Posted on — Leave a comment

Lemon Pound Cake Recipe: Moist, Buttery & Easy from Scratch

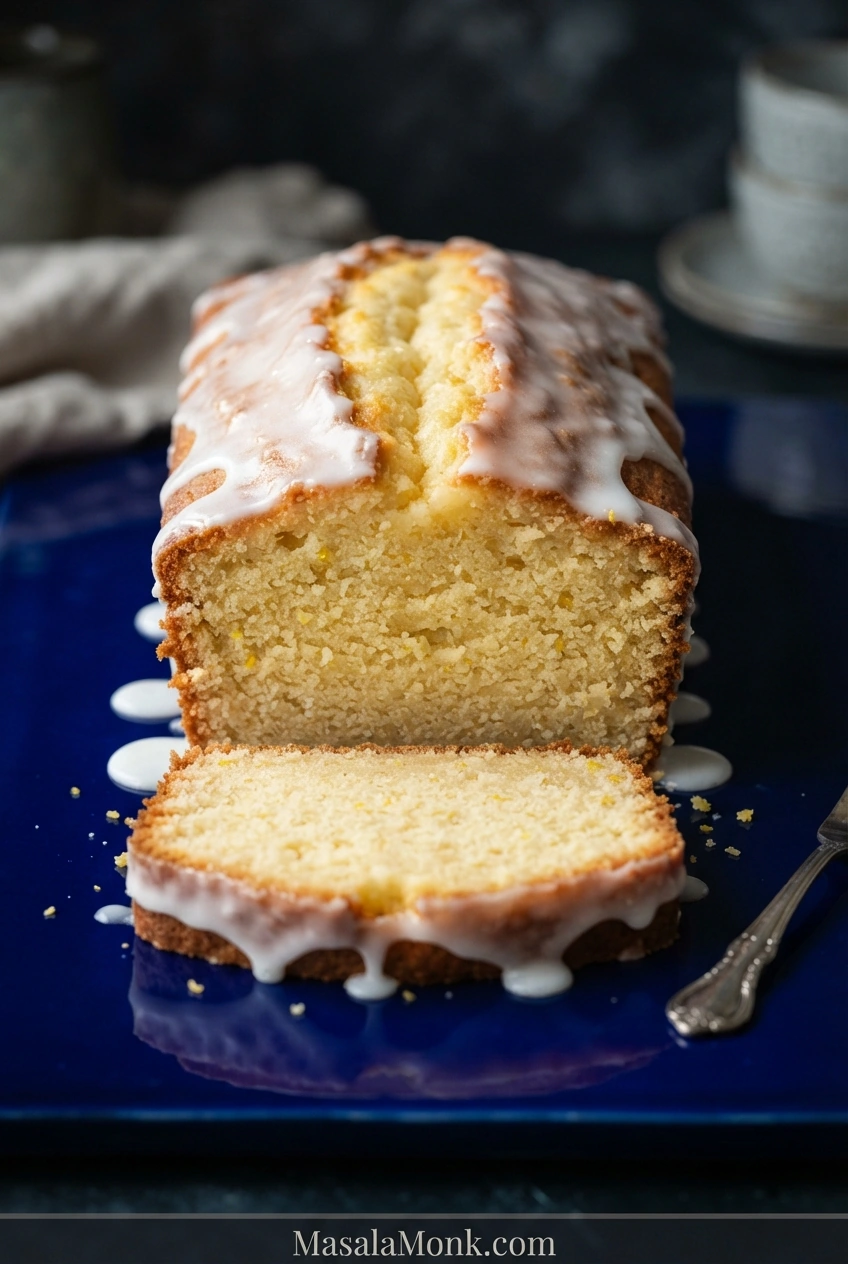
Glazed rectangular lemon pound cake on a dark blue surface, with a cracked crown, a cut end showing the crumb and a separate iced slice in front.

Cut into this lemon pound cake and you’ll find a fine, buttery crumb flecked with zest beneath a tart white glaze. The lemon aroma comes through before the first bite. The cake itself should taste lemony before the glaze—the glaze is there to brighten it, not rescue it.

Pound cake has a naturally close texture, with small, fairly even air pockets. A good slice feels substantial yet tender, holds together neatly and yields easily when you take a bite.

This from-scratch version uses sour cream for tenderness, fresh zest rubbed into sugar for fragrance and a simple two-ingredient glaze. The batter comes together with a classic butter-and-sugar creaming method and bakes in one loaf pan. There’s no separate lemon syrup to make—just time to let the loaf cool before glazing.

Lemon Pound Cake Recipe

Yield1 loaf; about 10 slices
TextureFine, close, buttery and tender
Pan9 × 5-inch / 23 × 13 cm light-coloured metal loaf pan
Hands-on prepAbout 25 minutes; allow additional time for chilled ingredients to warm slightly
Baking timeAbout 65–75 minutes; begin checking around 60 minutes
Oven325°F / 160°C conventional / 140°C fan
Cooling10–15 minutes in the pan, then completely on a rack
Before servingAllow several hours overall, including cooling and time for the glaze to set

Ingredients

  • 250 g / 8.8 oz all-purpose flour, plain flour or maida — about 2 US cups + 1 tablespoon
  • 6 g baking powder — 1½ teaspoons
  • 3 g fine salt — ½ teaspoon
  • 227 g / 8 oz unsalted butter — 1 cup; softened
  • 250 g / 8.8 oz granulated or caster sugar — about 1¼ US cups if using granulated sugar; weigh caster sugar for accuracy
  • 10–12 g finely grated fresh lemon zest — about 2 tablespoons; yellow peel only
  • 4 large eggs — about 200 g without shells
  • 120 g / 4.2 oz full-fat sour cream — about ½ cup
  • 30 ml fresh lemon juice — 2 tablespoons
  • 5 ml vanilla extract — 1 teaspoon

Measure before you mix. Set the cake ingredients within reach, and reserve the separate icing sugar and lemon juice for glazing after the loaf cools.
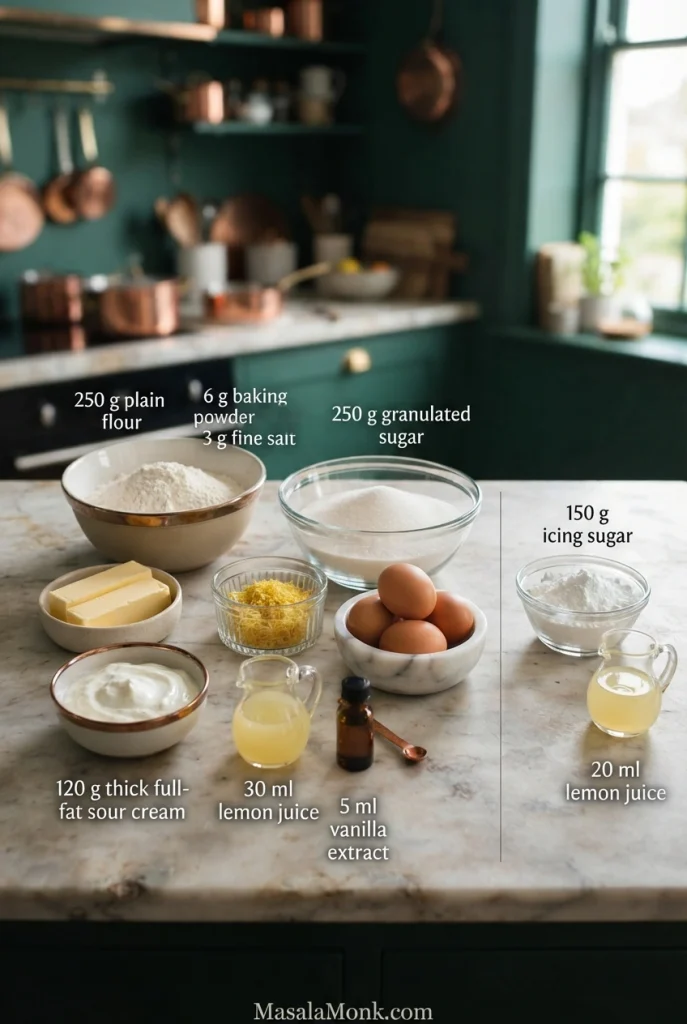
Kitchen counter with flour, granulated sugar, butter, lemon zest, four eggs, sour cream, vanilla and small jugs of juice; icing sugar and glaze juice are grouped at the right.
The cake ingredients sit on one side; the icing sugar and lemon juice for the glaze are grouped separately. Everything is measured before mixing begins.

Measure Flour and Soften Butter

Measuring flour: a scale is best. If using cups, loosen the flour, spoon it into the measuring cup and level the top. Don’t scoop straight from the bag.
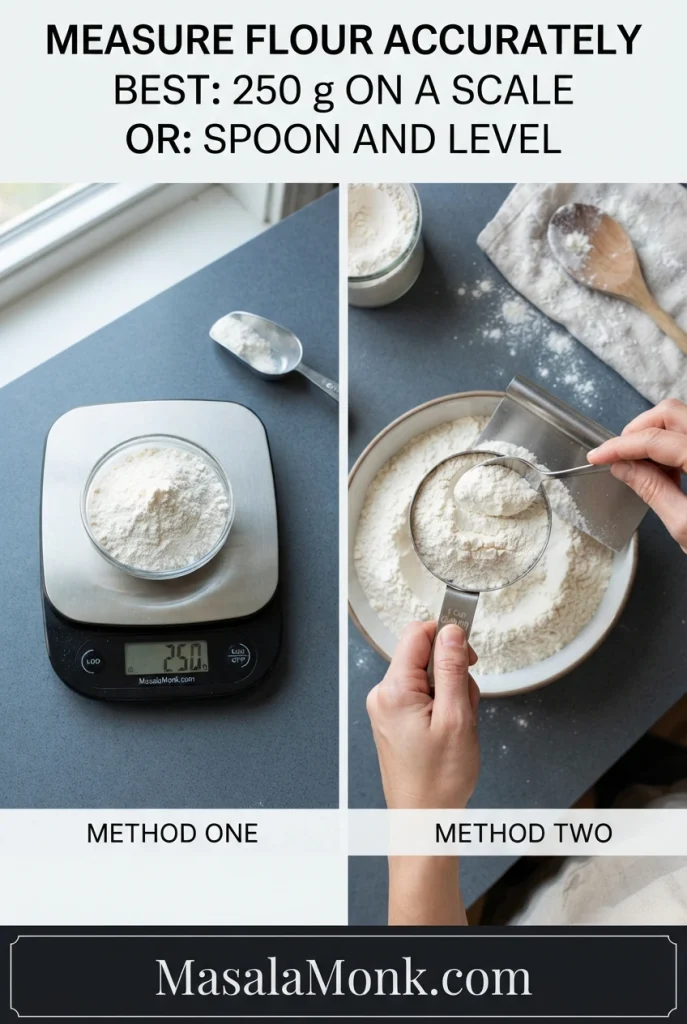
Split image of a flour-filled bowl on a digital scale reading 250 g and a hand spooning flour into a dry measuring cup over a larger bowl.
The scale gives the 250 g flour target, while the other photograph shows spooning flour into a dry measuring cup. Tare the empty bowl first; afterwards, level the filled cup gently without packing it.

Before starting: the butter should be soft enough to dent when pressed but still look matte and hold its shape; around 64–68°F / 18–20°C is a useful target. Let the eggs and sour cream lose their refrigerator chill, too. This waiting time is separate from the hands-on prep estimate.
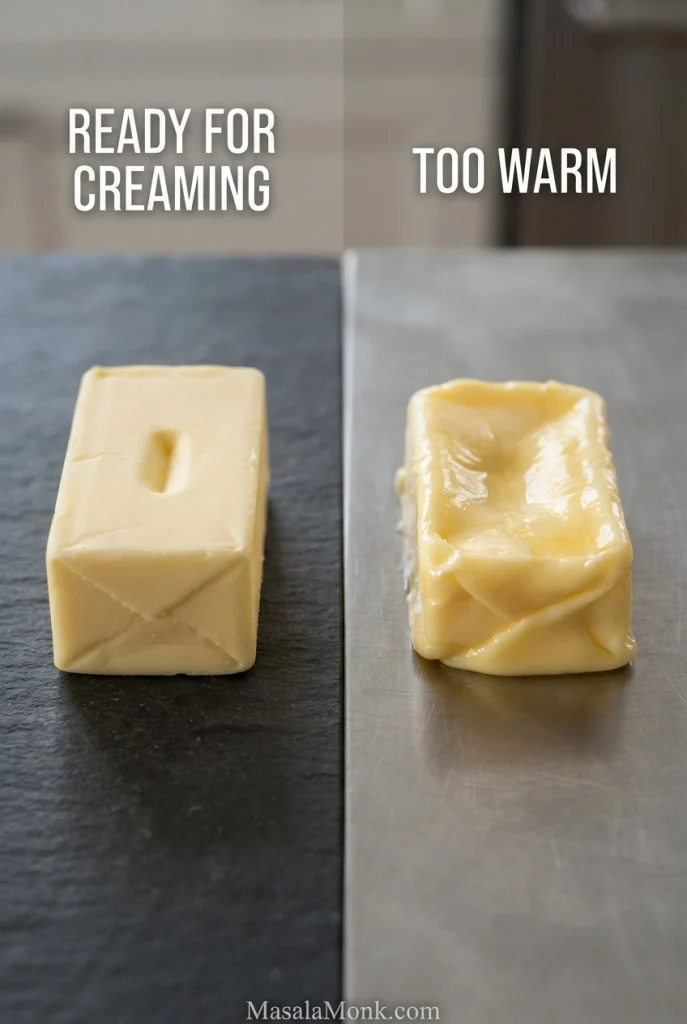
Two pieces of butter shown side by side: the left is matte and keeps its shape with a finger dent, while the right is softer, glossy and slumped.
Butter can soften unevenly when left in a large block. Cut it into similar-sized pieces first; if the edges turn shiny or slump, let the butter firm again before starting the lemon-sugar creaming stage.

For the Lemon Glaze

  • 150 g / 5.3 oz powdered or icing sugar — about 1⅓ US cups, plus a little extra if needed for adjustment
  • 20 ml fresh lemon juice to start — 1 tablespoon + 1 teaspoon; have a little extra available

Use the ingredient card as a visual checklist. The written quantities above are the measuring reference; the bowls and small inset photograph are illustrative.
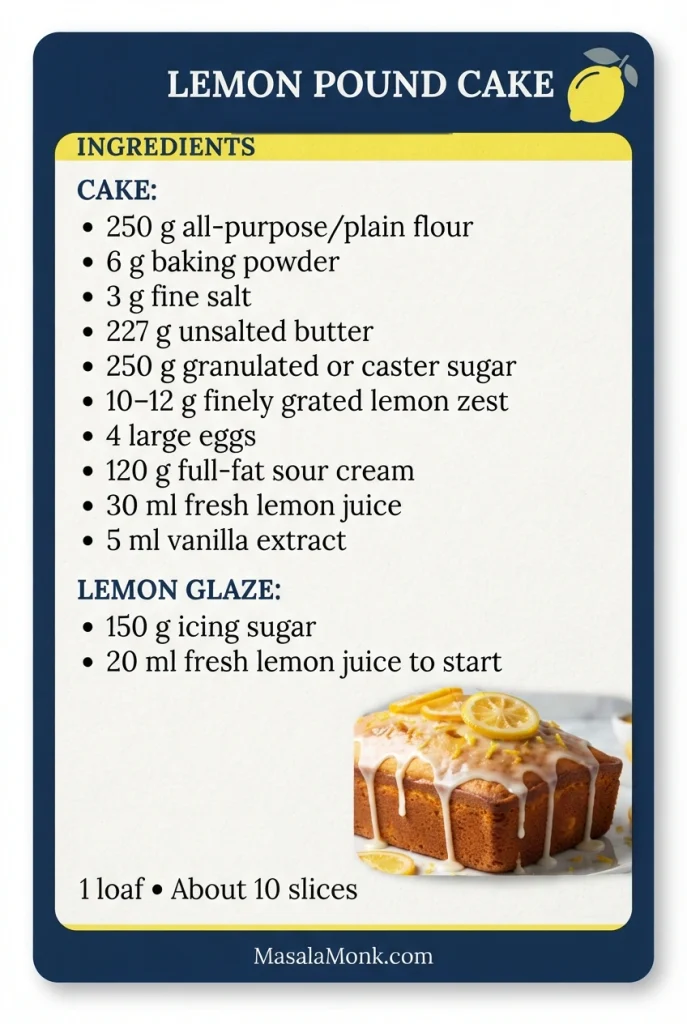
Lemon pound cake ingredient card listing ten cake ingredients and two glaze ingredients, with a small picture of a glazed loaf decorated with lemon slices.
All ten cake ingredients and the two glaze ingredients in one visual checklist. Use the written measurements above as your reference; the lemon slices are optional decoration.

How many lemons? Have about three medium lemons available, plus an extra if yours are small or dry. You’ll need 10–12 g zest and at least 50 ml juice across the cake and glaze. Measure both, since yield varies. Zest the lemons before cutting and squeezing them.
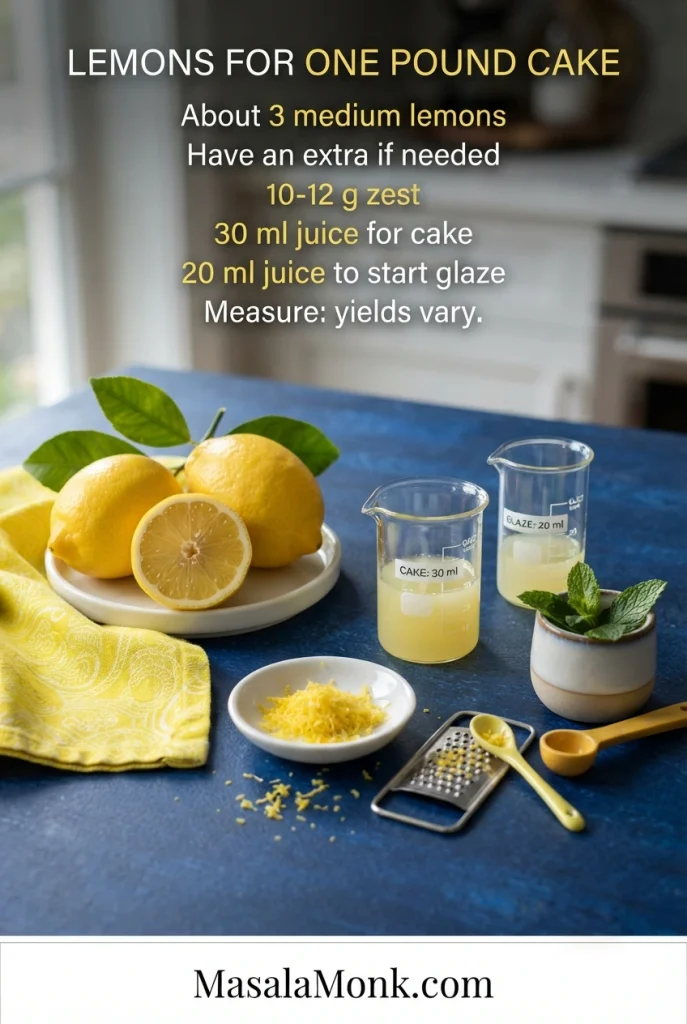
Lemons, grated yellow zest, a hand zester and two small measuring vessels marked for cake juice and glaze juice on a blue countertop.
Zest the lemons before squeezing them. Measure 30 ml juice for the batter and at least 20 ml for the glaze; strain the glaze juice for a smooth finish.

Equipment and Loaf-Pan Choice

Useful equipment: an electric hand mixer or stand mixer, fine zester, kitchen scale, parchment paper, a long skewer or cake tester, and a wire cooling rack.

Use a 9 × 5-inch light-coloured metal loaf pan if possible. The pan’s depth and capacity matter as well as its length and width; a shallow pan may not hold the full batter safely. Dark metal, glass and ceramic also heat differently, which can affect how quickly the crust browns. If you are using a different pan, compare loaf-pan sizes and see how pan materials differ before baking.

How to Make Lemon Pound Cake

Prepare the Pan and Lemon-Sugar Base

  1. Prepare the oven and pan. Put a rack near the centre of the oven and heat to 325°F / 160°C conventional or 140°C fan. Lightly grease the 9 × 5-inch loaf pan. Line its base and long sides with parchment, leaving enough overhang to lift the cake out later.
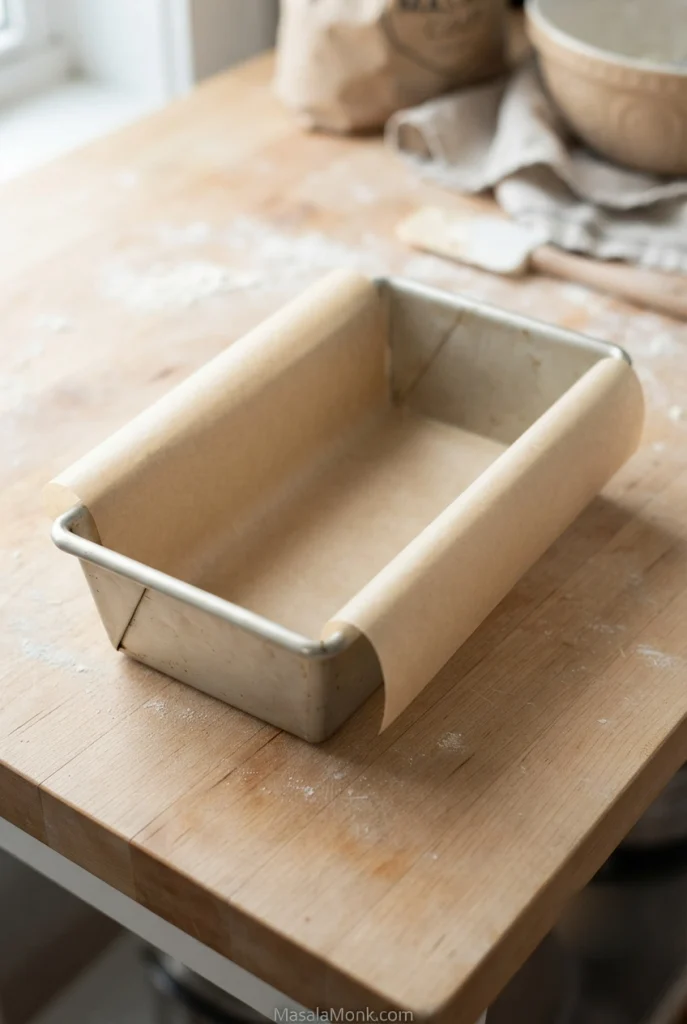
Empty light-coloured rectangular metal loaf pan lined across the base and up its long sides with a single parchment sling extending above the rim.
Press the parchment against the loaf pan’s base and bottom corners before adding batter. Also, keep the long overhanging tabs upright so folds do not get trapped along the rising cake’s sides.
  1. Mix the dry ingredients and make the lemon sugar. Whisk the flour, baking powder and salt together in a medium bowl. In the mixing bowl, rub the measured lemon zest into the sugar with clean fingertips for 30–60 seconds. As you rub, the sugar should start to feel slightly damp and smell intensely lemony.
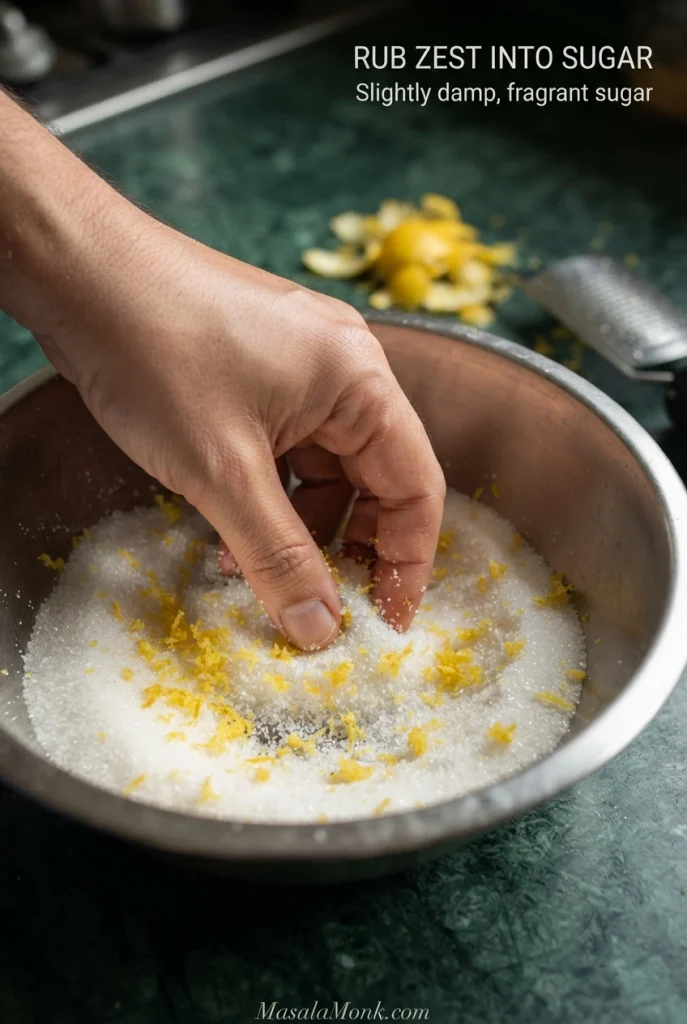
Hand rubbing finely grated yellow lemon zest into white granulated sugar in a large stainless-steel mixing bowl.
The sugar becomes fragrant and slightly damp as the finely grated zest releases its aromatic oils. It should still feel granular, ready to cream with the butter.

Zest the yellow peel, not the white pith. The aromatic oils are concentrated near the surface, so short, light strokes are more useful than pressing hard.
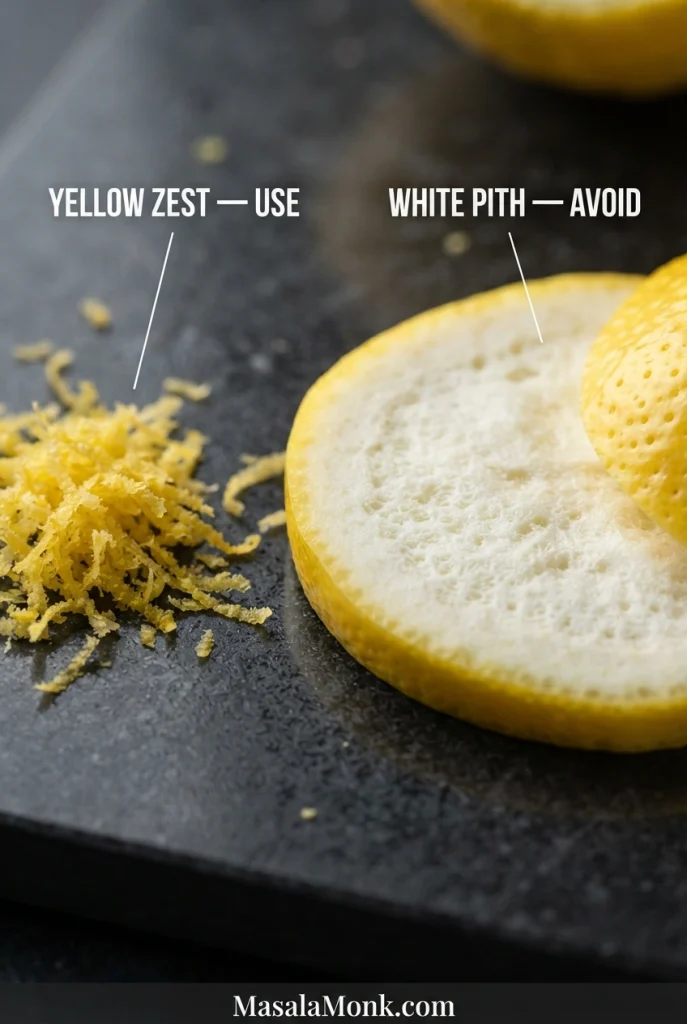
Close-up comparison of loose yellow lemon zest on a dark surface and the white pith of a cut lemon peel, with use and avoid labels.
Move the fine zester around the lemon as soon as a patch of white pith begins to show. Light, shallow strokes collect the yellow oil-rich peel without shaving away much of the bitter white layer.

Cream the Butter and Add Eggs

  1. Cream the butter and lemon sugar. Add the softened butter and beat at medium speed until pale, creamy and visibly lighter, scraping the bowl once or twice. About 3–4 minutes is a useful guide. Look for a mixture that holds soft ridges and appears noticeably aerated, then stop.
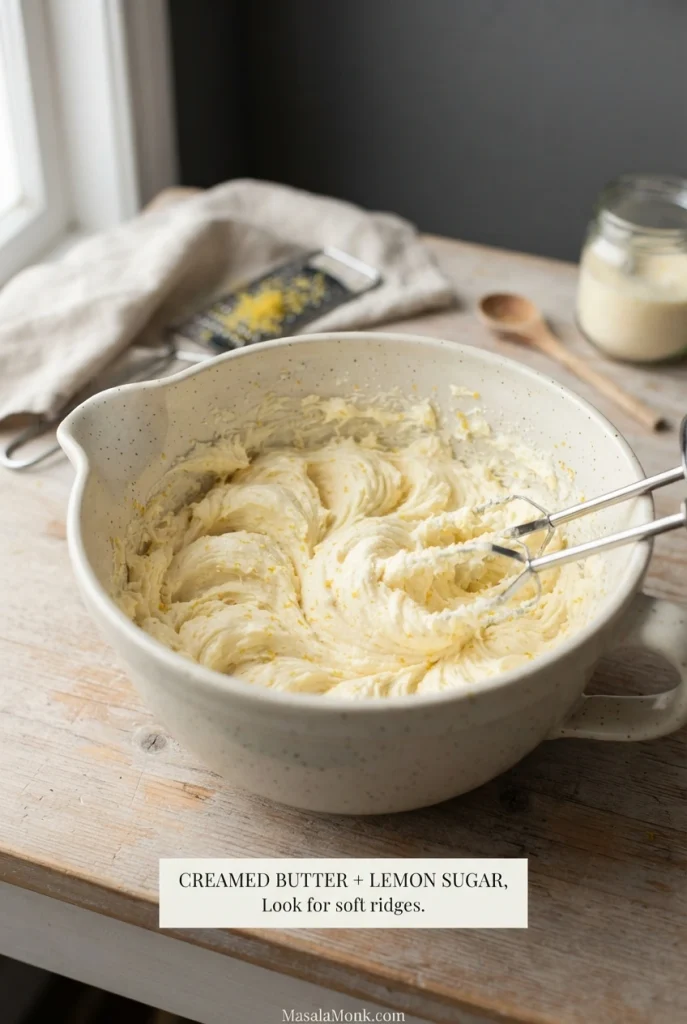
Cream-coloured butter-and-lemon-sugar mixture with soft ridges and zest flecks in a ceramic mixing bowl, with two metal beaters resting in it.
The mixture should look paler, lighter and creamy, with soft ridges that hold briefly. Scrape the bottom of the bowl so the butter and lemon sugar are evenly mixed.
  1. Add the eggs gradually. Beat them in one at a time at medium-low speed, letting each mix in before adding the next. Scrape the bowl as needed. A little graininess is common. If the mixture starts visibly curdling, beat in 1 tablespoon of the already-measured flour mixture before adding the next egg.

Did the egg-stage mixture turn oily or split? See the grainy-versus-separated comparison before proceeding.

Combine and Finish the Batter

  1. Combine the sour cream, juice and vanilla. Stir them together in a small bowl until smooth.
  1. Finish the batter. With the mixer on low, add one-third of the remaining dry ingredients, followed by half the sour-cream mixture. Add another third of the dry ingredients, the rest of the sour-cream mixture, then the last of the dry ingredients. Stop when faint flour streaks remain. Scrape underneath the batter and finish with a few folds by hand. It should be thick and creamy, falling from the spatula in heavy ribbons before slowly settling back into the bowl.
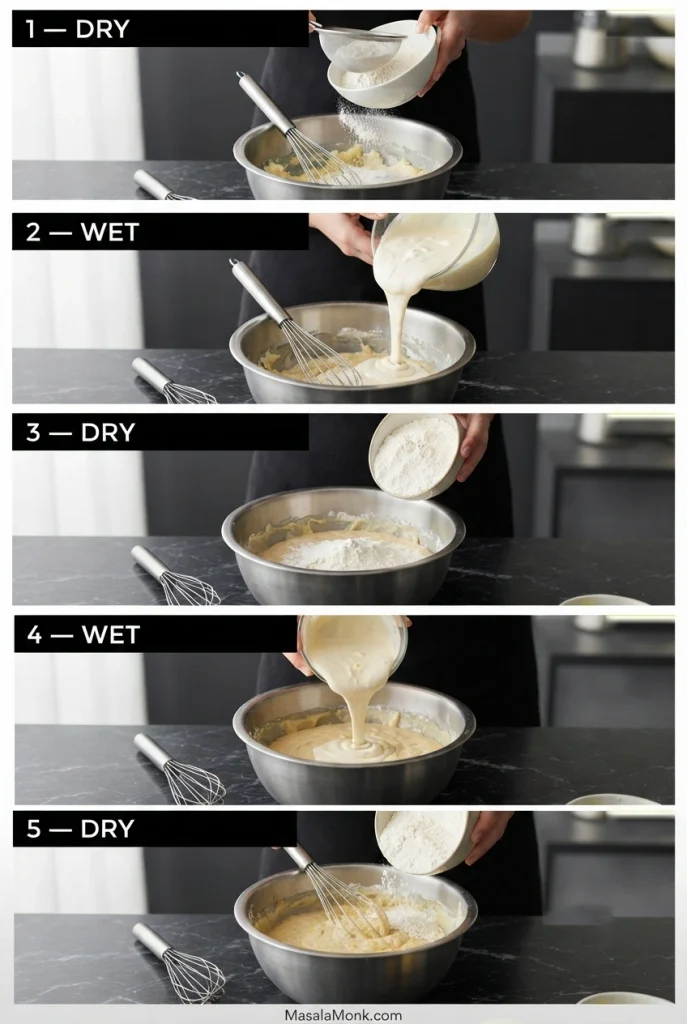
Five stacked mixing photographs labelled in order: 1 dry, 2 wet, 3 dry, 4 wet and 5 dry; flour and creamy liquid are added to a metal bowl.
The WET additions are the sour cream, lemon juice and vanilla mixture. The batter thickens after each flour addition; follow the dry–wet–dry–wet–dry sequence to finish it.

Check the batter before filling the pan. It should fall heavily from a spatula and settle slowly. A freely pourable mixture is not the intended texture for this recipe.
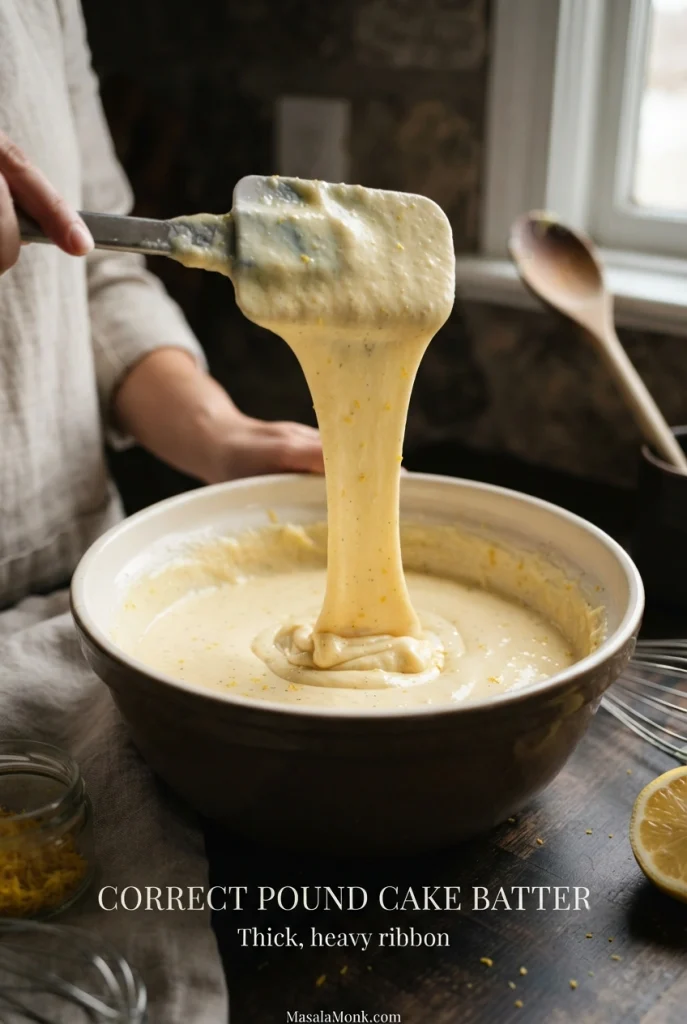
Spatula held above a bowl as thick pale-yellow lemon pound cake batter falls back in one heavy ribbon, with tiny flecks visible.
The finished batter falls in a thick, slow ribbon and gradually settles back into the bowl. It should be creamy and spoonable, not thin and pourable.

Fill the Pan and Check the Bake

  1. Fill the pan and bake. Scrape the batter into the prepared loaf pan and smooth the top. Leave room for the cake to rise; if your pan is unusually shallow or the batter comes close to the rim, bake the excess separately in a suitable small tin or lined muffin cups. Avoid opening the oven unnecessarily early. Begin checking around 60 minutes; expect approximately 65–75 minutes in the specified pan. A long crack along the top is normal.
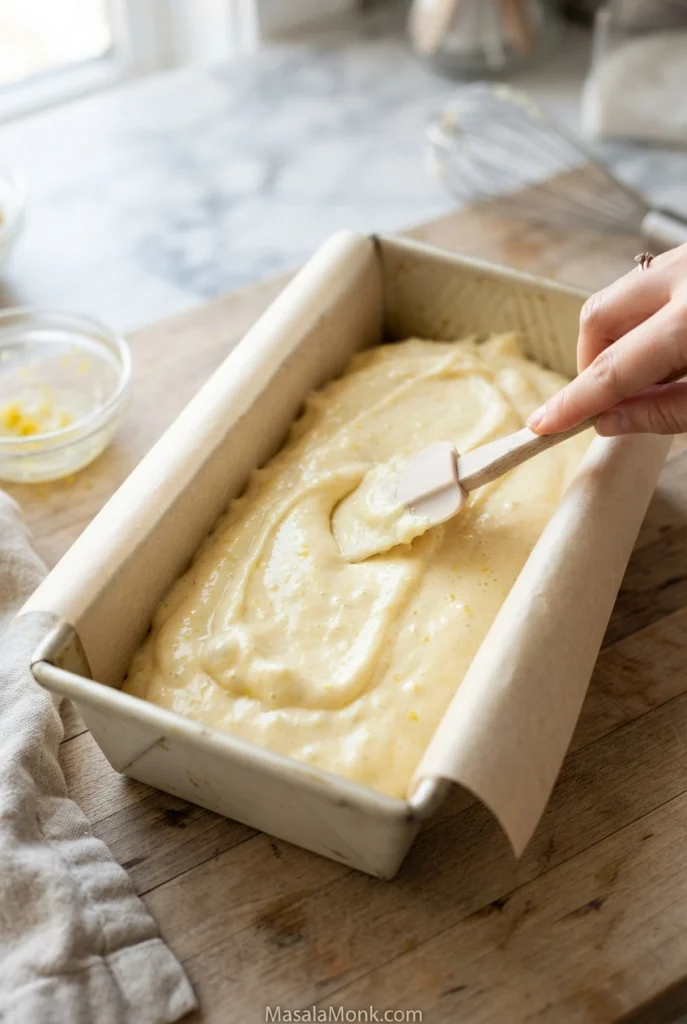
Hand using a small spatula to smooth pale-yellow pound cake batter inside a rectangular metal loaf pan lined with overhanging parchment.
Spread the batter into the corners and level the top gently, leaving room for the loaf to rise.

Using a smaller pan? Check the smaller-pan FAQ and size photograph before putting the loaf in the oven.

  1. Check for doneness. Look for a golden, set top and a centre that springs back lightly. Test near the centre in two spots, angling the skewer into solid cake beside any wide crack. A few moist crumbs are fine; wet batter means it needs longer. If the top is already dark enough, tent it loosely with foil.
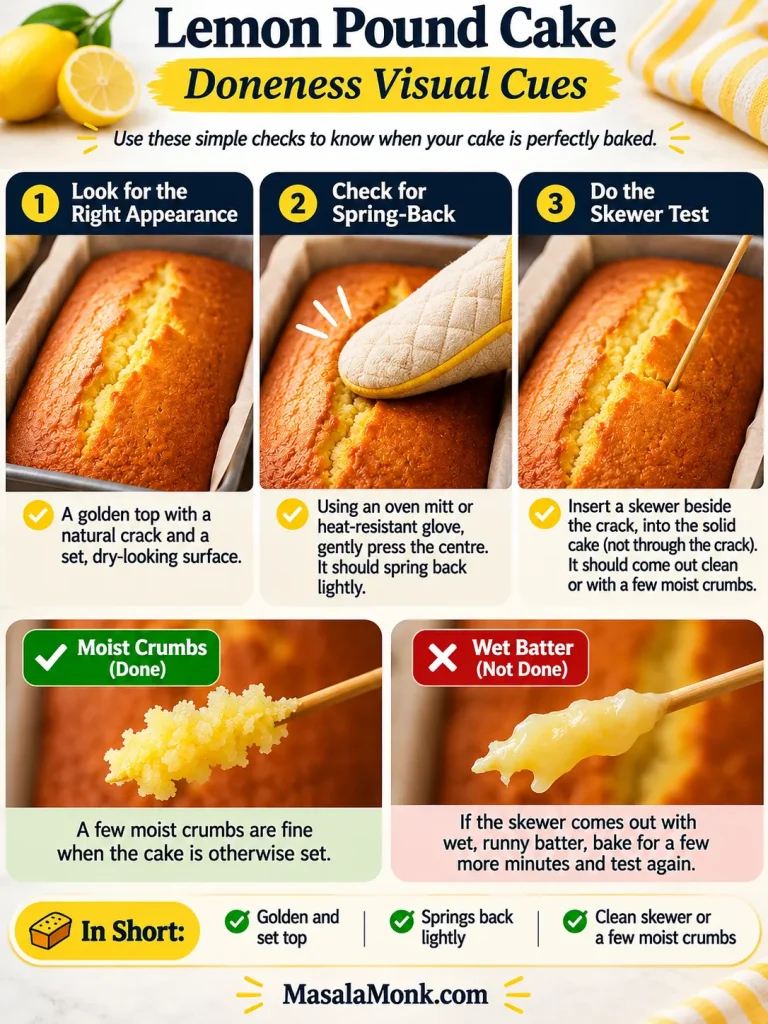
Lemon pound cake doneness guide showing a golden cracked top, spring-back check with an oven mitt, skewer placement beside the crack, and moist crumbs versus wet batter.
Look for a golden, set top and test the solid cake beside the natural crack. A few moist crumbs are fine when the centre is otherwise set; wet batter means it needs longer. Use heat protection around the hot loaf.

Choose the skewer entry point deliberately. An open crack may look like an easy route, but it does not sample the solid crumb around it.
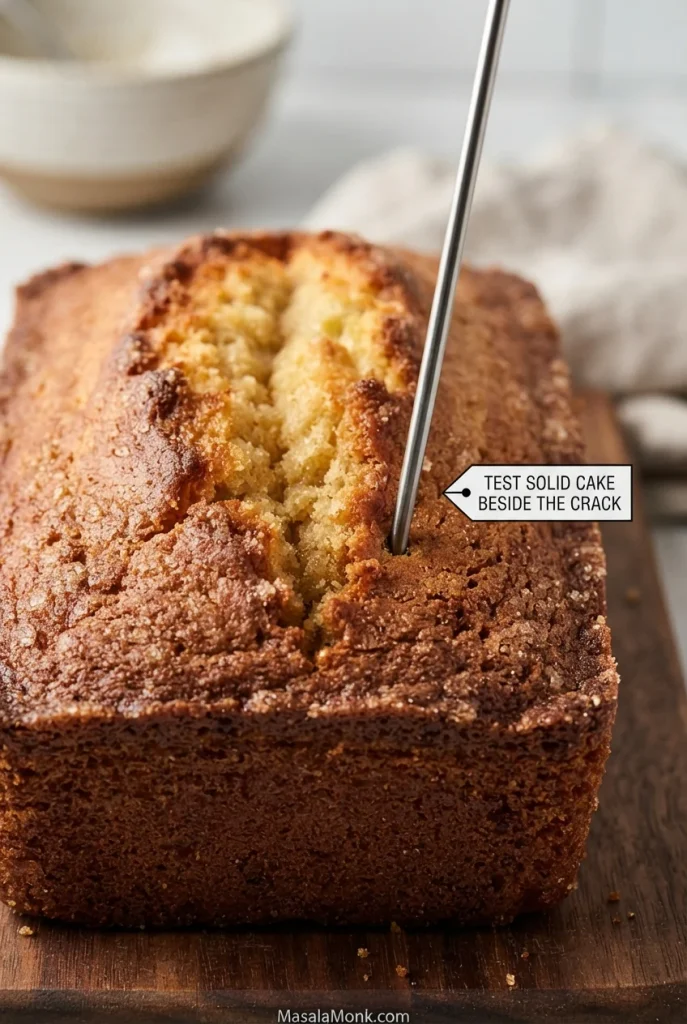
Close-up of a golden, cracked pound cake crown with a long metal skewer inserted into solid cake just beside the central crack.
For a confirming test, insert a clean skewer into a fresh patch of solid cake, not back through the first hole. Reusing the same opening may fail to tell you whether the neighbouring centre is still damp.

Uncertain what came off the tester? Compare moist crumbs with wet batter before deciding whether to bake longer.

Cool, Glaze and Slice

  1. Cool the loaf. Let it rest in its pan for 10–15 minutes, then lift it out using the parchment and transfer it to a wire rack. Wait until it is completely cool before glazing. The crumb will be easier to slice neatly after it has settled.
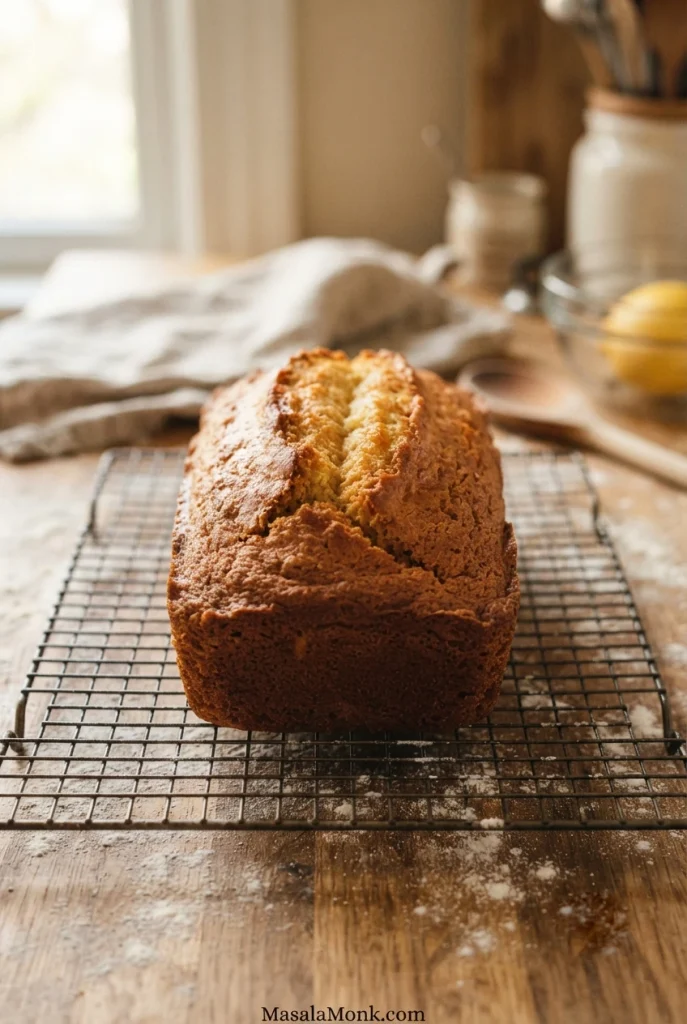
Unglazed golden-brown lemon pound cake with a raised lengthwise crack resting on a metal cooling rack above a wooden table.
After lifting the loaf onto the wire rack, peel away any damp parchment remaining underneath. Otherwise, steam caught between the paper and bottom crust can soften the base while the top appears dry.
  1. Make the glaze. Whisk 150 g icing sugar with 20 ml lemon juice. Add more juice about ½ teaspoon at a time until the glaze falls from a spoon in a slow, thick ribbon. Spoon it over the cooled loaf, letting it settle down the sides. Allow it to set before slicing.
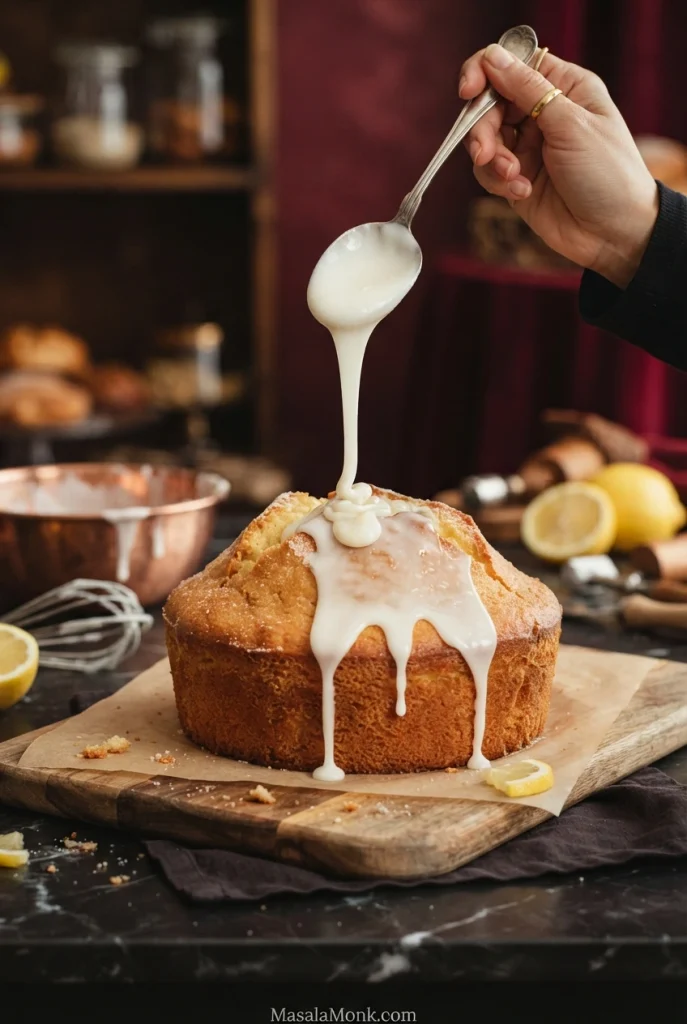
Hand tipping a spoon so a thick ribbon of opaque white lemon glaze falls onto the crowned top of a golden pound cake.
Pour glaze over the cooled crown and let gravity form natural drips. Move the spoon to bare spots as needed rather than forcing icing over every edge.

Glaze running off too quickly? Compare thick, correct and runny glaze before pouring the rest.

Look at the finished loaf as a whole. The naturally cracked crown and golden sides should remain visible beneath the white lemon glaze.
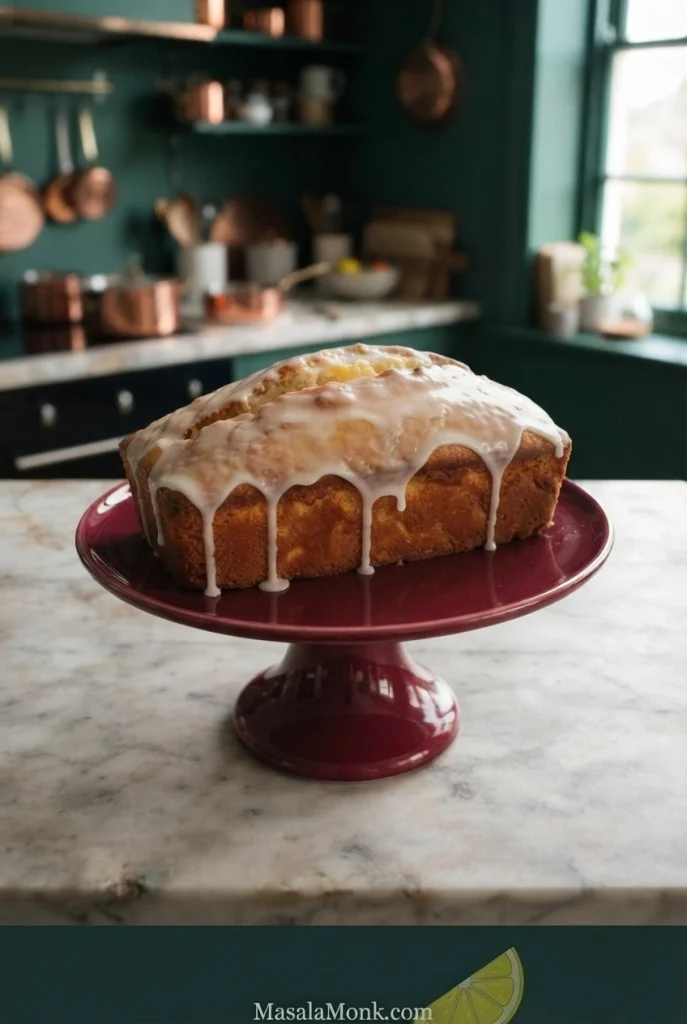
Whole uncut rectangular lemon pound cake with white glaze dripping down its browned sides, displayed on a burgundy pedestal stand.
A golden, naturally cracked crown peeks through the white lemon glaze, with thick drips running down the sides.

Slice only after the cake cools and the icing sets. The recipe makes about ten servings, depending on how thickly you cut them.
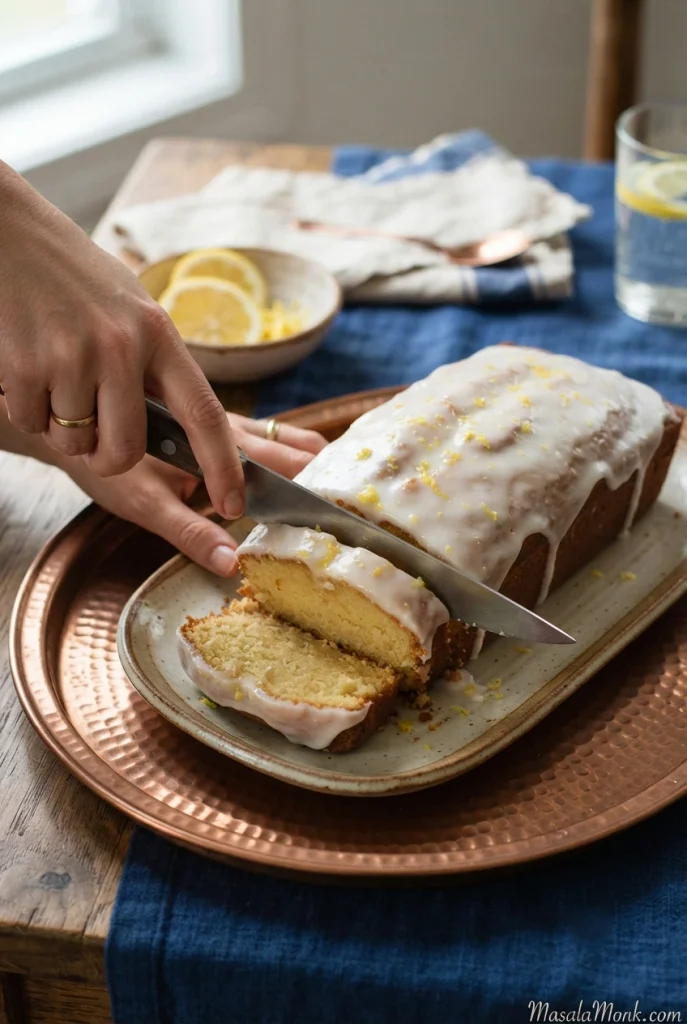
Hands cutting another slice from an iced lemon pound cake on an oval serving dish, with an already-cut slice at the front.
Saw gently through the browned crust. Between slices, wipe the knife so the white icing does not streak the next piece of pale crumb.

Review ingredients · Back to top

The Cake Should Taste Lemony Before the Glaze

For stronger lemon flavour, pay attention to the zest. Much of a lemon’s fragrance comes from oils in its yellow peel. Rubbing that zest into sugar before creaming helps spread the aroma through the cake.
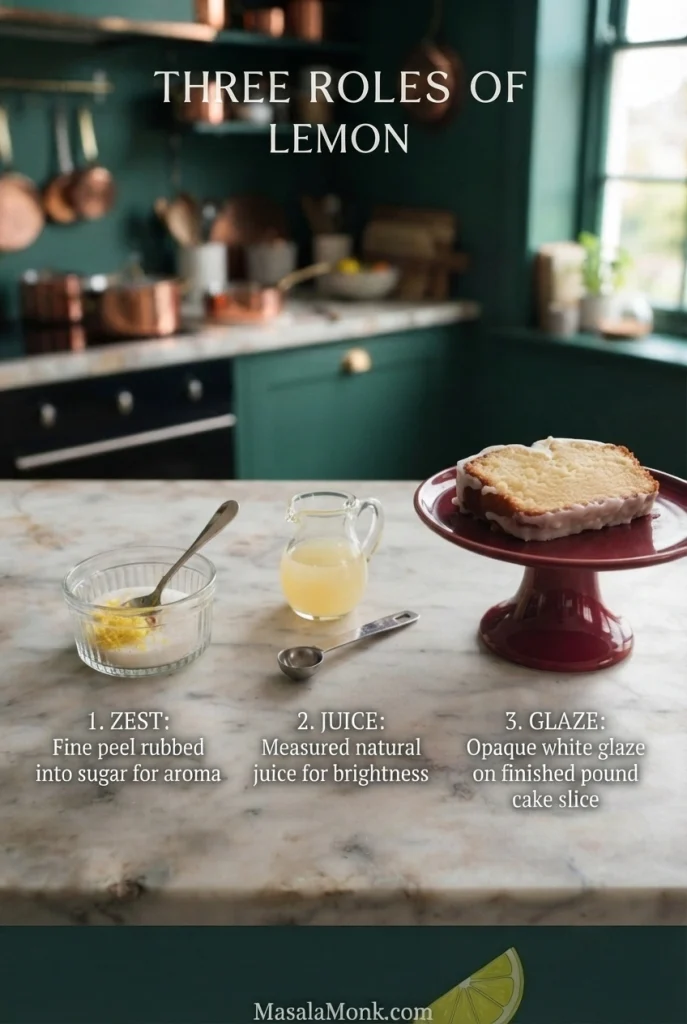
Three-part flavour graphic with finely grated zest in a bowl, lemon juice in a clear pitcher, and a white-glazed pound cake slice on a stand.
Grate zest shortly before rubbing it into sugar instead of leaving the tiny yellow shavings exposed for a long period. That keeps more of the peel’s aroma ready for distribution through the lemon pound cake batter.

More juice isn’t the best shortcut to a more lemony loaf. Juice adds acidity and liquid, which can change the batter’s balance. Keep the measured amount in the cake and use fresh, finely grated zest for the baked-in lemon aroma.

What the Crumb Should Look Like

Once the loaf is cool, cut through the centre to see how evenly the crumb has baked.
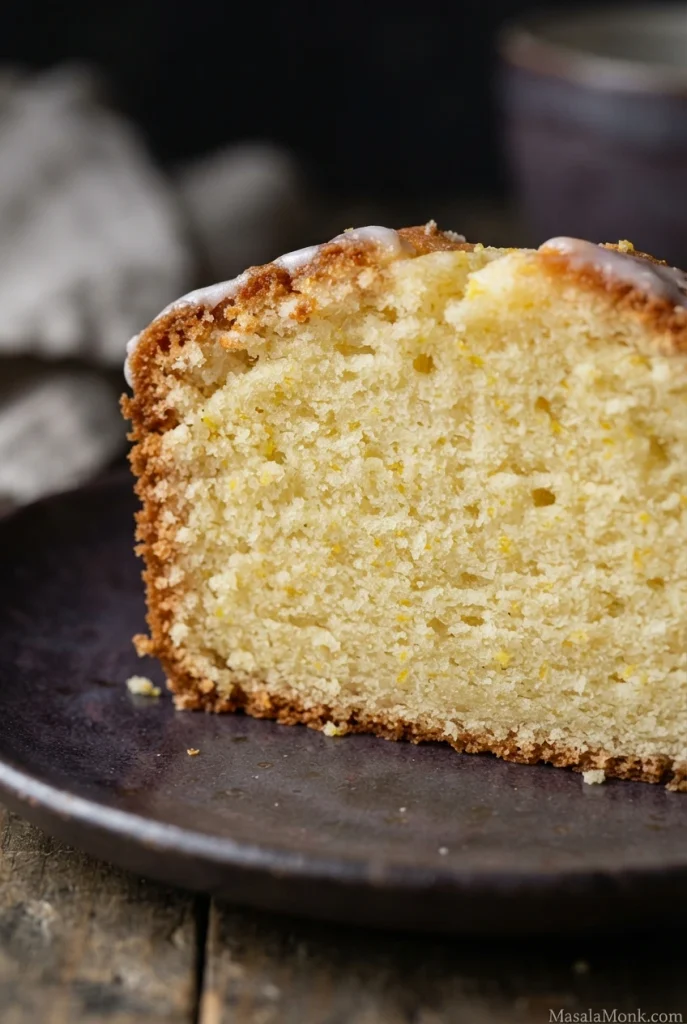
Close-up of a cut lemon pound cake slice showing a pale-yellow close crumb with small air holes, golden crust and a little white glaze near the top.
Fine lemon pound cake crumb has many small air cells that naturally vary in size. Before judging a shadow near the crust as a gummy band, view the cooled slice under even light; darkness alone is not a texture diagnosis.
  • Fine and close: the crumb is substantial, with small, fairly even air cells.
  • Moist but matte: the centre looks tender, without a shiny or pasted-together band.
  • Buttery and tender: the slice holds together but yields easily when you bite into it.
  • Evenly baked: the texture remains consistent through the slice, with no wet or gluey strip near the bottom.

A close crumb is a style. A gummy streak is a fault.
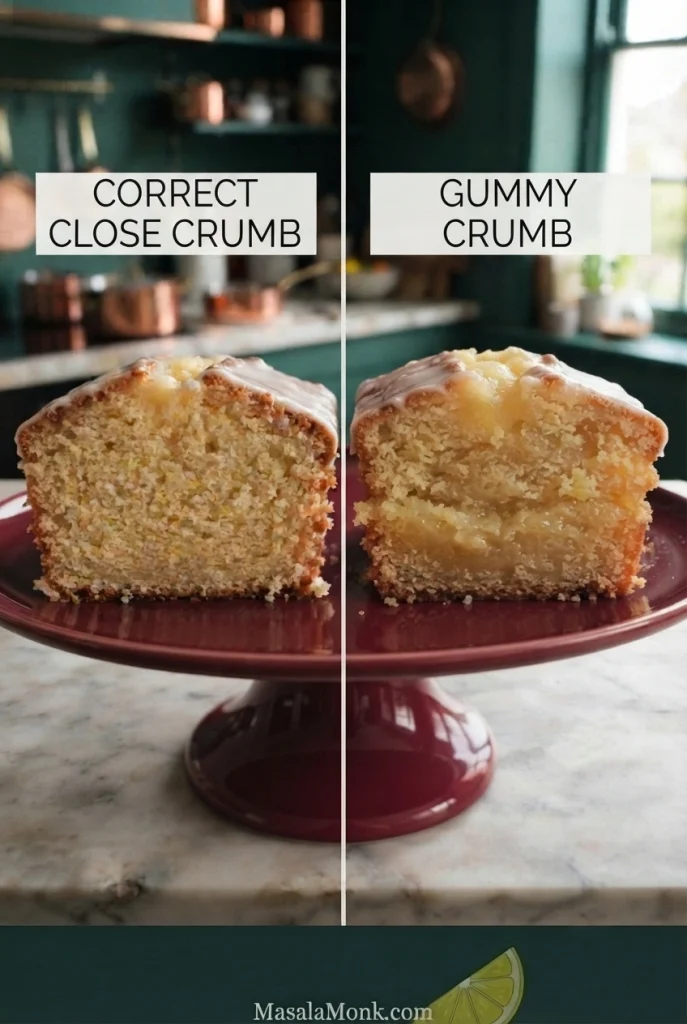
Side-by-side cut lemon pound cake slices: the left has a close crumb with small pores, while the right has a visibly compressed, gummy-looking lower area.
If a cooled cake slice leaves a tacky, paste-like film on a clean knife, that can be a clue to gummy crumb rather than ordinary close texture. However, the appearance still does not identify one definite baking mistake.

Not sure whether you are seeing a compact strip or an underbaked centre? Compare the two faults side by side.

And then comes the best part: a bite. This is a rich butter cake, not an airy sponge. The bright lemon glaze cuts through that buttery crumb just enough.
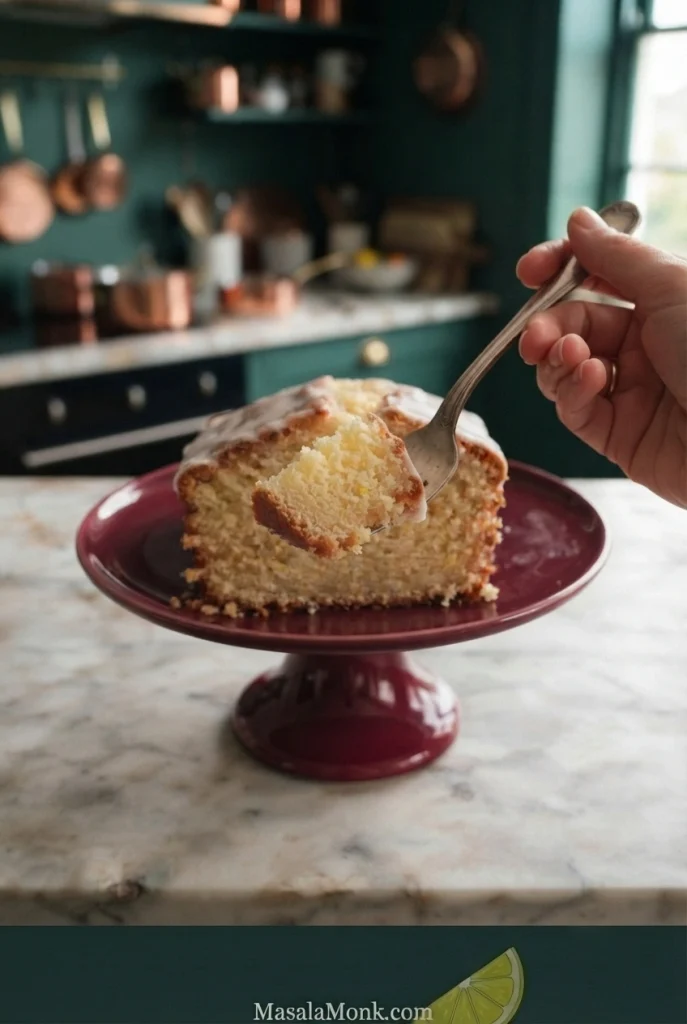
Hand using a fork to lift a bite from a partially eaten white-glazed lemon pound cake slice on a burgundy pedestal stand.
A buttery, tender forkful with a little tang from the glaze—the close crumb is part of the pleasure of a good pound cake.

For more on butter temperature, creaming and the structure of this style of cake, see our classic Pound Cake Recipe.

Back to recipe · Back to top

Lemon Glaze: Getting the Consistency Right

A good lemon glaze falls from the spoon in a slow, thick ribbon. It should stay visible on the cooled cake, with just enough movement to settle gently down the sides.
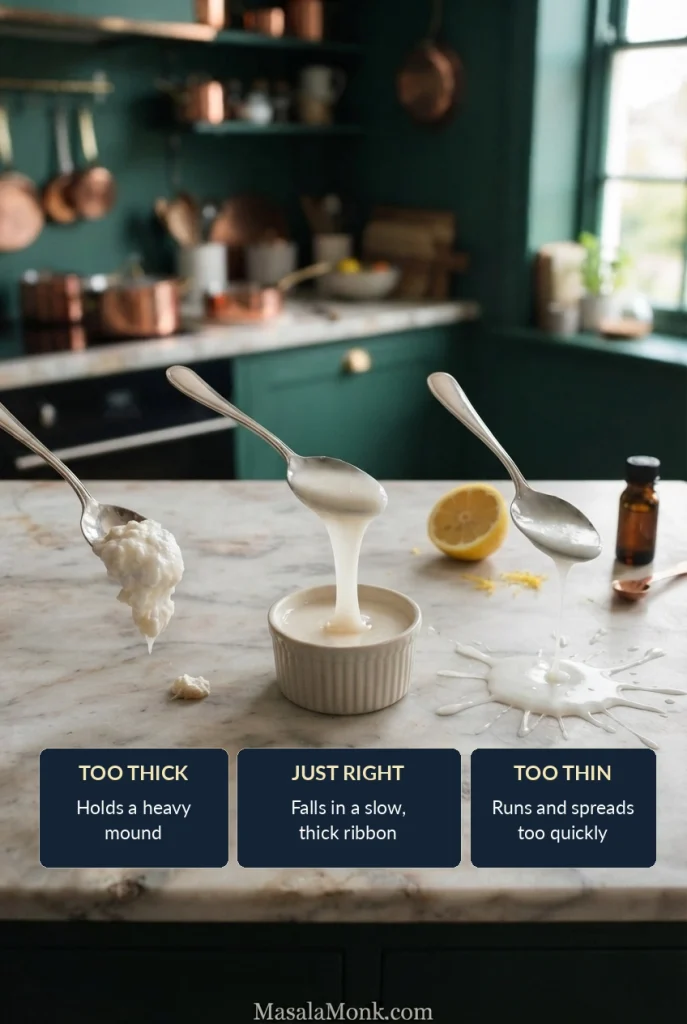
Three spoons demonstrate glaze thickness: stiff icing holding a mound on the left, a slow white ribbon in the centre, and runny icing forming a puddle on the right.
Before glazing the lemon pound cake, test a teaspoon of icing on a cool saucer. It should spread slowly but remain opaque; if it runs into a thin puddle like the right-hand sample, whisk in a little more icing sugar.

Too thick? Add another ½ teaspoon of lemon juice and stir again. Too thin? Whisk in a little more icing sugar. If the glaze disappears into the cake, it may be too runny or the loaf may still be warm.
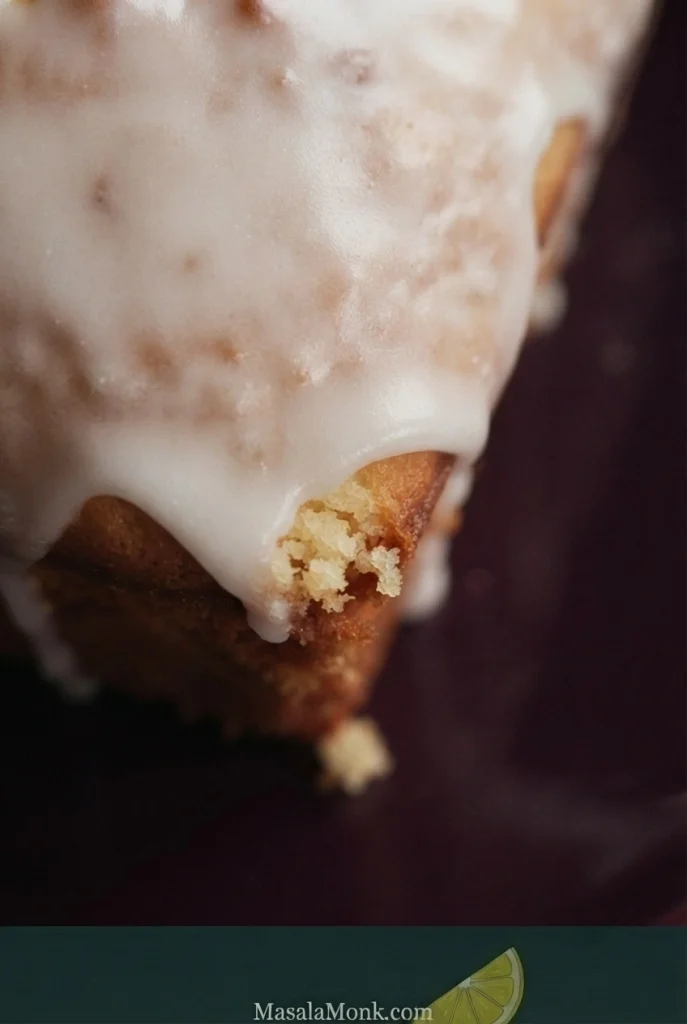
Extreme close-up of opaque white lemon icing coating the top and edge of a golden pound cake, with a small area of crumb visible.
The set lemon glaze should look softly satin, not wet or glassy. Before wrapping the loaf, wait until drips have stopped moving and lost their tackiness; pressing film into the crown can pull away its white coating.

For an extra-tart serving, try a little homemade lemon curd alongside a slice.

Back to the glazing step · Back to top

Troubleshooting Lemon Pound Cake

If something went wrong, start with where it shows up. A wet centre, gummy band and greasy patch can all get called “dense cake,” but they point to different possibilities.

Find the Symptom First

What HappenedCheck First
Wet or sunken centreDoneness, oven accuracy and pan size
Gummy or “sad” streakMixing, aeration, batter separation, leavening and doneness
Greasy patchesButter temperature or fat separating in the batter
Curdled batterIngredient temperatures and how quickly eggs were added
Dark crust, underdone middlePan material, oven heat and rack position
Dry crumbFlour quantity, oven temperature and bake duration
Weak lemon flavourFreshness and quantity of zest
Runny glazeExcess juice or glazing a warm cake

Wet Centres and Gummy Streaks

Wet or sunken in the middle: if the cake is still baking and the centre contains wet batter, give it more time. Tent the top loosely with foil if it’s already deeply golden. A skewer that passes straight down a wide top crack can miss underdone cake, so check the solid crumb near the centre as well. If this keeps happening, check your oven temperature and loaf-pan size.
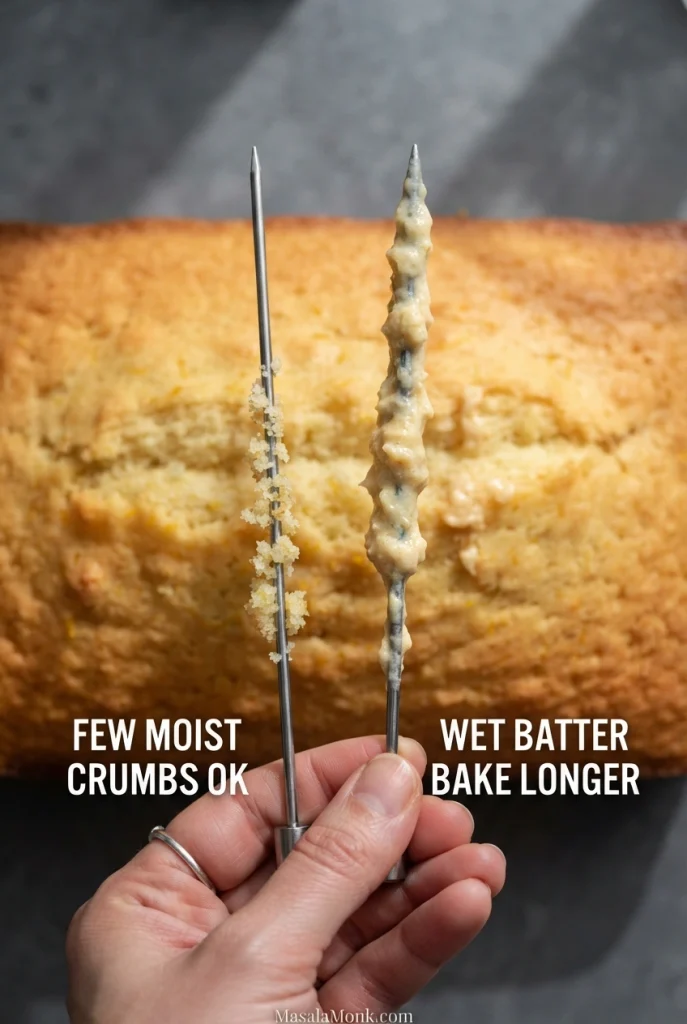
Hand holding two cake testers in front of a baked loaf: one has small baked crumbs on it, while the other is thickly coated with wet batter.
After a skewer comes out coated in wet batter, wipe it before testing a different spot. Otherwise, leftover batter on the metal can confuse the next reading; separate small crumbs are a different result.

A gummy band or “sad streak”: this is a dense, sometimes translucent strip, often near the bottom. Possible causes include under- or overmixing, excessive creaming, batter separation, leavening problems or insufficient baking. The appearance doesn’t always identify one definite cause. If the surrounding cake is already fully baked, additional oven time may only dry it out without repairing the gummy layer.
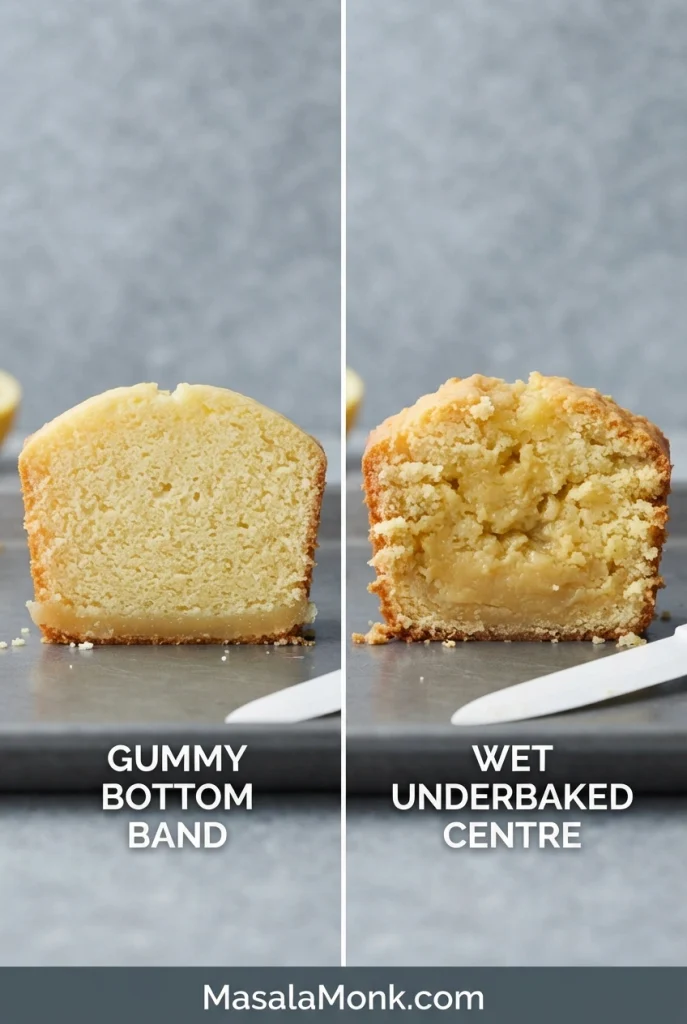
Two cut pound cake slices side by side: left with a narrow dense band along the bottom, right with a wet-looking, underbaked centre.
These problems are best checked at different times: investigate a wet centre with a tester while baking, but assess a gummy bottom band after the slice has cooled. Extra oven time will not reliably reverse an already-set dense strip.

Separated Batter, Browning and Dryness

Curdled or greasy batter: slight graininess as eggs go in is common, but glossy oil patches signal separation. If caught early, mix in a tablespoon of the already-measured dry ingredients. Next time, use soft, shape-holding butter and add eggs gradually; severe separation may not recover fully.
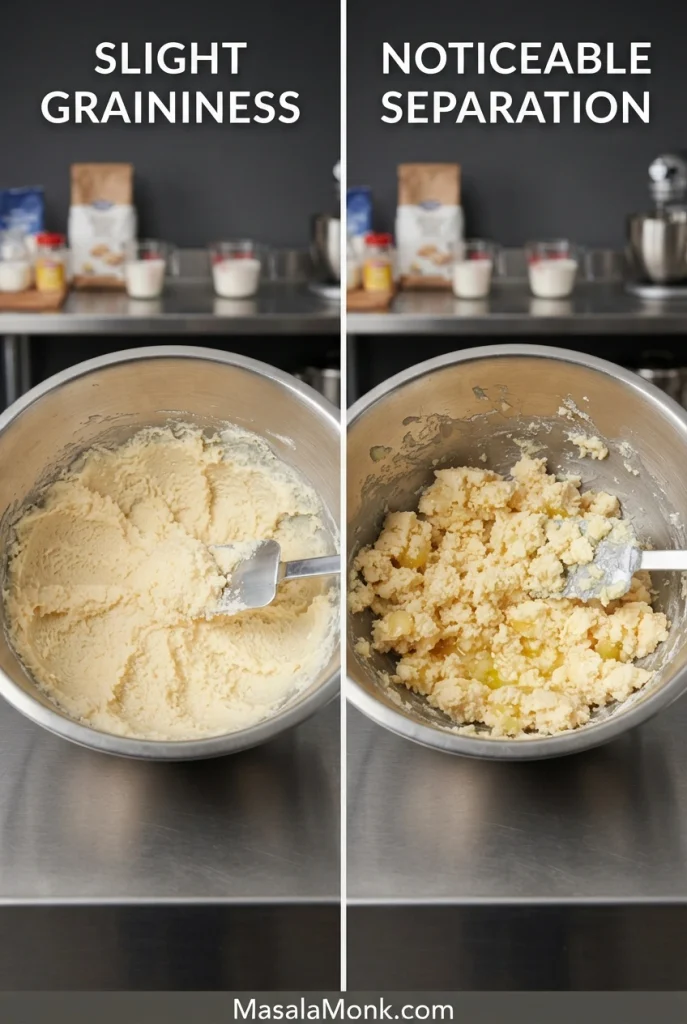
Side-by-side metal mixing bowls: slightly grainy but cohesive pale batter on the left; chunky, separated egg-stage mixture with shiny patches on the right.
Small curds during egg addition are not the same as an oily split. In this comparison, glossy patches in the right-hand bowl are the warning sign; the left-hand mixture remains mostly cohesive.

Lemon flavour too mild: serve the baked loaf with tart lemon curd or, if unglazed, a sharper icing. Next time, measure fresh zest carefully; extra batter juice changes the liquid balance and cannot replace fragrant peel oils.

Dark outside, underdone inside: a dark pan can brown the crust faster than a light-coloured one. If the cake is still baking, loosely cover the top once it’s sufficiently golden and let the middle finish. For future bakes, check pan material and oven temperature. King Arthur Baking explains how baking-pan size and material affect results.
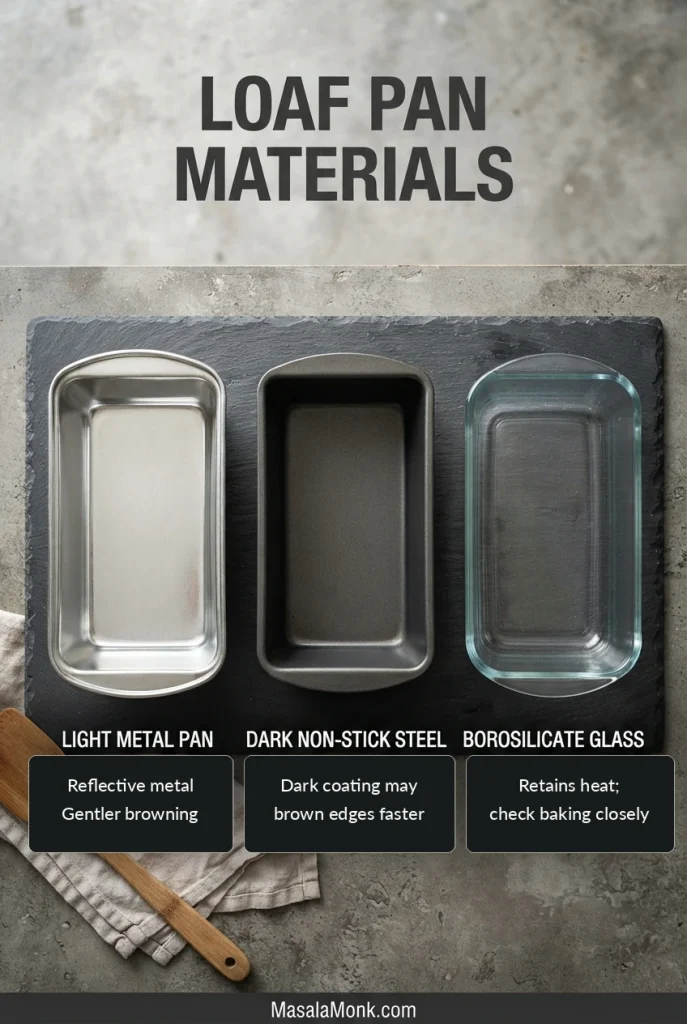
Three empty loaf pans seen from above, labelled light metal, dark nonstick steel and glass, arranged on a grey worktop.
These are photographs of different pan materials, not a tested bake-off. Even pans with similar dimensions may brown differently because coatings and wall thickness vary, so the same oven time is not automatically transferable.

Dry crumb: softly whipped cream alongside a slice can make it more enjoyable now. Next time, weigh the flour if possible, check for an oven running hot and begin testing before the end of the estimated bake window. A skewer with a few moist crumbs is acceptable; there’s no need to bake until it emerges dusty-dry.

Try the method again · Back to top

Ingredient Substitutions & Pan Changes

Thick, full-fat plain Greek yogurt is the closest practical substitute if you don’t have sour cream. Other dairy changes can affect the balance of fat and liquid in the batter.

ChangeBest Approach
Thick, full-fat plain Greek yogurtTry 120 g in place of the 120 g sour cream. Texture and richness may vary slightly by brand.
ButtermilkDon’t replace sour cream cup-for-cup; it’s much thinner and changes the batter.
Cream cheeseUse a pound-cake formula designed around cream cheese because its fat and moisture balance differs.
Bundt panUse a recipe or reliable conversion for that pan’s capacity and shape. The loaf timing won’t transfer directly.

Storage, Freezing & Make Ahead

Keep the Cake Fresh

At room temperature: keep the completely cooled cake with its plain lemon-sugar glaze airtight in a cool room for up to 3 days. Cover the cut end well; that’s where the crumb dries first. In a hot or humid kitchen, refrigerating it is the better option.
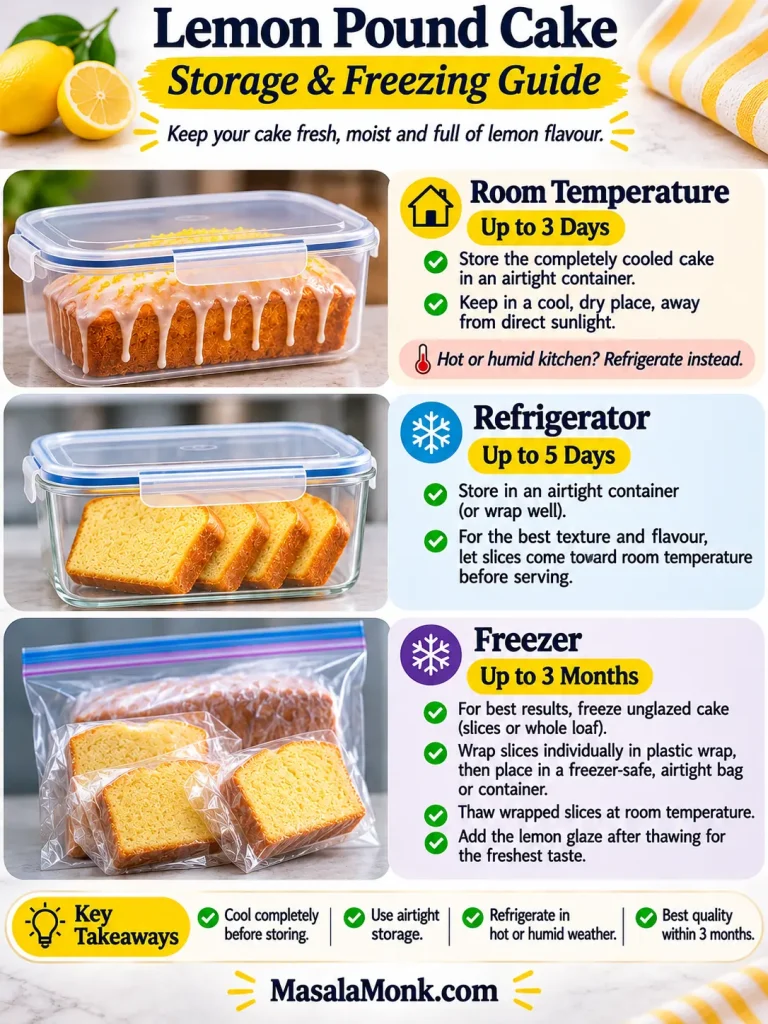
Lemon pound cake storage and freezing guide showing airtight room-temperature storage for 3 days, refrigeration for 5 days, and individually wrapped unglazed slices for freezing up to 3 months.
Keep cooled lemon pound cake airtight for up to 3 days in a cool room or 5 days refrigerated. In hot or humid weather, refrigerate it. For longer storage, freeze well-wrapped, ideally unglazed slices for up to 3 months; thaw before adding fresh glaze.

Protect the cut face. Once a slice is removed, air reaches the exposed crumb more easily than the glazed top, so cover that surface before storing the rest of the loaf.
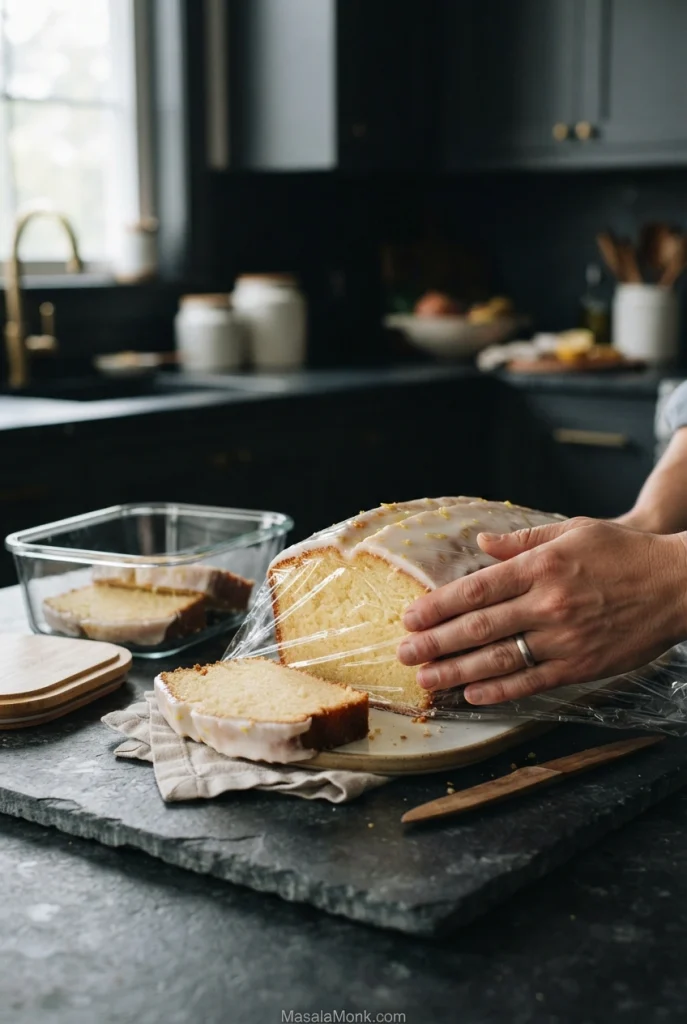
Hand pressing transparent food wrap against the exposed pale cut face of a glazed lemon pound cake, with a glass food-storage dish nearby.
Press the wrapping film directly against the exposed cut crumb, not across the glazed crown. Once the loaf is cool and the icing has set, this protects the most vulnerable surface without pulling off its white coating.

In the refrigerator: keep the plain cake well covered for up to 5 days. Butter firms when cold and some lemon aroma becomes less noticeable, so let slices come toward room temperature before serving. Refrigerate cakes stored with perishable toppings such as cream cheese frosting or lemon curd.

Freeze and Make Ahead

To freeze: wrap the loaf or individual slices securely and freeze for up to 3 months for best quality. Freezing without the glaze usually gives the neatest finish. Thaw while wrapped, let the cake return to room temperature and glaze before serving.
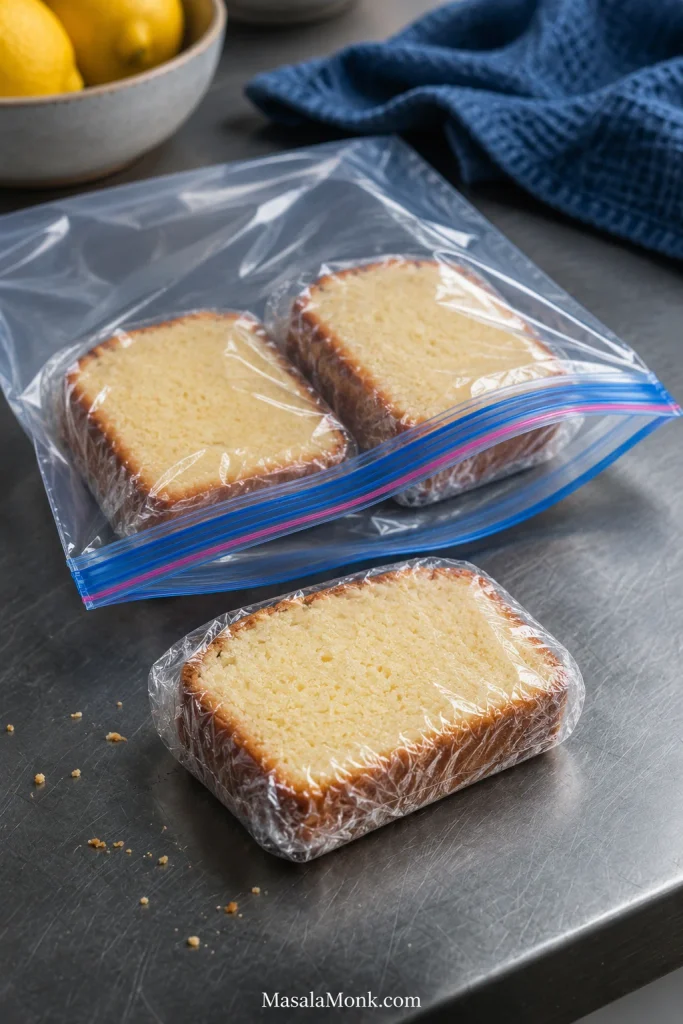
Two individually wrapped unglazed lemon pound cake slices inside an open resealable freezer bag, with a third wrapped slice in front.
The two lemon pound cake slices inside the freezer bag are wrapped individually, not left loose. Date the outer bag and arrange portions in a loose layer when possible, so one can be removed without crushing the others.

Making it ahead: bake the loaf the day before serving, cool it completely and keep it airtight. Add the glaze closer to serving if you want the freshest finish.

The next day, the cake often slices especially neatly and tastes pleasantly buttery with tea or coffee. The lemon glaze gives each bite its bright finish.
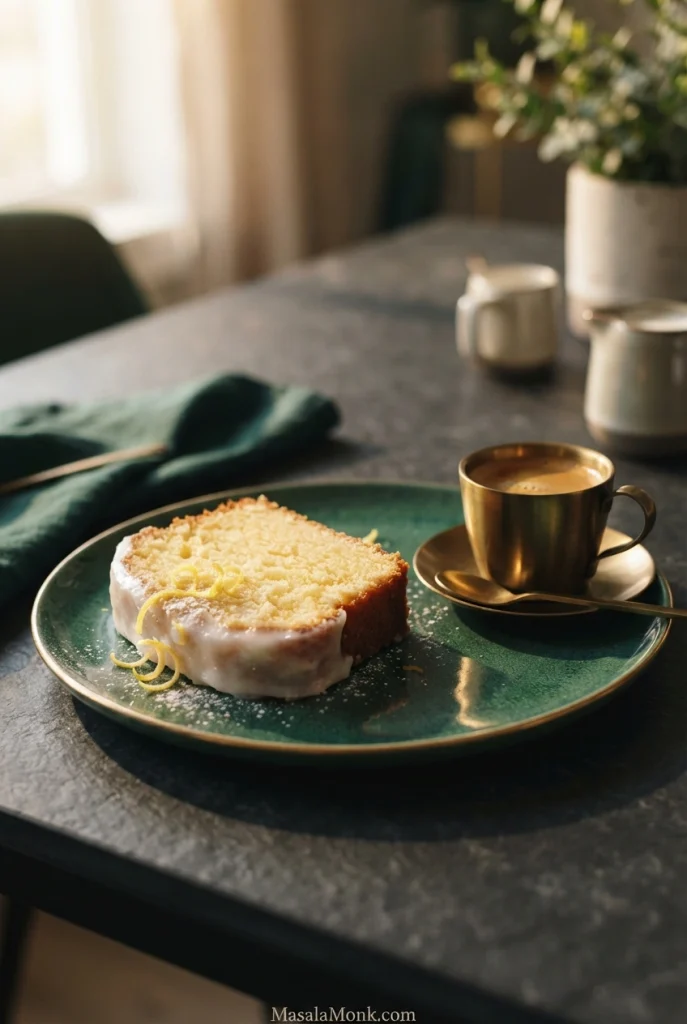
Slice of white-glazed lemon pound cake on a dark green plate beside a small metallic coffee cup on a tabletop.
A slice of lemon pound cake with coffee makes a lovely next-day treat. Let it come toward room temperature to enjoy its buttery texture and bright glaze.

Questions About Lemon Pound Cake

Cracks and Loaf-Pan Questions

A top crack alone is not a defect. Compare the overall crown shape and check the centre for doneness before assuming something went wrong.

Why did my lemon pound cake crack on top?

A long crack along the top is normal. The outside begins setting while the middle is still rising, so the expanding centre breaks through the surface. The crack itself doesn’t mean the cake has failed.
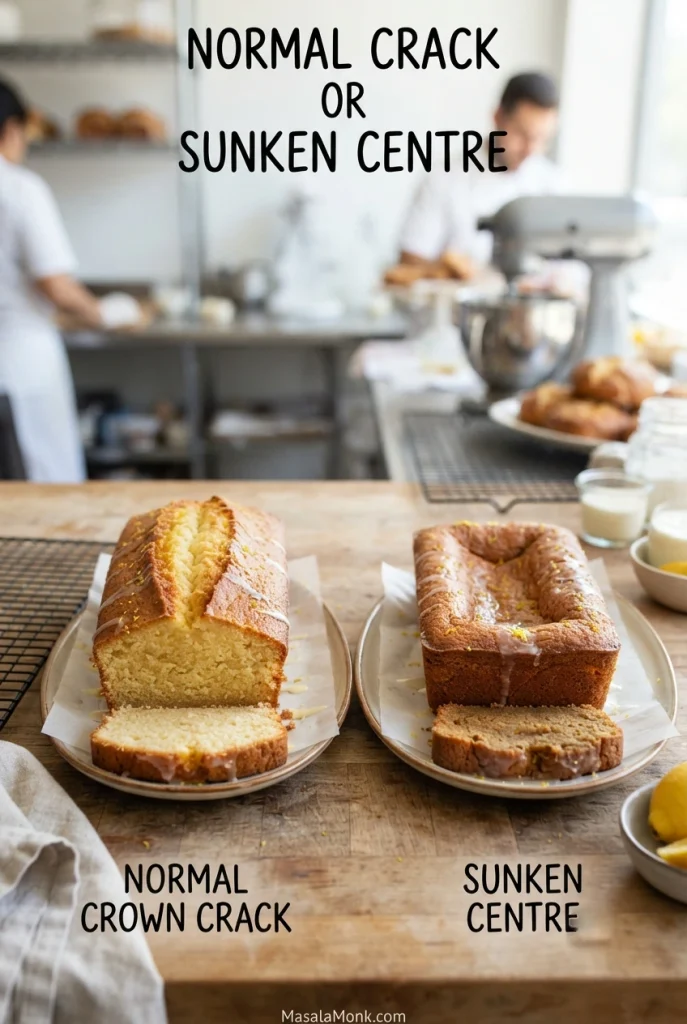
Two baked lemon pound cake loaves with cut slices in front: the left has a raised lengthwise crack and the right has a sunken centre.
Compare the height of the centre with the loaf’s outer shoulders. A raised, split crown is usually normal; by contrast, a hollow that sinks below the surrounding top needs a closer doneness and pan-size check.

Changing the pan changes the bake. Check its depth and usable capacity, not only the length and width stamped on the rim.

Can I use an 8½ × 4½-inch loaf pan?

The smaller pan may not hold the full batch with enough room to rise. A 9 × 5-inch pan is the safer choice for these quantities. If you use the smaller pan, leave room for expansion and bake any excess separately in a suitable small tin or lined muffin cups. Check the smaller portions earlier and don’t rely on the stated loaf timing.
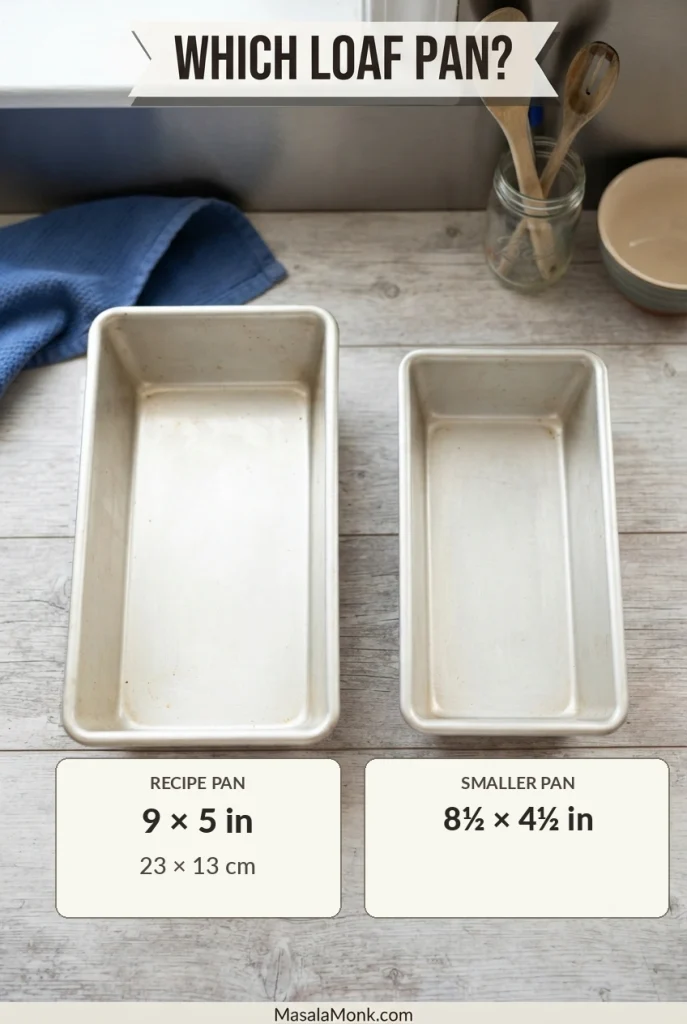
Two empty metal loaf pans on a tabletop: larger 9 × 5-inch recipe pan on the left and smaller 8½ × 4½-inch pan on the right.
A slightly narrower pan can produce a deeper layer of lemon pound cake batter, not merely a higher risk of overflow. Consequently, an already-golden top may hide a centre that needs additional time before the skewer test passes.
Can I bake lemon pound cake in a glass loaf pan?

Glass holds and transfers heat differently from light-coloured metal, affecting browning and bake time. Reducing the temperature by about 25°F / 15°C is a common starting adjustment for glass bakeware, but follow your pan manufacturer’s guidance. Check the centre carefully; the specified metal-pan timing may change.

Lemon Choices and Pound Cake Traditions

Can I use bottled lemon juice?

Fresh juice gives a cleaner citrus flavour, and you’ll need fresh lemons for the zest anyway. Bottled juice can contribute acidity, but it won’t replace the fragrant oils in freshly grated peel.

Can I use Meyer lemons?

Yes. Meyer lemons are generally sweeter and less sharply acidic than standard lemons, so the finished loaf may have a softer citrus character. Measure the zest and juice because fruit size and yield vary. Our guide to lemon varieties provides more background on Meyer lemons and other types.

Is this an old-fashioned lemon pound cake?

It has the rich, close crumb associated with traditional pound cake, but this is a modern lemon loaf. Older pound-cake formulas often rely on butter, sugar, eggs and flour for most or all of their structure. This version includes sour cream and baking powder for a different balance of richness and tenderness.

Serve at room temperature. The cake is good plain, with tea or coffee, or with a little tart lemon curd alongside.
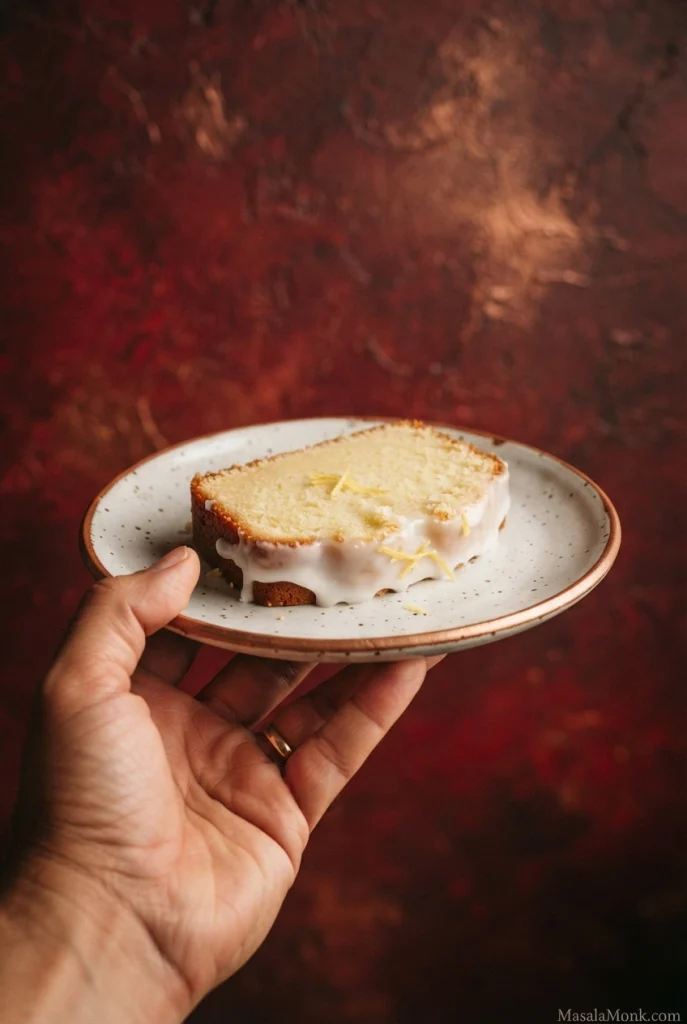
Hand holding a small cream-coloured plate with a slice of white-glazed lemon pound cake against a deep red textured background.
Serve at room temperature, when the buttery crumb feels tender and the lemon aroma comes through. Tea, coffee or a spoonful of lemon curd all work beautifully alongside.

How did your loaf turn out? Tell us about the crumb, the crack on top or how the glaze set—we can help troubleshoot if something went wrong. And if you’re baking it again, would you choose a thin tart drizzle or a generous white layer running down the sides?

Back to recipe · Back to top

Posted on — Leave a comment

Chocolate Banana Cake Recipe: Moist, Easy & From Scratch

Square chocolate banana cake topped with a thin layer of glossy chocolate ganache, with one piece removed to reveal the moist dark crumb.

Those ripe bananas on the counter could become another banana loaf. But if what you’re craving is chocolate cake, use them for this instead.

This is a soft, moist chocolate banana cake with a tender cake crumb and plenty of cocoa. The banana brings sweetness, moisture and a gentle banana flavour, but chocolate still leads. In other words, it eats like chocolate cake with banana in it—not banana bread dressed up with cocoa.

No mixer required. Two bowls, a whisk, a spatula and one 9-inch square pan will do it. The one measurement worth being particular about is the banana: weigh 250g after peeling rather than relying on a banana count.

If banana rather than chocolate is what you want to taste first, our moist banana cake with cream cheese frosting takes that route instead.

Ready to bake? Jump straight to the recipe and method.

Table of Contents

Quick Answer

For a moist chocolate banana cake that stays soft and cake-like, use 250g mashed ripe banana with 190g all-purpose flour and 50g natural cocoa. Bake it in a 9-inch (23cm) square pan at 175°C/350°F for about 35–40 minutes, beginning your first check around 35 minutes. It’s ready when the middle is set and a skewer brings up a few moist crumbs rather than wet batter.

Chocolate Banana Cake Recipe

Prep time: 20 minutes
Bake time: about 35–40 minutes; begin checking at 35 minutes
Cooling time: about 1 hour total
Pan: 9-inch (23cm) square cake pan
Oven: 175°C/350°F conventional or 160°C fan
Yield: 12–16 pieces

Overhead square chocolate cake marked with cutting guides for 12 larger portions and 16 smaller square portions.
For 12 generous portions, cut the cake in a 3-by-4 grid; a 4-by-4 grid gives 16 smaller squares. Wipe the knife between cuts for neat edges.

Ingredients

  • 250g (about 1 cup plus 2 tablespoons) very ripe mashed banana, weighed after peeling
  • 190g (about 1½ cups plus 1 tablespoon) all-purpose flour
  • 50g (about ½ cup plus 1½ tablespoons) unsweetened natural cocoa powder
  • 1 teaspoon baking powder
  • ½ teaspoon baking soda
  • ½ teaspoon fine salt
  • 100g (½ cup packed) light or dark brown sugar
  • 80g (about ⅓ cup plus 1 tablespoon) granulated sugar
  • 100ml neutral oil, such as sunflower, canola or vegetable oil
  • 2 large eggs
  • 120g (½ cup) plain unsweetened yogurt
  • 2 teaspoons vanilla extract

Optional: 85–100g (about ½ cup) dark or semisweet chocolate chips or chopped chocolate.

Weights are the reference measurements; cup amounts are approximate, especially for banana, flour and cocoa.

Method

  1. Heat the oven. Set it to 175°C/350°F conventional or 160°C fan. Lightly grease a 9-inch (23cm) square pan and line the base and two sides with baking paper, leaving enough overhang to lift the cake out later.
  1. Mash the bananas. Mash the peeled fruit until mostly smooth, then weigh out 250g. A few small, soft pieces are perfectly fine; there is no need to turn the banana into a completely smooth purée.
  1. Mix the dry ingredients. Whisk the flour, cocoa, baking powder, baking soda and salt together thoroughly. Break up any stubborn cocoa lumps while you’re there.
  1. Mix the wet ingredients. In a larger bowl, whisk the brown sugar, granulated sugar and oil until combined. Whisk in the eggs, then add the yogurt, vanilla and mashed banana. It may look a little uneven once the banana goes in. That’s normal.
Two mixing bowls containing wet and dry chocolate cake ingredients beside a whisk, spatula and lined square baking pan.
The larger bowl holds the wet ingredients because the dry mixture is folded into it later—less transferring, less mess.

Fold the Batter and Fill the Pan

  1. Make the batter. Add the dry ingredients to the wet mixture and fold with a spatula, scraping around the sides and across the bottom of the bowl. Stop as soon as the flour and cocoa disappear into the batter. It should be fairly thick and spreadable. Fold in the optional chocolate chips or chunks with the final few strokes.
Hand folding thick chocolate cake batter from the bottom of a mixing bowl with a silicone spatula.
Check the bottom of the bowl for hidden streaks of flour or cocoa before you stop folding.

Before moving the batter into the pan, look at how a spoonful falls back into the bowl. This is a useful final texture checkpoint, particularly when the ripeness of your bananas varies.

Thick chocolate batter falling from a spatula and leaving a broad groove that slowly settles in the bowl.
What should chocolate cake batter look like? The trail left by the spatula should hold briefly and then settle slowly. If it disappears instantly, the batter is looser than intended.
  1. Fill the pan. Scrape the batter into the prepared pan, ease it into the corners and level the top. Once it’s even, leave it alone.
Chocolate cake batter being spread into the corners of a parchment-lined square pan with a spatula.
Thick batter can mound in the centre. Check that the corners are filled to a similar depth before baking.

Bake, Test and Cool

  1. Bake. Put the pan on the centre rack and bake for about 35–40 minutes, beginning your first check around 35 minutes. Don’t judge this dark cake by colour alone. The glossy look across the middle should disappear and the surface should look set rather than wet.
  1. Check for doneness. Insert a thin skewer into the middle. A few moist crumbs are enough; liquid batter means it needs a few more minutes. If the skewer is smeared with melted chocolate, test another spot before returning the cake to the oven. You may simply have tested a chocolate chip rather than the cake.
Thin cake skewer held above the centre of baked chocolate cake with a few moist crumbs attached.
Probe the centre rather than the edges. If you added chocolate chips, test two spots to avoid mistaking a melted pocket for raw batter.

A dark streak on the skewer can be misleading when the batter contains chocolate pieces. Compare the examples below before deciding that the whole cake needs more oven time.

Two cake skewers comparing thick wet chocolate batter with a smaller glossy smear of melted chocolate.
A smear from a chocolate chip can resemble wet batter. Test another spot and check that the centre surface is set before baking longer.
  1. Cool. Leave the cake in its pan for about 15 minutes, then lift it onto a rack. Let it cool before slicing, and cool it completely before adding ganache. The crumb settles as the cake cools and slices much more cleanly than it does straight from the oven.

What the Cooled Crumb Should Look Like

Once the cake has cooled, cut a square from near the centre. The exposed crumb tells you more about the result than the dark surface does: it should hold its shape without smearing, crumbling apart or looking unset.

Cut square of plain chocolate banana cake showing a moist, cohesive brown crumb with small and medium air pockets.
A good chocolate banana cake crumb holds together with small, irregular air pockets—softer than a brownie and finer than a banana loaf.

If your finished cake looks wet, gummy or unusually heavy, the troubleshooting guide separates those problems and their likely causes.

A Few Ingredients That Matter

Don’t Count Bananas; Weigh Them

Use bananas that are soft, fragrant and generously speckled with brown. Very dark skins are fine as long as the fruit itself smells fresh and shows no mould or spoilage.

Bananas shown at different ripeness stages, from yellow fruit through heavily brown-spotted bananas to visibly spoiled fruit.
Brown-speckled bananas are usually sweet and soft. Visible mould, rotten flesh or an unpleasant fermented smell means discard.

The recipe uses 250g banana after peeling. That’s more useful than telling you to use “three bananas,” because three small bananas and three enormous bananas are not remotely the same amount of fruit.

Glass bowl of mashed ripe banana sitting on a digital kitchen scale displaying 250 grams.
How full the bowl looks is unreliable. Tare the empty bowl first, then weigh the finished mash rather than relying on banana count.

You don’t need to worry about being a few grams either side. The point is to avoid casually adding a great deal more banana than the recipe was built around. More fruit brings more moisture, and enough extra can make the cake heavier and push it closer to banana bread territory.

Frozen ripe bananas work too. Thaw them completely and keep the liquid they release. Mash the fruit and liquid together, then weigh 250g of the mixture.

Use Natural Unsweetened Cocoa

Use natural unsweetened cocoa here. Dutch-process cocoa has different acidity, so it isn’t a straight swap in this formula. Drinking chocolate isn’t a substitute either; it usually contains added sugar and much less cocoa.

Two bowls comparing natural unsweetened cocoa powder with darker Dutch-process cocoa powder.
Darker cocoa is not automatically the better choice. For this recipe, its acidity matters more than the shade of brown.

If you’re curious about the chemistry, King Arthur Baking explains natural and Dutch-process cocoa in detail. For a chocolate cake without banana in the formula, see our classic moist chocolate cake.

Weigh the Flour if You Can

If you’re measuring the 190g flour by volume, spoon it into the cup and level the top instead of scooping straight from the bag. A heavily packed cup can add considerably more flour and leave the crumb heavier and drier. King Arthur Baking’s flour-measuring guide shows the method clearly.

Flour being spooned loosely into a measuring cup and levelled beside flour packed into a cup by scooping.
A level top can still hide packed flour underneath. Spoon flour loosely into the cup and sweep flat without tapping it down.

This is one place where precision matters. Whether your walnuts later weigh 72g or 78g really doesn’t.

Plain or with Ganache?

Leave the cake plain and you get the simpler version: chocolate-banana squares that are easy to pick up and very much at home beside tea or coffee. A light dusting of cocoa or icing sugar is plenty if you want to dress the top without adding another layer.

Ganache changes the mood. It adds another hit of chocolate and a smooth, rich layer against the cake underneath, so the same square suddenly feels much more like dessert.

Two chocolate banana cake squares shown side by side, one plain and one topped with glossy chocolate ganache.
Choose the plain cake for easy hand-held pieces or the ganache version for a richer plated dessert. Neither is unfinished.

For some tang against the chocolate, our smooth cream cheese frosting is another option. Ganache, though, keeps this particular cake firmly in chocolate territory.

Optional Chocolate Ganache

  • 150g dark or semisweet chocolate, finely chopped
  • 120ml (½ cup) heavy or whipping cream
  1. Put the chopped chocolate in a heatproof bowl.
  1. Heat the cream until steaming and just beginning to simmer around the edges.
  1. Pour it over the chocolate and leave it alone for 2 minutes.
  1. Stir slowly from the centre outwards. It may look streaky at first; keep going gently and it will come together.
  1. Let the ganache cool until thick enough to spread without running straight off the cake.
Three bowls showing chocolate ganache at runny, smoothly spreadable and firm consistencies.
When is ganache ready? A slow ribbon should briefly hold its shape. Runny ganache can spill; very firm ganache is harder to spread without disturbing the cake.
  1. Spread it over the completely cooled cake and give it time to settle before slicing.
Offset spatula gently spreading glossy chocolate ganache from the centre toward the edges of a square cake.
Start in the centre and work outward with a light hand. Pressing too firmly can drag crumbs into the topping.

If the ganache is still running off the spoon, give it more time to cool. If it has gone firmer than you wanted, warm it very gently until it loosens again.

Variations and Substitutions

Bake the basic version once before changing half the bowl.

  • Chocolate chips or chunks: Fold in 85–100g for pockets of melted chocolate through the crumb. Dark or semisweet chocolate keeps the sweetness in check.
  • Toasted walnuts: Add about 75g, roughly chopped. They bring crunch to an otherwise tender cake and work naturally with both banana and chocolate.
  • Espresso powder: Add 1 teaspoon with the dry ingredients. At that amount it deepens the cocoa flavour without making the cake taste obviously of coffee.
Square chocolate cake displayed with dark chocolate pieces, toasted walnuts and espresso powder as three optional variations.
Chocolate brings soft pockets, toasted walnuts bring crunch, and espresso powder strengthens the cocoa impression without changing the crumb much.

Some changes go beyond a casual substitution. Replacing all the oil with butter, cutting the sugar dramatically, removing the eggs or swapping the wheat flour for almond or coconut flour changes the structure of the cake. Those need more than a straight one-for-one exchange.

Troubleshooting Your Chocolate Banana Cake

Dense, gummy and raw are three different problems. Before changing the recipe next time, have a look at what actually happened to this cake.

Four chocolate cake cross-sections comparing properly baked, raw, gummy and dense crumb structures.
Compare only after cooling. Raw cake looks unset; gummy cake looks sticky and compressed; dense cake is cooked through but has a tight crumb. The properly baked example stays cohesive without looking pasty.

The Middle Is Still Wet or Raw

Wet batter on the skewer usually means the simplest thing: it needs longer in the oven. Loosely cover the top with foil if it is already dark enough, then continue baking at the same temperature and check again after a few minutes.

When this happens repeatedly, check the oven temperature and pan size. A smaller pan—or any setup that leaves the batter in a deeper layer—will take longer for the middle to bake through.

The Crumb Is Gummy or Pasty

A gummy cake isn’t always an underbaked one. Too much banana is one possibility, particularly when bananas were measured by number instead of weight. With frozen fruit, remember that the thawed banana and its released liquid together should total about 250g.

Also give the cake time to cool before deciding something went wrong. The crumb is softer and more delicate while the cake is hot, so its final texture is easier to judge once it has cooled.

The Cake Is Dense but Fully Baked

A tight, heavy crumb points somewhere else. Too much flour, old or mismeasured leavening, or a lot of mixing after the flour goes in can all make the cake denser than intended. Weigh the flour if possible and stop folding once the batter is combined.

It Rose and Then Sank

A little settling as the cake cools is normal. A deep dip through the middle is different and often means the structure wasn’t quite set when the cake came out. Too much baking powder or soda can also make a cake rise quickly and then fall back.

Chocolate cake with a deep sunken centre beside a cut cake showing set edges and a visibly underbaked middle.
A modest dip can happen during cooling. A deep crater, particularly above a wet middle, suggests the centre did not set properly.

The Edges Are Done but the Middle Isn’t

Loosely cover the top with foil and keep baking. The foil slows further browning while the middle catches up. If it happens repeatedly, check the pan and oven: a dark pan, smaller pan or oven running hot can cook the outside faster.

The Cake Turned Out Dry

Too much flour and too much oven time are the first places to look. Weigh the flour if you can and remember that a few moist crumbs on the skewer are enough—you don’t need to bake until it comes out bone-dry.

And don’t throw away an already-dry cake. Ganache, softly whipped cream or vanilla ice cream can make those slices much nicer to eat.

Piece of chocolate cake served with glossy chocolate sauce and vanilla ice cream to make a dry slice more enjoyable.
Serve small pieces of a dry cake with cream, ganache or ice cream. The contrasting texture makes the slice more enjoyable; rebaking will not help.

There Are Large Holes or Bitter Spots

A bitter or soapy patch is a good reason to suspect a pocket of baking soda. Large tunnels can also come from uneven mixing or too much leavener. Give the dry ingredients a proper whisk at the beginning so the small quantities of baking powder and soda don’t sit in one part of the batter.

Storage and Freezing

Let the cake cool before covering it. Wrap it while it’s still steaming and that moisture has nowhere to go except back onto the surface.

Chocolate cake shown covered for room-temperature storage, inside a refrigerator container and individually wrapped for freezing.
Cover exposed cut sides closely because they dry out first. Freeze slices individually so you can thaw only what you need.
  • Room temperature: Keep the plain cake tightly covered for up to 2 days in a cool room. In a hot or humid kitchen, refrigerate it sooner.
  • Refrigerator: Keep it covered for up to 5 days. Chilled cake will be firmer, particularly under ganache, so give a slice some time at room temperature before eating if you prefer it softer.
  • Freezer: Wrap cooled individual slices well and freeze for up to 3 months. Thaw them while still wrapped so condensation collects on the wrapping rather than directly on the cake.

Frequently Asked Questions

Can I Make Chocolate Banana Cake a Day Ahead?

Yes. Bake it, cool it and keep it well covered. You can leave it plain or add the ganache once the cake is completely cool. That makes it easy to bake the day before you plan to serve it.

Can I Use It as a Birthday Cake?

Yes. It works well as a simple single-layer celebration cake, especially with ganache over the top. Add candles, chocolate curls, sprinkles or chopped toasted nuts and leave the complicated decorating to another birthday.

Can I Double the Recipe?

Yes, but don’t put twice the batter into the same 9-inch pan. Divide a double batch between two pans instead. When both are baking together, leave some space around them for air to circulate and expect the exact baking time to vary with your oven.

One Last Slice

There are days when ripe bananas call for banana bread. And there are days when you look at the same bananas and would much rather have chocolate cake. This is for the second kind of day.

And if what you wanted all along was warm chocolate with a molten middle, save the bananas for breakfast and make our chocolate lava cakes instead.

Bake this one? Tell us what you did—your pan, approximate bake time, any substitutions and, most useful of all, how the crumb turned out. Those details can help the next baker far more than a simple “loved it.”

Need the instructions again? Return to the recipe or back to the top.

Posted on — Leave a comment

Chocolate Mousse Cake Recipe: Easy, Rich & Silky

Round chocolate mousse cake with a slice removed, showing one dark chocolate cake base, a deep chocolate mousse layer and a thin glossy ganache top.

You do not really know whether a chocolate mousse cake has worked until you cut the first slice. The mousse needs to stand cleanly without feeling stiff, the cake underneath needs to stay tender after hours in the refrigerator, and the fork should pass through both without pushing the mousse out of place.

This recipe is built around getting that slice right: a tender chocolate cake base, a deep layer of cool, silky mousse and a thin ganache finish. Cold from the refrigerator, the mousse feels light against the darker cake, while the ganache gives the last bite a little more chocolate intensity.

It looks like a special-occasion dessert, but the construction stays manageable—one baked base, one mousse and no complicated inserts or repeated layers to line up. Most of the work can be finished the day before. The mousse is the stage worth watching closely, and the method below gives you physical cues for knowing when to fold, when to stop and when the cake is ready to move on.

Quick Answer: Chocolate Mousse Cake

This chocolate mousse cake uses an 8-inch (20 cm) chocolate cake base topped with a generous egg-free, gelatin-free mousse and a thin ganache finish. Allow about 45 minutes of hands-on work, plus baking, cooling and at least 4–6 hours for the mousse to set. Making it overnight is the easiest option. The cake gives you about 10–12 rich slices.

The most useful mousse cue comes before assembly: it falls from the spatula in a broad, soft ribbon and holds gently on the cake instead of running. Spreadable now; sliceable later.

Labelled cross-section of chocolate mousse cake showing thin chocolate ganache, deep chocolate mousse and one tender chocolate cake base.
The mousse is intentionally much deeper than the cake base. As a result, each slice eats more like silky chocolate mousse supported by tender cake than a conventional multi-layer chocolate cake.

Chocolate Mousse Cake Recipe

Makes10–12 slices
Pan8-inch / 20 cm round springform pan
Active timeAbout 45 minutes
Bake22–27 minutes at 175°C / 350°F
Mousse chillAt least 4–6 hours; overnight is ideal
Total elapsedAbout 6–8 hours, or make it overnight
Make aheadYes — assemble the cake the day before serving

Equipment

The simplest setup is one 8-inch (20 cm) springform pan for both baking and assembly. If you only have a regular 8-inch cake pan, bake the cake in that and assemble it later inside a matching springform pan or cake ring.

  • 8-inch / 20 cm springform pan
  • Acetate cake collar or parchment paper
  • Digital kitchen scale
  • Electric hand mixer or stand mixer
  • Mixing bowls and a flexible spatula

Ingredients

Measure the mousse cream in two separate portions: 200 g for the warm chocolate mixture and 300 g for whipping. The 100 g cream for the ganache is additional, so keep it separate as well.

Chocolate cake base

  • 100 g (about ¾ cup plus 1 tablespoon) all-purpose flour, spooned and levelled if measuring by volume
  • 30 g (about ⅓ cup) unsweetened natural cocoa powder
  • 150 g (¾ cup) granulated sugar
  • 1 teaspoon baking powder
  • ½ teaspoon baking soda
  • ¼ teaspoon fine salt
  • 1 large egg, at room temperature
  • 120 g (½ cup) buttermilk, at room temperature
  • 60 ml (¼ cup) neutral oil
  • 1 teaspoon vanilla extract
  • 80 ml (⅓ cup) hot coffee or hot water

Chocolate mousse layer

  • 250 g (9 oz) good semisweet chocolate, preferably around 50–60% cacao, finely chopped
  • 500 g heavy whipping cream, at least 35% fat, divided: 200 g (about ¾ cup plus 1½ tablespoons) for the chocolate and 300 g (about 1¼ cups) for whipping
  • 1 teaspoon vanilla extract
  • ⅛ teaspoon fine salt

Thin ganache finish

  • 100 g (3½ oz) semisweet chocolate, finely chopped
  • 100 g (about ⅓ cup plus 1 tablespoon) heavy cream

Kitchen note: Keep the cake, mousse and ganache ingredients in three separate groups before you start. Weigh the chocolate, cream, flour and cocoa if you can; the volume measures are there for convenience. If you are still choosing the right chocolate or cream, the ingredient guidance below explains what matters.

Overhead layout of ingredients grouped separately for chocolate cake, chocolate mousse and chocolate ganache.
Keep the two chocolate portions separate as well as the cream: 250 g belongs to the mousse, whereas the remaining 100 g is reserved for the ganache. This small bit of preparation prevents a mix-up later.

Before You Begin

If you are using the same springform pan for baking and assembly, clean and dry the sides once the cake has been removed. When the cake is completely cool, return it to the base and line the inside edge of the pan with acetate.

Acetate gives you the smoothest mousse sides and peels away easily once the cake is cold. Parchment works too if you care more about the cake than perfectly polished edges.

Eight-inch springform pan with parchment on the bottom and a clear acetate collar fitted around the inside edge.
Fit the acetate snugly rather than letting it bow away from the cake. A close collar gives the mousse a straighter wall to set against and leaves less space for obvious air gaps around the perimeter.
  • Cool the cake completely. Residual oven heat can soften freshly made mousse.
  • Use cold whipping cream. In a warm kitchen, chilling the bowl and beaters for 10–15 minutes can make whipping easier.
  • Clear a flat refrigerator shelf. The mousse needs to set level.
  • Have the collar ready before making the mousse. It is easiest to spread while still smooth and flexible.

Small surface marks can wait until finishing; a warm cake base or loose mousse cannot. The troubleshooting guide separates cosmetic flaws from issues that affect the set.

How to Make Chocolate Mousse Cake

Bake the Cake

Heat the oven to 175°C / 350°F. Grease the 8-inch (20 cm) pan and line the bottom with parchment.

In a large bowl, whisk together the flour, cocoa powder, sugar, baking powder, baking soda and salt. In another bowl, whisk the egg, buttermilk, oil and vanilla until smooth.

Add the wet ingredients to the dry ingredients and whisk just until combined. Pour in the hot coffee or water and stir gently until the batter is smooth. It will be fairly fluid; that is normal.

Fluid chocolate cake batter being poured into a parchment-lined round springform pan.
The batter is meant to look fairly fluid at this stage. That higher-moisture texture helps the relatively thin chocolate cake base stay tender after the assembled dessert spends hours in the refrigerator.

Pour the batter into the prepared pan and bake for 22–27 minutes. Start checking near the early end. The centre needs to look set, and a skewer inserted near the middle can carry a few moist crumbs rather than coming out coated in wet batter.

Let the cake cool in the pan for about 10 minutes, then release it carefully and transfer it to a rack. Leave it until completely cool. If the top has formed a pronounced dome, trim only enough to give the mousse a reasonably level base.

Make the Mousse

Before heating anything, separate the mousse cream: 200 g for the warm chocolate base and 300 g to keep cold for whipping. The ganache’s 100 g cream is additional.

Chocolate mousse formula showing 250 grams semisweet chocolate and 500 grams heavy whipping cream divided into 200 grams for the chocolate and 300 grams for whipping.
Keep the whipping portion refrigerated while you make the chocolate base. Cold cream is easier to bring to medium peaks without overshooting.

Put the 250 g chopped chocolate in a heatproof bowl. Heat 200 g (about ¾ cup plus 1½ tablespoons) of the cream until steaming but not boiling. Pour it over the chocolate and leave it undisturbed for 2 minutes.

Stir slowly from the centre outward until the chocolate and cream come together into a smooth, glossy mixture. Add the vanilla and salt.

Close-up of smooth glossy chocolate and cream emulsion in a stainless steel bowl.
A glossy emulsion shows the cream and melted chocolate have come together. If tiny chocolate pieces remain, give the bowl another moment and stir again before introducing the whipped cream.

Leave the chocolate mixture to cool until it remains fluid but no longer feels warm enough to melt whipped cream on contact. Do not wait until it begins firming around the edges.

Whip, Fold and Check the Texture

Meanwhile, whip the remaining 300 g (about 1¼ cups) cold cream to medium peaks. When you lift the beaters, the cream holds a distinct peak but the tip bends over. You want body without stiffness.

Whisk lifted from whipped cream at medium peaks, with a formed peak whose tip bends over.
Medium peaks are the stopping point, not a stage to whip past. Once the cream becomes very stiff, it is harder to fold gently and the finished chocolate mousse can feel noticeably denser.

Fold about one-quarter of the whipped cream into the chocolate mixture to lighten it. Add the remaining cream in two additions, folding gently and sweeping the spatula along the bottom of the bowl so no heavy chocolate is left underneath.

Hands folding chocolate mixture into whipped cream with a silicone spatula in a stainless steel bowl.
The first spoonful of whipped cream loosens the chocolate base; the later additions are about preserving lift. Watch the bottom of the bowl, where heavier chocolate tends to collect.

Stop when the colour is even. On the spatula, the mousse falls in a broad, soft ribbon. In the bowl, it mounds gently instead of flowing like a sauce. If it looks like that, you are ready to assemble. Spreadable now; sliceable later.

Silky chocolate mousse falling from a spatula in a broad ribbon and forming a soft mound in the bowl.
Have the lined pan ready before the mousse reaches this stage. Chocolate continues firming as it cools, so prompt assembly is easier than trying to smooth mousse that has begun to set in the bowl.

Assemble the Cake

Place the completely cooled cake back on the springform base or on the board you are using inside the cake ring. Fit the acetate or parchment collar snugly around it.

Spoon the mousse over the cake while it is still easy to spread. Work it gently towards the edges first so the space beside the collar fills without large air pockets, then level the top with a spatula.

Chocolate mousse being spread over one chocolate cake base inside an acetate-lined cake ring.
Fresh mousse should still have enough movement to settle against the acetate without heavy smoothing. If it starts firming in the pan, fewer spatula strokes are better than repeatedly chasing a perfectly flat surface.

Around the collar, look for an even layer with no obvious gaps. Give the top a final pass and stop. Tiny bubbles or faint spatula marks are easy to forgive; overworked mousse is much harder to fix.

Cover the pan without letting the cover touch the mousse.

Chill Until Set

Refrigerate for at least 4–6 hours. Overnight is ideal for a celebration or whenever you want to finish most of the work the day before.

The outside firms before the middle, so judge the centre rather than the edge alone. When the middle feels set and the surface holds as you move the pan gently, the cake is ready to unmould.

Unmould and Add the Ganache

Remove the outer ring from the cold cake. Peel the acetate or parchment slowly away from the mousse, then return the cake to the refrigerator while you make the ganache.

Hands slowly peeling a clear acetate collar away from the smooth side of a chilled chocolate mousse cake.
If the acetate begins pulling at the mousse, stop instead of tugging harder. A short additional chill usually protects the smooth edge better than trying to force a soft cake away from the collar.

Put the 100 g chopped chocolate in a heatproof bowl. Heat the 100 g cream until steaming, pour it over the chocolate and leave it for 2 minutes. Stir gently from the centre until smooth.

Let the ganache cool until it remains fluid but no longer feels hot. Pour it over the centre of the mousse and spread it into a thin layer, stopping at the edge or allowing a few drips down the sides if that is the finish you want.

Thin glossy chocolate ganache being poured over the top of a chilled chocolate mousse cake with exposed mousse sides.
Test the ganache from a spoon before pouring: it should flow in a thin stream rather than fall in thick clumps. That gives you more control over the finish without needing to work the mousse surface repeatedly.

Refrigerate for another 20–30 minutes, until the ganache has settled. Keeping this layer thin gives you another hit of darker chocolate without turning the top into a heavy frosting. For neat portions later, use the clean-slicing method.

What a Good Slice Looks and Feels Like

The first clean slice tells you most of what you need to know. Look for a moist, tender crumb underneath a clearly defined mousse layer. The mousse holds a neat edge instead of slumping onto the plate, but gives easily when the fork passes through it.

Single chocolate mousse cake slice showing moist chocolate cake, a deep airy mousse layer and a thin glossy ganache top.
If the first cut pushes mousse outward or smears badly, refrigerate the cake a little longer before portioning the rest. It is easier to give it time than to repair collapsed slices.

In a good slice, each layer does something different. The cake brings deeper cocoa flavour and a little chew, the mousse is cooler, lighter and silkier, and the thin ganache leaves a darker chocolate note at the end. None needs to dominate the bite.

How to Cut Clean Slices

Start with a well-chilled cake and a warm, dry knife. Dip a long sharp blade briefly in hot water, wipe it completely dry, then make one deliberate downward cut. Clean, rewarm and dry the blade before the next slice.

Long sharp knife cutting vertically through a chilled chocolate mousse cake with visible cake, mousse and ganache layers.
As soon as the cut is complete, slide a thin cake server beneath the base to lift the portion. Supporting the cake from below helps the tall mousse layer reach the plate without being squeezed.

If you prefer the mousse a little more yielding, let each cut portion sit for a few minutes before eating. Leave the rest of the cake in the refrigerator while you serve, especially in a warm room.

Fresh raspberries or strawberries are enough alongside it. If a slice slumps, drags or feels unusually dense, use the troubleshooting guide to identify the likely cause before changing ingredients.

Chocolate Mousse Cake Troubleshooting

First decide whether the problem affects the structure or only the appearance. A slightly uneven top, tiny bubble or faint collar mark can usually be ignored. Mousse that pours like cream, seized chocolate or a centre that remains loose needs attention. If you need an answer immediately, jump straight to the symptom-by-symptom fixes.

Troubleshooting graphic comparing minor surface bubbles and spatula marks with structural problems such as slumping mousse and shifting layers.
A thin ganache finish can hide faint surface marks, but it cannot rescue mousse that has not set. Check the structure before spending time on appearance.

Match the Symptom to Its Likely Cause

What you see Likely cause What to do now
Mousse pours like cream Chocolate was still too warm or the cream was under-whipped Give it a few minutes in a cool room and check again. If it remains very loose, chill only briefly, checking frequently—the chocolate can begin setting around the edges before the centre thickens.
Hard chocolate flecks The chocolate mixture cooled too far before folding Leave small flecks alone. Continued folding will not melt set chocolate and can knock more air from the mousse.
Mousse looks grainy or greasy The chocolate mixture has begun to split or the cream was over-whipped Stop folding. Aggressive mixing usually makes an overworked mousse worse.
Mousse firms while still in the bowl The chocolate is setting before assembly Transfer it to the prepared cake promptly and spread it with as few strokes as possible.
Centre still feels loose The mousse needs more time in the refrigerator Leave the cake where it is and check the centre again later.
Mousse slides from the cake The cake was warm, the mousse was very loose or the dessert moved before setting Return it to a level refrigerator shelf and leave it until the centre is firm before moving it again.
Ganache dents or softens the mousse The ganache was too warm or the mousse was not cold enough Return the cake to the refrigerator and let the ganache cool further before continuing.

Other Texture and Release Problems

Dry cake: Judge it after chilling, because that is how this dessert is actually eaten. Too much flour or a few extra minutes in the oven become more obvious once the crumb is cold. Judge this cake cold.

Broken cake during transfer: Let it cool completely and support the base with parchment or a flat cake lifter. Assembling it directly on the springform base or serving board avoids another transfer later.

Dense mousse: Revisit the medium-peak stage and folding step first. Cream whipped until stiff is harder to fold without losing air, and prolonged folding makes the mousse heavier still.

Acetate sticking to the mousse: Stop peeling and return the cake to the refrigerator for another 20–30 minutes. Then peel the acetate slowly back against itself rather than pulling it straight away from the cake.

If the Cake Will Not Hold Its Shape

When the cake has broken badly or the mousse will not support neat slices, stop trying to rebuild it. Provided everything has remained safely chilled, spoon pieces of cake and mousse into dessert glasses, add the ganache and finish with berries or shaved chocolate. It will no longer be the celebration cake you planned, but it can still be a very good chocolate dessert. This rescues presentation, not food that has been left unsafe.

Clear dessert glass layered with chocolate cake pieces, chocolate mousse and ganache, finished with raspberries and chocolate shavings.
Wide dessert glasses are easier to fill and eat from than tall, narrow ones. Leave the cake in recognisable pieces so each spoonful can catch some crumb, mousse and ganache.

Back to recipe  ·  Back to top

A Few Ingredient Choices That Matter

Chocolate and Cream Make the Mousse

A good semisweet chocolate around 50–60% cacao gives the mousse enough structure and chocolate intensity without pushing it towards an especially dark, firm result. Milk and white chocolate contain different proportions of cocoa solids, cocoa butter, milk solids and sugar, so they are not direct replacements in this formula.

Use a chocolate you enjoy eating. The mousse contains very little besides chocolate and cream, so harsh, waxy or overly sweet chocolate has nowhere to hide.

The cream matters just as much. Use heavy whipping cream with at least 35% fat. Part of it forms the smooth chocolate base; the rest traps the air that gives the mousse its lighter texture. Lower-fat table cream or cooking cream will not whip the same way.

A Cake That Stays Tender When Cold

This cake spends hours in the refrigerator before anyone eats it. Oil stays fluid when chilled, helping the crumb remain tender underneath the mousse. That makes it particularly useful here even if you normally prefer butter in cakes served at room temperature.

The recipe uses natural unsweetened cocoa powder. Natural and Dutch-process cocoa differ in acidity, so they are not always interchangeable when baking soda is part of the leavening. King Arthur Baking’s guide to natural and Dutch-process cocoa explains the difference in more detail. If you want a conventional chocolate layer cake rather than mousse cake, see our Chocolate Cake Recipe.

Why This Mousse Doesn’t Need Gelatin

The mousse gets its structure from semisweet chocolate, properly whipped cream and refrigeration. There is no gelatin and no egg in the mousse itself, giving it a softer, more yielding texture than a heavily stabilised mousse.

Although the mousse contains no egg, the cake base uses one, so the finished chocolate mousse cake is not egg-free.

That softer structure comes with a practical trade-off: this is a chilled dessert. The mousse can hold a clean slice without being made stiff enough to spend hours on a hot buffet table.

For chocolate mousse designed to be served on its own rather than used as a cake layer, see our Chocolate Mousse Recipe.

Make-Ahead, Storage and Freezing

The Easiest Make-Ahead Schedule

The day before: bake the cake, cool it completely, make the mousse, assemble everything and refrigerate overnight. By the time guests arrive the next day, the part most likely to make you watch the clock is already finished.

Serving day: remove the ring and collar, add the ganache and refrigerate for another 20–30 minutes. Add berries or another simple decoration shortly before serving.

Make-ahead timeline showing chocolate mousse cake preparation the day before, overnight chilling and ganache finishing on serving day.
For a calmer serving day, weigh the ganache chocolate and cream in advance and keep the cream refrigerated. The only finishing jobs are melting, spreading, the short final chill and decoration.

Refrigerator Storage

Keep the cake covered in the refrigerator and enjoy it within 2–3 days for the best texture. A cake carrier or tall container protects the surface without letting a cover touch the ganache.

Freezing the Cake

You can freeze the cake once it is completely cold and set. Wrap it well or place it in an airtight freezer-safe container and use it within about 1 month for best quality. Thaw it overnight in the refrigerator rather than on the counter.

Storage guide showing chocolate mousse cake covered in the refrigerator for 2 to 3 days or frozen for about one month and thawed overnight.
If you expect to serve only a few portions, freeze individual slices separately until firm before wrapping them. That way you can thaw what you need without exposing the whole cake to repeated temperature changes.

If you are making it for a celebration, add delicate fresh-fruit decorations after thawing rather than before freezing.

Warm-Weather Serving and Transport

Start with the cake cold from the refrigerator, carry it level in an insulated box and place cold packs around the container without pressing them against the cake itself.

Chocolate mousse cake carried level inside an insulated container with cold packs and cold-storage time and temperature guidance.
Use a firm, flat board under the cake inside the carrier. Insulation helps with temperature, but it cannot prevent a soft dessert from sliding if the box tilts during the journey.

In a hot kitchen, return the cake to the refrigerator between decorating steps and bring it out close to serving time. This matters particularly with a gelatin-free mousse: it does not need to be stiff to slice cleanly, but it does need to stay cold.

A cake can remain physically upright and still become unsafe if it sits warm for too long. The USDA advises keeping cold perishable food at or below 40°F / 4°C and limiting time out of refrigeration to two hours, or one hour when the temperature is above 90°F / 32°C. In hot weather, bring the cake out for serving instead of using it as a long table display.

Back to recipe  ·  Back to top

Variations and Other Ways to Use the Mousse

Raspberry

Scatter fresh raspberries over the ganache just before serving or place a few beside each slice. Their sharpness cuts through the chocolate without changing the mousse itself. A raspberry mousse or fruit insert is a different construction and needs different proportions, so fresh fruit is the simplest way to get that contrast here.

Chocolate mousse cake slice with one cake base, deep chocolate mousse, thin ganache and fresh red raspberries.
After rinsing raspberries, pat them completely dry before adding them to the ganache. Water droplets can leave marks on the glossy top even when the berries themselves look fresh.

Coffee

Use hot brewed coffee instead of hot water in the cake batter. The amount is small enough to deepen the cocoa flavour without making the finished cake taste overtly of coffee. For a stronger mocha character, serve it with espresso rather than adding extra liquid to the mousse.

Changes That Need More Than a Simple Swap

Milk chocolate and white chocolate are not one-for-one replacements for semisweet chocolate in this mousse. Their different balance of cocoa solids, cocoa butter, milk solids and sugar changes how the mousse sets.

Chocolate chips can work in a pinch, but bars or couverture-style chocolate generally melt and emulsify more smoothly. If using chips, choose a brand that melts well rather than one specifically formulated to hold its shape during baking.

Using the Mousse Between Cake Layers

This mousse works as a substantial layer in a low, well-supported cake, but it is not automatically a filling for a tall stacked cake. Several cake layers create more weight and sideways pressure, and that kind of cake may need a firmer filling, an edge dam or additional structural support.

For the cake on this page, use the mousse as written. For a three- or four-layer frosted cake, choose a filling designed for that construction rather than simply trying to make this mousse stiffer.

A Cake Worth Making Ahead

The waiting pays off when the collar comes away and the first slice finally tells you how the cake turned out. Warm the knife, cut through the thin ganache and lift the slice: tender chocolate cake underneath, mousse standing cleanly above it, both yielding together when you take a bite. That is what all the cooling and chilling were for.

Posted on — Leave a comment

German Chocolate Cake Frosting Recipe: Gooey, Coconut-Pecan & Easy

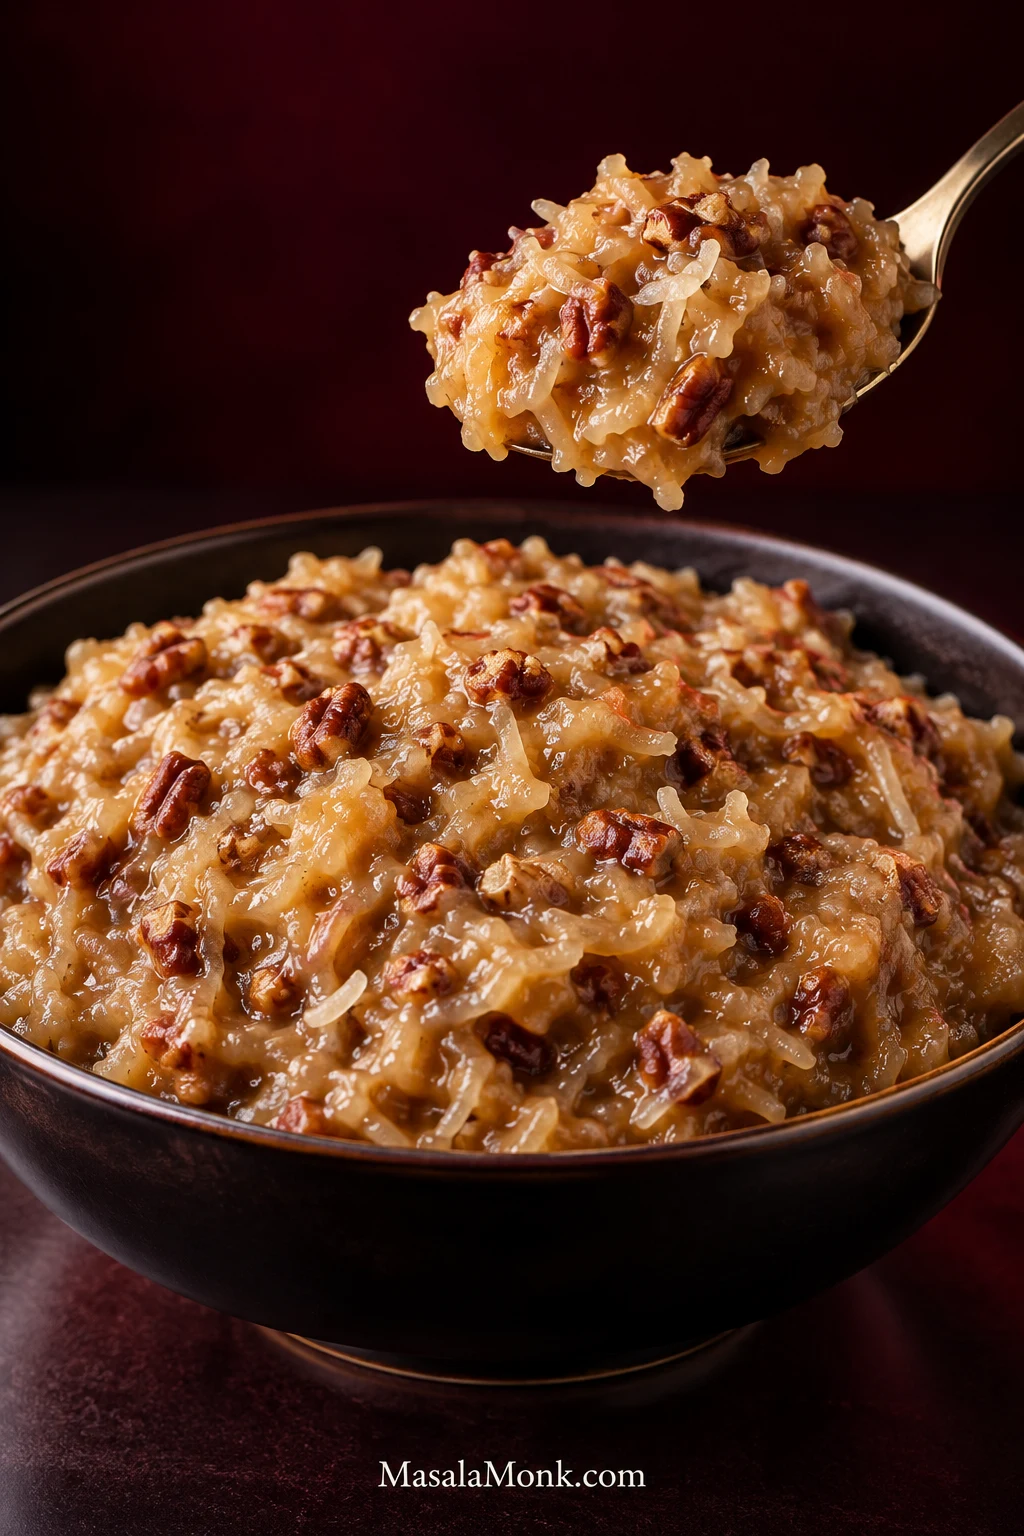
Caramel-amber German chocolate frosting in a dark bowl with moist shredded coconut and chopped pecans, with a spoonful held above the bowl.

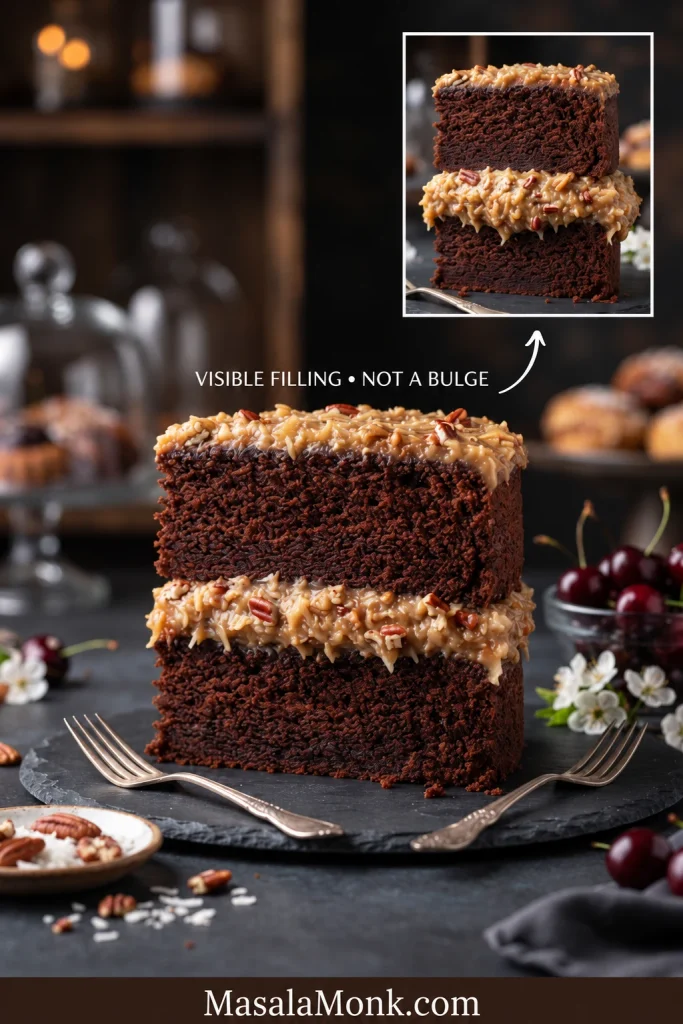
German chocolate frosting—also called German chocolate icing or coconut-pecan frosting—is the cooked topping and filling used on a classic German chocolate cake. What makes it special is the contrast: soft coconut, toasted pecans and buttery caramel-like custard against the chocolate cake underneath.

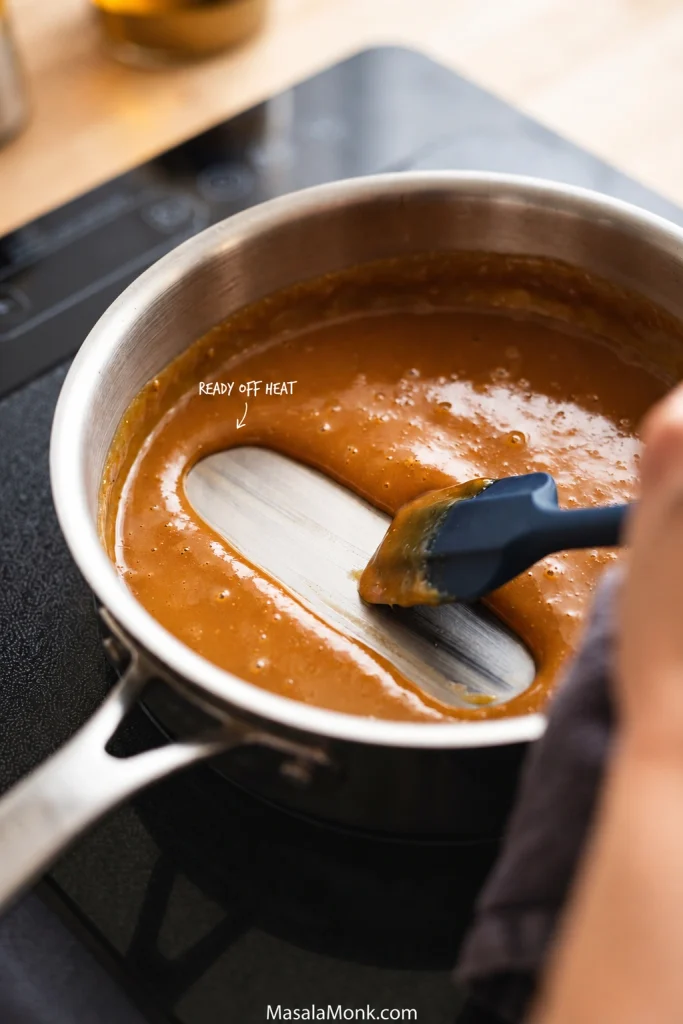
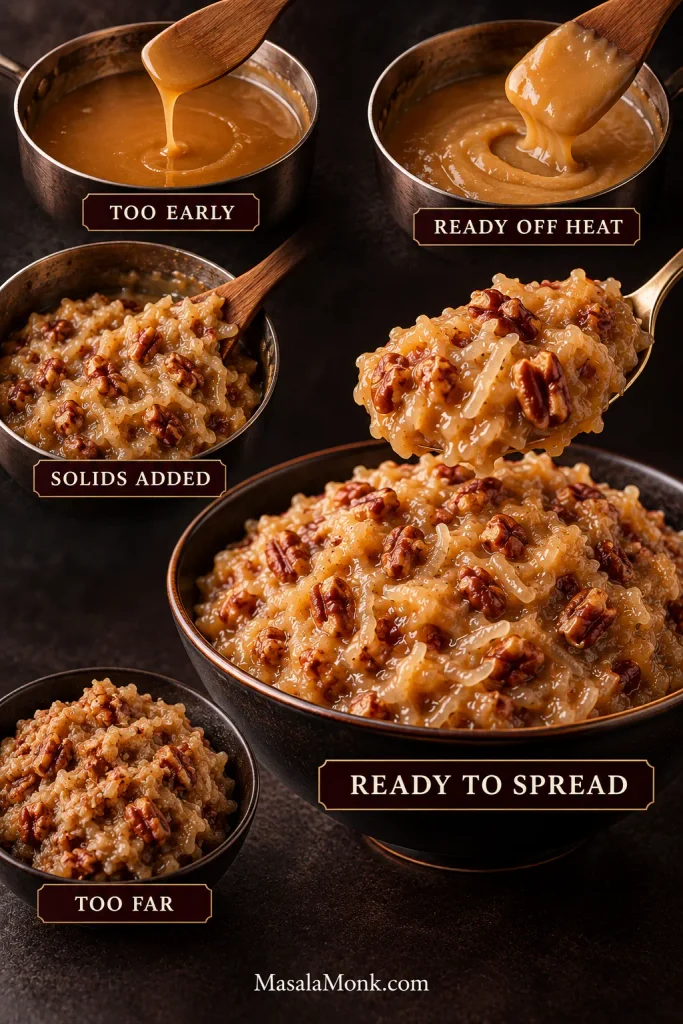
In the classic coconut-pecan version, the frosting itself contains no chocolate; the chocolate belongs in the cake. The tricky part is knowing when the custard is ready. Cook time gets you close, but texture tells you when to move on.

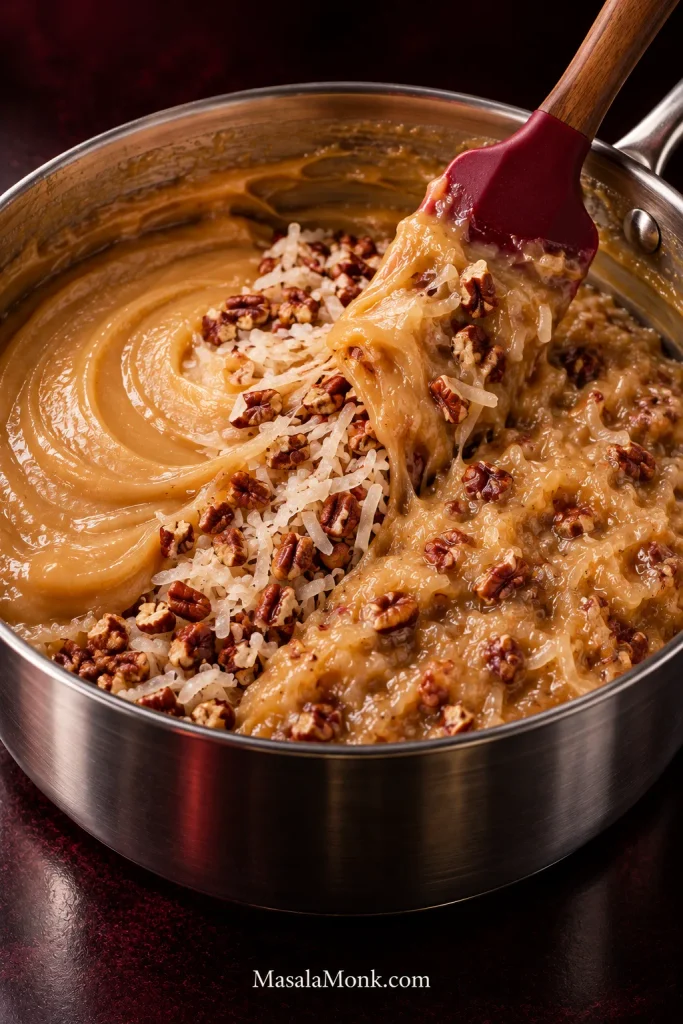
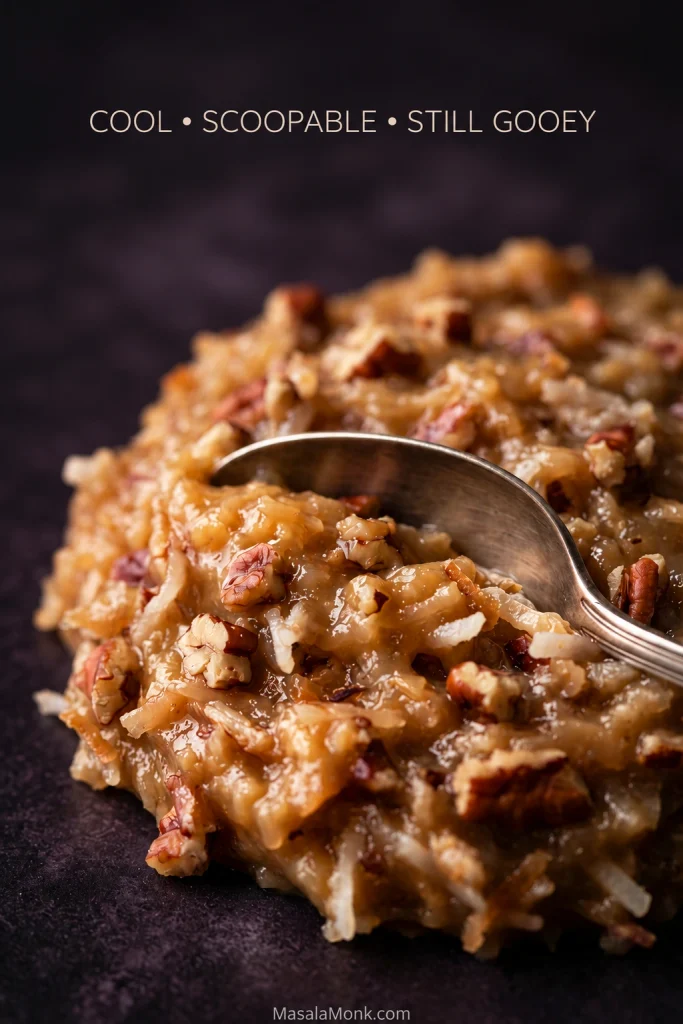
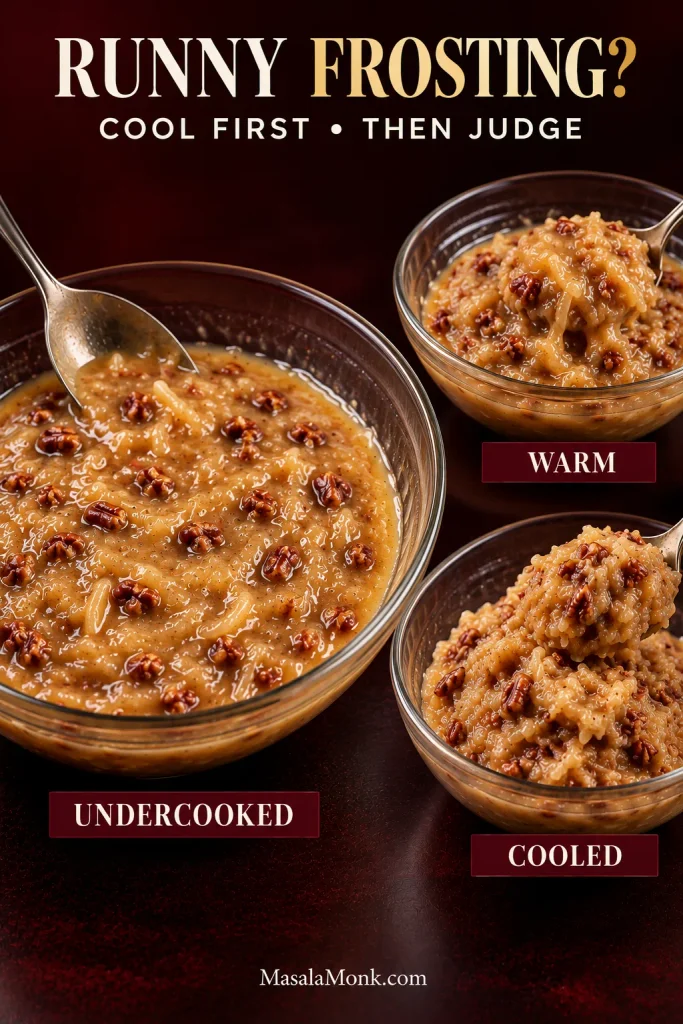
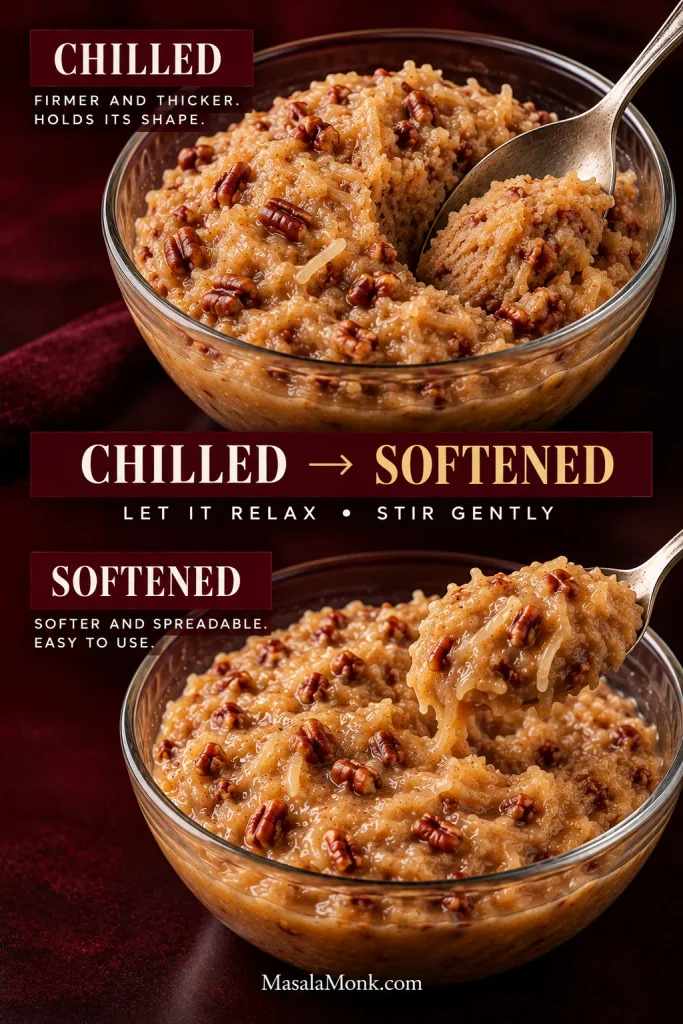
Two finish lines: First, thicken the custard on the stove. Then let the finished coconut-pecan frosting cool until a spoonful holds a soft mound instead of spreading into a puddle.

German Chocolate Cake Frosting Recipe

A gooey homemade coconut-pecan frosting made with evaporated milk, egg yolks, brown sugar, butter, moist shredded coconut and toasted pecans.

Prep10 minutes
Pecan Toast6–8 minutes
StovetopAbout 10–15 minutes
CoolAbout 45–60 minutes
Ready to SpreadAbout 1¼–1½ hours
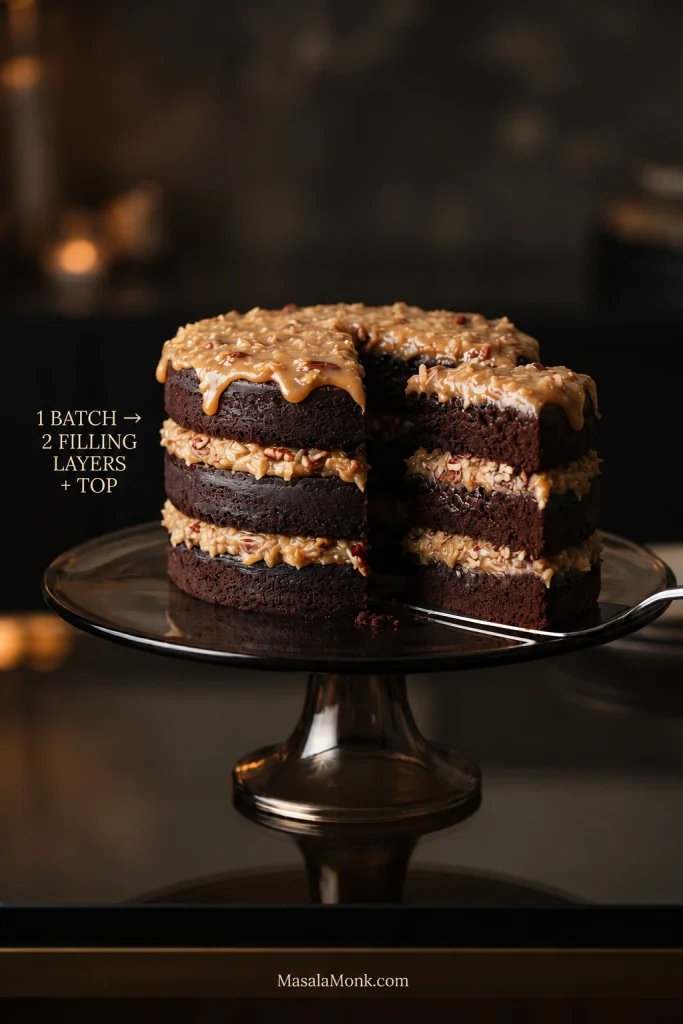
YieldFilling + top for one 3-layer 9-inch cake

Equipment

  • Medium heavy-bottomed saucepan
  • Whisk
  • Heatproof silicone spatula or wooden spoon
  • Wide heat-safe bowl or shallow dish for cooling
  • Small baking sheet for the pecans
  • Optional but useful: digital kitchen scale, instant-read thermometer and fine-mesh strainer

Ingredients

  • 4 large egg yolks
  • 12 fl oz / about 355 ml full-fat evaporated milk
  • 250 g packed light brown sugar, approximately 1 cup plus 3 tablespoons
  • ¾ cup / 170 g unsalted butter, cut into pieces
  • ½ teaspoon fine salt
  • 1½ teaspoons / 7.5 ml vanilla extract
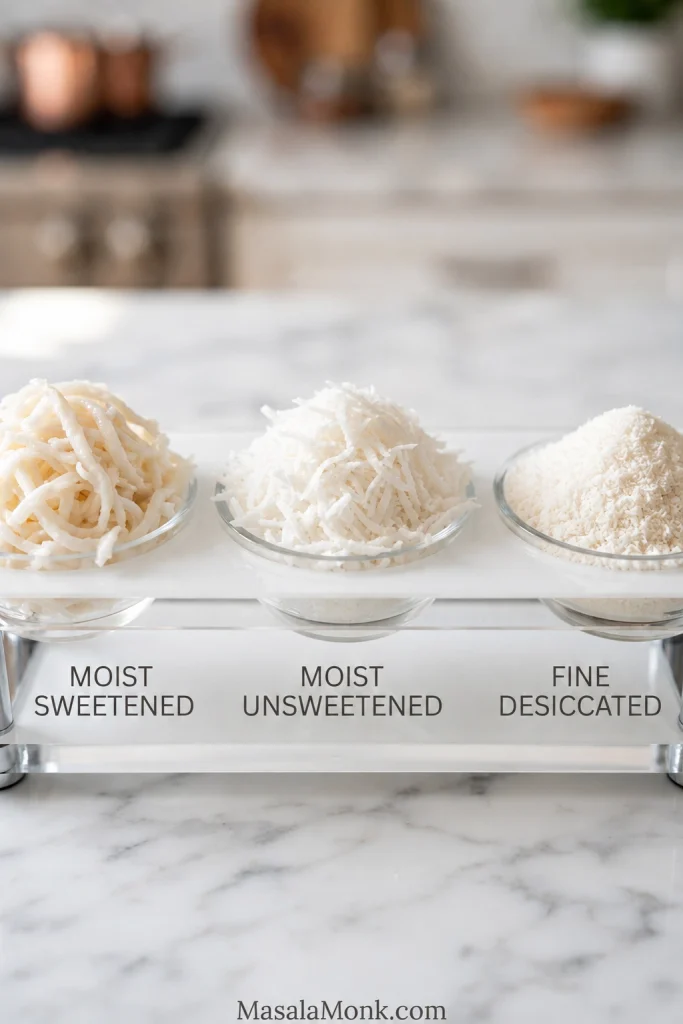
  • 180 g sweetened shredded coconut, about 2 to 2¼ cups depending on the shred and how loosely it is packed
  • 170 g pecan halves, about 1½ cups after chopping

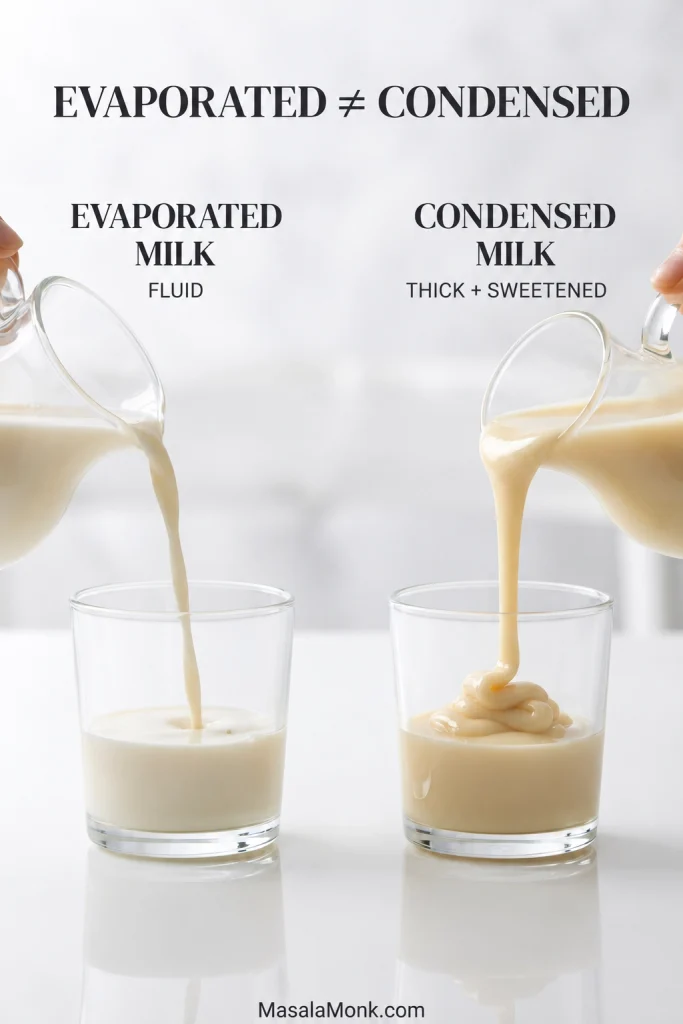
Check the can: Use evaporated milk, not sweetened condensed milk. Measure 12 fl oz / about 355 ml since can sizes can vary. For the difference in sugar and viscosity, see evaporated vs condensed milk ↓.

1. Toast the pecans

Heat the oven to 350°F / 175°C. Spread the pecan halves on a baking sheet and toast for 6–8 minutes.

Take them out when the kitchen starts to smell distinctly nutty and the pecans have deepened only slightly in color. They can move from fragrant to scorched quickly, so aroma is more useful here than dramatic browning.

Move them off the hot pan, let them cool briefly, then chop them into small but distinct pieces.

2. Whisk the custard base before heating

In the saucepan, whisk the egg yolks and evaporated milk together until smooth. You should not see streaks or little pieces of yolk.

Whisk in the brown sugar and salt, then add the butter. Mixing the yolks thoroughly into the cold milk helps them warm evenly once the pan goes on the stove, which lowers the chance of little cooked egg pieces later.

3. Cook until the custard coats the spoon

Set the saucepan over medium to medium-low heat and stir continuously, scraping across the bottom and into the corners.

At first, the butter melts and the sugar dissolves into a smooth, fairly loose mixture. That early looseness is normal. As it heats, keep any bubbling gentle and continue stirring.

Expect roughly 10–15 minutes on the stove, although your pan and burner may make it a little faster or slower.

How to recognize the cooked stage

The frosting is ready to leave the heat when all three are true:

  • The custard looks glossy and noticeably thicker.
  • It coats the back of your spoon or spatula, and a line drawn through that coating stays open.
  • A spatula dragged across the bottom leaves a clean trail for a moment before the custard flows back over it.

Brown sugar makes this version darker from the start, so judge doneness by the way it moves and coats the spoon rather than by color.

If you use an instant-read thermometer, the egg mixture should reach at least 160°F / 71°C. The USDA recommends 160°F for dishes containing eggs. Use the thermometer for the safety check; use the physical cues above for texture.

See a few cooked egg pieces? If the rest of the mixture still looks smooth, take the pan off the heat and strain it through a fine-mesh strainer before adding the coconut and pecans. A panful of recognizable scrambled egg is better restarted.

Take it off while it still flows. The base must thicken in the saucepan, but it should not already look like cold frosting. Coconut, pecans and cooling will give it more body.

Caramel custard in a stainless saucepan with a spatula leaving a clean trail that is beginning to close at the edges.
Look at the edges of the pan trail, not just the empty center. A properly cooked German chocolate frosting base begins easing back over the exposed pan; instant closure means it is still thin, while a trench that barely moves signals too much reduction.

If the cooked stage still feels ambiguous, compare all five consistency stages ↓.

4. Add the vanilla, coconut and pecans

Remove the saucepan from the heat and stir in the vanilla. Fold in the shredded coconut and toasted chopped pecans until everything is coated in the glossy custard.

The mixture should immediately look fuller, with the coconut and pecans suspended through the custard instead of sitting in a pool of liquid.

Shredded coconut and chopped pecans being folded into caramel custard with a red spatula in a stainless saucepan.
As you fold, glossy custard should work into the spaces between the coconut and pecans. If you still see dry-looking pockets, keep folding gently; don’t put the pan back on the heat.

5. Transfer it out of the saucepan

Scrape the frosting into a wide heat-safe bowl or shallow dish. Getting it out of the hot pan slows the cooking and helps it cool more evenly.

Give it a stir once or twice while it cools, then leave it alone to thicken.

6. Cool until a spoonful holds its shape

For same-day cake assembly, allow roughly 45–60 minutes at room temperature. A shallow dish will cool faster than a deep bowl, and a warm kitchen will take longer.

For a layer cake, the frosting is ready when it no longer feels warm and a spoonful sits in a soft mound instead of flattening into a puddle. Scoop through it and it should fold over itself slowly, with glossy custard still visible between the coconut and pecans. This frosting often looks least convincing while it is still warm.

Close-up of cooled coconut-pecan frosting with a spoon pressing into a soft, moist mound that holds its shape.
A useful final check is the spoon mark: ready-to-spread coconut-pecan frosting leaves a defined scoop with rounded, moist edges. A puddle is still too loose; a sharp, dry ridge suggests the mixture has gone too firm.

If the frosting stays loose after it has cooled, use the runny frosting diagnosis ↓ before adding anything to the batch.

Make sure the cake layers are cool too. Warm cake and warm filling make a slippery combination.

German Chocolate Frosting Consistency: 5 Stages

Use the visual below to decide whether the frosting needs more heat, more cooling, or simply time after the coconut and pecans go in.

Five stages of German chocolate frosting showing thin custard, ready-off-heat custard, coconut and pecans added, ready-to-spread frosting, and an overly thick final state.
Use the five stages as a reverse diagnosis as well as a cooking guide. If a batch still resembles the loose “solids added” stage while it is warm, it may simply need more cooling. A hot batch already resembling “too far,” however, needs to leave the heat immediately.
StageWhat to look for
Too earlyThin and sauce-like. A spatula trail disappears almost immediately. Keep cooking and stirring.
Ready to leave the heatGlossy and clearly thicker. It coats the spoon and leaves a brief trail across the pan. Remove it while it still flows.
Coconut and pecans addedFuller and chunkier, with glossy custard holding the coconut and nuts together. Transfer it out of the hot pan.
Ready to spreadCool, gooey and scoopable. A spoonful holds a soft mound and slowly folds over itself.
Too farVery stiff while still hot, moving almost as one mass, or starting to look dry, rough or separated. Remove it from the heat immediately.

The egg yolks thicken the milk mixture during cooking, coconut and pecans add bulk, and the butter firms as everything cools. Cooling can take a properly cooked frosting from soft to spreadable, but it cannot reliably turn an undercooked sauce into a stable cake filling.

German Chocolate Frosting Troubleshooting

Why is my German chocolate frosting runny?

German chocolate frosting is usually runny because it is still warm or because the custard did not cook long enough. If it reached the cooked stage, give it time to cool; if it came off the stove too early, it needs more cooking.

Three bowls comparing undercooked, warm, and cooled German chocolate frosting, showing increasingly thicker coconut-pecan textures.
Watch what the frosting does after the spoon moves away. Undercooked German chocolate frosting levels into a low pool, while a correctly cooked warm batch leaves more visible ridges around the coconut and pecans. Once cooled, those ridges become a soft mound.

Still warm? That may be completely normal. If your cake layers are already cooling on the counter, resist adding extra ingredients just because the frosting still looks loose.

If it came off the stove thin like sauce and the coconut and pecans have not been added yet, return it to medium-low heat and keep stirring until it reaches the cooked stage described in the recipe.

Already stirred in the coconut and pecans? If the frosting remains loose after cooling, gentle reheating over low heat can sometimes help. Stir slowly and watch closely—the coconut makes the base harder to judge, and it will firm again as it cools.

If the frosting is still loose after cooling

If a fully cooled batch is still pouring, check the basics:

  • Did the base reach the cooked stage before the coconut went in?
  • Did you use the full measured amount of evaporated milk?
  • Was the full-fat evaporated milk replaced with another dairy?
  • Were all 4 egg yolks included?
  • Were the coconut and pecans measured correctly?

A brief chill can help a correctly cooked batch that is simply softer than you want. Check the cooking and measurements before adding powdered sugar, melted chocolate or cornstarch; those ingredients change the frosting itself.

Why did my German chocolate frosting get too thick?

Frosting that feels very firm straight from the refrigerator may be completely fine once it loses the chill. Let it sit at room temperature briefly and stir before deciding it needs fixing.

Frosting that was already very stiff while still hot probably cooked too long. Move it out of the saucepan straight away. If it is only a little too firm while still warm, a teaspoon of warm evaporated milk at a time may loosen it; stir well after each addition and stop as soon as it spreads comfortably.

I can see little pieces of cooked egg

A few pale flecks can often be strained out before the coconut and pecans go in. If much of the pan has turned into recognizable scrambled egg, starting again is the better use of your time.

The frosting looks grainy, curdled or oily

These problems can look similar at first, but they do not always need the same response.

Four German chocolate frosting texture problems showing pale cooked-egg flecks, an overly thick mixture, visible separated oil, and fine grittiness.
The location of the defect helps identify it: cooked egg appears as isolated pale flecks, grittiness roughens the custard itself, and true oil separation forms distinct greasy pools around the solids. Normal custard gloss remains an even coating.
  • Very thick and rough: the frosting may have cooked too long. Get it off the heat; continuing to reduce it will only make it stiffer.
  • Oily separation: take the pan off the heat. If the separation is slight, gentle stirring as it cools may help it come back together.
  • Fine grittiness: poorly dissolved sugar or overcooking can contribute.

If the frosting remains coarse, greasy or visibly separated after cooling, restarting is usually more reliable than trying to force it back together. Moderate heat and steady stirring are the best prevention.

The filling is sliding out between the cake layers

German chocolate filling usually slides because the cake or frosting is too warm, the filling layer is too thick, or both.

If the filling is already squeezing out, the fix is usually temperature and assembly rather than remaking the frosting.

Chocolate cake layers with coconut-pecan filling sitting close to the cake edge, plus a smaller example showing excessive filling bulging outward.
Let the cake edge be your guide. A good German chocolate cake filling layer reaches the edge roughly flush with the crumb; if the coconut-pecan filling already projects outward before stacking, the next layer is likely to squeeze it farther out.
  • Cool the cake layers before assembling.
  • Wait until the frosting is cool and scoopable.
  • Spread a moderate filling layer all the way to the edge, but do not build a thick bulge that gets squeezed outward when the next cake layer goes on.
  • Chill the assembled cake briefly before moving or decorating it further.

Planning the layers before you stack? See how much frosting one batch gives you ↓.

Ingredient Choices That Change the Frosting

Why evaporated milk works here

Evaporated milk gives the custard concentrated dairy with less water than ordinary milk, helping it thicken without the heavy sugar load of sweetened condensed milk. Use the measured amount in the recipe rather than assuming every can is the same size.

Ordinary whole milk contains more water and will not behave the same way in a direct one-for-one swap. For this formula, evaporated milk is the dependable choice.

Egg yolks do the thickening

Egg yolks supply much of the thickening as well as richness, so an egg-free version needs a different thickening system rather than simply leaving them out.

Coconut and pecans

For the recipe as written, use moist sweetened shredded coconut. Moist unsweetened shredded coconut can work as a less-sweet variation, although the final set may differ slightly depending on the product. Fine desiccated coconut produces a drier, less chewy frosting; if it is your only option, add it gradually rather than automatically using the full weight. Chop unusually long coconut strands a few times before adding them.

Three samples comparing moist sweetened shredded coconut, moist unsweetened shredded coconut, and fine desiccated coconut.
Shred size changes more than appearance. Moist shredded coconut leaves flexible strands and open spaces for custard, while fine desiccated coconut packs more densely, so equal-looking volumes can give the frosting very different body.

Keep the coconut untoasted here for its soft chew against the crisp pecans. Walnuts can stand in for pecans if needed; the flavor changes, but the texture still works.

Why this version uses brown sugar

Many classic coconut-pecan frostings use granulated sugar. Light brown sugar gives this version a deeper caramel note. Butter adds richness and helps the frosting settle into a soft, spoonable texture as it cools; vanilla and salt keep the sweetness from tasting one-dimensional.

Evaporated Milk vs Sweetened Condensed Milk

The cans are easy to confuse, but their sugar content and viscosity are different enough that you should not swap them can-for-can in this recipe.

Evaporated milk pouring in a thin stream beside sweetened condensed milk falling in a thick ribbon into separate clear glasses.
The pour makes the difference visible: evaporated milk falls in a fluid stream, whereas sweetened condensed milk ribbons and piles on itself. That thickness comes with much more sugar and milk solids, so it cannot replace evaporated milk 1:1 in German chocolate frosting.
Evaporated milkSweetened condensed milk
Concentrated milk without a large amount of added sugarConcentrated milk with a substantial amount of sugar already dissolved into it
This recipe adds 250 g brown sugar separatelyA condensed-milk frosting needs much less or no additional sugar, depending on the recipe
Use the measured amount called for in this recipeNeeds a formula designed around the sugar already in the can

Opened condensed milk by mistake? Save it for our Magic Cookie Bars, where condensed milk, coconut and pecans are supposed to be together.

How Much German Chocolate Frosting Do You Need?

Before assembling a three-layer cake, reserve a generous portion for the top and divide the rest evenly between the two filling layers. You want enough coconut-pecan filling to see a generous layer when the cake is sliced without building either layer so thick that it gets pushed out at the edges.

Three-layer chocolate cake with two coconut-pecan filling layers and frosting on top, with a wedge removed to reveal the interior.
Use the cut face as the quality check: two similarly generous coconut-pecan filling bands give every slice a consistent bite without forcing filling beyond the cake edge. Leaving the sides bare also keeps the dark chocolate cake in balance with the sweet topping.
UseWhat one batch gives you
Three-layer 9-inch cakeTwo filling layers plus a generous coconut-pecan top.
Two-layer 8- or 9-inch cakePlenty for the center and top, with room for a thicker finish.
9×13-inch cakeA generous layer across the top.
Filling, top and fully covered sidesMake additional frosting or use a smoother frosting on the exterior. The chunky coconut-pecan mixture is harder to control on vertical sides.

Using coconut-pecan frosting on cakes and cupcakes

Shredded coconut and chopped pecans make this frosting chunky on purpose. For cupcakes, spoon it on and shape it with the back of a spoon or a small offset spatula. For piped borders, rosettes or birthday-cake swirls, use a smooth frosting instead. The chocolate buttercream in our chocolate cake recipe is made for that job.

Do you have to frost the sides? No. German chocolate cake is commonly finished with coconut-pecan frosting between the layers and on top, with the chocolate cake left visible around the sides. Covering the sides works best with cool cake and cool frosting and gives a deliberately textured finish.

How to keep the finished cake from tasting too sweet

German chocolate frosting is meant to be sweet, but the finished cake does not need to feel heavy or cloying.

  • For a less-sweet batch, use the moist unsweetened shredded coconut variation described above.
  • Keep the salt in the recipe.
  • Toast the pecans so their nutty flavor can stand up to the sweet custard.
  • For the least-sweet finish, leave the sides bare and use the coconut-pecan frosting between the layers and on top.
  • If you prefer frosted sides, choose something tangier rather than another very sweet buttercream. Our chocolate cream cheese frosting is one option.

Halving or doubling the batch

For a half batch, halve every ingredient—including using 2 egg yolks—and use a smaller saucepan so the shallow mixture does not reduce too aggressively.

For a double batch, use a larger, wider saucepan. More frosting takes longer to heat and reduce, so the original 10–15 minute stovetop window will change. Watch for the same cooked stage rather than trying to double the minutes.

Have some frosting left? Spoon it over fudgy brownies, blondies, cupcakes or cookie bars, or add a small spoonful to vanilla or chocolate ice cream.

Make Ahead and Storage

Can you make German chocolate frosting ahead?

Yes. For same-day cake assembly, cool it at room temperature until it reaches the spreadable stage in the recipe. For another day, transfer it to a shallow container and refrigerate it promptly; it does not need to sit out until fully cool first.

How long does it keep?

Keep the frosting refrigerated and use it within 3–4 days. Do not leave it at room temperature for more than 2 hours, or more than 1 hour if the room is above 90°F / 32°C.

Once a cake is filled with coconut-pecan frosting, store the assembled cake covered in the refrigerator as well. The frosting will feel much firmer once chilled.

How to soften refrigerated frosting

Let cold coconut-pecan frosting stand at room temperature briefly, then stir gently. Spreading it straight from the refrigerator can tug at or tear a tender cake layer.

Chilled coconut-pecan frosting holding a firm spoon trench compared with the same frosting softened to a smoother, more spreadable consistency.
Cold firmness and overcooking are not the same problem. Chilled German chocolate frosting can hold a deep spoon trench, but after warming slightly it should relax into rounded, spreadable folds. If it stays rough and rigid, temperature alone probably is not the issue.

Once softened, it should be gooey and spoonable again, with soft coconut and toasted pecans held in a rich custard that spreads easily and stays where you put it.

Posted on — Leave a comment

Pineapple Upside Down Cake with Cake Mix: Easy, Moist & Caramelized

A well-made pineapple upside down cake with cake mix should release as one piece: the fruit stays anchored, caramel gathers around the rings, and the cake sides look baked and stable rather than wet or collapsed.

The best moment comes when you lift the pan: glossy pineapple rings, amber-brown caramel and soft yellow cake underneath, with the topping still warm around the fruit.

A box of cake mix makes the batter easy. The parts that need a little attention are the pineapple, the amount of water, the bake and the flip. Get those right and this pineapple upside down cake with cake mix stays moist without turning gummy, and the topping comes out with the cake instead of staying behind in the pan.

If you would rather make the batter from scratch, use our pineapple upside down cake recipe.

Before You Mix: Box, Juice, Fruit and Flip

For a straightforward version, use yellow cake mix, pineapple rings packed in juice and a light-colored 13 × 9-inch metal pan. Then keep these four points straight:

What mattersWhat to do
Cake mix boxUse the eggs or egg whites and oil or butter listed on the package in your hand.
WaterCount the reserved pineapple juice toward the amount of water called for on the box.
FruitDrain and blot the pineapple on both sides before it goes into the pan.
FlipLoosen and invert the cake while it is hot, then leave the pan over it for 5 minutes.
Pineapple rings and cherries arranged in one layer over brown sugar in a light-colored rectangular metal baking pan.
The open patches between the pineapple rings are intentional. They give the butter and brown sugar room to form caramel around the fruit, so there is no need to crowd every inch of the pan.

Pineapple Upside Down Cake with Cake Mix Recipe

A simple 13 × 9-inch cake-mix version with pineapple juice in the batter and pineapple rings baked into a warm brown-sugar topping.

Prep
15 minutes

Bake
About 40–46 minutes

Rest & Cool
About 35 minutes

Total
About 1 hour 30–40 minutes

Yield: 12 servings

Equipment

  • 13 × 9-inch (33 × 23 cm) light-colored metal baking pan
  • Mixing bowl and hand mixer or sturdy whisk
  • Strainer and liquid measuring cup
  • Thin knife or small offset spatula and a toothpick or thin skewer
  • Oven mitts and a large heatproof rimmed platter, tray or baking sheet that fully covers the pan

Ingredients

  • 1 box yellow cake mix, usually 13.25–15.25 oz (about 376–432 g)
  • 1 can pineapple rings in juice, 20 oz (567 g), juice reserved
  • Eggs or egg whites, in the quantity called for on your cake-mix box
  • Oil or butter, in the quantity called for on your cake-mix box
  • Reserved pineapple juice + enough water to equal the amount of water called for on the box
  • ¼ cup unsalted butter (4 tbsp / 57 g), melted, for the topping
  • 1 cup packed light brown sugar (about 200 g)
  • Maraschino cherries, one per pineapple ring, drained and blotted dry, optional

Instructions

  1. Heat the oven and prepare the pan. Preheat to 350°F (175°C) with a rack in the center. Lightly grease or spray the sides of a 13 × 9-inch pan; leave the bottom for the caramel topping. Set the empty pan against your serving platter or tray now and make sure the platter completely covers it. It is much easier to sort that out before the cake is hot.
  2. Drain and dry the fruit. Set a measuring cup beneath a strainer and save the pineapple juice. Lay the rings on paper towels and blot both sides. Blot the cherries too, if using, so loose syrup does not run into the caramel.
  3. Build the topping. Pour the melted butter evenly over the bottom of the pan, then sprinkle the brown sugar from edge to edge. Arrange the pineapple rings in a single layer and place a cherry in each center if you like. Cut another ring into pieces to fill larger spaces; avoid stacking the fruit.
  4. Measure the cake liquid. Check how much water your box requires. Measure the reserved pineapple juice, then add only enough water to reach that amount.
  5. Mix the batter. Add the eggs or egg whites and oil or butter listed on your package, then use the measured pineapple-juice mixture in place of the box water. Mix as directed on the box. The batter should look like ordinary cake batter, not unusually thin.
  6. Cover the pineapple gently. Pour or spoon the batter over several areas of the pan, then smooth it lightly to the corners so the fruit stays in place.

Before baking, the batter only needs even coverage; it does not need a perfectly smooth surface.

Yellow cake batter being poured into several areas over pineapple rings and brown sugar in a rectangular metal baking pan.
Once the batter reaches the corners, stop smoothing; extra sweeping can drag the pineapple underneath.

Bake, Check and Flip

  1. Bake. Put the cake on the center rack and start checking at about 40 minutes. In a light-colored metal 13 × 9-inch pan, expect roughly 40–46 minutes, but use the cake itself to decide when it is ready.
  2. Check the center. The middle should look set, show no obvious wobble and spring back lightly. Test 2–3 spots near the center; there should be no wet batter. Keep the tester in the cake crumb. If it reaches the pineapple underneath, the juice can make a finished cake look underdone. If the top browns before the center is ready, tent it loosely with foil and keep baking.
  3. Loosen and flip while hot. As soon as the cake comes out, run a thin knife around the edge. Put the rimmed serving platter directly against the pan. Wearing oven mitts, hold the two together and rotate them as one unit. The flip feels more dramatic than it is because the cake never needs to fall through the air.
  4. Let the topping release. Leave the inverted pan over the cake for about 5 minutes, then lift it straight up. If a pineapple ring stays behind, put it back while everything is warm and spoon over any caramel left in the pan. Nothing is ruined.
  5. Cool before slicing. Let the cake stand for about 30 minutes. It will still be pleasantly warm, but the crumb will be firm enough for cleaner slices and the caramel will remain soft around the pineapple.

Recipe Notes

  • Less-sweet topping: reduce the brown sugar to ¾ cup (about 150 g). The caramel will be lighter and the pineapple will come through more clearly.
  • Dark or nonstick pan: follow the pan-specific temperature guidance on your cake-mix package rather than automatically using 350°F.

Method note: MasalaMonk has not independently kitchen-tested this version. The method is based on current cake-mix directions and established pineapple upside-down cake techniques.

Cake Mix, Pan and Flip Guide

If you are using the yellow cake mix, pineapple rings in juice and the light-colored metal pan above, you can make the cake from the recipe card alone. The rest is here for substitutions, pan questions and anything that does not go quite as planned.

Let the Cake Mix Box Set the Batter Formula

Whether your cake mix is around 13.25 oz (376 g) or 15.25 oz (432 g), use the eggs or egg whites and oil or butter printed on that package. Keep the box’s water amount the same; the reserved pineapple juice simply supplies part or all of it.

Cake mixes do not all use the same formula. One may call for oil, another for butter, and a white mix may give you an egg-white option. The package in your hand is a better guide than an old one-size-fits-all formula.

Clear measuring jug containing pineapple juice while water is poured in, with a cake-mix box nearby.
Measure the pineapple juice first. Add only enough water to reach the amount called for on the cake-mix box.

Which cake mix works best?

Yellow cake mix gives the most classic result. Its buttery vanilla crumb lets the pineapple and caramel stay in front. Butter yellow is richer, while white or French vanilla gives the cake a lighter vanilla background.

Skip angel-food cake mix for this method. Its foam-based batter behaves very differently from standard cake mix, so it is not a straight substitute here.

Can I use pineapple cake mix?

Yes. It puts pineapple flavor into the crumb as well as the topping. Use yellow mix when you want the rings and caramel to lead; choose pineapple-flavored mix when you want the fruit flavor throughout the cake.

Pineapple Juice Is a Swap, Not an Extra Ingredient

A 20-ounce can may or may not provide enough juice to replace all the water called for on your cake-mix box. Measure the reserved juice first, then add only enough water to reach the box’s required amount.

Adding the full amount of water from the package and then pouring in pineapple juice as well makes the batter wetter than the mix was designed to handle.

Choose pineapple packed in juice if you can. You get useful juice for the batter without the extra sweetness of heavy syrup. If you only have pineapple in heavy syrup, drain the fruit thoroughly and use water or separate pineapple juice for the batter. Don’t use the thick syrup cup for cup.

The pineapple can stay juicy inside. Blotting each ring on both sides removes the loose surface water that can thin the butter-and-sugar layer underneath.

Canned pineapple rings on white paper towels while a hand presses another towel onto one ring to remove surface moisture.
You are not trying to dry out the pineapple. Take the rings from visibly wet and dripping to merely damp on the surface while keeping the fruit supple and juicy.

If the cake turns out wet or gummy, the soggy-cake troubleshooting below helps separate excess moisture from an underbaked center.

Pineapple and the Brown-Sugar Topping

For a 13 × 9-inch pan, ¼ cup (57 g) butter and 1 cup (about 200 g) packed brown sugar gives you the classic glossy caramel layer. After baking, the caramel should settle into amber-brown pockets around the pineapple instead of forming a thin watery layer.

Close-up of a pineapple ring and maraschino cherry on cake, with amber caramel gathered around the fruit and visible pineapple fibers.
Good caramel is rarely perfectly uniform. It should deepen around the pineapple edges and in the low spots between the fruit, while the pineapple itself remains textured instead of disappearing beneath a glassy coating.

For a less-sweet cake, reduce the brown sugar to ¾ cup (about 150 g). The caramel will be lighter and less candy-like, so the pineapple tastes brighter.

Best pan for pineapple upside down cake

Use a light-colored metal 13 × 9-inch pan if you have one. It gives the caramel steady heat from underneath without browning as aggressively as very dark bakeware.

Glass is usable, though metal is the better choice here. Skip silicone for this cake, and avoid springform pans because melted butter and sugar can leak through the seam.

A single 8- or 9-inch round pan is too small for the full recipe. If you want round pineapple upside-down cakes, use a method designed for two round pans because the topping amounts, fruit arrangement and bake time all change.

Avoid a substantially larger pan too. The batter becomes much shallower and the balance between cake and topping changes.

Empty light-colored 13-by-9-inch rectangular metal baking pan on a clean studio surface.
The 13×9 footprint matters as much as the material: it keeps the batter depth and topping-to-cake ratio where this recipe expects them. Change the pan size, and both the center bake and the way the caramel behaves can change.

Bake Time and Doneness

For the light-colored metal 13 × 9-inch version, 40–46 minutes at 350°F (175°C) is a practical working range. Start checking at about 40 minutes.

One clean toothpick can miss a wet pocket, so check 2–3 places near the center. Keep the tester in the cake crumb; pineapple juice underneath can make a finished cake look wet. If the top browns before the middle is ready, tent it loosely with foil and keep baking.

Baked yellow cake in a rectangular metal pan while a thin tester is inserted near the center before the cake is inverted.
The tester is confirmation, not the first clue: look for a set, lightly springy center, then check 2–3 nearby spots rather than trusting one hole.

When to Flip Pineapple Upside Down Cake

The topping releases best while the caramel is still hot, so don’t leave the baked cake sitting in the pan to cool. Loosen and invert it promptly, then leave the pan over the cake for about 5 minutes so the warm topping can settle over the fruit.

If a pineapple ring stays behind, put it back in place while everything is warm and spoon over any caramel left in the pan.

Rectangular baking pan being lifted vertically from an inverted pineapple upside-down cake resting flat on a serving platter.
After inversion, resist the urge to twist the pan or peek underneath. Let gravity and the warm caramel do the releasing first; when the rest is over, lift the pan straight up so it is less likely to drag the pineapple across the cake.

Pineapple Options: Rings, Crushed, Tidbits or Fresh

PineappleBest use and what to watch
RingsClassic look, juicy pineapple bites and straightforward moisture control.
CrushedFruit in almost every bite; press out loose juice thoroughly.
TidbitsMore even pineapple in each portion; drain well so extra juice does not thin the caramel.
FreshFirmer fruit with a little more bite; remove the core, slice about ¼ inch thick and provide the batter water separately.

Using crushed pineapple with cake mix

Start with one 20 oz (567 g) can of crushed pineapple. Drain it in a fine-mesh strainer, then give it a few firm presses to remove more loose juice before spreading it in a thin layer over the brown sugar. Crushed pineapple is messier than rings, but pressing out the loose juice gives you an even fruit layer without watering down the caramel.

Crushed pineapple being pressed with a spoon in a fine-mesh strainer over a clear bowl collecting excess juice.
A few firm presses should remove the loose juice without squeezing the pineapple dry. That is enough moisture control for an even fruit layer without watering down the caramel.

Using fresh pineapple

You can use fresh pineapple. Remove the tough core and slice the fruit about ¼ inch thick so it has time to soften during baking. Since there is no canned juice to reserve, use purchased pineapple juice or the amount of water called for on your cake-mix box.

Peeled and cored fresh pineapple rings sliced thinly, with one slice standing on edge to show its thickness.
Aim for slices about ¼ inch thick with the tough core removed; that gives fresh pineapple time to soften as the cake bakes.

Extra fruit can go into our pineapple jam recipe, which also works with canned crushed pineapple.

Are the cherries necessary?

No. Maraschino cherries give you the familiar bright red centers and classic pineapple upside down cake look, but they do not affect the bake. Leave them out if you prefer the pineapple and caramel on their own.

Once you have chosen your fruit, return to the recipe card when you are ready to bake.

Pineapple Upside Down Cake Troubleshooting

Why is my pineapple upside down cake soggy?

A soggy pineapple upside down cake usually comes from too much water or juice in the batter, very wet fruit or an underbaked center. Blot the pineapple well, count its juice toward the water on the cake-mix box, and check more than one spot near the center before taking the cake out of the oven.

A softer crumb directly beneath the pineapple is normal. A wet, gummy layer or raw center is not.

Cross-section of a pineapple upside-down cake slice showing a narrow moist layer beneath the pineapple and airy baked yellow crumb below.
A narrow moist seam beneath the pineapple can be normal; a thick, dense or gummy layer points toward excess moisture or an underbaked center.

Common Pineapple Upside Down Cake Problems and Fixes

ProblemLikely cause and fix
Raw centerThe middle needs more time. Check several spots near the true center; one clean toothpick can miss a wet pocket.
Pineapple stuck to the panA ring can occasionally stay behind even with good timing. Put it back in place while everything is warm and spoon over any caramel left in the pan.
Watery caramelLoose pineapple or cherry liquid diluted the butter and sugar. Drain and blot the fruit more thoroughly.
Pineapple moved out of placeThe batter may have been too thin or poured heavily into one spot. Keep the package water ratio and spread the batter gently from several areas of the pan.
Cake broke during the flipAn underbaked center is fragile. Confirm that the middle is done and keep the platter pressed firmly against the pan as you turn it.
Pale toppingExcess fruit moisture can dilute the caramel. Drain the fruit thoroughly and use a metal pan when possible.
Greasy toppingToo much butter can leave the topping oily. Measure the ¼ cup accurately and spread it evenly before adding the sugar.
Whole cake feels unusually denseExtra water or juice, extra eggs or rich add-ins such as pudding mix and sour cream can make the cake heavier than intended. Stick with the wet-ingredient amounts on your box and count pineapple juice toward its water amount.
Cake is too sweetUse pineapple packed in juice and reduce the brown sugar to ¾ cup (about 150 g) if you want a lighter caramel topping.

Once you have found the likely cause, return to the recipe card or go back to the top.

Make Ahead, Storage and Serving

To get ahead, prepare the individual parts first. Drain the pineapple, measure what you need and have the pan and serving platter ready. Mix the batter shortly before baking.

The cake is especially good the day it is baked, while the topping is glossy and the crumb directly under the pineapple is moist but still holds its shape.

Once completely cool, cover the cake and refrigerate it. For the best texture, plan to finish refrigerated leftovers within about 3 days. Bring a slice closer to room temperature before serving, or warm it gently if you want the caramel softer.

Freezing is possible, but it is not the best choice for this cake because the pineapple and caramel can become softer after thawing. Refrigeration is better when you expect to finish it within a few days.

For serving, no frosting is needed. A spoonful of homemade whipped cream gives you a cool, lightly sweet contrast to the warm pineapple and brown-sugar caramel.

Rectangular slice of pineapple upside-down cake topped with a pineapple ring and maraschino cherry, served on a dark red plate with whipped cream and a metal fork.
Add whipped cream to individual slices rather than dressing the whole cake. That way, the cream stays cool and distinct while the pineapple topping and caramel remain the focus.

After about 30 minutes, the cake should still be warm, the caramel soft around the pineapple and the crumb firm enough for a clean slice. That is a good time to take the first one.

Back to recipe card · Back to top ↑