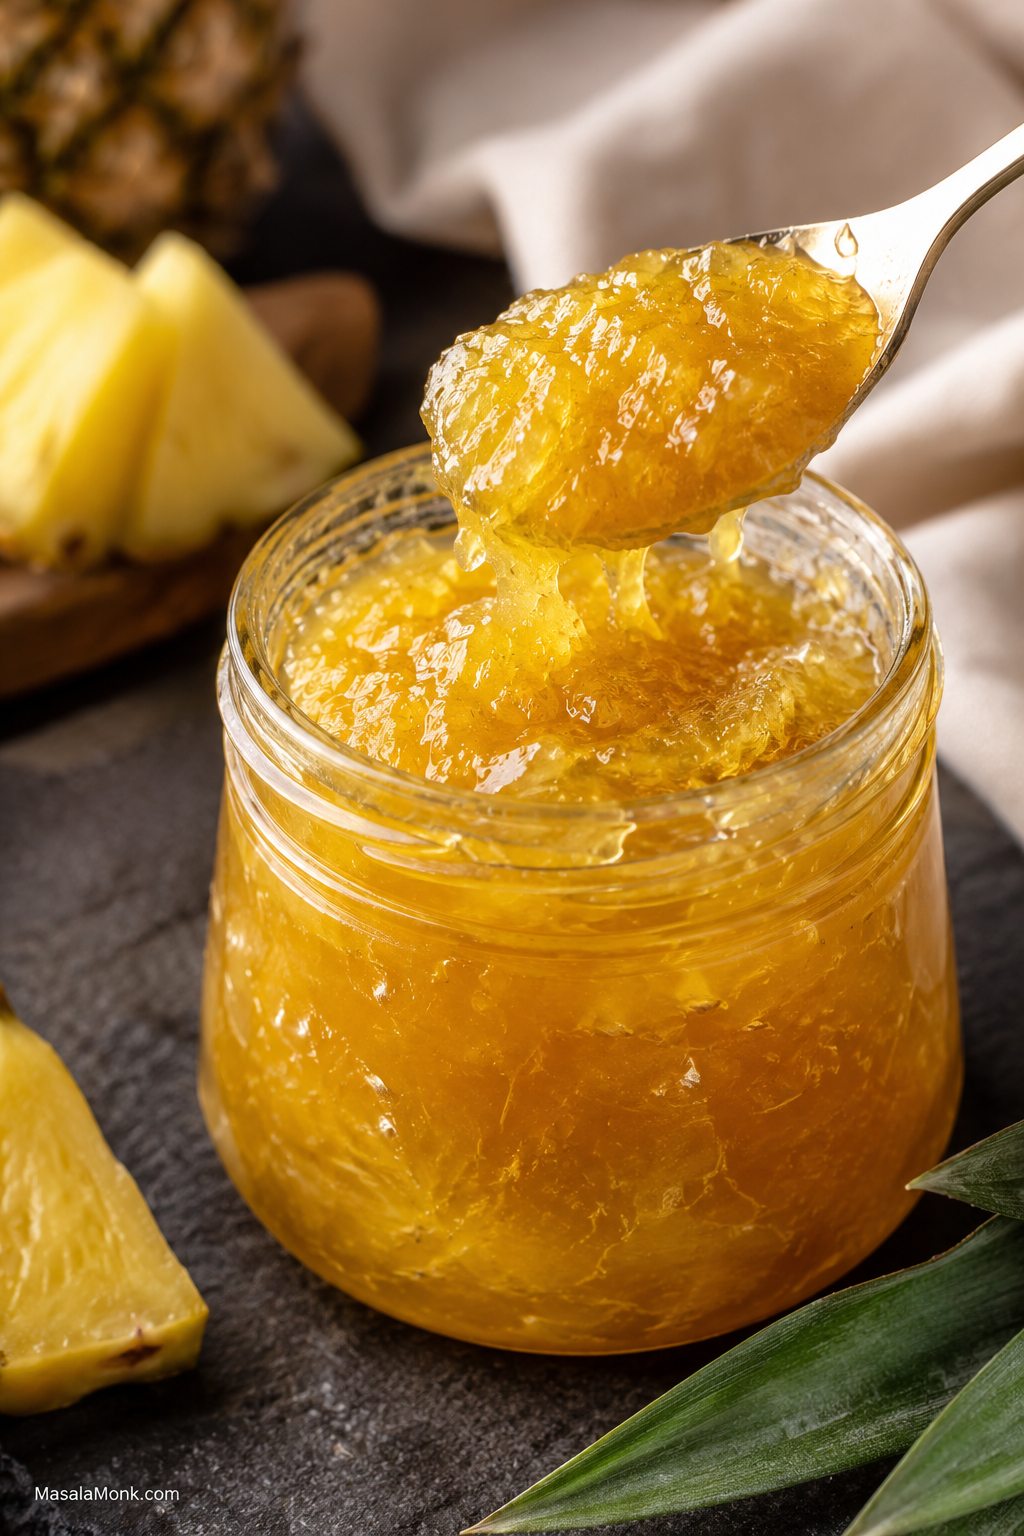
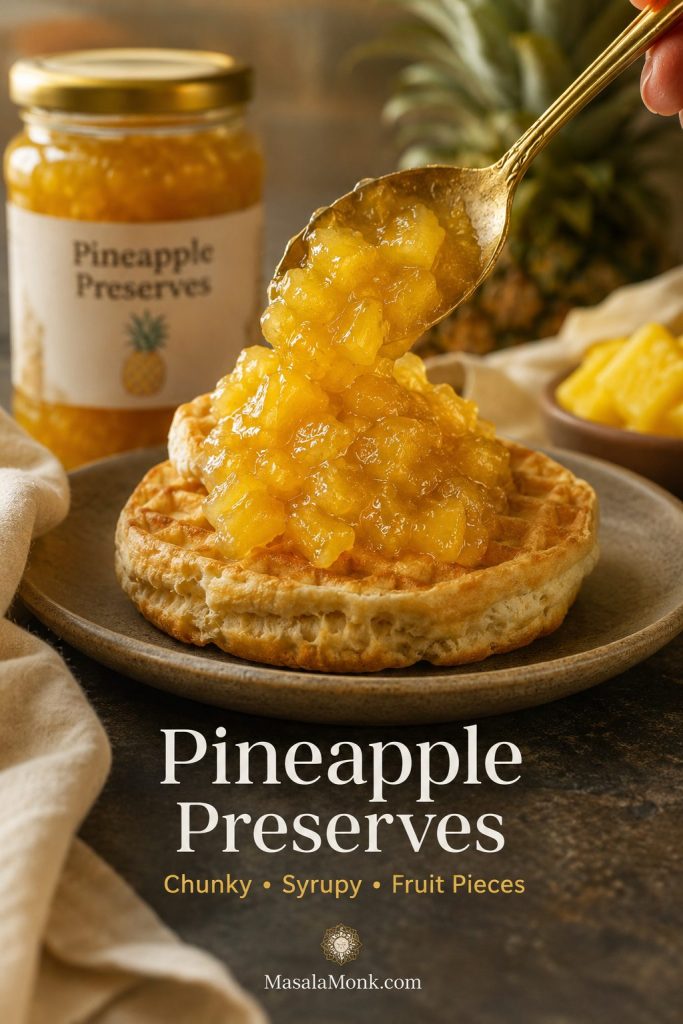
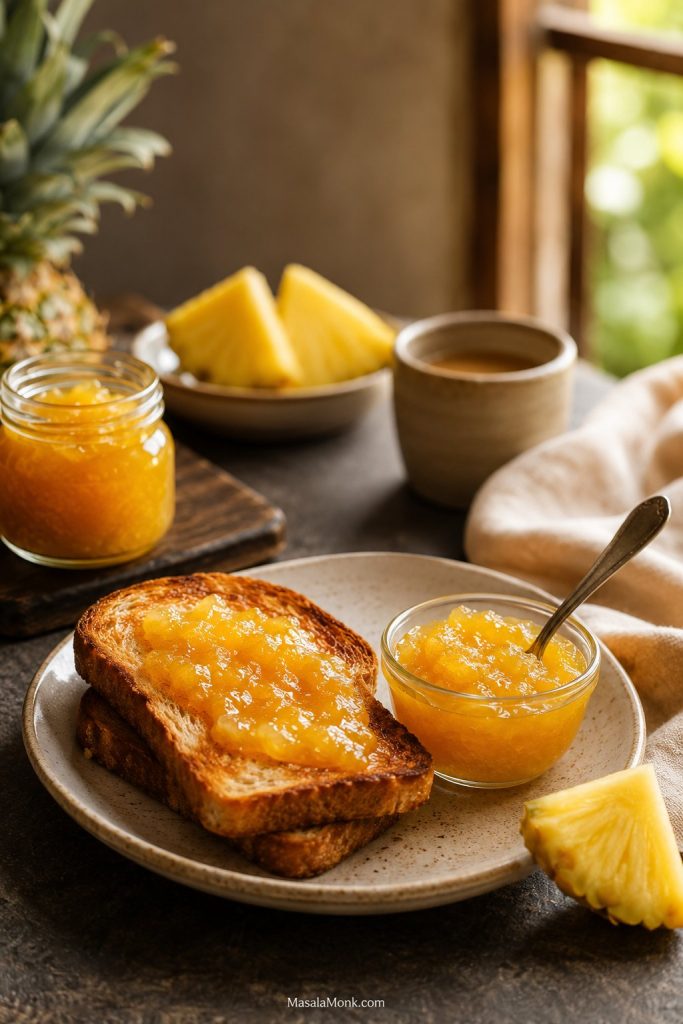
This pineapple jam recipe turns fresh pineapple or canned crushed pineapple into a glossy, golden spread that tastes bright, tropical, and properly homemade. Make it smooth and spoonable for toast, leave it chunkier for pineapple preserves, or cook it down further when you need a thick filling for tarts, cookies, and pastries.
The main version is a simple no-pectin pineapple jam for the fridge or freezer. Pineapple, sugar, lemon or lime juice, and a pinch of salt cook down into a sweet-tart fruit spread that thickens as it cools and stays soft enough to spread.
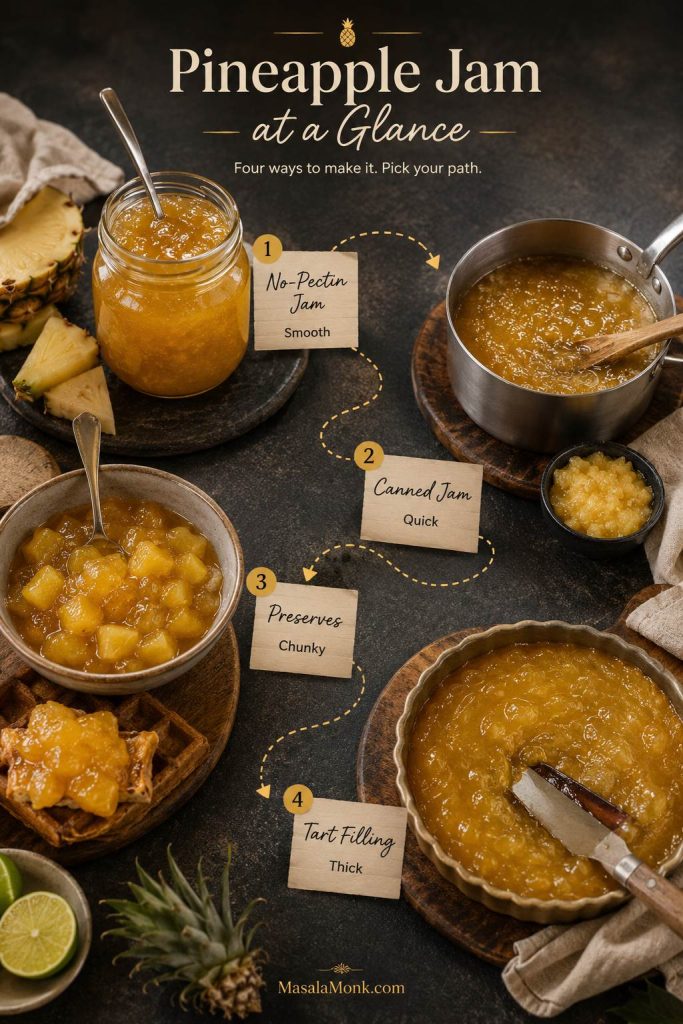
Once you know what the bubbles, spoon trail, and cold-plate test should look like, the recipe becomes very forgiving. Use crushed pineapple for jam, diced pineapple for preserves, canned pineapple for a quick pantry batch, or a wider pan and longer cooking time for pineapple tart filling.
The best part is that the recipe does not fall apart if your pineapple is extra juicy, your can is a little watery, or you want a softer spoonable finish instead of a firm jar. The texture tests below will tell you when to stop.
Table of Contents
Use this guide to choose between smooth pineapple jam, chunkier pineapple preserves, a quick canned pineapple batch, or a thicker filling for tarts and pastries.
Quick Answer
For an easy pineapple jam recipe, simmer crushed pineapple with sugar, lemon or lime juice, and a pinch of salt until it turns shiny, golden, and thick enough to mound softly on a spoon. If you want pineapple preserves instead, use diced pineapple and stop cooking while the fruit pieces are still visible in a thick syrup.
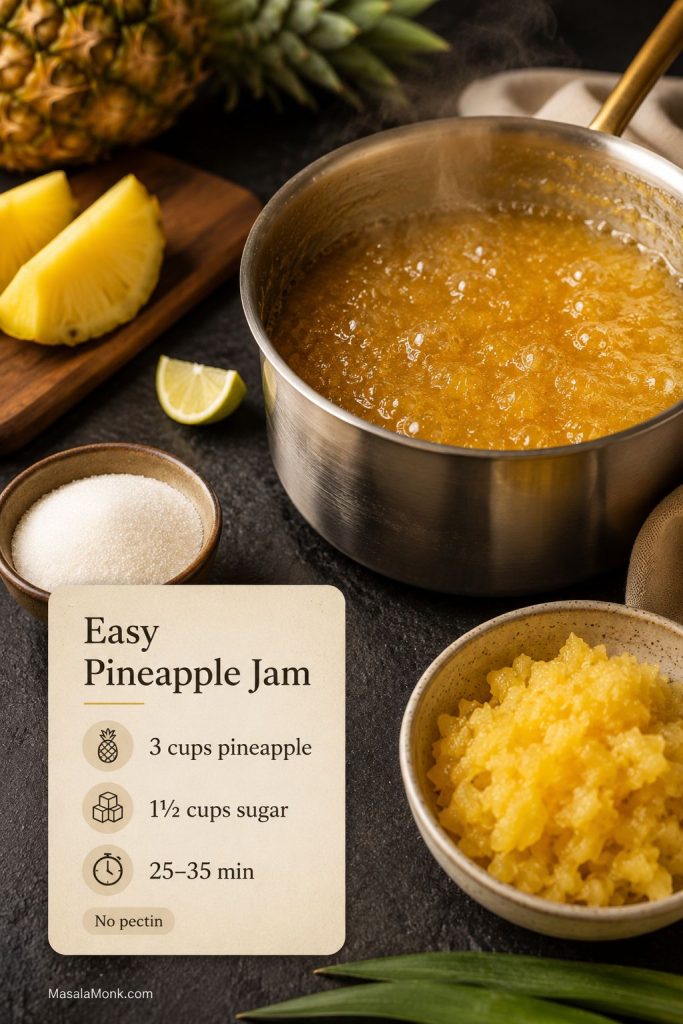
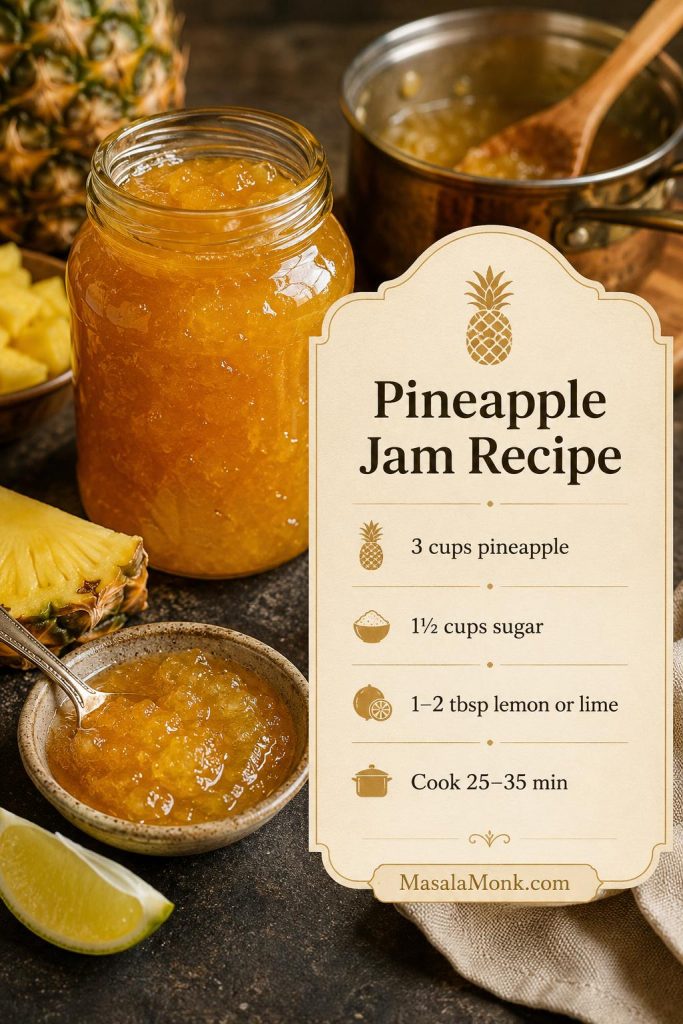
The easiest no-pectin ratio is 3 cups crushed pineapple, 1½ cups sugar, and 1–2 tablespoons lemon or lime juice. Cook for about 25–35 minutes. The jam is ready when it leaves a brief trail in the pan, passes the cold-plate test, or reaches about 220°F / 104°C at sea level.
However, do not worry if it looks a little loose while hot. Pineapple jam thickens as it cools, so the goal is glossy and spreadable rather than stiff or rubbery. For the safest first batch, make the crushed pineapple version and refrigerate it.
Pineapple Jam Recipe at a Glance
This pineapple jam recipe can go in four useful directions: soft-set jam, chunkier preserves, quick canned pineapple jam, or a much thicker tart filling. Start with the version that matches how you plan to serve it.
| Version | Pineapple | Sugar | Cook Time | Best For |
|---|---|---|---|---|
| No-pectin pineapple jam | 3 cups / about 680 g crushed pineapple | 1½ cups / 300 g | 25–35 minutes | Toast, cookies, cakes, yogurt, everyday spreading |
| Canned pineapple jam | 1 can / 20 oz / 567 g crushed pineapple in juice | ¾–1 cup / 150–200 g | 20–30 minutes | Quick pantry batch, small jars, beginner version |
| Pineapple preserves | 5½–6 cups diced pineapple | ⅔–1 cup | 30–40 minutes | Biscuits, waffles, ice cream, cheese boards, glazes |
| Pineapple tart filling | 4 cups grated or finely pulsed pineapple | ½–¾ cup, then adjust | 1–2½ hours | Pineapple tarts, pastry filling, thumbprint cookies |
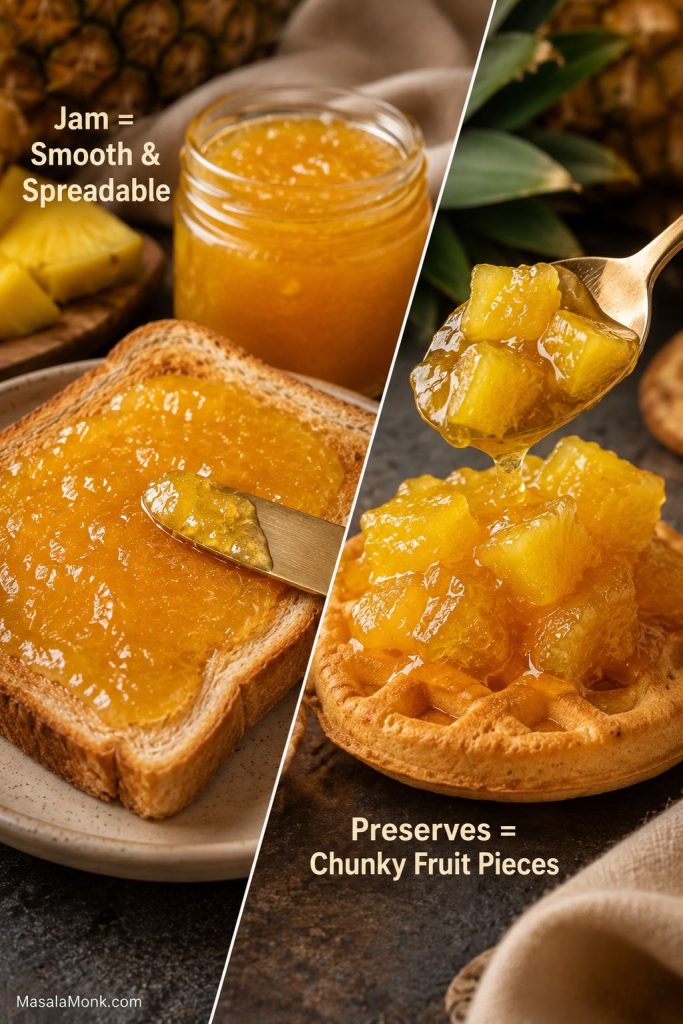
Pineapple Jam vs Pineapple Preserves
Although pineapple jam and pineapple preserves use similar ingredients, they do not eat the same way. This pineapple jam recipe gives you both paths, so you can choose the texture that fits how you plan to use it.
A smoother jam is easier to spread because the fruit is crushed, finely chopped, pulsed, or mashed as it cooks. Choose this version for toast, scones, thumbprint cookies, cake layers, yogurt bowls, and everyday spooning.
Meanwhile, preserves are chunkier. The fruit is usually diced into small, even pieces and cooked until tender in a thick syrup. Choose this version when you want visible pineapple pieces on biscuits, pancakes, waffles, cheesecake, ice cream, cheese boards, or savory glazes.
Another easy way to think about it: jam should glide across toast, while preserves should give you soft little pineapple pieces in each spoonful.
| Version | Fruit Cut | Texture | Best Uses |
|---|---|---|---|
| Pineapple jam | Crushed, finely chopped, or pulsed | Smoother, soft-set, glossy, spreadable | Toast, scones, cookies, cake filling, yogurt, pastries |
| Pineapple preserves | Small dice, about ¼–½ inch | Chunkier fruit pieces in thick syrup | Biscuits, waffles, ice cream, cheese boards, glazes |
| Pineapple tart filling | Grated, finely pulsed, or cooked down further | Very thick, sticky, paste-like | Pineapple tarts, cookies, pastry filling, filled buns |
Ingredients for Pineapple Jam and Preserves
You only need a few ingredients, but each one has a job. Pineapple brings the fruit and acidity, sugar helps the mixture thicken and shine, citrus keeps the flavor lively, and salt balances the sweetness. Because this pineapple jam recipe is flexible, the fruit cut matters as much as the ingredient list.
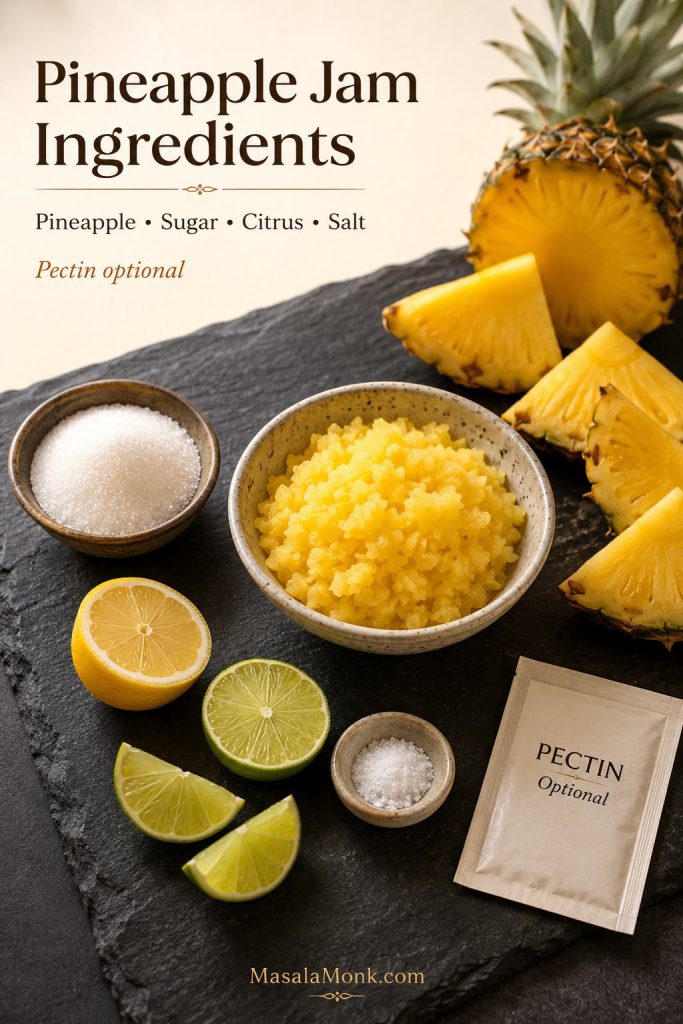
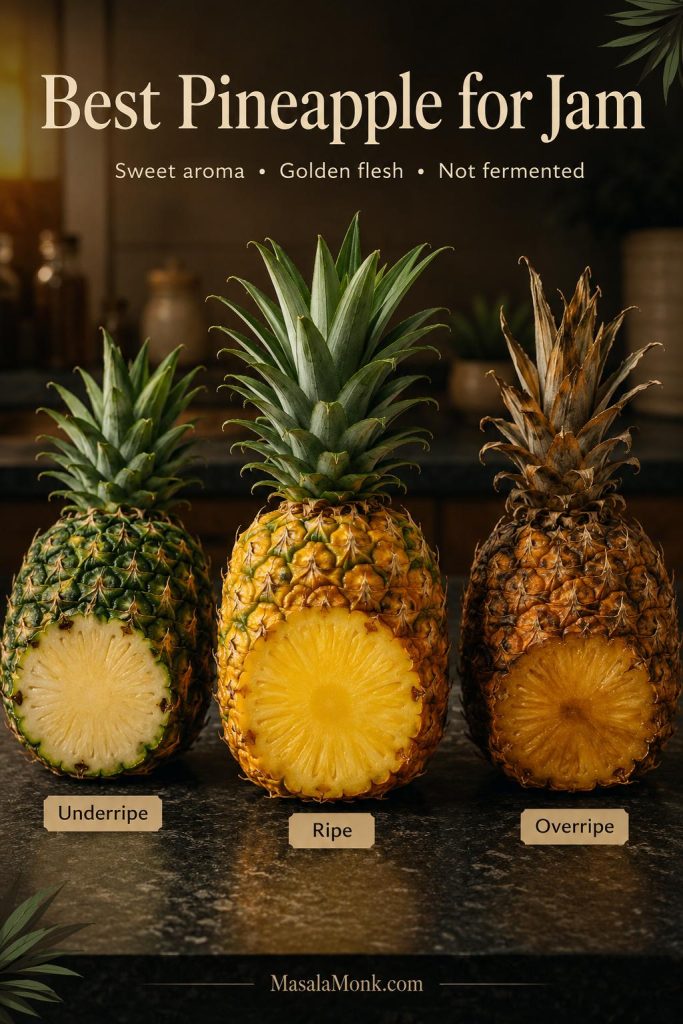
Pineapple
Fresh ripe pineapple gives the brightest flavor and color. Canned crushed pineapple works well when you want a faster batch. For jam, crush or finely chop the fruit. For preserves, cut it into small even pieces so everything softens at the same rate.
Choose pineapple that smells sweet and fruity, not fermented. Very underripe pineapple can taste sharp, while overripe pineapple may make the jam darker and softer. A very sweet pineapple gives a rounder jam; a sharper one may need the higher end of the sugar range. If the fruit tastes flat, lime juice usually wakes it up better than more sugar.
Sugar
Sugar does more than sweeten the jar. It helps create body, improves the glossy finish, and supports the spreadable texture. For the main no-pectin version, start with 1½ cups sugar for 3 cups crushed pineapple. Use up to 2 cups if you prefer a firmer, sweeter jam.
Lemon or Lime Juice
Lemon juice gives a clean, classic fruit-spread flavor. Lime juice tastes a little more tropical and works especially well if you plan to use the jam with coconut desserts, pineapple tart filling, or drink-inspired pairings.
Salt
A small pinch of salt will not make the jam salty. Instead, it rounds out the sugar and helps the pineapple taste brighter.
Pectin, Optional
You can make pineapple jam without pectin, but pectin is useful when you want a quicker set, a firmer jar, or a lower-sugar method designed for that purpose. Different pectin types need different sugar levels and cooking steps, so follow the instructions on the package if you use it.
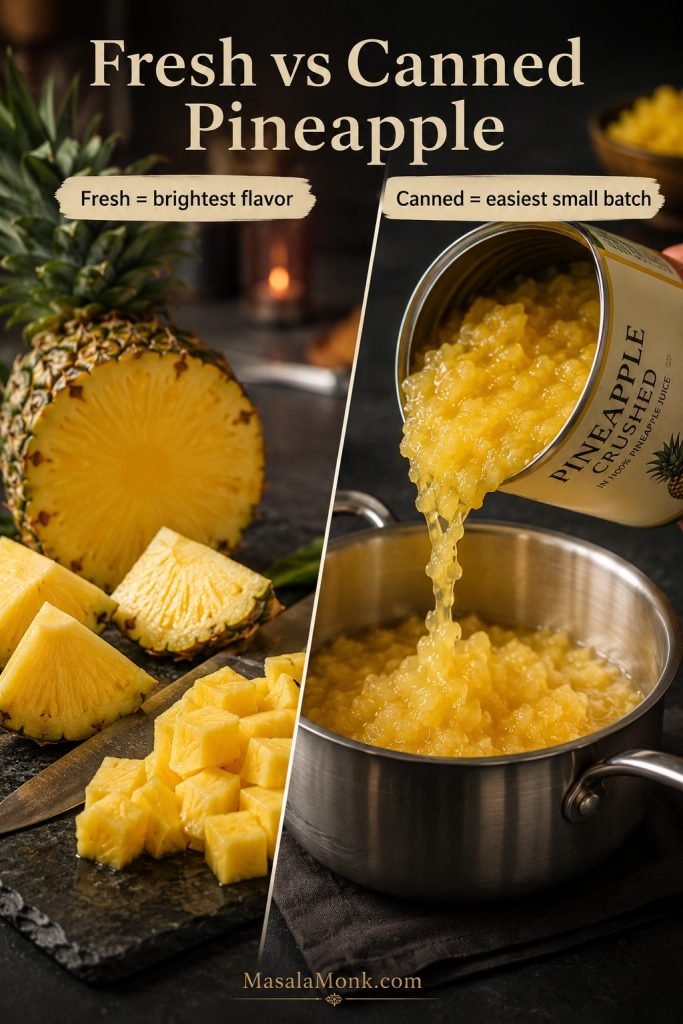
Fresh vs Canned Pineapple
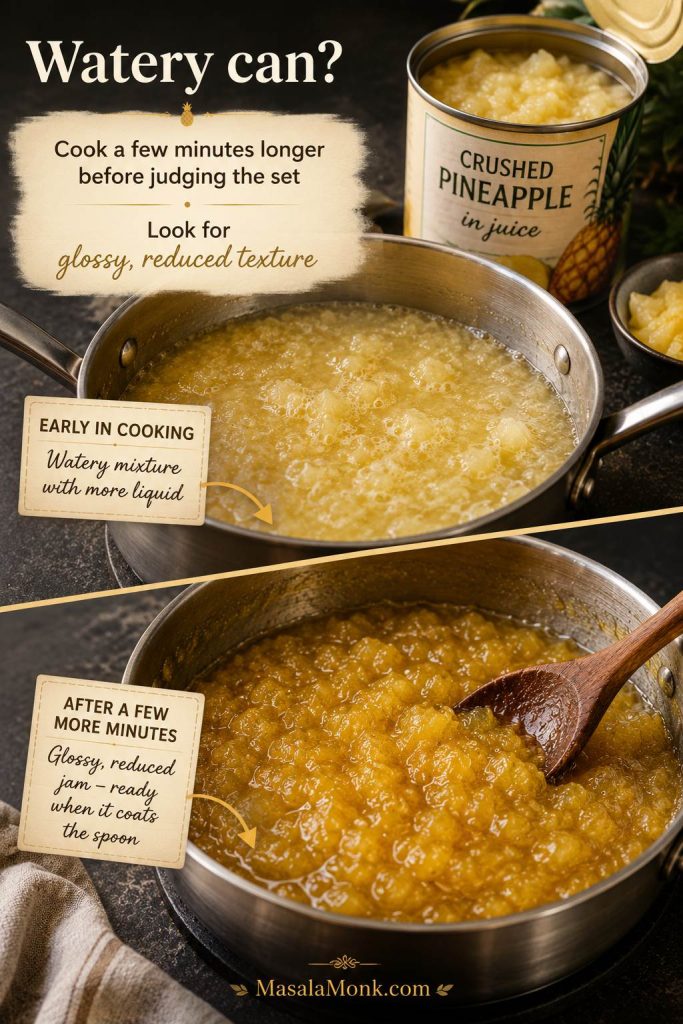
Fresh pineapple gives the brightest aroma and color, but canned pineapple is not a failure shortcut. It is fast, consistent, available year-round, and especially useful for a small-batch pineapple jam recipe. In fact, canned crushed pineapple is the easiest beginner version because the fruit is already evenly cut. The only real adjustment is moisture: if the can looks watery, cook a few minutes longer before judging the set.
How to Prep Fresh Pineapple for Jam
When using fresh pineapple, peel, core, and chop the fruit first. Then, pulse it in a food processor for jam or dice it by hand for preserves. Try not to leave large pieces of tough core in the mixture because they can stay fibrous even after cooking.
Best Canned Pineapple to Use
For canned pineapple jam, choose crushed pineapple or pineapple chunks packed in juice rather than heavy syrup. Drain only if the can is extremely watery. Some juice helps the fruit cook down evenly and keeps the sugar from catching too early.
| Pineapple Type | Best For | How to Use It |
|---|---|---|
| Fresh pineapple | Brightest flavor, best color, homemade preserves | Peel, core, chop, then crush or dice depending on texture |
| Canned crushed pineapple in juice | Quick pineapple jam, small batches, pantry version | Use with juice unless very watery; simmer longer if needed |
| Canned pineapple chunks | Preserves or jam after chopping | Chop smaller or pulse briefly before cooking |
| Pineapple in syrup | Last-resort option | Reduce added sugar and expect a sweeter final jam |
If you are working with extra pineapple juice, save it for drinks, smoothies, marinades, or a tropical party bowl like this punch with pineapple juice.
Small-Batch Pineapple Jam
A small batch is perfect when you have one can of pineapple or a little fresh fruit left after cutting a whole pineapple. Since this is a small flexible batch, keep it chilled instead of treating it as pantry-stable.
Small batches are also helpful when you are learning the texture cues. They reduce faster, are easier to stir, and give you a low-pressure way to understand how pineapple changes as it cooks. If you are standing in the kitchen with one 20-ounce can of crushed pineapple, this is the easiest place to start.
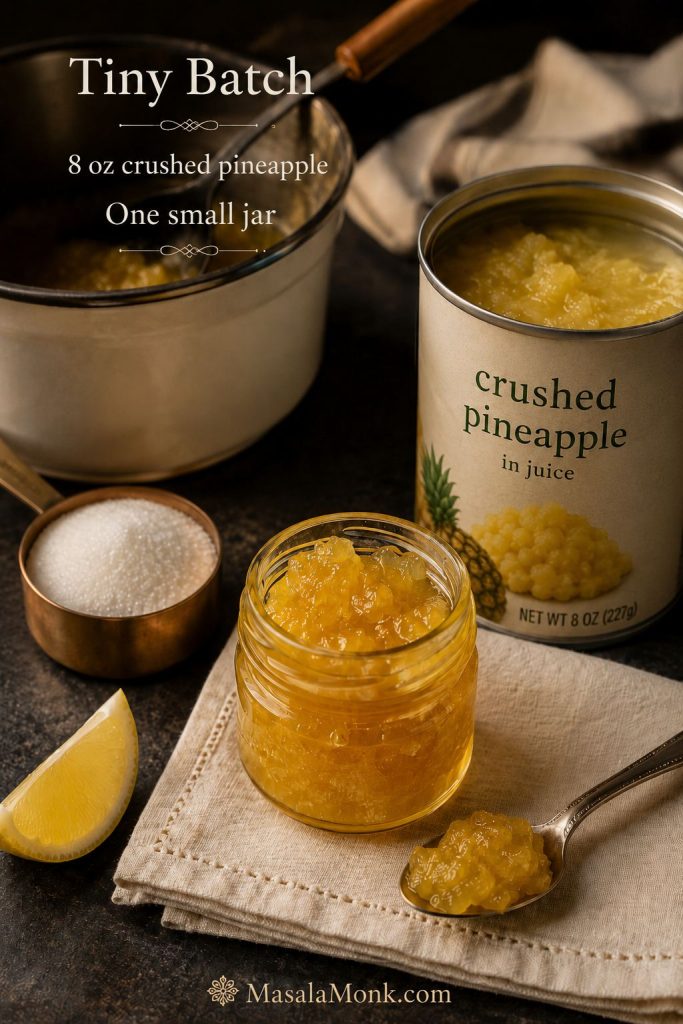
Tiny 8-Ounce Can Version
- 1 can / 8 oz / 227 g crushed pineapple in juice
- ⅓–½ cup / 65–100 g sugar
- 1–2 teaspoons lemon or lime juice
- Small pinch of salt
Simmer everything in a small saucepan for 15–25 minutes, stirring often, until shiny and jammy. This makes roughly one small jar, depending on how much you reduce it.
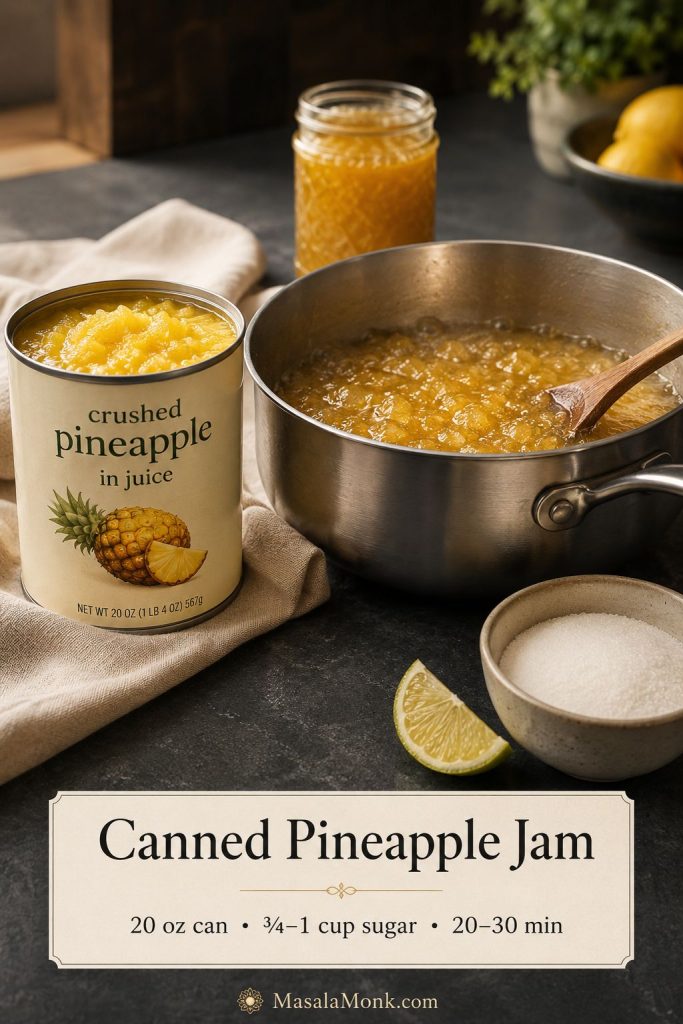
20-Ounce Can Version
- 1 can / 20 oz / 567 g crushed pineapple in juice
- ¾–1 cup / 150–200 g sugar
- 1 tablespoon / 15 ml lemon or lime juice
- Pinch of salt
Cook for 20–30 minutes, or until the bubbles look slower and the fruit has reduced into a soft-set spread. If the canned pineapple is very juicy, the batch may need a few extra minutes.
Pineapple Jam Without Pectin
This no-pectin pineapple jam recipe is all about patience, not complicated technique. As the pineapple simmers, excess moisture cooks off, the sugar concentrates, and the mixture slowly changes from juicy fruit sauce into a glossy spread.
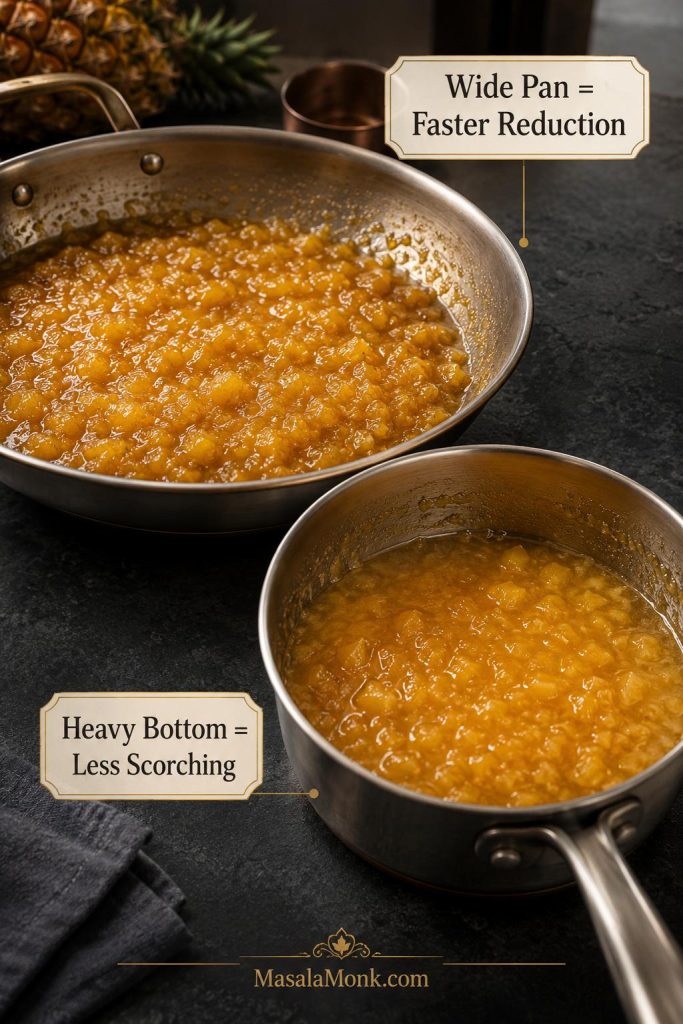
Because pineapple is not naturally high in pectin, the mixture needs enough time to reduce. A heavy-bottomed saucepan helps prevent scorching, while a wider pan speeds up evaporation.
No-pectin pineapple jam sets by reduction rather than by a strong natural pectin gel. That means the finished texture is usually softer and more spoonable than commercial jam, but the flavor is more concentrated because the fruit cooks down slowly.
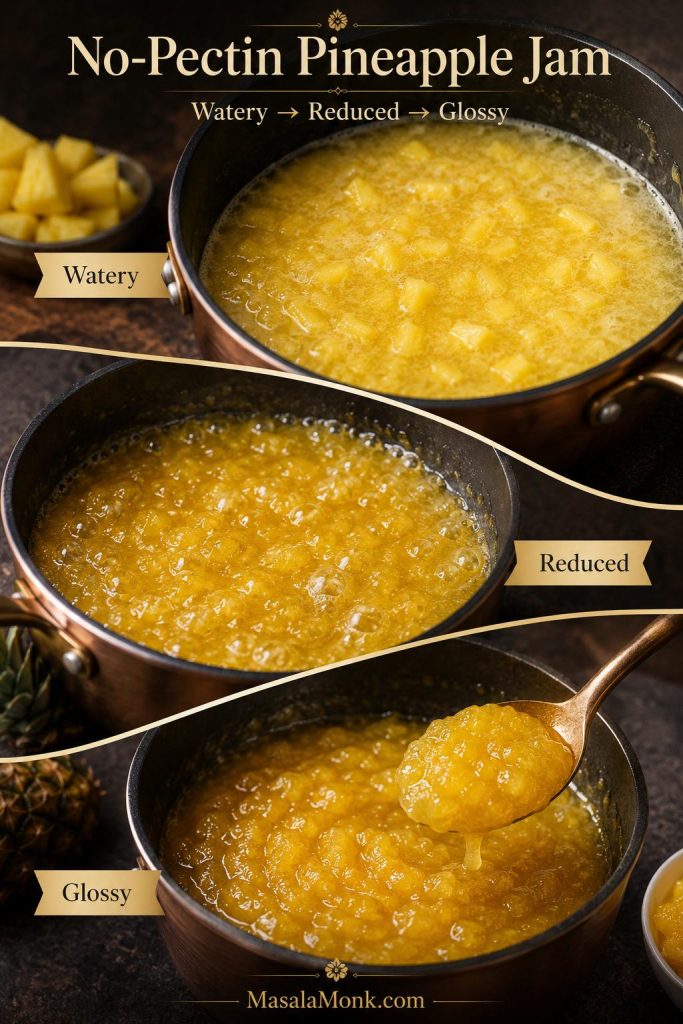
The method is simple: combine crushed pineapple, sugar, lemon or lime juice, and salt. Bring the mixture to a boil, then simmer and stir often. As it cooks, the fruit will look less watery, the bubbles will become slower and shinier, and the jam will start leaving a brief trail when you drag a spatula across the bottom of the pan.
How to Make Pineapple Preserves
Make preserves when you want little golden pieces of pineapple in every spoonful. They are chunkier than jam, a little more syrupy, and especially good over biscuits, waffles, yogurt, ice cream, or cheesecake.
Think of this as the pineapple preserve recipe path: diced fruit, less mashing, and a syrupy finish with visible golden pieces instead of a smoother spread.
Then, cut the fruit into small pieces, about ¼–½ inch. Pieces that are too large can feel chewy or slide off toast; however, pieces that are too small will collapse into jam.
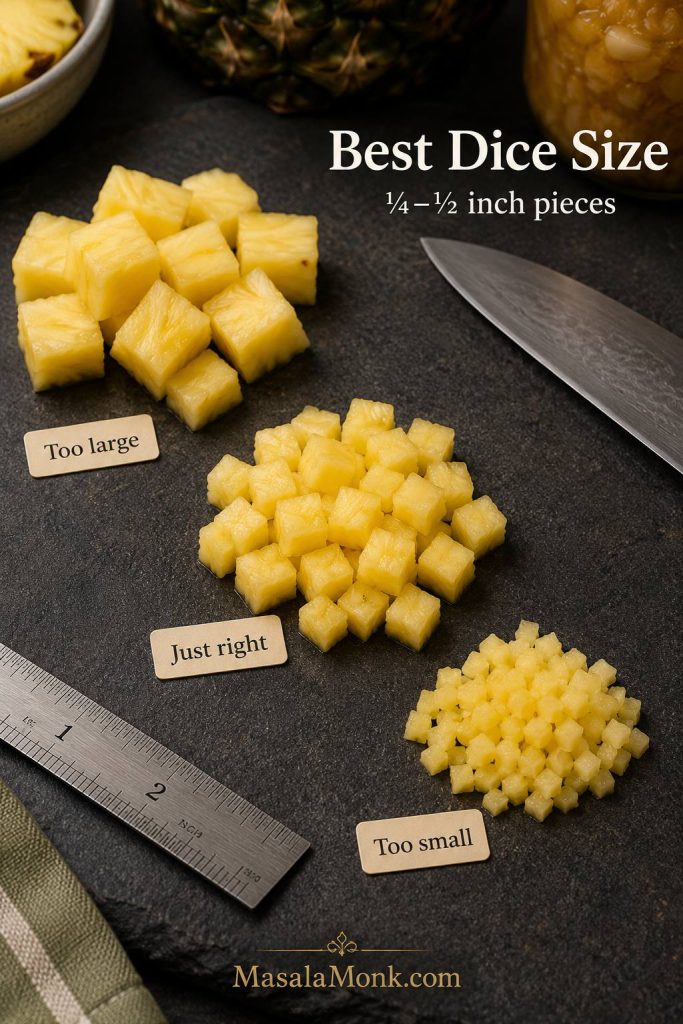
Do not pulse preserves too finely unless you want jam. The whole point is to keep small pineapple pieces visible.
For a fruit-forward batch, use less sugar than the classic no-pectin jam. A good starting point is 5½–6 cups diced pineapple, ⅔–1 cup sugar, 2 tablespoons lemon juice, and a pinch of salt.
Cook the mixture in a wide pan for about 30–40 minutes, stirring often, until the pineapple turns tender and golden and the liquid reduces to a thick syrup. If the fruit starts breaking down too much, lower the heat and stir more gently.
For a middle texture, mash only part of the fruit. As a result, you get preserves with body: chunky enough for biscuits and waffles, but still thick enough to spoon over yogurt, cheesecake, or ice cream.
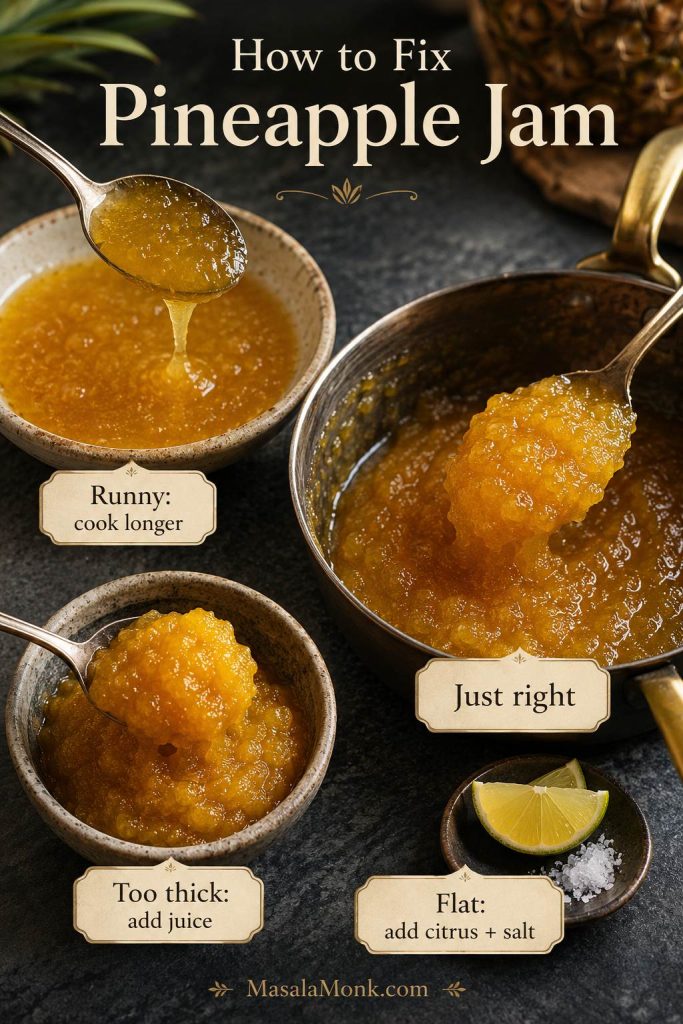
How to Tell When Pineapple Jam Is Done
Because hot jam looks looser than cooled jam, the most common mistake is stopping too early. Instead of relying only on the clock, use the texture cues below.
If this is your first time making pineapple jam, judge it by texture rather than time alone. Some pineapples are juicier than others, and canned pineapple can vary from can to can, so a batch may need a few extra minutes.
| Stage | Visual Cue | What It Means |
|---|---|---|
| Early | Fast, watery bubbles | Keep cooking; too much moisture remains |
| Middle | Thicker fruit sauce | Stir more often so the bottom does not catch |
| Almost done | Slow, glossy bubbles | Start testing with a spoon trail or cold plate |
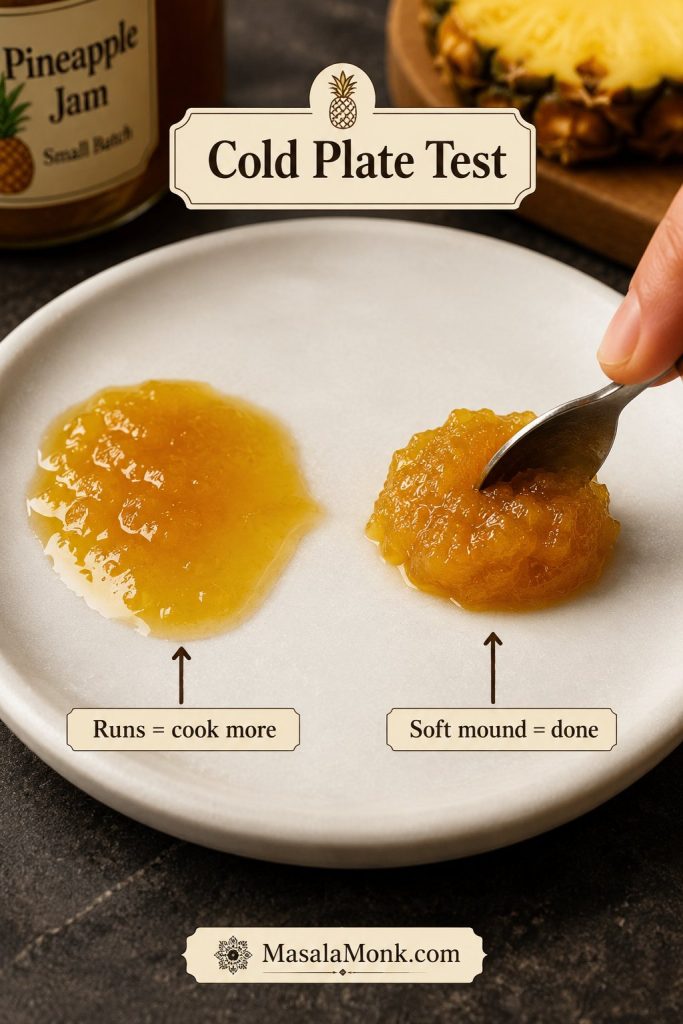
| Done | Soft mound on a cold plate | Jar and cool; it will thicken more as it chills |
| Too far | Sticky, dark, stiff texture | Loosen gently with a splash of pineapple juice or water |
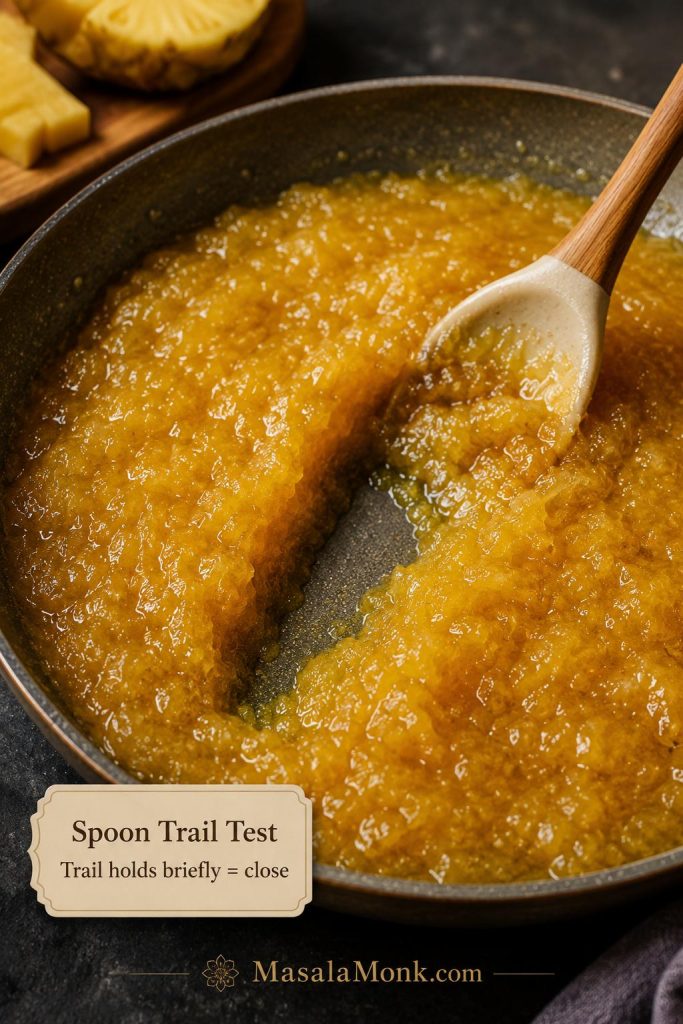
Spoon Trail Test
Drag a spatula or wooden spoon across the bottom of the pan. If the jam leaves a clean trail for a moment before slowly filling in, it is close. If liquid rushes back immediately, keep cooking.
Cold Plate Test
Place a small plate in the freezer before you start cooking. When the jam looks thick, spoon a little onto the cold plate and wait 30–60 seconds. Then, push it with your finger. It should thicken, wrinkle slightly, or hold a soft mound instead of running like juice.
Thermometer Cue
A classic jam-style set usually lands around 220°F / 104°C at sea level. This is a useful guide, but it should not be your only test. Pineapple type, pan width, sugar level, and altitude can all affect the final texture.
If you live at a higher elevation, the finishing temperature can be slightly lower. Therefore, use the cold-plate test and spoon trail along with the thermometer.
Bubble Cue
At the beginning, the mixture bubbles quickly and looks watery. Near the end, the bubbles become larger, slower, and glossier. The jam will look more like a thick fruit spread than a simmering fruit sauce.
| Texture | What It Looks Like | What to Do |
|---|---|---|
| Too runny | Liquid rushes back after stirring; cold-plate sample runs | Cook 5–10 minutes longer, stirring often |
| Just right | Shiny, soft-set, spoonable, gentle mound on cold plate | Remove from heat and jar while warm |
| Too thick | Stiff, sticky, hard to spread, darkening quickly | Stir in 1–2 tablespoons water or pineapple juice and warm gently |
Use this quick visual recipe card as a saveable reminder before the full method below.
Pineapple Jam Recipe Card: No-Pectin Jam or Chunky Preserves
This base pineapple jam recipe makes soft-set no-pectin jam. Use crushed pineapple for jam or diced pineapple for chunkier preserves.
Ingredients for Pineapple Jam
- 3 cups / about 680 g crushed pineapple, fresh or canned in juice
- 1½ cups / 300 g granulated sugar
- 1–2 tablespoons / 15–30 ml lemon or lime juice
- ⅛ teaspoon fine salt, or a small pinch
For a firmer, sweeter jam: increase sugar up to 2 cups / 400 g.
For Pineapple Preserves Instead
- Use 5½–6 cups small diced pineapple, about ¼–½ inch pieces
- Use ⅔–1 cup sugar, depending on sweetness
- Use 2 tablespoons / 30 ml lemon juice
- Add a pinch of salt
Equipment
- Heavy-bottomed saucepan or wide pan
- Food processor, blender, knife, or potato masher
- Silicone spatula or wooden spoon
- Measuring cups or digital scale
- Jam thermometer, optional
- Small freezer plate for testing
- Clean jars with lids
Method
- Prepare the pineapple. For jam, crush or finely chop the pineapple. For preserves, dice it into small even pieces.
- Combine the ingredients. Add pineapple, sugar, lemon or lime juice, and salt to a heavy saucepan.
- Start cooking. Bring to a boil over medium-high heat, stirring often so the sugar dissolves evenly.
- Simmer and reduce. For jam, cook for 25–35 minutes, stirring frequently. For preserves, cook for 30–40 minutes, or until the pineapple pieces are tender and suspended in thick syrup. Scrape the bottom and sides of the pan so the mixture does not scorch.
- Check the texture. Jam is ready when it looks shiny, thickened, and spoonable. It should leave a brief trail in the pan, mound softly on a cold plate, or reach about 220°F / 104°C at sea level. Preserves should look syrupy with visible fruit pieces.
- Jar and cool. Spoon the hot jam or preserves into clean jars. Let cool, then cover and refrigerate. The mixture will thicken more as it chills.
Notes
- This flexible no-pectin recipe is intended for refrigerator or freezer storage.
- For shelf-stable canning, follow a tested preservation method and proper processing instructions.
- If using canned pineapple packed in syrup, reduce the sugar and taste as it cooks.
- For a smoother jam, use an immersion blender briefly before the jam gets too thick.
- Avoid doubling the batch in the same pan the first time. Larger batches take longer to reduce and are easier to scorch, so make two separate batches if you need more.
Pineapple Jam With Pectin
If you want a firmer version of this pineapple jam recipe, pectin can help you get there without cooking the fruit as long. It can also help if you are using a lower-sugar method designed for pectin.
However, pectin is not one-size-fits-all. Regular powdered pectin, liquid pectin, low-sugar pectin, and calcium-activated pectin all behave differently. Some require a high sugar ratio, while others are designed for lower-sugar spreads.
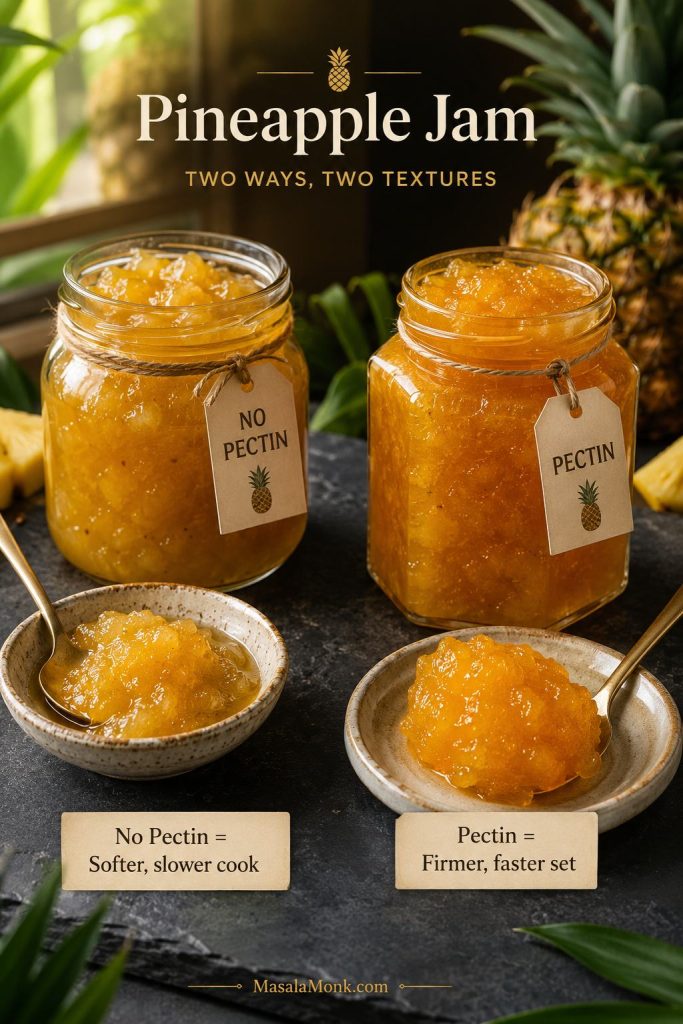
Pectin versions are not automatically better; they are simply faster and firmer. If you use pectin, follow the specific package instructions for fruit amount, sugar amount, boiling time, and jar processing. Otherwise, the jam may turn too stiff, too loose, overly sweet, or unsuitable for pantry storage if you are trying to can it.
Canning Pineapple Jam and Preserves Safely
Pineapple jam can be canned, but pantry storage needs a tested method, not a flexible refrigerator-jam formula. The amount of sugar, acid, pectin, fruit, headspace, jar size, and processing time all matter.
Because this is a flexible pineapple jam recipe, treat the main batch as a refrigerator or freezer pineapple jam. If you want pantry storage, use a tested preservation method and follow the jar size, headspace, and processing time exactly.
For shelf-stable jars, Ball’s pineapple jam canning recipe is a useful reference. In addition, the National Center for Home Food Preservation guide to jams, jellies, and marmalades is a good place to check broader home-preservation safety guidance.
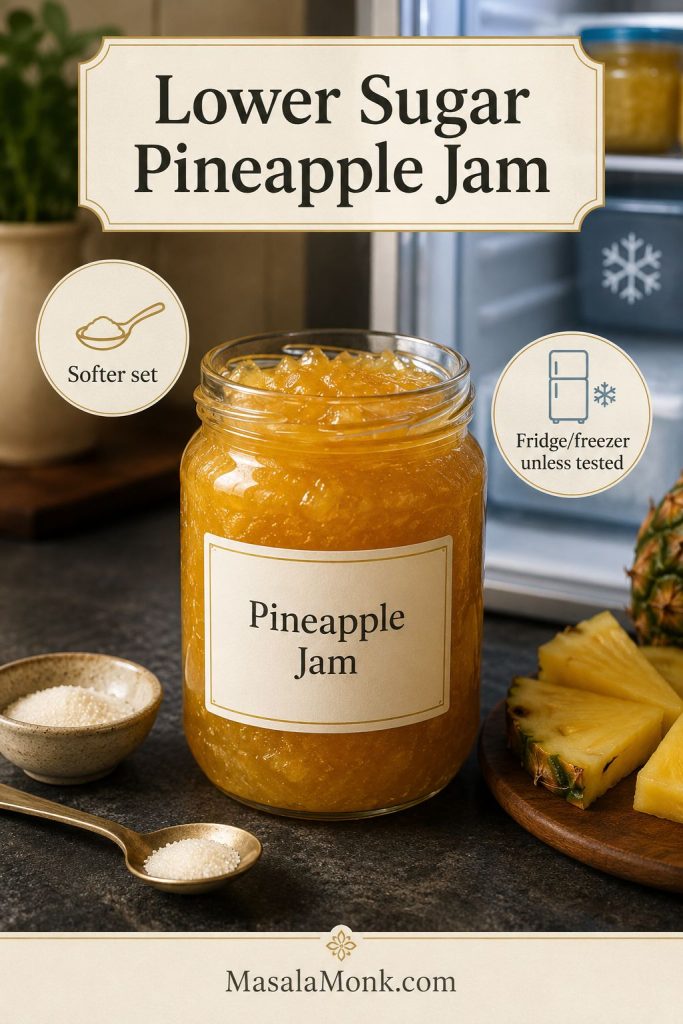
Be especially careful with low-sugar or sugar-free pineapple jam. Reducing sugar can affect set, texture, and storage safety. If you want a lower-sugar version, use a pectin and method designed for low-sugar jam, then refrigerate, freeze, or process only according to the instructions for that exact style.
Pineapple Jam for Tarts and Filling
You can also adapt this pineapple jam recipe into a thicker filling for tarts, cookies, and pastries. Unlike spreadable jam, tart filling cooks until most of the liquid evaporates and the mixture becomes sticky, concentrated, and paste-like.
Tart Filling Ratio
For a small tart-filling batch, start with about 4 cups finely pulsed or grated pineapple, ½–¾ cup sugar, 1 tablespoon lemon or lime juice, and a pinch of salt. Add sugar after some of the pineapple liquid has cooked off, then keep reducing until the filling is thick, sticky, and no longer watery.
How Thick Tart Filling Should Be
Cook it in a wide pan so moisture evaporates quickly. Then, continue cooking over medium-low heat until the mixture is darker, concentrated, and able to hold its shape when cooled.
For tart filling, the mixture should not slide around the pan like jam. It should move as a sticky mass, leave the pan bottom visible for longer, and hold its shape once cooled.

Near the end, stir more often and lower the heat if the filling starts catching on the bottom. Tart filling is ready when it looks darker, moves together as one sticky mass, and no longer releases watery juice around the edges.
This can take much longer than jam for toast. Depending on pineapple quantity and juiciness, tart filling may need 1–2½ hours. It is ready when a cooled spoonful holds its shape and does not leak liquid. For rolled pineapple tarts, the cooled filling should be thick enough to portion and shape.
Flavor Options for Pineapple Tart Filling
Finally, optional spices such as cinnamon, clove, star anise, ginger, or vanilla can make pineapple filling warmer and more dessert-like. Use them lightly so the fruit stays the main flavor.
How to Store Pineapple Jam and Preserves
After cooking, let the jam cool before sealing and storing. It will thicken as it cools, so do not judge the final texture while it is still boiling hot.
Because this pineapple jam recipe is written as a flexible refrigerator or freezer method, storage depends on sugar level, cleanliness, and how the jars are handled after cooling.
| Storage Method | How Long | Best For |
|---|---|---|
| Refrigerator | For best quality, use within about 2 weeks. Higher-sugar batches handled only with clean utensils may last longer. | Everyday no-pectin pineapple jam and preserves |
| Freezer | About 2–3 months for best texture | Small batches, lower-sugar versions, extra jars |
| Shelf-stable pantry storage | Only with a tested canning method | Properly processed jam using safe canning instructions |
Use clean jars and utensils every time. If the jam smells fermented, looks moldy, becomes fizzy, or changes in a way that feels off, discard it.
Ways to Use Pineapple Jam and Preserves
The fun of pineapple jam is that it moves easily between breakfast, dessert, and savory food. It can be the bright layer in a cake, the glossy topping on cheesecake, or the sweet-tart glaze that wakes up grilled chicken or pork.
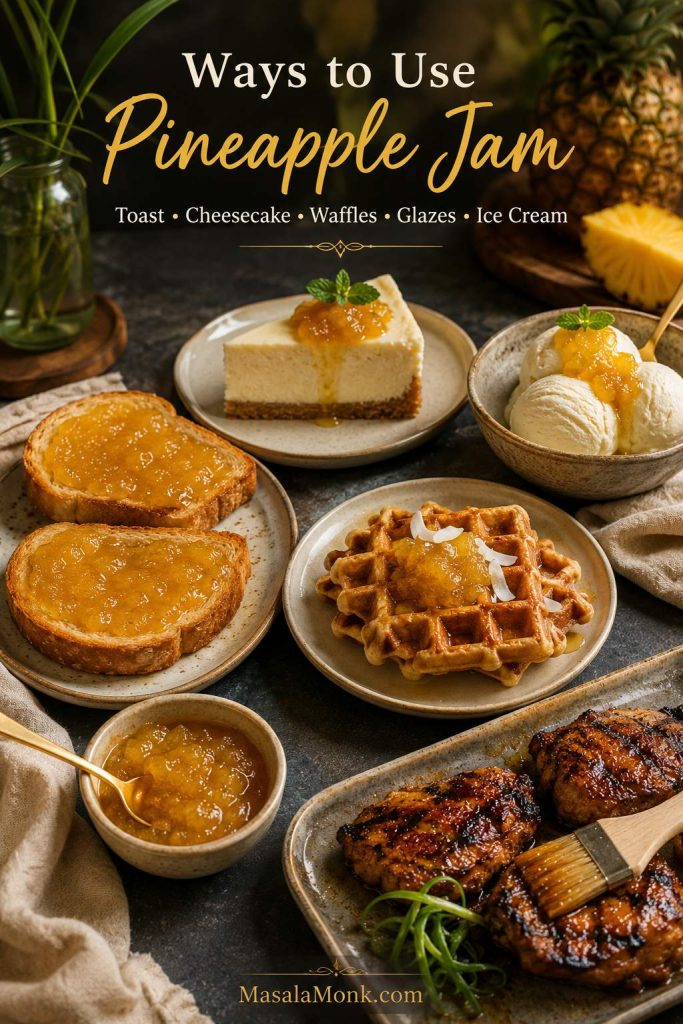
- Spread on toast, biscuits, English muffins, or scones.
- Spoon over pancakes, waffles, French toast, yogurt, or oatmeal.
- Use as a filling for thumbprint cookies, sandwich cookies, cakes, cupcakes, or tart shells.
- Spoon over chilled cheesecake, especially a simple no bake cheesecake where the bright pineapple cuts through the creamy filling.
- Serve chunky pineapple preserves with vanilla ice cream, yogurt, or a scoop of homemade coconut ice cream.
- Brush over grilled chicken, pork chops, ham, shrimp, or tofu as a sweet-tart glaze.
- Pair with cream cheese, goat cheese, or brie for a quick appetizer.
- Use a spoonful in tropical mocktails, cocktails, or fruit punches when you want pineapple sweetness and texture.
Best Version for Each Use
| Use | Best Version | Why It Works |
|---|---|---|
| Toast, scones, biscuits | Soft-set pineapple jam | Spreads easily without large fruit pieces falling off |
| Waffles, pancakes, ice cream | Pineapple preserves | Chunky fruit pieces feel more generous as a topping |
| Thumbprint cookies or tart shells | Thicker jam | Holds better and does not run as much during serving |
| Pineapple tarts and pastry filling | Tart filling | Cooked longer until sticky, concentrated, and shape-holding |
| Pork, chicken, shrimp, or tofu glaze | Preserves or looser jam | Melts into a sweet-tart glaze with visible fruit if desired |
| Cheesecake or coconut desserts | Jam or preserves | Bright pineapple cuts through rich, creamy desserts |
Troubleshooting Pineapple Jam
Pineapple jam is forgiving. However, the texture can shift depending on pineapple ripeness, water content, pan size, sugar level, and cooking time.
If your batch does not look right at first, do not panic. Most texture issues can be fixed by cooking a little longer, adding a splash of liquid, or balancing the sweetness with citrus and salt.
Quick Fixes for Common Problems
| Problem | Likely Cause | Fix |
|---|---|---|
| Jam is runny | Not cooked long enough, pineapple was very juicy, or sugar was reduced too much | Return to the pan and simmer 5–10 minutes longer. Test on a cold plate before jarring again. |
| Jam is too thick | Over-reduced or cooked at too high a heat | Warm gently with 1–2 tablespoons water, pineapple juice, or lemon juice until spreadable. |
| Jam tastes too sweet | Pineapple was very ripe or canned in syrup | Add a little more lemon or lime juice and a tiny pinch of salt. Next time, reduce sugar slightly. |
| Jam tastes flat | Not enough acid or salt | Add lemon or lime juice in small amounts, then taste again. |
| Preserves are tough or chewy | Pineapple pieces were too large or included too much core | Chop smaller next time. For this batch, cook gently with a splash of water until softer. |
| Jam is browning too fast | Heat is too high or pan bottom is too thin | Lower the heat, stir more often, and use a heavier pan next time. |
| Canned pineapple flavor tastes dull | Pineapple was packed in syrup or tasted muted from the can | Add lime juice, lemon zest, ginger, or a small splash of pineapple juice to brighten it. |
The Most Common Texture Mistake
The easiest mistake is judging the jam while it is still hot. If it slides across the cold plate like syrup, give it another few minutes. If it mounds softly and looks shiny, stop before it turns sticky or overly firm.
Pineapple Jam Variations
Once you have the basic method, this recipe is easy to adapt. Keep the first batch simple, then try one of these variations.
Pineapple Lime Jam
Use lime juice instead of lemon juice and add ½–1 teaspoon lime zest near the end. This gives the jam a brighter tropical finish.
Pineapple Ginger Jam
Add 1–2 teaspoons freshly grated ginger while the fruit cooks. Ginger works especially well if you plan to use the jam as a glaze for chicken, pork, shrimp, or tofu.
Pineapple Vanilla Jam
Stir in ½–1 teaspoon vanilla after removing the jam from the heat. This makes it softer and more dessert-like, especially for pancakes, yogurt, cakes, or thumbprint cookies.
Pineapple Coconut Jam
Add 2–4 tablespoons finely shredded coconut near the end of cooking, or stir in toasted coconut after the jam cools. This leans into a piña colada-style flavor, especially if you like the pineapple-coconut pairing in these piña colada variations.
Pineapple Jalapeño Jam
Add 1–2 tablespoons finely minced jalapeño for a sweet-hot condiment. This is excellent with cream cheese, grilled meats, tacos, sandwiches, and cheese boards. For a shelf-stable spicy jam, use a tested canning method rather than improvising the acid and pepper ratio.
Brown Sugar Pineapple Preserves
Replace 2–4 tablespoons of the white sugar with brown sugar for a deeper caramel flavor. This version works especially well as a glaze for ham, pork, or grilled pineapple desserts.
Thicker Pineapple Pastry Filling
Cook the jam longer over low heat until it is thick enough to hold its shape. This is the better version for pineapple tarts, filled cookies, pastry pockets, and cake layers that need a firmer filling.
FAQs
Jam or preserves: what is the real difference?
The difference is mostly texture. Pineapple jam is smoother because the fruit is crushed or finely chopped. Pineapple preserves are chunkier, with small pieces of fruit suspended in syrup.
Do you need pectin for pineapple jam?
No, not for a refrigerator or freezer version. Pineapple, sugar, and citrus can cook down into a soft-set jam on their own. However, pectin is helpful if you want a firmer set, a quicker recipe, a lower-sugar method, or a canning formula designed for that purpose.
When is pineapple jam safe for pantry storage?
Pineapple jam is safe for pantry storage only when you follow a tested canning method with the correct sugar, acid, pectin if required, jar size, headspace, and processing time. The flexible no-pectin recipe on this page should be treated as refrigerator or freezer jam unless you switch to a tested canning formula.
What is the safest way to make lower-sugar pineapple jam?
Use a lower-sugar pectin method or keep the jam refrigerated or frozen. Reducing sugar in a regular no-pectin batch can make the texture softer, and it should not be treated as shelf-stable unless the recipe is designed for that kind of storage.
What changes when you use canned pineapple?
Canned pineapple is usually softer and wetter than fresh pineapple, so it may cook down faster or need a few extra minutes depending on how much juice is in the can. Use pineapple packed in juice when possible, and simmer until it becomes shiny, reduced, and spoonable.
What is the best pineapple for jam?
Fresh ripe pineapple gives the brightest flavor. Canned crushed pineapple in juice is the easiest option and works well for small-batch pineapple jam. Avoid syrup-packed pineapple unless you are prepared to reduce the sugar.
Should you use crushed pineapple or chunks for preserves?
Use chunks or diced pineapple for preserves because you want visible fruit pieces. Crushed pineapple is better for a smoother jam. If using canned chunks, cut them smaller so they soften evenly and spoon easily over biscuits, waffles, yogurt, or ice cream.
Why is my pineapple jam runny?
Runny pineapple jam usually needs more cooking time. Pineapple can release a lot of liquid, especially if it is very ripe or canned with juice. Return the jam to the pan and simmer until it looks reduced, shiny, and spoonable. Then test it on a cold plate before jarring again.
How long does homemade pineapple jam last?
For best quality, use refrigerator pineapple jam within about 2 weeks. Higher-sugar batches handled only with clean utensils may last longer, but discard the jar if you see mold, fizzing, fermentation, off smells, or any change that feels unsafe.
How do you make pineapple jam thicker for tarts?
Cook it longer in a wide pan over medium-low heat until most of the moisture evaporates. Tart filling should be much thicker than spreadable jam. It should move as a sticky mass, leave the pan bottom visible for longer, and hold its shape once cooled.
Where does pineapple jam taste best besides toast?
Pineapple jam is excellent with biscuits, scones, pancakes, waffles, yogurt, ice cream, cheesecake, thumbprint cookies, cakes, pork, chicken, shrimp, cheese boards, and tropical desserts. Chunkier pineapple preserves are especially good when you want visible fruit pieces.
Final Thoughts
The best pineapple jam tastes like concentrated pineapple: bright, tropical, sweet-tart, and just thick enough to spoon generously over whatever needs a little sunshine. Start with crushed pineapple for the easiest jam, switch to diced fruit when you want preserves, and cook it longer when you need a sturdy filling for tarts or pastries.
After one batch, the texture cues become much easier to recognize. The bubbles slow down, the color deepens, the spoon leaves a trail, and the jam turns shiny enough to jar. That is the moment to stop, cool it, and decide where the first spoonful is going.
If you make it, notice whether you preferred fresh pineapple, canned crushed pineapple, or diced preserves. That one choice changes the texture more than anything else, and it is usually the difference between a smooth breakfast jam and a chunkier dessert-style preserve.


