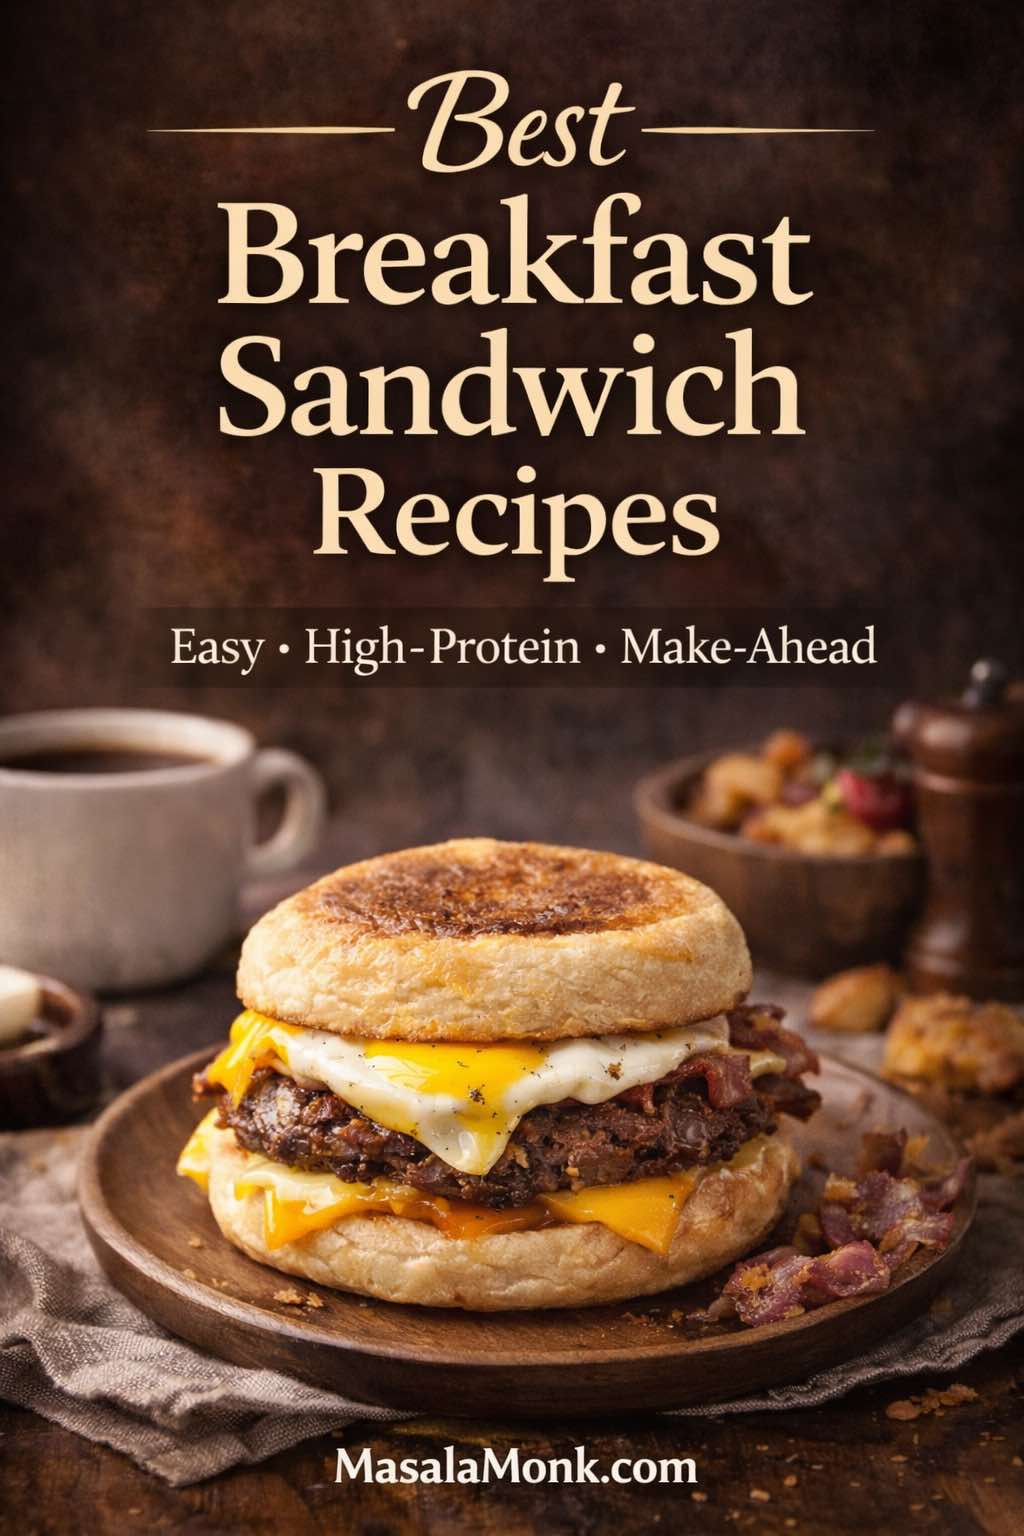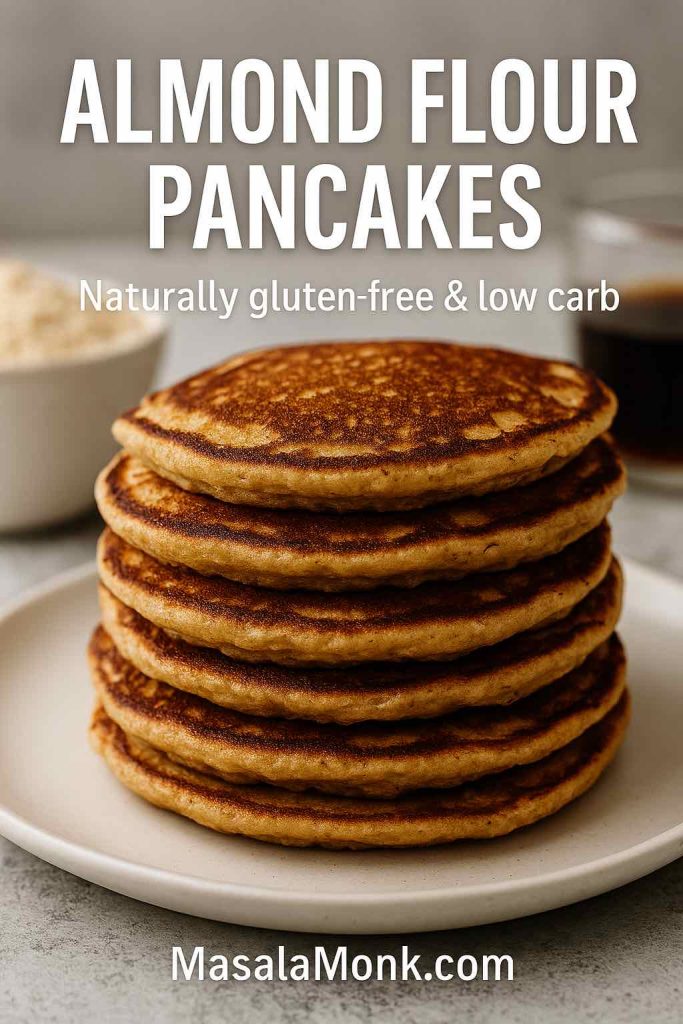
Bagel toppings and spreads can make the difference between dry bread with stuff on it and the bagel everyone reaches for first. A plain bagel can become breakfast, lunch, a sweet snack, or a full brunch board with one good spread, one useful topping, and one small finish. Usually, the best ones have the right mix of creamy, crisp, salty, sweet, fresh, or bright.
Along the way, this guide covers the best bagel toppings and spreads for every kind of craving: classic cream cheese schmear, smoked salmon and lox, sweet bagel toppings, savory combinations, healthy ideas, breakfast bagels, and bagel bar toppings for brunch. You will also get an easy homemade bagel schmear recipe with sweet and savory flavor variations, plus exact amounts for schmear, smoked salmon, and brunch boards.
Whether you are using a fresh bakery bagel, a freezer bagel, or the last plain bagel in the bag, the right spread and one good finish can make it feel intentional. In practice, the spread does more than add flavor; it gives the toppings something to hold onto and helps the whole bagel eat better.
Table of Contents
Toppings & Spreads
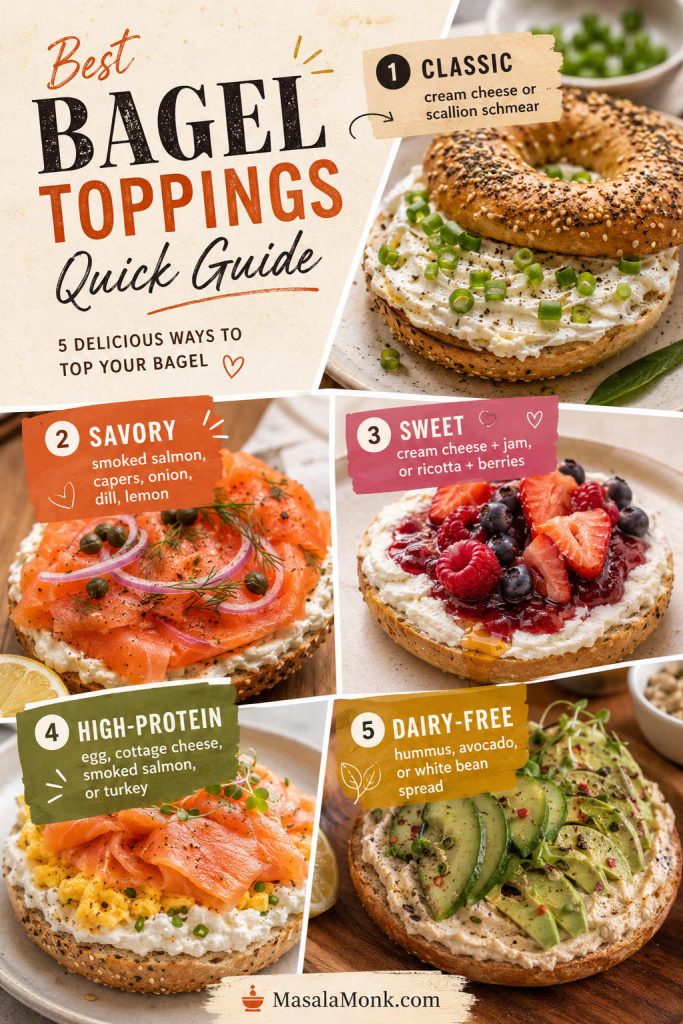
Quick Answer: Best Bagel Toppings and Spreads
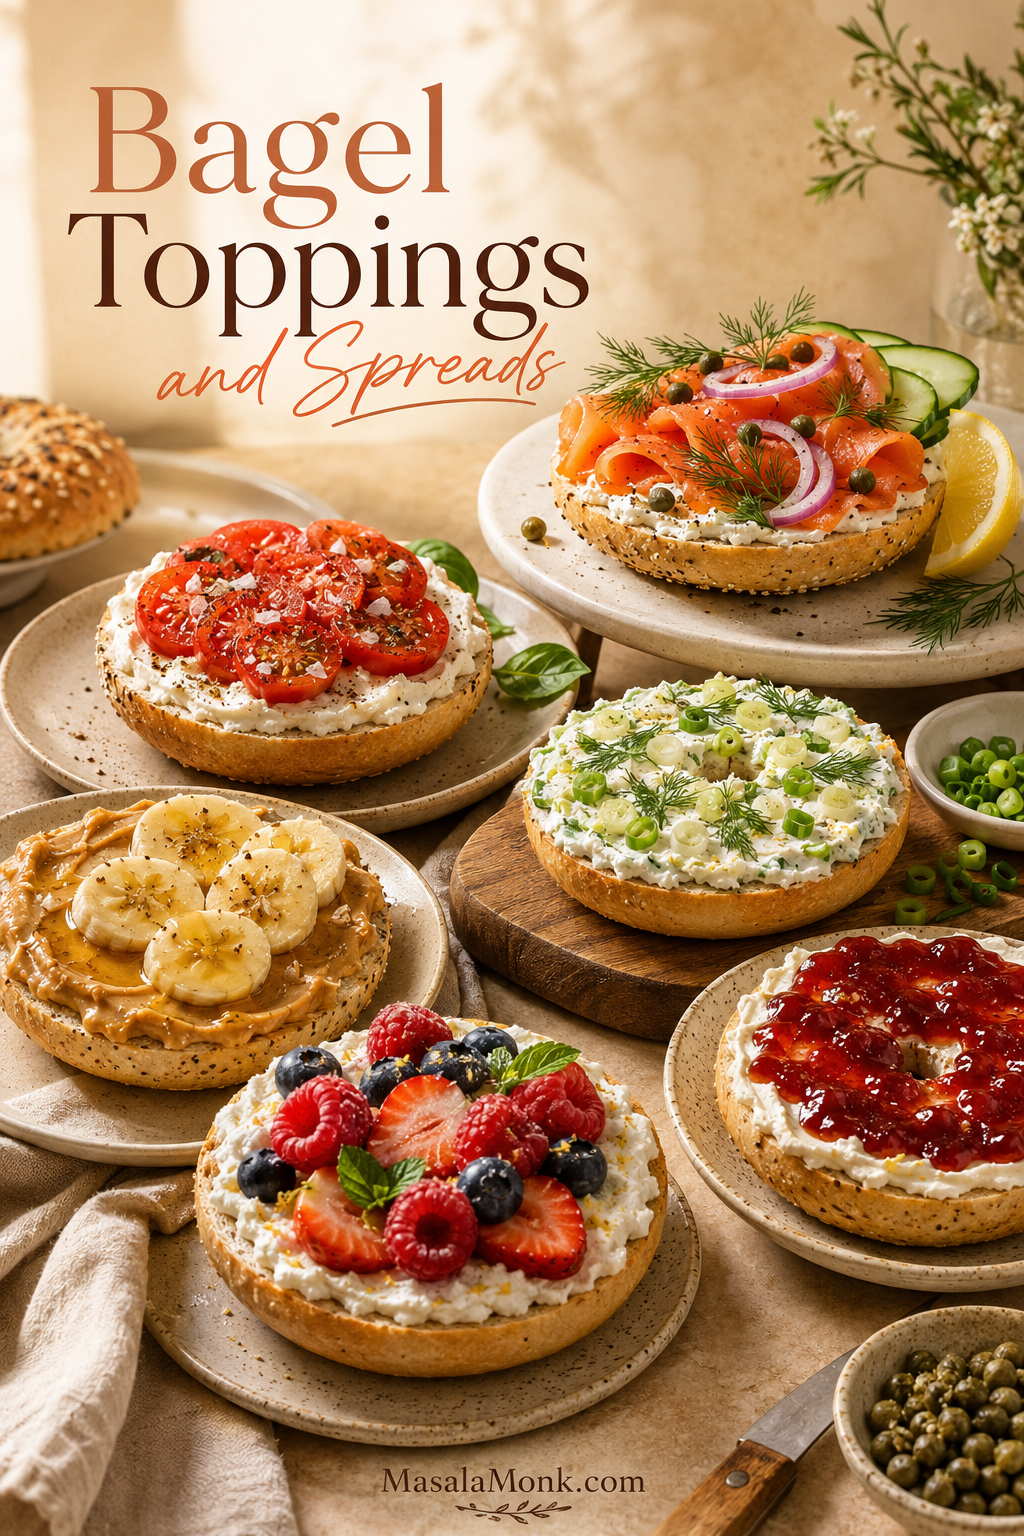
Start a classic bagel with cream cheese or scallion schmear. When you want something savory, it is hard to beat a tangy spread with smoked salmon, capers, red onion, dill, and lemon. For a sweet bagel, try cream cheese with jam, peanut butter with banana and honey, or ricotta with berries.
If you only remember one rule, choose the spread first. The best bagel toppings and spreads usually work together: the spread gives moisture, while the toppings add flavor, texture, and a final finish.
Beyond that, other easy bagel toppings include butter, avocado, eggs, hummus, tuna salad, egg salad, turkey, cucumber, tomato, cottage cheese, Nutella, berries, apple slices, honey walnut cream cheese, and everything bagel seasoning.
| Craving | Reliable bagel topping idea |
|---|---|
| Classic | Cream cheese, scallion schmear, butter, or jam |
| Deli-style | Cream cheese, smoked salmon, capers, red onion, dill, lemon |
| Breakfast | Egg, cheese, bacon, avocado, tomato, sausage, or turkey |
| Sweet | Cream cheese and jam, peanut butter and banana, ricotta and honey, Nutella and strawberries |
| Healthy | Hummus, avocado, cottage cheese, smoked salmon, turkey, egg, Greek yogurt cream cheese |
| Brunch board | Assorted schmears, smoked salmon, cucumber, tomato, onion, capers, eggs, fruit, herbs |
Making brunch instead of one bagel? Jump to the easy bagel schmear recipe or the bagel bar quantities before you shop.
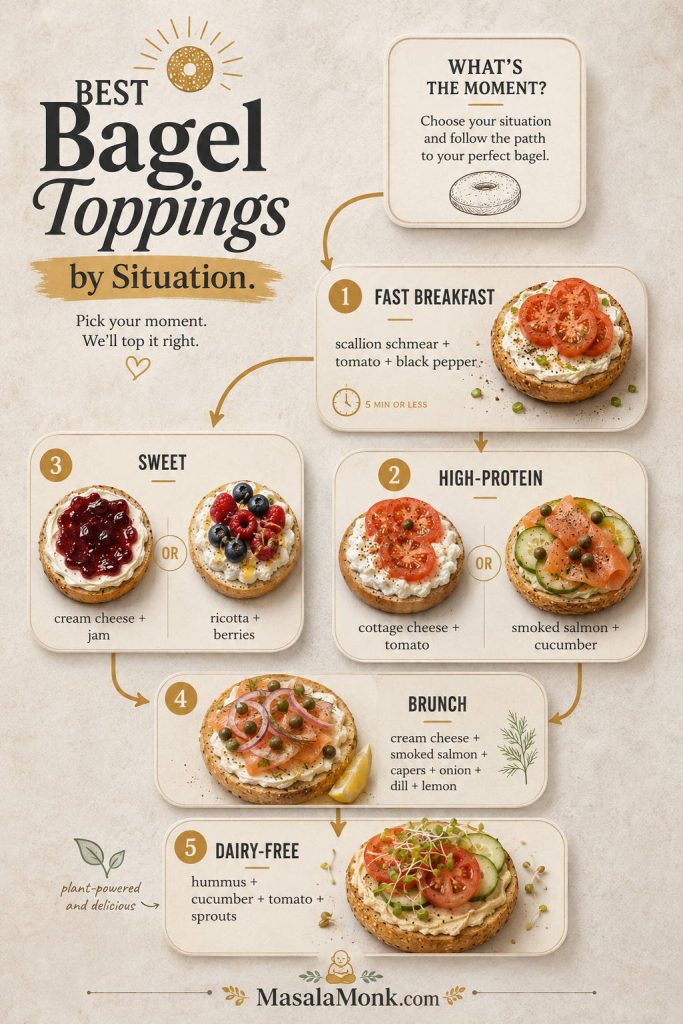
What bagel toppings and spreads should you use right now?
When you do not know what you want yet, start with the spread. Once that is chosen, the rest of the bagel usually becomes obvious.
| If you want… | Use this topping combination |
|---|---|
| The fastest classic bagel | Scallion cream cheese + black pepper |
| A filling breakfast | Egg + cheese + avocado or bacon |
| A brunch-style bagel | Cream cheese + smoked salmon + capers + red onion + dill |
| Something sweet | Cream cheese + jam, or peanut butter + banana + honey |
| A lighter lunch | Hummus + cucumber + tomato + sprouts |
| A high-protein option | Cottage cheese + tomato, or smoked salmon + cucumber |
Best bagel toppings by situation
- Best fast breakfast: scallion cream cheese, tomato, black pepper, and flaky salt.
- High-protein pick: cottage cheese with tomato, or smoked salmon with cucumber.
- Sweet favorite: cream cheese with jam, or ricotta with berries and honey.
- Brunch favorite: cream cheese, smoked salmon, capers, onion, dill, and lemon.
- Dairy-free pick: hummus with cucumber, tomato, sprouts, olive oil, and paprika.
Quick fix: if a bagel tastes unfinished, do not automatically add more toppings. Instead, add the missing piece: lemon for lift, capers for sharpness, flaky salt for tomato, herbs for creaminess, honey for sweet spreads, or crunch for soft fillings.
How to Build a Better Bagel
A good bagel is not just a pile of toppings. It tastes better when the layers make sense together. Use this simple formula:
Spread + main topping + crunch + brightness + seasoning.
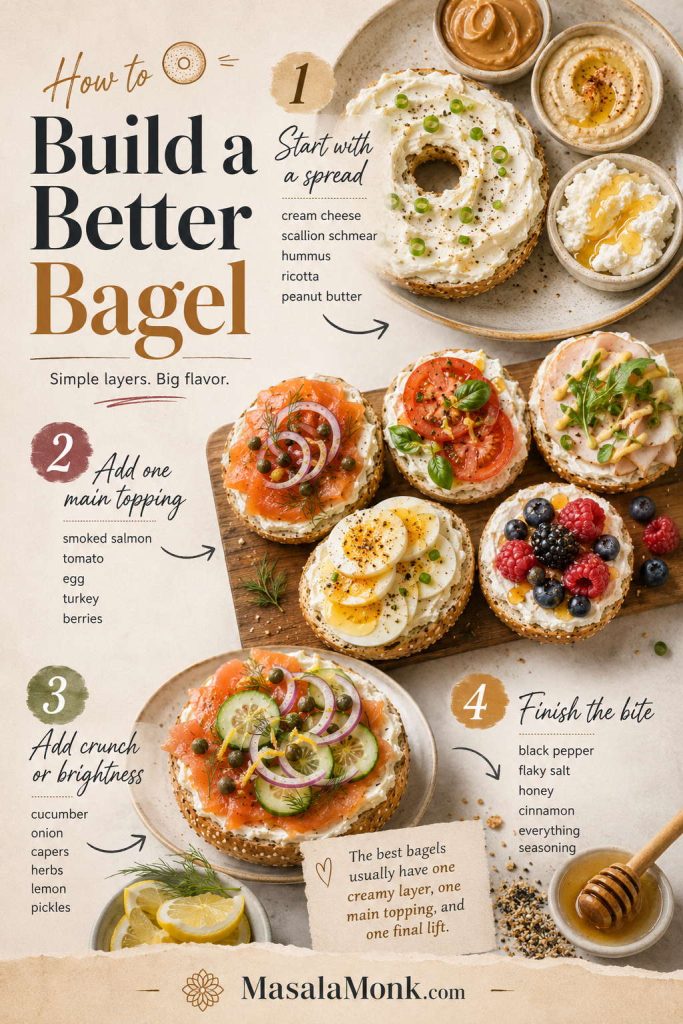
However, you do not need all five parts every time. Even two or three good layers can keep the bagel from becoming dry, heavy, soggy, or one-note.
Start with a bagel spread
The spread gives the bagel moisture and flavor. It also helps small toppings stay in place.
- Classic: plain cream cheese, whipped cream cheese, scallion schmear
- Savory: garlic herb spread, hummus, avocado, labneh, goat cheese
- Sweet: butter, peanut butter, almond butter, ricotta, mascarpone, cream cheese with jam
- Lighter: Greek yogurt cream cheese, cottage cheese, tofu cream cheese, white bean spread
Add one main bagel topping
The main topping decides whether the bagel feels like breakfast, lunch, snack, or brunch. It can be as simple as an egg, a few slices of tomato, smoked salmon, tuna salad, turkey, banana, berries, or roasted vegetables.
For a quick weekday bagel, one spread and one main topping may be enough. However, for a brunch bagel or open-faced bagel, a finishing layer helps every bite feel more complete.
Finish bagel toppings with crunch, brightness, or seasoning
This is the small step that makes a bagel taste finished. A plain schmear becomes brighter with chives or lemon. Smoked salmon becomes cleaner and sharper with capers, onion, and a squeeze of lemon. Peanut butter becomes more interesting with banana, honey, cinnamon, or a tiny pinch of salt.

- Crunch: cucumber, onion, radish, sprouts, toasted nuts, granola, crispy bacon
- Brightness: lemon, pickled onions, capers, tomatoes, berries, apple slices
- Seasoning: black pepper, chili flakes, flaky salt, everything bagel seasoning, cinnamon, herbs
The bagel test: When the bite feels too rich, add cucumber, tomato, herbs, lemon, or pickled onion. An unfinished bite usually needs one small finish: flaky salt, black pepper, capers, chili flakes, honey, cinnamon, or everything seasoning. Messy builds are easier to control when toppings are sliced thinner and the spread works like glue.
When bagels turn soggy, messy, or dull, the bagel topping mistakes section will help you fix the texture before adding more ingredients.
One small detail makes a big difference: press capers gently into the creamy layer before adding smoked salmon so they stick instead of rolling off. For wet toppings like tomato or cucumber, slice thinly and pat dry before layering.
Bagel Topping Mistakes That Make Bagels Soggy, Messy, or Flat
A bagel can have great toppings and still eat badly if the texture is off. These are the small mistakes that turn a good idea into a soggy, slippery, or bland bagel.
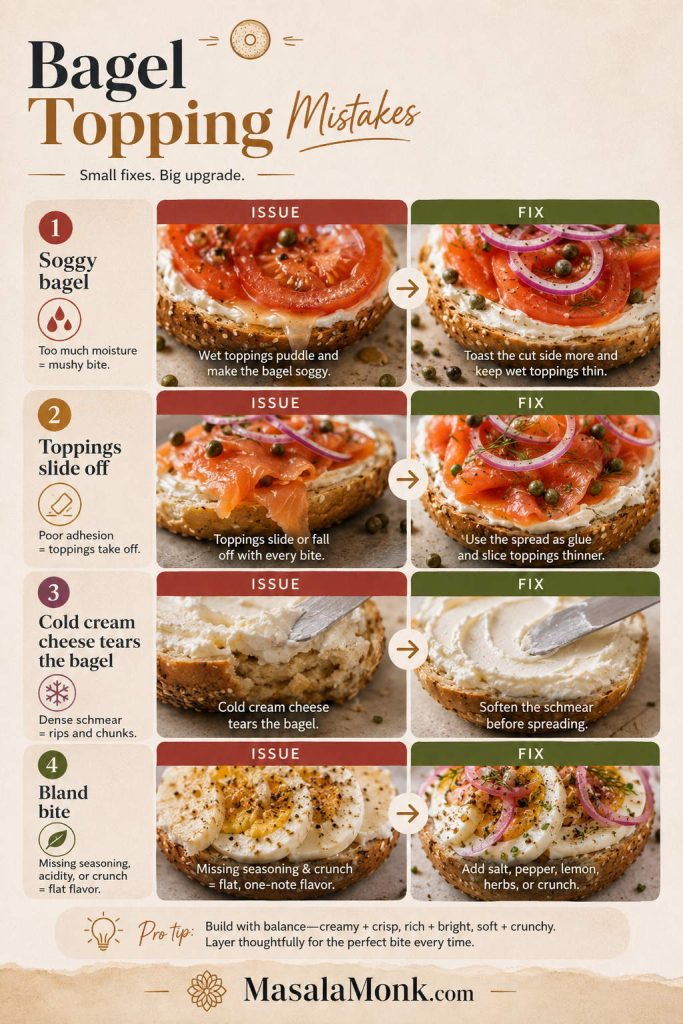
| Mistake | What happens | Better move |
|---|---|---|
| Using cold block cream cheese | It tears the bagel and spreads unevenly. | Let cream cheese soften first, or beat it into a schmear. |
| Piling on wet tomatoes or cucumbers | The cut side gets soggy before you finish eating. | Slice thinly, pat dry, and use a thick spread, hummus, avocado, or butter as a barrier. |
| Adding delicate toppings to a piping-hot bagel | The spread melts, herbs wilt, and smoked salmon can feel greasy. | Let the bagel cool for a minute before adding schmear, fish, herbs, or fresh vegetables. |
| Overloading a closed sandwich | The filling slides out and the bagel becomes hard to bite. | Keep tall builds open-faced, or use fewer toppings and slice them thinner. |
| Skipping the final finish | The bagel tastes like bread plus spread instead of a finished bite. | Add lemon, herbs, black pepper, flaky salt, capers, honey, cinnamon, or chili flakes. |
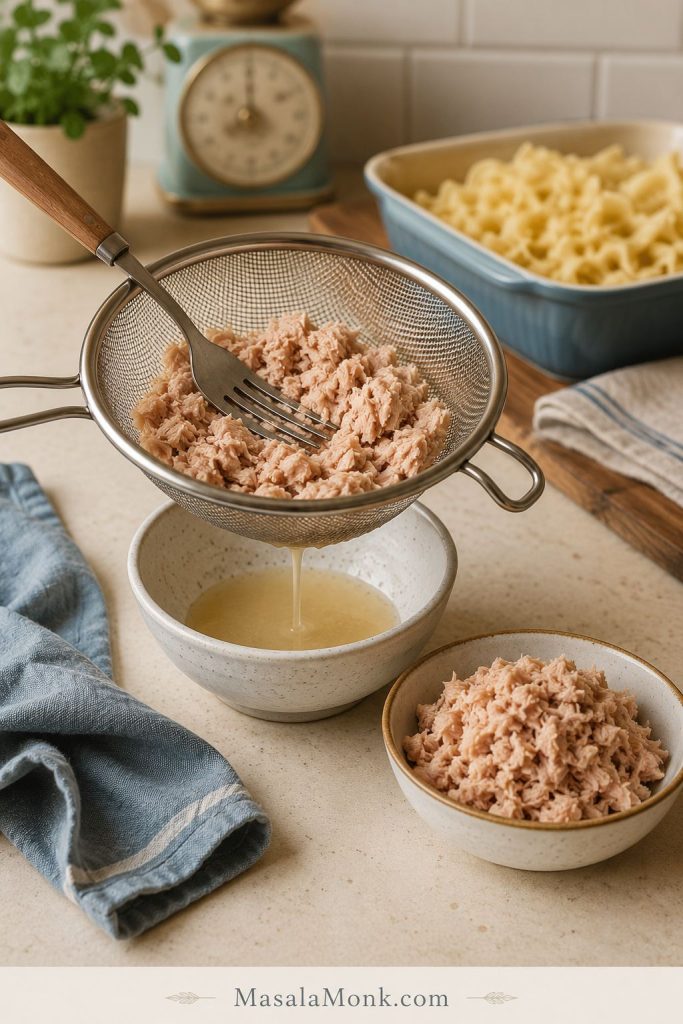
| Using loose tuna, egg, or chicken salad | The filling slides off the bagel. | Use a thicker salad, add lettuce as a barrier, or serve it open-faced. |
How to keep wet toppings from making bagels soggy
In most cases, the two biggest fixes are simple: toast the cut side enough to create a barrier, and keep wet toppings thin. Tomato, cucumber, avocado, pickles, and loose salads are all good on bagels, but they need structure underneath them. A thick schmear, hummus, avocado, butter, or even lettuce can help protect the bread from turning soft too quickly.
For more detail on getting the cut side sturdy, see the toasting guide before adding tomato, cucumber, eggs, avocado, hummus, or smoked salmon.
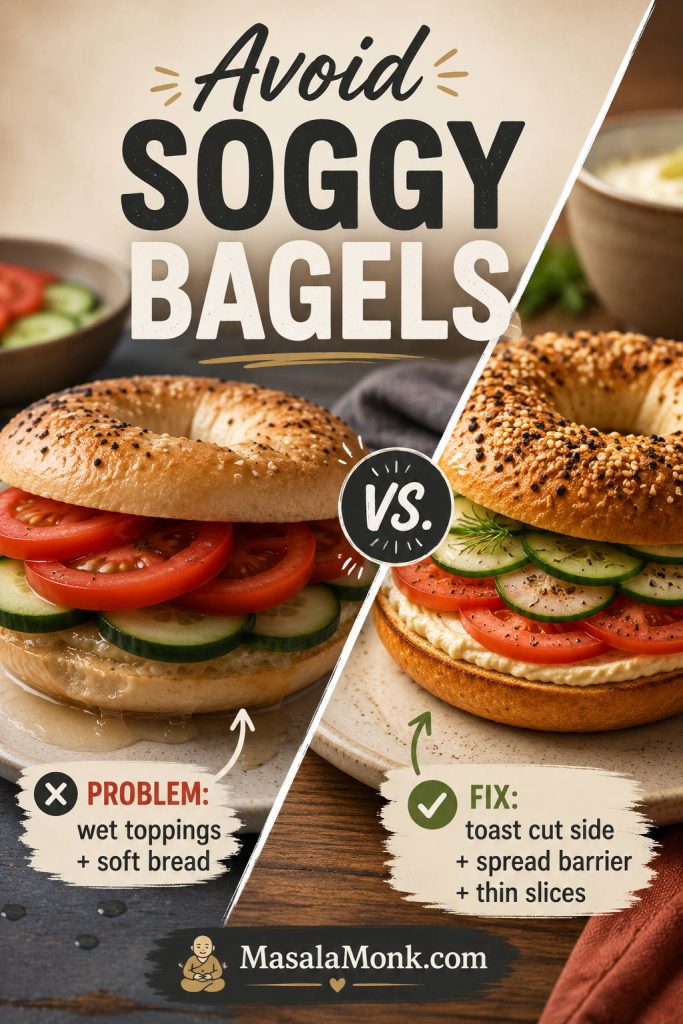
Texture rule: the wetter the topping, the sturdier the bagel needs to be. Toast a little longer, use a thicker spread, and keep juicy toppings thin.
15 Bagel Topping Ideas to Try First
Think of these as the safe bets — the combinations to try before you start inventing anything complicated. They cover the classics, quick breakfasts, sweet cravings, and the “I need this to feel like lunch” moments.
These are the bagels I would put in front of someone who says, “Just tell me what works.” They are not the weirdest ideas; instead, they are the bagel toppings and spreads that taste complete without needing ten toppings.
To keep this practical, effort is rated from 1 to 5, with 1 being almost no prep and 5 needing more cooking or assembly.
Classic bagel toppings and spreads to try first
Start with these before getting creative; each one gives the bagel a clear base, one main topping, and a small detail that makes the bite feel intentional.
| Bagel combination | Best moment | Effort | Good bagel choices | Why it tastes balanced |
|---|---|---|---|---|
| Scallion cream cheese + smoked salmon + capers + red onion | Brunch / lunch | 2/5 | Plain, everything, poppy, pumpernickel | Salmon brings salt, capers and onion add bite, and the schmear keeps the bagel rich without feeling dry. |
| Plain schmear + tomato + black pepper + flaky salt | Fast breakfast | 1/5 | Plain, sesame, onion | Juicy tomato, creamy spread, and enough salt make it feel complete. |
| Avocado + fried egg + chili flakes + lemon | Filling breakfast | 3/5 | Everything, whole wheat, sesame | Egg makes it filling, avocado keeps it creamy, and lemon/chili stop it from feeling heavy. |
| Hummus + cucumber + tomato + sprouts | Light lunch | 1/5 | Sesame, whole wheat, plain | Cool cucumber and sprouts keep the hummus from feeling dense. |
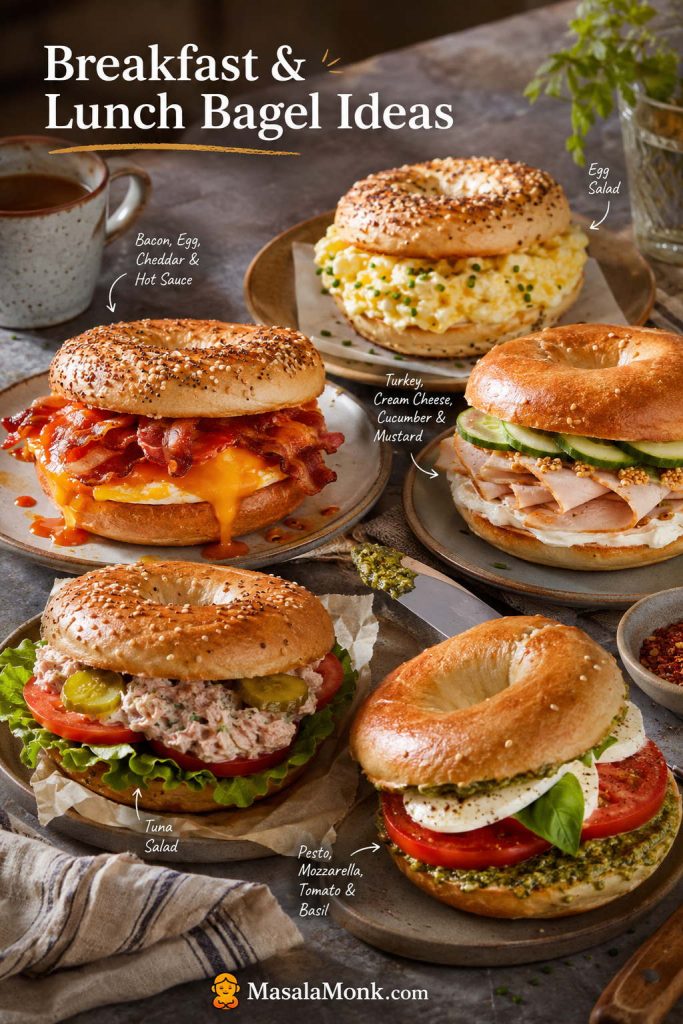
Breakfast and lunch bagel topping ideas
These builds are meant to eat like real meals, so the spread, protein, vegetables, and toast level need to help the bagel hold together.
| Bagel combination | Best moment | Effort | Good bagel choices | Why it tastes balanced |
|---|---|---|---|---|
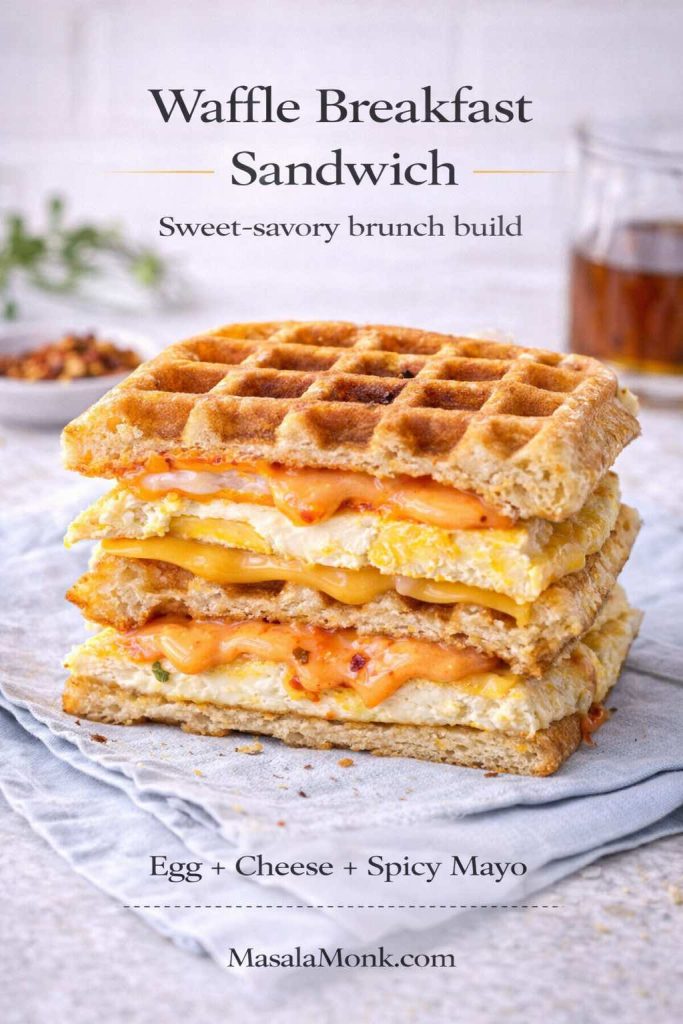
| Bacon + egg + cheddar + hot sauce | Weekend breakfast | 3/5 | Plain, everything, Asiago | Cheddar and egg make it rich; hot sauce cuts through the breakfast heaviness. |
| Turkey + cream cheese + cucumber + mustard | Easy lunch | 1/5 | Plain, sesame, whole wheat | Cucumber keeps the turkey from eating dry, while mustard gives the sandwich some bite. |
| Tuna salad + tomato + lettuce + pickles | Meal-style lunch | 2/5 | Plain, poppy, whole wheat | Creamy filling tastes better with crisp, briny, and juicy layers. |
| Egg salad + chives + everything seasoning | Make-ahead lunch | 2/5 | Plain, everything, poppy | Chives and everything seasoning make soft egg salad taste more like a proper deli bagel. |
| Pesto + mozzarella + tomato + basil | Vegetarian lunch | 2/5 | Plain, sesame, Asiago | Pesto seasons the cheese, tomato adds juiciness, and basil keeps it from feeling flat. |
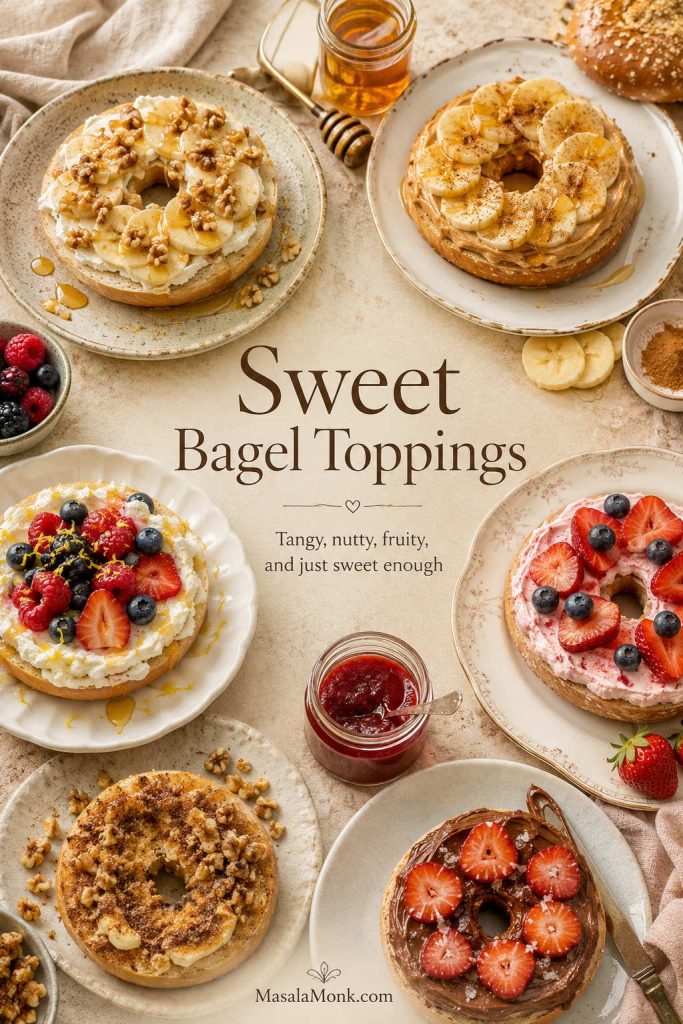
Sweet bagel toppings and spreads to try
Sweet bagels taste better when the topping has a little tang, salt, nuttiness, or fruit instead of only more sugar.
| Bagel combination | Best moment | Effort | Good bagel choices | Why it tastes balanced |
|---|---|---|---|---|
| Honey walnut cream cheese + banana | Sweet breakfast | 1/5 | Cinnamon raisin, plain, whole wheat | Banana makes it filling, honey walnut schmear adds sweetness, and cinnamon keeps it cozy. |
| Peanut butter + banana + honey + cinnamon | Fast filling snack | 1/5 | Plain, cinnamon raisin, whole wheat | Peanut butter gives staying power, banana softens the bite, and honey/cinnamon make it feel finished. |
| Ricotta + berries + honey + lemon zest | Sweet brunch | 1/5 | Plain, blueberry, whole wheat | Ricotta gives softness, berries add juice, and lemon zest keeps the sweetness clean. |
| Strawberry cream cheese + fresh berries | Bakery-style breakfast | 1/5 | Plain, blueberry | Fresh berries keep the strawberry spread from tasting too candy-sweet. |
| Butter + cinnamon sugar + toasted walnuts | Cozy snack | 1/5 | Cinnamon raisin, plain | Butter melts into the toasted cut side, while cinnamon sugar and walnuts add cozy crunch. |
| Nutella + strawberries + pinch of salt | Dessert-style bagel | 1/5 | Plain, blueberry, mini bagels | Strawberries brighten the chocolate spread, and salt keeps it from tasting one-note. |
How to choose from this list
If the Caprese-style bagel is the one you want to build, use a thick pesto rather than a loose sauce so it spreads cleanly. This homemade pesto recipe and variations guide has basil pesto, red pesto, vegan pesto, nut-free pesto, pesto dip, pesto butter, and sandwich-friendly ideas.
Creative bagel upgrades when you want something different
After the basics, these are the bagels to try when plain cream cheese is not enough and you want something more snacky, brunchy, global, or restaurant-style without making the whole thing complicated.
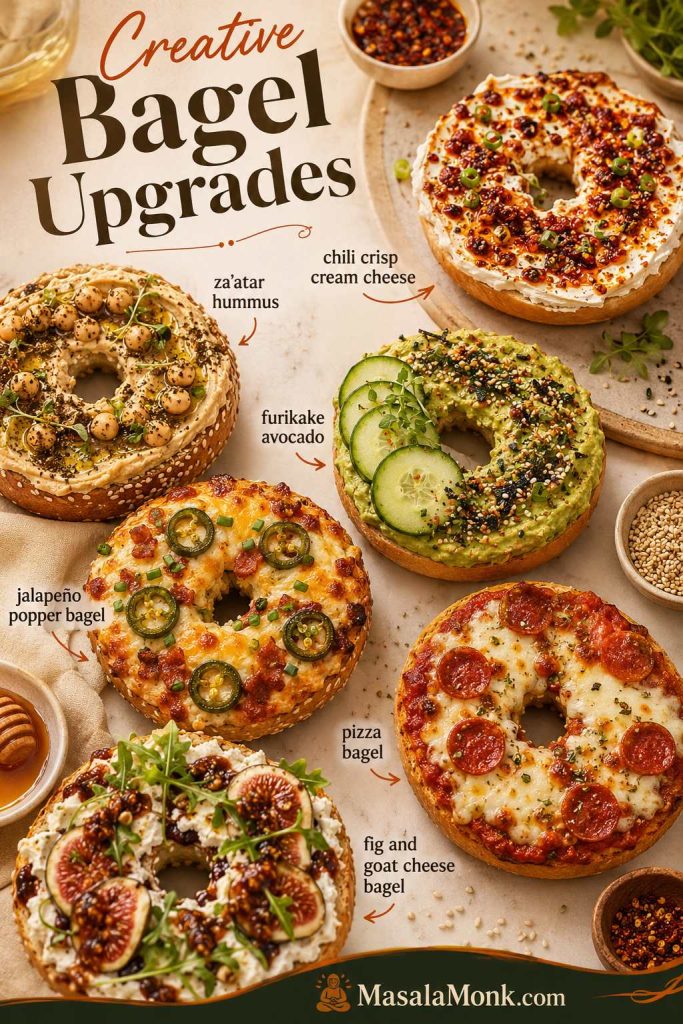
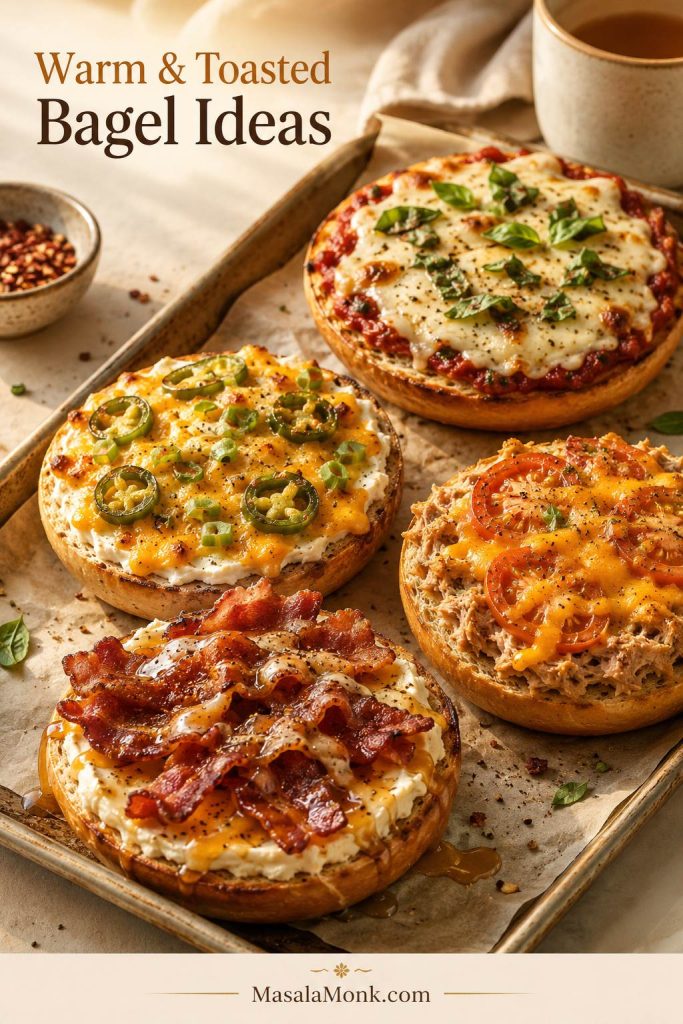
Warm and toasted
- Jalapeño popper bagel: cream cheese, cheddar, jalapeño, scallion, garlic powder, toasted until warm.
- Pizza bagel: marinara, mozzarella, Parmesan, basil, and a quick toast until the cheese melts.
- Maple bacon breakfast bagel: cream cheese, crispy bacon, maple drizzle, and black pepper.
- Tuna melt bagel: thick tuna salad, cheddar, tomato, and a short toast until the cheese softens.
Fresh and savory
- Za’atar hummus bagel: hummus, cucumber, tomato, olive oil, za’atar, and lemon.
- Whipped feta cucumber bagel: whipped feta, cucumber ribbons, dill, black pepper, and lemon.
- Cucumber dill labneh bagel: labneh, cucumber, dill, lemon zest, and flaky salt.
- Roasted red pepper bagel: goat cheese or hummus, roasted red peppers, basil, and a little olive oil.
Bold and snacky
- Chili crisp cream cheese bagel: plain schmear, chili crisp, scallions, cucumber, and sesame seeds.
- Furikake avocado bagel: mashed avocado, furikake, cucumber, lime, and a little chili oil.
- Pickle-everything schmear: cream cheese, chopped pickles, everything seasoning, and scallion.
- Sun-dried tomato cream cheese: cream cheese, chopped sun-dried tomatoes, basil, black pepper, and lemon zest.
Sweet-salty
- Honey pecan bagel: cream cheese, honey, cinnamon, and toasted pecans.
- Fig and goat cheese bagel: goat cheese, fig jam, walnuts, honey, and black pepper.
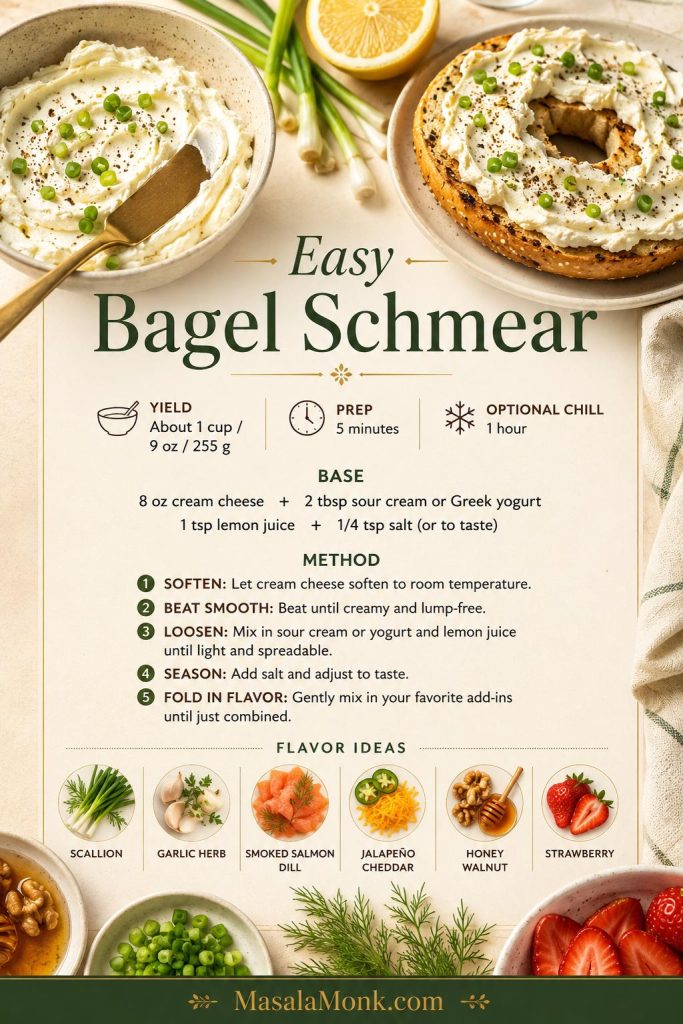
Easy Bagel Schmear Recipe
A good bagel schmear is softer and more spreadable than cold cream cheese straight from the block. It should glide over a toasted bagel without tearing it apart, and it should taste lightly seasoned even before you add toppings.

This base recipe makes about 1 cup / 9 oz / 255 g, enough for roughly 4 to 6 bagels, depending on how generously you spread it. Because schmear is one of the most useful bagel spreads, it also works as the base for many sweet and savory toppings.
The finished texture should be soft enough to spread easily but thick enough to hold herbs, capers, onions, or chopped salmon without turning loose.
Bagel schmear ingredients
The base is simple, but each small addition changes how the schmear spreads, tastes, and holds toppings.
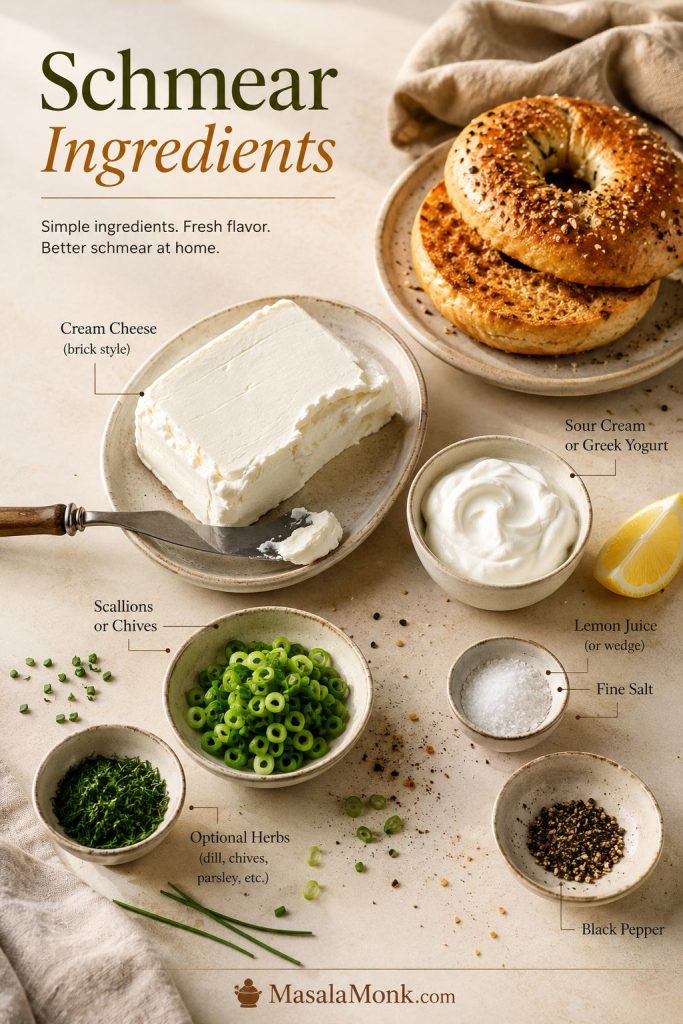
| Ingredient | US amount | Metric amount |
|---|---|---|
| Brick cream cheese, softened | 8 oz | 225 g |
| Sour cream, Greek yogurt, or crème fraîche | 2 tbsp | 30 g / 30 ml |
| Fresh lemon juice | ½ tsp | 2.5 ml |
| Fine salt | Pinch to ⅛ tsp | To taste |
| Black pepper | Optional | Optional |
How to make bagel schmear
The goal is a spreadable texture first; once the base is smooth, herbs, smoked salmon, honey walnut, or berries fold in more evenly.
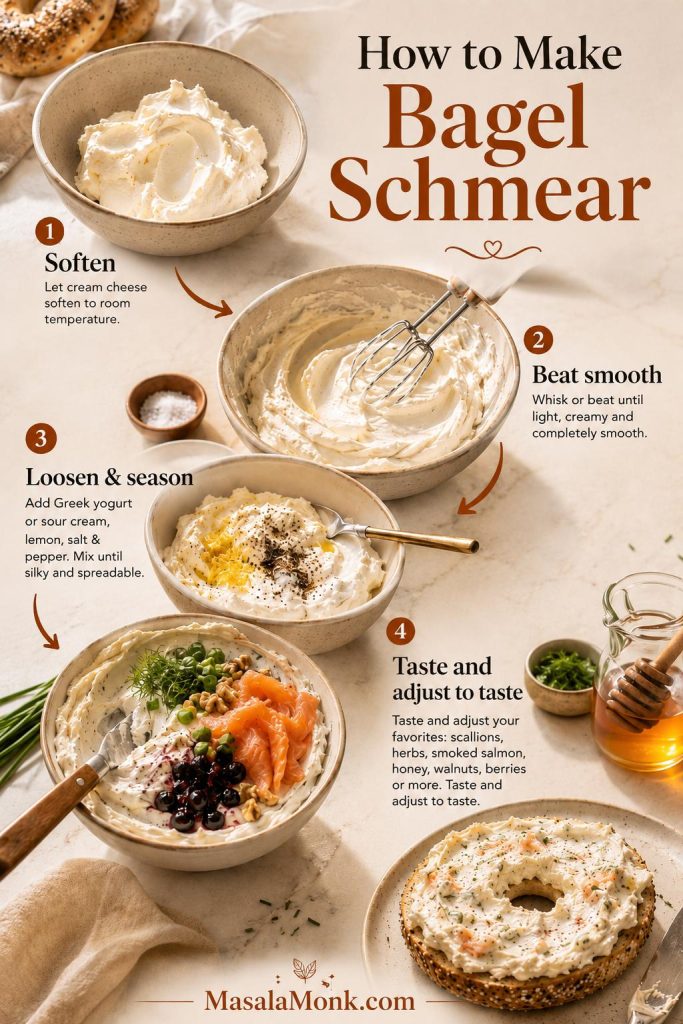
- Soften the cream cheese. Leave it at room temperature for about 30 minutes, or until it gives slightly when pressed.
- Beat until smooth. Use a hand mixer, stand mixer, or sturdy spoon. The texture should look creamy, not lumpy.
- Loosen it slightly. Mix in sour cream, Greek yogurt, or crème fraîche.
- Season it. Add lemon juice and salt. Then taste before adding more salt, especially if you plan to add smoked salmon, capers, bacon, cheddar, or everything seasoning.
- Keep it plain or add flavor. Finally, fold in one of the flavored cream cheese ideas below.
Once the base is smooth, use the flavored cream cheese ideas to turn one batch into savory, sweet, or smoked salmon schmear.
How much schmear do you need per bagel?
Use the amount as a texture decision: lighter for everyday breakfasts, thicker for deli-style bagels, and a little extra when guests are sampling flavors.
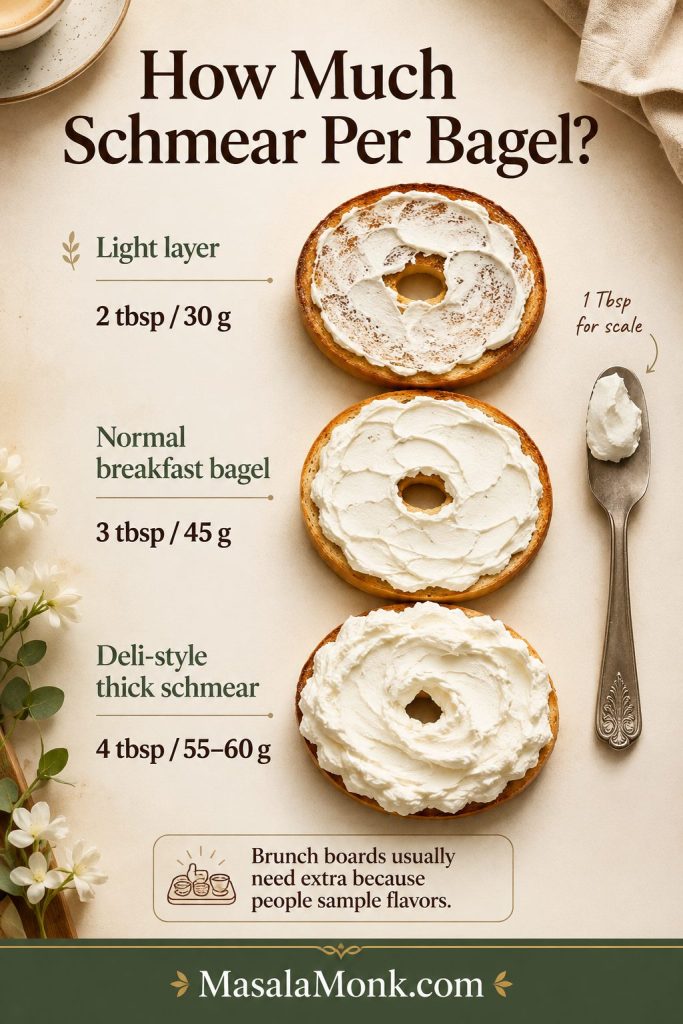
| Style | Amount per whole bagel |
|---|---|
| Light layer | 2 tbsp / 30 g |
| Normal breakfast bagel | 3 tbsp / 45 g |
| Deli-style thick schmear | 4 tbsp / 55–60 g |
| Open-faced bagel halves | 1–2 tbsp / 15–30 g per half |
If you are serving a bagel bar, plan slightly more spread than you think you need. People usually take more schmear when there are several flavors to try.
Flavored Cream Cheese Ideas for Bagels
Think of flavored cream cheese as the easiest way to make a plain bagel feel planned. One good mix-in can do the work of several loose toppings.
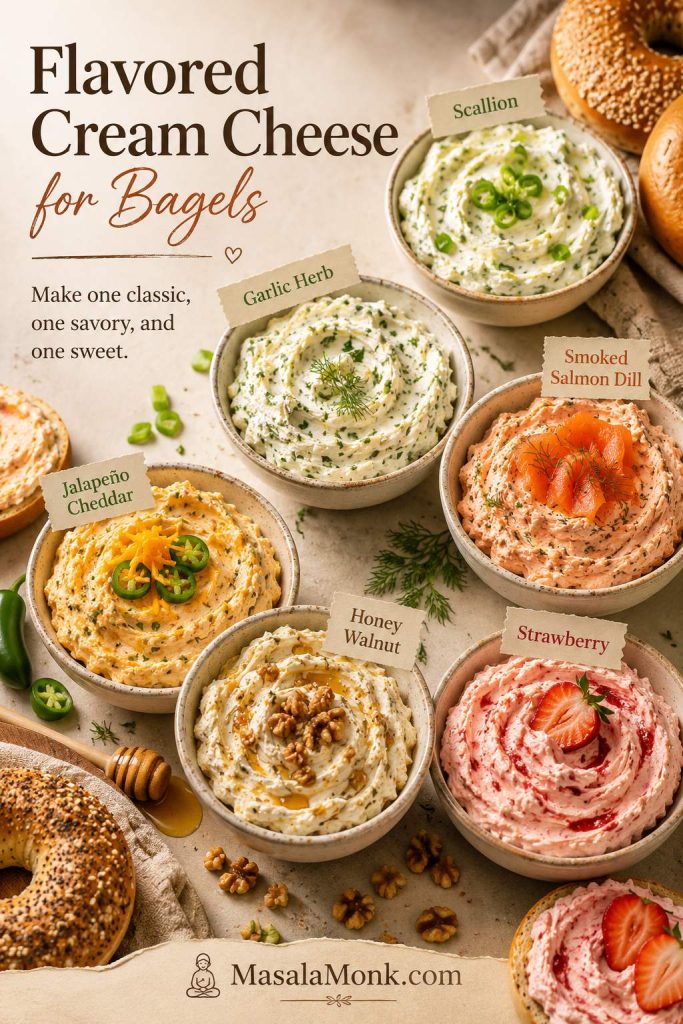
Once the base is smooth, flavored cream cheese is easy. Start with 8 oz / 225 g cream cheese, then fold in one flavor direction. If you are making more than one flavor, keep one plain or scallion, one savory, and one sweet. That way, the board works for both breakfast people and dessert-leaning people.
If you are only making two flavors, make one scallion or garlic-herb schmear and one honey walnut or strawberry cream cheese. That way, you cover the savory people, the sweet people, and the person who wants to try both.
Best flavored cream cheese ideas for bagels
| Flavor | Add to 8 oz / 225 g schmear base | Good bagel choices |
|---|---|---|
| Scallion schmear | ¼ cup finely sliced scallions or chives + black pepper | Everything, sesame, plain |
| Garlic herb | 1 small grated garlic clove + 2 tbsp chopped dill, parsley, or chives + lemon zest | Plain, sesame, whole wheat |
| Smoked salmon dill | 3–4 oz / 85–115 g chopped smoked salmon + dill + lemon | Plain, poppy, pumpernickel |
| Jalapeño cheddar | 1 minced jalapeño + ½ cup shredded cheddar + scallion | Everything, cheese, plain |
| Honey walnut | 2 tbsp honey + ¼ cup chopped walnuts + pinch of cinnamon | Cinnamon raisin, plain, whole wheat |
| Strawberry | 2–3 tbsp strawberry jam or ½ cup chopped berries + 1 tbsp powdered sugar if needed | Plain, blueberry, whole wheat |
| Everything bagel | 1–2 tbsp everything bagel seasoning | Plain, sesame |
| Veggie cream cheese | ⅓ cup finely diced cucumber, carrot, bell pepper, or celery + herbs | Plain, whole wheat, sesame |
How to make one cream cheese base work harder
Once you understand the base formula, you can also play with sun-dried tomato, olive-herb, maple cinnamon, cranberry orange walnut, lemon pepper, or pickle-everything cream cheese. One simple base can cover several bagel toppings and spreads without much extra work.
Make-ahead tip: flavored cream cheese usually tastes better after chilling for at least 1 hour. For brunch, make the schmears the night before, then let them soften for 15–30 minutes before serving.
Bagel Spreads Besides Cream Cheese When You Want Something Different
What bagel spreads to use when cream cheese is not the answer
This is the section for the morning when the cream cheese tub is empty, or when you want the bagel to feel more like lunch than a bakery breakfast.

Of course, cream cheese is the classic, but it is not the only spread that belongs on a bagel. The easiest way to replace it is to choose another spread that gives the bagel moisture: hummus for savory crunch, avocado for breakfast, ricotta for sweet toppings, peanut butter for a filling snack, and white bean spread for a dairy-free lunch bagel.
If you want the bagel to feel like lunch, choose hummus, avocado, white bean spread, tuna salad, turkey, or a thick savory salad. On the other hand, if you want it to feel like breakfast, choose butter, ricotta, peanut butter, cottage cheese, egg, or a fruit-friendly spread.
For plant-based builds, the vegan bagel toppings section has hummus, avocado, tofu cream cheese, white bean spread, and nut butter ideas.
For example, hummus works best when cucumber, tomato, sprouts, or paprika keep the bite from feeling dense. Meanwhile, ricotta and cottage cheese work better when fruit, honey, lemon zest, pepper, or herbs give them a clear direction.
Best bagel spreads to pair with toppings
| Spread | Toppings to add | Good bagel choices |
|---|---|---|
| Hummus | Cucumber, tomato, sprouts, paprika, olive oil | Sesame, plain, whole wheat |
| Avocado | Egg, chili flakes, lemon, tomato, everything seasoning | Everything, sesame, whole wheat |
| Ricotta | Honey, berries, lemon zest, pistachios | Plain, blueberry, whole wheat |
| Peanut butter | Banana, honey, cinnamon, chia seeds, jam | Plain, cinnamon raisin, whole wheat |
| Cottage cheese | Tomato, black pepper, cucumber, berries, honey | Plain, whole wheat, sesame |
| Butter | Jam, cinnamon sugar, honey, flaky salt | Plain, cinnamon raisin, blueberry |
| White bean spread | Tomato, herbs, olive oil, lemon, roasted peppers | Plain, sesame, whole wheat |
| Mascarpone | Berries, honey, citrus zest, toasted nuts | Plain, blueberry, mini bagels |
How to make mild bagel spreads taste finished
Spread first, then toppings: a mild spread like ricotta, cottage cheese, or white bean spread usually needs a stronger finish. Add lemon, herbs, pepper, honey, cinnamon, flaky salt, or fruit so the bagel does not taste unfinished.
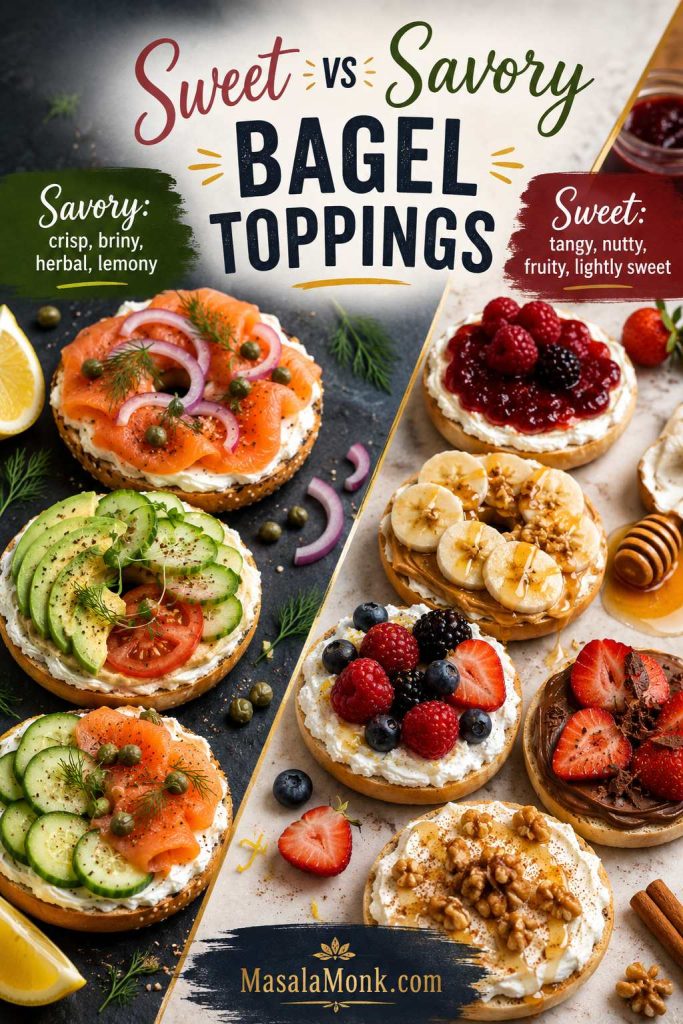
Savory Bagel Toppings
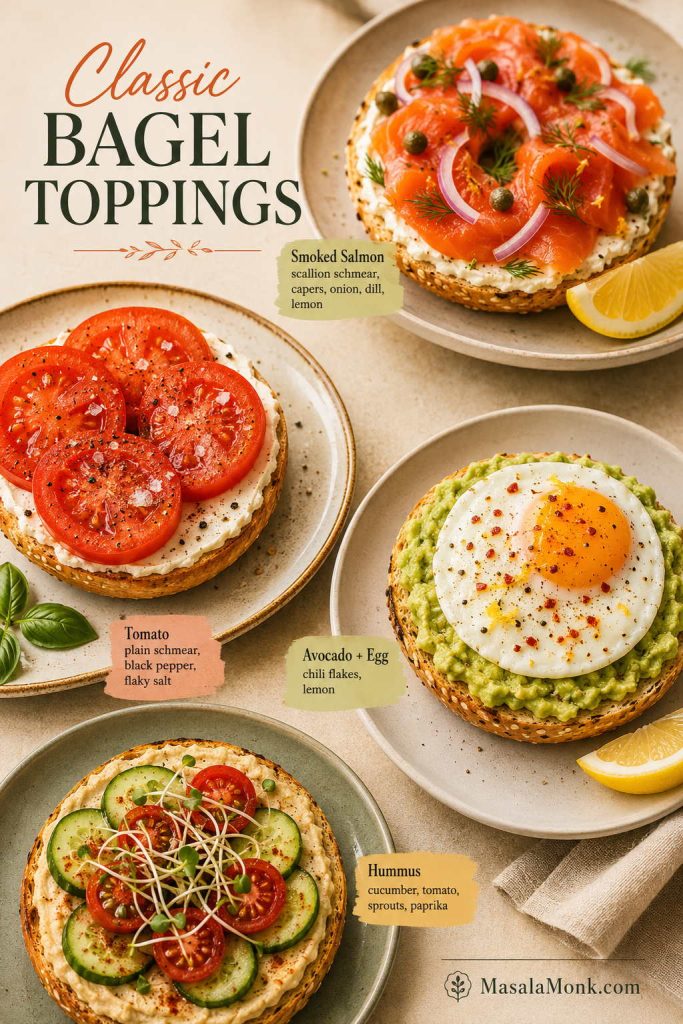
If your savory bagel tastes heavy after three bites, it usually does not need more meat or more cheese. Instead, it needs something crisp, sharp, juicy, or herbal to cut through the richness. A classic schmear and smoked salmon are iconic, but hummus, avocado, eggs, tuna salad, turkey, chicken salad, pesto, goat cheese, and crisp vegetables can be just as satisfying.
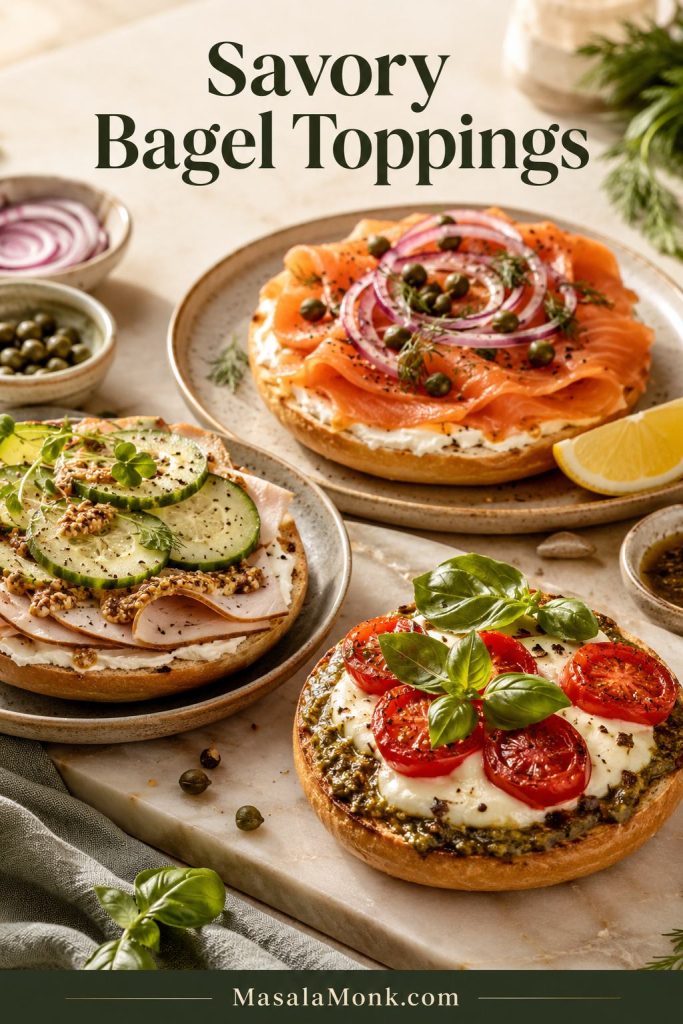
At the same time, the lunch bagel should not collapse halfway through. If you are using tomato, cucumber, pickles, roasted peppers, or avocado, keep the slices thin and use a creamy spread underneath to protect the toasted surface.
Classic savory topping ideas
- Plain schmear + tomato + black pepper
- Scallion schmear + cucumber + dill
- Smoked salmon + capers + red onion + lemon
- Hummus + cucumber + tomato + paprika
- Avocado + fried egg + chili flakes
- Tuna salad + lettuce + pickles
- Egg salad + chives + everything seasoning
- Turkey + cream cheese + cucumber + mustard
- Chicken salad + celery + herbs
- Pesto + tomato + mozzarella
- Goat cheese + roasted peppers + basil
- Bacon + cream cheese + tomato
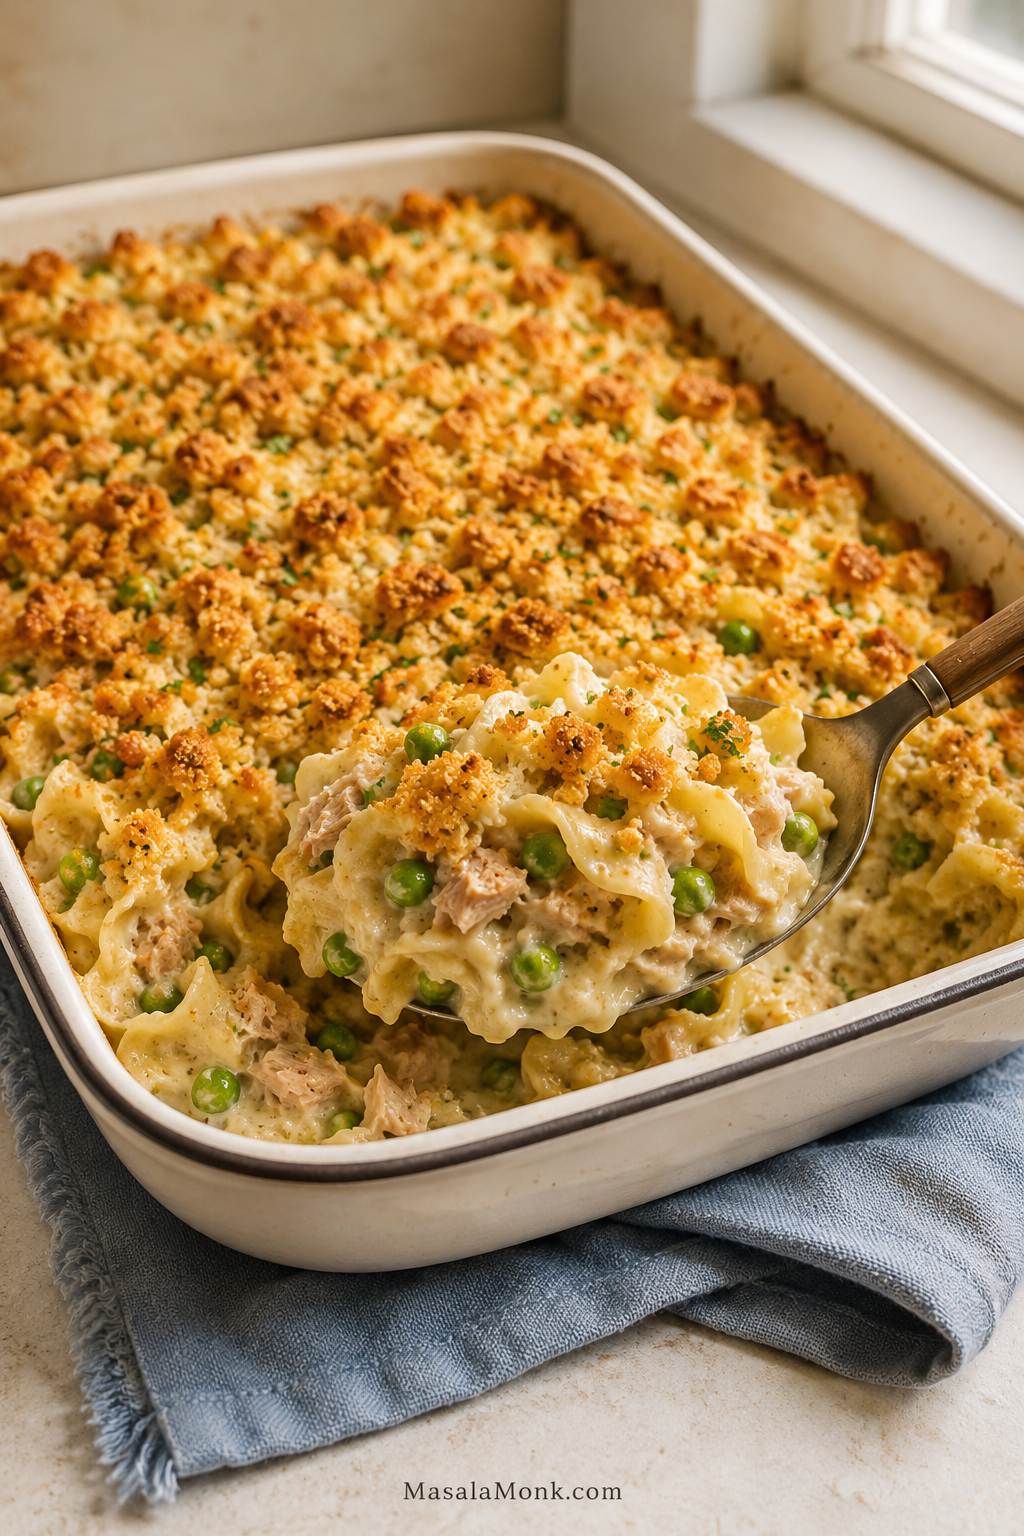
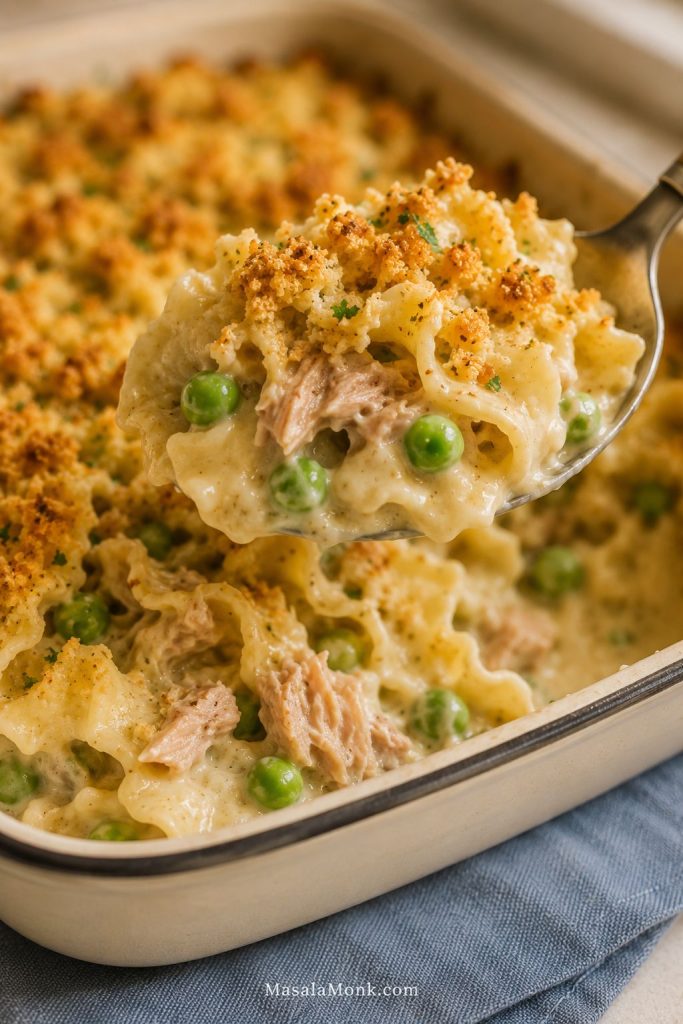
If tuna salad is your easy lunch topping, this healthy tuna salad guide has lighter deli-style, avocado, Mediterranean, no-mayo, tuna-and-egg, and sandwich-friendly variations you can spoon onto toasted bagels.
Savory combinations worth making
Use these when you want a bagel that eats more like a meal than a snack. Each one has creaminess, a main topping, and a sharper or fresher finish. In other words, these bagel toppings and spreads are built to hold up beyond the first bite.
| Combination | Build |
|---|---|
| Lox-style bagel | Cream cheese, smoked salmon, capers, red onion, dill, lemon |
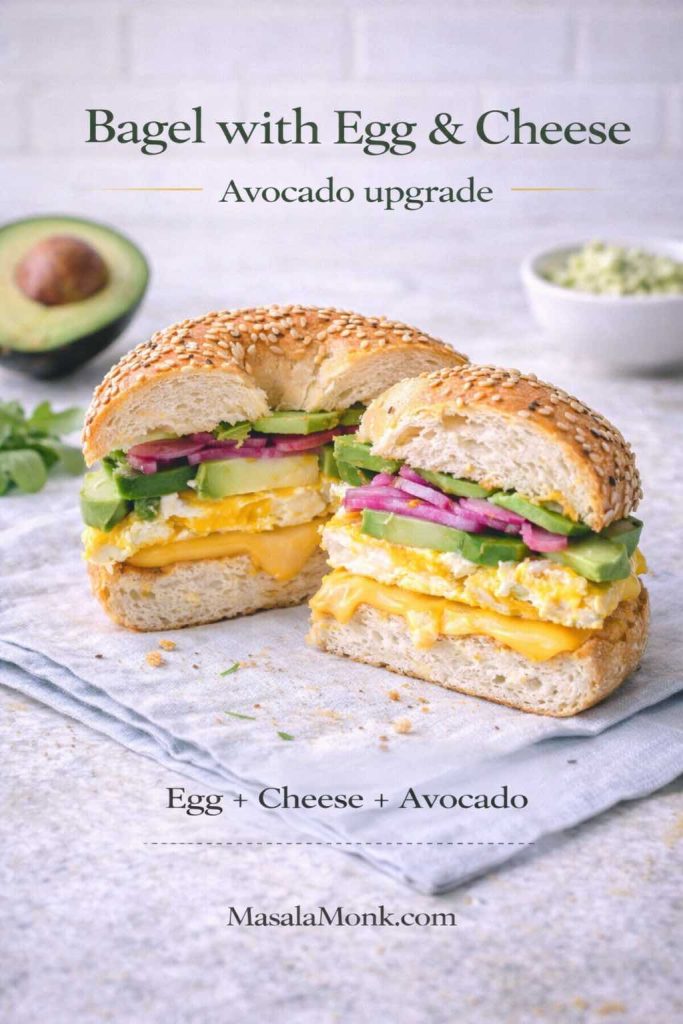
| Avocado egg bagel | Mashed avocado, fried or scrambled egg, chili flakes, lemon, salt |
| Hummus crunch bagel | Hummus, cucumber, tomato, sprouts, paprika, olive oil |
| Deli turkey bagel | Cream cheese, turkey, cucumber, lettuce, mustard, black pepper |
| Tuna melt bagel | Tuna salad, cheddar, tomato, toasted until warm |
| Caprese bagel | Mozzarella, tomato, pesto, basil, black pepper |
Chicken salad, tuna salad, and egg salad all need the same thing on a bagel: a thick enough texture to stay put. If the filling is loose, serve the bagel open-faced or add lettuce as a barrier.
Packing a savory bagel for later? Use the work and lunchbox toppings guide so juicy or slippery toppings do not soak the bread.
Bagel Toppings That Travel Well for Work or Lunchboxes
For packed lunches, choose bagel toppings that stay firm and do not leak into the bread. Thick hummus, cream cheese, turkey, peanut butter, firm egg salad, thick tuna salad, and sliced cheese travel better than watery tomatoes, loose salads, avocado, or overfilled smoked salmon builds.
A good lunchbox bagel should still taste good a few hours later: a sturdy toasted base, a spread that acts like a barrier, and fresh toppings packed separately when they are juicy or slippery.
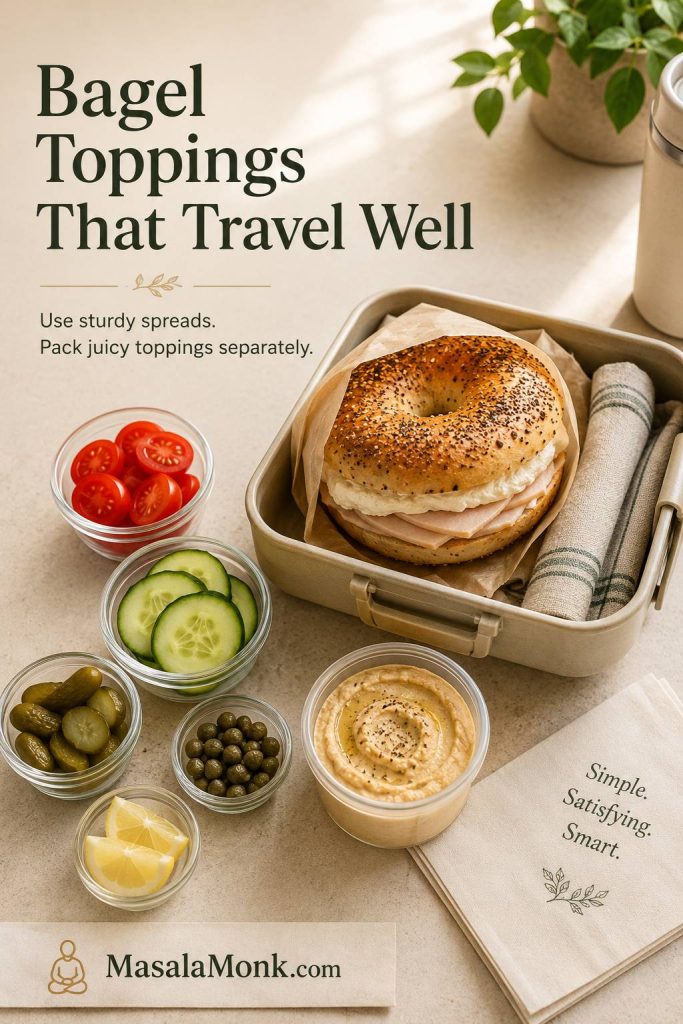
| Pack it now | Pack separately | Skip for packed bagels |
|---|---|---|
| Cream cheese, hummus, turkey, cheese, peanut butter, thick tuna or egg salad | Tomato, cucumber, avocado, pickles, capers, lemon wedges | Watery tomatoes, loose salads, overfilled lox bagels, very wet spreads |
Sweet Bagel Toppings
In general, sweet bagel toppings are more satisfying when they have a little contrast instead of tasting only sweet. Tangy cream cheese, toasted nuts, salt, lemon zest, cinnamon, berries, and honey can make a sweet bagel feel more like breakfast and less like frosting on bread.
That said, sweet bagels need a lighter hand when the bagel itself already has cinnamon, raisins, or blueberries. Start with tangy or lightly salted toppings first, then move sweeter only if the bagel itself is plain.
If you are starting with cinnamon raisin, blueberry, or another flavored bagel, check the bagel type pairings before adding a very sweet spread.
Easy sweet bagel ideas
- Plain cream cheese + strawberry jam
- Butter + cinnamon sugar
- Peanut butter + banana + honey
- Almond butter + apple slices + cinnamon
- Ricotta + honey + pistachios
- Mascarpone + berries
- Nutella + strawberries
- Cream cheese + brown sugar + cinnamon
- Greek yogurt cream cheese + berries + granola
- Honey walnut cream cheese + banana
- Apple butter + cream cheese
- Peanut butter + jam + flaky salt
If you want a fruit spread that feels brighter than regular strawberry jam, this pineapple jam recipe makes a glossy sweet-tart spread for toast, scones, waffles, yogurt, and breakfast-style bagels.
Fruit spreads are especially good on plain or lightly toasted bagels because they bring both sweetness and brightness. A warm toasted cut side with cream cheese and glossy fruit spread feels completely different from a cold, overloaded sweet bagel.
Sweet topping tip: cinnamon raisin and blueberry bagels already bring sweetness, so they usually taste best with tangy or lightly salted toppings like plain cream cheese, butter, peanut butter, ricotta, or honey walnut cream cheese rather than very sugary spreads alone.
In fact, for sweet bagels, a tiny pinch of salt often does more than extra sugar. It makes peanut butter, honey, berries, chocolate-hazelnut spread, and sweet cream cheese taste fuller without making the bagel heavy.
Sweet bagel combinations by mood
Choose the topping based on whether you want the bagel to feel like breakfast, dessert, or something in between. This is also where bagel spreads matter most, because a tangy or lightly salted base keeps sweet toppings from becoming too much.
| Mood | Try this |
|---|---|
| Bakery-style | Strawberry cream cheese + fresh berries + lemon zest |
| Cozy | Butter + cinnamon sugar + toasted walnuts |
| Protein-friendly | Peanut butter + banana + chia seeds |
| Dessert-like | Nutella + strawberries + pinch of salt |
| Light and creamy | Ricotta + honey + berries |
| Fall-style | Apple butter + cream cheese + cinnamon |
Healthy and High-Protein Bagel Toppings That Still Taste Good
A bagel is best treated like a bigger, denser bread base, not a breakfast problem to apologize for. The toppings matter because they decide whether it feels like a quick carb moment or a breakfast that holds you for a while. For a lighter plate, use one half open-faced instead of building a heavy closed sandwich.
The goal is not to make the bagel smaller; it is to make the topping smarter, more satisfying, and still good enough to look forward to.
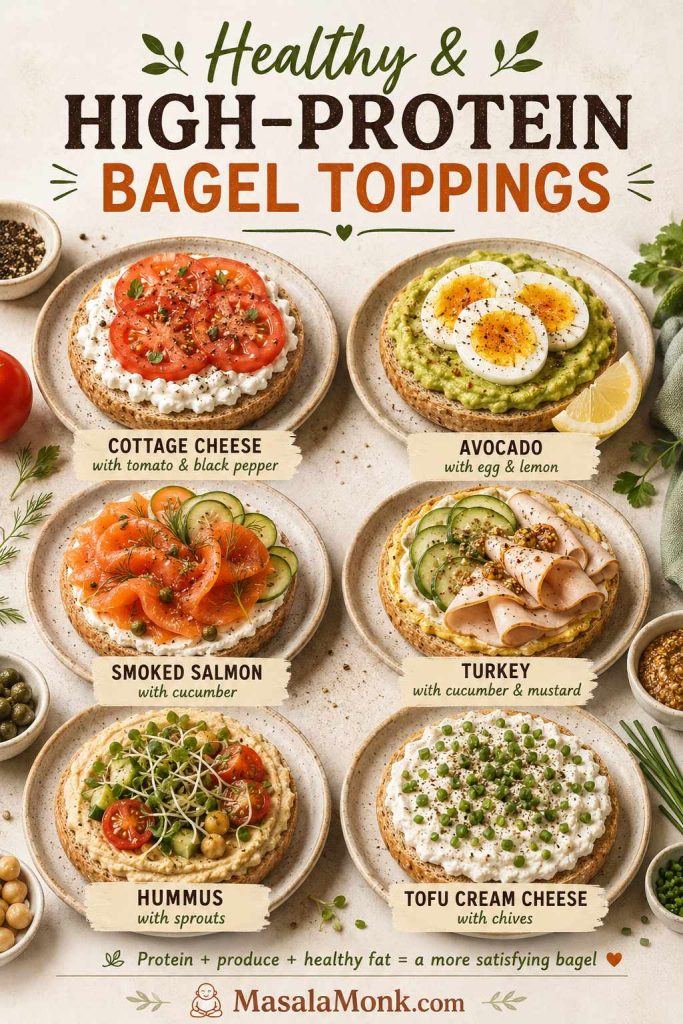
For dairy-free or higher-protein variations, tofu cream cheese, cashew cream cheese, white bean spread, egg whites, turkey slices, smoked salmon, and Greek yogurt-style spreads all work with the same spread-plus-finish formula.
Balanced bagel toppings for protein, produce, and healthy fats
| Idea | Why it feels balanced |
|---|---|
| Cottage cheese + tomato + pepper | Creamy, fresh, and high in protein |
| Avocado + egg + lemon | Rich, filling, and bright |
| Hummus + cucumber + sprouts | Dairy-free, crunchy, and easy |
| Smoked salmon + cucumber | Protein-rich and classic |
| Greek yogurt cream cheese | Tangier and lighter than a heavy spread |
| Tuna salad with Greek yogurt | More protein and less heaviness |
| Turkey + cucumber + mustard | Lean, savory, and crisp |
| Ricotta + berries | Sweet, creamy, and lighter than frosting-like spreads |
| White bean spread + tomato | Vegan, filling, and good with herbs |
| Tofu cream cheese + chives | Dairy-free and bagel-friendly |
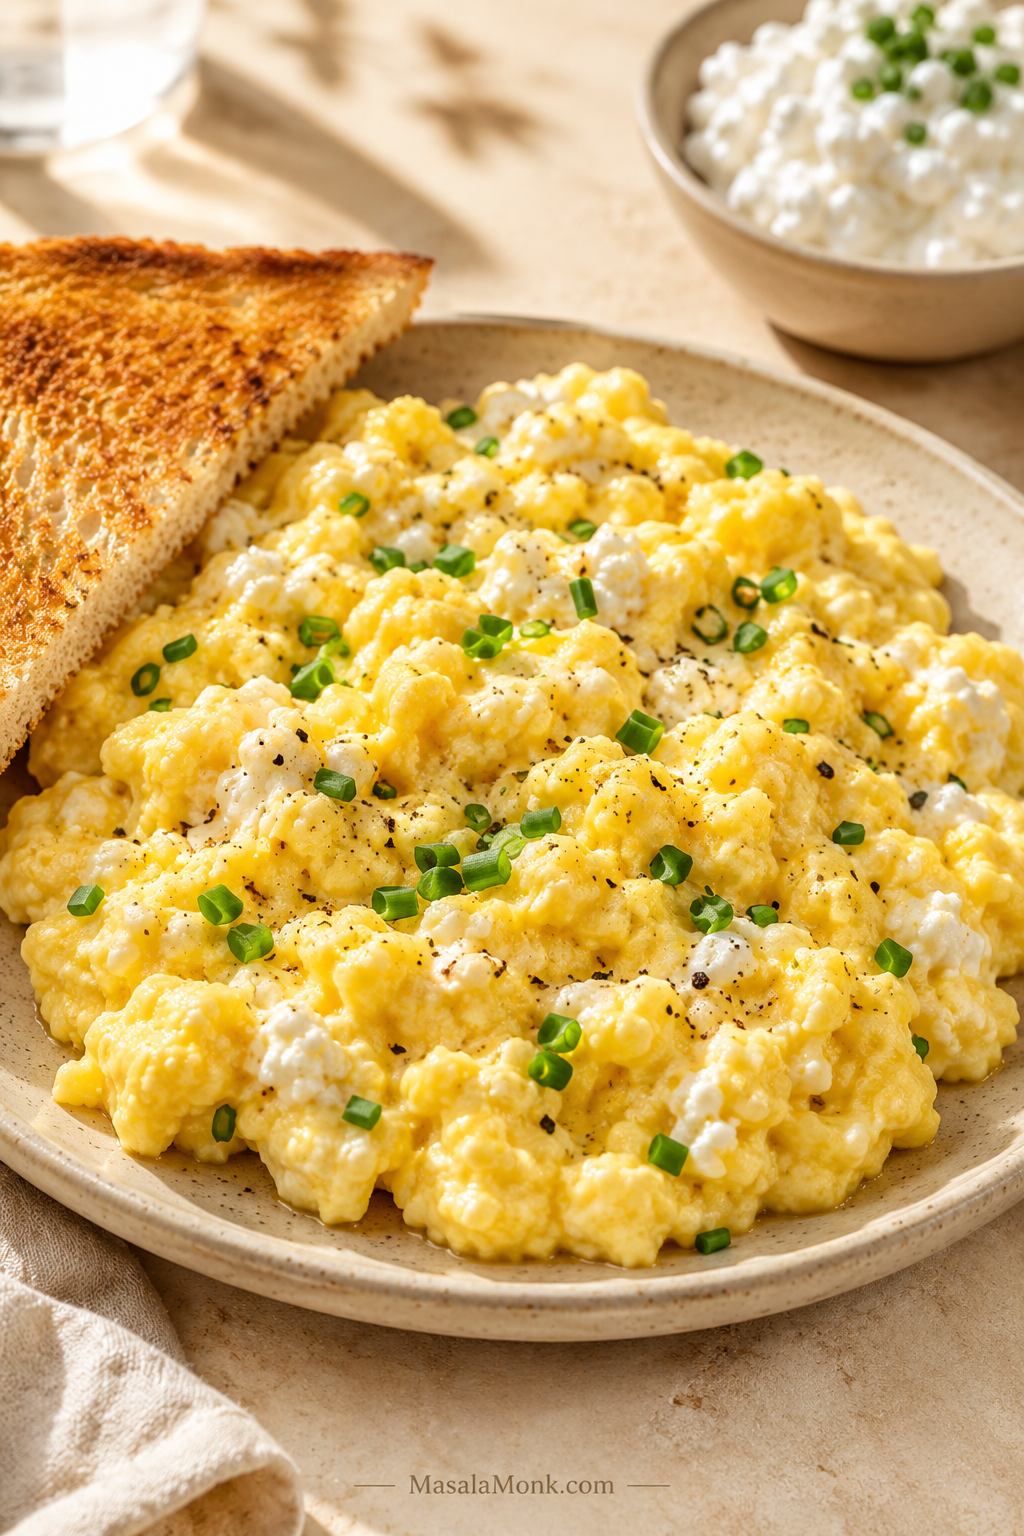
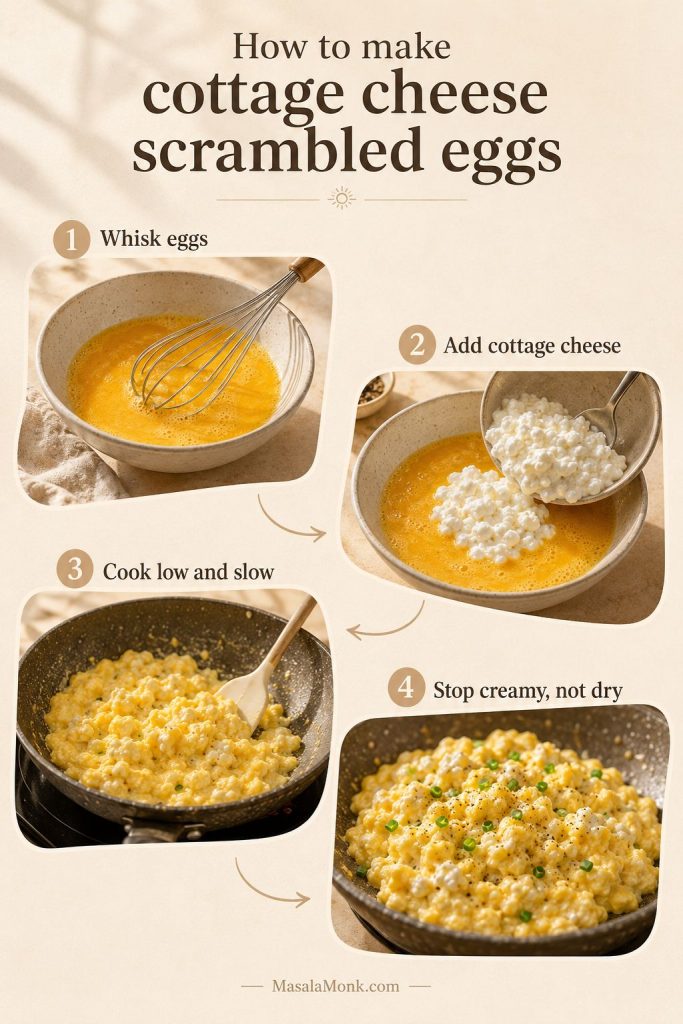
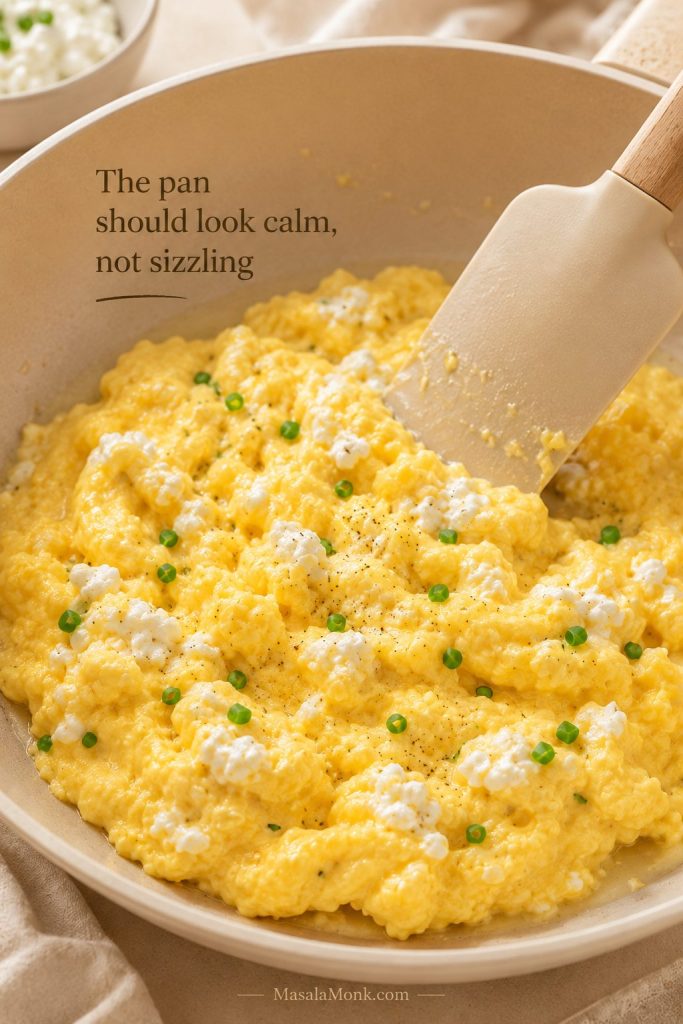
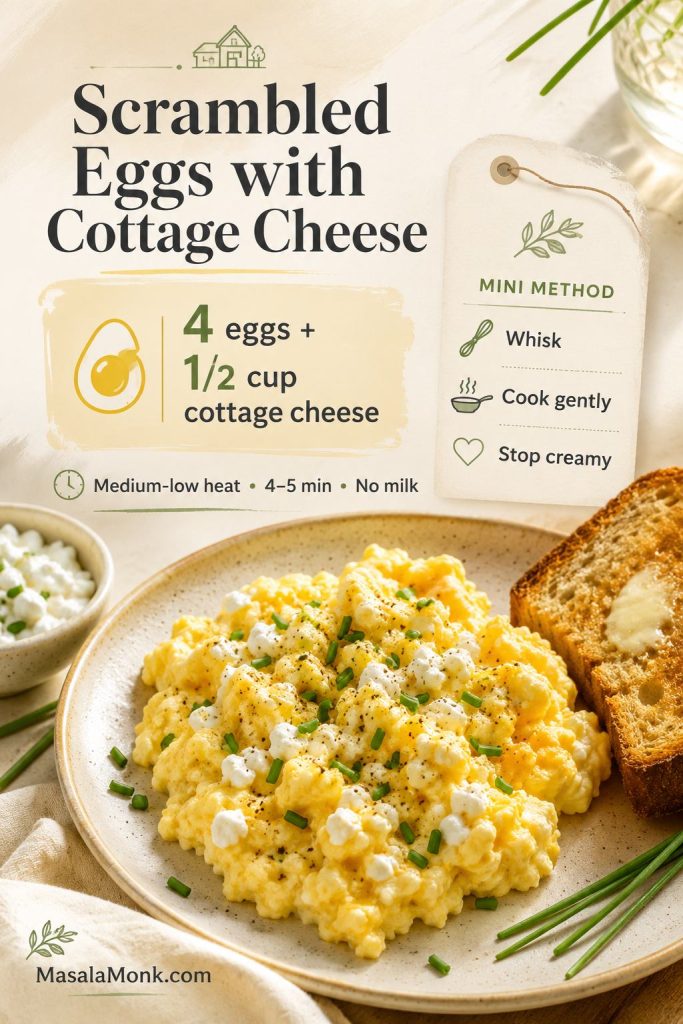
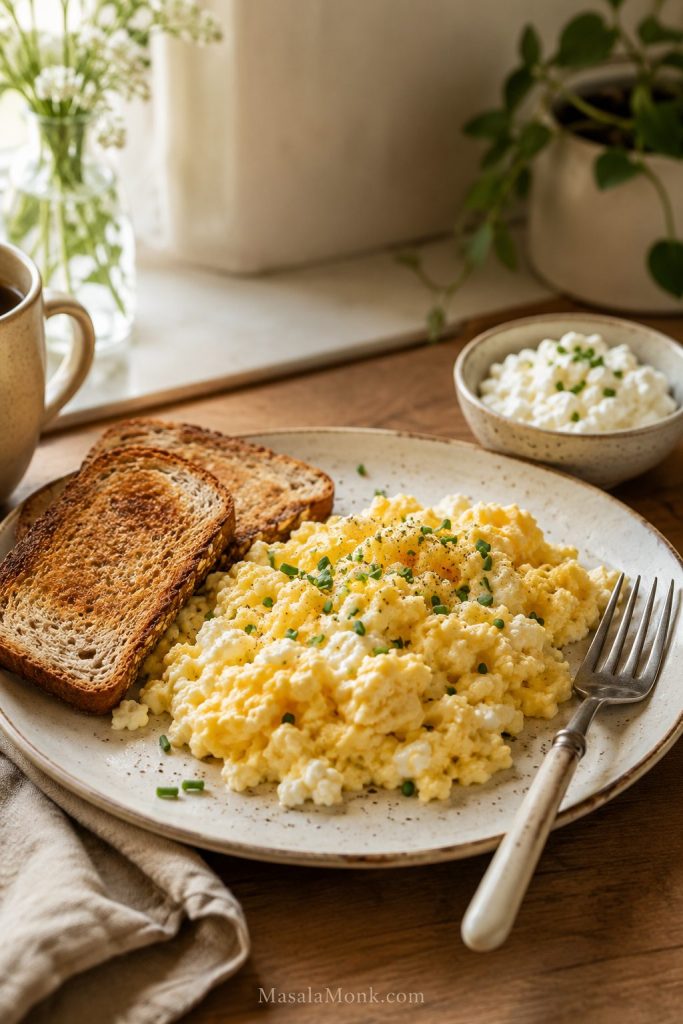
If you want a warmer high-protein breakfast bagel, spoon soft eggs over a toasted half and finish with chives, tomato, or hot sauce. These scrambled eggs with cottage cheese are especially useful when you want creamy eggs with more protein.
Balance tip: if the bagel itself is large, use an open-faced style. One bagel split into two halves with protein and vegetables often feels more satisfying than a closed sandwich overloaded with spread.
Vegan bagel toppings and spreads
Vegan bagel toppings do not need to feel like substitutes. A thick swipe of hummus with cucumber and paprika, avocado with lemon and everything seasoning, or white bean spread with roasted peppers can taste just as complete as a cream cheese bagel.
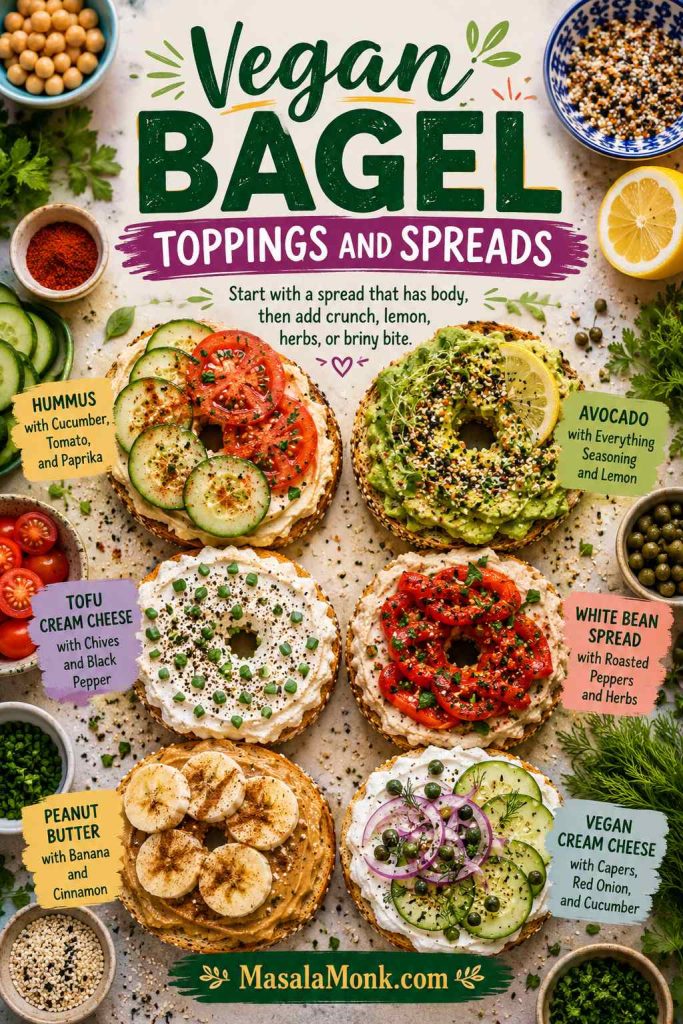
Start with a spread that already has body, then add something crisp, juicy, nutty, or briny. Hummus, avocado, tofu cream cheese, white bean spread, peanut butter, almond butter, jam, olive tapenade, and vegan cream cheese all give the bagel enough moisture before you add fresh toppings.
- Hummus + cucumber + tomato + paprika
- Avocado + everything seasoning + lemon
- Tofu cream cheese + chives + black pepper
- White bean spread + roasted peppers + herbs
- Peanut butter + banana + cinnamon
- Vegan cream cheese + capers + red onion + cucumber
How to Toast Bagels for Toppings and Boards
Because many toppings are wet, creamy, or warm, toasting matters more than it seems. A lightly toasted bagel is fine for butter and jam, but a bagel with cream cheese, tomato, egg, avocado, smoked salmon, or hummus needs a firmer surface.
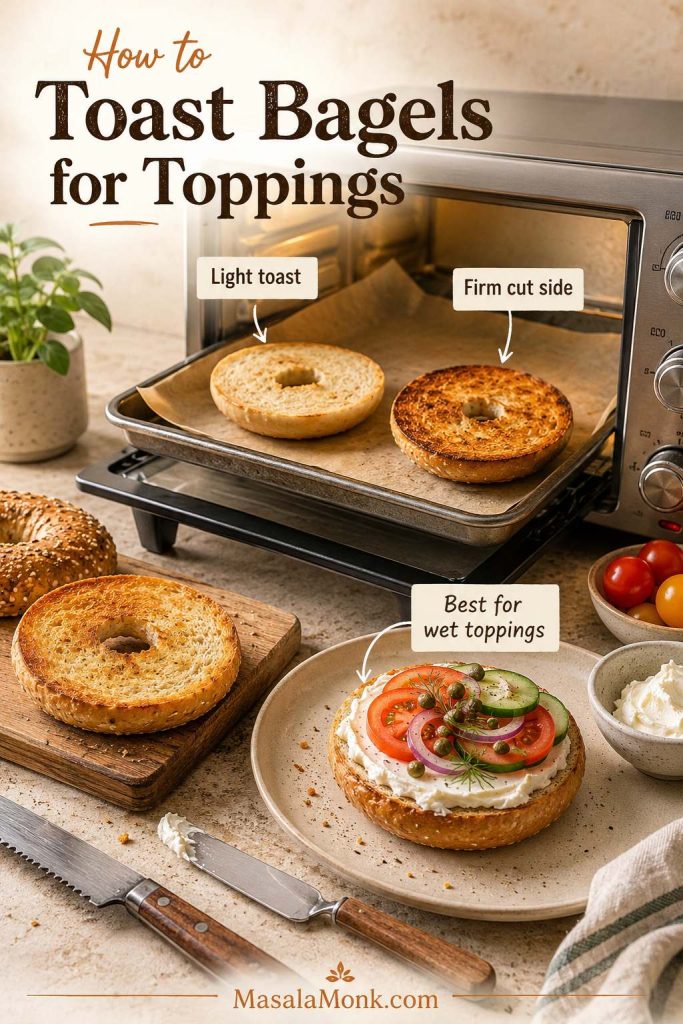
| Method | Time / temperature | Use it for |
|---|---|---|
| Regular toaster | 2–5 minutes, depending on toaster strength | Everyday bagels, breakfast bagels, cream cheese bagels |
| Toaster oven | 375°F / 190°C for 4–6 minutes, cut side up | Open-faced bagels and warm toppings |
| Bagel chips or small pieces | 375°F / 190°C for 8–10 minutes | Boards, dips, smoked salmon spread, cream cheese boards |
| Garlic-toasted bagel pieces | 400°F / 200°C for 8–10 minutes | Brunch boards, savory spreads, party trays |
For a soft-but-sturdy bagel, toast only the cut side. For a loaded open-faced bagel, toast a little longer so the surface can hold cream cheese, tomato, cucumber, avocado, or eggs without going soggy.
Day-old bagels only need enough heat to firm the cut side. Over-toasting makes thick schmear and dry toppings feel heavier.
Breakfast Bagel Ideas
For breakfast, the bagel needs to do a little more than taste good for five minutes. A spread plus protein — eggs, smoked salmon, cottage cheese, turkey, peanut butter, or Greek yogurt cream cheese — makes it feel more like a real meal.
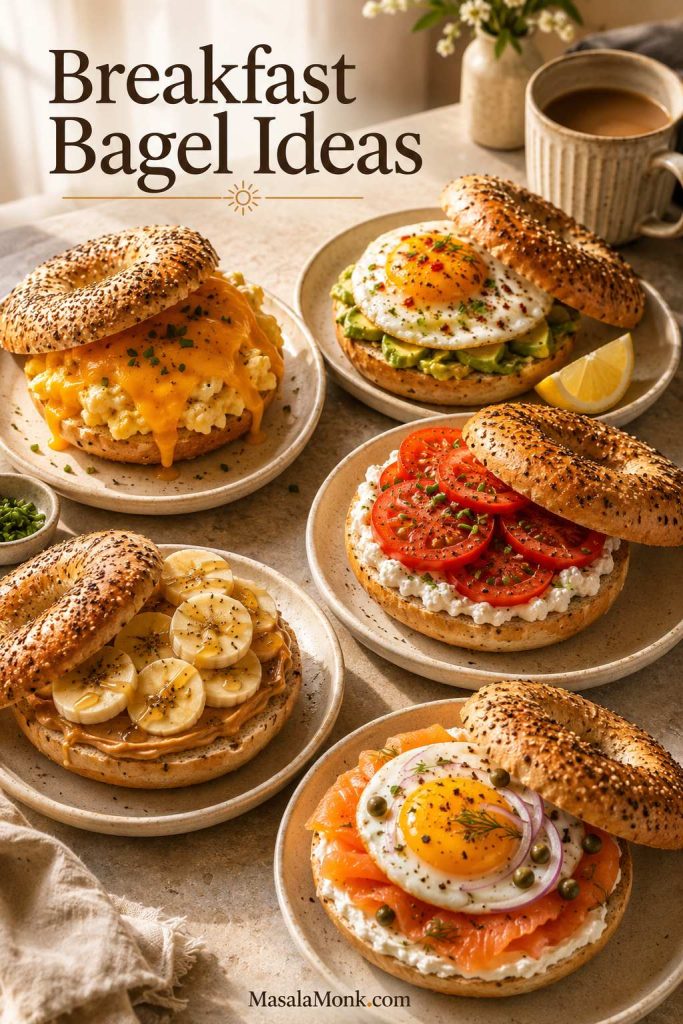
This is where a bagel is especially useful: it can hold eggs, cheese, avocado, hash browns, or smoked salmon without needing much cooking beyond the filling.
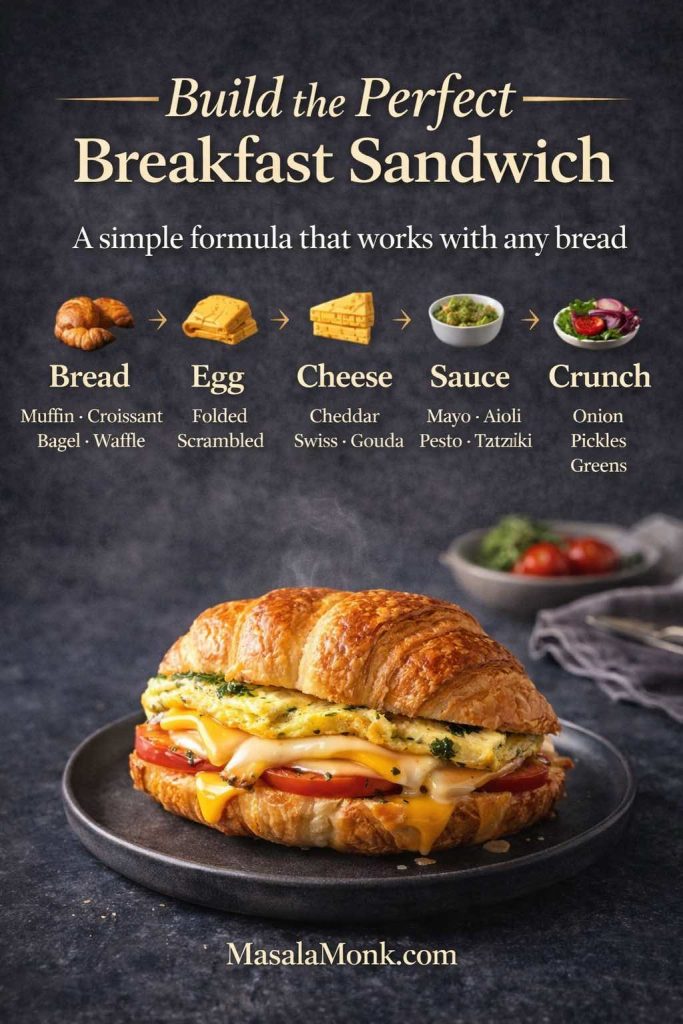
For more morning ideas, this breakfast sandwich recipe guide has more ways to build a hearty breakfast around eggs, cheese, spreads, and add-ons.
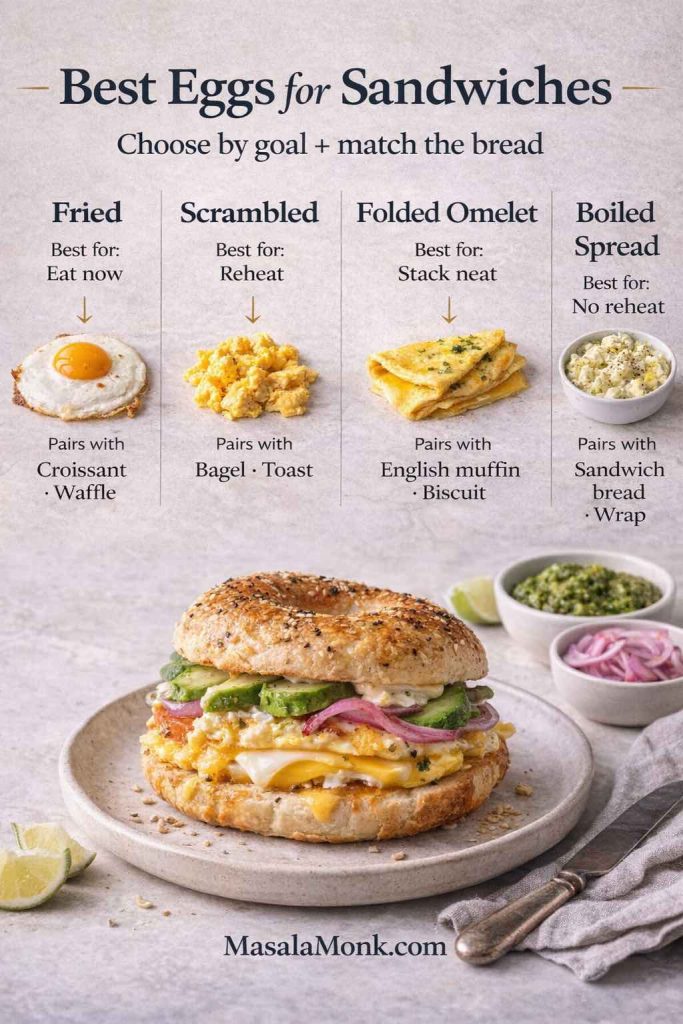
Basic egg and cheese bagel formula
| Ingredient | Amount for 1 bagel |
|---|---|
| Bagel | 1, split and toasted |
| Egg | 1–2 large eggs |
| Butter or oil | 1 tsp / 5 g |
| Cheese | 1 slice or ¼ cup shredded |
| Cream cheese, sauce, or avocado | 1–2 tbsp / 15–30 g |
| Fresh topping | Tomato, onion, herbs, spinach, or avocado |
Breakfast bagel combinations
- Bacon, egg, and cheese
- Egg, cheddar, avocado, and tomato
- Scrambled egg with scallion cream cheese
- Sausage, egg, and cheddar
- Smoked salmon, egg, dill, and cream cheese
- Peanut butter, banana, and honey
- Greek yogurt cream cheese, berries, and granola
- Hummus, egg, cucumber, and paprika
- Cottage cheese, tomato, black pepper, and chives
For smaller servings, see the kids’ bagel toppings or mini bagel toppings sections.
Bagel Toppings for Kids
For kids, keep the bagel toppings simple, familiar, and easy to hold. Cream cheese with jam, peanut butter with banana, butter with cinnamon sugar, strawberry cream cheese, egg and cheese, mini bagel pizzas, and Nutella with strawberries all work because they are flavorful without being hard to bite.
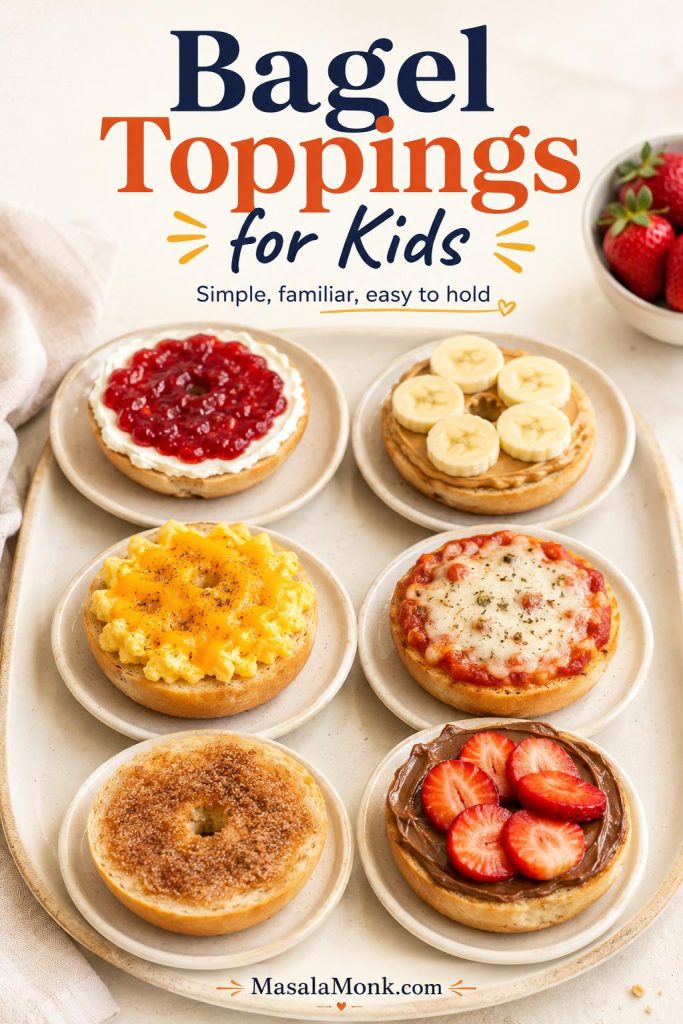
For a crisp diner-style breakfast bagel, add a small hash brown patty or a thin layer of crispy shredded potatoes with egg and cheese. This air fryer hash browns guide is useful when you want golden potatoes without babysitting a skillet.
Toasting tip: toast the cut sides well if you are adding egg, avocado, tomato, or warm fillings. A firmer toasted surface keeps the bagel from turning soggy.
Smoked Salmon, Lox, and Cream Cheese Bagels
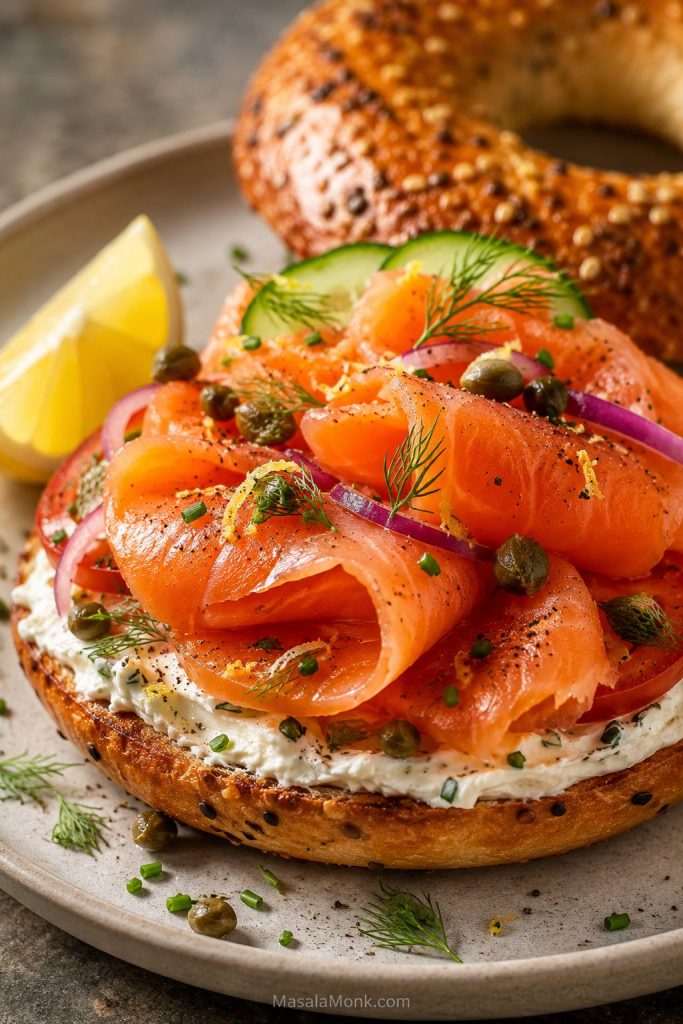
A smoked salmon bagel is one of the most reliable savory combinations because every piece has a job. Cream cheese adds richness, salmon adds salt and protein, cucumber or tomato adds freshness, capers add sharpness, onion adds bite, dill adds fragrance, and lemon wakes everything up.
Ideally, the best bites have cool cucumber, soft cream cheese, salty salmon, sharp onion, and a little lemon all at once. A smoked salmon bagel should taste like a deli order, not just fish on bread.
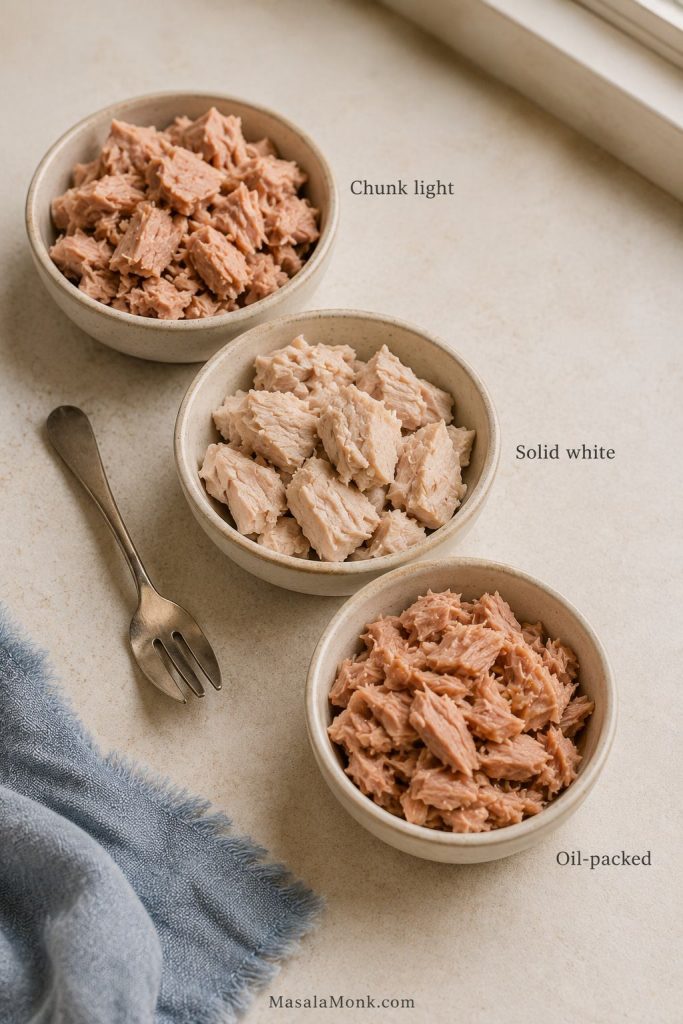
Smoked salmon vs lox vs gravlax: which one goes on a bagel?
People often use these names loosely, but they do not taste exactly the same. The best choice depends on whether you want smoky, salty, herbal, or flaky fish.
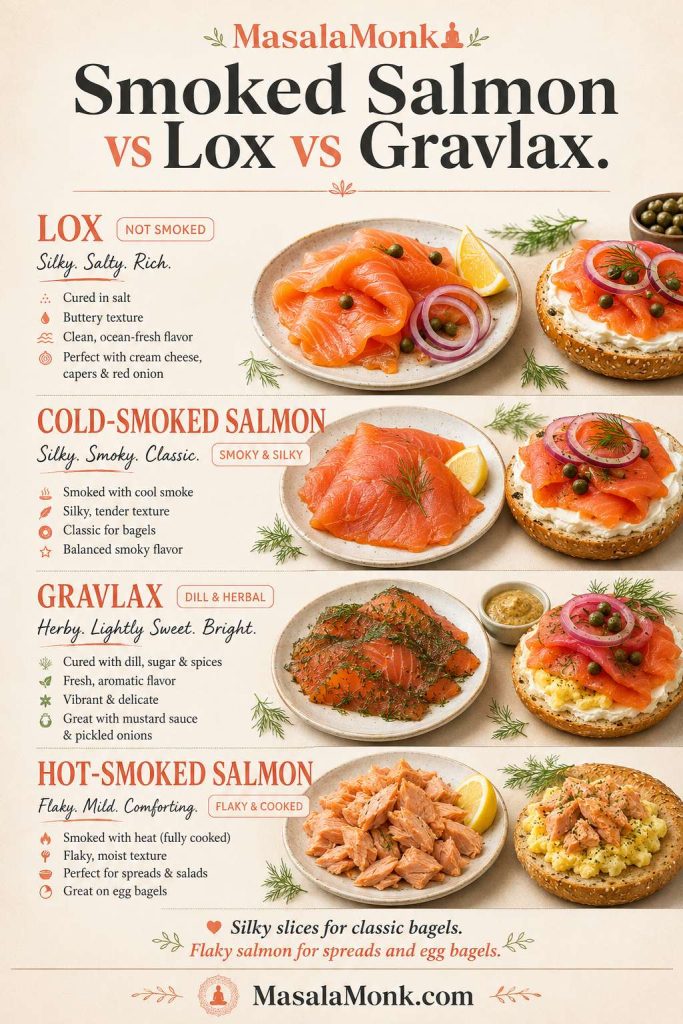
| Type | What it tastes like | Best bagel build |
|---|---|---|
| Smoked salmon | Silky or firmer depending on style, with a smoky flavor | Cream cheese, cucumber, red onion, capers, dill, lemon |
| Lox | Salty, silky, rich, and usually not smoky | Plain schmear, tomato or cucumber, red onion, capers |
| Gravlax | Herbal, slightly sweet, and dill-forward | Labneh or cream cheese, cucumber, dill, lemon zest |
| Hot-smoked salmon | Flaky, cooked-tasting, and more robust | Flaked into schmear, added to egg bagels, or served on brunch boards |
For the easiest first smoked salmon bagel, buy cold-smoked salmon or lox-style salmon if you want silky folds. Use hot-smoked salmon when you want a flakier, more filling brunch spread, egg bagel, or smoked salmon schmear. For a deeper breakdown of the terms, this Food & Wine guide to lox, gravlax, and smoked salmon explains how the curing and smoking methods differ.
One-bagel smoked salmon formula
| Ingredient | Amount |
|---|---|
| Bagel | 1, split and toasted |
| Cream cheese or schmear | 2–4 tbsp / 30–60 g |
| Smoked salmon or lox | 2–3 oz / 55–85 g |
| Capers | 1–2 tsp |
| Red onion | 3–5 thin rings or 1–2 tbsp sliced |
| Cucumber or tomato | 4–6 thin slices |
| Dill or chives | 1–2 tsp |
| Lemon | 1 wedge or ½ tsp zest |
Serving smoked salmon for a group? Use the bagel bar quantities and keep the storage tips in mind so the salmon stays chilled.
How to layer a smoked salmon bagel
Layering matters because the smallest toppings are the easiest to lose; press them into the schmear before adding larger salmon folds.
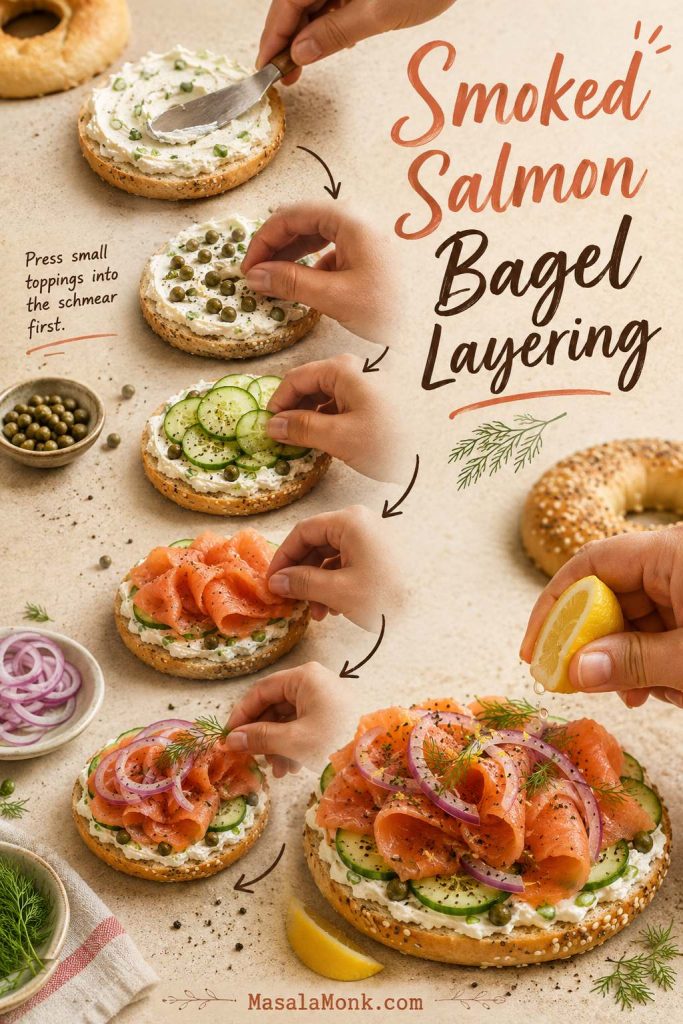
- Toast the bagel and let it cool for a minute so the spread does not melt immediately.
- Spread cream cheese or scallion schmear on both cut sides.
- Press capers lightly into the creamy layer.
- Add cucumber or tomato if using.
- Layer smoked salmon in loose folds instead of flat sheets.
- Finish with red onion, dill, black pepper, and lemon.
Loose folds of salmon make the bagel feel fuller without needing a huge amount of fish. For a softer, spreadable version, chop smoked salmon and fold it into the schmear base with dill, lemon zest, and chives. This is especially useful for a bagel bar because guests can spread it quickly without pulling apart delicate salmon slices.
If you have extra smoked salmon, cucumber, avocado, or lemony sauce after brunch, turn the same flavors into a simple bowl later. This salmon bowl recipe includes a no-cook smoked salmon direction with cucumber, avocado, and a bright yogurt-style sauce.
Best Bagel Toppings by Bagel Type
At this point, bagel choice really matters. A cinnamon raisin bagel needs a different topping than an everything bagel, and a pumpernickel bagel can handle stronger, saltier flavors.
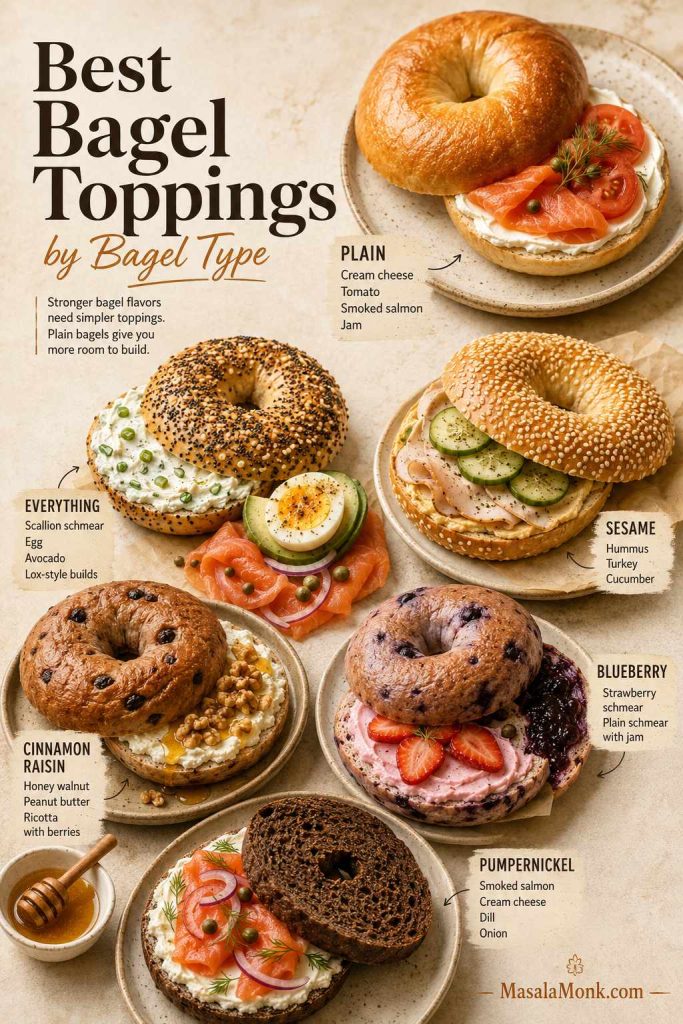
Because stronger bagels already have personality, the topping should usually be simpler. Everything, onion, cheese, cinnamon raisin, blueberry, and pumpernickel bagels bring flavor on their own; plain and whole wheat bagels give you more room to build.
If the bagel is already salty or garlicky, keep the spread calmer and let the toppings do less work. If the bagel is sweet, use tangy, creamy, or lightly salted toppings so the whole bite does not become sugary.
| Bagel type | Toppings that pair well |
|---|---|
| Plain | Any cream cheese, smoked salmon, egg, avocado, butter, jam |
| Everything | Scallion cream cheese, lox, egg and cheese, avocado, hummus |
| Sesame | Hummus, smoked salmon, turkey, cucumber, peanut butter |
| Poppy seed | Cream cheese, lox, egg salad, tuna salad |
| Cinnamon raisin | Butter, honey walnut cream cheese, peanut butter, apple, ricotta |
| Whole wheat | Hummus, avocado, turkey, cottage cheese, tuna, egg |
| Onion | Cream cheese, tomato, egg, bacon, deli turkey |
| Asiago or cheese | Egg, bacon, tomato, garlic herb cream cheese, turkey |
| Blueberry | Plain cream cheese, strawberry cream cheese, butter, honey, ricotta |
| Pumpernickel | Smoked salmon, horseradish cream cheese, cucumber, dill |
When in doubt, let the bagel lead. Plain and whole wheat bagels are flexible; everything, onion, cheese, blueberry, cinnamon raisin, and pumpernickel bagels already have a point of view.
Bagel Bar Toppings, Spreads, and Brunch Board Quantities
A bagel bar should feel generous without becoming chaotic. You do not need every topping on the table at once; you need the right mix of bagels, spreads, proteins, fresh toppings, and small bowls that are easy to refill.
This is low-pressure brunch food. Instead of cooking every guest a separate breakfast, you are giving everyone enough good pieces to build the bagel they actually want.
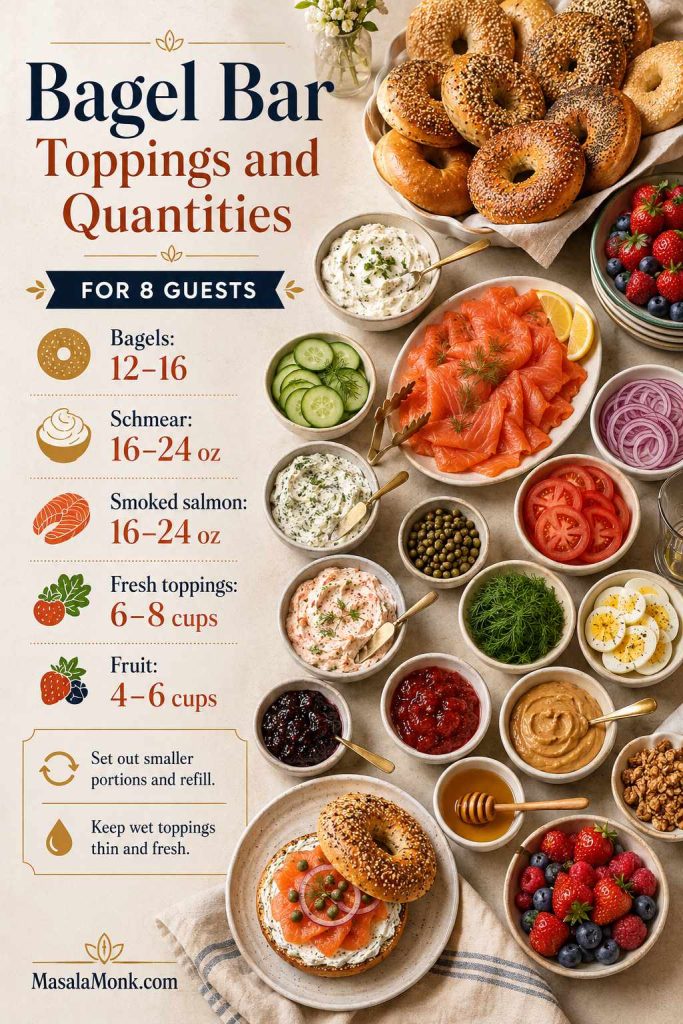
How many bagels per person?
| Serving style | Bagels per person | Good for |
|---|---|---|
| Light brunch | 1 bagel | When serving fruit, salad, eggs, pastries, or sides |
| Main meal | 1½ bagels | Hungry guests or fewer side dishes |
| Mini bagels | 2 mini bagels | Grazing boards and mixed toppings |
Bagel bar quantity table
The bagels are easy. The part people misjudge is the spread, salmon, and fresh toppings. A good board should look full when it lands on the table, but still be easy to refill without everything getting wet or messy.
The exact mix depends on your crowd, but these numbers keep you from underbuying the expensive parts and overbuying the things that wilt or get soggy. If your guests love smoked salmon, eggs, or thick cream cheese, round up slightly.
Sliced fresh toppings means cucumber, tomato, onion, radish, lettuce, herbs, fruit, or similar add-ons.
For make-ahead timing, use the storage and prep guide so schmear, salmon, sliced vegetables, and bagels stay fresh.
Mini Bagel Toppings for Brunch Boards and Kids
Mini bagels work best with toppings that do not slide around. Use thick schmears, small slices, and easy spreads so guests can pick them up without losing half the topping on the board.
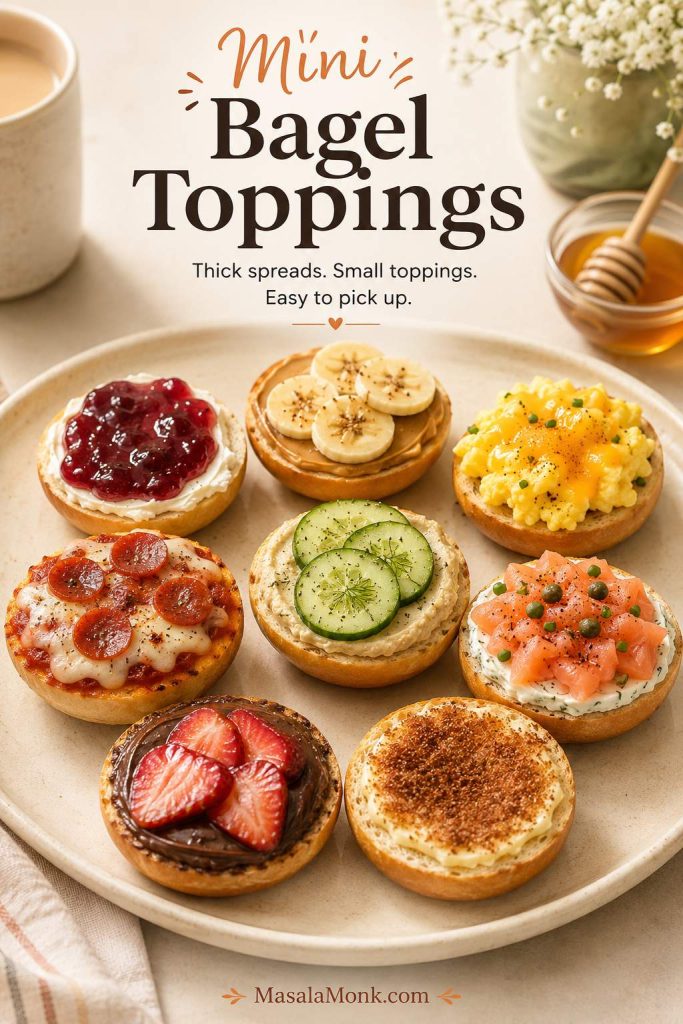
- Cream cheese + jam
- Peanut butter + banana
- Egg + cheese
- Mini pizza bagels
- Hummus + cucumber
- Smoked salmon chopped into schmear
- Nutella + strawberries
- Butter + cinnamon sugar
| Guests | Bagels | Cream cheese / spreads | Smoked salmon | Sliced fresh toppings |
|---|---|---|---|---|
| 2 | 2–3 | 4–6 oz / 115–170 g | 4–6 oz / 115–170 g | 1–2 cups |
| 4 | 4–6 | 8–12 oz / 225–340 g | 8–12 oz / 225–340 g | 3–4 cups |
| 8 | 8–12 | 16–24 oz / 450–680 g | 1–1½ lb / 450–680 g | 6–8 cups |
| 12 | 12–18 | 24–32 oz / 680–900 g | 1½–2 lb / 680–900 g | 8–12 cups |
What to put on a bagel bar
- Bagels: plain, everything, sesame, whole wheat, cinnamon raisin, poppy, mini bagels
- Spreads: plain cream cheese, scallion schmear, garlic herb cream cheese, honey walnut cream cheese, hummus, butter, jam
- Proteins: smoked salmon, hard-boiled eggs, scrambled eggs, bacon, turkey, tuna salad, egg salad
- Fresh toppings: cucumber, tomato, red onion, avocado, radish, lettuce, sprouts, herbs
- Finishes: capers, lemon wedges, everything seasoning, flaky salt, black pepper, chili flakes, honey
- Sweet side: berries, banana slices, apple slices, Nutella, peanut butter, cinnamon sugar
The board should look abundant, but it should still feel easy to use: spreads in bowls, wet toppings contained, bagels sliced, and the brightest ingredients where people can see them.
For the egg option on a bagel bar, cook the eggs ahead and slice them right before serving. This air fryer hard-boiled eggs guide is handy when you want easy peeled eggs for brunch plates, toast, deviled eggs, or snack boards.
Bagel bar equipment
- Large board, tray, platter, or sheet pan
- Small bowls or ramekins for capers, onions, jams, nuts, and seasonings
- Spreader knives for each cream cheese flavor
- Serrated knife for slicing bagels
- Toaster or toaster oven
- Serving spoons and small tongs
- Parchment paper for easy cleanup
- Airtight containers for make-ahead spreads
For a bagel bar, smaller bowls are not just prettier. They keep wet toppings from soaking into the bread and make the board easier to refill.
Hosting tip: do not put every topping directly on the board if it will make things wet. Keep capers, jams, honey, pickled onions, and chopped herbs in small bowls so guests can build cleaner bagels.
Make-Ahead, Storage, and Food Safety
Most bagel toppings are easy to prep ahead. However, they do not all hold the same way. Cream cheese spreads are great make-ahead items, while sliced tomatoes, cucumbers, avocado, and toasted bagels are better closer to serving time.
To keep a bagel bar calm, prep the sturdy things early and leave the wet, fresh, or delicate things for last.
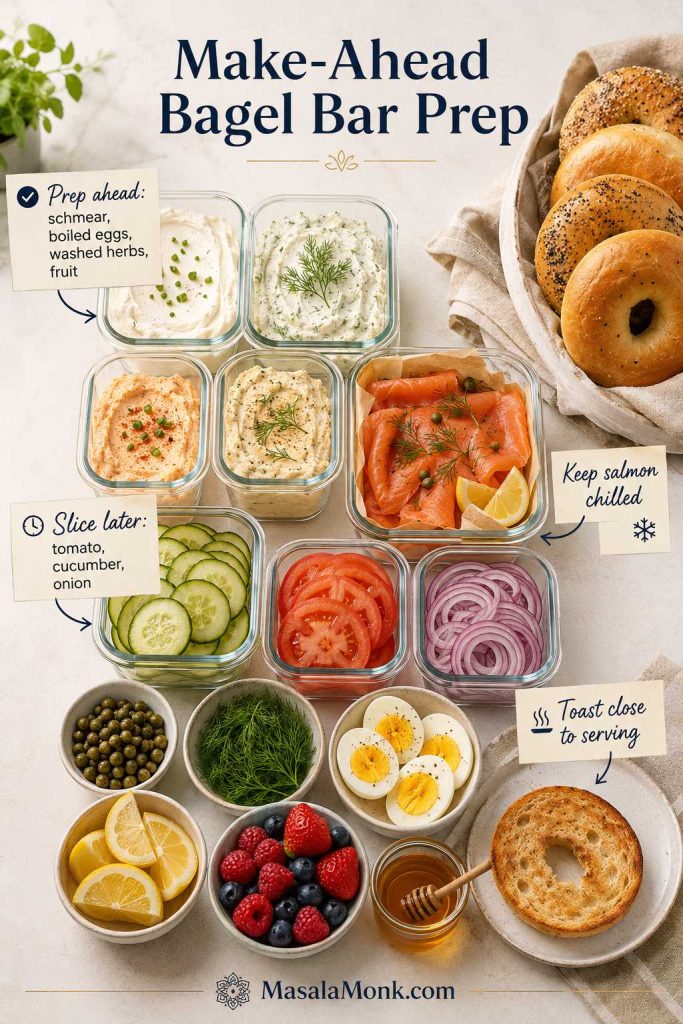
Storage guide
| Item | Best storage |
|---|---|
| Plain schmear | About 5–7 days refrigerated in an airtight container |
| Flavored cream cheese | Best within 3–5 days |
| Smoked salmon cream cheese | Best within 2–3 days, or sooner if the smoked salmon package says so |
| Cut tomatoes and cucumbers | Best same day; pat dry before serving |
| Pickled onions | 3–5 days refrigerated |
| Toasted bagels | Best fresh |
| Frozen bagels | Slice first, then freeze in a sealed bag |
What to prep ahead
- 1 day ahead: schmear flavors, pickled onions, boiled eggs, washed herbs, washed fruit
- Morning of serving: slice tomatoes, cucumbers, onions, radishes, fruit, and bagels
- Right before serving: toast bagels, slice avocado, arrange smoked salmon, add lemon wedges
How long can a bagel bar sit out?
If your bagel bar includes cream cheese, smoked salmon, eggs, meat, or cut produce, keep everything chilled until serving. According to FDA food safety guidance, perishable foods that need refrigeration should not sit at room temperature for more than 2 hours, or more than 1 hour when the temperature is above 90°F / 32°C.
During a longer brunch, set out smaller portions and refill from the refrigerator as needed. That keeps the board fresher and the toppings do not sit out longer than they should.
Recipe Card: Easy Bagel Schmear with 6 Flavor Variations
Use this as the base recipe for the schmear ideas above. It starts with softened cream cheese, a little sour cream or Greek yogurt, lemon, and salt, then turns into sweet or savory flavored cream cheese.
Equipment
- Medium mixing bowl
- Hand mixer, stand mixer, or sturdy spoon
- Rubber spatula
- Measuring spoons
- Airtight container
Ingredients
- 8 oz / 225 g brick cream cheese, softened
- 2 tbsp / 30 g sour cream, Greek yogurt, or crème fraîche
- ½ tsp / 2.5 ml fresh lemon juice
- Pinch to ⅛ tsp fine salt, to taste
- Black pepper, optional
Instructions
- Add softened cream cheese to a mixing bowl.
- Beat until smooth, creamy, and slightly lighter.
- Add sour cream, Greek yogurt, or crème fraîche.
- Add lemon juice and salt, then mix again until spreadable.
- Fold in one flavor variation from the list below.
- Taste and adjust with more lemon, salt, herbs, honey, or seasoning as needed.
- Chill for 1 hour if you want the flavor to deepen.
- Store refrigerated in an airtight container.
Six Easy Flavor Variations
| Variation | Add to the base schmear |
|---|---|
| Scallion schmear | ¼ cup sliced scallions or chives + black pepper |
| Garlic herb schmear | 1 small grated garlic clove + 2 tbsp chopped herbs + lemon zest |
| Smoked salmon dill schmear | 3–4 oz / 85–115 g chopped smoked salmon + dill + lemon |
| Jalapeño cheddar schmear | 1 minced jalapeño + ½ cup shredded cheddar + scallion |
| Honey walnut schmear | 2 tbsp honey + ¼ cup chopped walnuts + pinch of cinnamon |
| Strawberry cream cheese | 2–3 tbsp strawberry jam or ½ cup chopped berries + 1 tbsp powdered sugar if needed |
Notes
- Use brick-style cream cheese for the thickest, creamiest result.
- Greek yogurt makes the schmear tangier; sour cream makes it softer and richer.
- Add salty mix-ins slowly. Smoked salmon, capers, bacon, cheddar, and everything seasoning can make the spread salty fast.
- For a bagel bar, make 2–3 different schmear flavors so guests can build sweet and savory bagels.
- For a full bagel build, pair this schmear with one main topping, one crunchy or fresh topping, and one finishing detail such as lemon, pepper, herbs, honey, or flaky salt.
Still deciding? Start with the bagel type, then choose the spread. Plain bagels give you the most freedom, everything bagels want creamy or savory toppings, and sweet bagels usually need something tangy, salty, or nutty to stay balanced.
FAQs About Bagel Toppings and Spreads
What are the most popular bagel toppings?
The most popular bagel toppings are cream cheese, butter, jam, smoked salmon or lox, capers, red onion, egg and cheese, avocado, peanut butter, tuna salad, egg salad, hummus, tomato, cucumber, and everything bagel seasoning. However, the best choice depends on the bagel itself: plain bagels can take almost anything, while everything, cinnamon raisin, blueberry, and pumpernickel bagels usually need more thoughtful pairings.
What goes on a bagel besides cream cheese?
For a simple breakfast bagel, use butter or jam. For a savory dairy-free option, choose hummus or white bean spread; for something filling, use avocado or eggs; and for sweet or high-protein builds, try ricotta, cottage cheese, peanut butter, or almond butter. Tuna salad, egg salad, turkey, smoked salmon, pesto, goat cheese, honey, Nutella, and fresh fruit also work when the spread and toppings support each other.
What is schmear?
Schmear usually means a spread for bagels, especially cream cheese. In everyday bagel-shop language, asking for a schmear usually means you want a generous layer of cream cheese, not a thin scrape. A good homemade schmear is softer and easier to spread because it is mixed until creamy and sometimes loosened with sour cream, Greek yogurt, crème fraîche, lemon, herbs, or seasonings.
What is the best spread for an everything bagel?
Everything bagels pair especially well with scallion cream cheese, plain schmear, lox spread, garlic herb cream cheese, avocado, egg, hummus, or tuna salad. Since the bagel already has garlic, onion, sesame, poppy, and salt, the spread can stay simple.
What goes best on a plain bagel?
Plain bagels are the most flexible because they do not compete with the toppings. Use them when you want the spread or filling to stand out: scallion schmear, smoked salmon, egg and cheese, avocado, butter and jam, hummus with cucumber, ricotta and honey, or peanut butter with banana.
What goes best on an everything bagel?
Everything bagels already bring garlic, onion, sesame, poppy, and salt, so the best toppings are creamy, fresh, or protein-rich rather than heavily seasoned. Scallion cream cheese, smoked salmon, egg and cheese, avocado, hummus, tuna salad, cucumber, and plain spread with tomato all work because they support the seasoning instead of fighting it.
What goes best on a cinnamon raisin bagel?
Cinnamon raisin bagels are already sweet and spiced, so they usually need tangy, creamy, nutty, or lightly salted toppings. Plain cream cheese, butter, peanut butter, ricotta, honey walnut schmear, apple slices, and a small pinch of flaky salt all keep the sweetness from feeling too heavy.
What goes best on a blueberry bagel?
Blueberry bagels work best with toppings that either sharpen the fruit or keep it creamy. Try plain schmear, lemon cream cheese, strawberry cream cheese, butter, ricotta, mascarpone, honey, fresh berries, or almond butter.
What are good sweet bagel toppings?
Good sweet bagel toppings include cream cheese and jam, honey walnut cream cheese, peanut butter and banana, almond butter and apple, ricotta and honey, Nutella and strawberries, butter and cinnamon sugar, mascarpone with berries, and Greek yogurt cream cheese with granola. That said, a pinch of salt, lemon zest, cinnamon, or toasted nuts helps sweet toppings taste more complete.
What are healthy bagel toppings?
The healthiest bagel toppings are usually the ones that add protein, produce, or healthy fat instead of only more spread. Eggs, avocado, smoked salmon, hummus, cottage cheese, Greek yogurt cream cheese, turkey, tuna, tofu cream cheese, white bean spread, cucumber, tomato, sprouts, herbs, and fresh fruit can all make a bagel more satisfying.
How much cream cheese do you need per bagel?
Use about 2 tbsp / 30 g for a light layer, 3 tbsp / 45 g for a normal breakfast bagel, and 4 tbsp / 55–60 g for a thick deli-style schmear. For open-faced bagel halves, use 1–2 tbsp / 15–30 g per half.
Should bagels be toasted before adding toppings?
Toast bagels when the toppings are wet, creamy, warm, or heavy. A firmer cut side helps hold cream cheese, tomato, cucumber, eggs, avocado, hummus, tuna salad, and smoked salmon without turning soggy.
How do you keep bagel toppings from sliding off?
Use the spread as glue, slice toppings thinly, and press small toppings like capers, scallions, herbs, seeds, or everything seasoning into the creamy layer. If the build is tall, wet, or slippery, serve the bagel open-faced instead of closing it.
How long can a bagel bar sit out?
A bagel bar with cream cheese, smoked salmon, eggs, meat, or cut produce should not sit out for more than 2 hours. In hot weather above 90°F / 32°C, keep it to 1 hour. For longer gatherings, set out smaller portions and refill from the refrigerator.
Final Thoughts
Ultimately, a better bagel does not always need more toppings. Often, it needs one smarter finishing detail: lemon on smoked salmon, flaky salt on tomato, cinnamon with peanut butter, herbs in cream cheese, or cucumber with hummus.
Start with the spread, then let the rest of the bagel answer one simple question: what would make this bite more satisfying? A plain bagel with cream cheese and tomato may only need black pepper and flaky salt. A smoked salmon bagel comes alive with capers, onion, dill, and lemon. Peanut butter feels more finished with banana, cinnamon, and a tiny pinch of salt.
Once you know the rhythm, almost any bagel in the kitchen can become something worth sitting down for: a fast breakfast, a proper lunch, a sweet snack, or a brunch board that feels generous without being complicated.