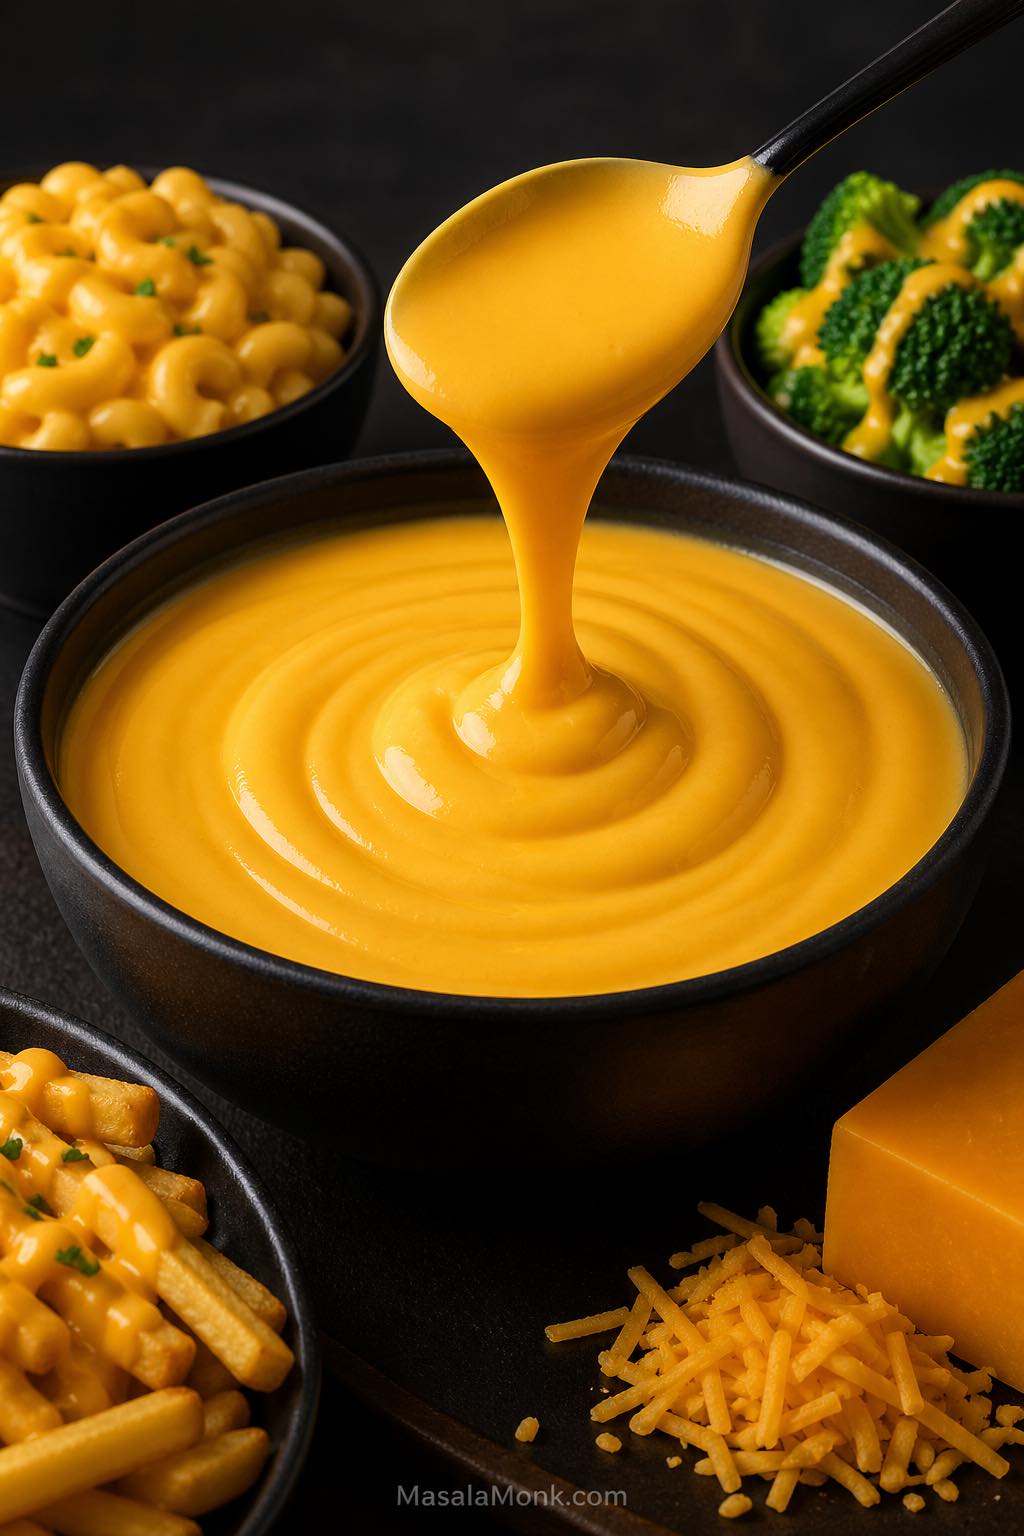
A good cheese sauce recipe should give you a smooth, creamy, cheesy sauce that is easy to control. It should work for mac and cheese, broccoli, cauliflower, fries, baked potatoes, pasta, nachos, pretzels, burgers, rice bowls, and casseroles without turning grainy, oily, lumpy, or gluey.
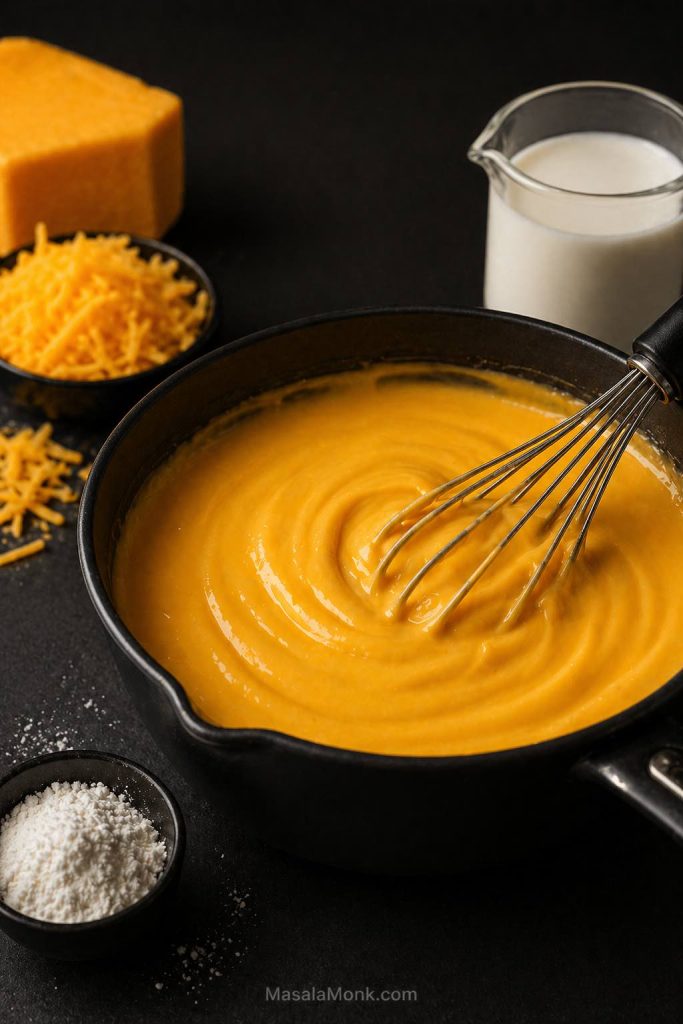
This easy cheese sauce recipe uses a simple butter-flour roux, milk, and freshly grated cheddar. The method is quick, but the details matter: cook the roux long enough, add the milk slowly, remove the pan from heat before adding cheese, and adjust the texture based on how you plan to serve it.
The main recipe turns cheddar cheese, milk, butter, and flour into a medium-thick sauce for vegetables, fries, potatoes, sandwiches, and pasta. It tastes fresher than a jarred sauce because it starts from scratch with real ingredients. From there, you can adapt the same base for mac and cheese, broccoli, cauliflower, pasta, nachos, no-flour sauce, gluten-free sauce, keto sauce, microwave sauce, thicker dips, thinner drizzles, and reheated leftovers.
Cheese Sauce Guide
Use this guide to make a smooth basic cheese sauce first, then adjust the texture, ingredients, and method for the way you want to serve it.
Make the Sauce
Adjust the Sauce
Quick Answer: How to Make Cheese Sauce
To make a smooth cheese sauce, melt butter, whisk in flour, cook the roux briefly, then slowly whisk in milk. Once the base thickens, remove the pan from heat and stir in freshly grated cheddar until melted.
The most important step is adding the cheese away from direct heat. That way, the sauce stays creamy instead of turning grainy, oily, or separated.
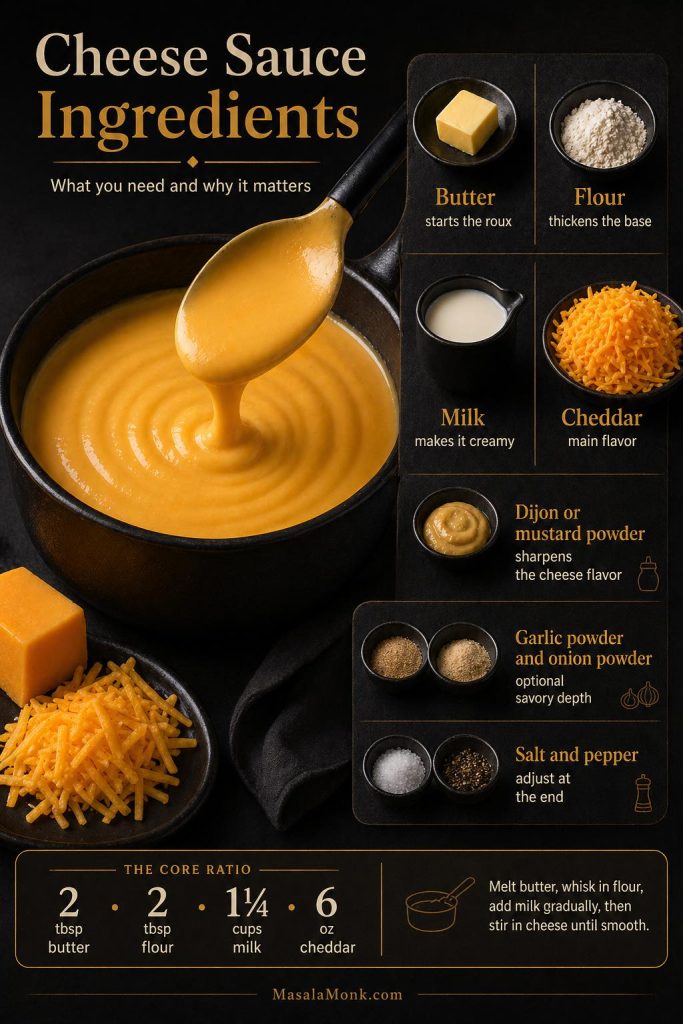
For a reliable all-purpose sauce, this recipe uses 2 tablespoons butter, 2 tablespoons flour, 1¼ cups milk, and 6 ounces freshly grated cheddar cheese. That gives you a medium-thick sauce for mac and cheese, broccoli, cauliflower, baked potatoes, fries, pasta, and nachos-style drizzling.
The smooth sauce rule: thicken the milk base first, then turn off the heat before adding cheese. Cheese does not need hard boiling to melt. Gentle residual heat is enough.
At a Glance
At a glance: This cheese sauce recipe makes about 2 cups / 480 ml / 0.48 L of smooth cheddar sauce in about 12 minutes. It uses 2 tbsp butter, 2 tbsp flour, 1¼ cups / 300 ml milk, and 6 oz / 170 g cheddar cheese. Keep it thick for broccoli, fries, potatoes, and sandwiches, or thin it with warm milk for pasta, mac and cheese, and rice bowls.
Practically speaking, that means you can start with one reliable base and adjust it without guessing. The same cheese sauce can stay thick for fries, loosen into a pasta coating, cover broccoli and cauliflower, or shift into a no-flour version with one small method change.
Why This Cheese Sauce Recipe Works
This recipe works because the cheese is added to a thickened milk sauce instead of being melted directly over high heat. As a result, the cheddar has a smoother base to melt into and the finished sauce is easier to control.
The butter and flour create a smooth base, the milk gives the sauce enough moisture, and the cheddar melts in gently after the pan comes off the heat. The same butter-flour-milk logic also shows up in béchamel sauce. Here, however, the base becomes richer because cheddar cheese is stirred in at the end.
That order matters. When cheese is boiled too hard, the sauce can turn grainy, oily, or separated. With a thickened milk base, though, the cheese has a smoother place to melt.
For a homemade cheese sauce, the goal is not just melting cheese. The recipe needs enough liquid, enough thickening power, and gentle heat so the sauce stays smooth after the cheddar melts.
This recipe also starts with a medium-thick texture on purpose. It is thick enough for vegetables, fries, potatoes, and sandwiches, while still being easy to loosen with warm milk or pasta water when you want a thinner sauce for noodles, mac and cheese, or rice bowls.
Cheese Sauce Ingredients
Although this recipe uses basic ingredients, each one has a specific job. The butter and flour create the thickened base, the milk makes it creamy, and the cheddar cheese gives the sauce its main flavor.
Main Ingredients and What They Do
| Ingredient | Amount | Why it matters |
|---|---|---|
| Unsalted butter | 2 tbsp / 28 g / 1 oz | Combines with flour to make the roux. Salted butter works too, but reduce added salt. |
| All-purpose flour / plain flour | 2 tbsp / 16–18 g / 0.6 oz | Thickens the milk and helps stabilize the sauce so the cheese melts smoothly. Do not use self-rising flour. |
| Whole milk | 1¼ cups / 300 ml / 10 fl oz / 0.3 L | Gives the sauce body and creaminess. Whole milk gives the smoothest everyday result. |
| Freshly grated cheddar cheese | 6 oz / 170 g / about 1½ cups | The main cheese. Medium cheddar is the easiest default; sharp cheddar gives stronger flavor. |
| Dijon mustard or mustard powder | 1 tsp Dijon / 5 ml, or ¼ tsp mustard powder / about 1 g | Optional, but it sharpens the flavor and makes the sauce taste more cheesy. |
| Garlic powder | ¼ tsp / about 0.7 g | Optional background flavor, especially good for potatoes, fries, broccoli, and pasta. |
| Onion powder | ¼ tsp / about 0.6 g | Optional savory depth without making the sauce taste onion-heavy. |
| White pepper or black pepper | Pinch to ⅛ tsp / about 0.3 g | Adds gentle warmth. White pepper keeps the sauce paler; black pepper is easier to find. |
| Salt | ⅛–¼ tsp / about 0.75–1.5 g | Add after the cheese melts because cheddar can vary a lot in saltiness. |
Measurement note: cheese is best measured by weight. If using cups, lightly spoon the grated cheese into the cup instead of packing it down. For this recipe, 1 cup of liquid is treated as 240 ml.
Milk Options
The milk you choose changes the richness of the sauce. Whole milk is the best everyday choice for this cheese sauce recipe, although other dairy options can work depending on the texture you want.
- Whole milk: best everyday choice for a smooth, creamy cheese sauce.
- 2% milk: works, but the sauce will taste slightly lighter.
- Skim milk: not ideal because the sauce can taste thinner and less creamy.
- Half-and-half: richer and thicker; useful when you want a heavier sauce.
- Heavy cream: very rich; better for keto-style sauce than the basic roux version.
Can I Use Pre-Shredded Cheese?
Freshly grated cheese melts more smoothly. Pre-shredded cheese is convenient, but many bags contain anti-caking ingredients that can make the sauce less silky. If pre-shredded cheese is all you have, use gentle heat, add it slowly, and avoid boiling after it goes in.
Best Cheese for Cheese Sauce
In general, the best cheese for cheese sauce is flavorful but still easy to melt. Medium cheddar is the safest default because it gives a classic cheddar taste without becoming as temperamental as very aged cheese.

For the smoothest everyday result, start with medium cheddar or a cheddar-Monterey Jack blend. Sharp cheddar gives stronger flavor, but it works best when blended with a smoother melting cheese.
| Cheese | Best use | Notes |
|---|---|---|
| Medium cheddar | Best everyday choice | Balanced flavor, good melting, and classic color. |
| Sharp cheddar | Stronger cheddar flavor | Use gentle heat. Sharp cheddar tastes great but can turn grainy if overheated. |
| Mild cheddar | Kid-friendly sauce | Smooth and mellow, but less bold. |
| White cheddar | White cheese sauce | Good when you want a pale sauce for pasta, potatoes, or vegetables. |
| Monterey Jack | Smooth melting blend | Excellent mixed with cheddar when you want a softer, creamier melt. |
| Colby or Colby Jack | Mild creamy sauce | Good for kids, nachos-style drizzling, and burgers. |
| Young Gouda | Creamy, mellow sauce | Use young gouda rather than very aged gouda for smoother melting. |
| Gruyère | Cauliflower, potatoes, gratins | Nutty and excellent, but more expensive. Good blended with cheddar. |
| Parmesan | Flavor accent | Use a small amount with cheddar or Jack. Parmesan alone can make the texture gritty. |
| Mozzarella | Stretchy accent | Not ideal as the main cheese sauce cheese. It can become stringy. |
| Blue cheese or Gorgonzola | Specialty sauces | Better for dedicated blue cheese or Gorgonzola sauce, not the basic cheddar version. |
Once you know the texture you like, you can experiment with sharper cheddar, smoked cheddar, white cheddar, gouda, Gruyère, or small amounts of Parmesan.
How to Make Cheese Sauce
Before you start cooking, it helps to understand that the method is simple but heat-sensitive. Timing and temperature control make the difference between a smooth cheese sauce and a grainy one. This recipe works best in a small to medium heavy-bottomed saucepan, about 1.5–2 qt / 1.5–2 L.
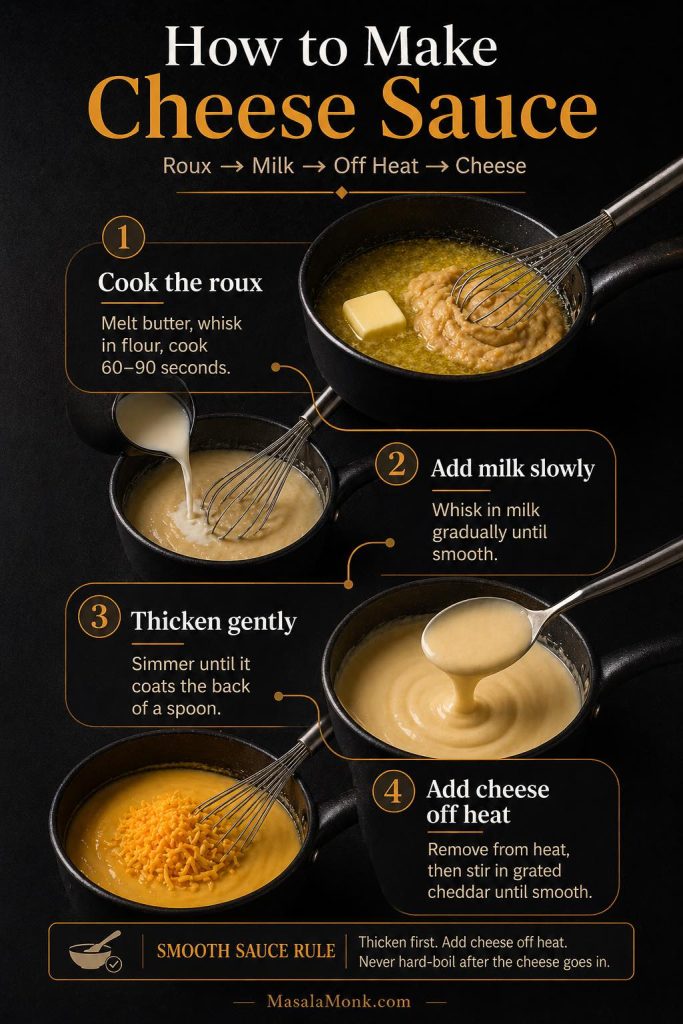
1. Grate the Cheese First
Grate the cheddar before you start cooking. Cheese melts more evenly when it is ready to add in small handfuls. If it is very cold, let it sit at room temperature for a few minutes while you make the roux.
2. Melt the Butter Gently
Place the saucepan over medium-low to medium heat. Add the butter and let it melt without browning. If the butter starts sizzling aggressively, lower the heat.
3. Whisk in the Flour
Add the flour and whisk for 60–90 seconds. The mixture should look pale, foamy, and smooth. This step cooks out the raw flour taste. Do not brown the roux for this recipe; a pale roux keeps the sauce creamy and mild.
4. Add the Milk Slowly
Whisk in the milk in 3 additions. Add a splash first, whisk until smooth, then add more. This gradual method helps prevent lumps. Once all the milk is in, keep whisking until the sauce looks smooth.
5. Simmer Until the Base Thickens
Cook the milk base until it reaches a gentle simmer and coats the back of a spoon. This usually takes 3–5 minutes. At this stage, you want gentle bubbling around the edges, not a hard boil.
6. Remove From Heat Before Adding Cheese
Turn off the heat and move the pan away from the burner if your stove stays hot. Wait until the bubbling settles. Then stir in the grated cheese by handfuls, letting each handful melt before adding the next.
7. Season and Adjust
Once the cheese is melted, taste the sauce. Add salt only after tasting because cheddar can be mild or salty depending on the brand and age. To build more flavor, add mustard, pepper, garlic powder, onion powder, cayenne, or a small splash of hot sauce.
Cheese Sauce Temperature Guide
Cheese is most fragile after it melts, so temperature control is one of the easiest ways to protect the texture. You do not need to measure every stage, but the cues below help when you want the sauce to turn out the same way every time.

| Stage | Best temperature / heat cue | Why it matters |
|---|---|---|
| Melting butter | Medium-low to medium heat | The butter should melt gently without browning. |
| Cooking the roux | 60–90 seconds over medium-low heat | This removes the raw flour taste while keeping the sauce pale. |
| Thickening the milk base | Gentle simmer, about 82–88°C / 180–190°F | The flour fully thickens the milk before the cheese is added. |
| Before adding cheese | Turn off heat and let bubbling stop | Cheese melts best with residual heat, not aggressive boiling. |
| Melting cheese | Ideally about 65–75°C / 150–167°F | This helps the cheese melt smoothly without separating. |
| Holding warm | Very low heat, about 55–60°C / 130–140°F if using a thermometer | This keeps the sauce warm without pushing it toward splitting. |
| Danger zone for texture | Do not hard-boil after cheese is added | Hard boiling can make cheese sauce grainy, oily, or separated. |
Cheese Sauce Ratio
Once you understand the base ratio, the recipe becomes easier to adjust. Instead of starting over, you can change the amount of milk or cheese depending on whether you want a dip, a topping, or a looser pasta sauce.
The easiest cheese sauce ratio for this recipe is 2 tbsp butter + 2 tbsp flour + 300 ml milk + 170 g cheese. That gives you a medium-thick sauce. For dipping, reduce the milk slightly; for pasta, add more liquid after the cheese melts.
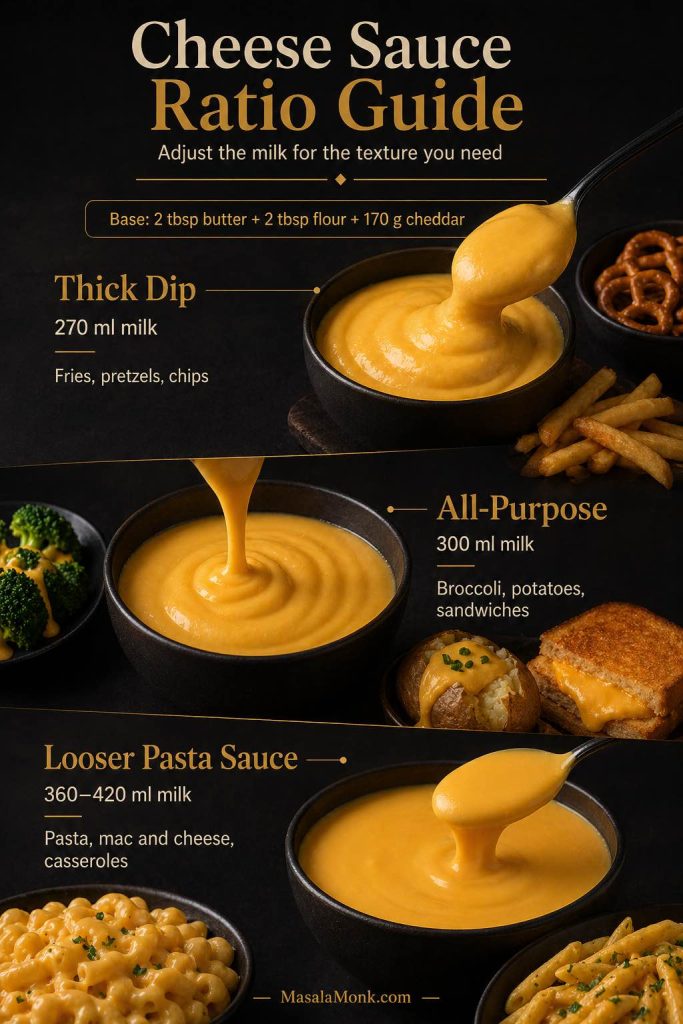
| Style | Milk | Cheese | Best for |
|---|---|---|---|
| Thick dip | 270 ml / 9 fl oz | 170 g / 6 oz | Fries, pretzels, chips, burgers |
| All-purpose sauce | 300 ml / 10 fl oz | 170 g / 6 oz | Broccoli, cauliflower, potatoes, sandwiches |
| Looser pasta sauce | 360–420 ml / 12–14 fl oz | 170 g / 6 oz | Pasta, macaroni, rice bowls, casseroles |
Texture cue: when the sauce is hot, it should fall from a spoon in a thick ribbon. If it sits in a heavy blob, whisk in warm milk. If it runs like plain milk, simmer the base longer next time before adding cheese.
How to Scale This Cheese Sauce Recipe
Fortunately, this recipe scales well as long as you keep the butter, flour, milk, and cheese in balance. For the smoothest result, use a larger pan when doubling the recipe so the milk base thickens evenly.
| Yield | Butter | Flour | Milk | Cheese |
|---|---|---|---|---|
| 1 cup / 240 ml / 0.24 L | 1 tbsp / 14 g | 1 tbsp / 8–9 g | 150 ml / 5 fl oz | 85 g / 3 oz |
| 2 cups / 480 ml / 0.48 L | 2 tbsp / 28 g | 2 tbsp / 16–18 g | 300 ml / 10 fl oz | 170 g / 6 oz |
| 4 cups / 960 ml / 0.96 L | 4 tbsp / 56 g | 4 tbsp / 32–36 g | 600 ml / 20 fl oz | 340 g / 12 oz |
Easy Homemade Cheese Sauce Recipe
This recipe makes a smooth cheddar cheese sauce that is thick enough for vegetables, fries, and baked potatoes, but easy to thin for pasta, mac and cheese, rice bowls, or drizzling.
Equipment
- Small to medium heavy-bottomed saucepan, about 1.5–2 qt / 1.5–2 L
- Whisk
- Box grater or fine grater
Ingredients
- 2 tbsp unsalted butter / 28 g / 1 oz
- 2 tbsp all-purpose flour or plain flour / 16–18 g / 0.6 oz
- 1¼ cups whole milk / 300 ml / 10 fl oz / 0.3 L, warmed slightly if possible
- 6 oz freshly grated cheddar cheese / 170 g / about 1½ cups
- 1 tsp Dijon mustard / 5 ml, or ¼ tsp mustard powder / about 1 g
- ¼ tsp garlic powder / about 0.7 g, optional
- ¼ tsp onion powder / about 0.6 g, optional
- Pinch to ⅛ tsp white pepper or black pepper / about 0.3 g
- ⅛–¼ tsp salt / about 0.75–1.5 g, added to taste after the cheese melts
- Warm milk, as needed, for thinning
Instructions
- Grate the cheese. Grate the cheddar from a block and set it aside. Freshly grated cheese melts more smoothly than most bagged shredded cheese.
- Make the roux. Melt the butter in a saucepan over medium-low to medium heat. Add the flour and whisk for 60–90 seconds, until pale, smooth, and lightly foamy.
- Add the milk. Slowly whisk in the milk in 3 additions, smoothing out the sauce before adding more. Keep whisking until no lumps remain.
- Thicken the base. Cook for 3–5 minutes, whisking often, until the sauce reaches a gentle simmer and coats the back of a spoon.
- Remove from heat. Turn off the heat and let the bubbling settle. This helps keep the cheese from overheating.
- Add the cheese. Stir in the grated cheddar by handfuls, letting each handful melt before adding the next.
- Season. Stir in Dijon, garlic powder, onion powder, pepper, and a small amount of salt. Taste and adjust.
- Adjust the texture. For a thinner cheese sauce, whisk in warm milk 1 tbsp / 15 ml at a time. For a thicker dip, add a little more grated cheese off heat.
Recipe Notes
- Do not boil the sauce after the cheese is added.
- For pasta or mac and cheese, thin this recipe with warm milk or pasta water until the cheese sauce is glossy and loose enough to coat noodles.
- For fries, pretzels, burgers, or sandwiches, keep the sauce slightly thicker.
- For extra smoothness, use medium cheddar or a cheddar-Monterey Jack blend.
- Cheese is best measured by weight. Cup measurements vary depending on how finely the cheese is grated and how tightly it is packed.
How Thick Should Cheese Sauce Be?
In practice, the best thickness depends on how you want to use the sauce. A cheese sauce for fries should be thicker than a cheese sauce for pasta, while a sauce for casseroles should start slightly loose because it thickens in the oven.

| Use | Best texture | How to adjust the main recipe |
|---|---|---|
| Broccoli or cauliflower | Spoonable and coating | Use the main recipe as written. |
| Fries, pretzels, chips | Thick dip | Use 270–300 ml milk, or add 30 g / 1 oz extra cheese off heat. |
| Pasta | Looser, glossy, coating | Add 60–120 ml / 2–4 fl oz warm milk or pasta water after the cheese melts. |
| Macaroni and cheese | Creamy and loose before mixing | Thin slightly before adding pasta because noodles absorb sauce. |
| Baked potatoes | Medium-thick | Use the main recipe as written. |
| Rice bowls or grain bowls | Pourable drizzle | Add 30–60 ml / 1–2 fl oz warm milk. |
| Casseroles and bakes | Slightly loose before baking | Add about 60 ml / 2 fl oz extra milk because oven heat thickens it. |
| Burgers and sandwiches | Thick and clingy | Use a little less milk or add extra cheese. |
If the sauce cools down, it will thicken. However, that does not mean you made the recipe wrong. Warm the cheese sauce gently and whisk in a splash of milk to bring it back to a pourable texture.
Cheese Sauce for Mac and Cheese
For mac and cheese, the sauce should be slightly looser than a dip because pasta absorbs liquid as it sits. Therefore, instead of making the sauce extra thick in the pan, keep it glossy and pourable before mixing it with the macaroni.
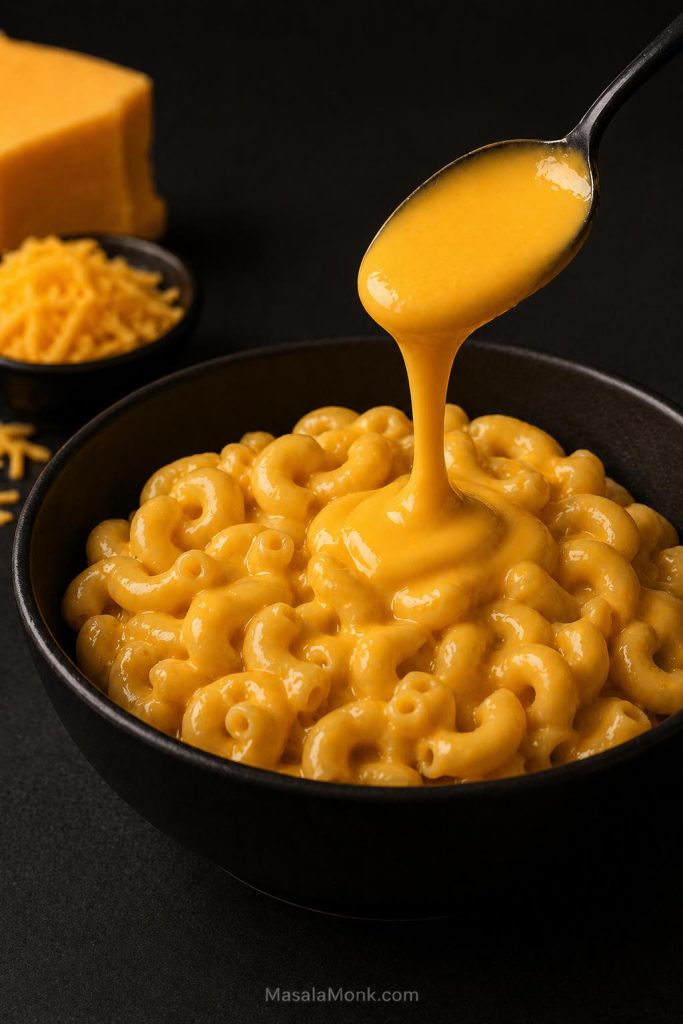
One batch of this recipe is usually enough for 8 oz / 225 g pasta when making creamy stovetop mac and cheese. A larger batch with 1 lb / 450 g pasta needs a doubled sauce recipe, or about 4 cups / 960 ml sauce. If you are baking the mac and cheese, loosen the sauce with an extra 60–120 ml / 2–4 fl oz milk because the oven will thicken it.
For the smoothest mac and cheese sauce, use medium cheddar with a smoother melting cheese such as Monterey Jack, Colby Jack, or young gouda. Sharp cheddar adds flavor, but too much aged cheese can make the sauce more likely to turn gritty if it gets too hot.
If you want a full pasta build instead of only the sauce, use this macaroni and cheese recipe for stovetop, baked, and Southern-style options.
Cheese Sauce for Broccoli, Cauliflower, and Vegetables
For broccoli, cauliflower, and other vegetables, the goal is different. Instead of making a loose pasta sauce, you want a spoonable sauce that coats the florets without clumping on top.

For steamed broccoli or cauliflower, use the main recipe as written. If the vegetables are very wet, drain them well first, because extra water can thin the sauce and make it slide off. For roasted vegetables, the sauce can be slightly looser because the dry edges help it cling.
For cauliflower cheese or a vegetable bake, keep the sauce a little looser before baking. As the dish sits in the oven, the cheese sauce thickens and the vegetables release moisture, so a sauce that looks perfect in the pan can become too heavy after baking.
For a full comfort-food dinner, this cheesy chicken broccoli rice shows how broccoli and cheese can move from a side dish into a complete meal.
Cheese Sauce for Pasta, Lasagna, and Casseroles
When cheese sauce is used for pasta, lasagna, or casseroles, it needs extra looseness because starches and oven heat both thicken the final dish. For that reason, a sauce that looks slightly thin before baking often finishes at the right texture.
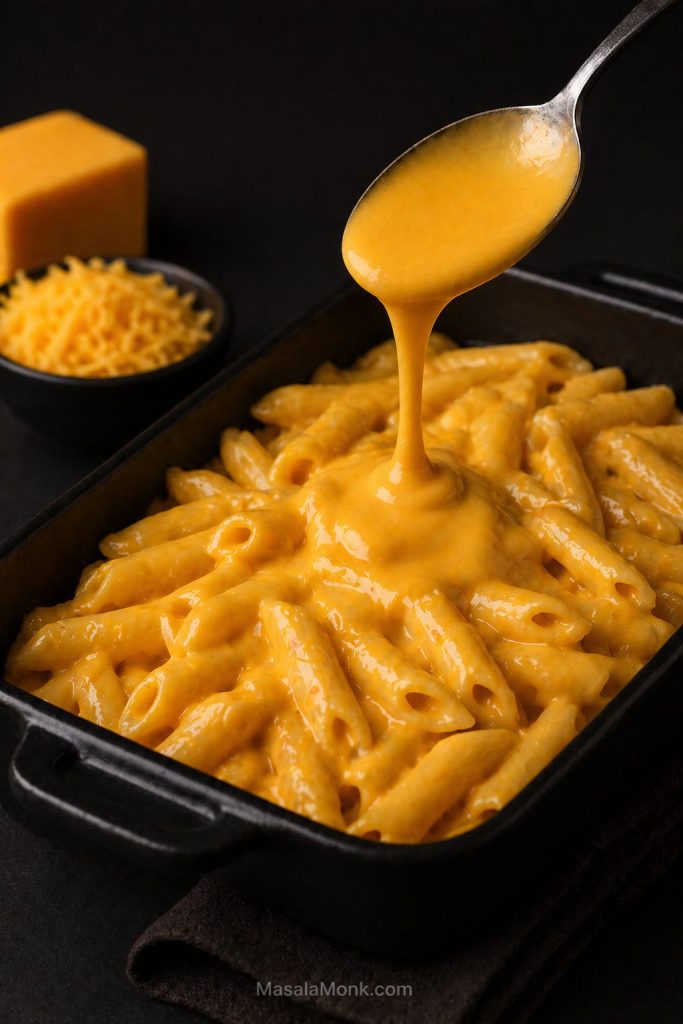
For pasta, thin the finished sauce with 60–120 ml / 2–4 fl oz warm milk or pasta water before tossing. Pasta water adds starch and helps the sauce cling, while milk keeps the flavor creamier. If the pasta sits for more than a few minutes, loosen it again with a small splash of warm milk.
For lasagna, pasta bakes, and casseroles, use the looser pasta-sauce ratio from the table above. A thicker sauce can work for topping, but it can make layered dishes feel heavy or gluey once baked.
For another creamy pasta direction, this chicken Alfredo pasta is useful because it stays in the same creamy sauce family while using a different method. If you want a baked pasta idea, this baked ziti recipe collection gives more casserole-style inspiration.
Nacho Cheese Sauce for Fries, Pretzels, Chips, and Dips
For fries, pretzels, chips, and dips, the sauce should be thicker and more seasoned than a pasta sauce. Otherwise, it can taste too mild once it is spread over salty snacks or used as a dip.
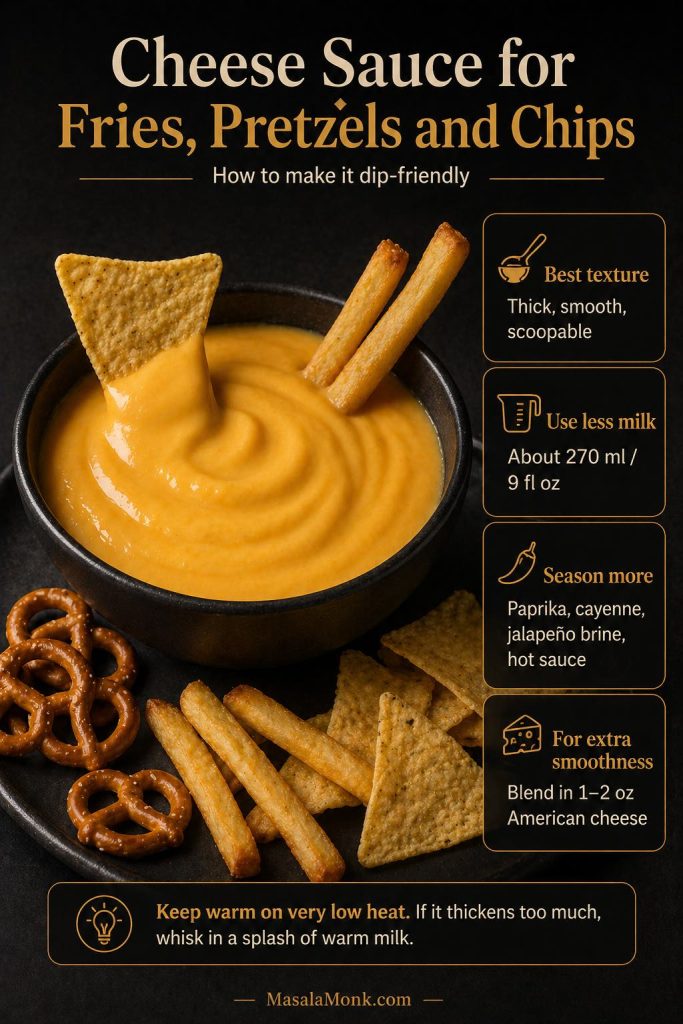
To make this recipe work more like a nacho cheese sauce, use the thick-dip ratio: 270 ml / 9 fl oz milk with 170 g / 6 oz cheese. Then season it with paprika, cayenne, jalapeño brine, hot sauce, garlic powder, or a little mustard. These additions make the sauce taste more like a dip instead of a plain cheddar topping.
For a smoother processed-style dip, replace 1–2 oz / 30–55 g of the cheddar with American cheese or another easy-melting processed cheese. Alternatively, a small amount of sodium citrate can make a very glossy sauce, but that is an advanced option rather than a requirement for this homemade version.
For a snack-style pairing, serve the thicker version with crispy homemade French fries. For a bigger game-day board, add pretzels, chips, roasted potatoes, or a scoopable dip on the side.
The classic roux method is the best starting point, but it is not the only option. If you need a no-flour, gluten-free, keto, or microwave cheese sauce, use the quick guide below before choosing the version that fits your kitchen.
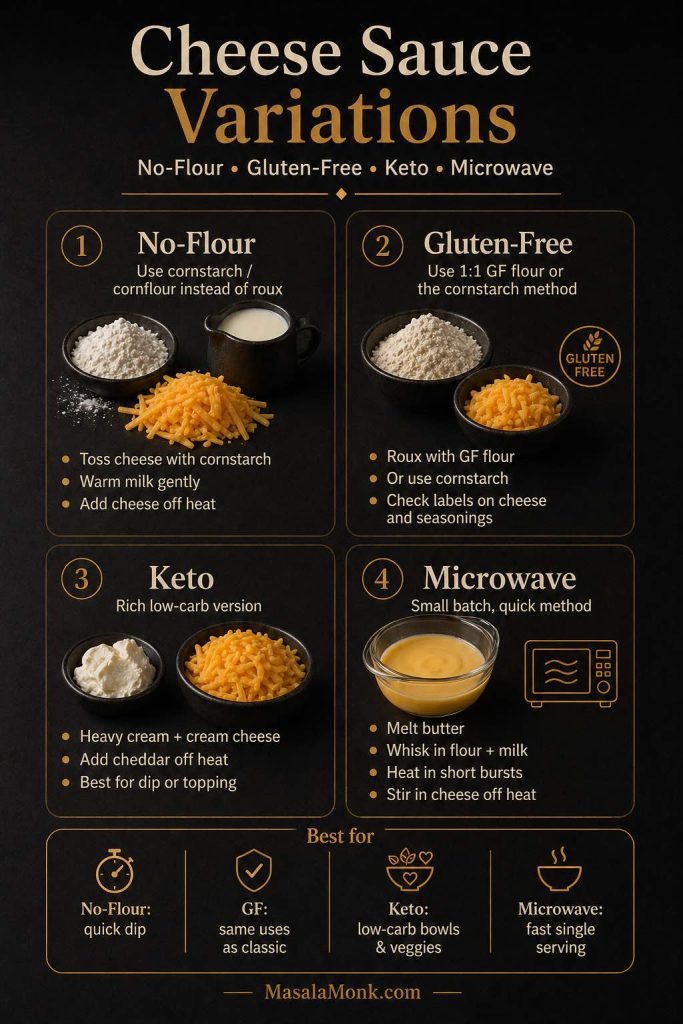
Cheese Sauce Without Flour
Still, a roux is not the only way to make a smooth sauce. If you want to skip flour, cornstarch can help the cheese melt into the liquid without making the sauce gritty.
You can make cheese sauce without flour by using cornstarch, also called cornflour in the UK and India. This version is useful if you want a flourless cheese sauce, a gluten-free cheese sauce, or a quicker sauce that does not start with a roux.
The no-flour version of this recipe uses cornstarch to help the cheese melt into the sauce smoothly. It makes a glossy sauce that is especially useful for dipping, drizzling, and quick snacks.
| Ingredient | US | Metric |
|---|---|---|
| Evaporated milk or whole milk | 1 cup | 240 ml / 8 fl oz / 0.24 L |
| Freshly grated cheddar cheese | 6 oz | 170 g |
| Cornstarch / cornflour | 1½ tsp | 4–5 g |
| Butter | 1 tbsp | 14 g / 0.5 oz |
| Dijon mustard or mustard powder | 1 tsp Dijon or ¼ tsp powder | 5 ml Dijon or about 1 g powder |
| Salt and pepper | To taste | To taste |
How to Make No-Flour Cheese Sauce
- Toss the grated cheddar cheese with the cornstarch until lightly coated.
- Warm the milk and butter in a saucepan over medium-low heat until steaming, not boiling.
- Lower the heat or remove the pan from heat.
- Add the cheese by handfuls, stirring until smooth.
- Add mustard, pepper, and salt to taste.
- If the sauce is too thick, loosen it gradually with warm milk, about 1 tbsp / 15 ml at a time.
Important: cornflour here means white cornstarch, not yellow cornmeal, maize flour, or makki atta. Cornmeal will not make a smooth cheese sauce.
Gluten-Free Cheese Sauce
As a result, the no-flour method also becomes the easiest gluten-free path for many readers. Still, a gluten-free flour blend can work well if you prefer the classic roux technique.
There are two easy ways to make gluten-free cheese sauce. The best choice depends on whether you want the recipe to feel like a classic roux-based cheese sauce or a faster cornstarch-thickened sauce.
- Use a 1:1 gluten-free flour blend in the main roux recipe. This keeps the method almost the same.
- Use the cornstarch/cornflour method above. This is the cleanest option if you want to avoid wheat flour completely.
If you are cooking for someone who needs a strictly gluten-free meal, check the labels on the cheese, mustard, seasonings, and any toppings you serve with the sauce.
Keto Cheese Sauce
On the other hand, keto cheese sauce needs a different base, since the classic version relies on both flour and milk. This version skips the roux and uses cream, cream cheese, butter, and cheddar instead.
| Ingredient | Amount |
|---|---|
| Heavy cream | ½ cup / 120 ml / 4 fl oz / 0.12 L |
| Cream cheese | 2 oz / 55 g |
| Freshly grated cheddar cheese | 4 oz / 115 g |
| Butter | 1 tbsp / 14 g / 0.5 oz |
| Mustard powder | ¼ tsp / about 1 g |
| Pepper, cayenne, or hot sauce | To taste |
Warm the cream, butter, and cream cheese over low heat until smooth. Remove from heat and stir in the cheddar gradually. Do not boil after adding cheddar. This keto version is richer and heavier than the classic sauce, so it works best as a dip, topping, or low-carb drizzle.
For low-carb dipping, pair this richer sauce with sturdy options from this keto chips guide, especially if you want something scoopable for nachos, dips, or snack plates.
Microwave Cheese Sauce
Although the stovetop method gives you the best control, the microwave works for a small batch when speed matters more than precision. For best results, heat the base in short bursts and stir often.
| Ingredient | Amount |
|---|---|
| Butter | 1 tbsp / 14 g / 0.5 oz |
| Flour | 1 tbsp / 8–9 g / 0.3 oz |
| Milk | ½ cup / 120 ml / 4 fl oz / 0.12 L |
| Freshly grated cheddar cheese | 2–3 oz / 55–85 g |
| Salt, pepper, mustard | To taste |
- Melt the butter in a microwave-safe bowl for 20–30 seconds.
- Whisk in the flour until smooth.
- Whisk in the milk gradually.
- Microwave for 45 seconds, then whisk.
- Microwave for another 30–45 seconds, or until thickened.
- Stir in the grated cheese off heat until smooth.
- Thin with a small splash of warm milk if needed.
Use short microwave bursts and stir often. The sauce can overheat quickly in the microwave, especially after the cheese is added.
How to Fix Grainy, Oily, Thick, Thin, or Lumpy Cheese Sauce
When cheese sauce goes wrong, the problem usually comes from heat, cheese choice, or the order of steps. Fortunately, many issues can be fixed, especially if you catch them early.
Quick Fixes for Common Cheese Sauce Problems
| Problem | Likely cause | How to fix it |
|---|---|---|
| Grainy or gritty cheese sauce | The cheese overheated, the sauce boiled after cheese was added, or the cheese was very aged. | Remove from heat. Whisk in warm milk 1 tbsp / 15 ml at a time. If needed, blend briefly or strain. Next time, add cheese off heat. |
| Oily or separated sauce | The emulsion broke and fat separated from the cheese. | Lower the heat immediately. Whisk in warm milk, or add a tiny cornstarch slurry made with ½ tsp cornstarch and 1 tbsp / 15 ml cold milk. |
| Lumpy sauce | Milk was added too quickly to the roux, or the sauce was not whisked enough. | Whisk firmly. If lumps remain before adding cheese, strain the sauce, then continue. |
| Floury taste | The roux was undercooked. | Cook the butter and flour for 60–90 seconds before adding milk. It should smell lightly buttery, not raw. |
| Too thick | Too much cheese, too little milk, too much simmering, or the sauce cooled down. | Whisk in warm milk 1 tbsp / 15 ml at a time until it loosens. |
| Too thin | The milk base did not thicken enough before cheese was added. | Simmer the base longer next time. To fix now, use a small cornstarch slurry and heat gently until thicker. |
| Stringy sauce | Too much mozzarella or another stretchy cheese, or cheese was overheated. | Use cheddar, Monterey Jack, Colby, or young Gouda as the base. Keep stretchy cheeses as accents. |
| Bland sauce | Mild cheese, not enough salt, or no sharp/acidic seasoning. | Add salt carefully, then mustard, pepper, garlic powder, onion powder, cayenne, or a small splash of hot sauce. |
| Too salty | Salty cheese, salted butter, or too much added salt. | Whisk in unsalted milk or cream. Serve with unsalted potatoes, pasta, rice, or vegetables. |
How to Prevent Cheese Sauce Problems Next Time
To prevent most problems, grate the cheese fresh, cook the roux briefly, thicken the milk before adding cheese, and remove the pan from heat before stirring in the cheddar. Rather than using more heat to force the cheese to melt, give it time to melt gently in the hot sauce base.

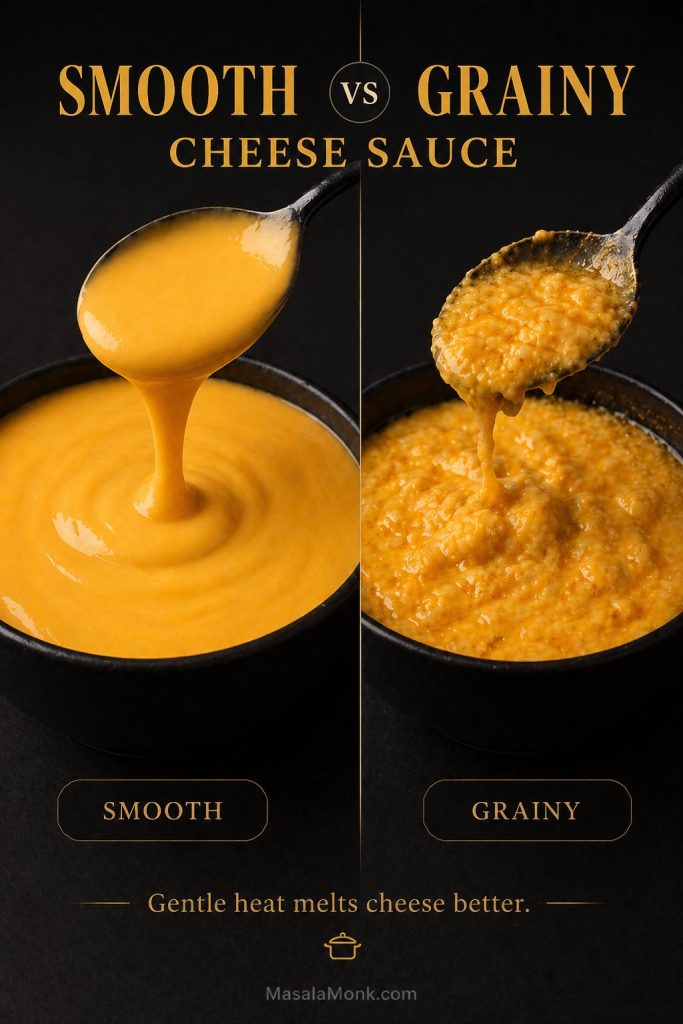
Why Cheese Sauce Turns Grainy
Cheese sauce turns grainy when the cheese proteins tighten and the fat separates instead of staying evenly dispersed in the sauce. High heat makes this more likely. Very sharp, aged, or dry cheeses can also be more difficult to melt smoothly.
For that reason, the safest method is to thicken the milk first, turn off the heat, and then stir in the cheese gradually. The residual heat melts the cheese without pushing it into a hard boil.
For a deeper look at why cheese sauces break, Serious Eats explains how heat can separate cheese fat, water, and proteins, which is why gentle heat matters so much here.
Can I Use Sodium Citrate for Extra-Smooth Cheese Sauce?
Yes, but treat it as an advanced option rather than a requirement. Sodium citrate is an emulsifying salt that helps cheese melt into a very smooth, glossy sauce. It is most useful when you want a processed-style dip or nacho-style sauce that stays more fluid as it cools.
If you already use sodium citrate in your kitchen, follow the ratio on your product or use a tested sodium-citrate sauce formula. For this homemade cheese sauce recipe, though, the roux method is the easier and more familiar starting point.
How to Store and Reheat Cheese Sauce
Even though cheese sauce is best fresh, leftovers can still work well if you reheat them gently. Cool leftover sauce quickly, transfer it to a shallow airtight container, and refrigerate it within 2 hours.
For general leftover safety, FoodSafety.gov recommends keeping refrigerators at 40°F / 4°C or below and freezers at 0°F / -18°C or below.
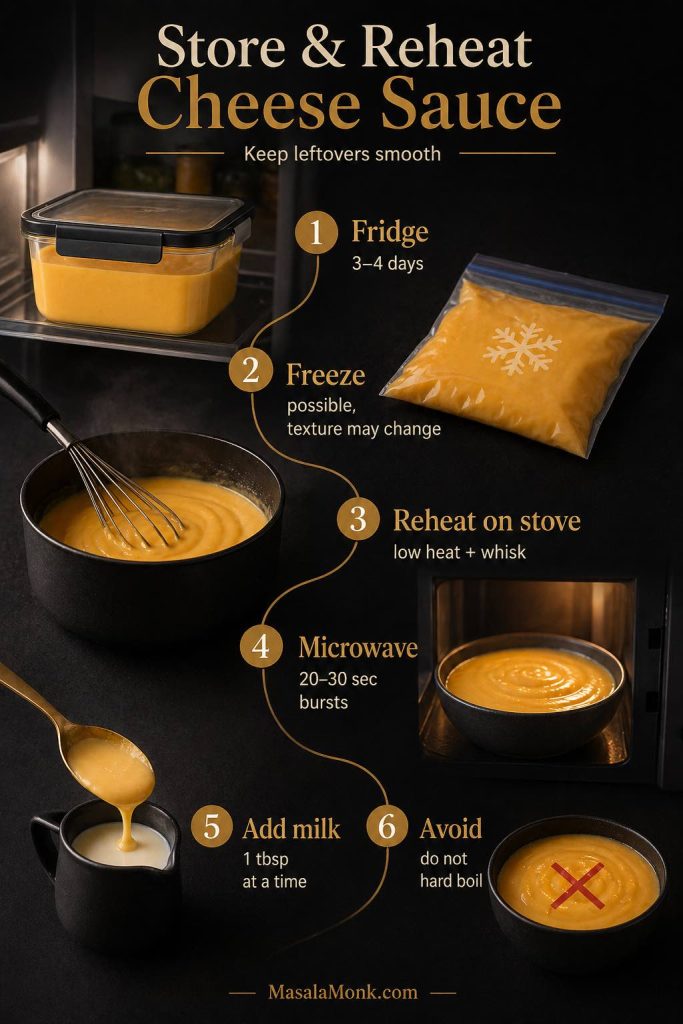
After that, reheat only the amount you need. Repeated cooling and reheating can make the sauce more likely to split, especially because this recipe contains both cheese and milk.
| Storage method | Best guidance |
|---|---|
| Refrigerator | Store in an airtight container for 3–4 days. |
| Refrigerator temperature | Keep at or below 4°C / 40°F. |
| Freezer | Possible, but not ideal for texture. Freeze for up to 1–2 months for best quality. |
| Freezer temperature | Keep at about -18°C / 0°F for longer storage. |
| Stovetop reheating | Reheat over low heat, whisking often. Add milk 1 tbsp / 15 ml at a time. |
| Microwave reheating | Use 20–30 second bursts and stir between each burst. |
| Keeping warm | Use very low heat or a warm setting. Stir occasionally and add milk if it thickens. |
| What to avoid | Do not hard-boil leftover cheese sauce. It can split or turn grainy. |
If refrigerated cheese sauce looks thick or slightly set, that is normal. To bring it back, warm it gently and whisk in a splash of milk until it becomes smooth again.
What to Serve With Cheese Sauce
By this point, you can treat the sauce as a flexible base rather than a single-use recipe. It can work as a vegetable sauce, pasta sauce, potato topping, snack dip, sandwich sauce, or creamy base for simple dinners.
Vegetables
- Broccoli
- Cauliflower
- Roasted carrots
- Green beans
- Asparagus
- Brussels sprouts
- Roasted potatoes
Pasta, Rice, and Potatoes
- Macaroni
- Shells
- Penne
- Rotini
- Baked potatoes
- Rice bowls
- Casseroles
Snacks, Sandwiches, and Game-Day Food
- French fries
- Potato wedges
- Pretzels
- Nachos-style chips
- Burgers
- Chicken sandwiches
- Grilled cheese
- Paneer wraps
- Tofu wraps
If you are building a game-day table, this sauce can sit next to a warmer, scoopable dip like buffalo chicken dip instead of trying to do every job on the table by itself.
Cheese Sauce FAQs
Can I Make This Cheese Sauce From Scratch?
Yes. This recipe makes cheese sauce from scratch with butter, flour, milk, and cheddar cheese. You do not need a packaged mix, jarred sauce, or processed cheese unless you want a glossier processed-style version.
Can I Make Cheese Sauce Without Flour?
Yes. Use cornstarch/cornflour instead of flour. Toss the grated cheese with cornstarch, warm the milk, then stir the cheese in gently. This is also a good gluten-free method if all your ingredients are certified gluten-free.
Is Cheese Sauce Gluten-Free?
The main recipe is not gluten-free because it uses all-purpose flour. To make it gluten-free, use a 1:1 gluten-free flour blend or use the cornstarch/cornflour method.
Is Cheese Sauce Keto?
The main recipe is not keto because it uses flour and milk. For keto cheese sauce, use heavy cream, cream cheese, butter, and cheddar instead.
Why Is My Cheese Sauce Grainy?
Cheese sauce usually turns grainy when the cheese gets too hot. Remove the sauce from heat before adding cheese, add the cheese gradually, and avoid boiling after the cheese melts.
How Do I Thin Cheese Sauce?
Whisk in warm milk 1 tablespoon / 15 ml at a time until the cheese sauce reaches the texture you want. For pasta, you can also use warm pasta water.
How Do I Thicken Cheese Sauce?
If the sauce is only slightly thin, let the milk base simmer a little longer before adding cheese. If the finished cheese sauce is thin, whisk in a small cornstarch slurry and heat gently, or add more grated cheese off heat.
Can I Make Cheese Sauce Without Milk?
Yes, but the sauce will change. Unsweetened oat milk, almond milk, or another neutral dairy-free milk can work, but the sauce may taste lighter and less creamy. Water works in an emergency, but milk gives this recipe a smoother cheese sauce with better flavor.
Can I Make Cheese Sauce With Water?
You can, but milk gives a much better texture and flavor. Water makes the sauce thinner and less creamy. If you need to avoid milk, use an unsweetened dairy-free milk that works well in savory sauces.
Can I Make Cheese Sauce With Cream?
Yes, but cream makes the cheese sauce richer and heavier. You can replace part of the milk with cream, or use cream in the keto version. For an everyday recipe, whole milk gives a better balance.
Can I Add American Cheese for a Smoother Sauce?
Yes. If you want a smoother, more processed-style cheese sauce, replace 1–2 oz / 30–55 g of the cheddar with American cheese or another easy-melting processed cheese. It makes the sauce glossier and more stable, but the flavor will be less purely cheddar.
Can I Freeze Cheese Sauce?
You can freeze cheese sauce, but the texture may change after thawing. Reheat it slowly over low heat and whisk in milk to bring it back together. For the smoothest texture, cheese sauce is best made fresh or refrigerated for a few days.
What Cheese Melts Best for Cheese Sauce?
Medium cheddar, mild cheddar, Monterey Jack, Colby Jack, young gouda, and Gruyère melt well. Very aged cheddar, Parmesan, and mozzarella can be used, but they are better as accents rather than the entire sauce base.
Is Cheese Sauce the Same as Mornay Sauce?
They are related. A classic Mornay sauce is a cheese sauce made from béchamel, usually with cheeses such as Gruyère, Parmesan, or other melting cheeses. This recipe is a practical cheddar cheese sauce for everyday cooking.
Can I Use This Cheese Sauce Recipe for Mac and Cheese?
Yes. Thin it slightly with warm milk or pasta water before tossing it with cooked macaroni because pasta absorbs sauce quickly. For baked mac and cheese, keep the sauce even looser before it goes into the oven.
Can I Use This Cheese Sauce Recipe for Nachos?
Yes, for a quick nachos-style drizzle. Keep it warm, make it slightly thicker, and season with cayenne, paprika, jalapeño, or hot sauce. For a more stadium-style nacho cheese sauce, use a smoother melting blend, a little American cheese, or an emulsifying-salt method.