Posted on Leave a comment

Yum Yum Sauce Recipe

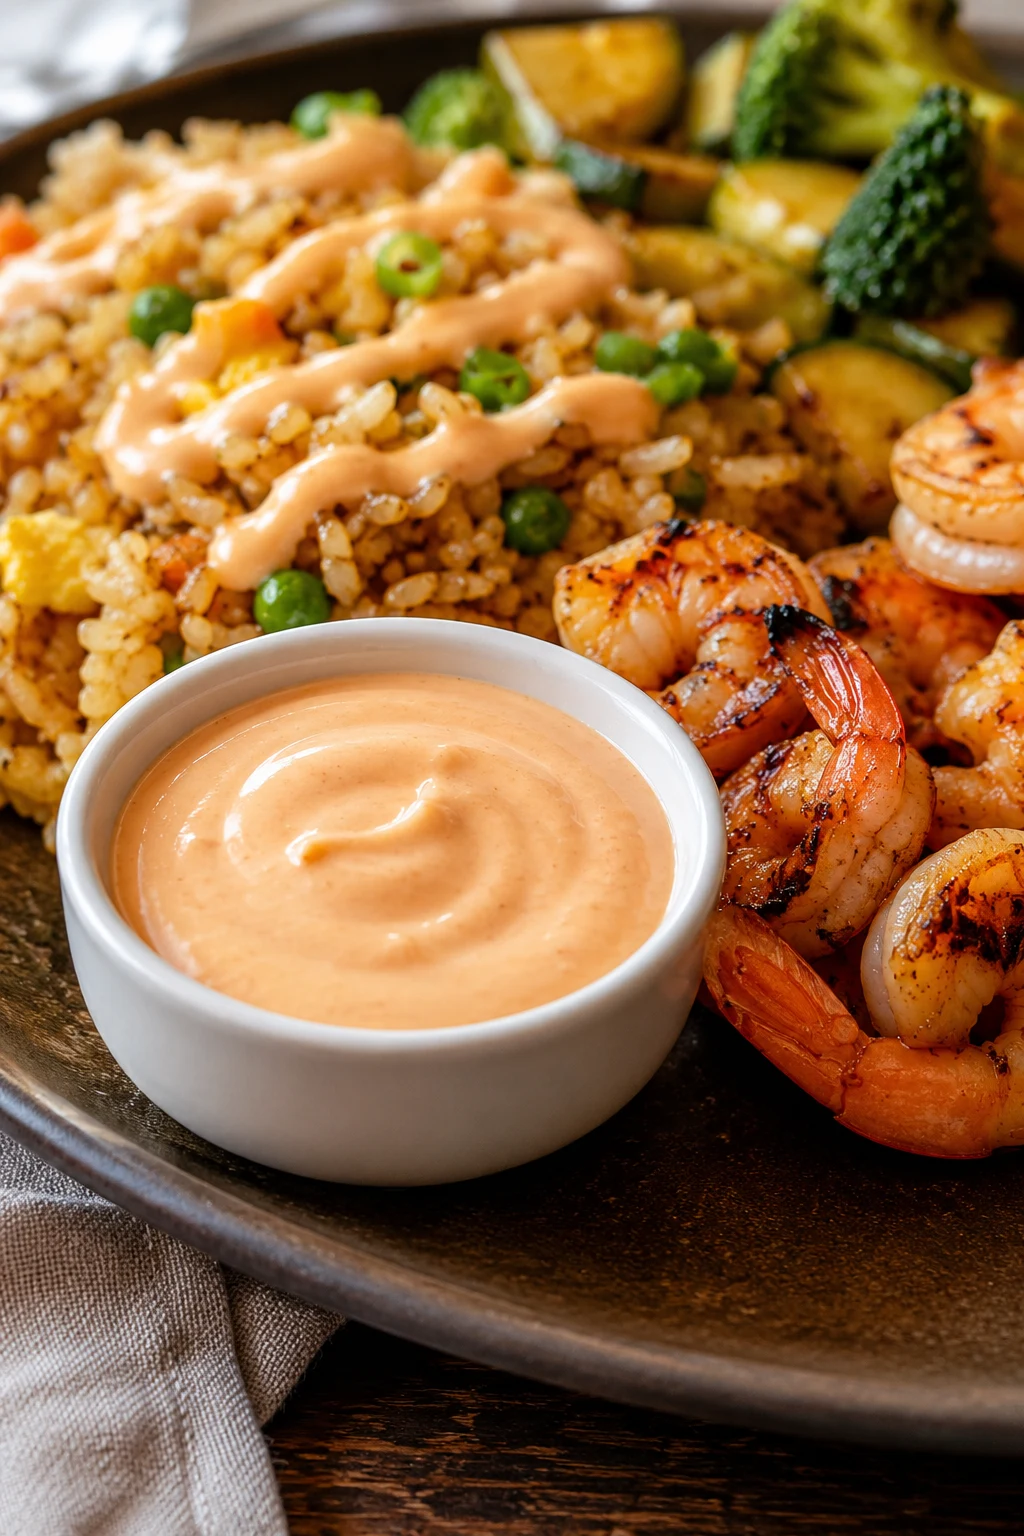
A small white cup of pale pink-orange yum yum sauce served with shrimp fried rice, grilled shrimp, broccoli, zucchini, and hibachi-style vegetables.

This yum yum sauce is the cool, creamy, pale pink-orange sauce people remember from the hibachi plate before anything else. It is a little sweet, a little tangy, rich enough for dipping, and somehow good on almost everything at the table.

Yum yum sauce is a mayo-based hibachi-style sauce made with ketchup or tomato paste, rice vinegar, sugar, garlic powder, onion powder, paprika, and water. It takes about 5 minutes to whisk together, then the fridge does the final work.

Make the simple ketchup version first. Once it chills, you can tune it sweeter, tangier, richer, thinner, or spicier without guessing. Ketchup gives you the friendly first batch; tomato paste gives you the deeper, less sweet version you try once you know what you like.

The goal is not just copying one restaurant bottle. It is to give you the sauce people keep reaching for: creamy but not heavy, sweet but not sugary, thin enough to drizzle, and bold enough to make rice, shrimp, chicken, and vegetables taste finished.

Keep it nearby when dinner is moving toward shrimp, vegetables, or a quick shrimp fried rice plate.

Quick Answer: How to Make Yum Yum Sauce

To make yum yum sauce, whisk mayonnaise with ketchup, rice vinegar, sugar, garlic powder, onion powder, paprika, a pinch of salt, and enough water to make it smooth. Ketchup gives the easiest sweet, pale pink-orange version. Tomato paste can replace ketchup when you want a deeper, less sweet sauce.

You can use it immediately if dinner is ready, but it tastes more like steakhouse-style yum yum sauce after chilling. Thirty minutes helps, 2 hours is better, and overnight gives the smoothest flavor. Stir before serving and thin with a little water if you want it pourable enough for fried rice, shrimp, chicken, vegetables, or bowls.

This sauce is often called hibachi white sauce, Japanese white sauce, shrimp sauce, pink sauce, or Japanese steakhouse sauce. It is best understood as an American hibachi-style restaurant sauce, not a traditional Japanese condiment.

Already cooking? Go straight to the recipe card, or use the texture guide if you need dip, drizzle, or dressing consistency.

Best first batch: Use 1 cup mayo, 2 tablespoons ketchup, 2 teaspoons rice vinegar, 1 teaspoon sugar, 1 teaspoon garlic powder, ½ teaspoon onion powder, ½ teaspoon paprika, a pinch of salt, and 1 to 2 tablespoons water. Chill for 30 minutes. This gives you the classic sweet, creamy hibachi-style version before you start adjusting.
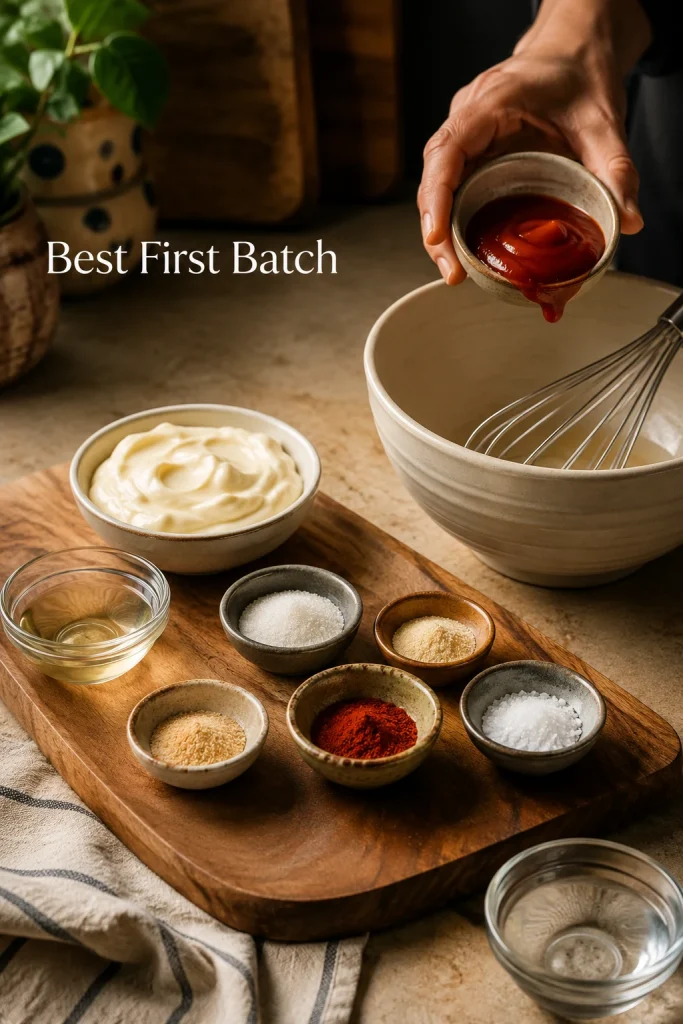
Ingredients for yum yum sauce arranged on a kitchen counter, including mayonnaise, ketchup, rice vinegar, sugar, garlic powder, onion powder, paprika, salt, water, a whisk, and a mixing bowl.
Start with the ketchup version when making your first batch because it gives the easiest sweet baseline before you adjust tang, heat, or richness.

Yum Yum Sauce at a Glance

Best default versionRegular mayo, ketchup, rice vinegar, sugar, garlic powder, onion powder, paprika, salt, and water
Active time5 minutes
Minimum total time35 minutes, including a 30-minute chill
Best flavorAfter 2 hours or overnight
YieldAbout 1¼ to 1½ cups / 300 to 360 ml, depending on thinning
Texture goalThick enough to dip, smooth enough to drizzle after thinning
Best withShrimp, fried rice, chicken, steak bites, vegetables, fries, spring rolls, rice bowls, wraps, and burgers
StorageUp to 1 week in an airtight container in the refrigerator

Yum Yum Sauce Recipe

This easy yum yum sauce starts thick and creamy, then thins into the pale pink-orange drizzle people love with fried rice, shrimp, chicken, vegetables, steak bites, fries, spring rolls, and hibachi-style bowls. The main recipe uses ketchup for the easiest first batch. Tomato paste, Kewpie mayo, butter, and heat are included as optional upgrades when you want a richer steakhouse-style sauce.

Active Time5 minutes
Cook Time0 minutes
Chill Time30 minutes minimum, 2 hours recommended
Minimum Total Time35 minutes
Best FlavorAfter 2 hours or overnight
YieldAbout 1¼ to 1½ cups / 300 to 360 ml
Serving Size2 tablespoons / 30 ml
Servings10 to 12
EquipmentMixing bowl, whisk, measuring spoons, airtight jar, optional squeeze bottle

Ingredients

  • 1 cup mayonnaise / about 230 g
  • 2 tablespoons ketchup / about 30 g
  • 2 teaspoons rice vinegar / 10 ml
  • 1 teaspoon sugar / 4 g
  • 1 teaspoon garlic powder / about 3 g
  • ½ teaspoon onion powder / about 1 g
  • ½ teaspoon paprika or smoked paprika / about 1 g
  • 1 to 2 tablespoons water / 15 to 30 ml, plus more as needed
  • Pinch of salt, to taste

Optional Restaurant-Style Add-Ins

  • Use 1 tablespoon tomato paste / 15 to 16 g instead of ketchup for a deeper, less sweet sauce.
  • Add 1 tablespoon melted cooled butter / 14 g for a silkier, richer finish.
  • Use Kewpie mayo instead of regular mayo for a fuller, more savory base.
  • Add a pinch of cayenne or ½ teaspoon sriracha for gentle heat.
  • If using tomato paste instead of ketchup, increase sugar to 2 teaspoons / 8 g.

Instructions

  1. Add the mayonnaise, ketchup, rice vinegar, sugar, garlic powder, onion powder, paprika, and a pinch of salt to a mixing bowl.
  2. Whisk until the sauce is smooth and evenly colored, with no streaks of tomato or spice.
  3. Add water 1 tablespoon at a time until the sauce reaches your preferred thickness.
  4. If using butter, let the melted butter cool slightly, then whisk it into the sauce. Do not add hot butter directly to the mayo.
  5. Taste lightly, but do not over-adjust yet. The flavor becomes smoother after chilling.
  6. Cover and refrigerate for at least 30 minutes. For better flavor, chill for 2 hours or overnight.
  7. Stir again before serving. Thin with another teaspoon or two of water if needed.

Recipe Notes

  • The ketchup version is sweeter, easier, and the best place to start.
  • The tomato paste version is deeper, less sweet, and better when you want the richer steakhouse-style finish.
  • Thick dip texture needs about 1 tablespoon water. Drizzle texture usually needs 2 to 3 tablespoons water. A looser dressing-style sauce can take up to 4 tablespoons.
  • To double the recipe, double everything except the water. Add water slowly at the end until the texture looks right.
  • Store in an airtight jar in the refrigerator for up to 1 week.
  • Freezing is not recommended because mayo-based sauces can separate after thawing.

Closest restaurant-style version: Use Kewpie mayo, 1 tablespoon tomato paste instead of ketchup, 2 teaspoons sugar, 1 tablespoon cooled melted butter, 2 tablespoons water, and a tiny pinch of cayenne. Chill for at least 2 hours before serving.
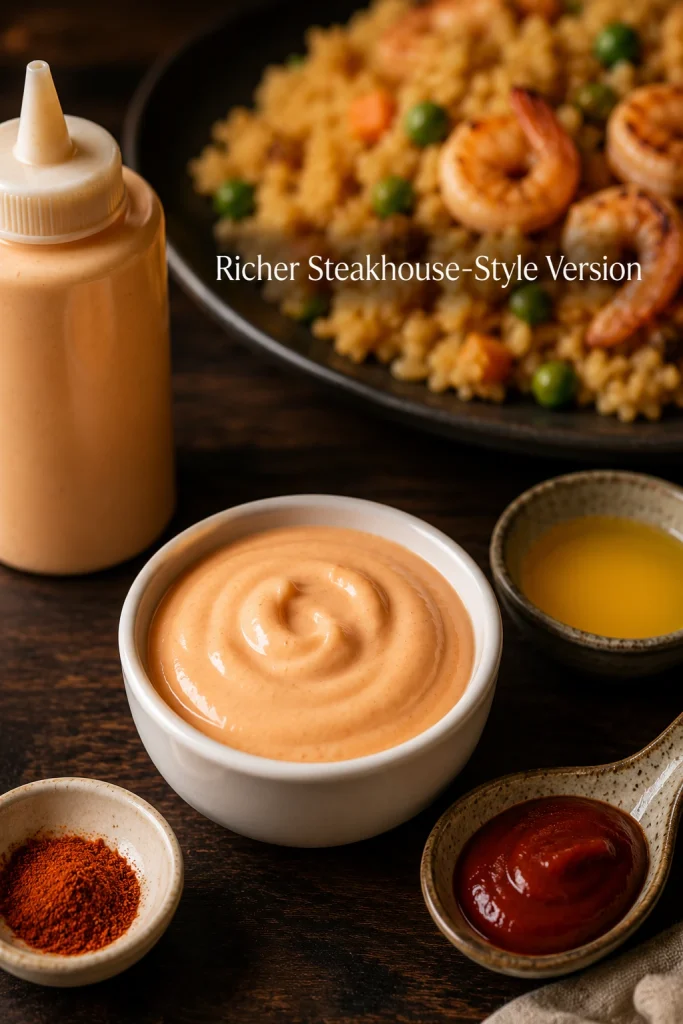
Rich pale pink-orange yum yum sauce with a squeeze bottle, tomato paste, melted butter, cayenne, and fried rice with shrimp in the background.
For a richer steakhouse-style sauce, tomato paste, cooled melted butter, and a tiny pinch of heat make the flavor rounder.

Before You Start

Start with the ketchup version if this is your first batch. It tastes familiar right away: sweet, creamy, lightly tangy, and close to the sauce-cup flavor people remember from hibachi dinners. Try tomato paste next time if you want deeper color, stronger tomato flavor, and less sweetness.

If it tastes like plain mayo after the first whisk, do not panic. That is normal before the sauce rests. A freshly mixed batch can taste sharper than expected, so give it 30 minutes before you start fixing things that may not be broken.

Yum yum sauce is a finishing sauce, not a pan sauce. Add it after cooking, not while the food is simmering or frying. For a sauce that cooks with the food, use this stir fry sauce recipe instead.

Choose Your Version: Classic, Richer, Spicy, or Lighter

The best version depends on what you want from the sauce tonight. Ketchup gives you the familiar sweet hibachi-night flavor. Tomato paste makes it deeper and less sweet. Kewpie and butter push it richer. Yogurt makes it lighter for bowls, even though it moves away from the classic copycat feel.

VersionUse ThisWhat It Tastes Like
Classic easy sauceMayo + ketchup + rice vinegar + sugar + garlic powder + paprikaFamiliar, gently sweet, family-friendly
Deeper sauceMayo + tomato paste + a little extra sugarLess sweet, deeper in color, more concentrated
Richer steakhouse-style sauceKewpie mayo + tomato paste + cooled melted butterSmoother, fuller, more savory
Spicy versionAdd cayenne, sriracha, sambal, or chili garlic sauceCreamy with gentle to medium heat
Keto or lower-sugar sauceTomato paste instead of ketchup + keto sweetenerTangier, less sweet, still creamy
Lighter bowl sauceHalf mayo + half Greek yogurtBrighter, lighter, better for bowls than copycat flavor

For a completely different quick dip in the same weeknight-sauce family, this peanut sauce recipe is better when you want something nutty, salty-sweet, and built for noodles or spring rolls.

Ketchup vs Tomato Paste

Stuck between ketchup and tomato paste? Use this as the simple rule: use ketchup for the easy sweet version and tomato paste for the deeper, less-sweet version.
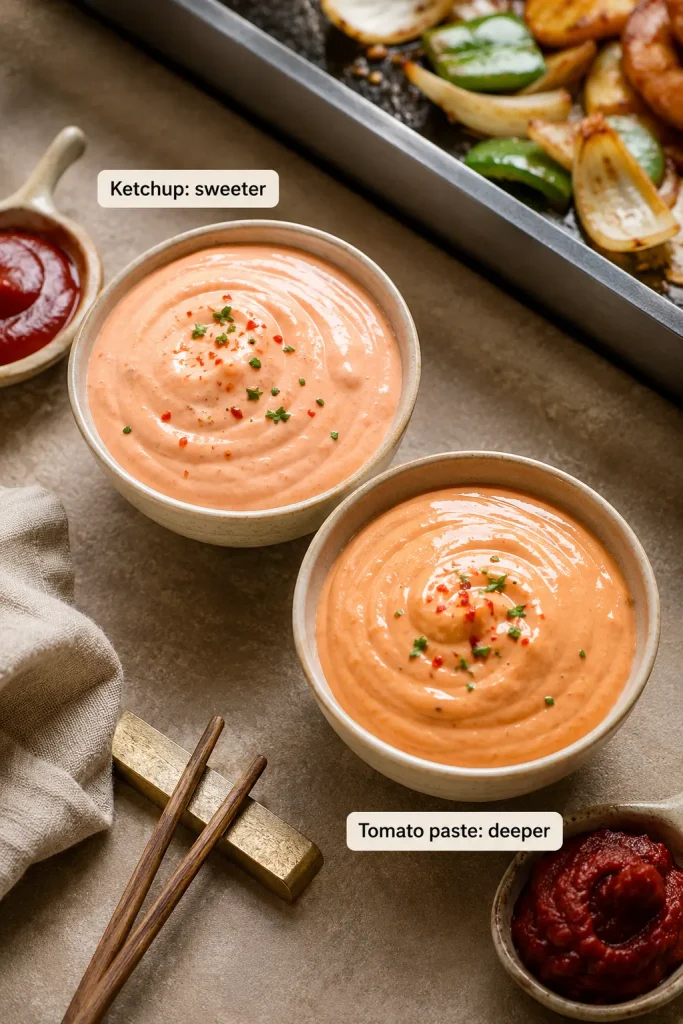
Two bowls of yum yum sauce comparing a lighter ketchup version with a deeper tomato paste version, with ketchup and tomato paste nearby.
Choose ketchup for a sweeter yum yum sauce, or tomato paste for a deeper, less-sweet restaurant-style flavor.
Use Ketchup WhenUse Tomato Paste When
You want the easiest versionYou want a deeper flavor
You prefer a sweeter sauceYou want less sweetness
You want a brighter pale pink-orange colorYou want a more concentrated tomato taste
You are making it for kids or family mealsYou are making a keto or lower-sugar version
You want a softer, familiar flavorYou want a richer steakhouse-style base

Ketchup usually needs less sugar. Tomato paste usually needs a little more. Taste after chilling.

Ingredients You Need

The core yum yum sauce ingredients are mayonnaise, ketchup or tomato paste, rice vinegar, sugar, garlic powder, onion powder, paprika, water, and salt. Butter and heat are optional.

Mayonnaise

Mayonnaise is the body of the sauce. Use one you already like, because its flavor comes through. Regular mayo works well. Kewpie tastes richer and slightly more savory. Light mayo or avocado oil mayo can work if you like the flavor, but the sauce may taste sharper or thinner. If using Miracle Whip, reduce the sugar and vinegar because it is already sweeter and tangier.

Ketchup or Tomato Paste

Ketchup gives the sauce that familiar hibachi-night sweetness. Tomato paste is the version you try when you want it to taste a little less sweet and a little more grown-up.

Rice Vinegar

Rice vinegar cuts through the richness of the mayo and keeps the sauce from tasting flat. It is mild enough to brighten the sauce without making it harsh.

Sugar

A little sugar gives the sauce its familiar sweet finish. Ketchup already contains sweetness, so the ketchup version needs less. Tomato paste is less sweet, so it usually needs a little more.

Garlic Powder, Onion Powder, and Paprika

Garlic powder and onion powder give savory depth without raw garlic bite. Paprika gives the sauce its warm color and keeps the flavor from feeling plain. Smoked paprika adds a deeper note that works well with grilled chicken, fried rice, shrimp, or steak bites.

Butter and Water

Butter is optional. Add it when you want the sauce to feel fuller and more like the little cup from a steakhouse; skip it when you want a brighter drizzle for rice or vegetables. Water decides whether the sauce behaves like a dip, drizzle, or dressing. Add it slowly because a small amount changes the consistency quickly.

Why This Recipe Works

This sauce works because every small ingredient fixes one common problem. Vinegar keeps the mayo from tasting heavy. Tomato gives color and tang. Sugar rounds the edges. Garlic powder, onion powder, and paprika make it taste like more than seasoned mayo. Water turns it from a thick dip into the soft ribbon people want over fried rice, shrimp, chicken, and vegetables.

The rest time matters too. After chilling, the garlic powder softens, the paprika settles into the mayo, and the vinegar stops tasting sharp. After 30 minutes it tastes more blended; after 2 hours it tastes closer to the steakhouse-style sauce people remember.

No Rice Vinegar? Use These Instead

Rice vinegar is mild and slightly sweet, which is why it works well here. Rice vinegar is usually milder than sharp white vinegar; for example, Kikkoman lists its rice vinegar at 4.2% acidity. If you need a swap, use another gentle acid and adjust slowly.
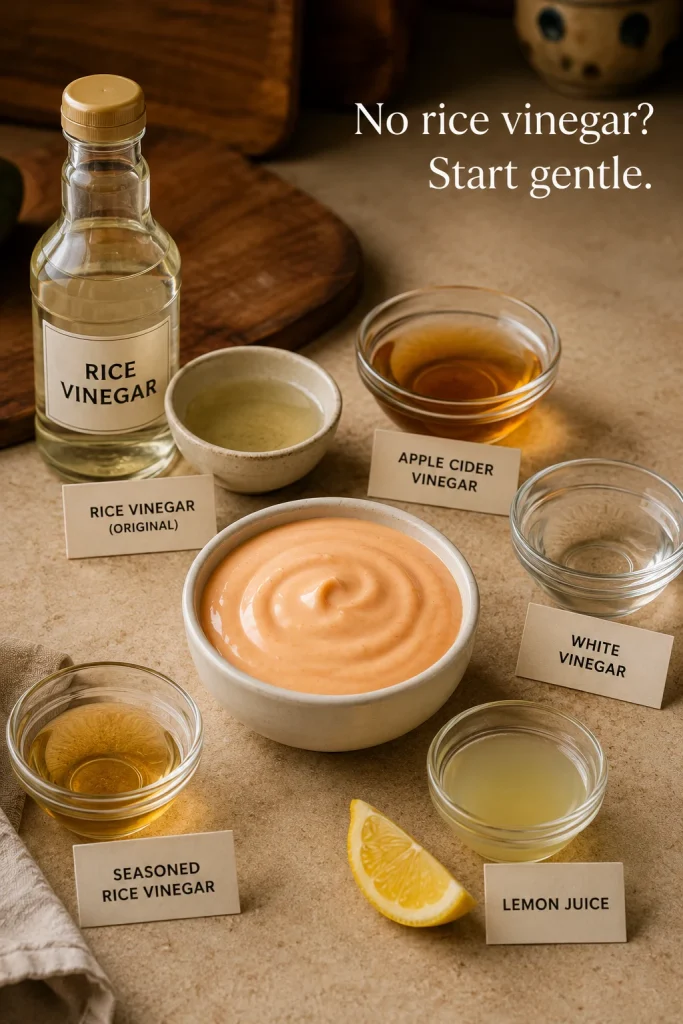
A bowl of yum yum sauce surrounded by rice vinegar, apple cider vinegar, white vinegar, lemon juice, seasoned rice vinegar, lemon wedges, and small labeled cards.
When replacing rice vinegar, start small; apple cider vinegar, white vinegar, lemon juice, and seasoned rice vinegar all sharpen the sauce differently.
SubstituteHow to Use It
Apple cider vinegarUse the same amount. It is slightly fruitier and a little sharper.
White vinegarUse a little less at first because it can taste sharper.
Lemon juiceUse the same amount for a fresher, brighter sauce.
Seasoned rice vinegarUse the same amount, but reduce the sugar slightly because it may already be sweetened.
MirinUse a small splash for sweetness and depth, but do not rely on it as the only acid.

Avoid strong vinegars like balsamic or malt vinegar. They can overpower the mayo and tomato. Whichever swap you use, start small, let the sauce rest, and adjust after the flavor settles.

Butter or No Butter?

No, yum yum sauce does not need butter. A good sauce can be made with mayo, ketchup or tomato paste, vinegar, sugar, seasonings, and water. Butter is optional; it makes the sauce richer and silkier, but the sauce still works without it.

Add butter if you want a fuller, sauce-cup style finish. Skip it if you want a brighter sauce for fried rice, spring rolls, or vegetables. If you use butter, melt it gently and let it cool until warm, not hot, before whisking it into the mayo.

How to Make Yum Yum Sauce

Add the mayo, ketchup, vinegar, sugar, garlic powder, onion powder, paprika, and salt to a bowl. Whisk until the sauce is completely smooth and there are no streaks of tomato or spice left in the mayo.
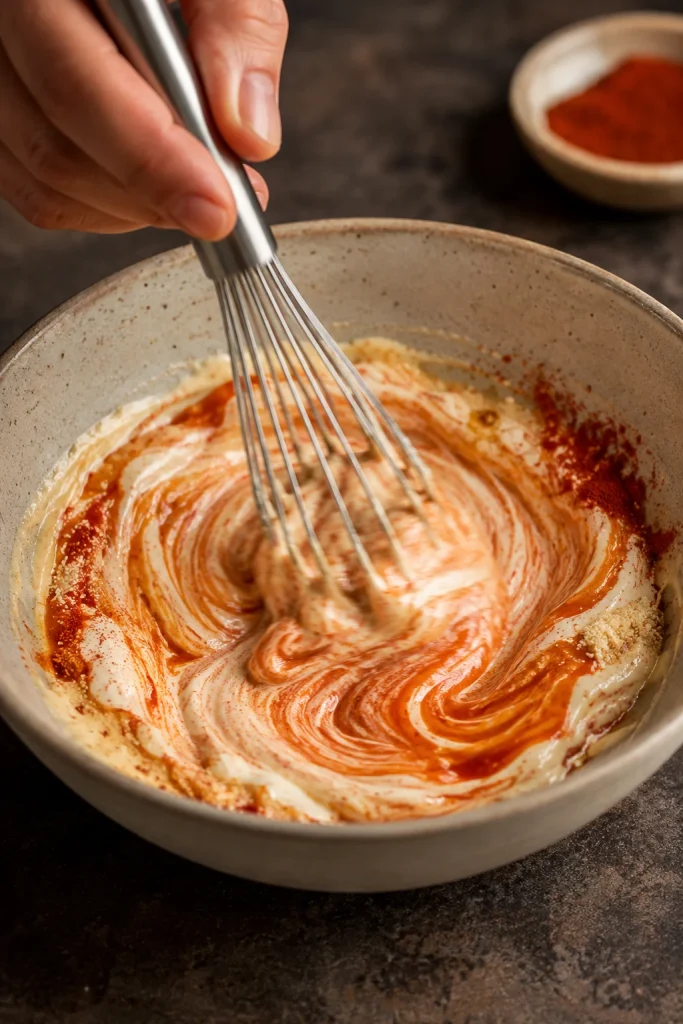
A hand whisking mayonnaise, ketchup, vinegar, sugar, garlic powder, onion powder, paprika, and salt in a ceramic bowl to make yum yum sauce.
Once the mayo, ketchup, vinegar, sugar, and spices turn evenly colored, the sauce is ready to chill and settle.

Thin the sauce with water. Start with 1 tablespoon for a thick dip. Add more water 1 teaspoon to 1 tablespoon at a time until it reaches the texture you want. If you are adding butter, make sure it is warm, not hot, before whisking it in.

Finished Sauce Texture

Once the sauce is fully whisked, check the spoon trail before you start changing the flavor. The texture should look glossy and smooth, not stiff or grainy.
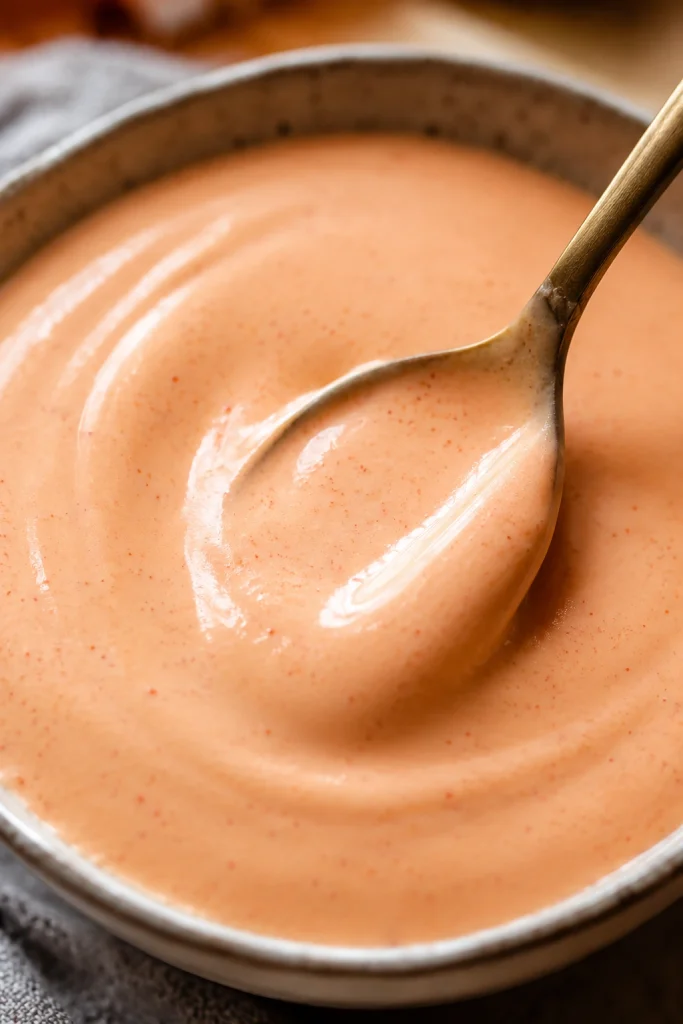
A close-up of smooth pale pink-orange yum yum sauce in a bowl, with a spoon dragging through the glossy surface.
A good finished sauce should leave a glossy spoon trail; if it looks stiff or heavy, loosen it slowly with water.

Taste the sauce, but do not make aggressive adjustments right away. Freshly mixed sauce often tastes more mayo-forward than the finished version. Cover and refrigerate it for at least 30 minutes, then stir and taste again.

A Few Things Not to Rush

  • Do not add all the water at once. The sauce can go from thick dip to thin dressing quickly.
  • Do not add hot butter directly to mayo. Let it cool first so the sauce stays smooth.
  • Do not cook the finished sauce in fried rice or stir-fry. Add it after cooking.
  • Do not use strong vinegars like balsamic or malt vinegar. They take the sauce in a completely different direction.

Best Texture: Dip, Drizzle, or Dressing

The right texture depends on the plate. Fries need a thick dip. Fried rice needs a loose ribbon. Shrimp can go either way.
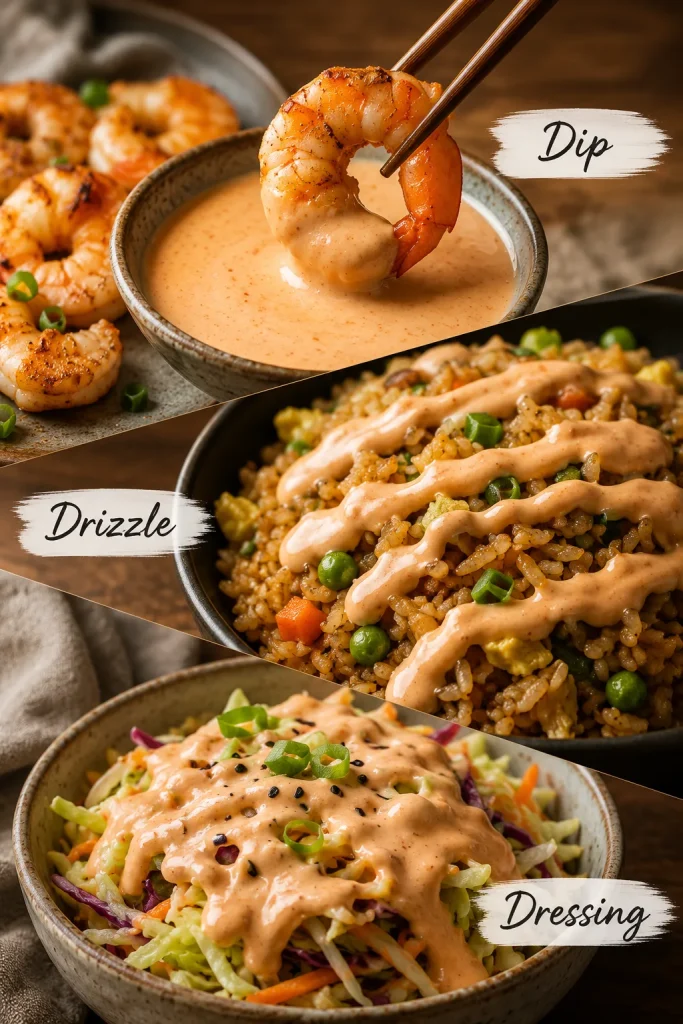
A three-part texture guide showing yum yum sauce as a thick dip with shrimp, a drizzle over fried rice, and a dressing over a slaw-style bowl.
Instead of using one texture for everything, keep it thick for dipping, looser for rice, and lightest for bowls or slaw.
TextureWater AmountBest For
Thick dip1 tablespoon / 15 mlShrimp, fries, nuggets, spring rolls, dumplings, roasted potatoes
Drizzle sauce2 to 3 tablespoons / 30 to 45 mlFried rice, chicken bowls, hibachi shrimp, steak bites, vegetables
Dressing-style sauce3 to 4 tablespoons / 45 to 60 ml, plus a little extra vinegarSalads, slaws, grain bowls, cold noodle bowls

The sauce should fall softly from a spoon for rice, but cling after one dip for shrimp, fries, and spring rolls. If you are serving it with hot fried rice, make it slightly thinner than you think; the rice will make a thick sauce feel heavier. If the sauce is for fries or spring rolls, stop thinning early so it clings to crispy edges.

Serving ideas: jump to fried rice, shrimp, bowls, or crispy snacks.

Why Yum Yum Sauce Tastes Better After Chilling

You can use the sauce immediately, but it tastes better after chilling. Right after mixing, the mayo, vinegar, tomato, sugar, and spices can taste separate. The sauce may also taste more mayo-forward than expected.

After 30 minutes in the fridge, the garlic powder and onion powder soften into the sauce. The paprika and tomato blend into the fat. The vinegar becomes less sharp, and the sweetness tastes less raw. After 2 hours, the flavor usually lands much closer to the hibachi-style sauce people remember from restaurants.

If you have time, make it the night before. Overnight chilling gives the smoothest flavor. If the sauce has been in the fridge overnight, let it sit for 5 to 10 minutes and stir before serving. It should be cool, not icy-thick.

Jump to recipe · Texture guide · Back to top

Hibachi White Sauce, Japanese White Sauce, and Shrimp Sauce

If you have ever searched for “that white sauce from hibachi,” this is probably the sauce you meant. In many American hibachi and Japanese steakhouse-style restaurants, this creamy sauce is called yum yum sauce, hibachi white sauce, Japanese white sauce, shrimp sauce, pink sauce, or Japanese steakhouse sauce.

The names come from how people use it. Some remember it with shrimp, some with fried rice, and some from the little sauce cups at a steakhouse. Even though it is often called white sauce, most homemade versions are pale peach or pink-orange because of ketchup, tomato paste, and paprika.

There is no single official formula. The goal is the familiar balance: cool mayo base, gentle sweetness, mild tang, pale tomato color, and enough water to make it dip-friendly or drizzle-friendly.

Homemade vs Store-Bought Yum Yum Sauce

Store-bought yum yum sauce is useful when you just want a squeeze bottle in the fridge. The problem is that bottled versions can swing too sweet, too salty, too thin, or too much like a generic mayo dressing.

Homemade is better when you want the sauce to match the plate: thicker for fries, looser for fried rice, sweeter for kids, tangier for shrimp, richer for steakhouse-style bowls. You can also make gluten-free, vegan, keto, or lighter versions more easily when you control the ingredients.

What to Eat with Yum Yum Sauce

Think of this as a cool finishing sauce. It works anywhere you want something creamy enough to soften heat, bright enough to wake up rice, and rich enough to cling to crispy snacks. This is the drizzle that makes plain rice, shrimp, and vegetables feel like hibachi night at home.

UseBest Texture
Fried riceLoose drizzle
ShrimpThick dip or light drizzle
Chicken bowlsDrizzle
Fries and nuggetsThick dip
Spring rolls and dumplingsThick dip
Burgers, wraps, and tacosSpread texture
Salads and slawsDressing-style

Fried Rice and Hibachi Plates

On fried rice and hibachi-style plates, keep it loose enough to fall from a spoon. You want pale, creamy streaks across hot rice, not a heavy scoop sitting on top. Add the sauce after cooking so the rice stays fluffy and the sauce stays smooth.
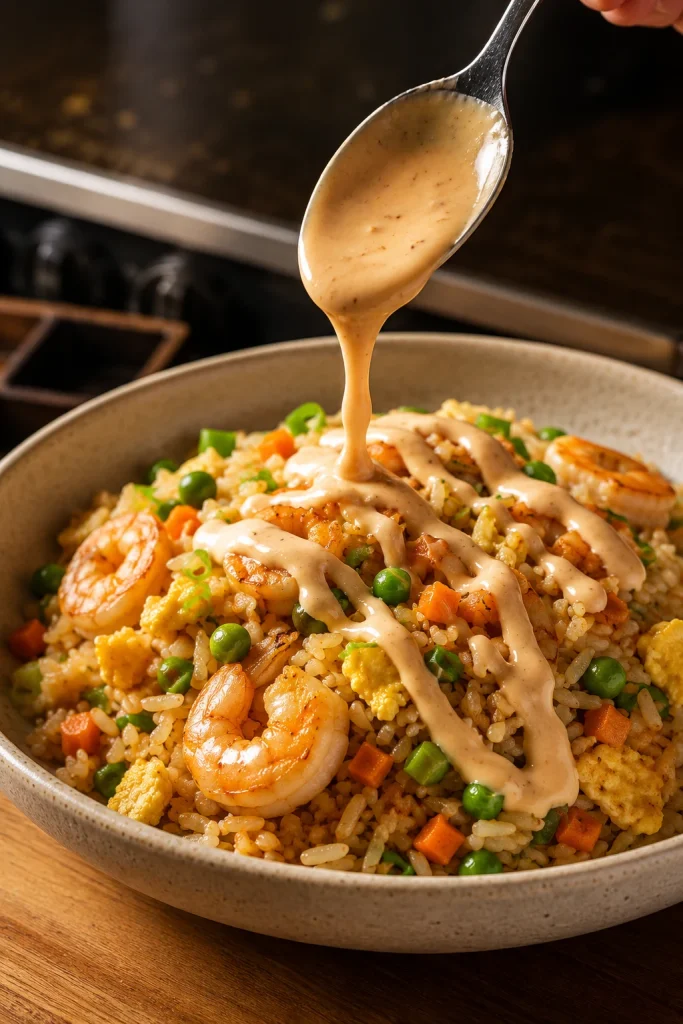
Yum yum sauce being spooned in ribbons over shrimp fried rice with egg, peas, carrots, scallions, and visible rice grains.
Drizzle the sauce after cooking fried rice so the grains stay fluffy and the cool sauce does not turn oily.

Shrimp, Seafood, and Chicken

Shrimp can go either way: thick as a dip or slightly loosened as a drizzle. For shrimp, the sauce should be thick enough to cling after one dip. If the protein is already rich or fried, add a little extra vinegar to the sauce for balance.
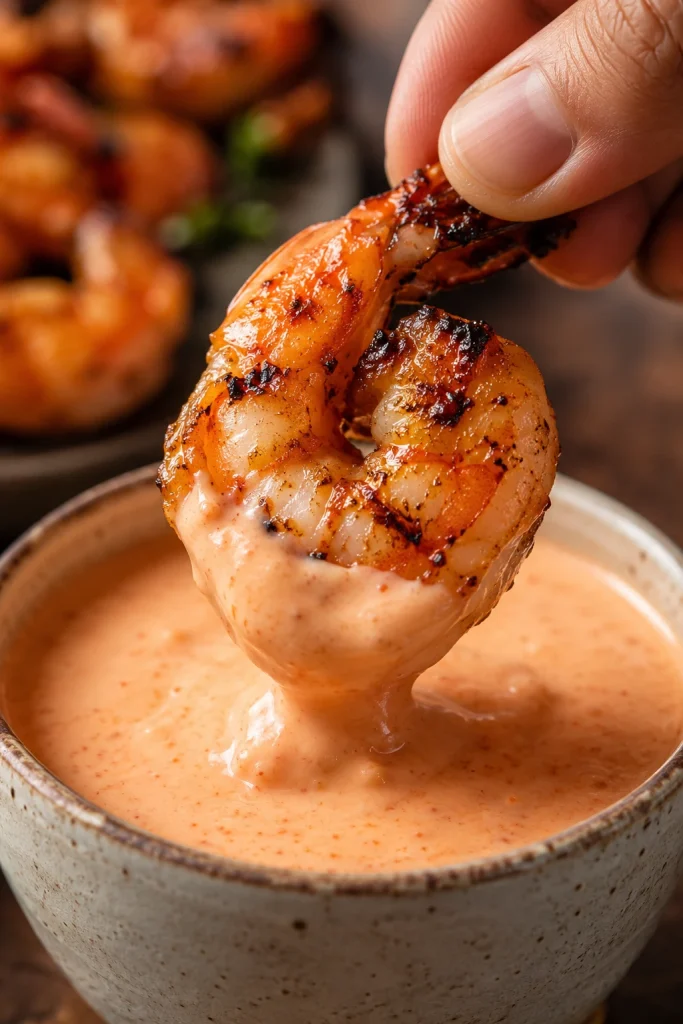
A grilled shrimp held by fingers and dipped into thick pale pink-orange yum yum sauce in a ceramic bowl.
Hibachi shrimp sauce works best as a thicker dip that clings after one swipe instead of sliding off the shrimp.

For another quick shrimp dinner with a brighter lemon-garlic direction, keep this shrimp scampi recipe nearby. If the meal is more fried fish than hibachi shrimp, this homemade tartar sauce is the better match.

Chicken, Steak Bites, and Hibachi Vegetables

Chicken and steak bites are best with a cool, smooth sauce that softens charred edges without hiding the grilled flavor.
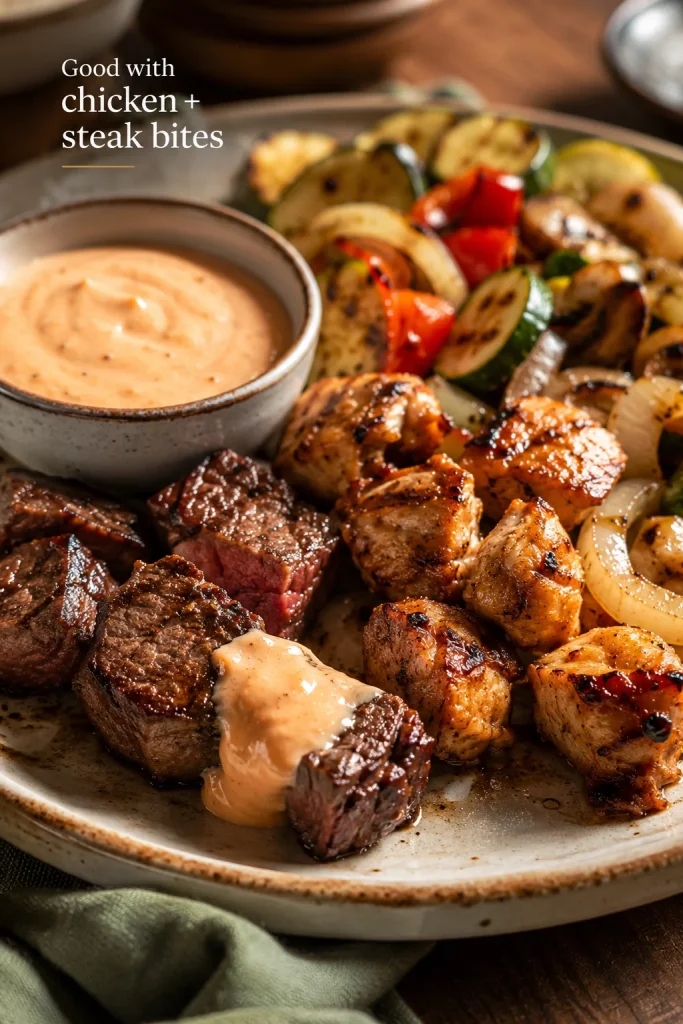
A plate of grilled chicken pieces, steak bites, hibachi-style vegetables, and a bowl of pale pink-orange yum yum sauce, with sauce on one piece of steak.
Beyond shrimp, a cool hibachi-style sauce helps balance grilled chicken, steak bites, onions, zucchini, and peppers.

Bowls, Wraps, and Rice Meals

Bowls need a smoother drizzle. A spoonful can make a simple bowl feel finished, especially when there is warm rice, crunchy cucumber, cabbage, lettuce, carrots, grilled chicken, shrimp, beef, tofu, or crispy vegetables.
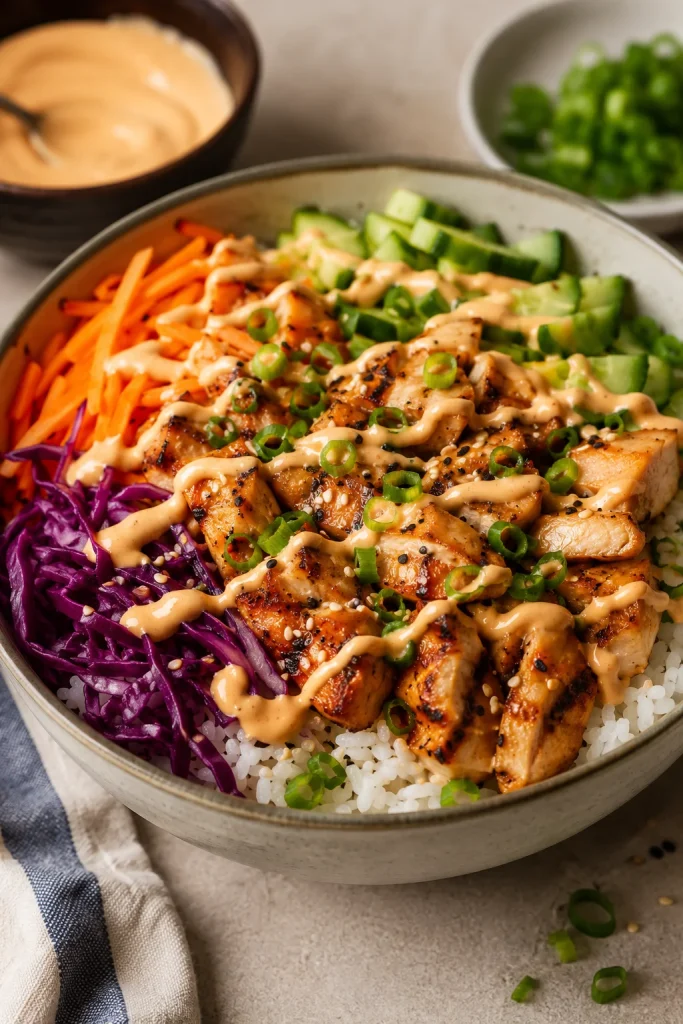
A rice bowl with grilled chicken, white rice, cucumber, purple cabbage, carrots, scallions, sesame seeds, and yum yum sauce drizzled across the top.
In rice bowls, a light drizzle adds flavor without covering the crunch of cucumber, cabbage, and carrots.

A seafood rice bowl can borrow the build from this salmon bowl recipe. With beef and rice, use it as a cool creamy contrast beside a saucy Korean beef bowl.

Fries, Spring Rolls, Dumplings, and Snacks

Crispy snacks are where the thicker version wins. Start with only 1 tablespoon water so the sauce clings to fries, nuggets, spring rolls, dumplings, potstickers, onion rings, roasted potatoes, and other crunchy bites instead of sliding back into the bowl.

A snack board with a bowl of thick yum yum sauce surrounded by fries, spring rolls, dumplings, nuggets, roasted potatoes, and onion rings.
Crispy snacks need a thicker sauce, so fries, spring rolls, dumplings, nuggets, and onion rings can catch it on their edges.

With spring rolls and fries, keep it spoonable and thick so every crispy edge catches some sauce. A crisp snack plate works well beside crispy veg spring rolls, fries, dumplings, or roasted potatoes.

Sandwiches, Burgers, and Tacos

As a burger, taco, or sandwich spread, keep it thicker than drizzle texture so it stays where you put it. It pairs especially well with crunchy lettuce, cucumber, cabbage, grilled chicken, shrimp, or crispy tofu.

Yum Yum Sauce Variations

Make the main version first if you can. Once you know the baseline, these variations help you make it spicier, richer, lighter, vegan, gluten-free, or lower in sugar.

Spicy Yum Yum Sauce

Add cayenne, sriracha, sambal, chili garlic sauce, or your favorite hot sauce. A pinch of cayenne gives gentle heat. About ½ to 1 teaspoon sriracha makes the sauce noticeably spicy. If it becomes too hot, add more mayo and a small pinch of sugar.

For a hotter fruit-and-chili direction that goes further than yum yum sauce, save this mango habanero sauce recipe for tacos, wings, shrimp, grilled chicken, paneer, tofu, or vegetables.

Kewpie Mayo Version

Kewpie mayo makes the sauce richer, smoother, and slightly more savory. It is a good choice if you want a fuller steakhouse-style flavor. Regular mayo still works well, especially when balanced with vinegar, tomato, garlic powder, paprika, and rest time.

Gluten-Free Version

This sauce can be made gluten-free if every packaged ingredient you use is labeled gluten-free. Check the mayo, ketchup, tomato paste, vinegar, hot sauce, and spice blends. If you add soy sauce, chili garlic sauce, or another condiment, choose a gluten-free version.

Vegan Version

Use vegan mayo in place of regular mayo. Skip the butter or use vegan butter. Sugar, maple syrup, or another sweetener can round out the flavor. Vegan mayo gives a more classic result than yogurt-style bases because it keeps the sauce creamy and rich.

Keto or Lower-Sugar Version

Tomato paste is usually the cleaner low-sugar base because ketchup brings sweetness before you even add a sweetener. Replace the sugar with a keto-friendly sweetener, then taste after chilling because some sweeteners can feel sharper before the sauce rests.

Low-Calorie or Greek Yogurt Version

The half-mayo, half-yogurt version is the sweet spot. It still tastes like a creamy sauce, while a full-yogurt version tastes more like a tangy bowl dressing. Use it for bowls, salads, slaws, or lighter chicken-and-rice plates rather than a strict hibachi copycat.

No-Mayo Version

You can make a no-mayo version with Greek yogurt, sour cream, vegan sour cream, or blended cashew cream, but it becomes a different sauce. To keep it balanced, add tomato, vinegar, sweetener, and seasoning in small amounts, then let it rest before adjusting again.

Troubleshooting Yum Yum Sauce

Most “failed” yum yum sauce is not actually failed. It usually just needs a short rest, a tiny splash of acid, or a spoonful of mayo to bring it back. If the flavor still feels off after chilling, the fix is usually small.
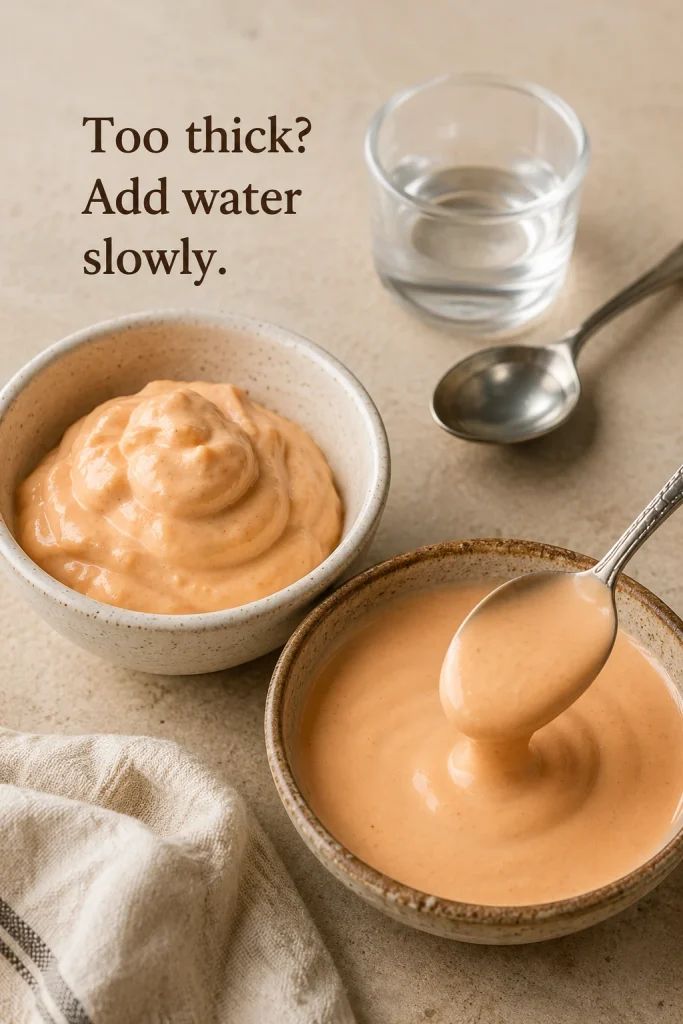
Yum yum sauce texture comparison showing a too-thick mound-like sauce beside a smoother drizzle texture, with water and a spoon nearby.
If the sauce is too thick, add water one teaspoon at a time until it changes from a mound to a smooth drizzle.
ProblemHow to Fix It
It tastes too much like mayoChill first. Then add a little more vinegar, paprika, garlic powder, ketchup or tomato paste, and a small pinch of sugar.
Too sweetAdd rice vinegar, lemon juice, or a pinch of salt.
Sharp or tangyAdd more mayo and a tiny pinch of sugar.
Thick and heavyAdd water 1 teaspoon at a time until it loosens.
Thin or runnyAdd mayo 1 tablespoon at a time until it thickens.
Looks too paleAdd a little more tomato paste, ketchup, or paprika.
Looks too orangeAdd more mayo.
Not steakhouse-style enoughUse Kewpie mayo, add the optional cooled butter, and chill the sauce longer.
Too spicyAdd mayo and a small pinch of sugar.
Tastes flatAdd salt, onion powder, garlic powder, or a tiny splash of rice vinegar.

When It Tastes Too Much Like Mayo

A mayo-heavy sauce usually needs rest and small balancing moves, not a full restart.
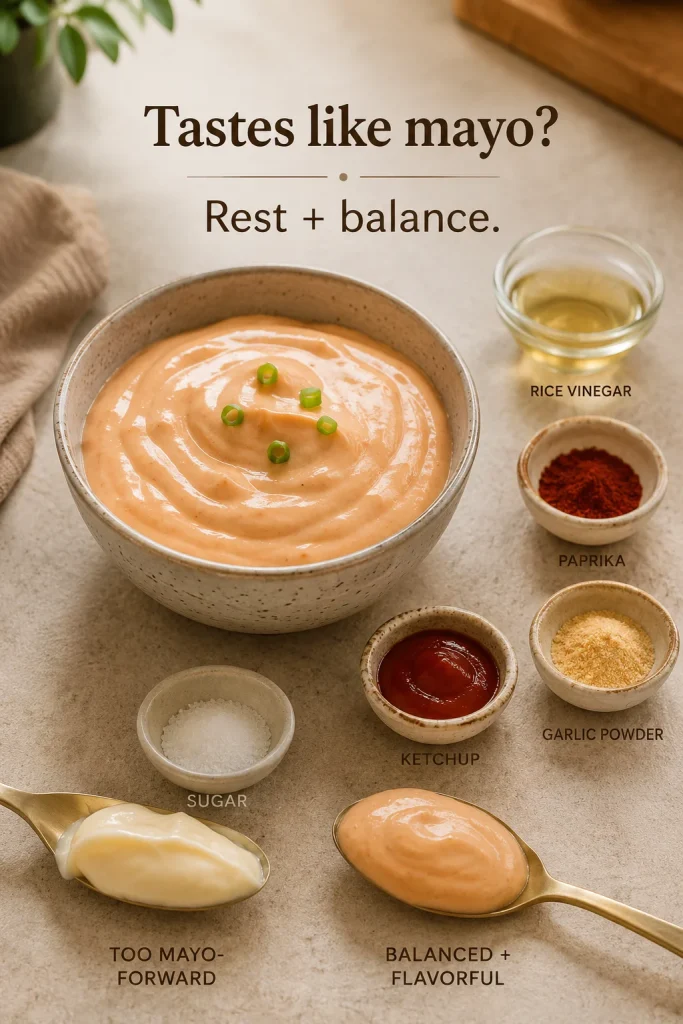
A bowl of yum yum sauce with rice vinegar, paprika, garlic powder, ketchup, sugar, and two spoons comparing a mayo-forward sauce with a more balanced sauce.
When the sauce tastes mayo-heavy, rest it first; then balance it with rice vinegar, ketchup or tomato paste, paprika, garlic, and sweetness.

Storage and Make-Ahead

Store yum yum sauce in an airtight jar or covered container in the refrigerator for up to 1 week. Stir it before serving because the sauce may thicken slightly as it chills.
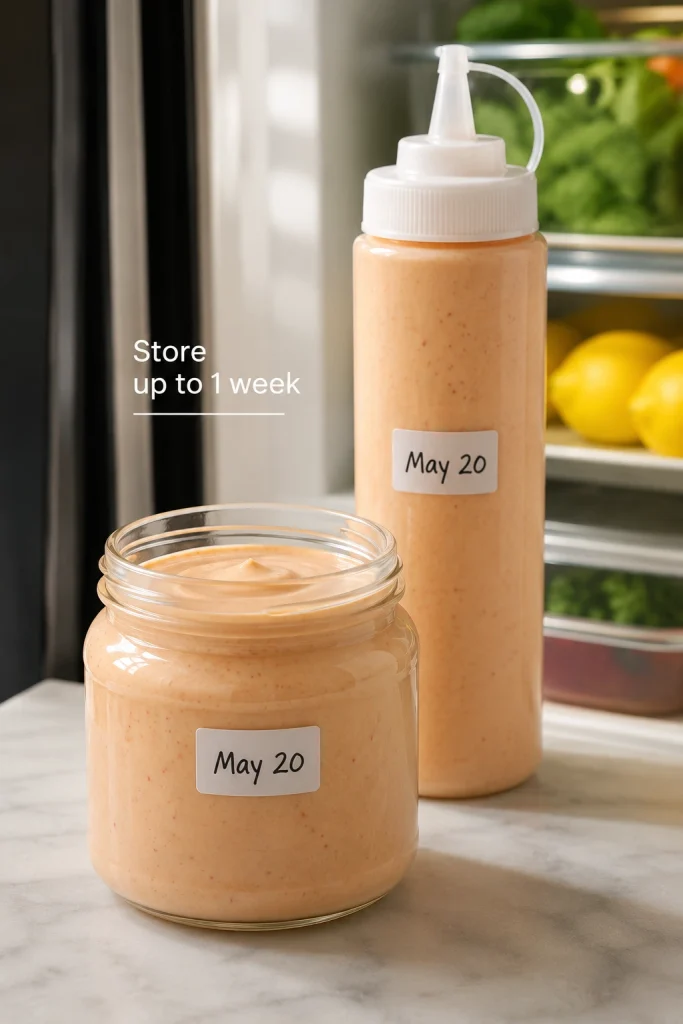
A glass jar and squeeze bottle filled with pale pink-orange yum yum sauce on a kitchen counter beside an open refrigerator, with date labels.
Refrigerate homemade yum yum sauce in a jar or squeeze bottle, then stir before serving because it thickens as it chills.

This is a good make-ahead sauce. The flavor is better after at least 30 minutes and usually best after 2 hours or overnight. If you are serving it for a hibachi-style dinner, make the sauce first and let it chill while you prepare the rice, shrimp, chicken, or vegetables.

A squeeze bottle is helpful when you want the restaurant-style drizzle over rice and shrimp. For storage, a jar is easier to clean.

Keep the sauce refrigerated and do not leave it sitting out for long periods. This is not a shelf-stable sauce and it is not meant for canning. For general food safety, FoodSafety.gov recommends refrigerating perishable foods within 2 hours and keeping the refrigerator at 40°F / 4°C or below.

If you use Greek yogurt, vegan mayo, homemade mayo, or any ingredient with a shorter use-by date, follow the shortest storage time. Freezing is not recommended because mayo-based sauces can separate and turn grainy after thawing.

Make-ahead tip: Make the sauce first when you start dinner. By the time the rice, shrimp, chicken, or vegetables are ready, the flavor will already be smoother. It is one of those small prep steps that makes tomorrow’s rice bowl easier before tomorrow even starts.

Jump to recipe · Troubleshooting · Back to top

FAQs

What is yum yum sauce made of?

Yum yum sauce is usually made with mayonnaise, ketchup or tomato paste, vinegar, sugar, garlic powder, paprika, and water. Some versions also include butter, onion powder, cayenne, sriracha, mirin, or hot sauce.

Is yum yum sauce actually Japanese?

Not traditionally. It is best known as an American hibachi-style sauce served at many Japanese steakhouse-style restaurants.

Is yum yum sauce the same as hibachi white sauce?

Usually, yes. Many restaurants and home cooks use those names for the same creamy mayo-based sauce.

Is yum yum sauce the same as spicy mayo?

No. Spicy mayo is usually mayo mixed with sriracha or another hot sauce. Yum yum sauce has more rounded flavor from tomato, vinegar, sugar, garlic powder, paprika, and water.

Can I make yum yum sauce without tomato paste?

Yes. Use ketchup instead. For this recipe, 2 tablespoons ketchup gives the easiest sweet, pale pink-orange sauce. Because ketchup is already sweet, start with only 1 teaspoon sugar and adjust after chilling.

Is this Benihana-style yum yum sauce?

It is a homemade hibachi-style sauce in the same creamy, sweet-tangy family, but restaurant formulas vary. For the closest restaurant-style version, use Kewpie mayo, tomato paste, cooled melted butter, a tiny pinch of heat, and a 2-hour chill.

What can I use instead of rice vinegar?

Use apple cider vinegar, white vinegar, lemon juice, or seasoned rice vinegar. White vinegar is sharper, so start with a little less. Seasoned rice vinegar may already contain sugar, so reduce the sugar slightly.

Does yum yum sauce need butter?

No. Butter is optional. It adds richness and a silkier texture, but the sauce still works without it. If using butter, cool it before whisking it into the mayo.

Why does my yum yum sauce taste like mayo?

Freshly mixed sauce often tastes mayo-forward before it rests. Chill it for at least 30 minutes, then add a little more vinegar, paprika, garlic powder, tomato, and sugar if needed.

Is yum yum sauce good on fried rice?

Yes. Thin it to drizzle texture and add it after cooking, not in the pan. It gives hot fried rice a creamy, tangy finish without making the rice soggy.

What does yum yum sauce go with?

It goes well with shrimp, fried rice, chicken, steak, vegetables, rice bowls, fries, spring rolls, dumplings, nuggets, burgers, wraps, and roasted potatoes.

Is yum yum sauce gluten-free?

It can be gluten-free if every packaged ingredient you use is labeled gluten-free. Check mayo, ketchup, vinegar, hot sauce, spice blends, and any add-ins.

How long does homemade yum yum sauce last?

It keeps for up to 1 week in an airtight container in the refrigerator. Stir before serving and discard it if it smells off, changes texture, or has been left out too long.

Can you freeze yum yum sauce?

Freezing is not recommended. Mayo-based sauces can separate, turn watery, or become grainy after thawing. Make a fresh batch and store it in the refrigerator instead.

How do I make yum yum sauce spicy?

Add cayenne, sriracha, sambal, chili garlic sauce, or hot sauce. Start small, chill the sauce, and taste again before adding more.
Jump to recipe · Storage · Back to top

Posted on 2 Comments

Easy Cheese Sauce Recipe for Mac, Broccoli, Nachos and More

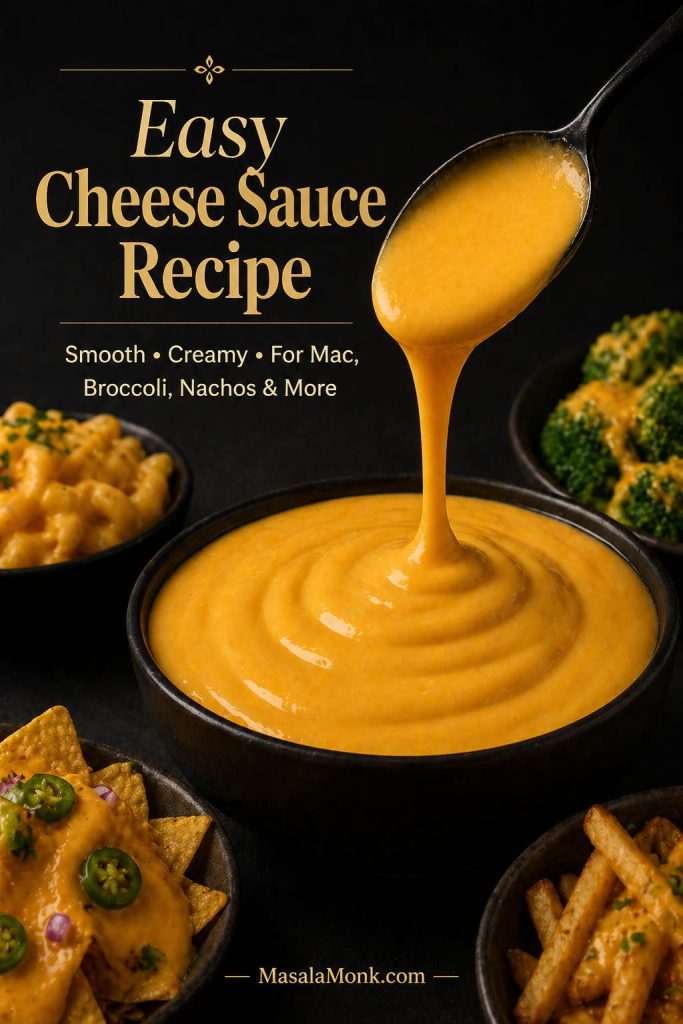
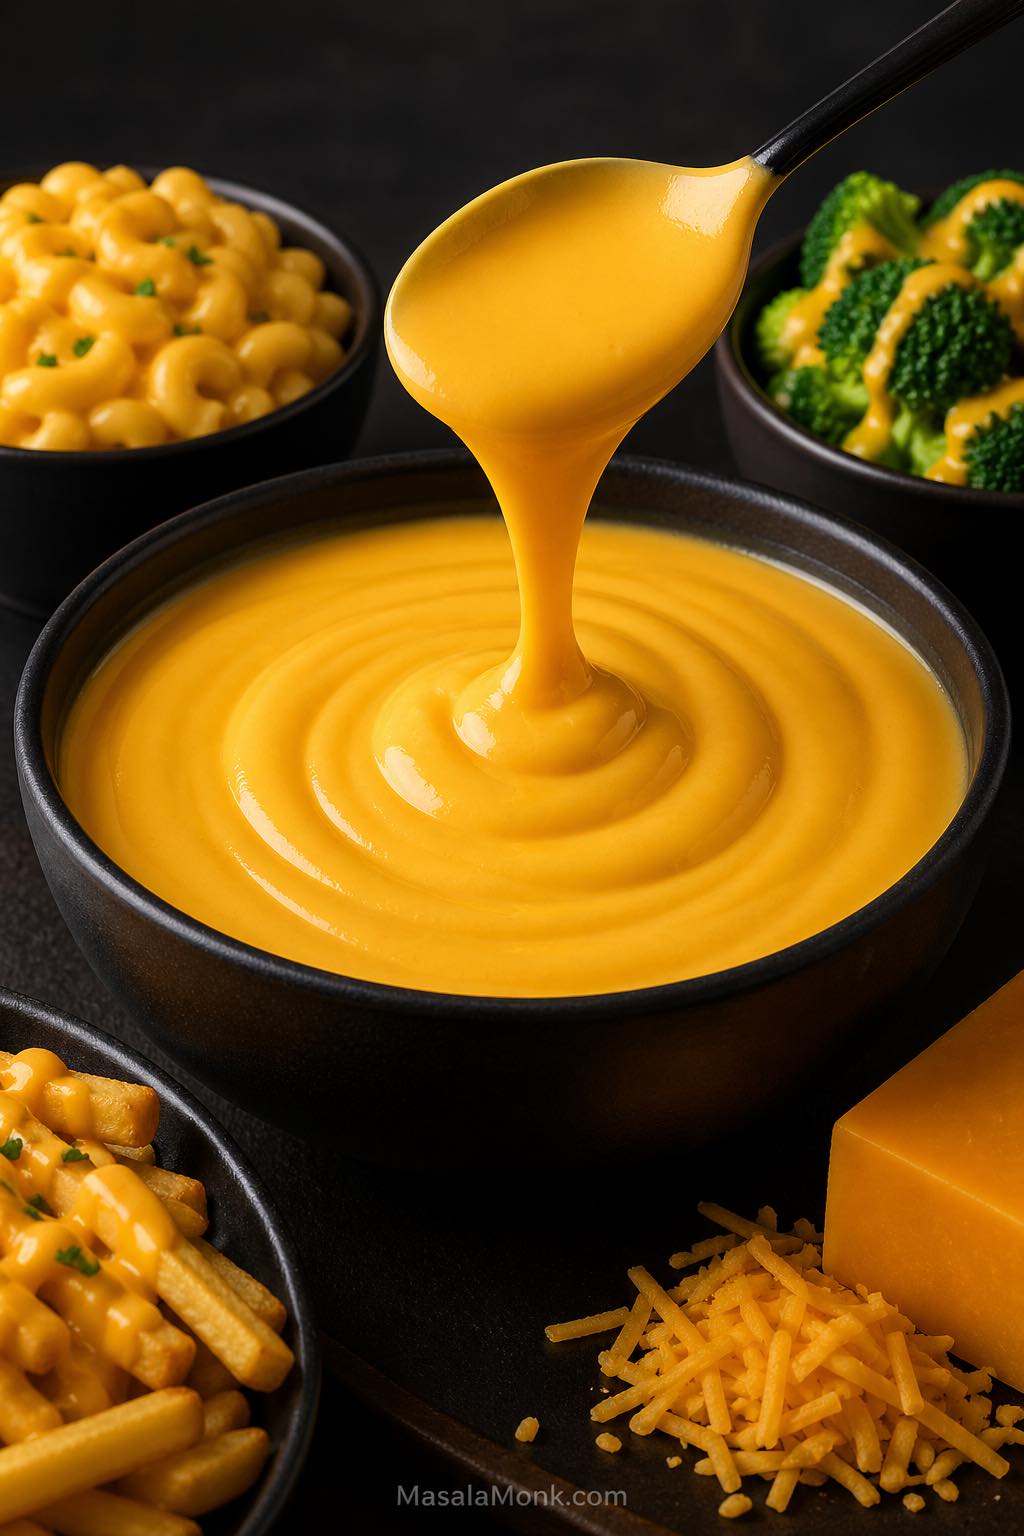
Smooth cheddar cheese sauce lifted with a spoon, served with mac and cheese, broccoli, fries and grated cheddar.

A good cheese sauce recipe should give you a smooth, creamy, cheesy sauce that is easy to control. It should work for mac and cheese, broccoli, cauliflower, fries, baked potatoes, pasta, nachos, pretzels, burgers, rice bowls, and casseroles without turning grainy, oily, lumpy, or gluey.

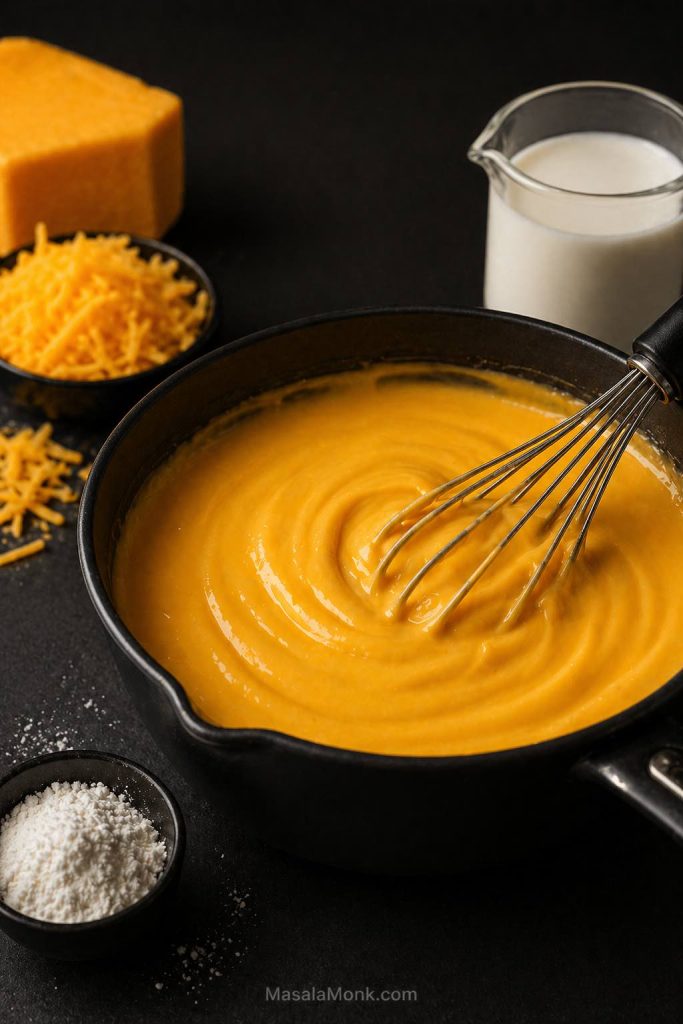
This easy cheese sauce recipe uses a simple butter-flour roux, milk, and freshly grated cheddar. The method is quick, but the details matter: cook the roux long enough, add the milk slowly, remove the pan from heat before adding cheese, and adjust the texture based on how you plan to serve it.

The main recipe turns cheddar cheese, milk, butter, and flour into a medium-thick sauce for vegetables, fries, potatoes, sandwiches, and pasta. It tastes fresher than a jarred sauce because it starts from scratch with real ingredients. From there, you can adapt the same base for mac and cheese, broccoli, cauliflower, pasta, nachos, no-flour sauce, gluten-free sauce, keto sauce, microwave sauce, thicker dips, thinner drizzles, and reheated leftovers.

Cheese Sauce Guide

Use this guide to make a smooth basic cheese sauce first, then adjust the texture, ingredients, and method for the way you want to serve it.

Quick Answer: How to Make Cheese Sauce

To make a smooth cheese sauce, melt butter, whisk in flour, cook the roux briefly, then slowly whisk in milk. Once the base thickens, remove the pan from heat and stir in freshly grated cheddar until melted.

The most important step is adding the cheese away from direct heat. That way, the sauce stays creamy instead of turning grainy, oily, or separated.

For a reliable all-purpose sauce, this recipe uses 2 tablespoons butter, 2 tablespoons flour, 1¼ cups milk, and 6 ounces freshly grated cheddar cheese. That gives you a medium-thick sauce for mac and cheese, broccoli, cauliflower, baked potatoes, fries, pasta, and nachos-style drizzling.

The smooth sauce rule: thicken the milk base first, then turn off the heat before adding cheese. Cheese does not need hard boiling to melt. Gentle residual heat is enough.

At a Glance

At a glance: This cheese sauce recipe makes about 2 cups / 480 ml / 0.48 L of smooth cheddar sauce in about 12 minutes. It uses 2 tbsp butter, 2 tbsp flour, 1¼ cups / 300 ml milk, and 6 oz / 170 g cheddar cheese. Keep it thick for broccoli, fries, potatoes, and sandwiches, or thin it with warm milk for pasta, mac and cheese, and rice bowls.

Practically speaking, that means you can start with one reliable base and adjust it without guessing. The same cheese sauce can stay thick for fries, loosen into a pasta coating, cover broccoli and cauliflower, or shift into a no-flour version with one small method change.

Why This Cheese Sauce Recipe Works

This recipe works because the cheese is added to a thickened milk sauce instead of being melted directly over high heat. As a result, the cheddar has a smoother base to melt into and the finished sauce is easier to control.

The butter and flour create a smooth base, the milk gives the sauce enough moisture, and the cheddar melts in gently after the pan comes off the heat. The same butter-flour-milk logic also shows up in béchamel sauce. Here, however, the base becomes richer because cheddar cheese is stirred in at the end.

That order matters. When cheese is boiled too hard, the sauce can turn grainy, oily, or separated. With a thickened milk base, though, the cheese has a smoother place to melt.

For a homemade cheese sauce, the goal is not just melting cheese. The recipe needs enough liquid, enough thickening power, and gentle heat so the sauce stays smooth after the cheddar melts.

This recipe also starts with a medium-thick texture on purpose. It is thick enough for vegetables, fries, potatoes, and sandwiches, while still being easy to loosen with warm milk or pasta water when you want a thinner sauce for noodles, mac and cheese, or rice bowls.

Cheese Sauce Ingredients

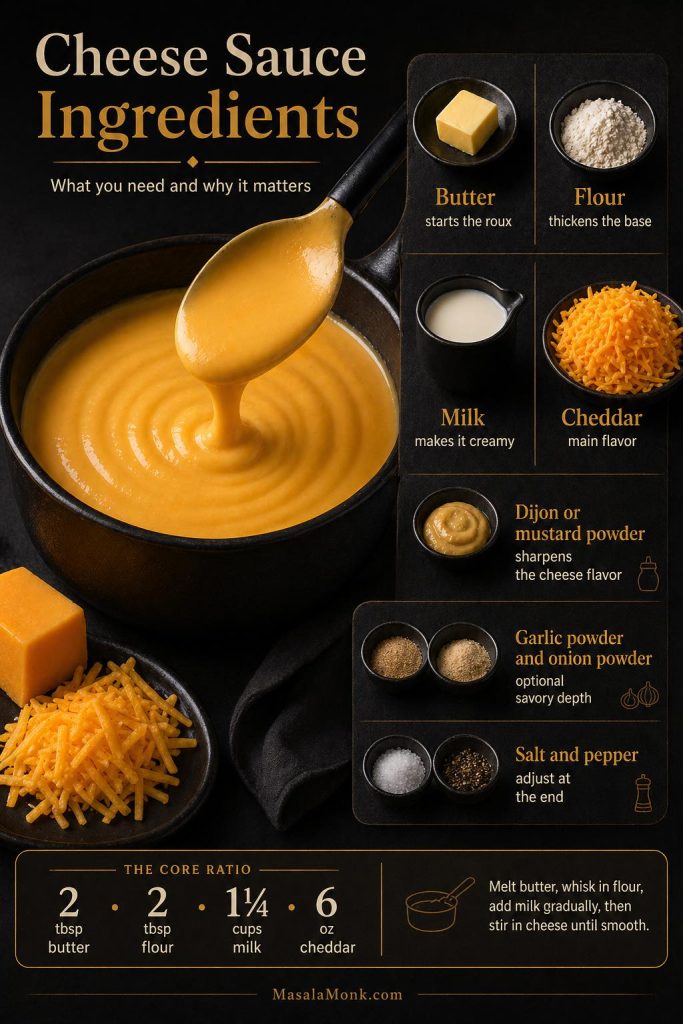
Although this recipe uses basic ingredients, each one has a specific job. The butter and flour create the thickened base, the milk makes it creamy, and the cheddar cheese gives the sauce its main flavor.

Cheese sauce ingredients guide showing butter, flour, milk, cheddar, mustard, garlic powder, onion powder, salt and pepper with the core ratio.
The basic cheese sauce ingredients are simple, but each one has a job: butter and flour build the roux, milk makes the sauce creamy, cheddar gives flavor, and seasonings sharpen the final taste.

Main Ingredients and What They Do

Ingredient Amount Why it matters
Unsalted butter 2 tbsp / 28 g / 1 oz Combines with flour to make the roux. Salted butter works too, but reduce added salt.
All-purpose flour / plain flour 2 tbsp / 16–18 g / 0.6 oz Thickens the milk and helps stabilize the sauce so the cheese melts smoothly. Do not use self-rising flour.
Whole milk 1¼ cups / 300 ml / 10 fl oz / 0.3 L Gives the sauce body and creaminess. Whole milk gives the smoothest everyday result.
Freshly grated cheddar cheese 6 oz / 170 g / about 1½ cups The main cheese. Medium cheddar is the easiest default; sharp cheddar gives stronger flavor.
Dijon mustard or mustard powder 1 tsp Dijon / 5 ml, or ¼ tsp mustard powder / about 1 g Optional, but it sharpens the flavor and makes the sauce taste more cheesy.
Garlic powder ¼ tsp / about 0.7 g Optional background flavor, especially good for potatoes, fries, broccoli, and pasta.
Onion powder ¼ tsp / about 0.6 g Optional savory depth without making the sauce taste onion-heavy.
White pepper or black pepper Pinch to ⅛ tsp / about 0.3 g Adds gentle warmth. White pepper keeps the sauce paler; black pepper is easier to find.
Salt ⅛–¼ tsp / about 0.75–1.5 g Add after the cheese melts because cheddar can vary a lot in saltiness.

Measurement note: cheese is best measured by weight. If using cups, lightly spoon the grated cheese into the cup instead of packing it down. For this recipe, 1 cup of liquid is treated as 240 ml.

Milk Options

The milk you choose changes the richness of the sauce. Whole milk is the best everyday choice for this cheese sauce recipe, although other dairy options can work depending on the texture you want.

  • Whole milk: best everyday choice for a smooth, creamy cheese sauce.
  • 2% milk: works, but the sauce will taste slightly lighter.
  • Skim milk: not ideal because the sauce can taste thinner and less creamy.
  • Half-and-half: richer and thicker; useful when you want a heavier sauce.
  • Heavy cream: very rich; better for keto-style sauce than the basic roux version.

Can I Use Pre-Shredded Cheese?

Freshly grated cheese melts more smoothly. Pre-shredded cheese is convenient, but many bags contain anti-caking ingredients that can make the sauce less silky. If pre-shredded cheese is all you have, use gentle heat, add it slowly, and avoid boiling after it goes in.

Best Cheese for Cheese Sauce

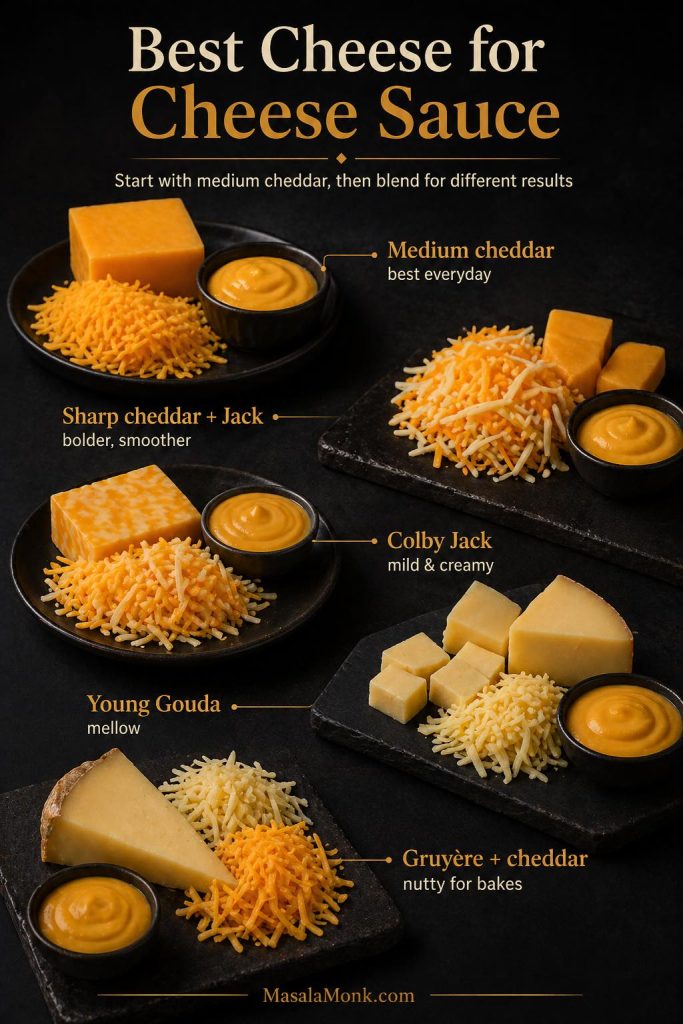
In general, the best cheese for cheese sauce is flavorful but still easy to melt. Medium cheddar is the safest default because it gives a classic cheddar taste without becoming as temperamental as very aged cheese.

Best cheeses for cheese sauce including medium cheddar, sharp cheddar with Monterey Jack, Colby Jack, young Gouda, and Gruyère with cheddar.
Medium cheddar is the easiest everyday choice for cheese sauce, while Monterey Jack, Colby Jack, young Gouda and Gruyère can help adjust the flavor, smoothness and richness.

For the smoothest everyday result, start with medium cheddar or a cheddar-Monterey Jack blend. Sharp cheddar gives stronger flavor, but it works best when blended with a smoother melting cheese.

Cheese Best use Notes
Medium cheddar Best everyday choice Balanced flavor, good melting, and classic color.
Sharp cheddar Stronger cheddar flavor Use gentle heat. Sharp cheddar tastes great but can turn grainy if overheated.
Mild cheddar Kid-friendly sauce Smooth and mellow, but less bold.
White cheddar White cheese sauce Good when you want a pale sauce for pasta, potatoes, or vegetables.
Monterey Jack Smooth melting blend Excellent mixed with cheddar when you want a softer, creamier melt.
Colby or Colby Jack Mild creamy sauce Good for kids, nachos-style drizzling, and burgers.
Young Gouda Creamy, mellow sauce Use young gouda rather than very aged gouda for smoother melting.
Gruyère Cauliflower, potatoes, gratins Nutty and excellent, but more expensive. Good blended with cheddar.
Parmesan Flavor accent Use a small amount with cheddar or Jack. Parmesan alone can make the texture gritty.
Mozzarella Stretchy accent Not ideal as the main cheese sauce cheese. It can become stringy.
Blue cheese or Gorgonzola Specialty sauces Better for dedicated blue cheese or Gorgonzola sauce, not the basic cheddar version.

Once you know the texture you like, you can experiment with sharper cheddar, smoked cheddar, white cheddar, gouda, Gruyère, or small amounts of Parmesan.

How to Make Cheese Sauce

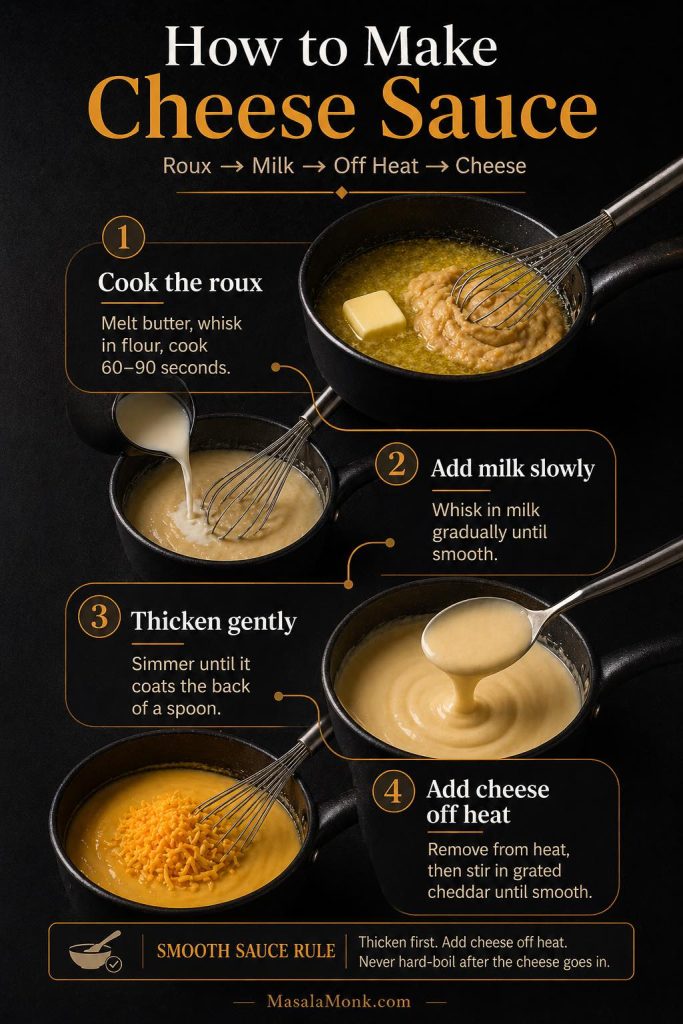
Before you start cooking, it helps to understand that the method is simple but heat-sensitive. Timing and temperature control make the difference between a smooth cheese sauce and a grainy one. This recipe works best in a small to medium heavy-bottomed saucepan, about 1.5–2 qt / 1.5–2 L.

Step-by-step guide showing how to make cheese sauce by melting butter, whisking in flour, adding milk and stirring in cheddar.
The key to smooth cheese sauce is the order of steps: make the roux, add milk slowly, thicken the base, then remove the pan from heat before stirring in cheddar.

1. Grate the Cheese First

Grate the cheddar before you start cooking. Cheese melts more evenly when it is ready to add in small handfuls. If it is very cold, let it sit at room temperature for a few minutes while you make the roux.

2. Melt the Butter Gently

Place the saucepan over medium-low to medium heat. Add the butter and let it melt without browning. If the butter starts sizzling aggressively, lower the heat.

3. Whisk in the Flour

Add the flour and whisk for 60–90 seconds. The mixture should look pale, foamy, and smooth. This step cooks out the raw flour taste. Do not brown the roux for this recipe; a pale roux keeps the sauce creamy and mild.

4. Add the Milk Slowly

Whisk in the milk in 3 additions. Add a splash first, whisk until smooth, then add more. This gradual method helps prevent lumps. Once all the milk is in, keep whisking until the sauce looks smooth.

5. Simmer Until the Base Thickens

Cook the milk base until it reaches a gentle simmer and coats the back of a spoon. This usually takes 3–5 minutes. At this stage, you want gentle bubbling around the edges, not a hard boil.

6. Remove From Heat Before Adding Cheese

Turn off the heat and move the pan away from the burner if your stove stays hot. Wait until the bubbling settles. Then stir in the grated cheese by handfuls, letting each handful melt before adding the next.

7. Season and Adjust

Once the cheese is melted, taste the sauce. Add salt only after tasting because cheddar can be mild or salty depending on the brand and age. To build more flavor, add mustard, pepper, garlic powder, onion powder, cayenne, or a small splash of hot sauce.

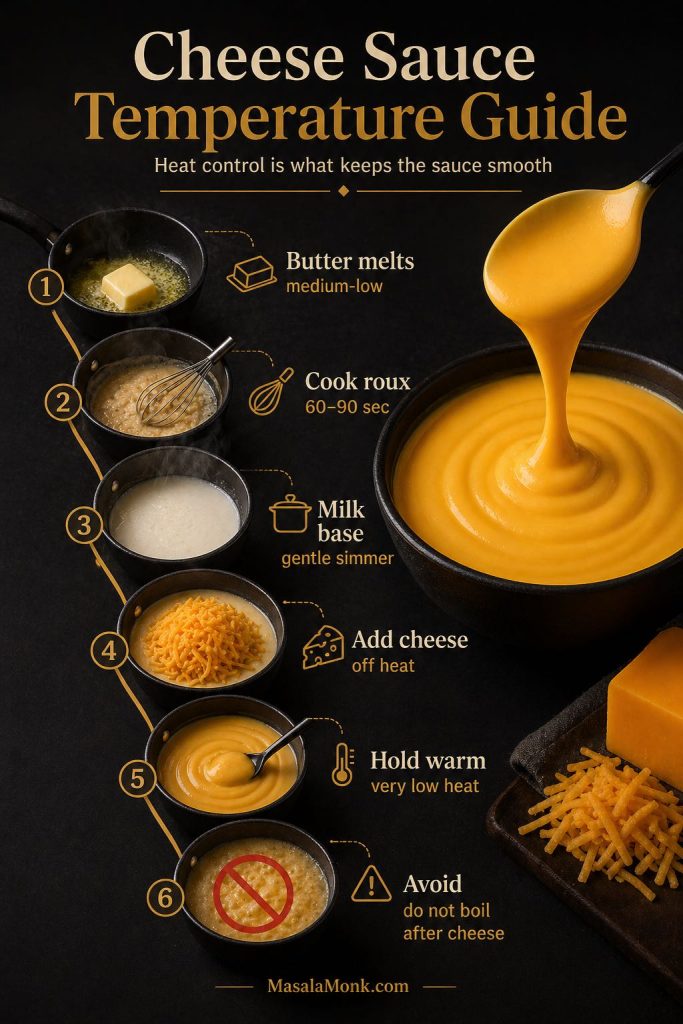
Cheese Sauce Temperature Guide

Cheese is most fragile after it melts, so temperature control is one of the easiest ways to protect the texture. You do not need to measure every stage, but the cues below help when you want the sauce to turn out the same way every time.

Cheese sauce temperature guide showing butter melting, roux cooking, milk simmering, cheese added off heat and sauce held warm.
Heat control is what keeps cheese sauce smooth. Cook the roux and milk base gently, then add the cheese off heat so the sauce does not turn grainy or oily.
Stage Best temperature / heat cue Why it matters
Melting butter Medium-low to medium heat The butter should melt gently without browning.
Cooking the roux 60–90 seconds over medium-low heat This removes the raw flour taste while keeping the sauce pale.
Thickening the milk base Gentle simmer, about 82–88°C / 180–190°F The flour fully thickens the milk before the cheese is added.
Before adding cheese Turn off heat and let bubbling stop Cheese melts best with residual heat, not aggressive boiling.
Melting cheese Ideally about 65–75°C / 150–167°F This helps the cheese melt smoothly without separating.
Holding warm Very low heat, about 55–60°C / 130–140°F if using a thermometer This keeps the sauce warm without pushing it toward splitting.
Danger zone for texture Do not hard-boil after cheese is added Hard boiling can make cheese sauce grainy, oily, or separated.

Cheese Sauce Ratio

Once you understand the base ratio, the recipe becomes easier to adjust. Instead of starting over, you can change the amount of milk or cheese depending on whether you want a dip, a topping, or a looser pasta sauce.

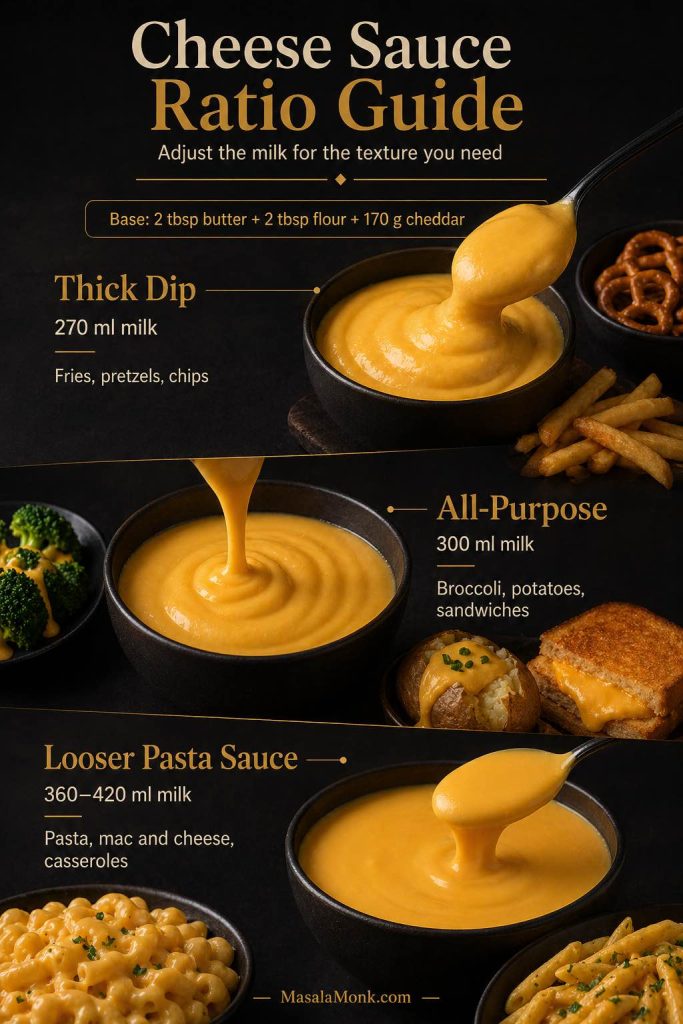
The easiest cheese sauce ratio for this recipe is 2 tbsp butter + 2 tbsp flour + 300 ml milk + 170 g cheese. That gives you a medium-thick sauce. For dipping, reduce the milk slightly; for pasta, add more liquid after the cheese melts.

Cheese sauce ratio guide showing thick dip, all-purpose cheese sauce and looser pasta sauce with different milk amounts.
Use the same butter, flour and cheddar base, then adjust the milk to make a thick dip, an all-purpose sauce, or a looser cheese sauce for pasta and casseroles.
Style Milk Cheese Best for
Thick dip 270 ml / 9 fl oz 170 g / 6 oz Fries, pretzels, chips, burgers
All-purpose sauce 300 ml / 10 fl oz 170 g / 6 oz Broccoli, cauliflower, potatoes, sandwiches
Looser pasta sauce 360–420 ml / 12–14 fl oz 170 g / 6 oz Pasta, macaroni, rice bowls, casseroles

Texture cue: when the sauce is hot, it should fall from a spoon in a thick ribbon. If it sits in a heavy blob, whisk in warm milk. If it runs like plain milk, simmer the base longer next time before adding cheese.

How to Scale This Cheese Sauce Recipe

Fortunately, this recipe scales well as long as you keep the butter, flour, milk, and cheese in balance. For the smoothest result, use a larger pan when doubling the recipe so the milk base thickens evenly.

Yield Butter Flour Milk Cheese
1 cup / 240 ml / 0.24 L 1 tbsp / 14 g 1 tbsp / 8–9 g 150 ml / 5 fl oz 85 g / 3 oz
2 cups / 480 ml / 0.48 L 2 tbsp / 28 g 2 tbsp / 16–18 g 300 ml / 10 fl oz 170 g / 6 oz
4 cups / 960 ml / 0.96 L 4 tbsp / 56 g 4 tbsp / 32–36 g 600 ml / 20 fl oz 340 g / 12 oz

Easy Homemade Cheese Sauce Recipe

This recipe makes a smooth cheddar cheese sauce that is thick enough for vegetables, fries, and baked potatoes, but easy to thin for pasta, mac and cheese, rice bowls, or drizzling.

Prep Time5 minutes
Cook Time7 minutes
Total Time12 minutes
YieldAbout 2 cups / 480 ml / 0.48 L

Equipment

  • Small to medium heavy-bottomed saucepan, about 1.5–2 qt / 1.5–2 L
  • Whisk
  • Box grater or fine grater

Ingredients

  • 2 tbsp unsalted butter / 28 g / 1 oz
  • 2 tbsp all-purpose flour or plain flour / 16–18 g / 0.6 oz
  • 1¼ cups whole milk / 300 ml / 10 fl oz / 0.3 L, warmed slightly if possible
  • 6 oz freshly grated cheddar cheese / 170 g / about 1½ cups
  • 1 tsp Dijon mustard / 5 ml, or ¼ tsp mustard powder / about 1 g
  • ¼ tsp garlic powder / about 0.7 g, optional
  • ¼ tsp onion powder / about 0.6 g, optional
  • Pinch to ⅛ tsp white pepper or black pepper / about 0.3 g
  • ⅛–¼ tsp salt / about 0.75–1.5 g, added to taste after the cheese melts
  • Warm milk, as needed, for thinning

Instructions

  1. Grate the cheese. Grate the cheddar from a block and set it aside. Freshly grated cheese melts more smoothly than most bagged shredded cheese.
  2. Make the roux. Melt the butter in a saucepan over medium-low to medium heat. Add the flour and whisk for 60–90 seconds, until pale, smooth, and lightly foamy.
  3. Add the milk. Slowly whisk in the milk in 3 additions, smoothing out the sauce before adding more. Keep whisking until no lumps remain.

  4. Thicken the base. Cook for 3–5 minutes, whisking often, until the sauce reaches a gentle simmer and coats the back of a spoon.
  5. Remove from heat. Turn off the heat and let the bubbling settle. This helps keep the cheese from overheating.
  6. Add the cheese. Stir in the grated cheddar by handfuls, letting each handful melt before adding the next.
  7. Season. Stir in Dijon, garlic powder, onion powder, pepper, and a small amount of salt. Taste and adjust.
  8. Adjust the texture. For a thinner cheese sauce, whisk in warm milk 1 tbsp / 15 ml at a time. For a thicker dip, add a little more grated cheese off heat.

Recipe Notes

  • Do not boil the sauce after the cheese is added.
  • For pasta or mac and cheese, thin this recipe with warm milk or pasta water until the cheese sauce is glossy and loose enough to coat noodles.
  • For fries, pretzels, burgers, or sandwiches, keep the sauce slightly thicker.
  • For extra smoothness, use medium cheddar or a cheddar-Monterey Jack blend.
  • Cheese is best measured by weight. Cup measurements vary depending on how finely the cheese is grated and how tightly it is packed.

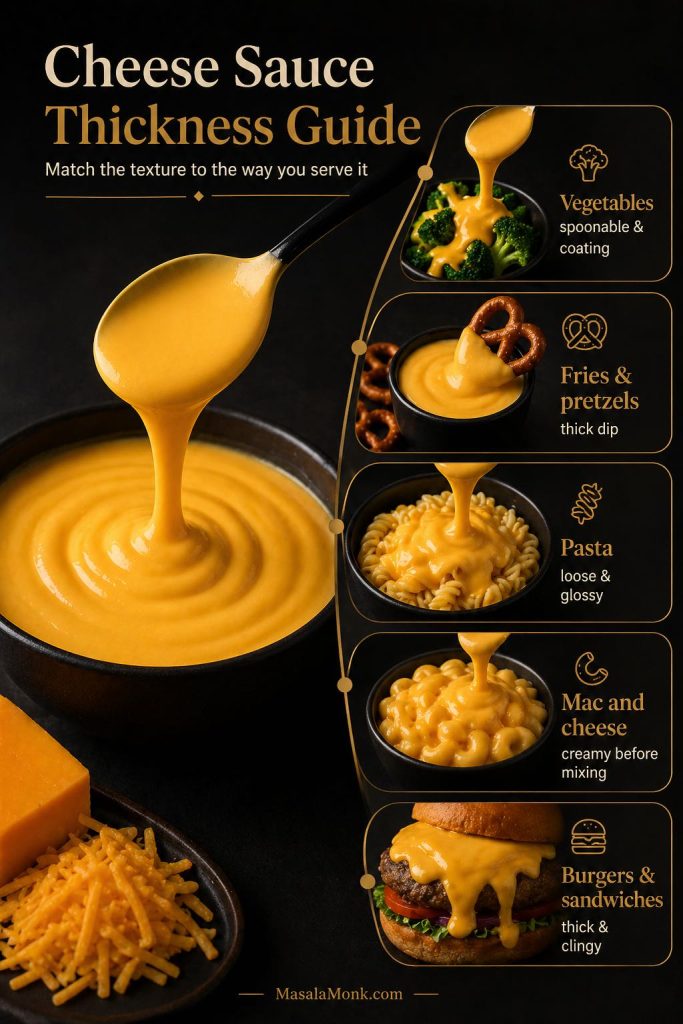
How Thick Should Cheese Sauce Be?

In practice, the best thickness depends on how you want to use the sauce. A cheese sauce for fries should be thicker than a cheese sauce for pasta, while a sauce for casseroles should start slightly loose because it thickens in the oven.

Cheese sauce thickness guide showing different textures for vegetables, fries, pasta, mac and cheese, burgers and sandwiches.
The best cheese sauce texture depends on how you serve it: spoonable for vegetables, thick for fries and pretzels, loose for pasta, creamy for mac and cheese, and clingy for burgers or sandwiches.
Use Best texture How to adjust the main recipe
Broccoli or cauliflower Spoonable and coating Use the main recipe as written.
Fries, pretzels, chips Thick dip Use 270–300 ml milk, or add 30 g / 1 oz extra cheese off heat.
Pasta Looser, glossy, coating Add 60–120 ml / 2–4 fl oz warm milk or pasta water after the cheese melts.
Macaroni and cheese Creamy and loose before mixing Thin slightly before adding pasta because noodles absorb sauce.
Baked potatoes Medium-thick Use the main recipe as written.
Rice bowls or grain bowls Pourable drizzle Add 30–60 ml / 1–2 fl oz warm milk.
Casseroles and bakes Slightly loose before baking Add about 60 ml / 2 fl oz extra milk because oven heat thickens it.
Burgers and sandwiches Thick and clingy Use a little less milk or add extra cheese.

If the sauce cools down, it will thicken. However, that does not mean you made the recipe wrong. Warm the cheese sauce gently and whisk in a splash of milk to bring it back to a pourable texture.

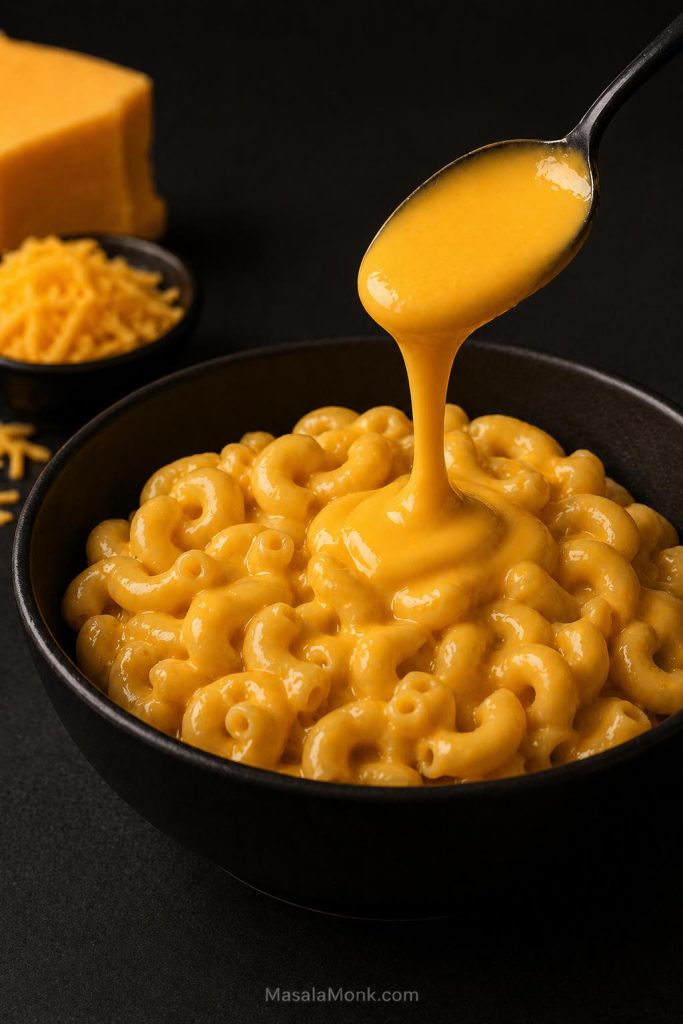
Cheese Sauce for Mac and Cheese

For mac and cheese, the sauce should be slightly looser than a dip because pasta absorbs liquid as it sits. Therefore, instead of making the sauce extra thick in the pan, keep it glossy and pourable before mixing it with the macaroni.

Creamy macaroni and cheese coated with smooth cheddar cheese sauce in a dark bowl.
For mac and cheese, keep the sauce slightly loose and glossy before mixing because pasta absorbs liquid as it sits.

One batch of this recipe is usually enough for 8 oz / 225 g pasta when making creamy stovetop mac and cheese. A larger batch with 1 lb / 450 g pasta needs a doubled sauce recipe, or about 4 cups / 960 ml sauce. If you are baking the mac and cheese, loosen the sauce with an extra 60–120 ml / 2–4 fl oz milk because the oven will thicken it.

For the smoothest mac and cheese sauce, use medium cheddar with a smoother melting cheese such as Monterey Jack, Colby Jack, or young gouda. Sharp cheddar adds flavor, but too much aged cheese can make the sauce more likely to turn gritty if it gets too hot.

If you want a full pasta build instead of only the sauce, use this macaroni and cheese recipe for stovetop, baked, and Southern-style options.

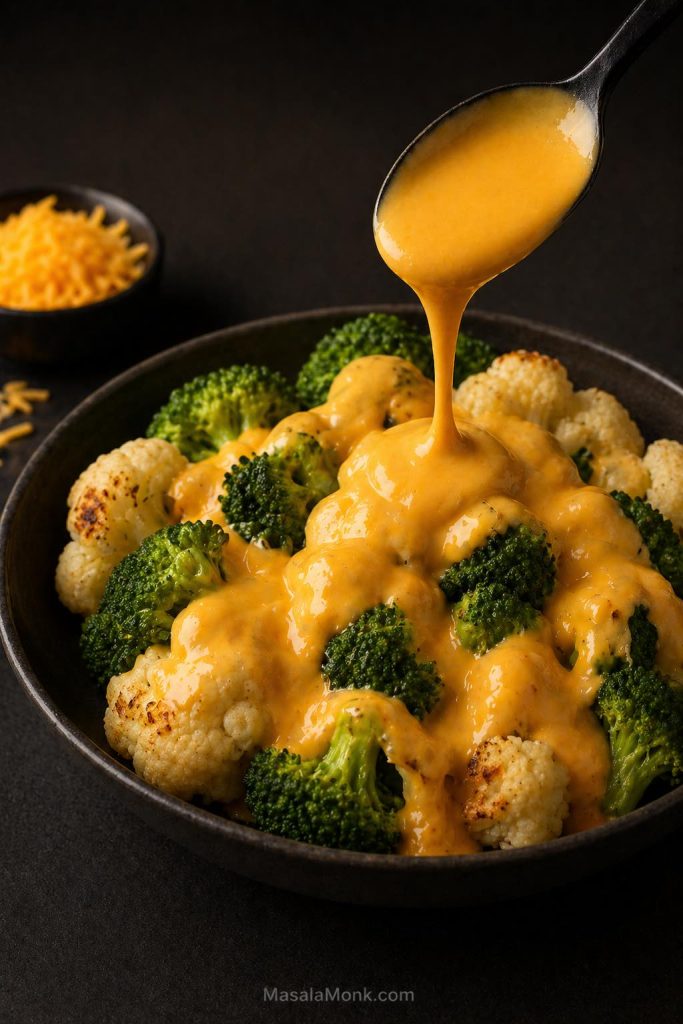
Cheese Sauce for Broccoli, Cauliflower, and Vegetables

For broccoli, cauliflower, and other vegetables, the goal is different. Instead of making a loose pasta sauce, you want a spoonable sauce that coats the florets without clumping on top.

Broccoli and cauliflower served with smooth cheddar cheese sauce spooned over the vegetables.
For broccoli and cauliflower, the cheese sauce should be spoonable and coating, thick enough to cling to the florets without clumping heavily on top.

For steamed broccoli or cauliflower, use the main recipe as written. If the vegetables are very wet, drain them well first, because extra water can thin the sauce and make it slide off. For roasted vegetables, the sauce can be slightly looser because the dry edges help it cling.

For cauliflower cheese or a vegetable bake, keep the sauce a little looser before baking. As the dish sits in the oven, the cheese sauce thickens and the vegetables release moisture, so a sauce that looks perfect in the pan can become too heavy after baking.

For a full comfort-food dinner, this cheesy chicken broccoli rice shows how broccoli and cheese can move from a side dish into a complete meal.

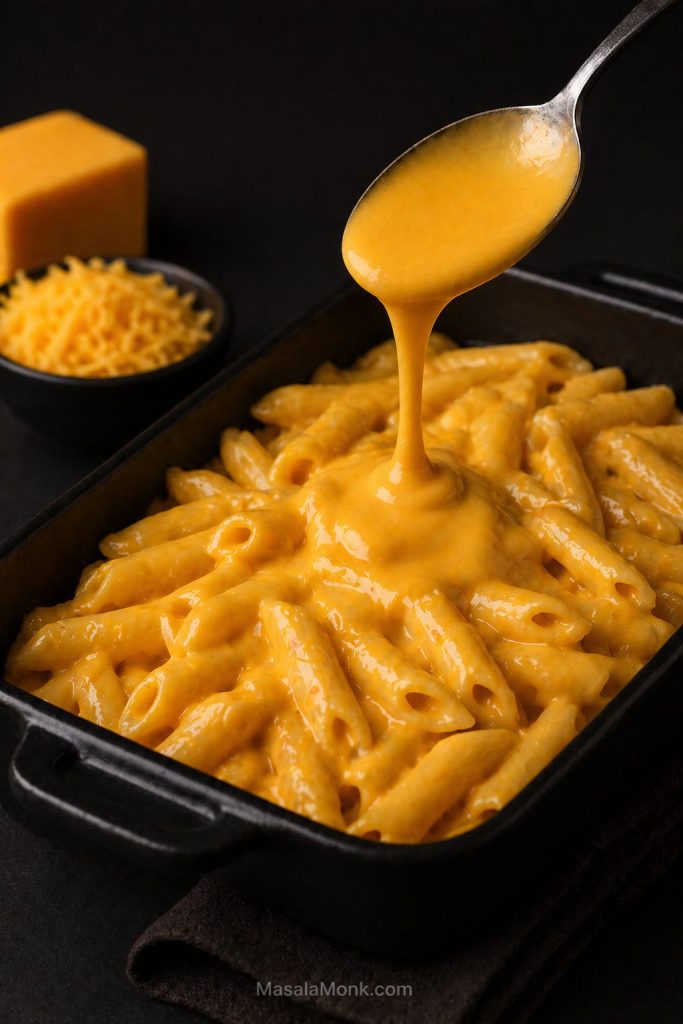
Cheese Sauce for Pasta, Lasagna, and Casseroles

When cheese sauce is used for pasta, lasagna, or casseroles, it needs extra looseness because starches and oven heat both thicken the final dish. For that reason, a sauce that looks slightly thin before baking often finishes at the right texture.

Pasta in a dark baking dish coated with looser glossy cheddar cheese sauce for casseroles and pasta bakes.
Pasta, lasagna and casseroles need a slightly looser cheese sauce because noodles, starches and oven heat all thicken the final dish.

For pasta, thin the finished sauce with 60–120 ml / 2–4 fl oz warm milk or pasta water before tossing. Pasta water adds starch and helps the sauce cling, while milk keeps the flavor creamier. If the pasta sits for more than a few minutes, loosen it again with a small splash of warm milk.

For lasagna, pasta bakes, and casseroles, use the looser pasta-sauce ratio from the table above. A thicker sauce can work for topping, but it can make layered dishes feel heavy or gluey once baked.

For another creamy pasta direction, this chicken Alfredo pasta is useful because it stays in the same creamy sauce family while using a different method. If you want a baked pasta idea, this baked ziti recipe collection gives more casserole-style inspiration.

Nacho Cheese Sauce for Fries, Pretzels, Chips, and Dips

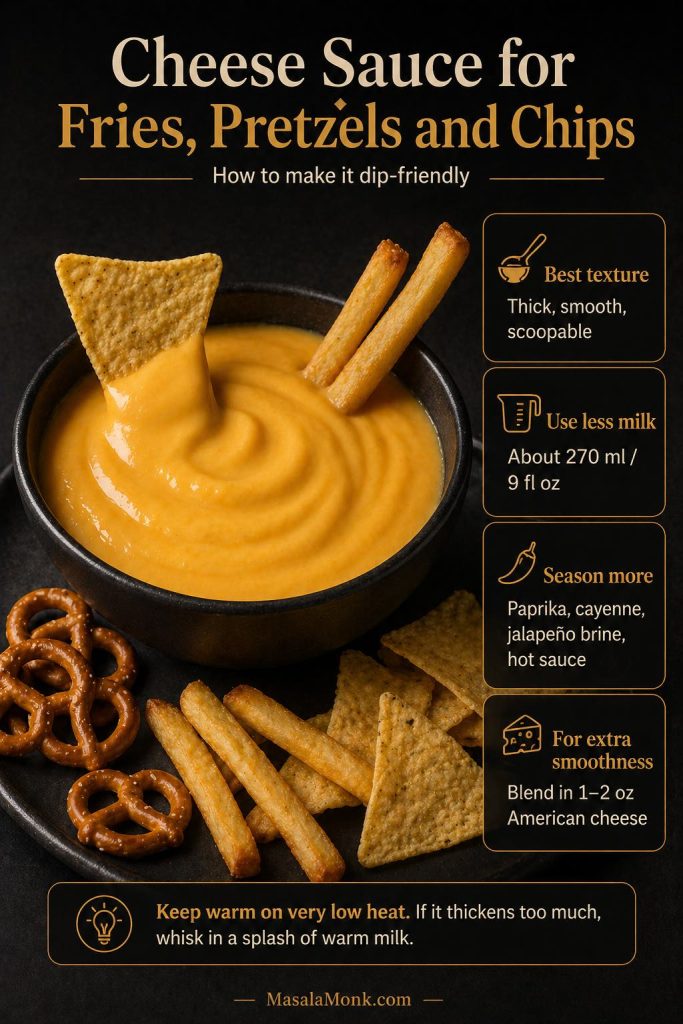
For fries, pretzels, chips, and dips, the sauce should be thicker and more seasoned than a pasta sauce. Otherwise, it can taste too mild once it is spread over salty snacks or used as a dip.

Thick cheddar cheese sauce served as a dip with fries, pretzels and tortilla chips.
For fries, pretzels and chips, make the cheese sauce thicker and more seasoned so it stays scoopable, flavorful and dip-friendly.

To make this recipe work more like a nacho cheese sauce, use the thick-dip ratio: 270 ml / 9 fl oz milk with 170 g / 6 oz cheese. Then season it with paprika, cayenne, jalapeño brine, hot sauce, garlic powder, or a little mustard. These additions make the sauce taste more like a dip instead of a plain cheddar topping.

For a smoother processed-style dip, replace 1–2 oz / 30–55 g of the cheddar with American cheese or another easy-melting processed cheese. Alternatively, a small amount of sodium citrate can make a very glossy sauce, but that is an advanced option rather than a requirement for this homemade version.

For a snack-style pairing, serve the thicker version with crispy homemade French fries. For a bigger game-day board, add pretzels, chips, roasted potatoes, or a scoopable dip on the side.

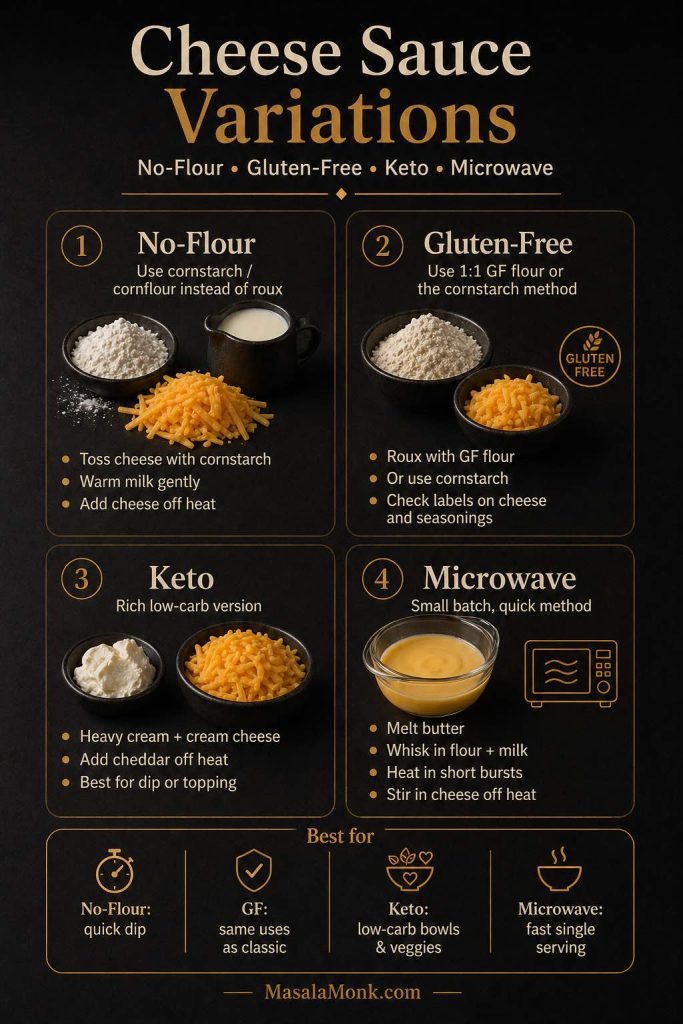
The classic roux method is the best starting point, but it is not the only option. If you need a no-flour, gluten-free, keto, or microwave cheese sauce, use the quick guide below before choosing the version that fits your kitchen.

Cheese sauce variations guide showing no-flour, gluten-free, keto and microwave cheese sauce methods.
The same cheese sauce idea can be adapted into no-flour, gluten-free, keto and microwave versions depending on how you cook and what ingredients you want to avoid.

Cheese Sauce Without Flour

Still, a roux is not the only way to make a smooth sauce. If you want to skip flour, cornstarch can help the cheese melt into the liquid without making the sauce gritty.

You can make cheese sauce without flour by using cornstarch, also called cornflour in the UK and India. This version is useful if you want a flourless cheese sauce, a gluten-free cheese sauce, or a quicker sauce that does not start with a roux.

The no-flour version of this recipe uses cornstarch to help the cheese melt into the sauce smoothly. It makes a glossy sauce that is especially useful for dipping, drizzling, and quick snacks.

No-flour cheese sauce made with cornstarch, milk and cheddar stirred into a smooth sauce.
For cheese sauce without flour, cornstarch or cornflour helps the cheddar melt smoothly into the milk without starting from a classic butter-flour roux.
Ingredient US Metric
Evaporated milk or whole milk 1 cup 240 ml / 8 fl oz / 0.24 L
Freshly grated cheddar cheese 6 oz 170 g
Cornstarch / cornflour 1½ tsp 4–5 g
Butter 1 tbsp 14 g / 0.5 oz
Dijon mustard or mustard powder 1 tsp Dijon or ¼ tsp powder 5 ml Dijon or about 1 g powder
Salt and pepper To taste To taste

How to Make No-Flour Cheese Sauce

  1. Toss the grated cheddar cheese with the cornstarch until lightly coated.
  2. Warm the milk and butter in a saucepan over medium-low heat until steaming, not boiling.
  3. Lower the heat or remove the pan from heat.
  4. Add the cheese by handfuls, stirring until smooth.
  5. Add mustard, pepper, and salt to taste.
  6. If the sauce is too thick, loosen it gradually with warm milk, about 1 tbsp / 15 ml at a time.

Important: cornflour here means white cornstarch, not yellow cornmeal, maize flour, or makki atta. Cornmeal will not make a smooth cheese sauce.

Gluten-Free Cheese Sauce

As a result, the no-flour method also becomes the easiest gluten-free path for many readers. Still, a gluten-free flour blend can work well if you prefer the classic roux technique.

There are two easy ways to make gluten-free cheese sauce. The best choice depends on whether you want the recipe to feel like a classic roux-based cheese sauce or a faster cornstarch-thickened sauce.

  • Use a 1:1 gluten-free flour blend in the main roux recipe. This keeps the method almost the same.
  • Use the cornstarch/cornflour method above. This is the cleanest option if you want to avoid wheat flour completely.

If you are cooking for someone who needs a strictly gluten-free meal, check the labels on the cheese, mustard, seasonings, and any toppings you serve with the sauce.

Keto Cheese Sauce

On the other hand, keto cheese sauce needs a different base, since the classic version relies on both flour and milk. This version skips the roux and uses cream, cream cheese, butter, and cheddar instead.

Ingredient Amount
Heavy cream ½ cup / 120 ml / 4 fl oz / 0.12 L
Cream cheese 2 oz / 55 g
Freshly grated cheddar cheese 4 oz / 115 g
Butter 1 tbsp / 14 g / 0.5 oz
Mustard powder ¼ tsp / about 1 g
Pepper, cayenne, or hot sauce To taste

Warm the cream, butter, and cream cheese over low heat until smooth. Remove from heat and stir in the cheddar gradually. Do not boil after adding cheddar. This keto version is richer and heavier than the classic sauce, so it works best as a dip, topping, or low-carb drizzle.

For low-carb dipping, pair this richer sauce with sturdy options from this keto chips guide, especially if you want something scoopable for nachos, dips, or snack plates.

Microwave Cheese Sauce

Although the stovetop method gives you the best control, the microwave works for a small batch when speed matters more than precision. For best results, heat the base in short bursts and stir often.

Ingredient Amount
Butter 1 tbsp / 14 g / 0.5 oz
Flour 1 tbsp / 8–9 g / 0.3 oz
Milk ½ cup / 120 ml / 4 fl oz / 0.12 L
Freshly grated cheddar cheese 2–3 oz / 55–85 g
Salt, pepper, mustard To taste
  1. Melt the butter in a microwave-safe bowl for 20–30 seconds.
  2. Whisk in the flour until smooth.
  3. Whisk in the milk gradually.
  4. Microwave for 45 seconds, then whisk.
  5. Microwave for another 30–45 seconds, or until thickened.
  6. Stir in the grated cheese off heat until smooth.
  7. Thin with a small splash of warm milk if needed.

Use short microwave bursts and stir often. The sauce can overheat quickly in the microwave, especially after the cheese is added.

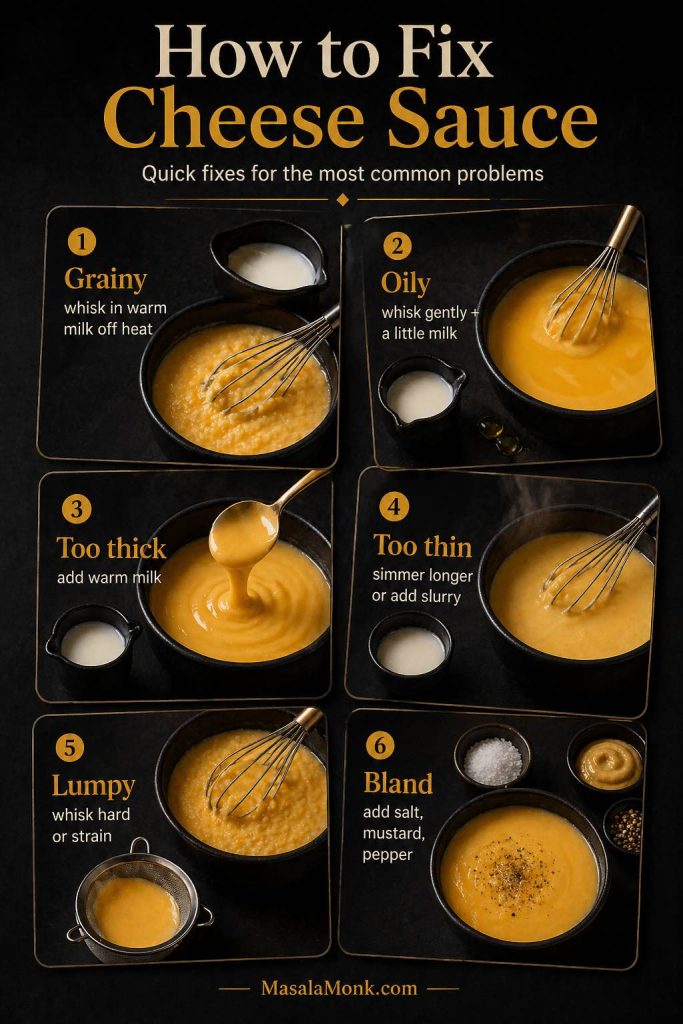
How to Fix Grainy, Oily, Thick, Thin, or Lumpy Cheese Sauce

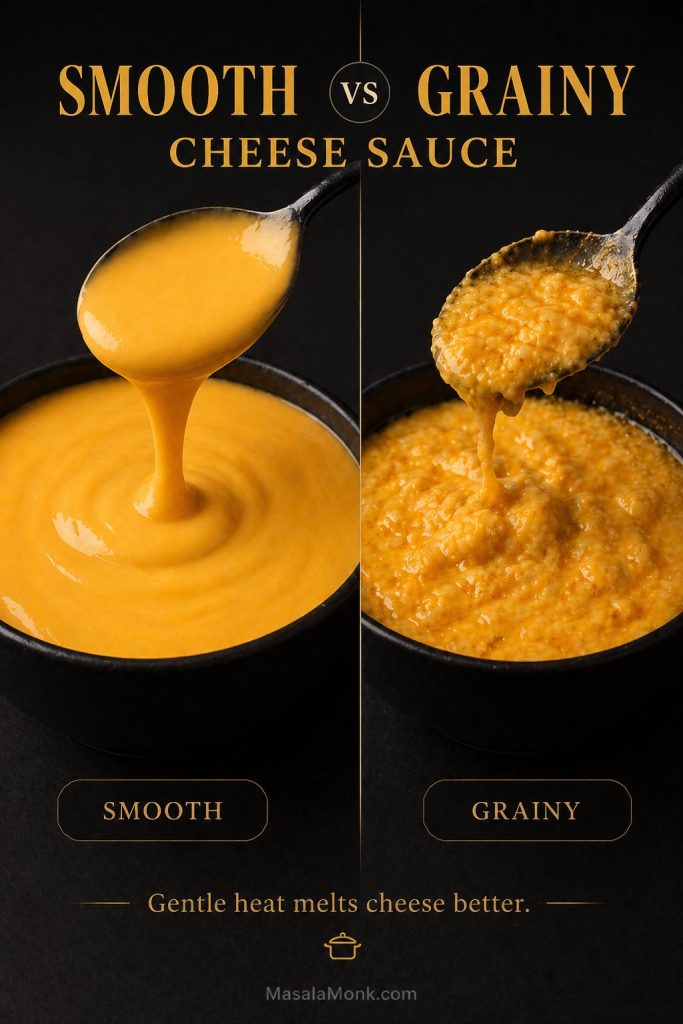
When cheese sauce goes wrong, the problem usually comes from heat, cheese choice, or the order of steps. Fortunately, many issues can be fixed, especially if you catch them early.

Comparison of smooth cheese sauce and grainy cheese sauce showing the difference between silky and broken texture.
Smooth cheese sauce comes from gentle heat and gradual melting. Grainy cheese sauce usually happens when the cheese overheats, separates, or is added before the base is ready.

Quick Fixes for Common Cheese Sauce Problems

Problem Likely cause How to fix it
Grainy or gritty cheese sauce The cheese overheated, the sauce boiled after cheese was added, or the cheese was very aged. Remove from heat. Whisk in warm milk 1 tbsp / 15 ml at a time. If needed, blend briefly or strain. Next time, add cheese off heat.
Oily or separated sauce The emulsion broke and fat separated from the cheese. Lower the heat immediately. Whisk in warm milk, or add a tiny cornstarch slurry made with ½ tsp cornstarch and 1 tbsp / 15 ml cold milk.
Lumpy sauce Milk was added too quickly to the roux, or the sauce was not whisked enough. Whisk firmly. If lumps remain before adding cheese, strain the sauce, then continue.
Floury taste The roux was undercooked. Cook the butter and flour for 60–90 seconds before adding milk. It should smell lightly buttery, not raw.
Too thick Too much cheese, too little milk, too much simmering, or the sauce cooled down. Whisk in warm milk 1 tbsp / 15 ml at a time until it loosens.
Too thin The milk base did not thicken enough before cheese was added. Simmer the base longer next time. To fix now, use a small cornstarch slurry and heat gently until thicker.
Stringy sauce Too much mozzarella or another stretchy cheese, or cheese was overheated. Use cheddar, Monterey Jack, Colby, or young Gouda as the base. Keep stretchy cheeses as accents.
Bland sauce Mild cheese, not enough salt, or no sharp/acidic seasoning. Add salt carefully, then mustard, pepper, garlic powder, onion powder, cayenne, or a small splash of hot sauce.
Too salty Salty cheese, salted butter, or too much added salt. Whisk in unsalted milk or cream. Serve with unsalted potatoes, pasta, rice, or vegetables.

How to Prevent Cheese Sauce Problems Next Time

To prevent most problems, grate the cheese fresh, cook the roux briefly, thicken the milk before adding cheese, and remove the pan from heat before stirring in the cheddar. Rather than using more heat to force the cheese to melt, give it time to melt gently in the hot sauce base.

Guide showing how to fix grainy, oily, thick, thin, lumpy and bland cheese sauce.
Most cheese sauce problems can be corrected if you catch them early: lower the heat, whisk gently, add warm milk, strain lumps, or adjust seasoning once the sauce is smooth again.

Why Cheese Sauce Turns Grainy

Cheese sauce turns grainy when the cheese proteins tighten and the fat separates instead of staying evenly dispersed in the sauce. High heat makes this more likely. Very sharp, aged, or dry cheeses can also be more difficult to melt smoothly.

For that reason, the safest method is to thicken the milk first, turn off the heat, and then stir in the cheese gradually. The residual heat melts the cheese without pushing it into a hard boil.

For a deeper look at why cheese sauces break, Serious Eats explains how heat can separate cheese fat, water, and proteins, which is why gentle heat matters so much here.

Can I Use Sodium Citrate for Extra-Smooth Cheese Sauce?

Yes, but treat it as an advanced option rather than a requirement. Sodium citrate is an emulsifying salt that helps cheese melt into a very smooth, glossy sauce. It is most useful when you want a processed-style dip or nacho-style sauce that stays more fluid as it cools.

If you already use sodium citrate in your kitchen, follow the ratio on your product or use a tested sodium-citrate sauce formula. For this homemade cheese sauce recipe, though, the roux method is the easier and more familiar starting point.

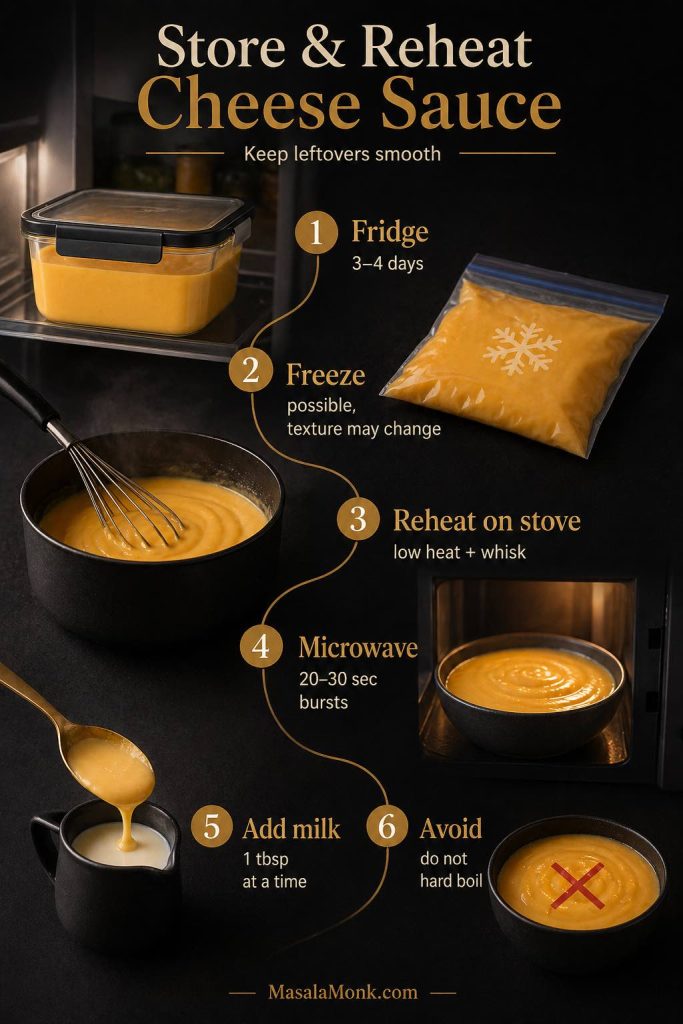
How to Store and Reheat Cheese Sauce

Even though cheese sauce is best fresh, leftovers can still work well if you reheat them gently. Cool leftover sauce quickly, transfer it to a shallow airtight container, and refrigerate it within 2 hours.

For general leftover safety, FoodSafety.gov recommends keeping refrigerators at 40°F / 4°C or below and freezers at 0°F / -18°C or below.

Guide showing how to store and reheat cheese sauce in the fridge, freezer, saucepan and microwave.
Leftover cheese sauce is best reheated gently. Use low heat, whisk often, and add a splash of milk to bring the sauce back to a smooth, pourable texture.

After that, reheat only the amount you need. Repeated cooling and reheating can make the sauce more likely to split, especially because this recipe contains both cheese and milk.

Storage method Best guidance
Refrigerator Store in an airtight container for 3–4 days.
Refrigerator temperature Keep at or below 4°C / 40°F.
Freezer Possible, but not ideal for texture. Freeze for up to 1–2 months for best quality.
Freezer temperature Keep at about -18°C / 0°F for longer storage.
Stovetop reheating Reheat over low heat, whisking often. Add milk 1 tbsp / 15 ml at a time.
Microwave reheating Use 20–30 second bursts and stir between each burst.
Keeping warm Use very low heat or a warm setting. Stir occasionally and add milk if it thickens.
What to avoid Do not hard-boil leftover cheese sauce. It can split or turn grainy.

If refrigerated cheese sauce looks thick or slightly set, that is normal. To bring it back, warm it gently and whisk in a splash of milk until it becomes smooth again.

What to Serve With Cheese Sauce

By this point, you can treat the sauce as a flexible base rather than a single-use recipe. It can work as a vegetable sauce, pasta sauce, potato topping, snack dip, sandwich sauce, or creamy base for simple dinners.

Vegetables

  • Broccoli
  • Cauliflower
  • Roasted carrots
  • Green beans
  • Asparagus
  • Brussels sprouts
  • Roasted potatoes

Pasta, Rice, and Potatoes

  • Macaroni
  • Shells
  • Penne
  • Rotini
  • Baked potatoes
  • Rice bowls
  • Casseroles

Snacks, Sandwiches, and Game-Day Food

  • French fries
  • Potato wedges
  • Pretzels
  • Nachos-style chips
  • Burgers
  • Chicken sandwiches
  • Grilled cheese
  • Paneer wraps
  • Tofu wraps

If you are building a game-day table, this sauce can sit next to a warmer, scoopable dip like buffalo chicken dip instead of trying to do every job on the table by itself.

Cheese Sauce FAQs

Can I Make This Cheese Sauce From Scratch?

Yes. This recipe makes cheese sauce from scratch with butter, flour, milk, and cheddar cheese. You do not need a packaged mix, jarred sauce, or processed cheese unless you want a glossier processed-style version.

Can I Make Cheese Sauce Without Flour?

Yes. Use cornstarch/cornflour instead of flour. Toss the grated cheese with cornstarch, warm the milk, then stir the cheese in gently. This is also a good gluten-free method if all your ingredients are certified gluten-free.

Is Cheese Sauce Gluten-Free?

The main recipe is not gluten-free because it uses all-purpose flour. To make it gluten-free, use a 1:1 gluten-free flour blend or use the cornstarch/cornflour method.

Is Cheese Sauce Keto?

The main recipe is not keto because it uses flour and milk. For keto cheese sauce, use heavy cream, cream cheese, butter, and cheddar instead.

Why Is My Cheese Sauce Grainy?

Cheese sauce usually turns grainy when the cheese gets too hot. Remove the sauce from heat before adding cheese, add the cheese gradually, and avoid boiling after the cheese melts.

How Do I Thin Cheese Sauce?

Whisk in warm milk 1 tablespoon / 15 ml at a time until the cheese sauce reaches the texture you want. For pasta, you can also use warm pasta water.

How Do I Thicken Cheese Sauce?

If the sauce is only slightly thin, let the milk base simmer a little longer before adding cheese. If the finished cheese sauce is thin, whisk in a small cornstarch slurry and heat gently, or add more grated cheese off heat.

Can I Make Cheese Sauce Without Milk?

Yes, but the sauce will change. Unsweetened oat milk, almond milk, or another neutral dairy-free milk can work, but the sauce may taste lighter and less creamy. Water works in an emergency, but milk gives this recipe a smoother cheese sauce with better flavor.

Can I Make Cheese Sauce With Water?

You can, but milk gives a much better texture and flavor. Water makes the sauce thinner and less creamy. If you need to avoid milk, use an unsweetened dairy-free milk that works well in savory sauces.

Can I Make Cheese Sauce With Cream?

Yes, but cream makes the cheese sauce richer and heavier. You can replace part of the milk with cream, or use cream in the keto version. For an everyday recipe, whole milk gives a better balance.

Can I Add American Cheese for a Smoother Sauce?

Yes. If you want a smoother, more processed-style cheese sauce, replace 1–2 oz / 30–55 g of the cheddar with American cheese or another easy-melting processed cheese. It makes the sauce glossier and more stable, but the flavor will be less purely cheddar.

Can I Freeze Cheese Sauce?

You can freeze cheese sauce, but the texture may change after thawing. Reheat it slowly over low heat and whisk in milk to bring it back together. For the smoothest texture, cheese sauce is best made fresh or refrigerated for a few days.

What Cheese Melts Best for Cheese Sauce?

Medium cheddar, mild cheddar, Monterey Jack, Colby Jack, young gouda, and Gruyère melt well. Very aged cheddar, Parmesan, and mozzarella can be used, but they are better as accents rather than the entire sauce base.

Is Cheese Sauce the Same as Mornay Sauce?

They are related. A classic Mornay sauce is a cheese sauce made from béchamel, usually with cheeses such as Gruyère, Parmesan, or other melting cheeses. This recipe is a practical cheddar cheese sauce for everyday cooking.

Can I Use This Cheese Sauce Recipe for Mac and Cheese?

Yes. Thin it slightly with warm milk or pasta water before tossing it with cooked macaroni because pasta absorbs sauce quickly. For baked mac and cheese, keep the sauce even looser before it goes into the oven.

Can I Use This Cheese Sauce Recipe for Nachos?

Yes, for a quick nachos-style drizzle. Keep it warm, make it slightly thicker, and season with cayenne, paprika, jalapeño, or hot sauce. For a more stadium-style nacho cheese sauce, use a smoother melting blend, a little American cheese, or an emulsifying-salt method.

Easy cheese sauce recipe graphic with smooth cheddar sauce for mac and cheese, broccoli, nachos, fries and dips.
Save this easy cheese sauce recipe for a smooth cheddar sauce you can use with mac and cheese, broccoli, nachos, fries, dips and more.

Back to top