Posted on Leave a comment

Easy 7 Layer Dip Recipe

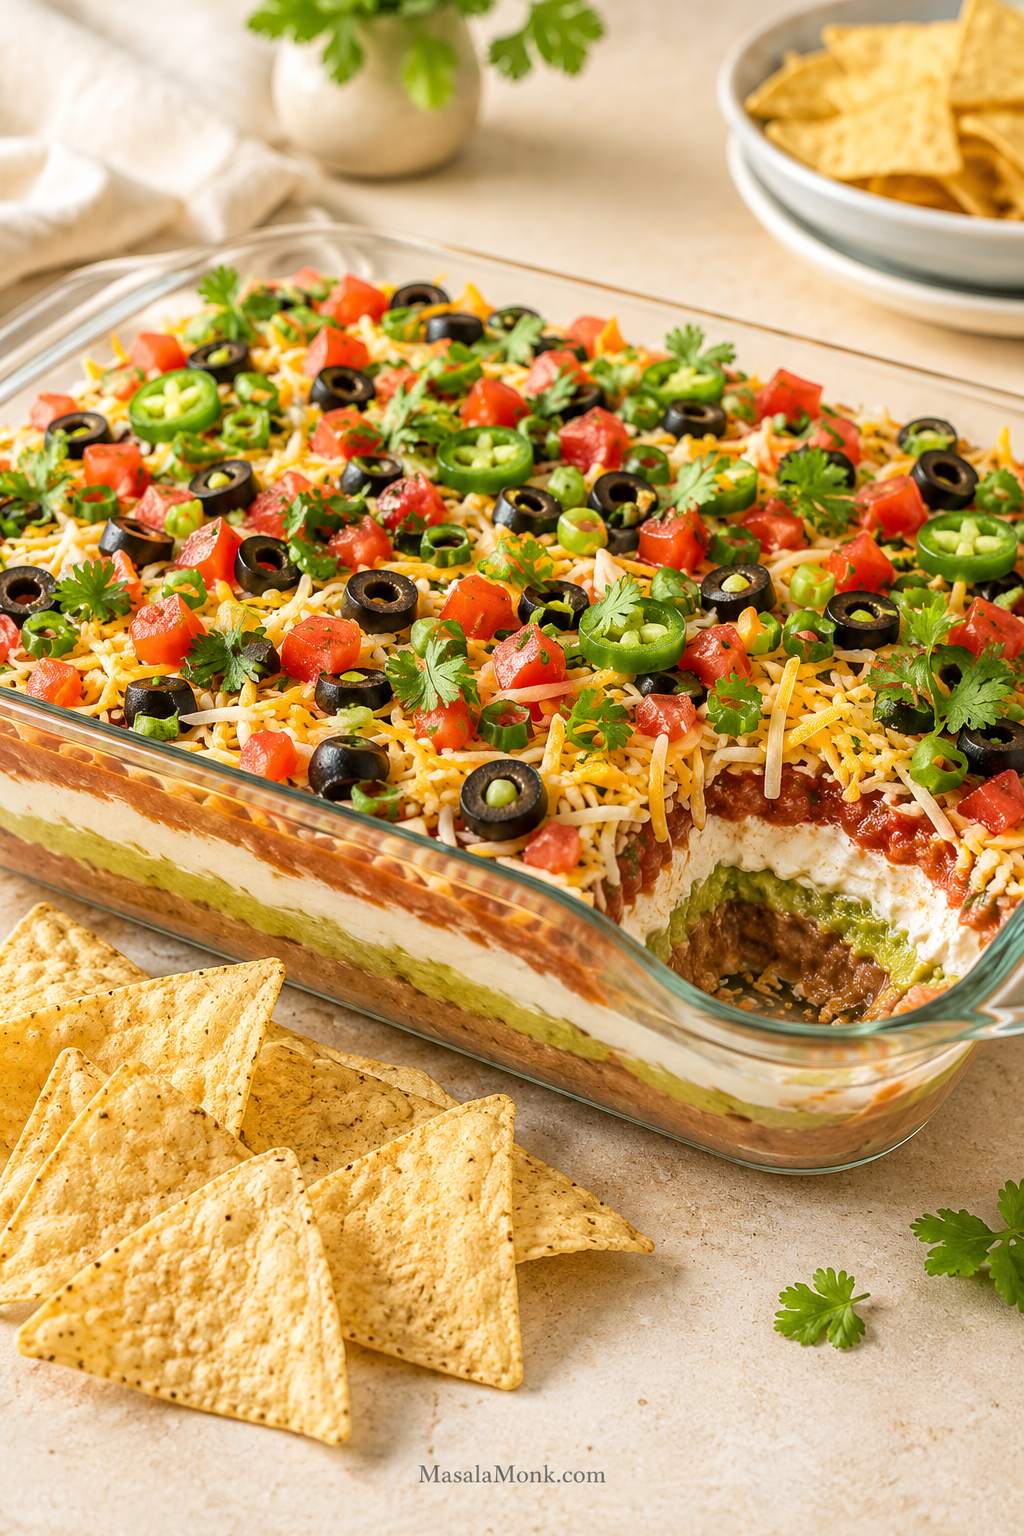
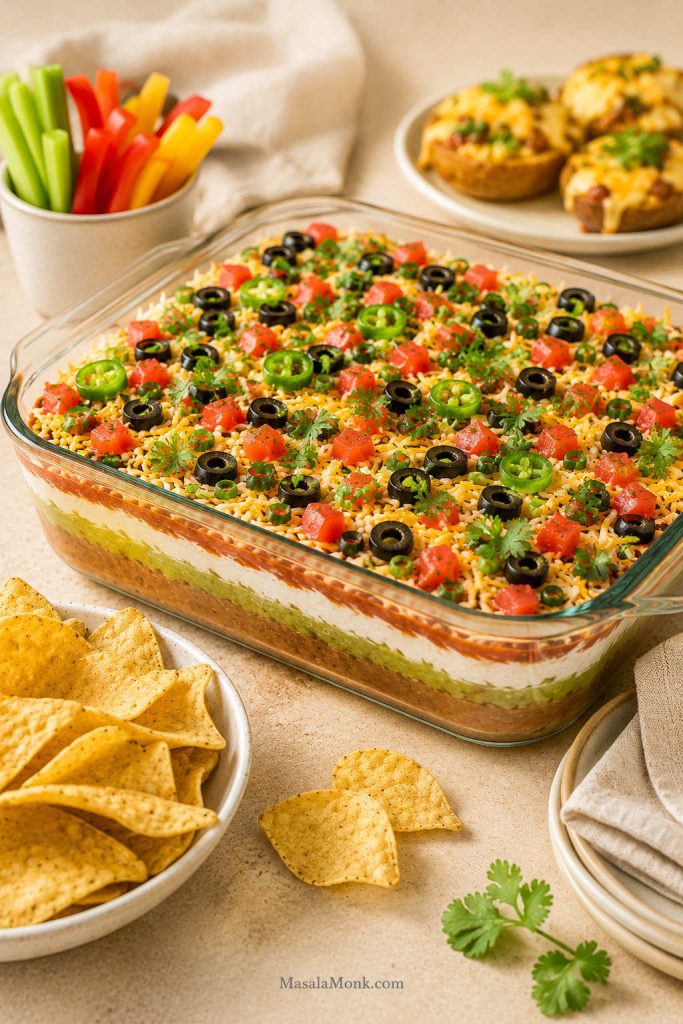
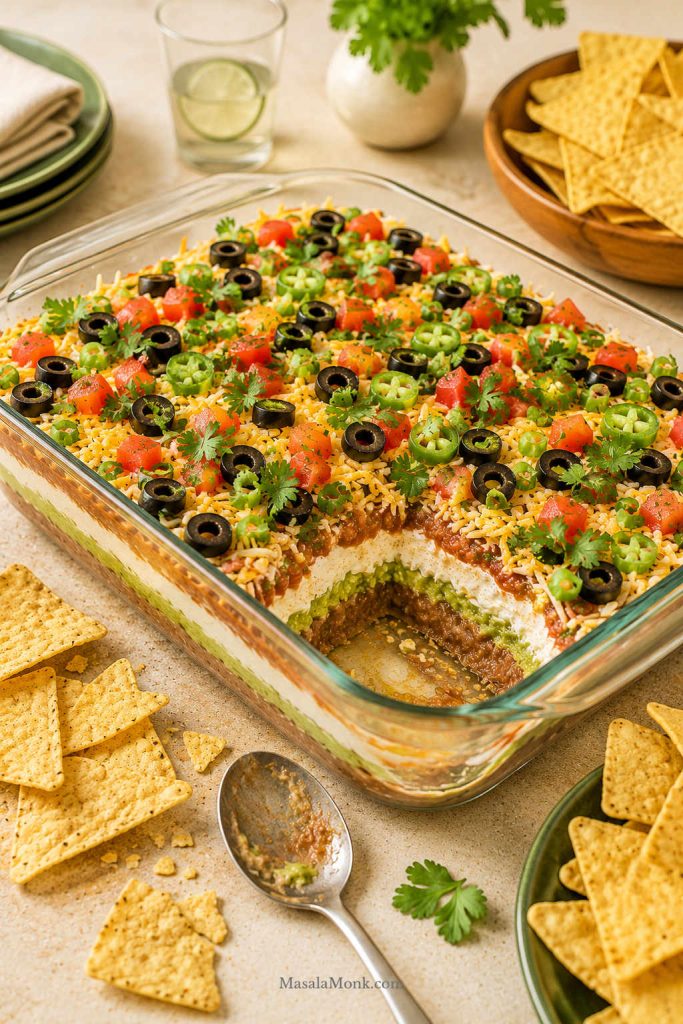
Finished 7 layer dip in a clear 9x13 glass dish with visible layers, colorful toppings, tortilla chips, and one corner lightly scooped.

This is the kind of 7 layer dip recipe people hover around at gatherings: cool, creamy, salty, fresh, and loaded enough that every chip gets a little bit of everything. The best versions look colorful when they land on the table and still taste good after the first few scoops.

This one keeps that appetizer-table magic while fixing the usual problems: stiff beans, loose salsa, browning avocado, broken chips, and layers that collapse too quickly. Instead of baking, it stays cold and no-bake, with seasoned refried beans, fresh avocado, taco-seasoned sour cream, drained salsa or pico, shredded cheese, tomatoes, olives, green onions, and jalapeños layered into a 9×13-inch dish.

The trick is not a secret ingredient. Most 7 layer dips are easy; this one is built around the parts that usually go wrong. The beans need to scoop cleanly, the avocado needs protection, the salsa should brighten without leaking, and the layers should be thin enough that the first scoop does not ruin the whole dish.

That is the difference between a dip people nibble at and a dip people keep “evening out” with one more chip until the corner of the dish is mysteriously gone.

Quick Answer: The Best 7 Layer Dip Recipe

This cold, no-bake 7 layer dip recipe is built in a 9×13-inch dish with seasoned refried beans on the bottom, then guacamole, taco-seasoned sour cream, drained salsa or pico de gallo, shredded cheese, diced tomatoes, and a final topping layer of olives, green onions, jalapeños, and cilantro.

The best layer order is the one that keeps the dip sturdy, fresh, and easy to scoop: heavy beans first, avocado protected in the middle, creamy sour cream above it, drained salsa for brightness, cheese for structure, and fresh toppings on top. If you have time, chill the dish for about 30 minutes so the layers settle before serving.

For exact amounts, jump to the recipe card. If you want the visual test first, see what a clean scoop should look like.

What a Clean Scoop Should Look Like

A good scoop should pick up beans, avocado, sour cream, salsa, cheese, and toppings together without pulling the whole dish apart. If the first scoop collapses the corner, the layers are usually too thick, too cold, or too loose.

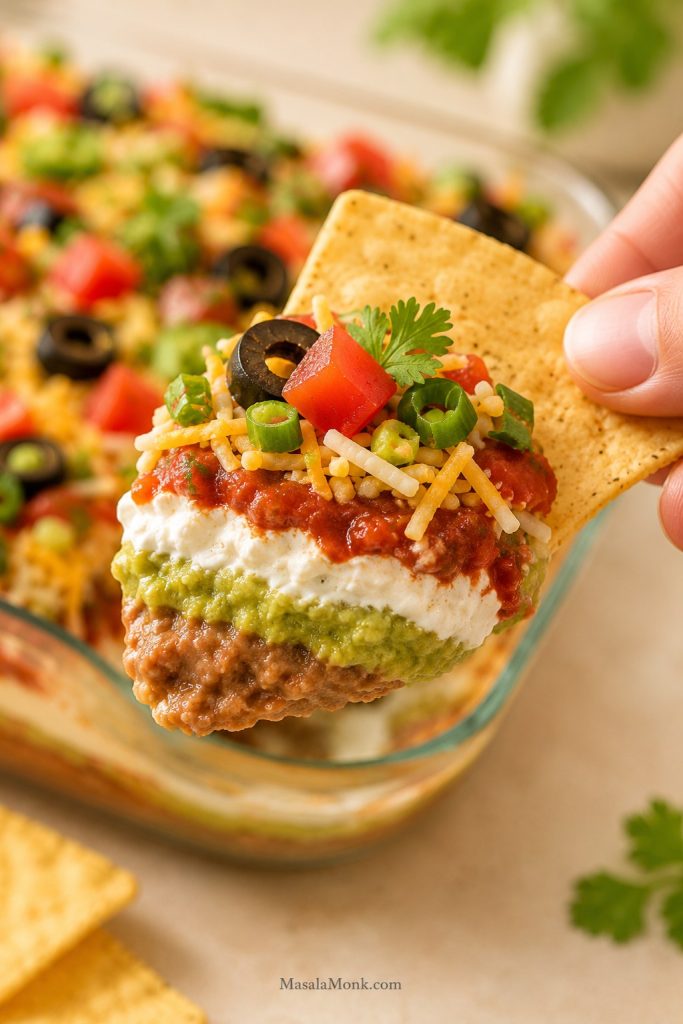
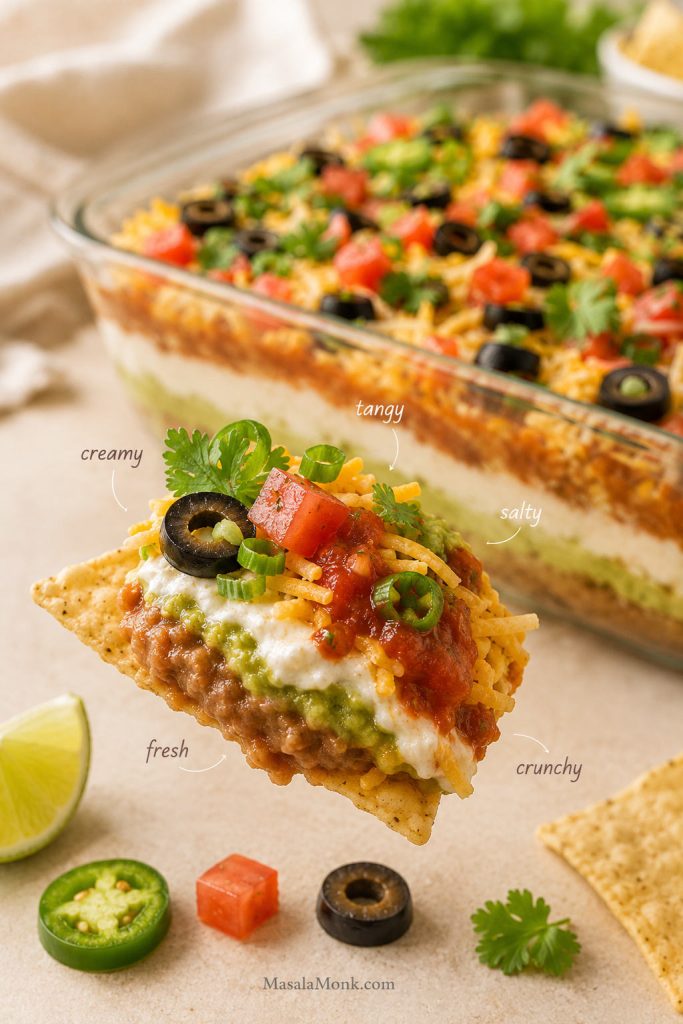
Tortilla chip lifting a clean scoop of 7 layer dip with refried beans, guacamole, sour cream, salsa, cheese, tomatoes, olives, and green onions.
A good scoop should catch beans, avocado, sour cream, salsa, cheese, and toppings together; if it drags the whole dish apart, the layers are probably too thick or too cold.

7 Layer Dip at a Glance

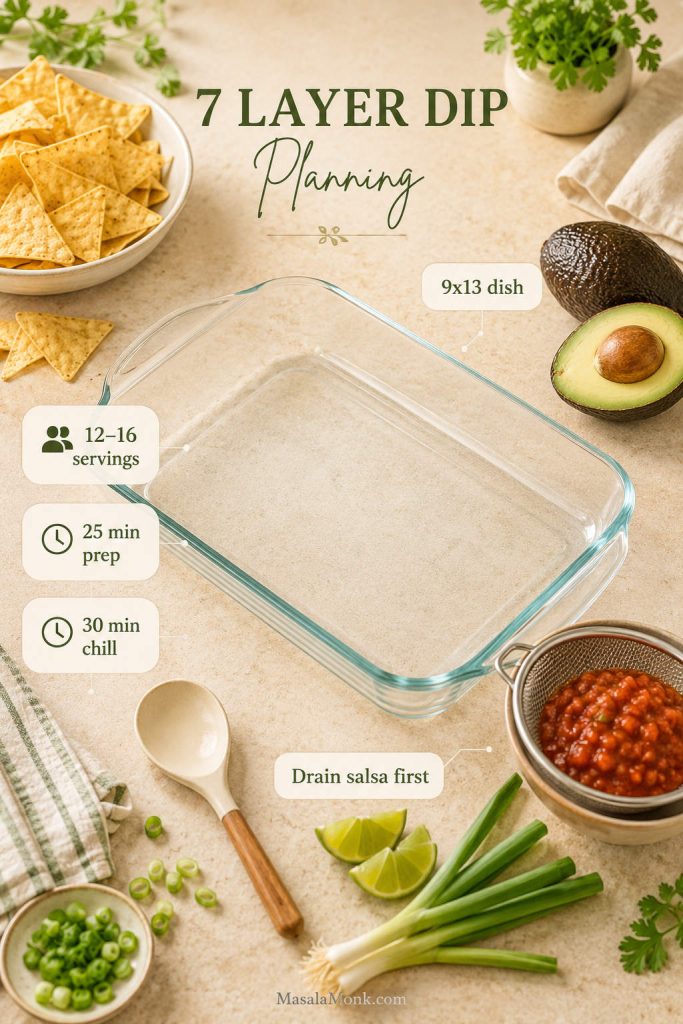
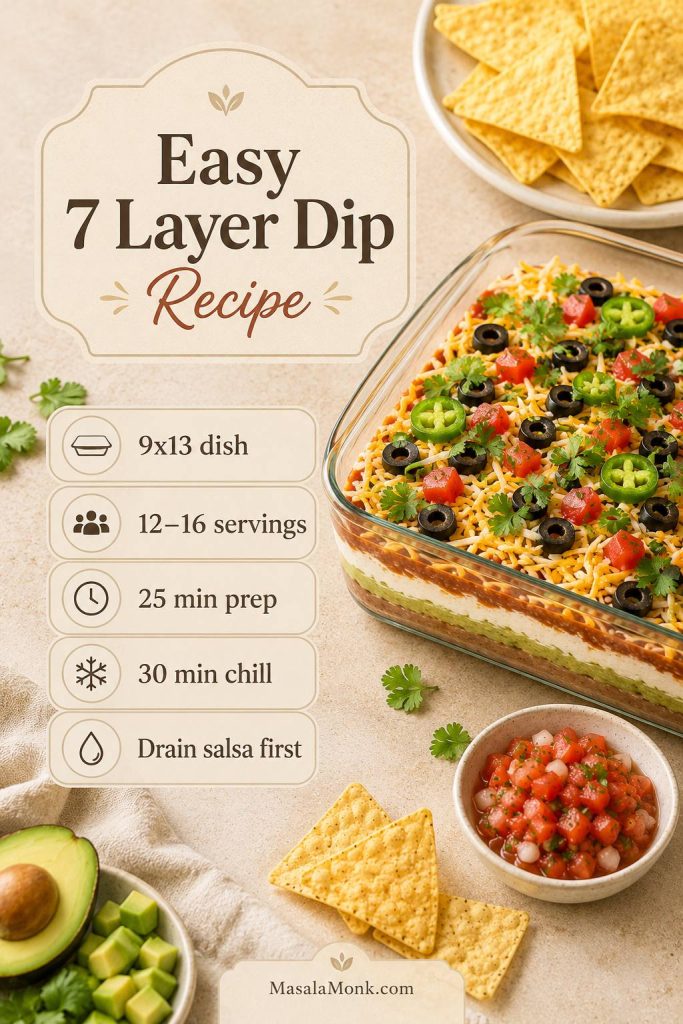
7 layer dip planning scene with a 9x13 dish, tortilla chips, avocados, salsa strainer, timer, and labels for servings, prep time, chill time, and draining salsa.
Before layering, check the dish size, serving count, chill time, and salsa-draining step so the dip is easier to serve when guests arrive.
Recipe type Cold, no-bake layered taco dip
Best dish 9×13-inch / about 23×33 cm glass or ceramic dish
Servings 12–16 appetizer servings
Main base 2 cans refried beans + 3 medium-large avocados
Prep time 25 minutes
Chill time 30 minutes recommended, optional if serving right away
Serve temperature Cold or lightly chilled
Best chips Sturdy tortilla chips or scoop-style chips
Make-ahead window Best assembled the same day; components can be prepped 1 day ahead
Biggest mistake Using loose salsa or pico without draining it first

What Is 7 Layer Dip?

7 layer dip is a cold layered Tex-Mex-style appetizer made with beans, avocado or guacamole, sour cream, salsa, cheese, and fresh toppings. It is usually served with tortilla chips and shows up at game days, potlucks, tailgates, movie nights, and casual parties because it is easy to make and easy to share.

The names often overlap. Some people call it seven layer dip, 7 layer taco dip, layered taco dip, Mexican layer dip, or layered bean dip. Although the exact toppings can change from kitchen to kitchen, the goal is always the same: a colorful, scoopable dish with a sturdy base, creamy middle layers, bright salsa, cheese, and fresh toppings.

If you are building a cold appetizer table, this dip also works well beside a make-ahead cheese ball recipe. Both can be chilled ahead, served with sturdy dippers, and set out when guests arrive.

Why This 7 Layer Dip Recipe Works

The goal is not just seven layers; it is seven layers that taste good together. The bean layer should be savory, the avocado should be bright, the sour cream should be tangy, the salsa should wake everything up, and the toppings should make each scoop feel fresh instead of heavy.

The best bite should be creamy from the beans and avocado, tangy from the sour cream and salsa, salty from the cheese and olives, and fresh from the tomatoes, green onions, cilantro, and jalapeños.

Flavorful bean base

The refried beans are loosened and seasoned before spreading, so they taste better and stay soft enough for chips to scoop through.

Fresh avocado middle

The avocado layer adds cool, creamy freshness. Covering it with sour cream helps slow browning and keeps the middle from drying out.

Bright but balanced salsa

Drained salsa or pico brings tangy tomato flavor without taking over the whole bite or sinking into the creamy layers.

Clean serving-dish structure

A 9×13-inch dish gives the layers room to spread, keeps the dip easier to scoop, and makes enough for a real appetizer table.

Loaded tortilla chip with 7 layer dip and small callouts for creamy, tangy, salty, fresh, and crunchy flavors.
The best bite is balanced: creamy beans and avocado, tangy salsa and sour cream, salty cheese and olives, plus fresh toppings for crunch and brightness.

7 Layer Dip Ingredients

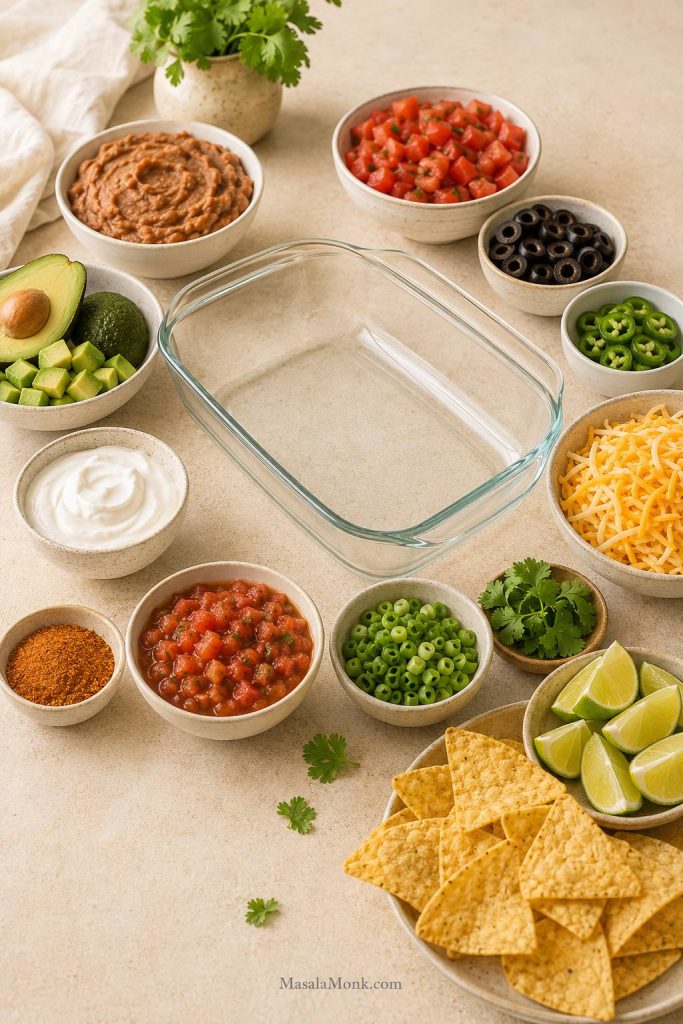
Ingredients for 7 layer dip arranged on a light surface, including refried beans, avocados, sour cream, taco seasoning, salsa, cheese, tomatoes, olives, green onions, jalapeños, lime, cilantro, and tortilla chips.
Simple ingredients work harder when the creamy layers are seasoned first, because plain beans or sour cream can make the finished dip taste flat.

This dip only works if the bean layer, avocado layer, and sour cream layer each taste good before they go into the dish. So, season the creamy layers first, then build the dish. That way every bite tastes balanced instead of just like plain beans, sour cream, and jarred salsa stacked together.

1. Refried Beans

Use two cans of refried beans for a full 9×13-inch dish. Pinto refried beans give the most classic flavor, while black refried beans taste a little earthier. If you are serving vegetarian guests, check the label because some refried beans are made with lard.

Plain canned beans can be stiff when cold, so stir them with a little salsa, cumin, chili powder, garlic powder, lime juice, and salt before spreading. You want a base that is thick enough to hold the layers but soft enough for a tortilla chip to scoop through.

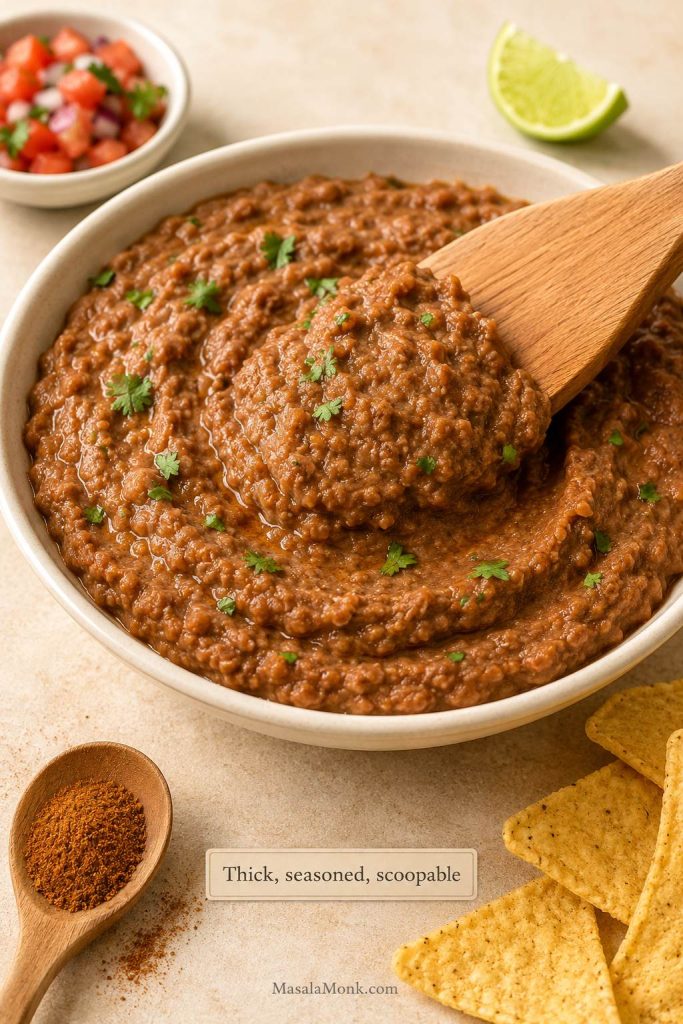
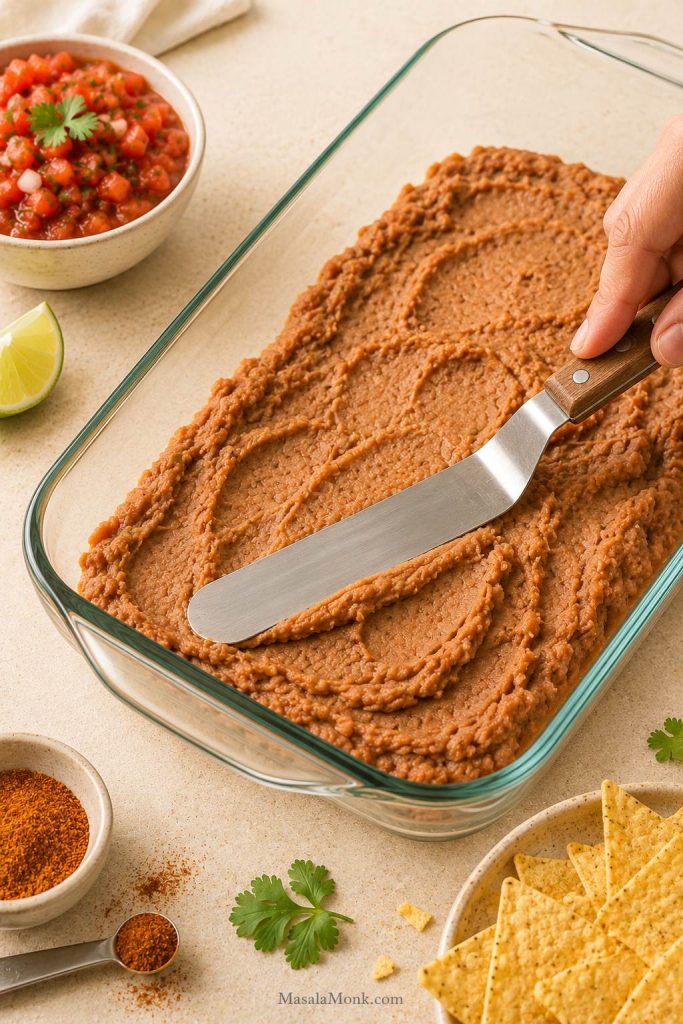
Seasoned refried beans in a bowl with a spatula showing thick scoopable texture, plus salsa, lime, chips, and seasoning nearby.
A sturdy refried bean base holds the dip together, but the texture still needs to be soft enough for chips to scoop cleanly.

2. Guacamole or Mashed Avocado

Fresh avocado gives the dip a cool, creamy middle. Mash ripe avocados with lime juice, salt, cilantro, and jalapeño if you like heat. Keep it slightly chunky for a fresher texture, or mash it smoother for cleaner layers.

Store-bought guacamole works too when you need a faster party dip. Choose a thicker guacamole, taste it first, and brighten it with lime juice, cilantro, or a little salt if it tastes flat.

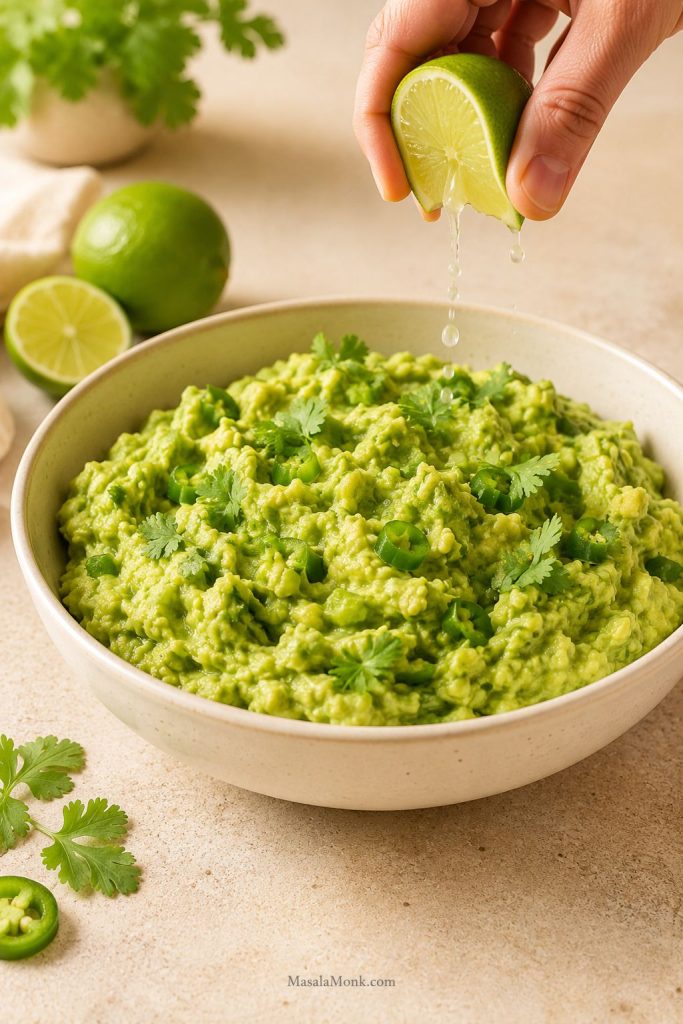
Bowl of fresh mashed avocado with lime, cilantro, jalapeño, and a hand mixing the guacamole layer for 7 layer dip.
Lime, cilantro, and salt brighten the avocado layer, while a slightly chunky texture keeps the dip fresh instead of heavy.

3. Sour Cream and Taco Seasoning

Sour cream mixed with taco seasoning creates the creamy taco-dip layer. Use enough seasoning to give it flavor, but do not overdo it because salsa, chips, cheese, and olives also bring salt.

A taco seasoning packet works well here. Start with less than the full packet if your chips, cheese, salsa, and olives are already salty, then add more to taste.

Bowl of sour cream being mixed with taco seasoning for the creamy layer of 7 layer dip.
Taco seasoning turns plain sour cream into a flavorful middle layer; however, add it gradually if your chips, cheese, salsa, and olives are already salty.

For a thicker texture, beat 4 oz / 113 g softened cream cheese into the sour cream before spreading. Cream cheese is optional. A small amount makes the layer richer and more stable; however, too much can make the dip feel heavy instead of fresh.

4. Salsa or Pico de Gallo

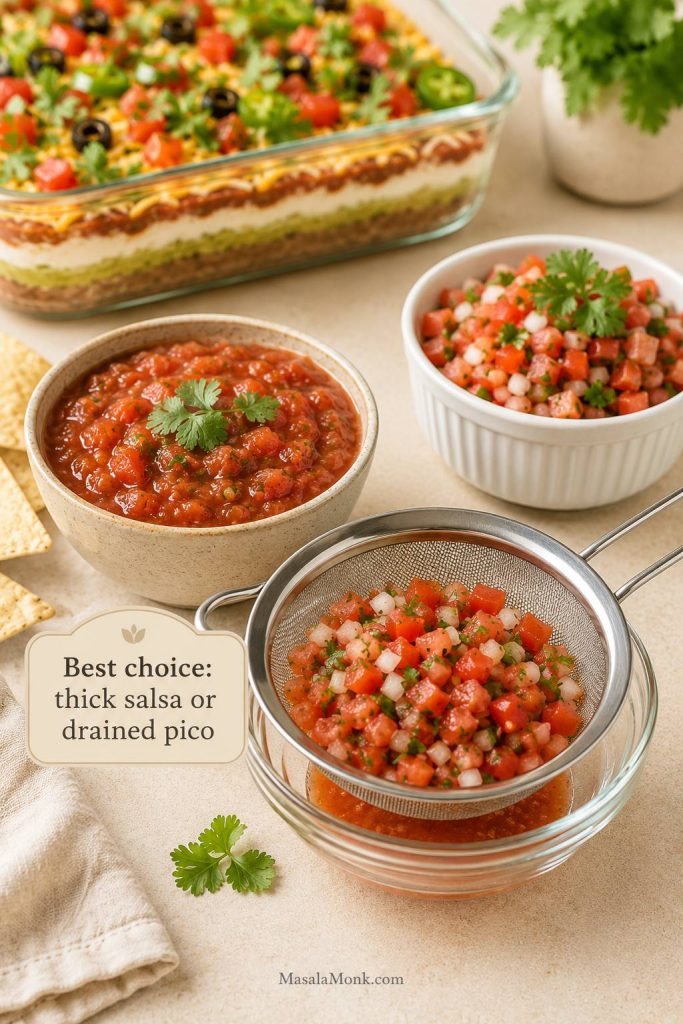
The best salsa for 7 layer dip is thick, chunky salsa or well-drained pico de gallo. Although pico tastes fresh and bright, tomatoes release liquid as they sit. Avoid thin restaurant-style salsa unless you strain it first, because it can leak into the sour cream and make the dip watery.

Chunky salsa, drained pico de gallo, and thin salsa in a fine-mesh strainer with text saying thick salsa or drained pico is best.
Thick salsa or drained pico gives 7 layer dip bright tomato flavor without letting excess liquid sink into the sour cream layer.

Most importantly, the salsa layer should brighten the dip, not take over the whole bite. If you want a brighter salsa bowl on the side, this mango salsa recipe gives the table something fresh, juicy, and chip-friendly without weighing down the creamy layers.

Place the salsa or pico in a fine-mesh strainer before layering. If it leaves a puddle in the bowl, it will leave a puddle in the dish.

For the full moisture-control guide, use the no-watery dip section.

5. Shredded Cheese

Cheddar gives sharper flavor, Monterey Jack tastes milder and creamier, pepper jack adds heat, and a Mexican cheese blend is the easiest all-purpose option. Freshly shredded cheese tastes best, but pre-shredded cheese works when you need a fast appetizer dish.

The cheese also helps separate the salsa from the fresh toppings, which keeps the top looking cleaner.

6 and 7. Fresh Toppings

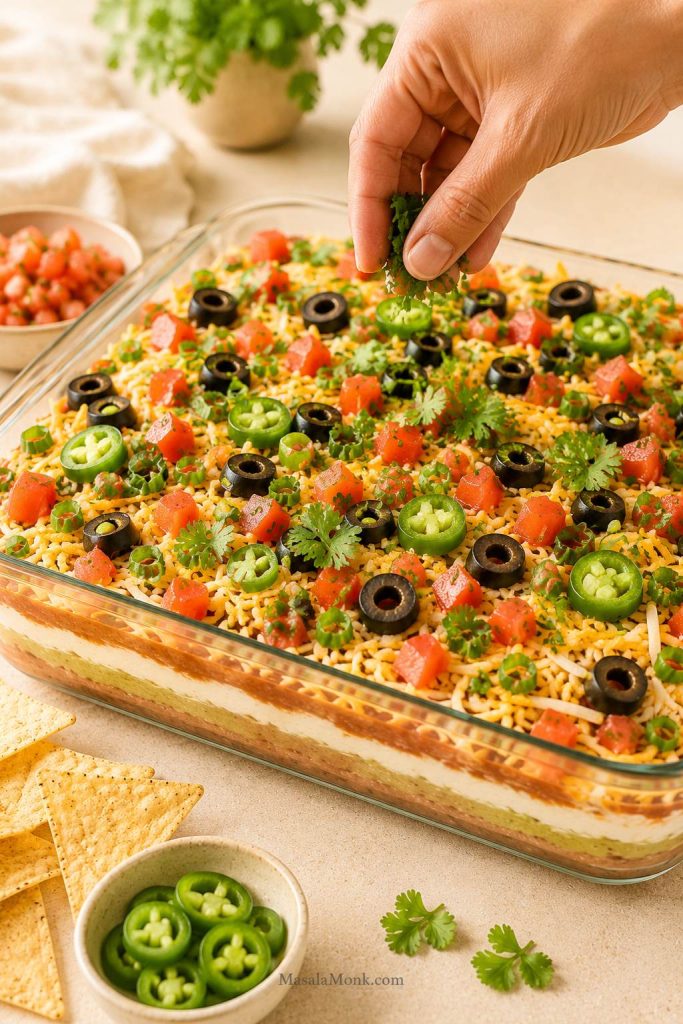
Finish with diced Roma tomatoes, black olives, green onions, cilantro, and jalapeños. Roma tomatoes are useful because they are meatier and less juicy than many slicing tomatoes. If your tomatoes are especially wet, seed them or blot them before adding them to the top.

Fresh toppings being added to 7 layer dip, including shredded cheese, diced tomatoes, sliced black olives, green onions, cilantro, and jalapeños.
Fresh toppings add color and crunch, although juicy tomatoes and delicate herbs are best added thoughtfully when making the dip ahead.

Best 7 Layer Dip Layer Order

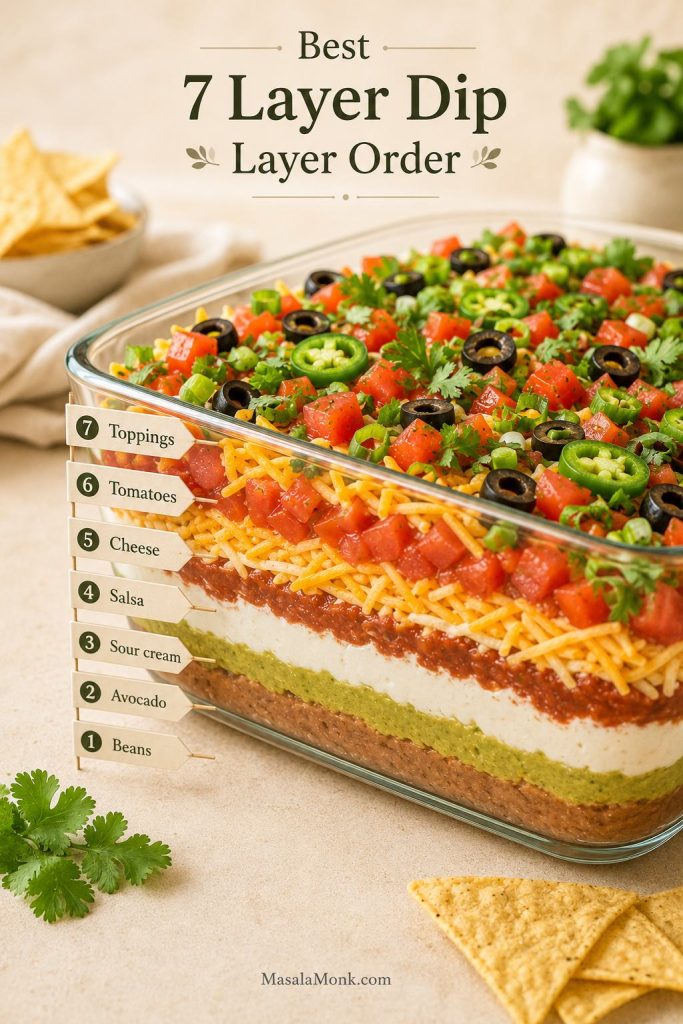
Side view of 7 layer dip in a glass dish with labeled layers for beans, avocado, sour cream, salsa, cheese, tomatoes, and toppings.
The best 7 layer dip layer order keeps heavy beans on the bottom, protects avocado in the middle, and leaves fresh toppings on top.

There are several common layer orders, and many of them work. In some versions, cheese goes earlier; in others, salsa sits on top or lettuce becomes one of the layers. For this 7 layer dip recipe, I like the order below because it keeps the heaviest layer on the bottom, protects the avocado, controls excess liquid, and leaves the top fresh and colorful.

The best order for 7 layer dip is:

  1. Seasoned refried beans
  2. Guacamole or mashed avocado
  3. Taco-seasoned sour cream
  4. Drained salsa or pico de gallo
  5. Shredded cheese
  6. Diced tomatoes
  7. Olives, green onions, jalapeños, and cilantro

The point is not to build the tallest dip. The point is to build layers thin enough that a normal chip can reach more than one flavor before it breaks.

Why Thin Layers Scoop Better

Thin layers help a chip reach more than one flavor without snapping. They also make the first scoop cleaner because the dip spreads across the dish instead of stacking too high in one deep spot.

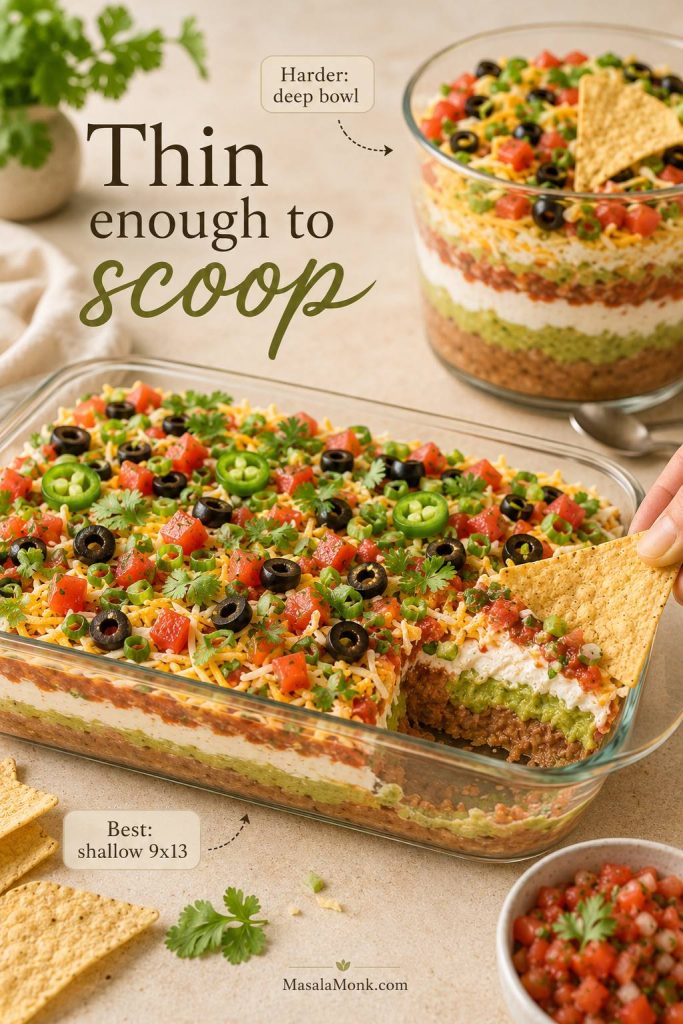
Shallow 9x13 dish of 7 layer dip being scooped cleanly, compared with a deeper bowl that is harder to scoop from.
A normal chip should reach more than one flavor before it breaks; that is why thinner, even layers beat a tall, heavy stack.

This order works because the beans create the sturdy base, the avocado stays tucked into the middle, the sour cream spreads gently over it, and the salsa is managed before the cheese and toppings go on. As a result, the top stays bright while the bottom stays strong enough for scooping.

Layer-order tip: Spread each layer gently all the way to the edges. That makes the dip look cleaner from the side, gives every scoop a bit of every layer, and helps protect the avocado from air.

Equipment You’ll Need

A 9×13-inch dish, a fine-mesh strainer, a few mixing bowls, and a spatula are the only tools that really matter. The strainer keeps salsa from watering down the dip, while the spatula helps spread the soft layers without dragging them into each other.

  • 9×13-inch / 23×33 cm glass or ceramic dish: best for a crowd and visible layers.
  • Fine-mesh strainer: for draining salsa or pico.
  • Mixing bowls: for the beans, avocado, and sour cream.
  • Fork or potato masher: for mashing avocado.
  • Silicone spatula or offset spatula: for spreading soft layers gently.
  • Knife and cutting board: for tomatoes, green onions, jalapeños, and herbs.
  • Plastic wrap: for covering the dish tightly if making it ahead.

How to Make 7 Layer Dip

The method is simple, but the small details matter: season each creamy layer, spread gently, drain the salsa, and chill the dish briefly if you have time.

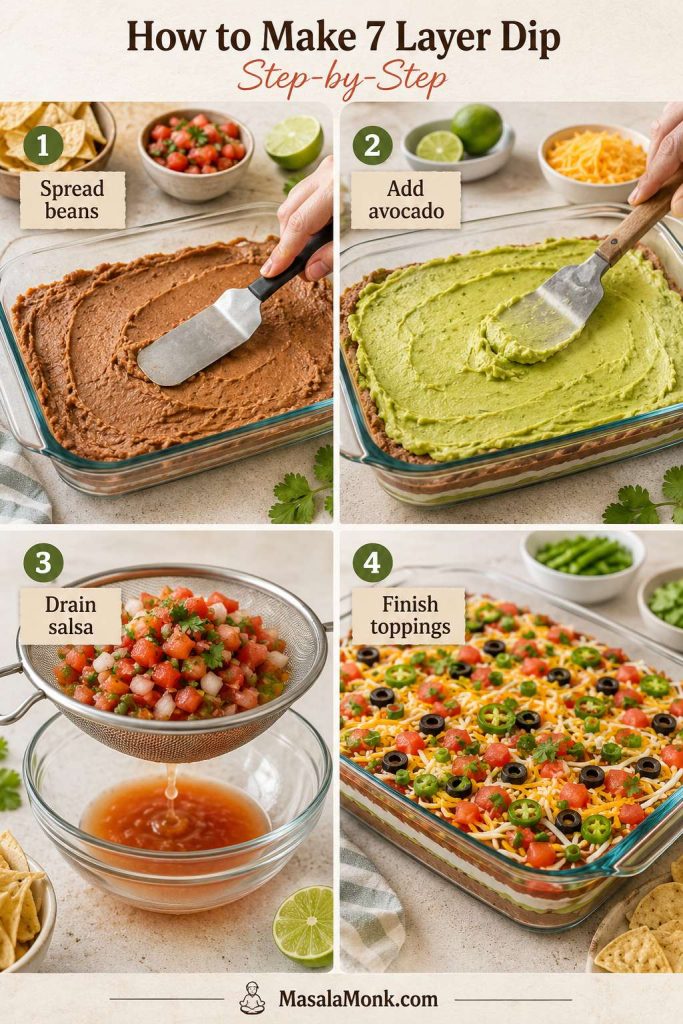
Four-step 7 layer dip guide showing beans spread in a dish, avocado added, salsa drained in a strainer, and toppings finished on the dip.
Build the dip in the right order: spread the beans, add avocado, drain the salsa, and finish with toppings for cleaner layers.

Step 1: Season and Loosen the Beans

Stir the refried beans with salsa, cumin, chili powder, garlic powder, lime juice, and salt. If the beans still feel too stiff, add another spoonful of salsa or a small spoonful of sour cream. The goal is thick and scoopable, not runny.

Spread the beans edge to edge in the bottom of the dish, including the corners. This gives every scoop a sturdy base and keeps the first chip from pulling up toppings with no beans underneath.

Spatula spreading seasoned refried beans into the corner of a clear 9x13 dish for the base layer of 7 layer dip.
Spreading beans into the corners gives every scoop a base, so early chips do not pull up toppings without the refried bean layer underneath.

Step 2: Make the Avocado Layer

Mash the avocados with lime juice, cilantro, jalapeño, and salt. Taste before layering; bland avocado makes the whole dish feel flat.

Then, dollop the avocado over the bean layer first and spread it gently. Do not press too hard, or you will drag the beans underneath.

Step 3: Mix the Sour Cream Layer

Stir sour cream with taco seasoning until smooth. If using cream cheese, make sure it is fully softened, then beat it with the sour cream before adding the seasoning so there are no lumps.

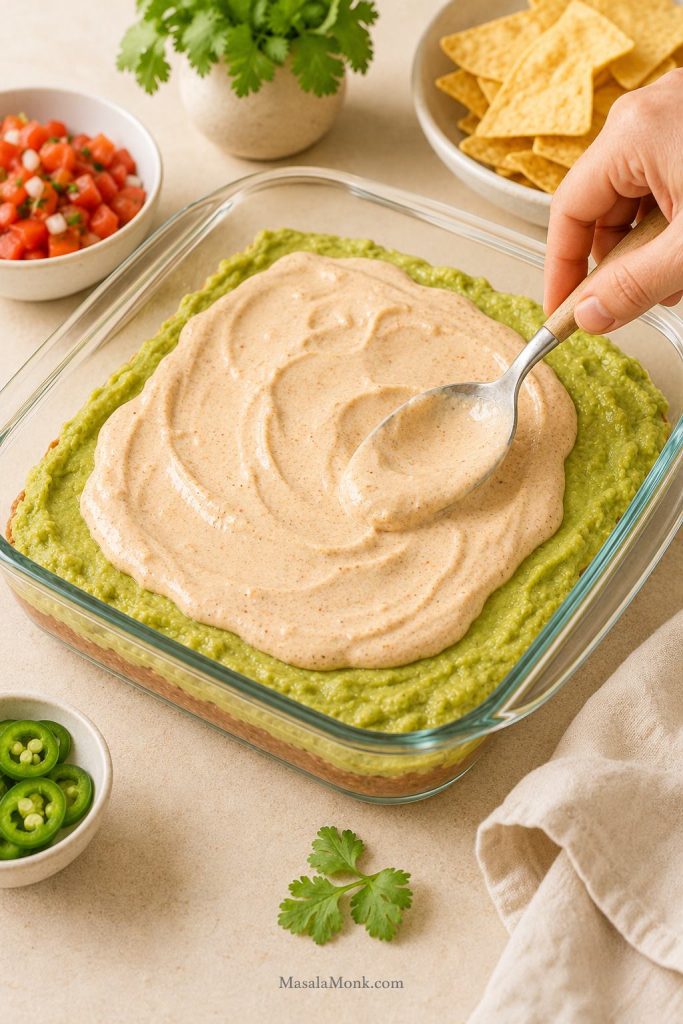
Next, dollop the sour cream mixture across the avocado and spread it gently to the edges. Try to cover the avocado completely; this helps slow browning and gives the dip a clean creamy middle.

Taco-seasoned sour cream being spread over the avocado layer in a glass dish to cover the green layer.
Covering avocado with sour cream helps slow browning and keeps the middle layer creamy through chilling and serving.

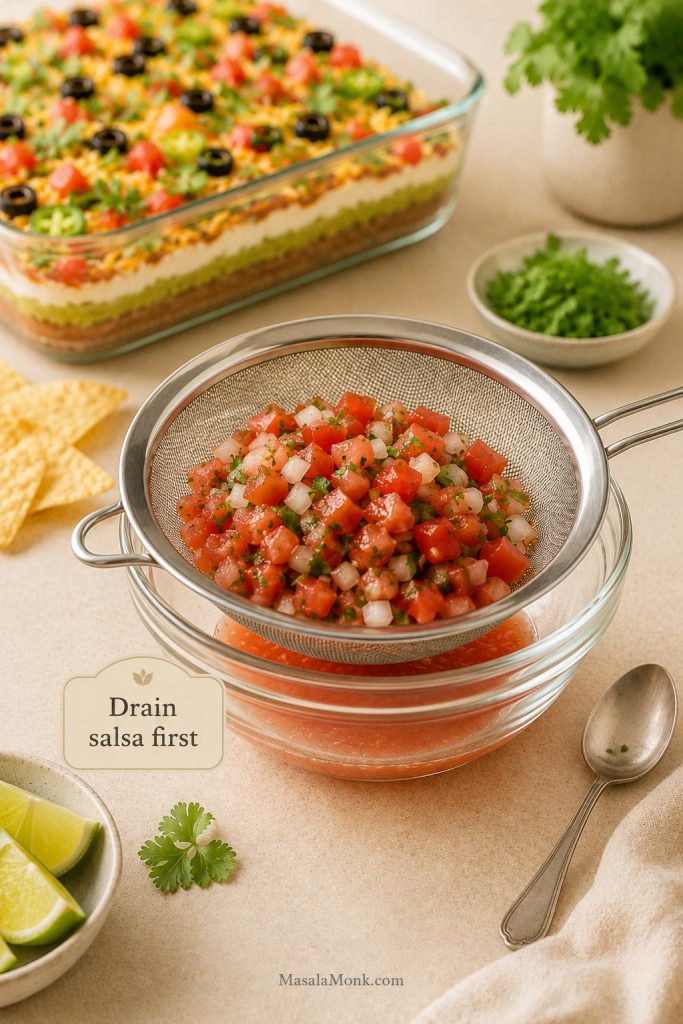
Step 4: Drain the Salsa or Pico

Place the salsa or pico in a fine-mesh strainer and drain for 5 to 10 minutes if it looks loose. You do not need to squeeze it dry; you just want to remove the liquid that would otherwise run into the sour cream.

Chunky salsa draining in a fine-mesh strainer over a glass bowl with visible liquid below and text saying drain salsa first.
If salsa releases liquid in the strainer, it would have released that liquid into the dip, so drain it before layering.

After that, spread the drained salsa in a thin, even layer. Too much can overpower the creamy layers and make them slide around, so use less if your salsa is very juicy.

Step 5: Add Cheese and Fresh Toppings

Sprinkle the cheese evenly over the salsa, then add diced tomatoes, olives, green onions, cilantro, and jalapeños. If the dip is being made several hours ahead, save the most delicate herbs and a few extra green onions for just before serving so the top looks fresh.

Step 6: Chill Briefly and Serve

Chill the dish for about 30 minutes if you have time. This helps the layers settle and makes the dip easier to scoop. If it has been refrigerated for several hours, let it sit for about 10 minutes before serving so the bean layer softens slightly.

Finally, serve with sturdy tortilla chips, scoop-style chips, or crunchy vegetables. The first scoop should cut through the layers without turning the whole dish into a landslide.

Planning for a party? The make-ahead section explains what to prep the day before and what to add right before serving.

Easy 7 Layer Dip Recipe

This easy 7 layer dip recipe is built for clean scooping: seasoned refried beans, guacamole, taco sour cream, drained salsa, cheese, tomatoes, olives, green onions, and jalapeños layered in a 9×13-inch dish. It is cold, creamy, colorful, crowd-friendly, and made to stay fresher and cleaner on the appetizer table.

Prep time:
25 minutes
Chill time:
30 minutes optional
Total time:
25–55 minutes
Yield:
12–16 servings
Dish:
9×13-inch / 23×33 cm dish
Serve:
Cold or lightly chilled

Ingredients

Bean layer

  • 2 cans refried beans, 15–16 oz each / 850–900 g total
  • ⅓ cup salsa / 80 ml, drained if loose
  • 1 teaspoon ground cumin / 2–3 g
  • ½ teaspoon chili powder / 1–2 g
  • ½ teaspoon garlic powder / about 1.5 g, optional
  • 1 tablespoon lime juice / 15 ml, optional
  • Salt, to taste

Guacamole layer

  • 3 medium-large ripe avocados / about 400–500 g avocado flesh
  • 2 tablespoons lime juice / 30 ml
  • ¼ cup chopped cilantro / 10–15 g
  • 1 small jalapeño, finely chopped, optional
  • Salt, to taste

Sour cream layer

  • 1½ cups sour cream / about 360 g
  • 2 tablespoons taco seasoning / about 18–20 g
  • Optional for a thicker texture: 4 oz cream cheese / 113 g, softened

Salsa layer

  • 1½ cups chunky salsa or pico de gallo / 360 ml, drained well
  • Use 1 cup / 240 ml if your salsa is very wet

Cheese and toppings

  • 1½–2 cups shredded cheddar, Monterey Jack, pepper jack, or Mexican cheese blend / 170–225 g
  • 1 cup diced Roma tomatoes / 150–180 g, seeded if juicy
  • ½ cup sliced black olives / about 60–75 g, drained
  • ⅓ cup sliced green onions / 25–35 g
  • Optional: chopped cilantro, pickled jalapeños, diced fresh jalapeño

For serving

  • Sturdy tortilla chips or scoop-style chips

Instructions

  1. Season the beans. In a bowl, stir the refried beans with salsa, cumin, chili powder, garlic powder, lime juice, and salt until thick but scoopable.
  2. Spread the base. Spread the bean layer evenly in a 9×13-inch dish, going all the way to the edges and corners.
  3. Make the avocado layer. Mash the avocados with lime juice, cilantro, jalapeño, and salt. Taste and adjust with more lime or salt if needed.
  4. Add the avocado. Dollop the avocado over the beans, then spread gently so you do not pull up the layer underneath.
  5. Mix the sour cream layer. Stir sour cream with taco seasoning until smooth. For a thicker texture, beat softened cream cheese into the sour cream before adding the seasoning.
  6. Cover the avocado. Dollop the sour cream layer over the avocado and spread it gently to the edges.
  7. Drain the salsa. Spoon salsa or pico into a fine-mesh strainer and drain for 5–10 minutes if it is loose or watery.
  8. Add the salsa and cheese. Spread the drained salsa in a thin layer, then sprinkle evenly with cheese.
  9. Finish the top. Add tomatoes, olives, green onions, cilantro, and jalapeños.
  10. Chill and serve. Chill for 30 minutes if possible. Serve cold or lightly chilled with sturdy tortilla chips.

Notes

  • Drain the salsa or pico well. This is the main fix for a loose, soggy dip.
  • Dollop each soft layer across the dish before spreading it gently for cleaner layers.
  • Halve the recipe for a smaller 8×8-inch dish.
  • Assemble the dip the same day you serve it for the best texture.
  • Cream cheese is optional. It makes the sour cream layer thicker but is not required.
Saveable easy 7 layer dip recipe card with a finished dip, tortilla chips, and text for 9x13 dish, servings, prep time, chill time, and draining salsa first.
Keep the core details handy: use a 9×13 dish, plan for 12 to 16 servings, chill briefly if possible, and drain salsa first.

Can You Make 7 Layer Dip Ahead?

You can make this 7 layer dip recipe ahead, but the real test is how it looks when guests arrive: bright avocado, clean creamy layers, no salsa leaking at the edges, and a top that still looks like you just finished it.

For guests, assemble the dip a few hours before serving, cover it tightly, and keep it chilled. However, if it is just for casual snacking or leftovers, overnight assembly is fine; just expect softer layers and a little avocado darkening.

The cleanest make-ahead plan is to prep the parts separately one day ahead. Mix the beans, stir together the sour cream layer, shred the cheese, slice the olives, chop the green onions, and drain the salsa. Then mash the avocado and assemble the full dish closer to serving time.

Make-ahead timing Best approach Why it works
30 minutes ahead Fully assemble and chill Best balance of fresh flavor and settled layers
2–6 hours ahead Fully assemble, cover tightly, refrigerate Great for guests if salsa is drained well
1 day ahead Prep components separately; assemble later Keeps toppings fresher and avocado brighter
Overnight fully assembled Possible, but not ideal Avocado can darken and salsa can release moisture

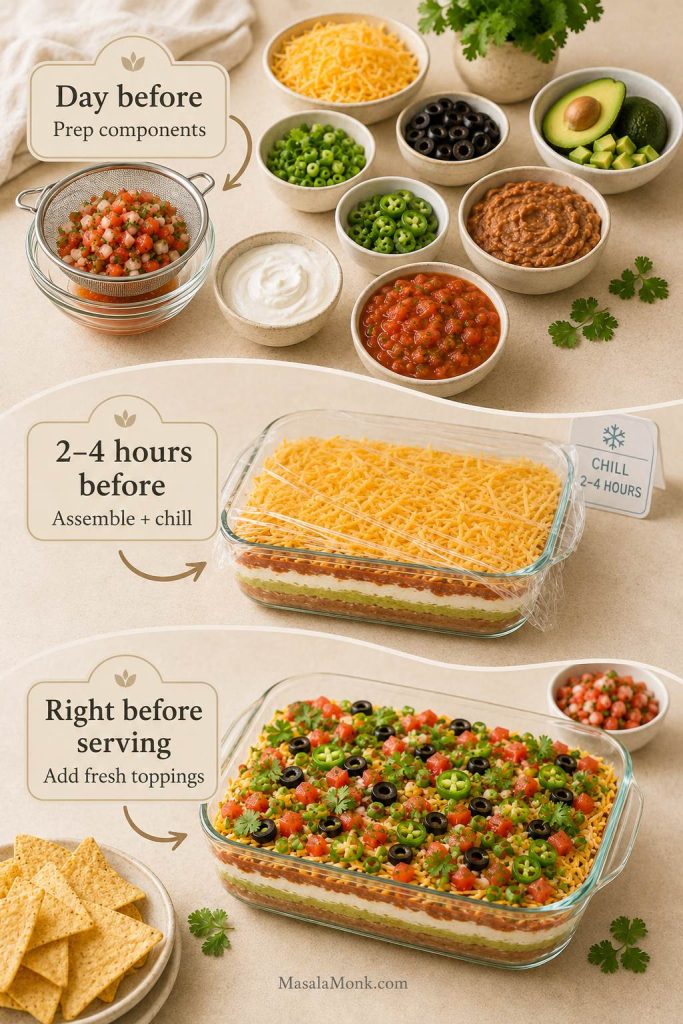
Easy Party Timeline

Make-ahead timeline for 7 layer dip showing day-before component prep, 2 to 4 hour assembly and chilling, and fresh toppings added before serving.
For the freshest make-ahead 7 layer dip, prep sturdy components early, assemble a few hours before serving, and add delicate toppings last.
  • The day before: mix the bean layer, mix the sour cream layer, shred cheese, chop sturdy toppings, and drain olives.
  • 2–4 hours before serving: mash the avocado, drain the salsa, assemble the dip, cover, and refrigerate.
  • Right before serving: add extra cilantro, green onions, jalapeños, or a few fresh tomatoes to brighten the top.

If you need to assemble the whole dish the night before, drain the salsa very well, seed juicy tomatoes, spread each layer to the edges, and press plastic wrap close to the surface before refrigerating. Then, add delicate toppings like cilantro and extra green onions right before serving so the top still looks fresh.

Best hosting move: Keep the full dish chilled until guests arrive. If the gathering is long, set out part of the dip and refill from the refrigerator instead of letting the whole dish sit out for hours.

For leftovers and food-safety timing, see how to store leftover 7 layer dip.

How to Keep 7 Layer Dip from Getting Watery

If a 7 layer dip looks perfect when you assemble it and then turns soupy around the edges, salsa is usually the first suspect. The fix is not more cheese or thicker sour cream. Instead, drain the salsa or pico before it ever touches the creamy layers.

If you remember only one thing before assembling the dip, make it this: drain the salsa first.

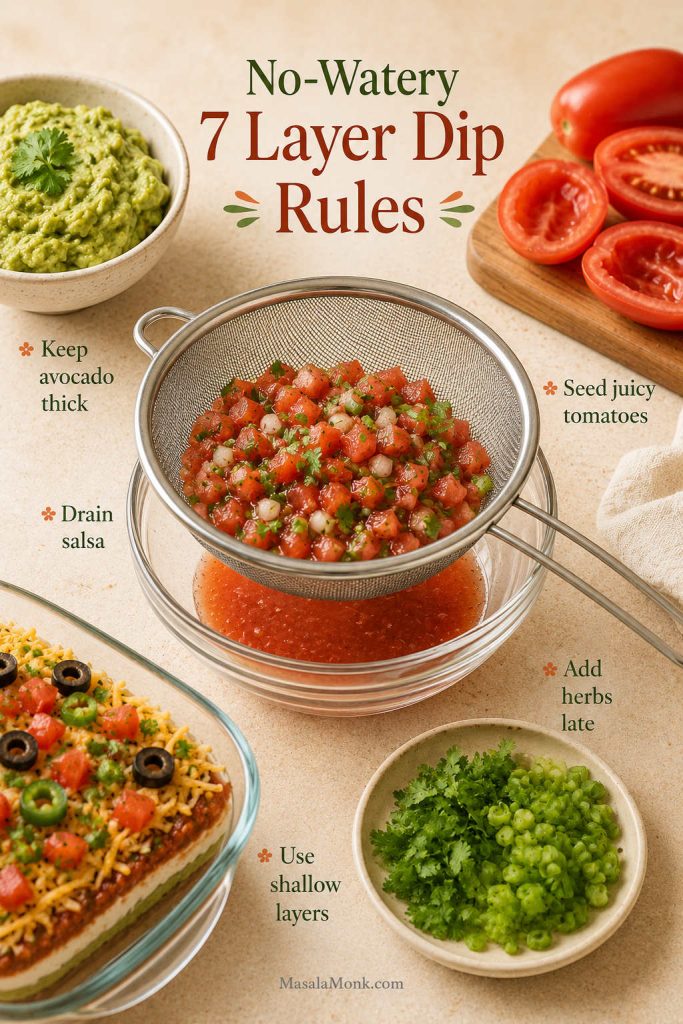
No-Watery-Dip Rules

Spoon salsa or pico into a fine-mesh strainer and let the loose liquid run off. If your salsa is especially juicy, use less of it, choose a thicker chunky salsa, or add only enough to create a thin flavorful layer. The salsa should brighten the dip, not turn it into a tomato-heavy puddle.

No-watery-dip rules: Drain salsa or pico, use Roma tomatoes or seed juicy tomatoes, keep the avocado layer thick, add delicate toppings late, and avoid making the layers so deep that chips have to dig through them.
No-watery 7 layer dip rules board with salsa draining in a strainer, thick guacamole, seeded tomatoes, fresh herbs, and shallow dip layers.
Watery dip is usually preventable: drain salsa, seed juicy tomatoes, keep avocado thick, add herbs late, and avoid overly deep layers.

Common Watery Dip Problems and Fixes

Problem What causes it Best fix
Liquid pools around the edges Salsa or pico was added straight from the jar or bowl Drain it in a fine-mesh strainer before layering
Tomatoes make the top soggy Very juicy tomatoes or unseeded tomatoes Use Roma tomatoes, seed them, or blot them lightly
The layers loosen after chilling Too many fresh watery toppings were added too early Add herbs, green onions, and extra tomatoes closer to serving
The avocado layer softens too much The avocados were overmixed or too much liquid was added Use just enough lime for flavor and keep the avocado layer thick
Lettuce turns limp Lettuce was layered too far ahead Use lettuce only for same-day serving, or save it for taco salad

Do Not Ignore the Bean Layer

The bean layer matters too. If the beans are too stiff, guests press harder with chips, which breaks the layers and makes the dish messy. If the beans are too loose, the base loses structure. Aim for thick, spreadable, and chip-friendly.

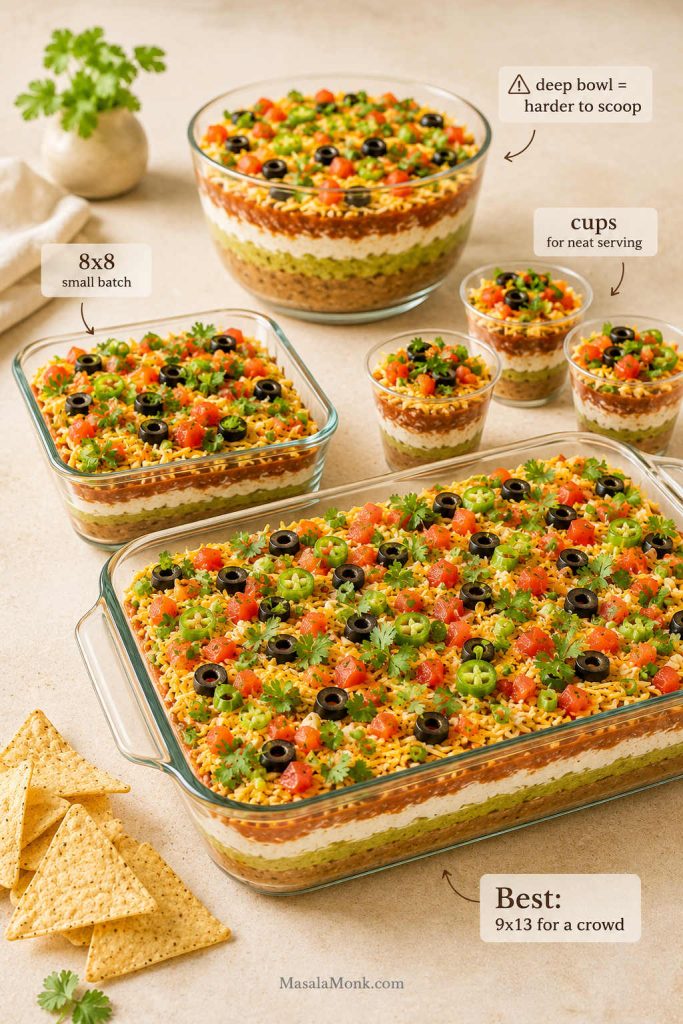
Best Dish Size for 7 Layer Dip

Comparison of 7 layer dip serving sizes with a 9x13 dish, 8x8 dish, individual cups, and a deep bowl labeled harder to scoop.
For a crowd, a shallow 9×13 dish gives the layers room and makes serving easier than a deep bowl.

A 9×13-inch / 23×33 cm glass or ceramic dish is the best choice for this 7 layer dip recipe because it gives you enough surface area for even layers, easy scooping, and a crowd-friendly amount of dip. A clear dish also shows off the layers from the side, which makes it look more impressive without any extra fuss.

The best serving dish is not just the prettiest one; it is the one that lets a chip reach more than one layer at a time. Although a deep bowl may show off the layers, a shallower dish is usually easier to eat from.

Dish or serving style Best for Watch out for
9×13-inch dish Parties, potlucks, game day, large family gatherings Use enough toppings so the surface does not look sparse
8×8-inch dish Small batch, family snack, casual dinner side Halve the recipe so the layers do not get too thick
Shallow platter Pretty presentation and easy scooping Layers spread thinner and can look messier faster
Deep trifle bowl Dramatic visible layers Harder to dip cleanly; better with a serving spoon
Individual cups or jars Office parties, kids, tailgates, no double-dipping More prep work, but very neat to serve

How to Make a Smaller 8×8 7 Layer Dip

For an 8×8-inch dish, halve the recipe. Use 1 can of refried beans, 1 to 2 avocados, about ¾ cup sour cream, ¾ cup drained salsa, ¾ to 1 cup cheese, and a lighter handful of toppings. Keep the same layer order; only reduce the quantities.

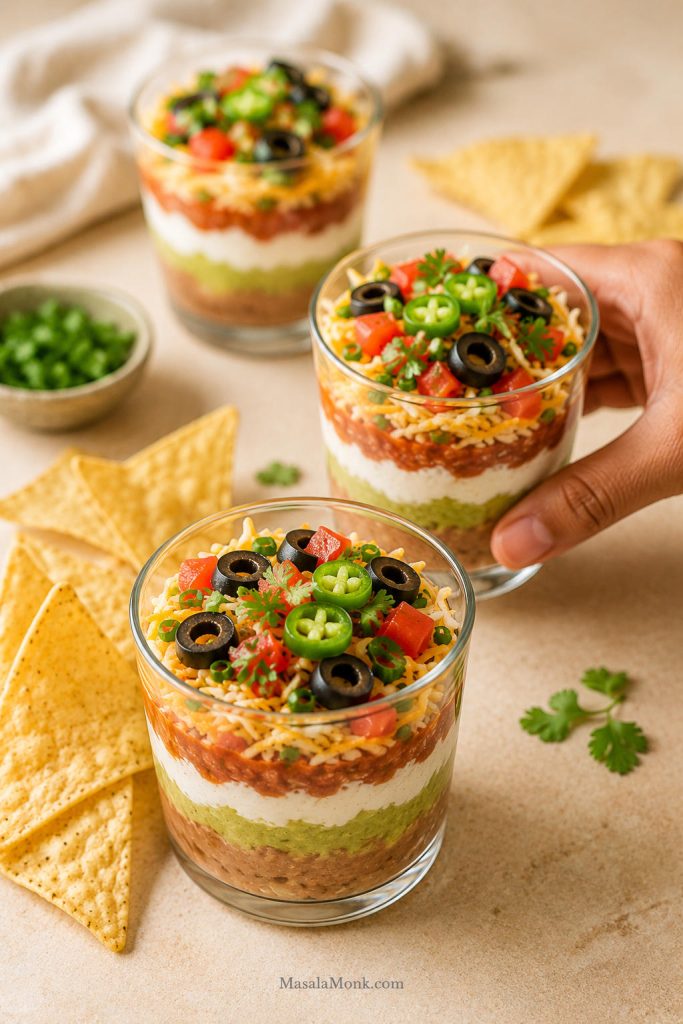
How to Make 7 Layer Dip Cups

For individual cups, use small clear cups or jars and add a spoonful of each layer in the same order: beans, guacamole, sour cream, drained salsa, cheese, tomatoes, and toppings. This works well when you want a cleaner appetizer table or when guests need an easy grab-and-go serving.

Individual 7 layer dip cups in clear glasses with visible beans, avocado, sour cream, salsa, cheese, tomatoes, olives, jalapeños, cilantro, and tortilla chips.
Individual 7 layer dip cups take more prep, but they make portions neat, visible, and easy for guests to grab.

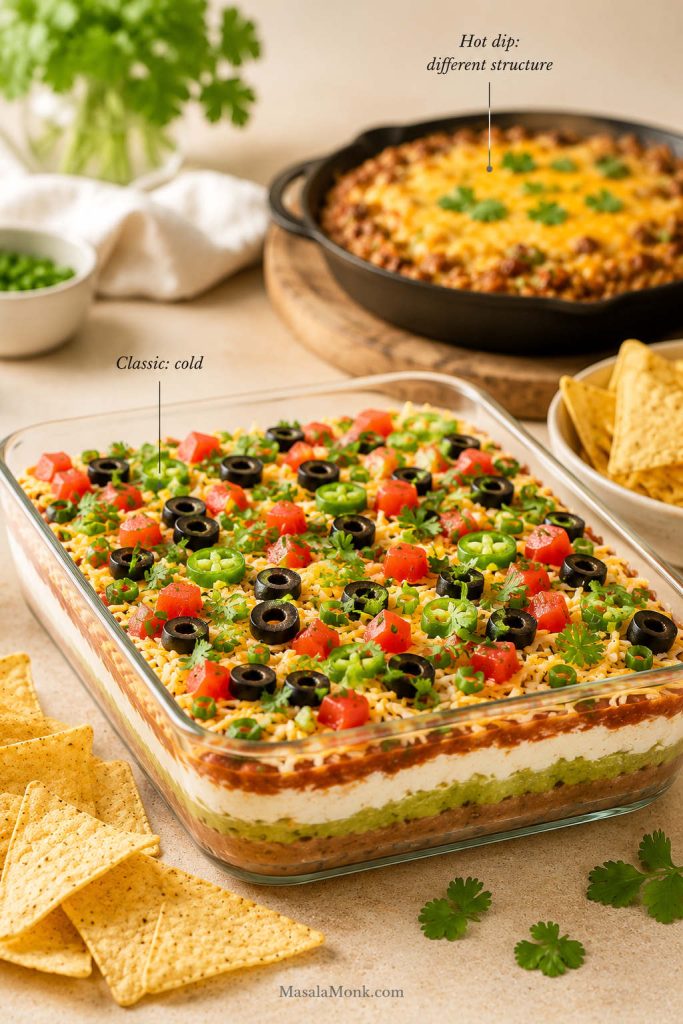
Is 7 Layer Dip Served Hot or Cold?

The classic version is served cold or lightly chilled. Beans, guacamole, sour cream, salsa, cheese, and toppings are layered into a no-bake dip and served with tortilla chips. That cold, creamy, crunchy contrast is part of why it works so well as a shared appetizer.

If you want a hot dip, use a baked taco dip structure instead. Warm versions usually need a different base, especially if you add ground beef, melty cheese, or more cream cheese. For this dish, keep it cold and focus on clean layers, managed moisture, and sturdy chips.

Cold 7 layer dip in a clear glass dish compared with a warm skillet taco dip in the background, with labels for classic cold and hot dip different structure.
Classic 7 layer dip is served cold or lightly chilled, while hot taco dip needs a different structure with warm fillings and melted cheese.

For a game-day spread, keep this dip cold and pair it with something hot and crisp, like air fryer chicken wings. The contrast works well: cool creamy layers, crunchy chips, and hot wings that bring the heat.

What to Serve with 7 Layer Dip

Best Chips and Dippers

Sturdy tortilla chips are the best choice because they can handle the bean layer without breaking. Scoop-style chips are especially useful because they pick up more of the layers at once. Thin restaurant-style chips taste great, but they can snap if the dip is very cold or the beans were not softened before spreading.

For a full 9×13 dish, plan on one 10–13 oz / 280–370 g bag of sturdy tortilla chips for every 6 to 8 people, and more if this is one of the main snacks on the table. Because every scoop tastes a little different — creamy, salty, tangy, fresh, and crunchy all at once — it usually disappears in uneven corners first, with everyone going back for the bite that has the most cheese, salsa, and avocado.

For a party where this is one of several appetizers, plan about ⅓ to ½ cup dip per person. Once it becomes the main snack on the table, expect people to eat more because every scoop tastes a little different.

Party Appetizer Pairings

Party appetizer spread with 7 layer dip, tortilla chips, sliced vegetables, small plates, napkins, and a warm appetizer in the background.
Sturdy tortilla chips are the main dipper, while crisp vegetables and one warm appetizer can round out the party table without crowding the dip.

You can also serve 7 layer dip with mini tostadas, pita chips, crunchy lettuce cups, bell pepper strips, cucumber rounds, celery sticks, or carrot sticks. For a bigger appetizer spread, it fits naturally next to creamy favorites like buffalo chicken dip and spinach dip.

For something warm and crisp beside the cold dip, a tray of potato appetizers works well with the same chips-and-dips mood: salty, crunchy, easy to share, and friendly for a mixed crowd. Deciding between a cold layered dip and a warm baked version? See hot vs cold 7 layer dip.

Chip tip: If the dip is very cold from the refrigerator, let it sit for 10 minutes before serving. The layers will still be chilled, but the beans will be easier to scoop.

7 Layer Dip Variations

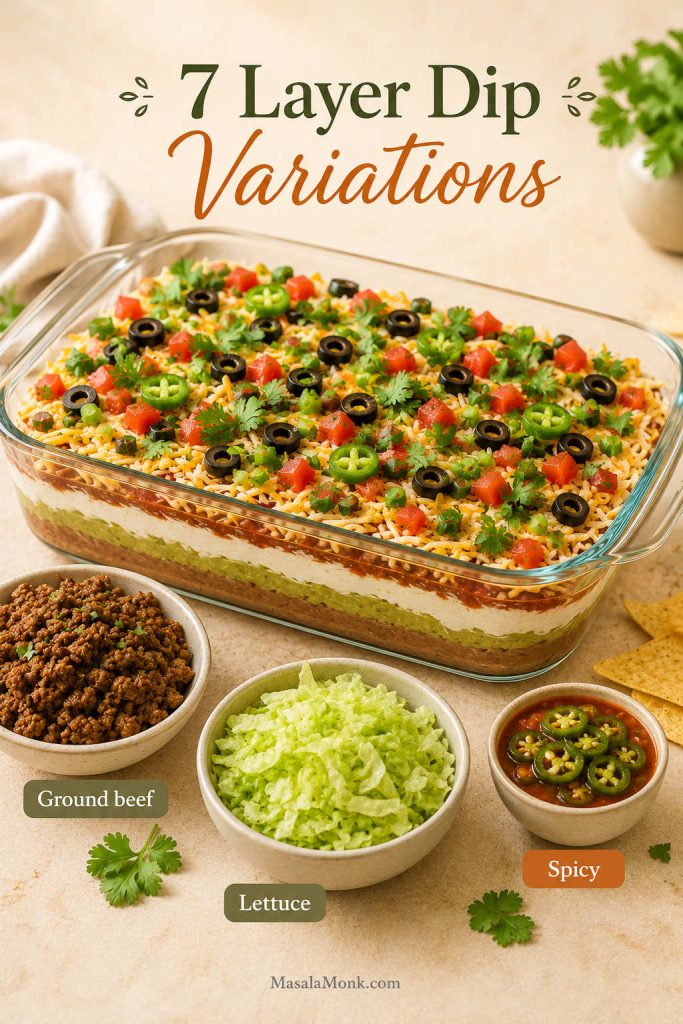
This is where 7 layer dip gets personal. Some people want olives, some want no olives, some want lettuce, some want ground beef, and some want the classic cold layers exactly as they are. Use the structure here as the base, then adjust the toppings without losing the clean scoop.

7 layer dip variation scene with a main dip and bowls of ground beef, shredded lettuce, and spicy jalapeño salsa.
Once the base structure is solid, you can add ground beef, lettuce, or jalapeño heat without losing the layered scoop.

7 Layer Dip with Ground Beef

For a heartier taco-night version, add cooked, well-drained, cooled taco-seasoned ground beef above the bean layer. Do not add hot beef to a cold dip because it can loosen the sour cream and avocado. Keeping the beef cooled and well-drained gives you taco flavor without making the layers greasy or soupy.

7 Layer Dip with Cream Cheese

This is the richer party version: beat 4 oz / 113 g softened cream cheese into the sour cream before adding taco seasoning. It makes the creamy layer thicker and more stable, but keep the amount modest so the dip still tastes fresh rather than heavy.

7 Layer Dip with Lettuce

Lettuce only belongs in this dip when it is heading to the table soon. It adds taco-salad crunch, but it wilts quickly once it sits against salsa and sour cream. Add it near the top and serve the dish the same day.

Spicy 7 Layer Dip

To add heat without making the dip watery, use hot salsa sparingly, mix diced jalapeño into the avocado, swap in pepper jack cheese, or finish with pickled jalapeños. For another creamy-spicy bite on the side, these baked jalapeño poppers fit the same party mood.

Vegetarian 7 Layer Dip

This recipe is vegetarian as written if your refried beans are vegetarian. Some canned refried beans contain lard, so check the label if that matters for your guests. Black refried beans or pinto refried beans both work well.

Lighter 7 Layer Dip

For a lighter version, use Greek yogurt in place of some or all of the sour cream, use a little less cheese, and add more fresh toppings. Keep the bean and avocado layers flavorful so the dip still tastes satisfying instead of like a reduced version of the original.

Troubleshooting 7 Layer Dip

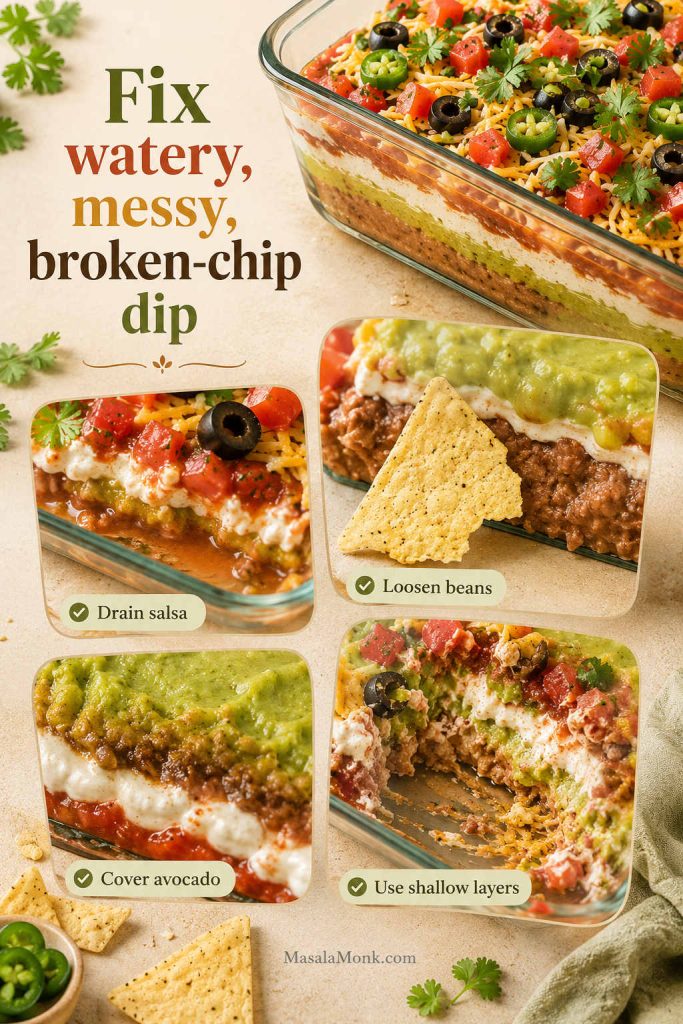
If a layered dip goes wrong, it usually shows up fast: a watery edge, a broken chip, a smeared top, or one scoop that pulls half the dish with it. However, most of these are not disasters. They are small texture issues you can prevent before the dish reaches the table.

Troubleshooting board for 7 layer dip showing watery salsa, a broken chip, browning avocado, messy layers, and fix labels for draining salsa, loosening beans, covering avocado, and using shallow layers.
When 7 layer dip turns messy, the cause is usually excess liquid, stiff beans, exposed avocado, or layers built too deep.

Moisture and Texture Fixes

Problem Why it happened How to fix it
The dip is watery Salsa, pico, tomatoes, or lettuce released too much liquid Drain salsa and pico, seed juicy tomatoes, and add delicate toppings closer to serving
The beans are too stiff Refried beans were spread straight from the can or chilled too hard Mix beans with salsa, lime juice, or a spoonful of sour cream until scoopable
Chips keep breaking The dip is too dense, too cold, or served in a deep dish Loosen the beans slightly, use a shallower dish, and serve with sturdy chips
Every scoop destroys the layers Layers are too thick, the dish is too deep, or the dip is too cold Use a 9×13 dish, spread thinner even layers, and let the dip sit 10 minutes before serving
The guacamole is browning The avocado layer had too much air exposure Use lime juice, cover the avocado with sour cream, and press plastic wrap close to the surface when chilling

Flavor and Serving Fixes

Problem Why it happened How to fix it
The layers look messy Each layer was spread too aggressively from one spot Dollop each soft layer across the dish first, then spread gently with an offset spatula or spoon
The dip tastes flat The beans or avocado were not seasoned enough Season the bean layer and avocado layer separately before assembly
The top looks dull after chilling Fresh herbs and green onions sat too long in the fridge Add cilantro, green onions, and extra jalapeños just before serving
The dip feels too salty Taco seasoning, cheese, olives, and chips all added salt Use less taco seasoning next time and balance with more avocado, sour cream, or fresh tomato

How to Store Leftover 7 Layer Dip

Cover leftovers from this 7 layer dip recipe tightly and refrigerate them as soon as the party is over. The dip is best within 1 to 2 days. The flavor will still be good the next day, but the layers may soften, the salsa may bleed into the creamy layers, and the avocado may darken slightly.

Do not freeze it. Sour cream, avocado, salsa, and fresh toppings do not thaw cleanly, so the texture will turn watery and grainy. Instead, if the leftovers look messy but still smell fresh and have been stored safely, scoop them into tacos, burrito bowls, quesadillas, or nachos rather than trying to serve them as a neat layered dip again.

Because this dip contains dairy and avocado, keep it chilled until serving and do not let it sit out for hours. The FDA recommends refrigerating perishable foods within 2 hours, or within 1 hour when the temperature is above 90°F / 32°C. A refrigerator should be kept at 40°F / 4°C or below. You can read the FDA’s safe food handling guidance here: Safe Food Handling.

Storage tip: For a long game day or gathering, serve a smaller portion first and keep the rest covered in the refrigerator for refills.

FAQs About 7 Layer Dip

What are the seven layers in 7 layer dip?

A classic version usually has refried beans, guacamole, sour cream, salsa, cheese, tomatoes, and toppings such as olives, green onions, jalapeños, or cilantro. The toppings can vary, but the best versions balance creamy, fresh, salty, and crunchy layers.

Which layer goes first?

Start with refried beans because they are the heaviest layer and create the base. Loosen and season them first, then spread them all the way to the corners so every scoop has structure.

What is the best layer order?

For most gatherings, use beans, guacamole, taco-seasoned sour cream, drained salsa or pico, cheese, tomatoes, and toppings. That order keeps the base sturdy, protects the avocado, and controls extra liquid. For the full explanation, see the best layer order section.

How many people does a 9×13 dish serve?

A 9×13 dish serves about 12 to 16 people as an appetizer. If it is one of several snacks, it can stretch further. If it is the main dip on the table, expect larger servings.

How much 7 layer dip should I plan per person?

For a party with several appetizers, plan about ⅓ to ½ cup dip per person. If this is the main snack with chips, plan more because people tend to come back for extra scoops.

How far ahead should I make it?

For guests, make this 7 layer dip recipe 30 minutes to 6 hours before serving. You can prep most components one day ahead, but full overnight assembly is not ideal because salsa can release liquid and avocado can darken. For timing details, see the make-ahead section.

Why did my dip get watery?

Usually, the culprit is loose salsa, pico de gallo, juicy tomatoes, or lettuce. Drain salsa before layering, use Roma tomatoes, seed or blot juicy tomatoes, and add delicate toppings closer to serving. For the full fix, see how to keep 7 layer dip from getting watery.

What salsa is best for 7 layer dip?

Thick, chunky salsa or well-drained pico de gallo works best. Thin restaurant-style salsa can taste good, but it should be strained first so it does not leak into the sour cream layer.

Can I use store-bought guacamole?

Yes. Store-bought guacamole is fine for a faster version. Choose a thick guacamole, taste it first, and add lime juice, cilantro, or salt if it needs more brightness.

Is it supposed to be hot or cold?

Serve it cold or lightly chilled. Hot taco dip is a separate style and usually needs a different structure with cooked meat, melted cheese, or a baked base.

Should lettuce go in it?

Use lettuce only when serving the dip soon after assembly. It adds crunch, but it wilts quickly once it sits against salsa and sour cream.

Do I need taco seasoning?

Taco seasoning gives the sour cream layer more flavor, and a packet works well. Start with less than the full packet if your chips, cheese, salsa, and olives are already salty, then add more to taste.

What can I use instead of sour cream?

Plain Greek yogurt is the easiest substitute. It tastes tangier and slightly lighter, but it works well with taco seasoning. You can also use half Greek yogurt and half sour cream.

What chips are best?

Sturdy tortilla chips or scoop-style chips are best because they can cut through the bean layer without snapping. If the dip has been refrigerated for several hours, let it sit for about 10 minutes so the beans soften slightly before serving. For more serving ideas, see what to serve with 7 layer dip.

How long can it sit out?

Do not leave it out for more than 2 hours, or more than 1 hour in hot weather above 90°F / 32°C. For long gatherings, set out a smaller amount and keep the rest refrigerated.

What is the difference between 7 layer dip and taco dip?

7 layer dip is a type of taco dip with distinct visible layers. Taco dip can be simpler, creamier, baked, meatier, or mixed together rather than layered. In everyday cooking, the names often overlap.

Is it the same as Mexican layer dip?

They are usually very similar. Mexican layer dip is a broader name that may include fewer or more than seven layers, while 7 layer dip specifically suggests a seven-part layered appetizer with beans, creamy layers, salsa, cheese, and toppings.

Final Tips for the Best 7 Layer Dip

The best 7 layer dip recipe is not complicated. It just needs care in the places that matter: seasoned beans, drained salsa, protected avocado, a 9×13 dish for a crowd, sturdy chips for scooping, and enough fresh toppings to make the dish look bright and generous.

When those pieces are in place, the dip does exactly what a great party appetizer should do. It looks colorful when it hits the table, scoops cleanly through the first rush, tastes creamy and fresh in the same bite, and keeps people coming back long after they said they were done snacking.

Are you team olives, team no olives, team lettuce, team ground beef, or classic cold layers only? Tell me which version disappears fastest at your table.

Final serving of 7 layer dip in a clear 9x13 dish with one corner scooped, tortilla chips around the dish, and colorful toppings still visible.
When the layers are built well, the dip can still look colorful, inviting, and easy to scoop after the first rush of chips.

Back to top

Posted on Leave a comment

Battered Fries Recipe

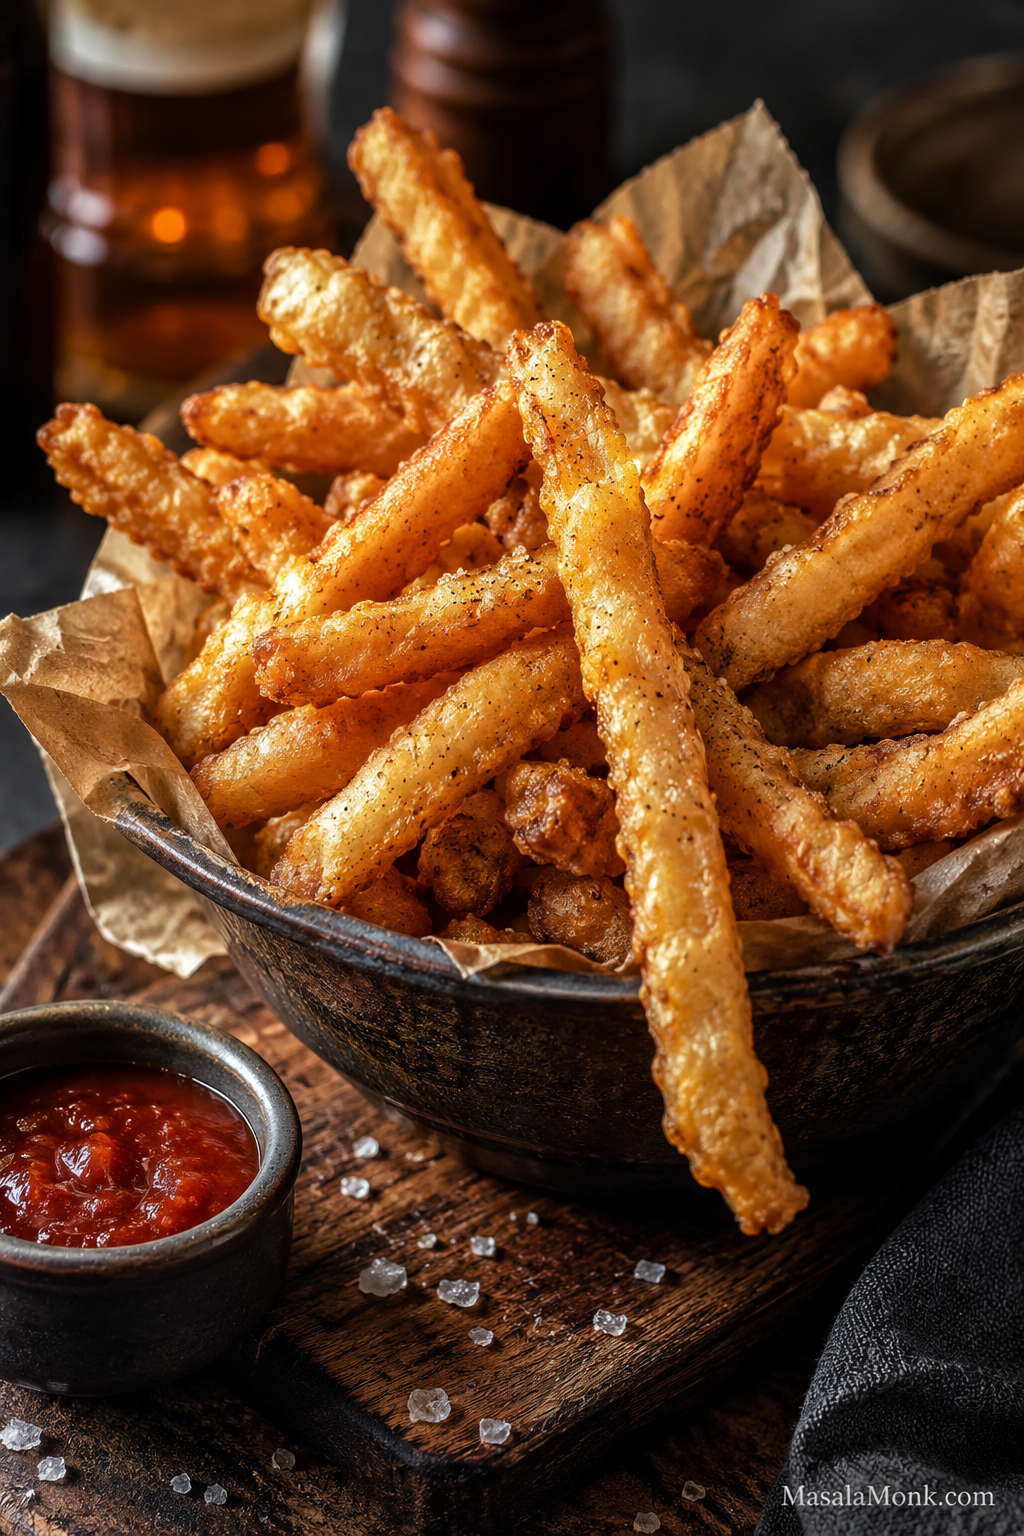
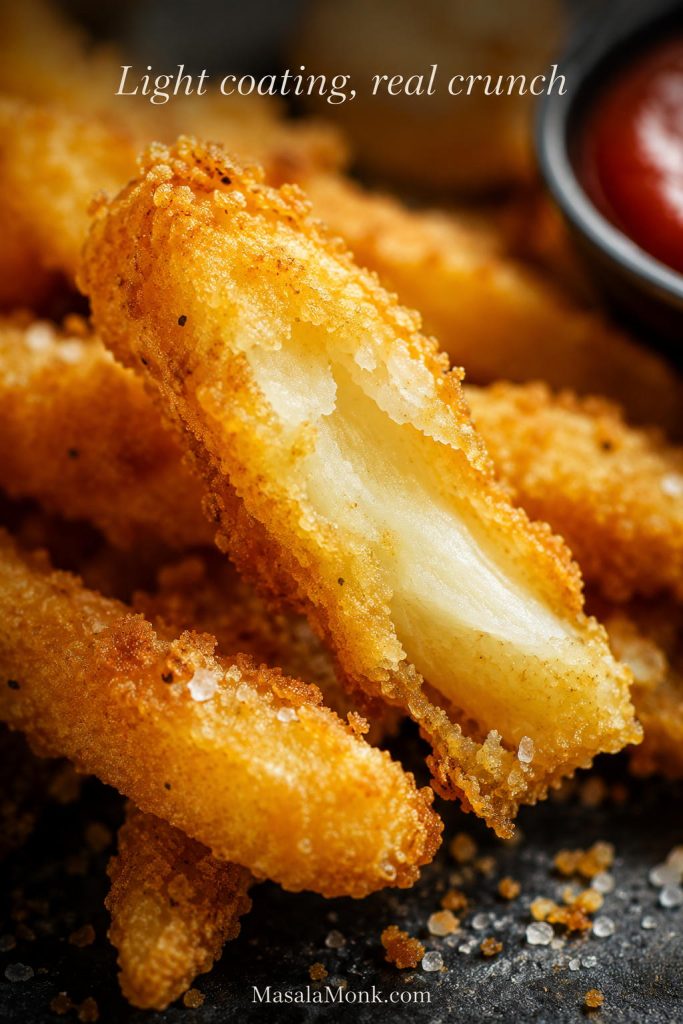
Golden battered fries in a bowl with a craggy crisp coating and dipping sauce on the side.

This battered fries recipe gives you golden, craggy fries with a crisp seasoned coating and fluffy potato centers. The batter clings lightly to each fry, so you get real crunch without a thick, cakey, doughy shell.

Depending on where you live, you may know them as battered fries, battered french fries, batter-dipped fries, or battered chips. This battered fries recipe starts with a no-beer batter, then gives you a pub-style beer batter option, thicker battered chips, air fryer notes, frozen-fries tips, exact frying temperatures, and fixes for soggy fries or batter that falls off.

The goal here is not a heavy potato fritter. These fries should still taste like proper fries first: hot, fluffy, salty, and potato-forward, with just enough seasoned coating to make the outside extra crisp. Once you understand the batter thickness and oil temperature, the recipe is much easier than it looks.

Close-up of battered fries showing a crisp golden coating and a fluffy potato center.
Aim for a crust like this: thin, craggy, and crisp, because a heavy shell can make battered fries taste more doughy than potato-rich.

Quick Answer: How to Make Battered Fries

To make battered fries, cut starchy potatoes into fries, soak them in cold water, dry them very well, coat them in a light seasoned batter, and fry until golden. For the best texture, first-fry the potatoes at 325°F / 165°C until pale and partly cooked, then dip them in batter and fry again at 375°F / 190°C until crisp.

The batter should be thin enough to drip slowly but thick enough to cling. A mix of flour, cornstarch or potato starch, baking powder, seasoning, and ice-cold sparkling water gives you crisp battered fries without beer. For beer battered fries, use cold lager or pilsner instead of sparkling water.

Serve them as soon as possible after frying. Battered fries lose crunch when they sit covered, stacked, or trapped in steam.

Best texture shortcut: dry the potatoes thoroughly, dust them lightly with flour, cornstarch, or potato starch before dipping, and fry in small batches so the oil stays hot.

If battered fries have turned soggy or the coating has slipped off before, do not worry. The drying, dusting, and double-fry steps below are there to fix exactly those problems.

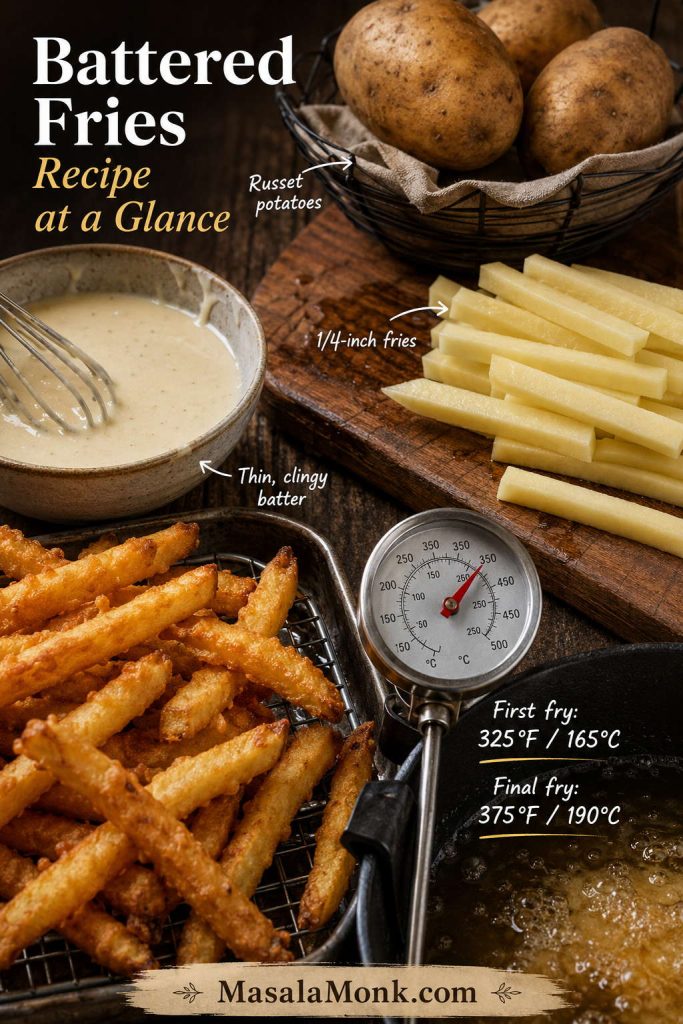
Battered Fries Recipe at a Glance

Potato choice Russet potatoes for battered fries; Maris Piper or King Edward for thicker battered chips.
Cut size ¼-inch fries for crisp battered french fries; ½-inch pieces for battered chips.
Batter texture Thin enough to drip slowly, thick enough to cling lightly.
Main liquid Ice-cold sparkling water, seltzer, or club soda for no-beer battered fries; cold lager or pilsner for beer battered fries.
Frying method For this battered fries recipe, first fry at 325°F / 165°C, then batter and final fry at 375°F / 190°C.
Success tip Dry the potatoes very well before battering.
Battered fries guide showing russet potatoes, quarter-inch fries, thin batter, and first and final fry temperatures.
If you want the quick version first, remember the four anchors of a good battered fries recipe: starchy potatoes, thin cuts, cold batter, and two controlled fry temperatures.
Ready to cook? Go straight to the step-by-step method or the recipe card.

What Are Battered Fries?

Battered fries are french fries coated in a seasoned batter before frying. The coating fries into a crisp, rough shell around the potato, giving you more crunch and seasoning than regular fries.

They are sometimes called battered french fries, batter-dipped fries, coated fries, or battered chips. The exact name changes by region, but the idea is the same: potato inside, crisp coating outside, and plenty of surface texture for salt, vinegar, ketchup, aioli, ranch, or cheese sauce.

For the classic unbattered version, start with MasalaMonk’s crispy homemade French fries guide; once you want a rougher, crunchier coating, come back to this battered version.

Why This Battered Fries Recipe Works

The crispness comes from a few small choices working together. Starchy potatoes give you fluffy centers. Soaking removes excess surface starch. Drying helps the batter cling. Cornstarch or potato starch keeps the coating crisp, baking powder lightens it, and cold carbonation helps the batter fry up airy instead of heavy.

Most importantly, the double-fry method makes the biggest difference. The first fry cooks the potato through before the batter goes on, while the second fry crisps the coating quickly. As a result, the outside turns golden without leaving the center hard or undercooked.

Battered Fries vs Regular Fries

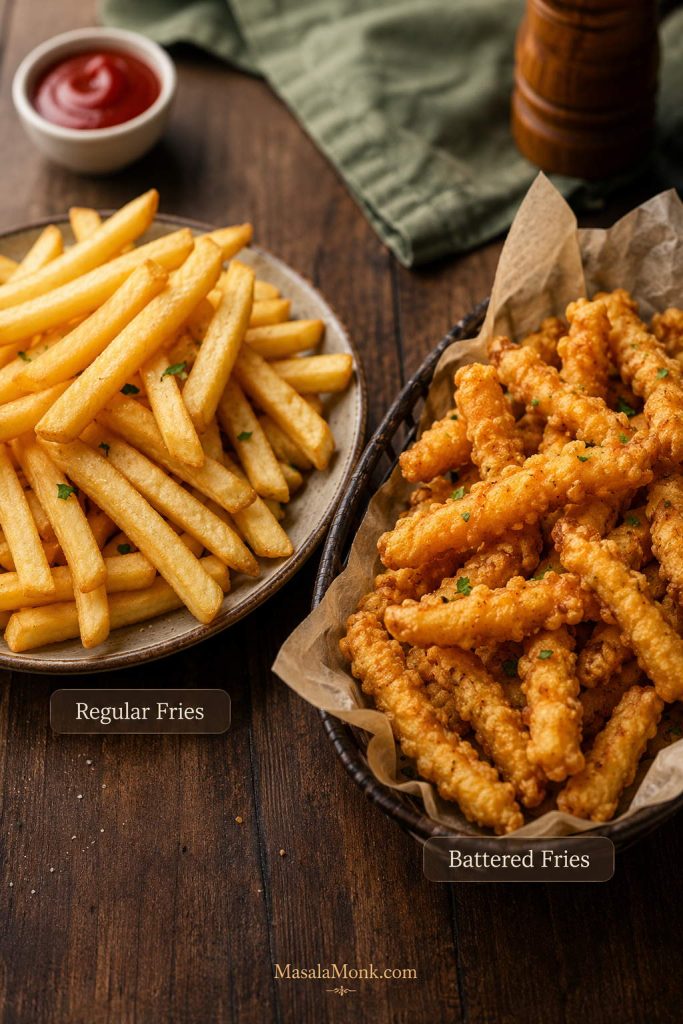
Regular fries are usually fried plain, sometimes after soaking, blanching, or double-frying. Battered fries get an extra coating before frying, so the outside is more rugged, crunchy, and seasoned.

Type Texture How It Is Made Best For
Regular fries Crisp outside, fluffy inside Fried without batter Classic fries, burgers, everyday sides
Battered fries Craggy, crisp, seasoned shell Dipped in seasoned batter before frying Pub-style fries, dipping sauces, fish and chips sides
Coated fries Lightly crisp, less batter-heavy Tossed in starch or dry coating Air fryer versions and lighter coatings
Beer battered fries Light, crisp, pub-style coating Made with cold beer in the batter Fish and chips, fried seafood, party snacks
Regular fries and battered fries shown side by side to compare smooth fries with craggy coated fries.
Regular fries give you a cleaner bite, whereas battered fries add a rougher seasoned surface that catches more salt, sauces, and spice.

You may also see breaded fries or coated fries. Those usually use a dry flour, starch, or breadcrumb-style coating rather than a loose wet batter. They can be easier for baking or air frying, but they do not give quite the same pub-style battered shell.

Battered Fries vs Battered Chips

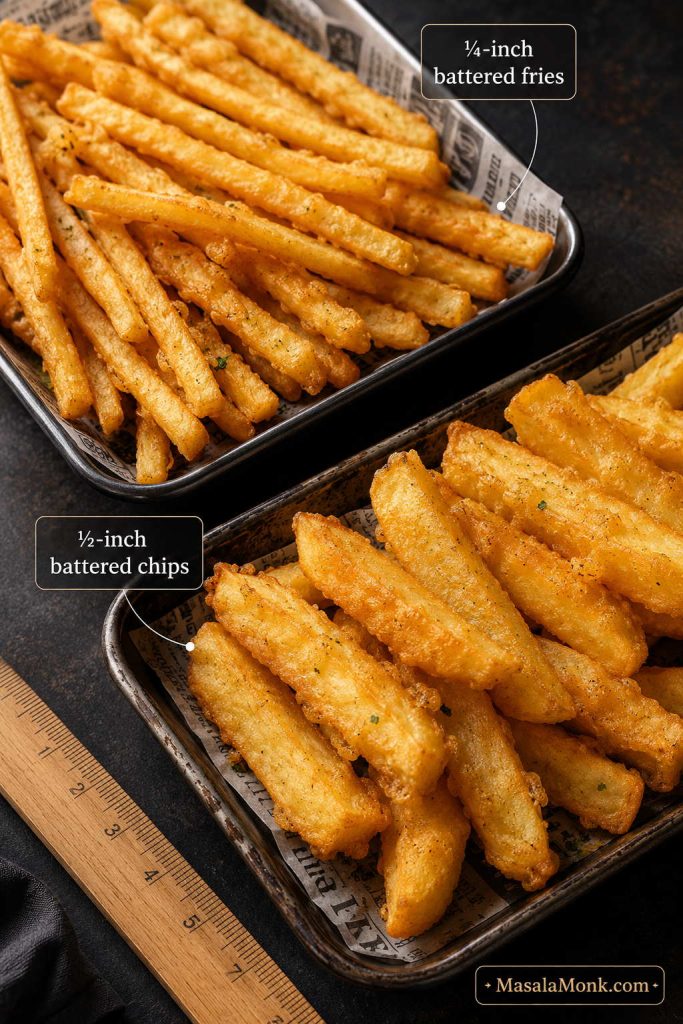
Battered fries and battered chips are close cousins. In the United States, battered fries usually means battered french fries. In the United Kingdom and some other places, chips often means thicker-cut fried potatoes, so battered chips are usually chunkier than American fries.

For thin or medium battered french fries, cut the potatoes about ¼ inch thick. For battered chips, cut them closer to ½ inch thick and cook the potato before battering, either by parboiling or first-frying. That way, the inside turns tender before the coating gets too dark.

Thin battered fries and thicker battered chips shown with cut-size labels.
Thin battered fries cook fast, but battered chips need a thicker-cut strategy, so the inside turns tender before the outside gets too dark.
Making thicker chips instead of fries? Jump to the battered chips method.

Ingredients for This Battered Fries Recipe

The main battered fries recipe uses a no-beer batter, so it works even if you do not want to cook with alcohol. A beer batter version is included below as an easy variation.

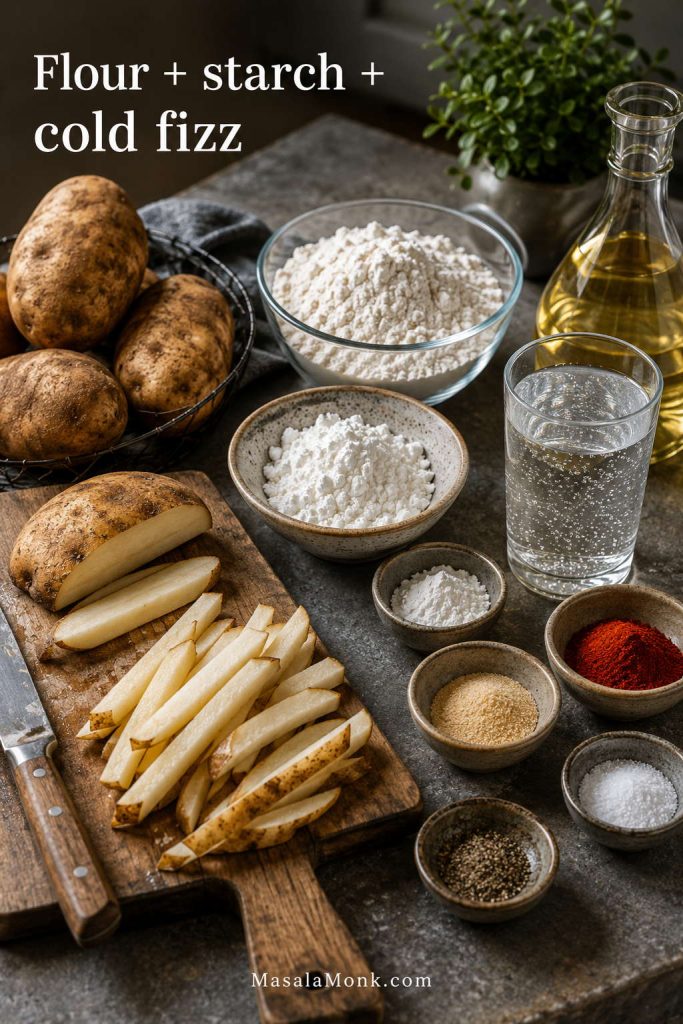
Ingredients for battered fries including potatoes, flour, starch, baking powder, seasonings, sparkling water, and oil.
Flour builds structure, starch sharpens the crunch, and cold fizz lightens the batter, so each ingredient has a clear job in the final texture.

Potatoes

  • 2 lb / 900g russet potatoes — best for fluffy centers and crisp edges.
  • Maris Piper or King Edward potatoes — good UK options for thicker battered chips.

Batter

  • 1 cup / 120g all-purpose flour — gives the batter structure.
  • ⅓ cup / 40g cornstarch or potato starch — helps the coating fry crisp instead of heavy. Potato starch gives a slightly more delicate, crackly finish; cornstarch is easier to find and still works well.
  • 1 tsp baking powder — lightens the batter.
  • 1 tsp fine salt — seasons the coating from the inside.
  • 1 tsp paprika — adds color and mild flavor.
  • ¾ tsp garlic powder — gives savory depth.
  • ½ tsp onion powder — rounds out the seasoning.
  • ¼ tsp black pepper — adds gentle heat.
  • ⅛–¼ tsp cayenne, optional — for a little kick.
  • ¾ cup / 180ml ice-cold sparkling water, seltzer, or club soda, plus 1–3 tbsp more as needed — keeps the batter light and crisp without beer.

Because some seasoning blends are already salty, reduce the fine salt in the batter slightly and season the finished fries to taste.

For Frying

  • Neutral oil for deep frying — vegetable, canola, sunflower, peanut, or another high-heat frying oil.
Why sparkling water? Cold carbonation gives the batter lift without beer. Sparkling water, seltzer, or club soda all work. For beer battered fries, use cold lager or pilsner in place of the water.
Got everything ready? Check the batter thickness guide before mixing, or head to the step-by-step method.

Best Potatoes for Battered Fries

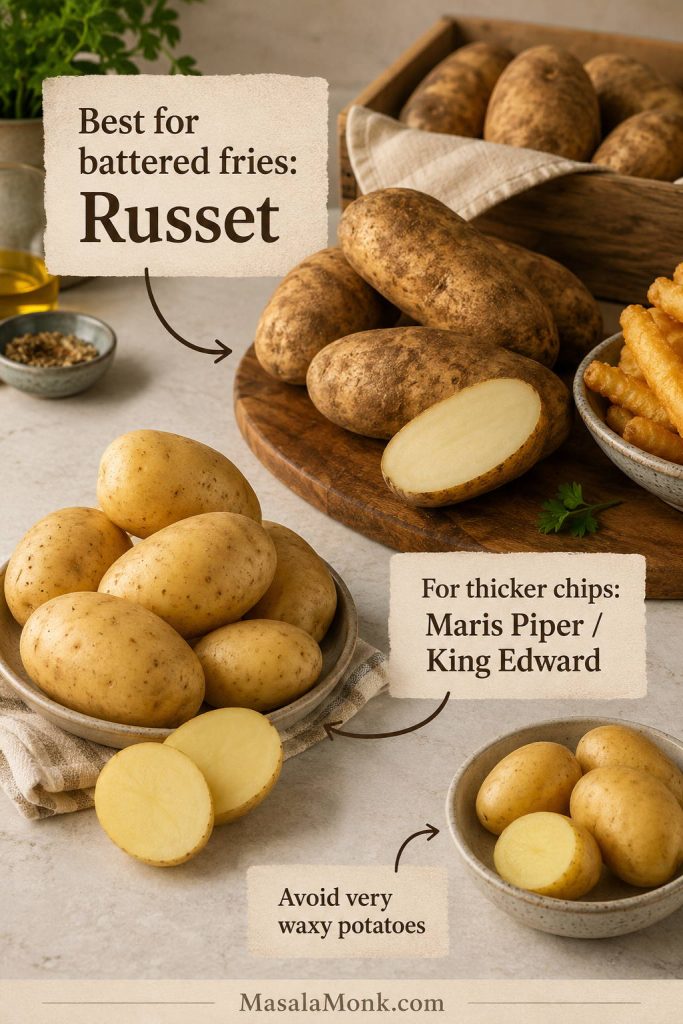
Starchy potatoes are best because they cook up fluffy inside and crisp well outside. In the US, use russet potatoes. For battered chips, especially UK-style chips, Maris Piper or King Edward potatoes are good choices.

Avoid very waxy potatoes if your goal is a fluffy center. Waxy potatoes hold their shape well, but they do not give the same classic fry texture.

For more potato-prep detail, the Idaho Potato Commission’s French fry guidance is a useful reference for russets, soaking, blanching, and batch size.

Potato guide showing russet potatoes for battered fries and Maris Piper or King Edward potatoes for thicker chips.
Russets work best for battered fries because their starchy texture stays fluffy, while Maris Piper or King Edward are especially useful for thicker battered chips.
Cut Best Use Texture
¼-inch fries Battered french fries Crisp coating, faster cooking, classic fry shape
⅜-inch fries Pub-style battered fries More potato inside, still crisp outside
½-inch chips Battered chips Thicker, softer center, best with parboiling or first-frying

Equipment You Need

You do not need restaurant equipment, but a few tools make battered fries much easier and safer.

  • Heavy-bottomed pot, Dutch oven, or deep fryer — choose something deep enough to leave several inches of headroom above the oil.
  • Oil or candy thermometer — the easiest way to keep the oil at the right temperature.
  • Large bowl — for soaking the potatoes.
  • Clean kitchen towels or paper towels — for drying the fries thoroughly.
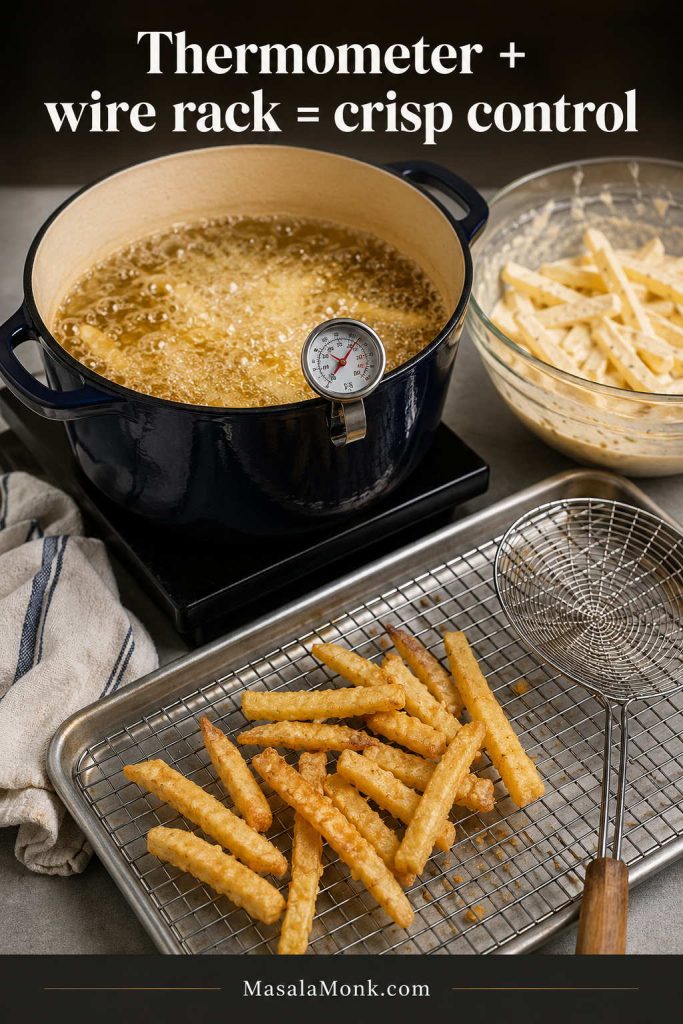
  • Wire rack over a sheet pan — better than piling hot fries on paper towels, which can trap steam.
  • Spider skimmer, slotted spoon, or tongs — for lowering and lifting fries safely.
Frying setup for battered fries with a deep pot, thermometer, wire rack, skimmer, towel, and batter bowl.
You do not need restaurant gear; instead, focus on a thermometer and wire rack, because they help control both oil temperature and steam.
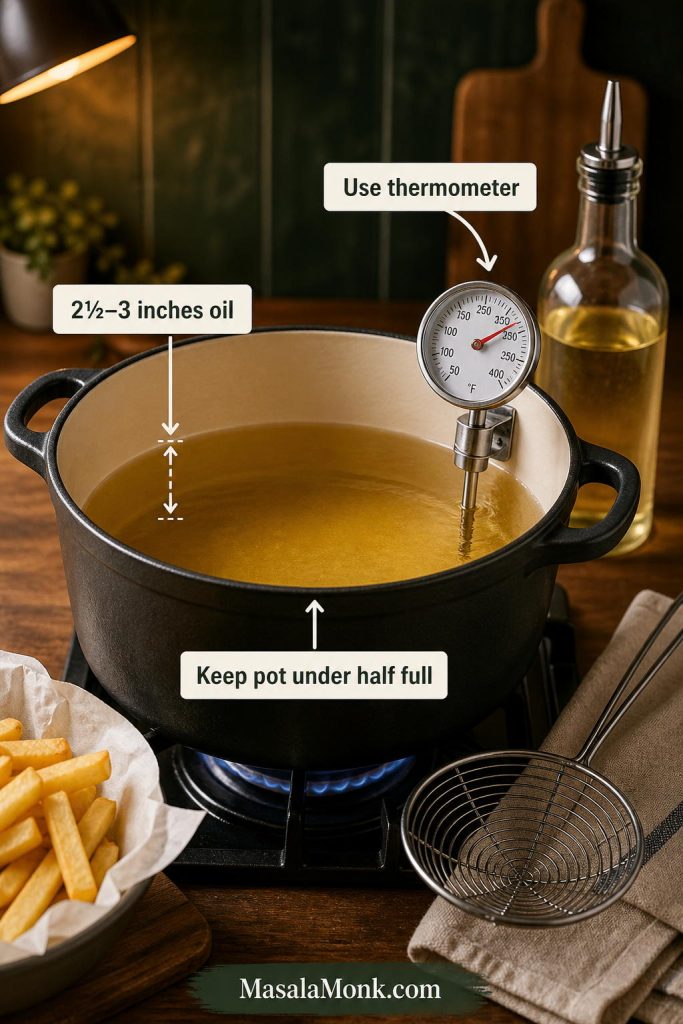
Deep-frying safety: never fill the pot more than halfway with oil. Add fries carefully, fry in small batches, and keep water away from hot oil. For more technical frying guidance, Oklahoma State University Extension explains why oil temperature, batch size, and recovery time matter during deep-fat frying.

Best Oil for Battered Fries

Use a neutral, high-heat oil such as vegetable, canola, sunflower, or peanut oil. You want enough oil for the fries to move freely, usually about 2½–3 inches in a deep, heavy pot, but the pot should never be more than halfway full.

Deep pot with frying oil, thermometer, and oil-depth labels for making battered fries safely.
Neutral oil works best, but the real secret is control: enough depth for even frying, yet enough empty space in the pot for safe bubbling.

Oil temperature matters more than the exact oil brand. If the oil is too cool, the fries absorb oil and turn greasy. If it is too hot, the coating browns before the potato inside is tender. A thermometer is the easiest way to stay in control.

As a practical rule, fry only enough potatoes to cover the surface of the oil loosely, with space between pieces. If the oil stops bubbling actively or drops far below the target temperature, the batch is too large.

The Best Batter Thickness for Fries

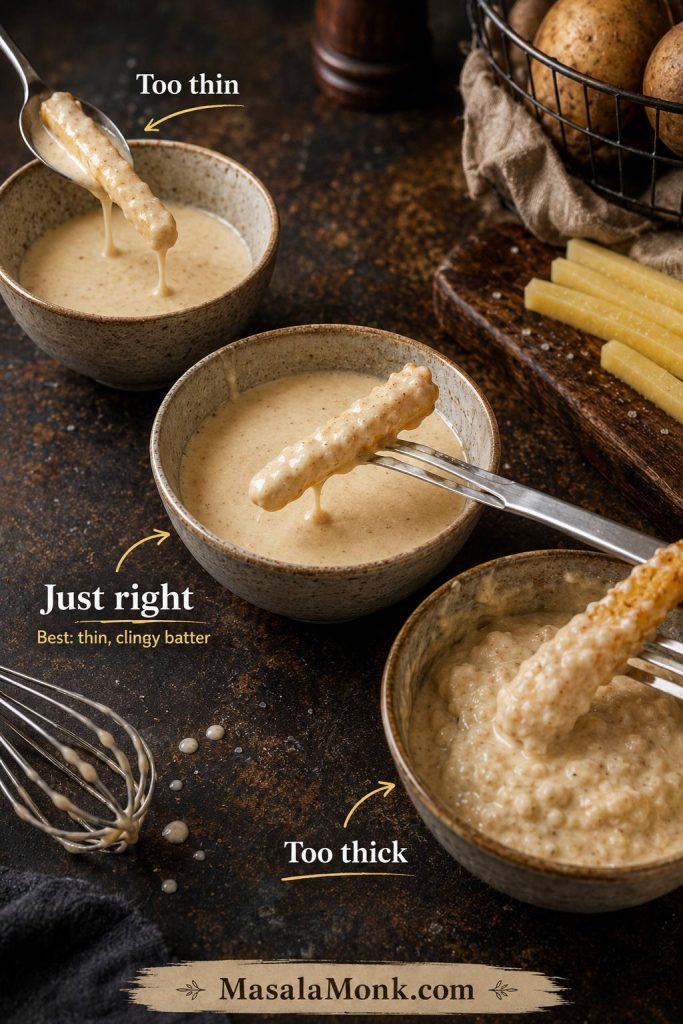
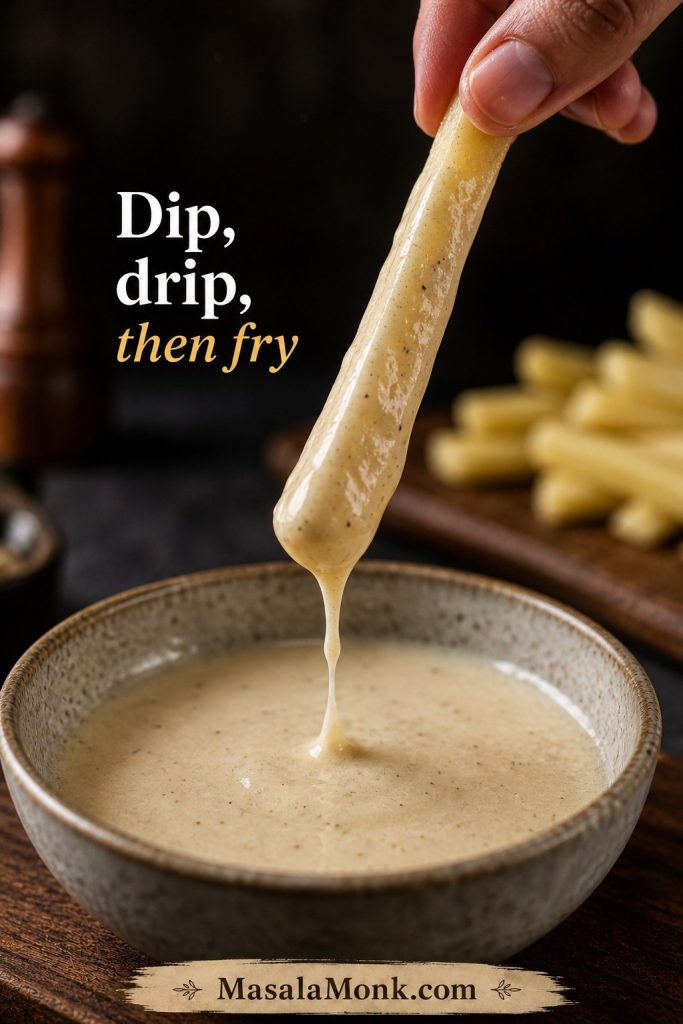
For this battered fries recipe, the batter should coat each fry in a thin layer, drip slowly, and still show the shape of the potato underneath. Think pourable gravy or thin pancake batter, not paste. If it runs off like water, it is too thin. However, if it sits on the fry in thick ridges, it is too heavy and can turn cakey.

Three bowls of batter showing too thin, just right, and too thick textures for battered fries.
Batter consistency changes everything: too thin slides off, too thick turns cakey, and the sweet spot drips slowly while still clinging.
Batter Texture What Happens How to Fix It
Too thin Runs off the fries and leaves bare spots Add flour 1 tbsp at a time
Just right Clings lightly and drips slowly Use immediately while cold
Too thick Turns cakey, clumpy, or doughy Add cold sparkling water, club soda, or beer 1 tbsp at a time
If your coating keeps sliding off, go to how to make batter stick or the troubleshooting table.

How to Make Batter Stick to Fries

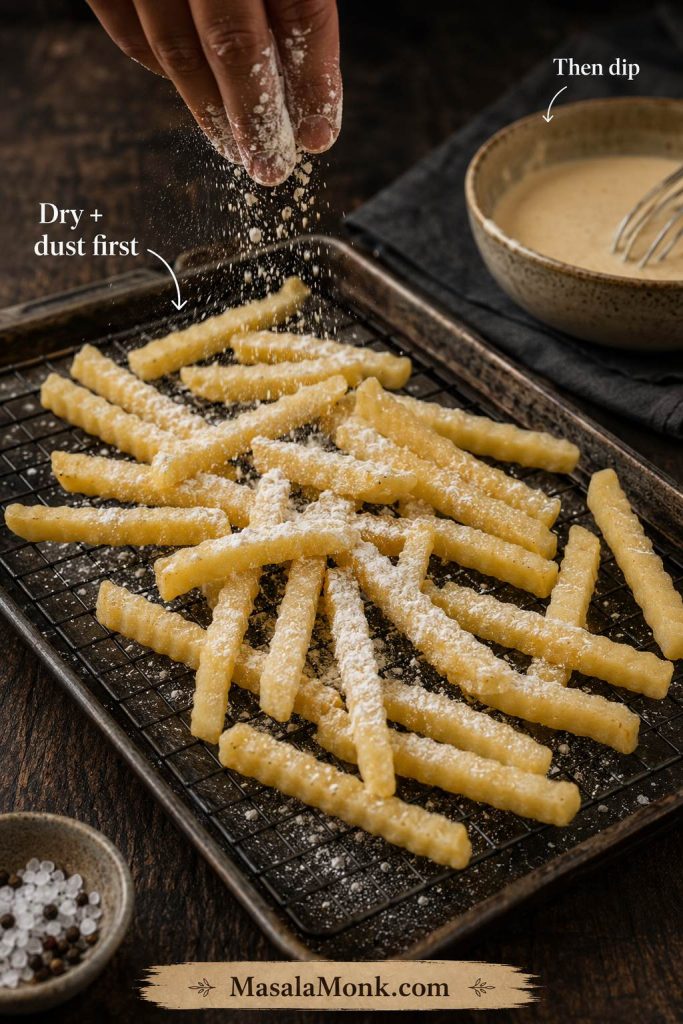
If the batter keeps sliding off, the answer is usually not to make it much thicker. In fact, batter that is too thick can turn heavy and slide off in clumps. The better approach is dry potatoes, a light dusting, and hot oil.

Fries being dusted with flour or starch before dipping into batter.
If batter keeps slipping off, dry the fries well and dust them lightly first, because grip matters more than a thicker batter does.
  • Dry the potatoes completely: surface moisture makes batter slip and oil splatter.
  • Use a light dusting first: a thin coat of flour, cornstarch, or potato starch gives the batter something to grip.
  • Keep the batter cold: cold batter fries up lighter and clings better.
  • Let excess batter drip off: too much batter creates clumps instead of a crisp shell.
  • Add fries one by one: this stops them from sticking together in the oil.
  • Keep the oil hot: if the oil is too cool, the coating absorbs oil before it sets.

How to Make This Battered Fries Recipe

The best method for this battered fries recipe is simple once you understand the order: soak, dry, first-fry, batter, final-fry. The first fry cooks the potato inside, while the second fry crisps the coating.

1. Cut and Soak the Potatoes

Peel the potatoes if you prefer a smoother fry, or leave the skins on for a more rustic texture. Cut into ¼-inch fries for battered french fries or thicker pieces for battered chips.

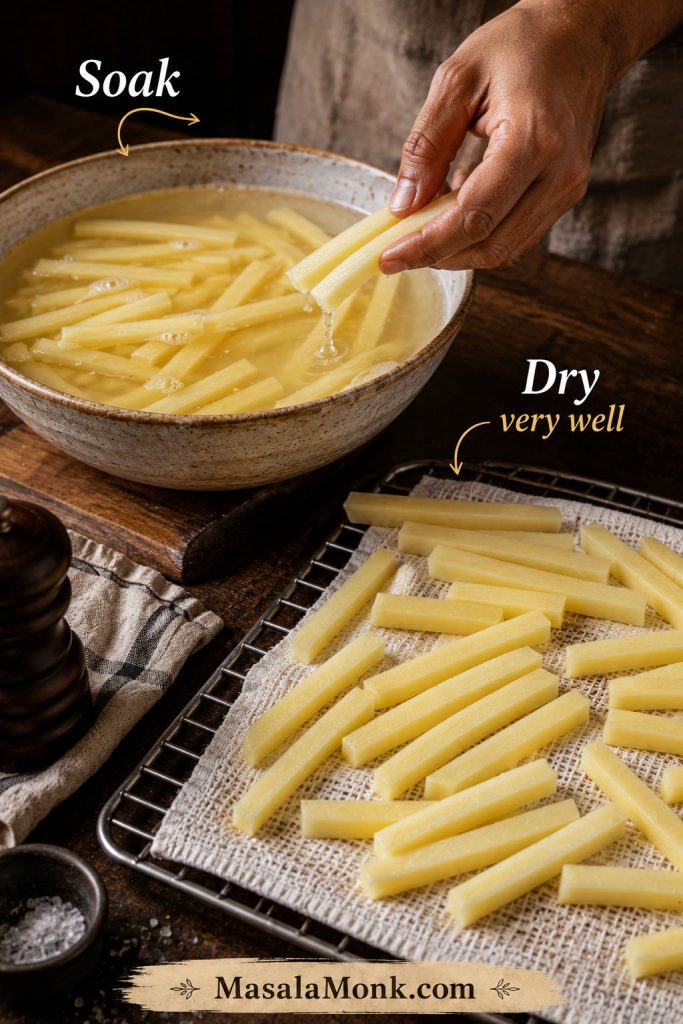
Place the cut potatoes in cold water for at least 30 minutes. For better texture, soak for 1–2 hours. Soaking helps remove excess surface starch, which can make fries brown unevenly or stick together. For a firmer fry, add 1 tbsp vinegar to the soaking water.

2. Dry the Fries Very Well

Drain the potatoes and spread them on clean kitchen towels. Pat them very dry. This step matters more than it looks: wet potatoes are one of the main reasons batter slips off, oil splatters, or fries turn soggy.

Cut potatoes soaking in water and drying on a towel before being battered and fried.
Soaking helps remove excess surface starch; however, drying is just as important, since wet fries splatter and resist a clean coating.

3. First-Fry the Potatoes

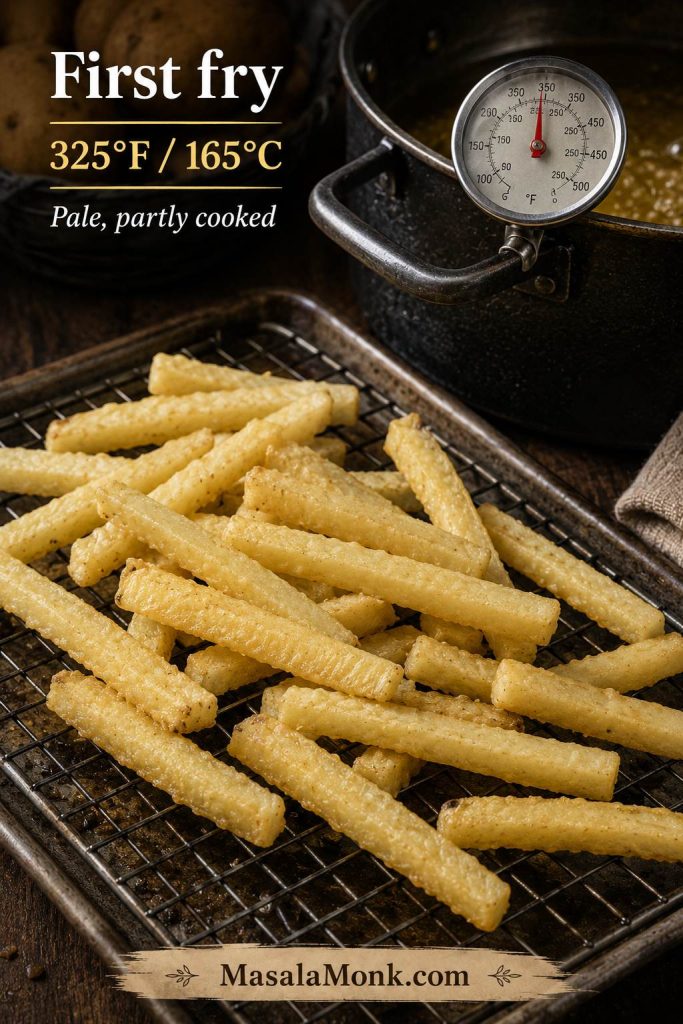
Heat oil in a heavy pot or deep fryer to 325°F / 165°C. Fry the dried potatoes in small batches for 4–5 minutes, just until they are pale and partly cooked. They should not be deeply browned yet.

Pale first-fried potatoes resting on a wire rack beside a pot and thermometer.
The first fry should leave the potatoes pale and partly cooked, so the second fry can focus on crisping the batter instead of finishing the center.

Transfer the first-fried potatoes to a wire rack. Do not pile them into a bowl, or they will steam and soften.

4. Mix the Batter

In a bowl, whisk together the flour, cornstarch or potato starch, baking powder, salt, paprika, garlic powder, onion powder, black pepper, and cayenne if using. Slowly whisk in the ice-cold sparkling water, seltzer, or club soda until the batter is smooth but still thin enough to drip slowly.

Do not overmix. A few tiny lumps are fine, and the batter should stay cold. Once the sparkling water, club soda, or beer is mixed in, the bubbles slowly fade, so mix the batter close to the final fry instead of letting it sit while the oil heats.

5. Dust, Dip, and Fry

Raise the oil temperature to 375°F / 190°C. Lightly dust the first-fried potatoes with flour, cornstarch, or potato starch. Dip a few fries into the batter, then hold them over the bowl or set them briefly on a wire rack so the excess batter can drip away. If you see a thick clump, smooth it lightly before the fry goes into the oil. Carefully lower the fries into the hot oil one by one.

A potato fry lifted from batter with excess batter dripping back into the bowl.
Let the extra batter drip back into the bowl for a moment, because a lighter coating fries crisper and tastes less heavy.

When you are unsure about the batter thickness, fry one test fry first. It is the easiest way to save the whole batch. A coating that slides off needs a slightly thicker batter or a more careful dusting. A heavy, bready coating means the batter needs another tablespoon of cold sparkling water, club soda, or beer.

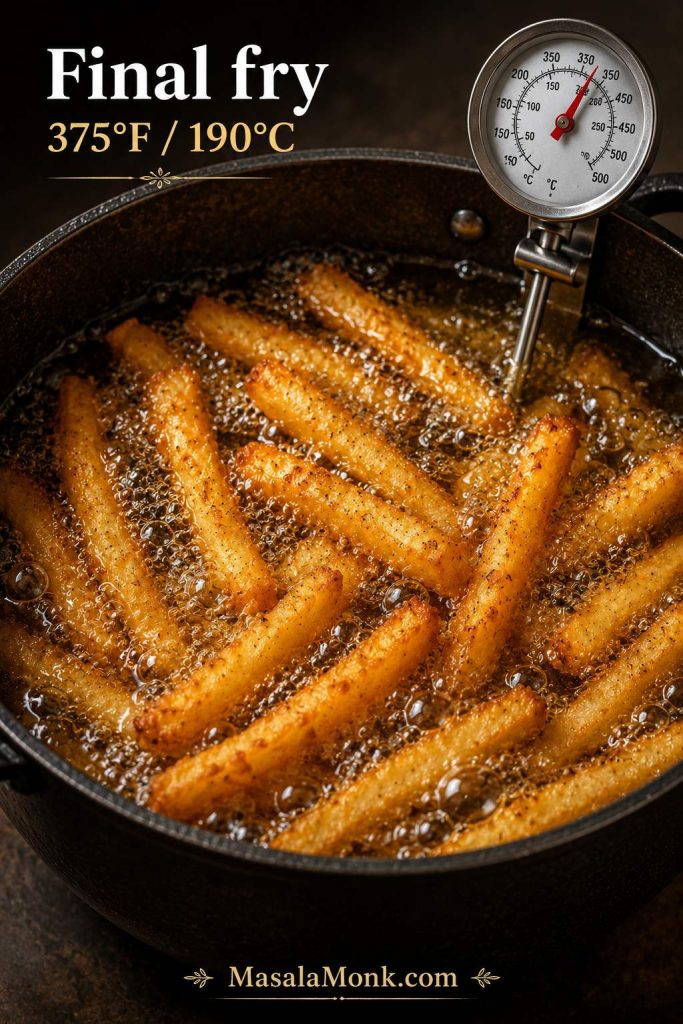
Fry in small batches for 2–4 minutes, until the coating is golden, crisp, and craggy. The bubbling should slow slightly, and the fries may float freely near the surface. Let the oil return to 375°F / 190°C between batches so the fries stay crisp instead of greasy.

Battered fries frying in bubbling hot oil with a thermometer showing final fry temperature.
During the final fry, small batches help the oil recover faster, and that usually means less grease and better crunch.

6. Season While Hot

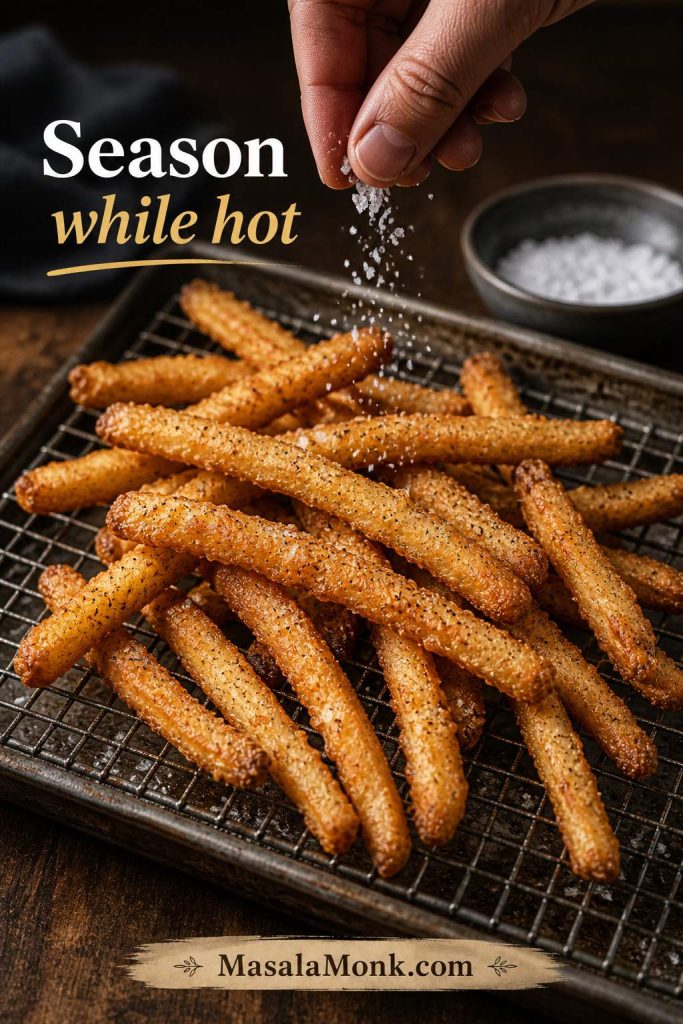
Move the battered fries to a wire rack and season immediately with salt. If you want flavored fries, add Cajun seasoning, garlic salt, smoked paprika salt, or chili-lime seasoning while the coating is still hot.

Freshly fried battered fries being salted on a wire rack while still hot.
Season the fries right away, because the hot craggy surface catches salt and spice far better than fries that have already cooled.
Want the shorter method? Go to the quick single-fry version. Want a pub-style version? Go to beer battered fries.

Quick Single-Fry Battered Fries

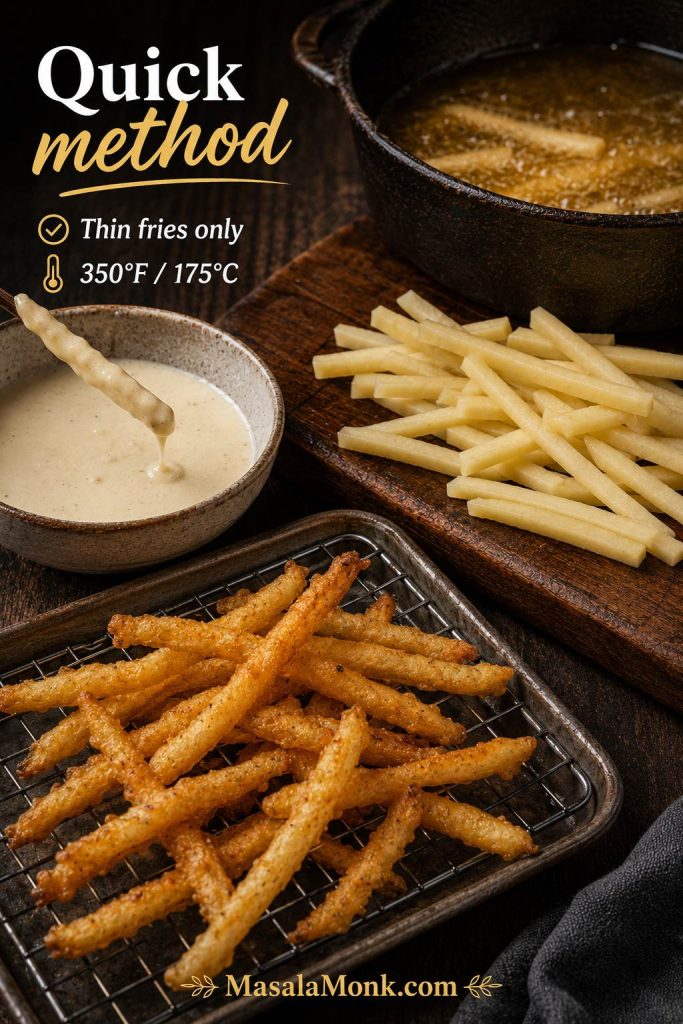
The double-fry method gives this battered fries recipe the crispest, most reliable result. However, when you want a faster batch, the single-fry method still works well as long as the potatoes are cut thin and dried thoroughly.

  1. Cut, soak, and dry the potatoes very well.
  2. Heat oil to 350°F / 175°C.
  3. Dip the raw dried fries into the batter in small handfuls.
  4. Let excess batter drip off.
  5. Fry for 7–10 minutes, turning occasionally, until golden and cooked through.
  6. Drain on a wire rack and season while hot.
Thin battered fries being made with a quick single-fry method at 350 degrees Fahrenheit.
The single-fry shortcut works best for thinner fries; for thicker cuts, the double-fry method is usually more reliable.

This method is easier, but the coating may brown before thicker fries are fully tender inside. For thicker battered chips or the crispiest battered french fries, use the double-fry method above.

Beer Battered Fries Variation

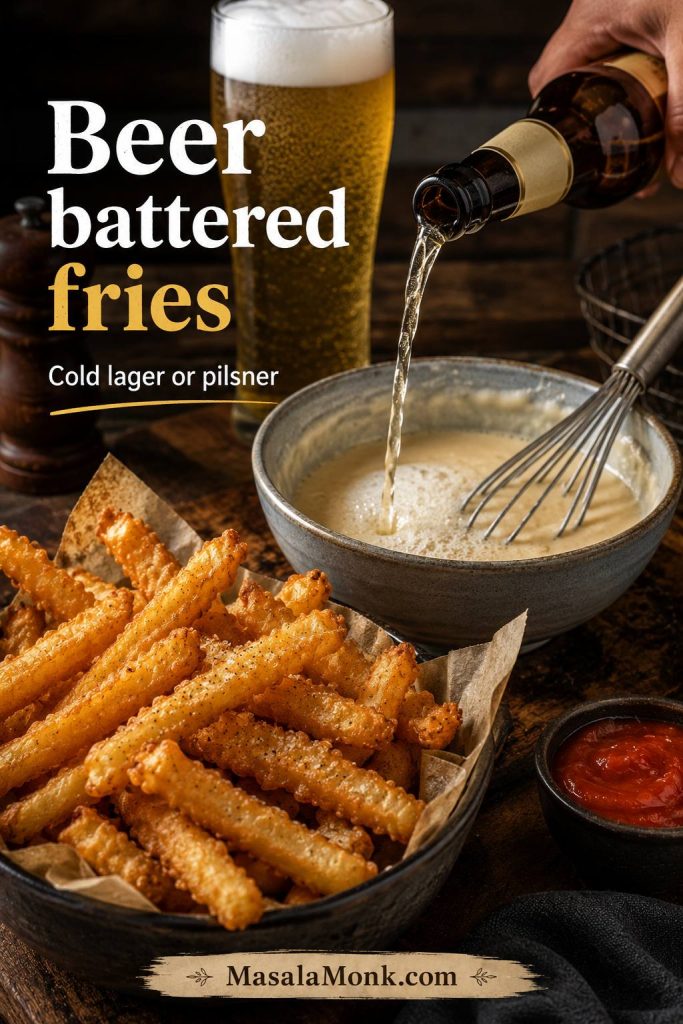
To turn this battered fries recipe into beer battered fries, replace the sparkling water with ¾ cup / 180ml ice-cold lager or pilsner. Then, add a little more beer, 1 tablespoon at a time, if the batter is too thick.

Beer being poured into batter with golden beer battered fries served nearby.
Beer battered fries get a pub-style edge from cold lager or pilsner, yet the batter still needs to stay thin and cold for the best finish.

Lager, pilsner, or light beer works best because the flavor stays clean and the carbonation helps the batter fry crisp. Very bitter IPAs, heavy stouts, and sweet flavored beers can overpower the potatoes, so use them only if you specifically want that flavor in the coating.

Beer batter tip: keep the beer cold and the coating thin. Warm beer or thick batter can make beer battered fries heavy instead of crisp.
Using beer? Follow the same recipe card, replacing the sparkling water with cold lager or pilsner.

No-Egg and Gluten-Free Battered Fries

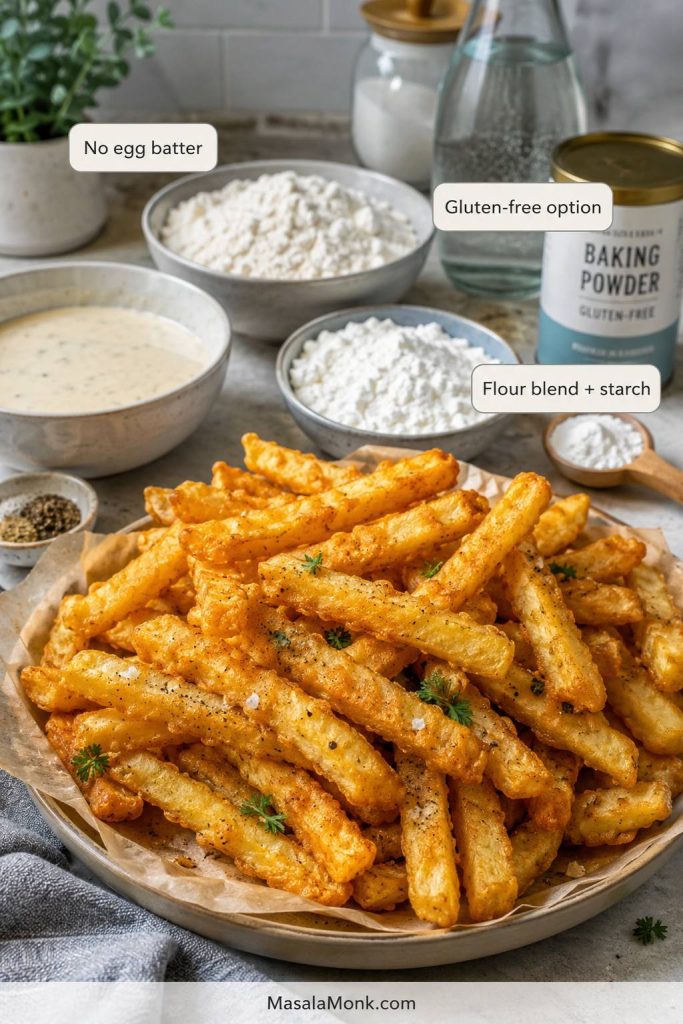
This battered fries recipe is already made without egg. The batter gets its lightness from baking powder and cold sparkling water instead.

Gluten-free and no-egg battered fries with flour blend, starch, baking powder, sparkling water, and finished fries.
This version proves that battered fries do not need egg, and with the right flour-starch balance, a gluten-free batter can still fry crisp.

For gluten-free battered fries, replace the all-purpose flour with a gluten-free all-purpose flour blend or use a mix of rice flour and cornstarch. Keep the batter thin and cold, and fry a small test piece first so you can adjust the thickness before coating the whole batch.

If you are cooking for someone who needs strict gluten-free food, also check the baking powder, seasonings, and any dipping sauces for gluten-containing additives or cross-contact warnings.

How to Make Battered Chips

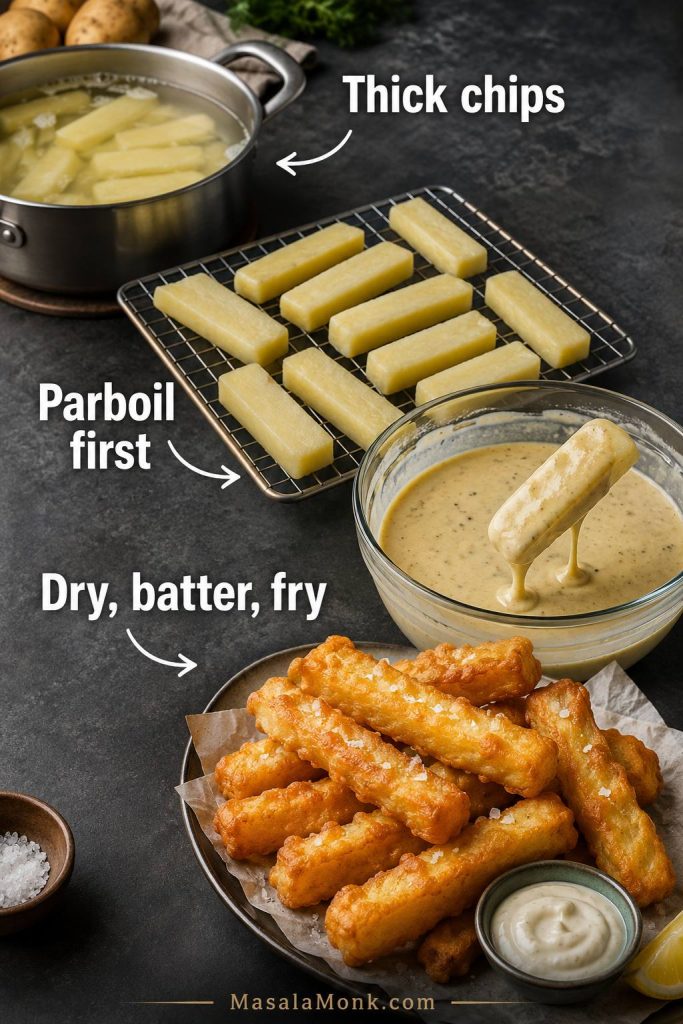
Battered chips are usually thicker than battered french fries, so they need a slightly different method. Use russet, Maris Piper, or King Edward potatoes and cut them about ½ inch thick.

  1. Cut the potatoes into thick chips.
  2. Parboil for 5–7 minutes, just until the edges begin to soften.
  3. Drain and dry on a wire rack until the surface moisture is gone.
  4. Dust lightly with flour, cornstarch, or potato starch.
  5. Dip in a slightly thicker batter.
  6. Fry at 180°C / 356°F for about 5–7 minutes, depending on thickness, until golden and crisp.
Thick battered chips shown with parboiling, drying, battering, and frying steps.
Because battered chips are thicker than battered french fries, parboiling first helps the potato soften before the coating turns deeply golden.

For a UK-style golden battered chips look, add a pinch of turmeric to the batter. Some regional orange chips use food coloring, but it is optional and not needed for a good crisp coating.

Lager gives battered chips a classic pub-style flavor, but sparkling water or club soda works if you want a no-beer version. Keep the batter slightly thicker than the battered-fries batter so it grips the larger chips, but do not make it paste-like.

Air Fryer Battered Fries: What Works

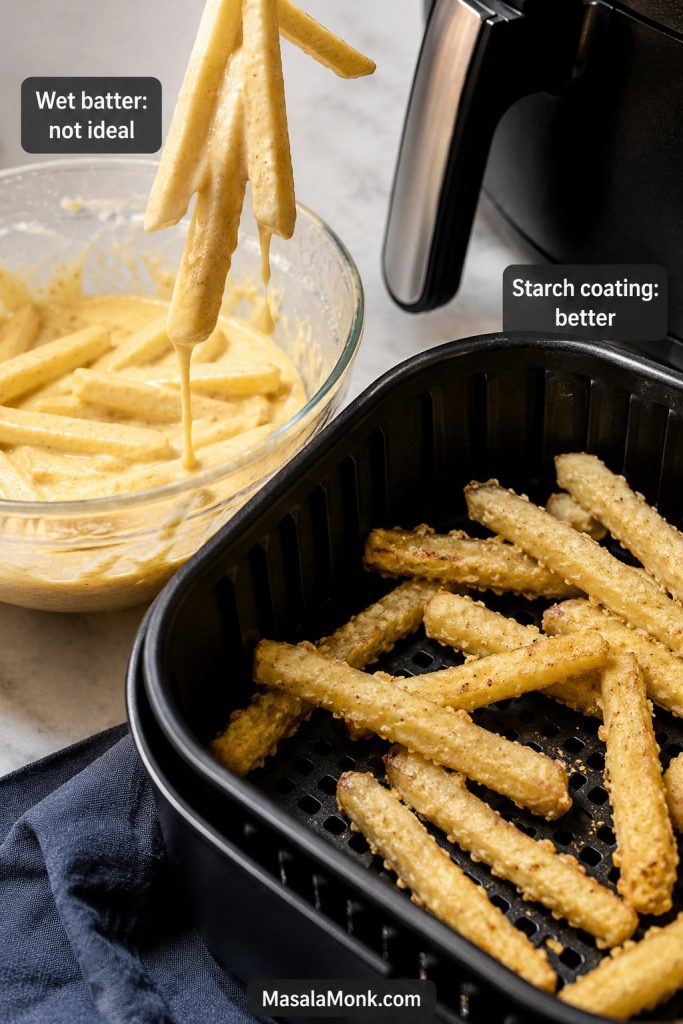
This battered fries recipe is best deep-fried because hot oil sets the wet batter immediately. In an air fryer, loose wet batter can drip before it crisps, which makes the fries patchy or messy.

So, if you came here hoping to pour wet batter over fries and air fry them, the honest answer is: it is not the best method. That does not mean you are out of options, though. You will get better results with a starch coating that behaves more like a crisp shell.

Wet battered fries compared with starch-coated fries in an air fryer basket.
Air fryer battered fries work better with a starch coating than a loose wet batter, so adjust the method rather than forcing the deep-fry version.

For air fryer battered fries, use a clingy starch coating instead of a loose batter. Toss the potatoes with a cornstarch slurry or a dry flour-cornstarch coating, spray generously with oil, and air fry in a single layer at 375°F / 190°C for about 14–20 minutes, flipping and spraying again halfway through.

However, when the real goal is crisp potato texture with less oil, MasalaMonk’s air fryer hash browns guide is a better air fryer potato starting point because it focuses on thin layers, moisture control, shaking, and crisp edges.

Best answer: deep frying gives the most authentic battered fries. The air fryer is better for coated fries than loose wet-battered fries.

How to Batter Frozen Fries

You can batter frozen fries, but fresh-cut or first-fried homemade potatoes work better. Frozen fries already contain surface moisture and may already have a light coating, so the batter may not cling as evenly.

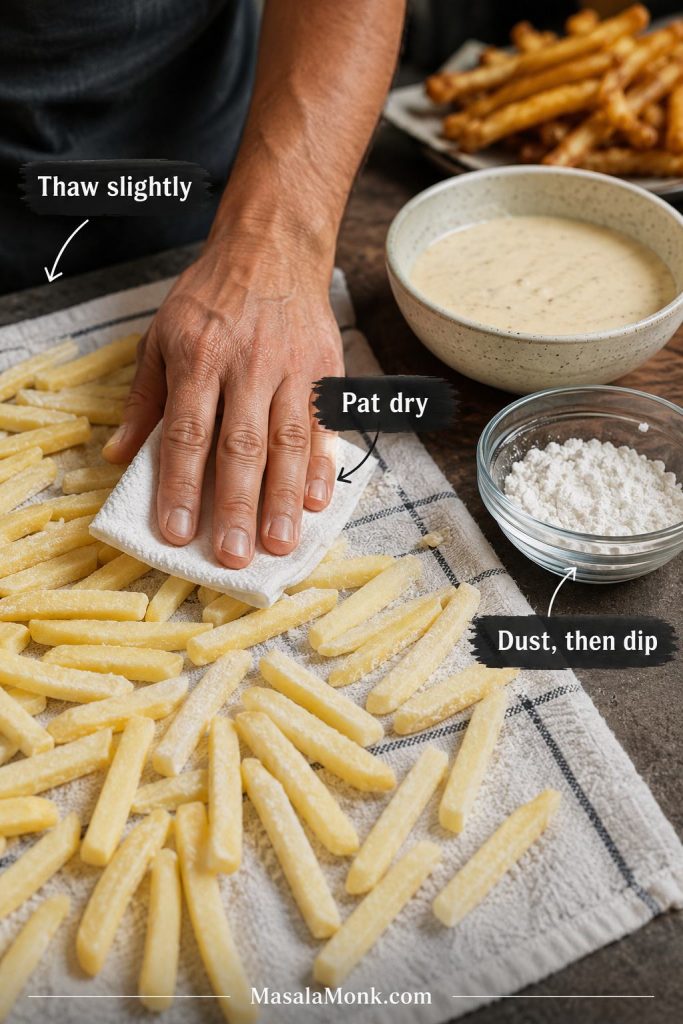
If you want to use frozen fries, do not batter them while icy. Let them thaw slightly, pat them very dry, dust lightly with cornstarch, potato starch, or flour, then dip them in a slightly thicker batter. Fry in small batches so the oil temperature does not drop too much.

Frozen fries being thawed slightly, patted dry, dusted with starch, and prepared for battering.
Frozen fries can still work, but only after a little thawing, careful drying, and a light dusting, otherwise the batter may cling unevenly.

Make-Ahead Battered Fries

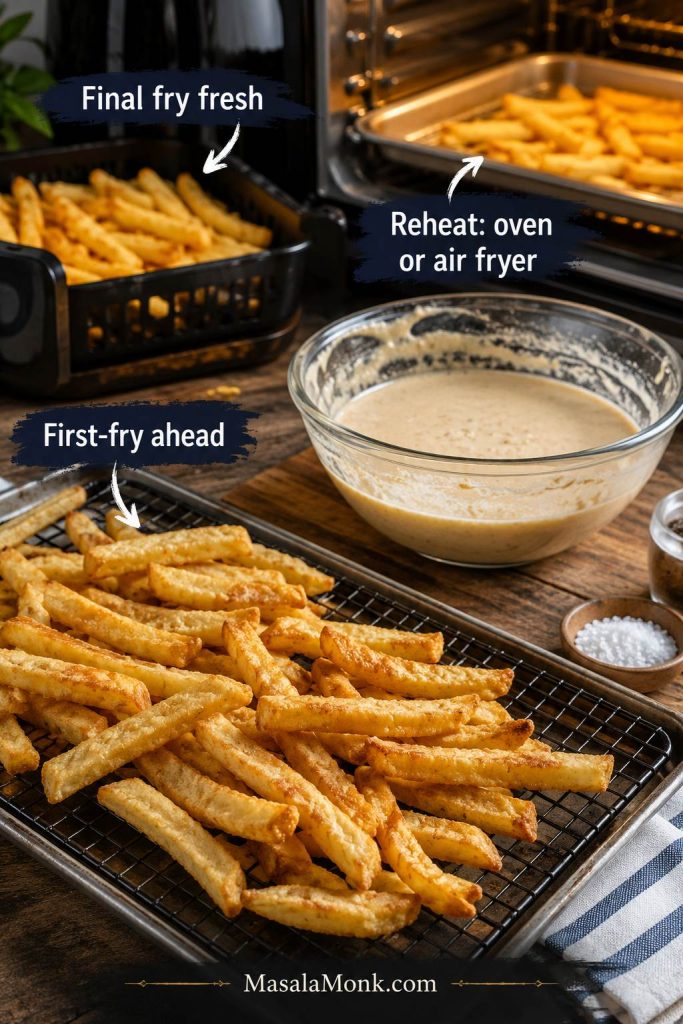
This battered fries recipe is best right after frying, but you can still make hosting easier. Cut, soak, dry, and first-fry the potatoes earlier in the day, then let them cool on a wire rack. When you are ready to serve, make the batter fresh, dip the fries, and do the final fry.

Make-ahead battered fries setup with first-fried fries, fresh batter, oven reheating, and air fryer reheating cues.
For easier hosting, first-fry the potatoes ahead of time; then, once you are ready to serve, batter and finish-fry them fresh.

Do not batter the fries far in advance. The coating will soften as it sits. If you need to hold cooked battered fries for a short time, keep them on a wire rack in a low oven so steam does not collect underneath.

Store leftover battered fries in the fridge in a shallow container once fully cooled. They are best reheated within 1–2 days, because the coating softens the longer it sits.

To reheat leftovers, use a hot oven or air fryer until the coating crisps again. Avoid microwaving, which makes the batter soft.

Battered Fries Variations

Cajun Battered Fries

Add Cajun seasoning to the batter and sprinkle a little more over the fries as soon as they come out of the oil. This is one of the easiest ways to make seasoned battered french fries with a little heat.

Garlic Parmesan Battered Fries

Season the hot fries with garlic salt, black pepper, and finely grated parmesan-style cheese. Add parsley if you want a more restaurant-style finish.

Spicy Battered Fries

Add cayenne, chili powder, or smoked paprika to the batter. Serve with spicy mayo, ranch, or a cooling garlic dip.

Battered Sweet Potato Fries

Sweet potatoes can be battered, but they have more moisture and a softer texture than russets. Cut them a little thicker, dry them well, and use a light coating. Expect a softer center and a slightly sweeter flavor.

Double Battered Fries

Double battered fries have an extra-heavy coating. They can be very crunchy, but they can also turn thick and doughy if the batter is not thin enough. For most batches, one light coating gives the best balance of potato and crunch.

Troubleshooting Battered Fries

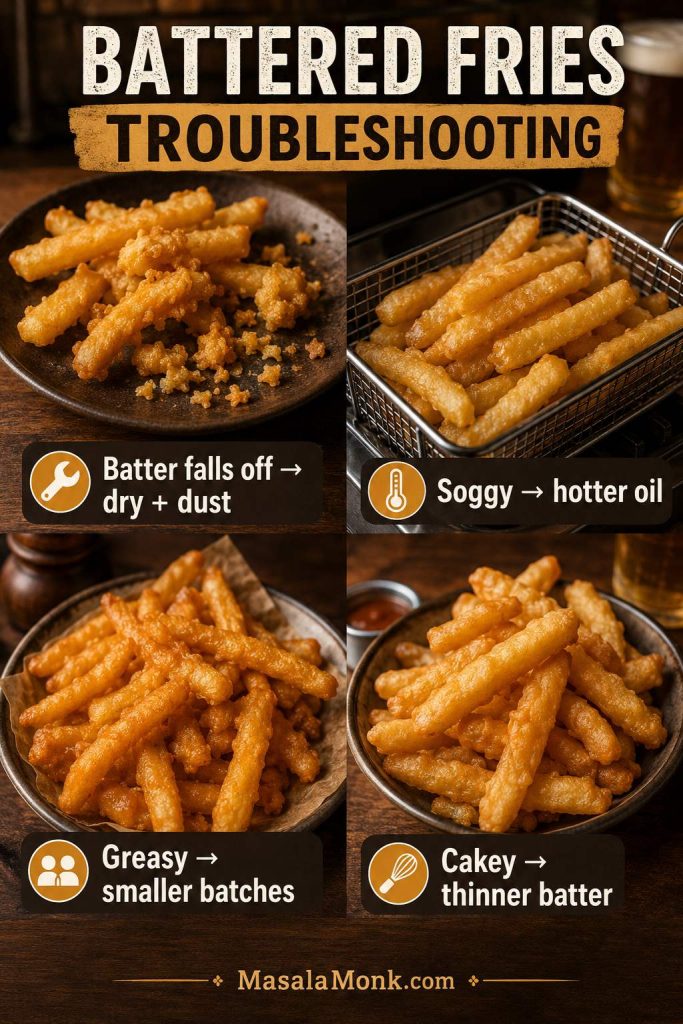
If this battered fries recipe did not come out crisp, the problem is usually moisture, batter thickness, oil temperature, or overcrowding. Fortunately, small changes make a big difference with battered potatoes.

Troubleshooting board for battered fries showing fixes for batter falling off, soggy fries, greasy fries, and cakey coating.
When battered fries go wrong, the problem is usually moisture, oil temperature, overcrowding, or batter thickness — and each one has a fix.
Problem Likely Cause Fix
Batter falls off Fries are wet, batter is too thin, or potatoes were not dusted Dry thoroughly, dust with flour/cornstarch/potato starch, and thicken the batter slightly
Fries are soggy Oil is too cool, pan is overcrowded, or batter is too thick Use a thermometer, fry in small batches, and thin the batter
Fries are greasy Oil temperature dropped too low Let the oil return to temperature between batches
Coating is cakey Batter is too thick Add cold sparkling water, club soda, or beer 1 tbsp at a time
Potatoes are hard inside Fries are too thick or skipped the first cook Use the double-fry method or parboil thick chips first
Fries stick together Too many fries added at once Add fries one by one and separate them early in frying
Batter clumps Too much batter stayed on the fries Let excess batter drip off before frying

Battered Fries Time and Temperature Guide

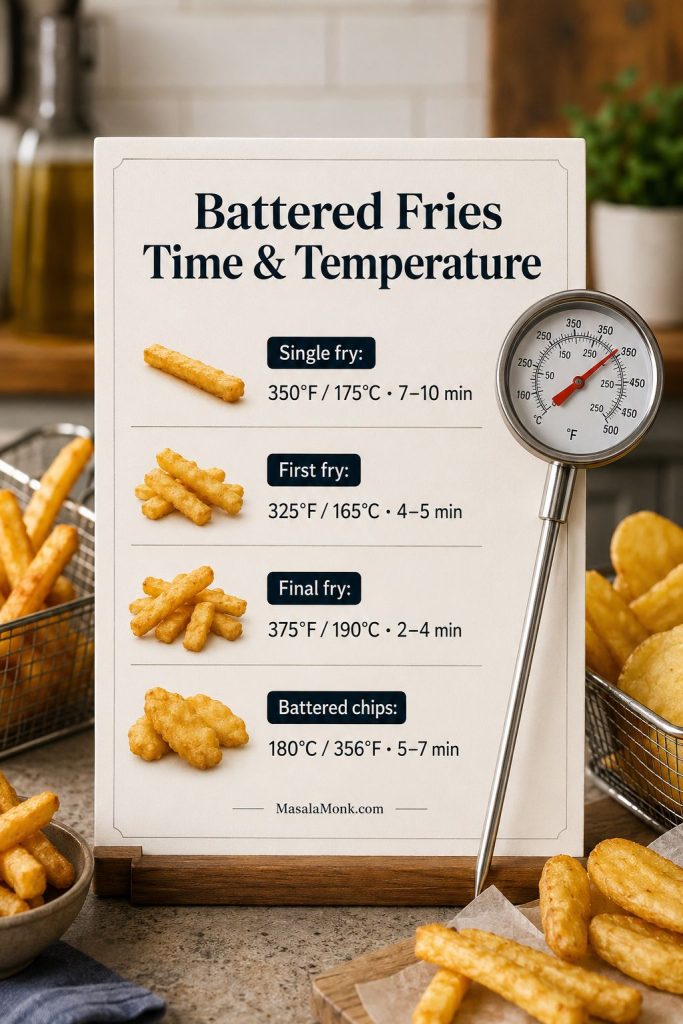
Use this chart as a quick reference for oil temperature, cook time, and method choice.

Time and temperature guide for battered fries with single fry, first fry, final fry, and battered chips temperatures.
Use this guide as a quick check when switching between single-fry battered fries, double-fried fries, beer batter, and thicker battered chips.
Method Potato Cut Prep Temperature Cook Time
Quick single-fry battered fries ¼-inch fries Soak + dry 350°F / 175°C 7–10 min
Best double-fry battered fries ¼-inch fries First fry, then batter 325°F then 375°F / 165°C then 190°C 4–5 min + 2–4 min
Beer battered fries ¼-inch fries Double fry preferred 325°F then 375°F / 165°C then 190°C 4–5 min + 2–4 min
Battered chips ½-inch chips Parboil + dry + dust 180°C / 356°F 5–7 min after parboiling, depending on thickness
Air fryer coated fries ¼–½-inch fries Starch slurry or dry coating 375°F / 190°C 14–20 min

What to Serve with Battered Fries

This battered fries recipe is best served hot, while the coating is still crisp. For the most obvious pairing, serve the fries with MasalaMonk’s fish and chips recipe. The crisp coating also works well with burgers, chicken tenders, fried shrimp, and creamy or tangy dips.

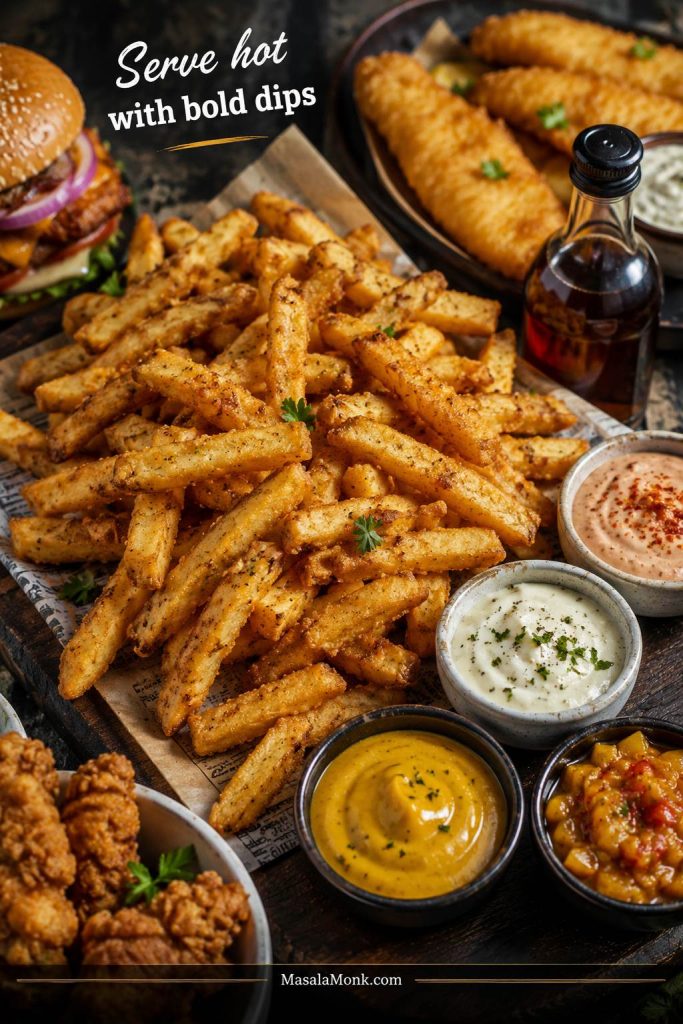
Battered fries served with dipping sauces, fish, burger, chicken, malt vinegar, and bold dips.
Battered fries love bold pairings, so creamy dips, sharp vinegar notes, and crisp fried sides all make especially good matches.
  • Burgers and sandwiches
  • Fried chicken or chicken tenders
  • Fried shrimp or calamari
  • Onion rings
  • Garlic aioli
  • Spicy mayo
  • Ranch dressing
  • Cheese sauce
  • Malt vinegar and salt

For a sweet-tangy dip that works surprisingly well with fries, try mango mustard sauce. Keep it thick for dipping so it clings to the crisp coating instead of running off.

If you want something sharper and more pickle-like, amba sauce is another bold option for fries, wedges, and roasted potatoes.

Ready to make them? The full measured battered fries recipe is below.
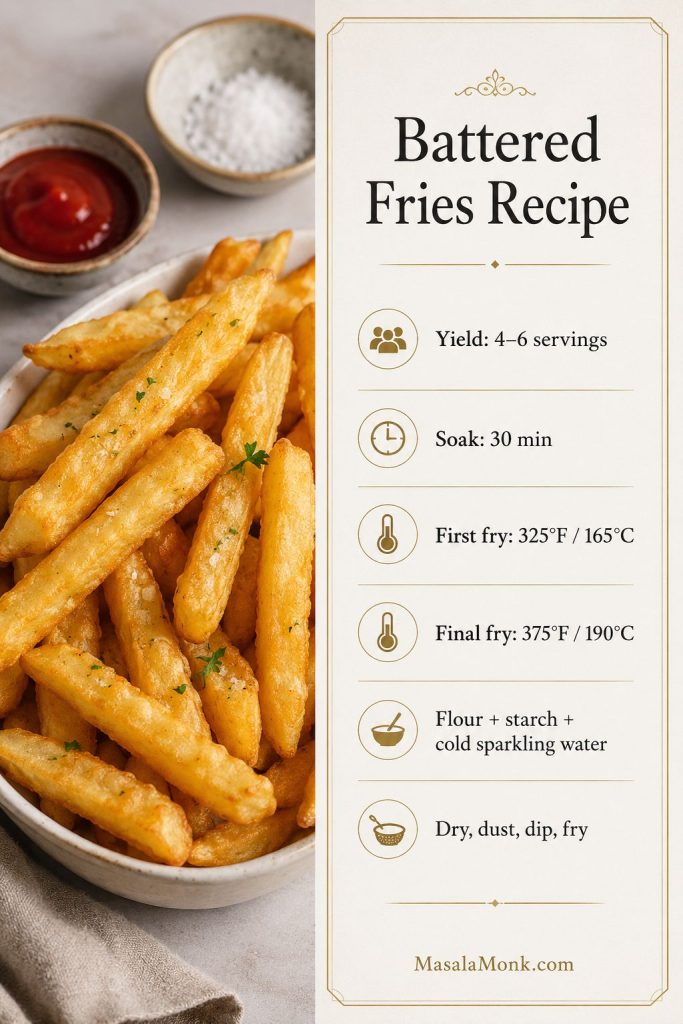
Saveable battered fries recipe card with yield, soak time, fry temperatures, batter ingredients, and method summary.
Once the method clicks, this saveable battered fries recipe card makes the timing, temperatures, and batter basics easy to revisit.

Battered Fries Recipe

This battered fries recipe cooks up golden outside with fluffy potato centers inside. The coating is seasoned but light, so the potato still comes through. The main version uses a no-beer batter made with flour, cornstarch or potato starch, baking powder, seasoning, and ice-cold sparkling water, seltzer, or club soda. For a pub-style finish, use the beer batter variation below.

Prep Time20 minutes
Soak Time30 minutes
Cook Time25 minutes
Total Time1 hour 15 minutes
Yield4–6 servings
MethodDeep frying
CategorySide dish / snack
DietVegetarian

Ingredients

For the Potatoes

  • 2 lb / 900g russet potatoes, cut into ¼-inch fries
  • Cold water, for soaking
  • 1 tbsp vinegar, optional
  • Neutral oil, for deep frying

For the Batter

  • 1 cup / 120g all-purpose flour
  • ⅓ cup / 40g cornstarch or potato starch
  • 1 tsp baking powder
  • 1 tsp fine salt, plus more for finishing
  • 1 tsp paprika
  • ¾ tsp garlic powder
  • ½ tsp onion powder
  • ¼ tsp black pepper
  • ⅛–¼ tsp cayenne, optional
  • ¾ cup / 180ml ice-cold sparkling water, seltzer, or club soda, plus 1–3 tbsp more as needed

Instructions

  1. Cut the potatoes: Cut the potatoes into ¼-inch fries. For thicker battered chips, cut them closer to ½ inch thick.
  2. Soak: Place the cut potatoes in cold water for at least 30 minutes, or 1–2 hours for better texture. Add 1 tbsp vinegar if using.
  3. Dry thoroughly: Drain the potatoes and dry them very well with clean kitchen towels. Surface moisture will make the batter slip and can cause oil splatter.
  4. First fry: Heat oil to 325°F / 165°C. Fry the potatoes in small batches for 4–5 minutes, until pale and partly cooked. Drain on a wire rack.
  5. Make the batter: Whisk together flour, cornstarch or potato starch, baking powder, salt, paprika, garlic powder, onion powder, pepper, and cayenne. Whisk in ice-cold sparkling water, seltzer, or club soda until the batter is thin but clingy. Do not make the batter too far ahead.
  6. Heat for final fry: Raise the oil to 375°F / 190°C.
  7. Dust and dip: Lightly dust the first-fried potatoes with flour, cornstarch, or potato starch. Dip into the batter and let excess drip off over the bowl or briefly on a wire rack.
  8. Final fry: Fry in small batches for 2–4 minutes, until golden and crisp. The bubbling should slow slightly, and the fries may float freely near the surface. Add the fries one by one so they do not stick together.
  9. Season: Transfer to a wire rack and season immediately with salt. Serve hot.

Beer Battered Fries Variation

Replace the sparkling water, seltzer, or club soda with ¾ cup / 180ml ice-cold lager or pilsner. Add more beer 1 tbsp at a time if the batter is too thick. Keep the batter cold and thin for the crispest beer battered fries.

Notes

  • This battered fries recipe works best when the batter is mixed close to frying time, while the liquid is still cold and bubbly.
  • The batter should coat the fries lightly and drip slowly. Thick batter makes cakey fries.
  • You may not need every drop of batter. A light coating is better than forcing thick batter onto every fry.
  • Potato starch gives a slightly more delicate, crackly coating; cornstarch is easier to find and still works well.
  • Longer soaking, up to 1–2 hours, improves texture but is optional.
  • Use a thermometer for the oil. Cool oil makes greasy fries.
  • Use a deep, heavy pot and leave several inches of headroom so the oil does not bubble over.
  • Drain on a wire rack instead of piling fries on paper towels.
  • Do not cover hot battered fries. Steam softens the crisp coating quickly.
  • For battered chips, cut thicker, parboil 5–7 minutes, dry well, dust, batter, and fry at 180°C / 356°F.
  • For make-ahead prep, cut, soak, dry, and first-fry the potatoes earlier, then batter and final-fry just before serving.

FAQs About Battered Fries

Are battered fries the same as battered chips?

They are similar, but battered chips are usually thicker. In the US, battered fries usually means battered french fries. In the UK, chips are thicker fried potatoes, so battered chips often need parboiling or first-cooking before battering.

Are battered fries the same as coated fries?

Not always. Battered fries are usually dipped in a wet batter before frying. Coated fries may use a lighter dry coating or starch coating instead. Both can be crisp, but battered fries usually have a more noticeable craggy shell.

What is battered fries batter made of?

Battered fries batter is usually made with flour, cornstarch or potato starch, baking powder, salt, seasonings, and a cold fizzy liquid such as sparkling water, club soda, or beer. The batter should be thin and cold so it fries crisp instead of turning thick and cakey.

What makes this battered fries recipe crisp?

The crisp texture comes from dry potatoes, a thin cold batter, cornstarch or potato starch, baking powder, and hot oil. The double-fry method also helps because the potato cooks first, then the batter crisps quickly in the final fry.

Should you cook the fries before battering them?

For the best battered fries, first-fry the potatoes at 325°F / 165°C until partly cooked, then batter them and fry again at 375°F / 190°C. Thin fries can be battered raw and single-fried, but the double-fry method is more reliable.

What can you use instead of beer in battered fries?

Ice-cold sparkling water, seltzer, or club soda works well instead of beer. The carbonation helps keep the batter light and crisp without adding beer flavor.

What kind of beer works best for beer battered fries?

Cold lager, pilsner, or light beer works best because the flavor stays clean and the carbonation helps the coating fry crisp. Very bitter or heavy beers can overpower the potatoes.

Is pancake batter good for battered fries?

Pancake batter is not ideal because it can fry up sweet, thick, and cakey. A better battered fries recipe uses flour, starch, baking powder, seasoning, and cold sparkling water or beer for a lighter, crispier coating.

Why does the batter fall off fries?

Batter usually falls off when the fries are too wet, the batter is too thin, or the potatoes were not dusted before dipping. Dry the potatoes very well, dust lightly with flour, cornstarch, or potato starch, and make sure the batter clings instead of running off.

Why are battered fries soggy?

Soggy battered fries usually come from cool oil, overcrowding, wet potatoes, or batter that is too thick. Fry in small batches, keep the oil hot, dry the potatoes well, and use a thin coating.

Do battered fries work in an air fryer?

Wet battered fries are better deep-fried because hot oil sets the batter quickly and evenly. In an air fryer, loose batter can drip before it sets. For air fryer fries, use a starch slurry or dry flour-cornstarch coating and spray well with oil.

Do baked battered fries work?

Wet-battered fries do not bake as well as they fry because the batter needs fast heat to set. For baked fries, use a dry starch coating instead of a loose wet batter, spread the fries in one layer, and use enough oil to help the coating crisp.

How do you batter frozen fries?

Frozen fries work best when they are thawed slightly, patted very dry, dusted with flour, cornstarch, or potato starch, then dipped in a slightly thicker batter before frying. The coating may not cling as evenly as it does on fresh-cut or first-fried potatoes.

How do you keep battered fries crispy?

Serve them right away, drain them on a wire rack, and avoid covering them while hot. If you need to hold them briefly, keep them on a rack in a low oven so steam does not soften the coating.

What is the best way to reheat battered fries?

A hot oven or air fryer is the best way to reheat battered fries because dry heat helps the coating crisp again. Microwaving is not recommended because it softens the batter.

What oil is best for battered fries?

Use a neutral high-heat oil such as vegetable, canola, sunflower, or peanut oil. Avoid low-smoke-point oils for deep frying.

Once you get the batter thickness and oil temperature right, these battered fries are easy to repeat. Start with the no-beer version first, then try the beer batter, battered chips, or Cajun variation when you want a more pub-style batch. Serve them hot, keep the coating light, and do not be surprised if they disappear fast.

Posted on 6 Comments

Easy Lemon Pepper Chicken Wings (Air Fryer, Oven & Fried Recipe)

Easy lemon pepper chicken wings on a plate with fries and creamy dip, glass of white wine and a woman in the background, styled like a premium magazine cover with the title Easy Lemon Pepper Chicken Wings – Crispy & Flavorful.

There’s a very particular kind of happiness that comes from a tray of lemon pepper chicken wings landing on the table. The first thing you notice is the smell: hot chicken, citrus, and black pepper all hitting your nose at once. Then you see the skin, blistered and golden, flecked with tiny bits of lemon zest and coarse pepper. And finally there’s that crunch when you bite in, followed by juicy meat and a bright, salty, lemony finish that makes your fingers impossible not to lick.

You do not need a restaurant fryer or a game-day catering budget to make wings like that at home. With a bag of wings, a couple of lemons, and a bit of patience, you can build your own version that’s just as addictive—maybe more, because you can tweak it exactly the way you like.

In this long, detailed guide, you’ll walk through:

  • A flexible base recipe for lemon pepper chicken wings
  • Three cooking methods: air fryer, oven-baked, and shallow-fried
  • A fresh homemade lemon pepper seasoning you can keep in a jar
  • A buttery “lemon pepper wet” sauce for glossy, saucy wings
  • Variations like honey lemon pepper, spicy three-pepper wings, and lemon pepper ranch
  • Side dishes, dips, and drinks that turn wings into a full spread
  • How to store and reheat leftovers safely while keeping them crisp

Grab a drink, skim once to see which method you’ll use, and then dive back in with your wings and spices ready to go.

Also Read: What to Mix with Jim Beam: Best Mixers & Easy Cocktails


Why Lemon Pepper Chicken Wings Hit So Hard

Before getting into the practical stuff, it helps to understand what we’re chasing.

Texture: Crispy Outside, Juicy Inside

The dream lemon pepper chicken wing is all about contrast:

  • Skin: tight, dry, and crisp enough that you hear it crackle
  • Meat: tender and still juicy, never stringy or overcooked
  • Coating: light enough to cling, bold enough to taste in every bite

That combination comes from a few small habits: drying the wings, seasoning them well, and cooking them with enough heat and airflow that the skin really dehydrates and browns. Certain techniques, like using a little baking powder in the dry rub, are popular because they raise the pH of the skin and help it crisp more deeply, a trick explored in depth in testing-focused cooking articles.

Portrait graphic showing lemon pepper chicken wings with text callouts for crispy skin, juicy meat and bright lemon and pepper seasoning, explaining why the wings are so addictive.
This is what a great lemon pepper wing should look and feel like: crackly skin that gives way with a snap, juicy meat that stays tender all the way to the bone, and a bold mix of lemon and black pepper that lingers just enough to make you reach for another. It’s the kind of balance that works whether you’re eating over the kitchen counter on a Friday night or passing a platter around on game day.

Flavor: Bright, Salty, Peppery

Then there’s the flavor profile:

  • Lemon: zesty and fresh, with just enough juice to be tangy
  • Pepper: freshly cracked and slightly floral, not just dusty heat
  • Salt: present but balanced, never harsh
  • Butter or oil: there in the background, carrying all the other flavors

A good lemon pepper seasoning hits those notes cleanly. In its traditional form, lemon pepper is made by infusing dried lemon zest into cracked black pepper and then combining it with salt and optional aromatics. When you build your own version at home, you can decide how lemony, how peppery, and how salty you want it.

Comfort: Casual but Special

Finally, wings have that special status of being both casual and celebratory. They fit into:

  • Friday-night snacks
  • Game-day spreads
  • Lazy family dinners
  • Potluck tables where everybody grabs with their fingers

Lemon pepper in particular has a kind of “grown-up” flavor profile—more sharp and aromatic than heavily sweet sauces—while still being totally approachable.

That’s what we’re aiming for: wings that feel like something you’d order from a favorite place, only made at home, exactly to your taste.

Also Read: Katsu Curry Rice (Japanese Recipe, with Chicken Cutlet)


Ingredients for Lemon Pepper Chicken Wings

To keep things painless, let’s group everything into four parts: the wings, the base seasoning, the lemon pepper blend, and the optional wet sauce.

The Wings and Base Seasoning

For roughly 4 servings (or fewer, if everyone is wing-obsessed), you’ll want:

  • 1 kg / 2.2 lb chicken wings, split into drumettes and flats, wing tips removed
  • 2 tablespoons neutral oil (such as avocado, sunflower, or canola)
  • 1½–2 teaspoons fine salt, adjusted according to your lemon pepper blend
  • 1 tablespoon baking powder (aluminium-free; optional but excellent for crispness)
  • ½ teaspoon garlic powder
  • ½ teaspoon onion powder

This base seasoning gives the wings a solid, savory foundation. If you’ve ever wondered why some baked or air-fried wings feel a bit flabby, it’s often because the skin never really dries out or because there isn’t enough salt on the meat itself.

Recipe card style image showing raw chicken wings in a bowl with jars of salt, garlic powder and onion powder, plus text listing the base seasoning ingredients for lemon pepper chicken wings.
Everything that goes into the base rub for these wings: chicken, neutral oil, salt, baking powder and a mix of garlic and onion powder to build that savory crunch before the lemon pepper even hits.

The baking powder is a small but powerful addition. Tests on crispy poultry have shown that an alkaline coating encourages browning and crunch, which is why this trick shows up again and again in recipes for crispy baked wings and roasted chicken skin.

If you’d rather skip it, you absolutely can; just make a point of drying the wings very thoroughly and not overcrowding them during cooking.

Also Read: Simple Bloody Mary Recipe – Classic, Bloody Maria, Virgin & More


Homemade Lemon Pepper Seasoning

There are many store-bought lemon pepper seasonings available, and some are genuinely tasty. However, they also vary hugely in saltiness and lemon intensity, and quite a few are mostly salt with a faint citrus scent.

Making your own gives you control. You can keep it bright, adjust the salt, and even decide how fine or coarse the pepper should be.

For a small jar:

  • 2 tablespoons finely grated lemon zest (preferably from unwaxed lemons)
  • 1½ tablespoons freshly cracked black pepper
  • 1 tablespoon flaky or coarse salt
  • ½ teaspoon garlic powder
  • ½ teaspoon onion powder
  • ½–1 teaspoon sugar (optional, but it rounds off any bitterness and helps browning)
Portrait recipe card showing a small bowl of homemade lemon pepper seasoning with visible lemon zest, black pepper and salt on a wooden surface, surrounded by peppercorns and lemon, plus text listing the seasoning ingredients.
A small batch of homemade lemon pepper seasoning—lemon zest, cracked black pepper, salt, garlic and onion powder—so you can control exactly how bright, salty and peppery your wings taste.

To prepare it:

  1. Spread the lemon zest in a thin layer on a plate or small tray.
  2. Let it air-dry for a few hours, or place it in a very low oven until it’s no longer wet to the touch.
  3. Combine the dried zest with the pepper, salt, and other seasonings, then stir thoroughly.
  4. Store in an airtight jar away from direct heat and light.

If you’d like reassurance on the proportions or want another perspective, you can glance at a similar homemade lemon pepper seasoning recipe that uses dried lemon zest, black pepper, and salt as its backbone.

For each kilo of wings, plan on 1½–2 tablespoons of this seasoning, plus more at the table for anyone who likes an extra sprinkle.

Also Read: Air Fryer Hard-Boiled Eggs (No Water, Easy Peel Recipe)


Lemon Pepper “Wet” Sauce

Some people love their lemon pepper chicken wings dry and crisp, with the seasoning clinging directly to the skin. Others adore the “wet” style: glossy, buttery, and intensely lemony.

For a small batch of wet sauce:

  • 4 tablespoons unsalted butter, melted
  • 1–2 tablespoons fresh lemon juice, to taste
  • 1 tablespoon lemon pepper seasoning
  • Optional: 1 teaspoon hot sauce if you like an extra kick
Portrait recipe card showing a bowl of lemon pepper wet sauce with a whisk, plus text listing melted butter, fresh lemon juice, lemon pepper seasoning and optional hot sauce for coating lemon pepper chicken wings.
This quick lemon pepper “wet” sauce—melted butter whisked with lemon juice, seasoning and a touch of heat—turns crisp wings into the glossy, intensely lemony style you’d usually only get from a good wing joint.

Whisk it all together until smooth. Taste and adjust the lemon, salt, and heat. If it feels too sharp, a pinch more butter or a drop of honey will smooth things out. If it tastes flat, a bit more lemon juice or seasoning will wake it up.

You’ll toss fresh-cooked wings in this sauce to make them “lemon pepper wet”.

Also Read: Tres Leches – Mexican 3 Milk Cake Recipe


Optional Extras

Depending on your mood, you can also have these on standby:

  • Extra fresh lemon wedges for squeezing
  • A little more freshly cracked black pepper at the table
  • Honey for quick honey lemon pepper wings
  • Cayenne pepper or chili flakes for a spicier batch
  • Ranch dressing or yogurt-based sauces for dipping

Now that everything’s assembled, it’s time to get the wings ready to cook.


Prepping the Wings Properly

Spending ten minutes on prep makes a huge difference later. Instead of jumping straight into cooking, take a moment to set the wings up for success.

Portrait image showing hands cutting raw chicken wings on a wooden board into drumettes, flats and tips, with text overlay titled Trimming and Splitting.
Start strong by trimming and splitting each wing into a drumette, a flat and a tip so everything cooks evenly and is easy to eat.

Trimming and Splitting

If your wings aren’t already separated, start by cutting each whole wing into:

  • The drumette (the meaty piece that looks like a tiny drumstick)
  • The flat (the two-boned middle section)
  • The tip (which you can save for stock if you like)

Sharp kitchen shears work well; a small chef’s knife is also fine. Once you’ve separated them, discard any stray feathers or bits of skin.

Picture of Chicken Wings separated into 3 parts - the drumette, the flat and the Tip.
This is how the wing would look like after proper cutting – Chicken Wings separated into 3 parts – the Drumette, the Flat and the Tip.

Drying the Skin

Next, lay the pieces out on a tray or large plate lined with paper towels. Pat every side dry. Flip them and pat again. It may feel a little tedious, but this step is one of the keys to crisp wings later, especially in the oven or air fryer.

If you’re planning ahead, you can put the tray of dried wings into the fridge, uncovered, for an hour or two. The circulating air helps dry the skin even further. Some cooks even leave them overnight.

Portrait image of chicken wings on a plate lined with paper towels while a hand pats them dry, with text overlay titled Drying the Skin.
Patting the wings bone-dry with paper towels is the small prep step that pays off later in ultra-crispy skin.

Seasoning the Meat

Once the wings are dry, slide them into a big bowl. Sprinkle over base seasoning or:

  • The oil
  • Salt
  • Baking powder
  • Garlic powder
  • Onion powder

Using your hands or a spatula, toss everything until the wings are evenly coated. Make sure the baking powder doesn’t clump; it should be completely mixed into the other seasonings.

At this stage you can cook right away, or you can let the wings sit in the fridge for about half an hour to absorb the salt and spices. That short rest is a kind of mini dry brine; it helps season the meat all the way through and encourages a beautiful, even color on the skin.

Portrait image showing a hand sprinkling seasoning over raw chicken drumettes on a plate, with text overlay titled Seasoning the Meat.
A generous, even coating of salt and spices or use the base seasoning we create earlier in the post – on the wings sets up deep flavor before the lemon pepper ever goes on.

Notice that we still haven’t added the lemon pepper seasoning. That comes later, once the wings are cooked and still hot. Adding it at the end protects the lemon zest from burning and keeps the flavor bright.

Also Read: Peanut Butter Cookies (Classic Recipe & 3 Variations)


Base Method: From Raw Wings to Golden and Ready

Although the details differ from method to method, the basic flow is always the same:

  1. Prep and season the wings
  2. Cook using air fryer, oven, or oil
  3. Toss hot wings in lemon pepper seasoning and/or wet sauce
  4. Check internal temperature
  5. Serve and enjoy

With that structure in mind, you can choose the cooking approach that fits your kitchen and mood.


Air Fryer Lemon Pepper Chicken Wings

If you own an air fryer, this is likely to become your favorite method. It’s fast, fairly clean, and makes crisp wings with very little oil.

Preheating and Setup

Begin by preheating your air fryer to 190–200°C / 375–400°F. Preheating ensures the wings start crisping immediately, rather than steaming while the machine warms up.

While it heats, lightly oil the basket if things tend to stick, and double-check that the air vents are clear. Basic air fryer safety guidelines, such as keeping the unit on a heat-resistant surface and avoiding obstructed vents, help everything cook evenly and safely.

Portrait image of an air fryer with a hand adjusting the dial while seasoned chicken wings sit in the basket in a single layer, with text overlay about preheating to 190–200°C and arranging the wings properly.
Preheat the air fryer fully, then slide in the wings in a single, uncrowded layer so the hot air can crisp every side instead of steaming them.

Arranging the Wings

Place the seasoned wings into the basket in a single layer. It’s okay if they’re a little close, but try to avoid stacking them. Air fryers crisp food by blasting it with hot moving air; when air can’t circulate, you get pale, soft spots instead of even browning. Overcrowding is one of the most common reasons for disappointing results.

If you have more wings than comfortably fit in one layer, plan on cooking them in batches rather than forcing everything in at once.

Cooking Time and Turning

Slide the basket in and air fry the wings for about 22–26 minutes, flipping or shaking them halfway through. The exact time depends on:

  • The size of your wings
  • Your specific air fryer model
  • How packed the basket is
Portrait image of an air fryer basket filled with golden lemon pepper chicken wings being pulled out by hand, with overlay text listing cooking time, flipping halfway and checking doneness around 20 minutes.
Once the basket is loaded, let the wings go for 22–26 minutes, giving them a shake halfway through so every side gets blasted with hot air instead of sitting in one spot.

Around the 20-minute mark, start checking their color and texture. The skin should look golden to deep brown and feel firm when you tap it with tongs.

Seasoning While Hot

As soon as the wings are cooked, transfer them to a clean bowl while they’re still sizzling. Sprinkle over 1½–2 tablespoons lemon pepper seasoning and toss until every piece looks speckled with zest and pepper.

If you’re going for air-fried lemon pepper wet wings, drizzle in some of the butter–lemon sauce and toss again. The residual heat helps the flavors sink in and the butter cling without separating.

Portrait image of hot lemon pepper chicken wings in a bowl while a hand sprinkles seasoning over them, showing how to toss the wings with lemon pepper while they are still sizzling.
As soon as the wings come out of the air fryer or oven, shower them with lemon pepper and toss while they’re still sizzling so the zest, pepper and butter lock onto every piece.

Pile the wings onto a platter, garnish with fresh lemon wedges for squeezing, and bring them straight to the table.

Also Read: Homemade Hot Chocolate with Cocoa Powder Recipe


Oven-Baked Lemon Pepper Chicken Wings

When you’re feeding more than a couple of people, the oven suddenly becomes your best friend. A single large tray can handle a mountain of wings at once.

Preheating the Oven

Set your oven to 220°C / 425°F. If it has a convection (fan) option, switch it on; that extra air movement mimics the air fryer effect and encourages crisp skin.

Portrait image of a hand turning the oven dial to 220°C / 425°F with the door open, showing a foil-lined baking sheet and wire rack inside, with text overlay titled Preheating the Oven.
Crank the oven up to 220°C / 425°F and drop a rack over a lined tray before you even think about the wings—high heat and airflow are what turn seasoned chicken into proper oven-crisp lemon pepper wings.

Place a wire rack on a rimmed baking sheet and line the sheet with foil or parchment for easier cleanup. The rack keeps wings elevated, allowing hot air to circulate underneath, which is especially helpful when the sheet is crowded.

Arranging and Baking

Spread the seasoned wings out in a single layer on the rack. Avoid stacking them; if necessary, use two trays and swap their positions halfway through baking.

Slide the tray into the hot oven and bake for 40–45 minutes, turning the wings once in the middle of the cooking time. As they roast, the skin will gradually tighten and brown, and the fat will drip down onto the tray.

Portrait image of raw seasoned chicken wings laid in a single layer on a wire rack set over a baking sheet, being slid toward the oven, with text overlay titled Arranging & Baking.
Spread the wings out on a rack in one even layer and let the oven do its thing for 40–45 minutes—no stacking, no crowding, just steady heat working on every side.

If, towards the end, they look well-cooked but not quite crisp enough for your taste, you can switch on the broiler for the last 2–3 minutes. Watch carefully at this stage; the lemon and pepper can go from perfect to scorched very quickly under direct heat.

Tossing in Lemon Pepper

Once they’re sizzling and golden, transfer the wings to a mixing bowl. Immediately dust them with lemon pepper seasoning and toss gently but thoroughly. If you’d like some of them wetter, move half to another bowl and toss those in your butter–lemon sauce.

Portrait image of freshly baked chicken wings in a metal mixing bowl being tossed with lemon pepper seasoning using a wooden spoon, with text overlay titled Tossing in Lemon Pepper.
As soon as the tray comes out, scrape the hot wings into a bowl and toss them in lemon pepper so the citrus, salt and cracked pepper cling to the crust while it’s still sizzling.

The baked method gives you lemon pepper chicken wings with a little less hands-on time than frying, plenty of crunch, and the satisfaction of pulling a huge, steaming tray from the oven.

Also Read: Watermelon Daiquiri: A Refreshing Twist on a Classic Cocktail


Fried Lemon Pepper Chicken Wings

There’s something undeniably satisfying about fried wings. The oil helps create that deeply blistered, crunchy skin that many people associate with their favorite wing spots.

Heating the Oil

Choose a wide, heavy pan—a deep skillet or Dutch oven works well—and pour in 2–3 cm of neutral oil. Heat it to 175–180°C / 347–356°F. If you don’t have a thermometer, you can use the old bread test: a small piece of bread should sizzle and turn golden in under a minute.

Portrait image of a cast iron skillet filled with hot oil on the stove, with a hand dipping a small piece of bread in to test the temperature, and text overlay titled Heating the Oil for fried lemon pepper wings.
Heat a shallow pool of neutral oil until a scrap of bread sizzles and turns golden in under a minute—that’s the sweet spot for blistered, crunchy fried lemon pepper wings.

Keep the handle turned inward and the pan on a stable burner. Having a splatter guard or lid nearby is handy, just in case.

Frying in Batches

Lower the wings into the oil carefully, placing them away from you to minimize splashes. Fry only as many as fit comfortably in a single layer; crowding cools the oil and leads to greasy, unevenly cooked wings.

Let them sizzle for 10–12 minutes, turning occasionally so they brown on all sides. Heavier wings may need a little longer. The skin should be deeply golden and crisp, and the meat cooked through.

Portrait image of chicken wings frying in hot oil in a skillet while a pair of tongs lifts a golden drumette above the surface, with text overlay titled Frying in Batches.
Work in small batches so each wing has room to move in the oil, turning them until every side is deep golden and crisp instead of greasy and uneven.

Check the internal temperature of a few wings with an instant-read thermometer; it should read at least 165°F / 74°C, matching the recommended safe minimum temperature for chicken.

Transfer cooked wings to a wire rack set over a tray or to paper towels to drain.

Seasoning Straight from the Oil

While the wings are still hot and glistening, move them into a bowl and shower them with lemon pepper seasoning. Any residual oil on the surface helps the spices cling and bloom. For a truly indulgent batch, pour in some of the buttery lemon mixture too and toss until everything looks shiny.

Portrait image of a plate piled with fried chicken wings while a hand sprinkles lemon pepper seasoning over them, with lemon wedges on the table and text overlay titled Fried Lemon Pepper Chicken Wings – Seasoning Straight from the Oil.
As soon as the wings leave the oil, hit them with lemon pepper so the hot, glistening crust grabs every speck of citrus, salt and black pepper.

If you’re cooking several rounds of fried wings, you can hold finished ones in a low oven (around 140°C / 285°F) for a short time. Just remember the usual game-day safety guidance: cooked foods shouldn’t sit in the “danger zone” between cold and hot for extended periods.

Also Read: Authentic Butter Chicken Recipe (Murgh Makhani) Creamy and Flavorful


Lemon Pepper Chicken Wings Variations

Once you’ve done a straightforward batch, it’s hard to resist playing. Fortunately, the base lemon pepper chicken wings recipe is like a blank canvas that welcomes small tweaks.

Honey Lemon Pepper Chicken Wings

To turn a portion into honey lemon pepper wings:

  1. Stir 2–3 tablespoons honey into your melted butter–lemon sauce.
  2. Toss a batch of hot wings in this mixture until they’re evenly coated and shining.
  3. Taste one and adjust with another splash of lemon juice or a pinch of salt if needed.
Portrait image of honey lemon pepper chicken wings piled on a plate, glistening with a sticky honey–lemon glaze, with text overlay explaining to stir honey into warm lemon-butter sauce and toss the hot wings.
Honey lemon pepper wings take the same crispy base and wrap it in a glossy honey–lemon glaze that softens the sharp edges and makes every bite a little bit sticky, sweet and impossible to stop at one.

The honey softens the sharp edges of the lemon and pepper, so this variation is especially popular with people who like a gentler, slightly sweet wing.


Spicy Lemon Pepper Chicken Wings

If your crowd enjoys a bit more heat, you can make spicy lemon pepper wings by layering in a few extra flavors.

For the dry rub, add:

  • ½–1 teaspoon cayenne pepper, chili powder, or a mix of your favorite hot spices

For the finishing sauce, consider:

  • A spoonful of hot sauce
  • Extra cracked black pepper on top
Portrait image of spicy lemon pepper chicken wings on a plate, coated in a fiery three-pepper glaze with visible chili flakes and black pepper, with text overlay explaining to add cayenne to the rub and hot sauce to lemon-butter before tossing the wings.
Spicy lemon pepper wings layer heat from black pepper, cayenne and hot sauce over that same bright citrus base, so you get proper three-pepper fire without losing the lemony punch.

The idea is to pull heat from three places: the black pepper, the cayenne or chili, and the hot sauce. That way, you get a “three-pepper” style intensity without losing the citrusy brightness that makes lemon pepper wings so distinctive.

Also Read: Kali Mirch Paneer | Black Pepper Paneer- Kid Friendly Recipe


Lemon Pepper Ranch Chicken Wings

When you want to lean toward creamy, herby flavors without giving up the lemon-pepper backbone, ranch steps in.

There are a couple of simple routes:

  1. Lemon Pepper Ranch Dip
    Stir some lemon pepper seasoning into a bowl of thick ranch. Use it as a dip for classic lemon pepper wings, vegetable sticks, and maybe some potato wedges.
  2. Ranch-Coated Lemon Pepper Wings
    Thin ranch with a bit of lemon juice until it’s just pourable. Toss freshly cooked, lightly lemon-peppered wings in a small amount of this dressing so they get a light ranch glaze.
Portrait image of lemon pepper ranch chicken wings on a rustic plate, drizzled with creamy ranch, with a bowl of herby ranch dip and lemon wedges in the background, plus text overlay explaining how to make lemon pepper ranch dip or a light ranch glaze for the wings.
Lemon pepper ranch wings take the same crisp, citrusy base and finish it with cool, herby ranch—either as a thick dip on the side or a light glaze over the hot wings.

Either way, you keep the zing of lemon and the bite of black pepper, while adding the familiar tang and herbs of ranch.


Extra Twists to Try

As you get comfortable, you might experiment with:

  • Garlic Lemon Pepper Wings – Add minced garlic to the butter sauce or increase the garlic powder in the base rub.
  • Smoky Lemon Pepper Wings – Add a little smoked paprika or chipotle powder to the seasoning mix.
  • Herby Lemon Pepper Wings – Finish with chopped parsley or thyme for fresh, green notes.

Small changes can dramatically shift the personality of your wings without requiring a completely new recipe.


Dips, Sides, and Extras for Wing Night

A platter of lemon pepper chicken wings is already a good time, yet pairing them with a few well-chosen sides turns everything into a proper event. You don’t need to go overboard; two or three complementary dishes go a long way.

Portrait image of a wing night spread with lemon pepper chicken wings in the center, surrounded by fries, creamy dip, jalapeño poppers and churros on a dark wooden table, with text overlay asking what to serve with lemon pepper wings and suggesting dips, potatoes, comfort sides and something sweet.
Turn a simple tray of lemon pepper wings into a full wing night by adding a creamy dip, a hot potato side, a cheesy bite like jalapeño poppers and an easy dessert to finish.

Cool and Creamy Dips

First, let’s talk dips. Wings love anything creamy or tangy that cools the palate.

A versatile approach is to offer more than one option:

  • A selection pulled from spinach dip recipes gives you both cold and hot spinach-based dips, including a classic spinach-artichoke style that is fantastic with salty, zesty chicken.
  • When the wings are bright and peppery, a chilled bowl of yogurt, cucumber, lemon, and garlic based on a Greek tzatziki sauce recipe brings a cooling, refreshing contrast and feels lighter than a traditional ranch.

You can also keep a simple blue cheese dip or herbed mayonnaise around, especially if you’re making a spicy batch.


All the Potato Things

Next come the potatoes, because wings and potatoes are a classic duo.

For a straightforward side that always disappears, a big tray of crispy homemade French fries does the job. You can season them simply with salt or play around with variations: garlic-parmesan, chili, or even a light dusting of lemon pepper to echo the wings.

If you feel like branching out, take a look at 10 easy potato appetizers. There you’ll find ideas like smashed potatoes, loaded bites, and other crispy snacks that sit happily beside a wing platter and give people something else to nibble between drumettes.


Comfort Sides That Make It a Meal

Sometimes you want the wings to feel like the centerpiece of a hearty dinner rather than just snacks. In that case, adding one or two warm, substantial dishes helps.

A bubbling pan of macaroni and cheese brings creamy comfort to the table. Next to lemon pepper chicken wings, the rich cheese sauce and soft pasta respond beautifully to the tangy, crisp chicken.

For an additional spicy, creamy bite, baked jalapeño poppers fit right in. They have their own crunch and heat, yet they don’t duplicate the exact flavors of the wings, which keeps the spread interesting.

And if you want a sweet finish without getting too formal, you might end with churros. Using the method from how to make churros, you can fry or bake ridged sticks of dough, roll them in cinnamon sugar, and serve them with chocolate or caramel sauce. They feel playful and shareable, which matches the whole mood of wing night.


Drinks That Pair with Lemon Pepper Chicken Wings

Although you can absolutely just set out a cooler of cold drinks and call it a day, matching your beverages to lemon pepper wings is surprisingly fun.

Because lemon is already a star here, citrusy drinks are natural partners. A chilled lemon drop martini style drink echoes the lemon while bringing a sweet-tart edge that works nicely with salty, peppery chicken. You can make a non-alcoholic version using lemon juice, simple syrup, and sparkling water served in glasses with sugared rims.

During cooler months, you might also lean into autumnal flavors by offering a pumpkin-spice-flavored latte or dessert built from your own spice blend, especially if you already have the oven and stove busy with wings and sides.


Storing and Reheating Lemon Pepper Chicken Wings

With a big batch, you’ll often have a few wings left over. Stored and reheated properly, they make an easy next-day lunch or snack that’s almost as good as the original round.

Portrait image showing cooked lemon pepper chicken wings in a glass container beside an air fryer, with text overlay explaining how to store them in the fridge and reheat in the oven or air fryer to keep the skin crispy.
Once wing night is over, cool the leftovers, tuck them into the fridge and bring them back to life in the oven or air fryer so the skin crisps up again instead of going limp.

Storing Safely

After everyone has eaten, let the wings cool down briefly, then transfer them into an airtight container. Try to get them into the refrigerator within two hours of cooking. Game-day food safety advice consistently emphasizes this 2-hour window for hot foods like wings, to avoid letting them sit in the temperature range where bacteria grow fastest.

In the fridge, cooked wings will usually keep well for 3–4 days.

Reheating in the Oven

For a fairly large batch or whenever you want the most uniform results, the oven is a good choice:

  1. Bring the wings out of the fridge while the oven preheats to 175–190°C / 350–375°F.
  2. Arrange them on a wire rack set over a baking sheet.
  3. Warm them for 8–12 minutes, turning once if necessary, until they’re hot, the skin has re-crisped, and a thermometer reads at least 165°F / 74°C in the thickest part.

Comparisons of reheating methods often find that the oven returns the best combination of juicy meat and crisp skin, while the microwave tends to make the coating soft.

Reheating in the Air Fryer

If you only have a handful of wings to reheat, the air fryer shines:

  1. Preheat to about 175–180°C / 350–360°F.
  2. Place the wings in a single layer in the basket.
  3. Heat for 5–8 minutes, shaking once, until they’re sizzling again and the skin feels crisp.

The air fryer works quickly and restores a nice crunch without needing much effort. Guides on reheating wings in an air fryer recommend similar temperatures and timings, with the same target internal temperature for safety.

Once more, the microwave is best kept as a last resort. It will heat the meat, but it tends to steam the skin, undoing all your crisping work.

Also Read: French Toast Sticks (Air Fryer + Oven Recipe) — Crispy Outside, Custardy Inside


Using Leftover Lemon Pepper Chicken Wings in New Ways

Interestingly, leftover lemon pepper chicken wings don’t have to stay wings. If you strip the meat from the bones, you suddenly have a bowl of tender, lemony chicken that’s perfect for other dishes.

For instance, you can:

  • Toss the meat with a little mayonnaise or yogurt, chopped celery, and herbs for a quick lemon pepper chicken salad.
  • Sprinkle it over greens with cherry tomatoes, cucumbers, and a light vinaigrette for an easy lunch.
  • Layer it into sandwiches or sliders, using ideas from chicken sandwich recipes—anything from Buffalo to BBQ styles can overlap nicely with the lemon pepper flavor, especially if you add cheese, lettuce, and pickles.

In this way, one batch of wings can stretch into multiple meals without feeling repetitive.


Bringing It All Together

By now you’ve seen that making excellent lemon pepper chicken wings at home isn’t complicated; it’s just a series of small, thoughtful steps:

  • Drying and seasoning the wings so they’re flavorful before they ever hit the heat
  • Choosing the cooking method that matches your gear and your crowd
  • Finishing with a fresh, lively lemon pepper seasoning and, if you’re in the mood, a buttery wet sauce
  • Adding simple variations—honey, spice, ranch—to keep things interesting
  • Surrounding the wings with dips, potatoes, and a few extras to turn them into a full occasion
  • Handling leftovers in a way that keeps them both safe and delicious

Whether you’re planning a game-night spread, a relaxed weekend dinner, or just a kitchen experiment on a random afternoon, this approach lets you take a humble pack of wings and transform it into something everyone reaches for.

Next time you see a pile of wings at the shop, you’ll know exactly what to do: grab a couple of lemons, check your pepper grinder, and give yourself permission to fill your kitchen with the smell of hot, crackling, lemon pepper chicken wings.

FAQs about Lemon Pepper Chicken Wings

1. What are the ingredients for lemon pepper chicken wings?

For classic lemon pepper chicken wings, you usually need chicken wings, oil, salt, black pepper, lemon zest or lemon pepper seasoning, and a few simple pantry spices. Typically, the ingredients for lemon pepper chicken include wings, garlic powder, onion powder, a small amount of baking powder for crispiness, and either a homemade or store-bought lemon pepper blend. For saucy versions, you simply add butter and a splash of lemon juice to turn the dry rub into a glossy coating.

2. How do I make lemon pepper chicken wings crispy?

Firstly, pat the wings very dry with paper towels before you season them. Then, toss them with a little oil, salt, and a light dusting of baking powder along with your spices. After that, cook the lemon pepper wings in a hot oven or air fryer without crowding the tray or basket, so the skin has room to dry and blister. Finally, toss them in lemon pepper once they’re cooked and still hot; this way, you get crisp skin plus a fresh coating of seasoning instead of burnt lemon.

3. Can I cook lemon pepper chicken wings in the air fryer?

Absolutely, air fryer lemon pepper wings are one of the easiest options. First, preheat your air fryer so the wings start cooking in hot air right away. Next, arrange the wings in a single layer and cook them until the skin is golden and crisp, flipping once. Afterward, toss the hot wings in lemon pepper seasoning or a butter-lemon sauce to finish. Because the air fryer circulates hot air around each piece, air fryer chicken wings lemon pepper usually turn out very crispy with minimal oil.

4. How do I bake lemon pepper wings in the oven?

To make baked lemon pepper wings, start by preheating the oven to a high temperature, usually around 220°C / 425°F. Place the seasoned wings on a rack set over a baking sheet so air can circulate underneath. Then bake until the wings are brown and crisp, turning once halfway. Right after they come out of the oven, toss them in lemon pepper seasoning or melted butter with lemon and pepper, and you’ll have oven baked lemon pepper chicken with a satisfying crunch and bright flavor.

5. Can I use frozen wings for lemon pepper chicken wings?

Yes, you can, although the process changes slightly. Ideally, you thaw frozen wings in the fridge overnight so you can dry and season them properly. If you must cook from frozen, you can start them plain in the oven or air fryer until they’re mostly cooked, then drain off any excess moisture, pat them as dry as you can, and season them before finishing. This method works, but thawed wings still give the crispiest lemon pepper chicken wings.

6. What is the best way to make lemon pepper wet wings?

For lemon pepper wet wings, you cook the wings until the skin is crisp, then toss them in a butter-based sauce. Typically, the sauce includes melted butter, lemon juice, and lemon pepper seasoning; sometimes a little garlic or hot sauce goes in as well. Once the wings are done, you immediately coat them in this mixture, creating shiny, saucy lemon pepper wings that still have a bit of crunch underneath the glaze.

7. How can I make honey lemon pepper wings?

To create honey lemon pepper wings, you start with regular lemon pepper chicken wings and simply sweeten the finishing sauce. Melt butter, stir in lemon juice, lemon pepper seasoning, and then add honey until the balance of sweet and tangy feels right. When the wings are finished cooking, toss them in this honey-lemon mixture. As a result, you get sticky, glossy honey lemon pepper wings that keep the citrus and pepper bite but add a gentle caramel sweetness.

8. Are lemon pepper chicken wings spicy?

On their own, most lemon pepper chicken wings are more tangy and peppery than truly spicy. Black pepper brings a mild heat and a floral bite, while the lemon makes everything feel bright. If you enjoy spice, you can turn them into spicy lemon pepper wings by adding cayenne, chili flakes, or hot sauce to the dry rub or finishing butter. Conversely, if you prefer a milder flavor, you can reduce the pepper and let the lemon and garlic stand out more.

9. Can I make salt and pepper chicken wings using the same method?

Yes, the same base technique works beautifully for salt and pepper chicken wings. Instead of finishing with lemon pepper, you season the wings with salt, black pepper, and sometimes garlic, spring onions, or chopped chilies after cooking. In other words, you follow the same steps for drying, seasoning, and crisping the wings, then swap the lemon for extra aromatics. This way, you can easily make both salt and pepper chicken and lemon pepper chicken in one session.

10. What are the ingredients for lemon pepper chicken breast or boneless lemon pepper wings?

The ingredients for lemon pepper chicken breast are almost identical to those for wings. You need chicken breast or boneless pieces, oil, salt, garlic powder, onion powder, and lemon pepper seasoning, plus optional butter and lemon juice for a sauce. For boneless lemon pepper wings, you cut boneless chicken into chunks or strips, coat them lightly, cook them until golden, and then toss them in lemon pepper seasoning or a lemon-butter sauce. Essentially, you’re using the same flavors, just on boneless pieces instead of whole wings.

11. How long should I marinate or season lemon pepper chicken wings?

Interestingly, you don’t have to marinate lemon pepper chicken wings for hours to get good flavor. Usually, it’s enough to season the wings with salt, spices, and oil, then let them rest in the fridge for 30–60 minutes. That short rest works like a dry brine and helps the meat absorb the salt. Later, you finish with lemon pepper seasoning or a wet sauce after cooking, which keeps the lemon taste bright. If you want to marinate longer, you can, but it’s better to keep strong acids like lemon juice for the end so they don’t toughen the meat.

12. How do I keep lemon pepper wings from drying out?

To keep lemon pepper wings juicy, start by not overcooking them. Use a thermometer and aim for an internal temperature of 165°F / 74°C, then pull them from the heat. Additionally, try not to trim away too much skin or fat, because those help keep the meat moist while it crisps. Finally, avoid long, harsh marinating in pure lemon juice; instead, add most of the acid at the end in a sauce or final seasoning so you get flavor without dryness.

13. Can lemon pepper chicken wings be made gluten-free or dairy-free?

In many cases, lemon pepper chicken wings are naturally gluten-free if you avoid flour or breadcrumb coatings and choose a gluten-free lemon pepper seasoning. If you’re sensitive, double-check that your baking powder and spices are labeled safe. For a dairy-free version, you simply skip the butter and use oil instead when you make the finishing sauce, or you stick to a dry lemon pepper rub. Consequently, you can still enjoy lemon pepper wings even with gluten-free or dairy-free needs.

14. Can I prepare lemon pepper chicken wings ahead of time?

Yes, preparing ahead is very practical. First, you can season the wings with the base spices and refrigerate them, uncovered or loosely covered, for a few hours or overnight; this helps the skin dry and the meat absorb salt. Then, you cook them close to serving time so they’re fresh and crisp. Alternatively, you can fully cook the lemon pepper chicken wings, chill them, and reheat them later in the oven or air fryer. As long as you cool and store them properly and heat them back to a safe temperature, they keep their flavor and much of their crunch.

15. How do I reheat lemon pepper wings so they stay crispy?

To reheat lemon pepper wings without losing texture, avoid the microwave whenever possible. Instead, use a hot oven or air fryer. In an oven, place the wings on a rack set over a baking sheet and warm them at a moderate temperature until they’re hot through and the skin re-crispens. When using an air fryer, reheat them in a single layer at a medium-high setting for a few minutes, shaking once. In short, dry, circulating heat restores crispiness far better than steaming or microwaving does.

16. Can I turn this recipe into black pepper chicken or black pepper chicken sauce?

You can absolutely borrow the same flavor base for black pepper chicken or a simple black pepper chicken sauce. Instead of focusing on lemon, you boost the pepper and add soy sauce, garlic, and maybe a little stock or water to create a glossy stir-fry sauce. Then you cook sliced chicken pieces and vegetables, such as onions and peppers, in that mixture. Although the result is different from lemon pepper chicken wings, it uses the same balance of savory, peppery heat and can be a nice way to enjoy similar flavors in a completely new dish.

Posted on 16 Comments

Crispy Homemade French Fries From Fresh Potatoes (Recipe Plus Variations)

Woman frying crispy homemade French fries in a pan on the stove, lifting golden fries from hot oil for a MasalaMonk recipe guide.

There’s a special kind of joy in biting into crispy homemade french fries that you made yourself. The outside is shatteringly crisp, the inside is fluffy and hot, and you can taste actual potato instead of just salt and grease. Once you learn how to do diy french fries at home, it becomes hard to go back to limp, lukewarm fast-food versions.

In this guide, we’ll walk through:

  • A straightforward french fries ingredients and procedure section you can follow every time
  • The best way to cook fries using a classic double-fry method
  • Easier options like oven fries at 425°F and air fryer frozen french fries
  • Fun variations: seasoned fries, garlic parmesan french fries, chili cheese french fries, truffle fries, and more
  • Smarter choices for healthy potato fries, from oil selection to veggie alternatives

The aim is simple: by the end, you’ll be able to make perfect french fries in several styles, whether you’re cooking for movie night, a party tray of loaded fries, or just a snack for one.

Also Read: Simple Bloody Mary Recipe – Classic, Bloody Maria, Virgin & More


Why Bother Making Crispy French Fries at Home?

At first glance, buying a bag of frozen fries or grabbing a portion from a takeaway seems easier. However, at home french fries come with a few big advantages.

To begin with, you control the ingredients. You choose the potatoes, the oil, and the salt level. You can keep things minimal for a simple fries recipe, or go wild with flavors like cajun french fries or cheese french fries. When you’re in charge, “quality fries” actually means something.

Moreover, you get to decide how indulgent you want your fries to be. Potatoes themselves are not villains. According to Potatoes USA’s nutrition overview, a medium potato has around 110 calories, zero fat, and offers vitamin C, potassium, and fiber when you keep some peel on. Deep frying adds fat and energy, of course, but with homemade fries, you can:

  • Use better oils
  • Fry at the right temperatures
  • Or choose oven fries potatoes and air fryer french fries most of the time

A typical restaurant portion of fries can be high in fat and sodium. Overviews like Verywell Fit’s french fries nutrition facts break down just how quickly calories add up when fries are cooked in old oil and then heavily salted. Making real potato fries at home lets you adjust all of that.

Finally, the flavor is simply better. Fresh potato fries have a clean, sweet, potato-forward taste that frozen fries rarely match. Once you’ve had real french fried potatoes straight from your own kitchen, it’s hard not to feel a tiny bit smug.

Also Read: Homemade Hot Chocolate with Cocoa Powder Recipe


Best Potatoes for Crispy Homemade French Fries

The heart of any good potato french fries recipe is, unsurprisingly, the potato. Not all varieties behave the same in hot oil or a hot oven, so it’s worth thinking about the type you buy.

Starchy vs “gold” potatoes

For classic crispy fries with fluffy interiors, starchy potatoes are ideal:

  • Russet / Idaho potatoes: High starch and low moisture. These are perfect for french fries from russet potatoes if you want that restaurant-style contrast between crisp outside and soft inside.
  • Yukon Gold and other yellow potatoes: Slightly waxier, with more moisture, but very creamy. These are excellent for gold potato fries or yukon gold french fries when you want a rich, buttery interior and deep golden exterior.

Side-by-side comparisons, like this piece on Russet vs Yukon Gold, point out that Russets crisp up more dramatically than yellows because of their starch and lower moisture, whereas Yukon Golds keep their shape and feel denser and creamier. That matches what you’ll see in your pan: Russets are your friend for the crispiest french fries, while golds are great when you lean toward golden potato french fries that feel more substantial.

In short:

  • For extra crispy french fries or skinny fries → choose Russet/Idaho.
  • For rich, slightly softer thick cut fries or steak fries → try Yukon Gold or another yellow potato.

You can mix them too, especially if you like serving a variety of textures on one platter.

Also Read: Mimosa Recipe: 10 Easy Versions from Classic to Caramel Apple


Oils, Heat, and Tools for Homemade French Fries that are Crispy

Once you’ve got your potatoes sorted, the next question is: what do you fry them in, and how?

Oils that work well for fries

When you’re deep-frying, you want oils that can handle high temperatures and stay reasonably stable:

  • Refined peanut or sunflower oil
  • Canola or rapeseed oil
  • Rice bran oil
  • High-oleic vegetable blends
  • Light or refined olive oil (for fries in olive oil, not extra virgin)

Articles on the healthiest oils for cooking and frying highlight avocado, refined olive, peanut, and similar oils because they combine decent smoke points with more monounsaturated fats. They’re not magic health potions, but they’re a smarter choice than repeatedly overheated, low-quality oils.

For full-on indulgence, some people love beef tallow fries or duck fat french fries. Both fats give incredible flavor, but they are obviously richer and make the most sense for occasional “wow” dinners. On the other end of the spectrum, you can choose very light oil coatings in the oven or air fryer for healthier french fries.

Helpful tools (and what you can skip)

You do not need a dedicated “french fry fryer” to make excellent fries. You can absolutely make french fries at home using basic tools:

  • A heavy pot or deep frying pan
  • A thermometer (to manage that best way to fry fries temperature window)
  • A large bowl for soaking
  • A colander or sieve
  • A clean towel for drying
  • A wire rack and tray for draining cooked fries

A dedicated fryer can make things more convenient if you make home made fries often, but it’s not a requirement. A sharp knife is also plenty for cut fries, although a mandoline or fry cutter can be fun if you often crave french fries shoestring, crinkle cut french fries, or thick cut french fries.

Also Read: French 75 Cocktail Recipe: 7 Easy Variations


Ingredients for Classic French Fries

The nice part about a simple french fries recipe is how short the shopping list is. Here’s a good base for four people.

Core ingredients

  • 1 kg (about 2.2 lb) potatoes (Russet for crispiest; Yukon Gold for creamier)
  • Oil for frying (enough to fill your pot 5–7 cm / 2–3 inches deep)
  • 2–3 teaspoons fine salt

That’s your essential french fries ingredients list: nothing fancy, just the basics that define fresh french fries.

Optional extras for crunch and flavor in Crispy Homemade French Fries

If you’d like to push things toward the crunchy fries recipe end of the spectrum or turn out seasoned fries, keep these on hand:

  • Cornstarch or rice flour (for french fries with crispy coating)
  • Garlic powder, onion powder, smoked paprika, chili powder (for seasoned french fries or cajun french fries)
  • Grated Parmesan, cheddar, or other cheese (for parmesan french fries or cheesy french fries)
  • Truffle oil and fresh parsley (for truffle french fries recipe)
  • Fresh garlic and butter or olive oil (for garlic french fries recipe)

With these extras, the same basic batch of fries can become restaurant style fries, garlic parmesan fries, or loaded french fries without much extra effort.

Also Read: Tres Leches – Mexican 3 Milk Cake Recipe


Step-by-Step Crispy Homemade French Fries (Stovetop)

Let’s start with the classic version: crispy homemade french fries cooked in oil on the stove. This method gives you extra crispy fries if you follow the temperatures and timing closely.

Recipe card showing classic crispy homemade French fries on a plate with ketchup and text for serves, prep time, and cook time.
Classic crispy homemade French fries – a MasalaMonk recipe card with serving size and cook times, perfect for pinning or saving for later.

Step 1: Cut and soak the potatoes

First, scrub your potatoes well. You can peel them if you prefer, but leaving the skins on makes more rustic real potato fries and adds a touch of fiber.

Cut the potatoes into sticks about 8–10 mm thick. For skinny french fries or french fries shoestring, go thinner; for steak fries or thick cut fries, cut chunky batons or wedges.

As soon as you cut them, drop the sticks into a big bowl of cold water. This rinses away surface starch and stops oxidation. Swish them around, then drain and refill with fresh cold water. If you like, add a spoonful of vinegar or lemon juice; it can help them hold their structure during cooking.

Soaking for 20–30 minutes helps prevent the outside from turning gummy and gives you a better chance at truly crispy french fries rather than soggy ones. Once you’re done soaking, drain the potatoes thoroughly and spread them out on a clean towel. Pat them dry until they feel matte. Water on the surface is the enemy here: it lowers oil temperature and encourages splattering.

Step 2: First fry (par-cooking)

Heat your oil to around 150–160°C (300–320°F). At this stage, the goal is to cook the potatoes through without browning them much. For deep frying, a two-stage cook—first at a lower temperature, then at a higher one—is key to combining a fluffy interior with crisp exterior.

Working in small batches, gently lower the dried potato sticks into the hot oil. Fry for about 4–6 minutes. They should turn from opaque to slightly translucent and feel tender if you poke them with a knife, but they should not yet be golden.

Lift them out with a slotted spoon and place them on a rack set over a tray. Repeat with the remaining batches. At this point, you have par-cooked fries: soft, pale, and flexible. You can pause here, cool them, and even refrigerate for several hours if you want to fry just before serving. That’s how many restaurant style french fries are prepped.

Step 3: Second fry (crisping and coloring)

For the second fry, raise the oil temperature to 185–190°C (365–375°F). That hotter environment is where you’ll develop the golden crust that makes crispiest french fries such a pleasure.

Again in small batches, slide the par-cooked fries back into the oil. Fry for 2–4 minutes, until they’re uniformly golden, with little blistered areas and crisp edges. Keep an eye on their color; you’re aiming for golden potato french fries, not dark brown or burnt ones.

There’s a health reason for that, too. When starchy foods like potatoes are fried or baked at high heat, they can form acrylamide, a compound that health agencies monitor. The US FDA’s guidance on acrylamide in foods suggests aiming for light golden colors and avoiding burnt bits whenever possible. The National Institute of Environmental Health Sciences also notes that french fries and similar foods can be significant acrylamide sources when heavily browned. So, aim for gold, not mahogany.

Once the fries are ready, lift them onto the rack or a paper-towel-lined tray. Immediately sprinkle them with salt while they’re still sizzling, so the crystals cling. If you like seasoned fries, this is the moment to toss with paprika, garlic powder, or any spice mix you enjoy.

And just like that, you’ve completed the core french fries procedure: cut, soak, dry, par-fry, then finish hot.

Also Read: High Protein Overnight Oats | 5 Recipes (Low Calorie, Vegan, Bulking & More)


Slightly Smarter, Still Crispy: Health Notes and Oil Choices

Even though fried fries recipes are not exactly health food, you can still make better choices without losing all pleasure.

First, use fresh or properly filtered oil and avoid letting it smoke. Overheated, repeatedly reused oil isn’t just unpleasant in flavor; it can contribute to off flavors and degraded fats. A thermometer makes it much easier to maintain that best way to fry french fries temperature range, whether you’re in a pot or a countertop fryer.

Second, consider how often you go for fully deep-fried crispy french fries versus lighter versions. You might save deep-fried extra crispy french fries for weekends, while turning to oven fries or air fryer homemade fries on busy weeknights.

Third, balance your plate. Fries alongside grilled chicken, salad, or roast vegetables feel different from fries plus more fried items. That’s where side dishes and smarter recipes around your fries come in—and we’ll circle back to those in a bit.

Also Read: 10 High Calorie Protein Shakes & Smoothie Recipes for Healthy Weight Gain


Oven Fries at 425°F: Baked, Seasoned, and Easy

When you’d rather not deal with a pot of hot oil, oven fries 425°F are a great compromise. They won’t be identical to deep-fried fries, yet you can get delicious baked seasoned fries with crisp edges and tender middles.

Recipe card showing a tray of oven-baked seasoned fries at 425 degrees, held with an oven mitt, with serving size and baking time details.
Oven-baked fries at 425°F – crispy seasoned fries with less oil, with prep and bake times highlighted so you can see the whole MasalaMonk method at a glance.

Basic oven fries method

  1. Preheat your oven to 220°C / 425°F.
  2. Cut your potatoes into wedges or sticks, just as before.
  3. In a bowl, toss them with 1–2 tablespoons of oil—this can be olive, avocado, or any neutral oil you like.
  4. Season generously with salt, pepper, and any spices you enjoy: garlic powder, smoked paprika, dried thyme, or a ready-made seasoning blend.
  5. Spread the fries out in a single layer on a baking sheet, leaving a bit of space between pieces. Crowding leads to steaming rather than crisping.
  6. Bake for about 20–25 minutes, turning once halfway through, until the edges are golden brown and the fries are tender inside.

At this point, you’ve made seasoned oven fries that work beautifully with the same sauces and toppings you’d use for deep-fried versions. They’re particularly nice as a side to oven-baked mains or as part of a lighter tray meal.

If you’re planning a party spread that doesn’t revolve solely around fries, you can point guests toward other potato-centric snacks too. A collection like MasalaMonk’s potato appetizers fits naturally alongside oven fries on a buffet table, giving people more variety while still leaning into that potato comfort.

Also Read: How to Cook Perfect Rice Every Time (Recipe)


Air Fryer Fries: Crispy Homemade French Fries With Less Oil

Next, let’s move to fries airfryer style. Air fryers circulate very hot air around food, using far less oil than deep frying. Comparative work on deep-fried vs air-fried potatoes has shown that air-fried samples can have dramatically less fat and slightly fewer calories per serving, which makes them a handy tool when you’d like healthier french fries more often.

Recipe card showing air fryer French fries made from fresh-cut potatoes, with seasoning sprinkled over the basket and serving and cook times displayed.
Air fryer French fries made from fresh-cut potatoes – a MasalaMonk recipe card that highlights how to get crispy fries with less oil, plus prep and air-fry times at a glance.

Fresh potato fries in the air fryer

For easy french fries recipe done in the air fryer:

  1. Cut your potatoes into sticks and soak them as you would for deep frying.
  2. Drain and dry thoroughly.
  3. Toss with 1–2 teaspoons of oil, salt, and seasonings.
  4. Place them in the air fryer basket in a loose, even layer.
  5. Cook at 190°C / 375°F for 15–20 minutes, shaking every 5 minutes so they brown evenly.
  6. For extra crispy french fries, finish with a final 3–5 minutes at 200°C / 400°F.

This method gives you healthy potato fries that still feel indulgent. They’re especially good as skinny fries, where the higher surface area means lots of crunchy bits.

Frozen Crispy Homemade French Fries in the air fryer

For those nights when you want the best frozen fries for air fryer with minimal fuss:

  1. Preheat the air fryer to 200°C / 400°F.
  2. Tip frozen shoestring fries, straight cut fries, frozen waffle fries, or other shapes into the basket. Try not to overstack them.
  3. Air fry for 10–18 minutes depending on thickness, shaking halfway through.
  4. Season as soon as they come out of the basket.

Most brands are already partially fried in oil, so you often don’t need extra. However, a light spray of oil can help paler brands crisp a little better. This technique works well if you want to focus your kitchen time on main dishes but still end up with crispy fries recipe results.

If you’re fond of multitasking with your air fryer, ideas like air fryer hard-boiled eggs fit nicely into the same workflow. You might prepare homemade fries for dinner and a batch of eggs for breakfast with very little extra effort.

Also Read: Béchamel Sauce for Lasagna: Classic, Vegan & Ricotta Sauce Recipe


Playing With Shapes: Shoestring, Thick Cut, Steak, and Crinkle

Once you have a reliable french fries recipe, the next step is having fun with shapes. Different cuts give you different textures and cooking times.

Skinny and shoestring fries

Thin skinny fries or french fries shoestring are all about extreme crispness:

  • Cut the potatoes into matchsticks.
  • Soak, dry, and fry exactly as for the classic recipe.
  • Shorten the par-fry to keep them from overcooking, and watch carefully during the second fry—they go from golden to too dark very quickly.

Shoestring fries are fantastic when you’re making loaded french fries recipe variations like chile-topped fries, because so many edges catch sauce and cheese.

Thick cut fries and steak fries

On the opposite end, thick cut french fries and steak fries are all about a soft, potato-y center:

  • Cut the potatoes into chunky batons or wedges.
  • Lengthen the par-fry slightly or start them in the oven with a bit of water in the pan, then finish in hot oil or under the broiler.
  • Because there’s more potato in each piece, they stay creamy inside even when the exterior is thoroughly crisp.

Thick cut fries shine alongside robust dishes: grilled steak, roasted chicken, or as part of a plate with gravy and vegetables.

Crinkle cut and waffle fries

For crinkle cut french fries, fries crinkle cut, or french fries crinkle, you’ll need a crinkle cutter or a mandoline that makes ridges. The technique stays the same—soak, dry, par-fry, then crisp—but the ridges create extra surface area. That means more crunch, and it also means they hold onto seasonings and sauces really well.

Similarly, frozen waffle fries from the store become great canvases for fancy fries toppings. Their lattice structure acts like a little basket for cheese, carne asada, or creamy sauces.

Also Read: Peanut Butter Cookies (Classic Recipe & 3 Variations)


Veggie Fries: Sweet Potato, Yuca, Jicama, and Rutabaga

While classic french fries from white potatoes are iconic, you can also explore veggie french fries when you’re craving variety or want to shift the nutrition profile a bit.

Sweet potato fries

Sweet potato french fries deserve their own shout-out. They bake and air fry beautifully, and they pair well with both sweet and savory seasonings, from cinnamon and chili to garlic and smoked paprika. You can even make crinkle cut sweet potato fries for added texture.

Sweet potatoes tend to be softer and more prone to burning at high heat, so a light coating of cornstarch and oil, plus slightly lower temperatures, often work best. For more detail on how sweet potatoes differ nutritionally from white potatoes, you might enjoy MasalaMonk’s sweet potato nutrition breakdown and their piece on the potato debate: white vs sweet. Those articles go into fiber, vitamins, and even blood sugar considerations in a way that helps you decide when to reach for which.

Recipe card showing crispy spiced sweet potato fries in a round tray with dipping sauce, lime, and sweet potato pieces, plus serving and cook time details.
Crispy, spiced sweet potato fries with a creamy dip – a MasalaMonk recipe card that highlights this naturally sweet, oven or air-fried alternative, complete with prep and cook times.

Yuca, jicama, and rutabaga fries

Beyond sweet potatoes, you can experiment with:

  • Yuca french fries: dense, starchy, and very satisfying. They need peeling and careful boiling before frying, but the final texture is almost creamy.
  • Jicama french fries: lower in carbs, with a fresh crunch and a subtle sweetness. These are typically best baked or air fried with strong seasonings.
  • Rutabaga french fries: slightly earthy and sweet, good roasted until caramelized and then tossed with spices.

These alternatives work well when you want healthy potato fries style sides on repeat without always using white potatoes. They’re also fun for guests who’ve never tried such variations.

Also Read: Chicken Alfredo Pasta, 5 Ways (Classic to Cajun, Veg, 15-Minute Jar, Healthy)

Four glasses lined up on a board, each filled with a different veggie fry—sweet potato, yuca, jicama and rutabaga—with a hand picking up one fry and dipping sauces blurred in the background.
Veggie fries medley: sweet potato, yuca, jicama and rutabaga, for nights when you want all the crunch of fries with a little extra colour and variety on the MasalaMonk table.

Seasoned, Spiced, and Coated Fries

Once you’ve mastered the basics, it’s time to play with seasoned fries, homemade seasoned french fries, and light coatings for texture.

Basic seasoned Crispy Homemade French Fries

For a straightforward seasoned fries recipe, start with fresh, hot fries and toss them with:

  • Fine salt
  • Garlic powder
  • Onion powder
  • Smoked paprika
  • A pinch of black pepper or chili powder

This base mix instantly transforms simple french fries into something closer to best seasoned fries, and you can adjust the heat level to taste.

Top-down view of a wooden board with three piles of seasoned fries labeled Cajun, Garlic Herb and Smoky Paprika, each with a matching dipping sauce and a hand picking up a fry.
Seasoned fries three ways – Cajun, garlic herb and smoky paprika – so you can turn one batch of MasalaMonk fries into a full flavour tasting board.

Cajun and herby variations

To steer your fries toward cajun french fries, blend:

  • Paprika
  • Cayenne
  • Garlic powder
  • Oregano
  • Thyme
  • A bit of brown sugar and black pepper

Toss this through hot fries and you’ll have spicy, deeply flavored seasoned homemade fries that go especially well with tangy dips like tzatziki or yogurt-based sauces.

Alternatively, if you’d rather lean into herbs, use rosemary, thyme, cracked black pepper, and flaky salt. These herby seasoned french fries feel more rustic and pair beautifully with roast meats and vegetables.

Crispy coatings for Homemade French Fries

If you want french fries with crispy coating without turning them into full battered french fries, a light dusting of starch can help. After soaking and drying, toss the raw potato sticks in a spoonful of cornstarch or rice flour, shake off the excess, and then fry as usual. The coating makes subtle bubbles and ridges on the surface, giving you extra crispy fries that stay crunchy a little longer.

Also Read: Crock Pot Lasagna Soup (Easy Base + Cozy Slow-Cooker Recipes)


Cheesy, Loaded, and Fancy Fries

Now comes the most playful part: turning a bowl of fries into a full meal or an irresistible shareable plate.

Garlic parmesan fries

To create garlic parmesan french fries, start with a batch of hot, freshly fried fries.

  1. In a small pan, gently warm a bit of butter or olive oil with minced garlic until fragrant, not browned.
  2. Toss the hot fries with this garlic mixture.
  3. Add a handful of grated Parmesan and chopped parsley.
  4. Season with salt and pepper as needed.

This same approach also works for simple parmesan french fries if you skip the garlic or for sweet french fries if you play with honey and chili flakes instead.

Recipe card showing garlic parmesan fries in a bowl with cheese being sprinkled on top, surrounded by garlic cloves and a parmesan wedge, plus serving and cook time details.
Buttery, garlicky parmesan fries piled high in a bowl – a MasalaMonk recipe card that highlights this extra-crispy variation, complete with prep and cook times for easy reference.

Chili cheese and carne asada fries

For fully loaded chili cheese french fries, layer:

  • A bed of crispy fries
  • A ladle of hot chili (vegetarian or meaty)
  • Grated cheddar or Monterey Jack
  • Jalapeños, scallions, maybe a drizzle of sour cream

Slide the whole thing under the broiler for a minute until the cheese melts. Suddenly, your crispy fries have become serious comfort food.

Recipe card showing chili cheese loaded fries in a cast iron skillet, topped with chili, melted cheese, jalapeños and sour cream, with serving and bake time details
Chili cheese loaded fries served in a cast iron skillet – a MasalaMonk recipe card for the ultimate comfort fry platter, complete with prep and bake times for easy game-night planning.

Similarly, carne asada french fries combine:

  • Fries
  • Chopped grilled steak
  • Pico de gallo or salsa
  • Guacamole
  • Sour cream or crema
  • Fresh coriander

They’re messy, delicious, and perfect for sharing.

Carne asada fries on a rectangular tray topped with grilled steak strips, guacamole, salsa, sour cream and cilantro, with hands squeezing lime and reaching for a fry.
Carne asada fries loaded with steak, salsa, guacamole and sour cream – a MasalaMonk feast that turns a simple tray of fries into a full-on meal.

Truffle and “fancy” fries

When you want fancy fries without too much effort, truffle french fries recipe style toppings make a big impression.

  • Toss hot fries with a little truffle oil (a few drops go a long way).
  • Add grated Parmesan and parsley.
  • Season with salt and cracked pepper.

Because truffle oil can dominate, it’s best used with neutral, simply salted fries rather than heavily seasoned ones.

If you’d like more ideas for dips and cheesy sides that pair well with loaded fries, MasalaMonk’s spinach dip collection and their buffalo chicken dip recipes offer plenty of inspiration. Both kinds of dip are excellent alongside loaded french fries or even spooned over the top.

Tall metal cup filled with truffle fries topped with parmesan and herbs, served on a dark plate with aioli, styled like an elegant restaurant snack.
Skinny truffle fries finished with parmesan, herbs and a side of aioli – a simple MasalaMonk twist that turns fries into a wine-bar style treat.

Sauces and Dips for Crispy Homemade French Fries

Good fries deserve good sauces. Beyond ketchup, you can easily mix and match flavors for your own french fry dip recipe collection.

Creamy dips

For creamy dipping sauce for french fries, try ideas like:

  • A simple garlic mayonnaise with lemon juice
  • A smoky paprika mayo
  • A yogurt-based dip with herbs and garlic

These work especially well with seasoned fries and cajun fries, where the spices already bring a lot of personality.

If you want to branch out further, the cool, garlicky punch of tzatziki is a great contrast to hot fries. A guide like MasalaMonk’s Greek tzatziki sauce recipes shows how versatile that sauce can be across different herbs and add-ins, and every version is happy to share a plate with crispy fries.

Four quick fries dipping sauces – garlic mayo, smoky ketchup, spicy mayo and herb yogurt – so you can switch up the flavour of every MasalaMonk fries night in minutes.

Cheesy and baked dips for Crispy Homemade French Fries

Meanwhile, cheesy dips make perfect companions to french fries loaded with toppings. Spinach and artichoke dip, hot cheese dips, or buffalo chicken dip can all sit in the center of a platter surrounded by straight cut french fries, curly french fries, or crinkle cut fries for dipping.

Because fries and rich dips can be quite substantial, you may find it useful to round out your menu with lighter but still indulgent favorites. Dishes like classic deviled eggs with variations or high-protein snacks and breakfasts, such as overnight oats recipes, help keep things balanced over the course of a day, even if dinner is definitely in “treat” territory.


What to Serve With Crispy Homemade French Fries

Rather than thinking of fries as an afterthought, you can build entire meals around them in a way that feels intentional and satisfying.

Classic comfort plates

On one hand, there’s the timeless pairing of chicken and french fries:

  • Grilled or fried chicken
  • Homemade fries (deep-fried, oven-baked, or air fried)
  • Coleslaw or a fresh salad

You can also swap chicken pieces for sandwiches. A platter of fries next to juicy sandwiches from a range like MasalaMonk’s chicken sandwich recipe collection makes a complete, crowd-pleasing spread.

For full comfort food mode, consider serving fries alongside creamy classics:

Those casseroles and bakes give you vegetables and dairy in forms people love, while the fries bring crunch and a salty edge to balance the creaminess.

Party spreads and grazing boards

For parties or movie nights, a fries-centric board can be a huge hit. You might:

  • Offer multiple shapes: thick cut fries, skinny fries, crinkle cut fries
  • Provide several seasonings: plain salted, cajun, garlic herb
  • Add bowls of dips: tzatziki, spinach dip, buffalo chicken dip, ketchup, mustard-based sauces

Alongside that, including a few extra nibbles from potato-focused ideas like MasalaMonk’s potato appetizers roundup keeps everyone happy without making fries the sole attraction.


Leftovers, Crispy Homemade French Fries, and Casseroles

Every now and then, you might find yourself with cooked fries left over. They won’t be as crisp the next day, but they are far from useless.

Turning fries into home fries

One option is to make a sort of shortcut home fries recipe:

  1. Chop leftover fries into bite-sized pieces.
  2. Heat a skillet with a spoon of oil or butter.
  3. Add onions or peppers if you like, then the chopped fries.
  4. Cook over medium-high heat until the edges crisp and the pieces heat through.
  5. Season again and serve with eggs for breakfast.

These cooking home fries from leftover fries are especially good with runny yolks or as part of a brunch plate.

Cast iron skillet filled with breakfast home fries made from chopped leftover fries, peppers and three fried eggs, served with coffee, toast and salsa
Turn last night’s fries into this cosy breakfast home fries skillet, topped with sunny-side eggs and peppers for an easy MasalaMonk-style brunch.

Casseroles with Crispy Homemade French Fries

Another route is to layer leftover fries into a bake:

  • Assemble a cheeseburger casserole with french fries: fries on the bottom, cooked ground meat or meat alternative, cheese, and pickles or onions, then bake until bubbly.
  • Create a riff on shepherd’s pie using fries as a topping instead of mashed potatoes.

These dishes aren’t traditional, but they’re a fun way to avoid waste and to reimagine fries in a new context.

Also Read: Coconut Water Cocktails: 10 Easy, Refreshing Drinks


Bringing It All Together

To sum everything up, making french fries at home doesn’t need to be complicated. You start with good potatoes, a sensible approach to oil and heat, and a simple french fries recipe that you can repeat without thinking too hard. From there, the world opens up: you can lean toward healthy potato fries most days, then indulge in deep-fried extra crispy french fries when the mood hits.

You’ve seen how to:

  • Choose between Russet and Yukon Gold for the best french fry potato
  • Use soaking, drying, and double frying to achieve reliably crispy homemade french fries
  • Swap in oven fries, air fryer fries, or veggie french fries like sweet potato, yuca, jicama, and rutabaga
  • Turn plain fries into seasoned fries, garlic parmesan fries, chili cheese fries, carne asada fries, and truffle fries
  • Build full meals and snack boards around fries with dips, casseroles, sandwiches, and brunch ideas

Whether you keep it simple with a plate of lightly salted fresh french fries, or go all out with a giant platter of loaded french fries recipe piled high with cheese and toppings, you now have the tools to make them taste the way you want, every time you crave them.

Also Read: Cottage Cheese Lasagna Recipe | Chicken, Spinach, & Ricotta

FAQs about Crispy Homemade French Fries

1. What is the best potato for crispy homemade french fries?

For truly crispy homemade french fries, starchy potatoes work best. Russet or Idaho potatoes are usually considered the best french fry potato because they have a high starch, low moisture content that turns fluffy inside and crisp outside after frying. Yukon Gold or other “gold” potatoes also make excellent golden potato french fries, although they come out a little creamier and denser. If you prefer extra crunch and light interiors, reach for Russets; if you like a richer bite, go for Yukon Golds.


2. How do I keep fries crispy and not soggy?

To keep fries crunchy instead of limp, several small steps matter. Dry the potatoes thoroughly after soaking so you’re not dropping water into the oil. Then, cook them twice: a gentle first fry to cook the potato through, followed by a hotter second fry that creates the crisp crust. Avoid crowding the pan, since too many fries at once will cool the oil and make everything greasy. Salt and season fresh french fries right after the second fry while they are still hot, and serve them soon so the crust stays crisp.


3. Why do recipes tell me to soak potatoes before frying?

Soaking sliced potatoes in cold water helps pull out surface starch, which can otherwise form a gummy coating and prevent crispy fries from developing. A soak of 20–30 minutes is usually enough for a simple french fries recipe. After soaking, draining and drying thoroughly is just as important. When excess starch and moisture are removed, the fries brown more evenly and stay crisp longer, which is essential for the crispiest french fries.


4. Can I make crispy homemade french fries without a deep fryer?

Yes, you absolutely can make homemade fries without a dedicated fryer. A deep, heavy pot or a sturdy frying pan works fine as long as you use enough oil to submerge the potatoes and maintain consistent heat. A thermometer helps you hit the right temperature range. In addition, you can make oven fries and air fryer fries with just a thin coating of oil if you’d rather skip deep-frying altogether. The technique changes slightly, yet you still end up with easy french fries that taste fantastic.


5. What is the best way to fry french fries for perfect results?

A classic double-fry method is often considered the best way to fry french fries. First, fry the potatoes at a lower temperature so they cook through without much color. Then, after a short rest, fry them again at higher heat so the outside turns crisp and golden. During both steps, keep the oil temperature steady and avoid crowding the pan. Using this approach, even a beginner can turn out perfect french fries from a straightforward easy french fries recipe.


6. How hot should the oil be for french fries?

For the first fry, aim for oil around 150–160°C (300–320°F). This lets the interior of the potato cook gently without the outside browning too quickly. For the second fry, raise the temperature to about 185–190°C (365–375°F). At this higher heat, the surface dries out and browns into a crisp shell. Keeping the oil in this range is one of the main secrets behind extra crispy french fries and prevents the fries from soaking up too much oil.


7. Can I make french fries without oil?

You can make french fries without oil in the strict sense by baking or air frying plain potato sticks, though they will taste more like roasted potatoes than true fries. More realistically, very small amounts of oil—just enough to lightly coat the potatoes—create healthy potato fries that still feel indulgent. Oven-baked oven fries 425 and air-fried potatoes both work well with only a teaspoon or two of oil per serving, especially when you add bold seasonings.


8. Are homemade fries healthier than fast food fries?

While fries are still an occasional treat, homemade fries can be a better option than many fast-food versions. You decide the portion size, which oil to use, and how much salt to add. You can also make french fries from fresh potatoes instead of relying on heavily processed products. If you alternate deep-fried batches with oven fries or air fryer homemade fries, and you pair them with protein and vegetables, french fry meals can fit more comfortably into a balanced way of eating.


9. What’s the difference between shoestring, thick cut, steak fries, and crinkle cut?

All these names refer mainly to shape and thickness. Shoestring fries and skinny fries are very thin and cook quickly, giving you lots of crunchy texture. Thick cut fries and steak fries are chunkier sticks or wedges with a soft, fluffy center. Crinkle cut french fries have wavy ridges that increase surface area and help hold onto sauce and seasoning. You can use the same basic french fries recipe for each style; just adjust cooking time so the inside cooks before the outside browns too much.


10. How do I make seasoned fries at home?

To make a seasoned fries recipe at home, start with freshly cooked, hot fries. Immediately toss them with salt, then add your favorite flavors. A simple mix might include garlic powder, onion powder, smoked paprika, and black pepper. For cajun french fries, you can add cayenne, oregano, and thyme. If you prefer herby seasoned homemade fries, try rosemary, thyme, or mixed Italian herbs. Because you apply the spices while the fries are hot, they cling well and create deeply flavorful seasoned french fries.


11. How can I make fries extra crispy with a coating?

For french fries with crispy coating, a light starch layer helps. After soaking and drying the potatoes, toss them in a spoonful of cornstarch or rice flour until just lightly dusted. Shake off the excess, then fry using the usual two-step method. The starch forms tiny bubbles and ridges on the surface, leading to extra crispy fries. You still get the flavor of real potato fries, but with a more pronounced crunch that holds up better under sauces and toppings.


12. Can I make french fries in the air fryer from frozen?

Yes, air fryer frozen french fries are one of the easiest weeknight options. Place frozen fries in air fryer—whether they are shoestring, waffle, or steak-cut—in a single layer, set the temperature around 200°C / 400°F, and cook until they’re crisp and hot, shaking the basket once or twice. Many people look for the best frozen fries for air fryer because par-fried frozen fries crisp quickly and take well to extra seasonings. With this method, you still get satisfying crunch without using much additional oil.


13. Can I microwave french fries?

You can microwave fries, yet they rarely come out crisp. Microwave french fries tend to steam rather than brown, so they soften instead of staying crunchy. If you want to use the microwave, you can briefly pre-cook thick wedges or steak fries, then finish them in a hot oven, pan, or air fryer to reintroduce crispness. For reheating leftovers, a skillet or air fryer generally gives better results than the microwave alone.


14. How do I reheat leftover fries so they don’t turn floppy?

To revive fries, spread them in a single layer in a hot pan with a thin film of oil, or place them in a preheated air fryer basket. Heat until the outside becomes crisp again and the centers are warmed through. This method works for frozen fried potatoes, french fries and chips, or leftover home made fries from the day before. Reheating on a baking sheet in a hot oven also helps, though it may take slightly longer to recapture the original crunch.


15. How can I make fries healthier without losing too much flavor?

If you want healthier french fries without giving them up entirely, there are several strategies. Bake or air fry potato sticks with just a small amount of oil instead of deep-frying. Switch between white potatoes and alternatives like sweet potato french fries, yuca french fries, jicama french fries, or rutabaga french fries for more variety in fiber and nutrients. Additionally, serve your crispy homemade french fries as a side with lean protein, salads, or vegetable-rich dishes rather than pairing them only with other heavy foods.


16. What sauces go well with homemade fries?

Although ketchup is classic, homemade fries welcome a wide range of sauces. Garlic mayonnaise, mustard-based dips, smoky paprika mayo, yogurt-and-herb sauces, and spicy chili dips all pair beautifully with crispy fries. Cheese-based sauces turn simple fries into french fries loaded with flavor, while lighter dips like tzatziki give a refreshing contrast. By keeping a few favorite sauces on hand, you can turn one basic easy fries recipe into many different experiences just by changing what you serve alongside.

Posted on 11 Comments

Buffalo Chicken Dip | Healthy, Crockpot & Veg Recipes

Hand dipping a celery stick into a bubbling buffalo chicken dip in a cast iron skillet on a wooden table

There are some recipes people like, and then there are recipes people hover around. This creamy buffalo chicken wing dip definitely belongs in the second group. It has everything you love about hot wings—heat, tang, salty richness—folded into a scoopable, shareable spread that works for game days, house parties, holiday evenings or the most low-key movie night.

Once you understand the basic structure of this hot wing chicken dip, you can twist it into a baked version, a crockpot buffalo-style chicken dip, a quick skillet batch, high-protein or low-carb options, and even vegetarian or vegan “buffalo chicken” style dips. You can then build a whole menu around it, with wings, jalapeño poppers, creamy side dishes, and even a couple of cocktails to cut through all that glorious richness.


Why This Creamy Wing Dip Works So Well

Every good buffalo-style chicken dip—no matter how fancy it looks in the photo—comes down to a few simple ideas:

  1. Shredded chicken for texture and savoriness
    Tender chicken brings the “wing” part of the flavor. When you shred it finely, each bite of dip feels meaty without being chunky or awkward to scoop.
  2. A smooth, tangy base
    Cream cheese, sour cream or yogurt and a little creamy dressing (usually ranch or blue cheese) give the dip its body. This mixture softens the heat, spreads the flavor and makes the whole thing feel luxurious.
  3. Buffalo-style hot sauce for fire and acidity
    A generous amount of hot sauce delivers that familiar wing flavor. The trick is balancing it with the creamy base so the dip stays bold but still pleasant to eat by the spoonful.
  4. Melty cheese for comfort
    A handful of shredded cheese melts through the mixture, giving the wing dip extra body and those stretchy strings everyone secretly chases with their chips.

When you keep these four pillars in mind—chicken, creamy base, buffalo-style sauce, and cheese—you can replace individual components and still end up with something delicious. That’s why one basic buffalo chicken wing dip recipe can morph into dozens of variations without ever feeling repetitive.

Also Read: Simple Bloody Mary Recipe – Classic, Bloody Maria, Virgin & More


Core Ingredients for Buffalo Chicken Dip

To give you a solid starting point, here’s a flexible list you can reuse across several methods: baked, slow cooker, stovetop, and more.

Choosing the chicken

You can use almost any cooked chicken:

  • Leftover roast or grilled chicken
  • Poached chicken breasts or thighs
  • Rotisserie chicken from the store
  • Even canned chicken in a pinch

For a party-sized batch of buffalo style chicken dip, aim for 2 cups (250–300 g) of shredded chicken. Finely shredded meat blends into the creamy base much more easily than large chunks, so it is worth taking an extra minute with your forks.

Building the creamy base

A reliable base ratio looks like this:

  • 225 g cream cheese, softened
  • ½ cup thick plain yogurt or sour cream
  • ½ cup ranch or blue cheese dressing

This gives you a mixture that’s rich, tangy and thick enough to feel substantial, yet still soft enough to scoop. Yogurt brings a little extra protein and a more pronounced tang, while sour cream gives a slightly silkier feel.

If you like to keep an eye on nutrition, it helps to know that plain Greek yogurt tends to be lower in fat and calories but higher in protein than sour cream, as shown in comparisons that use USDA data.(foodess.com) That makes it a handy ingredient when you want your hot chicken dip to be a bit lighter but still creamy.

Hot sauce and cheese

For that signature buffalo wing taste:

  • ½ cup buffalo-style hot sauce, or to taste
  • 1 cup shredded cheese (cheddar, mozzarella, Colby Jack or a blend)

The hot sauce brings heat and acidity; the cheese melts through and anchors everything. A small pinch of garlic powder and onion powder (about ¼ teaspoon each) rounds out the flavor and pushes the dip closer to what you’d get at a pub or sports bar.

Also Read: Tres Leches – Mexican 3 Milk Cake Recipe


Oven-Baked Buffalo Style Chicken Dip

The most straightforward way to make this dish is in the oven. Baked buffalo style chicken dip comes out bubbling around the edges with a lightly bronzed top, and it feels slightly more special than a dip made in the microwave.

Hand dipping toasted bread into classic baked buffalo chicken dip with golden cheese crust, served with wings and veggie sticks
Classic baked buffalo chicken dip with a bubbling cheesy top—ready in about 30 minutes and perfect as the base recipe for every variation in this guide.

Step-by-step baked buffalo chicken wing dip

Ingredients

  • 2 cups cooked shredded chicken
  • 225 g cream cheese, softened
  • ½ cup plain yogurt or sour cream
  • ½ cup ranch or blue cheese dressing
  • ½ cup buffalo-style hot sauce
  • 1 cup shredded cheese (plus extra for topping)
  • 2 tbsp chopped spring onion or chives (optional)
  • ¼ tsp garlic powder
  • ¼ tsp onion powder
  • Salt and pepper

1. Preheat and prep

First, preheat your oven to 180°C / 350°F. Lightly grease an 8×8 inch (20×20 cm) baking dish or a similar small casserole. A shallow dish gives you more golden top; a deeper one gives you a softer center.

Hand brushing oil inside a square baking dish for buffalo chicken dip with a preheated oven and bowl of oil in the background
Step 1 – Preheat the oven to 180°C / 350°F and lightly grease your baking dish so the buffalo chicken dip bakes evenly and releases cleanly.

2. Mix the creamy buffalo base

Next, combine the softened cream cheese, yogurt or sour cream, ranch or blue cheese dressing, hot sauce, garlic powder and onion powder in a bowl. Whisk until the mixture is completely smooth.

At this stage, take a little taste:

  • If it feels too mellow, add another splash of hot sauce.
  • If it tastes sharper than you’d like, stir in a spoonful of cream cheese or yogurt.
  • If it seems flat, a pinch of salt helps other flavors pop.

Recipes like the oven-baked buffalo chicken dip at Taste of Home follow almost exactly this pattern: a short list of creamy ingredients plus hot sauce, chicken and cheese, baked until hot and bubbly.

Hand whisking cream cheese, yogurt, dressing and buffalo-style hot sauce in a mixing bowl to make the creamy base for buffalo chicken dip.
Step 2 – Mix the creamy base by whisking softened cream cheese, yogurt or sour cream, ranch or blue cheese dressing, and buffalo-style hot sauce until completely smooth and well seasoned.

3. Fold in chicken and cheese

Then, add the shredded chicken, ¾ of your shredded cheese and the chopped herbs. Stir until the chicken is fully coated and you don’t see any dry pockets.

The mixture should be thick but spreadable. If it feels overly stiff, another spoonful of dressing or yogurt will loosen it.

Hand folding shredded chicken, shredded cheese and chopped herbs into a creamy orange buffalo sauce in a mixing bowl.
Step 3 – Fold in shredded chicken, cheese and herbs until every piece is coated in the creamy buffalo sauce and the dip looks thick and spreadable.

4. Bake until bubbling

Spread the mixture evenly in your prepared baking dish. Sprinkle the remaining cheese over the top.

Bake for 20–25 minutes, or until:

  • The edges are bubbling
  • The cheese topping has melted and turned golden in places

If you love a browned crust, you can finish the dish under a hot grill or broiler for 2–3 minutes, keeping a close eye so the cheese doesn’t burn.

Hand wearing an oven mitt sliding a baking dish of buffalo chicken dip with melted cheese into a hot oven
Step 4 – Bake the buffalo chicken dip for 20–25 minutes until the cheese on top is melted, bubbling around the edges and lightly golden.

5. Rest and serve

Finally, let the baked chicken wing dip rest for about 5–10 minutes. During this pause, it thickens slightly and becomes easier to scoop.

Scatter extra herbs or a handful of crumbled blue cheese over the top if you like. Then carry it straight to the table with vegetables, crackers and bread.

A second, milder dip—perhaps one from the spinach dip recipes collection—looks beautiful next to this fiery, cheesy dish and gives your guests another flavor to explore.

Hand dipping a celery stick into baked buffalo chicken dip with a golden cheese crust, surrounded by baguette slices and veggie sticks on a wooden table
Step 5 – Let the buffalo chicken dip rest for a few minutes, garnish with herbs, then serve with crunchy veggie sticks and toasted bread for dipping.

Make-ahead tips for baked buffalo chicken wing dip

You can assemble this oven-baked buffalo chicken wing dip a day ahead:

  • Mix the base, chicken and cheese.
  • Spread it in the dish, cover tightly and refrigerate.
  • When you’re ready to serve, uncover, add the final layer of cheese and bake.

Because the mixture starts cold, it may need an extra 5–10 minutes in the oven. Check that the center is hot and the edges are bubbling before you bring it out.

Also Read: How to Cook Perfect Rice Every Time (Recipe)


Slow Cooker Buffalo Chicken Wing Dip for Parties

When you’re planning a game day or a long evening with friends, a slow cooker version—often called buffalo wing dip or buffalo style chicken dip in the slow cooker—is incredibly practical. You can prep everything earlier, then simply let the crockpot keep it warm while people graze.

There are two main approaches:

  1. Using chicken that is already cooked and shredded.
  2. Starting with raw chicken breasts, which cook in the slow cooker before becoming dip.

Crockpot buffalo wing dip with cooked chicken

For this crockpot method, use the same ingredient list as the baked version.

1. Load the slow cooker

Place the cream cheese (cut into cubes), yogurt or sour cream, ranch or blue cheese dressing, hot sauce, chicken, shredded cheese and seasonings into the slow cooker. Stir them together roughly.

2. Cook on LOW

Cover the crockpot and cook on LOW for about 2–3 hours, stirring once or twice. The aim is to gently melt the cheese and cream cheese until you have a smooth, hot wing dip.

3. Keep warm

Once the mixture is fully melted and bubbling around the edges, switch the slow cooker to WARM. This keeps the dip scoopable for hours without scorching it.

Hand ladling slow cooker buffalo chicken wing dip from a black crockpot, with veggie sticks, wings and dip bowls on a wooden table
Slow cooker buffalo chicken wing dip simmering in a crockpot—a hands-off, crowd-sized party batch you can keep warm for hours on game day.

Many popular recipes follow this rhythm almost exactly, such as slow cooker buffalo chicken dips from Allrecipes and Taste of Home that layer chicken, hot sauce, cheese and dressing, then cook on LOW before switching to WARM for serving.

Slow cooker method with raw chicken

If you prefer to start with raw chicken, you can do that as well:

  1. Place 2 small chicken breasts into the bottom of the slow cooker.
  2. Pour over your hot sauce, dressing and a splash of water or stock.
  3. Cook on LOW for 3–4 hours, until the chicken is tender.
  4. Shred the chicken directly in the pot using two forks or a hand mixer.
  5. Add cream cheese, yogurt or sour cream and shredded cheese. Stir to combine.
  6. Cook on LOW for another 30–45 minutes, then switch to WARM.

This approach is especially handy if you’re starting from frozen or raw meat and don’t want to dirty any extra pans.

Also Read: Crock Pot Lasagna Soup (Easy Base + Cozy Slow-Cooker Recipes)


Quick Stovetop and Skillet Buffalo Chicken Wing Dip

Sometimes turning on the oven or hauling out the slow cooker feels like too much. On a hot afternoon or in a tiny kitchen, a stovetop buffalo-style chicken dip is just easier.

Hand dipping a celery stick into skillet buffalo chicken dip with melted cheese in a cast iron pan on a wooden table
Skillet buffalo chicken dip made on the stovetop in one pan—quick hot wing–style flavor with a gooey cheese pull, ready fast for last-minute cravings.

Simple skillet method

  1. In a large skillet, gently heat the cream cheese, yogurt or sour cream, hot sauce and dressing over low to medium-low heat.
  2. Stir constantly until the mixture becomes smooth and creamy.
  3. Add the shredded chicken, cheese and seasonings.
  4. Continue to cook, stirring, until the cheese melts and the dip is piping hot.
  5. If your skillet is oven-safe, you can sprinkle extra cheese on top and slide it under the grill or broiler for a couple of minutes for a lightly browned finish.

Skillet versions often show up in slow-cooker recipes too; for instance, some Allrecipes methods start with a creamy mixture on the stove before moving to the slow cooker.(Allrecipes) In everyday life, though, you can simply stop once the dip is melted and serve it straight from the pan.

Also Read: High Protein Overnight Oats | 5 Recipes (Low Calorie, Vegan, Bulking & More)


Using Canned or Rotisserie Chicken

Realistically, you won’t always have perfectly poached or roasted chicken waiting in the fridge. Fortunately, this spicy chicken dip is very forgiving.

Canned chicken for speed

Canned chicken makes a surprisingly good base for buffalo style chicken dip when you’re short on time:

  • Use two 170 g (6 oz) cans, drained well.
  • Flake the meat with a fork to remove clumps.
  • Stir it into your creamy buffalo base just as you would fresh chicken.

Because canned chicken is lean and a bit drier, you might want to:

  • Add a spoonful or two of extra yogurt or dressing.
  • Increase the cheese slightly for more richness.

Recipes like Allrecipes’ baked buffalo dip with canned chicken use exactly this trick to turn pantry items into a party-ready hot dip with minimal effort.

Rotisserie chicken for extra flavor

Rotisserie chicken is ideal when you want the wing dip to feel extra luxurious with minimal extra work:

  • Pull the meat off the bones while it is still slightly warm.
  • Shred it finely, chopping any very large pieces.
  • Avoid large skin or cartilage pieces, though a little chopped crispy skin can add delicious flavor.

With rotisserie chicken, the rest of the recipe stays exactly the same, but the taste becomes deeper and more complex. That makes this approach wonderful for holidays or any time you want your buffalo style chicken dip to feel a notch above the usual.

Also Read: Homemade Hot Chocolate with Cocoa Powder Recipe


Lighter, High-Protein and Low-Carb Variations

A classic buffalo chicken wing dip is undeniably indulgent. Even so, you can nudge it toward healthier territory without sacrificing the flavors you love.

Greek yogurt hot wing dip

For a lighter yet creamy chicken wing dip, Greek yogurt is a star:

  • Use ½ block cream cheese instead of a full block.
  • Increase Greek yogurt to ¾–1 cup.
  • Keep hot sauce and cheese the same.
Hand dipping a carrot stick into high-protein buffalo chicken dip made with Greek yogurt, served with veggie sticks and toasted bread.
High-protein buffalo chicken dip made with Greek yogurt—lighter than the classic version, still extra creamy and perfect with crunchy veggie dippers.

Because Greek yogurt is typically lower in fat and higher in protein than sour cream, according to nutrition comparisons based on USDA data, it turns this into more of a high-protein buffalo chicken dip without feeling “diet” in the slightest.(foodess.com)

When you taste the mixture, you may find it a little tangier than the original. In that case, an extra tablespoon of cream cheese or a tiny drizzle of honey can round out the flavor.

Cottage cheese for a protein boost

For a really protein-dense spicy chicken dip:

  1. Blend 1 cup cottage cheese until completely smooth.
  2. Use that in place of half the cream cheese and half the yogurt or sour cream.
  3. Season generously with salt, pepper, garlic powder and extra hot sauce to keep the flavor bold.

This style of hot chicken dip is ideal when you want something that feels like a treat but works within a higher-protein eating plan.

Hand dipping a wholegrain cracker into protein buffalo chicken dip made with cottage cheese, with extra crackers, cottage cheese, and veggie sticks on a wooden board.
Protein buffalo chicken dip made with cottage cheese for a macro-friendly twist—extra creamy, high in protein, and still perfect with crackers or veggie sticks.

Lower-carb, keto-friendly chicken wing dip

Because the base ingredients are mostly meat, cheese and dairy, this hot wing chicken dip is already relatively low in carbohydrates. To keep it firmly in low-carb or keto territory:

  • Choose full-fat cream cheese, yogurt or sour cream and cheese.
  • Avoid any sweet sauces or sugary dressings.
  • Serve with low-carb dippers such as:
    • Celery sticks
    • Cucumber slices
    • Bell pepper strips
    • Lightly steamed broccoli florets
Hand dipping an orange bell pepper strip into keto buffalo chicken dip topped with golden cheese, surrounded by fresh veggie sticks on a wooden table.
Keto buffalo chicken dip with a golden, bubbly cheese crust—low-carb, high-fat, and perfect served with crunchy veggie sticks instead of chips or bread.

Meanwhile, guests who aren’t counting carbs can happily spoon their portion next to something extra cosy, like a bowl of creamy macaroni and cheese that covers stovetop, baked and Southern-style versions.


Vegetarian and Vegan Buffalo-Style Dip

Not everyone at the table eats meat or dairy, but that doesn’t mean they should miss the fun. You can borrow the same buffalo wing flavors and package them into vegetarian and vegan versions.

Meat-free buffalo ranch dip

For a vegetarian take:

  • Replace shredded chicken with roasted cauliflower florets, chopped into bite-sized pieces.
  • Or sauté a mix of white beans and finely chopped mushrooms until golden and fold them into the creamy base.
Hand dipping crusty bread into vegetarian buffalo cauliflower dip with roasted cauliflower and veggie sticks on a wooden table.
Vegetarian buffalo cauliflower dip made with roasted florets and a creamy, cheesy base—all the heat and comfort of classic buffalo dip, just without the chicken.

The result is a hearty, buffalo ranch dip that’s full of texture and spice but completely meat-free. It also sits nicely alongside actual wings, so vegetarians and omnivores can share the table without anyone feeling left out.

Dairy-free and vegan version

To go fully plant-based:

  • Swap cream cheese for a thick vegan cream cheese or blended cashew cream.
  • Use unsweetened plant yogurt instead of dairy yogurt or sour cream.
  • Choose a vegan cheese that melts well.
  • Stir in roasted cauliflower or soy-based “chicken” strips.
Hand dipping a celery stick into vegan buffalo “chicken” dip made with cashew cream, served with veggie sticks on a light surface.
Vegan buffalo “chicken” dip made with cashew cream and plenty of heat—fully plant-based, dairy-free, and perfect with crunchy veggie dippers.

Bake it just as you would the classic buffalo-style chicken dip, keeping an eye on how your plant-based cheese behaves. After one or two tries, you’ll know exactly how long it needs for a perfectly melty texture.

Also Read: Peanut Butter Cookies (Classic Recipe & 3 Variations)


What to Serve with Spicy Chicken Dip

A good hot wing chicken dip needs the right cast of supporting characters. With a few well-chosen sides and dippers, you can turn one bubbling dish into a whole buffet.

Classic dippers and fresh crunch

Start with a mix of crisp and neutral options:

  • Celery and carrot sticks
  • Cucumber rounds
  • Simple crackers
  • Pita triangles or toasted baguette slices
  • Soft bread cubes

The vegetables bring freshness and crunch, while the breads and crackers offer a mild base for that bold buffalo flavor.

Wings, poppers and creamy sides

To lean fully into a game-day vibe, build a spread around the dip:

  • Crispy chicken wings
    A batch of air fryer chicken wings gives you crunchy, shatteringly crisp wings without deep-frying, which pair naturally with any buffalo-inspired dish.
  • Baked jalapeño poppers
    A tray of baked jalapeño poppers echoes the spicy, cheesy theme and disappears just as fast as the dip itself.
  • A second creamy dip
    For guests who prefer milder flavors, something from the spinach dip recipes collection works beautifully—especially a cool spinach artichoke dip or yogurt-based variation.
  • Comforting vegetable side
    During the holidays, green bean casserole recipe ideas make a cosy partner for this spicy, cheesy dish.
  • Potato bites and other nibbles
    Air-fried potatoes are a natural match. Chilli garlic potato bites bring crunch, spice and a bit of smoky flavor without deep-frying, and they’re perfect for scooping up the dip.

Cool dips and drinks to tame the heat

Rich, spicy food almost always tastes better with something bright or cooling alongside it:

  • A big bowl of blue cheese dip from the blue cheese dip for wings guide gives people a way to mix tangy and spicy flavors.
  • A chilled platter of chopped vegetables with a simple yogurt ranch dressing offers a refreshing break from all the cheese.

For drinks, bubbles and citrus cut through the richness beautifully:

  • A batch of cocktails from the French 75 cocktail recipe post—gin, lemon and sparkling wine—feel festive but still sharp and refreshing.
  • Meanwhile, the creative gin cocktail recipes guide offers pineapple, lychee, coffee and other twists that hold up well against strong savory flavors.

Naturally, you can offer non-alcoholic options alongside these: sparkling water with lemon, iced tea or citrusy sodas all make sense next to a tray of hot wings and dips.


Storing, Reheating and Food Safety

Whenever you make a creamy buffalo-style chicken dip, it helps to treat it like any other dish containing cooked meat and dairy.

How long can spicy chicken dip sit out?

Food safety guidance from organizations such as the USDA and FoodSafety.gov generally recommends that perishable foods, including leftovers with meat and dairy, should not sit at room temperature for more than about two hours, or just one hour if the room is very hot.(Food Safety and Inspection Service) After that, bacteria can multiply quickly.

Practically speaking, that means:

  • If your dip is in a slow cooker on WARM, you can leave it out for the duration of a normal gathering.
  • If it is in a regular dish and has cooled down on the table for a couple of hours, it’s better to wrap it, chill it promptly, and then reheat portions later rather than letting it sit all evening.

Storing and reheating leftovers

To store leftovers:

  1. Transfer any remaining dip to shallow, airtight containers.
  2. Allow it to cool slightly on the counter, but move it to the fridge within that 2-hour window.
  3. Keep it chilled and aim to eat it within 3–4 days, as suggested in general leftover guidelines.(Food Safety and Inspection Service)

To reheat, you can:

  • Warm small portions in the microwave, stirring between bursts.
  • Reheat larger amounts in a small baking dish at 160–175°C / 325–350°F until hot and bubbling.
  • Gently melt it in a saucepan over low heat, adding a spoonful of yogurt or milk if it seems too thick.

Once leftovers have been reheated, it is safest to eat them right away and avoid reheating the same portion multiple times.

Also Read: How to Make Churros (Authentic + Easy Recipe)


Leftover Ideas: Sandwiches, Stuffed Potatoes and More

When you’ve made a generous batch, leftovers of this buffalo style chicken dip turn into a secret stash of ready-to-go, seasoned chicken filling. Instead of spooning it back into a bowl, you can transform it into new dishes with very little extra work.

Buffalo chicken dip leftovers turned into four easy meals including a sandwich, stuffed potato, quesadilla wedge and mac and cheese, arranged on a wooden board.
Buffalo chicken dip leftovers turned into four easy meals—sandwiches, stuffed potatoes, quesadillas and mac and cheese—so one batch of dip stretches far beyond game day.

Spicy chicken sandwiches and sliders

Warm the leftover dip until soft and spreadable, then pile it onto toasted buns:

  • Add crisp lettuce and slices of tomato for freshness.
  • Layer in pickles, sliced onion or shredded cabbage for crunch.
  • Drizzle a little extra ranch or blue cheese dressing if you’d like things saucier.

For more ideas on toppings, breads and flavor combinations, you can borrow structures from the chicken sandwich recipes guide, which includes buffalo, BBQ and other styles.

Loaded baked potatoes

A few spoonfuls of leftover spicy chicken ranch dip are fantastic in baked potatoes:

  1. Bake potatoes until tender inside and crisp outside.
  2. Split and fluff the insides with a fork.
  3. Stir in warm dip and a little extra cheese.
  4. Return them to the oven or under the grill until the tops bubble and brown.

Top with chopped spring onions, jalapeño slices or even a dollop of yogurt for a complete meal.

Quesadillas and wraps

Spread leftover wing dip across a tortilla, sprinkle with a bit more cheese and top with another tortilla. Toast it in a skillet until crisp on both sides and slice into wedges. Serve with carrot sticks, celery and extra hot sauce.

Alternatively, spoon the heated dip into soft tortillas with shredded lettuce, cucumber and tomatoes, then roll into wraps for an easy lunch.

Buffalo mac and cheese mash-up

For the ultimate comfort combo, swirl warm dip through a bowl of creamy macaroni and cheese. The result is a mash-up that tastes like pub food in the best way—rich, cheesy pasta with pockets of spicy chicken running through it.


Build a Full Game-Day Spread Around Wing Dip

Once you’ve cooked this creamy wing dip a couple of times, it starts to feel natural to build entire menus around it. A simple, satisfying spread might look like this:

With a layout like that, people can move around the table, build plates that suit their mood and come back to the creamy wing dip whenever they like. It becomes the friendly constant in the middle of everything else.


A Simple Hot Wing Dip Formula You Can Adapt Forever

Underneath all the variations—baked, slow cooker, skillet, high-protein, keto, vegetarian or extra-rich—the structure of this buffalo style chicken dip stays the same:

Cooked chicken + creamy base + buffalo-style hot sauce + cheese

Once you remember that formula, you’re free to improvise:

  • Swap canned chicken, rotisserie chicken or leftover roast.
  • Adjust the base with more Greek yogurt, a little cottage cheese or extra cream cheese.
  • Choose cheddar for a sharper bite, mozzarella for extra stretch or a blend for balance.
  • Dial the heat up or down according to the crowd.
  • Fold the dip into sandwiches, wraps, potatoes and pasta when you have leftovers.

After a few rounds, you won’t really need to check measurements anymore. You’ll glance into your fridge, see chicken, hot sauce, a block of cream cheese and some shredded cheese, and know exactly what to do.

That’s when this creamy buffalo chicken wing dip—whatever version you land on—stops being just another recipe and quietly becomes your signature party dish.

Also Read: Béchamel Sauce for Lasagna: Classic, Vegan & Ricotta Sauce Recipe

FAQs about Buffalo Chicken Dip

1. Can I make buffalo chicken dip ahead of time?

Absolutely. Firstly, you can assemble the entire spicy chicken dip up to a day in advance. Mix the cooked chicken, creamy base, hot sauce, and cheese, then spread it in your baking dish, cover tightly, and refrigerate. When you’re ready to serve, uncover it, add the final layer of cheese, and bake until hot and bubbling. As a result, you get the ease of a make-ahead recipe with the taste and texture of a freshly baked buffalo wing dip. Just remember it may need a few extra minutes in the oven because it starts cold from the fridge.


2. Can I use canned chicken in this chicken wing dip?

Yes, you can. To begin with, canned chicken is a brilliant shortcut when you want a quick buffalo chicken dip recipe with minimal prep. Drain the cans very well, then flake the meat with a fork so there are no large clumps. After that, stir it into your creamy buffalo mixture just as you would shredded roast or rotisserie chicken. The flavor will still be rich and tangy, especially once it bakes with hot sauce and cheese. If it seems a bit dry, simply add a spoonful of extra yogurt, sour cream, or dressing to loosen the dip.


3. How do I make buffalo chicken dip with rotisserie chicken?

Rotisserie chicken works beautifully here. First, strip the meat from the bones while it’s still slightly warm; this makes shredding easier. Next, chop or shred the meat into small pieces so it blends evenly into the buffalo ranch chicken dip. You can use a mix of breast and thigh for the best flavor. Then, fold the shredded chicken into your creamy base and cook using your favorite method—baked, slow cooker, or stovetop. Because rotisserie meat already has plenty of seasoning, the final chicken wing dip tends to taste extra savory and satisfying.


4. What’s the best way to make buffalo chicken wing dip in a slow cooker?

For a crock pot version, start by adding cream cheese, yogurt or sour cream, ranch or blue cheese dressing, hot sauce, shredded chicken, and cheese to the slow cooker. Then, stir everything roughly to combine. Cook the dip on LOW for about 2–3 hours, stirring once or twice, until it’s smooth and melted. Afterwards, switch the setting to WARM so your buffalo style chicken dip stays hot and scoopable for the whole party. If you’re starting with raw chicken breasts, cook them first with the sauce on LOW until tender, shred the meat in the pot, and then add the remaining ingredients.


5. Can I make Instant Pot buffalo chicken dip?

Definitely. Initially, place chicken breasts, hot sauce, a splash of water or stock, and a bit of dressing in the Instant Pot. Pressure cook on HIGH for a short cycle (often around 10 minutes, depending on thickness) and allow a brief natural release. Once you open the pot, shred the chicken directly inside using forks or a mixer. After that, stir in cream cheese, yogurt or sour cream, dressing, and shredded cheese. Finally, use the sauté function on LOW to melt everything together into a creamy, spicy chicken dip. Keep stirring so the bottom doesn’t scorch.


6. How can I make this spicy chicken dip healthier or higher in protein?

There are several easy tweaks. For one thing, you can replace part of the cream cheese and sour cream with thick Greek yogurt, which usually has more protein and less fat. In addition, blending cottage cheese until smooth and using it for a portion of the base gives you an ultra-creamy, high-protein chicken ranch dip. You might also choose leaner chicken breast instead of darker meat, and use reduced-fat cheese if you prefer. Even with these adjustments, the hot chicken dip stays satisfying thanks to the spices and buffalo-style sauce.


7. Is buffalo chicken dip okay for low-carb or keto diets?

Generally, yes. The main ingredients—chicken, cream cheese, full-fat yogurt or sour cream, cheese, and hot sauce—are naturally low in carbohydrates. Nevertheless, you’ll want to check your dressing and sauces for hidden sugars if you’re strict about carbs. To keep this buffalo wing dip recipe keto-friendly, use full-fat dairy and serve it with low-carb dippers such as celery sticks, cucumber rounds, bell pepper strips, and broccoli florets. As long as you skip bread and crackers, this cheesy chicken dip fits neatly into many low-carb meal plans.


8. Can I make buffalo chicken dip without cream cheese?

You can, although the texture changes a little. Instead of cream cheese, you may use a combination of thick Greek yogurt, sour cream, and a bit of grated cheese to help the dip set as it bakes. Alternatively, blending cottage cheese until velvety creates a surprisingly rich base. Moreover, you can add a small amount of mayonnaise or extra shredded cheese for body. The result is still a creamy, hot wing dip recipe, just with a slightly lighter and less dense mouthfeel than the classic cream cheese version.


9. How do I make a dairy-free or vegan buffalo-style dip?

To create a dairy-free version, swap each creamy element for a plant-based counterpart. Use vegan cream cheese or cashew cream for the base, then add unsweetened plant yogurt instead of sour cream. Furthermore, choose a vegan cheese that melts well to mimic the gooey texture. For the “chicken,” roasted cauliflower florets or a soy-based chicken alternative work well. Season everything with hot sauce, garlic and onion powder, then bake or warm on the stove until thick and bubbly. This way, you get a vegan buffalo-style dip that still hits those familiar wing flavors.


10. Can I make a vegetarian buffalo cauliflower dip instead of chicken?

Yes, and it’s delicious. First roast bite-sized cauliflower florets with a drizzle of oil, a pinch of salt and a little hot sauce until they’re tender and lightly browned. Once they cool slightly, chop them into small pieces and fold them into your creamy base just as you would shredded chicken. Additionally, you can mix in a handful of white beans for extra protein. When you bake this vegetarian buffalo cauliflower dip, it delivers the same spicy, tangy flavor but with a completely meat-free twist that even non-vegetarians tend to enjoy.


11. How long should I bake chicken wing dip in the oven?

For a basic baked buffalo wing dip recipe, a good guideline is 20–25 minutes at 180°C / 350°F in a small baking dish. Usually, you’ll know it’s ready when the edges are bubbling enthusiastically and the cheese on top has melted and begun to brown in spots. However, if your dish is deeper or the mixture was very cold from the fridge, it might need an extra 5–10 minutes. On the other hand, if you’re using a wide, shallow skillet, the dip may heat through more quickly, so keep an eye on it.


12. How long can buffalo-style chicken dip sit out, and how should I store it?

Because this hot chicken dip contains cooked meat and dairy, it’s considered perishable. Generally, it’s wiser not to leave it out at room temperature for more than about two hours. After that, transfer leftovers to shallow, airtight containers, allow them to cool slightly, then refrigerate. As a rule of thumb, try to eat refrigerated leftovers within three to four days. When reheating, warm the dip until piping hot and bubbling—whether in the oven, on the stove, or in short bursts in the microwave—so the texture recovers and the flavor stays vibrant.


13. Can I freeze buffalo chicken dip?

Freezing is possible, though the texture changes a little. Cream cheese and yogurt or sour cream can turn slightly grainy after thawing. Even so, many people are happy with the result for casual gatherings. To freeze, cool the cooked dip completely, then pack it into a freezer-safe container, leaving a little room at the top. Later, thaw it overnight in the fridge. Then, reheat it gently in the oven or on the stove, stirring in a splash of fresh cream, milk, or yogurt if it seems thick. Although not perfect, it’s a convenient way to avoid wasting leftovers.


14. What can I serve with this spicy chicken dip besides chips?

There are countless options. Besides tortilla chips, crackers and bread, you can offer crisp vegetables such as celery, carrots, cucumbers, bell peppers and cherry tomatoes. In addition, toasted baguette slices, pita wedges, soft pretzels and breadsticks all pair nicely with a creamy buffalo ranch chicken dip. For a more substantial spread, you might add wings, jalapeño poppers, potato bites, or even simple roasted vegetables. That way, guests who want something lighter can focus on fresh dippers, while others indulge in the more decadent bites alongside the hot wing chicken dip.


15. How can I adjust the heat level in my buffalo wing dip recipe?

Tuning the spice is easy. To make a milder chicken wing dip, reduce the amount of hot sauce and increase the creamy components slightly—more yogurt, sour cream or dressing will soften the heat. Conversely, to make the dip hotter, you can add extra buffalo-style sauce, a pinch of cayenne or some finely chopped fresh chili. Additionally, stirring in more blue cheese or ranch dressing often balances a mixture that feels too fiery. Taste the dip before baking when it’s still in the mixing bowl; tweaking the seasoning at that stage is much simpler.


16. What should I do with leftover chicken wing dip?

Leftovers are extremely versatile. You can turn them into fillings for sandwiches, sliders or wraps by gently reheating the dip and spooning it into buns or tortillas with fresh lettuce and crunchy vegetables. Moreover, you can stuff baked potatoes with the warm mixture and a little extra cheese, then grill or broil until golden. Another fun idea is to spread the leftover spicy chicken dip between tortillas and toast them into quesadillas. Finally, stirring a spoonful into hot mac and cheese creates a richly flavored pasta dish that tastes like pub food in the best possible way.