Zucchini chips sound easy until you pull them from the oven or air fryer and find the same annoying problem: browned edges, soft centers, and slices that look like chips but bend like roasted zucchini.
If that has happened to you, the problem was probably not just the cooking time. Zucchini is naturally tender and water-rich, so it needs a little help before it can become crisp. Even slicing, a short salting step, proper drying, light oil, enough space, and the right heat make the difference between limp slices and a snack you actually want to keep reaching for.
Most zucchini chips recipes are not actually disagreeing with each other. They are making different snacks. This guide starts with the easiest crisp-edged air fryer parmesan version, then shows when to use the oven, panko, keto/no-breadcrumb, or dehydrator method for the texture you actually want. If you already know the texture you want, compare the styles first.
These will not behave exactly like packaged potato chips, and that is okay. The win is a crisp-edged, salty bite that lets zucchini be zucchini without turning limp.
To make crispy zucchini chips, slice the zucchini evenly, salt the slices briefly, pat them very dry, season lightly, and cook in a single layer. Start with air fryer parmesan zucchini chips at 370°F / 188°C for 10–12 minutes, then cool them spread out for a few minutes so the cheese can firm. Need amounts and steps? Jump to the recipe card.
Seasoning helps, but the real win happens before the zucchini hits the heat. If the slices go in wet, they soften before the edges can firm up. Use only a little oil or oil spray, avoid crowding, and do not judge the final texture until the chips have cooled for a few minutes.
Before the air fryer or oven does any work, set the zucchini up for success with even slices, salt, towels, light oil, and parmesan.
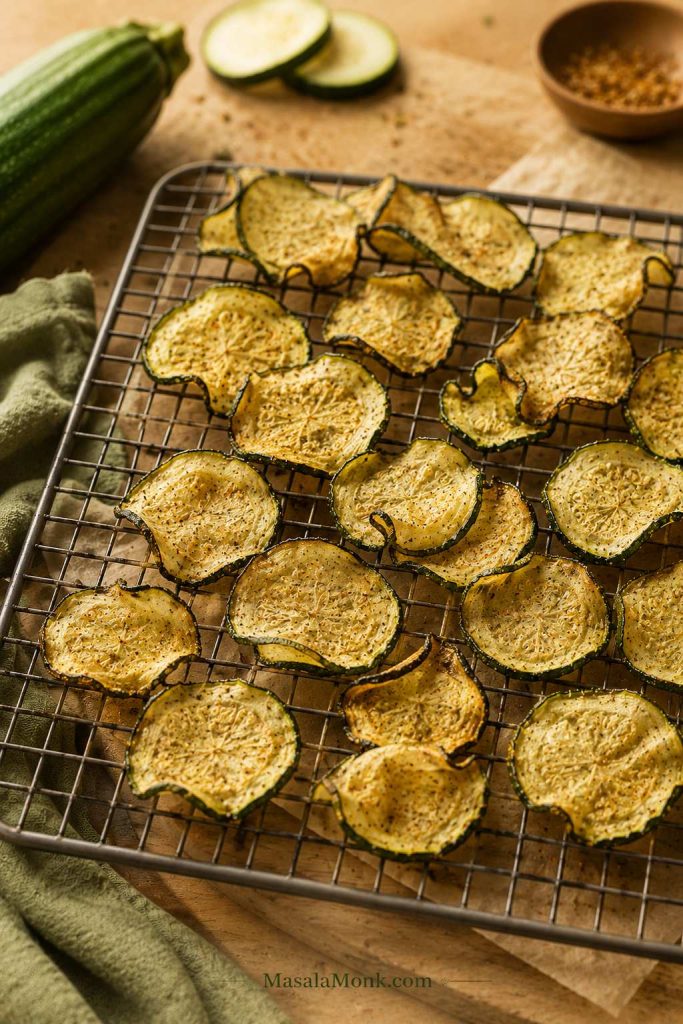
Best first batch: air fryer parmesan zucchini chips.
The crispness rule: slice evenly, salt briefly, pat very dry, cook in one layer, and cool spread out.
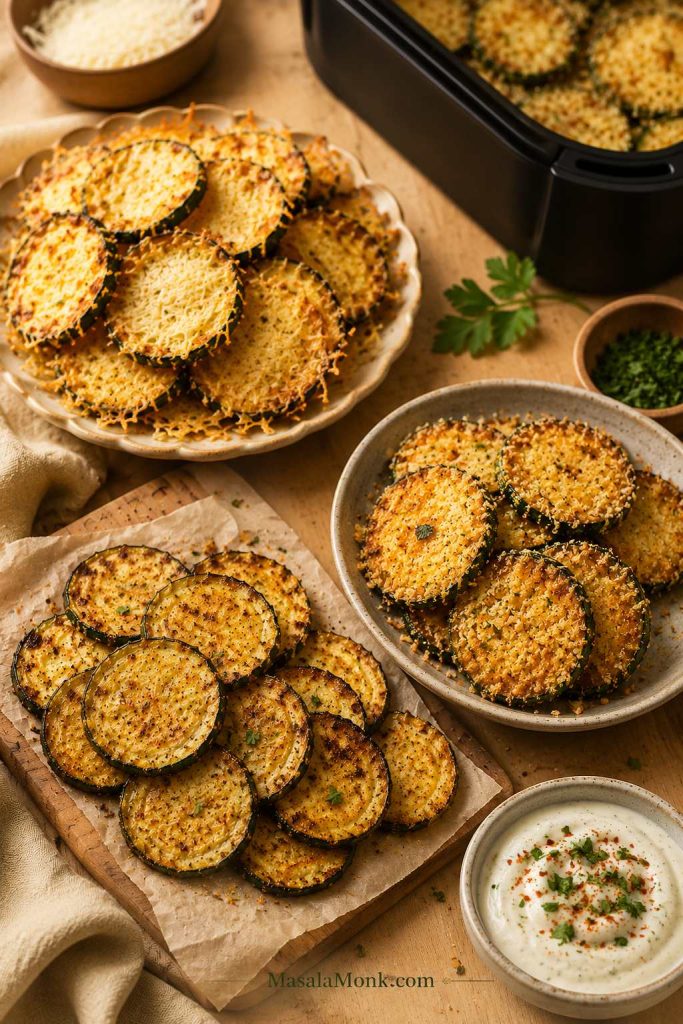
Crispy Air Fryer Parmesan Zucchini Chips Recipe
This is the first batch to make because parmesan gives zucchini a shortcut to crisp edges. The slices still need salting and drying, but the cheese browns quickly, firms as it cools, and turns a soft vegetable into something snackable without breadcrumbs or a long oven bake.
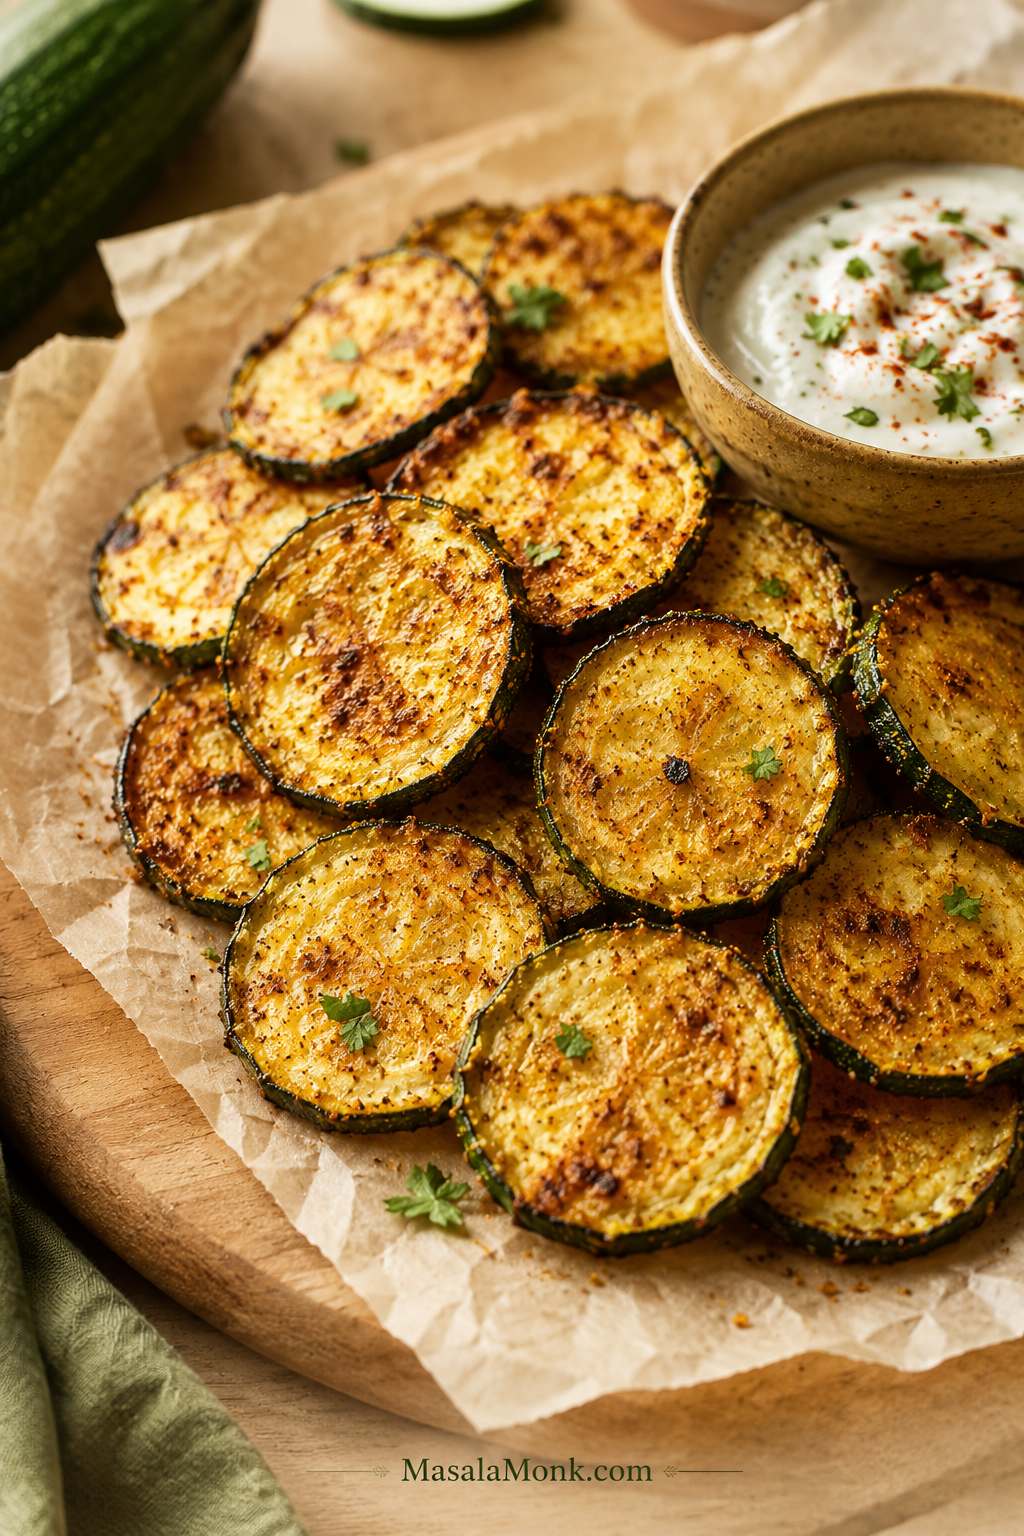
Texture: crisp parmesan edges, tender centers, and a salty snack bite. Not packaged potato-chip snap, but much better than limp zucchini rounds.
Yield4 servings
Prep Time20 minutes
Cook Time10–12 minutes
Total Time30–35 minutes
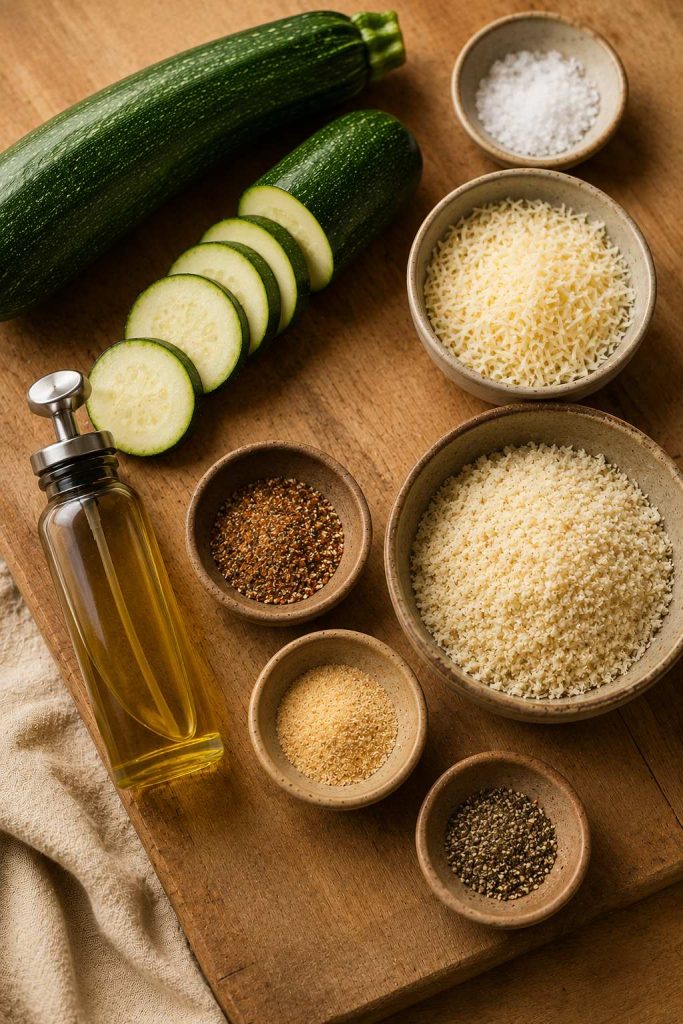
Ingredients
2 medium zucchini, about 400 g / 14 oz total
½ tsp fine salt, about 3 g, for salting the zucchini
1 tbsp olive oil or avocado oil, 15 ml, or use oil spray
½ tsp garlic powder, about 1.5 g
½ tsp paprika or smoked paprika, about 1 g
¼ tsp black pepper, about 0.5 g
⅓ cup finely grated parmesan, about 30 g
Extra salt only if needed, after cooking
Instructions
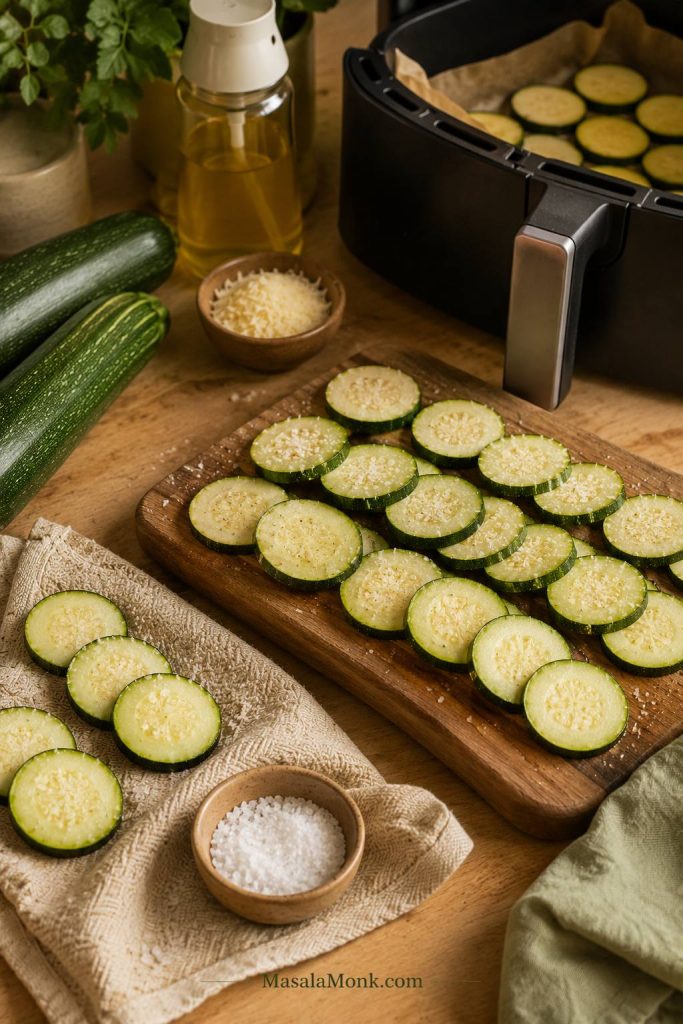
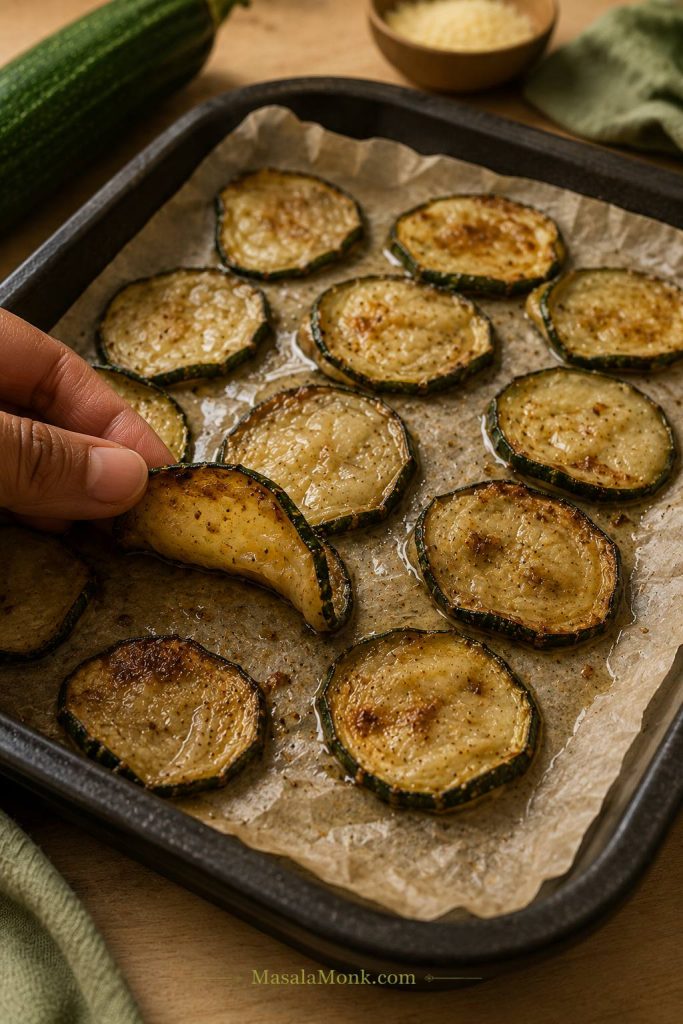
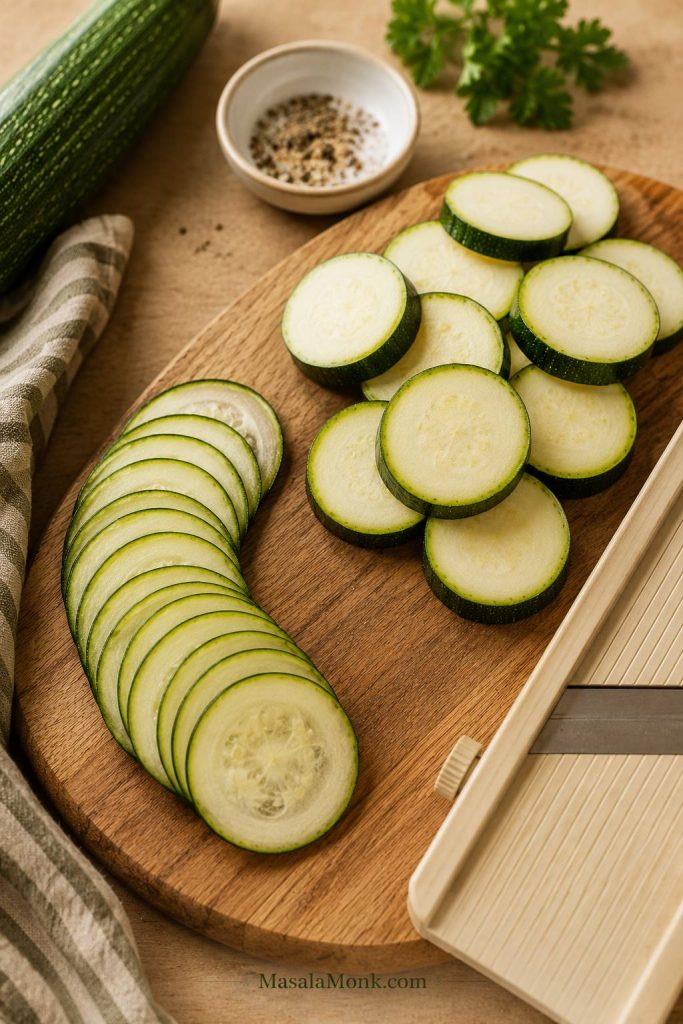
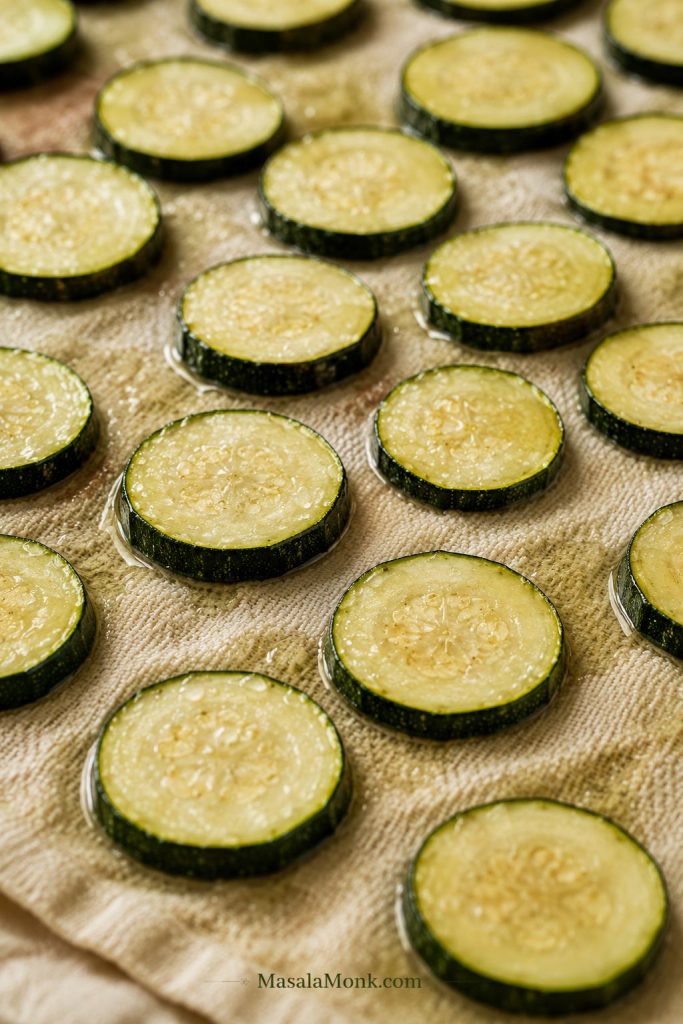
Slice the zucchini. Slice into even rounds, about ⅛ inch / 3 mm for thinner chips or slightly thicker if your air fryer tends to blow thin slices around.
Salt the slices. Arrange the zucchini on a towel or in a colander. Sprinkle with the salt and let rest for 15–20 minutes.
Dry very well. Pat the slices dry with a clean kitchen towel or paper towels. The surface should look matte, not shiny-wet.
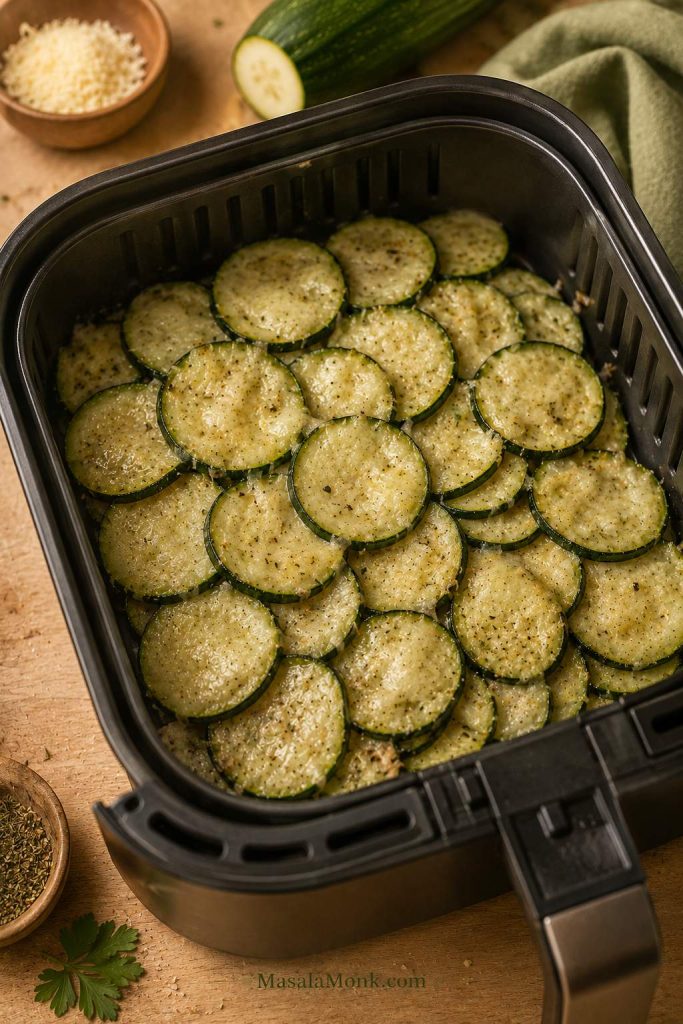
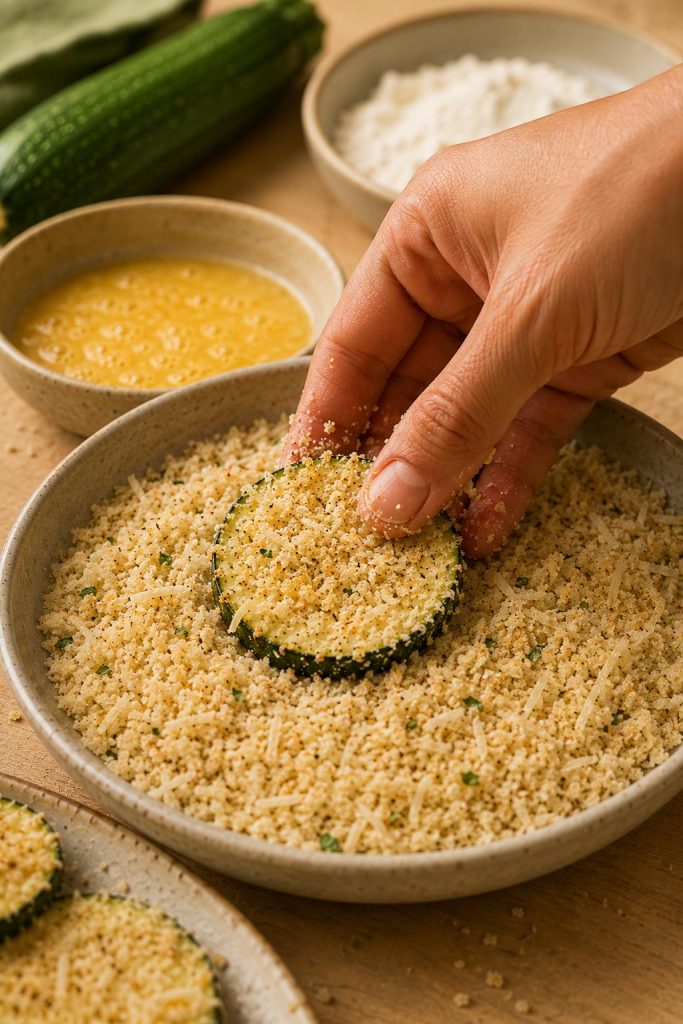
Season lightly. Toss the zucchini with oil, garlic powder, paprika, black pepper, and finely grated parmesan. The slices should look lightly glossy, with seasoning clinging to the surface instead of sliding around.
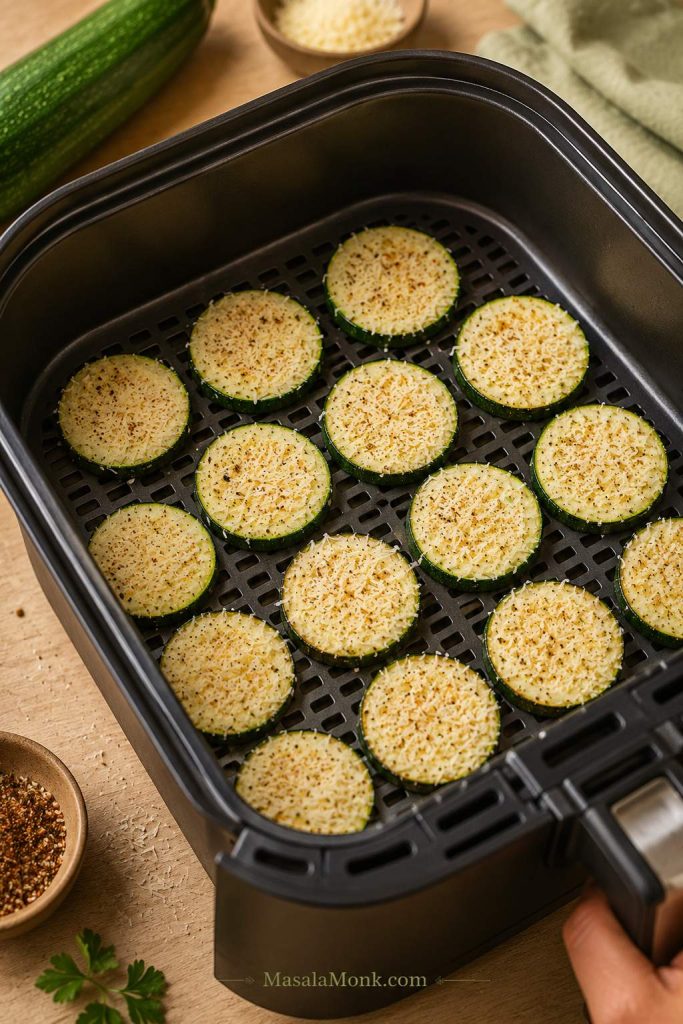
Arrange in the air fryer. Place slices in a single layer in the basket. Cook in batches if needed; it is better to cook two quick batches than one crowded soft batch.
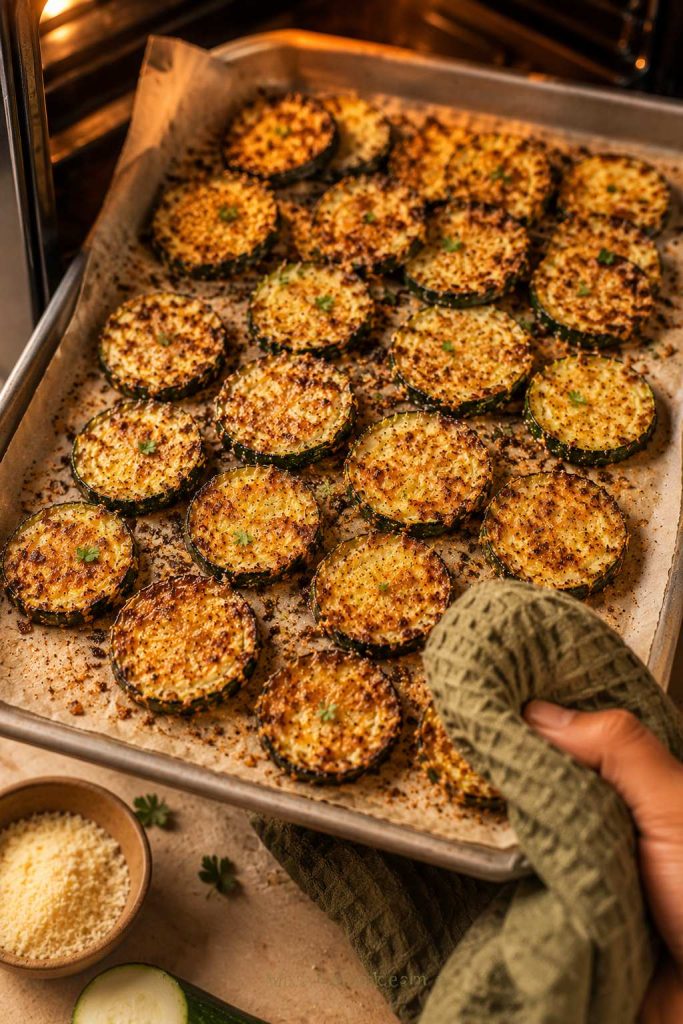
Air fry. Cook at 370°F / 188°C for 10–12 minutes, flipping or shaking gently halfway, until the parmesan smells toasted, the edges look dry, and the slices feel lighter. Start checking around 8 minutes.
Remove finished chips early. If some slices are golden before others, remove them and keep cooking the softer pieces.
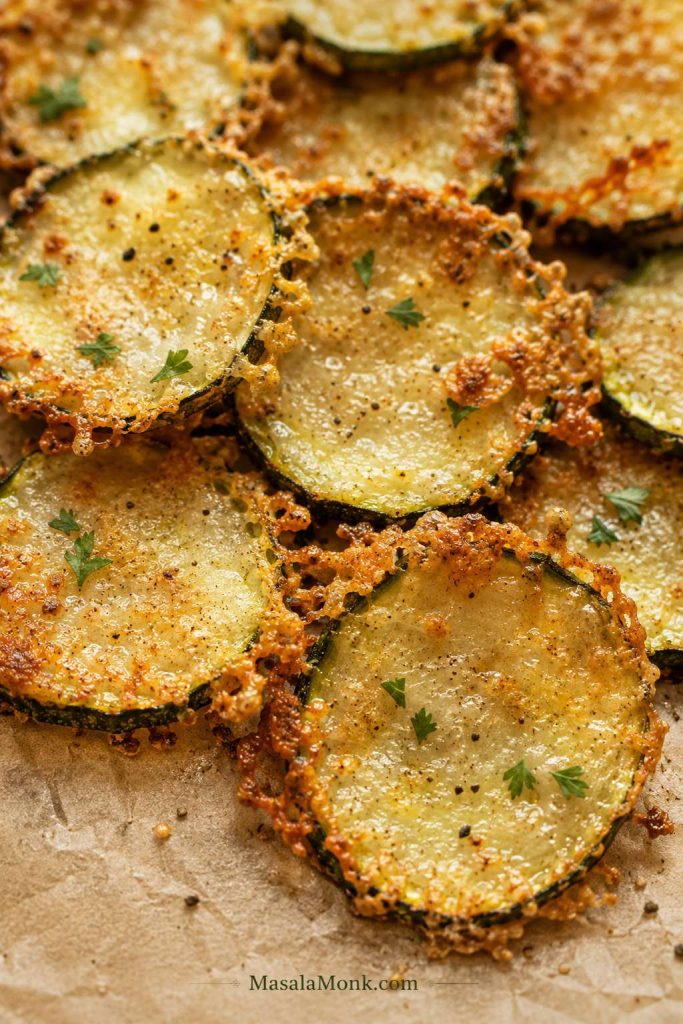
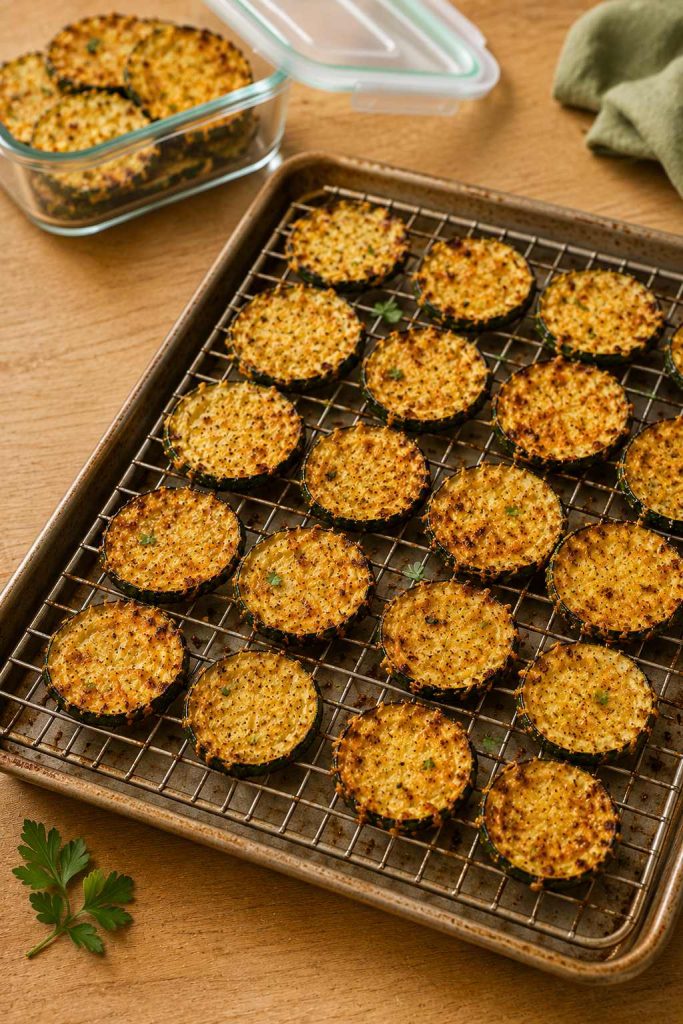
Cool before serving. Spread the chips out for a few minutes. The parmesan firms up and the edges crisp more as they cool.
For air fryer zucchini chips, keep the rounds in one layer. Hot air needs open gaps to dry the edges instead of steaming the centers.
Recipe Notes
Use finely grated parmesan for the most reliable crisping.
Smaller or thinner slices may finish first; pull them out early.
Do not add extra salt until after cooking, especially if using parmesan.
Serve soon after cooling, while the parmesan edges are still crisp.
Re-crisp leftovers in the air fryer or oven, not the microwave.
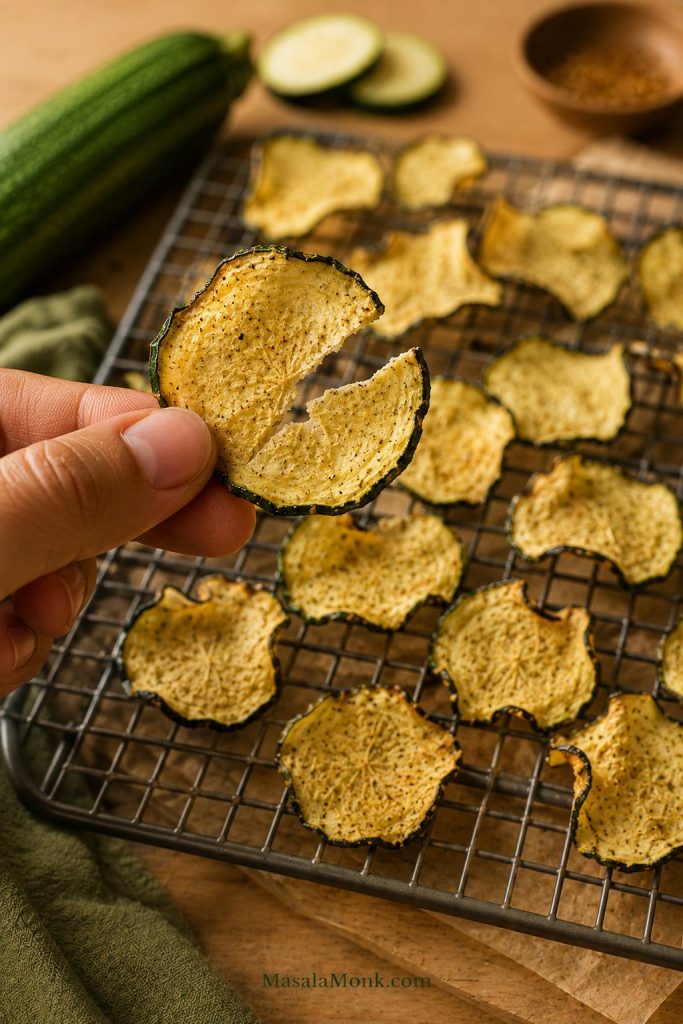
Why this works: salting gives the slices a better start, parmesan browns quickly, and cooling lets the cheese firm up. That is why the chips often feel crisper after a few minutes on the plate than they do straight from the air fryer. If they still come out soft, use the soggy-chip fixes.
With parmesan zucchini chips, the best sign is a lacy golden edge. Let them cool briefly so the cheese can firm and crisp.
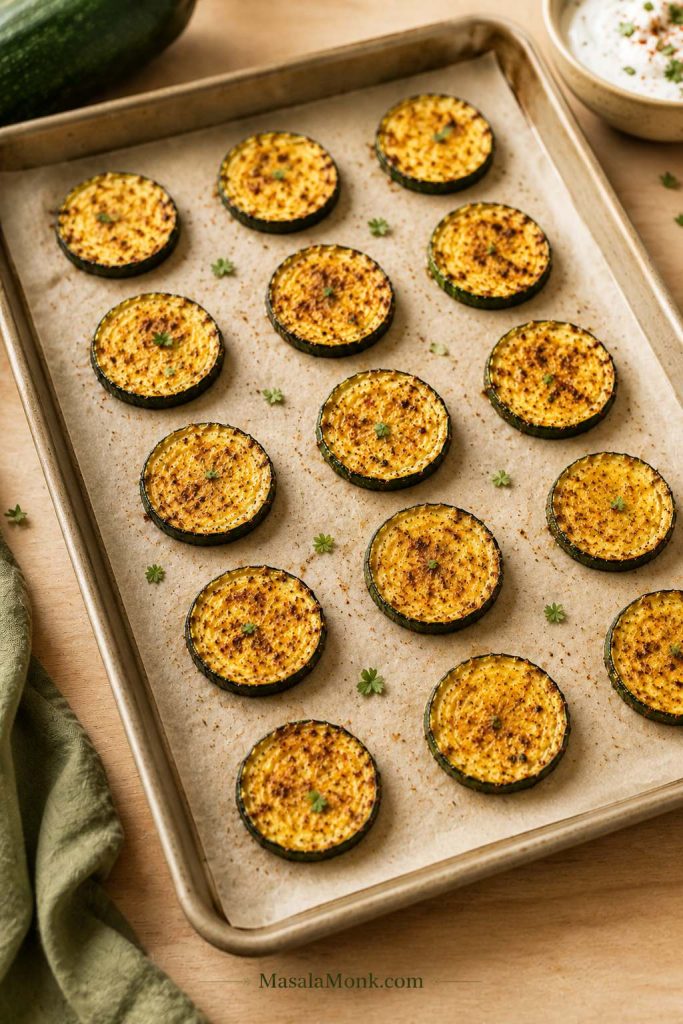
The first successful batch feels obvious in hindsight: the slices look lighter, the parmesan smells toasted, and the edges firm up while you are getting the dip. A few softer pieces are normal. At their best, they taste salty and cheesy, with crisp edges and tender centers.
The first crisp one is the cook’s tax. Eat it while the edges are still at their best.
Want a Different Texture? Choose Your Zucchini Chip Style
From here, the same idea can shift into oven trays, panko coating, keto chips, or make-ahead dehydrated chips. You do not need to master every version today. Choose the one that matches what you want to eat: the air fryer method for speed, the panko method for crunch, or the dehydrator method for make-ahead chips.
Thin chips dry. Parmesan rounds crisp. Panko rounds crunch. Once you know which style you are making, the times stop looking random.
Not every zucchini chip should look the same: thin chips dry, parmesan rounds crisp at the edges, and panko rounds bring the loudest crunch.
If You Want…
Make This
Why It Works
The easiest first try
Fast cheesy: air fryer parmesan
Parmesan helps the edges crisp quickly and adds salty, snacky flavor.
The crunchiest appetizer
Crunchy appetizer: panko rounds
Panko creates a crisp coating while the zucchini stays tender inside.
Keto or no-breadcrumb snack
Low-carb: plain or parmesan
Parmesan gives better low-carb crispness than almond flour alone.
Larger sheet-pan batch
Sheet-pan: oven-baked
A baking sheet gives the slices more room than most air fryer baskets.
The most chip-like thin slices
Thin veggie chips: low oven or dehydrator
Slower heat gives thin slices time to turn light and crisp.
A sturdy dipper
Sturdy dippers: panko or thick parmesan
Thin plain chips are delicate; coated rounds hold up better.
Best choice guide: air fryer parmesan for the first batch, low oven or dehydrator for the most chip-like thin texture, panko for party crunch, parmesan for keto, and dehydrator or low-and-slow oven for better storage.
This is the kind of tray that disappears by the edges first: the lacy parmesan pieces, the extra-golden rounds, the ones everyone says they are “just testing.”
Most failed batches come down to one problem: the slices steam before they crisp. Already dealing with a limp tray? Skip to the troubleshooting table.
Zucchini carries a lot of moisture. When the slices are too thick, too crowded, or too wet, that moisture gets trapped. Instead of crisping at the edges, the zucchini softens. That is how you get chips that look browned but still bend in the middle.
If your last batch came out limp, you are not alone. This vegetable can make even a good recipe feel unpredictable until you give the slices a better start.
If zucchini chips brown but still bend, they probably steamed before they crisped. Next time, go thinner, drier, or less crowded.
The rule that saves most batches: slice evenly, salt briefly, pat very dry, cook with space, and cool the chips spread out. That matters more than adding extra oil.
Once you solve that, the reward is simple: golden edges, better seasoning, and chips that feel like a snack instead of a side dish.
The Mistakes That Keep Zucchini Chips Soft
If a batch stays limp, the fix usually points back to one of these habits. This is not about being fussy; it is about giving zucchini a fair chance to crisp.
You salted but did not dry. Salting brings moisture to the surface; drying removes it. If the slices still look shiny, press them between towels before cooking.
You used too much oil. Glossy is good. Wet or slick is not. Too much oil coats the surface and keeps the chip soft.
You crowded the basket or pan. Overlapping slices steam each other. Cook in batches if needed.
You sliced unevenly. Thin pieces brown first while thick pieces stay soft. Pull the crisp ones early instead of waiting for the whole tray to match.
You used wet flavors too early. Lemon juice, hot sauce, fresh garlic paste, and watery marinades belong after cooking.
You piled them hot. Stacked chips lose their edge quickly. Spread them out for a few minutes first.
You expected every method to crunch the same way. Thin chips dry, parmesan rounds crisp, and panko rounds crunch. Choose the texture first.
Why These Ingredients Help Zucchini Chips Crisp
The ingredient list is short, but every item has a job. Medium zucchini gives you neat slices, salt draws moisture to the surface so you can pat it away, oil helps browning, parmesan firms into crisp edges, and panko gives the loudest crunch.
Keep the ingredient list simple, but choose each one for a job: salt manages moisture, parmesan builds crisp edges, and panko adds crunch.
Best zucchini: medium, firm zucchini with fewer watery seeds. Oversized zucchini can stay soft in the center.
Best crisping helper: finely grated parmesan. It clings better than large shreds and sets as it cools.
Best crunch coating: panko. Use it for appetizer-style rounds, not thin delicate chips that need to stay light.
Best oil approach: a light toss or spray. Glossy is enough; greasy slices soften.
Best seasoning type: dry spices and dried herbs. Save lemon juice, hot sauce, and fresh garlic paste for after cooking.
If you only have a very large zucchini, cut it lengthwise and scoop out the soft, seedy center if it looks watery. Use the firmer outer flesh for chips. And if you are comparing it with cucumber, remember that zucchini and cucumber are different vegetables, even though they can look similar at first glance.
Equipment That Actually Helps
You do not need a perfect kitchen setup here. A sharp knife, a clean towel, and enough space on the tray will get you most of the way there.
Mandoline or sharp knife: for even thickness.
Kitchen towels or paper towels: for drying after salting.
Parchment or wire rack: for oven batches and cooling.
Oil spray: for a light coating without greasiness.
Tongs: for pulling finished chips early.
Dehydrator: optional, but helpful for dry, make-ahead veggie chips.
Dry towels, even slices, and a little patience will do more for crispness than another spoonful of seasoning.
How Thin Should You Slice Zucchini for Chips?
Thickness decides whether you get a delicate chip, a cheesy round, or a sturdy dipper.
Slice thickness decides the snack: thin rounds make delicate chips, while thicker rounds hold parmesan or panko coatings better.
For thin plain chips, aim for about ⅛ inch / 3 mm. These slices dry better, but they can burn quickly or fly around in some air fryer baskets.
For breaded or panko chips, slice closer to ¼ inch / 6 mm. Thicker rounds hold the coating better and are less fragile. They will be crunchy outside and tender inside, not dry all the way through; see the panko method if that is the texture you want.
For parmesan chips, either thickness can work. Choose thinner slices for a more chip-like result, or slightly thicker slices for a snacky zucchini round with crisp cheese edges.
A good batch will not all finish at the same second. Pull the crisp ones early. That is not fussiness; that is how zucchini behaves.
Should You Salt Zucchini First?
Yes. It is the small step that makes the biggest difference, especially if your zucchini is juicy or your last batch came out soft.
Salt draws moisture to the surface so you can pat it away before the zucchini hits the air fryer, oven, or dehydrator. It also helps breaded coatings stick because the slices are not slippery.
Here is the simple way to do it:
Slice the zucchini evenly.
Spread the slices on a clean towel or place them in a colander.
Sprinkle with salt.
Let them rest for 15–30 minutes.
Pat very dry with a clean kitchen towel or paper towels.
You should see moisture on the surface after the rest. That is good. It means the water is on the towel instead of trapped in the chip.
After salting, moisture should bead on the zucchini surface. That is the water you want on the towel, not trapped inside the chip.
You do not need to rinse if you used a light amount of salt. If you salted heavily, rinse quickly and dry extremely well. For thin low-and-slow chips, you can rest the zucchini longer, even up to 45–60 minutes, but for most batches, 20–30 minutes is enough.
Do not skip the drying after salting. Pat away the surface moisture before cooking, or the slices will steam. Next, see how spacing changes the result in the air fryer and oven methods.
Once the slices release moisture, press them until they look matte. Shiny zucchini usually means softer chips later.
Air Fryer Zucchini Chips: What Matters Most
The air fryer moves hot air, not magic. If the slices overlap, steam wins.
A crowded air fryer basket traps steam fast. Even well-seasoned zucchini chips stay soft when the slices overlap this much.
This is the weeknight version: quick heat, toasted parmesan, and a snack that is ready before anyone gets impatient. Good air fryer chips have browned parmesan around the edges, a garlic-paprika aroma, and enough firmness to dip gently after they cool for a few minutes.
Air Fryer Style
Temperature
Time
What to Look For
Plain thin chips
370°F / 188°C
12–18 minutes
Edges dry and lightly browned
Parmesan chips
370°F / 188°C
10–12 minutes
Cheese is golden and edges are crisp
Panko chips
400°F / 204°C
10–12 minutes
Panko is golden and crunchy
Very thin slices may finish early; thicker slices may need a few more minutes. Pull the early winners. Waiting for the whole basket to match is how the best chips become bitter.
The second batch is usually better because you already know how fast your air fryer runs.
If very thin chips fly around: slice them slightly thicker next time or use an air fryer rack or mesh insert if your model allows it. Overcrowding the basket will hold them down, but it will also trap steam.
Oven Zucchini Chips: Hot and Fast vs Low and Slow
The oven only looks confusing because thin chips and coated rounds need completely different treatment. Use a hot oven, around 425°F / 218°C, for parmesan or panko-coated rounds that need quick browning. For thin plain slices, a low oven around 225–235°F / 107–113°C gives the zucchini time to dry out.
Hot oven batches should smell toasted and look golden at the edges. Low oven batches should look drier, lighter, and slightly curled.
Baked zucchini chips need steady heat and enough tray room. Look for golden tops, drier centers, and edges that lift slightly.
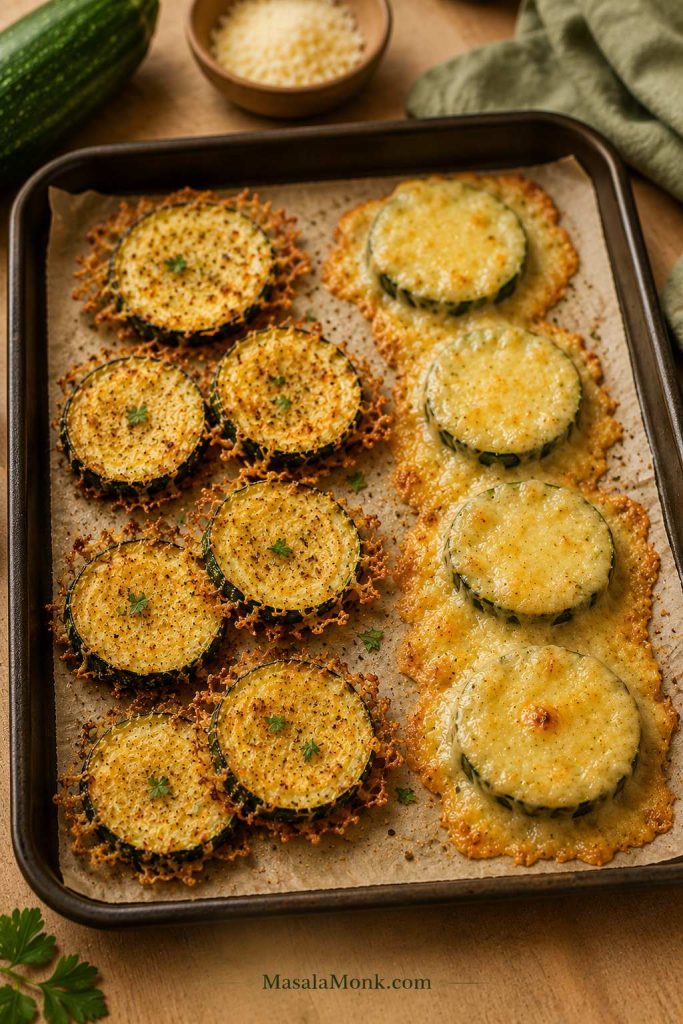
Hot Oven Parmesan or Panko Chips
Preheat the oven to 425°F / 218°C.
Slice zucchini into ¼-inch / 6 mm rounds for panko chips, or slightly thinner for parmesan chips.
Salt, rest, and dry the slices.
Coat with parmesan or panko mixture.
Arrange in a single layer on a parchment-lined baking sheet.
Spray lightly with oil.
Bake for 25–30 minutes, flipping halfway, until golden and crisp at the edges.
The chips should look lighter, slightly curled at the edges, and golden where the cheese or coating touches the heat. If they only look browned but still bend like roasted zucchini, give them more time.
On a sheet pan, visible gaps are not wasted space. They let heat move around each zucchini slice so the edges can firm.
Low-and-Slow Thin Zucchini Chips
Preheat the oven to 225–235°F / 107–113°C.
Slice zucchini thinly, about ⅛ inch / 3 mm.
Salt for 20–30 minutes, then pat very dry.
Use very little oil, or just a light spray, then add dry seasoning.
Spread in a single layer on parchment or a wire rack set over a baking sheet.
Bake for 70–120 minutes, rotating trays halfway.
Start checking around 70 minutes, then remove dry pieces every 10–15 minutes as needed.
Cool completely before serving.
They are done when the centers stop looking wet, the edges curl slightly, and the slices feel light. If they still bend like roasted zucchini, they need more time.
Low-and-slow zucchini chips should look light, thin, and slightly curled. Cooling them on a rack keeps the undersides from softening.
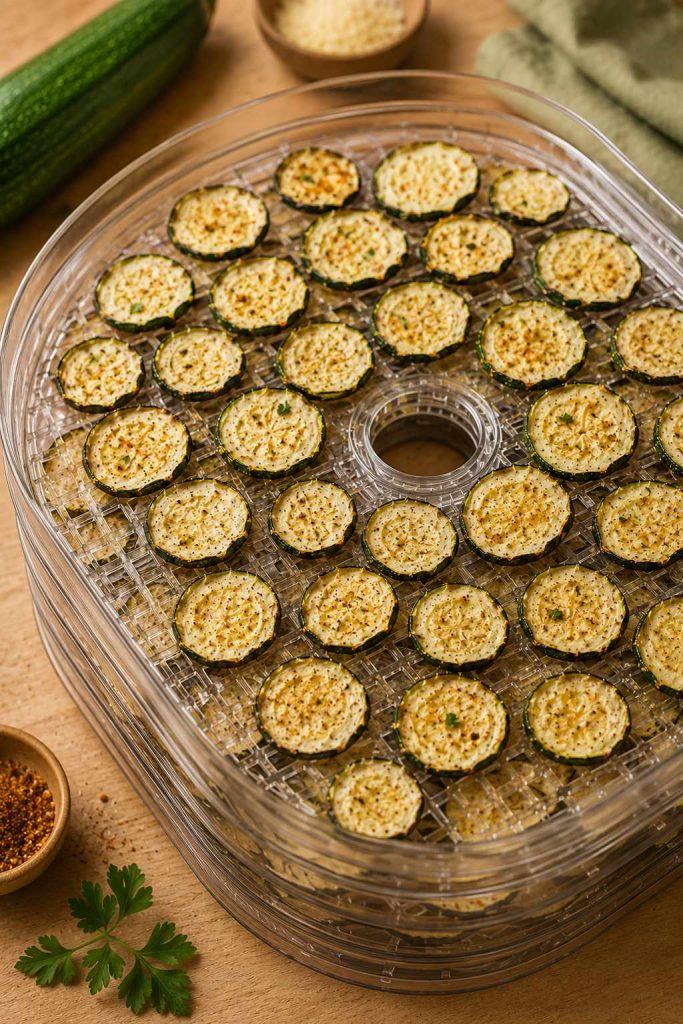
Dehydrator Zucchini Chips
The dehydrator is not the fastest route, but it is the one to choose if you want chips that stay crisp after the first hour. This is the quiet, patient version: less hot-snack energy, more crisp pantry-snack payoff.
Slice zucchini very thin and even.
Salt lightly for 20–30 minutes, then pat dry very well.
Use very little oil or skip oil completely.
Season lightly with garlic powder, paprika, pepper, or dried herbs.
Arrange in a single layer on dehydrator trays.
Dehydrate at 135–150°F / 57–66°C for 4–8 hours.
Rotate trays if your dehydrator heats unevenly.
Cool completely before storing.
For dehydrator zucchini chips, single-layer spacing is the method. Thin slices dry more evenly and store better after they cool.
Use salt lightly here; dehydrated chips taste saltier as they dry. Humid kitchens, thicker slices, and crowded trays will push the timing toward the longer end.
Cool one chip, then test it. Warm zucchini can lie to you. Fully dried chips should snap or feel crisp after cooling, not leathery. For keeping that texture, use the storage and re-crisping guide.
Cool one chip before testing. A dehydrated zucchini chip should feel dry and crisp, not warm, leathery, or bendy.
Parmesan Zucchini Chips: How to Get Lacy, Crisp Edges
Parmesan chips are done when the cheese looks golden and lacy at the edges, not pale and melted. If the parmesan smells sharp, bitter, or turns dark brown before the zucchini looks lighter, the heat is too high or the slices need more drying before cooking.
Finely grated parmesan works best because it clings in a thin layer and firms as it cools. Big shreds melt into patches. Too much cheese can also form a heavy blanket instead of a crisp edge, so use enough to coat lightly, not bury the zucchini.
Parmesan helps, but too much can act like a blanket. A lighter coating gives zucchini chips better lacy edges and cleaner crisping.
Use finely grated parmesan, not big shreds.
Look for golden, lacy edges instead of dark brown spots.
Pull the tray or basket if the cheese smells bitter.
Let the chips cool spread out so the cheese can firm.
Add extra salt only after tasting; parmesan already brings salt.
Parmesan chips are especially good with something tomatoey on the side. A small bowl of marinara sauce makes them feel closer to a crispy zucchini appetizer than a plain vegetable snack.
Breaded or Panko Zucchini Chips
When you want the kind of crunch people hear across the table, use panko. Treat this version as crispy zucchini rounds, not thin vegetable chips. They are golden outside, tender inside, and strong enough for thick dips.
Panko crisps better than regular breadcrumbs because the flakes are larger and airier. Finished panko rounds should sound crisp when tapped with tongs, even though the zucchini inside stays tender.
This is the party version: golden crumbs outside, soft zucchini inside, and enough crunch to scoop a thick dip without collapsing.
With panko zucchini chips, the coating turns golden and crisp while the zucchini inside stays tender.
Panko Ingredients
2 medium zucchini, sliced into ¼-inch / 6 mm rounds
½ cup all-purpose flour, about 60 g
2 large eggs, beaten
1 cup panko breadcrumbs, about 55–60 g
½ cup finely grated parmesan, about 45 g
1 tsp Italian seasoning or dried oregano
½ tsp garlic powder
Oil spray
Panko Method
Salt the zucchini rounds briefly and pat them dry.
Set up three bowls: flour, beaten eggs, and panko mixed with parmesan and seasoning.
Coat each slice in flour, then egg, then panko mixture.
Press gently so the coating sticks.
Arrange in a single layer and spray lightly with oil.
Bake at 425°F / 218°C for 25–30 minutes, or air fry at 400°F / 204°C for 10–12 minutes, checking early because panko can brown quickly.
For panko zucchini chips, press the crumbs onto dry slices gently. That contact helps the coating cling and brown into a crunchy shell.
If the coating falls off, the zucchini was probably too wet before breading. Salt, drain, and dry the slices well before coating. For more soft-chip fixes, check the troubleshooting table.
If breadcrumbs are off the table, parmesan is the easiest way to get real edge crispness. Plain zucchini can dry nicely, but parmesan gives the snack more structure and a salty bite.
Almond flour can work, but it does not behave like panko. It tends to feel heavier and less crisp, so use it lightly or pair it with parmesan instead of expecting a breadcrumb-style crunch.
If you are building a bigger low-carb snack plate, these parmesan chips can sit alongside other keto chips, cucumber sticks, olives, cheese, and a creamy ranch or garlic yogurt dip.
Dry Seasonings That Work Best
Keep the wet flavors for later. Before cooking, dry spices are your friend.
Garlic parmesan: garlic powder, black pepper, and finely grated parmesan.
Ranch-style: garlic powder, onion powder, dried dill, parsley, and black pepper.
Chili lime: chili powder, garlic powder, lime zest, and a squeeze of lime after cooking.
Smoky paprika: smoked paprika, garlic powder, black pepper, and a little parmesan.
Italian herb: dried oregano, basil, garlic powder, black pepper, and parmesan.
Spicy parmesan: garlic powder, paprika, cayenne, black pepper, and finely grated parmesan.
Taste before adding more salt at the end, especially with parmesan. If you like heat, keep hot sauce or other wet sauces for after cooking; they work better as a finishing touch than as a pre-cook coating.
What to Serve with Zucchini Chips
The dip depends on the style of chip. Thin plain chips are delicate, so they work better with lighter dips like ranch, garlic yogurt, or tzatziki. Parmesan chips are great with marinara or salsa verde. If you want something sweeter and brighter, mango salsa also works.
For a snack board, pair warm zucchini chips with one creamy dip, one bright dip, and a few crunchy extras like cucumber sticks, carrot sticks, crackers, or olives. The contrast is what makes the board work: warm chips, cool dip, crisp edge, creamy finish.
How to Store and Re-Crisp Zucchini Chips
Fresh is best, but leftovers are not hopeless. You just have to bring the dry heat back.
They are best while the cheese has just firmed, the edges still crackle lightly, and the centers are still warm. As they sit, zucchini continues to soften, so even a crisp batch can lose some texture.
Do not seal in the steam you just worked so hard to remove. Spread hot chips out for a few minutes before piling them into a bowl or container.
Same-Day Storage
If you are serving them within a few hours, cool them completely first. Keep them loosely covered rather than sealing them while warm.
Overnight Storage
Refrigerate parmesan or panko chips in an airtight container once fully cool. They will lose some crispness, but you can revive them in the oven or air fryer.
Make-Ahead Chips
Choose low-and-slow oven chips or dehydrator chips if you need something that stores better. They hold up longer because they are dried more thoroughly.
How to Re-Crisp Them
To re-crisp zucchini chips, spread them out and bring back dry heat. The air fryer or oven works better than a microwave.
Air fryer: re-crisp at 350–370°F / 175–188°C for 3–5 minutes, checking often.
Oven: bake at 350°F / 175°C for 8–10 minutes, uncovered, until the edges crisp again.
Re-crisped chips will not be exactly like fresh, but dry heat can still bring back that salty edge. The microwave is the one option to skip; it softens zucchini instead of reviving it.
Troubleshooting: Soggy, Burnt, Oily, or Uneven Chips
A soft tray is not a failed recipe. It is usually one adjustment away: drier slices, less oil, more space, or a few more minutes.
Quick Fixes for Soft or Uneven Zucchini Chips
Problem
Right Now
Next Batch
Chips are soggy
Re-crisp uncovered in the air fryer or oven.
Salt longer, pat very dry, use less oil, and avoid crowding.
Chips are soft in the middle
Cook a few minutes longer at moderate heat.
Slice thinner or use a lower, slower oven method.
Edges burned but centers stayed soft
Remove the burnt pieces and lower the heat slightly.
Slice more evenly and check earlier.
Chips stayed soft
Spread them out and cook a few minutes more.
Use a single layer and cook in batches.
Chips feel oily
Drain briefly on a towel and re-crisp with dry heat.
Use oil spray or toss with less oil.
Fixes for Coating, Salt, and Air Fryer Problems
Problem
Right Now
Next Batch
Parmesan burned
Pull the basket or tray before the cheese turns bitter.
Use finely grated parmesan, less cheese, or slightly lower heat.
Parmesan stuck to the tray
Let it cool briefly before lifting.
Use parchment for oven chips or a light oil spray for air fryer chips.
Panko coating fell off
Serve the loose crumbs as a crunchy topping.
Dry zucchini well before breading and press the coating gently.
Panko browned but zucchini stayed watery
Return the soft pieces to the oven or air fryer for a few minutes.
Use ¼-inch / 6 mm slices and dry them better before coating.
Chips taste too salty
Serve with an unsalted dip or yogurt sauce.
Use less salt before cooking, especially with parmesan.
Chips taste bitter
Remove dark pieces and serve the lighter ones.
Lower heat slightly and add delicate seasonings after cooking.
Air fryer chips flew around
Pause and settle the chips if needed.
Slice slightly thicker or use a rack/mesh insert.
Chips softened after cooling
Re-crisp in the air fryer or oven.
Cool spread out before storing or serving.
If the first tray bends, do not panic. Moisture usually won the first round, and the next batch often only needs one or two adjustments.
Frequently Asked Questions
Why are my zucchini chips soggy?
Zucchini chips turn soggy when moisture gets trapped. Slice evenly, salt briefly, pat very dry, use little oil, and cook in a single layer.
Why are my air fryer zucchini chips not crispy?
The slices may be wet, thick, crowded, or coated with too much oil. Cook in batches and pull finished pieces early instead of waiting for every slice to match.
Do you have to salt zucchini first?
You do not absolutely have to, but it helps a lot. Even a 15–20 minute rest gives the slices a better start before they hit the heat.
Do they get crispier as they cool?
Yes, especially parmesan chips. The cheese firms as it cools, so give the chips a few minutes before judging the texture.
Air fryer or oven: which is better?
Choose the air fryer for speed and small batches. Use the oven for larger trays, panko-coated chips, and low-and-slow thin chips.
Can I bake zucchini chips without breadcrumbs?
Yes. Use thin slices, salt and dry them well, then bake low and slow at 225–235°F / 107–113°C. Add finely grated parmesan if you want crisp edges without breadcrumbs.
What is the best no-breadcrumb coating?
Finely grated parmesan is the easiest no-breadcrumb coating because it browns, firms as it cools, and adds salty flavor.
How thin should I slice the zucchini?
Slice about ⅛ inch / 3 mm for thin plain chips and about ¼ inch / 6 mm for breaded or panko rounds.
Are zucchini chips keto?
Plain and parmesan versions can be keto-friendly. Panko or regular breadcrumb-coated chips are not keto unless you use a low-carb coating.
Can I use yellow squash or courgette?
Yes. Courgette is another name for zucchini, and yellow summer squash can also work. If you actually have cucumber, use it fresh in a cucumber salad instead of baking it into chips.
Should I peel the zucchini?
No. The skin adds color, helps the slices hold together, and gives better texture.
Can I use frozen zucchini?
Frozen zucchini is not ideal for chips because it releases too much liquid after thawing. Use fresh zucchini for this recipe.
Are these the same as zucchini fries?
No. Chips are usually sliced into rounds, while zucchini fries are cut into thicker sticks and often breaded.
Can I use a dehydrator for zucchini chips?
Yes. Slice very thin, salt and dry the slices, season lightly, and dehydrate at 135–150°F / 57–66°C for 4–8 hours.
How do I store zucchini chips?
Cool them completely first. Store fully dried chips airtight, refrigerate parmesan or panko leftovers, and re-crisp in the air fryer or oven.
Final Thoughts
Zucchini chips stop feeling random once you stop treating every version like the same snack. Thin chips need drying time, parmesan rounds need a light coating and a cool-down, and panko rounds need enough thickness to hold their crunch.
Your first batch teaches you what your zucchini and air fryer are doing. Usually, the next one is the keeper.
When the edges finally crisp, the whole thing clicks: not a packaged potato chip, not a limp roasted round, but a golden, salty zucchini snack that actually earns its dip.
There’s a particular kind of craving that shows up the moment you’ve been eating low carb for a while: not hunger, exactly—more like a restless need for crunch. You can be completely satisfied after dinner, yet still want something salty, crisp, and snackable. That’s why keto chips are such a common sticking point. Chips aren’t just food; they’re texture, routine, and comfort.
The good news is that chips on keto can absolutely work. The even better news is that you don’t have to settle for a sad substitute that tastes like cardboard or crumbles the second it touches salsa. Once you understand how different low carb chips behave—thin and snappy, thick and scoopable, airy and crunchy—you can choose the right “chip” for the job: dipping, nachos, movie-night grazing, or a grab-and-go snack box.
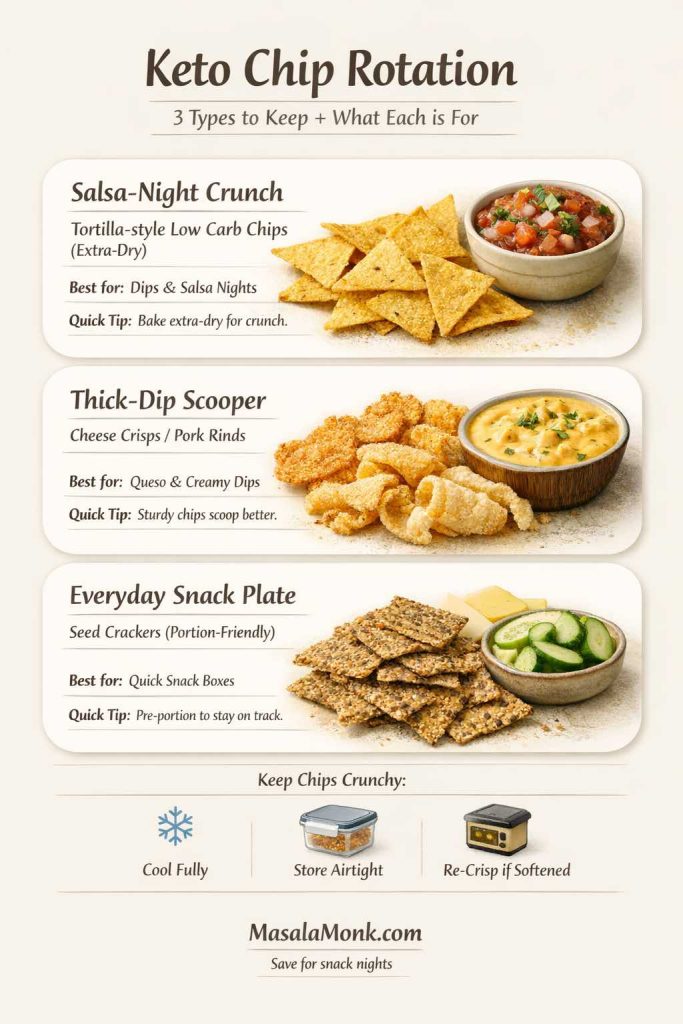
The secret isn’t hunting for one magical chip. It’s building a small rotation based on how you actually eat chips:
thin and snappy for salsa
sturdy for thick dips
something that survives nachos
something that scratches “hot chips” cravings
something that works when you’re busy and need a snack box situation
Once you stop forcing one chip to do every job, keto-friendly chips become much easier — and far more enjoyable.
This guide is built for real life. It covers keto chip snacks you can make at home, low-carb & keto friendly chips you can buy, and the chip replacements that quietly do the job better than most “keto chips” ever will. Along the way, you’ll also get dip pairings and a few easy snack setups that keep the crunch without turning into an accidental carb blowout.
What you’ll find in this keto chips guide
This post isn’t just a list—it’s a practical playbook, with easy recipes and real-life fixes you can actually use. Here’s what we cover below:
What counts as keto chips (serving size, total carbs vs fiber, and how to compare options smartly)
How to choose low carb chips by “dip-ability” (salsa vs thick dips vs nachos vs grab-and-go crunch)
Keto cheese chips and parmesan crisps + a homemade cheese crisps recipe (the easiest win)
Scoopable cheese “cracker chips” recipe (built for thick dips that destroy flimsy chips)
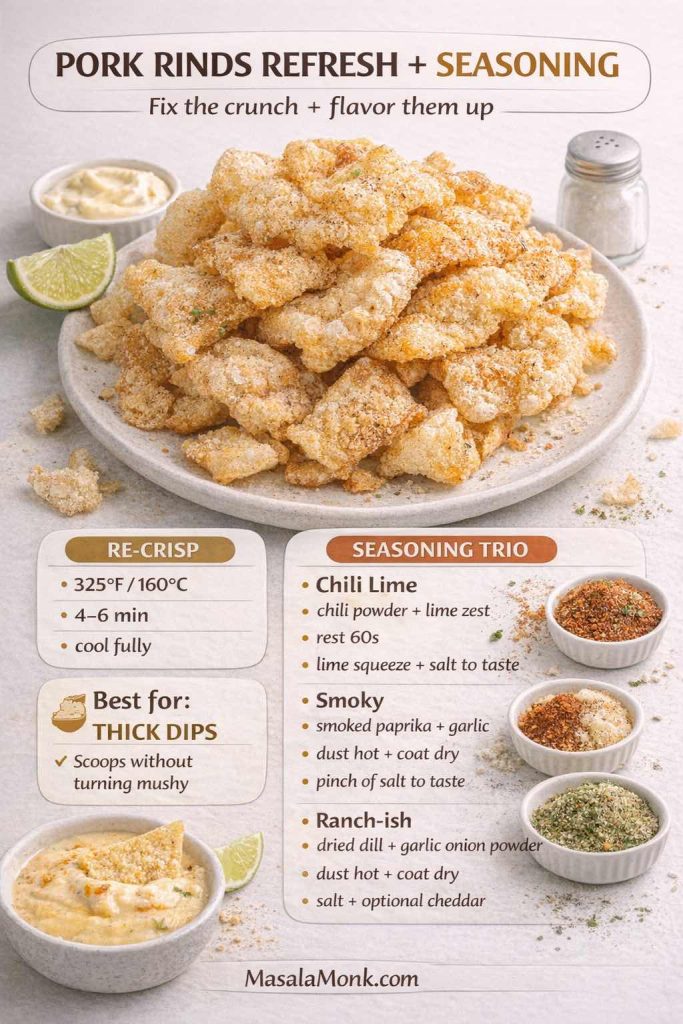
Pork rinds and scratchings + a quick re-crisp trick and seasoning ideas (best for thick dips)
Keto chicken skin chips and meat-chip crunch with oven + air fryer recipes (hard-crunch, “keto pringles” energy)
Seed crackers and keto crackers + a simple DIY seed cracker recipe (reliable chip replacement)
Almond flour crackers recipe that feels like real crackers (sturdy + dip-friendly)
Keto tortilla chips and low carb tortilla chips + the homemade tortilla chips recipe (oven + air fryer) that actually gets crisp
“Keto Doritos” seasoning dust recipe for hot-chip cravings and bland-chip rescues
Dip recipes that make chips feel satisfying:thick queso + scoopable salsa + a quick guac-style idea
Snack box setups, nacho layering, and crunch troubleshooting (so chips stay crisp and snacking doesn’t spiral)
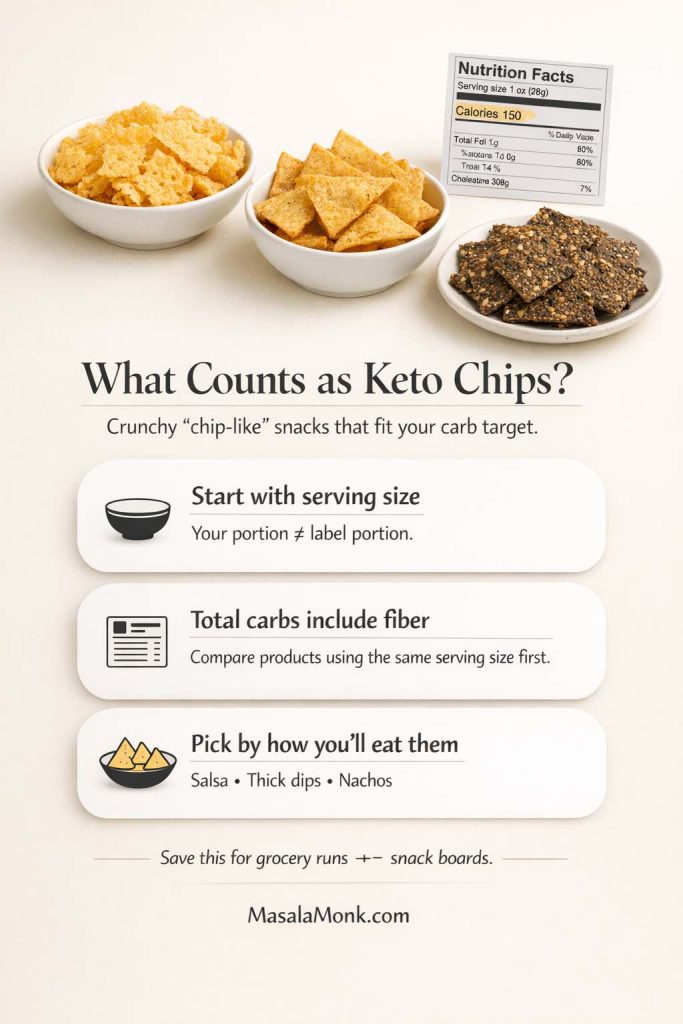
What counts as keto chips?
At a practical level, keto chips are anything crunchy and chip-like that fits your carb target for the day. Sometimes that means a food that naturally has almost no carbs (like baked cheese crisps). Other times it means a low carb tortilla chip made from a wrap or a high-fiber dough. Either way, the “keto” part isn’t a vibe—it’s the numbers, plus how you actually eat them.
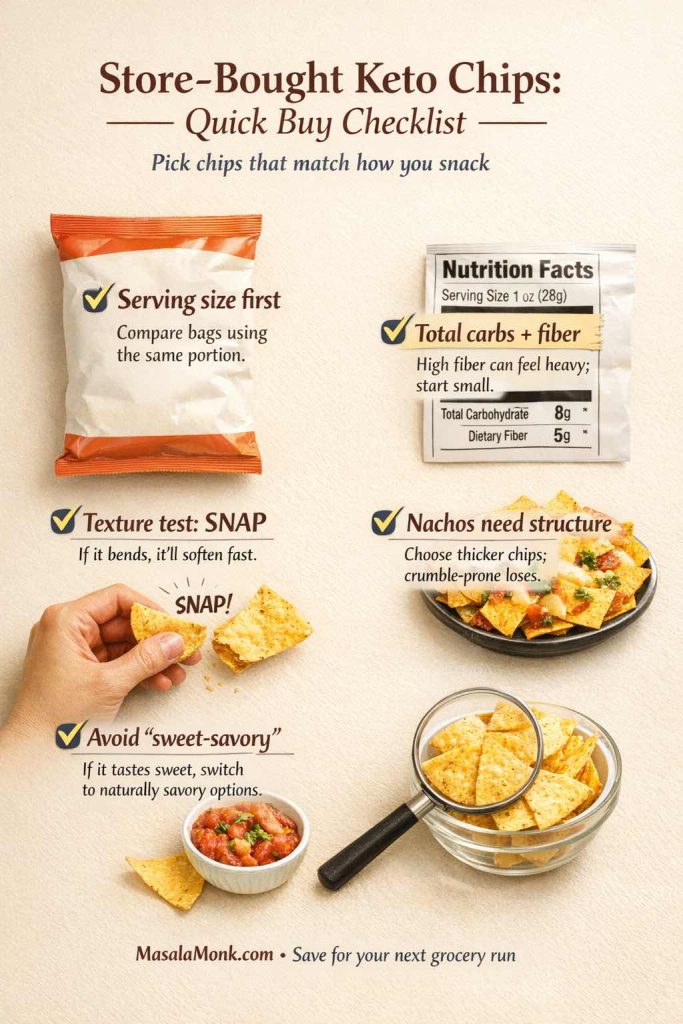
That’s why serving size matters more than the front-of-bag language. Even when a snack is marketed as low carb chips, the carb count is always tied to the listed portion. Double the portion, and you double the carbs. The U.S. Food and Drug Administration’s explanation of the Nutrition Facts label is a helpful baseline because it lays out how serving sizes and carbohydrate values are presented and how to compare products without fooling yourself: how to use the Nutrition Facts label.
What counts as keto chips isn’t a vibe—it’s portion + label math. Use this quick visual to compare snacks the smart way: start with serving size, understand that total carbs include fiber, then choose the chip style based on how you’ll actually eat it (salsa, thick dips, or nachos). Save-worthy for grocery runs and “chips night” planning.
Next, it helps to understand what “total carbohydrate” includes on labels. Fiber is listed under total carbohydrate, and some products use fiber-heavy formulations that look dramatically lower in net carbs than they do in total carbs. The FDA’s interactive explainer on total carbohydrate breaks down what’s inside that number and why it’s structured the way it is: FDA Interactive Nutrition Facts Label: Total Carbohydrate.
Finally, remember that keto approaches vary. Some people aim for very low carbs, while others are simply trying to keep things low carb and steady. If you want a neutral overview of how ketogenic patterns are typically described, this background from Mayo Clinic’s keto overview is a decent orientation point.
Once those basics are in place, choosing keto chips becomes much simpler: pick the texture you want, then pick the version that fits your numbers.
The simplest way to choose low carb chips: pick by “dip-ability”
Instead of chasing the perfect chip, start with a question that actually matches how you snack:
Do you want something thin and crisp for salsa?
Do you need sturdy chips for dipping into thick queso-style dips?
Are you building nachos?
Or are you just looking for a crunchy snack to eat by the handful?
From there, chip choices get easier fast. Thin and crisp chips don’t always scoop well. Thick chips don’t always feel “real” with salsa. Airy chips can be fun but may collapse in dips. So rather than forcing one option into every situation, it’s smarter to keep two or three types in rotation.
Below we cover the main “families” of keto chips and chip alternatives, plus how they behave in the real world.
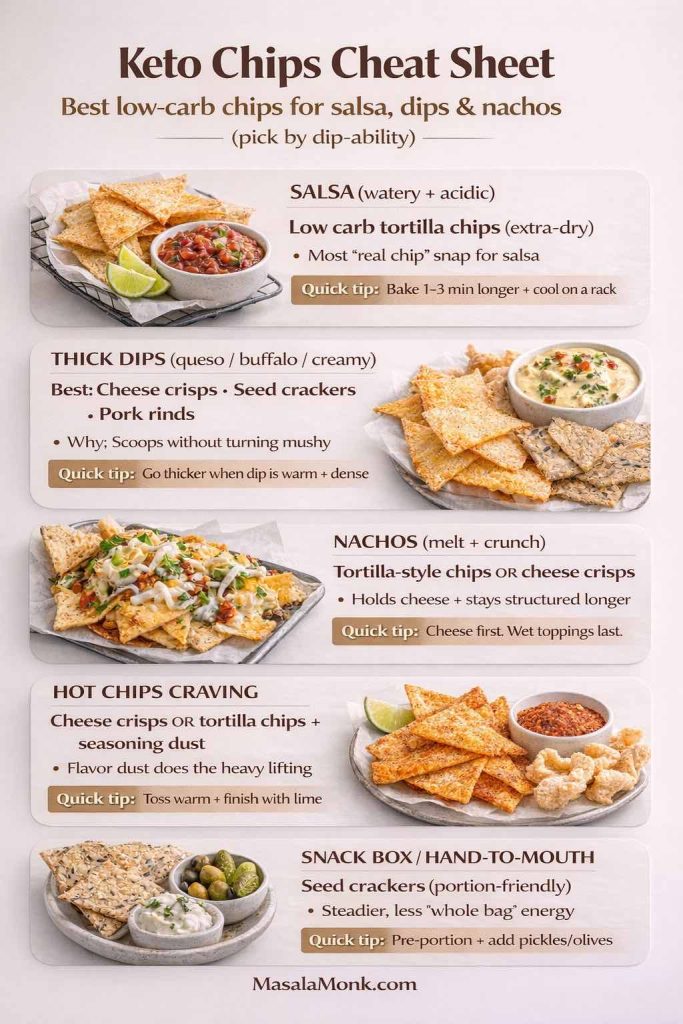
Quick Cheat Sheet: Which Keto Chip Works for What?
Use this as the “pick-by-dip-ability” shortcut. Once you match chip style to the job, keto chips stop feeling like a compromise.
Keto Chips Cheat Sheet (save this): pick the best low-carb chips based on what you’re actually eating—keto chips for salsa, best keto chips for dipping, keto nacho chips, or hot chips cravings. The biggest upgrade isn’t a “perfect chip,” it’s matching the crunch to the dip (and using the quick tips so chips stay crisp). This graphic is designed to be share-worthy for Pinterest and practical enough to use on game night.
What you’re craving
Best keto chip option
Why it works
Quick tip to make it better
Salsa (watery, acidic)
Tortilla-style low carb chips (baked extra-dry)
They feel most “real” with salsa and keep that tortilla snap
Bake 1–3 minutes longer than you think, then cool on a rack
Thick dips (queso, buffalo dip, creamy dips)
Cheese crisps / seed crackers / pork rinds
These scoop without dissolving or turning into mush
Choose the sturdier option when the dip is dense and warm
Nachos (melt + crunch)
Tortilla-style chips or cheese crisps
Tortilla chips give the classic vibe; cheese crisps stay sturdy
Put cheese first so it acts like a “seal,” keep wet toppings late
“Hot chips” cravings
Cheese crisps or tortilla chips with seasoning dust
Flavor carries the craving more than the base
Toss warm chips with spice + finish with lime for that “dusted” feel
Snack-by-the-handful
Seed crackers (portion-friendly)
They’re steadier, more filling, and less “accidental whole bag”
Pre-portion into a bowl or snack box so it stays intentional
Busy snack box situation
Seed crackers + cheese crisps
Easy to pack, less fragile, pairs with dips cleanly
Add something tangy (pickles/olives) so the snack feels “done”
Which Keto Chip Works for What?
The 3 Rules That Make Keto Chips Work
Pick the chip by dip. Salsa wants thin and dry; thick dips want sturdy and scoopable.
Dry beats brown. Crispness is mostly moisture removal—especially for tortilla-style chips.
Structure beats willpower. Portion into a bowl and pair with a dip so you stop snacking when you’re satisfied.
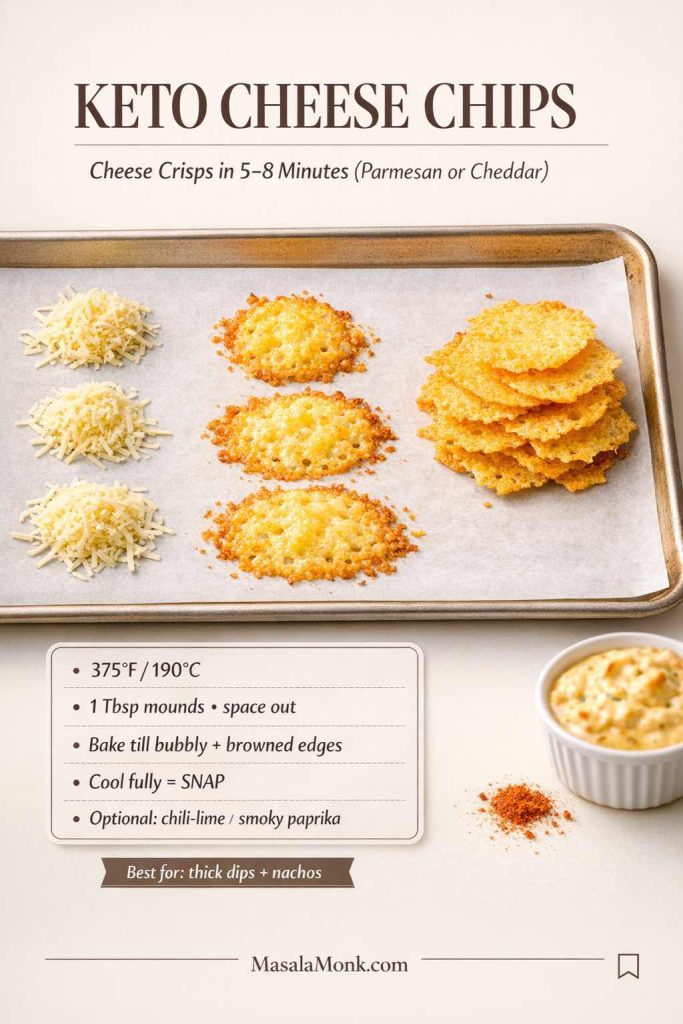
Keto cheese chips and parmesan crisps: the classic crunch that rarely fails
If you want keto chips that feel instantly satisfying and require almost no negotiation with your carb budget, keto cheese chips are the easiest win. Cheese crisps and parmesan chips keto-style snacks deliver that loud snap and salty finish that most people miss first.
They also behave beautifully with dips. Because they’re sturdy and rich, they can scoop thicker dips without dissolving. Moreover, they’re easy to flavor without relying on anything complicated: smoked paprika, chili powder, garlic powder, black pepper, or a little dried oregano can shift the vibe from “plain cheese” to “nacho chip energy.”
Homemade cheese crisps you’ll actually repeat
What you need
Finely shredded cheese (parmesan crisps the easiest; cheddar is bolder; a mix is great)
Keto Cheese Chips (Parmesan or Cheddar): The fastest low-carb chip fix. Bake small cheese mounds at 375°F / 190°C until the edges brown—then cool completely (that’s when they turn crunchy). Perfect for thick dips, queso, and nachos, and easy to spice up with chili-lime or smoky paprika.
How to do it
Heat oven to 190°C / 375°F.
Line a tray with parchment.
Drop small mounds of cheese (about a tablespoon each). Keep space between them.
Season lightly (if using).
Bake until bubbling and browned at the edges, usually 5–8 minutes depending on cheese and thickness.
Cool completely before lifting. Cooling is where they become crisp.
The cooling step is non-negotiable. They firm up as they cool. If you grab them warm, they’ll feel floppy and you’ll assume you messed up.
Make them taste like “hot chips” without pretending they’re the same
Sometimes you don’t want “cheese chips.” You want the aggressive spicy-dusted vibe — the low carb hot chips craving. If you’re chasing the keto doritos vibe—spicy, salty, dusted—season before baking with chili powder + smoked paprika. Then finish with lime right before eating. It lands surprisingly close to that “hot chips” craving without pretending it’s the same thing and gives the sharp, dusty, spicy feel people associate with nacho-style chips and “hot chip” snacks.
Make them sturdier for dipping
If your cheese chips snap too easily, two small tweaks help:
Use a slightly thicker mound rather than a thin sprinkle.
Mix parmesan with cheddar. Parmesan crisps hard and thin; cheddar adds body.
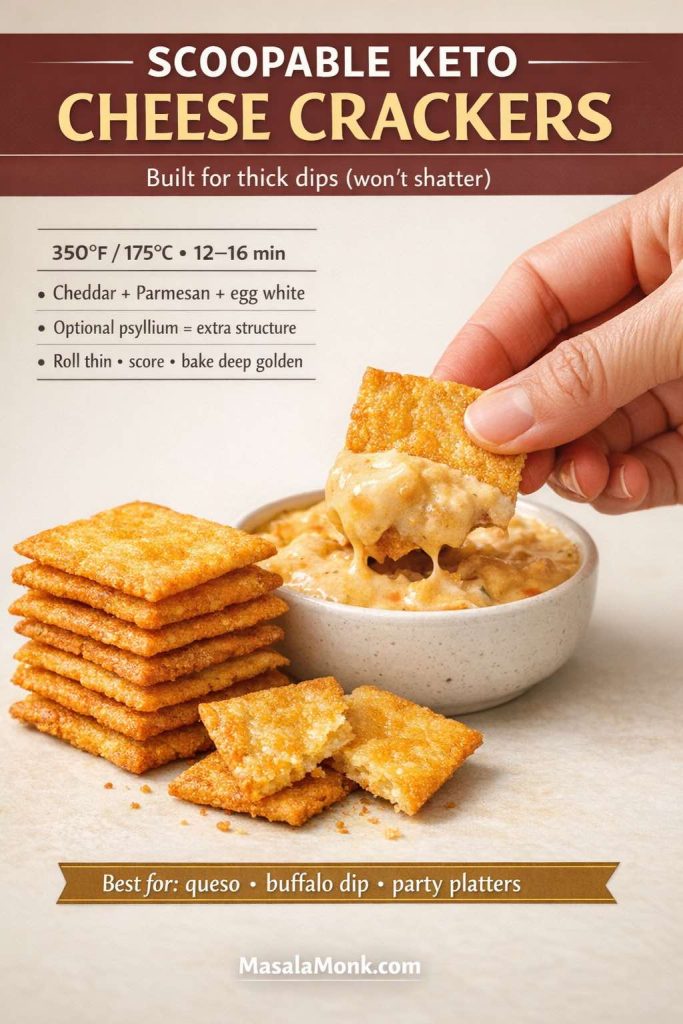
Turn cheese crisps into “cheese crackers” that scoop
Cheese crisps are amazing, yet sometimes you want a cracker-like bite that holds shape and dips without shattering. This version adds a tiny bit of structure.
Quick cheese crackers (keto cheese crackers)
1 cup shredded cheddar
1/3 cup finely grated parmesan
1 egg white
1–2 teaspoons psyllium husk powder (optional but helpful)
Seasoning: garlic powder, paprika, black pepper
Scoopable Keto Cheese Crackers (Low-Carb Chips for Dipping): These are the “chip replacement” that actually holds up in thick queso, buffalo dip, and creamy dips—no shattering. Roll the dough thin, score, bake 12–16 minutes at 350°F / 175°C, then cool for peak crunch. Perfect when you’re craving keto chips for dipping but want something sturdier than flimsy crisps.
Method
Heat oven to 175°C / 350°F.
Mix everything until it forms a sticky mass.
Roll between parchment to a thin sheet (about 2–3 mm).
Score into squares.
Bake 12–16 minutes until deeply golden.
Cool on the tray, then snap along the score marks.
That gives you a sturdier “chip” that behaves like a scoopable cracker—perfect when you want keto crackers for cheese nights.
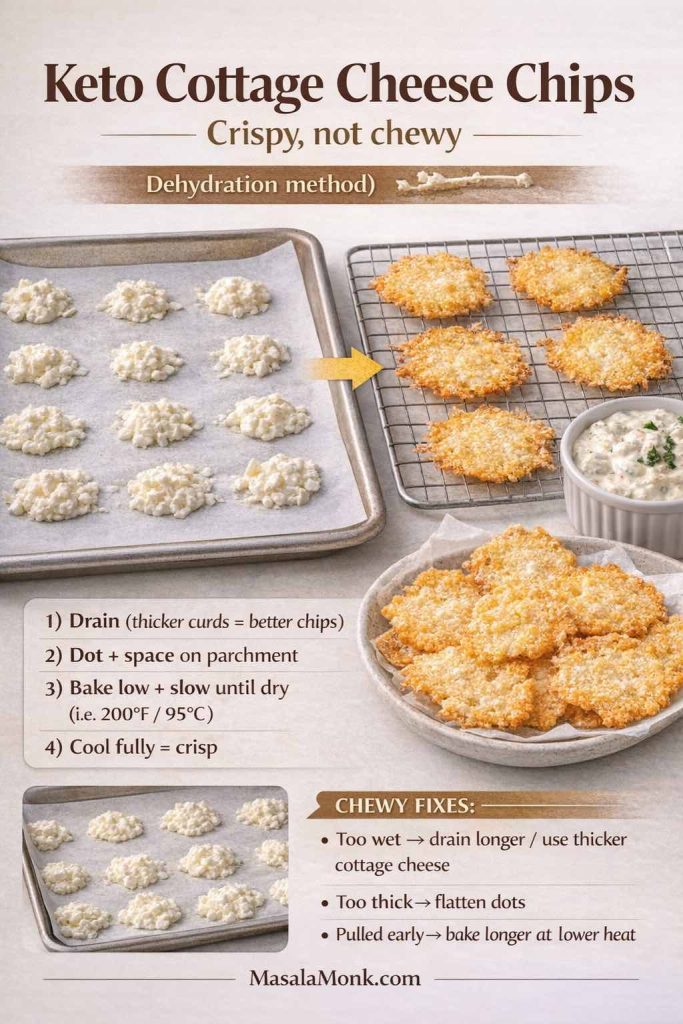
Want a lighter, tangier crunch? Keto cottage cheese chips are the “high-protein” version of cheese crisps — but the method is different: you’re dehydrating, not just melting cheese.
Keto cottage cheese chips (crispy, not chewy): these work best when you treat them like dehydration, not “quick baking.” Drain first, dot and space on parchment, bake low + slow until fully dry, then cool completely for the final crunch. Use this as your quick fix guide when a batch turns chewy—usually it just needs more drying time or thinner dots. (MasalaMonk.com)
More dips that make cheese crisps feel like a full snack
Cheese crisps become dangerously snackable when they have the right dip next to them. A simple strategy is to keep a creamy base on hand and change the flavor each time. If you want a dependable base, homemade mayo with variations gives you a flexible starting point, especially for quick chip dips. If you prefer an egg-free option, eggless mayonnaise works as a smooth, neutral base too.
From there, spice it up with something bold. A spoon of hot sauce works, yet a layered sauce works even better. This pepper sauce guide is a great internal reference because it gives you multiple styles (bright vinegar heat, smoky heat, herb-forward heat) that can transform a basic dip in seconds.
If you want a party-ready option that’s hot, rich, and built for scooping, buffalo chicken dip is a classic pairing that feels like a proper snack table, not a compromise.
Pork rinds and scratchings: best keto chips for thick dips and “scoop” snacks
Pork rinds and similar crunchy scratchings are polarizing, yet they’re undeniably effective as keto chips for dipping—especially for thick dips. Their structure is airy but sturdy, and they hold up under creamy, dense dips in a way that thin tortilla-style chips often can’t.
That said, they’re not always the best match for watery salsa. If salsa is your main goal, you’ll often prefer a tortilla-style keto chip. However, if you love thick dips, these can be your best keto chips for dipping—especially for anything warm and cheesy or anything creamy and heavy.
Make store-bought pork rinds taste “fresh” again
Even good crunchy snacks can taste stale if they’ve been open for a day. A quick crisp-up makes them feel brand new:
Spread on a tray and warm at 160°C / 325°F for 4–6 minutes
cool completely
Pork rinds are one of the best “keto chips for dipping” because they scoop thick dips without turning mushy. This quick card fixes the #1 problem (stale crunch): re-crisp at 325°F / 160°C for 4–6 minutes, cool fully, then hit them with a flavor dust (chili-lime, smoky, or ranch-ish). Save this for game nights and snack boards when you want big crunch with minimal carbs.
After that, toss with one of these seasoning blends:
Chili-lime: chili powder + lime zest + salt
Smoky: smoked paprika + garlic powder + pepper
Ranch-ish without the packet: dried dill + garlic powder + onion powder + salt
Pair them with something cooling
A Greek yogurt dip changes everything here. A great fit is Greek Tzatziki Sauce. It’s bright, garlicky, and thick enough to cling. In addition, the cucumber freshness cuts through rich, salty snacks so you don’t feel like you’re eating pure intensity.
If you’re building a game-night platter, another strong option is Blue Cheese Dip for Wings—especially if you like spicy snacks.
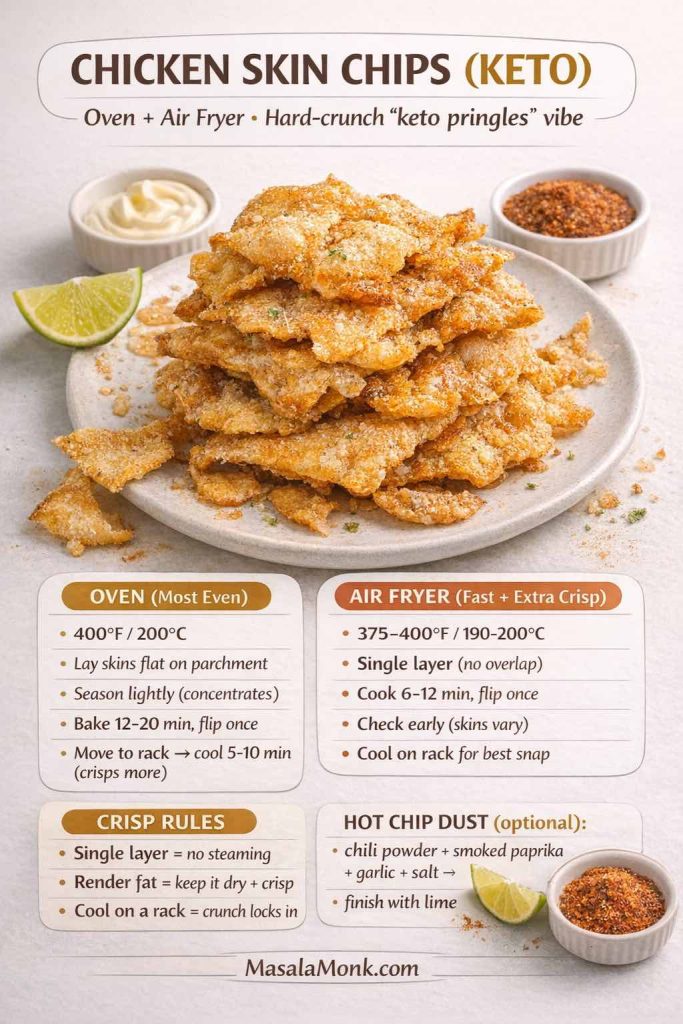
Keto chicken skin chips and keto meat chips: the “keto pringles” level of crunch
Some cravings aren’t satisfied by airy crunch. Sometimes you want that hard, thick, aggressive crunch that feels like kettle chips or even the idea of keto pringles. That’s where keto chicken skin chips and keto meat chips come in.
These options tend to be high in fat and protein and very low in carbs, so the carb question is usually easy. The bigger issue is portioning, because they’re intensely snackable and easy to overeat. They’re also not always ideal for delicate dipping—some varieties scoop beautifully, while others shatter.
Chicken skin chips at home recipe (oven method)
If you have access to chicken skin, you can turn it into chicken chips keto-style with surprisingly little effort. Lay the skins flat on parchment, season with salt and pepper, and bake until deeply crisp. Flip once. Then drain and cool. The cooling step matters because it crisps further as it rests. To shift the flavor into “hot chips” territory, sprinkle chili powder or smoked paprika after baking, then add a squeeze of lime. The result is bold without becoming bitter.
Save this: oven vs air fryer timings + the 3 rules that make chicken skin chips snap instead of chew.
Chicken Skin Chips (Keto): the hard-crunch option when you want “keto pringles” energy without relying on tortilla-style chips. This card gives you oven + air fryer timings, the 3 crisp rules that prevent steaming, and an optional hot-chip dust to make them taste aggressively snacky. Save it for game night, snack boards, and “I need crunch” moments.
Ingredients
Chicken skins (as flat as you can get them)
Salt + pepper
Optional: smoked paprika, chili powder, garlic powder
Method
Heat oven to 200°C / 400°F.
Lay skins flat on parchment. Single layer matters.
Season lightly (they shrink, so seasoning concentrates).
Bake until deeply crisp, flipping once, usually 12–20 minutes depending on thickness.
Drain on paper and cool before eating.
For a hot chip vibe, sprinkle seasoning after baking and finish with lime.
Air fryer chicken skin chips (faster, crispier)
If you’ve got an air fryer, chicken skin chips can become dangerously easy.
Method
Preheat air fryer (if yours benefits from it).
Arrange skins in one layer (no overlap).
Air fry around 190–200°C / 375–400°F, checking often.
Flip once.
Cool on a rack.
If you want to push the “hot chips” vibe, season after crisping and finish with lime.
Because air fryers vary wildly, watch the first batch carefully. Once you learn the timing, it becomes a repeatable “weekend snack” trick.
A “meat chip” idea that’s actually doable: jerky-style crisps
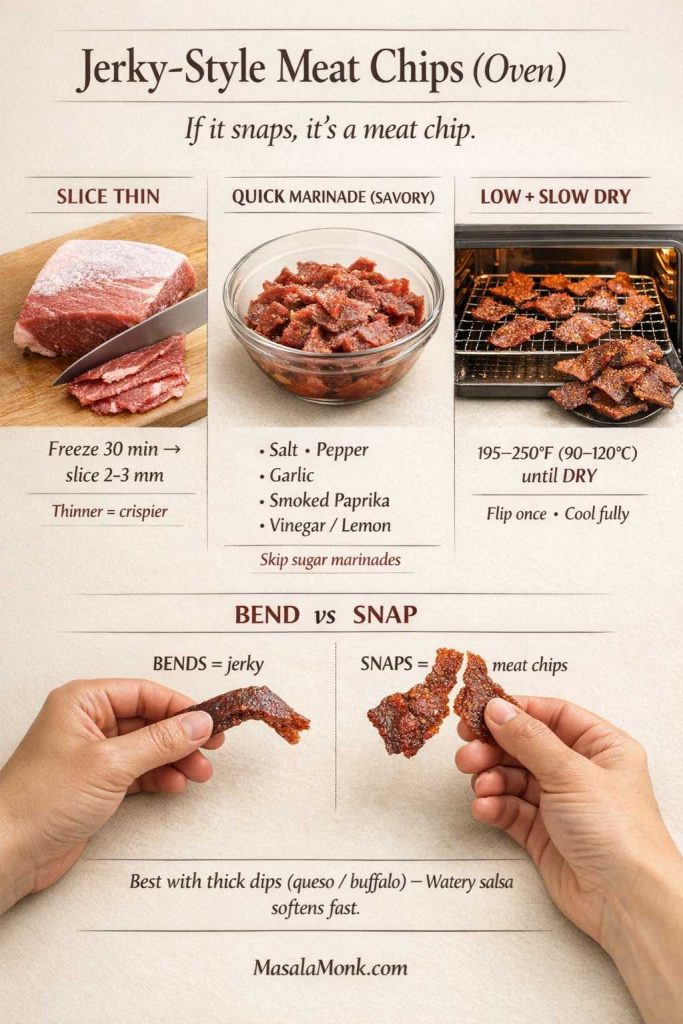
You’ll see phrases like keto turkey jerky, keto beef jerky, best jerky for keto, and beef sticks keto all grouped with chip terms because people use jerky as a crunchy-ish snack replacement. Jerky isn’t a chip, but you can make jerky crisp enough to feel chip-adjacent.
Jerky-style meat chips (oven): If your strip snaps, you’re in meat-chip territory. Slice lean beef very thin, season simply (skip sugar marinades), then dry low + slow until crisp. Use the quick Bend vs Snap test before serving—these pair best with thick dips like queso or buffalo-style. Save this as your go-to keto meat chip method.
Crispy jerky-style strips (oven)
Thinly slice very lean beef (freeze 30 minutes first to slice thin)
Marinate with salt, pepper, garlic powder, smoked paprika, and vinegar or lemon juice
Dry/bake at low heat (90–120°C / 195–250°F) until dry and crisp, flipping once
Cool fully
The key is thinness and dryness. If it’s bendy, it’s jerky. If it snaps, it’s meat-chip territory.
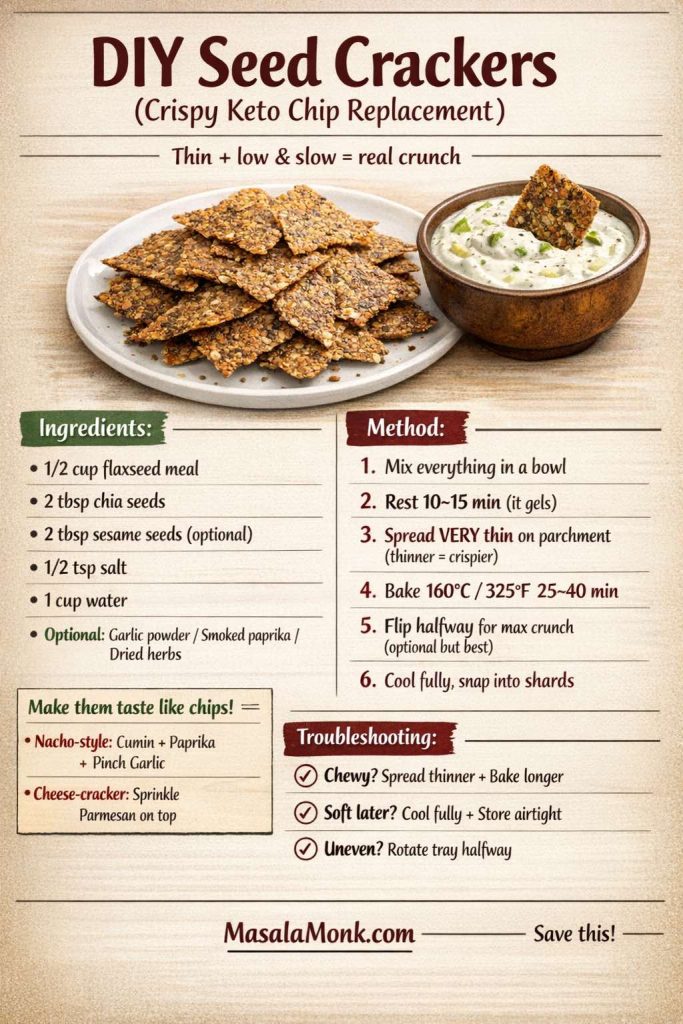
Seed crackers and keto crackers: the most reliable low carb chip replacement
If you want something that feels like chips but behaves more like a stable, everyday snack, seed crackers are the quiet hero. They’re one of the best low carb chip replacement options because they’re easy to make, easy to portion, and generally less likely to trigger “I ate the whole bag” behavior.
They’re also a natural bridge into keto crackers and almond crackers keto-style snacks, since many cracker-style recipes are built around seeds, fiber, and low-carb flours.
Why seed crackers work so well
They usually deliver:
a crisp, toasted crunch
more “weight” than airy chips
better dip performance than many thin keto chips
Plus, they pair beautifully with yogurt dips, mayo dips, and cheese-based dips.
If you want the dip that makes seed crackers feel restaurant-level, use Greek Tzatziki Sauce. It’s thick, bright, and makes the whole snack feel fresh.
Alternatively, if you’re going for a richer, more indulgent dip, use a mayo base:
Mix flaxseed meal with chia seeds, sesame, and water. Let it gel. Spread it very thin on parchment. Bake low and slow until dry and crisp, then break into shards.
You can turn these into “nacho chips” by adding cumin, paprika, and a pinch of garlic powder. You can also turn them into “cheese crackers” by baking with a light dusting of parmesan over the top.
Ingredients
1/2 cup flaxseed meal
2 tablespoons chia seeds
2 tablespoons sesame seeds (optional)
1/2 teaspoon salt
1 cup water
Optional: garlic powder, paprika, dried herbs
DIY Seed Crackers (Crispy Keto Chip Replacement): the most reliable low carb chip alternative when you want real crunch that actually holds up in dips. The key is spreading the mix very thin, baking low + slow, and letting it cool fully before snapping into shards. Use this as your go-to keto crackers / seed crackers base, then change the vibe with “nacho-style” spices or a parmesan top for a more “cracker chip” feel—perfect for snack boxes and dip nights.
Method
Mix everything in a bowl.
Rest 10–15 minutes until gelled.
Spread thin on parchment (thinner = crispier).
Bake at 160°C / 325°F for 25–40 minutes, depending on thickness.
Flip the sheet halfway through if you want extra crispness.
Cool, then snap into shards.
This is a great base for chip-and-dip nights because it scoops well and holds up.
Almond flour crackers that feel like “real crackers”
If you want almond flour keto crackers, this version is simple and sturdy.
Optional: sesame seeds or everything-style seasoning
Almond Flour Crackers (Keto + Dip-Friendly): These sturdy low carb cracker chips are perfect when you want something that actually holds up in queso, salsa, and thick dips. Roll the dough thin, score into squares, bake until golden, then cool completely for that real crunch. If they soften later, a quick re-crisp brings them back. Save this for snack boxes and chip-and-dip nights.
Method
Heat oven to 175°C / 350°F.
Mix dry ingredients, add egg + oil, then add water until a workable dough forms.
Roll between parchment into a thin sheet.
Score into squares.
Bake 12–18 minutes until golden and crisp.
Cool completely, then break.
If you want a deeper look at how keto-friendly flours behave across recipes, this keto flour guide is a great companion. If glucose stability is also on your mind, almond flour and diabetes supports why almond-based swaps often behave differently than wheat-based snacks.
Keto tortilla chips and low carb tortilla chips: for salsa nights and nachos
When people say “keto chips,” they often mean keto tortilla chips. They want triangles, they want that familiar tortilla snap and then they want the ability to do keto chips and salsa without feeling like they’re chewing on a substitute.
This is completely doable, but tortilla-style chips are the area where labels matter most. Two products can look similar and behave very differently. So start with the label basics from the FDA: understanding the Nutrition Facts label and the structure of total carbohydrate. That way, you’re comparing chips on the same foundation rather than trusting marketing language.
What’s actually inside many low carb tortillas (and why it matters)
A lot of low carb tortillas get their “net carb” profile from some combination of:
added fibers (like inulin, oat fiber, or other plant fibers like cellulose)
resistant starches or modified starches
gluten or protein structure (in some versions)
binding agents (like gums)
None of that is automatically “bad.” The point is simply this: a tortilla can look low carb on paper while still being very easy to overeat, and some people don’t feel great after huge fiber loads in one sitting. When that happens, it’s not a willpower issue—it’s how fiber-heavy products behave for some bodies.
If you ever want a neutral place to cross-check general nutrition numbers across foods and ingredients, USDA FoodData Central is useful.
Homemade keto tortilla chips that actually get crisp (oven + air fryer)
If you’ve tried making low carb tortilla chips and ended up with limp triangles, you’re not alone. Tortilla-style keto chips can be genuinely satisfying, but they need to be treated like a drying project, not a quick toast. You’re not just browning them — you’re removing moisture so they stay crisp long enough for salsa, dips, and nachos.
This is the master method: one approach that works with most low carb wraps and homemade tortillas, plus the fixes that matter when a batch goes wrong.
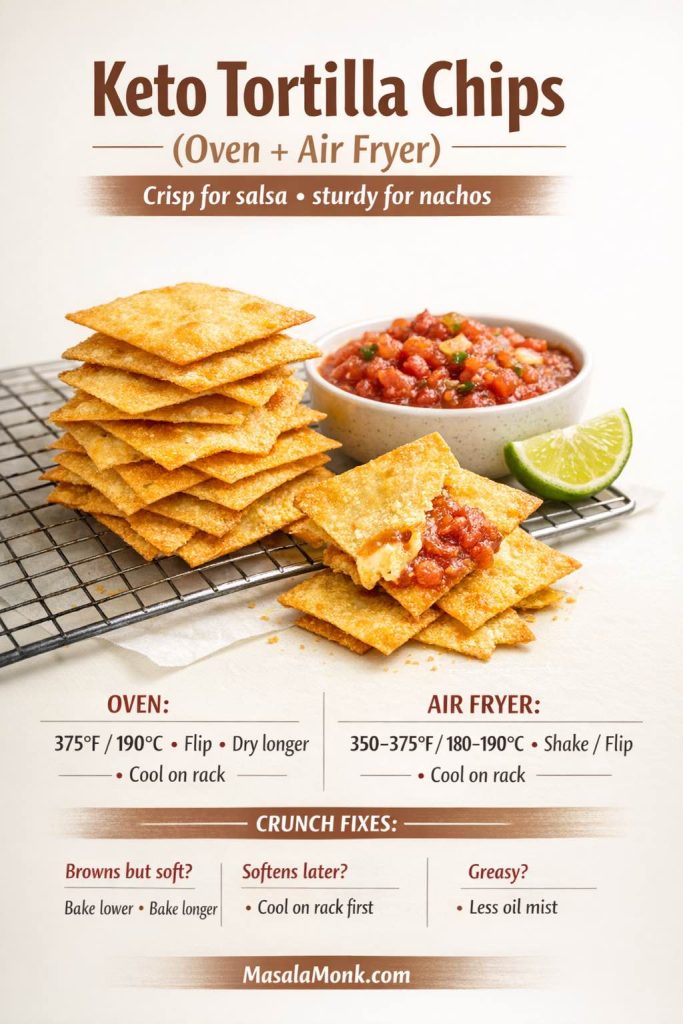
Keto Tortilla Chips (Oven + Air Fryer): The secret to low carb tortilla chips that stay crisp for keto chips and salsa is drying, not just browning. Bake or air fry in a single layer, flip/shake halfway, then cool on a rack so steam doesn’t soften the underside. Use these for keto nacho chips (cheese first, wet toppings last) and re-crisp later with a quick low-heat bake if humidity wins.
The oven method (most reliable for big batches)
What you’ll need
Low carb tortillas or homemade tortillas
Oil spray or a very light brush of oil
Salt + optional seasonings
2 baking trays (or bake in batches)
A cooling rack (highly recommended)
Step-by-step
Heat the oven to 190°C / 375°F.
Cut tortillas into triangles. Keep them similar in size so they crisp evenly.
Arrange in a single layer. Overlap turns into steaming.
Spritz or brush with oil lightly. Too much oil makes chips heavy and can keep them from drying properly.
Season. Salt is non-negotiable. Add spices if you want a “nacho” vibe.
Bake 8–12 minutes, then flip the chips.
Bake another 6–10 minutes until the edges are clearly crisp and the center feels dry.
Move to a cooling rack and let them cool 10 minutes. They finish crisping as they cool.
Pro move: after flipping, crack the oven door for the last 2–3 minutes to help moisture escape.
Why the rack matters: if you cool chips on a plate, steam softens the underside. A rack keeps air moving, which is the difference between “pretty good” and genuinely crisp.
The air fryer method (fastest for small batches)
The air fryer is perfect when you want keto chips and salsa right now and don’t need a giant batch. It also makes chips taste slightly “lighter” because airflow does more work than oil.
Preheat the air fryer if yours benefits from it.
Set it to 180–190°C / 350–375°F.
Arrange triangles in a single layer (cook in batches if needed).
Light oil spritz + salt + seasoning.
Air fry 4–6 minutes, shake or flip, then another 2–5 minutes until crisp.
Cool fully (this is where crisp happens).
Watch the first batch closely. Tortillas vary in thickness and fiber content, so the perfect time depends on your wrap. Once you find the sweet spot, it becomes repeatable.
Why your low carb tortilla chips aren’t crisp (quick fixes)
Most crunch problems come from a few predictable issues. The fixes are simple once you know what you’re looking at.
They browned but stayed soft: they need more drying time. Lower the heat slightly and bake longer so the center dries without burning.
They crisped, then softened later: they weren’t cooled properly. Always cool properly before storing.
They taste bitter: the seasoning burned. Add delicate spices later or use slightly lower heat for longer.
They’re crisp at the edges but chewy in the center: triangles are too big or the wrap is thick. Cut smaller, bake longer, and flip earlier.
They feel greasy: too much oil. Use a mist, not a brush.
If you want salsa-style chips that don’t collapse fast, bake them a touch longer than you think you should. A slightly “over-dry” chip is exactly what survives salsa and nachos.
How to store homemade keto chips (so they don’t go stale)
Homemade chips go soft mainly because moisture sneaks back in. Once that happens, they’re not ruined — you just need to re-crisp them.
Best storage: airtight container after chips are completely cool.
If they soften: re-bake at 160°C / 325°F for 4–6 minutes, then cool again.
If you live somewhere humid: add a small paper towel to the container (swap daily) to absorb moisture.
This makes tortilla-style keto chips far more practical. Instead of treating chips like a one-time project, you can bake once and refresh quickly when needed.
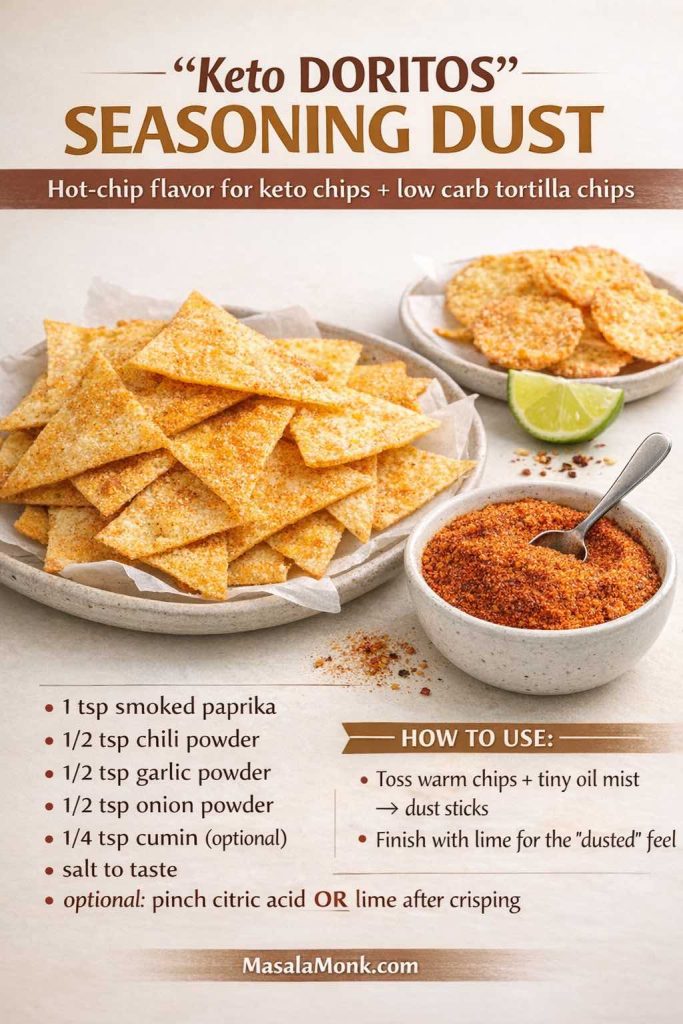
“Keto Doritos” flavor dust: the fastest way to fix a bland batch
Even crisp chips can feel disappointing if they taste flat. Seasoning matters more than people expect — especially for low carb chips, where you’re not getting the same corn-based flavor you’d get from regular tortilla chips.
This simple seasoning blend takes plain tortilla chips, cheese crisps, seed crackers, or pork rinds and pushes them into that spicy, dusty “hot chips” zone.
If your keto chips taste bland, don’t change the chip—change the dust. This “Keto Doritos” seasoning turns low carb tortilla chips, cheese crisps, seed crackers, or pork rinds into that salty, spicy low carb hot chips vibe in 30 seconds. Toss chips while warm with a tiny oil mist so the seasoning sticks, then finish with lime for the “dusted” feel. It’s the fastest way to rescue a batch and make keto chip snacks actually craveable.
Nacho-style seasoning (dry blend)
1 tsp smoked paprika
1/2 tsp chili powder
1/2 tsp garlic powder
1/2 tsp onion powder
1/4 tsp cumin (optional but excellent)
Salt to taste
Optional: pinch of citric acid, or a squeeze of lime after crisping
How to use it: toss warm chips with the seasoning (a light oil mist helps it stick), then finish with lime. Suddenly your “chip replacement” feels like a real snack, not a compromise.
If you like heat with depth instead of flat spice, a spoon of pepper sauce stirred into mayo makes an instant spicy dip that turns even simple chips into something you actually want to keep eating.
Make low carb tortillas at home (then turn them into chips)
If you’ve found a store-bought wrap you like, turning it into chips is already a win. However, if you don’t love the ingredient list on some low carb tortillas—or you want chips that taste cleaner and crisp the way you like—making tortillas at home gives you full control.
The bonus is flexibility: make them slightly thicker for wraps, then roll them thinner when you want chips. Once you have a tortilla you like, the crisping method you already used becomes automatic.
Here are two reliable routes:
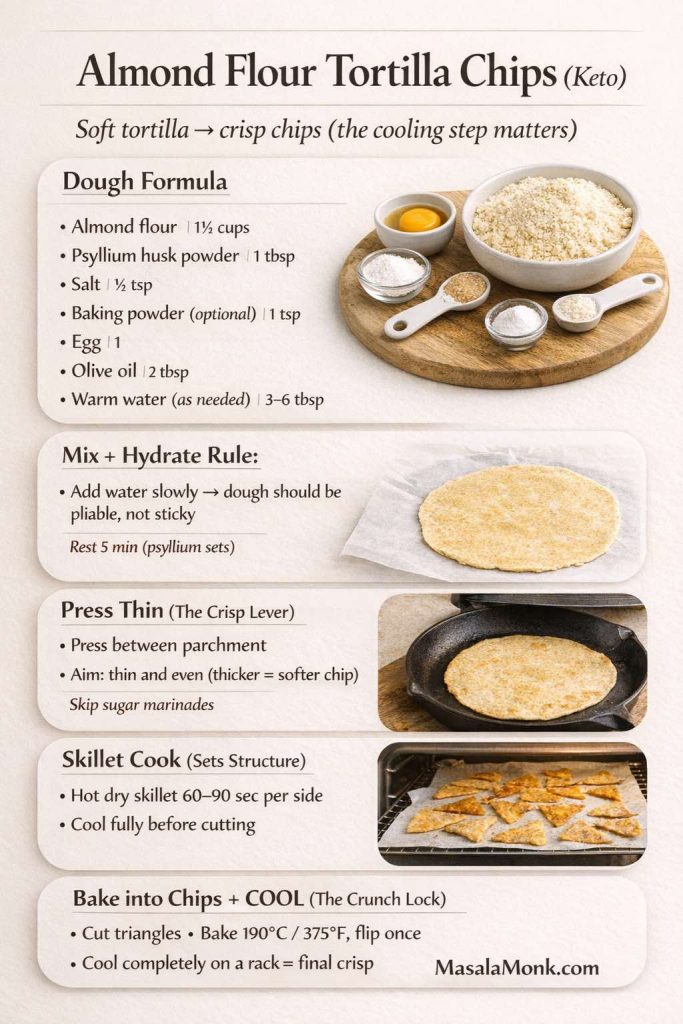
Almond flour tortillas (soft enough to wrap, crisp enough to chip)
If you’d rather make a dough-based chip, almond flour tortilla chips are the usual route. They take more effort, yet you control the thickness and the seasonings. This also naturally connects to a broader low-carb flour toolkit. If you want a deeper reference for how keto-friendly flours behave, MasalaMonk’s keto flour guide can help you understand why some doughs crisp while others stay soft.
Ingredients
1 1/2 cups almond flour
1 tablespoon psyllium husk powder (structure)
1/2 teaspoon salt
1 teaspoon baking powder (optional, for tenderness)
1 egg
2 tablespoons olive oil
3–6 tablespoons warm water (as needed)
If your ‘keto chips’ keep turning soft, this is the fix: press thin, set structure on the skillet, then bake + cool to lock crunch. These almond flour tortilla chips are sturdy enough for dips once they fully cool (that’s where the snap happens). Keep this graphic handy the next time you want real chip texture without the carbs.
Method
Mix dry ingredients.
Add egg and oil, then add water gradually until dough is pliable.
Divide into balls.
Press between parchment into thin circles.
Cook on a hot dry skillet 60–90 seconds per side.
To make chips
Let tortillas cool fully (they firm up).
Cut into triangles.
Bake at 190°C / 375°F until crisp, flipping once.
Do not forget to cool properly.
If you’re building chips from almond flour and you care about glucose stability too, almond flour and diabetes is a relevant resource that reinforces why almond-based swaps often behave differently from wheat-based snacks.
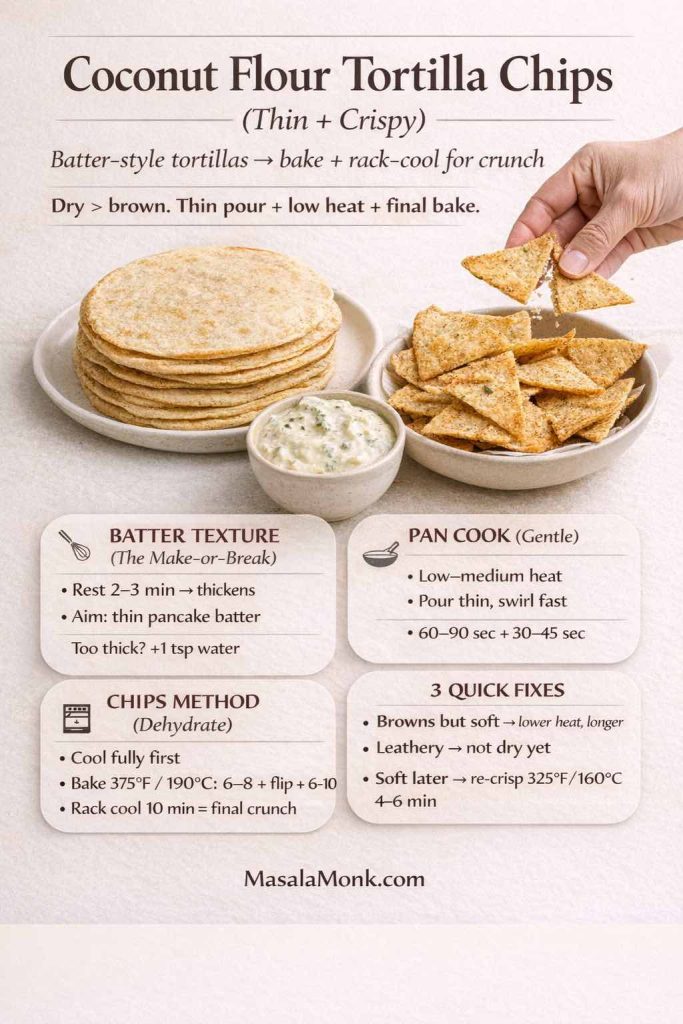
Coconut flour tortillas (lighter, more delicate)
Coconut flour absorbs a ton of water, so these can be fragile. Still, they work when you want thin chips.
Ingredients
2 tablespoons coconut flour
2 eggs
2 tablespoons water
1 tablespoon olive oil
Salt
Optional: pinch of baking powder
Coconut Flour Tortilla Chips (Thin + Crispy): Coconut flour is fragile, so the trick is batter-thin tortillas + a final bake (dry > brown). Pan-cook gently, then bake and cool on a rack so steam doesn’t soften the underside. This is the best route when you want thin keto chips for salsa without relying on store-bought wraps. (MasalaMonk.com)
Method
Whisk everything and let it sit 2 minutes.
Pour thin circles into a lightly oiled skillet.
Cook gently; flip carefully.
These are more fragile, but when they crisp successfully, they can be surprisingly satisfying as thin chips.
Keto chips and salsa: how to make it actually satisfying
Keto chips and salsa can work beautifully if you stop treating salsa like the whole snack and start treating it as one part of a complete setup.
A strong chips-and-salsa plate usually has:
a tortilla-style keto chip as the crunchy base
something creamy to balance acidity
something salty or cheesy to make it feel complete
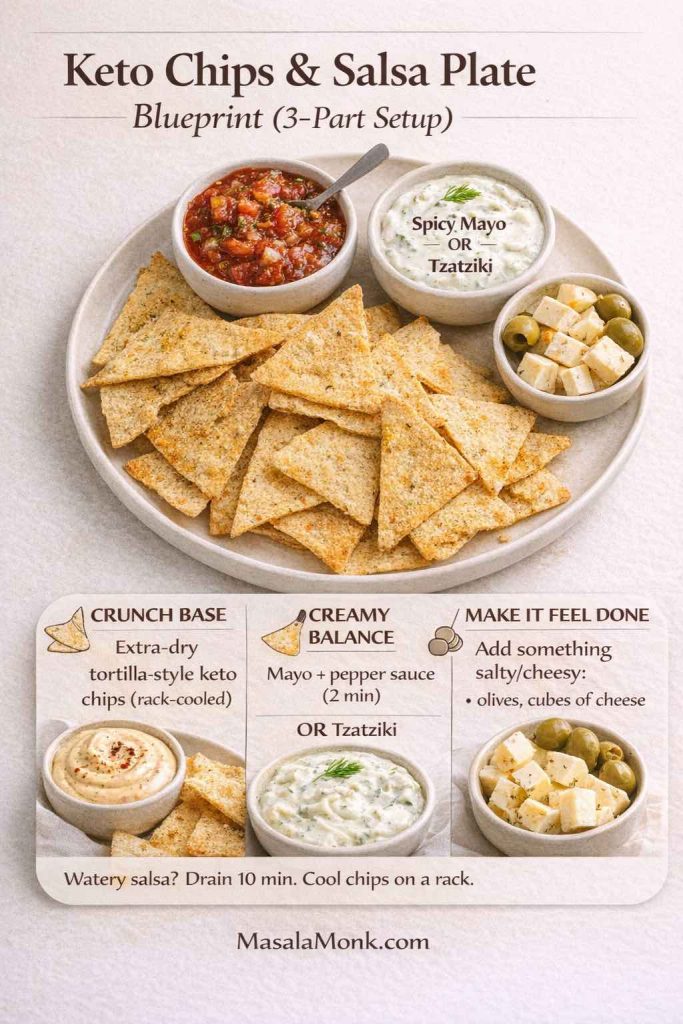
Keto chips & salsa that actually satisfies: build a 3-part plate. Start with extra-crisp tortilla-style keto chips, add a creamy dip (spicy mayo or tzatziki) to balance salsa acidity, then finish with something salty/cheesy (olives + cheese cubes). Bonus: if your salsa is watery, drain 10 minutes and rack-cool chips so they stay crunchy.
That creamy element can be as simple as a quick mayo dip (mayo + pepper sauce), or a cooling yogurt dip like Greek Tzatziki. Meanwhile, if you want an avocado-based angle, this post on avocado for diabetes supports why avocado-based dips are often used in lower-carb eating patterns.
Watery salsa destroys weak chips. So the trick is pairing chip type to dip type:
watery salsa → tortilla-style chips baked extra crisp
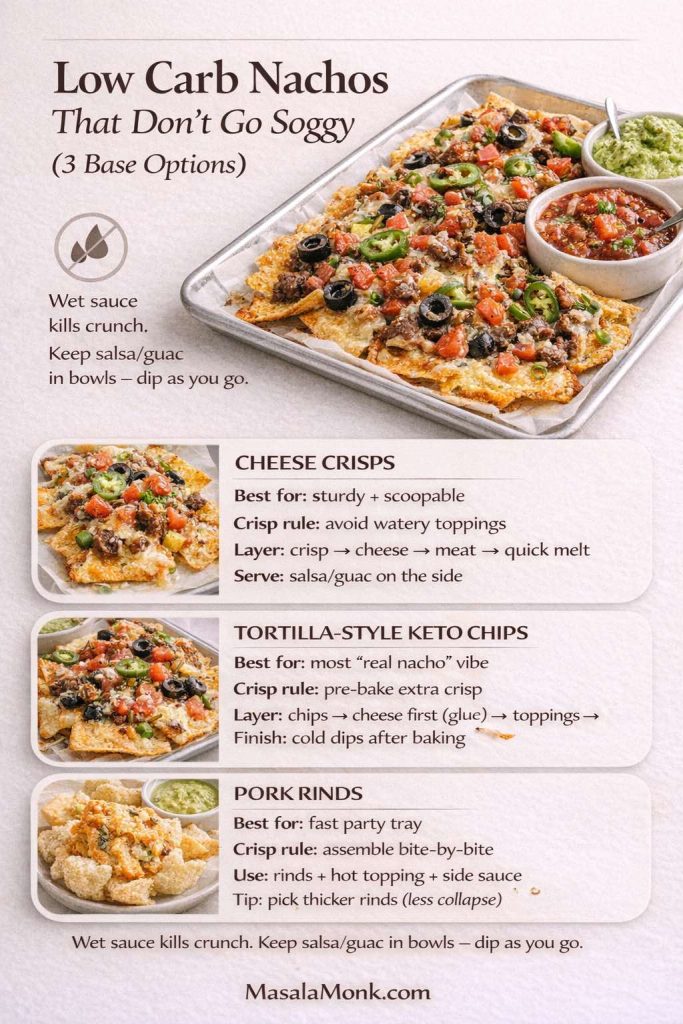
Keto nacho chips, keto taco chips, and the art of building low carb nachos
If you’re craving nachos, you’re not craving chips as much as you’re craving structure: crunchy base, melted toppings, and a little chaos on a tray.
The easiest way to do keto nacho chips without disappointment is to pick a base that stays crisp long enough to eat the plate.
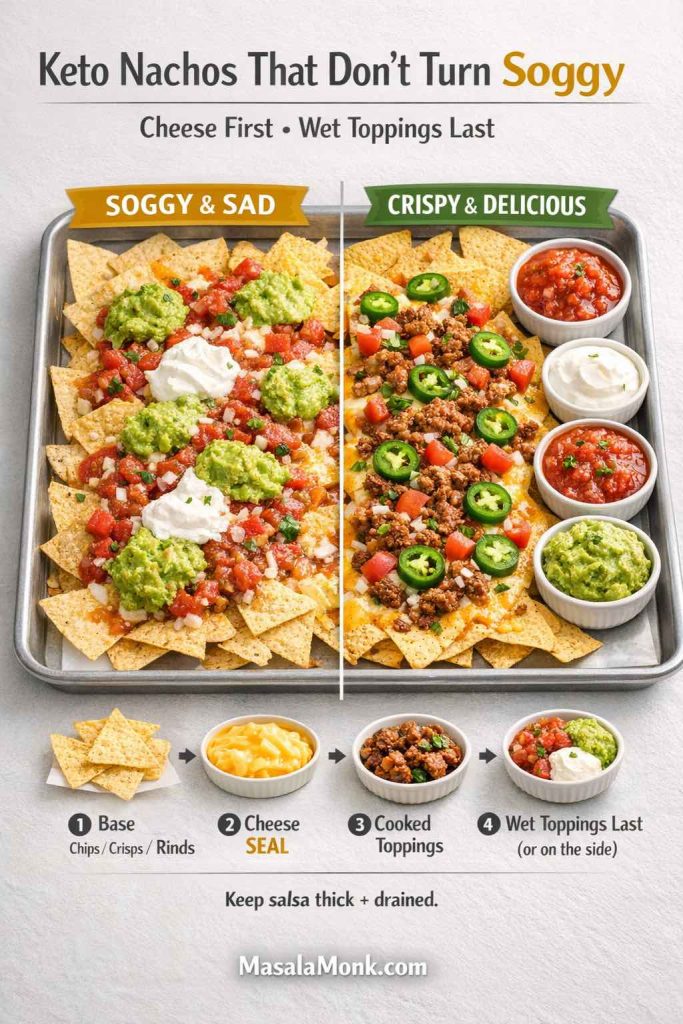
Build keto nachos that stay crispy by choosing the right base: cheese crisps for sturdy scooping, tortilla-style keto chips for the most “real nacho” vibe, or pork rinds for a fast party tray. The biggest crunch-saver: keep wet salsa/guac in bowls and dip as you go—and add cold dips after baking so nothing steams your chips.
Three keto nacho bases that work
1) Cheese crisps They’re naturally sturdy and don’t become soggy as fast. Layer lightly, add toppings that aren’t too watery, and keep wet sauces on the side.
2) Tortilla-style low carb chips Best when you want the most “normal” nacho vibe. Bake them extra crisp before topping, then layer cheese first so it acts like glue.
3) Pork rinds They can work surprisingly well, especially if you assemble bite-by-bite instead of drowning the whole tray in sauce.
If you want a nacho topping that feels like party food, Buffalo Chicken Dip can double as a hot, creamy topping. For a cooler, tangier finish, Blue Cheese Dip works brilliantly on the side.
Keto veggie chips: when you want crunch that feels lighter
Keto veggie chips can work, but they’re the most likely to disappoint if you expect them to taste like potato chips. If you treat them as their own snack—thin, crisp, salty, and fresh—they can be genuinely good.
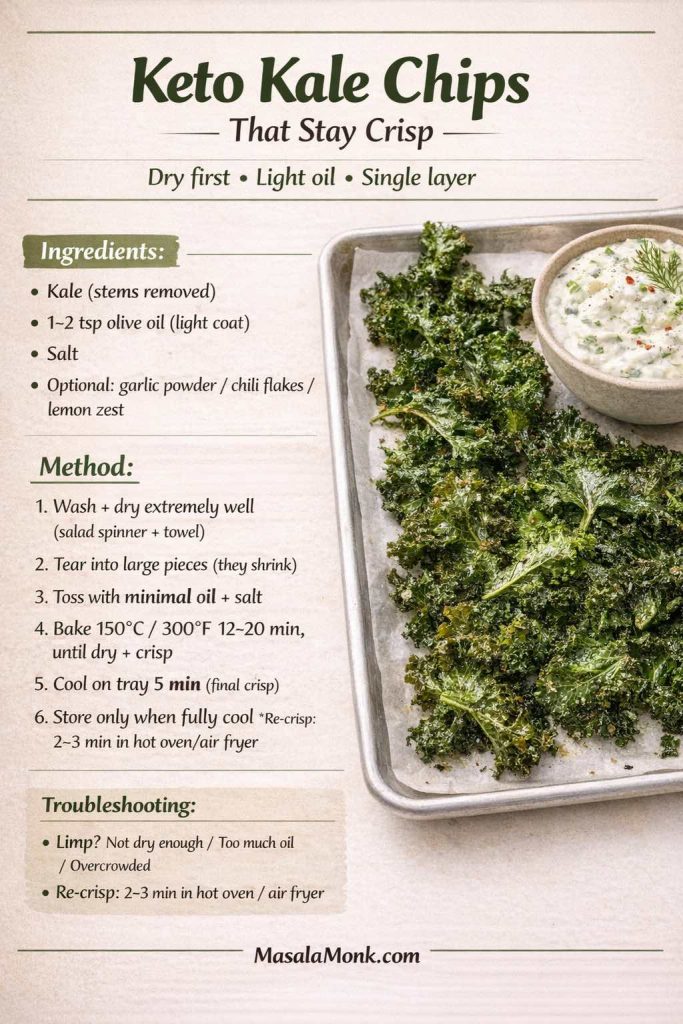
Keto kale chips that stay crisp
Keto kale chips are a classic for a reason. They crisp quickly and can be intensely snackable when seasoned well.
The biggest determinant is moisture. Dry the leaves thoroughly. Use a light touch of oil. Bake in a single layer. Then cool before storing.
Keto Kale Chips That Stay Crisp (Save This): The crunch comes from drying, not drowning in oil. Dry leaves extremely well, use minimal oil, bake in a single layer at 150°C / 300°F, then cool fully (that’s when they turn properly crisp). If they go limp later, re-crisp 2–3 minutes in a hot oven/air fryer. A perfect low carb veggie chips option when you want lighter crunch without the “chip replacement” heaviness.
If you want a dip that makes kale chips feel less “health snack” and more “snack snack,” serve them with Greek tzatziki sauce. It adds richness and tang, which makes veggie chips feel complete.
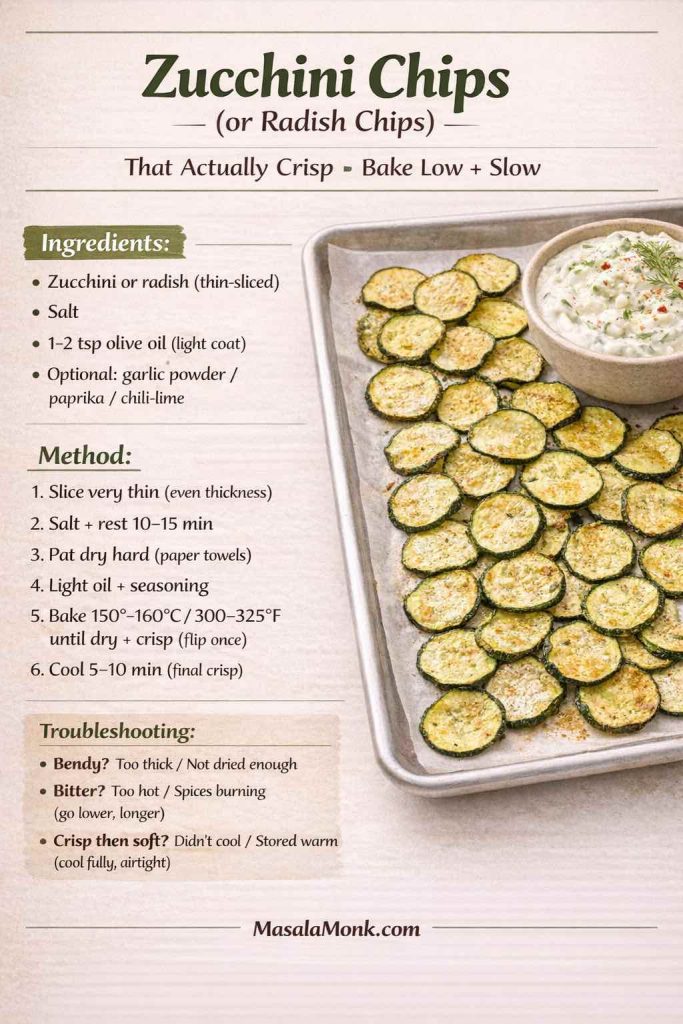
Zucchini chips, radish chips, and other veggie crisps
Zucchini, radish, and even thin-sliced eggplant can crisp if you slice them thin and bake them long enough to dry out. Salt them first to pull moisture, pat them dry, then bake.
Zucchini chips (or radish chips) that actually crisp: the whole secret is moisture management—salt, rest, and pat very dry before baking low + slow (300–325°F / 150–160°C). Cool 5–10 minutes for the final snap. Use these as a lighter keto veggie chips option when cheese crisps feel heavy, and dip them in a thick, creamy sauce (tzatziki or spicy mayo) so they feel like a real snack—not a “diet” plate.
If you’re looking for variety because cheese-based chips feel heavy every day, rotating in veggie chips is an easy way to keep snacks interesting while staying low carb.
Protein chips keto-style: what they are and what to watch
High-protein low carb chips exist in many forms. Some are basically puffed protein snacks. Others are fiber-heavy crisps with added protein. Some are more like crackers.
They can fit into a low carb plan, yet they can also be the kind of snack that looks “too good to be true.” That doesn’t mean they’re bad; it simply means you want to read the label carefully and portion intentionally.
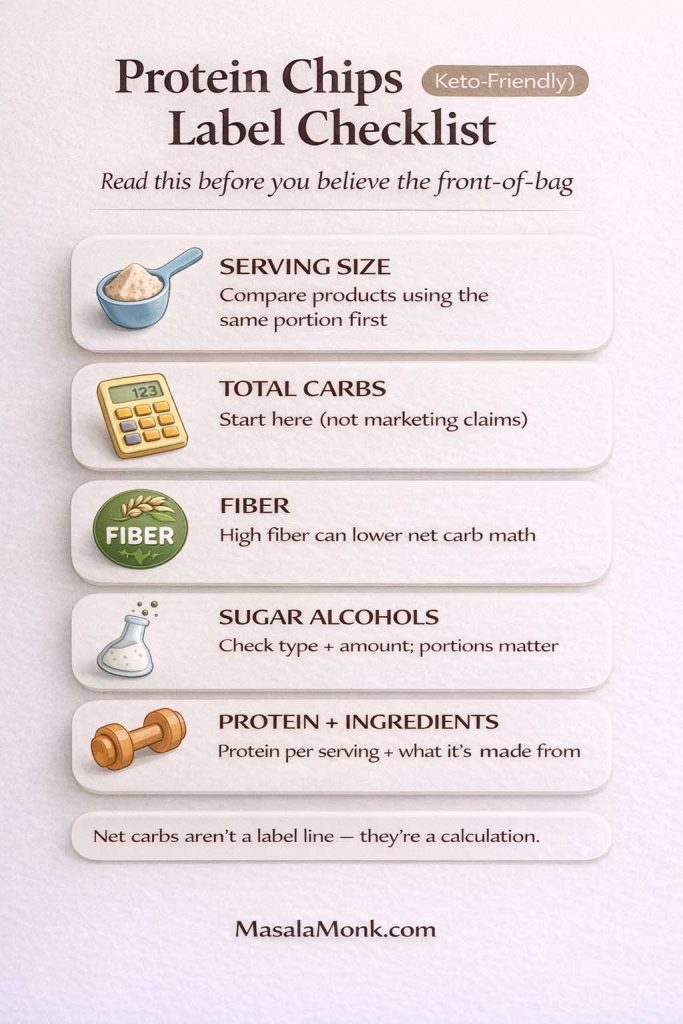
Buying “protein chips” for keto? Don’t trust the front-of-bag hype—use this 5-point label checklist first: serving size, total carbs, fiber, sugar alcohol type + amount, and protein + ingredients. It takes 15 seconds and stops the classic “I ate the whole bag” carb surprise. Save this graphic and keep it handy for shopping days. (MasalaMonk.com)
Start with the basics:
serving size
total carbs
fiber
any sugar alcohols
If you’re ever unsure how “net carb math” is being presented, the American Diabetes Association’s primer on carbohydrates and net carbs is a good neutral explanation: ADA: get to know carbs.
Quick note: “Net carbs” isn’t an official line on the label—it’s a calculation people use. Always compare products using the same serving size first.
For a purely neutral place to cross-check nutrition information across foods and ingredients, USDA FoodData Central is useful when you want a baseline reference.
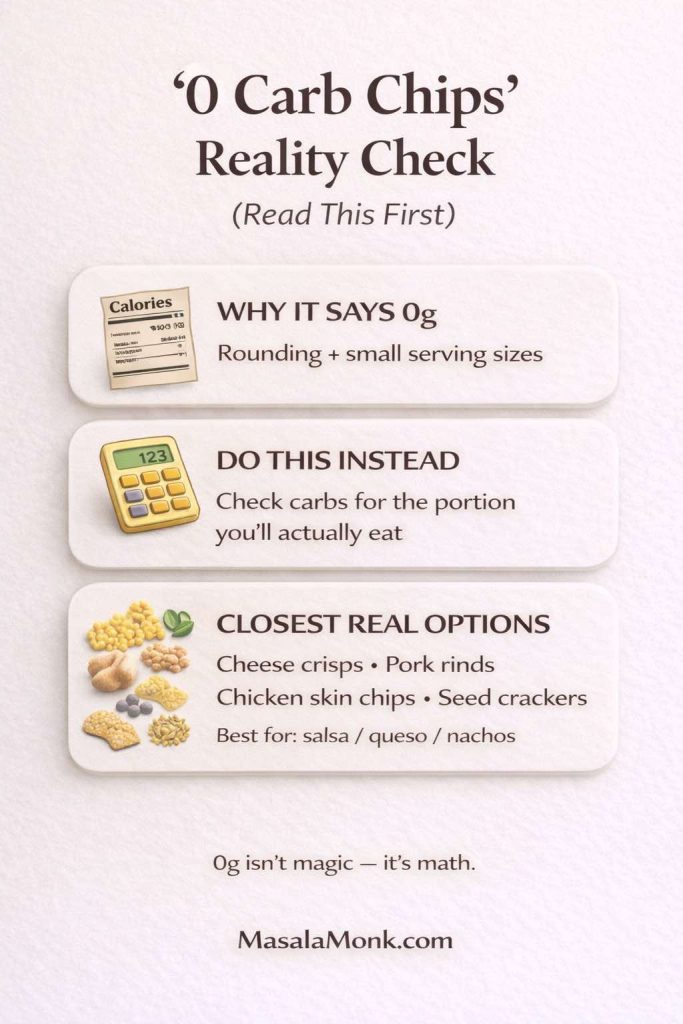
No carb chips, zero carb chips, and “0 carb chips”: what that usually means in real life
It’s tempting to chase the idea of no carb chips. After all, if chips without carbs existed in a way that felt exactly like tortilla chips, everyone would eat them.
In reality, “0 carb” often happens because of one or more of the following:
the serving size is small
the carbs per serving are low enough to round down
the snack is mostly fat/protein with tiny residual carbs
‘0 carb chips’ usually isn’t magic—it’s label math. This quick visual shows why some products display 0g, what to check (the carbs for the portion you’ll actually eat), and the most reliable near-zero-carb crunchy options—cheese crisps, pork rinds, chicken skin chips, and seed crackers—especially for salsa, queso-style dips, and nachos.
The important part isn’t to argue with the label; it’s to make sure the portion you actually eat still fits your day. This is exactly why the FDA’s breakdown of total carbohydrate and label structure is worth knowing: total carbohydrate explainer.
If you like the idea of near-zero carb chips, you’ll usually find the most reliable options in the “whole food turned crunchy” category: cheese crisps, chicken skin chips, pork rinds, and some seed crackers. Those aren’t perfect replicas of tortilla chips, yet they satisfy crunch in a way that makes you stop missing the original.
Sometimes the craving isn’t simply chips. It’s low carb hot chips—the spicy, salty, dusted, can’t-stop kind.
You can get that feeling without chasing an exact imitation. A few ways that work:
Season cheese crisps with chili powder, smoked paprika, garlic powder, and a pinch of salt, then finish with lime.
Bake tortilla-style low carb chips, then toss them with a chili-lime blend while they’re still warm.
Make a spicy dip that does the heavy lifting: mayo + pepper sauce is an instant “hot chips” companion.
For the dip base, use homemade mayo or eggless mayo. For the heat, use pepper sauce. That combination turns almost any chip substitute into a “this is what I wanted” snack.
Two dips that make keto chips feel like “real” chips: thick queso + scoopable salsa
Chips feel satisfying for two reasons: crunch and the dip. Most disappointment happens when thin chips meet watery salsa. Thicken the dip, and suddenly cheese crisps, tortilla-style chips, and seed crackers – which we cover in this post – all feel more like the “real” experience.
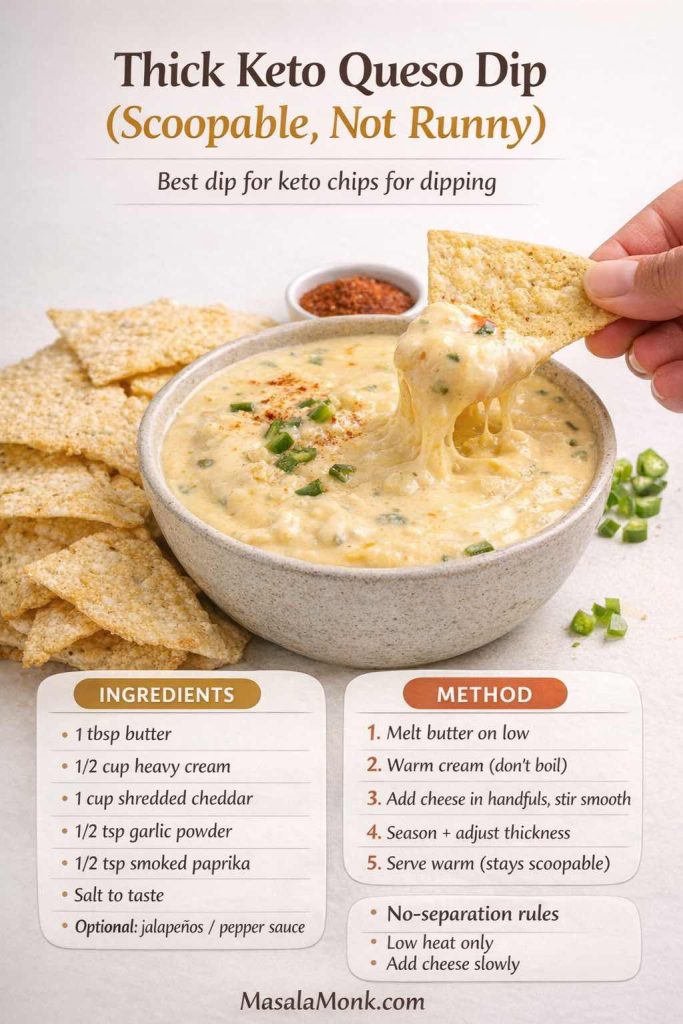
1) Thick queso-style cheese dip recipe (scoopable, not runny)
This is a simple, low carb queso-style dip you can make in minutes. It’s thick enough for sturdy chips, cheese crisps, and pork rinds — and it doesn’t turn watery the moment it hits the table.
Ingredients
1 tbsp butter
1/2 cup heavy cream (or full-fat milk if you tolerate it)
1 cup shredded cheddar (or a cheddar-parmesan mix)
1/2 tsp garlic powder
1/2 tsp smoked paprika
Salt to taste
Optional: chopped jalapeños, green chilies, or a spoon of pepper sauce
Thick Keto Queso Dip (scoopable, not runny): this is the “chips feel worth it” dip—creamy, stretchy, and built to stay thick instead of separating. The key is low heat + adding cheese slowly, so it stays smooth and dunkable. Serve it warm with your keto chips for dipping (cheese crisps, pork rinds, sturdy crackers, or tortilla-style chips), and it instantly turns snack time into a real plate. Save this card for game nights and quick cravings.
Method
Melt butter on low heat.
Add cream and warm gently (don’t boil).
Reduce heat and add cheese in handfuls, stirring until smooth.
Season, then taste and adjust.
Keep it thick: low heat and patience. High heat makes cheese seize, and overheated dips often separate.
If you prefer cold dips, a mayo base works beautifully too — especially when you want a quick spicy dip without cooking.
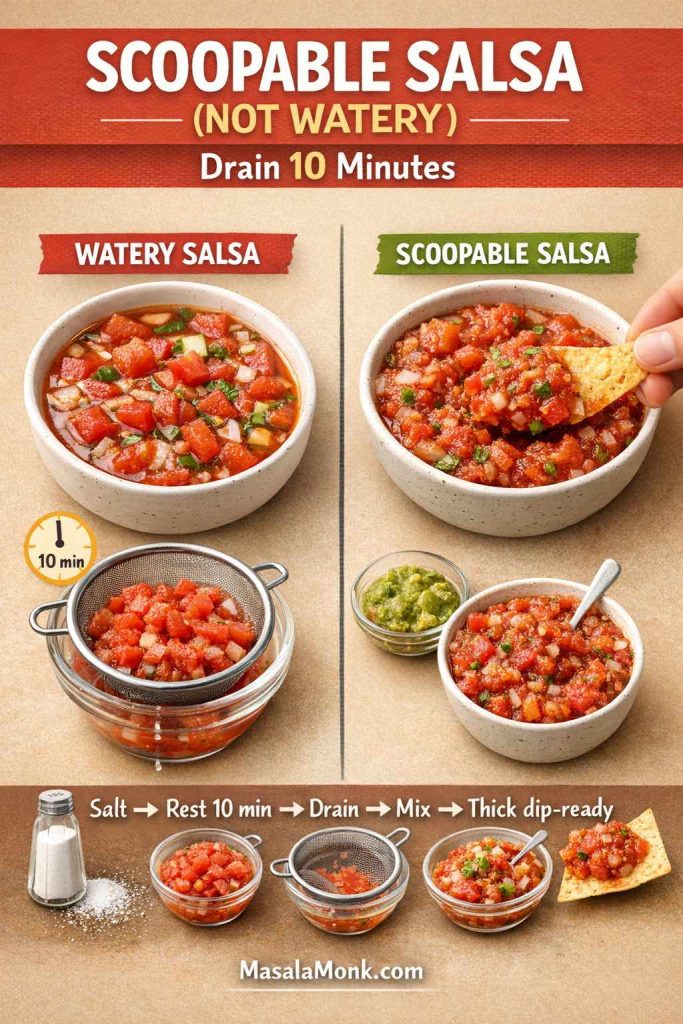
2) Salsa that’s thick enough for dipping (not watery)
Watery salsa is the fastest way to ruin keto chips. The fix is simple: remove excess moisture so salsa stays scoopable.
Scoopable Salsa (Not Watery): If you want keto chips and salsa that stays crunchy, the fix is moisture—not a “better chip.” Salt chopped tomatoes, rest 10 minutes, then drain before mixing. You’ll get a thick, dip-ready salsa that clings to low carb tortilla chips instead of turning them soft. Save this as your quick reminder for salsa nights (and for keto nacho chips—wet toppings last).
Quick scoopable salsa method
Chop tomatoes and salt them lightly.
Let them sit 10 minutes.
Drain off the excess liquid.
Add onion, cilantro, chili, lime, and salt to taste.
That draining step changes everything. Your chips stay crisp longer, and your salsa feels like a dip instead of a soup.
Scoopable Salsa (Not Watery) — the 10-minute drain trick that keeps keto chips crunchy. If your keto chips and salsa always turns soggy, it’s usually the salsa, not the chips. Salt chopped tomatoes, rest 10 minutes, drain, then mix in onion + cilantro + lime for a thick, dip-able salsa that actually holds up with low carb tortilla chips and keto nacho chips. Save this as your “chips stay crunchy” fix. MasalaMonk.com
Bonus: quick guac-style dip that plays well with chips
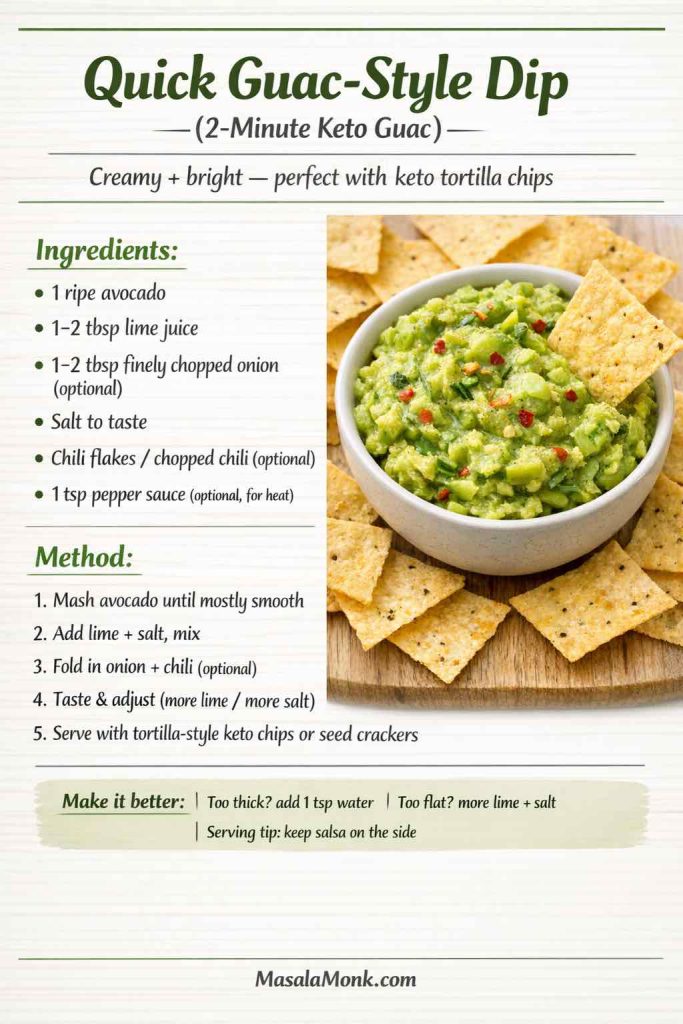
If you want a creamy dip that makes tortilla-style keto chips feel more like the real experience, avocado is the shortcut. Mash avocado with salt and lime, add a little onion, then finish with chili or pepper sauce for heat. It takes two minutes and makes chips feel like an actual snack.
Quick Guac-Style Dip (2-Minute Keto Guac): When you want keto chips and salsa vibes but need something creamier and more filling, this is the fastest win. Mash avocado + lime + salt, then add onion/chili if you like—and a spoon of pepper sauce for heat. It’s thick enough to cling to low carb tortilla chips, cheese crisps, or seed crackers, so snack time feels “done,” not endless. Save this card for salsa nights, nacho trays, and quick snack boxes.
Keto snack box and low carb snack box ideas that keep chips from taking over
Chips are easy to overeat because they don’t feel like a meal. A keto snack box fixes that by turning snacking into a small plate with structure. Instead of eating keto chips until you’ve accidentally eaten your carb budget, you pair crunch with protein and something fresh or tangy.
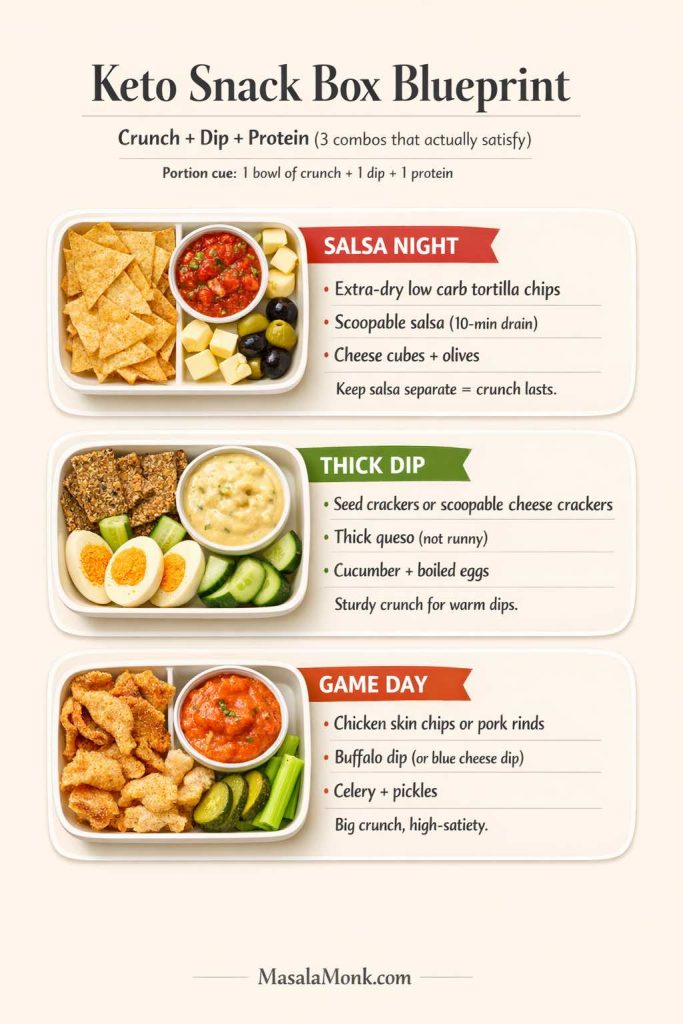
Keto Snack Box Blueprint (save this): the simplest way to make “keto chips” feel satisfying is pairing crunch + dip + protein. Use it as a rotation—one combo for dip nights, one for thick dips, one for game-day cravings—so you snack once and feel done (instead of circling the bag). Perfect as a quick reference when you want low-carb chips without the mindless grazing.
This also helps if you need shelf stable keto snacks, or if you’re building a simple approach for work, travel, or busy days.
The contrast between spicy and cool makes it more satisfying than chips alone.
3) Keto hiking food and road-trip crunch (less messy, more stable)
For travel, you want snacks that don’t crumble into dust instantly and don’t melt.
seed crackers or sturdy low carb tortilla chips
nuts
jerky (watch sweet marinades)
a small jar of mayo-based dip if you can keep it cold, or a dry seasoning blend if you can’t
If you’re choosing snacks for blood sugar steadiness rather than strict keto, having a reference list can help you build better snack patterns. This internal resource is useful as a broad companion: Low Glycemic Index foods list PDF.
Drinks that pair well with keto chips (and don’t make snack time feel like a compromise)
A snack moment feels more complete when there’s a drink alongside it. That doesn’t have to mean something sugary. Even coffee can be a satisfying pairing, especially with salty snacks.
How to build a snack board that works for keto and non-keto guests
If you’re hosting, you don’t want a separate “diet plate.” You want one table that works for everyone. This is where chip alternatives shine, because nobody complains about cheese crisps, dips, and snack boards.
A simple approach is to use a structure like the one described in the 3-3-3-3 charcuterie board rule, then swap the starch section into “a few crunchy options,” including at least one low carb chip option.
Why your keto chips aren’t crunchy (and how to fix it without overthinking)
Crunch problems are usually one of three things: moisture, thickness, or cooling.
Keep Keto Chips Crunchy (Save This): The 3-step fix for soggy keto chips—cool on a rack, store only when fully cool, and re-crisp fast (oven 325°F/160°C or air fryer 350°F/180°C) so your low-carb tortilla chips, cheese crisps, and crackers stay snappy instead of going soft in storage. Perfect as a quick troubleshooting card for humid days.
Moisture problems
Veggie chips and tortilla-style chips often soften because they’re holding water. Slice thinner, salt and pat dry, bake longer, and cool properly. If you stack chips while they’re still warm, steam gets trapped, and crispness disappears.
Thickness problems
Thin chips snap and feel “real,” yet they often fail in thick dips. Thick chips scoop better, but can feel dense. Choose based on the moment: salsa wants thin, queso wants thick.
Cooling problems
Cheese crisps need to cool to become crisp. If they feel bendy out of the oven, that’s normal. Let them rest, and the texture changes dramatically.
Low carb nachos that don’t turn soggy (layering that works)
Nachos fail for one boring reason: moisture. Once you accept that, it becomes easy to build keto nachos that stay crisp long enough to enjoy the tray.
The rule is simple: cheese first, wet toppings last — often on the side.
Keto nachos that don’t turn soggy (save this): the one rule that keeps low carb nachos crispy is cheese first, wet toppings last. Melt cheese to create a “seal,” add cooked toppings next, then keep salsa/guac/sour cream on the side (or add at the very end). Works with keto tortilla chips, cheese crisps, or pork rinds—especially for game night.
How to build them
Start with your base (tortilla-style low carb chips, cheese crisps, or pork rinds).
Add shredded cheese first so it melts into a “seal.”
Add cooked toppings next (meat, mushrooms, peppers).
Bake until melted.
Add wet toppings at the end (salsa, sour cream, guac) or serve them on the side for dipping.
If you want a party-ready topping that works as both dip and nacho layer, buffalo chicken dip is perfect. For a tangy companion dip that makes spicy nachos feel complete, blue cheese dip belongs on the side.
This is also the easiest way to make keto taco chips feel right: keep wet elements off the chips until the last second, then build bite-by-bite.
How to pick store-bought keto chips without relying on hype
If you buy low carb chips, you’ll notice something quickly: two bags can look similar, yet one stays crisp in salsa while the other collapses. One tastes clean and savory, another tastes oddly sweet. So instead of trusting marketing language, choose based on use—and read the label like you’re comparing tools, not snacks.
Store-bought keto chips vary wildly—so use this quick checklist before you buy. Start with serving size, then compare total carbs + fiber, and do the snap test (if it bends, it softens fast). If you’re making nachos, pick chips with structure. And if the flavor reads “sweet-leaning,” switch to naturally savory options. Save this graphic for your next grocery run and use it to choose low carb chips that match how you snack. (MasalaMonk.com)
For salsa: choose chips that are “dry + rigid,” not bendy
Salsa is the toughest test because it’s watery and acidic. For salsa nights, you want chips that feel dry, stiff, and snappy straight from the bag. If a chip bends before it snaps, it will soften fast once it hits salsa. Likewise, thin chips can be great—but only when they’re truly dry. If your goal is keto chips and salsa that feels satisfying, rigidity matters more than thickness.
Quick check: break one chip. You want a clean snap, not a bend.
For sensitive stomachs: watch fiber stacking and portion size
Many low carb tortilla chips and high-fiber “keto chips” get their numbers by leaning hard on added fibers. That can be totally fine—until you eat a big portion and suddenly your stomach feels like it’s negotiating terms. When that happens, it’s not a discipline issue; it’s simply how heavy fiber loads can feel for some people.
So, start small. In addition, avoid stacking fiber-heavy chips with other fiber-heavy snacks in the same sitting if you already know you’re sensitive. If you want chips to be a repeatable habit, comfort matters as much as macros.
Simple strategy: treat the first serving like a “test portion,” then decide if it works for you.
Avoid the “sweet chip” problem (yes, it happens)
Some store-bought keto friendly chips taste faintly sweet—even if they’re labeled as savory. That usually comes from certain sweeteners or flavor systems meant to balance bitterness. If that sweet note bugs you, don’t assume you “don’t like keto chips.” Instead, shift toward options that taste naturally savory: cheese crisps, seed crackers, or chips that rely on spices rather than sweetness to create flavor.
Meanwhile, if you’re chasing a nacho-style vibe, you can also fix a bland or slightly sweet chip by adding your own seasoning dust and a little acidity (like lime). That moves the flavor back into the “salty, dusty, snacky” zone.
Quick fix: warm chips briefly, then toss with a dry seasoning blend so it sticks better and tastes bolder.
One more thing that makes the whole “low carb chips” routine easier: keep a dip base ready
If you want keto chips to feel effortless, the real trick is having a dip base that’s always in the fridge. When dips are ready, you snack once and feel done; when dips aren’t ready, you keep hunting.
Then, whenever you want to upgrade the flavor fast, Pepper Sauce gives you multiple directions—bright, smoky, herb-forward—without needing a long ingredient list.
A lot of keto snacks lean high in saturated fat and sodium. That doesn’t mean you can’t enjoy them; it simply means variety helps. If you want a balanced, evidence-based view of potential pros and cons, Harvard’s overview is a useful reference: Harvard Nutrition Source on the ketogenic diet and Harvard Health on whether to try keto.
Rotating your chip styles—cheese one day, seed crackers another, tortilla chips for salsa nights, veggie chips for lighter crunch—keeps the routine enjoyable and easier to stick to.
Make-ahead rhythm: a simple rotation that keeps cravings calm
Most people don’t drift off low carb because they can’t cook. They drift because snack cravings hit when nothing is ready. A small rotation fixes that without turning your week into a project.
Keto Chip Rotation (save this): stop forcing one “keto chip” to do every job. Keep 3 types on hand—tortilla-style low carb chips for dip nights, cheese crisps/pork rinds for thick scoops, and seed crackers for portion-friendly snack plates. The bottom tips (cool fully, store airtight, re-crisp if softened) are the difference between “crispy” and “went soggy in 10 minutes.” Perfect quick-reference for weeknight cravings and a strong Pinterest save.
A practical rotation looks like this:
One sturdy option for thick dips: cheese crisps or cheese crackers
One salsa-friendly option: tortilla-style low carb chips baked extra crisp
One everyday option: seed crackers for quick snack plates
Then keep one dip base in the fridge — either tzatziki for fresh and cooling, or a mayo base you can change instantly with pepper sauce.
That’s the difference between constantly battling cravings and simply handling them. You’re not trying to remove cravings. You’re meeting them with something that works.
At the end of the day, the easiest way to stay consistent isn’t finding one perfect keto chips brand or one magical “zero carb” option. It’s building a small rotation that matches real cravings—salsa nights, thick dips, nachos, and quick snack plates—so you always have a crunch option that actually works.
For maximum crunch and minimal carbs: cheese crisps, chicken skin chips, pork rinds
For salsa and nachos: low carb tortilla chips
For steady everyday snacking: seed crackers and keto crackers
For variety: keto kale chips and other veggie chips
Then, instead of relying on willpower, rely on structure: a bowl portion instead of a bag, a dip that makes it feel satisfying, and a snack box approach when you need something grab-and-go.
You can eat chips on keto if the portion fits your daily carb target. In practice, that usually means choosing chips that are naturally low in carbs (like cheese crisps and pork rinds) or making low carb tortilla chips from wraps that are designed to be lower in net carbs. Either way, the simplest test is this: pick the crunch you want, then portion it so the numbers still work for your day.
2) Are chips allowed on keto or do they ruin ketosis?
Chips don’t “ruin keto” by default—overdoing carbs does. So, if you keep your serving controlled and choose keto friendly chips that stay within your carb budget, chips can fit. That said, mindless bag-snacking is where people get tripped up, because chips are easy to overeat even when the label looks friendly.
3) What are the best keto chips for salsa?
For salsa, tortilla-style keto chips usually feel the most “normal.” However, salsa is tough on weak chips because the moisture softens them fast. Therefore, you’ll get better results with chips that are extra dry and rigid—either baked low carb tortilla chips cooled on a rack, or seed crackers that hold their structure longer than thin chips.
4) What are the best keto chips for dipping in thick dips?
If the dip is thick—think queso-style dips, buffalo dips, or creamy ranch-style dips—sturdier options win. For example, cheese crisps and parmesan chips are naturally strong, pork rinds scoop surprisingly well, and seed crackers behave like reliable chip replacements. Meanwhile, thin tortilla chips often snap before you even get a proper scoop.
5) What’s the best low carb substitute for tortilla chips?
If you mainly want a scoopable crunch, seed crackers are one of the most reliable tortilla chip alternatives. On the other hand, if you want that salty “snack chip” hit with minimal carbs, cheese crisps and pork rinds are strong stand-ins. In contrast, veggie chips can work, yet they’re usually better as their own snack rather than a direct tortilla-chip replacement.
6) Do keto tortilla chips actually exist?
Yes—keto tortilla chips exist in two common forms: store-bought low carb chips, and homemade chips made from low carb tortillas or wraps. Even so, the experience varies a lot. Some tortilla-style chips are snappy and great for salsa, whereas others are more cracker-like and better for thicker dips. That’s why choosing by “dip-ability” is more useful than chasing a single perfect chip.
7) How do you make homemade keto tortilla chips crispy?
To get crispy homemade keto tortilla chips, treat it like a drying job, not just browning. First, cut evenly. Next, keep a single layer with no overlap. Then bake long enough to remove moisture, flip midway, and cool on a rack so steam doesn’t soften the underside. Finally, store only after fully cooled—warm chips sealed in a container turn soft fast.
8) Why are my low carb tortilla chips not crisp?
Usually it’s one of three things: moisture, thickness, or cooling. If chips brown but stay bendy, they need more drying time at a slightly lower heat. If they crisp and then soften later, they likely cooled on a plate instead of a rack, or they were stored before fully cooled. And if the edges crisp but the centers stay chewy, the triangles are too large or the wrap is too thick—cut smaller and bake longer.
9) How do I keep keto chips crispy after baking?
Let chips cool completely, then store them airtight. Still, humidity can soften them over time. In that case, re-crisp them in the oven for a few minutes, then cool again. Also, avoid stacking warm chips, because trapped steam is basically a crispness killer.
10) Are cheese chips low carb and keto-friendly?
Yes—cheese chips are one of the classic low carb keto chips because cheese has very few carbs. Plus, they’re naturally salty, crunchy, and satisfying. Even so, they’re calorie-dense, so portioning matters. Additionally, if you need extra scoop strength, make them slightly thicker or blend parmesan with cheddar for more body.
11) What are “keto cottage cheese chips,” and are they worth it?
Cottage cheese chips are a baked crisp made by drying small portions of cottage cheese until they turn crunchy. They can be a solid option when you want a lighter, tangier crunch than cheddar crisps. However, results depend on how wet the cottage cheese is, so drying time and spacing matter a lot. If your batch turns chewy, it usually needs more time to fully dehydrate. Results vary a lot by brand and moisture level, so they’re more finicky than cheese crisps or seed crackers. If you want a dependable crunch, start with cheese crisps or seed crackers first.
12) What are keto chicken skin chips and keto meat chips?
Keto chicken skin chips are crispy baked or air-fried chicken skins that turn into a hard, snackable crunch. Keto meat chips are similar in spirit—thin, dried, and crisped strips of meat that land in “chip-adjacent” territory. They tend to be very low carb, though they can be high in sodium and easy to overeat because the crunch is intense.
13) Are pork rinds keto, and do they work like chips?
Pork rinds are typically keto-friendly and often used as a no carb chip substitute. They work best with thick dips because they scoop well. Still, they’re not always ideal with watery salsa, since salsa can make them soften quickly. For that reason, they shine more in queso, creamy dips, and layered snack plates.
14) Are there any truly “0 carb chips”?
Sometimes “0 carb” is real in practice, but often it’s a label outcome tied to serving size and rounding. In other words, the carbs may be low enough per serving to show as zero, yet a larger portion could add up. So instead of chasing the label, focus on what you’ll actually eat and whether it still fits your carb target.
15) What are the best low carb chips for nachos?
For nachos, you need a base that stays crisp long enough to finish the tray. Tortilla-style low carb chips work when they’re baked extra dry, while cheese crisps are naturally sturdy if you keep wet toppings under control. Likewise, pork rinds can work if you assemble bite-by-bite or keep sauces on the side, because moisture is what makes nachos collapse.
16) How do I stop keto nachos from turning soggy?
Use a simple layering rule: cheese first, wet toppings last. Start with the chips, add shredded cheese to create a “seal,” then add cooked toppings. After baking, add salsa, sour cream, and guac at the end—or serve them on the side. That way, you keep the crunch instead of turning everything into a soft pile.
17) What’s a good low carb hot chips alternative?
If you’re craving “hot chips,” focus on the flavor dust rather than chasing an identical chip. Cheese crisps, tortilla-style keto chips, and pork rinds all work when tossed warm with a chili-forward seasoning and finished with a little acidity. As a result, you get that spicy, salty, dusted feel that scratches the craving without gimmicks.
18) Are veggie chips keto?
Some veggie chips can fit keto, yet they’re the easiest to misunderstand. Many store-bought veggie chips can still be starchy, while homemade versions are often more about “light crunch” than “chip replacement.” If you want the best experience, treat veggie chips as their own category and pair them with a creamy dip so they feel satisfying rather than flimsy.
19) What should I look for when buying store-bought keto chips?
Start with the serving size, then check total carbs, fiber, and any sugar alcohols. After that, think about how you’ll use them: thin, dry chips for salsa; thicker, sturdier options for dips; and chips that don’t crumble for nachos. Finally, buy the portion size that matches your habits—because even the best keto chips won’t help if the bag disappears in one sitting.
20) What are easy keto snack box ideas using chips?
A simple keto snack box works best when crunch is paired with protein and something bright. For instance, use seed crackers or cheese crisps as the base, add a thick dip, include olives or pickles for tang, and finish with a small portion of nuts or a protein bite. That structure makes snacking feel complete, so you’re less likely to keep grazing.
Crispy, healthy, and surprisingly easy—homemade fruit and veggie chips are the snack everyone deserves to master. Whether you want to transform a bumper crop, reduce food waste, or just love snacking smart, this guide dives deep into everything you need to know to make delicious chips right in your kitchen.
Why Make Chips at Home?
Forget expensive store-bought bags with mystery ingredients. Homemade chips let you:
Control the oil, salt, and seasoning
Use any produce—from classic potatoes to leafy greens or even green bananas
Skip additives and preservatives
Customize flavors exactly how you like them
Plus, it’s a fun and creative way to get more fruits and veggies in your diet!
Getting Started: What You’ll Need
Sharp knife or mandoline slicer (for uniform, thin slices—this is non-negotiable for great chips)
Baking sheets or dehydrator trays
Parchment paper or silicone baking mats
Salad spinner or clean towels (for drying slices)
Large mixing bowl
Air fryer or deep fryer (optional, but helpful for certain veggies)
Pro Tip: A mandoline slicer makes the biggest difference—uneven slices = uneven chips.
Core Method: The Science of Perfect Chips
1. Slice Thin and Even
Aim for 1–2 mm thickness. Too thick? They’ll be chewy. Too thin? They might burn.
Mandoline slicers are best, but a sharp chef’s knife works with patience.
2. Soak and Dry
Starchy veggies (potato, sweet potato, beet): Soak in cold water 15–30 minutes to remove surface starch. This gives you crispier chips and reduces browning.
All chips: Pat slices completely dry—moisture is the enemy of crisp!
Store in airtight containers once chips are completely cool.
Homemade chips have no preservatives—eat within 1–4 days for peak crispness.
If chips lose crunch, re-crisp in a low oven for a few minutes.
Your First Batch: Simple Oven Beet Chips
Ingredients:
2 medium beets
1–2 tsp olive oil
Salt and pepper
Method:
Preheat oven to 170 °C (340 °F).
Peel and slice beets as thinly as possible.
Toss with oil, salt, pepper.
Lay out in a single layer on parchment.
Bake 20–30 min, flipping halfway—watch carefully at the end!
Remove crisp chips; let cool to finish crisping.
Final Thoughts: Start Simple, Experiment Often
The joy of homemade chips is in the creativity and discovery. Use what you have, try new flavors, and don’t worry about making them perfect every time. The more you experiment, the better your chips will get—and the more fun you’ll have.
Got your own chip hacks or flavor combos? Share in the comments below!
Happy crunching!
Want more snack ideas or troubleshooting tips? Leave your questions, and let’s make snack-time epic together.
10 FAQs and Answers
1. What’s the best way to get homemade chips super crispy?
Answer: Slice your produce as thin and even as possible (1–2 mm) with a mandoline. Dry the slices thoroughly after washing or soaking. For oven or air fryer, don’t overcrowd the pan—single layers only. Bake/air fry at moderate heat, and let chips cool completely after cooking; they crisp up more as they cool.
2. My chips always turn out soggy. What am I doing wrong?
Answer: Sogginess is usually from too much moisture or thick slices. Pat slices very dry before cooking, and make sure you slice thin. Avoid using too much oil—brush or spray lightly. Try leaving the chips in a turned-off oven after baking to help them dry out further.
3. Can I make chips without any oil?
Answer: Yes! Dehydrators are great for oil-free chips. In the oven or air fryer, you can also skip oil, but chips may not be as golden or flavorful. Watch closely so they don’t burn or dry out too much.
4. What’s the healthiest vegetable for homemade chips?
Answer: Kale, spinach, beets, and carrots are popular for their nutrients. Leafy greens are low-calorie and packed with vitamins, while beets and carrots provide fiber and antioxidants. Choose vegetables you enjoy—variety is key to nutrition!
5. How long do homemade chips last, and how do I store them?
Answer: Let chips cool completely, then store in an airtight container at room temperature. They’re best eaten within 1–4 days. If they lose crunch, crisp them in a low oven (100°C/210°F) for a few minutes.
6. Which fruits work best for fruit chips?
Answer: Apples, bananas, pears, and mangoes are favorites. Choose firm, not overripe fruit for better crispness. Green bananas or plantains make the crunchiest chips.
7. Can I use a microwave to make chips?
Answer: Yes, the microwave can make small batches quickly! Lay slices between parchment or on a microwave-safe plate. Cook in 30–60 second bursts, flipping until crisp. Keep a close watch to avoid burning.
8. Why do my kale chips always turn out bitter or burnt?
Answer: Kale chips burn easily if the oven is too hot or they bake too long. Use lower temperatures (around 150°C/300°F), and check after 10–12 minutes. Remove thinner pieces as they crisp up to avoid burning.
9. Is it possible to make chips from vegetable peels?
Answer: Absolutely! Potato, carrot, beet, and parsnip peels can be washed, seasoned, and baked for a zero-waste, crunchy snack.
10. Are homemade chips healthier than store-bought?
Answer: Definitely! You control the oil, salt, and additives. Homemade chips can be baked or air-fried with minimal or no oil, and they’re free of preservatives and artificial flavors found in most packaged chips.