Posted on — Leave a comment

Crispy Zucchini Chips Recipe: Air Fryer, Oven, Panko, Keto & Dehydrator Methods

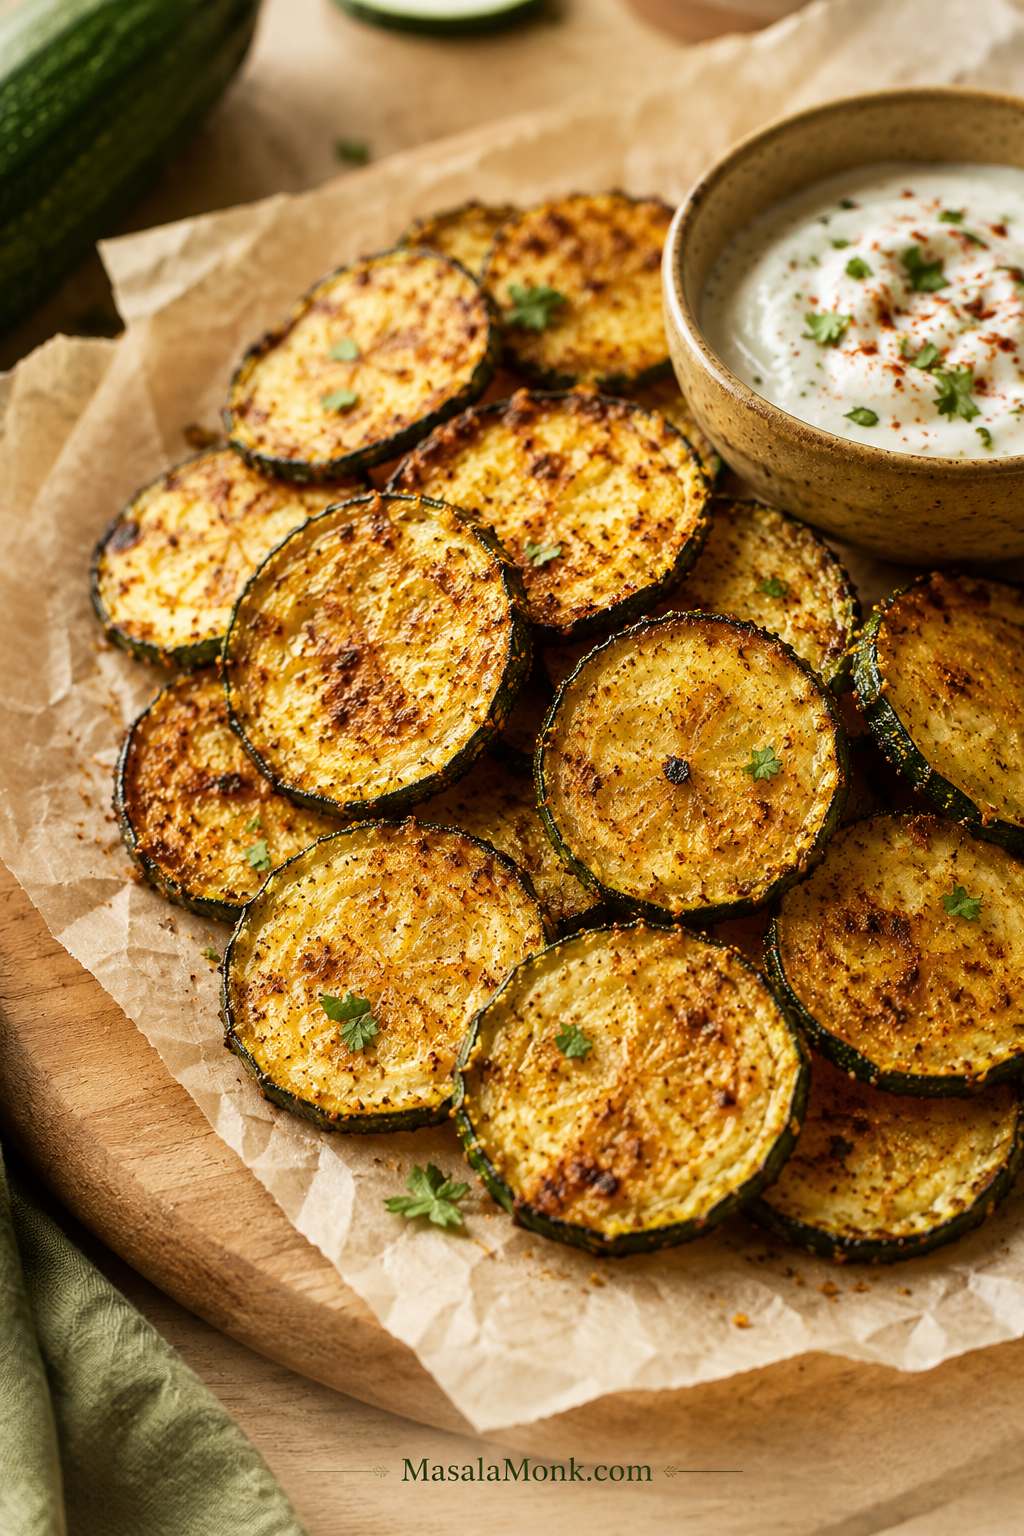
These crispy zucchini chips are golden at the edges, tender in the center, and best dipped while the parmesan still has its crunch.

Zucchini chips sound easy until you pull them from the oven or air fryer and find the same annoying problem: browned edges, soft centers, and slices that look like chips but bend like roasted zucchini.

If that has happened to you, the problem was probably not just the cooking time. Zucchini is naturally tender and water-rich, so it needs a little help before it can become crisp. Even slicing, a short salting step, proper drying, light oil, enough space, and the right heat make the difference between limp slices and a snack you actually want to keep reaching for.

Most zucchini chips recipes are not actually disagreeing with each other. They are making different snacks. This guide starts with the easiest crisp-edged air fryer parmesan version, then shows when to use the oven, panko, keto/no-breadcrumb, or dehydrator method for the texture you actually want. If you already know the texture you want, compare the styles first.

These will not behave exactly like packaged potato chips, and that is okay. The win is a crisp-edged, salty bite that lets zucchini be zucchini without turning limp.

Quick Answer: How to Make Crispy Zucchini Chips

To make crispy zucchini chips, slice the zucchini evenly, salt the slices briefly, pat them very dry, season lightly, and cook in a single layer. Start with air fryer parmesan zucchini chips at 370°F / 188°C for 10–12 minutes, then cool them spread out for a few minutes so the cheese can firm. Need amounts and steps? Jump to the recipe card.

Seasoning helps, but the real win happens before the zucchini hits the heat. If the slices go in wet, they soften before the edges can firm up. Use only a little oil or oil spray, avoid crowding, and do not judge the final texture until the chips have cooled for a few minutes.
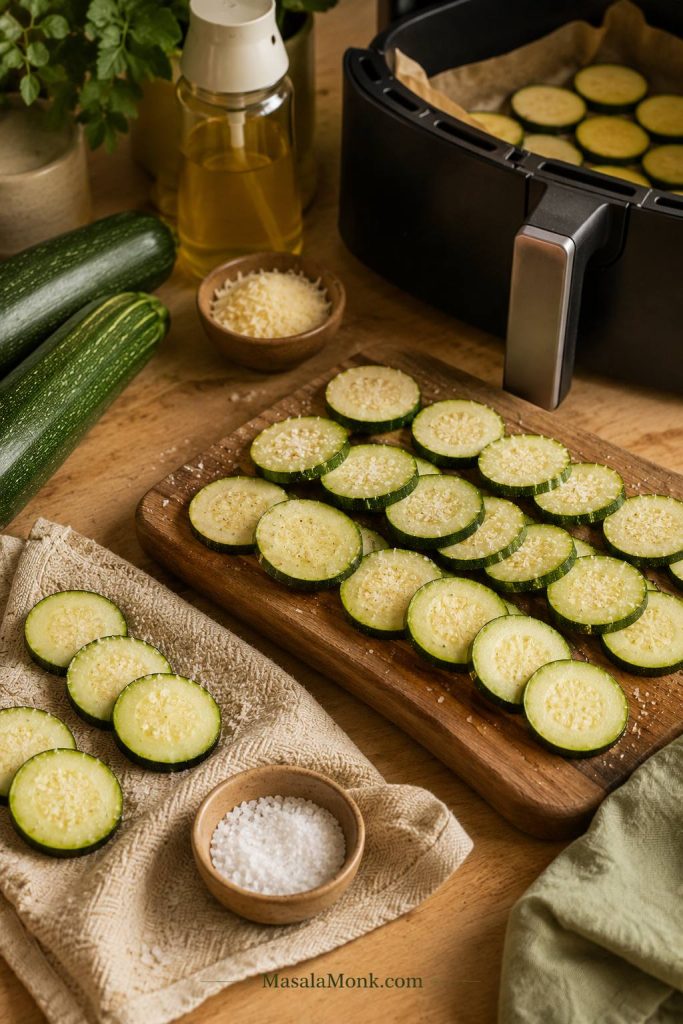
Sliced zucchini, salt, parmesan, oil spray, towel, and air fryer basket arranged on a wooden surface.
Before the air fryer or oven does any work, set the zucchini up for success with even slices, salt, towels, light oil, and parmesan.

Best first batch: air fryer parmesan zucchini chips.

The crispness rule: slice evenly, salt briefly, pat very dry, cook in one layer, and cool spread out.

Crispy Air Fryer Parmesan Zucchini Chips Recipe

This is the first batch to make because parmesan gives zucchini a shortcut to crisp edges. The slices still need salting and drying, but the cheese browns quickly, firms as it cools, and turns a soft vegetable into something snackable without breadcrumbs or a long oven bake.

Texture: crisp parmesan edges, tender centers, and a salty snack bite. Not packaged potato-chip snap, but much better than limp zucchini rounds.

Yield4 servings

Prep Time20 minutes

Cook Time10–12 minutes

Total Time30–35 minutes

Ingredients

  • 2 medium zucchini, about 400 g / 14 oz total
  • ½ tsp fine salt, about 3 g, for salting the zucchini
  • 1 tbsp olive oil or avocado oil, 15 ml, or use oil spray
  • ½ tsp garlic powder, about 1.5 g
  • ½ tsp paprika or smoked paprika, about 1 g
  • ¼ tsp black pepper, about 0.5 g
  • ⅓ cup finely grated parmesan, about 30 g
  • Extra salt only if needed, after cooking

Instructions

  1. Slice the zucchini. Slice into even rounds, about ⅛ inch / 3 mm for thinner chips or slightly thicker if your air fryer tends to blow thin slices around.
  2. Salt the slices. Arrange the zucchini on a towel or in a colander. Sprinkle with the salt and let rest for 15–20 minutes.
  3. Dry very well. Pat the slices dry with a clean kitchen towel or paper towels. The surface should look matte, not shiny-wet.
  4. Season lightly. Toss the zucchini with oil, garlic powder, paprika, black pepper, and finely grated parmesan. The slices should look lightly glossy, with seasoning clinging to the surface instead of sliding around.
  5. Arrange in the air fryer. Place slices in a single layer in the basket. Cook in batches if needed; it is better to cook two quick batches than one crowded soft batch.
  6. Air fry. Cook at 370°F / 188°C for 10–12 minutes, flipping or shaking gently halfway, until the parmesan smells toasted, the edges look dry, and the slices feel lighter. Start checking around 8 minutes.
  7. Remove finished chips early. If some slices are golden before others, remove them and keep cooking the softer pieces.
  8. Cool before serving. Spread the chips out for a few minutes. The parmesan firms up and the edges crisp more as they cool.
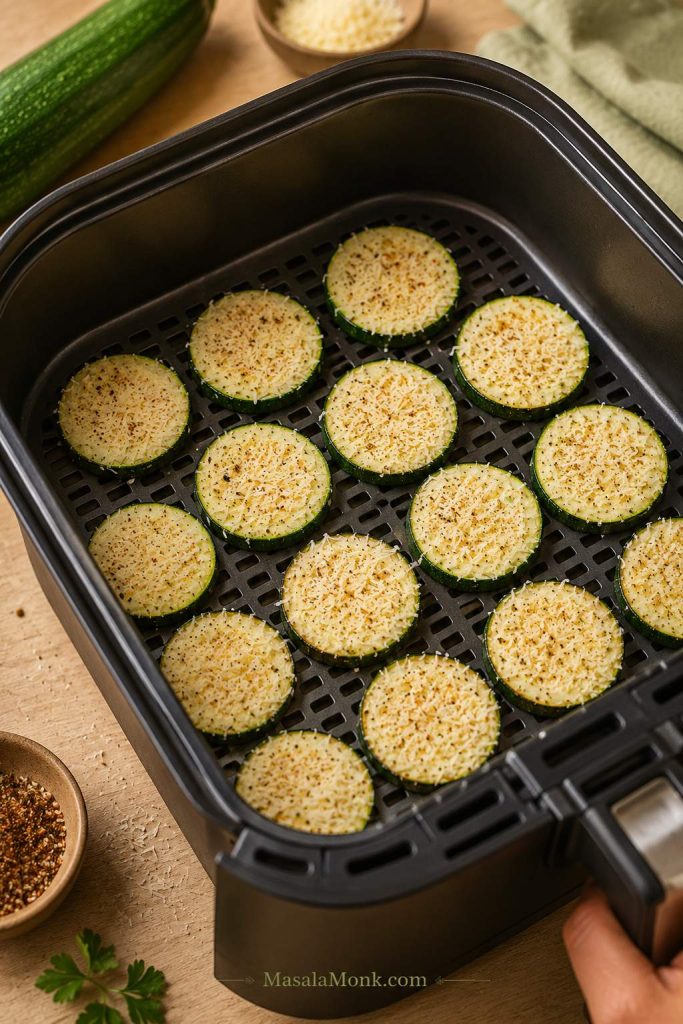
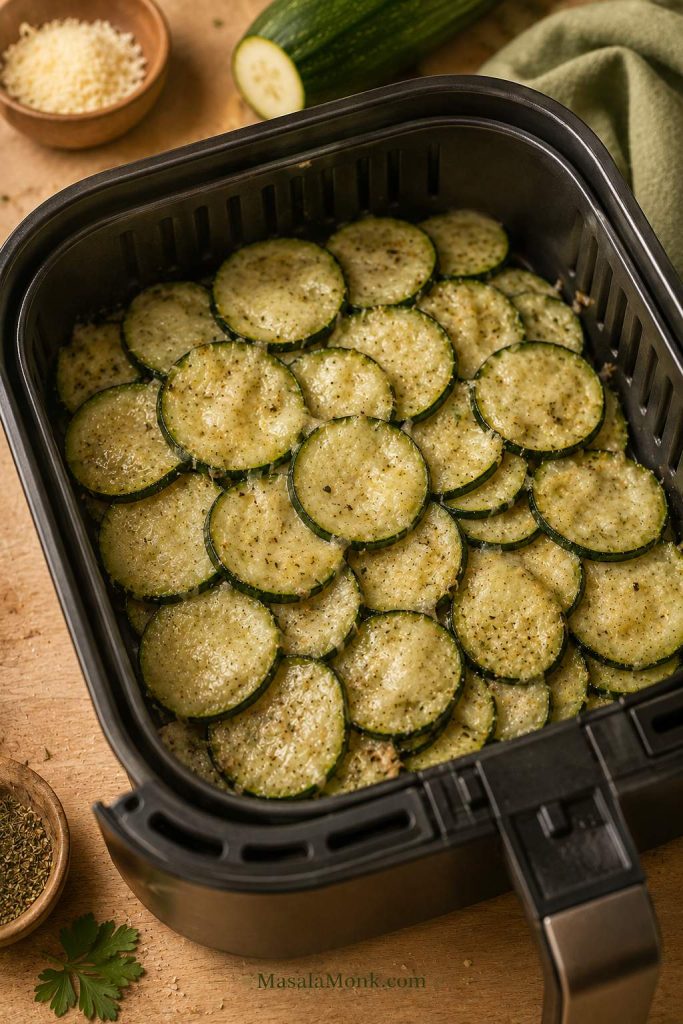
Parmesan-coated zucchini rounds arranged in one layer inside an air fryer basket.
For air fryer zucchini chips, keep the rounds in one layer. Hot air needs open gaps to dry the edges instead of steaming the centers.

Recipe Notes

  • Use finely grated parmesan for the most reliable crisping.
  • Smaller or thinner slices may finish first; pull them out early.
  • Do not add extra salt until after cooking, especially if using parmesan.
  • No air fryer? Use the hot oven parmesan method.
  • Serve soon after cooling, while the parmesan edges are still crisp.
  • Re-crisp leftovers in the air fryer or oven, not the microwave.

Why this works: salting gives the slices a better start, parmesan browns quickly, and cooling lets the cheese firm up. That is why the chips often feel crisper after a few minutes on the plate than they do straight from the air fryer. If they still come out soft, use the soggy-chip fixes.
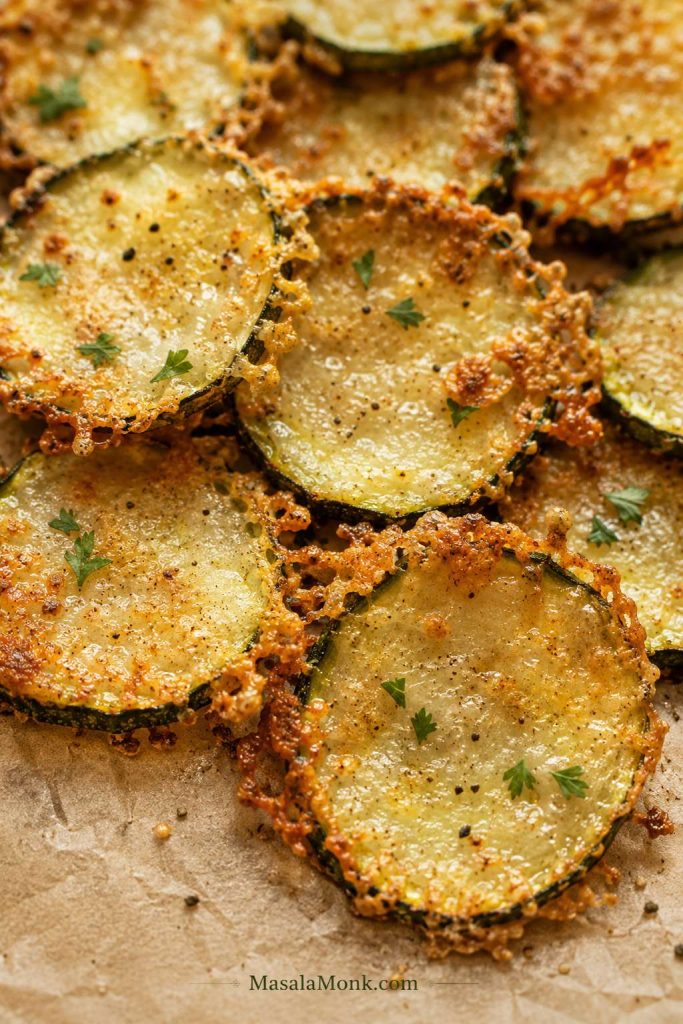
Close-up of parmesan zucchini chips with golden lacy cheese edges on parchment.
With parmesan zucchini chips, the best sign is a lacy golden edge. Let them cool briefly so the cheese can firm and crisp.

The first successful batch feels obvious in hindsight: the slices look lighter, the parmesan smells toasted, and the edges firm up while you are getting the dip. A few softer pieces are normal. At their best, they taste salty and cheesy, with crisp edges and tender centers.

The first crisp one is the cook’s tax. Eat it while the edges are still at their best.

Want a Different Texture? Choose Your Zucchini Chip Style

From here, the same idea can shift into oven trays, panko coating, keto chips, or make-ahead dehydrated chips. You do not need to master every version today. Choose the one that matches what you want to eat: the air fryer method for speed, the panko method for crunch, or the dehydrator method for make-ahead chips.

Thin chips dry. Parmesan rounds crisp. Panko rounds crunch. Once you know which style you are making, the times stop looking random.
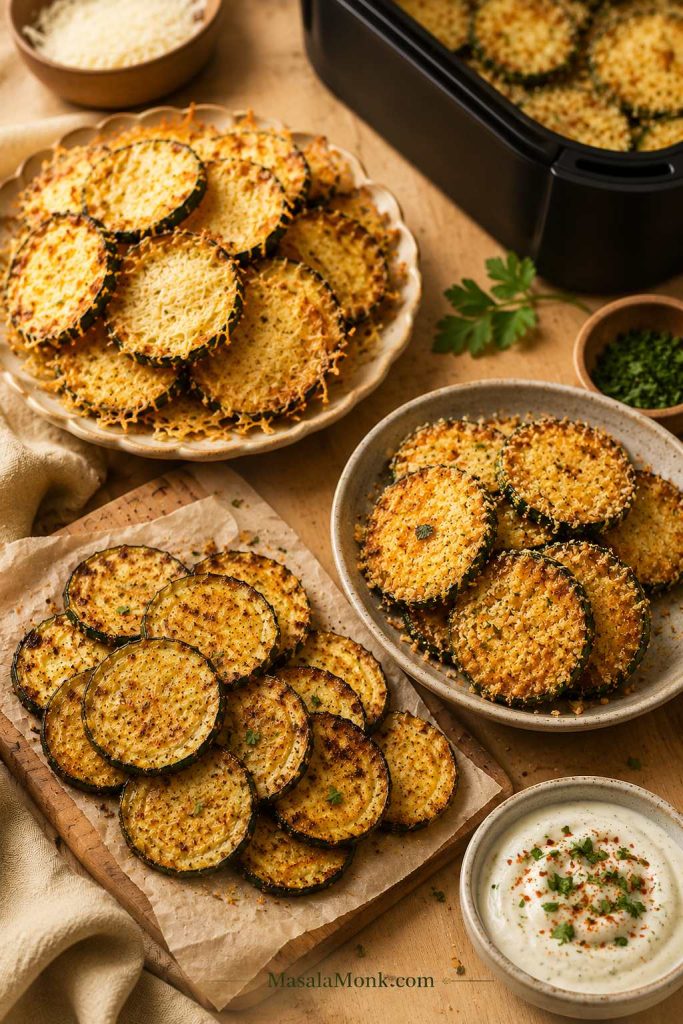
Three zucchini chip styles shown together: thin plain chips, parmesan rounds, and panko-coated rounds.
Not every zucchini chip should look the same: thin chips dry, parmesan rounds crisp at the edges, and panko rounds bring the loudest crunch.
If You Want…Make ThisWhy It Works
The easiest first tryFast cheesy: air fryer parmesanParmesan helps the edges crisp quickly and adds salty, snacky flavor.
The crunchiest appetizerCrunchy appetizer: panko roundsPanko creates a crisp coating while the zucchini stays tender inside.
Keto or no-breadcrumb snackLow-carb: plain or parmesanParmesan gives better low-carb crispness than almond flour alone.
Larger sheet-pan batchSheet-pan: oven-bakedA baking sheet gives the slices more room than most air fryer baskets.
The most chip-like thin slicesThin veggie chips: low oven or dehydratorSlower heat gives thin slices time to turn light and crisp.
A sturdy dipperSturdy dippers: panko or thick parmesanThin plain chips are delicate; coated rounds hold up better.

Best choice guide: air fryer parmesan for the first batch, low oven or dehydrator for the most chip-like thin texture, panko for party crunch, parmesan for keto, and dehydrator or low-and-slow oven for better storage.

This is the kind of tray that disappears by the edges first: the lacy parmesan pieces, the extra-golden rounds, the ones everyone says they are “just testing.”

Why Zucchini Chips Turn Soggy

Most failed batches come down to one problem: the slices steam before they crisp. Already dealing with a limp tray? Skip to the troubleshooting table.

Zucchini carries a lot of moisture. When the slices are too thick, too crowded, or too wet, that moisture gets trapped. Instead of crisping at the edges, the zucchini softens. That is how you get chips that look browned but still bend in the middle.

If your last batch came out limp, you are not alone. This vegetable can make even a good recipe feel unpredictable until you give the slices a better start.
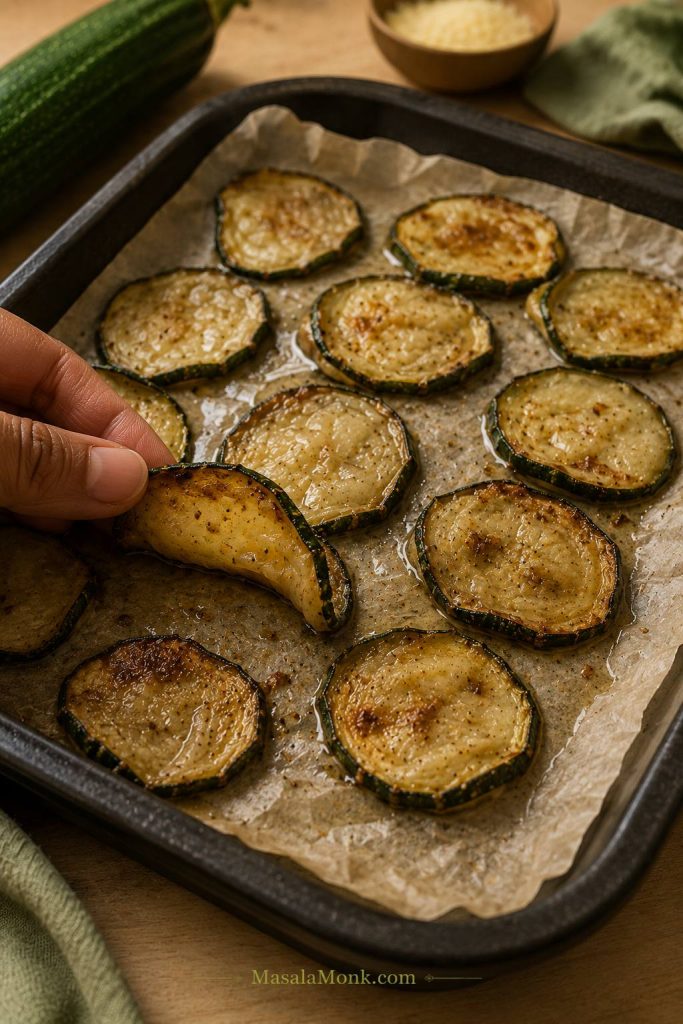
Soft browned zucchini chip being bent above a tray of limp zucchini slices.
If zucchini chips brown but still bend, they probably steamed before they crisped. Next time, go thinner, drier, or less crowded.

The rule that saves most batches: slice evenly, salt briefly, pat very dry, cook with space, and cool the chips spread out. That matters more than adding extra oil.

Once you solve that, the reward is simple: golden edges, better seasoning, and chips that feel like a snack instead of a side dish.

The Mistakes That Keep Zucchini Chips Soft

If a batch stays limp, the fix usually points back to one of these habits. This is not about being fussy; it is about giving zucchini a fair chance to crisp.

  • You salted but did not dry. Salting brings moisture to the surface; drying removes it. If the slices still look shiny, press them between towels before cooking.
  • You used too much oil. Glossy is good. Wet or slick is not. Too much oil coats the surface and keeps the chip soft.
  • You crowded the basket or pan. Overlapping slices steam each other. Cook in batches if needed.
  • You sliced unevenly. Thin pieces brown first while thick pieces stay soft. Pull the crisp ones early instead of waiting for the whole tray to match.
  • You used wet flavors too early. Lemon juice, hot sauce, fresh garlic paste, and watery marinades belong after cooking.
  • You piled them hot. Stacked chips lose their edge quickly. Spread them out for a few minutes first.
  • You expected every method to crunch the same way. Thin chips dry, parmesan rounds crisp, and panko rounds crunch. Choose the texture first.

Why These Ingredients Help Zucchini Chips Crisp

The ingredient list is short, but every item has a job. Medium zucchini gives you neat slices, salt draws moisture to the surface so you can pat it away, oil helps browning, parmesan firms into crisp edges, and panko gives the loudest crunch.
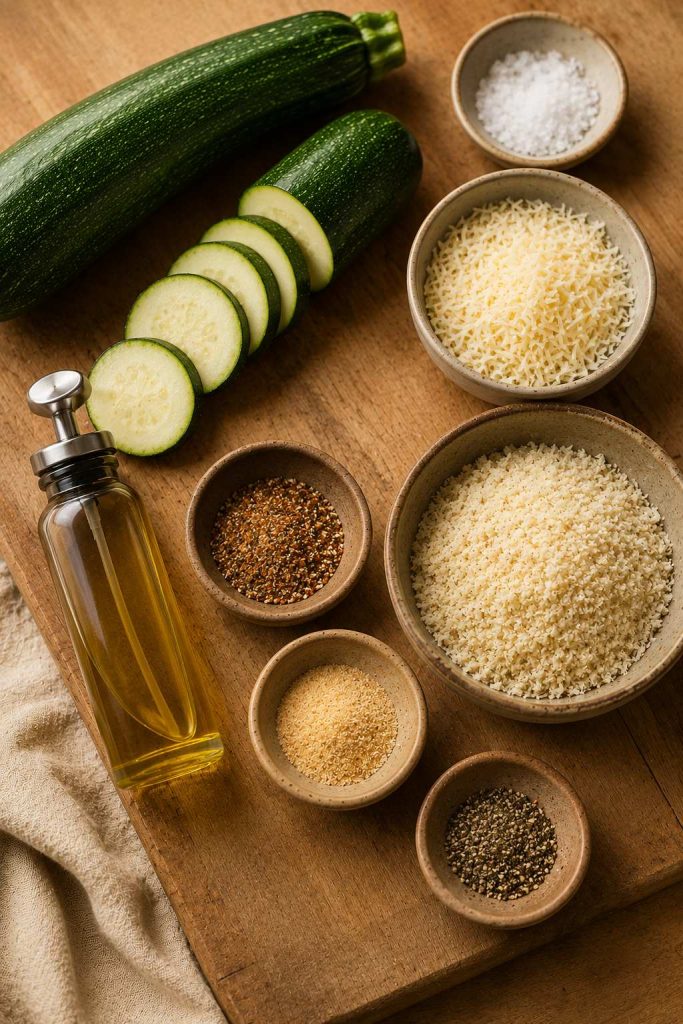
Zucchini, salt, grated parmesan, panko, oil spray, and spices arranged on a wooden board.
Keep the ingredient list simple, but choose each one for a job: salt manages moisture, parmesan builds crisp edges, and panko adds crunch.
  • Best zucchini: medium, firm zucchini with fewer watery seeds. Oversized zucchini can stay soft in the center.
  • Best crisping helper: finely grated parmesan. It clings better than large shreds and sets as it cools.
  • Best crunch coating: panko. Use it for appetizer-style rounds, not thin delicate chips that need to stay light.
  • Best oil approach: a light toss or spray. Glossy is enough; greasy slices soften.
  • Best seasoning type: dry spices and dried herbs. Save lemon juice, hot sauce, and fresh garlic paste for after cooking.

If you only have a very large zucchini, cut it lengthwise and scoop out the soft, seedy center if it looks watery. Use the firmer outer flesh for chips. And if you are comparing it with cucumber, remember that zucchini and cucumber are different vegetables, even though they can look similar at first glance.

Equipment That Actually Helps

You do not need a perfect kitchen setup here. A sharp knife, a clean towel, and enough space on the tray will get you most of the way there.

  • Mandoline or sharp knife: for even thickness.
  • Kitchen towels or paper towels: for drying after salting.
  • Parchment or wire rack: for oven batches and cooling.
  • Oil spray: for a light coating without greasiness.
  • Tongs: for pulling finished chips early.
  • Dehydrator: optional, but helpful for dry, make-ahead veggie chips.

Dry towels, even slices, and a little patience will do more for crispness than another spoonful of seasoning.

How Thin Should You Slice Zucchini for Chips?

Thickness decides whether you get a delicate chip, a cheesy round, or a sturdy dipper.
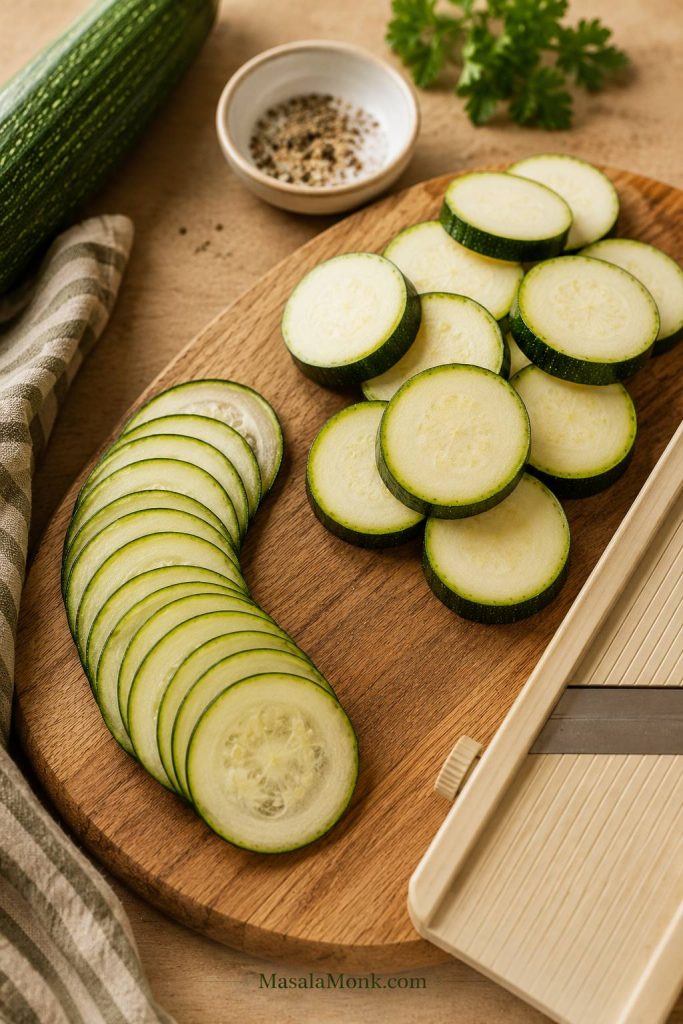
Thin zucchini slices and thicker zucchini rounds shown on a cutting board with a slicing tool.
Slice thickness decides the snack: thin rounds make delicate chips, while thicker rounds hold parmesan or panko coatings better.

For thin plain chips, aim for about ⅛ inch / 3 mm. These slices dry better, but they can burn quickly or fly around in some air fryer baskets.

For breaded or panko chips, slice closer to ¼ inch / 6 mm. Thicker rounds hold the coating better and are less fragile. They will be crunchy outside and tender inside, not dry all the way through; see the panko method if that is the texture you want.

For parmesan chips, either thickness can work. Choose thinner slices for a more chip-like result, or slightly thicker slices for a snacky zucchini round with crisp cheese edges.

A good batch will not all finish at the same second. Pull the crisp ones early. That is not fussiness; that is how zucchini behaves.

Should You Salt Zucchini First?

Yes. It is the small step that makes the biggest difference, especially if your zucchini is juicy or your last batch came out soft.

Salt draws moisture to the surface so you can pat it away before the zucchini hits the air fryer, oven, or dehydrator. It also helps breaded coatings stick because the slices are not slippery.

Here is the simple way to do it:

  1. Slice the zucchini evenly.
  2. Spread the slices on a clean towel or place them in a colander.
  3. Sprinkle with salt.
  4. Let them rest for 15–30 minutes.
  5. Pat very dry with a clean kitchen towel or paper towels.

You should see moisture on the surface after the rest. That is good. It means the water is on the towel instead of trapped in the chip.
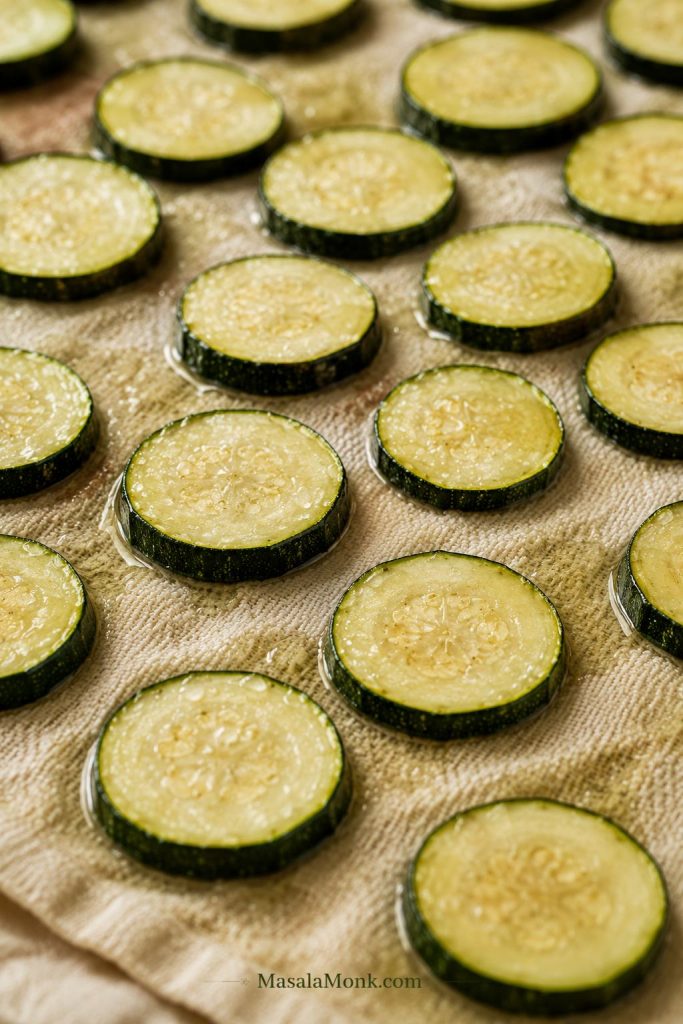
Salted zucchini rounds resting on a towel with moisture beads visible on the surface.
After salting, moisture should bead on the zucchini surface. That is the water you want on the towel, not trapped inside the chip.

You do not need to rinse if you used a light amount of salt. If you salted heavily, rinse quickly and dry extremely well. For thin low-and-slow chips, you can rest the zucchini longer, even up to 45–60 minutes, but for most batches, 20–30 minutes is enough.
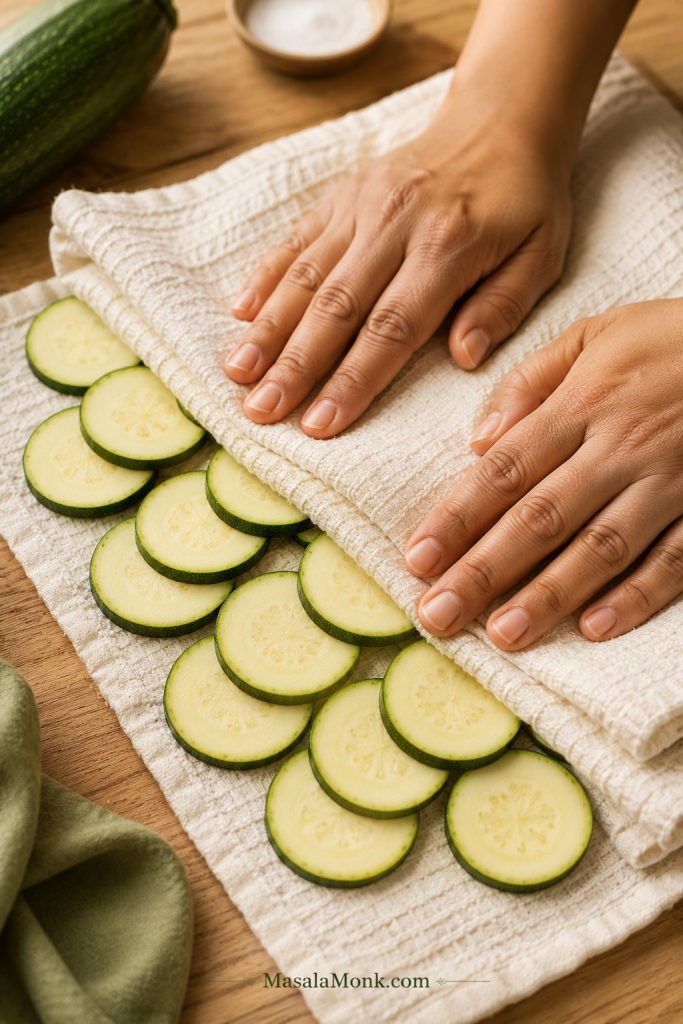
Do not skip the drying after salting. Pat away the surface moisture before cooking, or the slices will steam. Next, see how spacing changes the result in the air fryer and oven methods.

Hands patting zucchini rounds dry between clean towels before cooking.
Once the slices release moisture, press them until they look matte. Shiny zucchini usually means softer chips later.

Air Fryer Zucchini Chips: What Matters Most

The air fryer moves hot air, not magic. If the slices overlap, steam wins.
Overlapping zucchini rounds crowded inside an air fryer basket.
A crowded air fryer basket traps steam fast. Even well-seasoned zucchini chips stay soft when the slices overlap this much.

This is the weeknight version: quick heat, toasted parmesan, and a snack that is ready before anyone gets impatient. Good air fryer chips have browned parmesan around the edges, a garlic-paprika aroma, and enough firmness to dip gently after they cool for a few minutes.

Air Fryer StyleTemperatureTimeWhat to Look For
Plain thin chips370°F / 188°C12–18 minutesEdges dry and lightly browned
Parmesan chips370°F / 188°C10–12 minutesCheese is golden and edges are crisp
Panko chips400°F / 204°C10–12 minutesPanko is golden and crunchy

Very thin slices may finish early; thicker slices may need a few more minutes. Pull the early winners. Waiting for the whole basket to match is how the best chips become bitter.

The second batch is usually better because you already know how fast your air fryer runs.

If very thin chips fly around: slice them slightly thicker next time or use an air fryer rack or mesh insert if your model allows it. Overcrowding the basket will hold them down, but it will also trap steam.

Oven Zucchini Chips: Hot and Fast vs Low and Slow

The oven only looks confusing because thin chips and coated rounds need completely different treatment. Use a hot oven, around 425°F / 218°C, for parmesan or panko-coated rounds that need quick browning. For thin plain slices, a low oven around 225–235°F / 107–113°C gives the zucchini time to dry out.

Hot oven batches should smell toasted and look golden at the edges. Low oven batches should look drier, lighter, and slightly curled.
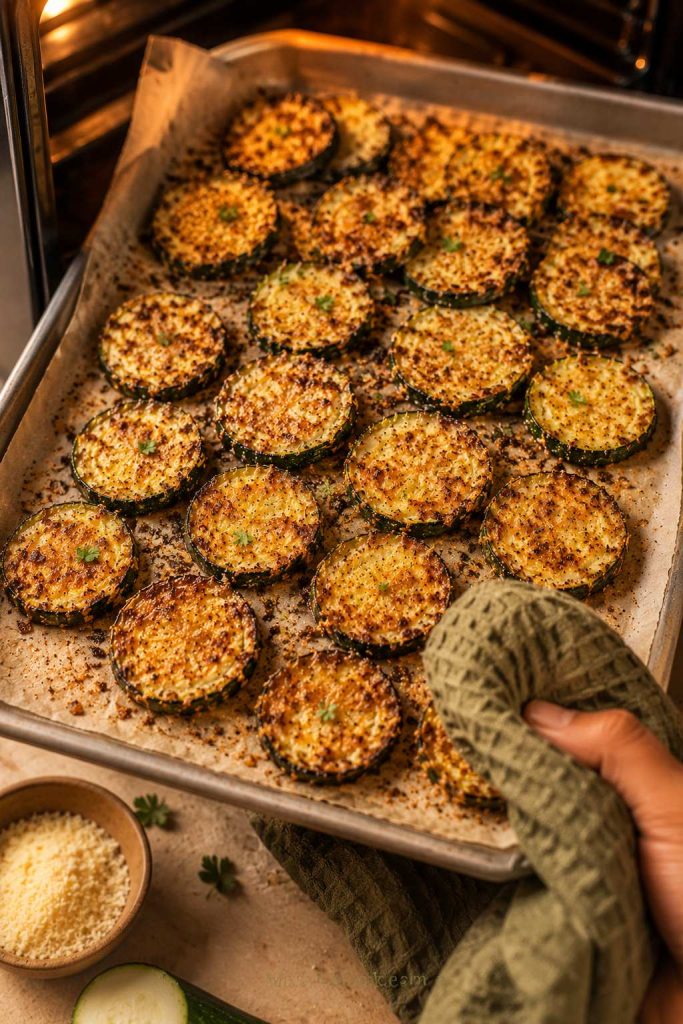
Golden baked zucchini chips on a parchment-lined sheet pan being pulled from the oven.
Baked zucchini chips need steady heat and enough tray room. Look for golden tops, drier centers, and edges that lift slightly.

Hot Oven Parmesan or Panko Chips

  1. Preheat the oven to 425°F / 218°C.
  2. Slice zucchini into ¼-inch / 6 mm rounds for panko chips, or slightly thinner for parmesan chips.
  3. Salt, rest, and dry the slices.
  4. Coat with parmesan or panko mixture.
  5. Arrange in a single layer on a parchment-lined baking sheet.
  6. Spray lightly with oil.
  7. Bake for 25–30 minutes, flipping halfway, until golden and crisp at the edges.

The chips should look lighter, slightly curled at the edges, and golden where the cheese or coating touches the heat. If they only look browned but still bend like roasted zucchini, give them more time.
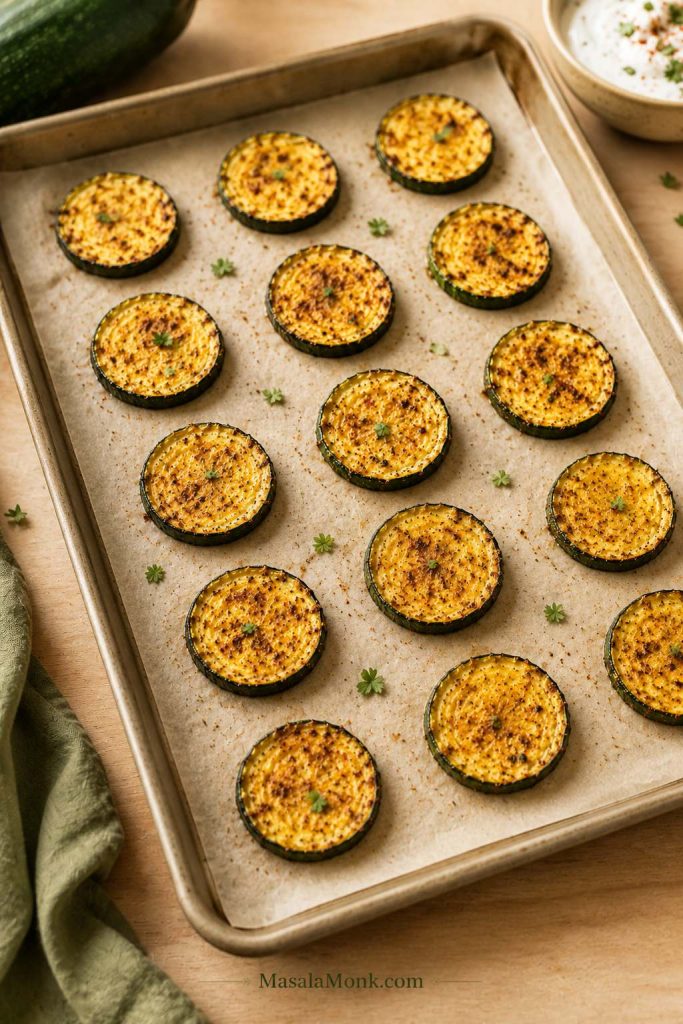
Zucchini rounds arranged with space between them on a parchment-lined sheet pan.
On a sheet pan, visible gaps are not wasted space. They let heat move around each zucchini slice so the edges can firm.

Low-and-Slow Thin Zucchini Chips

  1. Preheat the oven to 225–235°F / 107–113°C.
  2. Slice zucchini thinly, about ⅛ inch / 3 mm.
  3. Salt for 20–30 minutes, then pat very dry.
  4. Use very little oil, or just a light spray, then add dry seasoning.
  5. Spread in a single layer on parchment or a wire rack set over a baking sheet.
  6. Bake for 70–120 minutes, rotating trays halfway.
  7. Start checking around 70 minutes, then remove dry pieces every 10–15 minutes as needed.
  8. Cool completely before serving.

They are done when the centers stop looking wet, the edges curl slightly, and the slices feel light. If they still bend like roasted zucchini, they need more time.
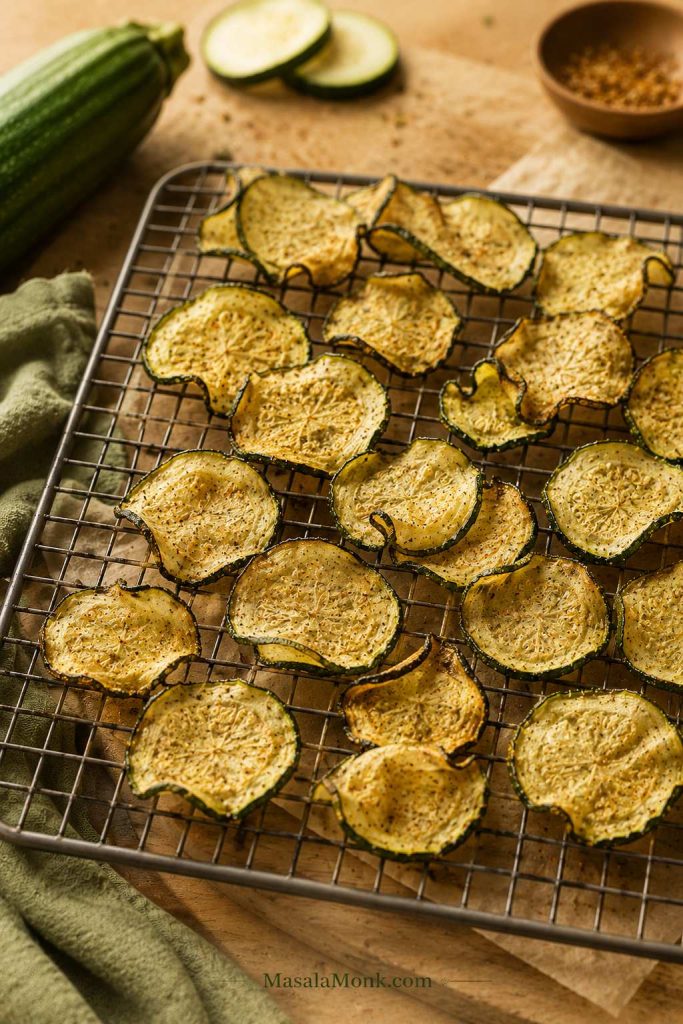
Thin lightly curled zucchini chips cooling on a wire rack.
Low-and-slow zucchini chips should look light, thin, and slightly curled. Cooling them on a rack keeps the undersides from softening.

Dehydrator Zucchini Chips

The dehydrator is not the fastest route, but it is the one to choose if you want chips that stay crisp after the first hour. This is the quiet, patient version: less hot-snack energy, more crisp pantry-snack payoff.

  1. Slice zucchini very thin and even.
  2. Salt lightly for 20–30 minutes, then pat dry very well.
  3. Use very little oil or skip oil completely.
  4. Season lightly with garlic powder, paprika, pepper, or dried herbs.
  5. Arrange in a single layer on dehydrator trays.
  6. Dehydrate at 135–150°F / 57–66°C for 4–8 hours.
  7. Rotate trays if your dehydrator heats unevenly.
  8. Cool completely before storing.
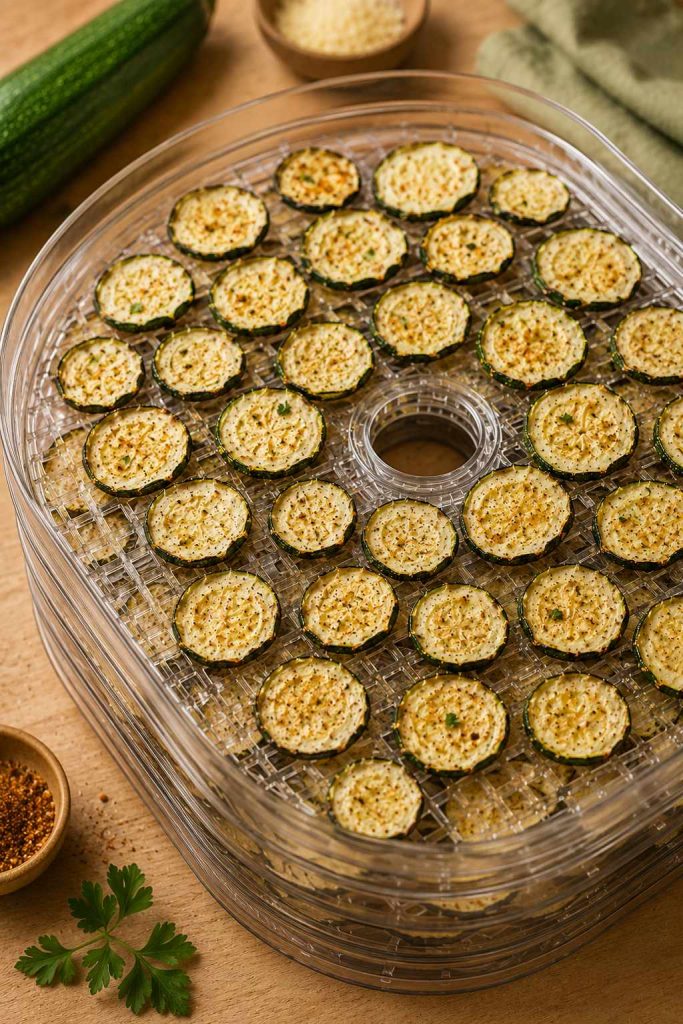
Thin zucchini slices arranged in a single layer on a dehydrator tray.
For dehydrator zucchini chips, single-layer spacing is the method. Thin slices dry more evenly and store better after they cool.

Use salt lightly here; dehydrated chips taste saltier as they dry. Humid kitchens, thicker slices, and crowded trays will push the timing toward the longer end.

Home-drying guidance supports the same idea used here: a single layer and steady dehydrator temperature help the slices dry evenly.

Cool one chip, then test it. Warm zucchini can lie to you. Fully dried chips should snap or feel crisp after cooling, not leathery. For keeping that texture, use the storage and re-crisping guide.
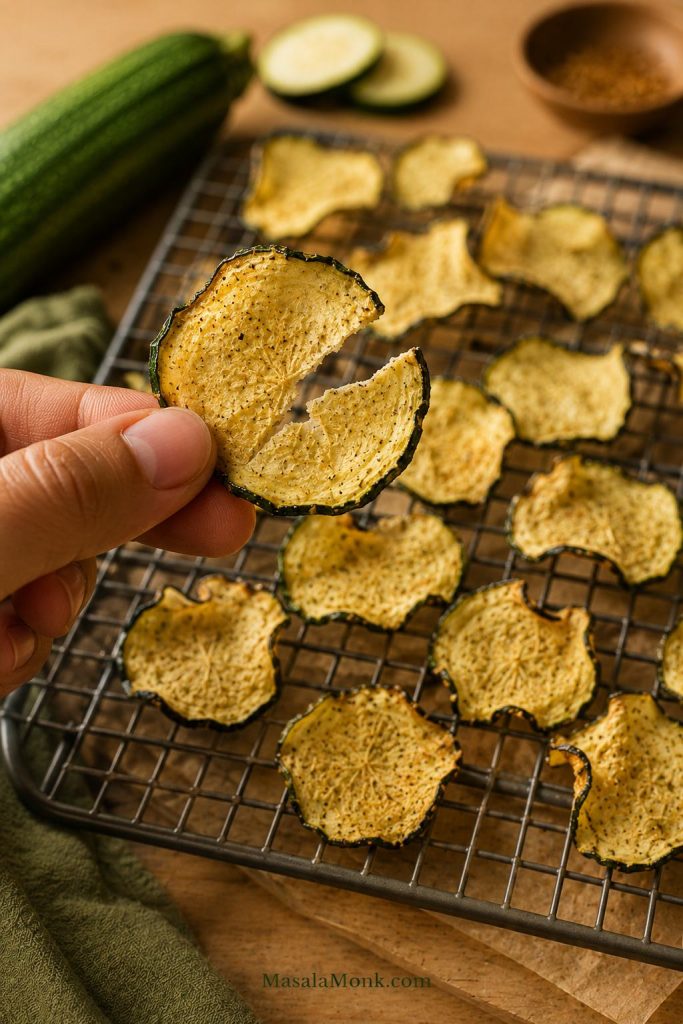
Hand holding a thin dried zucchini chip above a rack of dehydrated zucchini chips.
Cool one chip before testing. A dehydrated zucchini chip should feel dry and crisp, not warm, leathery, or bendy.

Parmesan Zucchini Chips: How to Get Lacy, Crisp Edges

Parmesan chips are done when the cheese looks golden and lacy at the edges, not pale and melted. If the parmesan smells sharp, bitter, or turns dark brown before the zucchini looks lighter, the heat is too high or the slices need more drying before cooking.

Finely grated parmesan works best because it clings in a thin layer and firms as it cools. Big shreds melt into patches. Too much cheese can also form a heavy blanket instead of a crisp edge, so use enough to coat lightly, not bury the zucchini.
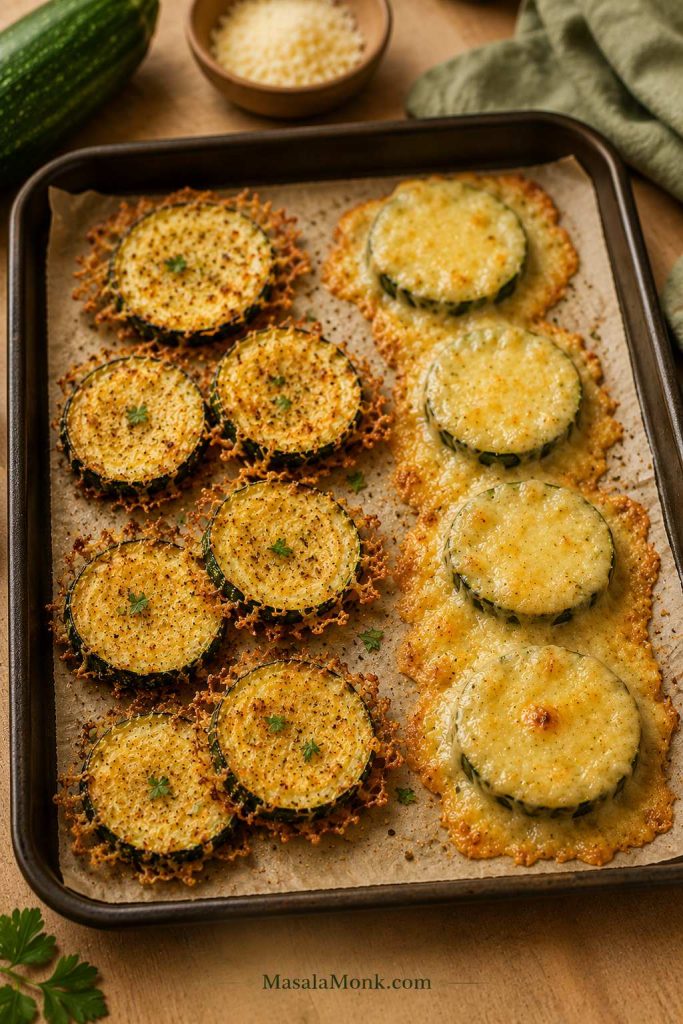
Zucchini rounds on a tray showing light lacy parmesan coating beside heavy melted cheese coating.
Parmesan helps, but too much can act like a blanket. A lighter coating gives zucchini chips better lacy edges and cleaner crisping.
  • Use finely grated parmesan, not big shreds.
  • Look for golden, lacy edges instead of dark brown spots.
  • Pull the tray or basket if the cheese smells bitter.
  • Let the chips cool spread out so the cheese can firm.
  • Add extra salt only after tasting; parmesan already brings salt.

Parmesan chips are especially good with something tomatoey on the side. A small bowl of marinara sauce makes them feel closer to a crispy zucchini appetizer than a plain vegetable snack.

Breaded or Panko Zucchini Chips

When you want the kind of crunch people hear across the table, use panko. Treat this version as crispy zucchini rounds, not thin vegetable chips. They are golden outside, tender inside, and strong enough for thick dips.

Panko crisps better than regular breadcrumbs because the flakes are larger and airier. Finished panko rounds should sound crisp when tapped with tongs, even though the zucchini inside stays tender.

This is the party version: golden crumbs outside, soft zucchini inside, and enough crunch to scoop a thick dip without collapsing.
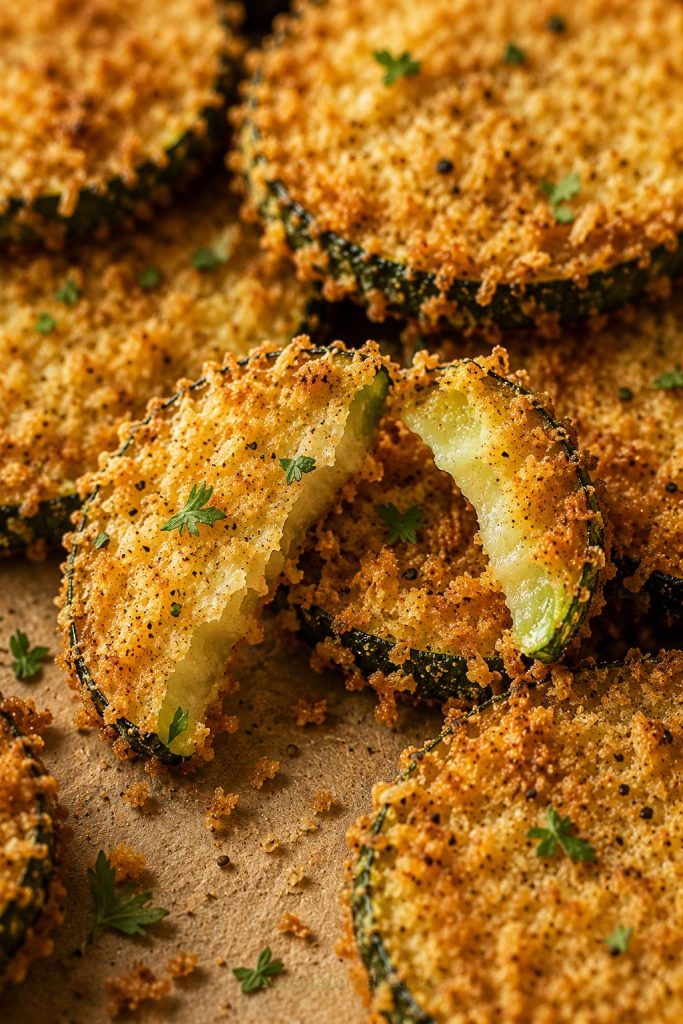
Broken panko-coated zucchini chip showing a crunchy golden coating and tender zucchini center.
With panko zucchini chips, the coating turns golden and crisp while the zucchini inside stays tender.

Panko Ingredients

  • 2 medium zucchini, sliced into ¼-inch / 6 mm rounds
  • ½ cup all-purpose flour, about 60 g
  • 2 large eggs, beaten
  • 1 cup panko breadcrumbs, about 55–60 g
  • ½ cup finely grated parmesan, about 45 g
  • 1 tsp Italian seasoning or dried oregano
  • ½ tsp garlic powder
  • Oil spray

Panko Method

  1. Salt the zucchini rounds briefly and pat them dry.
  2. Set up three bowls: flour, beaten eggs, and panko mixed with parmesan and seasoning.
  3. Coat each slice in flour, then egg, then panko mixture.
  4. Press gently so the coating sticks.
  5. Arrange in a single layer and spray lightly with oil.
  6. Bake at 425°F / 218°C for 25–30 minutes, or air fry at 400°F / 204°C for 10–12 minutes, checking early because panko can brown quickly.
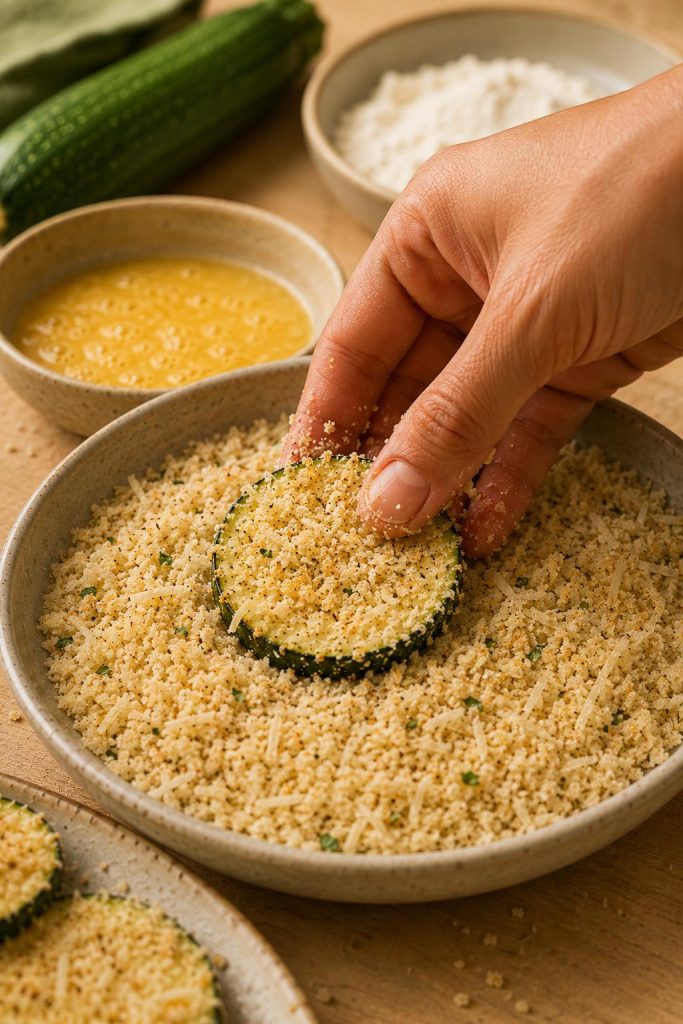
Hand pressing a zucchini round into panko crumbs during breading.
For panko zucchini chips, press the crumbs onto dry slices gently. That contact helps the coating cling and brown into a crunchy shell.

If the coating falls off, the zucchini was probably too wet before breading. Salt, drain, and dry the slices well before coating. For more soft-chip fixes, check the troubleshooting table.

The panko version is especially good with buffalo chicken dip or spinach artichoke dip. If you want something simpler, a warm cheese sauce works too.

Keto and No-Breadcrumb Zucchini Chips

If breadcrumbs are off the table, parmesan is the easiest way to get real edge crispness. Plain zucchini can dry nicely, but parmesan gives the snack more structure and a salty bite.

Almond flour can work, but it does not behave like panko. It tends to feel heavier and less crisp, so use it lightly or pair it with parmesan instead of expecting a breadcrumb-style crunch.

If you are building a bigger low-carb snack plate, these parmesan chips can sit alongside other keto chips, cucumber sticks, olives, cheese, and a creamy ranch or garlic yogurt dip.

Dry Seasonings That Work Best

Keep the wet flavors for later. Before cooking, dry spices are your friend.

  • Garlic parmesan: garlic powder, black pepper, and finely grated parmesan.
  • Ranch-style: garlic powder, onion powder, dried dill, parsley, and black pepper.
  • Chili lime: chili powder, garlic powder, lime zest, and a squeeze of lime after cooking.
  • Smoky paprika: smoked paprika, garlic powder, black pepper, and a little parmesan.
  • Italian herb: dried oregano, basil, garlic powder, black pepper, and parmesan.
  • Spicy parmesan: garlic powder, paprika, cayenne, black pepper, and finely grated parmesan.

Taste before adding more salt at the end, especially with parmesan. If you like heat, keep hot sauce or other wet sauces for after cooking; they work better as a finishing touch than as a pre-cook coating.

What to Serve with Zucchini Chips

The dip depends on the style of chip. Thin plain chips are delicate, so they work better with lighter dips like ranch, garlic yogurt, or tzatziki. Parmesan chips are great with marinara or salsa verde. If you want something sweeter and brighter, mango salsa also works.

For a snack board, pair warm zucchini chips with one creamy dip, one bright dip, and a few crunchy extras like cucumber sticks, carrot sticks, crackers, or olives. The contrast is what makes the board work: warm chips, cool dip, crisp edge, creamy finish.

How to Store and Re-Crisp Zucchini Chips

Fresh is best, but leftovers are not hopeless. You just have to bring the dry heat back.

They are best while the cheese has just firmed, the edges still crackle lightly, and the centers are still warm. As they sit, zucchini continues to soften, so even a crisp batch can lose some texture.

Do not seal in the steam you just worked so hard to remove. Spread hot chips out for a few minutes before piling them into a bowl or container.

Same-Day Storage

If you are serving them within a few hours, cool them completely first. Keep them loosely covered rather than sealing them while warm.

Overnight Storage

Refrigerate parmesan or panko chips in an airtight container once fully cool. They will lose some crispness, but you can revive them in the oven or air fryer.

Make-Ahead Chips

Choose low-and-slow oven chips or dehydrator chips if you need something that stores better. They hold up longer because they are dried more thoroughly.

How to Re-Crisp Them
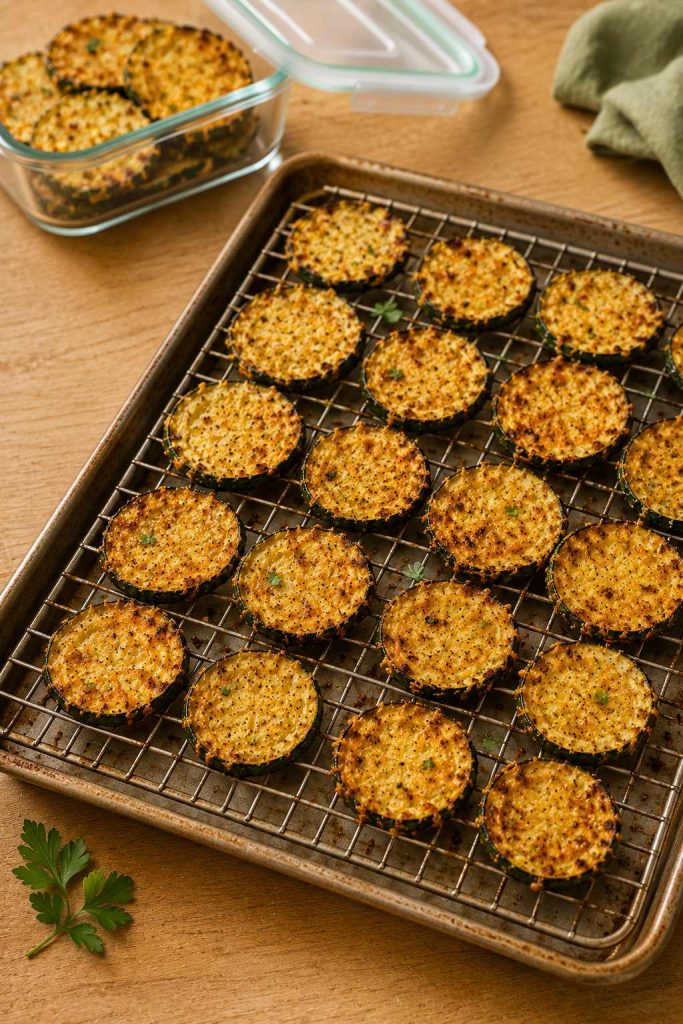
Leftover zucchini chips spread on a rack with an open storage container nearby for re-crisping.
To re-crisp zucchini chips, spread them out and bring back dry heat. The air fryer or oven works better than a microwave.
  • Air fryer: re-crisp at 350–370°F / 175–188°C for 3–5 minutes, checking often.
  • Oven: bake at 350°F / 175°C for 8–10 minutes, uncovered, until the edges crisp again.

Re-crisped chips will not be exactly like fresh, but dry heat can still bring back that salty edge. The microwave is the one option to skip; it softens zucchini instead of reviving it.

Troubleshooting: Soggy, Burnt, Oily, or Uneven Chips

A soft tray is not a failed recipe. It is usually one adjustment away: drier slices, less oil, more space, or a few more minutes.

Quick Fixes for Soft or Uneven Zucchini Chips

ProblemRight NowNext Batch
Chips are soggyRe-crisp uncovered in the air fryer or oven.Salt longer, pat very dry, use less oil, and avoid crowding.
Chips are soft in the middleCook a few minutes longer at moderate heat.Slice thinner or use a lower, slower oven method.
Edges burned but centers stayed softRemove the burnt pieces and lower the heat slightly.Slice more evenly and check earlier.
Chips stayed softSpread them out and cook a few minutes more.Use a single layer and cook in batches.
Chips feel oilyDrain briefly on a towel and re-crisp with dry heat.Use oil spray or toss with less oil.

Fixes for Coating, Salt, and Air Fryer Problems

ProblemRight NowNext Batch
Parmesan burnedPull the basket or tray before the cheese turns bitter.Use finely grated parmesan, less cheese, or slightly lower heat.
Parmesan stuck to the trayLet it cool briefly before lifting.Use parchment for oven chips or a light oil spray for air fryer chips.
Panko coating fell offServe the loose crumbs as a crunchy topping.Dry zucchini well before breading and press the coating gently.
Panko browned but zucchini stayed wateryReturn the soft pieces to the oven or air fryer for a few minutes.Use ¼-inch / 6 mm slices and dry them better before coating.
Chips taste too saltyServe with an unsalted dip or yogurt sauce.Use less salt before cooking, especially with parmesan.
Chips taste bitterRemove dark pieces and serve the lighter ones.Lower heat slightly and add delicate seasonings after cooking.
Air fryer chips flew aroundPause and settle the chips if needed.Slice slightly thicker or use a rack/mesh insert.
Chips softened after coolingRe-crisp in the air fryer or oven.Cool spread out before storing or serving.

If the first tray bends, do not panic. Moisture usually won the first round, and the next batch often only needs one or two adjustments.

Frequently Asked Questions

Why are my zucchini chips soggy?

Zucchini chips turn soggy when moisture gets trapped. Slice evenly, salt briefly, pat very dry, use little oil, and cook in a single layer.

Why are my air fryer zucchini chips not crispy?

The slices may be wet, thick, crowded, or coated with too much oil. Cook in batches and pull finished pieces early instead of waiting for every slice to match.

Do you have to salt zucchini first?

You do not absolutely have to, but it helps a lot. Even a 15–20 minute rest gives the slices a better start before they hit the heat.

Do they get crispier as they cool?

Yes, especially parmesan chips. The cheese firms as it cools, so give the chips a few minutes before judging the texture.

Air fryer or oven: which is better?

Choose the air fryer for speed and small batches. Use the oven for larger trays, panko-coated chips, and low-and-slow thin chips.

Can I bake zucchini chips without breadcrumbs?

Yes. Use thin slices, salt and dry them well, then bake low and slow at 225–235°F / 107–113°C. Add finely grated parmesan if you want crisp edges without breadcrumbs.

What is the best no-breadcrumb coating?

Finely grated parmesan is the easiest no-breadcrumb coating because it browns, firms as it cools, and adds salty flavor.

How thin should I slice the zucchini?

Slice about ⅛ inch / 3 mm for thin plain chips and about ¼ inch / 6 mm for breaded or panko rounds.

Are zucchini chips keto?

Plain and parmesan versions can be keto-friendly. Panko or regular breadcrumb-coated chips are not keto unless you use a low-carb coating.

Can I use yellow squash or courgette?

Yes. Courgette is another name for zucchini, and yellow summer squash can also work. If you actually have cucumber, use it fresh in a cucumber salad instead of baking it into chips.

Should I peel the zucchini?

No. The skin adds color, helps the slices hold together, and gives better texture.

Can I use frozen zucchini?

Frozen zucchini is not ideal for chips because it releases too much liquid after thawing. Use fresh zucchini for this recipe.

Are these the same as zucchini fries?

No. Chips are usually sliced into rounds, while zucchini fries are cut into thicker sticks and often breaded.

Can I use a dehydrator for zucchini chips?

Yes. Slice very thin, salt and dry the slices, season lightly, and dehydrate at 135–150°F / 57–66°C for 4–8 hours.

How do I store zucchini chips?

Cool them completely first. Store fully dried chips airtight, refrigerate parmesan or panko leftovers, and re-crisp in the air fryer or oven.

Final Thoughts

Zucchini chips stop feeling random once you stop treating every version like the same snack. Thin chips need drying time, parmesan rounds need a light coating and a cool-down, and panko rounds need enough thickness to hold their crunch.

Your first batch teaches you what your zucchini and air fryer are doing. Usually, the next one is the keeper.

When the edges finally crisp, the whole thing clicks: not a packaged potato chip, not a limp roasted round, but a golden, salty zucchini snack that actually earns its dip.
Back to top

Posted on — 1 Comment

Keto Chips: Best Low-Carb Snacks (For Salsa, Dips & Nachos)

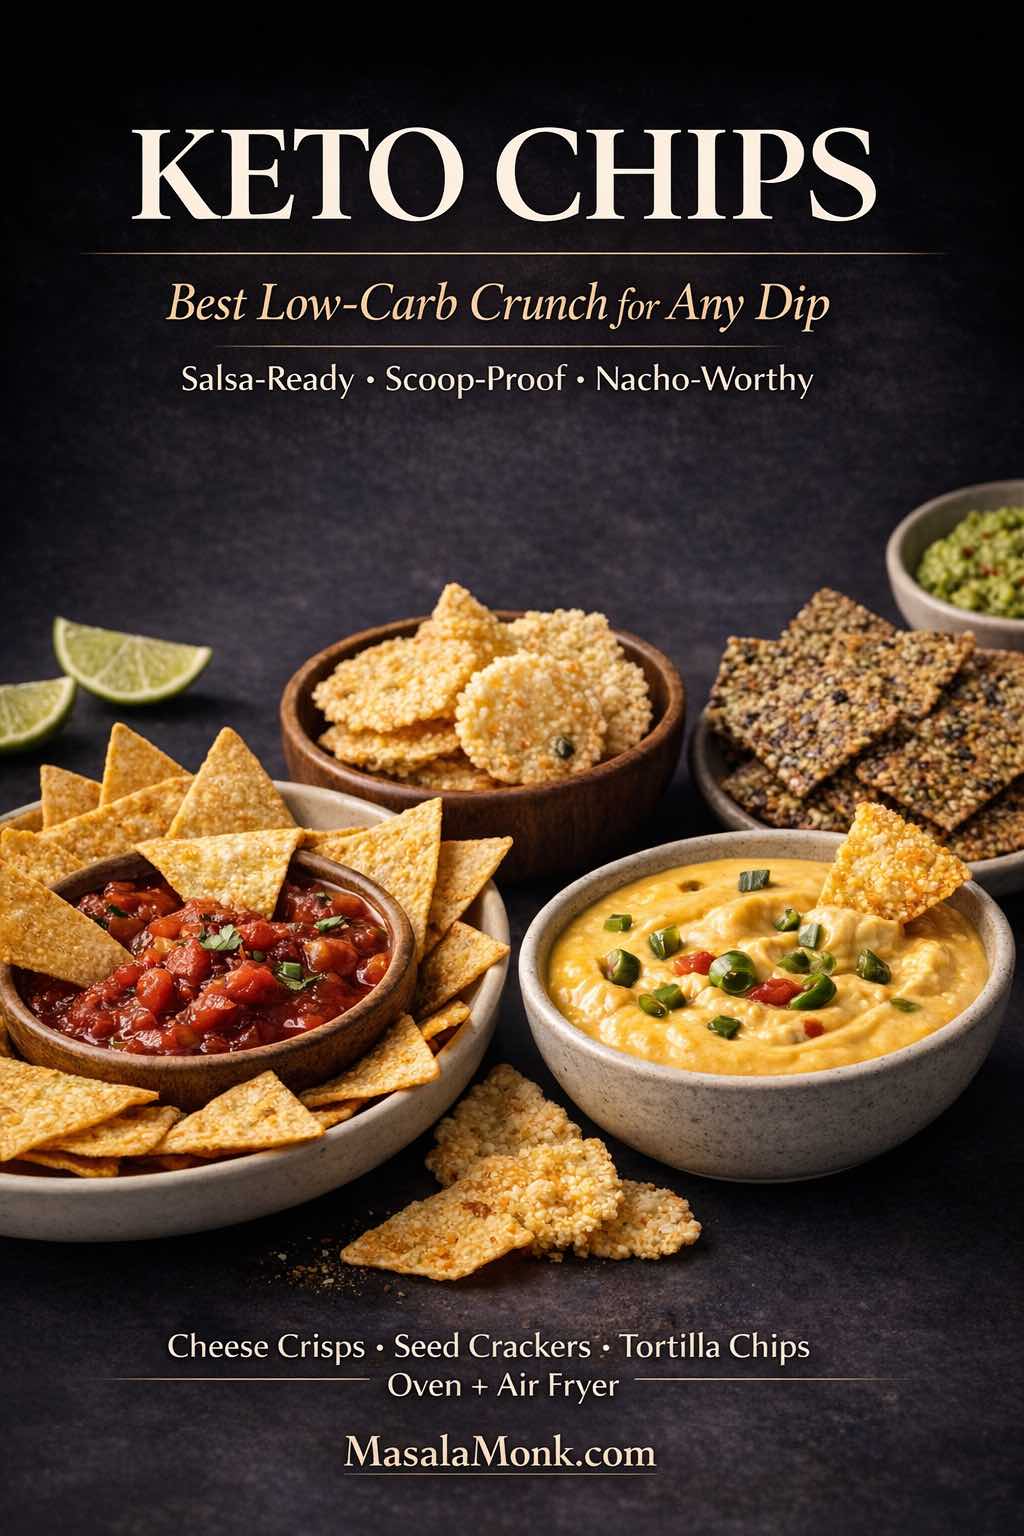
Photoreal magazine-style cover showing keto chips and low-carb chip options with chunky salsa, thick queso dip, cheese crisps, and seed crackers on a dark moody background. Text reads “Keto Chips,” “Best Low-Carb Crunch for Any Dip,” “Salsa-Ready • Scoop-Proof • Nacho-Worthy,” with “Cheese Crisps • Seed Crackers • Tortilla Chips (Oven + Air Fryer)” and MasalaMonk.com.

This post was updated on:

There is a very specific kind of low-carb craving that has little to do with hunger: you want something salty that snaps. The hard part is that no single keto chip does every job well. A thin tortilla-style chip can be excellent with salsa and useless with a heavy queso; a cheese crisp can scoop a thick dip beautifully but feel far richer than what you want for casual grazing.

So if you want chips on keto, this guide is organized by what you want the chip to do. You can buy something ready-made, bake a quick batch from low-carb tortillas, make cheese or seed crackers from scratch, build a nearly zero-carb crunch from pork rinds or chicken skin, or fix the texture problem that keeps turning homemade chips soft.

Jump to: quick picks · what counts as keto-friendly · store-bought · tortilla chips · cheese chips · zero/no-carb · salsa & nachos · crunch fixes


Best Keto & Low-Carb Chips at a Glance

Start with the way you plan to eat them. The best low carb chips for salsa are not necessarily the best ones for queso or nachos, so use the job to narrow the field.

NeedBest option + why
SalsaExtra-dry low-carb tortilla chips — familiar shape, but dry enough to survive a wet dip.

Thick queso or creamy dipCheese crisps, seed crackers, or pork rinds — stronger scoops that resist breaking.
NachosTortilla-style chips or sturdy cheese crisps — enough structure for heat and toppings.
Lowest-carb crunchPork rinds, chicken skin, or cheese crisps — different from tortilla chips, but naturally very low in carbohydrate.
Everyday cracker-style snackSeed or almond-flour crackers — easy to portion and sturdier in a snack box.
Spicy “hot chip” cravingTortilla chips or cheese crisps + seasoning dust — the seasoning delivers most of the effect.
Store-boughtRead the serving, then do the snap test — a chip that bends in the bag usually softens quickly in dip.

The useful question is not “Which keto chip is best?” but “Best for what?”
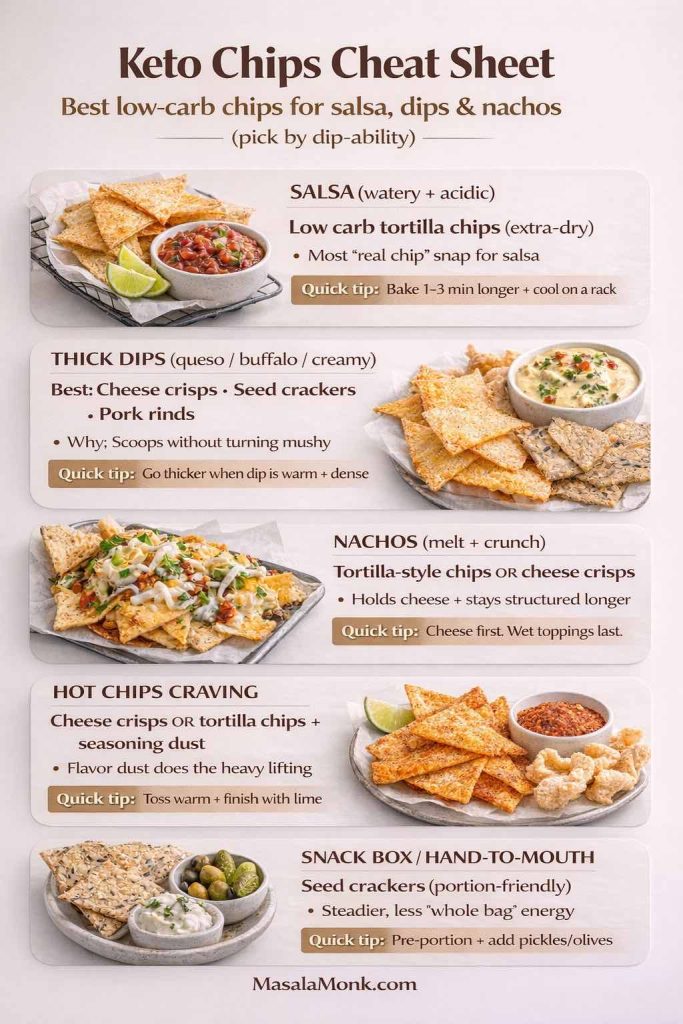
Keto chips cheat sheet comparing low-carb chip styles for salsa, thick dips, nachos, spicy snacks, and snack boxes.
Use the cheat sheet as a second view of the same decision: salsa rewards dryness, thick dips reward strength, and nachos need structure.

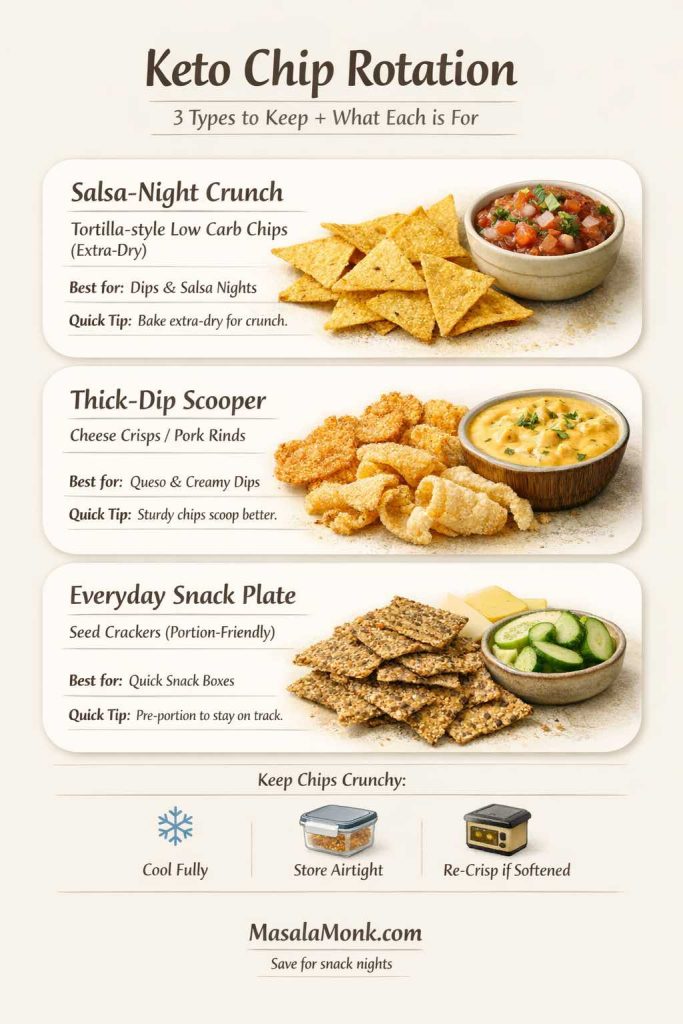
If you only keep two options around, make them different: one dry tortilla-style chip for salsa and nachos, and one sturdier option such as cheese crisps or seed crackers for thicker dips.

What Chips Are Keto-Friendly?

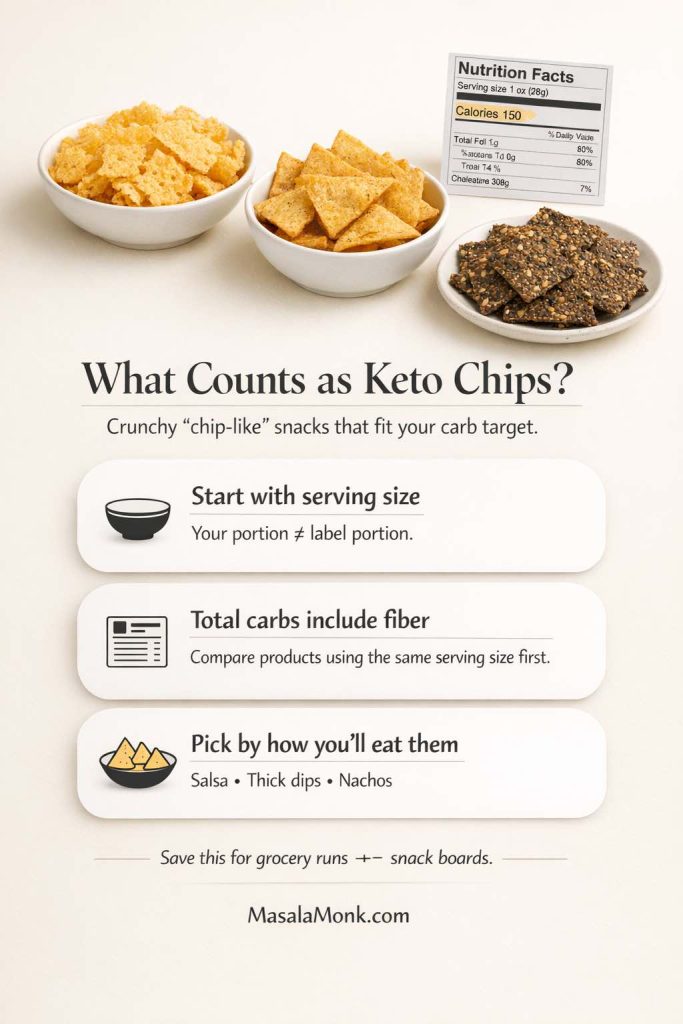
In practice, a chip is keto-friendly only in the context of the portion you actually eat and the carb target you are following. That can mean a naturally very-low-carb food such as a cheese crisp or pork rind, or a tortilla-style chip made from a lower-carb wrap or flour blend. The word keto on the front of a package is not enough by itself.

Keto chip comparison showing serving size, total carbohydrates, fiber, and chip styles for salsa, dips, and nachos.
Start with serving size and carbohydrate information, then choose the chip for the way you plan to eat it.

For packaged chips, read the serving size first and then the carbohydrate line. The FDA guide to the Nutrition Facts label is the useful baseline here: the numbers belong to the stated serving, not to the entire bag.

Fiber is listed within total carbohydrate on U.S. labels, which is why some high-fiber products advertise a much smaller “net carb” number. That can be useful information, but it does not make portion size irrelevant. Compare products using the same serving logic, and pay attention to how much you normally eat rather than how tidy the marketing looks.

Texture belongs in this decision too. A chip can fit your carb target and still be a bad choice for salsa because it bends or turns pasty when wet. Conversely, a sturdy cheese or seed cracker may be excellent with queso even if it does not resemble a tortilla chip at all.


Store-Bought Keto & Low-Carb Chips: What to Look For

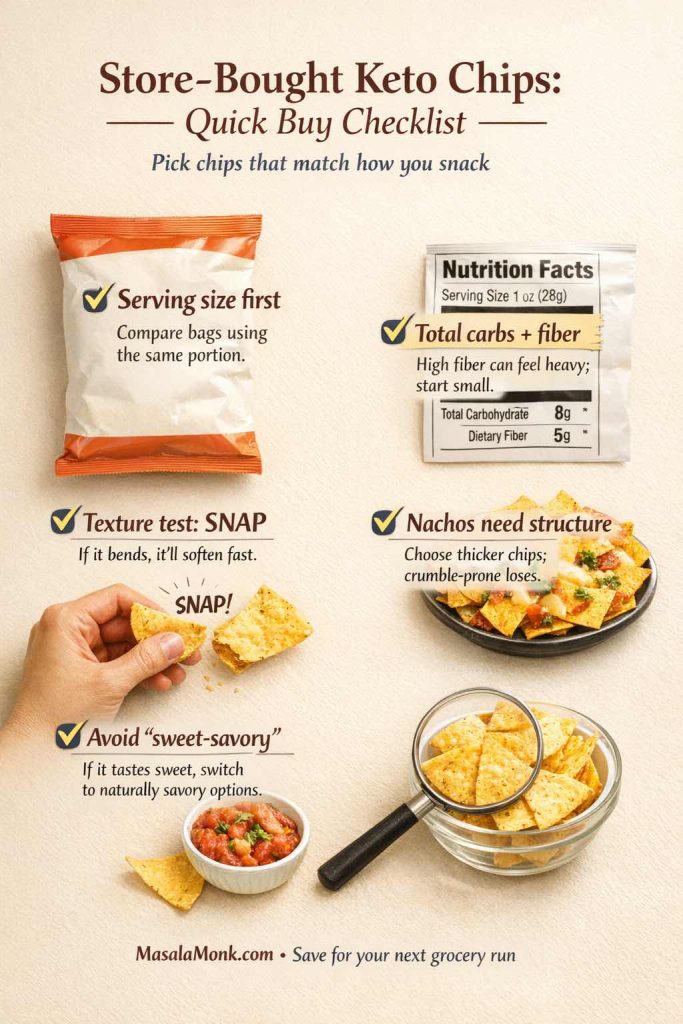
Store-bought low-carb chips differ as much in texture as they do in carb numbers. Rather than trusting a large keto or protein claim on the front of the bag, check the serving, understand what kind of chip you are buying, and then ask whether its texture matches the job.

Store-bought keto chip checklist for serving size, carbohydrates, snap, nacho strength, and savory flavor.
For a quick grocery check, compare the serving and carbohydrate information first; then judge whether the chip is dry and rigid enough for the way you plan to use it.
Type you will seeBest use + compromise
Protein tortilla-style chipsConvenient packaged snacking with familiar savory flavors, but some are brittle, powdery, or weak in wet dips.
Fiber-heavy tortilla-style chipsCan work well for salsa and nachos when genuinely dry; texture and fiber load vary widely between products.
Cheese crispsExcellent hard crunch for thick dips, but richer, saltier, and less tortilla-like.
Pork rindsStrong scoops for queso and creamy dips, but they soften quickly in watery salsa.
Seed/almond crackersSturdy for snack boxes and dense dips, though the experience is more cracker-like than chip-like.
Veggie crispsLighter snacking, but often too fragile for heavy dipping.
This is a category guide, not a brand ranking: the label and physical texture still decide whether a particular product works for you.

Do a 15-second scan. Start with the listed serving size, then total carbohydrate and fiber. If sugar alcohols or sweeteners are present, note the amount and how the brand presents its “net carb” claim. Finally, break one chip. For salsa or nachos, a clean snap is more promising than a bend.

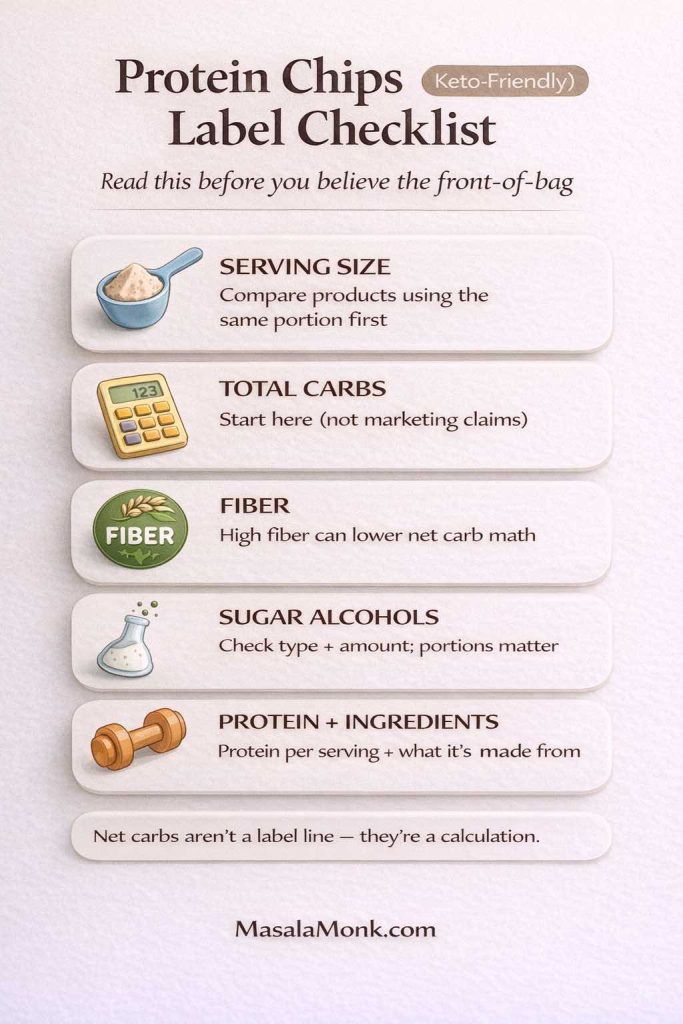
Protein-chip label checklist covering serving size, total carbohydrates, fiber, sugar alcohols, protein, and ingredients.
High protein and low carbohydrate are separate questions. Check the serving, total carbohydrate, fiber, sugar alcohols, protein, and ingredient list.

Protein chips can fit a low-carb eating pattern, but high protein does not automatically mean low carb. Some products also rely heavily on added fibers. If large servings of high-fiber snacks make you uncomfortable, start with the stated serving before deciding the bag is an everyday option.

Flavor matters too. Some lower-carb formulas leave a sweet or vanilla-like note even when the seasoning is nominally savory. If that clashes with salsa, queso, or guacamole, a naturally savory base such as cheese crisps, seed crackers, or pork rinds may simply be a better fit.

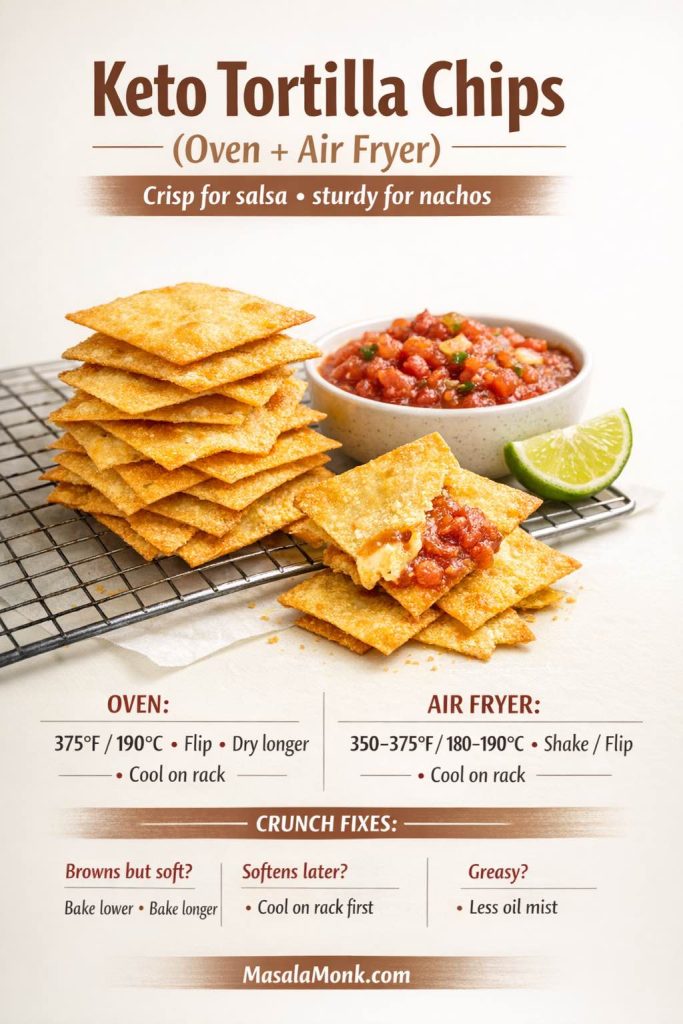
Keto Tortilla Chips: Oven + Air Fryer

For salsa and nachos, tortilla-style chips are still the closest thing to the familiar experience. The useful mental model is drying, not merely browning: the center has to lose enough moisture to snap after cooling, not just turn golden at the edge.

Low-carb tortilla chips with oven and air-fryer methods, plus cooling and troubleshooting tips.
Tortilla-style chips need a single layer, enough drying time, and a full cool on a rack. If the center still bends after cooling, the batch needs more drying.

Baseline batch: 4 low-carb tortillas

Yield: roughly 24–32 chips, depending on whether each tortilla is cut into 6 or 8 wedges. Oven time: usually 14–22 minutes plus cooling. Wrap thickness and fiber content can move that timing noticeably.

  • 4 low-carb tortillas
  • 1–2 tsp neutral or olive oil, or a very light oil spray
  • ¼–½ tsp fine salt
  • Optional: smoked paprika, chili powder, garlic powder, cumin, or another dry seasoning
  1. Heat the oven to 190°C / 375°F.
  2. Cut each tortilla into 6–8 similar-size wedges. Smaller, even triangles dry more predictably than large irregular ones.
  3. Arrange them in a single layer on one or two trays. If pieces overlap, steam gets trapped between them.
  4. Use just enough oil to lightly coat the surfaces, then season.
  5. Bake for 8–12 minutes, flip, then bake another 6–10 minutes.
  6. Move the chips to a rack for about 10 minutes before judging the texture.

The doneness test: pick up a fully cooled chip and bend the center. If the edges crack but the middle still folds, it is browned but not dry. Return the batch to a slightly lower oven for a few more minutes. If the center snaps cleanly, it is ready for salsa.

Very high-fiber wraps can behave differently from ordinary tortillas: some brown early while the center stays flexible. In that case, lower the heat a little and extend the drying time rather than pushing the color darker. Add wet finishes such as lime only after baking; moisture added before storage works against the crispness you just created.

Air fryer: faster for a small batch

Set the air fryer to about 180–190°C / 350–375°F. Work in a single layer, lightly oil and season the wedges, then cook for 4–6 minutes. Flip or shake and continue for another 2–5 minutes. Cool before deciding whether the chips need another minute or two; warm chips can feel softer than they will once the steam has escaped.

The first batch is calibration. If the chips taste bitter, a spice may be scorching before the tortilla dries; season more lightly before cooking and add delicate spices afterward. If they feel greasy, cut the oil rather than extending the bake.

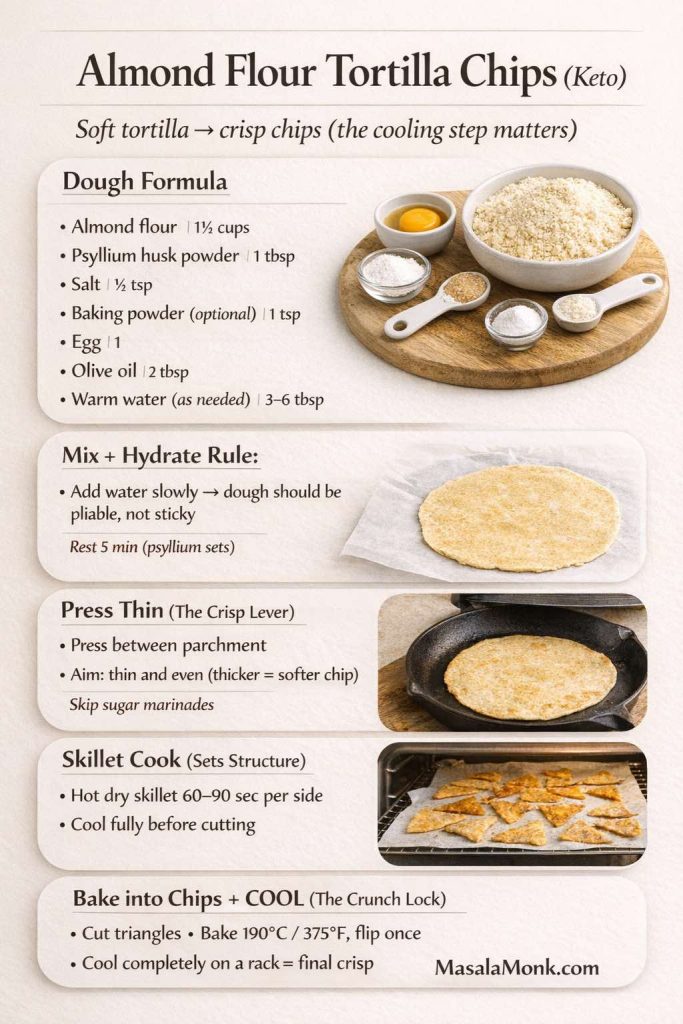
From-scratch almond-flour tortilla chips

If you want control over the dough as well as the bake, almond flour is the sturdier route. For more on why low-carb flours behave so differently, see the MasalaMonk keto flour guide.

  • 1½ cups almond flour
  • 1 tbsp psyllium husk powder
  • ½ tsp salt
  • 1 tsp baking powder, optional
  • 1 egg
  • 2 tbsp olive oil
  • 3–6 tbsp warm water, as needed
Almond-flour tortilla chips made by skillet-cooking thin tortillas, cutting, baking, and cooling.
For almond-flour tortilla chips, roll the dough thin, set the structure on a skillet, then cut and bake until the centers are dry.
  1. Mix the dry ingredients, then add the egg and oil.
  2. Add warm water gradually until the dough is pliable rather than sticky.
  3. Divide into 4–6 balls and press each very thinly between parchment. Aim for an even sheet; thick patches stay chewy.
  4. Cook on a hot dry skillet for about 60–90 seconds per side to set the tortilla.
  5. Cool, cut into triangles, then bake at 190°C / 375°F until dry and crisp, flipping once.
  6. Cool on a rack before serving.

If a cooled almond-flour chip bends through the center, roll the next batch thinner or give the cut chips more oven time. The skillet sets the structure; the oven removes the moisture.

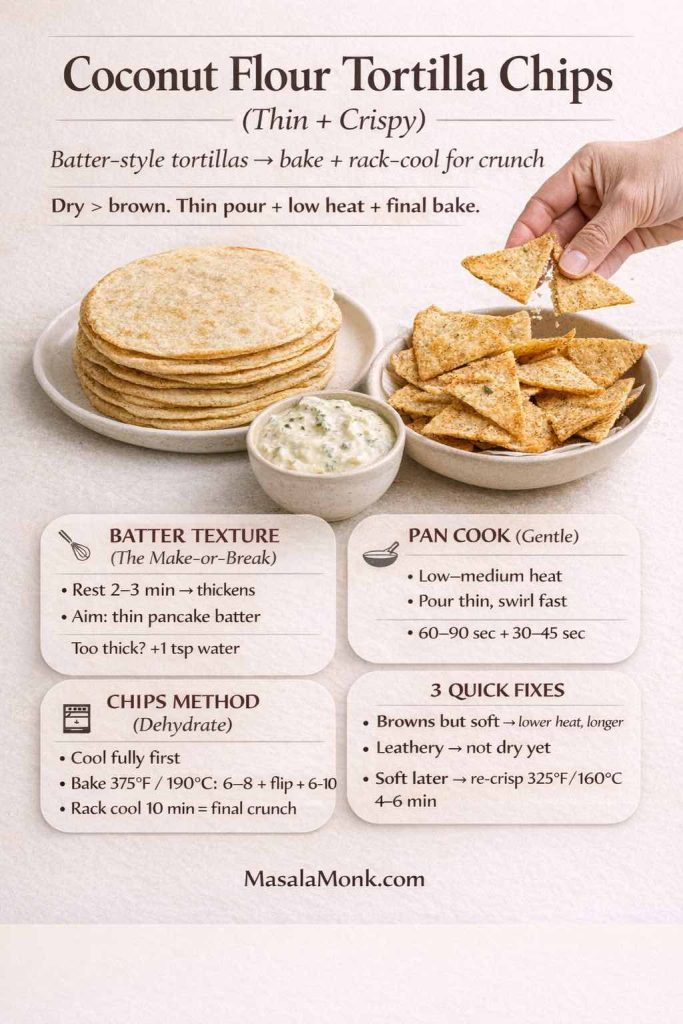
Coconut-flour tortilla chips: thinner and more delicate

  • 2 tbsp coconut flour
  • 2 eggs
  • 2 tbsp water
  • 1 tbsp olive oil
  • Salt
  • Pinch of baking powder, optional
Thin coconut-flour tortilla chips made by skillet-cooking a delicate batter before baking until dry.
Coconut-flour tortillas are fragile: cook a thin batter gently, cut only once set, then use the oven to dry the pieces before cooling.

Whisk everything and let the batter stand for about two minutes so the coconut flour hydrates. Cook thin circles gently in a lightly oiled skillet, flipping only when the first side has enough structure to release. Cool, cut, then bake until the pieces feel dry. These are less forgiving than almond-flour chips, so treat them as a delicate salsa chip rather than a heavy queso scoop.

For storage and re-crisping, jump to How to Keep Keto Chips Crispy rather than repeating the same instructions here.

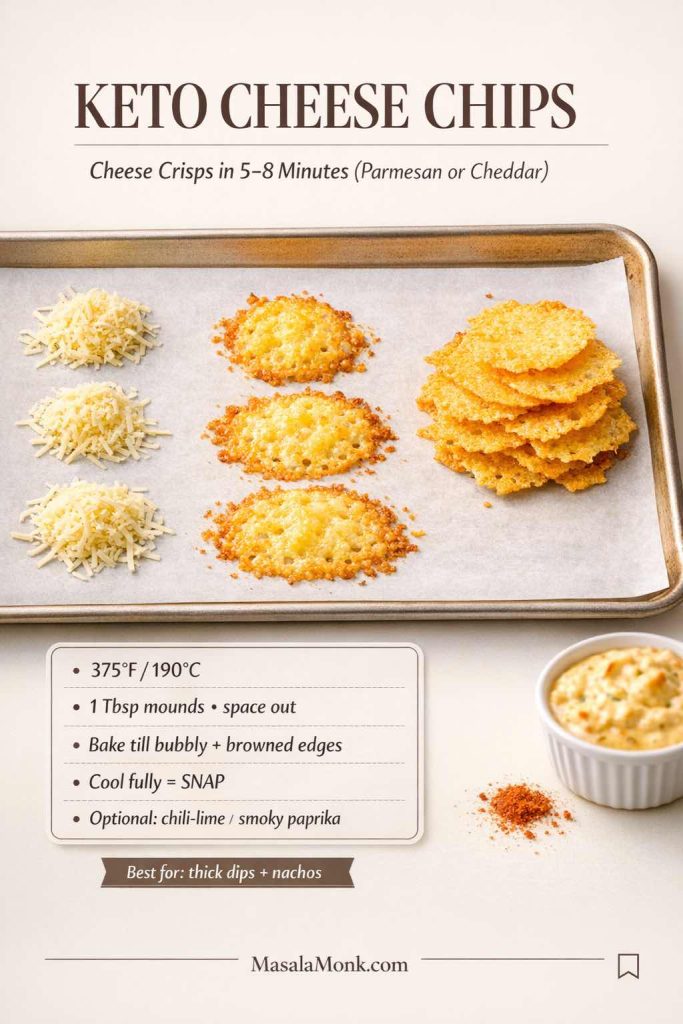
Keto Cheese Chips & Parmesan Crisps

Cheese crisps are the quickest route to a hard, salty crunch. Parmesan dries into a thinner, harder wafer; cheddar gives more body. A blend sits between the two and works especially well when the chip needs to carry a thick dip.

Parmesan and cheddar cheese crisps with oven temperature, baking time, and cooling instructions.
Parmesan makes a thinner, harder crisp; cheddar gives more body. Both firm significantly after they leave the oven.

Basic parmesan or cheddar crisps

Baseline batch: 1 cup finely shredded cheese makes about 12–16 small crisps, depending on how large you make the mounds. Allow roughly 5 minutes to portion, 5–8 minutes to bake, and 5–10 minutes to cool.

  • 1 cup finely shredded parmesan, cheddar, or a mix
  • Optional: smoked paprika, chili powder, garlic powder, black pepper, or dried oregano
  1. Heat the oven to 190°C / 375°F and line a tray with parchment.
  2. Place roughly tablespoon-size mounds of cheese on the tray, leaving room for them to spread.
  3. Season lightly.
  4. Bake for about 5–8 minutes, until the edges are amber and the bubbling has slowed.
  5. Leave the crisps to cool before lifting them. Warm cheese is flexible; the snap develops as it cools.

For a sturdier dipping crisp, make the mounds slightly thicker or mix parmesan with cheddar. If the finished crisp shatters the moment it touches queso, the next batch needs a little more body—not necessarily more baking.

If cheese is becoming a regular snack base, the separate guide to carbs in cheese from a keto perspective is useful for comparing varieties rather than treating every cheese as nutritionally identical.

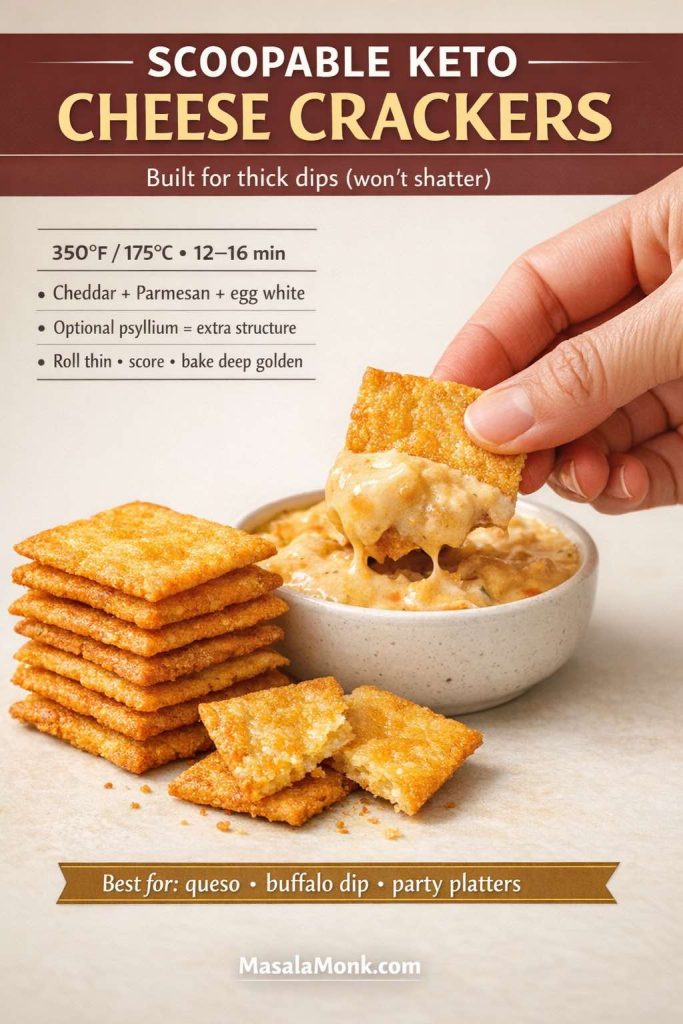
Scoopable cheese crackers

  • 1 cup shredded cheddar
  • ⅓ cup finely grated parmesan
  • 1 egg white
  • 1–2 tsp psyllium husk powder, optional
  • Garlic powder, paprika, and black pepper
Sturdy keto cheese crackers designed for scooping queso and other thick dips.
This version adds enough structure to behave more like a cracker, so it can carry thicker queso or creamy dips without shattering.

Mix into a sticky dough, roll between parchment to roughly 2–3 mm, score into squares, and bake at 175°C / 350°F for 12–16 minutes. Look for a deeply golden sheet with dry edges. Cool before snapping along the score lines.

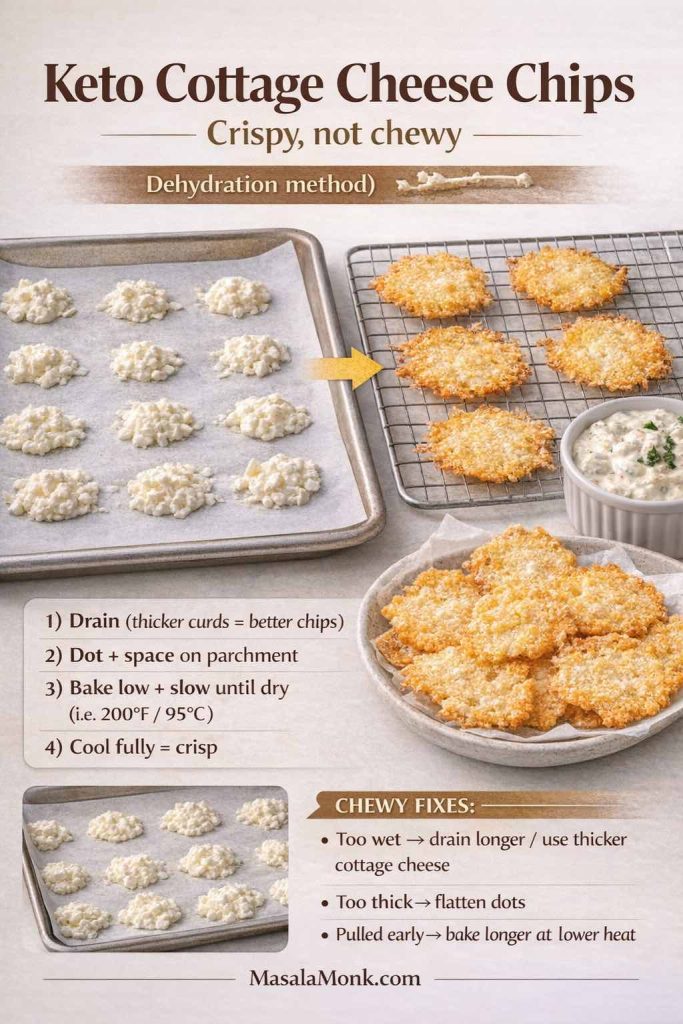
Cottage-cheese chips need dehydration, not just browning

Cottage cheese chips showing draining, thin portions, low-and-slow baking, and cooling for crispness.
Cottage-cheese chips work by moisture removal: drain well, use small thin portions, bake until dry, then cool completely.

Drain cottage cheese thoroughly before it hits the tray. Spoon small, thin portions with space around each one; thick dollops tend to brown outside while staying chewy in the middle. Bake at a lower temperature than ordinary cheese crisps until the chips look dry rather than merely golden, then cool completely. If a batch stays flexible after cooling, the next adjustment is usually less moisture or thinner portions, not more seasoning.

Seed & Almond-Flour Crackers

Seed crackers are the quiet workhorse of this list: less rich than cheese crisps, sturdier than many tortilla-style chips, and easy to portion into snack boxes. The critical variable is thickness.

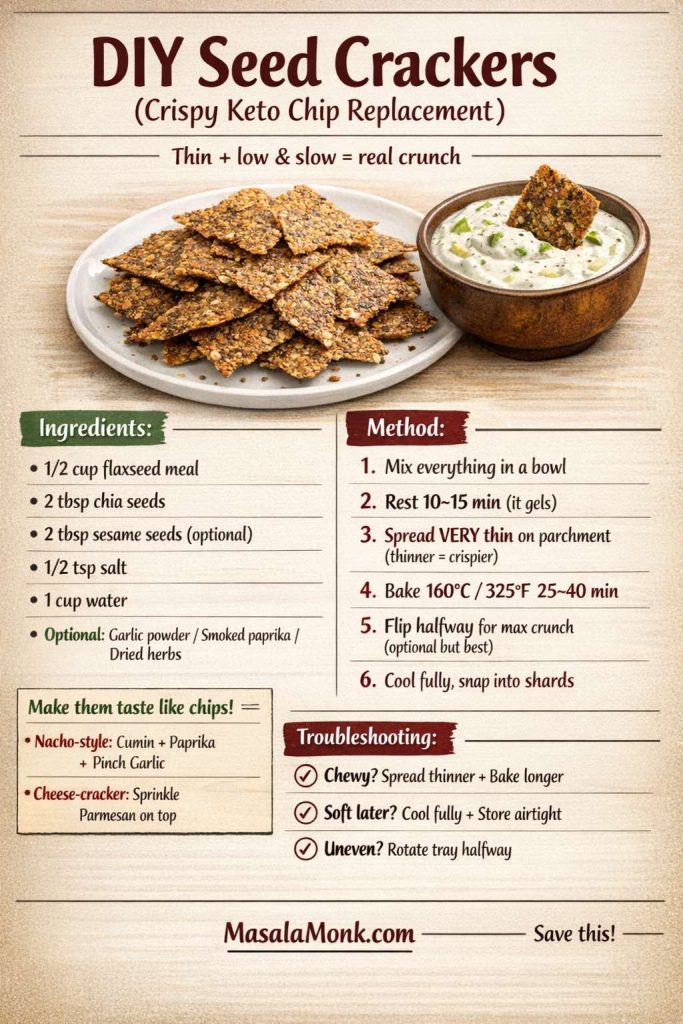
Crisp seed crackers

  • ½ cup flaxseed meal
  • 2 tbsp chia seeds
  • 2 tbsp sesame seeds, optional
  • ½ tsp salt
  • 1 cup water
  • Garlic powder, paprika, cumin, or dried herbs, optional
Seed cracker recipe using flax, chia, and sesame, spread thin and baked until dry and crisp.
Let the seed mixture gel, then spread it into a genuinely thin sheet. Thick patches remain leathery after the edges are already crisp.
  1. Mix everything and let it stand for 10–15 minutes, until the water has turned the seeds into a cohesive gel.
  2. Spread the mixture thinly and as evenly as possible on parchment.
  3. Bake at 160°C / 325°F for about 25–40 minutes, depending on thickness.
  4. For a very crisp sheet, flip it partway through once it is firm enough to handle.
  5. Cool completely before breaking into shards.

The visual cue is dryness through the center. If the edge snaps but the middle flexes, the sheet needs more time. A nacho-style version can take cumin, paprika, and garlic; a light parmesan dust makes the same base more savory.

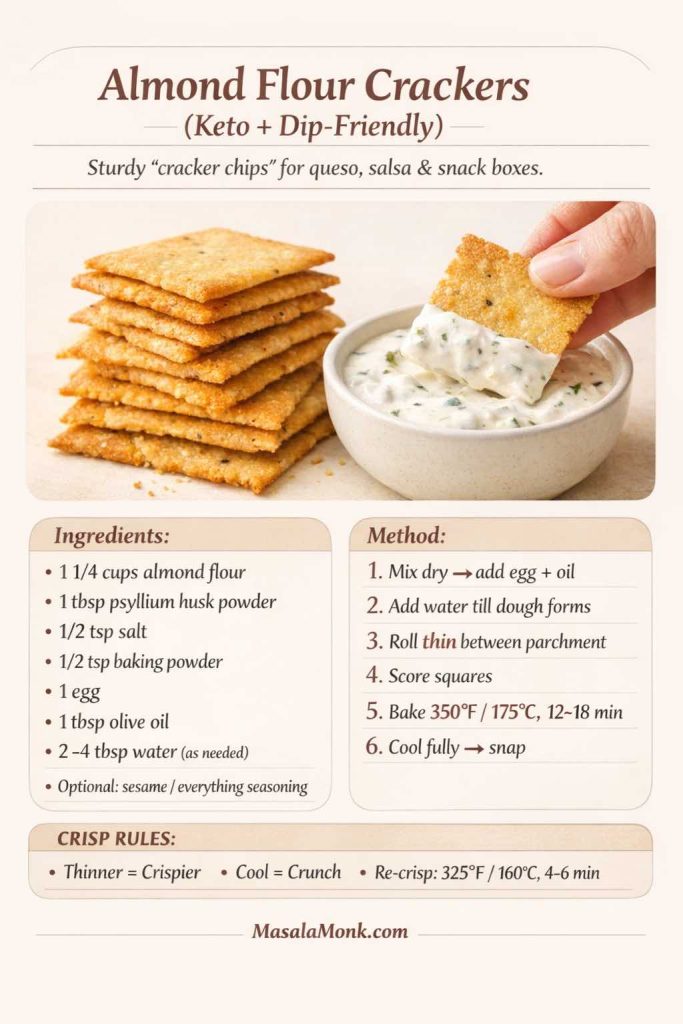
Almond-flour crackers

  • 1¼ cups almond flour
  • 1 tbsp psyllium husk powder
  • ½ tsp salt
  • ½ tsp baking powder
  • 1 egg
  • 1 tbsp olive oil
  • 2–4 tbsp water, as needed
  • Sesame seeds or everything-style seasoning, optional
Almond-flour keto crackers rolled thin, scored, baked until golden, and cooled for crunch.
Almond-flour cracker dough should be rolled thin and even, scored before baking, and cooled completely before the final texture is judged.

Heat the oven to 175°C / 350°F. Mix the dry ingredients, then add the egg and oil. Add only enough water to make a workable dough. Roll thinly between parchment, score, and bake for 12–18 minutes. The center squares should look as dry as the edge pieces; pale, soft centers usually mean the sheet was too thick or needs more time.

Zero-Carb and Nearly Zero-Carb Chips

When people search for no carb chips or zero-carb chips, the useful answers usually stop looking like tortilla chips. Pork rinds, chicken skin, cheese crisps, and meat-based snacks can get much closer to the carb target because the base is fat and/or protein rather than flour.

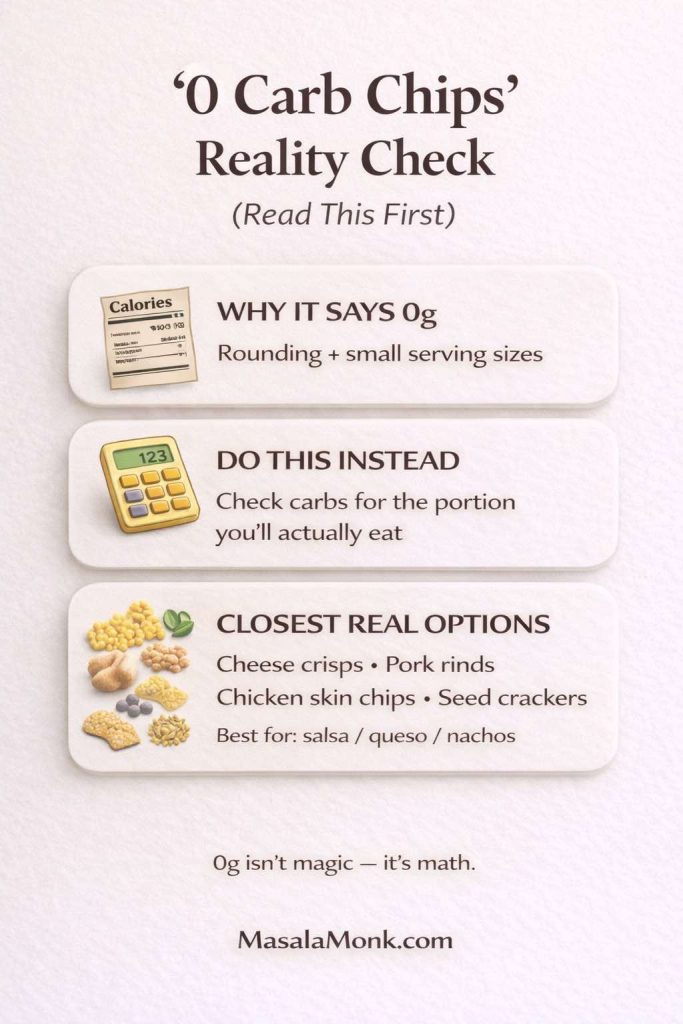
Zero-carb chip reality check explaining serving size and near-zero-carb cheese, pork-skin, and meat-based options.
A 0g-carb label is still tied to a stated serving. Near-zero-carb chip substitutes are usually cheese-, pork-skin-, chicken-skin-, or meat-based.

Pork rinds: strongest with thick dips

Pork rinds are naturally scoopable because of their curled, airy structure. They work particularly well with queso and creamy dips, but watery salsa softens them quickly.

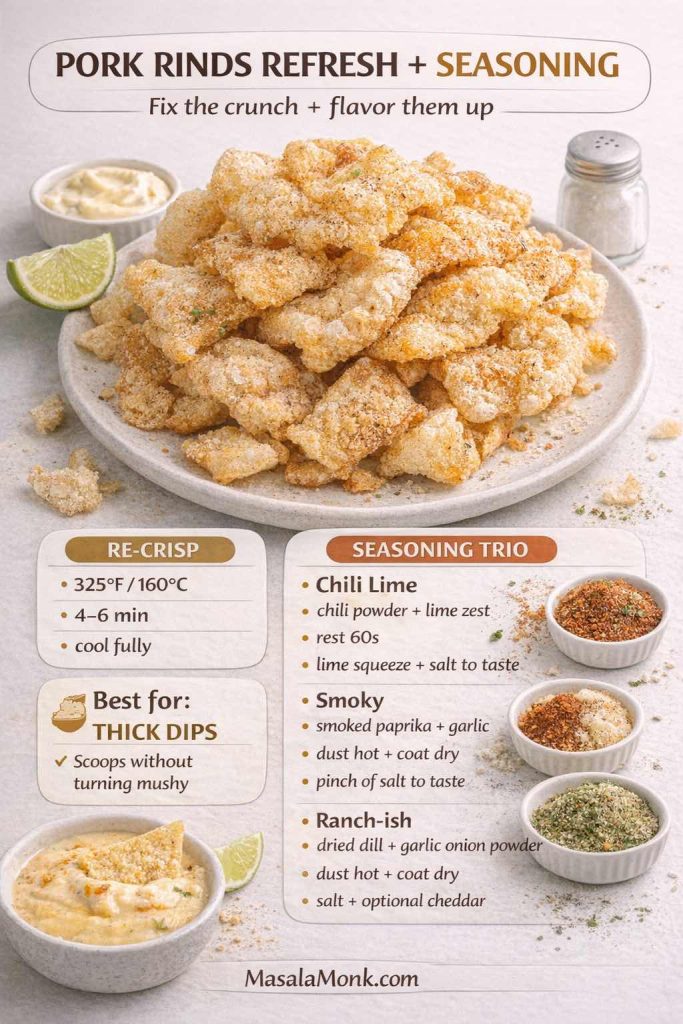
Pork rind refresh method with a short oven re-crisp and seasoning ideas for thick dips.
A short oven re-crisp can restore a bag that has gone a little soft; season the warm rinds after heating, then cool before serving.

If an open bag has merely lost its snap, warm the rinds at about 160°C / 325°F for 4–6 minutes, then cool. That can refresh texture; it cannot fix stale or rancid flavor. Season after warming with chili-lime, smoked paprika and garlic, or a dill-and-garlic blend.

Chicken skin chips

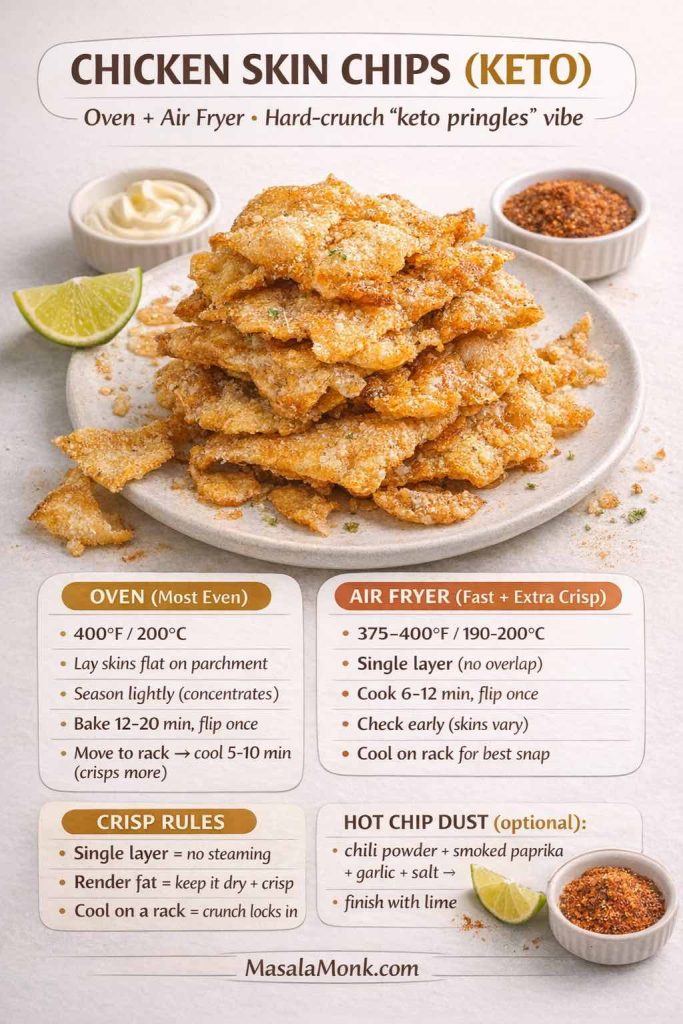
Chicken skin chips with oven and air-fryer methods for a crisp low-carb snack.
Chicken skin crisps best in a single layer so rendered fat can escape instead of steaming the pieces.

Lay chicken skins flat in a single layer, season lightly, and bake around 200°C / 400°F until deeply crisp, flipping once; an air fryer around 190–200°C / 375–400°F can work for smaller batches. Because this starts with raw poultry, use a food thermometer and make sure the pieces reach 74°C / 165°F before serving. USDA identifies 165°F as the safe minimum internal temperature for poultry.

The texture continues to firm as rendered fat drains and the skins cool. If the pieces are crowded, they steam; if they are heavily seasoned before cooking, the seasoning can become harsh as the skins shrink.

Jerky-style meat crisps: safety comes before extra crunch

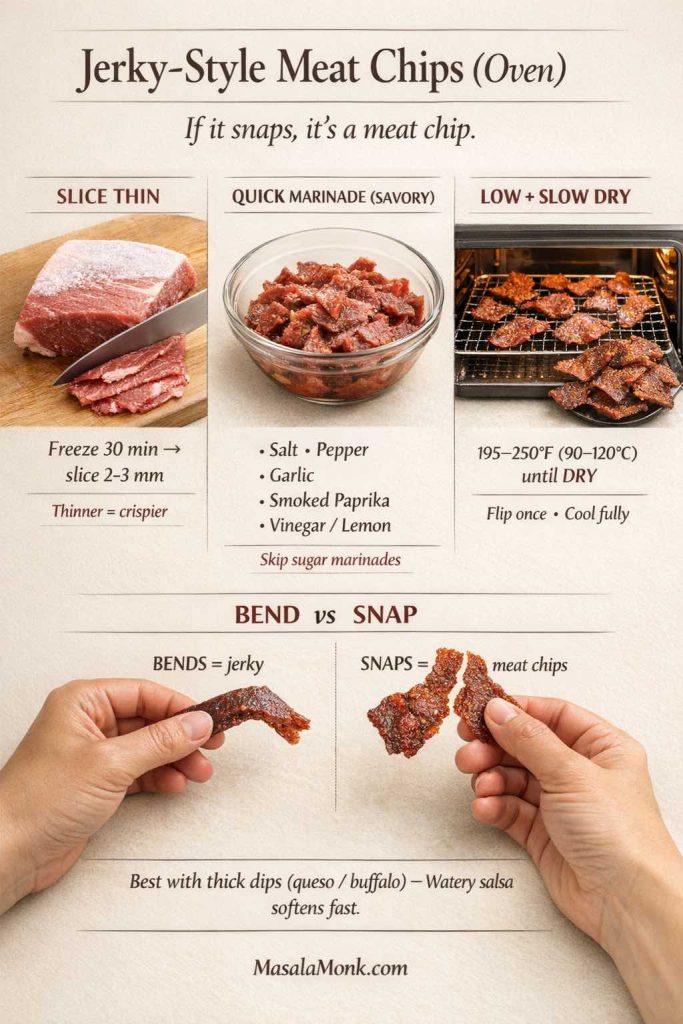
Jerky-style meat crisps with a bend-versus-crisp texture check and food-safety reminder.
For homemade meat crisps, use a safe jerky process first; low-temperature drying raw meat from the start is not enough to control food-safety risk.

Do not simply put raw beef into a very low oven and wait for it to dry. USDA’s current home-jerky guidance recommends heating meat to 71°C / 160°F (and poultry to 74°C / 165°F) before dehydrating, because low-temperature drying alone may not destroy pathogens. See USDA’s home jerky guidance for the full process.

If you want a crisper, chip-adjacent texture after that safe heating step, continue drying in a dehydrator or controlled low oven until the strips are drier than ordinary jerky, watching closely near the end. Treat the graphic as a texture idea, not as a shortcut around the safe heat step.

Keto Veggie Chips: Lighter Crunch, Different Job

Veggie chips are useful when cheese- and meat-based snacks feel too rich, but they should be judged on their own terms. Their enemy is water, and the fix is almost always more drying rather than more oil.

Kale chips

Kale chips showing thorough drying, light oiling, single-layer baking, and cooling.
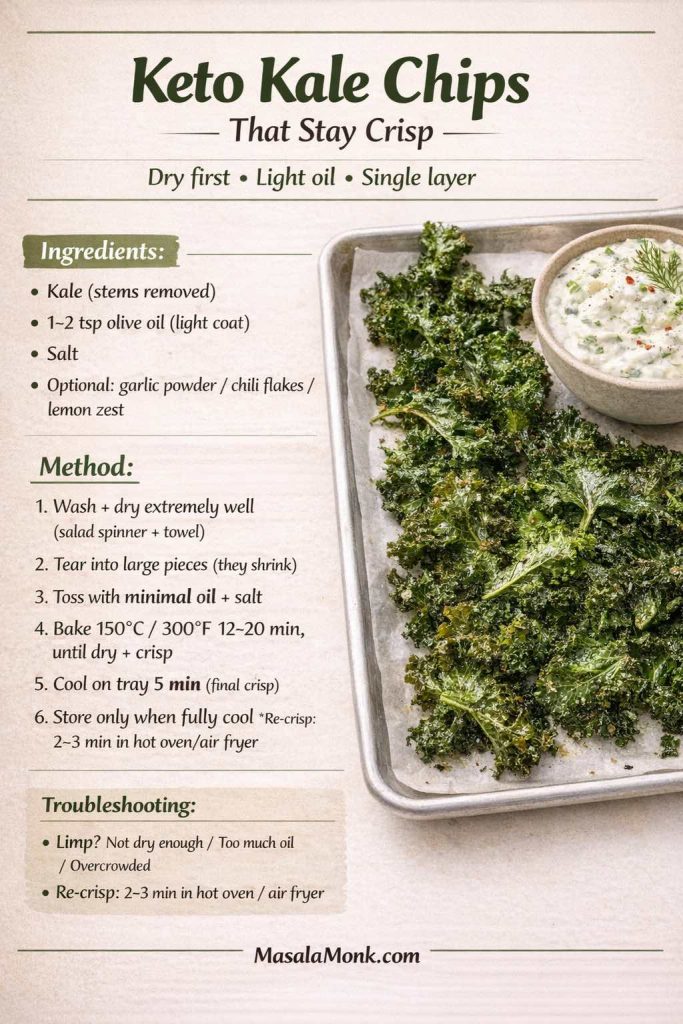
Dry kale thoroughly, use only a light coating of oil, bake in one layer, and let the leaves cool before storing.

Remove thick stems, wash, and dry the leaves thoroughly. Massage with just enough oil to barely coat the surface, then bake around 150°C / 300°F until the leaves feel papery and crisp. If the kale is darkening while still leathery, the leaves were probably wet or over-oiled.

Zucchini, radish, and similar watery vegetables

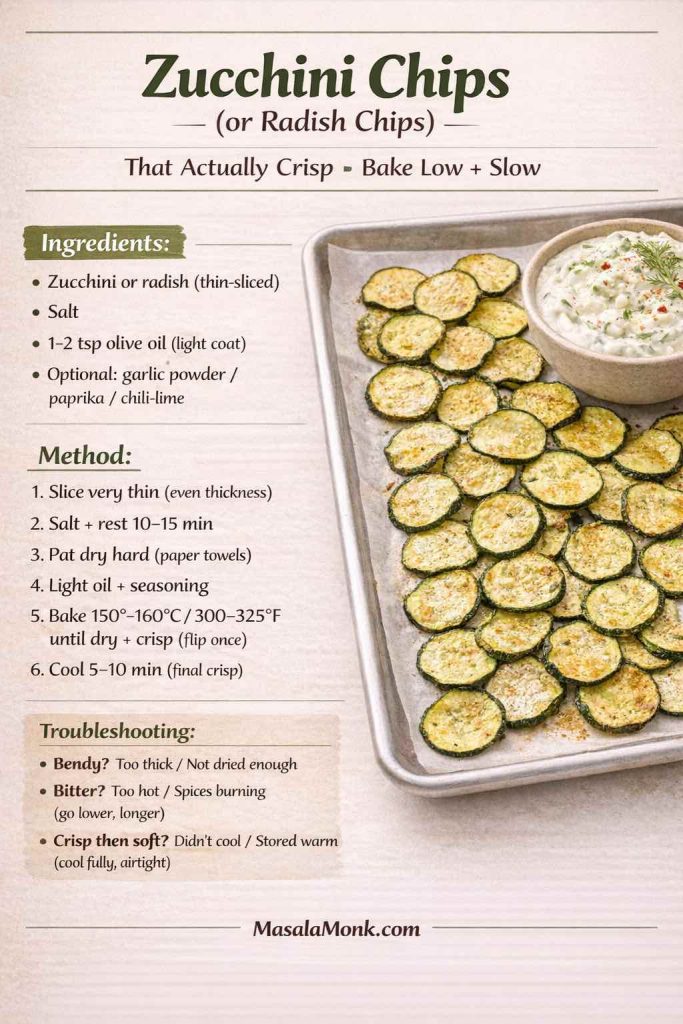
Zucchini chips sliced thin, salted, dried, and baked low and slow until crisp.
Thin zucchini slices are salted, rested, blotted very dry, then baked at low heat until the centers lose their moisture.

Slice as evenly and thinly as you can, salt lightly, rest, and blot away the moisture that beads on the surface. Bake around 150–160°C / 300–325°F until dry, then let the slices cool for 5–10 minutes. If they are browned at the rim but still translucent and flexible in the center, they need more drying time. These are better with a thick creamy dip than with a very wet salsa.

Keto Hot Chips & Doritos-Style Seasoning

Sometimes the craving is not for a particular chip at all; it is for salt, acid, chili and that powdery seasoning that sticks to your fingers. In that case, changing the seasoning is far easier than chasing a perfect commercial imitation.

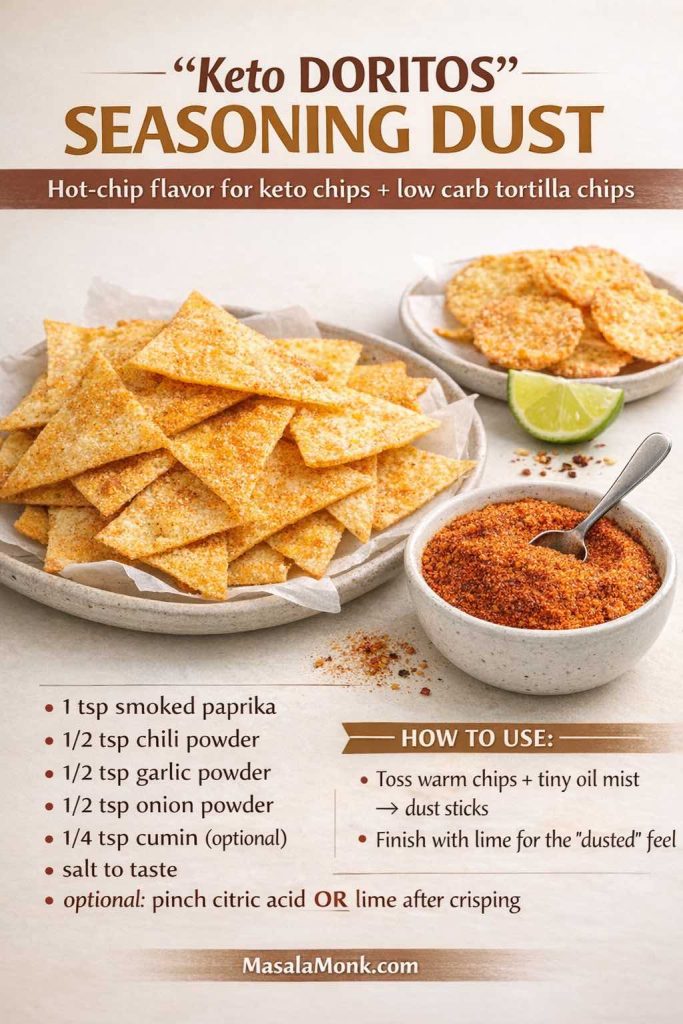
Spicy Doritos-style seasoning blend for keto tortilla chips, cheese crisps, or pork rinds.
Use a neutral crisp base, season while it is still warm, then finish with lime. Tortilla chips, cheese crisps and pork rinds all take this kind of seasoning well.

A useful starting mix is chili powder, smoked paprika, garlic powder and salt. Toss it with warm chips so the dust adheres, then add lime just before eating. Keep the lime out of storage containers; acid and moisture are best added at the last moment.


Best Keto Chips for Salsa, Dips & Nachos

This is where chip choice matters most. Salsa tests dryness, queso tests strength, and nachos test whether the base can survive heat plus toppings without turning into a soft layer underneath everything else.

For salsa: choose dry first, thin second

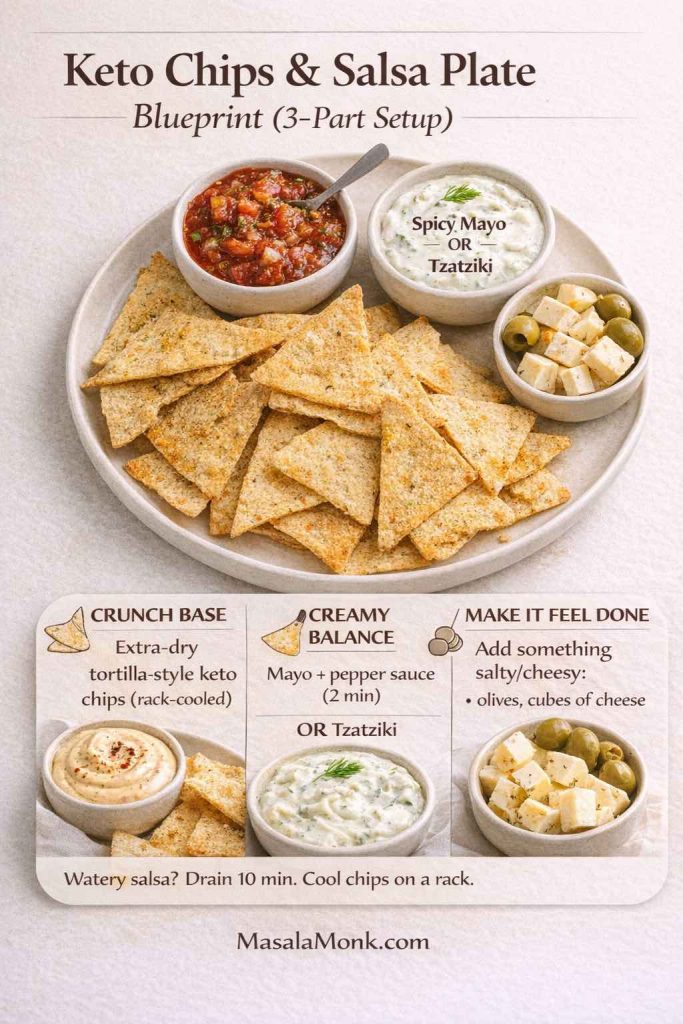
For keto chips and salsa, a thin tortilla-style chip feels the most familiar, but only if it is dry enough. If it bends before it snaps, the salsa will soften it almost immediately. Seed crackers are the sturdier fallback when the salsa is especially juicy.

Keto chips and salsa plate with a crisp base, creamy element, and salty or briny extra.
A satisfying salsa plate does not need ten components: one crisp base, one cooling/creamy element and one salty or briny extra are enough.

If you want a ready-made salsa path, pair this section with MasalaMonk’s salsa verde recipe. For a creamy contrast, fresh guacamole gives tortilla-style chips more body without turning the whole plate into queso.

For thick dips: strength beats resemblance

For keto chips for dipping, cheese crackers, seed crackers and pork rinds are often better here than delicate tortilla chips. If the dip is hot and dense, you need a chip that can carry weight without folding or dissolving.

For a full party dip rather than another mini-recipe inside this article, use Buffalo Chicken Dip or Spinach Dip and pick one of the sturdier bases above.

For nachos: start with the base, then control moisture

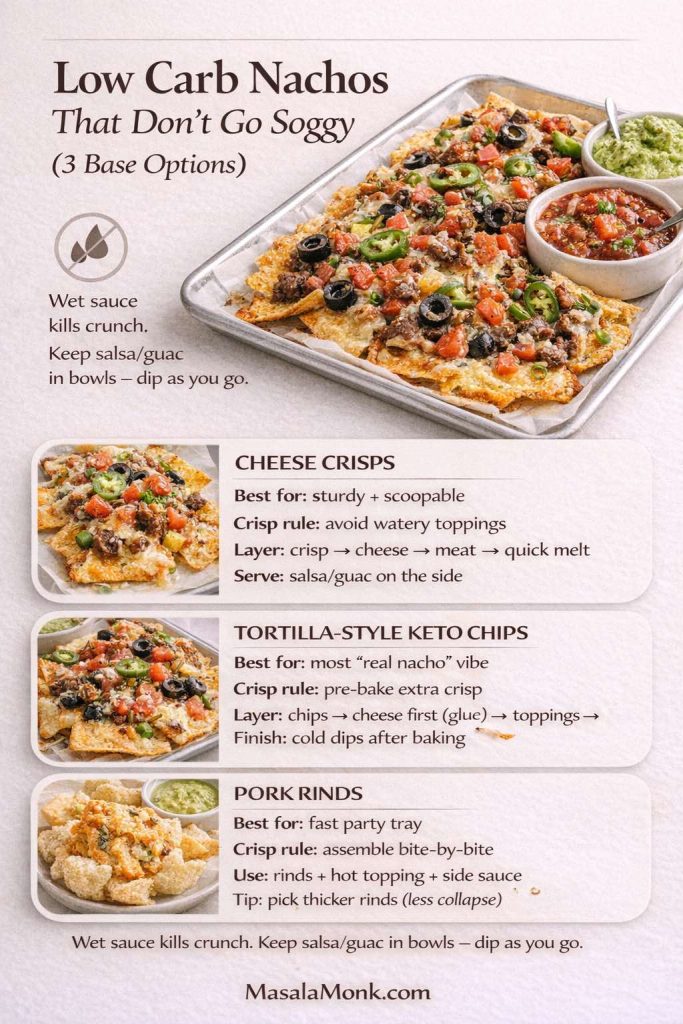
Three low-carb nacho bases: tortilla-style chips, cheese crisps, and pork rinds.
Three workable nacho bases: tortilla-style chips for the classic feel, cheese crisps for strength, and pork rinds for a quick low-carb tray.

For low carb nacho chips, tortilla-style chips give the most familiar result. Cheese crisps are sturdier but richer. Pork rinds can work for a fast tray, especially if the wet components stay on the side.

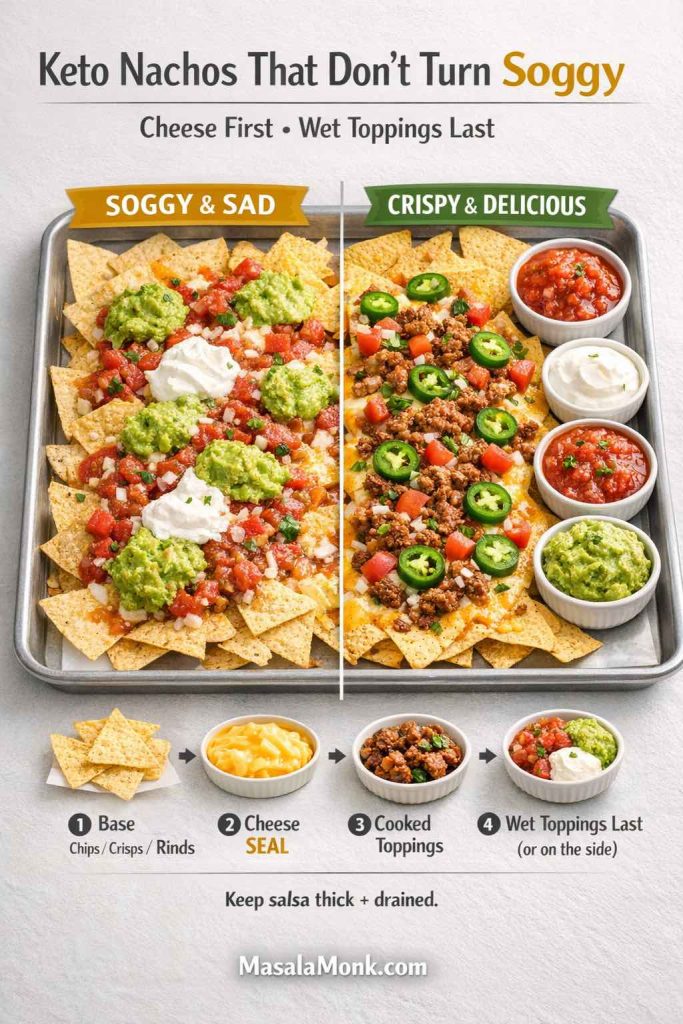
Low-carb nacho layering guide: cheese first, cooked toppings next, wet toppings last.
The order matters: dry base first, cheese next, cooked toppings after that, and salsa, guacamole or sour cream only at the end or on the side.
  1. Spread the chip base in a single layer rather than building a deep pile.
  2. Add shredded cheese first so it melts directly onto the chips.
  3. Add cooked, relatively dry toppings such as meat, peppers or olives.
  4. Bake just long enough to melt the cheese.
  5. Add salsa, guacamole and sour cream after baking—or serve them beside the tray.

If you want a dedicated cheese sauce instead of shredded cheese, the MasalaMonk cheese sauce recipe is a better next stop than duplicating a full sauce guide here.


Dips That Actually Work With Keto Chips

The easiest way to make a chip substitute feel disappointing is to pair it with a dip that is too thin for the base. Match the texture: dense queso needs a stronger scoop, while tortilla-style chips reward a salsa with less free liquid.

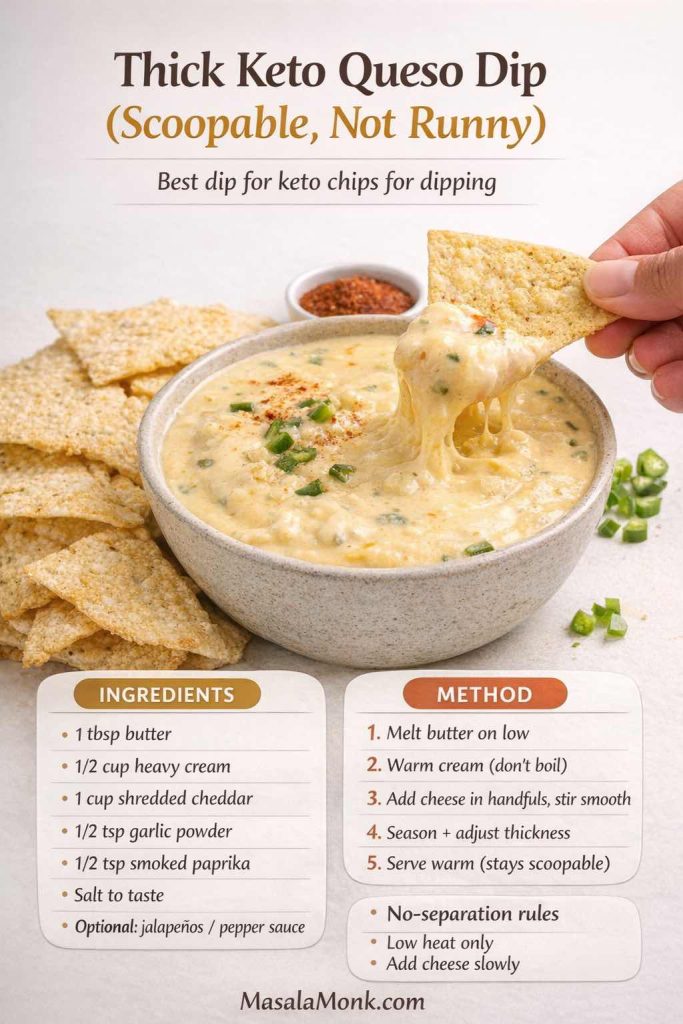
Thick queso

  • 1 tbsp butter
  • ½ cup heavy cream (or full-fat milk if that suits you)
  • 1 cup shredded cheddar or cheddar-parmesan mix
  • ½ tsp garlic powder
  • ½ tsp smoked paprika
  • Salt to taste
  • Jalapeño, green chilies, or pepper sauce, optional
Thick queso dip made over low heat so it stays smooth and scoopable.
Keep queso over low heat and add the cheese gradually. A smooth, thick dip comes from gentle heat rather than boiling.

Melt the butter over low heat, warm the cream without boiling, then add cheese in small handfuls and stir until each addition melts. The finished queso should fall slowly from a spoon rather than pour like a thin sauce. If it becomes grainy or oily, the heat was probably too high.

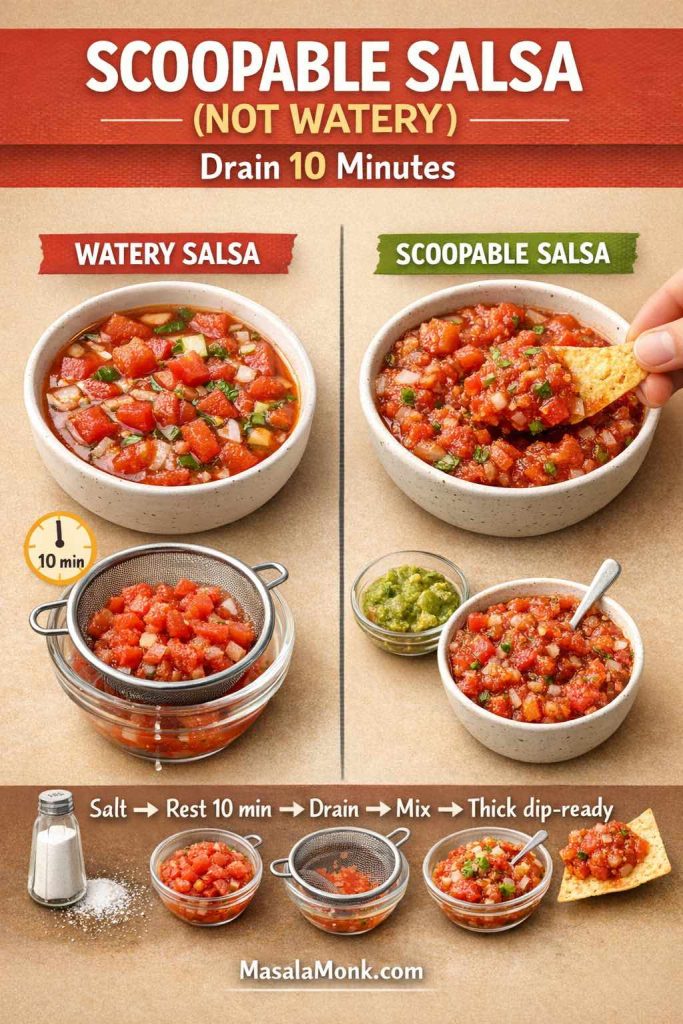
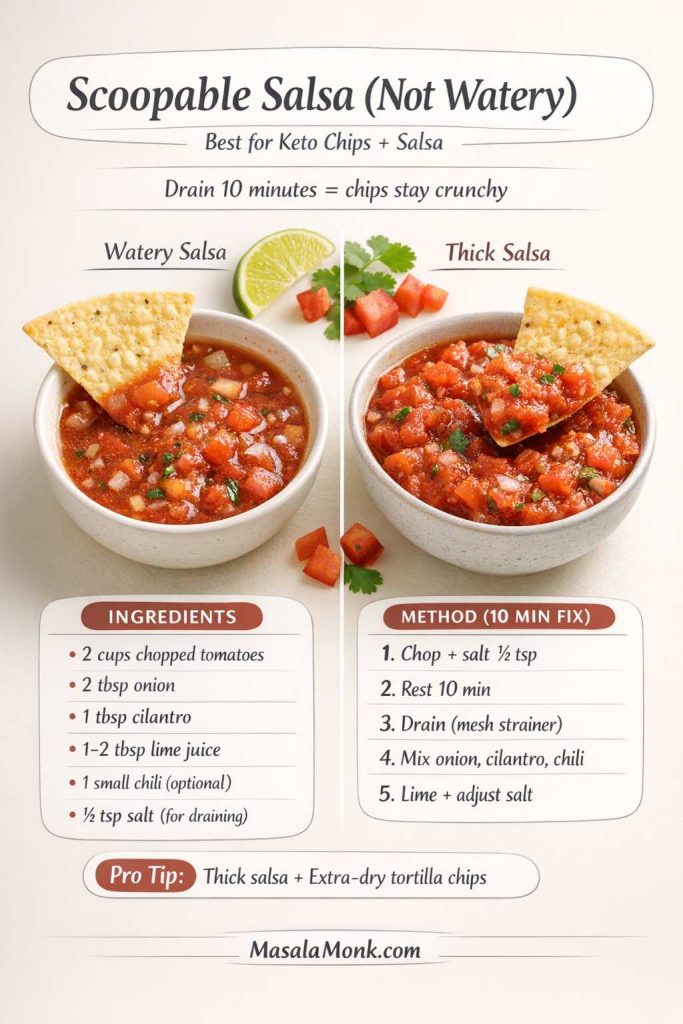
Scoopable salsa

Scoopable salsa made by salting and draining chopped tomatoes before mixing.
For a thicker salsa, salt chopped tomatoes first and drain the liquid they release before adding onion, cilantro, chili, and lime.

Chop the tomatoes, salt lightly, and leave them for 10 minutes. If liquid has pooled underneath, drain it before adding onion, cilantro, chili, lime, and the final seasoning. The goal is not a dry salsa; it is a salsa that clings to a chip instead of immediately running off it.

Ten-minute tomato-draining method for thicker salsa that keeps low-carb chips crisp longer.
The 10-minute drain is the practical checkpoint: visible tomato liquid leaves the bowl before the final salsa is mixed.

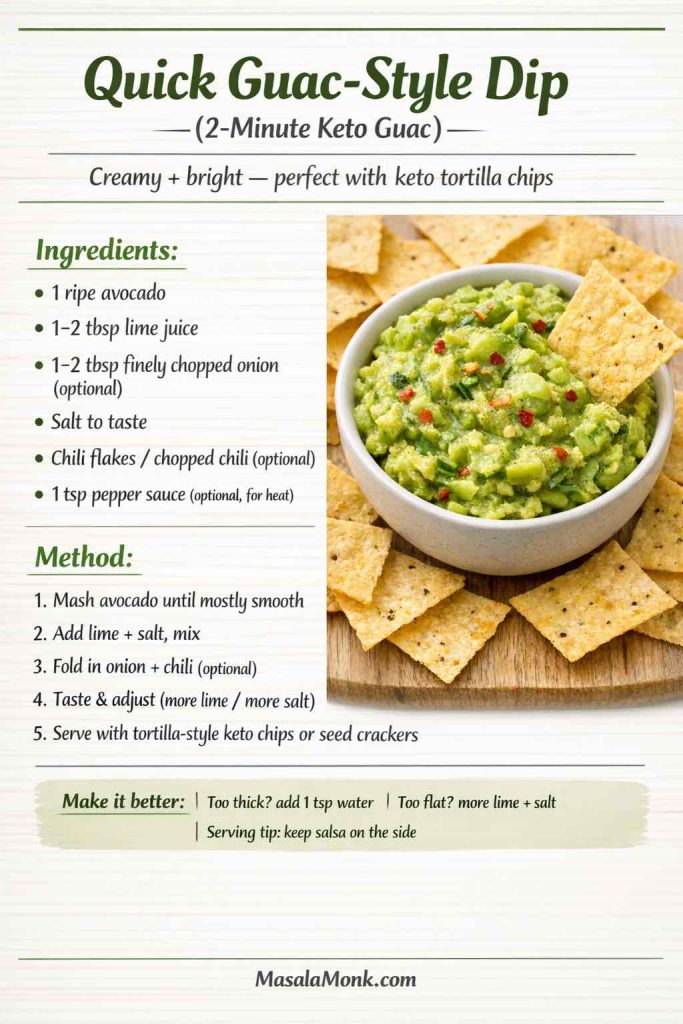
Quick guacamole

Quick guacamole-style dip made with avocado, lime, salt, onion, and chili.
For a fast guacamole-style dip, mash ripe avocado with lime and salt, then add onion or chili for texture and heat.

A basic version needs only ripe avocado, lime, and salt. Add onion, chili, or cilantro if you want more contrast. For a fuller treatment, move to the complete MasalaMonk guacamole recipe rather than duplicating it here.

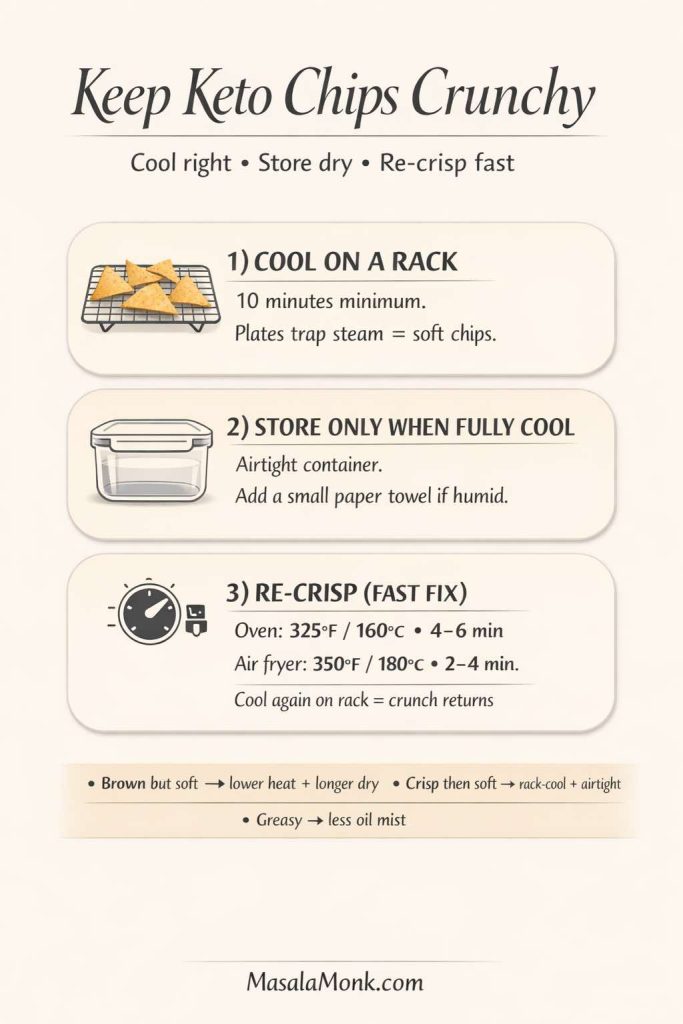
How to Keep Keto Chips Crispy

Most homemade chip failures come down to moisture, uneven thickness, too much oil, or trapped steam while cooling. Diagnose the texture before changing the whole recipe.

Keto chip crunch guide covering rack cooling, dry storage, and quick oven or air-fryer re-crisping.
Cool first and store second. A rack lets steam escape; sealing warm chips traps the moisture that softens them.
What happenedWhat it means + what to change
Brown outside, soft in the centerThe surface cooked before the center dried. Lower the heat slightly, make the pieces thinner or more even, and extend drying time.
Crisp when hot, soft after coolingSteam was trapped or the center still held moisture. Cool on a rack and do not seal until completely cool.
Crisp at first, soft the next dayHumidity or storage moisture got back in. Re-crisp briefly, cool again, then return to an airtight container.
Greasy instead of crispToo much oil is slowing moisture loss. Use a mist or very light coating rather than brushing heavily.
Edges crisp, centers chewyThe pieces are too thick or too large. Roll or slice thinner, cut smaller, or extend the low-heat drying phase.
The visible failure tells you which variable to change; more heat is not always the answer.

For many tortilla chips and crackers, a short re-crisp at about 160°C / 325°F for 4–6 minutes works well. An air fryer around 180°C / 350°F for 2–4 minutes can be faster. Cool again before serving or storing.

Keto Snack Boxes, Boards & Make-Ahead Rotation

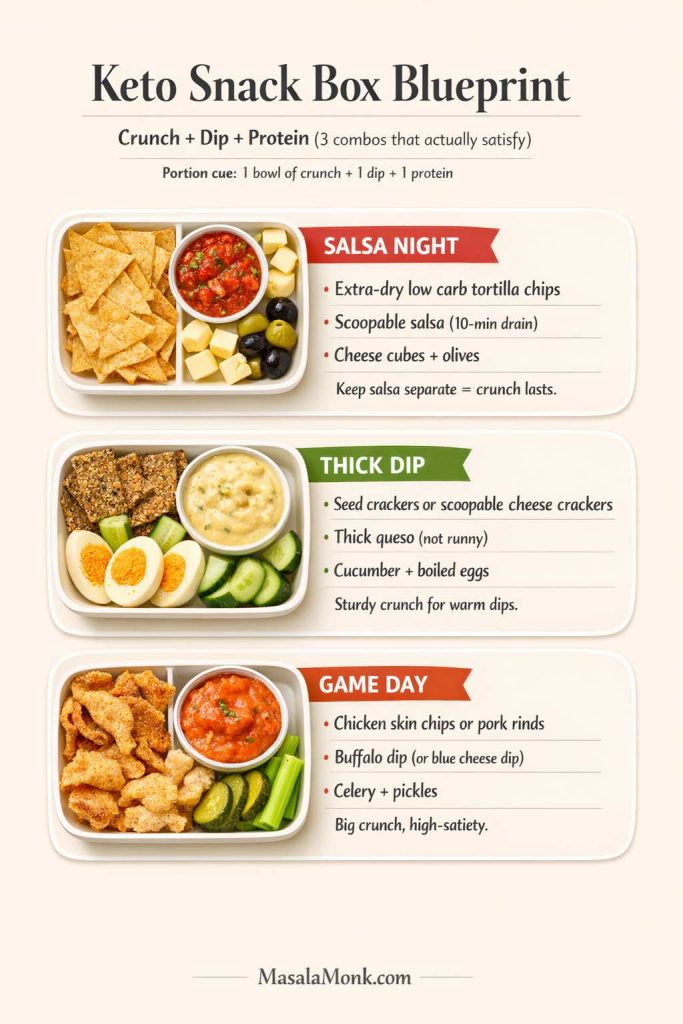
Chips are easiest to overeat when they are the entire snack. A better setup gives the crunch a job inside a small plate: something crisp, something creamy, a protein element and one bright or briny bite.

Keto snack box blueprint combining low-carb chips, dip, protein, and a fresh or briny element.
Build a snack box around contrast: crunch + dip + protein, then add something sharp such as pickles, olives or fresh vegetables.
SituationBuild it
Salsa nightTortilla-style chips + salsa + guacamole + olives
Thick-dip snackCheese or seed crackers + buffalo/spinach dip + cucumber
Road tripSeed crackers + cheese + nuts + pickles
Game dayCheese crisps or pork rinds + warm dip + jalapeños + crunchy vegetables
A snack plate feels more complete when the chips are one component instead of the entire meal.

For a larger mixed table, the charcuterie board guide is the natural next step. If you are comparing broader low carb snacks rather than chips specifically, use the keto-friendly snacks guide.

This rotation also prevents one substitute from becoming exhausting. You do not need every option in this article in your kitchen at once.

Three-chip keto rotation using tortilla-style chips, cheese crisps, and seed crackers for different snack jobs.
A practical three-crunch rotation: tortilla-style chips for salsa, cheese crisps or pork rinds for thick dips, and seed crackers for everyday snack plates.

A Short Health Note

Keto-compatible does not automatically mean nutritionally superior. Many packaged or cheese/meat-based snack options can be high in sodium or saturated fat, while very high-fiber products can feel quite different from ordinary chips. Variety and portion size still matter. For broader context, Harvard’s overview of ketogenic diets discusses both potential uses and limitations.

That is another reason this guide treats cheese crisps, seed crackers, tortilla chips and veggie chips as different tools rather than one universal answer.


Keto Chips FAQ

Are there truly zero-carb chips?

Some cheese-, pork-skin- or meat-based snacks can be extremely low in carbohydrate, and some labels may show 0g per serving. Still, the stated serving and the actual amount you eat matter. Read the label rather than treating “zero carb” as a separate food category.

Can I turn regular low-carb tortillas into chips?

Yes. Cut them into triangles, use very little oil, bake or air fry in one layer, and give them enough time to dry. Different wraps behave differently, so the first batch is partly a texture test.

Why do homemade tortilla chips soften after cooling?

Usually because steam was trapped underneath or because the center never fully dried. Cool on a rack and avoid sealing chips while they are even slightly warm.

Which keto chips work best with salsa?

Extra-dry tortilla-style chips are the closest to the classic experience. Seed crackers are a sturdier fallback. The wetter the salsa, the more rigid the chip needs to be.

Which base works best for keto nachos?

Tortilla-style chips give the most familiar result, cheese crisps give more strength, and pork rinds are useful for a fast tray. Whichever base you choose, keep salsa, guacamole and sour cream until the end.

Are protein chips automatically keto-friendly?

No. Protein and carbohydrate are separate numbers. Check the serving size, total carbohydrate, fiber and sweeteners just as you would for any other packaged chip.

How long do homemade keto chips stay crisp?

That depends heavily on the base and humidity. Store only fully cooled chips in an airtight container. If tortilla chips or crackers soften, a short oven or air-fryer re-crisp often restores them.

Can I make keto chips ahead for a party?

Yes, but choose the stable types. Seed crackers and well-dried tortilla chips are easier to make ahead than delicate veggie chips. Keep wet dips and toppings separate until serving.


The easiest way to make low-carb chips satisfying is to stop asking one chip to do everything. Keep the tortilla-style crunch for salsa and nachos, reach for cheese or pork rinds when the dip is heavy, use seed crackers when you want something steadier, and fix moisture before blaming the recipe. Once the texture matches the job, the whole category becomes much less about compromise.

Posted on — Leave a comment

How to make Chips at home? 5 Fruits and Vegetables that can be made into Chips at home

FRUIT & VEGETABLE CHIPS

Crispy, healthy, and surprisingly easy—homemade fruit and veggie chips are the snack everyone deserves to master. Whether you want to transform a bumper crop, reduce food waste, or just love snacking smart, this guide dives deep into everything you need to know to make delicious chips right in your kitchen.


Why Make Chips at Home?

Forget expensive store-bought bags with mystery ingredients. Homemade chips let you:

  • Control the oil, salt, and seasoning
  • Use any produce—from classic potatoes to leafy greens or even green bananas
  • Skip additives and preservatives
  • Customize flavors exactly how you like them

Plus, it’s a fun and creative way to get more fruits and veggies in your diet!


Getting Started: What You’ll Need

  • Sharp knife or mandoline slicer (for uniform, thin slices—this is non-negotiable for great chips)
  • Baking sheets or dehydrator trays
  • Parchment paper or silicone baking mats
  • Salad spinner or clean towels (for drying slices)
  • Large mixing bowl
  • Air fryer or deep fryer (optional, but helpful for certain veggies)

Pro Tip: A mandoline slicer makes the biggest difference—uneven slices = uneven chips.


Core Method: The Science of Perfect Chips

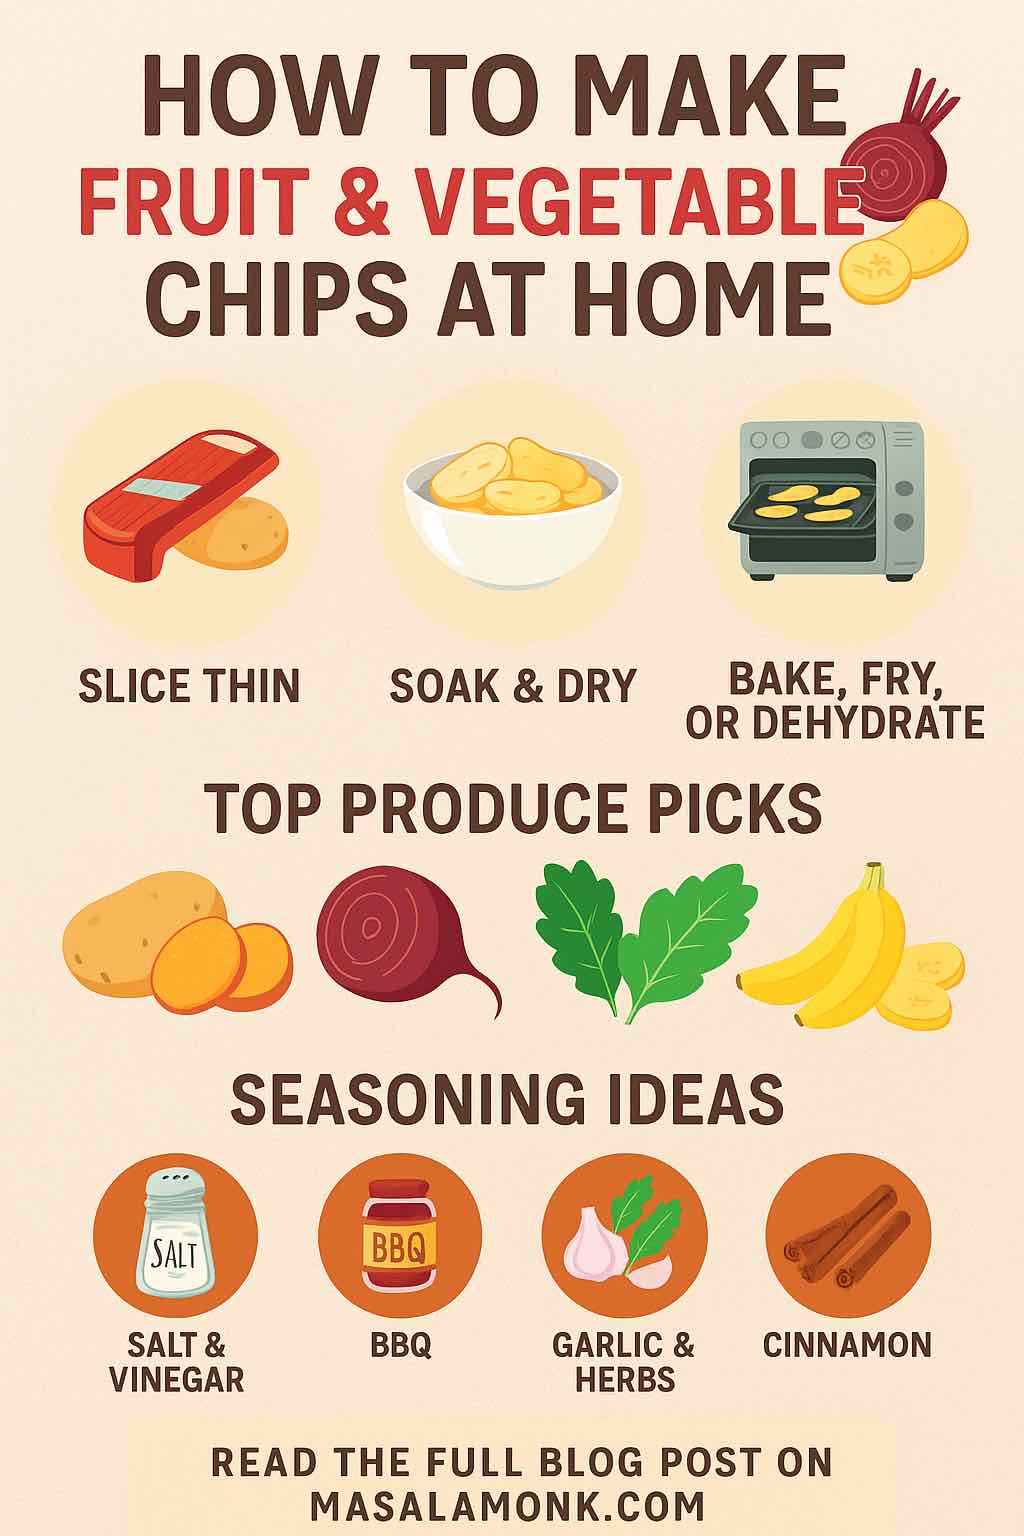
1. Slice Thin and Even

  • Aim for 1–2 mm thickness. Too thick? They’ll be chewy. Too thin? They might burn.
  • Mandoline slicers are best, but a sharp chef’s knife works with patience.

2. Soak and Dry

  • Starchy veggies (potato, sweet potato, beet): Soak in cold water 15–30 minutes to remove surface starch. This gives you crispier chips and reduces browning.
  • All chips: Pat slices completely dry—moisture is the enemy of crisp!

3. Season Creatively

  • Basic: Olive oil, salt, pepper.
  • Advanced: Smoked paprika, za’atar, garlic powder, cinnamon, nutritional yeast, chili powder, ranch mix.
  • Leafy greens: Add nutritional yeast for a cheesy crunch, or lemon zest for zing.

4. Choose Your Cooking Method

A. Oven-Baked

  • Preheat to 150–180 °C (300–350 °F).
  • Lay slices in a single layer on parchment. Don’t overlap!
  • Brush or spray with oil. Sprinkle seasoning.
  • Bake 15–30 min, flipping halfway. Check often in final 5 minutes!
  • Remove golden chips, return undercooked ones for a few extra minutes.

B. Air Fryer

  • Preheat to 160–180 °C (320–350 °F).
  • Arrange slices in a single layer.
  • Air-fry for 8–18 min, shaking the basket halfway.

C. Dehydrator

  • Set to 55–65 °C (130–150 °F).
  • Dry for 8–16 hours (depends on slice thickness and water content).
  • No oil needed—just patience!

D. Deep Frying (Occasional Treat)

  • Oil to 150–170 °C (300–340 °F).
  • Fry in batches, stirring so they don’t stick.
  • Drain on paper towels; season while hot.

5 Fruits & Vegetables That Make Awesome Chips

1. Potato & Sweet Potato

  • Prep: Peel (optional), slice thin, soak, dry.
  • Flavor: Classic (salt), BBQ, salt & vinegar, cinnamon-sugar (sweet potato).
  • Best method: Oven, air fryer, or deep fryer.

2. Beetroot

  • Prep: Peel, slice very thin, soak briefly.
  • Flavor: Sea salt, black pepper, or balsamic vinegar powder.
  • Best method: Oven for earthy sweetness and crispness.

3. Kale (or Spinach, Cabbage)

  • Prep: Tear into chip-size pieces, remove stems, wash and dry very thoroughly.
  • Flavor: Olive oil + nutritional yeast, or sesame oil + chili flakes.
  • Best method: Oven-baked at a low temp (150 °C/300 °F) for 10–15 min.

4. Zucchini/Carrot/Parsnip

  • Prep: Slice lengthwise or into coins, pat dry.
  • Flavor: Garlic powder, Italian herbs, or just salt.
  • Best method: Oven or dehydrator.

5. Banana/Plantain

  • Prep: Peel, slice diagonally, brush with lemon juice to prevent browning.
  • Flavor: Salt for savory (green banana), cinnamon for sweet (ripe banana).
  • Best method: Dehydrator or oven at low temp.

User Experiences: The Honest Truth

What Home Cooks Love:

  • “Mandoline slicing is key! Without it, I always get some soggy chips and some burnt.”
  • “Leaving chips in the (turned-off) oven for an hour after baking really crisps them up.”
  • “Green bananas make the crunchiest chips—ripe ones are just chewy.”

What Can Go Wrong:

  • Kale chips are notorious for being tricky: “They get brittle or burnt if you’re not careful. Low heat and watch closely.”
  • Dehydrators can take a long time (“Overnight at least!”) but reward patience.
  • Batches vary: Even with the same recipe, humidity and slice thickness make a big difference.

Best User Hacks:

  • Toss potato or beet slices in a bit of vinegar before baking for an extra tang and crisp.
  • For root veggies, try brining or lightly fermenting before baking—this boosts crunch and flavor!
  • Use a salad spinner for speedy, effective drying—no more damp chips.

Pro Tips & Troubleshooting

  • Chips aren’t crisp? Let them cool fully—many crisp up as they cool.
  • Still soggy? Return to a low oven (100 °C/210 °F) for 10–15 min, or leave in the warm, off oven to dry further.
  • Uneven browning? Your slices might be uneven or you’ve overcrowded the pan.
  • Too oily? Brush, don’t drizzle. Or skip oil and use a dehydrator.

Safety Note: Acrylamide Awareness

Some veggies (especially potatoes) produce a natural compound called acrylamide at high temperatures, which in large amounts could pose health risks.

  • How to reduce it?
    • Soak starchy veggies before cooking.
    • Bake/air fry at moderate temps.
    • Avoid over-browning.

Creative Seasoning Combos

  • BBQ: Smoked paprika, garlic, onion powder, a touch of brown sugar
  • Mediterranean: Za’atar, lemon zest, sumac
  • Spicy: Cayenne, black pepper, lime juice powder
  • Sweet: Cinnamon, nutmeg, coconut sugar (for apple, banana, or sweet potato chips)

Storage & Shelf Life

  • Store in airtight containers once chips are completely cool.
  • Homemade chips have no preservatives—eat within 1–4 days for peak crispness.
  • If chips lose crunch, re-crisp in a low oven for a few minutes.

Your First Batch: Simple Oven Beet Chips

Ingredients:

  • 2 medium beets
  • 1–2 tsp olive oil
  • Salt and pepper

Method:

  1. Preheat oven to 170 °C (340 °F).
  2. Peel and slice beets as thinly as possible.
  3. Toss with oil, salt, pepper.
  4. Lay out in a single layer on parchment.
  5. Bake 20–30 min, flipping halfway—watch carefully at the end!
  6. Remove crisp chips; let cool to finish crisping.

Final Thoughts: Start Simple, Experiment Often

The joy of homemade chips is in the creativity and discovery. Use what you have, try new flavors, and don’t worry about making them perfect every time. The more you experiment, the better your chips will get—and the more fun you’ll have.

Got your own chip hacks or flavor combos? Share in the comments below!


Happy crunching!


Want more snack ideas or troubleshooting tips? Leave your questions, and let’s make snack-time epic together.

10 FAQs and Answers

1. What’s the best way to get homemade chips super crispy?

Answer:
Slice your produce as thin and even as possible (1–2 mm) with a mandoline. Dry the slices thoroughly after washing or soaking. For oven or air fryer, don’t overcrowd the pan—single layers only. Bake/air fry at moderate heat, and let chips cool completely after cooking; they crisp up more as they cool.


2. My chips always turn out soggy. What am I doing wrong?

Answer:
Sogginess is usually from too much moisture or thick slices. Pat slices very dry before cooking, and make sure you slice thin. Avoid using too much oil—brush or spray lightly. Try leaving the chips in a turned-off oven after baking to help them dry out further.


3. Can I make chips without any oil?

Answer:
Yes! Dehydrators are great for oil-free chips. In the oven or air fryer, you can also skip oil, but chips may not be as golden or flavorful. Watch closely so they don’t burn or dry out too much.


4. What’s the healthiest vegetable for homemade chips?

Answer:
Kale, spinach, beets, and carrots are popular for their nutrients. Leafy greens are low-calorie and packed with vitamins, while beets and carrots provide fiber and antioxidants. Choose vegetables you enjoy—variety is key to nutrition!


5. How long do homemade chips last, and how do I store them?

Answer:
Let chips cool completely, then store in an airtight container at room temperature. They’re best eaten within 1–4 days. If they lose crunch, crisp them in a low oven (100°C/210°F) for a few minutes.


6. Which fruits work best for fruit chips?

Answer:
Apples, bananas, pears, and mangoes are favorites. Choose firm, not overripe fruit for better crispness. Green bananas or plantains make the crunchiest chips.


7. Can I use a microwave to make chips?

Answer:
Yes, the microwave can make small batches quickly! Lay slices between parchment or on a microwave-safe plate. Cook in 30–60 second bursts, flipping until crisp. Keep a close watch to avoid burning.


8. Why do my kale chips always turn out bitter or burnt?

Answer:
Kale chips burn easily if the oven is too hot or they bake too long. Use lower temperatures (around 150°C/300°F), and check after 10–12 minutes. Remove thinner pieces as they crisp up to avoid burning.


9. Is it possible to make chips from vegetable peels?

Answer:
Absolutely! Potato, carrot, beet, and parsnip peels can be washed, seasoned, and baked for a zero-waste, crunchy snack.


10. Are homemade chips healthier than store-bought?

Answer:
Definitely! You control the oil, salt, and additives. Homemade chips can be baked or air-fried with minimal or no oil, and they’re free of preservatives and artificial flavors found in most packaged chips.