Posted on 1 Comment

Homemade Cheeseburger Macaroni Recipe

Homemade cheeseburger macaroni in a dark skillet with elbow pasta, browned ground beef, glossy cheddar sauce, and a serving spoon.

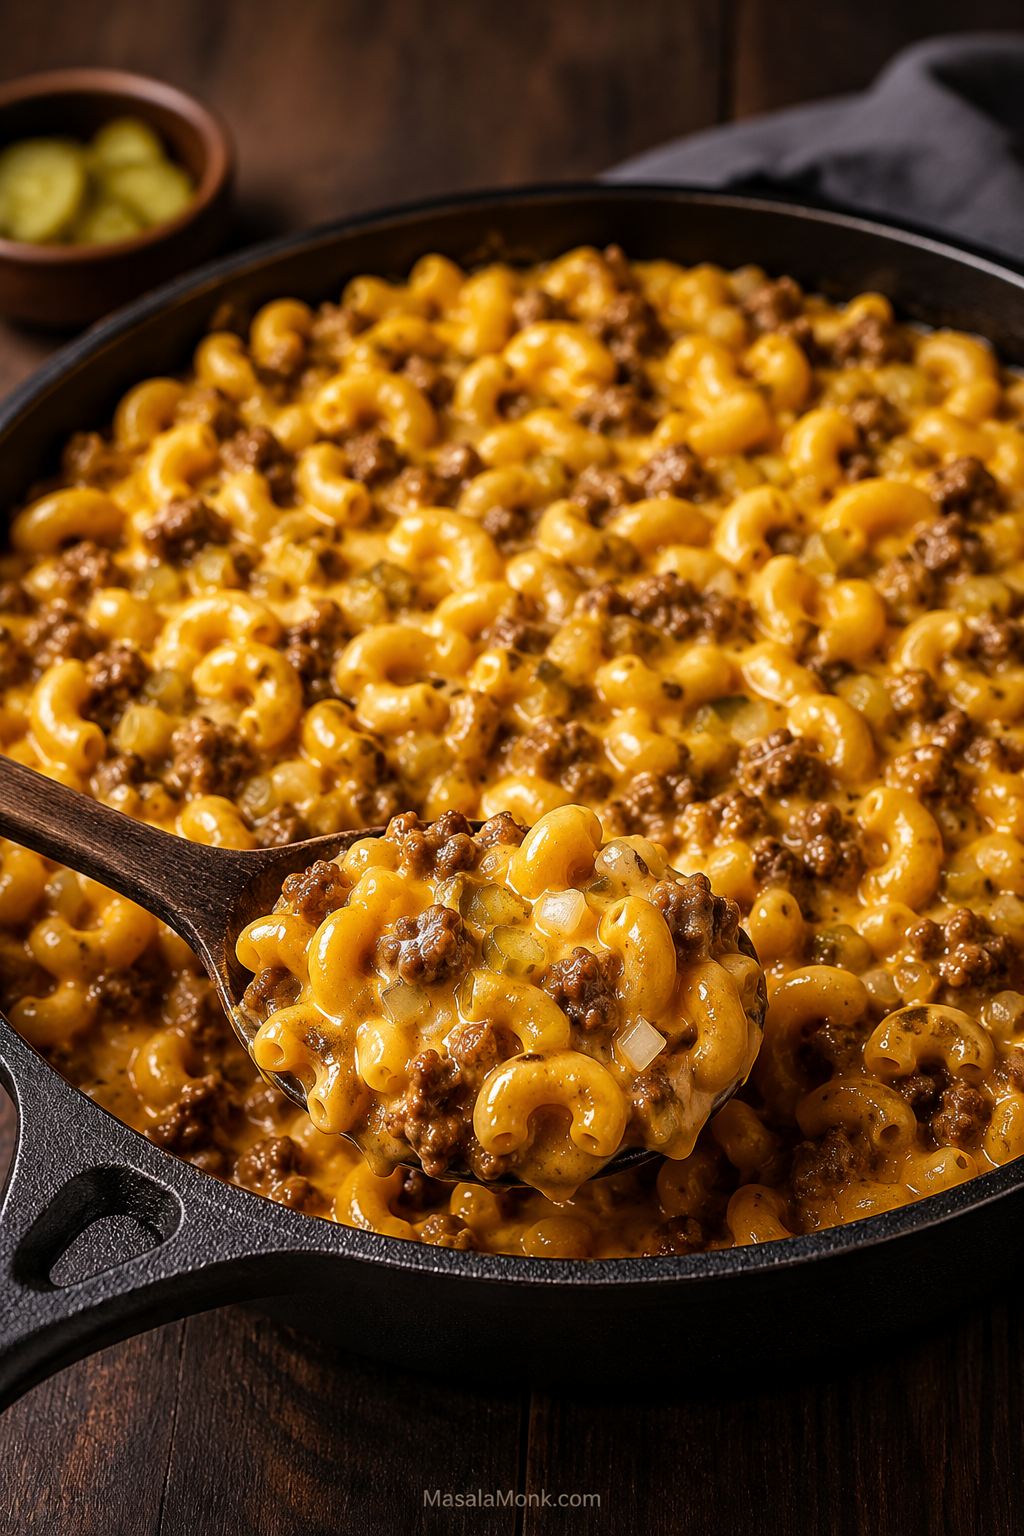
This homemade cheeseburger macaroni recipe is a one-pot stovetop dinner with browned ground beef, tender elbow macaroni, real cheddar, and the tangy-savory flavor of a cheeseburger. It has the comfort of the boxed skillet dinner many of us remember, but the sauce is richer, smoother, and easier to adjust because everything is made from simple pantry ingredients.

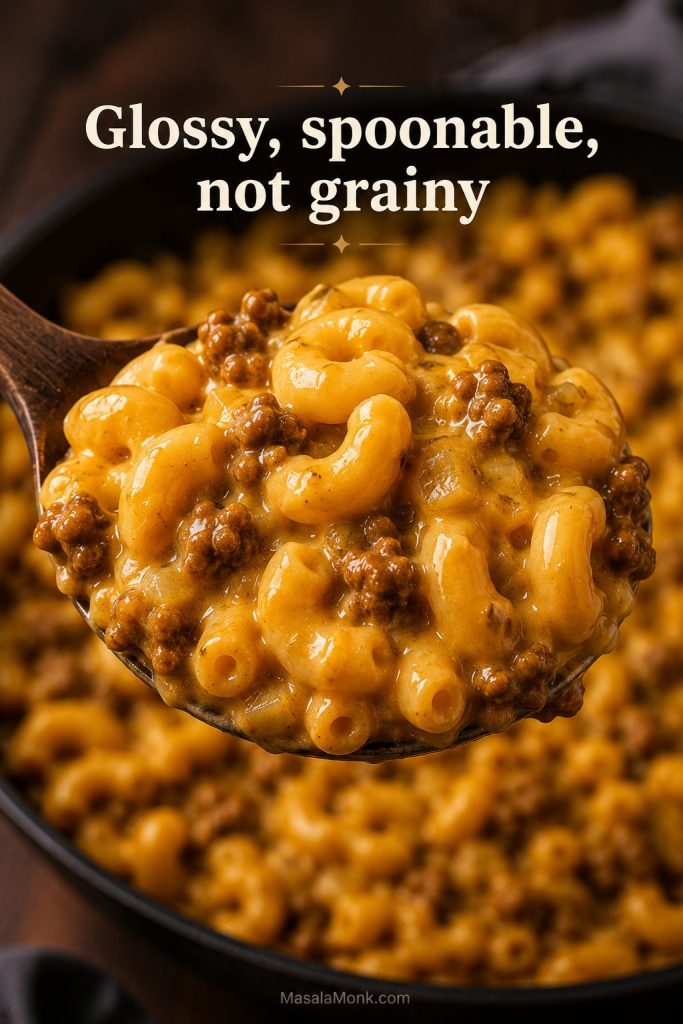
The macaroni cooks directly in beef broth and milk, so the pasta releases starch as it simmers and helps thicken the sauce from inside the pot. Then the cheddar goes in after the heat is off, which keeps the final pot glossy instead of grainy. In about 35 minutes, you get a saucy, spoonable ground beef pasta that tastes like cheeseburger mac and cheese without needing a packet.

This is the kind of dinner to make when you have a pound of ground beef, 8 ounces of pasta, and not much patience left for dinner decisions. It scratches the same nostalgic itch as the boxed version, but tastes fuller and fresher because the sauce is built in the pan instead of poured from a packet.

Quick Answer: How to Make Homemade Cheeseburger Macaroni

To make homemade cheeseburger macaroni, brown ground beef with onion and garlic, then stir in tomato paste, ketchup, mustard, Worcestershire, and seasonings. Add beef broth, milk, and dry elbow macaroni, then simmer until the pasta is tender. Turn off the heat, rest the pot for 2–3 minutes, and stir in freshly shredded cheddar until creamy.

The recipe takes about 30–35 minutes in one deep skillet or Dutch oven. For the smoothest sauce, keep the simmer gentle once the milk goes in, then add the cheese after the heat is off.

It takes a few minutes longer than the fastest boxed-style versions, but those minutes go into browning the beef properly and building a sauce that tastes fuller than a packet.

Spoon lifting creamy cheeseburger macaroni with elbow pasta, ground beef, and smooth cheddar sauce.
Aim for this texture early: glossy cheeseburger macaroni that holds together on the spoon without turning dry, oily, or grainy.

Best First Version

Best first version: Use 85/15 ground beef, elbow macaroni, whole milk, beef broth, sharp cheddar, yellow mustard, and chopped dill pickles at the end. The finished pot should look glossy and spoonable, with sauce clinging to the elbows instead of pooling at the bottom or tightening into a paste.
Ingredients for the best first version of cheeseburger macaroni, including ground beef, elbow pasta, milk, broth, cheddar, mustard, and pickles.
For the most balanced first batch, start with beef, elbows, broth, milk, sharp cheddar, mustard, and pickles so the pot tastes creamy, beefy, and burger-like.

Ready to cook from the exact amounts? Go straight to the homemade cheeseburger macaroni recipe card.

Why You’ll Love This Cheeseburger Macaroni

Depending on where you grew up, you might think of this as cheeseburger pasta, hamburger mac and cheese, cheeseburger mac and cheese, or the from-scratch version of that boxed skillet dinner many people remember. Whatever you call it, the goal is the same: browned ground beef, tender elbows, a cheddar-rich sauce, and enough tomato paste, ketchup, mustard, Worcestershire, and pantry spices to make the whole pot taste like a cheeseburger dinner.

Even better, the pasta cooks directly in the sauce. That means no separate pasta pot, no seasoning packet, and no watery finish. As the macaroni simmers, its starch helps everything thicken; afterward, the cheddar melts in gently so the final pot stays glossy and smooth.

It is also forgiving. When the sauce gets too thick, a splash of milk or broth loosens it. If the pasta needs another minute, add a little more liquid and cover the pot again. For more burger flavor, finish with extra mustard or a handful of chopped pickles at the end.

Most importantly, this is the kind of dinner that works when people are hungry now: familiar enough for kids, flexible enough for adults, and easy to adjust at the end with pickles, hot sauce, extra mustard, or more cheese.

It also has that rare weeknight-dinner quality where nobody needs convincing. The smell of beef, cheddar, onion, and pasta does most of the work before the bowls even hit the table.

What Is Cheeseburger Macaroni?

A good homemade cheeseburger macaroni recipe should feel like a complete stovetop dinner: tender elbows, browned ground beef, cheddar sauce, and the kind of tangy, savory seasoning you expect from a cheeseburger. It is not trying to be fancy, and that is the point. The charm is that it turns a pound of ground beef and a handful of pantry ingredients into a full, comforting meal.

Think of it as a homemade Hamburger Helper-style cheeseburger macaroni: the same cozy beefy-cheesy comfort, but with real cheddar, fresh onion and garlic, and a sauce you can adjust instead of a seasoning packet.

The dish sits somewhere between a skillet pasta and mac and cheese. It should be saucy and cheesy, but it should also taste beefy and slightly tangy, the way a cheeseburger does. That is why this version uses tomato paste for depth, a little ketchup for sweet-tangy flavor, mustard for sharpness, Worcestershire for savory depth, and optional pickles or relish at the end.

Cheeseburger Macaroni vs Cheeseburger Pasta

Cheeseburger macaroni usually means elbow macaroni, ground beef, and a cheddar-based sauce. It is the most classic name for this style of recipe.

Cheeseburger pasta is broader. It can use elbows, shells, rotini, cavatappi, or small penne. The flavor is still cheeseburger-inspired, but the shape can change depending on what you have in the pantry.

Hamburger Mac and Cheese vs Cheeseburger Macaroni

Hamburger mac and cheese usually leans creamier and cheesier, almost like classic mac and cheese with ground beef stirred in. Cheeseburger macaroni leans a little more beefy and seasoned, with a sauce that coats the pasta instead of burying it.

This pot lands in the sweet spot: rich enough for the hamburger mac and cheese crowd, but still burger-flavored enough for anyone craving homemade cheeseburger macaroni. For the more classic pasta-and-cheese version without the burger flavor, this macaroni and cheese recipe covers creamy stovetop, baked, and Southern-style versions in more detail.

Why This Cheeseburger Macaroni Works

The places this dish usually goes wrong are predictable: the pasta absorbs too much liquid, the cheese gets too hot, or the pot tastes creamy but not very burger-like. This method is built around avoiding those problems from the start.

If texture is your main worry, keep the creamy sauce tips and troubleshooting guide close; they cover the most common thick, thin, grainy, and bland-pot problems.

The trick is not complicated, but the order matters. Let the beef brown properly, give the tomato paste and spices a minute in the pan, simmer the macaroni gently, and wait until the heat is off before adding the cheese.

One-Pot Pasta Makes the Sauce Creamier

Instead of boiling the macaroni in a separate pot, the dry pasta simmers directly in beef broth and milk. As it cooks, the pasta releases starch into the liquid. Because of that, the sauce thickens and clings to the elbows without needing a heavy separate cheese sauce.

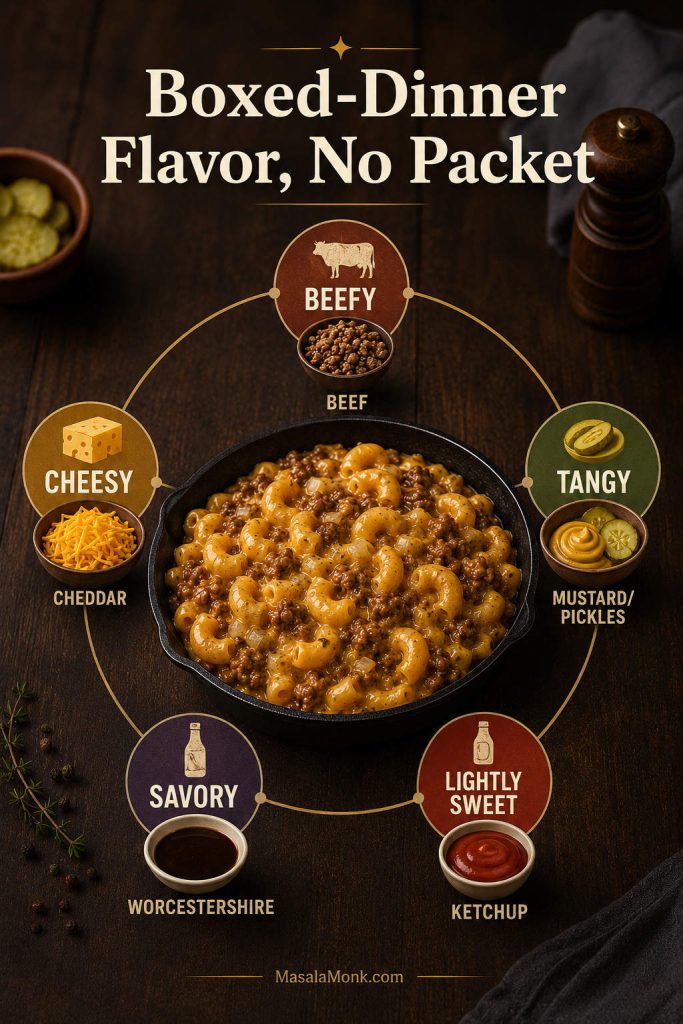
Tomato Paste, Mustard, and Worcestershire Add Cheeseburger Flavor

Plain ground beef and cheddar can taste like beefy mac, but not necessarily like a cheeseburger. Tomato paste gives the sauce a deeper cooked flavor, ketchup adds a little sweet-tangy burger note, mustard sharpens the sauce, and Worcestershire makes the beef taste richer.

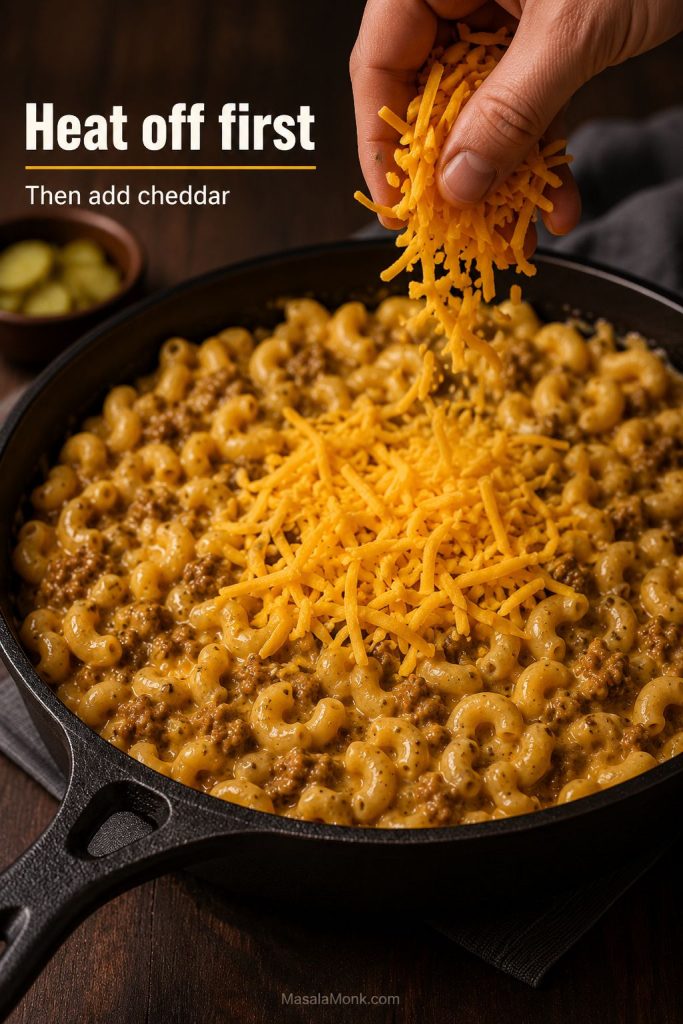
Add the Cheese After the Heat Is Off

Cheddar can turn oily or grainy if it is boiled. That is why the pasta finishes cooking first, rests briefly, and then gets the cheese stirred in after the heat is off. It is a small step, but it makes a big difference in the final texture.

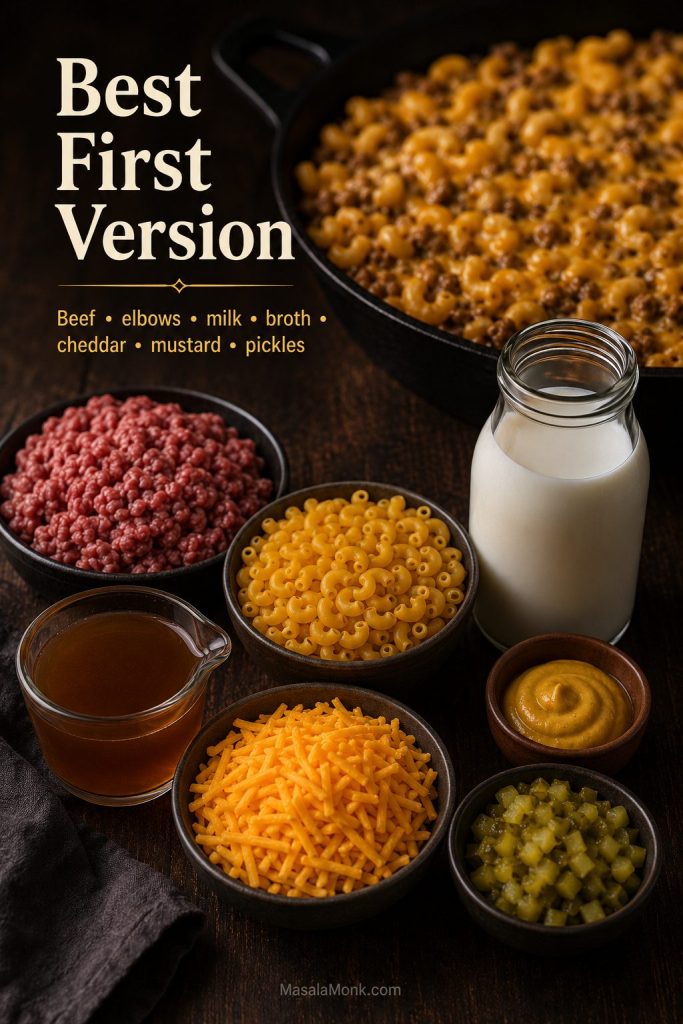
Ingredients for Cheeseburger Macaroni

Nothing here is unusual, which is part of the appeal. This is pantry-and-fridge cooking: ground beef, a small pasta shape, milk, broth, cheddar, and a few sharp, savory extras that make the pot taste more like a cheeseburger than plain beefy pasta.
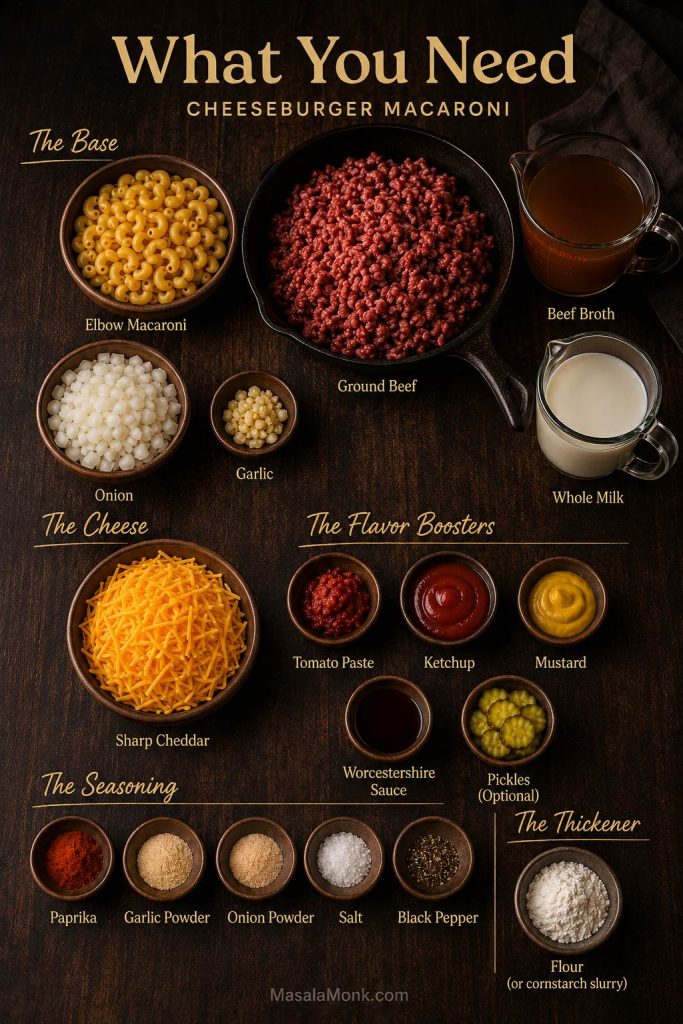
Ingredient guide for cheeseburger macaroni with ground beef, elbow macaroni, broth, milk, cheddar, tomato paste, mustard, Worcestershire, seasonings, and thickener.
Although the ingredient list is simple, tomato paste, mustard, Worcestershire, and a small thickener help the sauce taste deeper and cling better.

Ground Beef

Use 1 pound / 450 g of lean ground beef. An 85/15 or 90/10 blend works well because it has enough flavor without making the finished pasta greasy. If your beef releases a lot of fat, drain the excess before adding the tomato paste and liquids.

If you like to check with a thermometer, ground beef should reach 160°F / 71°C. The USDA’s safe minimum internal temperature chart lists 160°F / 71°C for ground meats.

Elbow Macaroni

Elbow macaroni is the classic shape for homemade cheeseburger macaroni. It cooks quickly, holds sauce well, and gives the dish that familiar skillet-dinner feel. Small shells, rotini, cavatappi, or small penne can also work, but they may need slightly different cooking times and a splash more liquid.

Beef Broth and Milk

The base ratio here is 2 cups / 480 ml beef broth plus 1½ cups / 360 ml whole milk for 8 oz / 225 g dry macaroni. The broth keeps the pasta beefy, while the milk gives the sauce body. That amount gives the macaroni enough liquid to cook through without leaving you with soup at the end.

For the cooking sequence, see the simmer the pasta step, where the broth, milk, and dry elbows come together in one pot.

Tomato Paste, Ketchup, Mustard, and Worcestershire

This is the cheeseburger flavor base. Tomato paste adds depth without making the dish taste like tomato pasta. Ketchup gives a small sweet-tangy note, mustard adds sharpness, and Worcestershire sauce makes the beef flavor rounder.

Flour or Cornstarch

A little flour helps the sauce thicken and cling to the pasta. If you prefer cornstarch, mix it with cold milk or broth first so it becomes a smooth slurry. Do not sprinkle dry cornstarch straight into the hot skillet, because it can clump.

If the sauce thickens too much or turns clumpy, the troubleshooting table has the fastest fixes.

Cheddar Cheese

Freshly shredded sharp cheddar gives the best flavor. Mild cheddar works too, but sharp cheddar cuts through the richness better. For an extra-smooth skillet-dinner finish, you can add 2 oz / 55 g American cheese or cream cheese along with the cheddar.

For melting details, jump to best cheese for cheeseburger macaroni or the cheese-after-heat step.

Optional Pickles or Relish

Pickles are optional, but they are one of the easiest ways to make the pasta taste more like a cheeseburger. Add chopped dill pickles or relish at the end, not during the simmer. That keeps the flavor bright instead of harsh. For more topping ideas, this burger topping guide is useful for thinking about mustard, pickles, cheese, onions, and burger-sauce-style finishes.

How to Make Cheeseburger Macaroni in One Pot

Once everything is measured, the cooking moves quickly. Keep the pot nearby, stir a few times, and trust the resting step before you decide the sauce needs fixing.

You need a 12-inch deep skillet with a lid or a 5–6 quart Dutch oven. A shallow pan can reduce the liquid too quickly before the macaroni has time to soften, so choose something deep enough for the pasta to simmer evenly.

One-pot cheeseburger macaroni method board showing browning beef, building flavor, simmering pasta, resting, and adding cheese.
Once you see the order, the one-pot method is easy: brown the beef, build flavor, simmer the pasta, rest the pot, then add cheese gently.

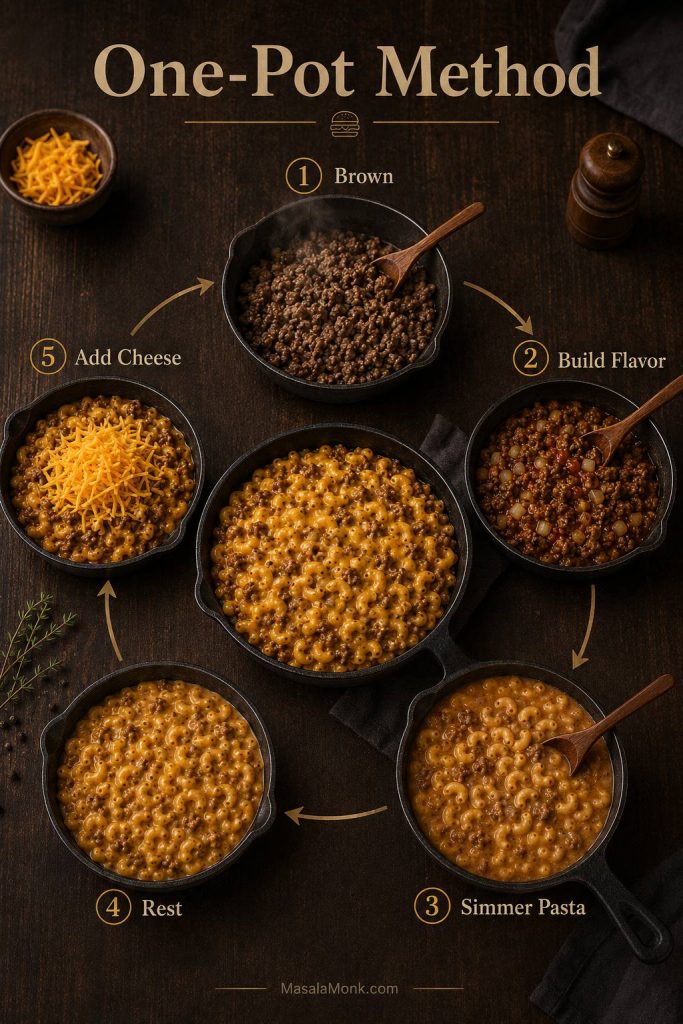
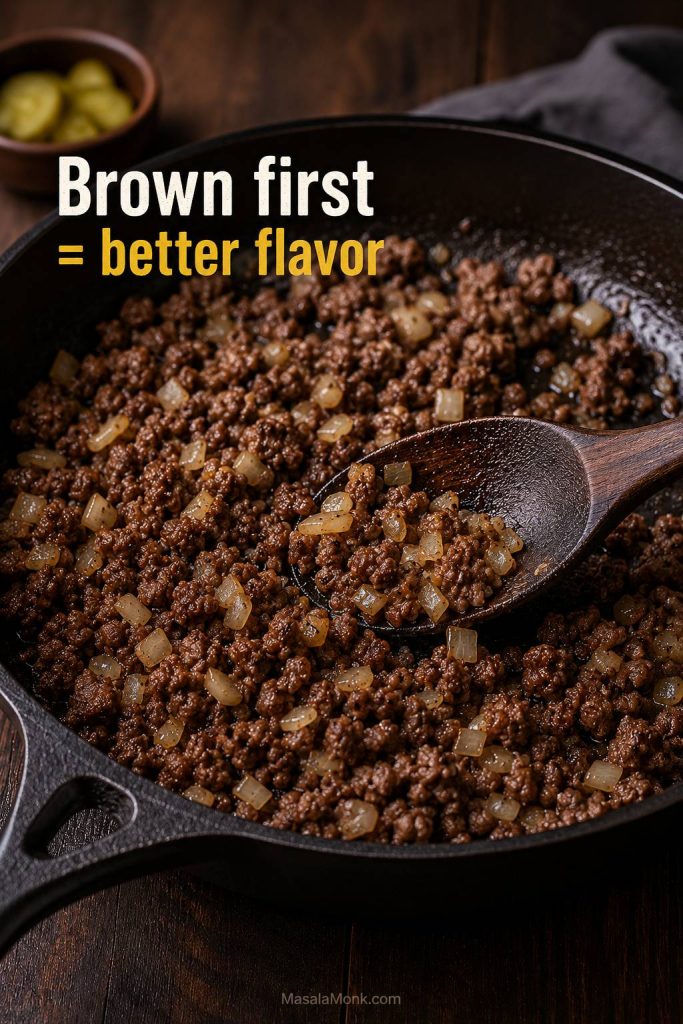
Brown the Beef and Onion

Heat the skillet over medium-high heat. Add a tablespoon of butter or oil, then add the chopped onion and ground beef. Cook for 6–8 minutes, breaking up the beef as it browns. The beef should be cooked through and the onion should soften. Drain excess fat if the pan looks greasy.

Ground beef and chopped onion browning in a skillet for cheeseburger macaroni.
Browning the beef before adding liquid gives the final pasta deeper flavor, while softened onion adds sweetness and body to the sauce.

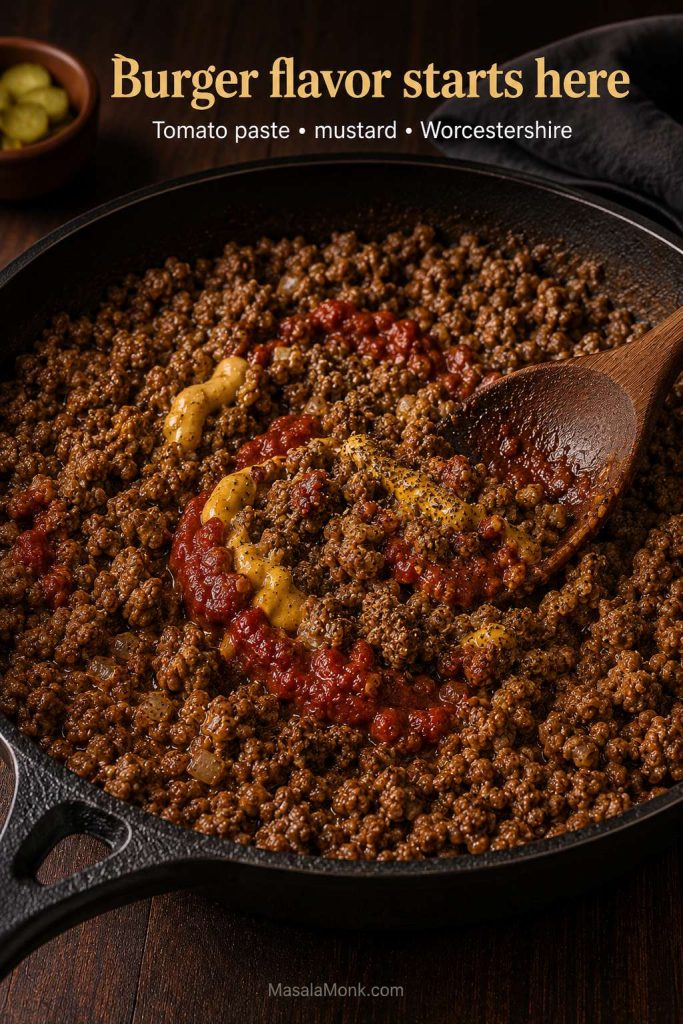
Build the Cheeseburger Flavor Base

Stir in the garlic and cook for about 30 seconds. Then add tomato paste, ketchup, mustard, Worcestershire sauce, paprika, garlic powder, onion powder, salt, pepper, and flour. Cook for 1–2 minutes, stirring often, until the tomato paste darkens slightly and the spices smell warm.

Tomato paste, mustard, Worcestershire sauce, ketchup, and seasonings being stirred into browned beef for cheeseburger macaroni.
Before the broth and milk go in, the beef gets its cheeseburger flavor from tomato paste, mustard, Worcestershire, ketchup, and warm spices.

If you are using cornstarch instead of flour, do not add it dry at this stage. Mix 2 teaspoons cornstarch with 1 tablespoon cold milk or broth, then stir that slurry in after the broth and milk go into the pan.

Simmer the Pasta

Pour in the beef broth and milk, scraping the bottom of the pan so nothing sticks. If using the cornstarch slurry, stir it in now. Next, add the dry elbow macaroni and stir well.

Dry elbow macaroni being added to a skillet with ground beef, broth, and milk for one-pot cheeseburger macaroni.
Use the one-pot ratio as your anchor: 8 ounces elbows, 2 cups broth, and 1½ cups milk, then adjust only if the pasta needs it.

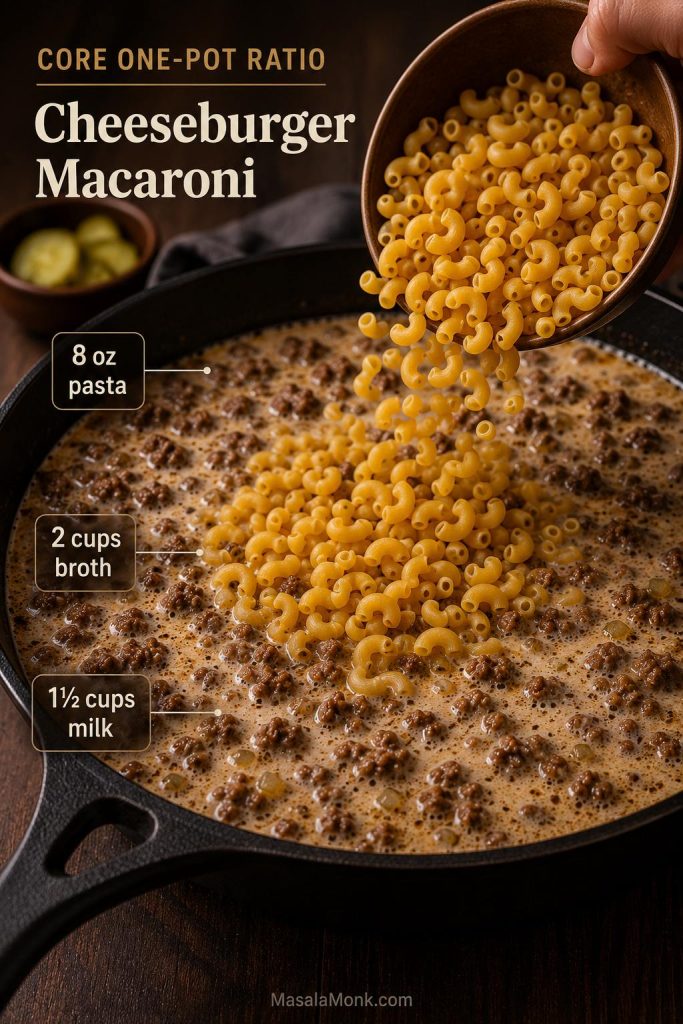
Bring the mixture to a boil, then reduce the heat to medium-low, cover, and simmer for 10–12 minutes. Stir once or twice so the pasta cooks evenly. The macaroni should be just tender and most of the liquid should be absorbed.

Gentle simmer guide for cheeseburger macaroni comparing a hard boil with a calmer simmer after milk is added.
After the milk is added, a gentle simmer is safer than a hard boil because it cooks the pasta evenly and protects the sauce texture.

If the pasta is still firm and the sauce is already thick, add ¼ cup broth or milk, cover again, and cook for another 2–3 minutes.

If the sauce looks too thick or too loose near the end, check the creamy sauce tips before adding more cheese.

Stir in the Cheese After the Heat Is Off

Turn off the heat and let the pasta rest for 2–3 minutes. After that, stir in the cheddar gradually, one handful at a time. This helps the cheese melt into the sauce instead of clumping or separating.

Shredded cheddar being added to hot cheeseburger macaroni after the skillet has been taken off the heat.
Instead of boiling the cheddar, add it after the heat is off so it melts into the pasta without turning oily or grainy.

Finish With Pickles, If Using

Taste the pasta and adjust the salt, pepper, mustard, or Worcestershire if needed. Finally, fold in chopped pickles or relish at the very end if you want a stronger cheeseburger flavor. Serve warm while the sauce is still soft and glossy.

How to Get That Boxed-Dinner Flavor Without a Packet

The boxed version works because it hits a very specific craving: beefy, salty, cheesy, a little tangy, and soft enough to eat by the spoonful. The homemade version has to keep that comfort while adding better flavor.

Here, that flavor comes from a small group of pantry ingredients working together rather than from a packaged mix.

Flavor map for cheeseburger macaroni showing beef, cheddar, mustard, pickles, Worcestershire sauce, and ketchup around a skillet of pasta.
Boxed-dinner flavor comes from balance: beef, cheddar, mustard, pickles, Worcestershire, and ketchup create the savory, tangy, lightly sweet profile.
Ingredient What it adds
Tomato paste Deep cooked tomato flavor without making the sauce watery or too tomato-heavy.
Ketchup A small sweet-tangy burger note. Keep it modest so the dish does not taste like sloppy joe pasta.
Mustard Sharpness that makes the sauce taste more like a cheeseburger.
Worcestershire sauce Beefy depth and savory balance.
Paprika Warm color and a mild skillet-dinner seasoning note.
Garlic powder and onion powder Rounded pantry flavor that supports the fresh onion and garlic.

If your tomato paste tastes sharp, a tiny pinch of sugar can round it out. You may not need it if your ketchup is already sweet enough.

Once the base flavor is right, the variations section shows how to make it smokier, spicier, creamier, or more pickle-forward.

Best Cheese for Cheeseburger Macaroni

The cheese is where this dish either turns creamy or turns grainy. Use enough cheddar for bold flavor, but add it gently so it melts into the sauce instead of separating into oil and grit.
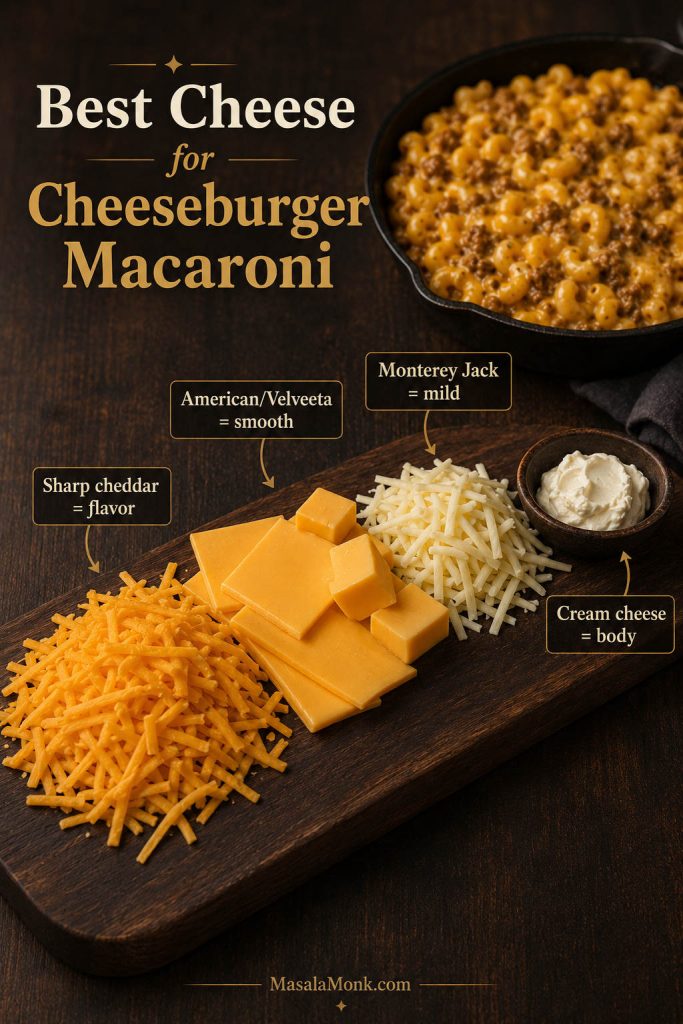
Cheese guide for cheeseburger macaroni with sharp cheddar, American cheese, Velveeta, Monterey Jack, cream cheese, and a skillet of pasta.
For flavor, sharp cheddar should lead; meanwhile, American cheese, Velveeta, Monterey Jack, or cream cheese can soften the sauce in smaller amounts.

Sharp Cheddar

Sharp cheddar is the best everyday choice. It has enough flavor to stand up to the beef, broth, and seasonings. Mild cheddar melts nicely but tastes softer, so the finished dish may need a little more mustard, Worcestershire, or salt to feel balanced.

American Cheese, Velveeta, or Cream Cheese as a Melt-Helper

For a smoother sauce, add 2 oz / 55 g American cheese, Velveeta, or cream cheese along with the cheddar. This is optional, not required. A little helps the sauce become silkier; however, too much can make the dish taste heavy.

Monterey Jack or Colby Jack

Monterey Jack or Colby Jack can replace part of the cheddar if you want a milder, softer pot. A mix of sharp cheddar and Monterey Jack is a good choice for kids or anyone who prefers a gentler cheese flavor.

Best balance: For the strongest flavor, use mostly sharp cheddar. For a smoother, softer sauce, replace ½ cup of the cheddar with Monterey Jack, or add 2 oz American cheese, Velveeta, or cream cheese after the heat is off.

Why Pre-Shredded Cheese Can Turn Grainy

Pre-shredded cheese is convenient, but it often has anti-caking coatings that can make sauces feel less smooth. For the silkiest cheeseburger macaroni, shred a block of cheddar yourself and add it after the heat is off.

For a deeper dive into smooth cheddar sauces, roux thickness, no-flour options, and reheating, this easy cheese sauce recipe is a useful companion.

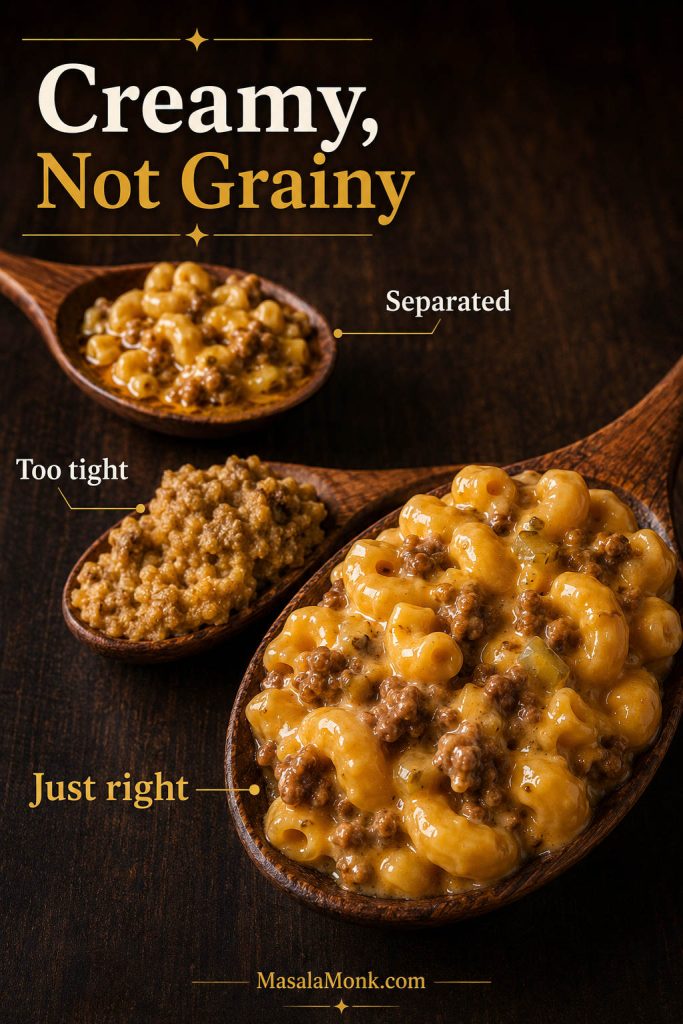
How to Keep Cheeseburger Macaroni Creamy, Not Grainy

This is the section that matters most if you have ever made a skillet pasta that turned dry, gritty, oily, or gluey. Cheeseburger macaroni should be saucy and spoonable, not soupy and not stiff.

Texture guide for cheeseburger macaroni comparing separated sauce, too-thick sauce, and creamy just-right sauce on wooden spoons.
If the sauce separates or tightens, gentle heat, a short rest, and a splash of warm milk or broth can usually bring it back toward creamy.
Tip Why it helps
Use freshly shredded cheese Block cheese melts more smoothly than many pre-shredded cheeses.
Turn off the heat before adding cheddar High heat can make cheddar separate or turn grainy.
Add cheese gradually Small handfuls melt more evenly than one big pile.
Let the pasta rest first The sauce thickens as it sits, so do not rush to add extra cheese or thickener.
Use warm milk or broth to loosen A small splash brings back creaminess without watering down the whole pot.
Use evaporated milk for extra smoothness It gives a silkier, more stable sauce if you want a smoother finish.
Do not judge the sauce too early. When the pasta first finishes simmering, the sauce may look slightly loose. Let it rest for 2–3 minutes, then stir. It will thicken as the starch settles and the cheese melts in.

Milk vs Evaporated Milk vs Cream

Whole milk is the best default for this recipe because it keeps the sauce smooth without making the pot too heavy. However, you can adjust the dairy depending on the texture you want.
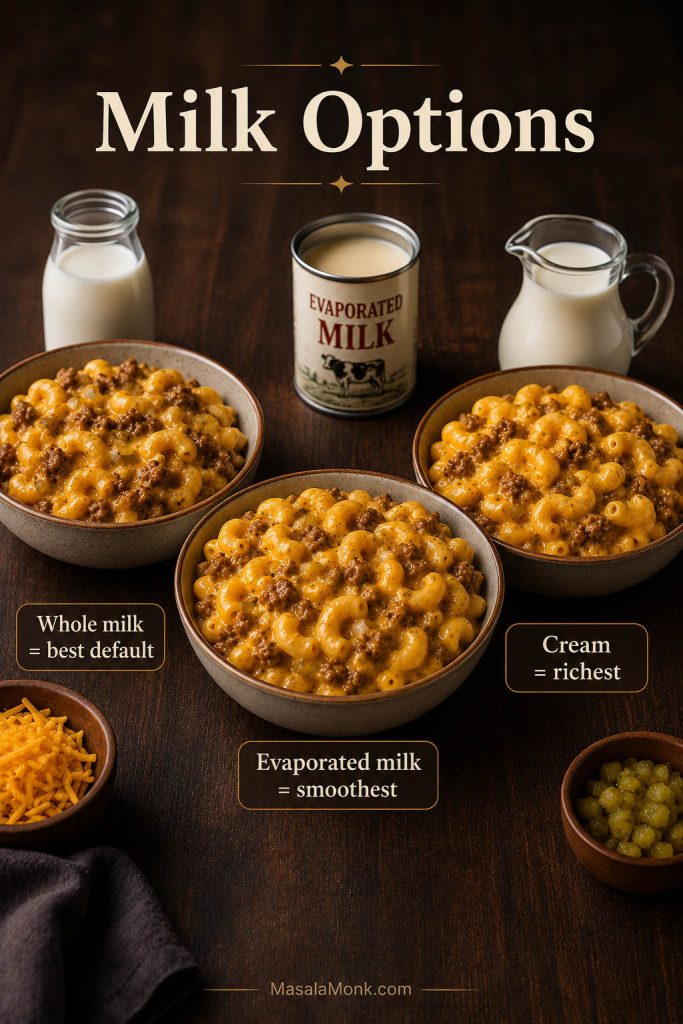
Milk options for cheeseburger macaroni showing bowls made with whole milk, evaporated milk, and cream.
Whole milk keeps the sauce balanced, evaporated milk makes it silkier, and cream gives the pot a richer but heavier finish.
Dairy option Best for Notes
Whole milk Best default Balanced, easy to keep on hand, and rich enough for a weeknight skillet dinner.
Evaporated milk Smoothest sauce Great when you want a silkier cheeseburger macaroni.
Half-and-half Richer sauce Use if you want a heavier finish, but keep the heat gentle.
Heavy cream Very rich version Works, but can feel too heavy in a full pot of ground beef pasta.
Sour cream Tangy hamburger mac and cheese Add after the heat is off so it stays smooth.
Cream cheese Extra body Use a small amount so it does not dominate the cheddar flavor.

For a smoother, slightly richer sauce, replace the whole milk with the same amount of evaporated milk. Meanwhile, sour cream or cream cheese should go in after the pasta cooks and the heat is turned off.

Cheeseburger Macaroni Variations

Once the base pot works, you can push it in a few directions. Add bacon when you want it smoky, pickles when you want it more burger-like, jalapeños when you want heat, or extra cheese when you want it closer to hamburger mac and cheese.

Choose the version based on what you want the bowl to taste like. Classic boxed-dinner comfort stays simple with cheddar and mustard, while a more burger-like pot gets pickles. If you want a richer hamburger mac and cheese direction, add extra cheddar plus a little American cheese, Velveeta, or cream cheese.

Four bowls of cheeseburger macaroni variations labeled classic, bacon, spicy, and pickle-forward.
After the base recipe works, adjust the finish: bacon adds smoke, jalapeño adds heat, and pickles make the pasta taste more burger-like.

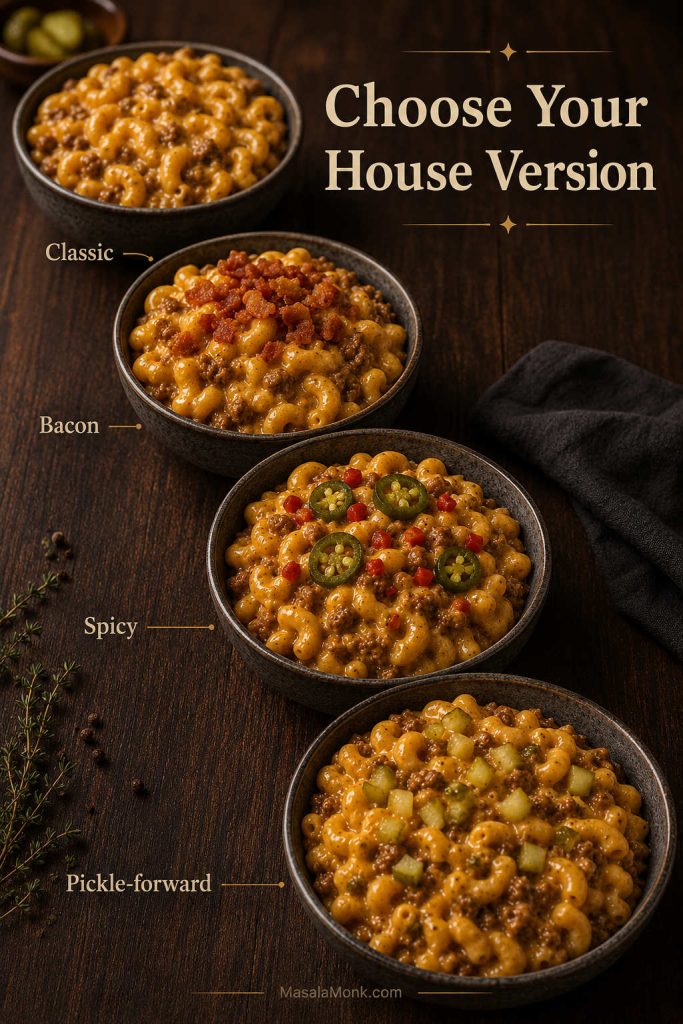
Bacon Cheeseburger Macaroni

Cook 4–6 slices of bacon until crisp, crumble them, and stir them in at the end. You can also sprinkle some on top for crunch. Just drain some of the bacon fat before browning the beef so the dish does not turn greasy.

Cheeseburger Mac and Cheese

For a more mac-and-cheese-style version, add an extra ½ cup cheddar and 2 oz / 55 g American cheese, Velveeta, or cream cheese. The result will be richer, silkier, and less like a light skillet pasta.

Spicy Cheeseburger Pasta

Add diced jalapeños with the onion, use pepper jack for part of the cheddar, or stir in hot sauce at the end. A pinch of chili flakes also works if you want heat without changing the flavor too much.

Pickle Cheeseburger Macaroni

Fold in ¼ cup chopped dill pickles or relish after the cheese melts. This is the most direct way to make the pasta taste like a cheeseburger, but keep it optional because pickle flavor is personal.

Baked Cheeseburger Macaroni

Prepare the stovetop recipe first. Then transfer it to a greased baking dish, top with ½–1 cup extra cheddar, and bake at 375°F / 190°C for 10–15 minutes, just until the top is melted and bubbly. Since the pasta is already cooked, this is a short finish, not a long casserole bake.

Baked cheeseburger macaroni in a rectangular dish with melted cheddar on top and a spoon lifting saucy pasta.
For a baked finish, the stovetop pasta only needs 10–15 minutes in the oven, just long enough to melt the topping without drying it out.

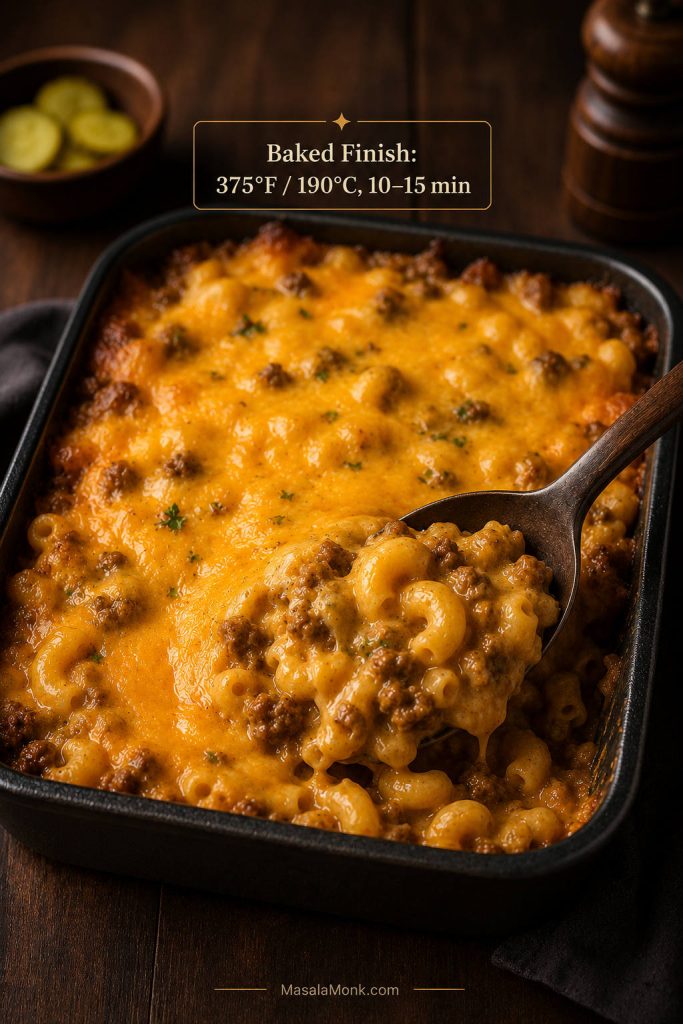
If you prefer old-school baked noodle dinners with a crunchier top, this tuna noodle casserole recipe follows that route with egg noodles, creamy sauce, peas, and a crisp topping.

Gluten-Free Cheeseburger Macaroni

Use a sturdy gluten-free elbow, shell, or brown-rice pasta. Watch the texture closely because some gluten-free pastas soften faster or release starch differently. Add extra broth or milk in small splashes only if needed.

Lighter Cheeseburger Macaroni

Use 90/10 ground beef, 2% milk, and a moderate amount of cheddar. The sauce will be a little less rich, but the tomato paste, mustard, Worcestershire, and spices will still keep the flavor strong.

What to Serve With Cheeseburger Macaroni

Cheeseburger macaroni is rich, so the best sides are crisp, green, acidic, or simple. A green salad, roasted broccoli, green beans, coleslaw, cucumber salad, or pickles all work well. Garlic bread is good too, especially if you want a bigger comfort-food dinner.

Cheeseburger macaroni served with green salad, roasted broccoli, pickles, and garlic bread on a dinner table.
Because cheeseburger macaroni is rich and cheesy, crisp greens, roasted broccoli, pickles, or salad help balance the meal.

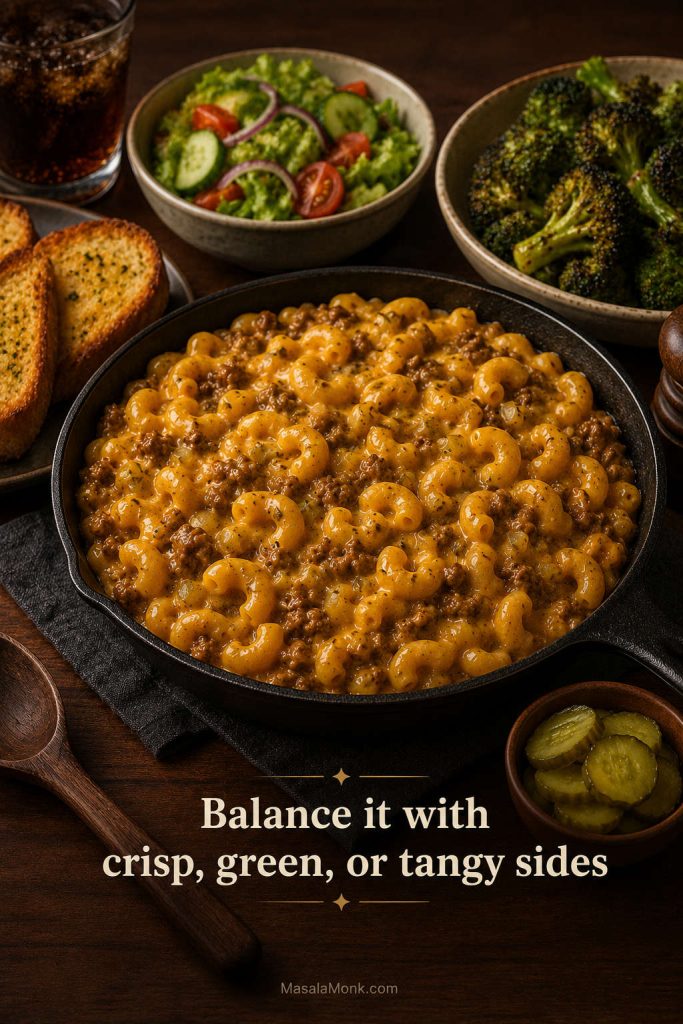
If you are building a cozy dinner table, this pairs well with a crisp salad or a lighter vegetable side. For a bigger comfort-food spread, a creamy potato side like hashbrown casserole works best when the main bowl is not already extra cheesy.

Storage, Freezing, and Reheating

Store leftover cheeseburger macaroni in an airtight container in the refrigerator for 3–4 days. For general leftover safety guidance, you can also check the FoodSafety.gov cold storage chart.

Leftovers thicken in the fridge, so do not reheat them dry. A splash of milk or broth brings the sauce back much better than extra cheese does.

Leftover cheeseburger macaroni in a storage container, being reheated with milk or broth, with a finished bowl nearby.
Leftovers thicken as they chill, so reheat cheeseburger macaroni gently with milk or broth before deciding whether it needs more cheese.

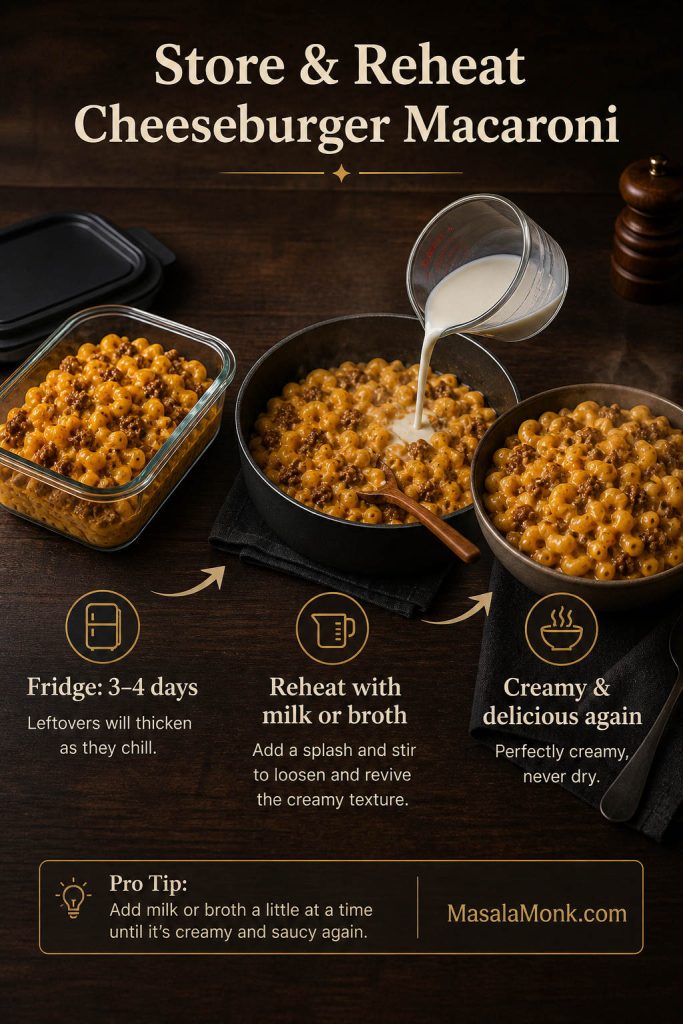
If leftovers look tight after reheating, use the same logic from the creamy sauce tips: warm liquid first, extra cheese only if needed.

To reheat on the stove, add the pasta to a small pan with a splash of milk or broth and warm it gently over low heat, stirring often. To reheat in the microwave, use short bursts and stir between rounds. Add a spoonful of milk or broth before reheating if the pasta looks dry.

You can freeze cheeseburger macaroni, although the pasta will soften after thawing. For the best leftover texture, slightly undercook the macaroni if you know you are making the dish ahead. Then reheat gently and refresh the sauce with a little milk or broth.

Cheeseburger Macaroni Troubleshooting

Most problems with cheeseburger macaroni are easy to fix. The key is to adjust the sauce slowly and avoid overheating the cheese.
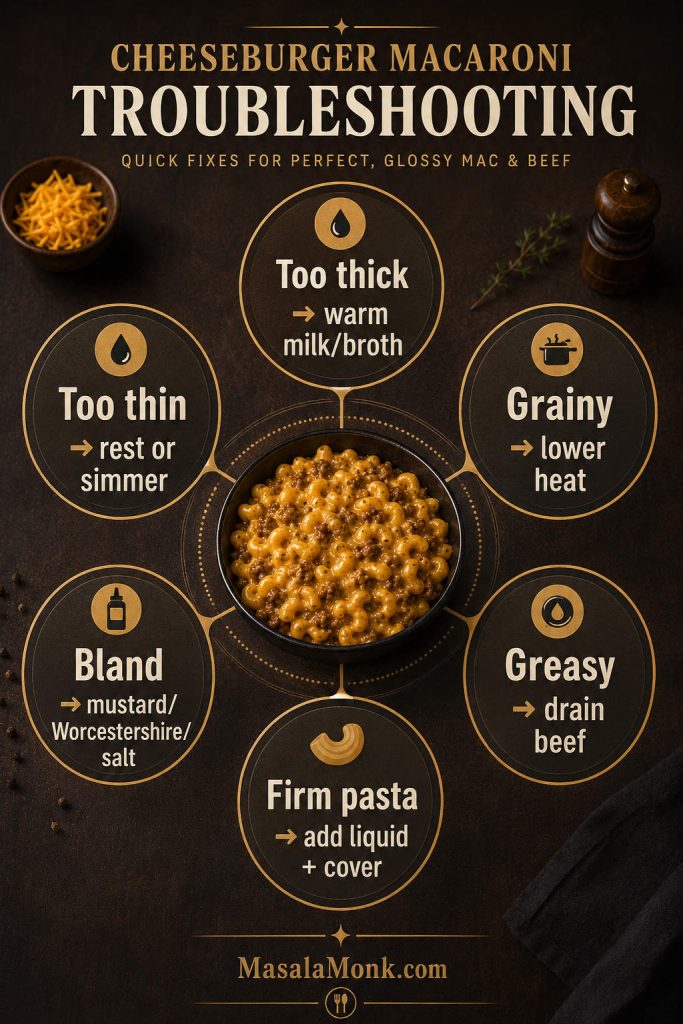
Troubleshooting guide for cheeseburger macaroni with fixes for sauce that is too thick, too thin, grainy, bland, greasy, or undercooked.
Most problems are fixable: thin sauce needs rest, thick sauce needs warm liquid, grainy sauce needs gentler heat, and bland sauce needs more seasoning.
Problem What happened Fix
Sauce is too thick The pasta absorbed more liquid than expected. Add warm milk or broth, 2 tablespoons at a time, until smooth again.
Sauce is too thin It has not rested or reduced enough. Let it rest for 3 minutes first. If still loose, simmer uncovered for 1–2 minutes.
Pasta is undercooked The liquid reduced before the macaroni softened. Add ¼ cup broth or milk, cover, and cook 2–3 minutes more.
Pasta is mushy It simmered too long or too hard. Next time, keep the heat lower and start checking around 9–10 minutes.
Cheese sauce is grainy The cheese was added over high heat or pre-shredded cheese was used. Turn off the heat before adding cheese and use freshly shredded block cheese.
Dish tastes bland It needs more salt, acid, or savory depth. Add salt, pepper, mustard, Worcestershire, or chopped pickles.
Dish tastes greasy The beef released too much fat. Drain the beef before adding broth and milk.
Tastes too tomato-heavy Too much ketchup or tomato sauce was used. Use tomato paste for depth and keep ketchup to about 1 tablespoon.
Cornstarch clumped Dry cornstarch was added directly to the hot pan. Mix cornstarch with cold milk or broth first, then stir the slurry into the liquid.

Homemade Cheeseburger Macaroni Recipe Card

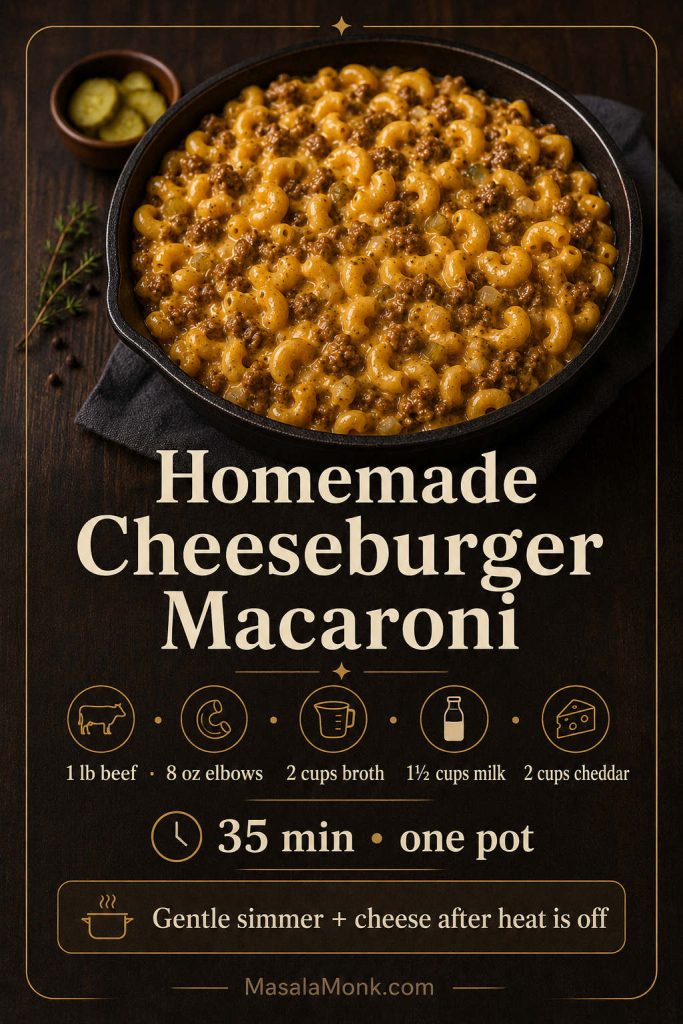
If you only remember two things, remember these: keep the simmer gentle once the milk goes in, and add the cheese after the heat is off. Those two steps do most of the work for a creamy, non-grainy sauce.

Homemade Cheeseburger Macaroni Recipe

A saucy one-pot homemade cheeseburger macaroni recipe with ground beef, elbow pasta, cheddar cheese, and classic burger-style seasoning.

Prep Time10 minutes
Cook Time25 minutes
Total Time35 minutes
Yield4 hearty or 6 smaller servings

Category: Dinner
Cuisine: American
Method: Stovetop
Equipment: 12-inch deep skillet with lid or 5–6 quart Dutch oven

Ingredients

  • 1 lb / 450 g lean ground beef
  • 1 tbsp butter or neutral oil
  • 1 small yellow onion, finely chopped
  • 2 cloves garlic, minced
  • 2 tbsp / 30 g tomato paste
  • 1 tbsp / 15 g ketchup
  • 1–2 tsp yellow mustard or Dijon mustard
  • 1 tsp Worcestershire sauce
  • 1 tsp paprika
  • 1 tsp garlic powder
  • 1 tsp onion powder
  • ¾ tsp salt, plus more to taste
  • ½ tsp black pepper
  • 1 tbsp all-purpose flour, or 2 tsp cornstarch mixed with 1 tbsp cold milk or broth
  • 2 cups / 480 ml beef broth
  • 1½ cups / 360 ml whole milk
  • 8 oz / 225 g elbow macaroni
  • 2 cups / 225 g freshly shredded sharp cheddar cheese
  • Optional: 2 oz / 55 g American cheese, Velveeta, or cream cheese
  • Optional: ¼ cup / 35–40 g chopped dill pickles or relish, added at the end

Instructions

  1. Heat a large deep skillet or Dutch oven over medium-high heat. Add butter or oil, then add the onion and ground beef. Cook for 6–8 minutes, breaking up the beef, until browned. Drain excess fat if needed.
  2. Stir in garlic and cook for 30 seconds. Add tomato paste, ketchup, mustard, Worcestershire sauce, paprika, garlic powder, onion powder, salt, pepper, and flour. Cook for 1–2 minutes, stirring, until the tomato paste darkens slightly. If using cornstarch instead of flour, do not add it here; use the slurry in the next step.
  3. Pour in beef broth and milk, scraping the bottom of the pan. If using the cornstarch slurry, stir it in now. Add the dry elbow macaroni and stir well.
  4. Bring to a boil, then reduce heat to medium-low. Cover and simmer gently for 10–12 minutes, stirring once or twice, until the pasta is just tender and most of the liquid has been absorbed.
  5. If the pasta is still firm and the sauce is already thick, add ¼ cup broth or milk, cover, and cook 2–3 minutes more.
  6. Turn off the heat and let the pasta rest for 2–3 minutes.
  7. Stir in the cheddar gradually until smooth. Add optional American cheese, Velveeta, or cream cheese if using.
  8. Taste and adjust salt, pepper, mustard, or Worcestershire. Fold in chopped pickles or relish at the end if using. Serve warm.

Recipe Notes

  • Keep the pasta at a gentle simmer after the milk goes in. A hard boil can make the sauce rougher and may cause sticking.
  • If the sauce looks loose, let it rest before adding more cheese. It thickens as it sits.
  • Add the cheese after the heat is off to reduce graininess.
  • Pickles should go in at the end so they stay bright.
  • For a baked finish, transfer to a greased dish, top with extra cheddar, and bake at 375°F / 190°C for 10–15 minutes.
Saveable recipe card for homemade cheeseburger macaroni with beef, elbow pasta, broth, milk, cheddar, timing, and key sauce tips.
Keep the formula handy: 1 pound beef, 8 ounces elbows, 2 cups broth, 1½ cups milk, 2 cups cheddar, and cheese added after the heat is off.

FAQs

Once you understand the base pot, the recipe becomes easy to bend toward your own table: sharper with mustard, smokier with bacon, creamier with extra cheese, or brighter with pickles at the end.

Is cheeseburger macaroni the same as Hamburger Helper?

It has the same cozy skillet-dinner idea: ground beef, macaroni, cheddar, and a creamy sauce. This version is homemade, though, so it uses real cheese, fresh onion and garlic, tomato paste, mustard, Worcestershire, broth, milk, and pantry spices instead of a packaged seasoning mix.

What pasta works best for cheeseburger macaroni?

Elbow macaroni is the classic choice because it cooks quickly and holds the sauce well. Small shells, rotini, cavatappi, or small penne can also work, but check the pasta early and add a little extra liquid if needed.

Why did my cheese sauce turn grainy?

The heat was probably too high when the cheese went in, or the cheese did not melt smoothly. Turn off the heat before adding cheddar, stir it in gradually, and use freshly shredded block cheese whenever possible.

Should the pasta be cooked before adding it?

No. For this one-pot cheeseburger macaroni recipe, the dry pasta cooks directly in the broth and milk. That helps the sauce thicken and saves you from boiling pasta separately.

How do I make it more like hamburger mac and cheese?

Add a little extra cheddar and include 2 oz / 55 g American cheese, Velveeta, or cream cheese. You can also use evaporated milk instead of whole milk for a smoother, richer sauce.

Ground Turkey Instead of Beef

Ground turkey works, but it is leaner and milder than beef, so the pasta may need a little more Worcestershire, mustard, paprika, salt, or cheese to taste full and savory.

Using Velveeta or American Cheese

Use either one as a melt-helper rather than replacing all the cheddar. A small amount of American cheese or Velveeta makes the sauce smoother and more boxed-dinner-like, while sharp cheddar keeps the flavor stronger.

No-Milk or Dairy-Free Cheeseburger Macaroni

You can use more broth, but the sauce will be less creamy. For a dairy-free version, use an unsweetened plain milk alternative and a dairy-free cheese that melts well, then keep the heat gentle.

Vegetables That Work Well

Peas, diced bell pepper, corn, spinach, and finely chopped mushrooms all work. Add firm vegetables with the onion, and add quick-cooking vegetables near the end so they do not overcook.

What gives cheeseburger macaroni its cheeseburger flavor?

The cheeseburger flavor comes from more than just beef and cheese. Tomato paste gives depth, ketchup adds a little sweet tang, mustard brings sharpness, Worcestershire makes the beef taste richer, and pickles or relish at the end add that unmistakable burger finish.

Is this recipe freezer-friendly?

It can be frozen, but the pasta will soften after thawing. If you plan to freeze it, slightly undercook the macaroni and reheat gently with a splash of milk or broth.

If this becomes your house version, share where you landed: extra creamy, pickle-forward, bacon-topped, spicy, or closer to classic hamburger mac and cheese.

The best version is still the fresh stovetop pot: saucy elbows, browned beef, melted cheddar, and just enough tang to make it taste like a cheeseburger. Serve it hot, scoop it generously, and do not be surprised if the quietest part of dinner is the first few minutes.

Back to top

Posted on Leave a comment

Air Fryer Burgers Recipe: Juicy Hamburgers, Time & Temp

Juicy air fryer cheeseburger with melted cheddar, lettuce, tomato, red onion, pickles, and toasted bun on a dark surface, with an air fryer basket in the background.

A good air fryer burger recipe should give you juicy patties, clear timing, and a reliable way to know when the burgers are done. This guide to air fryer hamburgers starts with fresh ground beef patties, then covers thicker burgers, frozen patties, cheeseburgers, toasted buns, smoke prevention, toppings, storage, and a full recipe card with US and metric details.

The best default is simple: cook fresh ¼-lb / 113 g hamburger patties at 375°F / 190°C for 8–10 minutes, flipping halfway, until the center reaches 160°F / 71°C. From there, adjust by thickness, starting temperature, and air fryer model instead of relying on one fixed minute for every burger.

For a bunless version, the same patties can become lettuce-wrap burgers, burger bowls, or low-carb cheeseburger plates. For more ideas in that direction, see these keto hamburger recipes.

How Long to Cook Hamburgers in the Air Fryer

Best default: Use 1 lb / 454 g ground beef for 4 patties. Shape each patty about 4 oz / 113 g and ½ inch / 1.25 cm thick. Air fry at 375°F / 190°C for 8–10 minutes, flipping halfway, until the center reaches 160°F / 71°C. Add cheese only at the end.

Air fryer burger timing guide showing 375°F or 190°C, 8 to 10 minutes, flipping halfway, and a 160°F center temperature for fresh quarter-pound patties.
For most fresh ¼-lb patties, 375°F for 8–10 minutes is the best starting point; the center temperature is what confirms the burger is done.

Start checking early the first time

If you are making these for the first time, start checking at 8 minutes rather than waiting for the full range to pass. That way, you learn how your air fryer handles your patties without overcooking the first batch.

Put simply, the 8–10 minute range works best for patties that are about 4 oz / 113 g each and about ½ inch / 1.25 cm thick. Thinner patties may finish closer to 6–8 minutes, while thicker patties may need 10–12 minutes. Because air fryer baskets, patty thickness, and beef fat percentage all vary, the time range is only the starting point.

Use temperature, not color, to check doneness

For that reason, the thermometer matters more than the clock. Ground beef can look brown before it is safe, or stay slightly pink after it reaches temperature, so do not judge doneness by color alone.

For the most accurate reading, insert the thermometer through the side of the patty so the tip reaches the center instead of stopping near the surface. That way, you are checking the part of the burger that takes the longest to cook.

Food safety note: Ground beef burgers should reach 160°F / 71°C in the center. FoodSafety.gov lists 160°F as the safe minimum internal temperature for ground meat, so a thermometer is the clearest way to avoid guessing. See the safe minimum internal temperature chart.

Why this air fryer method works

In practice, the air fryer is good at burgers because it cooks fast, drains extra fat, and keeps the process cleaner than a skillet. The tradeoff is that patties can dry out if they are too lean, too thin, or cooked too long. That is why thickness, beef choice, spacing, and internal temperature matter more than chasing one exact minute.

Air Fryer Burger Time and Temperature Chart

Best default temperature

For most fresh patties, 375°F / 190°C is the best first setting. It is hot enough to cook the burgers quickly and help the outside brown. However, it is not so aggressive that the edges dry out before the center is done.

If this is your first time making burgers in the air fryer, use the quarter-pounder row as your starting point. After that, adjust by thickness instead of changing everything at once.

Fresh burger time chart

Because patty size changes the answer, start with the row that matches your burger instead of forcing every patty into the same time. Once you know how your air fryer handles one batch, adjust the next batch by 1–2 minutes rather than changing the temperature immediately.

Fresh air fryer burger timing chart comparing sliders, thin patties, quarter-pound patties, thicker three-quarter-inch patties, and half-pound patties with their cook times.
Fresh burger timing changes most with patty size and thickness, so match your patty to the closest size instead of using one fixed cook time for every batch.
Fresh burger type Air fryer temp Approx. time Flip? Internal temp
Fresh quarter-pounder / ¼-lb / 113 g patties, about ½ inch / 1.25 cm thick 375°F / 190°C 8–10 minutes Yes, halfway 160°F / 71°C
Fresh thicker patties, about ¾ inch / 2 cm thick 375°F / 190°C 10–12 minutes Yes 160°F / 71°C
Fresh ½-lb / 225 g thick patties 360–370°F / 182–188°C 14–18 minutes Yes 160°F / 71°C
Thin fresh patties 375°F / 190°C 6–8 minutes Yes 160°F / 71°C
Mini burgers or sliders 375°F / 190°C 5–7 minutes Yes 160°F / 71°C

Frozen Burger, 400°F, and Cheeseburger Timing

However, frozen burgers need a wider range because the center has to thaw before it can safely finish cooking. Before adding cheese to any burger, check the center first. Otherwise, the cheese may melt while the patty still needs more time.

Frozen air fryer burger guide showing timing for quarter-pound and third-pound patties, flipping halfway, checking for 160°F, and adding cheese at the end.
Frozen burgers need a wider timing range because the center has to thaw first; check the temperature before adding cheese.
Burger type Air fryer temp Approx. time Flip? Internal temp
Frozen ¼-lb / 113 g patties 360–375°F / 182–190°C 10–14 minutes Yes 160°F / 71°C
Frozen ⅓-lb / 150 g patties 360–375°F / 182–190°C 12–16 minutes Yes 160°F / 71°C
Thin fresh patties at 400°F / 200°C 400°F / 200°C 6–8 minutes Yes 160°F / 71°C
Frozen burgers at 400°F / 200°C 400°F / 200°C 11–15 minutes Yes 160°F / 71°C; check early because the outside may brown first
Cheeseburgers Same as burger Add cheese last 30–60 seconds 160°F / 71°C before cheese

Should you air fry burgers at 375°F or 400°F?

For most homemade patties, 375°F is the better first choice because it gives the center time to cook before the edges dry out. However, 400°F can work for thinner patties or for people who like a firmer browned outside. In that case, start checking early and use a thermometer, because the outside can look done before the center reaches 160°F.

Comparison chart for air fryer burgers showing 375°F as the best default for control and 400°F as an option for thinner patties with earlier checking.
Use 375°F as the most reliable starting point for homemade burgers, and treat 400°F as an option for thinner patties or stronger browning with an early temperature check.

In short, 375°F is the better beginner setting, while 400°F is an alternate for thinner patties or cooks who already know their air fryer runs evenly. That said, once you know how your air fryer behaves, you can fine-tune the temperature without guessing.

How to adjust the time

If your air fryer runs hot, start checking a minute early. On the other hand, if your patties are thick, cold, or crowded, they may need longer. In either case, do not press the burgers while they cook; pressing squeezes out the juices you are trying to keep.

If you are not sure which row fits your burger, choose the lower end of the time range first. Then check the center and add 1–2 minutes only if the patty has not reached 160°F / 71°C.

Back to table of contents ↑

Hamburger Patties in the Air Fryer

For your first batch, keep the patties simple: 1 lb / 454 g ground beef divided into 4 loose patties, about 4 oz / 113 g each. Shape each patty about 4–4½ inches / 10–11.5 cm wide and about ½ inch / 1.25 cm thick. That size cooks evenly, fits most air fryer baskets, and gives you a better chance of hitting 160°F without drying out the edges.

Raw air fryer burger patties showing 4-ounce portions, 4 to 4 and a half inch width, half-inch thickness, a shallow center dimple, and a bun size comparison.
Even patty size is what makes the timing chart work: aim for 4 oz patties that are about ½ inch thick, slightly wider than the bun, and gently dimpled in the center.

Because burgers shrink as they cook, shape each patty slightly wider than the bun. Then press a shallow dimple in the center so the patty stays flatter instead of puffing up into a dome.

When the patties are the same size, they finish at about the same time. Otherwise, the smaller patties can dry out while the thicker ones are still catching up.

If one patty is noticeably larger, place it where your air fryer runs hottest, or give it an extra minute after removing the smaller patties. That way, the thinner burgers do not dry out while the thickest one finishes.

This same method works for fresh beef patties, homemade burger patties, and plain hamburger patties from the butcher counter. However, the main adjustment is thickness: thin patties cook faster, while thick patties need more time to reach 160°F in the center.

For best texture, avoid mixing the beef too much. Once ground beef is overworked, the cooked patty can turn dense and springy instead of tender and juicy.

Can you cook raw ground beef patties in the air fryer?

Yes. Raw ground beef patties can go straight into the air fryer as long as they are shaped evenly, cooked in a single layer, and checked for 160°F in the center. However, loose ground beef mixtures and very wet patties can cook unevenly, so formed patties work best.

Ingredients for Air Fryer Hamburgers

You only need a few ingredients for classic burgers. Since the cooking method is simple, the beef, seasoning, patty shape, and cheese timing matter more than a long ingredient list. In other words, better patties matter more than more ingredients.

Since the ingredient list is short, each choice matters. The beef controls juiciness, the salt controls flavor, and the patty shape controls how evenly the burger cooks.

Air fryer burger ingredients including ground beef, salt, black pepper, garlic powder, onion powder, Worcestershire sauce, cheese slices, burger buns, lettuce, tomato, onion, and pickles.
The ingredient list stays simple because the success of air fryer burgers comes from good beef, even patties, enough seasoning, and adding cheese only at the end.

Ground beef

Use 1 lb / 454 g ground beef for 4 regular burgers. For the juiciest result, choose 80/20 ground beef. For a slightly leaner patty with less smoke, 85/15 is a good middle ground.

Seasoning

A simple mix of salt, black pepper, garlic powder, and onion powder is enough. If the beef is good and the patties are shaped well, the seasoning should support the burger rather than cover it up. Since kosher salt brands vary, start with a little less if you are using fine table salt. Worcestershire sauce or steak sauce is optional, but a small amount adds savory depth without turning the burger into meatloaf.

Cheese

American cheese melts the easiest. Cheddar, pepper jack, Swiss, provolone, and mozzarella also work, but thicker slices may need the full final minute to soften. Because the air fryer fan is strong, add cheese only at the end so it does not slide off, burn, or blow around inside the basket.

Buns and toppings

Use burger buns, brioche buns, potato buns, lettuce wraps, or bowls. Classic toppings include lettuce, tomato, onion, pickles, mustard, ketchup, and a creamy burger sauce. For a homemade creamy base, use this homemade mayonnaise recipe and turn it into burger sauce with ketchup, mustard, pickle juice, and a little seasoning.

Do you need oil, parchment, or foil?

Fresh 80/20 or 85/15 patties usually do not need oil because the beef has enough fat. However, if you are using very lean fresh patties or dry-surfaced frozen patties, a light oil spray can help browning.

If you use parchment, choose perforated parchment made for air fryers and never block airflow under the patties. Likewise, use foil only if your air fryer manual allows it. Otherwise, trapped grease and blocked airflow can slow cooking, create smoke, and make the burgers cook unevenly.

In short, airflow matters more than lining the basket. If a liner blocks the holes or traps grease under the patties, skip it.

Best Ground Beef for Air Fryer Burgers

If juiciness matters most, start with 80/20. If your air fryer smokes easily or you prefer a slightly lighter burger, 85/15 is the safer everyday choice. Very lean beef can work, but it needs more care because it dries out faster.

Best ground beef guide for air fryer burgers comparing 80/20 beef for juicy burgers, 85/15 beef for balanced burgers, and 90/10 or leaner beef that can dry out faster.
For the juiciest air fryer burgers, 80/20 is the most forgiving, while 85/15 is a good everyday choice when you want less smoke without losing too much moisture.
Ground beef Best for What to know
80/20 Juiciest classic burgers Rich, flavorful, and forgiving, but it can drip more fat and create more smoke in some air fryers.
85/15 Balanced everyday burgers Still juicy, usually less smoky, and a good choice for indoor air fryer cooking.
90/10 or leaner Leaner burgers Can dry out faster. Add moisture and check the temperature early.

As a result, 80/20 or 85/15 is the most reliable choice for a first batch. Shape the patties gently, keep them even in thickness, and add a center dimple so they do not puff into domes as they cook.

If you are using very lean beef, add a little moisture with Worcestershire sauce, grated onion, mustard, or a small amount of oil. Then start checking early, because lean patties can move from done to dry quickly.

For a thinner burger with a harder griddled crust instead of a thicker air fryer patty, try this classic smash burger method.

How to Make Air Fryer Hamburgers

This method is for fresh ground beef patties. Once the patties are shaped, the rest is mostly about spacing, flipping, and checking the center. After that, assembly is quick because the burgers only need a short rest.

Step-by-step air fryer burger guide showing preheating, shaping patties, making a dimple, seasoning, cooking in one layer, flipping halfway, checking the center, and resting before assembly.
The method is simple once the order is clear: shape the patties evenly, cook them in one layer, flip halfway, check the center, then rest and assemble.

1. Preheat the air fryer

Preheat the air fryer to 375°F / 190°C for about 3 minutes. Although some models heat quickly, preheating helps the patties start cooking evenly.

If you skip preheating, add 1–2 minutes and start checking at the low end of the range. Once you know your air fryer, the timing becomes easier to repeat.

2. Shape the patties gently

Divide 1 lb / 454 g ground beef into 4 loose portions, about 4 oz / 113 g each. Then shape each portion into a patty about 4–4½ inches / 10–11.5 cm wide and ½ inch / 1.25 cm thick. Because the patties shrink as they cook, starting a little wider helps them fit the bun better later.

3. Make a center dimple

Press a shallow dimple into the center of each patty with your thumb or the back of a spoon. This small step helps the burgers stay flatter instead of puffing up in the middle.

4. Season both sides

Season the outside of the patties with salt, pepper, garlic powder, and onion powder. If using Worcestershire sauce, mix it in lightly before shaping, or brush a tiny amount over the patties before seasoning.

5. Air fry in a single layer

Place the patties in the basket in a single layer. Then leave space between them so hot air can move around each burger. Do not stack patties, and do not crowd the basket.

If all 4 patties do not fit with space between them, cook in batches. Otherwise, the burgers may steam instead of brown. Later batches may cook slightly faster because the air fryer is already fully hot.

6. Flip halfway

Air fry for 8–10 minutes total, flipping halfway through. Even if your model usually cooks without flipping, turning the patties makes the result more reliable across different basket styles.

7. Check the center

Check the thickest part of each patty. The burgers are done when the center reaches 160°F / 71°C. For the cleanest reading, insert the thermometer from the side so the tip lands in the center of the patty.

Digital thermometer inserted from the side into an air fryer burger patty showing 160°F and 71°C as the internal temperature for ground beef burgers.
Color is not a reliable doneness check for ground beef, so insert the thermometer from the side and make sure the center of the patty reaches 160°F.

If one patty is thicker than the others, it may need an extra minute or two. In that case, remove the finished patties and let the thicker one continue cooking until it reaches temperature.

8. Rest and assemble

Let the patties rest for about 2 minutes before assembling. Meanwhile, toast the buns, slice the toppings, or stir together a quick sauce.

Can you toast burger buns in the air fryer?

Yes. After the patties come out, place the buns cut-side up in the basket and air fry at 350–375°F / 175–190°C for 1–2 minutes. Watch closely because buns go from toasted to dry quickly.

How to Make Air Fryer Cheeseburgers

To make cheeseburgers, cook the patties first, then add cheese at the very end. The easiest method is to place a slice of cheese on each cooked patty during the final 30–60 seconds of cooking.

Air fryer cheeseburger guide showing cheese added at the end of cooking, melted cheese on the patty, and a reminder not to add cheese halfway.
Add cheese only after the burger is almost done; the final 30–60 seconds or residual basket heat is usually enough to melt it without making a mess.

Instead of running the fan longer just to melt cheese, you can also use the heat that is already trapped in the basket. Turn the air fryer off, place cheese on the hot patties, close the basket, and let the residual heat melt the cheese for about 1 minute.

If your cheese slides, folds, or blows off, do not fight the fan. Instead, melt the cheese with leftover heat after cooking. That way, the cheese softens over the patty instead of ending up on the basket.

Do not add cheese halfway through cooking. It can melt off the burger, stick to the basket, burn at the edges, or blow around inside the air fryer.

Frozen Burgers in the Air Fryer

Frozen patties are perfect for nights when nothing was thawed. They can go straight from freezer to basket; however, they need a little more patience because the center has to thaw before it can safely finish cooking.

That is why frozen burgers usually need a lower-to-moderate temperature and a wider time range than fresh patties. In practice, smaller ¼-lb / 113 g patties finish sooner, while thicker ⅓-lb / 150 g patties need the longer end of the range.

Fresh versus frozen air fryer burger guide comparing fresh patties cooked at 375°F with frozen patties cooked from frozen, including cook times, flipping, and 160°F internal temperature.
Fresh patties give you the most control, while frozen patties need extra time because the center must thaw before the burger can safely finish cooking.

How to air fry frozen burger patties

  1. Preheat the air fryer to 360–375°F / 182–190°C.
  2. Place frozen patties in a single layer.
  3. Air fry for 10–16 minutes, depending on patty size and thickness.
  4. Flip halfway through.
  5. Season after the surface warms slightly if seasoning will not stick at the beginning.
  6. Cook until the center reaches 160°F / 71°C.
  7. Add cheese during the final 30–60 seconds if making cheeseburgers.

For exact ranges by patty size, use the frozen burger timing chart above. Before adding cheese to frozen burgers, check the center first. Otherwise, the cheese may look melted while the patty still needs more time inside.

What about Bubba-style frozen burgers?

Bubba-style frozen burgers can go straight from freezer to air fryer. However, they are often thick and fatty, so they may need the longer end of the timing range. Start at 360–375°F, flip halfway, and check for 160°F in the center.

If you cook frozen burgers at 400°F / 200°C, start checking early. The outside can brown before the center is fully done, especially with thicker frozen patties. In that case, a thermometer prevents the most common mistake: serving a burger that looks done outside but is not finished inside.

Back to table of contents ↑

Ninja Foodi, Air Fryer Oven and Basket Air Fryer Notes

The basic method is the same in most basket-style air fryers: cook fresh ¼-lb / 113 g patties at 375°F / 190°C, flip halfway, and check for 160°F / 71°C in the center. However, stronger models, smaller baskets, dual-zone air fryers, and air fryer ovens can change the timing by a minute or two.

Likewise, air fryer ovens may need slightly longer because the cooking space is larger than a compact basket. That means the best approach is to use the chart first, then adjust the next batch based on your specific model.

Air fryer model notes for burgers comparing basket air fryers, Ninja Foodi style models, and air fryer ovens with timing adjustments and 160°F internal temperature guidance.
Use the timing chart as your starting point, then adjust by model: stronger basket air fryers may finish sooner, while air fryer ovens can need a minute or two longer.
Air fryer type What to adjust Best starting point
Ninja air fryer or Ninja Foodi air crisp These can cook efficiently, so check early. 375°F / 190°C, 8 minutes, then check the center.
Ninja Foodi Grill Air crisp and grill mode behave differently. Use air crisp for this method; follow grill-plate timing if using grill mode.
Cosori, Instant Vortex, Gourmia, PowerXL, and similar basket air fryers Basket size and airflow vary. Use the chart first, then adjust by 1–2 minutes after your first batch.
Air fryer oven or toaster oven air fryer The larger cavity may cook slightly slower. Use the middle rack, flip halfway, and check the center early.

Back to table of contents ↑

How to Keep Air Fryer Burgers Juicy

These burgers stay juicy when the beef has enough fat, the patties are handled gently, and the cooking time does not run too long. As a result, a few small details make the difference between a tender burger and a dry one.

  • Use 80/20 or 85/15 beef. A little fat keeps the burger tender.
  • Do not overmix. Handle the meat gently and stop once the patties hold together.
  • Make even patties. Uneven patties cook unevenly.
  • Add a center dimple. This helps prevent puffing.
  • Do not press the burgers. Pressing forces juices out.
  • Flip once. It improves even cooking without overhandling.
  • Check temperature early. Start checking at the low end of the timing range.
  • Rest briefly. Two minutes is enough for most burgers.

In other words, juicy burgers come from control, not extra steps. Once the patties are shaped well and cooked to temperature, the air fryer does most of the work.

Finished air fryer cheeseburger with melted cheese, toasted bun, lettuce, tomato, onion, and pickles, shown with an air fryer basket in the background.
A juicy air fryer burger comes from control, not extra steps: shape the patty evenly, avoid overcooking, and stop once the center reaches temperature.

When using lean beef, add a little moisture with Worcestershire sauce, grated onion, mustard, or a small amount of oil. Also, check the temperature earlier because lean patties move from done to dry quickly.

The goal is a patty with browned edges, melted cheese, and a tender center — not a dry puck that only tastes like seasoning. So, once the burger reaches temperature, stop cooking and let it rest.

Troubleshooting Air Fryer Hamburgers

If the burgers turn out dry, smoky, uneven, or messy, do not change everything at once. In most cases, one small adjustment fixes the next batch: use slightly fattier beef, make the patties thinner, clean the basket, or add cheese later.

What not to do when air frying burgers

Before changing the recipe, check the most common mistakes first. These are the small things that usually cause dry burgers, uneven cooking, smoking, or messy cheese.

Air fryer burger mistakes to avoid, including stacking patties, pressing burgers, adding cheese too early, blocking airflow, judging doneness by color, and using one timing for every patty.
Most air fryer burger problems come from blocked airflow, uneven patties, early cheese, or guessing doneness by color instead of checking the center.
  • Do not stack patties in the basket.
  • Avoid pressing the burgers while they cook.
  • Add cheese only at the end, not halfway through cooking.
  • Never block the basket holes with solid parchment or foil.
  • Do not judge doneness by color alone.
  • Avoid using the same timing for thin fresh patties and thick frozen patties.

Air fryer burger troubleshooting chart

Once you know what went wrong, use the chart below to fix the next batch. Instead of changing the beef, temperature, timing, and basket setup all at once, adjust one thing first.

Problem Likely cause Fix
Dry burgers Lean beef or overcooking Use 80/20 or 85/15 beef, and check the temperature earlier.
Smoking air fryer Fat dripping onto a hot base, old grease, or very fatty beef Clean the basket, avoid overcrowding, and try 85/15 beef if smoke is frequent.
Burger puffed up No center dimple Press a shallow dimple in each patty before cooking.
Undercooked center Patty too thick or too cold Cook longer at 375°F and check for 160°F in the center.
Cheese blew off Cheese added too early or fan too strong Add cheese during the final 30–60 seconds, or melt it with residual heat after cooking.
Uneven cooking Basket overcrowded Cook in a single layer and leave space between patties.
Air fryer burger troubleshooting guide showing fixes for dry burgers, smoking, outside browning before the center finishes, puffing in the middle, and checking for 160°F internal temperature.
The best fix depends on the problem: dry burgers need more moisture control, smoking needs cleaner airflow, and underdone centers need a thermometer check instead of more browning.

How to fix the next batch

If you are not sure what went wrong, start with the simplest fix first. Next time, change only one thing at a time. If the burgers were dry, check earlier or use fattier beef; if they smoked, clean the basket or use a slightly leaner blend.

If smoke happens, do not panic. Usually, it means fat is hitting a very hot surface or old grease is still in the basket. Before cooking the next batch, clean the basket, avoid overcrowding, and use the lower end of the temperature range if your air fryer runs hot.

The next batch becomes easier to control because you are matching the fix to the actual problem instead of guessing.

If this happens often with air fryer recipes, it is worth checking these common air fryer mistakes. Overcrowding, blocked airflow, old grease, and wrong timing can affect burgers, fries, wings, and almost everything else you cook in the basket.

Jump to recipe card → | Back to table of contents ↑

Best Sauces and Toppings for Air Fryer Hamburgers

A good burger only needs a few toppings, but the sauce can change the whole direction of the meal. For that reason, keep the patty simple and use the sauce to make it classic, spicy, Indian-style, or bowl-friendly.

Air fryer burger sauce and topping guide showing classic burger sauce, mango habanero sauce, mango mustard sauce, green chutney, pickles, onion, tomato, and lettuce.
Keep the burger patty simple and use the sauce to change the direction: classic, spicy-sweet, tangy, or fresh and herby.

Classic burger sauce is the easiest place to start: mix mayonnaise, ketchup, mustard, finely chopped pickles or pickle juice, garlic powder, onion powder, and a little black pepper. If you want a fresh base, use this homemade mayonnaise; if you need an egg-free spread, use eggless mayonnaise.

When you want heat, brush the cooked patty lightly with mango habanero sauce or serve it on the side for fries. Meanwhile, mango mustard sauce gives the burger a tangy, fruity change from plain mustard.

An Indian-style burger works especially well with green chutney, onion, tomato, mayo, and a pinch of chaat masala. Because the chutney is bright and herb-heavy, it cuts through the richness of the patty.

Air Fryer Burger Variations

Once the basic method is set, you can change the toppings and sauces without changing the cooking technique. That way, one reliable patty method can turn into several different dinners.

Air fryer burger variations guide showing a classic cheeseburger, spicy mango habanero burger, mango mustard burger, green chutney burger, and a low-carb lettuce-wrap option.
Once the basic air fryer patty is reliable, the easiest way to change the burger is through the sauce: classic, spicy-sweet, tangy, herby, or low-carb.
  • Classic cheeseburger: American cheese, pickles, onion, lettuce, tomato, and burger sauce.
  • Spicy mango habanero burger: Cheddar, onions, pickles, and mango habanero sauce.
  • Mango mustard burger: Lettuce, pickles, onion, and mango mustard sauce.
  • Green chutney burger: Green chutney, mayo, onion, tomato, and chaat masala.
  • Low-carb burger bowl: Lettuce, pickles, cheese, onions, tomato, and sauce without the bun.
  • Pesto cheeseburger: Pesto mayo, tomato, mozzarella or provolone, and roasted peppers.

For a lower-carb plate, keep the same patty method and build the meal around lettuce, pickles, cheese, onions, tomato, and sauce instead of a bun.

What to Serve With Air Fryer Hamburgers

For an easy burger-night plate, pick one sauce, one crispy side, and something fresh to cut through the richness. That way, the meal feels complete without turning dinner into a project.

For the classic burger-and-fries plate, serve the patties with homemade fries, wedges, or potato snacks. If a make-ahead side is easier, potato salad is one of the best choices. For a party-style spread, add one or two ideas from these potato appetizers.

If the air fryer is already out, keep the sides easy. Air fryer mozzarella sticks make the meal feel like a game-day plate, while air fryer croquettes are a good option when you want something crispy that is not fries.

For something fresh, add a cabbage slaw, cucumber salad, onion-tomato salad, or raw papaya salad. A crisp fresh side helps balance the richness of the burgers and cheese.

Storage and Reheating

Make-ahead tip: You can shape the raw patties up to 24 hours ahead and refrigerate them in a covered container with parchment between layers. Keep them cold until cooking, then air fry straight from the fridge and check the center for 160°F / 71°C.

Air fryer burger storage guide showing raw patties made ahead with parchment, cooked patties stored separately from buns and toppings, and patties reheated in the air fryer.
Store patties, buns, and toppings separately so leftovers reheat cleanly; warm the patty first, then assemble the burger fresh.

Cooked hamburger patties store better than fully assembled burgers. If you know you will have leftovers, store the patties, buns, cheese, sauces, and toppings separately. Otherwise, the bun can turn soggy while the lettuce and tomato lose their texture.

Once the patties are cooked, refrigerate leftovers within 2 hours. If the room is very hot, refrigerate them within 1 hour. After that, reheat only the patties and assemble the burgers fresh so the buns and toppings stay in better shape.

  • Refrigerate: Cool cooked patties, then store in an airtight container for 3–4 days.
  • Freeze: Wrap cooked patties individually and freeze for up to 2 months.
  • Reheat in the air fryer: Reheat patties at 350°F / 175°C until warmed through.
  • Add cheese after reheating: Cheese melts better when added at the end instead of reheated from cold.
  • Avoid reheating assembled burgers: The bun can dry out while lettuce, tomato, and sauce turn soggy.

For more air fryer recipes with ground beef, this burger method is the easiest starting point because the patties cook quickly, portion neatly, and can be served on buns, in bowls, or over salad.

Air Fryer Burgers Recipe Card

Air Fryer Burgers

These air fryer burgers are built for a quick, juicy first batch: fresh ground beef, simple seasoning, 375°F heat, one flip, and cheese added only at the end.

Yield 4 burgers
Prep Time 10 minutes
Cook Time 8–10 minutes
Total Time 18–20 minutes

Ingredients

  • 1 lb / 454 g ground beef, preferably 80/20 or 85/15
  • ¾ tsp kosher salt, or to taste
  • ½ tsp black pepper
  • ½ tsp garlic powder
  • ½ tsp onion powder
  • 1 tsp / 5 ml Worcestershire sauce or steak sauce, optional
  • 4 cheese slices, about 3 oz / 85 g total, optional
  • 4 burger buns
  • Lettuce, tomato, onion, pickles, sauce, or toppings of choice

Instructions

  1. First, preheat the air fryer to 375°F / 190°C.
  2. Next, divide the beef into 4 loose portions, about 4 oz / 113 g each.
  3. Then shape each portion into a patty about 4–4½ inches / 10–11.5 cm wide and ½ inch / 1.25 cm thick.
  4. After that, press a shallow dimple into the center of each patty so the burgers stay flatter as they cook.
  5. Once the patties are shaped, season both sides with salt, pepper, garlic powder, and onion powder. If using Worcestershire sauce, mix it in gently before shaping or brush a tiny amount over the patties before seasoning.
  6. Then place the patties in the air fryer basket in a single layer, leaving space between them.
  7. As the burgers cook, flip them halfway through the 8–10 minute cooking time.
  8. Once the time is close, check the center of each patty. For the most accurate reading, insert the thermometer through the side of the patty so the tip reaches the center. The burgers are done when they reach 160°F / 71°C.
  9. If making cheeseburgers, add cheese during the final 30–60 seconds, or place cheese on the hot cooked patties and close the warm basket briefly until melted.
  10. Finally, rest the patties for 2 minutes, then assemble with buns, sauce, and toppings.

Notes

  • Best beef: Use 80/20 for the juiciest burgers or 85/15 for a slightly leaner burger with less smoke.
  • Salt: Kosher salt brands vary. If using fine table salt, start with less and adjust to taste next time.
  • Preheating: If you skip preheating, add 1–2 minutes and start checking early.
  • Batch cooking: If the patties do not fit in a single layer with space between them, cook in batches. Later batches may cook slightly faster.
  • Oil: Fresh 80/20 or 85/15 patties usually do not need oil. Use a light spray only for very lean or dry-surfaced patties.
  • Frozen patties: Cook frozen ¼-lb / 113 g patties at 360–375°F for 10–14 minutes and frozen ⅓-lb / 150 g patties for 12–16 minutes, flipping halfway.
  • Bubba-style burgers: Start at 360–375°F and use the longer end of the timing range for thick frozen patties.
  • Cheese: Add cheese at the end only. Adding it too early can make it slide off or blow around.
  • Doneness: Ground beef burgers should reach 160°F / 71°C in the center.
  • Parchment or foil: Use only if your air fryer manual allows it, and never block airflow or trap grease under the patties.
  • Storage: Refrigerate cooked patties within 2 hours, or within 1 hour if the room is very hot. Store patties separately from buns and toppings for the best leftovers.

If you are cooking a different patty size, use the recipe card as the base and the timing chart above as the adjustment guide. That way, the method stays simple while the timing changes to match the burger.

One rule matters most: timing can change, but doneness should be checked with a thermometer. Use the chart for timing, then use the center temperature to decide when the burgers are done.

Air fryer burgers time and temperature guide showing 375°F or 190°C, 8 to 10 minutes for fresh patties, flip halfway, cook to 160°F or 71°C, and adjust timing for frozen burgers.
Use this as the quick visual summary: fresh patties, frozen patties, cheeseburgers, and the center-temperature check that keeps air fryer burgers reliable.

Back to table of contents ↑

FAQs About Air Fryer Burgers and Hamburgers

Can you cook hamburgers in an air fryer?

Yes. When cooked in a single layer, hamburgers cook well in an air fryer because the hot circulating air reaches the top, bottom, and sides of each patty. For the best result, leave space between the patties and flip halfway.

What temperature do you cook hamburgers in the air fryer?

For most fresh hamburger patties, use 375°F / 190°C. This temperature gives the center enough time to cook while still helping the outside brown.

How long do hamburgers take in the air fryer?

In most cases, fresh ¼-lb / 113 g hamburger patties take 8–10 minutes at 375°F / 190°C. However, thinner patties may finish in 6–8 minutes, while thicker patties may need 10–12 minutes.

How long do you cook ½-pound burgers in the air fryer?

Fresh ½-lb / 225 g burgers usually need about 14–18 minutes at 360–370°F / 182–188°C, depending on thickness and air fryer strength. Flip halfway and check that the center reaches 160°F / 71°C.

Do you flip burgers in the air fryer?

Yes. Although some air fryers cook fairly evenly without flipping, flipping halfway gives more reliable results across different basket styles and patty thicknesses.

What internal temperature should air fryer hamburgers reach?

Ground beef burgers should reach 160°F / 71°C in the center. Since color can be misleading, use a food thermometer rather than judging by appearance alone. For the best reading, insert the thermometer from the side so the tip reaches the center of the patty.

How long do frozen burgers take in the air fryer?

Usually, frozen burger patties take 10–16 minutes. A ¼-lb / 113 g frozen patty often takes 10–14 minutes, while a thicker ⅓-lb / 150 g frozen patty may take 12–16 minutes.

Can I cook frozen burgers at 400°F in the air fryer?

Yes, but check early. At 400°F, the outside can brown before the center is fully done, especially with thick frozen patties. For more control, use 360–375°F and cook until the center reaches 160°F.

When should you add cheese to air fryer burgers?

Once the burger is almost done, add cheese during the final 30–60 seconds. If the fan blows the cheese around, turn the air fryer off and let the residual heat melt the cheese instead.

Why did my air fryer burger smoke?

Usually, smoke comes from fat dripping onto a hot base, old grease in the basket, overcrowding, or very fatty beef. To prevent it next time, clean the basket before cooking, avoid crowding, and use 85/15 beef if smoke is a recurring problem.

Can I make these burgers in a Ninja, Cosori, Instant Vortex, Gourmia, or PowerXL air fryer?

Yes. The method is the same: cook fresh ¼-lb patties at 375°F, flip halfway, and check for 160°F in the center. However, smaller or stronger air fryers may finish a minute or two faster, while crowded baskets or thicker patties may need longer. For Ninja Foodi Grill-style models, use the air-fry function unless you are intentionally using the grill plate.

Can you cook burgers in an air fryer oven?

Yes. Use the air fry setting, place the patties on a rack or tray with space between them, flip halfway, and start with the same time and temperature chart. Air fryer ovens may need 1–2 extra minutes because the cooking space is larger.

Can I cook more than four burgers at once?

Only if they fit in a single layer with space between them. Otherwise, cook in batches. Crowding the basket slows cooking, blocks airflow, and can make the burgers steam instead of brown.

Do I need to spray the air fryer basket for burgers?

Usually, no. If you are using 80/20 or 85/15 beef, the patties release enough fat as they cook. However, if your patties are very lean or your basket tends to stick, use a light spray instead of adding extra oil to the burgers.

Can I make turkey burgers this way?

Yes, but turkey burgers are leaner and need different doneness guidance. Since ground poultry should reach 165°F / 74°C, do not use the 160°F ground beef temperature for turkey burgers.

Can I use foil or parchment under air fryer burgers?

Use foil or parchment only if your air fryer manual allows it. Also, never block airflow under the patties, because blocked airflow can slow cooking, trap grease, create smoke, and make the burgers cook unevenly.

Back to table of contents ↑ | Back to top ↑

Posted on Leave a comment

Five Ingredient Casseroles | Deliciously SIMPLE Casserole Recipes

bowl of soup and two silver spoons

Hello, food lovers! 🙋‍♀️ Today, we’re going to explore a delightful video from Julia Pacheco, a YouTube channel dedicated to sharing simple, delicious, and budget-friendly recipes. This time, we’re learning how to make five different casseroles, each with only five ingredients. These recipes are perfect for those busy weeknights when you need a quick and easy dinner. 🥘🥦🍗🥚

🍲 White Chicken with Creamy Sauce 🍗

This recipe is a unique take on a chicken dish, featuring chicken wrapped in crescent rolls and smothered in a rich and creamy sauce. The chicken is seasoned with Italian seasoning, pepper, and salt, then wrapped in crescent dough and baked in a 9×13 baking dish. The result is a delicious and satisfying meal that’s sure to be a hit with the whole family. 🍗🥐🥛

🍲 Chicken and Spinach Lasagna 🥬

Next up is a chicken and spinach lasagna. This recipe combines ground chicken and spinach for a high-protein, nutrient-rich meal. The lasagna is layered with a creamy sauce and topped with cheese, then baked until golden and bubbly. This is a great way to sneak some veggies into your family’s diet. 🍗🥬🧀

🍲 Chicken Cordon Bleu Casserole 🍗

This Chicken Cordon Bleu Casserole is a simplified version of the classic dish. It features chicken, ham, and cheese, all baked together in a creamy sauce. This casserole is a great way to use up leftover chicken or ham, and it’s sure to be a hit with kids and adults alike. 🍗🍖🧀

🍲 Philly Cheese Steak Casserole 🥩

This Philly Cheese Steak Casserole is a hearty and satisfying meal that’s perfect for a cold winter’s night. It features ground beef, onions, peppers, and provolone cheese, all baked together in a delicious casserole. Serve it in hoagie rolls for a complete meal. 🥩🧅🫑🧀

🍲 French Onion Chicken Casserole 🍗

Last but not least is the French Onion Chicken Casserole. This recipe features chicken breasts, caramelized onions, and a rich French onion soup sauce, all topped with melted mozzarella cheese. Serve it over mashed potatoes for a comforting and delicious meal. 🍗🧅🧀🥔

🎥 Video and Channel Credits 📺

All these amazing recipes and tips are from the YouTube channel Julia Pacheco. Julia shares her passion for food and cooking through her easy-to-follow recipes and meal prep videos. Check out the original video for a step-by-step guide on how to prepare these meals. Also, don’t forget to visit and subscribe to the Julia Pacheco channel for more simple and delicious recipes.