Posted on — 3 Comments

Mango Habanero Sauce Recipe: Sweet-Spicy Hot Sauce for Wings, Tacos & Chicken

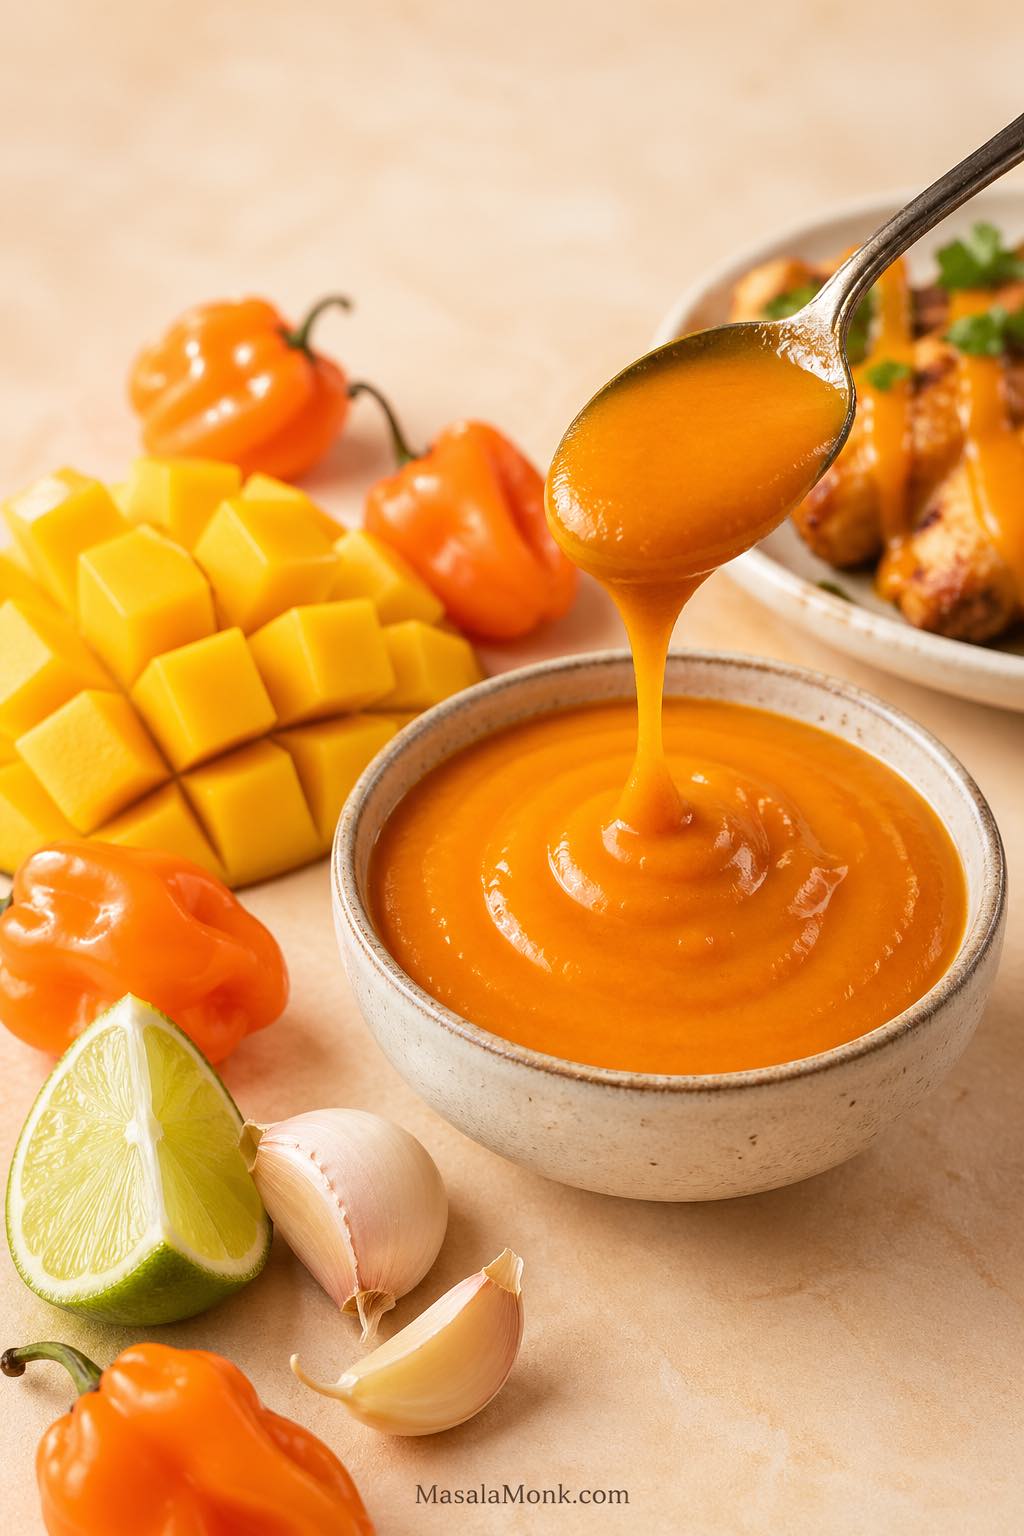
Glossy mango habanero sauce in a bowl with fresh mango, orange habanero peppers, lime, garlic and wings in the background.

A good mango habanero sauce recipe should taste fruity, fiery, tangy, and balanced. The mango should come through clearly, the habanero should bring real heat, and the vinegar, lime, salt, garlic, and onion should keep the sauce sharp enough for wings, tacos, grilled chicken, shrimp, fish, paneer, tofu, burgers, wraps, fries, and rice bowls.

The useful part is that this homemade mango habanero sauce starts with one flexible base. From there, you can thin it into hot sauce, finish it with butter for wings, reduce it into a glaze, stir it into a creamy dip, or push it toward a BBQ-style sauce. Instead of locking you into one narrow version, it shows you how to control heat, texture, sweetness, acidity, and storage.

Here, the sauce starts as a cooked blender mango habanero sauce: mango, habanero, onion, garlic, vinegar, water, and salt simmer first, then everything is blended smooth and finished with lime juice and sweetener. As a result, the finished sauce tastes rounder than a raw blend, smoother than a salsa, and more useful than a plain vinegar hot sauce.

It is also easy to make. The base simmers in one pan, then blends into a smooth, pourable sauce without special hot sauce equipment. For that reason, you can make a bold homemade hot sauce at home without fermenting, canning, or buying specialty tools.

The one thing to respect is the habanero itself. It is seriously hot, so this recipe gives you a clear heat guide before you cook. Start with one pepper for a medium-hot mango habanero sauce, use two for a properly hot version, and only go beyond that if you already know you love very spicy sauces.

Quick Answer: What Is Mango Habanero Sauce?

Mango habanero sauce is a sweet-spicy homemade sauce made with ripe mango, habanero peppers, vinegar, lime juice, garlic, onion, salt, and a little sweetener. In this recipe, the sauce is cooked and blended, so it becomes smooth, bright orange, fruity, tangy, and hot.

Unlike mango mustard sauce, this mango habanero sauce recipe is hotter and more chili-forward. Where mango salsa stays chunky and fresh, this sauce is cooked, blended, and pourable. Amba sauce, by contrast, leans more sour and pickle-like, while mango habanero sauce is sweeter, fruitier, and built around habanero heat.

Its biggest advantage is flexibility. For example, you can drizzle it over tacos and eggs, toss it with wings, brush it onto grilled shrimp or salmon, serve it with fries, or spread it inside burgers and wraps.

At a glance: This homemade mango habanero sauce recipe makes about 1¾ cups / 420 ml. Use 1 habanero for medium-hot, 2 for hot, and 3+ only if you love serious heat. The base sauce is cooked, smooth, fruity, tangy, and pourable. Increase the vinegar for a thinner hot sauce, or finish the sauce with butter for a glossy wing sauce.

This version is best for readers who want a homemade mango habanero sauce that is hot but still usable, not a sauce so fiery that it only works a few drops at a time.
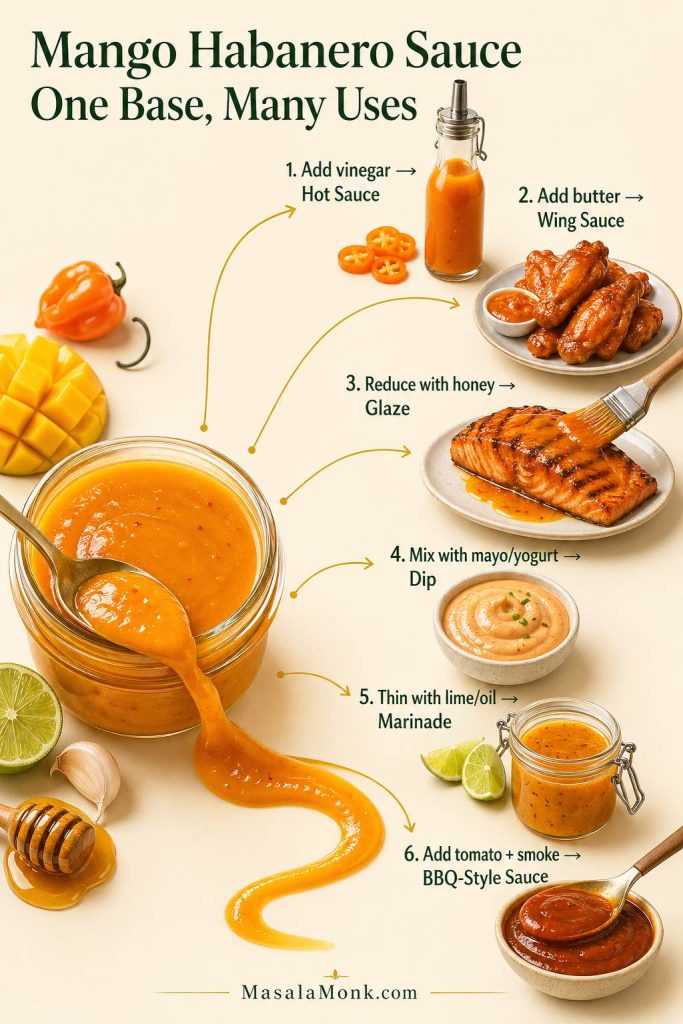
Homemade mango habanero sauce in a jar with arrows showing how to turn one base into hot sauce, wing sauce, glaze, dip, marinade, and BBQ-style sauce.
One homemade mango habanero sauce can go several directions. Thin it with vinegar for hot sauce, finish it with butter for wings, reduce it with honey for a glaze, stir it into mayo or yogurt for a creamy dip, or loosen it with lime and oil for a quick marinade.

Why This Mango Habanero Sauce Recipe Works

The balance starts with the mango. It gives the sauce body, color, and natural sweetness. The habanero brings the heat, but it also adds a floral, fruity aroma. Meanwhile, vinegar and lime keep everything sharp, while salt makes the mango and chili taste complete.

Cooking the base first also matters. It softens the onion, garlic, mango, and habanero before blending, so the finished sauce tastes rounder instead of raw or harsh. As a result, the cooked base tastes smoother, while the lime added at the end keeps the sauce bright.

That balance makes the sauce flexible at home. For example, keep it medium-thick for dipping, thin it with extra vinegar for hot sauce, finish it with butter for wings, or reduce it into a glaze for grilled food.

What Does Mango Habanero Sauce Taste Like?

At first, mango habanero sauce should taste fruity and bright. After a few seconds, the habanero heat should build. The mango gives the recipe ripe tropical sweetness, the vinegar and lime keep the sauce tangy, and the habanero adds a floral heat that lingers.

A good batch should not taste like mango jam, and it should not taste like plain vinegar hot sauce either. Instead, the best version lands in that sweet and spicy middle ground: fruity enough for dipping, sharp enough for tacos, and bold enough for wings.
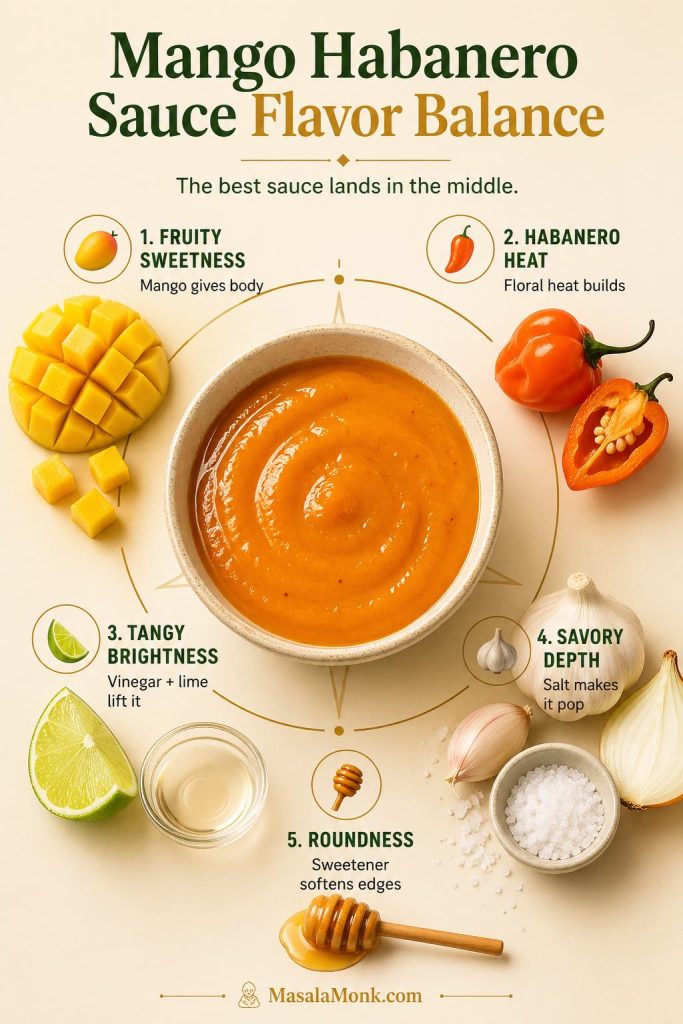
Mango habanero sauce flavor balance guide showing mango sweetness, habanero heat, vinegar and lime brightness, savory depth, and honey roundness.
A good mango habanero sauce should land in the middle: fruity from mango, hot from habanero, bright from vinegar and lime, savory from garlic, onion, and salt, and rounded with just enough sweetener.

When one flavor takes over, adjust the sauce in stages. First, fix flatness with salt. Next, use lime or vinegar when the sauce tastes too sweet. Finally, when the habanero heat is running the show, bring the sauce back into balance with more mango or a little honey.

Ingredients for This Mango Habanero Sauce Recipe

Think of the ingredients in roles, not just measurements. Mango gives body, sweetness, and color. Habanero gives heat and aroma. Vinegar gives sharpness, lime gives freshness, garlic and onion give depth, and sweetener rounds the edges.

The table below gives you a balanced starting point. Once the sauce is blended, you can adjust sweetness, heat, acid, salt, and thickness to match how you want to use it.
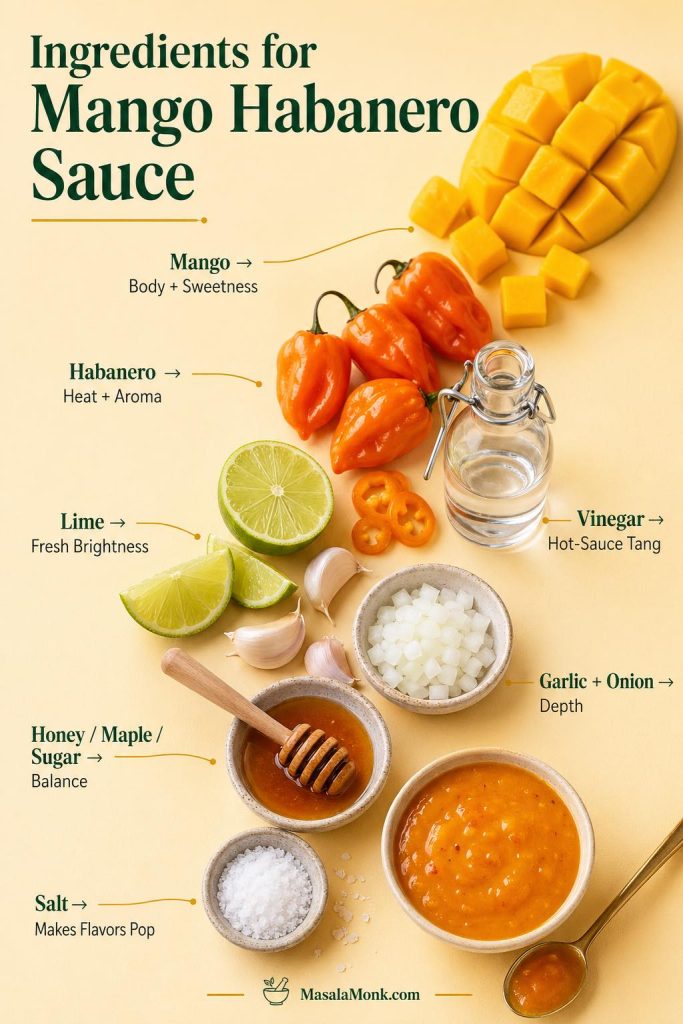
Ingredients for mango habanero sauce including ripe mango, habanero peppers, lime, vinegar, garlic, onion, honey, salt, and finished sauce.
Each ingredient has a job in mango habanero sauce: ripe mango gives body and sweetness, habanero brings heat, vinegar and lime keep it tangy, garlic and onion add depth, and honey or sugar rounds the edges.
Ingredient US Amount Metric Amount Why It Matters
Ripe mango, diced 1½ cups 250 g / 8.8 oz Sweetness, body, color, and fruit flavor
Fresh habanero peppers 1–2 peppers about 10–20 g / 0.35–0.7 oz Heat and floral chili aroma
Onion, chopped ¼ cup 40 g / 1.4 oz Savory body and depth
Garlic 2 cloves 6 g / 0.2 oz Sharpness and backbone
Apple cider vinegar or white vinegar ⅓ cup 80 ml / 2.7 fl oz Tang and hot-sauce character
Fresh lime juice 2 tbsp 30 ml / 1 fl oz Fresh brightness
Water ¼ cup 60 ml / 2 fl oz Helps the sauce simmer and blend
Honey, sugar, or maple syrup 1–2 tbsp 20–40 g honey/maple or 12–25 g sugar Balances heat and acid
Fine sea salt ¾ tsp 4–5 g Makes the sauce taste complete

Optional flavor additions include ½–1 teaspoon grated ginger for tropical warmth, ¼ teaspoon cumin for earthiness, ¼ teaspoon smoked paprika for a BBQ-style direction, or a tiny pinch of allspice for a Caribbean-style note. However, for a first batch, keep the sauce simple before adding too many extra spices.

Best Mango to Use: Fresh, Frozen or Mango Pulp

For the brightest fresh mango flavor, use ripe mango that smells sweet before you cut it. Since mango is the body of this sauce recipe, the fruit should taste good before it goes into the pan.
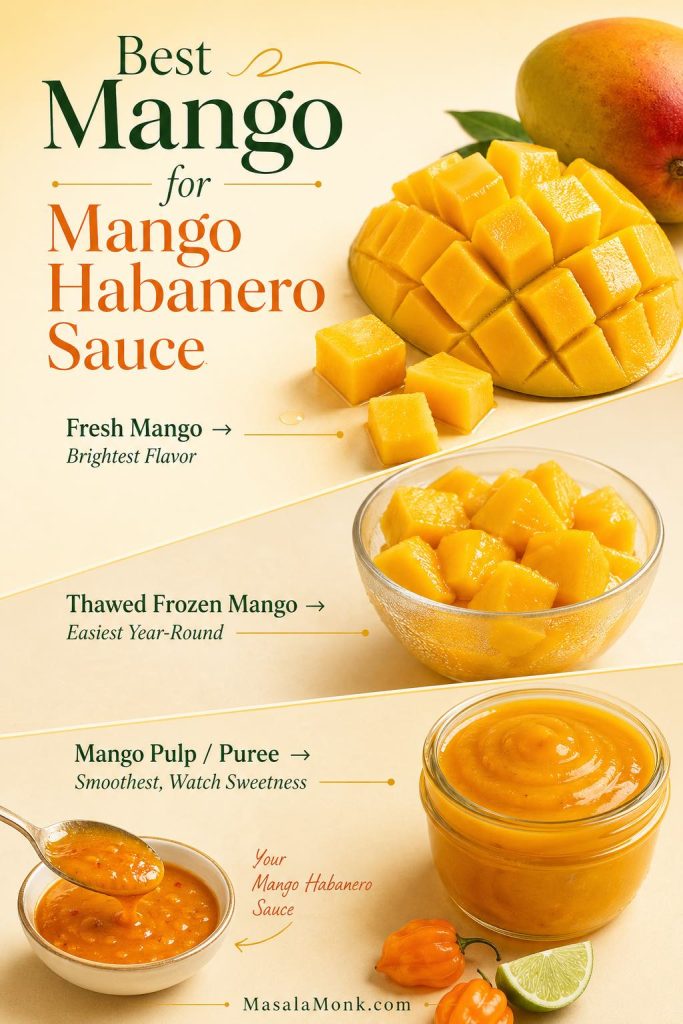
Best mango options for mango habanero sauce, showing fresh mango, thawed frozen mango, mango pulp or puree, and finished mango habanero sauce.
Fresh mango gives mango habanero sauce the brightest flavor, thawed frozen mango is the easiest year-round option, and mango pulp or puree makes the sauce extra smooth. If using sweetened pulp, start with less honey or sugar and adjust after blending.

Meanwhile, mango habanero sauce with frozen mango can also taste excellent when fresh mango is out of season. Thaw frozen mango first, then use it like fresh diced mango. It often blends smoothly and gives the sauce a consistent color and texture.

Mango pulp or mango puree can also work, especially when you want a very smooth sauce. However, the one thing to watch is sweetness. Many mango pulps are already sweetened, so start with little or no honey or sugar and adjust after blending.

On the other hand, underripe mango will make the sauce sharper and less fruity. Very fibrous mango can also make the finished sauce harder to blend smooth, so strain it through a fine mesh sieve if needed.

Can You Use Mango Pulp or Mango Puree?

Yes, mango pulp or mango puree can work well in this mango habanero sauce recipe. Use about 1 cup / 250 g mango pulp in place of the diced mango. If the pulp is sweetened, skip the honey or sugar at first and adjust only after the sauce has simmered and blended.

Heat Guide for This Mango Habanero Sauce Recipe

This is the section to read before cutting the peppers. Habaneros are much hotter than jalapeños; the Chile Pepper Institute lists orange habanero at around 250,000 Scoville Heat Units. That kind of habanero pepper heat can take over a mango sauce quickly.

For that reason, one seeded habanero is the best first batch for most people. After blending, you can always add more heat in small amounts. Once too much habanero is blended into the whole sauce, though, it is much harder to fix.
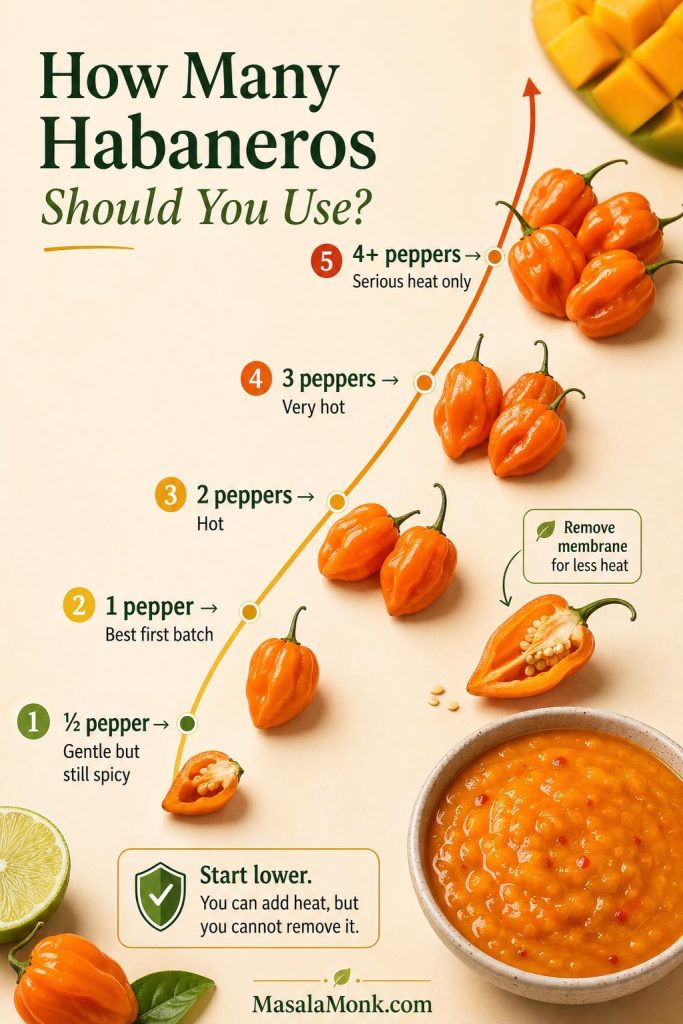
Heat guide for mango habanero sauce showing ½ pepper, 1 pepper, 2 peppers, 3 peppers, and 4+ habaneros from gentle heat to serious heat.
Start lower when making mango habanero sauce. One seeded habanero is the safest first batch for most people, while two peppers make it hot and three or more should be saved for serious heat lovers.

Use the table below to make a mild mango habanero sauce, medium-hot sauce, hot sauce, or extra hot mango habanero sauce without guessing.

Heat Level Habanero Amount Prep Method Best For
Gentle but still spicy ½ pepper Seeds and membrane removed First-time habanero users
Medium-hot 1 pepper Mostly seeded Best first batch
Hot 2 peppers Some membrane left Wings, tacos, spicy bowls
Very hot 3 peppers Some seeds and membrane included Hot sauce lovers
Extreme 4+ peppers Use with caution Serious heat lovers only
Heat tip: Start with less habanero than you think. You can always blend in more heat later, but you cannot remove it once the whole batch is too hot.
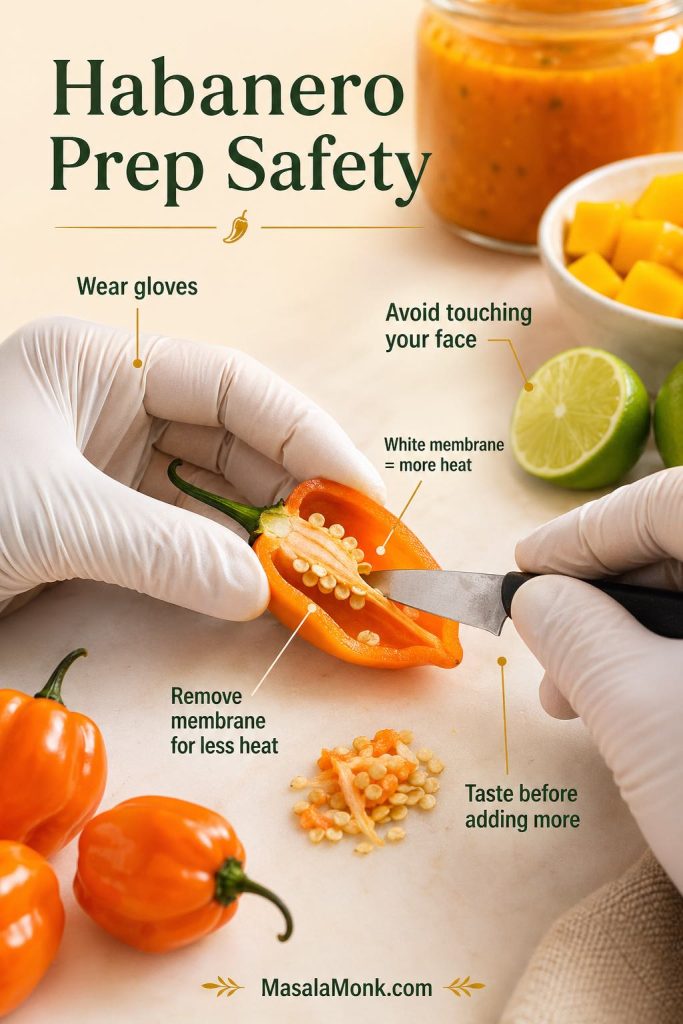
Gloved hands removing seeds and white membrane from an orange habanero pepper for mango habanero sauce.
Wear gloves when cutting habaneros, avoid touching your face, and remove some of the white membrane if you want better heat control. The membrane carries much of the pepper’s heat, so removing it makes the mango habanero sauce easier to manage.

Before cutting the peppers, wear gloves. In addition, avoid touching your eyes, nose, lips, or face after handling habaneros. The white membrane inside the pepper carries a lot of the heat, so removing it gives this sauce recipe more control.

Equipment You Need

You need a small saucepan, a blender or immersion blender, gloves for handling habaneros, a spoon or spatula, and a clean jar or bottle for storing the finished sauce. A high-speed blender gives the smoothest mango habanero sauce, but an immersion blender works if you do not mind a slightly thicker texture. For a very smooth, bottle-friendly hot sauce, keep a fine mesh sieve nearby so you can strain the sauce after blending.

How to Make This Mango Habanero Sauce Recipe

The method is simple, but the order matters: cook first, blend second, brighten last. First, simmering softens the mango, onion, garlic, and habanero. Next, blending turns them into a smooth sauce. Finally, lime juice and sweetener go in near the end so the finished sauce tastes bright instead of dull.
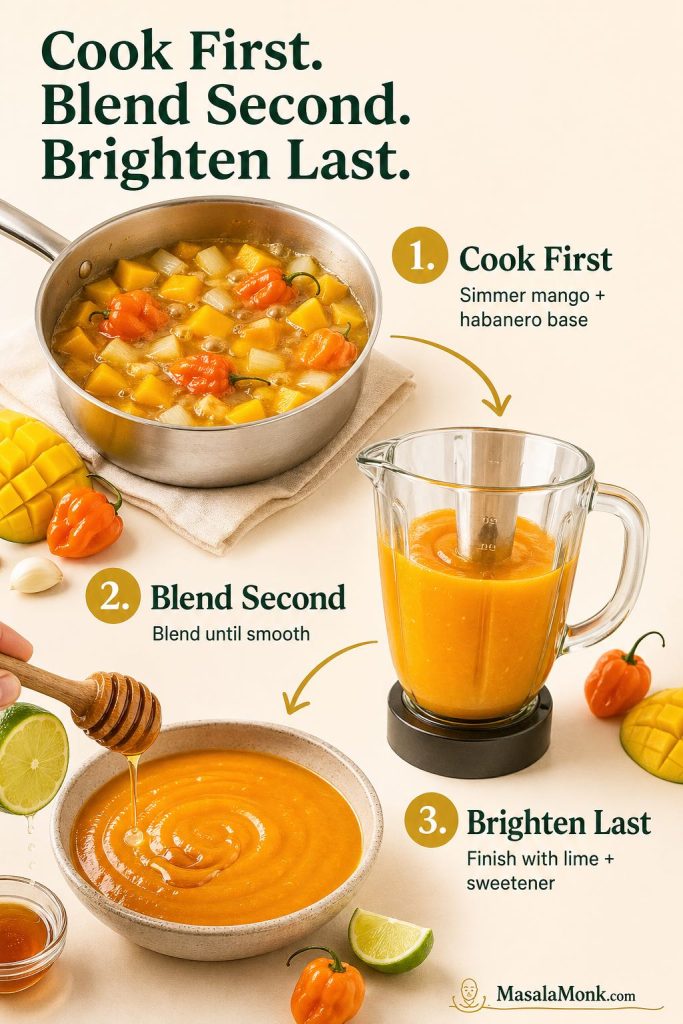
Three-step method for mango habanero sauce showing mango and habanero simmering, blending smooth, and finishing with lime and sweetener.
The order matters for smooth mango habanero sauce: simmer the mango, habanero, onion, garlic, vinegar, and water first, blend the softened mixture until smooth, then finish with lime juice and sweetener for brightness.

1. Prep the habaneros safely

First, put on gloves. Remove the stems from the habaneros. For less heat, cut the peppers open and scrape out most of the seeds and white membrane.

2. Simmer the mango and habanero base

Next, add the mango, habanero, onion, garlic, vinegar, water, and salt to a small saucepan. Bring the mixture to a visible boil over medium heat, then reduce it to a gentle simmer.

Simmer for 10–15 minutes, stirring often, until the mango and onion are soft. This cooking step rounds out the onion, garlic, and habanero, so the finished sauce tastes smoother and less raw.

3. Cool slightly and blend

After that, let the mixture cool for about 5 minutes. Blend until completely smooth. If using a blender, vent the lid slightly and cover it with a towel so steam does not build pressure.

4. Finish the sauce

At this point, return the sauce to the pan. Stir in lime juice, honey or sugar, and any optional spices. Then, simmer for another 2–5 minutes, until the mango habanero sauce looks glossy and unified.

5. Taste and adjust

Finally, taste carefully, using only a tiny spoon at first. Habanero heat builds as you eat, so the sauce may feel hotter after a few seconds.

  • If the sauce tastes flat, add salt.
  • If the mango habanero sauce tastes too sweet, add lime juice or vinegar.
  • If the recipe tastes too sharp or too hot, add mango or honey.
  • If the sauce is too thick, add water a spoonful at a time.
  • If the sauce is too thin, simmer uncovered until it reduces.
Common mistakes to avoid: Do not add all the habaneros at once if you are unsure about heat. Also, do not skip the salt, because the sauce will taste flat. Do not over-thin the sauce before blending; you can always add water later. Finally, do not assume this homemade mango habanero sauce is shelf-stable just because it contains vinegar.

Use the mango habanero sauce recipe below as the master version. From there, adjust the thickness and finish depending on whether you want hot sauce, wing sauce, glaze, dip, marinade, or BBQ-style sauce.

Mango Habanero Sauce Recipe

This homemade mango habanero sauce recipe makes a cooked blender sauce that is fruity, fiery, tangy, smooth, and flexible enough for wings, tacos, chicken, shrimp, fish, paneer, tofu, fries, burgers, wraps, and bowls.

YieldAbout 1¾ cups / 420 ml / 14 fl oz
Prep Time10 minutes
Cook Time15–20 minutes
Total Time25–30 minutes

Ingredients

  • 1½ cups / 250 g ripe mango, diced
  • 1–2 habanero peppers, stemmed
  • ¼ cup / 40 g chopped onion
  • 2 garlic cloves / 6 g, roughly chopped
  • ⅓ cup / 80 ml apple cider vinegar or white vinegar, preferably 5% acidity
  • ¼ cup / 60 ml water
  • ¾ tsp / 4–5 g fine sea salt
  • 2 tbsp / 30 ml fresh lime juice
  • 1–2 tbsp honey, sugar, or maple syrup
  • Optional: ½–1 tsp grated ginger
  • Optional: ¼ tsp cumin
  • Optional: ¼ tsp smoked paprika
  • Optional: tiny pinch to ¼ tsp allspice

Instructions

  1. Wear gloves before handling the habaneros. Remove the stems. For less heat, remove seeds and most of the white membrane.
  2. Add mango, habanero, onion, garlic, vinegar, water, and salt to a small saucepan.
  3. Bring to a visible boil over medium heat, then reduce to a gentle simmer.
  4. Simmer for 10–15 minutes, stirring often, until the mango and onion are soft.
  5. Cool for 5 minutes, then blend until completely smooth.
  6. Return the sauce to the pan. Stir in lime juice, sweetener, and any optional spices.
  7. Simmer for 2–5 minutes more, until glossy and slightly thickened.
  8. Taste carefully. Adjust salt, lime/vinegar, sweetener, or water as needed.
  9. Cool the mango habanero sauce and store it in a clean jar or bottle in the refrigerator.

Recipe Notes

  • Use 1 habanero for a medium-hot sauce and 2 habaneros for a hotter version.
  • For a thinner homemade mango habanero hot sauce, increase the vinegar to ½ cup / 120 ml and strain after blending.
  • For a thicker glaze, simmer uncovered for a few extra minutes.
  • For wing sauce, use the butter-finished conversion below.
  • This is a refrigerator sauce recipe, not a tested shelf-stable canning recipe.
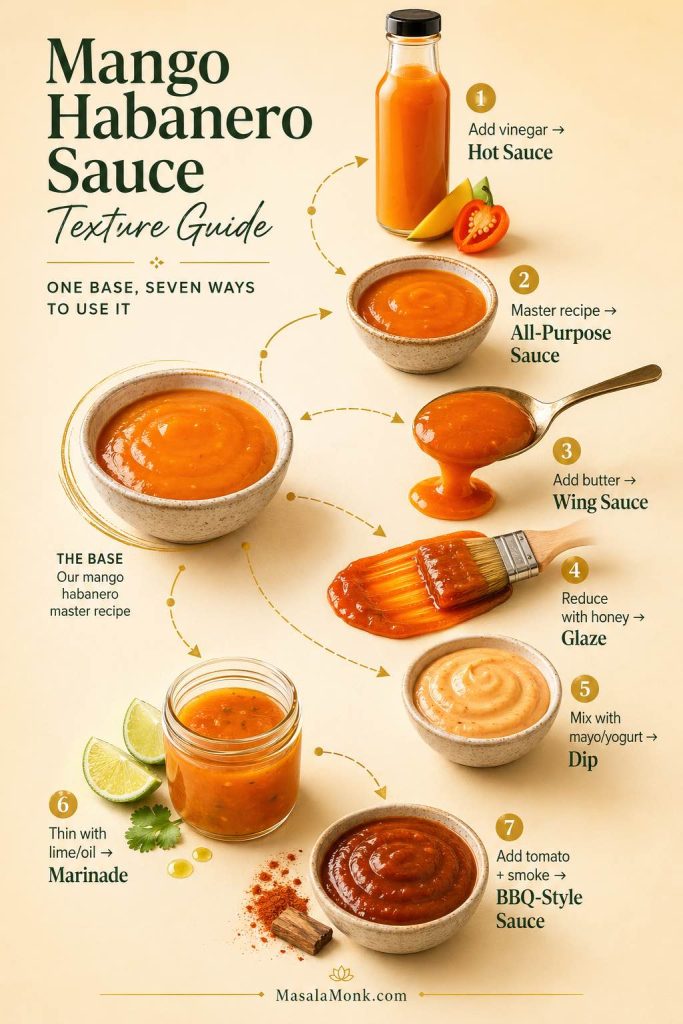
Mango habanero sauce texture guide showing how one base becomes hot sauce, all-purpose sauce, wing sauce, glaze, dip, marinade, and BBQ-style sauce.
Use the master mango habanero sauce as a base, then adjust the texture for the job: add vinegar for hot sauce, butter for wing sauce, honey for glaze, mayo or yogurt for dip, lime and oil for marinade, or tomato and smoke for a BBQ-style sauce.

Homemade Mango Habanero Hot Sauce Version

Choose this version when you want something bottle-friendly. More vinegar makes the sauce thinner, sharper, and easier to drizzle over tacos, eggs, grilled food, bowls, and roasted vegetables.

Element All-Purpose Sauce Hot Sauce Version
Vinegar ⅓ cup / 80 ml ½ cup / 120 ml
Water ¼ cup / 60 ml ¼ cup / 60 ml, plus more if needed
Sweetener 1–2 tbsp 1 tbsp to start
Final simmer 2–5 minutes 5 minutes
Texture Medium-thick Thin and pourable
Optional step Usually no strain Strain for bottle-smooth sauce

Compared with the all-purpose sauce, this hot sauce version tastes sharper, thinner, and more vinegar-forward. Therefore, use it when you want a real hot sauce texture rather than a thicker dipping sauce.
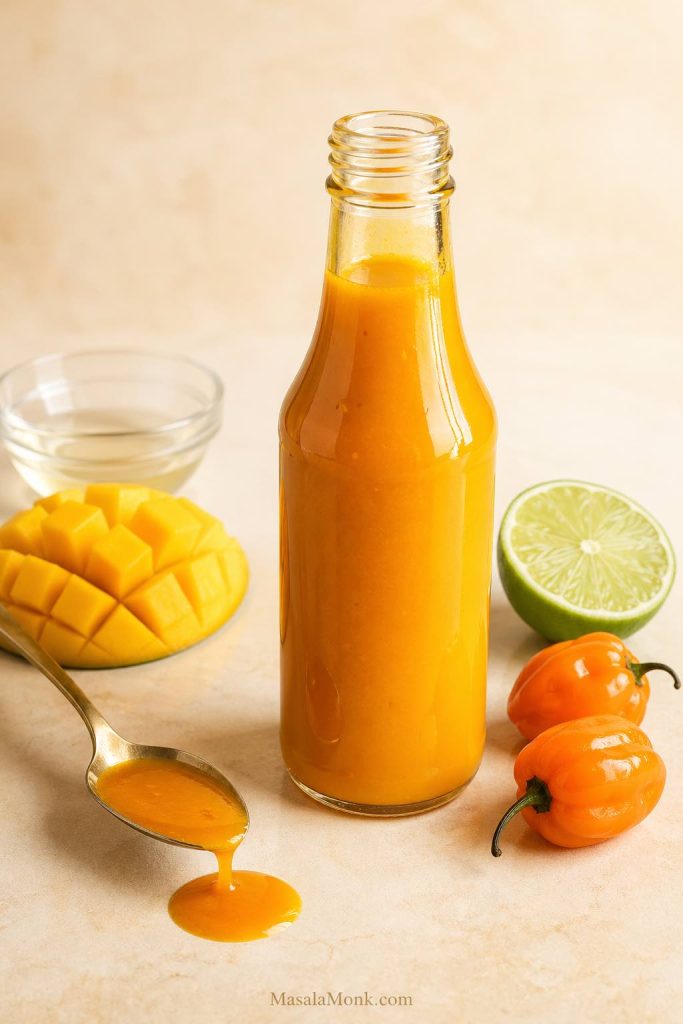
Homemade mango habanero hot sauce in a glass bottle with mango, habanero peppers, lime, vinegar, and a spoonful of orange sauce.
For a thinner mango habanero hot sauce, add extra vinegar, blend until smooth, and strain if you want a bottle-friendly texture. This version is sharper and more pourable than the thicker all-purpose sauce.

Mango Habanero Wing Sauce

For wings, the sauce needs to cling. Butter gives it gloss, honey helps it stick, and gentle heat brings everything together. In other words, this is the sweet heat version to use when you want glossy mango habanero sauce for wings.

This wing version works for chicken wings, boneless wings, tenders, cauliflower wings, paneer bites, or crispy tofu. For best results, warm the sauce first, then toss it with hot cooked wings just before serving.
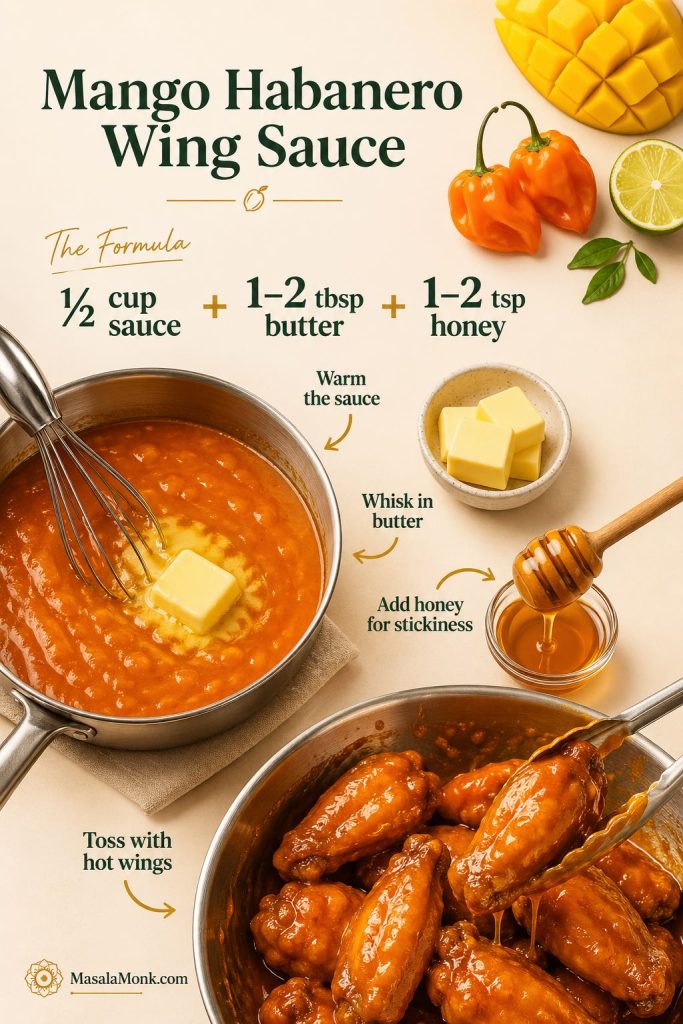
Mango habanero wing sauce formula showing ½ cup sauce, butter, honey, warm sauce, whisk in butter, add honey, and toss with hot wings.
Turn the base mango habanero sauce into a glossy wing sauce by warming ½ cup sauce with butter and a little honey. The butter helps the sauce cling, while the honey gives the wings a sweet, sticky finish.

For 2 lb / 900 g Wings

Ingredient US Amount Metric Amount
Mango habanero sauce ½ cup 120 ml / 4 fl oz
Butter 1–2 tbsp 14–28 g / 0.5–1 oz
Honey or brown sugar 1–2 tsp 7–14 g honey or 4–8 g sugar
Lime juice or vinegar, optional 1 tsp 5 ml
Salt Pinch To taste

First, warm the mango habanero sauce in a small pan over low heat. Next, whisk in the butter until glossy. If you want a stickier wing sauce, add honey or brown sugar. Finally, if the sauce tastes too sweet, add lime juice or vinegar before tossing it with hot cooked wings.

Optional Baked Wings

For a simple oven version, use 2 lb / 900 g chicken wings, 1 tbsp / 10–12 g aluminum-free baking powder, ¾ tsp / 4 g kosher salt, ½ tsp garlic powder, and ½ tsp smoked paprika. First, pat the wings very dry. Then, toss them with the seasoning, arrange them on a rack, and bake at 425°F / 220°C for 45–50 minutes, flipping halfway.

After the wings are cooked, toss them with warm mango habanero wing sauce. For food safety, chicken wings should reach 165°F / 73.9°C internally, following USDA poultry temperature guidance.
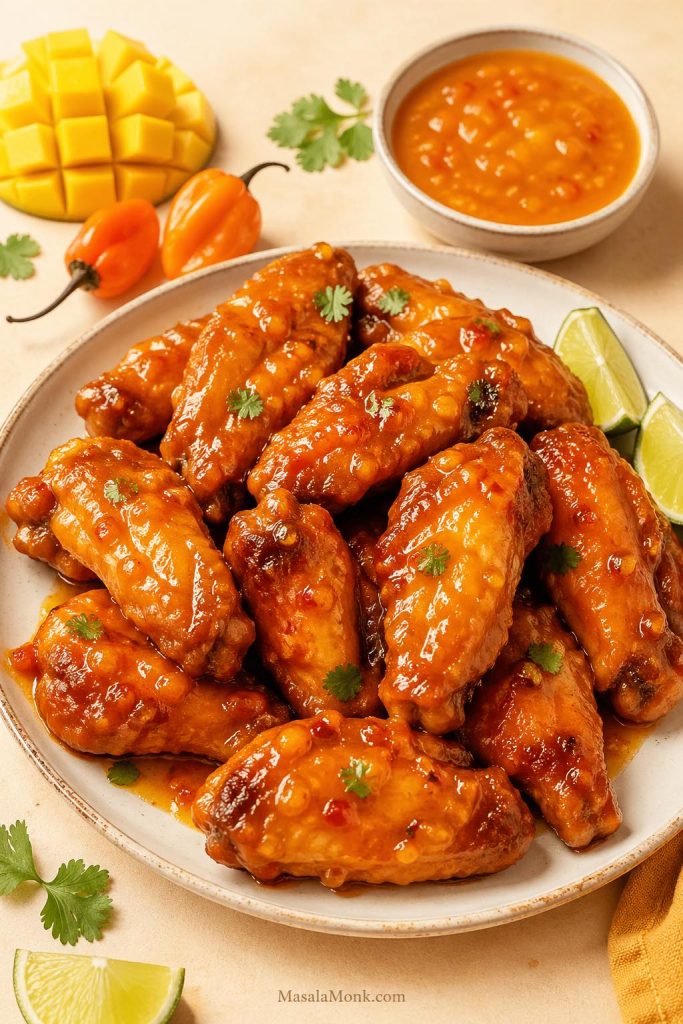
Glossy mango habanero chicken wings on a plate with mango, habanero peppers, lime wedges, and a bowl of orange wing sauce.
Toss hot cooked wings with warm mango habanero wing sauce just before serving so the buttery, sweet-spicy glaze clings instead of sliding off. The sauce should look glossy, sticky, and bright orange once it coats the wings.

Mango Habanero Glaze

For a glaze, reduce the sauce instead of thinning it. A few extra minutes in the pan makes it thicker, shinier, and better for brushing onto grilled chicken, salmon, shrimp, pork, paneer, tofu, roasted vegetables, or skewers.

Ingredient Amount
Mango habanero sauce ¾ cup / 180 ml
Honey 1 tbsp / 20 g
Lime juice or vinegar 1 tsp / 5 ml
Butter or oil, optional 1 tbsp / 14 g butter or 1 tsp / 5 ml oil

Simmer for 5–8 minutes, until the glaze lightly coats the back of a spoon. Then, brush it onto food near the end of cooking so the sugars do not burn.
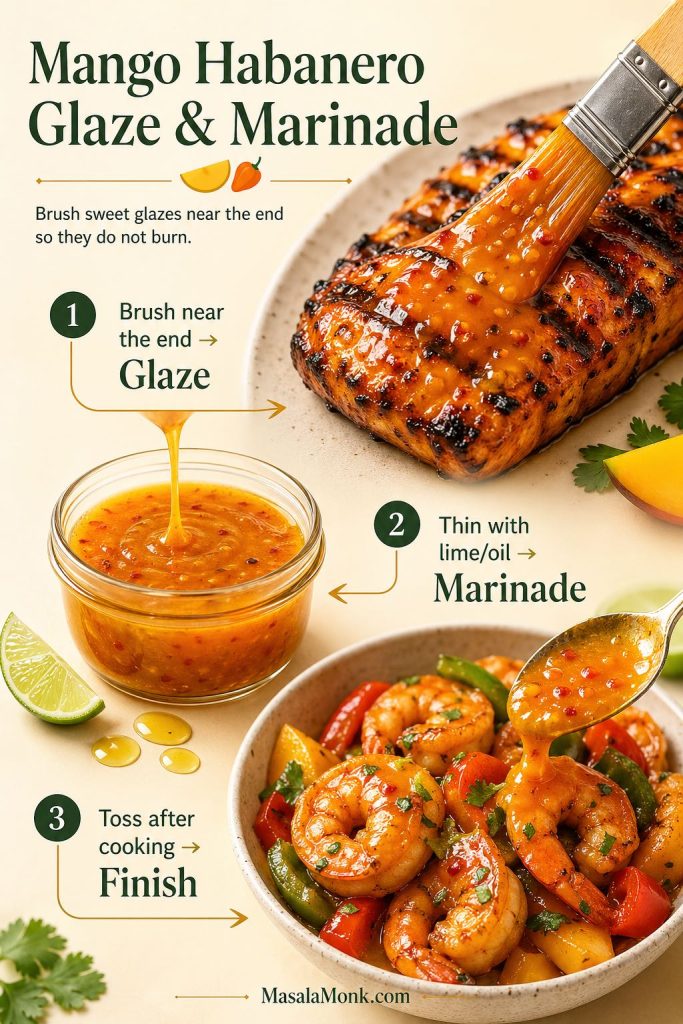
Mango habanero glaze and marinade guide showing sauce brushed on grilled food, thinned with lime and oil, and spooned over cooked shrimp.
Use mango habanero sauce as a glaze, marinade, or finishing sauce depending on texture. Brush sweet glazes near the end of cooking so they do not burn, thin the sauce with lime and oil for a marinade, or spoon it over cooked shrimp, chicken, paneer, tofu, or vegetables just before serving.

Mango Habanero Sauce Variations

Once the master sauce is balanced, the variations are easy. In fact, you can keep the same mango-habanero base, then change the texture, sweetness, smokiness, or cooking method depending on how you want to serve it.

For your first batch, however, keep the sauce simple. It is easier to learn your preferred heat and acid level before adding extra spices or turning the sauce into BBQ sauce, salsa, aioli, or a fermented hot sauce.
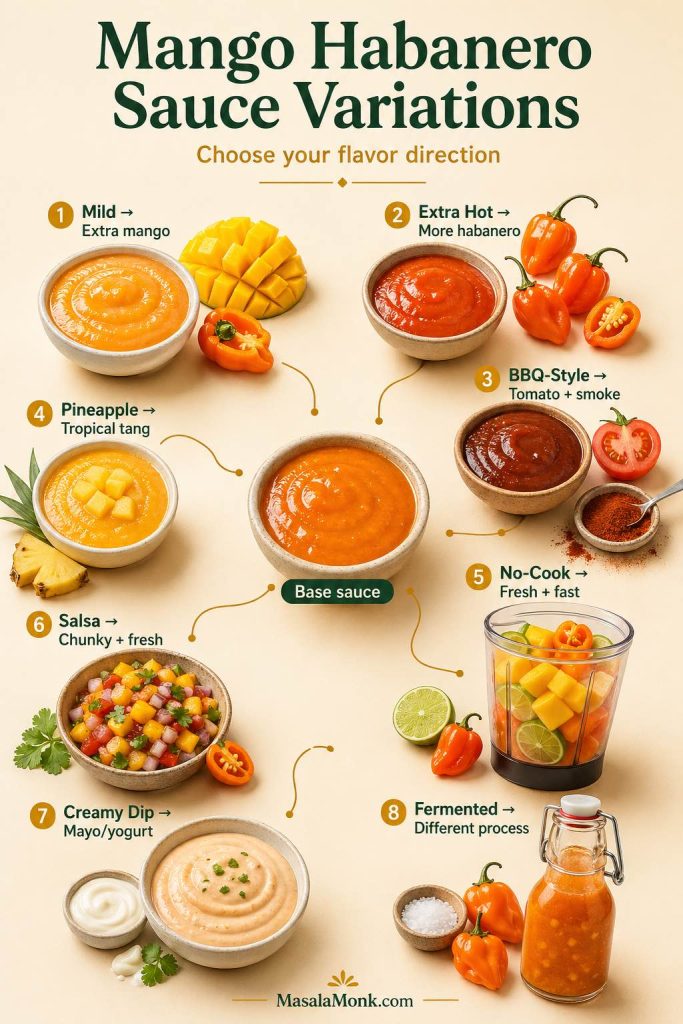
Mango habanero sauce variations guide showing mild, extra hot, BBQ-style, pineapple, no-cook, salsa, creamy dip, and fermented hot sauce options.
Once the base mango habanero sauce is balanced, you can take it in several directions. Add more mango for a milder sauce, more habanero for extra heat, pineapple for tropical tang, tomato and smoke for BBQ-style sauce, or mayo and yogurt for a creamy dip.

Mild Mango Habanero Sauce

For a milder sauce, use ½ seeded habanero and remove most of the white membrane. After blending, add extra mango if the heat still feels too sharp. You can also add a small amount of cooked orange bell pepper for body and color, but keep mango as the main flavor.

Extra Hot Mango Habanero Sauce

For an extra hot mango habanero sauce, use 3 or more habaneros only if you already enjoy very spicy sauces. Even then, add the extra pepper gradually so the sauce stays usable.

Mango Habanero BBQ Sauce

For a smoky, thicker version, simmer 1 cup / 240 ml mango habanero sauce with 2 tbsp / 30 g tomato paste, 1 tbsp / 12–14 g brown sugar, 1 tbsp / 15 ml apple cider vinegar, ½ tsp smoked paprika, ¼ tsp cumin, and 1 tsp / 5 ml Worcestershire sauce if you use it. As a result, the sauce becomes darker, thicker, and smoky-sweet after 8–10 minutes.

Pineapple Mango Habanero Sauce

For a brighter tropical variation, replace ½ cup / 80–90 g of the mango with pineapple. This version tastes sharper, juicier, and especially good with grilled shrimp, fish, chicken, tacos, and pork.

No-Cook Mango Habanero Sauce

For a faster, fresher version, blend the mango, habanero, vinegar, lime juice, garlic, salt, and sweetener without simmering. However, use less onion, or skip the onion, because raw onion can become sharp in a no-cook sauce.

This version tastes brighter and fruitier. However, it also tastes sharper and less rounded than the cooked sauce. Use the no-cook version within 2–3 days, and keep it refrigerated the whole time.

Mango Habanero Salsa

For a chunky salsa-style version, mix 1½ cups / 250 g diced mango with ½–1 very finely minced habanero, ¼ cup / 40 g red onion, 2 tbsp / 30 ml lime juice, 2 tbsp chopped cilantro, ½ tsp / 3 g salt, and optional tomato, cucumber, or pineapple. Then, rest the salsa for 10 minutes before serving.

For a chunkier mango topping with onion, cilantro, lime, and optional tomato or cucumber, see the full mango salsa recipe.

Mango Habanero Aioli or Creamy Dip

For a creamy dip, stir 1–2 tbsp cooled mango habanero sauce into ¼ cup mayonnaise, Greek yogurt, sour cream, or vegan mayo. Then, use it as a dip or sandwich spread for fries, burgers, wraps, tacos, nuggets, and roasted vegetables.

Fermented Mango Habanero Hot Sauce

Fermented mango habanero hot sauce is a different process from this quick cooked sauce. Instead of simmering first, the peppers, mango, onion, and garlic are usually fermented in a salt brine or mash before being blended with vinegar or lime.

Fermentation changes the safety and storage rules, so this quick cooked recipe should not be treated as a fermented sauce. If you want a fermented version, follow a dedicated fermented hot sauce method and pay attention to acidity, cleanliness, gas buildup, refrigeration, and pH if storing longer.

How to Use Mango Habanero Sauce

This is where the sauce earns its place in the fridge. For example, you can keep it medium-thick for dipping, thin it for drizzling, reduce it for glazing, or loosen it into a quick marinade.

Use this mango habanero sauce for chicken, shrimp, salmon, fish tacos, rice bowls, burgers, wraps, roasted vegetables, paneer, tofu, and fries. In other words, it works anywhere you want sweet heat with a bright mango finish.

What to eat with mango habanero sauce, including wings, tacos, shrimp, salmon, fries, paneer or tofu, burgers, wraps, and bowls.
Mango habanero sauce works as a dip, drizzle, glaze, or finishing sauce. Use it with wings, tacos, shrimp, salmon, fries, paneer, tofu, burgers, wraps, bowls, or roasted vegetables whenever you want sweet heat with a bright mango finish.

As a hot sauce

As a hot sauce, it works best when the texture is thin and pourable. Drizzle it on tacos, eggs, nachos, rice bowls, grilled vegetables, beans, burritos, wraps, and roasted potatoes. For a thinner hot sauce texture, use the extra-vinegar version above.

As a wing sauce

For wings, warm it first so it coats evenly. Toss it with chicken wings, boneless wings, tenders, nuggets, cauliflower wings, paneer bites, or crispy tofu just before serving.

As a glaze

When using it as a glaze, brush it on grilled chicken, shrimp, salmon, pork, paneer, tofu, roasted carrots, sweet potatoes, or skewers near the end of cooking. Otherwise, the sugars in the mango and honey can scorch if they cook too long.

As a marinade

For a quick mango habanero marinade, thin the sauce with a little extra lime juice, vinegar, or oil. Use it for chicken, shrimp, fish, paneer, tofu, or vegetables. However, avoid marinating delicate seafood for too long because the acid can change the texture.

As a dip

For dipping, keep the texture thicker. This works as a mango habanero dipping sauce for fries, potato wedges, onion rings, pakoras, chips, crackers, chicken tenders, nuggets, vegetable sticks, or roasted cauliflower. If the sauce feels too hot, mix a spoonful into mayo or yogurt.

As a sandwich sauce

Inside sandwiches and wraps, a little goes a long way. Use it on burgers, fried chicken sandwiches, grilled cheese, wraps, rolls, spicy mayo-style spreads, and grilled paneer sandwiches. The sweet, spicy, tangy flavor works especially well with rich or crispy fillings.

Mango Habanero Sauce vs Hot Sauce vs Wing Sauce vs Salsa

The names can get confusing because mango and habanero show up in several forms. However, the difference is mostly texture and use: hot sauce is thinner, wing sauce is buttery, glaze is reduced, salsa is chunky, marinade is looser, and BBQ sauce is smoky-sweet.
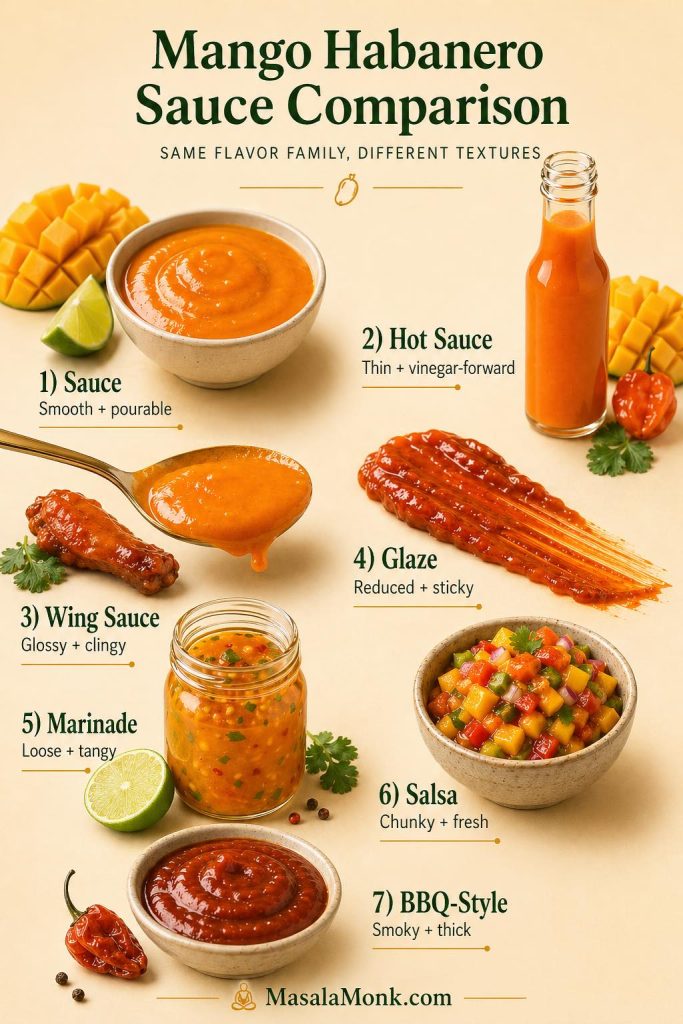
Mango habanero sauce comparison showing sauce, hot sauce, wing sauce, glaze, marinade, salsa, and BBQ-style sauce with different textures.
Mango habanero sauce can take several forms. Keep it smooth and pourable as an all-purpose sauce, thin it into hot sauce, finish it with butter for wings, reduce it into a sticky glaze, loosen it for marinade, make it chunky as salsa, or push it smoky and thick for BBQ-style sauce.
Version Texture Main Flavor Best Use
Mango habanero sauce Smooth, medium-thick, pourable Sweet, fruity, tangy, hot Wings, tacos, chicken, shrimp, dipping
Mango habanero hot sauce Thinner and more vinegar-forward Sharper, brighter, hotter Tacos, eggs, bowls, grilled food
Mango habanero wing sauce Glossy, buttery, clingy Sweet-hot and slightly sticky Chicken wings, tenders, cauliflower wings
Mango habanero marinade Loose, tangy, lightly sweet Bright, spicy, acidic Chicken, shrimp, fish, paneer, tofu
Mango habanero salsa Chunky or roasted Fresh, juicy, spicy Chips, tacos, fish, bowls
Mango habanero BBQ sauce Thicker, smoky, sticky Sweet, smoky, spicy Grilled chicken, ribs, burgers, sandwiches

Sauce Texture Guide

After blending, texture is the easiest thing to change. For example, a spoonful of vinegar can turn the base into a hot sauce, while a few extra minutes of simmering can turn it into a glaze. Use this guide to adjust the sauce for the way you want to serve it.

Version Texture Best Use How to Adjust
Mango habanero hot sauce Thin, pourable Tacos, eggs, bowls, grilled food Add more vinegar or water; strain if needed
All-purpose mango habanero sauce Medium-thick, pourable Chicken, tacos, fish, dipping Use the master recipe
Mango habanero wing sauce Glossy, clingy Wings, tenders, cauliflower wings Add butter and simmer briefly
Mango habanero glaze Thick, lacquered Grilled chicken, shrimp, salmon, paneer Add honey and reduce
Mango habanero dipping sauce Thick, spoonable Fries, tenders, pakoras, nuggets, vegetables Simmer slightly longer or stir into mayo/yogurt
Mango habanero marinade Loose, pourable Chicken, shrimp, fish, paneer, tofu Thin with lime, vinegar, or oil
Mango habanero BBQ sauce Thick, smoky-sweet Grilling, ribs, burgers Add tomato paste, brown sugar, and smoked paprika

How to Fix Mango Habanero Sauce

Sauces are adjustable, especially before serving. Because mango sweetness, vinegar sharpness, and habanero heat can vary from batch to batch, taste the sauce after blending and fix it while it is still warm.
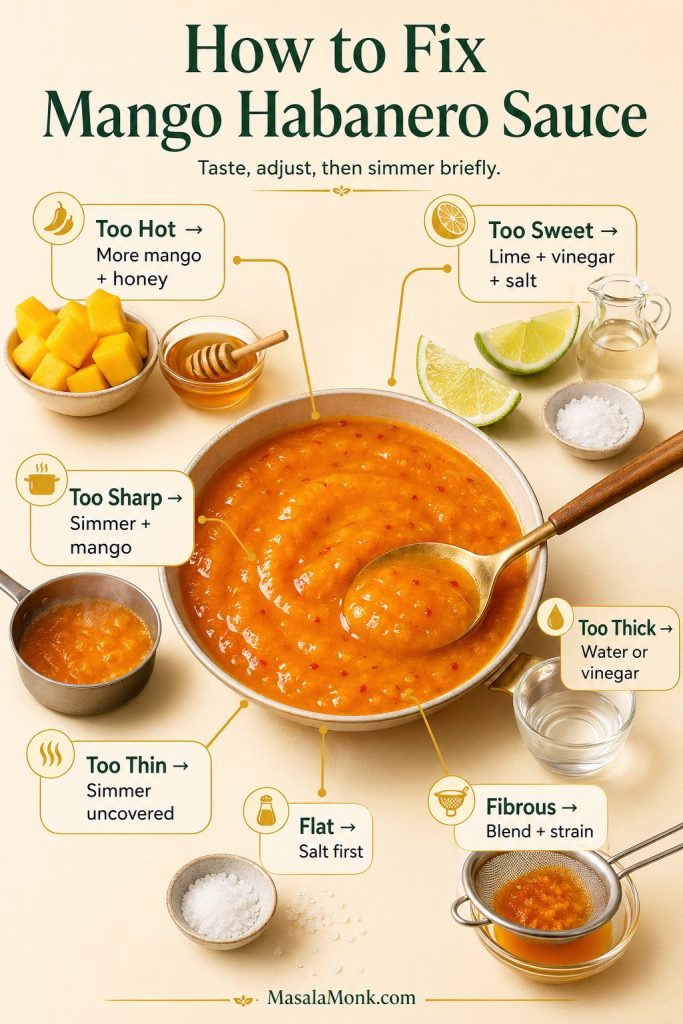
Troubleshooting guide for mango habanero sauce showing fixes for sauce that is too hot, too sweet, too sharp, too thick, too thin, flat, or fibrous.
Mango habanero sauce is easy to adjust while it is still warm. Add mango and honey if it is too hot, lime, vinegar, and salt if it is too sweet, water or vinegar if it is too thick, and simmer uncovered if it is too thin.
Problem Likely Cause Fix
Too hot Too much habanero or membrane Add more mango first; then round it with honey, lime, or butter if making wing sauce
Too sweet Very ripe mango plus too much sweetener Add vinegar, lime, and salt
Too sharp Too much acid or not enough simmering Simmer 3–5 minutes more; add mango or honey
Too thin Too much water or juicy mango Simmer uncovered until reduced
Too thick Dense mango or over-reduction Add water, vinegar, or lime 1 tbsp / 15 ml at a time
Bitter Burned garlic/onion or too much pepper pith Add mango and sweetener; avoid browning garlic next time
Flat Not enough salt or acid Add salt first. If it still tastes dull, add lime or vinegar
Not mango-forward Mango was bland or underripe Add ripe mango, thawed frozen mango, or mango pulp
Grainy or fibrous Fibrous mango or weak blender Blend longer, strain, or use smoother mango/frozen mango

Scaling the Recipe

Scaling is easy for mango, vinegar, lime, garlic, onion, sweetener, and salt. However, habaneros are the exception. Their size and heat vary so much that they should be scaled by taste, not strict multiplication.

If you double the mango and liquid, you can usually double the garlic, onion, vinegar, lime, sweetener, and salt. With habaneros, start lower, blend, taste carefully, and increase only if the sauce needs more heat.
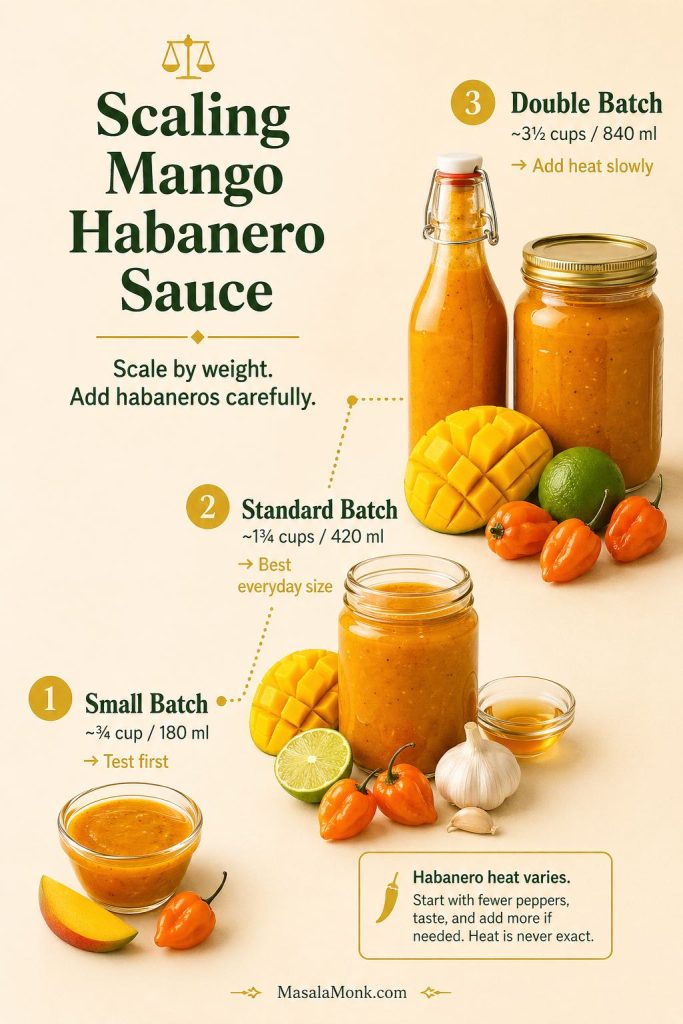
Scaling guide for mango habanero sauce showing small batch, standard batch, and double batch with a reminder to add habaneros carefully.
Scale mango habanero sauce by weight when possible, but add the habaneros more carefully than the mango, vinegar, lime, salt, and aromatics. Pepper heat varies, so start with fewer habaneros, taste after blending, and add more only if needed.
Ingredient Small Batch: ~¾ cup / 180 ml Standard: ~1¾ cups / 420 ml Double: ~3½ cups / 840 ml
Mango 125 g / ¾ cup 250 g / 1½ cups 500 g / 3 cups
Habanero ½–1 pepper 1–2 peppers 2–4 peppers, added carefully
Onion 20 g / 2 tbsp 40 g / ¼ cup 80 g / ½ cup
Garlic 1 clove / 3 g 2 cloves / 6 g 4 cloves / 12 g
Vinegar 40 ml / 2 tbsp + 2 tsp 80 ml / ⅓ cup 160 ml / ⅔ cup
Lime juice 15 ml / 1 tbsp 30 ml / 2 tbsp 60 ml / ¼ cup
Water 30 ml / 2 tbsp 60 ml / ¼ cup 120 ml / ½ cup
Honey 10–20 g 20–40 g 40–80 g
Salt 2–2.5 g 4–5 g 8–10 g

Storage, Freezing, and Canning Safety

Storage is the one place where homemade hot sauce should stay conservative. After the sauce cools, store it in a clean glass jar or bottle in the refrigerator. For best flavor and freshness, use it within 1–2 weeks. For longer storage, freeze small portions instead.
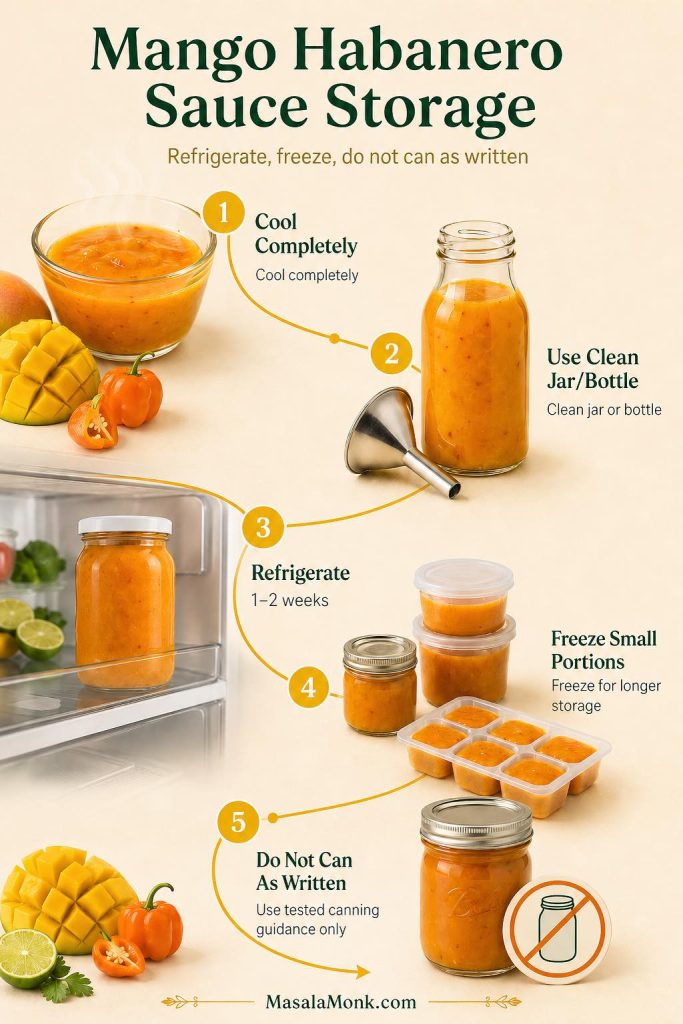
Mango habanero sauce storage guide showing sauce cooling, being bottled, refrigerated for 1–2 weeks, frozen in small portions, and not canned as written.
Treat this homemade mango habanero sauce as a refrigerator sauce. Cool it completely, store it in a clean jar or bottle, refrigerate for 1–2 weeks, or freeze small portions for longer storage. Do not can this recipe as written unless you are using tested canning guidance.

Even though the sauce contains vinegar and lime juice, it also contains mango, onion, garlic, and fresh peppers. Therefore, it should be treated as a refrigerator sauce, not a shelf-stable canned hot sauce, unless you are following tested preservation guidance.

For hot sauce safety, SDSU Extension explains that hot sauce should have a pH below 4.6 and include acid such as vinegar. For canning-style recipes, use vinegar labeled 5% acidity; Illinois Extension notes that tested USDA and National Center for Home Food Preservation recipes are built around that acidity level.

Canning note: Do not water-bath can this sauce as written. For shelf-stable preservation, use a tested canning recipe and proper acidity controls.

The National Center for Home Food Preservation has separate tested mango sauce canning guidance. In other words, do not treat this refrigerator mango habanero sauce recipe as a shelf-stable canning recipe.

FAQs

Is mango habanero sauce very spicy?

Yes, it can be. Because habaneros are very hot peppers, this mango habanero sauce recipe can become intense quickly. Use ½ to 1 seeded habanero for a more controlled first batch, or 2 habaneros for a properly hot sauce.

Can I make this mango habanero sauce recipe less spicy?

Yes. First, use fewer habaneros. Next, remove the seeds and membrane before cooking. If the finished sauce is still too hot, add more mango, honey, lime, or butter if you are turning it into wing sauce.

Is this mango habanero sauce easy to make?

Yes. This is an easy cooked blender sauce: simmer the mango, habanero, onion, garlic, vinegar, water, and salt, then blend and finish with lime juice and sweetener.

Can I make mango habanero sauce at home without special equipment?

Yes. You only need a saucepan, blender, gloves, spoon or spatula, and a clean jar or bottle. For a smoother homemade hot sauce, however, a high-speed blender and fine mesh sieve are helpful.

Can I use frozen mango?

Yes. Frozen mango works well in this sauce recipe. Thaw it before cooking so the mango simmers evenly and blends smoothly with the habanero, vinegar, garlic, and onion.

Can I use mango pulp or mango puree?

Yes. Use about 1 cup / 250 g mango pulp or mango puree instead of diced mango. If the pulp is sweetened, skip the honey or sugar at first, then adjust the sauce after blending.

Should mango habanero sauce be cooked?

For this style, yes. Cooking the mango, habanero, onion, and garlic before blending makes the sauce smoother, rounder, and more versatile. A raw blender version can taste fresher, but it will also taste sharper and less polished.

How do I make mango habanero hot sauce thinner?

Increase the vinegar to ½ cup / 120 ml, add water as needed, blend very smooth, and strain if you want a bottle-friendly texture. This gives the mango habanero sauce a thinner, sharper hot sauce consistency.

How do I make mango habanero wing sauce?

Warm ½ cup / 120 ml mango habanero sauce with 1–2 tbsp / 14–28 g butter, plus a little honey if you want it stickier. Then, toss hot cooked wings in the warm sauce just before serving.

Can I make mango habanero sauce without sugar?

Yes. If your mango is ripe and sweet, you can skip the honey, sugar, or maple syrup. However, the sauce will taste sharper and more hot-sauce-like, so adjust with extra mango or a little more salt if needed.

Can I make mango habanero sauce without vinegar?

You can reduce the vinegar and use more lime juice for a fresher flavor. However, the sauce will taste less like hot sauce and should still be refrigerated. For storage and hot-sauce character, vinegar is the better choice.

Is habanero mango sauce the same as mango habanero sauce?

Yes. Habanero mango sauce and mango habanero sauce usually mean the same thing: a sweet-hot sauce made with mango and habanero peppers. Mango habanero sauce is the more common way to describe it because the mango gives the sauce its body, color, and sweetness.

Is mango habanero sauce the same as mango habanero salsa?

No. Mango habanero sauce is usually smooth, cooked, and pourable. Mango habanero salsa is usually chunky, fresher, and made for chips, tacos, fish, shrimp, and bowls.

What vinegar is best for mango habanero sauce?

Apple cider vinegar gives the sauce a rounder, fruitier tang. White vinegar tastes sharper and more classic for hot sauce. Either works, but use vinegar labeled 5% acidity if you are following preservation-style guidance.

What can I use instead of habanero peppers?

Scotch bonnet peppers are the closest substitute because they have a similar fruity heat. Use the same cautious approach: start with ½ to 1 pepper, then increase only after tasting. For a milder sauce, use jalapeño, serrano, or Fresno peppers. The recipe will not have the same floral habanero punch, but it will still make a good spicy mango sauce.

Does mango habanero sauce need to be refrigerated?

Yes. This homemade mango habanero sauce should be refrigerated because it contains mango, onion, garlic, and fresh peppers. Store it in a clean jar or bottle and use it within 1–2 weeks for best flavor and freshness.

How long does mango habanero sauce last?

Store this mango habanero sauce recipe in the refrigerator and use it within 1–2 weeks for best flavor and freshness. For longer storage, freeze small portions instead of leaving the sauce at room temperature.

Can you freeze mango habanero sauce?

Yes. Freeze it in small portions, then thaw only what you need. The texture may loosen slightly after thawing, so shake, stir, or blend it again before serving.

Can I can mango habanero sauce?

Do not can this recipe as written. It is a refrigerator sauce, not a tested shelf-stable canning recipe. Use a tested canning recipe and proper pH controls if you want shelf-stable preservation.

Save this mango habanero sauce recipe for the next time you want a sweet, spicy, tangy sauce for wings, tacos, bowls, grilled food, or dipping.
Mango habanero sauce recipe pin with glossy orange sauce in a jar, spoon pour, mango, habanero peppers, lime, garlic, and honey.
This mango habanero sauce recipe makes a sweet, spicy, tangy sauce for wings, tacos, bowls, dipping, glazing, and drizzling. The mango gives body and sweetness, while habanero, lime, vinegar, and garlic keep it bright and fiery.

Back to top

Posted on — 1 Comment

Salmon Bowl Recipe

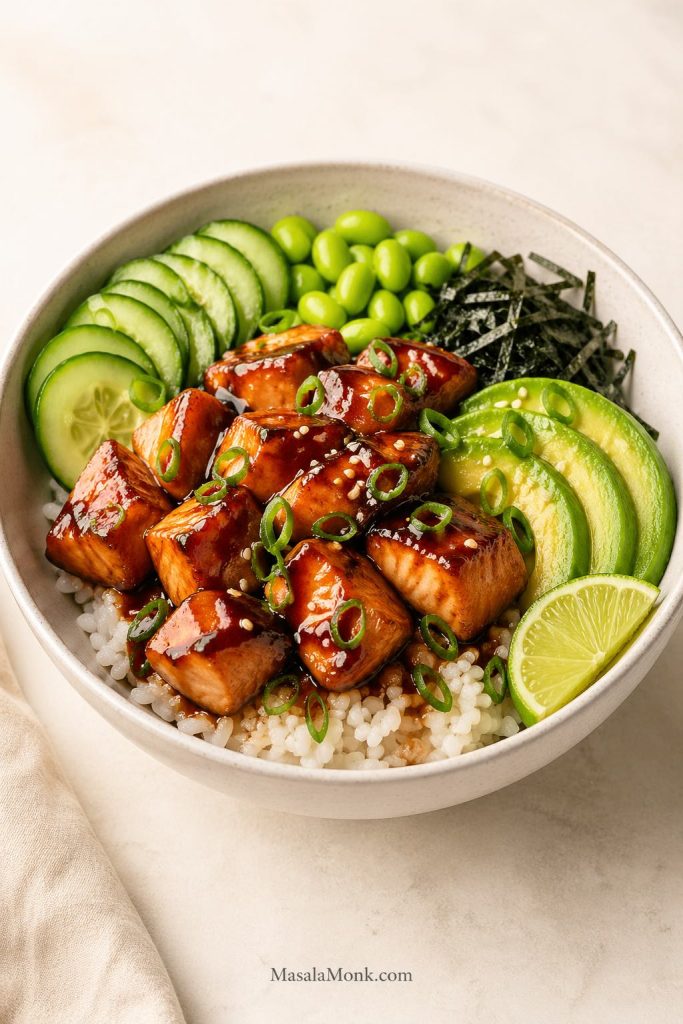
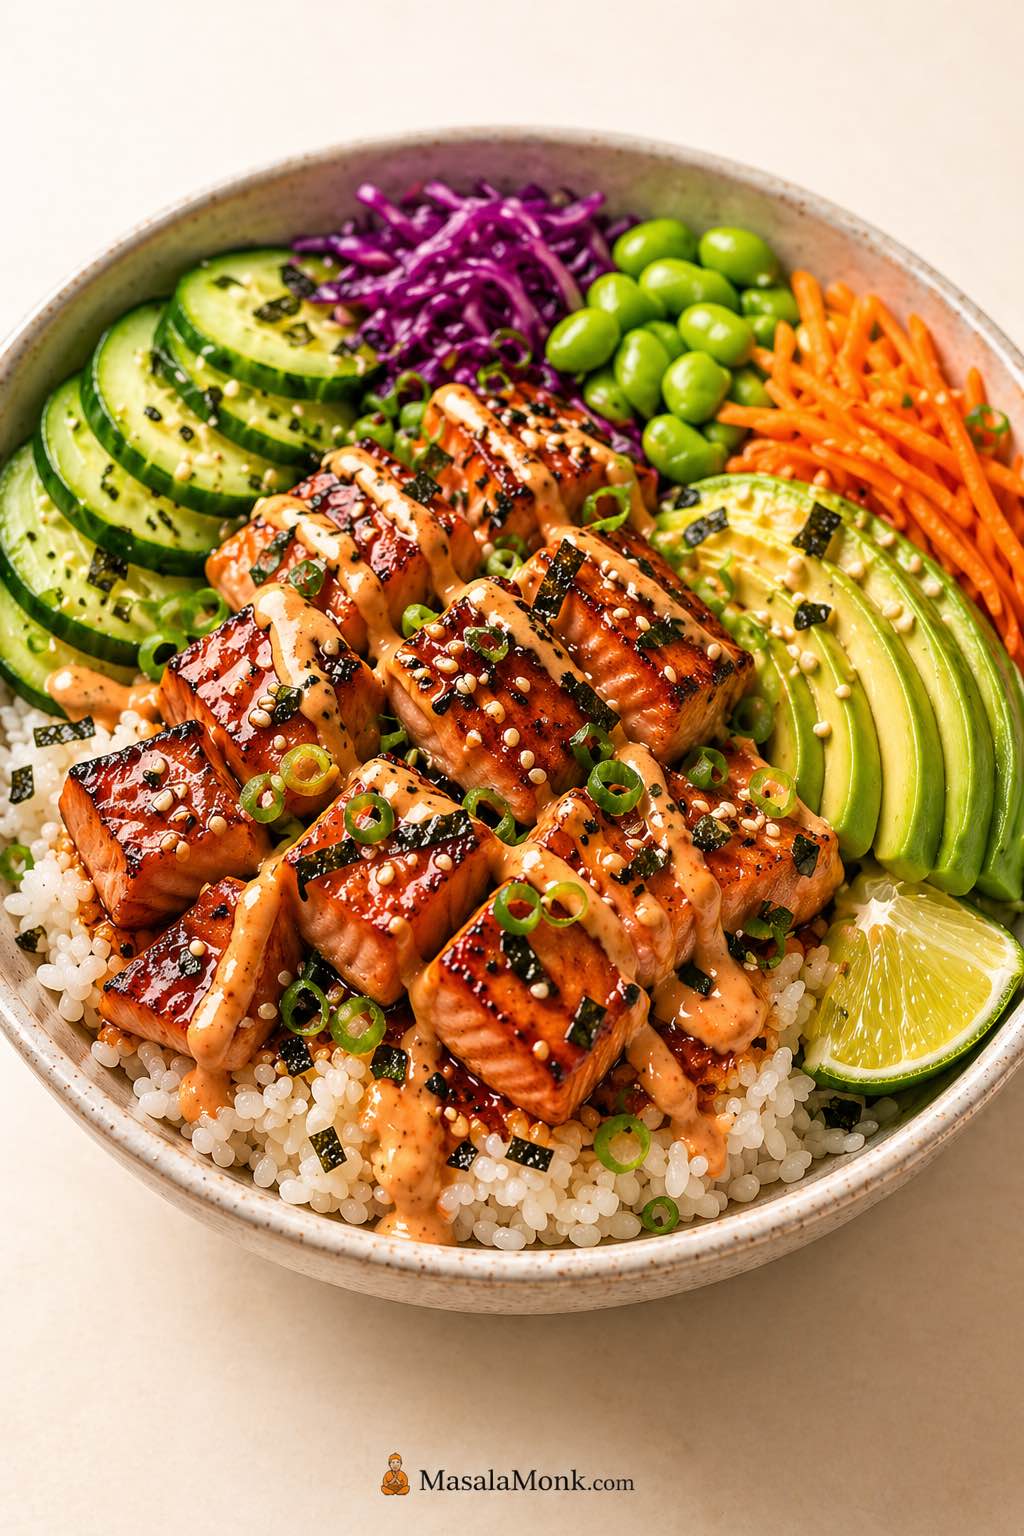
Salmon bowl recipe with pan-seared salmon bites, rice, avocado, cucumber, edamame, cabbage, carrots, sesame, scallions, lime, and creamy sauce.

A good salmon bowl recipe should be easy enough for dinner tonight and flexible enough to change with whatever rice, sauce, vegetables, and toppings you already have. This version starts with tender cooked salmon, warm rice, crunchy vegetables, avocado, and a creamy sauce, then gives you simple ways to make it sweeter, spicier, lighter, or more meal-prep friendly.

This cooked salmon rice bowl is not a raw salmon poke recipe. Instead, the main version uses salmon bites seasoned with soy sauce, garlic, ginger, honey, and lime or rice vinegar, then finishes them with cucumber, avocado, edamame or cabbage, scallions, sesame, and a creamy sriracha yogurt sauce.

Make the main bowl first if you want the easiest version. After that, use the rice guide, sauce guide, topping guide, and variation ideas to turn the same base into a teriyaki salmon bowl, spicy salmon bowl, sushi-style salmon bowl, air fryer salmon bowl, Asian sesame soy salmon bowl, or healthy salmon quinoa bowl.

Quick Answer: The Best Salmon Bowl Recipe Formula

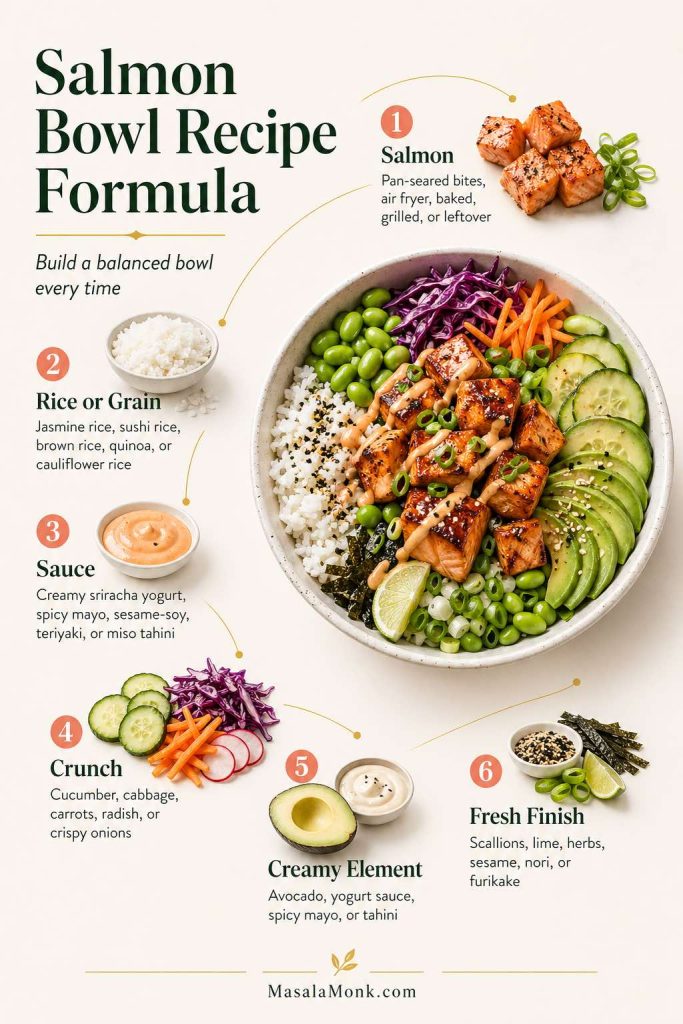
The easiest formula is simple: cooked salmon + rice or grain + sauce + crunch + something creamy + a fresh finish. Start with warm rice, add tender salmon bites, then balance the bowl with cucumber, cabbage, carrots, edamame, avocado, scallions, sesame seeds, and lime.

For the best first version of this salmon bowl recipe, make a pan-seared salmon rice bowl with jasmine rice or sushi rice, cucumber, avocado, edamame or shredded cabbage, and creamy sriracha yogurt sauce. Because the base is simple, it tastes fresh and filling without needing a long ingredient list.

Once you understand the formula, the same bowl can go in many directions. For example, choose teriyaki sauce for a sweeter weeknight bowl, spicy mayo for a sushi-style bowl, sesame soy dressing for a lighter bowl, quinoa for a higher-protein base, or air fryer salmon bites when you want the easiest cooking method.

Salmon bowl recipe formula showing salmon, rice or grain, sauce, crunch, creamy element, and fresh finish with a finished salmon rice bowl.
Use this salmon bowl recipe formula as your quick guide: start with salmon and rice, then add sauce, crunch, something creamy, and a fresh finish to build a balanced bowl every time.

Why This Salmon Bowl Recipe Works

This salmon bowl recipe works because every part balances the next. The warm rice makes it filling, while the salmon brings richness. Meanwhile, the cucumber and cabbage add crunch, avocado softens the salty sauce, and lime or rice vinegar keeps the bowl bright. Cutting the salmon into bites also helps it cook quickly and gives you more browned edges than a whole fillet.

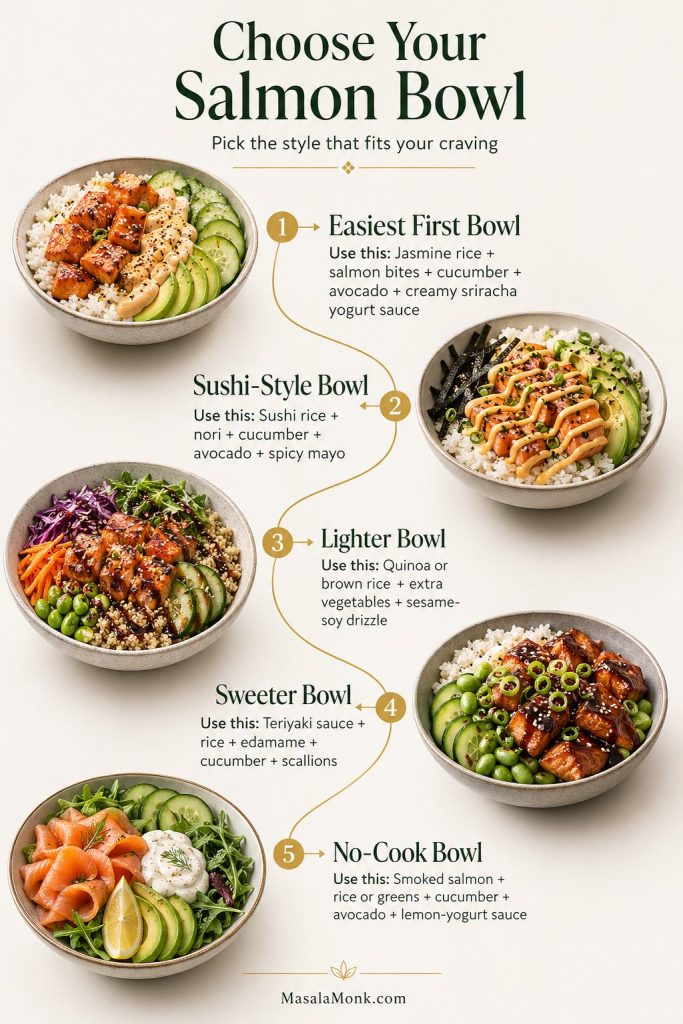
If You Want Use This
The easiest first bowl Jasmine rice + pan-seared salmon bites + cucumber + avocado + creamy sriracha yogurt sauce
A sushi-style bowl Sushi rice + nori + cucumber + avocado + spicy mayo
A lighter bowl Quinoa or brown rice + extra vegetables + sesame-soy drizzle or Greek yogurt sauce
A sweeter bowl Teriyaki sauce + rice + edamame + cucumber + scallions
A no-cook bowl Smoked salmon + rice or greens + cucumber + avocado + lemon-yogurt sauce
Choose your salmon bowl guide with easy, sushi-style, lighter, sweeter, and no-cook salmon bowl ideas using rice, sauce, toppings, and vegetables.
Start with the bowl that matches your craving: a classic salmon rice bowl for the easiest dinner, sushi-style with nori and spicy mayo, lighter with quinoa and vegetables, sweeter with teriyaki, or no-cook with smoked salmon, cucumber, avocado, and lemon-yogurt sauce.

Salmon Bowl Recipe

This is the best salmon bowl recipe to make first because it gives you a clear base before you start changing sauces, toppings, or cooking methods. It uses cooked salmon bites, warm rice, crisp vegetables, avocado, and a creamy sriracha yogurt sauce. However, you can also pan-sear the salmon as written, use the air fryer or oven, or build the bowl with leftover cooked salmon using the notes below.

Easy Salmon Rice Bowl

Prep Time
15 minutes
Cook Time
10 minutes
Total Time
25 minutes
Servings
2 bowls

Equipment

  • Nonstick or well-seasoned skillet
  • Mixing bowl
  • Small bowl for sauce
  • Rice cooker or saucepan
  • Air fryer, optional

Ingredients

For the salmon

  • 10 to 12 oz / 285 to 340 g salmon fillet, skin removed, cut into 1-inch / 2.5 cm pieces
  • 1 tablespoon / 15 ml soy sauce or tamari
  • 1 teaspoon / 5 ml honey or maple syrup
  • 1 teaspoon / 5 ml lime juice or rice vinegar
  • 1 teaspoon grated ginger
  • 1 small garlic clove, grated or minced
  • 1 teaspoon / 5 ml sesame oil or neutral oil
  • 1/4 teaspoon black pepper
  • Pinch of salt, only if needed
  • 1 to 2 teaspoons neutral oil for the pan, if needed

For the creamy sriracha yogurt sauce

  • 1/3 cup / about 80 g Greek yogurt
  • 1 to 2 teaspoons / 5 to 10 ml sriracha, to taste
  • 1 teaspoon / 5 ml lime juice
  • 1 teaspoon / 5 ml honey or maple syrup, optional
  • Pinch of salt
  • 1 to 2 teaspoons / 5 to 10 ml water, to loosen if needed

Optional lighter sesame-soy drizzle

  • 1 tablespoon / 15 ml soy sauce or tamari
  • 1 teaspoon / 5 ml rice vinegar or lime juice
  • 1 teaspoon / 5 ml sesame oil
  • 1 teaspoon / 5 ml honey or maple syrup
  • 1 teaspoon / 5 ml water, to loosen
  • Optional: grated ginger, chili crisp, or sesame seeds

For the bowls

  • 2 cups / about 320 to 370 g cooked rice, warm
  • 1 cup / about 120 g cucumber, diced or sliced
  • 1 cup cooked shelled edamame, shredded cabbage, or carrots
  • 1 avocado, sliced or diced
  • 2 tablespoons sliced scallions
  • 1 tablespoon sesame seeds
  • Lime wedges, for serving
  • Optional: nori strips, furikake, chili crisp, pickled ginger, or cilantro

Instructions

  1. Cook the rice. Prepare your rice or grain first so it is warm when the salmon is ready. As a rough guide, about 2/3 cup dry white rice makes about 2 cups cooked rice, depending on the rice.
  2. Pat dry and season the salmon. Pat the salmon pieces dry with paper towels so they brown instead of steaming. Then, in a bowl, toss them with soy sauce, honey, lime juice or rice vinegar, ginger, garlic, oil, and black pepper.
  3. Pan-sear the salmon. Heat a nonstick or well-seasoned skillet over medium-high heat. Add a little neutral oil if the pan looks dry. After that, add the salmon in a single layer and cook for 5 to 7 minutes total, turning once or twice, until browned outside and cooked through.
  4. Mix the sauce. Stir together Greek yogurt, sriracha, lime juice, honey if using, salt, and enough water to make it drizzleable. If you prefer a lighter bowl, mix the sesame-soy drizzle instead.
  5. Assemble the bowls. Divide warm rice between two bowls. Then add salmon, cucumber, edamame or cabbage, avocado, scallions, sesame seeds, and sauce.
  6. Finish and serve. Add lime, nori, furikake, chili crisp, pickled ginger, or cilantro if you like. Before serving, taste and adjust with more lime if the bowl feels flat, more sauce if it feels dry, or more cucumber if it tastes too salty.

Recipe Notes

  • The creamy sauce makes about 1/3 cup, enough for 2 bowls.
  • Double the sauce if you like a saucier bowl or are using brown rice, quinoa, or extra vegetables.
  • Use skinless salmon if you want neat salmon bites. If your salmon has skin, cook it as a fillet and flake it over the bowl.
  • Jasmine rice is the easiest weeknight base. Sushi rice gives the bowl a sushi-style feel.
  • Use mayo instead of Greek yogurt for a richer spicy mayo sauce.
  • Use tamari instead of soy sauce for a gluten-free option.
  • For a dairy-free bowl, use dairy-free mayo for the sauce or choose the sesame-soy drizzle.
  • Use low-sodium soy sauce if you are sensitive to salt.
  • Skip sesame oil and sesame seeds if avoiding sesame.
  • If using frozen salmon, thaw it in the refrigerator and pat it very dry before seasoning.
  • To serve 4, double all ingredients and cook the salmon in batches so it browns instead of steaming.
  • For an air fryer salmon bowl, use the air fryer method later in the post.
  • Cook salmon until opaque and cooked through. For general seafood safety guidance, salmon is commonly cooked to 145°F / 63°C.

Ingredients for Salmon Bowls

This salmon bowl recipe works best when every component has a job. The salmon gives the bowl protein and richness, while the rice makes it filling. Meanwhile, the sauce ties everything together, and the toppings add crunch, freshness, creaminess, spice, or brightness.

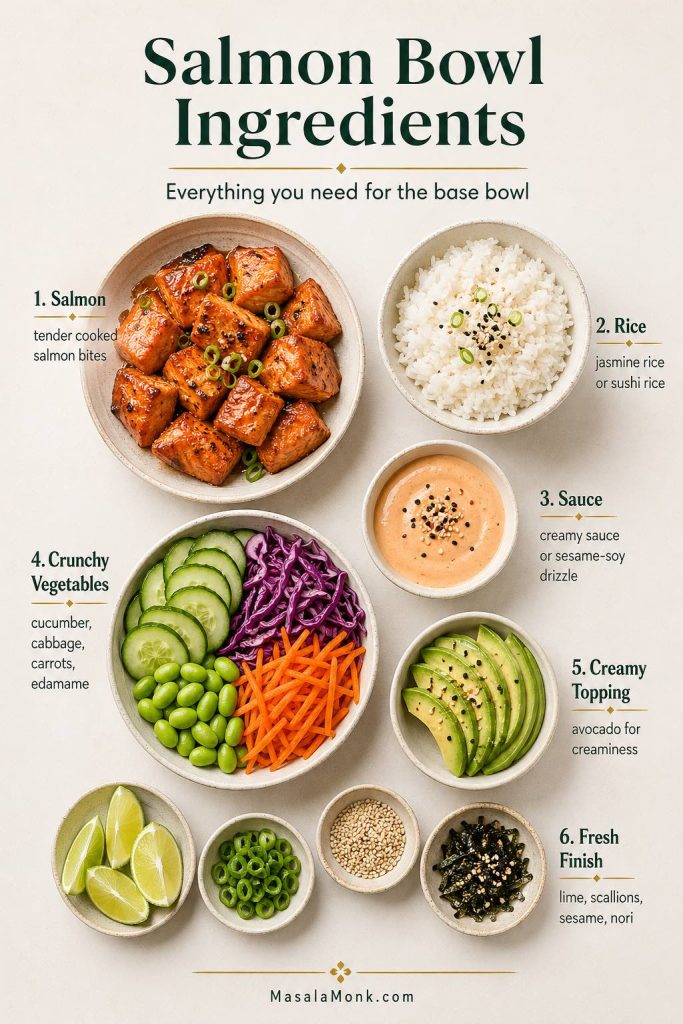
Salmon bowl ingredients with cooked salmon bites, rice, creamy sauce, cucumber, cabbage, carrots, edamame, avocado, lime, scallions, sesame, and nori.
These are the core salmon bowl ingredients: tender cooked salmon, warm rice, a creamy or soy-based sauce, crunchy vegetables, avocado for richness, and lime, scallions, sesame, or nori for a fresh finish.

Salmon

Use fresh or fully thawed salmon. Skinless salmon is easiest if you want salmon bites, but full fillets also work. If you cook full fillets, simply flake the salmon over the rice before adding sauce and toppings.

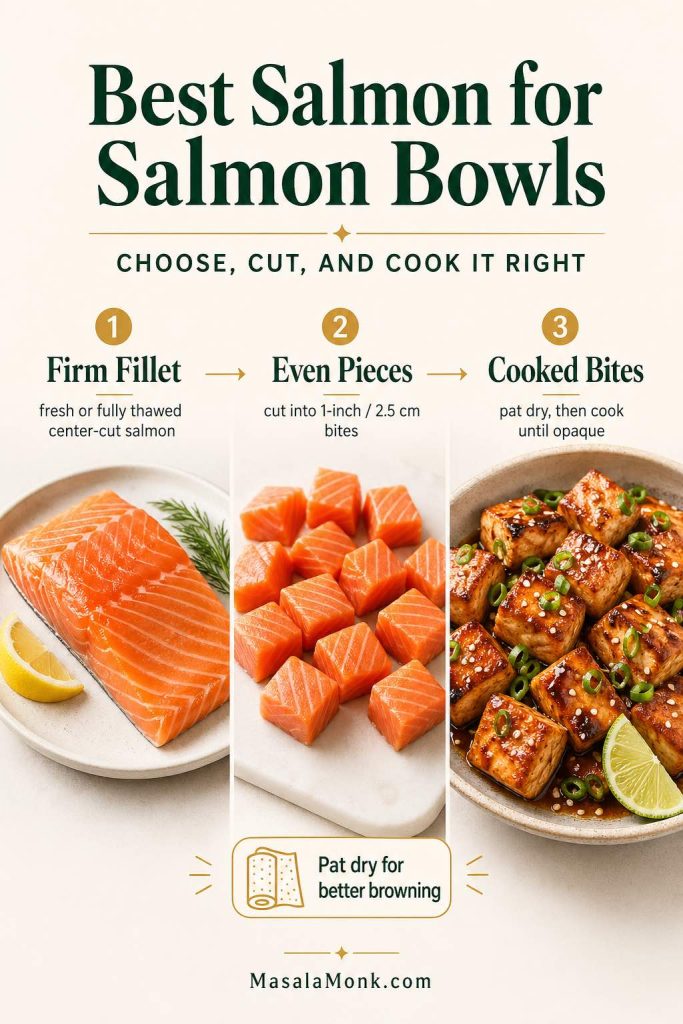
The best salmon for salmon bowls is a fresh or fully thawed center-cut fillet that can be cut into even 1-inch / 2.5 cm pieces. Atlantic salmon, sockeye, coho, or any firm salmon fillet can work; however, the most important thing is to pat it dry and cook it just until opaque.

Best salmon for salmon bowls guide showing a firm salmon fillet, 1-inch salmon pieces, cooked salmon bites, and a pat-dry tip for better browning.
Better salmon bowl bites start with a firm fillet, even 1-inch pieces, and a quick pat-dry step before cooking so the salmon browns instead of steaming.

This recipe is designed for cooked salmon. As a result, it is easier for most home kitchens than raw salmon bowls, while still giving you the fresh, colorful rice-bowl feel.

Rice or Grain

White rice, jasmine rice, sushi rice, brown rice, quinoa, cauliflower rice, and coconut rice can all work. For example, use sushi rice for a sushi-style bowl, jasmine rice for an easy salmon and rice bowl, quinoa for a healthy salmon bowl, and coconut rice for a spicy or mango-topped version.

Sauce

The creamy sriracha yogurt sauce is the easiest first choice because it is tangy, spicy, and lighter than classic spicy mayo. For something richer, use spicy mayo. For something lighter, use the sesame-soy drizzle. If you want a sweeter bowl, use teriyaki sauce instead.

Toppings

The easiest salmon bowl toppings are cucumber, avocado, edamame, cabbage, carrots, scallions, sesame seeds, lime, nori, or furikake. For a sweet-bright topping, spoon over fresh mango salsa instead of using plain diced mango.

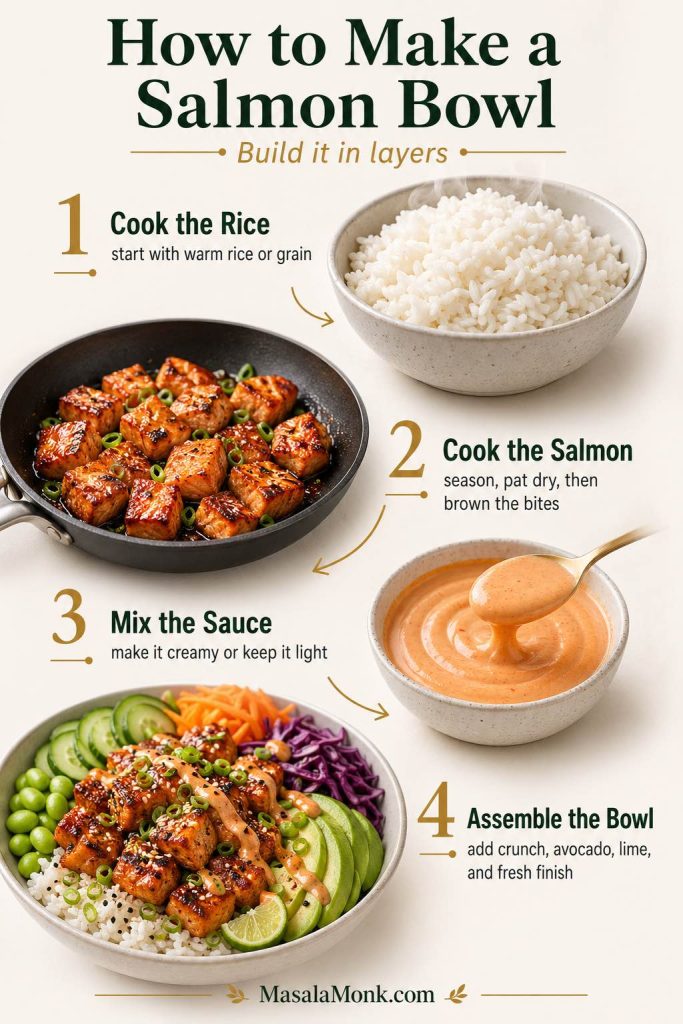
How to Make a Salmon Bowl

This recipe comes together best when you build the salmon bowl in layers. First, keep the rice warm. Then, cook the salmon just until tender. After that, add cold crunchy toppings for contrast and drizzle the sauce at the end so the bowl stays fresh instead of heavy.

1. Cook the Rice

Start with the rice because it can sit covered while you cook the salmon. Warm rice makes the bowl feel more complete and helps the sauce spread through the bowl. Leftover rice also works; however, reheat it before assembling so the bowl does not taste cold and dry.

2. Season and Cook the Salmon

Cut the salmon into 1-inch / 2.5 cm pieces, pat them dry, then season them with soy sauce, garlic, ginger, honey, lime juice or rice vinegar, and a little oil. Because salmon bites cook quickly, avoid crowding the pan and watch closely near the end.

3. Mix the Sauce

For the creamy sauce, stir Greek yogurt with sriracha, lime juice, a pinch of salt, and a small spoon of honey if you want a rounder flavor. Then add a splash of water until it drizzles easily. For a lighter bowl, use the sesame-soy drizzle instead.

4. Assemble the Bowl

Add warm rice to the bowl first, then salmon, crunchy vegetables, avocado, sauce, and garnishes. Finally, finish with scallions, sesame seeds, lime, nori, furikake, chili crisp, or herbs. The best bowls have a little warmth, crunch, creaminess, acidity, and spice in every bite.

Before serving, taste one bite with rice, salmon, sauce, and toppings together. Add lime if it tastes flat, more sauce if it feels dry, cucumber or rice if it tastes salty, and chili crisp or sriracha if you want more heat.

How to make a salmon bowl guide showing warm rice, browned salmon bites, creamy sauce, and an assembled salmon rice bowl with avocado, cucumber, vegetables, lime, and sauce.
Build the bowl in layers: warm rice first, browned salmon bites next, a creamy or light sauce, then crunchy vegetables, avocado, lime, and fresh toppings at the end.

Best Rice for Salmon Bowls

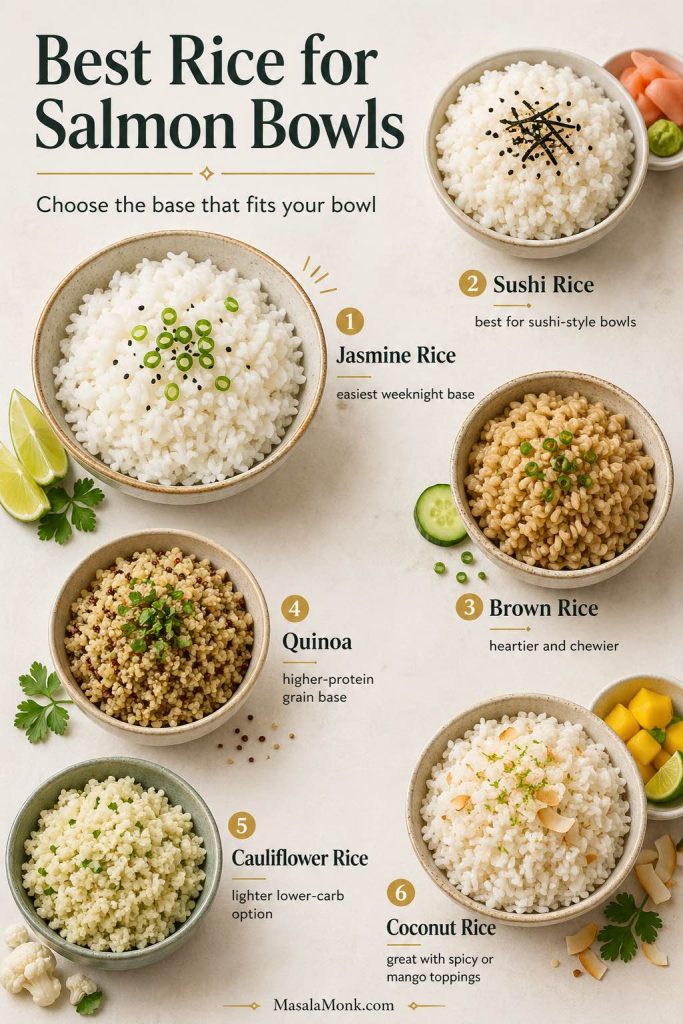
The rice changes the whole bowl, which is why this recipe gives you several options for pairing it with salmon. For example, soft white rice makes it feel like a quick weeknight dinner, while sushi rice makes it taste closer to a deconstructed sushi roll. Meanwhile, quinoa or brown rice makes the bowl heartier and more meal-prep friendly.

Best rice for salmon bowls guide with jasmine rice, sushi rice, brown rice, quinoa, cauliflower rice, and coconut rice options.
The base changes the whole bowl: jasmine rice keeps it easy, sushi rice gives it a sushi-style feel, brown rice or quinoa makes it heartier, cauliflower rice keeps it lighter, and coconut rice pairs well with spicy or mango-topped salmon bowls.
Rice or Base Best For Why It Works
Jasmine rice Easy weeknight salmon bowls Soft, fragrant, simple, and easy to pair with most sauces.
Sushi rice Sushi-style or poke-style salmon bowls Sticky enough to hold sauce and toppings well.
Brown rice Heartier salmon rice bowls Nuttier, chewier, and more filling than white rice.
Quinoa Healthy salmon bowls A good choice when you want a higher-protein grain base.
Cauliflower rice Lower-carb salmon bowls Lightens the bowl while keeping the sauce and toppings central.
Coconut rice Spicy or tropical salmon bowls Pairs nicely with chili, lime, mango, and herbs.
Crispy rice Texture-heavy salmon bowls Adds crunch and makes the bowl feel more restaurant-style.

Jasmine Rice

Jasmine rice is the easiest base for a weeknight bowl because it is soft, lightly fragrant, and quick to pair with creamy sauce, sesame soy dressing, teriyaki sauce, green chutney yogurt, or spicy mayo.

Sushi Rice

Sushi rice is best when you want a sushi-style or poke-style bowl. Its slightly sticky texture helps the salmon, cucumber, avocado, nori, sesame, and sauce feel connected instead of scattered.

Brown Rice

Brown rice gives the bowl a nuttier flavor and a chewier texture, so use it when you want the meal to feel more filling or meal-prep friendly.

Quinoa

Quinoa is useful for a healthy salmon bowl or high-protein salmon bowl. It also pairs nicely with Greek yogurt sauce, tzatziki, green chutney yogurt, cucumber, avocado, herbs, and lemon.

Cauliflower Rice

Cauliflower rice is useful when you want a lower-carb salmon bowl. However, keep the toppings generous and the sauce flavorful so the bowl still feels satisfying.

Coconut Rice

Coconut rice shines with spicy salmon, mango salsa, lime, cilantro, chili crisp, and cucumber. As a result, it turns a simple bowl into something warmer, sweeter, and more tropical.

Crispy Rice

Crispy rice is best when texture is the whole point. Use warm rice pressed into a pan until crisp in spots, then add salmon, cucumber, avocado, and spicy sauce on top.

How to Cook Salmon for Bowls

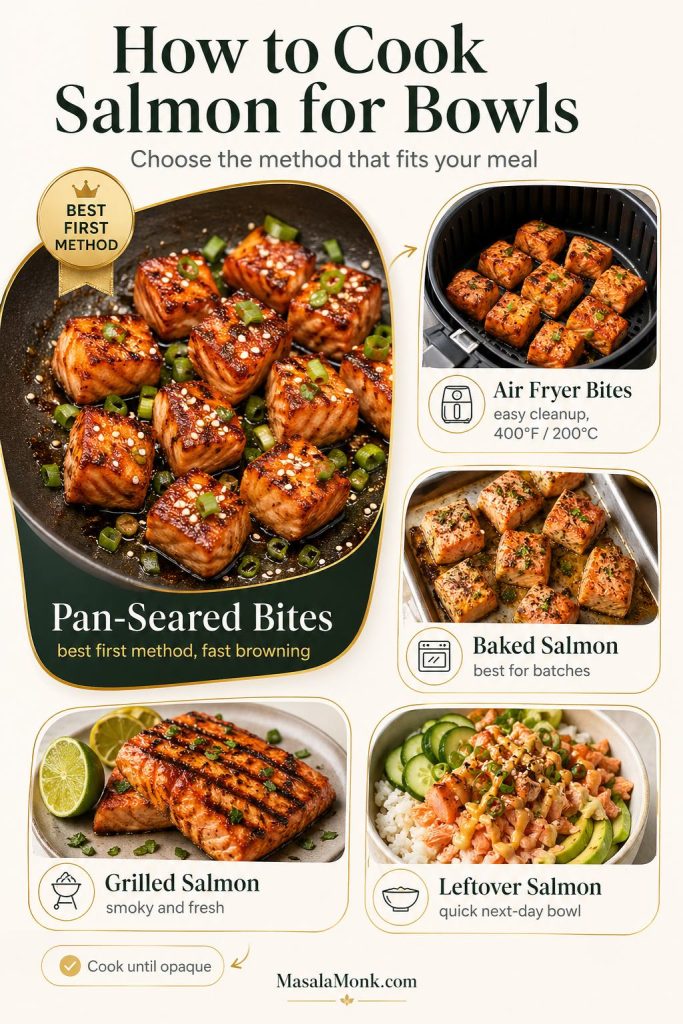
This salmon bowl recipe is flexible because the fish can be pan-seared, air fried, baked, grilled, or flaked from leftovers. For food safety, fish such as salmon is generally cooked to 145°F / 63°C, or until the flesh is no longer translucent and separates easily with a fork, according to FoodSafety.gov safe minimum internal temperature guidance.

How to cook salmon for bowls guide comparing pan-seared salmon bites, air fryer bites, baked salmon, grilled salmon, and leftover salmon with a cook-until-opaque note.
These Pan-seared salmon bites give the fastest browning for the main recipe, while air fryer, baked, grilled, and leftover salmon give you easier cleanup, batch cooking, smoky flavor, or a quick next-day bowl.

Pan-Seared Salmon Bites

Pan-seared salmon bites are the best first method for this recipe. Cut the salmon into 1-inch / 2.5 cm pieces, pat them dry, season them, then cook in a single layer for 5 to 7 minutes total, turning once or twice, until browned outside and opaque inside.

Air Fryer Salmon Bowl

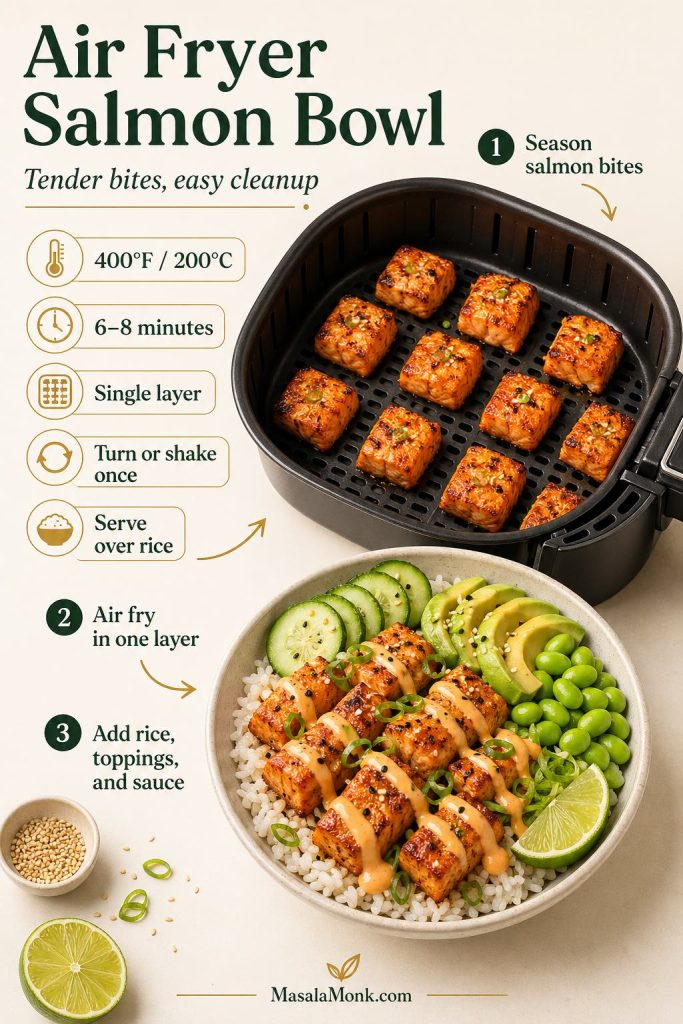
To make an air fryer salmon bowl, season the salmon bites the same way, then arrange them in a lightly oiled air fryer basket in a single layer. Air fry at 400°F / 200°C for about 6 to 8 minutes, shaking or turning once, until the salmon is opaque and cooked through. After that, serve over rice with cucumber, avocado, edamame, and sauce.

Air fryer salmon bowl guide showing salmon bites cooked at 400°F for 6 to 8 minutes, then served over rice with avocado, cucumber, edamame, lime, and creamy sauce.
Air fryer salmon bites cook best in a single layer at 400°F / 200°C for 6–8 minutes, then turn into a quick salmon rice bowl with avocado, cucumber, edamame, lime, and sauce.

Baked Salmon Bowl

When you want less stovetop cleanup, bake seasoned salmon bites or fillets at 400°F / 200°C until cooked through. Salmon bites usually take about 8 to 12 minutes, while fillets often take about 10 to 14 minutes depending on thickness. This method is especially helpful if you are making several bowls at once.

Grilled Salmon Bowl

Grilled salmon suits fresh summer toppings like cucumber, cabbage, mango salsa, herbs, lime, avocado, and yogurt sauce. Once the salmon is cooked, flake it over the bowls and add sauce right before serving.

Leftover Cooked Salmon

Leftover cooked salmon can make a very good salmon rice bowl. Reheat it gently or serve it cool over warm rice with a bold sauce. If the salmon feels a little dry, flake it and use extra sauce, avocado, lime, and cucumber to bring the bowl back to life.

Salmon Bowl Sauce Guide

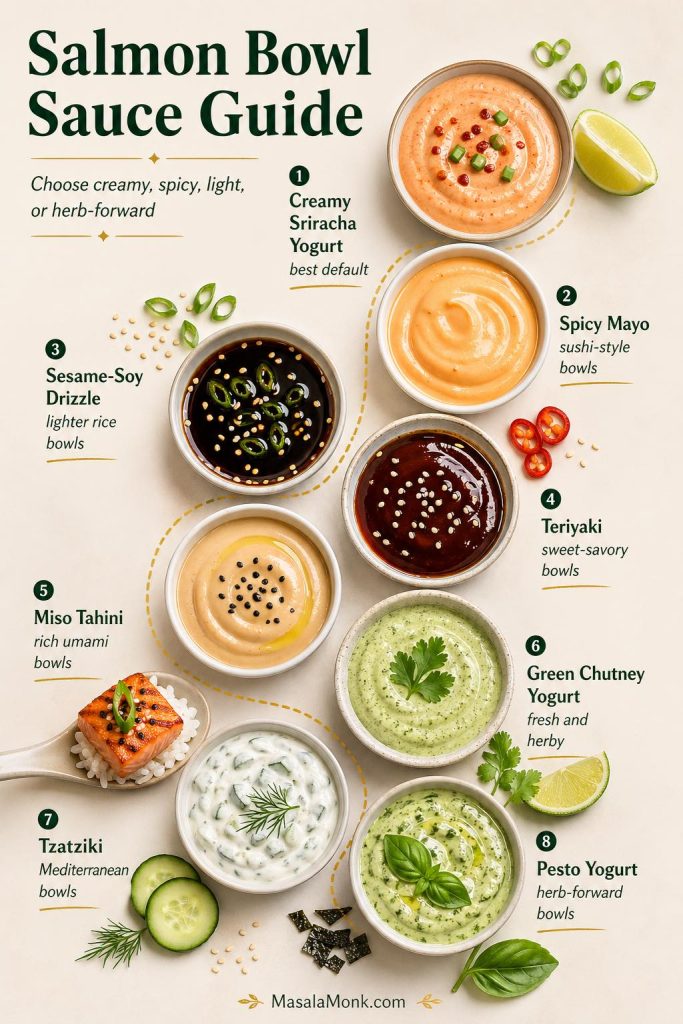
The sauce is what makes the salmon, rice, and toppings feel like one complete bowl recipe. A good sauce should bring moisture, salt, acidity, and flavor direction. Therefore, use this as a quick salmon bowl sauce recipe and dressing guide: choose one based on the bowl you want, whether creamy, spicy, sweet-savory, herb-forward, Mediterranean, or light and citrusy.

The right salmon bowl sauce changes the whole direction of the bowl: creamy sriracha yogurt keeps it balanced, spicy mayo makes it sushi-style, sesame-soy keeps it lighter, teriyaki adds sweetness, and herb sauces bring a fresher finish.
Sauce Quick Formula for 2 Bowls Best Use
Creamy sriracha yogurt 1/3 cup / 80 g Greek yogurt + 1–2 tsp sriracha + 1 tsp lime juice + pinch of salt Best default sauce
Spicy mayo 3 tbsp mayo + 1–2 tsp sriracha + 1 tsp lime juice + splash of water Sushi-style or spicy salmon bowls
Sesame-soy drizzle 1 tbsp soy sauce or tamari + 1 tsp rice vinegar + 1 tsp sesame oil + 1 tsp honey Lighter salmon rice bowls
Teriyaki sauce Use 2 to 3 tbsp teriyaki sauce, or brush it over the salmon near the end of cooking Sweet-savory weeknight bowls
Miso tahini 1 tbsp tahini + 1 tsp white miso + 1 tsp lime juice or rice vinegar + warm water to loosen Richer umami bowls
Green chutney yogurt 2 tbsp Greek yogurt + 1 tbsp green chutney + squeeze of lime Fresh MasalaMonk-style bowls
Tzatziki Use prepared tzatziki, or thin with lemon juice if needed Mediterranean salmon bowls
Pesto yogurt 2 tbsp Greek yogurt + 1 tbsp pesto + lemon juice + water to loosen Herb-forward bowls

Creamy Sriracha Yogurt Sauce

This is the best default sauce for the main recipe because it gives the bowl tang, heat, and creaminess without becoming too heavy. Stir Greek yogurt with sriracha, lime juice, salt, and a tiny bit of honey if you want balance.

Spicy Mayo

Use spicy mayo when you want a richer sushi-style bowl. Mix mayonnaise with sriracha, lime juice, and a splash of water. It suits sushi rice, cucumber, avocado, nori, sesame seeds, furikake, and chili crisp.

Teriyaki Sauce

Teriyaki sauce is the best choice when you want a sweeter, glossy bowl. Pair it with rice, cucumber, edamame, avocado, sesame, and scallions. However, if using bottled teriyaki sauce, taste before adding extra salt because some sauces are already quite salty.

Sesame Soy Drizzle

For a lighter salmon rice bowl sauce, mix soy sauce or tamari with rice vinegar or lime juice, sesame oil, ginger, and a little honey. This keeps the bowl fresh and savory without adding a creamy element.

Miso Tahini Sauce

Miso tahini sauce is a strong choice when you want a deeper, nuttier bowl. Whisk tahini with white miso, lime juice or rice vinegar, warm water, and a touch of honey. Then pair it with brown rice, cucumber, cabbage, carrots, and sesame seeds.

Green Chutney Yogurt Sauce

For a fresh MasalaMonk-style bowl, stir green chutney into Greek yogurt with a squeeze of lime. It turns the bowl herby, spicy, tangy, and bright, especially with cucumber, cabbage, rice, and avocado.

Tzatziki Sauce

Use tzatziki sauce for a Mediterranean salmon bowl. It is a good match for rice or quinoa, cucumber, tomato, herbs, lemon, olive oil, and grilled or baked salmon.

Pesto Yogurt Sauce

For an herb-forward bowl, thin pesto sauce with Greek yogurt, lemon juice, and a little water. It suits salmon, quinoa, tomatoes, cucumber, avocado, and greens.

Best Toppings for Salmon Bowls

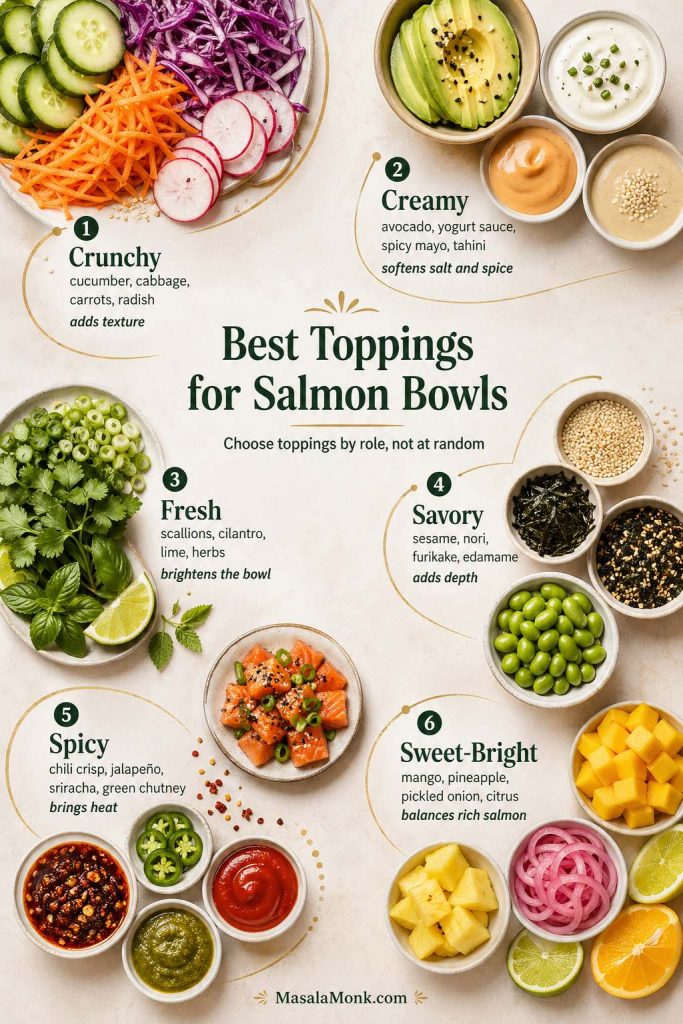
A good salmon bowl recipe needs toppings that do more than fill space. If you are wondering what to put in a salmon bowl, think in roles instead of random extras. Instead of piling on toppings randomly, choose ingredients that add crunch, creaminess, freshness, spice, savory depth, or brightness.

Best toppings for salmon bowls guide with crunchy, creamy, fresh, savory, spicy, and sweet-bright toppings like cucumber, avocado, scallions, sesame, chili crisp, mango, and pickled onion.
A balanced salmon bowl needs toppings with a job: crunchy vegetables for texture, avocado or sauce for creaminess, herbs and lime for freshness, sesame or nori for savory depth, chili for heat, and mango or pickled onion to brighten rich salmon.

Crunchy Toppings

Cucumber, cabbage, carrots, radish, and crispy onions add the crunch that keeps the bowl from feeling soft or heavy. Cucumber is the easiest default because it suits nearly every sauce.

Creamy Toppings

Avocado is the most useful creamy topping because it softens salty sauces, balances spice, and makes the bowl feel more satisfying. Yogurt sauce, spicy mayo, tahini sauce, and pesto yogurt sauce can also add creaminess.

Fresh Toppings

Scallions, cilantro, lime, herbs, and mango salsa make the bowl taste brighter. If the salmon or sauce feels rich, add more lime, herbs, or a spoon of mango salsa to lift the whole bowl.

Savory Toppings

Sesame seeds, edamame, nori, furikake, and pickled ginger bring savory depth. These are particularly useful for sushi-style bowls, poke-style cooked salmon bowls, spicy bowls, and sesame-soy salmon rice bowls.

Spicy Toppings

Chili crisp, jalapeño, sriracha, green chutney, crushed red pepper, and spicy mayo all pair nicely with salmon. However, if you are adding a spicy topping, keep the sauce slightly creamy or acidic so the heat does not feel harsh.

Sweet-Bright Toppings

Mango, pineapple, pickled onion, and citrus are useful when the bowl needs freshness. They shine with spicy salmon, coconut rice, cucumber, avocado, and lime.

Salmon Bowl Variations

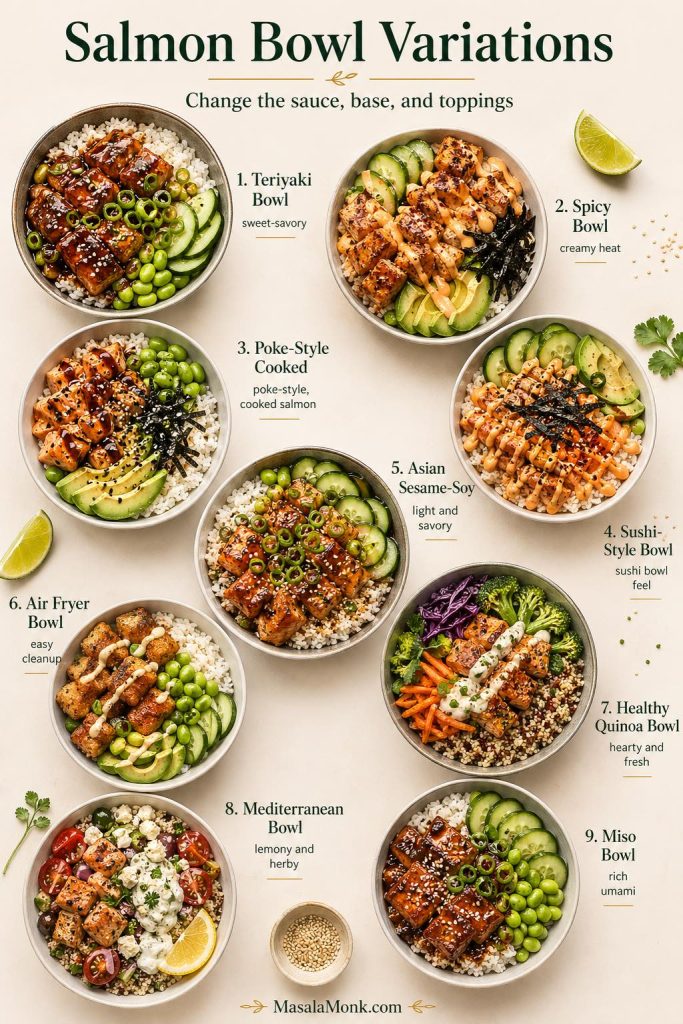
Once you know the basic formula, this recipe can become almost any style of salmon bowl. Instead of rewriting the whole recipe, keep the salmon, rice, sauce, and toppings balanced, then change one or two components to create a new version.

Salmon bowl variations guide showing teriyaki, spicy, poke-style cooked, sushi-style, Asian sesame-soy, air fryer, healthy quinoa, Mediterranean, and miso salmon bowls.
The same salmon bowl base can move in many directions: teriyaki for sweet-savory flavor, spicy mayo for heat, sushi-style with nori and avocado, sesame-soy for a lighter bowl, quinoa for a heartier healthy version, or Mediterranean with herbs, lemon, and tzatziki.

Teriyaki Salmon Bowl

Choose teriyaki sauce when you want a sweeter, glossy weeknight bowl. Then serve the salmon over rice with cucumber, avocado, edamame, sesame seeds, and scallions.

Teriyaki salmon bowl with glossy salmon bites, rice, avocado, cucumber, edamame, nori, scallions, sesame, lime, and teriyaki glaze.
For the teriyaki salmon bowl variation, the salmon bites get a darker glossy glaze while cucumber, avocado, edamame, nori, scallions, and lime keep the rice bowl fresh and balanced.

Spicy Salmon Bowl

Make it spicy by adding spicy mayo, chili crisp, cucumber, avocado, nori, sesame seeds, and lime. This version is a natural fit for sushi rice or jasmine rice.

Poke-Style Cooked Salmon Bowl

A poke-style cooked salmon bowl works best with sushi rice, cucumber, avocado, edamame, sesame seeds, nori, and a sesame-soy drizzle. If you are considering raw salmon, read the FDA seafood safety guidance first; cooked salmon is the safer default for homemade bowls.

Salmon Sushi Bowl

To make it sushi-style, use cooked salmon, sushi rice, cucumber, avocado, nori, sesame seeds, furikake, and spicy mayo. Then add pickled ginger if you want a sharper sushi-style finish.

Asian Sesame Soy Salmon Bowl

For an Asian salmon bowl, use the sesame-soy drizzle, rice, cucumber, edamame, avocado, scallions, sesame seeds, and nori. Add chili crisp or sriracha if you want more heat.

Air Fryer Salmon Bowl

Use the air fryer when you want quick salmon bites with less stovetop cleanup. After cooking, serve them over rice with crunchy toppings and either creamy sriracha yogurt sauce, spicy mayo, teriyaki sauce, or sesame soy drizzle.

Healthy Salmon Bowl

To keep the bowl lighter, start with brown rice, quinoa, or cauliflower rice. Then add extra cucumber, cabbage, carrots, edamame, herbs, avocado, and a Greek yogurt-based sauce. Keep it satisfying rather than sparse: the goal is fresh, balanced, and filling.

Mediterranean Salmon Bowl

The Mediterranean version works best with rice or quinoa, cucumber, tomato, herbs, lemon, olive oil, and tzatziki sauce. Grilled or baked salmon is especially good here.

Miso Salmon Bowl

Miso gives the bowl a deeper, more savory flavor. Glaze the salmon with miso, honey, ginger, and rice vinegar, then serve it with rice, cucumber, edamame, scallions, sesame seeds, and a little extra lime or rice vinegar for brightness.

Smoked Salmon Bowl

A no-cook version is easiest with smoked salmon over sushi rice or greens, cucumber, avocado, scallions, sesame, and a light lemon-yogurt or sesame-soy sauce. Since smoked salmon is already salty, keep the sauce lighter.

Crispy Salmon Rice Bowl

For extra texture, cook the salmon bites until the edges are deeply browned. Then serve them over warm rice or crispy rice with cucumber, avocado, spicy sauce, sesame, and nori.

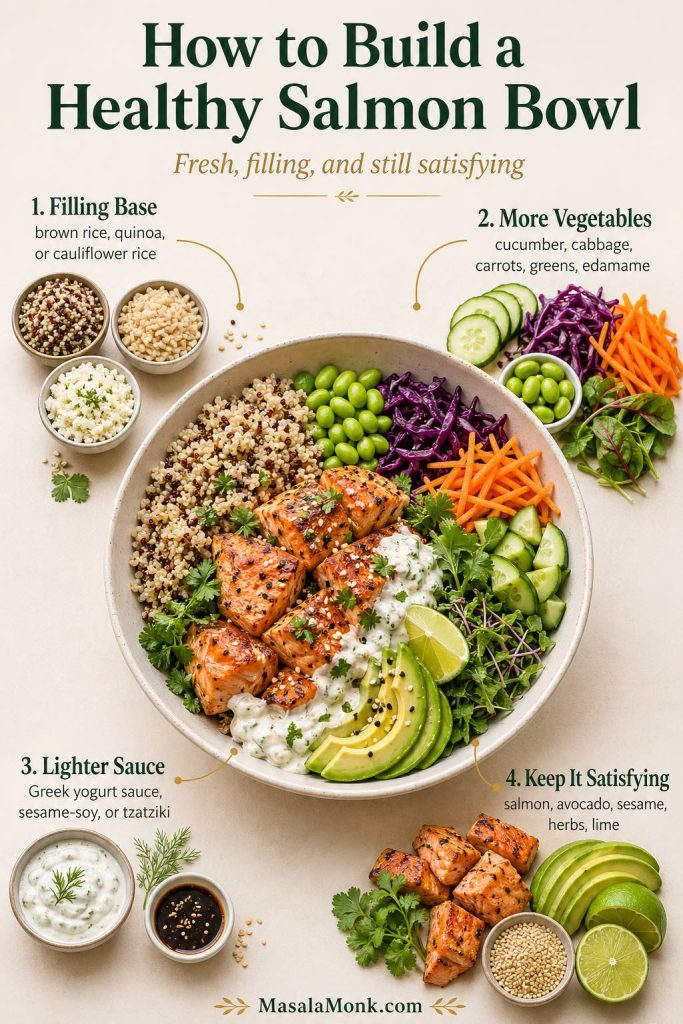
How to Make a Healthy Salmon Bowl

A healthy salmon bowl recipe should still feel satisfying. Instead of removing everything rich or flavorful, build the bowl with a filling base, enough vegetables, a good sauce, and toppings that add texture.

Healthy salmon bowl guide with quinoa, salmon bites, extra vegetables, avocado, herbs, lime, lighter sauce, and satisfying toppings.
A healthy salmon bowl should still feel filling: start with quinoa, brown rice, or cauliflower rice, add plenty of vegetables, choose a lighter sauce, and keep the bowl satisfying with salmon, avocado, sesame, herbs, and lime.

Choose a Filling Base

Use brown rice for a heartier bowl, quinoa for a higher-protein grain base, or cauliflower rice if you want a lighter, lower-carb option. However, white rice is also fine when the rest of the bowl has plenty of salmon, vegetables, and sauce.

Add More Vegetables

Cucumber, cabbage, carrots, edamame, greens, radish, and herbs make the bowl more colorful and fresh. Add at least two vegetables so the bowl has crunch and contrast.

Use a Lighter Sauce

Greek yogurt sauce, sesame soy drizzle, chutney yogurt sauce, and tzatziki are all good choices when you want a lighter salmon bowl. They add flavor and moisture without making the bowl feel too heavy.

Keep the Bowl Satisfying

Do not skip all the rich ingredients. A little avocado, sesame, yogurt sauce, or olive oil can make the bowl feel complete. As a result, a good healthy salmon bowl should taste fresh and filling, not plain.

Salmon Bowl Meal Prep and Storage

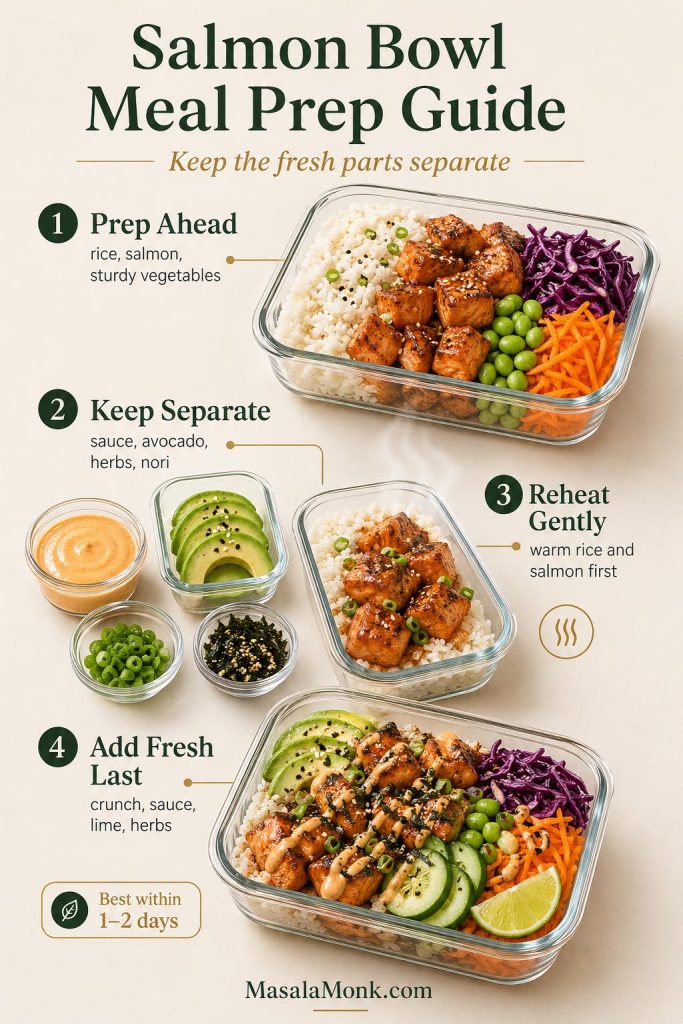
This salmon bowl recipe can work for meal prep, but it is best when the warm and cold parts are stored separately. As a result, the rice, sauce, and sturdy vegetables can be prepped ahead, while delicate toppings should be added right before serving.

Salmon bowl meal prep guide showing rice, salmon, sturdy vegetables, separate sauce, avocado, herbs, nori, reheating, and fresh toppings added last.
Meal-prep salmon bowls stay fresher when the warm parts and delicate toppings are stored separately: reheat the rice and salmon first, then add sauce, avocado, herbs, nori, lime, and crunchy vegetables right before eating.

What to Prep Ahead

Cook the rice, mix the sauce, wash and chop sturdy vegetables, and portion your toppings. You can also cook the salmon ahead, although it tastes best freshly cooked or gently reheated.

Cool cooked rice promptly, refrigerate it in a covered container, and reheat it until steaming before building the bowl.

What to Keep Separate

Keep sauce, avocado, herbs, nori, furikake, and crispy toppings separate until serving, especially if packing the bowls for lunch. This keeps the bowl from becoming soggy and helps the toppings stay fresh.

How to Reheat

Reheat the rice and salmon gently, then add cold toppings and sauce after warming. If the salmon was already cooked, avoid overheating it or it can become dry.

For food safety, reheat leftovers until steaming hot. FoodSafety.gov lists leftovers at 165°F / 74°C on its safe minimum internal temperature chart.

How Long It Keeps

For best texture, eat salmon bowls within 1 to 2 days. Store cooked salmon, rice, sauce, and fresh toppings in separate airtight containers whenever possible.

Leftover Salmon Ideas

Leftover cooked salmon is perfect for quick bowls because it already has flavor and texture. Flake it over warm rice, add cucumber, avocado, herbs, and sauce, then finish with lime or sesame seeds.

You can also turn leftover salmon into a salmon salad bowl, salmon wrap, salmon fried rice-style bowl, or salmon croquettes for another meal.

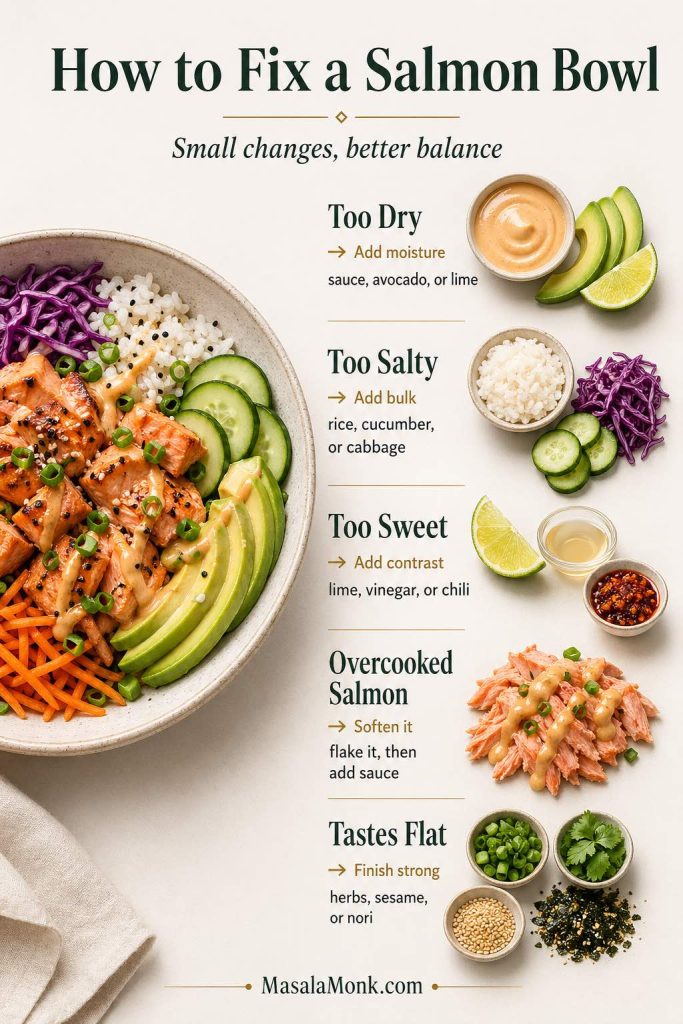
Troubleshooting Salmon Bowls

If your bowl tastes almost right but not quite finished, the fix is usually sauce, acid, crunch, or balance. Therefore, use the guide below before changing the whole recipe.

How to fix a salmon bowl guide with fixes for a dry, salty, sweet, flat, or overcooked salmon bowl using sauce, avocado, lime, rice, cucumber, herbs, sesame, and nori.
Most salmon bowl problems are easy to balance before serving: add sauce, avocado, or lime for dryness, rice or cucumber for saltiness, chili or vinegar for sweetness, and herbs, sesame, or nori when the bowl tastes flat.
Problem How to Fix It
The bowl tastes dry Add more sauce, avocado, lime juice, or a small spoon of sesame soy drizzle.
The bowl is too salty Add more rice, cucumber, avocado, cabbage, or yogurt sauce.
The bowl is too sweet Add lime juice, rice vinegar, chili crisp, cucumber, or herbs.
The salmon is overcooked Flake it into the bowl and use extra sauce, avocado, cucumber, and lime.
The bowl feels flat Add acid, crunch, herbs, sesame, nori, furikake, or a stronger sauce.

What to Serve with Salmon Bowls

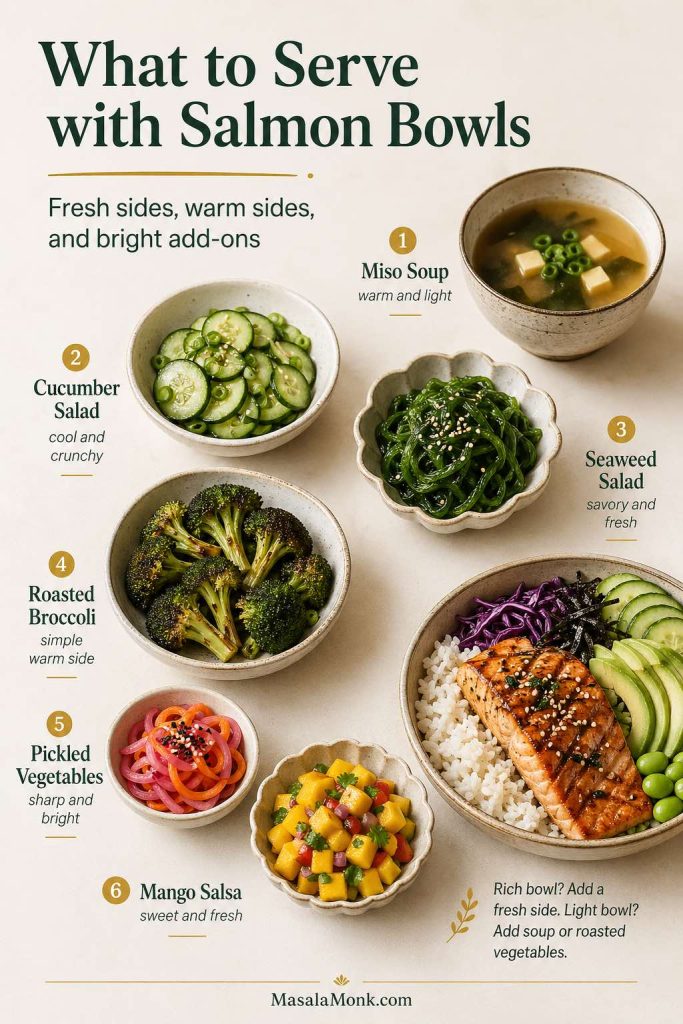
Salmon bowls are usually filling enough on their own, but you can serve them with a small side if you want a bigger meal. Good options include miso soup, cucumber salad, seaweed salad, roasted broccoli, pickled vegetables, simple greens, or mango salsa.

What to serve with salmon bowls guide showing miso soup, cucumber salad, seaweed salad, roasted broccoli, pickled vegetables, mango salsa, and a salmon rice bowl.
Salmon bowls are filling on their own, so the best sides are simple: miso soup or roasted broccoli for warmth, cucumber or seaweed salad for freshness, pickled vegetables for brightness, and mango salsa for a sweet contrast.

If the bowl is spicy or rich, choose a fresh side. If the bowl is light, choose something warmer like soup or roasted vegetables.

FAQs About Salmon Bowls

What is a salmon bowl made of?

A salmon bowl recipe is usually made with cooked salmon, rice or grains, sauce, vegetables, and toppings. For example, a simple version can include salmon, rice, cucumber, avocado, edamame or cabbage, scallions, sesame seeds, and a creamy or soy-based sauce.

What is the best rice for salmon bowls?

Jasmine rice is the easiest everyday choice, while sushi rice is best for sushi-style or poke-style bowls. Brown rice and quinoa are good for heartier or healthier bowls, and coconut rice is a strong match for spicy salmon, mango, lime, and herbs.

What sauce goes best with salmon and rice?

Creamy sriracha yogurt sauce is the best default because it adds tang, spice, and moisture. Spicy mayo, teriyaki sauce, sesame soy drizzle, miso tahini sauce, green chutney yogurt, tzatziki, and pesto yogurt also work depending on the flavor you want.

Can I make a salmon bowl in the air fryer?

Yes. Cut the salmon into 1-inch / 2.5 cm pieces, season it, and air fry at 400°F / 200°C for about 6 to 8 minutes, depending on the size of the pieces. Arrange the salmon in a single layer and turn or shake once so it cooks evenly.

Is a salmon bowl healthy?

A healthy salmon bowl recipe usually includes salmon, a filling base, vegetables, and a balanced sauce. Use brown rice, quinoa, or cauliflower rice if you want a lighter or higher-protein bowl, and choose Greek yogurt sauce or sesame soy drizzle instead of a heavier mayo-based sauce.

Can I make a salmon bowl without rice?

Yes. Use quinoa, cauliflower rice, greens, cabbage, or a mix of vegetables instead of rice. If you skip rice, make sure the bowl still has enough sauce, avocado, vegetables, and toppings so it feels complete.

Is a salmon poke bowl raw or cooked?

A traditional poke-style bowl is often made with raw fish, but this homemade salmon bowl uses cooked salmon by default. Therefore, you can still use sushi rice, cucumber, avocado, edamame, sesame, nori, and soy-sesame sauce to get a poke-style flavor without using raw salmon.

Can I use leftover salmon for a salmon bowl?

Yes. Leftover cooked salmon works well in salmon bowls. Reheat it gently or serve it cool over warm rice, then add sauce, cucumber, avocado, herbs, sesame, and lime.

Can I use canned salmon for a salmon bowl?

Yes. Drain canned salmon well, remove any large bones or skin if you prefer, then flake it over warm rice with cucumber, avocado, scallions, sesame, and a bold sauce. Canned salmon works best with spicy mayo, green chutney yogurt, or sesame-soy drizzle because those sauces bring back freshness.

Can I use frozen salmon?

Yes. Thaw frozen salmon in the refrigerator, pat it very dry, then cut and season it as written. Avoid cooking frozen salmon bites directly for this bowl because the outside can overcook before the center is ready.

Can I use smoked salmon?

Yes, but use it as a no-cook variation rather than cooking it again. Since smoked salmon is already salty, pair it with a lighter sauce, cucumber, avocado, lemon, herbs, and rice or greens.

Can I make a salmon avocado bowl?

Yes. Use the main salmon rice bowl recipe and make avocado one of the main toppings. Avocado adds creaminess, balances salty sauce, and pairs nicely with spicy mayo, sesame-soy drizzle, teriyaki sauce, and lime.

What vegetables go well in salmon bowls?

Cucumber, cabbage, carrots, edamame, radish, avocado, scallions, greens, and herbs all work well. Choose at least one crunchy vegetable and one fresh garnish so the bowl does not feel too soft or rich.

How long does a salmon rice bowl last in the fridge?

For best texture, eat a salmon rice bowl within 1 to 2 days. Store the salmon, rice, sauce, and toppings separately when possible, then assemble after reheating the warm components.

This salmon bowl recipe is easiest when you start with the main version first, then adjust the rice, sauce, toppings, and cooking method to fit the bowl you want. Once you have the formula, you can make it creamy, spicy, lighter, teriyaki-style, sushi-style, or meal-prep friendly without starting over.

Posted on — Leave a comment

Ground Pork Recipes: 10 Easy Weeknight Dinners to Make Tonight

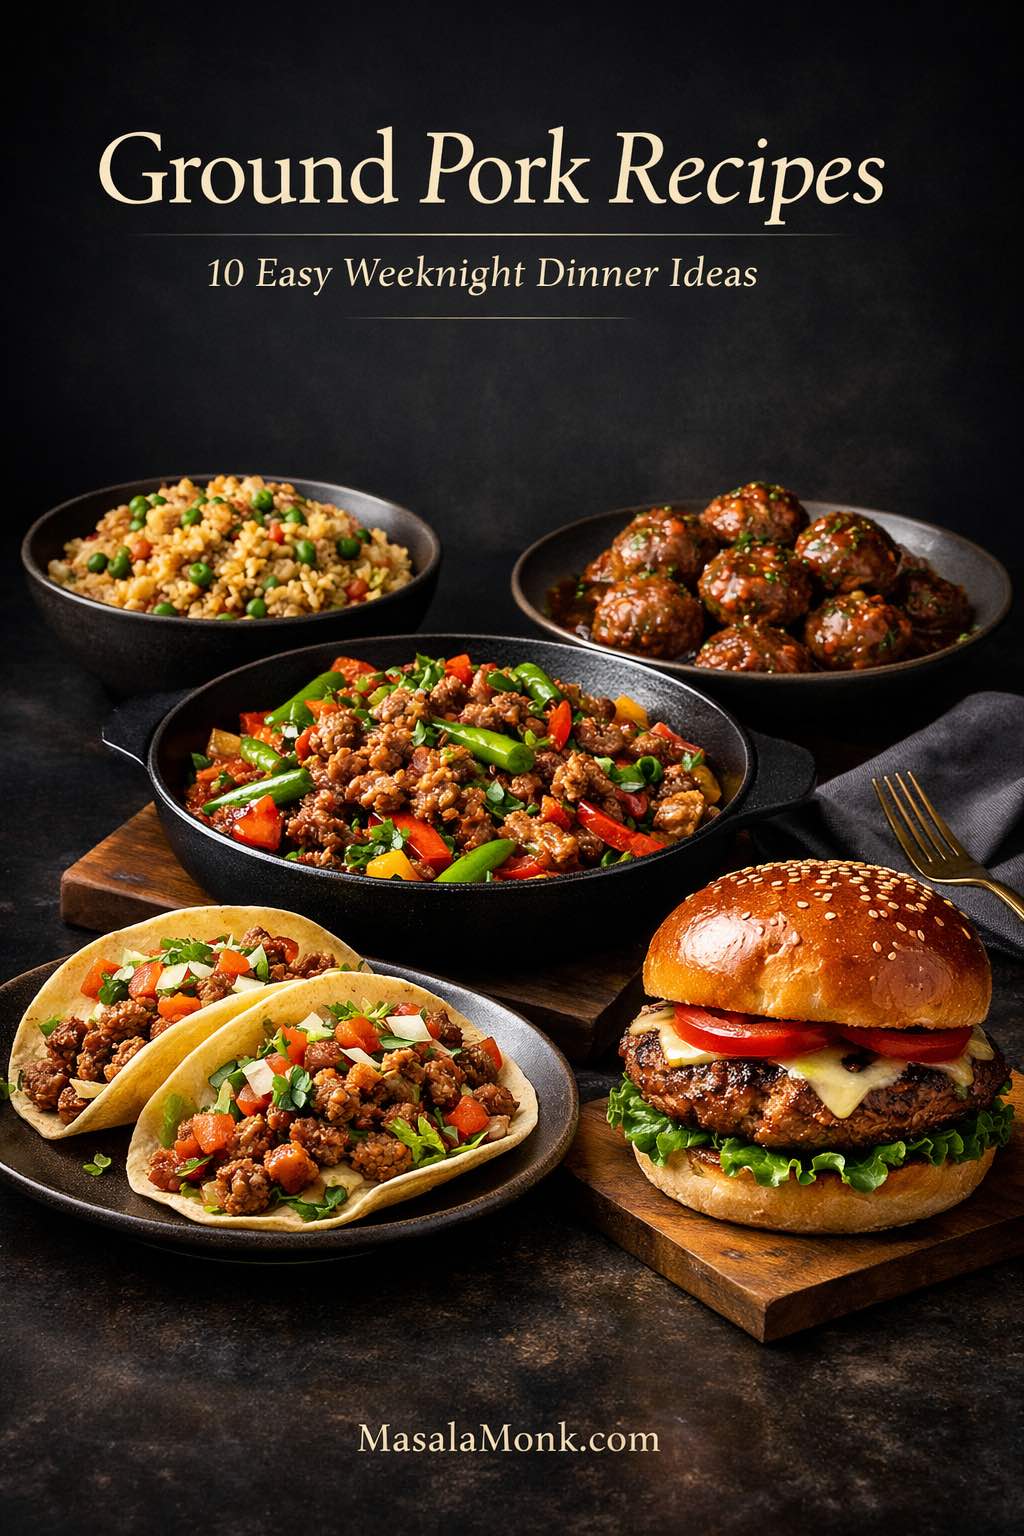
Ground pork recipes featured image showing stir fry, tacos, fried rice, meatballs, and a burger for easy weeknight dinners.

Ground pork recipes, or pork mince recipes in many regions, are one of the easiest ways to get a flavorful, affordable dinner on the table fast. One pound can become a quick stir fry, juicy tacos, tender meatballs, fried rice, pasta, burgers, or a comforting rice-based skillet. That range is what makes ground pork one of the most useful proteins to keep around for busy nights.

Still, not every ground pork dinner solves the same problem. Some are best when dinner needs to happen in 20 minutes, while others stretch a pound farther, reheat better the next day, or feel more comforting when you want something steadier and heartier. So, the smartest move is to start with the kind of night you are actually having.

These 10 ground pork recipes cover the weeknight dinners people reach for most: fast skillets, tacos, burgers, pasta, meatballs, fried rice, lighter bowls, and a few deeper comfort-food options. Use the quick picks below when you want the answer fast, or scroll straight to the recipe that sounds right for tonight.

If you want the fastest path, jump to the comparison table or go straight to the recipe list.

Fastest pick: Ground Pork Stir Fry. Best budget pick: Ground Pork Fried Rice. Best leftovers pick: Ground Pork Meatballs. And for best comfort pick: Ground Beef and Pork Meatloaf or Pork Giniling.

Decision guide for ground pork recipes showing the fastest, budget, leftovers, comfort, and light dinner picks.
Use this quick chooser to match your night to the right ground pork dinner, whether you need speed, budget value, leftovers, comfort, or something lighter.

Quick Answers: Best Ground Pork Recipes for Weeknights

Need the short version? Start here.

Fastest Dinner

Go with ground pork stir fry. It is the fastest all-around option, works with whatever vegetables you have, and still feels like a complete dinner instead of a backup plan.

Best for Leftovers

Ground pork meatballs and ground beef and pork meatloaf are the strongest leftover picks, with pork giniling close behind when you want a rice-based comfort meal that reheats well.

Best Budget Dinner

Ground pork fried rice is the best budget-first choice, while ground pork egg roll bowl and ground pork tacos also stretch a pound well without making dinner feel skimpy.

Best Light Pick

Ground pork lettuce wraps are the freshest light option, while ground pork egg roll bowl gives you a similar lighter feel in a warmer one-pan format.

Best Comfort Pick

Choose ground beef and pork meatloaf for the most classic comfort-food dinner, ground pork pasta for a fast tomato-led comfort meal, or pork giniling for a steadier rice-based option.

At a Glance: Easy Ground Pork Recipes by Time and Type

Use this quick comparison to find the best fit for tonight.

At-a-glance comparison chart for ground pork recipes showing cooking times and best uses for stir fry, tacos, burgers, meatballs, pasta, fried rice, meatloaf, egg roll bowl, lettuce wraps, and pork giniling.
A fast side-by-side look at cooking time, leftovers value, comfort level, and weeknight usefulness across all 10 ground pork recipes in the post.
RecipeBest forTimeBest if you haveFlavor profileServe with
Ground Pork Stir FryFastest flexible dinner20 minMixed vegetablesSavory, gingery, garlickyRice or noodles
Ground Pork TacosFamily-friendly dinner25 minTortillas and toppingsSpiced, juicy, brightSlaw, salsa, lime
Ground Pork MeatballsMeal prep and leftovers30–35 minBreadcrumbs and an eggTender, savory, versatilePasta, rice, salad
Ground Beef and Pork MeatloafHearty comfort dinner60–75 minA little more timeRich, classic, homeyMash, beans, roasted veg
Ground Pork BurgersBurger night25–30 minBuns and simple toppingsJuicy, savory, classicBuns, slaw, pickles
Ground Pork PastaFast comfort dinner25–30 minPasta and pantry tomatoesSavory, garlicky, saucyParmesan, greens, salad
Ground Pork Fried RiceBudget dinner / leftover-rice night20–25 minCooked rice and odds and endsSavory, flexible, satisfyingAs-is or with egg
Ground Pork Egg Roll BowlOne-pan lighter dinner20–25 minCabbage or slaw mixSoy-ginger, cabbage-forwardAs-is or with rice
Ground Pork Lettuce WrapsFreshest light dinner20–25 minLettuce and a punchy sauceSweet-savory, bright, punchyLettuce cups, herbs, rice
Pork GinilingRice-based comfort meal35–40 minRice and a tomato baseTomatoey, savory, comfortingSteamed rice

Best first pick: choose stir fry for pure speed, tacos for easy family appeal, meatballs for leftovers, burgers for classic comfort, fried rice for budget value, and egg roll bowl for one-pan ease.

10 Easy Ground Pork Recipes for Dinner on Busy Weeknights

Each one is here because it solves a real weeknight dinner problem. Some are built for speed, some for leftovers, some for comfort, and some for stretching a pound of pork into a fuller, more affordable meal.

1. Ground Pork Stir Fry Recipe

Ground pork stir fry with broccoli, green beans, red bell pepper, and rice in a black bowl.
Because stir fry is the fastest pick in this roundup, the real win is contrast: browned pork, bright vegetables, and just enough rice to turn fridge odds and ends into a proper dinner.

Choose this if: dinner needs to happen fast and you want the most flexible recipe on the page.

When the fridge is full of odds and ends, stir fry is usually the smartest move. The pork browns quickly, stays juicy enough to support a lot of vegetables, and carries sauce well. That makes it especially useful on nights when dinner depends on what is already in the fridge.

Time: about 20 minutes
Serves: 4
Best for: speed, flexibility, and using up vegetables

What you need

  • 1 pound ground pork
  • 1 tablespoon neutral oil, only if needed
  • 1 small onion or 3 to 4 scallions, chopped
  • 3 to 4 cloves garlic, minced
  • 1 tablespoon grated ginger
  • 4 to 5 cups mixed vegetables, cut into bite-size pieces
  • 3 tablespoons soy sauce
  • 1 to 2 teaspoons chili paste or chili flakes
  • 1 teaspoon sesame oil
  • 1 to 2 teaspoons rice vinegar or lime juice
  • 1/2 teaspoon black pepper
  • Cooked rice or noodles, for serving
Ground pork stir fry process image showing browned pork with red peppers, green beans, onions, and a wooden spoon in a hot skillet.
Proper browning is what gives this stir fry real flavor, while the vegetables should stay bright and the skillet should look glossy, not watery.

How to make ground pork stir fry

  1. Heat a large skillet or wok over medium-high to high heat. Add the pork and let it sit for 45 to 60 seconds before stirring so it browns instead of steaming.
  2. Break up the meat and cook until no longer pink and browned in spots, about 5 to 6 minutes. Add a little oil only if the pan looks dry.
  3. If the skillet looks very greasy, spoon off some fat, but leave enough behind to carry flavor.
  4. Add the onion, garlic, and ginger. Cook for about 1 minute, stirring often, until fragrant.
  5. Add the vegetables that take longer first, such as broccoli or carrots. Follow with faster-cooking vegetables like mushrooms, peppers, cabbage, or spinach.
  6. Stir in the soy sauce, chili, sesame oil, vinegar or lime juice, and black pepper. Toss until the vegetables are just tender and the skillet looks glossy rather than watery.
  7. Taste and adjust. Add more soy for depth or more acid for brightness.

Best ways to serve it

Serve the stir fry over 3 to 4 cups cooked rice or with about 8 ounces cooked noodles. For a lighter plate, spoon it over shredded cabbage or cauliflower rice and add cucumber on the side for contrast.

Easy variations and leftovers

Add a sweeter savory finish with a quick teriyaki sauce for a glossier version. You can also lean hotter with chili crisp and extra scallions. Leftovers reheat well for lunch, especially when you keep the rice separate so the vegetables stay in better shape overnight.

Best result: do not crowd the pan. The browning is what keeps this from tasting flat.

Related next pick: want a rice-based budget dinner instead? Try Ground Pork Fried Rice.

2. Ground Pork Tacos Recipe

Ground pork tacos on a dark plate with juicy seasoned pork, soft tortillas, cilantro, red onion, lime, and salsa.
Juicy pork, soft tortillas, and just enough fresh topping make these tacos one of the easiest crowd-pleasing dinners in the whole post.

Choose this if: you want a fast, flexible family dinner that still feels generous.

Tacos are one of the easiest ways to turn one pound of pork into a dinner that feels bigger than it is. Pork stays juicy, takes spice well, and works with enough toppings, slaws, and sides that the meal feels generous without getting expensive.

Time: about 25 minutes
Serves: 4
Best for: family dinners, easy customization, and stretching one pound of pork

Ingredients for ground pork tacos

  • 1 pound ground pork
  • 1 small onion, finely chopped
  • 2 to 3 cloves garlic, minced
  • 1 tablespoon chili powder
  • 1 teaspoon cumin
  • 1 teaspoon paprika
  • 1/2 teaspoon oregano
  • 3/4 teaspoon kosher salt, or to taste
  • 1/2 teaspoon black pepper
  • 1 tablespoon tomato paste
  • 2 to 4 tablespoons water
  • 8 to 12 tortillas, flour or corn
  • Toppings such as slaw, salsa, avocado, cilantro, lime, pickled onions, or shredded lettuce

How to cook the filling

Ground pork tacos process image showing browned juicy taco filling with onions in a skillet and a wooden spoon.
A good taco filling should look deeply browned, richly seasoned, and moist enough to spoon easily into tortillas without turning greasy or dry.
  1. Cook the ground pork in a skillet over medium-high heat until browned and broken up well, about 5 to 6 minutes.
  2. Add the onion and cook until softened, about 3 minutes, then stir in the garlic.
  3. Add the chili powder, cumin, paprika, oregano, salt, and pepper. Cook for 30 seconds so the spices bloom instead of tasting dusty.
  4. Stir in the tomato paste and water. The filling should stay juicy enough to spoon into tortillas easily, not dry and crumbly.
  5. Warm the tortillas while the filling finishes.
  6. Squeeze lime over the meat just before serving for a brighter finish.

Toppings and serving ideas

Build the tacos with one crunchy element and one fresh one. Slaw, shredded lettuce, salsa, chopped onion, cilantro, avocado, and lime are enough for a strong version. For a more relaxed family dinner, set everything out taco-bar style so everyone can build their own plate.

Leftover ideas

For a creamier taco, add a quick eggless mayonnaise-based sauce or a spoonful of green chutney for something brighter. Leftover taco meat also works well in rice bowls, quesadillas, stuffed peppers, or a quick breakfast hash with eggs.

Watch out for this: the filling should stay juicy. A dry taco filling makes the whole dinner feel flatter than it needs to.

Related next pick: want the same kind of fast dinner in burger form instead? Try Ground Pork Burgers.

3. Ground Pork Meatballs Recipe

Ground pork meatballs in tomato sauce in a dark bowl, garnished lightly and styled as a comforting leftovers-friendly dinner.
Tender meatballs and a glossy, controlled sauce make this one of the easiest dinners in the post to cook once and enjoy again later.

Choose this if: you want the best all-around meal-prep and leftovers option in the guide.

Meatballs are the easiest make-ahead winner in the lineup. Pork stays tender naturally, the mixture is forgiving, and the finished meatballs can move into pasta, rice bowls, sandwiches, or freezer meals without much extra work.

Time: about 35 minutes
Serves: 4
Makes: about 16 medium meatballs
Best for: leftovers, freezer cooking, and versatile dinners

What you need

  • 1 pound ground pork
  • 1 egg
  • 1/2 cup breadcrumbs, panko or fine dried crumbs
  • 1/4 cup grated Parmesan, optional
  • 2 to 3 cloves garlic, minced
  • 2 tablespoons finely chopped parsley or onion
  • 3/4 teaspoon kosher salt
  • 1/2 teaspoon black pepper
  • 1 tablespoon milk or water if the mixture feels tight
  • Oil for the pan or a parchment-lined baking sheet
  • Sauce for serving

How to make them

  1. Heat the oven to 425°F if baking.
  2. Combine the pork, egg, breadcrumbs, Parmesan, garlic, parsley or onion, salt, pepper, and milk or water.
  3. Mix gently and stop as soon as everything holds together. Overmixing makes meatballs dense.
  4. Form into evenly sized meatballs, about 1 1/2 inches wide, so they cook at the same rate.
  5. Bake for 12 to 15 minutes, or until cooked through and lightly browned. You can also sear them in a skillet and finish in sauce.
  6. The finished meatballs should feel lightly firm and springy, not tight or dry.
  7. Simmer the cooked meatballs in sauce for a few minutes when using one, so they stay moist and pick up more flavor.
Baked ground pork meatballs on a parchment-lined sheet pan with a spatula lifting one meatball.
This is the point where ground pork meatballs prove why they are one of the smartest make-ahead dinners in the post: even sizing and light browning give you a tender batch that can head to sauce, pasta, subs, or the freezer without falling apart.

How to serve them

Serve them with marinara sauce and pasta, over rice with a gingery glaze, in sub rolls, or with roasted vegetables and salad. Because the seasoning starts fairly neutral, the same batch can move in several directions without feeling repetitive.

Make-ahead and freezer notes

Double the batch when possible. You can freeze cooked meatballs for quick dinners later, or freeze them uncooked on a tray first and then transfer them to a container once firm. Either way, they are one of the best meal-prep dinners in the whole guide.

Best result: mix gently and stop early. Tender meatballs come from restraint, not extra mixing.

Related next pick: want another leftovers-first comfort option? Try Ground Beef and Pork Meatloaf.

4. Ground Beef and Pork Meatloaf

Ground beef and pork meatloaf slices with glaze, mashed potatoes, and green beans on a black plate.
Meatloaf is the slow, hearty comfort turn in this roundup, and the beef-and-pork mix earns its place by staying juicier than all-beef while giving you the kind of leftovers that justify the longer cook time.

Choose this if: you want the most classic, hearty comfort dinner on the page with especially good leftovers.

When you want something slower, steadier, and more classic than the skillet dinners, meatloaf makes sense. The beef brings familiar meatloaf depth, while the pork keeps the slices juicy. It takes longer, but the leftovers are strong enough to make that extra time feel worth it.

Time: about 70 minutes including rest time
Serves: 6
Best for: comfort food, planned leftovers, and make-ahead dinners

Ingredients for the loaf

  • 1/2 pound ground beef
  • 1/2 pound ground pork
  • 1 egg
  • 3/4 cup breadcrumbs
  • 1 small onion, finely chopped
  • 2 cloves garlic, minced
  • 2 tablespoons ketchup or tomato paste
  • 1 tablespoon Worcestershire sauce or soy sauce
  • 1 teaspoon kosher salt
  • 1/2 teaspoon black pepper
  • For the top: 3 tablespoons ketchup, 1 teaspoon brown sugar or honey, and 1 teaspoon vinegar

How to bake it

  1. Heat the oven to 375°F.
  2. Mix the beef, pork, egg, breadcrumbs, onion, garlic, ketchup or tomato paste, Worcestershire, salt, and pepper just until combined.
  3. The mixture should feel moist enough to hold together but not wet or loose.
  4. Shape into a loaf in a loaf pan or on a lined sheet tray.
  5. Stir together the glaze ingredients and spread over the top.
  6. Bake for 45 to 55 minutes, or until the loaf is cooked through and firm but still juicy.
  7. Rest for 10 minutes before slicing so it does not crumble and lose its juices.
Ground beef and pork meatloaf process image showing glossy rested slices on a dark board with a knife.
Clean slices and a glossy set glaze are the payoff for letting meatloaf rest before cutting into it too early.

How to serve it

Serve meatloaf with mashed potatoes, roasted carrots, green beans, or a crisp salad to balance the richness. Plain steamed vegetables also work especially well here because the loaf brings enough flavor on its own.

Leftover ideas

Leftover slices make excellent sandwiches, rice bowls, or quick dinner plates. You can also pan-crisp a slice the next day so the leftovers feel more deliberate and less like repetition.

Watch out for this: let the loaf rest before slicing. Cutting too early is the easiest way to lose juices and structure.

Related next pick: want another leftovers-friendly option that cooks faster? Try Ground Pork Meatballs.

5. Ground Pork Burgers Recipe

Ground pork burger with cheese, pickles, red onion, tomato, and lettuce on a toasted bun.
A juicy ground pork burger works best with a well-browned patty, a soft toasted bun, and crisp toppings that keep the dinner rich but still balanced.

Choose this if: you want a classic burger-night dinner with a juicier, slightly richer twist than beef.

Burger night does not need to rely on beef. Ground pork makes especially juicy patties, and the flavor works best when the seasoning stays simple and the toppings bring a little crunch or brightness.

Time: about 25 to 30 minutes
Serves: 4
Best for: burger night, family dinners, and classic comfort

What you need

  • 1 pound ground pork
  • 1 teaspoon kosher salt
  • 1/2 teaspoon black pepper
  • 1/2 teaspoon garlic powder or 1 small clove garlic, finely grated
  • 1 teaspoon Worcestershire sauce or soy sauce, optional
  • 4 burger buns or sturdy lettuce leaves
  • Cheese, pickles, lettuce, onion, tomato, or slaw for serving
  • Oil for the pan, only if needed

How to make the patties

Ground pork burgers process image showing two browned pork patties in a skillet, one with melted cheese and a spatula underneath.
A good pork burger patty should look well browned, gently handled, and juicy enough to rest briefly before it ever goes into the bun.
  1. Combine the pork, salt, pepper, garlic, and Worcestershire if using. Mix just until the seasoning is distributed.
  2. Divide into 4 patties and shape them slightly wider than the buns. Keep them a little thicker in the center than you would with very lean beef.
  3. Chill the patties for 10 minutes if you have time. That helps them hold together more neatly in the pan.
  4. Cook in a hot skillet or grill pan over medium-high heat for about 4 to 5 minutes per side, or until cooked through and browned well on the outside.
  5. Add cheese during the last minute if using, then rest the patties briefly so the juices settle.

Best ways to serve them

Keep the toppings simple so the burger still tastes like pork. Pickles, slaw, onion, lettuce, tomato, and cheese all work well. A swipe of eggless mayonnaise or a spoonful of chimichurri can brighten the burger without making it fussy.

Easy variations and leftovers

Serve them in buns for a classic burger dinner or in lettuce leaves when you want something lighter. Leftover patties also work well sliced into rice bowls or chopped into a breakfast hash the next day.

Watch out for this: do not overwork the meat. The more you mix and press, the less juicy the burgers feel.

Related next pick: want a handheld dinner with more spice and less assembly? Try Ground Pork Tacos.

6. Ground Pork Pasta Recipe

Ground pork pasta with penne, tomato sauce, Parmesan, and basil in a black bowl.
When the lighter skillet dinners do not sound satisfying enough, ground pork pasta is the fast comfort turn in this roundup: tomato sauce, browned pork, and pantry pasta that still feel like a proper dinner.

Choose this if: you want a fast comfort dinner that feels fuller and more familiar than rice or stir fry.

This is the pasta option for nights when you want a quick tomato-pork sauce without spending all evening on it. The pork brings richness, garlic and onion build the base, and a modest amount of tomato turns everything into a weeknight sauce that clings to the pasta instead of pooling underneath it.

Time: about 25 to 30 minutes
Serves: 4
Best for: comfort dinners, pantry cooking, and easy leftovers

Ingredients

  • 1 pound ground pork
  • 8 ounces pasta such as spaghetti, penne, or rigatoni
  • 1 small onion, finely chopped
  • 3 to 4 cloves garlic, minced
  • 2 tablespoons tomato paste
  • 1 cup crushed tomatoes or tomato sauce
  • 1/2 teaspoon chili flakes, optional
  • 1/2 teaspoon black pepper
  • Salt, to taste
  • 1/4 to 1/2 cup pasta water, as needed
  • Parmesan and basil or parsley, optional

How to cook it

Ground pork pasta process image showing penne coated in tomato sauce with browned pork in a skillet and a wooden spoon lifting the pasta.
A good skillet finish leaves the pasta evenly coated and glossy, with the pork worked into the sauce instead of sitting loose underneath it.
  1. Cook the pasta in salted water until just shy of done. Save some pasta water before draining.
  2. Brown the ground pork in a large skillet until cooked through and lightly caramelized.
  3. Add the onion and cook until softened, then stir in the garlic and chili flakes if using.
  4. Stir in the tomato paste and cook for 30 to 60 seconds so it darkens slightly and loses its raw edge.
  5. Add the crushed tomatoes or sauce and a splash of pasta water. Simmer for a few minutes until the sauce looks savory and lightly concentrated.
  6. Add the pasta and toss until the sauce coats it well. Use more pasta water as needed so the pan looks glossy rather than dry.
  7. Finish with Parmesan and herbs if you like.

How to serve it

Serve it with Parmesan, herbs, and a simple salad when you want a fuller plate. Mushrooms, spinach, or zucchini also fit naturally here if you want more volume. For a deeper tomato route, a fuller Bolognese sauce style can pull this dinner in a richer direction.

Leftover notes

Leftovers reheat well with a splash of water so the sauce loosens instead of tightening up. That small step keeps the pasta from feeling dry the next day.

Best result: use the pasta water. It is what helps the sauce cling instead of sitting loose in the bowl.

Related next pick: want another comfort dinner with even better next-day leftovers? Try Ground Beef and Pork Meatloaf.

7. Ground Pork Fried Rice Recipe

Ground pork fried rice with egg, peas, carrots, scallions, and separate rice grains in a black bowl.
Fried rice is the best budget-first pick in the post because leftover rice stretches the pork beautifully, while separate grains, egg, and vegetables keep the bowl from feeling flat or skimpy.

Choose this if: you have leftover rice and want one of the best budget-friendly dinners in the roundup.

Fried rice is the budget-first answer when there is already rice in the fridge. The rice stretches the pork, the eggs and vegetables fill out the bowl, and the whole thing comes together quickly once the prep is done.

Time: about 20 to 25 minutes
Serves: 4
Best for: leftover rice, budget dinners, and quick one-pan meals

What you need

  • 1 pound ground pork
  • 3 to 4 cups cold cooked rice
  • 2 eggs
  • 1 small onion or several scallions
  • 2 to 3 cloves garlic
  • 1 to 2 cups mixed vegetables such as peas, carrots, mushrooms, or cabbage
  • 2 to 3 tablespoons soy sauce
  • 1 teaspoon sesame oil
  • 1/2 teaspoon black pepper
  • Chili crisp or hot sauce, optional

How to make ground pork fried rice

Ground pork fried rice process image showing separate rice grains with browned pork, peas, carrots, egg, and a wooden spoon in a skillet.
Separate grains, browned pork, and just enough gloss are what make fried rice feel properly stir-fried instead of soft, sticky, or clumped together.
  1. Heat a large skillet well and brown the ground pork first. Remove excess fat if needed, but keep enough for flavor.
  2. Push the pork aside or remove it briefly, then scramble the eggs.
  3. Add the onion, garlic, and vegetables. Cook until the vegetables soften but still keep some texture.
  4. Add the cold rice and break up any clumps. Let it sit in the pan for a minute or two so some grains pick up light toasty color.
  5. Return everything together, then season with soy sauce, sesame oil, pepper, and chili if using. Seasoning near the end helps keep the rice from turning mushy.
  6. Finish with scallions for freshness.

How to serve it

Serve fried rice as a complete bowl, or top it with extra chili crisp, sliced cucumber, or a fried egg. If you need a refresher on getting the grains right before they ever hit the pan, this guide on how to cook rice is a useful starting point.

Easy variations and leftovers

Kimchi, leftover roasted vegetables, chopped greens, or mushrooms all fit naturally here. Leftovers also reheat well in a skillet, and the flavor often improves slightly the next day once everything settles together.

Watch out for this: use cold rice and let it toast a little. Fresh hot rice is much more likely to turn soft and clumpy.

Related next pick: want another rice-friendly comfort dinner? Try Pork Giniling.

8. Ground Pork Egg Roll Bowl

Ground pork egg roll bowl with cabbage, carrots, scallions, and sesame in a black bowl.
This ground pork egg roll bowl works best when the pork is well browned, the cabbage stays tender-crisp, and the whole bowl looks glossy and savory rather than wet or heavy.

Choose this if: you want the best one-pan mix of speed, value, and a lighter overall feel.

Ground pork egg roll bowl is one of the easiest one-pan dinners here. It works best when you want something fast, lighter, and practical enough to repeat often, especially if you are using a bag of slaw mix or extra cabbage that needs using.

It lands between the other lighter options: warmer and easier than lettuce wraps, but still cleaner and less heavy than the richer comfort dinners.

Time: about 20 to 25 minutes
Serves: 4
Best for: one-pan dinners, cabbage-heavy meals, and lighter weeknights

Ingredients for the skillet

  • 1 pound ground pork
  • 1 small onion, chopped
  • 3 cloves garlic, minced
  • 1 tablespoon grated ginger
  • 5 to 6 cups shredded cabbage or slaw mix
  • 2 to 3 tablespoons soy sauce
  • 1 teaspoon sesame oil
  • 1 to 2 teaspoons rice vinegar or lime juice
  • Scallions, sesame seeds, peanuts, or chili crisp for topping
  • Optional rice for serving

How to cook it

Ground pork egg roll bowl cooking in a skillet with cabbage, carrots, scallions, and a spoon.
This is the texture you want before serving: the cabbage should be softened and glossy but still distinct, so the bowl stays lighter and fresher than a heavier pork skillet or a soggy cabbage stir-fry.
  1. Brown the pork in a large skillet until cooked through.
  2. Add the onion, garlic, and ginger, then cook until fragrant.
  3. Add the cabbage in batches if needed. It will look like too much at first, but it cooks down quickly.
  4. Season with soy sauce and sesame oil. Taste before topping. The skillet should already taste savory and balanced on its own.
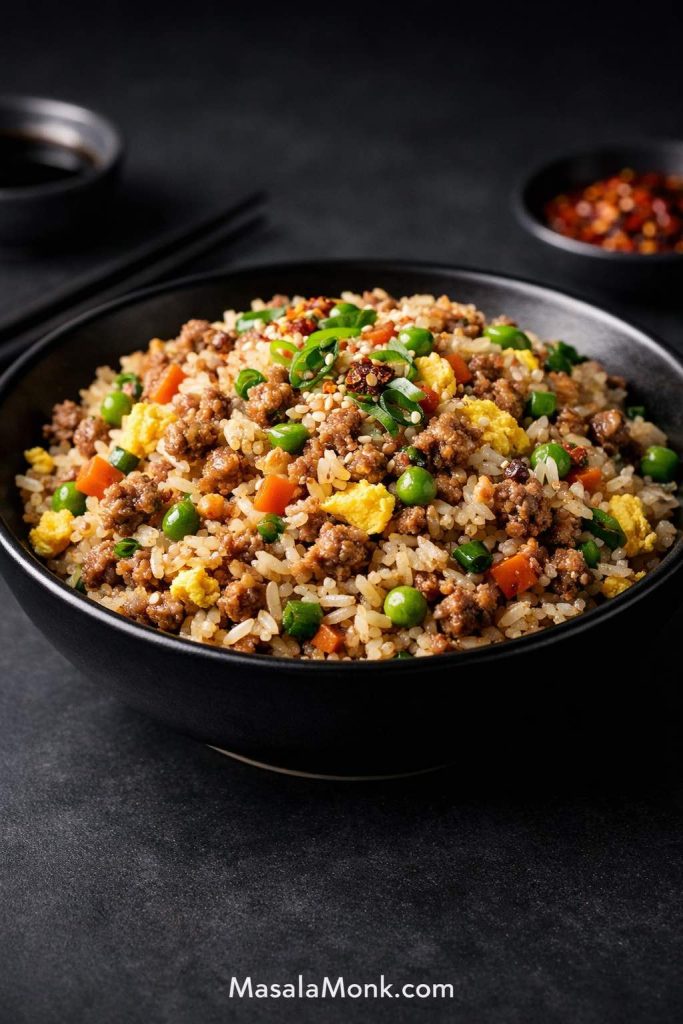
  5. Cook until the cabbage is tender but still slightly crisp, not limp or watery.
  6. Finish with rice vinegar or lime so the dish stays bright.

Toppings and serving

You can serve it straight from the pan, which is part of the appeal. For a fuller dinner, spoon it over rice or add a fried egg. Scallions, sesame seeds, peanuts, or chili crisp make the bowl feel more finished without adding much work.

Leftover notes

Reheat leftovers quickly over medium heat so the cabbage keeps some texture. Otherwise, slow reheating softens the vegetables too much and makes the bowl feel flatter the second time around.

Best result: stop while the cabbage still has a little bite. Once it goes limp, the whole skillet feels heavier.

Related next pick: want a fresher handheld version? Try Ground Pork Lettuce Wraps.

9. Ground Pork Lettuce Wraps

Ground pork lettuce wraps on a dark plate with crisp lettuce, glossy pork filling, peanuts, scallions, herbs, and lime.
Crisp lettuce, glossy pork filling, and a few bright toppings turn this into the freshest dinner in the lineup without making it feel skimpy.

Choose this if: you want the freshest, brightest, most hands-on dinner on the page.

Lettuce wraps work best when the filling is seasoned more assertively than usual, because the lettuce softens the impact and needs a punchier pork mixture to keep the wraps lively.

It is not only lighter. It is fresher, crisper, and more interactive at the table.

Time: about 20 to 25 minutes
Serves: 4
Best for: lighter dinners, interactive meals, and crisp fresh textures

What you need

  • 1 pound ground pork
  • 2 to 3 cloves garlic, minced
  • 1 tablespoon grated ginger, optional but useful
  • 2 to 3 tablespoons soy sauce
  • 1 teaspoon chili paste or chili flakes
  • 1 teaspoon brown sugar or honey, optional
  • 1 to 2 teaspoons lime juice or rice vinegar
  • Butter lettuce, romaine leaves, or another sturdy lettuce
  • Toppings such as herbs, peanuts, scallions, shredded carrots, or cucumber

How to make the filling

  1. Brown the pork in a skillet and cook until lightly caramelized.
  2. Add the garlic and ginger, then stir in the soy sauce, chili, and sugar or honey if using.
  3. Cook until the filling is glossy and well seasoned. It should taste slightly stronger than you think it needs to, because the lettuce will soften the impact.
  4. Brighten with lime juice or vinegar at the end so the richness stays under control.
  5. Wash and dry the lettuce well so the wraps stay crisp instead of slippery.

How to serve it

Ground pork lettuce wraps with two filled lettuce cups, extra leaves, peanuts, scallions, carrots, and lime on a black plate.
The trick with lettuce wraps is not to overfill them: a modest spoonful of pork, a little crunch, and a squeeze of lime keep this dinner feeling fresher and lighter than the warmer bowl-style recipes in the roundup.

Set out the lettuce, warm filling, and toppings separately so everyone can build their own wraps. Butter lettuce makes softer, neater wraps, while romaine gives more crunch. Extra lime, cucumber, herbs, peanuts, and scallions make the whole meal feel brighter and more complete.

Easy swaps and leftovers

When the lettuce is not great or the leftovers feel awkward the next day, turn the filling into rice bowls or noodle bowls instead. That backup plan makes this recipe even more practical on a busy night.

Best result: season the filling a little harder than usual. The lettuce mutes it more than most people expect.

Related next pick: want a warm one-pan cabbage dinner instead? Try Ground Pork Egg Roll Bowl.

10. Pork Giniling (Filipino Ground Pork)

Pork giniling served with white rice in a dark bowl, showing tomato-based ground pork with potatoes, carrots, and peas.
Tomato-based pork, tender vegetables, and white rice make this one of the steadier, more comforting dinners in the whole lineup.

Choose this if: you want a practical, tomato-based rice dinner that feels especially comforting and complete.

Pork giniling brings a different kind of comfort to the lineup. Instead of soy, cabbage, or noodles, it gives you a tomato-based, rice-first dinner that feels warm, homey, and complete in a way the faster skillet meals do not.

Time: about 35 to 40 minutes
Serves: 4
Best for: rice-based comfort food, homey dinners, and tomato-forward ground pork meals

Ingredients

  • 1 pound ground pork
  • 1 small onion, chopped
  • 3 cloves garlic, minced
  • 2 tomatoes, chopped, or 1 cup tomato sauce
  • 1 to 2 tablespoons tomato paste for deeper flavor
  • 1 potato, diced small
  • 1 carrot, diced small
  • 1/2 cup peas, optional but useful
  • 3/4 teaspoon salt, or to taste
  • 1/2 teaspoon black pepper
  • 1 to 2 teaspoons soy sauce or fish sauce, optional
  • Steamed rice, for serving

How to make it

Pork giniling cooking in a skillet with ground pork, tomato sauce, diced potatoes, carrots, peas, and a wooden spoon.
This is the stage that makes pork giniling different from taco meat or pasta sauce: the tomato base should be cooked down and spoonable, with tender potatoes and carrots turning the skillet into a true rice dinner rather than just seasoned mince.
  1. Brown the pork in a skillet or sauté pan until cooked through.
  2. Add the onion and garlic, then cook until softened and fragrant.
  3. Add the tomatoes and tomato paste, then cook until the mixture looks saucy rather than raw.
  4. Add the potato and carrot with 1/2 to 3/4 cup water so they can soften as the sauce simmers.
  5. Season with salt, pepper, and soy sauce or fish sauce if using.
  6. Add peas near the end so they stay bright, then simmer until the vegetables are tender and the sauce lightly coats the pork.

How to serve it

Serve pork giniling over steamed rice first and keep the rest of the plate simple. The rice and saucy pork do most of the work together, which is why the meal feels complete even without many side dishes.

Leftover notes

Leftovers reheat well and often taste even better the next day once the tomato and pork have had more time together. For a looser bowl, keep it slightly saucier. For a thicker finish, reduce it a little more before serving.

Best result: let the tomatoes cook down properly before adding water. That is what gives the dish a deeper, rounder base.

Related next pick: want another rice-based dinner that is faster and cheaper? Try Ground Pork Fried Rice.

How to Choose the Best Ground Pork Recipe Tonight

Use this section when you know the constraint, but not the recipe. Pick the dinner that fits the problem in front of you.

When You Need Dinner in 20 Minutes

Start with ground pork stir fry, ground pork fried rice, ground pork egg roll bowl, or ground pork lettuce wraps. These are the quickest options, they stay on the stovetop, and they do not ask for much downtime. Best first pick: choose stir fry when you need flexibility, or fried rice when the rice is already cooked.

When Tomorrow’s Lunch Matters Too

ground pork meatballs, ground beef and pork meatloaf, ground pork fried rice, and pork giniling all hold up well. None of them depend on delicate textures that disappear overnight. Best first pick: go with meatballs when you want the most flexible leftovers.

When You Want Something Lighter

Choose ground pork lettuce wraps for the freshest option, ground pork egg roll bowl for a warm one-pan dinner, or a vegetable-heavy ground pork stir fry when you still want a fuller plate.

When You Need to Stretch Leftover Rice

Go straight to ground pork fried rice if the rice is already cooked. After that, pork giniling or ground pork egg roll bowl both work well over rice when you want the meal to feel fuller and more affordable.

When You Need a Safe Family-Friendly Pick

ground pork tacos, ground pork burgers, ground pork meatballs, ground pork pasta, and ground pork fried rice are the safest broad-appeal choices. Best first pick: choose tacos when you want the most customization at the table, or burgers when you want something more classic.

How to Cook and Season Ground Pork Better

Ground pork cooks fast, but a few small mistakes can make dinner taste flat. In most cases, bland results come from weak browning, weak seasoning, or no contrast to cut through the richness. A little better browning and seasoning makes a big difference.

Build flavor in the pan, season it clearly, and finish with something bright, fresh, or sharp so the dish does not feel heavy. That balance is what makes dinner taste finished rather than flat.

Instructional guide showing how to cook and season ground pork better with five fixes for browning, fat, seasoning, moisture, and finishing.
Use this card as the fast reset: brown harder, grease less, season with intent, stop before the meat dries out, and finish with something that brings the whole dish back to life.

How to Brown the Meat for Better Flavor

Use enough heat and enough pan space. When the pan is crowded, the meat releases moisture and steams. When you let it sit before stirring too much, you get caramelized bits that deepen the flavor of the whole dish.

How Much Fat to Leave in the Pan

Leave enough fat behind to carry flavor, especially in stir fries, fried rice, and bowl dinners. However, when the pan looks greasy rather than lightly slick, spoon off some excess before adding the aromatics. That keeps the finished dish savory instead of heavy.

Best Seasoning for Tacos

Chili powder, cumin, paprika, garlic, onion, oregano, salt, pepper, lime, and a spoonful of tomato paste make a strong taco base. The tomato paste helps round out the meat so it tastes fuller and less dry.

Best Seasoning for Stir Fries and Bowls

Soy sauce, garlic, ginger, chili, sesame, scallions, and something bright like rice vinegar or lime work especially well. That combination keeps the meat savory and flavorful without letting it feel too rich.

Best Seasoning for Meatballs, Meatloaf, and Patties

Garlic, onion, black pepper, herbs, and either tomato-based or smoky-savory accents usually work best. Meatballs can go more herby, meatloaf benefits from a stronger savory base and glaze, and burgers work best when the seasoning stays fairly simple.

How to Keep It Juicy

Do not overcook it, and use ingredients that support juiciness too. Sauces, tomatoes, cabbage, rice, noodles, and fresh toppings all help keep it satisfying. For food safety, cook it to a safe internal temperature and check the USDA safe temperature chart when you need a quick reference.

How to Keep It From Tasting Bland

Brown it properly, season it with purpose, and balance the richness with something bright. Lime, vinegar, herbs, scallions, chili, pickled toppings, and crisp vegetables all help. The best dinners work because they combine savory depth with a little lift.

Ground Pork Dinner FAQs

What Are the Best Weeknight Picks?

The best weeknight options are usually ground pork stir fry, ground pork tacos, ground pork fried rice, ground pork egg roll bowl, and ground pork pasta. They cook quickly, use practical ingredients, and still feel like proper dinners rather than last-minute compromises.

What Can I Make With 1 Pound?

You can make all ten recipes on this page with about one pound, though some stretch better than others. Tacos, fried rice, egg roll bowl, lettuce wraps, and pork giniling are especially strong when you want that pound to go farther with rice, cabbage, tortillas, vegetables, or toppings.

Is It Good for Meal Prep?

Yes, many of these meals are. Meatballs, beef and pork meatloaf, fried rice, and pork giniling all hold up well and reheat well, which makes them especially useful for meal prep and next-day lunches.

Are Ground Pork and Pork Mince the Same Thing?

In most recipe contexts, yes. Ground pork is the more common label in some regions, while pork mince is the usual wording in others. For this kind of weeknight cooking, they usually refer to the same ingredient.

Can It Replace Ground Beef?

Yes, in many recipes it can. It is often juicier and a little richer, so it works especially well in meatballs, meatloaf, tacos, burgers, bowls, and sauces. The final flavor will still be different, though, so the best results usually come from choosing recipes that genuinely suit it.

What Vegetables Pair Best?

Cabbage, mushrooms, carrots, peppers, broccoli, greens, onions, and scallions all pair especially well with it. For contrast, cucumber, herbs, and crunchy slaws help brighten richer dishes.

What Seasonings Work Best?

Garlic, onion, black pepper, soy, ginger, chili, lime, herbs, paprika, cumin, and tomato all work well. The smartest approach is to match the flavor profile to the dinner you want rather than look for one universal spice blend.

How Long Do Leftovers Keep?

As a general rule, cooked leftovers keep well for a few days in the fridge and longer in the freezer. For current food-safety guidance, see the USDA leftovers and food safety guide.

↑ Back to top

Start with stir fry for speed, tacos for family-friendly flexibility, burgers for classic comfort, meatballs for leftovers, fried rice for budget value, or egg roll bowl for one-pan ease. That is the strength of ground pork, or pork mince if that is the label you usually buy: it can turn into several very different dinners without making weeknights harder. A quick marinara sauce can push meatballs or pasta in a more classic comfort-food direction, while a fresh green chutney or bright chimichurri can change tacos, burgers, bowls, and wraps completely. Pick the dinner that fits tonight, and one pound of pork can take you a long way.

Posted on — 7 Comments

Balti Paneer Gravy (Restaurant-Style, Creamy + Bold Recipe)

Macro close-up of Balti Paneer Gravy with soft paneer cubes in a silky hung-curd sauce, speckled with kasoori methi, with text overlay and recipe credit to Dr. Aman Singh Kahlon.

There are certain paneer gravies that feel comforting in a familiar way, and then there are the ones that taste like they came straight off a restaurant menu—glossy, aromatic, and strangely addictive. This Balti Paneer Gravy belongs firmly in the second group. From the first spoonful, it’s clear you’re not dealing with a thin, hurried curry. Instead, you get a sauce that’s rich without being heavy, spicy without being harsh, and creamy without turning sweet.

What makes it especially satisfying is the balance: onions browned to the right shade, nuts blended into silk, hung curd adding body and tang, and a final creamy finish that rounds everything out. Even better, the paneer itself stays tender because the method respects it. It’s marinated briefly, sautéed just enough, and then soaked so it doesn’t go rubbery the moment it meets heat again.

This recipe is shared with due credit to Dr. Aman Singh Kahlon, who originally posted it on Facebook after it became a small hit in a restaurant context. A friend wanted new vegetarian gravies for his menu, and this balti-style paneer was suggested alongside another paneer gravy. Both did remarkably well for months, and the balti version in particular earned that rare compliment people reserve for truly satisfying curries: finger-licking good. I’ve only refined the wording and formatted it for a smooth home-cook flow—ingredients and method remain faithful to the original.

If you love restaurant-style paneer gravies, you may also enjoy the peppery, elegant comfort of Kali Mirch Paneer (Black Pepper Paneer), which sits in a different lane yet scratches a similar itch.


Balti Paneer Gravy — what “balti” means here

“Balti” has an interesting identity because it’s often defined more by approach than by a rigid list of ingredients. Historically, balti is closely linked to Birmingham and the idea of fast-cooked curry served in the same wok-like steel bowl. If you’re curious about how that story took shape, this piece on the origins of balti in Birmingham gives a clear, readable overview, while this deeper look at how balti is method-first (quick, hot, oil-driven) is also worth a skim: Birmingham balti and why it’s disappearing.

Infographic explaining what “balti” means using Balti Paneer Gravy: cooked on high heat, fast-cooked, and served in the same balti bowl with handles, shown with simple icons.
“Balti” is more method than ingredient: it’s cooked hot and fast, then served in the same handled balti bowl. This quick visual helps you understand the style before you start cooking Balti Paneer Gravy.

Now, in real-world Indian kitchens (and plenty of restaurant kitchens), “balti paneer” can also mean something slightly broader: a curry that’s brisk, bold, fragrant, and finished in a way that feels immediate—like it was cooked with intention rather than assembled. That’s the spirit this recipe captures.

What you’ll notice in this balti paneer gravy is that it’s not trying to imitate paneer butter masala, nor is it leaning fully into the tomato-forward snap of kadai paneer. Instead, it lands in a confident middle: onion depth, nutty silk, gentle tang from hung curd, a capsicum note that lifts the aroma, and a finishing creaminess that makes it taste “complete.”

Also Read: Mojito Recipe (Classic) + Ratios, Pitcher, Mocktail & Easy Variations


Paneer marination for Balti Paneer Gravy

Marination here isn’t about turning paneer or indian cottage cheese into tikka. Instead, it’s a quick flavor primer that prevents the cubes from tasting plain once they hit a rich sauce.

Paneer marination card for Balti Paneer Gravy showing paneer cubes lightly coated with ginger-garlic paste and red chilli powder, with quick amounts and a 10–15 minute resting time.
This quick paneer marination is a flavor primer, not tikka: a light coat of ginger-garlic paste and red chilli powder gives the cubes warmth and aroma so they taste seasoned even after they simmer in the rich Balti Paneer Gravy.

You’ll need

  • 200 g paneer, cut into 1.5-inch cubes
  • 1 tbsp ginger-garlic paste, fine
  • ½ tsp red chilli powder

Toss the paneer (indian cottage cheese) with ginger-garlic paste and chilli powder until each cube is lightly coated. Then set it aside while you prepare your pan.

Although the marinade is short and simple, it matters. Ginger-garlic starts building the “cooked curry” aroma early, while chilli powder gives the paneer a faint warmth that carries into the final bite rather than staying trapped in the gravy.

Also Read: Paloma Recipe: 12 Paloma Cocktail Drinks


Ingredients for Balti Paneer Gravy (hung curd + nuts + aromatics)

This gravy gets its restaurant-style texture from a combination of browned onions, nuts, and hung curd. Each element contributes something different, and together they build that velvety mouthfeel you expect from a serious paneer curry.

Everything you need for Balti Paneer Gravy in one glance: hung curd for a silky base, cashews and almonds for richness, kasoori methi for the restaurant aroma, and a final cream finish for that glossy, spoon-coating gravy.

Gravy base ingredients

  • 2 onions, finely sliced
  • 8 cashews
  • 8 almonds
  • 3–4 green chillies
  • A handful of coriander leaves, chopped
  • 2 tbsp kasoori methi
  • 4 whole cloves
  • 1 yellow or red bell pepper, sliced
  • 1 tsp Kitchen King masala (any brand)
  • 4 tbsp hung curd (thick, hung overnight)
  • Butter, for finishing the paste in the pan
  • 2 tbsp fresh cream, to finish

Kasoori methi is one of those ingredients that seems small until you leave it out, and then the whole gravy feels slightly incomplete. If you’ve ever wondered what it actually does and how to use it without turning a dish bitter, this guide on kasuri methi and how to use it explains it in a way that’s easy to apply.

Also Read: Air Fryer Donuts Recipe (2 Ways): Glazed Homemade Donuts + Biscuit Donuts


How to make Balti Paneer Gravy (step-by-step)

Step 1: Sauté the paneer briefly, then soak it

Heat a non-stick pan and add a little oil. Once the pan is warm, add the marinated paneer cubes and sauté them gently. You’re not aiming for a hard crust; rather, you want a light sear and a slight change in surface color.

As soon as the paneer looks lightly sautéed, remove it into a bowl and add enough water so the cubes are fully submerged.

Important: do not discard this soaking water. You will add it back into the gravy later.

This step looks modest, yet it has a real payoff. Many people soak paneer in water and hope for softness, but the combination of light frying and soaking works better because it creates tiny pathways inside the paneer that let it reabsorb moisture quickly. Serious Eats breaks down exactly why this works so well for store-bought paneer in their guide to softening store-bought paneer. Even if you never read another technique article, that one is genuinely useful.

Step 1 of Balti Paneer Gravy: paneer cubes lightly sautéed, then soaked in water to keep them soft and prevent rubbery paneer; soaking water is saved for the gravy.
Step 1 is your soft-paneer insurance: lightly sauté the marinated paneer, then soak it so the cubes stay tender in the gravy. Don’t discard the soaking water—it’s a small detail that adds flavor back into the sauce.

Step 2: Fry onions until golden brown

In the same pan, using the same fat, add a little more ghee or oil if needed. Add the finely sliced onions and fry them until golden brown.

This stage sets the base tone of your curry. If the onions are pale, the gravy can taste thin. On the other hand, if they’re burnt, the bitterness shows up later and refuses to leave. Aim for a confident golden-brown, where the onions smell sweet and deep rather than sharp.

Step 2 sets the entire gravy’s flavor: cook the onions until they’re evenly golden-brown and glossy. Too pale tastes flat; too dark turns bitter—this is the sweet spot that makes Balti Paneer Gravy taste restaurant-style.

Step 3: Add the aromatics and build the balti-style masala

Once the onions are golden, add:

  • cashews
  • almonds
  • green chillies
  • coriander leaves
  • kasoori methi
  • cloves
  • sliced bell pepper
  • Kitchen King masala
  • hung curd

Now cook this mixture for a few minutes, stirring steadily. The goal is to “bhuno” it—let it cook until the raw smell disappears and the mixture looks cohesive.

At first, the curd may look like it’s just sitting in the pan. However, as it warms and meets the onion base, it starts to integrate. Meanwhile, the nuts toast slightly, the cloves bloom, and the capsicum releases that sweet aroma that makes the whole kitchen smell like a curry section in a restaurant.

Once it’s aromatic and unified, remove the pan from heat and let the mixture cool.

Step 3 is where the gravy’s signature texture starts: nuts and hung curd melt into the golden onions and aromatics. Cook until everything looks cohesive—once it comes together like this, you’re ready to cool and blend for a silky restaurant-style base.

Step 4: Blend into a smooth paste

Transfer the cooled mixture to a blender and blend it into a smooth paste. If needed, add a tiny splash of water to help it move, but keep it thick. The richness comes from concentration, so you don’t want to dilute it too early.

Set the paste aside.

Step 4 of Balti Paneer Gravy showing the cooled onion, nuts, herbs, and hung curd mixture blended into a thick, pale creamy paste with methi flecks for a silky, restaurant-style gravy base.
Step 4 is your “silky gravy” guarantee: blend the cooled base until it’s thick and completely smooth. When the paste looks pale, creamy, and flecked with herbs like this, your Balti Paneer Gravy will finish glossy—not grainy.

Step 5: Cook the paste again until the oil separates

Return the pan to medium heat and add a little butter. Once the butter melts, add the blended paste and cook it again.

This second bhuno is where the dish begins to taste like restaurant style balti paneer rather than “homemade curry paste.” Stir patiently until the paste thickens and you see oil separating at the edges.

This stage also smooths out any roughness from onion or curd. Gradually, the paste becomes glossy, darker, and more rounded.

Step 5 of Balti Paneer Gravy showing the masala paste being bhuno-cooked until oil separates at the edges, the key restaurant-style doneness cue.
Step 5 is the make-or-break moment: bhuno the blended masala until you see oil separating at the edges. That glossy separation is what removes raw onion/curd taste and gives Balti Paneer Gravy its restaurant-style depth.

Step 6: Loosen with the paneer soaking water, then simmer

Now add the water you used to soak the paneer. Start with a moderate amount and stir well. Bring the gravy to a boil.

Because the soaking water already carries a little flavor from the paneer and marinade, it folds into the gravy naturally. It’s a small detail, but it makes the final sauce taste cohesive rather than “diluted.”

Once the gravy is boiling, add the paneer cubes and simmer for a few minutes.

Step 6 of Balti Paneer Gravy showing paneer soaking water being poured into the pale, blended masala to loosen it into a smooth simmering gravy with visible kasoori methi flecks.
Step 6 is where the paste becomes a proper gravy: pour in the reserved paneer-soaking water little by little and stir until it loosens into a smooth simmer. This keeps the flavor concentrated while letting you control the final consistency.

Step 7: Finish with cream, then rest

Stir in 2 tbsp fresh cream, then turn off the heat.

Finally, let the balti paneer gravy rest for about 10 minutes before serving.

Step 7 of Balti Paneer Gravy showing fresh cream being poured into the pale, methi-flecked gravy with paneer cubes, then rested to become glossy and cohesive.
Step 7 is the restaurant finish: add fresh cream at the end, switch off the heat, and rest the gravy for 10 minutes. That short rest is what turns Balti Paneer Gravy glossy, smooth, and perfectly cohesive.

That resting time is where everything settles into place. The gravy thickens slightly, the flavor edges soften, and the paneer absorbs a little of the sauce without turning tough. If you’ve ever had a curry that tasted better after sitting, this is the reason: fats emulsify, spices relax, and the whole dish becomes more harmonious.

Also Read: Tapas Recipe With a Twist: 5 Indian-Inspired Small Plates


Balti Paneer Gravy texture: what you should see and smell

A lot of paneer gravies taste “almost right,” yet they miss that last 10% that makes a dish feel restaurant-level. Here, the final texture is your best clue.

You want a gravy that:

  • coats the back of a spoon without feeling like paste
  • looks glossy rather than chalky
  • smells layered—onion sweetness, spice warmth, methi perfume—without one ingredient shouting over the others
Texture check for Balti Paneer Gravy showing a side-by-side comparison of glossy gravy versus chalky gravy, with visual cues and simple fixes like bhuno longer, add hot water, and rest 10 minutes.
Quick texture check: glossy Balti Paneer Gravy should look smooth, shiny, and spoon-coating. If it looks chalky or dull, bhuno a little longer, loosen with a splash of hot water, and rest 10 minutes to bring back that restaurant-style finish.

If it looks slightly too thick, add a splash of hot water and simmer gently for a minute or two. Conversely, if it looks thin, cook it uncovered a little longer and allow the moisture to evaporate. Because nuts and curd provide body, it will thicken naturally as it cooks.

Also Read: Air Fryer Salmon Recipe (Time, Temp, and Tips for Perfect Fillets)


Balti paneer gravy vs kadai paneer vs paneer butter masala

Sometimes the easiest way to understand a curry is to see what it’s not.

Not all paneer gravies taste the same: Balti Paneer Gravy is aromatic and glossy, Kadai Paneer is rustic and capsicum-forward, and Paneer Butter Masala is richer and sweeter-leaning. Use this comparison to pick the style that matches your mood.

Balti paneer gravy

This version is bold, aromatic, and bhuno-driven. It has richness from nuts and cream, yet it stays lively because capsicum, methi, and green chilli keep it bright.

Kadai paneer

Kadai paneer often leans into a tomato-and-capsicum base with kadai masala notes—more direct, more rustic, and typically sharper.

Paneer butter masala

Paneer butter masala usually goes smoother and sweeter, with tomato richness, butter, and cream taking center stage.

So, if you want the silkiness of a creamy gravy but still prefer a curry that feels punchy and restaurant-like, paneer balti is a satisfying lane to cook in.

Also Read: Masterclass in Chai: How to Make the Perfect Masala Chai (Recipe)


Hung curd: why it works so well in Balti Paneer Gravy

Hung curd is one of the quiet heroes here. It adds:

  • thickness without needing flour or heavy cream upfront
  • tang that keeps the gravy from tasting flat
  • a “cooked dairy” richness that feels more complex than plain cream
Two-panel guide showing hung curd (thick yogurt) being strained in muslin and the finished thick, spoonable curd used to make Balti Paneer Gravy silky and restaurant-style.
Hung curd is the texture secret: strain yogurt until it turns thick and spoonable (not pourable). That thickness helps Balti Paneer Gravy stay creamy, glossy, and stable instead of watery or dull.

If you don’t have hung curd, you can thicken regular curd by straining it for a couple of hours in a cloth. Another option is to use thick Greek yogurt, although the flavor will be slightly different.

Because this recipe already relies on a nut base, you don’t need to overdo substitutions. As long as your dairy is thick and your bhuno stage is patient, the gravy holds.

Also Read: Keto Mocktails: 10 Low Carb, Sugar Free Recipes


Paneer softness: how this method prevents rubbery cubes

Paneer becomes rubbery for two common reasons:

  1. it’s cooked too long at high heat
  2. it’s added to the gravy too early and left boiling
Paneer texture check for Balti Paneer Gravy showing soft paneer cubes coated in silky gravy versus rubbery paneer cubes, with the fix: sauté briefly, soak in water, and add paneer at the end.
Soft paneer is the whole point of this gravy: it should stay tender and let the sauce cling. If your paneer turns rubbery, sauté briefly, soak in water, and add it near the end so it warms through without overcooking.

This method sidesteps both problems. First, the paneer is lightly sautéed rather than aggressively fried. Then it’s soaked so it rehydrates. Finally, it’s simmered briefly at the end and allowed to rest off heat.

If you’re using very firm paneer, you can also soak it in warm water for a few minutes before marinating, then proceed as written. Still, the fry-then-soak approach remains one of the most reliable ways to fix store-bought texture, as explained in this guide on softening paneer effectively.

If you ever feel like making paneer from scratch for a special dinner, BBC Good Food’s method for how to make paneer at home is clear and approachable. Fresh paneer tends to be softer and milkier, which makes a creamy gravy taste even more luxurious.

Also Read: Crock Pot Pork Chops and Sauerkraut (No Dry Chops Recipe)


Kitchen King masala in paneer balti recipe: what it adds

Kitchen King masala is used in many Indian restaurant kitchens because it’s a “shortcut” blend that gives you immediate complexity—warm spices, slight sweetness, and a familiar curry-house aroma. In this paneer balti recipe, it plays well with onion sweetness, nuts, and dairy.

Kitchen King masala adds that restaurant-style depth to Balti Paneer Gravy with just 1 teaspoon. If you don’t have it, garam masala works as a straightforward substitute—your gravy will still taste rich and aromatic.

If you don’t have it, you can substitute a balanced garam masala. That said, the dish will shift slightly. Kitchen King tends to push the flavor toward that classic restaurant palate, which is exactly what this recipe aims for.

Also Read: Slow Cooker Pork Tenderloin (Crock Pot Recipe) — 3 Easy Ways


Kasoori methi: the finish that makes it smell like a menu dish

Kasoori methi (dried fenugreek leaves) is one of those ingredients that feels almost invisible until it’s missing. It adds a fragrant, slightly bitter edge that keeps creamy gravies from tasting one-dimensional.

To use it well:

  • rub it between your palms before adding, so it releases aroma
  • keep the amount controlled
  • treat it like a finishing herb rather than a bulk ingredient
Kasoori methi finish for Balti Paneer Gravy showing dried fenugreek leaves crushed between fingers and sprinkled into the pale, creamy paneer gravy to boost aroma and prevent bitterness.
Kasoori methi is the final “restaurant aroma” step—crush it in your fingers first, then sprinkle it in right at the end. You’ll get a stronger fragrance with less bitterness, and the gravy tastes instantly more menu-style.

If you want a simple explanation of what it is, what it tastes like, and how to avoid bitterness, this guide to kasuri methi uses and substitutes is genuinely practical.

Also Read: Chicken Pesto Pasta (Easy Base Recipe + Creamy, One-Pot, Baked & More)


Serving ideas: what to eat with Balti Paneer Gravy

This is the kind of gravy that makes bread feel like a necessary tool rather than a side option. Even so, it also works beautifully with rice.

Balti Paneer Gravy served in a bowl with a cream swirl, alongside naan and jeera rice, with lemon and onion salad for a complete restaurant-style vegetarian meal.
Serve Balti Paneer Gravy the restaurant way: scoop it with naan, pair it with jeera rice, and add lemon + onion on the side to cut through the creamy, methi-flecked gravy.

Best bread pairings

  • butter naan
  • tandoori roti
  • kulcha
  • laccha paratha

Because the gravy is creamy and glossy, breads that have a bit of chew or char give the best contrast.

Rice pairings

  • jeera rice
  • simple basmati
  • light pulao

If you want to build a full, satisfying vegetarian meal around it, you can pair it with Authentic Punjabi Style Rajma Curry for a comforting, menu-like spread, or keep things lighter with Easy Aloo Gobi.

For a different style of comfort altogether—subtler spices, coconut fragrance, and a soothing pour-over feel—this Kerala Style Coconut Vegetable Stew is a lovely counterpoint on another day.

Also Read: Eggless Yorkshire Pudding (No Milk) Recipe


Restaurant-style Balti Paneer Gravy at home: small choices that change everything

A curry like this isn’t complicated, yet it rewards attention. The difference between “good” and “why does this taste like a restaurant?” often comes down to a few practical choices.

Bhuno checkpoints guide for Balti Paneer Gravy showing three stages of the masala paste in a pan—raw, glossy, and oil separates—so cooks can stop at oil separation for restaurant-style depth.
Bhuno isn’t a vague instruction—it has clear stages. Cook the paste until it turns glossy, then keep going until oil separates at the edges. That final checkpoint is what gives Balti Paneer Gravy its deep, restaurant-style flavor.

Let the onions earn their color

Golden onions are the backbone. If you rush this stage, the gravy can taste hollow later, even if your spice levels are perfect.

Toast the nuts in the masala

Cashews and almonds don’t just thicken; they add sweetness and roundness. When they warm and toast slightly in the onion base, the flavor becomes deeper and more integrated.

Cook the blended paste again

This is the step many people skip when they’re tired. Nevertheless, the second bhuno is where the sauce develops its restaurant-style finish. As the paste cooks, it becomes glossy, loses raw edges, and turns cohesive.

Rest before serving

Serving immediately is tempting, yet the 10-minute rest transforms the gravy. The spice settles, the cream integrates more smoothly, and the whole dish becomes calmer and richer at the same time.

Also Read: Garlic & Paprika Cabbage Rolls (Keto-Friendly Recipes) – 5 Bold Savory Twists


Variations that still feel like balti paneer

Once you’ve made the base recipe once, it becomes easy to adjust to your mood without losing the core identity of the dish.

Make this Balti Paneer Gravy your way: go Spicy with extra green chilli and black pepper, push it Dhaba-style by browning onions deeper and bhuno longer, or keep it Lighter by reducing cream and relying on hung curd + nuts for silk.

Spicier balti paneer gravy

If you want more heat, increase green chillies or add a little extra red chilli powder to the paneer marinade. You can also finish with a pinch of crushed black pepper for a sharper kick.

Dhaba-leaning paneer balti

For a more dhaba-style push, keep the onions slightly more browned and let the gravy cook a touch longer after adding the soaking water. That deeper “fried masala” tone comes through more strongly.

Slightly lighter, still restaurant-like

Use a little less cream at the end, and rely on the nuts and hung curd for richness. The gravy will still feel silky, just less indulgent.

Party starter pairing

If you’re planning a menu night and want a snack that matches the same “rich, spiced, restaurant” mood, these Cheese Balls with Indian-inspired variations make a fun companion—especially because they also use thick yogurt and spice in a way that feels familiar.

Also Read: 10 Low Carb Chia Pudding Recipes for Weight Loss (Keto, High-Protein, Dairy-Free)


Storage, reheating, and leftovers (Balti Paneer Gravy gets even better)

This curry is one of those rare gravies that often tastes better the next day. The spices have time to settle, the sauce thickens slightly, and the overall flavor becomes more rounded.

Balti Paneer Gravy storage and reheating guide showing Day 1 fresh gravy versus Day 2 chilled thicker gravy, plus the reheating fix: add a splash of hot water, warm on low heat, and rest 5 minutes.
Balti Paneer Gravy is a great make-ahead curry: it thickens after chilling, then turns silky again with a splash of hot water and gentle reheating. Resting for 5 minutes at the end brings back that glossy, restaurant-style texture.

Cool it down, refrigerate it, and reheat gently on the stove. If it thickens too much overnight, add a splash of water and stir patiently.

For general safety guidance on how long cooked leftovers keep in the refrigerator, USDA FSIS provides a clear reference in their official page on leftovers and food safety. That’s especially useful if you’re meal-prepping or cooking for guests and want a reliable baseline.

Leftovers can also become something entirely new. If you have paneer gravy or a dry-ish paneer sabji left over, you can turn it into an unexpectedly satisfying lunch—this Paneer Sabji Sandwich idea is a simple way to stretch the dish into the next day without feeling like you’re repeating dinner.

Step-by-step collage showing how to turn leftover Balti Paneer Gravy into a toasted paneer sandwich: spread leftover gravy, add paneer and sliced cucumber/onion, then toast and serve.
Leftover Balti Paneer Gravy makes an unreal sandwich: spread the thick gravy on bread, add paneer cubes (and cucumber/onion if you like), then toast until golden. It’s an easy next-day lunch that tastes like a fresh dish, not leftovers.

If you’re building a week that leans protein-forward, you may also enjoy this collection of vegetarian high-protein Indian meal prep ideas, which complements this gravy nicely in the same “cook once, enjoy twice” rhythm.


A short note on the “balti” story (for the curious cook)

Even if you’re cooking this as a straightforward home curry, it’s fun to know that balti carries a real cultural thread. It’s widely associated with Birmingham and the Pakistani community’s influence on British curry culture, where speed, high heat, and serving-in-the-same-bowl helped balti become iconic. If that background interests you, the National Geographic piece on the story behind balti is a great starting point, and Adventure.com’s write-up on balti as a method-first curry adds more detail.

That history doesn’t change your dinner, of course, but it does make the word “balti” feel less like a label and more like a living style of cooking—fast, aromatic, and satisfying.

Also Read: How to Make a Flax Egg (Recipe & Ratio for Vegan Baking)


Balti Paneer Gravy — final serve and closing

When you finally bring the pot to the table, this gravy has a particular kind of charm: it looks rich, it smells layered, and it has enough depth to make a simple meal feel celebratory. Whether you scoop it with naan, spoon it over jeera rice, or serve it as part of a bigger vegetarian spread, it holds its own without demanding extra fuss.

Most of all, it’s the kind of curry that makes people pause mid-bite and say, “Wait—what’s in this?” Not because it’s strange, but because it tastes thoughtfully built.

Recipe credit, with gratitude: This Balti Paneer Gravy is shared with due credit to Dr. Aman Singh Kahlon (originally shared on Facebook). The recipe became popular in a restaurant setting and has been enjoyed by many; it’s shared here so more home cooks can bring that same restaurant-style comfort to their own tables.

Also Read: Dirty Martini Recipe (Classic, Extra Dirty, No Vermouth, Spicy, Blue Cheese, Tequila + Batched)

FAQs

1) What is Balti Paneer Gravy?

Balti Paneer Gravy is a bold, restaurant-style paneer curry where the sauce is cooked “fast and fragrant” with a bhuno-style base. In practice, it’s a glossy paneer gravy with deep onion flavor, warm spices, and a creamy finish—often brighter and more aromatic than heavier paneer curries.

2) Is Balti Paneer the same as Paneer Balti?

Yes—most people use “Balti Paneer” and “Paneer Balti” interchangeably. Both refer to a balti-style paneer curry, and the wording usually depends on regional preference rather than a meaningful recipe difference.

3) Balti Paneer Gravy vs Kadai Paneer—what’s the difference?

Balti paneer gravy is typically smoother and more sauce-forward, with a rounded spice profile and a glossy finish. Kadai paneer, in contrast, leans more rustic and capsicum-heavy, often with a sharper, kadai-masala character and a more textured gravy.

4) Balti Paneer Gravy vs Paneer Butter Masala—what should I expect?

Balti paneer gravy usually tastes more aromatic and spice-led, while paneer butter masala is generally richer, sweeter, and more buttery. If you want a creamy paneer curry that still feels punchy and restaurant-like, balti paneer is a great middle path.

5) How spicy is this paneer balti recipe?

It can be mild to medium, depending on the number of green chillies and the chilli powder used. If you prefer a gentler curry, reduce the green chillies and use a mild chilli powder; the gravy will still taste full-bodied because the base carries plenty of flavor.

6) Why do you marinate paneer for balti paneer gravy?

Marinating paneer helps it taste seasoned all the way through, rather than relying only on the sauce. Even a short marinade with ginger-garlic and chilli makes the cubes more flavorful once they simmer in the gravy.

7) How do I keep paneer soft in restaurant style balti paneer?

To keep paneer tender, avoid over-frying it and don’t boil it aggressively in the sauce. Brief sautéing followed by soaking (then a short simmer at the end) helps maintain a softer texture and prevents rubbery cubes.

8) Can I skip the nuts in balti paneer gravy?

You can, although the gravy will be less silky and less restaurant-like. If you need a substitute, use a bit more thick curd or finish with slightly more cream; however, the nutty depth and smooth body will be reduced.

9) What can I use instead of hung curd?

If hung curd isn’t available, strain regular curd for a couple of hours to thicken it. Greek yogurt can also work, provided it’s thick and not overly tangy. Either way, gentle heat helps keep the gravy smooth.

10) How do I prevent curd from splitting in balti paneer gravy?

Use thick curd, keep the heat moderate, and cook the base patiently. Additionally, once the blended paste returns to the pan, bhuno it steadily rather than rushing—this encourages a more stable, cohesive sauce.

11) What is the best “balti paneer masala” substitute for Kitchen King masala?

A balanced garam masala is the simplest substitute. For a closer restaurant-style effect, you can combine garam masala with a small pinch of cumin-coriander powder; still, the final flavor will shift slightly.

12) Can I make balti paneer gravy without cream?

Certainly. The gravy can still be rich from nuts and thick curd alone. If you skip cream, let the curry rest a little longer so the sauce settles and tastes rounded.

13) Can I make this balti paneer recipe ahead of time?

Absolutely. In fact, the gravy often tastes even better after it sits because the spices mellow and integrate. Make the sauce in advance, then add paneer close to serving so the cubes stay soft.

14) How long does balti paneer gravy last in the fridge?

Typically, it keeps well for 2–3 days when stored properly in a sealed container. Reheat gently and add a splash of water if the gravy thickens after chilling.

15) Can I freeze balti paneer gravy?

You can freeze the gravy base, although paneer texture may change after thawing. For best results, freeze only the sauce, then add fresh paneer when reheating and finishing the dish.

16) What should I serve with Balti Paneer Gravy?

It pairs beautifully with naan, tandoori roti, kulcha, or jeera rice. For a complete meal, add a crisp onion salad, lemon wedges, and a simple raita on the side.

17) Why does my balti paneer gravy taste bitter?

Bitterness usually comes from over-browned onions, too much kasoori methi, or spices cooked too aggressively. Next time, aim for golden onions (not dark), keep methi measured, and cook the paste patiently over steady heat.

18) Why is my balti paneer gravy too thick or too thin?

If it’s too thick, loosen it gradually with hot water and simmer briefly. If it’s too thin, cook it uncovered until it reduces; since the base contains nuts and dairy, it will naturally thicken as moisture evaporates.

19) Can I make a vegan balti-style tofu gravy using this method?

Yes. Replace paneer with firm tofu and use plant-based yogurt and cream alternatives. While the flavor profile will shift slightly, the same bhuno-and-finish approach still delivers a rich, balti-inspired gravy.

20) What makes this a restaurant style balti paneer gravy at home?

It’s the combination of a properly cooked onion base, the nut-and-curd body, and the second bhuno after blending—plus a short rest at the end. Together, those steps create the glossy texture and layered flavor people associate with restaurant paneer gravies.

Posted on — 4 Comments

Air Fryer Donuts Recipe (2 Ways): Glazed Homemade Donuts + Biscuit Donuts

Portrait cover image of a glossy glazed air fryer donut close-up on a warm beige background with text “Air Fryer Donuts” and “Glazed in Minutes,” MasalaMonk.com in the footer.

Warm donuts have a way of making a normal day feel like a small celebration. The problem is that classic donuts frying at home can turn into a whole production—oil, thermometers, splatters, lingering smells, and that “now I have a pot of oil to deal with” moment. Air fryer donuts solve that in a surprisingly satisfying way.

Air Fried Donuts are not trying to be a deep-fryer stunt. Instead, they’re built for repeatability: soft, fluffy centers, a delicate outer set, and finishes that make them feel like a real treat. Even better, you can make air fried doughnuts in two very different styles depending on the time you have and the mood you’re in:

  • Homemade air fryer donuts made from scratch, risen until airy, then dipped in a simple glaze that sets into that classic thin shell.
  • Air fryer biscuit donuts made with biscuit dough, shaped in minutes, and finished with cinnamon sugar or glaze for instant gratification.

So whether you want an all-in weekend project or a shortcut dessert that still looks like you tried, donuts in the air fryer can fit the moment.

If you’re building a full breakfast spread, you can balance the sweetness with something crisp and dunkable like these French toast sticks. Meanwhile, if you’re serving a crowd and want a make-ahead option on the table, no-bake banana pudding keeps things generous without chaining you to the kitchen.

Also Read: Air Fryer Salmon Recipe (Time, Temp, and Tips for Perfect Fillets)


Air Fryer Donuts at a Glance (Time, Temp, Doneness)

Before you start mixing dough or cutting biscuit rings, it helps to understand what makes doughnuts in the air fryer behave differently from a pot of oil. The air fryer is basically a compact convection oven with attitude: powerful heat + fast airflow + a small cooking chamber. That combination can turn out beautifully tender donuts, as long as you cook for structure first and color second.

Infographic titled “Air Fryer Donuts at a Glance” showing a glazed donut and quick reference for donuts in the air fryer: best temp 350°F/180°C, typical time 3–5 minutes from scratch and 4–6 minutes for biscuit donuts, plus doneness cues like puffed, set on top, light golden, and feels light.
Air fryer donuts are easiest when you stop guessing. Use this quick guide for donuts in the air fryer—350°F, short batches, and simple doneness cues—so your homemade doughnuts in air fryer stay soft and your biscuit donuts don’t turn dry.

Best temperature for air fryer donuts

Most air fried doughnuts do best at 350°F / 180°C. That temperature gives the dough enough time to puff and set without turning the outside too dark too quickly.

If your air fryer runs hot, stay on the lower end of the range. Conversely, if your air fryer runs cool, a small bump can help. Still, it’s usually smarter to add time rather than crank the temperature, because pale donuts are fixable with glaze, while dry donuts are a little harder to rescue.

How long to cook donuts in the air fryer

Air fryer times vary more than people expect. Basket size, fan power, and even where the heating element sits can change the outcome. With that said, these ranges keep you grounded:

  • From-scratch donut dough: 3–5 minutes per batch
  • Biscuit donuts in air fryer: 4–6 minutes, flipping halfway

Even so, don’t let the numbers boss you around. Instead, treat the clock like a guide and use doneness cues to make the final call.

Don’t overcook air fryer donuts chasing color. Use these doneness cues: look for donuts that are puffed, dry and set on top, and light golden—not deep brown. If a donut feels heavy when lifted, add 30–60 seconds, then check again. Once you learn these signs, donuts in the air fryer become a reliable method, not guesswork.

Doneness cues for air fried doughnuts

Air fried doughnuts are done when they look set and feel light. In practice, that usually means:

  • The donut is visibly puffed, not flat.
  • The surface looks dry and set, not wet or tacky.
  • The color is light golden, not deep brown.
  • When you lift one, it feels airy for its size.

Once you get comfortable with those cues, “donut in air fryer recipe” stops being a rigid script and becomes a flexible method.

Also Read: Masterclass in Chai: How to Make the Perfect Masala Chai (Recipe)


Why Air Fryer Donuts Work (and when they don’t)

Deep fryer donuts and air fryer doughnuts don’t cook the same way, and that’s okay. Oil surrounds the dough and transfers heat aggressively, so the surface browns quickly and evenly. Air fryers cook with moving hot air, so browning is often gentler and more patchy unless you manage airflow and don’t overcrowd the basket.

Fortunately, donuts don’t need an intensely browned shell to taste amazing. They need softness, freshness, and a finish that makes the bite feel rich. That’s why glazes, cinnamon sugar, and butter-brushed coatings matter so much in air fryer doughnuts: the finish supplies the “donut shop” satisfaction even when the crust is lighter.

Air fryer donuts don’t cook like deep-fried donuts—and that’s the point. Use this comparison to set expectations (lighter browning, softer outer set) and get better results: pull donuts at light golden, finish while warm, and let glaze, cinnamon sugar, or butter create that donut-shop bite without overcooking.

Air fryer donuts vs deep fryer donuts

If you’ve ever done deep fryer donuts, you already know the magic: fast browning, plush interior, and that unmistakable fried aroma. Still, deep frying has its own learning curve. Oil temperature control is everything, and a few degrees can change the outcome.

For a classic overview of doughnuts frying at home—temperature cues, timing, and what to look for—Serious Eats’ guide is a solid reference: Sweet Technique: How to Make Doughnuts. Likewise, King Arthur Baking’s yeast-raised doughnut recipe is a clean baseline for the traditional method: Yeast-Raised Doughnuts.

Even so, if you’re using an air fryer for donuts, you’re usually choosing it for the opposite reasons: less mess, less fuss, and more repeatability. In that sense, air fryer doughnuts are more like a dependable weekly ritual than a once-in-a-while frying project.

The most common reason homemade air fryer donuts turn dry

Overcooking happens fast in an air fryer. Sometimes it’s because you want more color. Other times it’s because you’re making a bigger batch and the later donuts sit longer “just to be safe.” Either way, the fix is simple: cook until set and lightly golden, then let glaze, butter, or cinnamon sugar finish the job.

Dry donuts are rarely under-flavored. Instead, they’re just overdone. Once you learn where “done” actually sits in your air fryer, everything gets easier.

Also Read: Crock Pot Pork Chops and Sauerkraut (No Dry Chops Recipe)


Air Fryer Donuts: Homemade Glazed Doughnuts From Scratch

This homemade air fryer donuts method is the “real deal” version: yeasted dough, two rises, and that fluffy interior that makes a plain glazed donut feel almost elegant. It’s also the method that turns air fryer doughnuts into something you’ll be proud to serve.

If you like seeing a well-tested reference point for this style, Emma Fontanella’s air fryer glazed donuts are widely shared for a reason: the approach is straightforward and the result is genuinely donut-like. You can see that method here: Air Fryer Glazed Donuts. In the version below, you’ll get a full, reader-friendly recipe with the kind of details that make it repeatable in a real kitchen.

This is the “from scratch” path for homemade air fryer donuts: yeast-raised dough, two rises, and a smooth glazed finish. Let the dough rise until doubled and domed, cut donuts about 1/2–3/4 inch thick, air fry briefly, then glaze while warm and let it set 10–15 minutes for that classic donut-shop bite—without over-browning.

Ingredients for homemade air fryer donuts

For the donut dough

  • 2 ¾ cups (330 g) all-purpose flour, plus extra for dusting
  • 2 ¼ teaspoons instant yeast (1 packet)
  • ¼ cup (50 g) sugar
  • ¾ teaspoon fine salt
  • ¼ teaspoon nutmeg (optional, but classic)
  • ¾ cup (180 ml) warm milk (warm, not hot)
  • 1 large egg
  • 3 tablespoons (42 g) melted butter
  • 1 teaspoon vanilla extract (optional)

For the simple glaze

  • 1 ½ cups (180 g) powdered sugar
  • 2–3 tablespoons milk (as needed)
  • 1 tablespoon melted butter
  • ½ teaspoon vanilla extract
  • Pinch of salt

And for the basket

  • Neutral oil spray or a light brush of oil

A quick yeast note

Instant yeast can go straight into the flour. If you’re using active dry yeast, it’s still easy—just dissolve it in the warm milk with a pinch of sugar and wait until it looks foamy, then proceed.

Step-by-step recipe: homemade donuts in the air fryer

1) Mix the dough

Start by whisking the dry ingredients together in a large bowl: flour, yeast, sugar, salt, and nutmeg.

In another bowl, whisk the warm milk, egg, melted butter, and vanilla until smooth. Pour the wet mixture into the dry mixture and stir until a shaggy dough forms. It will look messy at first, but give it a minute—flour needs a moment to hydrate.

Air fryer donut dough Step 1 showing shaggy mixed dough in a bowl with text “Mix the Dough” and note that shaggy dough is correct before adding more flour.
Step 1 for homemade air fryer donuts: mix until the dough looks shaggy and rough—this is normal. Don’t add extra flour yet; kneading is what turns it smooth.

2) Knead until smooth and elastic

Now knead. You can do this by hand on a lightly floured surface, or use a stand mixer with a dough hook.

  • By hand: knead for about 8–10 minutes.
  • With a mixer: knead 5–6 minutes on medium-low.

The dough should become smooth, supple, and slightly tacky. It should not be so sticky that it smears everywhere, but it also shouldn’t be stiff. If you keep adding flour because you want it “clean,” you’ll often trade softness for density.

What to look for: the dough should feel soft enough that it will rise into something airy, not tight and bread-like.

Air fryer donut dough Step 2 showing a smooth dough ball being stretched to show elasticity, with text “Knead Until Smooth” and note that smooth and elastic dough is ready to rise.
Step 2 for homemade air fryer donuts: knead until the dough is smooth and elastic. Slightly tacky is ideal—stop adding flour too early and you’ll get softer donuts.

3) First rise: let it get puffy

Place the dough in a lightly oiled bowl, cover it, and let it rise until doubled and noticeably puffy. Depending on your room, that could be 60 minutes or it could be 90.

If your kitchen is cool, you can create a warm spot by turning your oven on for 60 seconds, turning it off, then letting the covered bowl rise inside.

Air fryer donut dough Step 3 infographic showing before and after first rise in a bowl, highlighting dough that is doubled and domed after rising.
Step 3: first rise. Look for dough that’s clearly doubled and domed, not just “a little bigger.” This is what keeps air fryer donuts light instead of dense.

4) Roll and cut your donuts

Lightly flour your surface. Roll the dough to about ½ to ¾ inch thick.

Cut donuts using a donut cutter, or use two cutters: one larger round cutter and one smaller cutter for the center. If you don’t have cutters, even a glass and a bottle cap can work in a pinch.

Set each donut on a small square of parchment paper. That little trick makes transferring delicate risen donuts into the air fryer much easier.

Air fryer donut dough Step 4 showing rolled dough being cut into donut rings with a cutter, with guidance to roll to 1/2 to 3/4 inch thickness and cut straight down.
Step 4: roll and cut your air fryer donuts. Aim for 1/2 to 3/4 inch thickness, then cut straight down without twisting so the donuts rise higher and cook evenly.

5) Second rise: the fluff-maker

Cover the donuts gently and let them rise again until they look airy and feel light. This rise is where a homemade air fryer donuts recipe shifts from “fine” to “wow.”

A good sign: if you lightly press the dough, it should spring back slowly, leaving a soft indentation for a moment.

Air fryer donut dough Step 5 showing donuts after cutting versus after the second rise, highlighting puffier rings that spring back slowly when pressed.
Step 5: second rise. Puffy donut rings mean lighter homemade air fryer donuts. Press lightly—if it springs back slowly, they’re ready to cook.

6) Preheat and prep

Preheat your air fryer to 350°F / 180°C for about 3–5 minutes.

Lightly oil the basket or tray. If you’re using parchment under the donuts, ensure the parchment is weighed down by the donut so it doesn’t get pulled into the heating element by airflow.

Air fryer donuts Step 6 showing donuts on parchment squares inside an air fryer basket, with instructions to preheat to 350°F/180°C, lightly oil the basket, and weigh parchment under donuts.
Step 6: preheat and prep the basket. Oil lightly, preheat to 350°F, and make sure parchment stays under the donuts so airflow stays even and nothing shifts while cooking.

7) Air fry the donuts (in batches)

Place donuts in a single layer, leaving space between them so air can circulate.

Cook for 3–5 minutes. Start checking early, especially on the first batch. Air fryer models vary a lot, and the first batch teaches you the truth about your machine.

Don’t chase dark color. Aim for set + light golden. The glaze will make them look finished and glossy.

Air fryer donuts Step 7 showing donuts spaced in an air fryer basket with a comparison of light golden versus too dark donuts, plus 350°F and 3–5 minutes guidance.
Step 7: air fry in batches with space. Pull donuts when they’re set and light golden—going too dark is the fastest way to end up with dry air fryer donuts.

8) Glaze while warm

While the donuts cook, whisk together the glaze ingredients. Start with 2 tablespoons of milk and add more only if needed. You want the glaze to be thick enough to cling, yet fluid enough to settle into a smooth surface.

Dip each warm donut into the glaze, let excess drip off, and place on a rack to set. Give them 10–15 minutes and the glaze will form that thin, slightly crackly shell that makes a glazed donut feel “right.”

Air fryer donuts Step 8 showing a three-panel sequence—dip, drip, and set—demonstrating glazing warm donuts and letting the glaze set for 10 to 15 minutes.
Step 8: glaze while warm. Dip, let the excess drip, then set on a rack until glossy—this is how glazed air fryer donuts get that smooth donut-shop finish.

Making the glaze taste like it matters

Glaze can be flat if it’s just powdered sugar and water. That’s why a little melted butter and a pinch of salt are worth it—they add richness and balance without making the glaze heavy.

If you want to go one step further, you can add a tiny touch of nutmeg or cardamom. The flavor stays subtle, yet the donut suddenly tastes like it belongs in a good bakery case.

Infographic titled “Glaze That Sets Perfectly” showing a donut being dipped in glaze and a 3-column guide for donut glaze consistency: too thin, just right, and too thick, with quick fixes for air fryer donuts and biscuit donuts.
Glaze makes air fryer donuts taste “donut-shop” good. Use this quick donut glaze guide to hit the perfect consistency—too thin, just right, or too thick—then fix it fast so your glazed donuts set smooth and glossy instead of running off or clumping.
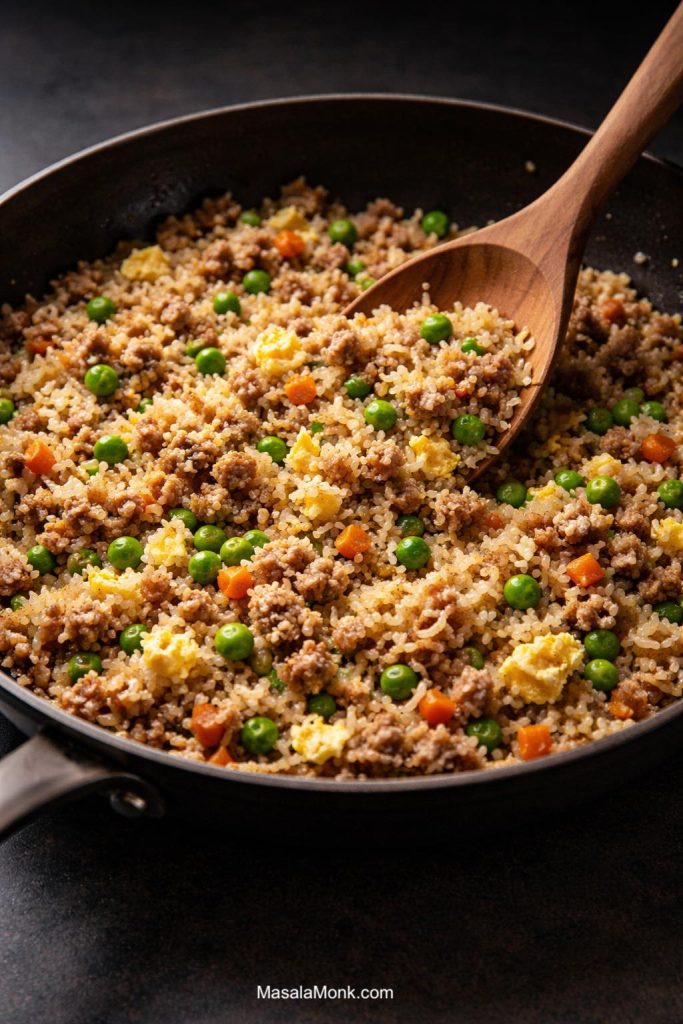
Troubleshooting homemade air fryer donuts

Donuts are forgiving, but a few problems show up again and again. Thankfully, each has a simple fix.

If they’re dense:
Usually the dough didn’t rise enough, or too much flour was added during kneading and rolling. Next time, keep the dough soft and give the second rise the time it needs.
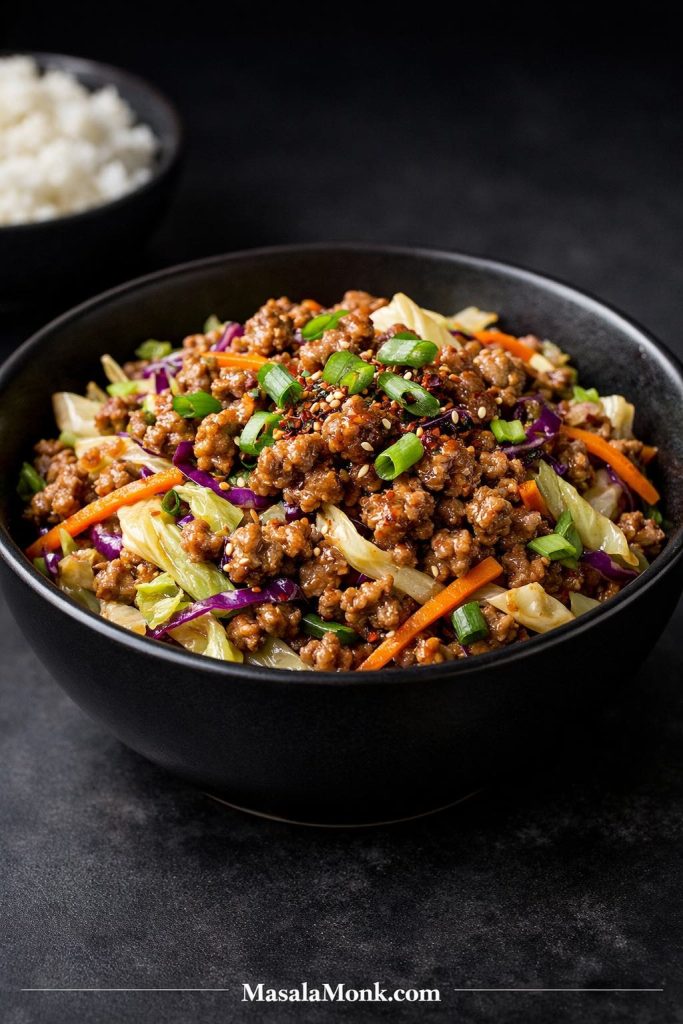
If they’re dry:
Most often they cooked too long. Pull earlier and rely on glaze. Also, keep in mind that air fryer donuts continue to firm slightly as they cool, so stopping at “just done” matters.
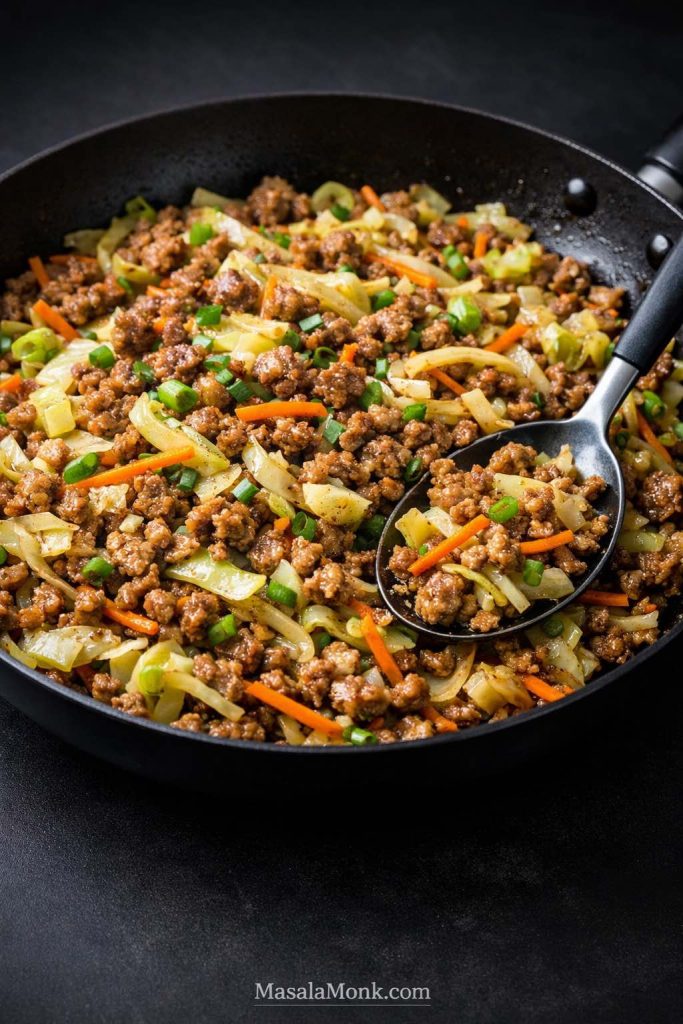
If they’re pale:
Your air fryer might run cool. Add a minute, but don’t jump the temp too high. Pale donuts with glaze still look inviting. Dark donuts often taste overcooked.
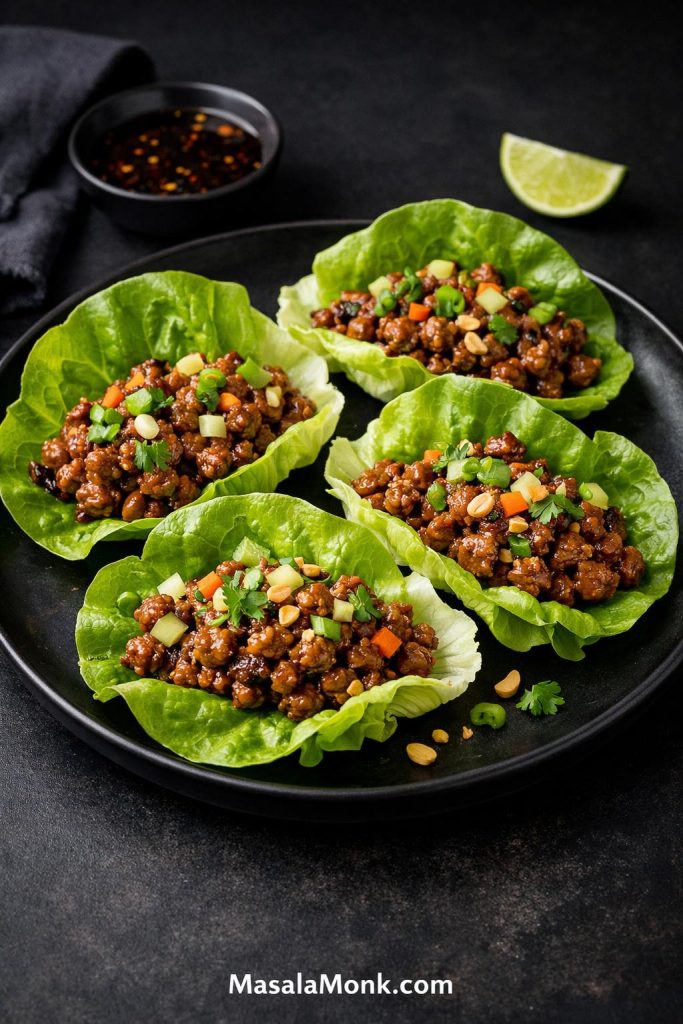
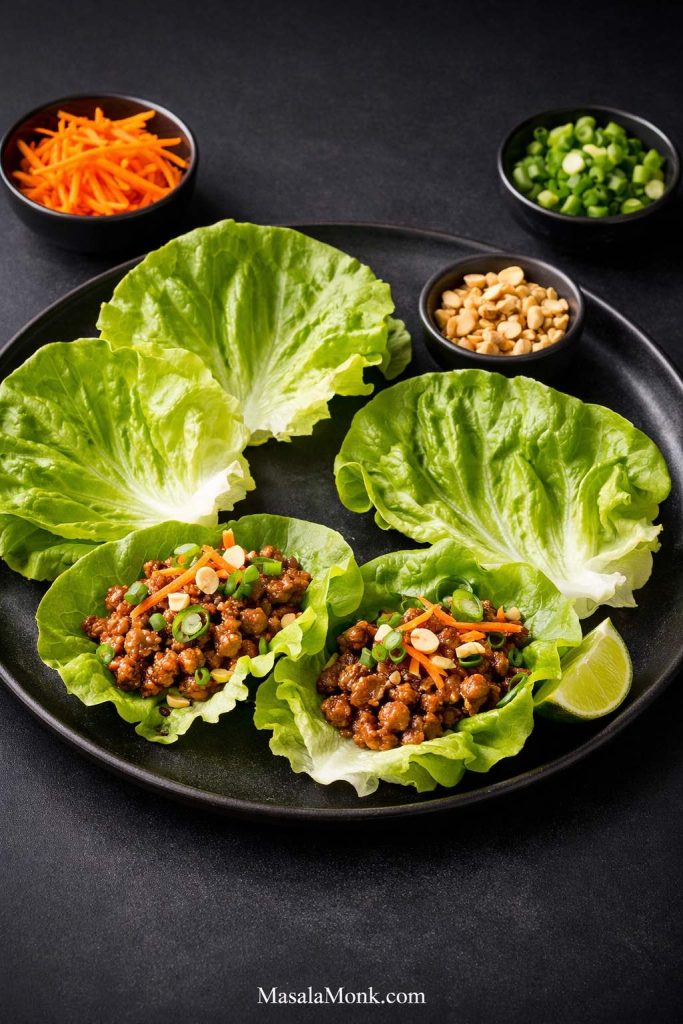
If the surface looks rough:
Too much bench flour during rolling can leave the dough dry. Use a light dusting and roll gently.

Air fryer donuts get better fast once you know what to look for. Use this troubleshooting guide to spot the problem—dense, dry, pale, or rough—and fix the next batch with simple changes like proofing longer, cooking to light golden, adjusting time by 30–60 seconds, and keeping bench flour light.

At this point, you’ve got a complete air fryer doughnuts recipe you can keep repeating. However, sometimes you want donuts fast—without mixing, rising, or waiting. That’s where biscuit donuts come in.


Also Read: Hot Chocolate Coffee: 3 Easy Recipes (Cocoa, Mix, or Espresso)


Air Fryer Biscuit Donuts (Donuts From Biscuit Dough)

Biscuit donuts are the shortcut that feels almost unfair. They’re quick, they’re fun, and they’re exactly the kind of dessert you can make on a whim.

You’ll see this style described in dozens of ways: biscuit donuts recipe, homemade donuts from biscuits, donuts made from biscuits, donuts using canned biscuits, donuts from biscuits in air fryer, or canned biscuit donuts in air fryer. No matter the wording, the idea is the same: use biscuit dough, cut a hole, air fry, then finish immediately while hot.

If you want a straightforward reference for this approach, RecipeBoy has a clear step-by-step method using canned dough in the air fryer: Air Fryer Canned Biscuit Donuts. What matters most is the finish and the timing—cook just until set and golden, then coat while warm.

Section master infographic titled “Air Fryer Biscuit Donuts (Canned Dough)” showing glazed and cinnamon sugar donuts with a quick method strip: cut rings and save holes, air fry with space at 350–360°F for 4–6 minutes and flip halfway, then finish hot with butter and coating for donut-like texture.
These air fryer biscuit donuts are the fastest donuts from canned dough: no rising, short cook time, and two finishes. Cut rings and save the holes, air fry at 350–360°F for 4–6 minutes (flip halfway), then finish hot—butter first, then cinnamon sugar or glaze—for a tender, donut-like bite.

Ingredients for air fryer biscuit donuts

  • 1 can of biscuit dough (any standard biscuit-style dough works)
  • A small cutter for the donut hole (or the wide end of a piping tip)
  • Neutral oil spray (optional)
  • Melted butter (highly recommended for coating)

For cinnamon sugar

  • ½ cup sugar
  • 1–2 teaspoons cinnamon (to taste)

For glaze
Use the same simple glaze from the homemade recipe above.

How to make donuts from biscuits in air fryer (Step-by-step recipe)

1) Cut and shape

Separate the biscuits and place them on a board. Cut the center out of each biscuit to make a donut shape. Save the holes; they turn into donut bites that cook faster and coat beautifully.

If your biscuit dough is thick, stretch each ring slightly. That little adjustment helps them cook evenly.

Air fryer biscuit donuts Step 1 showing biscuit dough rounds cut into donut rings with donut holes saved for bites, with tip to cut straight down for clean edges.
Step 1 for air fryer biscuit donuts: cut biscuit dough into rings and save the donut holes for quick bites. Cut straight down for clean edges, then stretch thick rings slightly so donuts from biscuits cook evenly.

2) Prep for cooking

Lightly spray both sides with oil, or leave them plain and brush with melted butter after cooking. Either way works, although a light spray can encourage a more even golden surface.


Air fryer biscuit donuts Step 2 showing two prep options: light oil before cooking or brushing with butter after cooking for even golden color.
Step 2: prep your biscuit donuts for the air fryer. A light oil spray can help even browning, but butter after cooking works too—either way keeps canned biscuit donuts tender instead of dry.

3) Air fry (with space)

Preheat your air fryer to 350–360°F.

Place the donuts in a single layer. Leave space between them. Air flow is your friend here, and crowding makes everything uneven.

Cook for 4–6 minutes total, flipping halfway. A useful starting point is:

  • 3 minutes on the first side
  • Flip
  • 2 minutes on the second side
  • Add 30–60 seconds if needed

Donut holes usually cook faster, so check them early.

Air fryer biscuit donuts Step 3 showing donut rings spaced in an air fryer basket at 350–360°F with instructions to flip halfway and note that donut holes cook faster.
Step 3: air fry biscuit donuts in a single layer with space. Cook at 350–360°F for 4–6 minutes total and flip halfway—crowding causes uneven browning, and donut holes usually cook faster.

4) Finish immediately

This part is non-negotiable. Coating warm donuts is what makes them taste like a treat instead of a biscuit.

Air fryer biscuit donuts Step 4 showing finishing while hot: brush donuts with melted butter first, then coat in cinnamon sugar or dip in glaze for best texture.
Step 4 is the secret to donut-like texture: finish biscuit donuts while hot. Brush with melted butter first, then either coat in cinnamon sugar or dip in glaze—waiting too long makes donuts from canned biscuits taste more like biscuits.

Cinnamon sugar biscuit donuts in the air fryer

Brush the hot donuts with melted butter, then toss them in cinnamon sugar. The butter helps the cinnamon sugar cling and gives the finish that rich “just made” taste.

If you like cinnamon sugar desserts and want a natural pairing on the same sweet-coating theme, this churros guide fits beautifully at the table. Churros and biscuit donuts scratch a similar itch, yet they feel different enough to justify both.

Glazed canned biscuit donuts air fryer style

Dip the warm donuts in glaze, let them drip, then set them on a rack. If you want a thicker glaze that clings more heavily, hold back a little milk so the glaze stays plush.

Once you’ve done this once, you’ll understand why so many people keep this method in their back pocket. It’s the quickest route to donuts made from biscuits that actually feel like a real dessert.

Also Read: Iced Coffee: 15 Drink Recipes—Latte, Cold Brew, Frappe & More


Air Fryer Donut Pan vs Basket (Do You Need One?)

Some kitchens love specialty tools. Others prefer a clean counter and fewer things to wash. Either approach is valid, especially when it comes to an air fryer donut pan.

If you’re wondering about a donut pan for air fryer donuts, it helps to know what it changes—and what it doesn’t.

Infographic titled “Air Fryer Donut Pan vs Basket” comparing using an air fryer basket versus a donut pan, noting the basket works for most air fryer donuts (better airflow, fast batches, yeast and biscuit donuts) while a donut pan is mainly useful for batter-style donuts and may block airflow.
Wondering if you need an air fryer donut pan? Most air fryer donuts turn out better in the basket because airflow stays strong and batches cook evenly. Use a donut pan mainly for batter-style donuts or when you want uniform shapes—otherwise, leave space and cook in batches for the best results.

Air fryer donut pan: what it’s good for

A donut pan can be helpful if you’re making batter-style donuts (more like baked donuts) or if you want consistent shapes with minimal handling. In addition, if you’re aiming for uniformity—say, for a party platter—a pan can keep rings neat and predictable.

Donut pan for air fryer donuts: when to skip it

If you’re making yeasted donuts, you’ll still be shaping and moving risen dough. If you’re making biscuit donuts, you already have a shape. In both cases, the basket method is plenty.

Moreover, pans can block airflow. That’s not always a deal-breaker, but it can reduce browning and add cook time. If your goal is speed and simplicity, the basket wins.

Simple spacing rules that matter more than any pan

No matter what you use, spacing is the quiet hero of air fryer donuts. Give each donut room. Let the air do its job. Cook in batches. Then finish while warm.

That’s the habit that makes donuts in the air fryer feel consistent.

Also Read: Cappuccino Recipe: How to Make a Perfect Cappuccino at Home


Air Fryer Donuts vs Deep Fryer Donuts (A Real-World Comparison)

Sometimes you want a fair comparison, not a hype statement. Here’s the honest version.

Infographic titled “Air Fryer Donuts vs Deep Fry Donuts” comparing deep fry and air fry across texture, flavor, and effort/cleanup: deep fry shows crisp shell and plush center with richer frying aroma but requires oil temperature control and more cleanup; air fry shows softer set and fluffy inside, finishes add richness, and quick batches with easy wipe-clean cleanup.
Air fryer donuts and deep fried donuts both work—just differently. Deep frying gives a crisper shell and richer frying aroma, but it comes with oil temperature management and cleanup. Air frying keeps things easy with quick batches and a softer outer set, and the “donut-shop” feel comes from finishes like glaze, butter, and cinnamon sugar.

Texture

Deep fryer donuts tend to have a more distinct fried crust with a plush interior. Air fryer donuts tend to have a softer outer set and a lighter crust. Still, the interior can be beautifully fluffy—especially with yeasted dough—so the overall experience is still donut-like.

Flavor

Deep frying adds a subtle richness that comes from oil browning. Air frying doesn’t. That’s why finishes matter more in the air fryer: glaze, butter, cinnamon sugar, and flavored coatings supply richness and aroma.

Effort and cleanup

Deep fryer donut recipes usually require managing oil temperature, careful timing, draining, and cleanup. Air fryer doughnuts reduce that entire workload to a few batches and a quick wipe-down.

If you’re curious about traditional frying technique, temperature cues, and what “done” looks like in a pot of oil, this Serious Eats piece is a strong explainer: Sweet Technique: How to Make Doughnuts. Likewise, King Arthur Baking’s yeast-raised doughnuts recipe is an excellent reference for the classic path: Yeast-Raised Doughnuts.

Even so, for everyday ease, the air fryer is hard to beat. That’s why so many people keep an airfryer donut method on rotation.

Also Read: Homemade Hot Chocolate with Cocoa Powder Recipe


How to Keep Air Fryer Donuts Soft (Small Choices, Big Payoff)

Donuts are at their best fresh. Still, you can keep them tender longer with a few practical habits.

Infographic titled “Keep Air Fryer Donuts Soft” showing three habits: stop at light golden (perfect vs too dark and dry), finish donuts while warm (dip in glaze or brush with butter), and use a cooling rack instead of a plate so glaze sets cleanly and doesn’t steam and stick.
Soft air fryer donuts come down to three small habits: stop at light golden (don’t chase color), finish while warm so glaze and butter absorb properly, and set donuts on a rack—not a plate—so airflow keeps the glaze from turning sticky. Do this and both homemade air fryer donuts and biscuit donuts stay tender.

Don’t over-brown them

This is worth repeating because it’s the most common mistake. Air fryer donuts don’t need deep color. A light golden set is the target, and glaze makes them look finished.

Finish while warm

Warm donuts absorb glaze better, and cinnamon sugar clings more evenly. Additionally, melted butter brushed onto hot donuts adds moisture and richness that carries into the final bite.

Use a rack, not a plate

Glazed donuts sitting on a flat plate can steam underneath and turn sticky. A rack lets air circulate and helps the glaze set cleanly.

Also Read: Double Chocolate Chip Cookies – Easy Recipe with 7 Variations


Storage and Reheat: Donuts in the Air Fryer (Again)

Air fryer donuts are best the day they’re made. Nevertheless, leftovers happen, and reheating in the air fryer is far better than the microwave.

Infographic titled “Store + Reheat Air Fryer Donuts” showing how to store donuts (cool completely, airtight container with paper towel, parchment between layers), a glaze tip (let glaze set on a rack, don’t stack until fully set), and how to reheat donuts in the air fryer at 300–320°F for 1–3 minutes.
Want air fryer donuts that stay soft the next day? Use this storage and reheat guide: cool completely, store in an airtight container with a paper towel, separate layers with parchment, and reheat donuts in the air fryer at 300–320°F for 1–3 minutes. For glazed donuts, let the glaze set on a rack first so it stays clean instead of sticky.

How to store air fryer donuts

  • Let donuts cool fully first.
  • Store in an airtight container with a paper towel underneath.
  • If your kitchen is humid, crack the lid slightly to prevent condensation.

Glazed donuts can get sticky if they’re stacked. If you need to stack them, separate layers with parchment.

How to reheat donuts in the air fryer

Reheating donuts in the air fryer works beautifully when you keep the temperature low:

  • 300–320°F for 1–3 minutes

That’s enough to warm the interior without drying it out. If the donuts are glazed, they may look slightly melty right away. Give them a minute and they’ll settle.

A simple safety note for parties

If you’re serving donuts with dairy-based toppings and they sit out during a long brunch, it’s smart to follow basic food safety guidance about time at room temperature. The USDA explains the “danger zone” concept and timing here: 40°F–140°F Danger Zone.

Also Read: Easy Lemon Pepper Chicken Wings (Air Fryer, Oven & Fried Recipe)


Air Fryer Donuts: Finishes That Make Them Feel New Every Time

Once you’ve got the base method down—whether it’s homemade air fryer donuts or biscuit donuts in air fryer form—you can keep things interesting by changing the finish.

Keep air fryer donuts exciting with quick finishes you can do in minutes. This guide gives five easy topping ideas—classic glaze, cinnamon sugar, chocolate glaze, cardamom sugar, and warm spiced apples—each with a simple mix + do method so your homemade air fryer donuts or biscuit donuts feel new every time.

Classic vanilla glaze (the everyday favorite)

Use the glaze recipe above. Keep it thick enough to cling, and dip while warm.

Cinnamon sugar (fast, cozy, impossible to hate)

Brush hot donuts with melted butter, then toss in cinnamon sugar. The butter matters—it gives the coating depth and keeps the bite tender.

Chocolate glaze (for the “dessert” version)

Turn your vanilla glaze into chocolate by whisking in cocoa powder. Thin with milk a little at a time until smooth.

If you’re also building a chocolate dessert theme on the table, a natural companion can be vegan chocolate cake recipes, especially if you want extra frosting ideas that can translate into donut drizzles or dips.

For cinnamon sugar air fryer donuts that taste donut-shop good, timing matters: brush with butter first, toss while hot, and coat evenly. Use this quick ratio guide for cinnamon sugar or cardamom sugar so homemade air fryer donuts and biscuit donuts get a perfect, fragrant coating every time.

Cardamom sugar (quietly luxe)

Swap cinnamon for ground cardamom in your sugar coating. It’s fragrant and a little unexpected, yet still comforting.

Warm spiced fruit topping (brunch energy)

If you want something that feels a little more “special occasion,” spoon warm spiced apples over glazed donuts. Our stewed cinnamon apples pancake recipe fits that flavor direction beautifully and makes a natural add-on without forcing anything.

Also Read: 19 Essential Kitchen Tools That Make Cooking Easier


A Simple Brunch Spread Built Around Air Fryer Donuts

Air fryer donuts can stand alone, yet they also shine as part of a spread. With a few thoughtful additions, you can turn one batch into a whole “help yourself” table.

Turning air fryer donuts into a full brunch spread is easier than it looks. Use this simple donut board blueprint—glazed and cinnamon sugar donuts in the center, vanilla glaze and chocolate dips, fresh fruit, and easy add-ons like French toast sticks, banana pudding, and fudge—so guests can snack and serve themselves.

That way, donuts become the warm centerpiece rather than the only thing you’re responsible for.


Air Fryer Donuts: A Calm First-Time Game Plan

If you’re making doughnuts in the air fryer for the first time, the most helpful approach is treating the first batch like a gentle calibration.

First time making air fryer donuts? Use this simple calibration method: start with just 2 donuts, check early for a light golden finish, then adjust by 30–60 seconds until you lock in the perfect cook time for your air fryer. Once you dial it in, every batch gets easier—and glaze finishes the look without overcooking.
Infographic titled “First Batch Calibration” for air fryer donuts showing a 3-step method: cook a test batch of 2 donuts at 350°F/180°C, check early for light golden color, then adjust cook time by 30–60 seconds and repeat to lock in the ideal timing.

Start with a small batch. Check early. Pull one donut and look at the inside. Adjust time by 30–60 seconds. Then repeat.

After that, everything becomes automatic. The recipe stops feeling like a “special event,” and it becomes the kind of thing you can do on a random afternoon—because you already know what your air fryer donut method looks like when it’s right.

Also Read: How to Cook Tortellini (Fresh, Frozen, Dried) + Easy Dinner Ideas


Full Recipe: Homemade Air Fryer Donuts (Glazed)

Makes: about 10–12 donuts
Air fryer temp: 350°F / 180°C
Cook time: 3–5 minutes per batch

Ingredients

Dough

  • 2 ¾ cups (330 g) all-purpose flour
  • 2 ¼ tsp instant yeast
  • ¼ cup (50 g) sugar
  • ¾ tsp fine salt
  • ¼ tsp nutmeg (optional)
  • ¾ cup (180 ml) warm milk
  • 1 egg
  • 3 tbsp melted butter
  • 1 tsp vanilla (optional)

Glaze

  • 1 ½ cups powdered sugar
  • 2–3 tbsp milk
  • 1 tbsp melted butter
  • ½ tsp vanilla
  • Pinch of salt
This homemade air fryer donuts recipe gives you the real glazed-donut feel without deep frying. Follow the yeast-raised method, cook at 350°F for 3–5 minutes, then glaze while warm so the coating sets smooth and glossy. Use the proofing cues and glaze rule on the card to keep donuts soft, fluffy, and donut-shop good.

Instructions

  1. Whisk flour, yeast, sugar, salt, and nutmeg in a bowl.
  2. Whisk warm milk, egg, butter, and vanilla in another bowl.
  3. Combine wet and dry until a shaggy dough forms.
  4. Knead until smooth and elastic.
  5. Cover and rise until doubled and puffy.
  6. Roll to ½–¾ inch thick and cut donuts.
  7. Rise again until airy.
  8. Preheat air fryer to 350°F / 180°C and lightly oil the basket.
  9. Air fry donuts in a single layer for 3–5 minutes, until set and lightly golden.
  10. Whisk glaze; dip warm donuts; set on a rack until glaze firms.

Also Read: Easy and Healthy Oat Cookies- No Sugar | No Butter | No Refined Flour


Full Recipe: Air Fryer Biscuit Doughnuts (Canned Dough)

Makes: depends on the can
Air fryer temp: 350–360°F
Cook time: 4–6 minutes total, flipping halfway

Ingredients

  • 1 can biscuit dough
  • Oil spray (optional)
  • Melted butter (for coating)

Cinnamon sugar

  • ½ cup sugar
  • 1–2 tsp cinnamon

Optional glaze
Use the glaze recipe above.

This is the fastest way to make donuts from canned biscuit dough in the air fryer. Follow the recipe card for air fryer biscuit donuts—cook at 350–360°F for 4–6 minutes and flip halfway—then finish hot with melted butter and either cinnamon sugar or a simple glaze for a donut-shop style bite.

Instructions

  1. Separate biscuits and cut centers to form rings. Save holes.
  2. Preheat air fryer to 350–360°F.
  3. Arrange donuts in a single layer with space.
  4. Air fry 4–6 minutes total, flipping halfway.
  5. While hot, brush with melted butter and toss in cinnamon sugar, or dip in glaze.

A Sweet Finish

Air fryer donuts are one of those rare recipes that feel both comforting and practical. On one day, you can make homemade donuts in the air fryer—yeasted, airy, and glazed. On another, you can throw together biscuit donuts in the air fryer in minutes and still get that warm, fresh treat experience.

Either way, once you’ve made them once, you’ll start seeing all the possibilities: glazed, cinnamon sugar, chocolate, spiced, topped, shared. Then, before you know it, air fryer donuts stop being a novelty and start becoming a simple habit—one you’ll be genuinely happy to repeat.

Also Read: Sourdough Recipe: 10 Easy Bread Bakes (Loaves, Rolls & Bagels)

Closing infographic titled “A Sweet Finish” for air fryer donuts, showing a plate of donuts with four finish options—vanilla glaze, cinnamon sugar, chocolate dip, and cardamom sugar—plus a two-path choice between from-scratch yeast-raised donuts (two rises) and biscuit shortcut donuts (canned dough, minutes), with the takeaway “Light golden → finish warm → let toppings do the magic.”
Air fryer donuts are the kind of treat you can actually repeat: go from scratch (yeast-raised, two rises) when you want the “real deal,” or take the biscuit shortcut when you want donuts in minutes. Either way, pull them light golden, finish while warm, and pick a mood—vanilla glaze, cinnamon sugar, chocolate dip, or cardamom sugar—for that donut-shop feeling without deep frying.

FAQs

1) What is the best temperature for air fryer donuts?

For most air fryers, air fryer donuts cook best at 350°F / 180°C. That temperature helps the dough puff and set without drying out. If your air fryer runs hot, drop slightly toward 340–345°F; if it runs cool, extend the cook time instead of cranking heat.

2) How long do donuts cook in the air fryer?

Timing depends on thickness and your machine, yet typical ranges are:

  • Homemade air fryer donuts (yeast dough): about 3–5 minutes
  • Air fryer biscuit donuts: about 4–6 minutes, flipping halfway
    Rather than relying only on time, stop when the donuts look set, feel light, and turn a soft golden color.

3) How do I know when air fried doughnuts are done?

Look for a donut that’s puffed, set on top, and light golden. In addition, it should feel lighter than it looks when you lift it. If the surface is getting dark but the center seems underdone, lower the temperature next batch and add a minute.

4) Can I make doughnuts in the air fryer without a donut pan?

Absolutely. In fact, most donut in air fryer recipe methods use a standard basket or tray. As long as you leave space for airflow and cook in batches, you can make air fryer doughnuts without any specialty tools.

5) Do I need an air fryer donut pan or donut pan for air fryer donuts?

Not necessarily. A donut pan for air fryer cooking can help with uniform shapes in batter-style donuts, but it isn’t required for yeast donuts or donuts from biscuit dough. For many kitchens, the basket method is simpler and just as effective.

6) Why are my homemade air fryer donuts dry?

Most often, homemade air fryer donuts turn dry when they cook too long or at too high a temperature. Instead, pull them when they’re just set and lightly golden, then finish with glaze, butter, or cinnamon sugar while warm.

7) Why did my air fryer donuts come out dense instead of fluffy?

Typically, density comes from under-proofing (not rising long enough) or adding too much flour during kneading/rolling. For fluffier air fryer donuts, keep the dough soft, allow a full second rise, and roll gently without pressing out the air.

8) Can I make air fryer doughnuts from canned biscuits?

Yes—air fryer donuts from canned biscuits are one of the quickest versions. Simply cut centers, air fry at about 350–360°F, flip halfway, then coat immediately. This approach covers canned biscuit donuts in air fryer style with minimal effort.

9) How do I make donuts from biscuits in air fryer without them turning tough?

First, avoid overcooking—biscuit donuts air fryer batches can go from tender to firm quickly. Next, coat while warm (butter + cinnamon sugar or glaze) so the outside stays soft. Finally, don’t overcrowd the basket, because uneven airflow can dry edges.

10) What’s the easiest biscuit donuts recipe for the air fryer?

The simplest biscuit donuts recipe is: cut rings from biscuit dough, air fry 4–6 minutes total (flip halfway), then brush with melted butter and toss in cinnamon sugar. As a result, you get donuts made from biscuits with a classic, cozy finish.

11) Can I make air fryer biscuit donuts with biscuit dough that has no layers?

Yes. Even non-layered biscuit dough works for air fryer biscuit donuts. However, layered dough tends to puff more dramatically. If your dough is thicker, stretch the ring slightly so it cooks evenly.

12) Why are my canned biscuit doughnut in air fryer unevenly browned?

Usually it’s spacing. If donuts touch, airflow can’t circulate, so browning becomes patchy. Additionally, some air fryers heat more strongly in certain zones, so rotating the basket once mid-cook can help.

13) Should I flip doughnut in the air fryer?

For biscuit donuts in the air fryer, flipping halfway usually improves even browning. For homemade yeast donuts, flipping may or may not be needed depending on your air fryer; if the tops color faster than the bottoms, flip gently near the end.

14) Can I cook doughnut holes in the air fryer too?

Definitely. Donut holes cook faster, so check them early. Because they’re small, they’re also perfect for glazing, cinnamon sugar, or quick chocolate dip—especially when you want variety without extra work.

15) Can I make air fried donuts ahead of time?

You can, although they’re best fresh. If you need to plan ahead, make the donuts, cool completely, and store airtight. For the best texture later, reheat briefly in the air fryer and glaze afterward.

16) How do I reheat donuts in the air fryer without drying them out?

Use a lower temperature—around 300–320°F—for 1–3 minutes. That warms the center without toughening the outside. If the donuts are glazed, let them sit a minute after reheating so the glaze settles.

17) How do I store air fried donuts so the glaze doesn’t get sticky?

Let glazed donuts set fully on a rack, then store in a container with a paper towel underneath. Also, avoid stacking unless you separate layers with parchment. If your kitchen is humid, cracking the lid slightly can reduce condensation.

18) What’s the difference between air fryer doughnut and air fryer donut?

They’re the same food—just two common spellings. You’ll see air fryer doughnuts recipe and air fryer donut recipe used interchangeably, and both refer to donuts made in an air fryer.

19) Can I use a deep fryer donut recipe dough in the air fryer?

Sometimes, but results vary. Deep fryer donuts are built for fast oil cooking, so they may brown differently in hot air. Even so, a yeast-raised dough can still work well as air fried doughnuts if you cook gently and finish with glaze.

20) Is an air fryer for donuts worth it if I also deep fry?

If you enjoy deep fried donuts, you’ll still love frying for that classic crust. On the other hand, an air fryer for donuts is great when you want fewer steps, less cleanup, and a repeatable treat you can make more often.