Posted on 7 Comments

Low Carb Chia Pudding Recipes

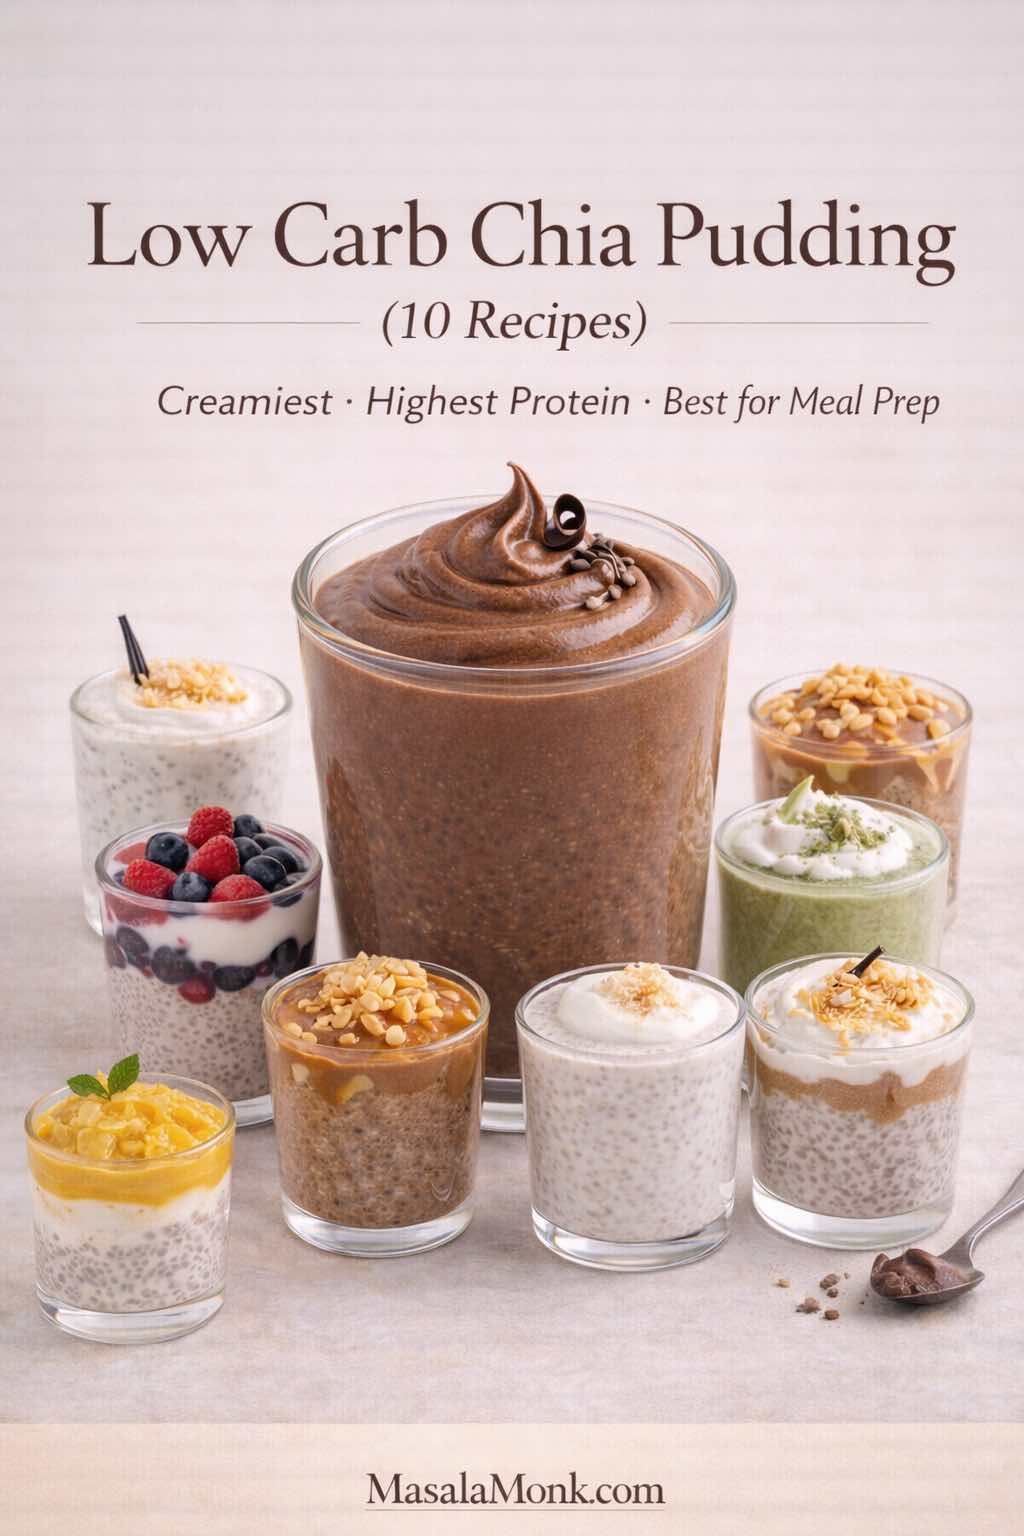
Cover image showing a premium glass jar of low carb chia pudding with a smooth whipped topping on a warm-cream seamless background. Editorial food photography style for “Low Carb Chia Pudding” featuring 10 recipes including keto, high protein, dairy-free, and blended options, with MasalaMonk.com branding.

This post was last updated on

Looking for low carb chia pudding recipes for weight loss? The most useful place to start is the pudding itself. Chia is not a fat burner, but a make-ahead serving can be easy to portion, simple to build with protein, and satisfying without relying on much added sugar. Here you can make it light with almond milk, thick and tangy with Greek yogurt, rich with coconut milk, chocolatey with protein powder, or completely smooth after blending.

Here for the thick Greek-yogurt chia pudding? Start with ¾ cup plain Greek yogurt + 3 tablespoons chia seeds + ¼ cup / 60 ml unsweetened almond milk or water. Stir again after 10 minutes, then chill for at least 2 hours. Jump to the full Greek yogurt chia pudding recipe ↓
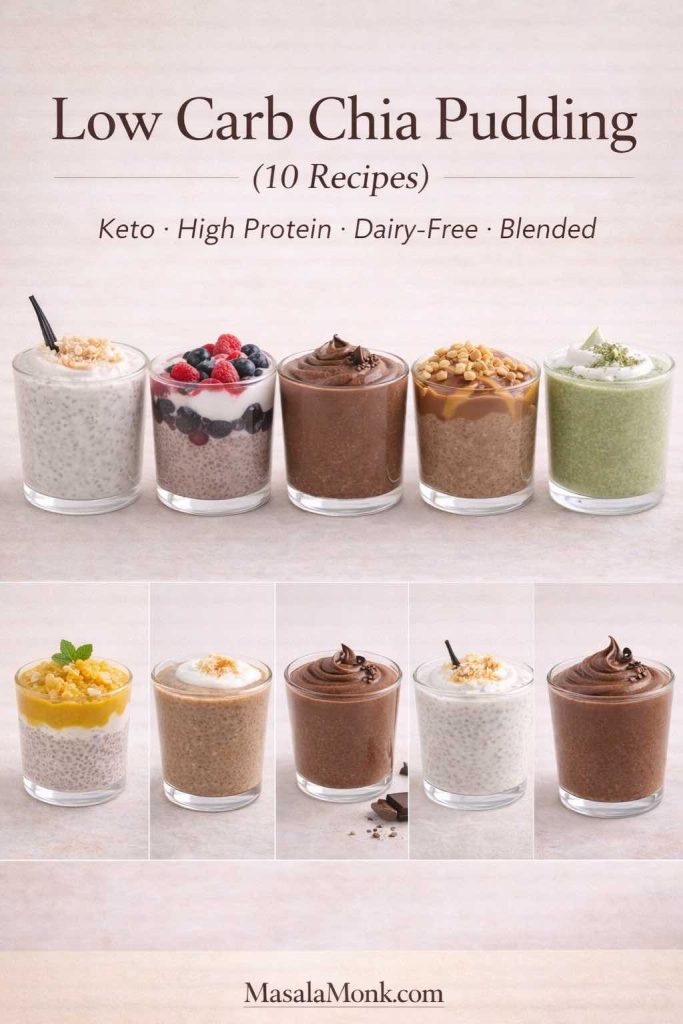
Collage showing ten low carb chia pudding cups including vanilla, Greek yogurt, chocolate, peanut butter, matcha, mango, coconut and blended mousse variations.
All 10 chia pudding recipes at a glance—from thick Greek yogurt and keto coconut milk to chocolate protein pudding, fruit layers and smooth blended mousse.

You do not need to read this guide from top to bottom. Use the jumps above if you already know what you want, or use the table of contents to solve the ratio, liquid, protein, meal-prep, or troubleshooting question that brought you here.


Low Carb Chia Pudding for Weight Loss: What Actually Matters

Chia pudding is not a fat burner, and a jar does not cause weight loss by itself. What makes it useful in a weight-management routine is practical: chia is easy to portion ahead, it creates a substantial gel-like texture when hydrated, and it can be paired with protein-rich ingredients such as Greek yogurt or protein powder.

The rest of the jar matters just as much. Canned coconut milk, nut butter, nuts, granola, fruit, sweeteners, and large portions can quickly change both calories and carbohydrates. A chia pudding that replaces a less satisfying breakfast is a different situation from adding a rich pudding on top of everything else you already eat.

  • Start unsweetened: choose unsweetened almond milk, plain Greek yogurt, or an unsweetened coconut base when keeping added sugar low matters.
  • Add protein when the jar needs to function as a meal: Greek yogurt or a protein powder you already tolerate well are the easiest routes.
  • Measure calorie-dense toppings: nut butter, nuts, seeds, coconut and granola are easy to overserve.
  • Use fruit deliberately: berries are easy to portion; mango and apple work better as measured flavor accents when carbs matter.
  • Do not confuse “keto” or “low carb” with automatically low-calorie: coconut milk and nut butter can make an excellent low-carb pudding while still creating a very energy-dense jar.

That is the reason this guide includes several styles rather than one “perfect” weight-loss pudding: the best jar is the one whose portion, protein, texture, and toppings fit the rest of your day.


Why Chia Pudding Works So Well as a Breakfast

A good chia pudding does two practical things well: it gives you a breakfast you can prepare ahead, and it creates a thick, substantial texture from very little morning work. Chia seeds absorb liquid as they hydrate, while Greek yogurt, protein powder, nuts, or richer milks can make the finished jar feel more complete.
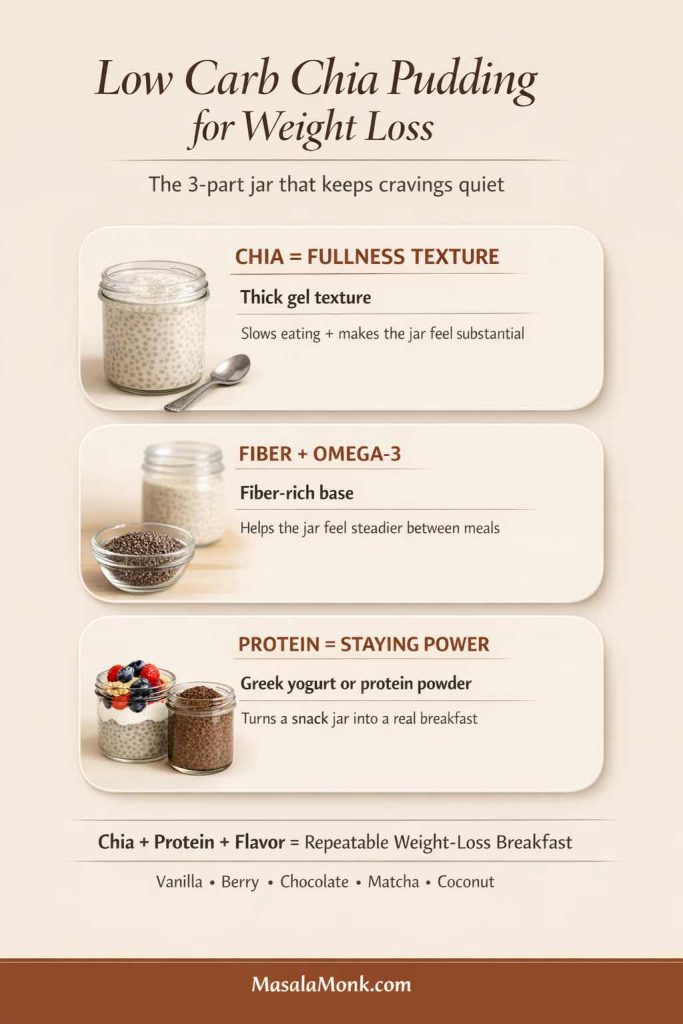
Infographic explaining how chia creates a thick gel texture and can be combined with protein such as Greek yogurt or protein powder.
Chia supplies the pudding structure; protein and the rest of the ingredients determine whether the jar behaves more like a snack or a full breakfast.

Chia seeds are naturally rich in fiber and contain alpha-linolenic acid, a plant-based omega-3 fat. For a useful evidence-based overview rather than exaggerated claims, see the Harvard Nutrition Source guide to chia seeds.

Protein is the easiest way to make the jar feel more meal-like

Plain chia and milk can work perfectly well as a snack, but Greek yogurt or protein powder gives you another lever when you want the jar to function as breakfast. Greek yogurt also changes the texture immediately: instead of waiting for milk alone to become pudding-like, you start with a thick, creamy base.
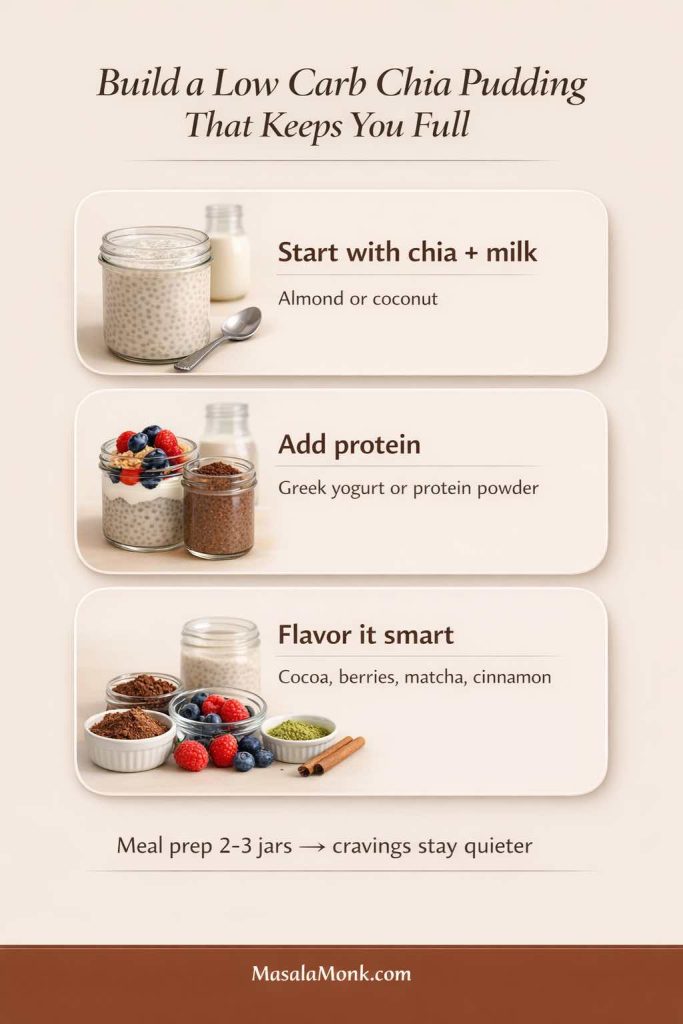
Three-step low carb chia pudding builder showing chia and milk, an optional protein addition, and flavor options such as cocoa, berries, matcha and cinnamon.
Think of the jar in three layers: chia + liquid for structure, an optional protein source for a more substantial breakfast, then flavors you genuinely want to eat.

Low Carb Chia Pudding Ratio: The Base Recipe That Prevents Clumps

For a classic milk-based chia pudding, this is the dependable starting point:

  • 3 tablespoons chia seeds (roughly 30–35 g, depending on how you measure)
  • 1 cup / 240 ml liquid
  • Pinch of salt
  • ½ teaspoon vanilla, optional
  • Sweetener to taste, optional
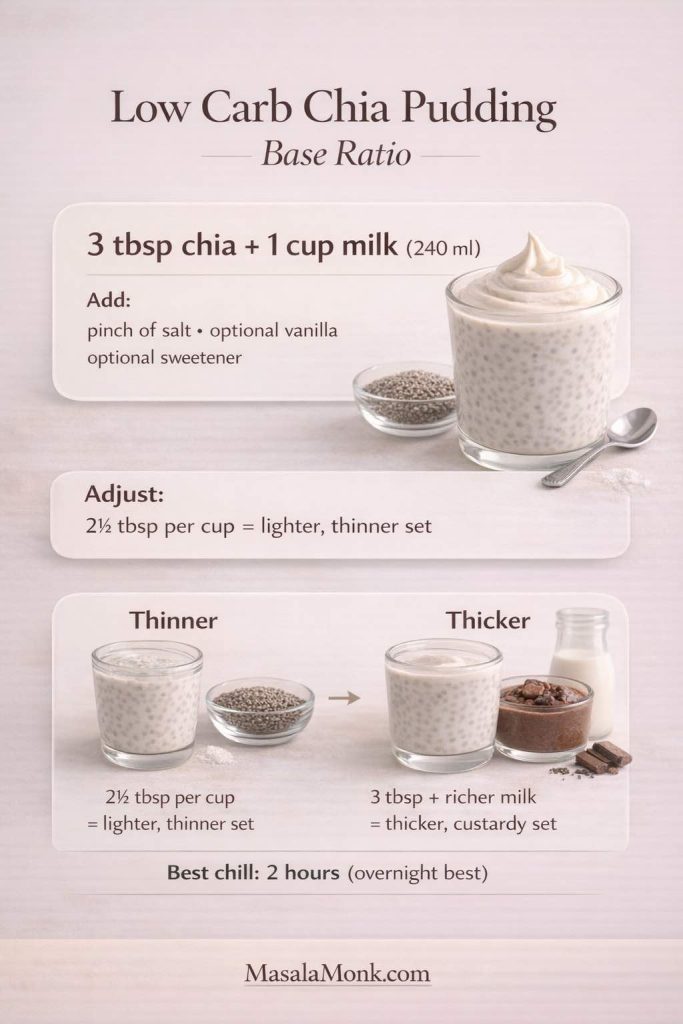
Chia pudding ratio infographic showing 3 tablespoons chia seeds to 1 cup or 240 ml milk, with adjustments for thinner or thicker pudding.
Start with 3 tablespoons chia to 1 cup / 240 ml liquid. Use a little less chia for a softer set, or keep the full amount and use a richer liquid for a denser pudding.

The exact result changes with your liquid. Thin almond milk gives a lighter pudding, while canned coconut milk sets much richer. Greek yogurt needs far less added liquid because the yogurt already provides most of the body.

The stir-rest-stir method

  1. Whisk the liquid with vanilla, salt, sweetener, cocoa, protein powder, or other smooth flavorings first.
  2. Add the chia and whisk vigorously for 20–30 seconds.
  3. Let the mixture stand for 10 minutes.
  4. Whisk or stir thoroughly a second time.
  5. Cover and refrigerate for at least 2 hours; overnight gives the most settled texture.
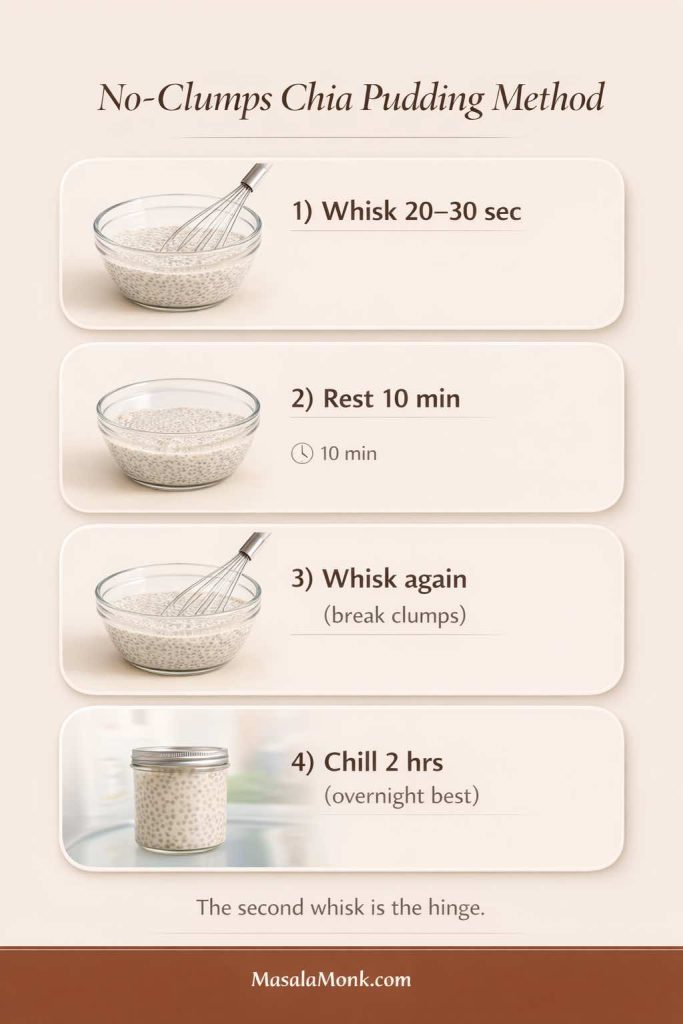
No-clumps chia pudding method showing whisking, a 10-minute rest, a second whisk and a final chill.
The second stir is the important one: the seeds have started hydrating but have not fully set, so this is your chance to break up clusters before they become permanent.

Can you make quick chia pudding?

Yes, although “quick” still means giving chia time to hydrate. Follow the same method and chill for 30–45 minutes. The texture will be softer than an overnight jar. Greek yogurt is particularly useful when you want a thick pudding sooner because much of the thickness is already present before the chia sets.

Give the chia enough time to hydrate

Chia thickens because the seeds absorb liquid over time. For pudding, use them fully hydrated rather than judging the mixture immediately after stirring. If the texture still seems thin after 30 minutes, give it more time before adding extra seeds; the biggest change usually happens during the longer refrigerator rest.


Choosing Your Liquid: Almond Milk, Coconut Milk, Yogurt, Oat Milk & More

Your liquid controls far more than flavor. It changes thickness, richness, carbohydrate content, and how much additional chia you may need. Choose the liquid first, then fine-tune the jar.
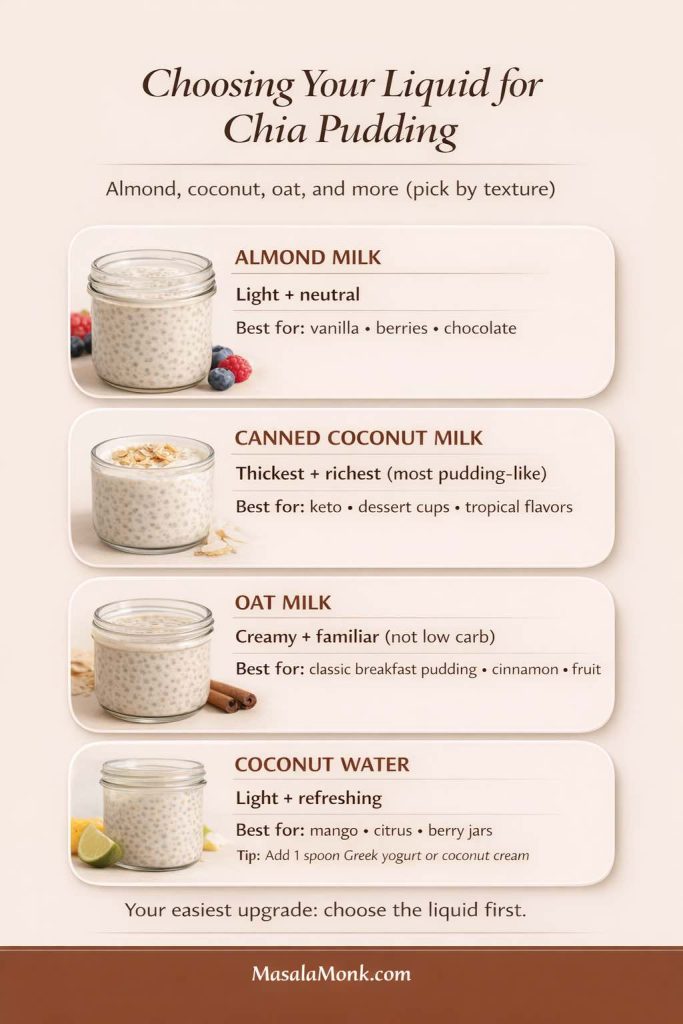
Guide comparing almond milk, canned coconut milk, oat milk and coconut water for chia pudding, including texture and best-use notes.
Almond milk stays light, canned coconut milk gives the richest set, oat milk is creamy but usually higher in carbohydrate, and coconut water creates a lighter fruit-friendly chia gel.

Almond milk: light and versatile

Unsweetened almond milk is an easy low-carb base because its flavor stays out of the way. It works especially well with vanilla, chocolate, cinnamon, berries, matcha, and nut butter.

Canned coconut milk: richest and thickest

If you want a pudding that feels especially rich, canned coconut milk is hard to beat. Because brands vary in thickness, whisk in enough water to make the mixture comfortably pourable before adding chia. Very thick coconut milk can otherwise produce dense pockets before the seeds hydrate evenly.

Greek yogurt: thick before it even chills

Greek yogurt works differently from milk. Instead of using a full cup of liquid, start with yogurt and loosen it gradually. For our full high-protein version, ¾ cup Greek yogurt + ¼ cup / 60 ml water or unsweetened almond milk creates a creamy starting mixture before the chia goes in.

Jump to the Greek yogurt chia pudding recipe →

Oat milk: creamy, but usually not low carb

Oat milk produces a mild, familiar breakfast-pudding flavor. It can still be used with any of the methods in this guide, but check the nutrition label if keeping carbohydrates low is an important part of your goal.

Coconut water: light and fruit-friendly

Coconut water produces a much lighter gel than milk. It pairs particularly well with mango, lime and berries, but it will not taste as creamy unless you add a spoonful of Greek yogurt or coconut cream. If you would rather drink your chia than turn it into pudding, our Chia Seed Water guide uses a much lighter chia-to-liquid ratio and covers plain, lemon, coconut-water and overnight versions.

Dairy-Free Chia Pudding: The Easiest Swaps

Several recipes in this collection are naturally dairy-free when you use plant milk and skip optional Greek yogurt. Unsweetened almond milk is the lightest neutral base; canned coconut milk gives the richest dairy-free texture; and a lighter coconut-milk beverage works well for matcha, mango, apple-cinnamon, and gingerbread.

If you use protein powder in a dairy-free jar, check the ingredient label: whey and casein are dairy proteins, while many pea, soy, rice, and blended plant proteins are dairy-free.


High Protein Chia Pudding: Greek Yogurt, Protein Powder & Collagen

There are three straightforward ways to increase the protein in a chia jar. Greek yogurt gives you protein and immediate thickness. Protein powder can add more protein and flavor but needs to be dissolved well. Collagen peptides dissolve easily, although they do not thicken the pudding the way yogurt does. If collagen is part of your routine, Harvard Health has a measured overview of what collagen supplements can and cannot reasonably claim.
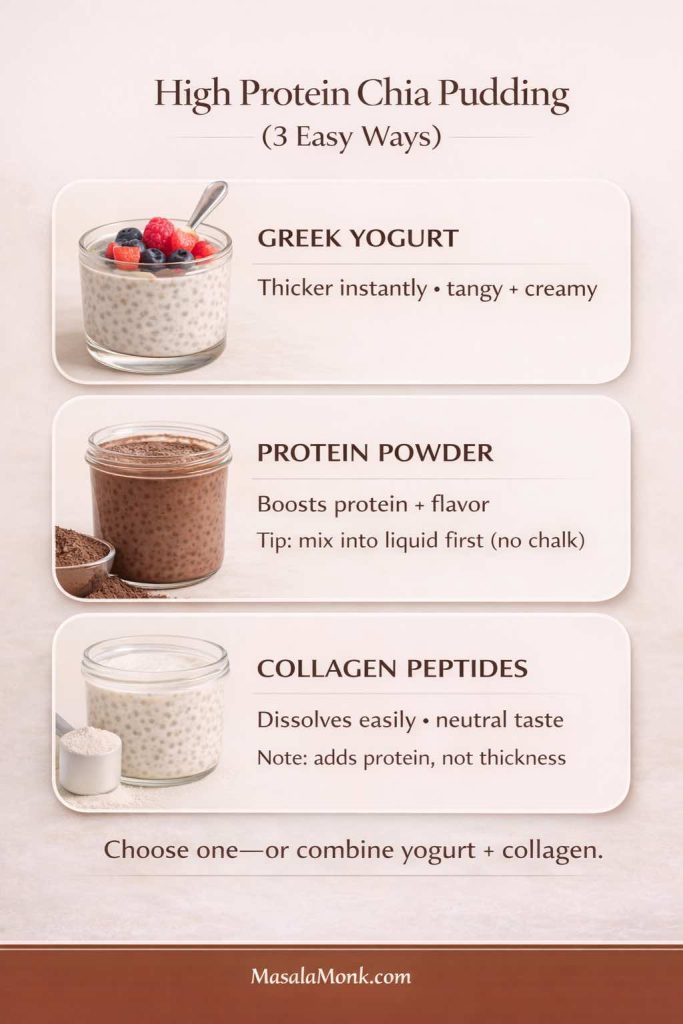
High protein chia pudding comparison showing Greek yogurt, protein powder and collagen peptides as three ways to add protein.
Greek yogurt changes both protein and texture; protein powder is a bigger flavor lever; collagen dissolves easily but contributes little to thickness.

How to add protein powder without a chalky texture

Do not dump dry protein powder into a finished chia pudding. Whisk it completely into the milk first, then add the chia. If your powder is stubborn, make a smooth paste with a small amount of liquid before gradually whisking in the rest.

Keep extra liquid nearby: protein powders absorb liquid very differently. After the 10-minute rest, add 2–4 tablespoons milk if the mixture has become unusually thick before it goes into the refrigerator.
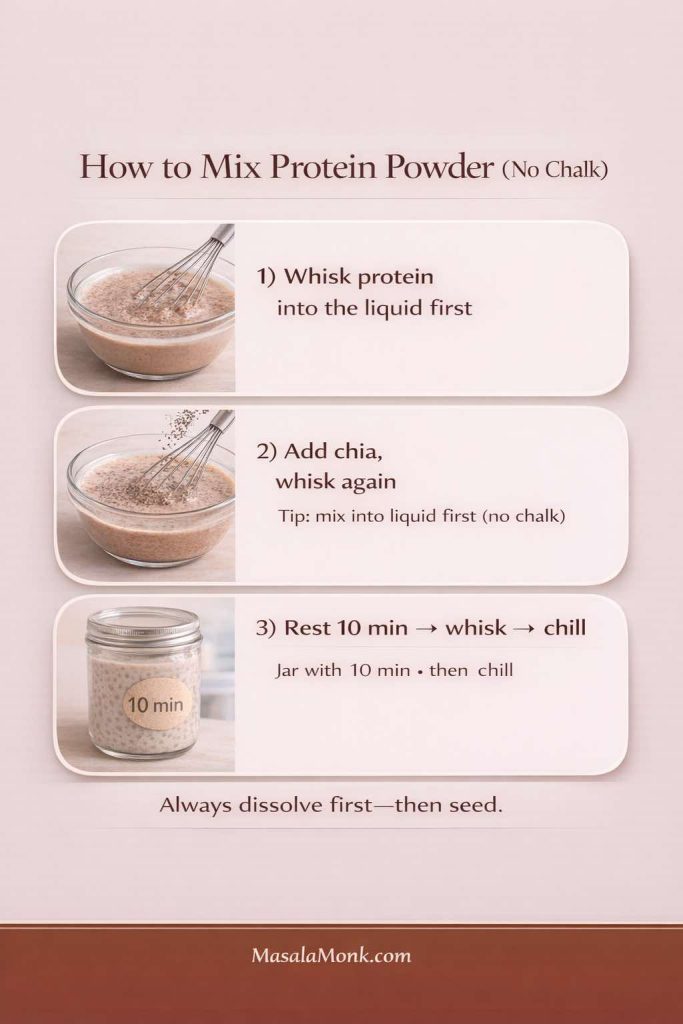
Three-step guide showing protein powder whisked into liquid first, followed by chia seeds and a final 10-minute rest and second stir.
For smooth protein chia pudding: dissolve the powder first, add the seeds second, then use the same 10-minute rest and second-stir method.

10 Low Carb Chia Pudding Recipes

Each recipe below makes roughly 2 small servings or 1 generous serving, depending on appetite and toppings. For meal prep, multiply the ingredients and portion the finished mixture into individual jars.

Low-carb vs keto: these recipes are not all equally low in carbohydrate. The unsweetened almond-milk, Greek-yogurt, chocolate, and coconut versions are the easiest to keep very low carb. Mango and apple are fruit-forward options; use the fruit as a measured accent if carbohydrate intake is a priority.
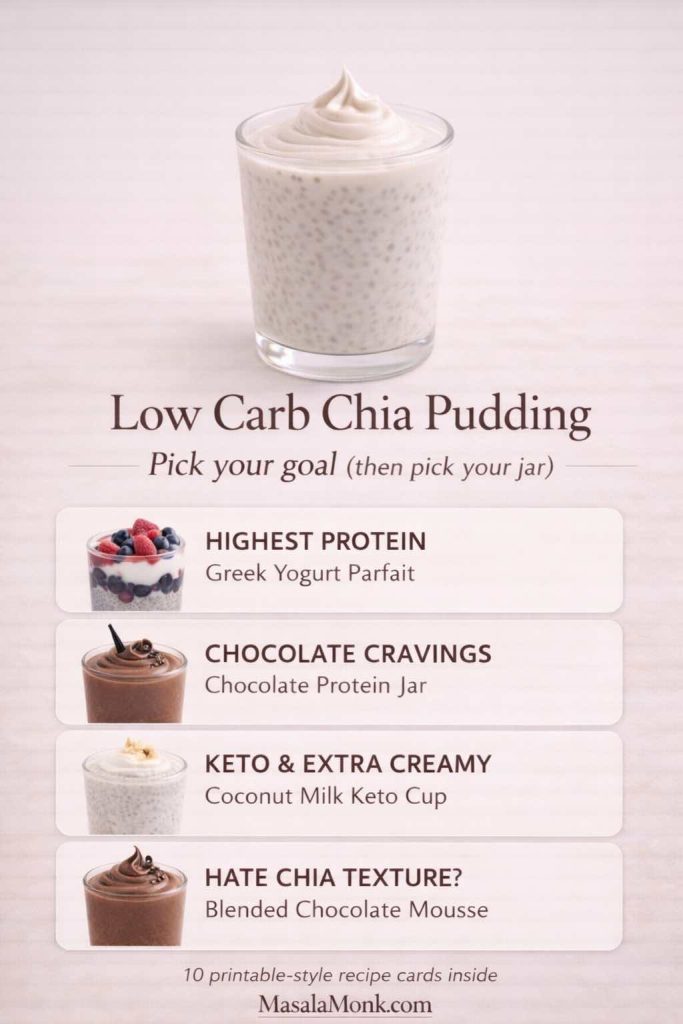
Goal-based chia pudding chooser showing Greek yogurt for highest protein, chocolate protein pudding for chocolate cravings, coconut milk for extra-creamy keto pudding and blended chocolate mousse for people who dislike whole chia texture.
Start with the result you want: Greek yogurt for thick and protein-forward, chocolate protein for cocoa cravings, coconut milk for the richest keto texture, or blended mousse if whole chia seeds are the problem.
If you want…Make this one
Thickest high-protein jarGreek Yogurt Chia Pudding
Simple everyday keto baseVanilla Almond Milk
Chocolate + proteinChocolate Protein
Chocolate dessert feelChocolate Peanut Butter
Fresh café-style flavorMatcha
Fruit-forwardMango
Cozy breakfastApple Cinnamon
Warm-spice dessert flavorGingerbread
Richest keto textureCoconut Milk
No whole-seed textureBlended Chocolate Mousse

1) Keto Chia Pudding with Almond Milk

This is the easiest everyday low carb chia pudding to memorize. Vanilla keeps it neutral enough for berries, nuts, cocoa, cinnamon, or nut butter later.

Ingredients

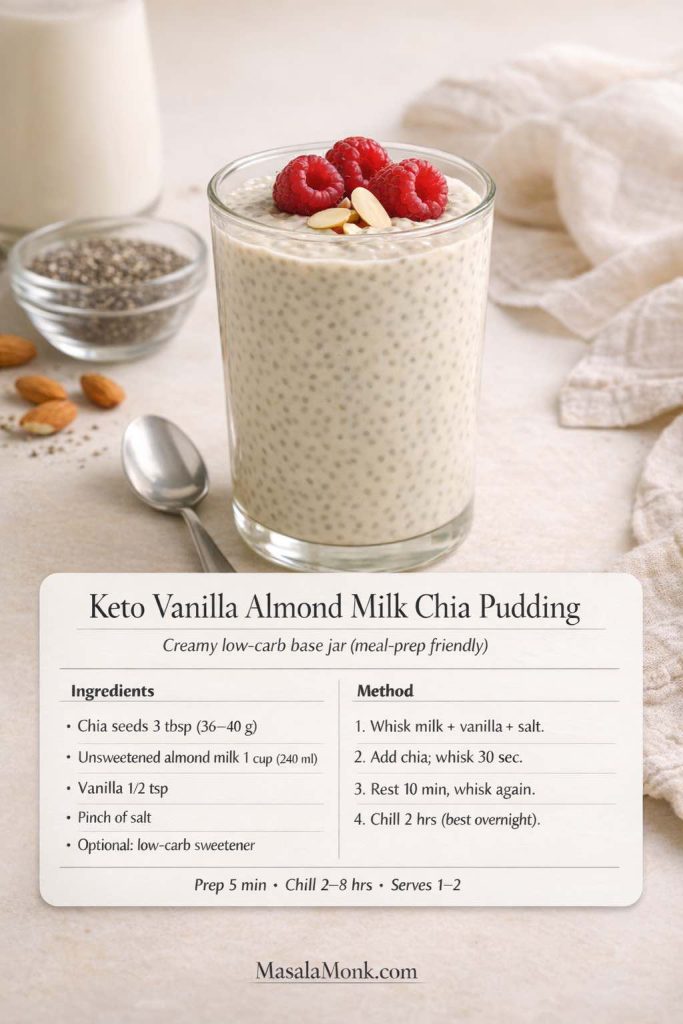
  • 3 tablespoons chia seeds
  • 1 cup / 240 ml unsweetened almond milk
  • ½ teaspoon vanilla extract
  • Pinch of salt
  • Optional low-carb sweetener, to taste
Keto vanilla almond milk chia pudding topped with raspberries and sliced almonds.
The almond-milk jar is the useful blank canvas of the collection: light enough for fruit, but easy to make richer with yogurt, nuts or nut butter.

Method

  1. Whisk almond milk, vanilla, salt and sweetener, if using.
  2. Add the chia and whisk vigorously for 20–30 seconds.
  3. Rest 10 minutes, then whisk again.
  4. Cover and refrigerate for at least 2 hours or overnight.

Easy variations: add ½ teaspoon cinnamon; stir in 1 tablespoon unsweetened shredded coconut; or add 1–2 tablespoons Greek yogurt at serving time for a creamier finish.

For a deeper single-recipe treatment, see the keto chia pudding with almond milk.


2) Chia Pudding with Greek Yogurt: High Protein & Ultra Creamy

If the chia pudding you want is thick, creamy and closer to cheesecake filling than a glass of soaked seeds, start here. Greek yogurt gives the jar body before the chia has even finished hydrating, while a small amount of liquid keeps the mixture creamy rather than pasty.

Ingredients

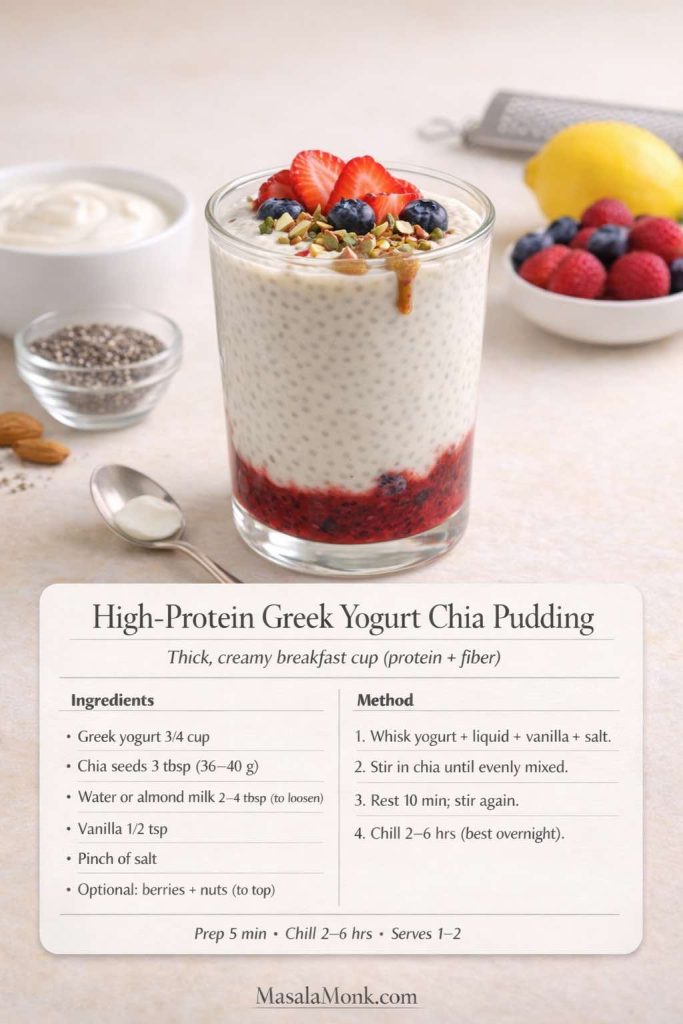
  • ¾ cup plain Greek yogurt
  • 3 tablespoons chia seeds
  • ¼ cup / 60 ml unsweetened almond milk or water, plus 1–2 tablespoons more after chilling if needed
  • ½ teaspoon vanilla extract
  • Pinch of salt
  • Optional sweetener, to taste
Thick high-protein Greek yogurt chia pudding layered with berries and topped with strawberries, blueberries, nuts and a small nut-butter drizzle.
This is the thickest protein-forward version in the collection: tangy Greek yogurt, hydrated chia and enough added liquid to keep the pudding creamy rather than stiff.

Method

  1. Whisk the Greek yogurt, vanilla, salt and ¼ cup / 60 ml water or almond milk until completely smooth.
  2. Stir in the chia seeds until evenly distributed.
  3. Rest for 10 minutes, then stir again so no dense chia pockets remain.
  4. Refrigerate for at least 2 hours. Overnight is fine.
  5. Stir before serving and add another 1–2 tablespoons liquid if you want it looser.

How thick should it look before chilling?

It should already be thick, but it should still move easily when stirred. If it looks like a stiff paste before going into the refrigerator, add another tablespoon or two of liquid. The chia will absorb more as it sits.

Can you use nonfat or regular yogurt?

Yes. Nonfat Greek yogurt works, although the finished pudding can taste a little sharper and less rich. Regular yogurt is thinner, so start with less added liquid and check the texture after hydration. Different yogurts vary enough that the final splash of liquid should be adjusted by texture rather than treated as an exact requirement.

Can you add protein powder too?

Yes. Whisk the protein powder into the yogurt and loosening liquid before adding chia. Protein powders absorb liquid differently, so expect to add another 1–3 tablespoons milk if the mixture becomes unusually stiff after the 10-minute rest.

Best toppings and variations

For a cheesecake-style jar, use vanilla, berries and a little lemon zest. For chocolate, whisk cocoa into the yogurt before adding chia. Peanut butter, chopped nuts, cacao nibs and a small berry layer all work well because they add contrast without turning the pudding watery.

If this thick, tangy, almost-cheesecake style is the chia pudding you actually want, keep going with our 10 Creative Chia Pudding Recipes. That collection branches into Greek-yogurt, cheesecake, chocolate, blueberry-lemon, mango and coconut-cream directions, so you can keep the texture you like and change the flavor.


3) Chocolate Protein Chia Pudding

This is the jar to make when you want chocolate flavor without turning breakfast into a sugar-heavy dessert. The important technique is dissolving the protein powder and cocoa before the chia goes in.

  • 1 cup / 240 ml unsweetened almond milk or dairy milk
  • 1 scoop chocolate protein powder, or vanilla protein plus extra cocoa
  • 2 tablespoons cocoa or cacao powder
  • 3 tablespoons chia seeds
  • Pinch of salt
  • Optional sweetener, to taste
  • Optional: 1 tablespoon Greek yogurt for extra creaminess
  • 2–4 tablespoons extra milk, only if your protein powder makes the mixture unusually thick
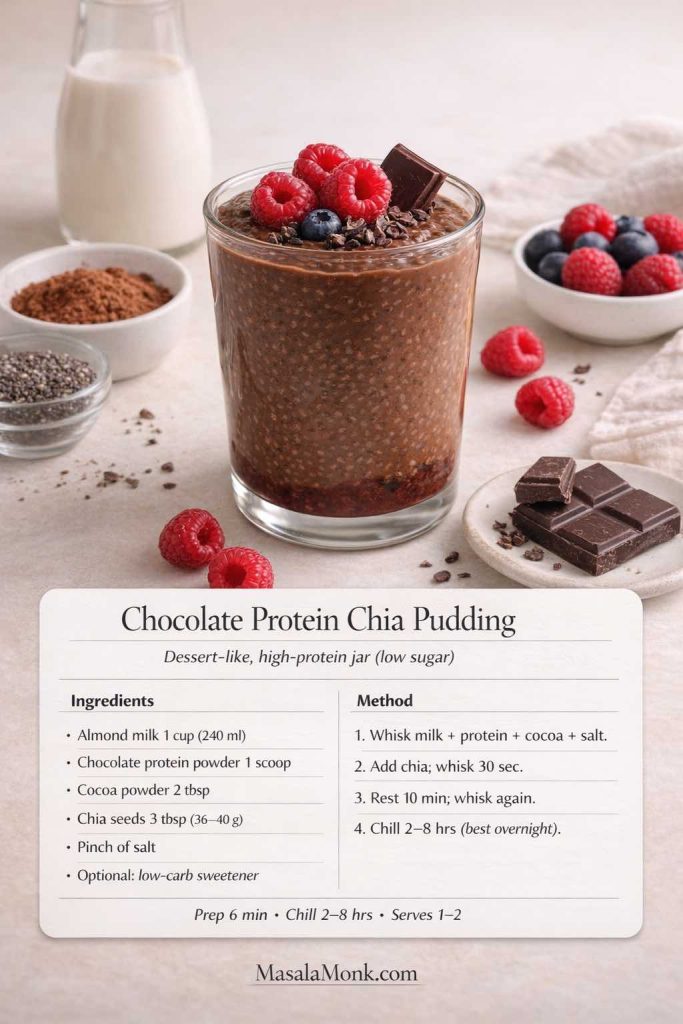
Chocolate protein chia pudding topped with raspberries, cacao nibs and dark chocolate.
Cocoa and protein powder make this the most direct chocolate-for-breakfast jar in the collection.
  1. Whisk the milk, protein powder, cocoa, salt and sweetener until completely smooth.
  2. Add chia and whisk again.
  3. Rest 10 minutes, then stir thoroughly. If it already looks very thick, add 2–4 tablespoons extra milk.
  4. Refrigerate for at least 2 hours; overnight gives the most settled texture.

If it tastes chalky: whisk the protein powder with a small amount of milk into a smooth paste first, then gradually add the rest of the milk.


4) Chocolate Peanut Butter Chia Pudding

Peanut butter supplies richness and makes chocolate taste fuller even when you keep the pudding only lightly sweetened.

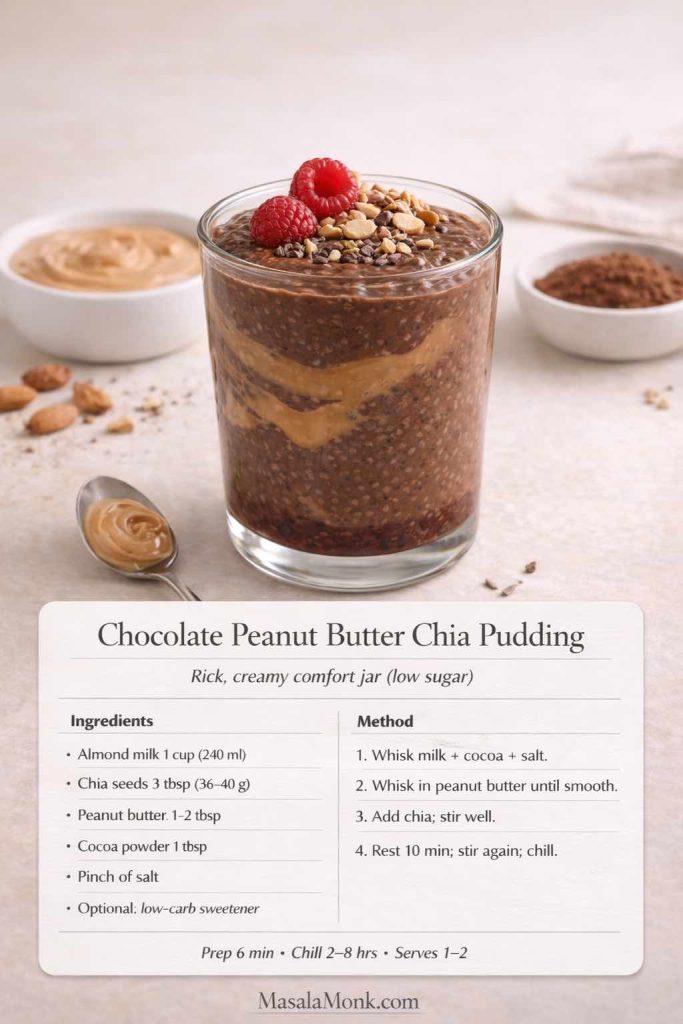
  • 1 cup / 240 ml almond milk or dairy milk
  • 3 tablespoons chia seeds
  • 1–2 tablespoons peanut butter
  • 1 tablespoon cocoa powder
  • Pinch of salt
  • Optional sweetener
Chocolate peanut butter chia pudding with a peanut butter swirl, raspberries, chopped peanuts and cacao nibs.
Chocolate and peanut butter create a richer dessert-style jar without needing much additional sweetness.
  1. Whisk milk, cocoa, salt and sweetener until smooth.
  2. Whisk in the peanut butter until evenly incorporated.
  3. Add chia, rest 10 minutes and stir again.
  4. Refrigerate for at least 2 hours.

A tiny splash of vanilla or pinch of cinnamon can make the cocoa taste deeper. Top with berries, roasted nuts or a few cacao nibs.


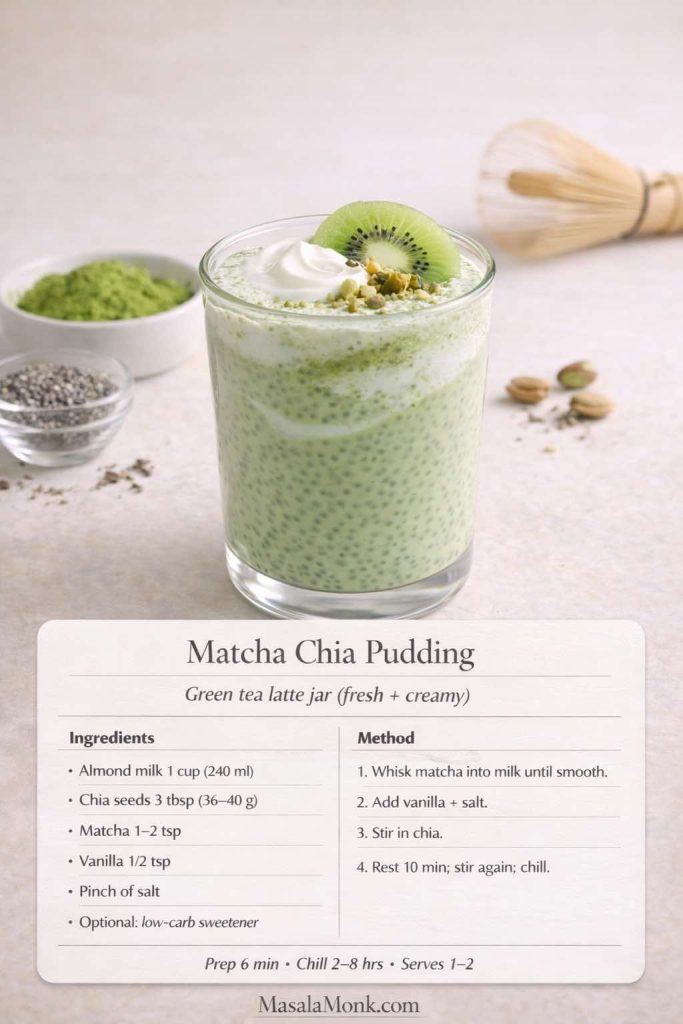
5) Matcha Chia Pudding

Matcha gives chia pudding a clean green-tea flavor that works especially well with vanilla and a small pinch of salt.

  • 1 cup / 240 ml unsweetened almond milk or light coconut-milk beverage
  • 3 tablespoons chia seeds
  • 1–2 teaspoons matcha powder
  • ½ teaspoon vanilla
  • Pinch of salt
  • Optional sweetener
Creamy matcha chia pudding topped with kiwi, pistachio and a small spoonful of yogurt.
Matcha creates a lighter, café-style change of pace between the richer chocolate and coconut puddings.
  1. Whisk or sift matcha into the milk until smooth.
  2. Add vanilla, salt and sweetener, if using.
  3. Add chia, rest 10 minutes, stir again and refrigerate.

If your matcha clumps, whisk it first with 1–2 tablespoons warm water to form a smooth paste. Matcha contains caffeine, so use less or enjoy it earlier in the day if you are sensitive to it.


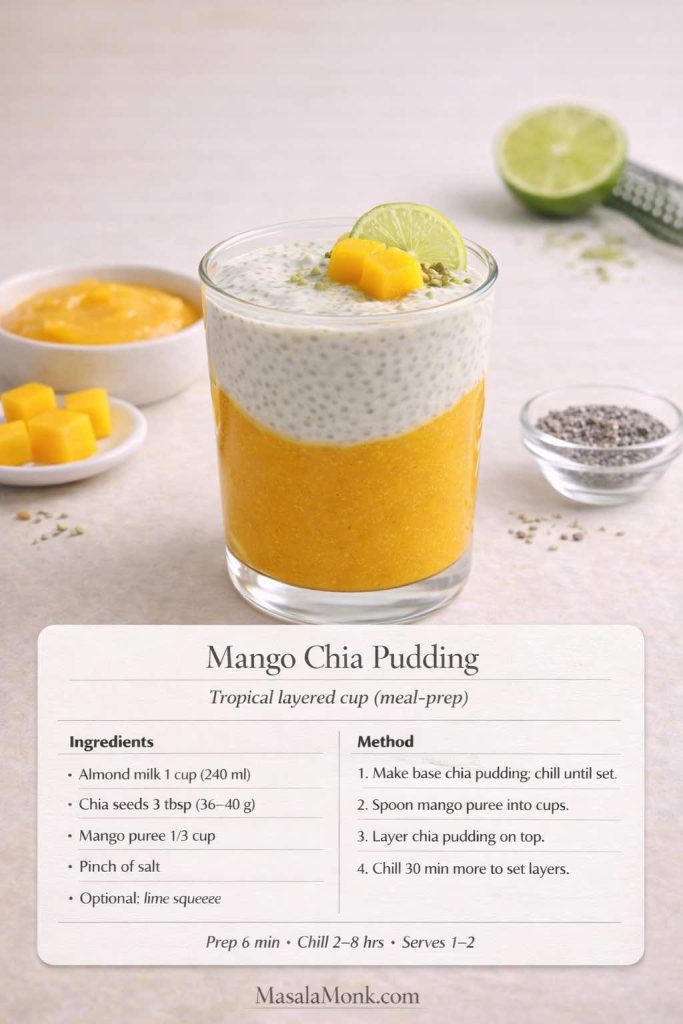
6) Mango Chia Pudding

Mango gives you plenty of flavor from a relatively small amount of fruit. Lime and a pinch of salt help the mango taste brighter, so you do not need to turn the whole jar into mango puree.

  • 1 cup / 240 ml almond milk or coconut-milk beverage
  • 3 tablespoons chia seeds
  • ⅓ cup mango puree or finely diced mango
  • Pinch of salt
  • Optional squeeze of lime
Layered mango chia pudding with bright mango puree, creamy chia pudding, mango pieces and lime.
Layering the mango rather than mixing a large quantity through the whole jar gives you strong tropical flavor without overwhelming the chia base.
  1. Make the chia base with milk, chia and salt.
  2. Chill until set.
  3. Fold in the mango just before eating, or layer the puree at the bottom of the jar.
  4. Finish with lime, if using.

If the tropical-fruit direction is what you like, try our pineapple chia pudding next. It uses the same two-stir logic but goes deeper on pineapple, yogurt, texture, and how to keep the pudding spoonable rather than watery.


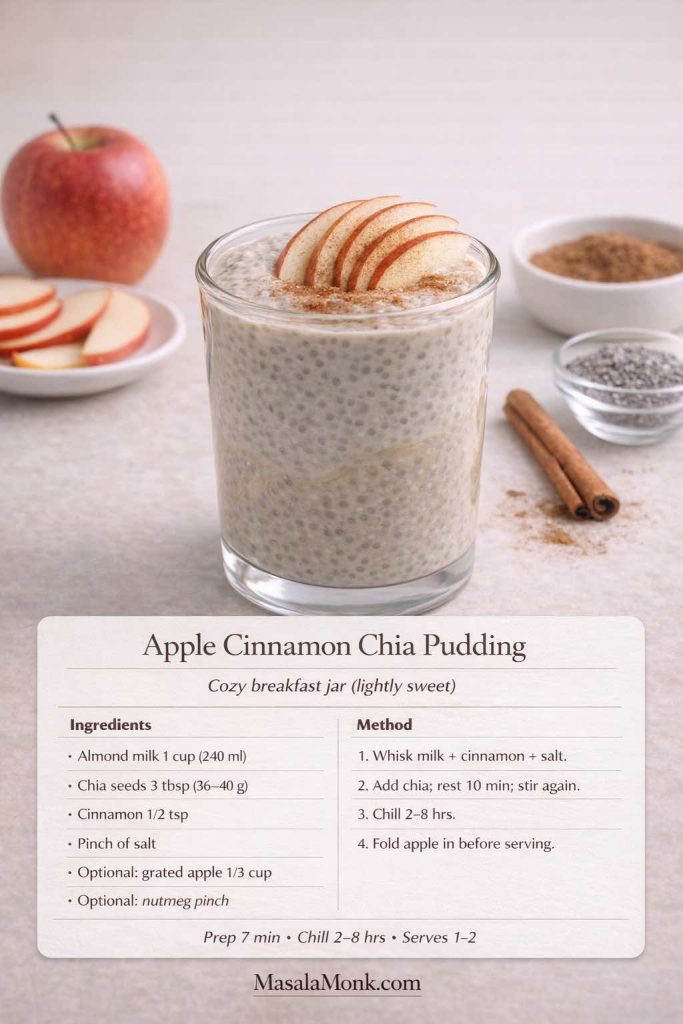
7) Apple Cinnamon Chia Pudding

This version gets most of its cozy character from cinnamon, vanilla and nutmeg, so the apple can stay a relatively small accent.

  • 1 cup / 240 ml unsweetened almond milk
  • 3 tablespoons chia seeds
  • ½ teaspoon cinnamon
  • Pinch of salt
  • Optional: ⅓ cup grated apple
  • Optional: pinch of nutmeg
Apple cinnamon chia pudding topped with thin apple slices and cinnamon.
For the freshest texture, add grated apple shortly before serving rather than letting it sit in the pudding for several days.
  1. Whisk milk, cinnamon, salt and nutmeg.
  2. Add chia, rest 10 minutes, stir again and chill.
  3. Fold in grated apple shortly before serving.

Stricter low-carb version: skip the apple and use cinnamon, vanilla and chopped pecans for a cinnamon-pecan jar.


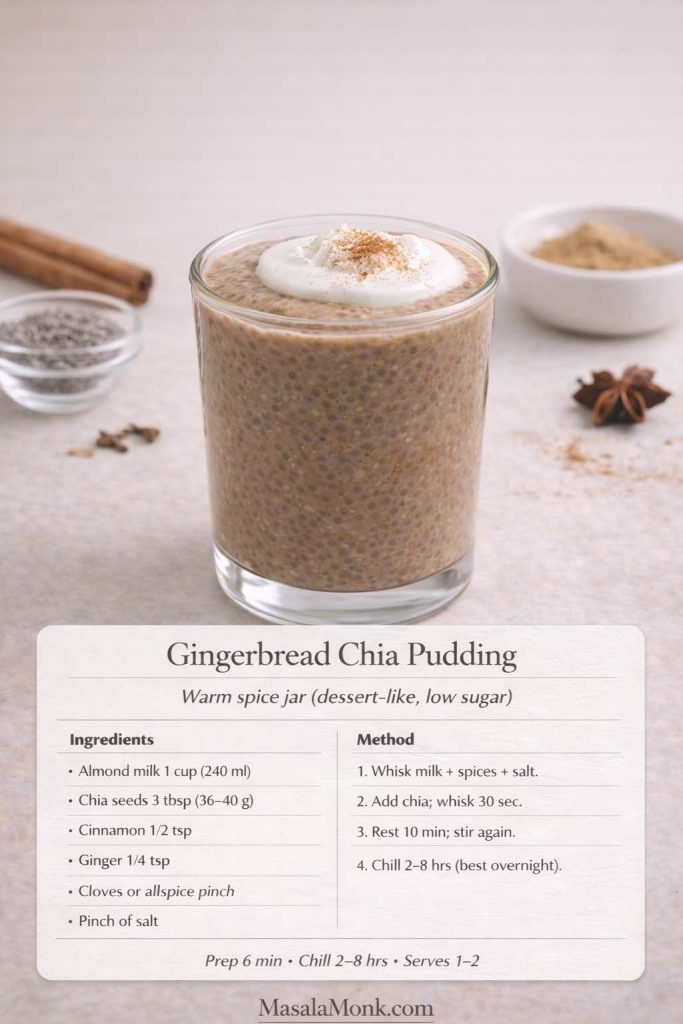
8) Gingerbread Chia Pudding

Gingerbread chia pudding is about warm-spice flavor rather than a health halo: cinnamon, ginger and cloves turn the same neutral base into something that feels much more dessert-like.

  • 1 cup / 240 ml almond milk or coconut-milk beverage
  • 3 tablespoons chia seeds
  • ½ teaspoon cinnamon
  • ¼ teaspoon ground ginger
  • Pinch of cloves or allspice
  • Pinch of salt
  • Optional sweetener
Gingerbread chia pudding topped with yogurt and cinnamon.
Warm spices transform a basic chia-and-milk jar without needing a complicated ingredient list.
  1. Whisk the spices, salt and sweetener into the milk.
  2. Add chia, rest 10 minutes, stir again and refrigerate.
  3. Serve with chopped nuts, Greek yogurt or coconut cream.

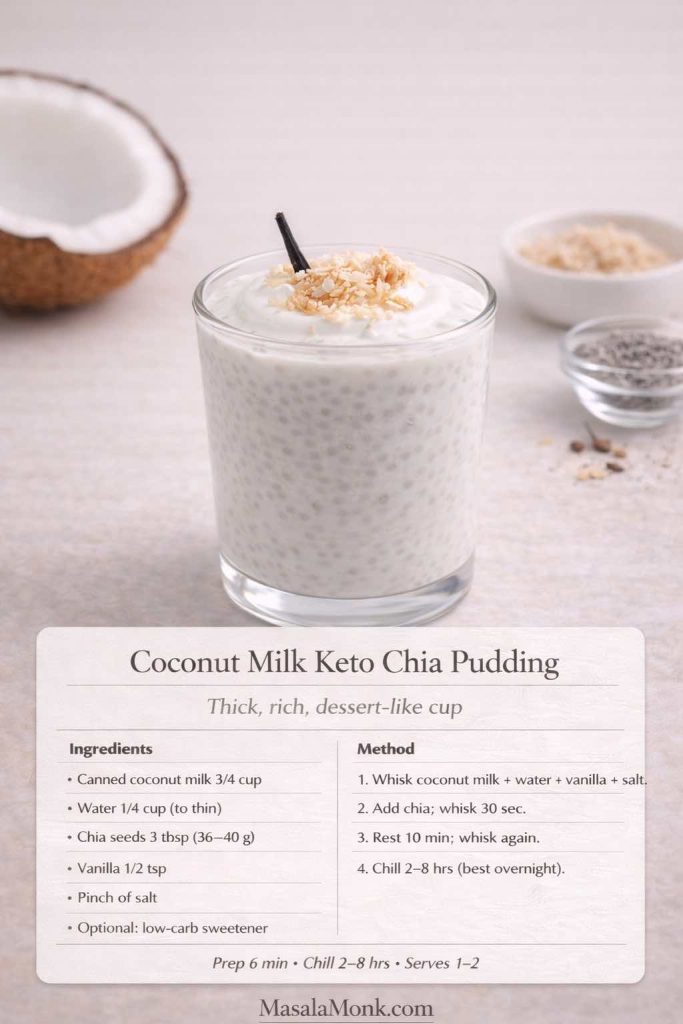
9) Keto Chia Pudding with Coconut Milk

This is the richest milk-based pudding in the collection. Canned coconut milk gives you much more body than almond milk, but thinning it slightly helps the chia hydrate evenly.

  • 3 tablespoons chia seeds
  • ¾ cup / 180 ml canned coconut milk
  • ¼ cup / 60 ml water, plus more if needed
  • ½ teaspoon vanilla
  • Pinch of salt
  • Optional sweetener
Rich coconut milk keto chia pudding topped with toasted coconut and vanilla.
Canned coconut milk produces the densest, richest milk-based chia pudding in this collection.
  1. Whisk coconut milk, water, vanilla, salt and sweetener until smooth.
  2. Add chia, rest 10 minutes and stir again.
  3. Refrigerate for at least 2 hours.
  4. If it becomes extremely thick overnight, loosen it with a splash of water before serving.

10) Blended Chia Pudding: Smooth Chocolate Mousse

If the idea of chia appeals to you but the whole-seed texture does not, this is the recipe worth trying. Let the chia hydrate first, then blend the finished pudding until glossy and smooth.

  • 1 cup / 240 ml almond milk or dairy milk
  • 3 tablespoons chia seeds
  • 1–2 tablespoons cocoa or cacao powder
  • Pinch of salt
  • Optional sweetener
  • Optional: 1 tablespoon peanut butter or 2 tablespoons Greek yogurt
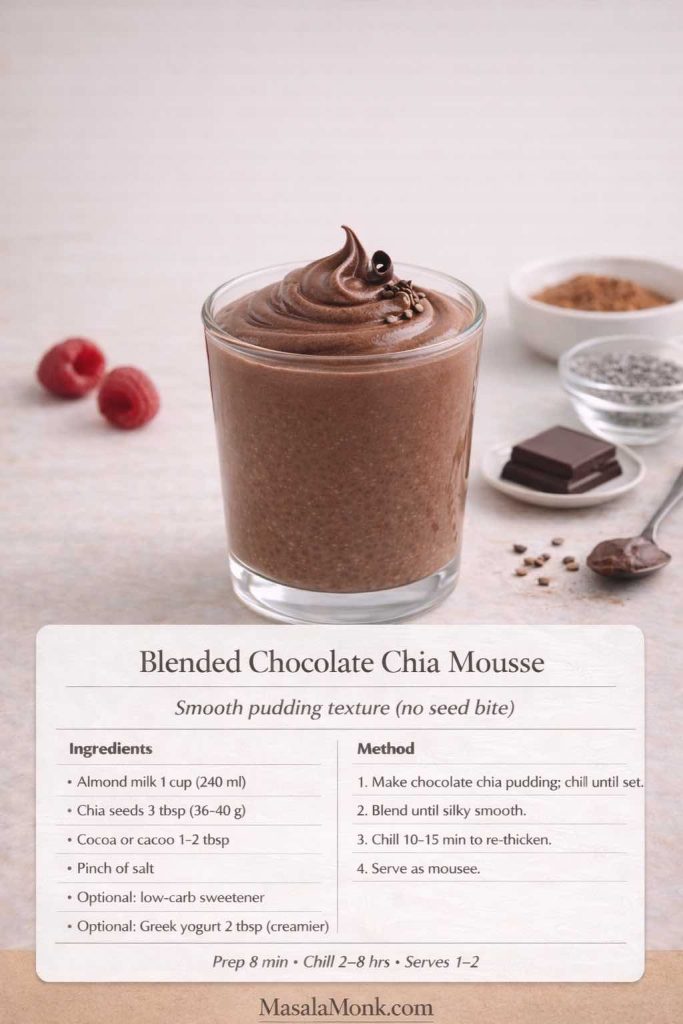
Silky blended chocolate chia mousse topped with dark chocolate and cacao nibs.
Hydrate first and blend second: that is what changes chia from a seedy pudding into a much smoother mousse-like texture.
  1. Make a standard chocolate chia pudding and refrigerate it for at least 2 hours.
  2. Blend until completely smooth and glossy.
  3. Add Greek yogurt or peanut butter if you want a richer finish.
  4. Chill for another 10–15 minutes before serving.

If protein powder is part of the recipe, blending after the chia has set can also smooth out small powdery pockets.

Whichever flavor you choose, texture is the part most likely to need adjusting. The fixes below are designed so you can rescue the pudding you already made instead of starting over.


Chia Pudding Troubleshooting: Runny, Too Thick, Lumpy or Bland

Most disappointing chia pudding can be traced to the ratio, hydration time, stirring pattern, or the thickness of the liquid you started with. Fix the texture before abandoning the jar.

ProblemWhat probably happenedWhat to do now
Runny after 2+ hoursToo much liquid, too little chia, or very thin milkAdd 1 teaspoon chia at a time, stir well and chill another 30–60 minutes.
Too thick or pastyRich coconut milk, thick yogurt, extra protein powder, or too much chiaStir in milk or water 1 tablespoon at a time until creamy.
Large chia clumpsThe seeds settled together before fully hydratingBreak them up thoroughly; next time use the 10-minute second stir.
Seeds still crunchyNot enough hydration time or liquidAdd a small splash of liquid and give the pudding more time.
Protein powder tastes chalkyPowder was added after the chia or not dissolved firstBlend the pudding, or next time dissolve powder completely before adding seeds.
Watery fruit layerJuicy fruit sat in the jar too longKeep berries and other watery toppings separate until serving.
Flavor is flatNot enough salt, aroma, richness or acidityAdd a pinch of salt plus vanilla, cinnamon, cocoa, nut butter, citrus zest or berries.
You hate the seed textureThe pudding may be fine; the texture simply is not for youBlend it into chocolate chia mousse.

One important correction: if a milk-based pudding is only slightly soft at the 30-minute mark, do not keep throwing chia into it. Give it the full two hours first. Chia continues absorbing liquid as it rests.


Chia Pudding Meal Prep & Storage

The easiest way to meal prep chia is to make one plain base and create several flavors from it rather than mixing four completely separate recipes.

  • Whisk the base in a bowl where you can easily break up clumps.
  • Do the 10-minute second stir.
  • Portion into three or four jars.
  • Flavor the jars in different directions—vanilla, cocoa, matcha, cinnamon, yogurt.
  • Keep crunchy toppings and watery fruit separate until serving.
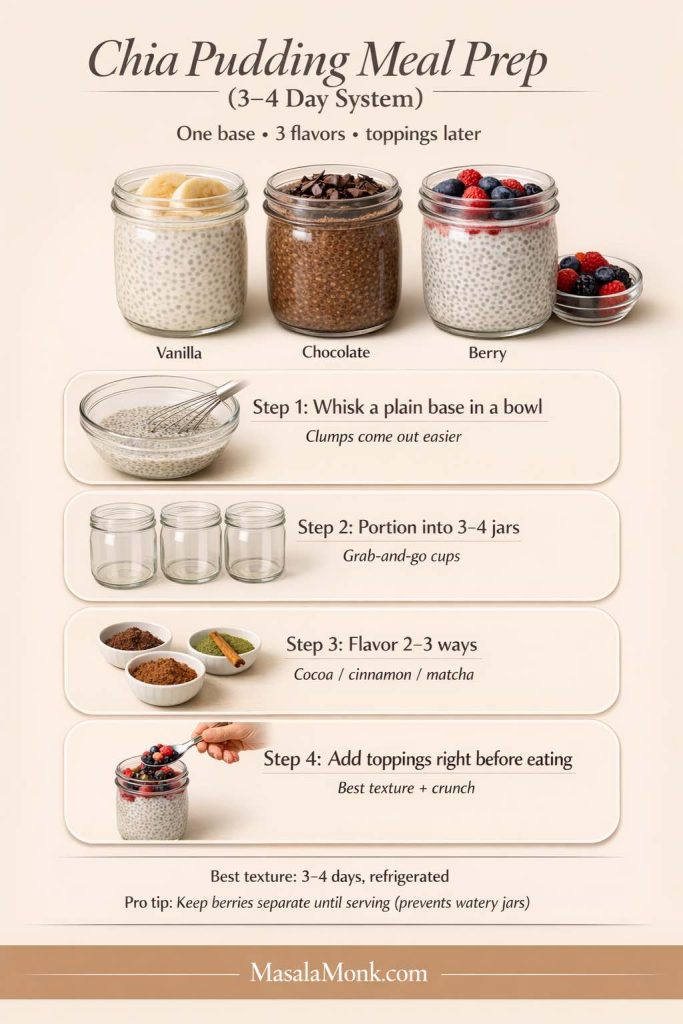
Chia pudding meal-prep system showing one base divided into several jars and flavored with vanilla, chocolate and berries, with toppings kept separate until serving.
One base, several flavors, toppings added later: this is much easier to repeat than making a completely different pudding every morning.

For quality, most chia puddings are best eaten within about 3–4 days when refrigerated. Yogurt- and milk-based versions should stay cold, and fruit is usually best added closer to serving. Follow normal refrigerated food-safety practices and discard anything that develops an unusual smell, appearance or signs of spoilage.

If what you really enjoy is the make-it-tonight, grab-it-tomorrow routine rather than chia specifically, our high protein overnight oats give you the same fridge-ready breakfast rhythm with oats, yogurt, protein-powder and dairy-free routes.


How to Make Chia Pudding Taste Better

If chia pudding tastes like a health chore, the problem is usually not the chia. A plain mixture of seeds and unsweetened milk needs flavor structure just like any other pudding.

  • Salt: a small pinch makes chocolate, vanilla, fruit and nut butter taste fuller.
  • Vanilla or warm spice: vanilla, cinnamon, ginger or nutmeg give the jar aroma without requiring much sweetness.
  • Depth: cocoa, cacao or matcha create a strong flavor identity.
  • Creaminess: Greek yogurt, canned coconut milk or nut butter changes both flavor and mouthfeel.
  • Contrast: berries, chopped nuts, toasted coconut and cacao nibs stop every spoonful feeling the same.
  • Acidity: lemon or lime zest can make fruit flavors brighter.
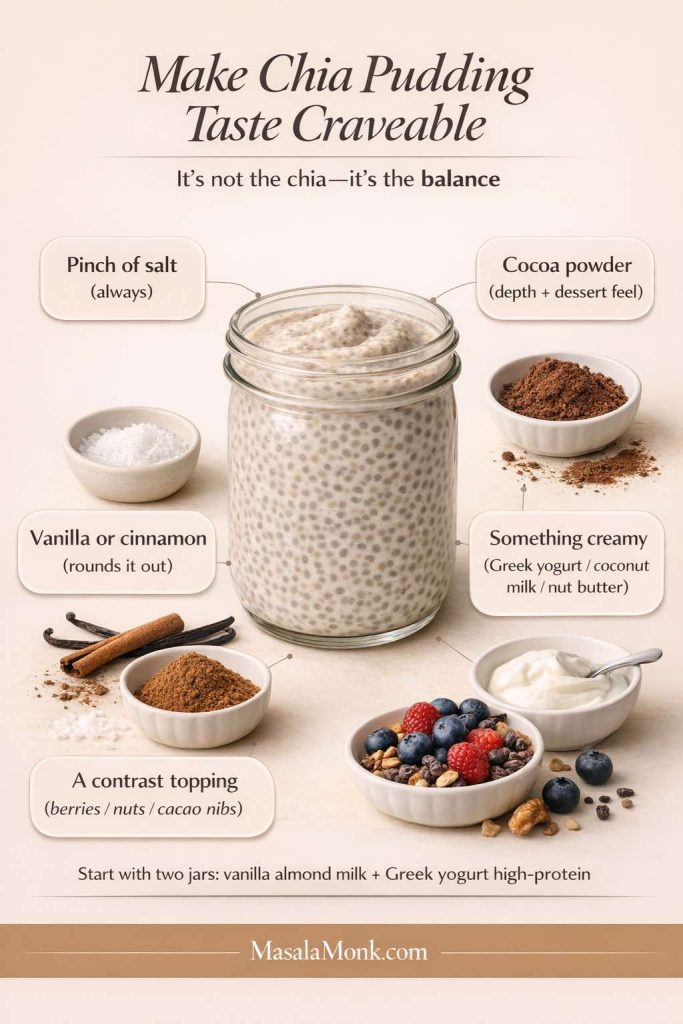
Flavor-balance guide for chia pudding showing salt, vanilla or cinnamon, cocoa, creamy ingredients and contrasting toppings.
Good chia pudding needs the same things other desserts do: seasoning, aroma, richness and contrast.

If you are making chia pudding for the first time, a useful two-jar experiment is one vanilla almond-milk jar and one Greek-yogurt jar. You will immediately learn whether you prefer a lighter gel-style pudding or a thicker, tangier texture.


Frequently Asked Questions

1) What is the best chia pudding ratio?

For a milk-based pudding, start with 3 tablespoons chia seeds to 1 cup / 240 ml liquid. Use a little less chia for a softer pudding. Greek-yogurt chia pudding uses a different ratio because yogurt already supplies most of the thickness.

2) How long does chia pudding need to set?

Give it at least 2 hours for a dependable set. A 30–45 minute quick version is possible but softer. Overnight works especially well for meal prep.

3) Why is my chia pudding watery?

It may need more time, more chia, or a better second stir. If it is still runny after at least two hours, add about 1 teaspoon chia, stir thoroughly and chill for another 30–60 minutes.

4) Why is my chia pudding too thick?

Thick Greek yogurt, canned coconut milk, protein powder and slightly heavy chia measurements can all produce an unexpectedly dense pudding. Stir in water or milk a tablespoon at a time until it becomes creamy again.

5) How do I stop chia seeds clumping together?

Whisk immediately after adding the seeds, then stir or whisk again after about 10 minutes. That second stir redistributes the seeds just as they begin to gel.

6) Can I make chia pudding with Greek yogurt and no milk?

Yes. Use water instead of milk to loosen the yogurt. Start with ¾ cup Greek yogurt, 3 tablespoons chia and ¼ cup / 60 ml water, then add another tablespoon or two after chilling if the pudding is too stiff.

7) Is Greek yogurt better than regular yogurt for chia pudding?

Neither is inherently better, but they behave differently. Greek yogurt is thicker and generally higher in protein, so it gives a firmer pudding. Regular yogurt starts looser, meaning you may need less added liquid or slightly more chia.

8) Can I add protein powder to chia pudding?

Yes. For the smoothest texture, dissolve the protein powder in the milk or yogurt mixture before adding the chia seeds. Because powders absorb liquid differently, keep a little extra milk nearby and adjust after the 10-minute rest.

9) Can I make chia pudding with almond milk?

Yes. Unsweetened almond milk is one of the easiest bases for low carb chia pudding because its flavor is mild and it works well with vanilla, cocoa, cinnamon, berries, matcha and nut butter.

10) Can I make chia pudding with coconut milk?

Yes. Canned coconut milk makes an especially rich pudding. If the coconut milk is very thick, dilute it with a little water before adding chia so the seeds hydrate evenly.

11) Can I make chia pudding with oat milk?

Yes. Oat milk creates a mild, creamy pudding, although many oat milks contain substantially more carbohydrate than unsweetened almond milk, so check the label if low carb is your priority.

12) Can I make dairy-free chia pudding?

Yes. Use unsweetened almond milk, coconut milk, or another dairy-free milk you enjoy. If adding protein powder, check whether it contains whey or casein; those are dairy proteins.

13) Can I make blended chia pudding?

Yes, and it is one of the best solutions if you dislike whole chia seeds. Let the pudding hydrate first, then blend until smooth. Cocoa, peanut butter or Greek yogurt can make the result even more mousse-like.

14) What is the easiest three-ingredient chia pudding?

A simple version is chia seeds + unsweetened almond milk + vanilla. Another is chia + coconut milk + cocoa. Add a pinch of salt if possible; it makes a surprisingly large difference to the finished flavor.

15) Can I use frozen berries in chia pudding?

Yes. Thawed berries release juice, which can be useful as a swirl or compote-style layer. For meal prep, keep very juicy berries separate until serving if you do not want them loosening the pudding.

16) How can I sweeten chia pudding without much sugar?

Start by improving flavor before simply increasing sweetness. Vanilla, cinnamon, cocoa, nut butter, coconut milk, berries, citrus zest and a pinch of salt can all make the pudding taste more complete. If you use a low-carb sweetener, add only enough to suit your taste.

17) Is chia pudding keto-friendly?

It can fit many low-carb or ketogenic eating patterns when made with ingredients such as unsweetened almond milk or coconut milk and appropriate toppings. The final carbohydrate content depends on your milk, yogurt, fruit, sweetener and serving size, so check the ingredients you actually use rather than relying on the word “keto” alone.

18) How long does chia pudding last in the fridge?

For quality, aim to eat most homemade chia pudding within about 3–4 days, refrigerated. Keep toppings such as nuts separate for crunch and add juicy fruit later if you want the pudding to stay thick.

19) Which chia pudding should I make first?

If you want the simplest base, start with vanilla almond milk chia pudding. If you came for the thick, creamy version, make the Greek yogurt chia pudding. And if chia’s seed texture has always bothered you, go directly to the blended chocolate mousse.
Posted on 4 Comments

Garlic & Paprika Cabbage Rolls (Keto-Friendly Recipes) – 5 Bold Savory Twists

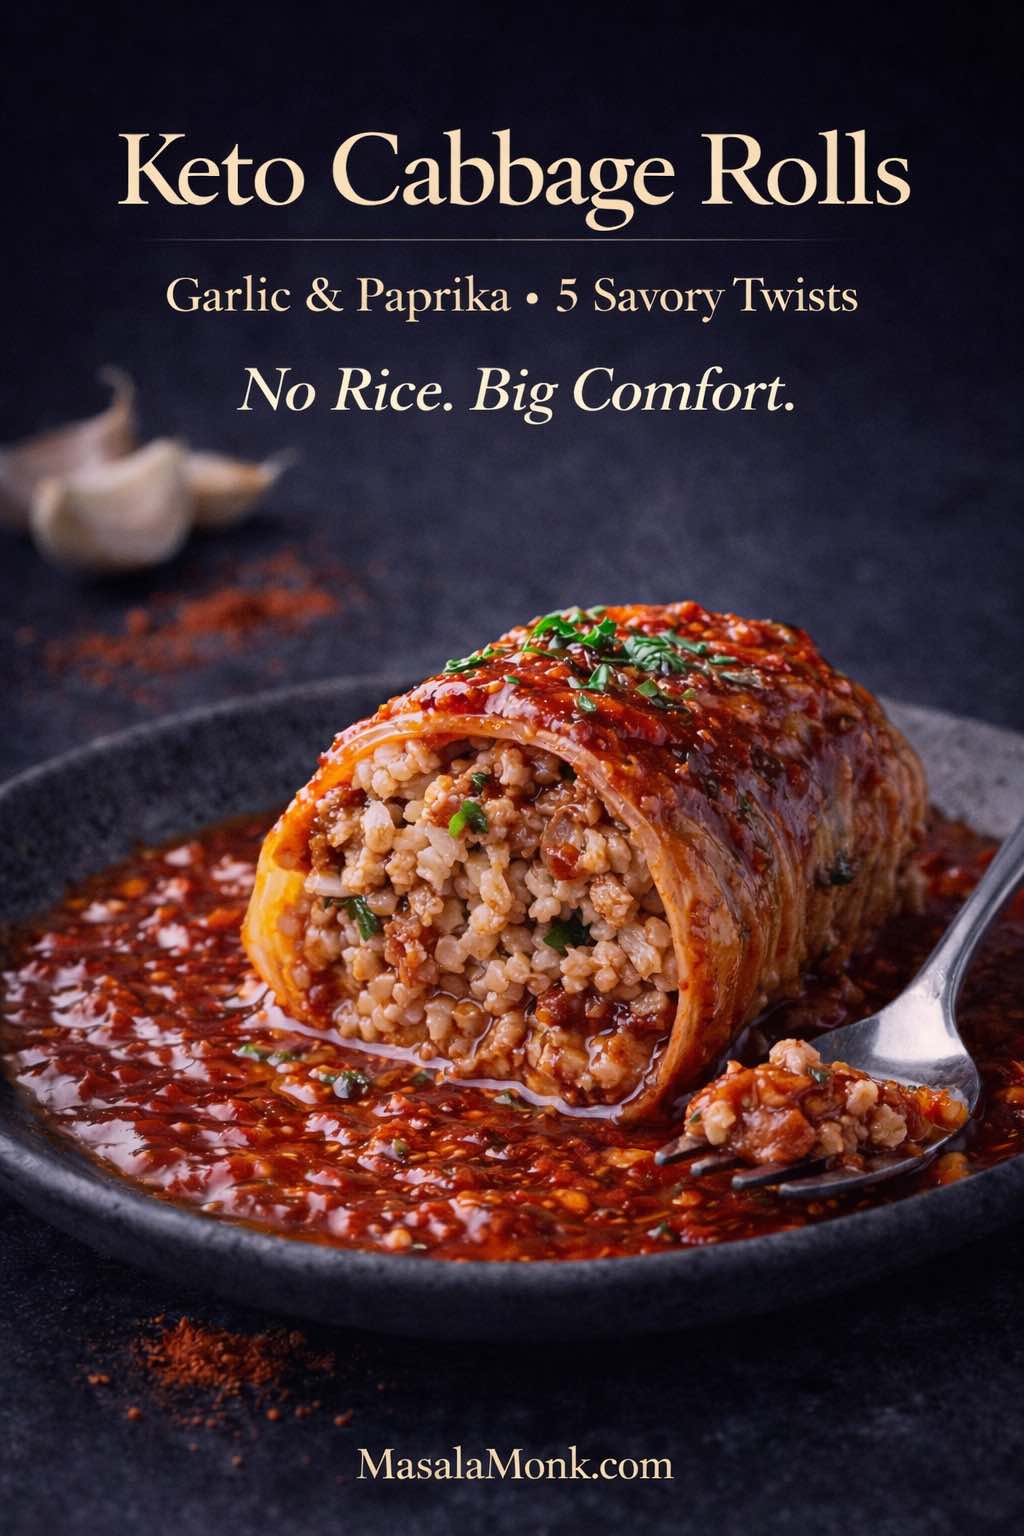
Moody close-up of a keto cabbage roll cut open to show a savory meat filling, sitting in a glossy garlic-paprika tomato sauce in a dark bowl, with a fork on the side and “Keto Cabbage Rolls” text overlay plus MasalaMonk.com at the bottom.

Stuffed cabbage rolls, keto or not keto – have a way of making a kitchen feel calm. Even before the oven is hot, the process itself—softening cabbage leaves, mixing a savory filling, rolling everything into neat parcels—turns dinner into something deliberate. Once the sauce bubbles and the cabbage goes silky at the edges, the whole dish tastes like it belongs on a table where people linger.

The classic version is famous for a reason. It’s hearty, tender, and deeply satisfying. It’s also often built around rice, which is exactly why cabbage rolls can feel tricky on a low carb diet. Still, the comfort isn’t coming from rice alone. It’s coming from the structure—cabbage wrapped around seasoned meat—plus a sauce that sinks into every fold and seam.

Keto Cabbage Rolls

That’s where these keto cabbage rolls shine. They keep everything that matters: the cozy, homey feel; the fork-tender cabbage; the rich tomato-forward sauce; the filling that tastes better the next day. The only difference is that instead of rice, the filling uses lower-carb “bulk” that still holds moisture and texture. More importantly, the flavor leans hard into garlic and paprika, so the rolls never feel like a compromise.
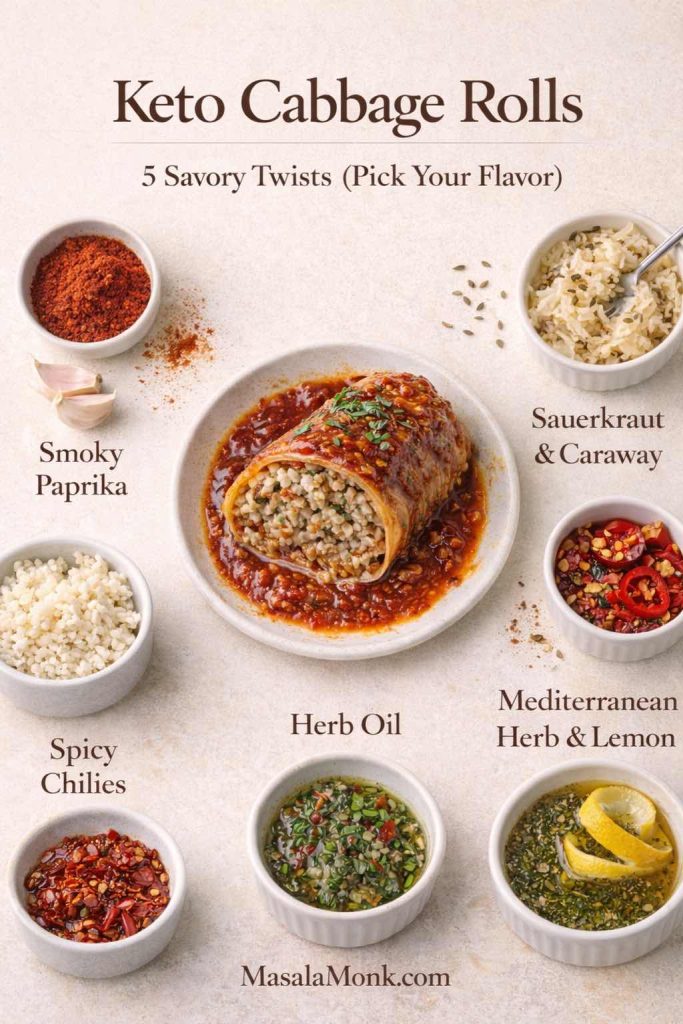
This is also not a one-note recipe. Cabbage rolls are a template, and once you have the core method, you can push them in completely different directions—smoky and deep, tangy with sauerkraut, bright and herb-forward, spicy, or Mediterranean-leaning. Each twist still tastes like cabbage rolls, yet each one feels like its own dinner.
Keto cabbage rolls in garlic-paprika tomato sauce with “5 savory twists” flavor picker: smoky paprika, spicy chilies, sauerkraut & caraway, Mediterranean herb & lemon, and herb oil, arranged around one cabbage roll on a light background.
Not sure which version to make tonight? Use this “pick your flavor” guide for keto cabbage rolls—same easy roll-and-bake base, five garlic-paprika twists (smoky, spicy, sauerkraut + caraway, Mediterranean herb + lemon, and herb oil). It helps readers choose a direction fast, keeps the recipe flexible, and makes meal prep easier when you’re cooking for different taste buds.

If you’re easing into keto or simply trying to eat fewer carbs without feeling deprived, it can help to understand the bigger picture of how low-carb swaps work. MasalaMonk’s guide to keto for beginners lays out the basics in a simple way. Even if you’re already comfortable with low carb eating, it’s a useful reminder that sustainable dinners come from repeatable patterns—structure, flavor, and satisfaction—rather than strict perfection.


Why cabbage rolls work so well when you’re keeping it low carb

Cabbage is one of those ingredients that behaves like a built-in plan. It gives you volume without heaviness, structure without flour, and a gentle sweetness that plays well with savory seasonings. Because it’s naturally sturdy, it holds up to long cooking times, which is why old-fashioned cabbage rolls show up across cuisines—Polish gołąbki (often spelled golabki), Ukrainian-style cabbage rolls, Hungarian cabbage roll recipes, Jewish stuffed cabbage, German cabbage rolls (including kohlrouladen), and Balkan sarma rolls.

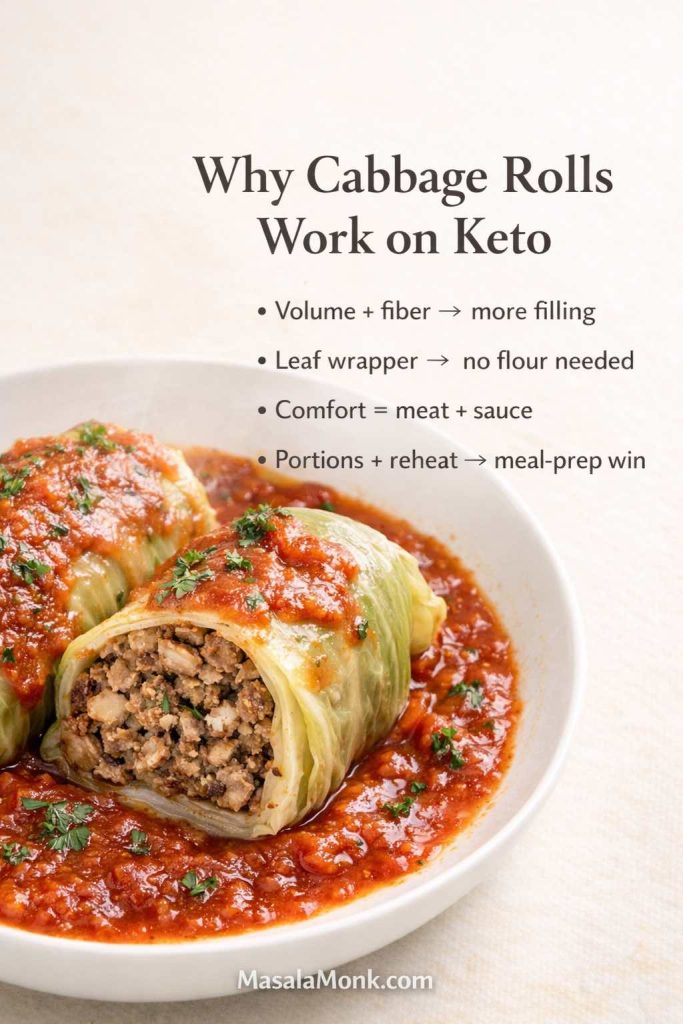
Keto cabbage rolls in a rich tomato garlic paprika sauce, one roll sliced open to show the meat filling. Text overlay reads “Why Cabbage Rolls Work on Keto” with bullets: volume + fiber = more filling, leaf wrapper = no flour needed, comfort = meat + sauce, portions + reheat = meal-prep win. MasalaMonk.com at bottom.
Why cabbage rolls work so well on keto: cabbage gives you volume + fiber without flour, and the “real comfort” still comes from meat + sauce. Use this quick cheat sheet when you’re deciding what to cook for the week—cabbage rolls portion cleanly, reheat beautifully, and stay satisfying even without rice.

Why the format stays satisfying even without rice

Even when spice blends change, the concept stays consistent: cabbage leaves stuffed with something rich, then cooked in a flavorful sauce until everything melds. That’s exactly the kind of dish that adapts beautifully to keto-friendly cooking, because the original structure doesn’t rely on breading or flour. Instead, you’re mostly adjusting the filling and the sauce while keeping the comfort intact.

From a nutrition standpoint, cabbage is also a practical base. It’s low calorie and fiber-rich, and it tends to make meals feel more filling—useful if you’re aiming for weight loss without feeling like you’re eating tiny portions. Cleveland Clinic’s overview of cabbage highlights its fiber and nutrient profile and explains why it can support a healthier eating pattern when used in satisfying meals: the health benefits of cabbage.
Meanwhile, cabbage rolls also make sense for meal prep. They portion cleanly, reheat well, and often taste even better after a rest. If you’re the kind of person who does better with a plan, they’re the sort of anchor dinner that makes the rest of the week easier.
Cabbage is one of the easiest low-carb staples to build meals around, and it does more than just “fill space.” If you want to go deeper on the nutrition side—fiber, nutrients, and why it works so well in everyday keto cooking—here’s a fuller guide on why cabbage is a staple in the keto kitchen.

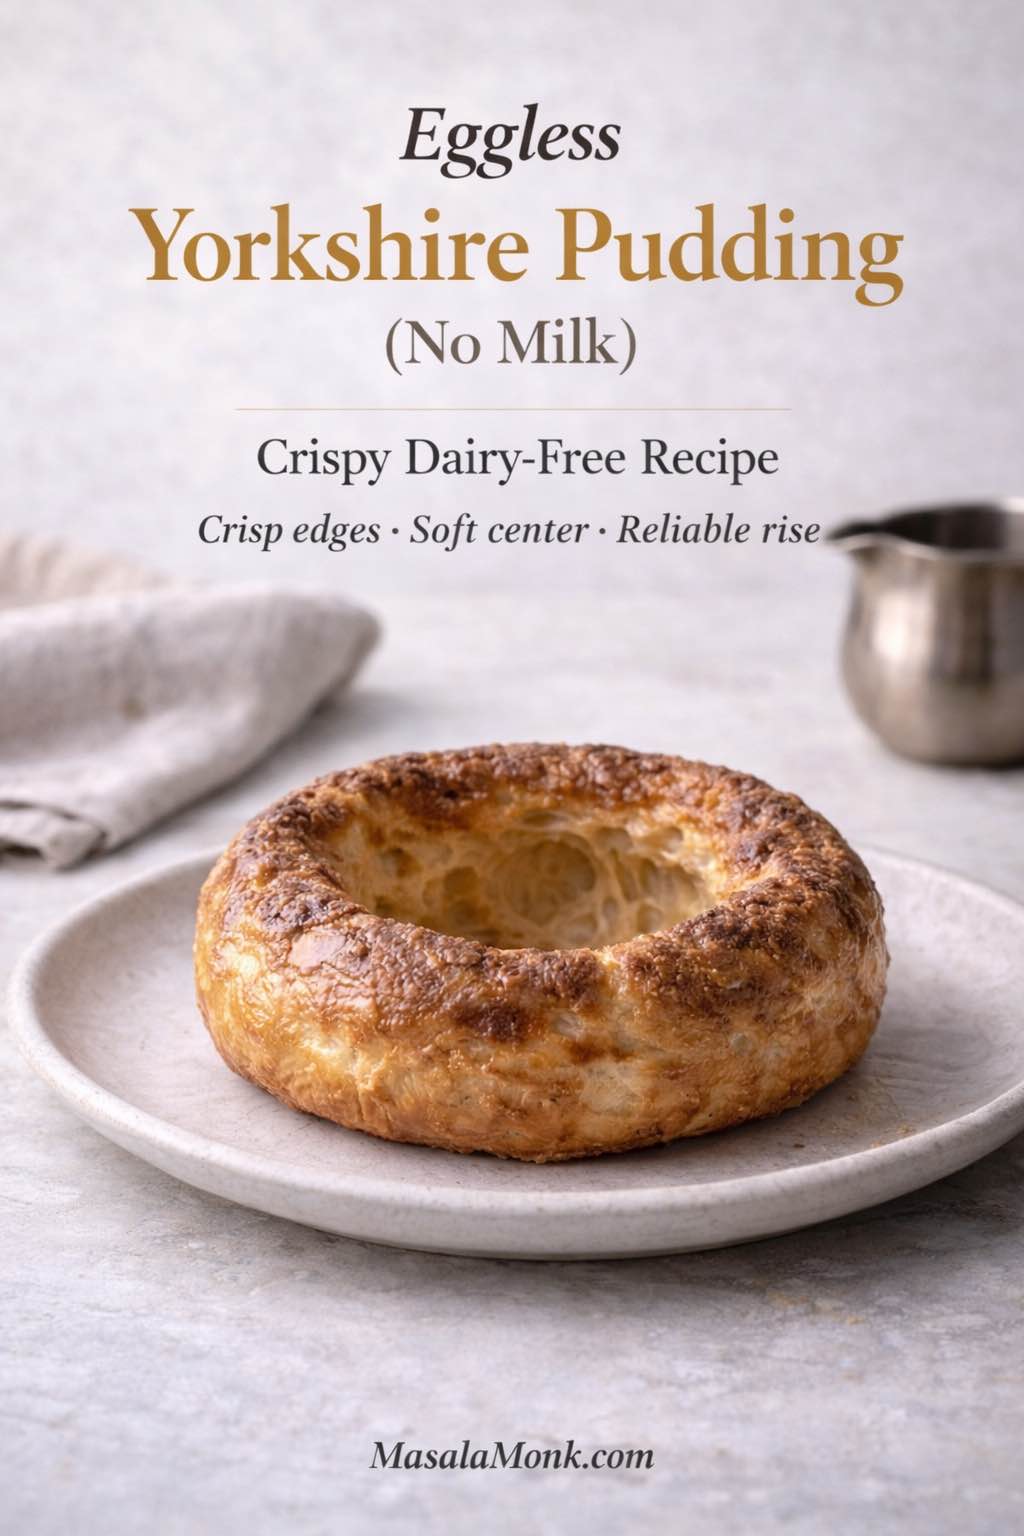
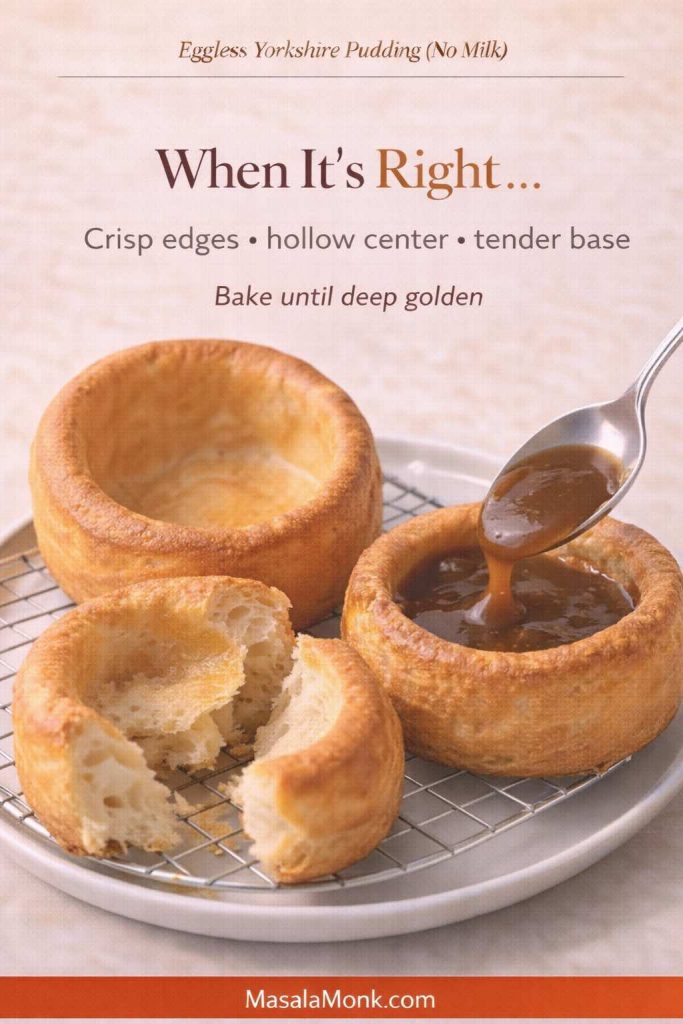
Also Read: Eggless Yorkshire Pudding (No Milk) Recipe


Keto cabbage rolls versus cabbage rolls with rice: the swap that keeps the comfort

Traditional stuffed cabbage rolls with rice are built around a familiar equation: meat + rice + seasonings + cabbage + tomato sauce. Sometimes the rice goes in uncooked, sometimes it’s partially cooked first. Either way, rice is there for bulk and to absorb juices.

However, rice is not the heart of cabbage rolls. The heart is the combination of tender cabbage and savory filling, plus the sauce that soaks into everything. So the strategy here is simple: keep what matters, replace what doesn’t.

To be clear, there’s nothing wrong with classic stuffed cabbage rolls with ground beef and rice if that’s how you cook. They’re a classic stuffed cabbage recipe for a reason. Yet if you want cabbage rolls that are keto compatible, you’re looking for a filling that stays moist, holds together, and doesn’t taste “substitution-y.”

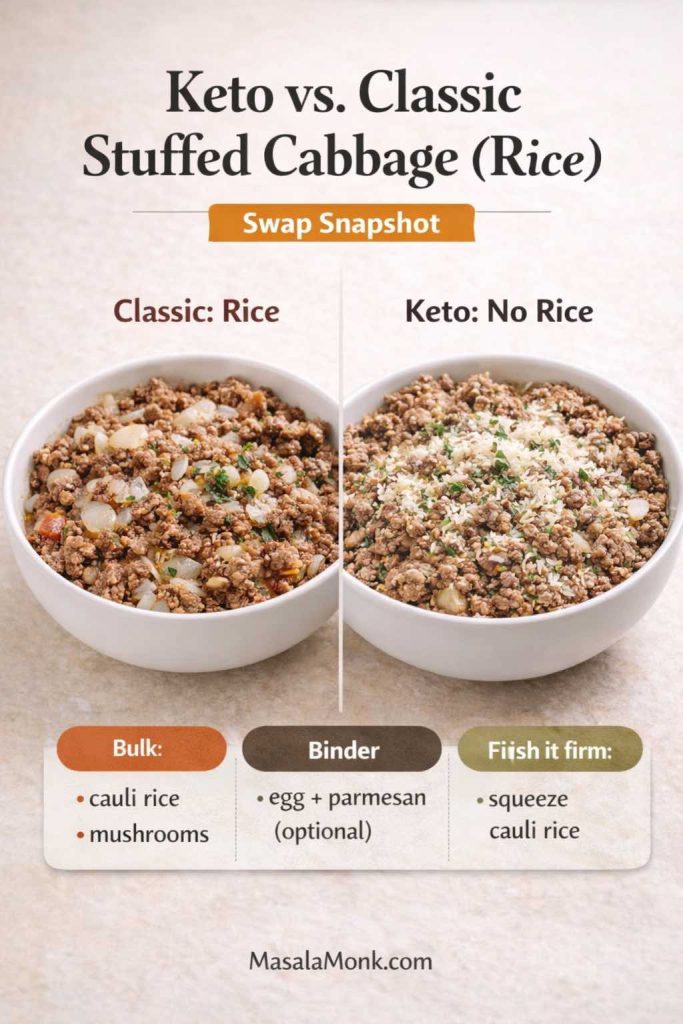
Side-by-side photo of two bowls of stuffed cabbage roll filling. Left bowl labeled “Classic: Rice” shows ground beef mixed with rice, onion, and herbs. Right bowl labeled “Keto: No Rice” shows ground beef with cauliflower rice, mushrooms, and parmesan. Text overlay says “Keto vs. Classic Stuffed Cabbage (Rice) — Swap Snapshot” with tips: bulk (cauli rice, mushrooms), binder (egg + parmesan optional), and keep it firm (squeeze cauliflower rice). MasalaMonk.com footer.
If you grew up on stuffed cabbage rolls with ground beef and rice, this is the exact swap that keeps the comfort: replace rice with squeezed cauliflower rice + finely chopped mushrooms for bulk and moisture, and use egg + parmesan (optional) when you want the filling extra tight. It tastes like the classic version—just lighter, lower carb, and less likely to turn watery in the pan.

What replaces rice in keto-friendly cabbage rolls?

You have a few excellent options, and you can mix them depending on what you like:

  • Cauliflower rice is the closest texture match. It bulks the filling without bringing carbs, and it disappears into the meat once baked.
  • Finely chopped mushrooms bring moisture and umami. They make the filling taste deeper, almost like it simmered longer.
  • Riced broccoli or finely shredded zucchini can work too, although zucchini needs to be squeezed well so it doesn’t water out the filling.
  • A small amount of grated parmesan or other hard cheese adds richness and helps bind.

Rice is mostly there for bulk and to soak up juices, not because it’s the “main flavor.” If you want a clearer sense of how rice compares to other options—and why swapping it out doesn’t change the comfort of the dish—this quick breakdown of quinoa vs rice and lower-carb alternatives

The point isn’t to mimic rice perfectly. Instead, it’s to build a filling that feels right: juicy, savory, substantial, and not crumbly. Once you do that, you’re no longer “making keto cabbage rolls.” You’re simply making cabbage rolls—ones that happen to be low carb.

Also Read: Crock Pot Chicken Breast Recipes: 10 Easy Slow Cooker Dinners (Juicy Every Time)


Ingredients for tender, flavorful keto-friendly cabbage rolls

Before the steps, it helps to understand what each ingredient is doing. That’s what makes these rolls reliable, even if you swap meats or choose a different twist.

The cabbage (and the best cabbage for cabbage rolls)

Most cabbage roll recipes start with green cabbage, and it’s still the most forgiving choice.

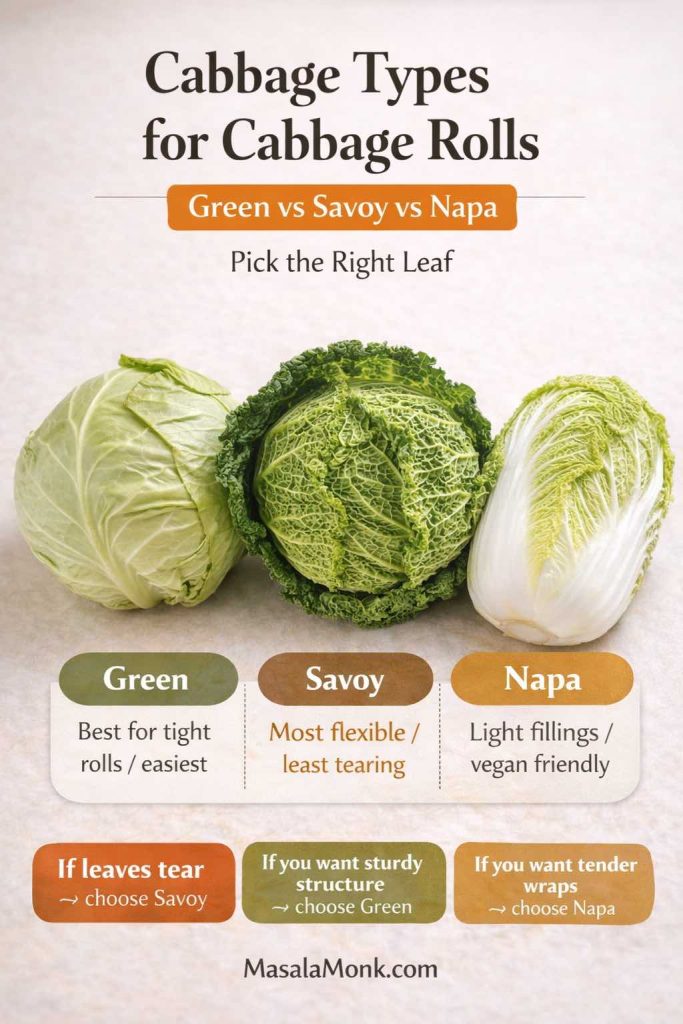
Infographic titled “Cabbage Types for Cabbage Rolls: Green vs Savoy vs Napa.” Three photos show green cabbage, savoy cabbage, and napa cabbage. Labels say: Green—best for tight rolls and easiest; Savoy—most flexible and least tearing; Napa—best for light fillings and vegan friendly. Bottom tips say: if leaves tear choose Savoy; for sturdy structure choose Green; for tender wraps choose Napa. MasalaMonk.com at bottom.
Choosing the right cabbage makes rolling feel easy. Use this quick picker: Green cabbage is the sturdy classic for tight rolls, Savoy is the most flexible (best if your leaves tear), and Napa is tender and great for lighter or vegan fillings. Pick the leaf first—then the rest of the recipe becomes simple.
  • Green cabbage: sturdy leaves, easy to roll, holds up well in oven or slow cooker.
  • Savoy cabbage: softer leaves that bend easily; it’s great if you want less wrestling while rolling.
  • Napa cabbage: thinner and more delicate; it’s especially good for vegan cabbage rolls or lighter fillings, though it can tear if overcooked.

If you’ve ever been frustrated by cabbage leaves splitting, savoy is often the answer. On the other hand, if you want maximum structure for a pan of stuffed cabbage in a thick sauce, green cabbage is the steady classic.

The filling (protein and flavor)

This recipe works with different meats, and each one gives a slightly different result:

  • Ground beef: richest flavor, most forgiving texture, classic “stuffed cabbage” taste.
  • Ground turkey: lighter but still satisfying; it benefits from extra fat and bold seasoning.
  • Ground pork: juicy and savory; paprika and garlic love pork.
  • Beef + pork blend: especially good for a more traditional European feel.
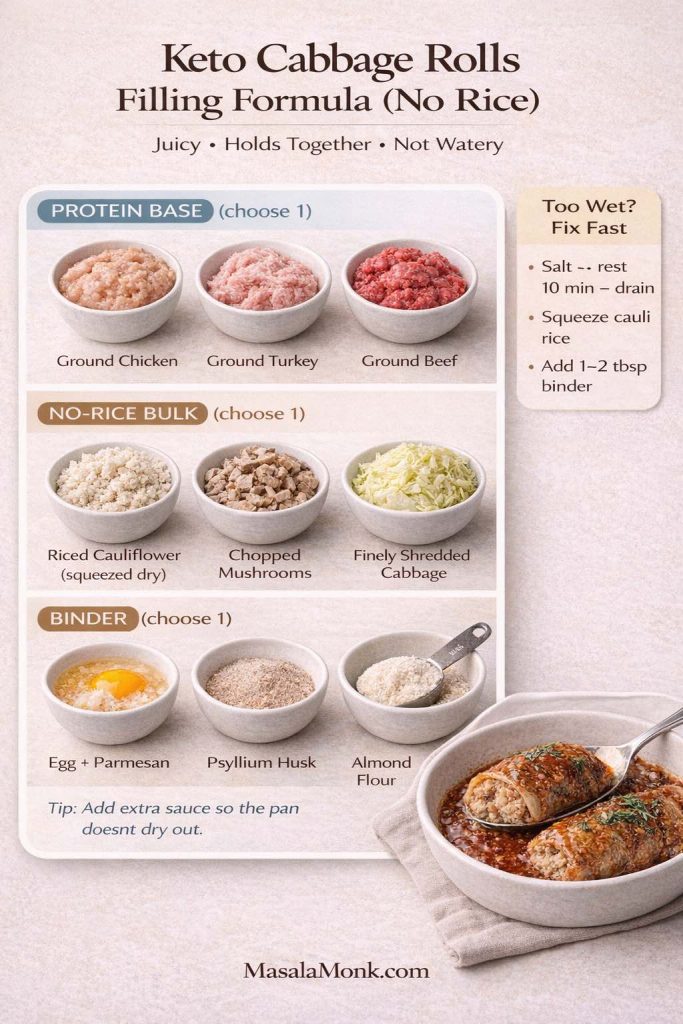
Infographic titled “Keto Cabbage Rolls Filling Formula (No Rice)” showing a mix-and-match chart: choose 1 protein (ground chicken, turkey, or beef), choose 1 no-rice bulk (riced cauliflower squeezed dry, chopped mushrooms, or finely shredded cabbage), and choose 1 binder (egg + parmesan, psyllium husk, or almond flour). Includes “Too wet? Fix fast” tips and a serving photo of cabbage rolls in tomato sauce.
This “no-rice” filling formula makes keto cabbage rolls that stay juicy without turning watery. Pick your protein, pick your bulk (cauli rice, mushrooms, or extra cabbage), then lock it together with the right binder (egg + parmesan, psyllium, or almond flour). Use the quick “too wet” fixes before you roll—so the cabbage wraps bake up neat, tender, and saucy every time.

To keep the filling cohesive without rice, you’ll use:

  • Egg as a binder (optional but helpful)
  • Cauliflower rice and/or chopped mushrooms for bulk
  • Garlic and paprika as the core flavor signature
  • Salt and pepper for structure (salt does more than people think here)

Meat choice changes the whole feel of cabbage rolls. Beef and pork tend to stay richer and more satisfying, while turkey usually needs a little extra fat and bold seasoning to keep the filling juicy. If you’ve noticed fattier meats keep you full longer, there’s a real reason for that—here’s a deeper look at beef and the keto diet.

The sauce (tomato comfort without the sugar reliance)

Many classic cabbage rolls rely on a sweet-leaning tomato sauce. On keto, you can still use tomatoes; the trick is building depth with garlic, paprika, broth, and fat rather than sugar. When done well, the sauce tastes like the cozy “cabbage rolls in tomato soup” style people love—round, mellow, and comforting.

Also Read: Sourdough Starter Recipe: Make, Feed, Store & Fix Your Starter (Beginner Guide)


How to soften cabbage leaves: three practical methods

This is where cabbage rolls either feel easy or feel impossible. The truth is that softening cabbage leaves is straightforward once you choose the method that fits your life.

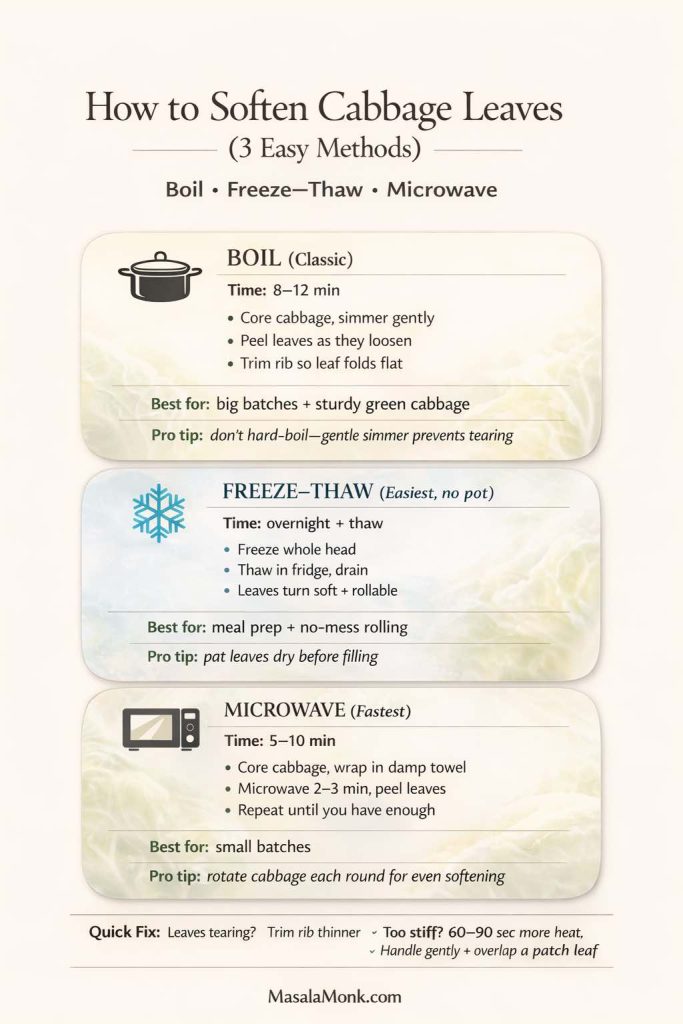
Infographic showing three ways to soften cabbage leaves for cabbage rolls: boiling (8–12 minutes), freeze–thaw method (freeze whole head, thaw to make leaves rollable), and microwave method (wrap in a damp towel and heat in short rounds). Includes quick fixes for torn leaves, stiff leaves, and overly soft leaves.
Soft cabbage leaves = rolls that don’t tear. Use this quick method picker to choose the best way to prep cabbage for cabbage rolls: boil (classic + reliable), freeze–thaw (quietly the easiest), or microwave (fastest for small batches). The “quick fix” line at the bottom saves you when leaves rip or feel stiff—so rolling stays calm and the pan bakes up neat.

Method 1: Boiling (the classic approach)

Bring a large pot of water to a gentle boil. Core the cabbage, then lower the whole head into the water. After a few minutes, the outer leaves will loosen. Use tongs to peel them off as they soften.

Once you have enough leaves, trim the thick rib at the base of each leaf. Rather than cutting it out completely (which can weaken the leaf), slice it down so the leaf lies flatter and rolls more easily.

Boiling is reliable, and it works with any cabbage variety. Still, it requires a big pot and a little patience.

Method 2: Freeze and thaw (quietly the easiest way to make cabbage rolls)

If you want the easiest way to make cabbage rolls without boiling water, freeze the whole head of cabbage overnight, then thaw it in the fridge. The freezing breaks down cell walls, which means the leaves become flexible and rollable once thawed.

This method is also excellent if you’re doing cabbage rolls for freezing later, because you’re already in a meal prep mindset. It feels like a small trick, yet it changes everything: the leaves soften without a pot of water, and you can prep when you have time rather than when you’re hungry.

Method 3: Microwave (the fastest shortcut)

Core the cabbage, wrap it in a damp towel, and microwave for a few minutes. Peel off softened leaves, then repeat until you have enough.

Microwave softening is quick and surprisingly effective. It’s also helpful if you’re making a small batch and don’t want to boil a huge pot of water.

If you’re newer to low carb cooking and want quick clarity on what counts as keto-friendly (and what doesn’t), these keto diet FAQs

Also Read: How to make No-Bake Banana Pudding: No Oven Required Recipe


The base keto cabbage rolls recipe (oven baked)

This is the core method. After you make it once, the twists become easy, because you’re no longer learning how to roll—you’re simply changing the flavor.

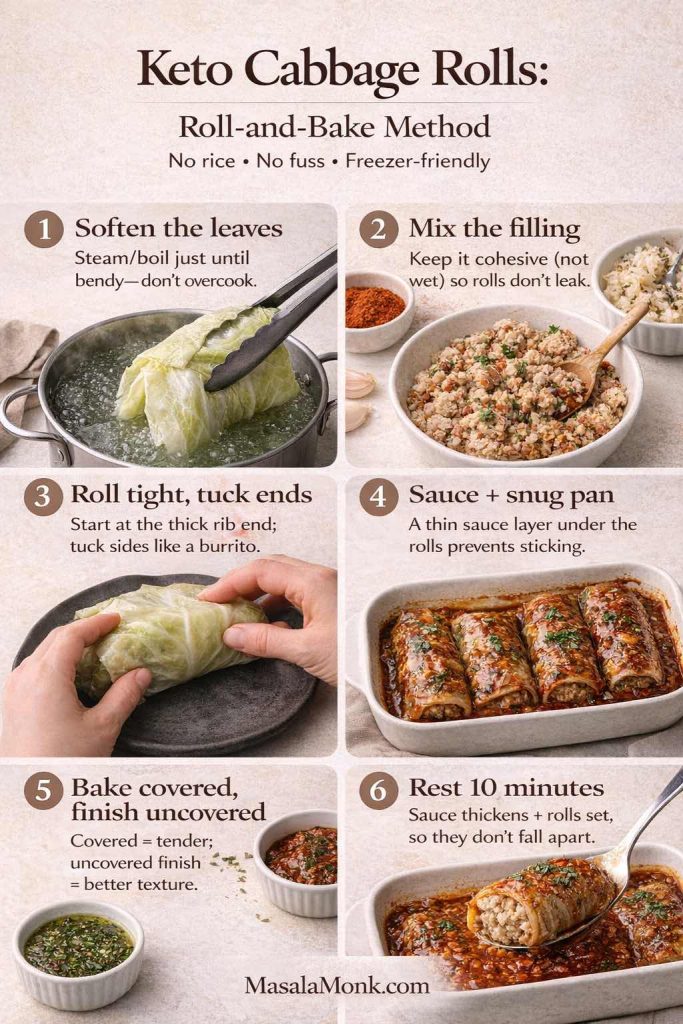
Roll-and-bake keto cabbage rolls, made simple: soften the leaves, mix a tight (not wet) filling, roll and tuck, then bake covered and finish uncovered for the best texture. This quick visual is the “don’t-mess-it-up” guide for sturdy rolls that hold together—especially if you’re meal-prepping or freezing a batch.

Ingredients (base)

For the cabbage rolls

  • 1 large green cabbage (or savoy)
  • 680 g / 1.5 lb ground beef (or turkey or pork)
  • 3–5 cloves garlic, finely minced or grated
  • 2 teaspoons paprika (sweet or smoked)
  • 1 teaspoon salt, plus more as needed
  • 1/2 teaspoon black pepper
  • 1 1/2 cups cauliflower rice (fresh, or thawed and squeezed dry)
  • 1/2 cup finely chopped mushrooms (optional but recommended for juiciness)
  • 1 egg (optional binder)
  • 1/3 cup grated parmesan (optional, helps bind and adds richness)
  • 2 tablespoons chopped parsley (optional)

For the sauce

  • 2 cups crushed tomatoes or tomato passata
  • 1 cup broth (beef or chicken)
  • 1 tablespoon tomato paste (optional, for deeper tomato flavor)
  • 1–2 tablespoons olive oil or butter
  • 1 teaspoon paprika
  • 1/2–1 teaspoon garlic powder (or another clove of garlic, minced)
  • Salt and pepper to taste
  • Optional: a splash of vinegar for balance

Step 1: Prep the cabbage leaves

Use one of the softening methods above. Once the leaves are pliable, trim the thick rib near the base so each leaf rolls without cracking.

Set leaves aside while you make the filling.

Step 2: Make the filling

In a large bowl, combine ground meat, garlic, paprika, salt, pepper, cauliflower rice, mushrooms (if using), egg (if using), and parmesan (if using). Mix gently until combined.

Mixing too aggressively can make the filling dense. Instead, fold everything together until it looks even, then stop.

Step 3: Roll

Lay a cabbage leaf flat. Place a portion of filling near the base. Fold the sides in, then roll up tightly. Place seam-side down in a baking dish.

Continue until you’ve used your leaves and filling. If you have extra small or torn leaves, tuck them around the rolls in the dish—those bits often become the best parts after baking.

Step 4: Make the sauce

In a bowl or measuring jug, whisk crushed tomatoes, broth, tomato paste, olive oil or butter, paprika, garlic, salt, and pepper. Taste it. You want it slightly stronger than you think you need, because it will mellow as it cooks.

Pour sauce over the rolls. Cover the dish tightly with foil.

Step 5: Bake

Bake at 190°C / 375°F until the cabbage is tender and the filling is cooked through. The time will vary based on roll size and meat choice, but 55–75 minutes is common for oven cabbage rolls.

For a thicker sauce, uncover the dish for the last 10–15 minutes to let it reduce slightly.

Food safety, written in a way that doesn’t interrupt dinner

Because these are rolls made with ground meat, safe internal temperature matters. USDA guidance for ground beef food safety recommends cooking ground beef to 160°F / 71°C. For ground turkey and other poultry, USDA’s turkey safe cooking guidance points to 165°F / 74°C. A thermometer makes this effortless, and it removes the guesswork.

If you’re cooking once and reheating during the week, USDA’s notes on leftovers and food safety reinforce reheating leftovers to 165°F / 74°C. That’s especially useful for soup and casserole versions, where it’s easy to assume the middle is hot when it isn’t.

Also Read: Chicken Adobo — Step-by-Step Recipe — Classic Filipino Adobong Manok


The sauce that tastes like “tomato soup” cabbage rolls—without leaning on sugar

Some cabbage roll casseroles and soups are famous for tasting like tomato soup, even when they’re not made with canned soup. That flavor comes from a few details working together: enough tomato concentration, a savory broth backbone, paprika’s gentle sweetness, and fat to round out acidity.

If your sauce tastes too sharp, a small splash of vinegar can actually help, because it adds a clean acidity that makes tomato taste more “complete.” Meanwhile, finishing with olive oil or a little butter can soften everything so the sauce tastes rich rather than harsh.

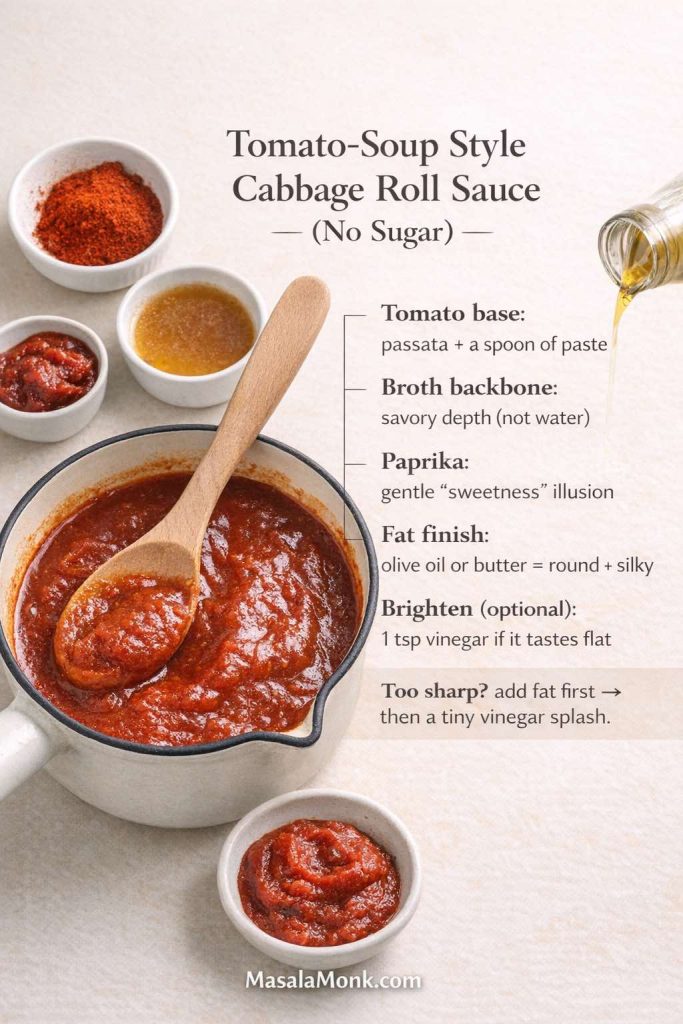
Tomato-soup style cabbage roll sauce in a small pot on a cream background with paprika, tomato paste, broth, and olive oil nearby. Text overlay lists the formula: passata + paste, broth for savory depth, paprika for “sweetness,” finish with olive oil or butter, and optional vinegar to brighten if the sauce tastes flat.
Want that cozy “tomato soup” cabbage-roll sauce without adding sugar? This visual nails the formula: concentrate the tomato base (passata + a spoon of paste), use broth for depth, lean on paprika for gentle warmth, then finish with olive oil or butter to round the acidity. If it tastes sharp or flat, add fat first—then a tiny vinegar splash to brighten.

If you want a credible external reference on why olive oil is often considered a strong everyday fat choice, Harvard Health’s article on extra-virgin olive oil offers a balanced take. For a broader “what fats matter most” reference, Harvard’s Nutrition Source overview of types of dietary fats is a solid citation that avoids fad language while still supporting a keto-friendly approach that focuses on quality.

When you’re serving cabbage rolls, something crunchy on the side is always welcome. A quick slaw is a natural pairing, and if you want a creamy base without fuss, MasalaMonk’s eggless mayonnaise makes a useful recipe – if you want want a simple dressing foundation and if you are not avoiding eggs, then have a look at Mayo Recipe: 15+ Homemade Mayonnaise Variations.


Five savory garlic and paprika twists (same method, different dinner)

Now for the fun part. Each of these twists starts from the base keto-friendly cabbage rolls recipe above. In other words, you’re not learning five different recipes. You’re choosing one flavor direction, then making small changes to the filling and sauce.

Because the base is already bold, the twists don’t need many extra ingredients. The goal is to keep the dish cohesive: cabbage, savory filling, tomato-based sauce, and one clear flavor identity.

Twist 1: Smoky garlic and paprika (deep, cozy, and bold)

If you like cabbage rolls that taste almost grilled—dark, savory, and rich—this is the direction.

Best meat choice: ground beef or ground pork
Add to the filling:

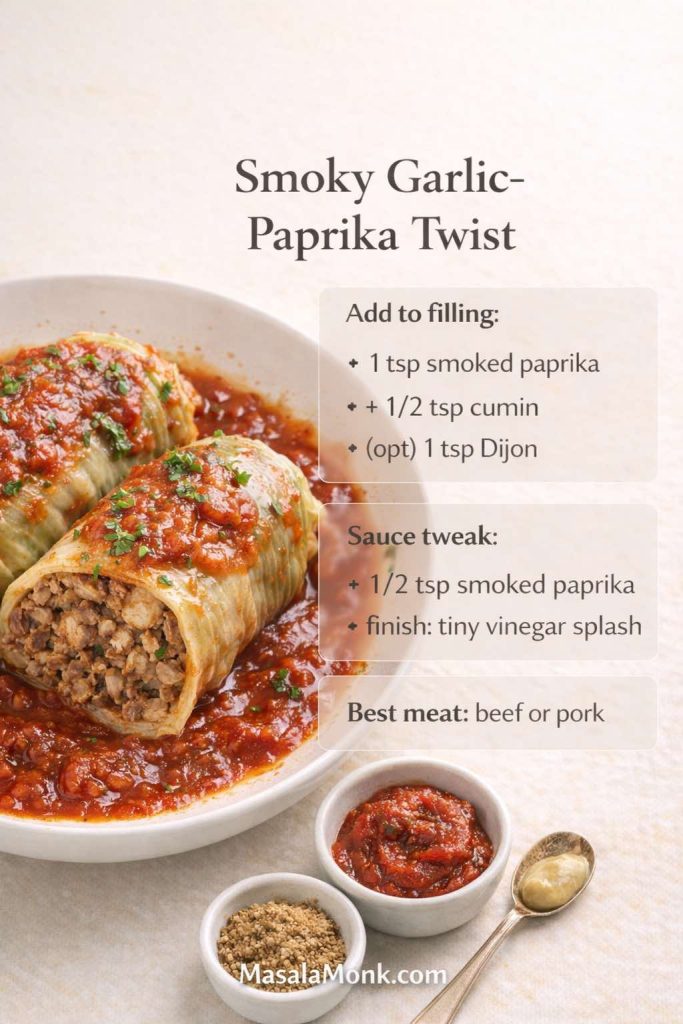
  • 1 teaspoon smoked paprika (in addition to the base paprika)
  • 1/2 teaspoon cumin
  • Optional: 1 teaspoon mustard (Dijon works well)
Smoky garlic–paprika keto cabbage rolls in rich tomato sauce, shown as two rolls on a plate (one cut open). Text overlay lists the twist: add 1 tsp smoked paprika, 1/2 tsp cumin, optional 1 tsp Dijon to the filling; sauce tweak adds 1/2 tsp smoked paprika and a small vinegar splash; best meat: beef or pork. MasalaMonk.com footer.
Twist #1 (Smoky): Want cabbage rolls that taste almost “grilled”? Add smoked paprika + a touch of cumin to the filling (optional Dijon for depth), then finish the sauce with an extra pinch of smoked paprika + a tiny vinegar splash. It keeps the rolls bold and cozy—and they taste even better on day two.

Adjust the sauce:

  • Add another 1/2 teaspoon smoked paprika
  • Finish with a small splash of vinegar

Smoked paprika adds a “slow-cooked” illusion. Meanwhile, vinegar keeps the sauce from feeling heavy. This twist is particularly good if you’re someone who likes robust flavors and wants a dish that still tastes exciting on day three.

If you’re in the mood for more hearty, high-protein keto dinners that reheat well, you’ll probably like these beef recipes for a weight loss keto plan.

Twist 2: Tangy sauerkraut garlic paprika rolls (a nod to Polish comfort)

Sauerkraut turns cabbage rolls into a different kind of comfort—bright, tangy, and deeply savory. This twist is inspired by the flavors people love in cabbage rolls with sauerkraut, stuffed cabbage and sauerkraut bakes, and many traditional Polish-style cabbage rolls, without trying to claim one strict “authentic” blueprint.

Best meat choice: beef + pork blend, or pork alone
Add to the baking dish:

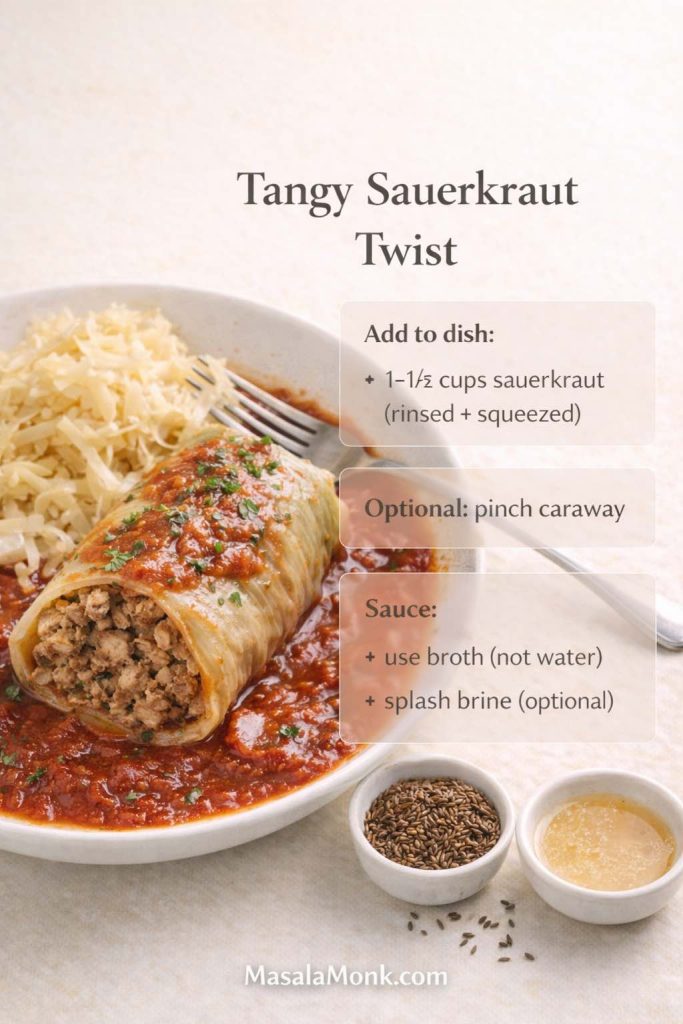
  • 1 to 1 1/2 cups sauerkraut, rinsed and squeezed dry
  • Optional: a pinch of caraway seed
Tangy sauerkraut keto cabbage rolls in rich tomato sauce on a plate, shown with a side of sauerkraut plus small bowls of caraway seeds and sauerkraut brine. Text overlay reads “Tangy Sauerkraut Twist” with notes: add 1–1½ cups rinsed, squeezed sauerkraut; optional pinch of caraway; use broth (not water) and add a splash of brine.
Want the Polish-comfort vibe without changing the base method? This tangy sauerkraut twist shows exactly what to add: 1–1½ cups rinsed + squeezed sauerkraut, an optional pinch of caraway, and a broth-based sauce with a small brine splash for brighter, deeper flavor—without turning the pan watery.

Adjust the sauce:

  • Use broth rather than water so the tang stays balanced
  • Add a splash of sauerkraut brine for more bite, if you like

Sauerkraut makes the whole dish taste brighter. It’s also a smart trick if someone in your house thinks cabbage rolls can taste “one-note.” This version is anything but.

Twist 3: Sour cabbage leaves and “sarma-inspired” flavor (bright, savory, addictive)

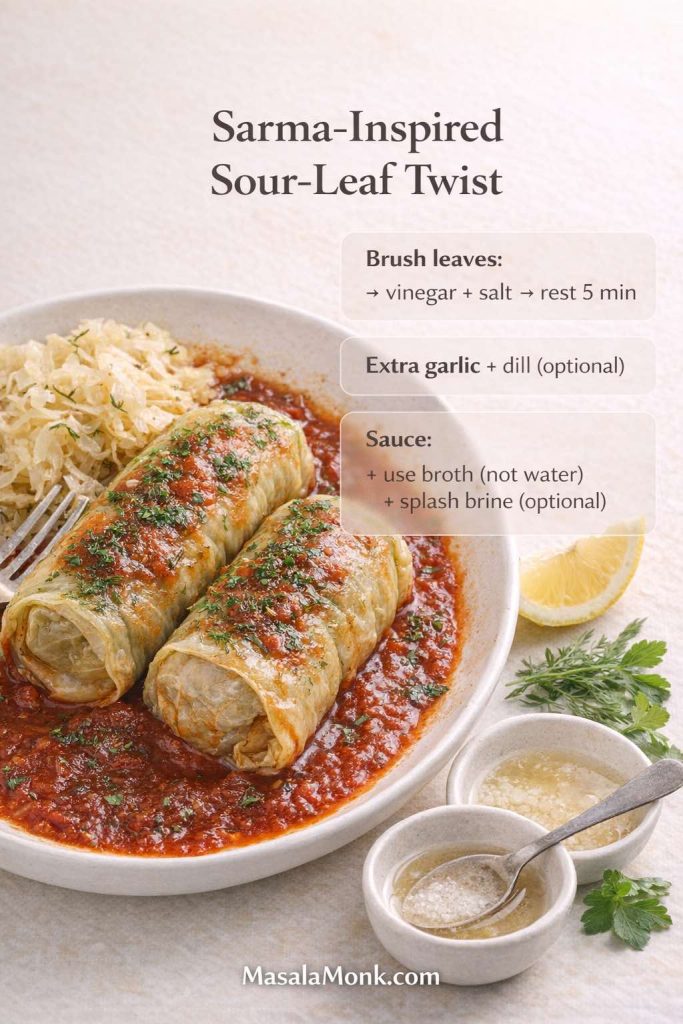
Sarma rolls often use sour cabbage leaves, which brings a tang that feels uniquely satisfying with meat. If you can find sour cabbage leaves, use them. If not, you can mimic the effect by brushing softened cabbage leaves with a little vinegar and salt, then letting them rest briefly before filling.

Best meat choice: pork or turkey
Add to the filling:

  • Extra garlic (one more clove)
  • Optional: dried dill, mint, or parsley
Sarma-inspired keto cabbage rolls on a light plate in rich tomato sauce, topped with herbs, with a lemon wedge and small bowls of vinegar and salt beside them. Text overlay highlights the “sour-leaf” trick: brush cabbage leaves with vinegar + salt and rest briefly, plus optional extra garlic and dill.
Sarma-inspired sour-leaf twist: If you can’t find sour cabbage leaves, this is the clean workaround—brush softened leaves with vinegar + salt, rest 5 minutes, then roll as usual. The result tastes brighter and more addictive, without changing the base method.

Adjust the sauce:

  • Keep the sauce slightly looser; it will reduce as it bakes
  • Finish with a small squeeze of lemon if you want a brighter edge

The result is tangy without being sharp. It also feels lighter than a pure beef version, which makes it a strong option if you want keto cabbage rolls that don’t sit too heavy.

Twist 4: Spicy garlic paprika rolls (for heat lovers)

If your goal is to make cabbage rolls that feel energizing rather than sleepy, add heat. Spicy cabbage rolls can still be comforting; they just also happen to be exciting.

Best meat choice: beef or turkey
Add to the filling:

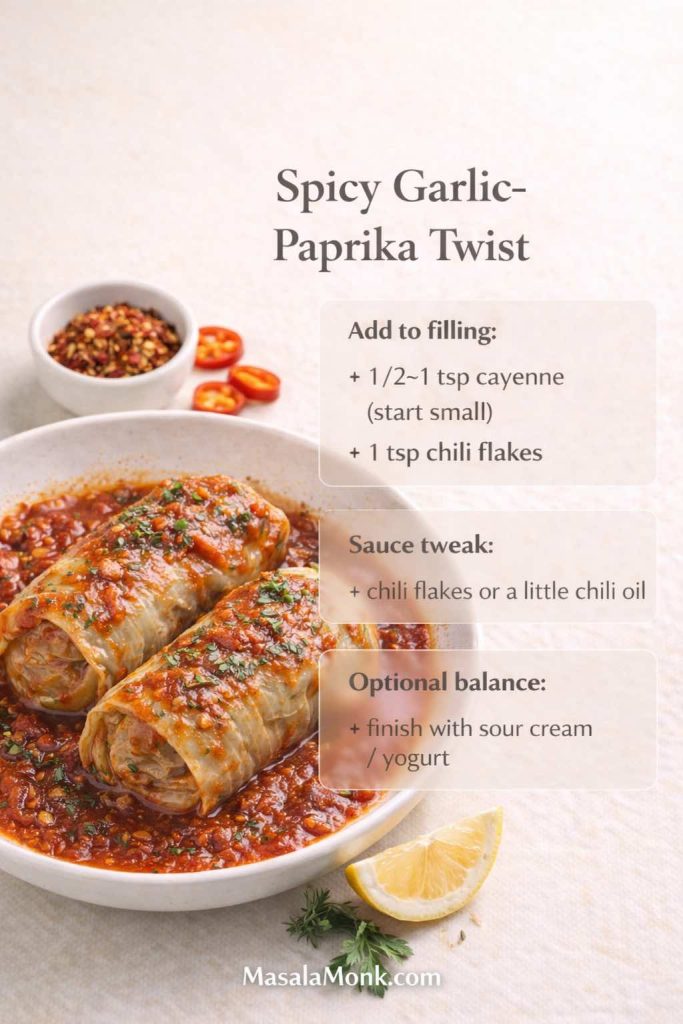
  • 1/2 to 1 teaspoon cayenne (start small)
  • 1 teaspoon chili flakes
“Two keto cabbage rolls in rich tomato sauce on a light background with chili flakes and parsley; text overlay reads ‘Spicy Garlic–Paprika Twist’ with tips: add 1/2–1 tsp cayenne (start small) + 1 tsp chili flakes, sauce tweak with chili flakes or chili oil, and optional balance with sour cream/yogurt; MasalaMonk.com footer.”
Spicy Garlic–Paprika Twist: Turn the base keto cabbage rolls into a heat-lover’s version by adding cayenne + chili flakes to the filling, then finishing the sauce with a little chili oil if you want extra punch. The “optional balance” tip (a spoon of sour cream/yogurt) is the fastest way to keep the sauce tasting rich—not harsh—while the rolls stay bold and satisfying.

Adjust the sauce:

  • Add chili flakes or a little chili oil
  • Keep garlic forward

This variation is also useful when you’re eating low carb and you miss “snacky” flavors. Heat and spice create the kind of satisfaction that helps you forget you’re even thinking about carbs.

Twist 5: Mediterranean herb garlic paprika rolls (fresh, fragrant, still cozy)

This twist leans into herbs rather than tang or smoke. It’s still tomato-based and still boldly seasoned, but the finish feels brighter and more fragrant.

Best meat choice: ground turkey (or lean beef)
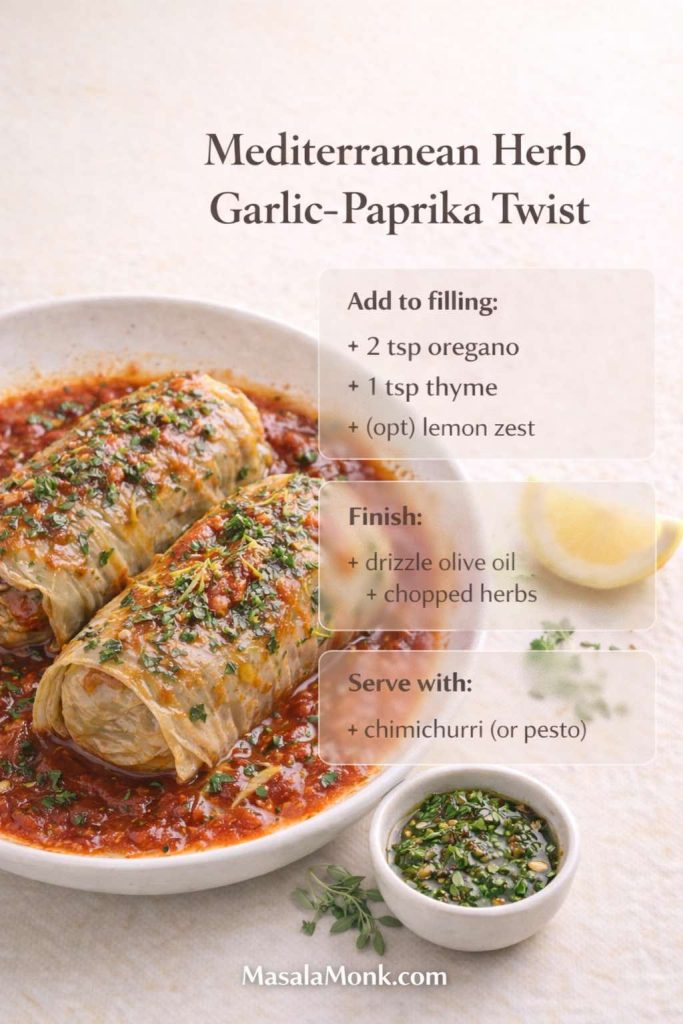
Add to the filling:

  • 2 teaspoons oregano
  • 1 teaspoon thyme
  • Optional: lemon zest
Mediterranean herb garlic-paprika keto cabbage rolls in rich tomato sauce, topped with chopped herbs and olive oil. Text overlay lists: add oregano, thyme, optional lemon zest; finish with olive oil and herbs; serve with chimichurri or pesto. MasalaMonk.com footer.
Mediterranean Herb Twist (fresh, fragrant, still cozy): Add oregano + thyme (and optional lemon zest) to the base garlic-paprika filling, then finish the baked rolls with a drizzle of olive oil + chopped herbs. The little bowl of chimichurri (or pesto) is the “dinner-party” shortcut—bright, garlicky, and perfect with tomato sauce. (Save/Pin this twist so you can swap flavors without relearning the recipe.)

Adjust the sauce:

  • Finish with a drizzle of olive oil and chopped herbs

For a punchy finishing sauce that fits perfectly here, a spoon of chimichurri on the side is almost unfairly good—garlic, herbs, acidity, and brightness, all in one. It’s especially helpful if you want the rolls to feel a bit more “dinner party” without changing the main recipe.

Herb-forward sauces are especially good with this version. If you like that kind of bright, garlicky finish, these pesto recipes are a great match alongside cabbage rolls.

Also Read: Sourdough Recipe: 10 Easy Bread Bakes (Loaves, Rolls & Bagels)


Cabbage roll soup and unstuffed cabbage roll soup (same flavors, easier weeknights)

Some nights, rolling feels like therapy. Other nights, it feels like too much. That’s where the soup version steps in.

Unstuffed cabbage roll soup—sometimes called unrolled cabbage soup, stuffed cabbage roll soup, or simply cabbage roll soup—is essentially the same recipe expressed differently. You still get garlic, paprika, tomato, tender cabbage, and savory meat. You’re just skipping the wrapping.

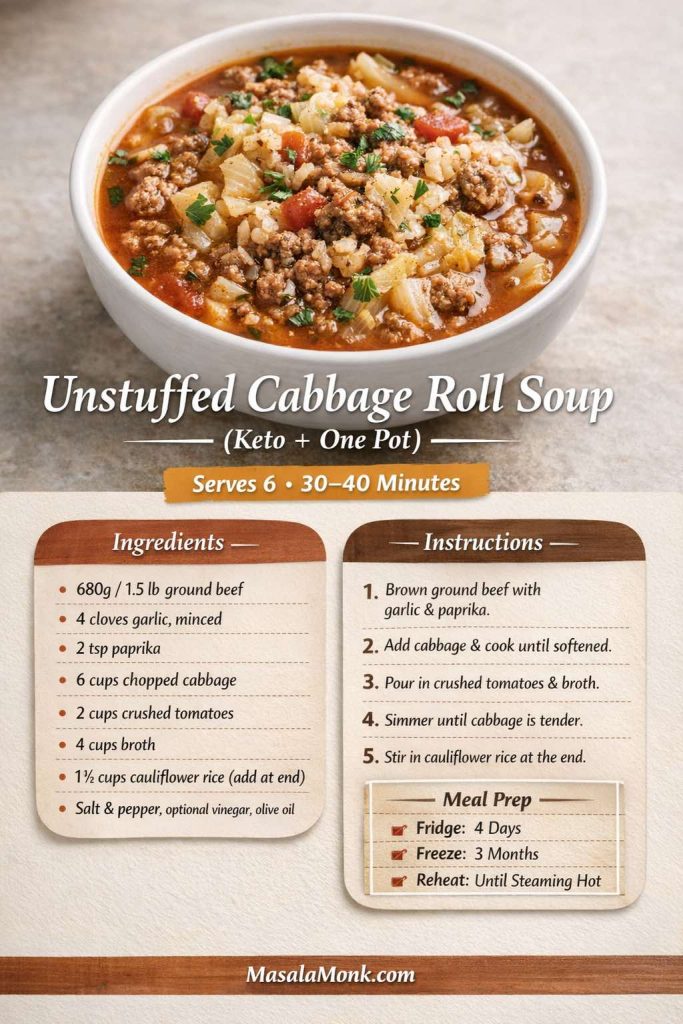
A bowl of unstuffed cabbage roll soup with ground beef, tender cabbage, tomatoes, and herbs in a tomato broth. Text overlay reads “Unstuffed Cabbage Roll Soup (Keto + One Pot)” plus a quick recipe card showing ingredients, 5 steps (brown beef with garlic and paprika, add cabbage, add tomatoes and broth, simmer, stir in cauliflower rice at end), and meal prep notes (fridge 4 days, freeze 3 months).
Want cabbage roll comfort without rolling? This unstuffed cabbage roll soup is the one-pot shortcut: ground beef + cabbage + tomato broth + garlic + paprika, finished with cauliflower rice at the end so it stays pleasantly textured. Save this card for busy nights—then scroll for baked rolls, casserole, skillet, and slow cooker versions in the same flavor family.

Unstuffed cabbage roll soup (keto-friendly method)

What you’ll do:

  1. Brown ground beef, turkey, or pork in a pot with garlic, paprika, salt, and pepper.
  2. Add chopped cabbage and stir until it begins to soften.
  3. Pour in crushed tomatoes and broth.
  4. Simmer until the cabbage is tender.
  5. Stir in cauliflower rice near the end, so it stays pleasantly textured rather than mushy.

Because this is a soup roll in spirit—cabbage roll flavors in a bowl—it works beautifully as a high-protein meal prep option. It also freezes well.

If you like cooking once and coasting for a few days, you might also enjoy these crock pot chicken breast recipes.

When you store soup for the week, safe reheating matters. FoodSafety.gov’s chart of safe minimum internal temperatures supports the common recommendation to reheat leftovers to 165°F / 74°C, which is especially relevant for meat-based soups.

Also Read: Peanut Butter Fudge: Recipes & Guide (8 Methods + Easy Variations)


Cabbage roll casserole: deconstructed, layered, and effortless

Cabbage roll casserole is the lazy cousin of stuffed cabbage rolls, and it’s a gift. It gives you the same taste profile without the rolling step. That’s why you’ll see it described as unrolled cabbage casserole, deconstructed cabbage roll casserole, or even “cabbage roll in a pan.”

This is also the format that best captures cravings for “easy cabbage casserole recipes” and “cabbage casserole with hamburger meat,” while staying firmly in keto-friendly territory.

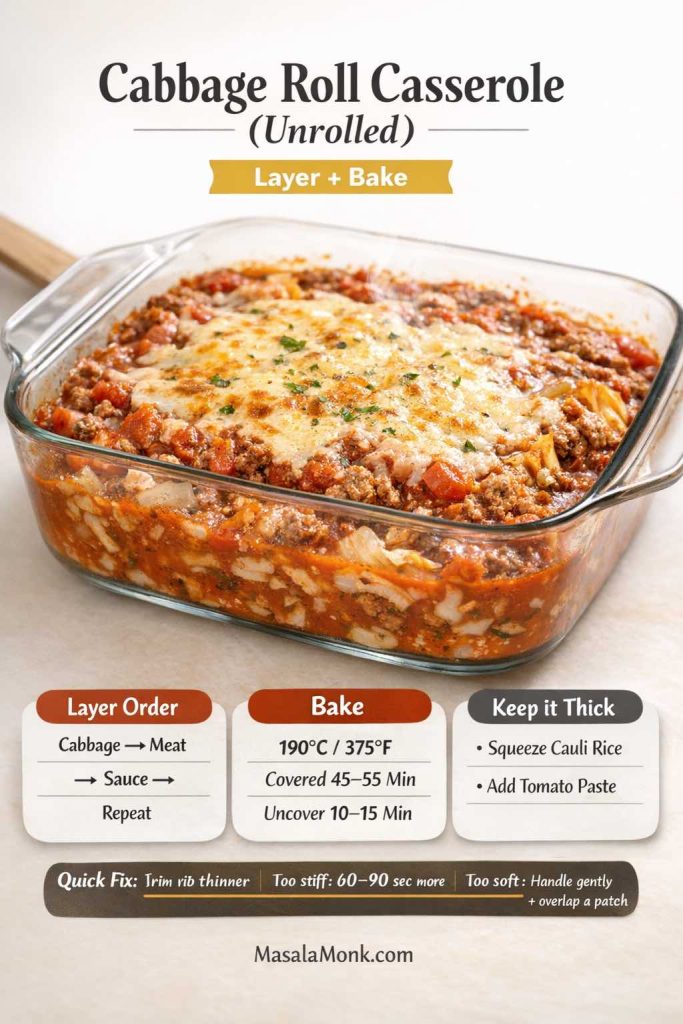
Photoreal cabbage roll casserole in a glass baking dish with saucy ground beef, tomatoes, and tender cabbage, topped with melted golden cheese. Text overlay reads “Cabbage Roll Casserole (Unrolled) — Layer + Bake” and shows quick cards: layer order (cabbage → meat → sauce → repeat), bake at 190°C/375°F covered 45–55 minutes then uncover 10–15 minutes, and “keep it thick” tips (squeeze cauliflower rice, add tomato paste). MasalaMonk.com footer.
If you want stuffed cabbage flavor without rolling, this cabbage roll casserole (unrolled) is the lazy-night win: layer cabbage + meat filling + sauce, bake covered until tender, then uncover briefly to thicken. The “keep it thick” tips prevent the #1 casserole problem (watery sauce), so you get a rich, spoonable result that reheats beautifully.

Keto cabbage roll casserole method (unrolled)

  1. Brown your ground meat with garlic, paprika, salt, and pepper.
  2. Stir in cauliflower rice and mushrooms (if using).
  3. In a baking dish, layer chopped cabbage and the meat mixture.
  4. Pour sauce over the top.
  5. Cover and bake until the cabbage is tender.
  6. Uncover near the end so the sauce thickens.

If you love a richer casserole, you can add cheese on top for a “cabbage rolls with cheese” feel—still very much in the spirit of cheese stuffed cabbage rolls, just without the fiddly wrapping.

Also Read: Best Vermouth for a Negroni Cocktail Drink Recipe


Skillet cabbage rolls and “cabbage roll in a bowl” (fast comfort)

Sometimes you want “stuffed cabbage” flavor in under 30 minutes. Skillet cabbage rolls—also described as cabbage roll in a skillet, cabbage roll skillet recipe, or cabbage roll in a bowl—deliver exactly that.

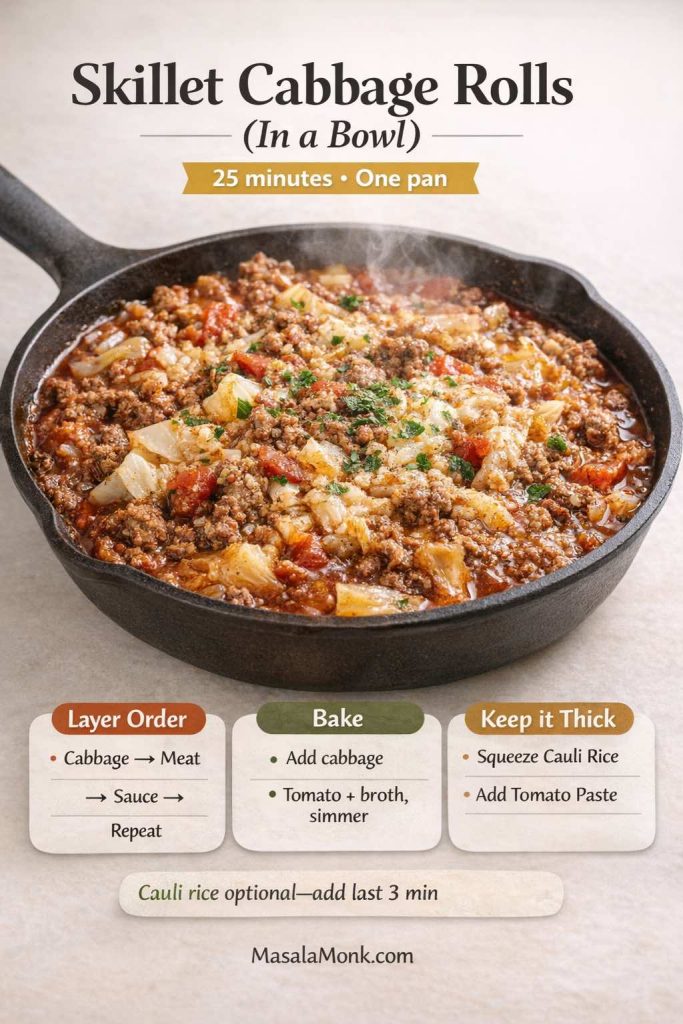
Skillet filled with “cabbage roll in a bowl” mixture: ground beef, tender cabbage, tomatoes, and herbs in a saucy garlic-paprika tomato base. Text overlay reads “Skillet Cabbage Rolls (In a Bowl) — 25 minutes • One pan” and includes quick steps: brown beef with garlic and paprika, add cabbage, add tomato + broth and simmer, finish with olive oil/sour cream/parmesan. Note says cauliflower rice is optional—add in the last 3 minutes. MasalaMonk.com footer.
When you want stuffed cabbage flavor fast, this skillet cabbage roll in a bowl hits the same comfort notes in one pan—garlic, paprika, tomato, tender cabbage, and savory beef—without rolling or baking. Keep this visual handy for weeknights, then use the rest of the post to choose your “format”: baked rolls, soup, casserole, slow cooker, and freezer-friendly prep.

The method is simple: brown meat with garlic and paprika, add shredded cabbage, pour in tomato and broth, then simmer until everything turns saucy and tender. You can finish with olive oil, sour cream, or parmesan, depending on your mood.

This is also one of the most forgiving versions if you’re using lean meat. Because the dish is saucy, you can adjust richness right at the end.

Also Read: Keto Flour: Guide to Low-Carb Flours That Bakes Like the Real Thing


Slow cooker cabbage rolls and crock pot cabbage roll casserole

Cabbage rolls in a slow cooker feel like a different kind of comfort. The cabbage becomes extra tender, the sauce sinks deeper into the filling, and the whole dish tastes like it spent the day becoming itself.

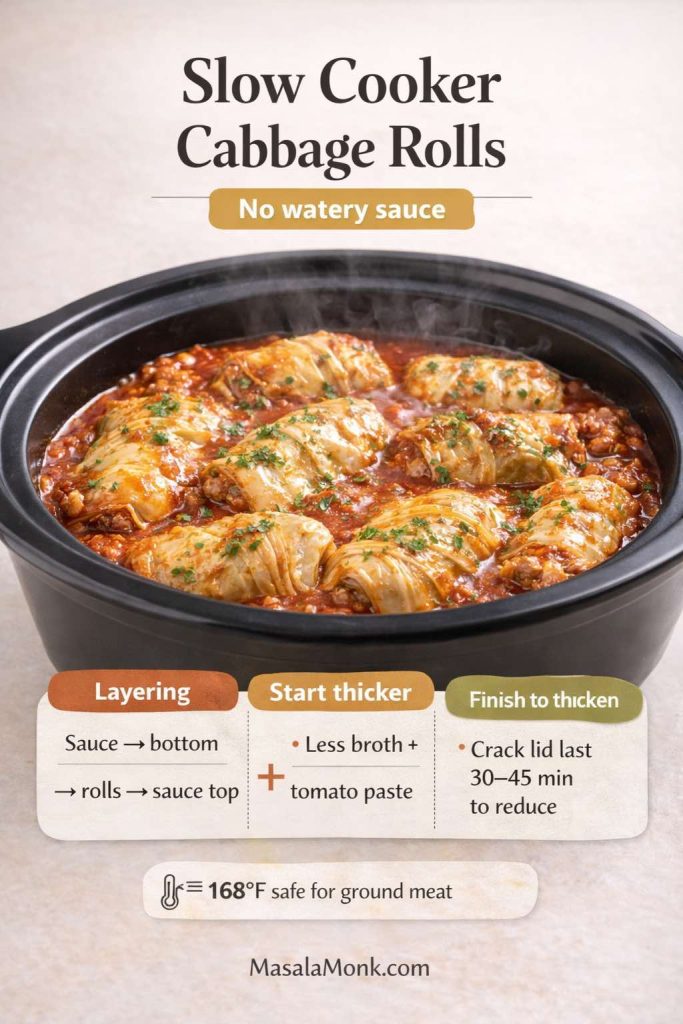
If you’re making cabbage roll crock pot style, the main difference is liquid management. Slow cookers trap moisture, so sauces tend to thin out unless they start thicker.

Photoreal slow cooker filled with cabbage rolls in rich tomato sauce, sprinkled with herbs, with steam rising. Text overlay reads “Slow Cooker Cabbage Rolls — No watery sauce” and shows three tip boxes: layering (sauce bottom → rolls → sauce top), start thicker (less broth + tomato paste), and finish to thicken (crack lid last 30–45 min to reduce). A thermometer icon notes safe internal temperature for ground meat. MasalaMonk.com footer.
Slow cooker cabbage rolls are effortless—until the sauce turns thin. Use this quick guide to keep crock pot stuffed cabbage rich and spoonable: layer sauce on the bottom and top, start with a thicker tomato base, and crack the lid near the end to reduce. It’s the easiest way to get slow-cooked tenderness without the “watery soup” problem.

Slow cooker stuffed cabbage rolls (keto-friendly)

  • Make and roll the cabbage rolls as usual.
  • Layer sauce on the bottom, then rolls, then more sauce.
  • Cook on low until the cabbage is very tender and the filling is safely cooked through.

Crock pot cabbage roll casserole (unstuffed)

  • Layer chopped cabbage, browned filling, and sauce in the slow cooker.
  • Cook on low until tender.
  • If the sauce is too thin, crack the lid for the final stretch or stir in a small amount of tomato paste near the end.

Again, safe internal temperature guidance matters, especially when cooking ground meat. USDA’s references for ground beef and poultry/ground turkey are good citations to keep the recipe grounded.

Also Read: Whole Chicken in Crock Pot Recipe (Slow Cooker “Roast” Chicken with Veggies)


Freezing cabbage rolls, freezing cabbage for cabbage rolls, and meal prep that actually works

Cabbage rolls are one of the best “cook once, eat twice” dinners. They’re also one of the best “cook once, eat six times” dinners if you freeze them.

That matters, because meal prep is often where a low carb diet either becomes easy or becomes exhausting. When you have a freezer-friendly high-protein option that you genuinely enjoy, it’s much easier to stay consistent.

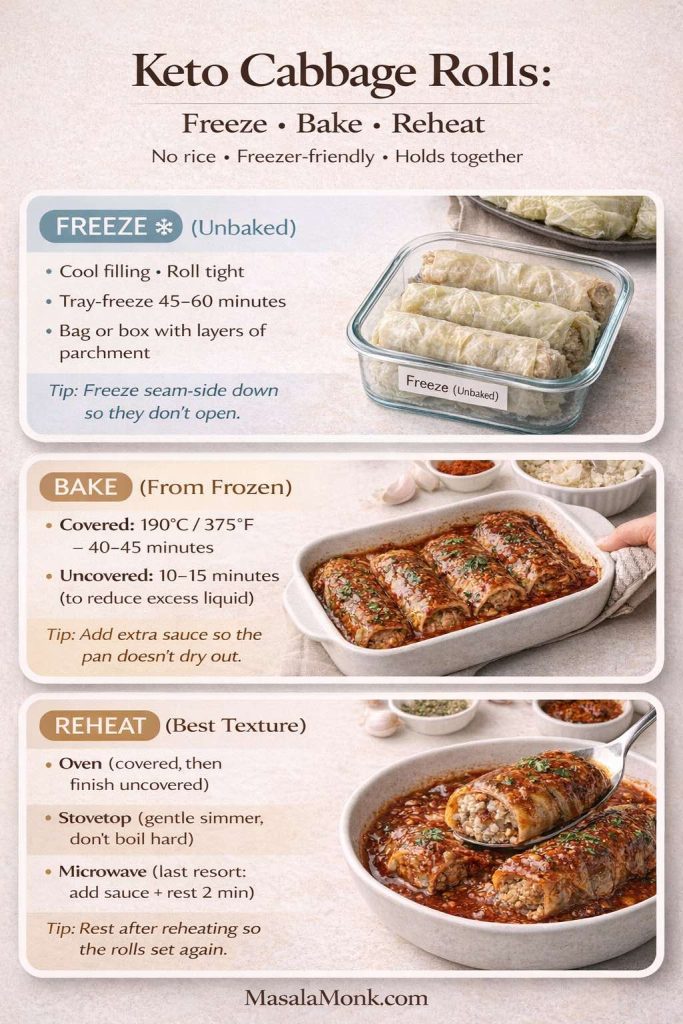
Infographic titled “Keto Cabbage Rolls: Freeze • Bake • Reheat” showing three steps: freeze unbaked rolls (cool filling, roll tight, tray-freeze 45–60 minutes, layer with parchment), bake from frozen (covered at 190°C/375°F for 40–45 minutes then uncover 10–15), and reheat options (oven, stovetop simmer, microwave last resort). Photos show unbaked rolls in a container and baked rolls in sauce.
Freezer-friendly keto cabbage rolls made easy: freeze unbaked, bake from frozen, then reheat without drying out. Use this quick chart to get the timing right, keep the rolls intact, and make meal-prep weeks feel effortless—no rice needed, just big comfort. (Perfect to save/print and great for batch cooking.)
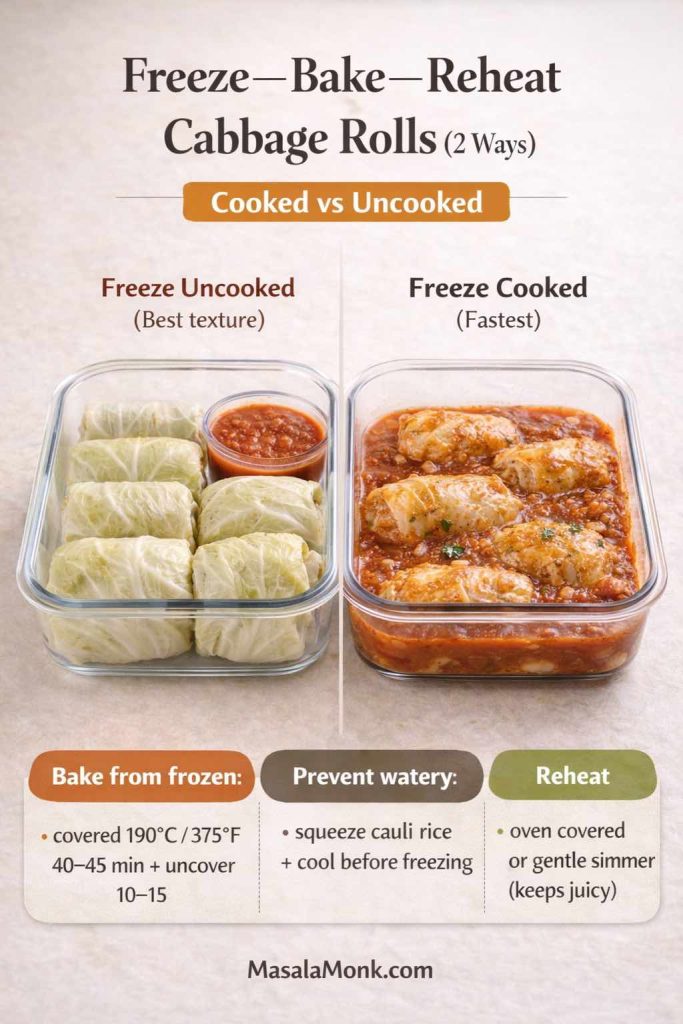
Infographic photo showing two glass meal-prep containers of cabbage rolls: left is “Freeze Uncooked (Best texture)” with raw cabbage rolls and a cup of sauce; right is “Freeze Cooked (Fastest)” with baked cabbage rolls in tomato sauce. Text overlay includes: “Bake from frozen: covered 190°C/375°F 40–45 min + uncover 10–15,” “Prevent watery: squeeze cauliflower rice + cool before freezing,” and “Reheat: oven covered or gentle simmer (keeps juicy).” MasalaMonk.com at bottom.
Freezing cabbage rolls is the difference between “I’ll cook later” and actually having dinner ready. This quick visual shows the two best options: freeze uncooked for the best texture or freeze cooked for the fastest reheat, plus the exact bake-from-frozen timing. The “prevent watery” note is the big one—squeeze cauliflower rice and cool before freezing so your rolls stay firm, saucy, and satisfying.

Freeze the cabbage (a simple prep trick)

If you haven’t tried it, freezing cabbage for cabbage rolls is one of the easiest prep hacks available. Freeze the whole head, thaw it, and the leaves become pliable. You can prep leaves on a calm day, then roll and cook later when you’re busy.

Freezing stuffed cabbage rolls (uncooked)

Freezing uncooked rolls often gives the best texture because everything cooks fresh later.

  • Assemble the rolls in a freezer-safe dish.
  • Pour sauce over.
  • Wrap tightly.
  • Freeze.

When you bake, you can cook from frozen, simply allowing extra time. Keep the dish covered so the sauce doesn’t evaporate too quickly before the center heats.

Freezing cabbage rolls (cooked)

Freezing cooked cabbage rolls is the convenience route:

  • Let rolls cool fully.
  • Portion with sauce.
  • Freeze in containers.

To reheat, warm gently so the filling stays juicy rather than drying out. USDA’s guidance on leftovers and food safety and FoodSafety.gov’s temperature chart both support reheating leftovers to 165°F / 74°C for safety.

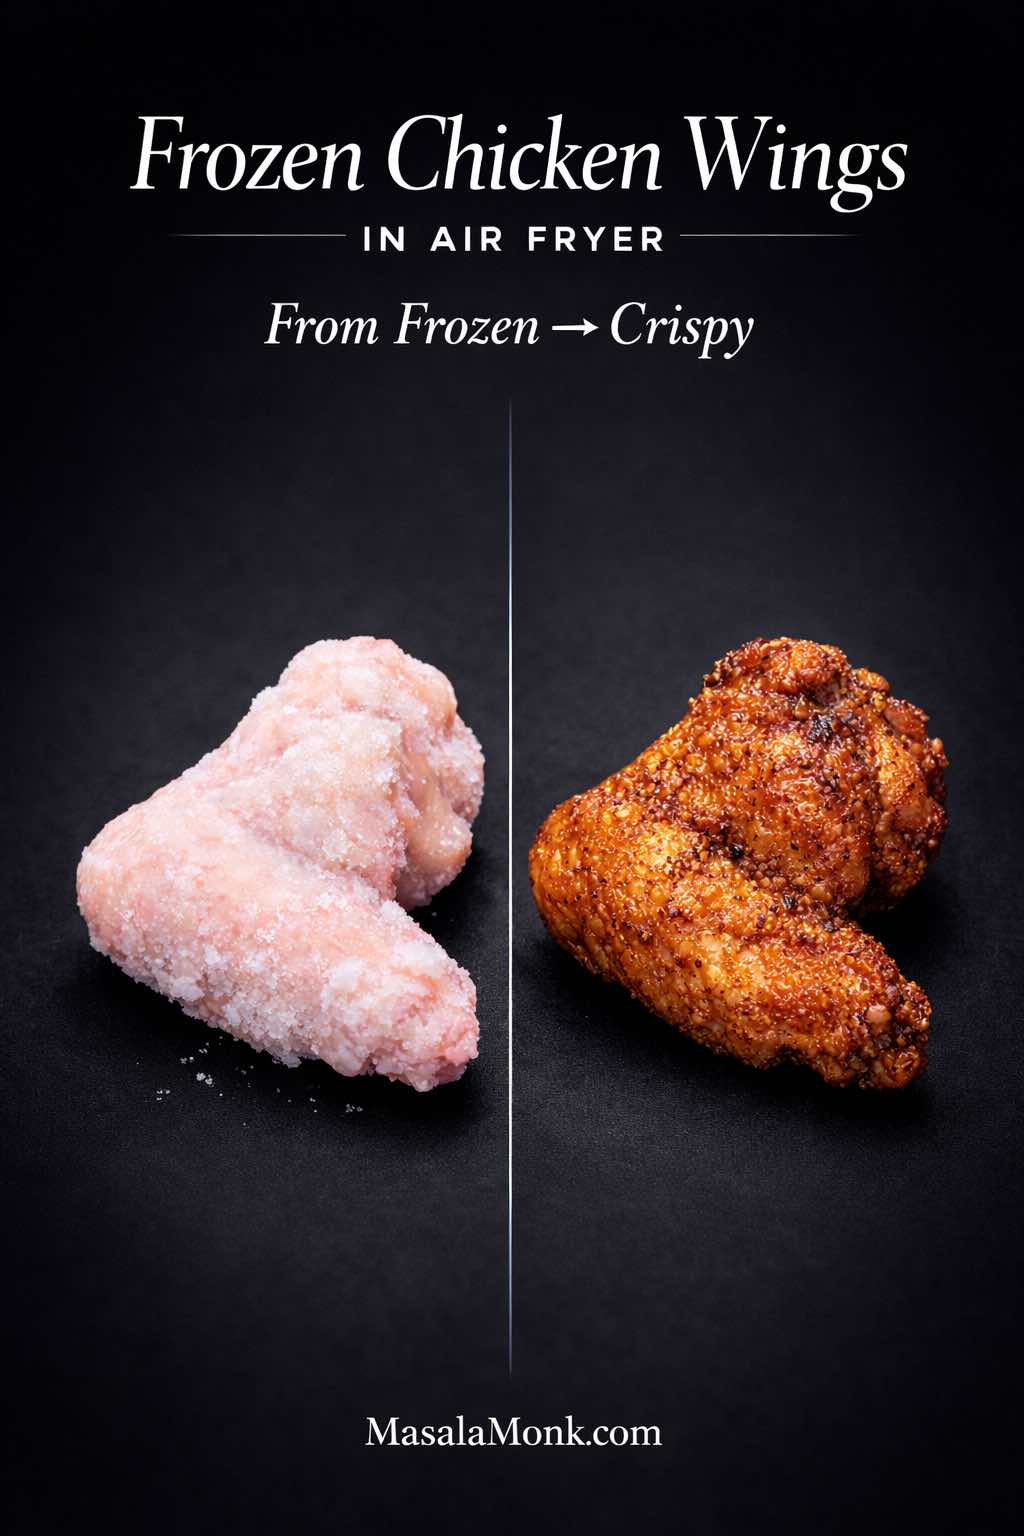
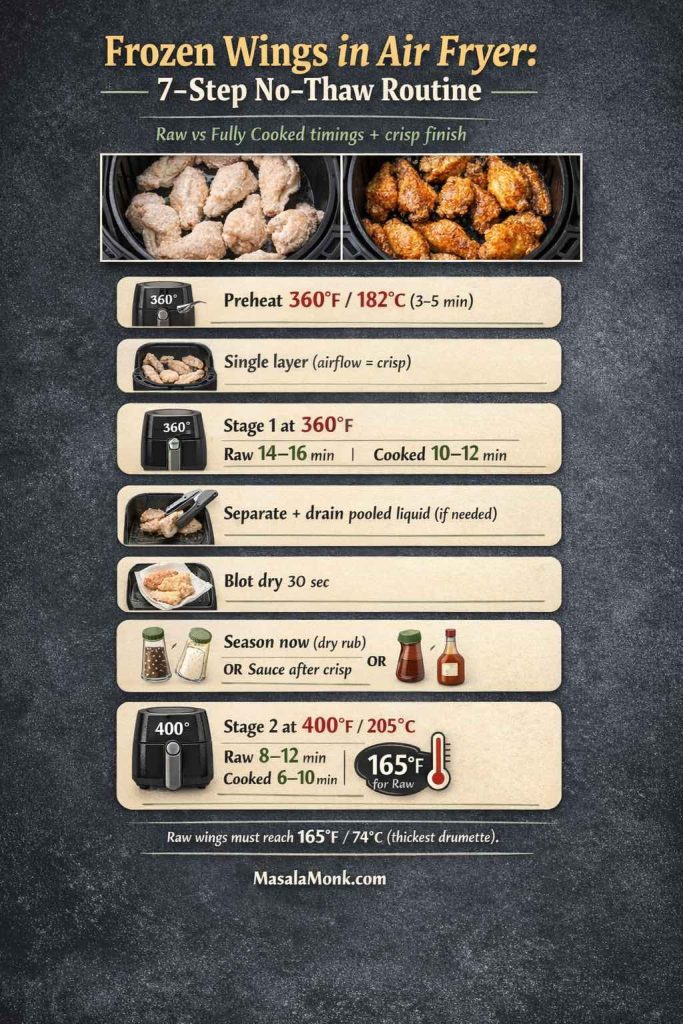
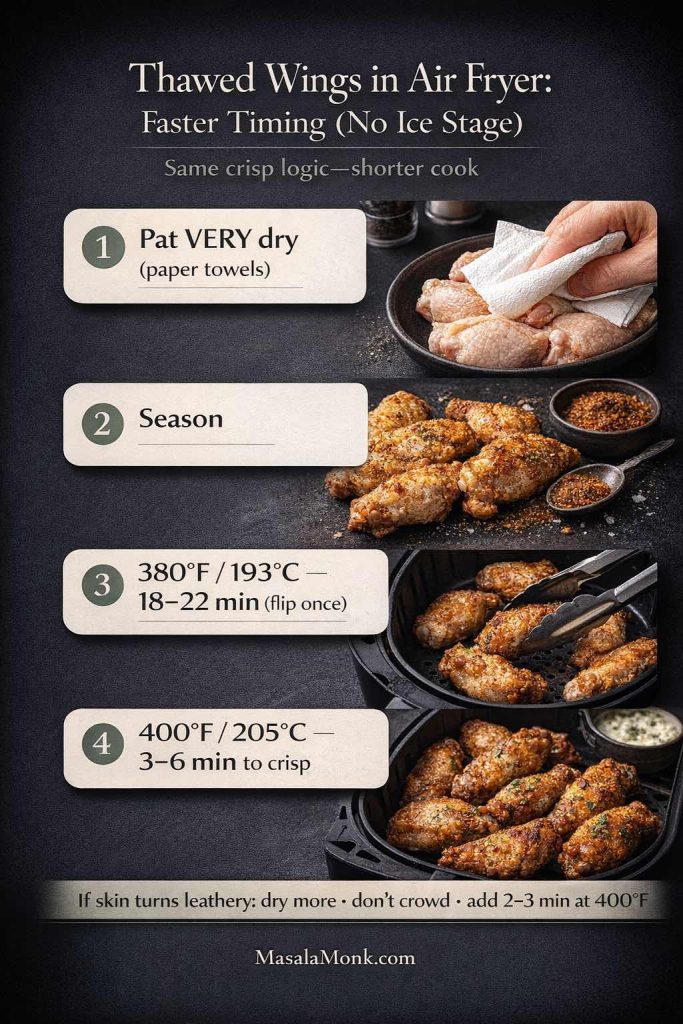
Also Read: Frozen Chicken Wings in Air Fryer (No Thaw) — Crispy From Frozen + Time & Temp


Vegan cabbage rolls, vegetarian cabbage rolls, and meatless stuffed cabbage that still feels hearty

Even though this post is built around keto cabbage rolls, it’s useful to include an option for households that mix diets. Maybe you’re eating low carb, while someone else wants a meatless version. Maybe you want a “lighter day” dinner that still has cabbage-roll comfort.

Vegan cabbage rolls and vegetarian cabbage rolls work especially well with napa cabbage or savoy cabbage, because the leaves are tender and the filling can be softer.

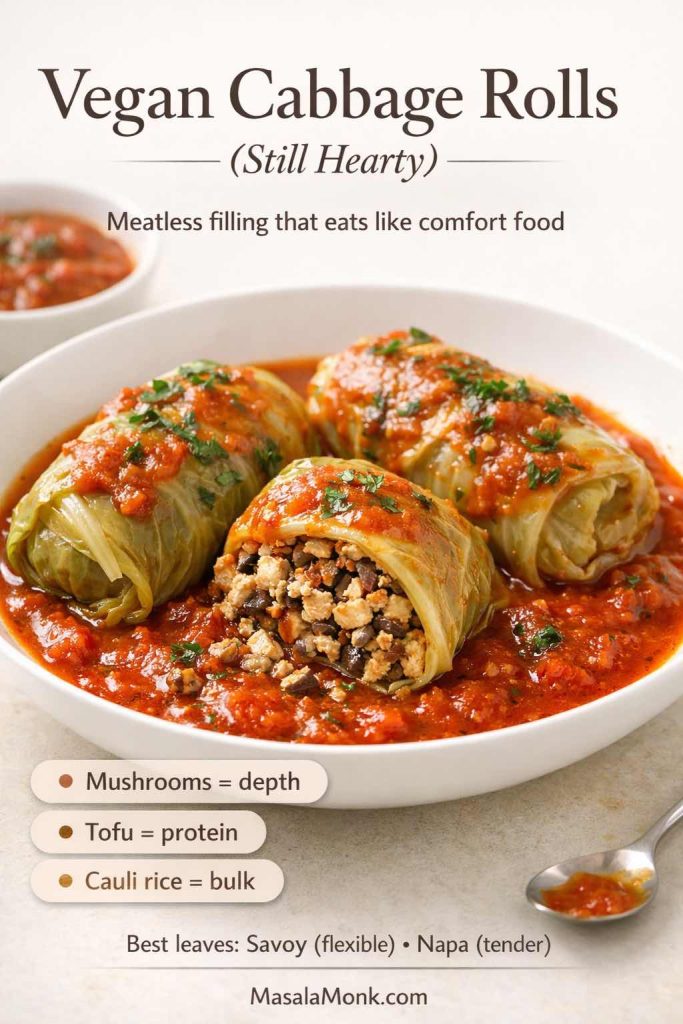
Vegan cabbage rolls in a rich tomato sauce on a white plate; one roll is cut open to show a hearty filling of crumbled tofu, mushrooms, and cauliflower rice. Text overlay reads “Vegan Cabbage Rolls (Still Hearty)” with notes: “Mushrooms = depth,” “Tofu = protein,” “Cauli rice = bulk,” and “Best leaves: Savoy (flexible) • Napa (tender).” MasalaMonk.com footer.
Vegan cabbage rolls that still eat like comfort food: tofu brings protein, mushrooms add deep savory flavor, and cauliflower rice gives that “bulk” without heaviness. If you’re cooking for a mixed table (keto + vegetarian/vegan), this is the easiest way to keep the cabbage-roll vibe consistent—same sauce, same cozy payoff, just a different filling.

A vegan, cabbage-roll-style filling that works

For a plant-forward approach, the goal is to create a filling that’s savory and satisfying:

  • Finely chopped mushrooms (for depth)
  • Crumbled tofu (for protein)
  • Cauliflower rice (for bulk)
  • Garlic and paprika (for continuity with the main recipe)
  • A binder such as ground flax mixed with water, if needed

You can bake these the same way, using the tomato sauce method above.

If you’re trying to keep a few plant-based, high-protein options in rotation, this list of plant-based protein sources for high-protein meal prep is full of practical ideas.

Also Read: Innovate Your Vegan Keto Breakfast: 5 Pistachio and Sunflower Seed Smoothie Recipes for Meal Replacement


Cabbage wraps, cabbage roll ups, and “cabbage wrap meat” shortcuts

Not everyone wants full baked cabbage rolls. Sometimes you want something quicker—something closer to a cabbage wrap recipe than a casserole. That’s where cabbage wraps come in.

You can think of cabbage wraps as a lighter, fresher cousin to baked cabbage rolls. Instead of cooking the rolls in sauce for an hour, you’re wrapping a cooked filling in softened leaves, then serving with a spoonable sauce.

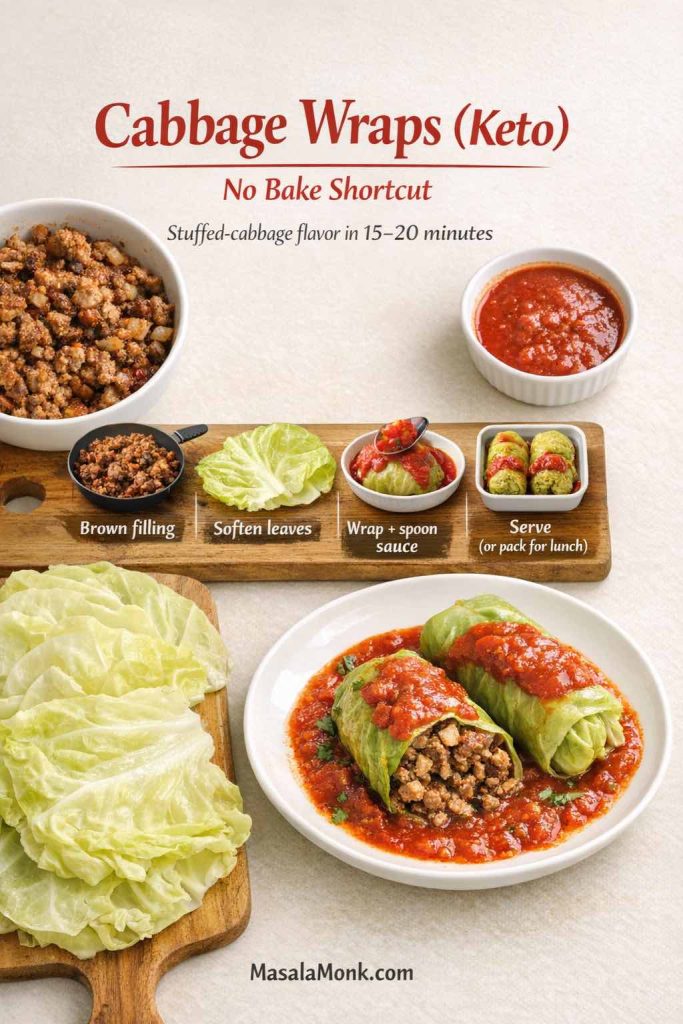
Top-down food graphic titled “Cabbage Wraps (Keto) — No Bake Shortcut.” It shows a plate with two cabbage wraps filled with seasoned ground meat and topped with tomato sauce. On the side are softened cabbage leaves on a board, plus step labels: “Brown filling,” “Soften leaves,” “Wrap + spoon sauce,” and “Serve (or pack for lunch).” MasalaMonk.com appears at the bottom.
When you want stuffed cabbage roll flavor without baking, these keto cabbage wraps are the fastest move: brown the garlic-paprika filling, soften a few leaves, wrap, and spoon sauce over top. The 4-step strip makes this a true weeknight shortcut—and it doubles as a lunch idea when you pack wraps with a little sauce cup on the side.

Quick cabbage wraps (keto-friendly)

  1. Brown ground beef with garlic and paprika.
  2. Make a quick sauce in the same pan (tomato + broth + paprika + olive oil).
  3. Spoon filling into softened cabbage leaves.
  4. Wrap and serve with sauce over top.

This gives you the comfort without committing to a baking dish. It’s also a great lunch format because the wraps hold together well in containers.

Also Read: Keto Fiesta: Spicing up Your Meals with Flavorful Taco Pie and Creative Toppings!


A note on “cabbage balls” and stuffed cabbage balls (when you want bite-sized comfort)

Cabbage balls show up in a few different traditions, and they’re essentially cabbage roll filling expressed as a small ball, sometimes wrapped partially in cabbage or simmered in sauce.

For a keto-friendly cabbage balls recipe approach, you can do this:

  • Make the same garlic paprika filling.
  • Roll it into small balls.
  • Brown them quickly, then simmer in the tomato sauce until cooked through.

It’s the same flavor story, just a different shape. The advantage is speed: no leaf-by-leaf rolling. The tradeoff is that you lose some of the classic cabbage roll structure. Still, if someone loves the filling more than the wrap, cabbage balls can be a satisfying variation.

Also Read: Air Fryer Hard-Boiled Eggs (No Water, Easy Peel Recipe)


Making cabbage rolls taste “traditional” without being stuck in one tradition

Cabbage rolls are one of those foods where families are fiercely loyal to what they grew up with. One home might swear by sweet-and-sour Jewish stuffed cabbage. Another might prefer a paprika-forward Hungarian stuffed cabbage rolls recipe. Someone else might love sauerkraut-heavy Polish cabbage rolls. Meanwhile, German cabbage rolls and kohlrouladen recipes often lean into deeper, darker savory notes.

Keto cabbage balls (no-rice) simmering in chunky garlic-paprika tomato sauce in a cast-iron skillet, with a small bowl of sour cream on the side. Text overlay reads ‘Keto Cabbage Balls (No-Rice)’, ‘Same filling, faster shape’, ‘Roll • Sear • Simmer’, ‘20 minutes’, and ‘Keep it firm: squeeze cauliflower rice’. MasalaMonk.com at bottom.
Keto cabbage balls are the “same filling, faster shape” version of cabbage rolls: roll the no-rice mix into balls, sear for crust, then simmer in the tomato sauce until juicy. The one tip that prevents mushy meatballs is right here—squeeze cauliflower rice dry before mixing.

This garlic and paprika foundation sits comfortably in that broader family of flavors. Garlic shows up everywhere. Paprika bridges sweet and smoky. Tomato sauce ties the whole dish to the “stuffed cabbage” comfort zone.

So if you’ve been chasing a version that feels familiar—old fashioned cabbage rolls, traditional stuffed cabbage, classic cabbage roll recipe—this approach can scratch the same itch. It doesn’t claim to replace any one grandmother’s method. Instead, it gives you a dependable base with enough flexibility to feel personal.

Also Read: Baked Jalapeño Poppers (Oven) — Time, Temp & Bacon Tips


Serving ideas that keep cabbage rolls satisfying (and keto-friendly)

A pan of cabbage rolls is already a complete meal, yet the right side can elevate it:

  • A crunchy slaw with a creamy dressing (again, eggless mayonnaise is handy as a base)
  • A spoon of herb sauce like chimichurri for brightness
  • A drizzle of olive oil and fresh herbs for the Mediterranean twist
  • A sprinkle of parmesan or feta for richness

Keeping one good red sauce around makes weeknight dinners easier—cabbage rolls, skillet cabbage, meatballs, and more. If you like having options ready in the fridge, these pizza sauce recipes are worth saving.


Troubleshooting Cabbage Rolls that are Keto Friendly

Even with a solid recipe, cabbage rolls can go sideways if a few details are off. The fixes are straightforward, though, and once you know them, you rarely run into the same problem twice.

Troubleshooting infographic for keto cabbage rolls in a glass baking dish with tomato-garlic sauce and parsley. Callouts list fixes: leaves tear (trim rib, don’t overboil, use savoy), watery filling (squeeze cauliflower rice, chop mushrooms fine), rolls fall apart (egg binder, roll tight, seam down), sauce too acidic (finish with olive oil or butter, tiny vinegar), tastes bland (salt filling and sauce separately). MasalaMonk.com footer.
Keto cabbage rolls going sideways? Save this troubleshooting visual. It covers the most common problems—torn leaves, watery “no-rice” filling, rolls that fall apart, sharp tomato sauce, and bland flavor—plus quick fixes that work fast (like squeezing cauliflower rice dry, rolling seam-side down, and balancing acidity with a little fat). Keep it right above the troubleshooting section so readers can scan, fix, and keep cooking.

If your cabbage leaves tear

The rib is usually the culprit. Trim it thinner so the leaf lies flat. Also, don’t overboil; overcooked leaves tear easily. If tearing keeps happening, switch to savoy cabbage, which folds more gently.

If your filling turns watery

Frozen cauliflower rice often holds water. Thaw and squeeze it dry. Mushrooms can also release liquid, so chop them finely and mix them with the meat so they cook evenly inside the roll.

If your rolls fall apart

Use an egg binder, roll tightly, and always place seam-side down. If you’re making a casserole or soup version, this is less of a concern, which is one reason unstuffed cabbage roll casserole is so forgiving.

If the sauce tastes too acidic

Finish with olive oil or butter, and consider a small splash of vinegar to balance. It sounds counterintuitive, yet it often makes tomato taste smoother rather than sharper. If you want a citation that supports the choice of olive oil as a staple fat, Harvard Health’s piece on extra-virgin olive oil is a useful reference.

If the dish tastes bland

Salt is not optional here. Cabbage is mild, and meat needs seasoning to taste “finished.” Season the filling well, then season the sauce separately. Paprika also needs enough salt to taste like something rather than like colored dust.

Also Read: Keto Mocktails: 10 Low-Carb Recipes for Guilt-Free Happy Hour Indulgence


Bringing it all together: one template, many dinners

Once you’ve made the base recipe, you’ve effectively unlocked multiple meals:

  • Oven baked keto cabbage rolls with garlic and paprika
  • Unstuffed cabbage roll soup for weeknights
  • Deconstructed cabbage roll casserole when you want comfort without rolling
  • Skillet cabbage rolls when time is short
  • Slow cooker cabbage rolls when you want hands-off cooking
  • Freezer-friendly cabbage rolls for meal prep
  • A vegan or vegetarian cabbage roll variation for mixed-diet households
  • Sauerkraut and sour cabbage leaf styles when you want tang
  • Spicy cabbage rolls when you want heat
  • Mediterranean cabbage rolls when you want herbs and brightness

That’s the hidden power of this dish. It isn’t just a recipe for stuffed cabbage rolls; it’s a repeatable system. You’re learning how to cook cabbage leaves, how to build a filling that stays juicy without rice, and how to make a tomato sauce that tastes like comfort without relying on sweetness.

And because these rolls are so satisfying, they also make it easier to stick with low carb eating without feeling like you’re losing your favorite foods.

If you want to keep building a keto dinner rhythm after this, it can feel natural to explore other high-protein, low carb anchors—MasalaMonk’s beef recipes for a weight loss keto plan is a solid next stop, especially if you like dinners that reheat well and feel filling without being complicated.

Also Read: Keto pancakes that actually taste like pancakes


Full printable-style recipe (base + quick twist guide)

Garlic & Paprika Keto Cabbage Rolls (Base Recipe)

Serves: 6–8
Prep time: 30–45 minutes (depending on cabbage method)
Cook time: 55–75 minutes

Ingredients

  • 1 large green cabbage (or savoy)
  • 680 g / 1.5 lb ground beef (or turkey or pork)
  • 3–5 cloves garlic, minced or grated
  • 2 teaspoons paprika
  • 1 teaspoon salt
  • 1/2 teaspoon black pepper
  • 1 1/2 cups cauliflower rice (squeezed dry if previously frozen)
  • 1/2 cup finely chopped mushrooms (optional)
  • 1 egg (optional)
  • 1/3 cup grated parmesan (optional)

Sauce

  • 2 cups crushed tomatoes or passata
  • 1 cup broth
  • 1 tablespoon tomato paste (optional)
  • 1–2 tablespoons olive oil or butter
  • 1 teaspoon paprika
  • Garlic powder or an extra clove of garlic
  • Salt and pepper
  • Optional: splash of vinegar

Method

  1. Soften cabbage leaves using boiling, freeze-thaw, or microwave. Trim ribs so leaves fold easily.
  2. Mix filling ingredients gently until combined.
  3. Roll filling in leaves; place seam-side down in a baking dish.
  4. Whisk sauce and pour over rolls. Cover tightly.
  5. Bake at 190°C / 375°F until tender and cooked through. Uncover at the end for a thicker sauce, if desired.
  6. Rest briefly before serving so the rolls hold together better.

Safety note: USDA guidance recommends cooking ground beef to 160°F / 71°C and poultry/ground turkey to 165°F / 74°C—see USDA ground beef safety and USDA poultry safety. Leftovers should be reheated to 165°F / 74°C as referenced in USDA’s leftovers guidance and FoodSafety.gov’s temperature chart.

Quick twist guide (additions only)

  • Smoky: add smoked paprika + cumin; finish sauce with vinegar
  • Sauerkraut: layer rinsed, squeezed sauerkraut in the dish; optional caraway
  • Sour-leaf style: brush leaves lightly with vinegar + salt; add dill or mint
  • Spicy: add chili flakes + cayenne; finish with chili oil
  • Mediterranean: add oregano + thyme; finish with olive oil, herbs, and optionally chimichurri or pesto

Also Read: How to Make Churros (Authentic + Easy Recipe)


FAQs

1) What are keto cabbage rolls?

Keto cabbage rolls are stuffed cabbage rolls made without rice or other high-carb fillers. Instead, the filling relies on meat, seasonings, and low-carb “bulk” like cauliflower rice or mushrooms, then everything bakes or simmers in a savory sauce until the cabbage turns tender and the filling stays juicy.

2) Can cabbage rolls be keto friendly even with tomato sauce?

Yes. Tomato-based sauce can still work for cabbage rolls that are keto compatible, especially when the flavor comes from garlic, paprika, broth, and fat—not added sugar. In practice, the sauce tastes comforting and rich without needing sweetness to feel complete.

3) What replaces rice in keto-friendly cabbage rolls?

Cauliflower rice is the closest stand-in for the texture of rice stuffed cabbage rolls. Meanwhile, finely chopped mushrooms add moisture and depth, almost like the filling simmered longer. Additionally, riced broccoli can work, and shredded zucchini can too—just squeeze it well so it doesn’t water out the filling.

4) Can I make cabbage rolls with uncooked rice on keto?

Not really. Cabbage rolls with uncooked rice (or cooked rice) are typically not low carb. If you love the “classic stuffed cabbage rolls with ground beef and rice” style, the keto approach is to keep the same seasonings and sauce while swapping rice for cauliflower rice or mushrooms.

5) Which meat works best for keto cabbage rolls: ground beef, turkey, or pork?

Ground beef gives the richest, most classic stuffed cabbage flavor and stays forgiving when baked. Ground pork turns especially juicy and savory, and paprika loves it. And then ground turkey is lighter, yet it usually benefits from extra fat and bolder seasoning so the filling doesn’t taste dry.

6) How do I keep keto cabbage rolls from falling apart?

First, roll tightly and place the rolls seam-side down. Next, trim the thick cabbage rib so the leaf folds smoothly. Also, using an egg binder can help, particularly if your filling is very lean or you’re using extra vegetables like mushrooms or zucchini.

7) What’s the easiest way to soften cabbage leaves for cabbage rolls?

Freeze-and-thaw is quietly one of the easiest methods: freeze the whole cabbage head, thaw it, and the leaves become pliable. Otherwise, boiling works reliably, and the microwave method is fast for smaller batches. Either way, trimming the rib makes rolling far easier.

8) Can I make cabbage rolls with frozen cabbage?

Yes. Cabbage rolls with frozen cabbage work well if the cabbage is thawed fully and the leaves are handled gently. In fact, freezing cabbage for cabbage rolls is a common prep trick because it softens the leaves without a big pot of water.

9) Are cabbage rolls healthy?

They can be, especially when the filling is high-protein and the sauce is balanced. Cabbage rolls healthy versions often focus on leaner meat, more vegetables, and a sauce that isn’t sugar-heavy. Even so, richer versions can still fit well in a low carb or keto diet when portions are sensible.

10) How long do cabbage rolls cook in the oven?

Cabbage rolls in oven typically take around 55 to 75 minutes at 375°F / 190°C, depending on roll size, cabbage thickness, and the meat used. If you make smaller rolls or use thinner leaves, they may finish sooner.

11) Can I make stuffed cabbage rolls in the oven ahead of time?

Absolutely. Assemble the rolls, cover tightly, and refrigerate. Then bake when needed. Because the flavors deepen after resting, homemade stuffed cabbage rolls often taste even better the next day.

12) What is unstuffed cabbage roll soup?

Unstuffed cabbage roll soup is the same comfort flavor—cabbage, meat, garlic, paprika, and tomato—without rolling. It’s also called stuffed cabbage roll soup, cabbage roll soup recipe, unrolled cabbage soup, or simply cabbage roll soup, depending on how people describe it.

13) How do I make easy cabbage roll soup recipe style but keto-friendly?

Brown ground meat with garlic and paprika, add chopped cabbage, then pour in crushed tomatoes and broth. Simmer until tender. Finally, stir in cauliflower rice near the end so it keeps a pleasant bite instead of turning mushy.

14) What is a cabbage roll casserole?

Cabbage roll casserole is a deconstructed version of stuffed cabbage—everything layered or mixed in one dish. You’ll also see it called unrolled cabbage casserole, stuffed cabbage roll casserole recipe, cabbage rolls casserole layered, or deconstructed cabbage roll casserole.

15) Can I make cabbage roll casserole crock pot style?

Yes. Slow cooker stuffed cabbage casserole is a popular option because it’s hands-off. Brown the meat first for better flavor, then layer cabbage, filling, and sauce in the crock pot. Since slow cookers trap moisture, start with a slightly thicker sauce.

16) What’s the fastest “cabbage roll in a bowl” method?

Skillet cabbage rolls—often called cabbage roll in a skillet or cabbage roll in a bowl—are the quick route. Brown meat with garlic and paprika, add shredded cabbage, stir in tomato and broth, then simmer until everything becomes saucy and tender.

17) Can I freeze cabbage rolls for meal prep?

Yes, cabbage rolls for freezing are one of the best meal-prep moves. You can freeze them cooked or uncooked. Cooked rolls are convenient for quick reheating, whereas uncooked rolls often give the best texture after baking.

18) How do I freeze stuffed cabbage rolls without getting watery?

Squeeze moisture from cauliflower rice and any watery vegetables like zucchini. Cool cooked rolls fully before freezing. Also, freeze portions with sauce so the filling stays juicy instead of drying out.

19) Can I cook frozen cabbage rolls without thawing?

Yes. Frozen cabbage rolls can bake from frozen; they simply need extra time. Keep them covered so the sauce doesn’t reduce too quickly before the center heats through.

20) What are cabbage balls, and are they keto friendly?

Cabbage balls are basically stuffed cabbage filling shaped into bite-sized portions, then simmered or baked in sauce. For a keto-friendly cabbage balls recipe, keep the same garlic-paprika filling and skip rice, using cauliflower rice or mushrooms for bulk instead.

21) Are there vegetarian cabbage rolls or vegan cabbage rolls that still feel hearty?

Yes. Vegetarian cabbage rolls and cabbage rolls vegan versions often use mushrooms for depth, cauliflower rice for bulk, and a protein base like tofu or a mix of nuts and seeds. The sauce and seasonings do a lot of the “comfort” work, so the result can still feel satisfying.

22) What’s the difference between sarma rolls, gołąbki, and galumpkis?

They’re all cabbage roll traditions with regional differences. Sarma rolls often use sour cabbage leaves and can have a tangier profile. Gołąbki refers to Polish cabbage rolls, commonly with meat and rice. Galumpkis is another name used for Polish-style stuffed cabbage rolls, especially in North American kitchens.

23) What are German cabbage rolls and kohlrouladen?

German cabbage roll recipes often lean savory and rich, and the term kohlrouladen usually refers to cabbage leaves stuffed with meat, then braised until tender. Even when the seasoning style differs, the method overlaps closely with classic stuffed cabbage.

24) What makes “old fashioned cabbage rolls” taste like the classic version?

Classic cabbage roll recipes usually rely on well-seasoned meat, tender cabbage, and a sauce that simmers long enough to meld everything. Even when you remove rice for keto-friendly cabbage rolls, keeping the same garlic, paprika, onion, and tomato comfort notes preserves that traditional feel.

25) Why do some cabbage roll recipes taste like tomato soup?

That “cabbage rolls in tomato soup” flavor happens when tomato, broth, and fat balance each other. Tomato gives sweetness and acidity, broth adds savory backbone, and fat rounds off sharpness so the sauce tastes smooth and comforting.

26) How do I make cabbage wraps instead of baked cabbage rolls?

Cabbage wraps are a quicker approach: cook the filling first, soften leaves, then wrap and serve with sauce spooned over top. It’s a useful shortcut when you want cabbage wrap meat style comfort without a long bake.

27) What’s the best cabbage for stuffed cabbage rolls?

Green cabbage is the most forgiving and sturdy for rolling. Savoy cabbage is more flexible and easier to fold, which helps if tearing is a problem. Napa cabbage is tender and great for vegan cabbage rolls, although it can be more delicate.

28) Why are my cabbage rolls bland, even with paprika?

Cabbage is mild, so seasoning has to be strong enough to carry through. Salt matters more than most people expect, and paprika needs salt to taste like something rather than just color. Also, season both the filling and the sauce separately for the best result.

29) Can I make “best cabbage roll recipe ever” style flavor on keto?

Yes—because “best stuffed cabbage recipe ever” usually means juicy filling, tender cabbage, and a sauce that tastes deep and balanced. You can keep that same goal while swapping rice for low-carb bulk and leaning into garlic and paprika for bold flavor.

30) How do I make keto cabbage rolls feel more filling for weight loss?

Prioritize protein, include enough fat to keep the filling satisfying, and don’t skimp on sauce because it prevents dryness. Also, pairing cabbage rolls with a crunchy low-carb side (like slaw) can make the meal feel larger without adding many carbs.

Posted on 1 Comment

Keto Chips: Best Low-Carb Snacks (For Salsa, Dips & Nachos)

Photoreal magazine-style cover showing keto chips and low-carb chip options with chunky salsa, thick queso dip, cheese crisps, and seed crackers on a dark moody background. Text reads “Keto Chips,” “Best Low-Carb Crunch for Any Dip,” “Salsa-Ready • Scoop-Proof • Nacho-Worthy,” with “Cheese Crisps • Seed Crackers • Tortilla Chips (Oven + Air Fryer)” and MasalaMonk.com.

This post was updated on:

There is a very specific kind of low-carb craving that has little to do with hunger: you want something salty that snaps. The hard part is that no single keto chip does every job well. A thin tortilla-style chip can be excellent with salsa and useless with a heavy queso; a cheese crisp can scoop a thick dip beautifully but feel far richer than what you want for casual grazing.

So if you want chips on keto, this guide is organized by what you want the chip to do. You can buy something ready-made, bake a quick batch from low-carb tortillas, make cheese or seed crackers from scratch, build a nearly zero-carb crunch from pork rinds or chicken skin, or fix the texture problem that keeps turning homemade chips soft.

Jump to: quick picks · what counts as keto-friendly · store-bought · tortilla chips · cheese chips · zero/no-carb · salsa & nachos · crunch fixes


Best Keto & Low-Carb Chips at a Glance

Start with the way you plan to eat them. The best low carb chips for salsa are not necessarily the best ones for queso or nachos, so use the job to narrow the field.

NeedBest option + why
SalsaExtra-dry low-carb tortilla chips — familiar shape, but dry enough to survive a wet dip.
Thick queso or creamy dipCheese crisps, seed crackers, or pork rinds — stronger scoops that resist breaking.
NachosTortilla-style chips or sturdy cheese crisps — enough structure for heat and toppings.
Lowest-carb crunchPork rinds, chicken skin, or cheese crisps — different from tortilla chips, but naturally very low in carbohydrate.
Everyday cracker-style snackSeed or almond-flour crackers — easy to portion and sturdier in a snack box.
Spicy “hot chip” cravingTortilla chips or cheese crisps + seasoning dust — the seasoning delivers most of the effect.
Store-boughtRead the serving, then do the snap test — a chip that bends in the bag usually softens quickly in dip.
The useful question is not “Which keto chip is best?” but “Best for what?”
Keto chips cheat sheet comparing low-carb chip styles for salsa, thick dips, nachos, spicy snacks, and snack boxes.
Use the cheat sheet as a second view of the same decision: salsa rewards dryness, thick dips reward strength, and nachos need structure.

If you only keep two options around, make them different: one dry tortilla-style chip for salsa and nachos, and one sturdier option such as cheese crisps or seed crackers for thicker dips.

What Chips Are Keto-Friendly?

In practice, a chip is keto-friendly only in the context of the portion you actually eat and the carb target you are following. That can mean a naturally very-low-carb food such as a cheese crisp or pork rind, or a tortilla-style chip made from a lower-carb wrap or flour blend. The word keto on the front of a package is not enough by itself.

Keto chip comparison showing serving size, total carbohydrates, fiber, and chip styles for salsa, dips, and nachos.
Start with serving size and carbohydrate information, then choose the chip for the way you plan to eat it.

For packaged chips, read the serving size first and then the carbohydrate line. The FDA guide to the Nutrition Facts label is the useful baseline here: the numbers belong to the stated serving, not to the entire bag.

Fiber is listed within total carbohydrate on U.S. labels, which is why some high-fiber products advertise a much smaller “net carb” number. That can be useful information, but it does not make portion size irrelevant. Compare products using the same serving logic, and pay attention to how much you normally eat rather than how tidy the marketing looks.

Texture belongs in this decision too. A chip can fit your carb target and still be a bad choice for salsa because it bends or turns pasty when wet. Conversely, a sturdy cheese or seed cracker may be excellent with queso even if it does not resemble a tortilla chip at all.


Store-Bought Keto & Low-Carb Chips: What to Look For

Store-bought low-carb chips differ as much in texture as they do in carb numbers. Rather than trusting a large keto or protein claim on the front of the bag, check the serving, understand what kind of chip you are buying, and then ask whether its texture matches the job.

Store-bought keto chip checklist for serving size, carbohydrates, snap, nacho strength, and savory flavor.
For a quick grocery check, compare the serving and carbohydrate information first; then judge whether the chip is dry and rigid enough for the way you plan to use it.
Type you will seeBest use + compromise
Protein tortilla-style chipsConvenient packaged snacking with familiar savory flavors, but some are brittle, powdery, or weak in wet dips.
Fiber-heavy tortilla-style chipsCan work well for salsa and nachos when genuinely dry; texture and fiber load vary widely between products.
Cheese crispsExcellent hard crunch for thick dips, but richer, saltier, and less tortilla-like.
Pork rindsStrong scoops for queso and creamy dips, but they soften quickly in watery salsa.
Seed/almond crackersSturdy for snack boxes and dense dips, though the experience is more cracker-like than chip-like.
Veggie crispsLighter snacking, but often too fragile for heavy dipping.
This is a category guide, not a brand ranking: the label and physical texture still decide whether a particular product works for you.

Do a 15-second scan. Start with the listed serving size, then total carbohydrate and fiber. If sugar alcohols or sweeteners are present, note the amount and how the brand presents its “net carb” claim. Finally, break one chip. For salsa or nachos, a clean snap is more promising than a bend.

Protein-chip label checklist covering serving size, total carbohydrates, fiber, sugar alcohols, protein, and ingredients.
High protein and low carbohydrate are separate questions. Check the serving, total carbohydrate, fiber, sugar alcohols, protein, and ingredient list.

Protein chips can fit a low-carb eating pattern, but high protein does not automatically mean low carb. Some products also rely heavily on added fibers. If large servings of high-fiber snacks make you uncomfortable, start with the stated serving before deciding the bag is an everyday option.

Flavor matters too. Some lower-carb formulas leave a sweet or vanilla-like note even when the seasoning is nominally savory. If that clashes with salsa, queso, or guacamole, a naturally savory base such as cheese crisps, seed crackers, or pork rinds may simply be a better fit.

Keto Tortilla Chips: Oven + Air Fryer

For salsa and nachos, tortilla-style chips are still the closest thing to the familiar experience. The useful mental model is drying, not merely browning: the center has to lose enough moisture to snap after cooling, not just turn golden at the edge.

Low-carb tortilla chips with oven and air-fryer methods, plus cooling and troubleshooting tips.
Tortilla-style chips need a single layer, enough drying time, and a full cool on a rack. If the center still bends after cooling, the batch needs more drying.

Baseline batch: 4 low-carb tortillas

Yield: roughly 24–32 chips, depending on whether each tortilla is cut into 6 or 8 wedges. Oven time: usually 14–22 minutes plus cooling. Wrap thickness and fiber content can move that timing noticeably.

  • 4 low-carb tortillas
  • 1–2 tsp neutral or olive oil, or a very light oil spray
  • ¼–½ tsp fine salt
  • Optional: smoked paprika, chili powder, garlic powder, cumin, or another dry seasoning
  1. Heat the oven to 190°C / 375°F.
  2. Cut each tortilla into 6–8 similar-size wedges. Smaller, even triangles dry more predictably than large irregular ones.
  3. Arrange them in a single layer on one or two trays. If pieces overlap, steam gets trapped between them.
  4. Use just enough oil to lightly coat the surfaces, then season.
  5. Bake for 8–12 minutes, flip, then bake another 6–10 minutes.
  6. Move the chips to a rack for about 10 minutes before judging the texture.

The doneness test: pick up a fully cooled chip and bend the center. If the edges crack but the middle still folds, it is browned but not dry. Return the batch to a slightly lower oven for a few more minutes. If the center snaps cleanly, it is ready for salsa.

Very high-fiber wraps can behave differently from ordinary tortillas: some brown early while the center stays flexible. In that case, lower the heat a little and extend the drying time rather than pushing the color darker. Add wet finishes such as lime only after baking; moisture added before storage works against the crispness you just created.

Air fryer: faster for a small batch

Set the air fryer to about 180–190°C / 350–375°F. Work in a single layer, lightly oil and season the wedges, then cook for 4–6 minutes. Flip or shake and continue for another 2–5 minutes. Cool before deciding whether the chips need another minute or two; warm chips can feel softer than they will once the steam has escaped.

The first batch is calibration. If the chips taste bitter, a spice may be scorching before the tortilla dries; season more lightly before cooking and add delicate spices afterward. If they feel greasy, cut the oil rather than extending the bake.

From-scratch almond-flour tortilla chips

If you want control over the dough as well as the bake, almond flour is the sturdier route. For more on why low-carb flours behave so differently, see the MasalaMonk keto flour guide.

  • 1½ cups almond flour
  • 1 tbsp psyllium husk powder
  • ½ tsp salt
  • 1 tsp baking powder, optional
  • 1 egg
  • 2 tbsp olive oil
  • 3–6 tbsp warm water, as needed
Almond-flour tortilla chips made by skillet-cooking thin tortillas, cutting, baking, and cooling.
For almond-flour tortilla chips, roll the dough thin, set the structure on a skillet, then cut and bake until the centers are dry.
  1. Mix the dry ingredients, then add the egg and oil.
  2. Add warm water gradually until the dough is pliable rather than sticky.
  3. Divide into 4–6 balls and press each very thinly between parchment. Aim for an even sheet; thick patches stay chewy.
  4. Cook on a hot dry skillet for about 60–90 seconds per side to set the tortilla.
  5. Cool, cut into triangles, then bake at 190°C / 375°F until dry and crisp, flipping once.
  6. Cool on a rack before serving.

If a cooled almond-flour chip bends through the center, roll the next batch thinner or give the cut chips more oven time. The skillet sets the structure; the oven removes the moisture.

Coconut-flour tortilla chips: thinner and more delicate

  • 2 tbsp coconut flour
  • 2 eggs
  • 2 tbsp water
  • 1 tbsp olive oil
  • Salt
  • Pinch of baking powder, optional
Thin coconut-flour tortilla chips made by skillet-cooking a delicate batter before baking until dry.
Coconut-flour tortillas are fragile: cook a thin batter gently, cut only once set, then use the oven to dry the pieces before cooling.

Whisk everything and let the batter stand for about two minutes so the coconut flour hydrates. Cook thin circles gently in a lightly oiled skillet, flipping only when the first side has enough structure to release. Cool, cut, then bake until the pieces feel dry. These are less forgiving than almond-flour chips, so treat them as a delicate salsa chip rather than a heavy queso scoop.

For storage and re-crisping, jump to How to Keep Keto Chips Crispy rather than repeating the same instructions here.

Keto Cheese Chips & Parmesan Crisps

Cheese crisps are the quickest route to a hard, salty crunch. Parmesan dries into a thinner, harder wafer; cheddar gives more body. A blend sits between the two and works especially well when the chip needs to carry a thick dip.

Parmesan and cheddar cheese crisps with oven temperature, baking time, and cooling instructions.
Parmesan makes a thinner, harder crisp; cheddar gives more body. Both firm significantly after they leave the oven.

Basic parmesan or cheddar crisps

Baseline batch: 1 cup finely shredded cheese makes about 12–16 small crisps, depending on how large you make the mounds. Allow roughly 5 minutes to portion, 5–8 minutes to bake, and 5–10 minutes to cool.

  • 1 cup finely shredded parmesan, cheddar, or a mix
  • Optional: smoked paprika, chili powder, garlic powder, black pepper, or dried oregano
  1. Heat the oven to 190°C / 375°F and line a tray with parchment.
  2. Place roughly tablespoon-size mounds of cheese on the tray, leaving room for them to spread.
  3. Season lightly.
  4. Bake for about 5–8 minutes, until the edges are amber and the bubbling has slowed.
  5. Leave the crisps to cool before lifting them. Warm cheese is flexible; the snap develops as it cools.

For a sturdier dipping crisp, make the mounds slightly thicker or mix parmesan with cheddar. If the finished crisp shatters the moment it touches queso, the next batch needs a little more body—not necessarily more baking.

If cheese is becoming a regular snack base, the separate guide to carbs in cheese from a keto perspective is useful for comparing varieties rather than treating every cheese as nutritionally identical.

Scoopable cheese crackers

  • 1 cup shredded cheddar
  • ⅓ cup finely grated parmesan
  • 1 egg white
  • 1–2 tsp psyllium husk powder, optional
  • Garlic powder, paprika, and black pepper
Sturdy keto cheese crackers designed for scooping queso and other thick dips.
This version adds enough structure to behave more like a cracker, so it can carry thicker queso or creamy dips without shattering.

Mix into a sticky dough, roll between parchment to roughly 2–3 mm, score into squares, and bake at 175°C / 350°F for 12–16 minutes. Look for a deeply golden sheet with dry edges. Cool before snapping along the score lines.

Cottage-cheese chips need dehydration, not just browning

Cottage cheese chips showing draining, thin portions, low-and-slow baking, and cooling for crispness.
Cottage-cheese chips work by moisture removal: drain well, use small thin portions, bake until dry, then cool completely.

Drain cottage cheese thoroughly before it hits the tray. Spoon small, thin portions with space around each one; thick dollops tend to brown outside while staying chewy in the middle. Bake at a lower temperature than ordinary cheese crisps until the chips look dry rather than merely golden, then cool completely. If a batch stays flexible after cooling, the next adjustment is usually less moisture or thinner portions, not more seasoning.

Seed & Almond-Flour Crackers

Seed crackers are the quiet workhorse of this list: less rich than cheese crisps, sturdier than many tortilla-style chips, and easy to portion into snack boxes. The critical variable is thickness.

Crisp seed crackers

  • ½ cup flaxseed meal
  • 2 tbsp chia seeds
  • 2 tbsp sesame seeds, optional
  • ½ tsp salt
  • 1 cup water
  • Garlic powder, paprika, cumin, or dried herbs, optional
Seed cracker recipe using flax, chia, and sesame, spread thin and baked until dry and crisp.
Let the seed mixture gel, then spread it into a genuinely thin sheet. Thick patches remain leathery after the edges are already crisp.
  1. Mix everything and let it stand for 10–15 minutes, until the water has turned the seeds into a cohesive gel.
  2. Spread the mixture thinly and as evenly as possible on parchment.
  3. Bake at 160°C / 325°F for about 25–40 minutes, depending on thickness.
  4. For a very crisp sheet, flip it partway through once it is firm enough to handle.
  5. Cool completely before breaking into shards.

The visual cue is dryness through the center. If the edge snaps but the middle flexes, the sheet needs more time. A nacho-style version can take cumin, paprika, and garlic; a light parmesan dust makes the same base more savory.

Almond-flour crackers

  • 1¼ cups almond flour
  • 1 tbsp psyllium husk powder
  • ½ tsp salt
  • ½ tsp baking powder
  • 1 egg
  • 1 tbsp olive oil
  • 2–4 tbsp water, as needed
  • Sesame seeds or everything-style seasoning, optional
Almond-flour keto crackers rolled thin, scored, baked until golden, and cooled for crunch.
Almond-flour cracker dough should be rolled thin and even, scored before baking, and cooled completely before the final texture is judged.

Heat the oven to 175°C / 350°F. Mix the dry ingredients, then add the egg and oil. Add only enough water to make a workable dough. Roll thinly between parchment, score, and bake for 12–18 minutes. The center squares should look as dry as the edge pieces; pale, soft centers usually mean the sheet was too thick or needs more time.

Zero-Carb and Nearly Zero-Carb Chips

When people search for no carb chips or zero-carb chips, the useful answers usually stop looking like tortilla chips. Pork rinds, chicken skin, cheese crisps, and meat-based snacks can get much closer to the carb target because the base is fat and/or protein rather than flour.

Zero-carb chip reality check explaining serving size and near-zero-carb cheese, pork-skin, and meat-based options.
A 0g-carb label is still tied to a stated serving. Near-zero-carb chip substitutes are usually cheese-, pork-skin-, chicken-skin-, or meat-based.

Pork rinds: strongest with thick dips

Pork rinds are naturally scoopable because of their curled, airy structure. They work particularly well with queso and creamy dips, but watery salsa softens them quickly.

Pork rind refresh method with a short oven re-crisp and seasoning ideas for thick dips.
A short oven re-crisp can restore a bag that has gone a little soft; season the warm rinds after heating, then cool before serving.

If an open bag has merely lost its snap, warm the rinds at about 160°C / 325°F for 4–6 minutes, then cool. That can refresh texture; it cannot fix stale or rancid flavor. Season after warming with chili-lime, smoked paprika and garlic, or a dill-and-garlic blend.

Chicken skin chips

Chicken skin chips with oven and air-fryer methods for a crisp low-carb snack.
Chicken skin crisps best in a single layer so rendered fat can escape instead of steaming the pieces.

Lay chicken skins flat in a single layer, season lightly, and bake around 200°C / 400°F until deeply crisp, flipping once; an air fryer around 190–200°C / 375–400°F can work for smaller batches. Because this starts with raw poultry, use a food thermometer and make sure the pieces reach 74°C / 165°F before serving. USDA identifies 165°F as the safe minimum internal temperature for poultry.

The texture continues to firm as rendered fat drains and the skins cool. If the pieces are crowded, they steam; if they are heavily seasoned before cooking, the seasoning can become harsh as the skins shrink.

Jerky-style meat crisps: safety comes before extra crunch

Jerky-style meat crisps with a bend-versus-crisp texture check and food-safety reminder.
For homemade meat crisps, use a safe jerky process first; low-temperature drying raw meat from the start is not enough to control food-safety risk.

Do not simply put raw beef into a very low oven and wait for it to dry. USDA’s current home-jerky guidance recommends heating meat to 71°C / 160°F (and poultry to 74°C / 165°F) before dehydrating, because low-temperature drying alone may not destroy pathogens. See USDA’s home jerky guidance for the full process.

If you want a crisper, chip-adjacent texture after that safe heating step, continue drying in a dehydrator or controlled low oven until the strips are drier than ordinary jerky, watching closely near the end. Treat the graphic as a texture idea, not as a shortcut around the safe heat step.

Keto Veggie Chips: Lighter Crunch, Different Job

Veggie chips are useful when cheese- and meat-based snacks feel too rich, but they should be judged on their own terms. Their enemy is water, and the fix is almost always more drying rather than more oil.

Kale chips

Kale chips showing thorough drying, light oiling, single-layer baking, and cooling.
Dry kale thoroughly, use only a light coating of oil, bake in one layer, and let the leaves cool before storing.

Remove thick stems, wash, and dry the leaves thoroughly. Massage with just enough oil to barely coat the surface, then bake around 150°C / 300°F until the leaves feel papery and crisp. If the kale is darkening while still leathery, the leaves were probably wet or over-oiled.

Zucchini, radish, and similar watery vegetables

Zucchini chips sliced thin, salted, dried, and baked low and slow until crisp.
Thin zucchini slices are salted, rested, blotted very dry, then baked at low heat until the centers lose their moisture.

Slice as evenly and thinly as you can, salt lightly, rest, and blot away the moisture that beads on the surface. Bake around 150–160°C / 300–325°F until dry, then let the slices cool for 5–10 minutes. If they are browned at the rim but still translucent and flexible in the center, they need more drying time. These are better with a thick creamy dip than with a very wet salsa.

Keto Hot Chips & Doritos-Style Seasoning

Sometimes the craving is not for a particular chip at all; it is for salt, acid, chili and that powdery seasoning that sticks to your fingers. In that case, changing the seasoning is far easier than chasing a perfect commercial imitation.

Spicy Doritos-style seasoning blend for keto tortilla chips, cheese crisps, or pork rinds.
Use a neutral crisp base, season while it is still warm, then finish with lime. Tortilla chips, cheese crisps and pork rinds all take this kind of seasoning well.

A useful starting mix is chili powder, smoked paprika, garlic powder and salt. Toss it with warm chips so the dust adheres, then add lime just before eating. Keep the lime out of storage containers; acid and moisture are best added at the last moment.


Best Keto Chips for Salsa, Dips & Nachos

This is where chip choice matters most. Salsa tests dryness, queso tests strength, and nachos test whether the base can survive heat plus toppings without turning into a soft layer underneath everything else.

For salsa: choose dry first, thin second

For keto chips and salsa, a thin tortilla-style chip feels the most familiar, but only if it is dry enough. If it bends before it snaps, the salsa will soften it almost immediately. Seed crackers are the sturdier fallback when the salsa is especially juicy.

Keto chips and salsa plate with a crisp base, creamy element, and salty or briny extra.
A satisfying salsa plate does not need ten components: one crisp base, one cooling/creamy element and one salty or briny extra are enough.

If you want a ready-made salsa path, pair this section with MasalaMonk’s salsa verde recipe. For a creamy contrast, fresh guacamole gives tortilla-style chips more body without turning the whole plate into queso.

For thick dips: strength beats resemblance

For keto chips for dipping, cheese crackers, seed crackers and pork rinds are often better here than delicate tortilla chips. If the dip is hot and dense, you need a chip that can carry weight without folding or dissolving.

For a full party dip rather than another mini-recipe inside this article, use Buffalo Chicken Dip or Spinach Dip and pick one of the sturdier bases above.

For nachos: start with the base, then control moisture

Three low-carb nacho bases: tortilla-style chips, cheese crisps, and pork rinds.
Three workable nacho bases: tortilla-style chips for the classic feel, cheese crisps for strength, and pork rinds for a quick low-carb tray.

For low carb nacho chips, tortilla-style chips give the most familiar result. Cheese crisps are sturdier but richer. Pork rinds can work for a fast tray, especially if the wet components stay on the side.

Low-carb nacho layering guide: cheese first, cooked toppings next, wet toppings last.
The order matters: dry base first, cheese next, cooked toppings after that, and salsa, guacamole or sour cream only at the end or on the side.
  1. Spread the chip base in a single layer rather than building a deep pile.
  2. Add shredded cheese first so it melts directly onto the chips.
  3. Add cooked, relatively dry toppings such as meat, peppers or olives.
  4. Bake just long enough to melt the cheese.
  5. Add salsa, guacamole and sour cream after baking—or serve them beside the tray.

If you want a dedicated cheese sauce instead of shredded cheese, the MasalaMonk cheese sauce recipe is a better next stop than duplicating a full sauce guide here.


Dips That Actually Work With Keto Chips

The easiest way to make a chip substitute feel disappointing is to pair it with a dip that is too thin for the base. Match the texture: dense queso needs a stronger scoop, while tortilla-style chips reward a salsa with less free liquid.

Thick queso

  • 1 tbsp butter
  • ½ cup heavy cream (or full-fat milk if that suits you)
  • 1 cup shredded cheddar or cheddar-parmesan mix
  • ½ tsp garlic powder
  • ½ tsp smoked paprika
  • Salt to taste
  • Jalapeño, green chilies, or pepper sauce, optional
Thick queso dip made over low heat so it stays smooth and scoopable.
Keep queso over low heat and add the cheese gradually. A smooth, thick dip comes from gentle heat rather than boiling.

Melt the butter over low heat, warm the cream without boiling, then add cheese in small handfuls and stir until each addition melts. The finished queso should fall slowly from a spoon rather than pour like a thin sauce. If it becomes grainy or oily, the heat was probably too high.

Scoopable salsa

Scoopable salsa made by salting and draining chopped tomatoes before mixing.
For a thicker salsa, salt chopped tomatoes first and drain the liquid they release before adding onion, cilantro, chili, and lime.

Chop the tomatoes, salt lightly, and leave them for 10 minutes. If liquid has pooled underneath, drain it before adding onion, cilantro, chili, lime, and the final seasoning. The goal is not a dry salsa; it is a salsa that clings to a chip instead of immediately running off it.

Ten-minute tomato-draining method for thicker salsa that keeps low-carb chips crisp longer.
The 10-minute drain is the practical checkpoint: visible tomato liquid leaves the bowl before the final salsa is mixed.

Quick guacamole

Quick guacamole-style dip made with avocado, lime, salt, onion, and chili.
For a fast guacamole-style dip, mash ripe avocado with lime and salt, then add onion or chili for texture and heat.

A basic version needs only ripe avocado, lime, and salt. Add onion, chili, or cilantro if you want more contrast. For a fuller treatment, move to the complete MasalaMonk guacamole recipe rather than duplicating it here.

How to Keep Keto Chips Crispy

Most homemade chip failures come down to moisture, uneven thickness, too much oil, or trapped steam while cooling. Diagnose the texture before changing the whole recipe.

Keto chip crunch guide covering rack cooling, dry storage, and quick oven or air-fryer re-crisping.
Cool first and store second. A rack lets steam escape; sealing warm chips traps the moisture that softens them.
What happenedWhat it means + what to change
Brown outside, soft in the centerThe surface cooked before the center dried. Lower the heat slightly, make the pieces thinner or more even, and extend drying time.
Crisp when hot, soft after coolingSteam was trapped or the center still held moisture. Cool on a rack and do not seal until completely cool.
Crisp at first, soft the next dayHumidity or storage moisture got back in. Re-crisp briefly, cool again, then return to an airtight container.
Greasy instead of crispToo much oil is slowing moisture loss. Use a mist or very light coating rather than brushing heavily.
Edges crisp, centers chewyThe pieces are too thick or too large. Roll or slice thinner, cut smaller, or extend the low-heat drying phase.
The visible failure tells you which variable to change; more heat is not always the answer.

For many tortilla chips and crackers, a short re-crisp at about 160°C / 325°F for 4–6 minutes works well. An air fryer around 180°C / 350°F for 2–4 minutes can be faster. Cool again before serving or storing.

Keto Snack Boxes, Boards & Make-Ahead Rotation

Chips are easiest to overeat when they are the entire snack. A better setup gives the crunch a job inside a small plate: something crisp, something creamy, a protein element and one bright or briny bite.

Keto snack box blueprint combining low-carb chips, dip, protein, and a fresh or briny element.
Build a snack box around contrast: crunch + dip + protein, then add something sharp such as pickles, olives or fresh vegetables.
SituationBuild it
Salsa nightTortilla-style chips + salsa + guacamole + olives
Thick-dip snackCheese or seed crackers + buffalo/spinach dip + cucumber
Road tripSeed crackers + cheese + nuts + pickles
Game dayCheese crisps or pork rinds + warm dip + jalapeños + crunchy vegetables
A snack plate feels more complete when the chips are one component instead of the entire meal.

For a larger mixed table, the charcuterie board guide is the natural next step. If you are comparing broader low carb snacks rather than chips specifically, use the keto-friendly snacks guide.

This rotation also prevents one substitute from becoming exhausting. You do not need every option in this article in your kitchen at once.

Three-chip keto rotation using tortilla-style chips, cheese crisps, and seed crackers for different snack jobs.
A practical three-crunch rotation: tortilla-style chips for salsa, cheese crisps or pork rinds for thick dips, and seed crackers for everyday snack plates.

A Short Health Note

Keto-compatible does not automatically mean nutritionally superior. Many packaged or cheese/meat-based snack options can be high in sodium or saturated fat, while very high-fiber products can feel quite different from ordinary chips. Variety and portion size still matter. For broader context, Harvard’s overview of ketogenic diets discusses both potential uses and limitations.

That is another reason this guide treats cheese crisps, seed crackers, tortilla chips and veggie chips as different tools rather than one universal answer.


Keto Chips FAQ

Are there truly zero-carb chips?

Some cheese-, pork-skin- or meat-based snacks can be extremely low in carbohydrate, and some labels may show 0g per serving. Still, the stated serving and the actual amount you eat matter. Read the label rather than treating “zero carb” as a separate food category.

Can I turn regular low-carb tortillas into chips?

Yes. Cut them into triangles, use very little oil, bake or air fry in one layer, and give them enough time to dry. Different wraps behave differently, so the first batch is partly a texture test.

Why do homemade tortilla chips soften after cooling?

Usually because steam was trapped underneath or because the center never fully dried. Cool on a rack and avoid sealing chips while they are even slightly warm.

Which keto chips work best with salsa?

Extra-dry tortilla-style chips are the closest to the classic experience. Seed crackers are a sturdier fallback. The wetter the salsa, the more rigid the chip needs to be.

Which base works best for keto nachos?

Tortilla-style chips give the most familiar result, cheese crisps give more strength, and pork rinds are useful for a fast tray. Whichever base you choose, keep salsa, guacamole and sour cream until the end.

Are protein chips automatically keto-friendly?

No. Protein and carbohydrate are separate numbers. Check the serving size, total carbohydrate, fiber and sweeteners just as you would for any other packaged chip.

How long do homemade keto chips stay crisp?

That depends heavily on the base and humidity. Store only fully cooled chips in an airtight container. If tortilla chips or crackers soften, a short oven or air-fryer re-crisp often restores them.

Can I make keto chips ahead for a party?

Yes, but choose the stable types. Seed crackers and well-dried tortilla chips are easier to make ahead than delicate veggie chips. Keep wet dips and toppings separate until serving.


The easiest way to make low-carb chips satisfying is to stop asking one chip to do everything. Keep the tortilla-style crunch for salsa and nachos, reach for cheese or pork rinds when the dip is heavy, use seed crackers when you want something steadier, and fix moisture before blaming the recipe. Once the texture matches the job, the whole category becomes much less about compromise.

Posted on 7 Comments

Eggless Yorkshire Pudding (No Milk) Recipe

Eggless Yorkshire pudding made without milk on a plate, showing a golden, crisp rim and hollow center—dairy-free Yorkshire pudding recipe cover image.

Eggless Yorkshire pudding (no milk) can feel like a contradiction at first—after all, the traditional version depends on eggs for structure and milk for richness. Still, with the right batter consistency and a properly heated tin, you can bake dairy-free Yorkshire puddings that rise tall, turn crisp around the edges, and stay tender in the middle.

If you’re looking for a Yorkshire pudding recipe without eggs, a dairy free Yorkshire pudding recipe, or simply a reliable way to make Yorkshire pudding without milk for a roast dinner or party food, this method is built to be repeatable. It focuses on the same core principles used in the most successful egg-free approaches: a thin, rested batter poured into smoking-hot fat, then baked hot and undisturbed until deeply golden.

Along the way, you’ll see how to tweak the batter for no egg Yorkshire pudding variations, how to choose the best pan for Yorkshire pudding so the rise is consistent, and how to adapt the same base into mini Yorkshire puddings, giant Yorkshires, and stuffed Yorkshire pudding dinners that hold gravy, curry, or stew without collapsing.


Eggless Yorkshire pudding (no milk): what it’s like when it’s right

When this works, you’ll get a Yorkshire pudding that looks like a popover: browned walls, a hollow center, and edges that shatter a little when you tear one open. The base will be slightly softer than an egg-based version, but still sturdy enough to hold a ladle of gravy or a spoonful of curry.

Three eggless Yorkshire puddings made without milk on a cooling rack: one whole with tall crisp walls, one torn open to show a hollow center, and one being filled with gravy; text overlay reads “When It’s Right… Crisp edges • hollow center • tender base” and “Bake until deep golden,” with MasalaMonk.com in the footer.
This is the goal. When eggless Yorkshire pudding (no milk) turns out right, you’ll see tall browned walls, a hollow center, and crisp edges that hold gravy without collapsing. Bake until deep golden—that extra color is what keeps dairy-free, egg-free Yorkshires crisp instead of soft.

Also, the flavor is clean and savory rather than “eggy.” If you want a hint of that classic aroma, you can add a tiny pinch of kala namak (black salt)—the same trick used in a lot of egg-free cooking, like in these plant-based breakfast ideas that use tofu as an egg stand-in. Here’s a helpful guide on that approach: plant-based breakfast ideas that use tofu instead of eggs.

Meanwhile, if you’re here because you specifically need a dairy free Yorkshire pudding recipe, the good news is that milk is the easier part to replace. The bigger challenge is structure, which is why you’ll see so much emphasis on heat, resting, and pan choice.

Also Read: Crock Pot Chicken Breast Recipes: 10 Easy Slow Cooker Dinners (Juicy Every Time)


Yorkshire pudding recipe without eggs: the foundation you can trust

This batter is built for two common needs: skipping eggs and skipping milk. If you landed here seeking a Yorkshire pudding recipe without eggs, a dairy-free Yorkshire pudding recipe, or simply Yorkshire pudding without milk that still rises, this is the base to start with. It’s also flexible enough that you can turn it into giant yorkshire pudding, miniature yorkshire puddings, or even a tray-baked yorkshire pudding in a roasting tin.

Ingredients (makes about 12 standard puddings)

  • 225 g self-raising flour
  • ½ tsp baking powder
  • ½ tsp fine salt
  • 300 ml unsweetened soy milk
  • 100 ml warm water
  • Neutral oil for the tin (about ¾–1 tsp per hole)

No self-raising flour? Use 225 g plain flour + 2¼ tsp baking powder (instead of ½ tsp) + the same salt.

Flat lay of ingredients for eggless Yorkshire pudding with no milk, including self-raising flour, baking powder, salt, unsweetened soy milk, warm water, and oil with a muffin tin, plus a note for substituting plain flour; MasalaMonk.com footer.
Quick ingredient check before you start: this eggless Yorkshire pudding (no milk) batter uses self-raising flour plus a little baking powder for lift, soy milk for reliable browning, warm water for steam, and hot oil in the tin for crisp edges. If you don’t have self-raising flour, the plain flour + baking powder swap keeps the recipe doable without changing the method.

If you only have plain flour, you can still make this work. Use all-purpose flour and increase baking powder to compensate, similar to the “no self-raising flour” workaround used in a popular vegan yorkshire method here: self-raising flour substitute notes for vegan Yorkshire puddings.

Soy milk is the most reliable milk swap for lift and browning. That said, if you’re avoiding soy or simply prefer homemade, these options are useful:


Yorkshire pudding without milk: why the batter has warm water

It’s tempting to pour in plant milk and call it a day, yet warm water has a quiet role here. First, it keeps the batter thin enough to climb. Second, it boosts early steam. Third, it helps the batter hit hot fat without cooling it too much.

Split-screen graphic for eggless Yorkshire pudding (no milk) comparing “plant milk only” batter versus “plant milk + warm water,” explaining that warm water makes a thinner batter, creates more early steam, improves lift, and keeps oil hotter on contact; MasalaMonk.com footer.
Warm water is the quiet advantage in Yorkshire pudding without milk. It keeps the batter thin enough to climb, creates more early steam for lift, and helps the batter hit the hot oil without cooling it down too much. The result is a better rise and crispier edges in eggless, dairy-free Yorkshires.

That combination matters because Yorkshire puddings rise like popovers. Heat sets the outside quickly while steam expands inside, pushing the batter upward. Without eggs, the rise depends on two things: steam expansion and fast-setting walls. Self-raising flour plus a touch of baking powder helps the batter set before it can slump, while a thin, rested batter makes it easier for steam to push upward. If you enjoy the deep explanation, this is a great technical read on what makes a popover-style rise happen: why hot fat and high heat matter for Yorkshire puddings and popovers.

Also Read: Mozzarella Sticks Recipe (Air Fryer, Oven, or Fried): String Cheese, Shredded Cheese, and Every Crunchy Variation


How to make Yorkshire pudding without eggs or milk

This is where things get satisfying. Once you bake a batch that rises, you’ll start trusting the process, because the rules are simple and repeatable.

1) Preheat the oven properly

Set your oven to 220°C (or 200°C fan). Don’t rush this. A hot oven is not a suggestion here; it’s the engine.

Empty metal muffin tin on a baking tray beside an oven thermometer reading 220°C, labeled Step 1 for eggless Yorkshire pudding (no milk): fully preheat the oven because high heat drives the rise, with MasalaMonk.com in the footer.
Step 1 makes everything else work. For eggless Yorkshire pudding without milk, a fully preheated oven (220°C / 200°C fan) is the “rise engine.” If the oven isn’t truly hot before the batter hits the tin, the puddings set too slowly and turn out flatter and softer.

2) Make the batter, then rest it

Whisk self-raising flour, baking powder, and salt in a bowl. Next, pour in soy milk and warm water, then whisk until smooth.

Glass measuring jug of thin Yorkshire pudding batter with a whisk and a timer, showing Step 2 for eggless Yorkshire pudding (no milk): pour like crepe batter and rest 30–60 minutes for a better rise, with MasalaMonk.com in the footer.
Step 2 sets the texture and the lift. Keep the eggless Yorkshire pudding batter thin (closer to crepe batter than pancake batter), then rest it for 30–60 minutes so the flour hydrates and the puddings rise more smoothly once the batter hits hot oil.

You’re aiming for a pourable batter that looks closer to crepe batter than pancake batter. If it feels thick, add a tablespoon of warm water and whisk again. If it looks thin but smooth, you’re in the right zone.

Split comparison of Yorkshire pudding batter consistency for an eggless no-milk recipe: left shows batter pouring thick with the note “too thick = flat,” right shows a thinner pourable batter with “pourable = rises,” plus “aim for crepe-batter pour” and a MasalaMonk.com footer.
Batter thickness is the silent deal-breaker. For eggless Yorkshire pudding without milk, you want a smooth, pourable batter that flows like crepe batter. If it pours thick like pancake batter, it sets too fast and can’t climb—thin it with a tablespoon of warm water and whisk again.

Now let it rest. Ten minutes is the minimum. Thirty minutes is better. An hour is often excellent, particularly if your kitchen is cool. Resting gives the flour time to hydrate, which improves how the batter behaves when it hits hot fat. If you’ve ever noticed how resting changes the texture of other batters, it’s a similar idea—this batter guide for fluffy idlis and crisp dosas captures the concept beautifully: why batter consistency and resting time change the final texture.

3) Heat the tin and oil until it’s fiercely hot

Use a metal muffin tin, ideally a standard 12-hole tin. Add about ¾–1 tsp neutral oil to each hole.

Slide the tin into the oven for 8–10 minutes, until the oil is shimmering and looks almost smoking.

Metal muffin tin filled with small pools of shimmering hot oil, shown as Step 3 for eggless Yorkshire pudding (no milk) with text overlay about preheating 8–10 minutes and a footer that reads MasalaMonk.com.
Step 3 is the whole game: preheat the muffin tin with oil until it shimmers (8–10 minutes). That heat is what creates tall, crisp eggless Yorkshire puddings—pour the batter quickly and avoid opening the oven early so the rise doesn’t collapse.

This is the moment that separates flat “muffin-like” results from true Yorkshire rise. In fact, the most consistent egg-free methods emphasize the same thing: deep metal wells and very hot fat. If you want a technique-focused walkthrough from a dedicated vegan approach, this guide breaks down the common failure points clearly: why vegan Yorkshire puddings fail and how to fix them.

4) Pour quickly, then bake without opening the door

Pull the hot tin out carefully. Working quickly, pour batter into each hole—about one-third to one-half full.

Then return the tin to the oven immediately. Bake 18–22 minutes, until puffed and deeply golden.

Batter being poured from a jug into a hot oiled metal muffin tin for eggless Yorkshire pudding (no milk), labeled Step 4: pour fast, fill each well ⅓–½, and bake 18–22 minutes without opening the oven; MasalaMonk.com footer.
Step 4 is where eggless Yorkshires either rise or collapse. Pour the thin batter into the smoking-hot oil fast, fill each well only about one-third to one-half, then bake 18–22 minutes without opening the oven door. That steady heat is what sets crisp edges and a hollow center.

Resist the urge to check early. Opening the door drops heat, and that can collapse an egg-free rise. Instead, trust the timer for the first 18 minutes. After that, check once, quickly, and let them finish browning.

5) Let them set for crispness

Transfer the puddings to a rack for a minute or two. That tiny pause helps the shell stay crisp rather than steaming itself soft on a plate.

Eggless Yorkshire puddings cooling on a wire rack, with one torn open to show a hollow center; text overlay explains Step 5 for Yorkshire pudding without milk: rest 1–2 minutes so steam escapes and the shell stays crisp, with MasalaMonk.com in the footer.
Don’t skip the rack rest. Even perfect eggless Yorkshire puddings can turn soft if they steam on a plate. Let them sit on a wire rack for 1–2 minutes so moisture escapes—this keeps the edges crisp while the center stays tender and hollow.

Also Read: Sourdough Starter Recipe: Make, Feed, Store & Fix Your Starter (Beginner Guide)


Egg free Yorkshire pudding recipe: the choice of fat

There’s a reason “beef dripping Yorkshire pudding” is a classic phrase: fat contributes flavor and crispness. However, if you’re making a dairy free yorkshire pudding or plant based yorkshire pudding, neutral oil is the easiest and most consistent.

Two ramekins labeled neutral oil and beef dripping shown as “Fat Choice: Flavor vs Flexibility” for eggless Yorkshire pudding (no milk), noting neutral oil is reliable and plant-friendly while beef dripping gives classic roast flavor, with a Yorkshire pudding blurred in the background and MasalaMonk.com in the footer.
Fat choice changes the flavor, not the method. Neutral oil is the most reliable option for eggless Yorkshire pudding without milk—easy, consistent, and plant-friendly. Beef dripping gives that classic roast-dinner taste; just heat it until shimmering hot before you pour in the batter for crisp edges and a better rise.

If you do eat beef, you can absolutely bake Yorkshire pudding in beef dripping using this same method. Still, for most kitchens, oil is simply more practical and keeps the recipe accessible.

If you’re curious about oils and smoke points, focus less on perfection and more on the simple rule: pick a neutral fat that can handle high heat.

Also Read: How to make No-Bake Banana Pudding: No Oven Required Recipe


Plant milk swaps for milk free Yorkshire pudding

Plant milks vary wildly. Some are thin, some are thick, some contain gums, and some brown more easily than others. Because of that, swapping milk can change the rise.

Comparison graphic titled “Best Plant Milk for Rise” for eggless Yorkshire pudding (no milk), showing four glass carafes labeled soy, oat, almond, and coconut drink with notes on lift and texture, plus “use unsweetened” and a MasalaMonk.com footer.
Not all plant milks bake the same. For Yorkshire pudding without milk, unsweetened soy milk tends to give the best rise and browning. Oat milk can be softer, almond milk is lighter (sometimes less dramatic lift), and coconut drink varies—so keep the batter thin and pourable.

Soy milk (best for consistency)

Unsweetened soy milk usually gives the most dependable lift and browning. It behaves closer to dairy milk in structure than many other plant milks.

Oat milk (tender, sometimes softer)

Oat milk can produce a gentler shell, especially if it’s thickened. If you’re using homemade, strain it well and keep it smooth. This version is designed specifically to avoid the gummy texture that can mess with batters: easy homemade oat milk that isn’t slimy.

Almond milk (lighter taste, sometimes less dramatic rise)

Almond milk works, particularly if you don’t mind a slightly softer set. If you make it at home, keep it simple and unsweetened: how to make almond milk at home.

Coconut milk (use thoughtfully)

This is where many dairy-free cooks get tripped up. Canned coconut milk is rich and heavy; it can make the batter thicker and reduce lift. Coconut milk beverage is lighter and behaves closer to other plant milks. If you’re unsure which you have, this explainer helps: coconut milk basics and how it differs by type.


Best pan for Yorkshire pudding: what matters more than brand

You’ll see endless discussion about the “best yorkshire pudding tin,” and brands do exist for everything from stainless steel yorkshire pudding tins to non stick yorkshire pudding trays. Still, before you get pulled into product debates, focus on the features that genuinely affect your bake.

Metal beats silicone for lift

A metal tray heats quickly and transfers heat into the oil and batter fast. Silicone, on the other hand, is convenient but slower to heat, which often leads to pale, soft puddings. Silicone can still work, particularly for casual batches or smaller ovens, but it’s not ideal when you want tall crowns.

Side-by-side comparison of eggless Yorkshire puddings baked in a metal muffin tin versus a silicone tray: the metal pan batch is taller and crispier, while the silicone batch is paler and softer; text overlay says “Best Pan: Metal Wins” with MasalaMonk.com in the footer.
Pan choice changes the rise. For eggless Yorkshire pudding (no milk), a heavy metal tin heats faster and helps the batter climb into taller, crispier walls. Silicone trays can work, but they usually bake up paler and softer because they don’t transfer heat as aggressively.

Deep wells matter

A deep muffin pan or popover pan gives batter a vertical runway. That’s why popover pans and deeper yorkshire pudding trays often produce better rise than shallow tins.

Infographic titled “Pan Types That Actually Matter” for eggless Yorkshire pudding (no milk), showing a 12-hole muffin tin, 6-hole Yorkshire tin, popover pan, roasting tin for tray-baked slices, and a cast iron skillet for a giant Yorkshire, with MasalaMonk.com in the footer.
Your pan choice changes the shape of your Yorkshire more than any brand name. A 12-hole muffin tin is the reliable everyday option, a 6-hole Yorkshire tin makes bigger puddings, a popover pan pushes extra height, a roasting tin gives a sliceable tray-bake, and a cast iron skillet is perfect for a giant Yorkshire you can cut into wedges.

Common tin types you’ll see (and what they’re good for)

  • A standard muffin tin (often 12 holes) is a great everyday choice.
  • A 6 hole Yorkshire pudding tin gives larger puddings with more dramatic size.
  • A 4 hole yorkshire pudding tin is perfect if you want oversized puddings without committing to a whole tray.
  • A popover pan is a strong option when you want extra height.
  • A roasting tin works for a large tray yorkshire pudding, especially if you like slicing and sharing.

As for materials, stainless steel yorkshire pudding trays and heavy-gauge non-stick tins both work well. Cast iron is also excellent, although it behaves differently: it holds heat for a long time, so you get strong crispness but less flexibility once it’s preheated.

If you own premium cookware like Le Creuset, you can use it; however, you don’t need it. A sturdy pan that heats evenly is enough.

Also Read: Chicken Adobo — Step-by-Step Recipe — Classic Filipino Adobong Manok


Cast iron Yorkshire pudding and giant Yorkshires

A cast iron Yorkshire pudding is the easiest way to make one big, dramatic Yorkshire that you can slice like bread. It bakes up with a bold rise, deeply browned edges, and a center that stays soft enough to soak up gravy.

Giant eggless Yorkshire pudding baked in a cast iron skillet with a slice removed to show the hollow center and crisp edges; text overlay reads “Giant Yorkshire in Cast Iron” with tips to preheat skillet and oil, pour batter, and bake deep golden; MasalaMonk.com footer.
Want one dramatic centerpiece instead of individual cups? A cast iron skillet makes a giant eggless Yorkshire pudding with deeply browned, crisp edges and a hollow center you can slice and fill like a savory bowl. Preheat the skillet and oil until shimmering hot, pour in the rested batter, then bake until deep golden for the best rise.

Start by heating your oven to 220°C (200°C fan). Put a cast iron skillet inside to preheat. Once the oven is hot, carefully remove the skillet, add 1–2 tablespoons of neutral oil, then return it to the oven for 8–10 minutes until the oil is shimmering hot. Pour in your rested batter and immediately put the skillet back into the oven. Bake until the Yorkshire is well-risen and a deep golden brown.

Giant Yorkshires work brilliantly as a centerpiece for roast dinners and for extra-large Yorkshire pudding meals. Slice into wedges and serve alongside gravy, or keep it whole and fill it like a savory bowl with saucy vegetables, beans, or stew.

Also Read: Sweetened Condensed Milk Fudge: 10 Easy Recipes


Mini Yorkshire puddings, miniature Yorkshires, and party food bites

Miniature yorkshire puddings are perfect for parties because they’re easy to fill and serve. Moreover, they feel special without requiring extra effort.

To make mini yorkshires, use the same batter, yet fill each well slightly less. Because the batter layer is thinner, they cook faster. Start checking at around 15–18 minutes.

From there, you can turn them into yorkshire pudding party food in dozens of ways:

Nine mini eggless Yorkshire puddings (no milk) arranged in a grid and filled with three toppings—mushroom-onion gravy, roasted vegetables in gravy, and a thick chickpea/bean curry—with text overlay “Mini Yorkshires = Party Food,” bake time 15–18 minutes, and MasalaMonk.com in the footer.
Mini Yorkshires are the easiest party upgrade. Bake mini eggless Yorkshire puddings (no milk) until deeply golden (about 15–18 minutes), then fill them with thick, spoonable toppings so they stay crisp—mushroom-onion gravy, roasted veg + gravy, or a thick chickpea/bean curry all work beautifully.
  • Fill with thick gravy and roasted vegetables
  • Add a spoon of saucy beans
  • Top with spiced mushrooms
  • Use them as a base for small bites at a holiday table

If you’re serving meat, mini roast beef and yorkshire puddings are a classic combination. If you’re vegetarian, you can do the same structure with roasted vegetables and onion gravy.

Also Read: Sourdough Recipe: 10 Easy Bread Bakes (Loaves, Rolls & Bagels)


Yorkshire pudding pies, stuffed Yorkshires, and “Yorkshire pudding pies” dinners

The phrase yorkshire pies can mean different things depending on who’s talking: sometimes it’s a roast dinner baked into a giant pudding, and sometimes it’s mini puddings stuffed like a canapé. Either way, the idea is the same: the Yorkshire becomes the crust.

Split image of two large stuffed eggless Yorkshire puddings (no milk): one filled with mushroom-onion gravy and roasted vegetables, the other filled with thick rajma/chickpea masala; text overlay says “Stuffed Yorkshires = Dinner” and “The Yorkshire becomes the crust,” with MasalaMonk.com in the footer.
Stuffed Yorkshires turn this recipe into a full meal. Bake larger eggless Yorkshire puddings (no milk), then fill with thick, spoonable fillings so they stay crisp—mushroom-onion gravy + roasted veg for roast-dinner vibes, or rajma/chickpea masala for a cozy curry-style dinner. Think of it like an edible bowl: the Yorkshire becomes the crust.

For a stuffed yorkshire pudding dinner, bake large puddings in a 6-hole tin, then fill them with:

  • roasted vegetables and gravy
  • mushrooms and onions
  • thick stews or bean-based sauces

For an easy, deeply satisfying option that pairs beautifully with the crisp edges of eggless yorkshires, try a spoonable curry. Rajma works especially well: Punjabi-style rajma curry. Likewise, a coconut-based stew creates a lighter but still comforting pairing: Kerala-style coconut vegetable stew.

You can also go the “Yorkshire pudding pies” route by baking a giant yorkshire pudding in a roasting tin, then piling on your filling and slicing it like a savory pie.

Also Read: Peanut Butter Fudge: Recipes & Guide (8 Methods + Easy Variations)


Vegetarian Yorkshire pudding and plant based Yorkshire pudding dinners

An eggless batter is already friendly for many vegetarian tables. Still, if you want a fully plant based Yorkshire pudding dinner, your fillings matter.

Instead of thinking “roast beef or nothing,” lean into what makes yorkshires great: they love sauce. They love savoriness. They love contrast.

Infographic titled “Best Plant-Based Pairings” for eggless Yorkshire pudding (no milk), showing one plain Yorkshire pudding beside three bowls labeled mushroom–onion gravy, lentil stew, and chickpea masala, with the note “Thick, spoonable sauces keep Yorkshires crisp” and MasalaMonk.com in the footer.
Yorkshires love sauce—just keep it thick. For a plant-based dinner with eggless Yorkshire pudding (no milk), choose spoonable pairings that won’t steam the shell soft: mushroom–onion gravy for roast-dinner vibes, lentil stew for hearty comfort, or chickpea masala for a cozy curry-style meal.

A few plant-forward ideas:

  • Mushroom-onion gravy plus roasted carrots and potatoes
  • Lentil stew ladled into large yorkshires
  • Chickpea masala spooned into mini puddings for a snacky dinner

If you want inspiration for hearty, bowl-friendly soups, these collections can help you build a whole meal around your puddings: vegan lentil soup recipes and yellow moong dal vegan soups.


Eggless Yorkshire pudding with milk: a quick adaptation

Sometimes the need is narrower: eggs are the issue, but milk is fine. In that case, eggless Yorkshire pudding with milk is an easy variation.

Simply replace soy milk with dairy milk. Keep warm water because it helps maintain the thin batter and steam. The rest of the method stays the same: hot oil, hot oven, quick pour, no peeking.

This adaptation is particularly useful when you’re baking for someone with an egg allergy but not dairy intolerance.

Also Read: 10 Vegan Chocolate Cake Recipes (Easy, Moist, & Dairy-Free)


Lactose free Yorkshire pudding and dairy free Yorkshires: what changes, what doesn’t

Lactose free and dairy free sound similar, but they aren’t identical. Lactose-free dairy milk still behaves like dairy milk in baking, so it’s usually an easy swap. Dairy-free, by contrast, shifts you into plant milk territory, which is where thickness and additives can change the rise.

If you’re deciding which dairy alternatives to keep on hand, this overview can help you weigh options: dairy-free milk alternatives and how they differ.


Yorkshire pudding in an air fryer: possible, but choose your setup carefully

Air fryer yorkshire pudding is doable, but it’s fussier than oven-baked. The main challenge is heat stability: you need the oil hot and the cooking environment consistent, which can be harder in smaller baskets.

Air fryer setup for eggless Yorkshire pudding (no milk) showing a small metal muffin tin inside an air fryer basket with text overlay: “Use a metal tin that fits • preheat 5–8 min • bake until deep golden,” and MasalaMonk.com in the footer.
Air fryer Yorkshires can work—setup is everything. Use a metal tin that fits your basket and preheat both the air fryer and the tin before adding oil and batter. Then bake until deep golden (not just set), because eggless Yorkshire pudding without milk needs extra browning to stay crisp.

If you want to try it, use a metal tin that fits your air fryer basket and preheat both the machine and the tin. Keep the batter thin. Then cook until deeply browned, not just “set.” Pale egg-free yorkshires tend to turn soft quickly.

Appliances like Ninja are powerful, but even the best air fryer still behaves differently than a full oven. In other words, treat it as a variation, not the gold standard.

Also Read: Baked Ziti Recipe Collection: 15 Easy Variations


Yorkshire pudding tray talk: silicone, non-stick, stainless steel, and everything in between

If you’ve ever gone down the rabbit hole of yorkshire pudding trays, you’ve seen it all: 6 cup yorkshire pudding trays, 12 hole yorkshire pudding tins, ceramic yorkshire pudding trays, shallow yorkshire pudding tins, extra deep yorkshire pudding trays, disposable yorkshire pudding trays, even niche options marketed as air fryer yorkshire pudding trays.

Here’s the practical truth: a heavy, deep metal tin wins most of the time.

Non-stick can be helpful, particularly for easy release, but it isn’t essential if you use enough hot fat. Stainless steel tins heat well, too. Ceramic is slower to heat and tends to soften the crispness. Silicone is the most convenient but least punchy.

Brands exist everywhere—Tefal, MasterClass, and store lines from Argos, among others—yet your method matters more than a logo.

Also Read: Vegan Mayo Recipe Guide: 5 Plant-Based Mayonnaise


Golden, crisp, and not flat: troubleshooting eggless Yorkshire pudding

When egg-free yorkshires fail, they usually fail in predictable ways. Thankfully, the fixes are equally predictable.

Troubleshooting infographic for eggless Yorkshire pudding (no milk) showing three problems—flat, pale + soft, and soggy—with fixes: heat oil more, keep batter thin, don’t open the oven early, bake longer to deep golden, and cool on a rack 1–2 minutes; MasalaMonk.com footer.
If your eggless Yorkshires didn’t behave, this is the fastest reset. Flat usually means the oil wasn’t hot enough, the batter was too thick, or the oven door was opened early. Pale + soft needs more bake time (deep golden = crisp). Soggy is almost always trapped steam—cool on a rack for 1–2 minutes and don’t stack.

When the puddings don’t rise

This is almost always one of the following:

The oil wasn’t hot enough.
It needs to be shimmering-hot before batter touches it.

The batter was too thick.
Thin it slightly with warm water. A thick batter sets too fast and can’t climb.

The pan didn’t heat properly.
Metal pans help. Deep wells help. Preheating helps.

The oven temperature was too low or unstable.
Give your oven time to fully preheat. Don’t open the door early.

If you want a detailed breakdown of common failure points from a technique-driven vegan approach, this guide is worth reading once: a detailed vegan Yorkshire pudding method with common fixes.

When they’re pale and soft

Browning is not just about looks. It’s about texture.

Bake longer. Aim for deeper color. Also, cool on a rack so steam escapes.

When they taste bland

Increase salt slightly. Also, consider a pinch of mustard powder, black pepper, or kala namak if you like that subtle savory “eggy” note.

Also Read: Potato Salad Recipe: Classic, Russian, German, Vegan & More


Vegan gluten free Yorkshire pudding recipe notes (if you need it)

Sometimes the ask is bigger: vegan and gluten free yorkshire pudding, gluten free vegan yorkshire puddings, or dairy and gluten free yorkshire pudding. The truth is that gluten-free versions can be done, but they’re more sensitive because structure shifts again.

Infographic titled “Gluten-Free + Vegan: What to Expect” for eggless Yorkshire pudding (no milk), with three cards: Structure (no gluten = more sensitive rise), Batter (keep it thinner than you think), and Bake (oil hotter, bake longer to dry the shell), plus MasalaMonk.com in the footer.
If you need gluten free vegan Yorkshire puddings, expect a more sensitive rise. Keep the batter thinner than you think, get the oil extra hot, and bake longer so the shell dries and stays crisp. This quick guide helps you adapt the eggless, no-milk method without guessing your way through a batch.

If you want to keep this post focused, you can treat gluten-free as a separate recipe later. Still, if you need a quick direction right now, most successful approaches use a blend of gluten-free flour plus starch, while keeping the batter thin and the oil extremely hot.

A useful example of the gluten-free plus vegan approach is here: a gluten-free vegan Yorkshire pudding method. Treat it as a reference, then adjust based on how your batter behaves.

Also Read: High Protein Overnight Oats | 5 Recipes (Low Calorie, Vegan, Bulking & More)


Keto Yorkshire pudding and “free from” variations

Keto yorkshire pudding is usually built around low-carb flours and often relies on eggs for structure, which doesn’t align with an eggless goal. If you want egg-free and keto together, you’ll likely be experimenting more, and results can vary.

Infographic titled “Keto vs Free From: What to Expect” for eggless Yorkshire pudding (no milk), comparing keto Yorkshire options (often egg-based and more experimental if egg-free) versus store-bought “free from” products (still check labels for egg and milk; bake until deep golden for crispness), with MasalaMonk.com in the footer.
Quick reality check before you bake: most keto Yorkshire pudding recipes rely on eggs for structure, so an egg-free keto version usually takes more experimenting and results can vary. Meanwhile, “free from” store-bought Yorkshires still need label-reading—egg and milk can show up in surprising places. If you want the most reliable crisp, dairy-free, eggless Yorkshire pudding, baking from scratch keeps everything in your control.

On the other hand, “free from Yorkshire puddings” often refers to store-bought options that avoid specific allergens. If you’re baking from scratch, you get more control and usually better texture.

Also Read: Keto pancakes that actually taste like pancakes


Make-ahead eggless Yorkshire puddings: batter, storage, and re-crisping

If you’re cooking for a holiday, a roast, or a crowd, make-ahead matters.

Make-ahead and re-crisp infographic for eggless Yorkshire pudding (no milk) with three steps: rest batter 30–60 minutes (or chill), bake ahead best same day, and re-crisp in a hot oven for 3–6 minutes while avoiding the microwave; MasalaMonk.com footer.
Holiday-friendly plan: Rest the eggless no-milk batter (30–60 minutes, or chill it), bake the Yorkshires earlier in the day, then re-crisp in a hot oven for 3–6 minutes right before serving. Skipping the microwave keeps the shell crisp instead of turning it soft.

Can you rest batter longer?

Yes. In fact, resting longer often improves consistency. Refrigerating batter for several hours can work too, although you’ll want to bring it closer to room temperature before pouring so it doesn’t chill the oil on contact.

Can you bake ahead?

You can, but they’re best fresh. Still, you can bake them earlier in the day and reheat in a hot oven to revive crispness. Keep them spread out rather than stacked so steam doesn’t soften them.

How to reheat

A hot oven for a few minutes usually brings back the shell. Avoid microwaving if you can; it tends to soften the structure.

Also Read: Béchamel Sauce for Lasagna: Classic, Vegan & Ricotta Sauce Recipe


Ready made Yorkshire pudding, frozen Yorkshires, and premade options

Sometimes you don’t want a project. Maybe you’re building a meal fast, or maybe you want a backup plan.

Ready made yorkshire pudding and frozen yorkshire pudding options exist in many places. In the UK, brands like Aunt Bessie’s are widely recognized, and supermarkets like Marks and Spencer, Sainsbury’s, Asda, and Ocado often carry variations—sometimes including giant yorkshire pudding trays or mini yorkshire puddings frozen. In the US, stores such as Whole Foods Market or Publix may stock British-style items seasonally or through specialty ranges, depending on location and time of year.

Those premade options can be handy, especially for a holiday table. Even so, if you’re after a true eggless yorkshire pudding, label-reading matters because many premade products still contain egg and milk.

Pinterest-style graphic for eggless Yorkshire pudding (no milk) showing a frozen Yorkshire puddings pack and an ingredient label card highlighting “EGG” and “MILK (WHEY),” with text advising to check labels for egg, milk, and whey; MasalaMonk.com in the footer.
Buying frozen Yorkshires as a shortcut? Check the label first. Many ready-made Yorkshire puddings still contain egg, milk, or whey—even when they look “simple.” If you need truly egg-free or dairy-free, scan the ingredients before you buy, or bake this no-milk eggless version so you control what’s inside.

If you do buy frozen puddings, crisp them well in a hot oven. Most of the disappointment people feel with store-bought yorkshires comes from under-baking and pale reheating.

Also Read: Vegan French Toast: 6 Easy Recipes (Pan, Air Fryer, GF & High-Protein)


Serving ideas that make these feel like a full meal

Yorkshire puddings love saucy foods. That’s true whether you’re doing a classic roast, a vegetarian dinner, or a plant-based spread.

Two of my favorite pairings for a dairy free yorkshire pudding dinner are:

If you want an external gravy reference that fits a traditional roast dinner mood, these are reliable:

Drinks that go beautifully with eggless Yorkshire puddings

Yorkshires are often served at dinner, yet they also work at brunch, as a snack board, or as part of a cozy winter spread. Drinks can set the mood in a way that feels effortless.

For a warm pairing, try:

If you’re hosting adults and want a “holiday table” drink, you can also lean into cocktails:


A slightly more advanced variation: extra lift with aquafaba

If you’ve baked the base version and want taller crowns, aquafaba can help. It’s the liquid from canned chickpeas, and it behaves surprisingly well in egg-free baking when paired with heat and a thin batter.

Infographic for eggless Yorkshire pudding (no milk) titled “Extra Lift: Add Aquafaba,” showing bowls of chickpeas, aquafaba liquid, and lightly whipped aquafaba with instructions “3 tbsp aquafaba • whisk lightly • fold in,” plus MasalaMonk.com in the footer.
Optional level-up for taller crowns: aquafaba (the liquid from canned chickpeas) can add extra lift to eggless Yorkshire pudding without milk. Whisk a small amount until lightly foamy, fold it into the rested batter, then bake exactly the same way—hot oil, quick pour, and no opening the oven early.

A detailed approach that many cooks follow is here: an aquafaba-based vegan Yorkshire pudding method for extra lift.

You don’t need aquafaba to succeed, though. Think of it as the “level up” variation once you’ve nailed the foundation.

Also Read: How to Cook Tortellini (Fresh, Frozen, Dried) + Easy Dinner Ideas


A gentle closing note (because this recipe is worth repeating)

Eggless yorkshire pudding can feel like a contradiction the first time you hear it. Nonetheless, once you understand what really drives the rise—hot fat, a thin rested batter, and steady oven heat—it stops feeling mysterious and starts feeling almost inevitable.

Bake a batch on a regular day first, when you’re not under pressure. Then, once you’ve seen them lift, you can confidently scale up for holidays, turn them into miniature yorkshire puddings for party food, bake a giant yorkshire pudding tray for a centerpiece dinner, or keep the batter ready for a quick comfort meal that doesn’t rely on eggs or dairy at all.

And if you’re experimenting, keep the method steady while you change one variable at a time. That way, every batch teaches you something useful—plus, you still get Yorkshire puddings at the end, which is rarely a bad outcome.

Also Read: 19 Essential Kitchen Tools That Make Cooking Easier

FAQs about No-Milk Eggless Yorkshire pudding

1) Can I make eggless Yorkshire pudding with no milk and still get a good rise?

Yes. Eggless Yorkshire pudding (no milk) rises when three things line up: a thin batter, very hot fat in the tin, and a fully preheated oven. When those are right, the batter lifts up the sides and sets into a crisp shell with a tender center.

2) What’s the difference between “dairy free Yorkshire pudding” and “lactose free Yorkshire pudding”?

Dairy-free means no dairy ingredients at all (no milk, no butter, no whey). Lactose-free can still use dairy milk that has had lactose removed. In practice, lactose-free behaves like regular milk in baking, whereas dairy-free relies on plant milk and can change browning and texture.

3) Which plant milk works best for Yorkshire pudding without milk?

Unsweetened soy milk is the most reliable for structure and browning. Oat milk can be softer depending on thickness, while almond milk usually tastes lighter but may rise a bit less. Whichever you choose, use unsweetened milk and keep the batter pourable.

4) Can I make eggless Yorkshire pudding with milk if I’m only avoiding eggs?

Absolutely. Use the same method, keep the batter thin, and swap the plant milk for regular milk. The heat and timing stay the same, so you still get crisp edges and a hollow center.

5) Why did my Yorkshire pudding without egg turn out flat?

Most flat egg-free Yorkshires come from one issue: the fat wasn’t hot enough when the batter went in. Another common cause is batter that’s too thick to climb. Finally, opening the oven too early can collapse the rise before the shell sets.

6) Why are my milk free Yorkshire puddings soggy?

Sogginess usually means they didn’t bake long enough to set a firm shell, or they steamed on a plate instead of cooling briefly on a rack. Also, overfilling the wells traps moisture and prevents crisp edges.

7) How long should I rest the batter for no egg Yorkshire pudding?

Rest at least 10 minutes. For steadier results, rest 30–60 minutes. Resting hydrates the flour and helps the batter expand more smoothly when it hits hot oil.

8) What pan is best for eggless Yorkshire puddings: muffin tin, popover pan, or Yorkshire pudding tin?

A metal muffin tin or popover pan gives the most consistent rise because it heats fast and creates strong oven spring. A 6 hole Yorkshire pudding tin makes larger puddings, though it may need extra baking time. Silicone trays are convenient, yet they often brown less and rise less because they don’t transfer heat as aggressively.

9) Can I use a cast iron Yorkshire pudding pan for a giant Yorkshire?

Yes. Cast iron holds heat extremely well, so it’s ideal for a giant Yorkshire pudding or an extra large Yorkshire pudding that you slice into wedges. Preheat the skillet with oil until shimmering hot, then pour the batter and bake until deeply golden.

10) What’s the best oil for Yorkshire puddings if I’m not using beef drippings?

Use a neutral high-heat oil such as sunflower, rapeseed/canola, or vegetable oil. The key is getting it hot enough before adding batter. For traditional flavor, beef dripping works, yet it won’t be suitable for vegan or plant based Yorkshire pudding.

11) Can I make Yorkshire pudding in beef dripping with an eggless batter?

Yes, the cooking method stays the same. The batter can be egg-free while the fat is beef dripping. Just remember it won’t be vegan or vegetarian.

12) Can I cook Yorkshire pudding in an air fryer?

You can, provided you use a metal tin that fits and you preheat both the air fryer and the tin well. Because air fryers vary, timing will differ; therefore, focus on deep browning for crispness rather than stopping as soon as they look set.

13) Is there a reliable gluten free vegan Yorkshire pudding option?

There are workable versions, but they’re more sensitive because gluten-free flour blends behave differently. A thinner batter, very hot oil, and a longer bake to dry the shell are especially important for gluten free vegan Yorkshire puddings.

14) How do I make mini Yorkshire puddings for party food?

Use the same batter, then fill each well slightly less than usual so they bake faster and stay crisp. Miniature Yorkshire puddings are perfect for fillings like gravy, mushrooms, or saucy vegetables.

15) What are “Yorkshire pudding pies” and “stuffed Yorkshire pudding” meals?

Yorkshire pudding pies usually mean a large Yorkshire baked in a tray or skillet and served with a generous filling, almost like a crust. Stuffed Yorkshire pudding is the same idea in individual form: bake larger puddings, then fill them with roast-style sides or thick, spoonable sauces.

16) Can I buy vegan Yorkshire pudding or pre made Yorkshire puddings instead?

In some places you’ll find ready made Yorkshire pudding, frozen Yorkshires, or pre made Yorkshire puddings. However, many contain egg or milk, so check ingredients carefully if you need egg free or dairy free.

17) How do I reheat eggless Yorkshire puddings so they stay crisp?

Reheat in a hot oven until the edges feel dry and crisp again. Avoid microwaving because it softens the shell. For best texture, reheat them spaced out so steam can escape.

18) How many Yorkshire puddings does this recipe make, and can I scale it?

A standard batch typically makes about 12 in a muffin tin of eggless yorkshire pudding, depending on how full you pour. You can scale up easily; nonetheless, bake in batches so the tin and oil stay properly hot for each round.

19) What’s the simplest “perfect eggless Yorkshire pudding mix” approach for beginners?

Keep it basic: self-raising flour, baking powder, salt, plant milk, warm water. Then focus on the method—rest the batter, heat the oil until shimmering, pour quickly, and bake without opening the oven early.

20) Can I make Yorkshire pudding for two people without wasting batter?

Yes. Make a smaller batch by halving the ingredients, or bake a full batch and reheat extras later. Even when scaled down, the method remains identical: thin batter, hot fat, and steady oven heat.

Posted on Leave a comment

Frozen Chicken Wings in Air Fryer (No Thaw) — Crispy From Frozen + Time & Temp

Split “before and after” cover image: a frosty frozen chicken wing on the left and a golden, crispy air-fried chicken wing on the right, separated by a thin vertical line on a smooth black background. Text overlay reads “Frozen Chicken Wings in Air Fryer” and “From Frozen → Crispy,” with “MasalaMonk.com” in the footer.

Cooking frozen chicken wings in an air fryer should feel effortless. Still, the first time you try wings straight from the freezer, they can come out pale, soggy, or oddly chewy—like the outside never decided whether it wanted to crisp or steam. Fortunately, the fix isn’t complicated. In fact, once you understand what’s happening inside the basket, you can turn almost any bag of frozen wings into crispy, juicy wings you’d happily serve at a party.

Because this method starts with frozen wings, you won’t need thawing or any fussy steps that only work in one specific model. Along the way, you’ll see how to handle raw frozen chicken wings in the air fryer versus pre cooked wings in the air fryer, how to get time and temperature right without second-guessing, and how to finish with Buffalo, hot, garlic-parm, or dry-rub flavors without sacrificing crispiness.

Quick answer (no thaw): cook frozen wings in 2 stages for crisp skin.

  • Raw frozen wing sections (drumettes + flats): 360°F / 182°C for 14–16 min, then 400°F / 205°C for 8–12 min (total 22–28 min). Cook to 165°F / 74°C in the thickest piece.
  • Fully cooked frozen wings: 360°F / 182°C for 10–12 min, then 400°F / 205°C for 6–10 min (total 16–22 min).

Tip: If wings are stuck together, run the first stage for 6–8 minutes, then separate and continue.

If you ever want a “fresh wings” method with extra technique and seasoning ideas, you’ll also like this related MasalaMonk recipe: Air Fryer Chicken Wings. It complements what you’re doing here, especially when you’re working with thawed wings in the air fryer.

Also Read: Mozzarella Sticks Recipe (Air Fryer, Oven, or Fried): String Cheese, Shredded Cheese, and Every Crunchy Variation


Start here: what kind of frozen wings do you have?

Before you press Start, it helps to identify what’s in the bag. This one detail decides your timing, your doneness check, and your crisping strategy.

Start-here guide for frozen wings in an air fryer: check the bag for “raw/uncooked” vs “fully cooked.” Raw wings use a 2-stage cook (360°F then 400°F) and must reach 165°F/74°C. Fully cooked wings use the same two-stage method with less time for reheating and crisping.
Not sure if your frozen wings are raw or fully cooked? This one check saves you from pale, soggy wings (or undercooked chicken). Look for “uncooked/raw” vs “fully cooked” on the bag, then use the same 2-stage air-fryer method: start at 360°F to de-ice/render, finish at 400°F to crisp. Raw wings must hit 165°F / 74°C in the thickest piece. Save this graphic for quick reference and share it for your next wing night.

Raw frozen chicken wings

These are uncooked wings that have been frozen. They might be labeled “uncooked,” “raw,” or “ready to cook.” They must reach a safe internal temperature of 165°F / 74°C in the thickest part. For a clear, authoritative reference, the USDA FSIS safe temperature chart is the standard. If the packaging is gone and you truly can’t tell, treat them like raw: use the raw timing, then confirm 165°F / 74°C in the thickest piece before serving.

Pre-cooked frozen wings

These are already cooked, then frozen. They might say “fully cooked” or “ready to heat.” Your goal becomes reheating and re-crisping, not cooking through from raw. As a result, they usually finish faster, and they’re more forgiving—unless they’re heavily sauced, which can soften the skin if you don’t crisp first.

Split comparison graphic showing bagged frozen chicken wings: raw/uncooked on the left and fully cooked/ready-to-heat on the right. It lists a two-stage air fryer method. Raw wings: 360°F for 14–16 minutes, then 400°F for 8–12 minutes (cook to 165°F). Fully cooked wings: 360°F for 10–12 minutes, then 400°F for 6–10 minutes. Rest 2–3 minutes. MasalaMonk.com footer.
Not sure if your frozen wings are raw or fully cooked? This one detail changes everything. Use this quick visual to pick the right air fryer time + temperature: raw wings need a longer first stage and must hit 165°F / 74°C, while fully cooked wings finish faster because you’re mainly reheating + crisping. Save it for busy nights, then follow the full method below for the crispy two-stage finish (and Buffalo, hot, garlic-parm, and dry-rub options). If this helped, save/share/pin it so you’ve got the timings when you need them.

Sauced “Buffalo” or “hot wings” frozen

Some bags are fully cooked and pre-sauced. They’re convenient, although the sauce can trap moisture. That doesn’t mean you’re stuck with soggy wings—rather, it means you’ll do a crisp stage first, then sauce again at the end (or at least “reset” the sauce so it clings).

Wingettes/drumettes vs whole wings

Frozen wing sections (flats and drumettes) cook more evenly than whole wings. Whole wings can still work, although they often need a little more time because the thickest parts are larger and the joints hold moisture.

One more reassurance, since it comes up constantly: cooking from frozen is considered safe when done correctly, and the USDA discusses safe defrosting methods and the “cook without thawing” approach in its guide, The Big Thaw.

Bagged frozen wings (premade): what to check first

If you’re using a store bag (including Perdue), check the label for “fully cooked” vs “uncooked/raw.” That one line decides everything.

• If fully cooked: follow the fully cooked times (your goal is heat-through + crisp).
• If raw/uncooked: treat them like raw chicken and cook to 165°F / 74°C in the thickest piece. Cook raw wings to 165°F / 74°C in the thickest piece; a thermometer is the most reliable check.

If the bag is heavily sauced, crisp first and re-sauce at the end so the skin doesn’t go soggy.

Also Read: Sourdough Starter Recipe: Make, Feed, Store & Fix Your Starter (Beginner Guide)


The core method: how to cook frozen chicken wings in an air fryer so they turn crispy

There’s a reason “crispy frozen chicken wings” can be elusive: frozen wings release water as they heat, and that water turns into steam. Steam is the enemy of crisp skin. So the method that works best is a deliberate two-stage approach: first you melt away the surface ice and render fat, then you crank the heat to drive off moisture and crisp the skin.

This is the foundation for almost every variation in this post—whether you’re making frozen buffalo wings in the air fryer, air fried wings from frozen with dry rub, or even an air fryer recipe for frozen chicken wings that you toss in garlic-parm.

Step 1: Preheat the Air Fryer

Preheat to 360°F / 182°C for 3–5 minutes.

Step 1 graphic for frozen chicken wings in an air fryer: a black air fryer shows 360°F with “Preheat,” raw frozen wing sections sit on a tray, and the overlay reads “360°F / 182°C for 3–5 minutes” plus “Hot basket = less steam → crispier wings,” with MasalaMonk.com in the footer.
Step 1 (Preheat): Start frozen chicken wings at 360°F / 182°C for 3–5 minutes so the basket is already hot when the wings go in. That quick preheat reduces early steam (the #1 reason frozen wings turn pale or soggy), which sets you up for crisp skin in the final 400°F stage—whether you’re cooking raw frozen wings or reheating fully cooked frozen wings. Save/share this step for a repeatable frozen-wings routine.

Even if your air fryer “doesn’t require” preheating, a short preheat improves consistency. It gives you a predictable starting point, so your first minutes aren’t spent slowly warming the basket while the wings leak water.

Step 2: Arrange wings in a single layer

Put the wings in the basket in one layer. If you have a big pile, cook in batches. Crowding is the fastest way to turn crisping into steaming.

Split comparison photo of frozen chicken wings in an air fryer basket: left side shows wings piled/crowded with “NO” label and note “Crowding = steam”; right side shows wings spaced in a single layer with note “Airflow = crisp.” Headline reads “Step 2: Single Layer,” with tip “If you have a pile, cook in batches,” and MasalaMonk.com footer.
Single layer is the difference between crispy wings and steamy wings. If your frozen wings come out pale or soggy, it’s usually crowding—not your air fryer. Use this quick visual: pile = trapped steam, space = airflow + crunch. Cook in batches if needed (it’s faster than re-cooking soft wings later). Keep going for the exact time + temperature stages that turn frozen wings into real “game-day crisp.”

If you’ve ever had a batch come out uneven—some wings crisp, others soft—this is usually why. For a helpful deep dive on airflow issues (and other common problems), you can check MasalaMonk’s guide on air fryer mistakes to avoid.

Step 3: First cook at 360°F / 182°C (the “de-ice + render” stage)

Cook at 360°F / 182°C:

  • Pre cooked chicken wings in air fryer (from frozen): 10–12 minutes
  • Raw frozen chicken wings in air fryer: 14–16 minutes
Three-panel photo shows frozen chicken wings in an air fryer basket during Step 3 at 360°F / 182°C. Left: wings still icy and clumped. Middle: tongs separating wings after 6–8 minutes if stuck. Right: wings spaced in a single layer. Overlay lists timing: raw frozen wings 14–16 minutes; fully cooked frozen wings 10–12 minutes; flip or shake halfway. Footer reads MasalaMonk.com.
Step 3 is where frozen wings stop “steaming” and start getting on track for crisp skin. Cook at 360°F / 182°C to melt surface ice and begin rendering fat—then separate any stuck wings at 6–8 minutes so airflow can hit every side. Use the timing that matches your bag (raw: 14–16 min; fully cooked: 10–12 min) and flip/shake halfway. This sets you up perfectly for the high-heat crisp stage next.

Halfway through, open the basket, separate any wings that have frozen together, then flip or shake gently.

If you see a lot of water collecting in the bottom, that’s normal. If your model has a pull-out drawer, carefully empty the liquid once during the first stage, then continue. It helps to carefully drain it off if your air fryer design makes that easy. Otherwise, the wings sit in moisture and soften instead of browning.

Step 4: Dry the surface quickly

This step sounds small, yet it changes everything.

Split-screen instructional photo for frozen chicken wings in an air fryer. Left: air fryer basket with frozen drumettes and pooled water underneath after the first cook stage. Right: wings on a paper-towel-lined plate being gently blotted with tongs. Text overlay explains: less surface water = less steam = crisp skin; “drain pooled water if needed” and “blot, don’t press.” MasalaMonk.com in footer.
Step 4 is the crunch “switch.” Frozen wings release water as they heat—if that moisture stays on the surface, it turns into steam and the skin stays soft. After the first 360°F stage, quickly drain any pooled water, then pat/blot the wings for 30 seconds (don’t press). Now your 400°F crisp stage actually crisps. This tiny move is the difference between rubbery freezer wings and crispy frozen chicken wings in the air fryer—especially for drumettes, wing sections, and pre-cooked bagged wings.

Pull the basket and use tongs to move wings onto a plate lined with paper towels. Pat the top lightly. You’re not trying to crush anything; you’re simply removing the layer of moisture that would otherwise re-steam in the crisp stage.

If your wings are pre-sauced, you can still blot gently. You’ll keep plenty of flavor, while giving the skin a better shot at crisping.

Step 5: Season (or wait, depending on the style)

Now decide your flavor direction:

Step 5 seasoning guide for frozen chicken wings in an air fryer: split image shows wings being dusted with dry rub/cornstarch before the 400°F crisp stage on the left, and crispy wings being tossed in Buffalo/BBQ sauce after cooking on the right. Text highlights “season now for dry rub” and “crisp first, sauce last” for best crunch, with MasalaMonk.com footer.
Step 5 is where most “frozen wings” go wrong: timing. If you’re doing a dry rub (salt, pepper, garlic, paprika, lemon pepper), season right after the blot-dry step so it grabs and crisps at 400°F. If you’re going Buffalo, hot wings, or BBQ, hold the sauce until AFTER the crisp stage—sauce too early traps steam and softens the skin. Optional crunch boost: toss with 1–2 tsp cornstarch per lb before the final crisp. Save this as your quick “season vs sauce” rulebook for crispy frozen chicken wings every time.
  • For dry rub wings, season now.
  • For classic salt-and-pepper wings, season now.
  • For Buffalo/hot wings, wait until after crisping for the best texture.
  • For sweet BBQ, wait until after crisping so sugars don’t burn.

Optional crisp booster: toss wings with 1–2 teaspoons cornstarch per pound right before the 400°F stage (especially helpful for wings that look wet after blotting).

Step 6: Final crisp for frozen chicken wings in air fryer: 400°F / 205°C

Turn the air fryer up to 400°F / 205°C and cook:

  • Pre cooked frozen wings in air fryer: 6–10 minutes
  • Raw frozen wings in air fryer: 8–12 minutes
Step 6 of a frozen wings air fryer guide: cooked wings in an air fryer basket being flipped with tongs, with an inset showing 400°F / 205°C. Text notes final crisp timing: pre-cooked frozen wings 6–10 minutes and raw frozen wings 8–12 minutes, single layer for crisp skin. MasalaMonk.com in footer.
Final crisp is where frozen wings turn from “heated” to actually crispy: raise the air fryer to 400°F / 205°C, keep wings in a single layer, and flip once. Use 6–10 minutes for pre-cooked frozen wings and 8–12 minutes for raw frozen wings after the first stage—this is the moisture-drive-off step that gives you crackly skin instead of steam-soft wings.

Flip once during this stage. You’re looking for a deeper golden color, a tighter skin, and edges that look slightly blistered.

Step 7: Check doneness (raw wings only)

For raw wings, measure internal temperature in the thickest part of the drumette without touching bone. As metioned earlier, you’re aiming for 165°F / 74°C as that is considered a safe point.

Step 7 “Check Doneness” graphic for frozen chicken wings in an air fryer: a cooked wing held with tongs while an instant-read thermometer probes the thickest part of a drumette. The display shows 165°F / 74°C with the note “don’t touch bone” and “rest 2–3 min,” plus MasalaMonk.com in the footer.
Raw frozen wings aren’t “done” when they look brown—they’re done when the thickest drumette hits 165°F / 74°C. Use an instant-read thermometer, insert it into the meatiest part, and avoid touching bone (bone can give a false reading). Once you hit temp, rest 2–3 minutes so juices settle and the skin stays crisp. This one check removes guesswork and makes your frozen chicken wings in the air fryer reliably juicy every time. Save or pin this quick safety check so you never have to second-guess wing doneness again—full timings + crisp stages are in this blog post.

Once you hit that number, rest the wings for 2–3 minutes. During that short pause, the surface stays crisp while juices settle.

Also Read: How to make No-Bake Banana Pudding: No Oven Required Recipe


Frozen chicken wings in air fryer: how long do they take?

The exact time depends on wing size, air fryer power, and whether the wings are raw or pre-cooked. Still, you can rely on a range and then adjust using visual cues and (for raw wings) a thermometer. If you’re cooking more than a single layer (or your basket is small), plan on adding 2–4 minutes to the crisp stage—or cook in batches for better crunch.

Frozen wings in air fryer time and temperature cheat sheet showing two-stage method: 360°F (182°C) then 400°F (205°C), with timings for raw vs fully cooked and wing sections vs whole wings, plus cook-to 165°F (74°C) note and quick fix for stuck wings. MasalaMonk.com
Frozen Wings Air Fryer Time + Temp Cheat Sheet: Use the two-stage method—360°F / 182°C to de-ice + render, then 400°F / 205°C to crisp. This chart breaks down exact ranges for raw vs fully cooked and wing sections vs whole wings, plus the quick fix for wings stuck together.

Frozen chicken wings in air fryer time & temperature (ranges by type)

Sections of frozen chicken wings (drumettes + flats), raw:

  • 360°F / 182°C for 14–16 minutes
  • then 400°F / 205°C for 8–12 minutes
    Total: about 22–28 minutes

Frozen wing sections, pre-cooked:

  • 360°F / 182°C for 10–12 minutes
  • then 400°F / 205°C for 6–10 minutes
    Total: about 16–22 minutes

Whole frozen wings (larger), raw:

  • 360°F / 182°C for 16–18 minutes
  • then 400°F / 205°C for 10–14 minutes
    Total: about 26–32 minutes

Whole frozen wings, pre-cooked:

  • 360°F / 182°C for 12–14 minutes
  • then 400°F / 205°C for 8–12 minutes
    Total: about 20–26 minutes

If you’re thinking “that’s a wide range,” you’re right. The key is to treat the time like a starting point and use the crisp stage to dial in texture.

Moreover, if your air fryer is smaller (or you’re cooking a lot), you’ll likely need batches. On the other hand, if you have a large basket that fits wings in a single layer comfortably, you’ll finish faster because airflow is stronger.

Frozen wings at 400°F: how long?

Using 400°F for the entire cook can over-brown the outside before the inside heats evenly (especially with raw wings). The best use of 400°F is as the final crisp stage:

  • Fully cooked frozen wings: 6–10 minutes at 400°F / 205°C
  • Raw frozen wings (after a 360°F start): 8–12 minutes at 400°F / 205°C

If wings still look pale or feel soft, add 2–4 minutes at 400°F, but only if they’re in a single layer.

Also Read: Chicken Adobo — Step-by-Step Recipe — Classic Filipino Adobong Manok


Cooking frozen wings in an air fryer: the small details that make a big difference

Crispy wings are rarely about one magic trick. Instead, it’s a handful of small choices that stack in your favor.

Infographic titled “Frozen Wings in Air Fryer: Small Details That Make Them Crispy” showing 5 tweaks: separate wings early so airflow hits all sides, cook in a single layer (don’t stack), pat dry before the crisp stage to reduce steam, sauce after crisping, and use a thermometer for raw wings (165°F / 74°C in the thickest piece). MasalaMonk.com branding at bottom.
Frozen wings in the air fryer: 5 tiny tweaks that stop steaming and boost crunch. Separate clumps, keep a single layer, blot before the crisp stage, sauce last, and use 165°F / 74°C for raw wings—then jump back to the full guide for exact times, temps, and troubleshooting.

Separate wings early

Frozen wings often clump. If you let them stay glued together too long, the interior sides won’t crisp because they never get exposed to airflow. So, midway through the first stage, use tongs to separate them.

Don’t stack

This is worth repeating because it’s the difference between “air fry” and “steam.”

If you’re tempted to pile them high, cook two batches instead. You’ll end up with wings that are actually crisp, which is the whole point of making wings in air fryer frozen in the first place.

Pat dry before the crisp stage

Water on the surface becomes steam. Steam softens skin. Therefore, blotting is not optional if you want reliable crunch.

Sauce later

If you want sticky wings, you can still get them. You just have to crisp first, then sauce. That sequencing keeps the outside crisp while still delivering the “saucy wing” experience.

Use a thermometer for raw wings

Visual cues aren’t dependable for safety. Wings can brown before they’re done. Conversely, they can look pale while they’ve already reached temperature. The simplest standard is to cook to 165°F / 74°C, as per USDA, and a thermometer is the most reliable check.

Also Read: Sweetened Condensed Milk Fudge: 10 Easy Recipes


Chicken wings in air fryer from frozen: two paths depending on raw vs pre-cooked

At this point, you can follow the core method and succeed. Still, it helps to see the two most common cases written out clearly—because these are the questions people run into when they’re standing in front of the air fryer trying to decide whether to add five minutes or ten.

Raw frozen chicken wings in air fryer (clear step-by-step recipe)

  1. Preheat to 360°F / 182°C.
  2. Cook wings 14–16 minutes (single layer), flipping once.
  3. Separate wings, drain moisture if needed, and blot dry.
  4. Season with salt, pepper, garlic powder, paprika, or your favorite dry rub.
  5. Crisp at 400°F / 205°C for 8–12 minutes, flipping once.
  6. Check 165°F / 74°C in the thickest piece.
  7. Rest 2–3 minutes, then sauce or serve.
Infographic showing raw frozen chicken wings in an air fryer with a 7-step method: preheat 360°F/182°C, cook in a single layer 14–16 min (flip once), separate/drain/blot dry, season, crisp at 400°F/205°C for 8–12 min (flip once), then check 165°F/74°C and rest 2–3 min.
Raw frozen wings, simplified: follow this 7-step two-stage air fryer method (360°F cook → blot + season → 400°F crisp) and always confirm 165°F / 74°C in the thickest piece for safe, truly crispy wings.

Because these are raw, treat them like raw chicken from start to finish. If you want a quick safety refresh—especially about cross-contamination and why rinsing isn’t recommended—the CDC’s chicken food safety guidance is straightforward and practical.

Pre cooked chicken wings in air fryer (from frozen, crisp-first approach)

  1. Preheat to 360°F / 182°C.
  2. Cook wings 10–12 minutes, flipping once.
  3. Blot gently to remove surface moisture.
  4. Crisp at 400°F / 205°C for 6–10 minutes.
  5. Toss with sauce or finish with seasoning.
Pre-cooked frozen chicken wings in an air fryer, crisp-first method infographic. Steps: preheat to 360°F/182°C; heat through 10–12 minutes flipping once; blot gently to remove surface moisture; crisp at 400°F/205°C for 6–10 minutes; sauce or season at the end and serve immediately. Tip: crisp first, sauce last for best texture.
Pre-cooked frozen wings don’t need the long “ice-melt” stage—just heat through, blot off surface moisture, then finish with a high-heat crisp. This crisp-first sequence keeps the skin snappy and stops wings from tasting like reheated freezer food. Use 360°F/182°C to warm them evenly, then 400°F/205°C to lock in crunch, and toss with sauce only at the very end.

Pre-cooked wings are especially good for quick weeknights. Even so, they benefit from that crisp stage—otherwise they can taste like reheated freezer food instead of something you actually crave.

Also Read: Sourdough Recipe: 10 Easy Bread Bakes (Loaves, Rolls & Bagels)


Frozen buffalo wings in air fryer: crisp, then sauce (so they stay snappy)

Buffalo wings are a classic for a reason. Yet, when you start from frozen, the biggest risk is sauce + steam turning the skin soft.

So here’s the pattern: crisp first, then sauce, then a short “set” step if you want extra cling.

Infographic titled ‘Frozen Wings in Air Fryer: Sauce Timing Map: Crisp-First vs Sauce-First.’ Left panel: dry/rub style (crisp-first) with salt + pepper, lemon pepper, Cajun dry rub, garlic-parm finish; note says ‘Season AFTER blotting → then crisp.’ Right panel: sauced style (crisp-first, sauce last) with Buffalo, hot sauce, BBQ, sweet chili; note says crisp wings first, toss in sauce, optional 1–2 minutes at 400°F/205°C to set. Footer: MasalaMonk.com.
Sauce timing is the #1 reason frozen wings turn soggy. Use this quick map: dry rub = season after blotting, then crisp; Buffalo/BBQ/sweet chili = crisp first, sauce last (and if you want the sauce to cling, give it 1–2 minutes at 400°F / 205°C to “set”). Save this graphic for wing nights—then use the exact time + temp ranges above for your wing type.

Buffalo finish for frozen chicken wings in air fryer (crisp, then sauce)

  1. Cook and crisp using the core method.
  2. Meanwhile, warm hot sauce with a little butter until glossy.
  3. Toss wings quickly, coating evenly.
  4. For extra adhesion, put sauced wings back in the air fryer for 1–2 minutes at 400°F / 205°C.

Now you get the best of both worlds: saucy wings that still have bite.

To serve Buffalo wings the classic way, the tangy cooling dip matters just as much as the sauce. This MasalaMonk roundup is perfect for pairing: blue cheese dip for wings.

Also Read: Peanut Butter Fudge: Recipes & Guide (8 Methods + Easy Variations)


Frozen hot wings recipe: a simple way to make them taste bold without getting soggy

“Hot wings” can mean a lot of things. Sometimes it’s a spicier Buffalo. Other times it’s a sticky hot glaze. In either case, the approach remains similar: get the wings crisp first, then add heat.

Infographic showing frozen hot wings in an air fryer using a crisp-then-glaze method: 1) Crisp frozen wings first with no sauce until browned and crackly. 2) Whisk a fast hot glaze (hot sauce, a little butter/oil, garlic, smoked paprika; tiny honey optional). 3) Toss lightly and return to air fryer up to 1 minute to set. Rule: crisp first, glaze last.
Frozen hot wings in the air fryer taste best when you crisp first and sauce last. This quick “crisp-then-glaze” method keeps wings bold and spicy without turning the skin soggy—plus you can set the glaze for just 1 minute max. Optional: a light cornstarch dusting (1–2 tsp per lb) can boost crunch. Use this as your fast game-day shortcut, then follow the full MasalaMonk frozen wings guide for timings, temps, and sauce variations.

Fast hot glaze (spicy, glossy, not too sweet)

  • Hot sauce
  • A touch of butter or oil
  • Garlic powder
  • A pinch of smoked paprika
  • Optional: a tiny amount of honey (keep it minimal so it doesn’t burn)

Toss wings after crisping, then return them for a minute to set. Because the glaze is thin, it clings without drowning the skin.

If you’re building a game-day spread, another wing-adjacent crowd-pleaser is a warm dip. MasalaMonk’s Buffalo chicken dip fits naturally next to wings on the table.

Also Read: 10 Vegan Chocolate Cake Recipes (Easy, Moist, & Dairy-Free)


Air fryer wings frozen: dry-rub and “no-sauce” styles that stay crisp longer

Sauced wings are great. Still, if you want wings that stay crisp for longer—especially if you’re serving a crowd—dry rub wings are the easiest win. They also travel better, hold better, and reheat better.

Vertical infographic titled “Frozen Wings: Dry-Rub Styles That Stay Crispy.” It says to season after blotting and crisp at 400°F / 205°C. It lists 3 no-sauce options per 1 lb wings: Classic savory dry rub (salt 3/4 tsp, black pepper 1/2 tsp, garlic powder 3/4 tsp, onion powder 1/2 tsp, smoked paprika 3/4 tsp, cayenne pinch), Lemon pepper (1 1/2–2 tsp plus optional salt), and Garlic-parm finish after crisping (butter, garlic powder, parmesan).
Want wings that stay crispy longer (and hold up for batches)? Use these low-moisture “no-sauce” finishes: a classic savory dry rub, a bright lemon-pepper hit, or a garlic-parm finish added after crisping. The key is simple: blot dry after the first stage, then season, then crisp at 400°F / 205°C—so flavor sticks without steaming the skin. Optional pro move: a tiny cornstarch dusting for extra crunch.

Classic savory dry rub

  • Salt
  • Black pepper
  • Garlic powder
  • Onion powder
  • Smoked paprika
  • Optional: pinch of cayenne

Season after the first stage (when you blot dry), then crisp at 400°F / 205°C.

Lemon pepper style (bright and punchy)

Lemon pepper seasoning works beautifully on wings because it tastes big without needing sauce. Add it after blotting so it adheres, then crisp.

Garlic-parmesan finish (crispy + rich)

Crisp the wings first. Then toss in:

  • A little melted butter
  • Garlic powder (or minced garlic, quickly warmed)
  • Finely grated parmesan

Because the finish is low-moisture, the wings stay crunchy instead of turning soft.

Also Read: Kahlua Drinks: 10 Easy Cocktail Recipes (Milk, Vodka, Coffee)


Best way to cook frozen chicken wings: what to do when your air fryer behaves differently

Some air fryers run hot. While some run cool. Then some have strong fans. And some have weaker airflow. Instead of fighting your machine, use these adjustments.

Vertical infographic: ‘Frozen Wings in Air Fryer—Adjust for Your Model (Runs Hot/Cool)’. Three fixes: (1) Browning too fast (inside not done): keep 360°F/182°C stage, crisp longer at 390°F/199°C; cook raw wings to 165°F/74°C. (2) Wings look dry: shorten first stage slightly, rely on crisp stage; sauce/finish after crisping. (3) Wings won’t crisp: fewer wings, blot drier, extend crisp +2–4 min; single layer = airflow. MasalaMonk.com footer.
When your air fryer runs hot, cool, or has weaker airflow, this quick guide stops the guesswork: adjust the crisp stage (390°F vs 400°F), fix dryness, and force crisping with the right order (fewer wings → blot drier → extend crisp). Save this troubleshooting card for the next batch—then follow the full method in this post for timings, flavors, and doneness checks.

If wings are browning too fast but not done inside (raw wings)

Lower the crisp stage slightly: do 390°F / 199°C instead of 400°F / 205°C, and add a few minutes. Meanwhile, keep the first stage the same so fat renders properly.

If wings look dry

Oddly enough, overly long cooking can dry the meat even if the skin isn’t that crisp. In that case, shorten the first stage a little and rely on the crisp stage for texture.

If wings won’t crisp

This usually comes down to moisture and crowding. First, reduce how many wings are in the basket. Next, blot more thoroughly after the first stage. Finally, extend the crisp stage by 2–4 minutes.

Also Read: Hot Chocolate Coffee: 3 Easy Recipes (Cocoa, Mix, or Espresso)


Frozen party wings in air fryer: how to keep batches consistent

Party wings are where the air fryer shines—because you can cook in batches while keeping quality high. Still, consistency matters.

Vertical infographic titled “Party Wings in Air Fryer: Batch System (Crisp All Night).” It shows a 4-step flow: Cook first batch in a single layer for airflow, Hold wings on a rack (not a plate) and don’t cover with foil, Re-crisp 2–3 minutes at 400°F/205°C, then Sauce right before serving or offer dips on the side. Footer: MasalaMonk.com.
Cooking wings for a crowd? Use this “Cook → Hold → Re-crisp → Sauce” batch system so every round stays crunchy. The key is airflow while holding (rack, not a plate), then a quick 2–3 minute re-crisp at 400°F/205°C—sauce goes on at the very end. Save/pin this for game day.

Batch strategy

  • Cook the first batch using the full method.
  • Hold finished wings on a rack (not a plate) so airflow keeps them crisp.
  • When you’re ready to serve, do a quick 2–3 minute re-crisp at 400°F / 205°C.

Avoid covering hot wings with foil while holding—trapped steam will soften the skin fast.

Sauce strategy

Sauce each batch right before serving. That way, wings don’t sit in sauce and soften. Alternatively, offer sauces on the side and let people dip.

If you want a “dip-friendly” base that you can turn into garlic mayo, spicy mayo, or creamy herb dip, MasalaMonk’s eggless mayonnaise is an excellent starting point. If you prefer plant-based, vegan mayo also works beautifully as a wing dip base.

Also Read: Cappuccino Recipe: How to Make a Perfect Cappuccino at Home


Thawed wings in air fryer: what changes if you already thawed them?

Sometimes you planned ahead. Other times the wings thawed in the fridge because plans changed. Either way, the method is similar, yet timing changes because you’re no longer melting ice first.

Thawed chicken wings in an air fryer timing guide (no ice stage): 1) Pat wings very dry with paper towels, 2) Season, 3) Air fry at 380°F / 193°C for 18–22 minutes, flipping once, 4) Crisp at 400°F / 205°C for 3–6 minutes. Tip shown: if skin turns leathery, dry more, don’t crowd, and add 2–3 minutes at 400°F. MasalaMonk.com
Thawed wings cook faster because there’s no ice stage—but crisp skin still depends on drying and airflow. Use this quick timing card: 380°F (18–22 min) to cook through, then 400°F (3–6 min) to crisp. If the skin turns leathery, the fix is simple: pat drier, don’t crowd, and extend the final crisp a couple minutes. Save this graphic for wing night, and scroll this post for the full frozen-vs-thawed method + sauce ideas.

Thawed chicken wings in air fryer (baseline method)

  1. Pat wings very dry.
  2. Season.
  3. Cook at 380°F / 193°C for 18–22 minutes, flipping once.
  4. Crisp at 400°F / 205°C for 3–6 minutes.

Because thawed wings release less water upfront, you can often start a bit higher than the frozen method. Still, blotting matters. Otherwise, the skin can turn leathery instead of crisp.

For a full fresh-wing technique and seasoning inspiration, MasalaMonk’s Air Fryer Chicken Wings is a natural next read.

Also Read: Cold Brew Espresso Martini: How to Make It (Step-by-Step Recipe)


Frozen chicken wings in the air fryer: serving ideas that make the meal feel complete

Wings are often the main event. Yet, what you serve alongside them changes the whole vibe. Moreover, sides and dips give you variety without additional work.

Classic dip pairings

  • Blue cheese dip (especially for Buffalo)
  • Ranch-style dips (easy to build from mayo)
  • Garlic-herb dip

For a quick ranch-style dip, stir dried herbs (dill/parsley), garlic powder, black pepper, lemon, and a pinch of salt into mayo or vegan mayo—then thin with a splash of water until it’s pourable. For a dedicated dip lineup, this MasalaMonk guide to blue cheese dip for wings is a perfect guide to explore.

Fresh, herby “sauce direction” (lighter than Buffalo)

If you want a change from butter-and-hot-sauce flavors, go herby. Toss wings with a spoonful of chimichurri after crisping, or serve it on the side for dipping. MasalaMonk’s chimichurri recipe is ideal for that.

Pesto-style finishes

A small drizzle of pesto (or pesto mayo) can turn wings into something that feels restaurant-y. If you want variations, MasalaMonk’s pesto recipes and variations can give you multiple directions without adding complexity.

Also Read: Iced Coffee: 15 Drink Recipes—Latte, Cold Brew, Frappe & More


Cooking frozen buffalo wings and other sauced wings: how to avoid burning sugars

Many store-bought sauces contain sugar. Sugar browns fast. Consequently, if you cook heavily sauced wings at high heat for too long, you can end up with scorched spots before the wing is crisp.

Frozen wings in air fryer sauce timing guide to avoid burning sugars: crisp wings first at 400°F / 205°C, toss in sweet BBQ or sweet chili sauce after browning, then return to the air fryer for 1 minute max at 400°F / 205°C to set (optional).
Sauce timing is the #1 fix for sweet BBQ, sweet chili, and spicy-sweet frozen wings. Crisp the wings first (no sauce) so the skin can actually brown. Then toss in sauce after crisping—this prevents sugar from scorching before the wings get crunchy. Want extra cling? Do a 1-minute max “set” back in the air fryer at 400°F / 205°C. Save/pin this graphic for instant “no-burn” wing nights.

The safer approach for sweet or sticky sauces

  • Crisp the wings first with no sauce at 400°F / 205°C.
  • Toss with sauce after crisping.
  • Return for 1 minute only if you want it set and tacky.

This works for BBQ wings, sweet chili wings, and spicy-sweet glazes.

Also Read: Cranberry Moscow Mule Recipe: A Festive Holiday Cocktail With Easy Variations


Frozen wings in air fryer time: how to tell when they’re “done” beyond the clock

Time is useful, yet doneness is more reliable when you combine a few signals.

Portrait infographic titled “Frozen Wings: How to Tell They’re DONE (Beyond the Timer).” Two columns compare doneness signals for raw vs fully cooked frozen wings (reheat). Raw wings: thermometer reads 165°F/74°C in thickest drumette (avoid bone), juices run clear, meat pulls back at joint, skin tight and browned. Fully cooked wings: hot throughout, skin crisp and browned, tap test gives a faint crackle. Footer: MasalaMonk.com.
Beyond the clock: use the right doneness signals for frozen wings based on what you have—raw vs fully cooked (reheat). Raw wings are only “done” when the thickest piece hits 165°F / 74°C (avoid bone for accurate readings), then confirm the skin is tight + browned. Fully cooked wings don’t need a safety temp check—your goal is hot throughout + crisp skin, and the “tap test” (faint crackle) is the quickest cue. Save this as your frozen chicken wings doneness checklist for consistently crispy results.

For raw wings

  • Thermometer reads 165°F / 74°C in the thickest part (refer to USDA temperature guidance)
  • Juices run clear when pierced
  • The meat pulls slightly from the bone at the joint
  • The skin looks tightened and browned

For pre-cooked wings

  • Wings are hot throughout
  • Skin is crisped and browned
  • You hear a faint crackle when you tap the surface with tongs

If you’re unsure whether your frozen wings are raw or pre-cooked, treat them like raw and check temperature. It’s the simplest way to remove doubt.

Also Read: Baked Ziti Recipe Collection: 15 Easy Variations


Best frozen wings for air fryer: what actually matters when choosing a bag

Different brands vary, yet the most important factor for results is often not the brand—it’s the wing style.

Vertical infographic titled “Best Frozen Wings for Air Fryer” showing four frozen wing types—wing sections (drumettes + flats), whole wings, breaded wings, and pre-sauced wings—with what each is best for. Notes: sections cook evenly and flip easier; whole wings may need +2–4 minutes and thicker joints hold moisture; breaded wings brown fast so shorten the final crisp stage; pre-sauced wings should be crisped first, sauced after, with an optional 1-minute reset at 400°F / 205°C. Footer: MasalaMonk.com.
Best Frozen Wings for Air Fryer (what to buy): Wing style matters more than brand. For the crispiest results, choose wing sections (drumettes + flats)—they cook more evenly and flip easier. Using whole wings? Expect +2–4 minutes since thicker joints hold moisture. Breaded wings brown fast, so shorten the final crisp stage. Pre-sauced wings stay best when you crisp first, sauce last (optional: 1 minute at 400°F / 205°C to “set” sauce). Keep reading for the full timing chart + the two-stage crisp method.

Wing sections usually outperform whole wings

Wingettes/drumettes crisp more evenly, fit better, and flip more easily.

Breaded wings can be great, but need careful timing

Breaded wings brown quickly. That’s fine, although it means the crisp stage might be shorter to prevent scorching.

Pre-sauced wings can be convenient, but crisp-first still wins

They’ll taste much better if you crisp them first, then refresh sauce at the end.

If you’re building a broader air-fryer setup and want a practical list of machines, MasalaMonk has a roundup of best-selling air fryers. It’s a useful internal reference if you’re comparing sizes and baskets.

Also Read: Manhattan Cocktail Recipe (Classic + 6 Variations)


Frozen chicken wings in air fryer troubleshooting (the real fixes)

Even with a good method, a few problems show up again and again. Here’s what to do when they do.

Infographic titled ‘Frozen Wings in Air Fryer: Troubleshooting (Real Fixes)’ with a top photo strip showing pale steamed wings vs browned crispy wings. Six tip boxes: Not Crispy (single layer, blot after 360°F stage, add 3–5 min at 400°F); Watery/Steamy (drain liquid, blot 30 sec, don’t crowd); Browning fast inside not done (raw) (390°F + time, confirm 165°F/74°C); Wings stuck together (start 6–8 min at 360°F, separate, continue); Smoking (390°F, clean basket, avoid sugary sauce); Sauce soggy (crisp first, optional 1–2 min set). Footer: MasalaMonk.com.
Wings coming out soggy, watery, smoky, or uneven? Save this quick troubleshooting guide. It shows the real fixes that work with frozen wings: single-layer airflow (no steaming), drain + blot after the 360°F stage, then finish hot at 400°F for crisp skin. If you’re using raw frozen wings, the chart reminds you to confirm 165°F / 74°C in the thickest drumette before serving. And if sauce keeps ruining crunch, the rule is simple: crisp first → sauce after (optional 1–2 minutes to “set”). Keep this handy for wing night—and scroll for the full step-by-step method, times, and flavor options.

“My wings are still not crispy”

  • Cook fewer wings at once.
  • Blot more thoroughly after the first stage.
  • Extend the 400°F / 205°C crisp stage by 3–5 minutes.

“My wings are watery”

This often happens with frozen wings that release a lot of moisture early.

  • Drain the basket if water collects.
  • Blot thoroughly.
  • Give the wings a longer crisp stage.

“My wings are browned but the inside feels underdone”

This is most common with larger raw wings.

  • Add time at 360°F / 182°C first, then crisp again.
  • Confirm doneness with a thermometer and aim for 165°F / 74°C (USDA guidance).
Reheating chicken wings in an air fryer: avoid the microwave. Reheat at 380–400°F (193–205°C) for 4–7 minutes, shake or flip once, keep wings in a single layer, and sauce after reheating for crisp skin.
Leftover wings? Skip the microwave. Reheat in the air fryer at 380–400°F (193–205°C) for 4–7 minutes, flip once, and keep them in a single layer so the skin turns crisp again. Sauce after reheating to avoid soggy wings.

“My wings are smoking”

Rendered chicken fat can smoke, especially at 400°F. If your model smokes easily:

  • Reduce crisp stage to 390°F / 199°C and cook slightly longer.
  • Clean the basket and drawer regularly.
  • Avoid sugary sauces until the end.

Also Read: Rob Roy Drink Recipe: Classic Scotch Cocktail (Perfect + Dry + Sweet Variations)


Baked chicken wings from frozen: a solid oven backup when you’re cooking a lot

Sometimes you need volume. In that case, the oven is convenient because you can do a full sheet pan at once. Even so, the same crisping logic applies: airflow and moisture control.

Frozen chicken wings baked in the oven using a rack-over-sheet-pan method: bake at 425°F / 218°C for 45–55 minutes, flip halfway, then broil 1–2 minutes for extra crisp skin. Includes a visual reminder that the rack improves airflow so the bottoms don’t turn soggy. MasalaMonk.com footer.
Oven backup for big batches: When you need volume, this rack-over-sheet-pan method nails the same goal as air frying—airflow + moisture control. Bake frozen wings at 425°F / 218°C for 45–55 minutes, flip halfway, then broil 1–2 minutes right at the end for that last crisp hit. The rack is the difference-maker: it keeps the undersides from steaming against the pan. Sauce after crisping so you don’t soften the skin.

Oven method for frozen wings

  1. Heat oven to 425°F / 218°C.
  2. Place wings on a rack set over a sheet pan.
  3. Bake 45–55 minutes, flipping halfway.
  4. For extra crispness, broil 1–2 minutes at the end (watch closely).
  5. Sauce after crisping.

The rack matters because it lets hot air circulate around the wings. Without it, the underside can soften from contact with the pan.

Also Read: Best Vermouth for a Negroni Cocktail Drink Recipe


Fried chicken wings from frozen: what to know before you do it

Deep frying from frozen can be done, although it’s messy and can be risky if you aren’t careful. Frozen surfaces can cause oil splatter. Additionally, wing pieces that are stuck together can create uneven cooking.

Fried wings from frozen safety checklist graphic: deep-frying pot with wings and tongs. Key tips: fry in small batches (don’t crowd—less splatter, more even cooking), keep oil temperature steady (too cool = greasy, too hot = scorched), and for raw wings confirm 165°F / 74°C in the thickest piece with a thermometer. Note: if wings are stuck together, separate gently once loosened.
Deep-frying frozen wings can work, but it’s the easiest way to create a splattery mess (or uneven cooking) if you rush it. Use this quick safety checklist: small batches + steady oil temp + thermometer to 165°F / 74°C for raw wings. If wings are stuck together, let them loosen in the oil first—don’t force them apart. (Save/pin this so you don’t have to guess next time.)

If you include this method, keep it cautious:

  • Fry in small batches
  • Maintain steady oil temperature
  • Confirm raw wings reach 165°F / 74°C

For most people, an air fryer gives you enough crunch without the mess—especially when you follow the two-stage crisping method.

Also Read: Paper Plane Cocktail Recipe + Best Amaro Substitutes & Tips


A few flavorful ways to keep wings exciting (without turning the kitchen into a project)

Wings get repetitive only when you repeat the same sauce. Instead, rotate finishes that don’t add work.

Creamy dips that pair with everything

If you want a dip you can customize endlessly, start with a mayo base. MasalaMonk’s eggless mayonnaise is perfect for classic creamy dips, while the vegan mayo recipe gives you a plant-based option that still tastes rich.

From there, you can build:

  • Garlic mayo (garlic + lemon + salt)
  • Spicy mayo (hot sauce + paprika)
  • Herb dip (dill/parsley + lemon)

Fresh sauces for contrast

Chimichurri turns wings bright and herby. It feels lighter than Buffalo and adds a restaurant-style edge. Use MasalaMonk’s chimichurri recipe either as a toss after crisping or as a side dip.

A “sauce library” approach

If you like having options ready, a sauce hub helps. MasalaMonk’s pizza sauce collection and pesto variations can inspire new wing finishes beyond the usual lineup, while still staying practical.

Also Read: Green Chutney Recipe (Coriander–Mint / Cilantro Chutney)


Handling and safety, especially for raw frozen wings

Raw frozen wings behave like raw chicken once they start thawing in the basket. So it’s worth treating them with the same kitchen habits you’d use for fresh poultry:

  • Use separate tongs or wash them after touching raw wings
  • Wash hands after handling
  • Sanitize the cutting board if you use one
  • Avoid rinsing raw chicken (it spreads bacteria around the sink)

The CDC summarizes these basics clearly in its guide to chicken and food safety.

Meanwhile, for doneness, keep it simple: 165°F / 74°C at the thickest point is the standard, and the USDA safe temperature chart lays it out cleanly.

Also Read: 19 Essential Kitchen Tools That Make Cooking Easier


Bringing it all together: a simple “from frozen” wing routine you can repeat

If you want a routine you can memorize, use this:

  1. Preheat 360°F / 182°C
  2. Cook frozen wings (raw: 14–16 min, pre-cooked: 10–12 min)
  3. Separate + blot dry
  4. Season (or wait if saucing)
  5. Crisp 400°F / 205°C (raw: 8–12 min, pre-cooked: 6–10 min)
  6. Sauce after crisping
  7. For raw wings, confirm 165°F / 74°C
Infographic titled “Frozen Wings in Air Fryer: 7-Step No-Thaw Routine” showing raw vs fully cooked frozen wing timings. Steps: preheat 360°F/182°C for 3–5 minutes, cook in a single layer, Stage 1 at 360°F (raw 14–16 min, cooked 10–12 min), separate wings and drain liquid, blot dry 30 seconds, season now for dry rub or sauce after crisp, then Stage 2 at 400°F/205°C (raw 8–12 min, cooked 6–10 min). Raw wings must reach 165°F/74°C.
Use this 7-step no-thaw routine any time you’re making frozen chicken wings in the air fryer. It shows the exact two-stage method (360°F → 400°F), the correct time ranges for raw vs fully cooked wings, and the one doneness rule that matters for raw wings: 165°F / 74°C in the thickest drumette. Save this as your quick “wing night” checklist—then follow the steps above in this blog post for the full method and flavor options.

From there, you can go Buffalo with blue cheese dip, hot wings with a spicy glaze, dry rub for maximum crunch, or chimichurri for a bright twist—without changing your cooking method every time.

And if you want to explore the fresh-wing version later—especially for thawed wings, bigger seasoning ideas, or extra technique—MasalaMonk’s Air Fryer Chicken Wings is a natural next step.

Also Read: How to Cook Tortellini (Fresh, Frozen, Dried) + Easy Dinner Ideas


FAQs: Frozen Chicken Wings in Air Fryer

1) How long do frozen chicken wings take in an air fryer?

Most frozen chicken wings in an air fryer take 16–22 minutes if they’re pre-cooked and 22–30 minutes if they’re raw, depending on size and how full your basket is. As a rule of thumb, cook in two stages: a lower-temp warm/render stage, followed by a higher-temp crisp stage. That combination is usually more reliable than trying to blast them at one temperature the whole time.

2) What temperature should I use for frozen chicken wings in the air fryer?

A practical approach is 360°F / 182°C first, then 400°F / 205°C to crisp. The first temperature melts surface ice and helps fat render; afterward, the higher heat drives off moisture so the skin can brown and tighten.

3) Can I cook chicken wings in the air fryer from frozen without thawing?

Yes—chicken wings in air fryer from frozen work well when you leave space for airflow and finish with a high-heat crisp. In other words, the key is not thawing; it’s managing moisture and giving the wings enough room to brown rather than steam.

4) How do I make crispy frozen chicken wings in an air fryer?

To get crispy frozen chicken wings, avoid stacking, flip at least once, and use a brief crisp finish at 400°F / 205°C. Also, blotting the wings after the first stage helps, because it removes moisture that would otherwise soften the skin during the final minutes.

5) What’s the best air fryer wings from frozen method if my wings are stuck together?

Start the first stage at 360°F / 182°C for several minutes, then open the basket and separate them with tongs once the ice loosens. Afterward, continue cooking as normal. Trying to pry them apart while they’re rock-solid often tears skin and slows crisping later.

6) Can I air fry raw frozen chicken wings in the air fryer?

You can air fry raw frozen chicken wings, but you must ensure they’re cooked through. Use the two-stage method and check the thickest drumette for doneness. If you’re uncertain, extend the lower-temp stage slightly, then crisp at the end so texture doesn’t suffer.

7) How long should I air fry frozen wings at 400°F?

As a crisp stage, 400°F / 205°C is perfect: fully cooked wings usually need 6–10 minutes, while raw wings typically need 8–12 minutes after a 360°F start. If you try 400°F the entire time, the outside can brown before the inside heats evenly—so use it mainly for the final crisp.

8) What’s the frozen chicken wings air fryer time and temperature for drumettes or wing sections?

For frozen chicken wing sections (drumettes and flats), many batches do well with 360°F / 182°C for 14–16 minutes (raw) or 10–12 minutes (pre-cooked), then 400°F / 205°C for 6–12 minutes to crisp. However, larger pieces may require a few extra minutes, especially if the basket is crowded.

9) Can I cook pre cooked chicken wings in air fryer straight from frozen?

Absolutely. Pre cooked chicken wings in air fryer are ideal from frozen because your job is mainly reheating and crisping. Nevertheless, you’ll get the best bite if you crisp first and add sticky sauces afterward.

10) How do I make frozen buffalo wings in the air fryer without soggy skin?

Crisp the wings first, then toss in Buffalo sauce after they’re browned. If you want the sauce to cling, return the sauced wings to the basket for 1–2 minutes—just enough to set the coating without steaming the skin.

11) Can I stack frozen wings in an air fryer basket?

It’s possible, yet it usually sacrifices crispiness. When wings overlap, steam gets trapped and browning becomes patchy. Instead, cook in batches or use a rack accessory if your air fryer supports it, keeping space between pieces as much as possible.

12) Why are my air fried frozen wings not crispy?

Usually it comes down to one of three issues: too many wings at once, too much surface moisture, or not enough high-heat time at the end. Consequently, reduce the batch size, blot after the first stage, and extend the final crisp stage by a few minutes.

13) What if my frozen wings are already sauced or breaded?

For sauced wings, crisp them first and refresh sauce at the end. For breaded frozen wings, keep a close eye during the high-heat stage, because breading can brown quickly. In that case, shorten the final crisp stage slightly and rely on airflow (single layer) for texture.

14) How long do frozen wings take in an air fryer if they’re thawed first?

If they’re thawed, they usually cook faster because you’re no longer melting ice. Often, thawed wings take 18–24 minutes total, depending on size. Even so, drying them well before cooking remains important, because damp skin tends to turn rubbery rather than crisp.

15) What’s the best way to cook frozen wings if I’m making a lot for a party?

When you’re cooking for a crowd, batch cooking is the most consistent approach. Cook each batch until crisp, then hold wings on a rack so air can circulate. Right before serving, re-crisp for a couple minutes to restore crunch, then sauce or season immediately.

16) Can I cook frozen chicken wings in the oven if I don’t have an air fryer?

Yes. While an air fryer is faster, the oven works well for bigger batches. Typically, bake wings on a rack at 425°F / 218°C until browned and cooked through, flipping halfway. For extra crispness, finish with a short broil—watching closely so they don’t burn.

17) Is it better to air fry frozen wings at one temperature or two?

Two temperatures are usually better. First, a moderate heat helps thaw the surface and render fat; afterward, higher heat crisps. As a result, you get wings that are both juicy inside and properly crisp outside, instead of wings that are dark in spots and soft elsewhere.

18) How do I know whether my frozen wings are raw or pre-cooked?

Check the packaging for phrases like “fully cooked” or “uncooked.” If you’ve already tossed the bag and you’re not sure, treat them like raw wings and cook until fully done, then crisp at the end. That approach removes doubt while still giving you good texture.

19) Why are my frozen wings chewy or rubbery?

This usually happens when moisture never fully evaporates (crowded basket, no blotting, or too short a high-heat finish). Cook in a single layer, blot after the first stage, then extend the 400°F crisp stage by 2–5 minutes until the skin tightens and browns.

20) How do I reheat leftover wings so they stay crispy?

Air fry at 380–400°F / 193–205°C for 4–7 minutes, shaking once. Don’t microwave first—microwaving steams the skin and makes it soft.