Posted on Leave a comment

Shrimp Scampi Recipe: Garlic Butter Pasta & No-Wine Option

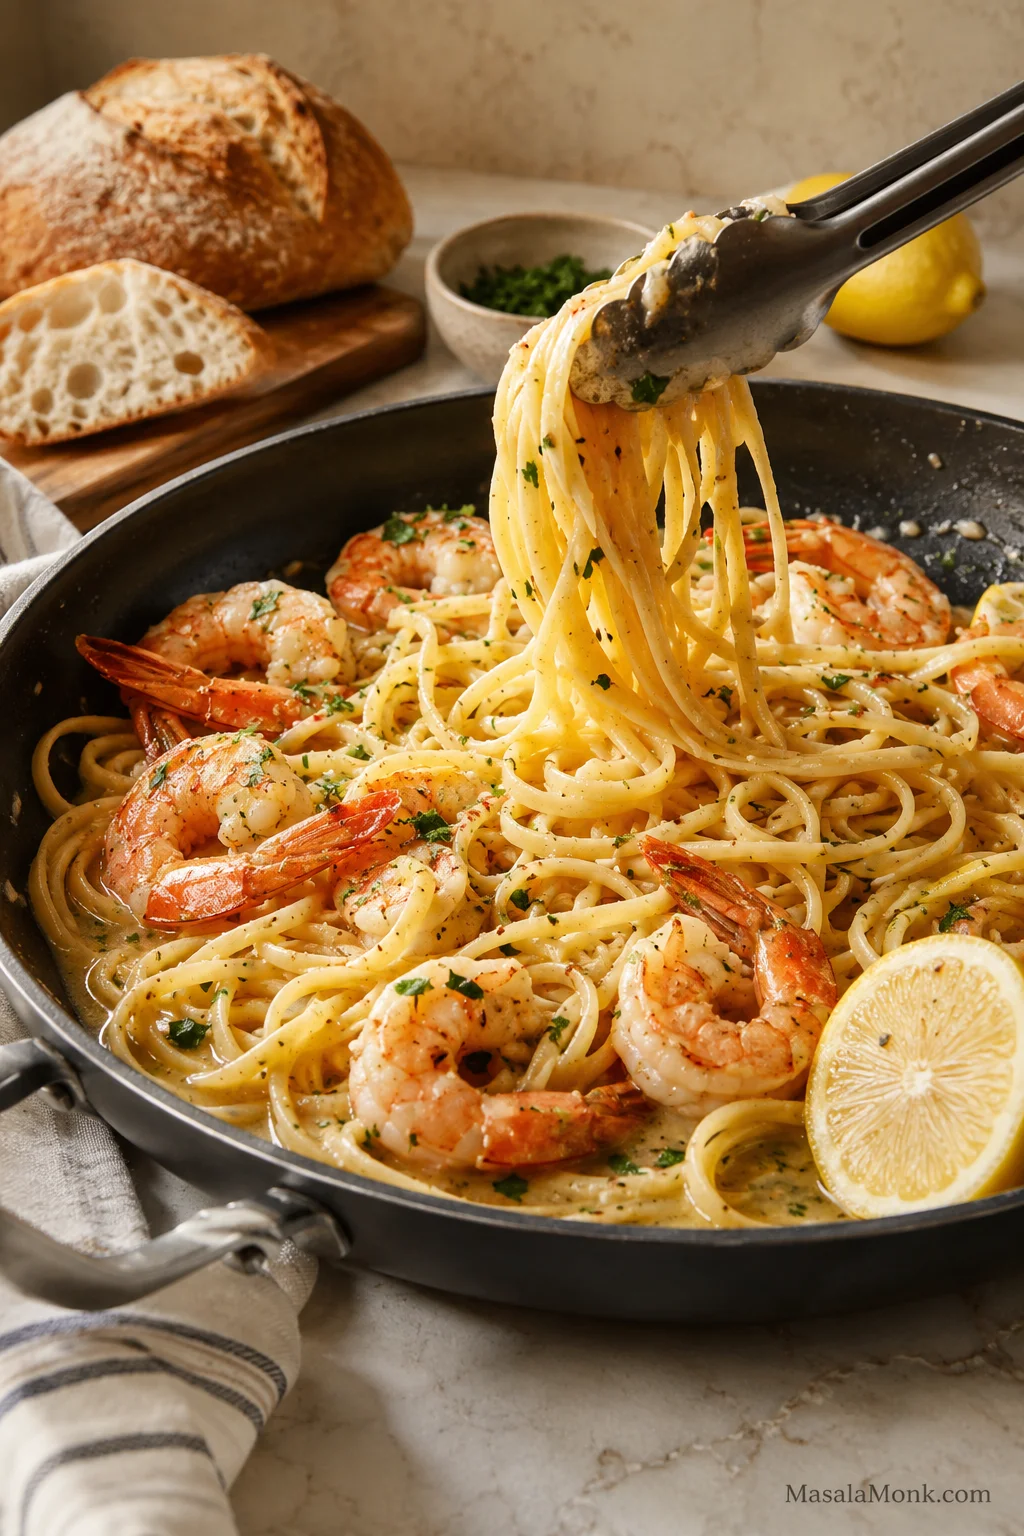
Shrimp scampi pasta in a skillet with shrimp, lemon, parsley, bread, and tongs lifting noodles.

This shrimp scampi recipe gives you tender shrimp or prawns in a silky garlic butter lemon sauce, with enough sauce to toss through pasta or drag a piece of crusty bread through at the end.

It feels like you did more than you did: shrimp sizzling in garlic butter, lemon cutting through the richness, parsley going in at the end, and a skillet that makes a weeknight dinner feel a little restaurant-style. It also keeps real-life scampi problems covered, whether you are using shrimp or prawns, wine or stock, pasta or bread, fresh or frozen shrimp.

The quick answer: shrimp scampi is shrimp cooked quickly in garlic, butter, olive oil, lemon, parsley, and white wine or stock. Serve it with pasta for dinner or with bread for a lighter skillet meal. The key is to pull the shrimp while it is still tender, build the garlic butter in the pan, then return the shrimp just long enough to finish.

Making the pasta version? Go straight to shrimp scampi pasta. Skipping alcohol? Use the no-wine shrimp scampi method.

If the pan juices turn thin, oily, flat, salty, or split, this guide shows you how to bring them back.

Recipe at a Glance

Prep time10 minutes
Cook time10 minutes
Total time20 minutes
Servings4
Main ingredient500g / 1.1 lb large shrimp or prawns
Best shrimp sizeLarge shrimp or prawns, about 16–20 or 21–25 count per pound
Pasta amount225g / 8 oz for a saucy shrimp scampi pasta
No-wine optionLow-sodium seafood stock, chicken stock, or vegetable stock
Main cooking cueShrimp should be pink, opaque, and curled into a loose C

Choose Your Shrimp Scampi Path

Use this as the quick choice point before cooking: pasta or bread, wine or stock, shrimp or prawns.
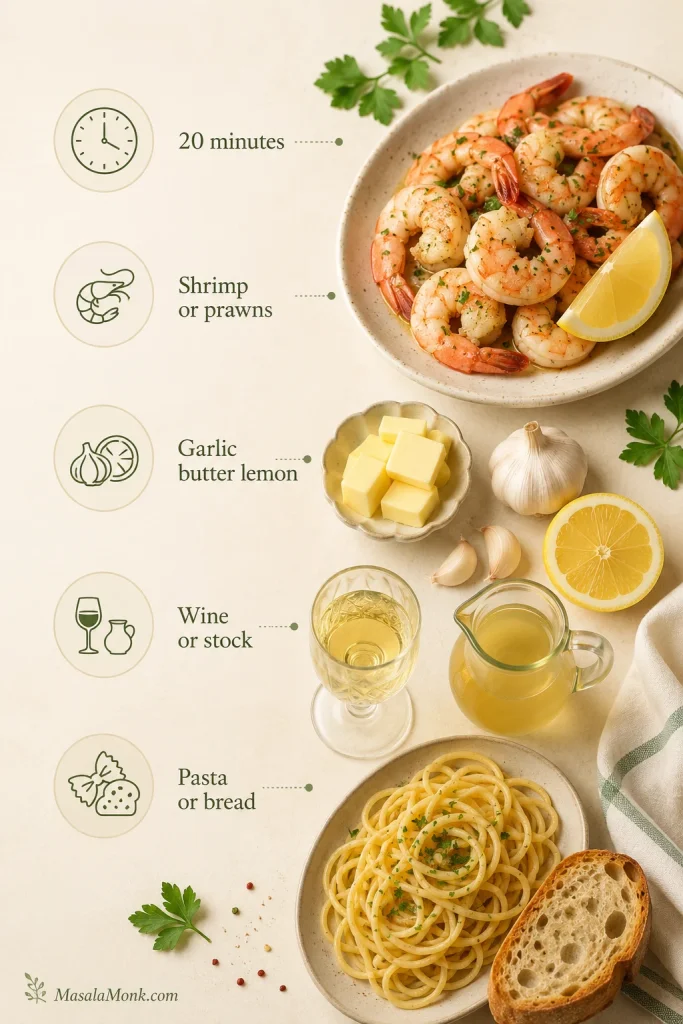
Visual guide showing shrimp or prawns, garlic butter lemon sauce, wine or stock, pasta or bread, and 20 minutes.
Before cooking, choose your path: shrimp or prawns, wine or stock, pasta or bread. This quick scampi map shows how the recipe stays flexible while still landing in about 20 minutes.

In This Recipe Guide

Before You Start

Shrimp scampi moves quickly once the pan is hot, so keep the shrimp dry, the garlic minced, the lemon ready, and the wine or stock measured before you start. Once those are ready, the cooking is simple: sear, simmer, swirl, toss, serve.

Using frozen shrimp, cooked shrimp, prawns, or king prawns? Check the shrimp type guide before the skillet gets hot.

Dry the Shrimp Before Cooking

This is the prep check that keeps the skillet from filling with excess moisture.
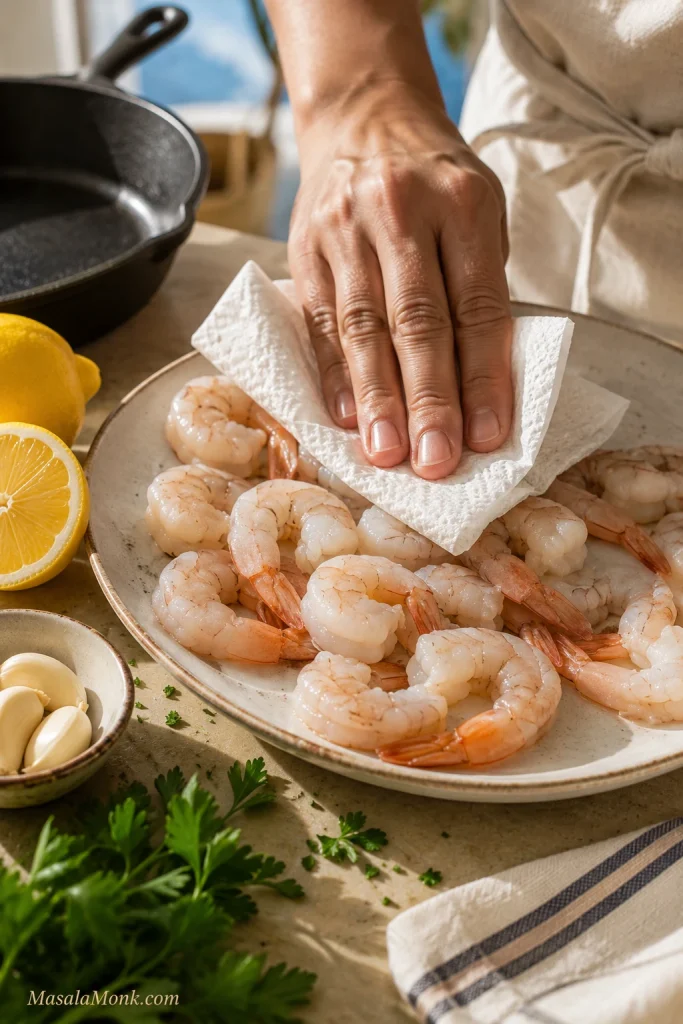
Raw shrimp being patted dry with a paper towel before making shrimp scampi.
First, blot the shrimp until the surface looks dry. This helps the seafood brown lightly and keeps extra water from thinning the scampi sauce.
  • Use a wide skillet. An 11–12 inch pan gives shrimp room to sear. If the shrimp do not fit in one layer, cook in batches.
  • Dry the shrimp well. Wet shrimp steam in the pan and can make the pan juices thin.
  • Pull the shrimp early. It should be almost done before it goes back into the sauce.
  • Keep the finish light. You want the garlic butter to lightly coat the shrimp and pasta, not turn thick like gravy or pool underneath.

You are aiming for shrimp that is just opaque, garlic that smells sweet and fragrant, and a buttery lemon coating that clings lightly to whatever you serve it with.

How to Make Shrimp Scampi

The actual cooking is fast. The shrimp should sizzle when it hits the pan, the garlic should stay pale and fragrant, and the finished pan should smell like garlic and lemon first, then butter and sweet shrimp.

  1. Prepare the shrimp. Thaw if frozen, drain well, pat dry, then season with salt and black pepper.
  2. Cook the pasta, if using. Cook pasta 1–2 minutes less than the package directions. Reserve 1 cup / 240ml pasta water before draining.
  3. Sear the shrimp. Heat a wide skillet over medium-high heat. Add olive oil and 1 tablespoon butter. Add shrimp in one layer and cook large shrimp for about 60–90 seconds per side, or up to 2 minutes per side for very large prawns. Transfer to a plate when almost cooked through.
  4. Cook the garlic. Lower heat to medium. Add minced garlic and red pepper flakes. Cook for 30–45 seconds, stirring constantly, until fragrant but not browned.
  5. Build the sauce. Add wine or stock and simmer for 2–3 minutes, scraping up any flavorful bits from the pan.
  6. Finish the sauce. Add lemon juice, lemon zest, and the remaining butter. Swirl until the butter melts into the wine or stock and the pan juices look silky.
  7. For pasta scampi, add pasta before the shrimp. Toss drained pasta in the sauce first, adding pasta water 2–3 tablespoons at a time until the noodles look loose, shiny, and lightly coated.
  8. Return the shrimp at the end. Add the shrimp back to the skillet and toss for 30–60 seconds, just until fully cooked. If you are not using pasta, return the shrimp directly after finishing the sauce.
  9. Finish and serve. Turn off the heat, stir in parsley, taste for salt, pepper, and lemon, and serve immediately.

Making this with pasta? Use the shrimp scampi pasta method next. If the pan juices look thin, oily, or split, jump to how to fix the sauce.

Visual Cues for the Skillet

Use these quick checks while cooking so the skillet cues match what you see in front of you.

Sear the shrimp in hot butter and oil. The first contact with the pan should be quick and active, not slow and watery.
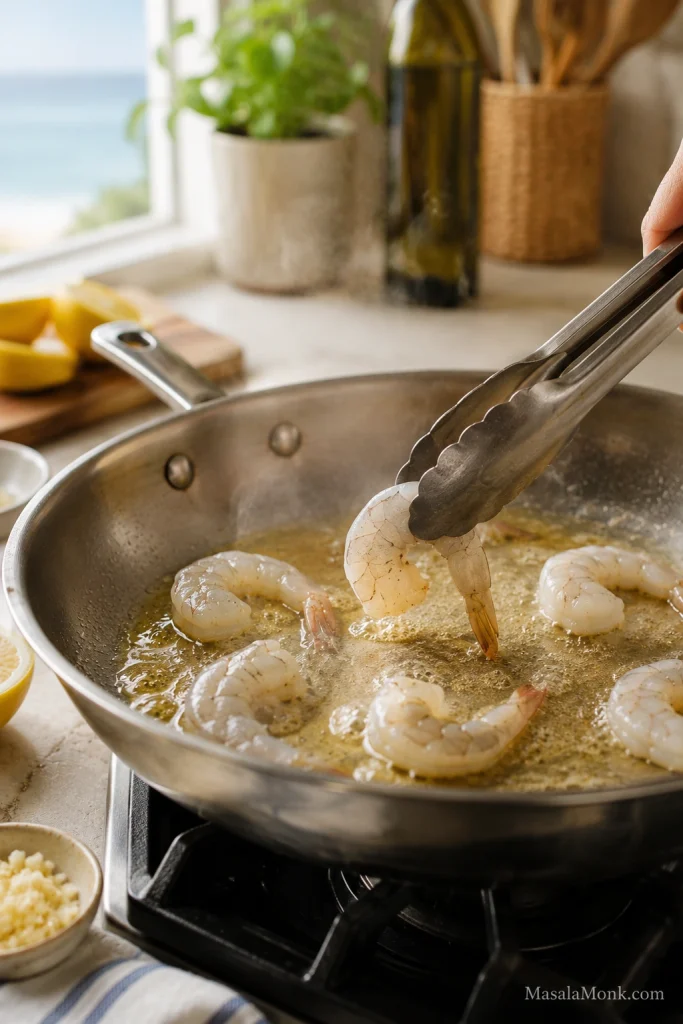
Shrimp being added to a hot skillet with melted butter and olive oil.
Once the butter and oil shimmer, add the shrimp. The goal is quick pan contact and gentle color, not simmering the shrimp in liquid.

Give the shrimp room in the skillet. A single layer keeps each piece in direct contact with the hot pan instead of steaming in its own moisture.
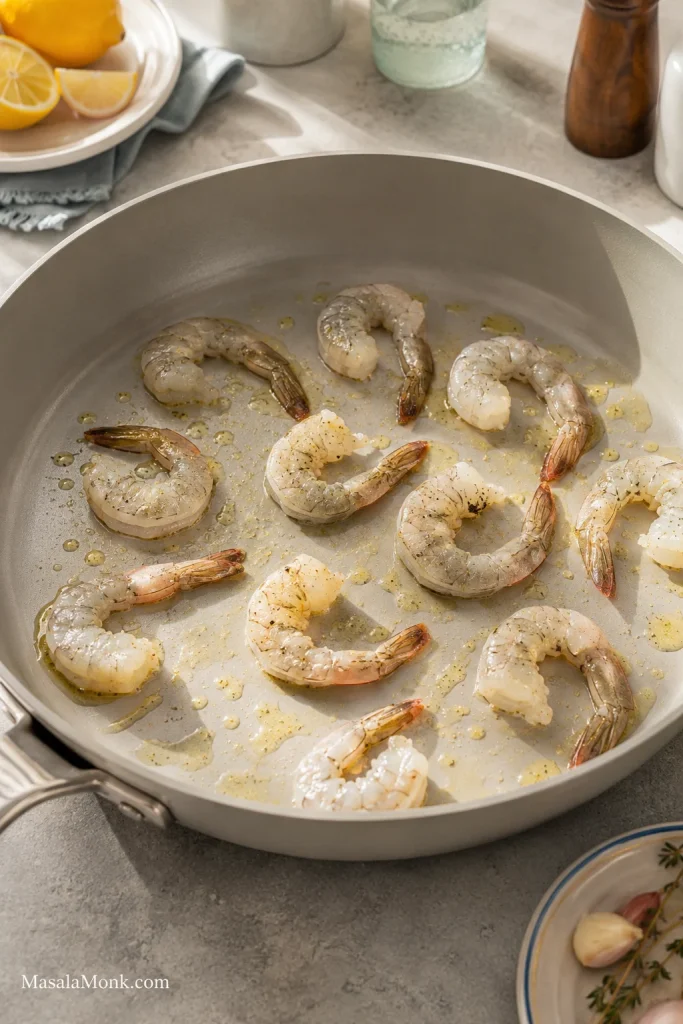
Raw shrimp spaced in one layer in a wide skillet with oil or butter.
Next, leave space between the shrimp. A crowded skillet steams the seafood, while a single layer gives faster cooking and a better bite.

Remove the shrimp before building the sauce. This short plate rest protects the shrimp texture while the pan flavor turns into sauce.
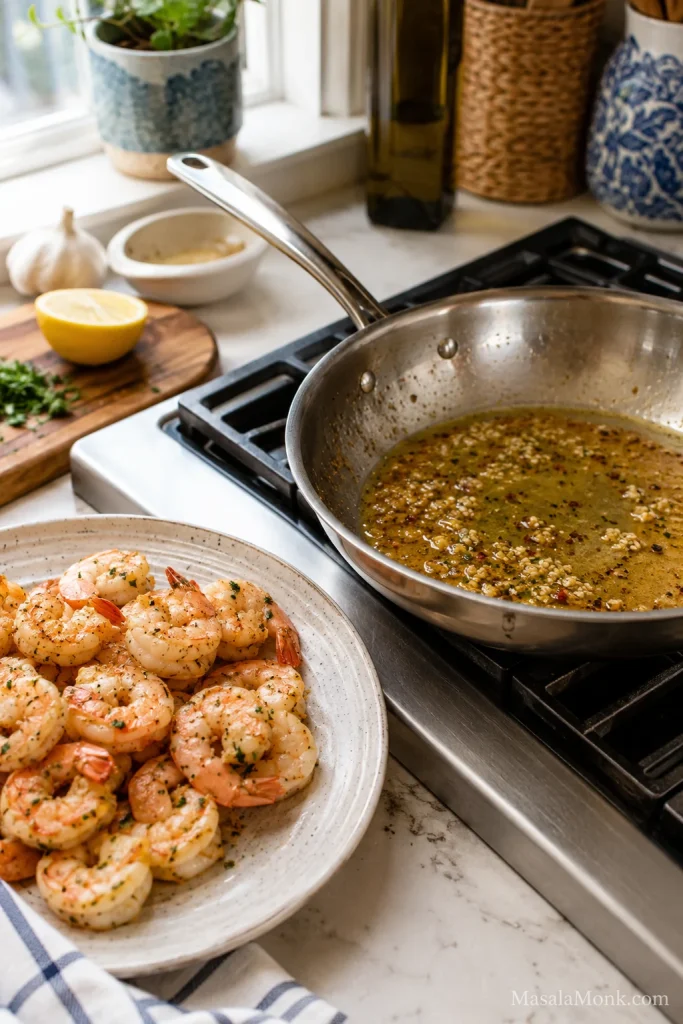
Cooked shrimp resting on a plate beside a skillet with garlic butter pan juices.
After the shrimp turns mostly pink, move it to a plate. That short rest keeps it tender while the skillet flavor becomes the garlic butter base.

Keep the garlic pale. Garlic is the backbone of the sauce, but it needs gentle heat.
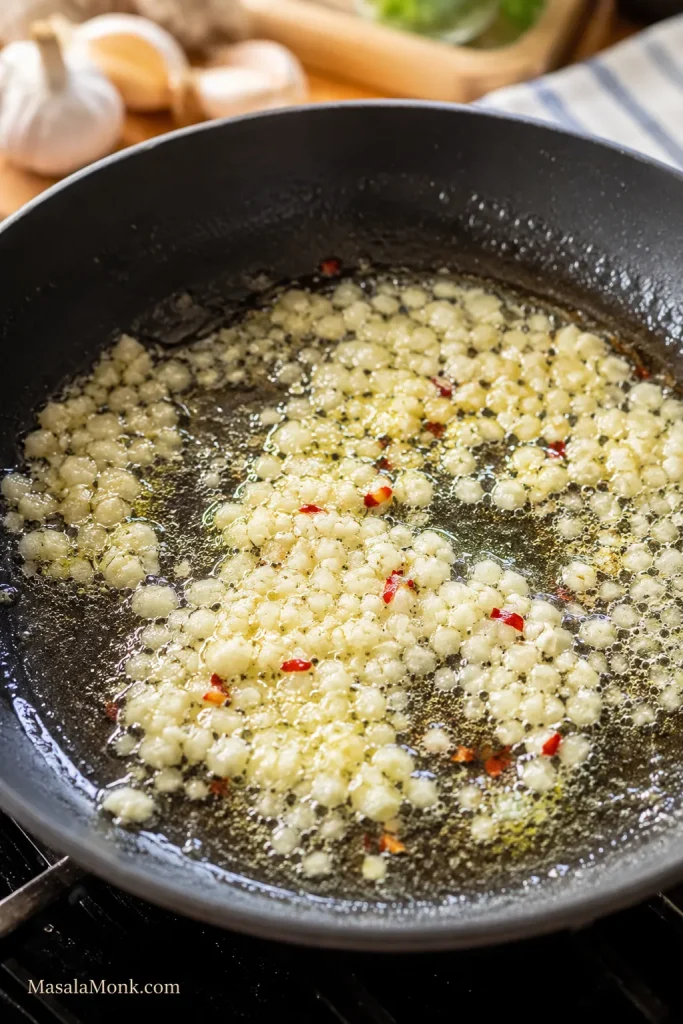
Pale minced garlic cooking gently in butter or olive oil with red pepper flakes.
Meanwhile, keep the garlic pale and fragrant. Light garlic tastes sweet and savory; dark garlic can make the whole shrimp scampi taste bitter.

Deglaze with wine or stock. This is where the browned shrimp and garlic flavor lift from the skillet.
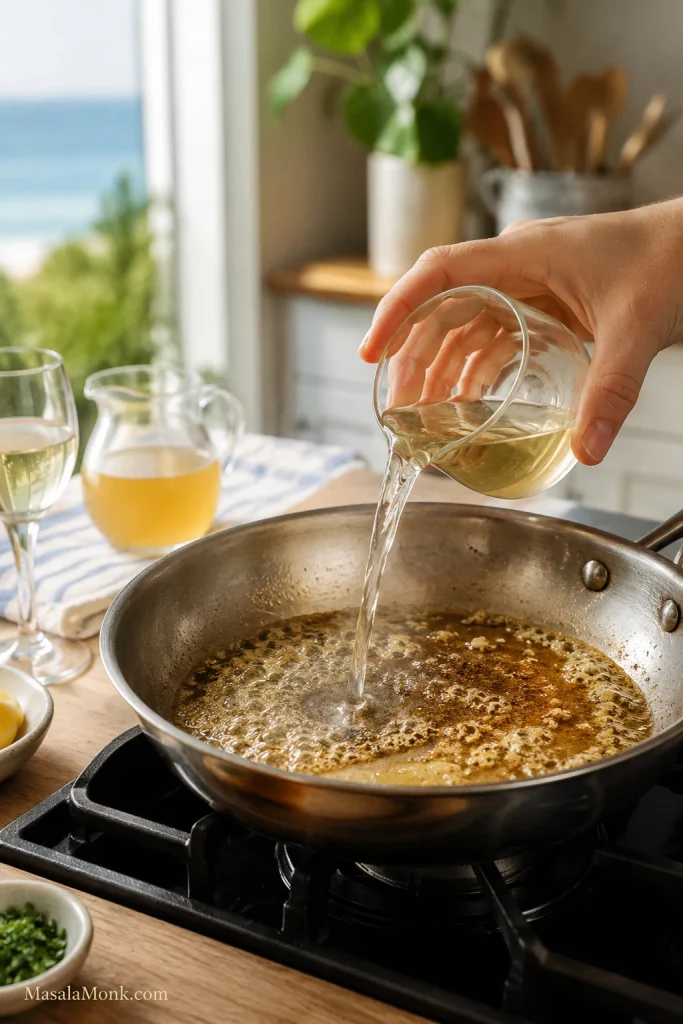
Wine or stock being poured into a skillet with garlic butter pan juices.
Then deglaze with dry white wine or stock. The liquid lifts the shrimp and garlic flavor from the pan, which is what gives the sauce depth.

Swirl butter into the pan juices. The sauce should come together as a glossy coating rather than a heavy gravy.
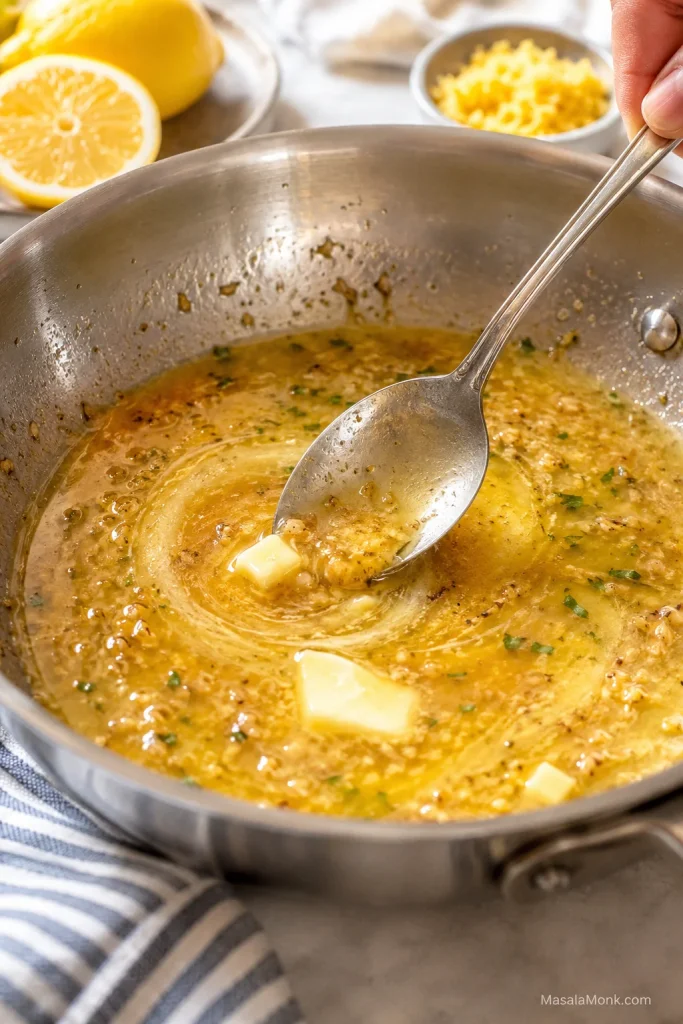
Butter melting into garlic lemon pan juices in a skillet.
Now swirl in butter until the pan juices look glossy and connected. If the sauce looks greasy, reduce the heat before adding more butter.

Return the shrimp at the end. The shrimp goes back only long enough to finish and coat.
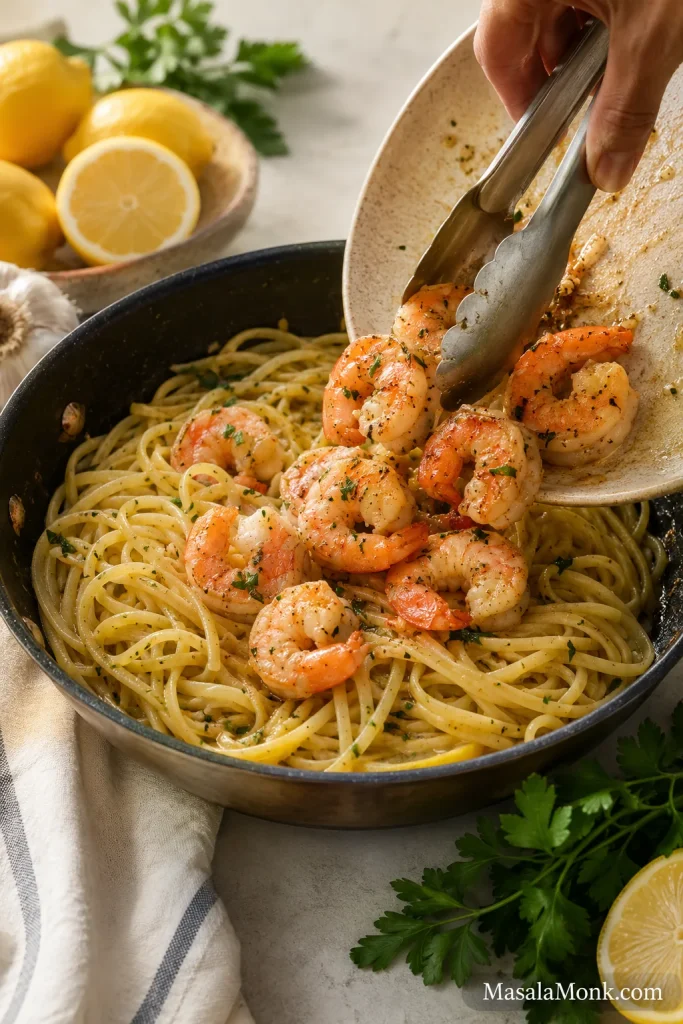
Cooked shrimp being added back to shrimp scampi pasta in a skillet.
Finally, return the shrimp for coating and warming only. When the shrimp is already pink and curled, another long cook is what makes it tough.

Finish with parsley and lemon. Fresh herbs and lemon zest belong at the end, where they stay bright.
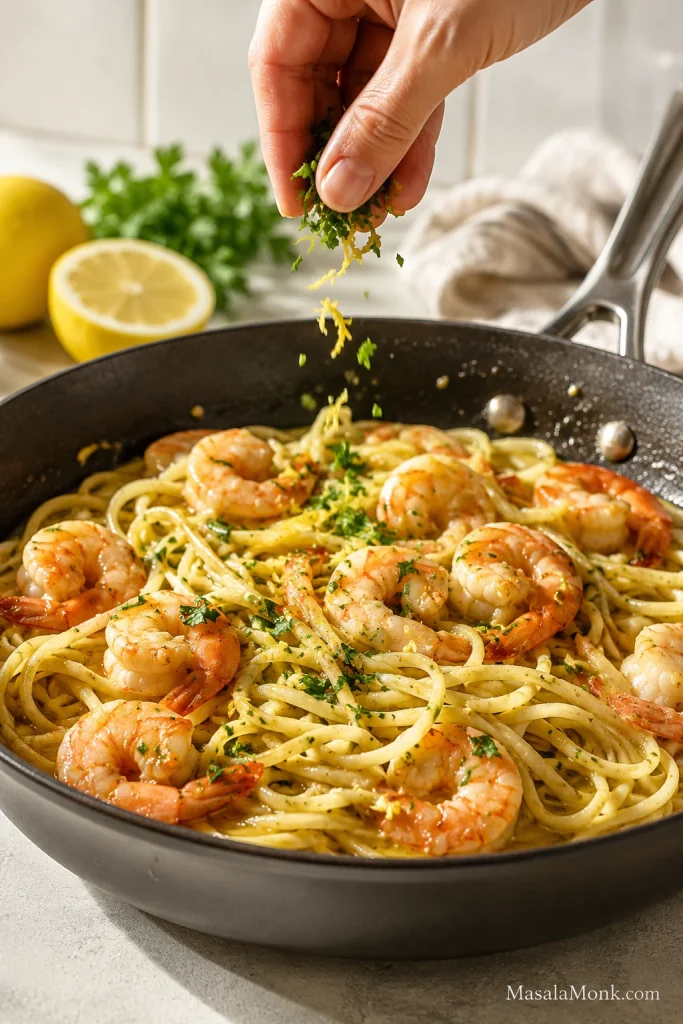
Parsley and lemon zest being sprinkled over finished shrimp scampi pasta in a skillet.
Finish off the heat with parsley and lemon zest. This fresh layer cuts through the butter and makes the shrimp scampi taste bright instead of heavy.

Doneness cue: shrimp are done when they turn pink, opaque, and curl into a loose C shape. If they curl tightly into an O, they are usually overcooked. If using a thermometer, shrimp should reach 63°C / 145°F; that matches the USDA safe minimum temperature chart for fish and shellfish.

Use the Loose C Doneness Cue

This visual check is faster than guessing by time, especially when shrimp sizes vary.
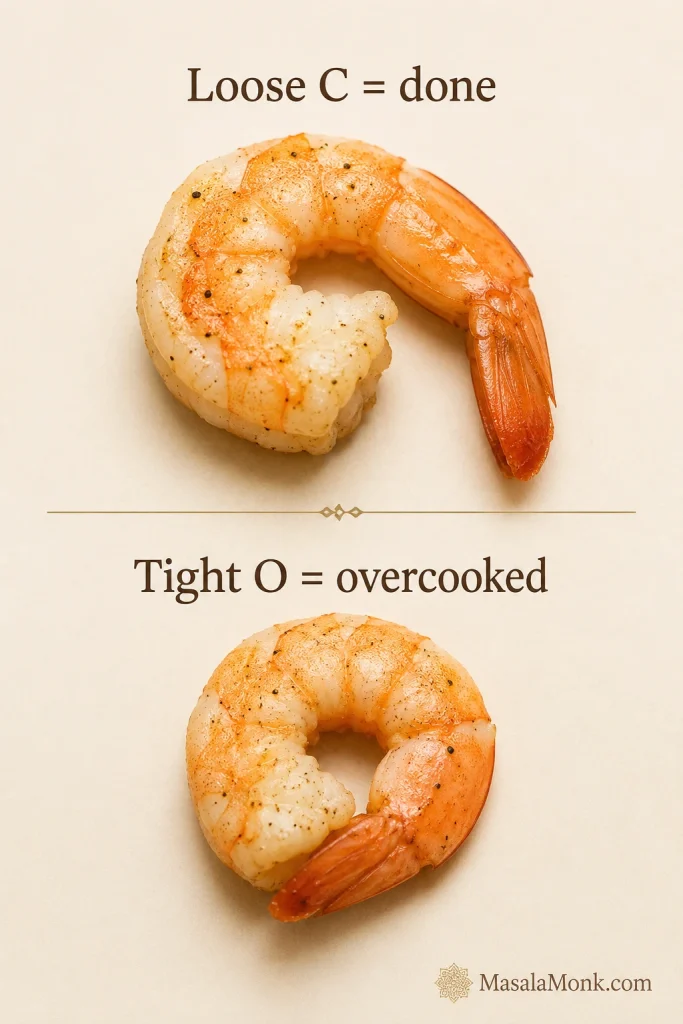
Comparison showing a loose C-shaped cooked shrimp and a tight O-shaped overcooked shrimp.
Use shape as a fast doneness check. Shrimp curled into a loose C are tender; shrimp curled into a tight O have usually gone too far.

Shrimp timing rule: pull shrimp when it looks almost done, not fully done. It will continue cooking from residual heat and again when it returns to the sauce.

Back to top · Back to recipe guide

How to Make Shrimp Scampi Pasta

For shrimp scampi pasta, toss the pasta directly in the skillet instead of spooning sauce over it later. This helps the garlic butter cling to the noodles.

If the noodles look dry, sticky, or oily while tossing, the sauce fixes will help before the shrimp overcooks.

  1. Use 225g / 8 oz linguine, spaghetti, angel hair, or capellini for the sauciest version.
  2. Cook the pasta 1–2 minutes shy of done and reserve 1 cup / 240ml pasta water.
  3. Build the sauce after removing the shrimp from the pan.
  4. Add the pasta to the sauce before returning the shrimp.
  5. Add pasta water 2–3 tablespoons at a time until the pasta looks loose and lightly coated.
  6. Return the shrimp only at the end and toss briefly.

Add Pasta Before the Shrimp Returns

This is the order that keeps the noodles saucy and the shrimp tender.
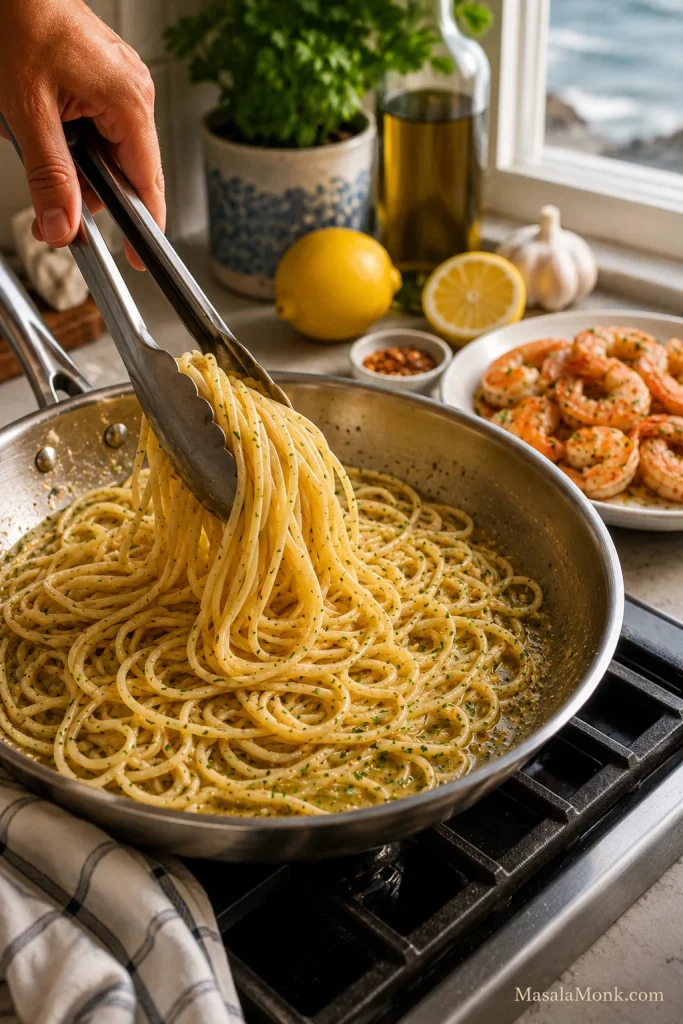
Pasta being tossed in garlic butter sauce while cooked shrimp waits on a plate beside the skillet.
For shrimp scampi pasta, let the noodles hit the sauce before the shrimp returns. The pasta absorbs the lemony garlic butter while the shrimp avoids extra heat.

When the pasta is right, it should look shiny and loose, with little flecks of garlic, parsley, and lemon zest clinging to the noodles. That is the moment where the dish stops being shrimp plus pasta and becomes shrimp scampi pasta.

Check the Pasta Texture Before Serving

This is the texture cue to look for before you turn off the heat.
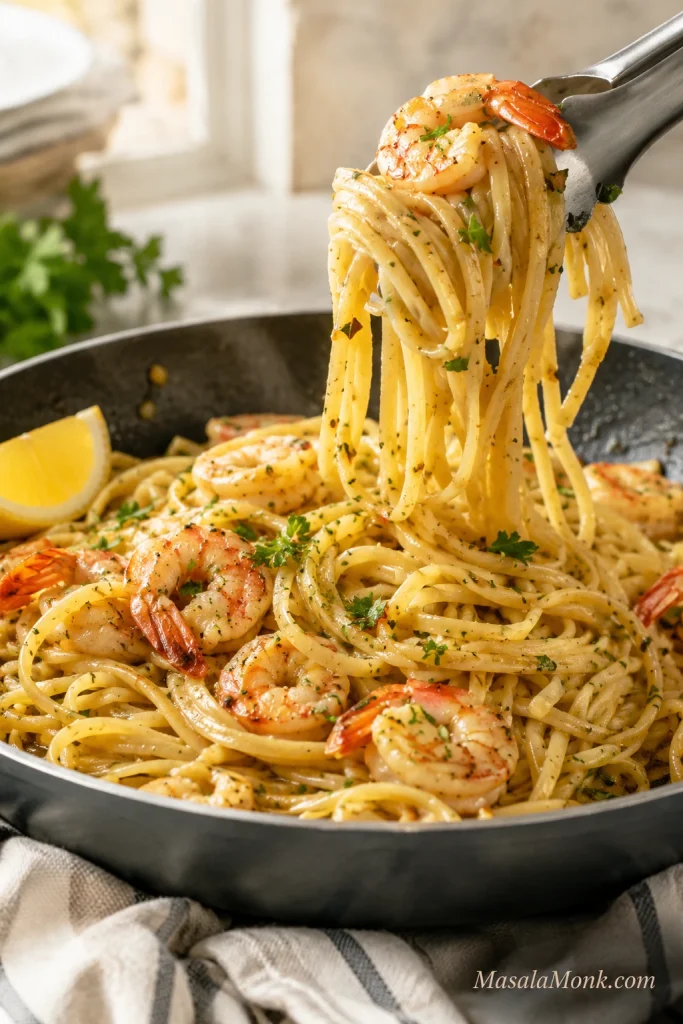
Tongs lifting shiny shrimp scampi pasta with shrimp, parsley, and lemon in a skillet.
Good shrimp scampi pasta should look loose, shiny, and lightly coated. If the noodles look sticky, toss in reserved pasta water one spoonful at a time.

Pasta ratio rule: 225g / 8 oz pasta gives you saucy, shrimp-forward scampi. A full 450g / 1 lb pasta box needs double the sauce, or the shrimp will get lost in the noodles.

Back to top · Back to recipe guide

Shrimp Scampi Without Wine

You can make shrimp scampi without wine. No wine does not mean less flavor; it just means you need body from stock and lift from lemon.

For the best no-wine shrimp scampi, use ½ cup / 120ml low-sodium seafood stock or chicken stock, then adjust acidity at the end. Vegetable stock works too, but it gives a lighter finish. Add up to ½ teaspoon white wine vinegar only if the sauce tastes flat after the lemon.

Wine vs Stock in Shrimp Scampi

This comparison is useful when you want the classic flavor or a no-wine version with enough body.
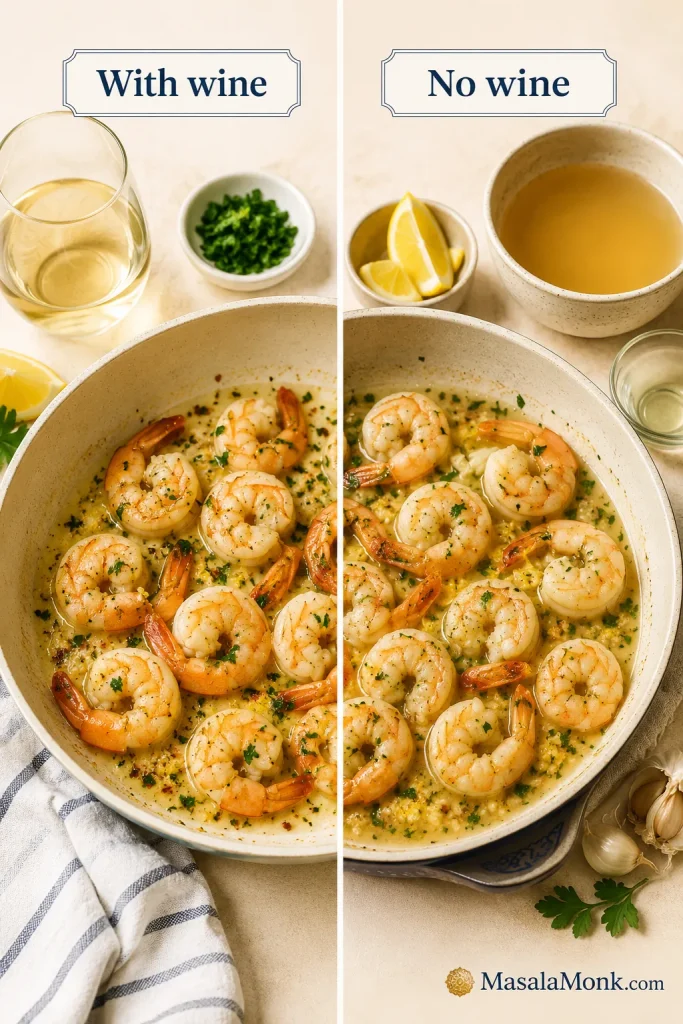
Split image comparing shrimp scampi made with wine and shrimp scampi made with stock.
Wine brings crisp acidity; stock makes the no-wine version savory and family-friendly. Either way, lemon keeps the garlic butter sauce lively.

Avoid sweet juices, too much vinegar, and salty cooking wine. Plain water can loosen the skillet juices in a pinch, but stock gives much better flavor.

Ingredients You Need

The ingredient list is short, which is part of the charm: shrimp, garlic, lemon, butter, parsley, and a pan sauce that tastes bigger than the effort.

Still choosing between shrimp, prawns, fresh, frozen, or cooked shrimp? Jump to the shrimp type guide before buying or thawing.

Shrimp Scampi Ingredients at a Glance

Use this image as the shopping and prep check before cooking.
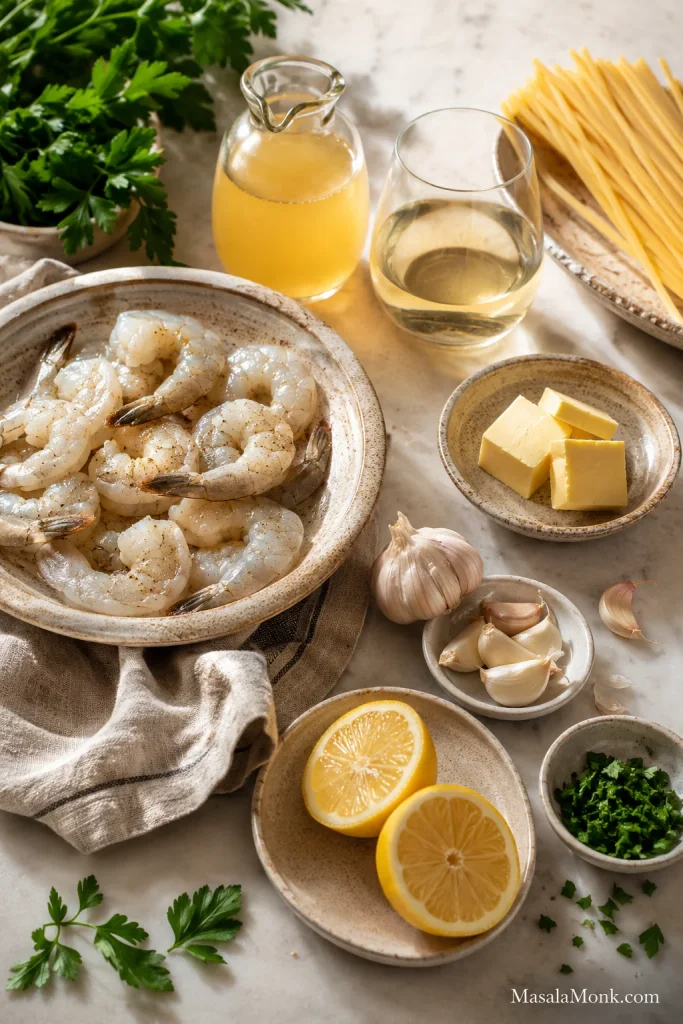
Shrimp scampi ingredients including shrimp, garlic, lemon, butter, parsley, pasta, wine, and stock.
The ingredient list is short, so each choice matters. Shrimp, garlic, lemon, butter, parsley, pasta, and wine or stock are enough when the balance is right.
  • Shrimp or prawns: Use 500g / 1.1 lb large shrimp or prawns, peeled, deveined, and patted dry. A 450g / 1 lb pack also works. The shrimp should smell clean, not fishy.
  • Pasta: Use 225g / 8 oz linguine, spaghetti, angel hair, or capellini if making shrimp scampi pasta.
  • Unsalted butter: 3 tablespoons / 42g gives the sauce richness. If using salted butter, reduce the added salt.
  • Olive oil: 2 tablespoons / 30ml helps sauté the shrimp and garlic without the butter burning too quickly.
  • Garlic: Use 5–6 medium cloves, finely minced, or about 18–25g minced garlic. Fresh garlic is best here.
  • Dry white wine: Use ½ cup / 120ml for the classic version.
  • Stock: Use ½ cup / 120ml low-sodium seafood stock, chicken stock, or vegetable stock for the no-wine version.
  • Lemon: Use 2 tablespoons / 30ml fresh lemon juice plus 1 teaspoon lemon zest. Zest before juicing.
  • Parsley: ¼ cup chopped fresh parsley adds color and freshness at the end.
  • Red pepper flakes: ¼ teaspoon is optional, but it gives gentle heat.
  • Salt and pepper: Start with ½ teaspoon fine salt for the shrimp, plus more for pasta water and final adjustment.
  • Pasta water: Reserve 1 cup / 240ml before draining pasta if making the pasta version.

Back to top · Back to recipe guide

What Is Shrimp Scampi?

Shrimp scampi is a quick shrimp dish made with garlic, butter, olive oil, lemon, white wine, parsley, and sometimes red pepper flakes. Many American versions serve it with pasta, especially linguine, spaghetti, angel hair, or capellini.

Across the US, this dish is usually called shrimp scampi. In India, Australia, and many other places, readers may also think of it as prawn scampi, king prawn scampi, tiger prawn scampi, or garlic butter prawns. UK readers may know “scampi” as langoustine tails, often breaded; this recipe is the American-style garlic butter shrimp or prawn scampi.

The sauce should be light and silky, not thick like Alfredo and not thin like soup. You are making a bright garlic butter sauce that coats the shrimp and clings to pasta if you use it.

Shrimp vs Prawns

You can use shrimp or prawns in this recipe. The method stays the same: cook them quickly, remove them from the pan, build the sauce, then return them briefly at the end.

Large shrimp or prawns give the best texture. Shrimp labeled 16–20 or 21–25 count per pound are ideal. Smaller shrimp cook faster, while very large king prawns or tiger prawns may need 30–60 seconds more.

Tail-on shrimp look good and can add a little extra flavor, especially if serving the scampi with bread, rice, or vegetables. Tail-off shrimp are easier to eat with pasta.

Fresh, Frozen, Raw, or Cooked Shrimp?

Raw shrimp or prawns give the best texture, but frozen raw shrimp is often the most practical choice. Avoid freezer-burned shrimp, thaw gently, drain well, and pat dry before cooking.

Shrimp typeHow to use it
Raw frozen shrimpThaw fully, drain well, and pat very dry before cooking.
Fresh raw shrimpUse if clean-smelling and truly fresh. Cook the same way as thawed frozen shrimp.
Cooked shrimpAdd only at the end for 30–60 seconds, just to warm through.
Frozen cooked shrimpThaw fully, pat dry, and warm gently in the finished sauce.
Shell-on shrimpMore flavor but more work. Better for baked versions or homemade stock.

Choose the Right Shrimp or Prawns

The timing changes depending on whether the seafood is raw, frozen, cooked, or extra large.
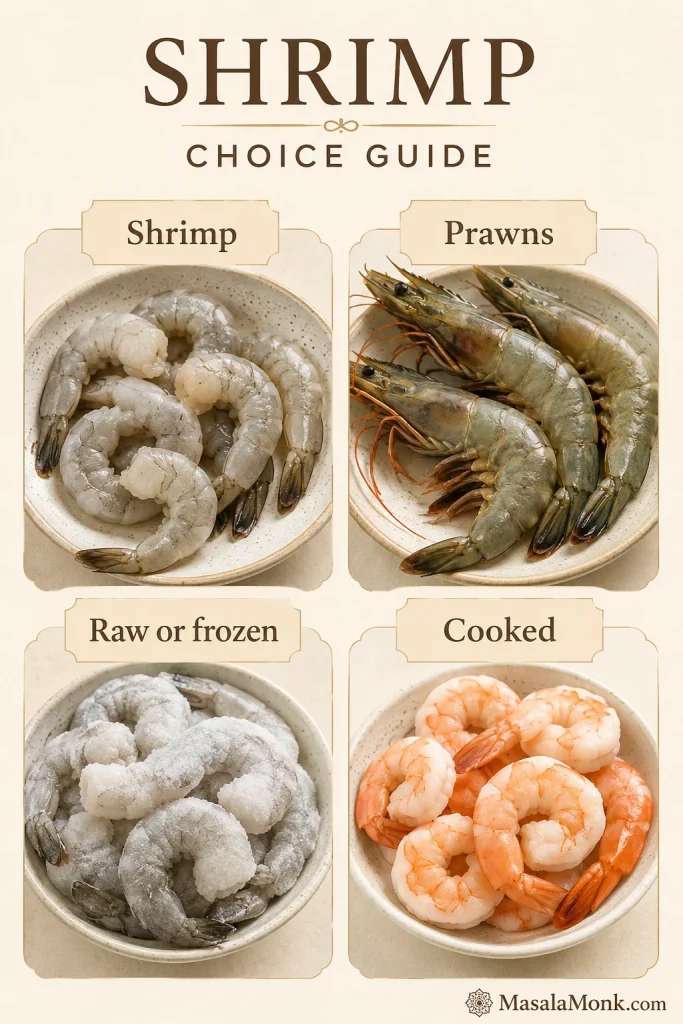
Guide showing shrimp, prawns, raw or frozen shrimp, and cooked shrimp for shrimp scampi.
Shrimp, prawns, raw frozen shrimp, and cooked shrimp can all work, but not the same way. Raw shrimp cooks into the best texture; cooked shrimp only needs a brief warm-through.

For thawing, use the fridge overnight or place the sealed shrimp bag in cold water. Cooked shrimp needs the lightest touch because it has already been cooked once.

Best Pasta to Use

Long, thin pasta works best because it catches the garlic butter sauce without overpowering the shrimp.

  • Linguine: classic and restaurant-style.
  • Spaghetti: easy, familiar, and reliable.
  • Angel hair: delicate and quick-cooking.
  • Capellini: light and excellent with this sauce.
  • Fettuccine: works if you increase the sauce.
  • Zucchini noodles: useful for a low-carb scampi-style bowl.

This recipe uses less pasta than some versions because the goal is a shrimp-forward, saucy skillet, not a big pot of noodles with a little shrimp scattered through it. For another seafood pasta with lemon, garlic, Parmesan, and pasta-water control, try this creamy salmon pasta.

The Garlic Butter Sauce

The sauce is why people come back to shrimp scampi. It should be buttery enough to feel special, lemony enough to stay fresh, and loose enough to coat instead of sit heavily underneath.

A good scampi sauce has three parts in balance: butter for richness, lemon for lift, and garlic for warmth. Wine or stock gives the sauce body, parsley freshens the finish, and pasta water helps everything cling if you are adding noodles.

When it lands right, the shrimp stays tender, the garlic tastes warm instead of sharp, and the last bit of lemon butter is exactly what the bread is for.

The sauce is right when the shrimp looks shiny and the pasta looks lightly coated. If there is a puddle underneath, it needs a little more tossing, reducing, or pasta-water control.

Best Wine for Shrimp Scampi

Use a dry, crisp white wine. The wine should brighten the garlic butter sauce, not make it sweet. Use something you would drink with lemony seafood; if it tastes sweet in the glass, it will taste sweet in the skillet.

Skipping alcohol entirely? Go back to the shrimp scampi without wine section and use stock instead.

  • Sauvignon Blanc
  • Pinot Grigio
  • Dry unoaked Chardonnay
  • Dry vermouth

Save sweet wine for sipping or dessert; scampi wants something crisp and dry. Skip salty cooking wine because it can make the sauce harsh.

Back to top · Back to recipe guide

How to Fix the Sauce

Most scampi problems are easy to fix if you catch them early.

ProblemFix
Too thinSimmer for 1–2 minutes, then swirl in a little butter. Next time, dry the shrimp better.
Greasy or splitAdd 1–2 teaspoons pasta water or warm water and swirl hard until shiny and smooth.
Too sharpAdd a little more butter or a splash of pasta water.
Flat flavorAdd lemon zest, parsley, or a tiny splash of white wine vinegar.
Bitter garlicThe garlic probably burned. Start the garlic again if possible.
Tough shrimpIt was overcooked. Next time, remove it earlier and finish briefly in the sauce.
Dry pastaAdd reserved pasta water a little at a time and toss well.
Too saltyAdd unsalted butter, pasta water, or more pasta. Use low-sodium stock next time.

Fix Thin Shrimp Scampi Sauce

This is the rescue when the pan juices look loose instead of glossy.
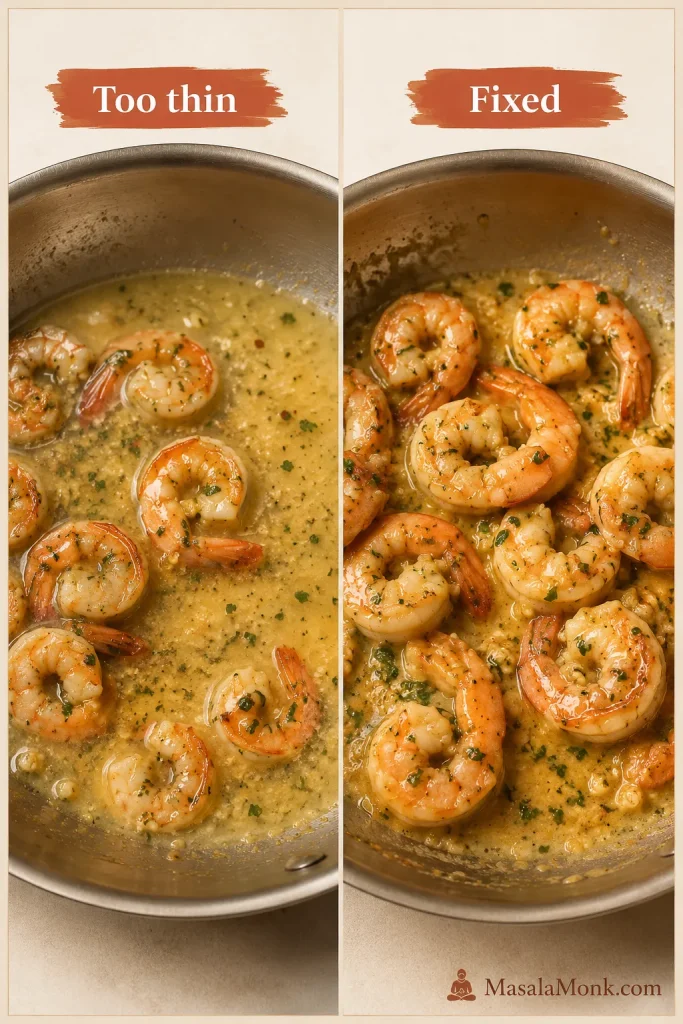
Before and after comparison of thin shrimp scampi sauce and fixed sauce coating shrimp.
If the sauce looks thin, reduce it briefly before adding more butter. The fixed scampi sauce should lightly cling to shrimp or pasta instead of pooling underneath.

Fix Split or Oily Scampi Sauce

This is the rescue when butter separates from the wine, stock, or pasta water.
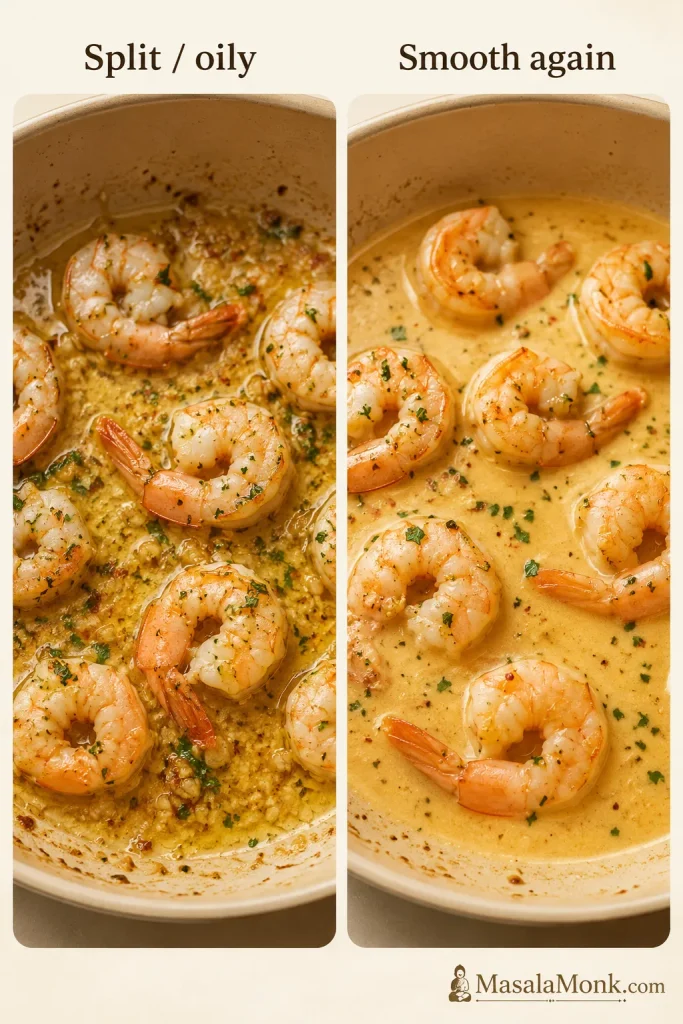
Before and after comparison of split oily shrimp scampi sauce and smooth sauce.
If the sauce splits, add a spoonful of pasta water or warm water and swirl hard. Starch and motion help the butter reconnect into a smooth coating.

Back to top · Back to recipe guide

Variations

Use these when you want the same garlic-lemon-butter idea in a different mood: creamier, baked, low-carb, air-fried, or more like a restaurant pasta.

Creamy Shrimp Scampi

Add ¼ to ½ cup / 60–120ml heavy cream after the wine or stock has reduced. Add 2–4 tablespoons Parmesan if you want a richer pasta-style sauce. Keep the heat low after adding cream so the sauce does not split.

Baked Shrimp Scampi

Arrange shrimp or prawns in a shallow baking dish with garlic butter, lemon, white wine or stock, salt, pepper, and parsley. Add panko and Parmesan if you want a crisp finish. Bake at 220°C / 425°F for 8–12 minutes, just until the shrimp are pink, opaque, and loosely curled.

If you want another lemon-garlic seafood dinner that cooks quickly, this baked tilapia keeps the same easy weeknight feel.

Air Fryer Shrimp Scampi

Toss shrimp with melted butter, olive oil, garlic, lemon juice, salt, pepper, and red pepper flakes. Air fry at about 190°C / 370°F for 5–6 minutes, shaking or turning once, just until the shrimp are pink, opaque, and loosely curled. Use a small oven-safe dish if you want to keep more sauce.

Restaurant-Style Shrimp Scampi Pasta

For restaurant-style shrimp scampi pasta, angel hair or linguine gives the cleanest finish. Add asparagus tips or cherry tomatoes if you want color, then finish with parsley, lemon, and Parmesan. Increase the sauce if you cook more than 225g / 8 oz pasta.

Low-Carb Shrimp Scampi

Skip the pasta and serve the shrimp with zucchini noodles, roasted vegetables, cauliflower rice, or a green salad. Keep the sauce slightly more concentrated because vegetables can release moisture.

Shrimp Scampi With Rice

Serve the shrimp and sauce over plain rice, rice pilaf, or lightly seasoned basmati rice. For a more generous seafood-and-rice dinner, this home-style paella is another natural place to go.

For a brighter plate, keep the rice simple and let the lemony shrimp and crisp salad do the work.
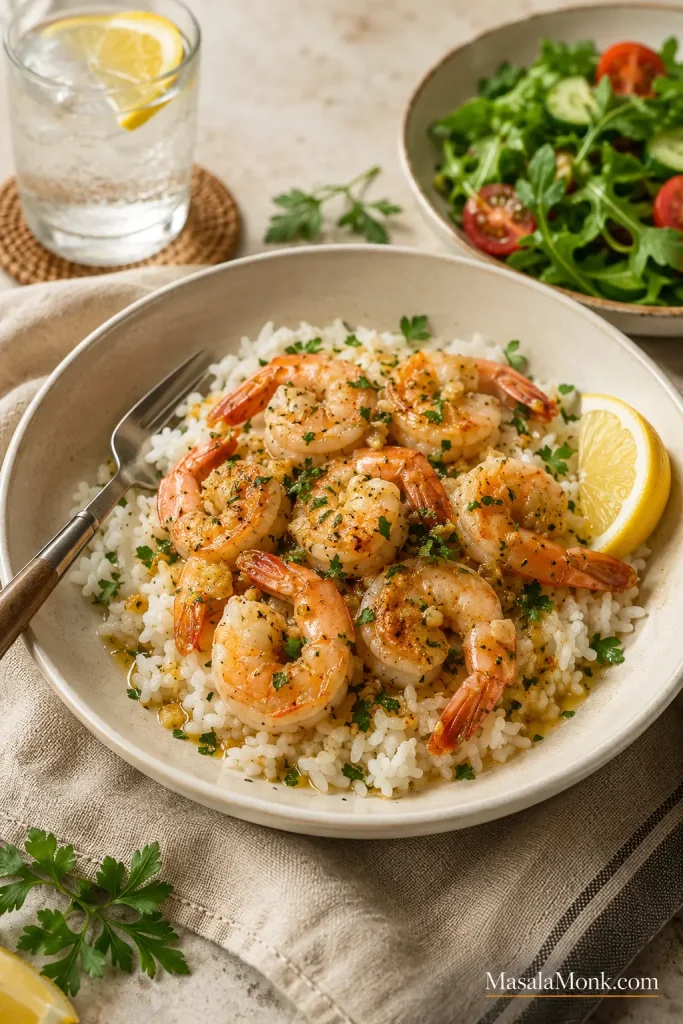
Shrimp scampi served over white rice with lemon, parsley, fork, and a green salad nearby.
For a lighter non-pasta dinner, spoon shrimp scampi over rice and add a crisp salad. The rice catches the butter sauce while the greens keep the plate fresh.

For another fast shrimp dinner with a completely different mood, these shrimp tacos with slaw and creamy cilantro-lime sauce are easy, bright, and weeknight-friendly.

What to Serve With It

The side you choose changes the mood of the meal. Pasta makes it dinner, bread makes it casual, rice keeps it simple, and salad keeps it light.

If you want…Serve shrimp scampi with…
Something to soak up sauceCrusty bread, garlic bread, toasted baguette
A classic pasta dinnerLinguine, spaghetti, angel hair, capellini
A simple non-pasta mealRice, rice pilaf, or orzo
A lighter plateGreen salad, zucchini noodles, roasted vegetables
A vegetable sideAsparagus, broccoli, zucchini, green beans, cherry tomatoes

Serve Shrimp Scampi With Crusty Bread

Bread turns the pan sauce into part of the meal instead of something left behind.
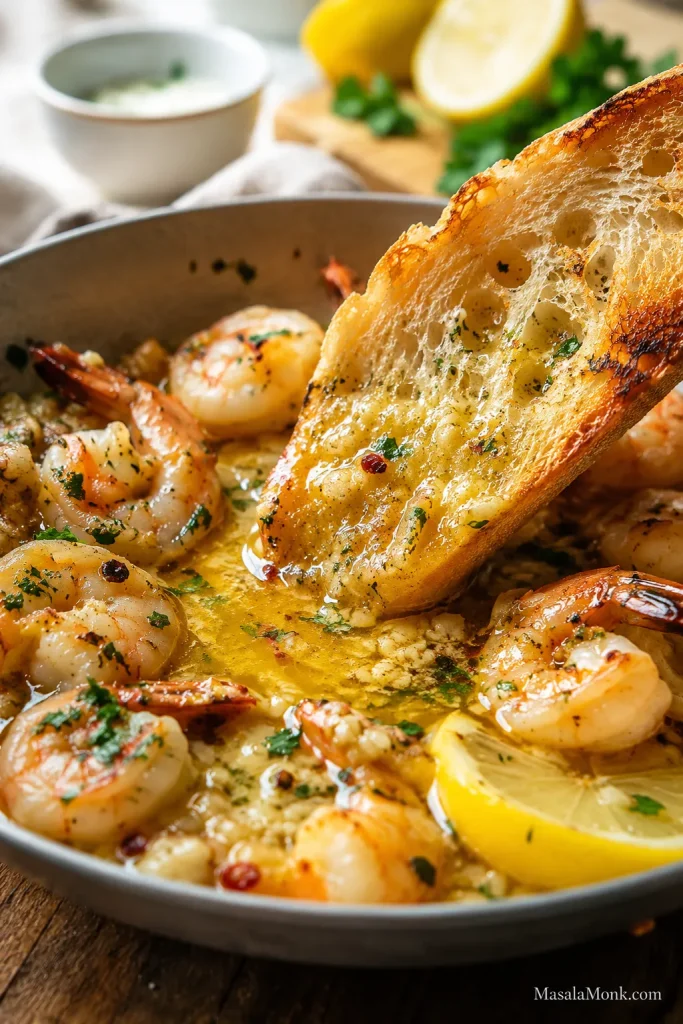
Crusty bread being dragged through lemon garlic butter shrimp scampi with shrimp nearby.
For a no-pasta shrimp scampi moment, use crusty bread to drag through the lemon garlic butter. The last swipe in the pan is often the best bite.

A crisp wedge salad keeps the plate cool and crunchy, while a homemade garlic bread loaf is the move when you want every bit of sauce gone. Plates are optional; bread is not.

If you make it, note how you served it — pasta, bread, rice, or vegetables — because that changes how much sauce you may want next time. The last spoonful of sauce is the point.

Back to top · Back to recipe guide

Storage and Reheating

Shrimp scampi is best eaten fresh because shrimp can toughen when reheated. Leftovers can be refrigerated in an airtight container for up to 2 days.

Reheat gently in a skillet over low heat with a splash of water, stock, or pasta water. Warm just until the shrimp is heated through. If storing shrimp scampi pasta, add a splash of liquid while reheating because the pasta will absorb sauce.

Freezing cooked shrimp scampi is not ideal. For prep ahead, clean and dry the shrimp, mince the garlic, chop the parsley, zest the lemon, and measure the sauce ingredients before cooking.

The best shrimp scampi feels simple at the table: tender shrimp, warm garlic, lemony butter, and just enough sauce left behind for bread or one last forkful of pasta.

Back to top · Back to recipe guide

Final Shrimp Scampi Texture Check

Right before the recipe card, this is the finished look to aim for: tender shrimp, bright lemon, loose pasta, and a clean buttery finish.
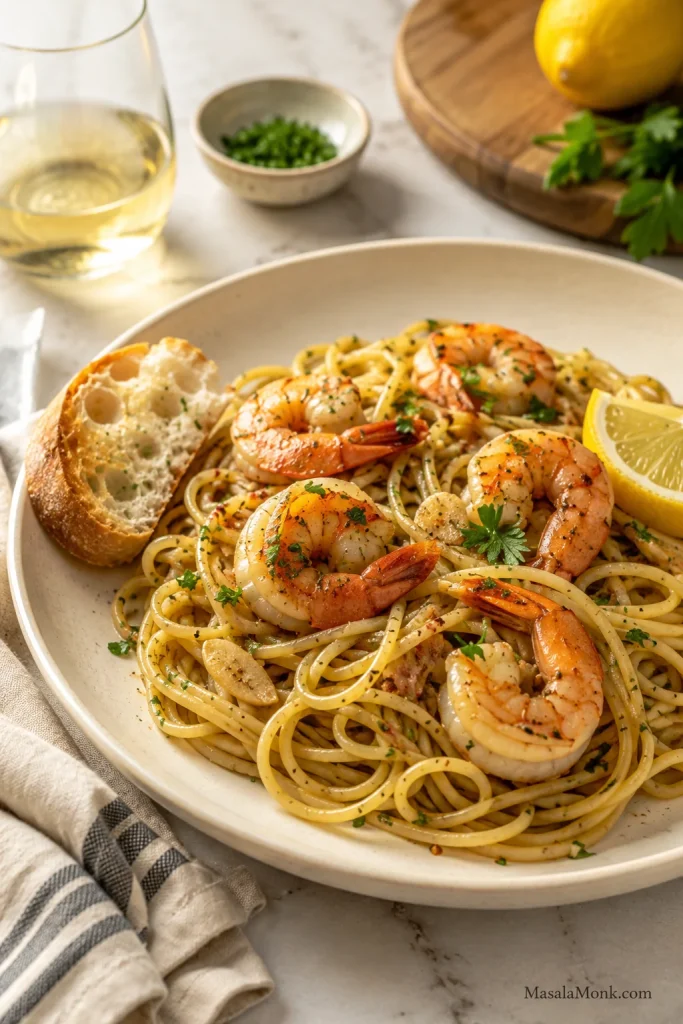
Finished shrimp scampi pasta on a plate with shrimp, lemon wedge, parsley, bread, and garlic butter sauce.
This is the recipe-card payoff: tender shrimp, lemony garlic butter, parsley, bread, and a clean plated finish. It shows exactly what the final shrimp scampi should feel like.

Shrimp Scampi Recipe

Here is the clean skillet version to cook from when you want tender shrimp, lemony garlic butter, and enough sauce for pasta or bread.

Description: Tender shrimp or prawns in a silky garlic butter lemon sauce, with a white wine or no-wine option and instructions for serving with pasta.

Prep Time10 minutes
Cook Time10 minutes
Total Time20 minutes
Servings4
MethodSkillet / sauté
CourseDinner, Main Course, Seafood
EquipmentWide skillet, pasta pot if using pasta, tongs, colander, zester, measuring cup

Ingredients

  • 500g / 1.1 lb large shrimp or prawns, peeled, deveined, and patted dry
  • ½ teaspoon fine salt, plus more for pasta water and final adjustment
  • Freshly ground black pepper, to taste
  • 225g / 8 oz linguine, spaghetti, angel hair, or capellini, optional
  • 3 tablespoons / 42g unsalted butter, divided
  • 2 tablespoons / 30ml olive oil
  • 5–6 medium garlic cloves, finely minced, or about 18–25g minced garlic
  • ½ cup / 120ml dry white wine, or low-sodium seafood stock, chicken stock, or vegetable stock
  • 2 tablespoons / 30ml fresh lemon juice
  • 1 teaspoon lemon zest
  • ¼ teaspoon red pepper flakes, optional
  • ¼ cup chopped fresh parsley
  • 1 cup / 240ml reserved pasta water, if using pasta

Instructions

  1. Prepare the shrimp. If using frozen shrimp, thaw fully. Drain well and pat dry with paper towels. Season with ½ teaspoon fine salt and black pepper.
  2. Cook the pasta, if using. Bring a large pot of salted water to a boil. Cook pasta 1–2 minutes less than the package directions. Reserve 1 cup / 240ml pasta water, then drain. Leave the pasta unrinsed.
  3. Sear the shrimp. Heat a wide skillet over medium-high heat. Add olive oil and 1 tablespoon butter. Add shrimp in one layer. Cook large shrimp for about 60–90 seconds per side, or up to 2 minutes per side for very large prawns. Transfer to a plate when almost cooked through. Cook in batches if needed.
  4. Cook the garlic. Lower heat to medium. Add minced garlic and red pepper flakes. Cook for 30–45 seconds, stirring constantly, until fragrant but not browned.
  5. Reduce the pan liquid. Add dry white wine or stock and simmer for 2–3 minutes, scraping the pan gently.
  6. Finish the sauce. Add lemon juice, lemon zest, and the remaining 2 tablespoons butter. Swirl or stir until the sauce comes together.
  7. Add pasta first, if using. Toss the drained pasta in the sauce. Pour in reserved pasta water a few tablespoons at a time until the noodles look loose, shiny, and lightly coated.
  8. Return the shrimp at the end. Add the shrimp back to the skillet and toss for 30–60 seconds, just until fully cooked. If not using pasta, return the shrimp directly after finishing the sauce.
  9. Finish and serve. Turn off the heat. Stir in parsley. Taste and adjust salt, pepper, and lemon. Serve immediately.

Notes

  • Success cue: shrimp should be just opaque, garlic should be fragrant, and sauce should lightly coat rather than pool.
  • For no-wine shrimp scampi, use low-sodium stock instead of wine and add up to ½ teaspoon white wine vinegar only if the sauce tastes flat.
  • Use 225g / 8 oz pasta for a saucy shrimp scampi pasta. A full 450g / 1 lb pasta box needs double sauce.
  • Smaller shrimp may cook in under 60 seconds per side. Very large prawns may need closer to 2 minutes per side.
  • Cooked shrimp should go in only at the end and warm for 30–60 seconds.
  • A split sauce can usually be saved with 1–2 teaspoons pasta water or warm water.
  • When shrimp, stock, butter, or Parmesan is salty, start with less salt and adjust at the end.
  • This dish is best served immediately. Leftovers can be refrigerated for up to 2 days, but reheating should be gentle.

Back to top · Back to recipe guide

FAQs

What is shrimp scampi?

Shrimp scampi is shrimp cooked quickly in garlic, butter, olive oil, lemon, white wine or stock, parsley, and sometimes red pepper flakes. It is often served with pasta or crusty bread.

Is prawn scampi the same as shrimp scampi?

For this recipe, yes. Shrimp and prawns can be cooked the same way, though very large prawns may need slightly more time.

What is scampi sauce made of?

Scampi sauce is usually made with butter, olive oil, garlic, dry white wine or stock, lemon juice, lemon zest, parsley, salt, pepper, and sometimes red pepper flakes.

Can I make shrimp scampi without wine?

Yes. Use low-sodium seafood stock, chicken stock, or vegetable stock, then add lemon and a tiny splash of white wine vinegar only if the sauce tastes flat.

What can I use instead of white wine?

Seafood stock gives the most natural flavor, chicken stock is the easiest pantry option, and vegetable stock keeps the sauce lighter.

What is the best wine for shrimp scampi?

Use a dry white wine that tastes crisp rather than sweet, such as Sauvignon Blanc, Pinot Grigio, dry unoaked Chardonnay, or dry vermouth.

Can I use frozen shrimp?

Yes. Thaw fully, drain well, and pat dry. Wet shrimp steam in the pan and can make the sauce thin.

Can I use cooked shrimp?

Yes, but add cooked shrimp only at the end for 30–60 seconds. It only needs to warm through.

What pasta goes best with shrimp scampi?

Linguine, spaghetti, angel hair, and capellini work best because they catch the light garlic butter lemon sauce.

How much pasta should I use?

Use 225g / 8 oz pasta for a shrimp-forward, saucy pasta. Use 450g / 1 lb only if you double the sauce.

Why is my shrimp rubbery?

Shrimp becomes rubbery when overcooked. Pull it when it is almost done and finish it briefly in the sauce.

Why is my shrimp scampi sauce thin?

The most common reason is wet shrimp. Simmer the sauce briefly, swirl in a little butter, and dry the shrimp better next time.

Why did my scampi sauce split?

The butter and liquid may have separated. Add 1–2 teaspoons pasta water or warm water and swirl until smooth again.

Can I make shrimp scampi ahead of time?

It is best cooked fresh, but you can prep the shrimp, garlic, parsley, lemon, and measured sauce ingredients ahead so the skillet cooking takes only minutes.

Can I make creamy shrimp scampi?

Yes. Add ¼ to ½ cup / 60–120ml heavy cream after reducing the wine or stock, then keep the heat low so the sauce does not split.

Can I bake shrimp scampi?

Yes. Bake shrimp with garlic butter, lemon, wine or stock, and optional breadcrumbs at 220°C / 425°F for 8–12 minutes, just until pink, opaque, and loosely curled.

Can I make shrimp scampi in the air fryer?

Yes. Air fry seasoned shrimp with butter, olive oil, garlic, and lemon at about 190°C / 370°F for 5–6 minutes, just until pink, opaque, and loosely curled.

What do you serve with shrimp scampi?

Serve it with pasta, crusty bread, garlic bread, rice, orzo, roasted vegetables, zucchini noodles, or a green salad.
Back to top · Back to recipe guide

Posted on 8 Comments

Chicken Pesto Pasta (Easy Base Recipe + Creamy, One-Pot, Baked & More)

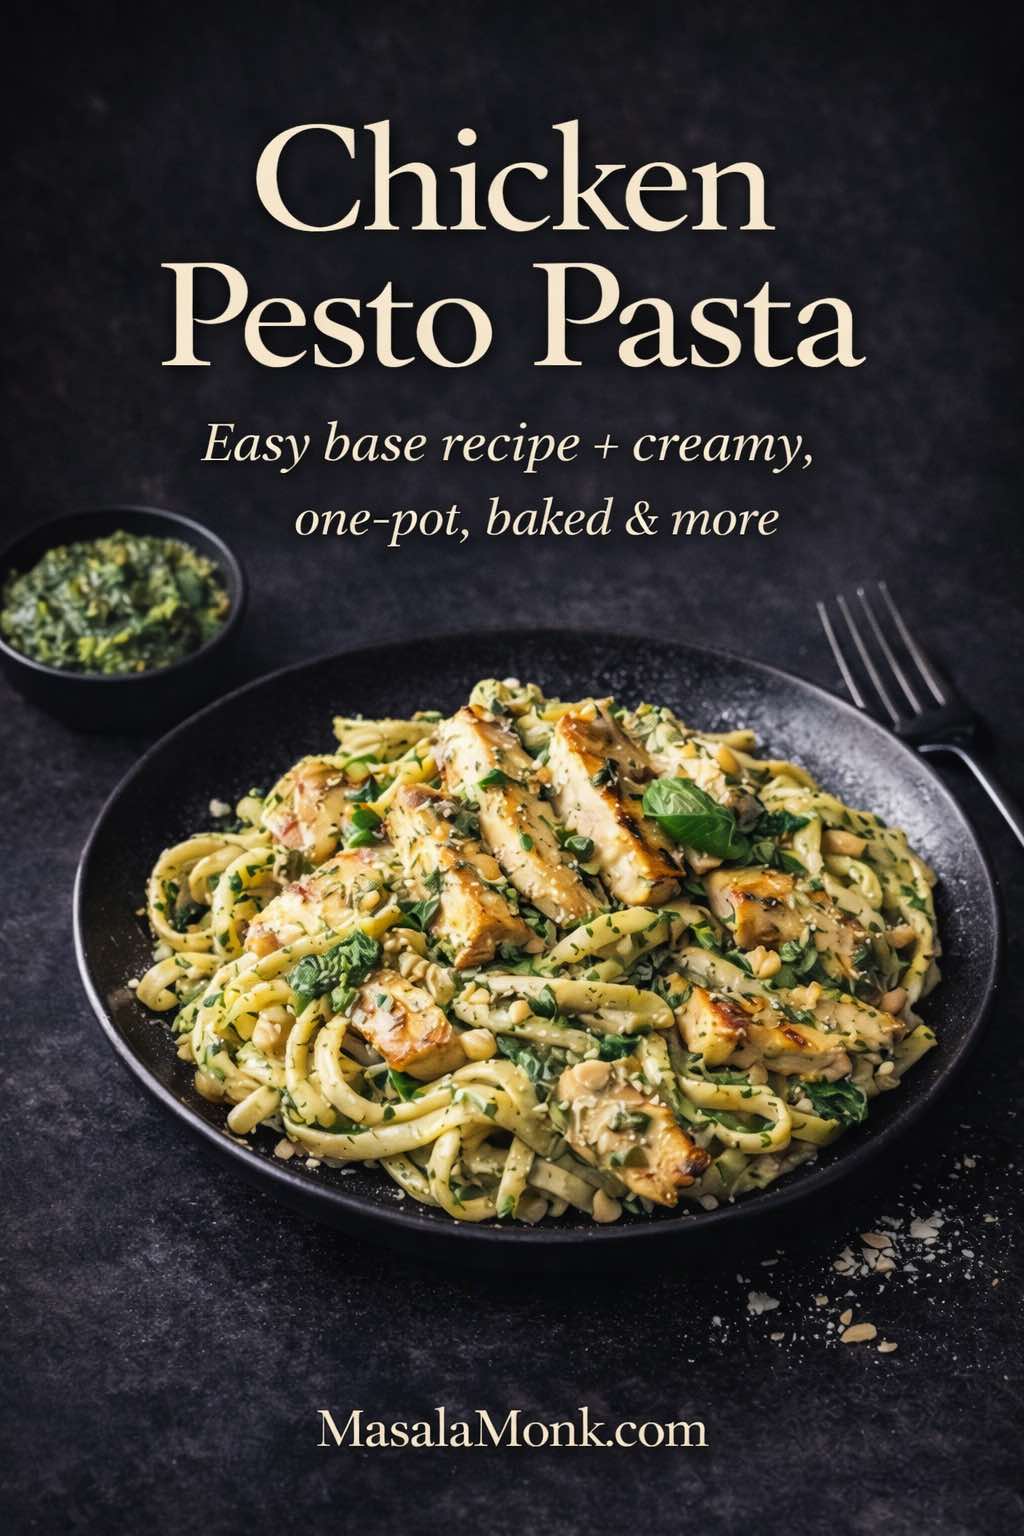
Dark, luxe magazine-style cover showing chicken pesto pasta on a black plate with basil, parmesan, and pine nuts, with text overlay “Chicken Pesto Pasta” and “Easy base recipe + creamy, one-pot, baked & more,” plus MasalaMonk.com footer.

Some dinners earn a permanent spot in your rotation because they’re both effortless and deeply satisfying. Chicken pesto pasta is exactly that kind of meal. It’s bright without feeling “light,” comforting without being heavy, and flexible enough to match whatever’s in your fridge—mushrooms you need to use up, a handful of tomatoes getting soft, leftover grilled chicken, or a craving for something creamy and cozy.

Even better, once you understand one dependable base method, everything else becomes a variation you can steer with tiny choices. Want a weeknight sprint? Make the fast version with a quick sauté and a splash of starchy water. Prefer a richer plate? Turn it creamy with a gentle swirl of dairy (or a lighter trick that still feels lush). Need fewer dishes? A one-pan finish gives you the same restaurant-style gloss with less mess. Feeding a crowd? A baked version becomes a bubbling, golden pasta bake with almost no extra effort.

So instead of treating each version like a different recipe, this guide gives you one reliable foundation—then shows you how to pivot into the best version for the mood you’re in.


Chicken Pesto Pasta (Easy Base Recipe)

This is the anchor—the version you’ll make on repeat. Whether you’re using basil pesto from the store or pulling a jar of homemade pesto from the fridge, the method stays the same. Nail this once, and every other variation becomes a simple, confident detour rather than a whole new recipe.

If you want pesto that tastes vivid and fresh, homemade is worth it whenever you have ten minutes. MasalaMonk’s guide to classic basil pesto sauce plus easy variations is a handy starting point, especially when you want to change the personality of the sauce without changing dinner. If you’re aiming for a dairy-free approach, this fresh basil vegan pesto gives you a bold base that still feels lush.

And if you’re the kind of cook who likes understanding ingredients a little more deeply, it’s surprisingly useful to know what Parmesan brings to a dish beyond “salty cheese.” MasalaMonk’s Parmesan guide and varieties helps you pick the right style and use it well—especially when you’re finishing a sauce.

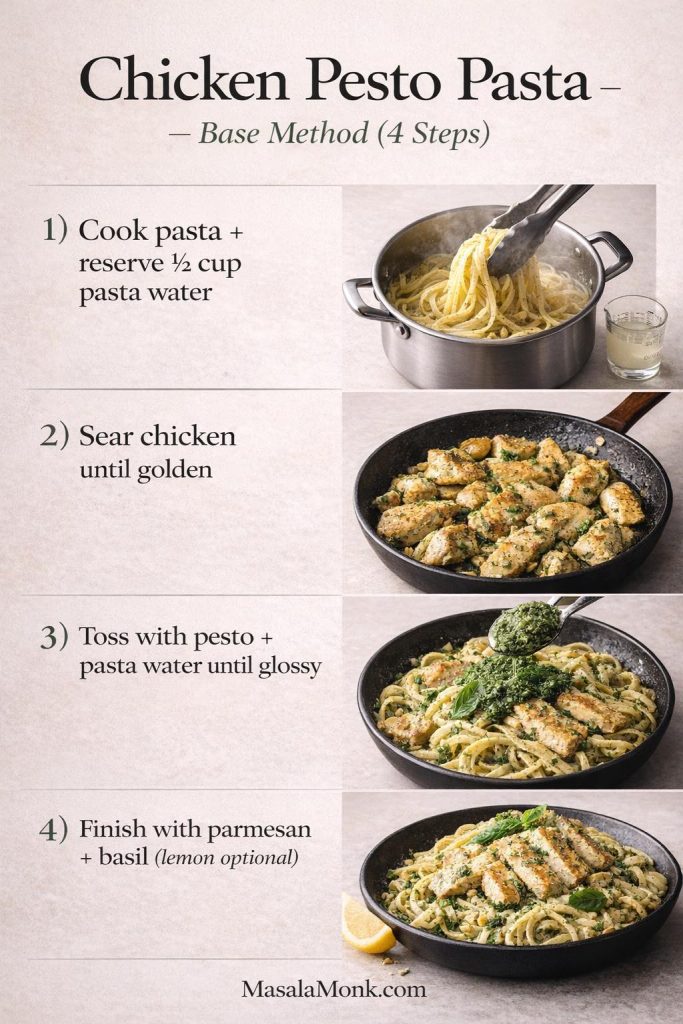
Four-step Chicken Pesto Pasta base method infographic showing: cook pasta and reserve pasta water, sear chicken until golden, toss pasta with pesto and pasta water until glossy, then finish with parmesan and basil; MasalaMonk.com footer.
Chicken pesto pasta, made simple: follow this 4-step base method (pasta water + pesto = glossy sauce) and you’ll be able to turn the same foundation into creamy, one-pot, baked, mushroom, or tomato variations without starting from scratch.

Base Recipe Card: Chicken Pesto Pasta (Serves 4)

Time: 25–35 minutes
Best for: weeknights, meal prep, “I want something comforting but not heavy” nights

Ingredients

  • 400 g pasta (penne, linguine, spaghetti, fettuccine—choose what you love)
  • 450–500 g chicken breast or chicken thighs, cut into bite-size pieces
  • 2–3 tablespoons olive oil
  • 3–4 garlic cloves, finely chopped (optional, but excellent)
  • ½ cup pesto, plus more to taste
  • ½ cup reserved pasta water, plus more as needed
  • ¼–½ cup grated Parmesan (optional, but helps everything cling)
  • Black pepper
  • Lemon wedge (optional, but often perfect)
  • Chili flakes (optional)
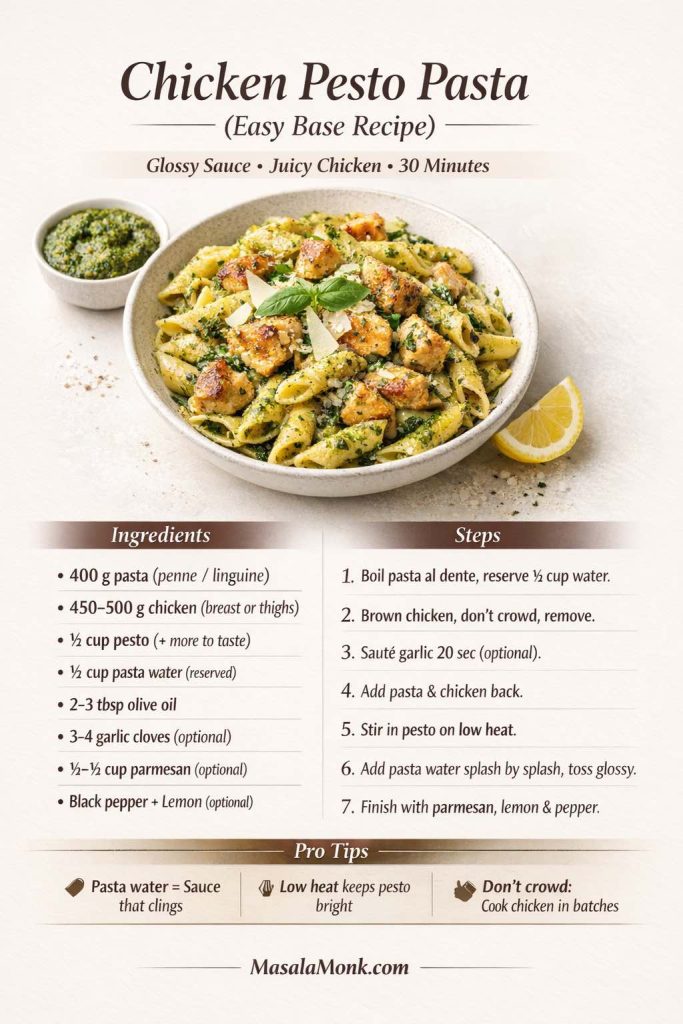
Chicken pesto pasta recipe card showing a bowl of pesto-coated penne with browned chicken, pesto ramekin, and lemon wedge, plus an ingredient list, step-by-step method, and pro tips for glossy sauce using reserved pasta water and low heat.
This Chicken Pesto Pasta “easy base recipe” card is your quick, no-scroll guide: ingredients, simple steps, and the three small moves that make it taste restaurant-level—brown the chicken, keep pesto on low heat, and use reserved pasta water to turn it glossy and clingy. Save it for busy nights, then scroll for creamy, one-pan, one-pot, baked, mushroom, and tomato variations.

The one move that changes everything

Keep pesto bright. It tastes best when it’s warmed gently, not cooked aggressively. In other words, pesto goes in at the end, on low heat.

How to cook chicken for pesto pasta (juicy, browned, not dry)

Start with a simple truth: if the chicken is dry, the whole bowl feels dry—no matter how good the pesto is. Fortunately, the fix is straightforward, and it’s more about timing than fancy technique.

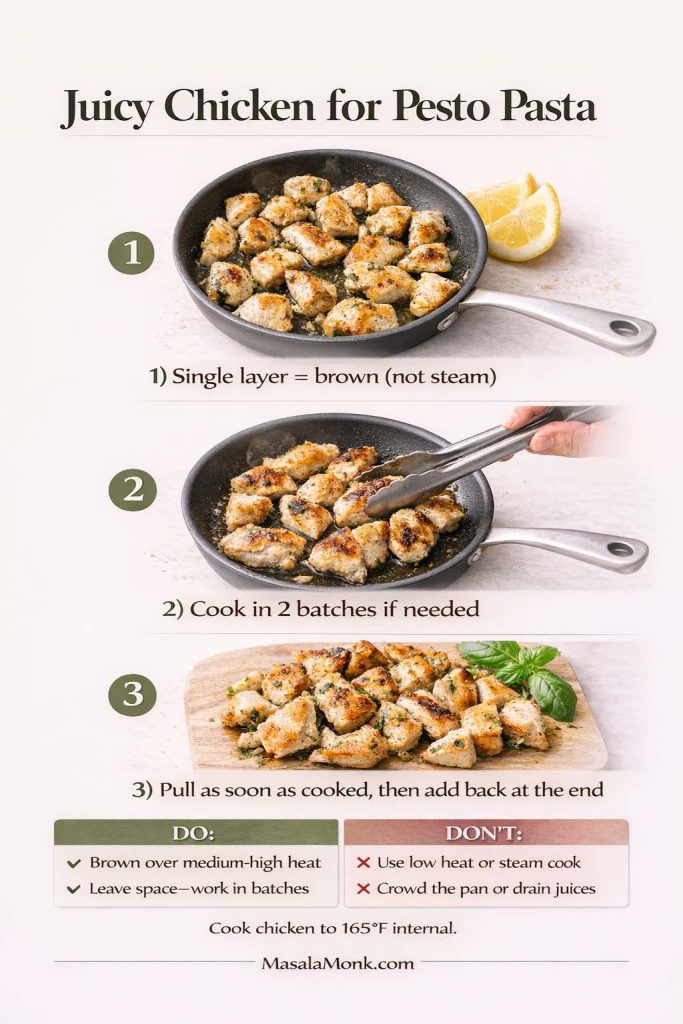
Infographic titled “Juicy Chicken for Pesto Pasta” showing three steps to keep chicken tender: brown chicken in a single layer, cook in two batches if needed, and remove as soon as cooked before adding back at the end. Includes a do/don’t box about avoiding steaming or crowding the pan and a note to cook chicken to 165°F internal.
Dry chicken can make even great pesto pasta feel disappointing—this quick guide fixes it. Brown chicken in a single layer (so it sears instead of steaming), cook in batches if the pan feels crowded, and pull it as soon as it’s cooked through—then add it back only at the end so it stays juicy. Save this technique card for chicken pesto pasta, creamy versions, and pasta salad meal prep, and scroll the post for the full base recipe plus one-pan, one-pot, baked, mushroom, tomato, grilled, and BBQ variations.
  1. Pat the chicken dry. This sounds minor, yet it’s the difference between browning and steaming. Dry surface browns; wet surface turns pale and watery.
  2. Season lightly. Pesto is often salty, so go easy with salt at first. Add black pepper generously.
  3. Brown, don’t crowd. Heat a large skillet until it’s properly hot, then add olive oil. Spread the chicken in a single layer. If the pan looks crowded, cook in two batches. That small bit of patience pays off because you’ll get color, and color equals flavor.
  4. Pull it early rather than late. As soon as the pieces are cooked through, move them to a plate. They’ll get a gentle warm-up later, and that’s how they stay tender instead of turning tough.

For a clear safety reference, chicken should reach a safe internal temperature of 165°F / 74°C. If you like referring to an authoritative standard, the USDA’s Safe Minimum Internal Temperature Chart is the one many cooks rely on.

How to make chicken pesto pasta (base method)

  1. Cook the pasta. Bring a large pot of water to a boil and salt it well. Cook pasta until al dente. Before draining, scoop out ½ cup of pasta water and keep it nearby.
  2. Build flavor in the pan. While the pasta cooks, brown the chicken as described above. Once it’s done, remove it to a plate. If you’re using garlic, add it to the same pan for about 20–30 seconds—just until fragrant.
  3. Combine pasta + chicken. Add drained pasta to the skillet, followed by the chicken and any juices on the plate (those juices are flavor).
  4. Add pesto, then loosen with pasta water. Turn the heat low. Stir in pesto, then immediately add a splash of pasta water and toss. Keep adding small splashes as you toss until the sauce turns glossy and clings to every bite.
  5. Finish with Parmesan if using. Sprinkle in Parmesan and toss again. If it thickens too much, add another spoonful of pasta water.
  6. Taste and adjust. A squeeze of lemon can brighten everything if the pesto tastes heavy. Chili flakes wake up the bowl. Black pepper almost always helps.

That pasta-water step is not optional if you want the sauce to behave. It’s what keeps pesto chicken pasta from turning into oily noodles with green streaks. For those who enjoy technique writing, Serious Eats explains the logic beautifully in The Right Way to Sauce Pasta—and once you “get it,” you’ll use the same idea in countless dishes.

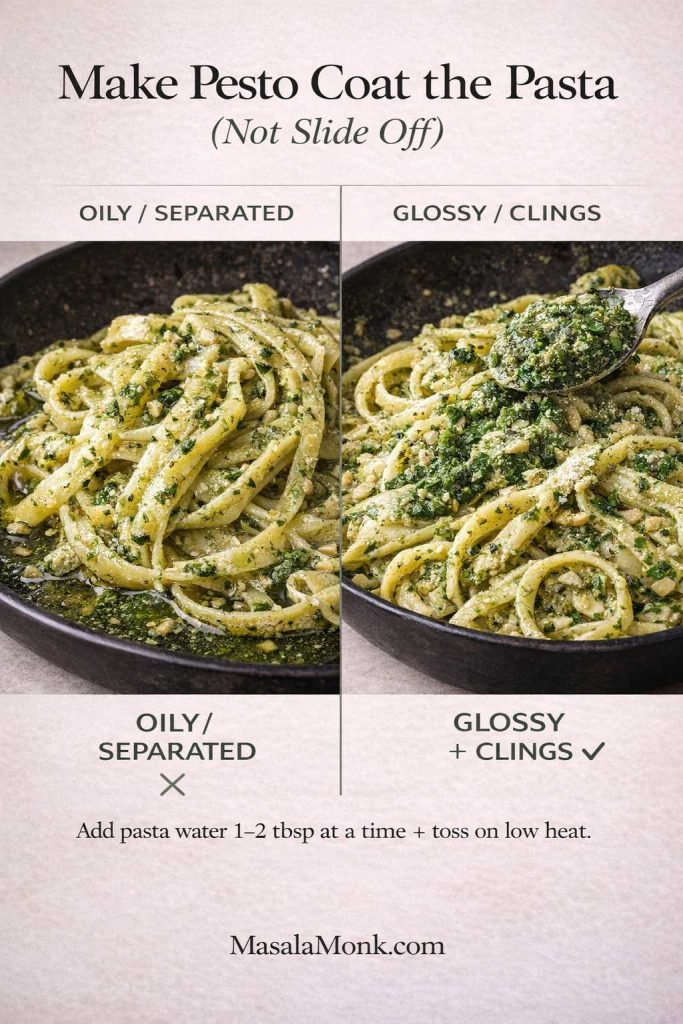
Side-by-side infographic showing pesto pasta sauce texture: left panel “oily/separated” pesto on noodles and right panel “glossy/clings” pesto coating pasta, with instruction to add pasta water 1–2 tablespoons at a time and toss on low heat; MasalaMonk.com footer.
If your chicken pesto pasta looks oily instead of silky, this is the fix: add reserved pasta water a tablespoon at a time and toss on low heat until the pesto turns glossy and clings to the noodles—no extra cream needed.
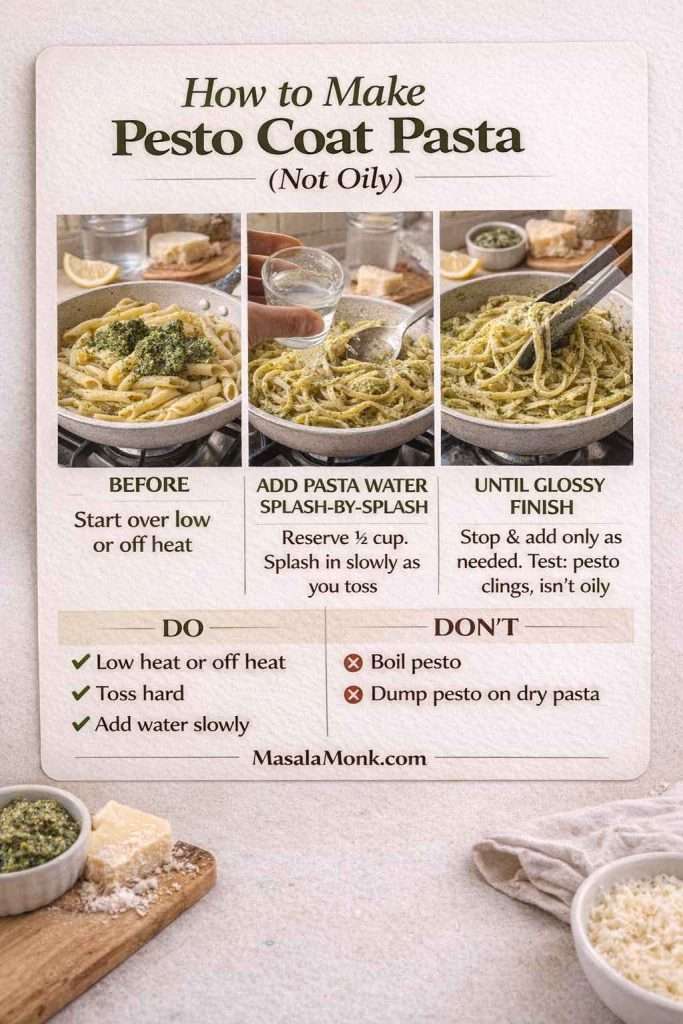
Step-by-step infographic showing how to make pesto coat pasta without turning oily: add pesto on low heat, splash in reserved pasta water while tossing, and stop when the sauce looks glossy and clings. Includes a simple do-and-don’t list, plus photos of pesto pasta in a pan and on a spoon.
If your pesto pasta ever turns into oily noodles with green streaks, this is the fix. Keep the heat low, stir pesto in gently, then add reserved pasta water splash-by-splash while you toss until the sauce turns glossy and clings to every bite. Use the quick “cling test” on a fork to know when to stop. Save this technique card—you’ll use it for chicken pesto pasta, creamy versions, and even pasta salad.

Simple swaps that keep it delicious

Even a “basic” pesto chicken pasta becomes more interesting when you know what swaps play nicely:

  • Chicken thighs stay tender and forgiving, which makes them ideal for quick pasta on busy nights.
  • A small spoon of butter added at the end can soften sharp edges if your pesto is very garlicky.
  • Extra Parmesan helps emulsify if your pesto is oily.
  • A squeeze of lemon balances rich pesto, especially when you turn it creamy.

Easy Chicken Pesto Pasta (Weeknight Fast)

There are nights when you want dinner to land quickly without losing its charm. This version is the fast route—minimal fuss, still full flavor, and it proves that “easy” doesn’t have to mean “meh.”

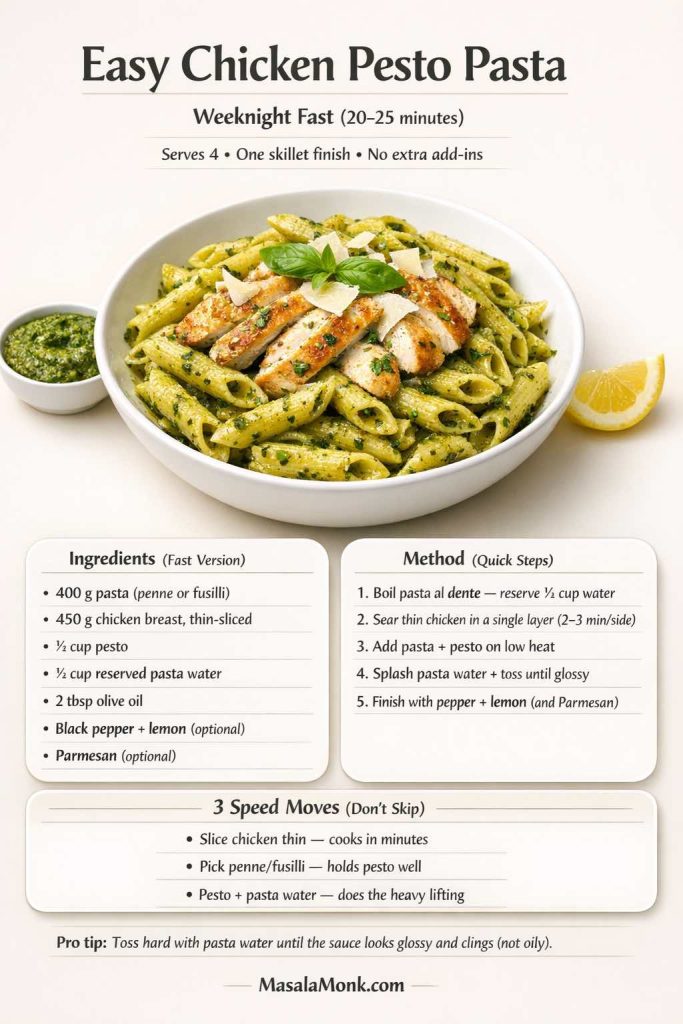
Recipe card for “Easy Chicken Pesto Pasta — Weeknight Fast (20–25 minutes)” showing a bowl of pesto penne topped with sliced chicken, plus a fast-version ingredients list, quick method steps (reserve pasta water, sear thin chicken, toss pesto on low heat until glossy), three speed moves, and a pro tip to toss with pasta water so the sauce clings instead of turning oily.
Need dinner fast without sacrificing flavor? This easy chicken pesto pasta recipe card is built for weeknights: thin-slice the chicken so it sears in minutes, cook penne or fusilli for reliable sauce cling, then finish everything in one skillet with pesto on low heat and a splash of reserved pasta water until glossy. The “3 speed moves” keep it effortless, but the real upgrade is the toss—so it tastes cohesive, not “assembled.” Save this for busy nights and scroll for creamy options, one-pan/one-pot methods, baked pasta, and the mushroom/tomato twists.

Recipe Card: Weeknight Fast Version (Serves 4)

Time: 20–25 minutes
Best for: busy nights, “I need dinner now,” last-minute guests

Do these three things to make it faster:

  • Slice chicken thinly so it cooks quickly.
  • Choose a pasta shape that cooks evenly and holds sauce well (penne, fusilli).
  • Skip extra add-ins and let pesto + pasta water do the heavy lifting.

Even then, don’t rush the finish. Tossing pasta and sauce together until glossy is what makes an easy bowl feel like something you’d happily serve to company—because it tastes cohesive, not “assembled.”


Creamy Chicken Pesto Pasta (Three Ways)

Some evenings are calling for something richer. The creamy version is still bright and herbal, yet it has that soft, comforting body that makes everyone go quiet after the first bite. Importantly, “creamy” doesn’t have to mean heavy—so you can choose your lane.

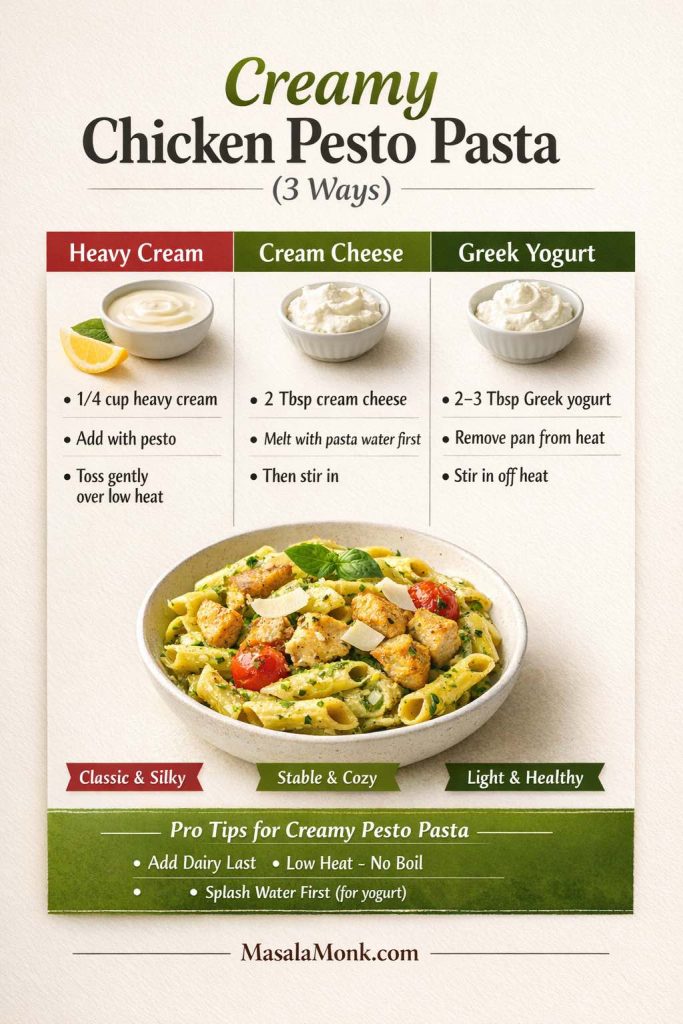
Creamy chicken pesto pasta infographic comparing 3 methods—heavy cream, cream cheese, and Greek yogurt—with amounts, when to add each one, and tips to prevent splitting, plus a bowl of pesto chicken pasta and “low heat, no boil” guidance.
Want creamy chicken pesto pasta without guesswork? This “3 ways” guide shows the exact amounts and timing for heavy cream (classic), cream cheese (stable), or Greek yogurt (lighter—stir in off heat). Keep the heat low, add dairy last, and use a splash of pasta water so the sauce turns silky instead of splitting. Save this for cozy nights, then scroll for one-pan, one-pot, baked, mushroom, and tomato variations.

Recipe Card: Creamy Chicken Pesto Pasta (Core Method)

Start with the base recipe. Once pasta and chicken are in the pan and pesto is added, choose one of these creamy paths:

1) Chicken pesto pasta with cream (classic)

  • Add ¼ cup heavy cream (or cooking cream).
  • Add a small splash of pasta water.
  • Toss gently over low heat for about a minute, just until silky.

Key point: Keep the heat gentle. Pesto tastes freshest when it isn’t cooked hard, and cream behaves best when it’s warmed rather than boiled.

2) Creamy without heavy cream (lighter but still lush)

If you want creamy texture without leaning hard on cream, these options work beautifully:

  • Greek yogurt (bright and light): Remove the pan from heat. Add a splash of pasta water first (so the pan cools slightly), then stir in 2–3 tablespoons yogurt until smooth.
  • Cream cheese (cozy and stable): Stir 1–2 tablespoons cream cheese into warm pasta water first, then toss it through. This is especially good with penne or “noodlier” shapes.
  • Milk + Parmesan (simple and classic): Add a small splash of milk, then use Parmesan as your thickener while you toss until glossy.

Each version still tastes unmistakably like pesto chicken pasta—just softer around the edges.

3) Chicken pesto Alfredo pasta (comfort-forward)

If you love the idea of pesto Alfredo, treat it as a direction rather than a separate universe. Use the creamy method above, then increase Parmesan slightly and finish with a tiny knob of butter. Suddenly you’re in the territory of pesto Alfredo without turning dinner into a long project.

If you want to explore creamy pasta beyond this dish, MasalaMonk’s Alfredo twists make a fun companion read—especially if you enjoy playing with flavors.


One Pan Chicken Pesto Pasta (Skillet Style)

One-pan pesto chicken pasta is the version you make when you want the “real” result with fewer steps and less cleanup. It’s not a totally different dish—it’s the same idea, just streamlined.

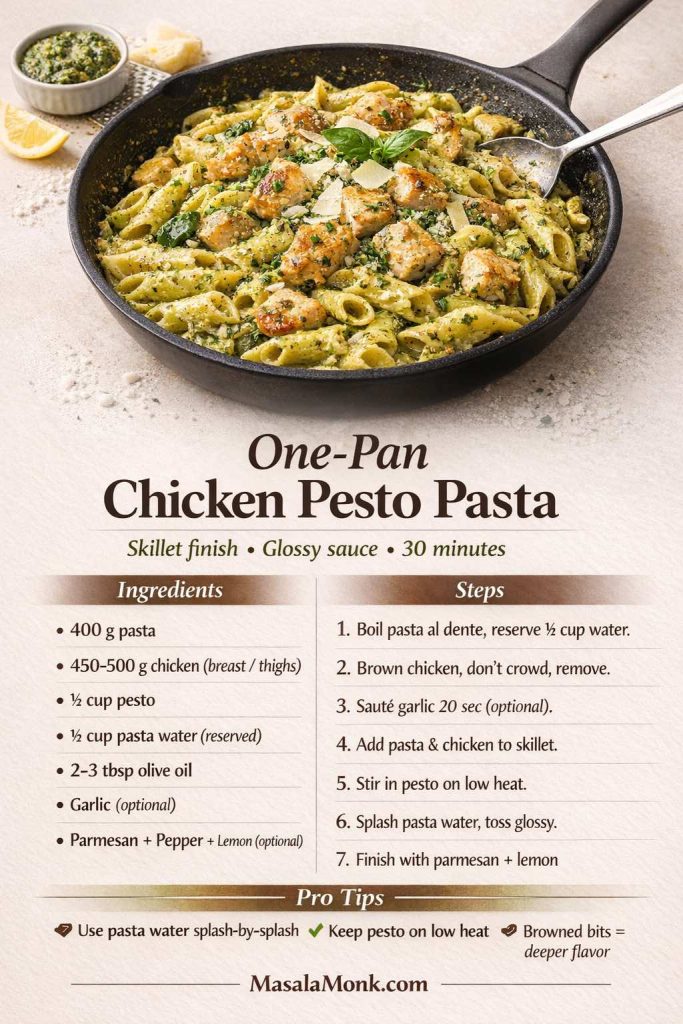
One-pan chicken pesto pasta recipe card showing a skillet of pesto-coated pasta with browned chicken, Parmesan, basil, pesto ramekin, and lemon wedge, plus an ingredient list, step-by-step skillet method, and pro tips to use reserved pasta water and keep pesto on low heat for a glossy sauce.
This one-pan chicken pesto pasta recipe card is the fastest way to get a glossy, restaurant-style bowl with minimal cleanup. Boil pasta al dente, brown the chicken (don’t crowd the pan), then toss everything together in the skillet with pesto on low heat and reserved pasta water splash-by-splash until it clings. Save this for busy nights—and scroll for the one-pot version, creamy options, baked pasta, and add-ins like mushrooms and tomatoes.

Recipe Card: One-Pan Finish (Serves 4)

How it works:

  • Boil pasta in a pot as usual (because it’s faster and more reliable).
  • Brown chicken in the skillet.
  • Add drained pasta directly to the chicken pan.
  • Stir in pesto on low heat, then finish with pasta water right there.

Because the skillet still holds those browned chicken bits, the flavor is deeper than you’d expect from such a simple method. Additionally, it’s the easiest way to control sauce texture because everything is already in one hot, wide surface where tossing is natural.


One Pot Chicken Pesto Pasta (Minimal Dishes, Big Reward)

One-pot pesto chicken pasta is a different style altogether. It’s not “pasta + sauce,” it’s a single-simmer approach where the cooking liquid turns into sauce. Done well, it tastes like a clever shortcut; done poorly, it can turn sticky. The good news? A few small rules keep it perfect.

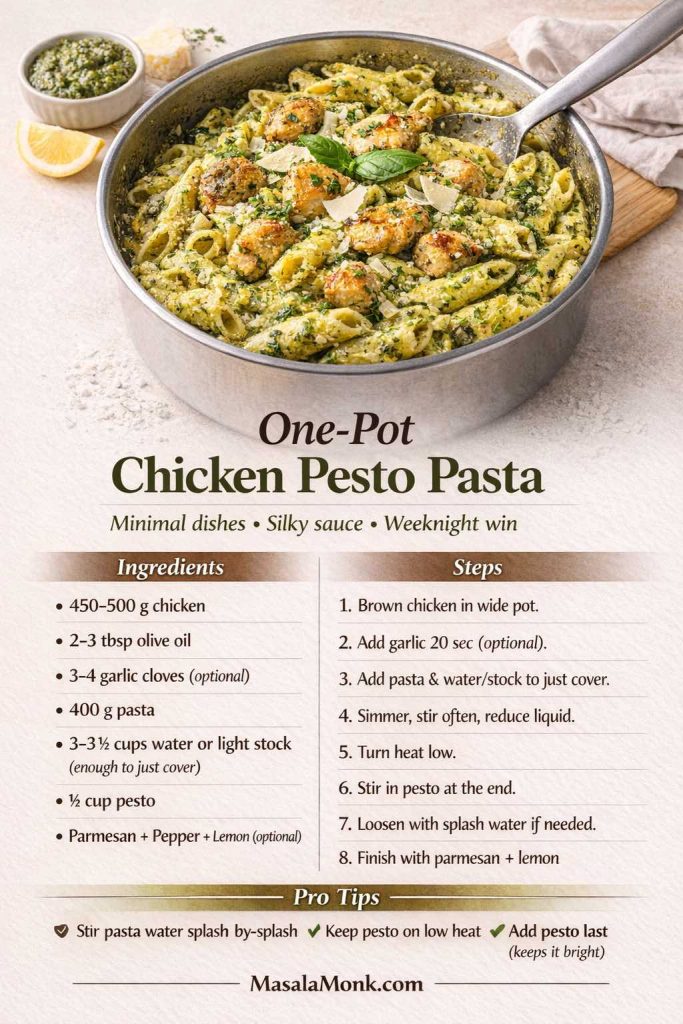
One-pot chicken pesto pasta recipe card showing a wide pot of pesto-coated pasta with browned chicken, Parmesan, basil, and a pesto ramekin, plus ingredients, step-by-step one-pot simmer instructions, and pro tips to stir often, add pesto at the end on low heat, and loosen the sauce with a splash of water if needed.
This one-pot chicken pesto pasta recipe card is for nights when you want big flavor with minimal dishes. Brown the chicken, simmer pasta in just enough water or light stock until it turns saucy, then add pesto at the end on low heat so it stays bright. Stir often, stop at al dente, and loosen with a splash of water if the sauce tightens. Save this for weeknights—and scroll for creamy options, baked pesto pasta, mushroom and tomato add-ins, plus storage and reheating tips.

Recipe Card: One-Pot Method (Serves 4)

  1. Brown chicken in a wide pot or deep skillet. Remove it if you want more control, or leave it in for maximum convenience.
  2. Add garlic (optional) for 20–30 seconds.
  3. Add pasta and enough water (or light stock) to just cover.
  4. Simmer, stirring often, until pasta is al dente and the liquid is reduced.
  5. Turn heat down low, then stir pesto in at the end.
  6. Loosen with a splash of water until glossy.
  7. Add chicken back (if removed), then finish with Parmesan if you like.

Why it works: The starch that normally goes down the drain stays in the pot, which helps everything cling.

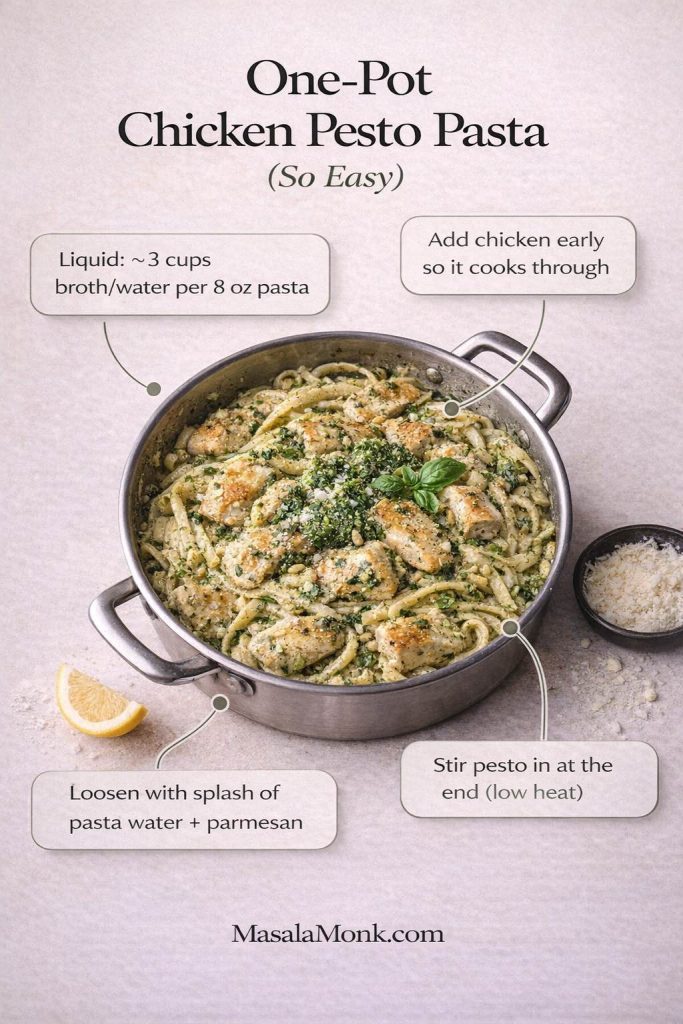
Top-down one-pot chicken pesto pasta infographic showing a pot of pesto pasta with chicken and basil, with callouts for liquid ratio (about 3 cups broth or water per 8 oz pasta), adding chicken early, stirring pesto in at the end on low heat, and finishing with pasta water plus parmesan; MasalaMonk.com footer.
One-pot chicken pesto pasta made foolproof: follow this simple ratio and timing—add chicken early, stir pesto in at the end on low heat, and finish with a splash of pasta water plus parmesan for a glossy sauce that coats every noodle.

One-pot creamy pesto chicken pasta

Once pesto is stirred in, add one of these:

  • 2–4 tablespoons cream, or
  • a spoon of cream cheese, or
  • Greek yogurt off heat (with a splash of water first)

Then toss until silky. That’s how the one-pot creamy version becomes something you’ll crave—not just a shortcut.


Chicken Pesto Pasta with Mushrooms (Deep, Savory, Balanced)

Mushrooms are the easiest way to make this pasta taste more “restaurant” without making it complicated. They add depth and make the pesto feel rounder, almost like the dish has been simmering longer than it has.

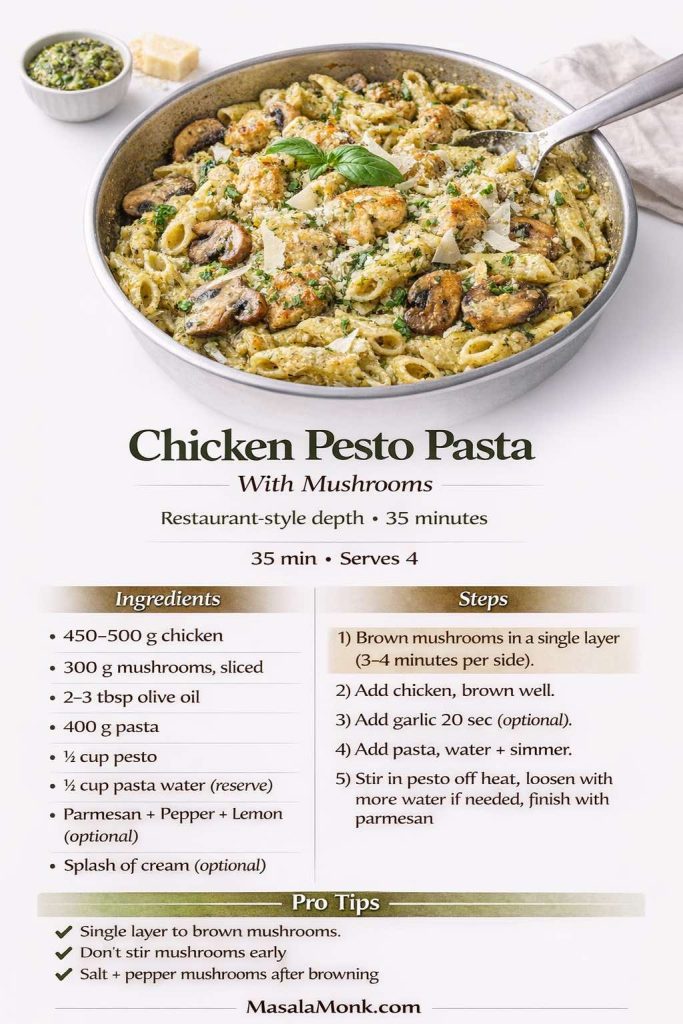
Chicken pesto pasta with mushrooms recipe card showing a skillet of pesto-coated penne with browned chicken, sautéed mushrooms, Parmesan, and basil, plus an ingredient list, step-by-step method, and pro tips to brown mushrooms in a single layer, avoid stirring early, and season after browning.
This chicken pesto pasta with mushrooms recipe card is the “restaurant-depth” upgrade—without extra work. The key is browning mushrooms in a single layer first (don’t stir early), then tossing everything with pesto on low heat and a splash of reserved pasta water so the sauce clings instead of turning oily. Save this for cozy weeknights, then scroll for the tomato version, grilled chicken option, pasta bake, creamy variations, and the one-pan/one-pot methods.

Recipe Card: Mushroom Add-In (Serves 4)

The essential rule: Don’t steam mushrooms. Brown them.

  • Heat the pan properly.
  • Add mushrooms and let them sit until they pick up color.
  • Only then stir. Once they’re browned, they taste nutty and savory rather than watery.

From there, the flow stays familiar:

  • Brown chicken (or brown it first and set aside).
  • Cook pasta.
  • Toss together with pesto and pasta water.

If you want a cozier bowl, this version transforms beautifully into a creamy mushroom pesto chicken pasta with a small splash of cream—no separate recipe required.


Chicken Tomato Pesto Pasta (Bright and Slightly Jammy)

Tomato and pesto can be magic together if you keep the balance right. Tomatoes bring sweetness and acidity, pesto brings richness and salt. When the two meet in the pan, you get a sauce that feels bright, not heavy.

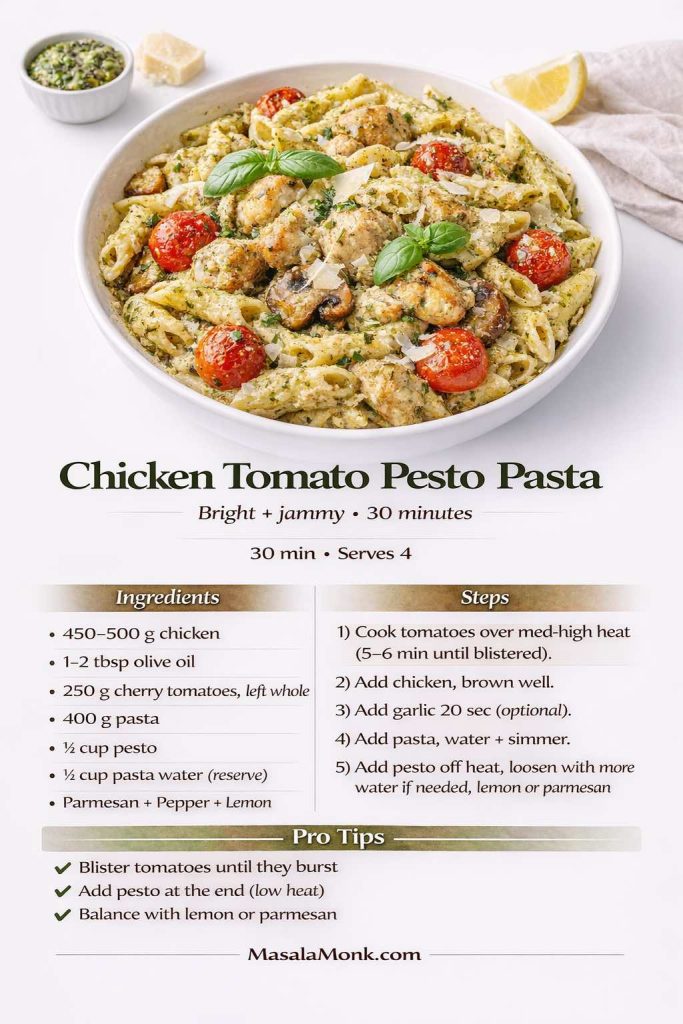
Chicken tomato pesto pasta recipe card showing a bowl of pesto-coated penne with browned chicken and blistered cherry tomatoes, plus a clear ingredient list, step-by-step instructions, and pro tips to blister tomatoes until they burst, add pesto at the end on low heat, and balance the sauce with lemon or Parmesan.
This chicken tomato pesto pasta recipe card is the bright, slightly jammy twist that makes pesto feel lighter and fresher. Blister cherry tomatoes until they burst, brown the chicken, then toss everything with pesto on low heat and reserved pasta water so the sauce turns glossy and clings. If the flavor needs balance, lemon brightens while Parmesan rounds it out. Save this for weeknights—then scroll for creamy options, one-pan and one-pot methods, the baked pesto pasta version, and the mushroom variation.

Recipe Card: Tomato Options

Option 1: Blistered cherry tomatoes (best flavor, easiest)
After browning the chicken, add cherry tomatoes to the same pan. Let them blister until they burst and soften. Then add pasta, pesto (on low heat), and pasta water.

Option 2: A little canned tomato (use as an accent)
If you’re using canned, think “accent,” not “marinara.” A few spoonfuls of crushed tomato simmered briefly is enough. Then turn the heat low before adding pesto so basil stays bright.

Balancing tomato + pesto

  • If it tastes flat, lemon helps.
  • If it tastes too sharp, Parmesan rounds it out.
  • If it tastes too salty, more pasta water (and an extra handful of pasta or veg) fixes it quickly.

If you’d like another dinner idea that leans into the same flavor family, MasalaMonk’s tortellini cooking guide includes a pesto direction with tomatoes that adapts easily to this style.


Grilled Chicken Pesto Pasta (Smoky, Fast, Summery)

When grilling is already happening—or you have leftover grilled chicken—this becomes one of the best “second dinners” you can make. It tastes like you planned it, even if it was born from leftovers.

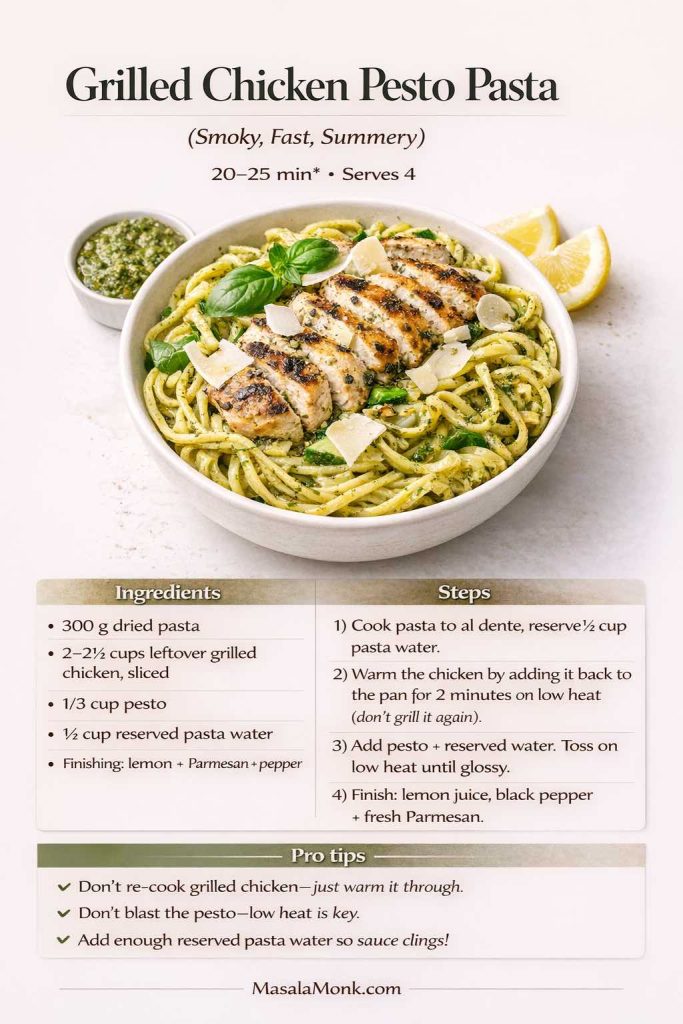
Grilled chicken pesto pasta recipe card showing a bowl of pesto-coated linguine topped with sliced grilled chicken, basil, and Parmesan, with a pesto ramekin and lemon wedges beside it. The card includes ingredients, quick steps to warm leftover grilled chicken gently, toss pesto with reserved pasta water on low heat until glossy, and pro tips to avoid overcooking the chicken.
This grilled chicken pesto pasta recipe card is the perfect “second dinner” when you already have leftover grilled chicken. Cook pasta al dente, warm the chicken gently (don’t re-grill it), then toss everything with pesto on low heat and reserved pasta water until the sauce turns glossy and clings. Finish with lemon, black pepper, and fresh Parmesan for a bright, smoky bowl that tastes like summer—even on a weeknight. Save this for busy nights, then scroll for creamy options, one-pan/one-pot methods, the baked pasta version, plus mushroom and tomato twists.

Recipe Card: Leftover Grilled Chicken Version

  • Cook pasta.
  • Make the sauce in the skillet with pesto + pasta water on low heat.
  • Add sliced grilled chicken at the end and warm it gently.

Because grilled chicken already has smoke and char, keep the rest simple: lemon, black pepper, and a glossy toss. The result tastes like summer even on a random Tuesday.


BBQ Chicken Pesto Pasta (Sweet-Smoky Twist)

BBQ chicken pesto pasta sounds unusual until you remember that pesto loves sweet tomato notes and smoky flavors. The trick is keeping barbecue as a supporting actor—more glaze than sauce—so the pesto still tastes like pesto.

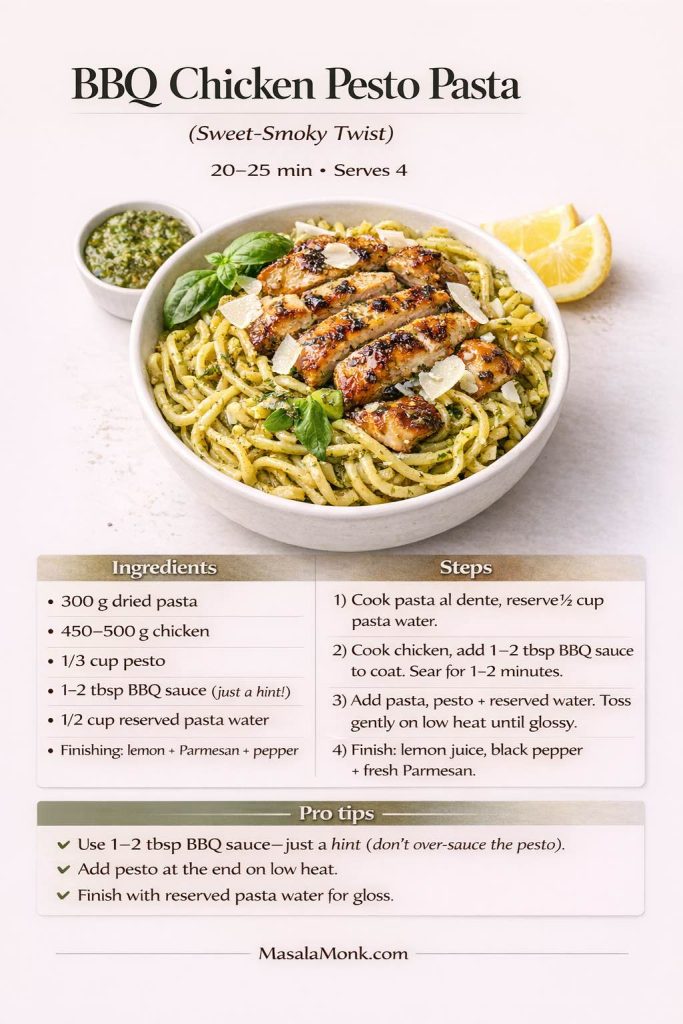
BBQ chicken pesto pasta recipe card showing a bowl of pesto-coated noodles topped with BBQ-glazed chicken, basil, Parmesan, a pesto ramekin, and lemon wedges. The card lists ingredients, 4 quick steps, and pro tips to use only 1–2 tablespoons BBQ sauce, add pesto at the end on low heat, and use reserved pasta water for a glossy sauce.
This BBQ chicken pesto pasta recipe card is a sweet-smoky twist that still tastes like pesto—not barbecue pasta. The trick is restraint: coat the chicken with just 1–2 tablespoons BBQ sauce, then toss everything with pesto on low heat and reserved pasta water until glossy. Finish with lemon, black pepper, and Parmesan to keep the bowl bright and balanced. Save this for weeknights when you want something different, then scroll for the base recipe, creamy options, one-pan and one-pot methods, the baked pesto pasta version, plus mushroom, tomato, grilled, and pasta-salad variations.

Recipe Card: BBQ Twist (Serves 4)

  • Toss cooked chicken lightly with 1–2 tablespoons barbecue sauce.
  • Add it to pasta and pesto at the end.
  • Use pasta water to keep everything cohesive and glossy.

The result is a sweet-smoky bowl that’s surprisingly addictive, especially with penne or fusilli.


Baked Chicken Pesto Pasta (Pasta Bake)

When you want a dish that feels generous—something you can spoon into bowls and watch people go back for seconds—baked chicken pesto pasta delivers. It’s also one of the easiest ways to make dinner feel like an event without extra work.

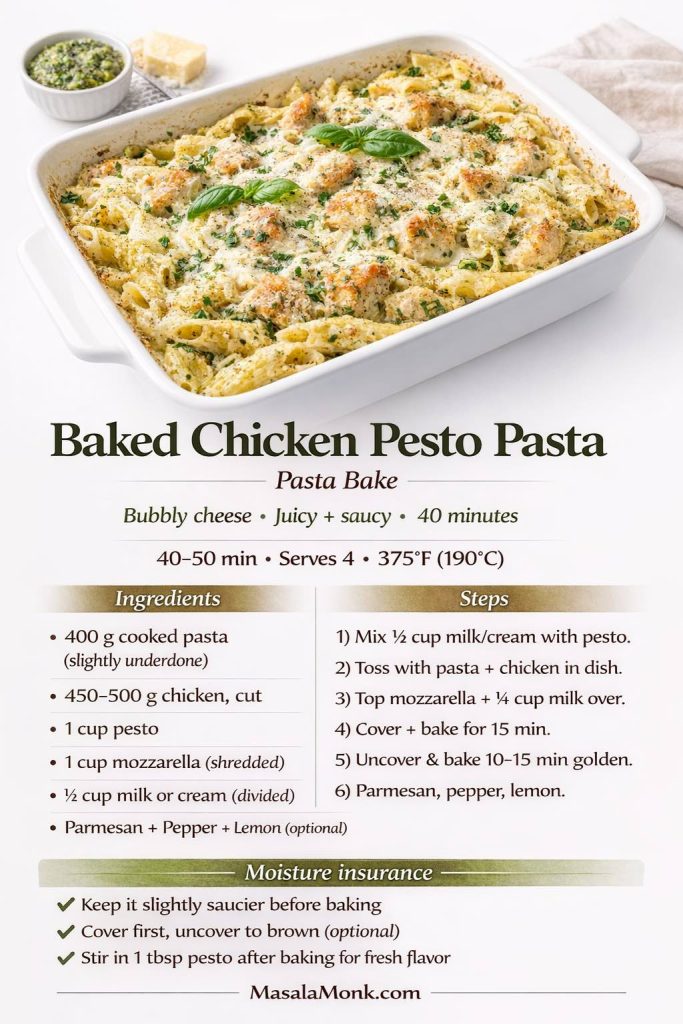
Baked chicken pesto pasta recipe card showing a white baking dish of pesto pasta with browned chicken, melted cheese, Parmesan, and basil, plus ingredients, oven temperature, bake time, step-by-step instructions, and “moisture insurance” tips to keep the pasta bake juicy and saucy.
This baked chicken pesto pasta recipe card is your no-fail pasta bake guide: keep the pasta slightly underdone, mix in enough sauce so it stays juicy, then bake until bubbly and lightly golden. The “moisture insurance” tips (cover first, don’t overbake, stir in a spoon of pesto after baking) make the top taste fresh instead of dull. Save this for cozy dinners, then scroll for the base method, creamy options, one-pan and one-pot versions, plus mushroom and tomato variations.

Recipe Card: Baked Pesto Chicken Pasta (Serves 6–8)

Time: 40–55 minutes
Oven: 200°C / 400°F

  1. Make the base chicken pesto pasta, but keep it slightly saucier than usual. That means extra pasta water and, if you like, a small splash of cream.
  2. Stir in cheese: mozzarella for melt, Parmesan for flavor.
  3. Transfer to a baking dish.
  4. Bake until bubbling and lightly golden.

Because pesto can lose its brightness under high heat, reserve a tablespoon of pesto and stir it in right after baking. That simple move makes the whole dish taste fresher instantly.

If you want extra baked-pasta technique—make-ahead tricks, moisture management, and how to keep a bake from turning dry—MasalaMonk’s baked ziti variations are a surprisingly relevant reference even when you’re not making ziti.


Best Pasta Shapes for Chicken Pesto Pasta

Pasta shape isn’t just aesthetics. It changes how sauce clings, how bites feel, and whether the dish reads “light and glossy” or “thick and cozy.” Once you notice this, you start choosing shapes with intention.

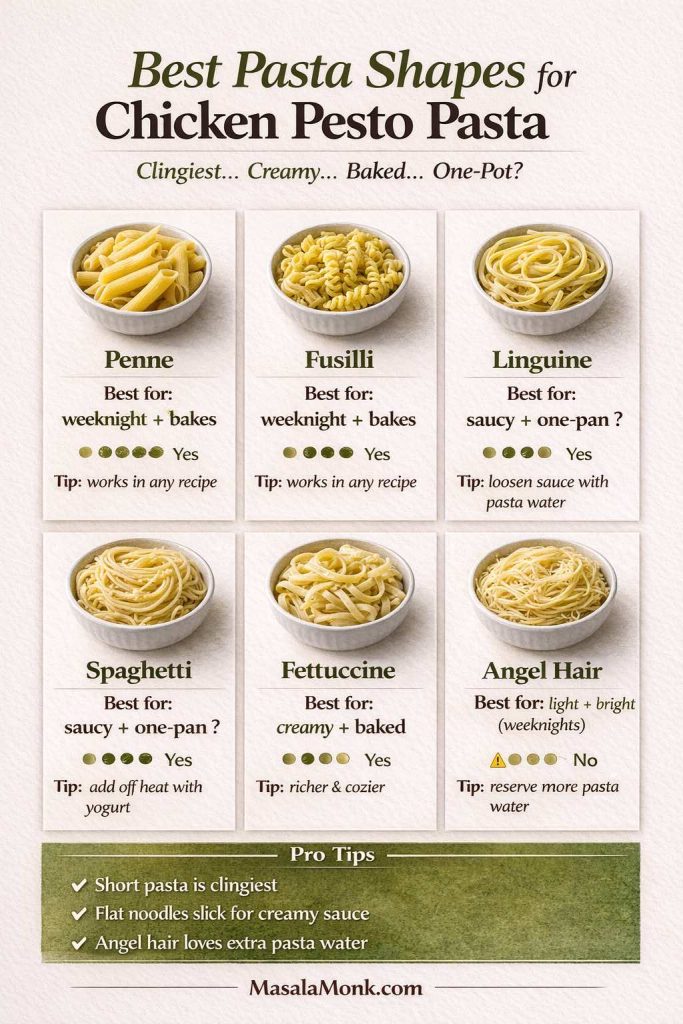
Infographic titled “Best Pasta Shapes for Chicken Pesto Pasta” showing six options—penne, fusilli, linguine, spaghetti, fettuccine, and angel hair—with notes on which is best for weeknights, creamy sauce, baked pasta, or one-pot methods, plus quick tips for sauce cling and using extra pasta water.
Not all pasta shapes behave the same with pesto. This cheat sheet shows the best pasta for chicken pesto pasta—whether you want a glossy one-pan bowl, a true one-pot method, or a creamier, cozier finish. Penne and fusilli grab sauce, linguine and spaghetti feel sleek, fettuccine shines in creamy versions, and angel hair needs extra pasta water to avoid clumping. Save this for later, then scroll for the base recipe card, creamy options, one-pan and one-pot methods, baked pasta, and add-ins like mushrooms and tomatoes.

Penne (weeknight MVP)

Penne holds pesto in the tubes, which makes it ideal for pesto penne chicken pasta. It also holds up well to baking, so if you’re making a pasta bake, penne is a safe bet.

Linguine (silky and polished)

Linguine makes the sauce feel sleek. It’s especially good when you’re chasing that glossy finish and want the pesto to coat each strand evenly.

Spaghetti (simple and fast)

Spaghetti shines when you keep it clean—pesto, chicken, pasta water, Parmesan. It’s also a great “starter” shape because it shows off the base method without distractions.

Fettuccine (best for creamy)

Fettuccine is at its best when the sauce is slightly thicker. That’s why it feels so satisfying in creamy versions.

Angel hair (quick cook notes)

Angel hair cooks quickly, which makes it tempting on busy nights. However, it clumps if you don’t toss immediately with enough pasta water. Go generous with water and keep tossing until glossy.


Chicken Pesto Noodles (When You Want Comfort in a Bowl)

Sometimes you’re not craving “pasta” in the classic sense—you’re craving noodles and sauce. Chicken pesto noodles are perfect for that, especially with egg noodles or a thinner pasta shape.

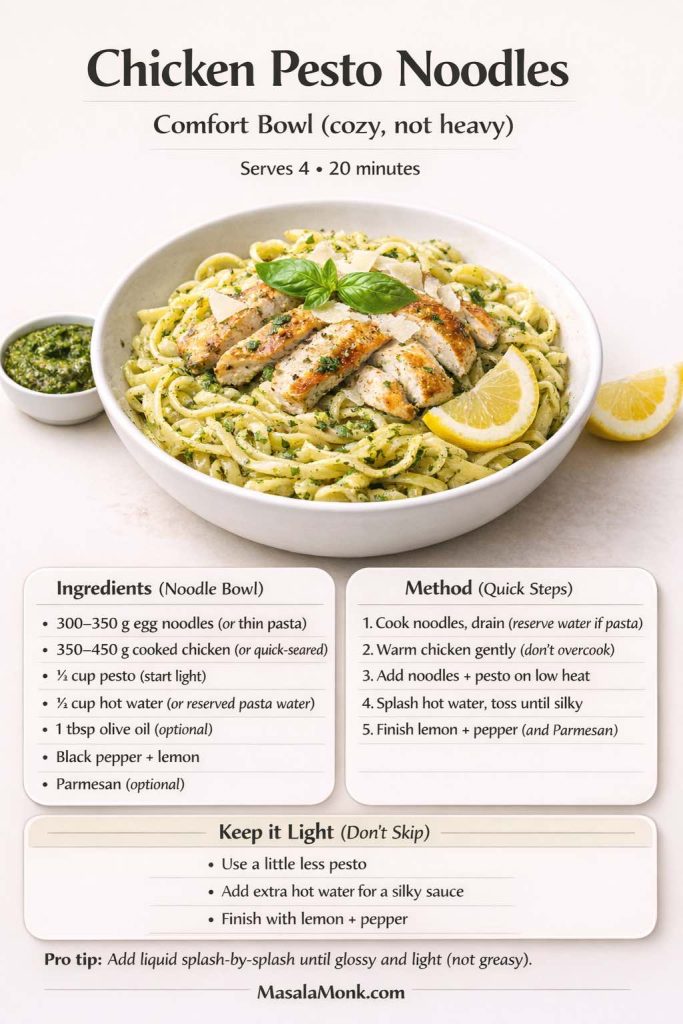
Recipe card for “Chicken Pesto Noodles — Comfort Bowl (cozy, not heavy)” showing a bowl of pesto-coated egg noodles topped with sliced chicken, basil, Parmesan, and lemon wedges, plus ingredients and quick steps to warm chicken gently, add pesto on low heat, and splash hot water or reserved pasta water until the noodles turn silky, then finish with lemon and black pepper.
Craving comfort without the heaviness? This chicken pesto noodles recipe card keeps it cozy and bright: start with egg noodles (or thin pasta), use a little less pesto, and loosen everything with hot water (or reserved pasta water) until silky. Warm the chicken gently, keep the heat low once pesto goes in, then finish with lemon + black pepper (and Parmesan if you want). Save this for quick dinners and scroll the post for the weeknight-fast pasta card, creamy options, one-pan/one-pot methods, baked pasta, plus mushroom and tomato twists.

Recipe Card: Noodle-Style Bowl

To keep it from feeling heavy:

  • Use a little less pesto than usual.
  • Add extra hot water (or reserved pasta water if you’re using pasta).
  • Finish with lemon and pepper.

That combination makes the bowl feel bright again, even when the noodles are cozy.


Basil Pasta Chicken (A Fresh Finish That Changes Everything)

Even if your pesto is basil-based, an extra handful of basil at the end can make the dish smell brand-new. This isn’t a different recipe; it’s the same pasta, simply finished with fresh basil ribbons and, if you like, a tiny drizzle of olive oil.

It’s a small flourish, yet it makes the bowl feel intentional—like you planned it, even if you didn’t.


Healthy Chicken Pesto Pasta (Without Losing What Makes It Great)

“Healthy” is easiest to sustain when it still tastes indulgent. Fortunately, you can make this dish lighter and more balanced without stripping away what makes it comforting.

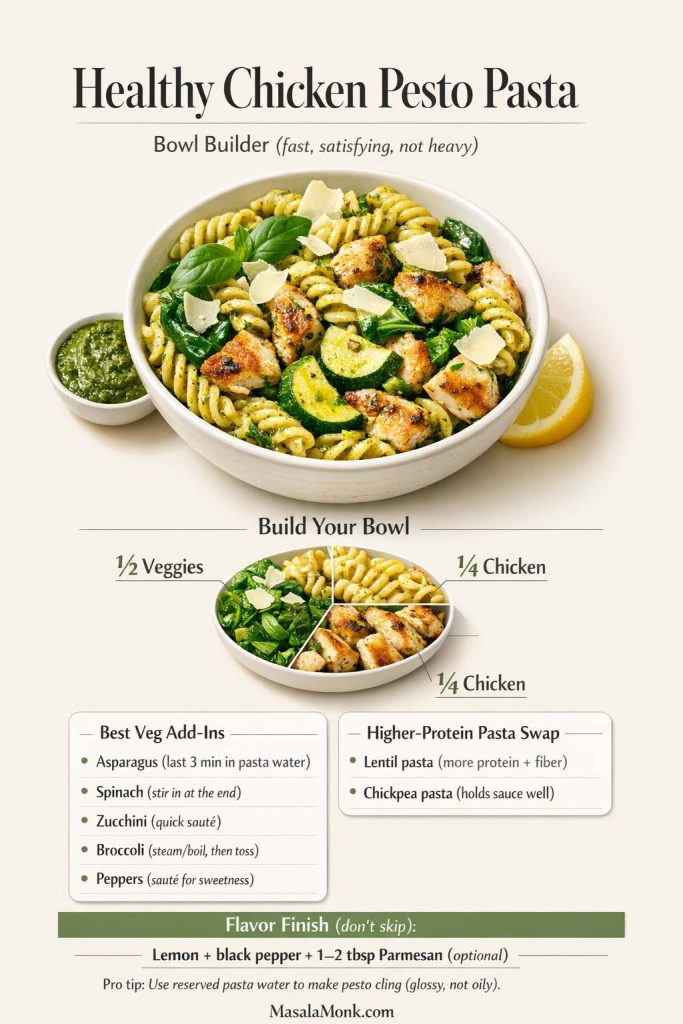
Healthy chicken pesto pasta bowl builder infographic showing a pesto chicken pasta bowl with zucchini and spinach, plus a “Build Your Bowl” plate formula (½ veggies, ¼ pasta, ¼ chicken), a list of best vegetable add-ins (asparagus, spinach, zucchini, broccoli, peppers), higher-protein pasta swaps (lentil, chickpea), and a flavor finish tip (lemon, black pepper, optional Parmesan) with a pasta-water pro tip.
Want healthy chicken pesto pasta that still tastes satisfying? Use this bowl-builder: fill half your bowl with veggies, then add pasta and chicken for balance. The quick add-ins (asparagus, spinach, zucchini, broccoli, peppers) boost volume without dulling pesto, while lentil or chickpea pasta adds extra protein and fiber. Finish with lemon + black pepper (and a little Parmesan if you want), then use reserved pasta water to keep the pesto glossy—not oily. Save this for meal-prep nights and scroll the post for the base recipe, creamy options, one-pan/one-pot methods, baked pasta, and mushroom/tomato twists.

Healthy upgrades that actually stick

  • Add vegetables for volume: asparagus, spinach, zucchini, peppers, broccoli.
  • Choose chicken breast if you want leaner protein, but cook it carefully so it stays tender.
  • Use pesto confidently, then stretch it with pasta water and brightness (lemon, pepper).
  • Finish with a smaller amount of Parmesan rather than removing it entirely—flavor helps you stay satisfied.

If you want a simple portion strategy that still feels generous, build the bowl like this: half vegetables, a quarter pasta, a quarter chicken—then sauce everything with pesto + pasta water so it tastes cohesive.

Asparagus (easy add-in)

Asparagus is made for pesto. Add chopped asparagus to boiling pasta water during the last 2–3 minutes. Drain, then toss into the base recipe. The asparagus stays vibrant, and the bowl feels lighter without feeling “diet.”

Higher-protein pasta swaps

If you want extra protein and fiber, lentil pasta is a strong option. MasalaMonk’s lentil pasta guide goes deeper into how it behaves and what to pair it with, which is helpful when you’re experimenting.


The Small Moves That Make This Pasta Outstanding

A great pasta dish isn’t about complicated ingredients. It’s about a few small moves that keep everything balanced, especially when pesto is involved.

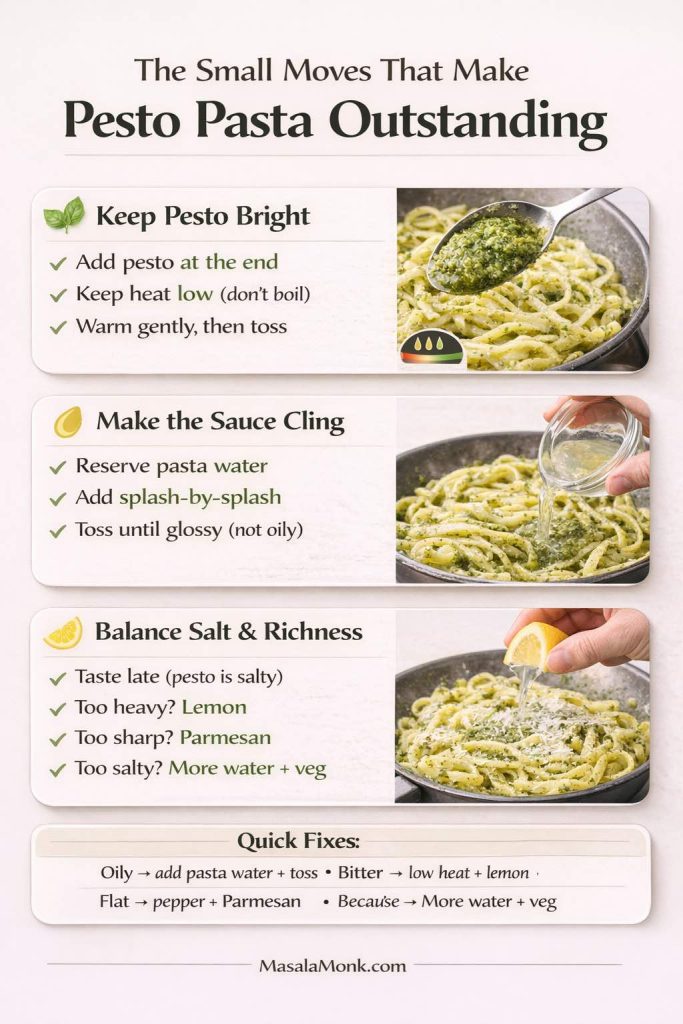
Infographic titled “The Small Moves That Make Pesto Pasta Outstanding” with three technique panels: keep pesto bright by adding it at the end on low heat, make the sauce cling by using reserved pasta water splash-by-splash until glossy, and balance salt and richness by tasting late and adjusting with lemon, Parmesan, or more water and vegetables. Includes a quick fixes strip at the bottom and MasalaMonk.com.
These are the small moves that make chicken pesto pasta taste restaurant-level. Add pesto at the end and keep the heat low so it stays bright. Use reserved pasta water splash-by-splash while tossing until the sauce turns glossy and clings (not oily). Then taste late—pesto is salty—and balance fast with lemon for freshness, Parmesan for roundness, or a little more water + veg if it’s too salty. Save this technique card for every pesto pasta you make, then scroll the post for the fast, creamy, one-pan, one-pot, baked, mushroom, tomato, grilled, BBQ, and pasta-salad versions.

Keep pesto bright

Pesto tastes best when it’s warmed gently rather than cooked hard. So, whether you’re making a clean spaghetti version or a creamy bowl, stir in pesto at the end and keep the heat low.

Make the sauce cling

Pasta water isn’t a garnish—it’s structure. Add it gradually while tossing until the pesto becomes a silky coating. That’s how the sauce goes from “thin” to “glossy.”

Balance salt and richness

Because pesto can be salty, taste late and adjust carefully. If it’s too salty, loosen with water and add a handful of vegetables. If it feels heavy, lemon fixes it fast. And if it tastes sharp, Parmesan softens it.


Chicken Pesto Pasta Salad (A Cold Version That Actually Works)

Even though this post focuses on hot versions, chicken pesto pasta salad deserves a spot because it’s one of the smartest ways to turn leftovers into tomorrow’s lunch. Better still, it’s genuinely delicious when you build it the right way.

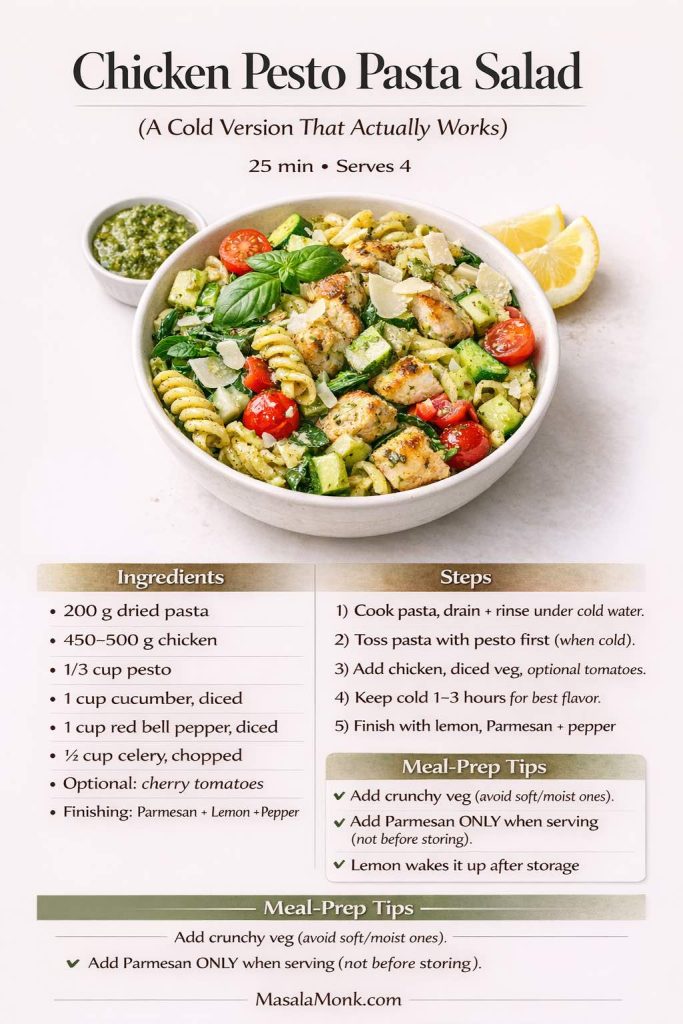
Chicken pesto pasta salad recipe card showing a bowl of cold pesto pasta with grilled chicken pieces, cucumber, cherry tomatoes, basil, Parmesan shavings, a pesto ramekin, and lemon wedges, plus ingredients, step-by-step instructions to rinse pasta and toss with pesto first, and meal-prep tips like using crunchy vegetables and adding Parmesan only when serving.
This chicken pesto pasta salad recipe card is the meal-prep version that actually stays good. Rinse and drain the pasta, toss it with pesto first, then add chicken and crunchy veg like cucumber, bell pepper, and celery so the salad stays fresh—not soggy. Chill for the best flavor, then finish with lemon, black pepper, and Parmesan right before serving (it keeps the texture better). Save this for quick lunches, and scroll the post for the hot base recipe, creamy options, one-pan and one-pot methods, the baked pasta version, plus mushroom and tomato twists.

Recipe Card: Pesto Pasta Salad with Chicken

  • Cook pasta, then rinse briefly under cool water and drain well.
  • Toss pasta with pesto first, then add chicken.
  • Add crunchy vegetables like cucumber, bell pepper, or celery.
  • Finish with lemon and pepper.
  • Add Parmesan right before serving.

Because cold pasta absorbs sauce, you’ll often want a little extra pesto or a drizzle of olive oil plus lemon to keep it lively.

If you plan to meal prep, it’s useful to keep safe storage windows in mind. FoodSafety.gov’s Cold Food Storage Charts is a strong reference, especially when you’re storing mixed dishes.


Storage and Reheating (So It Still Tastes Like Pesto)

Chicken pesto pasta tends to thicken in the fridge. The good news is the fix is easy, and you can bring back the glossy texture without turning the chicken rubbery.

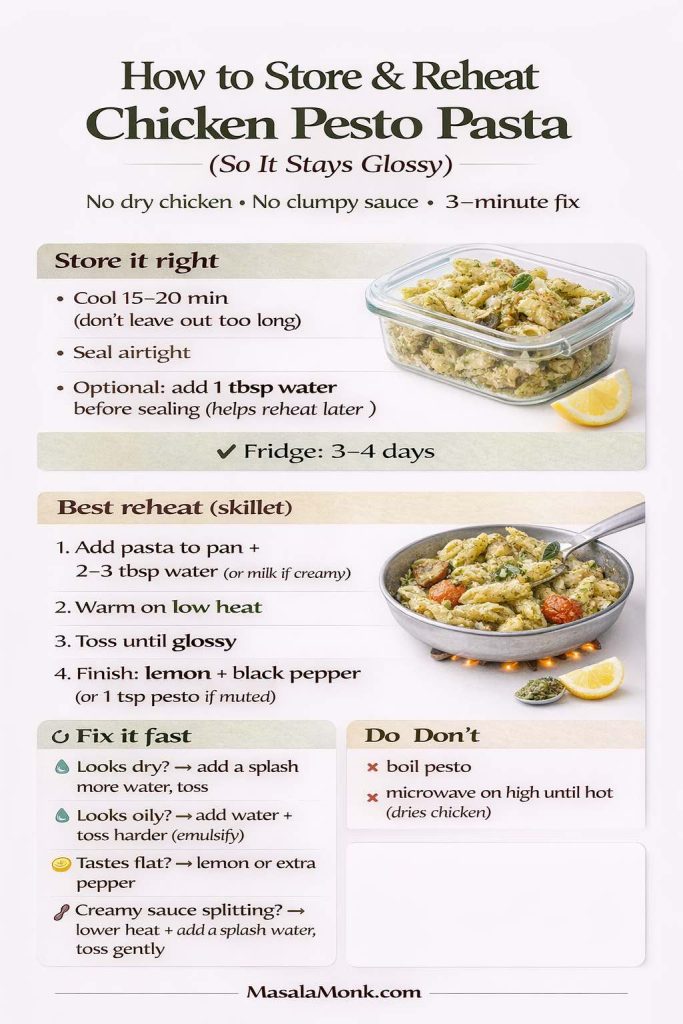
Infographic titled “How to Store & Reheat Chicken Pesto Pasta (So It Stays Glossy)” showing storage steps, fridge time (3–4 days), the best skillet reheat method with added water or milk for creamy versions, quick fixes for dry or oily sauce, and do/don’t tips like avoiding boiling pesto and microwaving on high.
Leftover chicken pesto pasta doesn’t have to taste dry or clumpy. This quick guide shows how to store it properly, then reheat it in a skillet with a splash of water (or milk if creamy) until the sauce turns glossy again. Use the “fix it fast” tips if it looks oily, tastes flat, or starts to split—then finish with lemon and black pepper (or a tiny spoon of pesto) to bring everything back to life. Save this for meal prep nights, and scroll for the base recipe, creamy options, one-pan/one-pot methods, baked pasta, and mushroom/tomato variations.

How to reheat without ruining it

  • Reheat gently in a skillet (low to medium-low).
  • Add a splash of water (or milk if it’s creamy).
  • Toss until glossy again.
  • If it tastes muted, add a tiny spoon of pesto or a squeeze of lemon at the end.

For general leftovers safety guidance, the USDA’s Leftovers and Food Safety page is a trustworthy reference worth bookmarking.


Pesto Storage (If You Make It in Batches)

If you start making pesto at home, you’ll quickly realize the real joy is batch-making and freezing portions. When pesto is ready in the freezer, dinner becomes a toss-and-go situation.

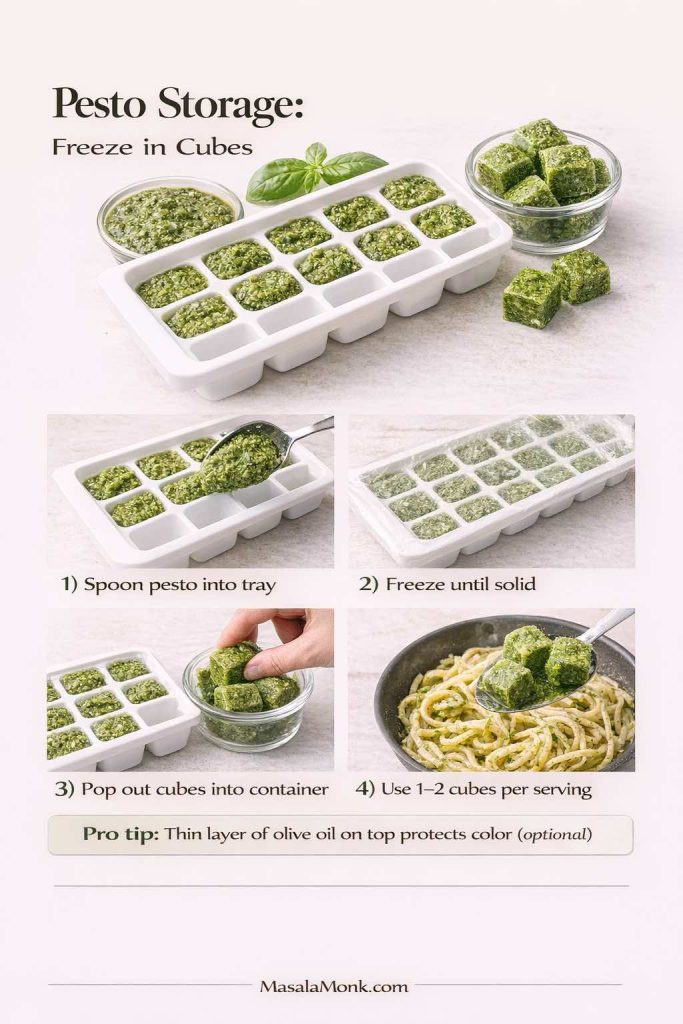
Step-by-step infographic titled “Pesto Storage: Freeze in Cubes” showing pesto spooned into an ice cube tray, frozen until solid, popped into a container, and added to hot pasta. Includes a pro tip that a thin layer of olive oil on top can help protect pesto color, and the footer MasalaMonk.com.
Make pesto once, then make weeknight chicken pesto pasta in minutes. This “freeze pesto in cubes” guide shows the easiest method: spoon pesto into an ice tray, freeze until solid, then store cubes in a container so you can grab 1–2 cubes per serving anytime. It’s the simplest way to keep pesto tasting fresh without wasting basil, and the optional olive-oil tip helps protect color. Save this for meal prep—then use those cubes for the base chicken pesto pasta recipe, creamy versions, one-pan/one-pot methods, pasta salad, and more.

For specific guidance on freezing pesto safely, the National Center for Home Food Preservation’s page on freezing pesto is excellent—especially if you like freezing pesto in cubes, then transferring them to a container once solid.


A Few Delicious Next Steps (If You Want More Ideas)

If you’re in a pesto mood and want to keep the momentum going:


Closing thought

Chicken pesto pasta is the kind of recipe that rewards you every time you make it. Once you’ve cooked it a couple of ways—maybe the fast version on a rushed weeknight, the creamy version on a cozy evening, and a baked one when friends come over—you’ll notice something: it stops being “a recipe” and becomes a flexible dinner you can steer on instinct.

So start with the base. Then pick a direction. A handful of mushrooms, a few tomatoes, a splash of cream, or a one-pot shortcut can take you somewhere new—while still tasting unmistakably like pesto, chicken, and comfort in a bowl.

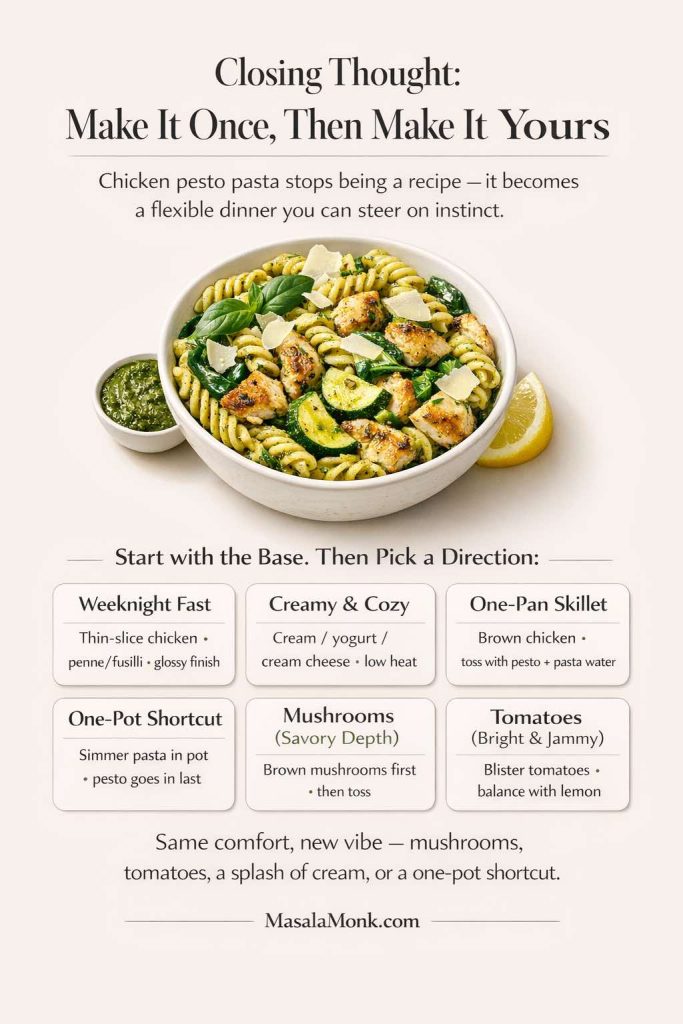
Closing summary infographic titled “Closing Thought: Make It Once, Then Make It Yours” showing a bowl of chicken pesto pasta and a “pick a direction” grid with six variations: Weeknight Fast, Creamy & Cozy, One-Pan Skillet, One-Pot Shortcut, Mushrooms (Savory Depth), and Tomatoes (Bright & Jammy). Includes a closing line about choosing mushrooms, tomatoes, a splash of cream, or a one-pot shortcut, with MasalaMonk.com at the bottom.
Chicken pesto pasta is the kind of dinner that gets better the more you make it—because once you learn the base, you can steer it on instinct. Use this “choose your path” guide to match the mood: go Weeknight Fast, turn it Creamy & Cozy, keep it One-Pan Skillet, simplify with a One-Pot Shortcut, or pivot into Mushrooms for savory depth or Tomatoes for a bright, jammy finish. Save this as your quick decision map, then scroll the post for the full base method and every variation in detail.

Chicken Pesto Pasta FAQs

1) How do I keep chicken juicy?

Pat it dry, cook it in a hot pan without crowding, and pull it as soon as it’s cooked through. Then add it back at the end so it warms up without overcooking.

2) What’s the best way to cook chicken breast so it doesn’t dry out?

Slice it thinner (or butterfly it), then cook quickly over medium-high heat. Because breast cooks fast, pulling it a minute early and letting carryover heat finish it prevents dryness.

3) Why does my pesto sauce look oily instead of coating the pasta?

This usually happens when there isn’t enough starchy water in the pan. Add reserved pasta water a splash at a time while tossing until the sauce turns glossy and clings. Also, keep the heat gentle once pesto goes in.

4) Which pasta shapes work best here?

Penne and fusilli grab sauce easily and hold up well to mix-ins. Linguine and spaghetti give a silkier feel. If you’re making a creamier version, fettuccine is especially satisfying.

5) How can I make this in under 25 minutes?

Use a fast-cooking pasta, cut chicken smaller, and cook both at the same time. Once the pasta drains, toss everything with pesto and a splash of reserved water right in the skillet for a quick finish.

6) Can I make a creamy version without heavy cream?

Yes. Stir in Greek yogurt off heat (with a splash of water first), add a spoon of cream cheese melted with pasta water, or use a small splash of milk plus Parmesan for body.

7) How do I keep a creamy sauce from splitting?

Lower the heat before adding dairy and avoid boiling once it’s in the pan. If using yogurt, add it off heat. If it starts to look grainy, add a little more pasta water and toss gently to bring it back together.

8) What’s the difference between one-pan and one-pot versions?

One-pan usually means pasta is boiled separately, then tossed in a skillet with chicken and pesto. One-pot means pasta simmers in the same pot as the chicken so the cooking liquid becomes part of the sauce.

9) How do I avoid gummy pasta in the one-pot method?

Stir often, keep enough liquid so the pasta can move freely, and stop cooking as soon as it reaches al dente. Then add pesto at the end and loosen with a splash of water if needed.

10) How do I cook mushrooms so they don’t turn watery?

Start with a hot pan, spread mushrooms out, and let them brown before stirring. Once they’ve released moisture and picked up color, they’ll taste deeper and won’t dilute the sauce.

11) What’s the easiest way to add tomatoes without making it too acidic?

Blister cherry tomatoes until they burst for natural sweetness. If using canned tomatoes, keep the amount small and simmer briefly before adding pesto at the end on low heat.

12) Can I turn it into a baked pasta dish?

Absolutely. Make the skillet version slightly saucier, mix in cheese, then bake until bubbling and lightly golden. For extra freshness, stir in a spoon of pesto right after baking.

13) How do I keep a pasta bake from drying out?

Add extra pasta water before baking and include enough cheese or a small splash of cream. If your oven runs hot, cover for part of the bake time, then uncover briefly to brown.

14) Can I use leftover grilled chicken?

Definitely. Slice it and warm it gently at the end. Since it’s already cooked, it only needs a brief heat-through to stay tender.

15) Does a BBQ twist work with pesto?

It can, as long as you use barbecue sauce lightly. Think of it as a glaze on the chicken, then combine with pesto and pasta water so the flavors stay balanced.

16) How do I store and reheat leftovers so it still tastes fresh?

Store in a sealed container in the fridge. Reheat gently with a splash of water (or milk for creamy versions), then finish with black pepper and a squeeze of lemon if it tastes muted.

17) Why does pesto sometimes taste bitter?

Bitterness can come from old basil, too much raw garlic, or overheating. Add pesto on low heat and avoid boiling it. If it still tastes sharp, Parmesan and a touch of lemon balance it quickly.

18) What should I serve on the side?

Go simple: a crisp salad, roasted vegetables, sautéed greens, or garlic bread. If your pasta is creamy, something bright and lemony on the side pairs especially well.