Posted on Leave a comment

Burger Patty Recipe

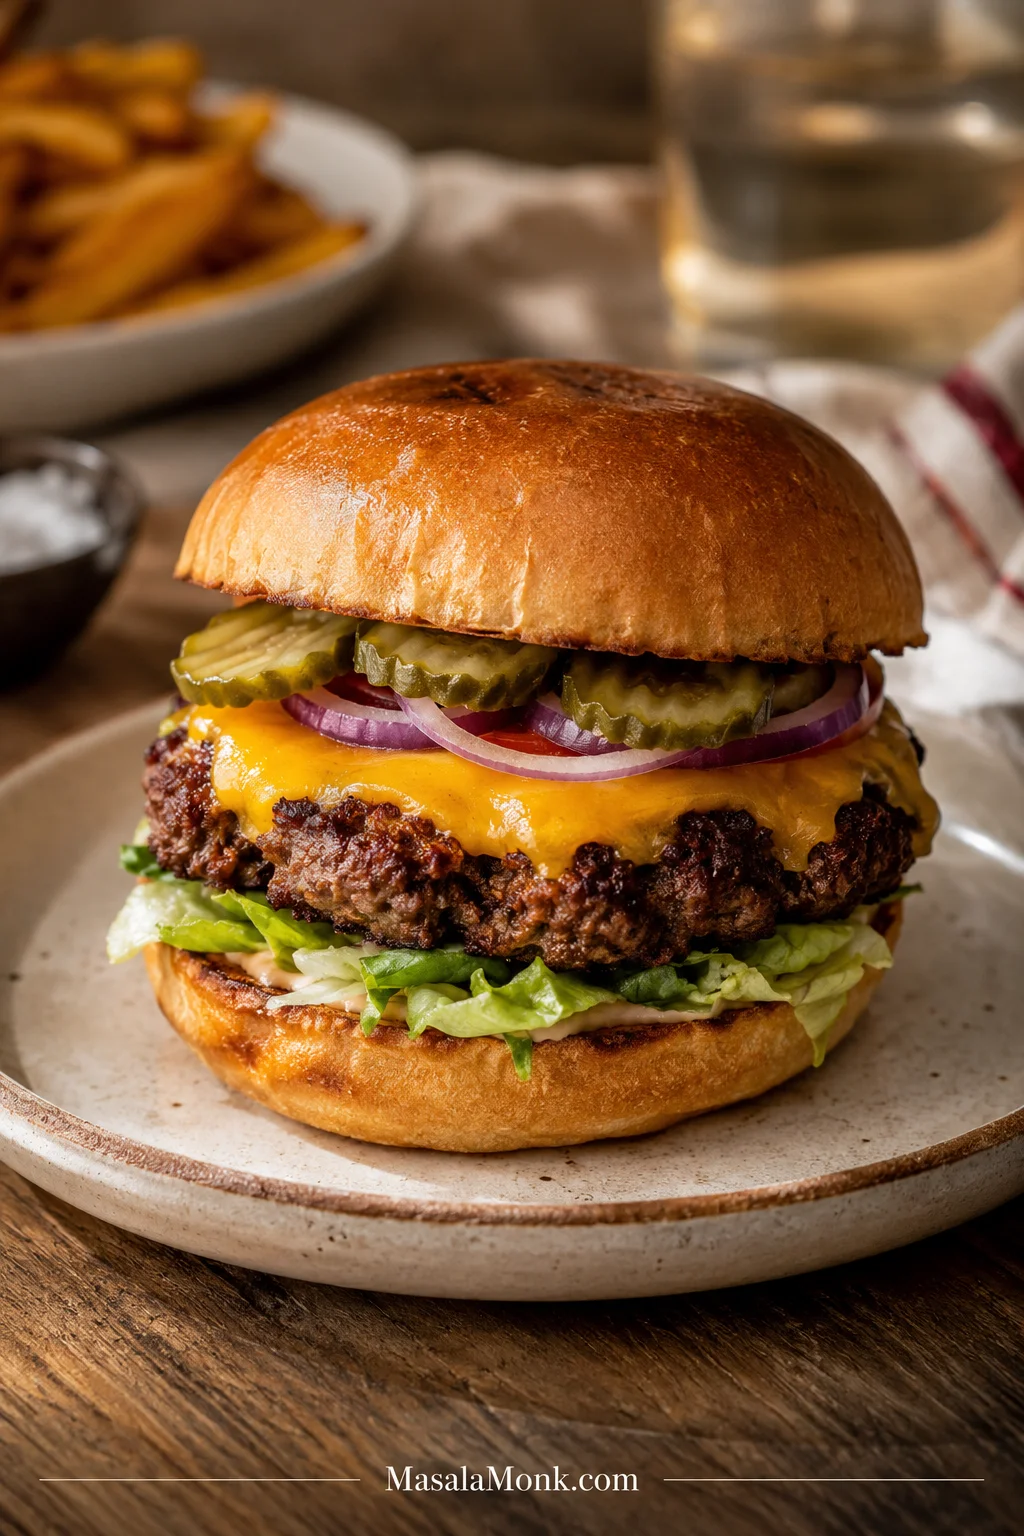
Cheeseburger on a toasted bun with melted cheese, lettuce, tomato, onion, pickles, and a browned beef patty that reaches the edge of the bun.

You opened the fridge, saw a pound of ground beef, and decided burgers were dinner. Good call. Now the goal is simple: patties that stay juicy, hold together, brown well, and do not turn into dry little beef discs.

This is a no-drama burger patty recipe for a regular weeknight. No egg, no breadcrumbs, no overthinking. Just cold beef, simple seasoning, gentle shaping, and a hot pan or grill.

It is built for the problems home cooks actually run into: patties that crack, shrink, puff, dry out, or fall apart before they ever make it to the bun.

The result still feels easy on a weeknight, but you get the good parts: browned edges, a juicy center, melted cheese if you want it, and a patty that actually fits the bun.

If your burgers have fallen apart before, it usually does not mean you needed egg. It usually means the beef was too warm, too wet, too lean, packed too tightly, salted too early, or flipped before the first side had a chance to brown.

Need dinner fast? Jump to the recipe. Trying to fix burgers that fell apart last time? Start with the mistake map.

Quick Answer: How to Make Burger Patties

Use 1 lb / 450 g 80/20 ground beef for 4 patties. Shape each one about 4 oz / 115 g, 4 to 4 1/2 inches / 10 to 11.5 cm wide, and about 3/4 inch / 2 cm thick. Make each patty slightly wider than the bun, press a shallow dimple in the center, salt the outside just before cooking, and cook on a hot skillet or grill without pressing.

No egg. No breadcrumbs. If you came here looking for a hamburger patty recipe without egg or breadcrumbs, this is that version. For simple beef patties, 80/20 beef, cold meat, gentle shaping, and proper cooking are enough.

Binder-Free Patty Cue

This is the quick visual for the no egg, no breadcrumbs method: simple beef, dry seasoning, and a patty that holds through browning.
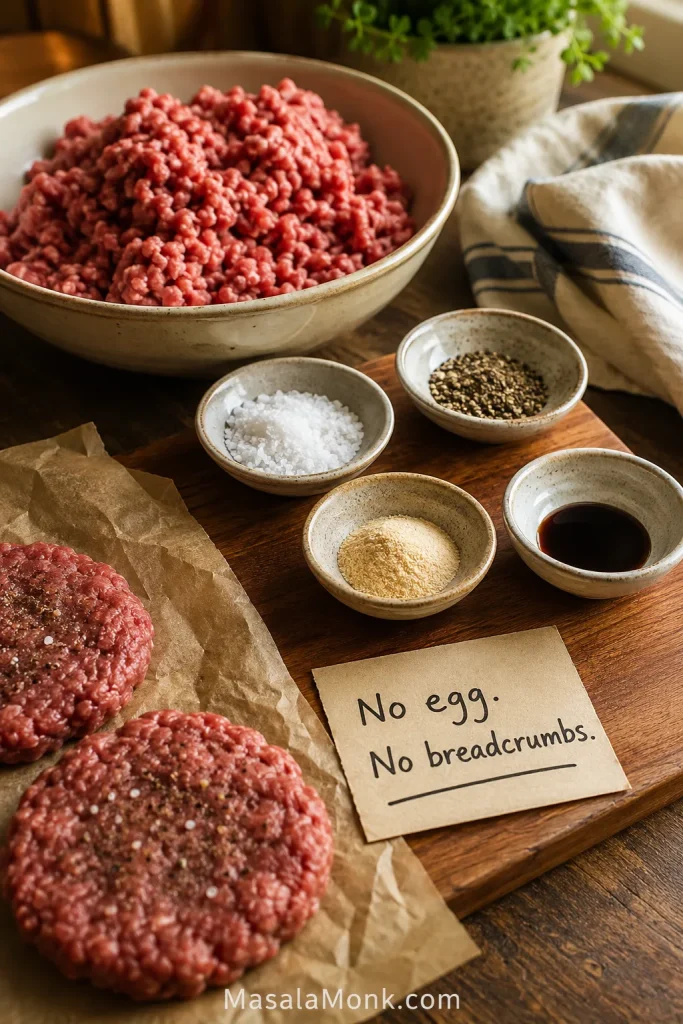
Raw ground beef with salt, pepper, garlic powder, onion powder, a small dark sauce dish, and a note that says no egg and no breadcrumbs.
No egg or breadcrumbs needed: cold beef, dry seasoning, gentle handling, and browning do the binding work.

Simple formula: 1 lb / 450 g beef = 4 patties. Keep them cold, shape them loose, salt them late, and let the first side brown before flipping.

Portion the Beef Before Shaping

Even portions are the quiet shortcut to even cooking. Divide the beef first, then shape each patty gently.
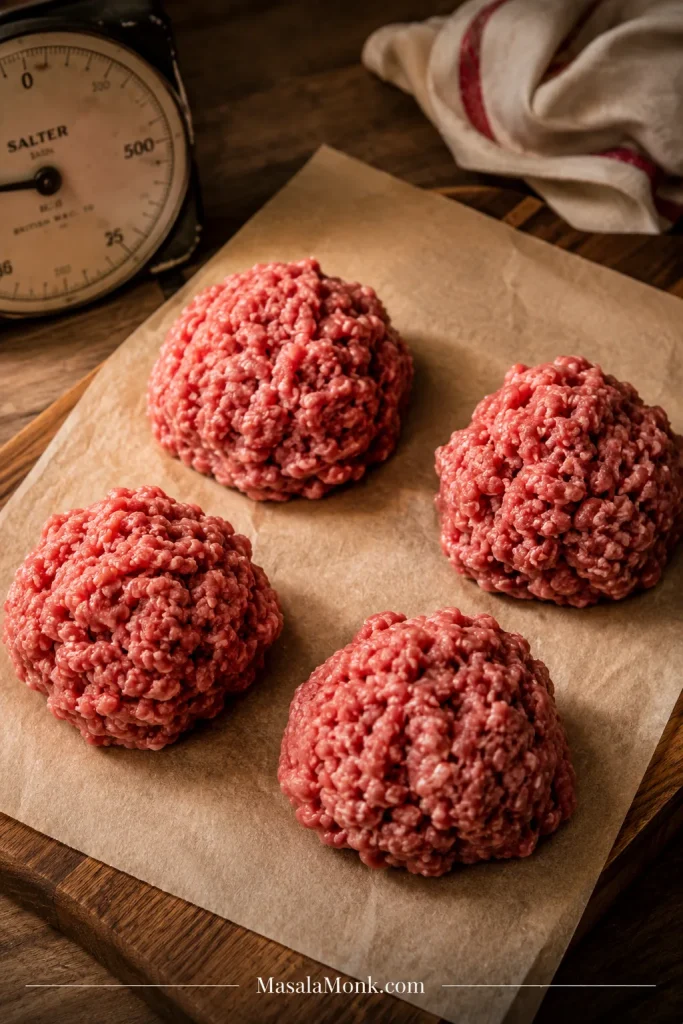
Four loose portions of raw ground beef on parchment paper with a kitchen scale nearby.
Portioning first keeps homemade burger patties even without packing the meat into dense rounds.

Burger Patty Mistake Map: Why They Fall Apart, Shrink, Puff, or Dry Out

Most burger problems are easier to fix once you know the cause. Egg is not usually the answer. Colder beef, less moisture, gentler shaping, better heat, or a later flip usually solve more.

Find the problem that sounds most like your last burger. That is the fix to focus on first.

Problem Patterns to Check First

Quick Diagnosis: Read the Patty Shape

A failed patty often explains itself before you change the whole recipe.
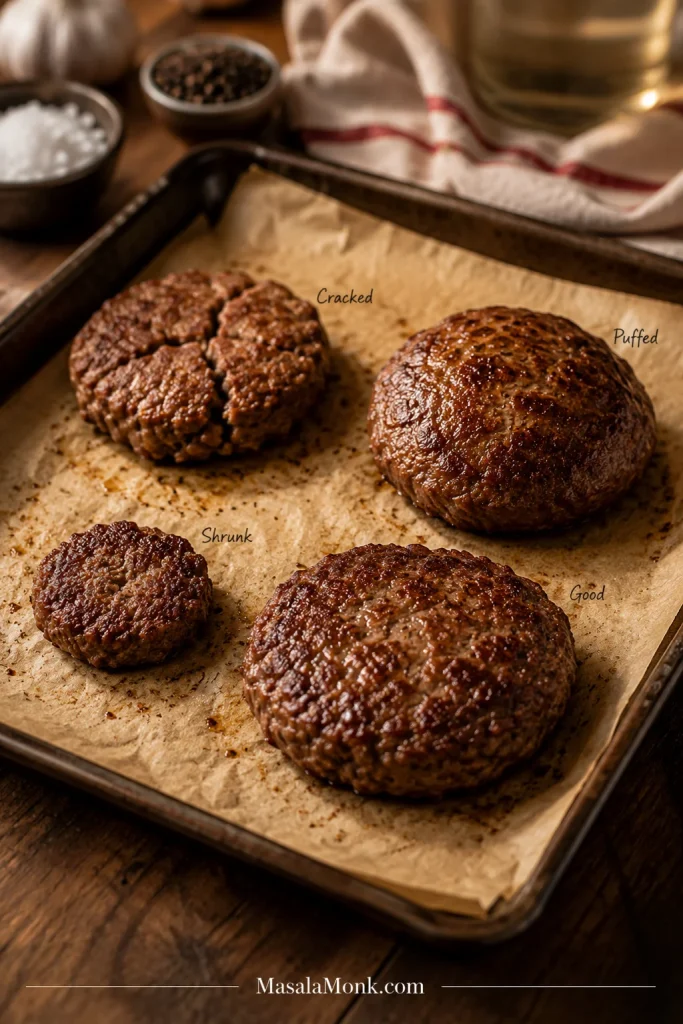
Parchment-lined tray with four burger patties labeled cracked, puffed, shrunk, and good.
Read the shape before changing the recipe: cracks, puffing, shrinking, and crumbling each point to a different fix.
  • Falling apart before cooking: the beef is warm, wet, too lean, or shaped too loosely.
  • Falling apart while cooking: the patty was flipped too early or the pan/grill was not hot enough.
  • Shrinking too much: the raw patties started too small or were packed too tightly.
  • Puffing in the middle: the dimple was missing, too shallow, or uneven.
  • Dry burgers: the beef was too lean, overworked, pressed while cooking, or overcooked.
  • Tight, springy texture: salt may have been mixed into the meat too early.

Pick the issue that matches what happened last time, then fix that first. Once you know the likely cause, the troubleshooting table gives the exact fix.

What success looks like: a good burger patty should be browned on the outside, slightly craggy around the edges, juicy in the middle, and wide enough to still fill the bun after cooking. It should hold together when flipped, but it should not feel dense, rubbery, or packed like sausage.

What a Good Burger Patty Looks Like

This is the texture target after cooking: browned outside, juicy inside, and sturdy without feeling packed.
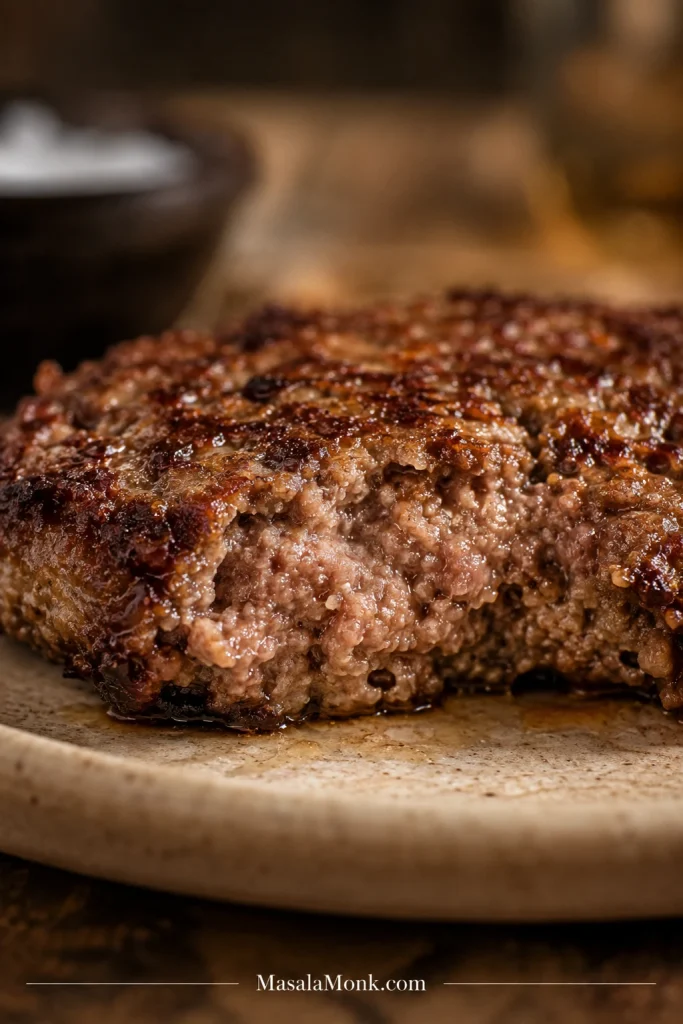
Close-up of a cooked beef burger patty with browned craggy edges and a juicy center visible from a cut side.
A good beef patty looks craggy and browned outside, not smooth, tight, or sausage-like.

Shallow Dimples Before Cooking

These patties show the dimple as a small guide, not a deep hole through the middle.
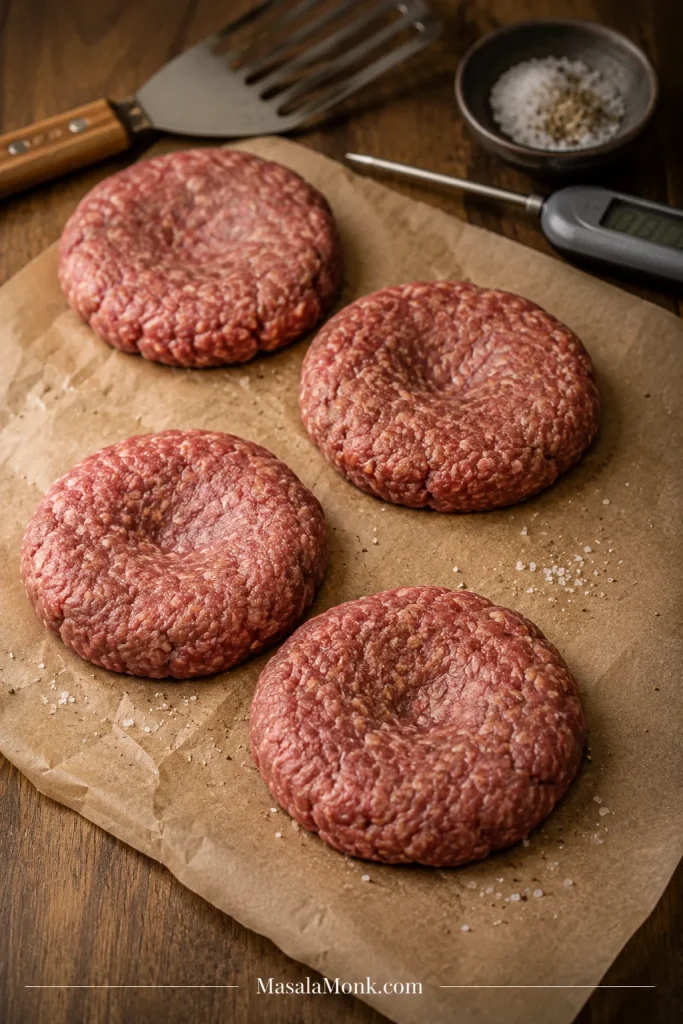
Four raw burger patties on parchment paper with shallow center dimples, a spatula, seasoning bowl, and thermometer nearby.
A shallow dimple helps the patty cook flatter while the middle stays thick enough to stay juicy.

Burger Patty Recipe

Juicy homemade hamburger patties made from ground beef with simple seasoning. These work in a skillet, on the grill, or as the base for cheeseburgers.

Servings4 patties
Prep Time10 minutes
Cook Time6 to 10 minutes
Total TimeAbout 20 minutes

Equipment

  • Mixing bowl or tray
  • Kitchen scale, optional but helpful
  • Cast iron skillet, grill, griddle, or air fryer
  • Spatula
  • Instant-read thermometer
  • Parchment paper, if freezing patties

Ingredients

  • Ground beef: 1 lb / 450 g, preferably 80/20 ground chuck
  • Kosher salt: 1 tsp, or about 3/4 tsp fine/table salt
  • Black pepper: 1/2 tsp
  • Garlic powder: 1/2 tsp
  • Onion powder: 1/2 tsp
  • Worcestershire sauce: 1 tsp, optional; skip if the beef already feels soft or loose
  • Neutral oil: 1 to 2 tsp, or just enough to lightly film the pan if needed

For Serving, Optional

  • 4 burger buns
  • Cheese slices
  • Lettuce, tomato, onion, pickles, and burger sauce

Instructions

  1. Keep the beef cold. Remove it from the fridge only when you are ready to shape.
  2. Add Worcestershire, if using. Drizzle lightly and toss once or twice. Skip it if the beef feels soft.
  3. Divide the beef. Split the meat into 4 equal portions, about 4 oz / 115 g each.
  4. Shape gently. Form each portion into a patty about 4 to 4 1/2 inches / 10 to 11.5 cm wide and 3/4 inch / 2 cm thick.
  5. Make them wider than the buns. Shape each patty about 1/2 inch / 1 cm wider than the bun.
  6. Add a shallow center dimple. Press a small depression into the middle. Keep it shallow so the center stays thick.
  7. Season just before cooking. Sprinkle the salt, pepper, garlic powder, and onion powder over both sides right before the patties go into the pan or onto the grill.
  8. Cook in a skillet. Heat a cast iron skillet over medium-high heat. Add oil if needed. Cook standard patties for 3 to 4 minutes on the first side, then 2 to 3 minutes on the second.
  9. Or cook on the grill. Grill over medium-high direct heat for about 3 to 4 minutes per side.
  10. Add cheese if using. Add it during the last 30 to 60 seconds.
  11. Check the temperature. Ground beef patties should reach 160°F / 71°C.
  12. Rest briefly. Let the patties rest for 2 minutes before serving.

Notes

  • Use 80/20 ground beef for the juiciest patties.
  • For the cleanest texture, skip Worcestershire the first time and add sauces to the finished burger instead.
  • If using fine/table salt instead of kosher salt, use a little less.
  • Salt the outside just before cooking for the best texture.
  • Use a thermometer instead of relying only on color.
  • Freeze raw patties flat first, then stack with parchment between them.

Once the basic method is clear, the rest is just solving the small problems: lean beef, soft patties, sticky grill grates, frozen meat, or burgers that fell apart last time.

When it works, it feels almost boring in the best way: the patty sizzles, releases cleanly, melts the cheese if you want it, and lands on the bun without drama.

Why These Burger Patties Hold Together

This method works because each step protects either shape, juiciness, or browning. Cold beef keeps the fat firm so the patty holds together. Gentle shaping keeps the texture loose instead of rubbery. Late salting seasons the outside without making the meat tight. A hot surface builds crust, and that crust helps the patty release before you flip.

The best homemade burgers do not need restaurant tricks. Work with the meat: keep it cold, shape it lightly, and let the hot surface do the browning.

  • 80/20 beef gives flavor and moisture. Fat helps the finished burger taste like a burger.
  • Cold meat holds shape better. Warm beef gets sticky before it reaches the pan.
  • A hot surface builds browning. Browning does more for flavor than extra mix-ins.

Ingredients for Homemade Burger Patties

Because the ingredient list is short, the beef does most of the work. Start with enough fat, keep extra moisture out of the patty, and save the saucy, crunchy, cheesy parts for the finished burger.

The beef and salt matter most. The pepper, garlic powder, and onion powder support the beef instead of hiding it. Worcestershire is optional; use it only if the meat feels firm enough to handle a little liquid.

Ground Beef

Use 1 lb / 450 g ground beef for 4 standard patties. The best choice is 80/20 ground beef, often sold as ground chuck. When the package says hamburger meat instead of ground beef, check the fat ratio if possible.

Fresh beef should smell clean, feel cold, and show visible fat flecks. If it looks watery or feels mushy, pat away excess moisture and keep it cold before shaping.

Look for 80/20 Ground Beef Texture

The fat flecks are not a flaw. They help the patty stay juicy and forgiving as it cooks.
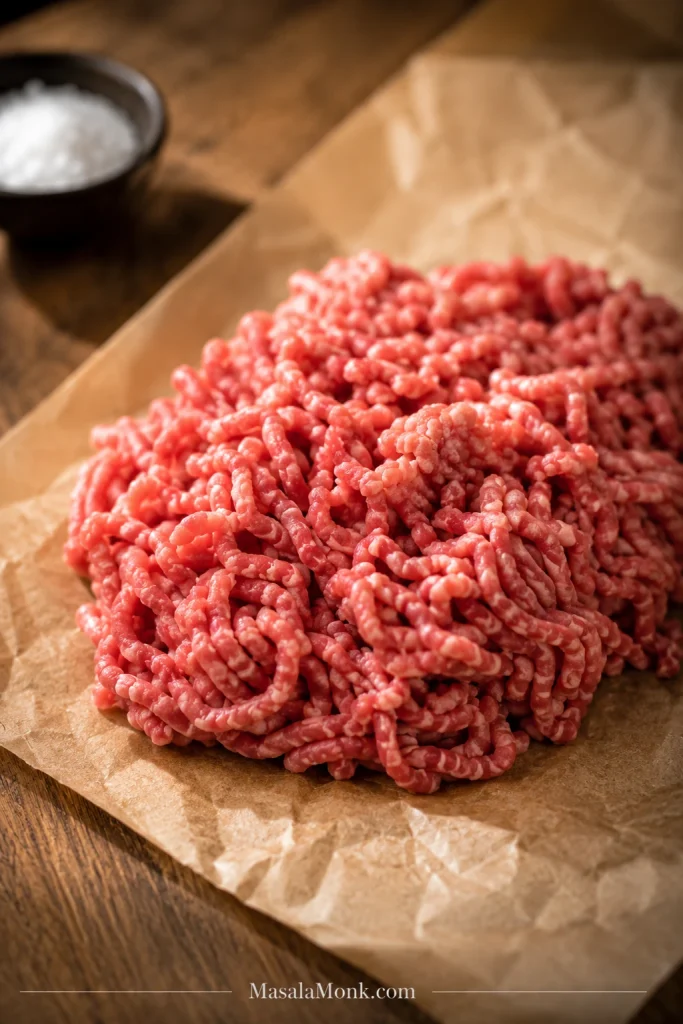
Close-up of raw 80/20 ground beef on parchment paper with visible white fat flecks.
Visible fat flecks are your friend; 80/20 ground beef gives burger patties flavor and moisture.

Best Beef Choices

  • 80/20 ground chuck: the best everyday choice; juicy, flavorful, and forgiving.
  • Choose 85/15 ground beef when you want a slightly leaner patty and can watch the cooking closely.
  • Use 90/10 ground beef carefully because it dries out faster and gives beginners less room for error.
  • Ground sirloin tastes beefy but needs careful cooking because it is usually leaner.
  • Loaded mixtures work better for family-style patties where a binder may be useful.

Lean beef is not wrong; it just gives you less room for error. If you only have lean beef, make slightly smaller patties, handle them less, avoid pressing, and watch the thermometer closely.

Salt

Use about 1 teaspoon kosher salt for 1 lb / 450 g ground beef. If you are using fine salt or table salt, use about 3/4 teaspoon because it packs more tightly into the spoon and tastes saltier by volume.

If your burger seasoning blend already contains salt, reduce or skip the extra salt.

Black Pepper

Black pepper gives the beef a little bite without making the burger taste heavily spiced. Freshly cracked pepper is best, but regular ground black pepper also works.

Garlic Powder and Onion Powder

Garlic powder and onion powder bring flavor without adding moisture. Fresh onion and garlic can taste good, but too much fresh onion, sauce, or grated vegetables can loosen the mixture and make it harder to shape.

Worcestershire Sauce

Worcestershire sauce is optional. A teaspoon adds savory depth, but extra liquid can make the meat softer. If the mixture already feels loose, skip it. You can always add sauce to the finished burger instead.

Oil

Oil is only there to help the first side release and brown. Use just enough to lightly film the pan. With 80/20 beef and a well-seasoned cast iron skillet, you may barely need any.

Do Burger Patties Need Egg or Breadcrumbs?

No. Simple beef burger patties do not need egg or breadcrumbs. With 80/20 beef, the binder is not egg — it is cold fat, gentle shaping, and a crust that forms before you flip.

Egg and breadcrumbs only make sense when you are intentionally making a softer, meatloaf-style patty or when the mixture is very lean, wet, or loaded with add-ins.

No Binder vs Binder-Style Patties

This comparison helps you choose between a beef-first burger and a softer meatloaf-style patty.
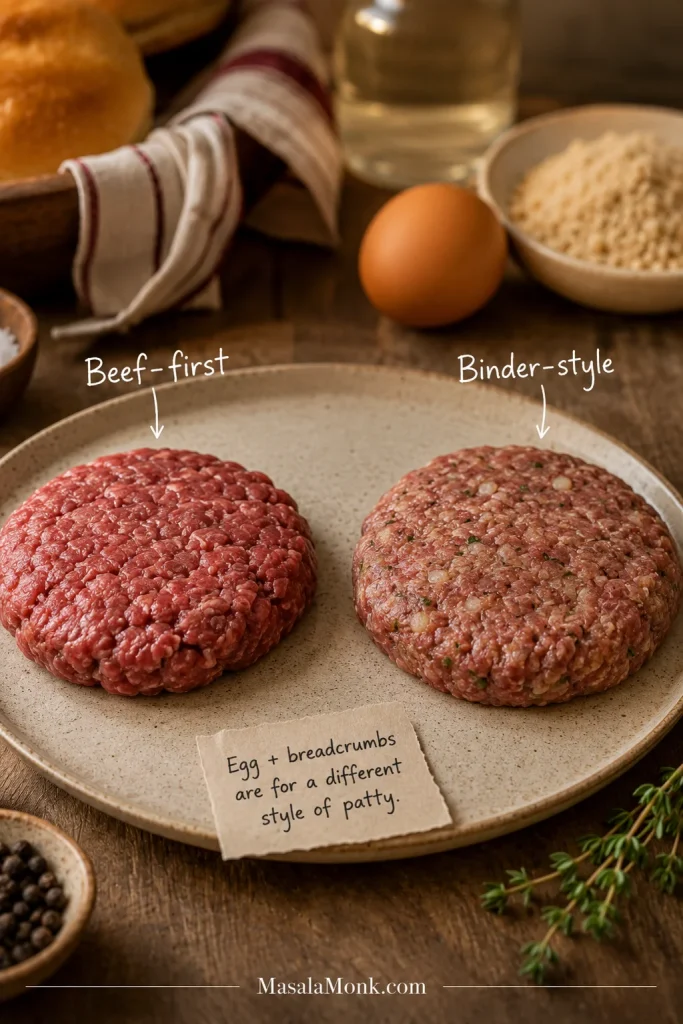
Two raw burger patty preparations labeled beef-first and binder-style, with egg and breadcrumbs near the binder-style patty.
Choose no-binder for a beef-first burger; use egg and breadcrumbs only for wet, meatloaf-style patties.

Simple rule: no binder for a beef-first burger; binder only for wet, lean, or meatloaf-style patties.

Skip Egg for Beef-First Patties

  • You are using 80/20 ground beef.
  • The goal is regular hamburger patties.
  • You are making smash burgers.
  • The meat mixture is simple and not wet.
  • You want a tender, beefy burger texture.

Use Egg Only for Softer Loaded Patties

  • The beef is very lean.
  • You are adding lots of fresh onion, grated vegetables, sauces, or herbs.
  • The goal is a softer family-style patty.
  • A loose mixture will not hold together.

Breadcrumbs Are for Absorbing Extra Moisture

Breadcrumbs absorb extra moisture. That can be useful if you add wet ingredients, but it makes the patty softer and more bound, closer to meatloaf than a regular burger.

Add These to the Burger, Not the Patty

If you want a beefy burger texture, keep wet add-ins out of the meat. Sauce, onions, pickles, and extra cheese usually belong on the burger, not inside the patty.

Think of the patty as the beef layer, not the whole burger. Let the meat bring crust and juiciness; let the toppings bring sauce, crunch, sharpness, and freshness.

Keep Toppings Out of the Meat

This visual separates structure from flavor: let the patty brown cleanly, then build the burger on top.
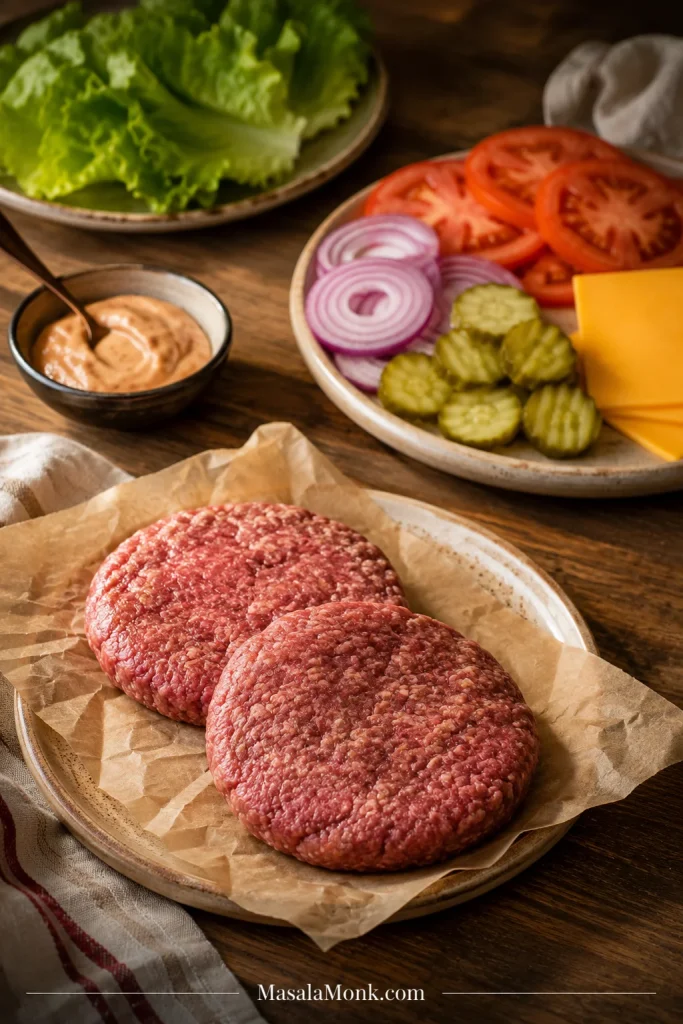
Raw burger patties on parchment paper with lettuce, tomato, onion, pickles, cheese slices, and sauce set aside.
Keep sauce, onion, pickles, and cheese on top so the beef patty browns and holds together.

If what you really want is a creamy burger-style dinner rather than a simple patty, homemade cheeseburger macaroni is a better place for extra sauce, cheese, ketchup, mustard, and Worcestershire.

Keep these out of the meat when you want a beef-first burger:

  • Lots of chopped onion: use it as a topping or cook it separately.
  • Ketchup or barbecue sauce: brush near the end so it glazes instead of soaking the meat.
  • Too much Worcestershire: use 1 teaspoon at most, or skip it if the beef feels soft.
  • Milk, egg, and breadcrumbs: save them for meatloaf-style patties.
  • Cheese mixed into the beef: melt cheese on top near the end instead.

Back to top ↑

Burger Patty Size Chart

Patty size is where a lot of homemade burgers quietly go wrong. Too thin and they dry out quickly. Too thick and the outside can brown before the center is done.

If your burgers always end up smaller than the bun, the raw patties probably started too small. Bun size matters more than perfect inches, but do not start bun-sized unless you want a smaller finished burger.

Visual cue: if the raw patty looks slightly too wide for the bun, it is probably the right size.

Use the Bun as Your Size Guide

The raw patty should look a little too wide now, because it will shrink as it cooks.
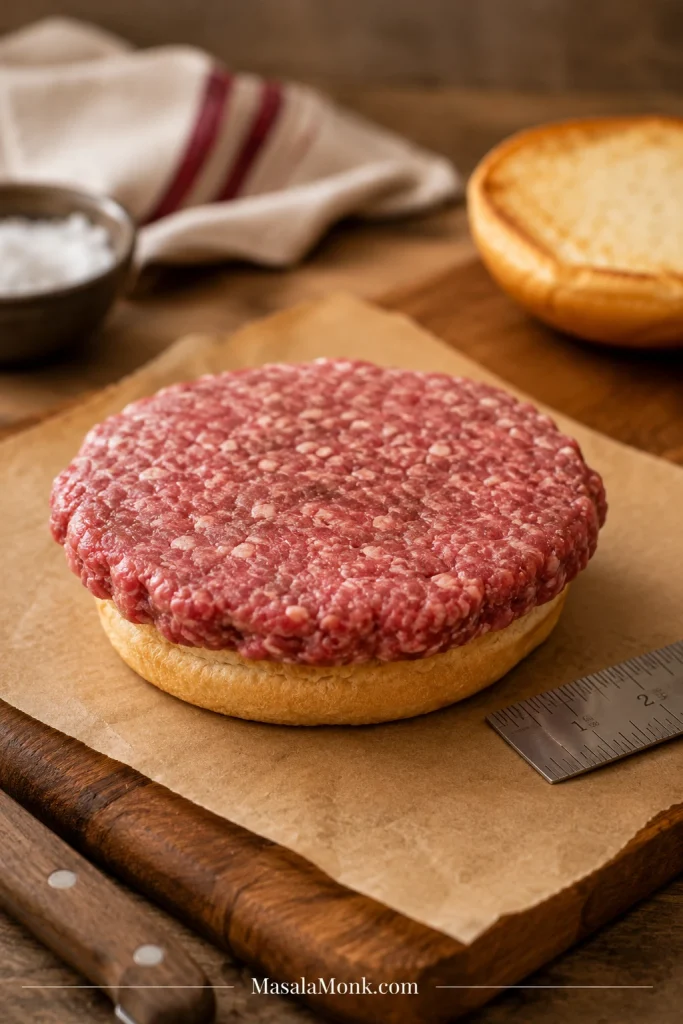
Raw burger patty shown wider than a burger bun on parchment paper with a ruler nearby.
Make the raw patty slightly wider than the bun so it still fits after shrinking.
Burger StyleRaw WeightApprox. Width / ThicknessBest Use
Thin burger3 oz / 85 gAbout 4 inches / 10 cm wide, 1/2 inch / 1 cm thickQuick diner-style burger
Standard burger4 oz / 115 gAbout 4 to 4 1/2 inches / 10 to 11.5 cm wide, 3/4 inch / 2 cm thickBest everyday patty
Thick burger5 to 6 oz / 140 to 170 gAbout 4 1/2 to 5 inches / 11.5 to 13 cm wide, 1 inch / 2.5 cm thickJuicier pub-style burger
Smash burger2 to 3 oz / 55 to 85 gSmashed thinCrispy griddle burger
Big 1/3-lb burger1/3 lb / 150 gAbout 1 inch / 2.5 cm thickHearty grill burger

Check the Patty Thickness

Thickness controls the balance between browning outside and cooking through in the center.
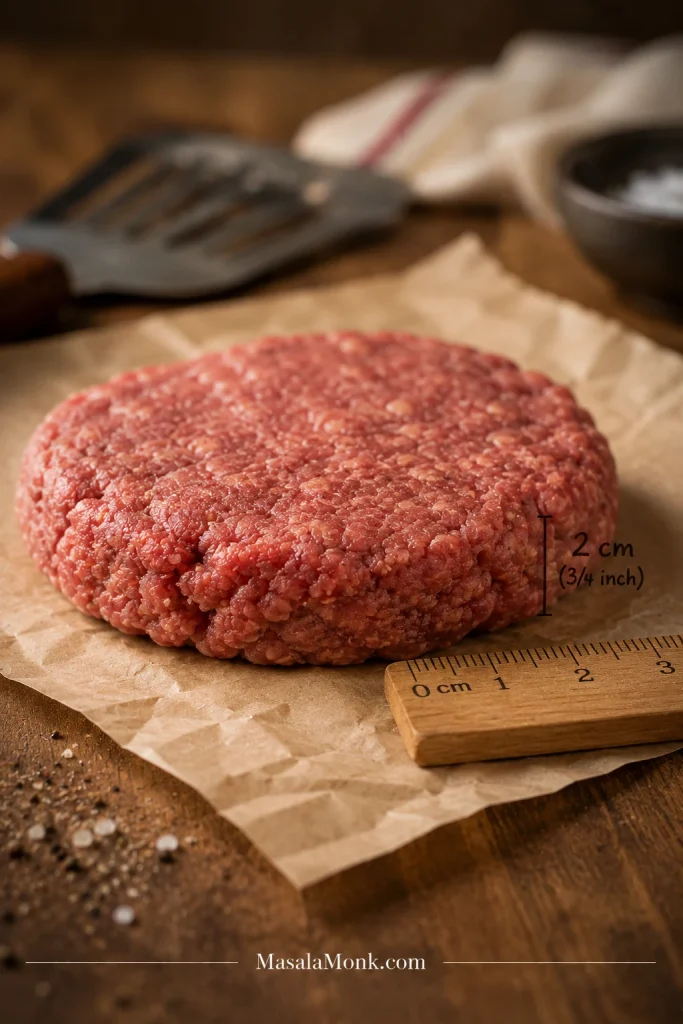
Side view of a raw burger patty on parchment paper with a ruler and a 2 cm thickness mark.
Aim for enough thickness to stay juicy, but not so much that the center lags behind.

For this recipe: 1 lb / 450 g ground beef makes 4 patties of about 4 oz / 115 g each. Shape each one about 1/2 inch / 1 cm wider than the bun so the finished burger still fills the bread.

How to Shape Burger Patties

Shaping is where a lot of burgers quietly get ruined before they ever touch the pan. You do not need a burger press or special tool. Your hands are enough for regular patties.

The 5-Second Patty Check

Before cooking, lift one patty with both hands. It should hold together without sagging, feel cold, and look slightly rough around the edges. If it feels wet, floppy, greasy, or pasty, chill it for 10 to 20 minutes. If it feels dense and bouncy, it was probably packed too tightly.

The 5-Second Patty Lift

A ready patty should feel cold and hold together when lifted without sagging.
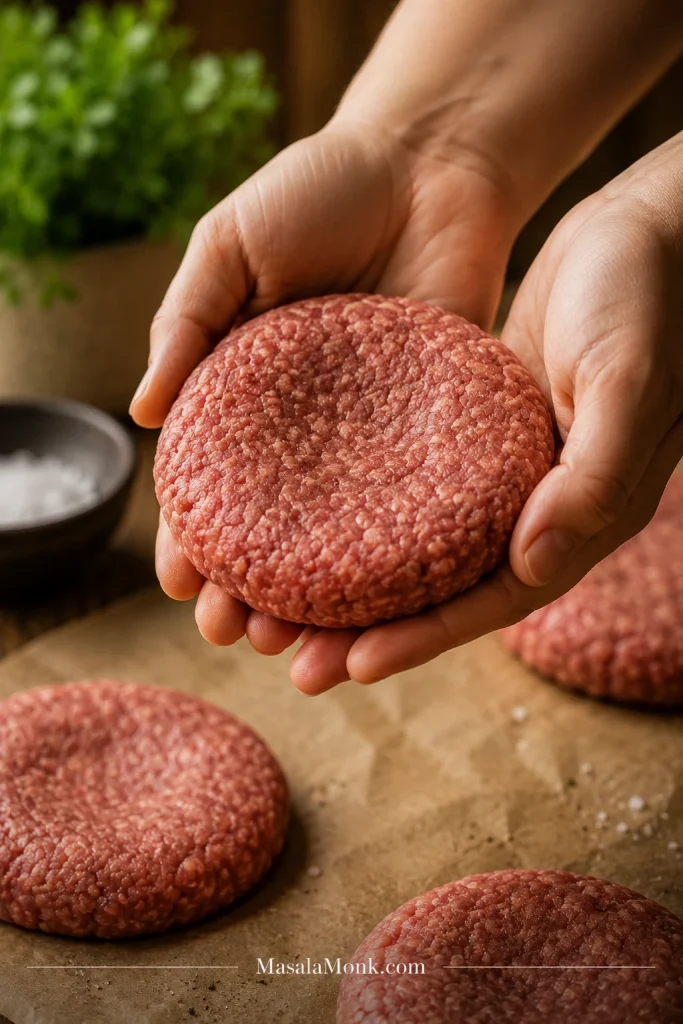
Two hands lifting a raw burger patty above parchment paper with other raw patties nearby.
Lift one patty gently; cold, cohesive patties are ready, while floppy patties need chilling.
  • Good patty: cold, slightly rough, and able to hold together when lifted.
  • Overworked patty: smooth, dense, bouncy, and tight around the edges.
  • Too-soft patty: floppy, greasy, wet, or hard to move without breaking.

Good vs Overworked vs Too Soft

This comparison shows the three textures to recognize before the patties ever hit heat.
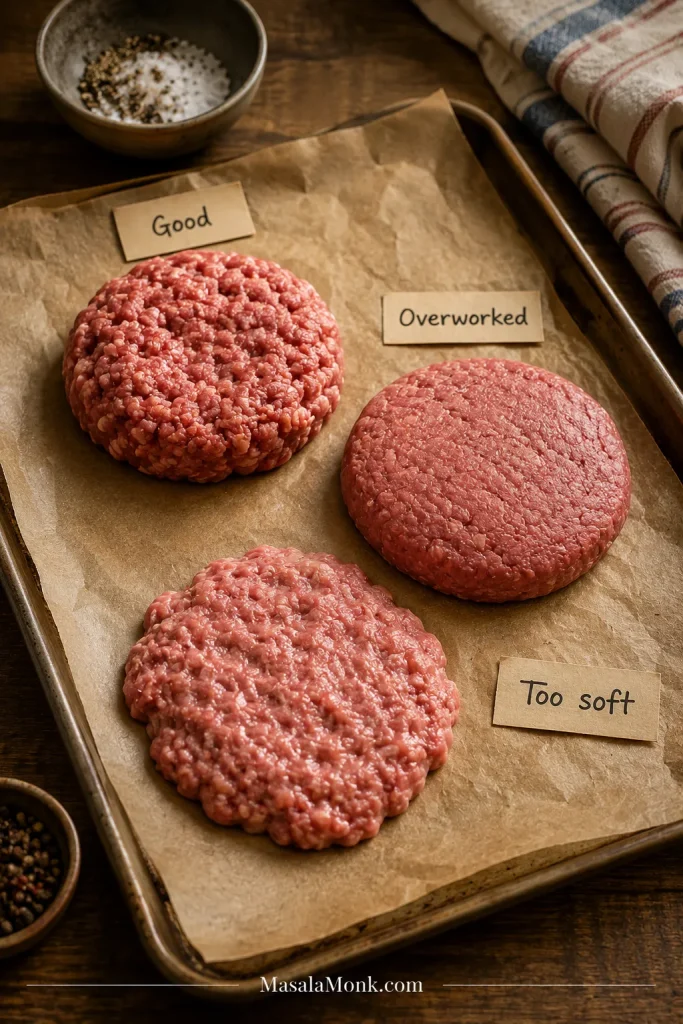
Three raw burger patties on a parchment-lined tray labeled good, overworked, and too soft.
Texture gives the warning: loose and rough is good, smooth is overworked, spreading is too soft.

1. Keep the Beef Cold

Cold beef shapes cleanly. Warm beef smears, sticks, and starts falling apart before it reaches the pan.

If the beef feels greasy and soft in your hands, pause. A few minutes in the fridge fixes more than breadcrumbs ever will. That is not a failure; it is an easy fix.

2. Divide Before Shaping

Divide the beef into equal portions first. For 1 lb / 450 g beef, make 4 portions of about 4 oz / 115 g each.

3. Shape Gently

Form each portion into a loose ball, then flatten it into a patty. Handle it just enough to bring it together. The surface can still look a little craggy. That loose, uneven texture is part of what keeps the burger tender.

Slight roughness around the edges is fine. A burger should look like beef, not dough. If the edges crack badly, gently press them back together without packing the center tight.

4. Make the Patties Wider Than the Buns

When the raw patty fits the bun perfectly, it will usually look too small after cooking. Shape each one about 1/2 inch / 1 cm wider than the bun so the finished burger still fits properly.

5. Add a Shallow Center Dimple

Press a shallow dimple into the center with your thumb or the back of a spoon. Keep it shallow. It should be a small dip, not a crater. The middle should not become thin or cracked.

Shallow Dimple Close-Up

Light pressure is enough; the center only needs to sit slightly lower than the edges.
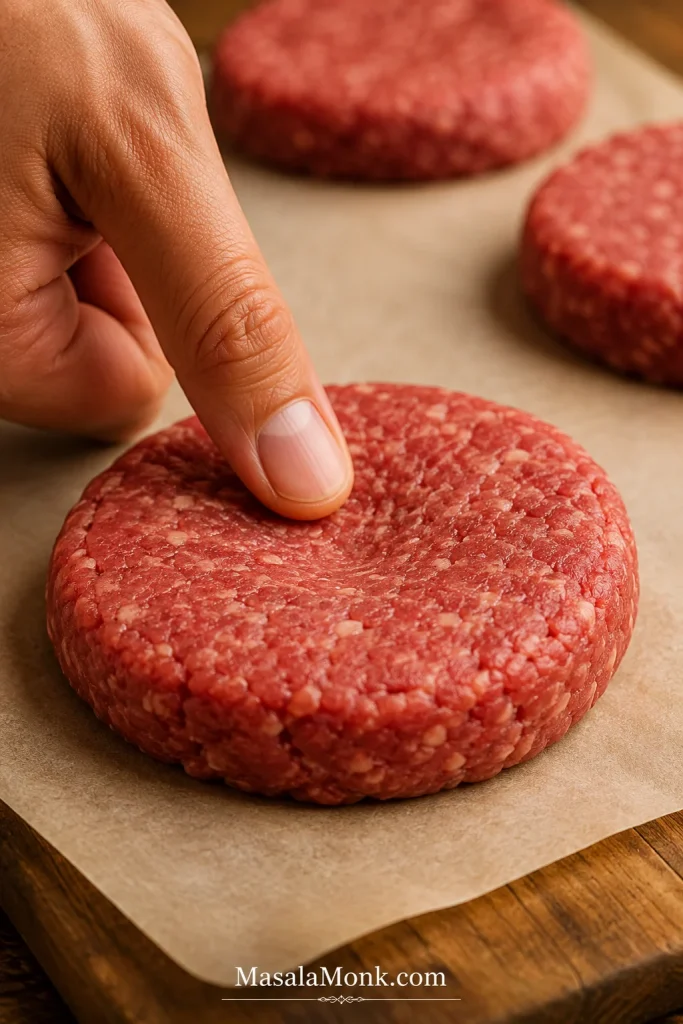
Fingertip gently pressing a shallow dimple into the center of a raw beef burger patty on parchment paper.
Stop once the center sits just slightly below the edges; deeper pressure can weaken the patty.

6. Chill If the Patties Feel Soft

If the shaped rounds feel soft and floppy, chill them for 10 to 20 minutes. They will be much easier to handle.

How to Season Burger Patties

Season the outside, not the inside, when you want a tender beef-first burger. Salt mixed into ground beef too early can make the texture tighter and springier. Garlic powder, onion powder, pepper, and paprika are more forgiving, but the cleanest method is to shape first and season both sides right before cooking.

If you already mixed salt into the beef, do not throw it out. Shape gently, cook soon, and avoid packing the meat tighter. The texture may be a little firmer, but the burgers can still be good.

Simple Burger Patty Seasoning for 1 lb / 450 g Beef

  • Kosher salt: 1 tsp, or about 3/4 tsp fine salt
  • Black pepper: 1/2 tsp
  • Garlic powder: 1/2 tsp
  • Onion powder: 1/2 tsp
  • Smoked paprika: 1/4 tsp, optional

Sprinkle the seasoning evenly over both sides right before cooking.

Add Seasoning Right Before Cooking

After shaping, sprinkle salt and pepper on the surface so the beef stays loose until it hits the heat.
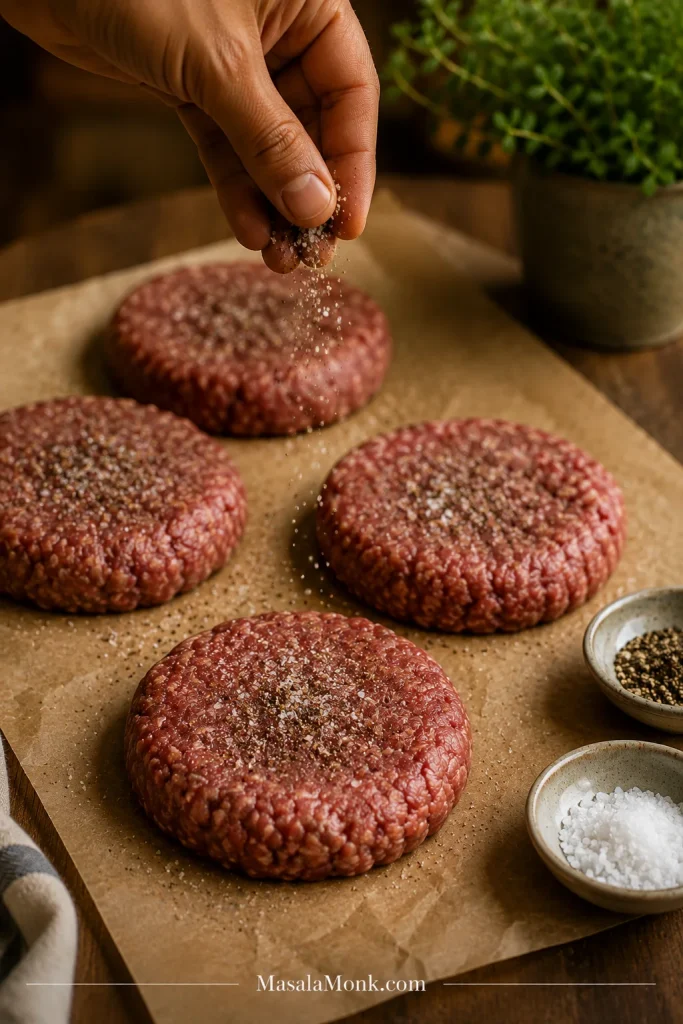
Hand sprinkling salt and pepper over shaped raw burger patties on parchment paper.
A last-minute sprinkle flavors the surface while keeping the burger patty tender inside.

Easy Seasoning Variations

Use these as small changes, not as a reason to mix wet ingredients into the beef.

  • Classic: salt, pepper, garlic powder, and onion powder.
  • Smoky: add a little smoked paprika.
  • Spicy: add cayenne, chili flakes, or pepper jack cheese.
  • BBQ-style: brush barbecue sauce near the end so it glazes instead of burns.
  • Salt-free prep: use garlic powder, onion powder, paprika, and pepper, then salt the outside right before cooking.

Back to top ↑

How to Cook Burger Patties

Best crust: cast iron or griddle.

For smoky flavor: use the grill.

Easiest hands-off method: air fryer.

For crispy thin edges: make smash burgers on a griddle.

With thick frozen patties: thaw first when possible.

Once the meat is shaped and seasoned, cooking is mostly about heat control. The pan or grill should be hot enough that the meat sizzles clearly when it touches the surface. If it lands quietly, wait a little longer before adding the rest.

Cook times are always approximate. The table is a starting point, not a promise. A thick cold patty and a thin room-temperature patty will not cook the same way.

Burger Patty Cooking Time by Size

Patty SizeSkillet TimeGrill TimeWhen to Start Checking
3 oz / 85 g thin pattyAbout 2 to 3 minutes per sideAbout 2 to 3 minutes per sideAround 5 minutes total
4 oz / 115 g standard patty3 to 4 minutes first side, 2 to 3 minutes second sideAbout 3 to 4 minutes per sideAround 6 minutes total
5 to 6 oz / 140 to 170 g thick patty4 to 5 minutes first side, 3 to 4 minutes second sideAbout 4 to 5 minutes per sideAround 8 minutes total
2 to 3 oz / 55 to 85 g smash pattyUsually under 3 minutes total on a very hot surfaceBetter on a griddle than grill gratesVery quickly; these cook fast

Time tells you when to start checking; internal temperature tells you when the burger is actually done.

Stovetop Burger Patties

If you are cooking indoors, cast iron is your friend. It gives the meat a browned crust and works even when grilling is not practical.

Listen for the Sizzle

The sound tells you whether the skillet is browning the patties or just steaming them.
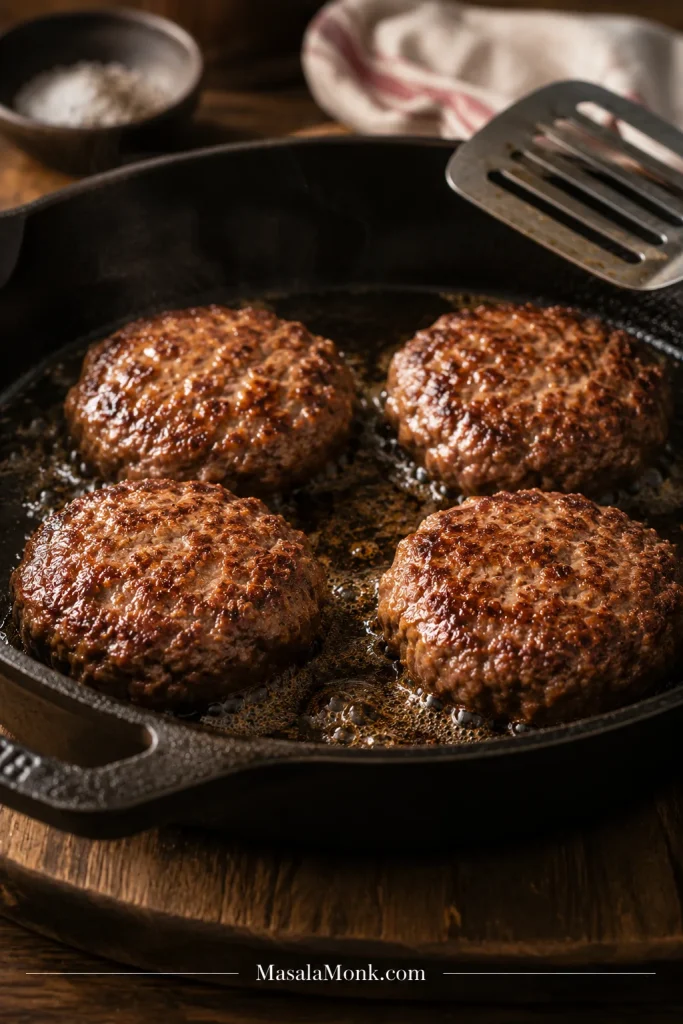
Four burger patties sizzling in a cast iron skillet with browned edges and bubbling fat.
A steady sizzle means the pan is hot enough to brown, not steam, the patties.
  1. Heat a cast iron skillet or heavy pan over medium-high heat.
  2. Add a thin film of oil if the pan needs it.
  3. Place the patties in the pan, leaving space between them.
  4. Cook 4 oz / 115 g patties for about 3 to 4 minutes on the first side.
  5. Flip once, after the first side has browned.
  6. Cook for another 2 to 3 minutes, or until cooked through.
  7. Add cheese during the last 30 to 60 seconds if making cheeseburgers.
  8. Rest briefly before serving.

Let the patties cook undisturbed. Pressing feels satisfying, but it squeezes out the juiciness you worked for. Before flipping, look for browned edges, a firmer underside, and easier release. If the spatula has to fight the patty, wait another 30 to 60 seconds.

Look for a Clean Flip

When the crust forms, the spatula slides under more easily and the patty stays intact.
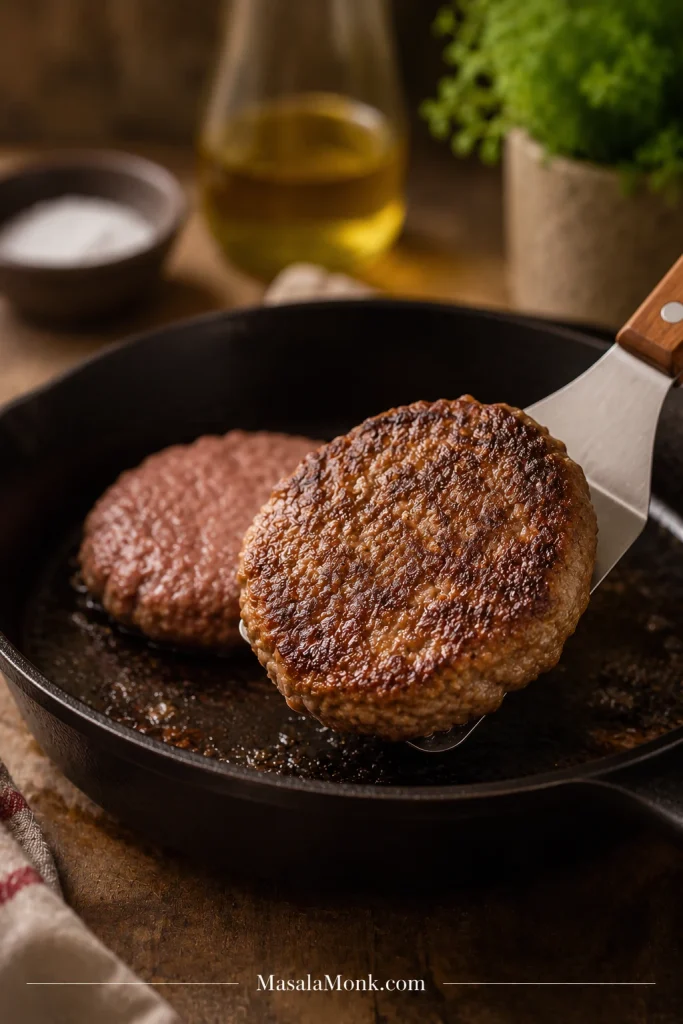
Metal spatula lifting a browned burger patty from a cast iron skillet while another patty cooks behind it.
Flip when the crust releases cleanly; the spatula should not have to fight the patty.

That first clean flip is the moment you know the patty is working: browned underneath, still juicy inside, and sturdy enough to finish without falling apart.

Grilled Burger Patties

On the grill, the payoff is smoke, char, and enough space to cook several burgers at once.

  1. Preheat the grill to medium-high heat.
  2. Clean and oil the grates if needed.
  3. Place the patties over direct heat.
  4. Grill standard patties for about 3 to 4 minutes per side.
  5. Flip once, after the first side has browned and releases cleanly.
  6. If a patty sticks, wait. Meat usually releases more easily once the first side has browned.
  7. Add cheese during the last minute if using.
  8. Check the internal temperature with a thermometer.

Air Fryer Burger Patties

Air fryer burgers are easiest, not crustiest. Use the air fryer when convenience matters more than the deepest browning.

Fresh patties usually take about 8 to 10 minutes at 375°F / 190°C, depending on thickness. Flip halfway through if your air fryer cooks unevenly. If they look pale, toast the bun and add cheese or sauce so the finished burger feels more complete. For more detail, see the full Air Fryer Burgers guide.

Cooking Frozen Burger Patties

Frozen patties are where timing charts start lying to you, because thickness changes everything. A thin frozen patty cooks very differently from a thick 1/3-lb patty.

Best result: thaw overnight in the fridge. Fastest result: cook from frozen over moderate heat, then finish hotter if needed for browning. Worst result: blasting a thick frozen patty on high heat from the start.

For frozen patties, start over medium heat until the center begins to thaw and the patty softens slightly. Then raise the heat near the end if you need more browning. Check the center with a thermometer before serving.

This works for homemade frozen patties and most plain store-bought frozen beef patties. If the package gives specific cooking instructions, use those as the starting point and still check the center temperature.

  • Thin frozen patties can cook from frozen over moderate heat, but watch them closely because they dry out quickly.
  • Standard frozen patties need more time than fresh patties, and the center should be checked with a thermometer.
  • Thick frozen patties are best thawed overnight when possible.
  • The counter is tempting, but the fridge gives you the safer, more even thaw.
  • Separate patties with parchment before freezing so they do not stick.

Burger Patty Internal Temperature

This recipe follows standard food-safety guidance for ground beef, so the target is 160°F / 71°C in the center. Check with an instant-read thermometer, using the FoodSafety.gov safe minimum internal temperature chart as the safety reference.

Color can fool you with burgers. The USDA FSIS explains why cooked ground beef color is not a reliable doneness test: burgers can brown before they are safe, and some can stay a little pink even after proper cooking. Use the thermometer instead of guessing.

To check a thin patty, insert the thermometer from the side into the center of the burger.

Check Temperature from the Side

A side-entry thermometer check reaches the center cleanly without tearing the patty open.
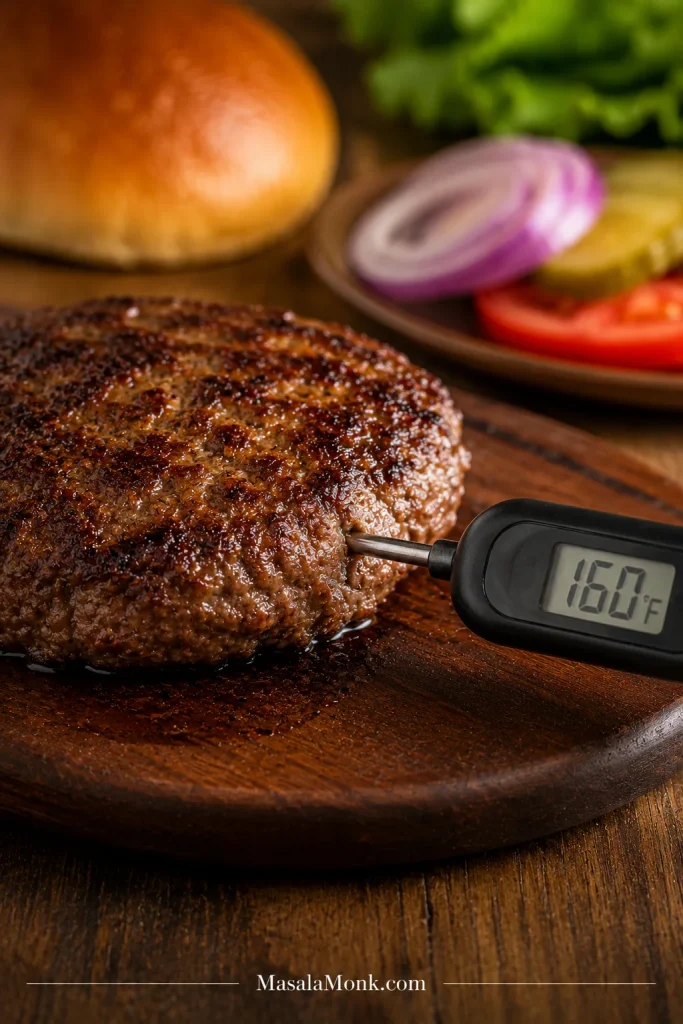
Cooked burger patty with an instant-read thermometer inserted from the side showing 160°F.
Check from the side so the thermometer reaches the center without tearing the patty open.

Why Burger Patties Fall Apart

Use this section after something has already gone wrong. Before cooking, fix the mixture. During cooking, fix the heat and flip timing. After cooking, look at fat level and final temperature.

A soft patty is not a failed patty. Before cooking, most problems can be fixed with chilling or reshaping. During cooking, most problems are fixed by waiting longer before flipping.

Common Burger Patty Problems and Fixes

ProblemWhy It HappensFix
Beef is too leanLean meat has less fat to help the patty stay juicy and cohesive.Use 80/20 or 85/15 ground beef.
Meat is too warmSoft fat makes the mixture loose and sticky.Chill the beef or shaped patties before cooking.
Too many wet mix-insOnion, sauces, or vegetables can loosen the meat.Use less liquid first. If you still want a wet, loaded mixture, switch to the binder-style variation.
Flipped too earlyNo crust has formed yet.Let the first side brown before flipping.
Pan or grill is not hot enoughThe patties steam instead of sear.Preheat properly before cooking.
Edges are crackedThe edges were left loose or the meat was handled too roughly.Gently press the edges together without compacting the whole patty.
Meat is overworkedThe texture becomes dense and can crack.Next time, bring the beef together gently and stop while the surface still looks a little craggy.
Frozen or thawed beef is wateryExtra moisture weakens the patty.Pat lightly, shape carefully, and chill before cooking.

The most reliable fix: use 80/20 beef, keep it cold, shape gently, chill soft patties before cooking, and wait for a crust before flipping. When in doubt, come back to temperature, texture, and timing.

Good news: burger mistakes are easy to read. Once you know whether the problem was warmth, moisture, shaping, heat, or timing, the next batch gets better fast.

Why Burger Patties Puff Up in the Middle

Patties puff up because the meat tightens as it cooks. The edges cook and shrink first, pushing the center upward.

The fix is a shallow dimple. Before cooking, press your thumb into the center of each raw patty. Make a small depression, not a hole. As the burger cooks, the center rises slightly and the patty ends up flatter.

This is especially useful for thick patties. Smash burgers do not need a dimple because they are pressed thin on the hot surface.

Back to top ↑

Make-Ahead, Storage, and Freezing

These patties freeze well for nights when dinner has to move fast. Shape them properly now and one pound of beef can become an easy future meal, not just tonight’s burgers.

Keep them cold, separate them properly, and avoid salting them too early. If making patties ahead, shape them plain and salt later. This keeps the texture looser and avoids drawing moisture out too early.

Make Ahead

You can shape raw patties up to 1 day ahead. Place them on a plate or tray, cover tightly, and refrigerate. Salt them right before cooking for the best texture.

Freezing Raw Patties

  1. Shape the patties.
  2. Place them on a parchment-lined tray.
  3. Freeze until firm.
  4. Stack with parchment between each patty.
  5. Transfer to a freezer bag or airtight container.
  6. Freeze for up to 3 months for best quality.

Parchment keeps the patties from freezing into one solid block.

Thawing

Thawing on the counter is tempting, but the fridge is the safer, better path. Overnight fridge thawing gives the best texture and most even cooking.

Storing Cooked Patties

Store cooked patties in an airtight container in the fridge for 3 to 4 days if they were cooled and refrigerated properly. Reheat gently in a skillet, air fryer, or microwave until hot. Avoid overheating, or the burgers can dry out.

Burger Patty Variations

Once the structure is right, flavor is easy. Change the seasoning, topping, or cooking style, but keep the same cold-beef, gentle-shaping method until the basic patty works for you.

Cheeseburger Patties

For classic burger night, cook the patties as written, then add cheese once the second side is nearly done. Cover the pan briefly or close the grill lid to help the cheese melt.

Smash Burger Patties

Choose this style when you want crispy edges, not thick juiciness. Use 2 to 3 oz / 55 to 85 g portions, shape them into loose balls, skip the dimple, and smash them thin on a very hot griddle or skillet.

BBQ Burger Patties

Brush the sauce late instead of mixing it into the meat. Add smoked paprika to the seasoning and brush barbecue sauce near the end so it glazes instead of burns.

Spicy Burger Patties

Add cayenne pepper, chili flakes, chopped jalapeño, or pepper jack cheese. Keep wet spicy sauces for topping rather than mixing too much into the meat.

Lean Burger Patties

Lean patties work for lighter meals, but they are less forgiving. Use 85/15 or 90/10 beef, keep the patties smaller, avoid pressing, and check early with a thermometer.

If you are building a lower-carb plate around the patties, the keto hamburger recipes guide has bunless cheeseburgers, burger bowls, lettuce wraps, and skillet-style ideas.

Binder-Style Family Patties

Use this style for wet add-ins or softer family-style patties. Add 1 egg and 1/4 cup breadcrumbs to 1 lb / 450 g beef. This changes the recipe, but it can help if you are using very lean meat or adding a lot of onion, herbs, sauces, or vegetables.

What to Serve with Burger Patties

These can become classic burgers, bunless plates, rice bowls, salads, or quick comfort-food dinners.

At the table, the win is simple: a patty that still fills the bun, a little crust at the edges, warm juices in the middle, and toppings that stay on top instead of trying to hold the meat together.

Burger-Night Payoff

This is the final proof: patties that stay juicy, fit the bun, and hold together at the table.
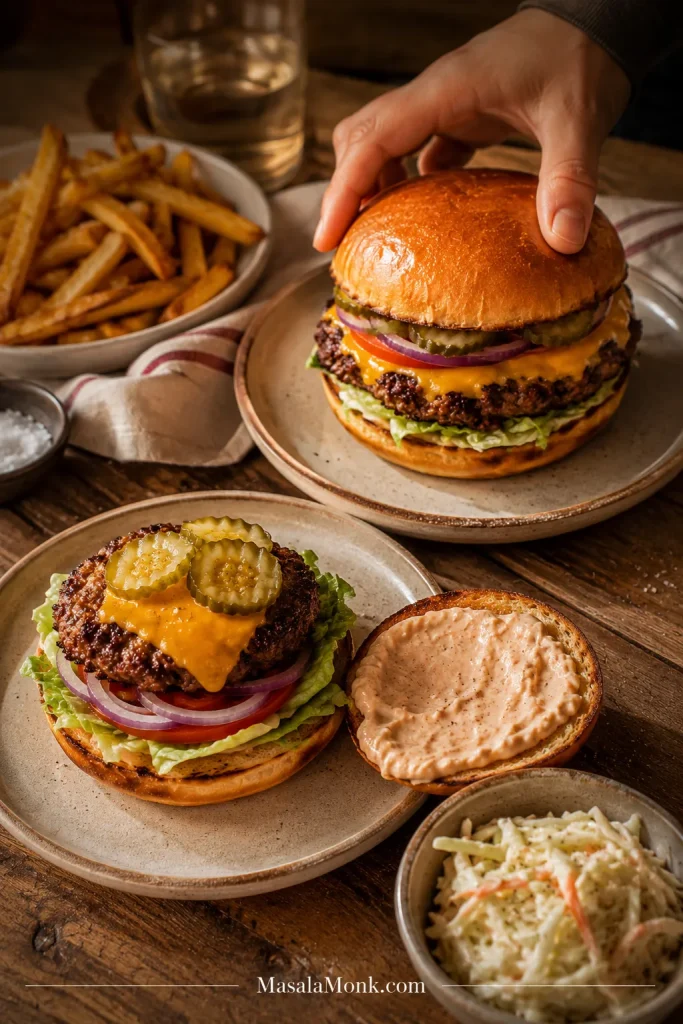
Burger night table with assembled cheeseburgers, an open burger, fries, coleslaw, toppings, and a hand reaching for a bun.
The payoff is a burger that stays juicy, fits the bun, and holds together at the table.
  • Classic burger night: toasted buns, cheese, lettuce, tomato, onion, pickles, ketchup, mustard, or a quick sauce made from homemade mayo
  • Lighter plate: lettuce wraps, salad, grilled vegetables, sliced avocado, or crisp coleslaw
  • Comfort plate: fries, potato wedges, roasted potatoes, macaroni salad, or a cool potato salad
  • No-bun dinner: patties over rice, mashed potatoes, salad bowls, or sautéed vegetables
  • Leftovers: chopped cooked patty in rice bowls, wraps, omelets, or quick pasta

If you are already baking bread, use a soft roll or sandwich-style bun here. A crusty loaf can overpower the patty.

Back to top ↑

Frequently Asked Questions

Can I make burger patties without egg and breadcrumbs?

Yes. For simple beef patties, 80/20 beef, cold meat, gentle shaping, and late salting are enough. Egg and breadcrumbs are only useful for very wet or meatloaf-style patties.

What is the best meat for burger patties?

80/20 ground beef or ground chuck is the best all-purpose choice because it stays juicy, browns well, and holds together without binders.

Do hamburger patties need egg?

For simple 80/20 beef patties, cold fat, gentle shaping, and proper browning are enough.

Do burger patties need breadcrumbs?

No, not for a regular beef-first burger. Breadcrumbs are only useful for wet, soft, meatloaf-style patties.

How much seasoning do I use for 1 lb of ground beef?

Use about 1 tsp kosher salt, 1/2 tsp black pepper, 1/2 tsp garlic powder, and 1/2 tsp onion powder. If using fine salt, use about 3/4 tsp instead.

Should I season burger meat before or after shaping?

Shape first, then season both sides just before cooking. Salt mixed in early can make the texture tighter.

How do I stop burger patties from falling apart?

Keep the beef cold, avoid wet mix-ins, shape gently, and wait for the first side to brown before flipping.

Why do my burgers puff up in the middle?

The meat contracts as it cooks and pushes the center upward. Press a shallow dimple into the center before cooking to help the patty stay flatter.

How thick should burger patties be?

For standard patties, aim for about 3/4 inch / 2 cm thick. Shape them slightly wider than the buns because they shrink as they cook.

Can I make burger patties ahead of time?

Yes. Shape the patties up to 1 day ahead and keep them covered in the fridge. Salt them right before cooking.

Can I freeze raw burger patties?

Freeze them flat until firm, then stack with parchment between each patty. Store for up to 3 months for best quality.

Can I cook burger patties from frozen?

You can, but thawed patties brown better and cook more evenly. If cooking from frozen, use moderate heat first and check the center with a thermometer.

How long do burger patties take in a skillet?

Standard 4 oz / 115 g patties usually take about 3 to 4 minutes on the first side and 2 to 3 minutes on the second side over medium-high heat.

How long do burger patties take on the grill?

Standard patties usually take about 3 to 4 minutes per side over medium-high direct heat. Timing depends on thickness and grill heat.

What temperature should burger patties reach?

Ground beef patties should reach 160°F / 71°C in the center. For thin patties, insert the thermometer from the side.

If one thing keeps going wrong with your burgers — falling apart, shrinking, puffing, or drying out — note the pattern and use the mistake map above next time. Once you know the pattern, the fix becomes much easier.

Final Tip

The whole method comes down to this: cold beef, loose hands, late salt, hot surface, no pressing. Get those five things right and the burger does most of the work for you.

Once you make them this way a couple of times, a pound of ground beef stops feeling like a gamble. It starts feeling like four reliable burgers waiting to sizzle, brown, melt a slice of cheese, and land on the bun without falling apart.
Back to top ↑

Posted on Leave a comment

Mashed Potatoes Recipe

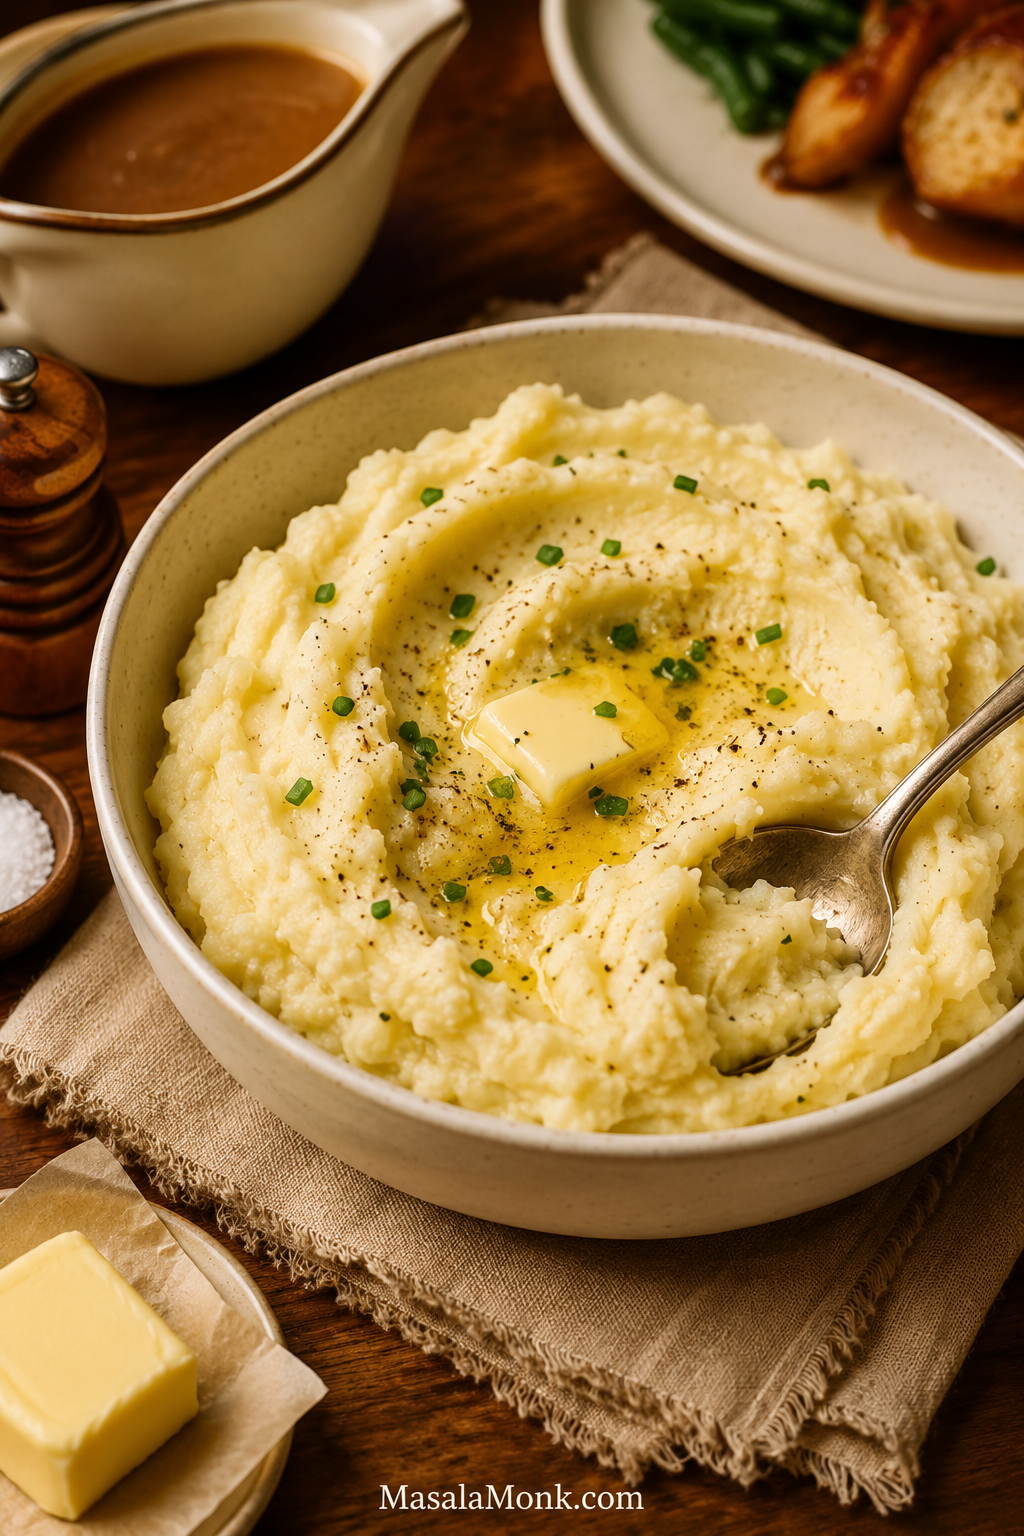
Creamy mashed potatoes in a cream ceramic bowl with melted butter, chives, black pepper, and a blurred gravy boat behind.

This is the mashed potato bowl people reach for first: soft, buttery, creamy enough to feel rich, and fluffy enough to hold a spoonful of gravy. It works for holidays, roast dinners, weeknights, and those “everything else is ready but the potatoes need help” moments.

The ingredients are simple, but the finish matters. Yukon Gold potatoes make the mash naturally creamy, russets make it lighter, warm milk blends in smoothly, and a gentle hand keeps the texture soft instead of sticky.

This recipe is built for real mashed potato moments: the holiday batch, the weeknight side, the dry mash that needs saving, the no-milk emergency, and the serving dish that has to stay warm while dinner catches up.

Quick Answer: How to Make Mashed Potatoes

To make mashed potatoes, simmer peeled potato chunks in cold salted water until very tender, drain well, dry them briefly in the hot pot, then mash with butter and warm milk or cream. Season to taste and add more warm liquid only until the potatoes are soft, creamy, and spoonable.

The finish is where the bowl is won. Dry the potatoes well, add warm liquid gradually, and stop as soon as the mash looks soft and spoonable.

Recipe at a Glance

Best potatoes Yukon Gold, russet, or a 50/50 mix
Texture Creamy, fluffy, buttery, and soft enough for gravy
Prep time 15 minutes
Cook time 20 minutes
Total time 35 minutes
Servings 4 generous or 5 smaller side servings
Best tool Masher for cozy homemade texture; ricer or food mill for a smoother, lighter finish
Main mistake to avoid Overmixing, especially with a blender or food processor
Why this method is worth saving: It gives you one reliable base recipe, then shows you how to steer it creamy, fluffy, richer, dairy-free, make-ahead, or rescue-ready without starting over.

Creamy Mashed Potatoes Recipe

Description: Creamy, fluffy mashed potatoes made with Yukon Gold or russet potatoes, warm milk, butter, and a gentle method that keeps the mash soft, gravy-ready, and easy to rescue if dinner gets ahead of you.

Success cue: Soft, steamy, spoonable potatoes that hold gentle ridges when dragged with a spoon and fall slowly instead of pouring or clumping.

Prep Time15 minutes
Cook Time20 minutes
Total Time35 minutes
Servings4 generous or 5 smaller side servings

Base Ingredients

  • 1 kg / 2.2 lb Yukon Gold potatoes, russet potatoes, or a mix
  • 75–100 g / about 5–7 tbsp unsalted butter
  • 180–240 ml / 3/4–1 cup whole milk, half-and-half, or milk and cream, warmed
  • 2 tsp to 1 tbsp kosher salt for the cooking water, depending on pot size and water volume
  • Fine salt, added gradually after mashing, to taste
  • 1/4–1/2 tsp black pepper

Optional Add-Ins

  • 60 ml / 1/4 cup sour cream
  • 60–100 g / 2–3.5 oz cream cheese
  • Chopped chives, parsley, extra melted butter, or gravy for serving

Instructions

  1. Peel the potatoes for a smooth bowl, or scrub them well if making a rustic version with some skin. Cut into even 1 1/2–2 inch / 4–5 cm chunks.
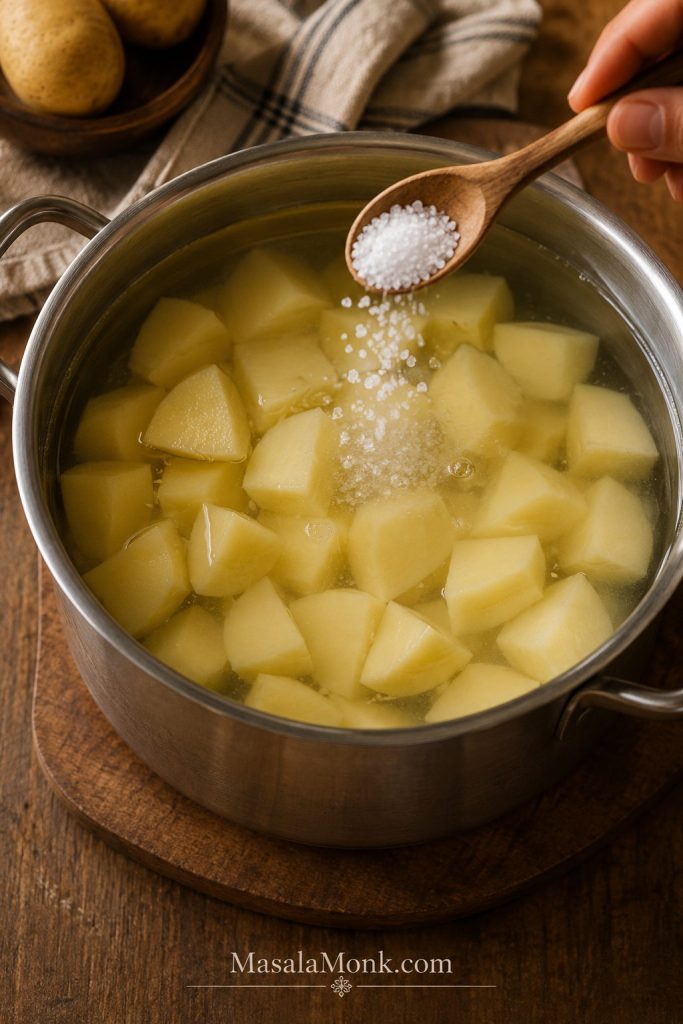
  2. Place the potatoes in a large pot and cover with cold water by about 1 inch / 2.5 cm. Add kosher salt to the water.
  3. Bring to a boil, then reduce to a steady simmer. Cook for 15–20 minutes, or until a fork slides through easily with almost no resistance.
  4. Drain well. Return the potatoes to the hot empty pot for 30–60 seconds so extra steam escapes and the surface looks dry. Do not rinse them.
  5. Mash gently with a potato masher. For a smoother finish, use a ricer or food mill.
  6. Add the butter and about 180 ml / 3/4 cup warm milk or cream. Mash or fold gently until creamy.
  7. Add more warm milk or cream only as needed. Start with less; you can always loosen the mash once the texture tells you what it needs.
  8. Season with fine salt and pepper. Taste and adjust. Add sour cream or cream cheese if using. Serve hot with extra butter, herbs, or gravy.

Recipe Notes

  • For the best all-purpose bowl, use a 50/50 mix of Yukon Gold and russet potatoes.
  • The potatoes are ready to mash when a fork slides through with almost no resistance. If they fight back at all, cook them longer.
  • Do not rinse after draining. Let steam escape in the hot pot instead.
  • A masher, ricer, or food mill keeps you in control. Save the blender for soups.
  • If using sour cream or cream cheese, add less milk at first. You can loosen the potatoes later, but you cannot easily remove excess liquid.
  • For make-ahead prep, make the mash slightly looser than usual and reheat gently with extra warm milk or butter.
Cook’s note: This method is built around the places mashed potatoes usually fail: undercooked centers, watery potatoes, cold dairy, too much mixing, and last-minute reheating.

Choose Your Mashed Potato Texture

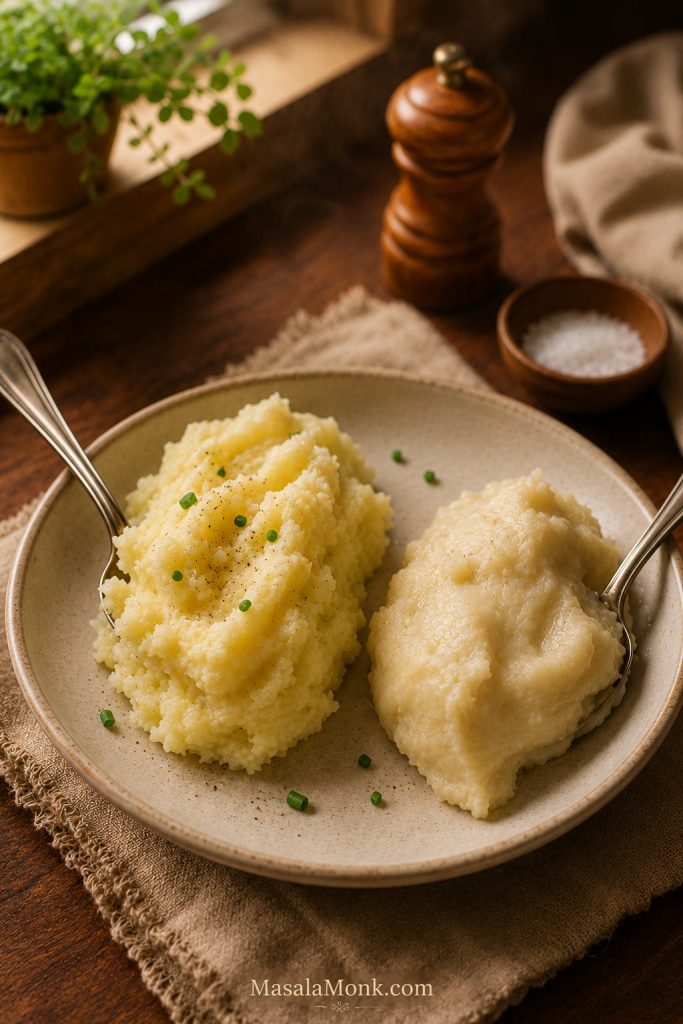
Before you start, decide what kind of mash you want on the table. A fluffy classic mash and a rich holiday batch use the same base method, but they need slightly different choices.

Once you choose the texture first, the rest of the recipe becomes easier: the potato, tool, dairy, and add-ins all have a job.

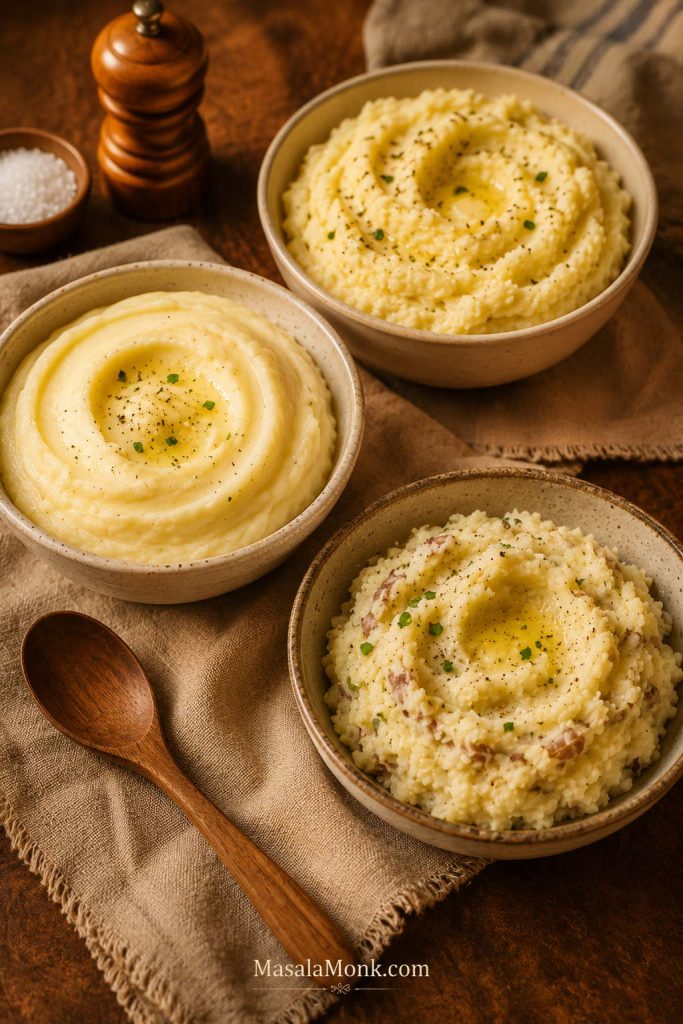
Three small servings of mashed potatoes showing smooth, fluffy, and rustic skin-on textures.
First choose the texture, then choose the tool. Smooth, fluffy, and rustic mashed potatoes all start similarly but finish differently.
You want Use Do this
Creamy everyday mash Yukon Gold potatoes Use warm milk and butter; mash gently.
Fluffy classic mash Russet potatoes Use a ricer or light masher; avoid heavy mixing.
Best balanced mash 50/50 Yukon Gold and russet Use moderate milk, enough butter, and stop when spoonable.
Rich holiday mash Yukon/russet mix + sour cream or cream cheese Make slightly looser before chilling or holding.
No-milk mash Reserved potato water, broth, butter, or olive oil Add slowly so the mash loosens without turning soupy.

Once the style is clear, the potato choice becomes easier. Yukon Golds lean creamy, russets lean fluffy, and a mix gives the safest balance.

The Mashed Potato Texture Rule

The rule that protects the bowl: Dry the potatoes first, add warm liquid slowly, and stop when the mash looks soft and spoonable. If it feels dry, loosen it gently. If it looks wet or sticky, pause before adding or mixing more.

Most mashed potato problems happen in the last few minutes, not at the ingredient stage. The right mash should look relaxed, not wet; soft, not slumped; ridged, not rubbery. Once you know that cue, the recipe becomes much easier to trust.

Why This Recipe Works

Great mashed potatoes do not come from adding every rich ingredient at once. They come from tender potatoes, enough salt, good draining, warm dairy, and a light hand at the end.

In practice, great mashed potatoes come down to moisture control and starch control. Cook the potatoes until fully tender, let surface steam escape after draining, then fold in fat and dairy without beating the mash into paste. That is what keeps the bowl creamy and light instead of watery or gluey.

Yukon Gold potatoes bring a naturally buttery texture. Russets are drier and fluffier. Using both gives you a reliable middle ground: rich enough for holidays, but not so dense that the serving dish feels heavy.

The drying step matters because boiled potatoes carry surface moisture. Letting steam escape in the hot pot keeps the mash from turning watery before the butter and milk go in.

Work the starch as little as possible after cooking. The more you beat the potatoes, the more the texture moves toward sticky and pasty.

Best Potatoes for Mashed Potatoes

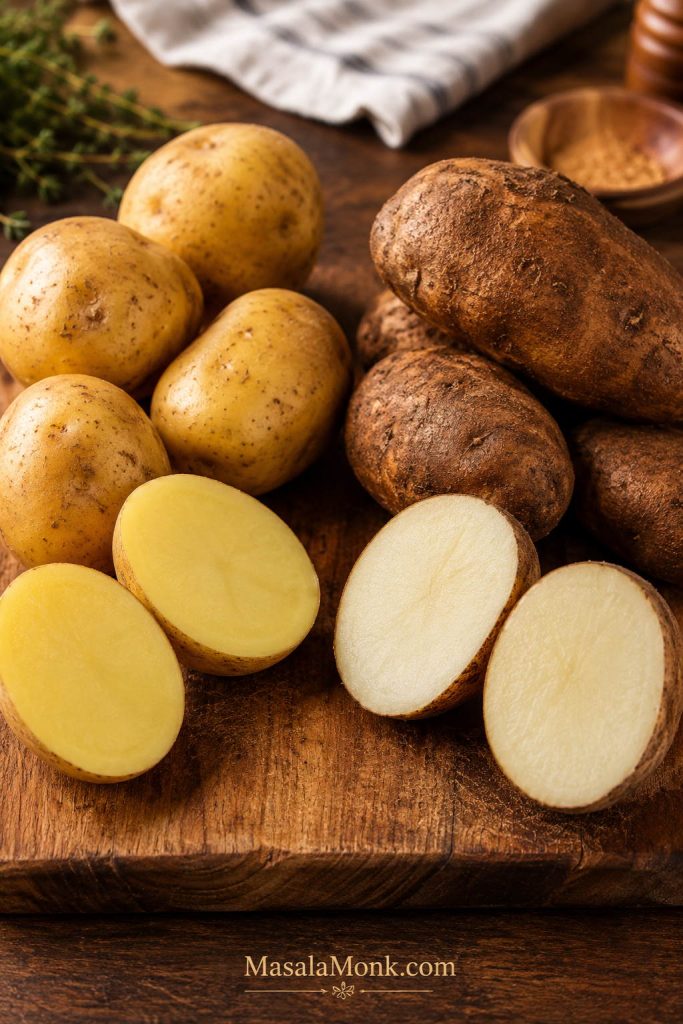
Potato choice decides whether the mash leans creamy, fluffy, rustic, or dense. If you are standing in the store and do not want to think about it, buy Yukon Golds. Choose russets for the fluffiest result, or use both if you want the best balance.

Yukon Gold potatoes and russet potatoes with whole potatoes and cut halves on a wooden board.
Yukon Golds bring buttery creaminess, while russets bring lift. Together, they give mashed potatoes a balanced texture that feels smooth without turning heavy.
Potato Texture Best for
Yukon Gold Creamy, buttery, naturally rich Smooth everyday mashed potatoes
Russet / Idaho Fluffy, light, slightly drier Classic fluffy mashed potatoes
Yukon Gold + Russet mix Creamy and fluffy Best all-purpose mashed potatoes
Red potatoes Waxy, rustic, holds shape Skin-on mashed potatoes
New potatoes / fingerlings Firm and waxy Not ideal for classic mash

Peel the potatoes for a smooth finish. For a rustic mash, leave some or all of the skin on, especially with Yukon Gold or red potatoes. Russet skins are thicker, so they are usually better peeled unless you want a very rustic texture.

Red potatoes are delicious, but they do not give the same classic fluffy texture as russets or the same smooth richness as Yukon Golds. Waxy new potatoes and fingerlings hold their shape well, but they do not mash into the same soft finish.

The Best Ratio

This ratio keeps the recipe flexible without turning it into a guessing game. You can scale it for two people, eight people, or a full holiday table without losing the texture.

For every 1 kg / 2.2 lb potatoes, use 75–100 g butter and 180–240 ml warm milk, half-and-half, or cream. Start with the lower amount of liquid, then add more only if the potatoes need it.

For salt, season the cooking water generously but carefully. For 1 kg / 2.2 lb potatoes, start with about 2 teaspoons kosher salt in a medium pot, or up to 1 tablespoon for a large pot of water. The water should taste seasoned, not harshly salty. After mashing, add fine salt in small pinches or 1/4 teaspoon increments until the flavor tastes full and balanced.

Kosher salt brands vary in weight, so use the cooking-water amount as a starting point and trust the final tasting step more than the spoon measurement.

Ingredient Everyday creamy mash Richer holiday mash
Potatoes 1 kg / 2.2 lb 1 kg / 2.2 lb
Butter 75 g / about 5 tbsp 100 g / about 7 tbsp
Milk or half-and-half 180 ml / 3/4 cup 240 ml / 1 cup
Optional sour cream Skip or use 2 tbsp 60 ml / 1/4 cup
Optional cream cheese Skip 60–100 g / 2–3.5 oz

This is the ratio that keeps you from guessing when the guest count changes.

Useful rule: Start with the everyday column. If you add sour cream, cream cheese, or extra butter, reduce the milk at first because rich add-ins loosen the mash too.

Ingredients

With mashed potatoes, a short ingredient list does not mean the details do not matter. The potato decides the texture, the butter softens the edges, the dairy loosens the mash, and the salt makes the whole dish taste complete.

The amounts are in the recipe card and ratio table above. Here is what each one does once it hits the potatoes.

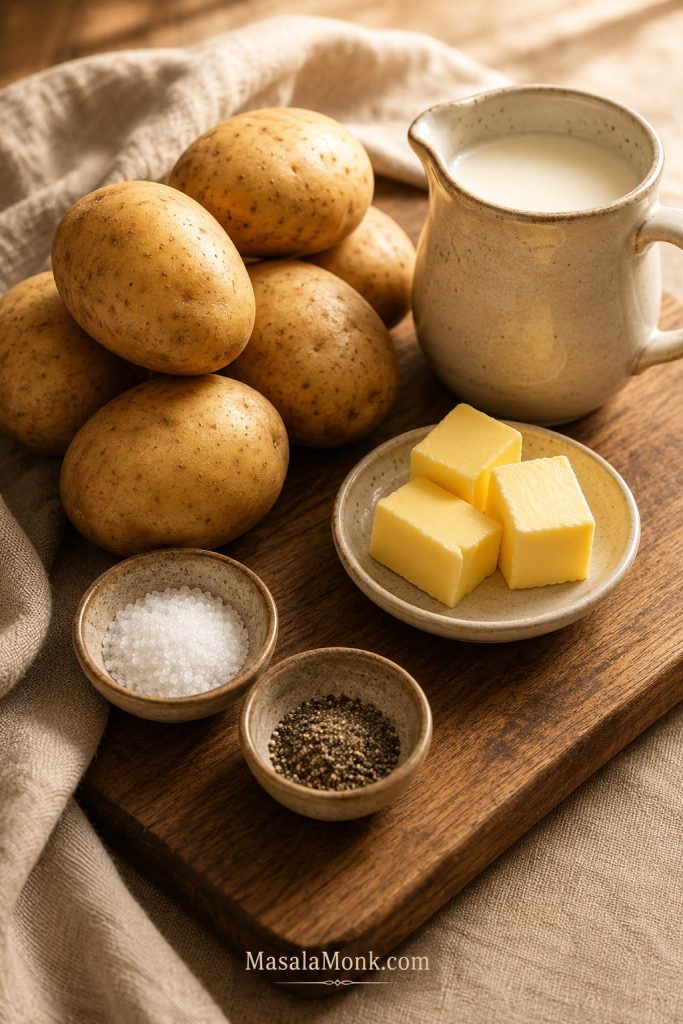
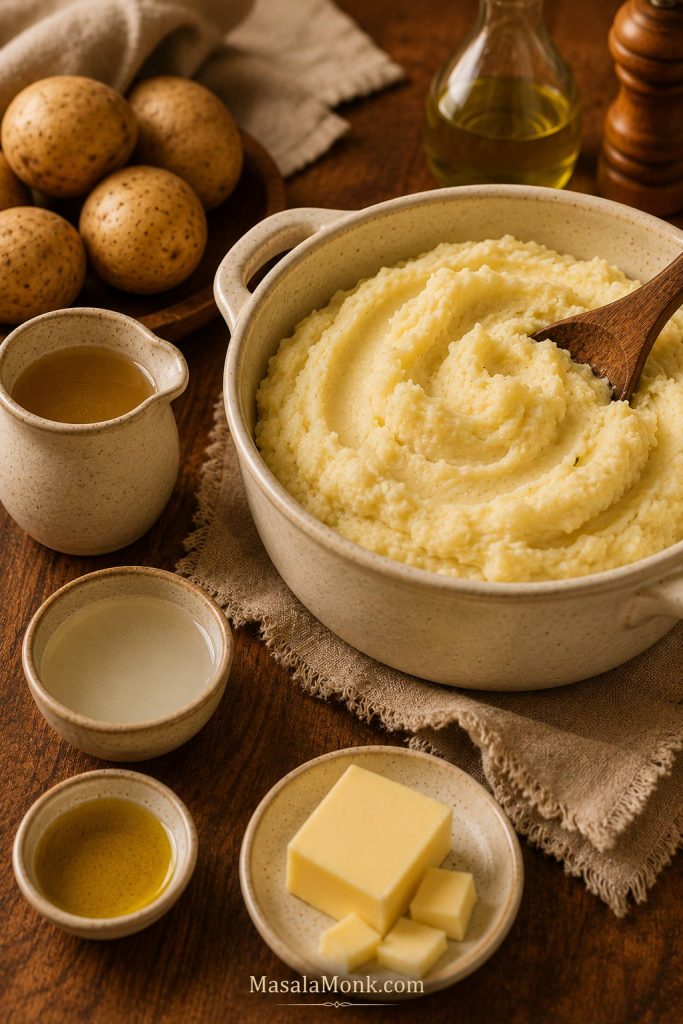
Raw potatoes, butter, milk, salt, and pepper arranged on a wooden board.
Before technique matters, the base stays simple: potatoes, butter, milk or cream, salt, and pepper. The magic comes from how gently those basics are handled.

Potatoes

Yukon Gold potatoes make the mash naturally creamy and buttery. Russets make it lighter and fluffier. A mix gives the most reliable everyday result.

Peel them for a smooth bowl, or scrub them well and leave some skin on for a rustic version.

Butter

Butter gives richness, but it also helps the texture feel soft instead of dry. Unsalted butter gives you more control; salted butter works if you season carefully at the end.

Milk, half-and-half, or cream

Whole milk gives a classic creamy texture. Half-and-half or cream makes the mash richer. Warm the dairy before adding it so it blends smoothly instead of cooling the potatoes down and making the texture tighten.

Salt

Salt the boiling water and season again after mashing. With so few ingredients, blandness has nowhere to hide. If the potatoes taste dull, they usually need a little more salt, butter, or both.

Black pepper

Black pepper gives a gentle warmth. Use white pepper if you want the potatoes to look very smooth without black specks.

Sour cream or cream cheese

Sour cream adds tang and balances the richness of butter. Cream cheese makes the mash thicker and richer, which is especially useful for make-ahead prep. Add less milk at first when using either one.

Herbs and toppings

Chives, parsley, thyme, roasted garlic, melted butter, parmesan, or crispy bacon can all be added depending on the meal. When using salty add-ins like parmesan, bacon, salted butter, broth, or gravy, season lightly at first and adjust at the end.

Equipment

You are not trying to purée potatoes into smoothness. You are breaking them down gently, then folding in enough butter and dairy to make them soft. That is why a masher, ricer, or food mill is safer than anything that spins fast.

  • Potato masher: best for a classic homemade bowl with a little texture.
  • Ricer: best for a very smooth, light finish.
  • Food mill: useful for larger batches or silky mash.
  • Hand mixer: okay on low speed, but stop as soon as the potatoes are smooth.
  • Blender or food processor: save these for soups; they can make mashed potatoes gluey.
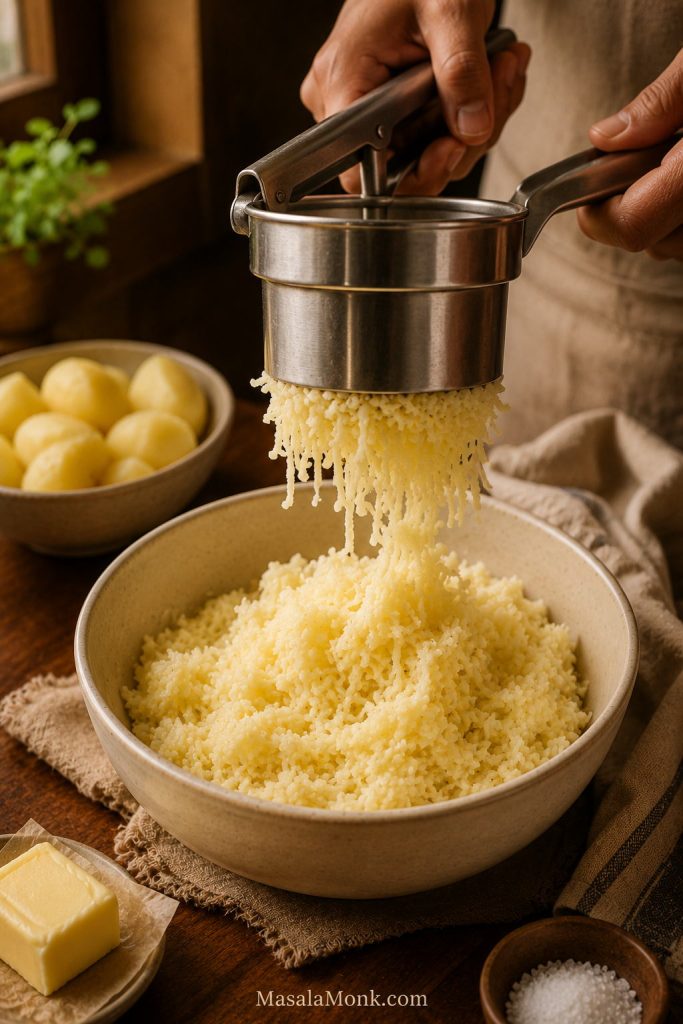
Potato ricer pressing cooked potatoes into fluffy strands over a bowl.
A potato ricer creates fine strands before mixing begins. That means smoother, fluffier mashed potatoes with less handling and less risk of gumminess.

Tool choice matters most when the potatoes are already tender. Before mixing too far, see How to Avoid Gluey Mashed Potatoes.

How to Make Mashed Potatoes Step by Step

Start with the recipe card if dinner is already moving. The step-by-step notes below are for getting the texture exactly right — not just edible, but soft, warm, and worth passing around again.

1. Peel and cut the potatoes

Peel the potatoes if you want a smooth bowl. If you prefer a rustic finish, scrub them well and leave some or all of the skin on.

Cut into even 1 1/2–2 inch / 4–5 cm chunks. The pieces do not need to be tiny, but they should be similar in size so they cook evenly.

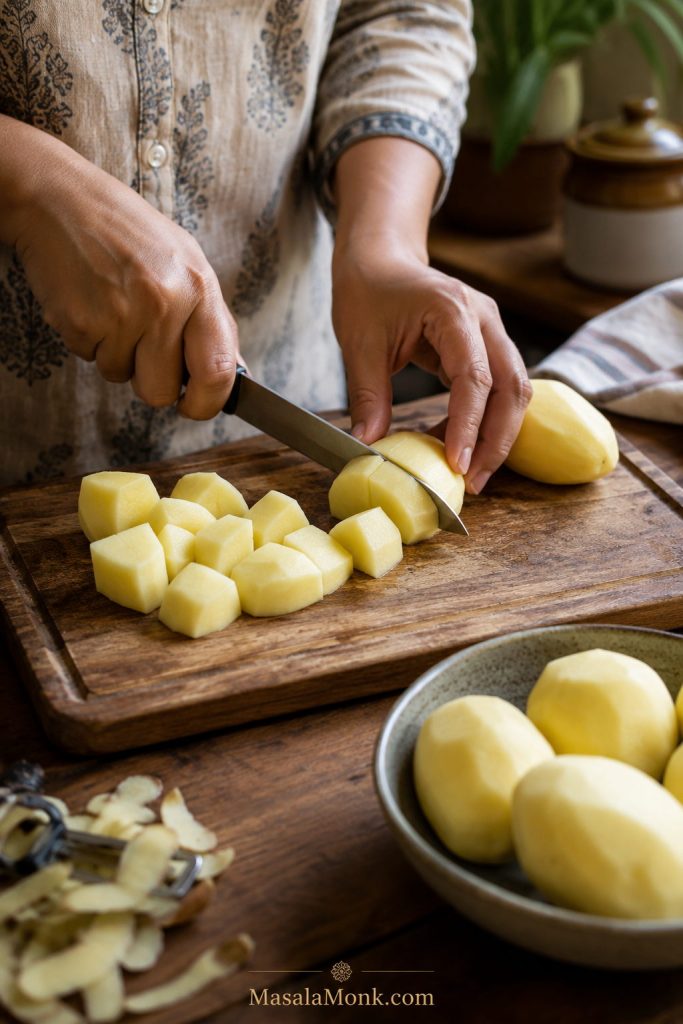
Hands cutting peeled potatoes into even chunks on a wooden cutting board.
Even potato chunks are small insurance against lumps. Because they cook at the same pace, you need less force when it is time to mash.

If you cut them ahead, keep them covered in cold water in the refrigerator for a few hours. Drain before cooking and start with fresh cold water so the flavor stays clean.

2. Start in cold salted water

Place the potato chunks in a large pot and cover with cold water by about 1 inch / 2.5 cm. Add kosher salt to the water; use about 2 teaspoons for a medium pot or up to 1 tablespoon for a larger pot.

Starting in cold water helps the pieces cook evenly. Salted water seasons them from the inside instead of leaving all the seasoning for the end.

Potato chunks in a pot of cold water with salt being added before boiling.
Seasoning starts in the pot, not at the end. Cold salted water helps the potatoes cook through evenly and taste good before butter goes in.

3. Boil until very tender

Bring the water to a boil, then reduce to a steady simmer. Cook for 15–20 minutes, depending on the size of the pieces.

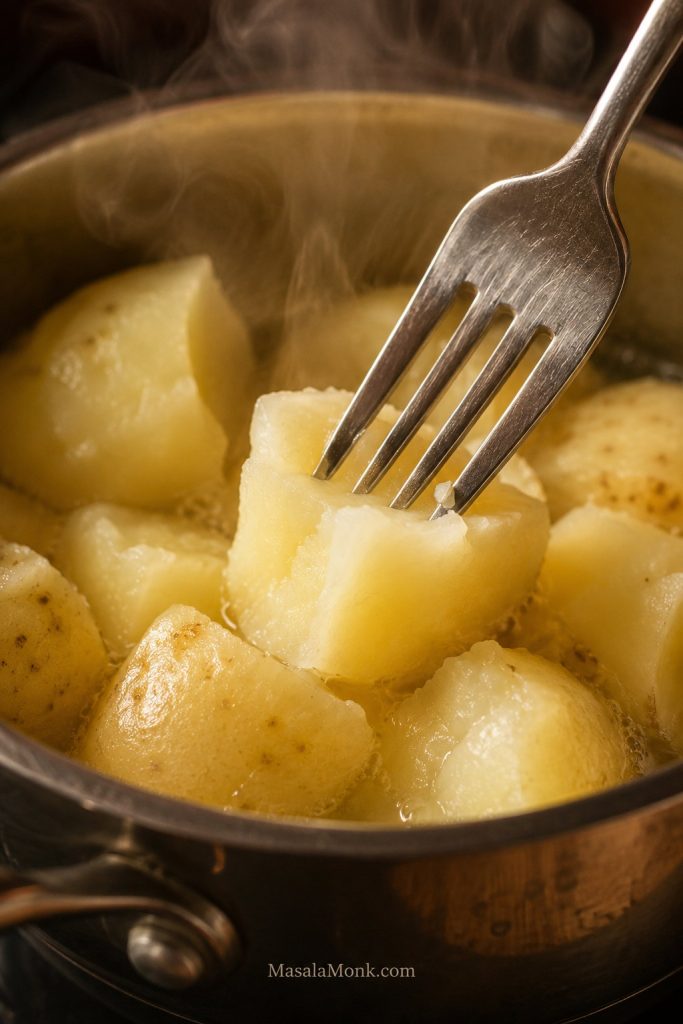
Use the clock only as a guide; the fork test tells you the truth. When a fork slides through with almost no resistance, the potatoes are ready to mash. Around the edges, they may look slightly softened, but the centers should be fully tender, not chalky.

Fork sliding into a tender boiled potato chunk with steam rising from the pot.
Look for tenderness, not just time. Once the fork slides through cleanly, the potatoes are ready to mash without stubborn centers.

Slightly over-tender potatoes mash better than undercooked ones. Do not leave cooked potatoes sitting in the hot water after they are tender, or they can absorb more water and make the final mash too thin.

4. Drain and dry

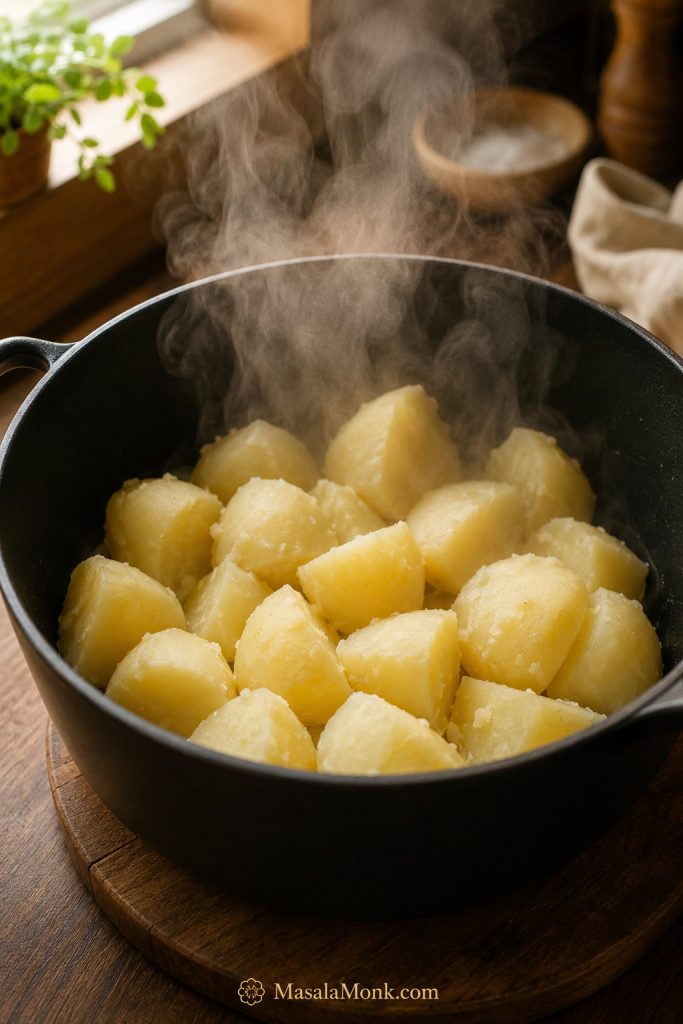
Drain very well in a colander. Then return the potatoes to the hot empty pot for 30–60 seconds. Shake the pot gently once or twice so steam escapes.

Skip the rinse after draining. The hot pot does the work here: it lets steam escape without washing away flavor. The potatoes should steam instead of shine.

Drained boiled potatoes steaming in a hot empty pot before mashing.
Steam is useful here. After draining, a brief rest in the hot pot lets surface moisture escape so the mash stays creamy instead of loose.

5. Mash gently

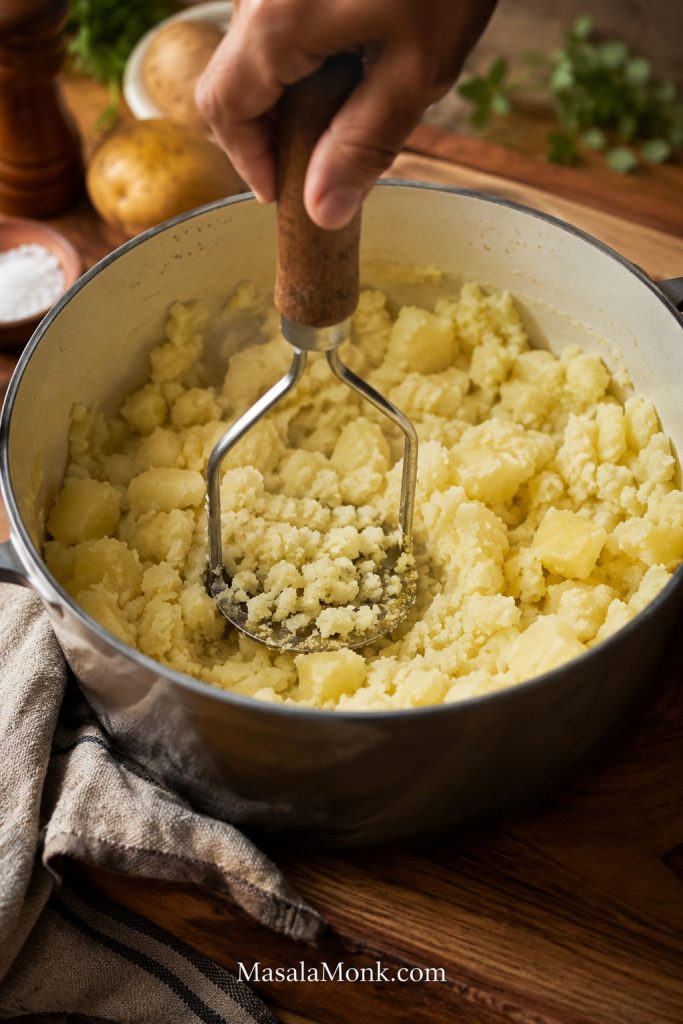
Use a potato masher for a classic texture. For a smoother bowl, pass the potatoes through a ricer or food mill.

Hand using a potato masher to mash cooked potatoes in a pot.
Stop before the potatoes fight back. Gentle mashing gives you control, while heavy beating can push the starch toward sticky and dense.

If you use a hand mixer, keep it on low speed and stop as soon as the potatoes are smooth.

6. Add butter and warm milk gradually

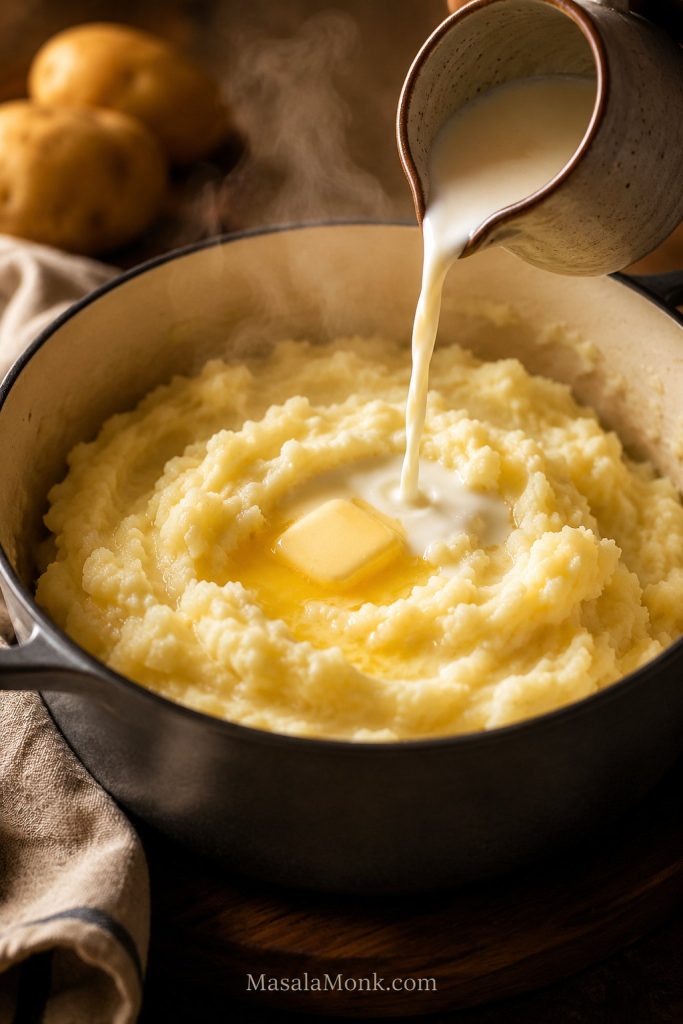
Warm the milk, half-and-half, or cream before adding it. It should be warm to the touch or lightly steaming, not boiling. Add the butter and about 3/4 cup / 180 ml warm liquid first, then mash or fold gently.

Warm milk being poured into mashed potatoes while butter melts into the mixture.
Add richness slowly. Warm milk or cream loosens the potatoes in stages, while butter folds in more smoothly when the mash is still hot.

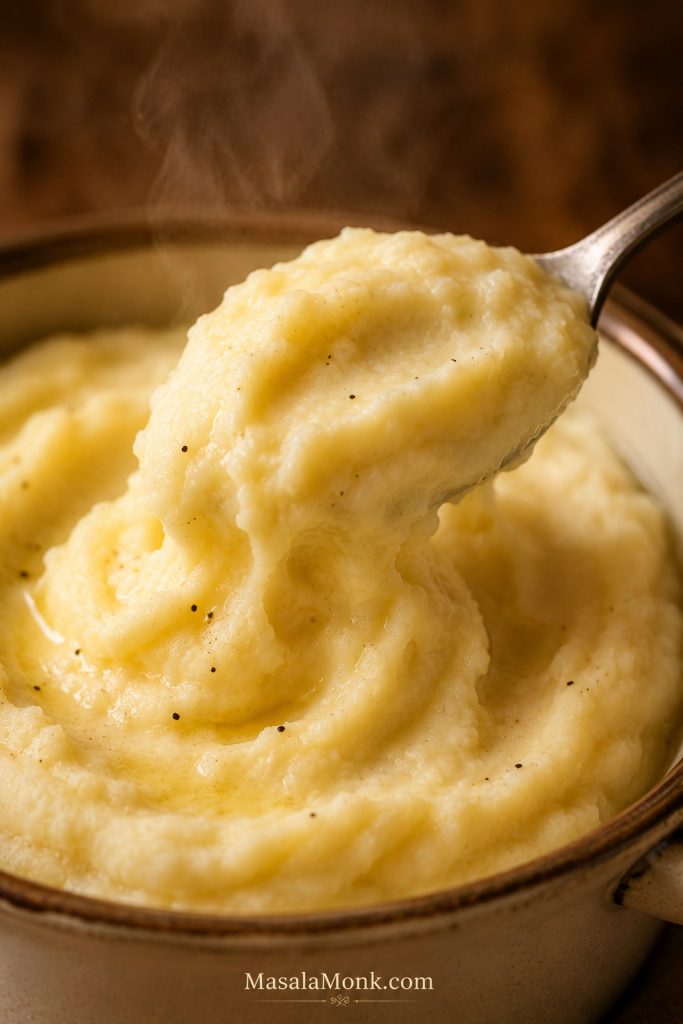
Start with less liquid; you can always loosen the mash once the texture tells you what it needs. Stop when it mounds softly on a spoon — that is the sweet spot before it turns too thin.

Final texture cue: soft, spoonable mashed potatoes

The final texture should be easy to see before you taste it. The mash should mound softly on a spoon, hold gentle ridges for a moment, and fall back without stretching, pouring, or clumping.

Spoon lifting creamy mashed potatoes with soft ridges, steam, and a light butter sheen.
This spoon lift is the final cue: the mash should mound softly, hold ridges for a moment, and fall back without stretching.

7. Season and finish

Taste before serving. Add fine salt in small pinches or 1/4 teaspoon increments, then add pepper, more butter, or a splash of warm milk if needed.

If dinner is moving fast, this is the moment to slow down for one minute. The potatoes are cooked; this last minute is what keeps them soft, warm, and worth serving.

If the texture is not where you want it yet, do not keep mixing blindly. Use the troubleshooting guide to fix dry, watery, lumpy, bland, or gluey mashed potatoes.

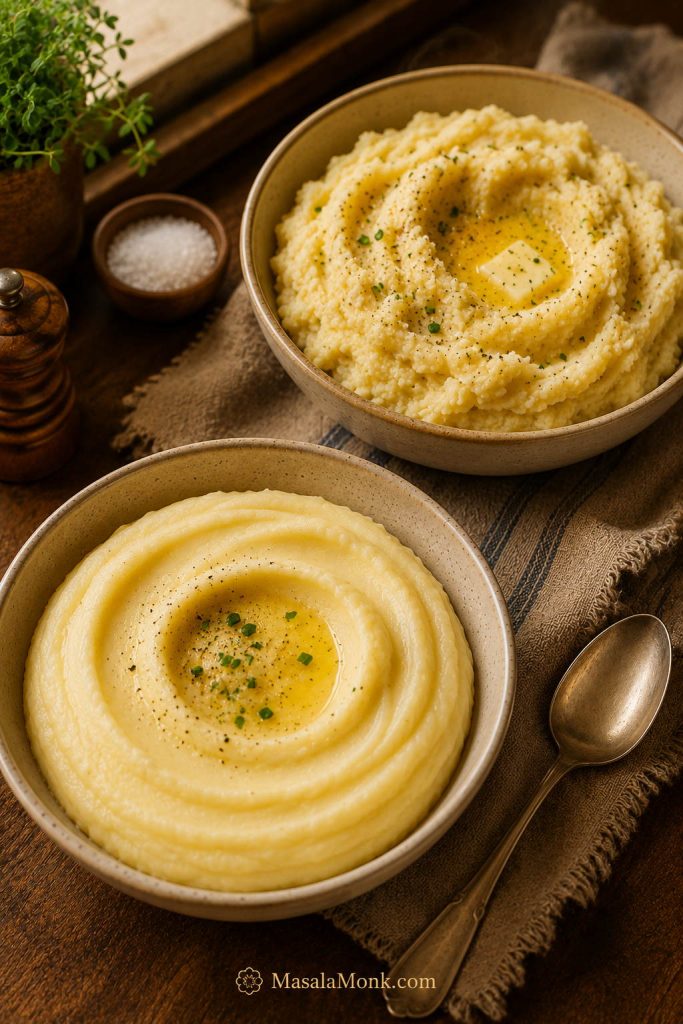
Creamy vs Fluffy Mashed Potatoes

Not every batch should be the same. Some dinners need rich, creamy potatoes. Others need a lighter mash that can hold gravy without feeling heavy. Neither version is better; the best texture is the one that fits the meal.

Two servings of mashed potatoes showing one smoother creamy texture and one lighter fluffy texture.
Creamy mashed potatoes sit smoother and richer, while fluffy ones hold lighter peaks. The better choice depends on the sauce, timing, and plate.

For a fluffy bowl

Use mostly russets, moderate liquid, and a light hand. Stop mixing as soon as the potatoes look soft.

For a creamy bowl

Use more Yukon Golds, warm half-and-half or cream, and a little more butter.

For a rich holiday batch

Add sour cream or cream cheese, but reduce the milk at first. You can always loosen the mash later.

For a rustic finish

Leave some skin on and use a potato masher. The uneven texture works beautifully beside gravy and roast meats.

If you think of these as whipped potatoes, use a ricer first, then fold in the butter and milk until smooth. Avoid aggressive whipping; the texture can move from smooth to gluey quickly.

For this creamy, classic version, skip rinsing after boiling and let the potatoes dry in the hot pot instead. If you are chasing an ultra-fluffy russet-only style, some methods rinse away extra starch, but this version keeps the process simpler and the flavor fuller.

How to Avoid Gluey Mashed Potatoes

Gluey mashed potatoes are frustrating because they usually happen at the very end, after everything looked fine. The good news is that the problem is predictable: sticky texture usually comes from overworked starch.

Fluffy mashed potatoes compared with a denser, glossier spoonful of gluey mashed potatoes.
The visual difference is easy to spot: fluffy mash looks soft and ridged, while gluey mashed potatoes look dense, glossy, and overworked.
Do this Avoid this
Use a masher, ricer, or food mill Blender or food processor
Cook until fully tender Mashing undercooked centers
Fold gently after mashing Beating hard after smooth
Add liquid gradually Pouring everything in at once
Stop when spoonable Trying to fix texture by mixing more

If the potatoes are already gluey, do not keep beating them. Truly gluey mash will not fully return to fluffy, but you can soften the mouthfeel with warm butter or cream. If it is very dense, use the leftovers for potato cakes, croquettes, soup, or a casserole topping.

How to Fix Mashed Potatoes That Went Wrong

A batch of imperfect mashed potatoes is usually not a disaster. Before you add more liquid or start mixing harder, pause and match the problem to the right fix.

The goal is not perfection at every step. The goal is knowing when to stop, when to loosen, and when to turn imperfect potatoes into something else delicious.

Texture problems

Problem Why it happened How to fix it
Gluey texture Overmixed starch, blender, food processor, or too much beating Stop mixing. Gently fold in warm butter or cream. If the mash is truly gluey, repurpose dense leftovers instead of trying to whip them back.
Watery texture Potatoes were not drained or dried well, or too much liquid was added Warm gently over low heat to release moisture. Fold carefully. Add potato flakes only as a last resort.
Lumps Potatoes were undercooked or cut unevenly Cook potatoes until completely tender. Use a ricer next time for smoother results.
Dry texture Not enough liquid or fat, or reheated without moisture Add warm milk, cream, broth, or butter a little at a time.
Too thin Too much milk or cream Warm gently to evaporate moisture. Add a few potato flakes only if needed.
Too stiff Not enough warm liquid Loosen a little at a time, folding only until the texture comes back.
Sticky after using a hand mixer The potatoes were beaten too long Stop mixing immediately. Fold in warm butter or cream. Use leftovers for cakes or casserole topping if needed.
Grainy after reheating The mash was too lean or reheated too aggressively Warm slowly and fold in butter, cream, or sour cream until smoother.

Flavor and serving problems

Problem Why it happened How to fix it
Bland flavor Cooking water was not salted, or not enough final seasoning was added Add salt gradually, then finish with butter, pepper, herbs, garlic, sour cream, or cheese.
Flat flavor even after salting They may need fat, tang, herbs, or deeper seasoning Add butter, black pepper, chives, roasted garlic, sour cream, parmesan, or a little gravy.
Got cold before serving They sat too long or the serving dish was cold Reheat gently with warm milk or butter. Next time, warm the serving dish and keep them covered.
Too much garlic or pepper The seasoning is overpowering the potatoes Fold in more plain mash if available, or soften the flavor with cream, butter, or sour cream.

Most fixes are small. The important thing is not to panic-mix the potatoes into a worse texture. Serve them warm if they still taste good, or save them for cakes, croquettes, soup, or a casserole topping where the texture can work in your favor.

Variations

Once the base mash is right, variations should support the meal, not bury the potatoes. Keep the flavor simple for rich mains, or add garlic, cheese, herbs, or tang when the potatoes need to carry more of the plate.

Garlic Mashed Potatoes

Use roasted garlic when you want mellow sweetness, sautéed garlic when you want a sharper savory edge, and garlic butter when you want the flavor to spread through the whole mash. For a deeper version with the garlic balance already worked out, use this garlic mashed potatoes recipe.

Cream Cheese Mashed Potatoes

Use cream cheese when you want a thicker, richer mash that reheats well. Let it soften first so it melts in easily, and add less milk at the beginning.

Sour Cream Mashed Potatoes

Use sour cream when you want tang that cuts through butter, gravy, steak, pork chops, or roast chicken. It makes the mash taste richer without feeling too heavy.

Loaded Mashed Potatoes

Fold in shredded cheddar, crispy bacon, chopped chives, and a spoonful of sour cream. Loaded mashed potatoes work well as a side dish or as the base for a comfort-food plate.

Parmesan Herb

Fold in grated parmesan, chopped parsley, chives, thyme, or a little roasted garlic. Parmesan adds saltiness and depth, so taste before adding more salt.

Buttermilk

Use warm buttermilk for a tangy Southern-style version. Keep the heat gentle and do not boil the buttermilk.

Extra Buttery

For holiday-style potatoes, increase the butter to 100–125 g / about 7–9 tbsp per 1 kg / 2.2 lb potatoes and use half-and-half or a mix of milk and cream.

Mashed Potatoes Without Milk

If this is an emergency “I already boiled the potatoes and there is no milk” moment, start with reserved potato water and butter. It is the safest fix because the water is already starchy and neutral.

No milk does not mean no comfort. It just means choosing the right liquid for the job. Potato water keeps the flavor clean, broth makes it more savory, and olive oil or vegan butter can add richness without dairy.

Mashed potatoes with cups of broth, potato cooking water, olive oil, and a butter-like block nearby.
No milk does not end the recipe. Potato water keeps things clean, broth adds savory depth, and olive oil or dairy-free butter brings richness.

Plant milk can work, but choose an unsweetened neutral version. Potato water is usually safer because it tastes like potato, not oat, almond, or coconut.

Situation Best substitute Notes
No milk at home Reserved potato water + butter Neutral, easy, and already starchy enough to loosen the mash.
No milk, but dairy is okay Cream cheese, sour cream, or thick plain yogurt Add gently so the flavor does not become too tangy or thin.
More savory flavor Warm chicken or vegetable broth Good with gravy, meatloaf, chicken, pork chops, and roast dinners.
Dairy-free version Olive oil + reserved potato water Gives richness without dairy. Add slowly.
Vegan version Vegetable broth + vegan butter or olive oil Use neutral plant milk only if you like the flavor.

If the no-milk mash still feels dry, stiff, or too thin, use the troubleshooting table. For leftovers or dairy-free make-ahead prep, see how to reheat mashed potatoes gently.

Make-Ahead Mashed Potatoes

Mashed potatoes are usually not finished in a quiet kitchen. They happen while gravy is thickening, mains are resting, and someone is asking when dinner is ready.

Make-ahead mashed potatoes are not about being fancy. They are about giving yourself one less thing to panic over when the oven is full, the gravy is waiting, and dinner is moving fast.

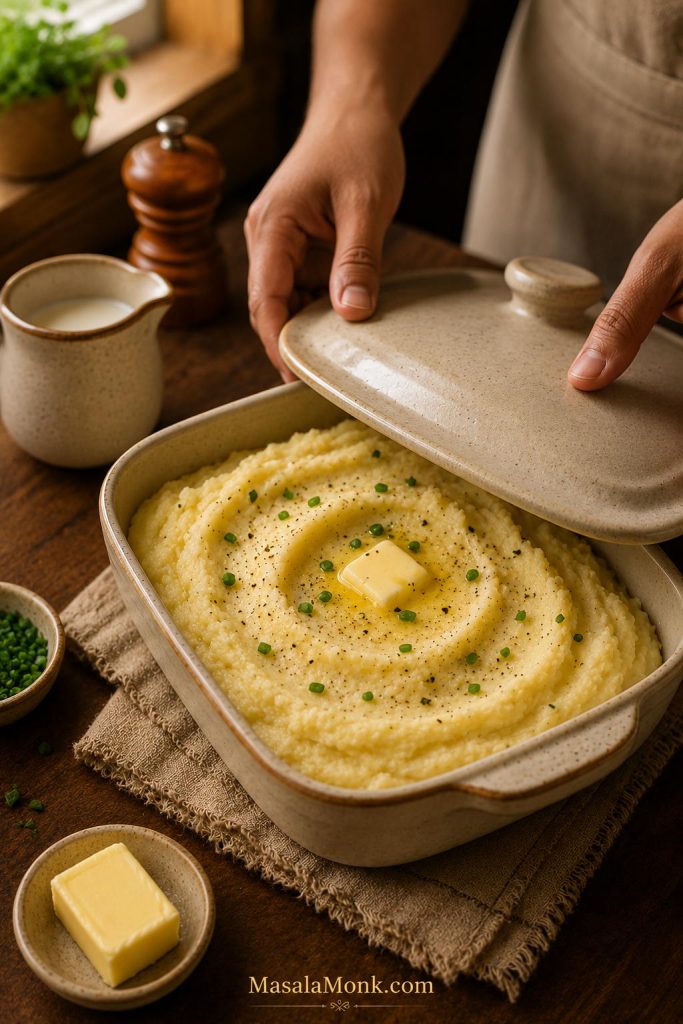
Hands covering a shallow dish of mashed potatoes with butter and a small milk jug nearby.
Make-ahead mashed potatoes should go into storage a little softer than serving texture. Later, that extra moisture helps them reheat without drying out.

For the best texture, make them up to 1–2 days ahead, keep them covered in the refrigerator, and reheat gently with extra warm milk, cream, butter, sour cream, or cream cheese.

The most important trick is to make them slightly softer than usual before chilling, because the fridge will firm them up. A little extra moisture and fat gives you room to reheat without drying them out.

For holiday serving, warm the serving dish, cover the potatoes tightly, and keep extra warm milk or butter nearby for a quick loosen before they go to the table.

Make-Ahead Method

  1. Prepare the base recipe as usual.
  2. Make the mash slightly looser than you want it at serving time.
  3. Add a little extra butter, milk, cream, sour cream, or cream cheese so it stays soft.
  4. Cool and store in a covered shallow dish or airtight container in the refrigerator.
  5. Reheat gently with extra warm milk or butter.
  6. Stir only as much as needed to bring the texture back.

Once the potatoes are made ahead, the real success comes from reheating them well. Jump to How to Reheat Mashed Potatoes before serving.

How to Reheat Mashed Potatoes

Cold mashed potatoes rarely look promising at first. They firm up in the fridge, but they usually come back with low heat, patience, and a little extra moisture.

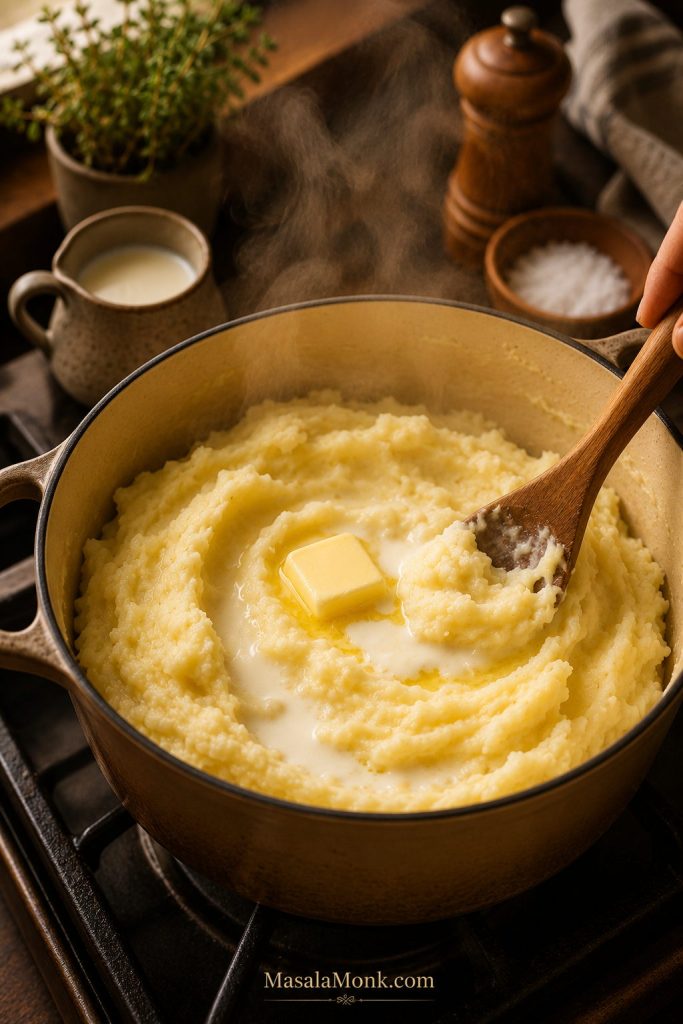
Mashed potatoes being reheated with melting butter, warm milk, steam, and a spoon folding through them.
Reheating is a recovery step, not a second mash. Low heat, steam, butter, and warm milk bring back creaminess without rough stirring.

Reheating is less about stirring hard and more about giving the potatoes back moisture slowly. Warm them gently for texture, but make sure leftovers are hot all the way through. If you are checking with a thermometer, aim for 165°F / 74°C.

Method How to do it Best for
Stovetop Place in a pot over low heat. Add warm milk, cream, or butter and stir gently until hot. Small to medium batches
Oven Place in a covered baking dish and reheat at 350°F / 175°C for 25–40 minutes. Add butter on top if the potatoes look dry. Holiday meals and larger batches
Microwave Reheat at medium power in short intervals, stirring every 1–2 minutes. Add a splash of milk or cream. Leftovers and single servings
Slow cooker Reheat first, then keep warm in the slow cooker. Add butter or milk if the surface starts drying out. Holding for a crowd
Slow cooker note: A slow cooker is good for holding hot mashed potatoes warm, but it is not the best way to slowly heat cold mashed potatoes from the fridge. Reheat them first, then transfer to the slow cooker on warm.

How Much to Make Per Person

A good side-dish estimate is 225–250 g / 1/2 lb raw potatoes per person. For a holiday meal with many sides, you can go slightly lower. For a mashed-potato-heavy dinner with gravy, meatballs, steak, or chicken, plan a little more.

If mashed potatoes are the side everyone reaches for first, round up. Leftovers are easier to use than an empty serving dish is to explain.

People Raw potatoes Approx. butter Approx. milk/cream
2 500 g / 1.1 lb 40–50 g 90–120 ml
4 1 kg / 2.2 lb 75–100 g 180–240 ml
8 2 kg / 4.4 lb 150–200 g 360–480 ml
10 2.25 kg / 5 lb 170–225 g 420–540 ml
20 4.5 kg / 10 lb 340–450 g 850 ml–1.1 L

For a lighter meal with many sides, use the lower end. For gravy-heavy dinners, holiday plates, or mashed-potato lovers, use the higher end.

What to Serve with Mashed Potatoes

Mashed potatoes are often the quiet thing holding the whole plate together. When they are soft, warm, and well-seasoned, even a simple dinner feels more complete.

The easiest rule is simple: if the main dish has gravy, pan juices, cream sauce, onion sauce, or mushrooms, mashed potatoes probably belong beside it.

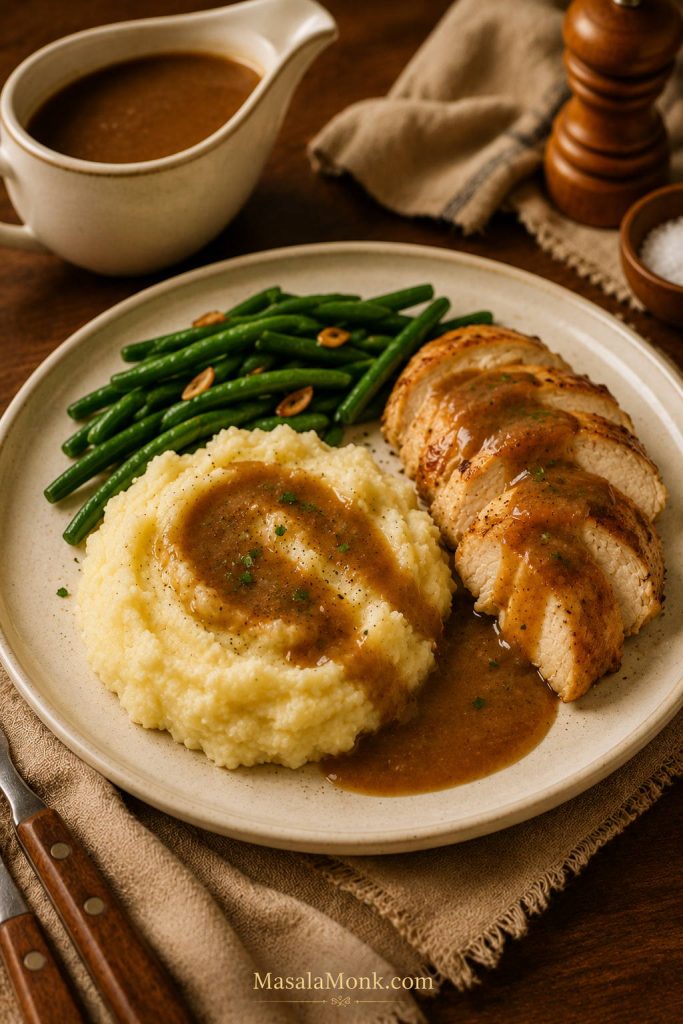
Dinner plate with mashed potatoes, gravy, sliced roast chicken, green beans, and a gravy boat in the background.
Mashed potatoes earn their place beside saucy mains because they catch gravy and pan juices. That is what turns a simple plate into comfort food.

Best mashed potato pairings

Think of mashed potatoes as the soft landing for the plate: one saucy main, one green vegetable, and one simple extra like rolls, salad, or roasted carrots is usually enough.

Keep the potatoes plain and buttery when the main dish is strongly flavored. Add garlic, cheese, sour cream, or herbs when the main dish is simple.

Meal type Best pairings Why it works
Gravy-heavy comfort dinners Meatloaf, meatballs, smothered pork chops, creamy mushroom mains The potatoes soak up sauce and make the plate feel complete.
Beef dinners Steak, pot roast, roast beef, beef stew, cottage pie Beef and mashed potatoes are classic because the richness balances well with butter and salt.
Chicken dinners Roast chicken, chicken gravy, creamy mushroom chicken, slow cooker French onion chicken Mashed potatoes turn chicken into a fuller comfort meal.
Pork dinners cream of mushroom pork chops, pork loin, sausages, ham Pork works well with creamy mash, mustardy sauces, onion gravy, or pan juices.
Seafood Salmon, white fish, fish cakes, shrimp in garlic butter Keep the potatoes simple so they do not overpower the fish.
Vegetarian meals Mushroom gravy, lentils, roasted mushrooms, green beans, peas, carrots Earthy vegetables and legumes pair well with buttery potatoes.
Holiday plates Turkey, ham, stuffing, gravy, sweet potato casserole, hashbrown casserole Mashed potatoes are the soft, savory anchor for a full holiday spread.

If the main dish does not have much sauce, add a simple brown gravy, mushroom gravy, chicken gravy, or onion gravy. Mashed potatoes taste best when there is something warm and savory to spoon over the top.

What to Do with Leftover Mashed Potatoes

Leftovers are not a problem here. Cold mash is one of those rare leftovers that can become better at holding its shape the next day. Leftover mash is already halfway to something crispy.

Use it for potato cakes, breakfast patties, croquettes, or fish cakes when you want something crisp outside and soft inside.

  • Mashed potato pancakes
  • Potato cakes
  • Croquettes
  • Fish cakes
  • Shepherd’s pie or cottage pie topping
  • Potato soup
  • Loaded mashed potato casserole
  • Breakfast patties
  • Waffles
  • Stuffed rolls
  • Crispy fried mashed potato balls

For quick mashed potato cakes, start with 2 cups cold mashed potatoes, 1 egg, 2–4 tablespoons flour or breadcrumbs, and a little cheese or herbs. Shape into patties and cook in a lightly oiled skillet until golden on both sides.

If you would rather turn leftovers into a full casserole-style dinner, use the mash as a topping for cottage pie, or move into another cozy potato bake like tater tot casserole. It keeps the same comfort-food mood while changing the texture completely.

If the leftover mashed potatoes are very soft, add flour, breadcrumbs, or grated cheese a little at a time before shaping them into cakes or patties. Cold mash holds together better than warm mash.

How to Store Mashed Potatoes

Store leftovers in an airtight container in the refrigerator for 3–4 days. When reheating, make sure they are hot all the way through; if you are checking with a thermometer, aim for 165°F / 74°C. For detailed safety guidance, the USDA leftovers guide is useful.

As they warm, add a splash of milk, cream, broth, or a little butter so the texture turns creamy again instead of dry or stiff.

Can You Freeze Mashed Potatoes?

Yes, they can be frozen, but the texture depends on how much fat and dairy they contain. A batch made with butter, cream, sour cream, or cream cheese freezes better than a lean version made with only potatoes and water.

To freeze, cool the mash completely and pack it into freezer-safe containers. The texture is usually best within the first month. It can be kept frozen longer, but it may become more watery or grainy over time.

Thaw overnight in the refrigerator and reheat gently with extra milk, cream, or butter. If the texture looks a little separated after thawing, warm the potatoes slowly and fold in extra butter or cream.

FAQs

These are the questions that usually come up once the potatoes are already peeled, boiling, or waiting on the stove.

1. What are the best potatoes for mashed potatoes?

Yukon Golds and russets are the safest choices. Yukon Golds make the mash creamy and buttery; russets make it lighter and fluffier. A mix gives the best balance.

2. Should I peel potatoes for mashed potatoes?

Peel them for a smooth mash. Leave some or all of the skin on for a rustic texture, especially with Yukon Gold or red potatoes.

3. Do you start mashed potatoes in cold or boiling water?

Start potatoes in cold water so the pieces cook evenly from outside to center. Boiling water can soften the edges before the middle is cooked.

4. How long should potatoes boil for mashed potatoes?

Potato chunks usually take 15–20 minutes. They are ready when a fork slides through easily with almost no resistance.

5. Why are my mashed potatoes gluey?

They turn gluey when the starch is overworked. This often happens from using a blender, food processor, or beating the potatoes too much.

6. Can I fix gluey mashed potatoes?

You can improve them, but you usually cannot make truly gluey potatoes fluffy again. Stop mixing, fold in warm butter or cream, and use dense leftovers for cakes, croquettes, soup, or casserole topping.

7. How do I make mashed potatoes without milk?

Use reserved potato cooking water, warm broth, olive oil, vegan butter, or unsweetened plant milk. Add gradually and taste as you go.

8. Can I use cream instead of milk?

Yes. Cream makes the potatoes richer and thicker. Use all cream for a holiday-style mash, or part milk and part cream for balance.

9. Can I use a hand mixer for mashed potatoes?

Yes, but use low speed and stop as soon as the potatoes are smooth. Overmixing can make the texture gluey.

10. Can I make mashed potatoes ahead of time?

Yes. Make them slightly softer than usual, refrigerate for 1–2 days, then reheat gently with extra warm milk, cream, or butter. Sour cream or cream cheese helps them reheat smoothly.

11. How do I reheat mashed potatoes without drying them out?

Reheat gently over low heat or in a covered dish. Add warm milk, cream, broth, or butter a little at a time until creamy again.

12. Can you freeze mashed potatoes?

Yes, but they freeze best with enough butter, cream, sour cream, or cream cheese. Thaw overnight and reheat slowly with extra dairy or fat.

13. How much mashed potato do I need per person?

Plan on about 225–250 g / 1/2 lb raw potatoes per person. For 4 people, use about 1 kg / 2.2 lb; for 8 people, use about 2 kg / 4.4 lb.

14. What can I add to mashed potatoes for more flavor?

Add roasted garlic, sour cream, cream cheese, parmesan, chives, parsley, black pepper, browned butter, cheddar, bacon, or gravy.

15. What is the secret to creamy mashed potatoes?

Use Yukon Gold potatoes, drain them well, add warm dairy gradually, and stop before the mash is overworked. Butter and warm half-and-half make the creamiest everyday version.

Final Thoughts

Once the method is in your hands, you can take the same potatoes creamy, fluffy, garlicky, cheesy, dairy-free, make-ahead, or gravy-ready without learning a new recipe each time.

That is why this method is worth saving: it gives you a good bowl when everything goes right, and a way back when the potatoes need help.

Posted on Leave a comment

Creamy Mushroom Sauce Recipe for Steak, Chicken, Pasta & More

A good creamy mushroom sauce should make the plate feel complete: rich enough for steak, loose enough for pasta, and spoonable enough for potatoes or rice.

This is the sauce to make when dinner is almost there but needs one thing to pull it together. Steak feels restaurant-style. Chicken tastes richer. Pasta turns silky. Even potatoes, rice, toast, or roasted vegetables feel like a proper meal once a glossy mushroom sauce lands on top.

It is not quite a side dish and not quite a gravy; it is the thing that makes the plate feel finished.

The secret is simple: brown the mushrooms first, then choose the finish. Let them release their moisture, shrink, darken, and catch at the edges before the cream goes in. Once that happens, garlic, broth, cream, parmesan, thyme, black pepper, and a little lemon turn those browned bits into a sauce you can use half a dozen ways.

This creamy mushroom sauce recipe takes about 20 to 25 minutes and makes roughly 3 cups / 700 to 720 ml. Keep it thick for steak, loosen it for pasta, soften it for chicken, or push it slightly toward gravy for potatoes and rice. Start with the creamy version below; the no-cream, no-wine, dairy-free, and gravy-style notes are adaptations, not separate recipes.

Creamy Mushroom Sauce at a Glance

A good mushroom sauce starts with well-browned mushrooms, then turns into a shiny skillet sauce that tastes savory first and creamy second.

  • Time: about 20 to 25 minutes in a wide skillet
  • Yield: about 3 cups / 700 to 720 ml
  • Mushrooms: 400–450g / 14–16 oz, roughly two 8 oz packs
  • Best mushrooms: cremini, baby bella, button, portobello, or mixed mushrooms
  • Best uses: steak, chicken, pork chops, pasta, mashed potatoes, rice, vegetables, toast, and omelettes
  • Texture: smooth and spoonable, not watery, gluey, greasy, or split

This is a skillet mushroom sauce, not a condensed soup shortcut or a mushroom ragu. Brown the mushrooms first, then finish with cream and parmesan so the sauce tastes deep before it tastes creamy.

Choose the Finish Before You Start

One skillet, one base, many possible dinners. Before you reduce it too far, decide where it is going: over steak, through pasta, across chicken, or closer to gravy.

Sauce map guide showing mushroom sauce served with steak, chicken, pasta, and potatoes or rice, with different finish notes for each.
Use the Sauce Map before the final simmer so one mushroom sauce can move toward steak, chicken, pasta, or potatoes without starting over.
Serve it withTextureLiquidFinish
SteakThick, shiny, spoonableBeef broth, pan drippings, or red wineBlack pepper, Dijon, Worcestershire, thyme
ChickenMedium creamyChicken brothLemon, parsley, parmesan
PastaLooser and silkyPasta water, cream, brothParmesan, black pepper, parsley
Pork chopsCreamy and smotheredChicken broth or pork pan juicesGarlic, thyme, optional slurry
Potatoes or riceThicker, gravy-likeStock or brothFlour or cornstarch option
Vegetables or toastMushroom-heavy, not too looseCream, milk, or brothHerbs, lemon, black pepper

Once you know the direction, jump to the notes for steak, chicken, pasta, pork chops, or potatoes and rice.

Before you start: Use a wide skillet. Wait until the mushroom liquid cooks off. Add parmesan over low heat. Those three choices prevent most watery, bland, split, or clumpy mushroom sauce problems.

Pick the direction first, then cook the base recipe below. In the final 2 minutes, the same skillet can stay thick for steak, loosen for pasta, or move closer to gravy.

Creamy Mushroom Sauce Recipe for Steak, Chicken, Pasta & More

A flexible skillet mushroom sauce built on deeply browned mushrooms, garlic, broth, cream, parmesan, thyme, and black pepper. Keep it spoonable for steak, looser for pasta, or thicken it slightly for a gravy-style finish.

Prep Time8 minutes
Cook Time15 minutes
Total Time23 minutes
YieldAbout 3 cups / 700–720 ml

Serves: 4 to 5 over steak, chicken, or pork chops; 3 to 4 with pasta

Equipment: 10- to 12-inch skillet, wooden spoon or spatula, whisk, measuring cup, fine grater or microplane

Ingredients

  • 400–450g / 14–16 oz mushrooms, sliced about 1/4 inch / 6 mm thick
  • 2 tbsp / 28g butter
  • 1 tbsp / 15 ml olive oil
  • 1 small shallot, finely minced, or 1/4 cup minced onion
  • 3 garlic cloves, minced
  • 2 tsp fresh thyme leaves, or 1/2 tsp dried thyme
  • 1/4 cup / 60 ml dry white wine, optional
  • 1/2 cup / 120 ml chicken, beef, or vegetable broth
  • 1 cup / 240 ml heavy cream or double cream
  • 1/3 cup / about 30g finely grated parmesan
  • 1–2 tsp lemon juice, to taste
  • 1/4 tsp salt to start, plus more to taste after parmesan
  • Freshly ground black pepper, to taste
  • 1–2 tbsp chopped parsley, optional, for finishing

Optional thickener for a gravy-style sauce: 1 tsp cornstarch mixed with 1 tbsp cold water.

Instructions

  1. Brown the mushrooms. Heat the butter and olive oil in a wide skillet over medium-high heat. Add the mushrooms and cook for 6 to 8 minutes, stirring occasionally, until they release moisture, the moisture evaporates, the pan looks mostly dry, and the edges begin to brown. If the pan is crowded, cook them in two batches.
  2. Add aromatics. Season the browned mushrooms with 1/4 tsp salt and black pepper. Add the shallot or onion and cook for 1 to 2 minutes. Add the garlic and thyme and cook for 30 to 45 seconds, just until fragrant.
  3. Deglaze the pan. Pour in the wine, or use extra broth if skipping wine. Scrape the browned bits from the bottom of the skillet. Simmer until the wine smells less sharp and reduces by about half, about 1 minute.
  4. Add broth and cream. Lower the heat to medium. Add the broth and cream. Simmer gently for 4 to 6 minutes, stirring occasionally, until the cream turns beige, the sauce begins to thicken, and it leaves light trails when you stir.
  5. Finish with parmesan. Reduce the heat to low. Stir in the parmesan gradually until melted and smooth. Taste before adding more salt.
  6. Balance the sauce. Add black pepper and 1 teaspoon lemon juice. Taste again. If it tastes flat, add salt. If it tastes heavy, add lemon. If it tastes creamy but not savory, add parmesan, Worcestershire, or more pepper.
  7. Adjust thickness. For steak or pork chops, simmer a little longer until spoonable. For pasta, stop slightly loose and loosen with reserved pasta water as needed. For a thicker gravy-style sauce, stir in the cornstarch slurry and simmer for 30 to 60 seconds.
  8. Serve warm. Spoon over steak, chicken, pork chops, pasta, mashed potatoes, rice, roasted vegetables, meatballs, toast, or omelettes.

Best Finishes

  • Steak: beef broth, Dijon, Worcestershire, and extra black pepper.
  • Chicken: chicken broth, lemon, parsley, and a medium-thick texture.
  • Pasta: stop the sauce slightly loose and loosen with pasta water.
  • No wine or gravy-style: use broth instead of wine; add the optional slurry for a thicker finish.

Storage: Refrigerate leftovers and reheat gently with a splash of liquid.

This is the quick turn from browned mushrooms to sauce: liquid lifts the browned bits, and cream pulls everything together.

Cream and liquid being poured into a skillet of browned mushrooms while a spoon stirs the sauce.
After browning, deglazing pulls flavor from the skillet into the sauce. Then cream ties the mushrooms, garlic, thyme, and pan juices together.

What Browning Should Look and Smell Like

This is the part where patience pays you back. Mushrooms do not become rich the second they hit the pan. First they steam, then they shrink, then the pan goes quieter and drier, and only after that do the edges begin to brown.

Do not judge the sauce in the first few minutes; mushrooms get messy before they get good. They may look wet, crowded, and pale at first, but keep going. The pan should smell deeper and nuttier before the cream goes in, not just buttery.

Two stages of mushrooms cooking in a pan: wet pale mushrooms labeled Wet First — Keep Cooking and browned mushrooms labeled Ready for Cream.
First comes moisture, then color. When the pan quiets down and the mushrooms turn golden at the edges, the sauce will taste much more savory.
  • Too wet: keep cooking until the pan looks mostly dry.
  • Too crowded: cook the mushrooms in two batches.
  • Too pale: give them another minute or two before adding garlic.
  • Ready for cream: the mushrooms are smaller, darker, and golden at the edges.

If the sauce still turns watery, bland, or thin after browning, use the troubleshooting guide before adding more cream.

Once the cream goes in, keep the heat gentle. The cream should turn beige as it picks up the browned mushroom juices. If it tastes creamy but not mushroomy, the problem is usually browning, not the amount of cream.

Tested texture note: A 12-inch skillet browns 400–450g mushrooms much better than a small saucepan. If the mushrooms pile up deeply, cook them in two batches. The sauce also thickens after parmesan and again as it cools, so stop slightly looser than you want it on the plate if it will sit for more than 5 minutes or if you are tossing it with pasta.

Ingredient Notes

The sauce is simple enough that the small choices show. Mushrooms bring savoriness, broth balances the pan, cream gives body, parmesan adds depth, and lemon keeps the finish lifted.

Ingredients for mushroom sauce arranged on a table, including mushrooms, cream, broth, parmesan, garlic, thyme, butter, lemon, salt, and black pepper.
Before the pan gets hot, line up the sauce builders: dry mushrooms for searing, broth for the pan, cream for body, parmesan for depth, and lemon for balance.

Cremini or baby bella mushrooms give the best everyday flavor, but button, portobello, or mixed mushrooms also work. Slice them about 1/4 inch / 6 mm thick.

Fresh, dry-looking mushrooms sear better than damp ones. If the mushrooms are dirty, a quick rinse is fine, but dry them well before cooking. For a quick visual reference, the Mushroom Council’s mushroom cleaning tips show the same brush, wipe, or brief-rinse approach.

Butter adds roundness, olive oil helps with heat, and pan drippings make the sauce deeper if you cooked steak, chicken, or pork first. Use chicken broth for chicken and pasta, beef broth for steak, and vegetable broth for a vegetarian version.

Heavy cream gives the smoothest finish, and finely grated parmesan melts into the pan instead of sitting in clumps. MasalaMonk’s Parmesan vs Parmigiano Reggiano guide is helpful when choosing between hard cheeses.

Dry white wine helps lift the browned bits from the pan, but broth works well too. If you skip wine, finish with lemon juice so the sauce still tastes bright.

Cooking without cream, wine, or dairy? Use the no-cream substitutions and dairy-free notes before you start.
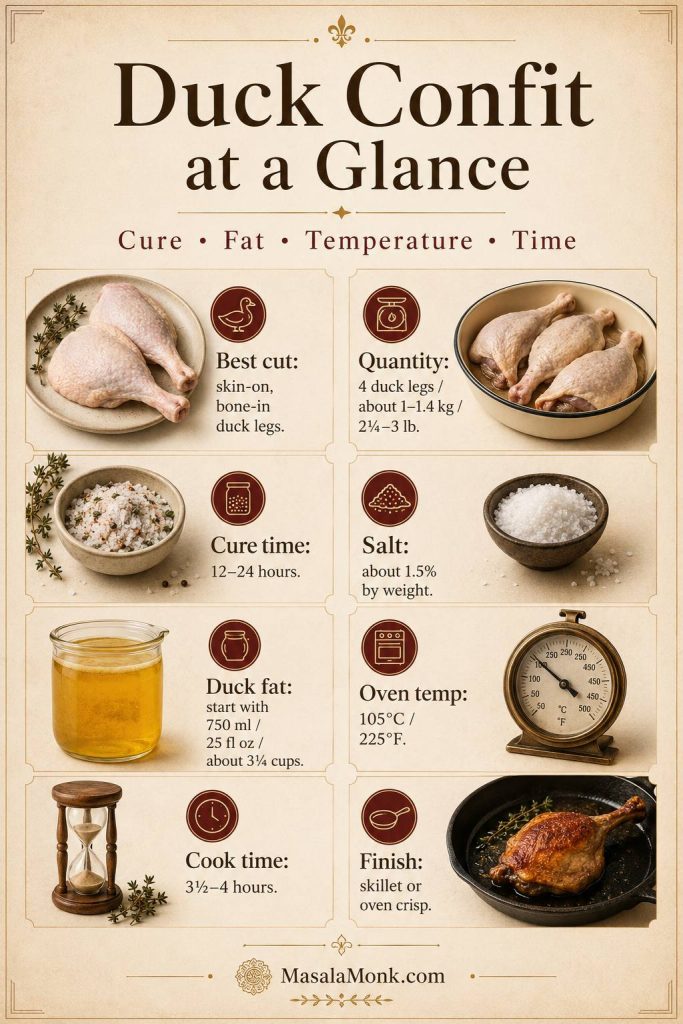
Getting the Texture Right

The sauce should coat the back of a spoon and fall in a slow ribbon for steak, chicken, and pork chops. For pasta, it should flow more loosely because it tightens as you toss. For potatoes, rice, or meatballs, it can sit closer to gravy.

Spoon test: Dip a spoon into the sauce and run your finger through the coating on the back. A line that holds for a moment means it is thick enough for steak or chicken. When the coating closes immediately, simmer longer. Loosen the sauce gently if it barely moves.

Close-up of creamy mushroom sauce with mushroom slices coating a spoon and dripping back into the pan.
Use the spoon test before serving. If the sauce coats and drips slowly, it is ready; if it runs, reduce it; if it drags, loosen it gently.

Then check the final texture.

Guide showing three mushroom sauce thicknesses: loose for pasta, spoonable for steak and chicken, and thicker for potatoes or rice.
Thickness is the final choice. Keep it loose for pasta, medium-spoonable for steak and chicken, and heavier when you want a mushroom gravy finish.

Use that texture guide before serving: thicker for steak, looser for pasta, or gravy-style for potatoes and rice.

If pasta tightens in the bowl, that is normal. A splash of hot pasta water brings it back.

How Much Sauce to Use — and Where It Works Best

Use enough sauce to feel generous, not so much that steak, pasta, or potatoes disappear under it.

Serve it withHow much to use
Steak1/3 to 1/2 cup per steak
Chicken breast or thigh1/3 cup per piece
Pork chop1/3 to 1/2 cup per chop
PastaFull batch for 250g / 8 oz long pasta or 300g / 10 oz short pasta
Mashed potatoes, rice, or vegetables1/4 to 1/3 cup per serving
Toast or omelette2 to 4 tbsp per serving

Mushroom Sauce for Steak

For steak: use pan drippings if you have them, and reduce until the sauce sits on the meat instead of running across the plate.

Seared steak on a dark plate topped with mushroom sauce, sliced mushrooms, thyme, and black pepper.
Mushroom sauce for steak should cling to the meat while the seared crust stays visible. Pepper, thyme, Dijon, or Worcestershire can deepen the finish.

Mushroom Sauce for Chicken

For chicken: keep the sauce medium-thick and bright with lemon or parsley. If the chicken is already cooked, warm it gently in the sauce. If it is not fully cooked, finish it gently until the thickest part reaches 165°F / 74°C. For a complete chicken dinner using this flavor family, see MasalaMonk’s Cream of Mushroom Chicken Recipe.

Chicken pieces on a cream-colored plate covered with mushroom sauce, sliced mushrooms, parsley, and a lemon wedge.
Mushroom sauce for chicken works best when it is rich but still bright. Parsley and lemon keep the cream from feeling too heavy.

Mushroom Sauce for Pasta

For pasta: keep the sauce loose enough to coat, not clump. Reserve 1 cup pasta water before draining, then toss over low heat and add pasta water 2 to 4 tablespoons at a time until glossy.

Pasta lifted with a fork from a bowl of mushroom sauce with sliced mushrooms, parmesan, parsley, and black pepper.
Keep mushroom pasta sauce loose and glossy so it slides through the noodles instead of settling in clumps.

Mushroom Sauce for Pork Chops

Pork chops: use chicken broth or pork pan juices and reduce until the sauce coats the chops well. A full pork version is waiting in MasalaMonk’s Cream of Mushroom Pork Chops.

Seared pork chops topped with mushroom sauce, sliced mushrooms, black pepper, thyme, green beans, and roasted potatoes.
Mushroom sauce for pork chops should be generous but controlled, coating the chop while leaving the seared edges visible.

Mushroom Sauce for Potatoes and Rice

Potatoes, rice, vegetables, toast, or omelettes: use a slightly thicker finish and let the mushrooms stay the focus. This sauce is especially good over garlic mashed potatoes. With rice, keep it looser so it soaks in instead of sitting heavily on top; MasalaMonk’s guide on how to cook rice is a simple place to start.
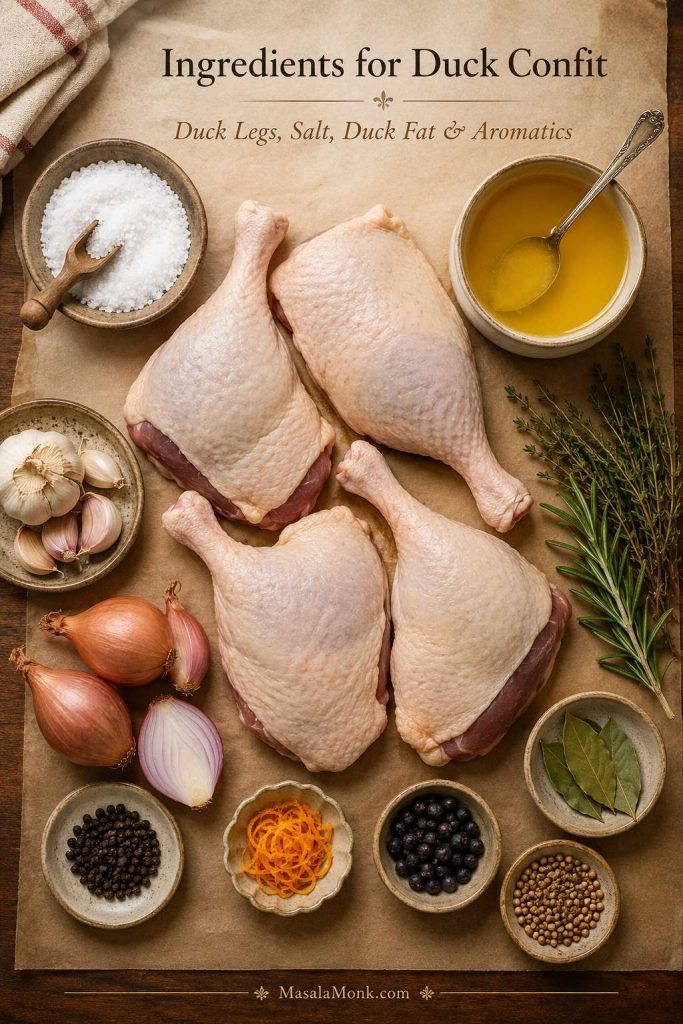
Thick mushroom sauce with visible mushroom slices spooned over mashed potatoes on a cream-colored plate.
Potatoes or rice work best when the sauce moves toward mushroom gravy: thicker, spoonable, and full of visible mushroom pieces.

No Cream, No Wine & Dairy-Free Options

Once the base works, substitutions become less risky because you know what each ingredient is replacing. Remove cream and you need body. Skip wine and you need brightness. Go dairy-free and you need body plus savoriness.

Without Cream

The no-cream versions will not all taste identical, but they can still be rich, savory, and useful. Choose milk + flour for creamy, broth + cornstarch for gravy-like, and cashew cream for dairy-free richness.

VersionHow to replace 1 cup / 240 ml creamBest for
Milk + flourCook 1 tbsp flour in the fat for 1 minute, then whisk in 1 cup / 240 ml whole milk gradually.Chicken, pasta, toast
Broth + cornstarchUse 1 cup / 240 ml extra broth, then thicken with 1–2 tsp cornstarch mixed with cold water.Steak, potatoes, rice, gravy-style sauce
Broth + milkUse 3/4 cup / 180 ml broth plus 1/4 cup / 60 ml whole milk, then thicken lightly if needed.Lighter creamy sauce
Cashew creamUse 1 cup / 240 ml cashew cream in place of heavy cream.Dairy-free pasta or vegetables
Guide for mushroom sauce without cream showing milk and flour, broth and cornstarch, broth and milk, and cashew cream options.
Mushroom sauce without cream still needs body. Flour, cornstarch, broth, milk, or cashew cream can thicken the sauce depending on what you have.

If you are also skipping wine or dairy, use the no-wine and dairy-free guide before finishing the sauce.

If using milk instead of cream, keep the heat gentle. Milk-based sauces are more likely to curdle or separate if boiled hard.

Without Wine

Wine helps, but it is not the soul of the sauce. Browned mushrooms, broth, parmesan, and lemon do most of the real work. Replace the wine with the same amount of broth, then add 1 to 2 teaspoons lemon juice before serving.

Dairy-Free

Use olive oil or vegan butter instead of butter, vegetable broth instead of chicken or beef broth, and cashew cream for the most neutral creamy body. For a lighter sauce, use vegetable broth and cornstarch slurry, then add a small splash of soy sauce or tamari for savory depth. Use unsweetened dairy-free milk only. Avoid sweetened plant milks; coconut milk works but changes the flavor.

These two swaps solve different problems: broth and lemon replace wine’s brightness, while olive oil, vegetable broth, and cashew cream replace dairy’s body.

Guide for no-wine and dairy-free mushroom sauce showing broth, lemon, olive oil, vegetable broth, cashew cream, cashews, mushrooms, garlic, and thyme.
Without wine, add brightness with broth and lemon. A dairy-free mushroom sauce gets body from olive oil, vegetable broth, and cashew cream.

Small Flavor Adjustments

To make it more garlicky, increase the garlic to 4 or 5 cloves and add it only after the mushrooms brown. A deeper steak version can use red wine, beef broth, Dijon, Worcestershire, thyme, and extra black pepper. Brighten the pan with lemon, parsley, or a splash of white wine. For more savoriness, add a few drops of Worcestershire or soy sauce, more parmesan, or a little extra broth.

Mushroom Sauce vs Mushroom Gravy

The line between sauce and gravy is blurry in real kitchens. If it is going over steak or pasta, keep it silkier. If it is going over potatoes, rice, meatballs, or roasts, you can push it thicker and more stock-forward.

FeatureMushroom sauceMushroom gravy
BaseCream + brothStock + roux or slurry
ColorCreamy, pale, golden, or beigeBrown and savory
TextureSilky, rich, spoonablePourable, thicker, gravy-like
Best forSteak, chicken, pork chops, pastaMashed potatoes, meatloaf, roasts, rice
FreezingNot ideal if cream-basedBetter if made without cream
ThickenerReduction, parmesan, optional slurryFlour, roux, or cornstarch

This recipe is a creamy sauce first. To take it closer to gravy, use more broth, less cream, and the optional cornstarch slurry.
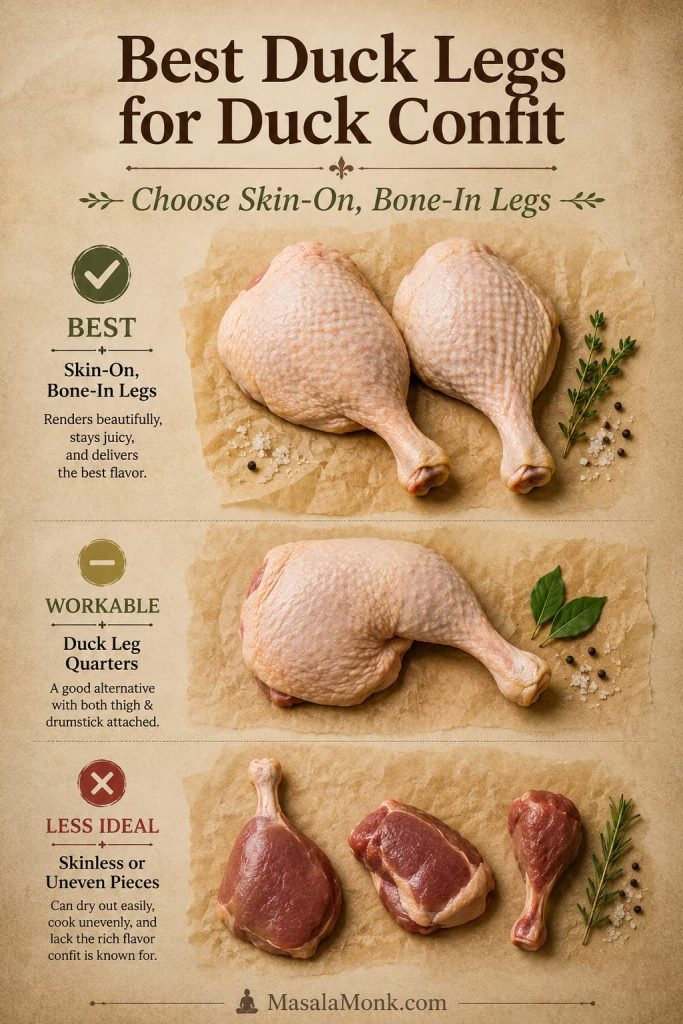
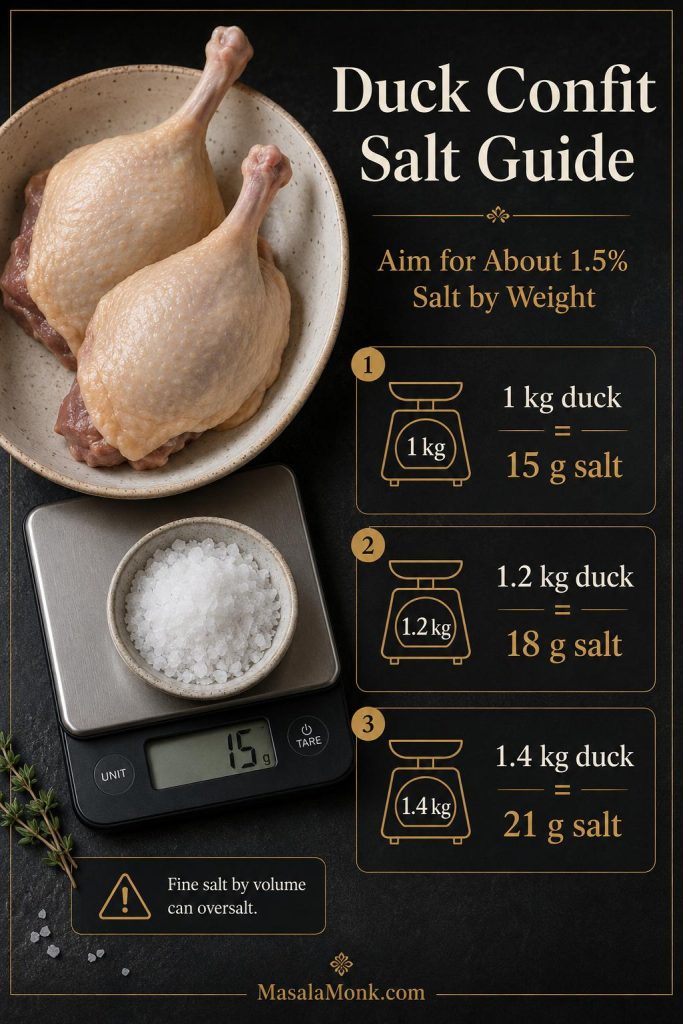
Can This Replace Canned Cream of Mushroom Soup?

Yes, this homemade sauce can replace canned cream of mushroom soup as a spoonable topping for chicken, pork chops, rice, pasta, potatoes, or vegetables. It tastes fresher and more mushroom-forward than canned soup.

As a pourable dinner sauce, keep the full 3-cup batch as written. To make a condensed-soup-style replacement, reduce and thicken it to about 2 cups. A gravy-style topping can stay closer to 2 1/2 to 3 cups, then thicken with slurry or roux.

Casseroles need a thicker sauce than a pourable skillet topping because the sauce has to hold vegetables, noodles, protein, and topping together. To turn the same sauce idea into a full casserole, MasalaMonk’s green bean casserole is a useful next step.

Watery, Split or Bland? Fix It Fast

If your sauce looks wrong, do not panic. Most mushroom sauce problems are fixable. Usually, the issue comes from mushrooms that steamed instead of browned, cream that boiled too hard, cheese added over high heat, or a sauce that was made too thick before pasta or reheating.

Quick Visual Fixes

Troubleshooting guide for mushroom sauce showing fixes for watery, split, bland, and plain cream-tasting sauce.
Use the fix-it guide at the first sign of trouble: reduce watery sauce, warm split sauce gently, brighten bland sauce, and build more mushroom depth.

Detailed Fix Table

ProblemFix nowNext time
Watery sauceSimmer uncovered for 2 to 5 minutes, or stir in 1 tsp cornstarch mixed with 1 tbsp cold water.Give the mushrooms enough time for the pan to dry before adding cream.
Too thickAdd warm broth, milk, cream, or pasta water 1 tbsp at a time.Stop simmering while the sauce is slightly looser than you want it on the plate.
Split or greasyLower heat and whisk in a splash of warm broth or cream. Avoid adding cold liquid directly.Keep the cream at a gentle simmer.
Tastes like plain creamAdd parmesan, salt, pepper, thyme, lemon, Worcestershire, or a splash of broth.Brown mushrooms longer and deglaze the pan before adding cream.
BlandAdd salt if flat, lemon if heavy, parmesan or Worcestershire if it lacks depth.Taste after parmesan before final seasoning.
Rubbery mushroomsKeep cooking until moisture evaporates and edges brown.Use a wide pan and avoid crowding.
Floury tasteSimmer 2 to 3 minutes longer after adding liquid.Cook flour in the fat for about 1 minute before adding liquid.
Parmesan clumpedTake the pan off the heat and whisk gently. Add a splash of warm liquid if needed.Use finely grated parmesan and avoid high heat.
Pasta absorbed the sauceAdd pasta water 2 to 4 tbsp at a time and toss over low heat.Keep the sauce looser before adding pasta.

Most fixes come back to two things: give the mushrooms more time in the pan, then keep the creamy finish gentle. For watery or bland sauce problems, recheck the wet-to-browned mushroom cue and the spoon test.

Storage, Reheating, and Make-Ahead Tips

Cream sauces are not difficult to reheat; they just do not like being rushed. Store leftovers in an airtight container in the refrigerator for 3 to 4 days. For general leftover safety, the USDA recommends using refrigerated leftovers within 3 to 4 days.

  • To refrigerate: cool the sauce, then store in an airtight container.
  • To reheat on the stove: warm over low or medium-low heat, stirring often.
  • To loosen: add a splash of broth, milk, cream, or pasta water.
  • To microwave: use short bursts and stir between each one.
  • To freeze: cream-based sauce is not ideal because it can split. A no-cream, gravy-style version freezes better.

If the sauce looks separated after chilling, warm it slowly and whisk in a little liquid. Do not bring it to a hard boil. For more general leftover storage guidance, see the USDA’s Leftovers and Food Safety guide.

FAQs About Mushroom Sauce

Can I use canned mushrooms?

Yes, canned mushrooms work in a pinch, but fresh mushrooms give better browning and flavor. Drain canned mushrooms well, pat them dry, and brown them before adding liquid.

How do I make mushroom sauce thicker?

Simmer mushroom sauce uncovered first; that gives the best flavor. For a faster fix, add a slurry made from 1 teaspoon cornstarch and 1 tablespoon cold water.

Why is my mushroom sauce watery?

Mushroom sauce is usually watery when the pan is still too wet before the cream goes in. Simmer uncovered, or use a small cornstarch slurry if dinner is waiting.

Why does it taste like plain cream?

If mushroom sauce tastes like plain cream, the mushrooms probably needed more browning, or the sauce needs salt, parmesan, pepper, lemon, or Worcestershire. It should taste savory before it tastes creamy.

Is this the same as mushroom gravy?

No. Mushroom sauce is usually creamier and better for steak, chicken, pasta, and pork chops. Mushroom gravy is usually more stock-based, brown, and thickened with flour or cornstarch.

What can I use instead of cream?

Use milk with flour for a lighter creamy sauce, broth with cornstarch for a gravy-style sauce, or cashew cream for dairy-free richness. Milk and broth are thinner than cream, so they usually need a thickener.

Can I make mushroom sauce ahead of time?

Yes. Make it 2 to 3 days ahead, refrigerate, and reheat gently with a splash of liquid. Leftovers keep for 3 to 4 days in an airtight container.

Why did the sauce split?

Cream sauces usually split when boiled too hard or reheated too aggressively. Lower the heat and whisk in a splash of warm broth or cream.

Final Spoonful

Once you understand the texture, this becomes the sauce you can pull out for half-finished dinners: steak that needs polish, chicken that needs richness, pasta that needs gloss, or potatoes that need comfort.

Tried it over steak, chicken, pasta, potatoes, or something else? Tell me what you spooned it over and how you finished it — Dijon, Worcestershire, extra pepper, pasta water, or your own trick.

Back to top

Posted on Leave a comment

Duck Confit Recipe: Crispy Duck Legs, Easy Oven Method & Duck Fat Guide

Crispy duck confit leg served with roasted potatoes, salad greens, and a small bowl of sauce.

Duck confit sounds like the kind of dish that belongs in a French restaurant kitchen: heavy pans, jars of duck fat, a long wait, and someone at the stove who already knows exactly what “done” feels like. But the scary part is not really the cooking. It is the uncertainty: how much fat is enough, whether the cure will make the duck too salty, why the skin looks soft after hours in the oven, and whether the meat is tender enough before you try to crisp it.

Once you understand the rhythm, the method becomes much less intimidating. You salt the duck legs, cook them slowly in fat until the meat turns silky, and then crisp the skin at the end. The slow cook is for tenderness. The final hot finish is for crackly skin. When those two jobs are separated, the recipe becomes calmer, more predictable, and much easier to repeat.

A Classic Oven Method Built for Home Cooks

This duck confit recipe gives you a classic-style oven method first: skin-on, bone-in duck legs, a measured salt cure, aromatics, duck fat, a low oven, and a crisp golden finish. Then it walks you through the parts that usually make home cooks hesitate: duck fat, pan size, salt, tenderness, storage, and crisping the skin without drying the meat.

The finished leg should arrive at the table with crackly skin, tender meat that pulls easily from the bone, and enough savory duck fat left behind to make potatoes, mushrooms, eggs, beans, and vegetables feel like part of the reward.

This version is built for home cooks: classic enough to taste right, practical enough for a normal kitchen, and detailed enough that you always know whether the duck is on track.

What duck confit should feel like: The slow cook is for tender meat, while the final heat is what makes the skin crackly.

Close-up of duck confit with crisp golden skin pulled back to show tender shredded meat underneath.
First, the slow oven cook makes the meat silky; then the final crisping step turns the skin golden, crackly, and deeply satisfying.

Quick Answer: The Most Reliable Duck Confit Method

The most reliable way to make duck confit at home is to use skin-on, bone-in duck legs. Cure them with salt and aromatics for 12 to 24 hours, then cook them slowly in duck fat in a close-fitting dish at 105°C / 225°F for 3½ to 4 hours, until the meat is tender enough to pull easily from the bone. After that, lift the legs from the fat and crisp them skin-side down in a skillet or roast them in a hot oven until the skin turns golden.

The full recipe card is below, but if you are cooking now, the oven method is the main path to follow. From start to table, duck confit usually takes overnight to about 1¼ days, but most of that time is inactive. The hands-on work is closer to 35–45 minutes, split between curing, arranging the duck, handling the fat, and crisping before serving.

Best path for most cooks: start with the oven method, the lower salt range, and the skillet crisp. Treat lower-fat or gadget methods as fallbacks after you understand the main method.

Duck Confit at a Glance

Best cutSkin-on, bone-in duck legs
ServingsPlan on 1 duck leg per person; very large legs can serve 2 lighter portions with sides
Quantity4 duck legs, about 1–1.4 kg / 2¼–3 lb total
Salt guideAbout 1.5% of the duck’s weight, usually 15–21 g kosher salt for 4 legs
Cure time12–24 hours
Duck fatStart with 750 ml / 25 US fl oz / about 3¼ cups; exact amount depends on pan size
Oven temperature105°C / 225°F, or about 95–100°C / 205–212°F for fan/convection ovens
Cook time3½–4 hours, or until very tender; fan ovens may need 30–60 minutes more
FinishSkillet crisp for the most controlled skin, or hot oven crisp for several legs
Total timeOvernight to 1¼ days, mostly inactive
Duck confit guide showing duck legs, salt, duck fat, oven temperature, cure time, cook time, and crisping method.
Before you start, these duck confit basics prevent confusion: measured salt, low oven heat, gentle fat coverage, and a final crisp for the skin.

Common mistakes to avoid: using a pan that is too wide, measuring fine salt by volume, letting the fat bubble hard, trying to crisp wet skin, and judging doneness only by time. Get those five things right, and the method becomes much calmer.

Success cues: after curing, the skin feels a little firmer; during cooking, the fat barely moves; when done, the leg feels loose and the meat pulls back slightly from the bone; after crisping, the skin is golden, dry, and crackly.

Why This Duck Confit Recipe Works

Good confit is not about complicated technique. Each stage has a clear job: the cure seasons the meat, low oven heat tenderizes it, duck fat protects it from harsh heat, and the final crisping step gives the skin that golden finish people remember. That contrast is the reason duck confit feels special: the meat is gentle and rich, while the skin gives you the crisp edge that keeps the whole plate from feeling heavy.

  • A measured salt cure seasons the legs deeply. Instead of a vague handful of salt, this recipe gives a weight-based range so the duck tastes seasoned, not aggressively salty.
  • Low oven heat keeps the cooking controlled. Duck legs need time for connective tissue to soften. A low oven lets that happen without the fat bubbling hard around the meat.
  • Duck fat surrounds the legs and regulates heat. The fat is not there to make the meat greasy. It creates a steady cooking environment.
  • A close-fitting pan reduces the amount of fat needed. Dish shape can save you from buying far more duck fat than necessary.
  • Crisping happens after the slow cook. Skin that looks soft after confit is normal; the skillet or hot oven creates the crackly finish right before serving.

What Is Duck Confit?

Duck confit is a classic method where duck legs are salted, slowly cooked in fat, and then crisped before serving. Traditionally, confit was also a preservation technique: the cooked duck was stored under a protective layer of fat. Today, most home cooks make it because it creates an incredible contrast of textures — deeply tender meat under crisp, golden skin.

The word confit can make the process sound complicated, but the actual cooking is quiet and controlled. You are not deep-frying the duck. You are cooking it slowly in warm fat, almost like a rich, careful braise. The fat surrounds the meat, protects it from harsh heat, and helps the connective tissue soften gradually.

This is a classic-style oven version, not a pressure-cooker shortcut or a duck breast confit. Those methods can work, but the main recipe here is built around duck legs, a salt cure, duck fat, low heat, and a final crisp.

Duck leg confit works so well because legs have more connective tissue than breast meat. Duck breast is better cooked quickly to medium-rare with crisp skin. For that style, see this duck breast recipe instead.

Duck Confit vs Roast or Braised Duck Legs

All three can be delicious, but they do not cook the same way. Roast duck legs go straight into dry oven heat, braised duck legs soften in liquid, and confit legs are slowly cooked in fat before they are crisped. That fat-cook-first, crisp-later rhythm is what gives the dish its silky meat and golden skin.

Ingredients for Duck Confit

The most reliable version does not need a long, intimidating ingredient list. Duck legs, salt, fat, and a few aromatics are enough. The aromatics should support the duck, not bury it.

Before you cure the duck: use this as a quick check: duck legs, measured salt, clean fat, and simple aromatics are doing most of the work.

Raw duck legs arranged with duck fat, salt, garlic, shallots, herbs, bay leaves, peppercorns, orange zest, and spices.
Duck confit uses a short ingredient list, but each part matters: duck legs bring collagen and fat, salt seasons deeply, and aromatics perfume the slow cook.

Duck Legs

Use 4 skin-on, bone-in duck legs, about 1–1.4 kg / 2¼–3 lb total. The skin is important because it becomes crisp at the end. The bone protects the meat and gives the finished legs a better texture.

If your duck legs are very large, expect the cooking time to sit closer to 4 hours. Smaller legs may be tender earlier, so start checking them after about 3 hours. The timer is useful, but tenderness is the real test.

Plan on one duck leg per person for a main course. If the legs are especially large and you are serving several sides, one leg can sometimes serve two lighter portions.

Duck leg buying visual: Skin-on, bone-in legs are the safest choice because they bring the fat, skin, bone, and connective tissue that make confit work.

Guide comparing skin-on bone-in duck legs, duck leg quarters, and less ideal skinless or uneven duck pieces.
For reliable oven duck confit, choose skin-on, bone-in duck legs of similar size so they cure, cook, and crisp more evenly.
  • Fresh or frozen both work. If using frozen duck legs, thaw them fully in the refrigerator before curing.
  • Choose similar sizes if possible. Legs that are close in size will cure and cook more evenly.
  • Keep the skin on. Skinless duck legs will not give you classic texture.
  • Fatty-looking legs are useful here. Some of that fat renders into the dish and can be strained for later cooking.
  • Skip pre-marinated duck legs. They may already be salty or sweetened, which makes the cure harder to control.

Duck Confit Salt Guide

Use about 1.5% salt by weight of the duck legs. That means about 15 g salt for 1 kg duck legs, 18 g for 1.2 kg, and 21 g for 1.4 kg. For most batches of 4 duck legs, 15–21 g kosher salt lands in the right range.

Duck confit salt guide with duck legs, kosher salt, a kitchen scale, and examples for 1.5 percent salt by weight.
A 1.5% salt cure gives you repeatable control, so the duck tastes seasoned and rich without becoming aggressively salty after resting.

Weighing the salt is better than using spoons because different salts vary dramatically by volume. Fine salt packs more tightly and tastes saltier by the spoonful, so use the lower end if you are not weighing.

For a gentler first try, use the lower end of the range and cure for 12 hours. You can always finish the cooked duck with a little flaky salt, but it is harder to fix a cure that was too heavy.

Duck Fat

Start with about 750 ml / 25 US fl oz / 3¼ cups rendered duck fat for 4 duck legs. You may need less if your pan is close-fitting, or more if your pan is wide. The exact quantity depends on the shape of your dish more than the recipe itself.

For the visual version, see the duck fat guide. Aim to cover the meaty parts with fat. Bone tips can poke out, and a tiny patch of skin above the fat is not a disaster. However, if a large patch of meat is exposed, switch to a smaller dish. If you cannot, turn the legs once halfway through cooking while they are still firm enough to handle.

Aromatics

For a classic but not fussy flavor, use garlic, shallots, thyme, rosemary, bay leaves, and black peppercorns. Orange zest, juniper berries, or coriander seeds are optional. They add a more restaurant-style aroma, but the recipe still works beautifully without them.

  • Garlic gives warmth and depth.
  • Shallots add gentle sweetness.
  • Thyme and rosemary give the duck a classic savory backbone.
  • Bay leaves add quiet background aroma.
  • Black peppercorns give mild spice without making the duck taste peppery.
  • Orange zest is optional, but especially good if you plan to serve the legs with orange sauce.

About the aromatics: use thyme, peppercorns, orange zest, juniper, or coriander in the cure. Use fresh garlic, thickly sliced shallots, bay leaves, rosemary, and more thyme in the cooking fat. Discard the wet cure aromatics before cooking, especially if they are covered in salt or moisture.

Equipment and Pan Size

You do not need restaurant equipment, but the right pan makes the whole recipe easier and cheaper because it reduces the amount of duck fat you need.

Best Pan and Equipment for Duck Confit

A close-fitting vessel is the key piece: it keeps the fat level higher around the legs and makes the rest of the equipment feel simple.

Duck confit equipment setup with a close-fitting baking dish, Dutch oven, skillet, strainer, tongs, and jar of duck fat.
The right pan saves both fat and stress: a close-fitting dish raises the duck fat level, keeps the legs close together, and makes the home oven method easier.
  • Close-fitting oven-safe baking dish, casserole, or small Dutch oven: the most important piece of equipment.
  • Lid, foil, or parchment: keeps the duck covered during the slow cook.
  • Tongs or a wide spatula: for lifting tender legs without tearing them.
  • Heavy skillet: for crisping the skin before serving.
  • Fine-mesh strainer and clean jar: for saving clean duck fat after cooking.

The duck legs should fit in one layer. They can sit close together, but they should not be piled on top of each other. A compact casserole or small Dutch oven usually works better than a wide roasting tray for a first batch.

  • Strongest choice: a small Dutch oven or compact ceramic baking dish.
  • Good choice: a medium casserole with a tight lid.
  • Use only if needed: a wide roasting pan, because it requires more fat.
  • Skip: shallow trays where the duck cannot be mostly covered.

A heatproof jug can make warm fat easier to pour, and a digital thermometer is useful if you want to check that the fat is staying low and steady. A nonstick skillet is helpful for crisping if you are nervous about the skin sticking or tearing.

How Much Duck Fat Do You Really Need?

Duck fat is usually the moment people pause — not because the recipe is hard, but because the jar looks expensive and the instructions often sound vague about how much you really need. This is the part worth making practical.

Recipes say “cover the duck with fat,” but that can mean very different amounts depending on the pan. The practical rule is simple: use the smallest oven-safe dish that fits the duck legs in a single layer without stacking them. A compact pan saves fat and keeps the duck more evenly covered.

Pan Size and Duck Fat Amount

Use this pan-size guide before buying more duck fat, because the same four legs can need very different amounts in different dishes.

Duck fat guide comparing a small baking dish, medium casserole or Dutch oven, and wide roasting pan with different fat amounts.
Duck fat needs change with the dish, not just the number of legs; a narrow pan raises the fat level and reduces waste.
Pan setupLikely duck fat needed for 4 legsMost useful for
Small close-fitting baking dish500–750 ml / about 2–3¼ cupsSaving duck fat
Medium casserole or Dutch oven750 ml–1 liter / about 3¼–4¼ cupsMost home batches
Wide roasting pan1 liter+ / 4¼ cups+Only when you have enough fat

This is usually the moment the recipe starts to feel less extravagant and more manageable: the duck does not need a dramatic pot of fat, just the right dish and enough quiet heat.

Scaling the recipe: for 2 duck legs, keep the salt at about 1.5% of the duck’s weight and use the smallest dish that fits them. For 6–8 legs, keep them in one layer or use two dishes. The fat amount changes with the dish, not just the number of legs, and the cook time still depends on tenderness.

How to Cure Duck Legs for Confit

The cure should feel controlled, not like you are packing the duck in salt. You are seasoning the meat deeply and giving the surface time to firm slightly before the slow cook.

What the Cure Should Look Like

The surface should look evenly seasoned, with aromatics adding flavor rather than burying the duck under salt.

Raw duck legs in a baking dish being sprinkled with salt, herbs, peppercorns, bay leaves, and orange zest.
Curing duck legs should feel measured, not intimidating: salt seasons the meat while herbs, bay, pepper, garlic, and citrus add quiet background flavor.
  1. Pat the duck legs dry. Moisture on the surface makes the cure less even.
  2. Rub with salt. Use about 1.5% salt by weight, or 15–21 g kosher salt for 4 duck legs, depending on their total weight.
  3. Add cure aromatics. Use thyme, peppercorns, optional orange zest, and optional juniper or coriander here if you like.
  4. Cover and refrigerate. Cure for 12–24 hours.
  5. Remove excess cure. Wipe off aromatics and visible salt. Rinse only if there are clumps of salt or the cure looks heavy.
  6. Dry very thoroughly. If you have time, let the legs sit uncovered in the refrigerator for 30–60 minutes after wiping or rinsing. The drier the surface, the cleaner the cooking fat and the better the final crisping.

For most home cooks, 12 hours gives balanced seasoning and 24 hours gives deeper flavor. A 1–2 hour cure can work for shortcut versions, but for this recipe, 12–24 hours is the safest and most balanced range. For a first batch, choose 12 hours and the lower salt range.

How to Make Duck Confit in the Oven

Start with this oven method if this is your first batch. It gives you the most reliable balance of classic texture, steady heat, and kitchen sanity. Once the legs are in the fat and the oven is low, your job is mostly to leave them alone.

The duck cooks at 105°C / 225°F for 3½ to 4 hours, then gets crisped at the end. If you are using a fan or convection oven, reduce the temperature to about 95–100°C / 205–212°F and check the fat after the first hour. The fat is right when it barely bubbles instead of boiling hard.

Duck confit recipes vary because oven temperature, pan shape, leg size, and how deeply the meat is submerged all change the timing; use 3½–4 hours as the main window, but let tenderness decide.

Before you start the oven method: this step-by-step image shows the full rhythm: cure, arrange, cover with fat, cook low, test tenderness, and crisp.

Step-by-step duck confit guide showing curing, arranging in a close dish, adding duck fat, slow cooking, checking tenderness, and crisping.
The oven method works because each stage has one job: season the duck, cook it gently in fat, test tenderness, and crisp only at the end.

Duck Confit Temperature and Cook Time

The low oven target keeps the fat calm; the clock gives you a window, but tenderness still decides the finish.

Duck confit temperature guide showing 105°C or 225°F, fan oven adjustment, 3½ to 4 hour cook time, and tenderness cues.
The 105°C / 225°F oven target keeps the fat calm, but real cook time still depends on leg size, dish shape, and fat depth.

Step 1: Melt the Duck Fat

Warm the duck fat just until liquid. It only needs to be fluid enough to pour around the duck legs. If it is hot enough to sputter, it is hotter than it needs to be.

Step 2: Arrange the Duck in a Close-Fitting Dish

Place the cured, dried legs in the smallest oven-safe dish that holds them in one layer without stacking. Add fresh garlic, thickly sliced shallots, bay leaves, rosemary, thyme, and peppercorns around the legs. Discard the wet cure aromatics rather than carrying all of that salt and moisture into the cooking fat.

Step 3: Cover with Duck Fat

Pour warm fat over the legs until the meaty parts are mostly submerged. If you are just short, press a piece of parchment directly over the duck before covering the dish. This helps keep the legs tucked under the fat. If a large patch of meat remains exposed, move everything to a smaller dish or check the short-on-duck-fat guide before adding more fat.

Step 4: Cover and Cook Low

Cover the dish with a lid, foil, or parchment plus foil. Cook at 105°C / 225°F for 3½ to 4 hours. Keep the fat nearly still, with only a few lazy bubbles at the edges. Hard bubbling means the heat is too aggressive.

What the Fat Should Look Like During the Slow Cook

This is the visual cue to watch for: the fat should be warm and quiet, not boiling around the duck.

Duck legs cooking gently in golden duck fat with garlic, shallots, bay leaves, thyme, and only a few small bubbles.
During the slow cook, the duck fat should barely bubble. Hard bubbling means the oven heat is too aggressive for silky confit texture.

Step 5: Check for Tenderness

Use the timer as a checkpoint; tenderness decides when the duck is ready. The legs are done when the meat offers almost no resistance when pierced, the joint bends easily, and the meat starts to pull back from the bone.

If the meat still feels tight, use the doneness cues and give it more time. This method is forgiving when the heat is low and steady. It is much better to cook the legs a little longer in quiet fat than to pull them before the connective tissue has softened.

Step 6: Cool in the Fat or Crisp Right Away

If serving immediately, lift the legs carefully from the fat and let the excess drip away before crisping. If making ahead, cool them until they are no longer steaming, transfer to a clean container with enough fat to cover, and refrigerate promptly. Move the duck and fat into shallow storage once they are no longer steaming so they chill faster.

How to Know It Is Done

This dish is done by texture, not by a neat internal temperature target. The legs need enough time for connective tissue to soften. That is why the most useful cues are physical.

How to Know Duck Confit Is Done

Look for looseness, not drama: the leg should bend easily and the meat should give way without force.

Cooked duck confit leg being tested with a fork, with tender meat, exposed bone, and a small close-up of pulled meat.
A done duck confit leg should feel relaxed: the joint loosens, the meat pulls from the bone, and a fork meets very little resistance.
  • Meat offers almost no resistance when pierced with a skewer or small knife.
  • At the joint, the leg bends easily.
  • You may see the meat pull back slightly from the bone.
  • A fork can loosen the meat without force.
  • The skin may still look soft and pale; that is normal before crisping.

If the meat still feels tight, return the legs to the fat and cook for another 30–45 minutes. Because the heat is low, an extra half hour is usually safer than serving duck that has not fully relaxed.

How to Crisp the Skin

The crisping step is where the recipe starts to feel special. The meat is already cooked; you are not trying to cook the duck again. You are slowly waking up the skin.

Before crisping, lift the legs from the fat and wipe away any thick clinging fat from the skin. Let them drain on a rack for a few minutes if they look especially glossy. Skin that is wet or coated in too much fat will take longer to crisp and may brown unevenly.

For the crispest skin, make the legs ahead, chill them in the fat, then lift, wipe, and crisp when cool or cold. The skin is easier to handle once the fat has set, and it is less likely to tear in the pan.

Crisp the legs as close to serving as possible. The meat can wait in the fat, but the skin is at its best within minutes of crisping.

How to Crisp Duck Confit Skin

The slow cook is already done, so the final heat should focus on dry skin, steady browning, and a crisp finish right before serving.

Duck confit crisping guide showing one leg in a skillet and several legs on a rack in the oven.
The duck is already cooked, so crisping is only about texture: dry the skin first, then use a skillet or hot oven until it turns deeply golden.

Most Reliable Method: Skillet Crisp

Place the legs skin-side down in a heavy skillet or nonstick skillet over medium heat. Cook for 6–10 minutes, or until the skin is crisp and deeply golden. Nonstick is especially forgiving if you are nervous about the skin sticking or tearing.

If the skin seems stuck, it usually needs more time. Once enough fat renders, it loosens more easily. Let it crisp until it naturally releases from the pan; this is a patience step, not a high-heat step.

This is where the quiet, slow recipe finally turns dramatic.

Hands-Off Method: Hot Oven Crisp

Place the legs on a rack set over a tray and roast at 200°C / 400°F for 20–30 minutes, until the skin is crisp and the meat is hot. This method is useful when cooking several legs at once.

Fast Finish: Broiler or Grill

A broiler or grill can help finish stubborn skin, but use it carefully. Duck skin can go from golden to burnt quickly. Keep the legs several inches from the heat and watch closely for the last 2–5 minutes.

If You Are Short on Duck Fat

Classic confit uses rendered duck fat because it gives the cleanest, fullest flavor. However, if the price of duck fat is the only thing stopping you, you can still make a useful confit-style version. Duck fat is still the best choice for clean flavor and silky meat, while substitutes are practical fallbacks when budget or availability gets in the way.

When the Duck Fat Looks Too Low

A compact dish is often the difference between exposed meat and good coverage, especially when you are trying to avoid buying another jar of fat.

Comparison showing duck legs in a large dish with low fat coverage and a smaller dish where the fat covers the meat better.
When duck fat looks low, the fix is often simple: move the legs into a snug dish so the fat surrounds more of the meat.

A small amount of duck fat can still work when the dish is compact enough, because the legs will render more fat as they cook. Some easy confit-style methods add a small splash of water or stock at the beginning to prevent scorching while the fat renders. This can be delicious, but it is closer to a confit-style braise than full duck-fat confit.

Duck Fat Substitutes for Duck Confit

Substitute fats can help when duck fat is expensive or unavailable, but the flavor and storage behavior will not be exactly the same.

Comparison of duck fat, goose fat, lard, olive oil, butter, and duck fat mixed with neutral oil for duck confit.
Duck fat gives the cleanest classic flavor, but goose fat, lard, olive oil, butter, or mixed fats can work when you understand the tradeoffs.
Fat optionHow it worksTradeoff
Duck fatClassic choice with the cleanest duck flavorMost traditional, but can be expensive
Goose fatClosest substitute if duck fat is unavailableRich and poultry-friendly, but not identical
LardWorks as a cooking fatAdds a porkier flavor
Olive oilCan create a confit-style resultFlavor becomes more olive-oil-forward
ButterTasty shortcut when duck fat is unavailableContains water and milk solids, so storage is shorter
Duck fat + neutral oilCan stretch a small amount of duck fatLess classic flavor; treat leftovers conservatively

If using butter, strain and store the leftover fat separately and treat the cooked duck like normal leftovers rather than traditional fat-preserved confit.

Other Ways to Cook Duck Confit

Once you understand the oven method, the shortcuts and gadget versions are easier to judge. These are useful when they solve a real problem — less duck fat, less oven time, or more hands-off cooking — but they should not distract from the main method if this is your first batch.

Method comparison visual: The oven method stays the main path here, while the other approaches are practical alternatives for specific kitchens.

Duck confit method guide comparing oven confit with sous vide, slow cooker, low-fat starter, and Instant Pot approaches.
Oven duck confit is the best first path for classic texture, while sous vide, slow cooker, low-fat, and pressure-cooker versions solve different kitchen problems.
MethodBest forTradeoff
Oven confitFirst batch and silky meat with crisp skinNeeds enough fat and time
Sous videLess added fat and precise temperatureLong cook; no traditional fat storage
Slow cookerHands-off tendernessSkin must be crisped separately
Low-fat starterBudget cooking or limited duck fatMore confit-style braise than classic confit
Instant PotSpeed-focused experimentLess classic texture and control

Make-Ahead Timeline

This is one of those dishes that rewards planning ahead. You do not need to stand over the stove all day; you just need to give the cure and slow cook enough time to do their work.

How the timing works: the cure and slow cook are mostly inactive, while the final crisping happens just before serving.

Make-ahead duck confit timeline showing curing, cooking low, crisping before dinner, and straining duck fat after serving.
Duck confit rewards planning because most of the work is inactive; after the legs are cooked, the final crisping step makes them taste freshly finished.
WhenWhat to do
Night before or up to 24 hours before servingSalt-cure the duck legs with aromatics.
Earlier on serving day or the day beforeCook the legs slowly in duck fat until tender.
Before dinnerLift the chilled legs from the fat, wipe the skin well, and crisp.
After servingStrain the fat, store leftovers, and save clean duck fat for later cooking.

What to Serve with Duck Confit

Because the legs are savory and full-flavored, the best sides either absorb the duck juices, cut through the fat, or add a little sweetness and acidity. You do not need many sides. One potato or bean dish, one bright salad or vegetable, and one sauce are enough.

My favorite way to serve it is simple: one crisp leg, potatoes that have met a spoonful of duck fat, a bitter green salad with a sharp dressing, and a small spoon of orange or cherry sauce. That plate gives you richness, crunch, acidity, and enough restraint that the duck remains the reason everyone is at the table.

The best plate gives you crackly skin, tender meat, something starchy, and something sharp enough to make you want the next bite.

How to build the plate: use the sides to balance the richness: something starchy, something green or sharp, and a sauce that wakes up the plate.

Duck confit served with roasted potatoes, bitter greens, beans or lentils, red cabbage, and several sharp sauces.
Because duck confit is rich, the best sides either absorb fat, add freshness, or bring acidity through potatoes, greens, beans, cabbage, or sharp sauces.

Easy Plate Ideas

  • Bistro-style plate: one crisp duck leg, duck fat potatoes, bitter greens, and orange or cherry sauce.
  • Rustic plate: duck confit with white beans, braised cabbage, and mustard vinaigrette.
  • Lighter plate: crisp duck over lentils, herbs, and something cold and sharp, such as a simple cucumber salad.
  • Cold-weather plate: duck legs with potatoes, roasted carrots, and a red wine or cherry sauce.

Potatoes, Beans, and Starches

  • Duck fat potatoes — the most obvious and probably the most memorable pairing.
  • Mashed potatoes — if you want a softer side, these garlic mashed potatoes give the duck a creamy, buttery base.
  • White beans — especially with garlic, herbs, and a little stock.
  • Lentils — earthy, simple, and excellent with full-flavored duck.
  • Potato salad — for a make-ahead side, choose a mustardy or vinegar-leaning potato salad rather than a very heavy creamy one.

Vegetables and Greens

  • Bitter greens such as arugula, frisée, endive, or radicchio.
  • Braised cabbage, especially red cabbage with a little vinegar.
  • Roasted carrots with herbs or citrus.
  • Green beans with garlic and lemon.
  • Mushrooms sautéed in a little duck fat.
  • Lemony chickpea salad if you want the meal to feel fresh but still filling.

Sauces and Fruit Pairings

The dish does not need a heavy sauce, but a small spoonful of something sharp, fruity, or winey can make the plate feel complete. Orange sauce is a classic pairing; this orange sauce for duck works especially well if you use orange zest in the cure.

Choose orange or cherry sauce for a sweet-sharp plate, red wine sauce for a deeper dinner-party feel, mustard vinaigrette for a lighter salad-style plate, and plum sauce if you want a sweeter, fruitier direction. For a cheese-board-style plate, a small spoon of fig jam can work beside crisp duck, bitter greens, and something salty.

Recipes Using Duck Confit

The quiet advantage of duck confit is that tomorrow’s dinner is already halfway done. Once the duck is cooked, the meat can be shredded and folded into quick meals that taste far more luxurious than the effort involved.

Best Ways to Use Leftover Duck Confit

A small amount of shredded duck can carry a whole meal, especially when it is crisped briefly before being folded into pasta, beans, hash, or salad.

Leftover duck confit used in pasta, potato hash with egg, salad, tacos, and beans.
Leftover duck confit is powerful in small amounts; fold it into pasta, hash, salad, tacos, or beans to make simple meals taste rich and restaurant-worthy.

To use leftover duck confit, lift the meat from the fat, remove the bone, shred the meat, and crisp it in a skillet with a spoonful of duck fat. Add it near the end of cooking so it stays savory and textured instead of disappearing into the dish.

The easiest wins are pasta, hash, beans, and salads because they let a small amount of shredded duck flavor the whole dish.

  • Pasta with duck confit: toss shredded duck with garlic, mushrooms, herbs, and a little pasta water.
  • Warm duck salad: serve crisp shredded duck over bitter greens with a sharp vinaigrette.
  • Potato hash with duck confit: crisp potatoes in duck fat, then add shredded duck and herbs.
  • Crispy duck tacos: crisp the shredded meat and serve with pickled onions.
  • Grilled cheese with duck confit: use a small amount of shredded duck with sharp cheese and mustard.
  • White beans with duck confit: fold the meat into white beans with garlic, thyme, and stock.
  • Ramen with duck confit: add shredded duck to broth, noodles, greens, and a soft egg.
  • Crisp duck over fries: for an occasional comfort-food plate, pile crisp shredded duck over hot fries and add a sharp sauce or pickled onions.

What to Do with Leftover Duck Fat

Leftover duck fat is part of the reward. Strain it, chill it, and use it wisely. It turns ordinary potatoes into something memorable and adds depth to vegetables, eggs, mushrooms, beans, and seared meats.

Best Uses for Leftover Duck Fat

Clean, strained duck fat is worth saving because even a spoonful can make simple vegetables, eggs, or beans taste richer.

Jar of clean golden duck fat surrounded by roast potatoes, eggs, mushrooms, cabbage, green beans, roasted vegetables, strainer, and jars.
After cooking, strain and chill the leftover duck fat; then use small spoonfuls to add deep savory flavor to potatoes, eggs, mushrooms, cabbage, beans, and vegetables.
  • Strain it through a fine-mesh sieve while warm, not scorching hot.
  • Remove spent aromatics such as herbs, garlic, shallots, bay leaves, and peppercorns before storing the fat.
  • Let juices settle if the fat looks cloudy; watery juices can collect underneath.
  • Separate the clean fat from the juices after chilling if a darker layer settles at the bottom.
  • Store in a clean jar in the fridge.
  • Use clean utensils each time you scoop fat out.
  • Do not pour hot fat down the sink. Let unwanted fat solidify, then discard it properly.

After chilling, clean fat will set on top and darker juices may settle underneath. The pale solid layer is fat. The darker layer underneath is meat juice, salt, and aromatics. Save the clean fat for cooking; use the darker juices quickly in beans, pan sauce, or gravy, or discard them.

Use duck fat for roast potatoes, fried eggs, mushrooms, cabbage, beans, carrots, Brussels sprouts, and pan-seared meats. Discard it if it smells off, looks moldy, or has been contaminated with crumbs or meat juices over time.

Storage, Freezing, and Reheating

This is one of those dishes that rewards making ahead, but home storage should be handled carefully. Traditional confit was preserved under fat, but modern kitchens vary in cleanliness, temperature control, salt levels, and handling. This recipe is written as a modern dinner recipe, not a long-term preservation project.

The fat helps protect the texture, but this recipe uses a regular salt cure, not curing salt for long-term preservation. In a home kitchen, it is safest to treat the cooked legs like cooked poultry unless you are deliberately following a tested preservation method. Once the duck and fat are no longer steaming, move them into shallow storage so they cool evenly and safely.

Storage visual guide: This image keeps the storage advice modern and safe: chill promptly, store airtight, freeze when needed, and crisp after reheating.

Duck confit storage guide showing a refrigerated container, freezer bag, reheating pan, crisping skillet, date labels, and safety notes.
For home cooks, duck confit should be treated as cooked food, not shelf-stable preservation: cool promptly, store airtight, freeze if needed, and crisp after reheating.

How Long to Store Duck Confit

For normal home storage, refrigerate the cooked legs for 3–4 days. When in doubt, freeze instead of stretching fridge storage.

SituationBest methodNotes
Normal cooked duck confitRefrigerate 3–4 daysKeep covered and chilled
Traditional fat-covered storageOnly for careful cooks using very clean containersFor everyday home cooking, use 3–4 days or freeze
Low-fat or butter shortcut versionTreat as normal cooked duckUse 3–4 days in the fridge; do not rely on long fat-covered storage
FreezingFreeze up to 3 monthsFreeze with some fat to protect the meat
Reheating whole legsSkillet or ovenReheat slowly, then crisp the skin
Reheating shredded meatSkillet with a little duck fatBest for pasta, hash, tacos, and beans

How to Reheat Without Losing Crisp Skin

For best texture, skip the microwave for whole legs. The meat may warm, but the skin will turn soft. If you are shredding the duck for pasta or hash, reheating in a skillet with a little duck fat is much better.

When storage feels uncertain — especially if the duck cooled slowly or sat out longer than planned — treat it like cooked poultry and follow standard leftovers guidance rather than relying on old-style confit storage. The USDA leftovers and food safety guide is a useful reference.

Duck Confit Troubleshooting

If something goes wrong, start here; this section is also worth checking before you change the oven temperature, salt, or pan. Most duck confit problems are fixable because the cooking is slow.

How to Fix Common Duck Confit Problems

Most problems point back to the same few causes: salt, heat, pan size, surface moisture, or how the fat was strained.

Duck confit troubleshooting guide showing fixes for tough meat, too salty duck, greasy texture, soft skin, and cloudy duck fat.
Most duck confit problems are fixable: cook tough meat longer, balance salt with plain sides, drain excess fat, dry the skin, and strain cloudy fat gently.
ProblemLikely causeFix nowFix next time
Duck is too saltyCure was too long, or fine salt was used by volumeServe with unsalted potatoes, beans, lentils, or bitter greensWeigh the salt and use a shorter cure
Meat is toughDuck was not cooked long enoughReturn to the fat for 30–45 minutesCook to tenderness, not just time
Meat is dryFat was too hot or bubbling hardServe with sauce or shred into pasta/beansLower the oven temperature and keep the fat barely moving
Final duck tastes greasyToo much fat clinging to the skin before crispingWipe the skin and drain on a rack after crispingLet excess fat drip off before skillet or oven finishing
Skin will not crispSurface is wet or coated with too much fatWipe well and crisp skin-side down in a skilletChill uncovered or wipe very well before crisping
Skin browns but stays softHeat is too high or the skin is still dampLower heat and keep cooking skin-side downDry the legs better before crisping
Skin tearsMoved too soon or pan was too hotLet the rest of the skin release naturallyUse medium heat and wait before turning
Not enough duck fatPan is too wideMove duck to a smaller dishChoose a compact dish from the start
Fat looks cloudyMoisture and juices mixed into the fatStrain, chill, and separate carefullyStore clean strained fat separately from juices

Duck Confit FAQs

Is duck confit hard to make?

Not really. Duck confit asks for time more than skill. Most of the recipe is inactive: salt the legs, let them rest, cook them slowly in fat, then crisp the skin before serving.

Which cut of duck is best for confit?

Skin-on, bone-in legs are the cut to buy because they have the fat, skin, bone, and connective tissue that make confit work. Duck breast is better cooked quickly and is not the classic cut for confit.

How much duck fat do I really need?

For 4 duck legs, start with about 750 ml / 25 US fl oz / 3¼ cups rendered duck fat, but pan size matters more than the number. A compact dish may need less, while a wide roasting pan may need much more.

Does duck confit need to be fully submerged in fat?

The meaty parts should be covered by fat for the most even cooking. Bone tips or a very small patch of skin can sit above the fat, especially if you use parchment and a tight cover. If too much meat is exposed, move the legs to a smaller pan before adding more fat.

What temperature should duck confit cook at?

This recipe uses 105°C / 225°F for 3½–4 hours. For fan or convection ovens, reduce the temperature to about 95–100°C / 205–212°F. The goal is low, steady heat: the fat should barely bubble, not boil aggressively.

Why is my duck confit not crispy?

Soft skin after the slow cook is normal — the crisping happens at the end, not during the fat cook. Wipe away excess fat, use medium heat, and give the skin enough time in the pan before moving it.

Can I make duck confit without duck fat?

You can make a confit-style duck leg with goose fat, lard, olive oil, butter, or a mix of duck fat and neutral oil, but duck fat gives the cleanest classic flavor. Treat substitute-fat versions like normal cooked leftovers rather than long fat-preserved confit.

Can I make duck confit with only 2 legs?

Yes. Keep the salt at about 1.5% of the duck’s weight and use the smallest oven-safe dish that fits the legs in one layer. The duck fat amount will depend more on the dish size than the number of legs.

Can I reuse duck fat after making confit?

Yes, if it is clean and smells fresh. Strain it, chill it, separate the pale fat from darker juices underneath, and use clean utensils each time. Discard it if it smells off, looks moldy, or has been contaminated with crumbs or meat juices.

What can I make with leftover duck confit?

Use leftovers in pasta, salads, tacos, hash, white beans, risotto, ramen, grilled cheese, or warm grain bowls. Shred the meat and crisp it in a skillet with a little duck fat for the best flavor.

At this point, the method is simple: cure, cover with fat, cook low, crisp. The recipe card below keeps the steps tight so you can cook from it.

Duck Confit Recipe

This duck confit recipe turns skin-on, bone-in duck legs into silky, pull-apart meat with golden crisp skin. The method is slow but mostly hands-off, with clear guidance for salt, duck fat, pan size, make-ahead storage, and final crisping.

Yield
4 servings
Total Hands-On Time
35–45 minutes
Prep Time
25 minutes
Inactive Cure Time
12–24 hours
Oven Cook Time
3½–4 hours
Finish Time
10–30 minutes
Total Time
Overnight to 1¼ days, mostly inactive
Method
Oven confit

Before you start: use a close-fitting oven-safe dish. Pan size affects how much duck fat you need.

Ingredients

For the Duck and Cure

  • 4 skin-on, bone-in duck legs, about 1–1.4 kg / 2¼–3 lb total
  • 15–21 g kosher salt, or about 1.5% of the duck’s weight
  • 2–4 small thyme sprigs
  • 1 teaspoon black peppercorns, lightly crushed
  • Optional: 2 strips orange zest
  • Optional: 4–6 juniper berries or 1 teaspoon coriander seeds

For Cooking

  • 750 ml / 25 US fl oz / about 3¼ cups rendered duck fat, plus more if needed depending on pan size
  • 6 garlic cloves, lightly smashed
  • 1–2 shallots, halved or thickly sliced
  • 4 small thyme sprigs
  • 1–2 small rosemary sprigs
  • 2 bay leaves
  • Optional: a few extra black peppercorns

Instructions

Cure and Cook the Duck

  1. Cure the duck. Pat the duck legs dry. Rub evenly with salt, then add thyme, peppercorns, and any optional cure aromatics. Cover and refrigerate for 12–24 hours.
  2. Prepare for cooking. Remove the duck from the cure. Wipe off aromatics and visible salt. Rinse only if there are clumps of salt or the cure looks heavy, then pat very dry. Discard the wet cure aromatics.
  3. Heat the oven. Preheat to 105°C / 225°F. If using a fan/convection oven, use about 95–100°C / 205–212°F and expect the cook time to run slightly longer.
  4. Melt the duck fat. Warm the duck fat just until liquid. It should be fluid enough to pour, not sputtering hot.
  5. Arrange and cover. Place the legs in the smallest close-fitting oven-safe dish or Dutch oven that holds them in one layer without stacking. Add fresh garlic, shallots, herbs, bay leaves, and optional peppercorns. Pour warm duck fat over the legs until the meaty parts are mostly submerged. Use parchment directly over the duck if needed, then cover with a lid or foil.
  6. Cook low and slow. Bake for 3½–4 hours, until the meat is very tender, pulls back slightly from the bone, and offers almost no resistance when pierced. The fat should barely bubble, not boil hard.

Cool, Crisp, and Serve

  1. Cool or finish. If making ahead, cool the legs until no longer steaming, transfer them to a clean container with enough fat to cover, and refrigerate promptly. If serving now, carefully lift them from the fat and let excess fat drip away.
  2. Crisp the skin. Wipe excess fat from the skin. Crisp skin-side down in a heavy or nonstick skillet over medium heat for 6–10 minutes, or roast on a rack at 200°C / 400°F for 20–30 minutes.
  3. Serve. Serve with duck fat potatoes, beans, lentils, bitter greens, braised cabbage, or a sharp fruit sauce such as orange, cherry, or plum.

Recipe Notes

  • Keep the fat quiet: the duck should cook slowly, not fry.
  • Judge the skin at the end: it will look soft after the slow cook; it crisps only during the final skillet or oven finish.
  • Salt carefully: weigh the salt if possible. If measuring by volume instead of weight, use coarse kosher salt; fine salt can make the cure too salty.
  • Leftover fat: strain, chill, and reuse clean duck fat for potatoes, eggs, mushrooms, beans, and vegetables.
  • Butter shortcut note: if you used butter instead of duck fat, the leftover fat will contain milk solids and water, so store it separately and use it sooner.

Storage

Refrigerate cooked duck confit for 3–4 days or freeze for up to 3 months. This recipe is for modern home storage, not long-term preservation. Reheat slowly, then crisp before serving.

Final texture visual: By the end of the process, the plate should show both parts of the method: tender meat from the slow cook and crisp skin from the final finish.

Duck confit leg served with pulled tender meat, crisp skin, roasted potatoes, salad greens, sauce, and a jar of duck fat.
By the end, this recipe gives you two rewards: crisp duck confit for dinner and clean golden duck fat for potatoes, eggs, vegetables, and beans.

The first time you make duck confit, the process feels mysterious. The second time, you know the rhythm: salt, rest, cover, cook, crisp. By then, the mystery is gone — and what is left is tender duck, crackly skin, and a jar of golden fat waiting for the next meal.

Back to top ↑

Posted on Leave a comment

Egg Foo Young Recipe with Takeout-Style Gravy

Golden Egg Foo Young patties served with brown gravy, sliced scallions, steamed rice, chopsticks, and a spoon on a ceramic plate.

The best Egg Foo Young recipe tastes like old-school Chinese-American takeout rebuilt for a home skillet: soft egg in the center, browned edges outside, little snaps of vegetable crunch, and brown gravy that turns plain rice into dinner. It should not taste like a flat breakfast omelet wearing sauce. It should feel sturdier, saucier, and more generous than that.

Homemade Egg Foo Young usually goes wrong in predictable ways: the filling is too wet, the patties tear when flipped, the eggs turn rubbery, or the gravy thickens into paste. This version keeps the mixture balanced, uses a clear 6-egg to 2–2½ cup filling ratio, and treats the first patty as a test round so you can adjust the heat, oil, or scoop size before the whole batch is cooked. If your first patty misbehaves, jump to troubleshooting before cooking the next one.

The method starts in a skillet and ends with hot gravy over rice. You can pan-fry for an easy weeknight dinner, shallow-fry for better browned edges, or use the restaurant-style method when you want puffier patties. Either way, the goal is the same: tender egg patties that hold together, a sauce that moves instead of sitting like paste, and a plate that finally feels like Egg Foo Young rather than an omelet with toppings.

Why the gravy should move: the sauce should coat the patty while still flowing into the rice. If it sits like paste, the dish starts feeling heavy before the eggs have a chance to shine.

Glossy brown gravy being poured from a small pitcher over a golden Egg Foo Young patty with rice blurred in the background.
The sauce should move as it pours. If it sits heavily on the patty, thin the gravy before serving so the eggs stay tender instead of buried.

Quick Answer: What Is Egg Foo Young?

Egg Foo Young is a Chinese-style egg patty made with beaten eggs, vegetables, and often shrimp, chicken, pork, beef, tofu, or extra vegetables. In Chinese-American takeout, it is usually served as separate patties with brown gravy and rice.

You may also see it written as Egg Foo Yung, Egg Fu Yung, or Egg Foo Yong. The spelling changes, but the idea stays the same: vegetables and protein are mixed directly into beaten eggs, cooked into patties, and finished with a savory brown sauce.

This recipe is built for the gravy-over-rice version people usually mean when they crave Egg Foo Young: browned edges, a tender center, crisp little vegetables, and enough sauce to make rice feel like part of the dish. It is not a folded breakfast omelet, a baked egg casserole, or a dry scramble. The patty should be sturdy enough for sauce, soft enough to cut cleanly, and generous enough that every bite tastes like more than plain egg. If the sauce is the part you came for, go straight to the brown gravy method.

Cut-open Chinese-American Egg Foo Young patty served with rice, brown gravy, scallions, a spoon, and a takeout box in the background.
This is the old-school Chinese-American version many people mean when they crave Egg Foo Young: separate patties, rice, scallions, and a savory brown sauce.

What this recipe prevents: wet filling that tears the patties, flat omelet-like rounds with no browned edges, bland eggs that depend completely on sauce, and gravy that turns gluey before it reaches the plate.

Recipe snapshot

Egg Foo Young at a Glance

Yield4 servings / 6 medium patties
Prep Time15 minutes
Cook Time20 minutes
Total Time35 minutes

Main method: pan-fried or shallow-fried patties in a skillet.

Restaurant-style option: deeper oil for puffier, crisp-edged patties.

Sauce: brown cornstarch gravy with stock, soy sauce, oyster sauce, sesame oil, and white pepper.

Best served with: steamed rice, fried rice, noodles, stir-fried vegetables, or a crisp cucumber salad.

Fastest weeknight version: use cooked shrimp, leftover chicken, roast pork, pressed tofu, or quick-cooking vegetables. Make the gravy first, cook smaller ⅓- to ½-cup patties, and adjust after the first one instead of forcing the whole batch through the same heat.

Cooked shrimp, chopped chicken, pressed tofu, scallions, eggs, and a skillet arranged for a quick Egg Foo Young dinner.
For a faster weeknight Egg Foo Young, start with cooked protein or pressed tofu; then keep the patties smaller so they set quickly and flip cleanly.

Why This Egg Foo Young Recipe Works

The egg has to stay in charge. That is the whole recipe. You want enough vegetables and protein to make the patties taste generous, but enough beaten egg to set around everything and hold the shape when you lift it from the pan.

  • The ratio keeps the patties stable. Six large eggs comfortably hold about 2 to 2½ cups total filling.
  • Small, controlled add-ins cook cleanly. Drained sprouts, thin cabbage, diced onion, and chopped protein stay tucked inside the egg instead of leaking water into the pan.
  • A tiny cornstarch slurry helps structure. One teaspoon in the egg mixture helps the patty hold without making it bouncy.
  • The sauce stays adjustable. Making the gravy separately means you can thin, thicken, or season it without overcooking the eggs.
  • The oil level controls texture. Pan-fry for weeknight ease, shallow-fry for better edges, or use deeper oil for restaurant-style puff.

The main rule: think of the mixture as eggs carrying filling, not vegetables barely glued together with egg. If the bowl looks like a dry pile or a loose soup, fix that before the first patty hits the pan.

Spoon lifting scoopable Egg Foo Young batter with beaten egg coating bean sprouts, scallions, onion, and chopped protein.
Before the mixture reaches the skillet, it should look scoopable and egg-forward. In other words, the eggs should carry the filling, not barely glue it together.

Ingredients for Fluffy Egg Foo Young

This is the kind of recipe that turns a few eggs, a handful of vegetables, and a little gravy into a proper meal. The ingredient list is simple; the important part is cutting the filling small enough to cook quickly and keeping it steady enough to stay inside the patty.

Small pieces are your friend here. They cook quickly, stay tucked into the egg, and give every bite crunch, sweetness, and little pockets of savoriness.

Egg Foo Young ingredients including eggs, bean sprouts, scallions, cabbage, chopped protein, soy sauce, stock, oyster sauce, and cornstarch on a prep counter.
Good Egg Foo Young starts before the pan: dry sprouts, small vegetables, measured filling, and a ready gravy base make the cooking much easier to control.

To make the Egg Patties

Eggs, Vegetables, and Protein

  • Eggs: Six large eggs make 6 medium patties, enough for 4 servings with rice and gravy.
  • Bean sprouts: One cup / about 70–85 g gives the patties classic crunch without crowding the eggs. Drain them well so the mixture stays scoopable. No sprouts? See the bean sprout substitutes.
  • Protein or tofu: Keep this to 115–140 g / 4–5 oz for the 6-egg version. Cooked shrimp, chicken, roast pork, or firm tofu all work as long as they are chopped small.
  • Vegetable-only version: Choose thin vegetables and keep the total filling within the ratio below. A quick sauté helps mushrooms, zucchini, or bell pepper settle into the eggs instead of loosening the mixture.
  • Onion: A small ¼ cup / about 35 g is enough once it is finely diced.
  • Cabbage or mushrooms: Use ⅓ to ½ cup / about 35–50 g finely shredded cabbage or thinly sliced mushrooms. Mushrooms should be pre-cooked if they seem watery.
  • Scallions / spring onions: Two scallions / about 15–20 g add freshness without making the mixture heavy.

Drain Bean Sprouts Before Mixing

Bean sprouts add the classic crunch, but they also carry water. Drain them before mixing so the egg can set cleanly around the filling.

Fresh bean sprouts draining in a fine mesh strainer over a bowl on a kitchen counter.
Wet sprouts can loosen the egg mixture quickly, so draining them well gives the first patty a much better chance of holding together.

Seasoning, Structure, and Frying Oil

  • Cornstarch: Mix 1 teaspoon / about 3 g cornstarch with 1 tablespoon / 15 ml cold water before whisking it into the eggs.
  • Sesame oil: A small ½ teaspoon / 2.5 ml adds aroma. More can overpower the patties.
  • White pepper: A little white pepper gives the eggs and gravy that warm Chinese-restaurant note without making the dish spicy.
  • Neutral oil: Use just enough to coat the pan for tender patties, or about ¼ inch / 6 mm for puffier shallow-fried edges.

Egg-to-filling ratio: for 6 large eggs, keep the total filling around 2 to 2½ cups. That includes bean sprouts, onion, cabbage or mushrooms, scallions, and protein. Use the numbers as a guide, but trust the bowl too: the egg should still visibly surround the filling.

Egg Foo Young ratio guide showing bowls for 4 eggs, 6 eggs, and 8 eggs with measured amounts of vegetables and protein.
The egg-to-filling ratio is the reason the patties hold together. Too much filling makes them tear, while enough beaten egg helps everything set into a stable round.
EggsTotal FillingBest Yield
4 large eggsAbout 1½ cups4 small patties
6 large eggs2 to 2½ cups6 medium patties
8 large eggs3 to 3½ cups8 medium patties or 6 large patties

Ingredient Prep Matters

If you remember only one prep rule, make it this: the add-ins should help the egg set, not fight it. When vegetables are drained and cut small, the patties cook calmly instead of sputtering, tearing, or leaking in the pan.

Hand slicing cabbage, scallions, onion, and mushrooms into small pieces on a cutting board for Egg Foo Young.
Small, thin vegetables cook more evenly inside the patties, so the egg can set around them instead of tearing around bulky pieces.

Cook Watery Vegetables First

Mushrooms, zucchini, bell pepper, and similar vegetables can release liquid as they cook. If you use more than ⅓ to ½ cup, sauté them briefly first, then let them cool before adding them to the eggs. Cooked shrimp, chicken, pork, or tofu should also be chopped small enough to stay tucked into the patty when you flip it.

Mushrooms and zucchini being sautéed in a skillet before being added to Egg Foo Young batter.
A quick sauté lets mushrooms, zucchini, and other watery add-ins release steam before they weaken the Egg Foo Young batter.

What Goes Into Egg Foo Young Gravy

Some people call it Egg Foo Young sauce, but the takeout version eats more like a light brown gravy. It should taste rounded, not just salty: savory from stock and soy sauce, slightly rich from oyster sauce, and smooth enough to coat the eggs without weighing them down.

Saucepan with Egg Foo Young gravy ingredients including stock, soy sauce, oyster sauce, cornstarch, white pepper, sesame oil, and dark soy sauce.
Egg Foo Young gravy gets its flavor before it thickens, so build the base with stock, soy sauce, oyster sauce, white pepper, and sesame oil first.
  • Stock: Chicken stock gives the most familiar flavor; 2 cups / 480 ml is enough sauce for the patties and rice. Vegetable stock works for a meatless version.
  • Light soy sauce: 1½ tablespoons / about 22 ml seasons the gravy and adds umami.
  • Oyster sauce: 1 tablespoon / 15 ml gives the sauce body and a deeper restaurant-style flavor.
  • Dark soy sauce: ½ teaspoon / 2.5 ml is optional, but it gives the gravy a deeper brown color.
  • Sugar: 1–2 teaspoons / 4–8 g rounds out the salty sauces without making the gravy sweet.
  • White pepper: ¼ teaspoon adds gentle warmth.
  • Cornstarch slurry: 2 tablespoons / about 16 g cornstarch mixed with 3 tablespoons / 45 ml cold water thickens the gravy.
  • Sesame oil: ½ teaspoon / 2.5 ml goes in at the end so the aroma stays fresh.

Easy swaps: use vegetable stock for a meatless gravy, vegetarian oyster sauce or mushroom sauce instead of oyster sauce, and tamari only if every other ingredient is also gluten-free. Dark soy sauce is optional; the gravy will be lighter without it but still good.

Pan-Fried vs Restaurant-Style Egg Foo Young

There are two common versions of Egg Foo Young in people’s minds. One is an easy skillet patty with gravy. The other is the puffier, crisp-edged Chinese restaurant version cooked in more oil. Both can be delicious, but the oil level changes the texture.

Pan-fried Egg Foo Young patty compared with a puffier restaurant-style patty near a wok and wire rack.
Pan-fried Egg Foo Young is easier at home; however, more oil creates puffier restaurant-style edges and a richer takeout texture.
MethodBest ForTextureNotes
Pan-friedEasy home cookingTender, lightly goldenUses the least oil and is easiest for beginners.
Shallow-friedBest home balanceGolden edges, slightly fuller centerUse about ¼ inch / 6 mm oil in a skillet or wok.
Deep-friedRestaurant-style puffPuffy, crisp-edged, richerUses more oil and needs temperature control.

Best setup for most home cooks: use a 10-inch nonstick skillet, a ½-cup measure, and a thin flexible spatula. Shallow-frying with about ¼ inch / 6 mm oil gives better browning than a barely oiled pan without the mess of deep-frying. Want the puffier version? Skip to the restaurant-style method.

How to Make Egg Foo Young

Once the filling is chopped, the gravy ingredients are measured, and your pan is ready, the recipe moves quickly. Keep the bowl close to the stove, cook in small batches, and adjust the heat after the first patty if you need to.

1. Prep the Filling

Drain the bean sprouts very well. Finely dice the onion, slice the scallions, and shred the cabbage or slice the mushrooms thinly. Chop your shrimp, chicken, pork, tofu, or vegetables into small pieces.

Cook chicken or pork first so the eggs can stay tender instead of waiting in the pan for meat to finish. Cooked shrimp, cooked chicken, roast pork, or tofu can go straight into the filling.

2. Make the Gravy Before Frying

Once the eggs hit the pan, things move quickly. Having the gravy ready means the patties can go straight from skillet to plate while they are still soft in the center and browned at the edges. If the sauce thickens while the patties cook, a splash of stock or water will bring it back.

3. Mix the Eggs

In a large bowl, whisk the eggs until the whites and yolks are fully combined. In a small bowl, mix 1 teaspoon cornstarch with 1 tablespoon cold water, then whisk that slurry into the eggs with sesame oil and white pepper.

Fold in the bean sprouts, onion, cabbage or mushrooms, scallions, and protein. The mixture should scoop easily: glossy egg around the filling, not soup and not a dry vegetable pile. Mix right before cooking so the vegetables keep their snap and the batter stays light.

4. Cook the Patties

Heat the Pan and Scoop the Batter

Heat a nonstick skillet, wok, or well-seasoned pan over medium to medium-high heat. Add enough neutral oil to coat the bottom for pan-frying, or about ¼ inch / 6 mm oil for a more shallow-fried texture.

Egg Foo Young patty frying in shallow oil with bubbles around the golden edge and a spatula near the pan.
A shallow layer of oil helps the edge set before the center dries out, which makes the patty sturdier when it is time to flip.

Use a ½-cup measure for standard patties. Scoop the egg mixture into the pan, nudging the filling into a round shape. Cook until the edges are set and the bottom is golden, about 2 to 3 minutes. Flip carefully and cook the second side until the middle has no liquid egg, about 1½ to 2 minutes more.

Let It Set Before Flipping

Egg Foo Young patty being lifted and flipped on a thin spatula in a skillet with shallow oil.
Wait until the first side feels stable on the spatula. Then flip once, gently, instead of moving the patty while the center is still loose.

Use the First Patty as Your Test

The first patty is often the test patty. If it browns too fast, lower the heat before the next batch; if it sticks or looks dry around the edges, add a little more oil. Look for a center that springs lightly and no loose egg running from the middle. After that first patty, the recipe usually relaxes: you know whether the pan wants less heat, more oil, or a smaller scoop. If the first one tears, browns too fast, or stays runny, do not guess; check the troubleshooting table before cooking the next batch.

Slightly uneven first Egg Foo Young patty on a spatula beside a skillet and a bowl of batter.
One imperfect first patty can save the whole batch, because it shows whether the pan needs less heat, more oil, or a smaller scoop.

Scoop size guide: use ⅓-cup scoops for small beginner-friendly patties, ½-cup scoops for standard home patties, and ¾-cup scoops only if you are using more oil and feel confident flipping larger rounds.

How to Know the Patties Are Right

Cut-open Egg Foo Young patty with golden edges, a set center, bean sprouts, scallions, and visible filling.
The best doneness cue is texture: the center should be set, the edge should be browned, and the inside should still look tender rather than dry.

You nailed the patties when:

  • The edges are golden but not hard.
  • The center springs lightly when pressed.
  • No loose egg runs from the middle.
  • The patty lifts without tearing.
  • The sprouts still have a little snap.

Doneness cue: the egg should be set in the center, not wet or liquid. Shrimp should look opaque. Chicken and pork are safest and easiest when cooked before they go into the egg mixture. For exact food-safe temperatures for egg dishes and poultry, the USDA safe temperature chart is a useful reference.

5. Rest Briefly, Then Serve

Transfer the cooked patties to a wire rack or a plate lined with paper towel. Let them rest in a single layer so the edges stay better. Spoon hot gravy over the top right before serving so the eggs stay tender and the sauce softens the edges without making the plate soupy.

How to Make the Brown Gravy

Bad Egg Foo Young gravy usually goes watery or gluey. The sweet spot is smooth, savory, and spoon-coating, with enough body to cling to the patties but enough movement to sink into the rice. That is the difference between plain egg patties and the takeout-style plate people remember.

Once the slurry is smooth, the sauce is simple. Cornstarch must be mixed with cold water before it touches hot liquid; otherwise, it can clump almost instantly.

Cornstarch slurry being stirred with cold water in a small glass bowl for Egg Foo Young gravy.
A smooth slurry is the shortcut to smooth Egg Foo Young gravy; mix it cold first, then whisk it into the hot sauce gradually.
  1. Combine the base. In a small saucepan, combine stock, light soy sauce, oyster sauce, optional dark soy sauce, sugar, and white pepper.
  2. Bring to a simmer. Heat gently until the mixture is steaming and lightly bubbling.
  3. Make the slurry. In a small bowl, stir cornstarch with cold water until smooth.
  4. Thicken slowly. Whisk the slurry into the simmering gravy a little at a time.
  5. Simmer until shiny. Cook for 30 to 60 seconds, until the gravy coats the back of a spoon.
  6. Finish with sesame oil. Add sesame oil at the end so the aroma stays fresh.

Gravy texture cue: the gravy should look shiny, coat the back of a spoon, and still pour easily. If it sits heavily on the patty, thin it before serving. If it disappears through the rice like broth, give it a little more time or a little more slurry.

Glossy brown Egg Foo Young gravy coating the back of a spoon with a visible drip over a saucepan.
Once the gravy coats the spoon and drips slowly, it is ready: thick enough for the patties, but still loose enough to flow into the rice.

Cornstarch Gravy vs Roux Gravy

The main recipe uses cornstarch because it is fast, glossy, and easy to control. If you want a richer old-school body, start with a light roux and finish with a smaller amount of slurry.

Two bowls of brown gravy showing a glossy cornstarch gravy and a thicker roux-style gravy with spoon trails.
Cornstarch gives Egg Foo Young gravy a glossy, lighter finish, while a roux adds a rounder restaurant-style body. Choose based on the texture you want.
StyleBest ForTexture
Cornstarch-only gravyFast weeknight Egg Foo YoungGlossy, light, pourable
Roux + cornstarch gravyMore old-school restaurant bodyRounder, richer, more gravy-like
Arrowroot gravyCorn-free adjustmentClearer and slightly slicker; avoid long boiling

For a roux version, cook 1 tablespoon neutral oil with 1 tablespoon flour for 1 to 2 minutes, then whisk in the stock and seasonings before finishing with a smaller amount of cornstarch slurry. Making the gravy gluten-free means checking every ingredient, not just swapping the soy sauce. Use tamari only if the stock, oyster sauce or vegetarian oyster sauce, and thickener are also gluten-free.

Restaurant-Style Egg Foo Young: How to Get Puffier Patties

Restaurant-style Egg Foo Young is not just “more oil.” Hotter oil sets the outside quickly, which helps the patty puff and brown before the center overcooks. That is why shallow-frying gives you a better home version than a barely oiled pan, and deeper oil gives you the most dramatic restaurant-style texture.

Oil Temperature for Restaurant-Style Puff

For puffier patties, use a wok or deep pot with 2–3 inches of neutral oil. Heat the oil to about 350°F / 175°C. When the egg mixture goes in, the oil temperature will drop. Letting the patties cook closer to 325°F / 160°C helps them puff and set without scorching.

Restaurant-style Egg Foo Young patty puffing in hot oil with a thermometer clipped to a wok and a wire rack nearby.
For restaurant-style Egg Foo Young, hot oil sets the outside quickly. Meanwhile, the center stays tender because the patty puffs before it overcooks.
  • Use a ladle instead of pouring from the bowl.
  • Lower the egg mixture gently into the oil so it forms a round patty.
  • Let the first side set before moving it.
  • Flip once the edges look golden and the patty feels stable.
  • Drain on a wire rack, not a flat plate, so the edges stay crisp.
  • Give each patty room so the oil stays hot and the edges set quickly.

Egg Foo Young Variations

Choose the variation by what you want from the plate. Shrimp gives the most classic takeout feel, chicken is the easiest leftover dinner, pork or char siu brings deeper flavor, and tofu or vegetables make the lightest version. The rule stays the same for all of them: keep the pieces small, control watery add-ins, and let the egg remain the binder.

How to Prep Add-Ins

Before you choose shrimp, chicken, pork, tofu, or vegetables, check how much moisture and cooking time that add-in brings to the eggs.

Prep bowls of shrimp, cooked chicken, pork or char siu, tofu, mushrooms, and cabbage for Egg Foo Young variations.
Different add-ins need different prep. Cooked meats are easiest, while mushrooms, tofu, and cabbage need the right size and moisture control.
Add-InCooked or Raw?Prep CueWatch-Out
ShrimpCooked easiest; raw okay if smallChop large shrimpRaw shrimp must turn opaque
ChickenCooked bestDice or shred smallRaw chicken can overcook the eggs
Pork / char siuCooked bestDice smallCan make the filling salty
Firm tofuUse pressed tofuPat dry and dice smallSoft tofu breaks down
MushroomsPre-cook if using more than a littleSlice thinReleases water
CabbageRaw okay if thinShred fineToo much makes patties loose

Shrimp Egg Foo Young

Shrimp is the most takeout-feeling version: sweet, quick-cooking, and easy to pair with brown gravy. Cooked small shrimp are easiest. If using raw shrimp, chop them small enough to turn opaque by the time the egg sets.

Shrimp Egg Foo Young patty cut open to show shrimp inside, served with brown gravy, scallions, and rice.
Shrimp Egg Foo Young gives the most classic takeout feel; for best results, chop large shrimp so the pieces stay tucked inside the patty.

Chicken Egg Foo Young

Chicken is the best leftover version. Use cooked chicken, chopped or shredded small, so the eggs can stay tender instead of waiting in the pan for raw meat to finish.

Cooked chopped chicken being folded into Egg Foo Young batter with bean sprouts, scallions, and vegetables in a glass bowl.
Chicken Egg Foo Young works best with cooked, chopped chicken because the eggs can set quickly instead of waiting for raw meat to cook through.

Pork Egg Foo Young

Pork, roast pork, or char siu gives the deepest old-school flavor. Dice it small and season the egg mixture lightly because cooked pork can bring plenty of salt on its own.

Pork Egg Foo Young patty cut open with diced char siu inside, scallions on top, and brown gravy in a bowl nearby.
Pork or char siu adds deeper flavor, but the pieces still need to be small enough for the egg to bind into a clean patty.

Vegetable Egg Foo Young

Vegetable Egg Foo Young works best when the vegetables are chosen for texture, not just volume. Thin cabbage, sprouts, scallions, and shredded carrot can usually go in raw; mushrooms, zucchini, bell pepper, and watery greens should be cooked briefly first.

Firm tofu works well if you want a meatless version with more body. Press it, pat it dry, and dice it small before adding it to the bowl. For vegetarian gravy, use vegetable stock and vegetarian oyster sauce or mushroom sauce.

Vegetable and tofu Egg Foo Young patty cut open with tofu cubes, bean sprouts, cabbage, carrot, scallions, and brown gravy.
Vegetable Egg Foo Young works best when the filling is chosen for texture, not volume. Firm tofu, cabbage, sprouts, and scallions keep it light but satisfying.

No Bean Sprouts? Use These Instead

Bean sprouts give Egg Foo Young its classic crunch, but you can still make good patties without them. Choose the substitute by what the mixture needs.

Bean sprout substitutes for Egg Foo Young including Napa cabbage, water chestnuts, snow peas, shredded cabbage, carrot, scallions, mushrooms, zucchini, and greens.
No bean sprouts? Use crisp substitutes like Napa cabbage, water chestnuts, or snow peas. Cook watery vegetables first so they do not loosen the batter.
  • For crunch: thin Napa cabbage, diced water chestnuts, or julienned snow peas.
  • For easy volume: finely shredded cabbage, shredded carrot, or extra scallions.
  • Use carefully: mushrooms, zucchini, and watery greens. Cook them briefly first, then cool before adding them to the eggs.

The substitute should support the egg, not take over the bowl. If the mixture starts looking like vegetables barely coated in egg, add another beaten egg or hold some filling back for the next batch.

Troubleshooting Egg Foo Young

Start with the First Patty

If your first patty is messy, do not panic. Egg Foo Young is easy to adjust batch by batch because you can change the scoop size, heat, oil, or mixture before the next patty goes in.

Most Egg Foo Young problems are batch-by-batch problems, not recipe-ending problems. Even restaurant-style Egg Foo Young is not about perfect circles; it is about tender eggs, enough filling, and a sauce that brings the plate together.

Egg Foo Young troubleshooting guide showing patties that fall apart, stay too runny, have burnt edges, and turn out just right.
One messy patty does not ruin Egg Foo Young; instead, use it to fix the mixture, heat, oil, or scoop size before the next round.

Common Problems and Quick Fixes

ProblemFix NowFix Next Time
Patties fall apartMake smaller patties and add 1 beaten egg to the remaining mixture if needed.Keep total filling to 2–2½ cups per 6 eggs.
Mixture looks waterySpoon off excess liquid before frying.Drain sprouts well and pre-cook vegetables that release liquid.
Center stays runnyLower heat slightly and cover the pan briefly.Use ½-cup scoops instead of oversized patties.
Edges burn before center setsReduce heat and add a little more oil if the pan is dry.Cook over medium to medium-high heat, not high heat.
Patties taste blandServe with hot gravy and garnish with scallions or white pepper.Use flavorful stock, white pepper, sesame oil, and a well-seasoned gravy.
Patties turn rubberyReheat gently and avoid cooking them further.Pull patties once the egg is set; do not cook until dry.
Gravy is too thinAdd a little more cornstarch slurry and simmer briefly.Bring the sauce to a simmer before adding slurry.
Gravy is too thickWhisk in stock or water, a splash at a time.Add slurry gradually instead of all at once.
Gravy is lumpyStrain it if needed, then whisk smooth.Mix cornstarch with cold water first and stream it in while whisking.
Leftovers become soggyReheat patties separately from the gravy.Store patties and gravy in separate containers.

What to Serve with Egg Foo Young

Plain steamed rice is the classic base because it catches the salty-silky finish and keeps the plate from feeling too rich. The rice is not just filler here; it is part of why the dish feels like dinner.

If you are making Egg Foo Young for brunch, keep the sides lighter with something crisp like this cucumber salad recipe. If you are building a Chinese restaurant-style dinner, pair it with fried rice, noodles, or stir-fried greens.

  • Steamed jasmine rice: the easiest and most classic base.
  • Spam fried rice: ideal when you want a full restaurant-style plate. You can also use the same cold-rice method with simpler add-ins.
  • Garlic noodles: richer, cozier, and good with extra gravy.
  • Stir-fried greens: bok choy, cabbage, green beans, broccoli, or snow peas all work well.
  • Cucumber salad: a cool, crisp contrast to the hot gravy.
  • Chili oil: add at the table if you want heat.
  • Extra scallions: a fresh finish that keeps the dish from feeling heavy.

Storage, Make-Ahead Tips, and Reheating

Egg Foo Young is at its best when the patties are hot and the gravy is freshly spooned over the top, but leftovers can still be very good if the sauce and eggs are stored separately. This keeps the patties from absorbing too much gravy and turning soft. For general leftover timing and storage safety, the USDA’s leftovers and food safety guidance is a useful reference.

  • Make the gravy ahead: prepare it up to 2 days ahead and refrigerate it separately. Reheat gently and thin with stock or water if needed.
  • Prep the vegetables ahead: chop them earlier in the day and keep them dry in the fridge. Mix them with the eggs only right before cooking.
  • Refrigerate: store cooked patties and gravy in separate airtight containers for up to 3–4 days.
  • Reheat patties: warm gently in a skillet over low to medium heat, or use an air fryer briefly if you want firmer edges.
  • Reheat gravy: warm in a saucepan, whisking in a splash of stock or water if it has thickened.
  • Microwave carefully: use short bursts because eggs can turn rubbery when overheated.
  • Freeze only if needed: freeze patties without gravy. The texture is better refrigerated than frozen.

FAQs

Is Egg Foo Young the same as an omelet?

It is omelet-like, but not exactly the same as a Western folded omelet. Egg Foo Young has the vegetables and protein mixed directly into the eggs, is usually cooked as separate patties, and is served with brown gravy.

What is Egg Foo Young gravy made of?

Most Egg Foo Young gravy is made with stock, soy sauce, oyster sauce, white pepper, sesame oil, and a cornstarch slurry. A roux can be added for a rounder, more old-school restaurant-style body.

Why does my Egg Foo Young fall apart?

Usually, the filling is too wet, too heavy, or the patties are too large. Keep the filling around 2 to 2½ cups for 6 eggs, drain vegetables well, and use ½-cup scoops.

Why is my Egg Foo Young not fluffy?

Flat Egg Foo Young usually comes from a dry pan, oversized patties, or watery filling. A barely oiled skillet makes the mixture behave like a flat omelet. A little more oil, smaller scoops, and controlled add-ins help the edges puff before the center dries out.

What meat is best for Egg Foo Young?

Shrimp gives the most classic takeout feel, chicken is easiest for leftovers, and roast pork or char siu gives deeper flavor. Whatever protein you choose, keep it small so the egg can hold it.

Can Egg Foo Young be made without bean sprouts?

Yes. Use thin Napa cabbage, shredded cabbage, water chestnuts, snow peas, shredded carrot, or extra scallions. Choose small, controlled substitutes so the egg patties still hold together.

Is Egg Foo Young Chinese or Chinese-American?

Egg Foo Young has roots in Chinese egg dishes, but the gravy-covered version many people order from takeout menus is strongly Chinese-American. This recipe is built around that restaurant-style plate: separate egg patties, vegetables, optional protein, rice, and brown gravy.

Can the gravy be vegetarian?

Yes. Use vegetable stock and vegetarian oyster sauce or mushroom sauce. Check the soy sauce and other condiments too if you need the whole dish to meet a specific dietary requirement.

How do I make Egg Foo Young taste like takeout?

The takeout flavor comes from three things working together: enough oil to brown the edges, small amounts of white pepper and sesame oil, and a brown gravy that tastes savory before it thickens. If the patties are dry and the gravy is flat, it will taste like an omelet with sauce, not Egg Foo Young.

Should the gravy go on before or after serving?

Spoon the gravy over the patties just before serving. If the patties sit in gravy too long, they soften and lose their best texture.

Can you bake or air-fry Egg Foo Young?

You can bake or air-fry the egg mixture in a small greased pan, but it will eat more like a baked omelet or mini frittata than classic Egg Foo Young. For browned edges and takeout-style texture, a skillet with enough oil is still the better method. For a baked egg texture, these egg muffin cups are a better fit.

Once the ratio clicks, Egg Foo Young stops feeling fussy. The first patty teaches you the heat, the sauce goes on at the end, and the rest becomes a flexible dinner you can make with shrimp, chicken, pork, tofu, or the vegetables already in the fridge.

Egg Foo Young Step by Step

Use this quick visual recap before the recipe card if you want the whole cooking flow in one place: prep the filling, mix the eggs, cook the patties, thicken the gravy, and serve hot.

Step-by-step Egg Foo Young process showing filling prep, egg mixing, patty cooking, gravy thickening, and serving with rice.
This visual roadmap shows the whole flow: prep the filling, mix the eggs, cook the patties, thicken the gravy, then serve hot.

Recipe card

Egg Foo Young Recipe with Takeout-Style Gravy

Fluffy Chinese-American egg patties with crisp vegetables, your choice of shrimp, chicken, pork, tofu, or extra vegetables, and smooth brown gravy to spoon over rice.

Prep Time15 minutes
Cook Time20 minutes
Total Time35 minutes
Servings4

Yield: 6 medium patties

Method: Pan-fried / shallow-fried

Cuisine: Chinese-American

Course: Dinner, main dish, brunch

Ingredients

For the Egg Patties

  • 6 large eggs
  • 1 teaspoon / about 3 g cornstarch mixed with 1 tablespoon / 15 ml cold water
  • ½ teaspoon / 2.5 ml toasted sesame oil
  • ¼ teaspoon white pepper
  • 1 cup / about 70–85 g bean sprouts, rinsed and very well drained
  • 115–140 g / 4–5 oz chopped cooked shrimp, cooked chicken, roast pork, or firm tofu
  • ¼ cup / about 35 g finely diced onion
  • ⅓ to ½ cup / about 35–50 g finely shredded cabbage or thinly sliced mushrooms
  • 2 scallions / spring onions, thinly sliced
  • 2–4 tablespoons / 30–60 ml neutral oil for pan-frying, or more as needed for shallow-frying

For the Gravy

  • 2 cups / 480 ml chicken stock or vegetable stock
  • 1½ tablespoons / about 22 ml light soy sauce
  • 1 tablespoon / 15 ml oyster sauce or vegetarian oyster sauce
  • ½ teaspoon / 2.5 ml dark soy sauce, optional
  • 1–2 teaspoons / 4–8 g sugar, to taste
  • ¼ teaspoon white pepper
  • 2 tablespoons / about 16 g cornstarch
  • 3 tablespoons / 45 ml cold water
  • ½ teaspoon / 2.5 ml toasted sesame oil

For Serving

  • Steamed rice or fried rice
  • Extra sliced scallions
  • Chili oil, optional

Instructions

Make the Gravy

  1. Prep the filling. Drain the bean sprouts well. Dice the onion, slice the scallions, shred the cabbage or mushrooms, and chop the protein small. Pre-cook raw chicken, raw pork, mushrooms, or vegetables that release a lot of moisture.
  2. Start the gravy. In a small saucepan, combine the stock, soy sauce, oyster sauce, optional dark soy sauce, sugar, and white pepper. Bring to a gentle simmer.
  3. Thicken the gravy. Stir 2 tablespoons cornstarch with 3 tablespoons cold water until smooth. Whisk the slurry into the simmering gravy a little at a time. Simmer for 30 to 60 seconds, until smooth and spoon-coating. Stir in sesame oil and keep warm.

Mix and Cook the Patties

  1. Mix the eggs. In a large bowl, whisk the eggs. Stir 1 teaspoon cornstarch with 1 tablespoon cold water, then whisk it into the eggs with sesame oil and white pepper.
  2. Add the filling. Fold in the bean sprouts, protein, onion, cabbage or mushrooms, and scallions. The mixture should scoop easily: glossy egg around the filling, not soup and not a dry vegetable pile.
  3. Heat the pan. Heat a nonstick skillet or wok over medium to medium-high heat. Add enough oil to coat the bottom, or about ¼ inch / 6 mm oil for a shallow-fried texture.
  4. Cook the patties. Scoop about ½ cup egg mixture into the pan for each patty. Cook for 2 to 3 minutes, until the edges set and the bottom is golden. Flip carefully and cook for 1½ to 2 minutes more, until the middle has no liquid egg.
  5. Adjust after the first patty. If it browns too quickly, lower the heat. If it sticks or looks dry around the edges, add a little more oil before the next batch.

Rest and Serve

  1. Repeat and serve. Cook the remaining patties in batches. Transfer to a wire rack or paper towel-lined plate, let them rest in a single layer, and spoon hot gravy over the patties just before serving.

Notes

  • Keep total filling around 2 to 2½ cups for 6 eggs.
  • The mixture should look egg-forward: glossy egg around the filling, not vegetables barely coated in egg.
  • The first patty is your test patty. Adjust heat, oil, or scoop size before continuing.
  • Use ⅓-cup scoops for easier flipping or ½-cup scoops for standard patties.
  • Cook chicken or pork before adding it. Cooked shrimp is easiest; raw shrimp should be chopped small and cooked until opaque.
  • For puffier edges, shallow-fry with about ¼ inch / 6 mm oil.
  • For roux-style gravy, cook 1 tablespoon oil with 1 tablespoon flour for 1 to 2 minutes, whisk in the stock and seasonings, then finish with less slurry.
  • Spoon gravy over the patties just before serving, not far ahead.
  • Store patties and gravy separately.

Back to top