You opened the fridge, saw a pound of ground beef, and decided burgers were dinner. Good call. Now the goal is simple: patties that stay juicy, hold together, brown well, and do not turn into dry little beef discs.
This is a no-drama burger patty recipe for a regular weeknight. No egg, no breadcrumbs, no overthinking. Just cold beef, simple seasoning, gentle shaping, and a hot pan or grill.
It is built for the problems home cooks actually run into: patties that crack, shrink, puff, dry out, or fall apart before they ever make it to the bun.
The result still feels easy on a weeknight, but you get the good parts: browned edges, a juicy center, melted cheese if you want it, and a patty that actually fits the bun.
If your burgers have fallen apart before, it usually does not mean you needed egg. It usually means the beef was too warm, too wet, too lean, packed too tightly, salted too early, or flipped before the first side had a chance to brown.
Need dinner fast? Jump to the recipe. Trying to fix burgers that fell apart last time? Start with the mistake map.
Quick Answer: How to Make Burger Patties
Use 1 lb / 450 g 80/20 ground beef for 4 patties. Shape each one about 4 oz / 115 g, 4 to 4 1/2 inches / 10 to 11.5 cm wide, and about 3/4 inch / 2 cm thick. Make each patty slightly wider than the bun, press a shallow dimple in the center, salt the outside just before cooking, and cook on a hot skillet or grill without pressing.
No egg. No breadcrumbs. If you came here looking for a hamburger patty recipe without egg or breadcrumbs, this is that version. For simple beef patties, 80/20 beef, cold meat, gentle shaping, and proper cooking are enough.
Binder-Free Patty Cue
This is the quick visual for the no egg, no breadcrumbs method: simple beef, dry seasoning, and a patty that holds through browning.
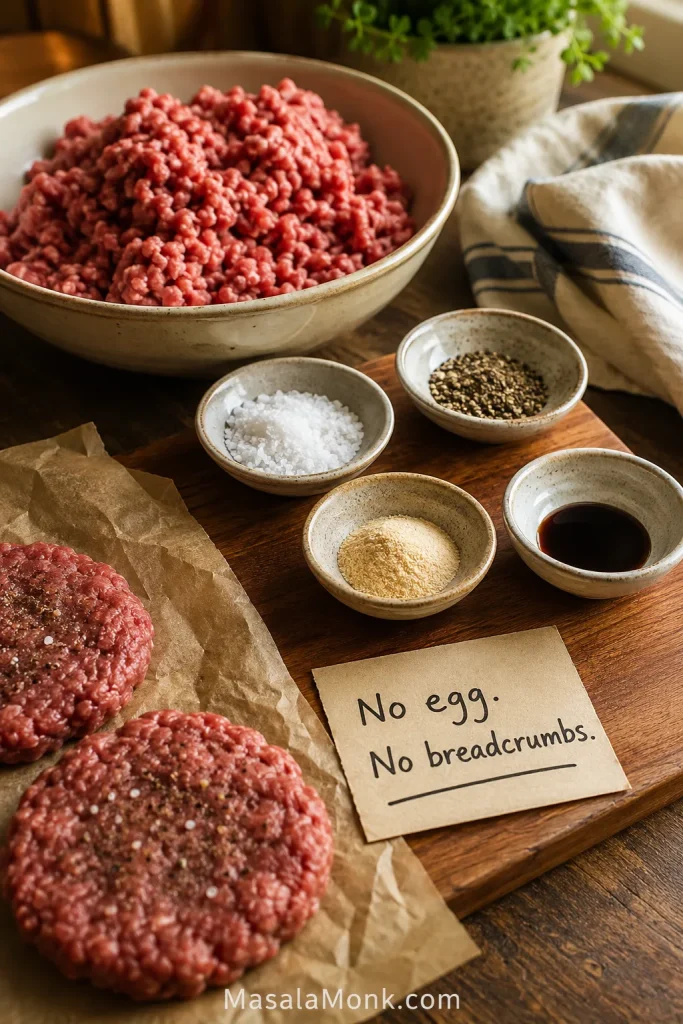
Simple formula: 1 lb / 450 g beef = 4 patties. Keep them cold, shape them loose, salt them late, and let the first side brown before flipping.
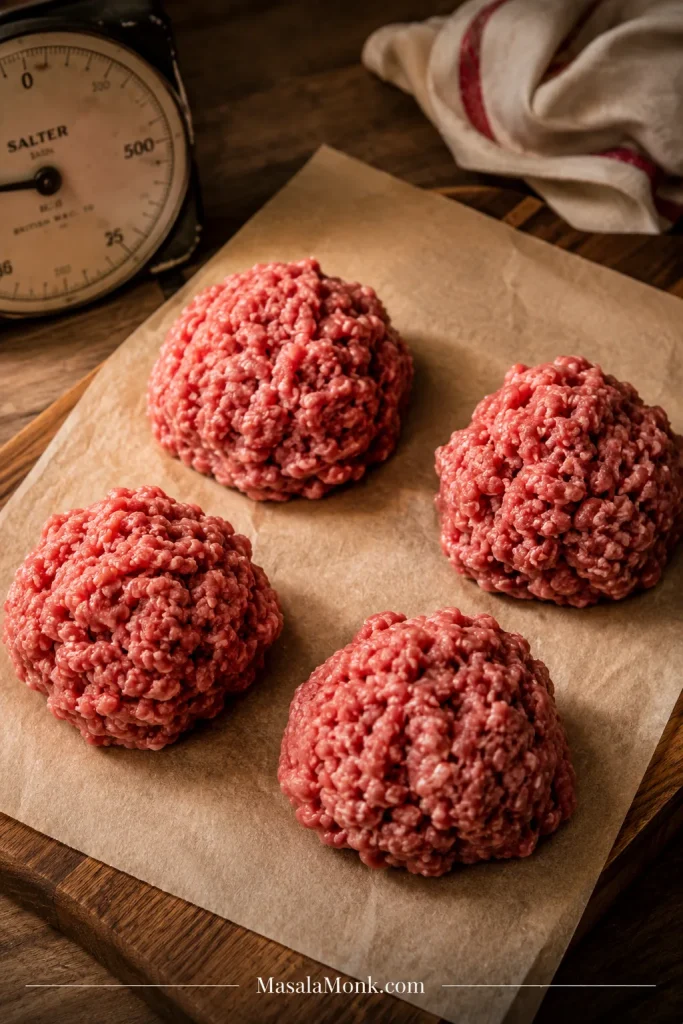
Portion the Beef Before Shaping
Even portions are the quiet shortcut to even cooking. Divide the beef first, then shape each patty gently.
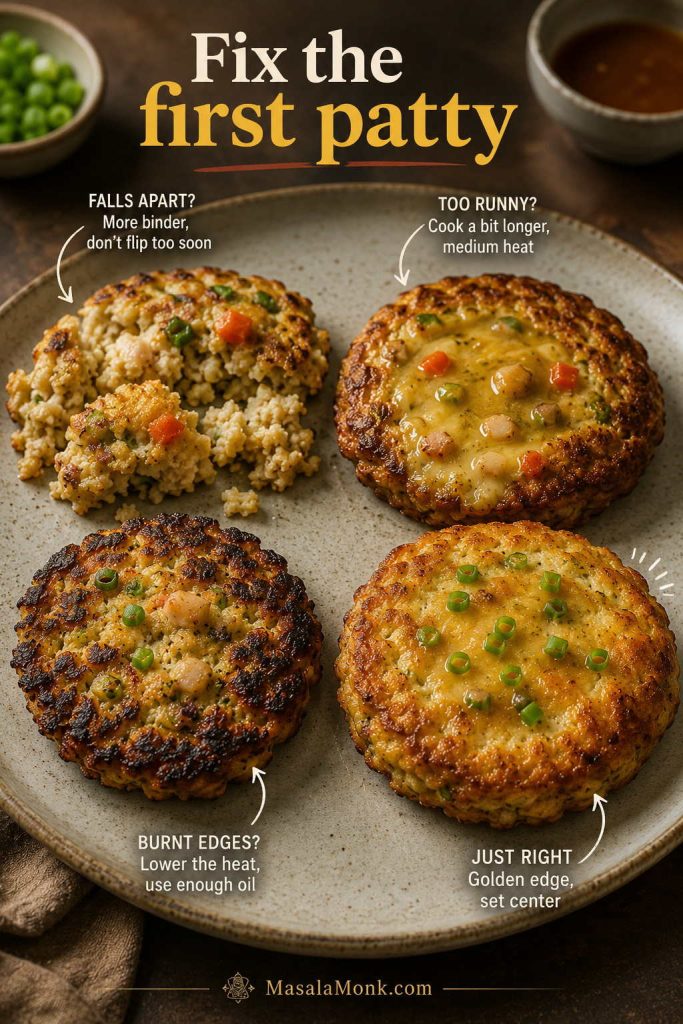
Burger Patty Mistake Map: Why They Fall Apart, Shrink, Puff, or Dry Out
Most burger problems are easier to fix once you know the cause. Egg is not usually the answer. Colder beef, less moisture, gentler shaping, better heat, or a later flip usually solve more.
Find the problem that sounds most like your last burger. That is the fix to focus on first.
Problem Patterns to Check First
Quick Diagnosis: Read the Patty Shape
A failed patty often explains itself before you change the whole recipe.
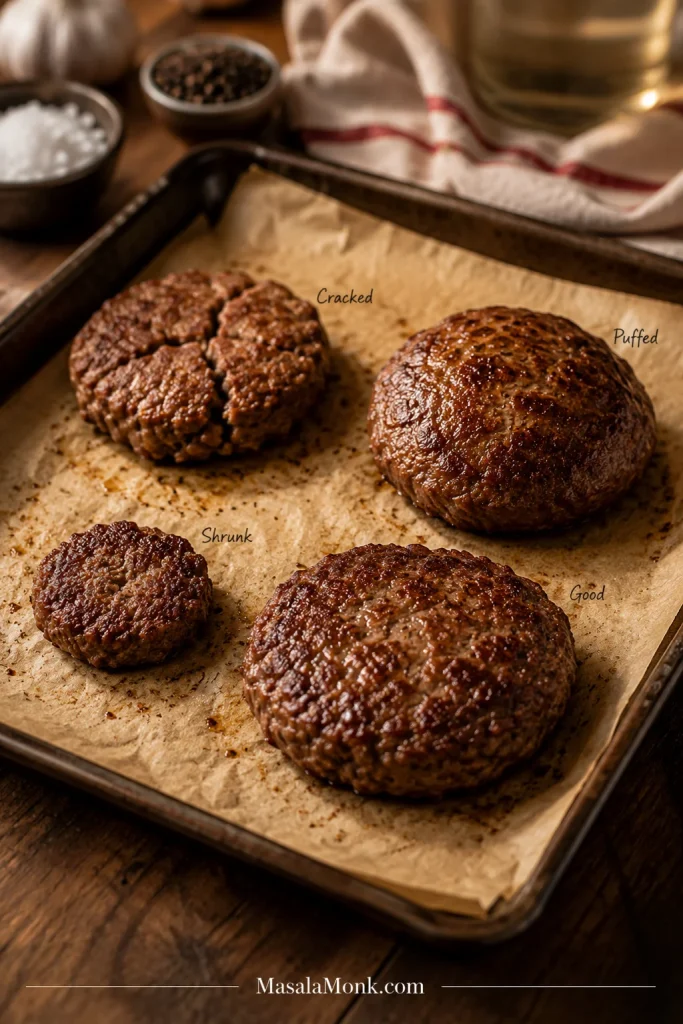
- Falling apart before cooking: the beef is warm, wet, too lean, or shaped too loosely.
- Falling apart while cooking: the patty was flipped too early or the pan/grill was not hot enough.
- Shrinking too much: the raw patties started too small or were packed too tightly.
- Puffing in the middle: the dimple was missing, too shallow, or uneven.
- Dry burgers: the beef was too lean, overworked, pressed while cooking, or overcooked.
- Tight, springy texture: salt may have been mixed into the meat too early.
Pick the issue that matches what happened last time, then fix that first. Once you know the likely cause, the troubleshooting table gives the exact fix.
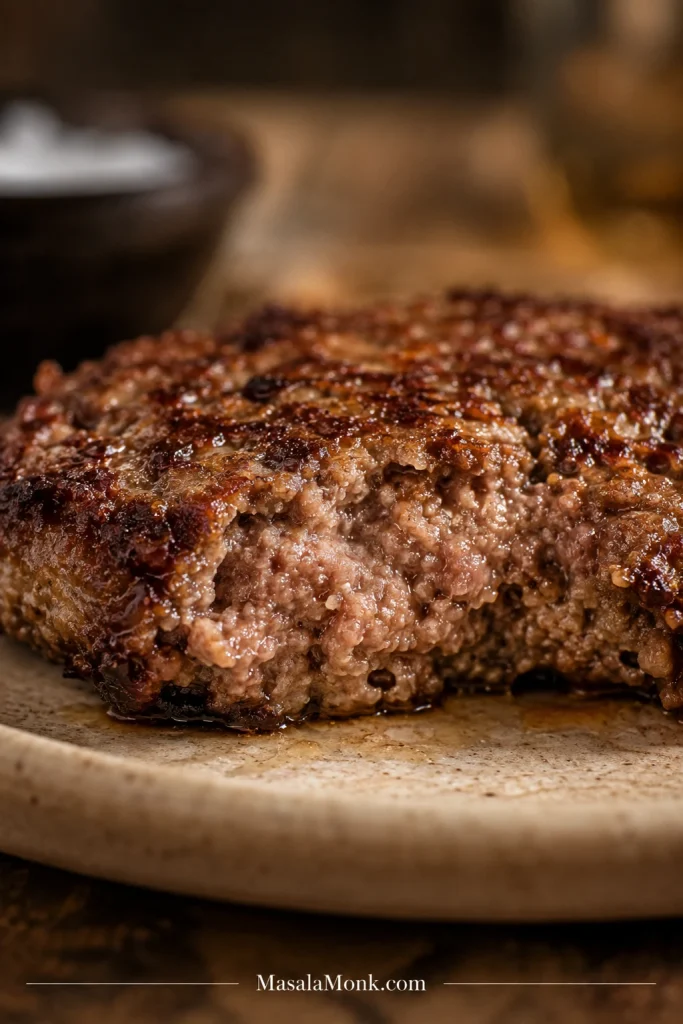
What success looks like: a good burger patty should be browned on the outside, slightly craggy around the edges, juicy in the middle, and wide enough to still fill the bun after cooking. It should hold together when flipped, but it should not feel dense, rubbery, or packed like sausage.
What a Good Burger Patty Looks Like
This is the texture target after cooking: browned outside, juicy inside, and sturdy without feeling packed.
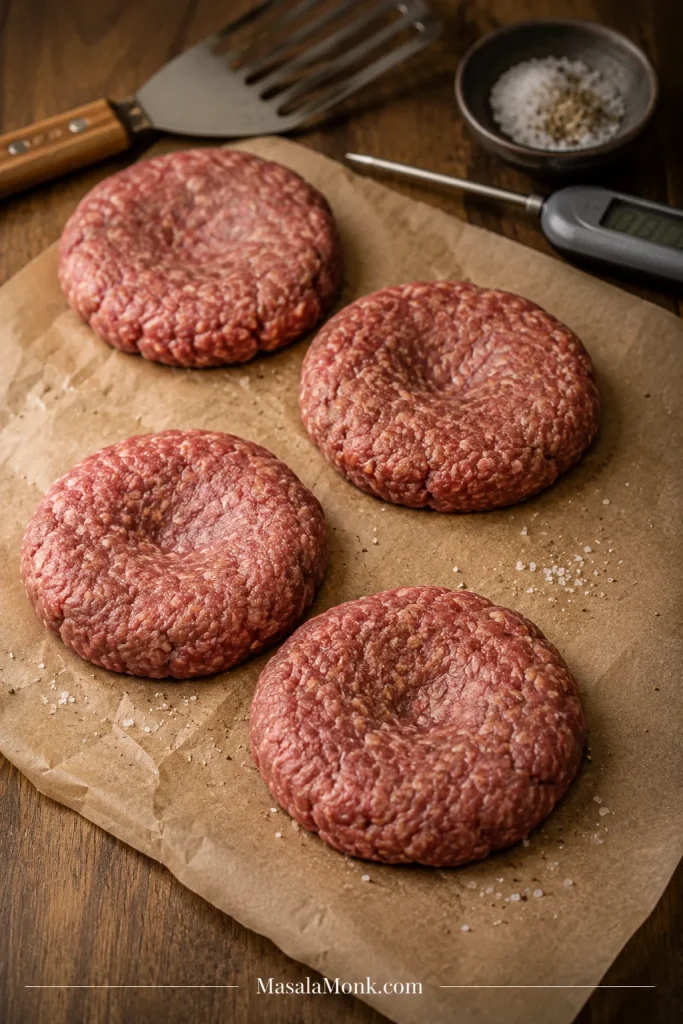
Shallow Dimples Before Cooking
These patties show the dimple as a small guide, not a deep hole through the middle.
Burger Patty Recipe
Juicy homemade hamburger patties made from ground beef with simple seasoning. These work in a skillet, on the grill, or as the base for cheeseburgers.
Equipment
- Mixing bowl or tray
- Kitchen scale, optional but helpful
- Cast iron skillet, grill, griddle, or air fryer
- Spatula
- Instant-read thermometer
- Parchment paper, if freezing patties
Ingredients
- Ground beef: 1 lb / 450 g, preferably 80/20 ground chuck
- Kosher salt: 1 tsp, or about 3/4 tsp fine/table salt
- Black pepper: 1/2 tsp
- Garlic powder: 1/2 tsp
- Onion powder: 1/2 tsp
- Worcestershire sauce: 1 tsp, optional; skip if the beef already feels soft or loose
- Neutral oil: 1 to 2 tsp, or just enough to lightly film the pan if needed
For Serving, Optional
- 4 burger buns
- Cheese slices
- Lettuce, tomato, onion, pickles, and burger sauce
Instructions
- Keep the beef cold. Remove it from the fridge only when you are ready to shape.
- Add Worcestershire, if using. Drizzle lightly and toss once or twice. Skip it if the beef feels soft.
- Divide the beef. Split the meat into 4 equal portions, about 4 oz / 115 g each.
- Shape gently. Form each portion into a patty about 4 to 4 1/2 inches / 10 to 11.5 cm wide and 3/4 inch / 2 cm thick.
- Make them wider than the buns. Shape each patty about 1/2 inch / 1 cm wider than the bun.
- Add a shallow center dimple. Press a small depression into the middle. Keep it shallow so the center stays thick.
- Season just before cooking. Sprinkle the salt, pepper, garlic powder, and onion powder over both sides right before the patties go into the pan or onto the grill.
- Cook in a skillet. Heat a cast iron skillet over medium-high heat. Add oil if needed. Cook standard patties for 3 to 4 minutes on the first side, then 2 to 3 minutes on the second.
- Or cook on the grill. Grill over medium-high direct heat for about 3 to 4 minutes per side.
- Add cheese if using. Add it during the last 30 to 60 seconds.
- Check the temperature. Ground beef patties should reach 160°F / 71°C.
- Rest briefly. Let the patties rest for 2 minutes before serving.
Notes
- Use 80/20 ground beef for the juiciest patties.
- For the cleanest texture, skip Worcestershire the first time and add sauces to the finished burger instead.
- If using fine/table salt instead of kosher salt, use a little less.
- Salt the outside just before cooking for the best texture.
- Use a thermometer instead of relying only on color.
- Freeze raw patties flat first, then stack with parchment between them.
Once the basic method is clear, the rest is just solving the small problems: lean beef, soft patties, sticky grill grates, frozen meat, or burgers that fell apart last time.
When it works, it feels almost boring in the best way: the patty sizzles, releases cleanly, melts the cheese if you want it, and lands on the bun without drama.
Why These Burger Patties Hold Together
This method works because each step protects either shape, juiciness, or browning. Cold beef keeps the fat firm so the patty holds together. Gentle shaping keeps the texture loose instead of rubbery. Late salting seasons the outside without making the meat tight. A hot surface builds crust, and that crust helps the patty release before you flip.
The best homemade burgers do not need restaurant tricks. Work with the meat: keep it cold, shape it lightly, and let the hot surface do the browning.
- 80/20 beef gives flavor and moisture. Fat helps the finished burger taste like a burger.
- Cold meat holds shape better. Warm beef gets sticky before it reaches the pan.
- A hot surface builds browning. Browning does more for flavor than extra mix-ins.
Ingredients for Homemade Burger Patties
Because the ingredient list is short, the beef does most of the work. Start with enough fat, keep extra moisture out of the patty, and save the saucy, crunchy, cheesy parts for the finished burger.
The beef and salt matter most. The pepper, garlic powder, and onion powder support the beef instead of hiding it. Worcestershire is optional; use it only if the meat feels firm enough to handle a little liquid.
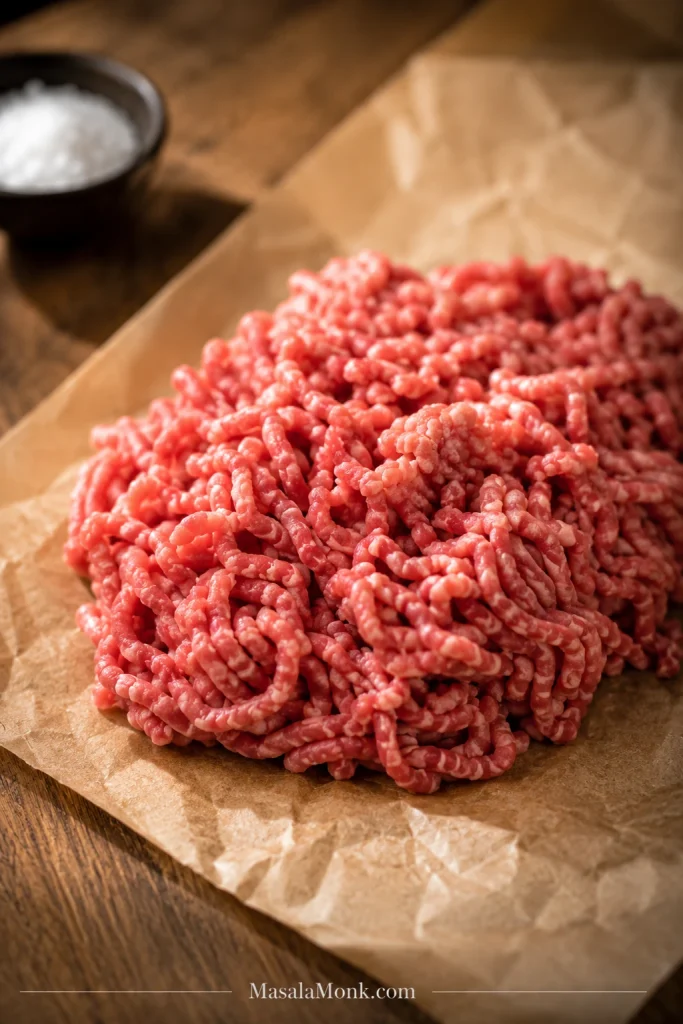
Ground Beef
Use 1 lb / 450 g ground beef for 4 standard patties. The best choice is 80/20 ground beef, often sold as ground chuck. When the package says hamburger meat instead of ground beef, check the fat ratio if possible.
Fresh beef should smell clean, feel cold, and show visible fat flecks. If it looks watery or feels mushy, pat away excess moisture and keep it cold before shaping.
Look for 80/20 Ground Beef Texture
The fat flecks are not a flaw. They help the patty stay juicy and forgiving as it cooks.
Best Beef Choices
- 80/20 ground chuck: the best everyday choice; juicy, flavorful, and forgiving.
- Choose 85/15 ground beef when you want a slightly leaner patty and can watch the cooking closely.
- Use 90/10 ground beef carefully because it dries out faster and gives beginners less room for error.
- Ground sirloin tastes beefy but needs careful cooking because it is usually leaner.
- Loaded mixtures work better for family-style patties where a binder may be useful.
Lean beef is not wrong; it just gives you less room for error. If you only have lean beef, make slightly smaller patties, handle them less, avoid pressing, and watch the thermometer closely.
Salt
Use about 1 teaspoon kosher salt for 1 lb / 450 g ground beef. If you are using fine salt or table salt, use about 3/4 teaspoon because it packs more tightly into the spoon and tastes saltier by volume.
If your burger seasoning blend already contains salt, reduce or skip the extra salt.
Black Pepper
Black pepper gives the beef a little bite without making the burger taste heavily spiced. Freshly cracked pepper is best, but regular ground black pepper also works.
Garlic Powder and Onion Powder
Garlic powder and onion powder bring flavor without adding moisture. Fresh onion and garlic can taste good, but too much fresh onion, sauce, or grated vegetables can loosen the mixture and make it harder to shape.
Worcestershire Sauce
Worcestershire sauce is optional. A teaspoon adds savory depth, but extra liquid can make the meat softer. If the mixture already feels loose, skip it. You can always add sauce to the finished burger instead.
Oil
Oil is only there to help the first side release and brown. Use just enough to lightly film the pan. With 80/20 beef and a well-seasoned cast iron skillet, you may barely need any.
Do Burger Patties Need Egg or Breadcrumbs?
No. Simple beef burger patties do not need egg or breadcrumbs. With 80/20 beef, the binder is not egg — it is cold fat, gentle shaping, and a crust that forms before you flip.
Egg and breadcrumbs only make sense when you are intentionally making a softer, meatloaf-style patty or when the mixture is very lean, wet, or loaded with add-ins.
No Binder vs Binder-Style Patties
This comparison helps you choose between a beef-first burger and a softer meatloaf-style patty.
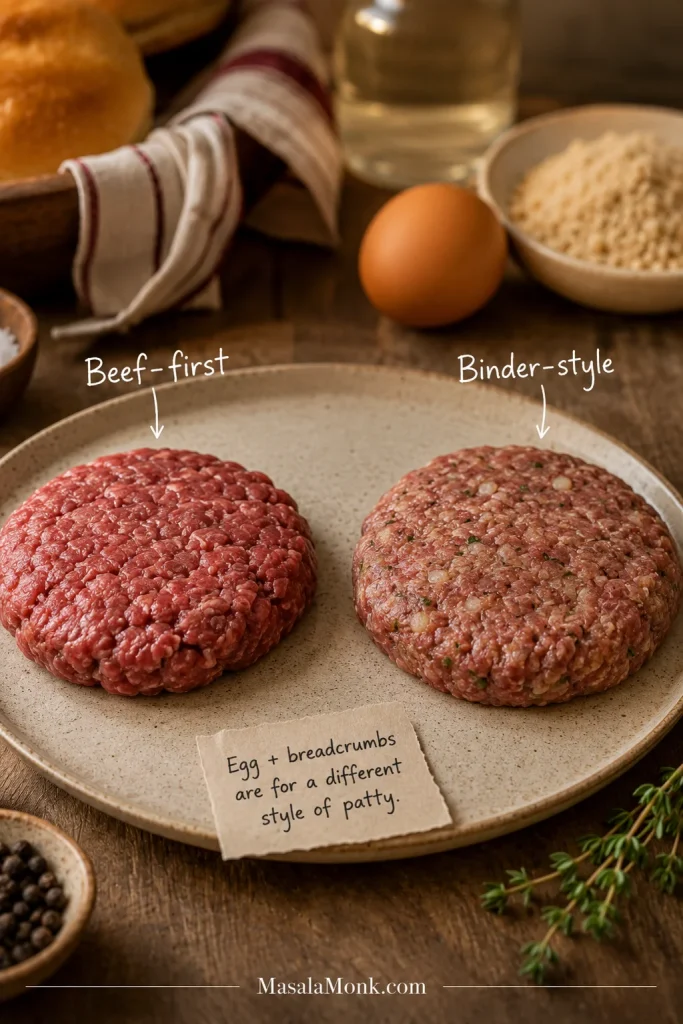
Simple rule: no binder for a beef-first burger; binder only for wet, lean, or meatloaf-style patties.
Skip Egg for Beef-First Patties
- You are using 80/20 ground beef.
- The goal is regular hamburger patties.
- You are making smash burgers.
- The meat mixture is simple and not wet.
- You want a tender, beefy burger texture.
Use Egg Only for Softer Loaded Patties
- The beef is very lean.
- You are adding lots of fresh onion, grated vegetables, sauces, or herbs.
- The goal is a softer family-style patty.
- A loose mixture will not hold together.
Breadcrumbs Are for Absorbing Extra Moisture
Breadcrumbs absorb extra moisture. That can be useful if you add wet ingredients, but it makes the patty softer and more bound, closer to meatloaf than a regular burger.
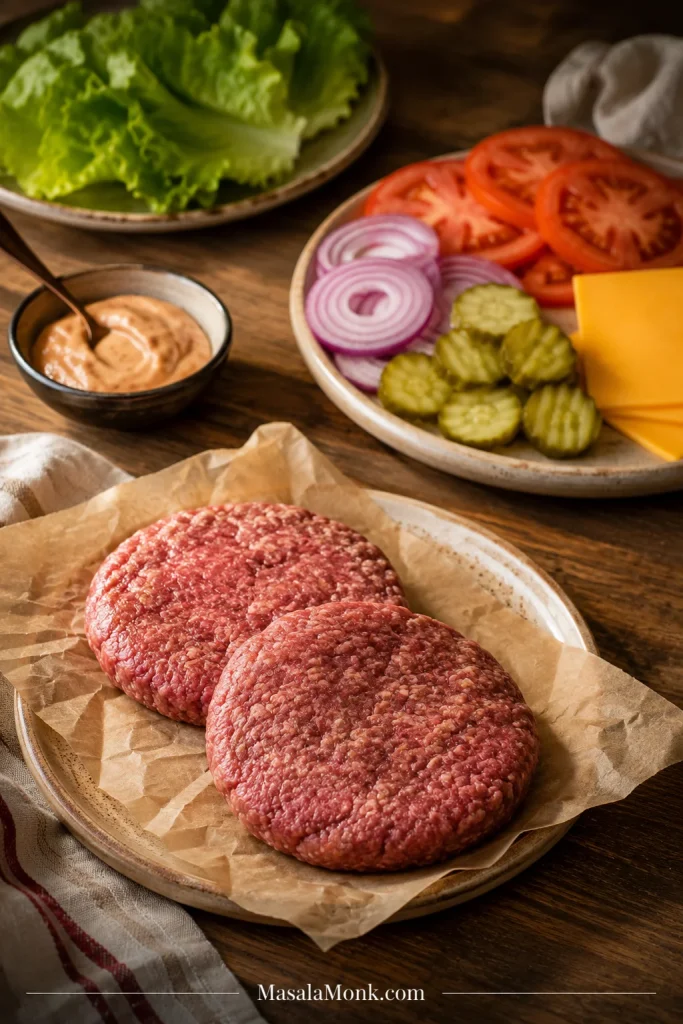
Add These to the Burger, Not the Patty
If you want a beefy burger texture, keep wet add-ins out of the meat. Sauce, onions, pickles, and extra cheese usually belong on the burger, not inside the patty.
Think of the patty as the beef layer, not the whole burger. Let the meat bring crust and juiciness; let the toppings bring sauce, crunch, sharpness, and freshness.
Keep Toppings Out of the Meat
This visual separates structure from flavor: let the patty brown cleanly, then build the burger on top.
If what you really want is a creamy burger-style dinner rather than a simple patty, homemade cheeseburger macaroni is a better place for extra sauce, cheese, ketchup, mustard, and Worcestershire.
Keep these out of the meat when you want a beef-first burger:
- Lots of chopped onion: use it as a topping or cook it separately.
- Ketchup or barbecue sauce: brush near the end so it glazes instead of soaking the meat.
- Too much Worcestershire: use 1 teaspoon at most, or skip it if the beef feels soft.
- Milk, egg, and breadcrumbs: save them for meatloaf-style patties.
- Cheese mixed into the beef: melt cheese on top near the end instead.
Burger Patty Size Chart
Patty size is where a lot of homemade burgers quietly go wrong. Too thin and they dry out quickly. Too thick and the outside can brown before the center is done.
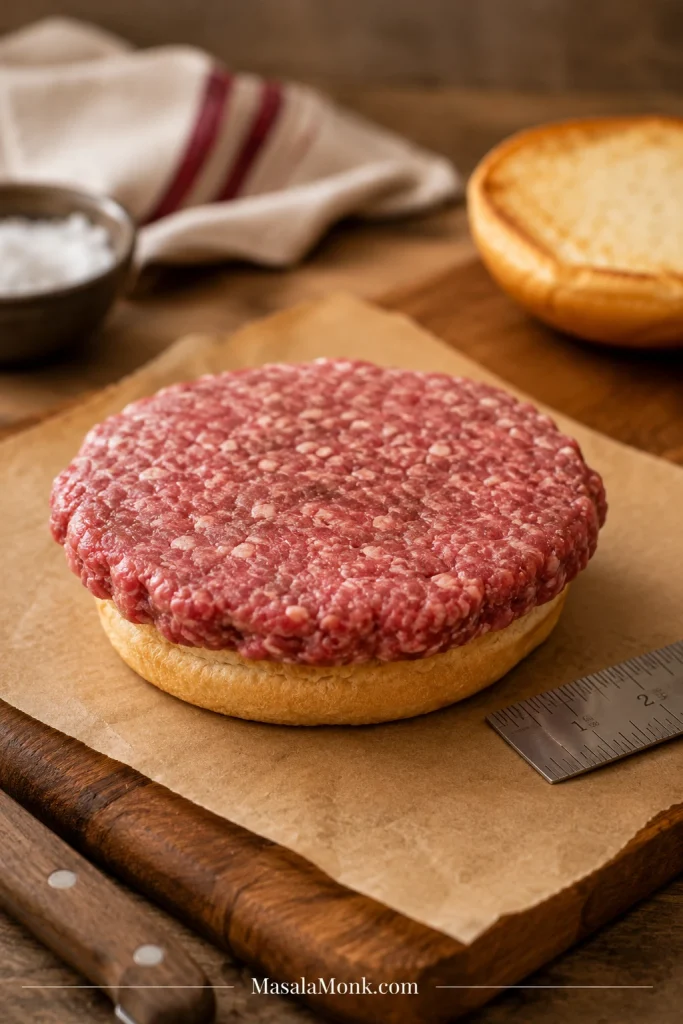
If your burgers always end up smaller than the bun, the raw patties probably started too small. Bun size matters more than perfect inches, but do not start bun-sized unless you want a smaller finished burger.
Visual cue: if the raw patty looks slightly too wide for the bun, it is probably the right size.
Use the Bun as Your Size Guide
The raw patty should look a little too wide now, because it will shrink as it cooks.
| Burger Style | Raw Weight | Approx. Width / Thickness | Best Use |
|---|---|---|---|
| Thin burger | 3 oz / 85 g | About 4 inches / 10 cm wide, 1/2 inch / 1 cm thick | Quick diner-style burger |
| Standard burger | 4 oz / 115 g | About 4 to 4 1/2 inches / 10 to 11.5 cm wide, 3/4 inch / 2 cm thick | Best everyday patty |
| Thick burger | 5 to 6 oz / 140 to 170 g | About 4 1/2 to 5 inches / 11.5 to 13 cm wide, 1 inch / 2.5 cm thick | Juicier pub-style burger |
| Smash burger | 2 to 3 oz / 55 to 85 g | Smashed thin | Crispy griddle burger |
| Big 1/3-lb burger | 1/3 lb / 150 g | About 1 inch / 2.5 cm thick | Hearty grill burger |
Check the Patty Thickness
Thickness controls the balance between browning outside and cooking through in the center.
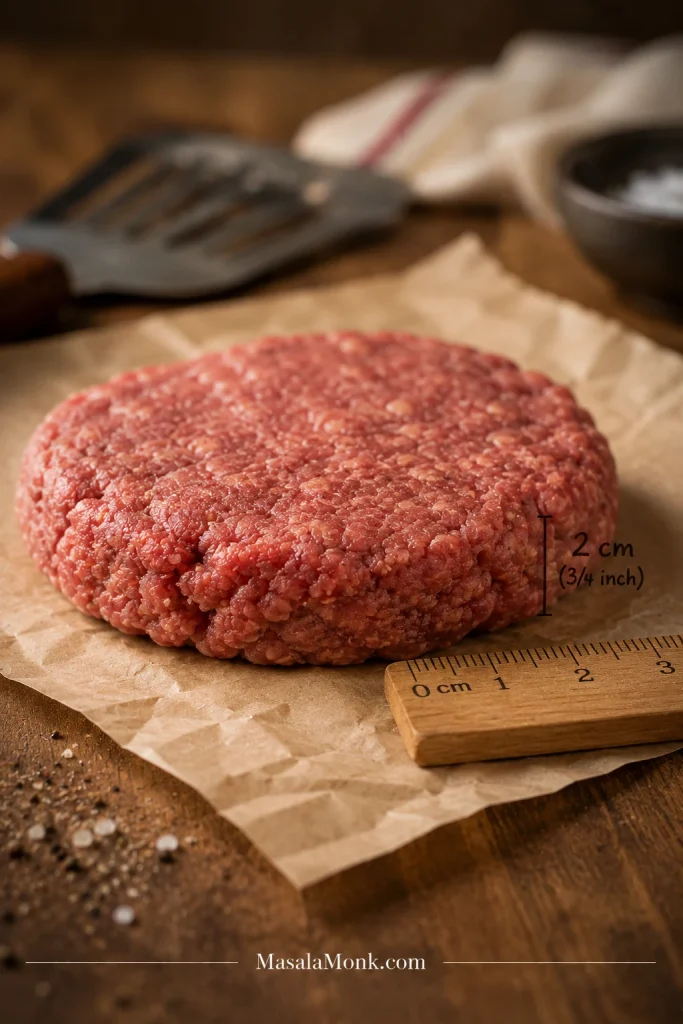
For this recipe: 1 lb / 450 g ground beef makes 4 patties of about 4 oz / 115 g each. Shape each one about 1/2 inch / 1 cm wider than the bun so the finished burger still fills the bread.
How to Shape Burger Patties
Shaping is where a lot of burgers quietly get ruined before they ever touch the pan. You do not need a burger press or special tool. Your hands are enough for regular patties.
The 5-Second Patty Check
Before cooking, lift one patty with both hands. It should hold together without sagging, feel cold, and look slightly rough around the edges. If it feels wet, floppy, greasy, or pasty, chill it for 10 to 20 minutes. If it feels dense and bouncy, it was probably packed too tightly.
The 5-Second Patty Lift
A ready patty should feel cold and hold together when lifted without sagging.
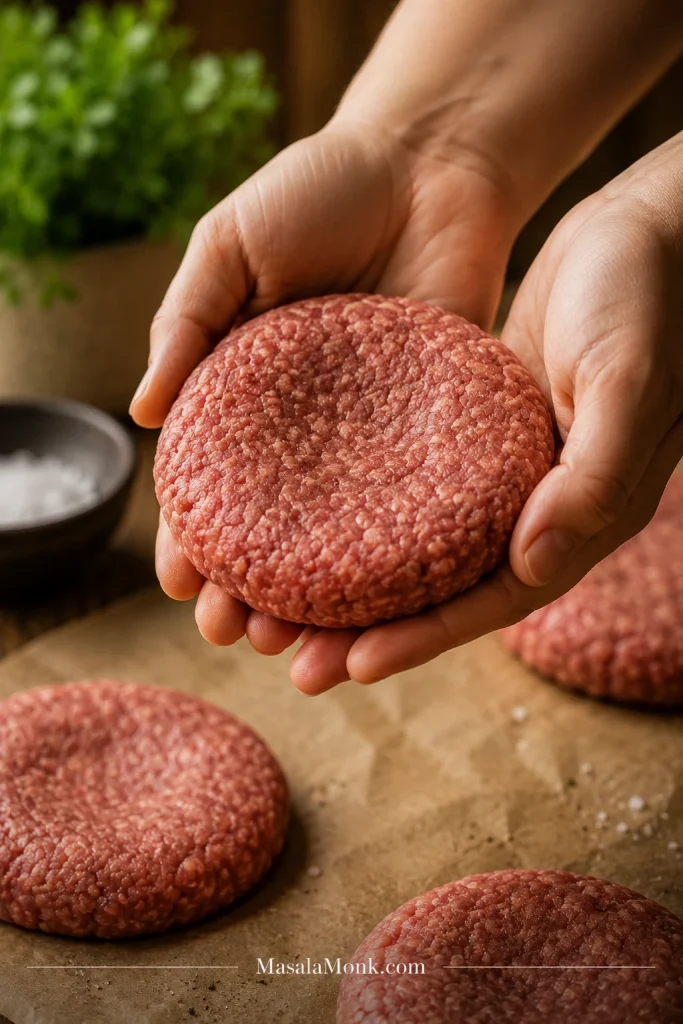
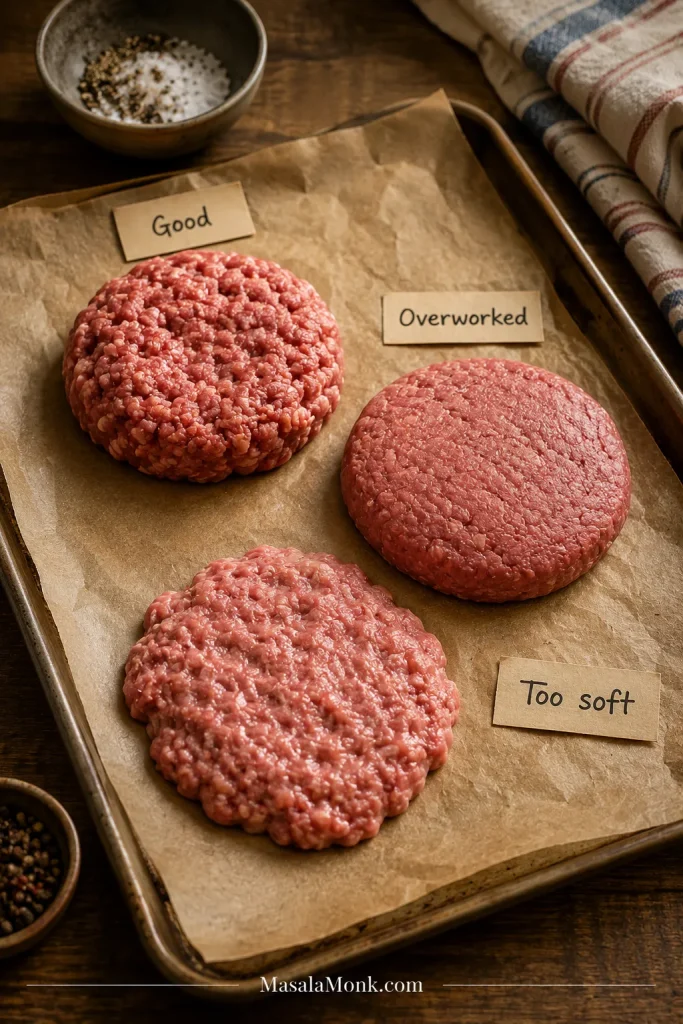
- Good patty: cold, slightly rough, and able to hold together when lifted.
- Overworked patty: smooth, dense, bouncy, and tight around the edges.
- Too-soft patty: floppy, greasy, wet, or hard to move without breaking.
Good vs Overworked vs Too Soft
This comparison shows the three textures to recognize before the patties ever hit heat.
1. Keep the Beef Cold
Cold beef shapes cleanly. Warm beef smears, sticks, and starts falling apart before it reaches the pan.
If the beef feels greasy and soft in your hands, pause. A few minutes in the fridge fixes more than breadcrumbs ever will. That is not a failure; it is an easy fix.
2. Divide Before Shaping
Divide the beef into equal portions first. For 1 lb / 450 g beef, make 4 portions of about 4 oz / 115 g each.
3. Shape Gently
Form each portion into a loose ball, then flatten it into a patty. Handle it just enough to bring it together. The surface can still look a little craggy. That loose, uneven texture is part of what keeps the burger tender.
Slight roughness around the edges is fine. A burger should look like beef, not dough. If the edges crack badly, gently press them back together without packing the center tight.
4. Make the Patties Wider Than the Buns
When the raw patty fits the bun perfectly, it will usually look too small after cooking. Shape each one about 1/2 inch / 1 cm wider than the bun so the finished burger still fits properly.
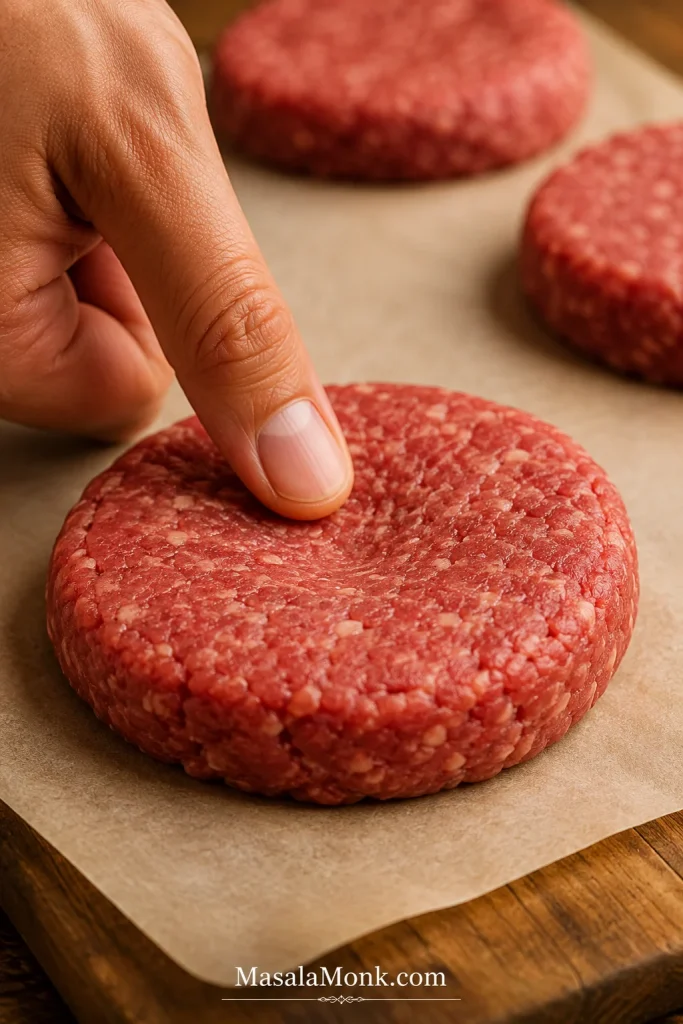
5. Add a Shallow Center Dimple
Press a shallow dimple into the center with your thumb or the back of a spoon. Keep it shallow. It should be a small dip, not a crater. The middle should not become thin or cracked.
Shallow Dimple Close-Up
Light pressure is enough; the center only needs to sit slightly lower than the edges.
6. Chill If the Patties Feel Soft
If the shaped rounds feel soft and floppy, chill them for 10 to 20 minutes. They will be much easier to handle.
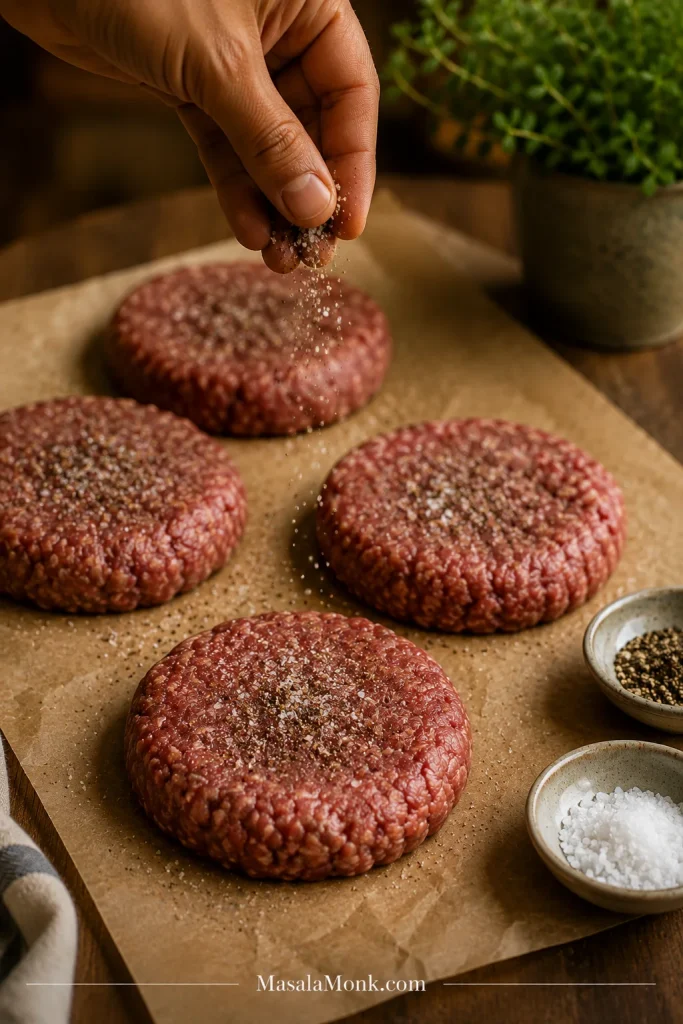
How to Season Burger Patties
Season the outside, not the inside, when you want a tender beef-first burger. Salt mixed into ground beef too early can make the texture tighter and springier. Garlic powder, onion powder, pepper, and paprika are more forgiving, but the cleanest method is to shape first and season both sides right before cooking.
If you already mixed salt into the beef, do not throw it out. Shape gently, cook soon, and avoid packing the meat tighter. The texture may be a little firmer, but the burgers can still be good.
Simple Burger Patty Seasoning for 1 lb / 450 g Beef
- Kosher salt: 1 tsp, or about 3/4 tsp fine salt
- Black pepper: 1/2 tsp
- Garlic powder: 1/2 tsp
- Onion powder: 1/2 tsp
- Smoked paprika: 1/4 tsp, optional
Sprinkle the seasoning evenly over both sides right before cooking.
Add Seasoning Right Before Cooking
After shaping, sprinkle salt and pepper on the surface so the beef stays loose until it hits the heat.
Easy Seasoning Variations
Use these as small changes, not as a reason to mix wet ingredients into the beef.
- Classic: salt, pepper, garlic powder, and onion powder.
- Smoky: add a little smoked paprika.
- Spicy: add cayenne, chili flakes, or pepper jack cheese.
- BBQ-style: brush barbecue sauce near the end so it glazes instead of burns.
- Salt-free prep: use garlic powder, onion powder, paprika, and pepper, then salt the outside right before cooking.
How to Cook Burger Patties
Best crust: cast iron or griddle.
For smoky flavor: use the grill.
Easiest hands-off method: air fryer.
For crispy thin edges: make smash burgers on a griddle.
With thick frozen patties: thaw first when possible.
Once the meat is shaped and seasoned, cooking is mostly about heat control. The pan or grill should be hot enough that the meat sizzles clearly when it touches the surface. If it lands quietly, wait a little longer before adding the rest.
Cook times are always approximate. The table is a starting point, not a promise. A thick cold patty and a thin room-temperature patty will not cook the same way.
Burger Patty Cooking Time by Size
| Patty Size | Skillet Time | Grill Time | When to Start Checking |
|---|---|---|---|
| 3 oz / 85 g thin patty | About 2 to 3 minutes per side | About 2 to 3 minutes per side | Around 5 minutes total |
| 4 oz / 115 g standard patty | 3 to 4 minutes first side, 2 to 3 minutes second side | About 3 to 4 minutes per side | Around 6 minutes total |
| 5 to 6 oz / 140 to 170 g thick patty | 4 to 5 minutes first side, 3 to 4 minutes second side | About 4 to 5 minutes per side | Around 8 minutes total |
| 2 to 3 oz / 55 to 85 g smash patty | Usually under 3 minutes total on a very hot surface | Better on a griddle than grill grates | Very quickly; these cook fast |
Time tells you when to start checking; internal temperature tells you when the burger is actually done.
Stovetop Burger Patties
If you are cooking indoors, cast iron is your friend. It gives the meat a browned crust and works even when grilling is not practical.
Listen for the Sizzle
The sound tells you whether the skillet is browning the patties or just steaming them.
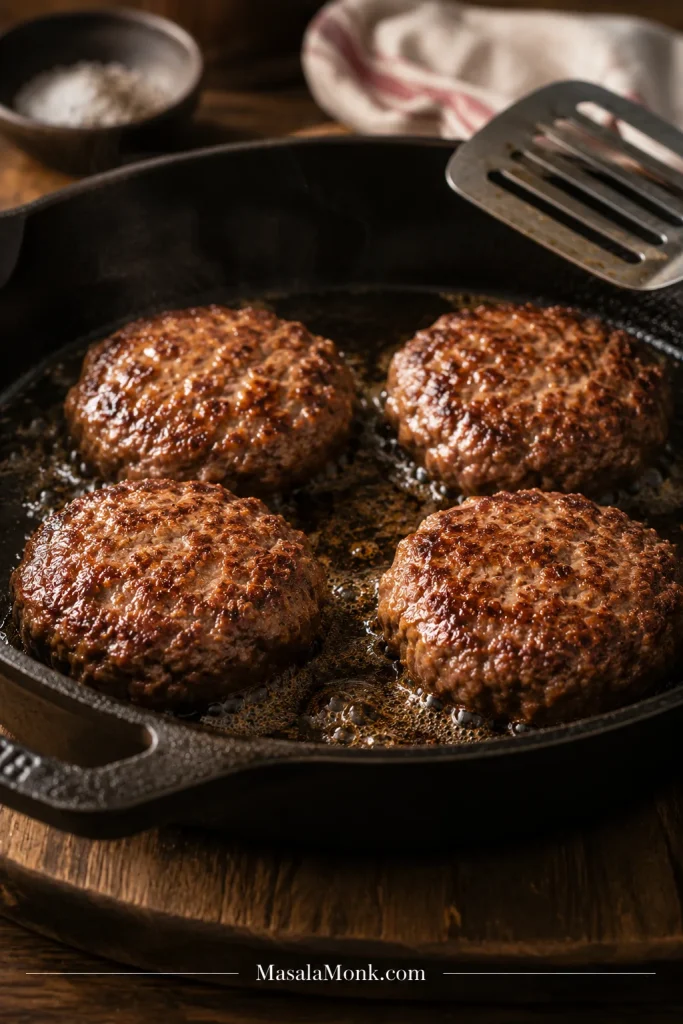
- Heat a cast iron skillet or heavy pan over medium-high heat.
- Add a thin film of oil if the pan needs it.
- Place the patties in the pan, leaving space between them.
- Cook 4 oz / 115 g patties for about 3 to 4 minutes on the first side.
- Flip once, after the first side has browned.
- Cook for another 2 to 3 minutes, or until cooked through.
- Add cheese during the last 30 to 60 seconds if making cheeseburgers.
- Rest briefly before serving.
Let the patties cook undisturbed. Pressing feels satisfying, but it squeezes out the juiciness you worked for. Before flipping, look for browned edges, a firmer underside, and easier release. If the spatula has to fight the patty, wait another 30 to 60 seconds.
Look for a Clean Flip
When the crust forms, the spatula slides under more easily and the patty stays intact.
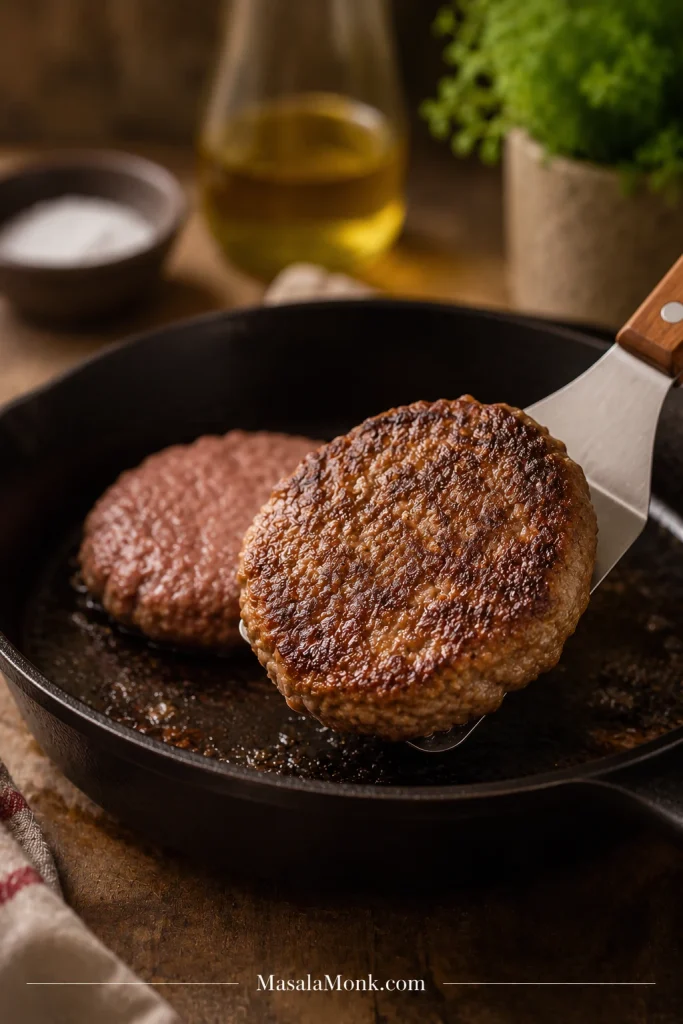
That first clean flip is the moment you know the patty is working: browned underneath, still juicy inside, and sturdy enough to finish without falling apart.
Grilled Burger Patties
On the grill, the payoff is smoke, char, and enough space to cook several burgers at once.
- Preheat the grill to medium-high heat.
- Clean and oil the grates if needed.
- Place the patties over direct heat.
- Grill standard patties for about 3 to 4 minutes per side.
- Flip once, after the first side has browned and releases cleanly.
- If a patty sticks, wait. Meat usually releases more easily once the first side has browned.
- Add cheese during the last minute if using.
- Check the internal temperature with a thermometer.
Air Fryer Burger Patties
Air fryer burgers are easiest, not crustiest. Use the air fryer when convenience matters more than the deepest browning.
Fresh patties usually take about 8 to 10 minutes at 375°F / 190°C, depending on thickness. Flip halfway through if your air fryer cooks unevenly. If they look pale, toast the bun and add cheese or sauce so the finished burger feels more complete. For more detail, see the full Air Fryer Burgers guide.
Cooking Frozen Burger Patties
Frozen patties are where timing charts start lying to you, because thickness changes everything. A thin frozen patty cooks very differently from a thick 1/3-lb patty.
Best result: thaw overnight in the fridge. Fastest result: cook from frozen over moderate heat, then finish hotter if needed for browning. Worst result: blasting a thick frozen patty on high heat from the start.
For frozen patties, start over medium heat until the center begins to thaw and the patty softens slightly. Then raise the heat near the end if you need more browning. Check the center with a thermometer before serving.
This works for homemade frozen patties and most plain store-bought frozen beef patties. If the package gives specific cooking instructions, use those as the starting point and still check the center temperature.
- Thin frozen patties can cook from frozen over moderate heat, but watch them closely because they dry out quickly.
- Standard frozen patties need more time than fresh patties, and the center should be checked with a thermometer.
- Thick frozen patties are best thawed overnight when possible.
- The counter is tempting, but the fridge gives you the safer, more even thaw.
- Separate patties with parchment before freezing so they do not stick.
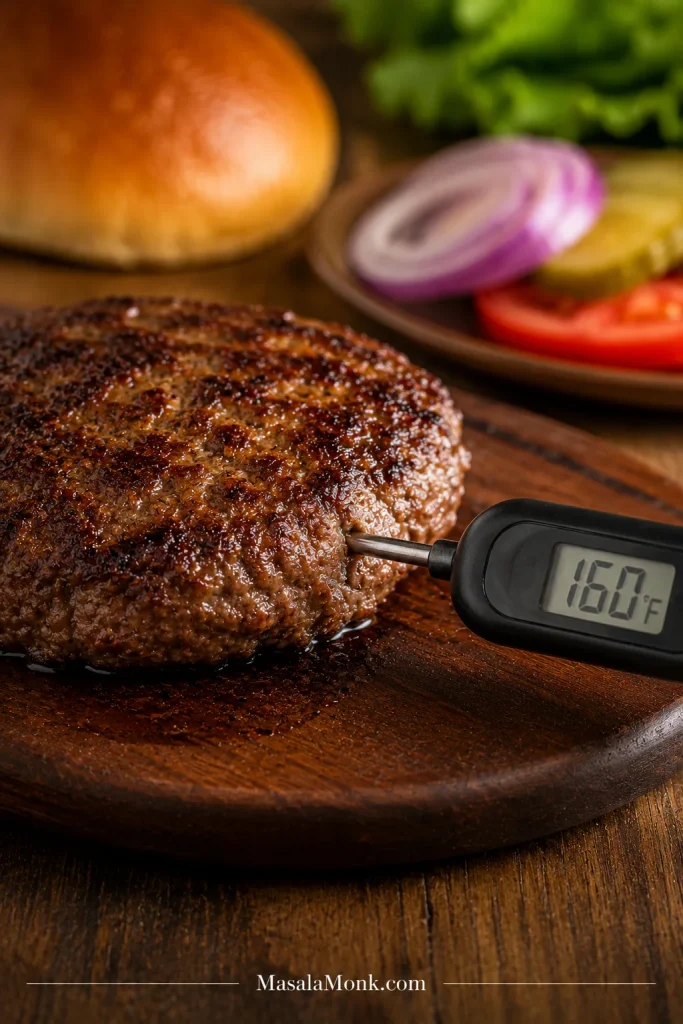
Burger Patty Internal Temperature
This recipe follows standard food-safety guidance for ground beef, so the target is 160°F / 71°C in the center. Check with an instant-read thermometer, using the FoodSafety.gov safe minimum internal temperature chart as the safety reference.
Color can fool you with burgers. The USDA FSIS explains why cooked ground beef color is not a reliable doneness test: burgers can brown before they are safe, and some can stay a little pink even after proper cooking. Use the thermometer instead of guessing.
To check a thin patty, insert the thermometer from the side into the center of the burger.
Check Temperature from the Side
A side-entry thermometer check reaches the center cleanly without tearing the patty open.
Why Burger Patties Fall Apart
Use this section after something has already gone wrong. Before cooking, fix the mixture. During cooking, fix the heat and flip timing. After cooking, look at fat level and final temperature.
A soft patty is not a failed patty. Before cooking, most problems can be fixed with chilling or reshaping. During cooking, most problems are fixed by waiting longer before flipping.
Common Burger Patty Problems and Fixes
| Problem | Why It Happens | Fix |
|---|---|---|
| Beef is too lean | Lean meat has less fat to help the patty stay juicy and cohesive. | Use 80/20 or 85/15 ground beef. |
| Meat is too warm | Soft fat makes the mixture loose and sticky. | Chill the beef or shaped patties before cooking. |
| Too many wet mix-ins | Onion, sauces, or vegetables can loosen the meat. | Use less liquid first. If you still want a wet, loaded mixture, switch to the binder-style variation. |
| Flipped too early | No crust has formed yet. | Let the first side brown before flipping. |
| Pan or grill is not hot enough | The patties steam instead of sear. | Preheat properly before cooking. |
| Edges are cracked | The edges were left loose or the meat was handled too roughly. | Gently press the edges together without compacting the whole patty. |
| Meat is overworked | The texture becomes dense and can crack. | Next time, bring the beef together gently and stop while the surface still looks a little craggy. |
| Frozen or thawed beef is watery | Extra moisture weakens the patty. | Pat lightly, shape carefully, and chill before cooking. |
The most reliable fix: use 80/20 beef, keep it cold, shape gently, chill soft patties before cooking, and wait for a crust before flipping. When in doubt, come back to temperature, texture, and timing.
Good news: burger mistakes are easy to read. Once you know whether the problem was warmth, moisture, shaping, heat, or timing, the next batch gets better fast.
Why Burger Patties Puff Up in the Middle
Patties puff up because the meat tightens as it cooks. The edges cook and shrink first, pushing the center upward.
The fix is a shallow dimple. Before cooking, press your thumb into the center of each raw patty. Make a small depression, not a hole. As the burger cooks, the center rises slightly and the patty ends up flatter.
This is especially useful for thick patties. Smash burgers do not need a dimple because they are pressed thin on the hot surface.
Make-Ahead, Storage, and Freezing
These patties freeze well for nights when dinner has to move fast. Shape them properly now and one pound of beef can become an easy future meal, not just tonight’s burgers.
Keep them cold, separate them properly, and avoid salting them too early. If making patties ahead, shape them plain and salt later. This keeps the texture looser and avoids drawing moisture out too early.
Make Ahead
You can shape raw patties up to 1 day ahead. Place them on a plate or tray, cover tightly, and refrigerate. Salt them right before cooking for the best texture.
Freezing Raw Patties
- Shape the patties.
- Place them on a parchment-lined tray.
- Freeze until firm.
- Stack with parchment between each patty.
- Transfer to a freezer bag or airtight container.
- Freeze for up to 3 months for best quality.
Parchment keeps the patties from freezing into one solid block.
Thawing
Thawing on the counter is tempting, but the fridge is the safer, better path. Overnight fridge thawing gives the best texture and most even cooking.
Storing Cooked Patties
Store cooked patties in an airtight container in the fridge for 3 to 4 days if they were cooled and refrigerated properly. Reheat gently in a skillet, air fryer, or microwave until hot. Avoid overheating, or the burgers can dry out.
Burger Patty Variations
Once the structure is right, flavor is easy. Change the seasoning, topping, or cooking style, but keep the same cold-beef, gentle-shaping method until the basic patty works for you.
Cheeseburger Patties
For classic burger night, cook the patties as written, then add cheese once the second side is nearly done. Cover the pan briefly or close the grill lid to help the cheese melt.
Smash Burger Patties
Choose this style when you want crispy edges, not thick juiciness. Use 2 to 3 oz / 55 to 85 g portions, shape them into loose balls, skip the dimple, and smash them thin on a very hot griddle or skillet.
BBQ Burger Patties
Brush the sauce late instead of mixing it into the meat. Add smoked paprika to the seasoning and brush barbecue sauce near the end so it glazes instead of burns.
Spicy Burger Patties
Add cayenne pepper, chili flakes, chopped jalapeño, or pepper jack cheese. Keep wet spicy sauces for topping rather than mixing too much into the meat.
Lean Burger Patties
Lean patties work for lighter meals, but they are less forgiving. Use 85/15 or 90/10 beef, keep the patties smaller, avoid pressing, and check early with a thermometer.
If you are building a lower-carb plate around the patties, the keto hamburger recipes guide has bunless cheeseburgers, burger bowls, lettuce wraps, and skillet-style ideas.
Binder-Style Family Patties
Use this style for wet add-ins or softer family-style patties. Add 1 egg and 1/4 cup breadcrumbs to 1 lb / 450 g beef. This changes the recipe, but it can help if you are using very lean meat or adding a lot of onion, herbs, sauces, or vegetables.
What to Serve with Burger Patties
These can become classic burgers, bunless plates, rice bowls, salads, or quick comfort-food dinners.
At the table, the win is simple: a patty that still fills the bun, a little crust at the edges, warm juices in the middle, and toppings that stay on top instead of trying to hold the meat together.
Burger-Night Payoff
This is the final proof: patties that stay juicy, fit the bun, and hold together at the table.
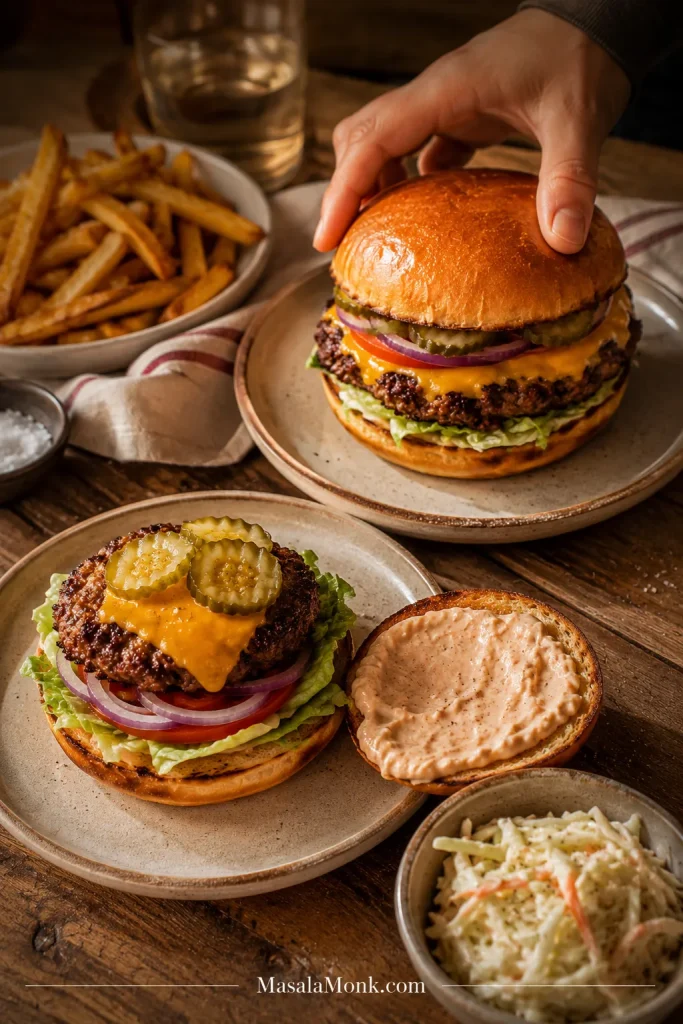
- Classic burger night: toasted buns, cheese, lettuce, tomato, onion, pickles, ketchup, mustard, or a quick sauce made from homemade mayo
- Lighter plate: lettuce wraps, salad, grilled vegetables, sliced avocado, or crisp coleslaw
- Comfort plate: fries, potato wedges, roasted potatoes, macaroni salad, or a cool potato salad
- No-bun dinner: patties over rice, mashed potatoes, salad bowls, or sautéed vegetables
- Leftovers: chopped cooked patty in rice bowls, wraps, omelets, or quick pasta
If you are already baking bread, use a soft roll or sandwich-style bun here. A crusty loaf can overpower the patty.
Frequently Asked Questions
Can I make burger patties without egg and breadcrumbs?
Yes. For simple beef patties, 80/20 beef, cold meat, gentle shaping, and late salting are enough. Egg and breadcrumbs are only useful for very wet or meatloaf-style patties.
What is the best meat for burger patties?
80/20 ground beef or ground chuck is the best all-purpose choice because it stays juicy, browns well, and holds together without binders.
Do hamburger patties need egg?
For simple 80/20 beef patties, cold fat, gentle shaping, and proper browning are enough.
Do burger patties need breadcrumbs?
No, not for a regular beef-first burger. Breadcrumbs are only useful for wet, soft, meatloaf-style patties.
How much seasoning do I use for 1 lb of ground beef?
Use about 1 tsp kosher salt, 1/2 tsp black pepper, 1/2 tsp garlic powder, and 1/2 tsp onion powder. If using fine salt, use about 3/4 tsp instead.
Should I season burger meat before or after shaping?
Shape first, then season both sides just before cooking. Salt mixed in early can make the texture tighter.
How do I stop burger patties from falling apart?
Keep the beef cold, avoid wet mix-ins, shape gently, and wait for the first side to brown before flipping.
Why do my burgers puff up in the middle?
The meat contracts as it cooks and pushes the center upward. Press a shallow dimple into the center before cooking to help the patty stay flatter.
How thick should burger patties be?
For standard patties, aim for about 3/4 inch / 2 cm thick. Shape them slightly wider than the buns because they shrink as they cook.
Can I make burger patties ahead of time?
Yes. Shape the patties up to 1 day ahead and keep them covered in the fridge. Salt them right before cooking.
Can I freeze raw burger patties?
Freeze them flat until firm, then stack with parchment between each patty. Store for up to 3 months for best quality.
Can I cook burger patties from frozen?
You can, but thawed patties brown better and cook more evenly. If cooking from frozen, use moderate heat first and check the center with a thermometer.
How long do burger patties take in a skillet?
Standard 4 oz / 115 g patties usually take about 3 to 4 minutes on the first side and 2 to 3 minutes on the second side over medium-high heat.
How long do burger patties take on the grill?
Standard patties usually take about 3 to 4 minutes per side over medium-high direct heat. Timing depends on thickness and grill heat.
What temperature should burger patties reach?
Ground beef patties should reach 160°F / 71°C in the center. For thin patties, insert the thermometer from the side.
If one thing keeps going wrong with your burgers — falling apart, shrinking, puffing, or drying out — note the pattern and use the mistake map above next time. Once you know the pattern, the fix becomes much easier.
Final Tip
The whole method comes down to this: cold beef, loose hands, late salt, hot surface, no pressing. Get those five things right and the burger does most of the work for you.
Once you make them this way a couple of times, a pound of ground beef stops feeling like a gamble. It starts feeling like four reliable burgers waiting to sizzle, brown, melt a slice of cheese, and land on the bun without falling apart.