Posted on — Leave a comment

Reuben Sandwich Recipe: Crispy Rye, Melty Swiss & Classic Deli Flavor

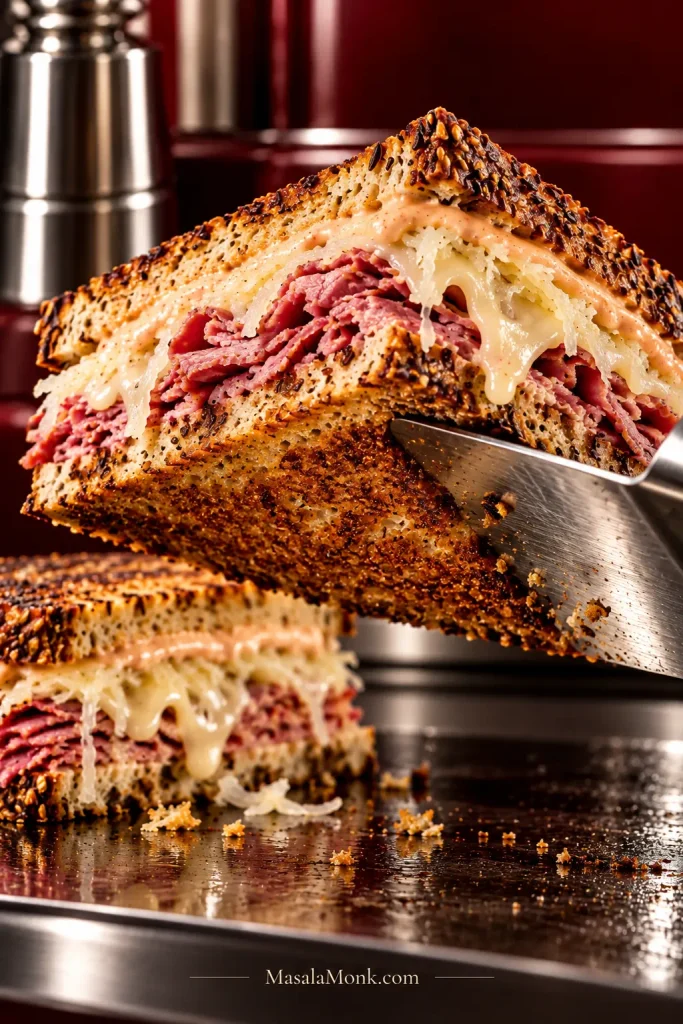
Toasted rye Reuben cut open to show folded corned beef, melted Swiss cheese, sauerkraut and Russian dressing on a polished deli-style set.

A Reuben can look finished before it actually is. The rye turns beautifully golden, then you cut through the middle and find cool corned beef, barely melted Swiss or enough sauerkraut steam to soften the crust.

When it works, the contrast is immediate: crisp rye first, then hot, supple corned beef, melted Swiss, sharp sauerkraut and creamy Russian dressing all arriving together.

This Reuben sandwich recipe gets there by warming the fillings before the sandwich reaches the skillet. The classic stack stays familiar—corned beef, Swiss cheese, sauerkraut and Russian dressing on rye—but now the bread can brown properly without racing against a refrigerator-cold middle. Thousand Island is the sweeter alternative if that is the Reuben you prefer.

DRY
Squeeze the sauerkraut until pressing it no longer releases obvious brine.

WARM
Get the corned beef and kraut warm through before they go between the bread.

BROWN
Use the final skillet cook to crisp the rye and finish melting the Swiss.
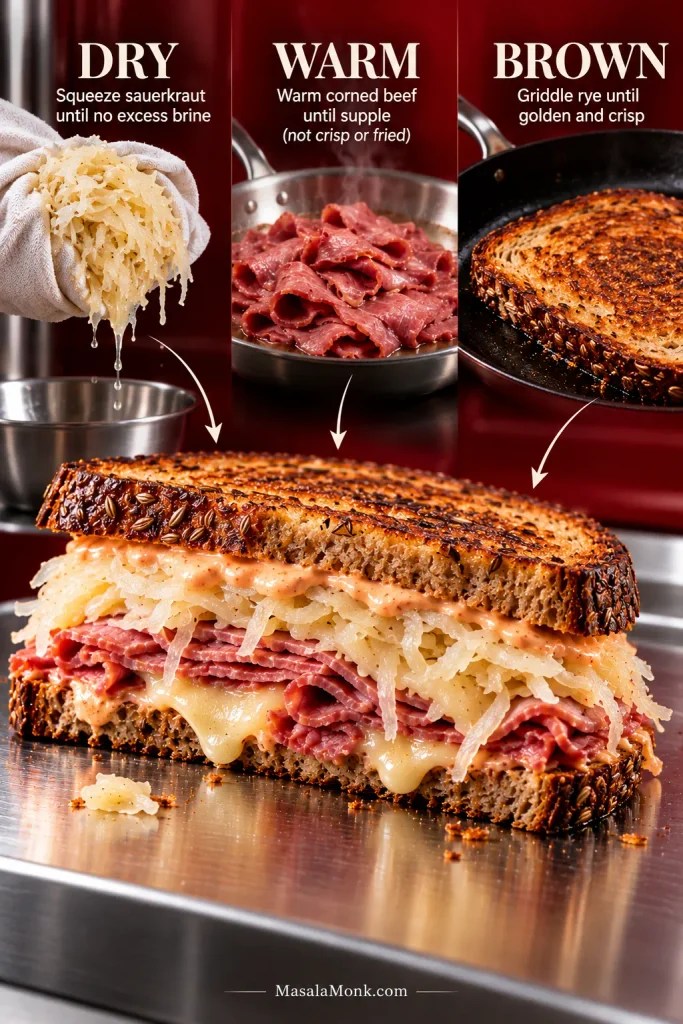
Cooking guide labeled Dry, Warm and Brown, showing squeezed sauerkraut, warmed corned beef, browned rye and a finished Reuben sandwich.
Three jobs, one result: dry filling, warm center, crisp rye.

Make the Reuben: Classic Skillet Method

This makes four Reubens, with the rye turning crisp and golden at about the same time the center becomes hot, soft and melty.

Yield
4 sandwiches

Prep
About 15 minutes

Cook
About 20 minutes

Total
About 35 minutes

Per sandwich
2 sturdy rye slices
4 oz / 113 g corned beef
2 slices / about 40–50 g Swiss
about 1¾ oz / 50 g well-drained, firmly squeezed sauerkraut
1½ tbsp / 22 ml Russian dressing
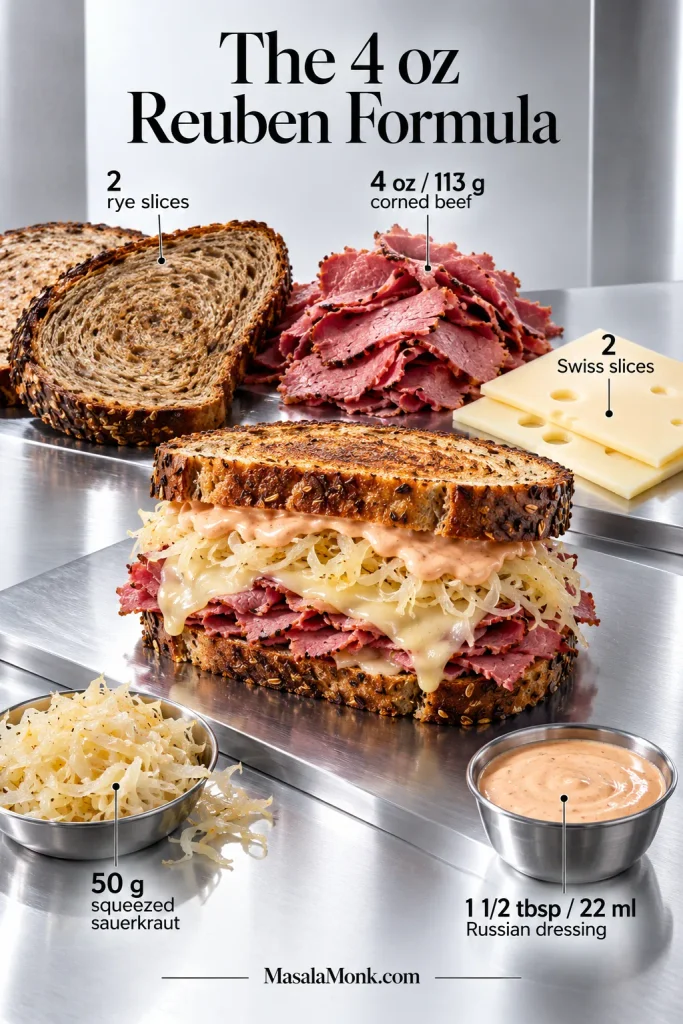
Ingredient guide for one Reuben showing two rye slices, 4 ounces or 113 grams of corned beef, two Swiss slices, 50 grams of sauerkraut and 1½ tablespoons of Russian dressing.
These Reuben sandwich ingredients are also a heat-management system. Keeping the filling proportionate means less mass for the skillet to warm, so the bread can crisp before the center becomes a problem.

Useful equipment: a 12-inch / 30 cm heavy skillet or large griddle, a wide spatula and a lid large enough to cover the sandwiches.

Quick Russian Dressing

  • Mayonnaise — ½ cup / 120 ml
  • Heinz-style bottled chili sauce — 2 tbsp / 30 ml, the tomato-based kind, not sweet Asian chili sauce
  • Ketchup — 1 tbsp / 15 ml
  • Prepared horseradish — 2 tsp / 10 ml, not creamy horseradish sauce, plus more to taste
  • Finely chopped dill pickle or dill relish — 1 tbsp / 15 ml
  • Worcestershire sauce — 1 tsp / 5 ml
  • Fresh lemon juice — 1 tsp / 5 ml
  • Sweet paprika — ¼ tsp
  • Freshly ground black pepper — to taste

This makes about ¾–⅞ cup / roughly 200 ml, with plenty left for dipping. Taste before adding salt; corned beef, Swiss, sauerkraut and Worcestershire already bring plenty.

For the Reuben Sandwiches

  • 8 slices sturdy rye bread, preferably about ⅜–½ inch / 1–1.3 cm thick
  • 16 oz / 454 g thinly sliced cooked corned beef, roughly 1/16–1/8 inch / 2–3 mm thick when slicing it yourself
  • 8 slices Swiss cheese / about 160–200 g total
  • About 7 oz / 200 g well-drained, firmly squeezed sauerkraut
  • 6 tbsp / 90 ml Russian dressing for the sandwiches, plus extra for serving
  • 3 tbsp / 42 g unsalted butter, softened, plus more as needed for unusually large bread

1. Mix the Russian dressing

Stir the mayonnaise, bottled chili sauce, ketchup, horseradish, pickle, Worcestershire, lemon juice, paprika and black pepper until smooth.

Taste, then add a little more horseradish or black pepper if needed. It should be creamy and tangy, with the horseradish clearly present but not dominating the beef and Swiss.
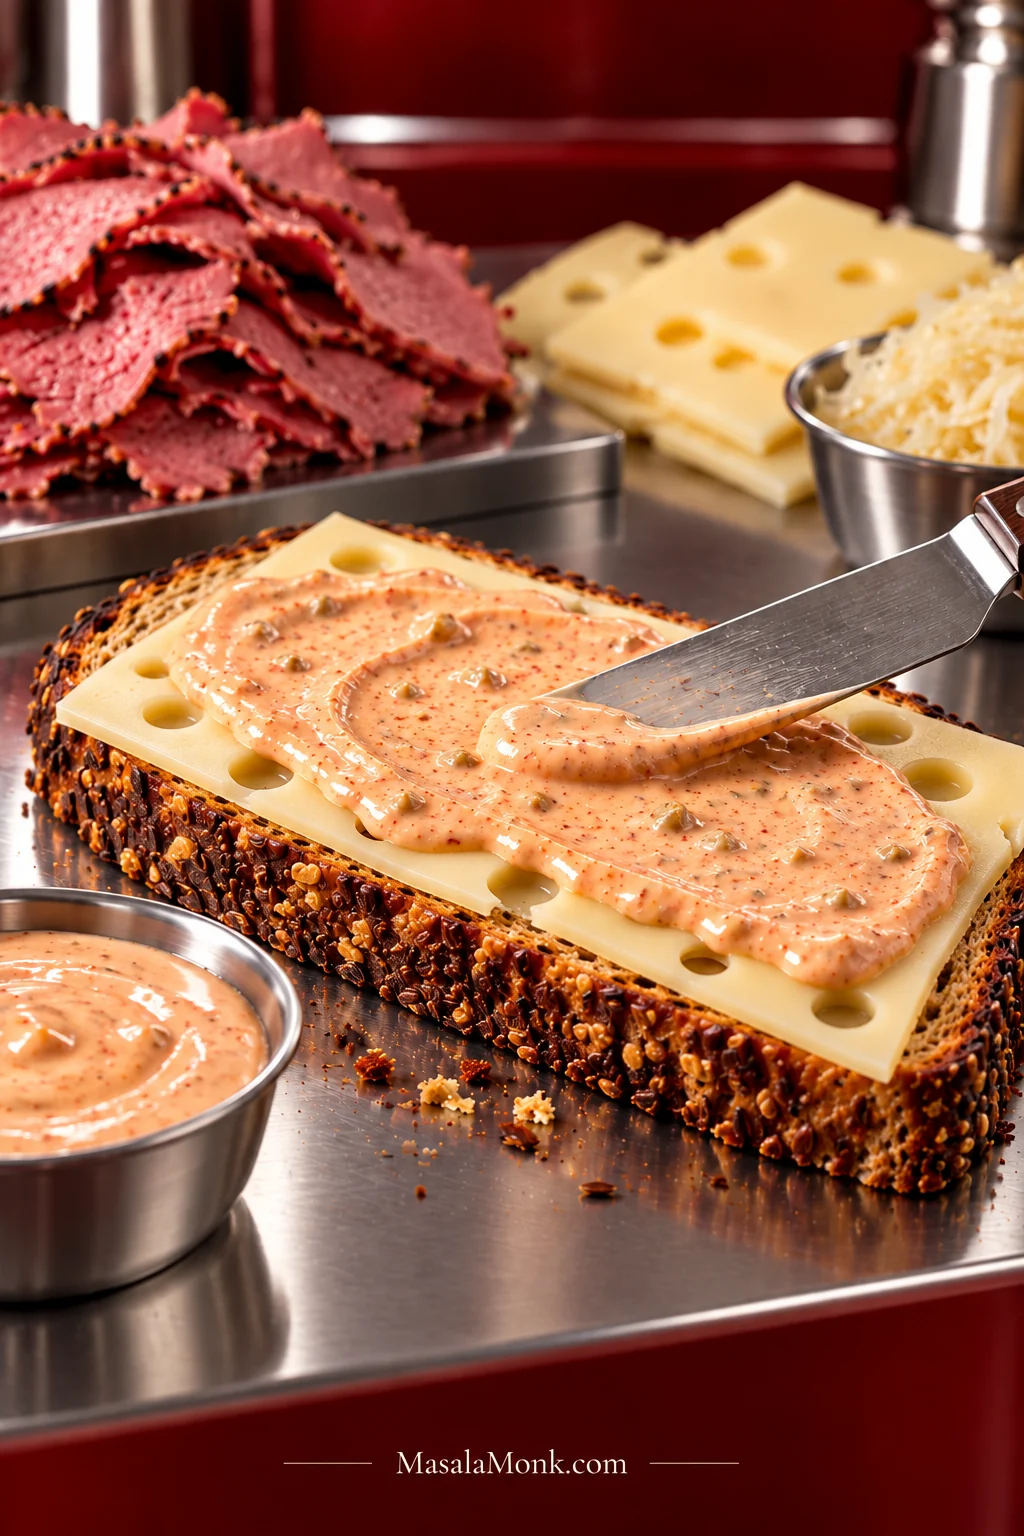
Russian dressing being spread in a thin layer over Swiss cheese on seeded rye bread during Reuben sandwich assembly.
Spread the Russian dressing over the Swiss rather than directly onto the rye. The cheese helps keep the wetter filling one layer away from the bread.

2. Squeeze the sauerkraut, then warm it

Drain the sauerkraut thoroughly, then squeeze it firmly with clean hands, paper towels or a clean kitchen towel. If obvious brine still comes out when you press it, keep squeezing.

Hands squeezing pale shredded sauerkraut in a clean cloth while visible brine drips out beneath it.
The goal is not dry cabbage. Sauerkraut should still look juicy and flexible, yet firm pressure should release no obvious liquid—the useful middle ground between jar-wet and overcooked.

Measure about 7 oz / 200 g after squeezing. Warm it in the skillet over medium heat for about 1–2 minutes, stirring once or twice, until the refrigerator chill is gone and the surface no longer looks wet.

Keep some life in it. The kraut should stay sharp and juicy rather than turning dry or fried.

3. Warm the corned beef without drying it

Move the kraut to a plate and wipe away any visible liquid from the skillet. Add the corned beef in loose folds instead of one compact mound.

A crowded skillet warms the beef unevenly, so work in two loose batches when necessary. Give each batch about 1 minute, turning gently, until the slices are supple and have lost their refrigerator chill. Meat that seems dry can use about 1 tsp / 5 ml water added to an empty area of the skillet; cover briefly and let the steam do the work.

That quick warm-up assumes ready-to-eat deli corned beef; previously cooked leftovers should be reheated to 165°F / 74°C before assembly.

Warm corned beef should bend and fold easily. Crisp, fried edges are a sign it has gone farther than a Reuben needs.
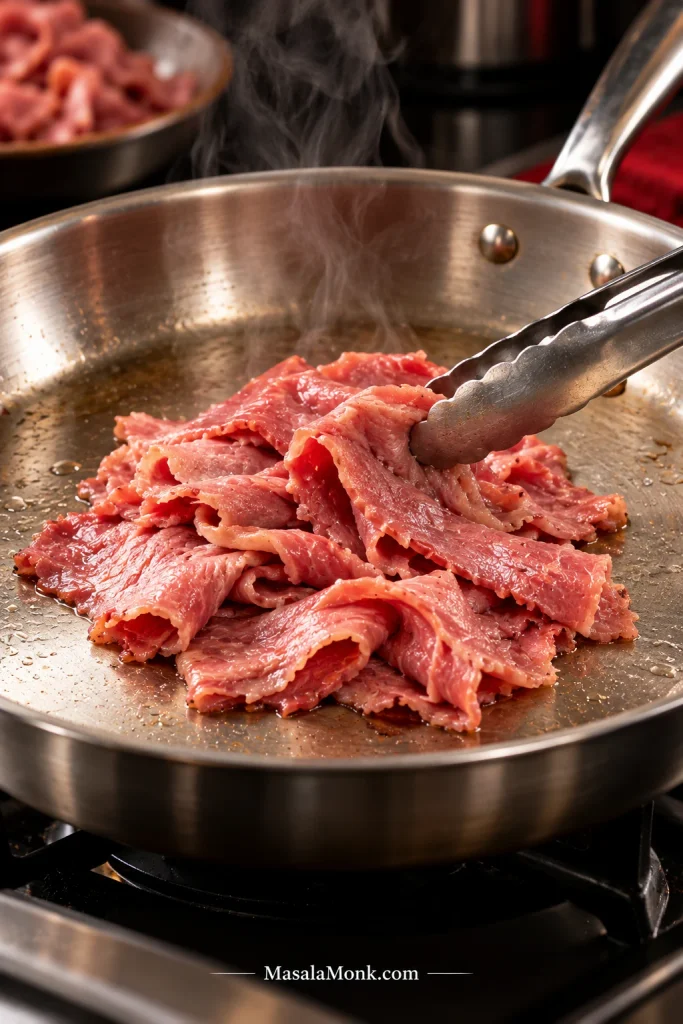
Thin slices of pink corned beef warming in loose folds in a stainless-steel skillet while metal tongs lift and separate the meat.
Use flexibility as the checkpoint: properly warmed corned beef should drape easily from the tongs. Once the edges stiffen or crisp, reheating has started turning into frying.

4. Build every sandwich in the same order

For each Reuben, stack:

  1. 1 slice rye bread
  2. 1 slice Swiss cheese
  3. About half of the 1½ tbsp / 22 ml Russian dressing
  4. 4 oz / 113 g corned beef
  5. About 1¾ oz / 50 g firmly squeezed sauerkraut
  6. The remaining half of the dressing
  7. 1 more slice Swiss cheese
  8. Second slice rye bread

Spread a thin, even layer of softened butter over the two outside bread surfaces.

5. Brown the rye over moderate heat

Wipe the skillet clean and dry, then return it to medium-low to medium heat. For an electric griddle, start around 350°F / 177°C.

Add the sandwiches without crowding the pan. A 12-inch / 30 cm skillet will usually hold two comfortably. For four at once, use a large griddle or two skillets so the first sandwiches are not sitting around while the last ones cook.

Press gently with a wide spatula so the bread makes good contact. There is no need to flatten the sandwich.

A Reuben browning in a skillet while a wide metal spatula applies light pressure to the seeded rye bread.
Watch the sandwich edges while pressing. If cheese, kraut or beef begins squeezing outward, ease off; better skillet contact should improve the crust without compressing the filling.

Cook the first side for roughly 3–4 minutes. Flip when the rye is evenly golden, then cook the second side for another 2–4 minutes.

Ideally, the rye reaches deep gold just as the Swiss sinks into the folds of beef. When the bread gets there first, lower the heat and cover for 30–60 seconds. Two rubbery squares of cheese mean the center still needs help; rapidly darkening rye means the pan is running too hot.

6. Check the center, then rest for one minute

The Reuben is ready when the rye is crisp and deeply browned, the Swiss has melted into the filling, and the corned beef in the center is properly hot.

Transfer to a cutting board and rest for about 1 minute. Then cut in half and serve. Wait much longer and steam begins stealing back some of that crisp crust.
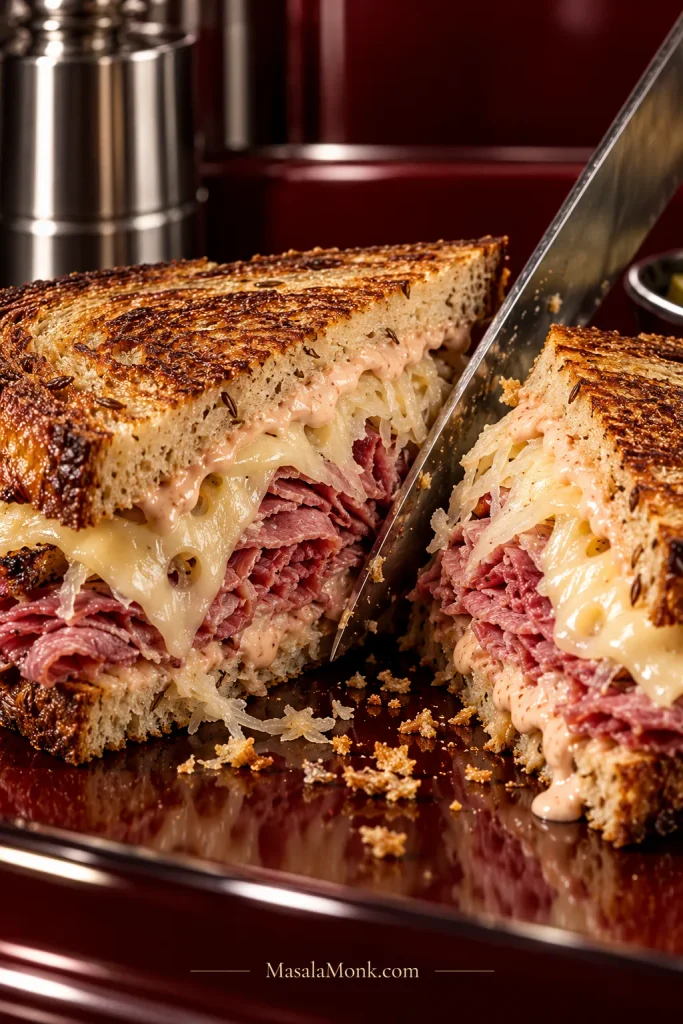
Freshly cut Reuben showing toasted rye, folded corned beef, melted Swiss cheese, sauerkraut and Russian dressing with crumbs along the cut edge.
The cut face gives another doneness check: Swiss should melt into the folds of corned beef rather than sit as two firm slices, while the sauerkraut should remain visibly defined.

Recipe Notes

  • Want a larger deli stack? Increase the corned beef to 5–6 oz / 142–170 g per sandwich, but use sturdy bread and give the extra meat more time to lose its refrigerator chill before assembly.
  • Using mayonnaise outside? Replace the butter with a very thin coating of mayonnaise for easy, even browning.
  • Very sour kraut? Rinse an unusually sharp or salty batch briefly in cold water, then squeeze it thoroughly before warming.
  • Do not overpress. Gentle pressure improves pan contact; crushing the sandwich compresses the bread and pushes filling out around the edges.

Cooking now? You can stop here. The guide below is for choosing the best rye and corned beef, understanding why the proportions matter, fixing a Reuben that comes out soggy or cold, or adapting the sandwich without losing what makes it a Reuben.

Why 4 oz / 113 g of Corned Beef Works

Four ounces / 113 g is deliberate. It gives you a generous fold of corned beef without turning the center into a dense block that takes much longer to heat than the rye takes to brown.

Reuben recipes vary widely. Lighter versions sit around 3 oz / 85 g of meat, while large deli sandwiches can climb past 6 oz / 170 g. Bigger stacks have their fans, but they become harder to heat evenly, hold and bite through.

The best Reuben is not necessarily the tallest one. At 4 oz / 113 g, beef, sharp kraut, melted Swiss, dressing and rye can still meet in the same bite instead of making you chew through a wall of meat first.
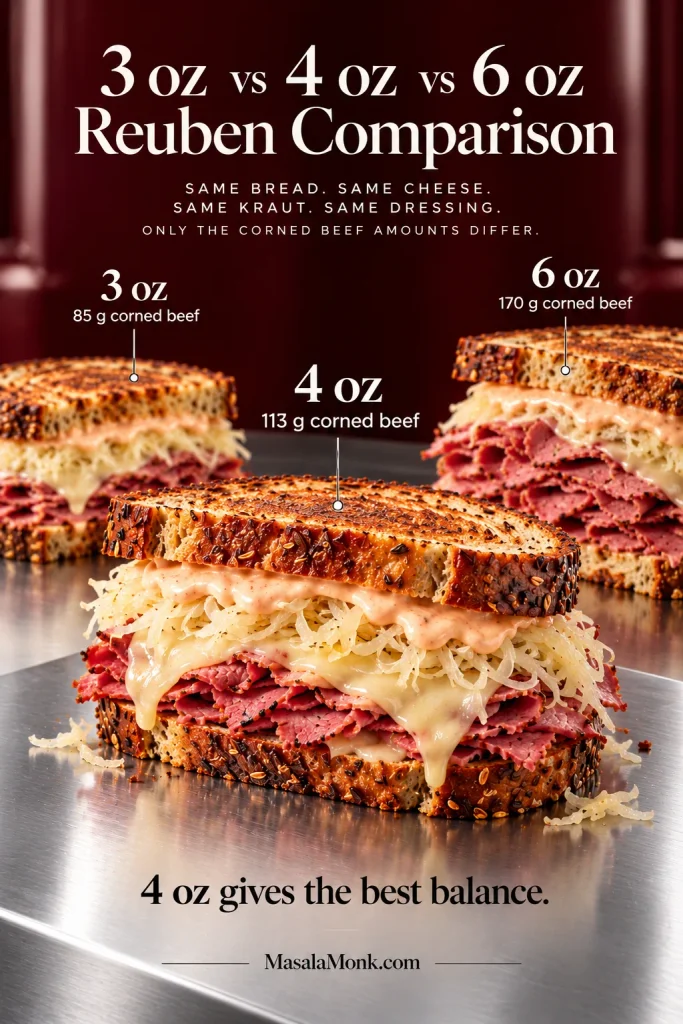
Three Reuben sandwiches comparing 3-ounce, 4-ounce and 6-ounce portions of corned beef, with the 4-ounce sandwich emphasized in the center.
Look at the cross-sections rather than only the numbers. Around 4 oz / 113 g corned beef, the Swiss, kraut and rye still read clearly; at 6 oz, meat begins to dominate the sandwich’s height.

Cooking now? Jump to the exact per-sandwich formula.

Best Rye Bread for a Reuben Sandwich

Seeded or Jewish rye is the clearest choice for a classic Reuben. It has familiar deli character and enough structure for the filling without making the bread the loudest flavor in the sandwich.

Marble rye works beautifully too, especially if you like that dark swirl against the corned beef when the sandwich is cut on the diagonal. Dark rye pushes the rye flavor harder; pumpernickel makes the whole sandwich denser and earthier.

Aim for slices around ⅜–½ inch / 1–1.3 cm thick. Thin, soft bread can bend under the filling, while very thick slices need gentler cooking so the center and crust finish together.
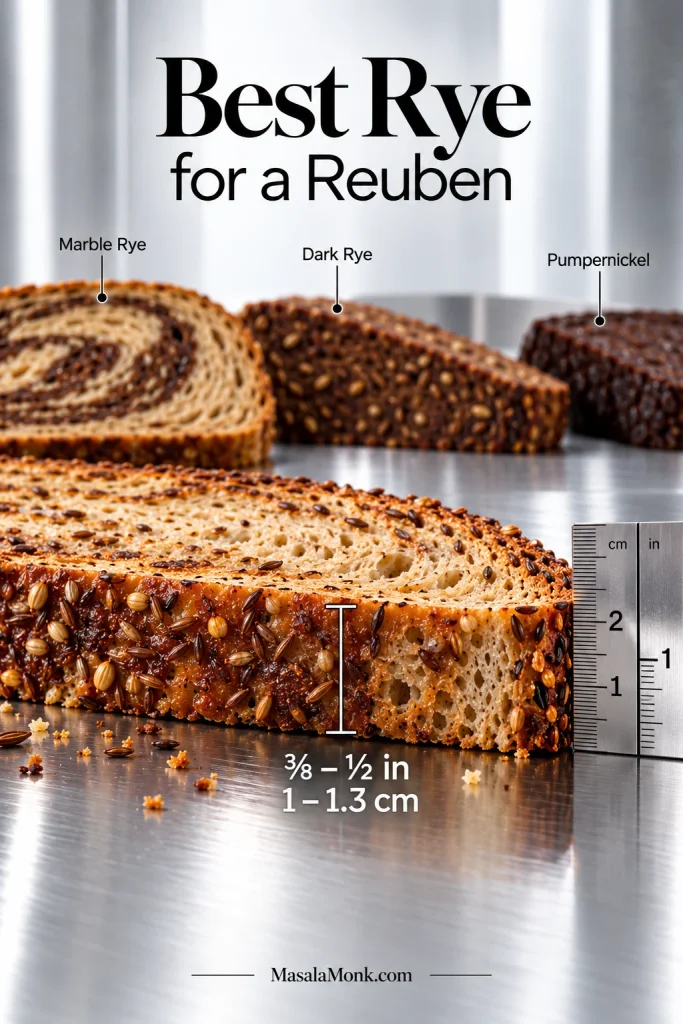
Seeded rye shown beside a ruler at about ⅜ to ½ inch thick, with marble rye, dark rye and pumpernickel displayed as smaller alternatives behind it.
Whichever rye you prefer, structure matters more than color. Seeded rye, marble rye, dark rye and pumpernickel taste different, but a sturdy slice near the target thickness carries the filling more cleanly.

When rye is not available, sturdy sourdough can still make an excellent grilled corned beef sandwich. Our sourdough bread guide includes a sandwich loaf designed to slice cleanly and toast well.

Corned Beef for Reuben Sandwiches: Deli, Leftover or Homemade?

Thin deli corned beef is the practical starting point

Around 1/16–1/8 inch / 2–3 mm gives you slices that still taste substantial but heat quickly and bite cleanly.
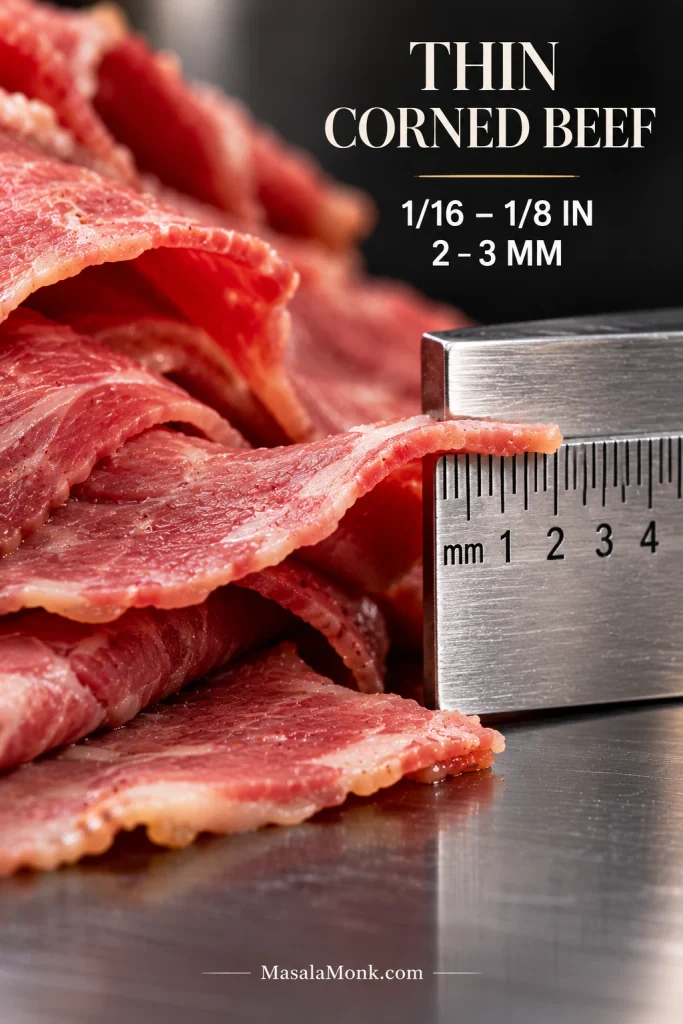
Macro view of thin pink corned beef slices beside a stainless-steel ruler showing a target thickness of about 2 to 3 millimeters or 1/16 to 1/8 inch.
The ruler is a reference; the practical cue is foldability. Corned beef for Reuben sandwiches should be thin enough to bend and layer loosely rather than stand upright as a rigid slab.

Fold the meat loosely. Those folds leave a softer, less compact center than pressing the slices into one dense rectangle.

Using deli corned beef now? Jump to the warming step.

For leftover homemade corned beef, cool first and slice across the grain

Very tender hot brisket can fall apart as soon as the knife reaches it. Let leftover corned beef cool enough to firm up, then slice across the grain.

For sandwich meat, aim for tender but sliceable. Neat slices are easier to stack, heat and eat than brisket that falls apart into shreds.

Choosing raw corned beef for Reuben sandwiches

If sandwiches are the goal, the flat cut is usually the better raw choice because its even shape gives you cleaner slices. The point cut is fattier, richer and less regular, so expect a looser stack.

Follow the package directions or a trusted full corned-beef recipe for cooking. Once done, cool the brisket enough to firm it up, slice across the grain and reheat those slices gently for the sandwich.

“Drained” and “Ready for a Reuben” Are Not the Same Thing

For one sandwich, use about 1¾ oz / 50 g sauerkraut after draining and squeezing. By eye, that is roughly a generous ¼ cup, although the volume changes with the kraut and how firmly you pack it.
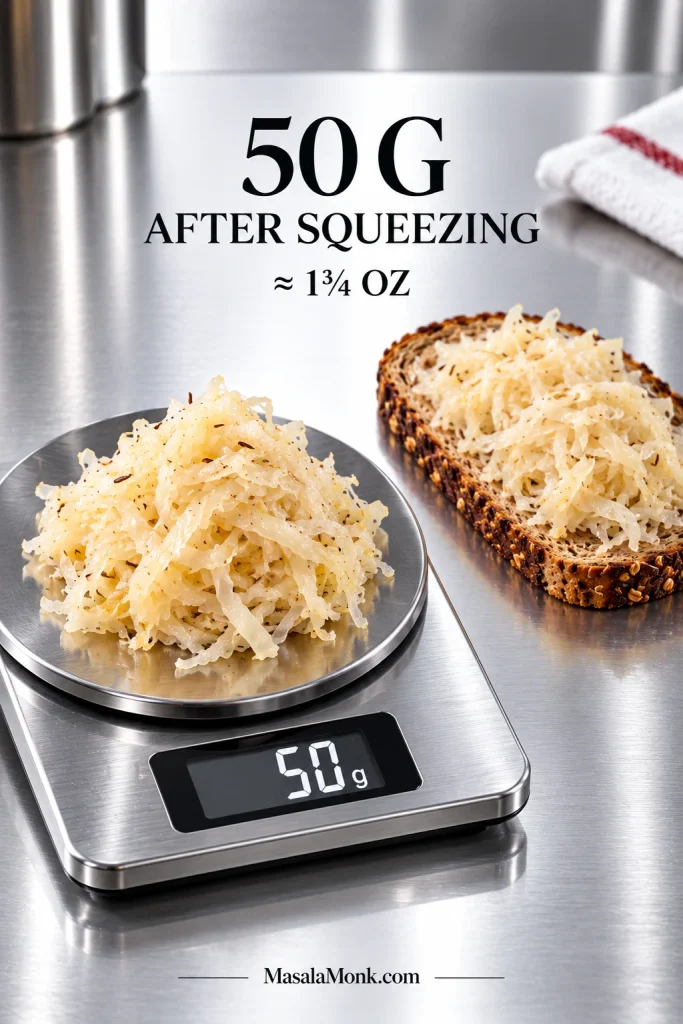
Digital kitchen scale reading 50 grams beneath squeezed sauerkraut, with another portion spread over rye bread to show approximate sandwich coverage.
Because sauerkraut volume changes with the cut and how tightly it is packed, post-squeeze weight is more repeatable than judging the Reuben portion by cups alone.

A spoonful of jar-wet kraut brings more brine than the rye can afford. What you want is cabbage that still tastes sharp and juicy but no longer sheds obvious liquid when pressed.

An unusually sour or salty batch can be rinsed briefly before another thorough squeeze. For deeper flavor, let a few strands begin to brown during warming; stop before the kraut turns dry.

Ready to cook it? Go to the squeeze-and-warm step.

Cheese and Dressing for a Reuben

Why Swiss Works So Well

Swiss melts easily without taking over the corned beef and kraut. Use about 2 slices / 40–50 g per Reuben, with one slice beside each piece of bread.

Emmental is an especially natural choice when available. Gruyère melts beautifully too, though its nuttier flavor changes the sandwich more noticeably.

Russian Dressing or Thousand Island?

Russian dressing is the default here because its sharper horseradish profile cuts through the corned beef and Swiss. Thousand Island gives you a sweeter, milder sandwich.

Use about 1½ tbsp / 22 ml per sandwich. The dressing should show up in the bite without leaking onto the plate. Extra can go at the table for dipping.

For homemade Russian dressing from the ground up, our homemade mayonnaise recipe gives you a neutral creamy base for the horseradish, pickle and tomato.

The Reuben Layer Order Is Doing Real Work

Build the sandwich in this order:

Rye → Swiss → Russian dressing → corned beef → sauerkraut → Russian dressing → Swiss → rye

Exploded Reuben showing, from top to bottom, rye bread, Swiss cheese, Russian dressing, folded corned beef, sauerkraut, more dressing, Swiss cheese and rye bread.
Notice what does not sit directly against the rye: the sauerkraut. Keeping the wettest filling one layer inward gives the crust another small buffer against moisture.

The Swiss sits beside the bread, the wetter dressing and kraut stay farther inside, and the meat remains loose rather than compressed into a dense slab.

Building the sandwich now? Jump to the assembly step.

If the Skillet Has to Heat a Cold Center, the Rye Usually Loses

By the time the sandwich reaches the skillet, most of the difficult work is already done. Now you are watching for two things to happen together: well-browned rye and Swiss melting into the beef.

Golden Reuben in a skillet with melted Swiss and hot filling, accompanied by the words “Golden Outside, Hot Inside — They should finish together.”
Use a mismatch as a diagnostic clue: if the rye is already dark while the Swiss still looks firm, the pan is outrunning the center and the heat needs to come down.

On an electric griddle, about 350°F / 177°C is a useful starting point. On the stovetop, steady, even browning is the better guide. Rapid dark spots while the cheese stays firm mean the pan is too hot.

A lid can finish stubborn cheese without forcing the rye to keep frying. When necessary, add about a teaspoon of water to an empty area of the skillet—not onto the sandwich—and cover briefly for a burst of steam.

Pan already hot? Go straight to the skillet step.

Reuben Troubleshooting: What Went Wrong?

If your Reuben looks right but eats wrong, the symptom usually tells you what happened.

Moisture & Heat Problems

Problem What happened + how to fix it
The rye is soggy immediately The sauerkraut was still wet or there was too much dressing. Squeeze the kraut harder, warm off the surface moisture and use less dressing inside.
The bread was crisp, then softened Steam was trapped after cooking. Serve promptly and do not wrap a piping-hot Reuben tightly.
The bread is golden but the center is cold The fillings started too cold. Give the beef and sauerkraut more of a head start before assembly.
The Swiss is still firm The middle needs more gentle heat. Lower the burner and cover the skillet briefly so the cheese can catch up.
The rye burns before the cheese melts The pan is running too hot. Turn it down and let color, rather than a fixed timer, tell you when to flip.
The corned beef is dry It was fried rather than gently reheated. Use loose folds and a little steam instead of browning the meat.

Structure, Balance & Flavor Problems

Problem What happened + how to fix it
The filling slides out There is too much wet filling or the stack is oversized. Pull back on the dressing or kraut and keep the sandwich easy to pick up.
The rye bends, tears or collapses The bread is too thin for the filling. Use sturdier rye that can carry the sandwich without folding underneath it.
Every bite tastes mostly of beef The sandwich is overstuffed. Pull the meat back toward the recipe amount so the rye, Swiss, kraut and dressing still show up.
The kraut dominates everything There is too much of it or the batch is unusually sour. Use a little less and rinse only when the flavor truly needs taming.
The sandwich tastes too salty The beef, kraut and Swiss are stacking salt on top of one another. Taste the components before assembly and adjust the kraut or corned-beef preparation rather than automatically seasoning more.
The dressing feels too sweet Switch from a sweet Thousand Island-style sauce to sharper Russian dressing with horseradish.
A metal spatula lifts a Reuben to reveal a deeply browned, dry rye underside while the open edge shows corned beef, sauerkraut and melted Swiss.
The underside reveals what the top can hide. An evenly browned, dry crust shows that the rye made good skillet contact instead of quietly steaming against a wet filling.

Reuben Variations That Actually Change the Sandwich

Pastrami Reuben. Pastrami makes the sandwich smokier and more peppery. Keep the slices thin and the stack manageable.

Rachel sandwich. A Rachel usually swaps the corned beef for turkey and commonly replaces sauerkraut with coleslaw. Our creamy coleslaw recipe can be chopped a little finer for sandwich use. Expect a sweeter, crunchier sandwich.

Mustard. A very thin swipe of spicy brown or Dijon mustard gives the Reuben another sharp edge.

Without sauerkraut. The sandwich will still be good, but it stops tasting fully Reuben-like once that sharp fermented cabbage disappears.

Other Ways to Cook a Reuben

Keep the same dry-kraut and prewarmed-filling setup. Only the final browning method changes. The skillet remains the primary method; these are useful alternatives when another appliance suits the situation better.

Prefer the classic version? Return to the skillet method.

Electric griddle

Use about 350°F / 177°C and cook as you would in the skillet. A broad griddle is particularly useful when several sandwiches need to finish together.

Air fryer

Air fry around 375–390°F / 190–200°C, turning halfway. Start checking at about 5–6 minutes and continue until the rye is well browned and the cheese has softened; many machines land around 6–8 minutes total. Secure the top slice with a toothpick if strong airflow lifts it.

Oven or toaster oven

Heat to around 375°F / 190°C. Build the sandwich as two open halves, with both bread slices butter-side down on the baking sheet.

On the bottom slice, layer Swiss → half the dressing → corned beef → sauerkraut. On the second slice, put the Swiss directly against the bread, then spread the remaining dressing over it.

Start checking after about 3 minutes. Once the meat is hot and the Swiss is visibly softening, close the sandwich and return it to the oven until the bread edges are golden and crisp and the cheese is fully melted into the filling.

Using a panini press? Moderate heat and light pressure are enough. Good contact is useful; crushing the sandwich is not.

Make Ahead, Store and Reheat Without Sacrificing the Rye

Make the components ahead, not the complete sandwich. Russian dressing can be mixed a day ahead and refrigerated. Corned beef can be portioned, and sauerkraut can be drained and squeezed before you need it.
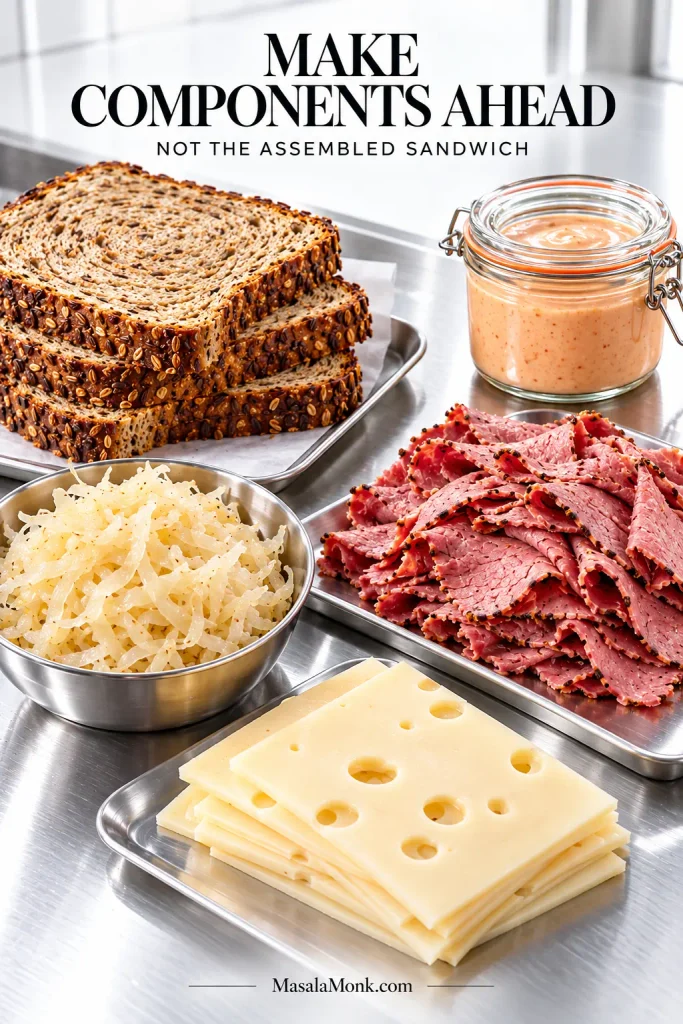
Rye bread, sliced corned beef, Swiss cheese, sauerkraut and Russian dressing arranged separately on a bright stainless-steel counter with no assembled sandwich.
Keep the rye completely separate from refrigerated filling components until assembly. Otherwise, dressing or moisture released by the kraut can begin softening the bread before the sandwich ever reaches the skillet.

Prepared kraut sometimes releases more liquid while it sits. Give it another squeeze before warming whenever moisture has collected underneath.

Reheating a leftover Reuben

Use a skillet, toaster oven or air fryer when possible. They can heat the middle while giving the rye a chance to crisp again. A microwave is fast, but trapped steam softens the bread.

The gentle warming in the main recipe assumes ready-to-eat deli corned beef. When reheating previously cooked leftovers, the USDA Food Safety and Inspection Service advises prompt refrigeration, generally using refrigerated leftovers within 3–4 days, and reheating them to 165°F / 74°C.

What to Serve With a Reuben

A Reuben is rich, salty and tangy, so crisp or acidic sides make sense beside it. Dill pickles and potato chips need almost no thought. For a larger deli-style plate, add crispy homemade French fries, or serve potato salad when you want something cool beside the hot sandwich.
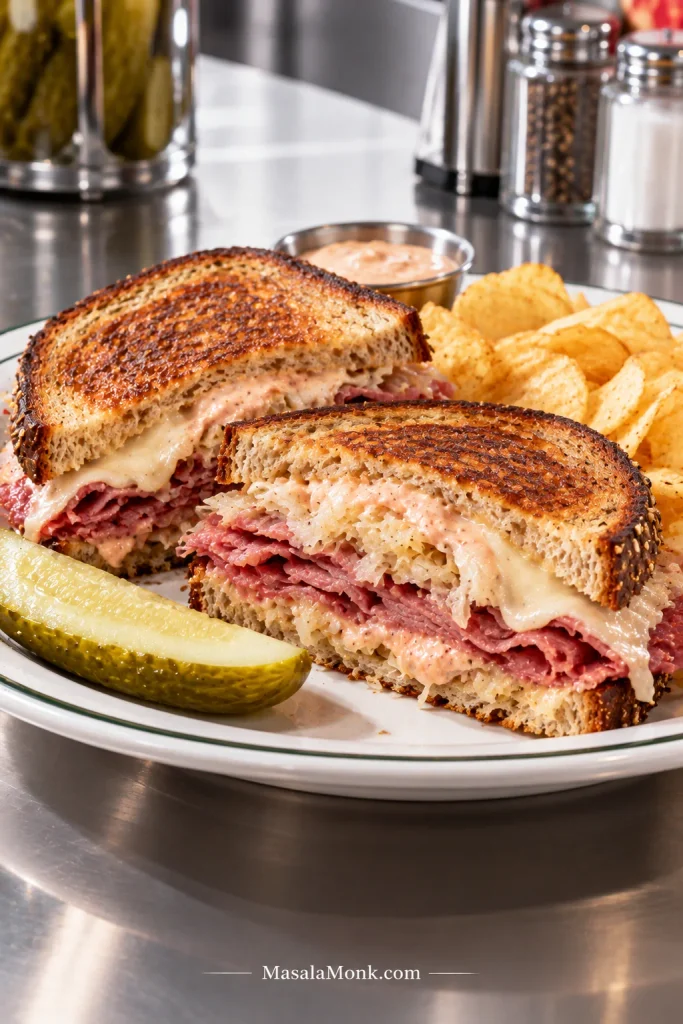
Two toasted Reuben halves on a white diner plate with potato chips, a dill pickle spear and a small metal cup of Russian dressing on a stainless-steel table.
The sides solve different problems: pickle acidity cuts through rich corned beef and Swiss, while potato chips add a dry crunch beside the hot, soft center of the Reuben.

A Brief Note on the Reuben’s Origins

The Reuben’s origin is disputed. One prominent account places an early version at Omaha’s Blackstone Hotel and connects it with Reuben Kulakofsky; another tradition points to New York restaurateur Arnold Reuben.

History Nebraska documents the Omaha account and surviving early menu evidence while also discussing the competing New York claim.

However the sandwich got its name, the goal on the plate is simpler: golden rye and a genuinely hot center arriving together.


Posted on — Leave a comment

Shakshuka Recipe: Easy Eggs in Spiced Tomato and Pepper Sauce

Dark skillet of shakshuka with several eggs in thick red tomato-pepper sauce, one broken golden yolk flowing into the sauce as torn bread dips into the pan.

Shakshuka is at its best when the tomato sauce clings to a piece of torn bread, the whites are just set, and the yolk spills into the sauce as soon as you break it. Onion, pepper, garlic, cumin and paprika make the base, but the real trick is knowing when the sauce is ready for the eggs.

Shakshuka is a one-pan dish of eggs gently poached in a spiced tomato and pepper sauce, with roots in North Africa and versions now eaten widely across the Middle East and beyond. The handoff is the heart of this shakshuka recipe: finish the sauce first, then change how you cook.

Shakshuka Recipe

Onion and bell pepper soften with cumin, paprika and garlic before tomatoes cook down into a thick, scoopable sauce. Six eggs go in off the heat, then finish gently until the whites are set and the yolks are as soft or firm as you like.

Serves
3 generously or 4 with bread and sides

Prep
About 10 minutes

Cook
About 25–35 minutes

Total
About 35–45 minutes

Pan
12-inch / 30 cm skillet with lid

Eggs
6 large

Ingredients

  • 2 tablespoons / 30 mL olive oil
  • 1 medium yellow onion, diced, about 5½–6 oz / 150–170 g prepared
  • 1 medium-large red bell pepper, diced, about 5½–7 oz / 160–200 g prepared; green also works for a sharper flavor
  • ½ teaspoon fine sea salt, plus more after the sauce has reduced
  • 3 garlic cloves, finely chopped, about 12 g
  • 1 teaspoon ground cumin
  • 1 teaspoon sweet paprika
  • ¼ teaspoon red pepper flakes, or to taste
  • 2 tablespoons / about 30 g tomato paste
  • 1 can whole peeled tomatoes, 28 oz / 794 g, crushed with their juices, or the same weight of good crushed tomatoes
  • ¼ teaspoon freshly ground black pepper
  • 6 large eggs
  • 2–3 oz / 60–85 g feta, crumbled, optional
  • 2–4 tablespoons chopped flat-leaf parsley or cilantro, optional

Method

  1. Soften the onion and pepper. Heat the olive oil in a 12-inch / 30 cm skillet over medium heat. Add the onion, bell pepper and ½ teaspoon salt. Cook for about 7–8 minutes, stirring occasionally, until the onion is translucent, a little gold is appearing at the edges and the pepper has lost its raw crunch.
  2. Bloom the aromatics. Add the garlic, cumin, paprika and red pepper flakes. Stir for about 30 seconds, until the garlic and spices smell aromatic.
  3. Cook the tomato paste. Stir it through the vegetables for 1–2 minutes, until the paste turns a deeper brick red and loses its raw canned smell.
  4. Add the tomatoes. Pour in the crushed tomatoes with their juices and add the black pepper. Bring everything to a lively simmer, then adjust the heat so the sauce bubbles steadily without spitting aggressively.
  5. Finish the sauce. Start checking after about 10 minutes. In a 12-inch / 30 cm skillet, the sauce often reaches the right consistency in 10–15 minutes; wetter tomatoes or a narrower pan can take longer. Drag a spoon across the bottom and look for a trail that stays open briefly. Press a shallow well into the sauce; it should not immediately flood. Lift a spoonful and it should still slump back into the pan. Taste now. Canned tomatoes vary considerably in saltiness, so season until the sauce tastes finished, staying slightly conservative if you plan to add feta at the end.

Add and Cook the Eggs

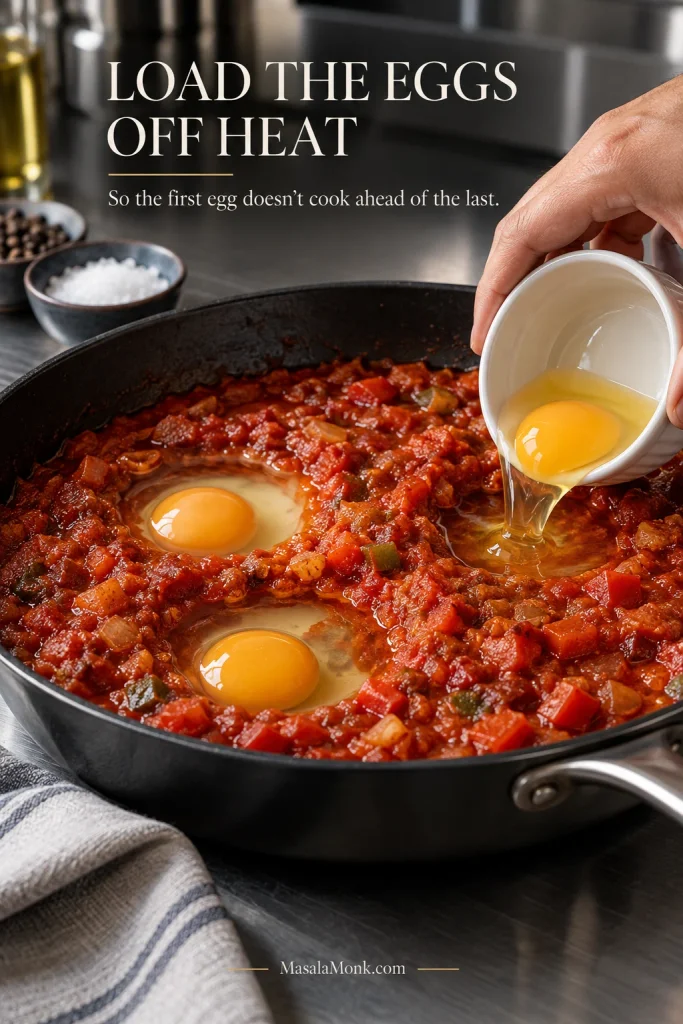
  1. Take the skillet off the heat and add all six eggs. Make six broad, shallow wells. Crack each egg into a small bowl or ramekin first, then slide it gently into place. Loading them away from the burner keeps the first egg from cooking while you are still placing the last.
  2. Return the skillet to low heat. Cover and start checking after about 4 minutes. The eggs often take about 4–8 minutes after the skillet returns to the heat. If a thick patch of white beside a yolk still looks glassy, spoon a little hot tomato sauce over that white only, leave the yolk exposed, cover briefly and check again.
  3. Stop where you like the yolks. The whites should be opaque and tender rather than rubbery. Soft yolks still move clearly when the skillet is nudged; jammy yolks move less; firm yolks barely move at all. Pull the skillet a little early because the hot tomato sauce and pan continue cooking the eggs after the burner is off.
  4. Finish and serve. Scatter with feta and herbs if using. The feta should begin to soften against the hot tomatoes while the herbs stay bright on top. Bring the skillet straight to the table.

Useful Method Notes

Fresh tomatoes: start with about 1.75–2 lb / 800–900 g ripe tomatoes, weighed after coring, then roughly chopped. Their water content varies, so cook to the same trail, well and scoop cues instead of copying the canned-tomato timing.

Oven finish: preheat the oven to 375°F / 190°C before making the egg wells. Transfer the oven-safe skillet after adding the eggs and start checking around 7–8 minutes.

Smaller batch: about 8 inches / 20 cm suits two eggs; roughly 9–10 inches / 23–25 cm works well for three or four. See Shakshuka for One or Two for the full scaling guide.

Need fully cooked eggs? Continue until both whites and yolks are firm. The FDA’s egg-safety guidance gives conservative cooking advice and information about pasteurized eggs for dishes served with softer yolks.

The Pan Changes Jobs When the Eggs Go In

Before the eggs, moisture is the problem. Onion and pepper need time to soften. Tomato paste needs a brief cook. The tomatoes need steady bubbling and uncovered surface area so excess water can escape. Taste and finish the seasoning here too.

After the eggs, excessive heat is the problem. The sauce is already finished. Lower heat gives the whites time to set without pushing every yolk farther than you wanted.

A wide skillet of canned tomatoes may reach the right consistency quickly; juicy fresh tomatoes in a narrower pan can take considerably longer. The clock changes with the pan and tomatoes. The finished sauce should not.

Instructional image comparing bubbling tomato sauce reducing before the eggs are added with shakshuka eggs cooking more gently in the second stage.
Listen as the skillet changes jobs. Before the eggs, expect an active simmer and steady steam; afterward, the pan should sound calmer. Hard spitting around the eggs means the heat is still too high.

Build a Tomato-Pepper Sauce That Can Hold an Egg

The finished sauce should taste ready to eat: savory from onion and garlic, sweet from the softened pepper, warmly spiced and concentrated enough to stand on its own.

Fresh vs Canned Tomatoes for Shakshuka

For the most predictable result, use whole peeled or crushed canned tomatoes. Whole tomatoes let you control how chunky the sauce stays; crushed tomatoes save that step. Diced tomatoes work too, although some brands stay firmer and may need breaking down with the spoon. Passata gives the smoothest sauce and can reduce a little faster.

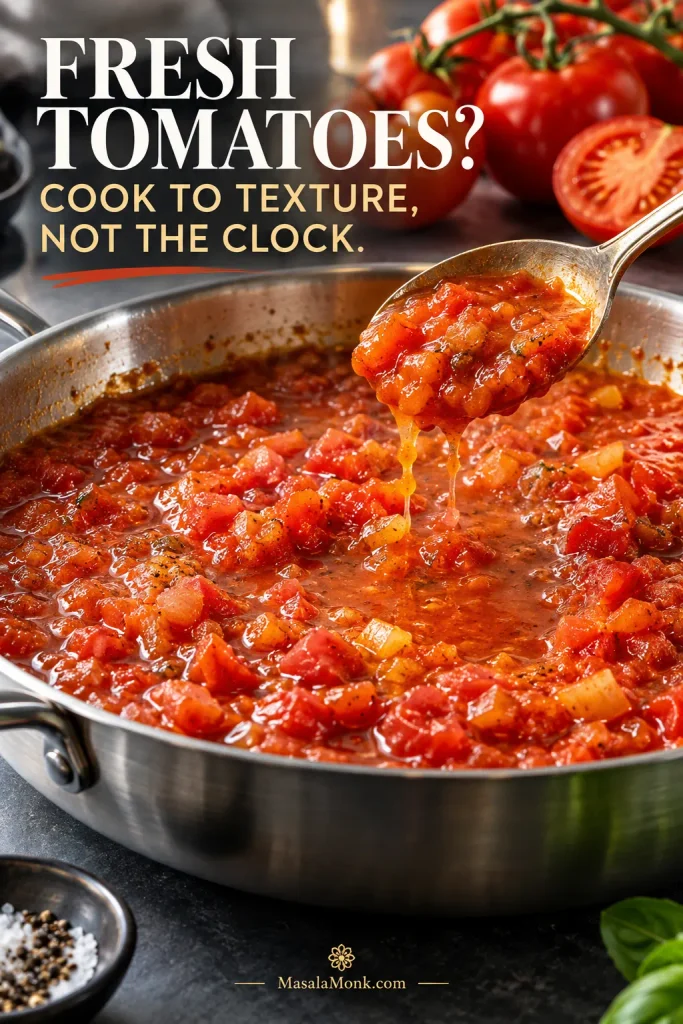
Fresh tomatoes deserve different treatment because their water content changes so much. Start with roughly 1.75–2 lb / 800–900 g ripe tomatoes, weighed after coring, then roughly chopped. Cook them until the sauce reaches the same consistency as the canned version. A juicy summer tomato may take much longer than a dense Roma. If the pan suddenly looks wetter than expected, nothing is wrong; give it time. For larger batches, our tomato sauce from fresh tomatoes guide goes deeper into choosing tomatoes and reducing excess water.

Stainless-steel skillet filled with loose chunky fresh-tomato sauce, with visible liquid and a spoon lifting some of the sauce while fresh tomatoes sit nearby.
With fresh tomatoes, watch the liquid moving between the pieces. The surface can look thick while clear moisture still collects underneath, so let that free liquid cook away before adding the eggs.

Build Flavor and Control the Reduction

Tomato paste gives the sauce more depth without demanding a long simmer. Cook 2 tablespoons / 30 g with the softened vegetables until it turns brick red and loses its raw canned smell. Leave it out and the tomatoes may need longer to reach the same body.

Cumin brings the earthy note, sweet paprika deepens the pepper flavor, and chile controls the heat. Smoked paprika works too if you want the whole pan noticeably smokier.

Crowd this amount of sauce into a small, deep skillet and you will wait longer for the tomatoes to reduce. A 12-inch / 30 cm skillet gives roughly 28 oz / 794 g tomatoes enough exposed surface while still leaving room for six eggs; spread the sauce much wider and it can dry sooner. Material matters less than shape here; stainless-steel, enameled, nonstick and well-seasoned cast-iron skillets can all work.

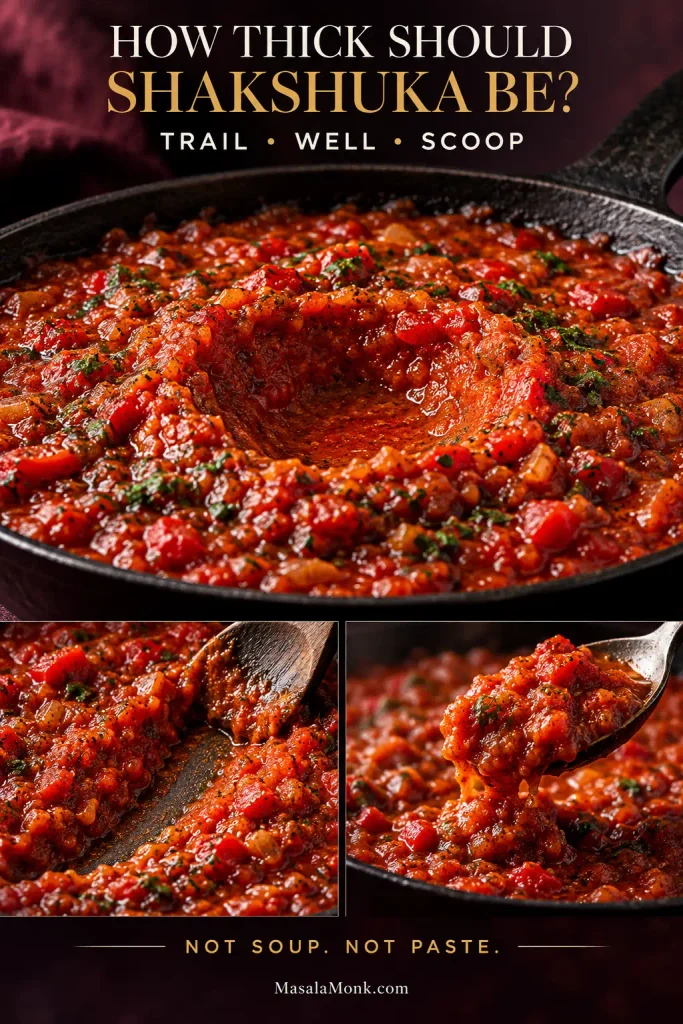
How Thick Should Shakshuka Be?

Check three things before the eggs go in.

Trail: drag a spoon through the sauce. The line across the bottom should stay visible for a moment before the tomatoes slowly move back.

Well: press a shallow hollow into the sauce. It should remain open instead of immediately filling with watery liquid.

Scoop: lift some sauce with the spoon. It should slump and fall back into the skillet, not sit in a stiff mound.

Thick shakshuka sauce shown with a spoon trail, a broad hollow that holds its shape, and a spoon lifting a scoop of tomato sauce.
The three checks matter most when they disagree. If a sauce holds a well but still pours freely from the spoon, give it another short uncovered simmer before adding the eggs.

You want the middle ground: not soup, not tomato paste. Taste it too. The tomatoes should feel rounded and concentrated, the sweet pepper should still sit behind them, and the cumin should come through clearly. Once yours does that, the eggs can go in.

Too thick? Stir in water 1 tablespoon / 15 mL at a time until the sauce loosens without becoming runny.

Set the Whites Without Sacrificing the Yolks

This is the annoying part of shakshuka: a yolk can look perfect while the thick white beside it is still translucent. Turning the burner higher usually punishes the yolk first.

Add the Eggs Evenly

Take the skillet off the burner. Make broad, shallow wells and slide in the eggs one by one from small bowls or ramekins.

Hand sliding a raw egg from a small bowl into finished tomato sauce while other raw eggs rest in shallow wells in a skillet off the heat.
Separate ramekins make the eggs easier to place and let you catch a stray shell or broken yolk before either reaches the finished sauce.

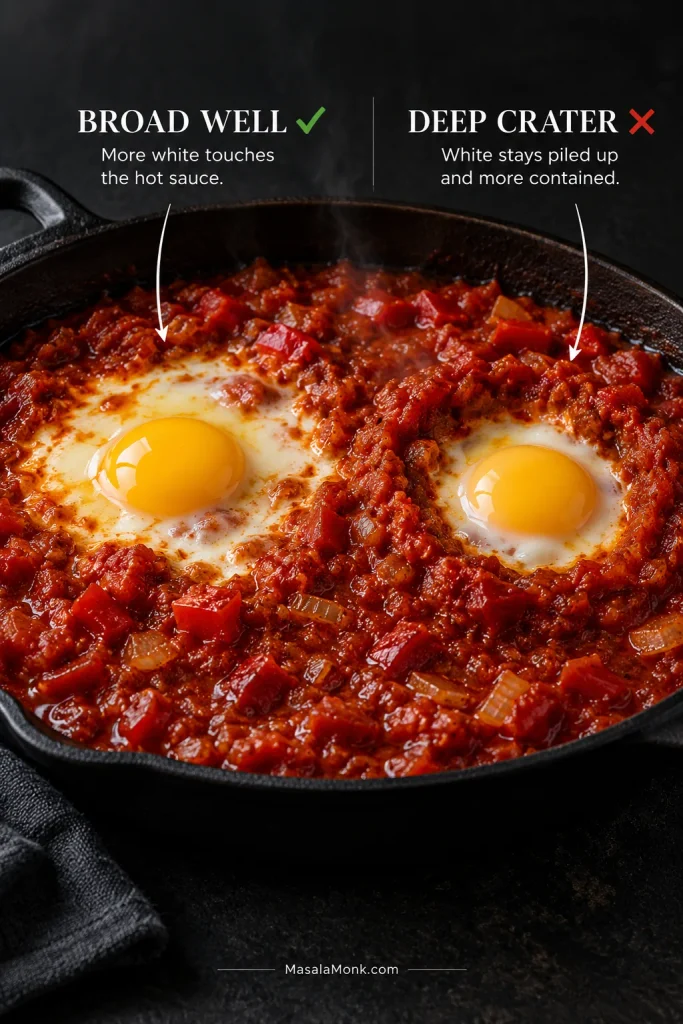
Deep craters hold a thick mass of white close to the yolk, where it takes longer to set. Broad wells let some of that white spread across the hot tomato sauce.

Skillet comparing an egg in a broad shallow well with its white spread over the sauce and another egg sitting in a deeper, narrower crater.
Widen the well with the back of the spoon instead of digging to bare pan. A broad depression gives the white more hot sauce to touch while keeping sauce beneath the egg.

Help the Whites Set Without Overcooking the Yolks

Return the loaded skillet to low heat and cover it. Start checking after about four minutes.

A glassy patch of thick white does not mean the whole pan needs more heat. Spoon a little hot tomato sauce over the white and leave the yolk uncovered. Do not chase one stubborn white by cooking the other five yolks to death.

Close-up of a soft golden egg yolk beside translucent white as a spoon places hot tomato sauce directly over the undercooked white.
Take the hot sauce from a clear patch between the eggs, not from beneath the yolk you are protecting. Spoon it over the stubborn white only to add heat without disturbing the yolk.

One side of the skillet may run hotter than the other. Rotate the pan and judge the eggs individually; they do not all need to be done at once.

Soft, Jammy or Firm Eggs

TargetWhiteYolk
Soft / runnyOpaque and softly setDomed and clearly moving when the pan is nudged
JammyFully setThicker with a smaller, slower jiggle
FirmCompletely setLittle or no visible movement

Take the skillet off the heat slightly before the yolks look completely finished. The hot tomato sauce and skillet will carry them a little further.

Close-up of a shakshuka egg with an opaque cooked white and a glossy domed soft yolk surrounded by thick tomato sauce.
Opaque whites and a yolk that still moves are your cue to stop for soft eggs. Pull the skillet slightly early; the hot sauce and pan will keep cooking the yolks.

Finish Shakshuka in the Oven

An oven can help when your burner has obvious hot spots or the bottoms of the eggs repeatedly firm before the tops of the whites.

Preheat to 375°F / 190°C before adding the eggs. Once the loaded oven-safe skillet goes in, start checking around 7–8 minutes. Some batches need longer; use the whites and yolks to make the final call.

Rescue the Pan

When something goes wrong, first check whether the eggs are already in the skillet.

Before the Eggs Go In

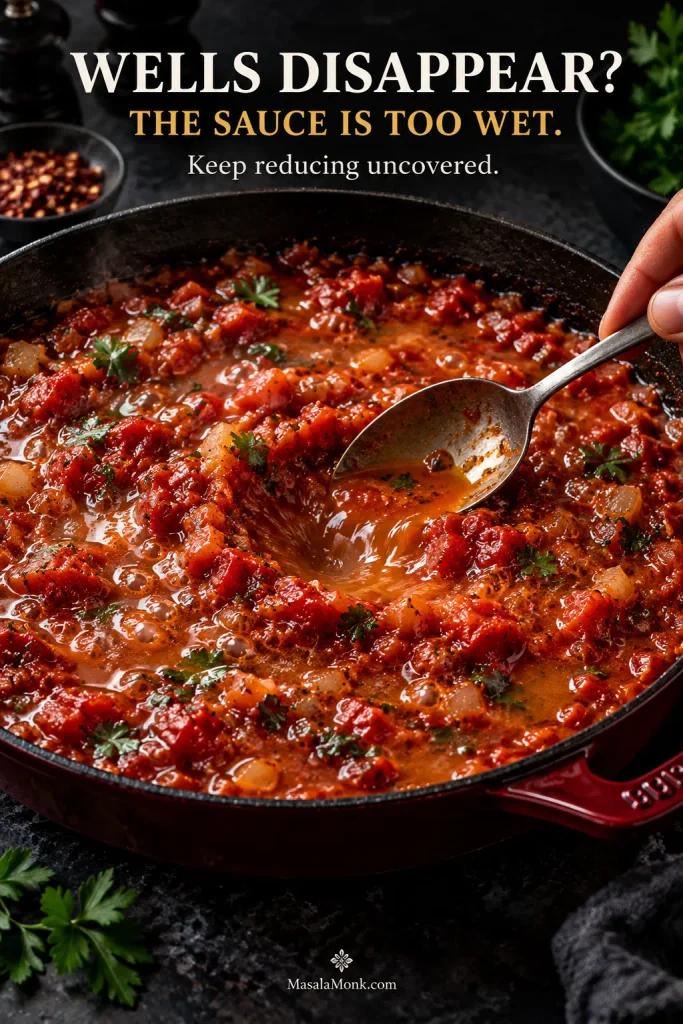
The sauce is watery or the wells immediately disappear. Keep simmering uncovered. The eggs can wait.

Spoon pressing a hollow into loose tomato sauce as watery liquid flows back into the space before the well can hold its shape.
Test the deepest part of the skillet, not just the rim. The edges may look reduced while the center is still loose; if a well there floods, keep simmering uncovered.

Fresh tomatoes have flooded the skillet. Nothing has necessarily gone wrong; they may contain more water. Keep cooking until the sauce reaches the same consistency cues.

The sauce is too thick. Add water 1 tablespoon / 15 mL at a time until it becomes scoopable again.

The flavor is weak. Check the consistency first. A loose sauce can make the tomatoes, pepper, salt and spices all taste muted.

The tomatoes taste sharply acidic. Cook them fully and check the salt. Once the sauce is properly reduced, a tiny pinch of sugar can soften an unusually harsh batch without making it sweet.

After the Eggs Go In

White translucent, yolk nearly ready? Treat that white locally with a little hot tomato sauce; do not keep cooking the whole pan.

One side is cooking faster. Rotate the skillet.

The yolks keep going hard. Check earlier and take the pan off sooner. Carryover heat will finish them a little further.

The bottom is catching. Lower the burner. The sauce no longer needs hard bubbling.

The lid leaves the surface watery. Uncover briefly. Next time, reduce the sauce a little further before adding the eggs, or use the oven finish if your stovetop repeatedly gives you trouble.

Shakshuka for One or Two

The same pan control matters when you scale shakshuka down. A smaller batch needs a smaller skillet: put two eggs and a little sauce in the same 12-inch pan used for six and everything becomes shallow, fast-cooking and harder to control.

Large 12-inch skillet and smaller 8-inch skillet each holding two shakshuka eggs, showing thinner sauce in the larger pan and deeper sauce in the smaller pan.
For a two-egg shakshuka, choose the skillet by sauce depth. You want enough tomato sauce beneath and around each egg to form broad wells without exposing large areas of bare pan.

For one
2 eggs
About 8 in / 20 cm skillet

For two
3–4 eggs
About 9–10 in / 23–25 cm skillet

Full pan
6 eggs
About 12 in / 30 cm skillet

The simplest small-batch system is to make the sauce once. Reheat enough to form a generous layer that can hold broad, shallow egg wells, then add only the eggs you plan to eat. A container of finished sauce in the fridge turns tomorrow’s breakfast into a few minutes of eggs instead of another round of chopping onion, pepper and garlic.

Make Ahead and Store the Sauce

Stop before the eggs. Cool the finished tomato-pepper sauce promptly and refrigerate it in a covered container. Reheat the portion you need until bubbling, then add fresh eggs.

Use refrigerated cooked leftovers within 3–4 days, following USDA guidance for handling leftovers safely. Finished shakshuka can be reheated, but its yolks will become firmer.

For longer storage, freeze the sauce without eggs. Thaw it in the refrigerator, reheat it in a skillet and finish with fresh eggs.

Shakshuka Variations

  • Feta: crumble 2–3 oz / 60–85 g over the pan near the end for salty, creamy contrast.
  • Harissa: stir harissa in with the aromatics or into the tomato sauce, adjusting it to taste and easing back on the separate chile flakes.
  • Chickpeas or white beans: stir drained cooked beans into the reduced sauce before making the egg wells.
  • Spinach: wilt it into the sauce before the eggs and cook off the water it releases.

Ground coriander can join the cumin and paprika if you like its citrusy warmth, and the bell pepper can be left out for a more tomato-forward pan.

For a version built around greens instead of tomatoes, our Green Shakshuka Recipe with Spinach, Herbs, Feta & Eggs uses leek, greens, herbs and lemon as the base.

What to Serve With Shakshuka

Bread gets first place beside the skillet. Warm pita, flatbread or a crusty loaf can scoop the thick tomato sauce and catch the yolk when it breaks. Our homemade pita bread recipe includes both oven and stovetop methods.

Shakshuka may be known as breakfast or brunch food, but it is just as comfortable at lunch or dinner. Thick yogurt or labneh, olives and extra feta can round out the table.

Something cold and crisp is especially welcome beside hot tomatoes and a rich yolk. Our cucumber salad with vinegar, dill and onion adds crunch and acidity without asking you to cook another dish.

Several hands sharing shakshuka from a skillet at a dark table with torn bread, yogurt or labneh, cucumber salad, olives and plates of eggs with tomato sauce.
Keep cool sides beside the skillet so yogurt, labneh or cucumber can brighten individual bites without cooling the shakshuka meant for second servings.

Put the skillet in the middle of the table. Shakshuka is easier to love when nobody is trying to carve six perfect restaurant portions out of it. Spoon an egg and plenty of sauce into shallow bowls, tear the bread, pass it around, and go back for whatever is left between the eggs.

Then break a yolk. Let it run through the cumin-scented tomatoes, drag a warm piece of bread through both, and take the next bite while the skillet is still hot.

Extreme close-up of torn bread lifting thick tomato-pepper sauce and flowing golden egg yolk from a skillet of shakshuka.
Posted on — Leave a comment

Easy Chicken Pot Pie Casserole with Biscuits

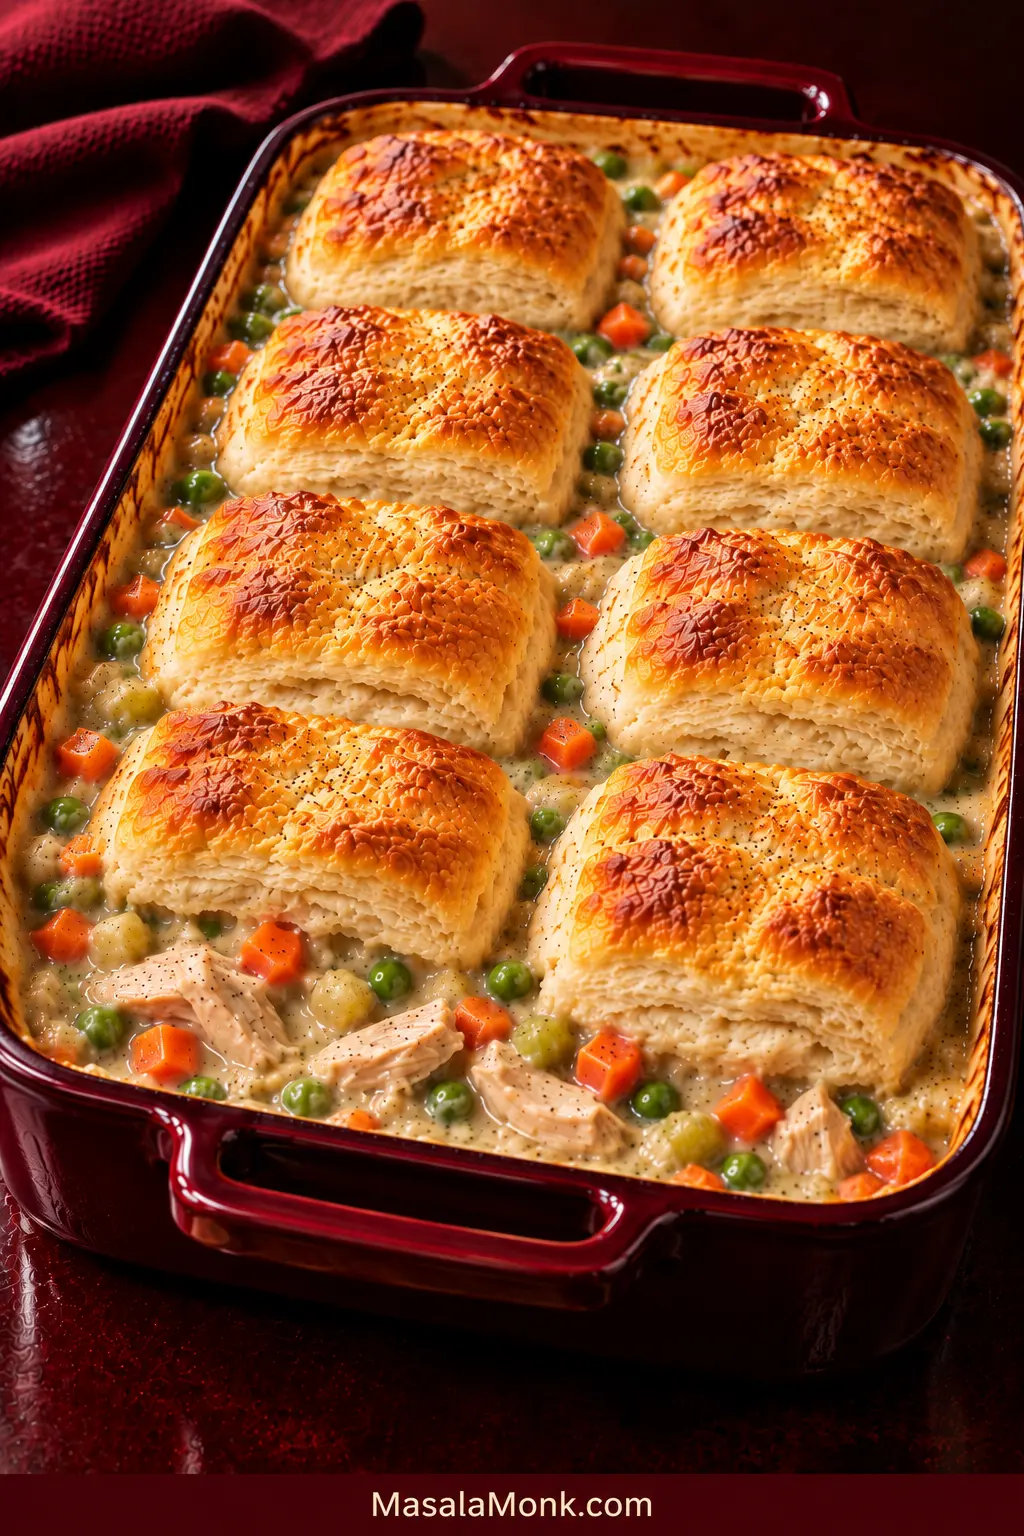
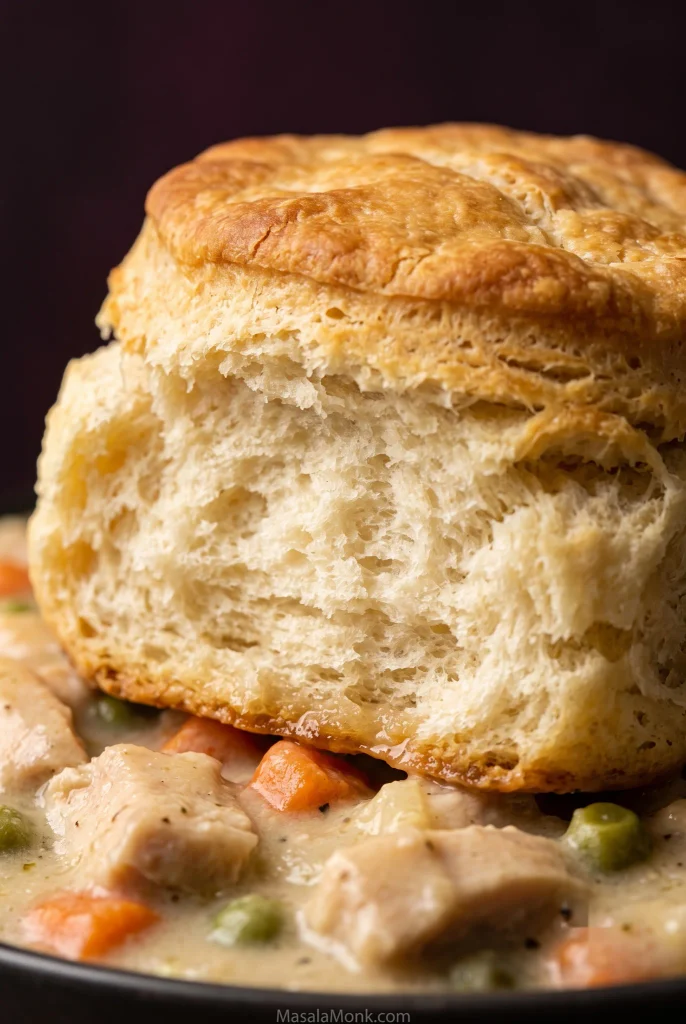
A finished chicken pot pie casserole should not look like biscuits fused into one solid crust. Visible pockets of creamy filling make the topping easier to read for doneness and keep the casserole looking saucy rather than bread-heavy.

This is the version for the night when you want chicken pot pie but not a pastry project. You still make a proper creamy filling, but cooked chicken and refrigerated biscuits take the fiddliest parts off your plate.

For an easy chicken pot pie casserole, this recipe builds the filling with a quick butter-and-flour gravy instead of condensed soup, while refrigerated biscuits handle the topping.

A good scoop catches chicken, vegetables and plenty of gravy with a piece of biscuit that flakes on top and stays tender underneath. That gravy-soft bottom is part of the appeal; gummy dough in the middle is not.

The biscuits get a short head start before they meet the gravy, so their centers have a chance to cook through before the tops get too dark.

Quick Answer

Chicken pot pie casserole is creamy chicken-and-vegetable pot pie filling baked under biscuits instead of pie crust. Plan on about 60–70 minutes start to finish. Bake this version at 375°F / 190°C in a 9×13-inch / 23×33 cm dish.

Partially bake the biscuits first, then set them over filling that is already hot and properly thickened. Finish until the gravy is bubbling between the biscuits and one near the center opens up fluffy, with no gummy raw dough inside.

The rule to remember: hot filling, thick gravy, biscuits with a head start.

Easy Chicken Pot Pie Casserole Recipe

Serves: 8

Prep: about 15–20 minutes

Cook: about 35–40 minutes

Rest: 10 minutes

Total: about 60–70 minutes

Oven: 375°F / 190°C

Dish: 9×13 in / 23×33 cm, about 3 qt / 2.8 L

For the creamy chicken filling

  • 4 tablespoons unsalted butter / 57 g
  • 1 medium yellow onion, diced, about 1 cup / 150 g
  • 2 medium carrots, cut into small, even dice, about 1 cup / 130 g
  • 2 celery ribs, cut into small, even dice, about ½ cup / 60 g
  • 2 garlic cloves, minced / about 6 g
  • ⅓ cup all-purpose flour / 40–42 g
  • 2 cups low-sodium chicken broth / 475 ml, plus 2–4 tablespoons / 30–60 ml more only if needed
  • ¾ cup whole milk / 180 ml
  • 1 teaspoon dried thyme
  • ½ teaspoon freshly ground black pepper, plus more to taste
  • ½ teaspoon poultry seasoning, optional
  • ½ teaspoon fine salt to start, plus more after tasting
  • 4 cups cooked chopped or shredded chicken / about 500–550 g cooked weight
  • 1 cup frozen peas / about 140–150 g; no need to thaw

Rotisserie chicken and leftover roast chicken both work well. If you are cooking chicken specifically for the casserole, our baked chicken breast recipe is an easy starting point. Starting with raw chicken? Cook it fully first, then measure 500–550 g cooked chicken.

Rotisserie chicken can already be quite salty, so taste the gravy after the chicken goes in before adding more salt. Poultry seasoning is optional, but it gives the filling a more familiar pot-pie flavor.

For the biscuit topping

  • 8 large refrigerated flaky biscuits, about 16.3 oz / 462 g total, such as a Grands-style biscuit
  • 1 tablespoon melted butter / 14 g

The shortcut is deliberate: cooked chicken and refrigerated biscuits save time, while the homemade gravy is where you control thickness and seasoning.

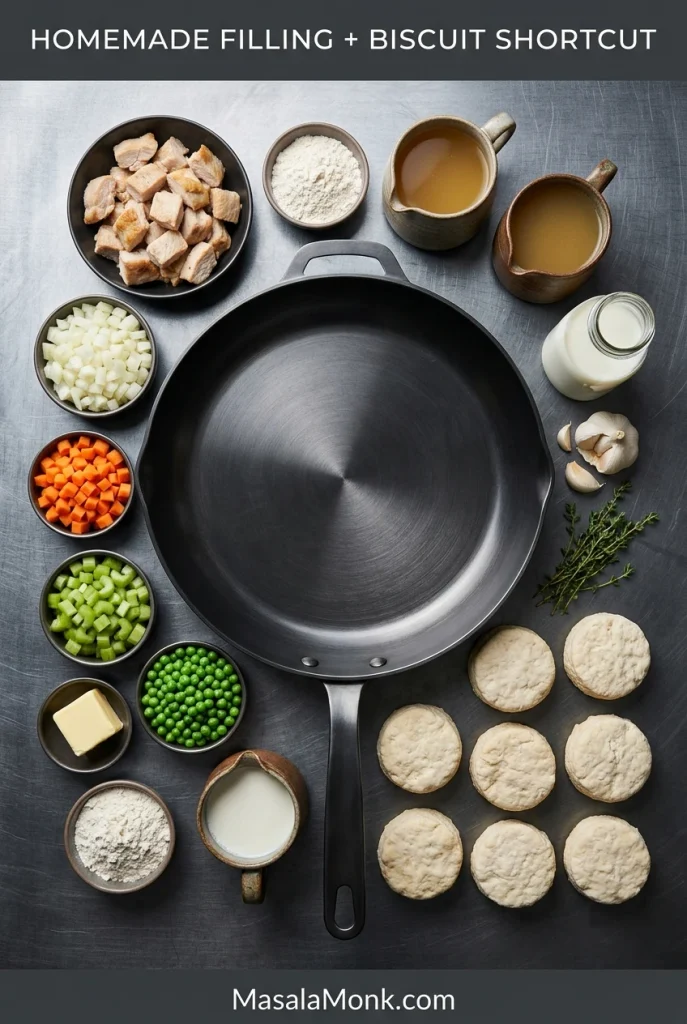
Overhead arrangement of cooked chicken, onion, carrots, celery, peas, butter, flour, broth, milk, herbs and refrigerated biscuits around a skillet.
The recipe mixes scratch-made filling with practical shortcuts.

Equipment

  • 9×13-inch / 23×33 cm baking dish
  • Large skillet or sauté pan
  • Rimmed baking sheet
  • Parchment paper
  • Whisk
  • Wooden spoon or silicone spatula
  • Aluminum foil, if needed

1. Start the biscuits

Heat the oven to 375°F / 190°C. Line a rimmed baking sheet with parchment and arrange the biscuits with some space between them.

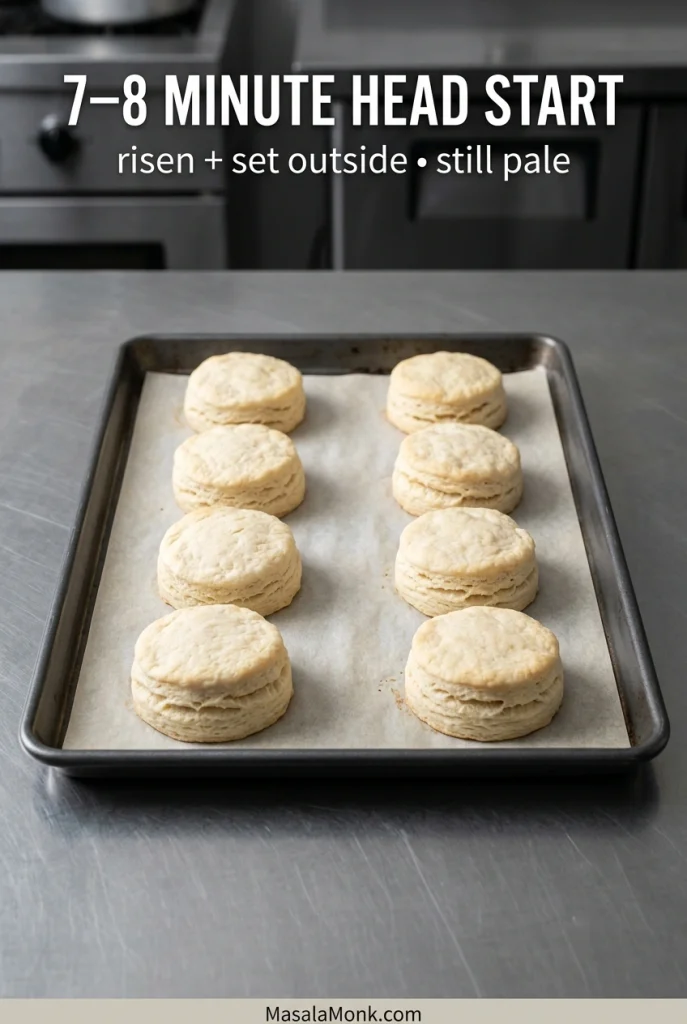
Bake for about 7–8 minutes. Package times vary, so let the biscuits tell you when to stop: they should have started rising and setting on the outside but still look pale and clearly underdone.

While the biscuits bake, begin the vegetables. After 7–8 minutes, take the biscuits out and set them aside; leave the oven at 375°F / 190°C.

Eight pale, partially baked biscuits arranged in two rows on a parchment-lined metal baking sheet.
Pale is right here. Deep browning now means the tops may outrun the centers later.

2. Soften the vegetables

Melt the butter in a large skillet over medium heat. Add the onion, carrots and celery and cook for about 6–8 minutes, stirring occasionally. Keeping the carrot and celery fairly small and even helps them soften at the same rate.

The onion should be soft and translucent. Bite a piece of carrot or celery if you are unsure; it should be noticeably softer but still hold its shape. Add the garlic and cook for about 30 seconds, just until fragrant.

3. Make the gravy

Sprinkle the flour over the vegetables and stir for 1–2 minutes. Slowly whisk in the 2 cups / 475 ml broth, starting with a small splash. Once the roux is smooth, continue adding the rest gradually. Stir in the milk, thyme, black pepper, poultry seasoning if using, and the initial ½ teaspoon salt.

Bring the sauce to a gentle simmer and cook for about 3–5 minutes, stirring frequently.

Drag a spatula across the bottom of the skillet. The path should remain visible briefly before the gravy flows back together. That’s the consistency you want before the chicken goes in.
Creamy chicken pot pie gravy with vegetables in a dark skillet, with a spatula leaving a visible channel through the thickened sauce.
A brief spatula trail signals the right thickness; instant closing is too loose, while barely closing is too thick.

4. Add the chicken and peas

Fold in the cooked chicken and frozen peas. Cook for another 2–3 minutes, until the chicken is hot and small bubbles are breaking through the filling.

The gravy should coat the chicken and vegetables while still moving easily when stirred. If it feels too tight, add the reserved broth a tablespoon at a time.

Taste now. The filling should already be something you’d happily eat on its own; the biscuits are finishing the casserole, not rescuing bland gravy. Add more salt, pepper or thyme only if it needs it.

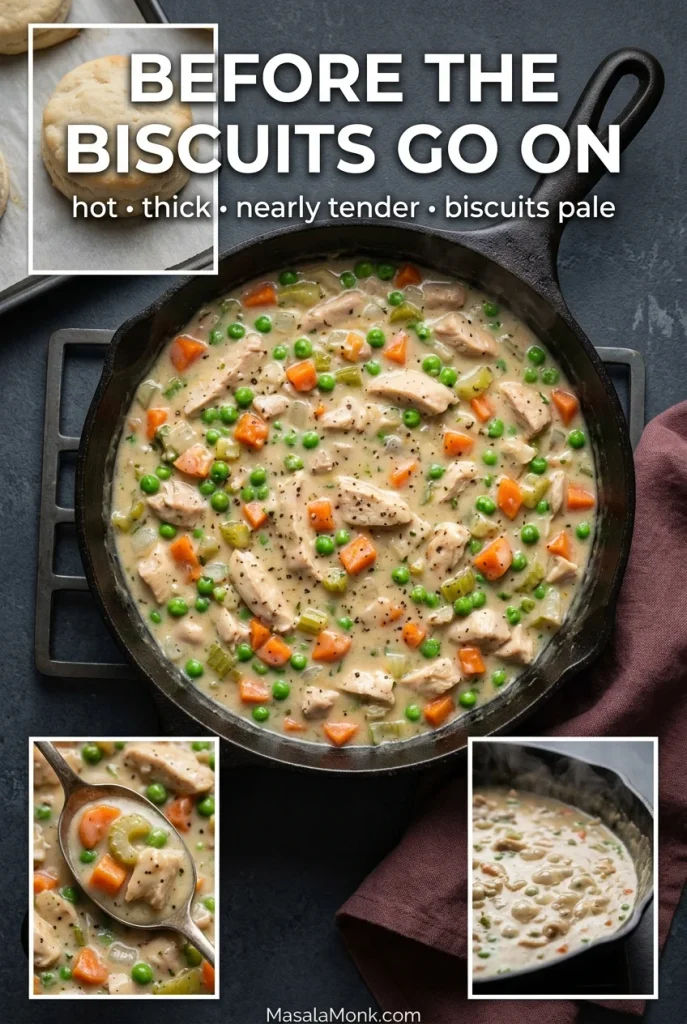
Before the Biscuits Go On

Take a quick look at four things:

  • Vegetables: nearly tender.
  • Filling: hot, with small bubbles breaking through.
  • Gravy: properly thickened but still easy to stir.
  • Biscuits: partly risen and set, but still pale.

Anything lagging is easier to correct now than after the biscuits go on.

Skillet of creamy chicken, peas and carrots with detail views of the filling consistency and a pale partially baked biscuit before assembly.
This is the last easy correction point for vegetable tenderness, gravy thickness, seasoning and biscuit readiness.

5. Assemble the casserole

Transfer the filling to the baking dish and spread it evenly.

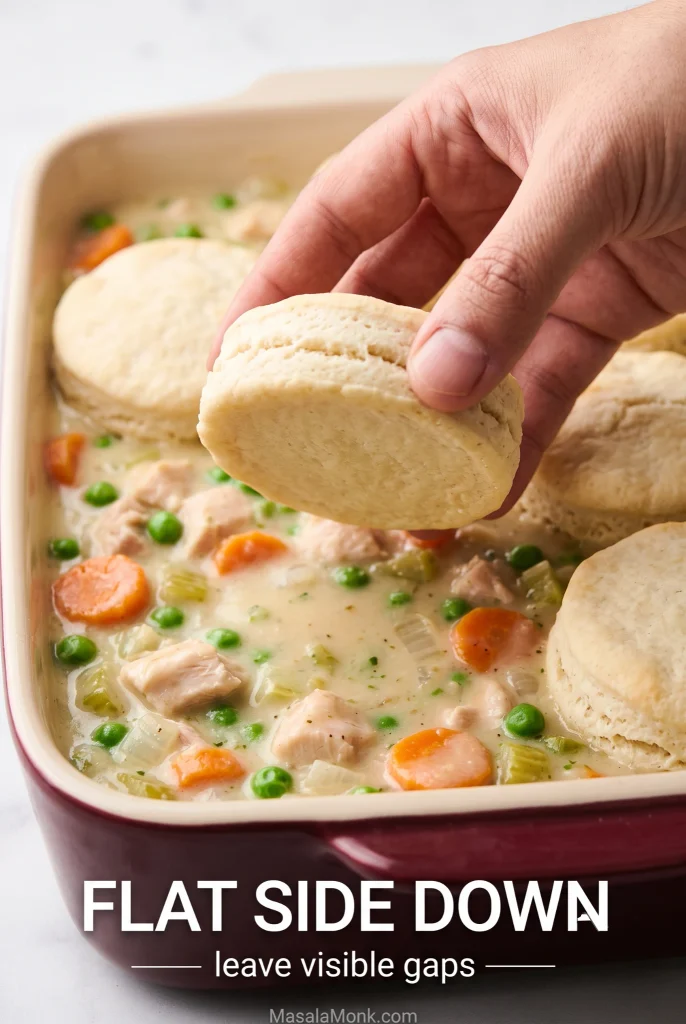
Arrange the partially baked biscuits over the top in two rows of four. They do not need to touch; leave some visible filling between them.

Transfer the biscuits with the flat sheet-pan side facing down against the filling. Brush the exposed tops lightly with melted butter.

Hand placing a partially baked biscuit flat-side down onto creamy chicken filling while other biscuits remain spaced apart across the casserole.
Set the firmer baked side on the gravy and leave gaps so the topping stays distinct.

6. Finish in the oven

Bake for about 15–20 minutes, until gravy is bubbling through some of the gaps and the biscuit tops are deep golden brown.

Baked chicken pot pie casserole with golden biscuits and creamy filling visibly bubbling in the spaces between them.
Look for both cues: deep-golden tops above and gravy bubbling through several gaps below.

If the tops get there first, no problem. Cover the dish loosely with foil and give the centers more time.

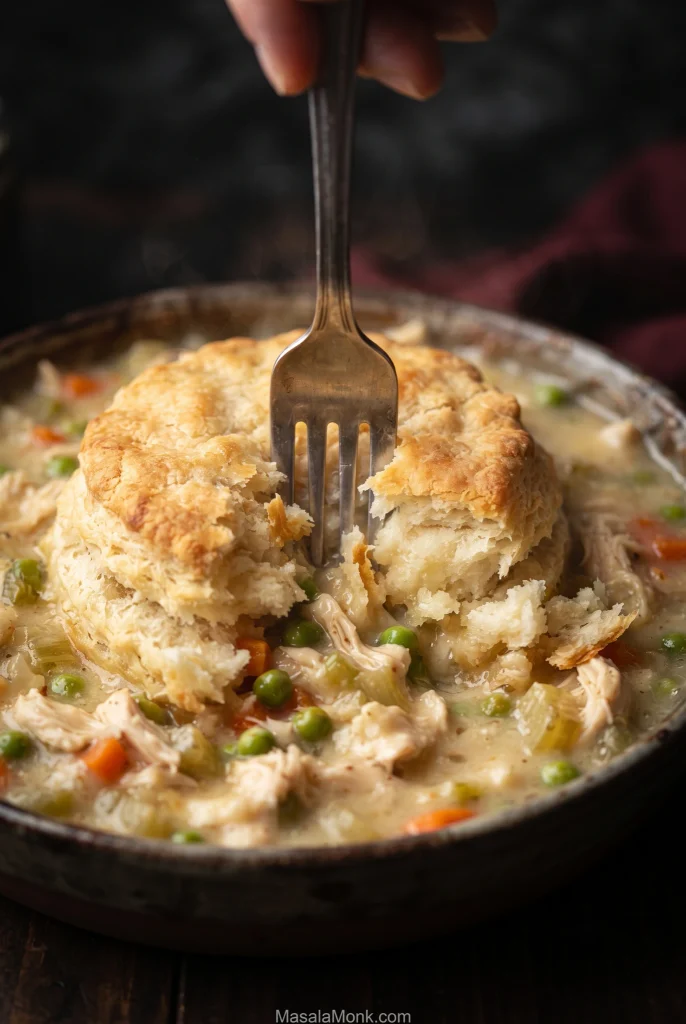
Check a biscuit near the middle rather than one at the edge. Open it gently: the center should be fluffy and cooked, not sticky, gummy or pasty.

Fork breaking open a golden biscuit over creamy chicken pot pie filling, exposing soft layered crumb above chicken, peas and carrots.
A cooked center should separate into soft layers, not smear or stretch like raw dough.

By now, the biscuits should be buttery and toasted on top, with creamy filling bubbling around them. Rest the casserole for 10 minutes so the gravy settles and each scoop holds together better.

Why Are the Biscuits Raw Underneath?

Thick biscuits can brown on top before the center is cooked through. The top bakes in dry oven heat while the underside sits over moist gravy, so the middle can lag behind.

Start with filling that is already hot. Put biscuit dough over refrigerator-cold gravy and much of the final bake gets spent warming the casserole instead of cooking the dough.

Large refrigerated biscuits become quite thick as their layers rise, so the center has farther to cook than the browned top suggests. The short first bake begins setting those layers before they meet the gravy.

Which Side Goes Down?

Put the flat, partially baked side down against the filling. The sheet-pan side will look flatter and feel firmer. That is the side you want on the gravy.

The biscuits do not need to form a solid lid. Leave some visible filling between them. Gravy bubbling through those gaps is exactly what you want to see.

Check the Middle Biscuit, Not the Prettiest One

Check a biscuit near the center before you take the casserole out. The biscuits around the edges often finish first, so the prettiest golden one may not tell you what is happening in the middle of the dish.

Fork opening a center biscuit in the casserole to reveal fluffy cooked layers, with an inset showing dense sticky underbaked dough.
The center biscuit is the stress test; distinct layers there usually mean the edge biscuits are safely done.

Soft Underneath Does Not Automatically Mean Raw

A cooked biscuit can be tender where it touches the gravy. The best part is where biscuit and filling meet: flaky above, gravy-soft underneath.

Close-up cross-section of a golden biscuit showing airy flaky layers above and a moist lower layer touching creamy chicken gravy.
Moisture alone does not mean raw dough. Clear layers that hold together matter more.
Cooked but tenderStill underdone
Moist where it touches the gravySticky or pasty inside
Fluffy layers through the centerDense or gummy middle
Pulls apart cleanlyDough smears or stretches

For completely crisp bottoms, bake the biscuits separately and place one over each serving.

What If My Biscuits Are a Different Size?

The 7–8 minute head start in this recipe is for large refrigerated flaky biscuits. Very tall refrigerated biscuits may need a little longer; smaller ones may need less.

Homemade cut biscuits and drop biscuits have different moisture and thickness, so they need their own timing even though the same doneness cues still matter.

For something intentionally softer and more dumpling-like, our Crockpot Chicken and Dumplings with Biscuits cooks canned dough in a much steamier environment. With the large refrigerated biscuits used here, thickness and appearance matter more than an exact package-to-package minute.

How Thick Should Chicken Pot Pie Filling Be?

The filling should coat the chicken and vegetables but still move when stirred. If it runs freely around them, simmer it longer. When it sits stiffly in the pan, loosen it with broth a tablespoon at a time.

If Your Casserole Isn’t Coming Together

ProblemDo this now
Biscuits are browning before the centers cookTent loosely with foil and keep baking until a biscuit near the center is fluffy and cooked through.
Filling is watery before assemblySimmer uncovered until it thickens enough to coat the chicken and vegetables.
Filling is too thickAdd broth a tablespoon at a time until the filling moves easily when stirred.
Vegetables are still hardIf they are only slightly firm, serve as is. If they are genuinely hard, lift off the biscuits, transfer the filling back to a skillet and cook until tender.
The filling tastes flatSeason individual servings with salt and pepper; once the biscuits are on, it is difficult to correct the whole casserole evenly.

Chicken Pot Pie Casserole with Cream of Chicken Soup

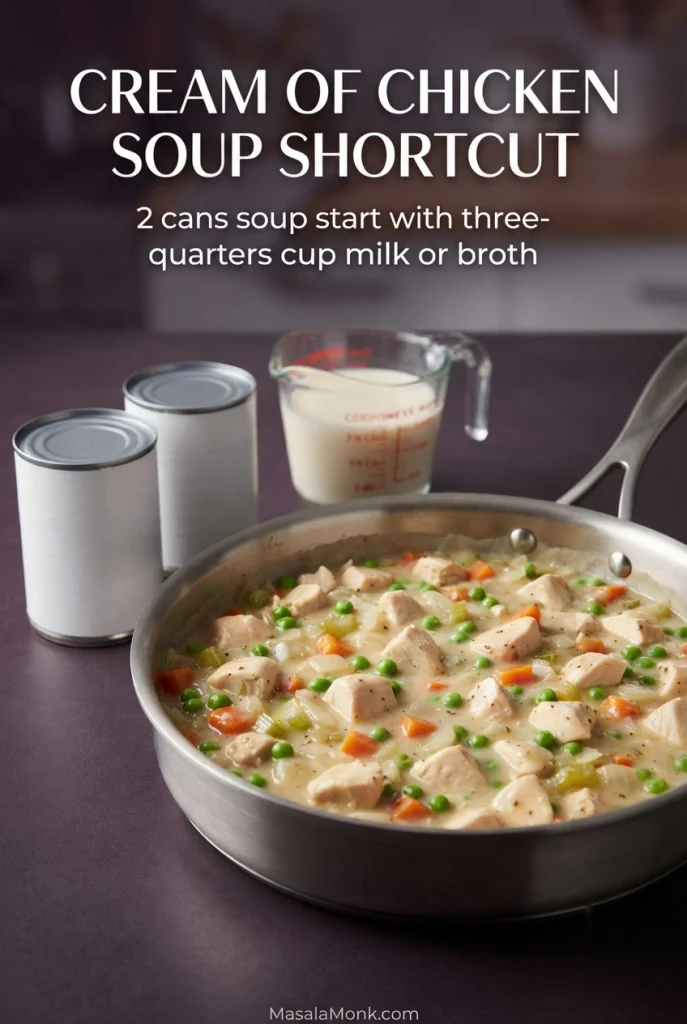
If you want to keep the biscuit method but skip making the roux, this condensed-soup shortcut cuts down the stovetop work. Start thick and loosen only if needed.

  • Use 2 tablespoons butter / 28 g to soften the onion, carrots and celery.
  • Skip the flour and the main recipe’s broth-and-milk quantities.
  • Stir in 2 cans condensed cream of chicken soup, 10.5 oz / 298 g each.
  • Start with ¾ cup / 180 ml milk or low-sodium chicken broth.

Heat everything thoroughly before deciding whether it needs more liquid. Add up to another ¼ cup / 60 ml, a few tablespoons at a time, only if the filling feels too thick.

Creamy chicken and vegetable filling in a skillet beside two cans of condensed soup and a measuring cup of liquid.
Judge thickness only after the soup mixture is fully hot, then loosen it a little at a time.

Fold in the chicken and peas, taste for salt, then continue with the partially baked biscuits.

One can of cream of chicken can also be replaced with cream of mushroom. If cream of mushroom is what you keep on hand, it also works in our Cream of Mushroom Chicken.

Chicken Pot Pie Casserole Substitutions

Most of the filling is easy to adapt; the two things to watch are extra moisture and ingredients that need longer to soften.

If you have…What to do
Leftover turkeySwap it for the chicken 1:1. For a pastry-topped version, use our Turkey Pot Pie Recipe.
Frozen mixed vegetablesHeat them until the densest pieces are nearly tender before assembly.
PotatoesDice them small and cook or par-cook them first.
MushroomsSauté until their excess moisture has cooked away before making the gravy.

Can You Make Chicken Pot Pie Casserole Ahead?

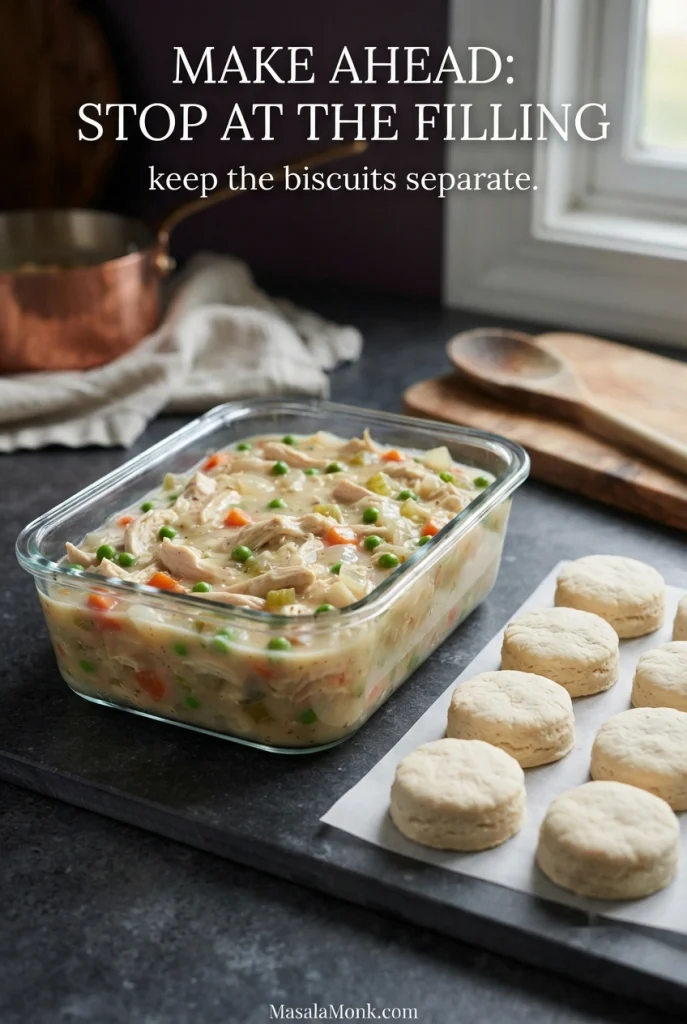
Yes—stop at the filling. You can make it 1–2 days ahead for best quality. Cool it promptly, cover and refrigerate it, and keep the biscuits separate.

At dinner time, bring the filling back to a gentle simmer, give the biscuits their short first bake and assemble the casserole while everything is hot.

Prepared creamy chicken pot pie filling in a glass baking dish beside a tray of separate biscuits for later assembly.
Reheat the filling before assembly so the final bake can focus on the biscuits, not a cold center.

Planning for leftovers too? See how to reheat the casserole without soggy biscuits.

Freezing the Filling

Freeze the filling without the biscuits in an airtight freezer-safe container. For best quality, use it within about 2–3 months. Thaw it overnight in the refrigerator, reheat thoroughly, then add freshly prepared biscuits.

How to Reheat It Without Soggy Biscuits

Lift the biscuits off when practical, heat the filling separately, and warm the biscuits in the oven or toaster oven before putting everything back together. The microwave works for a quick portion too; just expect a softer biscuit.
Hand placing a reheated golden biscuit over a bowl of hot creamy chicken, pea and carrot filling.
Reheat the filling gently; dry oven heat gives the biscuit a better chance to regain its crust.

For lunch tomorrow, the biscuit is the part worth protecting. Leave it sitting on gravy overnight and it will keep absorbing moisture, so store the biscuits separately whenever it is easy to do so.

Refrigerate leftovers promptly. The USDA lists cooked chicken leftovers and cooked chicken casseroles at 3–4 days in a refrigerator at 40°F / 4°C or below, and reheated leftovers should reach 165°F / 74°C. See the USDA food-safety guidance.

What Goes with Chicken Pot Pie Casserole?

Because the casserole already covers the rich, hearty part of dinner, lighter sides work especially well. For something cold and crunchy, our easy coleslaw recipe gives the creamy filling some welcome tang.

  • A crisp green salad with vinaigrette
  • Green Beans Almondine with toasted almonds and lemon
  • Steamed or roasted broccoli with lemon

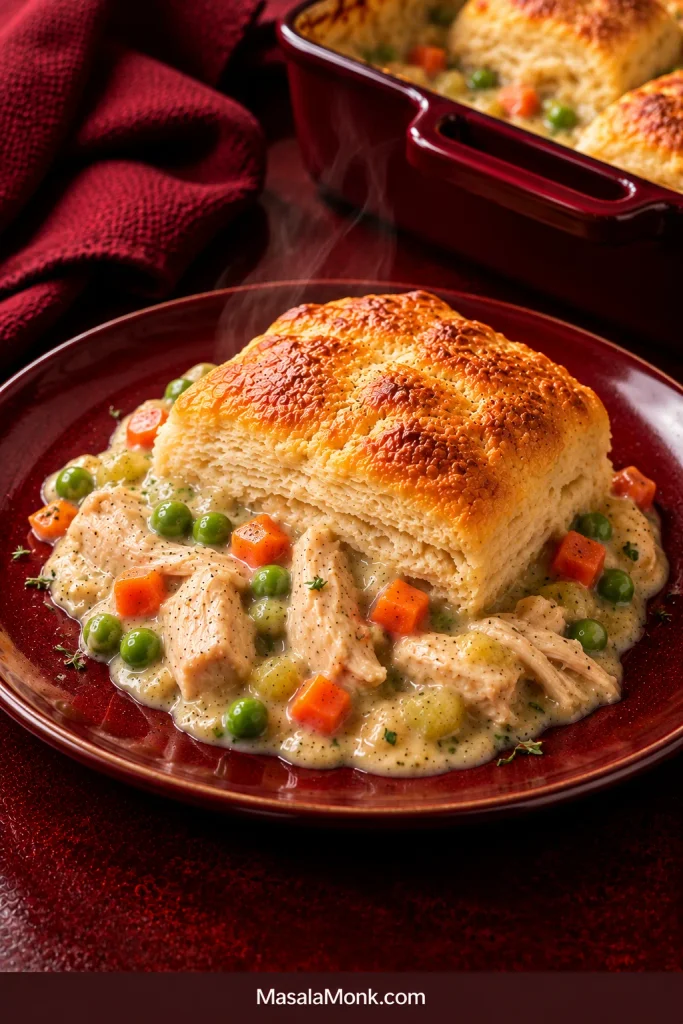
Spoon it while the gravy is still creamy and the biscuits are warm enough to pull apart. Their tops should flake, their centers should be fluffy, and the bottoms should have absorbed some gravy. That contrast—flaky above, gravy-soft underneath—is what makes the biscuit version worth making.

Golden biscuit served over creamy chicken pot pie filling with pieces of chicken, peas and carrots on a red plate.
After the 10-minute rest, the gravy stays creamy while the biscuit keeps its flaky top and tender underside.
Posted on — Leave a comment

Beef Barley Soup Recipe: Hearty, Tender Beef and Pearl Barley Soup

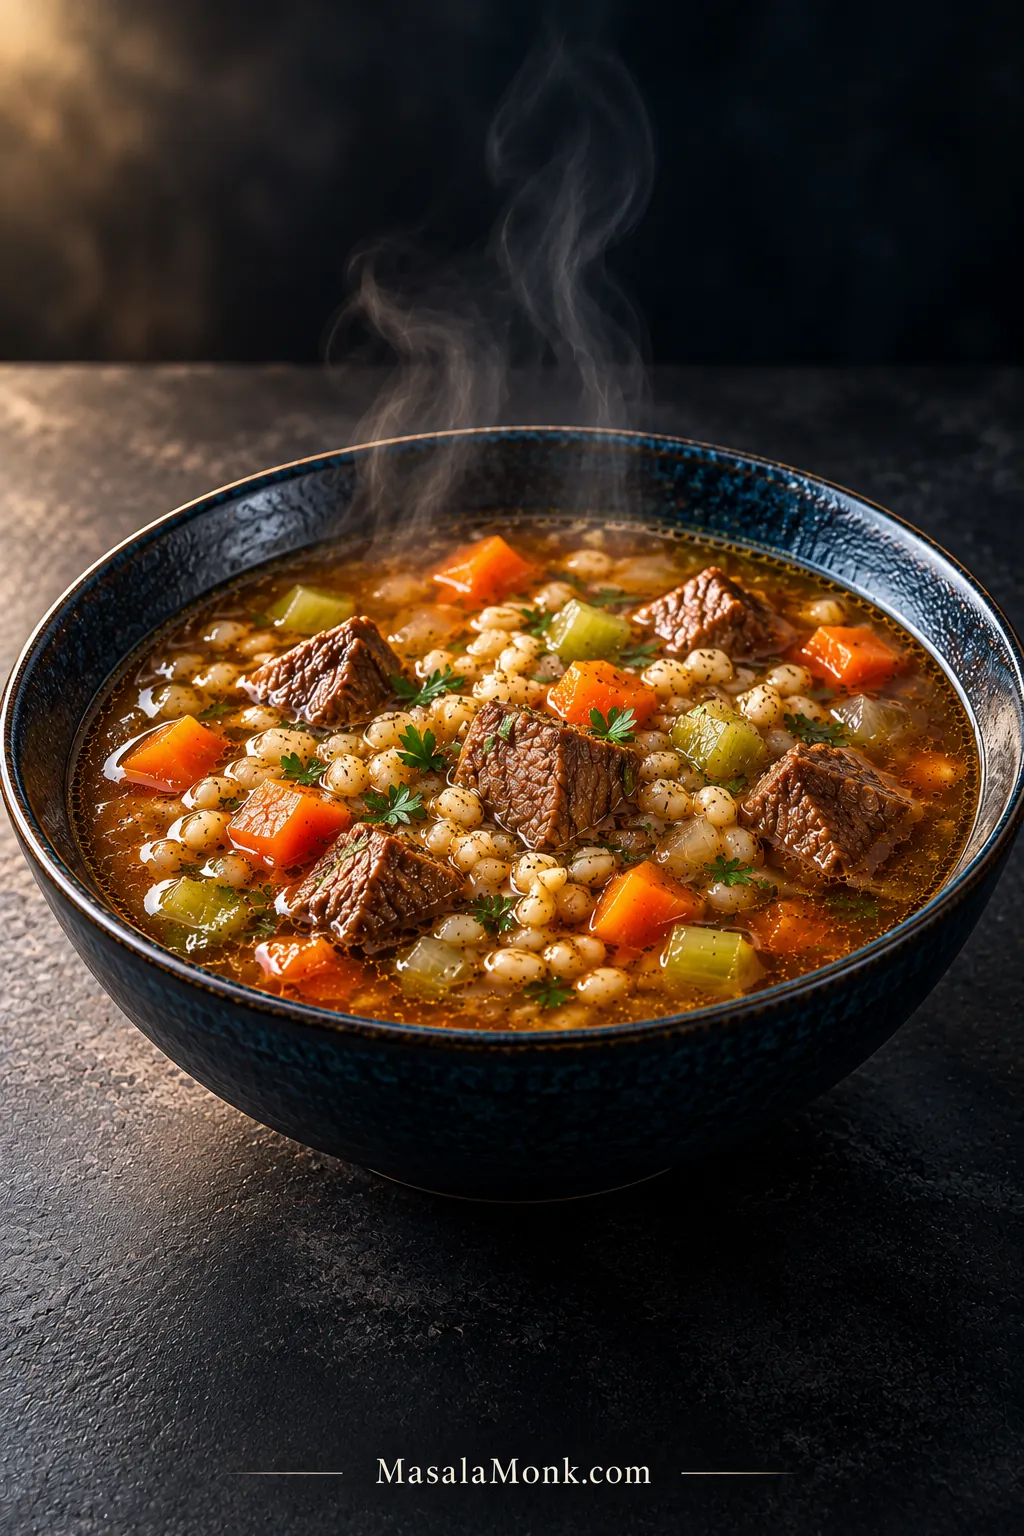
Steaming black bowl of beef barley soup with browned beef chunks, pearl barley, diced carrots, celery and parsley in deep brown broth.

A good beef barley soup recipe should give you tender pieces of beef, plump pearl barley with a little chew, carrots and celery that keep their shape, and enough deeply savory broth for the bowl to remain unmistakably soup. The best spoonful catches a little of everything, with dark broth settling back around the beef and grain instead of disappearing into them.

The tricky part is that those ingredients do not finish on the same schedule. This version browns the chuck in batches, gives the beef a head start, then brings in the barley and vegetables according to how long they actually need. The flavors stay classic—beef, barley, onion, carrots, celery and herbs—but the timing is more deliberate, which helps prevent rubbery beef, overdone vegetables and a pot that quietly turns into barley stew.

Quick Answer: Give the Beef a Head Start

Brown the chuck and simmer until it has clearly begun softening. Add the pearl barley, then add the carrots and celery when the barley has about 20-25 minutes left to cook. Use 3/4 cup (about 160 g) barley for a substantial soup that remains brothy, and adjust the final consistency with reserved broth.

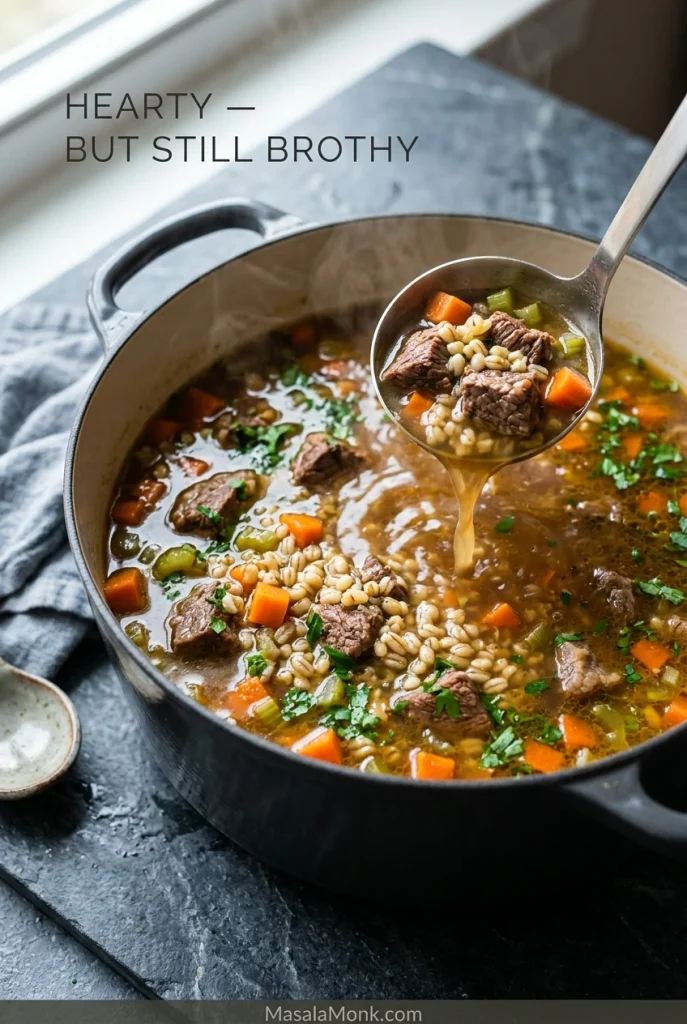
Dutch oven filled with beef barley soup as a ladle lifts beef, pearl barley, carrots and celery with brown broth visible around the ingredients.
A hearty bowl can still be brothy: look for liquid moving freely between the beef, barley and vegetables.

Before the Pot Goes On

  • Beef: boneless chuck roast, cut into 3/4-inch (2 cm) pieces.
  • Barley: regular pearl barley, sometimes sold as medium pearled barley; not quick-cooking barley.
  • Pot: 5 1/2- to 6-quart (about 5.2-5.7 L) Dutch oven or heavy soup pot.

Make the Soup: Tender Beef Barley Soup

Yield6 generous servings
PrepAbout 25 minutes
CookAbout 1 1/2-2 hours, depending on the beef and barley
TotalAbout 2-2 1/2 hours
Final textureTender beef, plump barley, intact vegetables and a full-bodied broth that still flows

Ingredients

  • 2 lb (900 g) boneless beef chuck roast, trimmed of thick hard exterior fat and cut into 3/4-inch (2 cm) pieces
  • 1 1/4 teaspoons fine sea salt, divided, plus more to taste; this is a starting point for low-sodium broth
  • 1 teaspoon freshly ground black pepper, divided
  • 2 tablespoons (30 ml) neutral cooking oil, plus a little more if needed between batches
  • 1 large yellow onion, about 8-9 oz (225-255 g), chopped
  • 4 garlic cloves, minced
  • 1 tablespoon (about 16 g) tomato paste
  • 1/2 cup (120 ml) dry red wine, such as Cabernet Sauvignon, Merlot or Pinot Noir, optional; if omitted, use an additional 1/2 cup (120 ml) beef broth in addition to the 7 cups below
  • 7 cups (1.65 L) low-sodium beef broth
  • 1-2 cups (240-480 ml) additional low-sodium beef broth, kept in reserve
  • 1 tablespoon (15 ml) Worcestershire sauce
  • 1 teaspoon dried thyme or 4 fresh thyme sprigs
  • 1 bay leaf
  • 3 medium carrots, about 8-9 oz (225-255 g), cut into 1/2-inch (1.25 cm) pieces
  • 3 celery ribs, about 5 oz (140 g), cut into 1/2-inch (1.25 cm) pieces
  • 3/4 cup (about 160 g) regular pearl barley, rinsed and drained if directed on the package
  • 1/4 cup chopped flat-leaf parsley
  • Up to 1 teaspoon (5 ml) red wine vinegar or apple cider vinegar, optional, for final adjustment

Brown the Beef

  1. Dry and season the beef. Pat the chuck very dry. Season with about 3/4 teaspoon of the salt and 1/2 teaspoon of the black pepper.
  2. Brown in batches. Heat 1 tablespoon oil over medium-high heat. Add enough beef for one uncrowded layer. Leave it undisturbed until the underside develops a dark brown crust and releases reasonably cleanly, then turn and brown additional sides. Transfer to a bowl and repeat with the remaining beef, adding the remaining oil as needed.

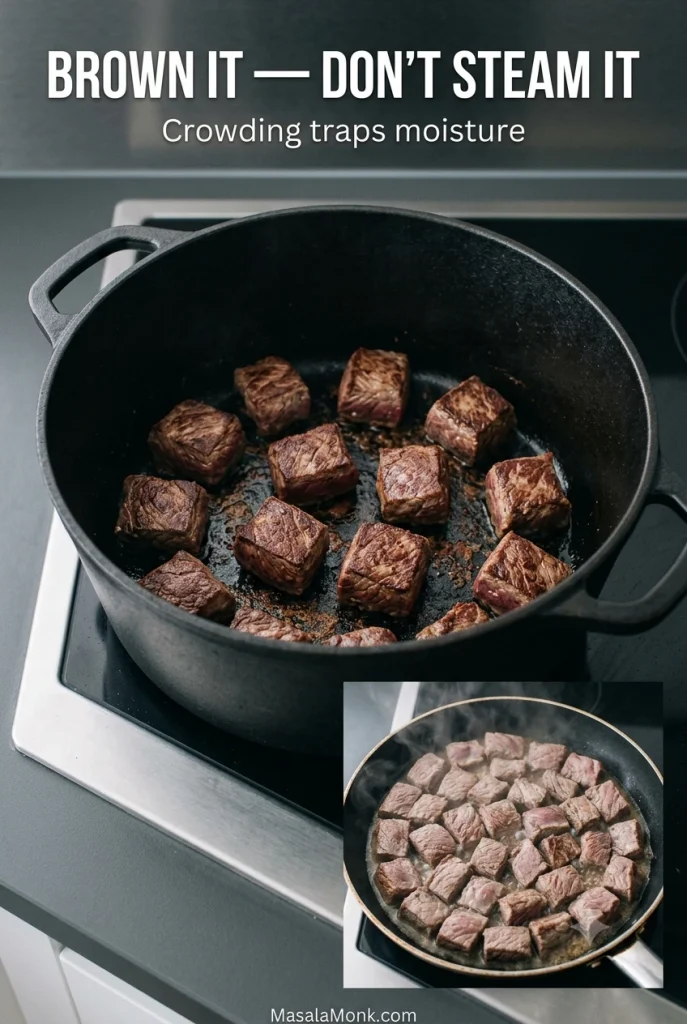
The beef does not need to cook through here. Look for dark brown patches on the meat and a brown film on the bottom of the pot. Pale, wet-looking beef needs more space. By the end of this step, the pot should smell roasted and beefy rather than steamed.

Instructional graphic showing well-spaced beef cubes browning in a dark pot beside an inset of crowded, pale beef releasing moisture. Text reads “Brown it — don’t steam it.”
Pale, wet-looking beef needs more room before it can brown properly.

Build the Broth

  1. Cook the onion. Reduce the heat to medium. Add the onion and cook for 5-6 minutes, until softened and lightly golden, scraping loose browned bits from the pot.
  2. Build the savory base. Stir in the garlic and tomato paste and cook for about 1 minute, until fragrant and the paste has darkened slightly. If using wine, add it now, scrape the bottom of the pot well, and let it bubble for 2-3 minutes. Without wine, add 1/2 cup (120 ml) extra beef broth here; this is in addition to the 7 cups used in the next step.
  3. Start the beef simmer. Return the beef and accumulated juices to the pot. Add 7 cups broth, Worcestershire, thyme, bay leaf, the remaining black pepper and the remaining 1/2 teaspoon salt. Bring just to the edge of a boil, then reduce to a gentle simmer. Partially cover and cook for about 40-45 minutes.

Before You Add the Barley, Check One Piece of Beef

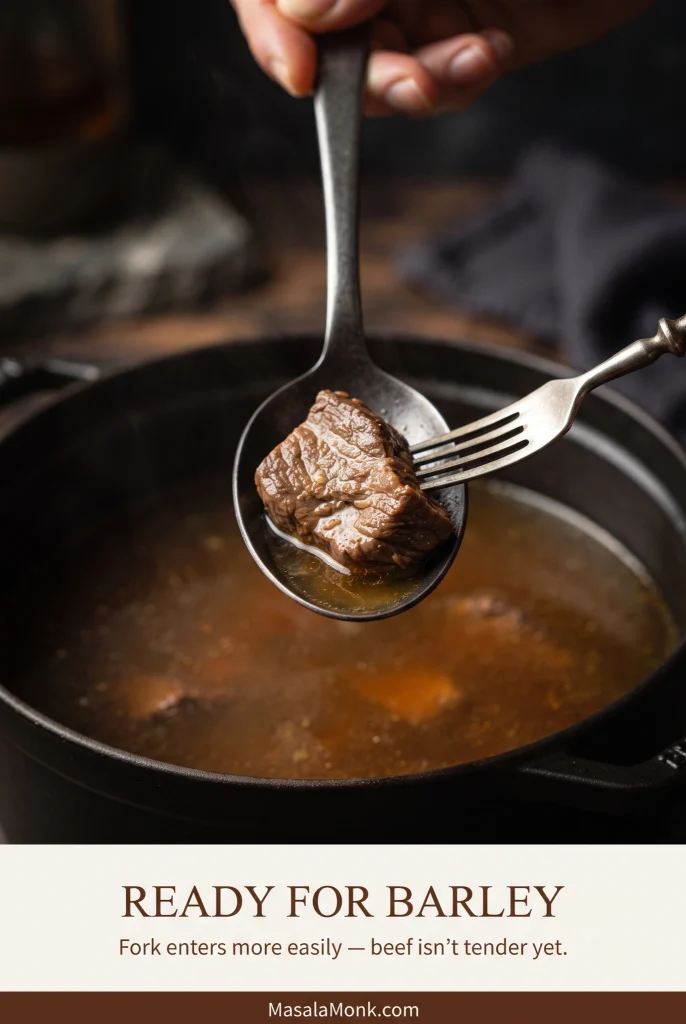
Test one beef cube after about 40-45 minutes. A fork should enter more easily than it did at the start, but the meat does not need to be fully tender yet. If the beef seems stubborn at this point, that is not unusual. Give it another 10-15 minutes, check again, and repeat as needed. Do not add the barley merely because another 15 minutes passed. Wait until the chuck has clearly begun to soften.

Do not rush the chuck.

Fork testing a cube of simmered beef above a spoon and pot of broth. The graphic says the beef should begin softening before pearl barley is added.
The chuck only needs to begin softening here; full tenderness comes later.

Add the Barley, Then the Vegetables

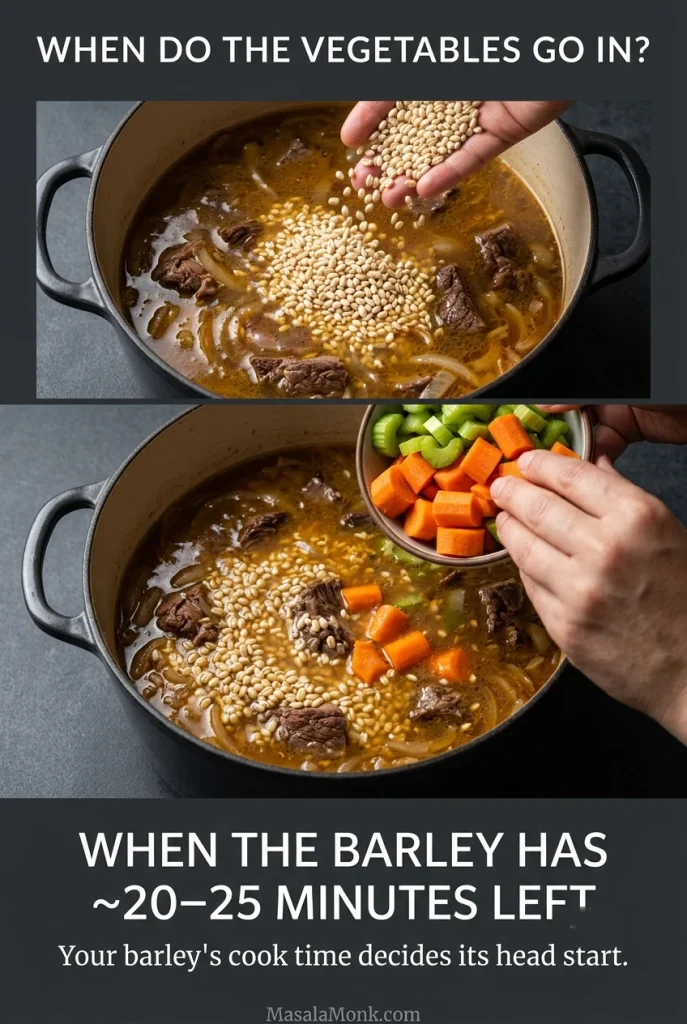
  1. Add the barley. Stir in the pearl barley. The dry amount may look small. Do not add more by eye.
  2. Add the vegetables when the barley has about 20-25 minutes left to cook. Check the cooking time on your barley. For a 30-35 minute pearl barley, that usually means adding the carrots and celery about 8-10 minutes after the barley goes in. A slower barley simply gets a longer head start.
Two-stage cooking graphic showing pearl barley added to beef broth first and chopped carrots and celery added later, when the barley has about 20–25 minutes left.
This 20-25 minute window assumes roughly 1/2-inch carrot and celery pieces; larger cuts need more time.
  1. Cook until the barley is ready. Keep the soup partially uncovered and stir across the bottom every 8-10 minutes so settled grain does not catch. Bite one grain as you approach its expected cooking time. It is ready when the center is tender with a little pleasant resistance left.

Finish the Soup

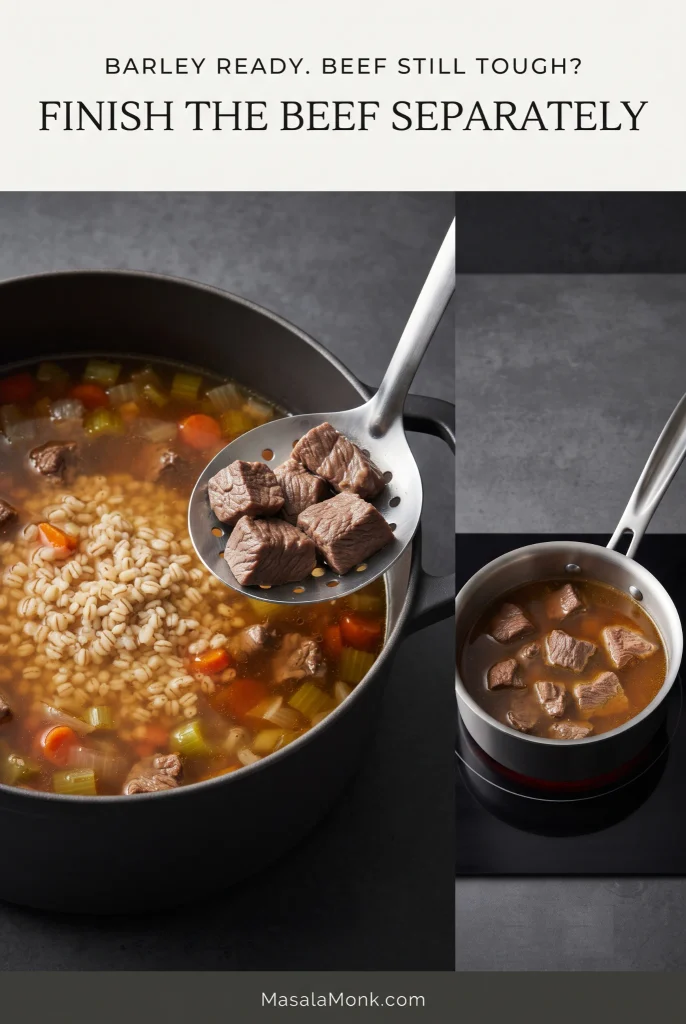
  1. Check the beef. Bite into a piece. It should give easily, without a rubbery center. If it needs only a few more minutes, leave the whole pot at the gentlest simmer. When the barley is already ready but the beef remains substantially tough, lift out the beef and finish it gently in a little hot broth before returning it to the pot.
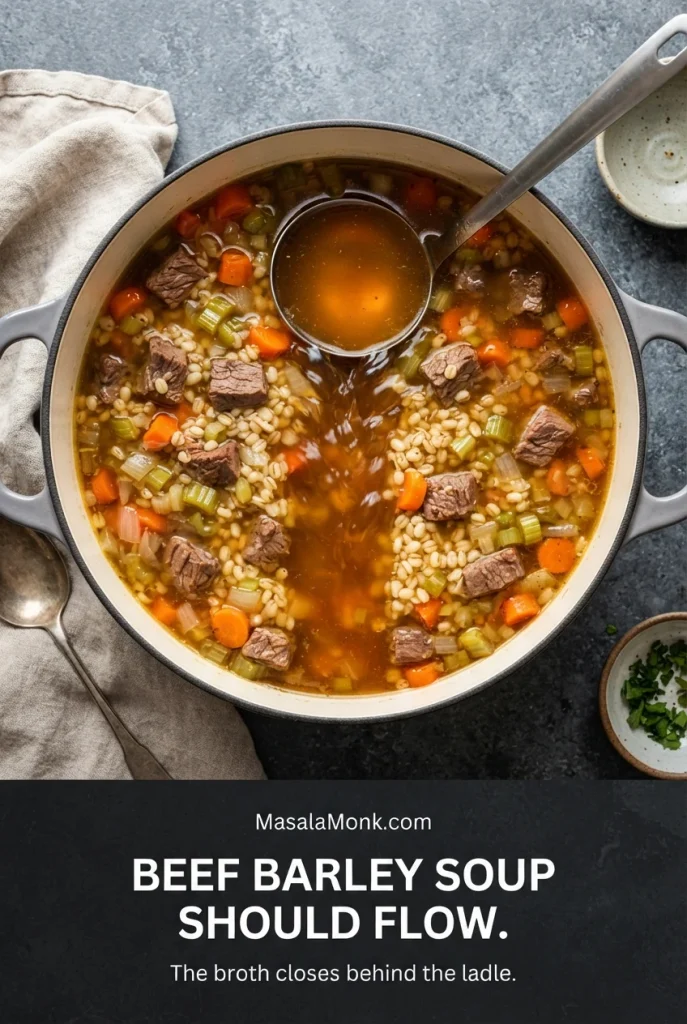
  2. Set the consistency. Remove the bay leaf and fresh thyme stems. Add hot reserved broth 1/4-1/2 cup (60-120 ml) at a time until liquid moves freely around the beef, vegetables and grain. Drag a ladle through the pot: the broth should close back in behind it instead of leaving a trench. If the soup is too thin, simmer uncovered for a few minutes.
Overhead pot of beef barley soup with a ladle raised above the surface, showing flowing brown broth between beef, barley and vegetables.
Set the soup’s flow before the final seasoning adjustment; added broth can change how salty the pot tastes.
  1. Season and rest. Taste before adding more salt. Adjust salt and black pepper and stir in the parsley. If the broth is properly salted but tastes rich and dull, add 1/2 teaspoon vinegar, taste, and add more only if needed, up to 1 teaspoon total. Rest for about 5 minutes before serving.

Recipe Notes

  • Use regular pearl barley. Different brands can cook at noticeably different speeds, so use the grain’s texture as the final judge.
  • Keep broth in reserve. The exact amount needed depends on the barley, simmer and how long the soup stands.
  • For multi-day leftovers, cook the barley separately. The make-ahead method below keeps the soup brothier for longer.

A finished spoonful is one last check on the whole pot: beef, barley and vegetables should all feel present, with broth still visible around them.

Close-up spoonful of beef barley soup containing a beef chunk, pearl barley, carrot and celery above a dark bowl of broth.

If you are cooking now, the recipe above is all you need. The guide below is for choosing beef and barley, adjusting the final texture, rescuing a pot that behaves differently from the ideal one, or adapting it for another kind of beef.

What Beef Makes the Best Beef Barley Soup?

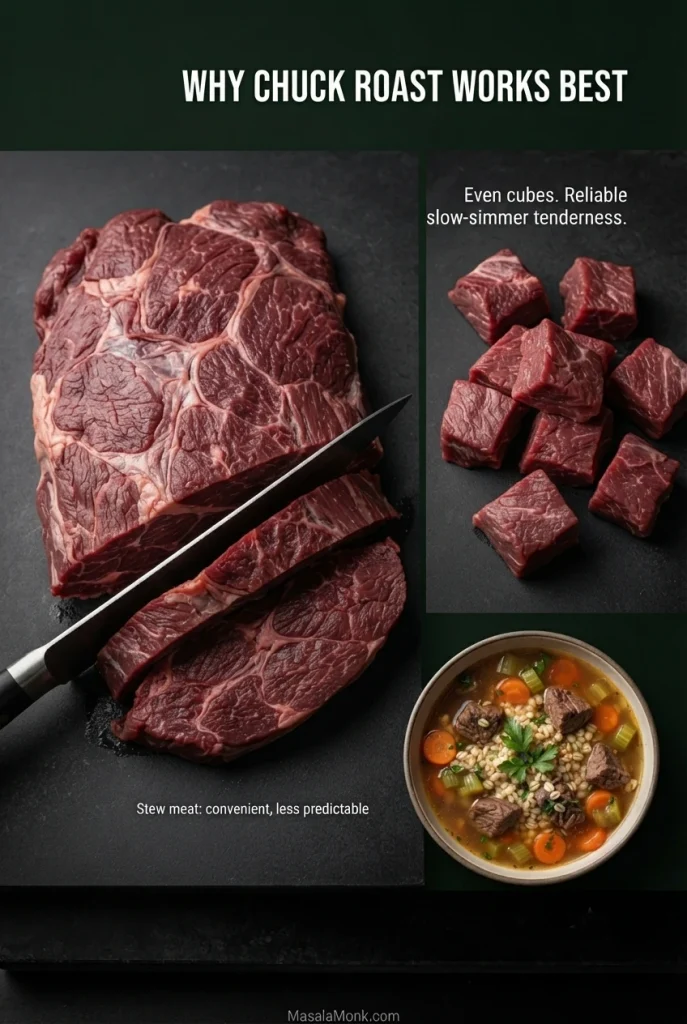
Boneless chuck roast is the best all-around choice because its marbling and connective tissue soften during a long, gentle simmer. Buying a whole roast also lets you cut pieces to a consistent size, which helps them reach tenderness more evenly.

Aim for pieces around 3/4 inch (2 cm). Smaller cubes can lose their presence in the finished bowl; much larger ones may still be firm when the barley is ready. Trim thick hard exterior fat and obvious silverskin, but leave the useful internal marbling.

Food guide showing a raw chuck roast, evenly cut beef cubes and a finished bowl of beef barley soup, with text explaining why chuck is preferred for a long simmer.
Even 3/4-inch chuck cubes are more likely to soften on the same schedule.
BeefHow it behaves here
Chuck roastPreferred. Rich, predictable and suited to a long gentle simmer.
Packaged stew meatConvenient, but less predictable than cutting a chuck roast yourself.
Boneless short ribRich and tender, but more expensive and often fattier.
Beef shankExcellent beef flavor, but usually needs a longer cooking window.
Ground beefA different, faster soup with browned beef crumbles instead of tender chuck pieces.
Cooked roast or brisketAdd near the end so already-tender beef does not dry out.
Cooked steak or prime ribWarm only briefly at the end, especially if you want to preserve a pink center.

Stew meat works too, but a package can contain several cuts. One cube may turn tender while the next still fights the fork, so check the meat itself instead of expecting every piece to finish together.
Pearl Barley: How Much to Use and When to Add It

Use regular pearl barley for this recipe. It needs no overnight soaking, but cooking time varies considerably with the grain and degree of pearling. Some pearl barley may be tender around the half-hour mark, while other medium pearled barley needs considerably longer. Check the package once, then let texture make the final decision. The Whole Grains Council’s barley guide explains the differences between hulled, pearl and quick barley.

  • Regular pearl barley: the recipe default; add it after the beef has clearly begun softening.
  • Quick-cooking barley: add it near the end and follow its shorter cooking time.
  • Hulled barley: cook it separately according to its package directions, then add it near the end. Its longer cook makes it awkward to synchronize with this soup’s beef and vegetables.

Pearl barley contains gluten, so this soup is not gluten-free.

How Much Barley Changes the Whole Pot

Dry pearl barleyWhat the soup becomes
1/2 cup (about 105 g)Brothier, with beef and vegetables dominating each spoonful.
3/4 cup (about 160 g)The balance used here: plenty of barley, with broth still moving freely around it.
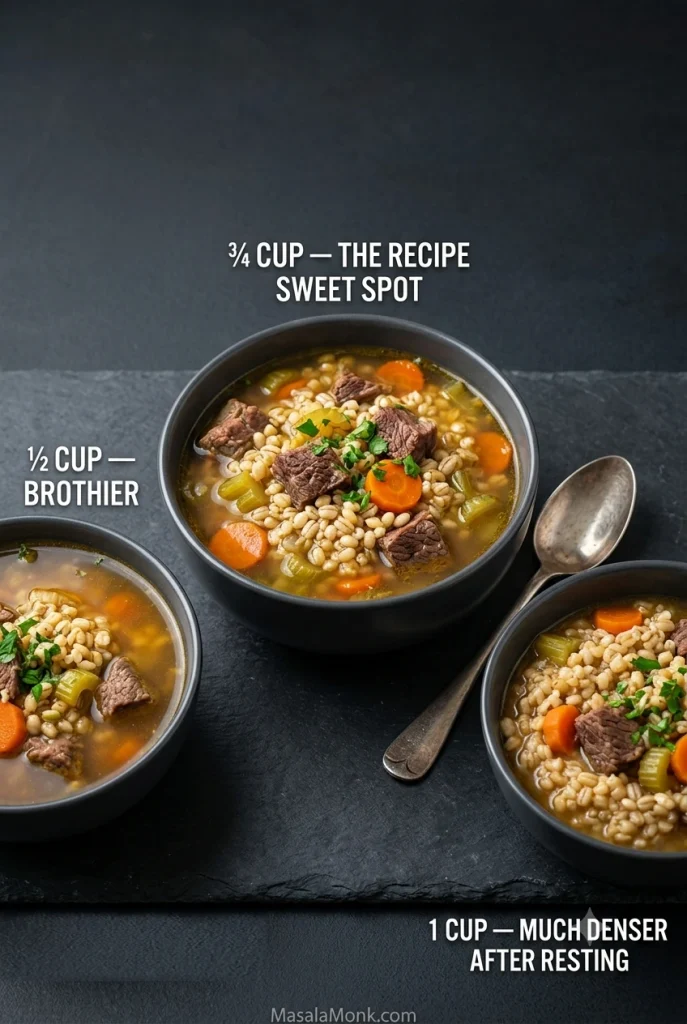
1 cup (about 210-215 g)Much more grain-heavy and likely to become stew-like after resting.
Three bowls compare beef barley soup made with one-half cup, three-quarters cup and one cup of dry pearl barley, with three-quarters cup marked as the preferred balance.
Three-quarters cup gives the best balance here; a full cup makes the soup noticeably denser after resting.

Three-quarters of a cup looks stingy when the barley is dry. It will not look stingy half an hour later. Leave it alone and let it expand before deciding the pot needs more grain.

How Thick Should Beef Barley Soup Be?

Beef barley soup should be hearty enough to satisfy, with broth moving freely between the solids. Tilt a full ladle and you should see liquid run around the beef, vegetables and barley rather than clinging like gravy.

  • Too thick now: add hot broth 1/4-1/2 cup (60-120 ml) at a time and stir before deciding whether it needs more.
  • Too thin now: simmer uncovered for a few minutes before changing the seasoning.
  • Much thicker tomorrow: nothing went wrong. Loosen the soup with broth or water while reheating.

Troubleshooting

The Beef Is Still Tough

Tough does not mean ruined. Keep the soup at a gentle simmer and check another piece in 10-15 minutes. Repeat until the fork enters reasonably easily. A hard boil is not the fix; give the chuck time.

The Barley Is Ready but the Beef Is Still Tough

If the beef needs only a few more minutes, leave the whole pot at the gentlest simmer. Substantially tough beef needs its own finish: lift out the pieces, put them in a small saucepan with enough hot soup broth to come partway up the meat, simmer gently until tender, then return everything to the pot. The grain and vegetables can stop cooking while the chuck catches up.

Split instructional graphic showing beef cubes lifted from beef barley soup and transferred to a small saucepan of broth to finish cooking separately.
Separate the jobs: let the barley stop cooking while the beef gets the extra time it needs.

The barley swallowed all the broth.

Add hot broth 1/4-1/2 cup (60-120 ml) at a time until the soup looks properly brothy again, then taste for salt.

The vegetables are falling apart.

There is no way to restore their shape once they are soft. Next time, add them when the barley has 20-25 minutes left to cook.

The broth tastes flat.

Check salt first. Properly salted but lacking savory depth? Add 1/2 teaspoon Worcestershire, taste, then add more only if needed. If the broth tastes rich and heavy, try 1/2 teaspoon red wine vinegar or apple cider vinegar instead. The vinegar should brighten the broth without announcing itself.

Smaller problemLikely fix
Barley is still hardKeep simmering gently and add broth if needed. Give the grain the time it needs.
Barley is mushyIt cooked too long or quick barley was used. Loosen the soup with broth; the grain’s bite cannot be restored.
Soup is greasySkim surface fat. Next time trim thick hard exterior fat and avoid unnecessary extra oil.
Soup is too saltyDilute with unsalted broth or water, then taste again.
Barley is stickingLower the heat and scrape across the bottom regularly after the grain goes in.
Broth looks cloudy or foamyThis is usually harmless coagulated protein from the beef. Skim it if you prefer a clearer-looking broth.

Variations That Need Different Timing

Beef Mushroom Barley Soup

For noticeable mushroom flavor without overwhelming the beef, use about 8 oz (225 g) sliced cremini or button mushrooms. Brown the beef first and remove it. If the pot looks dry, add 1-2 teaspoons oil, then cook the mushrooms until their released moisture has evaporated and real browning begins. Remove the mushrooms and cook the onion as written.

Continue with the broth and beef as written, then return the mushrooms for the final 10-15 minutes. Want mushrooms to play a bigger role? Increase them to 12-16 oz (340-450 g).

Bowl of beef mushroom barley soup with browned beef pieces, sliced mushrooms, pearl barley, carrots, celery and parsley in brown broth.

Using Leftover Roast Beef or Brisket

Use about 1 1/2 lb (680 g) chopped or cubed cooked roast beef or brisket. Build the broth without the long chuck-tenderizing phase, then cook the barley as directed.

Add the carrots and celery when the grain has about 20-25 minutes left. Stir in the cooked roast or brisket for only the final 5 minutes or so, just long enough to heat through.

Using Leftover Steak or Prime Rib

Already-pink steak or prime rib needs much less heat. Slice or cube it and add it only at the very end, just long enough to warm through. To protect a medium-rare center, put the meat directly into individual bowls and ladle the steaming soup over it.

Slices of pink cooked steak in a bowl as hot beef barley soup with pearl barley and vegetables is ladled over the meat.

Ground Beef Barley Soup

Use about 1 1/2 lb (680 g) ground beef for a faster soup with browned beef crumbles instead of tender chuck pieces. Brown the meat thoroughly, drain excess fat if needed, and transfer it to a bowl. Cook the onion, garlic and tomato paste as written, then return the beef when you add the broth.

Add the barley, followed by the carrots and celery when the grain has about 20-25 minutes left to cook. There is no long tenderizing phase.

Easy Swaps

SwapAdjustment
No wineReplace the 1/2 cup (120 ml) wine with the same amount of beef broth.
No tomato pasteOmit it if you want beef barley soup without tomato. The broth will be lighter in color and slightly less concentrated.
Quick-cooking barleyAdd it near the end and follow its shorter cooking time.
Hulled barleyCook separately according to package directions, then stir it into the soup near the end.

Make-Ahead Beef Barley Soup

For several days of leftovers, cook and store the barley separately. For a pot you expect to finish within a day or so, cooking the grain directly in the soup is the better default because it takes on beef flavor and gives the broth natural body.

How to Cook the Barley Separately

  1. Bring 3 cups (710 ml) water or low-sodium broth to a boil.
  2. Add the recipe’s 3/4 cup (about 160 g) pearl barley and a small pinch of salt.
  3. Reduce to a steady simmer and cook until the grain is tender through the center with a little chew. Start checking around the time listed on the package rather than forcing one universal minute mark.
  4. Drain well, cool promptly and refrigerate separately from the soup.
  5. Add barley to individual bowls as the soup reheats.
Container of beef and vegetable soup beside a separate bowl of cooked pearl barley, with a finished serving of beef barley soup in front.
Separate storage sacrifices a little shared beef flavor, but gives you far more control over leftover brothiness.

When the barley is staying out of the soup pot, continue simmering the beef until it is nearly tender—a fork goes in fairly easily, but there is still a little resistance. Add the carrots and celery at that point and cook for another 20-25 minutes, until the vegetables are tender and the beef is ready. Spoon barley into each bowl and ladle the hot soup over it.

If you like your beef barley soup especially brothy, portioning the barley bowl by bowl also lets each person control how grain-heavy their serving becomes. Our Minestrone Soup keeps its starch separate for the same practical reason: leftovers stay brothier.

Storage and Reheating

The flavors often settle and deepen overnight, while the soup itself becomes thicker. Add broth or water during reheating until it returns to the consistency you like.

Refrigerating. Divide the soup into shallow covered containers and refrigerate promptly. Use refrigerated leftovers within 3-4 days. If the barley was cooked separately, keep it in its own container and combine portions only as you reheat them. This follows USDA food-safety guidance on rapid cooling and leftover storage.

Freezing. Freeze chilled portions in airtight freezer-safe containers for best quality within about 2-3 months. Barley can be frozen in the soup, although keeping it separate gives you more control over the broth when freezing a batch for later.

Reheating. For about 2 cups of cold soup, start with 1/4 cup (60 ml) beef broth or water and add more as needed. Reheat leftovers to 165°F (74°C), stirring so the soup heats evenly.

Whenever you serve it, ladle the soup into warm bowls and scatter over a little parsley.

Green bowl of beef barley soup with beef, pearl barley, carrots, celery and parsley on a dining table beside bread and a spoon.

Bring it to the table while the broth is steaming and the beef is tender enough to meet the spoon without a fight. Crusty bread or soft dinner rolls are welcome alongside, but this is already dinner in the bowl.

Posted on — Leave a comment

Sheet Pan Sausage and Peppers Recipe: Easy Oven-Baked Italian Sausage, Peppers & Onions

Roasted Italian sausage links with red, orange and yellow bell pepper strips and golden onion spread across a rimmed aluminum sheet pan with visible areas of bare metal.

A good tray of sausage and peppers gives you browned sausage, sweet onion, blistered pepper edges and enough savory juices to make a piece of bread worthwhile. It is also the kind of dinner that asks very little of you once the pan goes into the oven—especially on a night when you want a proper dinner without turning cooking into another project.

The trick is getting the sausage and vegetables done together without steaming the peppers along the way. Keep the vegetables substantial, give everything room on the pan, and let the oven handle the rest.

This sheet pan sausage and peppers recipe uses fresh Italian sausage, three bell peppers and a large onion for an easy oven dinner with very little hands-on work. Eat it straight from the pan, spoon it over something that will catch the juices, or pile everything into toasted hoagie rolls.

Sheet Pan Sausage and Peppers at a Glance

Roast fresh Italian sausage, peppers and onion at 425°F / 220°C on an 18 × 13-inch / 46 × 33-cm rimmed sheet pan. Turn the links and stir the vegetables after 15 minutes, then start checking the sausage around 25 minutes. Fresh pork or beef sausage should reach 160°F / 71°C in the center; fresh chicken or turkey sausage should reach 165°F / 74°C. The thermometer, not the clock, makes the final call.

Sheet Pan Sausage and Peppers Recipe

Fresh Italian sausage, bell peppers and onion roast together at 425°F / 220°C until the sausage is browned in patches, the peppers are tender and the onion is sweet at the edges. This method is written for fresh/raw Italian sausage links.

Yield
4 generous servings
Prep Time
15 minutes
Cook Time
25–30 minutes
Total Time
40–45 minutes

Equipment

  • 18 × 13 in / 46 × 33 cm rimmed half-sheet pan
  • Cutting board and sharp knife
  • Tongs or sturdy spatula
  • Instant-read food thermometer

Ingredients

  • 1¼ lb / 20 oz / about 570 g fresh Italian sausage links, usually 5–6 depending on size, sweet/mild or hot
  • 3 large bell peppers, about 1 lb / 450–500 g, preferably a mix of colors
  • 1 very large yellow or sweet onion, about 9–10 oz / 250–285 g
  • 2 tbsp / 30 mL olive oil
  • 1 tsp dried oregano or Italian seasoning
  • 1 tsp garlic powder
  • ½ tsp freshly ground black pepper
  • ¼ tsp red pepper flakes, optional
  • ¼ tsp fine salt to start, plus more after roasting as needed
  • 1–2 tsp / 5–10 mL red wine vinegar or fresh lemon juice, optional
  • 2 tbsp / about 8 g chopped flat-leaf parsley, optional

Instructions

  1. Heat the oven. Set a rack in the middle of the oven and heat to 425°F / 220°C. Have a rimmed half-sheet pan ready. Use bare metal for the strongest contact browning; parchment is the easier-cleanup alternative.
  2. Cut the vegetables. Slice the bell peppers into strips about ½ inch / 1.25 cm wide. Cut the onion into thick half-moons or wedges of roughly similar size.
  3. Season. Toss the peppers and onion with the olive oil, oregano or Italian seasoning, garlic powder, black pepper, optional red pepper flakes and ¼ tsp salt. Italian sausage varies considerably in saltiness, so start here and adjust after roasting.
  4. Arrange the pan. Spread the vegetables into one loose layer and nestle the whole raw sausage links among them. Keep the links whole while they roast; slice them after resting.

Roast, Turn and Finish

  1. Roast for 15 minutes. The vegetables will shrink noticeably as they roast.
  2. Turn and stir. Flip the sausage links and stir the vegetables. The peppers and onions should now look smaller and softer, with darkening edges here and there and more bare pan visible between them. Spread them back out and roast for another 10–15 minutes.
  3. Check the sausage. Begin checking around 25 minutes. Fresh pork or beef sausage should reach 160°F / 71°C in the center; fresh chicken or turkey sausage should reach 165°F / 74°C.
  4. Add more color. If the sausage has reached its safe temperature but still looks pale, broil for 1–3 minutes. Watch continuously and remove ordinary parchment before broiling.
  5. Rest and finish. Give the sausages 3–5 minutes to rest. Taste the vegetables and adjust the salt. For a brighter finish, start with 1 tsp / 5 mL red wine vinegar or lemon juice, toss, taste, and add more if needed. Scatter over the parsley, if using.

The recipe above is enough to get dinner on the table. Below, the details cover the choices and problems that can change the result—from the sausage you start with and how you cut the vegetables to a watery pan, dark onion edges or links that need a little more color.

Check the Sausage Before You Start

Check the package before anything goes onto the pan. Fresh sausage and fully cooked sausage can look similar in the refrigerator, but their oven timing is very different.

Raw Italian sausage links arranged with uncooked bell peppers and yellow onion on a sheet pan, with browned fully cooked sausage links shown separately above the pan.
Two packages can look nearly identical in the refrigerator yet need different treatment in the oven. Therefore, check whether the links are fresh or fully cooked before arranging the pan; that distinction determines whether the sausage starts with the vegetables or joins them later.
What You Have How to Handle It
Fresh pork or beef Italian linksUse the main method and cook to 160°F / 71°C.
Fresh chicken or turkey linksUse the main method and cook to 165°F / 74°C.
Fully cooked sausageRoast the vegetables for 15 minutes first, then add the sausage for roughly the final 10–15 minutes.
Very thick fresh linksAllow extra time and check the center with a thermometer.
Thin fresh linksBegin checking before the full cooking window is up.

Sweet or mild Italian sausage lets the peppers and onion come through clearly. Hot Italian sausage follows the same method, and mixing sweet and hot links works too. Fennel flavor varies by sausage, so check the label if you’re not a fan.

Using kielbasa instead? It is already cooked, so the timing changes. Our kielbasa and potatoes recipe handles that combination separately.

Cut the Peppers and Onion to Match the Sausage

For this version, cut the peppers about ½ inch / 1.25 cm wide. They will soften considerably in the oven but should still have enough body to pick up easily with a fork when the sausage is done.

For softer hoagie-style vegetables, go a little thinner—about ¼–⅜ inch / 6–10 mm—and watch them at the halfway turn. Small onion tips often darken first. Pull off anything actually scorched and leave the browned pieces alone.

Red, orange and yellow bell peppers cut into thick and thin strips beside a chef’s knife and a small metal ruler showing about a half-inch width.
About ½-inch pepper strips are the sweet spot for the standard sheet-pan roast: they soften while keeping enough structure to stay distinct. For softer sausage-and-pepper hoagies, cut them thinner; meanwhile, slightly sturdier strips give you more timing tolerance when unusually large sausage links need longer to cook.

Red, orange and yellow peppers bring more sweetness; green keeps a slightly more savory edge. Use whatever mix sounds good.

Leave the sausage links whole; they’re easier to turn and temperature-check, then you can slice them after resting.

Get the Pan Right

Peppers and onions release water as they cook, while sausage adds fat and juices. Give that moisture room to sizzle away around the food instead of collecting underneath it. A standard half-sheet pan is a good fit for this batch.

Raw Italian sausage links, bell pepper strips and yellow onion wedges arranged in a loose single layer on an aluminum sheet pan with visible metal between the ingredients.
Treat visible pan as an early capacity test. If sausage, peppers and onions already cover almost every inch before roasting, moving part of the batch to a second pan is easier than trying to recover lost browning after the vegetables begin releasing water.
  • Dry visibly wet peppers after washing.
  • Spread everything into one layer.
  • Keep broth, water and marinara off the roasting pan.
  • For a larger batch, use another pan.

If the vegetables are turning tender but the pan still looks pale and wet, check the spacing before changing the seasoning or oven temperature. Crowding is often the reason roasting has started to behave more like steaming.

A sheet pan showing browned sausage and roasted peppers with exposed metal on one side and more crowded, pale, moist sausage and vegetables on the other.
A pale, wet pan is usually a surface-area problem before it is a seasoning problem. In other words, more oregano or garlic cannot replace the browning you lose when released vegetable moisture has too little exposed metal from which to evaporate.

Use bare metal for the best browning. Parchment makes cleanup easier, but you give up some direct pan contact. Ordinary parchment also needs to come off before the pan goes under the broiler.

What the Pan Should Look Like After 15 Minutes

At the halfway turn, judge the pan by its progress rather than by final color: the vegetables should be smaller and softer, with more metal beginning to show between them.

Partially roasted Italian sausage with softened red, orange and yellow peppers and onions after about 15 minutes, with more exposed aluminum visible between the food.
Halfway through, the pan should look unfinished rather than dramatically browned. Because the vegetables have already shrunk and released some moisture, this is the point to redistribute them—not the point to keep cooking until the food resembles the final tray.

The sausages do not need to color evenly on every side. Contact points against the hot metal will usually go darkest. Turn them once halfway through and leave the rest to the oven.

Metal tongs turning an Italian sausage link on a sheet pan and exposing its browned contact side, with partially roasted peppers and onions around it.
One well-browned contact side is enough to tell you the hot pan is doing its job. Turn the links once, stir the vegetables into new positions, and let the second half of roasting create fresh contact instead of repeatedly chasing color on every surface.

Know When It Is Done

Start looking closely around the 25-minute mark. Some links will be ready; unusually thick ones may need longer.

  • Sausage: browned in patches and safely cooked through. It does not need to be dark all over.
  • Peppers: soft and flexible with blistered edges, but not collapsed into the pan juices.
  • Onion: tender and sweet, with darker corners here and there.
  • Pan: rendered fat and concentrated juices, not a puddle of thin vegetable liquid.
Close view of a browned Italian sausage link surrounded by blistered red, orange and yellow peppers, golden onion and concentrated roasting juices on an aluminum sheet pan.
Do not force the vegetables to wait for the sausage if they reach this stage first. Once the peppers are soft and blistered and the onions are tender, move them off the pan if necessary and let unusually thick links finish safely on their own.

Brown tells you what the pan looks like; temperature tells you whether the sausage is done. Fresh pork or beef sausage should reach 160°F / 71°C; fresh chicken or turkey sausage should reach 165°F / 74°C. Those are the separate safe-temperature targets given by the USDA Food Safety and Inspection Service.

Instant-read thermometer probe inserted into the thickest central part of a browned Italian sausage link with roasted peppers and onions on the sheet pan.
Link thickness can move the cooking time more than the clock suggests, so temperature gets the final decision. Check the thickest part: pork or beef sausage should reach 160°F / 71°C, while chicken or turkey sausage should reach 165°F / 74°C.

Vegetables ready first? Take them off. Sausage safely cooked but still pale? Give it a minute or two under the broiler.

Taste and Finish the Pan

Italian sausage already brings plenty of salt, spice and fat to the pan, so taste the vegetables before adding more salt. Oregano, garlic and black pepper support those flavors without burying the sweetness of the peppers and onion.

A squeeze of lemon or a splash of red wine vinegar wakes up the rich sausage and sweet roasted vegetables, especially after a few bites. Parsley brings a fresh edge and a little color.

A hand squeezing a lemon wedge over browned Italian sausage, roasted red, orange and yellow peppers and golden onions on a sheet pan.
Rich Italian sausage and sweet roasted peppers often benefit from a small hit of acidity at the end. Start with a little lemon juice or red wine vinegar, then taste—the goal is to lift the roasted flavors and make the whole pan feel brighter, not noticeably sour.

Or keep everything rich and savory and put the contrast alongside it. A cold cucumber salad with vinegar, dill and onion gives you something crisp between bites.

Ways to Serve It

After the sausages have rested, leave them whole or slice them thickly and spoon the peppers and onion over the top. Rice and soft polenta soak up the pan juices beautifully. For a richer plate, put everything over creamy mashed potatoes.

Thick slices of browned Italian sausage with roasted bell peppers and onions served over a creamy pale side on a warm-toned ceramic dinner plate.
Resting the sausage before slicing is especially useful once the meal leaves the sheet pan. The cut surfaces stay juicier, while mashed potatoes or soft polenta can catch the concentrated roasting juices without diluting the peppers and onions.

For sausage-and-pepper hoagies

Toast the cut side of the roll well. The peppers are juicy, and a soft untoasted roll can turn soggy quickly. Slice the rested sausage into bite-size pieces, pile on the peppers and onion, and tuck in the provolone while everything is hot enough to soften it around the sausage and peppers.

Toasted hoagie roll filled with sliced Italian sausage, roasted red, orange and yellow peppers, golden onion and softened provolone, with the browned bread interior visible.
The part of the roll worth toasting most thoroughly is the cut face, because that is where the juicy sausage and peppers make contact. Once filled, that crisp inner surface gives the bread more resistance while the hot filling gently softens the provolone.

Marinara is optional; the sausage juices are already doing plenty of work. For homemade rolls, our sourdough bread guide includes homemade hoagie and sub rolls sturdy enough for a generous filling.

When you want tomato sauce

Don’t put the marinara on the roasting pan. Roast first, then spoon the sauce over or underneath the finished sausage and peppers. Our marinara sauce recipe works well here.

Adding potatoes

Potatoes need a head start unless they are cut very small. The simpler option is a second pan: these ranch roasted potatoes cook at the same 425°F / 220°C.

Cooking for a Crowd

For a main course, figure on roughly 4–5 oz / 115–140 g sausage per person—often about one substantial link—with extra for big appetites or loaded hoagies.

Servings Fresh Sausage Bell Peppers Large Onion Half-Sheet Pans
41¼ lb / 20 oz / about 570 g311
82½ lb / 40 oz / about 1.13 kg622
123¾ lb / 60 oz / about 1.7 kg933, usually in batches
Two aluminum sheet pans arranged together, each holding raw Italian sausage links, bell pepper strips and yellow onion with visible space between the ingredients.
More pans solve crowding only if the oven still has room to circulate heat around them. When cooking on two racks, compare the browning halfway through and swap pan positions if the upper and lower levels of your oven behave differently.

Two pans can cook together if your oven gives them enough room for air to move. Swap their positions halfway when one rack browns faster. For a larger crowd, batches are usually easier than filling every rack at once.

Make Ahead, Store and Reheat

Slice the peppers and onion up to a day ahead and refrigerate them covered, with the raw sausage stored separately. That leaves little more than seasoning and arranging the pan when dinner comes around.

Fresh uncooked sausage generally keeps for 1–2 days in the refrigerator. Once cooked, refrigerate the sausage-and-pepper leftovers for 3–4 days.

Refrigerate cooked leftovers within 2 hours, or within 1 hour when the surrounding temperature is above 90°F / 32°C. Reheat leftovers to 165°F / 74°C. The USDA sausage and food-safety guidance covers safe storage and handling in more detail.

For freezing, cool the sausage and vegetables, pack them airtight, and use them within about 1–2 months for best quality, following USDA freezer guidance for sausage. Thaw overnight in the refrigerator when you can. The peppers will be softer after freezing, which matters much less once the leftovers are headed into a sandwich, skillet or bowl.

Choose the Reheating Method by the Texture You Want

  • Best texture: use a hot skillet and let the sausage and vegetable edges pick up some color again.
  • Hands-off: spread the leftovers in a single layer on a pan and reheat at 375°F / 190°C until hot through, roughly 8–12 minutes for a modest single-layer portion. Check that the food reaches 165°F / 74°C.
  • Fastest: microwave until thoroughly hot; the vegetables will be softer.

The next day, the peppers are softer and the sausage, onion and seasoning have settled together. Tuck them into a toasted roll, spoon them over rice, or go in a saucier direction with our sausage pasta recipe.
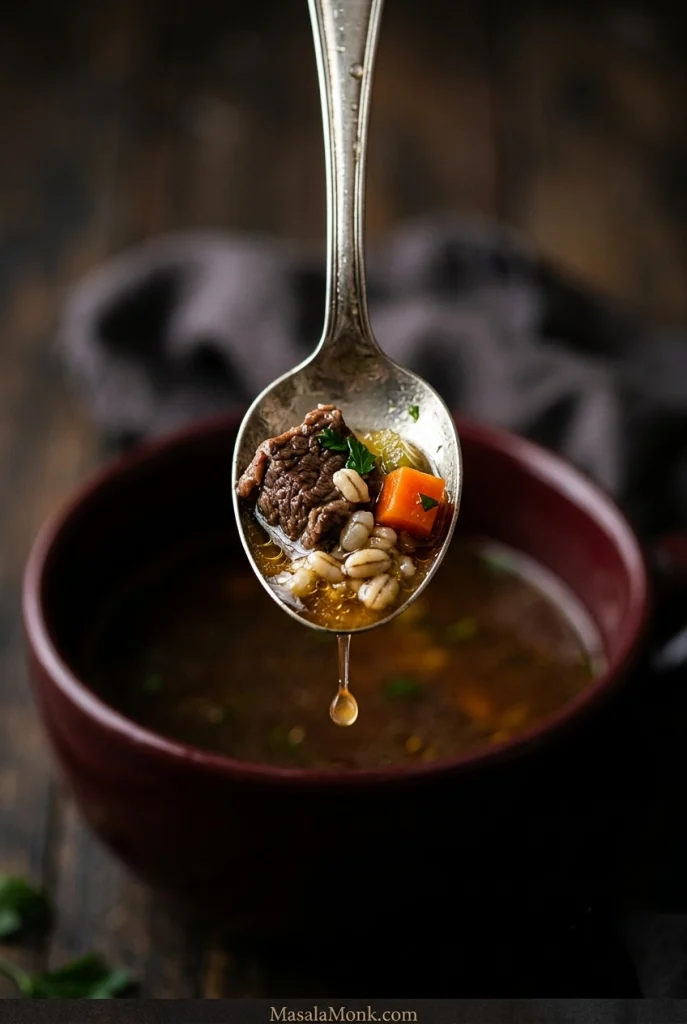
Breakfast may be even better. Crisp the chopped leftovers in a skillet, let the bottom pick up some color, then add eggs, potatoes or cheese. Our breakfast burrito recipe gives you a useful framework if everything is headed into a tortilla.
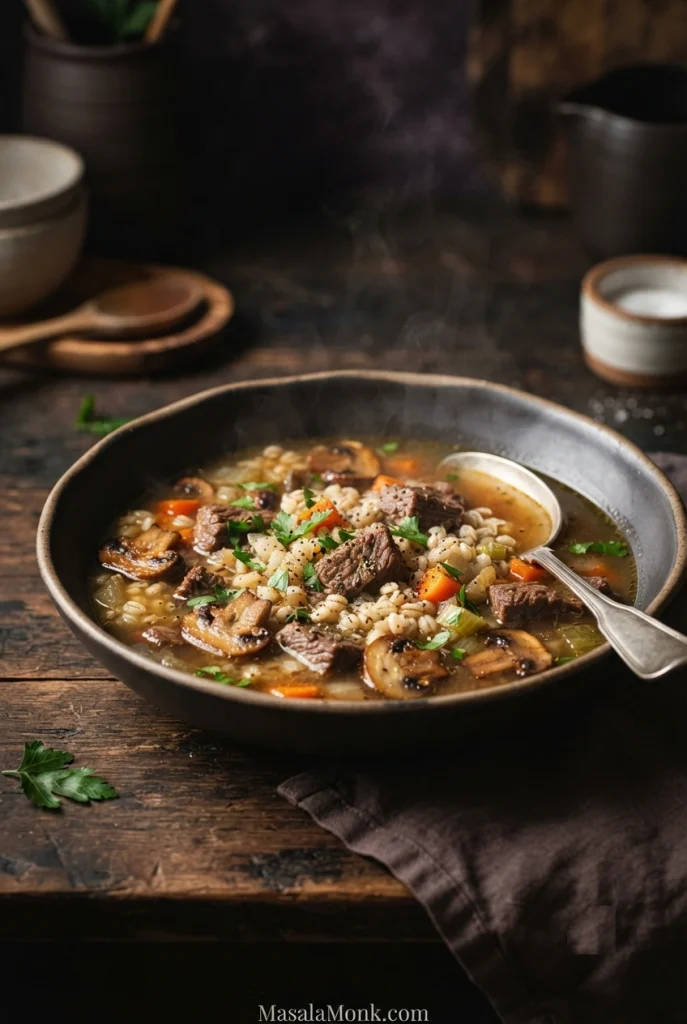
Sliced leftover sausage, roasted peppers and onions reheating in a skillet with a fried egg while a spatula lifts a browned piece of sausage and pepper.
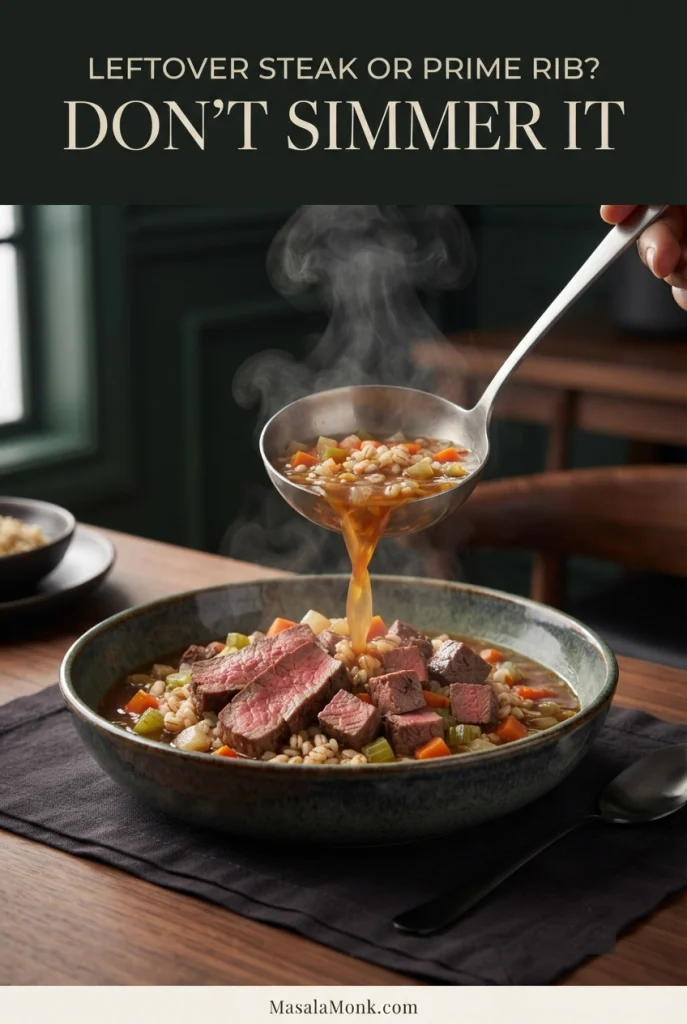
Reheating method changes the texture you get back. A microwave is quicker, whereas a hot skillet lets leftover sausage and peppers sit against metal long enough to rebuild some browned edges before you turn them.
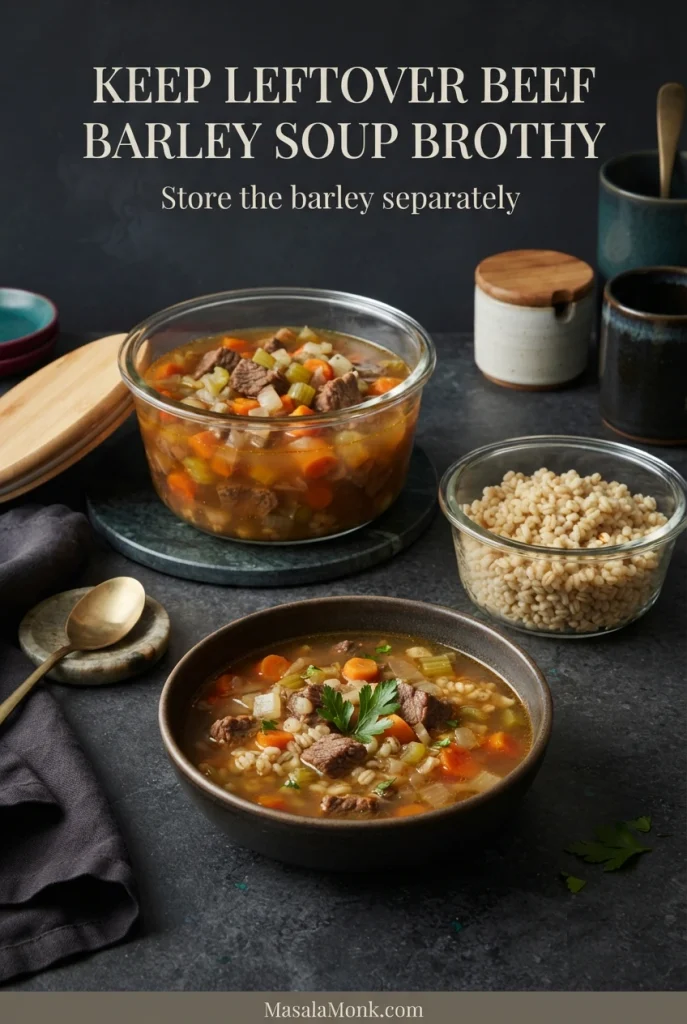
Something Went Wrong? Here’s What to Do

Most problems are visible right on the pan. Save dinner first; adjust the setup next time.

If the Sheet Pan Turns Watery

If the peppers and onions have already released enough liquid to make the pan watery, create more exposed metal first. That gives the moisture somewhere to evaporate before you decide whether the finished pan still needs a brief broil.

A stainless spatula pushes wet peppers and onions apart on a crowded sausage sheet pan, opening a wide strip of bare aluminum through the center.
A watery sheet pan is easier to fix in stages than all at once. First create bare-metal space; then, once the sausage is safely cooked, spoon off any remaining thin liquid before using a brief broil for extra color.

Match the Fix to What You See

What You See Do This Now Next Time
Watery peppers and onionsSpread them out. Once the sausage is safely cooked, spoon off excess thin liquid and broil briefly for more color.Dry wet vegetables and use the full-size pan.
Vegetables are tender but paleBroil briefly once the sausage is safely cooked.Use bare metal and leave more exposed pan between the vegetables.
Sausage is cooked but paleBroil for 1–3 minutes on a broiler-safe setup.Let the links make good contact with the pan and turn them halfway.
Vegetables are ready before the sausageMove them to a plate and let the sausage finish to the correct temperature.Cut the vegetables thicker when using very large links.
Onion edges are burningRemove the scorched pieces while the rest finishes.Cut the onion into thicker wedges or half-moons.
Precooked sausage is dryServe it with the juicy peppers and onions or warm marinara.Add fully cooked sausage only for the final 10–15 minutes.
The pan is very greasySpoon off excess rendered fat.Use a little less olive oil with especially fatty sausage.
The dish tastes too saltyServe it with an unsalted starch or extra unsalted vegetables to spread the seasoning across more food. A little lemon or vinegar can balance the richness, but it will not remove the salt.Start with less added salt on the vegetables.
A double batch is soggyDivide it across another pan and finish in a thinner layer.Use two pans from the beginning.

Don’t Leave the Pan Juices Behind

Give the links 3–5 minutes to rest, then slice them if you like. Spoon the hot peppers and onions over the top, scatter on parsley if you have it, add a squeeze of lemon if it tastes right, and bring everything to the table. The browned bits and savory juices left behind are worth a piece of bread.

Torn crusty bread being dragged through browned fond and concentrated juices on a nearly empty aluminum sheet pan with a few roasted pepper and onion pieces remaining.
What remains on the pan is a final clue to how the roast behaved. Concentrated fond and glossy savory juices are worth collecting with crusty bread; a broad puddle of thin liquid would instead suggest that too much moisture survived the cook.