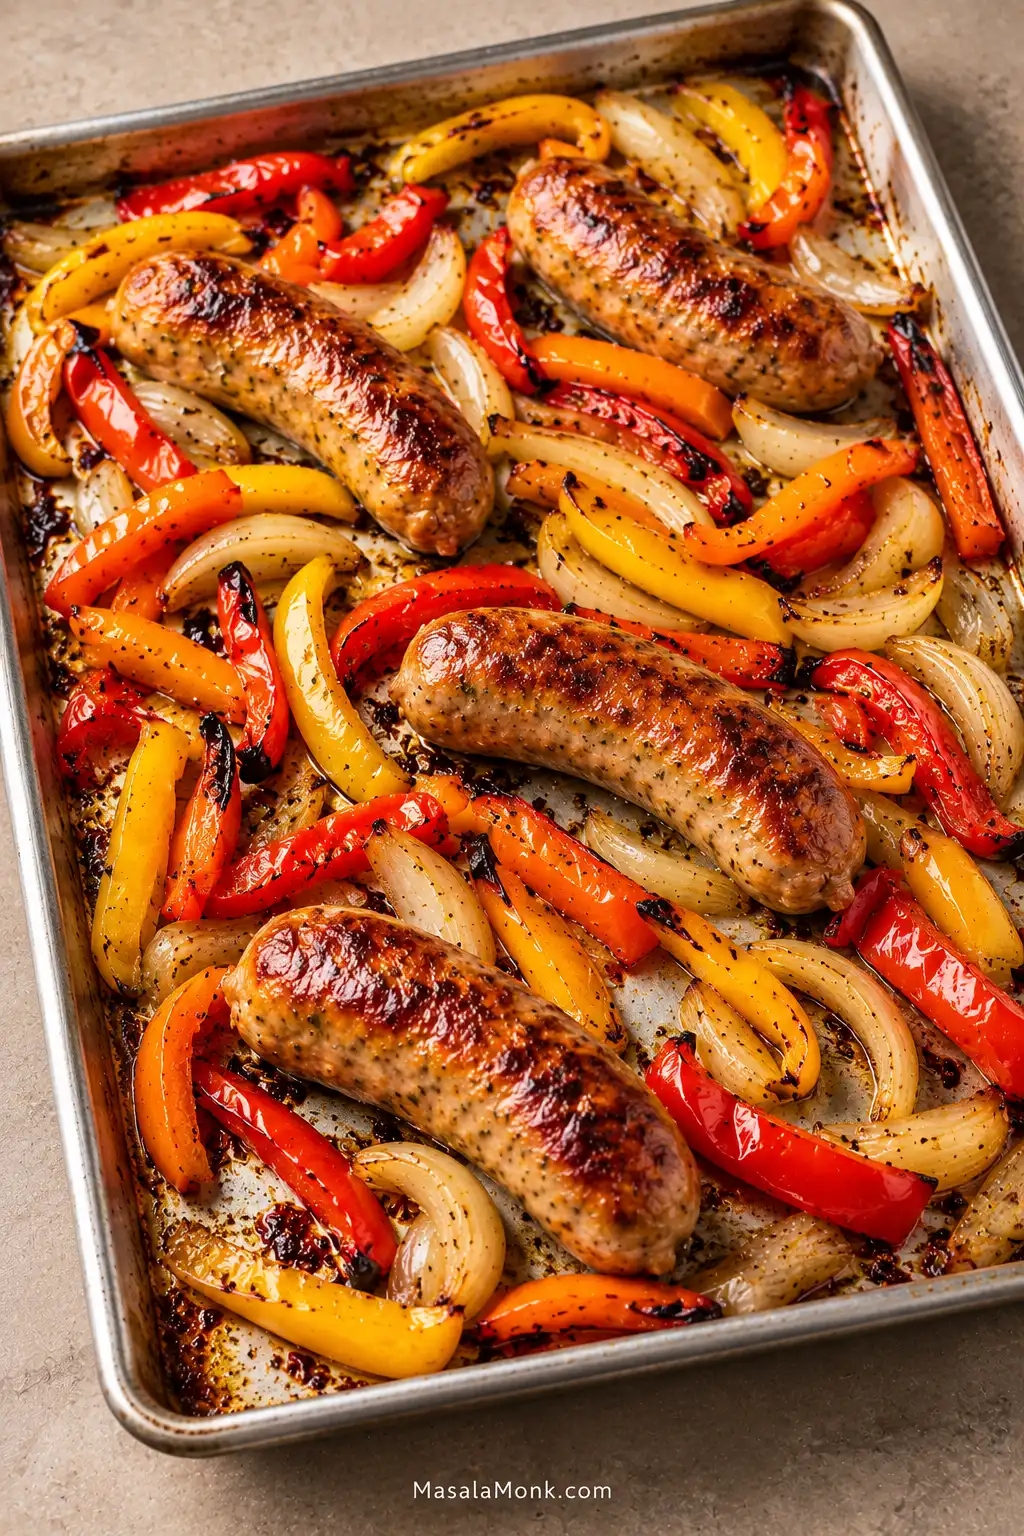
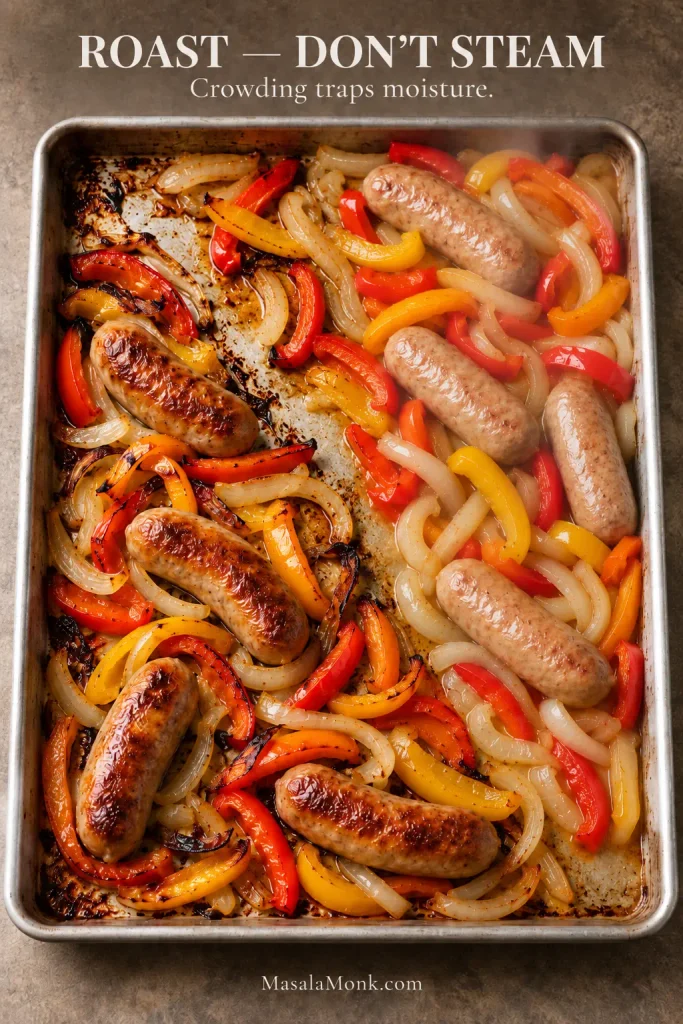
A good tray of sausage and peppers gives you browned sausage, sweet onion, blistered pepper edges and enough savory juices to make a piece of bread worthwhile. It is also the kind of dinner that asks very little of you once the pan goes into the oven—especially on a night when you want a proper dinner without turning cooking into another project.
The trick is getting the sausage and vegetables done together without steaming the peppers along the way. Keep the vegetables substantial, give everything room on the pan, and let the oven handle the rest.
This sheet pan sausage and peppers recipe uses fresh Italian sausage, three bell peppers and a large onion for an easy oven dinner with very little hands-on work. Eat it straight from the pan, spoon it over something that will catch the juices, or pile everything into toasted hoagie rolls.
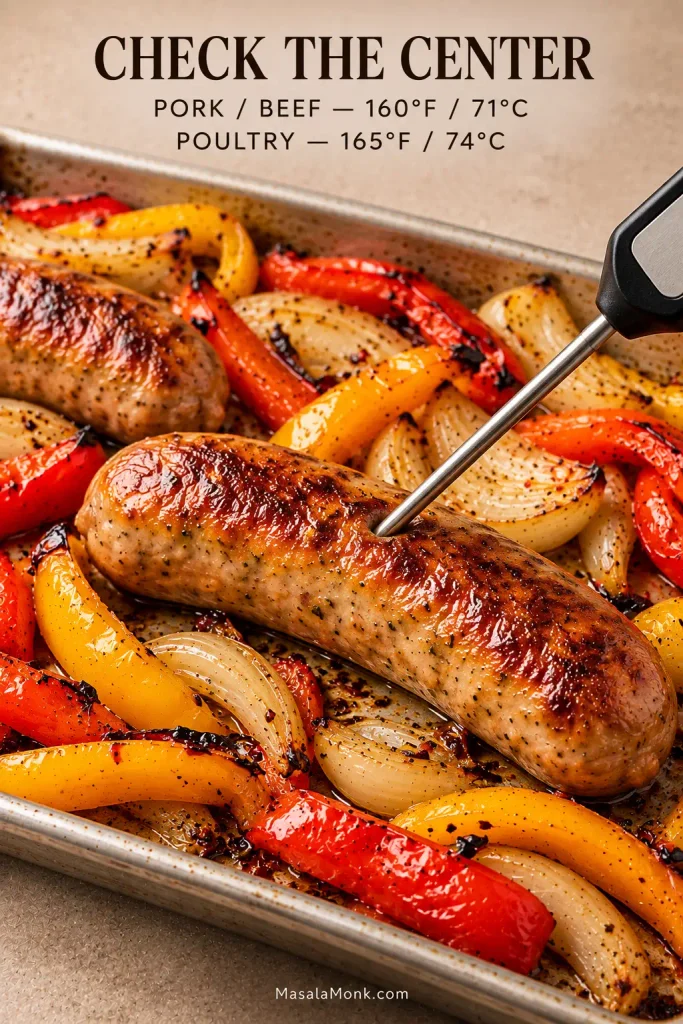
Roast fresh Italian sausage, peppers and onion at 425°F / 220°C on an 18 × 13-inch / 46 × 33-cm rimmed sheet pan. Turn the links and stir the vegetables after 15 minutes, then start checking the sausage around 25 minutes. Fresh pork or beef sausage should reach 160°F / 71°C in the center; fresh chicken or turkey sausage should reach 165°F / 74°C. The thermometer, not the clock, makes the final call.
Sheet Pan Sausage and Peppers Recipe
Fresh Italian sausage, bell peppers and onion roast together at 425°F / 220°C until the sausage is browned in patches, the peppers are tender and the onion is sweet at the edges. This method is written for fresh/raw Italian sausage links.
Yield 4 generous servings
Prep Time 15 minutes
Cook Time 25–30 minutes
Total Time 40–45 minutes
Equipment
18 × 13 in / 46 × 33 cm rimmed half-sheet pan
Cutting board and sharp knife
Tongs or sturdy spatula
Instant-read food thermometer
Ingredients
1¼ lb / 20 oz / about 570 g fresh Italian sausage links, usually 5–6 depending on size, sweet/mild or hot
3 large bell peppers, about 1 lb / 450–500 g, preferably a mix of colors
1 very large yellow or sweet onion, about 9–10 oz / 250–285 g
2 tbsp / 30 mL olive oil
1 tsp dried oregano or Italian seasoning
1 tsp garlic powder
½ tsp freshly ground black pepper
¼ tsp red pepper flakes, optional
¼ tsp fine salt to start, plus more after roasting as needed
1–2 tsp / 5–10 mL red wine vinegar or fresh lemon juice, optional
2 tbsp / about 8 g chopped flat-leaf parsley, optional
Instructions
Heat the oven. Set a rack in the middle of the oven and heat to 425°F / 220°C. Have a rimmed half-sheet pan ready. Use bare metal for the strongest contact browning; parchment is the easier-cleanup alternative.
Cut the vegetables. Slice the bell peppers into strips about ½ inch / 1.25 cm wide. Cut the onion into thick half-moons or wedges of roughly similar size.
Season. Toss the peppers and onion with the olive oil, oregano or Italian seasoning, garlic powder, black pepper, optional red pepper flakes and ¼ tsp salt. Italian sausage varies considerably in saltiness, so start here and adjust after roasting.
Arrange the pan. Spread the vegetables into one loose layer and nestle the whole raw sausage links among them. Keep the links whole while they roast; slice them after resting.
Roast, Turn and Finish
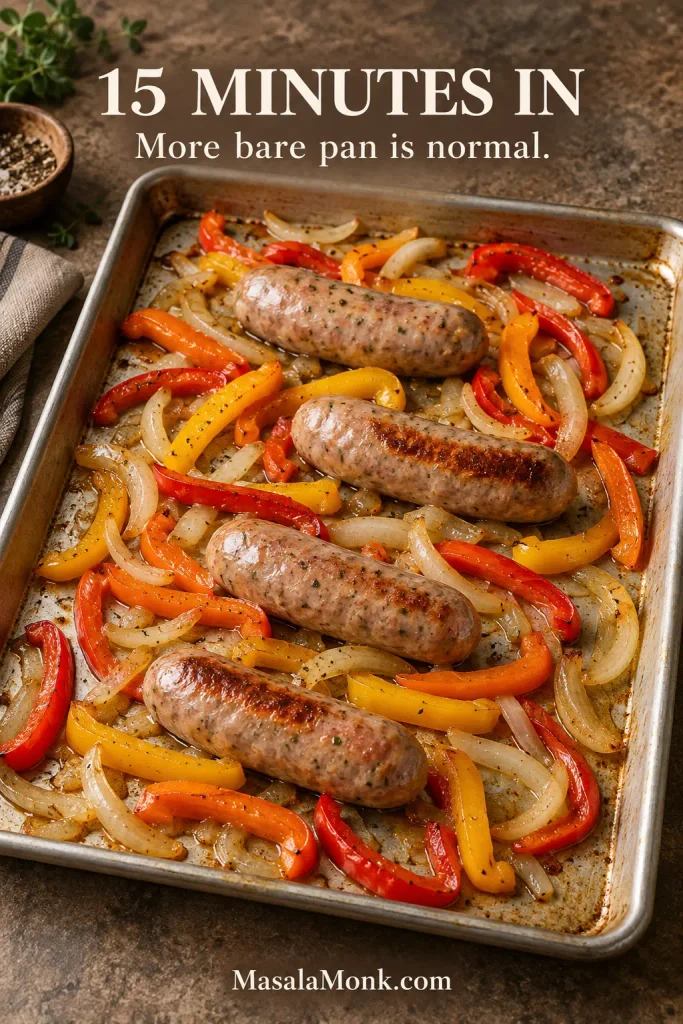
Roast for 15 minutes. The vegetables will shrink noticeably as they roast.
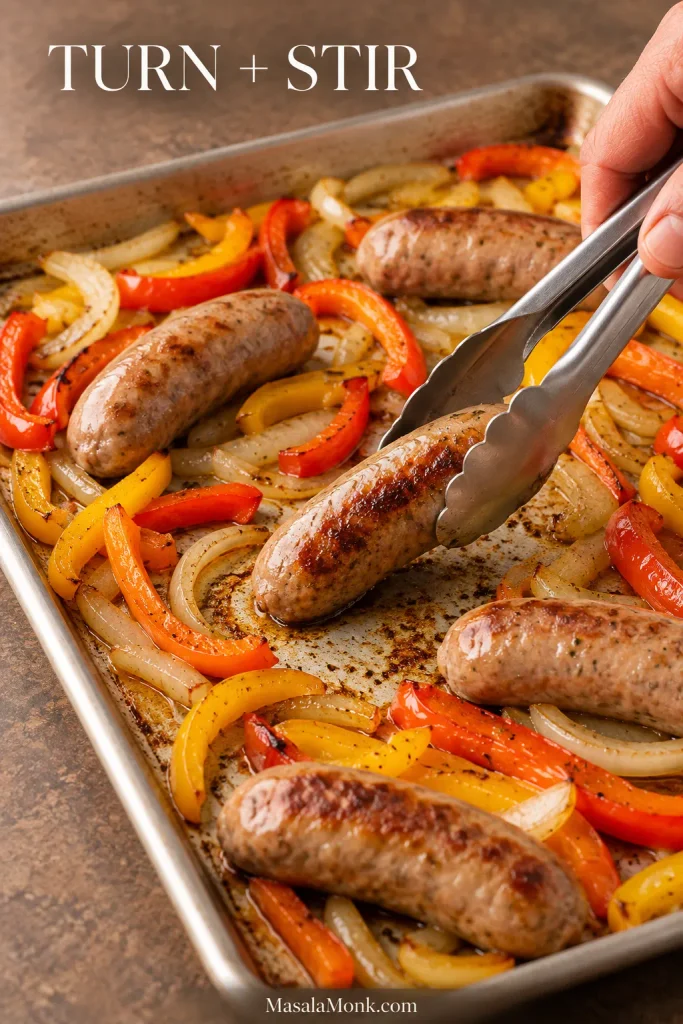
Turn and stir. Flip the sausage links and stir the vegetables. The peppers and onions should now look smaller and softer, with darkening edges here and there and more bare pan visible between them. Spread them back out and roast for another 10–15 minutes.
Check the sausage. Begin checking around 25 minutes. Fresh pork or beef sausage should reach 160°F / 71°C in the center; fresh chicken or turkey sausage should reach 165°F / 74°C.
Add more color. If the sausage has reached its safe temperature but still looks pale, broil for 1–3 minutes. Watch continuously and remove ordinary parchment before broiling.
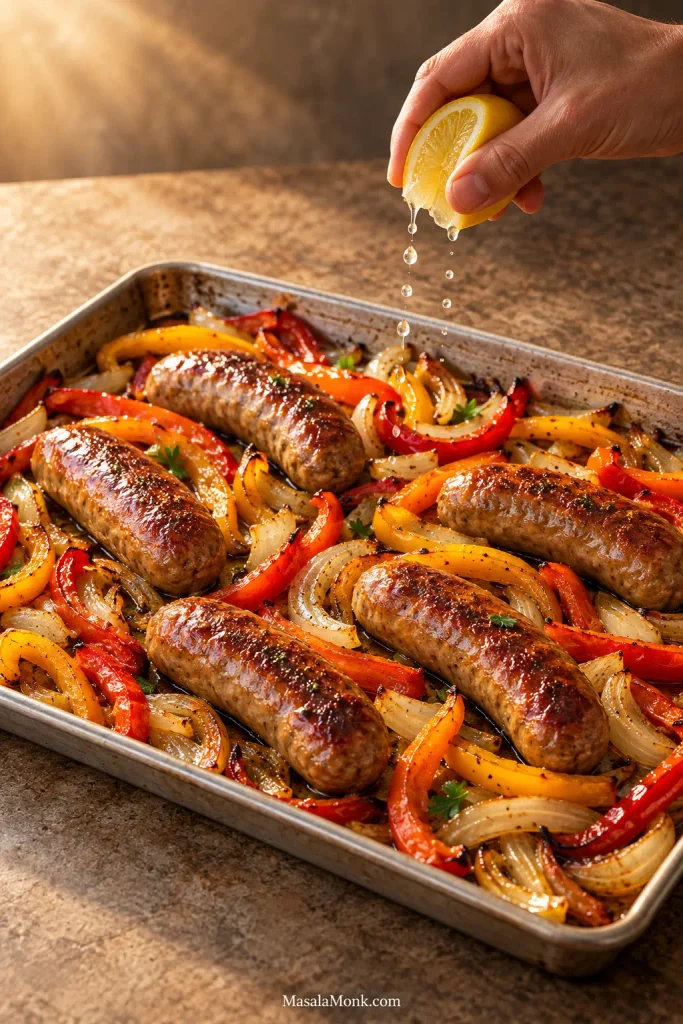
Rest and finish. Give the sausages 3–5 minutes to rest. Taste the vegetables and adjust the salt. For a brighter finish, start with 1 tsp / 5 mL red wine vinegar or lemon juice, toss, taste, and add more if needed. Scatter over the parsley, if using.
The recipe above is enough to get dinner on the table. Below, the details cover the choices and problems that can change the result—from the sausage you start with and how you cut the vegetables to a watery pan, dark onion edges or links that need a little more color.
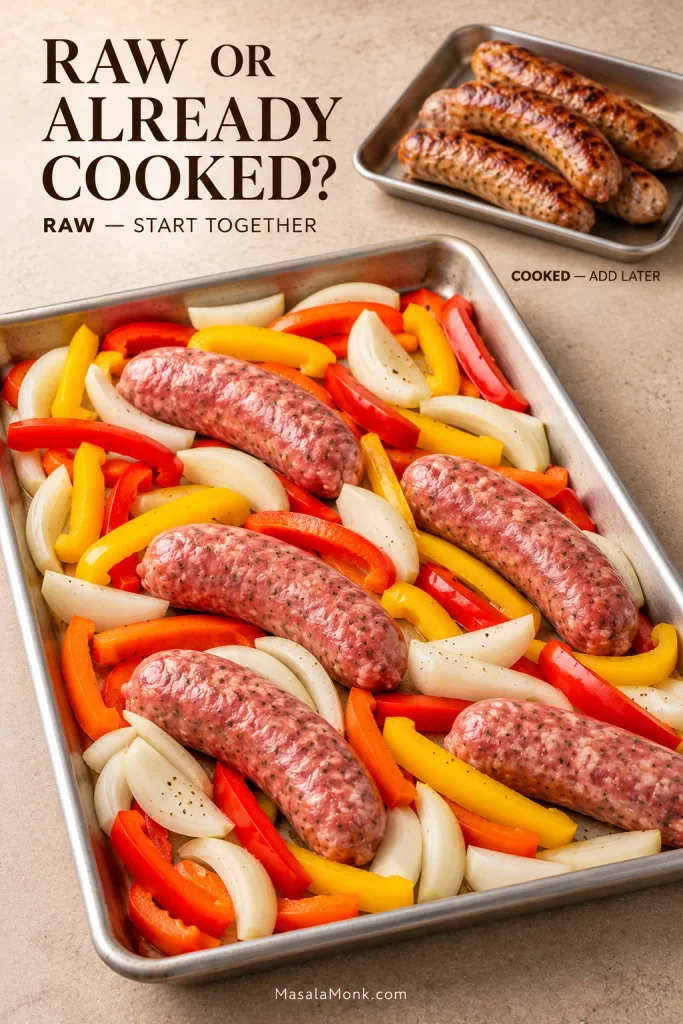
Check the package before anything goes onto the pan. Fresh sausage and fully cooked sausage can look similar in the refrigerator, but their oven timing is very different.
Two packages can look nearly identical in the refrigerator yet need different treatment in the oven. Therefore, check whether the links are fresh or fully cooked before arranging the pan; that distinction determines whether the sausage starts with the vegetables or joins them later.
What You Have
How to Handle It
Fresh pork or beef Italian links
Use the main method and cook to 160°F / 71°C.
Fresh chicken or turkey links
Use the main method and cook to 165°F / 74°C.
Fully cooked sausage
Roast the vegetables for 15 minutes first, then add the sausage for roughly the final 10–15 minutes.
Very thick fresh links
Allow extra time and check the center with a thermometer.
Thin fresh links
Begin checking before the full cooking window is up.
Sweet or mild Italian sausage lets the peppers and onion come through clearly. Hot Italian sausage follows the same method, and mixing sweet and hot links works too. Fennel flavor varies by sausage, so check the label if you’re not a fan.
Using kielbasa instead? It is already cooked, so the timing changes. Our kielbasa and potatoes recipe handles that combination separately.
Cut the Peppers and Onion to Match the Sausage
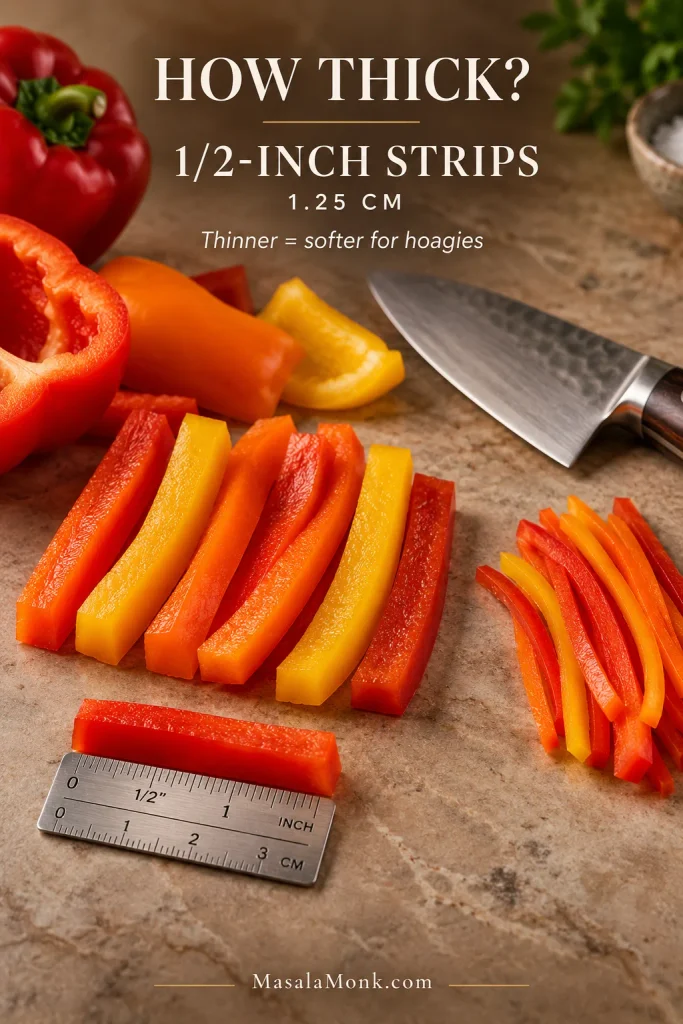
For this version, cut the peppers about ½ inch / 1.25 cm wide. They will soften considerably in the oven but should still have enough body to pick up easily with a fork when the sausage is done.
For softer hoagie-style vegetables, go a little thinner—about ¼–⅜ inch / 6–10 mm—and watch them at the halfway turn. Small onion tips often darken first. Pull off anything actually scorched and leave the browned pieces alone.
About ½-inch pepper strips are the sweet spot for the standard sheet-pan roast: they soften while keeping enough structure to stay distinct. For softer sausage-and-pepper hoagies, cut them thinner; meanwhile, slightly sturdier strips give you more timing tolerance when unusually large sausage links need longer to cook.
Red, orange and yellow peppers bring more sweetness; green keeps a slightly more savory edge. Use whatever mix sounds good.
Leave the sausage links whole; they’re easier to turn and temperature-check, then you can slice them after resting.
Get the Pan Right
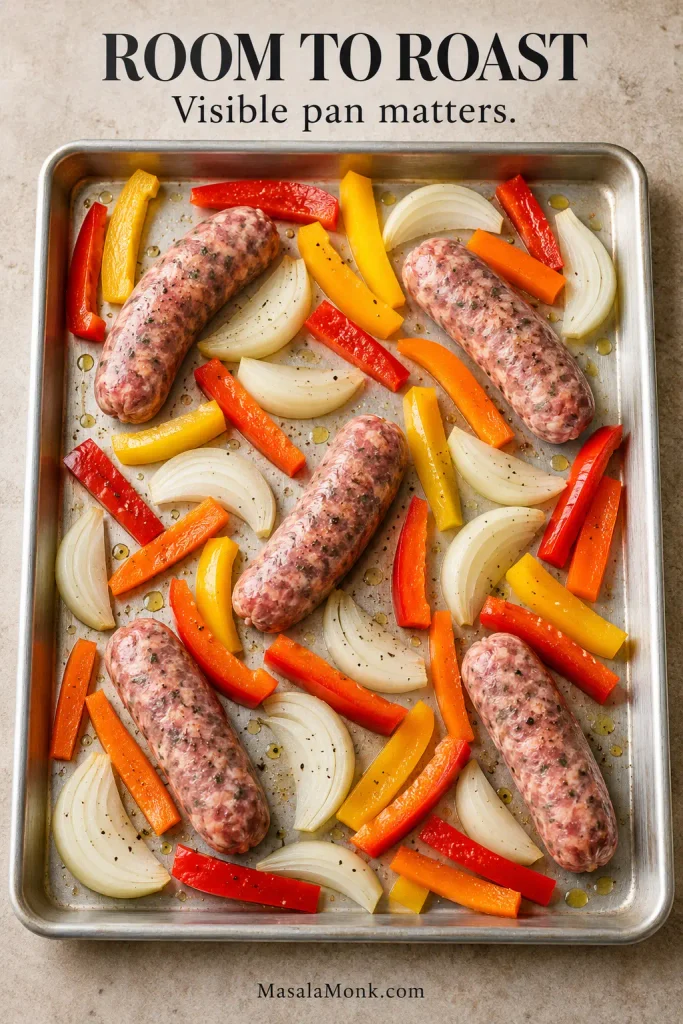
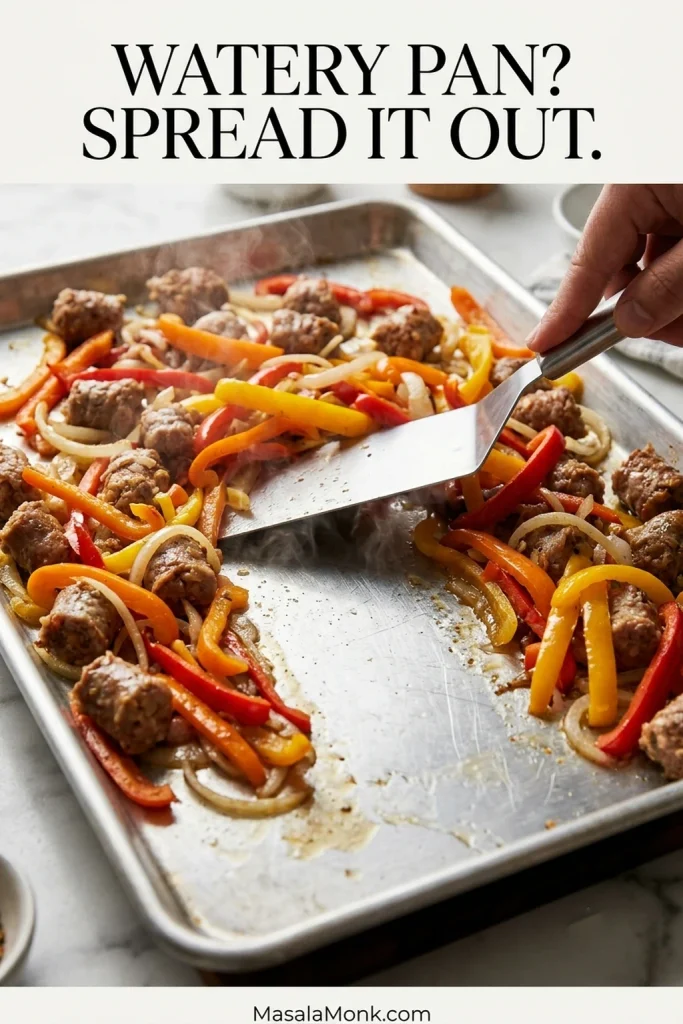
Peppers and onions release water as they cook, while sausage adds fat and juices. Give that moisture room to sizzle away around the food instead of collecting underneath it. A standard half-sheet pan is a good fit for this batch.
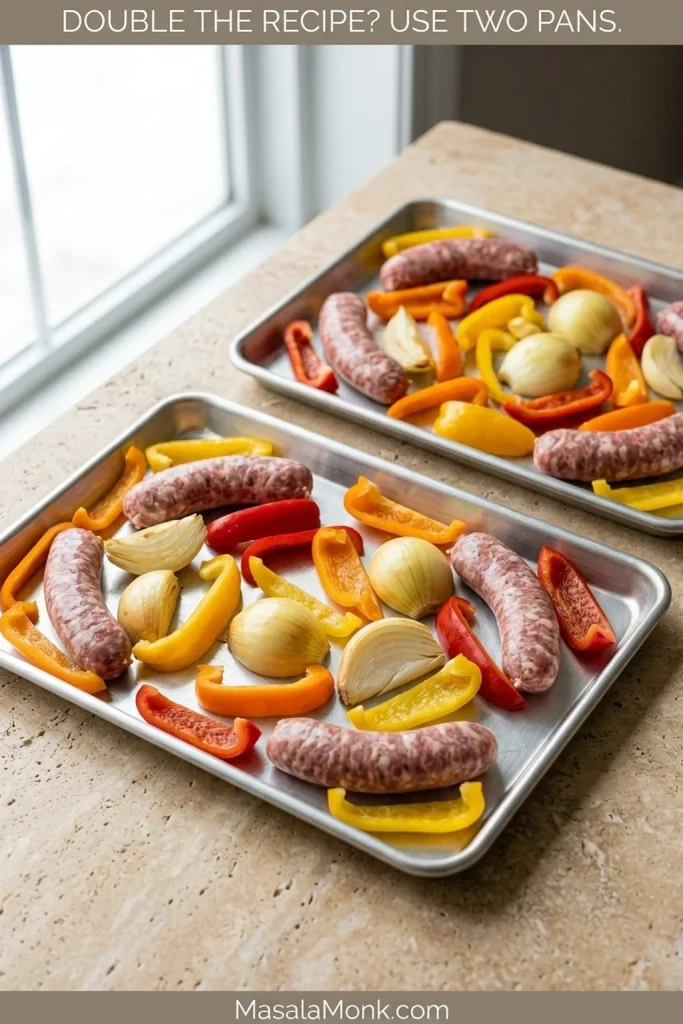
Treat visible pan as an early capacity test. If sausage, peppers and onions already cover almost every inch before roasting, moving part of the batch to a second pan is easier than trying to recover lost browning after the vegetables begin releasing water.
Dry visibly wet peppers after washing.
Spread everything into one layer.
Keep broth, water and marinara off the roasting pan.
For a larger batch, use another pan.
If the vegetables are turning tender but the pan still looks pale and wet, check the spacing before changing the seasoning or oven temperature. Crowding is often the reason roasting has started to behave more like steaming.
A pale, wet pan is usually a surface-area problem before it is a seasoning problem. In other words, more oregano or garlic cannot replace the browning you lose when released vegetable moisture has too little exposed metal from which to evaporate.
Use bare metal for the best browning. Parchment makes cleanup easier, but you give up some direct pan contact. Ordinary parchment also needs to come off before the pan goes under the broiler.
What the Pan Should Look Like After 15 Minutes
At the halfway turn, judge the pan by its progress rather than by final color: the vegetables should be smaller and softer, with more metal beginning to show between them.
Halfway through, the pan should look unfinished rather than dramatically browned. Because the vegetables have already shrunk and released some moisture, this is the point to redistribute them—not the point to keep cooking until the food resembles the final tray.
The sausages do not need to color evenly on every side. Contact points against the hot metal will usually go darkest. Turn them once halfway through and leave the rest to the oven.
One well-browned contact side is enough to tell you the hot pan is doing its job. Turn the links once, stir the vegetables into new positions, and let the second half of roasting create fresh contact instead of repeatedly chasing color on every surface.
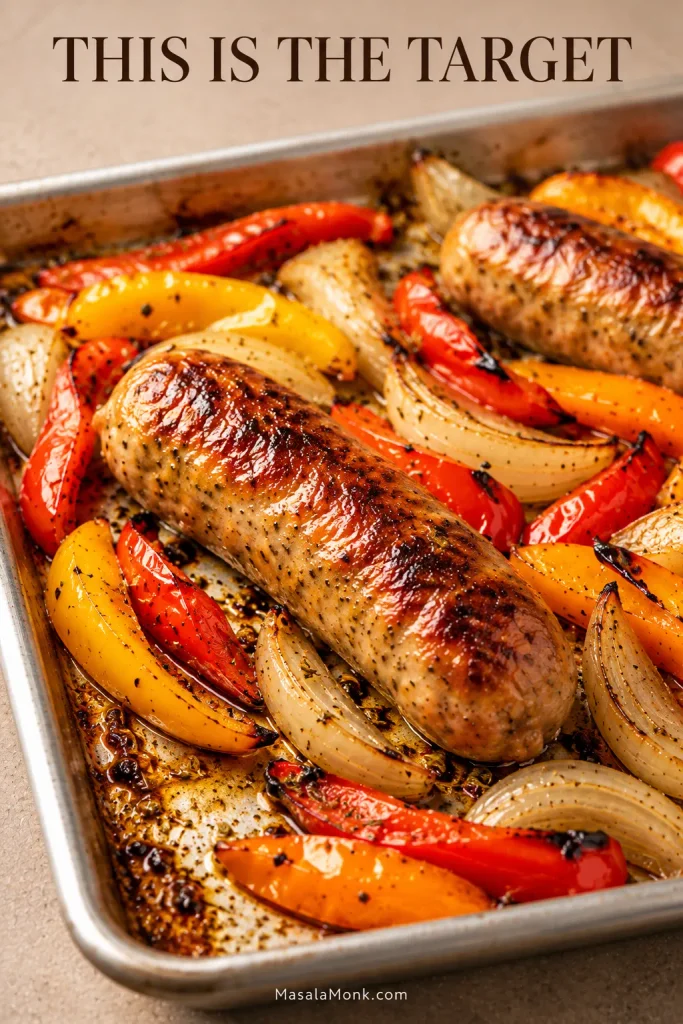
Start looking closely around the 25-minute mark. Some links will be ready; unusually thick ones may need longer.
Sausage: browned in patches and safely cooked through. It does not need to be dark all over.
Peppers: soft and flexible with blistered edges, but not collapsed into the pan juices.
Onion: tender and sweet, with darker corners here and there.
Pan: rendered fat and concentrated juices, not a puddle of thin vegetable liquid.
Do not force the vegetables to wait for the sausage if they reach this stage first. Once the peppers are soft and blistered and the onions are tender, move them off the pan if necessary and let unusually thick links finish safely on their own.
Brown tells you what the pan looks like; temperature tells you whether the sausage is done. Fresh pork or beef sausage should reach 160°F / 71°C; fresh chicken or turkey sausage should reach 165°F / 74°C. Those are the separate safe-temperature targets given by the USDA Food Safety and Inspection Service.
Link thickness can move the cooking time more than the clock suggests, so temperature gets the final decision. Check the thickest part: pork or beef sausage should reach 160°F / 71°C, while chicken or turkey sausage should reach 165°F / 74°C.
Vegetables ready first? Take them off. Sausage safely cooked but still pale? Give it a minute or two under the broiler.
Taste and Finish the Pan
Italian sausage already brings plenty of salt, spice and fat to the pan, so taste the vegetables before adding more salt. Oregano, garlic and black pepper support those flavors without burying the sweetness of the peppers and onion.
A squeeze of lemon or a splash of red wine vinegar wakes up the rich sausage and sweet roasted vegetables, especially after a few bites. Parsley brings a fresh edge and a little color.
Rich Italian sausage and sweet roasted peppers often benefit from a small hit of acidity at the end. Start with a little lemon juice or red wine vinegar, then taste—the goal is to lift the roasted flavors and make the whole pan feel brighter, not noticeably sour.
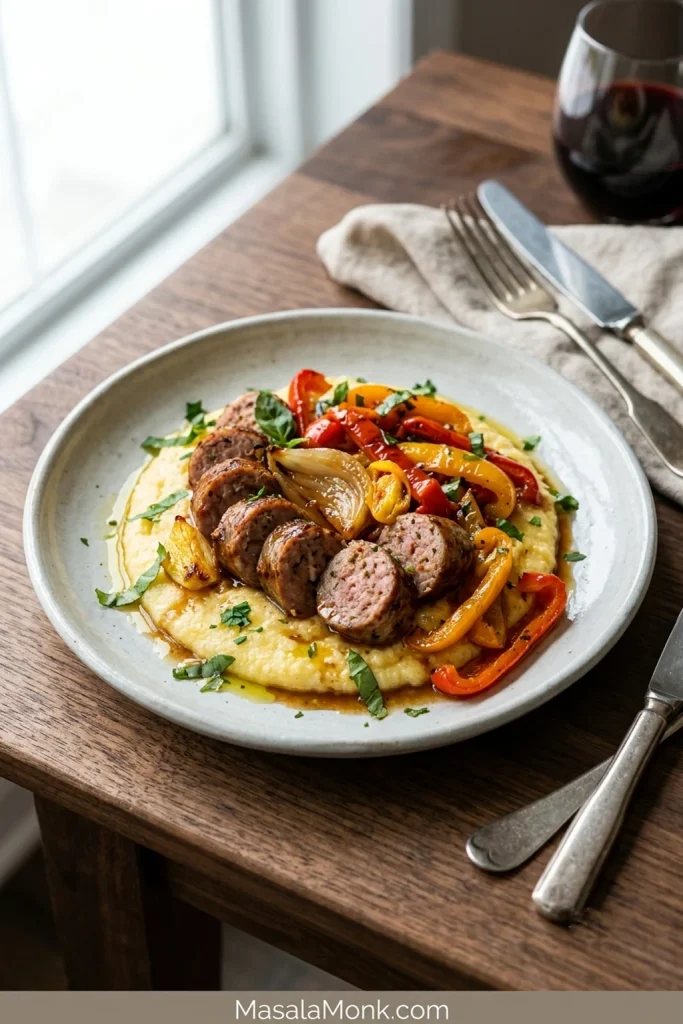
After the sausages have rested, leave them whole or slice them thickly and spoon the peppers and onion over the top. Rice and soft polenta soak up the pan juices beautifully. For a richer plate, put everything over creamy mashed potatoes.
Resting the sausage before slicing is especially useful once the meal leaves the sheet pan. The cut surfaces stay juicier, while mashed potatoes or soft polenta can catch the concentrated roasting juices without diluting the peppers and onions.
For sausage-and-pepper hoagies
Toast the cut side of the roll well. The peppers are juicy, and a soft untoasted roll can turn soggy quickly. Slice the rested sausage into bite-size pieces, pile on the peppers and onion, and tuck in the provolone while everything is hot enough to soften it around the sausage and peppers.
The part of the roll worth toasting most thoroughly is the cut face, because that is where the juicy sausage and peppers make contact. Once filled, that crisp inner surface gives the bread more resistance while the hot filling gently softens the provolone.
Don’t put the marinara on the roasting pan. Roast first, then spoon the sauce over or underneath the finished sausage and peppers. Our marinara sauce recipe works well here.
Adding potatoes
Potatoes need a head start unless they are cut very small. The simpler option is a second pan: these ranch roasted potatoes cook at the same 425°F / 220°C.
Cooking for a Crowd
For a main course, figure on roughly 4–5 oz / 115–140 g sausage per person—often about one substantial link—with extra for big appetites or loaded hoagies.
Servings
Fresh Sausage
Bell Peppers
Large Onion
Half-Sheet Pans
4
1¼ lb / 20 oz / about 570 g
3
1
1
8
2½ lb / 40 oz / about 1.13 kg
6
2
2
12
3¾ lb / 60 oz / about 1.7 kg
9
3
3, usually in batches
More pans solve crowding only if the oven still has room to circulate heat around them. When cooking on two racks, compare the browning halfway through and swap pan positions if the upper and lower levels of your oven behave differently.
Two pans can cook together if your oven gives them enough room for air to move. Swap their positions halfway when one rack browns faster. For a larger crowd, batches are usually easier than filling every rack at once.
Slice the peppers and onion up to a day ahead and refrigerate them covered, with the raw sausage stored separately. That leaves little more than seasoning and arranging the pan when dinner comes around.
Fresh uncooked sausage generally keeps for 1–2 days in the refrigerator. Once cooked, refrigerate the sausage-and-pepper leftovers for 3–4 days.
Refrigerate cooked leftovers within 2 hours, or within 1 hour when the surrounding temperature is above 90°F / 32°C. Reheat leftovers to 165°F / 74°C. The USDA sausage and food-safety guidance covers safe storage and handling in more detail.
For freezing, cool the sausage and vegetables, pack them airtight, and use them within about 1–2 months for best quality, following USDA freezer guidance for sausage. Thaw overnight in the refrigerator when you can. The peppers will be softer after freezing, which matters much less once the leftovers are headed into a sandwich, skillet or bowl.
Choose the Reheating Method by the Texture You Want
Best texture: use a hot skillet and let the sausage and vegetable edges pick up some color again.
Hands-off: spread the leftovers in a single layer on a pan and reheat at 375°F / 190°C until hot through, roughly 8–12 minutes for a modest single-layer portion. Check that the food reaches 165°F / 74°C.
Fastest: microwave until thoroughly hot; the vegetables will be softer.
The next day, the peppers are softer and the sausage, onion and seasoning have settled together. Tuck them into a toasted roll, spoon them over rice, or go in a saucier direction with our sausage pasta recipe.
Breakfast may be even better. Crisp the chopped leftovers in a skillet, let the bottom pick up some color, then add eggs, potatoes or cheese. Our breakfast burrito recipe gives you a useful framework if everything is headed into a tortilla.
Reheating method changes the texture you get back. A microwave is quicker, whereas a hot skillet lets leftover sausage and peppers sit against metal long enough to rebuild some browned edges before you turn them.
Something Went Wrong? Here’s What to Do
Most problems are visible right on the pan. Save dinner first; adjust the setup next time.
If the Sheet Pan Turns Watery
If the peppers and onions have already released enough liquid to make the pan watery, create more exposed metal first. That gives the moisture somewhere to evaporate before you decide whether the finished pan still needs a brief broil.
A watery sheet pan is easier to fix in stages than all at once. First create bare-metal space; then, once the sausage is safely cooked, spoon off any remaining thin liquid before using a brief broil for extra color.
Match the Fix to What You See
What You See
Do This Now
Next Time
Watery peppers and onions
Spread them out. Once the sausage is safely cooked, spoon off excess thin liquid and broil briefly for more color.
Dry wet vegetables and use the full-size pan.
Vegetables are tender but pale
Broil briefly once the sausage is safely cooked.
Use bare metal and leave more exposed pan between the vegetables.
Sausage is cooked but pale
Broil for 1–3 minutes on a broiler-safe setup.
Let the links make good contact with the pan and turn them halfway.
Vegetables are ready before the sausage
Move them to a plate and let the sausage finish to the correct temperature.
Cut the vegetables thicker when using very large links.
Onion edges are burning
Remove the scorched pieces while the rest finishes.
Cut the onion into thicker wedges or half-moons.
Precooked sausage is dry
Serve it with the juicy peppers and onions or warm marinara.
Add fully cooked sausage only for the final 10–15 minutes.
The pan is very greasy
Spoon off excess rendered fat.
Use a little less olive oil with especially fatty sausage.
The dish tastes too salty
Serve it with an unsalted starch or extra unsalted vegetables to spread the seasoning across more food. A little lemon or vinegar can balance the richness, but it will not remove the salt.
Start with less added salt on the vegetables.
A double batch is soggy
Divide it across another pan and finish in a thinner layer.
Use two pans from the beginning.
Don’t Leave the Pan Juices Behind
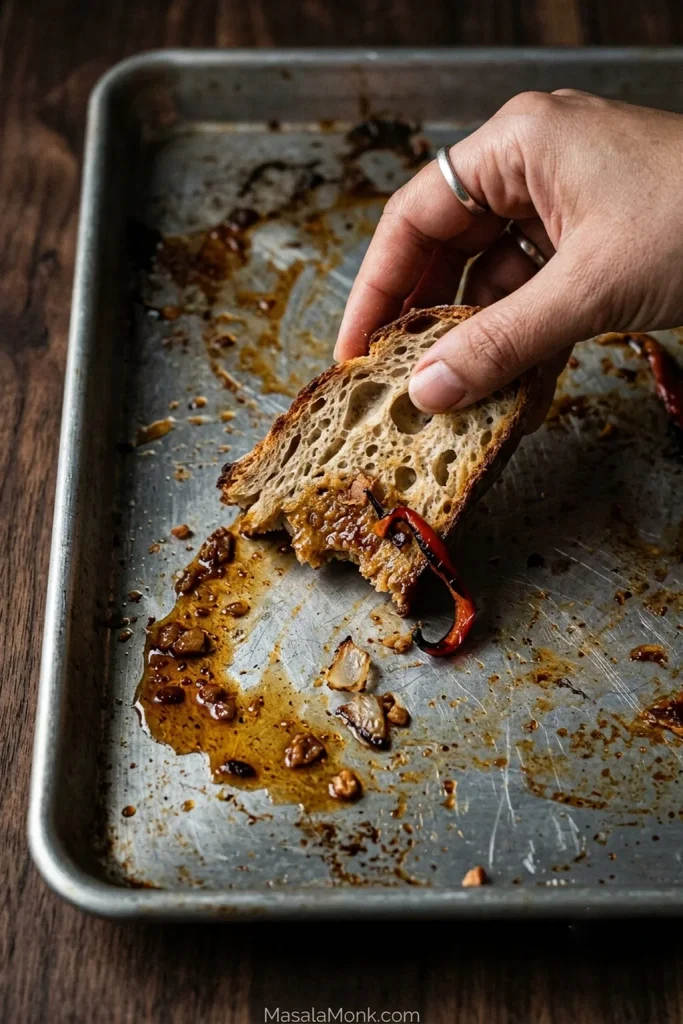
Give the links 3–5 minutes to rest, then slice them if you like. Spoon the hot peppers and onions over the top, scatter on parsley if you have it, add a squeeze of lemon if it tastes right, and bring everything to the table. The browned bits and savory juices left behind are worth a piece of bread.
What remains on the pan is a final clue to how the roast behaved. Concentrated fond and glossy savory juices are worth collecting with crusty bread; a broad puddle of thin liquid would instead suggest that too much moisture survived the cook.
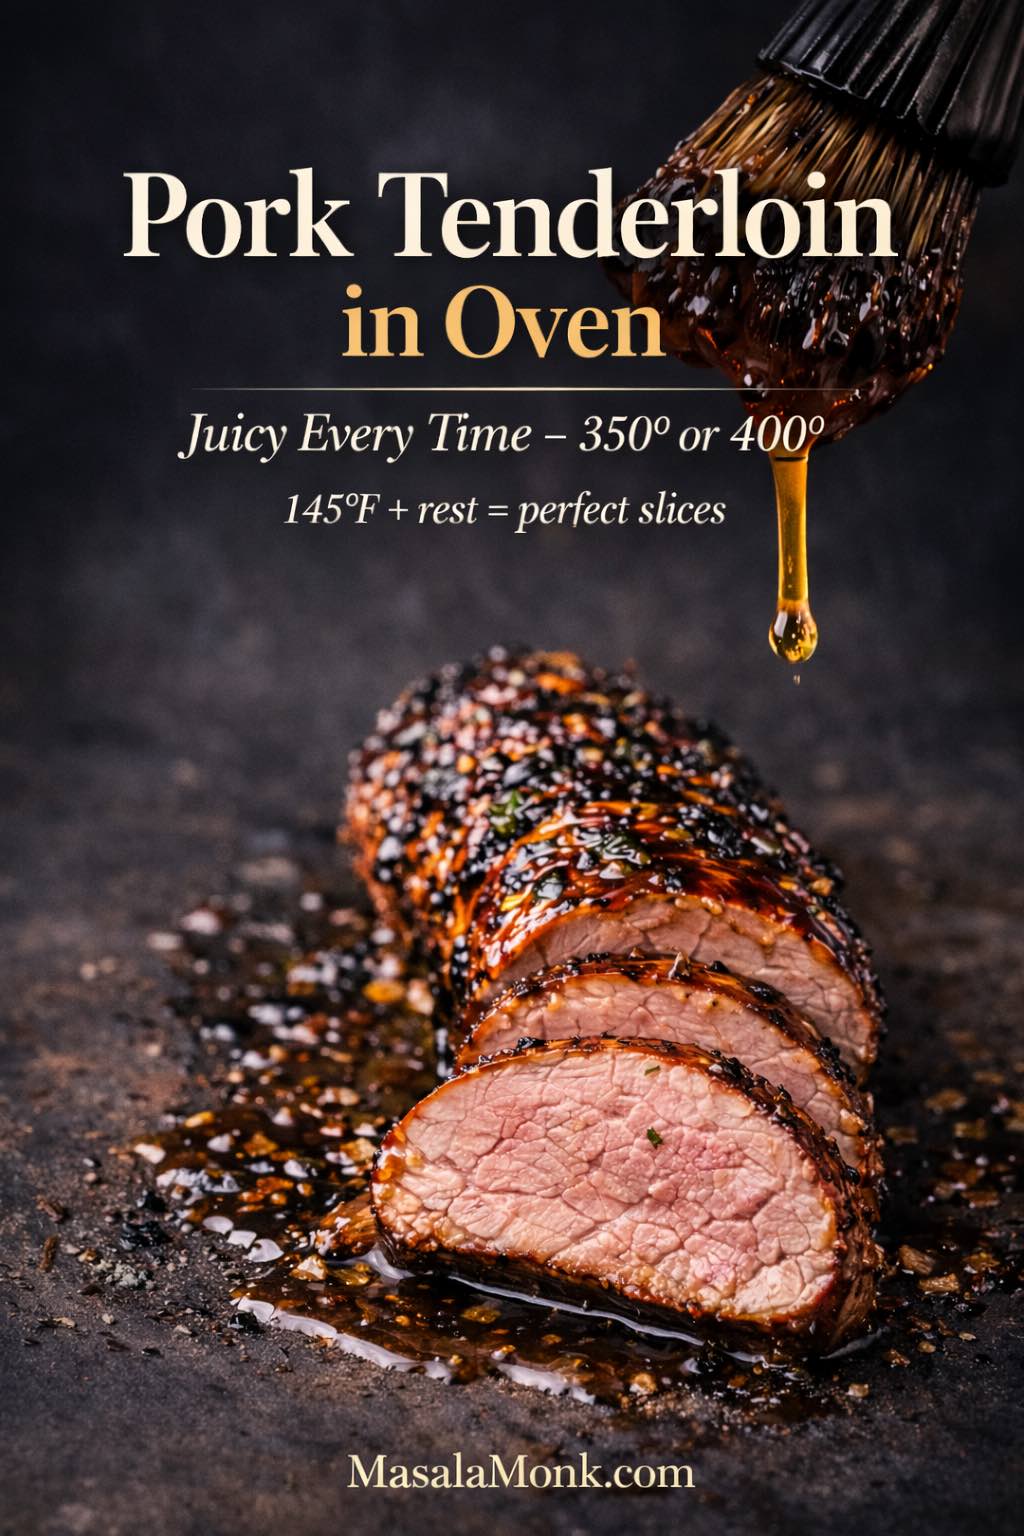
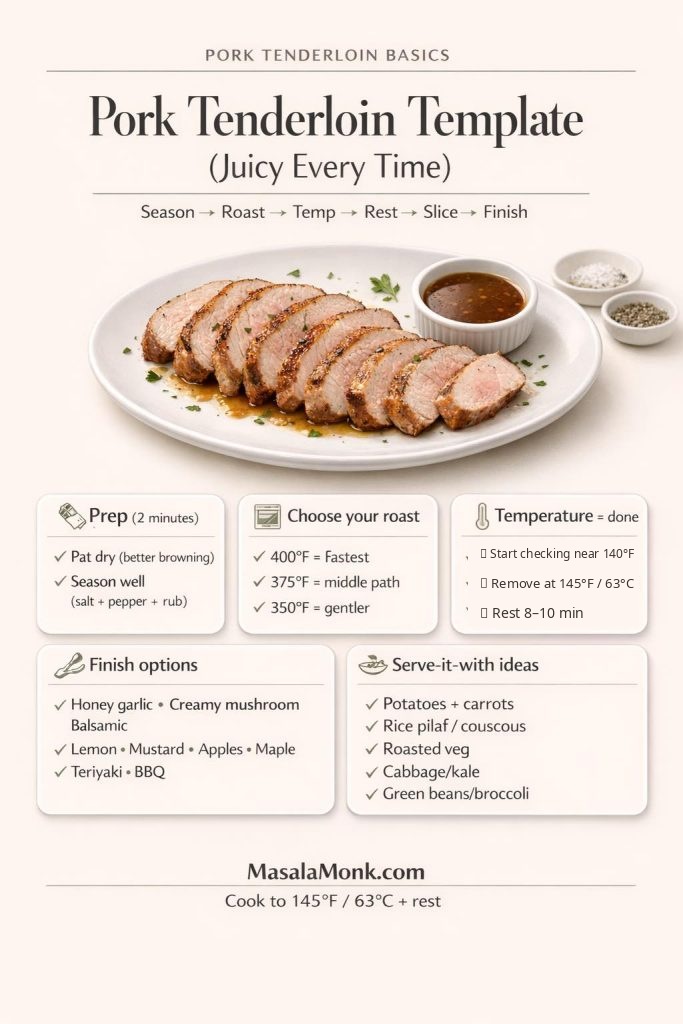
This pork tenderloin in oven recipe gets much easier once you stop trusting the clock alone. Because the cut is lean, a few extra minutes can take it from juicy to dry. Season it well, choose the oven temperature that suits dinner, cook the thickest center to 145°F / 63°C, rest, then slice.
Once that foundation is right, the same tenderloin can go honey garlic, creamy mushroom, lemony, balsamic, mustardy or BBQ without relearning the method. The guide also covers cast iron, a sheet-pan dinner, slow cooker, Instant Pot, grill, smoker, stuffed tenderloin and leftovers—but the dependable oven method comes first.
Quick answer: pork tenderloin in the oven
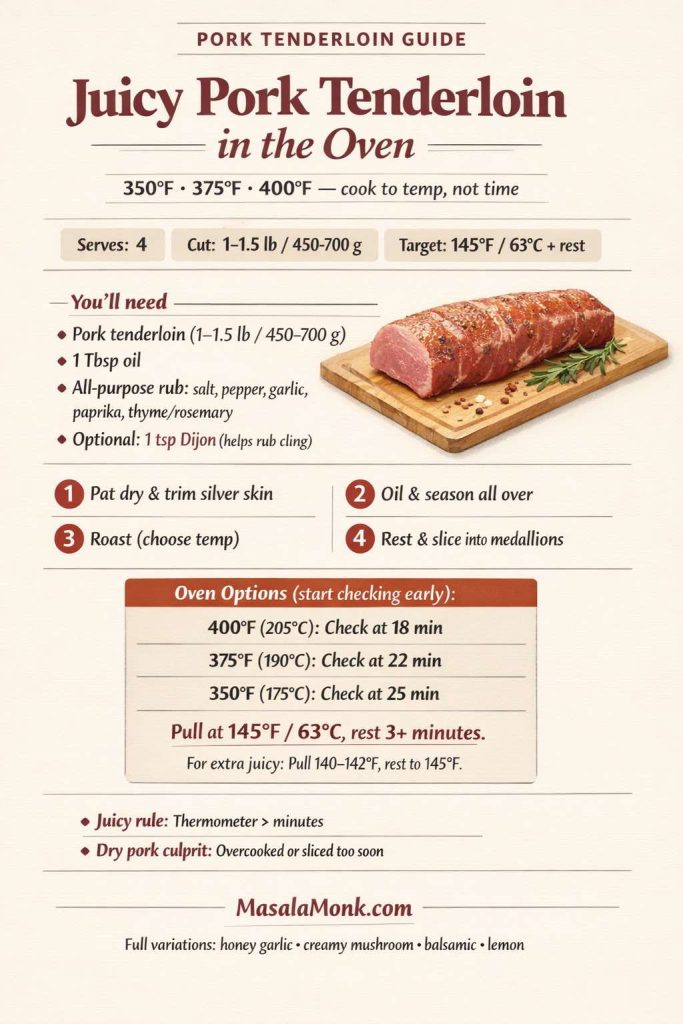
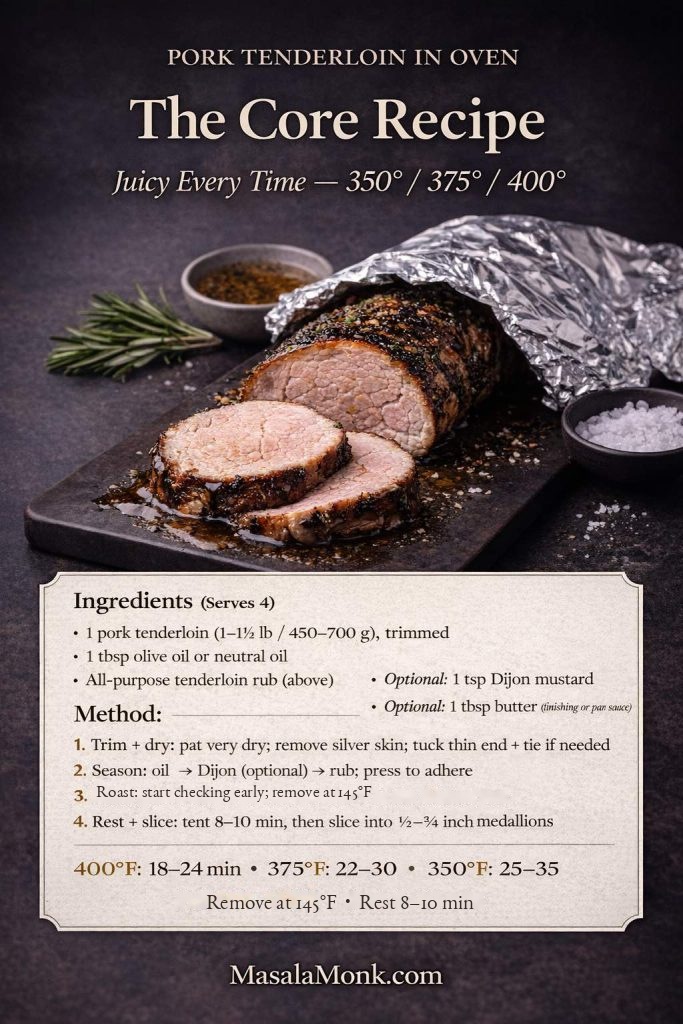
For a 1–1½ lb (450–700 g) pork tenderloin, roast at 400°F for about 18–24 minutes, 375°F for 22–30 minutes, or 350°F for 25–35 minutes. Start checking early and trust the thermometer more than the clock: the finished center should reach 145°F / 63°C, followed by an 8–10 minute rest before slicing.
Save this quick guide: pork tenderloin in the oven at 350°F, 375°F, or 400°F—plus the exact 145°F (63°C) internal temperature and resting rule for juicy slices every time.
Take what you need tonight, then come back later when you want a different flavor without learning a new technique.
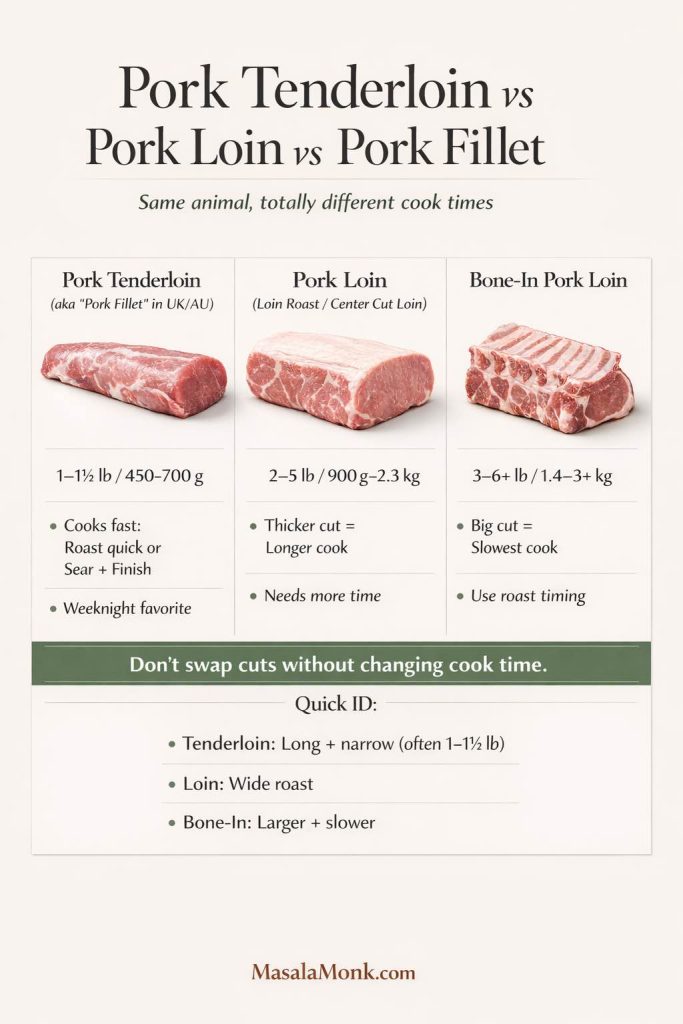
Pork tenderloin vs pork loin vs pork fillet (so timing finally clicks)
Before the oven even warms up, it helps to know what you’re cooking. Pork tenderloin and pork loin are not the same thing, and swapping them without adjusting time is one of the fastest ways to end up disappointed.
Not sure if you bought pork tenderloin or pork loin? This quick guide shows pork tenderloin vs pork loin vs pork fillet (UK/AU) and explains why cook time changes—so your oven roast stays juicy instead of overcooked.
Pork tenderloin is long, narrow, and usually weighs around 1 to 1½ pounds (about 450–700 g). It’s sometimes labeled as pork fillet, especially in the UK and Australia, which is why you’ll see phrases like “pork fillet oven time” or “roasting pork fillet UK.” In most cases, those are still talking about tenderloin.
Pork loin, on the other hand, is thicker and wider. It can show up as a whole boneless pork loin, a center cut pork loin filet, or a loin end pork roast, and it commonly weighs 2 to 5 pounds. A bone in pork loin roast will be even bigger and needs more time. When someone mentions “pork loin on the bone” or “bone in pork loin roast,” that’s a different cook altogether.
Tenderloin cooks quickly; loin cooks more slowly. That difference influences everything—temperature, timing, and how much rest you need.
If your package says pork tenderloin (sometimes labeled pork fillet), you’re in the right place. If it says pork loin roast, you can still use many flavor ideas below, but you must increase cook time and treat it like a larger roast. The flavors can transfer; the timing cannot.
If your package actually says pork loin roast, don’t stretch these tenderloin times to fit it. Switch to our Slow Cooker Pork Loin Recipe, which is built for that larger cut and gives you the right timing, moisture, and doneness guidance.
The one rule that keeps pork tenderloin juicy
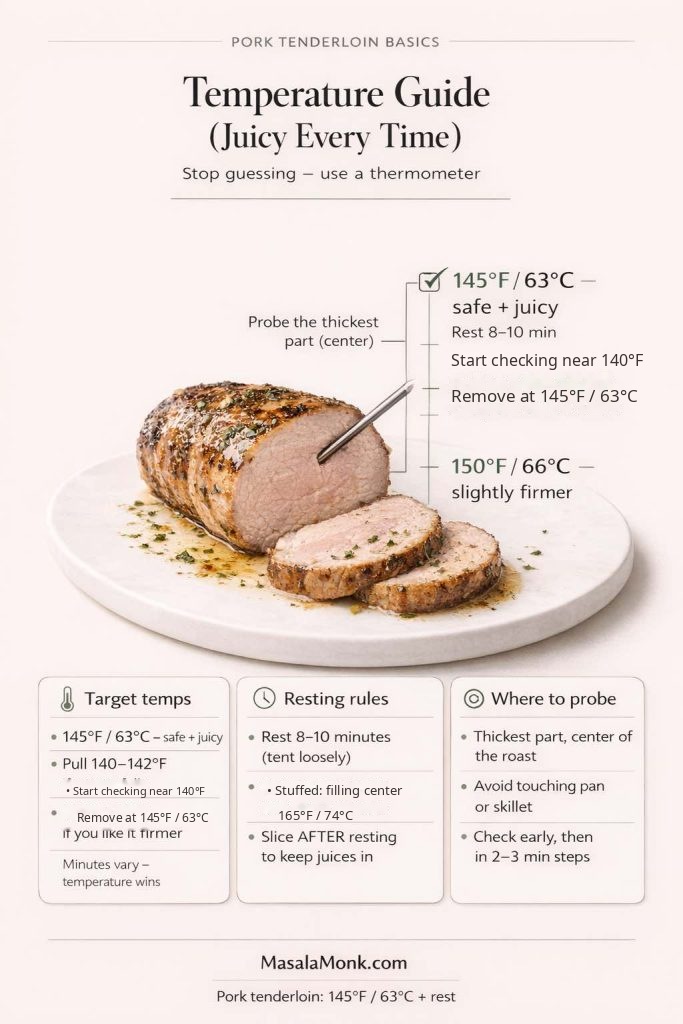
If there’s a single habit that transforms pork tenderloin, it’s cooking by internal temperature instead of guessing. Whole cuts of pork are considered safe at 145°F / 63°C followed by a short rest, as shown in the official guidance on the USDA safe temperature chart and the FoodSafety.gov temperature chart.
That standard is also where tenderloin tends to be at its best: juicy, tender, and sliceable. Start checking around 140°F so you can catch the roast before it overshoots, then remove it from the heat when the thickest center reaches 145°F / 63°C. Rest for at least 3 minutes; for clean, juicy slices, 8–10 minutes works especially well.
If you’re looking for “pork fillet oven time,” use this chart first — “pork fillet” is another name for pork tenderloin in many regions. Times vary by thickness, so start checking a little early and cook to temperature.
Pork Fillet (Tenderloin) Oven Time Chart
Oven Temp
Approx. Cook Time*
Best For
Remove At (Internal Temp)
350°F (175°C)
25–35 min
Most even cooking, biggest “juicy” safety margin
145°F / 63°C
375°F (190°C)
22–30 min
Balanced: quicker, still tender
145°F / 63°C
400°F (205°C)
18–25 min
Fastest; great when finishing with a glaze
145°F / 63°C
Temperature & Time Guide Table for Pork Fillet (Tenderloin) Oven
Times are a practical starting range for a typical 1–1½ lb (450–700 g) pork fillet/tenderloin. Thickness matters more than weight alone, so begin checking early and use the thermometer as the final doneness test.
Use the thermometer, not color or the clock: start checking around 140°F, remove an unstuffed pork tenderloin at 145°F / 63°C, then rest 8–10 minutes. For stuffed tenderloin, the center of the filling must reach 165°F / 74°C.
A little pink doesn’t automatically mean undercooked. Pork tenderloin can still have a faint rosy center after the thickest part has safely reached 145°F / 63°C. Color alone is not the doneness test—the thermometer is. Some people prefer the softer, juicier texture at 145°F; others simply like taking theirs a little higher for a firmer bite.
Three small details make the biggest difference:
Carryover heat is real. The temperature rises slightly after you remove the roast from the oven.
Resting matters. It’s not a polite suggestion; it’s how juices settle back into the meat.
Slicing too early costs you moisture. Even a perfectly cooked tenderloin can look dry if you cut it the moment it comes out.
If you prefer a firmer, more cooked texture, let the center reach about 150°F / 66°C before removing it from the oven. Even then, resting still helps the slices stay tender.
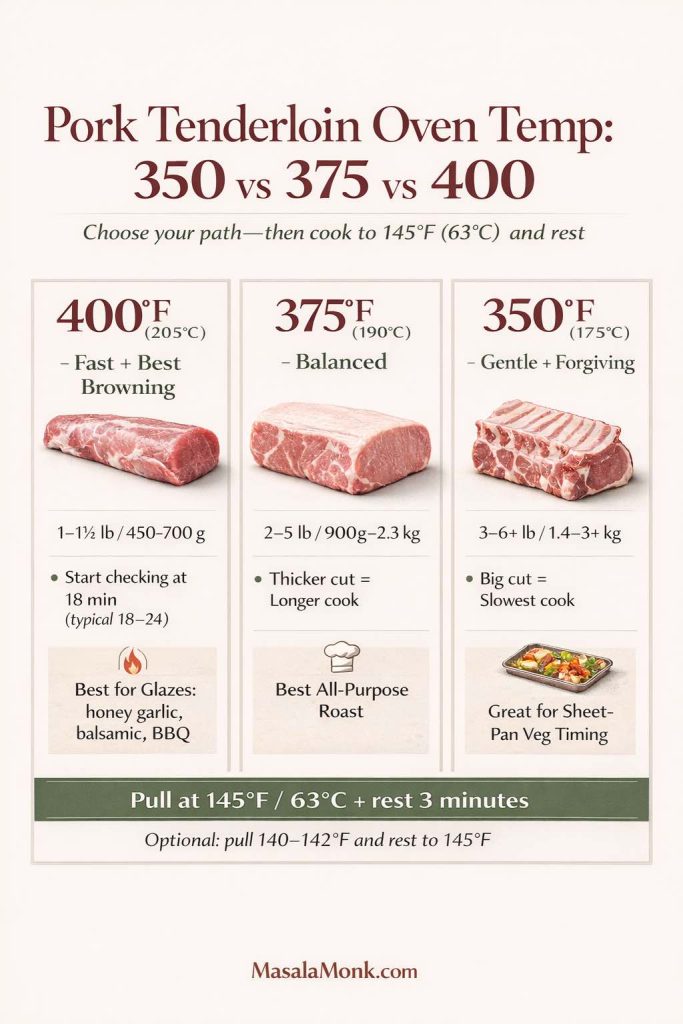
Pork tenderloin in oven: 350°F vs 400°F vs 375°F
There’s more than one “right” oven temperature. What matters is how the heat fits your evening.
Not sure whether to bake pork tenderloin at 350°F, 375°F, or 400°F? Use this quick chart to pick your oven temp, start checking at the right time, and pull at 145°F (63°C) for juicy pork tenderloin every time.
400°F (fast, great browning)
This is the weeknight favorite. It cooks quickly, encourages color on the outside, and works especially well with glazes—honey garlic, balsamic, maple-apricot, teriyaki-style finishes, or a BBQ brush-on at the end.
350°F (gentle, forgiving)
This is the calm, steady approach. It’s ideal when you’re also roasting vegetables and want everything to land together. It also gives you a slightly wider window before the meat goes past its sweet spot.
375°F (middle path)
This is the comfortable compromise: enough heat for browning, plus a gentler roast than 400°F.
There tend to be two strong camps here: 400°F people want browned edges and dinner sooner; 350°F people want the gentler timing window. Then 375°F sits quietly in the middle doing both reasonably well. There isn’t a single winner—the useful choice is the one that fits tonight’s dinner.
No matter which temperature you pick, the finish remains the same: cook to temperature, rest, slice.
The seasoning that makes pork taste like dinner, not “protein”
Because tenderloin is mild, seasoning is the difference between “fine” and genuinely craveable. Salt helps the meat hold onto moisture, while aromatics and spices build a crust that tastes roasted and savory.
You’ll get two approaches here:
a reliable all-purpose rub
targeted flavor profiles that turn the same roast into different meals
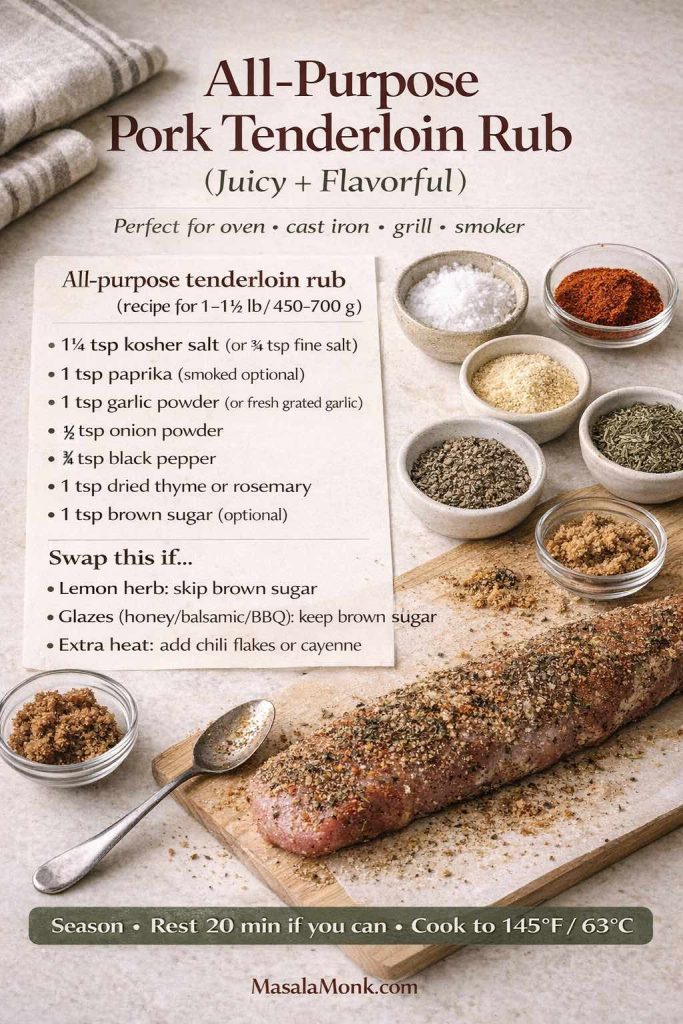
Use this all-purpose pork tenderloin rub for oven roasting, cast iron, grilling, or smoking—plus quick swaps for lemon herb, honey/balsamic/BBQ glazes, and extra heat for a more flavorful crust.
All-purpose tenderloin rub (recipe for 1–1½ lb / 450–700 g)
1 tsp brown sugar (optional, helps browning and pairs well with glazes)
This rub is flexible: it works for oven roasting, cast iron, grilling, and smoking. If you know you’re going lemon herb, you can skip the brown sugar. If you’re going honey garlic or balsamic, keep it.
A quick note on resting after seasoning
If you have time, season and let the tenderloin sit while the oven heats. Even 20 minutes helps. If you can do 45–60 minutes, the flavor tends to taste more “inside” the meat rather than just on the surface.
Want the flavor to go deeper than a surface rub? The Pork Tenderloin Marinade guide gives you quick, same-day, and overnight options, plus oven, grill, and air-fryer directions so the outside browns without the marinade scorching.
Pork tenderloin in oven: the core recipe
This is the dependable method that anchors everything else. Once it’s familiar, variations become simple choices rather than brand-new recipes.
Save this core pork tenderloin recipe card: choose 350°, 375°, or 400°, start checking early, remove the tenderloin at 145°F / 63°C, rest 8–10 minutes, then slice into juicy medallions.
Optional: 1 tbsp butter (useful for finishing or pan sauce)
If your package says pork fillet (UK/AU), it’s usually pork tenderloin—use the same 350/375/400 method below and remove it from the heat at 145°F / 63°C.
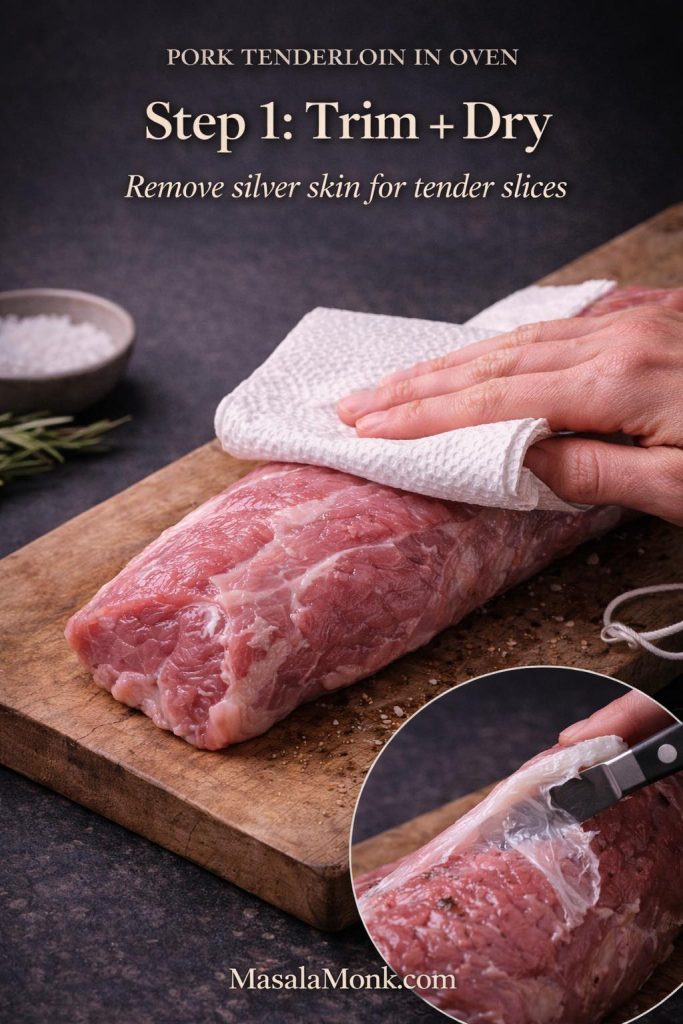
Step 1: Trim and dry
Pat the tenderloin dry very thoroughly. That dryness helps the seasoning stick and improves browning. If you see silver skin (a thin, shiny membrane), trim it away; it doesn’t soften with cooking.
Before pork tenderloin goes in the oven, pat it very dry and trim off any silver skin—this one step improves browning and keeps the finished medallions tender instead of chewy.
If one end is thinner, tuck that end under itself and tie lightly with kitchen twine. That small adjustment helps the roast cook more evenly so you don’t end up with overdone tail slices.
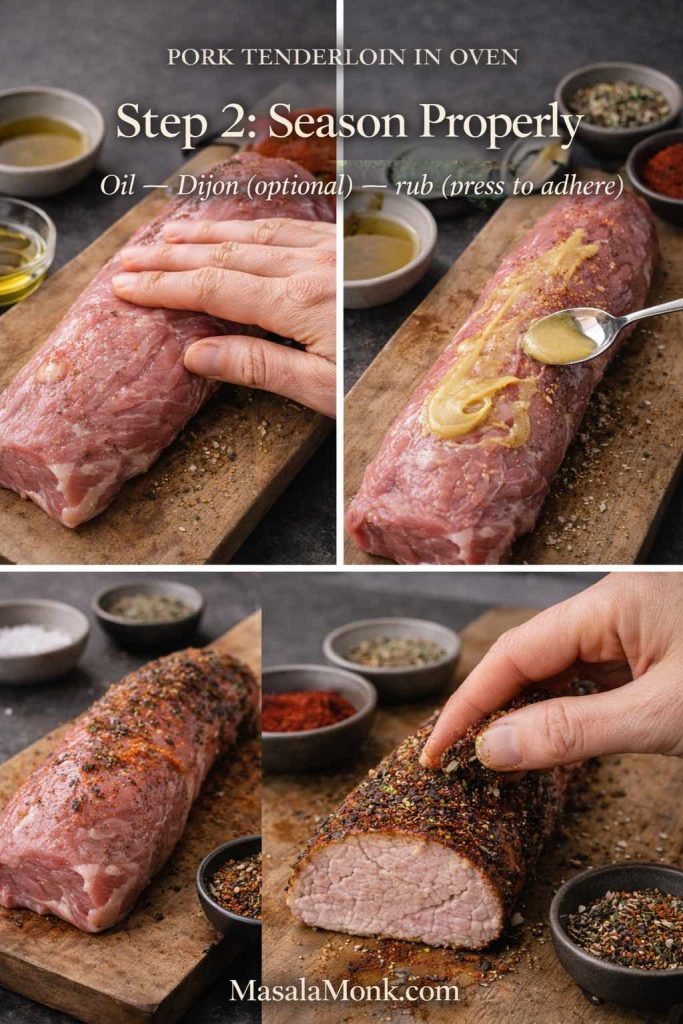
Step 2: Season properly
Rub the tenderloin with oil. If using Dijon, rub it on next. Then coat all sides with the seasoning rub, pressing gently so it adheres.
For pork tenderloin in the oven that tastes seasoned all the way through, coat it evenly: oil first, a thin swipe of Dijon if you like, then press on the rub so it sticks—no patchy spots, better browning, better flavor.
At this point, the surface should look evenly coated, not patchy. The aroma should be savory and warm from paprika and garlic.
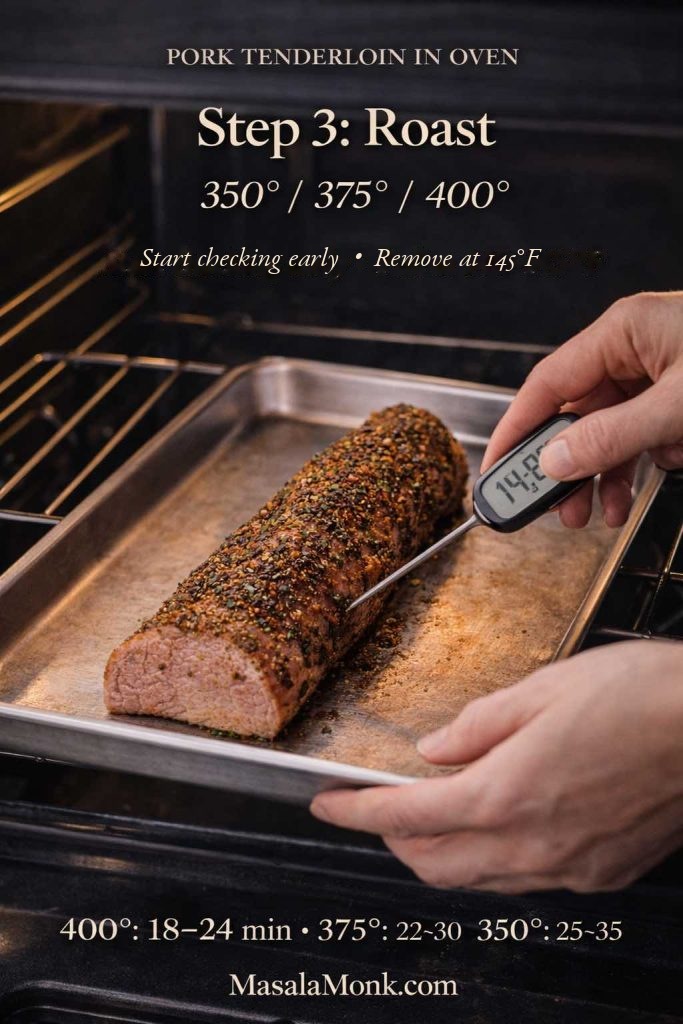
Step 3: Roast (choose one temperature)
Pork tenderloin in oven at 400°F (205°C)
Preheat oven to 400°F.
Roast 18–24 minutes, depending on thickness.
Start checking temperature at 18 minutes.
Remove from the oven when the thickest part reaches 145°F / 63°C.
Rest 8–10 minutes, then slice.
What you’ll notice: the outside develops a deeper color, and the kitchen smells roasted and garlicky. The surface should look set and lightly browned rather than pale. This is the classic “pork tenderloin 400” approach that works beautifully for a quick dinner and crisp edges.
Roast pork tenderloin at 350°, 375°, or 400°—start checking early, then remove it at 145°F / 63°C and rest 8–10 minutes before slicing.
Pork tenderloin in oven at 350°F (175°C)
Preheat oven to 350°F.
Roast 25–35 minutes.
Start checking temperature at 25 minutes.
Remove from the heat at 145°F / 63°C.
Rest 8–10 minutes, then slice.
What you’ll notice: slightly gentler browning, an even roast, and a more gradual finish. This is a comfortable option when you’re coordinating sides, or when you want the tenderloin to finish more evenly across the center.
Pork tenderloin in oven at 375°F (190°C)
Preheat oven to 375°F.
Roast 22–30 minutes.
Start checking at 22 minutes.
Remove from the heat at 145°F / 63°C.
Rest 8–10 minutes, then slice.
What you’ll notice: a balance—good color, but still forgiving.
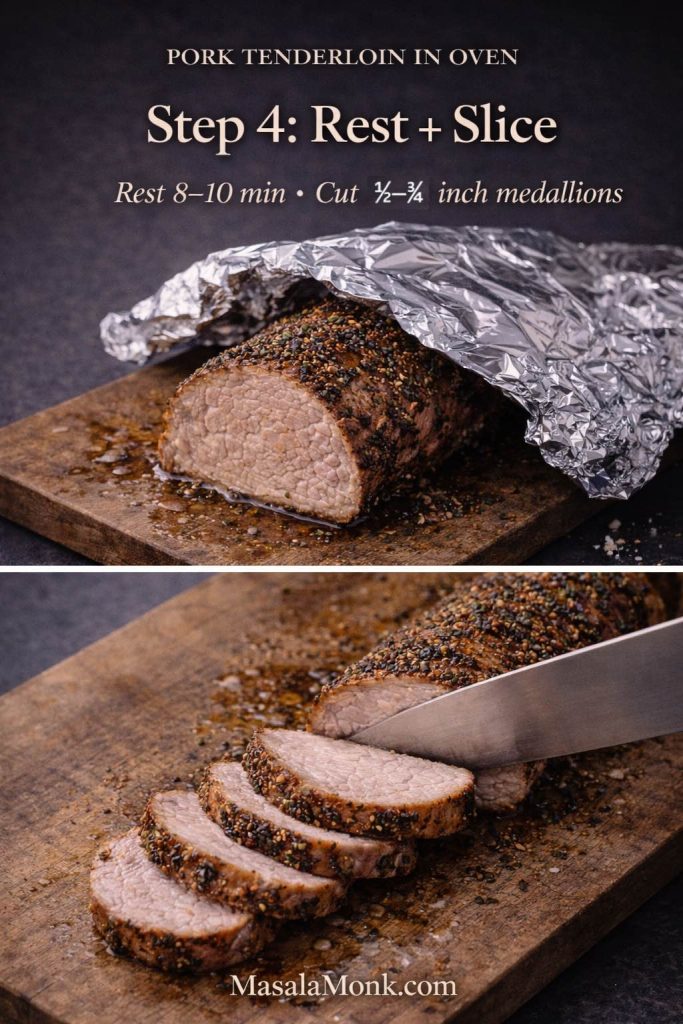
Step 4: Rest, then slice into medallions
Move the tenderloin to a cutting board and tent loosely with foil. While it rests, you can make a pan sauce, warm a glaze, or finish sides.
Step 4 is the juiciness step: rest pork tenderloin after roasting for 8–10 minutes, then slice across the grain into 1/2–3/4 inch medallions so every piece stays tender and moist.
After resting, slice across the grain into medallions. If the knife meets resistance, your slices may be too thick or you may be cutting in the wrong direction. Aim for slices about ½ to ¾ inch thick for a tender bite.
Next method: Air Fryer Pork Tenderloin →
Want the same juicy tenderloin without heating the whole oven? Try our Air Fryer Pork Tenderloin next. It uses the same temperature-first approach—cook the thickest center to 145°F / 63°C, rest, then slice—but gives you browned edges in a smaller appliance. Most standard 1–1½ lb tenderloins take about 18–24 minutes, depending on thickness and the air fryer.
Cast iron pork tenderloin (sear + oven finish)
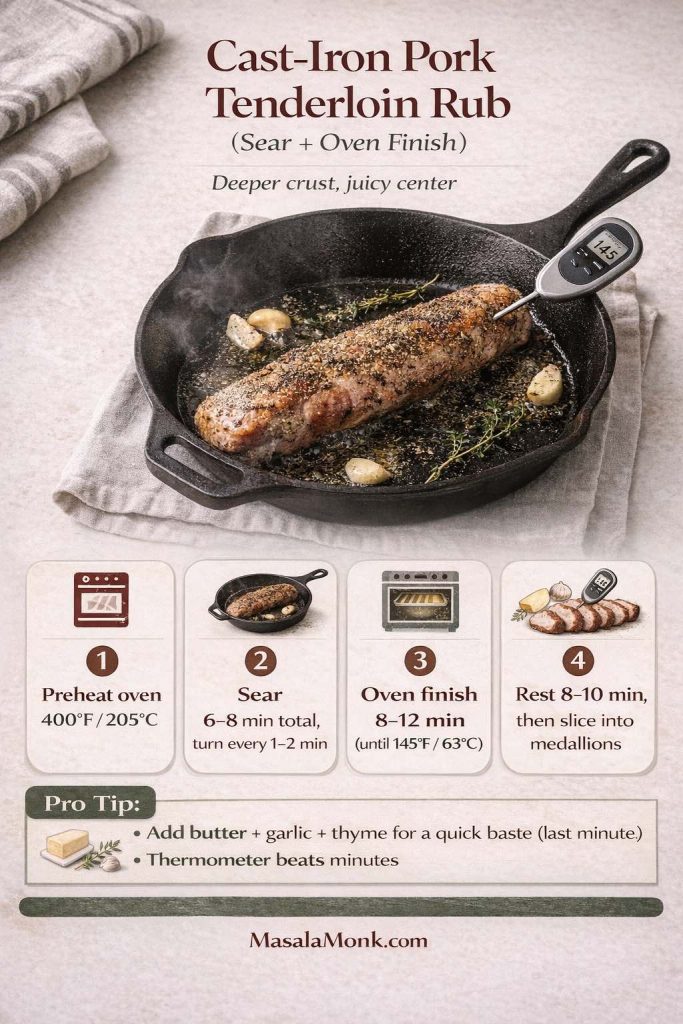
If you want deeper browning and a more savory “pan-roasted” flavor, start the tenderloin in a hot cast-iron skillet and finish it in the oven. The sear builds crust quickly; the oven brings the center to temperature gently.
This method is especially satisfying when serving the tenderloin plain with vegetables, because the crust brings flavor without needing a heavy sauce.
Ingredients
1 seasoned pork tenderloin
1 tbsp neutral oil (avocado, canola, grapeseed)
Optional: 1 tbsp butter + 1 smashed garlic clove + a sprig of thyme or rosemary
Want a deeper crust? This cast iron pork tenderloin guide shows the sear + oven finish method (400°F) and the exact 145°F (63°C) target temp, so you get juicy slices with real browning—not dry pork.
Method
Preheat oven to 400°F.
Heat a cast-iron skillet over medium-high until hot. Add oil.
Lay the tenderloin in the pan. You should hear an immediate sizzle.
Sear on all sides, turning every 1–2 minutes, until browned all around (about 6–8 minutes total).
Slide the skillet into the oven. Roast until the center reaches 145°F / 63°C (often 8–12 minutes depending on thickness).
Rest 8–10 minutes, then slice.
If you’re adding butter, drop it in during the last minute on the stovetop. As it foams, baste the tenderloin with a spoon for 20–30 seconds. The aroma becomes richer and more “roast-like,” even before it goes into the oven.
Creamy mushroom sauce (below) + mashed potatoes or roasted potatoes
Chimichurri on the side + grilled vegetables
Mustard glaze + carrots and onions roasted until sweet
Pork tenderloin with potatoes and carrots (sheet-pan dinner)
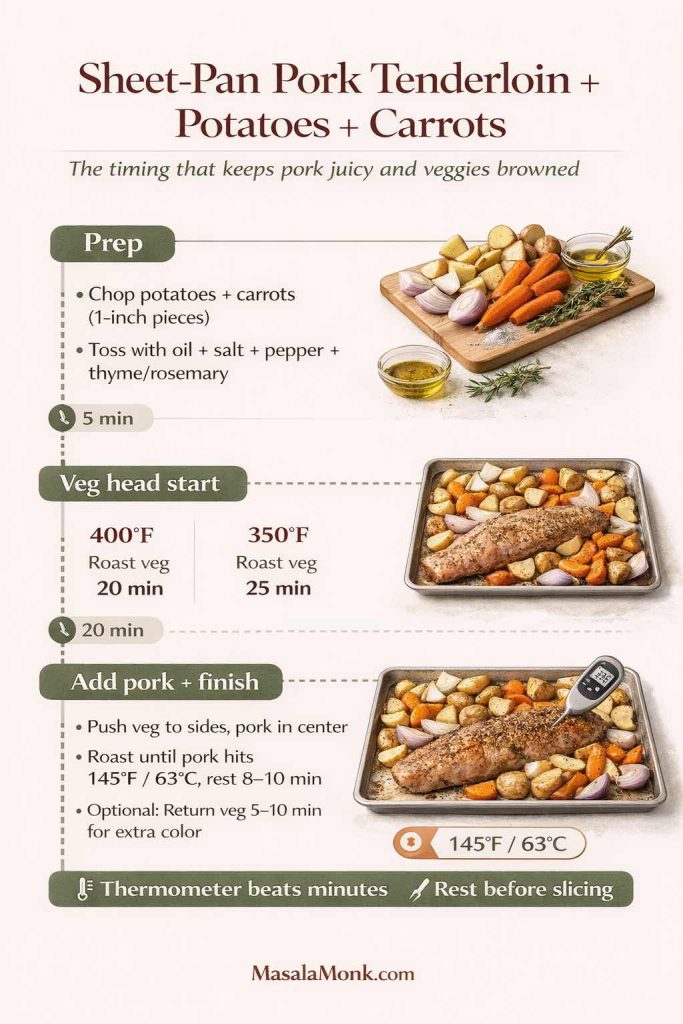
A sheet-pan dinner turns tenderloin into a complete meal with minimal effort. The only trick is timing: potatoes and carrots need a head start; the pork goes in later so it stays juicy.
Ingredients (serves 4)
1 pork tenderloin, seasoned (use the rub or any glaze variation)
500 g potatoes, cut into 1-inch chunks
3–4 carrots, cut into thick coins or batons
1 medium onion, cut into wedges (optional but excellent)
2–3 tbsp olive oil
1 tsp kosher salt
½ tsp black pepper
1 tsp dried thyme or rosemary
Optional: 1 tsp smoked paprika for the vegetables
One-pan dinner made easy: this sheet-pan pork tenderloin with potatoes and carrots guide shows the exact veggie head start and when to add the pork, so everything finishes together and the tenderloin stays juicy at 145°F (63°C).
Method
Preheat oven to 400°F for crisp edges, or 350°F for a gentler roast.
Toss potatoes, carrots, and onion with oil, salt, pepper, and herbs.
Roast vegetables first:
At 400°F: 20 minutes
At 350°F: 25 minutes
Push vegetables to the sides, then place the seasoned tenderloin in the center.
Roast until the pork reaches 145°F / 63°C.
Move pork to a board to rest. Toss vegetables in the drippings and return them to the oven for 5–10 minutes if they need more color.
Slice tenderloin into medallions and serve with the vegetables.
What you’ll notice: the carrots turn sweet, the onions soften and caramelize at the edges, and the potatoes soak up the meat juices like a built-in sauce.
If you like swapping potatoes, this quick read on white vs sweet potatoes can help decide what fits your flavor direction.
Serve-it-with ideas:
Honey garlic glaze + sweet potatoes + broccoli
Balsamic glaze + carrots + onions (they’re made for each other)
Sauce and glaze variations that are actually worth making
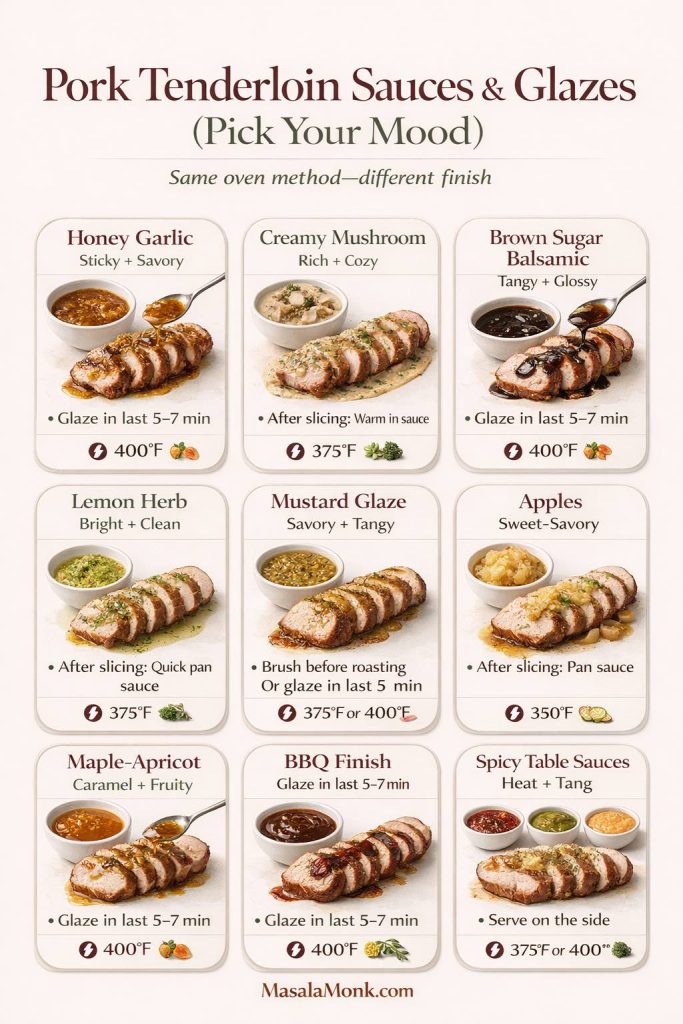
A good sauce changes everything. Even if your tenderloin is perfectly cooked, a finishing glaze or pan sauce makes the meal feel intentional—like you planned it rather than stumbled into it. Each variation below is complete, flavorful, and written so you can cook it without improvising.
Pick your flavor tonight: this pork tenderloin sauces and glazes chart shows when to apply each finish—honey garlic, creamy mushroom, brown sugar balsamic, lemon herb, mustard glaze, apples, maple-apricot, BBQ, and spicy table sauces—so you get a glossy, juicy result every time.
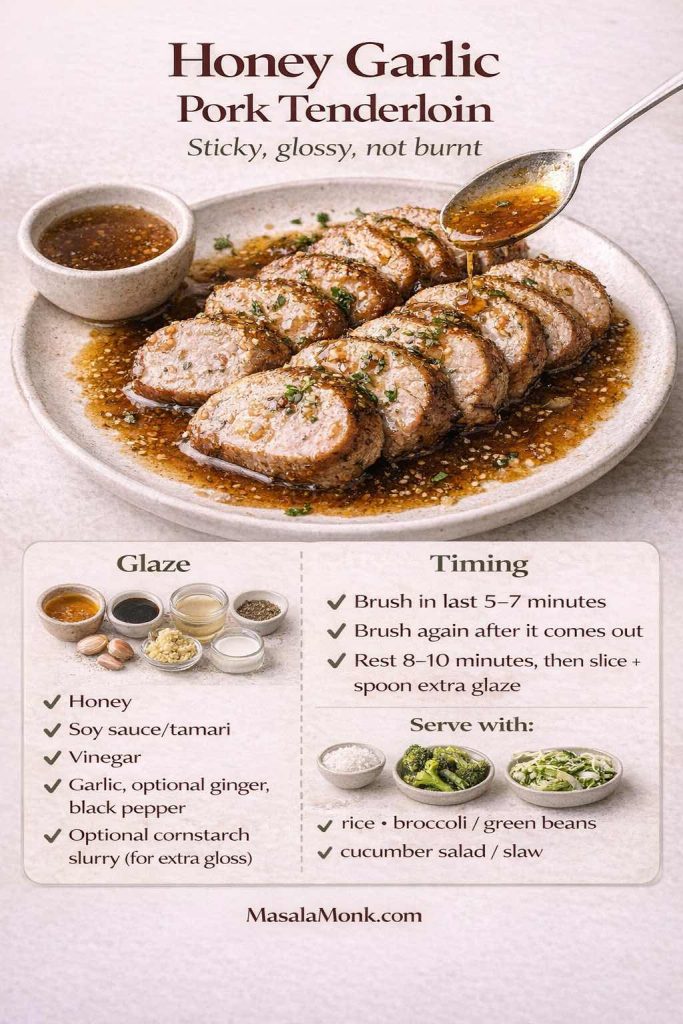
Honey garlic is the “everyone at the table is happy” flavor. It’s sweet, savory, and especially good when the tenderloin is sliced into medallions and coated in glaze.
Honey garlic glaze (recipe for 1 tenderloin)
3 tbsp honey
2 tbsp soy sauce (or tamari)
1 tbsp apple cider vinegar or rice vinegar
4 cloves garlic, finely minced or grated
1 tsp grated ginger (optional, but adds warmth)
½ tsp black pepper
Pinch of chili flakes (optional)
Optional thickener: 1 tsp cornstarch + 1 tbsp water
This honey garlic pork tenderloin recipe card shows the simple glaze and the exact timing that prevents burning—brush in the last 5–7 minutes, rest, then slice and spoon extra sauce for a glossy, juicy finish.
Method
Cook the tenderloin using the core oven method (400°F for speed, 350°F for gentleness).
While it roasts, combine honey, soy sauce, vinegar, garlic, ginger, and pepper in a small saucepan.
Warm gently for 2–3 minutes, stirring. The glaze should smell sweet and garlicky, not harsh.
If you want it thicker, whisk in the cornstarch slurry and simmer 30–60 seconds until glossy.
During the last 5–7 minutes of roasting, brush glaze over the tenderloin.
Brush again as soon as it comes out, then rest.
Slice into medallions and spoon remaining glaze over the top.
If you enjoy a teriyaki direction, a thicker homemade sauce like homemade teriyaki sauce works beautifully the same way—brushed on near the end so it turns lacquered rather than burnt.
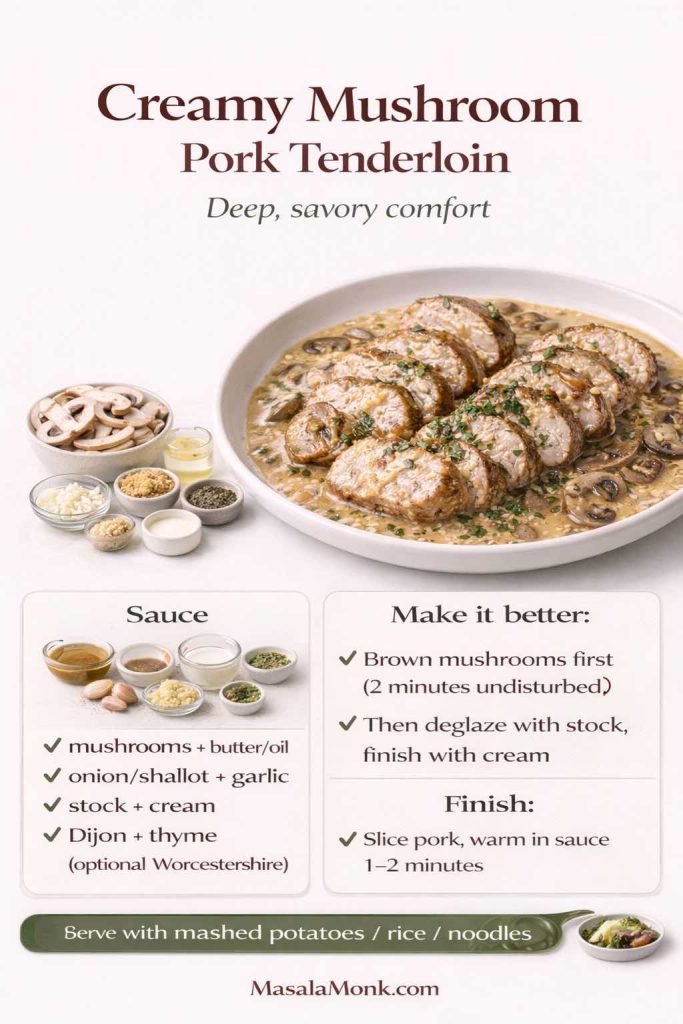
This is comfort food that still feels like a proper dinner. The flavor comes from browning mushrooms until they’re deeply savory—so the sauce tastes rich even before the cream goes in.
Creamy mushroom sauce (serves 4)
250–300 g mushrooms, sliced
1 tbsp butter
1 tbsp olive oil
1 small onion or 2 shallots, finely chopped
3 cloves garlic, minced
½ cup chicken stock (or water + a pinch of salt)
½ cup cream (or coconut cream for dairy-free)
1 tsp Dijon mustard
Optional: 1 tsp Worcestershire sauce
½ tsp dried thyme or 1 tsp fresh thyme leaves
Salt and pepper
This creamy mushroom pork tenderloin recipe card shows the sauce essentials and the one step that makes it taste restaurant-level—brown the mushrooms first, then deglaze with stock and finish with cream before warming sliced pork in the sauce.
Method
Roast or cast-iron sear the tenderloin to 145°F / 63°C, then rest it.
In the same skillet, heat butter and oil.
Add mushrooms and spread them out. Let them sit undisturbed for 2 minutes so they brown instead of steaming.
Stir, then keep cooking until moisture evaporates and the mushrooms deepen in color.
Add onion/shallot and cook until softened.
Add garlic and cook 30 seconds, just until fragrant.
Pour in stock and scrape up browned bits. Simmer 2–3 minutes.
Stir in cream, Dijon, thyme, and Worcestershire if using. Simmer until slightly thick.
Slice tenderloin into medallions, then warm the slices in the sauce for 1–2 minutes.
Taste, adjust salt and pepper, then serve.
If the sauce is the part you want to make the star of the plate, the full Creamy Mushroom Sauce Recipe goes deeper on browning the mushrooms, adjusting thickness, making it without wine or cream, and taking it toward a more gravy-like finish for pork and potatoes.
If you want a lighter vegetable side that still feels hearty, a quick mushroom and zucchini skillet fits beautifully here—especially because it keeps the plate balanced.
Serve-it-with ideas:
Mashed potatoes (this sauce was made for them)
Buttered noodles or rice
Roasted asparagus or green beans for contrast
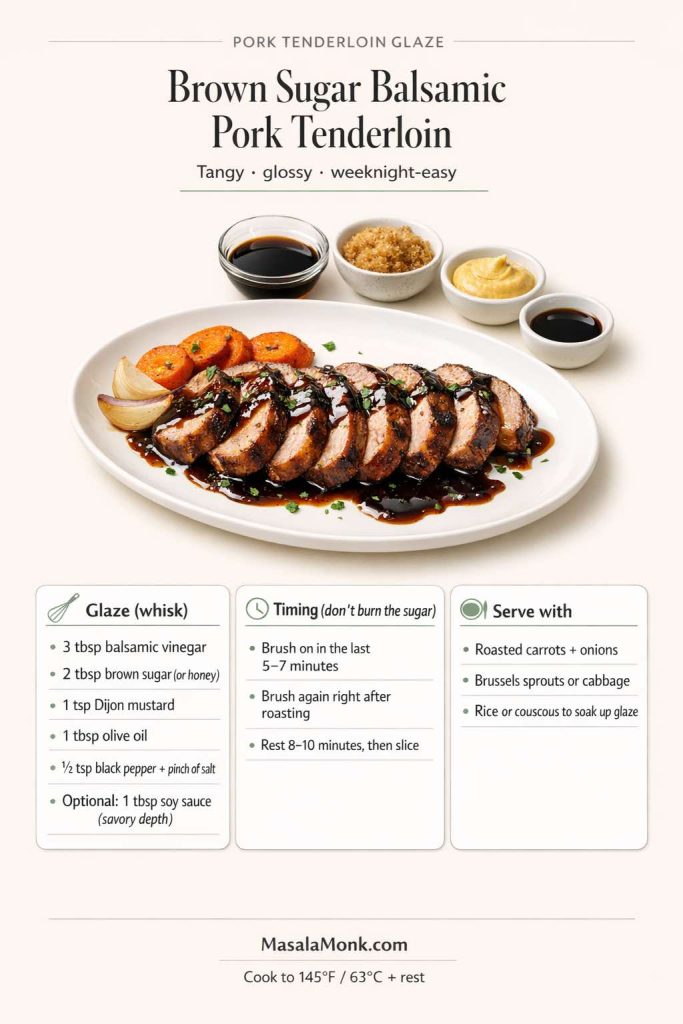
Brown sugar balsamic pork tenderloin (tangy, glossy, slightly sweet)
This glaze tastes bold without requiring much effort. It’s especially good when you’re roasting vegetables on the side, because balsamic and brown sugar make carrots and onions taste even sweeter.
Balsamic glaze (recipe for 1 tenderloin)
3 tbsp balsamic vinegar
2 tbsp brown sugar (or honey)
1 tsp Dijon mustard
1 tbsp olive oil
½ tsp black pepper
Pinch of salt
Optional: 1 tbsp soy sauce for extra savory depth
Brown sugar balsamic pork tenderloin, made the easy way: whisk the glaze, brush it on in the last 5–7 minutes (so the sugar doesn’t burn), then rest and slice for a tangy, glossy finish.
Method
Whisk all glaze ingredients together.
Roast the tenderloin using the core method.
Brush glaze on during the last 5–7 minutes of roasting.
Brush again right after it comes out.
Rest, slice, and drizzle pan juices over the medallions.
Because this glaze contains sugar, it behaves best when applied late. That timing gives you caramelization instead of bitterness.
Serve-it-with ideas:
Roasted carrots + onions
Brussels sprouts or cabbage roasted until crisp
A simple grain like couscous or rice to soak up the glaze
When you want something lighter than honey or cream, lemon brings freshness instantly. It’s also a beautiful match for potatoes and green vegetables.
Lemon herb finish
Zest of 1 lemon
2 tbsp lemon juice
1 tbsp olive oil
1 small garlic clove, grated
½ tsp salt
½ tsp black pepper
1 tbsp chopped parsley (optional)
Lemon pork tenderloin, two ways: spoon on a bright no-cook lemon herb finish after slicing, or make a quick lemon pan sauce (butter + stock) for a warmer, richer drizzle—both keep the pork fresh and juicy.
Quick lemon pan sauce (optional)
1 tbsp butter
¼ cup stock
2 tbsp lemon juice
1 tsp lemon zest
Pinch of salt
Method
Roast the tenderloin and let it rest.
Stir lemon herb finish ingredients together. Spoon over sliced medallions.
If you want a warm sauce, simmer butter + stock + lemon juice/zest for 1–2 minutes, then spoon over.
The scent here is bright and clean—lemon zest, garlic, and warm pork together. It’s simple, yet it tastes intentional.
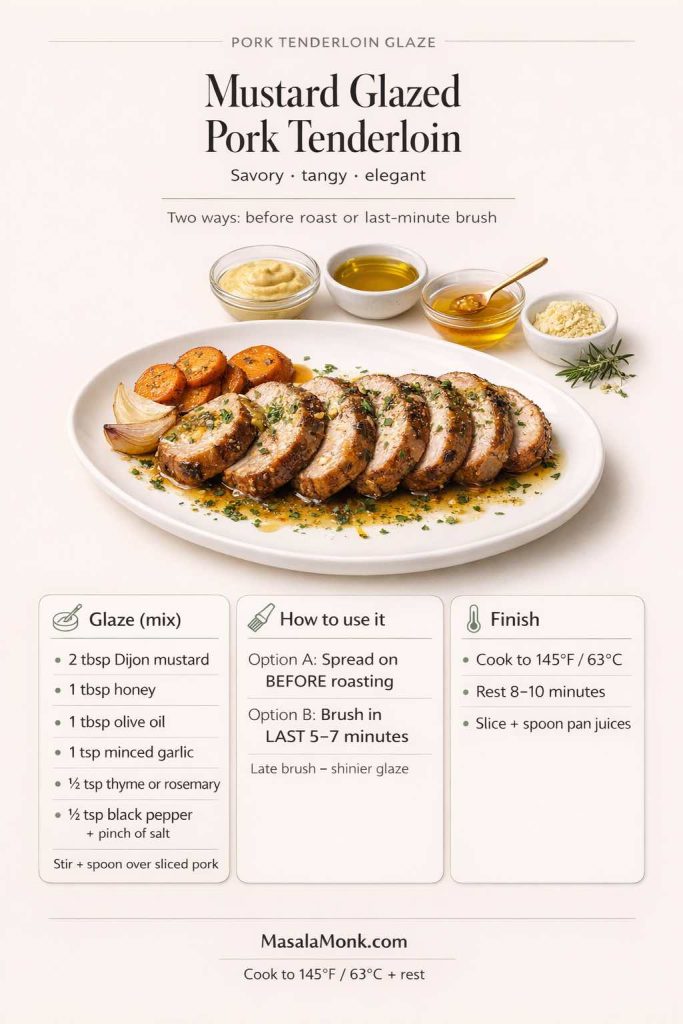
Mustard adds a gentle bite that makes tenderloin taste more like a classic roast dinner. It’s also a fantastic choice when you’re serving potatoes and carrots.
Mustard glaze
2 tbsp Dijon mustard
1 tbsp honey
1 tbsp olive oil
1 tsp minced garlic
½ tsp dried thyme or rosemary
½ tsp black pepper
Pinch of salt
Mustard glazed pork tenderloin that actually tastes “roast-dinner” good: mix Dijon + honey glaze, spread it on before roasting or brush in the last 5–7 minutes for extra shine, then rest and slice for juicy medallions.
Method
Mix glaze ingredients and spread evenly over the tenderloin before roasting.
Roast until the center reaches 145°F / 63°C.
Rest, slice, then spoon pan juices over the medallions.
The glaze becomes slightly darker at the edges and smells warmly herbal, especially with rosemary.
Serve-it-with ideas:
Sheet-pan potatoes and carrots
Green beans with a squeeze of lemon
A simple salad with crisp apples or pears
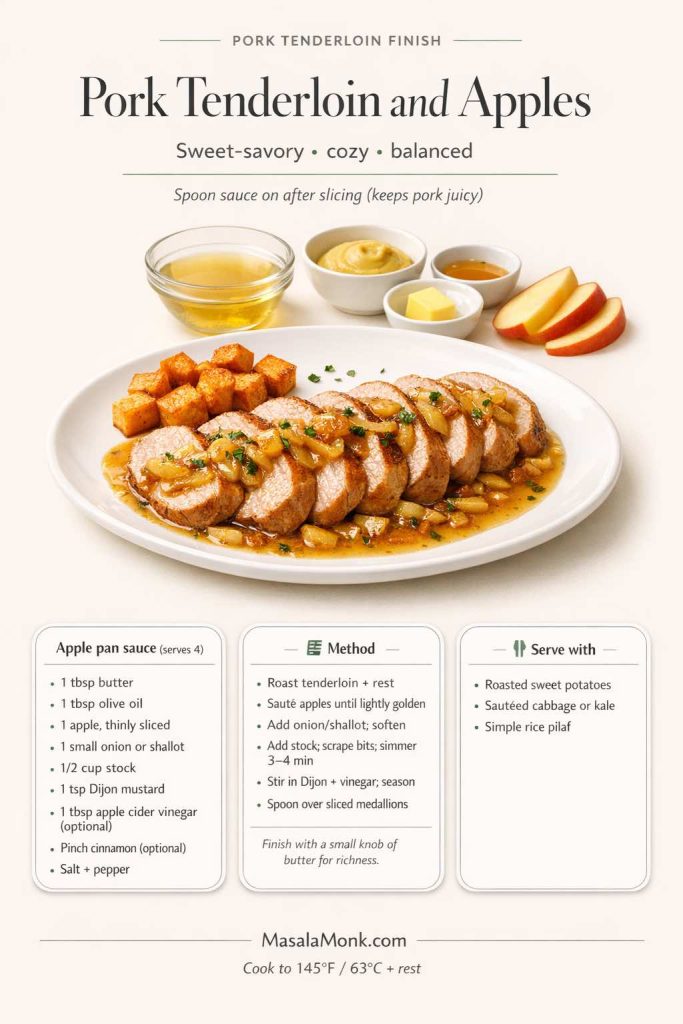
Pork tenderloin and apples (sweet-savory, cozy, balanced)
Apples and pork are a classic pairing because they bring sweetness and acidity that flatter savory meat. It feels cozy without needing cream.
Apple pan sauce (recipe serves 4)
1 tbsp butter
1 tbsp olive oil
1 apple, thinly sliced (sweet-tart varieties work best)
1 small onion or shallot, thinly sliced
½ cup stock
1 tsp Dijon mustard
1 tbsp apple cider vinegar (optional)
Pinch of cinnamon (optional, use lightly)
Salt and pepper
Pork tenderloin and apples is the easiest “cozy but not heavy” dinner: roast the tenderloin, then spoon a quick apple pan sauce (apple + onion/shallot + stock + Dijon) over sliced medallions so the pork stays juicy. This card includes the exact ingredients, the 3–4 minute simmer method, and simple sides that fit—roasted sweet potatoes, sautéed cabbage/kale, or rice pilaf.
Method
Roast the tenderloin and rest it.
Heat butter and oil in a skillet. Sauté apples until lightly golden.
Add onion/shallot and cook until softened.
Pour in stock, scrape up browned bits, and simmer 3–4 minutes.
Stir in Dijon and vinegar if using. Season well.
Slice tenderloin and spoon apple sauce over the medallions.
For extra richness, add a small knob of butter at the end. For extra brightness, add a touch more vinegar.
Serve-it-with ideas:
Roasted sweet potatoes
Sautéed cabbage or kale
A simple rice pilaf
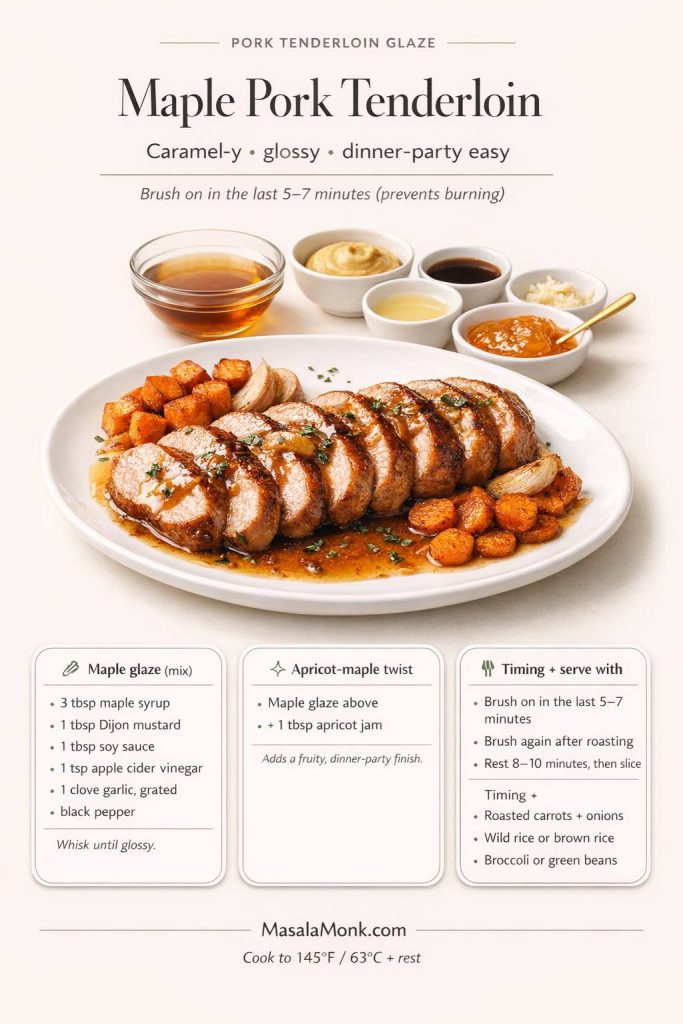
Maple pork tenderloin (plus a quick apricot twist)
Maple gives you a glaze that feels different from honey—more caramel, less floral. Add apricot jam and it turns into a dinner-party finish with almost no extra work.
Maple glaze
3 tbsp maple syrup
1 tbsp Dijon mustard
1 tbsp soy sauce
1 tsp apple cider vinegar
1 clove garlic, grated
Black pepper
Maple Pork Tenderloin (with optional apricot twist): whisk the quick maple glaze, then brush it on in the last 5–7 minutes so it turns glossy instead of burning. Rest 8–10 minutes, slice into medallions, and serve with roasted carrots + onions, wild/brown rice, and broccoli or green beans. This is the easiest “dinner-party” upgrade for pork tenderloin in the oven—same method, better finish.
Apricot-maple glaze
Maple glaze above
1 tbsp apricot jam
Brush on during the last 5–7 minutes of roasting, then brush again after it comes out. Rest, slice, and spoon any extra glaze over the top.
Serve-it-with ideas:
Roasted carrots and onions
Wild rice or brown rice
Broccoli or green beans for freshness
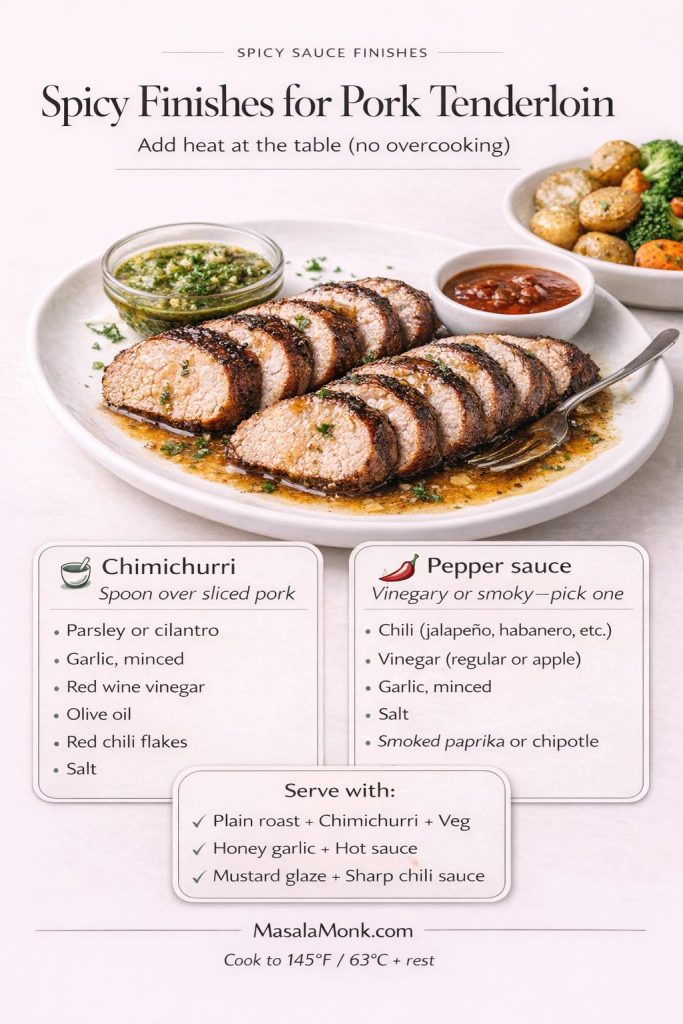
Spicy finishing options (when you want bold flavor at the table)
Some nights you want the tenderloin to stay simple, yet you still want punch. A finishing sauce on the side does that beautifully—each person can adjust heat and tang to taste.
If you love variety, pepper sauce ideas gives you multiple directions—from sharp and vinegary to smoky and deep.
For a bright, herby, garlic-forward option, a spoon of chimichurri sauce next to sliced tenderloin is especially good when the meat is simply roasted or grilled.
Want bold flavor without risking dry pork? Use a spicy finishing sauce at the table. This guide shows two easy options—chimichurri (herby + garlicky) and a quick pepper sauce (vinegary or smoky)—plus serving combos that pair perfectly with roasted pork tenderloin. Pin it for later, then use it anytime you want heat without overcooking.
Honey garlic tenderloin + a hot sauce on the side for contrast
Mustard-glazed tenderloin + a sharp chili sauce for bite
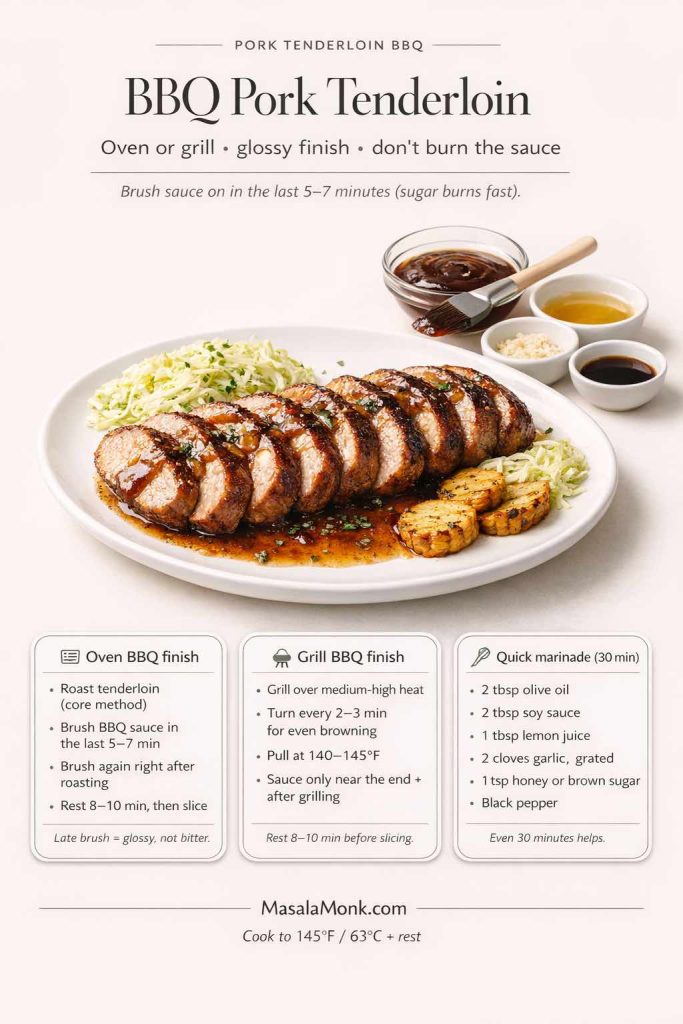
BBQ pork tenderloin (oven or grill)
BBQ flavor works beautifully on tenderloin as long as the sauce is applied late. Many BBQ-style sauces contain sugar, which can burn if brushed on too early.
BBQ pork tenderloin in oven
Roast the seasoned tenderloin using the core method.
During the last 5–7 minutes, brush with BBQ-style sauce.
Finish roasting, then brush again after it comes out.
Rest and slice.
BBQ Pork Tenderloin (Oven or Grill): the key is timing—brush BBQ sauce in the last 5–7 minutes so the sugar doesn’t burn, then rest 8–10 minutes for juicy slices. This card includes an oven finish, a grill finish, and a quick 30-minute marinade you can use on busy nights.
Best grilled pork tenderloin
Season with the base rub, or use a quick marinade.
Grill over medium-high heat, turning every few minutes for even browning.
Remove from the heat at 145°F / 63°C.
Rest, slice, serve.
A quick marinade for grilled marinated pork tenderloin:
2 tbsp olive oil
2 tbsp soy sauce
1 tbsp lemon juice
2 cloves garlic, grated
1 tsp honey or brown sugar
Black pepper
Even 30 minutes helps.
Smoked pork tenderloin (Traeger-style approach, without drying it out)
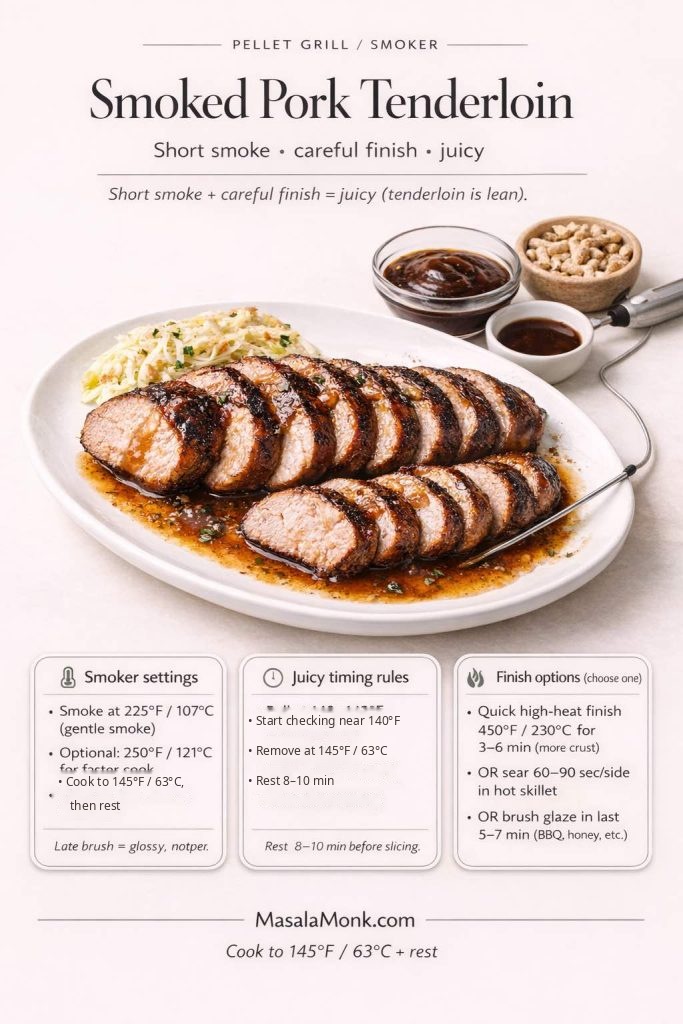
Smoked tenderloin tastes fantastic, although tenderloin isn’t built for hours and hours of low-and-slow cooking. Because it’s lean, it benefits from a shorter smoke and a careful finish.
For smoked pork tenderloin, use 225°F for more smoke or 250°F for a faster cook, start checking near 140°F and remove at 145°F / 63°C, then rest 8–10 minutes. If you want a high-heat crust, do that finishing step before the center reaches 145°F.
Smoke at the lower temperature until the tenderloin is nearly done. If you want more crust, give it a brief higher-heat finish before the center reaches 145°F. Remove it from the heat at 145°F / 63°C, then rest.
No matter the smoker, the goal stays consistent: stop at temperature, then rest.
Slow cooker pork tenderloin (sliceable, not overcooked)
A slow cooker can be a lifesaver. With tenderloin, the main priority is avoiding overcooking. Because it’s lean, it can go from tender to dry if it stays in too long.
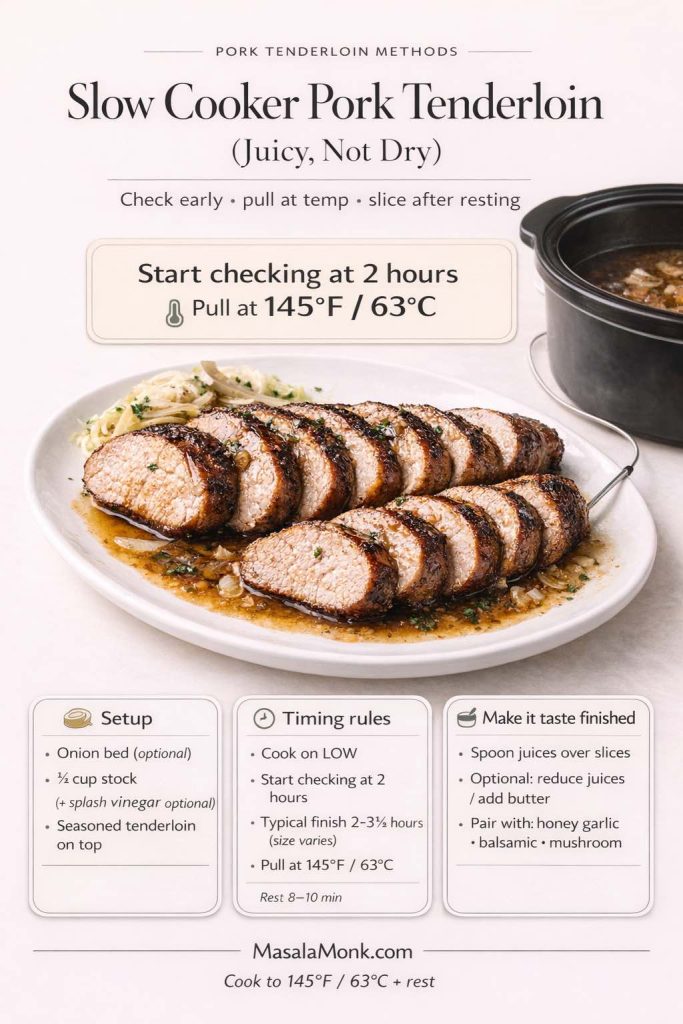
Slow cooker pork tenderloin doesn’t have to turn dry—this quick visual guide shows the only timing rule that matters: start checking at 2 hours and pull at 145°F / 63°C, then rest before slicing. Use a simple onion-and-stock base for moisture, spoon the cooking juices over the slices, and “finish” it with an easy glaze (honey garlic, balsamic, or creamy mushroom) so it tastes like a real dinner—not just leftover protein.
Simple slow cooker tenderloin recipe
Place sliced onions in the bottom if you like.
Add ½ cup stock (or stock plus a splash of vinegar for brightness).
Add the seasoned tenderloin.
Cook on LOW and start checking at 2 hours; most 1–1½ lb tenderloins finish around 2–3½ hours.
Remove once it reaches 145°F, rest, then slice.
Spoon cooking juices over the slices.
Finishing with sauce makes this feel more complete. Honey garlic, teriyaki-style, balsamic, or creamy mushroom all work well.
Cooking it this way tonight? The full Slow Cooker Pork Tenderloin guide goes further on LOW vs HIGH timing, temperature cues, saucier variations, and building the same cut into a complete slow-cooker dinner.
Instant Pot pork tenderloin (fast, useful, best with sauce)
Pressure cooking can be fast and convenient, though it benefits from a good sauce afterward.
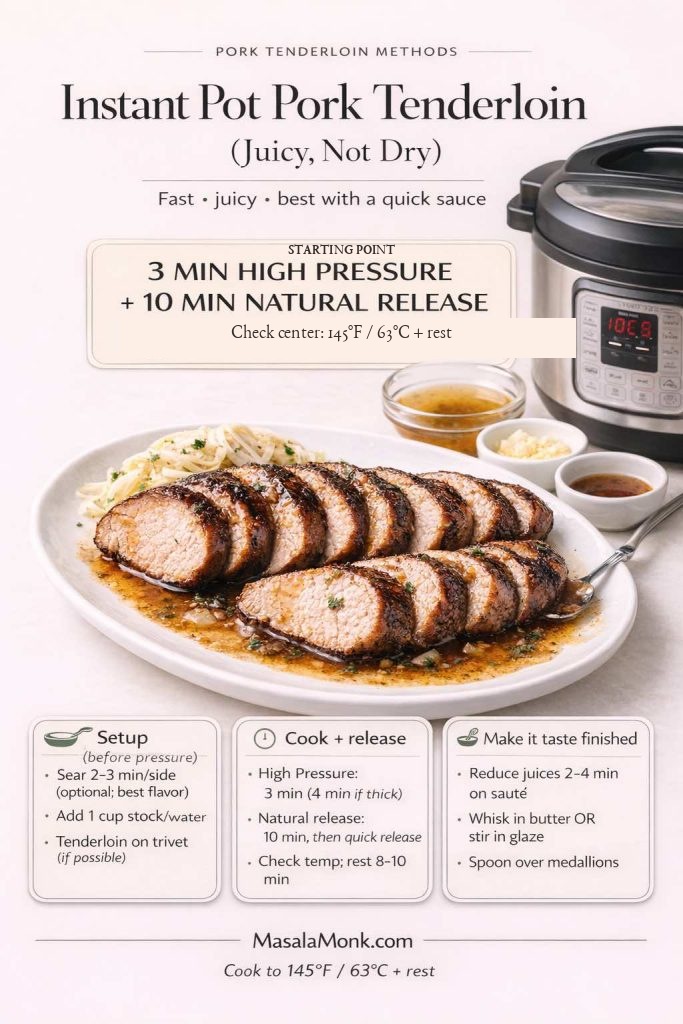
A useful Instant Pot starting point is 3 minutes on HIGH + 10 minutes natural release. Tenderloins vary in thickness, so check the thickest center after releasing; the pork should reach 145°F / 63°C, then rest before slicing.
Sear first (optional but best): sauté 2–3 minutes per side.
Add liquid: 1 cup stock or water (plus onions/garlic if you want).
Pressure cook (High): 3 minutes for a typical 1–1½ lb tenderloin (use 4 minutes if it’s notably thick).
Release: 10 minutes natural release, then quick release.
Finish: check internal temp; rest 8–10 minutes, then slice.
Make it taste finished: simmer the pot juices on sauté for 2–4 minutes to reduce, then whisk in a knob of butter or stir in one of your glazes.
Because every model differs slightly, checking internal temperature remains the most reliable finish.
Pulled-style tenderloin (when you want shreddable pork)
Tenderloin is not the first choice for classic pulled pork because it’s lean. Still, if tenderloin is what you have and you want something shreddable, it can work—provided it’s protected with liquid and you stop as soon as it becomes tender.
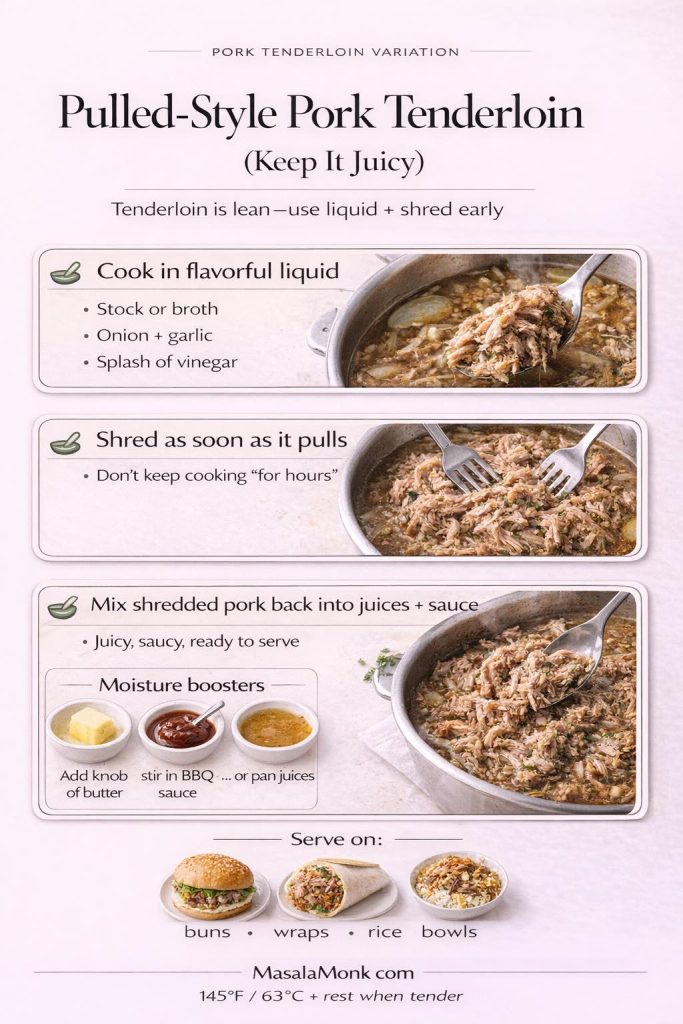
Pulled pork vibes without drying out lean tenderloin: cook it in a flavorful broth, shred as soon as it pulls, then stir it back into the juices so every bite stays saucy. This card doubles as a quick-reference for “pulled-style pork tenderloin” nights—use it for sliders, wraps, or rice bowls, and keep the moisture boosters (butter, BBQ sauce, pan juices) on standby.
Cook it in flavorful liquid (stock, onions, garlic, a touch of vinegar), then check for tenderness. As soon as it shreds easily, shred it and immediately mix it back into the cooking juices and sauce so it stays moist. Serve it in buns, wraps, or rice bowls.
Cook it in flavorful liquid.
Stop once it shreds easily.
Mix the shredded meat back into the cooking liquid and sauce immediately.
If your goal is the traditional barbecue pulled texture, pork shoulder is the best option. Pork loin can also handle longer cooking better than tenderloin. Even so, pulled-style tenderloin can be a satisfying “use what you have” dinner when it’s treated gently.
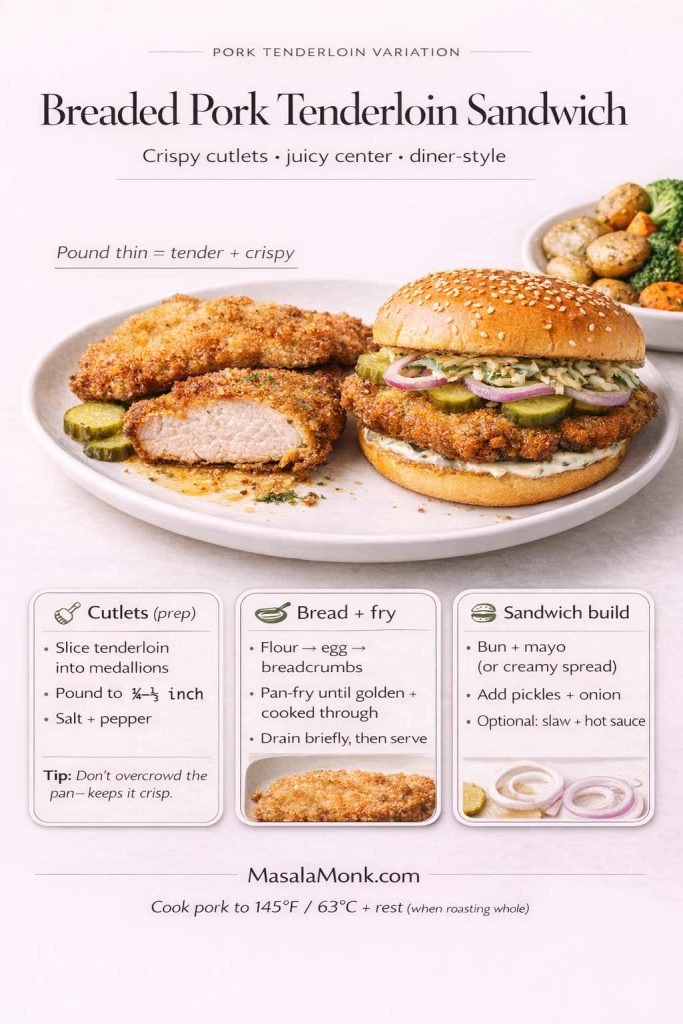
Breaded pork tenderloin and pork fillet sandwich style (crispy, hearty, different meal)
Roasted tenderloin is one personality. Crispy cutlets are another. When you slice tenderloin into medallions, pound thin, bread, and pan-fry, you get a completely different meal—crisp edges, juicy center, and the kind of sandwich that feels like comfort food.
Craving a crispy, diner-style pork tenderloin sandwich? This quick visual guide shows the cutlet method (slice → pound thin → bread → pan-fry) plus the easiest sandwich build with pickles and onion. Perfect for turning pork tenderloin into a totally different meal—crunchy outside, juicy center. Save it for later and use it as your weeknight blueprint.
Basic recipe for crispy cutlets
Slice tenderloin into medallions, then pound each slice thin.
Season with salt and pepper.
Dredge in flour, dip in beaten egg, then coat in breadcrumbs.
Pan-fry until crisp and cooked through.
Serve in a bun with pickles, onion, and a creamy spread such as mayonnaise.
For extra flavor, add a spoon of spicy sauce or a tangy slaw. Meanwhile, the leftover cutlets are incredible sliced into wraps.
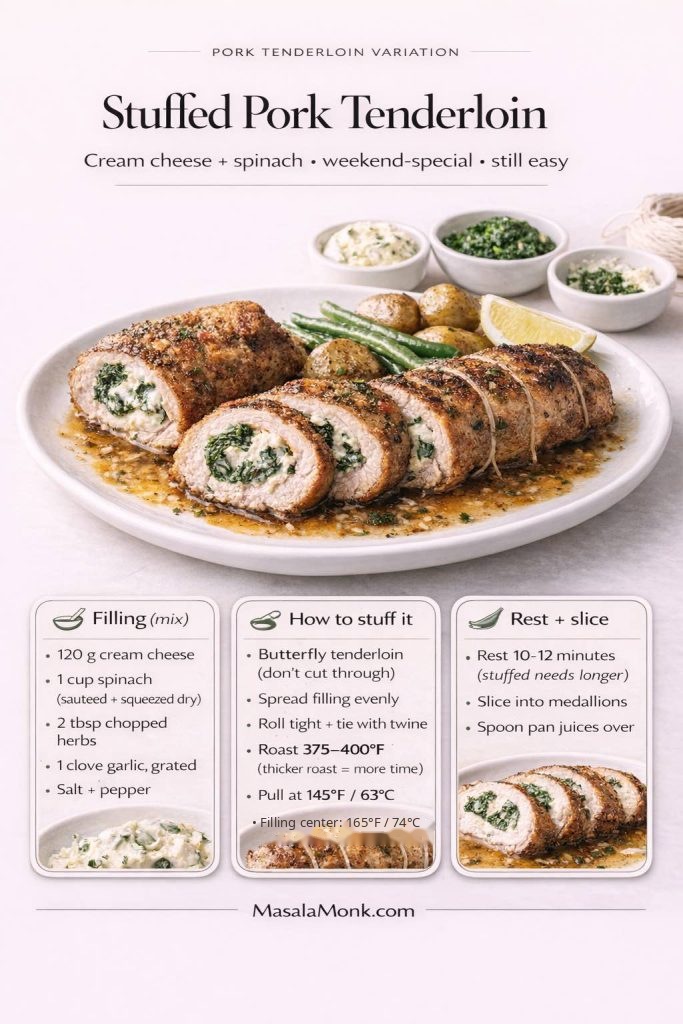
Stuffed pork tenderloin in oven (weekend-special, still approachable)
Stuffed tenderloin looks impressive and feels festive, especially for holiday pork tenderloin dinners. It does take a bit more prep, although the technique is approachable.
For this cream cheese and spinach stuffed pork tenderloin, butterfly, fill, roll and tie, then roast at 375–400°F. Because it is stuffed, check the center of the filling and cook it to 165°F / 74°C, then rest 10–12 minutes before slicing.
Butterfly the tenderloin (slice lengthwise, not all the way through), open it like a book, and flatten gently. Spread filling, then roll tightly and tie with twine at intervals. Roast at 375–400°F, checking the center of the filling with a food thermometer. Because this tenderloin is stuffed, the filling needs to reach 165°F / 74°C.
A stuffed tenderloin benefits from resting a bit longer—closer to 10–12 minutes—before slicing.
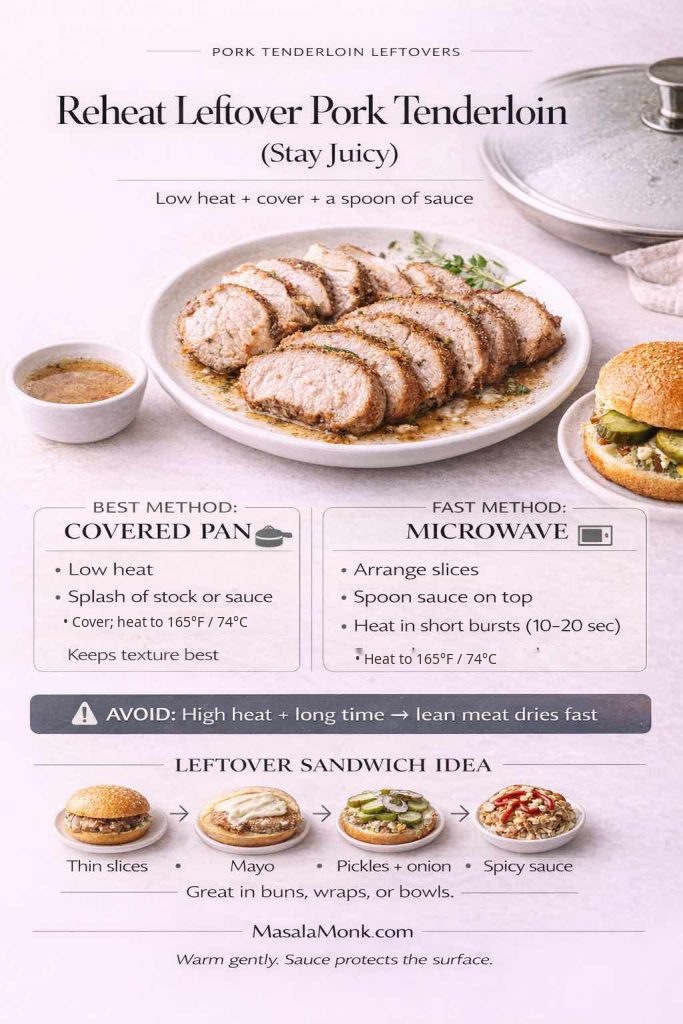
Leftover pork tenderloin (how to keep it juicy)
Leftovers are often where tenderloin truly shines, because the slices work in sandwiches, bowls, and quick skillets.
Reheat leftover pork tenderloin gently so it stays as juicy as possible: use a covered pan with a splash of stock or sauce, or microwave in short bursts with sauce on top, and heat the leftovers to 165°F / 74°C.
Best ways to reheat
Reheat slices gently in a covered pan with a splash of stock or sauce until the leftovers reach 165°F / 74°C.
Alternatively, microwave in short bursts with a spoon of sauce on top, checking until the leftovers reach 165°F / 74°C.
Avoid high heat for a long time, since lean meat dries quickly.
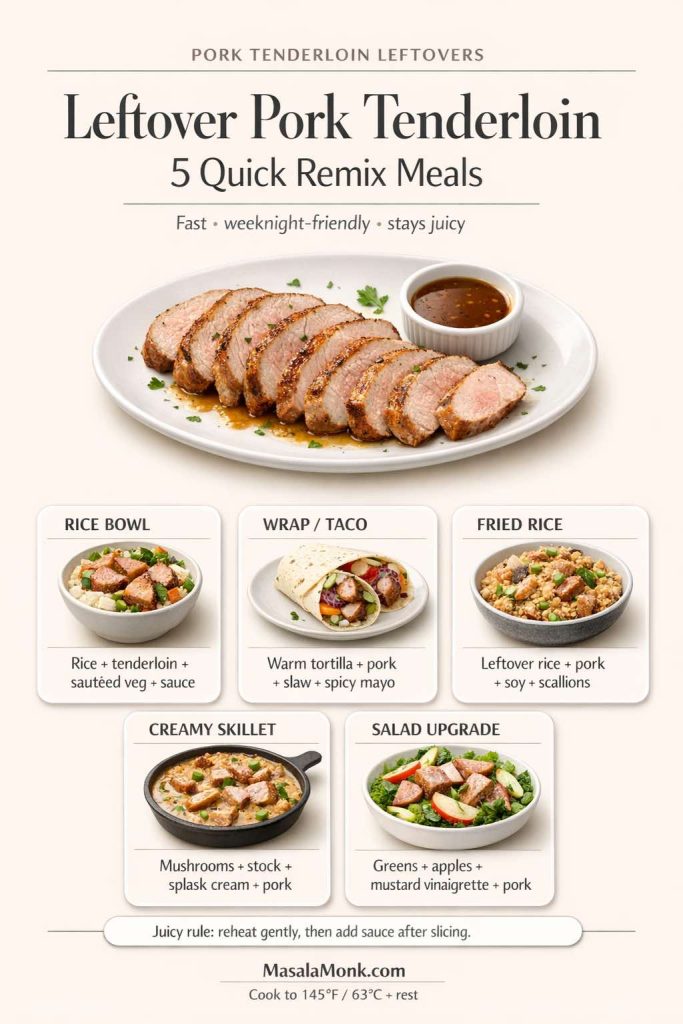
Leftover pork tenderloin doesn’t have to taste “leftover.” This quick guide gives you 5 easy remix meals—rice bowl, wrap/taco, fried rice, creamy skillet, and salad upgrade—so you can turn sliced tenderloin into fresh dinners that still stay juicy. Save it for busy nights, then grab the full pork tenderloin method + sauces on MasalaMonk.com (cook to 145°F/63°C and rest for the best texture). Pin it now so you always have a plan for tomorrow’s leftovers.
Leftover sandwich idea
Slice the tenderloin thinly, spread mayo, add crunchy pickles and onions, then finish with a spicy sauce if you like.
Putting it all together: a repeatable tenderloin template
Once you’ve cooked pork tenderloin in the oven a few times, the process becomes simple:
Pat dry, season well.
Roast at 400°F for speed, 350°F for gentleness, or 375°F for the middle path.
Start checking before 145°F; remove from the heat at 145°F / 63°C and rest.
Slice into medallions.
Finish with a sauce that matches the moment: honey garlic, creamy mushroom, balsamic, lemon, mustard, apples, maple, teriyaki, or BBQ.
The repeatable oven template: pat dry → season → choose 350/375/400°F → start checking before 145°F → remove at 145°F / 63°C → rest 8–10 minutes → slice → add your favorite finish.
From there, dinner becomes flexible. One night it’s pork tenderloin with potatoes and carrots. The next time it’s pork fillet in creamy mushroom sauce. Another evening, it becomes a pork fillet sandwich with crisp edges and a bright, punchy topping. Even smoked tenderloin has a place when you want that barbecue feel without committing to an all-day cook.
Most importantly, the tender result isn’t guesswork. Safe, juicy doneness comes from cooking to temperature and resting—exactly as laid out in the USDA temperature chart and the FoodSafety.gov internal temperature guide. Once that foundation is in place, everything else—glazes, sauces, sides, sandwiches—becomes a pleasure rather than a puzzle.
The part a timing chart can’t standardize
Two pork tenderloins can weigh almost the same and still finish several minutes apart. Thickness matters. So do starting temperature, oven calibration, pan material and how sharply the thin end tapers.
The most useful real-world cook record is four things:
weight
thickest point
oven temperature
minutes to 145°F / 63°C
Those four details tell another cook far more than “mine took 25 minutes.” The clock gets you close; the thermometer tells you where your particular tenderloin actually finished.
FAQs
1) What’s the difference between pork tenderloin and pork loin?
Pork tenderloin is the smaller, long, narrow cut and usually weighs about 1–1½ lb (450–700 g). Pork loin is thicker and often much larger, so it needs a different cook time. The flavor ideas can cross over; the timing cannot.
2) What temperature should pork tenderloin reach, and can it still be pink?
Cook an unstuffed whole pork tenderloin until the thickest center reaches 145°F / 63°C, then rest it before slicing. A faint rosy center can still be normal at that temperature, so use the thermometer rather than color alone as the doneness test.
3) How long does pork tenderloin take in the oven at 400°F?
A typical 1–1½ lb (450–700 g) tenderloin often takes about 18–24 minutes at 400°F, depending on thickness. Start checking early and remove it when the thickest center reaches 145°F / 63°C.
4) How long does pork tenderloin take in the oven at 350°F?
At 350°F, a typical pork tenderloin often takes about 25–35 minutes. Thickness matters more than the clock, so begin checking before the end of the range and use 145°F / 63°C as the finish point.
5) Is pork tenderloin better at 350°F or 400°F?
Both work. 400°F cooks faster and gives you more browning; 350°F gives you a gentler timing window. If you want the compromise, 375°F sits neatly between the two.
6) What’s the best way to season pork tenderloin?
Start with salt, black pepper, garlic and herbs, then decide whether dinner wants to lean smoky, tangy, sweet or spicy. Paprika adds warmth, Dijon adds tang, and a little brown sugar works well when you want a glaze-friendly crust. For deeper flavor, use a quick, same-day, or overnight marinade and blot away heavy excess before high heat so the outside browns instead of scorching.
7) Why is my pork tenderloin dry even when I follow the cook time?
Usually because it cooked a little past its sweet spot, or because it was sliced immediately. Tenderloin is lean, so a few extra minutes matter. A thermometer plus a proper rest is much more reliable than treating the timing chart as a deadline.
8) Should I sear pork tenderloin before baking it?
You don’t have to, but searing gives the outside a deeper roasted crust. If that sounds good, use the cast-iron method above: brown the tenderloin briefly on the stovetop, then finish it in the oven until the center reaches 145°F / 63°C.
9) Can I roast pork tenderloin with potatoes and carrots on one pan?
Yes. Give the vegetables a head start, then add the tenderloin later. That staggered timing lets the potatoes and carrots brown without forcing the lean pork to stay in the oven longer than it needs.
10) How do I keep honey garlic glaze from burning?
Brush a sugary glaze on near the end of roasting rather than at the beginning. Honey and brown sugar darken quickly, so the last 5–7 minutes is usually enough to make the surface glossy without scorching it.
11) What’s the best way to reheat leftover pork tenderloin?
Use gentle heat and a little moisture: a covered skillet with stock or sauce works especially well, while a microwave is fine in short bursts. Reheat cooked pork leftovers to 165°F / 74°C, then stop heating so the lean slices do not dry out further.
12) Can I slice pork tenderloin into medallions before cooking?
Yes, especially for quick pan-fried or sautéed pork medallions. For this oven method, however, roasting the tenderloin whole is easier to control and generally gives you a juicier center.