Posted on — Leave a comment

How to Make Paneer at Home: Soft Homemade Paneer

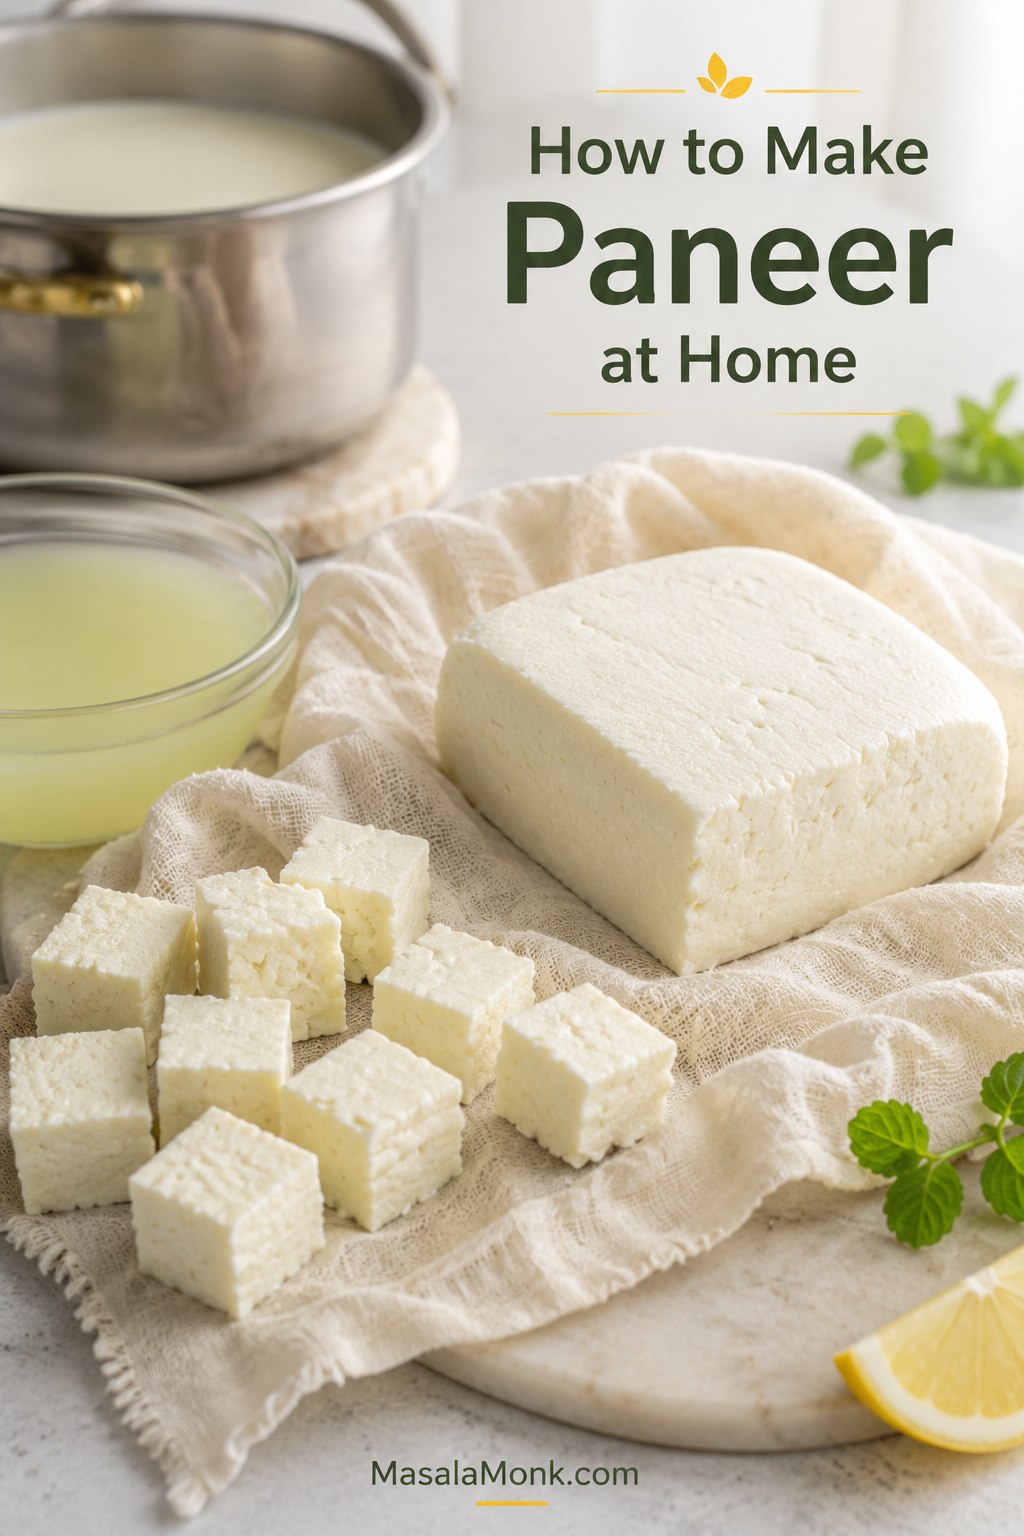
Fresh homemade paneer block on muslin with cut paneer cubes, pale whey in a glass bowl, and a milk pot in the background.

If you want to know how to make paneer at home, the process is simpler than it looks: heat milk, add just enough acid, strain the curds, and press only as much as your dish needs. Paneer may look like something you have to buy from an Indian grocery store, already pressed into a neat block for palak paneer, paneer tikka, or a creamy restaurant-style curry, but fresh homemade paneer is very doable in a regular kitchen.

The goal is not just paneer that sets. The goal is paneer that curdles cleanly, cuts neatly when you need cubes, and still stays tender when it goes into sauce.
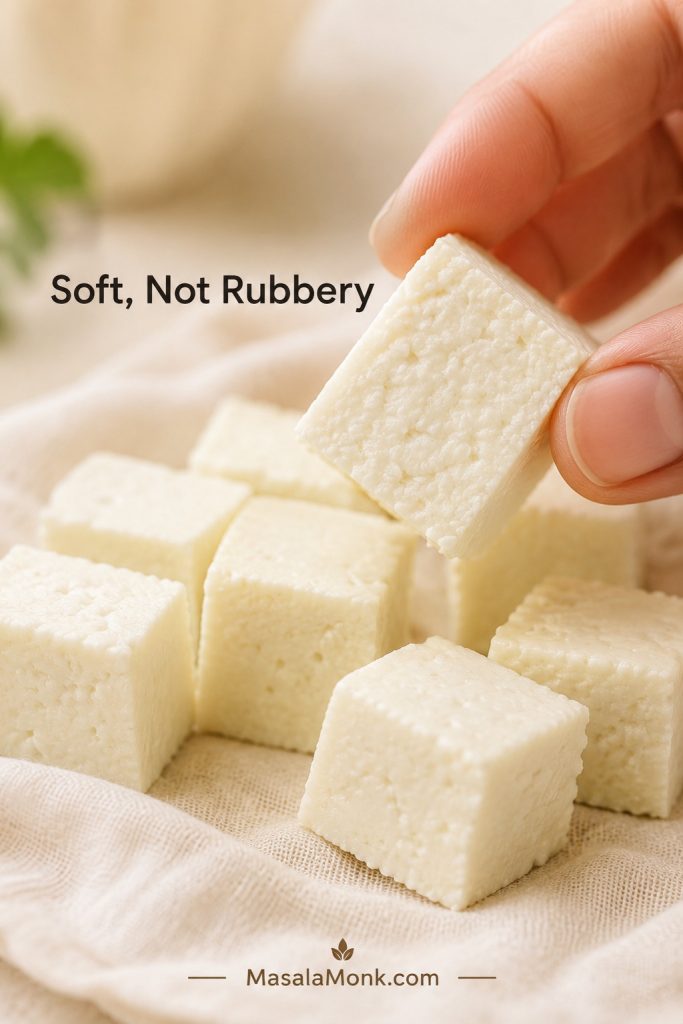
Close-up of a soft homemade paneer cube being held to show its moist interior.
This is the texture to aim for: paneer that sets cleanly but still looks moist inside. That softness is what keeps it tender in curry, bhurji, wraps, and bowls.

That texture comes from stopping at the right moments: before the milk boils too hard, before too much acid makes the curds tight, and before pressing turns soft curds into a dry block.

You do not need to understand cheesemaking to make paneer. You only need to know when the milk is hot enough, when the curds have separated, and when to stop pressing.

This guide helps most when you do not live near an Indian grocery store, feel unsure about supermarket milk labels, or have only found dense packaged paneer. If packaged paneer near you is firm, squeaky, or rubbery, homemade paneer can feel like a different ingredient.

If you have tried making paneer before and ended up with sour crumbs, weak curds, rubbery cubes, or milk that refused to curdle, you probably did not fail. Milk behaves differently from brand to brand: one batch may need gentler heat, another may need less acid, and another may need a shorter press. If you are nervous about wasting a large pot of milk, start with the 1-litre batch in the scaling table below.

If you are here because a batch already went wrong, jump to Troubleshooting Homemade Paneer first, then come back to the recipe with the problem in mind.

Once you have a good block, you can use it anywhere paneer texture matters: a rich curry like Balti Paneer Gravy, a quick filling, a salad bowl, a pan-seared snack, or a simple vegetarian dinner.

Quick Answer: How to Make Paneer at Home

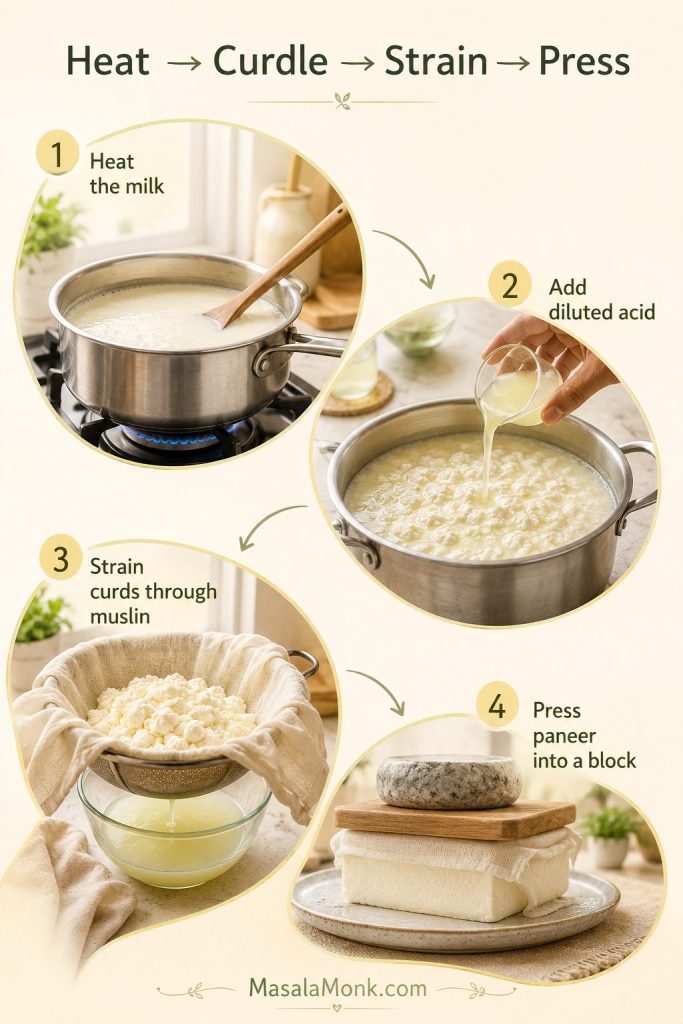
The easiest way to make paneer at home is to heat whole milk to 185–195°F / 85–90°C, or until it is steaming, foamy, and just about to rise. Add diluted lemon juice or plain white vinegar gradually until soft white curds separate from pale yellow-green, slightly translucent whey. Strain the curds through cloth, rinse briefly if needed, then press for 10 minutes for soft crumbles, 30–40 minutes for curry cubes, or up to 50 minutes for firmer tikka-style paneer.

The active work is about 20–25 minutes. The rest is mostly resting, draining, pressing, or chilling, depending on how firm you want the final paneer.

Best milkWhole milk / full-fat milk
Avoid if possibleSkim milk, fat-free milk, UHT milk, and ultra-pasteurized milk
Best beginner acidLemon juice or plain white vinegar, diluted with water
Temperature cue185–195°F / 85–90°C, or steaming and just about to rise
Yield from 2 litres / 8½ cups milkAbout 300–400 g / 10.5–14 oz paneer, depending on milk and pressing
Fridge storage2–3 days, covered or submerged in fresh cold water
Four-step paneer process showing milk heating, diluted acid being added, curds strained through muslin, and paneer being pressed.
The basic paneer recipe is simple, but each stage has a cue. Heat the milk, add acid gradually, strain when the whey clears, then press for the texture you need.

Still choosing ingredients? Start with Best Milk for Paneer. Already curdled the milk? Use the Pressing Times section to choose soft crumbles, curry cubes, or firmer tikka paneer.

Before You Start: 3 Things That Decide Paneer Texture

Most paneer problems come down to three simple choices: the milk, the acid, and how long you press. Get those right and the recipe becomes much more reliable.
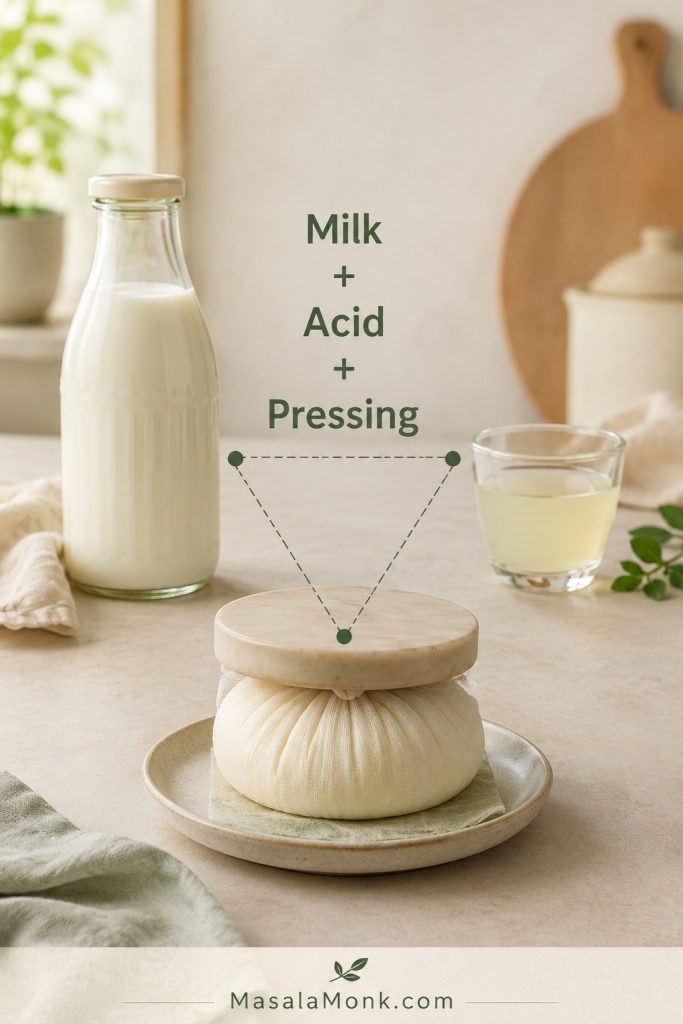
Milk, diluted acid, and paneer wrapped in muslin under a light weight shown as the three main texture factors.
If homemade paneer turns crumbly, sour, or rubbery, the cause is usually one of three things: milk choice, acid control, or pressing time.

Three things decide paneer texture: use whole milk for better curds, add diluted acid gradually, and press for the dish you are making. Bhurji needs almost no pressing, curry cubes need moderate pressing, and tikka needs a firmer block. Acid is the trigger, not the target.

At its simplest, paneer is just hot milk plus a little acid. The details below help you keep it soft, but the basic process is only heat, curdle, strain, and press.

Once you have seen milk split cleanly into curds and clearer yellow-green whey, the whole process feels much less mysterious.

Homemade Paneer Recipe

This is the base recipe if you want to make paneer at home with whole milk and lemon juice or vinegar. Use the pressing chart later in the guide to adjust the texture for bhurji, curries, tikka, wraps, bowls, or grilling.

Whole milk, lemon, vinegar, water, salt, muslin cloth, and a cooking pot arranged for making paneer at home.
Paneer does not need a long ingredient list. However, whole milk, diluted acid, and gentle handling matter more than any extra add-in.
Yield300–400 g / 10.5–14 oz paneer
Prep Time5 minutes
Cook Time15–20 minutes
Total Time45–70 minutes, plus optional chilling for firmer cubes

Equipment

  • Large heavy-bottomed pot, with room for the milk to rise
  • Wooden spoon or silicone spatula
  • Thermometer, optional but helpful for first-timers
  • Colander or large sieve
  • Cheesecloth, muslin, thin cotton towel, clean handkerchief, or nut milk bag
  • Large bowl to catch the whey
  • Plate or tray for pressing
  • Moderate weight, such as canned beans, a small pot, or a heavy skillet

Ingredients

  • 2 litres / 8½ cups / about 2.1 quarts whole milk
  • 3 tablespoons / 45 ml lemon juice or plain white vinegar, plus 1 tablespoon / 15 ml more if needed, diluted before adding
  • 3–4 tablespoons / 45–60 ml water, plus a little more if using the extra acid
  • ¼–½ teaspoon / about 1.5–3 g fine salt, optional

Step-by-Step Method

Heat, curdle, and strain the milk

  1. Prepare the strainer. Line a colander with cheesecloth, muslin, a thin cotton towel, or a nut milk bag. Place it over a large bowl to catch the whey.
  2. Heat the milk. Pour the milk into a heavy-bottomed pot. Heat over medium-low to medium heat, stirring often so the bottom does not scorch.
  3. Watch the temperature. Heat the milk to 185–195°F / 85–90°C. Without a thermometer, look for milk that is steaming, foamy at the edges, and just about to rise. Avoid a violent rolling boil.
  4. Dilute and add the acid. Mix the lemon juice or vinegar with the water. Turn the heat to low or switch it off, then add the diluted acid about 1 tablespoon at a time, stirring gently for a few seconds after each addition.
  5. Stop when the milk separates. Stop once you see soft white curds and pale yellow-green, slightly translucent whey. If the liquid still looks milky after 1–2 minutes, dilute the extra acid and add it 1 teaspoon at a time, waiting briefly between additions.
  6. Let the curds settle. Once curds form, stir as little as possible. Too much stirring can break soft curds into small grains. Let the curds sit in the hot whey for 5–10 minutes so they settle and gather.
  7. Strain and rinse. Pour the curds and whey into the lined colander. Gather the cloth gently and let gravity drain first. If you used lemon juice or vinegar, rinse the curds briefly under cool water to remove excess sourness and stop the cooking.

Salt, press, and cut the paneer

  1. Salt only if needed. For unsalted paneer, skip the salt. For lightly salted paneer, sprinkle the salt over the drained curds before shaping and pressing. If the paneer is going into a curry, you can skip the salt and season the sauce instead.
  2. Shape and press for your dish. Shape the curds into a flat square or disc inside the cloth. Press according to your final use: 0–10 minutes for soft crumbles, 15–20 minutes for a tender block, 30–40 minutes for curry cubes, or 45–50 minutes for firmer tikka cubes.
  3. Cut if needed. You can use soft paneer right away. For neat cubes, chill the pressed block for 20–30 minutes before cutting. For firmer tikka-style cubes, you can instead dip the pressed block in cold water for 5–10 minutes, then pat dry before cutting. Skip this for soft crumbled paneer.

Important cue: Once the curds have formed and the whey is no longer milky, pause. More acid will not make better paneer. It will only make sharper, firmer, more sour paneer.

Unsure which acid to use? The lemon, vinegar, yogurt, and citric acid comparison explains which option gives the cleanest flavor and which one makes softer curds.

Milk Temperature Cue

Use the thermometer reading or the visual cues together: the milk should be hot, steaming, foamy at the edges, and close to rising before you add acid.
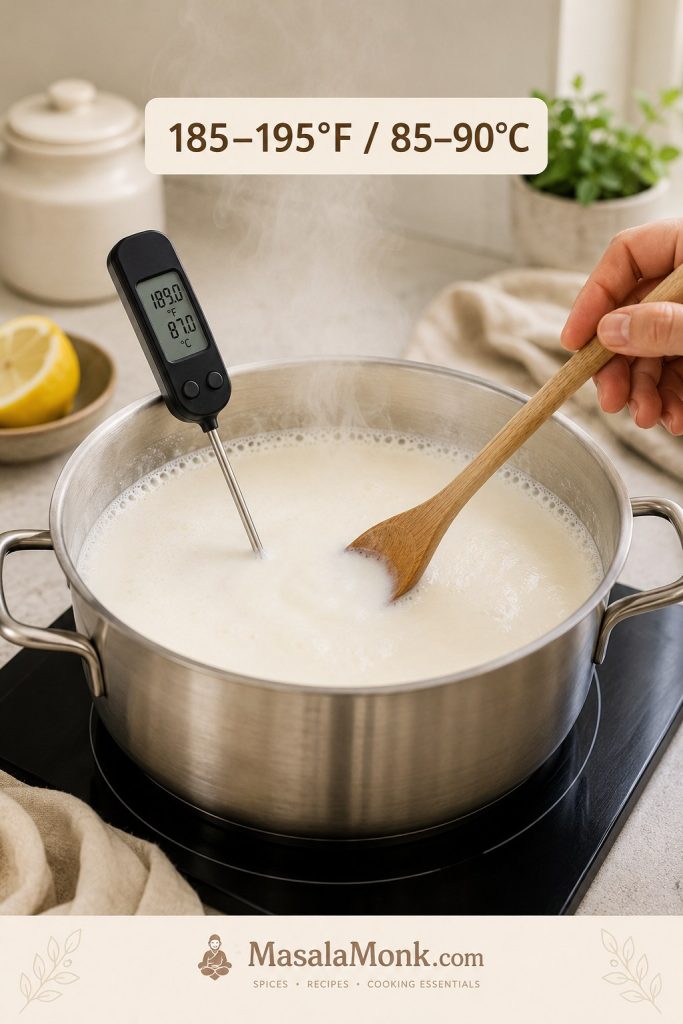
Milk heating gently in a pot with a thermometer showing the paneer temperature range of 185–195°F or 85–90°C.
The milk does not need a violent boil to make paneer. Look for steam, edge foam, and a near-rise so the curds form cleanly without tightening too early.

Curds and Whey Cue

After adding diluted acid, watch the liquid around the curds. Soft curds and pale yellow-green whey mean the milk has separated cleanly.
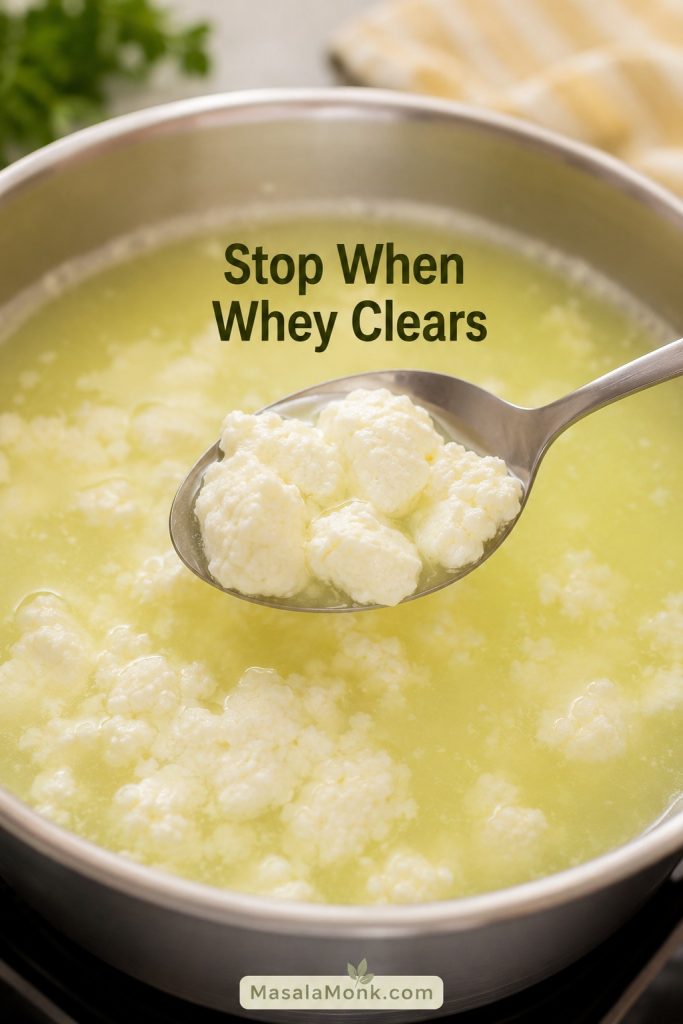
Soft white paneer curds forming in pale yellow-green whey inside a pot, with a spoon lifting the curds.
Clear whey is your stop sign. When soft curds gather and the liquid shifts from milky white to pale yellow-green, the acid has done its job.

Straining Paneer Curds

Once the curds have settled, pour them into the lined colander and let the whey drain first before you gather the cloth.
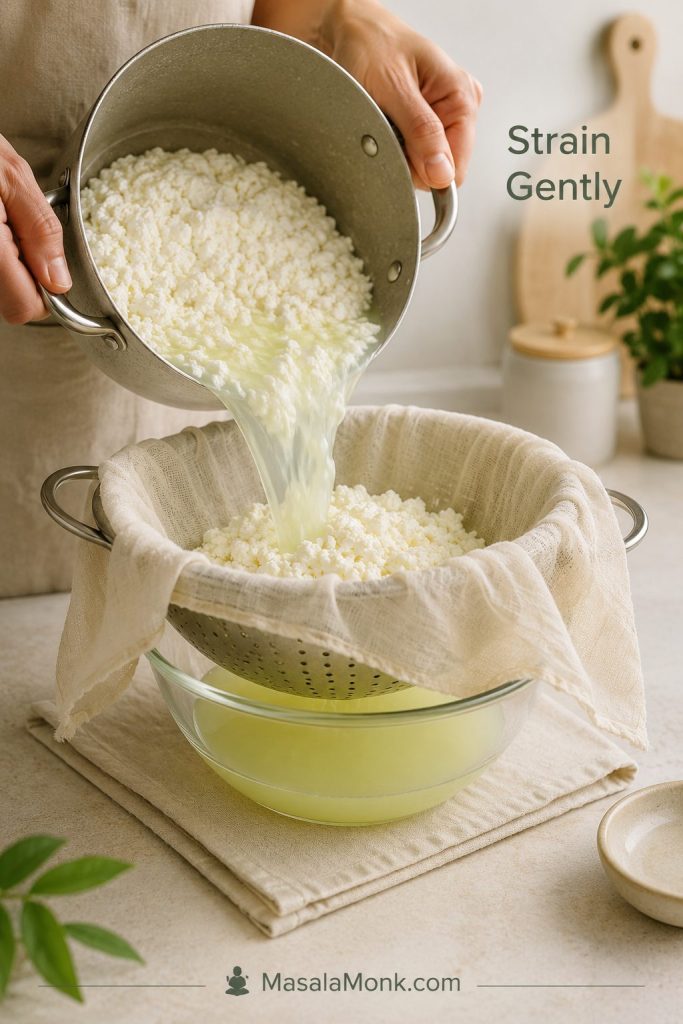
Paneer curds being poured into a muslin-lined colander over a bowl as pale whey drains below.
Let gravity do the first part of the draining. Squeezing too early can remove the moisture that makes homemade paneer soft and pleasant to eat.

How to Make Paneer with 1 Litre, 2 Litres, or 1 Gallon Milk

The recipe above uses 2 litres / about 8½ cups milk because it gives a useful home batch. You can scale homemade paneer up or down, but keep the acid flexible. Lemons vary, vinegar brands can differ slightly, and milk behaves differently by country, season, and processing method.

If this is your first time making paneer or you are testing a new milk brand, start with 1 litre. It is a smaller commitment, and it teaches you how that milk behaves before you make a larger batch.

Milk amountAcid to start withUse more only if…Expected paneer
1 litre / about 4¼ cups1–1½ tablespoons / 15–22 ml lemon juice or vinegar, dilutedThe whey still looks milkyAbout 150–200 g / 5–7 oz
2 litres / about 8½ cups3 tablespoons / 45 ml lemon juice or vinegar, dilutedUse up to 4 tablespoons / 60 ml if neededAbout 300–400 g / 10.5–14 oz
1 gallon / about 3.8 litres6 tablespoons / 90 ml lemon juice or vinegar, dilutedUse up to 8 tablespoons / 120 ml if neededAbout 600–750 g / 21–26 oz

Use these as practical ranges, not fixed guarantees. Richer milk gives more paneer. Leaner milk gives less. Longer pressing removes more moisture, so the final block weighs less. A 300–400 g block usually works for a family-style curry serving 3–4 people, depending on how paneer-heavy you like the dish.

What Soft Homemade Paneer Looks and Feels Like

The first batch is less stressful when you know what “right” looks like. These are the cues to trust as the milk changes from liquid to curds.

Three glasses showing milky whey, clear pale yellow-green whey, and over-acidified whey for making paneer.
Whey color tells you what to do next. Milky whey needs more time or a little more acid; clear yellow-green whey means the curds are ready to strain.
StageGood signWarning sign
Milk before acidSteaming, foamy at the edges, almost risingViolently boiling for several minutes
Curds formingSoft white clumps pulling away from the liquidTiny, tight, dry-looking grains
WheyPale yellow-green and slightly translucentCloudy, white, and still milky
Pressed blockSet but still slightly tender when touchedHard, dry, dense, or squeaky
Taste and smellClean, milky, faintly sweetSharply vinegary, harshly lemony, or stale-smelling

The curds should look soft and pillowy, not dry and pebbly. The pressed block should hold together, but it should not feel like a brick. If the paneer smells sharply acidic, rinse briefly and use less acid next time.

If your curds look tight, the whey is still milky, or the block feels squeaky, compare it with Troubleshooting Homemade Paneer before you throw the batch away.

What Is Paneer?

Paneer is a fresh Indian cheese made by curdling hot milk with an acid such as lemon juice, vinegar, yogurt, buttermilk, or citric acid. It is not aged, it does not need rennet, and it does not melt into strings like mozzarella or cheddar. Instead, paneer holds its shape when cooked, which is why it works so well in curries, skewers, stir-fries, wraps, sandwiches, and rice bowls.

Paneer is often called Indian cottage cheese, but that phrase can be confusing outside India. Western cottage cheese is loose, wet, and spoonable. Paneer is usually drained and pressed into a sliceable block. Depending on how long you press it, it can be soft and crumbly, tender and cubeable, or firm enough for tikka.

The flavor is mild, milky, and slightly sweet by design. That gentleness is exactly why paneer works so well with bold gravies, smoky marinades, peppery sauces, and spicy vegetables.

Best Milk for Homemade Paneer Outside India

Your carton matters more than the brand name here. The best milk for homemade paneer is whole milk, also called full-fat milk in many countries. It gives better curds, better yield, and a softer finished texture. Different countries sell milk under different labels, so do not worry if your carton does not say “full cream.” Look for regular pasteurized dairy milk with enough fat.

Generic whole milk carton held near soft paneer curds, muslin, and whey in a bright kitchen.
Start the paneer recipe at the milk carton. Whole milk or full-fat milk usually gives better curds, better yield, and a softer finished block.

Regular pasteurized whole cow’s milk is the best supermarket default. Buffalo milk is excellent if you can find it because it is richer and usually gives a softer, higher-yield paneer. Goat milk can work too, though the flavor is tangier and the curds may be more delicate.

The milk to be careful with is UHT, long-life, or ultra-pasteurized milk. These milks are treated at higher temperatures for longer shelf life, and that extra processing can make curd formation less reliable. If you are unsure what UHT or ultra-pasteurized means on a carton, this pasteurization guide explains the terms clearly.

Do not confuse regular pasteurized milk with ultra-pasteurized milk. Regular refrigerated pasteurized whole milk usually works well for paneer. The bigger issue is long-life, shelf-stable, UHT, or ultra-pasteurized milk, which can form weaker curds.
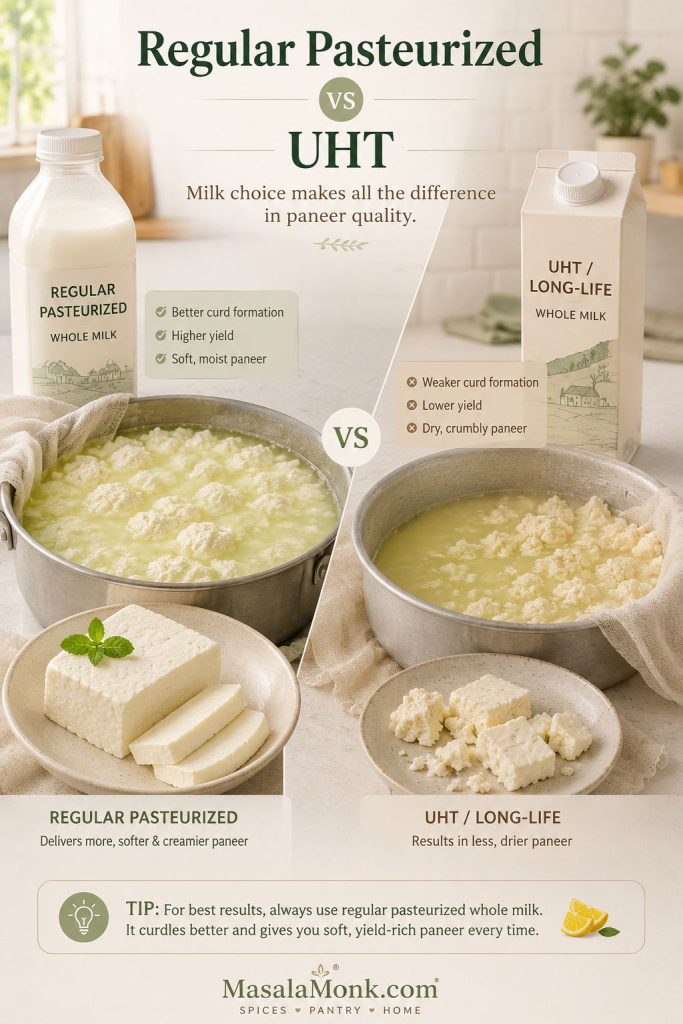
Regular pasteurized milk shown making clean paneer curds beside UHT milk shown with weaker curds.
Regular pasteurized milk and UHT milk are not equal for homemade paneer. If your milk will not curdle cleanly, long-life processing may be the reason.

Milk Labels That Work Best for Homemade Paneer

Milk label guide showing whole milk, full-fat milk, buffalo milk, 2 percent milk, lactose-free milk, skim milk, and UHT milk for paneer.
For soft homemade paneer, choose whole, full-fat, or buffalo milk when possible. Use 2% milk with lower-yield expectations, and avoid UHT or skim milk for reliable curds.
Milk labelUse for paneer?What to expect
Whole milk / full-fat milkBest choiceSoft, reliable curds and good yield.
Regular pasteurized cow’s milkYesThe best supermarket default for most readers.
Buffalo milkExcellentRicher, higher-yield, and traditionally prized for soft paneer.
Lactose-free dairy milkSometimesCan work if it is full-fat and not UHT or ultra-pasteurized.
2% milkPossible, not idealLower yield and a firmer, less creamy texture.
Skim or fat-free milkAvoidDry, weak, low-yield paneer that can crumble easily.
Organic milkCheck labelWorks if regular pasteurized, but some brands are ultra-pasteurized.
UHT / ultra-pasteurized / long-life milkAvoid if possibleMay curdle poorly or form weak curds.
Goat milkPossibleSofter curds and a tangier flavor.
Plant milkNot true paneerYou can make a vegan curd or tofu-style alternative, but it is not dairy paneer.

Important: Milk varies by country, brand, season, fat level, and processing. If one carton gives weak curds, do not blame yourself or the whole recipe. Try a different full-fat, non-UHT brand before changing the method.

If your milk is already hot but still not separating, go to Troubleshooting Homemade Paneer before adding too much acid.

Best Acid for Homemade Paneer: Lemon, Vinegar, Yogurt, or Citric Acid

Once the milk question is sorted, the next decision is acid. Paneer needs an acid to separate the milk into curds and whey. Lemon juice and plain white vinegar are the easiest choices for beginners because they are available almost everywhere. Yogurt, buttermilk, and citric acid also work, but they behave differently.

Watch the liquid around the curds; it tells you when to stop. The most important rule is not which acid you choose. It is how you add it. Dilute the acid with water, add it gradually, and stop as soon as the milk separates clearly. Too much acid can make paneer sour, grainy, firm, or rubbery.

Lemon juice or vinegar being mixed with water in a glass bowl before being added to milk for paneer.
Think of acid as a trigger, not the main ingredient. Diluting it first helps you add it gently and stop before the paneer turns sour or grainy.

Paneer Acid Options

Choose the acid by flavor and texture, but keep the method the same: dilute it, add it gradually, and stop when the milk separates clearly.
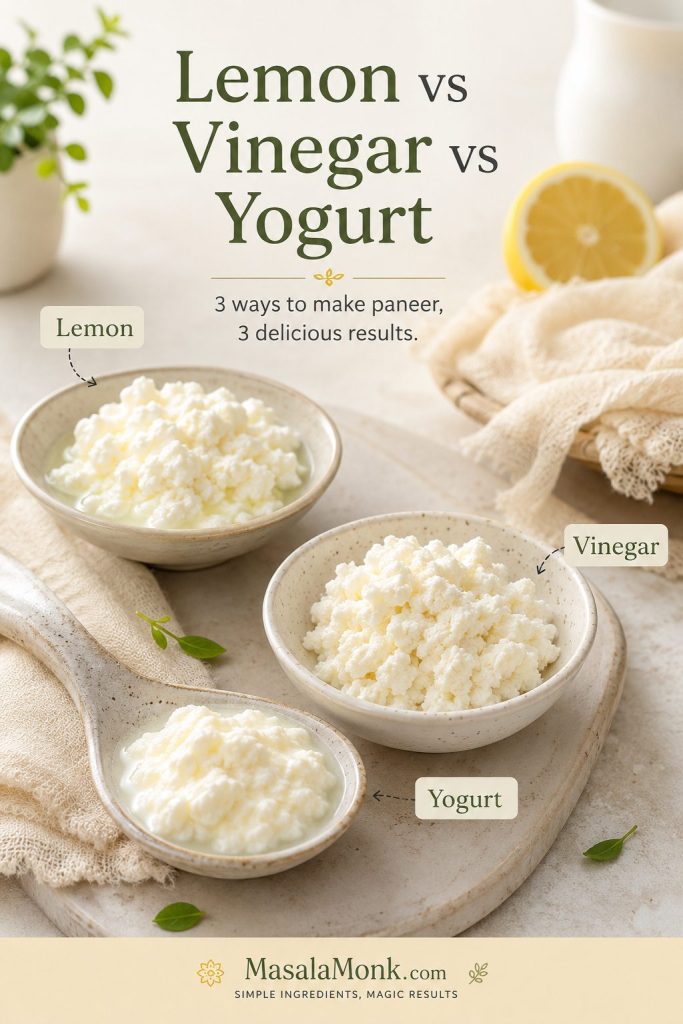
Lemon juice, vinegar, and yogurt shown with small paneer curd samples as acid options.
Lemon, vinegar, and yogurt can all make paneer. The choice affects flavor, but success still depends on adding acid gradually and stopping at the right whey cue.
AcidBest forFlavorTexture
Lemon juiceBeginner homemade paneerLight citrus note if not rinsedSoft to medium
Plain white vinegarReliable curdling and clean cubesNeutral if diluted and rinsedClean, firm curds
Yogurt / curdSofter paneerMild dairy tangSofter and moister
ButtermilkGentle curdlingMild tangSoft and delicate
Citric acidPrecise curdlingNeutral if measured carefullyCan turn firm if overused

How Much Acid to Use for Paneer

Practical starting point: for 2 litres / 8½ cups milk, start with 3 tablespoons / 45 ml diluted lemon juice or white vinegar. If using yogurt, start with ¼ cup / 60 g whisked plain yogurt and add more only if the whey still looks milky. If using citric acid, dissolve a very small amount in water first and add gradually; it is easy to overdo and can make paneer firm or sharp.

Measured lemon juice, vinegar, yogurt, and dissolved citric acid arranged beside a milk pot for paneer.
Measurements give you a safe starting point, but the pot gives the final answer. Stop when the curds gather and the whey clears.

Fresh lemon juice tastes clean, but lemons vary, so you may need a little more or less. Bottled lemon juice can work because it is consistent, though the flavor may be flatter than fresh lemon. Plain white vinegar is usually more predictable than fresh lemon juice and usually tastes neutral after dilution and rinsing.

Avoid strongly flavored vinegars unless you want that flavor in the paneer. Apple cider vinegar can work in a pinch, but plain white vinegar is cleaner. Whatever acid you use, add it slowly and watch the whey. The goal is not to empty the cup; the goal is to use only enough.

Step-by-Step Paneer Cues That Matter Most

The recipe card gives you the full method. These four cues keep homemade paneer soft instead of tight, sour, or rubbery.
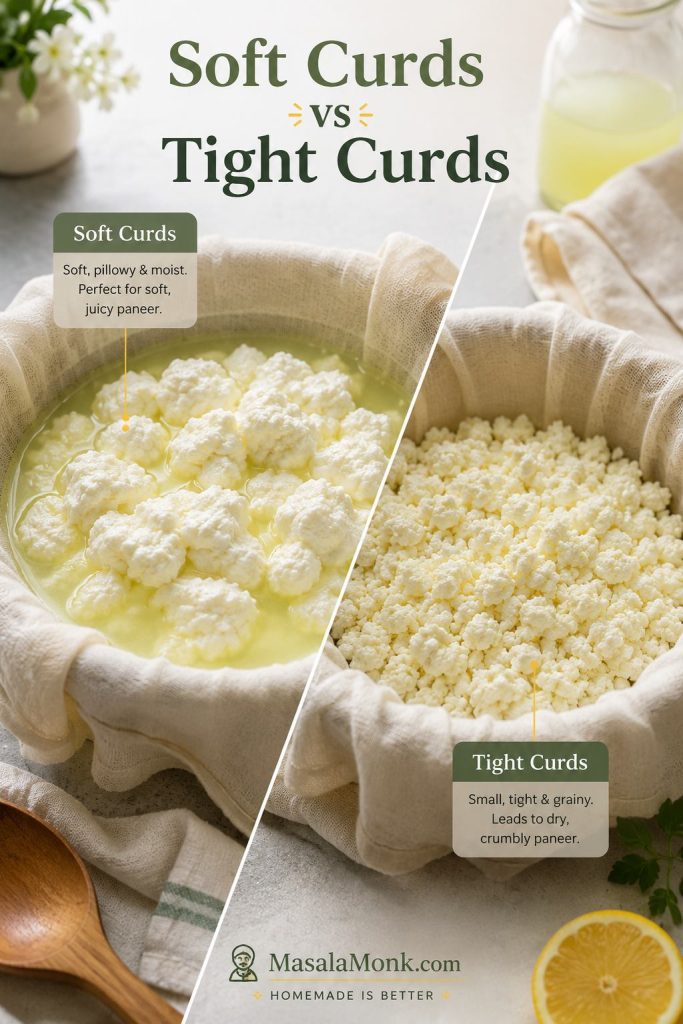
Soft pillowy paneer curds compared with tight grainy paneer curds in pale whey.
Good paneer curds should look soft, moist, and gathered. Tiny dry grains usually point to overheated milk, excess acid, or rough stirring.
  • Milk: use full-fat, non-UHT milk that separates cleanly.
  • Heat: stop at steaming and foamy, not a violent boil.
  • Acid: add it slowly and stop when the whey turns pale yellow-green and slightly translucent.
  • Draining: let gravity work before pressing; hard squeezing steals softness.

Rinsing Paneer Curds

Rinsing is useful when you used lemon juice or vinegar and want to remove sharpness. Keep it brief so the curds stay rich and delicate.
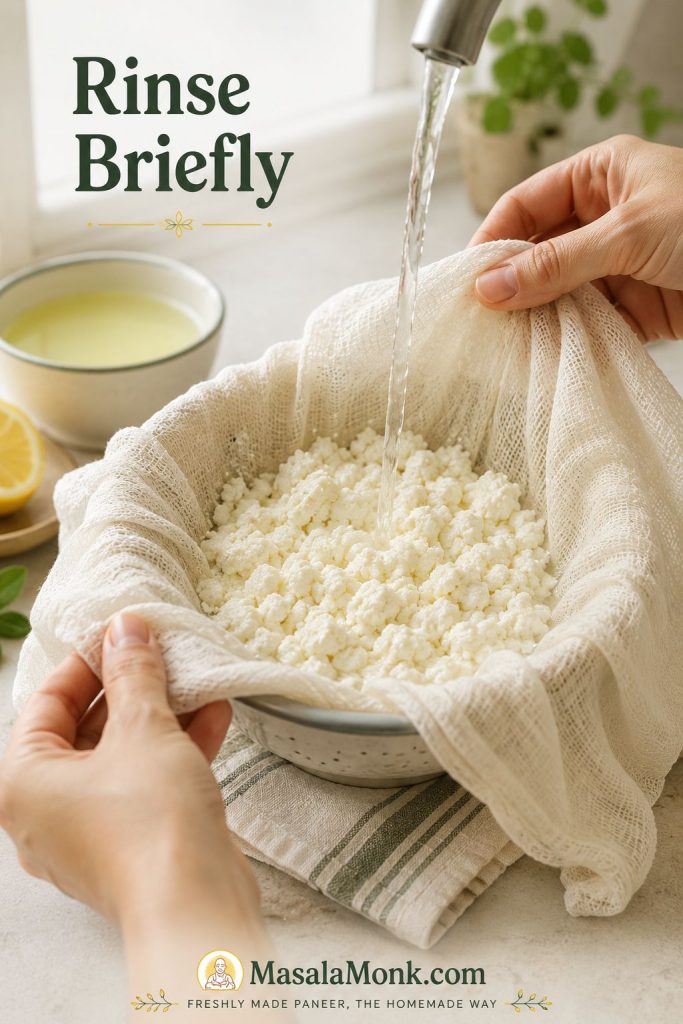
Paneer curds in muslin being briefly rinsed under cool water to reduce lemon or vinegar sourness.
A brief rinse can soften sharp lemon or vinegar flavor after straining. Keep it quick so the curds stay rich and do not lose too much dairy flavor.

Shape Before Pressing

Before you add weight, gather the drained curds neatly in the cloth. A tidy shape helps the paneer press evenly and cut more cleanly later.
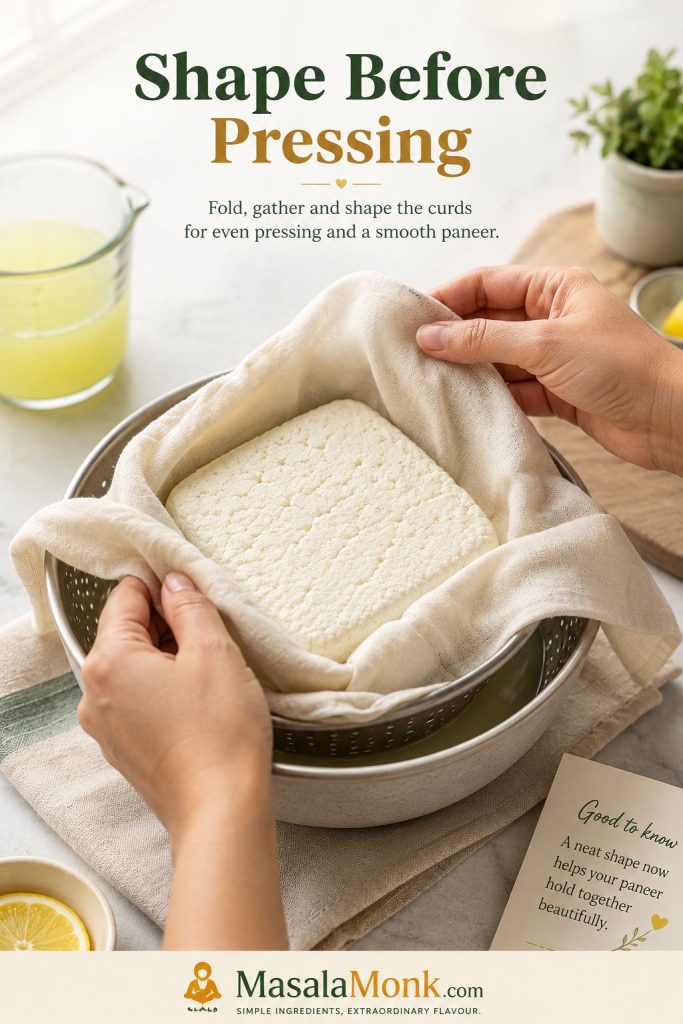
Hands folding muslin around drained paneer curds to shape them into a block before pressing.
Shape the curds before adding weight. This helps paneer set evenly, which makes cleaner cubes possible without forcing the block under heavy pressure.

How Long to Press Homemade Paneer

This is where you choose the paneer you actually want to eat: loose and soft for bhurji, tender for curry, or firm enough for skewers. Less pressing gives softer paneer. Longer pressing gives cleaner, firmer cubes.

If your paneer often turns hard, this is the section to slow down on. Pressing is not just a shaping step; it decides whether the paneer stays moist or becomes dense.
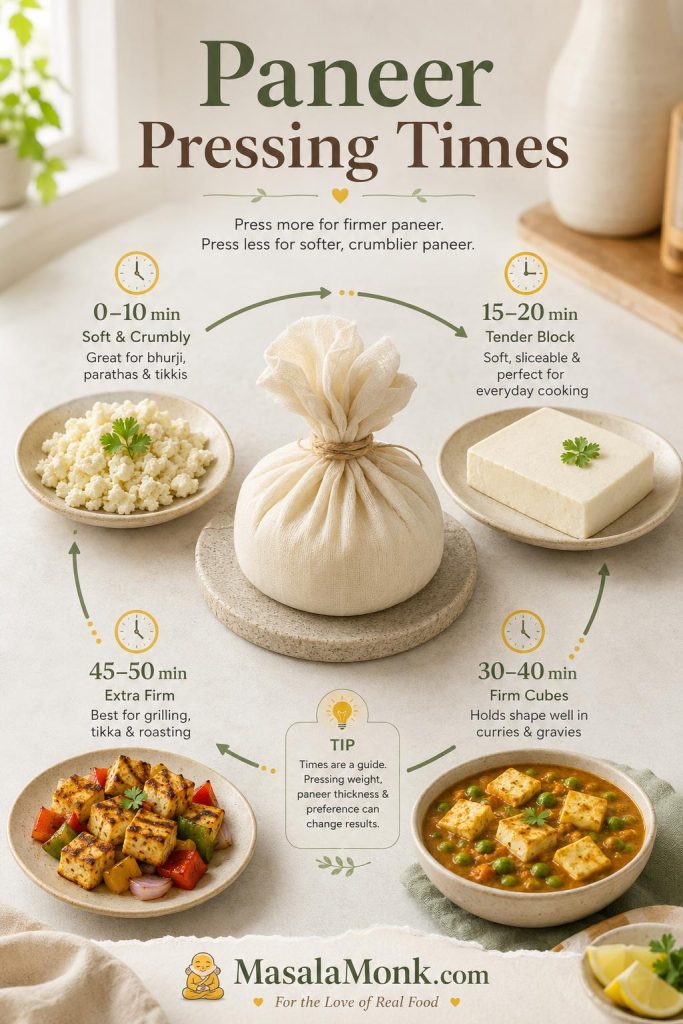
Paneer pressing guide showing soft crumbles, a tender block, curry cubes, and firmer tikka cubes with time cues.
The same paneer recipe can become soft bhurji curds, curry cubes, or tikka pieces. The difference is usually pressing time, not extra ingredients.
Final usePressing timeSuggested weightResult
Paneer bhurji, fillings, toast, sandwiches0–10 minutesNo weight or a very light plateLoose, soft curds
Bowls, salads, gentle pan-frying15–20 minutes400–600 g / 14–21 ozTender block
Curries like palak paneer, matar paneer, or balti paneer30–40 minutes600–900 g / 1.3–2 lbSliceable cubes that still stay moist
Paneer tikka, skewers, grilling45–50 minutes, then chill900 g–1.2 kg / 2–2.6 lbFirmer cubes that handle marinating and skewering
Very heavy pressing for several hoursAvoid for soft paneerAvoid heavy crushing weightCan become dense, dry, or rubbery

Use moderate weight, not crushing pressure. Two cans, a small pot, or a heavy skillet is enough for most home batches. If the paneer is for curry, a 30–40 minute press is usually plenty. If you want tidy cubes, chill the pressed block briefly before cutting.

Light vs Heavy Pressing

Use enough weight to form the block, not so much that the paneer loses all its moisture. This is especially important for curry cubes.
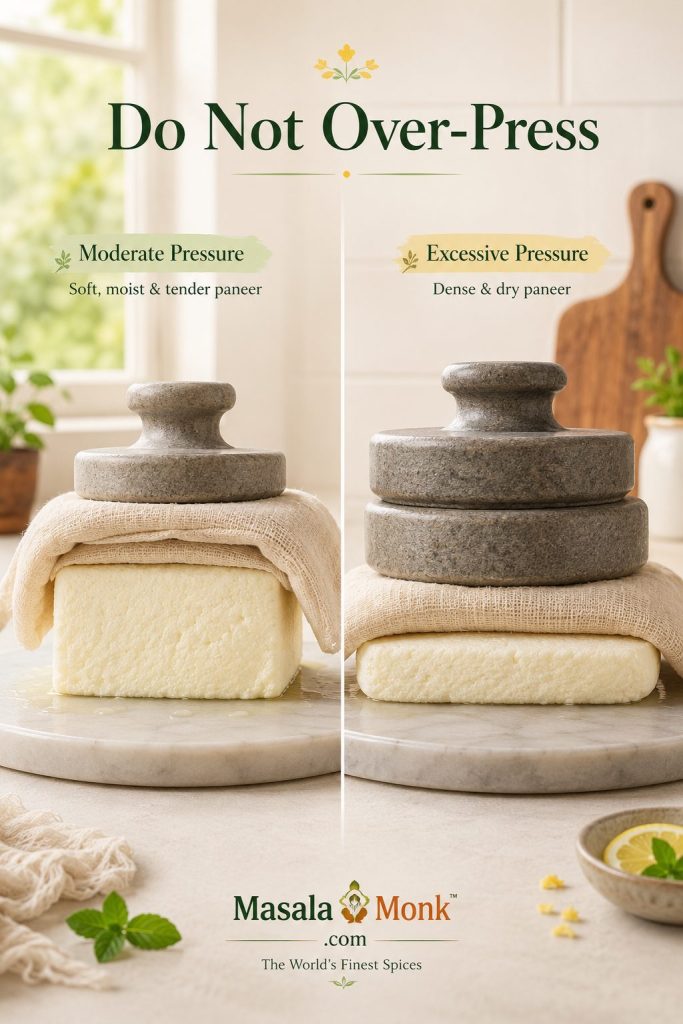
Light pressing compared with heavy pressing for paneer, showing a moist block and a denser compressed block.
Heavy pressing is one of the easiest ways to lose softness. For most paneer curries, moderate weight forms cubes without squeezing out all the moisture.

Once the paneer is pressed, the next texture risk happens in the pan. See How to Keep Paneer Soft When Cooking before adding the cubes to curry.

Soft Paneer vs Firm Paneer: Both Can Be Right

The best paneer is not always the firmest paneer. The right texture depends on what you are cooking next.

Soft crumbled paneer in a bowl beside firm paneer cubes, with bhurji and tikka-style uses in the background.
Soft paneer and firm paneer are both useful. Crumbles belong in fillings and bhurji, while firmer cubes work better for tikka, skewers, searing, and thicker gravies.

Soft paneer is delicate, moist, and slightly crumbly, so it works beautifully for bhurji, fillings, wraps, cutlets, quick bowls, and gentle curries where perfect cubes do not matter.

Firm paneer is better for tikka, skewers, grilling, pan-searing, or restaurant-style cubes in thick gravy. However, firm should not mean rubbery. Good firm paneer still has moisture inside.

How to Cut Paneer Cubes Cleanly

If you want tidy cubes, chill the pressed paneer briefly and cut with a sharp knife. Slightly larger cubes are easier to handle in curry.
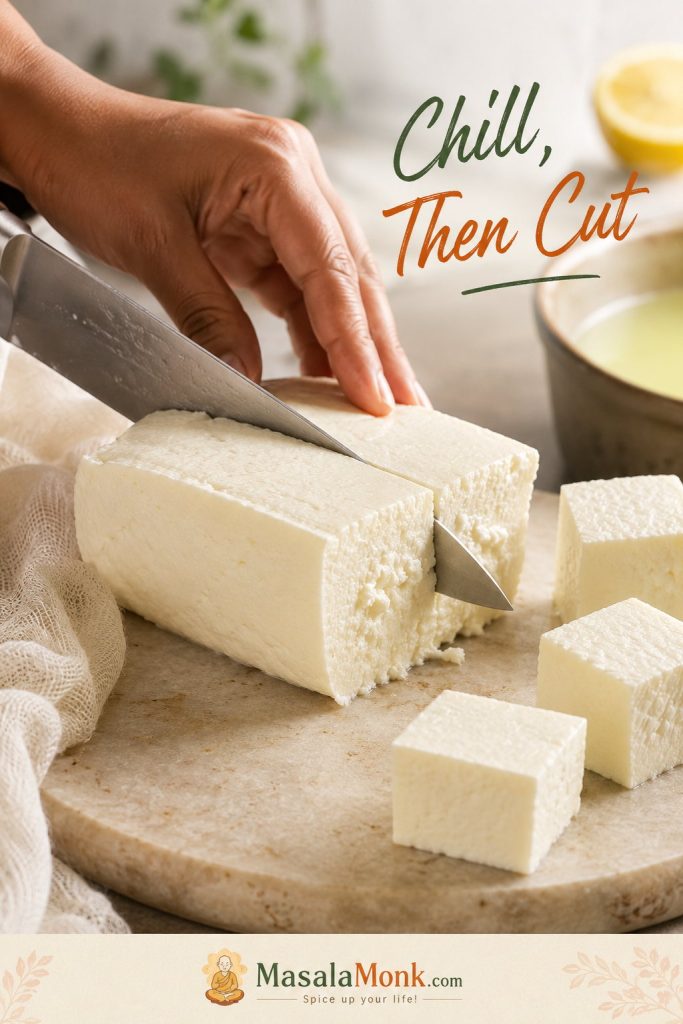
Pressed paneer block being cut into cubes with a sharp knife on a stone board.
If homemade paneer breaks when you cut it, chill the pressed block briefly first. A sharp knife and slightly larger cubes help tender paneer hold its shape.

How to Keep Paneer Soft When Cooking

Paneer can be perfect after pressing and still turn dry if it is cooked too aggressively. Most paneer dishes do not need the paneer to simmer for a long time. Add it when the sauce is already cooked, let it warm through gently, and avoid hard boiling. This matters in creamy gravies such as Kali Mirch Paneer, where paneer should stay tender rather than chewy.

Paneer cubes being gently added to a finished curry with a spoon.
Let the gravy finish cooking before the paneer goes in. Then the cubes only need a gentle warm-through, which helps them stay tender.
  • Curries: add paneer near the end and simmer gently for only a few minutes.
  • Pan-frying: sear quickly, then remove or add sauce. Long frying can toughen paneer.
  • Store-bought paneer: soak cubes in warm water for 10–15 minutes before cooking, especially if the block feels cold and stiff.
  • Homemade paneer: avoid over-pressing if it is going into a soft curry.
  • Paneer tikka: press firmer, chill before cutting, and handle gently while marinating.

Homemade paneer is often softer than store-bought paneer, so treat it gently. Use a sharp knife, cut slightly larger cubes if the paneer feels delicate, and avoid aggressive stirring after adding it to curry. If you are making a rich paneer gravy, the sauce should be ready before the paneer goes in. Paneer should finish the dish, not endure the whole cooking process.

Homemade Paneer vs Store-Bought Paneer

Store-bought paneer is convenient, and there is nothing wrong with using it. It is helpful when you are short on time or cooking a quick dinner. But homemade paneer gives you freshness and texture control that packaged paneer often cannot match.

Homemade paneer cube broken open beside a firmer store-bought-style paneer cube with generic packaging blurred behind.
Store-bought paneer is useful when you are short on time, but homemade paneer lets you control moisture, pressing, and softness from the start.

Many store-bought paneer blocks are firmer because they are pressed, packaged, transported, refrigerated, and stored before you cook with them. Some are excellent, but many are denser than the paneer you would make fresh at home.

If your only experience with paneer has been hard cubes that sit separately from the sauce, homemade paneer can change how you think about the dish. Good paneer should be gentle, milky, and tender enough to belong inside the gravy, not feel like a separate chewy block.

You can also fold homemade paneer into vegetable dishes near the end, as in an Aloo Gobi with Paneer variation, where the cubes add protein without needing a long cooking time.

Already Bought Paneer? Here’s How to Soften It

Warm-water soaking can relax cold store-bought paneer and make it feel less stiff, but it may not fully rescue a very dense block. Choose the method based on the dish.

Store-bought paneer cubes shown cold, soaking in warm water, and drained after softening.
Warm-water soaking can relax cold packaged paneer before it goes into curry. It will not fix every dense block, but it often makes store-bought paneer gentler to eat.
  • Quick curries: cut the paneer into cubes and soak in warm water for 10–15 minutes, then drain gently.
  • Browned paneer in saucy dishes: shallow-fry the cubes briefly, then soak them in warm water before adding them to the gravy.
  • Delicate creamy gravies: skip hard frying and add paneer near the end so it only warms through.
  • Very rubbery paneer: soaking helps, but it may not completely fix an over-pressed or low-moisture block.

If packaged paneer keeps turning dense for you, the pressing guide shows how homemade paneer can be adjusted for softer curry cubes or firmer tikka pieces.

Paneer vs Tofu, Halloumi, Ricotta, Queso Fresco, and Cottage Cheese

If you are new to paneer, think of it as a mild, dairy-based cheese that holds its shape. Firm tofu is the closest non-dairy shape-holder, halloumi is saltier and springier, and queso fresco or queso blanco can be crumbly or tangier. Ricotta works better for soft fillings than cubes, while Western cottage cheese is wet and curdy rather than pressed.

Small plates of paneer, firm tofu, halloumi, queso fresco, and ricotta or cottage cheese arranged for comparison.
Paneer is mild, fresh, and sturdy enough to hold its shape. Tofu, halloumi, queso fresco, and ricotta can help in some recipes, but none behave exactly the same.

If paneer is not sold where you live, homemade is often easier than hunting for the perfect substitute.

Richer Malai-Style Paneer Variation

If you are using regular cow’s milk and want richer, softer paneer, you can make a malai-style variation by adding cream. This is especially useful if your local milk produces firmer paneer than you like.

Cream being poured into warm milk in a pot with soft paneer cubes in the background.
A malai-style paneer variation adds richness when local milk gives firmer curds. Use a little cream with whole milk for a fuller, softer homemade paneer texture.

For 2 litres / 8½ cups whole milk, add ¼–½ cup / 60–120 ml heavy cream or replace ½ cup / 120 ml of the milk with cream. Use plain dairy cream without strong stabilizers if possible. Heat, curdle, strain, and press as usual. Because the extra fat makes the curds richer and softer, press gently unless you specifically need firm tikka cubes.

Can You Make Paneer with 2% or Low-Fat Milk?

You can make paneer with 2% milk, but it will not behave like whole-milk paneer. Expect less yield, leaner curds, and a block that may taste firmer or more crumbly. It can still work for bhurji, fillings, or macro-focused cooking, but whole milk is better for soft curry cubes.
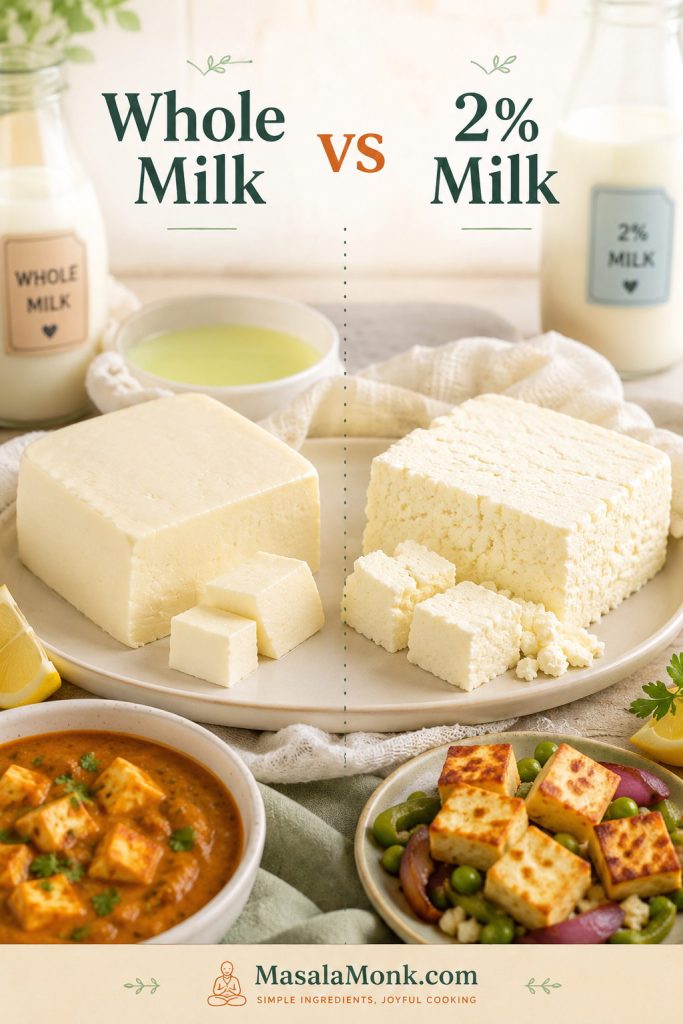
Whole milk paneer compared with a firmer and more crumbly 2 percent milk paneer result.
Low-fat milk can curdle, but the paneer is usually leaner, lower-yield, and more crumbly. For soft curry cubes, whole milk is the more forgiving choice.

Skim milk or fat-free milk is not recommended for this recipe. If you must use lower-fat milk, keep the method gentle: avoid harsh boiling, add acid gradually, rinse briefly, press lightly, and store the paneer in water. Expect a different result from full-fat paneer.

Instant Pot Note

You can make paneer in an Instant Pot, especially with the yogurt-boil function. Use it only to heat the milk; do not pressure cook the paneer. Once the milk is hot and foamy, add diluted lemon juice or vinegar gradually, then follow the same resting, straining, and pressing method. For your first batch, the stovetop is still easier because you can see exactly when the milk is hot enough and when the curds separate.

How to Use Homemade Paneer

Homemade paneer is best when you match the texture to the dish: soft curds for fillings, tender cubes for curries, and firmer cubes for grilling or skewers.

Homemade paneer used in curry, bhurji, tikka skewers, wraps, salad, and pan-seared cubes.
Once you know how to make paneer at home, it becomes a flexible vegetarian protein. Use soft curds in fillings, tender cubes in curry, and firmer pieces for tikka or searing.

Use soft crumbled paneer for fillings and quick meals

Soft paneer curds are excellent for paneer bhurji, toast, wraps, paratha fillings, sandwiches, cutlets, and snack-style recipes. They also work well in comfort-food ideas like Indian Cottage Cheese Jaffles, where a soft filling matters more than tidy cubes.

Use soft cubes for curries and vegetable dishes

For curries, you want paneer that holds shape but still feels moist. Press for 30–40 minutes, chill if needed, then add the cubes near the end of cooking. The sauce should be ready first; paneer only needs a few gentle minutes to warm through. This works for palak paneer, matar paneer, paneer butter masala, kadai paneer, and similar gravies.

Use firmer cubes for tikka, skewers, and grilling

For paneer tikka or skewers, press a little longer and chill before cutting. Firmer paneer is easier to marinate and thread onto skewers. Handle it gently, especially if your homemade paneer is softer than packaged paneer.

Use paneer for vegetarian protein

Paneer is also useful in vegetarian meal prep because it adds protein and richness without needing a long cooking time. Use it in salads, rice bowls, wraps, cutlets, and Indian-style meal prep plates. For more protein-focused Indian meal ideas, see MasalaMonk’s High-Protein Indian Meal Prep.

Do Not Throw Away the Whey

After you strain paneer, you will be left with whey: the pale yellow liquid that separated from the curds. It may look like something to discard, but it is useful in the kitchen.

Leftover paneer whey being poured into flour or dough, with dal and rice in the background.
Mild paneer whey is too useful to throw away. Add it to roti dough, dal, soups, rice, oats, or grains whenever a little extra dairy tang fits the dish.
  • Use whey to knead flatbread, roti, naan, paratha, or bread dough.
  • Add it to lentils, dals, soups, stews, and curries.
  • Use it as part of the liquid for rice, quinoa, oats, or other grains.
  • Add a small amount to smoothies if it is not too sour.
  • Freeze it in small portions for later cooking.
  • Use very sour whey carefully, because it can change the flavor of delicate dishes.

Mild whey is useful in dough, rice, dals, and soups. Very sour whey is better in robust curries, breads, or flatbreads where a little tang makes sense. Avoid using sour whey in delicate desserts or plain rice unless you specifically want that flavor.

Refrigerate whey promptly and use it within 2–3 days, or freeze it in small portions. If you make paneer often, you can also use leftover whey from one batch to help curdle a future batch, although lemon juice or vinegar is easier for beginners.

Storing the paneer too? Use the storage and freezing guide so the cubes stay fresh while the whey gets used in dough, dal, rice, or soup.

How to Store and Freeze Homemade Paneer

Homemade paneer is a fresh, high-moisture cheese, so treat it gently and use it soon. Fresh paneer is softest the day it is made, but it can be refrigerated for a short time. Do not leave it sitting at room temperature for long. Cool it, cover it, and refrigerate it promptly.

Storage methodBest timeNotes
Same dayBest textureUse fresh paneer the day you make it for the softest result.
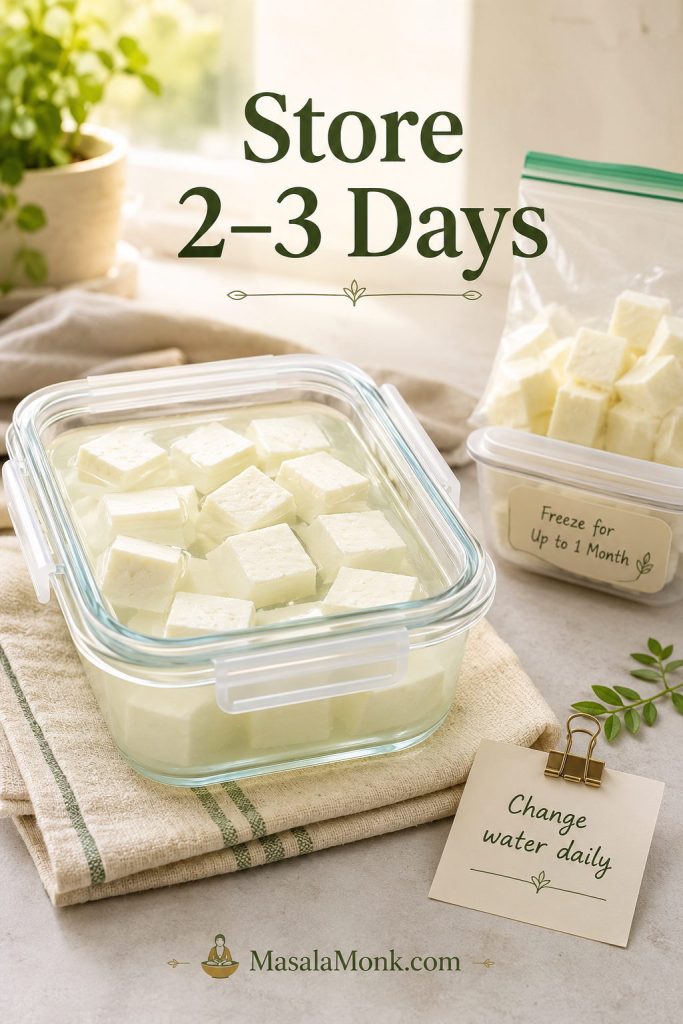
Refrigerator2–3 daysStore covered or submerged in fresh cold water. Change water daily.
FreezerUp to 1 month for best textureFreeze in portions. Thaw in the fridge and soak briefly in warm water before using if needed.
Homemade paneer cubes stored in fresh water inside a glass container with freezer portions and a note to change water daily.
Water storage keeps fresh paneer from drying out, but it does not make it long-keeping cheese. Change the water daily and use the paneer within 2–3 days.

To refrigerate paneer, cool it first, then store it in an airtight container. For softer paneer, cover it with fresh drinking water, keep the container covered, and change the water daily. Avoid storing paneer in very sour whey unless you want the flavor to become tangier. For broader cold-storage guidance, FoodSafety.gov has a useful reference, but for homemade paneer, the simple rule is: refrigerate promptly and use it within 2–3 days.

Unsalted homemade paneer tastes freshest sooner; if you lightly salt the curds, it may taste seasoned for snacks but should still be treated as a fresh cheese and used quickly.

If paneer smells sour in a bad way, feels slimy, looks moldy, becomes fizzy, or feels unusually sticky, discard it.

Troubleshooting Homemade Paneer

When you make paneer at home, an imperfect batch does not always mean failure. Paneer that will not cube neatly can still become bhurji, a sandwich filling, paratha stuffing, cutlets, toast, or a quick scramble. Most paneer problems are texture problems, not total failures.
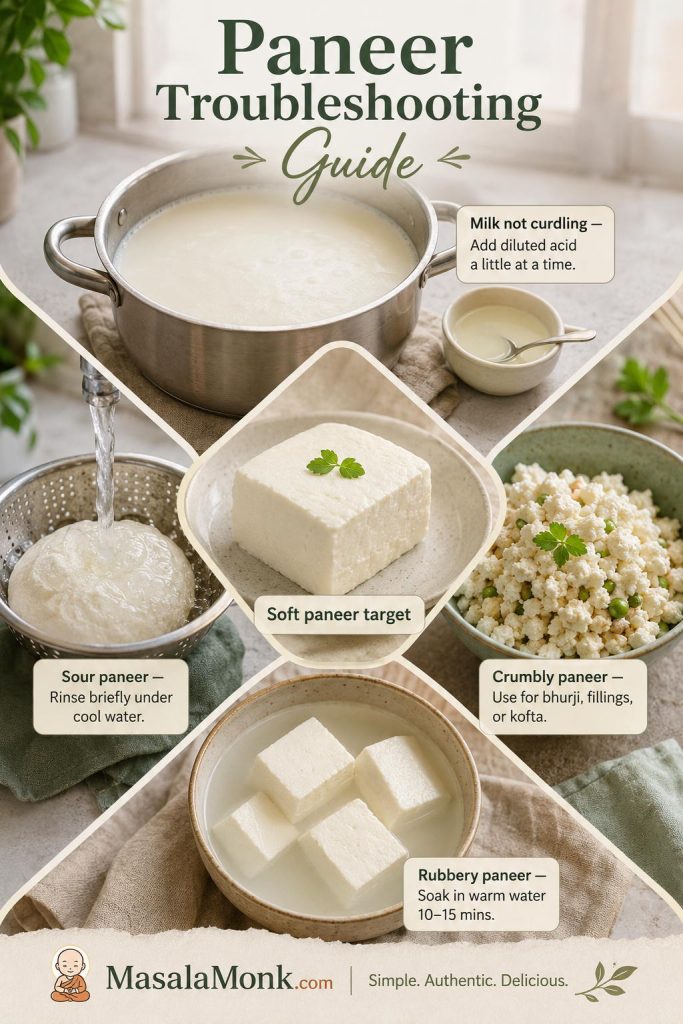
Paneer troubleshooting guide showing milk not curdling, sour paneer, crumbly paneer, rubbery paneer, and a soft paneer target.
Not every imperfect paneer batch is wasted. Milk that will not curdle can be adjusted slowly, sour curds can be rinsed, and crumbly paneer can still become bhurji or fillings.

Use the table below to decide what to do now and what to change next time.

ProblemLikely causeFix nowFix next time
Milk did not curdleMilk was not hot enough, not enough acid, or UHT/ultra-pasteurized milkReheat gently and add diluted acid 1 teaspoon at a timeUse full-fat, non-UHT milk
Whey still looks milkyIncomplete separationRest longer or add a little more diluted acidWait for pale yellow-green, slightly translucent whey before straining
Paneer tastes sourToo much acid or not rinsedRinse briefly under cool waterDilute acid and stop adding it earlier
Paneer is rubberyOverheating, too much acid, over-pressing, or harsh cookingSoak cubes in warm water for 10–15 minutesUse gentler heat, gradual acid, and shorter pressing
Paneer is crumblyWeak curds, low-fat milk, over-acidified curds, or not enough pressingUse it as bhurji or fillingUse richer milk and press slightly longer
Paneer breaks in curryToo soft, cut too soon, or stirred too roughlyAdd gently when the sauce is readyPress 30–40 minutes and chill before cutting
Paneer is dry after cookingFried or simmered too longSoak briefly in warm waterCook the sauce first, then warm paneer through gently

Why did my milk not curdle?

Usually, the milk was not hot enough, the acid was too weak, or the milk was UHT / ultra-pasteurized. Bring the milk back to 185–195°F / 85–90°C, add 1 teaspoon diluted lemon juice or vinegar, stir gently, and wait 30–60 seconds. Repeat only until the whey clears and the curds separate.

If the milk still refuses to separate, the milk itself may be the issue. Try another full-fat, non-UHT brand next time.

Why is my paneer rubbery?

Rubbery paneer usually comes from hard boiling, too much acid, heavy pressing, or long cooking in sauce. To rescue a batch, soak the cubes in warm water for 10–15 minutes. This will not fully reverse overcooking, but it can make the texture noticeably softer.
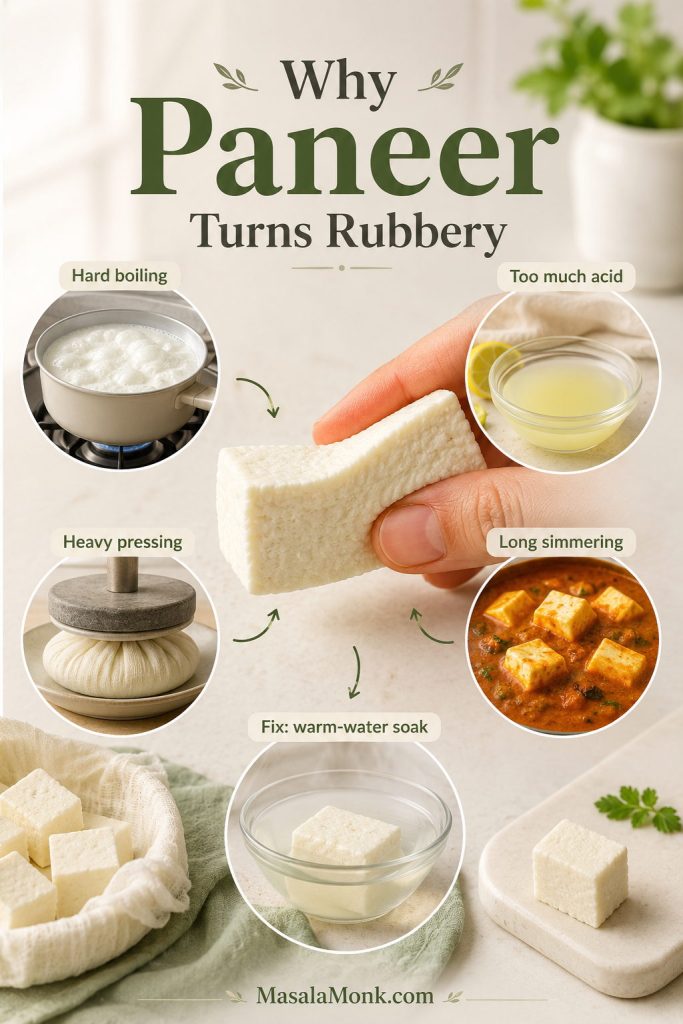
Causes of rubbery paneer shown around a firm paneer piece, including hard boiling, too much acid, heavy pressing, and long simmering.
Rubbery paneer is usually a moisture-loss problem. Harsh heat, extra acid, heavy pressing, and long simmering all tighten the curds, so controlling those steps keeps paneer softer.

Why does my paneer taste sour?

Sour paneer usually means too much lemon juice or vinegar remained in the curds. Rinse the curds briefly under cool water after straining. Next time, dilute the acid and add it gradually. Stop once the whey is clear enough and no longer looks milky.

Why is my paneer crumbly?

Crumbly paneer is not always bad. If it is moist and soft, use it for paneer bhurji, sandwich fillings, paratha fillings, cutlets, or toast. For a snackier route, lightly pressed or crumbled paneer also works in vegetarian patties such as Protein Packed Millet Cutlets.

For cleaner cubes next time, use full-fat, non-UHT milk, add acid slowly, rest the curds before straining, press for 30–40 minutes, and chill before cutting.

Why did my paneer break in curry?

The paneer may have been too soft for cubes, cut before it fully set, or stirred too roughly in the sauce. For curries, press the paneer for 30–40 minutes, chill it briefly, cut with a sharp knife, and add it only when the sauce is ready. Stir gently after adding paneer.

How do I make softer paneer next time?

Use richer milk, gentler heat, gradual acid, and shorter pressing. For especially soft paneer, add a little cream to the milk or use yogurt as the acid once you are comfortable with the basic method.

After you identify the problem, return to the homemade paneer recipe and watch the step-by-step paneer cues more closely on your next batch.

FAQs About Homemade Paneer

What is the best milk for making paneer at home?

Whole milk or full-fat milk is best because it gives better curds, better yield, and a softer texture. Regular pasteurized whole cow’s milk is the safest supermarket default.

Why did my milk not curdle?

Usually the milk was not hot enough, the acid was too weak, or the milk was UHT / ultra-pasteurized. Reheat gently, add diluted acid 1 teaspoon at a time, and stop once the whey clears.

Lemon juice or vinegar: which is better for paneer?

Both work. Lemon juice tastes fresher but varies in acidity. Plain white vinegar is more predictable and usually tastes neutral after dilution and rinsing.

How much paneer do you get from 1 litre, 2 litres, or 1 gallon of milk?

Yield varies by milk, fat level, draining, and pressing. Expect about 150–200 g from 1 litre, 300–400 g from 2 litres, and 600–750 g from 1 gallon / 3.8 litres.

How do you make paneer soft instead of rubbery?

Rubbery paneer usually comes from hard boiling, too much acid, heavy pressing, or long cooking in sauce. Use gentler heat, add acid gradually, press for less time, and add paneer near the end of cooking.

Is paneer the same as cottage cheese?

Not exactly. Paneer is sometimes called Indian cottage cheese, but Western cottage cheese is loose and wet, while paneer is drained and pressed.

Can ultra-pasteurized or UHT milk be used for paneer?

It may work sometimes, but it is not the best choice. Ultra-pasteurized and UHT milk can form weak, grainy, or unreliable curds. For your first batch, use full-fat, non-UHT milk if you can.

Can lactose-free milk be used for paneer?

Lactose-free dairy milk can work if it is full-fat and not UHT or ultra-pasteurized. Check the carton carefully, because some lactose-free milks are processed for long shelf life and may curdle less reliably.

What should I do with leftover whey?

Use whey in doughs, dals, soups, curries, rice, oats, or grains. You can also freeze it in small portions. If the whey is very sour, use it in recipes where a slight tang makes sense.

How long does homemade paneer last?

Homemade paneer tastes best the day it is made. Refrigerate it for 2–3 days, covered or submerged in fresh cold water. Change the water daily if storing submerged. Freeze for up to 1 month for best texture.

When should paneer be added to curry?

Add paneer near the end of cooking. The sauce should already be cooked and seasoned. Once the paneer goes in, simmer gently for a few minutes so it warms through without becoming tough.

Final Thought

Once you learn how to make paneer at home, the process becomes less about doing something complicated and more about reading what the milk is telling you. Use milk that curdles cleanly, heat it gently, add only enough acid, and press the curds for the dish in front of you.

After one good block, paneer stops feeling like a specialty-store ingredient. It becomes something you can make when a curry needs soft cubes, a wrap needs a filling, or a quick vegetarian meal needs something fresh, milky, and satisfying.


Fresh homemade paneer cubes on a ceramic plate with muslin, pale whey, and a blurred curry or greens in the background.
Good homemade paneer should feel simple by the end: clean curds, gentle pressing, soft cubes, and a fresh milky texture ready for the dish you want.

Back to top

Posted on — Leave a comment

Slow Cooker Cottage Pie Recipe That Won’t Go Watery

A good slow cooker cottage pie should lift in generous spoonfuls, with creamy mash on top and glossy beef gravy underneath.

A slow cooker cottage pie should feel like the perfect low-effort comfort dinner: rich beef mince, sweet vegetables, savoury gravy, creamy mashed potatoes, and a meal that waits for you. But this is also one of those recipes where the slow cooker can quietly work against you.

The filling can turn watery because the lid traps steam. The mash can sink if the gravy is too loose. The top can stay pale because a slow cooker heats gently but does not brown like an oven. And if you skip browning the mince, the flavour and texture need a little extra help.

The method is still simple: cook the beef until the gravy is rich, add mash once the filling looks ready, then choose a soft slow-cooker top or a golden finish. The filling uses less liquid than an oven version, tightens before the mash goes on, and gets its peas near the end.

What you get is savoury beef gravy, buttery fork-ridged mash, sweet carrots and peas, and a cottage pie that still serves in generous spoonfuls. Keep it soft-topped and easy, or finish it under the grill, broiler, or in the oven for golden cheddar edges.

It is the kind of dinner that feels calm by the time you serve it: beef gravy underneath, soft potato on top, and no last-minute pan juggling. This is the slow cooker version built to stay rich and comforting instead of turning into beef stew under mashed potatoes.
In the UK, cottage pie usually means beef mince under mashed potato, while shepherd’s pie traditionally uses lamb. In US search terms, the same beef version is often called crockpot shepherd’s pie.

In This Slow Cooker Cottage Pie Guide

Can You Make Cottage Pie in a Slow Cooker?

Yes, you can make cottage pie in a slow cooker, but the filling needs to be thicker and more settled than a normal oven version before you add the mashed potato. A slow cooker traps moisture, so a cottage pie recipe that works beautifully in the oven can become loose and soupy if the same amount of stock or tomatoes is used under a slow-cooker lid.

The most reliable method is to cook the beef filling first, make sure the gravy is saucy but not loose, then add mashed potatoes only when the filling is ready for the topping. To get a browned top, finish the pie under the grill or broiler, or transfer the filling to an oven dish and bake it briefly.
In US search terms, this same method also works as a crockpot shepherd’s pie with ground beef; in UK terms, beef under mash is cottage pie.

Think of the recipe in this order: gravy first, mash second, golden top if you want it. That simple rule prevents most slow-cooker cottage pie problems.

Split image showing finished slow cooker cottage pie beside a spoon trail through glossy beef filling before the mash is added.
Yes, cottage pie works in a slow cooker; however, the beef layer needs to look saucy, not loose, before the mash goes on.

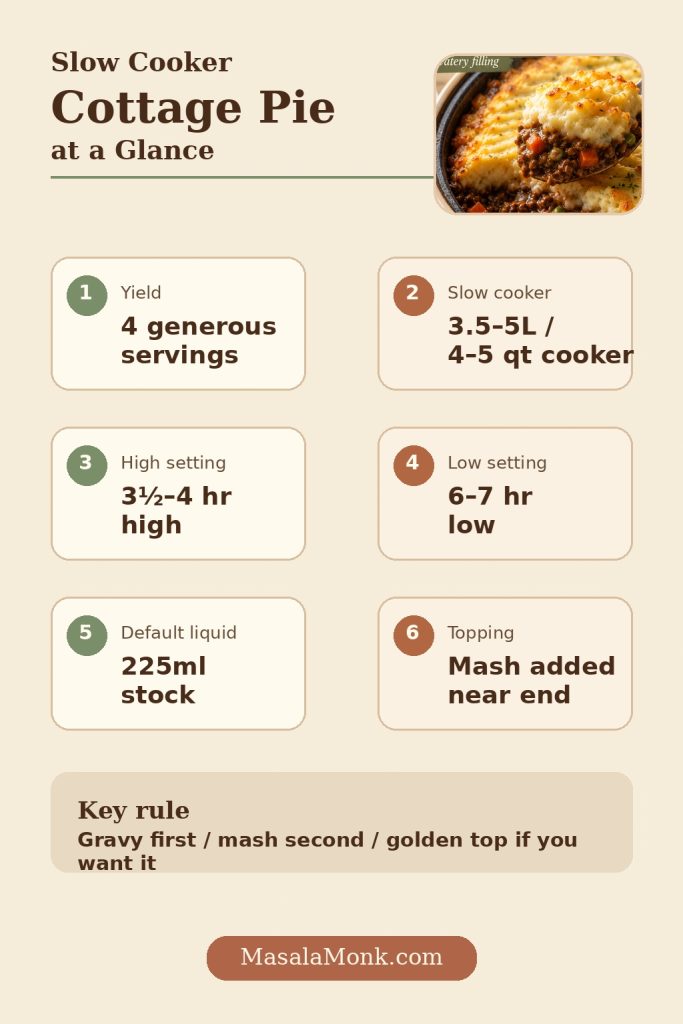
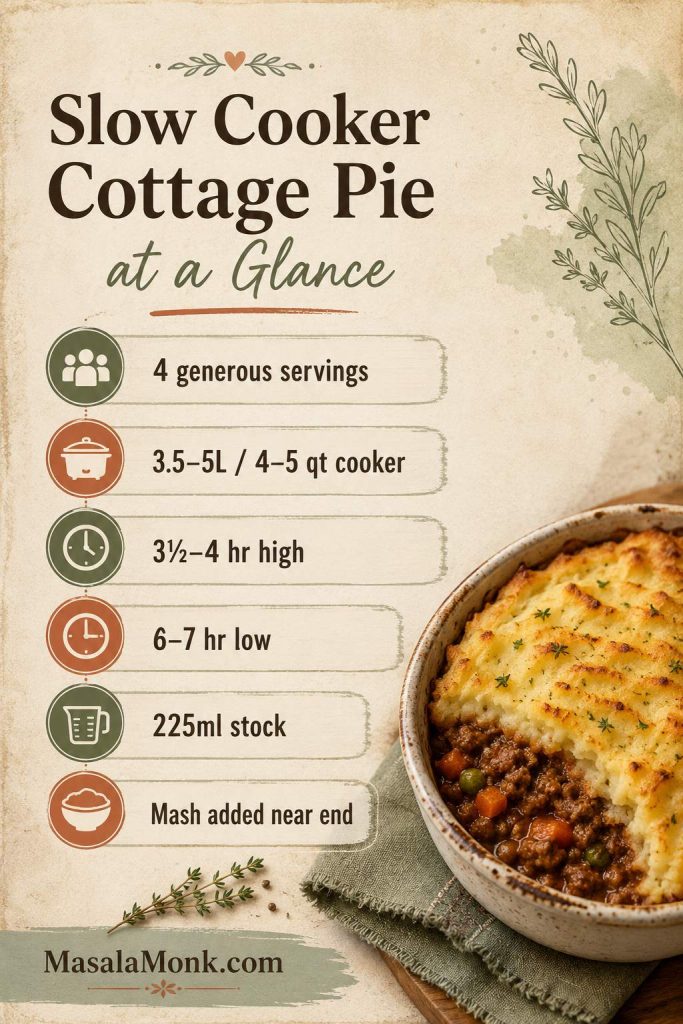
Slow Cooker Cottage Pie at a Glance

Yield
4 generous servings, or 5–6 moderate portions with sides
Slow cooker size
3.5–5L / 4–5 quart oval cooker
Filling cook time
3½–4 hours high or 6–7 hours low
Total time
About 4½–5½ hours on high
About 7–8½ hours on low

Main ingredient: 500g lean beef mince / about 1 lb 2 oz ground beef.

Default liquid: 225ml / scant 1 cup beef stock. Use about 200ml for mushrooms, frozen vegetables, or no-browning; use 100–150ml if adding chopped tomatoes.

Timing note: an oven or broiler finish is quicker; heating the mash through in the slow cooker takes longer.

Texture cue: the filling should be saucy but not loose, so the potato topping can rest neatly above the gravy.

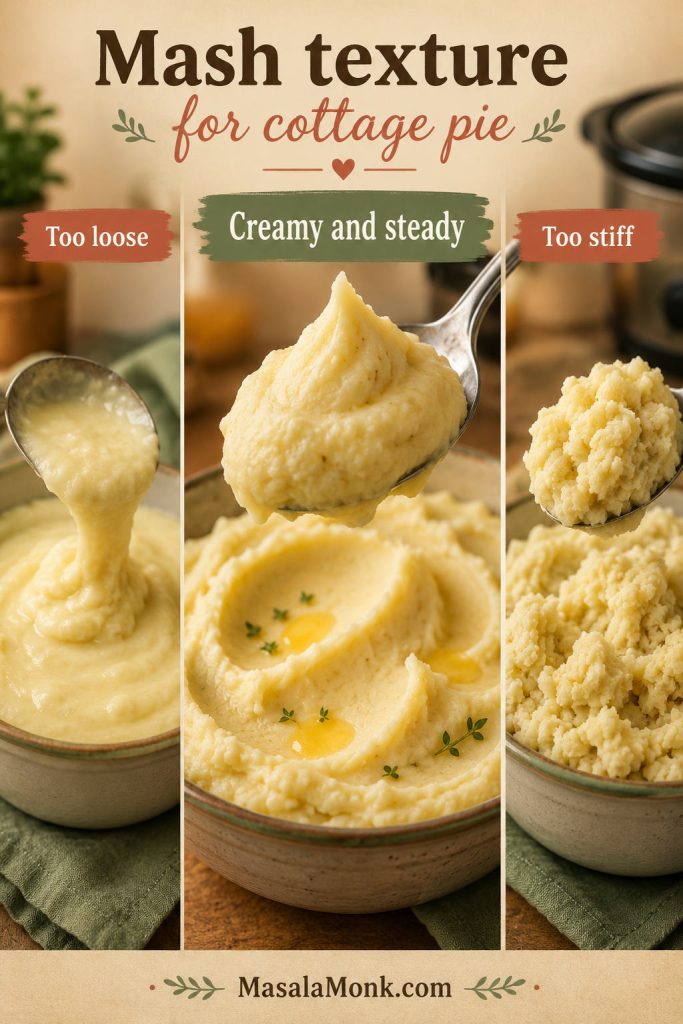
Mash cue: the mashed potato should be creamy, steady, and easy to spread.

Flavour move: brown the mince first when you can, then drain excess fat before slow cooking.
Infographic summarizing slow cooker cottage pie servings, cooker size, cooking time, stock amount, and when to add mash.
These are the numbers that keep the recipe calm: modest stock, the right cooker size, and mash added near the end.

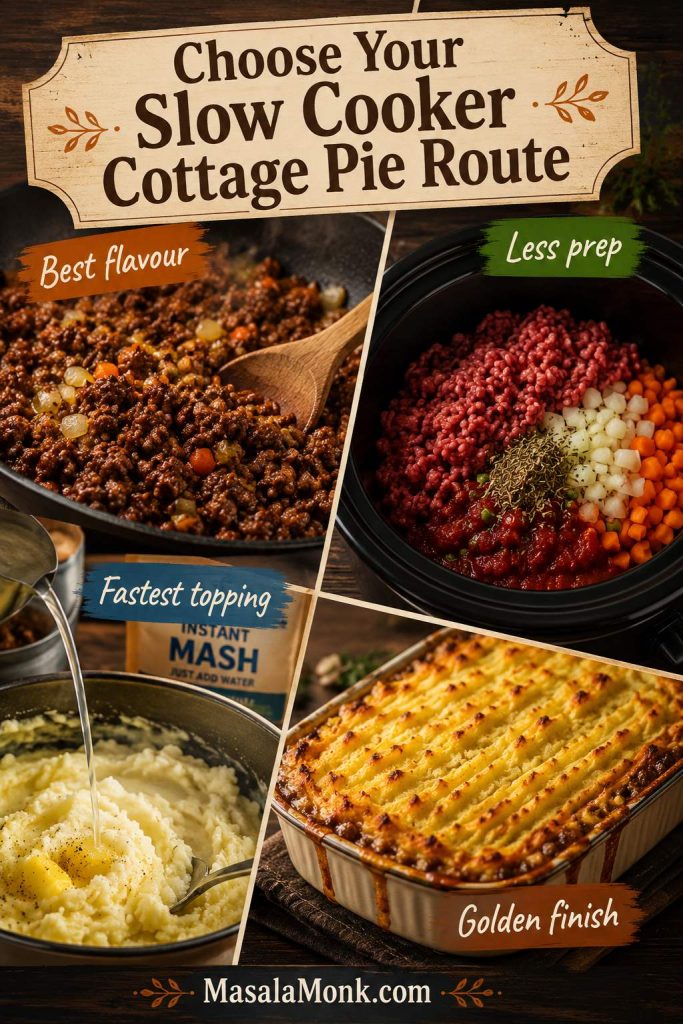
Choose Your Slow Cooker Cottage Pie Route

Use the browned-mince method for the best flavour, or choose one of the shortcuts below. Every version comes back to the same calm idea: make the filling glossy, not soupy, then add the topping.

RouteUse this ifHow to adjust
Best flavourYou can brown the minceUse the main method, drain fat, and thicken with flour from the start.
Raw-mince shortcutYou need less prepUse fresh, fully thawed lean mince, less stock, no flour at the start, and thicken near the end.
Instant-mash shortcutYou want the easiest toppingMake instant mash thicker than packet directions and add it only after the filling settles.
Golden-top versionYou want classic cottage pie textureSlow cook the filling, then finish safely under the grill, broiler, or in an oven dish.
Route chooser showing browned mince, raw mince shortcut, instant mash, and golden finish options for slow cooker cottage pie.
Choose the route that matches your night: browned mince for flavour, raw mince for ease, instant mash for speed, or a golden finish.

For the easiest weeknight version, use the raw-mince shortcut with frozen mixed vegetables and prepared or instant mash, then tighten the filling before topping. Shortcut routes count too: the goal is a savoury filling, a topping that stays put, and dinner that feels sorted.
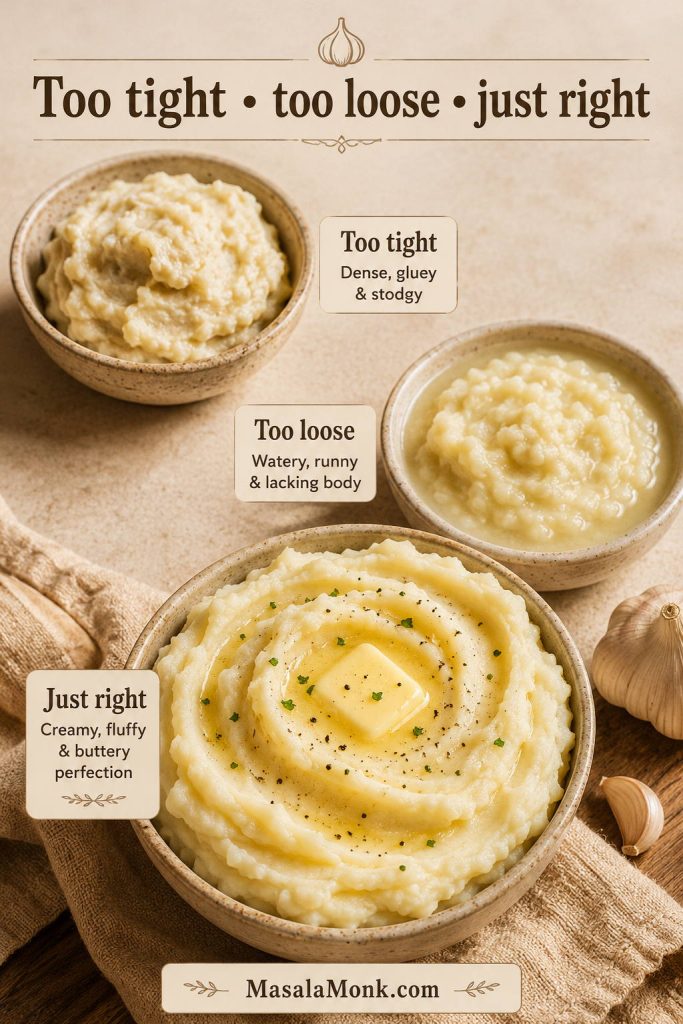
Brown the mince when you have the energy, and choose the golden finish when you want that classic baked top. If this is your first time making it, note your slow cooker size and stock amount; those two details make the next batch easier to adjust. The full recipe card sits below the topping choices, and the Jump to Recipe button takes you there directly.

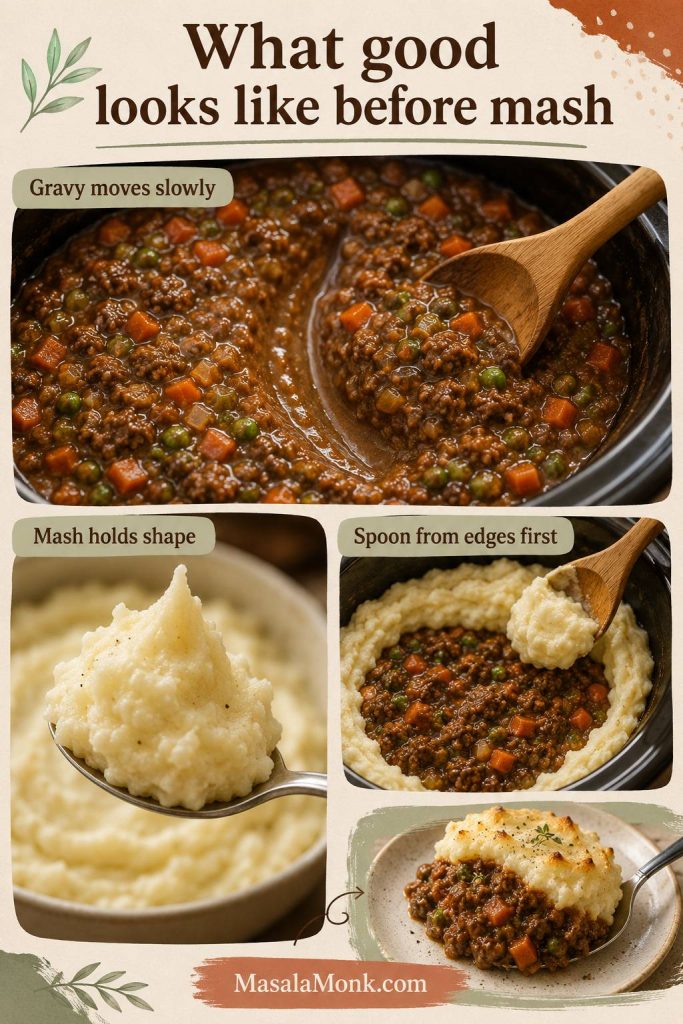
What Good Looks Like Before You Add the Mash

Here is what good looks like before the mash goes on, so you do not have to guess.

1. The gravy should move slowly

Drag a spoon through the beef filling. The gravy should leave a visible path for a second before slowly closing. If it floods back instantly, the filling needs more reduction or thickening.
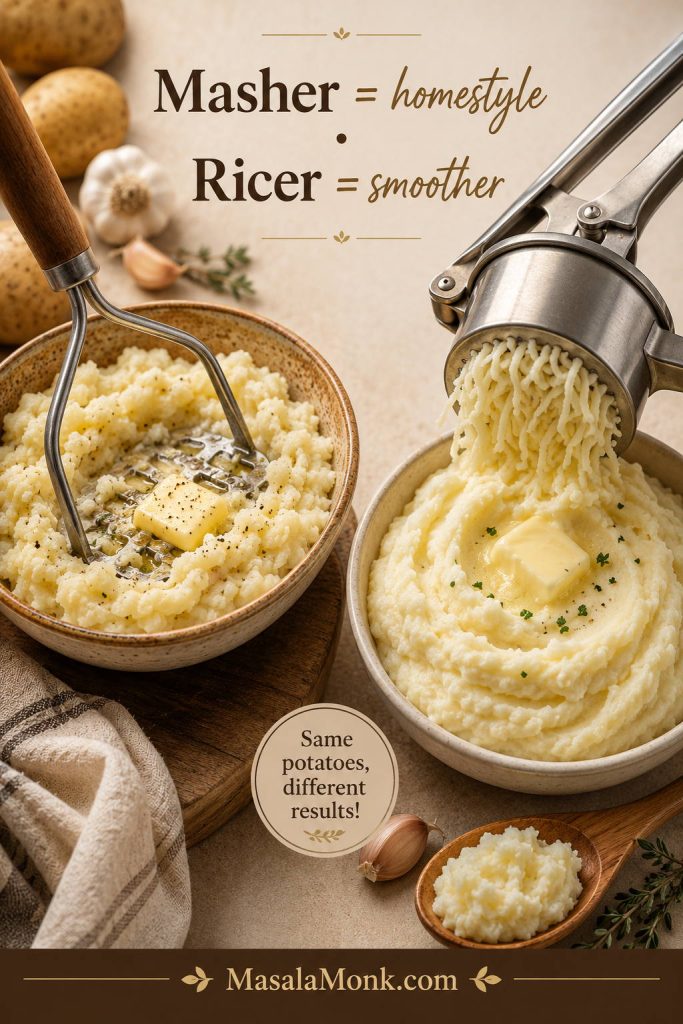
2. The mash should hold its shape

Scoop the mash with a spoon. It should hold soft peaks and feel spreadable, not loose or pourable. Wet mash is one of the main reasons toppings sink.

3. Add the topping gently

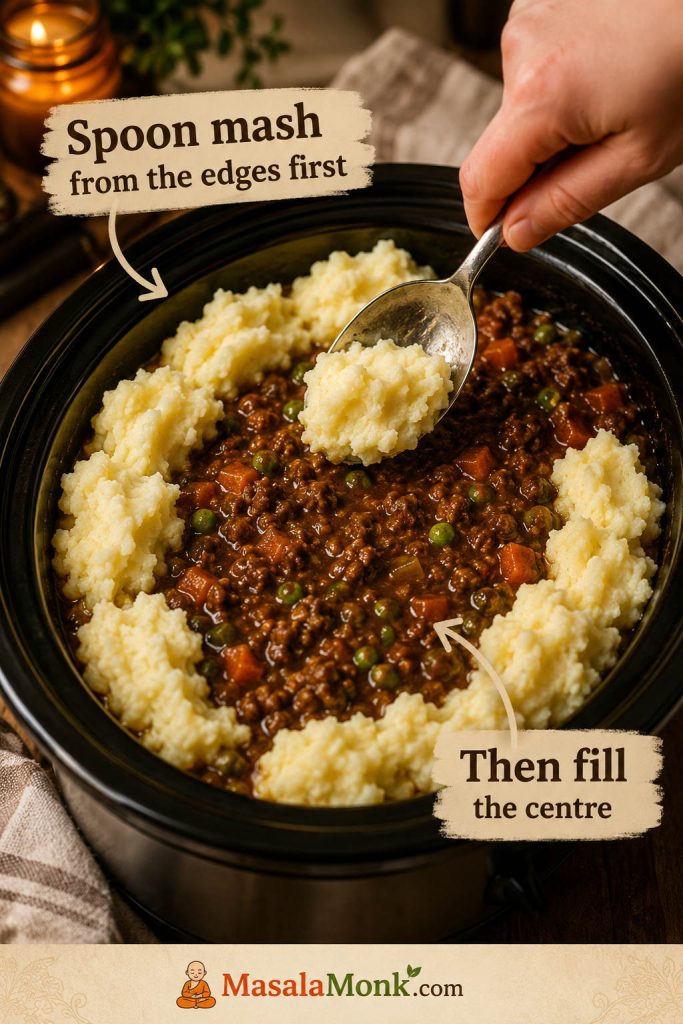
Add mash in small spoonfuls around the edges first, then fill the centre and spread gently. Dropping all the mash into the middle can push it through the filling.

What you’re looking for

A beef layer that holds together in deep spoonfuls, creamy mash that stays in place, and gentle topping. That is what keeps the finished pie from collapsing into stew.

Visual guide showing a spoon trail in cottage pie filling, mash holding its shape, and mashed potato being spooned around the edges.
Before topping, look for slow-moving gravy and mash with soft peaks; those two cues prevent most sinking problems.

If the gravy still looks loose, use the watery filling fixes; if the mash keeps disappearing into the beef, jump to the sinking mash fixes.

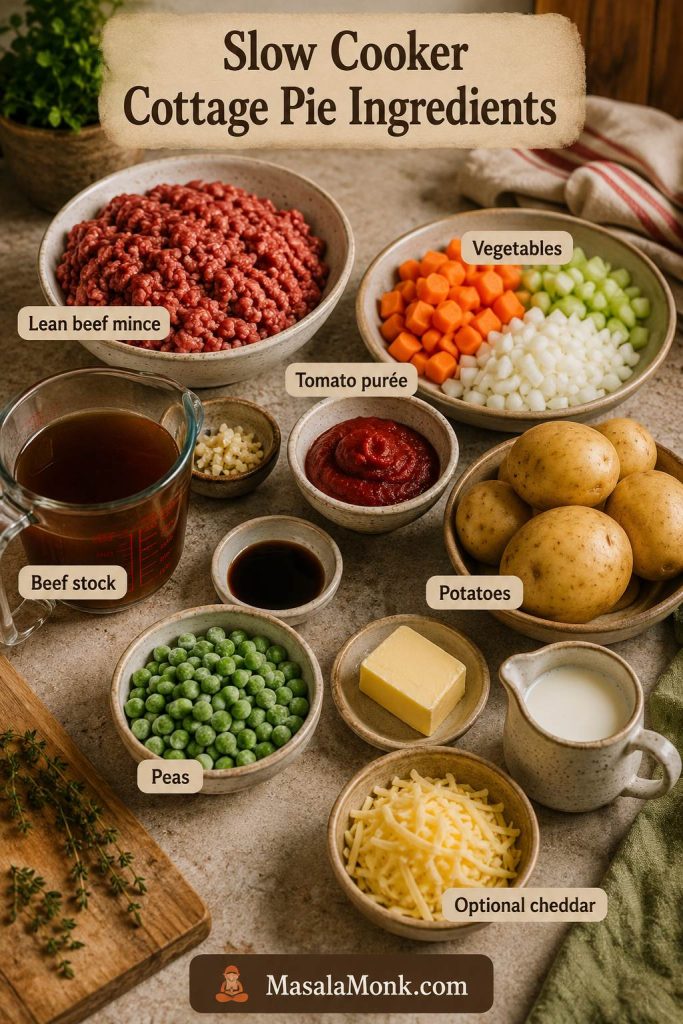
Ingredients for Slow Cooker Cottage Pie

Now that you know what the filling and mash should feel like, the ingredient choices make more sense: less loose liquid, a stronger gravy base, and mash that sits neatly on top. These are everyday cottage pie ingredients; the difference is not fancy shopping, but how the liquid and potatoes are handled.

The default version uses tomato purée or tomato paste rather than a full tin of chopped tomatoes, because the slow cooker does not reduce liquid like an oven or pan.

Ingredient board with beef mince, vegetables, tomato purée, beef stock, potatoes, peas, butter, milk, and cheddar for cottage pie.
In slow cooker cottage pie, ordinary ingredients work best when the stock stays modest and the mash is not too loose.

Beef filling ingredients

IngredientAmountNotes
Neutral oil or olive oil1 tsp, optionalUse only if cooking very lean mince in a dry pan.
Lean beef mince / ground beef500g / about 1 lb 2 ozUse 5–10% fat if possible. It gives flavour without making the slow cooker greasy.
Onion, finely diced1 largeAdds sweetness and helps build the gravy base.
Carrots, finely diced2 mediumClassic cottage pie sweetness and colour.
Celery, finely diced1–2 sticks / stalksBuilds a deeper savoury base.
Garlic2–3 clovesAdds depth without taking over.
Tomato purée / tomato paste2 tbspGives depth, colour, and savoury concentration without adding much water.
Plain flour / all-purpose flour2 tbspDefault thickener for the browned-mince method.
Beef stock225ml / scant 1 cupUse about 200ml for mushrooms, frozen mixed vegetables, or no-browning. If adding chopped tomatoes, reduce the stock to 100–150ml.
Worcestershire sauce1 tbspGives savoury, tangy depth.
Dried thyme or rosemary1 tspUse either, or a small mix of both.
Frozen peas100–150g / ¾–1 cupAdd near the end so they stay brighter.
Salt and black pepperTo tasteStart light if your stock is salty; adjust before adding the mash.

How Much Stock to Use in Slow Cooker Cottage Pie

Stock is the easiest place to control the finished texture. Start modest, then adjust for watery add-ins such as mushrooms, frozen vegetables, raw mince, or chopped tomatoes.

Stock guide showing a measuring jug and different stock amounts for default cottage pie, raw mince, frozen vegetables, mushrooms, and chopped tomatoes.
Because slow cookers trap moisture, adjusting the stock is one of the easiest ways to prevent watery cottage pie filling.

If you are using mushrooms, frozen vegetables, or chopped tomatoes, the watery filling section explains how to adjust the liquid before topping.

Optional flavour boosters and add-ins

  • Mushrooms: add 100–150g finely chopped mushrooms with the vegetables for a deeper, meatier filling. Use slightly less stock because mushrooms release moisture.
  • Red wine: replace 50–100ml of the stock with red wine. Let it bubble briefly in the pan before slow cooking.
  • Brown sauce or mustard: add 1 teaspoon to 1 tablespoon for a sharper UK-style savoury note.
  • Chopped tomatoes: use 200g / about 7 oz chopped tomatoes if you want a tomato-rich filling, and reduce the stock to 100–150ml. Expect to thicken near the end if needed.
  • Frozen mixed vegetables: use them in place of peas and carrots if needed, but add them late or reduce the stock because they release water.

Optional thickener

When the filling looks loose near the end, mix 1 tablespoon cornflour / cornstarch with 1 tablespoon cold water, stir it into the filling, and cook on high until the gravy tightens. For a quick UK-style option, you can use 1–2 teaspoons beef gravy granules instead, but taste before adding more because they add salt quickly.

Mashed potato topping ingredients

IngredientAmountNotes
Floury potatoes800–900g / 1 lb 12 oz–2 lbMaris Piper, King Edward, Russet, or Yukon Gold work well.
Butter30–45g / 2–3 tbspAdds flavour and helps the mash spread.
Milk60ml / ¼ cup, plus 1 tbsp at a time only if neededStart small. The mash should be creamy but not loose.
Cheddar, optional75–100g / ¾–1 cup gratedUse in the mash or on top for a cheesy finish.
Leftover, prepared, or instant mashAbout 4 cups / enough to coverWarm slightly if chilled, and keep it thicker than usual so it sits on the filling.
SaltTo tasteSeason the mash separately from the filling.

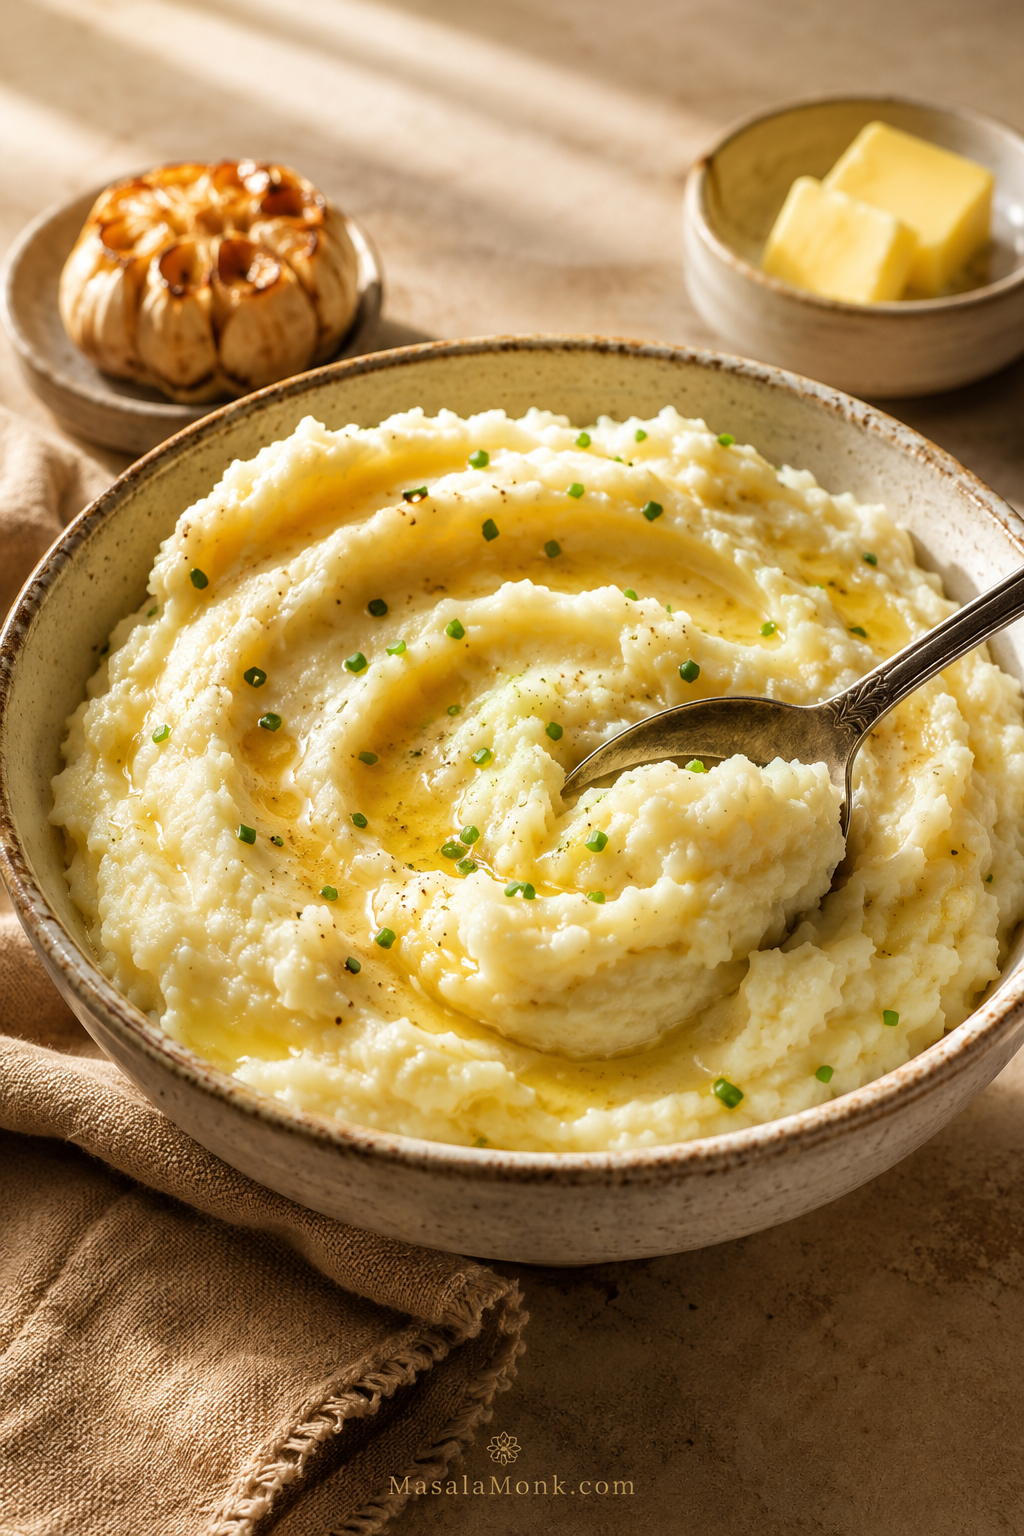
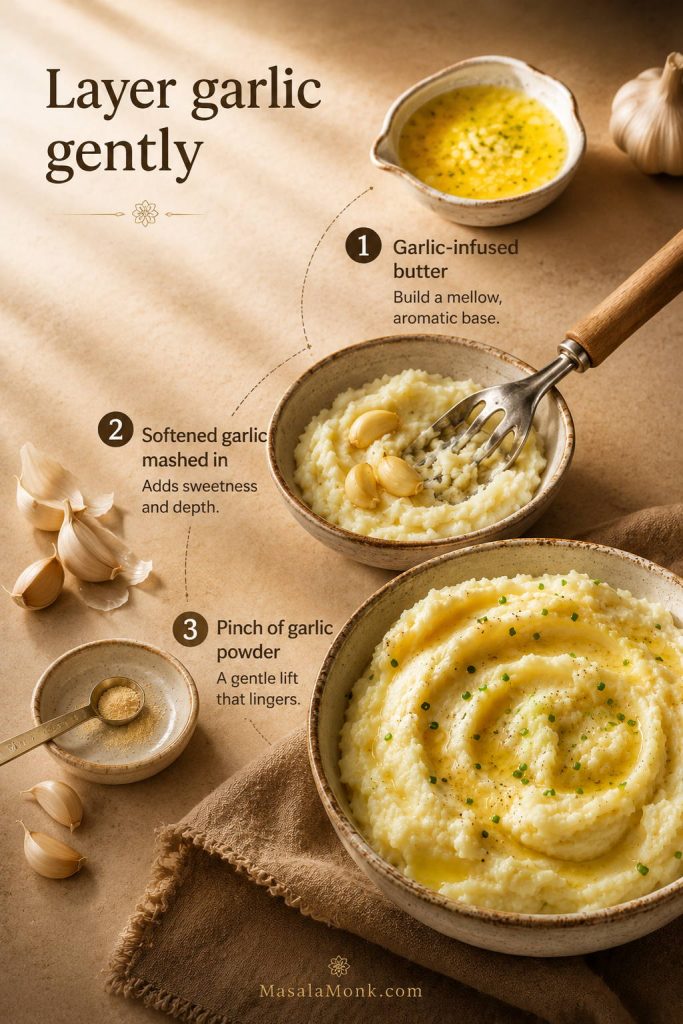
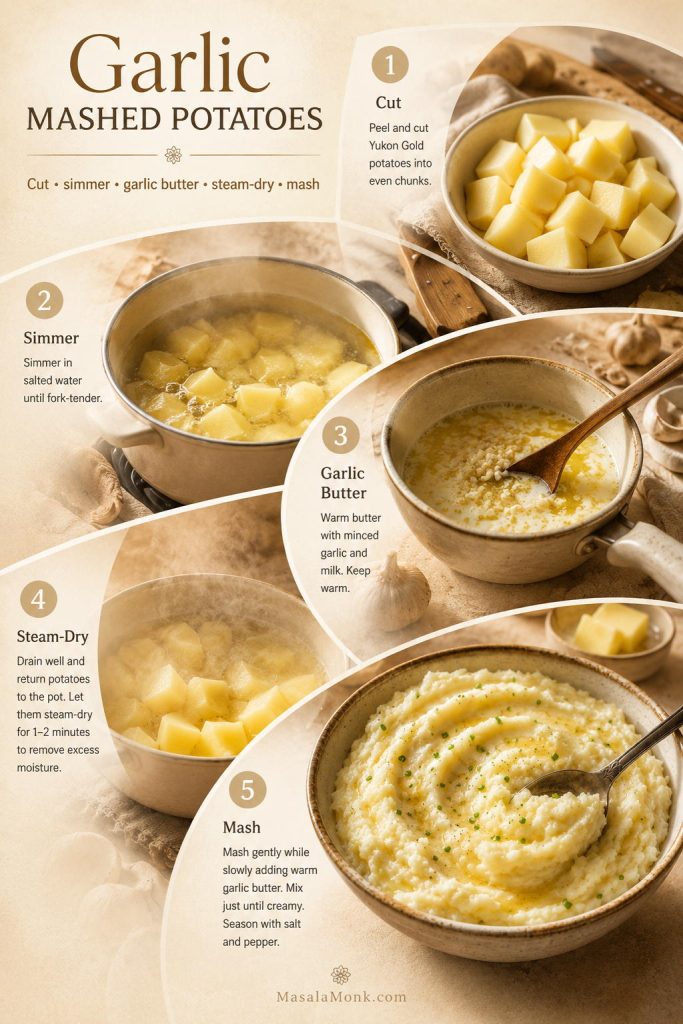
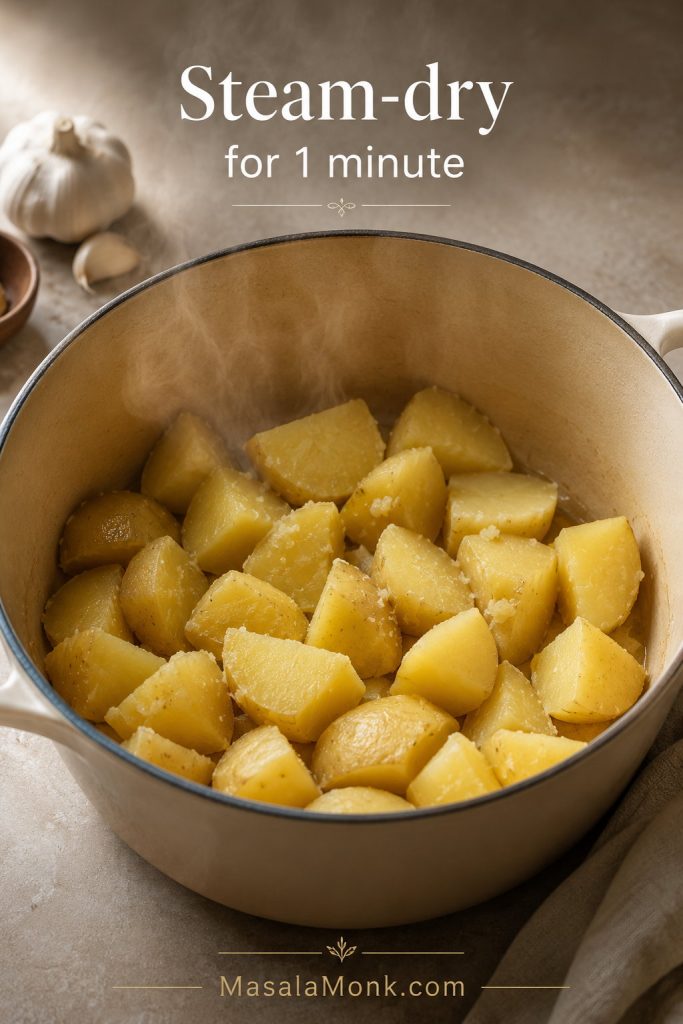
For a deeper guide to creamy potatoes that stay fluffy instead of gluey, use our garlic mashed potatoes recipe; the same steam-dry step helps this topping sit neatly on the filling.

Texture cue: the mash should hold soft peaks on a spoon. If it slides, pours, or feels like loose purée, it is too wet for this recipe. Steam-dry fresh potatoes and add milk gradually.

Slow Cooker Size and Equipment

A 3.5–5L / 4–5 quart oval slow cooker is ideal for this recipe. It keeps the beef layer deep enough while leaving enough surface area to spread the topping. A round slow cooker works too, but an oval insert makes the finished pie easier to serve.

Equipment guide showing an oval slow cooker, skillet, saucepan, masher, oven dish, measuring jug, bowl, fork, and thermometer.
An oval cooker gives the beef layer useful depth while leaving enough room to spread the potato evenly.
  • Large skillet or frying pan: for browning the mince and cooking the vegetables.
  • 3.5–5L / 4–5 quart slow cooker: best for the 500g beef version.
  • Large saucepan: for boiling potatoes.
  • Potato masher or ricer: for smooth mash that is steady enough to spread.
  • Small bowl: for mixing cornflour/cornstarch slurry if needed.
  • Oven dish: useful if you want a golden top and your slow-cooker insert is not oven-safe.
  • Instant-read thermometer: helpful for the raw-mince method.

Important insert safety note: only put a slow-cooker insert under the grill, broiler, or into the oven if the manufacturer says that exact insert is safe for that use. If there is any doubt, transfer the filling to an oven dish before topping and browning.

For the safest browning choices, check the finish options before putting any insert under direct heat.

The recipe is forgiving as long as the filling is not too loose and the topping is not too wet. Use less liquid than an oven cottage pie, adjust watery add-ins, and choose whether you want a soft slow-cooker top or a golden oven, grill, or broiler finish.

How to Make Slow Cooker Cottage Pie

The method looks detailed, but the cooking itself is simple: brown the beef if you can, let the slow cooker build the gravy, then top when the filling is ready. By the end, the carrots should be sweet, the gravy should smell deeply savoury, and the mash should sit proudly on top instead of sliding into the filling.

This is the kind of cottage pie that does not need perfect slices to feel right; it just needs a thick savoury base, warm potato, and enough gravy to make the greens on the side worth eating.

1. Brown the beef mince

Heat a large skillet or frying pan over medium-high heat. If you are using very lean mince or a dry pan, add 1 teaspoon oil first. Add the beef mince and break it into small crumbles with a wooden spoon. Let it brown properly instead of simply turning grey. A little colour on the beef gives the finished filling a deeper savoury flavour.

If the mince releases a lot of fat, spoon or drain off the excess before you continue. Slow cookers do not evaporate fat away, so this small step keeps the filling rich rather than greasy.

2. Add the vegetables

Add the onion, carrot, celery, garlic, and mushrooms if using. Cook for 4–5 minutes, stirring often, until the onion starts to soften and smell sweet. The vegetables do not need to be fully tender yet because they will finish in the slow cooker.

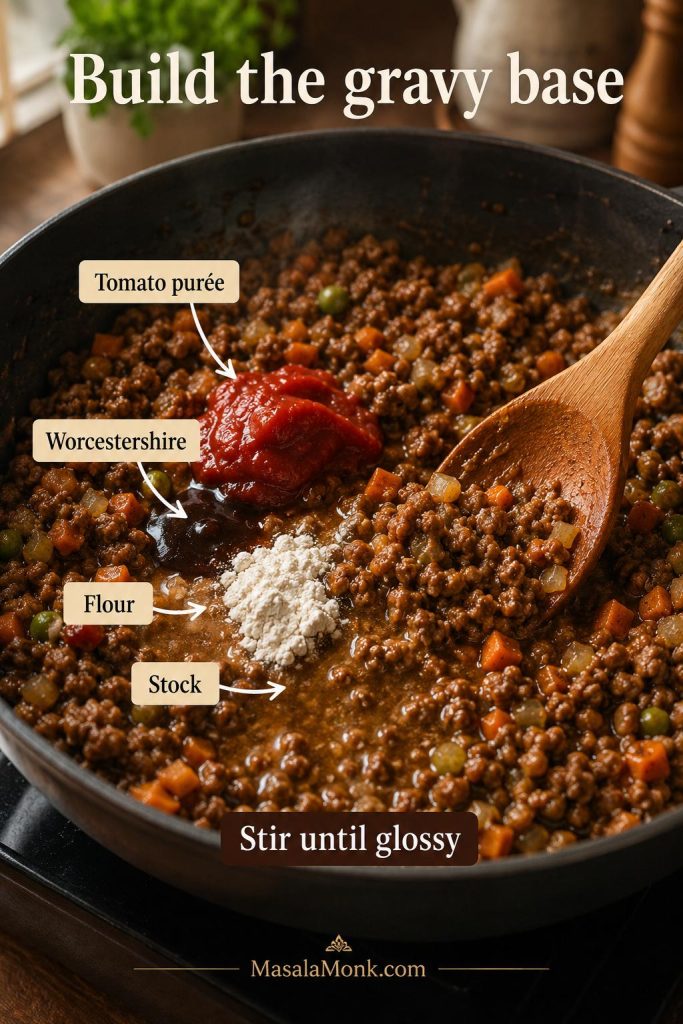
3. Build the gravy base

Stir in the tomato purée, Worcestershire sauce, thyme or rosemary, salt, and black pepper. Sprinkle over the flour and stir for 1 minute so it coats the mince and vegetables. This cooks off the raw flour taste and gives the gravy a smoother texture later.

Add the stock gradually, scraping the bottom of the pan as you stir. The mixture should become glossy and lightly saucy, not thin and soupy. If using wine, add it before the stock and let it bubble briefly.

Beef mince and vegetables being stirred in a skillet with tomato purée, Worcestershire sauce, flour, and stock.
This is where cooked mince becomes cottage pie filling: tomato purée, Worcestershire, flour, and stock create the gravy base.

4. Slow cook the filling

Transfer the beef mixture to the slow cooker. Cover and cook on high for 3½–4 hours or on low for 6–7 hours, until the vegetables are tender and the filling tastes rounded and savoury.

Start looking from 3 hours on high or 5½ hours on low if your slow cooker runs hot, has a wide insert, or the filling is sitting in a shallow layer. Try not to lift the lid too often early on, because each lift releases heat and can stretch the cooking time.

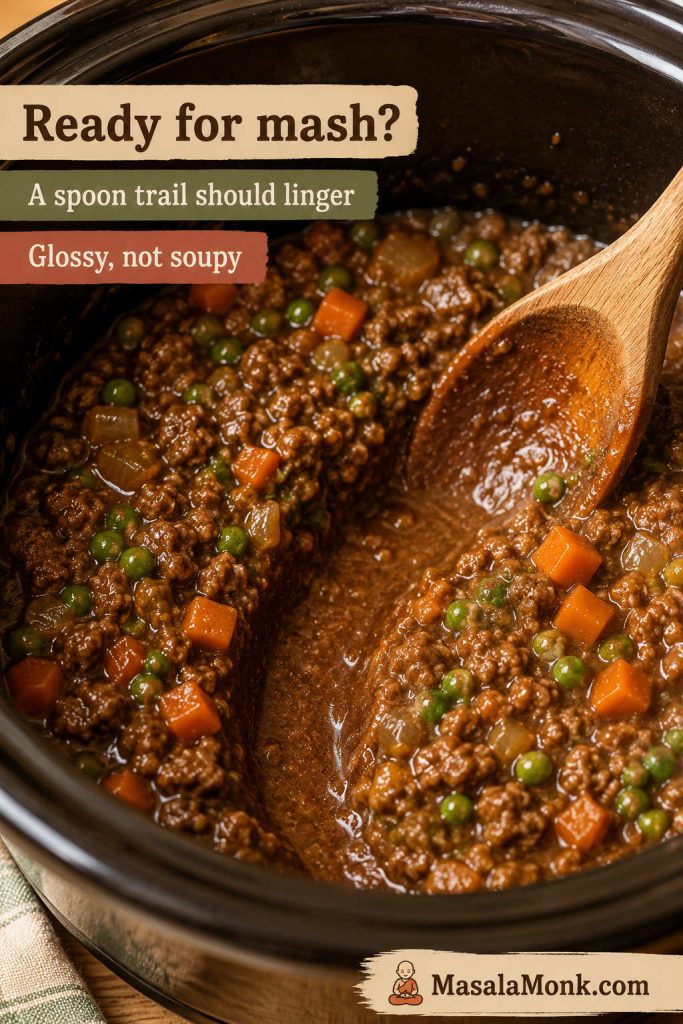
5. Look at the Gravy Before Adding Mash

Pause here before you add the mash; this one look makes the biggest difference. Stir the filling and drag a spoon through the centre. If the gravy leaves a visible trail for a second before slowly closing, the filling is ready for mash. The first spoonful should hold together but still look saucy.

When it is right, the filling should smell deeply savoury and look glossy rather than soupy, with carrots soft enough to melt into the gravy but still visible in each spoonful.

Close-up of a spoon trail through glossy beef mince filling in a slow cooker with peas, carrots, and onion visible.
Once a spoon trail lingers, the filling is ready for mash; if it floods back like soup, thicken it first.

If the trail disappears immediately, use the quick fixes in How to Stop Slow Cooker Cottage Pie Going Watery before adding mash.

When the gravy floods back immediately, pause and give it a little help before topping. Mix 1 tablespoon cornflour or cornstarch with 1 tablespoon cold water, stir it into the filling, and cook on high for 20–30 minutes. If your slow cooker holds heat well, you can cook uncovered. If it cools quickly, leave the lid slightly ajar, or thicken a few ladles of liquid in a small pan and stir it back into the slow cooker.

This is also the best time to taste the filling. Add salt, pepper, Worcestershire sauce, or a little more tomato paste if it needs more depth. Once the mash goes on, adjusting the filling becomes harder.

Should You Add the Mash at the Start?

It is better to add the mash near the end, after the beef filling has cooked and settled. If mash goes on too early, condensation can soften it, bubbling gravy can break through it, and you lose the chance to fix a loose filling before topping.

6. Add the peas late

Stir in the frozen peas during the final 20–30 minutes of filling time. They will heat through quickly, stay brighter, and release less water into the gravy than they would if added at the beginning.

7. Make creamy mash that holds its shape

You can make the mash during the final 30–40 minutes of the filling time, then keep it warm and loosely covered until the filling is ready to top.

Boil the potatoes in salted water until tender. Drain well, then return them to the hot pan for 1–2 minutes so extra steam escapes. Mash with butter, then add 60ml / ¼ cup milk. Add more milk 1 tablespoon at a time only if the mash is too stiff to spread.

Three-part mashed potato comparison showing too loose mash, creamy steady mash, and too stiff mash for cottage pie topping.
The best mash for cottage pie is creamy and steady, because loose mash sinks while stiff mash drags through the filling.

If using cheddar, stir some into the mash or save it for the top. Warm mash spreads more easily than cold leftover mash, so if you are using leftovers, warm them slightly before topping the filling.

8. Spoon the mash gently over the filling

Add the mash in small spoonfuls around the edges of the slow cooker first, then fill the centre. Spread gently with a fork or spatula. Avoid dropping all the mash into the middle at once because that weight can push through the filling.

Hand spooning mashed potato around the edges of slow cooker cottage pie filling before filling the centre.
Start spooning mash around the edges, then fill the centre; the border helps the potato spread without diving into the gravy.

If the topping starts to sink, pause and use the mash-sinking fixes before spreading the rest.

Use a fork to make ridges on top. Those ridges catch heat and brown better if you finish the pie under the grill, broiler, or in the oven.

9. Finish and rest

For the easiest finish, cover and cook on high for 45–60 minutes until the mash is hot. For a golden top, either use a safe grill/broiler finish or transfer the filling to an oven dish and bake until browned.

The slow-cooker-only version is softer and homier; the oven-finished version gives you those golden ridges and bubbling edges that make cottage pie feel more like a proper baked dinner.

Let the cottage pie rest for 10 minutes before serving. Resting lets the gravy settle and the mash firm slightly, so the first spoonful comes out with creamy potato on top and glossy beef gravy underneath.

Slow Cooker Timing Table

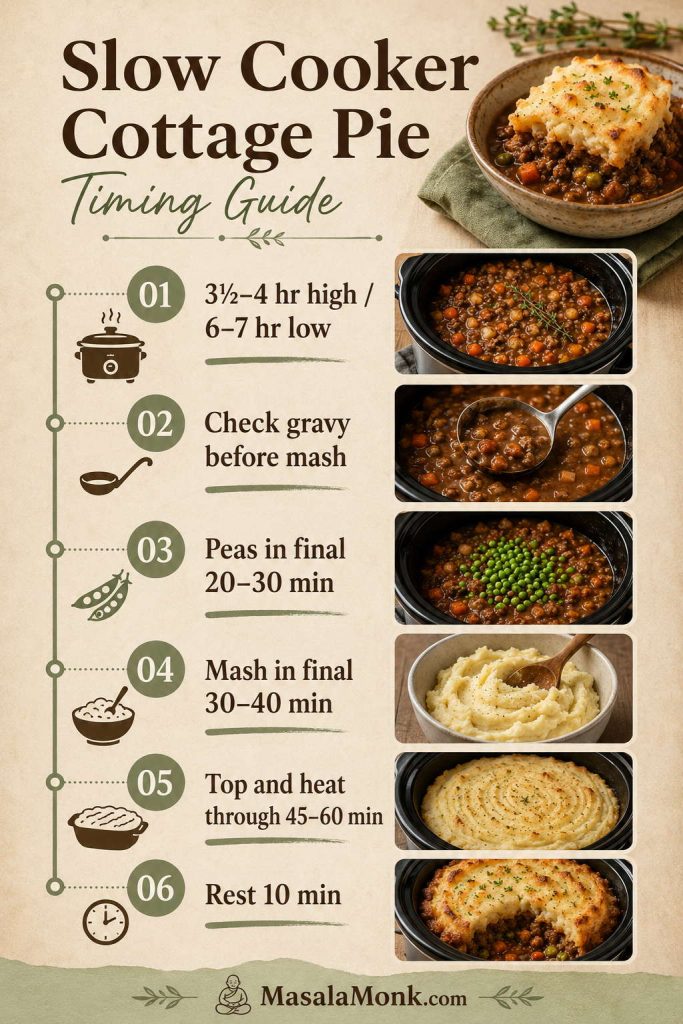
Use this timing table as a guide for when to look at the filling, add peas, warm the mash, and decide how you want to finish the top.

StageHigh settingLow settingNotes
Beef filling3½–4 hours6–7 hoursStart looking earlier if your slow cooker runs hot or has a wide insert.
Thickening adjustment20–30 minutes on highSwitch to highUse slurry only if the filling looks loose.
PeasFinal 20–30 minutesFinal 20–30 minutesAdd late for better colour and texture.
Mash topping in slow cooker45–60 minutesNot idealUse high to heat the mash through.
Oven-dish finish200°C / 400°F for 20–25 minutesSameMost classic finish if your insert is not oven-safe.
Grill / broiler finish5–10 minutesSameOnly use a safe insert or separate oven dish.
Timeline infographic showing slow cooker cottage pie filling time, gravy check, peas, mash timing, topping heat-through, and resting time.
Keep the flow calm: cook the filling first, add peas late, make the mash near the end, then rest before serving.

Choosing the Finish: Soft, Golden, or Classic

The slow cooker is excellent at making the filling tender and savoury. The finish depends on what you want from the topping: easiest, golden, or most classic.

What to expect: a slow cooker will heat the mash, but it will not give you a crisp browned crust. For a soft family-style cottage pie, keep it in the slow cooker. For a classic golden top, use the oven, grill, or broiler.

Finish optionGood forResultKeep in mind
Slow cooker onlyLowest effort family dinnerHot, soft mash topping with rich filling underneathNo crisp or golden top
Grill / broilerGolden top without baking the whole dishBrowned fork ridges, melted cheese, better colourInsert must be safe for direct heat
Oven dishNeatest classic cottage pie finishBubbling filling, golden mash, easier servingUses one extra dish
Three cottage pie finish options showing soft slow-cooker mash, golden browned mash, and a classic baked finish.
The slow cooker gives a soft top, while a grill, broiler, or oven finish adds golden ridges and bubbling edges.

Most classic: slow cook the filling, transfer it to an oven dish, top with mash, and bake at 200°C / 400°F for 20–25 minutes. This gives bubbling gravy at the edges, golden fork ridges, and a potato topping that feels baked rather than steamed.

No-extra-dish option: grill or broil the topping in the slow-cooker insert only if the manufacturer says the insert is safe for direct heat.

Easiest option: keep everything in the slow cooker and cook on high until the mash is hot. The top will be soft, not golden, but the dinner will still be comforting and complete.

Once the gravy looks glossy and the mash is hot, the rest is just the kind of comfort you want: soft if you keep it in the slow cooker, golden if you finish it under heat.

Can You Put Raw Mince in Slow Cooker Cottage Pie?

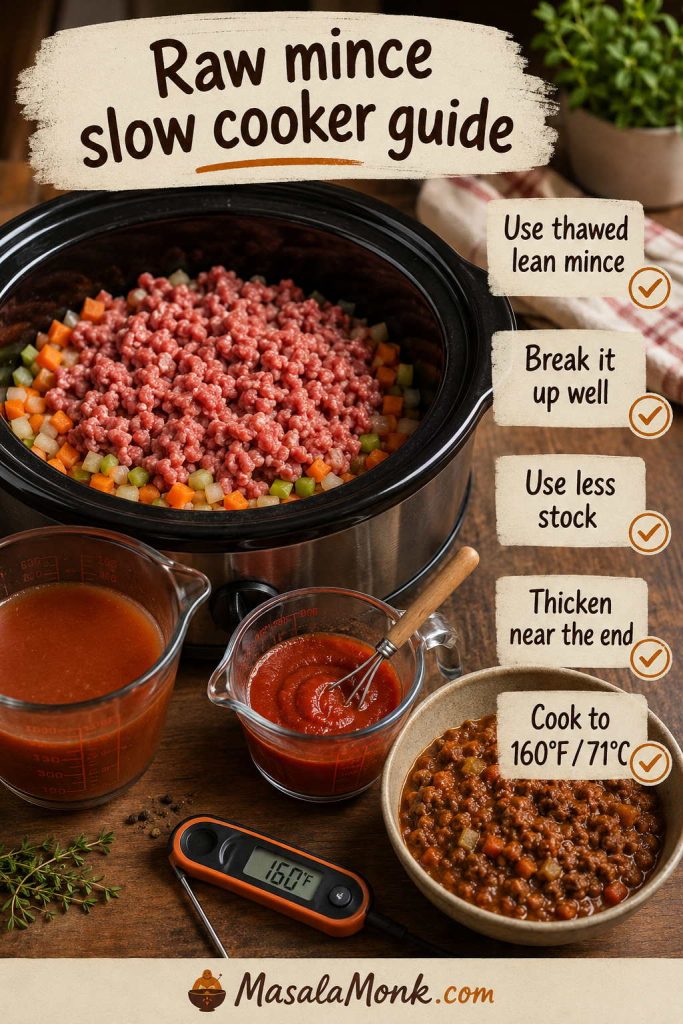
Yes, you can put raw mince in slow cooker cottage pie, but browned mince gives better flavour, better texture, and lets you drain fat first. If you need the shortcut, use fresh, fully thawed lean mince, reduce the stock, break it up well, and thicken near the end.

Some nights, simply getting dinner into the slow cooker is enough. This shortcut is not the richest version, but it can still give you a useful, comforting cottage pie if you handle the liquid carefully.

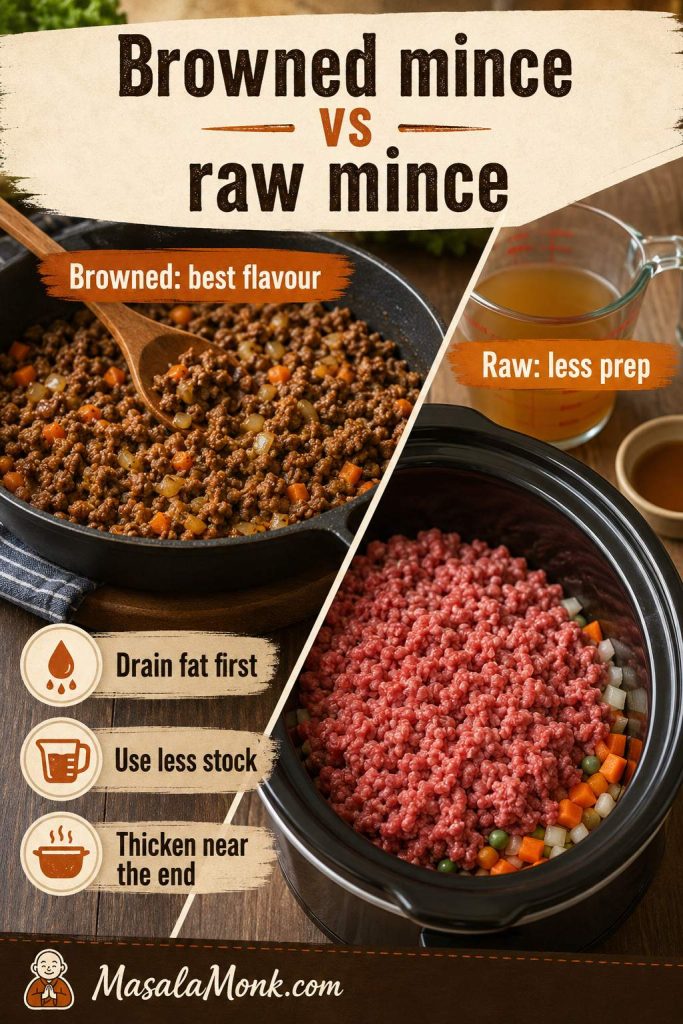
Browned Mince vs Raw Mince

Both routes can work, but they need different handling. Browning builds deeper flavour and lets you drain fat first; meanwhile, raw mince needs less stock, careful stirring, and a final texture check.

Comparison image showing browned beef mince in a pan beside raw thawed mince and vegetables in a slow cooker.
Browned mince gives deeper flavour; meanwhile, the raw-mince shortcut needs less stock and a final thickening step.

Is This a Dump-and-Go Cottage Pie?

It can be close to dump-and-go, but not completely hands-off. Use raw thawed lean mince, frozen mixed vegetables, less stock, and prepared mash if you want the easiest version. Just give the filling one look near the end so you can thicken it before the mash goes on.

Raw-mince / no-browning method

  1. Use fresh, fully thawed lean mince. Avoid starting with frozen raw mince.
  2. Crumble the mince into the slow cooker instead of leaving it in a block.
  3. Add the onion, carrot, celery, and garlic.
  4. Whisk the tomato purée, Worcestershire sauce, herbs, and 175–200ml stock together, then pour it over the mince and vegetables.
  5. Skip the flour at the beginning because it can clump with raw mince and cold liquid.
  6. Cook on high for 1 hour, then stir well to break up clumps if you are nearby. Either continue on high until the total cooking time reaches 3½–4 hours, or switch to low and cook for another 5–6 hours, until the beef is cooked through and the vegetables are tender.
  7. Spoon off excess fat or liquid if needed.
  8. Thicken near the end with 1–2 tablespoons cornflour/cornstarch mixed with equal cold water.
  9. Add peas, check seasoning, then top with mash that is spreadable but not loose.
Raw mince slow cooker guide showing thawed beef mince, diced vegetables, reduced stock, tomato purée, thermometer, and cooked filling.
Raw mince is the shortcut route, but it still needs thawed lean beef, less stock, good stirring, and final thickening.

For peace of mind with the raw-mince option, use an instant-read thermometer if you have one. Ground beef should reach 160°F / 71°C, and for slow-cooker safety the USDA recommends thawing meat before it goes into a slow cooker: USDA slow cooker food safety guidance.

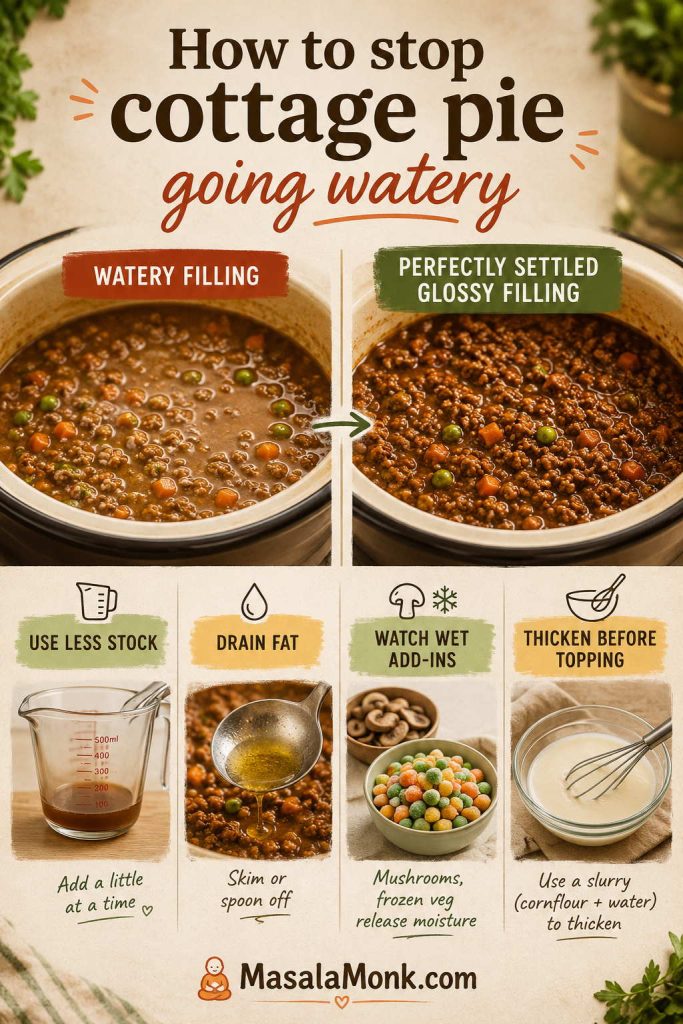
How to Stop Slow Cooker Cottage Pie Going Watery

Watery filling usually comes from too much stock, undrained fat, watery vegetables, or adding mash before the gravy has tightened.

Troubleshooting board comparing watery cottage pie filling with glossy settled filling and showing stock, drained fat, wet vegetables, and slurry.
Watery cottage pie usually comes from too much stock, undrained fat, or wet add-ins, so fix the filling before topping.

Use less stock than an oven recipe

For 500g beef mince, 225ml stock is the default for the browned method. Use about 200ml if you add mushrooms, frozen mixed vegetables, or raw mince. If adding 200g / about 7 oz chopped tomatoes, reduce the stock to 100–150ml. Use up to 250ml only if the mince is browned and drained and the filling genuinely looks dry.

Watch mushrooms, frozen veg, and chopped tomatoes

Mushrooms, frozen mixed vegetables, chopped tomatoes, and extra onions all bring moisture. They work well, but they need a lower stock amount or a little extra thickening near the end.

Drain the browned mince

Fat and liquid do not disappear in the slow cooker. Drain the mince if it releases a lot of fat, and spoon off any greasy layer before adding the mash.

Thicken before topping

If the filling is loose, thicken it first and use the spoon trail from earlier before adding the mash. Cornflour/cornstarch gives the cleanest fix; gravy granules are useful when you want a quick UK-style thickening shortcut.

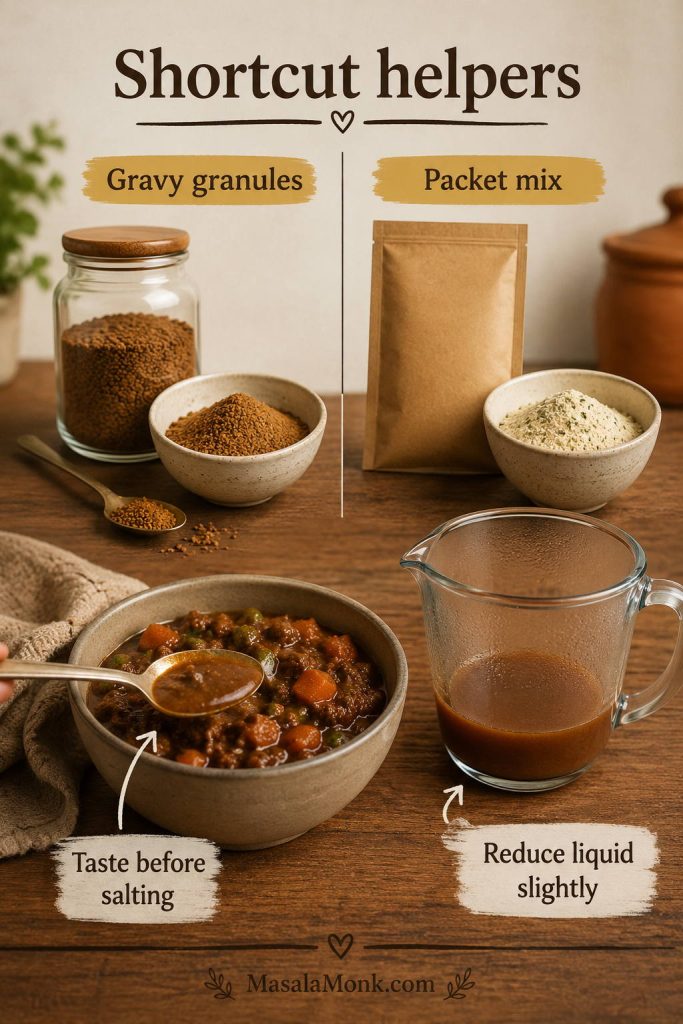
Gravy Granules and Cottage Pie Packet Mix

Shortcut helpers can be useful, especially in UK-style cottage pie, but they still need careful liquid control and tasting before extra salt goes in.

Shortcut helper board showing gravy granules, packet mix, glossy beef filling, a measuring jug, and a tasting spoon.
Gravy granules and packet mix can help on busy nights; however, reduce the liquid slightly and taste before salting.

Can You Use Gravy Granules to Thicken It?

Yes. Gravy granules are useful when you want a quick UK-style thickening shortcut, not just when something has gone wrong. Start with 1–2 teaspoons, let the filling settle for a few minutes, then taste before adding more because they add salt quickly.

Can You Use a Cottage Pie Packet Mix?

Yes. Use the packet as the flavour base, but reduce the liquid slightly because the slow cooker will not evaporate it the way an oven or pan does. Taste before adding extra salt, and make sure the filling is settled enough for topping.

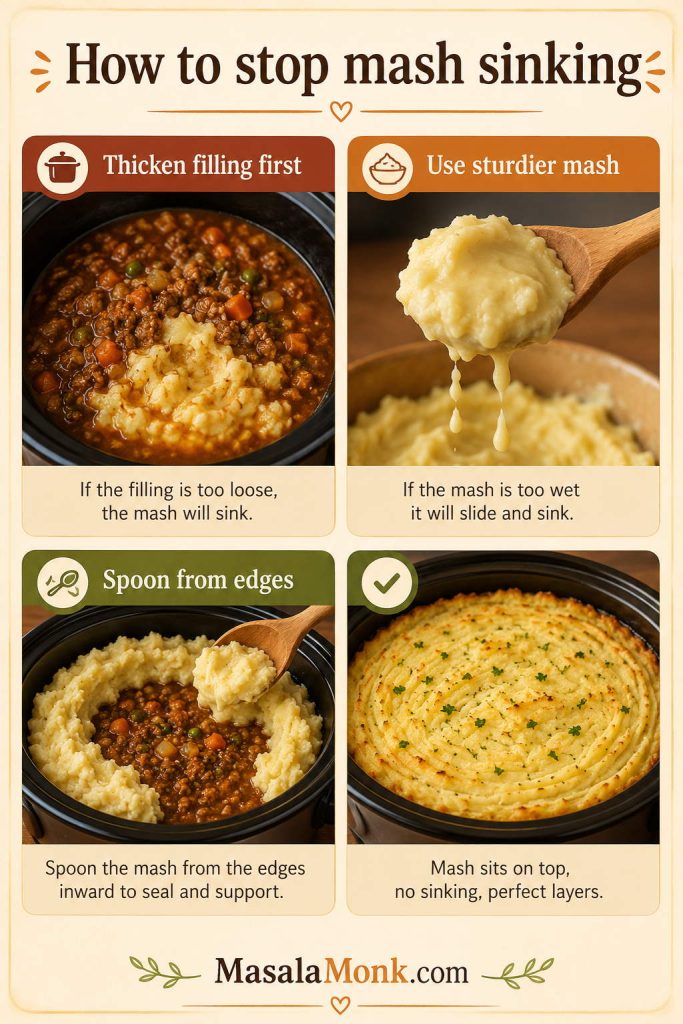
How to Stop the Mash Sinking

Mashed potato sinks when the filling is too loose, the mash is too wet, or the topping is added too heavily in one place. The fix is simple: thicken the filling first, use mash that holds its shape, and spoon from the edges inward.

Fix-it guide showing loose filling, wet mash, edge-first spooning, and finished mashed potato sitting on cottage pie.
If the mash sinks, the recipe is not ruined; next time, thicken the filling, use sturdier mash, and spoon from the edges inward.
  • Let fierce bubbling settle. If the filling is bubbling aggressively, turn the slow cooker off for 10 minutes before topping.
  • Use sturdy mash. Steam-dry the potatoes and add milk slowly.
  • Start at the edges. The rim gives the potato a firmer starting point than the centre.
  • Spoon, then spread. Dot small mounds of mash across the surface before smoothing.

If the mash already sank: serve it as a rustic cottage pie bowl. It will not look neat, but the flavour is still there. Next time, thicken the filling first and spoon the topping from the edges inward.

Topping Options: Mash, Cheese, Sliced Potatoes, and Shortcuts

The topping can be classic, cheesy, leftover, instant, or sliced. Choose the one that matches the amount of effort you want and the finish you like best.

ToppingBest forKeep in mind
Fresh mashBest textureSteam-dry potatoes and add milk slowly.
Leftover mashConvenienceWarm before spreading so it does not pull at the filling.
Instant mashFastest shortcutMake it thicker than packet directions.
Cheesy mashGolden finishCan get salty if the filling is already well seasoned.
Sliced potatoesDifferent textureNeeds oven, grill, or broiler finish.
Sweet potato mashLighter, sweeter toppingHolds more moisture, so use less milk.
Topping options board showing fresh mash, cheesy mash, leftover mash, instant mash, sliced potatoes, sweet potato mash, and finished cottage pie.
Once the beef layer is glossy and spoonable, the topping becomes flexible: classic mash, cheese, leftovers, instant mash, sliced potatoes, or sweet potato.

Classic mashed potato

Classic mash is the most reliable all-purpose topping. Use floury potatoes, butter, a little milk, and salt. The texture should be spreadable without sinking, but not so stiff that it tears up the filling underneath.

Cheesy mash

Cheddar gives this cottage pie a more finished, oven-baked feel. Stir some into the mash or scatter it on top before grilling or broiling. Cheese also helps the fork ridges brown.

Leftover mash

Leftover mash is one of the easiest shortcuts. Warm it slightly before spreading so it is not fridge-cold and stiff. If it has dried out, beat in a small knob of butter or a splash of milk, but keep the texture thick enough to sit on the filling.

If you have more leftover mash than you need for topping, turn it into crisp snacks with our croquettes recipe.

Can You Use Instant Mash for Slow Cooker Cottage Pie?

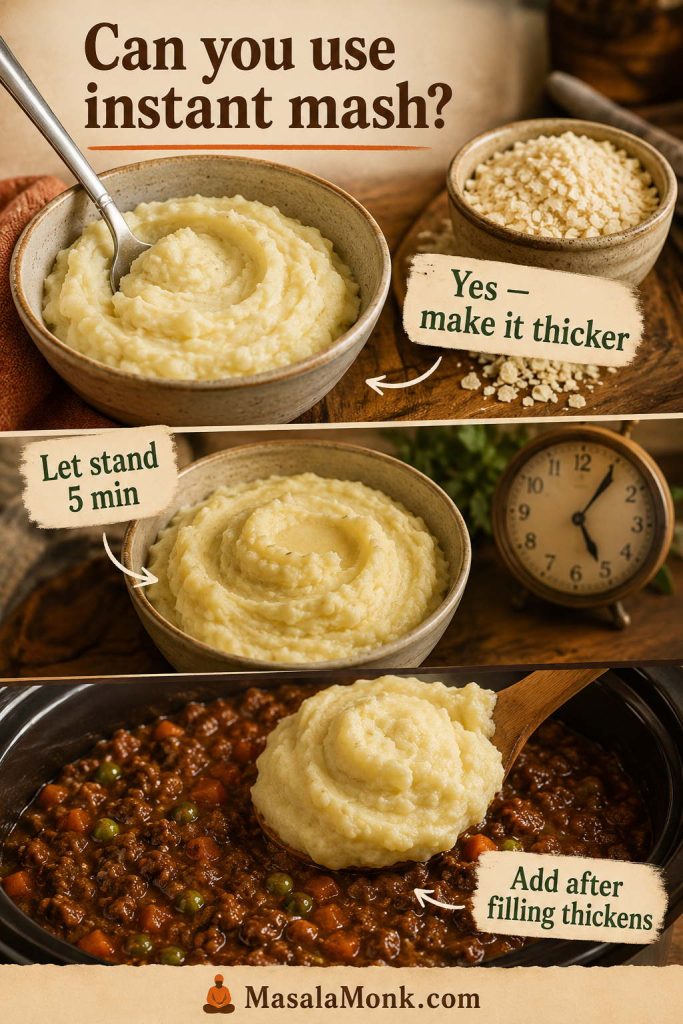
Yes, instant mash works for a shortcut version, but make it thicker than the packet directions suggest. Let it stand for 5 minutes before topping, and add a little grated cheese if it needs more structure. It is exactly the kind of shortcut that makes sense on a weeknight, especially when the beef filling is already rich and well seasoned.

Instant mash guide showing thick prepared instant mash, potato flakes, a timer, and mash being spooned over cottage pie filling.
Instant mash works as a cottage pie shortcut when it is thicker than usual and rested before it goes on.

Sliced potato topping

You can make slow cooker cottage pie with sliced potatoes, but it works best with an oven or grill finish. Slice the potatoes thinly, parboil if needed, layer them over a beef filling that holds together, brush with butter or oil, and finish until tender and golden. A slow cooker alone will soften sliced potatoes but will not make them crisp.

Sweet potato mash

Sweet potato mash gives the pie a sweeter, lighter feel. Because sweet potatoes hold more moisture than white potatoes, steam them well after cooking and use less milk. This works especially well for a lighter variation.

You should be able to scoop through soft potato into glossy beef gravy in a spoonful that lands on the plate as dinner, not soup. Use the recipe card below as the practical cook-through version.

Slow Cooker Cottage Pie Recipe Card

Description: A rich slow cooker cottage pie with savoury beef gravy, creamy mashed potatoes that sit neatly on top, optional cheddar, and an oven or grill finish for a golden top.

Before you top it: gravy first, mash second. The beef filling should briefly hold a spoon trail before the potato goes on. If it looks loose, thicken it first.

Need a shortcut or rescue? See raw mince, watery filling, instant mash, or golden finish before you start.

Prep time
25 minutes
Filling cook time
3½–4 hours high or 6–7 hours low
Total time
About 4½–5½ hours on high
About 7–8½ hours on low
Yield
4 generous servings

Timing note: an oven or broiler finish is quicker; heating the mash through in the slow cooker takes longer.

Equipment: 3.5–5L / 4–5 quart slow cooker, large skillet or frying pan, saucepan, potato masher or ricer, small bowl for slurry, and an oven dish if browning the top outside the slow cooker.

Ingredients

Beef filling

  • 1 tsp neutral oil or olive oil, optional, for very lean mince
  • 500g lean beef mince / ground beef, about 1 lb 2 oz
  • 1 large onion, finely diced
  • 2 medium carrots, finely diced
  • 1–2 celery sticks, finely diced
  • 2–3 garlic cloves, minced
  • 2 tbsp tomato purée / tomato paste
  • 1 tbsp Worcestershire sauce
  • 2 tbsp plain flour / all-purpose flour
  • 225ml beef stock / scant 1 cup
  • Stock adjustment: use about 200ml with mushrooms or frozen veg, 175–200ml for no-browning, or 100–150ml with chopped tomatoes
  • 1 tsp dried thyme or rosemary
  • 100–150g frozen peas / ¾–1 cup
  • Salt and black pepper, to taste, starting light if your stock is salty

Optional flavour boosters and add-ins

  • 100–150g mushrooms, finely chopped
  • 50–100ml red wine, replacing part of the stock
  • 1 tsp mustard or 1 tbsp brown sauce
  • 200g / about 7 oz chopped tomatoes, with stock reduced to 100–150ml

Optional thickener

  • 1 tbsp cornflour/cornstarch mixed with 1 tbsp cold water, only if the filling is loose near the end
  • For a UK-style shortcut, use 1–2 tsp beef gravy granules near the end, wait a few minutes, then taste before adding more because they add salt quickly.

Mash topping

  • 800–900g floury potatoes, peeled and cut into chunks
  • 30–45g butter / 2–3 tbsp
  • 60ml milk / ¼ cup, plus 1 tbsp at a time only if needed
  • 75–100g grated cheddar, optional
  • Or about 4 cups leftover, prepared, or instant mash, kept thicker than usual
  • Salt, to taste

Instructions

Cook the Beef Filling

  1. Brown the mince. Heat a large skillet over medium-high heat. Add 1 tsp oil if using very lean mince. Add the beef mince and cook until browned, breaking it into small crumbles. Drain excess fat.
  2. Add vegetables. Stir in onion, carrot, celery, garlic, and mushrooms if using. Cook for 4–5 minutes until beginning to soften.
  3. Build the gravy. Add tomato purée, Worcestershire sauce, herbs, salt, and pepper. Sprinkle over the flour and stir for 1 minute.
  4. Add stock. Pour in the beef stock gradually, scraping the pan and stirring until the mixture looks glossy. If using wine, add it before the stock and let it bubble briefly.
  5. Slow cook. Transfer to the slow cooker. Cover and cook on high for 3½–4 hours or low for 6–7 hours. Check earlier if your slow cooker runs hot.
  6. Check thickness. Stir the filling. Drag a spoon through it; the gravy should leave a brief path. If loose, stir in 1 tbsp cornflour/cornstarch mixed with 1 tbsp cold water and cook on high for 20–30 minutes.
  7. Add peas. Stir in frozen peas during the final 20–30 minutes of filling time. Taste and adjust seasoning.

Make the Mash and Finish

  1. Make mash. During the final 30–40 minutes of filling time, boil potatoes in salted water until tender. Drain, steam-dry for 1–2 minutes, then mash with butter and 60ml / ¼ cup milk. Add more milk 1 tablespoon at a time only if needed. Stir in some cheddar if using.
  2. Top the filling. Spoon mash over the beef filling in small mounds, starting around the edges. Spread gently and rough up the surface with a fork. Add cheddar on top if desired.
  3. Finish. For the easiest soft topping, cover and cook on high for 45–60 minutes. For a golden top, transfer to an oven dish and bake at 200°C / 400°F for 20–25 minutes, or grill/broil for 5–10 minutes only if your insert is safe for direct heat.
  4. Rest and serve. Let the cottage pie rest for 10 minutes before serving.

Recipe Notes

  • Best flavour: brown the mince when you can. It gives deeper flavour and lets you drain excess fat.
  • Raw-mince shortcut: skip the flour at the start, use fresh, fully thawed lean mince, reduce stock to 175–200ml, break the mince up well, whisk tomato purée into the stock before adding, and thicken near the end.
  • Chopped tomatoes: if using 200g / about 7 oz chopped tomatoes, reduce the stock to 100–150ml and check the filling before topping.
  • Shortcut mash: warm leftover or prepared mash slightly before spreading; make instant mash thicker than the packet directions.
  • Thickening options: cornflour/cornstarch slurry gives the cleanest fix; gravy granules also work but add salt quickly.
  • Slow-cooker insert warning: only grill/broil or oven-finish in the insert if the manufacturer says it is safe.

For a quick saveable reference, the image below keeps the core slow-cooker cottage pie numbers together without replacing the fuller method above.

Saveable recipe card for slow cooker cottage pie with a photo, serving count, beef mince amount, stock amount, timing, mash timing, and resting note.
Save the core slow cooker cottage pie numbers: 500g beef mince, 225ml stock, mash near the end, and 10 minutes of resting.

Why This Slow Cooker Cottage Pie Works

  • Less liquid: 225ml stock gives enough gravy for 500g beef mince without drowning the topping.
  • Tomato purée instead of a full tin of tomatoes: you get savoury depth without adding too much water.
  • Browning when possible: it builds flavour and lets you drain fat before slow cooking.
  • Flour first, slurry later: flour thickens the browned method from the start; cornflour/cornstarch rescues a loose filling near the end.
  • Late peas: they stay brighter and do not release water into the filling too early.
  • Steam-dried mash: extra steam leaves the potatoes, so the topping stays creamy but sturdy.

That same low-liquid thinking is useful in other slow-cooker dinners too; our slow cooker sausage casserole recipe uses the same idea to keep the sauce glossy instead of thin.

Fixes for Watery Filling, Sinking Mash, and Pale Topping

A loose filling is not a ruined dinner. Most slow-cooker cottage pie problems can be fixed with a little thickening, a short rest, or a gentler topping method.

ProblemFix nowFix next time
Filling is wateryAdd 1 tbsp cornflour/cornstarch mixed with 1 tbsp cold water. Gravy granules also work as a shortcut. Cook on high until thickened.Use less stock, drain browned mince, and reduce liquid for watery add-ins.
Mash sank into the fillingServe as a rustic beef-and-potato bowl.Thicken the filling first, then spoon the topping from the edges inward.
Filling tastes blandAdd salt, pepper, Worcestershire sauce, or a little more tomato paste.Brown the mince harder and use stronger beef stock.
Filling is greasySpoon fat from the surface before topping.Use lean mince and drain fat after browning.
Topping is paleFinish under the grill/broiler or transfer to an oven dish.Plan a golden finish from the beginning and use fork ridges on the mash.
Mash is glueyFold in a little butter and avoid overmixing.Use floury potatoes and mash by hand instead of overworking in a processor.
Mash is too looseStir in grated cheese or extra cooked potato if available.Steam-dry potatoes and add milk gradually.
Slow cooker is too fullRemove some filling before topping.Keep the slow cooker around half to two-thirds full for best cooking and topping space.

Variations and Scaling

These variations still follow the same core idea: keep the filling glossy, not soupy. When you add ingredients that release water or dilute flavour, adjust the stock and seasoning.

Budget version

To stretch the beef, add 100–150g cooked lentils or drained white beans, 100g finely chopped mushrooms, or 1 extra grated carrot. Reduce the stock by 25–50ml if adding mushrooms or frozen vegetables, and taste for extra Worcestershire sauce or tomato paste because stretch ingredients can soften the savoury flavour.

For a family-style version, dice or grate the vegetables small so they melt into the gravy rather than staying as large chunks.

Lighter version

Use 5% lean beef mince, 30g butter instead of 45g, skip extra cheese, and replace up to one-third of the potato with sweet potato if you like a sweeter topping. Add extra carrots, celery, or mushrooms, but keep the stock modest so the filling still feels hearty.

Crockpot shepherd’s pie with ground beef

For US-style crockpot shepherd’s pie, follow the same method with ground beef. You can also use frozen mixed vegetables and prepared mashed potatoes for a shortcut version, but make sure the beef layer holds together before adding the topping.

Lamb shepherd’s pie version

If using lamb mince, follow the same method but drain the fat carefully because lamb can be richer than beef. With lamb, the dish is traditionally called shepherd’s pie rather than cottage pie.

Guinness or red wine cottage pie

Replace part of the stock with Guinness or red wine for a deeper gravy. Use a modest amount and let it bubble briefly with the browned mince before slow cooking so the flavour becomes rounded rather than sharp.

Vegetarian or lentil cottage pie

For a vegetarian version, treat this as inspiration rather than a direct swap. Lentils and mushrooms need different liquid, so they deserve their own slow-cooker recipe.

Making a larger batch

If you want to make a larger crockpot cottage pie with 1kg / about 2 lb ground beef, use a 6–8 quart slow cooker and scale carefully. When scaling up, double the beef and vegetables, but be gentler with the liquid. You can always add more stock later; taking it back out is harder.

IngredientStandard recipeLarger version
Beef mince / ground beef500g / about 1 lb 2 oz1kg / about 2 lb
Slow cooker size3.5–5L / 4–5 quart6–8 quart
Stock225ml / scant 1 cupStart with 350ml / about 1½ cups, then add more only if needed
Flour2 tbsp3–4 tbsp
Potatoes800–900g1.5–1.8kg
Filling cook time3½–4 hours high or 6–7 hours lowCheck from 4 hours high or 7 hours low

If you add chopped tomatoes or a lot of mushrooms to a larger batch, reduce the stock further and check the filling before topping. For larger batches, the oven-dish finish is often easier than trying to brown a very full slow-cooker insert.

What to Serve with Slow Cooker Cottage Pie

This is already rich and filling, so the best sides are simple and fresh. For a classic plate, serve it with peas, steamed greens, cabbage, green beans, or roasted carrots. For a lighter plate, add a crisp salad with a sharp vinaigrette.

Serving spread with cottage pie, peas, greens, cabbage, green beans, salad, and chutney or relish.
Because cottage pie is rich and creamy, simple greens, peas, salad, or sharp chutney make the plate brighter and more balanced.

Pickled onions, chutney, or a spoonful of sharp relish also work well because they cut through the creamy mash and beef gravy. If the filling is a little looser and you are serving it more like a rustic cottage pie bowl, crusty bread is useful for catching the gravy.

It should feel generous rather than polished: creamy potato, glossy beef gravy, and enough structure to scoop without needing perfect slices.

Make Ahead, Storage, Freezing, and Reheating

Make Ahead and Freeze Slow Cooker Cottage Pie

The neatest make-ahead order is to prepare the beef filling first, chill it until it sets slightly, then top and finish later. Chilled filling is easier to cover neatly with mashed potato.

Make-ahead guide showing beef filling, mashed potato, freezer portions, and an assembled cottage pie dish ready to finish.
For the best make-ahead cottage pie texture, chill the filling first and freeze portions separately when possible.
  1. Make the beef filling.
  2. Cool and refrigerate it in a covered container.
  3. Make the mash fresh, or use leftover mash.
  4. Reheat the filling until hot.
  5. Top with mash and finish in the slow cooker, oven, or under the grill/broiler.

Can you assemble the whole pie ahead?

Yes, you can assemble the whole pie ahead if the filling is cold and settled. Cover and refrigerate, then reheat until piping hot before serving. A fully assembled chilled pie reheats best in the oven or microwave; the slow cooker is better for keeping already-hot food warm than for reheating from fridge-cold.

Avoid putting a fridge-cold ceramic slow-cooker insert straight into a hot oven. Transfer the pie to an oven dish if you want an oven finish.

Fridge storage

Cool leftovers promptly, then store in an airtight container in the fridge for 3–4 days. Keep the pie covered so the mash does not dry out.

Freezing

For best texture, freeze the beef filling and mashed potato separately. You can freeze assembled cottage pie, but the potato topping may soften slightly after thawing. Freeze in meal-size portions so reheating is easier.

For another freezer-friendly slow-cooker dinner with clear cooker-size guidance, see our slow cooker pulled pork recipe.

How to Reheat Slow Cooker Cottage Pie

Reheat leftovers quickly in the microwave, oven, or on the hob until piping hot. Avoid using a slow cooker as the main method for reheating cold leftovers because it takes too long to move chilled food through the safe temperature range.

Reheating guide showing cottage pie warmed in the microwave, oven, and stovetop with a reminder to heat until piping hot.
Reheat cottage pie until piping hot, using the microwave for speed, the oven for the topping, or the stovetop for loose filling.

For reheating, the USDA safe temperature chart lists leftovers and casseroles at 165°F / 74°C: USDA safe temperature chart.

FAQs

Can I put raw mince in slow cooker cottage pie?

Yes, but treat it as the shortcut version, not the best-flavour version. Use fresh, fully thawed lean mince, reduce the stock, break the mince up well, and thicken the filling near the end. Browned mince still gives better flavour and lets you drain fat first.

Is slow cooker cottage pie dump-and-go?

It can be close, especially if you use raw thawed mince, frozen mixed vegetables, and prepared mash. However, the filling still needs one look near the end so you can thicken it before topping.

Should I add mash at the beginning or near the end?

Add the mash near the end. It gives you a chance to let the filling settle first, so the potatoes stay defined instead of softening into the gravy.

Why did my slow cooker cottage pie go watery?

The usual causes are too much stock, undrained mince fat, watery vegetables, or not enough thickening. The fix is usually simple: use less liquid than an oven cottage pie, then tighten the gravy before the mash goes on.

How do I stop mash sinking into cottage pie?

Use a beef filling that is saucy but not runny, mash that holds its shape, and a gentle topping method. Spoon the potatoes from the edges inward instead of dropping everything into the centre.

Can I use instant mash?

Yes. It is not the fanciest topping, but it is a useful weeknight shortcut if you make it thicker than the packet directions suggest. Let it stand for 5 minutes, then add it only after the filling has thickened.

Can I use gravy granules to thicken the filling?

Yes — they are a handy UK-style shortcut when the filling looks loose, but start small because gravy granules season as well as thicken. Use 1–2 teaspoons near the end, wait a few minutes, then taste before adding more.

Can I use a cottage pie packet mix?

Yes, but reduce the liquid slightly because the slow cooker will not evaporate it like an oven or hob. Taste before adding extra salt, and make sure the filling is settled and glossy before topping.

Can I make it with frozen mixed vegetables?

Yes, frozen mixed vegetables are fine, especially for a shortcut version, but they release water as they heat. Add them late or reduce the stock slightly so the filling holds together.

Can I make it ahead?

Yes. The easiest make-ahead path is filling first, then mash and finish later. If the pie is fully assembled and chilled, reheat it in the oven or microwave until piping hot rather than relying on the slow cooker from cold.

Can I freeze slow cooker cottage pie?

Yes. For the neatest texture, freeze the beef filling and mash separately. Assembled cottage pie also freezes, but the potato topping may soften a little after thawing.

How do I get a golden top?

Use a short grill, broiler, or oven finish after the filling is already hot. Fork ridges, a little butter, and optional cheddar help the top brown quickly, so you get colour without drying out the gravy underneath.

Once you understand the two big ideas — keep the filling glossy, not soupy, and keep the mash sturdy — slow cooker cottage pie becomes a forgiving dinner. Make it soft and simple in the slow cooker, or give it those golden fork ridges under the grill. Either way, it should land on the table as proper comfort.

Tried this with raw mince, instant mash, gravy granules, leftover mash, sliced potatoes, packet mix, or a grill finish? Leave a comment with your slow cooker size, liquid amount, and what you changed — it helps other readers choose the right version.

Back to top

Posted on — Leave a comment

Pinakbet Tagalog Recipe

Bowl of Pinakbet Tagalog with pork, squash, okra, eggplant, ampalaya, long beans, and tomato-bagoong sauce, served with rice nearby.

Pinakbet Tagalog is the kind of vegetable dish that makes rice feel necessary. The best spoonful has salty bagoong-rich juices, sweet squash, silky eggplant, tender okra, a little bitter ampalaya, and enough porky depth to make the vegetables feel like the meal.

It is generous, home-style Filipino cooking: vegetables cooked until they soften into each other, but not so far that everything turns muddy. The squash should become creamy at the edges, the eggplant should turn soft and shiny, and the bitter melon should balance the sweetness instead of taking over.

If your pinakbet has ever turned watery, too salty, too bitter, or too soft, the problem usually is not the ingredient list. It is the order. Squash needs a head start, okra needs restraint, and bagoong needs to be cooked with the tomatoes instead of dumped in heavily at the end.

This is a Pinakbet Tagalog-style home recipe: squash-forward, shrimp-paste seasoned, saucy enough for rice, and built to keep the vegetables tender but distinct. It also includes notes for a sharper Ilocano direction, no-bagoong substitutions, and the small timing cues that keep pakbet from becoming mushy.

Quick Answer: What Is Pinakbet?

Pinakbet is a Filipino vegetable stew made with bagoong, tomatoes, and vegetables such as squash, okra, eggplant, bitter melon, and long beans. This version is Pinakbet Tagalog, made with bagoong alamang, pork, squash, and mixed vegetables in a salty, savory sauce that is meant for rice.

For the easiest balanced version, cook pork with onion, garlic, tomatoes, and shrimp paste. Add squash first, long beans next, and eggplant, ampalaya, and okra near the end. That order keeps the vegetables tender without turning everything into one soft mixed stew; the full vegetable cooking order is below.

  • Main seasoning: bagoong alamang, or shrimp paste
  • Protein: pork belly or pork shoulder, cut into 1-inch pieces
  • Vegetables: squash, long beans, okra, eggplant, and ampalaya
  • Liquid: 1 cup / 240 ml water or light stock, plus more only if needed
  • Texture goal: glossy and saucy, not soupy or mushy

Start here: Use 1 tablespoon bagoong first, then adjust with 1–3 teaspoons more near the end. Bagoong brands vary a lot, and starting low gives you room to correct the seasoning.

Pinakbet at a Glance

Yield4 generous servings with rice, or 5–6 smaller side servings
Prep time20 minutes
Cook timeAbout 40 minutes
Total timeAbout 1 hour
Best pan12-inch wide pan, wok, deep skillet, or wide Dutch oven
Main flavorSalty, savory, lightly sweet, earthy, and a little bitter
Main fixGive squash a head start and add delicate vegetables near the end
Pinakbet at a glance guide showing yield, prep time, cook time, best pan, flavor profile, and texture goal.
Use this Pinakbet Tagalog snapshot to set the cooking target early: tender vegetables, modest sauce, and a spoonable finish that stays clear of watery or mushy.

Why these amounts work: This recipe starts with 1 tablespoon bagoong and 1 cup / 240 ml water because both salt and liquid build as the vegetables cook. Bagoong tastes sharper before it softens into the tomatoes and squash, and the vegetables release liquid as they simmer. If you are unsure how saucy the finished dish should look, use the texture guide below before adding more water.

Pinakbet Tagalog vs Ilocano: What This Recipe Is

This is a Pinakbet Tagalog-style recipe: squash-forward, seasoned with bagoong alamang, and saucy enough to spoon over rice. It is the style many home cooks expect when they want pakbet with pork, shrimp paste, kalabasa, eggplant, okra, ampalaya, and long beans.

A stricter Ilocano-style pinakbet is often more closely tied to bagoong isda or fermented fish seasoning, and the finish can be drier and more vegetable-forward. To move this recipe in that direction, use bagoong isda, reduce the liquid slightly, stir less, and let the vegetables cook down more quietly.

Side-by-side comparison of Pinakbet Tagalog and Ilocano-style pinakbet with notes about bagoong and texture differences.
Pinakbet Tagalog usually leans rounder, saucier, and squash-forward. By contrast, Ilocano-style pinakbet often tastes sharper and drier, so the bagoong choice changes the whole direction of the dish.

Cook’s clarity: Follow the recipe as written for a rounder, shrimp-paste Tagalog-style pakbet. Use the Ilocano notes if you want a sharper, drier, more fermented-fish direction. The bagoong guide below explains when to use bagoong alamang, bagoong isda, or a lighter substitute.

Why This Pinakbet Recipe Works

Good pinakbet is not about throwing every vegetable into the pan and hoping for the best. Squash, okra, eggplant, long beans, and bitter melon do not cook at the same speed, and shrimp paste is strong enough that small choices matter.

The goal is a pan of vegetables that has softened into itself without losing every shape and texture. Squash should yield but still stay visible. Eggplant should look silky and soft. Okra should be tender, not slippery across the whole dish. Ampalaya should bring enough bitterness to balance the squash and tomato, not dominate every bite.

Brown the pork first

Pork belly or pork shoulder gives the tomato and seasoning mixture more depth. Let a little fat render before the aromatics go in.

Bloom the bagoong with tomatoes

Cooking the shrimp paste with softened tomatoes rounds out the sharp saltiness and helps the flavor spread through the pan.

Stage the vegetables

Squash needs a head start. Eggplant, okra, and ampalaya go in later so they soften without collapsing.

Tested texture target: In a wide pan, 1 cup / 240 ml water is usually enough to soften the pork and start the vegetables. Add up to 1/2 cup / 120 ml more only if the pork or squash needs extra time. The finished dish should have shallow glossy juices that cling lightly to the vegetables, not a soup-like broth.

Pinakbet Ingredients

The amounts below make 4 generous servings with rice, or 5–6 smaller servings as part of a larger meal. You get enough pork for richness, enough fermented seasoning for depth, enough tomato for body, and enough vegetable contrast to make the dish feel generous.

If you are cooking outside the Philippines, check Filipino or broader Asian groceries for long beans, bitter melon, Filipino eggplant, kalabasa, and bagoong alamang. Green beans, kabocha, butternut squash, and slender eggplant can still make a good home version if you keep the same balance of sweet, bitter, tender, and firm. If your market does not carry every Filipino vegetable, the substitution guide shows which swaps keep the dish closest to the original balance.

If you cannot find every traditional ingredient, do not let that stop you. The dish still works when the pan has the same basic shape: something sweet, something bitter if possible, something tender, something green, and enough savory depth to make it feel complete.

Ingredient board for Pinakbet Tagalog with pork, bagoong alamang, tomatoes, onion, garlic, squash, long beans, okra, eggplant, and ampalaya.
These ingredients show why Pinakbet Tagalog works before the pan even heats up: pork adds richness, bagoong brings depth, tomatoes give body, and the vegetables create the sweet, bitter, tender, and crisp-tender contrast that defines the dish.

Ingredient Amounts and Why They Matter

IngredientUS measureMetricWhy it matters
Pork belly or pork shoulder1/2 lb225 gPork belly gives richness; shoulder is leaner and may need a little more time.
Cooking oil1 tbsp15 mlUse less if the pork is very fatty.
Onion1 medium110–150 gBuilds sweetness in the savory foundation.
Garlic3–4 cloves12–16 gAdd after the onion so it does not burn.
Tomatoes2 mediumAbout 225 gCook down into the savory juices.
Bagoong alamang1 tbsp to start, plus 1–3 tsp more to taste15 g to start, plus more to tasteStarting low helps prevent the dish from becoming too salty.
Water or light stock1 cup, plus up to 1/2 cup more as needed240 ml, plus up to 120 ml more as neededLoosens the tomato-bagoong mixture without making the dish soupy.
Kalabasa / squash2 cups cubed250–300 gAdds sweetness and body.
Sitaw / long beans1–1 1/2 cups cut100–150 gAdds green bite and structure.
Okra6–8 pieces100–150 gAdd late so it keeps its shape.
Ampalaya / bitter melon1/2 medium, or up to 1 medium if you enjoy bitternessAbout 100–225 gGives the signature bitter edge.
Eggplant1 large or 2 small170–250 gAdd late so it softens without dissolving.
Black pepper1/4 tspAbout 0.5 gOptional, but rounds the flavor.

Best Vegetables for Pinakbet

The best bites have contrast: sweet squash, bitter ampalaya, silky eggplant, tender okra, and salty tomato-bagoong juices that pull everything together.

Guide showing squash, okra, eggplant, ampalaya, long beans, and tomatoes used in pinakbet, with short role labels.
Each vegetable does something different in pakbet, so the mix matters as much as the seasoning. Kalabasa brings sweetness, long beans keep the dish structured, eggplant turns silky, okra adds body, and ampalaya brings the bitter edge that keeps the dish from tasting flat.

Kalabasa / Squash

This sweet squash makes the salty seasoning feel round. Cut it into sturdy chunks so the edges turn creamy without the pieces disappearing.

Okra

Okra is there for softness and body, but it needs a light hand. Trim only the ends, add it late, and let it turn tender without stirring it into the whole pan.

Eggplant

Eggplant is at its best when it turns silky and soaks up the tomato-bagoong juices. Keep the pieces thick so they soften without vanishing.

Ampalaya

Ampalaya is the edge of the dish. Use less if you want a milder pan, but do not erase all the bitterness; that little bite is what keeps the squash and tomato from tasting too sweet.

Sitaw / Long Beans

Long beans keep the dish from feeling too soft, especially beside squash and eggplant. Cut them into 2- to 3-inch pieces so they cook evenly and keep a little bite.

Tomatoes

Once tomatoes soften into the pan, they make the fermented seasoning taste fuller and less sharp. Give them time to collapse before adding water.

Best Cut Sizes for Pinakbet

Pinakbet is forgiving, but the knife work quietly decides a lot. Small squash collapses too early, thin eggplant disappears, and overcut okra can make the texture slippery.

Cut size guide showing pork pieces, squash chunks, long beans, eggplant pieces, ampalaya half-moons, okra pods, and chopped tomatoes for pinakbet.
Good knife work quietly improves Pinakbet Tagalog. Larger squash chunks hold shape better, thick eggplant pieces soften without disappearing, and lightly trimmed okra stays cleaner in texture, so the finished dish feels tender rather than collapsed.
IngredientBest cut sizeWhat to watch
Pork belly or shoulderAbout 1-inch piecesSmall enough to tenderize, large enough to stay juicy.
Squash / kalabasa1 to 1 1/2-inch chunksHolds shape while becoming tender.
Long beans / sitaw2 to 3-inch piecesCooks evenly and stays easy to serve.
EggplantThick diagonal pieces or large chunksSoftens without dissolving into the dish.
AmpalayaThin half-moonsDistributes bitterness without taking over every bite.
OkraWhole small pods or halved large podsLess cutting means a cleaner texture.
TomatoesRough choppedBreaks down into the tomato-bagoong mixture without needing perfect dice.

How to Reduce Ampalaya Bitterness

Optional ampalaya tip: For milder bitter melon, soak the sliced ampalaya in water with a big pinch of salt for 20–30 minutes, then drain before cooking. Skip this if you enjoy the stronger bitter edge.

Ampalaya bitterness guide showing sliced bitter melon, soaking in salted water for 20 to 30 minutes, draining, and keeping some bitterness.
Ampalaya should soften its bitterness, not lose it completely. A short salted-water soak helps mellow the sharpness; however, keeping a little bitterness in the final dish is exactly what makes Pinakbet Tagalog taste balanced instead of one-note.

Ingredient Substitutes If You Cannot Find Everything

Pinakbet is best with traditional vegetables, but a home pot can still work when the market does not give you everything. Think about what each ingredient brings to the pan: sweetness from squash, bitterness from ampalaya, body from okra, and salty depth from the fermented seasoning.

Ingredient substitutes guide for pinakbet showing alternatives for long beans, squash, bitter melon, eggplant, and pork.
Traditional ingredients are ideal, yet pinakbet can still work when the pot keeps the same shape: something sweet, something green, something tender, a little bitterness if possible, and enough savory depth to make the vegetables feel complete.
Traditional ingredientGood substituteWhat to watch
Sitaw / long beansGreen beansGreen beans cook faster, so add them a little later.
KalabasaKabocha, pumpkin, or butternut squashSweetness and cooking time vary by squash type.
AmpalayaUse less, or skip if unavailableThe dish becomes less bitter and milder.
Filipino eggplantAny slender eggplantSimilar texture; avoid tiny pieces because they collapse.
Pork bellyPork shoulder, shrimp, chicken thighs, or tofuChanges richness and cooking time.

From here, the seasoning does the heavy lifting. This is where pinakbet can become deep and rounded, or too salty too quickly, so taste slowly and let the tomatoes do their work.

Bagoong Alamang vs Bagoong Isda

Bagoong is the ingredient that makes pinakbet taste like pinakbet. In this Tagalog-style version, bagoong alamang gives a round shrimp-paste flavor. To move the dish in a sharper Ilocano direction, use bagoong isda or bagoong monamon instead. For more background on Filipino pantry staples like bagoong and patis, this Filipino pantry guide is helpful.

Comparison guide showing bagoong alamang and bagoong isda for Pinakbet Tagalog and Ilocano-style pinakbet.
Bagoong does more than add salt; it gives pinakbet its fermented depth and unmistakable savory backbone. For a rounder Tagalog-style flavor, bagoong alamang fits naturally, while bagoong isda pushes the dish toward a sharper Ilocano direction.

Raw vs Ginisang Bagoong

Raw bagoong alamang tends to taste sharper and saltier, so it benefits from being cooked briefly with tomatoes before the water goes in. Ginisang bagoong is already sautéed and often tastes rounder, but many jars are also sweeter. Taste before adding more, especially if the jar is meant to be eaten as a condiment.

If your ginisang bagoong tastes sweet straight from the jar, be slower with extra squash and do not add more seasoning until the vegetables are cooked. Sweet jarred shrimp paste can taste pleasantly round at first, then too sweet once the squash softens.

Taste Before Adding More

Bagoong is powerful, so use it with patience. Let it bloom with the tomatoes, then taste again later when the vegetables have softened around it. A spoonful of cooking liquid may taste strong by itself; taste with squash or rice before deciding whether the dish needs more. If you cannot use shrimp paste at all, skip ahead to the without-bagoong options.

Bagoong typeStart withAdd more when
Very salty bagoong alamang1 tbspThe vegetables are cooked but the dish tastes flat.
Sweeter ginisang bagoong1 tbsp, then adjustThe dish needs more savory depth, not more sweetness.
Bagoong isda1 tbspYou want a sharper Ilocano-style flavor.
Fish sauce substitute1 tbspOnly after tasting near the end.

Bloom the bagoong: Cook it briefly with the tomatoes before adding water. Raw-stirred bagoong can taste sharp; cooked shrimp paste tastes rounder and spreads better through the dish.

Equipment You Need

A 12-inch wide pan, wok, deep skillet, or wide Dutch oven works best. Pinakbet has bulky vegetables, so a narrow pot forces you to stir more aggressively, which can break the squash and eggplant. Use a lid for gentle steaming and a wooden spoon or silicone spatula for turning.

How to Cook Pinakbet

Once everything is cut, the cooking is mostly patience. Brown the pork, soften the aromatics, let the tomatoes collapse, then cook the bagoong long enough for the smell to turn round and savory instead of sharply salty.

Do not rush the beginning. The tomato and shrimp paste mixture is what makes the vegetables taste complete, not like plain vegetables wearing salt. Once the squash and beans are in, give the pan enough time before you decide it needs more water. If your past batches turned watery, salty, bitter, or mushy, the troubleshooting table after the method will help you fix the problem.

A wide cooking surface helps everything cook in a shallow layer instead of being crushed. Do not stir just because the pan is quiet. You are looking for pieces that have softened into each other without losing themselves.

Best Vegetable Cooking Order

Slow-cooking vegetables and fast-cooking vegetables should not be treated the same way. This is the order that keeps pinakbet tender without making it mushy.

Three-stage guide showing the cooking order for pinakbet: base ingredients, squash and long beans, then eggplant, ampalaya, and okra.
The cooking order keeps Pinakbet Tagalog from turning into one soft pile. Build the savory base first, let the sturdier vegetables get started, then finish with the delicate ones so every bite still has contrast.
Add firstAdd in the middleAdd last
Pork, onion, garlic, tomatoes, bagoongSquash, kamote if using, long beansEggplant, ampalaya, okra
Builds the savory foundationNeeds time but should hold shapeOvercooks faster and can turn too soft

Step-by-Step Method

Build the Pork, Tomato, and Bagoong Base

  1. Brown the pork. Heat oil in a wide pan over medium heat. Add pork in one layer and cook for 5–8 minutes, until lightly browned and some fat has rendered. Spread the pork out so it browns instead of steaming.

Visual Cue: Brown the Pork

Pork pieces browning in a wide pan at the beginning of making Pinakbet Tagalog.
Browning the pork first builds flavor before the vegetables ever hit the pan. As the fat renders and the edges deepen in color, the base becomes richer, which means the later tomato-bagoong mixture tastes fuller without needing extra seasoning.
  1. Cook the aromatics. Add onion and cook for about 2 minutes, until softened. Add garlic and cook for 30 seconds to 1 minute, just until fragrant.
  2. Soften the tomatoes. Add tomatoes and cook for 3–5 minutes, pressing them gently with the spoon. They should lose their raw shape and look juicy around the edges.
  3. Bloom the bagoong. Stir in 1 tablespoon bagoong and cook for 1–2 minutes. The smell should become rounder and more savory.

Visual Cue: Build the Tomato-Bagoong Base

Pork, onion, garlic, softened tomatoes, and bagoong being stirred together in a wide pan for Pinakbet Tagalog.
This step is where Pinakbet Tagalog starts tasting like itself. Once the tomatoes soften and the bagoong cooks into them, the flavor turns rounder and less harsh, so the vegetables later absorb something savory rather than just salty.
  1. Simmer the pork. Add 1 cup water or light stock. Cover and simmer for 15–20 minutes, or until the pork starts to become tender. If using pork shoulder and it still feels firm, simmer 5–10 minutes longer before adding squash. If the liquid already looks high before the squash goes in, do not add more yet; the vegetables will release more as they cook.

Visual Cue: Simmer the Pork

Pork simmering in shallow tomato-bagoong liquid in a wide pan with steam rising.
Simmer the pork before adding the vegetables, especially if you are using pork shoulder instead of belly. That little bit of patience lets the meat start tenderizing early, while the squash and softer vegetables can still cook on their own schedule later.

Add the Vegetables and Finish the Dish

  1. Add the squash. Add kalabasa and cook for 5–7 minutes. It should begin to soften, but it should not be falling apart. Add up to 1/2 cup / 120 ml more water only if the pan looks dry or the squash needs more time.

Visual Cue: Add Squash First

Orange squash chunks being added to pork and tomato-bagoong sauce in a wide pan for pinakbet.
Squash goes in first because it is the vegetable that changes the dish’s body. As the edges soften, it thickens the pan slightly and rounds out the stronger bagoong flavor without making the pakbet taste sweet.
  1. Add the long beans. Add sitaw and cook for 2–3 minutes. The beans should brighten and begin to soften while still keeping some bite.

Visual Cue: Add Long Beans Next

Long beans being added to partially cooked squash and pork in a wide pan of Pinakbet Tagalog.
Long beans belong in the middle of the cooking process rather than at the beginning or the very end. This timing helps them stay green and tender, so the final pakbet still has a little structure instead of turning uniformly soft.
  1. Finish with eggplant, ampalaya, and okra. Cover and cook for 4–6 minutes, turning gently once or twice. The eggplant should look silky, the okra should still hold shape, and the ampalaya should soften without taking over the whole pan.

Visual Cue: Finish with Eggplant, Ampalaya, and Okra

Eggplant, ampalaya, and okra being added last to a pan of Pinakbet Tagalog with squash and long beans already cooking.
Eggplant, ampalaya, and okra cook quickly, so they should finish the dish instead of starting it. Added late, they keep their character: the eggplant turns silky, the okra stays tender, and the ampalaya gives bitterness without taking over the whole pot.
  1. Taste and adjust. Add 1–3 teaspoons more bagoong, pepper, or a small splash of water only if needed. The cooking liquid should cling lightly to the vegetables, with no large pool of broth at the bottom. Serve hot with rice.

Visual Cue: Taste, Adjust, and Finish

Finished Pinakbet Tagalog in a wide pan with a spoon lifting vegetables and glossy sauce.
The final texture should look moist and glossy, not brothy. Before adding more bagoong, taste with squash or rice, because the seasoning settles once the vegetables soften into the sauce.

How Long to Cook Pinakbet

Pinakbet is a stovetop dish, so the “temperature” is really about heat control. Medium heat is enough for most of the recipe. If the pan gets too hot, the juices can stick and the vegetables can break before they cook through.

StageHeatTimeVisual cue
Brown porkMedium to medium-high5–8 minutesEdges lightly browned, fat beginning to render
AromaticsMedium2–3 minutesOnion softened, garlic fragrant
Tomato and bagoongMedium3–5 minutesTomatoes juicy, bagoong darker and aromatic
Pork simmerMedium-low15–20 minutes, longer if needed for pork shoulderPork starting to tenderize
SquashMedium5–7 minutesFork enters but squash holds shape
Long beansMedium2–3 minutesBrighter, tender-crisp
Eggplant, ampalaya, okraMedium4–6 minutesTender, silky, and not collapsed

How Pinakbet Should Look When It Is Done

The best pinakbet does not look perfect. It looks generous, saucy, and ready for rice. The squash should be creamy at the edges but still in chunks. The long beans should keep a little bite. The eggplant should turn silky, not disappear. The okra should be tender without making the whole dish slippery.

If there is a lot of loose liquid, simmer uncovered for a few minutes. If the pan is dry before everything is tender, add a small splash of water, cover again, and continue gently. The final texture should feel saucy and spoonable, with shallow coated juices rather than loose broth. For a quick visual check, compare your pan with the watery vs right vs mushy guide.

You are done when the squash is fork-tender, the eggplant is silky, the long beans still have bite, and the cooking liquid lightly clings to the vegetables.

Finished Pinakbet Tagalog with notes showing tender squash, silky eggplant, long beans with slight bite, and glossy sauce that is not soupy.
Good pinakbet should look soft, but not sloppy. The vegetables ought to be tender and comfortable in the sauce, yet still easy to recognize, while the liquid should lightly coat them instead of drifting around like a separate broth.

Too Watery, Just Right, or Too Mushy

Three-panel comparison showing pinakbet that is too watery, just right, and too mushy.
This is one of the easiest ways to judge your Pinakbet Tagalog at a glance. If it looks watery, simmer uncovered; if it looks mushy, the vegetables likely stayed in too long, while the ideal version holds shape and still looks glossy.

Pinakbet Recipe Card

Pinakbet Tagalog Recipe

This Filipino Pinakbet Tagalog recipe builds a savory pork, tomato, and bagoong mixture first, then adds the vegetables in stages. The squash softens, the eggplant turns silky, and the okra and long beans keep their shape.

Yield
4 generous servings

Prep Time
20 minutes

Cook Time
40 minutes

Total Time
1 hour

Ingredients

  • 1/2 lb / 225 g pork belly or pork shoulder, cut into 1-inch pieces
  • 1 tbsp / 15 ml cooking oil
  • 1 medium onion, chopped
  • 3–4 garlic cloves, minced
  • 2 medium tomatoes, chopped
  • 1 tbsp / 15 g bagoong alamang, plus 1–3 tsp more to taste
  • 1 cup / 240 ml water or light stock, plus up to 1/2 cup / 120 ml more as needed
  • 2 cups / 250–300 g kalabasa or squash, cut into 1 to 1 1/2-inch chunks
  • 1 to 1 1/2 cups / 100–150 g sitaw or long beans, cut into 2- to 3-inch pieces
  • 6–8 okra, trimmed
  • 1/2 medium ampalaya, or up to 1 medium if you enjoy bitterness, seeded and sliced into thin half-moons
  • 1 large eggplant or 2 small eggplants, cut into thick pieces
  • 1/4 tsp black pepper, optional

Instructions

  1. Heat oil in a wide pan over medium heat. Add pork in one layer and cook for 5–8 minutes, until lightly browned and some fat has rendered.
  2. Add onion and cook for about 2 minutes, until softened. Add garlic and cook for 30 seconds to 1 minute, just until fragrant.
  3. Add tomatoes and cook for 3–5 minutes, pressing them gently, until softened and juicy around the edges.
  4. Stir in 1 tablespoon bagoong and cook for 1–2 minutes, until the smell becomes rounder and more savory.
  5. Add 1 cup water or light stock. Cover and simmer for 15–20 minutes, until the pork starts to become tender. If using pork shoulder and it still feels firm, simmer 5–10 minutes longer before adding the squash. Add up to 1/2 cup more water only if needed.
  6. Add squash and cook for 5–7 minutes, until a fork starts to enter but the pieces still hold shape.
  7. Add long beans and cook for 2–3 minutes, until brighter and beginning to soften.
  8. Finish with eggplant, ampalaya, and okra. Cover and cook for 4–6 minutes, turning gently once or twice, until the vegetables are tender but still distinct.
  9. Taste and adjust with 1–3 teaspoons more bagoong or pepper if needed. The finished dish should be moist and spoonable, with no large pool of broth at the bottom of the pan. Serve hot with rice.

Notes

  • Use a wide 12-inch pan so the vegetables cook evenly without being crushed.
  • Start with 1 tablespoon bagoong, especially if your brand is very salty.
  • For milder ampalaya, soak the slices in salted water for 20–30 minutes, then drain.
  • Add extra water only if the pork or squash needs more time.
  • Add crispy pork, bagnet, or lechon kawali just before serving so it does not become soggy.

A good batch should make rice feel like part of the recipe, not just a side. The juices should be salty enough to carry the vegetables, but not so strong that the squash, eggplant, okra, and ampalaya disappear.

Cook’s confidence: Flexible: exact vegetable mix, protein, and bitterness level. Not flexible: cooking the seasoning with the tomatoes, keeping the liquid modest, and giving slower vegetables more time than delicate ones.

What Pinakbet Should Feel Like

Pinakbet is not meant to eat like a smooth stew. It is a dish of contrast: squash softening at the edges, bitter melon cutting through sweetness, eggplant soaking up salty juices, and rice pulling everything together.

Some homes make it drier and sharper; others prefer it saucier and sweeter from squash. This version stays in the Pinakbet Tagalog lane while giving you room to adjust the bitterness, protein, and finish toward your own table.

Pakbet is simply the everyday shorter name many people use for pinakbet. The more useful difference is style: Pinakbet Tagalog is often shrimp-paste and squash-forward, while Ilocano pinakbet often leans more toward fermented fish seasoning and a drier finish.

Can You Make Pinakbet Without Bagoong?

You can make pinakbet without bagoong, but it becomes a pinakbet-inspired vegetable stew. Bagoong does three jobs at once: it adds salt, fermentation, and deep umami. Replacing it means rebuilding all three, not just adding something salty.

If seafood is fine, fish sauce is the closest simple substitute. For seafood-free versions, use soy sauce or tamari for salt, mushroom powder for umami, and a little miso or extra cooked tomato for depth. Add these slowly and taste with a piece of squash or rice, because substitutes can become too salty fast.

  • No bagoong available: start with 1 tablespoon fish sauce, then adjust once the vegetables are tender.
  • Seafood-free version: use soy sauce or tamari plus mushroom powder and extra tomato.
  • Vegetarian or vegan direction: use miso, tamari, mushroom powder, and tomato to rebuild depth.
  • Lower-sodium attempt: use less bagoong rather than removing it completely, if possible.
Guide to making pinakbet without bagoong using fish sauce, soy sauce or tamari, mushroom powder, miso, and extra tomato.
Without bagoong, the dish changes, but it does not have to become bland. Instead of replacing only the salt, rebuild the missing layers with umami, depth, and a little extra tomato so the vegetables still taste grounded and complete.

Pinakbet Variations

You can change the protein, but do not rush the vegetables; they are still the heart of the dish.

Pinakbet with Pork Belly

This is the richest everyday version. Brown the pork first so the rendered fat flavors the tomatoes and shrimp paste.

Pinakbet with Bagnet

Stir some bagnet or lechon kawali in near the end, then reserve a few crisp pieces for topping. If all of it simmers too long, it will soften.

Pinakbet with crispy bagnet pieces on top, mixed vegetables, glossy sauce, and rice nearby.
Bagnet gives pinakbet a completely different texture, especially when the crisp pieces are added close to serving time. That way, you get crunchy pork against soft vegetables and savory sauce instead of letting everything turn uniformly tender.

Pinakbet with Shrimp

Add shrimp in the final 2–3 minutes, after the vegetables are almost tender. Shrimp cooks quickly and turns rubbery if simmered too long.

Pinakbet with shrimp, squash, long beans, okra, eggplant, ampalaya, tomatoes, and glossy sauce served with rice.
Shrimp pinakbet needs a lighter hand than the pork version because shrimp cooks quickly and can toughen fast. Add it when the vegetables are almost done, and the dish stays sweet, seafood-forward, and still recognizably pakbet.

Chicken Pinakbet

Use boneless chicken thighs rather than chicken breast. Brown them first, then simmer until nearly tender before adding the squash.

Ginataang Pinakbet

Add coconut milk after the pork has softened and the squash has started cooking. Simmer gently; hard boiling can make coconut milk split.

Ginataang pinakbet with creamy coconut milk sauce, squash, long beans, eggplant, okra, and ampalaya in a shallow serving pan.
Ginataang pinakbet is richer, although it should still feel like a vegetable dish rather than a coconut stew. Simmer gently once the coconut milk goes in, because that softer cooking keeps the sauce smooth and the vegetables clear and distinct.

Meatless Pinakbet

Skip the pork but build depth with extra tomato, mushroom powder, and careful seasoning. If using tofu, add it near the end so it does not break apart.

Meatless pinakbet with squash, long beans, okra, eggplant, ampalaya, tomatoes, and glossy savory sauce in a bowl.
A meatless pinakbet can still taste full when the vegetables are cooked carefully and the seasoning is layered thoughtfully. Mushrooms, miso, soy, or extra tomato can help, yet the real success still comes from keeping the vegetables varied in texture and flavor.

Timing is what keeps each vegetable from disappearing into the next. Pork and chicken need time early, shrimp goes in late, crispy pork is best partly reserved for the top, and coconut milk needs gentle heat.

How to Fix Common Pinakbet Problems

Pinakbet is forgiving, but it tells on you quickly. Too much water pools under the vegetables, too much bagoong shows up in the first bite, and too much stirring shows up in the squash.

Start With the Problem You See

Troubleshooting guide for pinakbet showing fixes for watery texture, too much salt, too much bitterness, mushy vegetables, slimy okra, and flat flavor.
Most pinakbet problems come from the same few places: too much liquid, too much bagoong, bitter melon used too heavily, or vegetables added all at once. Fix what you can in the pan, then use the next batch to correct the timing.

Problem-by-Problem Fixes

ProblemFix nowNext time
Too waterySimmer uncovered for 3–5 minutes.Use less water and add extra only if pork or squash needs more time. Remember that the vegetables release liquid too.
Too saltyAdd more squash, eggplant, or tomato. Serve with plain rice.Start with less bagoong and adjust after vegetables cook.
Too bitterAdd a little more squash or tomato.Use less ampalaya, slice it thinner, or soak it briefly.
Vegetables are mushyYou cannot fully reverse this, but you can simmer uncovered if watery.Add vegetables in stages and turn gently.
Squash collapsedLet it thicken the dish and avoid more stirring.Use larger chunks and do not add squash too early.
Okra made it slimySimmer uncovered briefly and avoid stirring hard.Trim only the ends and add okra near the end.
Tastes flatAdd a little more bagoong, fish sauce, or tomato, then simmer briefly.Bloom the seasoning with the tomatoes before adding water.
Bagoong tastes too strongAdd tomato or squash, simmer gently, and serve with plain rice.Use less at the start and adjust later.
Dish tastes too sweetAdd a little fish sauce or bagoong.Watch sweet ginisang bagoong and very sweet squash.
Too oilySpoon off excess fat before serving.Render pork first and remove extra fat before adding vegetables.
Pork is toughSimmer the pork pieces longer before serving if vegetables can handle it.Give pork more time before adding squash and delicate vegetables.

What to Serve With Pinakbet

Filipino meal spread with Pinakbet Tagalog, steamed rice, adobo, fried fish, grilled pork, dipping sauce, and calamansi.
Pinakbet shines beside plain steamed rice because the sauce is bold enough to carry the plate. For a fuller Filipino-style meal, add adobo, fried fish, or grilled pork while keeping pinakbet at the center.

Pinakbet is best with hot steamed rice. Because the tomato-bagoong mixture is bold, plain rice is not an afterthought here; it is part of how the dish works. If you want a dependable pot of rice, MasalaMonk’s guide on how to cook rice covers stovetop, cooker, and Instant Pot methods.

For a fuller Filipino-style meal, pinakbet sits naturally beside a savory protein dish like chicken adobo. Fried fish, grilled pork, simple chicken, or crispy pork also work well. If the pinakbet itself already has pork belly or bagnet, keep the rest of the meal simple.

Pinakbet is at its best when it tastes like more than the sum of its vegetables: salty enough for rice, sweet from squash, bitter enough to stay interesting, and saucy without becoming soup.

How to Store, Reheat, and Freeze Pinakbet

Cool leftovers quickly and store them in a shallow airtight container in the refrigerator. Pinakbet is best eaten within 3–4 days because it contains cooked vegetables and often pork or seafood-based seasoning. Store rice separately so the vegetables do not continue softening in the rice.

To reheat, warm it gently in a pan over low to medium-low heat. Add a splash of water only if the vegetables look dry. Avoid aggressive stirring because the squash and eggplant can break apart.

Microwaving is fine for a quick lunch, but the vegetables will soften more than they do in a pan. Freezing is possible, but not ideal; squash, eggplant, and okra soften further after thawing.

For general leftover safety, follow the USDA FSIS guidance on leftovers and food safety.

Some families prefer pinakbet drier and sharper; others like it saucier and sweeter from squash. Once you understand the timing, you can move the dish toward your table without losing its shape.

Back to top

FAQs About Pinakbet

What is pinakbet made of?

Most pinakbet starts with bagoong, tomatoes, and mixed vegetables such as squash, okra, eggplant, ampalaya, and long beans. Pork, shrimp, fish, bagnet, or crispy pork may be added depending on the household version.

Is pinakbet the same as pakbet?

Yes. Pakbet is the everyday shorter name many people use for pinakbet, though the exact style can change by region and household.

What does pinakbet taste like?

Pinakbet is savory, salty, earthy, lightly sweet, and a little bitter. The squash and tomatoes bring sweetness, while bagoong gives deep umami. A good version should taste balanced, not simply salty.

What is the difference between Pinakbet Tagalog and Ilocano pinakbet?

Pinakbet Tagalog usually uses bagoong alamang and squash, while Ilocano pinakbet is more closely tied to bagoong isda and a drier, more vegetable-forward finish. This recipe is Tagalog-style, with notes for adjusting it in a sharper Ilocano direction.

What is the best bagoong for pinakbet?

For Pinakbet Tagalog, bagoong alamang is the easiest fit because it gives a rounded shrimp-paste flavor. For a sharper Ilocano-style direction, use bagoong isda or bagoong monamon.

How do you keep pinakbet from getting mushy?

Add vegetables in stages and stir gently. Squash needs a head start, long beans need only a few minutes, and eggplant, ampalaya, and okra should go in near the end. A wide pan also helps because the vegetables steam and simmer instead of being crushed together.

Is pinakbet supposed to be soupy?

No. Pinakbet should be moist and saucy, not soupy. The vegetables should soften and shrink slightly, with cooking liquid clinging to them rather than floating in broth. If there is too much liquid, simmer uncovered for a few minutes.

Why is my pinakbet watery?

Pinakbet can turn watery if too much water was added or if the vegetables released more liquid than expected. Simmer uncovered until the liquid reduces and clings lightly to the vegetables. Next time, start with less water and add extra only if the pork or squash needs more time.

How do you reduce ampalaya bitterness in pinakbet?

Use less ampalaya, slice it evenly, and avoid overcooking it. For a milder flavor, soak the sliced bitter melon in lightly salted water for 20–30 minutes, then drain before cooking. A little bitterness should remain because it keeps the dish balanced.

What can I use instead of bagoong alamang?

Fish sauce is the easiest substitute if seafood is not a problem. For seafood-free versions, use soy sauce or tamari with mushroom powder and extra tomato. The flavor will not be the same, but it will have more depth than plain salt.

What is the difference between pinakbet and dinengdeng?

Both are Filipino vegetable dishes, but they eat differently. Pinakbet is usually a sautéed or simmered vegetable stew with bagoong, tomatoes, and often pork or seafood, while dinengdeng is generally lighter and more broth-like.

How long does pinakbet last in the fridge?

Pinakbet is best eaten within 3–4 days when stored in a shallow airtight container in the refrigerator. Reheat gently so the squash, eggplant, and okra do not break apart.

Posted on — Leave a comment

Tiramisu Recipe

Slice of tiramisu lifted from a 9×13 pan, showing cocoa powder, mascarpone cream, and coffee-soaked ladyfinger layers.

This tiramisu recipe gives you creamy, coffee-soaked layers with rich mascarpone cream, firm savoiardi, deep espresso flavor, and a cocoa finish that cuts through the sweetness. The main version uses cooked yolks and whipped cream, so it does not rely on raw eggs for structure, and it is built for a generous 9×13-inch pan that slices cleanly after an overnight chill.

Here, the goal is not the fastest 10-minute shortcut. It is a reliable make-ahead tiramisu you can serve to guests tomorrow: soft but visible layers, coffee-soaked ladyfingers that are not wet, and a cream filling that holds on the plate without turning stiff or heavy.

Think of it as a modern home-kitchen tiramisu built around the classic structure: savoiardi, mascarpone, eggs, coffee, and cocoa, with a cooked-yolk cream method for more confidence.

You will also get a smaller 8×8 half-batch, a no-alcohol option, a more traditional no-cream direction, mascarpone substitute notes, pan-size guidance, and practical fixes for tiramisu that turns wet, dry, bitter, grainy, or too loose to slice.

Good tiramisu feels quietly luxurious: the spoon meets soft cream, the coffee has soaked into the ladyfingers without leaking into the dish, and the cocoa gives each bite a slightly bitter finish. Once the layers are built, the fridge does most of the work.

Quick Answer: How to Make Tiramisu

To make tiramisu, quickly dip firm ladyfingers in cooled espresso or strong coffee, layer them with mascarpone cream, chill until set, and dust the top with cocoa before serving. This cooked-yolk version gives you classic coffee-mascarpone flavor without relying on raw eggs in the main recipe.

For a full 9×13-inch pan, use about 40–45 firm ladyfingers, 500 g mascarpone, 4 egg yolks, 100–120 g sugar, 360 ml heavy cream, 300–360 ml strong cooled coffee, optional alcohol, and cocoa. Then dip the ladyfingers quickly rather than soaking them, and chill the finished tiramisu overnight for the cleanest slices.

Tiramisu at a Glance

DetailUse this
Best dish9×13-inch / 33×23 cm dish for the full recipe
Best ladyfingersFirm dry savoiardi, not soft cake-style fingers
Best coffeeStrong espresso, moka coffee, or bold brewed coffee, fully cooled
Egg methodCooked yolks in the main version; pasteurized eggs for raw-egg variations
AlcoholOptional; rum, Marsala, brandy, coffee liqueur, or no alcohol all work
Chill time8 hours minimum; overnight is best
Texture goalCreamy, soft, coffee-rich, and sliceable
Biggest mistakeSoaking the ladyfingers too long

If you are nervous about wet layers, start with the ladyfinger dip test before you assemble the pan.

What This Tiramisu Should Look Like

This cooked-yolk version gives you the familiar coffee, mascarpone, and cocoa flavor of tiramisu while keeping the main method more comfortable for a home kitchen.

Cooked egg-yolk ribbon over a double boiler beside a finished tiramisu slice, with text about cooked-yolk tiramisu and no raw eggs in the main version.
The cooked-yolk method keeps the familiar coffee, mascarpone, and cocoa flavor while giving the main tiramisu recipe a more confident home-kitchen structure.

For a full 9×13 pan, the goal is a generous make-ahead tiramisu that chills overnight and lifts into clean, guest-friendly squares.

9×13 tiramisu pan with a clean square lifted out, showing cocoa top, mascarpone cream, and ladyfinger layers.
Because the dessert is built in a 9×13 pan, it is easier to serve clean squares for guests, holidays, and make-ahead dessert tables.

Before you move deeper into the method, it helps to know the texture target: creamy layers, coffee-soaked ladyfingers, and no liquid pooling at the bottom.

Close-up side view of tiramisu with labels for soft layers, not wet, and sliceable texture.
The best tiramisu texture is creamy but controlled: the ladyfingers taste coffee-soaked, yet the bottom of the dish should not look flooded.

Why This Tiramisu Recipe Works

Tiramisu looks simple, but small details decide whether it slices cleanly or turns soft and wet. Because the yolks are gently cooked, the cream is folded carefully, and the dessert chills overnight, the flavor stays familiar while the texture becomes more reliable for a home kitchen.

  • Cooked yolks give richness without making fully raw eggs the only option.
  • Mascarpone keeps the cream layer thick, smooth, and lightly sweet.
  • Whipped cream adds stability for clean slices.
  • A quick coffee dip keeps the ladyfingers soft but not soggy.
  • Overnight chilling lets the dessert set instead of collapsing into a loose spoon dessert.

Choose Your Method

There is no single tiramisu method that suits every kitchen. The right choice depends on how traditional you want the texture to be, how comfortable you are with eggs, and whether you need the dessert to slice neatly for guests.

If you want…Use this path
Classic lightnessPasteurized eggs and whipped egg whites
Stable guest-friendly slicesCooked yolks and whipped cream
No alcoholStrong coffee plus vanilla in the cream
No eggs at allUse an eggless tiramisu method

This version is slightly more work than a no-egg shortcut, but it tastes more classic and gives you a creamier, more stable dessert that can be sliced cleanly the next day.

If you like make-ahead desserts that set in the fridge, MasalaMonk’s no bake cheesecake recipe follows a similar patience-first logic.

What Is Tiramisu?

Tiramisu is a no-bake Italian dessert made with coffee-soaked ladyfingers layered with mascarpone cream and finished with cocoa powder. It should taste creamy, lightly sweet, coffee-rich, and just bitter enough at the end.

The Accademia del Tiramisù traditional Treviso recipe uses mascarpone, egg yolks, sugar, ladyfingers, coffee, and bitter cocoa, then rests the dessert in the refrigerator before serving.

This version keeps that coffee-mascarpone-cocoa structure, but adapts the cream method for a modern home kitchen. Instead of relying on fully raw eggs, it uses gently cooked yolks and whipped cream for a filling that is rich, stable, and easier to slice.

Tiramisu Ingredients: What Matters Most

The ingredient list is short, so every choice matters. Tiramisu is not a dessert where you can hide weak coffee, watery mascarpone, or soggy biscuits under decoration. The flavor and texture come directly from the basics.

Tiramisu ingredients guide with mascarpone, savoiardi, espresso, egg yolks, sugar, cream, cocoa, and optional liqueur.
Mascarpone gives body, savoiardi hold structure, coffee drives flavor, and cocoa adds the bitter finish that keeps tiramisu balanced.

Mascarpone

Mascarpone gives tiramisu its rich, creamy body. Look for mascarpone that is thick, smooth, and spoonable, not watery or loose. A little separated liquid can usually be stirred back in gently. Mascarpone that still looks pourable after stirring is more risky, because the finished dessert may not slice cleanly.

Thick mascarpone lifted on a spoon, with a small comparison cue showing watery mascarpone.
Thick mascarpone helps the cream layer hold softly; however, watery mascarpone can loosen the filling before the tiramisu has time to set.

Meanwhile, keep mascarpone cold until you are ready to mix, but do not beat it aggressively. Once mascarpone loosens, overmixing can make it grainy or split. In this method, you only need to smooth it briefly before folding in the cooked yolk mixture and whipped cream.

Mascarpone is worth using when you can find it because it gives tiramisu that soft, rich, almost cloud-like cream that tangier substitutes cannot fully copy.

If your mascarpone already looks loose, check the runny tiramisu troubleshooting guide before you continue.

Cream cheese, ricotta, and Greek yogurt can all make tiramisu-style desserts, but they are not one-for-one replacements. Cream cheese is tangier and denser, ricotta can be grainy unless blended very smooth, and Greek yogurt creates a lighter, tangier dessert rather than classic tiramisu. For a dessert where cream cheese is meant to be the star instead of a substitute, MasalaMonk’s New York cheesecake recipe is the better direction.

Ladyfingers / Savoiardi

Firm dry savoiardi are the best choice because they soften slowly and help the layers hold together. They absorb coffee quickly, soften during the chill, and still give the dessert structure. Soft sponge fingers can work, but they need an even faster dip because they collapse more easily.

Firm dry savoiardi ladyfingers arranged diagonally, with one broken open to show the airy biscuit texture.
Firm dry savoiardi are ideal because they absorb coffee quickly, then soften gradually while the tiramisu chills.

If the package says savoiardi, that is usually what you want. They should feel dry and crisp before dipping. If your ladyfingers are soft and cake-like, treat them more gently: brush or barely dip them instead of dunking them like firm savoiardi.

For a 9×13-inch tiramisu, you will usually need 40–45 ladyfingers. Do not worry if you have to trim a few pieces to fill the corners of the dish; neat layers matter more than perfect whole biscuits.

Coffee or Espresso

Espresso is ideal, but moka coffee, bold brewed coffee, or strong instant espresso can also work. The coffee should taste a little too strong on its own because the mascarpone cream will soften it into balance. Weak coffee disappears under the cream and makes tiramisu taste flat.

Strong coffee options for tiramisu, including espresso, moka coffee, and strong instant espresso, with a weak coffee cue to avoid.
Use coffee that tastes slightly stronger than usual because the mascarpone cream will soften the bitterness and bring it into balance.

When the coffee is right, you should smell it as soon as the tiramisu is sliced. It should support the cream, not disappear under it. The first forkful should taste creamy first, then coffee, then cocoa bitterness at the end.

Before dipping, let the coffee cool completely. Otherwise, hot coffee can make the biscuits soften too quickly, and it can also loosen the cream if the dessert is assembled while everything is warm.

Eggs

Classic tiramisu uses eggs. This cooked-yolk version gives the filling richness without making fully raw yolks the default. The yolks are heated gently with sugar over a double boiler, then folded into mascarpone and whipped cream.

Whisk lifting a pale, thick, glossy cooked egg-yolk mixture from a bowl for tiramisu.
Once the yolks look pale, glossy, and ribbony, they are ready to enrich the mascarpone cream without making it loose.

For recipes served with raw or undercooked eggs, the FDA recommends pasteurized shell eggs or pasteurized egg products. That is why the more traditional raw-egg direction in this post uses pasteurized eggs.

Heavy Cream

Heavy cream is a modern home-kitchen choice, not the strict Treviso-style path. Here, it helps the mascarpone layer stay stable and sliceable while still keeping the familiar coffee, cocoa, and mascarpone flavor profile.

For a more traditional no-cream direction, use pasteurized egg whites instead of whipped cream. That option is lighter and closer to old-school tiramisu, but it needs more care because the egg whites are not cooked.

Sugar, Salt, Cocoa, and Alcohol

Sugar softens the bitterness of coffee and cocoa. Use 100 g if you prefer a balanced, less-sweet tiramisu, or up to 120 g if you want a rounder dessert.

A small pinch of salt helps the mascarpone cream taste fuller rather than simply sweet. It should not make the dessert salty; instead, it should make the coffee and cream taste more complete.

Use unsweetened cocoa powder for the top. Dust it shortly before serving if you want the cleanest finish. If you dust it before a long chill, the cocoa will darken and hydrate into the surface, which some people enjoy but others find less polished.

Alcohol is optional. Dark rum, Marsala, brandy, coffee liqueur, amaretto, or Grand Marnier can all work, but coffee-only tiramisu is completely valid.

Temperature Cues That Prevent Problems

Ingredient or layerBest temperatureWhy it matters
CoffeeFully cooled before dippingHot coffee softens ladyfingers too fast and can loosen the cream.
MascarponeCold but stirrableToo warm can turn loose; too cold can stay lumpy.
Yolk mixtureWarm, not hot, before foldingHot yolks can loosen the mascarpone layer.
Heavy creamCold before whippingCold cream whips better and holds structure.
Finished tiramisuFully chilled before slicingCold layers cut more cleanly and hold on the plate.

Once those temperatures are right, the recipe becomes much calmer. The cream folds more smoothly, the ladyfingers behave better, and the finished tiramisu sets with less drama.

Tiramisu temperature guide showing cooled coffee, cold mascarpone, warm yolks, cold whipped cream, and 8 hours minimum chill time.
Cool coffee protects the ladyfingers, cold cream whips better, and warm-not-hot yolks keep the mascarpone filling smooth.

How to Make This Tiramisu Step by Step

Once the coffee is cooled and the cream is ready, tiramisu is mostly assembly. The only technical step is the cooked yolk base, and even that is simple if you keep the heat gentle.

Move slowly through the cream, then quickly through the dipping. That is the rhythm of good tiramisu: gentle mixing, fast dipping, patient chilling.

Step-by-step tiramisu guide showing cooled coffee, cooked yolks, mascarpone cream, dipped ladyfingers, layering, chilling, and cocoa dusting.
Most tiramisu problems are avoided before assembly: cool the coffee, build a stable cream, dip briefly, and give the pan time to chill.

1. Brew and Cool the Coffee

Make espresso, moka coffee, or bold brewed coffee. Pour it into a shallow bowl and let it cool completely. If using rum, Marsala, brandy, or coffee liqueur, stir it in after the coffee has cooled.

2. Cook the Egg Yolks and Sugar

Set a heatproof bowl over a saucepan of barely simmering water. The bottom of the bowl should not touch the water. Add the egg yolks and sugar, then whisk constantly.

Egg yolks and sugar being whisked in a bowl over a saucepan for cooked-yolk tiramisu.
Gentle heat and steady whisking turn yolks and sugar into a smooth base, which gives the mascarpone filling richness and stability.

Whisk for 3–5 minutes, until the mixture becomes pale, thick, and ribbony. When you lift the whisk, the mixture should fall back into the bowl in a thick ribbon for a second before disappearing. For extra confidence, aim for about 160°F / 71°C while keeping the heat gentle.

Remove the bowl from the heat and let the mixture cool until warm, not hot. If the yolk mixture is too hot when it meets the mascarpone, the cream can loosen.

3. Loosen the Mascarpone

In a large bowl, beat the mascarpone only until it looks smooth and spreadable. Stop as soon as the lumps disappear. If you keep beating after it loosens, the cream can turn grainy later.

4. Whip the Cream

In another bowl, whip the cold heavy cream to medium-stiff peaks. The cream should hold a soft point on the whisk, but the surface should still look smooth and glossy. If it looks rough, dry, or clumpy, it has gone too far.

5. Fold the Cream Together

Fold the cooled yolk mixture into the mascarpone. Then fold in the whipped cream in two additions. Fold slowly until no obvious white streaks remain, then stop. The goal is a filling that looks thick, smooth, and airy, not something stirred until it turns loose or pourable.

When you lift the spatula, the cream should mound softly before settling. If it runs like sauce, chill it briefly before assembly and check that the whipped cream reached medium-stiff peaks.

Before you start assembling, use the texture checkpoint below to make sure the filling is thick, smooth, and airy rather than pourable.

Texture Target Before You Layer

The cream should be thick enough to mound on a spatula, the dipped ladyfingers should still lift without bending, and the chilled tiramisu should cut into soft but visible layers.

Thick mascarpone cream mounding on a spatula, with text reading “Thick, Smooth, Airy — Not Pourable.”
This is the texture checkpoint before assembly: thick enough to spread, light enough to fold, and stable enough to support two layers.

6. Dip the Ladyfingers

Working one at a time, dip each ladyfinger into the cooled coffee for about one second per side. Arrange the dipped ladyfingers in a single layer in the dish. Trim pieces as needed to fill gaps.

Leave any extra coffee behind instead of adding it to the pan. Too much added liquid is one of the main causes of soggy tiramisu.

Dipped versus soaked ladyfingers for tiramisu, showing a firm dipped biscuit beside an over-soaked collapsing biscuit.
Ladyfingers should be dipped, not soaked; as a result, they soften during chilling without releasing excess coffee into the pan.

7. Layer the Tiramisu

Spread half of the mascarpone cream over the first ladyfinger layer. Add a second layer of dipped ladyfingers, then spread the remaining cream over the top. Smooth the surface with an offset spatula.

Tiramisu being layered in a 9×13 pan with dipped savoiardi and mascarpone cream spread over the top.
Even layers help the coffee, cream, and savoiardi settle together, so the finished tiramisu cuts more neatly after chilling.

8. Chill Until Set

Cover the dish and refrigerate for at least 8 hours. Overnight is best. During this time, the ladyfingers soften, the coffee flavor settles, and the mascarpone cream firms enough to slice.

9. Dust with Cocoa and Serve

Just before serving, sift unsweetened cocoa powder over the top. Slice the tiramisu cold, wiping the knife between cuts for cleaner pieces.

Cocoa powder being sifted over chilled tiramisu just before serving.
Fresh cocoa should sit lightly on top, so add it after chilling rather than letting it hydrate into a dark, damp layer.

Recipe Card: Tiramisu with Cooked Yolks

Saveable tiramisu recipe card for a 9×13 pan with yield, chill time, ingredients, and a short method.
This saveable tiramisu recipe card keeps the essential assembly details close: 9×13 pan, cooked-yolk cream, quick dipping, and overnight chilling.

Creamy Tiramisu Recipe

This tiramisu gives you soft coffee-soaked ladyfingers, cooked-yolk mascarpone cream, and a cocoa-dusted top that slices cleanly after an overnight chill. It is rich and creamy without relying on raw eggs in the main version, with notes for no alcohol, an 8×8 half-batch, and a more traditional no-cream option.

Quick Texture Rule

Dip each ladyfinger for about 1 second per side. It should be damp outside but still firm enough to lift into the dish.

Yield12 servings
Dish9×13 inch / 33×23 cm
Prep Time40 minutes
Cook Time5 minutes
Chill Time8 hours minimum
Total Time8 hr 45 min+

Equipment

  • 9×13-inch / 33×23 cm dish
  • Hand mixer or stand mixer
  • Heatproof bowl and small saucepan for double boiler
  • Shallow bowl for coffee dipping
  • Rubber spatula
  • Offset spatula
  • Fine mesh sieve
  • Kitchen scale, recommended
  • Instant-read thermometer, optional

Ingredients

Coffee Dip

  • 300–360 ml / 1¼–1½ cups strong espresso or very strong coffee, cooled
  • 30–45 ml / 2–3 tablespoons dark rum, Marsala, brandy, or coffee liqueur, optional
  • 1–2 teaspoons sugar, optional, only if the coffee tastes very bitter

Mascarpone Cream

  • 4 large egg yolks
  • 100 g / ½ cup granulated sugar for a balanced tiramisu, or up to 120 g / ½ cup plus 2 tablespoons for a sweeter version
  • 500 g / 17.6 oz mascarpone, cold but stirrable
  • 360 ml / 1½ cups heavy cream, cold
  • 1 teaspoon vanilla extract, optional
  • ⅛–¼ teaspoon fine salt

Assembly Ingredients

  • 40–45 firm savoiardi ladyfingers / about 300–350 g
  • 2–3 tablespoons unsweetened cocoa powder, for dusting

Instructions

Make the Coffee and Cream

  1. Make and cool the coffee. Brew strong espresso, moka coffee, or very strong coffee. Pour into a shallow bowl and cool completely. Stir in optional alcohol once cool.
  2. Cook the yolks and sugar. Set a heatproof bowl over a saucepan of barely simmering water, making sure the bowl does not touch the water. Add egg yolks and sugar. Whisk constantly for 3–5 minutes, until pale, thick, and ribbony. For extra confidence, aim for about 160°F / 71°C.
  3. Cool slightly. Remove the yolk mixture from the heat and let it cool until warm, not hot.
  4. Loosen the mascarpone. In a large bowl, beat the mascarpone briefly until smooth. Stop as soon as it is spreadable.
  5. Add the yolk mixture. Fold the cooled yolk mixture into the mascarpone until smooth.
  6. Whip the cream. In a separate bowl, whip cold heavy cream to medium-stiff peaks. It should hold shape but still look smooth.
  7. Fold the filling. Fold the whipped cream into the mascarpone mixture in two additions. Add vanilla and salt if using. The filling should look thick and airy, not pourable.

Layer the Tiramisu

  1. Dip the ladyfingers. Dip each ladyfinger into the cooled coffee for about 1 second per side. Keep the dip brief; the biscuit should still lift easily into the dish.
  2. Build the first layer. Arrange dipped ladyfingers in a single layer in the dish, trimming pieces to fit if needed.
  3. Add cream. Spread half of the mascarpone cream over the ladyfingers.
  4. Repeat. Add a second layer of dipped ladyfingers, then spread the remaining cream over the top.
  5. Leave extra coffee behind. Once the ladyfingers are dipped and arranged, do not pour leftover coffee into the dish. Extra liquid is one of the main causes of soggy tiramisu.

Chill, Finish, and Serve

  1. Chill. Cover and refrigerate for at least 8 hours, preferably overnight.
  2. Finish. Just before serving, sift unsweetened cocoa powder over the top.
  3. Serve cold. Slice straight from the fridge, wiping the knife between cuts for cleaner pieces.

8×8 Half-Batch

For an 8×8-inch / 20 cm dish, use 20–24 ladyfingers, 250 g mascarpone, 2 egg yolks, 50–60 g sugar, 180 ml / ¾ cup heavy cream, 180 ml / ¾ cup strong coffee, 15–22 ml / 1–1½ tablespoons optional alcohol, and cocoa as needed.

8×8 tiramisu half-batch guide with a small pan, serving cue, ladyfingers, mascarpone, and espresso.
The 8×8 half-batch keeps the same tiramisu structure in a smaller dish, which is useful when you want fewer servings.

Using a different dish? Check the tiramisu pan size guide before changing quantities.

No-Alcohol Option

Skip the alcohol and use strong coffee only. Add 1 teaspoon vanilla to the mascarpone cream for a rounder flavor.

More Traditional No-Cream Option

For a lighter, more traditional-style version, replace the 360 ml / 1½ cups heavy cream with 4 large pasteurized egg whites. Whip the egg whites to stiff but glossy peaks, then fold them gently into the mascarpone-yolk mixture. Use pasteurized eggs because the whites are not cooked.

Storage

Keep tiramisu covered and refrigerated. It is best within 2–3 days. Do not leave it at room temperature for more than 2 hours. Freeze only if needed, preferably before the final cocoa dusting.

This is the kind of dessert that rewards patience. It looks simple when it goes into the fridge, then comes out the next day with softer layers, deeper coffee flavor, and a cleaner slice. That first lifted piece may never be the neatest, but once the pan opens up, the layers show beautifully.

Raw Eggs, Cooked Eggs, or No Eggs?

This is one of the most important decisions in tiramisu. Raw eggs are traditional in many versions, but not every guest is comfortable with them. Pregnant people, young children, older adults, and anyone with a weakened immune system should be especially careful with raw or undercooked eggs.

The cooked-yolk method gives the filling richness without making fully raw yolks the default. The yolks and sugar are whisked over gentle heat into a simple zabaglione-style base until pale, thick, and ribbony.

While you whisk, keep the heat gentle. If the bowl gets too hot or the mixture starts steaming heavily, lift it off the pan for a few seconds. That way, the yolks thicken into a glossy ribbon instead of scrambling into bits.

If you prefer the more traditional raw-egg method, use pasteurized eggs. To avoid eggs completely, use an eggless tiramisu method rather than simply leaving the eggs out of this recipe, because the cream structure will change.

Tiramisu egg-method guide comparing pasteurized raw eggs, cooked yolks, and an eggless method.
Choose the egg method around your kitchen needs: cooked yolks for stability, pasteurized eggs for a classic path, or eggless cream for no-egg needs.

Which Egg Method Should You Use?

MethodEgg-safety noteTextureBest use
Raw yolks and raw whitesUse pasteurized eggsLight and classicTraditional-style tiramisu
Cooked yolks + whipped creamHigher confidence if yolks are heated properlyCreamy and stableMain recipe
Cooked yolks + pasteurized egg whitesUse pasteurized whites because they are not cookedLighter and more traditionalNo-cream variation
No eggsNo raw eggs, but the cream structure changesCreamier, less classicEggless tiramisu

Important egg note

If you serve tiramisu made with raw or lightly cooked eggs, use pasteurized eggs or pasteurized egg products. That is especially important when serving higher-risk guests.

Classic vs Easy Tiramisu: Which Method Should You Use?

The biggest difference between classic Italian tiramisu and many easy versions is the cream layer. Traditionally, tiramisu relies on mascarpone, eggs, sugar, coffee, ladyfingers, and cocoa. Easier modern versions often use whipped cream for stability or skip eggs completely.

If you are looking for the strictest traditional version, use mascarpone, eggs, sugar, coffee, savoiardi, and cocoa without heavy cream. The version here keeps that flavor structure, but uses whipped cream for a more stable filling that many home cooks find easier to serve.

Both approaches have a place. A traditional egg-white version gives a lighter cream, while the cooked-yolk and whipped-cream method is more predictable when you want neat slices for guests.

StyleUsesBest forTradeoff
Traditional raw/pasteurized egg tiramisuMascarpone, yolks, whipped whitesClassic lightnessRaw egg concern unless pasteurized eggs are used
Cooked-yolk modern classicMascarpone, cooked yolks, whipped creamReliable home tiramisuModern, stable, and guest-friendly
Easy no-egg tiramisuMascarpone and whipped creamSpeed and no raw eggsCreamier and simpler, but less traditional
Eggless tiramisuCream, mascarpone, or substitutesNo-egg dietary needsNeeds its own method
Classic versus easy tiramisu comparison showing two plated slices with different cream textures.
Classic tiramisu leans lighter, while the cooked-yolk version gives more predictable slices for guests and make-ahead serving.

Best Ladyfingers for Tiramisu

The best ladyfingers for tiramisu are firm, dry savoiardi. They are crisp enough to absorb coffee without falling apart immediately, then they soften during the fridge rest.

Ladyfinger comparison for tiramisu showing firm savoiardi, soft sponge fingers, and sponge cake.
Firm savoiardi are the safest first choice because they can take a quick coffee dip without falling apart before the tiramisu sets.

Soft cake-style ladyfingers are more delicate. They can still work, but you should barely touch them to the coffee rather than giving them a full dip. If you use sponge cake instead of ladyfingers, brush it with coffee rather than dunking it.

The Ladyfinger Dip Test

After dipping, a ladyfinger should feel damp on the outside but still firm enough to lift without bending. If it starts sagging before it reaches the dish, it has absorbed too much coffee. If it still feels completely dry and chalky, the dip was too shallow.

A good rule is one second per side for firm savoiardi. For softer sponge fingers, touch them to the coffee and lift immediately. For sponge cake, do not dip at all; brush the coffee over the surface instead.

Do not worry if the first one feels awkward; after two or three ladyfingers, the rhythm becomes obvious.

Finally, remember the simplest rule: dip, do not soak. Each ladyfinger should touch the cooled coffee briefly and come out before it softens in your hand.

For the full prevention checklist, see how to keep tiramisu from getting soggy.

How Long to Chill Tiramisu

Because tiramisu needs time, a short chill may taste fine but rarely gives the same soft, sliceable texture. For the best result, make it the day before serving.

You can serve tiramisu the same day if it has at least 8 hours to chill, but it is noticeably better the next day. The coffee flavor settles, the ladyfingers soften evenly, and the cream cuts more cleanly.

This is why tiramisu is such a good hosting dessert: you are not rushing around while people are at the table. The hard work is already done, and all that is left is cocoa, a cold knife, and the first clean slice.

Chill timeResult
2–4 hoursEdible, but often loose or uneven
6 hoursBetter set, but not always ideal
8 hoursReliable minimum for this recipe
OvernightBest flavor and cleanest texture
2–3 daysStill good if covered, but softer
Tiramisu chill-time guide showing 2–4 hours loose, 8 hours set, and overnight as the cleanest slice.
The fridge turns separate layers into one dessert; therefore, overnight chilling gives tiramisu its cleanest texture and deeper coffee flavor.

Making it further ahead? See the make-ahead and storage notes before you decide how long to keep it.

That same patience matters in other make-ahead desserts too. MasalaMonk’s no bake mango cheesecake recipe is another good example, especially because fruit can make a chilled filling softer if the texture is not controlled.

How to Keep Tiramisu from Getting Soggy

In most cases, soggy tiramisu comes from too much liquid, weak structure, or not enough chill time. Fortunately, the fix starts before the dessert goes into the fridge.

Soft ladyfingers are not the problem; wet ladyfingers are. A good tiramisu should have tender layers after chilling, but the bottom of the pan should not be swimming in coffee. If you see liquid pooling, the ladyfingers were soaked too long or too much coffee was added to the dish.

Soggy tiramisu with liquid pooling beside sliceable tiramisu with clean cream and ladyfinger layers.
Soggy tiramisu usually comes from too much liquid; instead, aim for tender coffee-soaked layers that still hold their shape.

How to Prevent Soggy Tiramisu

  • Choose firm dry savoiardi instead of soft cake-style fingers.
  • Cool the coffee completely before dipping.
  • Dip one ladyfinger at a time for about one second per side, then move it straight into the dish.
  • Leave any extra coffee behind instead of adding it to the pan.
  • Keep the mascarpone thick, cold, and smooth.
  • Whip the cream to medium-stiff peaks.
  • Chill the tiramisu for at least 8 hours.
Soggy tiramisu prevention guide showing firm savoiardi, cooled coffee, quick dip, extra coffee left behind, and full chilling.
Soggy tiramisu is usually a liquid-control problem, so the safest path is dry savoiardi, cooled coffee, a fast dip, and patience.

If you love a wetter tiramisu, you can dip slightly longer, but be careful. A few extra seconds can turn firm ladyfingers into a soft pudding layer.

Alcohol, Coffee, and Cocoa: How to Balance the Flavor

Tiramisu should taste like cream, coffee, cocoa, and a little bitterness. It should not taste like plain whipped cream, wet cake, or a glass of liqueur.

The best version should not taste like sugar first. It should open with cold cream, move into coffee, and finish with enough cocoa bitterness to make the next bite feel tempting.

Tiramisu slice with labels showing cream first, coffee next, and cocoa finish.
A balanced tiramisu should taste creamy first, then coffee-rich, and finally just bitter enough from cocoa to make the next bite tempting.

Does Tiramisu Need Alcohol?

No. Alcohol is optional. Marsala, dark rum, brandy, coffee liqueur, amaretto, or Grand Marnier can add aroma and depth, but the dessert works beautifully with coffee only.

For a family-friendly tiramisu, skip the alcohol and add 1 teaspoon vanilla to the mascarpone cream. You can also stir a teaspoon of sugar into the coffee if it tastes too bitter.

Flavor goalWhat to use
Classic and cleanStrong coffee only
Warm and traditionalMarsala or dark rum
Coffee-shop styleCoffee liqueur
NuttyAmaretto or Frangelico
Brighter and citrusyGrand Marnier or orange liqueur
Family-friendlyNo alcohol, plus vanilla in the cream

What Coffee Works Best?

Espresso is ideal, but moka coffee, bold brewed coffee, or strong instant espresso can also work. The coffee should taste a little stronger than something you would casually drink, because the mascarpone cream softens its bitterness.

Avoid weak coffee. It makes tiramisu taste flat and sweet instead of balanced.

Can You Make Tiramisu Without Coffee?

You can, but it becomes a tiramisu-style dessert rather than classic tiramisu. For a no-coffee version, use hot chocolate, matcha, chai, or a fruit syrup as the soak. Keep the liquid strong and not too sweet, and dip even more carefully because many non-coffee soaks are thinner or sweeter than espresso.

When to Add Cocoa Powder

Dust cocoa just before serving if you want a clean, powdery finish. Dust it earlier if you prefer a darker, hydrated cocoa top. Both are acceptable, but the just-before-serving version looks fresher.

Tiramisu Pan Sizes: 9×13, 8×8, and Metric Baking Dishes

One reason tiramisu recipes feel confusing is that different recipes use different dish sizes. A small 8×8 tiramisu and a large 9×13 tiramisu cannot use the same number of ladyfingers or the same amount of mascarpone cream.

Dish sizeServesLadyfingersMascarponeCoffeeBest use
9×13 inch / 33×23 cm1240–45500 g300–360 mlFull recipe, parties, holidays
8×8 inch / 20 cm6–820–24250 g180 mlSmall batch
20×30 cm / about 8×12 inch8–10About 30500 g300 mlMedium, slightly taller tiramisu
Tiramisu pan-size guide comparing 9×13 inch, 8×8 inch, and 20×30 cm pans with serving and ladyfinger counts.
Pan size affects the number of ladyfingers, cream depth, and serving yield, so choose the dish before dipping and layering.

A 9×13-inch dish is the easiest default here because it gives you a generous dessert for guests and enough room for two clean layers. Use the half-batch note in the recipe card for an 8×8 pan.

A dish that is slightly larger or smaller is workable. Build two even layers, keep the coffee controlled, and prioritize balance over forcing every last drop into the pan.

Tiramisu Without Mascarpone

Mascarpone is best for classic tiramisu. It is rich, lightly sweet, and less tangy than cream cheese. If you replace it, the dessert can still be good, but it will not taste exactly the same.

When mascarpone is missing, you can still make a good layered coffee dessert, but it is better to be honest about the result: it will be tiramisu-style, not the same classic texture.

As a practical backup, cream cheese plus cream is the closest option. For something lighter, Greek yogurt works better as a healthy variation. Very smooth ricotta can give a more Italian-adjacent dairy flavor, but it will not create the same silky cream.

Mascarpone substitute guide for tiramisu showing mascarpone, cream cheese with cream, ricotta, and Greek yogurt.
Mascarpone gives tiramisu its classic soft richness; meanwhile, cream cheese, ricotta, and Greek yogurt can work only as texture-changing substitutes.

If the lighter dairy angle is what interests you most, MasalaMonk’s cottage cheese cheesecake recipe is a better fit than forcing cottage cheese or yogurt into classic tiramisu.

SubstituteWhat changesBest use
Cream cheeseTangier, denser, less classicEmergency substitute
RicottaLighter but can be grainy unless blended smoothRicotta-style tiramisu
Greek yogurtTangy, lighter, more “healthy dessert” than classic tiramisuHealthy tiramisu variation
Cream cheese + creamCloser body, still tangierBetter than plain cream cheese
Homemade mascarponeClosest replacement if made wellBest planned substitute

How to Fix Runny or Soggy Tiramisu

Most tiramisu problems come from the same few places: thin mascarpone, too much coffee, underwhipped cream, overmixed filling, or not enough time in the fridge.

Although some tiramisu problems can be improved after assembly, they cannot always be fully reversed. For example, a runny tiramisu can often be chilled longer and served in softer scoops or cups, but it will not magically become a firm slice if the cream was too loose or the ladyfingers were oversoaked. The real fix is usually in the next batch.

Tiramisu troubleshooting guide showing runny cream, wet bottom, grainy mascarpone cream, and a slice that will not hold.
Most tiramisu problems trace back to cream texture, coffee control, mixing, or chill time, so troubleshooting starts with the structure of the layers.

If the issue is wet layers, revisit the dip test. If the cream is loose or grainy, the temperature cues are usually the better place to start.

Tiramisu Troubleshooting Guide

ProblemLikely causeFix nowFix next time
Runny creamLoose mascarpone, underwhipped cream, or warm yolk mixtureChill longer; serve in cups if it still will not sliceUse thick mascarpone and medium-stiff whipped cream
Grainy creamOvermixed mascarpone or overheated egg mixtureDo not try to beat it smooth after assemblyMix mascarpone briefly and use gentle heat
Wet bottomLadyfingers soaked too long or extra coffee addedChill well and serve as a softer spoon dessertUse a 1-second dip per side and never pour coffee into the pan
Dry ladyfingersDip was too quick or chill time was too shortChill longerDip slightly deeper next time
Too bitterCoffee too harsh or too much cocoaServe with lightly sweetened cream or reduce cocoa on topUse smoother coffee and a lighter cocoa dusting
Too sweetToo much sugar or sweet liqueurAdd a heavier cocoa dusting and serve with unsweetened coffeeUse 100 g sugar instead of 120 g
Won’t slice cleanlyUnder-chilled or too much liquidChill longerRest overnight and reduce soaking
Flat flavorWeak coffeeServe with espressoUse stronger coffee next time
Grainy mascarpone creamOvermixed mascarpone, overheated yolks, or temperature shockChill and serve gently; do not keep beating itMix mascarpone briefly and fold only after the yolks cool

Most tiramisu mistakes are not dramatic failures. They usually become softer, spoonable desserts instead of clean slices. That is still delicious, but the next batch will be better once you know which detail caused the problem.

Make Ahead, Storage, and Freezing

Tiramisu is one of the best make-ahead desserts because it improves as it rests. The ladyfingers soften, the cream sets, and the coffee flavor becomes more even.

  • Best make-ahead timing: assemble the tiramisu the day before serving.
  • Fridge storage: keep it covered and refrigerated.
  • Best quality: eat within 2–3 days.
  • Serving: keep chilled until close to serving time.
  • Freezing: freeze only if needed; texture may soften after thawing.
  • Freezing tip: freeze before the final cocoa dusting, then dust after thawing.
Make-ahead tiramisu storage guide showing a covered pan in the fridge, freezer note, thawing cue, and cocoa dusting before serving.
Make tiramisu ahead for better texture, but keep it covered, cold, and cocoa-free until serving for the cleanest finish.

Do not leave tiramisu at room temperature for more than 2 hours. In hot weather or warm rooms, keep the serving window shorter and return leftovers to the refrigerator promptly.

After freezing, thaw tiramisu overnight in the refrigerator and dust with fresh cocoa after thawing. Do not thaw it at room temperature.

For the more traditional version with raw pasteurized egg whites, be stricter with storage. Keep it chilled the entire time and serve it within 24–48 hours for best quality.

For another chilled dessert that depends on layer structure, MasalaMonk’s banoffee pie recipe is a no-bake style dessert where the base, cream, and filling need to hold together before serving.

Tiramisu Variations

Once you understand the basic structure, tiramisu is easy to adapt. The trick is to keep the balance: a creamy layer, a soaked base, a bitter or bright finish, and enough chill time to bring everything together.

If you are changing the flavor, change only one major thing at a time: the soak, the cream, or the topping. Changing all three can make the dessert stop feeling like tiramisu.

Before changing flavors, it helps to understand the cream, coffee, and cocoa balance so the variation still tastes like tiramisu.

Tiramisu variations guide showing eggless, no-alcohol, pistachio, lemon, strawberry, and matcha tiramisu portions.
For the best tiramisu variations, change only one major element at a time so the dessert still tastes layered, creamy, and balanced.

Eggless Tiramisu

Use mascarpone and whipped cream without eggs. This is the best direction for readers who want no raw eggs and no cooked yolks at all, but the dessert will taste creamier and less classic than the cooked-yolk version.

No-Alcohol Tiramisu

Skip the rum or liqueur and use strong coffee only. Add vanilla to the cream if you want a rounder flavor.

For another family-friendly layered dessert, MasalaMonk’s no-bake banana pudding has a softer vanilla-banana profile built around cookies, cream, fruit, and chill time.

Pistachio Tiramisu

For pistachio tiramisu, fold a small amount of pistachio cream into the mascarpone layer and keep the coffee dip brief. Pistachio paste is rich, so start modestly and taste before adding more. Finish with chopped pistachios for texture.

Lemon or Limoncello Tiramisu

Use lemon syrup, lemon curd, or limoncello instead of a coffee-heavy profile. Keep the soak controlled so the dessert does not turn watery, and balance the lemon with enough mascarpone cream so it still feels lush.

Strawberry Tiramisu

Use a thick strawberry sauce or roasted strawberry layer rather than very juicy fresh berries. Fresh strawberries release liquid as they sit, so the fruit layer needs to be controlled if you want clean slices.

Matcha Tiramisu

Replace the coffee dip with a matcha soak and dust the top with matcha or a cocoa-matcha blend. Keep the matcha balanced so it does not taste bitter.

Cake-Style Tiramisu

A cake-style version is usually built with cake layers, mascarpone filling, coffee syrup, and cocoa instead of dipped savoiardi.

FAQs

Does tiramisu have raw eggs?

Traditional tiramisu often uses raw eggs, but this version uses cooked egg yolks for a more comfortable home method. If you make a raw-egg version, use pasteurized eggs.

What is a safer way to make tiramisu at home?

Use cooked yolks or pasteurized eggs, keep the dessert refrigerated, and do not leave it at room temperature for more than 2 hours. The cooked-yolk method gives you a good balance of classic flavor, texture, and home-kitchen confidence.

How long should tiramisu chill before serving?

Chill tiramisu for at least 8 hours. Overnight is best because the ladyfingers soften evenly and the mascarpone cream sets enough to slice.

Can I make tiramisu the same day?

Yes, if you can give it at least 8 hours in the refrigerator. However, overnight tiramisu usually tastes better and slices more cleanly because the coffee flavor settles and the layers soften evenly.

Why did my tiramisu turn runny?

Runny tiramisu usually comes from watery mascarpone, underwhipped cream, warm filling, oversoaked ladyfingers, or too little chill time. Chill it longer if it is already assembled, and use thicker mascarpone next time.

How do I stop ladyfingers from getting soggy?

Use firm dry savoiardi, cool the coffee completely, and dip each ladyfinger for about one second per side. Keep the dip brief and leave extra coffee behind instead of pouring it into the dish.

Why is my mascarpone cream grainy?

Grainy mascarpone cream usually comes from overmixing mascarpone, overheating the yolk mixture, or folding ingredients together at very different temperatures. Mix mascarpone briefly, cool the yolks until warm rather than hot, and fold gently.

Can I use instant coffee for tiramisu?

Yes. Instant espresso is better than weak brewed coffee. Make it strong, let it cool completely, and taste it before dipping the ladyfingers.

Can kids eat tiramisu?

For a kid-friendly tiramisu, skip the alcohol, use the cooked-yolk version or pasteurized eggs, and consider decaf coffee or a lighter coffee dip. Keep in mind that classic tiramisu still has a coffee flavor.

Does tiramisu need alcohol?

No. Alcohol is optional. Coffee-only tiramisu is valid and works well for a family-friendly version.

What alcohol is best in tiramisu?

Dark rum, Marsala, brandy, coffee liqueur, amaretto, and Grand Marnier can all work. Use only a small amount so the alcohol supports the coffee rather than overpowering it.

What can replace mascarpone in tiramisu?

Cream cheese, ricotta, or Greek yogurt can be used in tiramisu-style desserts, but they change the flavor and texture. Mascarpone is still the best choice for classic tiramisu.

Are ladyfingers and savoiardi the same thing?

Savoiardi are Italian ladyfingers. They are usually firm and dry, which makes them ideal for tiramisu. Some soft sponge-style ladyfingers are more delicate and need a much quicker dip.

Should cocoa powder go on before or after chilling?

Dust cocoa just before serving for the cleanest finish. If you dust before chilling, the cocoa will darken and hydrate into the top layer.

How long does tiramisu last in the fridge?

Tiramisu is best within 2–3 days when covered and refrigerated. It becomes softer as it sits. If you use raw pasteurized egg whites in the traditional option, serve it within 24–48 hours for best quality.

Is tiramisu better the next day?

Yes. Tiramisu is usually better the next day because the layers have time to soften, set, and absorb the coffee flavor evenly.

Back to top

Posted on — 2 Comments

Garlic Mashed Potatoes Recipe

Creamy garlic mashed potatoes in a ceramic bowl with melted butter, chives, and a spoon pulling through soft swirls.

These garlic mashed potatoes are the kind you want under a spoonful of gravy: soft buttery ridges, mellow garlic in every bite, and enough body to hold melted butter without turning stiff, sticky, or gluey.

The secret is simple. Start with good potatoes, cook them until they are truly tender, let the extra steam escape after draining, then fold in warm garlic butter and milk while the potatoes are still hot. That gives you creamy spoonfuls, fluffy edges, and garlic flavor that runs through the whole bowl instead of sitting in sharp little pockets.

The goal is not restaurant-perfect smoothness at any cost. Instead, it is a warm, spoonable bowl that tastes buttery, garlicky, and comforting from the first bite to the last — the kind of mashed potatoes that make gravy, roast chicken, steak, or mushrooms feel like a complete meal.

Serve them with roast chicken, steak, meatloaf, mushrooms, turkey, gravy, or a holiday table. They are especially good beside a slow cooker roast chicken because the soft potatoes catch all those garlic-herb juices.

Make the classic version first, then use the variations below for roasted garlic mashed potatoes, garlic parmesan mashed potatoes, red skin mashed potatoes, no-milk mashed potatoes, dairy-free mashed potatoes, or a richer sour cream and cream cheese version.

In This Garlic Mashed Potatoes Recipe

Start with the classic creamy method, then adjust the potato, garlic, dairy, batch size, and make-ahead details to fit your meal.

Quick Answer: How to Make Garlic Mashed Potatoes

To make creamy garlic mashed potatoes, boil 2½ lb / 1.1 kg Yukon Gold potatoes in salted water until very tender. Drain them well, return them to the warm pot for a minute so excess moisture can steam off, then mash gently with warm garlic butter and milk.

For the garlic butter mixture, warm 6 smashed garlic cloves with 6 tbsp / 85 g butter and ¾ cup / 180 ml whole milk or half-and-half. Strain the garlic out for a smooth, rounded flavor, or mash the softened cloves into the potatoes if you want a deeper garlic taste. Finish with salt, pepper, and optional sour cream.

The full recipe takes about 35 minutes. For the best texture, use hot potatoes, warm dairy, enough salt, and a masher or ricer instead of a blender or food processor.

Best basic formula: 2½ lb Yukon Gold potatoes + 6 garlic cloves + 6 tbsp butter + ¾ cup warm milk or half-and-half + salt + optional ¼ cup sour cream.
Close-up of garlic mashed potatoes with a spoon drag, melted butter in the ridges, and small chive flecks.
Look for soft ridges that hold butter without looking stiff or pasty. That is the visual cue for creamy mashed potatoes that are spoonable, not gluey.

Garlic Mashed Potatoes at a Glance

  • Best potato: Yukon Gold for creamy and buttery, russet for lighter and fluffier, red potatoes only for rustic skin-on mash.
  • Best garlic method: Warm smashed garlic in butter and milk for smooth everyday flavor.
  • Best texture rule: Drain well, steam-dry briefly, use warm dairy, and stop mixing once creamy.
  • Best tool: Potato masher for homestyle texture, ricer for smoother potatoes.
  • Make-ahead: Best within 2 days, with leftovers refrigerated for 3–4 days.

Which Version Should You Make?

The classic recipe is the best place to start, but different meals call for different mashed potatoes. Use this quick guide if you already know the flavor or texture you want.

Four small bowls of mashed potatoes showing classic, roasted garlic, parmesan, and red skin versions.
Choose the version by the meal: classic for gravy, roasted garlic for deeper flavor, parmesan for savory richness, and red skin mashed potatoes for rustic texture.
If You Want… Make This Version Best For
Classic creamy mashed potatoes Main recipe Weeknights, holidays, gravy
Sweeter, softer garlic flavor Roasted garlic version Turkey, roast beef, dinner parties
Bigger garlic flavor Mash in the softened garlic cloves, add roasted garlic, or finish with a little garlic powder Garlic lovers, steak dinners, bold savory sides
Steakhouse-style flavor Garlic parmesan version Steak, chicken, mushrooms
No peeling Red skin version Rustic weeknight dinners
Tangier, richer potatoes Sour cream or cream cheese version Make-ahead meals, holiday sides
No milk or dairy-free Broth, olive oil, or dairy-free butter version Dairy-free guests, lighter sides
A smaller dinner batch Small batch version Steak night, dinner for two or three
A bigger holiday bowl Double batch Thanksgiving, Christmas, Easter, potlucks

Why This Garlic Mashed Potatoes Recipe Works

Good mashed potatoes should feel generous before you even add gravy. They should be warm, soft, buttery, and seasoned all the way through. In this recipe, each step protects that texture.

The method works because it avoids the three things that ruin mashed potatoes: raw garlic, wet potatoes, and overmixing. The garlic is warmed so it tastes smooth instead of sharp. After draining, the potatoes are dried briefly so they do not water down the butter. Everything is folded together gently, so the mash stays silky instead of tightening into paste.

Cooking the potatoes until completely tender also matters. If the potatoes are still firm in the center, you will have to keep mashing to chase out lumps, and that extra work can make the potatoes heavy. When they are cooked properly, they mash easily and absorb the warm dairy without a fight.

A potato masher gives you a cozy homemade texture, while a ricer gives you a smoother, fluffier bowl. Either way, the goal is the same: stop once the potatoes are spoonable, soft, and able to hold gentle swirls.

Ingredients for Garlic Mashed Potatoes

You do not need many ingredients, but small choices make a big difference. Warm dairy blends better than cold milk, enough butter carries the garlic flavor, and the right potato keeps the mash creamy instead of pasty.

Yukon Gold potatoes, garlic, butter, milk, sour cream, salt, pepper, chives, and a potato masher arranged on a counter.
Even a simple garlic mashed potatoes recipe depends on balance: starchy potatoes for structure, butter for richness, and warm dairy so everything folds together smoothly.

Potatoes

Yukon Gold potatoes are the best default. They have a naturally creamy texture and a buttery flavor, so they make the recipe taste rich without needing a huge amount of cream.

Russets make a lighter, fluffier mash. Red potatoes work well when you want a rustic, skin-on version, but they should be mashed gently because they are waxier.

Garlic

Use 6 garlic cloves for the main batch. Smashed cloves warmed in butter and milk give the potatoes a mellow garlic flavor. If you love a stronger garlic note, mash the softened cloves into the potatoes instead of straining them out.

Butter

Use 6 tbsp / 85 g unsalted butter. Butter gives the potatoes richness and helps carry the garlic into every bite. If you use salted butter, season carefully at the end.

Milk or Half-and-Half

Use ¾ cup / 180 ml whole milk or half-and-half. Whole milk keeps the potatoes lighter. Half-and-half makes them richer and more holiday-worthy. Warm it before adding it to the potatoes.

Sour Cream

Sour cream is optional, but it adds a gentle tang and a fuller texture. Use ¼ cup / 60 g for balance, or up to ½ cup / 120 g if you want a tangier, richer mash.

Salt, Pepper, and Herbs

Salt the cooking water, then season again after mashing. Potatoes need salt in layers; otherwise, they can taste flat. Black pepper, white pepper, chives, parsley, and a little melted butter are all good finishing touches.

Salt reality: If the potatoes taste creamy but flat, they usually need more salt before they need more garlic. Add salt in small pinches, stir gently, and taste again.

Best Potatoes for Garlic Mashed Potatoes

Because texture is the goal, the best potato depends on whether you want creamy, fluffy, or rustic mashed potatoes. Yukon Gold is the easiest choice for a smooth, buttery bowl. Russet is better for a lighter texture. Red potatoes are best when you want skins and a little more bite.

Yukon Gold, russet, and red potatoes shown with different mashed potato textures.
Before choosing a potato, choose the texture. Yukon Gold leans creamy, russet leans fluffy, and red potatoes are best when you want a skin-on rustic mash.
Potato Best For Texture How to Use It
Yukon Gold Classic creamy mashed potatoes Buttery, smooth, rich Use as the default for this recipe.
Russet Fluffy mashed potatoes Light, airy, absorbent Use alone or mix with Yukon Gold.
Yukon + Russet Balanced texture Creamy with fluffy edges Use half and half for a very reliable batch.
Red Potatoes Red skin mashed potatoes Rustic, slightly chunky, skin-on Mash gently and avoid electric mixing.

Think of the potato choice as a texture choice, not a strict rule. Yukon Gold gives the creamiest, most buttery everyday mash. Russet gives you a lighter, fluffier bowl that absorbs butter and milk easily. Red potatoes work when you want skins and a rustic texture, but they are not the best choice for perfectly smooth garlic mashed potatoes.

Yukon Gold vs Russet: Creamy or Fluffy?

If you are choosing between Yukon Gold and russet potatoes, pick by texture first. Yukon Gold gives a creamier bowl, while russets make the mash lighter and more absorbent.

Side-by-side comparison of Yukon Gold mashed potatoes and russet mashed potatoes with cut potatoes nearby.
Yukon Gold gives a buttery, creamy mash, while russets absorb butter and milk more easily for a lighter, fluffier bowl.

For potato choice, higher-starch potatoes such as russets and Yukon Golds are usually better for a smooth, fluffy mash, while waxier red potatoes are better kept rustic. Better Homes & Gardens explains why chefs often prefer russets and Yukon Golds for creamy mashed potatoes.

Fresh Garlic vs Roasted Garlic vs Garlic Powder

Garlic can taste sweet, sharp, mellow, or bold depending on how it is added. That is why one garlic mashed potatoes recipe can taste completely different from another.

Fresh garlic warming in butter and milk beside roasted garlic being squeezed, with mashed potatoes between them.
For a weeknight bowl, fresh garlic in warm butter keeps the flavor rounded. For a deeper holiday-style side, roasted garlic adds sweetness and depth.
Garlic Method Flavor Best Use How Much to Use
Garlic warmed in butter and milk Smooth, rounded, balanced Best everyday method 6 cloves for 2½ lb potatoes
Garlic boiled with potatoes Soft and simple Quick shortcut 5–6 cloves
Roasted garlic Sweet, deep, mellow Holiday or special version 1 whole head garlic
Garlic powder Bold, familiar garlic flavor Flavor boost or backup ¼–½ tsp
Raw minced garlic Sharp and harsh Usually best avoided Sauté first if using

The main method uses garlic warmed in butter and milk because it gives the best balance of speed and flavor. Roasted garlic is deeper and sweeter, but it adds extra time. Garlic powder is useful when the finished potatoes taste good but need a little more punch.

How to Build More Garlic Flavor Without Raw Bite

If you want the garlic to stand out more, layer it instead of only adding more raw garlic. Warm smashed cloves in the butter and milk, mash in the softened cloves, and add a tiny pinch of garlic powder only if the finished potatoes still taste too mild. That gives you deeper garlic flavor without the harsh bite of raw minced garlic.

Garlic-infused butter, softened garlic cloves, garlic powder, and mashed potatoes arranged as a flavor-layering setup.
If the potatoes need more garlic, layer the flavor gradually instead of adding raw garlic. Infused butter, softened cloves, and a tiny pinch of garlic powder add depth without harshness.

Avoid stirring raw minced garlic straight into mashed potatoes. It can taste hot and harsh, especially if the potatoes are mild. If you want to use minced garlic, cook it gently in the butter first.

How to Make Garlic Mashed Potatoes

This method keeps the potatoes creamy and the garlic smooth. The steps are simple, but the little details make the bowl taste much better.

Step-by-step process showing cut potatoes, simmering, garlic butter, steam-drying, and gentle mashing.
The sequence matters because texture is built in stages: tender potatoes first, dry potatoes next, then warm garlic butter and gentle mashing.

Step 1: Cut the potatoes evenly

Peel the potatoes and cut them into 1 to 1½-inch chunks. Even pieces cook at the same pace, which helps you avoid hard centers and lumpy mashed potatoes.

Step 2: Start in cold salted water

Put the potatoes in a large pot and cover them with cold water by about 1 inch. Add a generous spoonful of salt. Starting cold helps the potatoes cook evenly from edge to center.

Step 3: Simmer until very tender

Bring the water to a boil, then reduce to a steady simmer. Cook for 15–20 minutes, or until a knife slides through the potatoes with no resistance. If the potatoes are undercooked, the mash will stay lumpy no matter how much you stir.

A fork testing a tender cooked potato chunk over a pot or colander.
A fork should slide through easily before you drain the pot; otherwise, firm centers can force extra mashing and make the texture heavier.

Step 4: Warm the garlic, butter, and milk

While the potatoes cook, add the butter, milk or half-and-half, and smashed garlic cloves to a small saucepan. Warm over low heat until the butter melts and the garlic smells mellow. Keep the mixture warm and fragrant, but do not let it boil hard or scorch.

Smashed garlic cloves warming gently in butter and milk in a small saucepan.
Keep the pan gentle here. Low heat lets the garlic perfume the butter and milk without turning sharp, bitter, or scorched.

Step 5: Drain and steam-dry

Drain the potatoes well, then return them to the warm empty pot for about 1 minute. Gently shake the pot or stir once so extra moisture can evaporate. This keeps the finished potatoes from tasting loose or watery.

Drained Yukon Gold potato chunks steaming in a warm pot before mashing.
Once drained, let the potatoes steam-dry briefly in the warm pot so the final mash tastes rich instead of watery.

Step 6: Mash gently

Mash the hot potatoes with a potato masher, or pass them through a ricer. Add the infused butter-milk mixture gradually, then strain out the garlic for a smoother background flavor or mash the softened cloves in for a deeper garlic taste.

Warm garlic butter being folded into hot potatoes with a masher or spoon.
Add the warm garlic butter gradually, then stop once the potatoes are creamy. Too much mixing can turn a soft mash tight and gluey.

Step 7: Finish and serve

Fold in sour cream if using, then season with salt and pepper. Taste before serving. The finished potatoes should hold soft swirls but still spoon easily. Transfer them to a warm bowl and finish with melted butter, chives, parsley, or extra pepper.

Common Garlic Mashed Potato Mistakes

Often, mashed potato problems happen before the bowl reaches the table. Avoid these mistakes and the final texture will be much easier to control.

Small scenes showing raw garlic, cold dairy, wet potatoes, undercooked potatoes, and overmixing.
Most mashed potato problems start early, so avoid raw garlic, cold dairy, wet potatoes, firm centers, and aggressive mixing before they ruin the texture.
  • Using raw garlic: It can taste sharp and harsh. Warm it gently in butter or roast it first.
  • Undercooking the potatoes: Firm centers lead to lumps and extra mashing.
  • Adding cold dairy: Cold milk or cream cools the potatoes and makes blending harder.
  • Skipping the steam-dry step: Wet potatoes can taste watery and loose.
  • Overmixing: Too much stirring, blending, or whipping can make potatoes gluey.

How to Make Them Creamy, Not Gluey

Because gluey mashed potatoes usually come from overmixing, aggressive blending, or wet potatoes, a silky bowl needs a gentler touch.

Three mashed potato textures compared: too tight, too loose, and just right.
The best texture sits between loose and tight: soft enough to spoon, thick enough to hold swirls, and never worked into paste.

Cook them all the way through

Potatoes should be tender enough to mash easily. If they are still firm in the center, you will have to work them too much, and that extra mixing can make the texture heavy.

Let extra moisture escape

After draining, return the potatoes to the warm pot for a minute. This tiny step makes the mash taste more concentrated and helps the butter and milk blend in properly.

Use warm dairy

Warm milk, cream, or half-and-half folds into hot potatoes more smoothly than cold dairy. It also keeps the potatoes from cooling too quickly while you mash.

Choose the right tool

A potato masher gives a cozy homemade texture. A ricer makes the smoothest, fluffiest potatoes. A blender or food processor can turn potatoes sticky, so leave those tools for soups and sauces.

Potato masher and ricer shown with homestyle mashed potatoes and smoother riced potatoes.
Use a masher for homestyle garlic mashed potatoes, or use a ricer when you want a smoother, fluffier texture.

Stop once they look right

When the potatoes are creamy and the dairy has disappeared into the mash, stop stirring. Extra mixing rarely makes mashed potatoes better; it usually makes them tighter.

Garlic Parmesan Mashed Potatoes

Garlic parmesan mashed potatoes are savory, salty, and a little more steakhouse-style. Make the main recipe, then fold in ½ to ¾ cup finely grated parmesan while the potatoes are still hot.

Garlic parmesan mashed potatoes with grated parmesan, black pepper, melted butter, and chives.
Parmesan adds salt, nuttiness, and a savory edge, so garlic parmesan mashed potatoes pair especially well with steak, mushrooms, roast chicken, or pan sauce.

Add the cheese after mashing so it melts smoothly into the potatoes. Since parmesan brings salt, season lightly at first and adjust after the cheese is fully mixed in. For a bolder garlic-parmesan flavor, add ¼ tsp garlic powder with the warm butter and milk.

This version is especially good with steak, roast chicken, meatballs, mushrooms, or a simple pan sauce. It gives the potatoes a deeper savory finish without making them feel like a completely different dish.

Roasted Garlic Mashed Potatoes

Roasted garlic mashed potatoes taste deeper, sweeter, and more holiday-worthy than the classic version. The garlic loses its sharp edge in the oven, turns soft and golden, then melts into the potatoes like a savory spread.

Roasted garlic being squeezed into hot mashed potatoes with a creamy finished bowl nearby.
Roast the garlic until the cloves turn soft and golden, then mash them in while the potatoes are hot so the flavor spreads evenly.

To make roasted garlic mashed potatoes, slice the top off 1 whole head of garlic, drizzle with a little olive oil, wrap in foil, and roast at 400°F / 200°C for 40–45 minutes, until the cloves are soft and golden. Squeeze the roasted cloves into the hot potatoes and mash them in with the warm butter and milk.

One whole head of roasted garlic sounds like a lot, but roasted garlic is much softer than fresh garlic. It melts into the potatoes and gives them a round, almost sweet savory flavor.

How Much Roasted Garlic Should You Use?

Use one roasted garlic head for a balanced batch. Go down to half a head for a gentler family-style bowl, or use two heads only when you want roasted garlic to be the main flavor.

Roasted Garlic Amount Flavor Level Best For
½ head Gentle and mellow Family dinners or lighter garlic flavor
1 whole head Balanced roasted garlic flavor Classic roasted garlic mashed potatoes
2 heads Deep garlic-lover flavor People who want roasted garlic to be the main flavor
Roasted garlic guide showing half a head, one head, and two heads for mashed potatoes.
Start with one roasted garlic head for balance. Use less for a gentle background flavor, or use more when you want roasted garlic to lead.

For the best flavor, mash the roasted cloves while the potatoes are still hot, then taste before adding garlic powder. Roasted garlic brings sweetness and depth, while garlic powder brings sharper garlic punch. Used together carefully, they make the potatoes taste fuller without turning harsh.

Red Skin Garlic Mashed Potatoes

Red skin garlic mashed potatoes are more rustic than the classic Yukon Gold version. They are slightly chunky, a little more textured, and lovely when you want a no-peel side dish.

Red potatoes are not wrong for mashed potatoes; they are just a different style. Use them when you want a skin-on, homestyle bowl, not when you want the smoothest, fluffiest mash.

Rustic red skin mashed potatoes with visible potato skins, melted butter, chives, and a hand masher nearby.
Red potatoes work best when the mash stays a little chunky and rustic because that texture makes the skins feel intentional instead of tough.

Use 2 lb / 900 g red potatoes, scrubbed well. Leave the skins on if they are thin and tender. Mash with 5–7 garlic cloves, 6 tbsp / 85 g butter, ½ cup / 120 ml milk or half-and-half, and optional ¼ cup / 60 g sour cream.

Keep this version gently mashed rather than perfectly smooth. Red potatoes can get sticky if they are overworked, so use a hand masher and stop while there is still a little texture.

Sour Cream, Cream Cheese, and Heavy Cream Versions

These add-ins change the mood of the bowl: sour cream makes it tangier, cream cheese makes it thicker and richer, and heavy cream gives it more of a holiday-table feel. Add them after the potatoes have been mashed with the warm garlic butter and milk.

Choose sour cream when you want brightness, cream cheese when you want a thicker make-ahead mash, and heavy cream when you want a richer holiday bowl. For everyday garlic mashed potatoes, half-and-half is usually the easiest middle ground.

Garlic mashed potatoes with sour cream, cream cheese, and heavy cream in small bowls around the main bowl.
Use sour cream when the mash needs brightness, cream cheese when it needs body, and heavy cream when you want a richer holiday-style bowl.
Add-In Amount for 2½ lb Potatoes What It Does
Sour Cream ¼–½ cup / 60–120 g Adds tang and creaminess
Cream Cheese 4 oz / 115 g, softened Makes the mash thicker and richer
Heavy Cream Use instead of milk Creates a denser holiday-style texture
Half-and-Half Use instead of milk Gives a balanced creamy finish
Garlic Herb Cheese 3–5 oz / 85–140 g Adds rich, herby flavor

If you are making the potatoes ahead, cream cheese is especially useful because it helps the mash reheat with a thicker, smoother body. If you want a lighter everyday version, stick with milk or half-and-half and use sour cream only as a small finishing touch.

Garlic Mashed Potatoes Without Milk

You can make garlic mashed potatoes without milk. They will not taste exactly the same, but they can still be rich, smooth, and flavorful if you use warm liquid and enough fat.

The important thing is not milk itself; it is moisture plus fat. Broth or potato water loosens the mash, while butter, olive oil, or dairy-free butter keeps it from tasting dry.

Garlic mashed potatoes with broth or potato water, butter or olive oil, and garlic for a no-milk version.
Without milk, the same rule still applies: add moisture to loosen the mash and fat to keep it rich.
No-Milk Option Use This Result
Butter + potato water 6 tbsp butter + ½ cup reserved cooking water Simple, rich, potato-forward
Broth + olive oil ½ cup warm broth + 3–4 tbsp olive oil Savory and lighter
Dairy-free butter + plant milk Dairy-free butter + unsweetened oat or almond milk Creamier vegan-style mash

For the best no-milk flavor, warm the garlic in butter, olive oil, or dairy-free butter before adding it to the potatoes. If you are using broth, add it gradually. You can always loosen thick potatoes, but it is harder to fix a watery bowl.

Dairy-Free or Vegan Garlic Mashed Potatoes

For a dairy-free version, use Yukon Gold potatoes, roasted or sautéed garlic, olive oil or dairy-free butter, warm vegetable broth, and optional unsweetened plant milk. Oat milk works well when it is plain and unsweetened. Almond milk can also work, but avoid anything sweetened or vanilla-flavored.

A good dairy-free formula for 2½ lb potatoes is 5–6 garlic cloves, 4 tbsp olive oil or dairy-free butter, and ½ to ¾ cup warm vegetable broth or unsweetened plant milk. Add the liquid slowly and stop when the potatoes are spoonable.

Dairy-free mashed potatoes with roasted garlic, olive oil, vegetable broth, plant milk, and herbs.
Roasted garlic and olive oil help dairy-free garlic mashed potatoes taste full and rounded, even without cream or butter.

Roasted garlic is especially good here because it adds sweetness and depth without needing cream. Finish with chives, parsley, black pepper, and a small drizzle of olive oil.

If you are looking for a lower-carb mash instead of a potato-based dairy-free version, you may also like MasalaMonk’s keto cauliflower mashed potatoes.

Small Batch and Holiday Scaling

The main recipe makes 6 servings, which works well for a family dinner or a modest holiday side. For a smaller dinner or a bigger table, scale the recipe with the same basic ratio and adjust the warm liquid at the end.

Small Batch Garlic Mashed Potatoes

For 2–3 servings, make a half batch. This is the right size for steak night, roast chicken for two, or a smaller dinner where you do not want a refrigerator full of leftovers.

Ingredient Small Batch Amount
Yukon Gold potatoes 1¼ lb / 565 g
Garlic cloves 3 cloves
Butter 3 tbsp / 42 g
Milk or half-and-half ⅓ cup / 80 ml, plus more if needed
Sour cream 2 tbsp, optional
Salt and pepper To taste

How to Scale for a Holiday Table

For 10–12 servings, double the main recipe: use 5 lb / 2.25 kg potatoes, 12 garlic cloves, 12 tbsp / 170 g butter, and 1½ cups / 360 ml milk or half-and-half. Start with slightly less liquid, then add more after mashing until the potatoes are soft enough to spoon but still hold gentle swirls.

Holiday mashed potato scaling guide with a large bowl and ingredients for 10 to 12 servings.
For a holiday batch, scale the ingredients carefully and make the potatoes slightly softer than usual so they stay spoonable as they sit.

When scaling up, use a large enough pot so the potato pieces cook evenly. If the pot is crowded, the potatoes may cook unevenly and the bottom pieces can soften before the top pieces are ready.

For a fuller holiday plate, these potatoes pair naturally with a creamy green vegetable side like MasalaMonk’s green bean casserole.

Make-Ahead Garlic Mashed Potatoes

Garlic mashed potatoes can be made ahead, which is helpful for holidays, dinner parties, and busy evenings. Since mashed potatoes firm up as they cool, make them slightly softer than you want them at serving time.

Garlic mashed potatoes stored in an airtight container with butter and milk nearby for reheating.
Make-ahead garlic mashed potatoes work best when you plan for reheating, so keep butter and warm dairy nearby to refresh the texture before serving.

How far ahead can you make them?

For the best texture, make them up to 2 days ahead. They can be refrigerated for 3–4 days, but they are creamiest when reheated within the first couple of days. For general leftover safety, the USDA recommends refrigerating leftovers for 3–4 days and reheating them to 165°F.

How to store them

Let the potatoes cool, then transfer them to an airtight container. If you want to reduce drying, press a piece of parchment or plastic wrap against the surface before covering.

How to reheat them

Reheat gently with extra butter and a splash of warm milk, cream, broth, or half-and-half. Stir slowly and avoid whipping. For oven reheating, place the potatoes in a covered baking dish and warm at 325°F / 160°C, stirring once or twice and adding more liquid as needed.

Garlic mashed potatoes being reheated gently with warm milk or cream and butter in a pot.
Reheat slowly and add moisture back gradually. Warm milk, cream, broth, or butter helps cold mashed potatoes become creamy again.

The gentlest way to revive cold mashed potatoes is to warm a little milk, cream, or broth first, then fold the chilled potatoes into it slowly. This loosens the mash without forcing you to whip it, which helps protect the texture.

How to keep them warm

For a holiday meal, transfer hot mashed potatoes to a buttered slow cooker and hold on the warm setting. Stir occasionally and add a splash of warm milk or broth if they thicken too much. Avoid holding them on high heat, because the edges can dry out.

Can you freeze garlic mashed potatoes?

You can freeze them, although the texture may change after thawing. Mashed potatoes with enough butter, cream, sour cream, or cream cheese freeze better than lean versions. Reheat slowly and stir in extra warm dairy or broth to bring back creaminess.

If you end up with extra mashed potatoes, turn them into something crisp the next day. MasalaMonk’s croquettes recipe includes a potato croquette method that works beautifully with leftover mash.

Slow Cooker and Instant Pot Garlic Mashed Potatoes

The stovetop method gives the most control, while slow cooker and Instant Pot notes are useful when the stove is full or you are cooking for a crowd.

Method Best Use Texture
Stovetop, then hold warm Best overall method for holidays and company Creamiest and easiest to control
Cook fully in slow cooker When the stove is full Useful, but usually denser
Instant Pot Fast cooking Soft and convenient, but less controlled than stovetop

Slow Cooker Method

The slow cooker is most useful for keeping finished mashed potatoes warm. For the best texture, make the potatoes on the stovetop first, then hold them warm in a buttered slow cooker.

Garlic mashed potatoes held warm in a slow cooker with butter, chives, and soft spoon marks.
Once the potatoes are finished, a buttered slow cooker keeps them warm without taking up burner space during a crowded meal.

Add the hot mash to the buttered insert, cover, and keep on warm. Stir gently before serving and add a splash of warm milk, cream, or broth if the potatoes thicken while they sit.

If you want to cook the potatoes fully in the slow cooker, use peeled potato chunks, garlic, salt, butter, and a small amount of broth or water. Cook until the potatoes are fully tender, then mash with warm dairy. The texture is usually denser than stovetop mashed potatoes, but the method is useful when the stove is full.

If the slow cooker is already out for dinner, these potatoes are a natural side for a saucy main like MasalaMonk’s slow cooker pork loin. Make the potatoes on the stovetop, then hold them warm while the rest of the meal finishes.

Instant Pot Method

For Instant Pot garlic mashed potatoes, use about 2 lb / 900 g potatoes, 5–6 garlic cloves, 1 cup water or broth, and salt. Cook on high pressure for about 8 minutes, then quick release. Drain if needed, or mash in the remaining liquid if only a small amount is left. Add butter and warm milk or half-and-half after cooking.

Cooked potato chunks and garlic in a pressure cooker insert with butter and warm milk nearby.
Pressure cooking saves time, but tenderness still matters; check the potatoes before mashing so you do not chase lumps later.

Pressure cooker timing can vary depending on potato size, so cut the potatoes evenly and check that they are fully tender before mashing.

Troubleshooting Garlic Mashed Potatoes

If the bowl is not perfect, do not panic and do not keep whipping. Most mashed potato problems get worse with more mixing. Instead, first decide what is wrong: texture, moisture, seasoning, or garlic strength. Then fix that one thing gently.

Check the Texture Before You Add More

Before adding anything, taste and check the texture separately. A bowl can be bland but perfectly creamy, or well-seasoned but too thick, so fix only the problem you actually have.

Troubleshooting guide for mashed potatoes with fixes for thick, thin, bland, and too-garlicky potatoes.
Start with texture before you change the flavor. A splash of warm dairy, extra potato, salt, or garlic should fix the specific problem you see.

Texture and Moisture Fixes

Problem Likely Cause How to Fix It
Gluey Overmixed, blended, or processed too hard Stop mixing. Then fold in warm butter or cream and serve as a rustic mash.
Lumpy Potatoes were undercooked Next time, cook until a knife slides through easily. For small lumps, a ricer can help.
Too thick Not enough warm liquid Add warm milk, cream, or broth 1–2 tbsp at a time. After each addition, stir gently and check again.
Too thin Too much liquid or potatoes were not dried Warm gently uncovered to evaporate moisture. If available, add more mashed potato to bring back body.
Watery Potatoes were not drained or steam-dried well Warm gently in the pot and stir carefully. Next time, steam-dry after draining.

Flavor and Garlic Fixes

Problem Likely Cause How to Fix It
Bland Not enough salt, butter, or garlic Add salt gradually first. Then add more butter, parmesan, garlic butter, or herbs if needed.
Too garlicky Garlic was raw or harsh Add more potato, butter, cream, sour cream, or parmesan to soften the flavor.
Not garlicky enough Garlic was too soft or strained out Add garlic powder, roasted garlic, or extra garlic butter in small amounts. However, taste after each addition because garlic powder gets strong quickly.
Bitter or harsh garlic Garlic scorched, was old, or was added raw Use fresh cloves, warm them gently over low heat, or switch to roasted garlic next time.

Once mashed potatoes turn gluey, there is no perfect way to reverse the texture. At that point, stop mixing, add flavor, and serve them as a thicker homestyle mash. Leftovers can also become potato cakes, mashed potato pancakes, or a casserole topping.

What to Serve with Garlic Mashed Potatoes

A bowl of garlic mashed potatoes can carry a simple dinner, so you do not need much else on the plate. They are soft enough for gravy, rich enough for steak, and comforting enough to sit beside roast chicken, mushrooms, or green beans.

They are especially good with anything rich enough to drag through the potatoes: roast chicken drippings, mushroom pan sauce, turkey gravy, steak juices, garlicky butter, or extra melted butter settling into the ridges.

Weeknight dinners

Holiday mains

  • Roast turkey
  • Roast beef
  • Baked ham
  • Turkey gravy
  • Green bean casserole
  • Roasted carrots or Brussels sprouts

Steakhouse-style dinner

  • Steak with pan sauce or chimichurri
  • Garlic butter mushrooms
  • Roasted asparagus
  • Creamed spinach
  • Red wine gravy

For a cozy everyday plate, serve them with roast chicken, a spoonful of pan juices, and something green. For a richer dinner, add steak, mushrooms, or gravy, then let the soft swirls catch the butter, sauce, and juices. That is where these garlic mashed potatoes do their best work.

Garlic mashed potatoes served with roast chicken, gravy or pan juices, green beans, and mushrooms.
The best pairings give the potatoes something rich to catch, whether that is gravy, roast chicken juices, mushroom sauce, or melted butter.

Garlic Mashed Potatoes Recipe

Creamy, buttery garlic mashed potatoes made with Yukon Gold potatoes, warm garlic butter, milk or half-and-half, and optional sour cream. The method keeps the potatoes smooth, flavorful, and not gluey.

Prep Time15 minutes
Cook Time20 minutes
Total Time35 minutes
Yield6 servings
CourseSide Dish
CuisineAmerican
MethodStovetop
Best ToolMasher or ricer

Equipment

  • Large pot or Dutch oven
  • Colander
  • Small saucepan
  • Potato masher or potato ricer
  • Spatula or wooden spoon

Ingredients

  • 2½ lb / 1.1 kg Yukon Gold potatoes, peeled and cut into 1 to 1½-inch chunks
  • 6 garlic cloves, smashed and peeled
  • 6 tbsp / 85 g unsalted butter
  • ¾ cup / 180 ml whole milk or half-and-half
  • ¼ cup / 60 g sour cream, optional
  • 1½–2 tsp fine salt, plus more for the cooking water
  • ¼ tsp black pepper or white pepper
  • Chives or parsley, optional
  • Extra melted butter, optional for serving

Instructions

  1. Cook the potatoes. Add the potato chunks to a large pot and cover with cold water by about 1 inch. Salt the water generously. Bring to a boil, then reduce to a steady simmer and cook for 15–20 minutes, until the potatoes are very tender. The potatoes are ready when a knife slides through the center with no resistance.
  2. Warm the garlic butter and milk. While the potatoes cook, combine the butter, milk or half-and-half, and smashed garlic cloves in a small saucepan. Warm over low heat until the butter melts and the garlic smells mellow. The mixture should smell fragrant and garlicky, not scorched or boiled.
  3. Drain and dry. Drain the potatoes well. Return them to the warm empty pot for about 1 minute so excess moisture can steam off.
  4. Mash. Mash the hot potatoes with a potato masher, or pass them through a ricer. Add the warm garlic butter and milk gradually. For a softer garlic flavor, strain out the garlic. For stronger flavor, mash the softened garlic into the potatoes.
  5. Finish. Fold in sour cream if using. Season with salt and pepper. Taste and adjust until the potatoes are creamy, buttery, and well seasoned. The finished potatoes should hold soft swirls but still spoon easily.
  6. Serve. Spoon into a warm bowl and finish with melted butter, chives, parsley, or extra black pepper.

Notes

  • Use Yukon Gold potatoes for the creamiest texture.
  • Use a ricer for smoother, fluffier mashed potatoes.
  • Avoid a blender, food processor, or aggressive electric mixing.
  • For garlic parmesan mashed potatoes, fold in ½–¾ cup finely grated parmesan after mashing.
  • For roasted garlic mashed potatoes, use 1 whole head roasted garlic for balanced flavor, or 2 heads only if you want roasted garlic to be the main flavor.
  • For red skin mashed potatoes, use red potatoes, leave the skins on, and keep the texture rustic rather than perfectly smooth.
  • Serve hot. Mashed potatoes thicken as they sit, so loosen with a splash of warm milk or broth before serving if needed.
  • For the most inviting bowl, make shallow swirls on top and let melted butter settle into the ridges before serving.
  • Store leftovers in an airtight container in the refrigerator for 3–4 days.
  • Reheat gently with extra butter and a splash of warm milk, cream, or broth.
  • Freezing is possible, but the texture may change after thawing.

FAQs About Garlic Mashed Potatoes

What is the best potato for garlic mashed potatoes?

Yukon Gold potatoes are the best default because they are creamy, buttery, and forgiving. Russets make a fluffier mash, while red potatoes are better for rustic red skin mashed potatoes.

Fresh garlic or roasted garlic: which tastes better?

Fresh garlic warmed in butter and milk gives a balanced everyday flavor. Roasted garlic tastes sweeter, deeper, and more mellow. Use fresh garlic when you want speed, and roasted garlic when you want a richer holiday-style side dish.

How much garlic should I use?

Use 6 garlic cloves for 2½ lb / 1.1 kg potatoes. If using roasted garlic, use 1 whole head because the flavor is softer. If the finished potatoes need more punch, add ¼–½ tsp garlic powder.

Are garlic mashed potatoes and garlic whipped potatoes the same?

People often use the names loosely, but garlic whipped potatoes are usually smoother and lighter. For a whipped-style texture, use a ricer or mash very well by hand, then fold in warm dairy. If you use a hand mixer, keep it on low and stop quickly so the potatoes do not become gummy.

Why did my mashed potatoes turn gluey?

They were probably overmixed or blended too aggressively. Potatoes release starch when worked too much. Use a masher or ricer, add warm dairy gradually, and stop once the potatoes are creamy.

How do you make garlic mashed potatoes creamier?

Use Yukon Gold potatoes, warm milk or half-and-half, enough butter, and optional sour cream. Also make sure the potatoes are fully cooked and steam-dried before mashing.

Do garlic mashed potatoes need sour cream?

Not necessarily. Butter and warm milk or half-and-half are enough for a creamy batch. Sour cream adds tang and body, so use it when you want a richer flavor.

Can I make garlic mashed potatoes with cream cheese?

For a thicker, richer batch, add 4 oz / 115 g softened cream cheese after mashing. It is especially useful for make-ahead garlic mashed potatoes because it helps the texture reheat with more body.

Can I boil garlic with the potatoes?

Boiling garlic with the potatoes gives a soft, simple garlic flavor. For a smoother and more rounded taste, warm smashed garlic in butter and milk. For a sweeter holiday-style version, use roasted garlic.

What should I do if my mashed potatoes are not garlicky enough?

Add garlic flavor gradually. Mash in the softened garlic cloves if you strained them out, add a little roasted garlic, or stir in ¼ tsp garlic powder. Taste before adding more because garlic powder gets strong quickly.

What can I use instead of milk?

You can use half-and-half, heavy cream, warm broth, reserved potato cooking water, unsweetened plant milk, or a mix of broth and olive oil. Add any liquid gradually so the potatoes do not become too loose.

Are red potatoes good for this recipe?

Red potatoes are good for rustic, skin-on mashed potatoes. They are not the best choice for an ultra-smooth mash because they are waxier. Mash them gently and avoid electric mixing.

How far ahead can I make them?

For the best texture, make them up to 2 days ahead. Store in an airtight container in the refrigerator, then reheat gently with extra butter and a splash of warm milk, cream, or broth.

How do I reheat garlic mashed potatoes without drying them out?

Reheat slowly and add moisture back in. Use a splash of warm milk, cream, broth, or half-and-half, plus a little butter. Stir gently and avoid whipping them aggressively.

Back to top