Posted on — 1 Comment

Bagel Toppings and Spreads

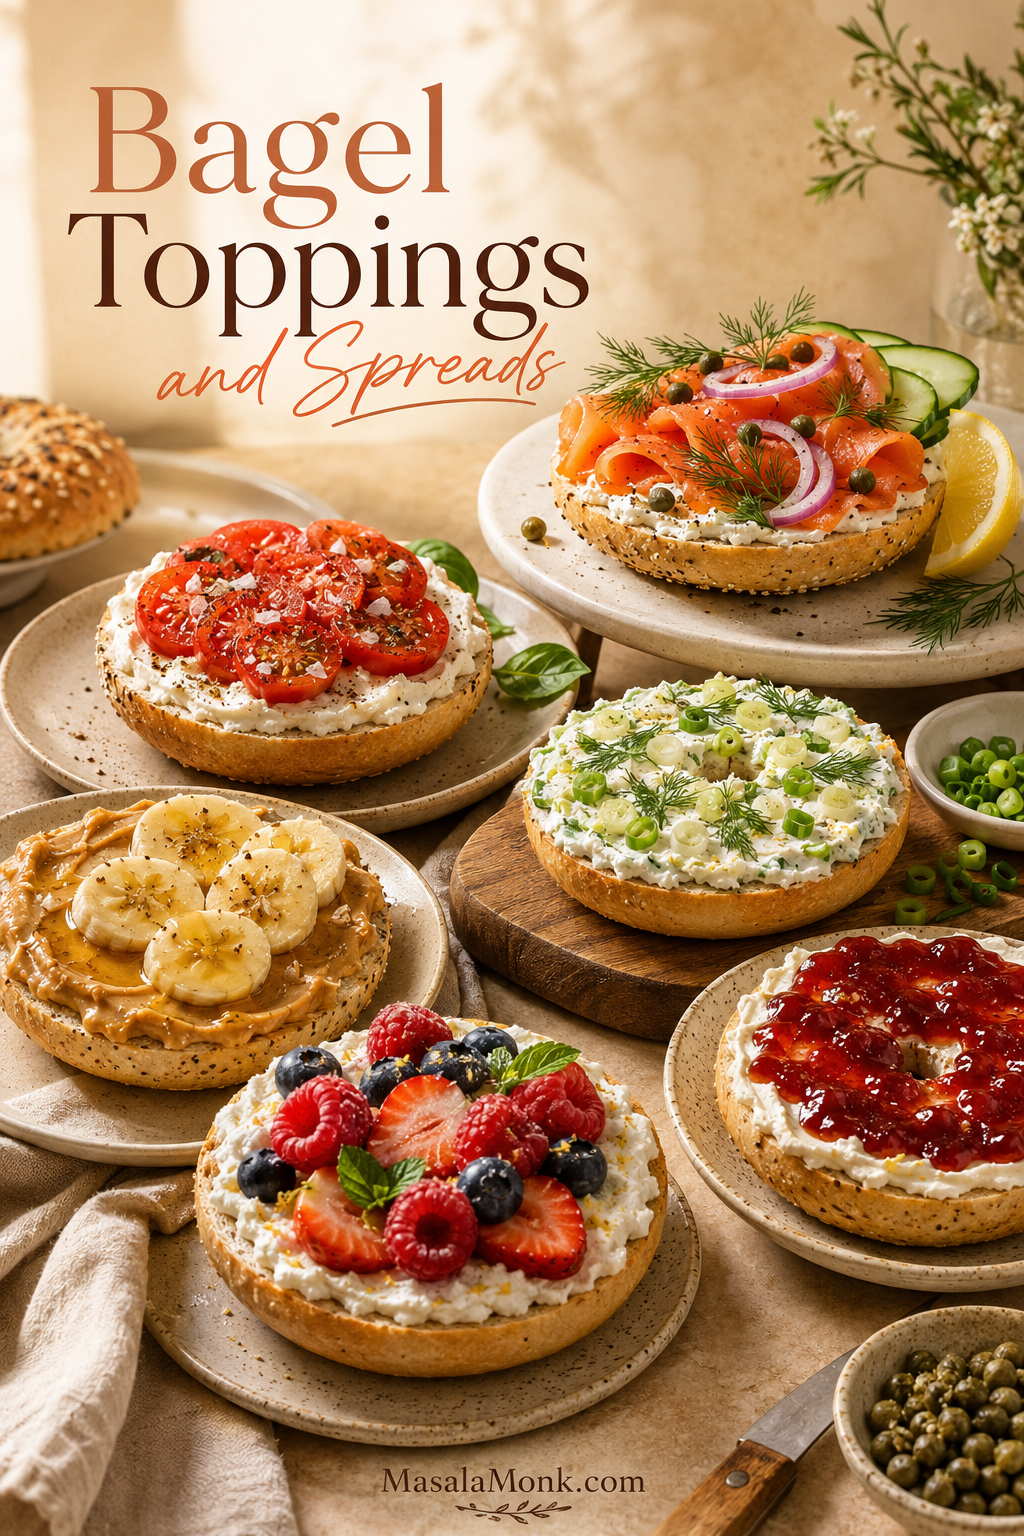
Assorted open-faced bagels with smoked salmon, scallion schmear, tomato, peanut butter banana, ricotta berries, and jam.

Bagel toppings and spreads can make the difference between dry bread with stuff on it and the bagel everyone reaches for first. A plain bagel can become breakfast, lunch, a sweet snack, or a full brunch board with one good spread, one useful topping, and one small finish. Usually, the best ones have the right mix of creamy, crisp, salty, sweet, fresh, or bright.

Along the way, this guide covers the best bagel toppings and spreads for every kind of craving: classic cream cheese schmear, smoked salmon and lox, sweet bagel toppings, savory combinations, healthy ideas, breakfast bagels, and bagel bar toppings for brunch. You will also get an easy homemade bagel schmear recipe with sweet and savory flavor variations, plus exact amounts for schmear, smoked salmon, and brunch boards.

Whether you are using a fresh bakery bagel, a freezer bagel, or the last plain bagel in the bag, the right spread and one good finish can make it feel intentional. In practice, the spread does more than add flavor; it gives the toppings something to hold onto and helps the whole bagel eat better.

Quick Answer: Best Bagel Toppings and Spreads

Start a classic bagel with cream cheese or scallion schmear. When you want something savory, it is hard to beat a tangy spread with smoked salmon, capers, red onion, dill, and lemon. For a sweet bagel, try cream cheese with jam, peanut butter with banana and honey, or ricotta with berries.

If you only remember one rule, choose the spread first. The best bagel toppings and spreads usually work together: the spread gives moisture, while the toppings add flavor, texture, and a final finish.

Beyond that, other easy bagel toppings include butter, avocado, eggs, hummus, tuna salad, egg salad, turkey, cucumber, tomato, cottage cheese, Nutella, berries, apple slices, honey walnut cream cheese, and everything bagel seasoning.
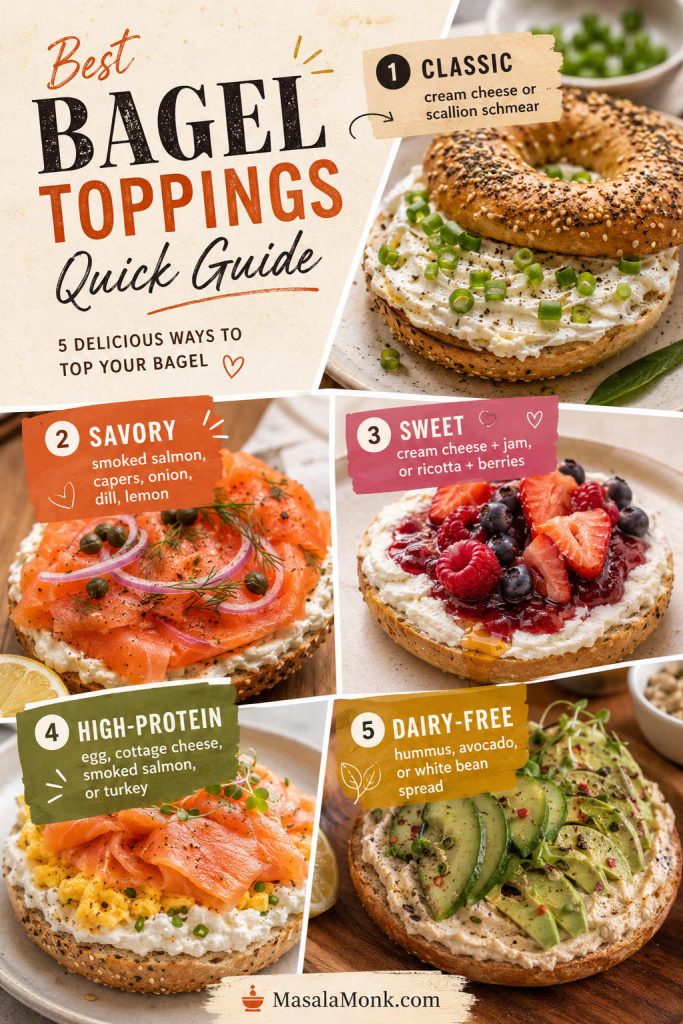
Quick guide showing classic, savory, sweet, high-protein, and dairy-free bagel topping ideas.
Use this quick guide when you know you want a bagel but not the direction. A classic schmear, smoked salmon, ricotta berries, egg, hummus, or avocado can each turn the same bagel into a different kind of meal.
CravingReliable bagel topping idea
ClassicCream cheese, scallion schmear, butter, or jam
Deli-styleCream cheese, smoked salmon, capers, red onion, dill, lemon
BreakfastEgg, cheese, bacon, avocado, tomato, sausage, or turkey
SweetCream cheese and jam, peanut butter and banana, ricotta and honey, Nutella and strawberries
HealthyHummus, avocado, cottage cheese, smoked salmon, turkey, egg, Greek yogurt cream cheese
Brunch boardAssorted schmears, smoked salmon, cucumber, tomato, onion, capers, eggs, fruit, herbs

Making brunch instead of one bagel? Jump to the easy bagel schmear recipe or the bagel bar quantities before you shop.

What bagel toppings and spreads should you use right now?

When you do not know what you want yet, start with the spread. Once that is chosen, the rest of the bagel usually becomes obvious.

If you want…Use this topping combination
The fastest classic bagelScallion cream cheese + black pepper
A filling breakfastEgg + cheese + avocado or bacon
A brunch-style bagelCream cheese + smoked salmon + capers + red onion + dill
Something sweetCream cheese + jam, or peanut butter + banana + honey
A lighter lunchHummus + cucumber + tomato + sprouts
A high-protein optionCottage cheese + tomato, or smoked salmon + cucumber

Best bagel toppings by situation

  • Best fast breakfast: scallion cream cheese, tomato, black pepper, and flaky salt.
  • High-protein pick: cottage cheese with tomato, or smoked salmon with cucumber.
  • Sweet favorite: cream cheese with jam, or ricotta with berries and honey.
  • Brunch favorite: cream cheese, smoked salmon, capers, onion, dill, and lemon.
  • Dairy-free pick: hummus with cucumber, tomato, sprouts, olive oil, and paprika.
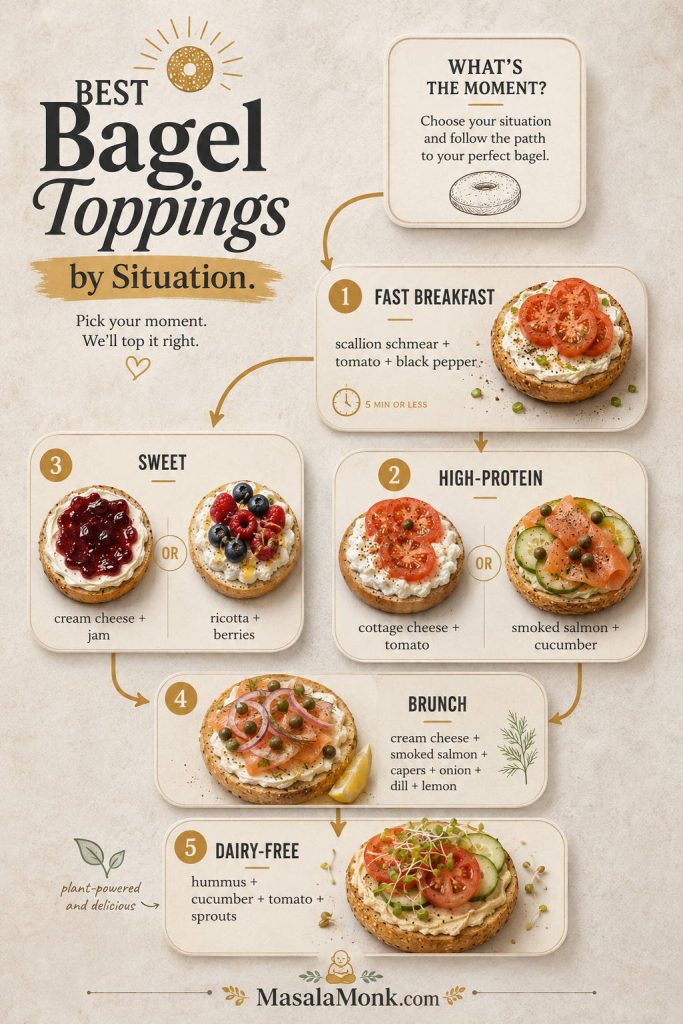
Bagel topping guide organized by situation, including fast breakfast, high-protein, sweet, brunch, and dairy-free options.
Instead of choosing toppings at random, start with the situation: fast breakfast, brunch, packed lunch, sweet snack, or dairy-free meal. From there, the best bagel toppings become much easier to narrow down.

Quick fix: if a bagel tastes unfinished, do not automatically add more toppings. Instead, add the missing piece: lemon for lift, capers for sharpness, flaky salt for tomato, herbs for creaminess, honey for sweet spreads, or crunch for soft fillings.

How to Build a Better Bagel

A good bagel is not just a pile of toppings. It tastes better when the layers make sense together. Use this simple formula:

Spread + main topping + crunch + brightness + seasoning.
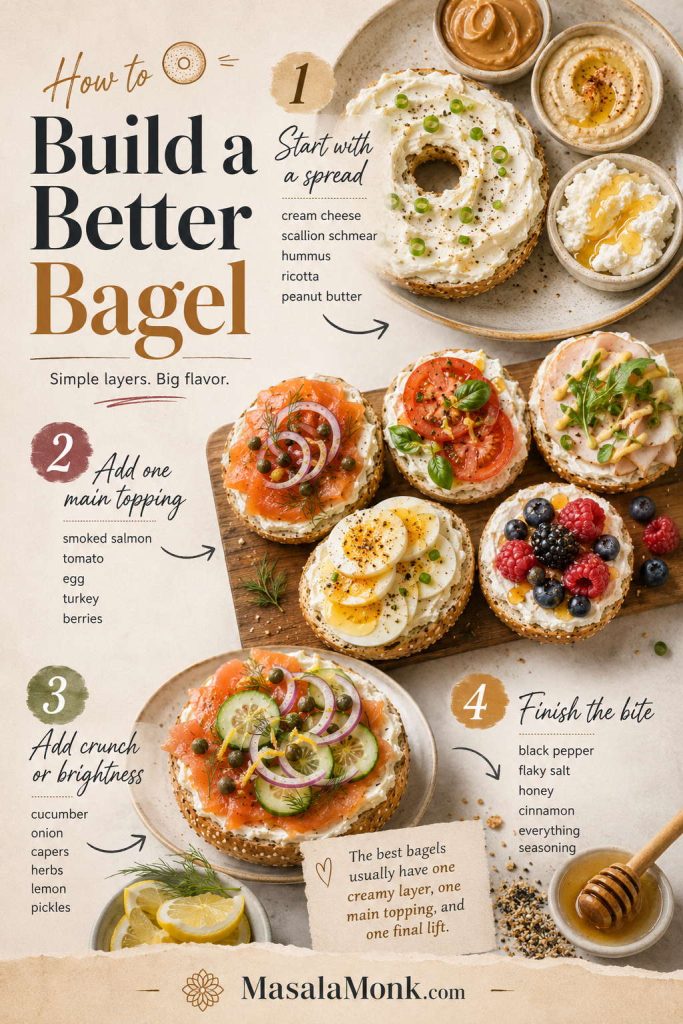
Step-by-step bagel-building guide with a spread, main topping, crunch or brightness, and final seasoning.
Once the spread is chosen, the bagel becomes easier to build. Add one main topping, then use cucumber, onion, lemon, capers, honey, herbs, or seasoning to shape the final bite.

However, you do not need all five parts every time. Even two or three good layers can keep the bagel from becoming dry, heavy, soggy, or one-note.

Start with a bagel spread

The spread gives the bagel moisture and flavor. It also helps small toppings stay in place.

  • Classic: plain cream cheese, whipped cream cheese, scallion schmear
  • Savory: garlic herb spread, hummus, avocado, labneh, goat cheese
  • Sweet: butter, peanut butter, almond butter, ricotta, mascarpone, cream cheese with jam
  • Lighter: Greek yogurt cream cheese, cottage cheese, tofu cream cheese, white bean spread

Add one main bagel topping

The main topping decides whether the bagel feels like breakfast, lunch, snack, or brunch. It can be as simple as an egg, a few slices of tomato, smoked salmon, tuna salad, turkey, banana, berries, or roasted vegetables.

For a quick weekday bagel, one spread and one main topping may be enough. However, for a brunch bagel or open-faced bagel, a finishing layer helps every bite feel more complete.

Finish bagel toppings with crunch, brightness, or seasoning

This is the small step that makes a bagel taste finished. A plain schmear becomes brighter with chives or lemon. Smoked salmon becomes cleaner and sharper with capers, onion, and a squeeze of lemon. Peanut butter becomes more interesting with banana, honey, cinnamon, or a tiny pinch of salt.

Bagel finishing ingredients including lemon, capers, flaky salt, pepper, herbs, chili flakes, honey, cinnamon, and everything seasoning.
When a bagel tastes dull, it usually needs a small finisher rather than another full topping. Lemon, capers, pepper, herbs, honey, cinnamon, or everything seasoning can add lift without crowding the bagel.
  • Crunch: cucumber, onion, radish, sprouts, toasted nuts, granola, crispy bacon
  • Brightness: lemon, pickled onions, capers, tomatoes, berries, apple slices
  • Seasoning: black pepper, chili flakes, flaky salt, everything bagel seasoning, cinnamon, herbs

The bagel test: When the bite feels too rich, add cucumber, tomato, herbs, lemon, or pickled onion. An unfinished bite usually needs one small finish: flaky salt, black pepper, capers, chili flakes, honey, cinnamon, or everything seasoning. Messy builds are easier to control when toppings are sliced thinner and the spread works like glue.

When bagels turn soggy, messy, or dull, the bagel topping mistakes section will help you fix the texture before adding more ingredients.

One small detail makes a big difference: press capers gently into the creamy layer before adding smoked salmon so they stick instead of rolling off. For wet toppings like tomato or cucumber, slice thinly and pat dry before layering.

Bagel Topping Mistakes That Make Bagels Soggy, Messy, or Flat

A bagel can have great toppings and still eat badly if the texture is off. These are the small mistakes that turn a good idea into a soggy, slippery, or bland bagel.
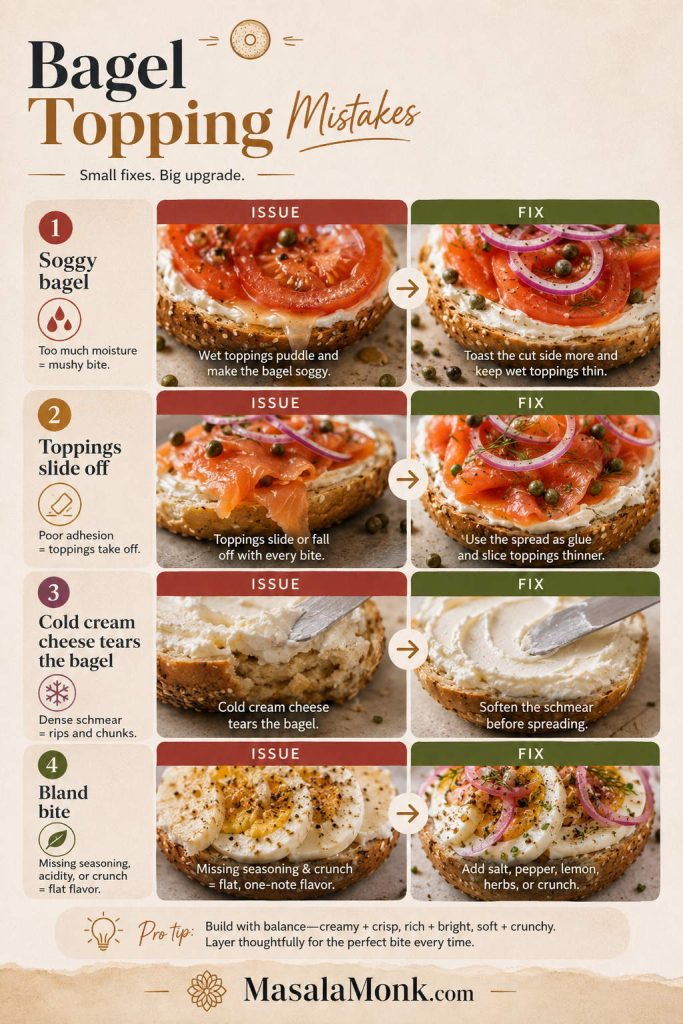
Bagel topping mistakes and fixes showing soggy bagels, sliding toppings, cold cream cheese, and bland bites.
Most disappointing bagels fail because of texture, not flavor. Toast the cut side, soften the schmear, slice wet toppings thinly, and use small finishes so the bagel stays crisp, stable, and satisfying.
MistakeWhat happensBetter move
Using cold block cream cheeseIt tears the bagel and spreads unevenly.Let cream cheese soften first, or beat it into a schmear.
Piling on wet tomatoes or cucumbersThe cut side gets soggy before you finish eating.Slice thinly, pat dry, and use a thick spread, hummus, avocado, or butter as a barrier.
Adding delicate toppings to a piping-hot bagelThe spread melts, herbs wilt, and smoked salmon can feel greasy.Let the bagel cool for a minute before adding schmear, fish, herbs, or fresh vegetables.
Overloading a closed sandwichThe filling slides out and the bagel becomes hard to bite.Keep tall builds open-faced, or use fewer toppings and slice them thinner.
Skipping the final finishThe bagel tastes like bread plus spread instead of a finished bite.Add lemon, herbs, black pepper, flaky salt, capers, honey, cinnamon, or chili flakes.
Using loose tuna, egg, or chicken saladThe filling slides off the bagel.Use a thicker salad, add lettuce as a barrier, or serve it open-faced.

How to keep wet toppings from making bagels soggy

In most cases, the two biggest fixes are simple: toast the cut side enough to create a barrier, and keep wet toppings thin. Tomato, cucumber, avocado, pickles, and loose salads are all good on bagels, but they need structure underneath them. A thick schmear, hummus, avocado, butter, or even lettuce can help protect the bread from turning soft too quickly.

For more detail on getting the cut side sturdy, see the toasting guide before adding tomato, cucumber, eggs, avocado, hummus, or smoked salmon.
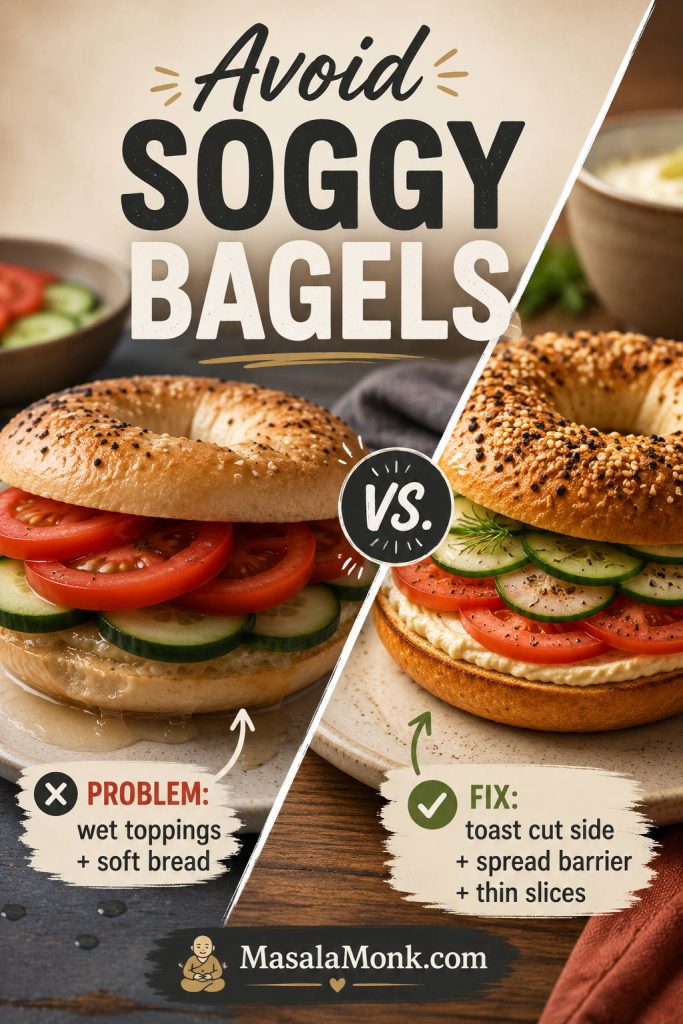
Before-and-after comparison showing a soggy bagel and a better bagel with toasted bread, a spread barrier, and thin tomato slices.
Juicy tomato and cucumber are great on bagels, but they need a toasted surface and a creamy barrier underneath so the bread stays firm.

Texture rule: the wetter the topping, the sturdier the bagel needs to be. Toast a little longer, use a thicker spread, and keep juicy toppings thin.

15 Bagel Topping Ideas to Try First

Think of these as the safe bets — the combinations to try before you start inventing anything complicated. They cover the classics, quick breakfasts, sweet cravings, and the “I need this to feel like lunch” moments.

These are the bagels I would put in front of someone who says, “Just tell me what works.” They are not the weirdest ideas; instead, they are the bagel toppings and spreads that taste complete without needing ten toppings.

To keep this practical, effort is rated from 1 to 5, with 1 being almost no prep and 5 needing more cooking or assembly.

Classic bagel toppings and spreads to try first

Start with these before getting creative; each one gives the bagel a clear base, one main topping, and a small detail that makes the bite feel intentional.
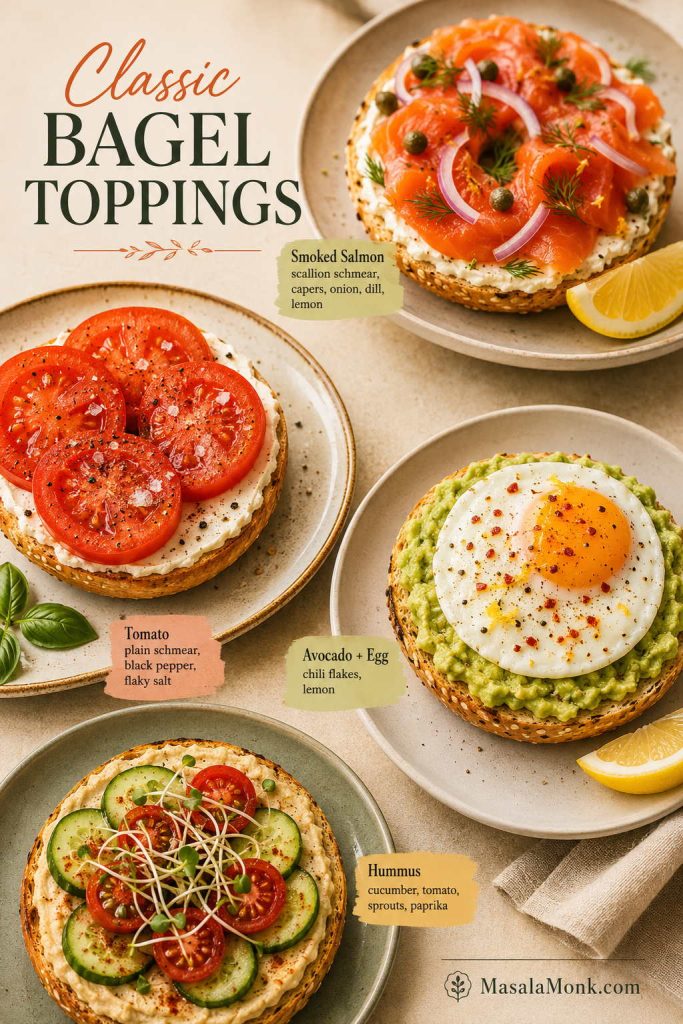
Four classic bagel toppings including smoked salmon with schmear, tomato with cream cheese, avocado egg, and hummus cucumber.
Classic bagel toppings work because they cover the essentials: creamy schmear, salty or fresh toppings, crisp vegetables, and a small finish. Start here before moving into more creative spreads.
Bagel combinationBest momentEffortGood bagel choicesWhy it tastes balanced
Scallion cream cheese + smoked salmon + capers + red onionBrunch / lunch2/5Plain, everything, poppy, pumpernickelSalmon brings salt, capers and onion add bite, and the schmear keeps the bagel rich without feeling dry.
Plain schmear + tomato + black pepper + flaky saltFast breakfast1/5Plain, sesame, onionJuicy tomato, creamy spread, and enough salt make it feel complete.
Avocado + fried egg + chili flakes + lemonFilling breakfast3/5Everything, whole wheat, sesameEgg makes it filling, avocado keeps it creamy, and lemon/chili stop it from feeling heavy.
Hummus + cucumber + tomato + sproutsLight lunch1/5Sesame, whole wheat, plainCool cucumber and sprouts keep the hummus from feeling dense.

Breakfast and lunch bagel topping ideas

These builds are meant to eat like real meals, so the spread, protein, vegetables, and toast level need to help the bagel hold together.
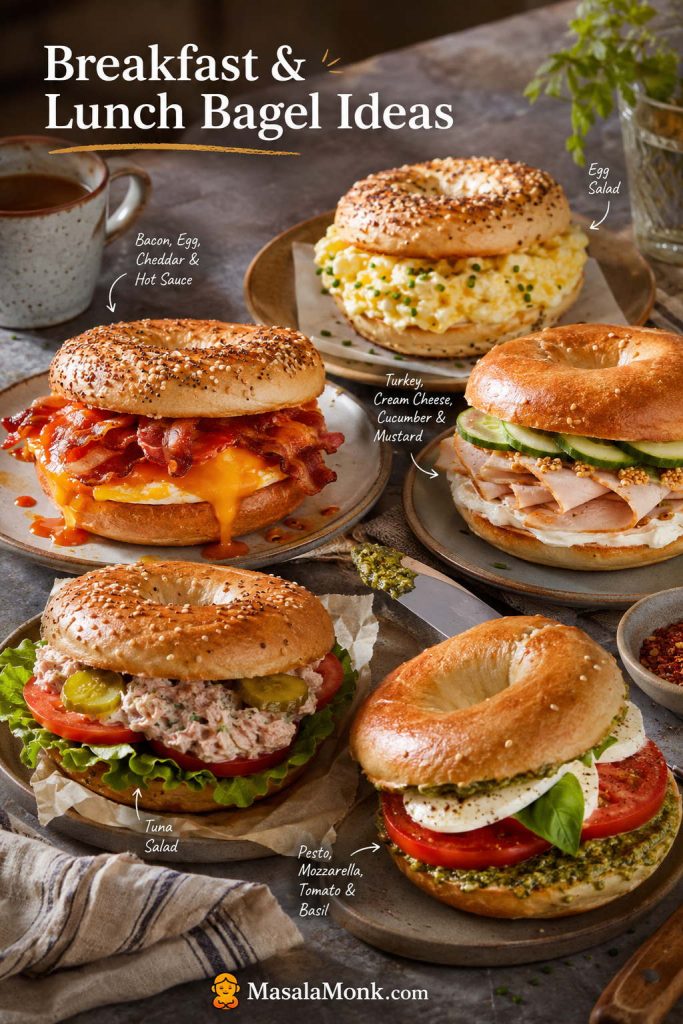
Breakfast and lunch bagels with bacon egg cheese, turkey cucumber, tuna salad, egg salad, and pesto mozzarella tomato.
Meal-style bagels hold together better when the cut side is toasted, the spread is thick, and crisp vegetables sit between the bread and creamy fillings.
Bagel combinationBest momentEffortGood bagel choicesWhy it tastes balanced
Bacon + egg + cheddar + hot sauceWeekend breakfast3/5Plain, everything, AsiagoCheddar and egg make it rich; hot sauce cuts through the breakfast heaviness.
Turkey + cream cheese + cucumber + mustardEasy lunch1/5Plain, sesame, whole wheatCucumber keeps the turkey from eating dry, while mustard gives the sandwich some bite.
Tuna salad + tomato + lettuce + picklesMeal-style lunch2/5Plain, poppy, whole wheatCreamy filling tastes better with crisp, briny, and juicy layers.
Egg salad + chives + everything seasoningMake-ahead lunch2/5Plain, everything, poppyChives and everything seasoning make soft egg salad taste more like a proper deli bagel.
Pesto + mozzarella + tomato + basilVegetarian lunch2/5Plain, sesame, AsiagoPesto seasons the cheese, tomato adds juiciness, and basil keeps it from feeling flat.

Sweet bagel toppings and spreads to try

Sweet bagels taste better when the topping has a little tang, salt, nuttiness, or fruit instead of only more sugar.

Sweet bagel topping ideas including peanut butter banana, ricotta berries, strawberry cream cheese, cinnamon sugar, and Nutella strawberries.
A sweet bagel should still feel like breakfast, not frosting on bread. Tangy cream cheese, soft ricotta, berries, toasted nuts, cinnamon, lemon zest, or a pinch of salt keep the sweetness in check.
Bagel combinationBest momentEffortGood bagel choicesWhy it tastes balanced
Honey walnut cream cheese + bananaSweet breakfast1/5Cinnamon raisin, plain, whole wheatBanana makes it filling, honey walnut schmear adds sweetness, and cinnamon keeps it cozy.
Peanut butter + banana + honey + cinnamonFast filling snack1/5Plain, cinnamon raisin, whole wheatPeanut butter gives staying power, banana softens the bite, and honey/cinnamon make it feel finished.
Ricotta + berries + honey + lemon zestSweet brunch1/5Plain, blueberry, whole wheatRicotta gives softness, berries add juice, and lemon zest keeps the sweetness clean.
Strawberry cream cheese + fresh berriesBakery-style breakfast1/5Plain, blueberryFresh berries keep the strawberry spread from tasting too candy-sweet.
Butter + cinnamon sugar + toasted walnutsCozy snack1/5Cinnamon raisin, plainButter melts into the toasted cut side, while cinnamon sugar and walnuts add cozy crunch.
Nutella + strawberries + pinch of saltDessert-style bagel1/5Plain, blueberry, mini bagelsStrawberries brighten the chocolate spread, and salt keeps it from tasting one-note.

How to choose from this list

If the Caprese-style bagel is the one you want to build, use a thick pesto rather than a loose sauce so it spreads cleanly. This homemade pesto recipe and variations guide has basil pesto, red pesto, vegan pesto, nut-free pesto, pesto dip, pesto butter, and sandwich-friendly ideas.

Creative bagel upgrades when you want something different

After the basics, these are the bagels to try when plain cream cheese is not enough and you want something more snacky, brunchy, global, or restaurant-style without making the whole thing complicated.

Creative bagel upgrades with chili crisp cream cheese, za’atar hummus, furikake avocado, jalapeño popper, pizza bagel, and fig goat cheese.
After the classics, creative bagel upgrades make a simple bagel feel restaurant-style. Chili crisp, za’atar, furikake, fig, goat cheese, jalapeño, and pizza toppings bring big flavor without needing a complicated build.

Warm and toasted

  • Jalapeño popper bagel: cream cheese, cheddar, jalapeño, scallion, garlic powder, toasted until warm.
  • Pizza bagel: marinara, mozzarella, Parmesan, basil, and a quick toast until the cheese melts.
  • Maple bacon breakfast bagel: cream cheese, crispy bacon, maple drizzle, and black pepper.
  • Tuna melt bagel: thick tuna salad, cheddar, tomato, and a short toast until the cheese softens.

Warm toasted bagel ideas with pizza bagels, jalapeño popper bagels, tuna melt bagels, and maple bacon breakfast bagels.
Warm toppings taste best when they melt into a firm toasted cut side. That is why pizza bagels, tuna melts, jalapeño popper bagels, and bacon breakfast bagels need heat before the toppings go on.

Fresh and savory

  • Za’atar hummus bagel: hummus, cucumber, tomato, olive oil, za’atar, and lemon.
  • Whipped feta cucumber bagel: whipped feta, cucumber ribbons, dill, black pepper, and lemon.
  • Cucumber dill labneh bagel: labneh, cucumber, dill, lemon zest, and flaky salt.
  • Roasted red pepper bagel: goat cheese or hummus, roasted red peppers, basil, and a little olive oil.

Bold and snacky

  • Chili crisp cream cheese bagel: plain schmear, chili crisp, scallions, cucumber, and sesame seeds.
  • Furikake avocado bagel: mashed avocado, furikake, cucumber, lime, and a little chili oil.
  • Pickle-everything schmear: cream cheese, chopped pickles, everything seasoning, and scallion.
  • Sun-dried tomato cream cheese: cream cheese, chopped sun-dried tomatoes, basil, black pepper, and lemon zest.

Sweet-salty

  • Honey pecan bagel: cream cheese, honey, cinnamon, and toasted pecans.
  • Fig and goat cheese bagel: goat cheese, fig jam, walnuts, honey, and black pepper.

Easy Bagel Schmear Recipe

A good bagel schmear is softer and more spreadable than cold cream cheese straight from the block. It should glide over a toasted bagel without tearing it apart, and it should taste lightly seasoned even before you add toppings.
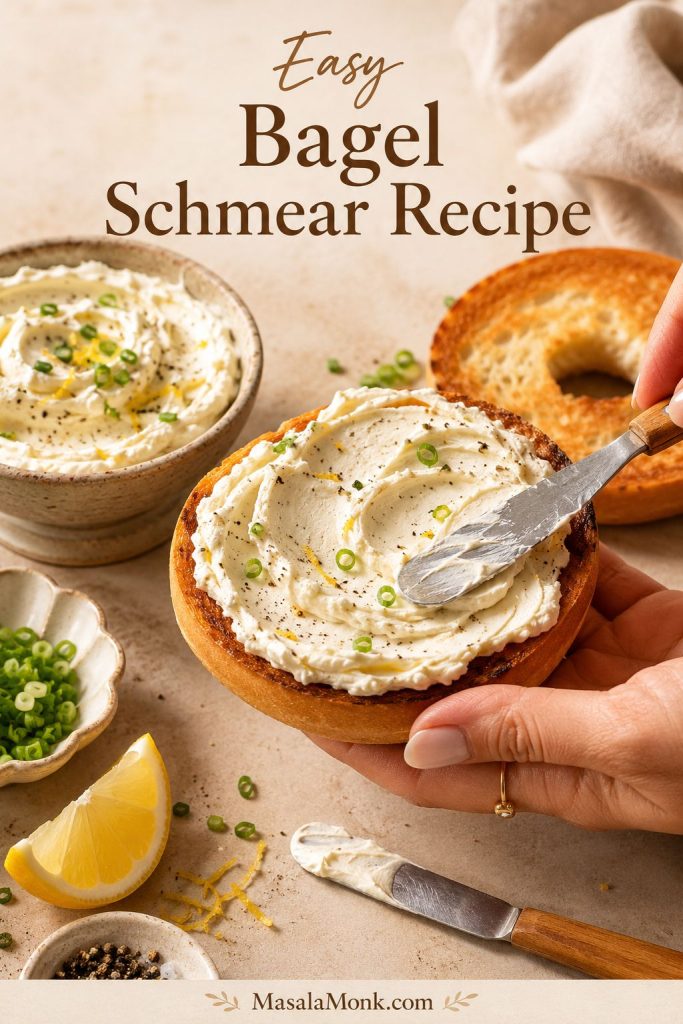
Homemade bagel schmear being spread on a toasted bagel with lemon, scallions, pepper, and a bowl of creamy spread nearby.
Soft schmear should spread in smooth strokes instead of tearing the bagel. Let the cream cheese soften first, then loosen it with lemon, herbs, or tangy dairy before adding toppings.

This base recipe makes about 1 cup / 9 oz / 255 g, enough for roughly 4 to 6 bagels, depending on how generously you spread it. Because schmear is one of the most useful bagel spreads, it also works as the base for many sweet and savory toppings.

The finished texture should be soft enough to spread easily but thick enough to hold herbs, capers, onions, or chopped salmon without turning loose.

Bagel schmear ingredients

The base is simple, but each small addition changes how the schmear spreads, tastes, and holds toppings.
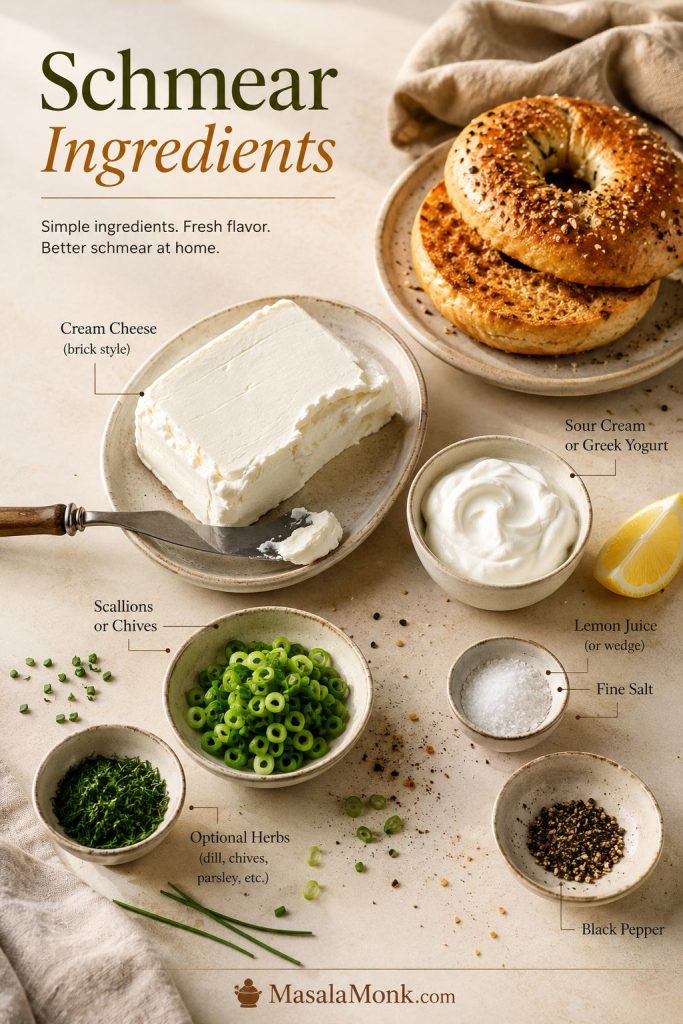
Bagel schmear ingredients including cream cheese, Greek yogurt or sour cream, lemon, salt, pepper, scallions, herbs, and bagel halves.
A simple bagel schmear does not need many ingredients. However, lemon, salt, pepper, scallions, and a little Greek yogurt or sour cream make cream cheese softer, brighter, and easier to pair with toppings.
IngredientUS amountMetric amount
Brick cream cheese, softened8 oz225 g
Sour cream, Greek yogurt, or crème fraîche2 tbsp30 g / 30 ml
Fresh lemon juice½ tsp2.5 ml
Fine saltPinch to ⅛ tspTo taste
Black pepperOptionalOptional

How to make bagel schmear

The goal is a spreadable texture first; once the base is smooth, herbs, smoked salmon, honey walnut, or berries fold in more evenly.
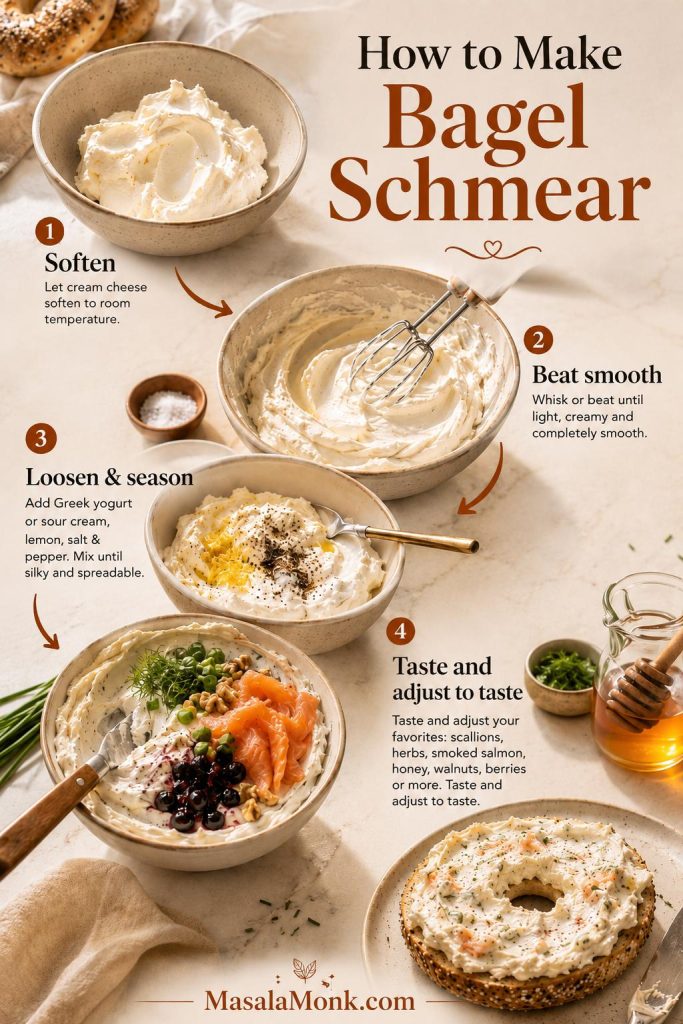
Four-step bagel schmear process showing softened cream cheese, beaten cream cheese, seasoning, and folded-in flavorings.
Homemade schmear is easiest when you build it in stages: soften, beat smooth, loosen and season, then fold in flavor. After that, the same base can become scallion, smoked salmon dill, honey walnut, or berry schmear.
  1. Soften the cream cheese. Leave it at room temperature for about 30 minutes, or until it gives slightly when pressed.
  2. Beat until smooth. Use a hand mixer, stand mixer, or sturdy spoon. The texture should look creamy, not lumpy.
  3. Loosen it slightly. Mix in sour cream, Greek yogurt, or crème fraîche.
  4. Season it. Add lemon juice and salt. Then taste before adding more salt, especially if you plan to add smoked salmon, capers, bacon, cheddar, or everything seasoning.
  5. Keep it plain or add flavor. Finally, fold in one of the flavored cream cheese ideas below.

Once the base is smooth, use the flavored cream cheese ideas to turn one batch into savory, sweet, or smoked salmon schmear.

How much schmear do you need per bagel?

Use the amount as a texture decision: lighter for everyday breakfasts, thicker for deli-style bagels, and a little extra when guests are sampling flavors.
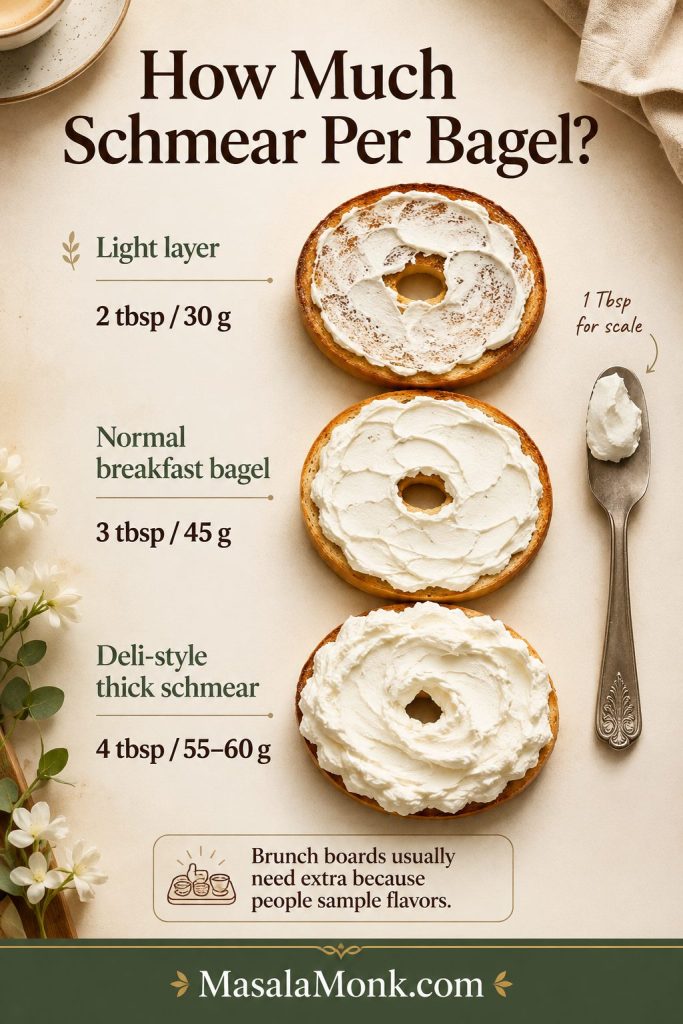
Schmear amount guide showing light, normal, and deli-style cream cheese layers on toasted bagel halves.
Schmear amount changes the whole bagel. Use a light layer for quick breakfasts, a normal layer for everyday bagels, and a thicker deli-style schmear for smoked salmon bagels or brunch boards.
StyleAmount per whole bagel
Light layer2 tbsp / 30 g
Normal breakfast bagel3 tbsp / 45 g
Deli-style thick schmear4 tbsp / 55–60 g
Open-faced bagel halves1–2 tbsp / 15–30 g per half

If you are serving a bagel bar, plan slightly more spread than you think you need. People usually take more schmear when there are several flavors to try.

Flavored Cream Cheese Ideas for Bagels

Think of flavored cream cheese as the easiest way to make a plain bagel feel planned. One good mix-in can do the work of several loose toppings.
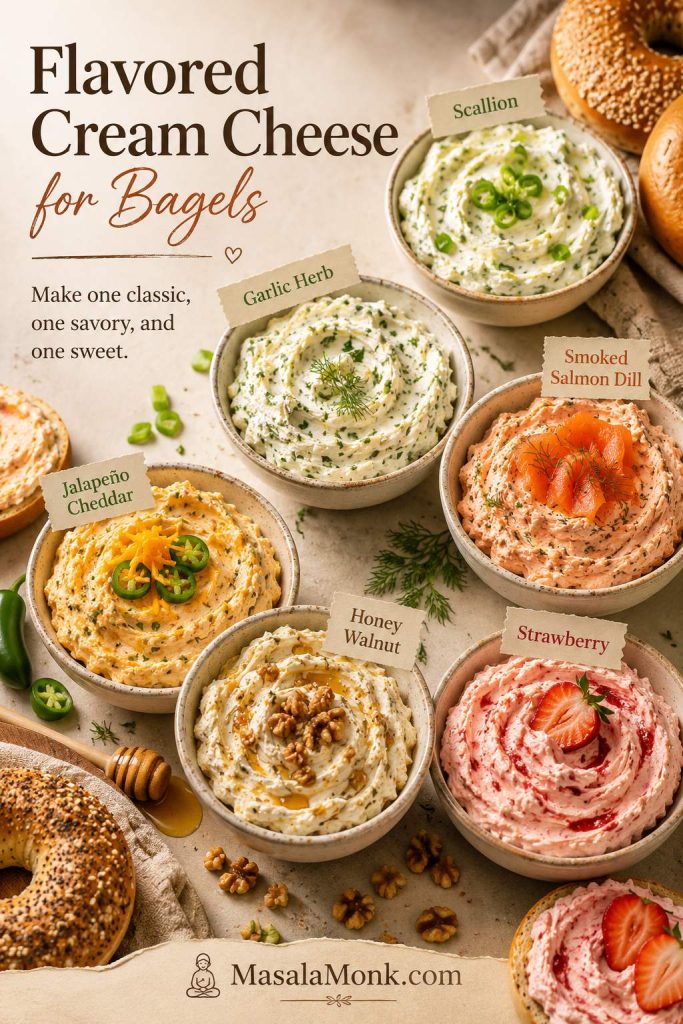
Flavored cream cheese bowls for bagels, including scallion, garlic herb, smoked salmon dill, jalapeño cheddar, honey walnut, and strawberry.
Flavored cream cheese can do the work of several loose toppings. For a balanced bagel bar, make one classic flavor, one savory flavor, and one sweet flavor so every guest has an easy starting point.

Once the base is smooth, flavored cream cheese is easy. Start with 8 oz / 225 g cream cheese, then fold in one flavor direction. If you are making more than one flavor, keep one plain or scallion, one savory, and one sweet. That way, the board works for both breakfast people and dessert-leaning people.

If you are only making two flavors, make one scallion or garlic-herb schmear and one honey walnut or strawberry cream cheese. That way, you cover the savory people, the sweet people, and the person who wants to try both.

Best flavored cream cheese ideas for bagels

FlavorAdd to 8 oz / 225 g schmear baseGood bagel choices
Scallion schmear¼ cup finely sliced scallions or chives + black pepperEverything, sesame, plain
Garlic herb1 small grated garlic clove + 2 tbsp chopped dill, parsley, or chives + lemon zestPlain, sesame, whole wheat
Smoked salmon dill3–4 oz / 85–115 g chopped smoked salmon + dill + lemonPlain, poppy, pumpernickel
Jalapeño cheddar1 minced jalapeño + ½ cup shredded cheddar + scallionEverything, cheese, plain
Honey walnut2 tbsp honey + ¼ cup chopped walnuts + pinch of cinnamonCinnamon raisin, plain, whole wheat
Strawberry2–3 tbsp strawberry jam or ½ cup chopped berries + 1 tbsp powdered sugar if neededPlain, blueberry, whole wheat
Everything bagel1–2 tbsp everything bagel seasoningPlain, sesame
Veggie cream cheese⅓ cup finely diced cucumber, carrot, bell pepper, or celery + herbsPlain, whole wheat, sesame

How to make one cream cheese base work harder

Once you understand the base formula, you can also play with sun-dried tomato, olive-herb, maple cinnamon, cranberry orange walnut, lemon pepper, or pickle-everything cream cheese. One simple base can cover several bagel toppings and spreads without much extra work.

Make-ahead tip: flavored cream cheese usually tastes better after chilling for at least 1 hour. For brunch, make the schmears the night before, then let them soften for 15–30 minutes before serving.

Bagel Spreads Besides Cream Cheese When You Want Something Different

What bagel spreads to use when cream cheese is not the answer

This is the section for the morning when the cream cheese tub is empty, or when you want the bagel to feel more like lunch than a bakery breakfast.
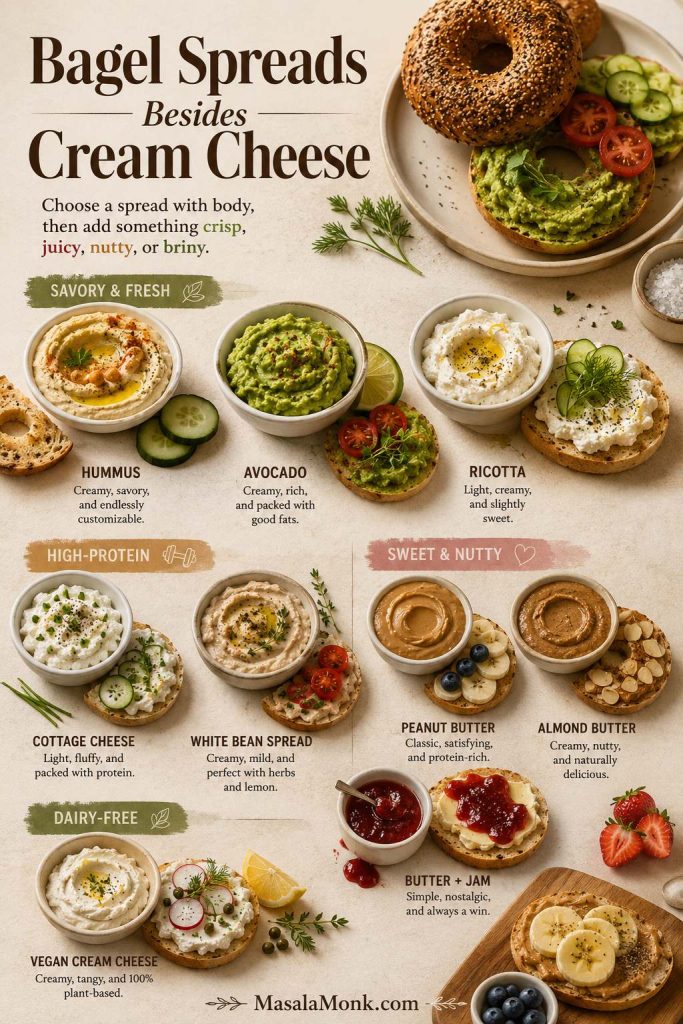
Bagel spreads besides cream cheese, including hummus, avocado, ricotta, cottage cheese, nut butter, jam, and vegan cream cheese.
Cream cheese is classic, although hummus, avocado, ricotta, cottage cheese, nut butter, white bean spread, jam, and vegan cream cheese can each push the same bagel in a new direction.

Of course, cream cheese is the classic, but it is not the only spread that belongs on a bagel. The easiest way to replace it is to choose another spread that gives the bagel moisture: hummus for savory crunch, avocado for breakfast, ricotta for sweet toppings, peanut butter for a filling snack, and white bean spread for a dairy-free lunch bagel.

If you want the bagel to feel like lunch, choose hummus, avocado, white bean spread, tuna salad, turkey, or a thick savory salad. On the other hand, if you want it to feel like breakfast, choose butter, ricotta, peanut butter, cottage cheese, egg, or a fruit-friendly spread.

For plant-based builds, the vegan bagel toppings section has hummus, avocado, tofu cream cheese, white bean spread, and nut butter ideas.

For example, hummus works best when cucumber, tomato, sprouts, or paprika keep the bite from feeling dense. Meanwhile, ricotta and cottage cheese work better when fruit, honey, lemon zest, pepper, or herbs give them a clear direction.

Best bagel spreads to pair with toppings

SpreadToppings to addGood bagel choices
HummusCucumber, tomato, sprouts, paprika, olive oilSesame, plain, whole wheat
AvocadoEgg, chili flakes, lemon, tomato, everything seasoningEverything, sesame, whole wheat
RicottaHoney, berries, lemon zest, pistachiosPlain, blueberry, whole wheat
Peanut butterBanana, honey, cinnamon, chia seeds, jamPlain, cinnamon raisin, whole wheat
Cottage cheeseTomato, black pepper, cucumber, berries, honeyPlain, whole wheat, sesame
ButterJam, cinnamon sugar, honey, flaky saltPlain, cinnamon raisin, blueberry
White bean spreadTomato, herbs, olive oil, lemon, roasted peppersPlain, sesame, whole wheat
MascarponeBerries, honey, citrus zest, toasted nutsPlain, blueberry, mini bagels

How to make mild bagel spreads taste finished

Spread first, then toppings: a mild spread like ricotta, cottage cheese, or white bean spread usually needs a stronger finish. Add lemon, herbs, pepper, honey, cinnamon, flaky salt, or fruit so the bagel does not taste unfinished.

Savory Bagel Toppings

If your savory bagel tastes heavy after three bites, it usually does not need more meat or more cheese. Instead, it needs something crisp, sharp, juicy, or herbal to cut through the richness. A classic schmear and smoked salmon are iconic, but hummus, avocado, eggs, tuna salad, turkey, chicken salad, pesto, goat cheese, and crisp vegetables can be just as satisfying.

Savory bagels with smoked salmon, turkey cucumber, pesto mozzarella tomato, cream cheese, capers, herbs, and vegetables.
Savory bagel toppings taste better with contrast: crisp cucumber, juicy tomato, sharp onion, lemon, herbs, mustard, or capers can cut through smoked salmon, turkey, pesto, tuna, or egg salad.

At the same time, the lunch bagel should not collapse halfway through. If you are using tomato, cucumber, pickles, roasted peppers, or avocado, keep the slices thin and use a creamy spread underneath to protect the toasted surface.

Classic savory topping ideas

  • Plain schmear + tomato + black pepper
  • Scallion schmear + cucumber + dill
  • Smoked salmon + capers + red onion + lemon
  • Hummus + cucumber + tomato + paprika
  • Avocado + fried egg + chili flakes
  • Tuna salad + lettuce + pickles
  • Egg salad + chives + everything seasoning
  • Turkey + cream cheese + cucumber + mustard
  • Chicken salad + celery + herbs
  • Pesto + tomato + mozzarella
  • Goat cheese + roasted peppers + basil
  • Bacon + cream cheese + tomato

If tuna salad is your easy lunch topping, this healthy tuna salad guide has lighter deli-style, avocado, Mediterranean, no-mayo, tuna-and-egg, and sandwich-friendly variations you can spoon onto toasted bagels.

Savory combinations worth making

Use these when you want a bagel that eats more like a meal than a snack. Each one has creaminess, a main topping, and a sharper or fresher finish. In other words, these bagel toppings and spreads are built to hold up beyond the first bite.

CombinationBuild
Lox-style bagelCream cheese, smoked salmon, capers, red onion, dill, lemon
Avocado egg bagelMashed avocado, fried or scrambled egg, chili flakes, lemon, salt
Hummus crunch bagelHummus, cucumber, tomato, sprouts, paprika, olive oil
Deli turkey bagelCream cheese, turkey, cucumber, lettuce, mustard, black pepper
Tuna melt bagelTuna salad, cheddar, tomato, toasted until warm
Caprese bagelMozzarella, tomato, pesto, basil, black pepper

Chicken salad, tuna salad, and egg salad all need the same thing on a bagel: a thick enough texture to stay put. If the filling is loose, serve the bagel open-faced or add lettuce as a barrier.

Packing a savory bagel for later? Use the work and lunchbox toppings guide so juicy or slippery toppings do not soak the bread.

Bagel Toppings That Travel Well for Work or Lunchboxes

For packed lunches, choose bagel toppings that stay firm and do not leak into the bread. Thick hummus, cream cheese, turkey, peanut butter, firm egg salad, thick tuna salad, and sliced cheese travel better than watery tomatoes, loose salads, avocado, or overfilled smoked salmon builds.

A good lunchbox bagel should still taste good a few hours later: a sturdy toasted base, a spread that acts like a barrier, and fresh toppings packed separately when they are juicy or slippery.
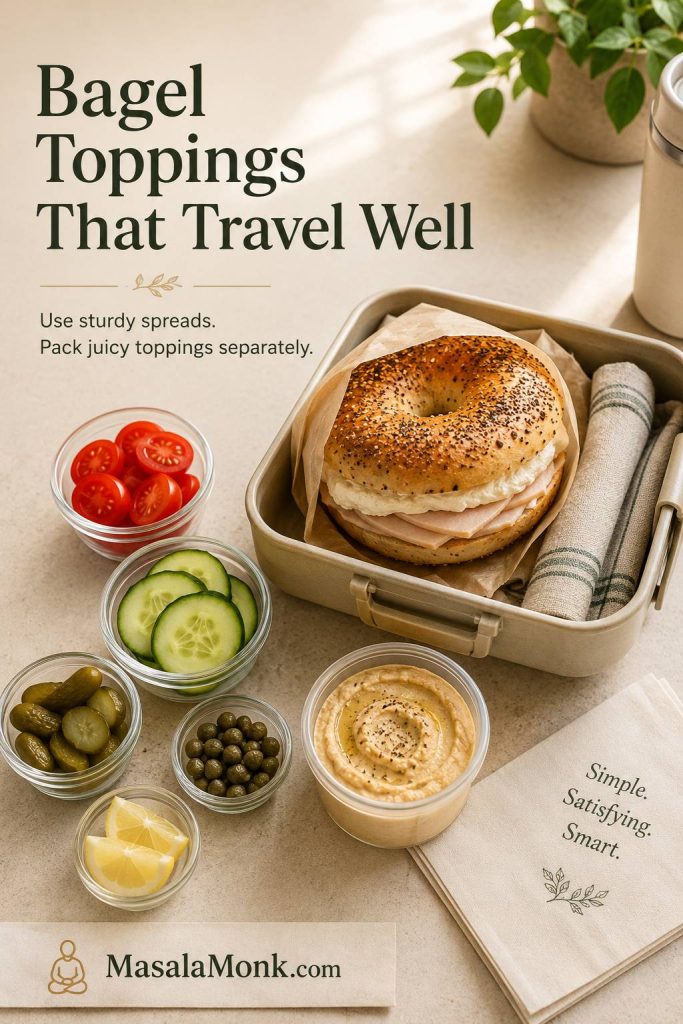
Packed lunch bagel with sturdy spread and separate containers of cucumber, tomato, pickles, capers, lemon, and hummus.
For work or lunchbox bagels, sturdy spreads matter most. Pack tomato, cucumber, pickles, capers, lemon, and other juicy toppings separately so the bread stays firm until lunch.
Pack it nowPack separatelySkip for packed bagels
Cream cheese, hummus, turkey, cheese, peanut butter, thick tuna or egg saladTomato, cucumber, avocado, pickles, capers, lemon wedgesWatery tomatoes, loose salads, overfilled lox bagels, very wet spreads

Sweet Bagel Toppings

In general, sweet bagel toppings are more satisfying when they have a little contrast instead of tasting only sweet. Tangy cream cheese, toasted nuts, salt, lemon zest, cinnamon, berries, and honey can make a sweet bagel feel more like breakfast and less like frosting on bread.

Sweet and savory bagel topping comparison with smoked salmon, avocado, cucumber, berries, jam, peanut butter banana, honey, and ricotta.
Sweet and savory bagel toppings need different kinds of contrast. Savory bagels usually want crunch, herbs, lemon, or briny toppings, while sweet bagels benefit from tangy cheese, fruit, nuts, honey, cinnamon, or salt.

That said, sweet bagels need a lighter hand when the bagel itself already has cinnamon, raisins, or blueberries. Start with tangy or lightly salted toppings first, then move sweeter only if the bagel itself is plain.

If you are starting with cinnamon raisin, blueberry, or another flavored bagel, check the bagel type pairings before adding a very sweet spread.

Easy sweet bagel ideas

  • Plain cream cheese + strawberry jam
  • Butter + cinnamon sugar
  • Peanut butter + banana + honey
  • Almond butter + apple slices + cinnamon
  • Ricotta + honey + pistachios
  • Mascarpone + berries
  • Nutella + strawberries
  • Cream cheese + brown sugar + cinnamon
  • Greek yogurt cream cheese + berries + granola
  • Honey walnut cream cheese + banana
  • Apple butter + cream cheese
  • Peanut butter + jam + flaky salt

If you want a fruit spread that feels brighter than regular strawberry jam, this pineapple jam recipe makes a glossy sweet-tart spread for toast, scones, waffles, yogurt, and breakfast-style bagels.

Fruit spreads are especially good on plain or lightly toasted bagels because they bring both sweetness and brightness. A warm toasted cut side with cream cheese and glossy fruit spread feels completely different from a cold, overloaded sweet bagel.

Sweet topping tip: cinnamon raisin and blueberry bagels already bring sweetness, so they usually taste best with tangy or lightly salted toppings like plain cream cheese, butter, peanut butter, ricotta, or honey walnut cream cheese rather than very sugary spreads alone.

In fact, for sweet bagels, a tiny pinch of salt often does more than extra sugar. It makes peanut butter, honey, berries, chocolate-hazelnut spread, and sweet cream cheese taste fuller without making the bagel heavy.

Sweet bagel combinations by mood

Choose the topping based on whether you want the bagel to feel like breakfast, dessert, or something in between. This is also where bagel spreads matter most, because a tangy or lightly salted base keeps sweet toppings from becoming too much.

MoodTry this
Bakery-styleStrawberry cream cheese + fresh berries + lemon zest
CozyButter + cinnamon sugar + toasted walnuts
Protein-friendlyPeanut butter + banana + chia seeds
Dessert-likeNutella + strawberries + pinch of salt
Light and creamyRicotta + honey + berries
Fall-styleApple butter + cream cheese + cinnamon

Healthy and High-Protein Bagel Toppings That Still Taste Good

A bagel is best treated like a bigger, denser bread base, not a breakfast problem to apologize for. The toppings matter because they decide whether it feels like a quick carb moment or a breakfast that holds you for a while. For a lighter plate, use one half open-faced instead of building a heavy closed sandwich.

The goal is not to make the bagel smaller; it is to make the topping smarter, more satisfying, and still good enough to look forward to.
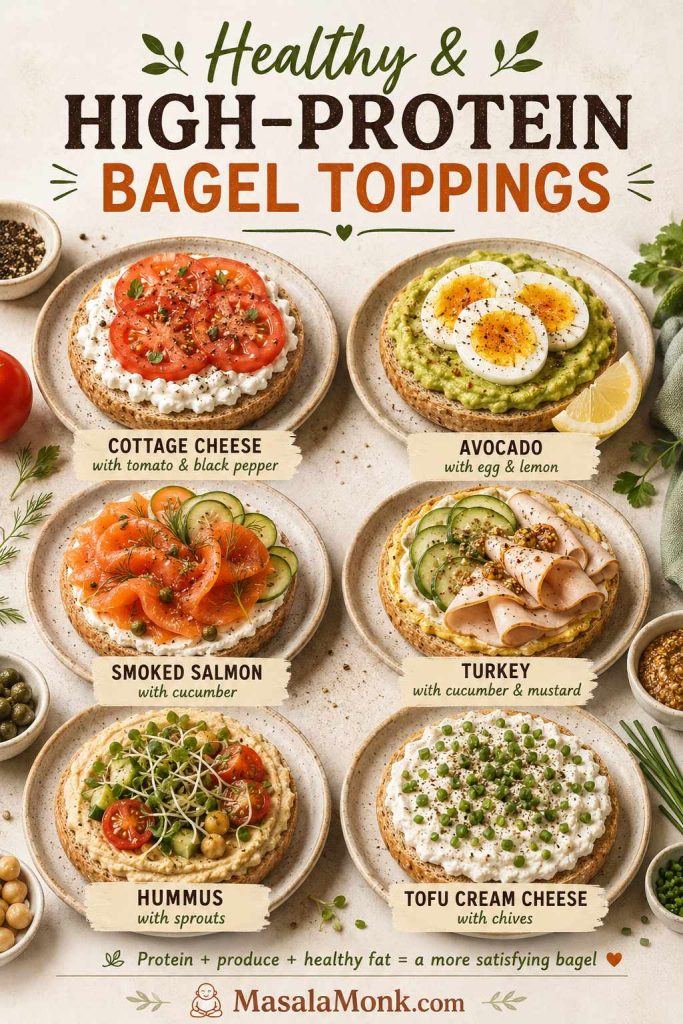
Healthy high-protein bagel toppings with cottage cheese tomato, avocado egg, smoked salmon cucumber, turkey mustard, hummus sprouts, and tofu cream cheese.
Healthy bagel toppings should still taste like something you want to eat. Cottage cheese, egg, smoked salmon, turkey, hummus, tofu cream cheese, avocado, and vegetables add protein, texture, and staying power.

For dairy-free or higher-protein variations, tofu cream cheese, cashew cream cheese, white bean spread, egg whites, turkey slices, smoked salmon, and Greek yogurt-style spreads all work with the same spread-plus-finish formula.

Balanced bagel toppings for protein, produce, and healthy fats

IdeaWhy it feels balanced
Cottage cheese + tomato + pepperCreamy, fresh, and high in protein
Avocado + egg + lemonRich, filling, and bright
Hummus + cucumber + sproutsDairy-free, crunchy, and easy
Smoked salmon + cucumberProtein-rich and classic
Greek yogurt cream cheeseTangier and lighter than a heavy spread
Tuna salad with Greek yogurtMore protein and less heaviness
Turkey + cucumber + mustardLean, savory, and crisp
Ricotta + berriesSweet, creamy, and lighter than frosting-like spreads
White bean spread + tomatoVegan, filling, and good with herbs
Tofu cream cheese + chivesDairy-free and bagel-friendly

If you want a warmer high-protein breakfast bagel, spoon soft eggs over a toasted half and finish with chives, tomato, or hot sauce. These scrambled eggs with cottage cheese are especially useful when you want creamy eggs with more protein.

Balance tip: if the bagel itself is large, use an open-faced style. One bagel split into two halves with protein and vegetables often feels more satisfying than a closed sandwich overloaded with spread.

Vegan bagel toppings and spreads

Vegan bagel toppings do not need to feel like substitutes. A thick swipe of hummus with cucumber and paprika, avocado with lemon and everything seasoning, or white bean spread with roasted peppers can taste just as complete as a cream cheese bagel.
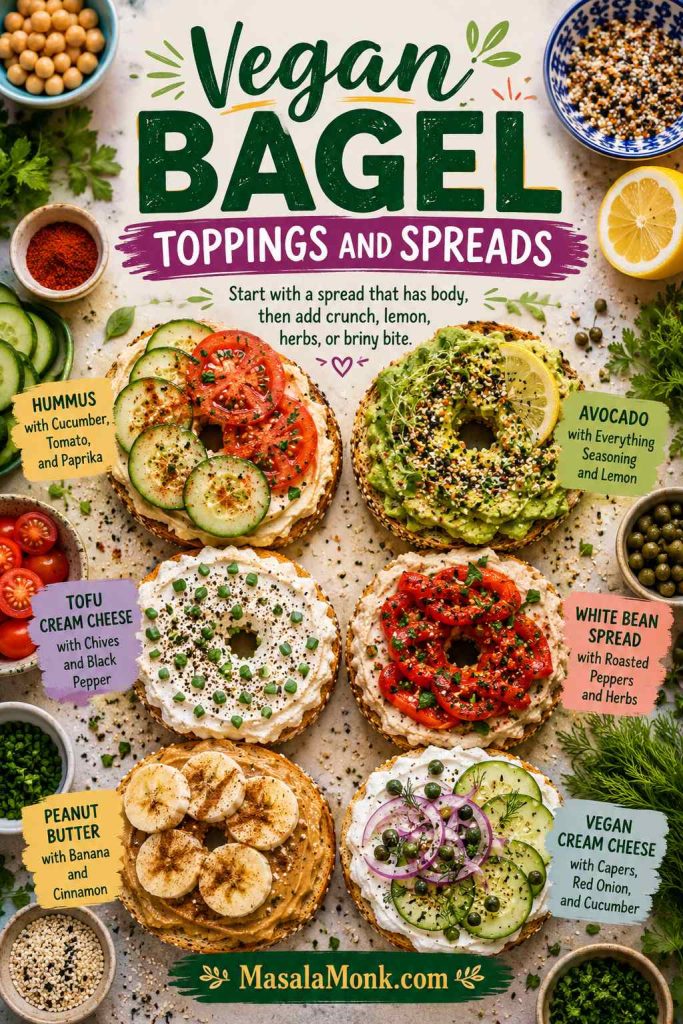
Vegan bagel toppings including hummus cucumber, avocado, tofu cream cheese, white bean spread, peanut butter banana, and vegan cream cheese.
Vegan bagel toppings do not need to feel like substitutes. Start with hummus, avocado, tofu cream cheese, white bean spread, or nut butter, then add crunch, lemon, herbs, or briny bite.

Start with a spread that already has body, then add something crisp, juicy, nutty, or briny. Hummus, avocado, tofu cream cheese, white bean spread, peanut butter, almond butter, jam, olive tapenade, and vegan cream cheese all give the bagel enough moisture before you add fresh toppings.

  • Hummus + cucumber + tomato + paprika
  • Avocado + everything seasoning + lemon
  • Tofu cream cheese + chives + black pepper
  • White bean spread + roasted peppers + herbs
  • Peanut butter + banana + cinnamon
  • Vegan cream cheese + capers + red onion + cucumber

How to Toast Bagels for Toppings and Boards

Because many toppings are wet, creamy, or warm, toasting matters more than it seems. A lightly toasted bagel is fine for butter and jam, but a bagel with cream cheese, tomato, egg, avocado, smoked salmon, or hummus needs a firmer surface.
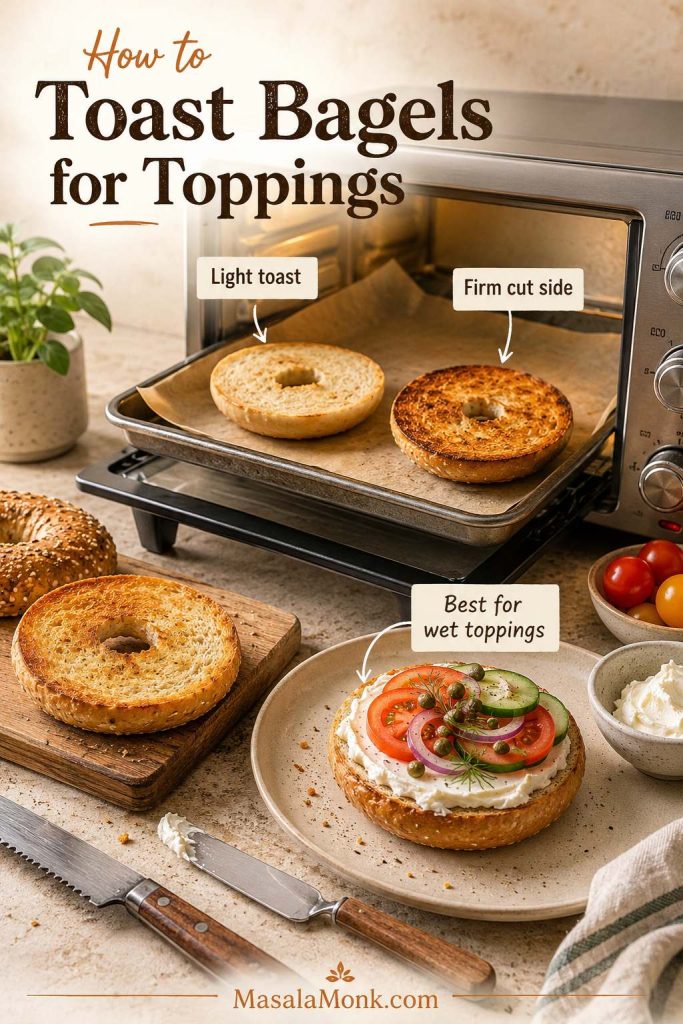
Toaster oven scene showing light toast, firm toasted cut side, and a topped bagel with cream cheese, tomato, cucumber, onion, and capers.
Toast level should match the toppings. Butter and jam only need light toast, but wet or creamy toppings like tomato, cucumber, avocado, hummus, eggs, or smoked salmon need a firmer cut side.
MethodTime / temperatureUse it for
Regular toaster2–5 minutes, depending on toaster strengthEveryday bagels, breakfast bagels, cream cheese bagels
Toaster oven375°F / 190°C for 4–6 minutes, cut side upOpen-faced bagels and warm toppings
Bagel chips or small pieces375°F / 190°C for 8–10 minutesBoards, dips, smoked salmon spread, cream cheese boards
Garlic-toasted bagel pieces400°F / 200°C for 8–10 minutesBrunch boards, savory spreads, party trays

For a soft-but-sturdy bagel, toast only the cut side. For a loaded open-faced bagel, toast a little longer so the surface can hold cream cheese, tomato, cucumber, avocado, or eggs without going soggy.

Day-old bagels only need enough heat to firm the cut side. Over-toasting makes thick schmear and dry toppings feel heavier.

Breakfast Bagel Ideas

For breakfast, the bagel needs to do a little more than taste good for five minutes. A spread plus protein — eggs, smoked salmon, cottage cheese, turkey, peanut butter, or Greek yogurt cream cheese — makes it feel more like a real meal.

Breakfast bagels with egg and cheese, avocado egg, cottage cheese tomato, peanut butter banana, and smoked salmon egg.
Breakfast bagels become more satisfying when protein, fruit, vegetables, or warmth join the spread. Egg, cheese, avocado, cottage cheese, peanut butter, banana, tomato, and smoked salmon all make the bite more filling.

This is where a bagel is especially useful: it can hold eggs, cheese, avocado, hash browns, or smoked salmon without needing much cooking beyond the filling.

For more morning ideas, this breakfast sandwich recipe guide has more ways to build a hearty breakfast around eggs, cheese, spreads, and add-ons.

Basic egg and cheese bagel formula

IngredientAmount for 1 bagel
Bagel1, split and toasted
Egg1–2 large eggs
Butter or oil1 tsp / 5 g
Cheese1 slice or ¼ cup shredded
Cream cheese, sauce, or avocado1–2 tbsp / 15–30 g
Fresh toppingTomato, onion, herbs, spinach, or avocado

Breakfast bagel combinations

  • Bacon, egg, and cheese
  • Egg, cheddar, avocado, and tomato
  • Scrambled egg with scallion cream cheese
  • Sausage, egg, and cheddar
  • Smoked salmon, egg, dill, and cream cheese
  • Peanut butter, banana, and honey
  • Greek yogurt cream cheese, berries, and granola
  • Hummus, egg, cucumber, and paprika
  • Cottage cheese, tomato, black pepper, and chives

For smaller servings, see the kids’ bagel toppings or mini bagel toppings sections.

Bagel Toppings for Kids

For kids, keep the bagel toppings simple, familiar, and easy to hold. Cream cheese with jam, peanut butter with banana, butter with cinnamon sugar, strawberry cream cheese, egg and cheese, mini bagel pizzas, and Nutella with strawberries all work because they are flavorful without being hard to bite.

Kid-friendly bagel toppings with cream cheese jam, peanut butter banana, egg cheese, mini pizza, cinnamon sugar, and Nutella strawberries.
Kid-friendly bagel toppings should be simple, familiar, and easy to hold. Cream cheese with jam, peanut butter banana, egg and cheese, mini pizza bagels, cinnamon sugar, and strawberry chocolate spread all keep the choices approachable.

For a crisp diner-style breakfast bagel, add a small hash brown patty or a thin layer of crispy shredded potatoes with egg and cheese. This air fryer hash browns guide is useful when you want golden potatoes without babysitting a skillet.

Toasting tip: toast the cut sides well if you are adding egg, avocado, tomato, or warm fillings. A firmer toasted surface keeps the bagel from turning soggy.

Smoked Salmon, Lox, and Cream Cheese Bagels

A smoked salmon bagel is one of the most reliable savory combinations because every piece has a job. Cream cheese adds richness, salmon adds salt and protein, cucumber or tomato adds freshness, capers add sharpness, onion adds bite, dill adds fragrance, and lemon wakes everything up.

Ideally, the best bites have cool cucumber, soft cream cheese, salty salmon, sharp onion, and a little lemon all at once. A smoked salmon bagel should taste like a deli order, not just fish on bread.
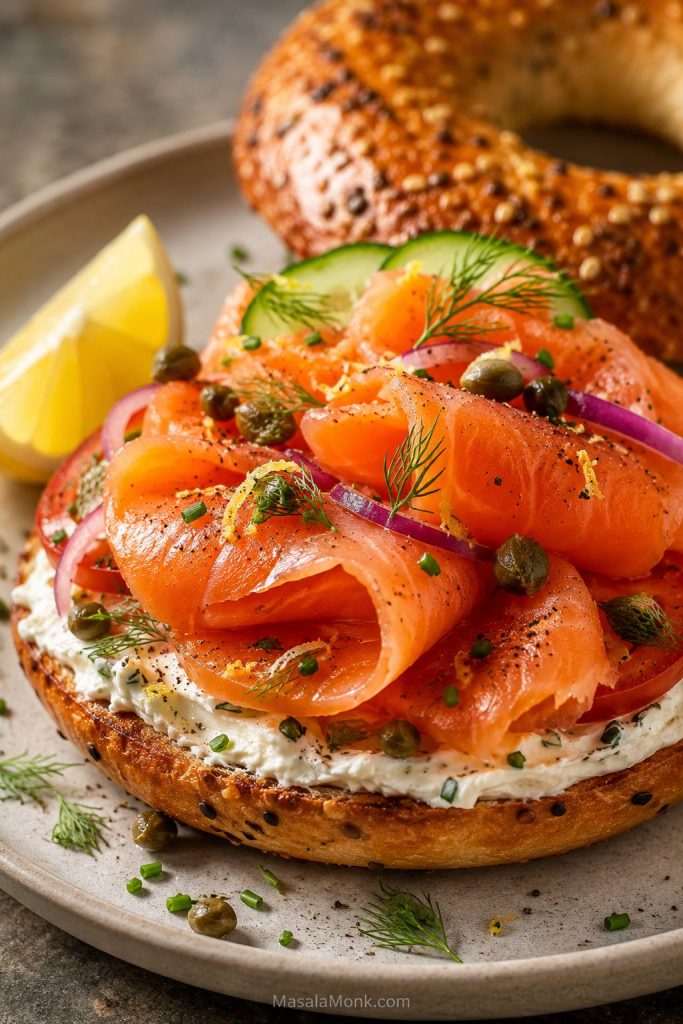
Close-up smoked salmon bagel with cream cheese, capers, red onion, cucumber, dill, lemon, and black pepper.
A smoked salmon bagel should taste creamy, salty, crisp, sharp, and lemony in the same bite. Thin onion, capers, cucumber, dill, pepper, and lemon keep the silky salmon feeling fresh.

Smoked salmon vs lox vs gravlax: which one goes on a bagel?

People often use these names loosely, but they do not taste exactly the same. The best choice depends on whether you want smoky, salty, herbal, or flaky fish.
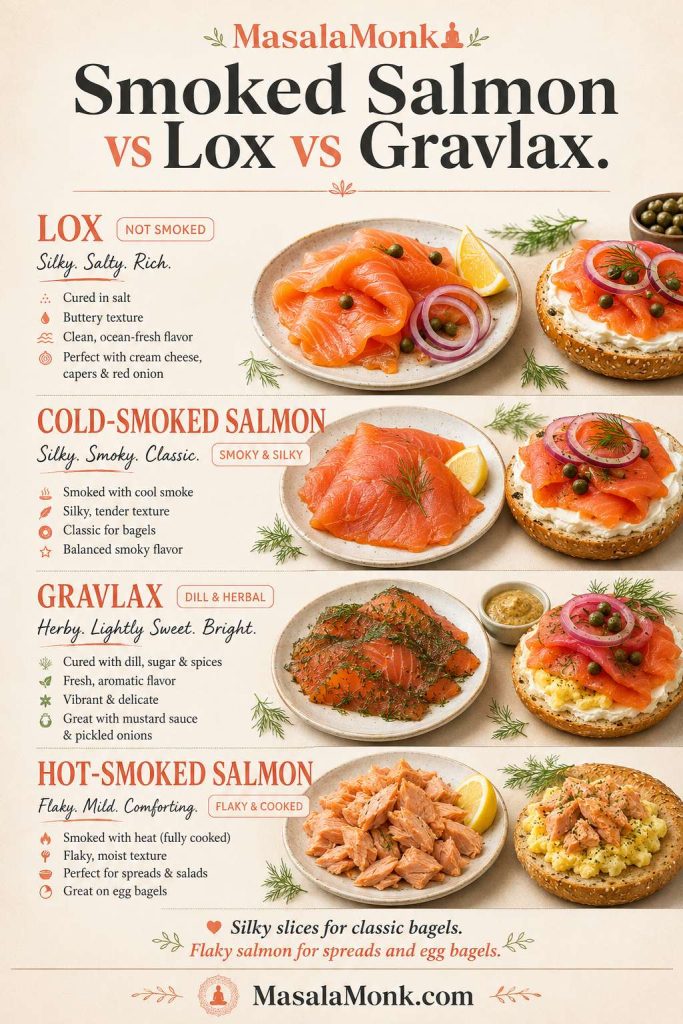
Comparison of lox, cold-smoked salmon, gravlax, and hot-smoked salmon with bagel serving suggestions.
Lox, cold-smoked salmon, gravlax, and hot-smoked salmon are not interchangeable. Silky slices suit classic cream cheese bagels, while flaky hot-smoked salmon works better in spreads, salads, and egg bagels.
TypeWhat it tastes likeBest bagel build
Smoked salmonSilky or firmer depending on style, with a smoky flavorCream cheese, cucumber, red onion, capers, dill, lemon
LoxSalty, silky, rich, and usually not smokyPlain schmear, tomato or cucumber, red onion, capers
GravlaxHerbal, slightly sweet, and dill-forwardLabneh or cream cheese, cucumber, dill, lemon zest
Hot-smoked salmonFlaky, cooked-tasting, and more robustFlaked into schmear, added to egg bagels, or served on brunch boards

For the easiest first smoked salmon bagel, buy cold-smoked salmon or lox-style salmon if you want silky folds. Use hot-smoked salmon when you want a flakier, more filling brunch spread, egg bagel, or smoked salmon schmear. For a deeper breakdown of the terms, this Food & Wine guide to lox, gravlax, and smoked salmon explains how the curing and smoking methods differ.

One-bagel smoked salmon formula

IngredientAmount
Bagel1, split and toasted
Cream cheese or schmear2–4 tbsp / 30–60 g
Smoked salmon or lox2–3 oz / 55–85 g
Capers1–2 tsp
Red onion3–5 thin rings or 1–2 tbsp sliced
Cucumber or tomato4–6 thin slices
Dill or chives1–2 tsp
Lemon1 wedge or ½ tsp zest

Serving smoked salmon for a group? Use the bagel bar quantities and keep the storage tips in mind so the salmon stays chilled.

How to layer a smoked salmon bagel

Layering matters because the smallest toppings are the easiest to lose; press them into the schmear before adding larger salmon folds.
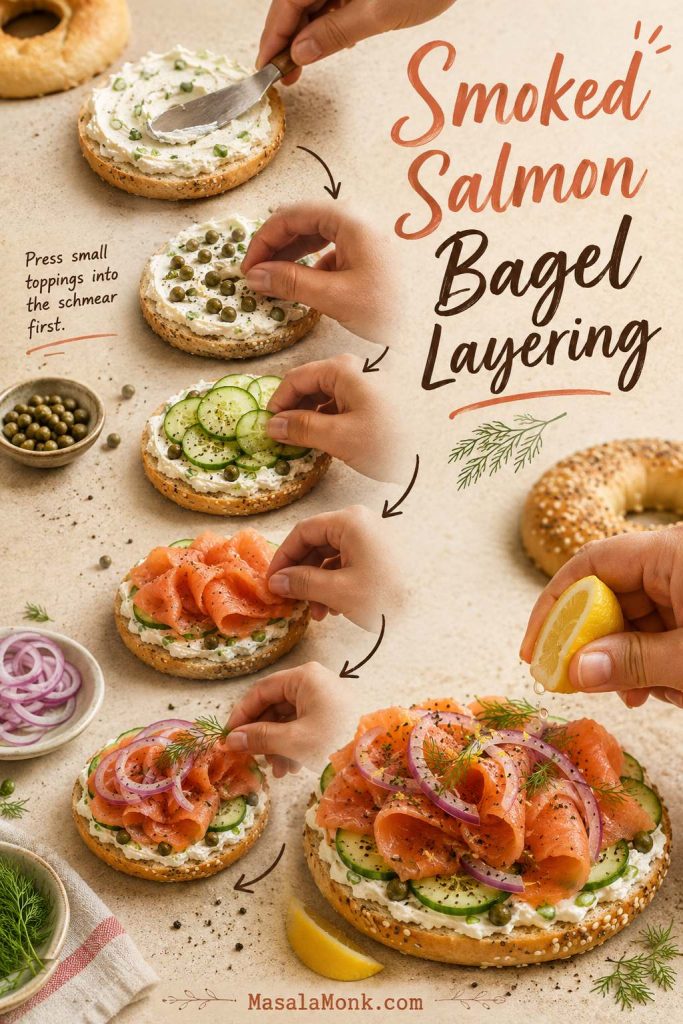
Step-by-step smoked salmon bagel layering guide with schmear, capers, cucumber, smoked salmon, red onion, dill, and lemon.
Layer a smoked salmon bagel from small to large. Press capers and herbs into the schmear first, then add cucumber, salmon folds, onion, dill, pepper, and lemon so the toppings stay in place.
  1. Toast the bagel and let it cool for a minute so the spread does not melt immediately.
  2. Spread cream cheese or scallion schmear on both cut sides.
  3. Press capers lightly into the creamy layer.
  4. Add cucumber or tomato if using.
  5. Layer smoked salmon in loose folds instead of flat sheets.
  6. Finish with red onion, dill, black pepper, and lemon.

Loose folds of salmon make the bagel feel fuller without needing a huge amount of fish. For a softer, spreadable version, chop smoked salmon and fold it into the schmear base with dill, lemon zest, and chives. This is especially useful for a bagel bar because guests can spread it quickly without pulling apart delicate salmon slices.

If you have extra smoked salmon, cucumber, avocado, or lemony sauce after brunch, turn the same flavors into a simple bowl later. This salmon bowl recipe includes a no-cook smoked salmon direction with cucumber, avocado, and a bright yogurt-style sauce.

Best Bagel Toppings by Bagel Type

At this point, bagel choice really matters. A cinnamon raisin bagel needs a different topping than an everything bagel, and a pumpernickel bagel can handle stronger, saltier flavors.
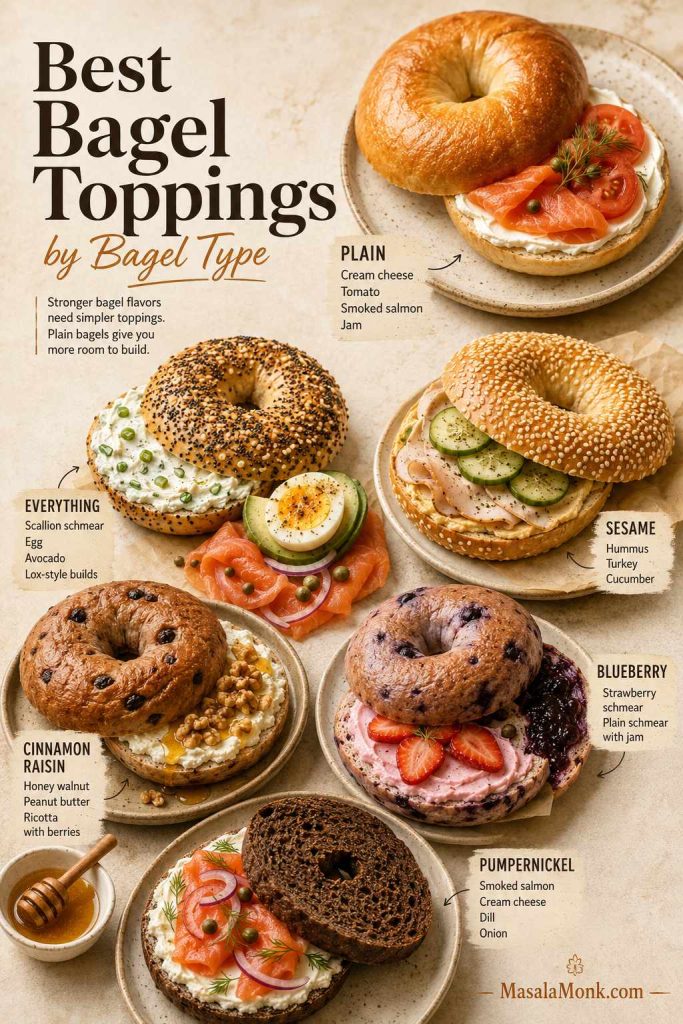
Bagel type pairing guide with plain, everything, sesame, cinnamon raisin, blueberry, and pumpernickel bagels with matching toppings.
The bagel itself already brings flavor. Plain bagels can handle almost anything, while everything, cinnamon raisin, blueberry, sesame, and pumpernickel bagels usually shine with more focused toppings.

Because stronger bagels already have personality, the topping should usually be simpler. Everything, onion, cheese, cinnamon raisin, blueberry, and pumpernickel bagels bring flavor on their own; plain and whole wheat bagels give you more room to build.

If the bagel is already salty or garlicky, keep the spread calmer and let the toppings do less work. If the bagel is sweet, use tangy, creamy, or lightly salted toppings so the whole bite does not become sugary.

Bagel typeToppings that pair well
PlainAny cream cheese, smoked salmon, egg, avocado, butter, jam
EverythingScallion cream cheese, lox, egg and cheese, avocado, hummus
SesameHummus, smoked salmon, turkey, cucumber, peanut butter
Poppy seedCream cheese, lox, egg salad, tuna salad
Cinnamon raisinButter, honey walnut cream cheese, peanut butter, apple, ricotta
Whole wheatHummus, avocado, turkey, cottage cheese, tuna, egg
OnionCream cheese, tomato, egg, bacon, deli turkey
Asiago or cheeseEgg, bacon, tomato, garlic herb cream cheese, turkey
BlueberryPlain cream cheese, strawberry cream cheese, butter, honey, ricotta
PumpernickelSmoked salmon, horseradish cream cheese, cucumber, dill

When in doubt, let the bagel lead. Plain and whole wheat bagels are flexible; everything, onion, cheese, blueberry, cinnamon raisin, and pumpernickel bagels already have a point of view.

Bagel Bar Toppings, Spreads, and Brunch Board Quantities

A bagel bar should feel generous without becoming chaotic. You do not need every topping on the table at once; you need the right mix of bagels, spreads, proteins, fresh toppings, and small bowls that are easy to refill.

This is low-pressure brunch food. Instead of cooking every guest a separate breakfast, you are giving everyone enough good pieces to build the bagel they actually want.
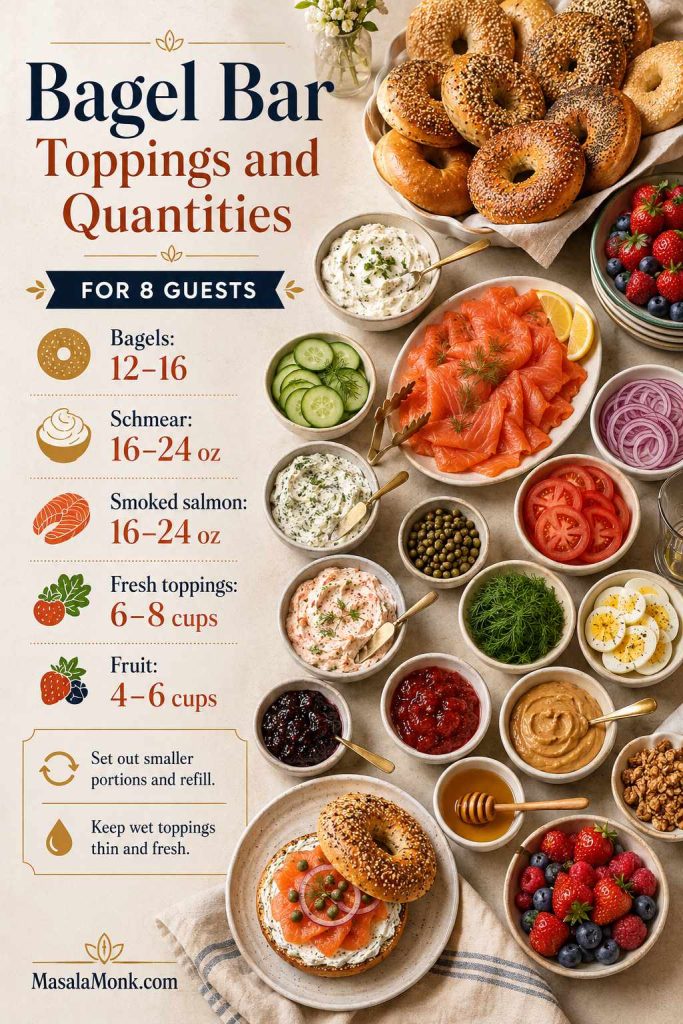
Bagel bar quantity guide for eight guests with bagels, schmear, smoked salmon, sliced vegetables, herbs, eggs, fruit, jam, peanut butter, and honey.
A bagel bar should look generous without turning messy. For eight guests, plan 12–16 bagels, 16–24 oz schmear, 16–24 oz smoked salmon, and plenty of fresh toppings, then refill smaller bowls as needed.

How many bagels per person?

Serving styleBagels per personGood for
Light brunch1 bagelWhen serving fruit, salad, eggs, pastries, or sides
Main meal1½ bagelsHungry guests or fewer side dishes
Mini bagels2 mini bagelsGrazing boards and mixed toppings

Bagel bar quantity table

The bagels are easy. The part people misjudge is the spread, salmon, and fresh toppings. A good board should look full when it lands on the table, but still be easy to refill without everything getting wet or messy.

The exact mix depends on your crowd, but these numbers keep you from underbuying the expensive parts and overbuying the things that wilt or get soggy. If your guests love smoked salmon, eggs, or thick cream cheese, round up slightly.

Sliced fresh toppings means cucumber, tomato, onion, radish, lettuce, herbs, fruit, or similar add-ons.

For make-ahead timing, use the storage and prep guide so schmear, salmon, sliced vegetables, and bagels stay fresh.

Mini Bagel Toppings for Brunch Boards and Kids

Mini bagels work best with toppings that do not slide around. Use thick schmears, small slices, and easy spreads so guests can pick them up without losing half the topping on the board.

Mini bagel toppings including cream cheese jam, peanut butter banana, egg cheese, mini pizza, hummus cucumber, and Nutella strawberries.
Mini bagels are best for brunch boards, kids, and grazing because guests can try more than one topping. Use thick spreads, small slices, and toppings that stay put when picked up.
  • Cream cheese + jam
  • Peanut butter + banana
  • Egg + cheese
  • Mini pizza bagels
  • Hummus + cucumber
  • Smoked salmon chopped into schmear
  • Nutella + strawberries
  • Butter + cinnamon sugar
GuestsBagelsCream cheese / spreadsSmoked salmonSliced fresh toppings
22–34–6 oz / 115–170 g4–6 oz / 115–170 g1–2 cups
44–68–12 oz / 225–340 g8–12 oz / 225–340 g3–4 cups
88–1216–24 oz / 450–680 g1–1½ lb / 450–680 g6–8 cups
1212–1824–32 oz / 680–900 g1½–2 lb / 680–900 g8–12 cups

What to put on a bagel bar

  • Bagels: plain, everything, sesame, whole wheat, cinnamon raisin, poppy, mini bagels
  • Spreads: plain cream cheese, scallion schmear, garlic herb cream cheese, honey walnut cream cheese, hummus, butter, jam
  • Proteins: smoked salmon, hard-boiled eggs, scrambled eggs, bacon, turkey, tuna salad, egg salad
  • Fresh toppings: cucumber, tomato, red onion, avocado, radish, lettuce, sprouts, herbs
  • Finishes: capers, lemon wedges, everything seasoning, flaky salt, black pepper, chili flakes, honey
  • Sweet side: berries, banana slices, apple slices, Nutella, peanut butter, cinnamon sugar

The board should look abundant, but it should still feel easy to use: spreads in bowls, wet toppings contained, bagels sliced, and the brightest ingredients where people can see them.

For the egg option on a bagel bar, cook the eggs ahead and slice them right before serving. This air fryer hard-boiled eggs guide is handy when you want easy peeled eggs for brunch plates, toast, deviled eggs, or snack boards.

Bagel bar equipment

  • Large board, tray, platter, or sheet pan
  • Small bowls or ramekins for capers, onions, jams, nuts, and seasonings
  • Spreader knives for each cream cheese flavor
  • Serrated knife for slicing bagels
  • Toaster or toaster oven
  • Serving spoons and small tongs
  • Parchment paper for easy cleanup
  • Airtight containers for make-ahead spreads

For a bagel bar, smaller bowls are not just prettier. They keep wet toppings from soaking into the bread and make the board easier to refill.

Hosting tip: do not put every topping directly on the board if it will make things wet. Keep capers, jams, honey, pickled onions, and chopped herbs in small bowls so guests can build cleaner bagels.

Make-Ahead, Storage, and Food Safety

Most bagel toppings are easy to prep ahead. However, they do not all hold the same way. Cream cheese spreads are great make-ahead items, while sliced tomatoes, cucumbers, avocado, and toasted bagels are better closer to serving time.

To keep a bagel bar calm, prep the sturdy things early and leave the wet, fresh, or delicate things for last.
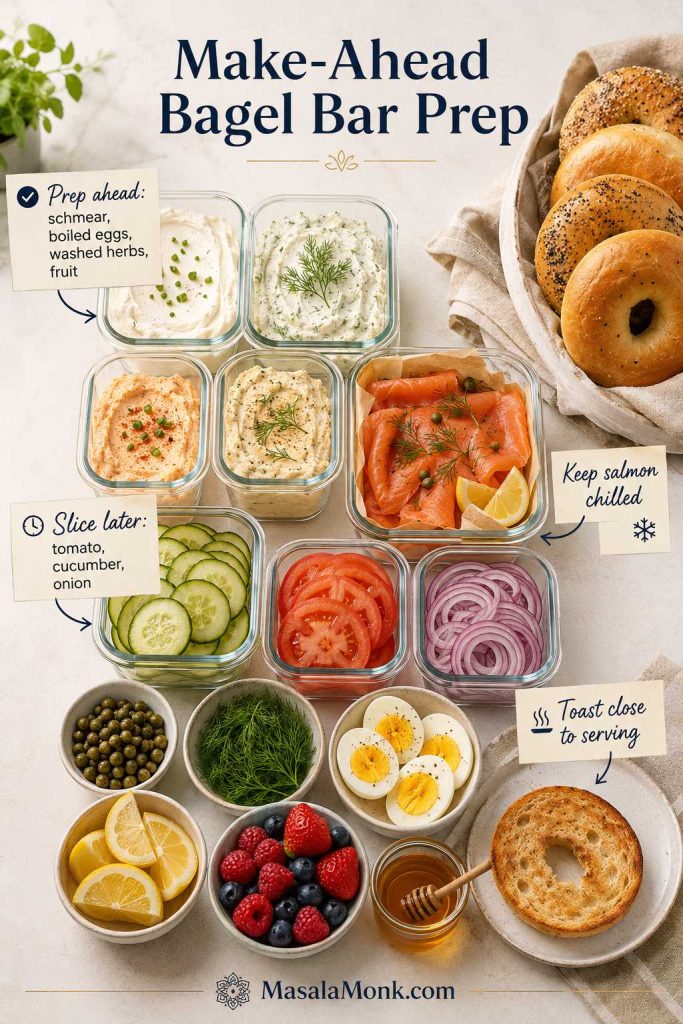
Make-ahead bagel bar prep with containers of schmear, smoked salmon, vegetables, herbs, boiled eggs, berries, lemons, honey, and bagels.
Make-ahead bagel bar prep works best when sturdy items are done early and delicate toppings wait. Prep schmear, eggs, herbs, and fruit ahead; slice wet toppings later, keep salmon chilled, and toast bagels close to serving.

Storage guide

ItemBest storage
Plain schmearAbout 5–7 days refrigerated in an airtight container
Flavored cream cheeseBest within 3–5 days
Smoked salmon cream cheeseBest within 2–3 days, or sooner if the smoked salmon package says so
Cut tomatoes and cucumbersBest same day; pat dry before serving
Pickled onions3–5 days refrigerated
Toasted bagelsBest fresh
Frozen bagelsSlice first, then freeze in a sealed bag

What to prep ahead

  • 1 day ahead: schmear flavors, pickled onions, boiled eggs, washed herbs, washed fruit
  • Morning of serving: slice tomatoes, cucumbers, onions, radishes, fruit, and bagels
  • Right before serving: toast bagels, slice avocado, arrange smoked salmon, add lemon wedges

How long can a bagel bar sit out?

If your bagel bar includes cream cheese, smoked salmon, eggs, meat, or cut produce, keep everything chilled until serving. According to FDA food safety guidance, perishable foods that need refrigeration should not sit at room temperature for more than 2 hours, or more than 1 hour when the temperature is above 90°F / 32°C.

During a longer brunch, set out smaller portions and refill from the refrigerator as needed. That keeps the board fresher and the toppings do not sit out longer than they should.

Recipe Card: Easy Bagel Schmear with 6 Flavor Variations

Use this as the base recipe for the schmear ideas above. It starts with softened cream cheese, a little sour cream or Greek yogurt, lemon, and salt, then turns into sweet or savory flavored cream cheese.
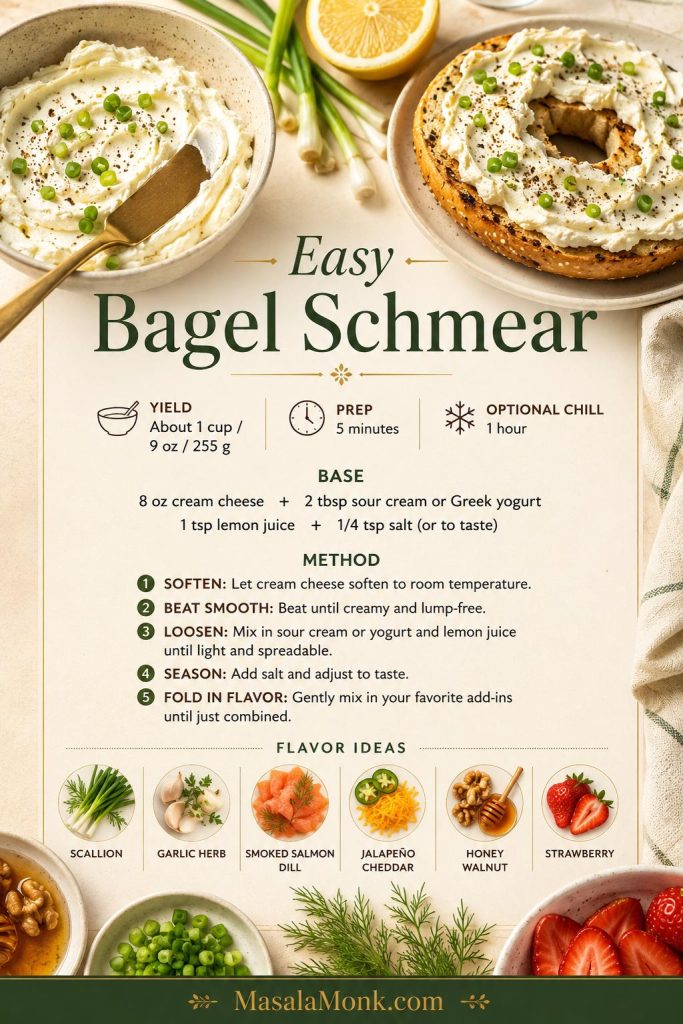
Saveable bagel schmear recipe card with yield, prep time, base ingredients, method, and flavor ideas.
Keep one batch of plain schmear, then flavor smaller portions for different bagel toppings. That way, one easy cream cheese base can support savory, sweet, smoked salmon, and brunch-board combinations.
Prep Time5 minutes
Optional Chill1 hour
YieldAbout 1 cup / 9 oz / 255 g
Serves4–6 bagels

Equipment

  • Medium mixing bowl
  • Hand mixer, stand mixer, or sturdy spoon
  • Rubber spatula
  • Measuring spoons
  • Airtight container

Ingredients

  • 8 oz / 225 g brick cream cheese, softened
  • 2 tbsp / 30 g sour cream, Greek yogurt, or crème fraîche
  • ½ tsp / 2.5 ml fresh lemon juice
  • Pinch to ⅛ tsp fine salt, to taste
  • Black pepper, optional

Instructions

  1. Add softened cream cheese to a mixing bowl.
  2. Beat until smooth, creamy, and slightly lighter.
  3. Add sour cream, Greek yogurt, or crème fraîche.
  4. Add lemon juice and salt, then mix again until spreadable.
  5. Fold in one flavor variation from the list below.
  6. Taste and adjust with more lemon, salt, herbs, honey, or seasoning as needed.
  7. Chill for 1 hour if you want the flavor to deepen.
  8. Store refrigerated in an airtight container.

Six Easy Flavor Variations

VariationAdd to the base schmear
Scallion schmear¼ cup sliced scallions or chives + black pepper
Garlic herb schmear1 small grated garlic clove + 2 tbsp chopped herbs + lemon zest
Smoked salmon dill schmear3–4 oz / 85–115 g chopped smoked salmon + dill + lemon
Jalapeño cheddar schmear1 minced jalapeño + ½ cup shredded cheddar + scallion
Honey walnut schmear2 tbsp honey + ¼ cup chopped walnuts + pinch of cinnamon
Strawberry cream cheese2–3 tbsp strawberry jam or ½ cup chopped berries + 1 tbsp powdered sugar if needed

Notes

  • Use brick-style cream cheese for the thickest, creamiest result.
  • Greek yogurt makes the schmear tangier; sour cream makes it softer and richer.
  • Add salty mix-ins slowly. Smoked salmon, capers, bacon, cheddar, and everything seasoning can make the spread salty fast.
  • For a bagel bar, make 2–3 different schmear flavors so guests can build sweet and savory bagels.
  • For a full bagel build, pair this schmear with one main topping, one crunchy or fresh topping, and one finishing detail such as lemon, pepper, herbs, honey, or flaky salt.

Still deciding? Start with the bagel type, then choose the spread. Plain bagels give you the most freedom, everything bagels want creamy or savory toppings, and sweet bagels usually need something tangy, salty, or nutty to stay balanced.

FAQs About Bagel Toppings and Spreads

What are the most popular bagel toppings?

The most popular bagel toppings are cream cheese, butter, jam, smoked salmon or lox, capers, red onion, egg and cheese, avocado, peanut butter, tuna salad, egg salad, hummus, tomato, cucumber, and everything bagel seasoning. However, the best choice depends on the bagel itself: plain bagels can take almost anything, while everything, cinnamon raisin, blueberry, and pumpernickel bagels usually need more thoughtful pairings.

What goes on a bagel besides cream cheese?

For a simple breakfast bagel, use butter or jam. For a savory dairy-free option, choose hummus or white bean spread; for something filling, use avocado or eggs; and for sweet or high-protein builds, try ricotta, cottage cheese, peanut butter, or almond butter. Tuna salad, egg salad, turkey, smoked salmon, pesto, goat cheese, honey, Nutella, and fresh fruit also work when the spread and toppings support each other.

What is schmear?

Schmear usually means a spread for bagels, especially cream cheese. In everyday bagel-shop language, asking for a schmear usually means you want a generous layer of cream cheese, not a thin scrape. A good homemade schmear is softer and easier to spread because it is mixed until creamy and sometimes loosened with sour cream, Greek yogurt, crème fraîche, lemon, herbs, or seasonings.

What is the best spread for an everything bagel?

Everything bagels pair especially well with scallion cream cheese, plain schmear, lox spread, garlic herb cream cheese, avocado, egg, hummus, or tuna salad. Since the bagel already has garlic, onion, sesame, poppy, and salt, the spread can stay simple.

What goes best on a plain bagel?

Plain bagels are the most flexible because they do not compete with the toppings. Use them when you want the spread or filling to stand out: scallion schmear, smoked salmon, egg and cheese, avocado, butter and jam, hummus with cucumber, ricotta and honey, or peanut butter with banana.

What goes best on an everything bagel?

Everything bagels already bring garlic, onion, sesame, poppy, and salt, so the best toppings are creamy, fresh, or protein-rich rather than heavily seasoned. Scallion cream cheese, smoked salmon, egg and cheese, avocado, hummus, tuna salad, cucumber, and plain spread with tomato all work because they support the seasoning instead of fighting it.

What goes best on a cinnamon raisin bagel?

Cinnamon raisin bagels are already sweet and spiced, so they usually need tangy, creamy, nutty, or lightly salted toppings. Plain cream cheese, butter, peanut butter, ricotta, honey walnut schmear, apple slices, and a small pinch of flaky salt all keep the sweetness from feeling too heavy.

What goes best on a blueberry bagel?

Blueberry bagels work best with toppings that either sharpen the fruit or keep it creamy. Try plain schmear, lemon cream cheese, strawberry cream cheese, butter, ricotta, mascarpone, honey, fresh berries, or almond butter.

What are good sweet bagel toppings?

Good sweet bagel toppings include cream cheese and jam, honey walnut cream cheese, peanut butter and banana, almond butter and apple, ricotta and honey, Nutella and strawberries, butter and cinnamon sugar, mascarpone with berries, and Greek yogurt cream cheese with granola. That said, a pinch of salt, lemon zest, cinnamon, or toasted nuts helps sweet toppings taste more complete.

What are healthy bagel toppings?

The healthiest bagel toppings are usually the ones that add protein, produce, or healthy fat instead of only more spread. Eggs, avocado, smoked salmon, hummus, cottage cheese, Greek yogurt cream cheese, turkey, tuna, tofu cream cheese, white bean spread, cucumber, tomato, sprouts, herbs, and fresh fruit can all make a bagel more satisfying.

How much cream cheese do you need per bagel?

Use about 2 tbsp / 30 g for a light layer, 3 tbsp / 45 g for a normal breakfast bagel, and 4 tbsp / 55–60 g for a thick deli-style schmear. For open-faced bagel halves, use 1–2 tbsp / 15–30 g per half.

Should bagels be toasted before adding toppings?

Toast bagels when the toppings are wet, creamy, warm, or heavy. A firmer cut side helps hold cream cheese, tomato, cucumber, eggs, avocado, hummus, tuna salad, and smoked salmon without turning soggy.

How do you keep bagel toppings from sliding off?

Use the spread as glue, slice toppings thinly, and press small toppings like capers, scallions, herbs, seeds, or everything seasoning into the creamy layer. If the build is tall, wet, or slippery, serve the bagel open-faced instead of closing it.

How long can a bagel bar sit out?

A bagel bar with cream cheese, smoked salmon, eggs, meat, or cut produce should not sit out for more than 2 hours. In hot weather above 90°F / 32°C, keep it to 1 hour. For longer gatherings, set out smaller portions and refill from the refrigerator.

Final Thoughts

Ultimately, a better bagel does not always need more toppings. Often, it needs one smarter finishing detail: lemon on smoked salmon, flaky salt on tomato, cinnamon with peanut butter, herbs in cream cheese, or cucumber with hummus.

Start with the spread, then let the rest of the bagel answer one simple question: what would make this bite more satisfying? A plain bagel with cream cheese and tomato may only need black pepper and flaky salt. A smoked salmon bagel comes alive with capers, onion, dill, and lemon. Peanut butter feels more finished with banana, cinnamon, and a tiny pinch of salt.

Once you know the rhythm, almost any bagel in the kitchen can become something worth sitting down for: a fast breakfast, a proper lunch, a sweet snack, or a brunch board that feels generous without being complicated.


Back to top

Posted on — 1 Comment

Paella Recipe

Finished home-stovetop mixed paella in a wide pan with saffron rice, chicken, shrimp, shellfish, lemon wedges, and parsley.

A good paella recipe should feel generous before anyone takes a bite: golden rice, saffron and paprika in the air, shrimp tucked into the top, lemon wedges on the side, and that quiet hope that there are toasted bits hiding at the bottom of the pan.

This version is built for a regular home kitchen, not a restaurant burner. It gives you browned chicken, tender shrimp, optional shellfish, a deep tomato-and-paprika sofrito, and a clear no-stir method so the rice cooks tender and separate instead of mushy.

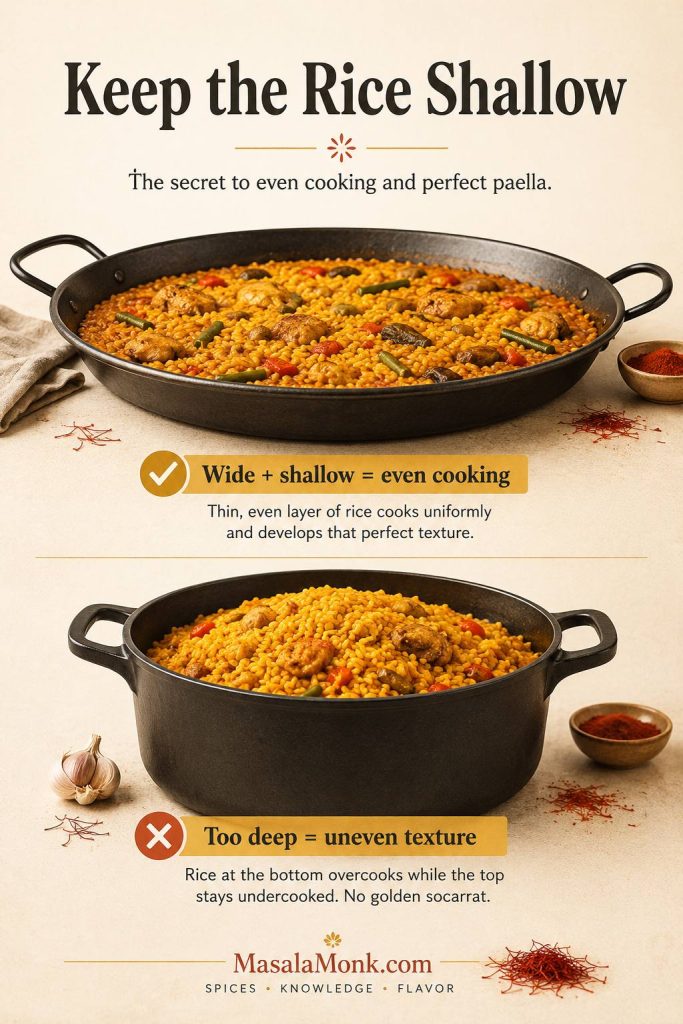
The rhythm is simple once you see it: build flavor first, add short-grain rice and hot stock, spread everything into a shallow layer, then leave it alone. This is a home-stovetop mixed paella with chicken, shrimp, optional shellfish, and saffron rice. It is inspired by paella mixta rather than strict Paella Valenciana, but it respects the principles that matter most: good rice, broad heat, careful seafood timing, and a proper rest.

Mixed paella with chicken, shrimp, shellfish, and saffron rice cooking in a wide pan on a regular home stovetop.
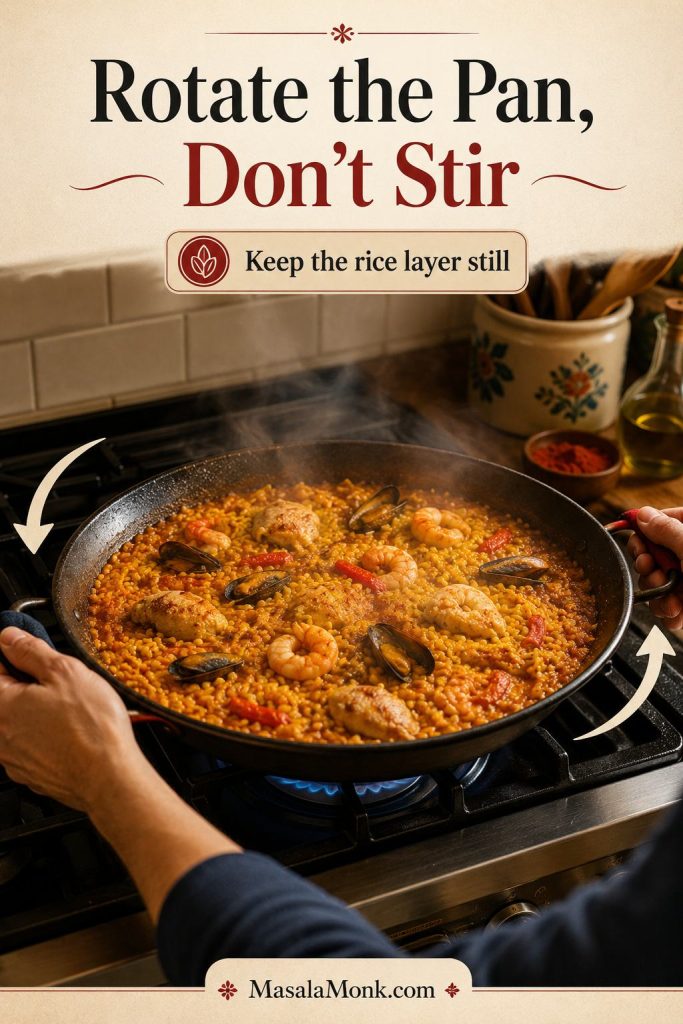
This home-stovetop mixed paella is built for a regular burner, so the real success cues are shallow rice, controlled heat, pan rotation, and seafood added near the end.

Quick Answer: How to Make Paella at Home

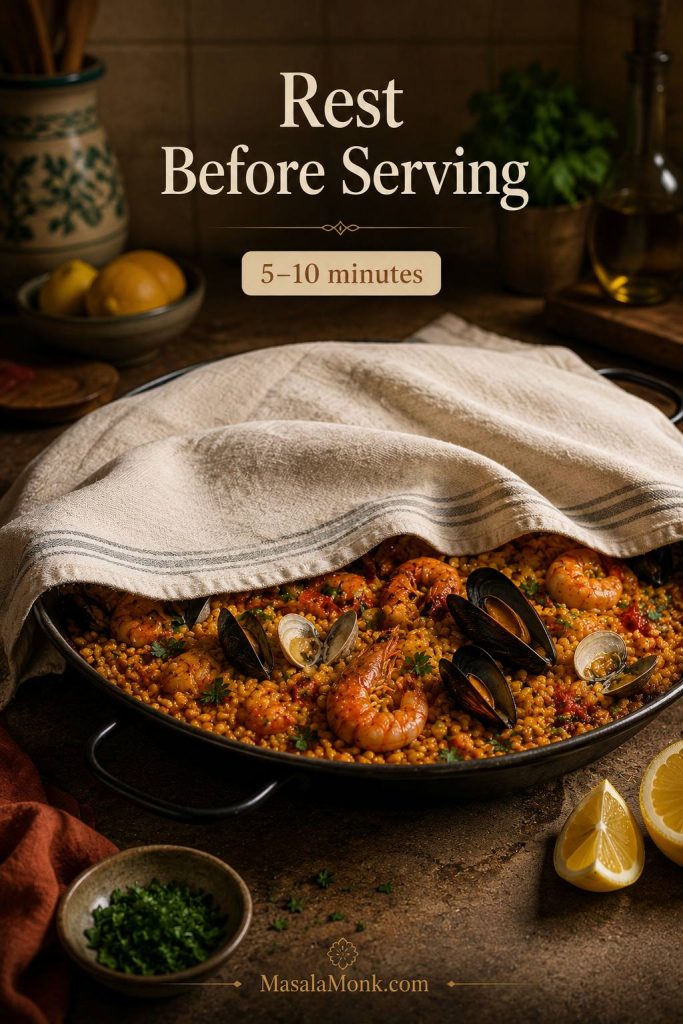
To make paella at home, cook a thick sofrito with onion, garlic, tomato, paprika, and saffron, then add short-grain rice and hot stock. Spread the rice into a shallow layer, simmer uncovered without stirring, add shrimp or shellfish near the end, and rest the pan before serving.

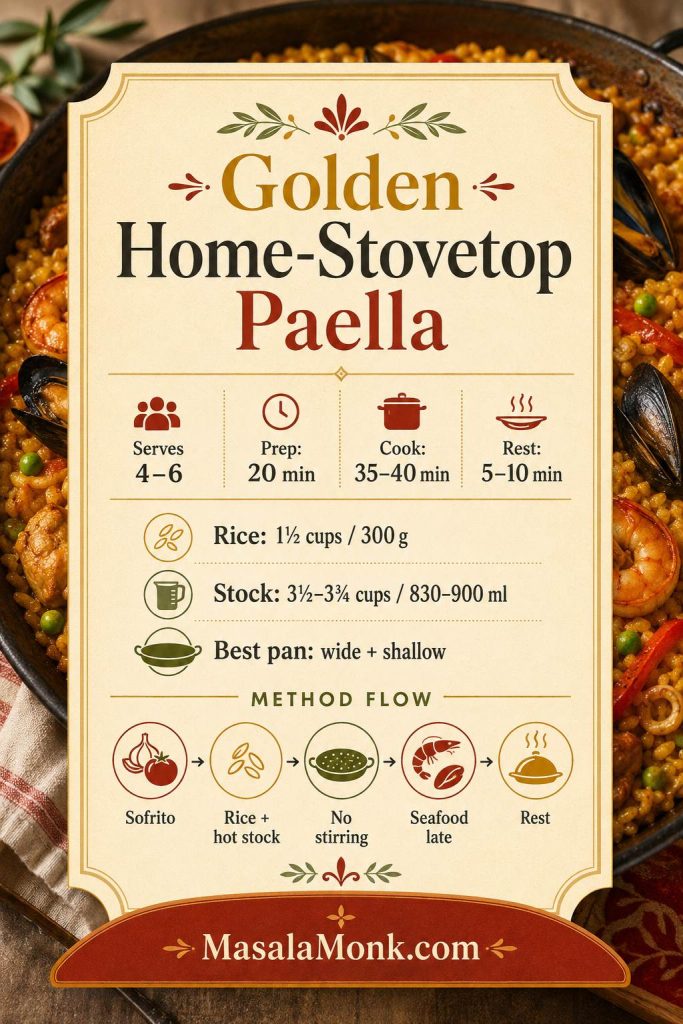
Four-step visual guide for making paella at home, showing sofrito, rice with hot stock, seafood added late, and rested paella.
Once the cooking rhythm is clear, paella feels much less intimidating: build a thick sofrito, add rice and hot stock, leave the pan alone, add seafood late, and rest before serving.

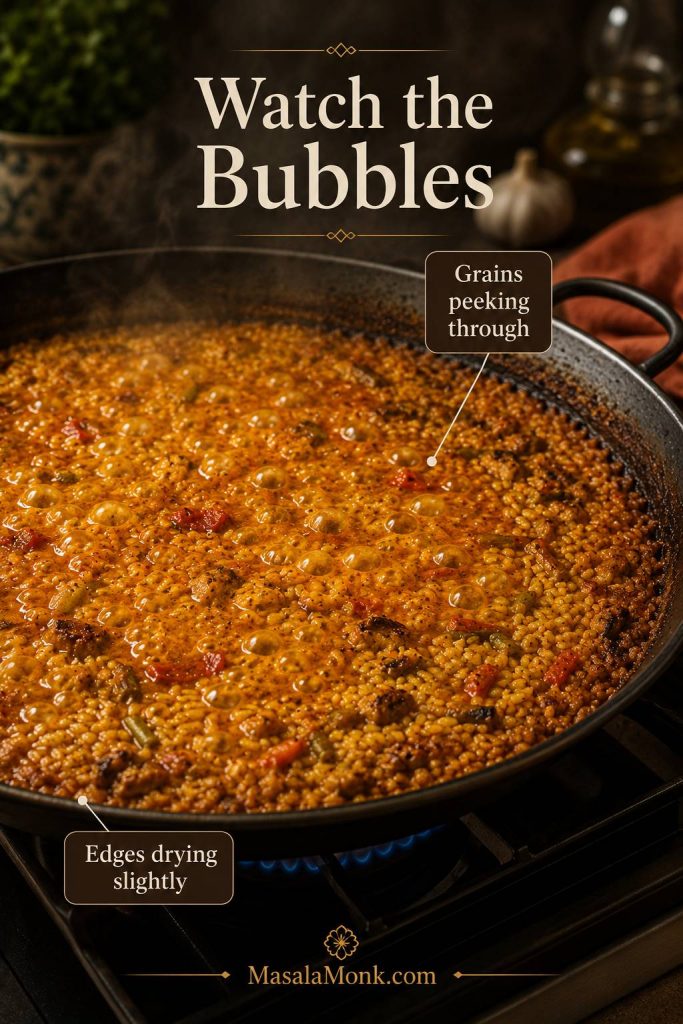
The best rice is Spanish short-grain rice such as bomba, Calasparra, or Valencia. Although a paella pan helps, a wide skillet or low-sided sauté pan can work if the rice stays shallow. Once the stock goes in, your job is mostly to watch the bubbles, rotate the pan if needed, and let the rice cook in place.

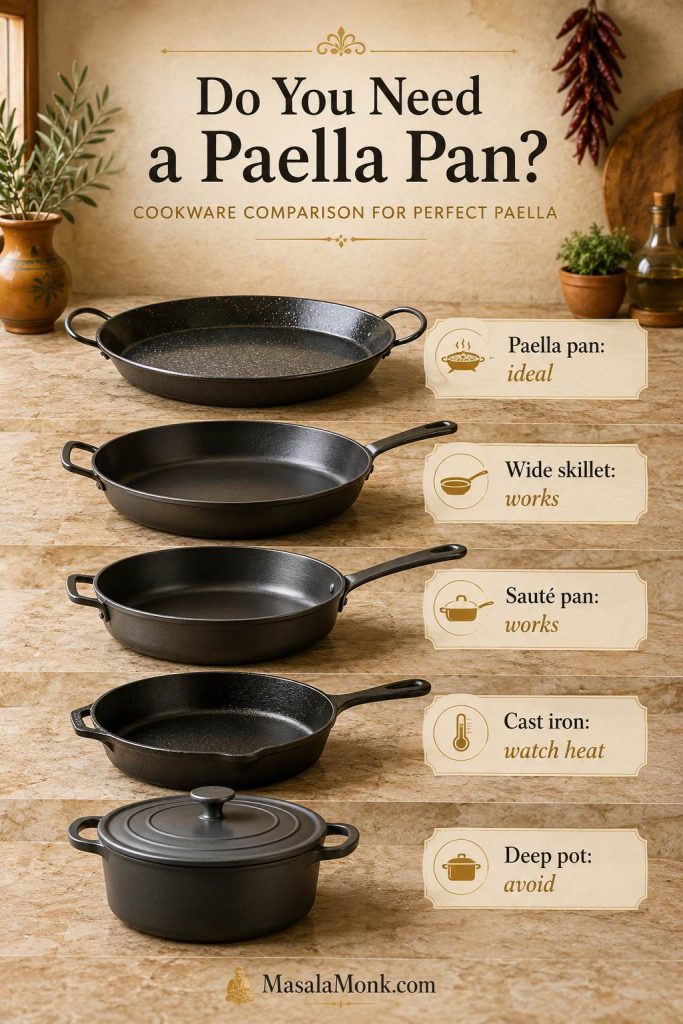
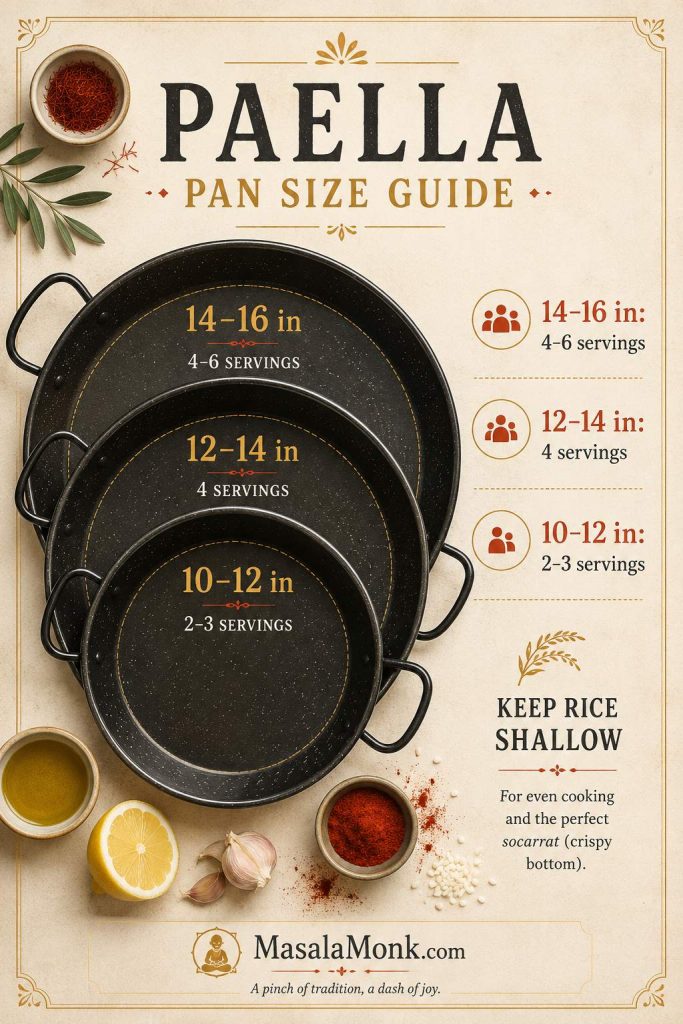
If you want the exact rice and pan details before cooking, jump to Best Rice for Paella or Do You Need a Paella Pan?.

If You Want More Seafood or a Chicken-and-Seafood Paella

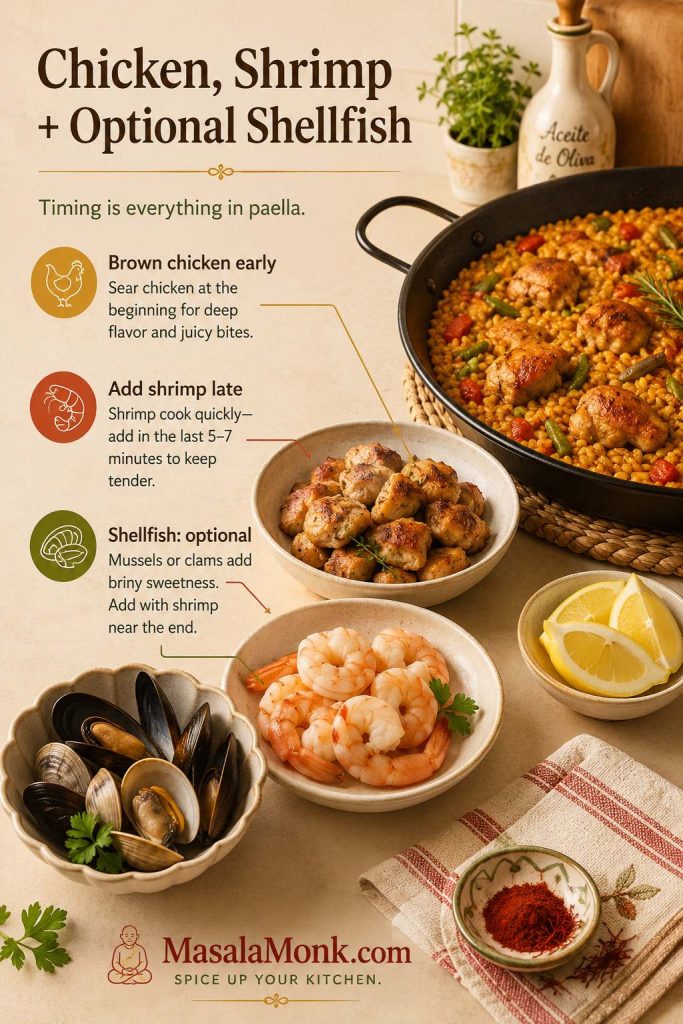
Use the same rice method and adjust the proteins. A seafood-forward paella can lean more heavily on seafood stock, shrimp, mussels, clams, squid, scallops, or firm white fish. For chicken and seafood paella, follow the recipe as written: browned chicken gives the rice body, while shrimp and optional mussels or clams go in near the end so they stay tender instead of rubbery. To adjust the pan further, see Paella Variations.

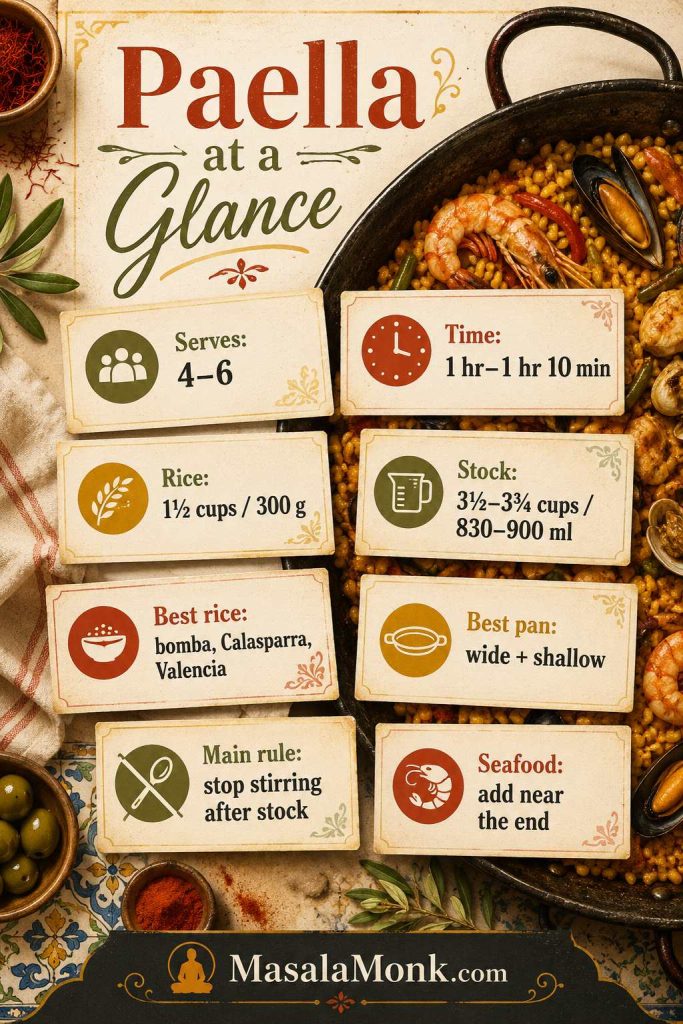
Paella at a Glance

  • Style: Home-stovetop mixed paella with chicken, shrimp, and optional shellfish
  • Serves: 4–6
  • Total time: About 1 hour to 1 hour 10 minutes
  • Best rice: Bomba, Calasparra, Valencia, or Spanish short-grain rice
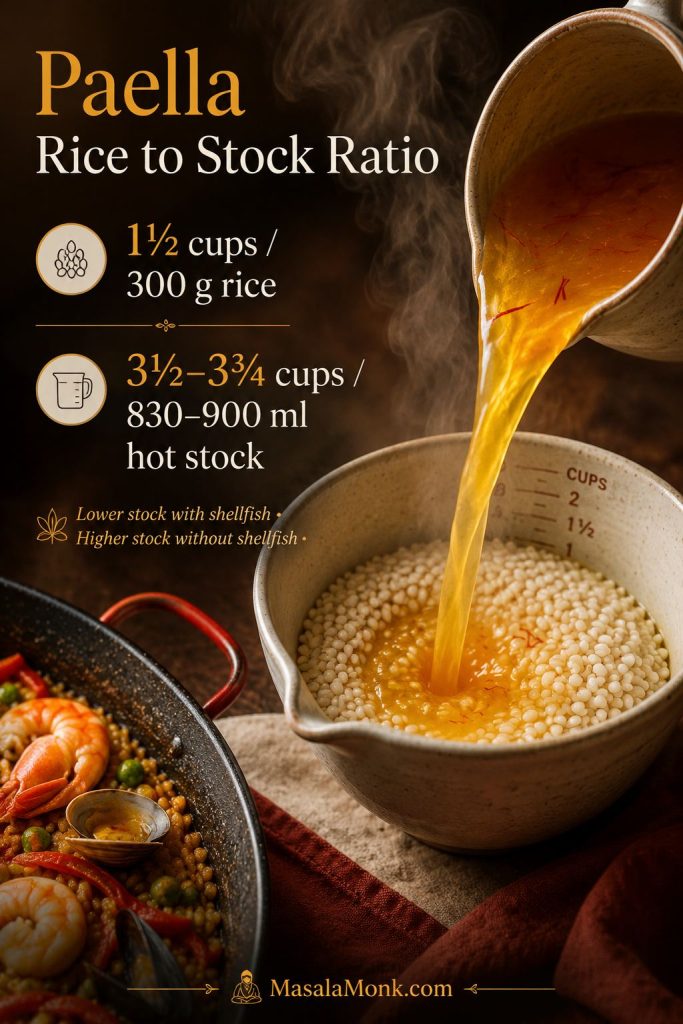
  • Rice amount: 1½ cups / about 300 g
  • Stock amount: 3½–3¾ cups / 830–900 ml hot stock
  • Best pan: Wide paella pan, skillet, or low-sided sauté pan
  • Main rule: Stop stirring once the stock goes in
  • Seafood timing: Add shrimp and shellfish near the end
Paella at-a-glance guide showing servings, cooking time, rice amount, stock amount, best rice, pan type, no-stir rule, and seafood timing.
Before cooking, check the three things that control paella texture most: the rice type, the stock amount, and whether the pan is wide enough for a shallow layer.

What This Method Helps You Avoid

Most disappointing paella comes down to the same few problems: rice that stays hard, rice that turns wet, a bottom that burns before the top is tender, or seafood that cooks too long. This method is designed to catch those problems early: the rice stays shallow, the stock is controlled, the seafood goes in late, and the pan is rotated instead of stirred.

Paella mistakes guide showing hard rice, wet rice, burnt bottom, and rubbery seafood as common problems to avoid.
Hard rice, wet rice, burnt bottoms, and rubbery shrimp usually start with liquid, heat, stirring, or timing. This method is built to catch those problems early.

If your main worry is fixing rice texture, heat, or seafood timing as you cook, keep the Paella Troubleshooting section nearby.

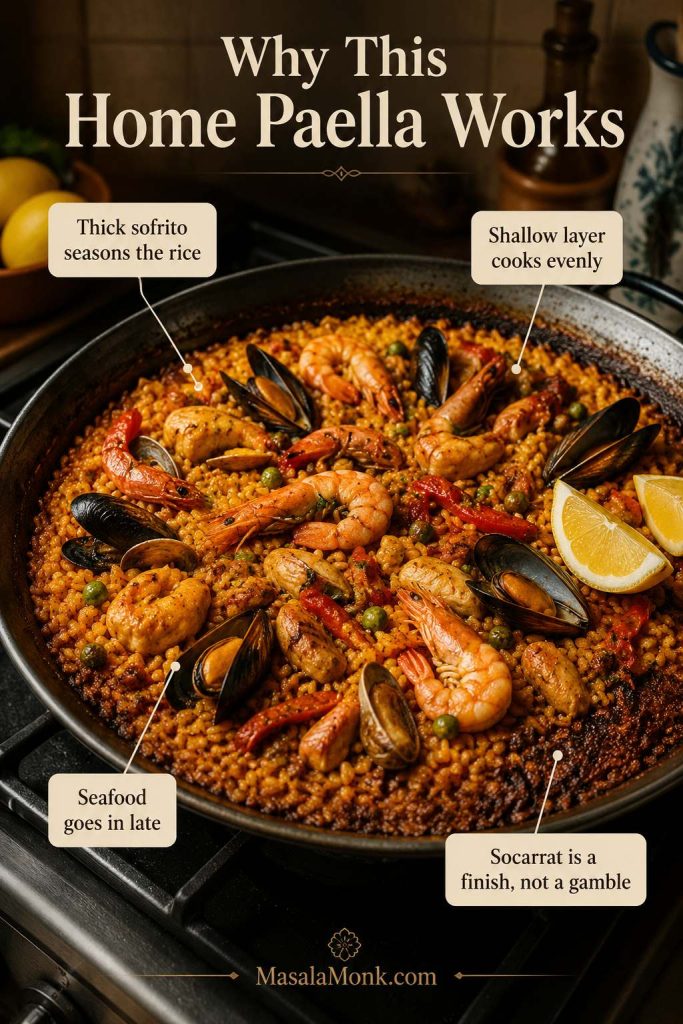
Why This Home Paella Works

This method works because it treats paella as a rice dish first. The chicken, shrimp, shellfish, saffron, paprika, and lemon all matter, but the rice texture decides whether the pan feels right. Keep the rice shallow, let it absorb the stock in place, and the grains have a much better chance of finishing tender, seasoned, and distinct instead of creamy.

  • Chicken thighs build a forgiving base, so the pan still feels hearty even if you keep the seafood simple.
  • A concentrated sofrito seasons the rice early, before the stock dilutes the pan.
  • Short-grain rice absorbs flavor without falling apart, which is why bomba, Calasparra, or Valencia rice works better than long-grain rice.
  • A shallow layer protects the texture, especially on a home stovetop with uneven heat.
  • Seafood goes in late, so shrimp stays juicy and shellfish opens without turning tough.
  • Socarrat stays optional, because tender, well-seasoned rice matters more than forcing a crust too early.
Home paella explainer with callouts for thick sofrito, shallow rice layer, late-added seafood, and optional socarrat.
This home paella works because flavor is concentrated first, the rice cooks in a shallow layer, and the seafood waits until the pan is nearly ready.

What This Paella Should Taste Like

Aim for paella that tastes savory, sunny, and deeply seasoned, not creamy or soupy. The rice should be tender but distinct, with saffron and paprika in the background, chicken giving the pan body, seafood adding a briny lift, and lemon cutting through at the end.

Close-up of paella rice with tender separate saffron grains, shrimp, chicken, and a moist but not soupy texture.
Look for paella rice that is tender, seasoned, and distinct. Creamy, soupy, or clumped grains mean the pan has moved away from classic paella texture.

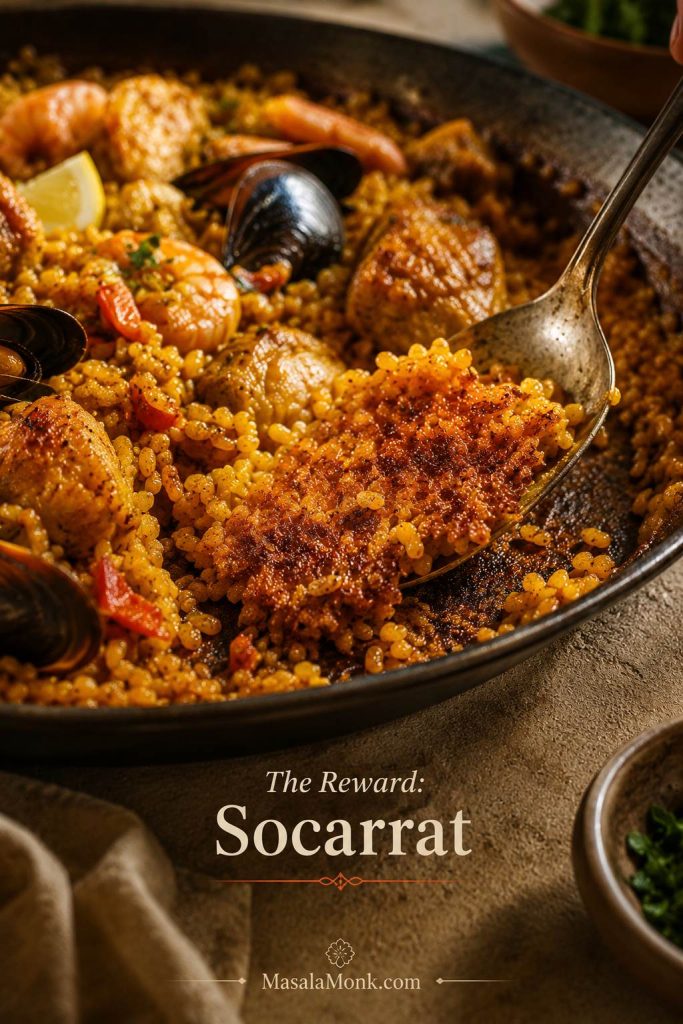
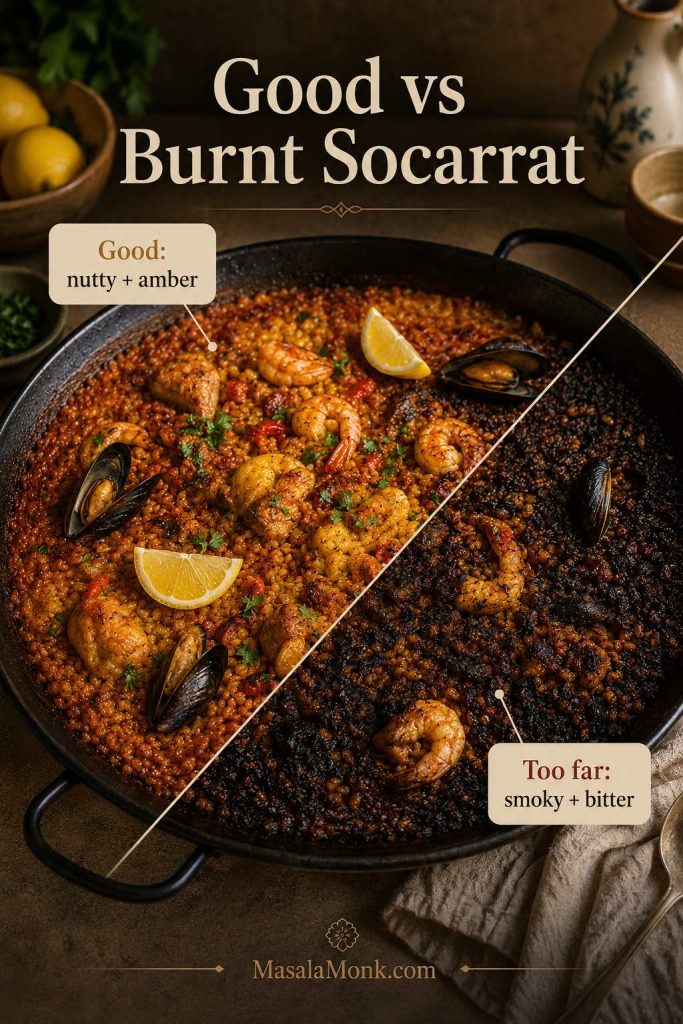
When socarrat forms, the bottom layer should taste toasted and nutty rather than bitter. Even without it, the paella can still be excellent. Tender rice and balanced flavor matter more than forcing a crust.

Success cues

Look for tender, separate rice; shrimp that is pink and opaque; savory stock flavor; lemon brightness; and, if you chase it, a toasted bottom that tastes nutty rather than bitter.

What Is Paella?

Paella is a Spanish rice dish from Valencia, traditionally cooked in a wide, low pan. The word is often used for both the dish and the pan, but the heart of paella is the rice: separate grains cooked in flavorful stock, usually with saffron, paprika, vegetables, and proteins arranged across the top.

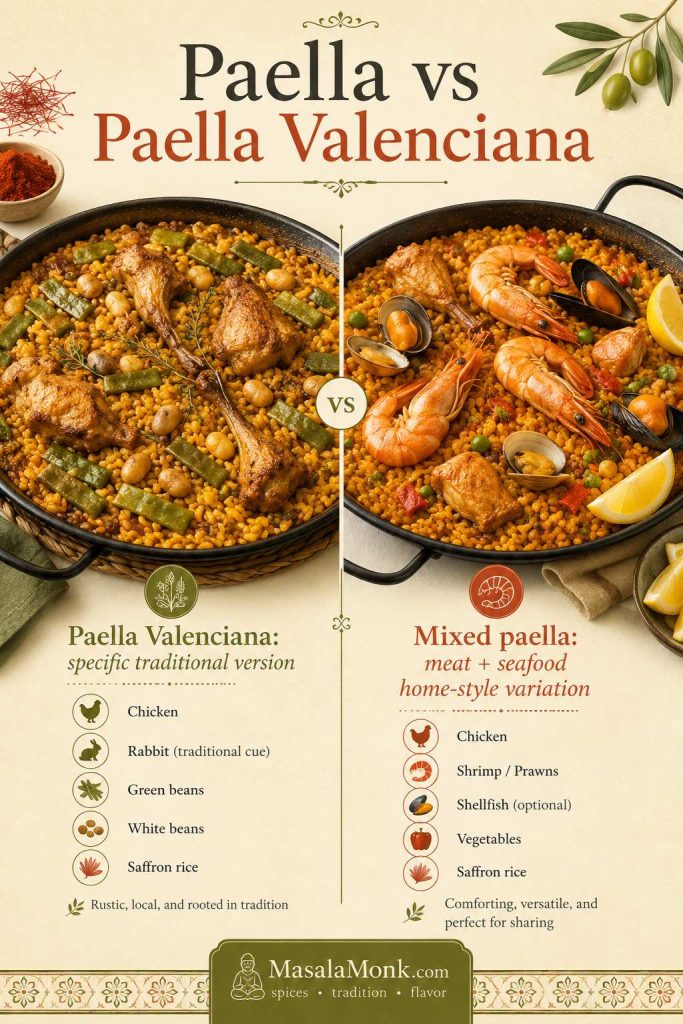
There are many versions now. Paella Valenciana is the classic Valencian version. Seafood paella focuses on shrimp, mussels, clams, squid, or fish. Mixed paella often combines meat and seafood. Home cooks also make chicken paella, vegetable paella, vegan paella, and Spanish-inspired chicken and chorizo paella.

In everyday recipe searching, “paella” often means the whole family of Spanish-style rice pans, while “Paella Valenciana” refers to a more specific traditional version. That distinction is helpful here because this pan is meant to be a practical mixed paella for a home stovetop, not a claim to be the one traditional version.

Comparison of Paella Valenciana ingredients and home-style mixed paella with chicken, seafood, saffron rice, and lemon.
Paella can refer to a broad family of Spanish-style rice pans, while Paella Valenciana is a more specific traditional version; this recipe stays honest as a home-style mixed paella.

This version is designed for a regular stovetop. It gives you the feel of a generous mixed paella without asking you to find every traditional Valencian ingredient or cook outdoors over a wide fire. The goal is a practical home method with good rice texture, clear timing, and enough guidance that you know what to do if the pan behaves differently from the recipe.

Is This Authentic Paella or Spanish-Style Paella?

This is a Spanish-style home paella, not a strict Paella Valenciana. That is not a disclaimer so much as a way to be clear and respectful.

Traditional Valencian paella has a specific identity. Spain’s official tourism site lists a Valencian-style paella built around rice, chicken, rabbit, tomato, green beans, garrofó, olive oil, saffron, paprika, water, and salt, with optional ingredients such as snails, garlic, rosemary, and peppers. It also notes mixed paella separately as another variety that may include seafood such as mussels, shrimp, prawns, and squid. You can read that official reference on Spain.info.

Think of this as home-style mixed paella: chicken, shrimp, optional shellfish, saffron rice, and a stovetop method that works without outdoor fire. It borrows from the spirit of Spanish mixed paella while being honest that it is not strict Paella Valenciana.

What about chorizo?

Chorizo is popular in many English-language paella recipes, especially chicken and chorizo paella, but it is not part of traditional Paella Valenciana. Here, chorizo is treated as an optional Spanish-inspired variation, not the base recipe.

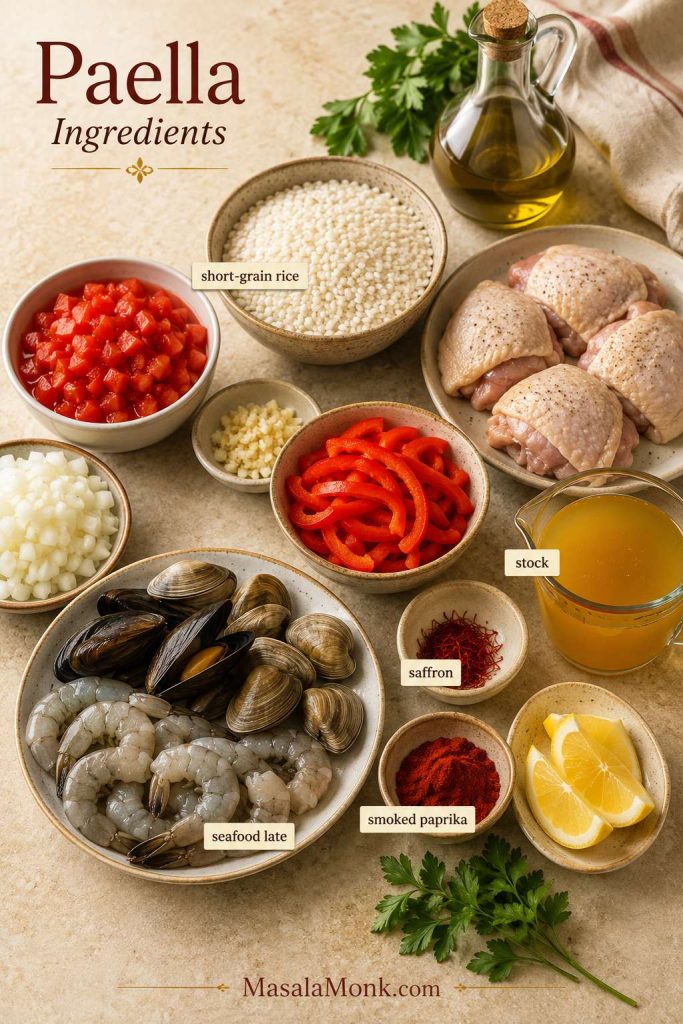
Paella Ingredients

The ingredient list is not long, but paella rewards choosing each part with care. Rice gives the pan structure, stock carries the flavor, saffron brings aroma and color, paprika adds warmth, tomato and aromatics create the sofrito, and the chicken and seafood make the meal feel generous.

Paella ingredients including short-grain rice, chicken, shrimp, shellfish, tomatoes, onion, garlic, saffron, smoked paprika, stock, lemon, parsley, and olive oil.
Every paella ingredient has a job: rice gives structure, sofrito builds depth, stock seasons the grains, saffron and paprika bring aroma, and seafood adds the final lift.

Rice for Paella

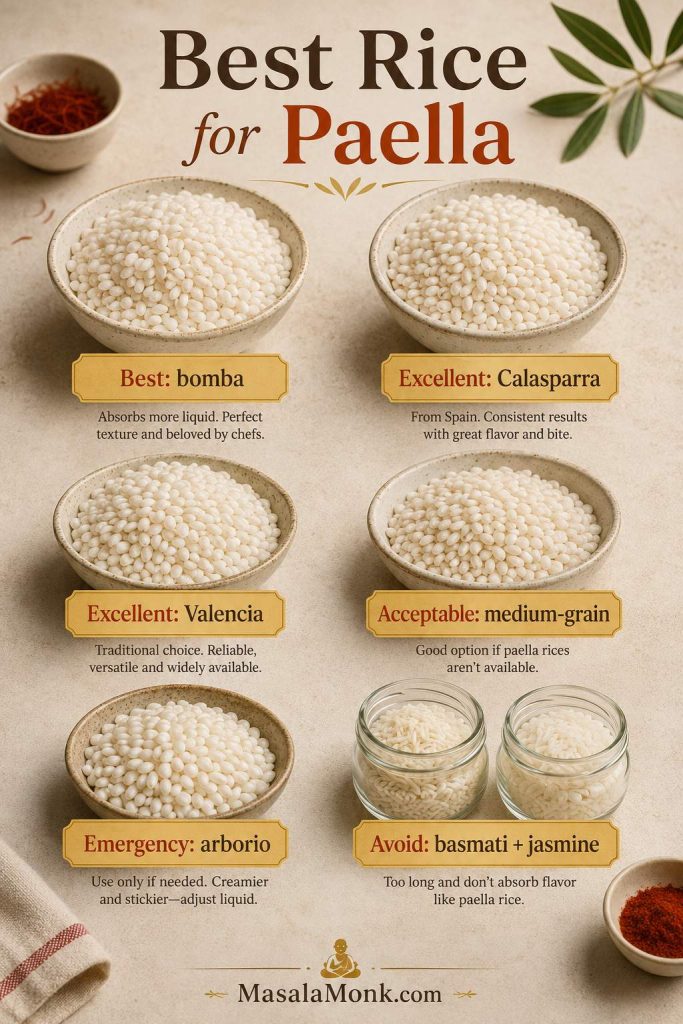
Use Spanish short-grain rice if possible. Bomba, Calasparra, and Valencia rice are the best choices because they absorb stock while holding their shape. Aim for grains that are tender and distinct, not creamy, sticky, or wet.

If you cannot find Spanish paella rice, medium-grain rice can work in a pinch. Arborio is only an emergency substitute because it is designed for risotto. With arborio, the no-stir rule becomes even more important.

Saffron and Paprika

Saffron gives paella its classic golden color and floral aroma. You only need a pinch. Crush the threads lightly and soak them in a little hot stock or hot water before adding them to the pan so the color and fragrance spread more evenly.

Spanish smoked paprika adds warmth and depth. Sweet paprika also works if you want a softer flavor. Add paprika after the tomato and aromatics have softened, and do not let it burn because scorched paprika turns bitter quickly.

Saffron threads blooming in hot stock beside smoked paprika for adding color, aroma, and warmth to paella.
Saffron brings the golden aroma, and smoked paprika adds warmth and depth. Together, they season the rice before the seafood ever touches the pan.

Chicken, Shrimp, and Optional Shellfish

Boneless chicken thighs are forgiving, juicy, and easy for a home paella. Shrimp adds a clear seafood note without making the recipe complicated. Mussels or clams are optional, but they make the pan more dramatic and release flavorful juices into the rice as they open.

Timing is what keeps the pan generous instead of overcooked. Chicken can be browned early, but shrimp should go in near the end so it stays tender. Mussels and clams can be nestled into the rice during the final simmer, just long enough to steam open.

Chicken, shrimp, and optional shellfish prepared for paella with labels showing chicken browned early and seafood added late.
Chicken can brown early to build flavor. Shrimp and shellfish should wait until the end so they stay tender.

Paella Sofrito: Onion, Garlic, Tomato, and Pepper

The sofrito is the flavor base. Onion, garlic, tomato, and bell pepper cook down in olive oil until soft and concentrated. Do not rush this stage. A watery sofrito makes the paella taste thin, while a thick, glossy sofrito gives the rice a savory backbone.

Stock or Broth

Use hot chicken stock, seafood stock, or a mix of the two. Seafood stock gives a deeper seafood-paella flavor, while chicken stock makes the recipe easier and more pantry-friendly. The stock should be hot when it goes into the pan so the rice starts cooking evenly.

Lemon, Parsley, and Finishing Touches

Lemon wedges are not just decoration. A squeeze of lemon brightens the rice, chicken, and seafood right before serving. Parsley adds freshness. Peas are optional and common in many home-style mixed paellas, but they are not required.

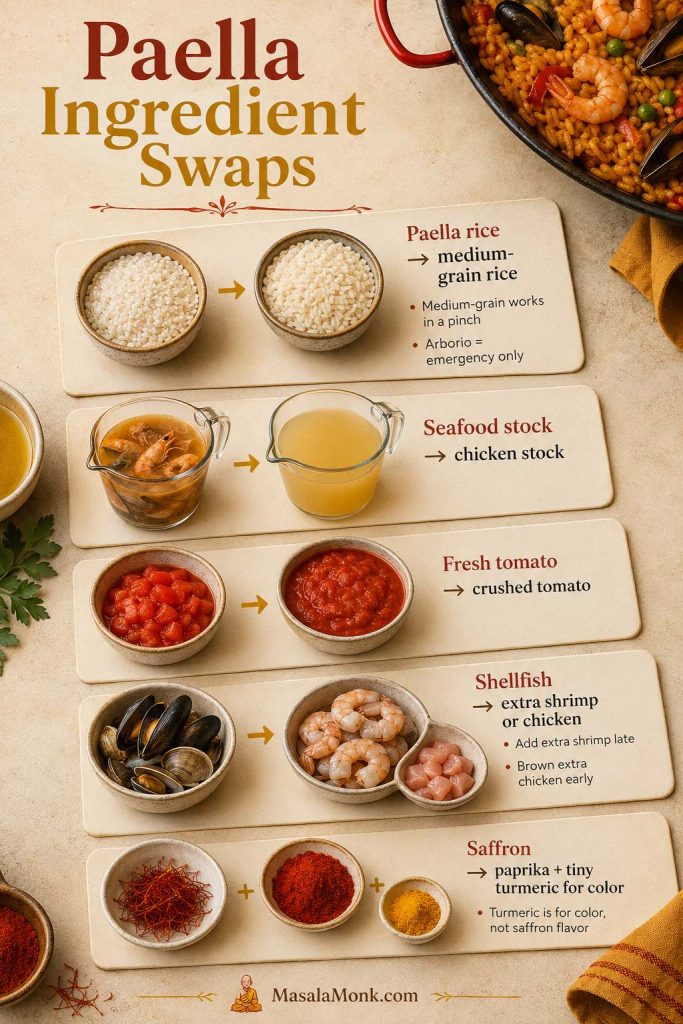
Paella Ingredient Swaps That Work

If you do not have… Use this instead What changes
Spanish paella rice Medium-grain rice or arborio in a pinch Watch the liquid closely and do not stir after adding stock.
Seafood stock Chicken stock or chicken stock mixed with a little clam juice The flavor will be lighter but still good.
Fresh tomatoes Crushed tomatoes Cook them down until thick, not watery.
Mussels or clams Extra shrimp or chicken Use slightly more stock because shellfish will not release liquid.
Saffron Good stock, paprika, and a tiny pinch of turmeric for color You lose saffron aroma, but the dish can still taste good.
Paella ingredient swaps board showing alternatives for paella rice, seafood stock, fresh tomatoes, shellfish, and saffron.
Smart paella swaps protect the method: choose a rice that can hold its shape, use flavorful stock, cook tomatoes down well, and treat turmeric as color help rather than saffron flavor.

Once the ingredients are ready, the recipe becomes less about juggling and more about timing: build the base, give the rice space, and add the seafood only when the pan is nearly there.

Best Rice for Paella

Choose short-grain Spanish rice that can absorb flavorful stock without collapsing into a creamy texture. Paella should not eat like risotto. The grains should be tender, separate, and deeply seasoned from the broth.

Rice guide showing bomba, Calasparra, Valencia, medium-grain, arborio, basmati, and jasmine rice options for paella.
The best rice for paella absorbs stock without falling apart, which is why Spanish short-grain rice works better than fragrant long-grain rice.

Unless your rice package specifically instructs you to rinse, start with dry grains. They coat more evenly in the sofrito and absorb the seasoned stock more predictably in the pan.

Rice Use it? Notes
Bomba rice Best choice Classic paella rice that absorbs stock well and holds its shape.
Calasparra rice Excellent Another strong Spanish paella rice option.
Valencia rice Excellent Good short-grain Spanish rice for paella.
Medium-grain rice Acceptable Works if Spanish rice is unavailable; watch the liquid closely.
Arborio rice Emergency substitute Can work, but do not stir or it will turn creamy like risotto.
Basmati rice Avoid Too long and firm for classic paella texture.
Jasmine rice Avoid Too fragrant and soft for this method.
Brown rice Avoid here Needs a different liquid ratio and cooking time.

Paella Rice to Stock Ratio

For this version, use 1½ cups / about 300 g short-grain rice with 3½–3¾ cups / 830–900 ml hot stock. Use the lower amount if adding mussels or clams because shellfish releases liquid into the pan. Use the higher amount if making chicken and shrimp paella without shellfish.

Paella rice-to-stock ratio guide showing one and a half cups rice with three and a half to three and three-quarter cups hot stock.
This paella rice-to-stock ratio gives the grains enough liquid to cook through, while the wide pan keeps the layer shallow enough for classic texture.

If you are cooking for two or scaling up for guests, check Scaling Paella for Two or a Crowd before changing the rice and stock amounts.

Keep an extra ½ cup / 120 ml hot stock or water nearby. A small splash can rescue firm rice in a dry pan, but a late flood of liquid usually makes the outside of the grains soften before the centers catch up.

Do You Need a Paella Pan?

No. A paella pan is ideal, but you can make this recipe in a wide skillet, stainless-steel sauté pan, or cast iron skillet. The real requirement is not the pan name; it is a wide, shallow cooking surface that keeps the rice in a thin layer.

Cookware guide showing a paella pan, wide skillet, sauté pan, cast iron skillet, and deep pot for making paella.
The pan name matters less than the shape; if the rice can spread thinly across a low, wide surface, the method has a much better chance of working.

Keep the Rice Layer Shallow

Think surface area, not depth: the rice needs room to cook in a shallow layer. If it is piled too deep, the bottom can burn before the top grains are tender. If the pan is too wide for your burner, the center may boil hard while the edges barely simmer.

Comparison showing paella rice in a shallow wide pan versus rice piled too deep in a pot.
A shallow rice layer cooks more evenly and gives the bottom a better chance to toast. A deep pile of rice can turn uneven before the center finishes.

Manage Home-Stovetop Hot Spots

Serious Eats explains this stovetop problem well: large paella pans work beautifully over broad outdoor heat, but home burners create hot spots, so smaller stovetop paellas are often more reliable indoors. Their guide is worth reading if you want the deeper heat-management logic: Serious Eats’ stovetop paella guide.

Home stovetop paella heat guide showing the center bubbling harder, slower-cooking edges, and arrows for rotating the pan.
Home burners often heat the center harder than the edges. Rotating the pan helps the rice cook evenly without stirring through the grains.

Once you have the right pan, the next important move is technique: see How to Make Paella Step by Step for the no-stir cooking flow.

Choose the Right Pan Size

Servings Pan size Best use
2–3 10–12 inch wide skillet Best for a small stovetop batch with more even heat.
4 12–14 inch wide pan Most reliable size for regular home burners.
4–6 14–16 inch paella pan or skillet Good if your burner, grill, or stovetop gives enough heat coverage.
6+ Large paella pan over grill or outdoor burner Better than piling a double batch into a deep pot.
Paella pan size guide showing ten to twelve inch, twelve to fourteen inch, and fourteen to sixteen inch pans with serving ranges.
A pan that is too large for the burner can cook unevenly, while a smaller wide pan often gives better control on a home stove.

Pan depth matters more than pan name

A shallow rice layer cooks more evenly and has a better chance of forming socarrat. A deep pot may hold the ingredients, but it traps too much steam and makes the rice more likely to turn soft or uneven.

Before You Start: Avoid These Paella Mistakes

  • Start with dry rice unless your package specifically tells you to rinse.
  • Avoid deep pots if you want classic paella texture.
  • Stop stirring after adding stock, or the rice can turn creamy and heavy.
  • Add shrimp near the end, because it will overcook if it simmers from the beginning.
  • Save socarrat for the finish; cook the rice first, then toast the bottom briefly.

How to Make Paella Step by Step

Read the method once before you start. Paella behaves differently from a stir-fry, biryani, pulao, or risotto: after the rice and stock go in, you stop stirring and let the pan do its work.

On a home stove, the center may bubble harder than the edges. That is normal. Rotate the pan instead of dragging a spoon through the rice, and keep the simmer steady rather than violent.

Hands rotating a paella pan on a stovetop while the rice simmers without being stirred.
When one area bubbles harder than another, shift the pan instead of stirring; that protects the rice texture while evening out the heat.

Paella looks dramatic when it comes to the table, but most of the cooking is quiet: the pan bubbles, the saffron deepens, and the rice slowly changes from loose broth into something golden enough to serve.

If you want the short version beside you while cooking, use the Paella Recipe Card, then come back to these step cues if the pan behaves unevenly.

1. Season and Brown the Chicken

Cut the chicken thighs into bite-size pieces and season them with salt and pepper. Heat olive oil in a wide pan over medium-high heat, then brown the chicken for about 4–5 minutes, until it has color on the outside. It does not need to cook fully at this stage because it will finish with the rice.

Look for golden edges and a little browning on the bottom of the pan. Those browned bits will dissolve into the stock later and help the rice taste deeper.

Chicken thigh pieces browning in a wide pan with golden edges and browned bits for paella.
Browning the chicken first creates savory bits in the pan, and those browned flavors later dissolve into the stock and rice.

2. Build the Sofrito

Add onion and bell pepper to the pan and cook for 4–6 minutes, until softened. Stir in garlic, then add grated tomatoes or crushed tomatoes. Cook for another 5–7 minutes, until the mixture thickens and looks less watery.

This is one of the places where patience pays off. The pan should smell savory and sweet, not raw and watery. If the tomato still looks loose, give it another minute or two before adding the rice.

Thick tomato, onion, garlic, and red pepper sofrito cooking down in a wide pan for paella.
The sofrito should look thick and glossy before the rice goes in, because a watery base can leave the finished paella tasting flat.

3. Add Paprika, Saffron, Rice, and Stock

Stir in smoked paprika and the soaked saffron. Add the rice and stir briefly so the grains are coated in the tomato-flavored oil. Pour in hot stock, scrape the bottom once to release any stuck flavor, and spread the rice evenly across the pan.

Hot saffron stock being poured into short-grain rice and tomato-paprika sofrito in a wide pan.
Add hot stock after the rice is coated in sofrito so the grains begin absorbing seasoned liquid right away.

At this stage, the liquid should taste well-seasoned. If the stock tastes flat now, the rice will taste flat later. Add salt before the rice finishes cooking, not only at the table.

4. Spread the Rice and Stop Stirring

This is the turning point. Once the rice is spread into an even layer, stop stirring. Rotate the pan if one side is bubbling harder than the other, but do not drag a spoon through the rice.

Paella rice, stock, sofrito, and chicken spread into an even layer with a spoon lifted away to show no stirring.
This is the turning point: once the rice is level, stop moving it so the grains can absorb stock in place.

Stirring releases starch and makes the dish creamy. For paella, you want the grains to cook in place so they absorb the stock and stay separate.

5. Simmer Until the Rice Is Almost Done

Let the rice simmer uncovered for about 8–10 minutes before adding the seafood. The liquid should bubble steadily, not violently. If the center is boiling aggressively while the edges are quiet, rotate the pan every few minutes.

As the rice cooks, the surface will look less soupy and more defined. You should see grains peeking through the liquid, and the edges of the pan will start looking a little drier. If the pan looks dry but the rice is still firm, add a small splash of hot stock or water around the edges.

Close-up of paella rice simmering with gentle bubbles, grains peeking through, and slightly dry edges.
As paella cooks, the surface should shift from soupy to defined, with gentle bubbles, visible grains, and edges that begin to dry slightly.

6. Add Shrimp and Shellfish Near the End

When the rice is partly cooked and most of the liquid has been absorbed, nestle the shrimp and optional mussels or clams into the top. Cook for another 6–8 minutes, until the shrimp is pink and opaque, the shellfish has opened, and the rice is tender.

Keep the shrimp near the surface and add it only near the end. Seafood cooks quickly, and once shrimp turns tight and rubbery, the rice cannot fix it. Discard any mussels or clams that stay closed after cooking.

Shrimp being added near the end of cooking on top of saffron paella rice in a wide pan.
Add shrimp near the end because seafood cooks fast; once it turns tight and rubbery, the rice cannot fix it.

7. Rest the Paella Before Serving

When the rice is tender and the seafood is cooked, remove the pan from the heat and cover it loosely with foil or a clean towel. Rest for 5–10 minutes. This helps the top grains finish steaming and lets the last moisture settle into the rice.

Finished paella resting under a towel with lemon wedges and parsley nearby.
Resting paella for a few minutes helps the top grains finish steaming and lets the remaining moisture settle before serving.

After resting, the rice should look moist but not soupy. The chicken should be cooked through by the time the rice is tender. If you use a thermometer, the thickest pieces should reach 165°F / 74°C.

8. Finish with Lemon and Parsley

Scatter parsley over the pan and serve with lemon wedges. Bring the paella to the table in the pan if you can. It looks dramatic, but it also lets everyone scoop from the tender rice on top down to the toasted bits at the bottom.

Lemon being squeezed and parsley scattered over finished paella before serving.
Lemon and parsley brighten the saffron rice, chicken, and seafood, so the finished paella tastes lively instead of heavy.

How to Get Socarrat

Socarrat is the toasted layer of rice at the bottom of a well-made paella. It should taste nutty and savory, not burnt. Treat it as a bonus on your first attempt, not the only measure of success.

For the safest socarrat, wait until the rice is cooked and the liquid is mostly absorbed. Then raise the heat for 60–120 seconds. Listen for a gentle crackle and smell for toastiness. Stop as soon as the aroma turns sharp, smoky, or bitter.

Paella pan with cooked saffron rice and a toasted bottom cue showing how to get socarrat at the end.
Socarrat works best when the rice is already tender and most liquid has absorbed; only then should the bottom get a brief controlled toast.

Do not try to create socarrat while the rice is still hard. You will burn the bottom before the top finishes. Tender rice comes first; the crisp bottom comes last.

If the bottom burns or the rice is still hard before you try for socarrat, jump to Paella Troubleshooting before pushing the heat.

Socarrat cues

  • Good sign: faint crackling, toasted aroma, rice mostly dry on top.
  • Bad sign: sharp burning smell, smoke, or blackened bitterness.
  • Best pan: carbon steel, stainless steel, or cast iron gives better browning than nonstick.
  • Beginner move: skip socarrat the first time and focus on tender rice.
Comparison of good amber socarrat and burnt blackened paella rice to show the difference in toasted bottom texture.
Amber socarrat adds crisp, savory flavor, while blackened rice turns smoky and bitter. Let aroma guide you as much as timing.

When it works, the first scrape from the bottom should feel like a reward: golden rice on top, toasted grains underneath, and no bitterness in the pan.

Spoon scraping toasted socarrat from the bottom of a paella pan with golden rice and amber crisp grains.
Good socarrat should taste nutty and toasted, not burnt, and the first spoon scrape is the reward for patient heat control.

Use the visual card below as a quick save, then follow the full recipe card for exact ingredients, timing, and notes. The guide above is still your safety net if the pan bubbles unevenly, the rice dries out, or the seafood needs careful timing.

Paella Recipe Card

Saveable recipe card for golden home-stovetop paella with servings, timing, rice amount, stock amount, pan note, and method flow.
Keep this quick-save card nearby for the cooking flow, but use the visual cues in the post—bubbles, dry edges, tender rice, and late seafood—to guide the pan.

Golden Home-Stovetop Paella

A golden Spanish-style home paella with saffron rice, browned chicken, tender shrimp, optional shellfish, tomato, paprika, lemon, and parsley. Designed for a regular stovetop with a wide pan and a clear no-stir method.

Prep Time20 minutes
Cook Time35–40 minutes
Rest Time5–10 minutes
Servings4–6

Best pan: Use a 14–16 inch wide, shallow pan for the full batch, or a 10–12 inch skillet for a half batch. Avoid deep pots because the rice needs to cook in a shallow layer.

Ingredients

  • 2 tablespoons extra-virgin olive oil
  • 450 g / 1 lb boneless skinless chicken thighs, cut into 1-inch / 2.5 cm pieces
  • 250–300 g / 9–10 oz large shrimp, peeled and deveined
  • Optional: 300–500 g / 10 oz–1 lb mussels or clams, cleaned
  • 1 medium onion, finely chopped
  • 1 red bell pepper, diced
  • 3–4 garlic cloves, minced
  • 2 medium tomatoes, grated, or ¾–1 cup crushed tomatoes
  • 1 teaspoon smoked Spanish paprika or sweet paprika
  • Pinch of saffron threads, soaked in 2 tablespoons hot stock or hot water
  • 1½ cups / about 300 g Spanish short-grain rice, such as bomba, Calasparra, or Valencia rice
  • 3½–3¾ cups / 830–900 ml hot chicken stock, seafood stock, or a mix
  • ½ cup frozen peas, optional
  • Salt and black pepper, to taste
  • Lemon wedges, for serving
  • Chopped parsley, for serving

Instructions

  1. Season the chicken. Pat the chicken dry and season with salt and black pepper.
  2. Brown the chicken. Heat olive oil in a wide shallow pan over medium-high heat. Add the chicken and brown for 4–5 minutes, until golden on the outside. It does not need to be fully cooked yet. Transfer to a plate if the pan is crowded.
  3. Cook the vegetables. Add onion and bell pepper to the pan. Cook for 4–6 minutes, until softened, then stir in garlic.
  4. Build the sofrito. Add grated tomatoes or crushed tomatoes. Cook for 5–7 minutes, until the mixture thickens and the raw tomato smell fades.
  5. Add spices and rice. Stir in paprika and soaked saffron. Add the rice and stir briefly so the grains are coated.
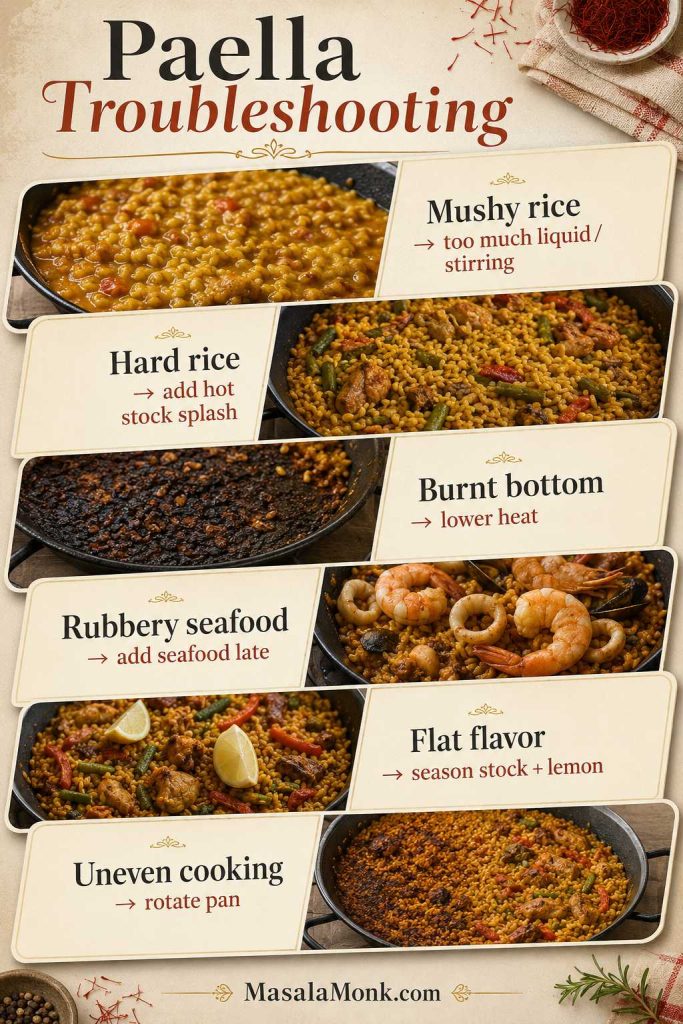
  6. Add stock. Pour in the hot stock and scrape the bottom once. Return the chicken to the pan. Spread the rice into an even shallow layer.
  7. Simmer without stirring. Simmer uncovered for 8–10 minutes without stirring. Rotate the pan if one side bubbles harder than the other.
  8. Add seafood near the end. Nestle shrimp and optional mussels or clams into the top. Cook for another 6–8 minutes, until the shrimp is pink and opaque, shellfish has opened, and the rice is tender.
  9. Check the rice. If the rice is still firm and the pan is dry, add a small splash of hot stock or water around the edges and cook a few minutes more.
  10. Optional socarrat finish. If the rice is cooked and you want a toasted bottom, raise the heat briefly for 60–120 seconds. Listen for a light crackle and stop before anything smells burnt.
  11. Rest. Remove from heat, cover loosely with foil or a clean towel, and rest for 5–10 minutes.
  12. Serve. Top with parsley and serve with lemon wedges.

Notes

  • Use 3½ cups / 830 ml stock if adding mussels or clams because shellfish releases liquid.
  • Use closer to 3¾ cups / 900 ml stock for chicken and shrimp paella without shellfish.
  • Keep ½ cup / 120 ml hot stock or water nearby for a small rescue splash if the rice is firm and the pan is dry.
  • If your pan is smaller, reduce the batch instead of piling the rice deep.
  • Avoid basmati and jasmine rice for this method.
  • Chorizo is a Spanish-inspired variation here, not part of traditional Paella Valenciana.
  • Paella is best served fresh, but leftovers can be reheated gently with a splash of stock or water.

Paella Variations

Use these variations as directions, not entirely new recipes. The base method stays the same: build flavor, add rice and stock, leave the rice alone, add delicate ingredients near the end, and rest before serving.

Seafood Paella Variation

This is the most dramatic version for the table. Skip the chicken and use shrimp, mussels, clams, squid, scallops, or firm white fish. Seafood stock gives the rice a deeper briny flavor, and the same late-add timing keeps delicate seafood from turning rubbery.

Seafood paella variation with saffron rice, shrimp, mussels, clams, squid, scallops, lemon, and parsley in a wide pan.
For a seafood paella variation, lean on seafood stock and add delicate seafood late so the pan tastes briny without turning rubbery.

If that seafood lane is what you love, MasalaMonk’s fish and chips recipe gives another crisp, lemon-friendly fish dinner with detailed texture cues.

Chicken Paella Variation

This is the simplest version to shop for and the easiest choice for seafood-averse guests. Use extra chicken thighs, green beans, bell pepper, and chicken stock, and increase the stock slightly because shellfish will not release liquid into the pan.

Chicken paella variation with saffron rice, browned chicken, green beans, red pepper, lemon wedges, and parsley.
Chicken paella keeps the same rice method but skips seafood, making it easier to shop for and more flexible for guests who prefer a meat-only pan.

For another rice-friendly chicken dinner with a simple stovetop method, MasalaMonk’s chicken adobo recipe is a strong companion recipe.

Vegetarian Paella

For a meatless pan that still feels colorful and satisfying, use vegetable stock and build around artichokes, green beans, roasted peppers, peas, mushrooms, or chickpeas.

Vegan Paella

For vegan paella, keep the olive oil, saffron, paprika, tomatoes, and vegetable stock, then let the vegetables and legumes do the work. Chickpeas, white beans, artichokes, mushrooms, and roasted peppers can make the pan feel generous without changing the rice method.

Vegetarian and vegan paella variations with saffron rice, artichokes, mushrooms, peppers, peas, chickpeas, herbs, lemon, and vegetable stock.
Meatless paella still depends on the same rice method; vegetables, mushrooms, legumes, and good stock simply replace the flavor and substance that meat or seafood would bring.

Chicken and Chorizo Paella

For chicken and chorizo paella, brown 100–150 g / 3½–5 oz sliced Spanish chorizo before the sofrito, then continue with the recipe. The flavor will be smoky and rich, but chorizo is a popular Spanish-inspired addition rather than a traditional Valencian one.

Paella Without Saffron

You can make paella without saffron, but the flavor and aroma will be different. Use good stock, smoked paprika, tomato, garlic, and a tiny pinch of turmeric only if you want a warmer yellow color. Too much turmeric will make the dish taste more like turmeric rice than paella.

Paella Without Seafood

If you do not like seafood, make the chicken version with extra vegetables and chicken stock. The method stays the same, but use a little more stock because shrimp, mussels, and clams will not be releasing moisture into the pan.

Can You Scale Paella for Two or a Crowd?

Paella does not scale like soup, curry, or stew because the rice needs a shallow layer. If you simply double the ingredients in a deep pot, the texture will suffer. The top may stay firm while the bottom turns soft or burns.

For two people, use a 10–12 inch skillet and reduce the batch by about half. For a crowd, use a large paella pan over a grill or outdoor burner, or make two smaller pans instead of forcing one overloaded pan onto a regular stovetop burner.

Serving goal Best approach Why
Paella for two Make a half batch in a 10–12 inch skillet. The rice stays shallow and the burner can heat the pan more evenly.
Paella for 4–6 Use the recipe as written in a 14–16 inch wide pan. This is the best home-size balance of yield and control.
Paella for a crowd Use an outdoor burner, grill, or two separate pans. Large pans need broad heat; one small burner usually creates hot spots.
Paella scaling guide showing a smaller wide pan for two and a larger pan over broad heat for a crowd, with a note not to pile rice deep.
Paella scales by changing pan size and heat coverage, not by piling more rice into a deep pot.

What to Serve with Paella

Paella is a full meal, so the sides should be simple. Serve it with lemon wedges, a green salad, roasted peppers, olives, or something fresh and herb-heavy like this tabbouleh recipe. Crusty bread is optional, but it is useful if you want to catch the flavorful juices around the edge of the pan.

If you want a crisp make-ahead side instead of a green salad, this coleslaw recipe brings crunch and acidity without requiring oven or stovetop space.

For drinks, keep the flavors bright and not too heavy. Sparkling water with lemon, chilled white wine, or a fresh watermelon margarita can work well with saffron rice and seafood, especially for a warm-weather table.

How to Store and Reheat Paella

This paella is best fresh from the pan after a short rest. The rice texture is at its best before refrigeration, and shrimp or shellfish are usually softer and juicier before reheating.

Because paella contains rice and often seafood, refrigerate leftovers within 2 hours of cooking. Spread them into a shallow airtight container so the rice cools quickly, and eat within 1–2 days for the best texture and safety.

If your paella has a lot of shellfish, remove the shells before storing leftovers so reheating is easier and the rice cools more quickly.

Reheat gently in a skillet with a small splash of stock or water. First, cover the pan briefly so the rice steams; then uncover it so extra moisture can evaporate. Avoid blasting seafood in the microwave for too long because shrimp can turn rubbery.

If you want to prep ahead, make the sofrito, clean the seafood, cut the chicken, and measure the rice and stock in advance. Do not fully cook paella hours ahead and expect the rice to taste freshly made.

Paella Troubleshooting: Rice, Pan, and Seafood Fixes

Most paella problems come from the same few causes: the wrong rice, too much liquid, too much stirring, a pan that is too deep, or heat that is too aggressive for the pan size.

Problem Likely cause Quick fix
Mushy rice Too much liquid, too much stirring, or deep pan Stop adding liquid, cook uncovered briefly, and rest off heat.
Hard rice Liquid evaporated too fast Add a small splash of hot stock around the edges and lower the heat.
Burnt bottom Heat too high or socarrat attempted too early Use steadier heat and save the high-heat push for the final 60–120 seconds.
Rubbery seafood Shrimp or shellfish added too soon Add seafood only near the end of cooking.
Flat flavor Weak stock, rushed sofrito, or not enough salt Season the stock, cook the tomato base down, and finish with lemon.
One side undercooked Burner heat is uneven or pan is too wide Rotate and shift the pan instead of stirring through the rice.
Paella troubleshooting guide showing mushy rice, hard rice, burnt bottom, rubbery seafood, flat flavor, and uneven cooking fixes.
When paella goes wrong, look at the pattern first: wet rice, dry rice, scorching, rubbery seafood, or uneven bubbling usually points to the fix.

Why Is My Paella Mushy?

Mushy paella usually means too much liquid, the wrong rice, too much stirring, or a pan that is too deep. Use short-grain paella rice, keep the rice shallow, and stop stirring once the stock goes in.

If the rice already looks soft and wet, stop adding liquid. Cook uncovered over low heat for a few more minutes so excess moisture can evaporate, then rest the pan off heat.

Why Is the Rice Still Hard?

Hard rice usually means the liquid evaporated before the grains cooked through. Add a small splash of hot stock or water around the edges, lower the heat, and give the pan a few more minutes. A large pour of cold liquid can soften the outside of the grains before the centers catch up.

Why Did the Bottom Burn?

The heat was probably too high, the pan was too thin for the burner, or you tried to get socarrat before the rice was cooked. Next time, use steadier heat during the rice stage and save the final high-heat push for the last minute or two.

Why Did I Not Get Socarrat?

There may have been too much liquid left in the pan, the heat may have been too low at the end, or the pan may have been nonstick. Socarrat forms best when the rice is cooked, the liquid is absorbed, and the bottom gets a brief controlled burst of heat.

Why Is My Seafood Rubbery?

Rubbery seafood is almost always a timing problem. Shrimp, mussels, clams, and calamari should not simmer from the beginning with the rice; they only need the final stretch of cooking.

Can You Stir Paella?

You can stir before the stock goes in. After the rice is spread into the stock, do not stir. Rotate the pan if needed, but leave the rice layer alone so the grains stay separate and the bottom has a chance to toast.

Why Does My Paella Taste Flat?

Flat paella usually starts with weak stock or a rushed sofrito. Season the stock well, let the tomato base cook down, and finish with lemon so the rice tastes bright instead of dull.

Why Is One Side Cooking Faster Than the Other?

Your burner may not be heating the whole pan evenly. Rotate the pan every few minutes instead of stirring the rice. If one area is boiling hard while another is barely moving, lower the heat slightly and shift the pan so the cooler side gets more contact with the flame or burner.

FAQs

What is the best rice for paella?

The best rice for paella is Spanish short-grain rice such as bomba, Calasparra, or Valencia. Medium-grain rice can work in a pinch, but basmati and jasmine are too long, fragrant, or soft for this method.
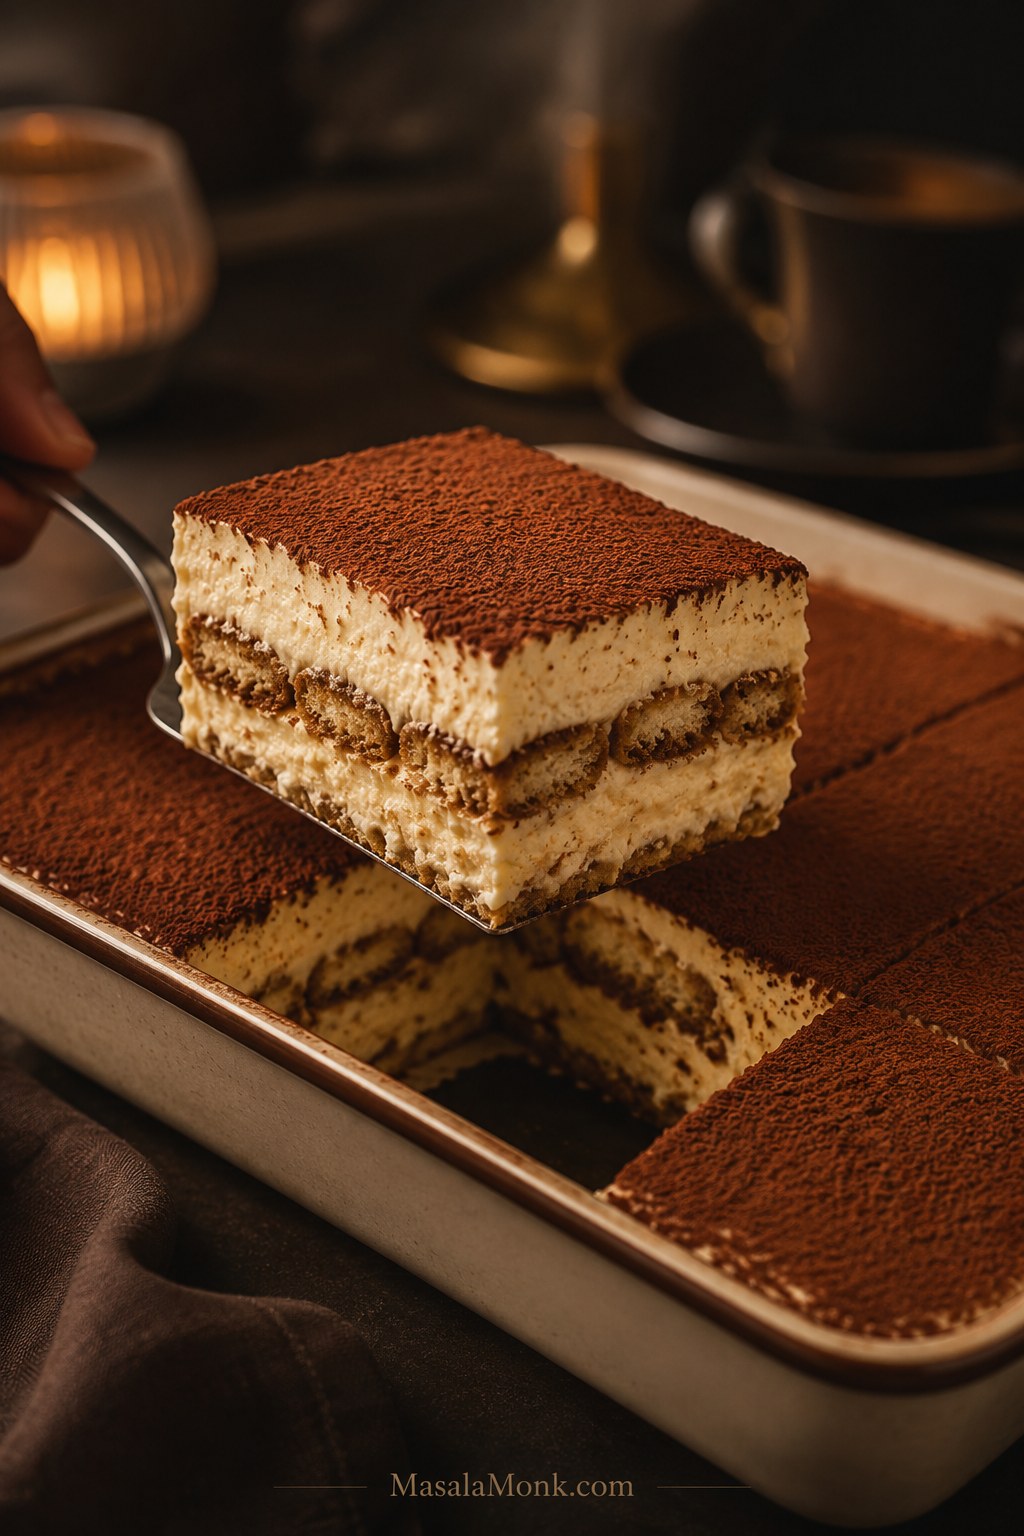
Do you need a paella pan?

You do not need a paella pan, but you do need a wide, low-sided pan. The rice should sit in a shallow layer, so a wide skillet or sauté pan is more useful than a deep pot.
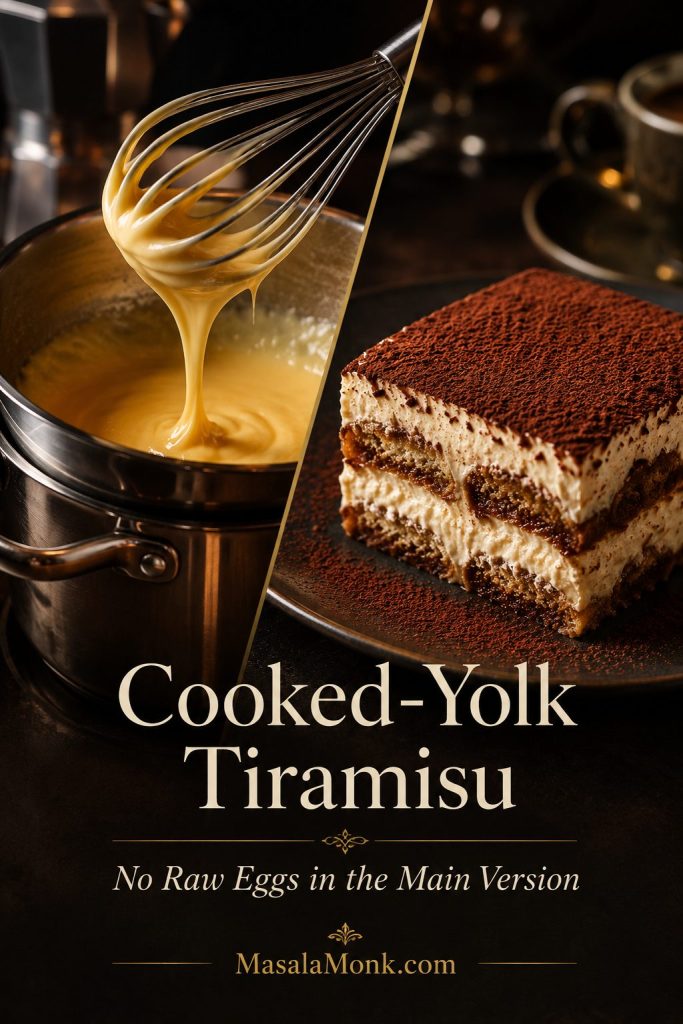
Can you make paella in a cast iron skillet?

Yes, you can make paella in a cast iron skillet if it is wide enough to keep the rice shallow. Cast iron holds heat well, so watch the bottom carefully and avoid pushing for socarrat before the rice is tender.

Is paella Spanish or Mexican?

Paella is Spanish. It comes from Valencia, Spain. Some people search for Mexican paella or confuse it with other rice dishes, but traditional paella is part of Spanish cuisine.

What gives paella its yellow color?

Saffron gives paella its classic golden color and floral aroma. Some home versions use a little turmeric for color when saffron is unavailable, but saffron gives the most traditional flavor.

Is saffron required for paella?

Saffron is strongly recommended, but you can make a good rice dish without it. If you skip saffron, rely on good stock, tomato, garlic, paprika, and careful seasoning. A tiny pinch of turmeric can help with color, but it will not replace saffron’s aroma.

Should paella be stirred?

Stir during the sofrito stage, then leave the rice alone once the stock goes in. That stillness helps the grains stay separate and gives the bottom a chance to toast.

What is the crispy rice at the bottom called?

The crispy toasted rice at the bottom of paella is called socarrat. It forms when the rice is cooked in a shallow layer and the bottom gets a brief controlled burst of heat near the end.

Is chorizo traditional in paella?

Chorizo is not traditional in Paella Valenciana. It is common in many Spanish-inspired home paella recipes, especially chicken and chorizo paella, but it should be treated as a variation rather than the classic version.

What is the difference between paella and risotto?

Paella is cooked mostly undisturbed so the rice grains stay separate and absorb stock without turning creamy. Risotto is stirred repeatedly to release starch and create a creamy texture.

What is the difference between paella and Paella Valenciana?

Paella is the broad name for the Spanish rice dish and its many versions. Paella Valenciana is the traditional Valencian version with a more specific ingredient identity, often including chicken, rabbit, green beans, garrofó, tomato, saffron, paprika, olive oil, water, salt, and rice.

Can paella be made ahead?

Paella is best cooked fresh, but you can prep the ingredients ahead. Chop the vegetables, clean the seafood, cut the chicken, soak the saffron, and measure the rice and stock before cooking. Fully cooked paella loses its best texture after sitting for a long time.

Serve it while the pan still smells of saffron, paprika, lemon, and toasted rice. Once you understand the rice, pan, and no-stir method, paella stops feeling like a risky project and starts feeling like a generous one-pan meal. Bring the whole pan to the table and let everyone find the spoonful they were hoping for.

Finished home-stovetop mixed paella served at the table with spoons, saffron rice, chicken, shrimp, shellfish, lemon wedges, parsley, and toasted rice texture.
A whole pan at the table lets everyone scoop from the tender top rice down to the toasted bits underneath, which is exactly how paella should feel: generous, shared, and a little dramatic.

Back to top

Posted on — Leave a comment

Tiramisu Recipe

Slice of tiramisu lifted from a 9×13 pan, showing cocoa powder, mascarpone cream, and coffee-soaked ladyfinger layers.

This tiramisu recipe gives you creamy, coffee-soaked layers with rich mascarpone cream, firm savoiardi, deep espresso flavor, and a cocoa finish that cuts through the sweetness. The main version uses cooked yolks and whipped cream, so it does not rely on raw eggs for structure, and it is built for a generous 9×13-inch pan that slices cleanly after an overnight chill.

Here, the goal is not the fastest 10-minute shortcut. It is a reliable make-ahead tiramisu you can serve to guests tomorrow: soft but visible layers, coffee-soaked ladyfingers that are not wet, and a cream filling that holds on the plate without turning stiff or heavy.

Think of it as a modern home-kitchen tiramisu built around the classic structure: savoiardi, mascarpone, eggs, coffee, and cocoa, with a cooked-yolk cream method for more confidence.

You will also get a smaller 8×8 half-batch, a no-alcohol option, a more traditional no-cream direction, mascarpone substitute notes, pan-size guidance, and practical fixes for tiramisu that turns wet, dry, bitter, grainy, or too loose to slice.

Good tiramisu feels quietly luxurious: the spoon meets soft cream, the coffee has soaked into the ladyfingers without leaking into the dish, and the cocoa gives each bite a slightly bitter finish. Once the layers are built, the fridge does most of the work.

Quick Answer: How to Make Tiramisu

To make tiramisu, quickly dip firm ladyfingers in cooled espresso or strong coffee, layer them with mascarpone cream, chill until set, and dust the top with cocoa before serving. This cooked-yolk version gives you classic coffee-mascarpone flavor without relying on raw eggs in the main recipe.

For a full 9×13-inch pan, use about 40–45 firm ladyfingers, 500 g mascarpone, 4 egg yolks, 100–120 g sugar, 360 ml heavy cream, 300–360 ml strong cooled coffee, optional alcohol, and cocoa. Then dip the ladyfingers quickly rather than soaking them, and chill the finished tiramisu overnight for the cleanest slices.

Tiramisu at a Glance

DetailUse this
Best dish9×13-inch / 33×23 cm dish for the full recipe
Best ladyfingersFirm dry savoiardi, not soft cake-style fingers
Best coffeeStrong espresso, moka coffee, or bold brewed coffee, fully cooled
Egg methodCooked yolks in the main version; pasteurized eggs for raw-egg variations
AlcoholOptional; rum, Marsala, brandy, coffee liqueur, or no alcohol all work
Chill time8 hours minimum; overnight is best
Texture goalCreamy, soft, coffee-rich, and sliceable
Biggest mistakeSoaking the ladyfingers too long

If you are nervous about wet layers, start with the ladyfinger dip test before you assemble the pan.

What This Tiramisu Should Look Like

This cooked-yolk version gives you the familiar coffee, mascarpone, and cocoa flavor of tiramisu while keeping the main method more comfortable for a home kitchen.

Cooked egg-yolk ribbon over a double boiler beside a finished tiramisu slice, with text about cooked-yolk tiramisu and no raw eggs in the main version.
The cooked-yolk method keeps the familiar coffee, mascarpone, and cocoa flavor while giving the main tiramisu recipe a more confident home-kitchen structure.

For a full 9×13 pan, the goal is a generous make-ahead tiramisu that chills overnight and lifts into clean, guest-friendly squares.

9×13 tiramisu pan with a clean square lifted out, showing cocoa top, mascarpone cream, and ladyfinger layers.
Because the dessert is built in a 9×13 pan, it is easier to serve clean squares for guests, holidays, and make-ahead dessert tables.

Before you move deeper into the method, it helps to know the texture target: creamy layers, coffee-soaked ladyfingers, and no liquid pooling at the bottom.

Close-up side view of tiramisu with labels for soft layers, not wet, and sliceable texture.
The best tiramisu texture is creamy but controlled: the ladyfingers taste coffee-soaked, yet the bottom of the dish should not look flooded.

Why This Tiramisu Recipe Works

Tiramisu looks simple, but small details decide whether it slices cleanly or turns soft and wet. Because the yolks are gently cooked, the cream is folded carefully, and the dessert chills overnight, the flavor stays familiar while the texture becomes more reliable for a home kitchen.

  • Cooked yolks give richness without making fully raw eggs the only option.
  • Mascarpone keeps the cream layer thick, smooth, and lightly sweet.
  • Whipped cream adds stability for clean slices.
  • A quick coffee dip keeps the ladyfingers soft but not soggy.
  • Overnight chilling lets the dessert set instead of collapsing into a loose spoon dessert.

Choose Your Method

There is no single tiramisu method that suits every kitchen. The right choice depends on how traditional you want the texture to be, how comfortable you are with eggs, and whether you need the dessert to slice neatly for guests.

If you want…Use this path
Classic lightnessPasteurized eggs and whipped egg whites
Stable guest-friendly slicesCooked yolks and whipped cream
No alcoholStrong coffee plus vanilla in the cream
No eggs at allUse an eggless tiramisu method

This version is slightly more work than a no-egg shortcut, but it tastes more classic and gives you a creamier, more stable dessert that can be sliced cleanly the next day.

If you like make-ahead desserts that set in the fridge, MasalaMonk’s no bake cheesecake recipe follows a similar patience-first logic.

What Is Tiramisu?

Tiramisu is a no-bake Italian dessert made with coffee-soaked ladyfingers layered with mascarpone cream and finished with cocoa powder. It should taste creamy, lightly sweet, coffee-rich, and just bitter enough at the end.

The Accademia del Tiramisù traditional Treviso recipe uses mascarpone, egg yolks, sugar, ladyfingers, coffee, and bitter cocoa, then rests the dessert in the refrigerator before serving.

This version keeps that coffee-mascarpone-cocoa structure, but adapts the cream method for a modern home kitchen. Instead of relying on fully raw eggs, it uses gently cooked yolks and whipped cream for a filling that is rich, stable, and easier to slice.

Tiramisu Ingredients: What Matters Most

The ingredient list is short, so every choice matters. Tiramisu is not a dessert where you can hide weak coffee, watery mascarpone, or soggy biscuits under decoration. The flavor and texture come directly from the basics.

Tiramisu ingredients guide with mascarpone, savoiardi, espresso, egg yolks, sugar, cream, cocoa, and optional liqueur.
Mascarpone gives body, savoiardi hold structure, coffee drives flavor, and cocoa adds the bitter finish that keeps tiramisu balanced.

Mascarpone

Mascarpone gives tiramisu its rich, creamy body. Look for mascarpone that is thick, smooth, and spoonable, not watery or loose. A little separated liquid can usually be stirred back in gently. Mascarpone that still looks pourable after stirring is more risky, because the finished dessert may not slice cleanly.

Thick mascarpone lifted on a spoon, with a small comparison cue showing watery mascarpone.
Thick mascarpone helps the cream layer hold softly; however, watery mascarpone can loosen the filling before the tiramisu has time to set.

Meanwhile, keep mascarpone cold until you are ready to mix, but do not beat it aggressively. Once mascarpone loosens, overmixing can make it grainy or split. In this method, you only need to smooth it briefly before folding in the cooked yolk mixture and whipped cream.

Mascarpone is worth using when you can find it because it gives tiramisu that soft, rich, almost cloud-like cream that tangier substitutes cannot fully copy.

If your mascarpone already looks loose, check the runny tiramisu troubleshooting guide before you continue.

Cream cheese, ricotta, and Greek yogurt can all make tiramisu-style desserts, but they are not one-for-one replacements. Cream cheese is tangier and denser, ricotta can be grainy unless blended very smooth, and Greek yogurt creates a lighter, tangier dessert rather than classic tiramisu. For a dessert where cream cheese is meant to be the star instead of a substitute, MasalaMonk’s New York cheesecake recipe is the better direction.

Ladyfingers / Savoiardi

Firm dry savoiardi are the best choice because they soften slowly and help the layers hold together. They absorb coffee quickly, soften during the chill, and still give the dessert structure. Soft sponge fingers can work, but they need an even faster dip because they collapse more easily.

Firm dry savoiardi ladyfingers arranged diagonally, with one broken open to show the airy biscuit texture.
Firm dry savoiardi are ideal because they absorb coffee quickly, then soften gradually while the tiramisu chills.

If the package says savoiardi, that is usually what you want. They should feel dry and crisp before dipping. If your ladyfingers are soft and cake-like, treat them more gently: brush or barely dip them instead of dunking them like firm savoiardi.

For a 9×13-inch tiramisu, you will usually need 40–45 ladyfingers. Do not worry if you have to trim a few pieces to fill the corners of the dish; neat layers matter more than perfect whole biscuits.

Coffee or Espresso

Espresso is ideal, but moka coffee, bold brewed coffee, or strong instant espresso can also work. The coffee should taste a little too strong on its own because the mascarpone cream will soften it into balance. Weak coffee disappears under the cream and makes tiramisu taste flat.

Strong coffee options for tiramisu, including espresso, moka coffee, and strong instant espresso, with a weak coffee cue to avoid.
Use coffee that tastes slightly stronger than usual because the mascarpone cream will soften the bitterness and bring it into balance.

When the coffee is right, you should smell it as soon as the tiramisu is sliced. It should support the cream, not disappear under it. The first forkful should taste creamy first, then coffee, then cocoa bitterness at the end.

Before dipping, let the coffee cool completely. Otherwise, hot coffee can make the biscuits soften too quickly, and it can also loosen the cream if the dessert is assembled while everything is warm.

Eggs

Classic tiramisu uses eggs. This cooked-yolk version gives the filling richness without making fully raw yolks the default. The yolks are heated gently with sugar over a double boiler, then folded into mascarpone and whipped cream.

Whisk lifting a pale, thick, glossy cooked egg-yolk mixture from a bowl for tiramisu.
Once the yolks look pale, glossy, and ribbony, they are ready to enrich the mascarpone cream without making it loose.

For recipes served with raw or undercooked eggs, the FDA recommends pasteurized shell eggs or pasteurized egg products. That is why the more traditional raw-egg direction in this post uses pasteurized eggs.

Heavy Cream

Heavy cream is a modern home-kitchen choice, not the strict Treviso-style path. Here, it helps the mascarpone layer stay stable and sliceable while still keeping the familiar coffee, cocoa, and mascarpone flavor profile.

For a more traditional no-cream direction, use pasteurized egg whites instead of whipped cream. That option is lighter and closer to old-school tiramisu, but it needs more care because the egg whites are not cooked.

Sugar, Salt, Cocoa, and Alcohol

Sugar softens the bitterness of coffee and cocoa. Use 100 g if you prefer a balanced, less-sweet tiramisu, or up to 120 g if you want a rounder dessert.

A small pinch of salt helps the mascarpone cream taste fuller rather than simply sweet. It should not make the dessert salty; instead, it should make the coffee and cream taste more complete.

Use unsweetened cocoa powder for the top. Dust it shortly before serving if you want the cleanest finish. If you dust it before a long chill, the cocoa will darken and hydrate into the surface, which some people enjoy but others find less polished.

Alcohol is optional. Dark rum, Marsala, brandy, coffee liqueur, amaretto, or Grand Marnier can all work, but coffee-only tiramisu is completely valid.

Temperature Cues That Prevent Problems

Ingredient or layerBest temperatureWhy it matters
CoffeeFully cooled before dippingHot coffee softens ladyfingers too fast and can loosen the cream.
MascarponeCold but stirrableToo warm can turn loose; too cold can stay lumpy.
Yolk mixtureWarm, not hot, before foldingHot yolks can loosen the mascarpone layer.
Heavy creamCold before whippingCold cream whips better and holds structure.
Finished tiramisuFully chilled before slicingCold layers cut more cleanly and hold on the plate.

Once those temperatures are right, the recipe becomes much calmer. The cream folds more smoothly, the ladyfingers behave better, and the finished tiramisu sets with less drama.

Tiramisu temperature guide showing cooled coffee, cold mascarpone, warm yolks, cold whipped cream, and 8 hours minimum chill time.
Cool coffee protects the ladyfingers, cold cream whips better, and warm-not-hot yolks keep the mascarpone filling smooth.

How to Make This Tiramisu Step by Step

Once the coffee is cooled and the cream is ready, tiramisu is mostly assembly. The only technical step is the cooked yolk base, and even that is simple if you keep the heat gentle.

Move slowly through the cream, then quickly through the dipping. That is the rhythm of good tiramisu: gentle mixing, fast dipping, patient chilling.

Step-by-step tiramisu guide showing cooled coffee, cooked yolks, mascarpone cream, dipped ladyfingers, layering, chilling, and cocoa dusting.
Most tiramisu problems are avoided before assembly: cool the coffee, build a stable cream, dip briefly, and give the pan time to chill.

1. Brew and Cool the Coffee

Make espresso, moka coffee, or bold brewed coffee. Pour it into a shallow bowl and let it cool completely. If using rum, Marsala, brandy, or coffee liqueur, stir it in after the coffee has cooled.

2. Cook the Egg Yolks and Sugar

Set a heatproof bowl over a saucepan of barely simmering water. The bottom of the bowl should not touch the water. Add the egg yolks and sugar, then whisk constantly.

Egg yolks and sugar being whisked in a bowl over a saucepan for cooked-yolk tiramisu.
Gentle heat and steady whisking turn yolks and sugar into a smooth base, which gives the mascarpone filling richness and stability.

Whisk for 3–5 minutes, until the mixture becomes pale, thick, and ribbony. When you lift the whisk, the mixture should fall back into the bowl in a thick ribbon for a second before disappearing. For extra confidence, aim for about 160°F / 71°C while keeping the heat gentle.

Remove the bowl from the heat and let the mixture cool until warm, not hot. If the yolk mixture is too hot when it meets the mascarpone, the cream can loosen.

3. Loosen the Mascarpone

In a large bowl, beat the mascarpone only until it looks smooth and spreadable. Stop as soon as the lumps disappear. If you keep beating after it loosens, the cream can turn grainy later.

4. Whip the Cream

In another bowl, whip the cold heavy cream to medium-stiff peaks. The cream should hold a soft point on the whisk, but the surface should still look smooth and glossy. If it looks rough, dry, or clumpy, it has gone too far.

5. Fold the Cream Together

Fold the cooled yolk mixture into the mascarpone. Then fold in the whipped cream in two additions. Fold slowly until no obvious white streaks remain, then stop. The goal is a filling that looks thick, smooth, and airy, not something stirred until it turns loose or pourable.

When you lift the spatula, the cream should mound softly before settling. If it runs like sauce, chill it briefly before assembly and check that the whipped cream reached medium-stiff peaks.

Before you start assembling, use the texture checkpoint below to make sure the filling is thick, smooth, and airy rather than pourable.

Texture Target Before You Layer

The cream should be thick enough to mound on a spatula, the dipped ladyfingers should still lift without bending, and the chilled tiramisu should cut into soft but visible layers.

Thick mascarpone cream mounding on a spatula, with text reading “Thick, Smooth, Airy — Not Pourable.”
This is the texture checkpoint before assembly: thick enough to spread, light enough to fold, and stable enough to support two layers.

6. Dip the Ladyfingers

Working one at a time, dip each ladyfinger into the cooled coffee for about one second per side. Arrange the dipped ladyfingers in a single layer in the dish. Trim pieces as needed to fill gaps.

Leave any extra coffee behind instead of adding it to the pan. Too much added liquid is one of the main causes of soggy tiramisu.

Dipped versus soaked ladyfingers for tiramisu, showing a firm dipped biscuit beside an over-soaked collapsing biscuit.
Ladyfingers should be dipped, not soaked; as a result, they soften during chilling without releasing excess coffee into the pan.

7. Layer the Tiramisu

Spread half of the mascarpone cream over the first ladyfinger layer. Add a second layer of dipped ladyfingers, then spread the remaining cream over the top. Smooth the surface with an offset spatula.

Tiramisu being layered in a 9×13 pan with dipped savoiardi and mascarpone cream spread over the top.
Even layers help the coffee, cream, and savoiardi settle together, so the finished tiramisu cuts more neatly after chilling.

8. Chill Until Set

Cover the dish and refrigerate for at least 8 hours. Overnight is best. During this time, the ladyfingers soften, the coffee flavor settles, and the mascarpone cream firms enough to slice.

9. Dust with Cocoa and Serve

Just before serving, sift unsweetened cocoa powder over the top. Slice the tiramisu cold, wiping the knife between cuts for cleaner pieces.

Cocoa powder being sifted over chilled tiramisu just before serving.
Fresh cocoa should sit lightly on top, so add it after chilling rather than letting it hydrate into a dark, damp layer.

Recipe Card: Tiramisu with Cooked Yolks

Saveable tiramisu recipe card for a 9×13 pan with yield, chill time, ingredients, and a short method.
This saveable tiramisu recipe card keeps the essential assembly details close: 9×13 pan, cooked-yolk cream, quick dipping, and overnight chilling.

Creamy Tiramisu Recipe

This tiramisu gives you soft coffee-soaked ladyfingers, cooked-yolk mascarpone cream, and a cocoa-dusted top that slices cleanly after an overnight chill. It is rich and creamy without relying on raw eggs in the main version, with notes for no alcohol, an 8×8 half-batch, and a more traditional no-cream option.

Quick Texture Rule

Dip each ladyfinger for about 1 second per side. It should be damp outside but still firm enough to lift into the dish.

Yield12 servings
Dish9×13 inch / 33×23 cm
Prep Time40 minutes
Cook Time5 minutes
Chill Time8 hours minimum
Total Time8 hr 45 min+

Equipment

  • 9×13-inch / 33×23 cm dish
  • Hand mixer or stand mixer
  • Heatproof bowl and small saucepan for double boiler
  • Shallow bowl for coffee dipping
  • Rubber spatula
  • Offset spatula
  • Fine mesh sieve
  • Kitchen scale, recommended
  • Instant-read thermometer, optional

Ingredients

Coffee Dip

  • 300–360 ml / 1¼–1½ cups strong espresso or very strong coffee, cooled
  • 30–45 ml / 2–3 tablespoons dark rum, Marsala, brandy, or coffee liqueur, optional
  • 1–2 teaspoons sugar, optional, only if the coffee tastes very bitter

Mascarpone Cream

  • 4 large egg yolks
  • 100 g / ½ cup granulated sugar for a balanced tiramisu, or up to 120 g / ½ cup plus 2 tablespoons for a sweeter version
  • 500 g / 17.6 oz mascarpone, cold but stirrable
  • 360 ml / 1½ cups heavy cream, cold
  • 1 teaspoon vanilla extract, optional
  • ⅛–¼ teaspoon fine salt

Assembly Ingredients

  • 40–45 firm savoiardi ladyfingers / about 300–350 g
  • 2–3 tablespoons unsweetened cocoa powder, for dusting

Instructions

Make the Coffee and Cream

  1. Make and cool the coffee. Brew strong espresso, moka coffee, or very strong coffee. Pour into a shallow bowl and cool completely. Stir in optional alcohol once cool.
  2. Cook the yolks and sugar. Set a heatproof bowl over a saucepan of barely simmering water, making sure the bowl does not touch the water. Add egg yolks and sugar. Whisk constantly for 3–5 minutes, until pale, thick, and ribbony. For extra confidence, aim for about 160°F / 71°C.
  3. Cool slightly. Remove the yolk mixture from the heat and let it cool until warm, not hot.
  4. Loosen the mascarpone. In a large bowl, beat the mascarpone briefly until smooth. Stop as soon as it is spreadable.
  5. Add the yolk mixture. Fold the cooled yolk mixture into the mascarpone until smooth.
  6. Whip the cream. In a separate bowl, whip cold heavy cream to medium-stiff peaks. It should hold shape but still look smooth.
  7. Fold the filling. Fold the whipped cream into the mascarpone mixture in two additions. Add vanilla and salt if using. The filling should look thick and airy, not pourable.

Layer the Tiramisu

  1. Dip the ladyfingers. Dip each ladyfinger into the cooled coffee for about 1 second per side. Keep the dip brief; the biscuit should still lift easily into the dish.
  2. Build the first layer. Arrange dipped ladyfingers in a single layer in the dish, trimming pieces to fit if needed.
  3. Add cream. Spread half of the mascarpone cream over the ladyfingers.
  4. Repeat. Add a second layer of dipped ladyfingers, then spread the remaining cream over the top.
  5. Leave extra coffee behind. Once the ladyfingers are dipped and arranged, do not pour leftover coffee into the dish. Extra liquid is one of the main causes of soggy tiramisu.

Chill, Finish, and Serve

  1. Chill. Cover and refrigerate for at least 8 hours, preferably overnight.
  2. Finish. Just before serving, sift unsweetened cocoa powder over the top.
  3. Serve cold. Slice straight from the fridge, wiping the knife between cuts for cleaner pieces.

8×8 Half-Batch

For an 8×8-inch / 20 cm dish, use 20–24 ladyfingers, 250 g mascarpone, 2 egg yolks, 50–60 g sugar, 180 ml / ¾ cup heavy cream, 180 ml / ¾ cup strong coffee, 15–22 ml / 1–1½ tablespoons optional alcohol, and cocoa as needed.

8×8 tiramisu half-batch guide with a small pan, serving cue, ladyfingers, mascarpone, and espresso.
The 8×8 half-batch keeps the same tiramisu structure in a smaller dish, which is useful when you want fewer servings.

Using a different dish? Check the tiramisu pan size guide before changing quantities.

No-Alcohol Option

Skip the alcohol and use strong coffee only. Add 1 teaspoon vanilla to the mascarpone cream for a rounder flavor.

More Traditional No-Cream Option

For a lighter, more traditional-style version, replace the 360 ml / 1½ cups heavy cream with 4 large pasteurized egg whites. Whip the egg whites to stiff but glossy peaks, then fold them gently into the mascarpone-yolk mixture. Use pasteurized eggs because the whites are not cooked.

Storage

Keep tiramisu covered and refrigerated. It is best within 2–3 days. Do not leave it at room temperature for more than 2 hours. Freeze only if needed, preferably before the final cocoa dusting.
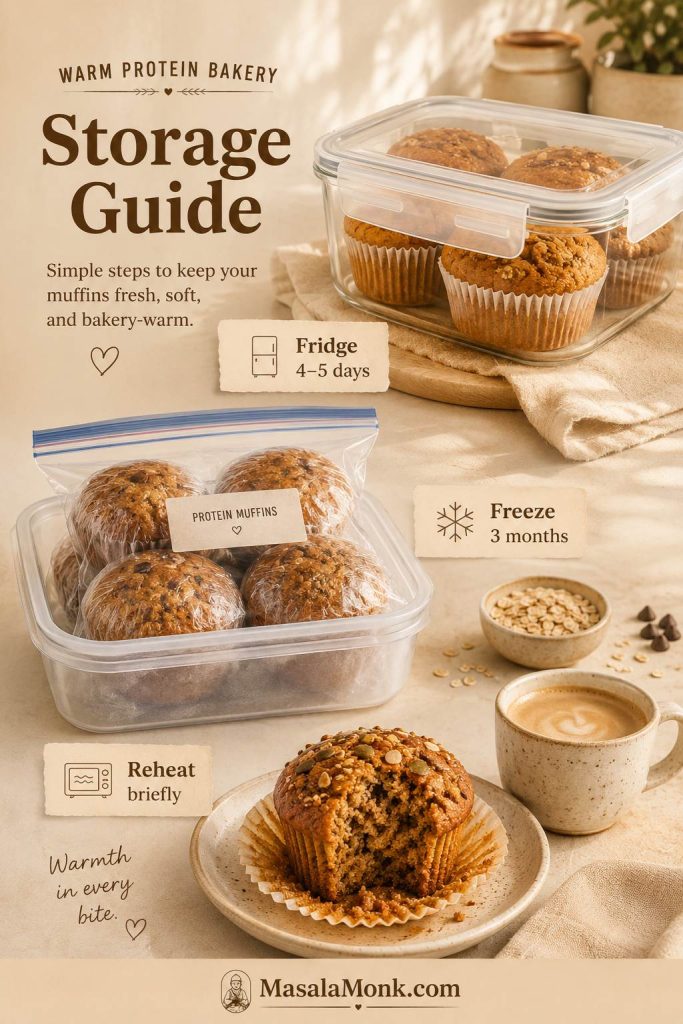
This is the kind of dessert that rewards patience. It looks simple when it goes into the fridge, then comes out the next day with softer layers, deeper coffee flavor, and a cleaner slice. That first lifted piece may never be the neatest, but once the pan opens up, the layers show beautifully.

Raw Eggs, Cooked Eggs, or No Eggs?

This is one of the most important decisions in tiramisu. Raw eggs are traditional in many versions, but not every guest is comfortable with them. Pregnant people, young children, older adults, and anyone with a weakened immune system should be especially careful with raw or undercooked eggs.

The cooked-yolk method gives the filling richness without making fully raw yolks the default. The yolks and sugar are whisked over gentle heat into a simple zabaglione-style base until pale, thick, and ribbony.

While you whisk, keep the heat gentle. If the bowl gets too hot or the mixture starts steaming heavily, lift it off the pan for a few seconds. That way, the yolks thicken into a glossy ribbon instead of scrambling into bits.

If you prefer the more traditional raw-egg method, use pasteurized eggs. To avoid eggs completely, use an eggless tiramisu method rather than simply leaving the eggs out of this recipe, because the cream structure will change.

Tiramisu egg-method guide comparing pasteurized raw eggs, cooked yolks, and an eggless method.
Choose the egg method around your kitchen needs: cooked yolks for stability, pasteurized eggs for a classic path, or eggless cream for no-egg needs.

Which Egg Method Should You Use?

MethodEgg-safety noteTextureBest use
Raw yolks and raw whitesUse pasteurized eggsLight and classicTraditional-style tiramisu
Cooked yolks + whipped creamHigher confidence if yolks are heated properlyCreamy and stableMain recipe
Cooked yolks + pasteurized egg whitesUse pasteurized whites because they are not cookedLighter and more traditionalNo-cream variation
No eggsNo raw eggs, but the cream structure changesCreamier, less classicEggless tiramisu

Important egg note

If you serve tiramisu made with raw or lightly cooked eggs, use pasteurized eggs or pasteurized egg products. That is especially important when serving higher-risk guests.

Classic vs Easy Tiramisu: Which Method Should You Use?

The biggest difference between classic Italian tiramisu and many easy versions is the cream layer. Traditionally, tiramisu relies on mascarpone, eggs, sugar, coffee, ladyfingers, and cocoa. Easier modern versions often use whipped cream for stability or skip eggs completely.

If you are looking for the strictest traditional version, use mascarpone, eggs, sugar, coffee, savoiardi, and cocoa without heavy cream. The version here keeps that flavor structure, but uses whipped cream for a more stable filling that many home cooks find easier to serve.

Both approaches have a place. A traditional egg-white version gives a lighter cream, while the cooked-yolk and whipped-cream method is more predictable when you want neat slices for guests.

StyleUsesBest forTradeoff
Traditional raw/pasteurized egg tiramisuMascarpone, yolks, whipped whitesClassic lightnessRaw egg concern unless pasteurized eggs are used
Cooked-yolk modern classicMascarpone, cooked yolks, whipped creamReliable home tiramisuModern, stable, and guest-friendly
Easy no-egg tiramisuMascarpone and whipped creamSpeed and no raw eggsCreamier and simpler, but less traditional
Eggless tiramisuCream, mascarpone, or substitutesNo-egg dietary needsNeeds its own method
Classic versus easy tiramisu comparison showing two plated slices with different cream textures.
Classic tiramisu leans lighter, while the cooked-yolk version gives more predictable slices for guests and make-ahead serving.

Best Ladyfingers for Tiramisu

The best ladyfingers for tiramisu are firm, dry savoiardi. They are crisp enough to absorb coffee without falling apart immediately, then they soften during the fridge rest.

Ladyfinger comparison for tiramisu showing firm savoiardi, soft sponge fingers, and sponge cake.
Firm savoiardi are the safest first choice because they can take a quick coffee dip without falling apart before the tiramisu sets.

Soft cake-style ladyfingers are more delicate. They can still work, but you should barely touch them to the coffee rather than giving them a full dip. If you use sponge cake instead of ladyfingers, brush it with coffee rather than dunking it.

The Ladyfinger Dip Test

After dipping, a ladyfinger should feel damp on the outside but still firm enough to lift without bending. If it starts sagging before it reaches the dish, it has absorbed too much coffee. If it still feels completely dry and chalky, the dip was too shallow.

A good rule is one second per side for firm savoiardi. For softer sponge fingers, touch them to the coffee and lift immediately. For sponge cake, do not dip at all; brush the coffee over the surface instead.

Do not worry if the first one feels awkward; after two or three ladyfingers, the rhythm becomes obvious.

Finally, remember the simplest rule: dip, do not soak. Each ladyfinger should touch the cooled coffee briefly and come out before it softens in your hand.

For the full prevention checklist, see how to keep tiramisu from getting soggy.

How Long to Chill Tiramisu

Because tiramisu needs time, a short chill may taste fine but rarely gives the same soft, sliceable texture. For the best result, make it the day before serving.

You can serve tiramisu the same day if it has at least 8 hours to chill, but it is noticeably better the next day. The coffee flavor settles, the ladyfingers soften evenly, and the cream cuts more cleanly.

This is why tiramisu is such a good hosting dessert: you are not rushing around while people are at the table. The hard work is already done, and all that is left is cocoa, a cold knife, and the first clean slice.

Chill timeResult
2–4 hoursEdible, but often loose or uneven
6 hoursBetter set, but not always ideal
8 hoursReliable minimum for this recipe
OvernightBest flavor and cleanest texture
2–3 daysStill good if covered, but softer
Tiramisu chill-time guide showing 2–4 hours loose, 8 hours set, and overnight as the cleanest slice.
The fridge turns separate layers into one dessert; therefore, overnight chilling gives tiramisu its cleanest texture and deeper coffee flavor.

Making it further ahead? See the make-ahead and storage notes before you decide how long to keep it.

That same patience matters in other make-ahead desserts too. MasalaMonk’s no bake mango cheesecake recipe is another good example, especially because fruit can make a chilled filling softer if the texture is not controlled.

How to Keep Tiramisu from Getting Soggy

In most cases, soggy tiramisu comes from too much liquid, weak structure, or not enough chill time. Fortunately, the fix starts before the dessert goes into the fridge.

Soft ladyfingers are not the problem; wet ladyfingers are. A good tiramisu should have tender layers after chilling, but the bottom of the pan should not be swimming in coffee. If you see liquid pooling, the ladyfingers were soaked too long or too much coffee was added to the dish.

Soggy tiramisu with liquid pooling beside sliceable tiramisu with clean cream and ladyfinger layers.
Soggy tiramisu usually comes from too much liquid; instead, aim for tender coffee-soaked layers that still hold their shape.

How to Prevent Soggy Tiramisu

  • Choose firm dry savoiardi instead of soft cake-style fingers.
  • Cool the coffee completely before dipping.
  • Dip one ladyfinger at a time for about one second per side, then move it straight into the dish.
  • Leave any extra coffee behind instead of adding it to the pan.
  • Keep the mascarpone thick, cold, and smooth.
  • Whip the cream to medium-stiff peaks.
  • Chill the tiramisu for at least 8 hours.
Soggy tiramisu prevention guide showing firm savoiardi, cooled coffee, quick dip, extra coffee left behind, and full chilling.
Soggy tiramisu is usually a liquid-control problem, so the safest path is dry savoiardi, cooled coffee, a fast dip, and patience.

If you love a wetter tiramisu, you can dip slightly longer, but be careful. A few extra seconds can turn firm ladyfingers into a soft pudding layer.

Alcohol, Coffee, and Cocoa: How to Balance the Flavor

Tiramisu should taste like cream, coffee, cocoa, and a little bitterness. It should not taste like plain whipped cream, wet cake, or a glass of liqueur.

The best version should not taste like sugar first. It should open with cold cream, move into coffee, and finish with enough cocoa bitterness to make the next bite feel tempting.

Tiramisu slice with labels showing cream first, coffee next, and cocoa finish.
A balanced tiramisu should taste creamy first, then coffee-rich, and finally just bitter enough from cocoa to make the next bite tempting.

Does Tiramisu Need Alcohol?

No. Alcohol is optional. Marsala, dark rum, brandy, coffee liqueur, amaretto, or Grand Marnier can add aroma and depth, but the dessert works beautifully with coffee only.

For a family-friendly tiramisu, skip the alcohol and add 1 teaspoon vanilla to the mascarpone cream. You can also stir a teaspoon of sugar into the coffee if it tastes too bitter.

Flavor goalWhat to use
Classic and cleanStrong coffee only
Warm and traditionalMarsala or dark rum
Coffee-shop styleCoffee liqueur
NuttyAmaretto or Frangelico
Brighter and citrusyGrand Marnier or orange liqueur
Family-friendlyNo alcohol, plus vanilla in the cream

What Coffee Works Best?

Espresso is ideal, but moka coffee, bold brewed coffee, or strong instant espresso can also work. The coffee should taste a little stronger than something you would casually drink, because the mascarpone cream softens its bitterness.

Avoid weak coffee. It makes tiramisu taste flat and sweet instead of balanced.

Can You Make Tiramisu Without Coffee?

You can, but it becomes a tiramisu-style dessert rather than classic tiramisu. For a no-coffee version, use hot chocolate, matcha, chai, or a fruit syrup as the soak. Keep the liquid strong and not too sweet, and dip even more carefully because many non-coffee soaks are thinner or sweeter than espresso.

When to Add Cocoa Powder

Dust cocoa just before serving if you want a clean, powdery finish. Dust it earlier if you prefer a darker, hydrated cocoa top. Both are acceptable, but the just-before-serving version looks fresher.

Tiramisu Pan Sizes: 9×13, 8×8, and Metric Baking Dishes

One reason tiramisu recipes feel confusing is that different recipes use different dish sizes. A small 8×8 tiramisu and a large 9×13 tiramisu cannot use the same number of ladyfingers or the same amount of mascarpone cream.

Dish sizeServesLadyfingersMascarponeCoffeeBest use
9×13 inch / 33×23 cm1240–45500 g300–360 mlFull recipe, parties, holidays
8×8 inch / 20 cm6–820–24250 g180 mlSmall batch
20×30 cm / about 8×12 inch8–10About 30500 g300 mlMedium, slightly taller tiramisu
Tiramisu pan-size guide comparing 9×13 inch, 8×8 inch, and 20×30 cm pans with serving and ladyfinger counts.
Pan size affects the number of ladyfingers, cream depth, and serving yield, so choose the dish before dipping and layering.

A 9×13-inch dish is the easiest default here because it gives you a generous dessert for guests and enough room for two clean layers. Use the half-batch note in the recipe card for an 8×8 pan.

A dish that is slightly larger or smaller is workable. Build two even layers, keep the coffee controlled, and prioritize balance over forcing every last drop into the pan.

Tiramisu Without Mascarpone

Mascarpone is best for classic tiramisu. It is rich, lightly sweet, and less tangy than cream cheese. If you replace it, the dessert can still be good, but it will not taste exactly the same.

When mascarpone is missing, you can still make a good layered coffee dessert, but it is better to be honest about the result: it will be tiramisu-style, not the same classic texture.

As a practical backup, cream cheese plus cream is the closest option. For something lighter, Greek yogurt works better as a healthy variation. Very smooth ricotta can give a more Italian-adjacent dairy flavor, but it will not create the same silky cream.

Mascarpone substitute guide for tiramisu showing mascarpone, cream cheese with cream, ricotta, and Greek yogurt.
Mascarpone gives tiramisu its classic soft richness; meanwhile, cream cheese, ricotta, and Greek yogurt can work only as texture-changing substitutes.

If the lighter dairy angle is what interests you most, MasalaMonk’s cottage cheese cheesecake recipe is a better fit than forcing cottage cheese or yogurt into classic tiramisu.

SubstituteWhat changesBest use
Cream cheeseTangier, denser, less classicEmergency substitute
RicottaLighter but can be grainy unless blended smoothRicotta-style tiramisu
Greek yogurtTangy, lighter, more “healthy dessert” than classic tiramisuHealthy tiramisu variation
Cream cheese + creamCloser body, still tangierBetter than plain cream cheese
Homemade mascarponeClosest replacement if made wellBest planned substitute

How to Fix Runny or Soggy Tiramisu

Most tiramisu problems come from the same few places: thin mascarpone, too much coffee, underwhipped cream, overmixed filling, or not enough time in the fridge.

Although some tiramisu problems can be improved after assembly, they cannot always be fully reversed. For example, a runny tiramisu can often be chilled longer and served in softer scoops or cups, but it will not magically become a firm slice if the cream was too loose or the ladyfingers were oversoaked. The real fix is usually in the next batch.

Tiramisu troubleshooting guide showing runny cream, wet bottom, grainy mascarpone cream, and a slice that will not hold.
Most tiramisu problems trace back to cream texture, coffee control, mixing, or chill time, so troubleshooting starts with the structure of the layers.

If the issue is wet layers, revisit the dip test. If the cream is loose or grainy, the temperature cues are usually the better place to start.

Tiramisu Troubleshooting Guide

ProblemLikely causeFix nowFix next time
Runny creamLoose mascarpone, underwhipped cream, or warm yolk mixtureChill longer; serve in cups if it still will not sliceUse thick mascarpone and medium-stiff whipped cream
Grainy creamOvermixed mascarpone or overheated egg mixtureDo not try to beat it smooth after assemblyMix mascarpone briefly and use gentle heat
Wet bottomLadyfingers soaked too long or extra coffee addedChill well and serve as a softer spoon dessertUse a 1-second dip per side and never pour coffee into the pan
Dry ladyfingersDip was too quick or chill time was too shortChill longerDip slightly deeper next time
Too bitterCoffee too harsh or too much cocoaServe with lightly sweetened cream or reduce cocoa on topUse smoother coffee and a lighter cocoa dusting
Too sweetToo much sugar or sweet liqueurAdd a heavier cocoa dusting and serve with unsweetened coffeeUse 100 g sugar instead of 120 g
Won’t slice cleanlyUnder-chilled or too much liquidChill longerRest overnight and reduce soaking
Flat flavorWeak coffeeServe with espressoUse stronger coffee next time
Grainy mascarpone creamOvermixed mascarpone, overheated yolks, or temperature shockChill and serve gently; do not keep beating itMix mascarpone briefly and fold only after the yolks cool

Most tiramisu mistakes are not dramatic failures. They usually become softer, spoonable desserts instead of clean slices. That is still delicious, but the next batch will be better once you know which detail caused the problem.

Make Ahead, Storage, and Freezing

Tiramisu is one of the best make-ahead desserts because it improves as it rests. The ladyfingers soften, the cream sets, and the coffee flavor becomes more even.

  • Best make-ahead timing: assemble the tiramisu the day before serving.
  • Fridge storage: keep it covered and refrigerated.
  • Best quality: eat within 2–3 days.
  • Serving: keep chilled until close to serving time.
  • Freezing: freeze only if needed; texture may soften after thawing.
  • Freezing tip: freeze before the final cocoa dusting, then dust after thawing.
Make-ahead tiramisu storage guide showing a covered pan in the fridge, freezer note, thawing cue, and cocoa dusting before serving.
Make tiramisu ahead for better texture, but keep it covered, cold, and cocoa-free until serving for the cleanest finish.

Do not leave tiramisu at room temperature for more than 2 hours. In hot weather or warm rooms, keep the serving window shorter and return leftovers to the refrigerator promptly.

After freezing, thaw tiramisu overnight in the refrigerator and dust with fresh cocoa after thawing. Do not thaw it at room temperature.

For the more traditional version with raw pasteurized egg whites, be stricter with storage. Keep it chilled the entire time and serve it within 24–48 hours for best quality.

For another chilled dessert that depends on layer structure, MasalaMonk’s banoffee pie recipe is a no-bake style dessert where the base, cream, and filling need to hold together before serving.

Tiramisu Variations

Once you understand the basic structure, tiramisu is easy to adapt. The trick is to keep the balance: a creamy layer, a soaked base, a bitter or bright finish, and enough chill time to bring everything together.

If you are changing the flavor, change only one major thing at a time: the soak, the cream, or the topping. Changing all three can make the dessert stop feeling like tiramisu.

Before changing flavors, it helps to understand the cream, coffee, and cocoa balance so the variation still tastes like tiramisu.

Tiramisu variations guide showing eggless, no-alcohol, pistachio, lemon, strawberry, and matcha tiramisu portions.
For the best tiramisu variations, change only one major element at a time so the dessert still tastes layered, creamy, and balanced.
Eggless Tiramisu

Use mascarpone and whipped cream without eggs. This is the best direction for readers who want no raw eggs and no cooked yolks at all, but the dessert will taste creamier and less classic than the cooked-yolk version.

No-Alcohol Tiramisu

Skip the rum or liqueur and use strong coffee only. Add vanilla to the cream if you want a rounder flavor.

For another family-friendly layered dessert, MasalaMonk’s no-bake banana pudding has a softer vanilla-banana profile built around cookies, cream, fruit, and chill time.

Pistachio Tiramisu

For pistachio tiramisu, fold a small amount of pistachio cream into the mascarpone layer and keep the coffee dip brief. Pistachio paste is rich, so start modestly and taste before adding more. Finish with chopped pistachios for texture.

Lemon or Limoncello Tiramisu

Use lemon syrup, lemon curd, or limoncello instead of a coffee-heavy profile. Keep the soak controlled so the dessert does not turn watery, and balance the lemon with enough mascarpone cream so it still feels lush.

Strawberry Tiramisu

Use a thick strawberry sauce or roasted strawberry layer rather than very juicy fresh berries. Fresh strawberries release liquid as they sit, so the fruit layer needs to be controlled if you want clean slices.

Matcha Tiramisu

Replace the coffee dip with a matcha soak and dust the top with matcha or a cocoa-matcha blend. Keep the matcha balanced so it does not taste bitter.
Cake-Style Tiramisu

A cake-style version is usually built with cake layers, mascarpone filling, coffee syrup, and cocoa instead of dipped savoiardi.

FAQs

Does tiramisu have raw eggs?

Traditional tiramisu often uses raw eggs, but this version uses cooked egg yolks for a more comfortable home method. If you make a raw-egg version, use pasteurized eggs.

What is a safer way to make tiramisu at home?

Use cooked yolks or pasteurized eggs, keep the dessert refrigerated, and do not leave it at room temperature for more than 2 hours. The cooked-yolk method gives you a good balance of classic flavor, texture, and home-kitchen confidence.

How long should tiramisu chill before serving?

Chill tiramisu for at least 8 hours. Overnight is best because the ladyfingers soften evenly and the mascarpone cream sets enough to slice.

Can I make tiramisu the same day?

Yes, if you can give it at least 8 hours in the refrigerator. However, overnight tiramisu usually tastes better and slices more cleanly because the coffee flavor settles and the layers soften evenly.

Why did my tiramisu turn runny?

Runny tiramisu usually comes from watery mascarpone, underwhipped cream, warm filling, oversoaked ladyfingers, or too little chill time. Chill it longer if it is already assembled, and use thicker mascarpone next time.

How do I stop ladyfingers from getting soggy?

Use firm dry savoiardi, cool the coffee completely, and dip each ladyfinger for about one second per side. Keep the dip brief and leave extra coffee behind instead of pouring it into the dish.

Why is my mascarpone cream grainy?

Grainy mascarpone cream usually comes from overmixing mascarpone, overheating the yolk mixture, or folding ingredients together at very different temperatures. Mix mascarpone briefly, cool the yolks until warm rather than hot, and fold gently.

Can I use instant coffee for tiramisu?

Yes. Instant espresso is better than weak brewed coffee. Make it strong, let it cool completely, and taste it before dipping the ladyfingers.

Can kids eat tiramisu?

For a kid-friendly tiramisu, skip the alcohol, use the cooked-yolk version or pasteurized eggs, and consider decaf coffee or a lighter coffee dip. Keep in mind that classic tiramisu still has a coffee flavor.

Does tiramisu need alcohol?

No. Alcohol is optional. Coffee-only tiramisu is valid and works well for a family-friendly version.

What alcohol is best in tiramisu?

Dark rum, Marsala, brandy, coffee liqueur, amaretto, and Grand Marnier can all work. Use only a small amount so the alcohol supports the coffee rather than overpowering it.

What can replace mascarpone in tiramisu?

Cream cheese, ricotta, or Greek yogurt can be used in tiramisu-style desserts, but they change the flavor and texture. Mascarpone is still the best choice for classic tiramisu.

Are ladyfingers and savoiardi the same thing?

Savoiardi are Italian ladyfingers. They are usually firm and dry, which makes them ideal for tiramisu. Some soft sponge-style ladyfingers are more delicate and need a much quicker dip.

Should cocoa powder go on before or after chilling?

Dust cocoa just before serving for the cleanest finish. If you dust before chilling, the cocoa will darken and hydrate into the top layer.

How long does tiramisu last in the fridge?

Tiramisu is best within 2–3 days when covered and refrigerated. It becomes softer as it sits. If you use raw pasteurized egg whites in the traditional option, serve it within 24–48 hours for best quality.

Is tiramisu better the next day?

Yes. Tiramisu is usually better the next day because the layers have time to soften, set, and absorb the coffee flavor evenly.

Back to top

Posted on — 2 Comments

High Protein Muffins That Stay Moist and Fluffy

High protein muffins on a cooling rack with one muffin split open to show a soft chocolate chip crumb.

Too many high protein muffins sound better than they taste. They promise easy breakfast meal prep and extra protein, then come out dry, rubbery, chalky, or heavy enough to feel like a compromise. This recipe is built the other way around: soft first, moist first, useful first.

The goal is a muffin you actually want to eat with coffee, not a “healthy” muffin you tolerate because it has protein. Greek yogurt, a reasonable amount of protein powder, oat flour or whole wheat flour, and banana or applesauce all work together to keep the crumb tender.

If you like make-ahead breakfasts in this same lane, you may also like these high protein overnight oats for a no-bake option.

Use the base recipe once, then make it fit your mornings: banana chocolate chip when you want cozy, blueberry lemon when you want fresh, pumpkin when you want softer and spiced, or cottage cheese when you want extra moisture without relying only on protein powder.

Soft Crumb, Not Chalky

Close-up of a high protein muffin torn open to show a soft moist crumb with chocolate chips.
The crumb tells you whether the recipe worked. Pull the muffins when they are just set, because they continue to firm up as they cool.

Already know you want to bake? Use the jump button to go straight to the recipe card. If you want to avoid dry protein muffins, read the batter and protein powder notes first.

Table of Contents

Use this guide to make soft protein muffins, choose the right protein base, fix texture problems, and store them for easy breakfasts or snacks.

Quick Answer: How Do You Make High Protein Muffins?

To make high protein muffins, combine flour or oat flour, protein powder, Greek yogurt, eggs, banana or applesauce, a little maple syrup or honey, leavening, and enough milk to make a sturdy muffin batter. After that, bake in a lined muffin tin until the tops spring back lightly and a toothpick comes out clean or with a few moist crumbs.

This recipe makes 12 muffins. The exact protein number depends on your protein powder, yogurt, flour, and mix-ins. Most batches land around 9–12 grams of protein per muffin, which makes them more filling without pushing the texture into dry, dense, or chalky territory.

Texture rule: the batter should be thick enough to scoop, but not dry or crumbly. When it looks stiff, loosen it gradually with milk before baking.

If you are ready to bake, jump to the recipe card. If your past protein muffins turned dry or rubbery, read the protein powder tips and troubleshooting guide first.

High Protein Muffins at a Glance

Yield12 muffins
Total timeAbout 30–35 minutes
ProteinAbout 9–12g per muffin, depending on protein powder, yogurt, flour, and mix-ins
TextureTender, lightly hearty, and muffin-like
Best first protein baseGreek yogurt + vanilla protein powder
Best no-powder pathGreek yogurt, cottage cheese, eggs, oats, nut butter, and seeds
Oven375°F / 190°C for 5 minutes, then 350°F / 175°C until done
StorageFridge 4–5 days, freezer up to 3 months
At-a-glance guide for high protein muffins showing yield, time, protein range, and freezer-friendly storage.
This 12-muffin batch is built for real meal prep: a realistic protein range, a soft crumb, and fridge-or-freezer flexibility for busy mornings.

What They Should Taste Like

These are not cupcake-style muffins, and they are not meant to taste like dry protein bars either. Instead, the crumb should be soft and lightly hearty, with enough moisture from Greek yogurt and banana or applesauce to keep each bite tender.

With banana, the muffins lean cozy and breakfast-like. Applesauce gives a more neutral base, which works better with blueberries, chocolate chips, lemon zest, or pumpkin spice. Either way, the muffin should feel satisfying without tasting like a protein powder project.

The best batch should feel like a real breakfast muffin first: warm, tender, lightly sweet, and satisfying enough that you would eat it even without counting the protein. If you add mini chocolate chips, they should give little sweet pockets in the crumb. If you choose blueberries, the muffin should feel fresher and brighter, not wet or gummy.

How Each Version Should Look Inside

Different mix-ins change the color and flavor of the crumb, but they should not change the goal: a tender muffin that still feels soft after cooling.

Crumb comparison of banana chocolate chip, blueberry lemon, and cottage cheese high protein muffins.
Banana chocolate chip is cozy, blueberry lemon is bright, and cottage cheese adds extra moisture. Every version should still bake up tender rather than chalky.

Choose Your Muffin Path

There is no single “right” way to make a higher-protein muffin. Some days you may want the extra boost from protein powder. Other times, you may want a more natural muffin built around Greek yogurt, cottage cheese, eggs, and oats. Use this table to choose the version that fits your kitchen and your taste.

PathBest forMain protein sourceTexture note
Protein powder muffinsHigher protein with simple ingredientsVanilla protein powder + Greek yogurtNeeds enough moisture so the crumb stays soft.
No-powder protein muffinsReaders who dislike protein powder tasteGreek yogurt, eggs, oats, hemp hearts, nut butterSofter and more natural, but usually lower in protein per muffin.
Cottage cheese protein muffinsMoist, filling breakfast muffinsBlended cottage cheese + eggsVery moist; needs proper baking and cooling so the centers set.
Decision guide showing protein powder, no-powder, and cottage cheese paths for high protein muffins.
Choose by texture and taste, not just protein. Protein powder gives the biggest boost; no-powder and cottage cheese versions lean more real-food and naturally moist.

Once you choose your path, use the protein powder notes for the main version, the no-powder section for real-food protein muffins, or the cottage cheese variation if you want extra moisture.

Why This High Protein Muffin Recipe Works

Greek yogurt keeps the crumb moist

Greek yogurt is one of the most useful ingredients here because it adds protein and moisture at the same time. It also helps balance the drying effect of protein powder, especially if you are using whey or a very absorbent plant-based powder.

Greek yogurt also gives the recipe a real-food protein base instead of making the entire muffin depend on powder. It is naturally protein-rich, and Harvard Health includes Greek yogurt among useful protein sources, which is why it works so well in breakfast recipes that need both moisture and staying power.

Greek yogurt being added to muffin batter ingredients to keep high protein muffins moist.
Greek yogurt helps twice: it adds protein and protects the crumb from drying out, which makes it one of the most useful ingredients in this batter.

Protein powder adds structure, but not too much

The fastest way to ruin protein muffins is to treat protein powder like regular flour. It absorbs liquid, changes the structure of the batter, and can make muffins firm when used too heavily. So this recipe uses enough protein powder to support the high-protein goal without letting it take over the texture.

A hotter oven start helps muffins rise

Start the muffins at a slightly higher oven temperature, then finish them lower. That short hot start encourages lift, while the gentler finish helps the center bake through without drying out the edges.

Banana or applesauce protects the texture

Mashed banana gives the muffins a naturally sweeter breakfast flavor. If you want a more neutral base, use unsweetened applesauce instead. Both add moisture, which is especially helpful in a protein-rich batter.

A little fat makes them taste like real muffins

Low-fat protein muffins often taste dry because too many softening ingredients are removed at once. That is why a modest amount of oil or melted butter helps the crumb stay tender, especially after refrigeration or freezing.

How Much Protein Should a Protein Muffin Have?

A realistic protein muffin can land anywhere from about 7g to 14g protein per muffin depending on the formula. Protein-powder versions can go higher, but the texture often becomes harder to protect. For this base recipe, the goal is about 9–12g protein per muffin with a soft, repeatable texture.

For exact numbers, use the labels on your own protein powder, yogurt, flour, and milk. Treat the nutrition estimate as a helpful range, not a fixed number. You can also look up individual ingredients in USDA FoodData Central if you want a more precise calculation.

That matters because a muffin with 20g protein is not automatically better if it tastes tough, chalky, or too lean. For most home bakers, the better target is a muffin that gives more protein than a regular muffin while still being enjoyable enough to make again.

Useful rule: a slightly lower-protein muffin that tastes good is more valuable than an ultra-high-protein muffin nobody wants to eat.

High protein muffin with a note showing a realistic 9 to 12 gram protein range and soft texture.
A realistic protein target protects texture. In practice, a softer 9–12g muffin is more useful than a dry batch chasing the biggest number.

Ingredients for High Protein Muffins

Best first version to make

Best first batch: start with oat flour, almond flour, vanilla protein powder, plain Greek yogurt, mashed banana, neutral oil, and mini chocolate chips. That version gives the easiest balance of flavor, moisture, and texture. Once you like the base, try applesauce, blueberries, pumpkin, or cottage cheese.

Ingredients for high protein muffins including oat flour, protein powder, Greek yogurt, banana, eggs, and chocolate chips.
Balance matters more than any one “healthy” add-in: flour gives body, Greek yogurt adds moisture, eggs set the crumb, and protein powder brings the boost.

Oat flour, white whole wheat flour, or all-purpose flour

Oat flour gives these muffins a wholesome breakfast feel. White whole wheat flour gives a slightly nutty but still soft muffin. All-purpose flour gives the most classic texture. For the base recipe, use 100g oat flour or 120g all-purpose or white whole wheat flour.

Comparison of oat flour, white whole wheat, and all-purpose flour textures in high protein muffins.
Flour choice changes the crumb: oat flour is heartier, white whole wheat adds soft nuttiness, and all-purpose flour gives the most classic muffin texture.

If oats are your favorite breakfast base, this guide to high protein oatmeal has more ideas for using oats with yogurt, protein powder, cottage cheese, seeds, and nut butter.

Almond flour or extra oat flour

A small amount of almond flour adds tenderness and helps keep the muffin from tasting too lean. If you do not want to use almond flour, use extra oat flour instead. Avoid replacing all the flour with almond flour unless you are using a recipe designed for that structure.

Protein powder

Vanilla protein powder is the easiest choice because it adds sweetness and flavor. Plain protein powder can work, but the muffins may need more vanilla, cinnamon, sweetener, or mix-ins. For example, chocolate protein powder works best in chocolate chip, double chocolate, or banana chocolate versions.

Greek yogurt

Use plain Greek yogurt. Full-fat or 2% yogurt gives the softest result, but nonfat Greek yogurt also works. If the batter looks too stiff after mixing, add a small splash of milk until it loosens.

Banana or applesauce

Use mashed ripe banana for a banana-forward muffin. If you want a more neutral base, use unsweetened applesauce instead. Banana gives more flavor and sweetness; applesauce keeps the muffin more flexible for blueberry, chocolate chip, or pumpkin variations.

Banana and applesauce high protein muffin comparison showing different moisture and flavor bases.
Banana makes the batch sweeter and more banana-bread-like. Applesauce keeps the base more neutral for blueberry, chocolate chip, or pumpkin variations.

Eggs, milk, and oil

Eggs give structure, milk adjusts the batter, and a little oil or melted butter keeps the crumb tender. Think of the milk as an adjustment, not a fixed amount. Start with less, then add only what the batter needs.

Mix-ins

Mini chocolate chips, blueberries, chopped walnuts, lemon zest, cinnamon, pumpkin spice, and diced strawberries can all work. Keep mix-ins to about ½–¾ cup so the muffins bake evenly.

Flavor and sweetness

Protein powder, oats, and Greek yogurt can mute sweetness once baked. If your protein powder is plain or lightly sweetened, use the full amount of maple syrup or honey and do not skip the vanilla, cinnamon, or salt. For a more treat-like muffin, mini chocolate chips usually help more than extra sweetener because they give little pockets of flavor in every bite.

Best Protein Powder for Muffins

Protein powder can make muffins better, but it can also make them dry if the batter is not balanced. Different powders absorb liquid differently, so use the batter texture as your final guide.

This is the part that decides whether your muffins taste like breakfast or like a protein bar in muffin form. The same recipe can turn out soft with one powder and dry with another, so the batter matters more than brand loyalty.

Four muffin batter bowls showing how whey, casein, and plant protein powders create different batter textures.
The same recipe can bake differently with whey, casein, or plant protein. Start with the formula, then adjust the batter before it goes into the pan.
Protein powder typeWhat to expect in muffinsBest adjustment
Whey isolateCan bake firm or dry if overused.Add extra yogurt or milk and check early for doneness.
Whey blendUsually easier than pure isolate and works well in muffin batter.Start with the recipe amount of milk, then adjust if needed.
CaseinAbsorbs a lot of liquid and can make the batter sturdy.Loosen gradually with milk until the batter is easy to scoop.
Pea proteinGood structure, but can become dense or earthy.Use enough flavor, moisture, and gentle mixing.
Plant protein blendOften reliable, but brands vary widely in absorption.Judge by batter texture, not just the printed amount of milk.
CollagenNot ideal as the only protein powder replacement.Use as a partial boost, not a full swap for flour or protein powder.

How protein powder changes batter moisture

Protein muffin batter absorption guide showing thick, just-right, and too-loose batter after adding milk.
A stiff batter does not always mean the recipe is wrong. Often, the protein powder simply needs a slower, splash-by-splash milk adjustment.

Protein powder rule: do not keep adding protein powder just to raise the number. Once protein powder becomes too large a share of the dry ingredients, muffins turn tough, dry, or heavy. A better muffin with 9–12g protein is more useful than a 20g muffin nobody wants to eat.

As a practical starting point, avoid replacing more than about one-third of the dry ingredient base with protein powder unless the recipe has been specifically built for that much powder. The more powder you add, the more moisture, fat, flavor, and careful baking you usually need.

Check the batter texture before baking

Before you bake: if the batter looks like cookie dough, it needs more milk. If it pours like pancake batter, it needs oat flour and a short rest. The sweet spot is thick, creamy, and scoopable.

Three bowls showing too-thick, just-right, and too-loose batter textures for high protein muffins.
This is the texture check that prevents most dry protein muffins. The batter should hold a scoop without crumbling or pouring.

If your batter already looks too stiff or too loose, fix it here before filling the pan. For finished muffins that came out dry, dense, or rubbery, jump to troubleshooting.

How to fix thick or loose batter

Muffin batter being fixed with milk for thick batter and oat flour for loose batter.
Most batter problems are fixable before baking. Use milk to loosen a stiff mix, or oat flour to tighten a loose one, then let the batter rest briefly.

This is the best moment to fix the batter. If it does not look scoopable, check the batter texture guide before filling the muffin tin.

Step-by-Step Method

1. Mix the dry ingredients

In a large bowl, whisk together the flour or oat flour, almond flour or extra oat flour, protein powder, baking powder, baking soda, salt, and cinnamon. Whisking first helps distribute the protein powder and leavening evenly.

2. Whisk the wet ingredients

In a separate bowl, whisk the Greek yogurt, eggs, mashed banana or applesauce, maple syrup or honey, oil or melted butter, milk, and vanilla. The mixture should look smooth and creamy.

3. Combine gently

Add the wet ingredients to the dry ingredients and fold with a spatula. Stop when no dry streaks remain. Do not worry if the mixture looks a little sturdier than regular muffin batter; that is normal here.

This is the point where the recipe either stays tender or starts getting tough. A few tiny lumps are fine; a perfectly smooth batter is not the goal.

High protein muffin batter being gently folded with a spatula before overmixing.
Stop folding as soon as the batter comes together. A few streaks are better than overmixing, which can make protein muffins dense or rubbery.

4. Check and fix the batter texture

The batter should be creamy, scoopable, and easy to portion. It should mound slightly on a spoon but still spread slowly when scooped into the muffin cup. If it looks dry or crumbly, add a small splash of milk. If it pours like pancake batter, add oat flour 1 tablespoon at a time and let it rest for 5 minutes.

5. Let the batter rest if needed

If using oat flour, casein, pea protein, or a thick plant protein blend, let the batter rest for 5 minutes before scooping. Some powders hydrate slowly, so a short rest can make the final texture more even. If it becomes too stiff after resting, loosen it with 1–2 tablespoons of milk.

6. Fold in mix-ins

Fold in chocolate chips, blueberries, nuts, or other mix-ins gently. Overmixing at this point can make the muffins dense.

7. Fill the muffin tin

Line a 12-cup muffin tin and lightly spray the liners. Fill each cup about ¾ full for regular muffins, or slightly fuller for taller tops.

High protein muffin batter scooped into a muffin tin with cups filled about three-quarters full.
Fill each muffin cup about three-quarters full. That gives the batter room to rise while still creating a generous, bakery-style top.

8. Bake and cool

Bake at the higher starting temperature first, then reduce the oven temperature without opening the door. After that, let the muffins cool in the pan for 10 minutes before moving them to a rack. A little patience here pays off because the centers continue to settle as they cool.

Bake Time, Temperature, and Doneness

For the best balance of lift and moisture, start the muffins at 375°F / 190°C for 5 minutes. Then reduce the oven to 350°F / 175°C and bake for another 12–17 minutes, depending on your oven, muffin tin, protein powder, and mix-ins.

High protein muffins baking with a hot-start oven cue of 375 degrees then 350 degrees.
A short hot start helps protein muffins lift before the lower temperature finishes the centers gently. This gives better rise without drying the edges.

How to check doneness

The muffins are done when the tops spring back lightly and a toothpick inserted in the center comes out clean or with a few moist crumbs. Do not wait until the tops feel hard. Instead, pull them when they are just set because they continue to firm up as they cool.

Toothpick test showing moist crumbs on a high protein muffin to indicate doneness.
Do not wait for a perfectly clean toothpick if you want a softer crumb. A few moist crumbs usually mean the muffins are done.

A good batch should rise slightly, feel soft when pressed, and smell warm and lightly sweet. The tops should not feel hard when they leave the oven. If they do, the batch likely baked a few minutes too long.

Cool before storing

Do not skip cooling: these muffins can seem slightly soft in the center when hot. Give them 10 minutes in the pan and more time on a rack before judging the final texture.

High protein muffins cooling on a wire rack with one muffin split open after cooling.
Cooling is part of the recipe, not an afterthought. Letting the muffins rest helps the centers settle and keeps extra steam out of the storage container.

After baking, let the muffins cool before judging the final crumb. Then use the storage and freezing tips if you are making them for meal prep.

Easy Muffin Variations

Use the base recipe as a flexible formula. The mixture should be sturdy enough to scoop, but still soft enough to settle into the muffin cups. Adjust with milk if your protein powder makes it too stiff.

Choose the version based on what you want the muffin to feel like: banana for cozy breakfast, blueberry for fresh and bright, chocolate chip for snack prep, oatmeal for a heartier morning muffin, and pumpkin for a softer fall batch.

Best first variation: banana chocolate chip is the easiest crowd-pleaser. Blueberry lemon is fresher, pumpkin is softer, and cottage cheese is best when you want extra moisture without relying only on protein powder.

For the easiest first batch, start with banana chocolate chip. For a brighter version, try blueberry lemon; for extra moisture, use the cottage cheese version.

Banana protein muffins

Choose this when you want the coziest version. Mashed ripe banana makes the muffins taste closer to banana bread, especially with cinnamon and mini chocolate chips.

Banana chocolate chip high protein muffins with one muffin split open to show a moist crumb.
Banana chocolate chip is the coziest variation: ripe banana adds sweetness, while mini chips spread little pockets of flavor through the crumb.

Blueberry protein muffins

Choose this when you want something fresher and brighter. Applesauce keeps the base neutral, while blueberries and lemon zest make the muffins feel more like a morning bakery muffin.

Blueberry lemon high protein muffins with one muffin split open to show a soft crumb and blueberry pockets.
Blueberry lemon gives the same protein muffin base a fresher, brighter flavor. Keep the batter thick enough so the berries stay suspended instead of sinking.

Chocolate chip protein muffins

Choose this when you want the batch to feel more like a snack than a strict breakfast. Mini chips spread through the crumb better, so you get chocolate in more bites without overloading the batter.

Chocolate chip high protein muffins served with Greek yogurt and fruit for snack prep.
For snack prep, mini chocolate chips make the muffins feel more satisfying without overloading the batter. Pair one with yogurt and fruit for a fuller bite.

Oatmeal protein muffins

For a heartier breakfast muffin, use oat flour and a small amount of rolled oats. Avoid steel-cut oats here because they will not soften properly in a standard muffin bake.

Pumpkin protein muffins

To make a fall-style batch, replace the banana or applesauce with pumpkin puree, add pumpkin pie spice, and use chocolate chips or walnuts. Because pumpkin adds a lot of moisture, these muffins may need the longer end of the bake window.

Pumpkin high protein muffins with a soft orange crumb and warm spice cues.
Pumpkin adds moisture, color, and warm spice, but it also softens the batter. Use the longer end of the bake window if the centers need more time.

Cottage cheese protein muffins

Choose this when you want extra moisture and a softer center. This is the best cottage cheese protein muffin direction if you want more real-food protein without making the batch depend only on powder. Blend the cottage cheese into the wet ingredients first so the batter bakes smooth instead of curdy.

Cottage cheese protein muffins with blended cottage cheese and a split muffin showing a smooth tender crumb.
Cottage cheese works best when blended into the wet ingredients first. That simple step adds moisture without leaving curdy pockets in the crumb.

For more breakfast ideas using the same ingredient, see cottage cheese for breakfast.

How to Make High Protein Muffins Without Protein Powder

You can make protein-rich muffins without protein powder, but the recipe needs a different strategy. For a no-powder batch, think in parts: a creamy protein base, eggs for structure, flour for body, and a little fat, seeds, or nut butter for staying power.

Important: this is not a direct one-for-one swap. If you simply remove the protein powder from the main recipe, the batter balance changes. Use the no-powder formula below instead.

If you are using protein powder after all, return to the main recipe card. If you want to avoid powder completely, follow the no-powder formula below rather than removing the powder from the main batter.

Best no-powder formula

For muffins without protein powder, start with a structure that balances moisture, lift, body, and staying power:

  • Creamy protein base: ¾–1 cup Greek yogurt or blended cottage cheese
  • Structure: 2 eggs
  • Body: 1 cup oat flour + 1 cup all-purpose or white whole wheat flour
  • Staying power: ¼–½ cup hemp hearts or nut butter
  • Moisture and flavor: banana or applesauce
  • Lift: 2 teaspoons baking powder + ½ teaspoon baking soda
  • Balance: ½ teaspoon salt
No-powder high protein muffin formula with Greek yogurt or cottage cheese, eggs, flour, seeds, nut butter, and a finished muffin.
A no-powder protein muffin needs its own structure. Build around yogurt or cottage cheese, eggs, flour, and seeds or nut butter instead of simply removing protein powder.

This will usually give less protein than a protein-powder muffin. The flavor is often more natural, though, and the texture can be softer.

The same idea works in other breakfast batters too. These oat pancakes use oats, cottage cheese, and high-protein options in a way that feels very similar: simple ingredients, better texture, and no need to rely only on protein powder.

Best real-food protein options

IngredientHow it helpsBest use
Cottage cheeseAdds protein and moisture.Blend with wet ingredients for a smooth muffin.
Greek yogurtAdds protein and keeps the crumb soft.Use in banana, blueberry, and chocolate chip muffins.
EggsAdd structure and protein.Useful in almost every muffin formula.
Oats or oat flourAdd breakfast texture and slow-digesting carbs.Best for oatmeal and banana protein muffins.
Nut butterAdds fat, flavor, and some protein.Best in banana, chocolate, and peanut butter muffins.
Hemp, flax, or chiaAdds protein, fiber, and texture.Use in small amounts so the muffins do not turn heavy.

For the best no-powder result, use cottage cheese or Greek yogurt as part of the wet base rather than treating them like simple add-ins. They help the batter stay moist while adding protein in a more natural way.

Troubleshooting: Why Are My Protein Muffins Dry, Dense, or Rubbery?

Most protein muffin problems are not disasters. They are signals. Dry muffins, sticky centers, flat tops, and chalky flavor usually mean the batter needed a little more moisture, less mixing, or a shorter bake.

If your first batch is not perfect, do not treat it like a failure. Protein muffin batter is more sensitive than regular muffin batter because protein powder, oats, yogurt, and cottage cheese all hold moisture differently. Most problems can be fixed by changing the liquid, mixing less, or pulling the muffins from the oven a little earlier.

The batter usually tells you what it needs. A stiff batter needs a little milk. A loose batter needs oat flour and a short rest. Finally, flat flavor usually needs more vanilla, cinnamon, salt, fruit, or chocolate next time.

Dry vs moist: read the crumb

Dry protein muffin crumb compared with soft moist protein muffin crumb for troubleshooting.
Dry protein muffins usually point back to the batter. More moisture, less overbaking, and a better powder-to-flour balance can change the result.

If the problem started before baking, go back to the batter texture cue. If the muffins looked fine going in but came out dry, check the bake time and doneness notes.

Protein muffin troubleshooting guide

Troubleshooting guide for high protein muffins showing fixes for dry, rubbery, chalky, wet, flat, and stuck muffins.
Most protein muffin problems have a simple cause. Once you know whether it is moisture, mixing, bake time, or liners, the next batch is easier to fix.

Use the tables below like a quick diagnosis: find what happened, then adjust the next batch before changing the whole recipe.

Texture problems

ProblemLikely reasonFix
Dry muffinsToo much protein powder, not enough moisture, or overbaking.Add more yogurt or milk next time and check the muffins earlier.
Rubbery textureThe batter was overmixed after the wet and dry ingredients were combined.Fold gently and stop as soon as the batter comes together.
Chalky tasteThe protein powder flavor is too strong or too much powder was used.Use a better-tasting powder, add cinnamon or vanilla, or reduce the powder slightly.
Wet centerToo much fruit, yogurt, or cottage cheese; muffins may also need more cooling.Bake 2–4 minutes longer and let the muffins cool fully before storing.

Baking and pan problems

ProblemLikely reasonFix
Flat topsThe oven was not hot enough at the start or the batter was too thin.Use the hot-start method and keep the batter thick enough to hold shape.
Muffins stick to linersLow-fat, high-protein batters often cling to paper liners.Spray the liners lightly or use silicone muffin cups.
Blueberries sinkThe berries were too wet, too large, or folded into thin batter.Toss berries with a little flour and keep the batter thick.

Batter and flavor fixes

ProblemLikely reasonFix
Batter too thickThe protein powder absorbed more liquid than expected.Add milk gradually until the batter softens.
Batter too thinToo much yogurt, fruit, or milk was added.Add oat flour 1 tablespoon at a time and let the batter rest for 5 minutes.
Muffins taste “healthy” in a bad wayNot enough flavor against the protein powder.Add cinnamon, vanilla, banana, chocolate chips, lemon zest, or a pinch more salt.

How to Store and Freeze Protein Muffins

These muffins are at their best once fully cooled, which makes them useful for breakfast prep. Bake a batch, cool them completely, then keep a few in the fridge and freeze the rest for mornings when you want something filling without cooking.

For another freezer-friendly breakfast that works well on busy mornings, these freezer-friendly breakfast burritos are a savory option to keep alongside muffins.

Storage guide for high protein muffins showing fridge storage, freezer storage, and reheating.
Store protein muffins only after they cool completely. Then refrigerate the week’s batch and freeze the rest so the texture stays fresher for longer.

Meal prep tip: save the base recipe once, then change only the fruit, mix-ins, and protein powder adjustment. The batter texture should stay the same even when the flavor changes.

Storage times

Storage methodHow longBest tip
Room temperatureSame day, or overnight if your kitchen is coolFor longer storage, refrigerate because these muffins are moist and yogurt-based.
Refrigerator4–5 daysStore in an airtight container with a paper towel to absorb moisture.
FreezerUp to 3 monthsFreeze individually, then move to a freezer bag or airtight container.
Reheating15–45 secondsMicrowave briefly until just warm, not hot and tough.

What to Serve with High Protein Muffins

These muffins work well as a quick breakfast, lunchbox item, pre-workout bite, or afternoon snack. For a fuller breakfast, serve one with Greek yogurt, fruit, boiled eggs, cottage cheese, nut butter, or a smoothie.

High protein muffins served with Greek yogurt, fruit, eggs, and coffee for breakfast meal prep.
One muffin can be a quick snack, but it becomes a fuller breakfast with Greek yogurt, fruit, eggs, cottage cheese, or coffee.

When you want a softer, bakery-style breakfast, warm one muffin briefly and split it with a little butter, peanut butter, or almond butter.

For snack prep, pair this recipe with healthy oat protein bars so you have both baked muffins and grab-and-go bars ready for the week.

Once you understand the batter, this becomes an easy recipe to repeat. Keep the base the same, change the fruit or mix-ins, and you have a breakfast muffin that can move from weekday meal prep to a weekend coffee plate without feeling like “diet food.”

For your own next batch, note the protein powder you used and how much milk the batter needed. Once you know that one detail, this recipe becomes easy to repeat with banana, blueberries, chocolate chips, pumpkin, or cottage cheese.

Ready to bake? The full recipe card below gives you the exact amounts, bake time, and adjustment notes. If your protein powder is very absorbent, start with the lower milk amount and add more only after mixing.

High Protein Muffins Recipe Card

A flexible, meal-prep friendly muffin base made with Greek yogurt, protein powder, oat flour or whole wheat flour, and banana or applesauce. Use the notes below to adjust the batter for your protein powder and favorite mix-ins.

Yield12 muffins

Prep Time10 minutes

Bake Time17–22 minutes

Total Time30–35 minutes

High protein muffins recipe card image with yield, time, protein range, and batter texture cue.
Save the texture cue along with the ingredient list: the batter should hold its shape, feel creamy, and scoop easily before it goes into the muffin tin.

Equipment

  • 12-cup muffin tin
  • Muffin liners or silicone muffin cups
  • Mixing bowls
  • Whisk
  • Rubber spatula
  • ¼ cup scoop or spoon
  • Wire cooling rack

Ingredients

Dry ingredients

  • 1 cup oat flour, 100g, for the default breakfast-style version
  • Flour swap: use 1 cup all-purpose or white whole wheat flour, 120g, for a softer classic muffin texture
  • ½ cup almond flour, about 50–55g, for extra tenderness
  • Almond-free swap: use ½ cup extra oat flour instead
  • ½ cup vanilla protein powder, about 50–60g
  • 2 teaspoons baking powder
  • ½ teaspoon baking soda
  • ½ teaspoon fine salt
  • 1 teaspoon cinnamon

Wet ingredients

  • ¾ cup plain Greek yogurt, about 180g
  • ½ cup mashed ripe banana or unsweetened applesauce, about 120g
  • 2 large eggs
  • ⅓ cup maple syrup or honey, about 80ml
  • 3 tablespoons neutral oil or melted butter, about 45ml
  • 3–6 tablespoons milk, about 45–90ml, starting with 3 tablespoons and adding more only if the batter looks too stiff
  • 2 teaspoons vanilla extract

Optional mix-ins

  • ½ cup mini chocolate chips
  • ½–¾ cup blueberries
  • ½ cup chopped walnuts or pecans
  • 1 tablespoon lemon zest for blueberry muffins
  • ½ teaspoon pumpkin pie spice for a warmer flavor

Instructions

  1. Preheat the oven. Preheat to 375°F / 190°C. Line a 12-cup muffin tin and lightly spray the liners.
  2. Mix the dry ingredients. In a large bowl, whisk together the flour, almond flour or extra oat flour, protein powder, baking powder, baking soda, salt, and cinnamon.
  3. Mix the wet ingredients. In a second bowl, whisk Greek yogurt, mashed banana or applesauce, eggs, maple syrup or honey, oil or melted butter, 3 tablespoons milk, and vanilla.
  4. Combine gently. Add the wet ingredients to the dry ingredients. Fold with a spatula until just combined.
  5. Adjust the batter. The batter should be sturdy but not dry. If it looks stiff, add a small splash of milk. If it looks too loose, add oat flour 1 tablespoon at a time and rest for 5 minutes.
  6. Rest if needed. If using oat flour, casein, pea protein, or a very absorbent plant protein powder, let the batter rest for 5 minutes before scooping.
  7. Add mix-ins. Fold in chocolate chips, blueberries, nuts, or other mix-ins. Do not overmix.
  8. Fill the muffin tin. Divide the batter between 12 muffin cups, filling each about ¾ full.
  9. Bake with a hot start. Bake at 375°F / 190°C for 5 minutes. Without opening the oven, reduce the temperature to 350°F / 175°C and bake for 12–17 more minutes.
  10. Check for doneness. The muffins are done when the tops spring back lightly and a toothpick comes out clean or with a few moist crumbs.
  11. Cool properly. Cool in the pan for 10 minutes, then transfer to a wire rack. Let the muffins cool before storing.

Recipe Notes

  • Best texture cue: the batter should mound on a spoon but still spread slowly in the muffin cup.
  • Protein powder varies: if your batter looks dry, add milk gradually before baking.
  • Banana version: use mashed ripe banana instead of applesauce.
  • Neutral base: use applesauce and vanilla protein powder.
  • Softer muffins: avoid overbaking and give the muffins enough cooling time.
  • Sticking prevention: use silicone liners or spray paper liners lightly.
  • Dairy-free batch: use thick dairy-free yogurt and a plant-based protein powder, then adjust the milk as needed.

Approximate Nutrition

Approximate per muffin, based on 12 muffins: 180–230 calories, 9–12g protein, 20–28g carbohydrates, 6–10g fat, and 2–4g fiber. Exact numbers vary by protein powder, yogurt, flour, sweetener, milk, and mix-ins.

Storage

Store fully cooled muffins in an airtight container in the refrigerator for 4–5 days, or freeze for up to 3 months. Reheat briefly in the microwave until just warm.

FAQs About High Protein Muffins

How much protein is in each muffin?

Each muffin has about 9–12 grams of protein depending on the protein powder, yogurt, flour, milk, eggs, and mix-ins you use. For the most accurate number, calculate using the exact brands and amounts in your kitchen.

What if I do not want to use protein powder?

A no-powder version needs a slightly different formula built around cottage cheese, Greek yogurt, eggs, oats, nut butter, or seeds. Simply removing the protein powder from this recipe will change the flour-to-liquid balance.

Which protein powder works best for muffins?

A vanilla whey blend or plant-based blend is the easiest starting point. Whey isolate can bake dry if used heavily, while casein and some plant powders may need extra milk because they absorb more liquid.

Why did my protein muffins turn dry?

Dry muffins usually come from too much protein powder, not enough liquid, overbaking, or using a powder that absorbs heavily. Next time, add more yogurt or milk and check the muffins earlier.

Why is my batter thicker than regular muffin batter?

Protein powder, oat flour, and Greek yogurt all make the batter sturdier than a classic muffin batter. It should still be scoopable, not dry. Let it rest for 5 minutes, then loosen with a small splash of milk if needed.

Does oat flour work in this recipe?

Oat flour works well and gives the muffins a breakfast-style flavor. The texture will be slightly heartier than all-purpose flour. If the batter gets too stiff, add a little more milk.

How should I freeze and reheat them?

Cool the muffins fully, freeze them individually, then move them to a freezer bag or airtight container for up to 3 months. To reheat, microwave briefly from frozen or thaw overnight in the fridge.

How do I make a dairy-free version?

Choose a thick dairy-free yogurt and a plant-based protein powder. Because plant-based powders often absorb more liquid, add milk gradually until the batter looks sturdy but workable.

Blueberries or chocolate chips: which works better?

Both work well, but they give different results. Blueberries make the muffins feel fresher and more breakfast-like, while mini chocolate chips make them feel more snackable. Keep mix-ins around ½–¾ cup so the muffins bake evenly.

How do I know when they are done?

The tops should spring back lightly, and a toothpick should come out clean or with a few moist crumbs. Pull them before they feel firm and dry because they continue to set as they cool.

Are these filling enough for breakfast?

They can be, especially when paired with fruit, Greek yogurt, cottage cheese, eggs, or coffee. On their own, they are more filling than a regular muffin because they include protein-rich ingredients and a more substantial crumb.

If you try these, leave a note with the protein powder you used, whether you chose banana or applesauce, and how much milk your batter needed. Those little details often help the next reader get a softer batch on the first try.

Back to top

Posted on — 2 Comments

Breakfast Casserole with Hash Browns

Breakfast casserole with hash browns, sausage, eggs, cheese, peppers, and golden edges in a 9x13 baking dish.

This breakfast casserole with hash browns is the egg-based brunch bake to make when you want something hearty, cheesy, sliceable, and easy to prep ahead. Frozen shredded hash browns, eggs, sausage, cheese, and a creamy egg mixture bake together in a 9×13 pan until the center is softly set, the cheese melts into the potatoes, and the edges turn golden.

The key is moisture control. Hash brown breakfast casserole can turn watery, greasy, rubbery, or bland if the potatoes are too wet, the meat is not drained, or the vegetables go in raw. This version shows you how to avoid that, plus how to make it with bacon, ham, no meat, hash brown patties, or overnight prep.

It is the kind of casserole that makes sense when the morning already has enough going on, whether that means Christmas breakfast, Easter brunch, overnight guests, a weekend family breakfast, or a meal-prep Sunday where one pan needs to handle the eggs, potatoes, cheese, and sausage.

This pan is especially good for the kind of morning where people drift into the kitchen at different times, coffee is still being poured, and nobody wants to stand at the stove making eggs in batches. It comes out hot, cheesy, and ready to slice, and everyone can make it their own with hot sauce, scallions, salsa, or fruit on the side.

This is the egg-based breakfast version. If you were looking for the creamy cheesy potato side dish made with sour cream, cheddar, cream soup or homemade sauce, and a crunchy topping, use this hashbrown casserole recipe instead. That one is the dinner-side and potluck version; this one is the breakfast casserole with eggs.

Quick Answer: Breakfast Casserole with Hash Browns

To make breakfast casserole with hash browns, layer thawed and patted-dry frozen shredded hash browns in a greased 9×13-inch baking dish with cooked sausage, sautéed onion and bell pepper, and shredded cheese. Pour over a mixture of eggs, milk or half-and-half, sour cream or Greek yogurt, and seasoning. Bake at 350°F / 175°C for 45–55 minutes, or until the center is set and the edges are lightly golden.

The texture is much better when the hash browns are thawed and excess moisture is removed before baking. This keeps the casserole from turning watery and helps the eggs set more evenly. If that is your main concern, the watery casserole fixes below are worth reading before you assemble the pan. If you assemble it the night before, bake it cold from the fridge and add a few extra minutes as needed.

The finished bake should feel hearty but not heavy: tender eggs, savory sausage, melted cheese, and hash browns that taste like breakfast potatoes instead of a wet potato layer.

Best default formula: 30 oz / 850 g frozen shredded hash browns + 10 large eggs + 1 lb / 454 g cooked sausage + 2 cups / 225 g cheese + 1 cup / 240 ml milk or half-and-half + ½ cup / 120 g sour cream or Greek yogurt.

This is the version I would choose for a holiday breakfast, a brunch table, or a meal-prep pan because it is sturdy enough to slice but still soft and creamy in the center.

Lifted slice of hash brown breakfast casserole showing eggs, sausage, cheese, peppers, and shredded potato layers.
A clean slice tells you the casserole had enough eggs, the hash browns were not too wet, and the pan rested before cutting.

Hash Brown Breakfast Casserole at a Glance

Best pan 9×13-inch / 23×33 cm baking dish
Oven temperature 350°F / 175°C
Hash browns 30 oz / 850 g frozen shredded hash browns, thawed and patted dry
Eggs 10 large eggs for balanced texture; 12 for a taller egg bake
Default protein 1 lb / 454 g breakfast sausage, cooked and drained
Cheese 2 cups / about 225 g shredded cheddar, Colby Jack, Monterey Jack, or pepper Jack
Bake time 45–55 minutes, or 55–65 minutes if chilled overnight
Make-ahead Assemble overnight, or prep components separately for the cleanest texture

Breakfast Casserole vs Hashbrown Casserole

The phrase “hashbrown casserole” can mean two different dishes. This recipe is a breakfast casserole with hash browns, which means it has eggs, cheese, hash browns, and usually sausage, bacon, ham, or vegetables. It is baked like a brunch egg casserole and served in slices.

A classic side-dish hashbrown casserole is different. That version is usually a creamy potato bake with sour cream, cheddar, cream soup or homemade sauce, butter, and sometimes a crunchy topping. It is served with dinner, holiday meals, potlucks, and barbecue-style mains. This breakfast version stays in the egg-and-brunch lane.

Use this breakfast version when you want eggs and protein in the same pan. Use the side-dish version when you want a cheesy potato casserole to serve next to ham, chicken, barbecue, or a holiday dinner spread.

Split comparison of egg-based breakfast casserole with hash browns and creamy side-dish hashbrown casserole.
Although both dishes use hash browns, this breakfast casserole is built around eggs and protein, while the side-dish version is creamier, softer, and meant for dinner plates or potlucks.

Why This Hash Brown Breakfast Casserole Works

The best hash brown breakfast casseroles taste like a real breakfast plate baked into one pan: golden potatoes, savory sausage, soft eggs, sweet peppers, and melted cheese. This recipe works because each part is handled before it goes into the dish instead of asking the oven to fix everything at once.

Thawed, dried hash browns do not leak water into the eggs. Cooking and draining the sausage first keeps the casserole savory without making it greasy. A quick sauté gives the onion and bell pepper time to soften and lose some moisture before baking.

Milk or half-and-half keeps the eggs tender, while sour cream or Greek yogurt adds body and creaminess without making the center loose. Dry mustard or Dijon, garlic powder, pepper, and enough salt help season the potatoes, not just the eggs.

Resting is the quiet step that makes the slices look better. Like many egg bakes, this casserole firms as it sits, so cutting into it right away can make the center look looser than it really is.

Ingredients for Hash Brown Breakfast Casserole

The main version is a sausage breakfast casserole with hash browns, but the same base works with bacon, ham, or vegetables. If you are not sure which potatoes to use, jump to the hash brown comparison before you start. Here is what each ingredient does.

Ingredients for breakfast casserole with hash browns, including eggs, sausage, cheese, dairy, peppers, onion, seasonings, and thawed potatoes.
The best texture starts before baking: thawed potatoes, cooked sausage, sautéed vegetables, and a balanced egg mixture all help the casserole set evenly.

Hash Browns

Use 30 oz / 850 g frozen shredded hash browns for the most classic texture. Thaw them first, then pat them dry with paper towels or squeeze gently in a clean kitchen towel if they feel wet. This step is one of the biggest differences between a clean, sliceable casserole and a watery one.

Thawed shredded hash browns being pressed dry in a towel before making breakfast casserole.
Drying thawed hash browns is the easiest no-soggy step because it removes extra moisture before the eggs ever hit the pan.

For a more golden potato layer, see the crispy hash brown base option before layering the eggs.

If you are still deciding which kind of potatoes to use, this air fryer hash browns guide is useful because it explains frozen shredded hash browns, patties, diced potatoes, and homemade grated potatoes in more detail.

Eggs

Use 10 large eggs for a creamy, balanced 9×13 casserole. If you want a taller, more egg-forward breakfast bake, use 12 eggs. If you use fewer than 8 eggs in a 9×13 pan, the casserole becomes more potato-heavy and may not hold together as neatly.

Dairy

Use 1 cup / 240 ml whole milk or half-and-half plus ½ cup / 120 g sour cream or Greek yogurt. Whole milk keeps the casserole lighter; half-and-half makes it richer. Sour cream gives a softer, creamier texture and helps the egg layer feel less flat.

Cheese

Use 2 cups / about 225 g shredded cheese. Cheddar gives the most classic breakfast-casserole flavor, Colby Jack melts smoothly, Monterey Jack keeps things mild and creamy, and pepper Jack adds a little heat without changing the whole dish. Divide the cheese so some melts into the casserole and some goes on top.

Sausage, Bacon, Ham, or No Meat

The default is 1 lb / 454 g breakfast sausage, cooked and drained. You can replace it with cooked bacon, diced ham, or sautéed vegetables. For a bacon version, cook the bacon first and crumble it before adding it to the pan.

Vegetables and Seasoning

Onion and bell pepper are the safest default because they bring sweetness and color without overwhelming the casserole. Sauté them first. Raw vegetables can release water as they bake, especially mushrooms, spinach, zucchini, and peppers. For seasoning, use garlic powder, black pepper, dry mustard or Dijon, and enough salt to season the potatoes.

Egg-to-Dairy Ratio for a 9×13 Breakfast Casserole

The egg-to-dairy balance is what keeps the center creamy instead of wet. Use this table if you want to make the bake taller, richer, lighter, or more sliceable.

Texture Goal Eggs Dairy
Balanced and sliceable 10 large eggs 1 cup milk + ½ cup sour cream
Taller and more egg-forward 12 large eggs 1 cup milk or half-and-half
Richer and creamier 10 large eggs 1 cup half-and-half + ½ cup sour cream
Lighter 10 large eggs 1 cup whole milk only
Egg-to-dairy ratio guide for making hash brown breakfast casserole balanced, taller, richer, or lighter.
Once the base formula is right, small egg and dairy changes can make the casserole taller, richer, lighter, or easier to slice.

Best Hash Browns for Breakfast Casserole

Most breakfast casserole recipes use frozen shredded hash browns, but they are not the only option. The best choice depends on whether you want a soft, classic casserole, a chunkier potato bite, or a more defined potato layer.

Comparison of shredded hash browns, diced hash browns, hash brown patties, and fresh shredded potatoes for breakfast casserole.
Shredded hash browns give the classic soft breakfast casserole texture; patties create a more defined base, while diced potatoes make the bake chunkier.
Hash Brown Type Best For How to Use
Frozen shredded hash browns Classic breakfast casserole texture Thaw, pat dry, and layer into the pan.
Diced hash browns Chunkier, potato-forward casserole Thaw if frozen. Bake time may be slightly longer.
Hash brown patties Defined potato base or shortcut layer Arrange 8–10 patties in the bottom of a 9×13 pan.
Refrigerated shredded hash browns Fast prep, less thawing Pat dry if damp. Use the same amount by weight.
Fresh shredded potatoes Homemade version Rinse, drain, and squeeze very dry before using.

O’Brien-style hash browns, which usually include diced peppers and onions, also work. Because they already include vegetables, reduce or skip the fresh bell pepper and onion in the recipe, and make sure the potatoes are thawed so the casserole does not bake up watery.

Should You Thaw Hash Browns First?

For this recipe, yes. Thawing is the safer choice because frozen hash browns can release extra moisture into the egg mixture and extend the bake time. Longer bake time can make the edges overcook before the center sets.

The best method is to thaw the hash browns in the refrigerator overnight, then pat them dry. If they feel wet, squeeze them gently in a clean towel. They do not need to be bone-dry, but they should not be icy or dripping.

Can You Use Frozen Hash Browns Without Thawing?

You can bake this with frozen hash browns, but thawed and dried hash browns give a cleaner, less watery casserole. If speed matters more than sliceability, use them frozen and expect a softer center and a longer bake time.

Should You Brown the Hash Browns First?

You do not have to, but it gives the casserole better potato flavor and helps remove moisture. To do it, warm a little butter or oil in a large skillet, add the thawed hash browns, and cook for 5–8 minutes until some of the moisture evaporates and a few edges turn lightly golden. Then spread them into the baking dish.

Want a Crispier Hash Brown Base?

If you want the potato layer to taste more like diner-style breakfast potatoes, pre-bake it before adding the eggs. Spread the thawed hash browns in the greased baking dish, drizzle with 2 tablespoons melted butter or oil, and bake at 400°F / 200°C for 15–20 minutes. Then add the sausage, cheese, and egg mixture and bake as directed.

This step is optional, but it makes the edges more golden and gives the casserole a more memorable first bite.

Pre-baked crispy hash brown base in a baking dish before eggs, sausage, and cheese are added.
Pre-baking the hash brown layer is optional, but it adds golden edges and a more diner-style potato flavor underneath the eggs.

How to Keep It from Getting Watery

The biggest mistake with breakfast casserole with hash browns is adding too much hidden moisture. Hash browns, vegetables, sausage, bacon, and spinach can all release liquid into the eggs if they are not handled first.

Moisture Source What to Do Why It Helps
Frozen shredded hash browns Thaw and pat dry before layering. Prevents icy potatoes from watering down the egg mixture.
Bell peppers and onions Sauté for 3–5 minutes first. Softens the vegetables and cooks off extra water.
Mushrooms Cook until their liquid evaporates. Stops them from leaking water into the eggs.
Spinach Wilt and squeeze dry before adding. Keeps the casserole from turning loose or watery.
Sausage or bacon Cook and drain well. Prevents grease from pooling around the eggs.

The cleanest slices come from thawed hash browns, cooked vegetables, drained meat, and a wide 9×13-inch dish. For extra potato flavor, lightly brown the hash browns in a skillet before layering them into the casserole.

How to Make Breakfast Casserole with Hash Browns

This is the basic 9×13 method. It is simple, but the order matters. For exact amounts while you cook, use the recipe card.

Step-by-step guide showing dried potatoes, cooked sausage, sautéed vegetables, whisked eggs, layering, baking, and resting.
Follow the order for the best result: dry the potatoes, cook the filling, whisk the eggs, layer evenly, bake until set, then rest.

1. Prepare the Baking Dish

Grease a 9×13-inch / 23×33 cm baking dish with butter or nonstick spray. A 3-quart baking dish works well. Avoid a very deep smaller dish unless you are prepared to bake longer.

2. Thaw and Dry the Hash Browns

Thaw the frozen shredded hash browns, then pat them dry. Spread them evenly in the bottom of the prepared baking dish. Season this layer lightly because potatoes need more seasoning than eggs.

3. Cook the Sausage

Cook the sausage in a large skillet over medium heat, breaking it into small pieces. Drain off excess grease. If you are using bacon, cook it until crisp and crumble it. If you are using ham, it usually only needs to be diced.

4. Sauté the Vegetables

In the same skillet, cook the onion and bell pepper for a few minutes until slightly softened. This keeps them from releasing too much water into the casserole.

5. Whisk the Egg Mixture

In a large bowl, whisk the eggs, milk or half-and-half, sour cream or Greek yogurt, garlic powder, dry mustard or Dijon, black pepper, and salt. Whisk until the mixture looks smooth and evenly blended.

6. Layer the Casserole

Scatter the cooked sausage, sautéed vegetables, and most of the cheese over the hash browns. Pour the egg mixture evenly over the top. Use a spatula to gently nudge the filling so the eggs settle into the layers. Finish with the remaining cheese.

7. Bake Until Set

Bake at 350°F / 175°C for 45–55 minutes, or until the edges are puffed and lightly golden and the center no longer jiggles loosely. Do not wait for the whole top to look dry; the casserole will continue to firm as it rests. If it was refrigerated overnight, it may need 55–65 minutes.

Finished breakfast casserole with hash browns, golden edges, set center, sausage, peppers, cheese, and thermometer cue.
Stop baking when the center is set but the top still looks tender; a completely dry-looking surface usually means the eggs have gone too far.

8. Rest Before Slicing

Let the casserole rest for 10–15 minutes before cutting. This improves the texture and makes the slices cleaner.

If this is your first time making it, start with the sausage-and-cheddar version below. It gives you the cleanest baseline for texture, seasoning, and bake time, then the bacon, ham, spicy, vegetarian, and patty versions are easy to adjust later.

Recipe Card: Breakfast Casserole with Hash Browns

This make-ahead breakfast casserole bakes hash browns, eggs, sausage, and cheese into a creamy, savory 9×13 breakfast bake with golden edges and clean slices. It is hearty enough for brunch, holidays, or breakfast meal prep.

Servings
10–12
Prep Time
20 minutes
Cook Time
45–55 minutes
Total Time
About 1 hour 15 minutes

Equipment

  • 9×13-inch / 23×33 cm baking dish
  • Large skillet
  • Large mixing bowl
  • Whisk
  • Spatula
  • Foil, optional for overnight storage or if the top browns too quickly

Ingredients

  • 30 oz / 850 g frozen shredded hash browns, thawed and patted dry
  • 1 lb / 454 g breakfast sausage
  • ½ cup / 75 g diced onion
  • 1 cup / 120–150 g diced bell pepper
  • 10 large eggs
  • 1 cup / 240 ml whole milk or half-and-half
  • ½ cup / 120 g sour cream or plain Greek yogurt
  • 2 cups / about 225 g shredded cheddar, Colby Jack, or Monterey Jack, divided
  • 1 tsp kosher salt, or to taste depending on sausage and cheese
  • ½ tsp black pepper
  • ½ tsp garlic powder
  • ½ tsp dry mustard or 1 tsp Dijon mustard
  • Optional: ¼ tsp smoked paprika, a few dashes hot sauce, sliced scallions for serving

Instructions

  1. Preheat the oven to 350°F / 175°C. Grease a 9×13-inch baking dish.
  2. Thaw the hash browns and pat them dry. Spread them evenly in the prepared baking dish.
  3. Cook the sausage in a large skillet over medium heat until browned and fully cooked. Break it into small crumbles, then drain excess grease.
  4. Add the diced onion and bell pepper to the skillet and cook for 3–5 minutes, until slightly softened. Scatter the sausage and vegetables over the hash browns.
  5. Sprinkle about 1½ cups of the cheese over the potato and sausage layer. Save the remaining ½ cup for the top.
  6. In a large bowl, whisk the eggs, milk or half-and-half, sour cream or Greek yogurt, salt, pepper, garlic powder, and dry mustard or Dijon until smooth.
  7. Pour the egg mixture evenly over the casserole. Gently press the filling with a spatula so the egg mixture settles through the layers. Sprinkle the remaining cheese on top.
  8. Bake for 45–55 minutes, until the edges are lightly golden, the center is set, and the middle no longer sloshes when the dish is gently moved. If baking straight from the refrigerator, plan on 55–65 minutes.
  9. Rest for 10–15 minutes before slicing. Top with scallions or hot sauce if you like.

Notes

  • Use 12 eggs instead of 10 if you want a taller, more egg-forward casserole.
  • While you prep the sausage and vegetables, you can let the eggs sit out for 15–20 minutes so they blend more easily and bake a little more evenly.
  • Thaw and dry the hash browns before baking for the cleanest texture.
  • Replace the sausage with 2½–3 cups cooked vegetables for a no-meat version.
  • Use 1½ cups / 225 g diced ham instead of sausage for a ham version.
  • Use about 1 cup cooked crumbled bacon for a bacon version. For an easier prep option, cook the strips first using this air fryer bacon recipe, then crumble them into the casserole.
  • If using hash brown patties, use 8–10 patties in the bottom of the pan and expect a slightly longer bake.
  • To avoid a watery casserole, do not add raw mushrooms, raw spinach, or icy hash browns directly to the pan.
  • If the top browns before the center is set, loosely cover the dish with foil.
  • Egg-based casseroles should be cooked until set; for food safety, egg dishes are commonly cooked to 160°F / 71°C. See the FDA’s egg safety guidance for more detail: What You Need to Know About Egg Safety.
Recipe card for breakfast casserole with hash browns showing 30 ounces hash browns, 10 eggs, 1 pound sausage, 350°F, and 45 to 55 minutes.
Start with the dependable 9×13 formula: 30 ounces hash browns, 10 eggs, 1 pound sausage, cheese, dairy, and a 350°F bake.

Overnight Breakfast Casserole with Hash Browns

This casserole is ideal for making ahead because the ingredients are sturdy and the 9×13 format feeds a group. You have two good options: the easiest overnight method and the best-texture method.

If you are making this for guests, the overnight version is less about saving ten minutes and more about saving your morning. The sausage is cooked, the cheese is ready, the potatoes are handled, and breakfast can go into the oven before the kitchen gets busy.

Overnight breakfast casserole with hash browns being prepared in the refrigerator and baked the next morning.
Overnight prep is useful because the potatoes, sausage, cheese, and egg mixture are handled before the morning gets busy.

Easy Overnight Method

Assemble the entire casserole in the baking dish, cover tightly, and refrigerate overnight. In the morning, let the dish sit at room temperature while the oven preheats. Bake as directed, adding 5–10 minutes if the center is still loose.

Best-Texture Overnight Method

For the cleanest texture, prep the components separately. Cook and drain the sausage, sauté the vegetables, thaw and dry the hash browns, and whisk the egg mixture. Refrigerate everything separately, then assemble just before baking. This prevents the potatoes from sitting in the egg mixture all night and gives a neater slice.

Overnight tip: If your hash browns are very wet or your vegetables are raw, the casserole can turn watery by morning. Dry the potatoes well, cook the vegetables first, and drain the meat before assembling.

Can You Bake It Straight from the Fridge?

Yes. A cold casserole usually needs extra time. Start checking around 50 minutes, but do not be surprised if it takes 55–65 minutes. When the top browns quickly while the center is still soft, cover the dish loosely with foil and keep baking.

If you are baking from cold, use the doneness cues rather than the clock alone.

Sausage, Bacon, Ham, and No-Meat Hash Brown Breakfast Casserole

Once the base is set, this recipe becomes very flexible. Sausage is the classic choice, bacon makes it smoky, ham makes it perfect for leftovers, and the no-meat version works well when the vegetables are cooked first. Pick the version that fits your morning rather than changing the whole recipe.

For the most dependable first batch, use sausage, cheddar or Colby Jack, thawed shredded hash browns, and the 10-egg base. Bacon, ham, cream cheese, pepper Jack, and extra vegetables all work, but they change salt, moisture, richness, or bake time.

If you are using patties instead of shredded potatoes, go straight to the hash brown patty version because the setup and bake time are slightly different.

If your family already has a “usual” breakfast casserole version, this is the section to make it yours. Some houses are sausage-and-cheddar houses, some are bacon-and-pepper-Jack houses, and some are firmly leftover-ham-after-Easter houses.

Four hash brown breakfast casserole variations with sausage, bacon, ham, and vegetarian fillings on separate plates.
Sausage, bacon, ham, and vegetables all work in this hash brown breakfast casserole, but each one changes salt, moisture, richness, or bake time.

Sausage Version

This is the default version and the most classic. Use 1 lb / 454 g breakfast sausage, cooked and drained. Mild sausage gives a family-friendly flavor, while hot sausage adds more punch. If your sausage is very salty, reduce the added salt in the egg mixture.

Bacon Version

Replace the sausage with 8–12 oz raw bacon, cooked until crisp and crumbled, or about 1 cup cooked bacon pieces. Bacon is saltier than sausage, so go easy on extra salt. For a loaded version, use half sausage and half bacon.

Ham and Cheese Version

Use 1½ cups / about 225 g diced ham, or up to 12 oz / 340 g for a ham-heavy version. This is especially useful after Easter, Christmas, or any big breakfast where leftover ham is already in the fridge. Cheddar, Swiss, Monterey Jack, and Colby Jack all work well here.

Vegetarian Version

Skip the meat and add more vegetables. Good choices include sautéed mushrooms, bell peppers, onions, spinach, broccoli, and scallions. The key is to cook watery vegetables first. Spinach should be wilted and squeezed dry. Mushrooms should be sautéed until their liquid cooks off.

For a no-meat 9×13 casserole, use about 2½–3 cups cooked vegetables in place of the sausage. A good mix is 1 cup bell pepper, ¾ cup mushrooms, ½ cup onion, and 1 cup spinach that has been wilted and squeezed dry. Add an extra ½ cup cheese if you want the casserole to feel richer without meat.

Cream Cheese Version

A richer version starts with 4 oz / 115 g softened cream cheese stirred into the warm cooked sausage before it goes into the casserole. This makes the filling extra creamy and hearty. Keep the sour cream in the egg mixture or reduce it slightly if you prefer a lighter texture.

Spicy Version

Use pepper Jack cheese, hot breakfast sausage, diced jalapeño, and a few dashes of hot sauce in the egg mixture for a version that tastes warmer and sharper without losing the potato-and-egg comfort. A little smoked paprika or chili powder also works well.

Gluten-Free Notes

The casserole can be naturally gluten-free, but check labels carefully. Some sausage, frozen hash browns, seasoning blends, and shredded cheeses may include additives or cross-contact warnings. Use certified gluten-free ingredients if needed.

Breakfast Casserole with Hash Brown Patties

Hash brown patties make a more defined potato layer and are a useful shortcut. Instead of shredded hash browns, arrange 8–10 frozen hash brown patties in a single layer in the bottom of a greased 9×13-inch baking dish. They can overlap slightly if needed.

Frozen hash brown patties arranged in a 9×13 baking dish with sausage, cheese, and eggs nearby.
Hash brown patties are a useful shortcut because they create a clear potato base before the eggs, cheese, and sausage go on top.

Top the patties with cooked sausage, bacon, or ham, then add cheese and pour the egg mixture over everything. Because patties are denser than shredded hash browns, the bake time may land closer to 50–60 minutes. Let the casserole rest before slicing so the patty layer and egg layer hold together.

Patty Setup Amount for 9×13 Pan
Hash brown patties 8–10 frozen patties
Eggs 10 large eggs, or 9 if using fewer toppings
Milk or half-and-half 1 cup / 240 ml
Cheese 2 cups / 225 g
Protein 1 lb sausage or 1½ cups diced ham

For a more structured patty-style bake, cover the dish with foil for the first 25 minutes, then uncover and bake another 20–30 minutes until the edges are golden and the center is set. This helps the egg mixture cook through without drying out the cheese on top too early.

Slice of breakfast casserole with a defined hash brown patty base, eggs, sausage, cheese, and peppers.
The patty version slices differently from shredded hash browns because the potato layer stays more structured in each piece.

Patty version shortcut: Use 8–10 hash brown patties, 10 eggs, 1 cup / 240 ml milk or half-and-half, 2 cups / 225 g cheese, and 1½ cups diced ham or 1 lb cooked sausage. Use 9 eggs only if your pan is less loaded.

Can You Make It in a Slow Cooker?

You can make a breakfast casserole with hash browns in a slow cooker, but the texture will be softer and more scoopable than the oven version. It will not have the same golden edges or clean slices.

For a slow cooker version, layer thawed hash browns, cooked sausage or ham, vegetables, cheese, and egg mixture in a greased slow cooker. Cook on low until the eggs are set, and avoid holding it too long after cooking because eggs can turn rubbery.

Start checking around 3–4 hours on low, depending on your slow cooker size and how full it is. Avoid cooking on high if you want a softer egg texture; the edges can overcook before the center sets.

How to Tell When It’s Done

Breakfast casserole is done when the center is set, the edges are puffed, and the top is lightly golden. The middle should not slosh when you gently shake the dish. A knife inserted near the center should come out mostly clean, though a little melted cheese is normal.

If you use a food thermometer, the center of an egg-based casserole should reach 160°F / 71°C. This is especially helpful when baking a cold overnight casserole, a deeper pan, or a loaded version with extra meat and vegetables.

A good finished casserole should not look dry or stiff. The center should be set enough to slice after resting, but the eggs should still look tender and slightly creamy around the potatoes.

Try not to bake it until the top looks dry all the way across. A breakfast egg bake should look set, puffed, and lightly golden, but still moist inside. The rest time will finish the texture without drying out the eggs.

Troubleshooting: Watery, Rubbery, Bland, or Loose

Most problems come down to moisture, bake time, or balance. Use this table if your casserole is watery, greasy, bland, or hard to slice.

Troubleshooting guide for watery breakfast casserole showing drying potatoes, sautéing vegetables, draining meat, and covering a browning top.
Most watery casseroles start with hidden moisture, so dry the potatoes, sauté watery vegetables, drain the meat, and cover only if the top browns too fast.
Problem Likely Cause Fix
Watery casserole Wet hash browns, raw vegetables, or too much liquid Thaw and dry the hash browns. Sauté vegetables first. Drain spinach, mushrooms, sausage, and bacon well.
Rubbery eggs Overbaking or too little dairy Bake just until set. Use milk, half-and-half, sour cream, or Greek yogurt for tenderness.
Center not set Cold pan, deep dish, frozen potatoes, or too many add-ins Keep baking in 5–10 minute increments. Cover the top loosely with foil if it is browning too fast.
Greasy casserole Sausage or bacon was not drained Drain cooked meat before layering it into the dish.
Bland potatoes Hash browns were not seasoned Season the egg mixture well and lightly season the potato layer before adding toppings.
Casserole falls apart Cut too soon or too little egg for the amount of filling Rest 10–15 minutes before slicing. Use 10–12 eggs for a full 9×13 pan.
Top browns too quickly Oven runs hot or cheese is exposed too long Cover loosely with foil and continue baking until the center sets.

Storage, Freezing, and Reheating

Let the casserole cool, then store leftovers in an airtight container in the refrigerator. For best quality and food safety, cooked egg casseroles and leftovers are generally best used within 3–4 days. You can also freeze portions for longer storage. FoodSafety.gov’s cold storage chart is a useful reference for leftover timing: Cold Food Storage Charts.

Breakfast casserole slices stored in a glass container, wrapped for freezing, and served reheated on a plate.
After cooling, slice the casserole for easier breakfasts: refrigerate what you will eat soon, then freeze individual portions for later.

How to Refrigerate

Cool the casserole, cover the baking dish, or move slices to airtight containers. Refrigerate within 2 hours of baking.

How to Freeze

Freeze individual slices wrapped tightly, then place them in a freezer-safe bag or container. For easier breakfasts, freeze slices separately so you can reheat only what you need.

If you are building a bigger freezer breakfast rotation, these meal prep breakfast burritos use the same cooked-filling, no-soggy logic in a grab-and-go format.

How to Reheat

Reheat individual slices in the microwave in short intervals until hot. For better texture, reheat slices in a covered oven-safe dish at 325°F / 165°C until warmed through. Add a splash of milk before reheating if the casserole seems dry.

What to Serve with It

This casserole is hearty on its own, so the best sides are usually fresh, bright, or simple. Serve it with fruit salad, sliced avocado, toast, biscuits, salsa, hot sauce, or a green salad for brunch.

Breakfast casserole with hash browns served with fruit, salsa, greens, and coffee on a brunch plate.
Since the casserole is already rich with eggs, cheese, potatoes, and sausage, fresh sides like fruit, salsa, greens, and coffee keep the plate balanced.

For brunch, keep the plate balanced with fruit and something crisp or fresh so the casserole does not feel too heavy. For meal-prep mornings, simple sides work best because the eggs, potatoes, cheese, and sausage are already doing the filling work. To rotate in a cold make-ahead option, these overnight oats are a good opposite: creamy, chilled, and ready straight from the fridge.

FAQs

Do hash browns need to be thawed before breakfast casserole?

For the best texture, yes. Thawed hash browns bake more evenly and are easier to dry before adding to the casserole. This helps prevent a watery center.

What kind of hash browns work best?

Frozen shredded hash browns are the best all-purpose choice. They give the classic breakfast casserole texture and spread evenly through a 9×13 dish. Diced hash browns make the casserole chunkier, while hash brown patties create a more defined potato base.

Should I cook the hash browns before adding them?

You do not have to cook them first, but lightly browning thawed hash browns gives the casserole better flavor and helps remove moisture. If you are short on time, thawing and patting them dry is enough.

Can I use fresh potatoes instead of frozen hash browns?

Yes, but fresh shredded potatoes need more prep. Rinse them to remove excess starch, drain well, and squeeze very dry before using. If they go into the casserole wet, the egg mixture can turn loose.

Why is my breakfast casserole watery?

Usually, extra moisture sneaks in through the potatoes, vegetables, or meat. Thaw and dry the hash browns, cook watery vegetables first, squeeze spinach dry, and drain sausage or bacon before layering everything into the pan.

How many eggs do I need for a 9×13 hash brown breakfast casserole?

Use 10 large eggs for a balanced casserole or 12 eggs for a taller, more egg-forward bake. If you use fewer eggs, the casserole becomes more potato-heavy and may slice less cleanly.

Can I halve this recipe?

Yes. Use an 8×8-inch or 9×9-inch baking dish, about 15 oz / 425 g hash browns, 5–6 eggs, ½ lb / 225 g sausage, ½ cup milk or half-and-half, ¼ cup sour cream or Greek yogurt, and 1 cup cheese. Start checking around 30–35 minutes because a smaller casserole bakes faster.

Is this better with sausage, bacon, or ham?

Sausage gives the most classic breakfast casserole flavor. Bacon adds smoky crispness, while ham is a great option for leftover holiday ham. All three work, as long as cooked meats are drained before layering.

Can this breakfast casserole be made the night before?

Yes. Assemble the casserole, cover it tightly, and refrigerate overnight. Bake it in the morning, adding 5–10 extra minutes if it goes into the oven cold. For the cleanest texture, prep the components separately and assemble before baking.

How long does breakfast casserole with hash browns bake at 350°F?

Most 9×13 versions bake for 45–55 minutes at 350°F / 175°C. If the casserole is cold from the refrigerator, extra loaded, or made in a deeper dish, it may need closer to 55–65 minutes.

Can I use hash brown patties instead of shredded hash browns?

Yes. Arrange 8–10 hash brown patties in the bottom of a greased 9×13 pan, then layer the meat, cheese, and egg mixture over them. The casserole may need a slightly longer bake time.

How do I make it without meat?

Skip the sausage and use 2½–3 cups cooked vegetables such as mushrooms, peppers, onions, spinach, broccoli, or scallions. Cook watery vegetables first so they do not release liquid into the eggs.

Does hash brown breakfast casserole freeze well?

It freezes best in individual slices. Cool the casserole completely, wrap the portions tightly, and reheat only what you need. The texture is usually better when slices are thawed overnight in the refrigerator before reheating.

If you make this, I’d love to know which version became your house version: sausage, bacon, ham, vegetarian, or hash brown patties. Those little changes are often what make a breakfast casserole feel like it belongs on your table.

Back to top