Pumpkin bread should feel soft and generous when you cut into it: warmly spiced, unmistakably pumpkin and moist enough to stay tender after cooling. The challenge is getting that softness without leaving a heavy, wet stripe through the center.
A loaf that looks beautifully baked on top and turns wet when sliced is especially frustrating. The good news is that the middle gives you clues before the knife goes in. The thickness of the puree, the way the batter falls and the appearance of the center crack all help you judge what is happening inside.
This easy pumpkin bread recipe uses one bowl, a whisk and a spatula—no electric mixer and no complicated technique. It is simple enough for breakfast, warm enough for an autumn afternoon and sturdy enough to wrap and take to someone else. The first slice feels like a treat; the loaf often cuts even more cleanly the next morning.
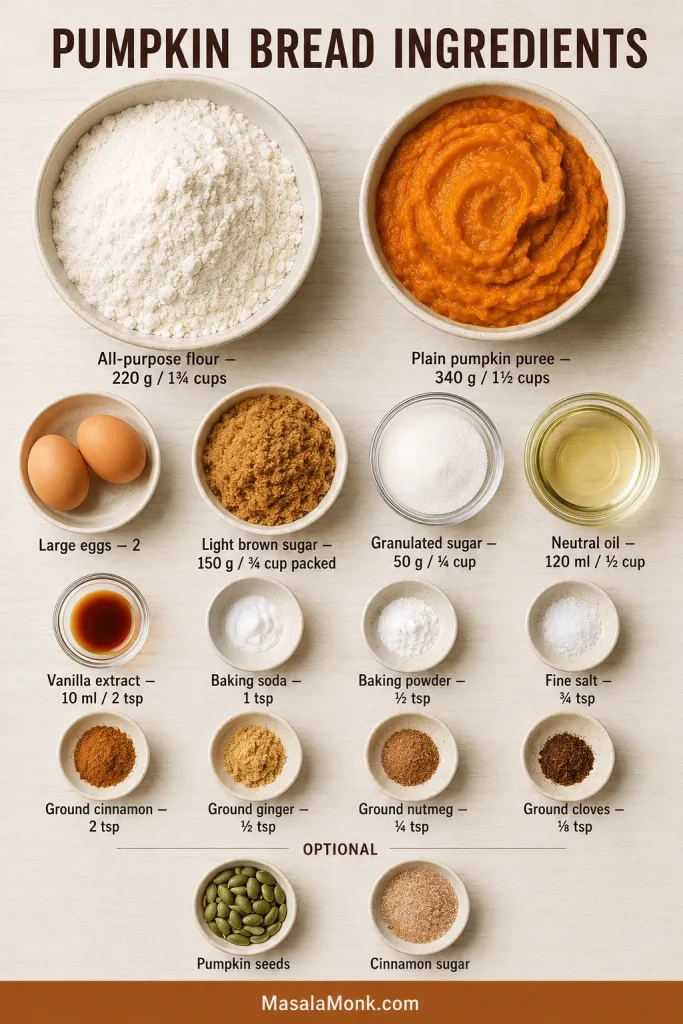
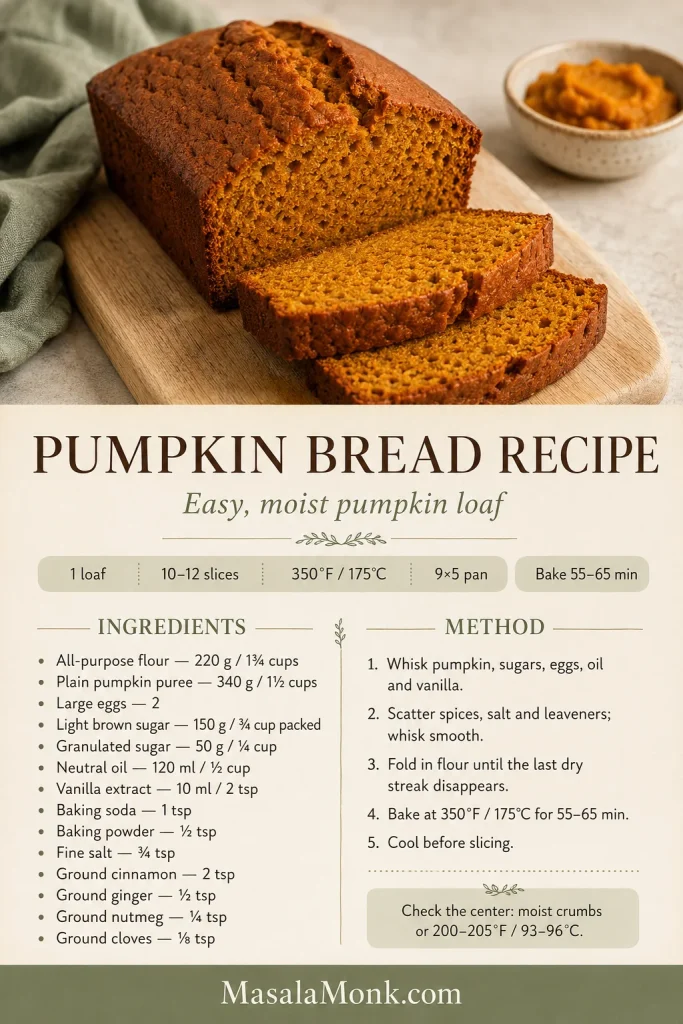
Use 340 g / 1½ cups plain pumpkin puree with 220 g / 1¾ cups all-purpose flour. Bake the batter in a light-colored 9×5-inch / 23×13 cm metal loaf pan at 350°F / 175°C and begin checking at 52 minutes.
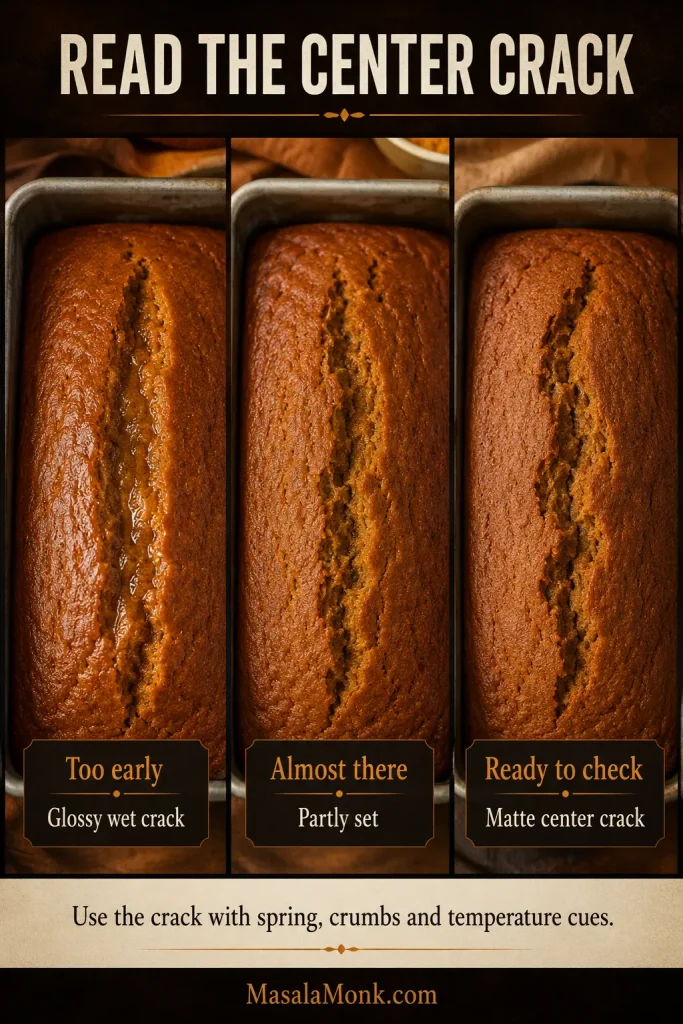
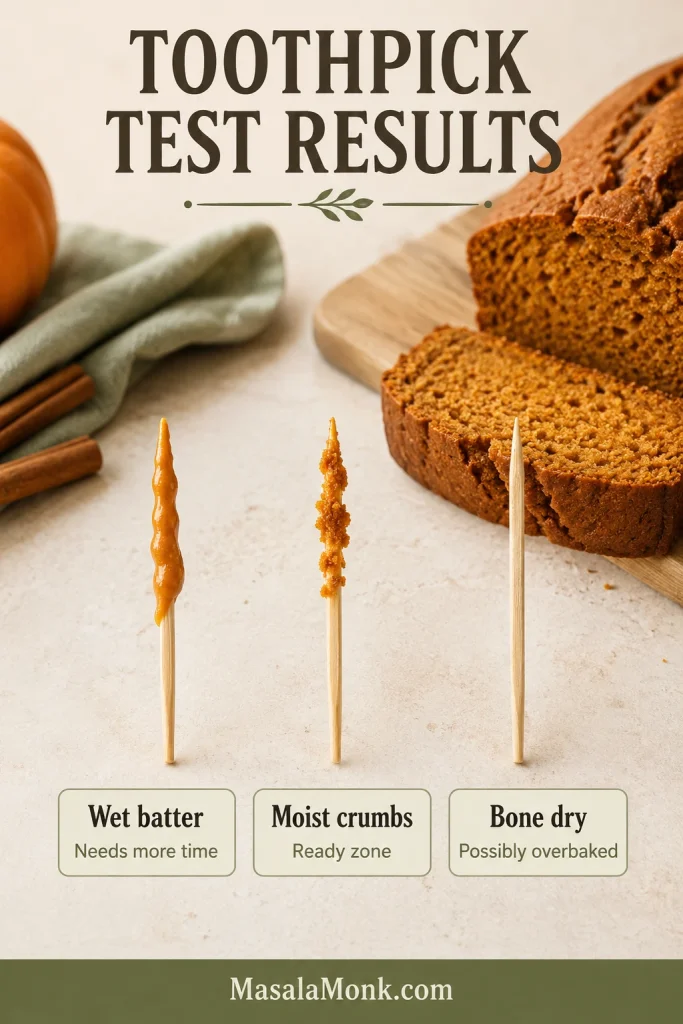
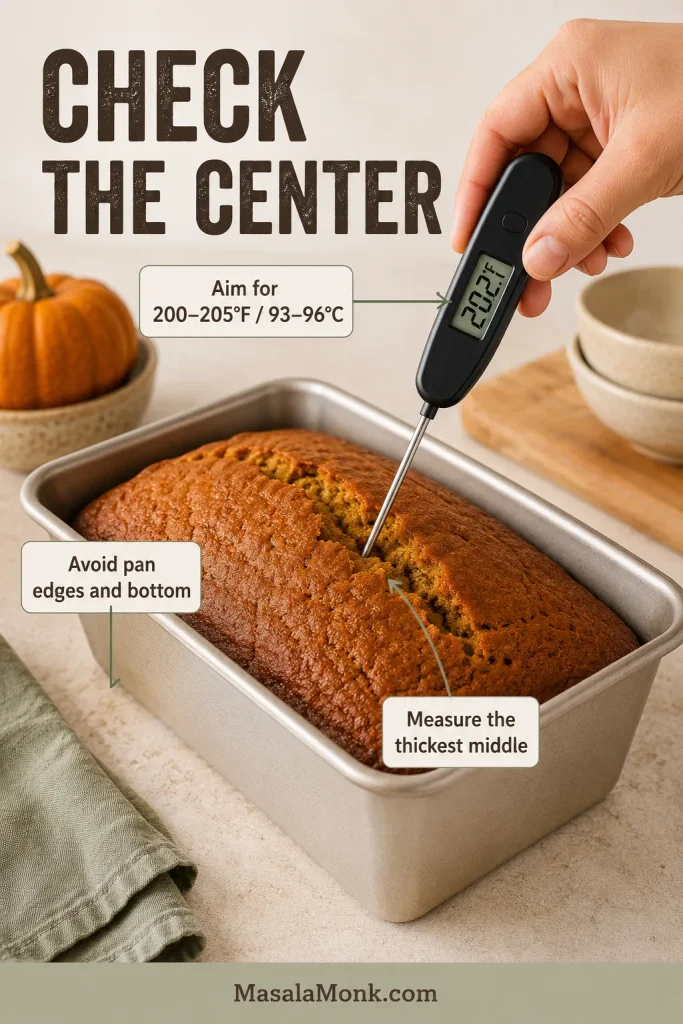
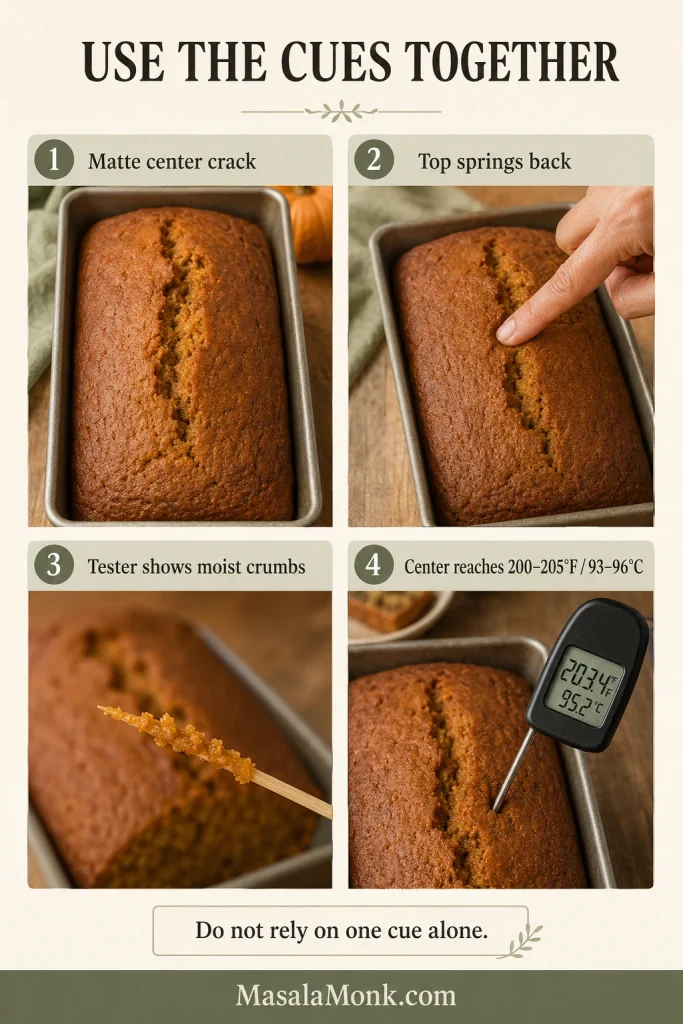
The center crack should look matte rather than glossy. Press beside it for a gentle spring, then check that a toothpick or thin skewer shows moist crumbs instead of liquid batter. For final confirmation, an optional thermometer usually reads 200–205°F / 93–96°C.
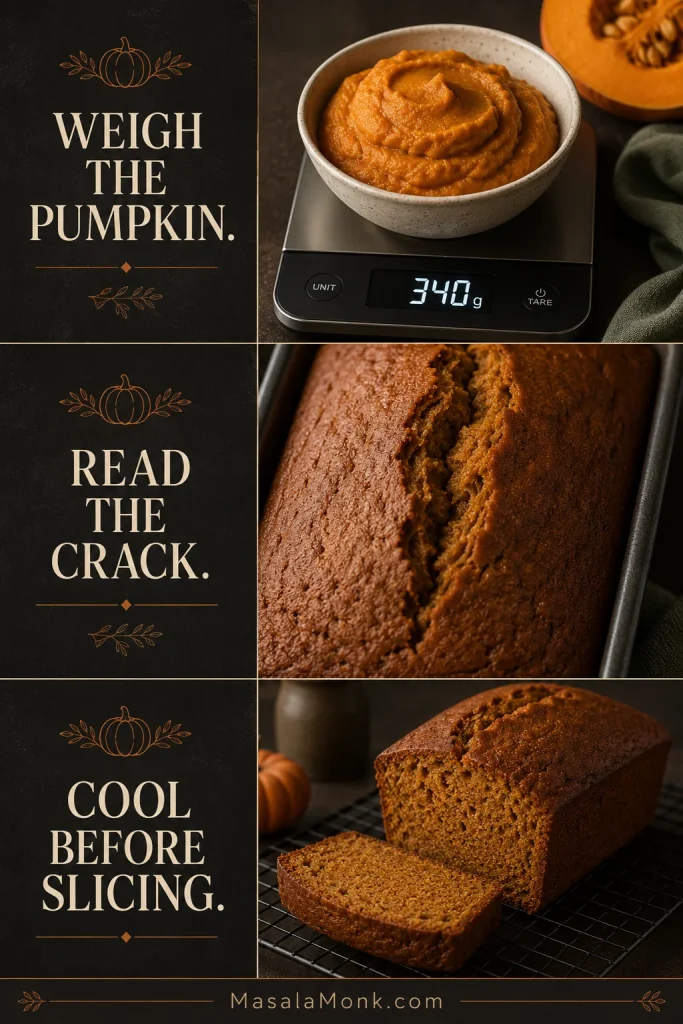
Weigh the pumpkin. Read the crack. Cool before slicing.
These are the three checks to remember before baking.
Weigh the pumpkin, read the crack and cool before slicing—three checks that protect texture.
Easy, Moist Pumpkin Bread Recipe
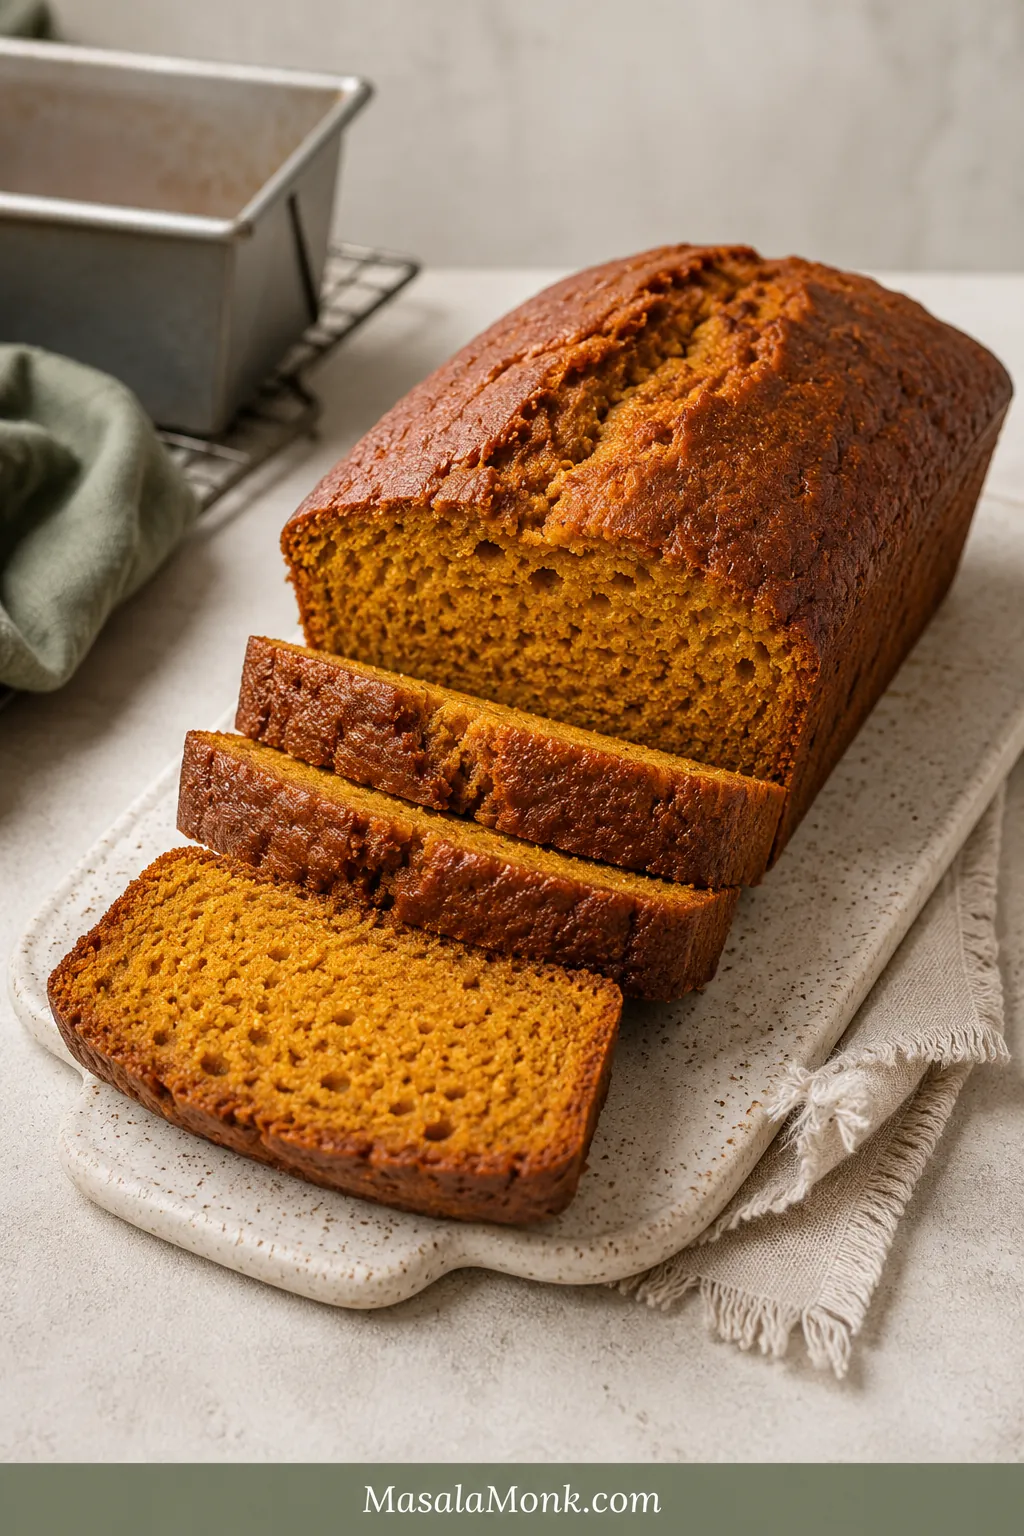
A lightly firm top gives way to a plush orange crumb. Pumpkin comes first, cinnamon follows, and ginger, nutmeg and cloves stay quietly in the background. The loaf itself is dairy-free, so serve it plain or choose a dairy-free topping when needed.
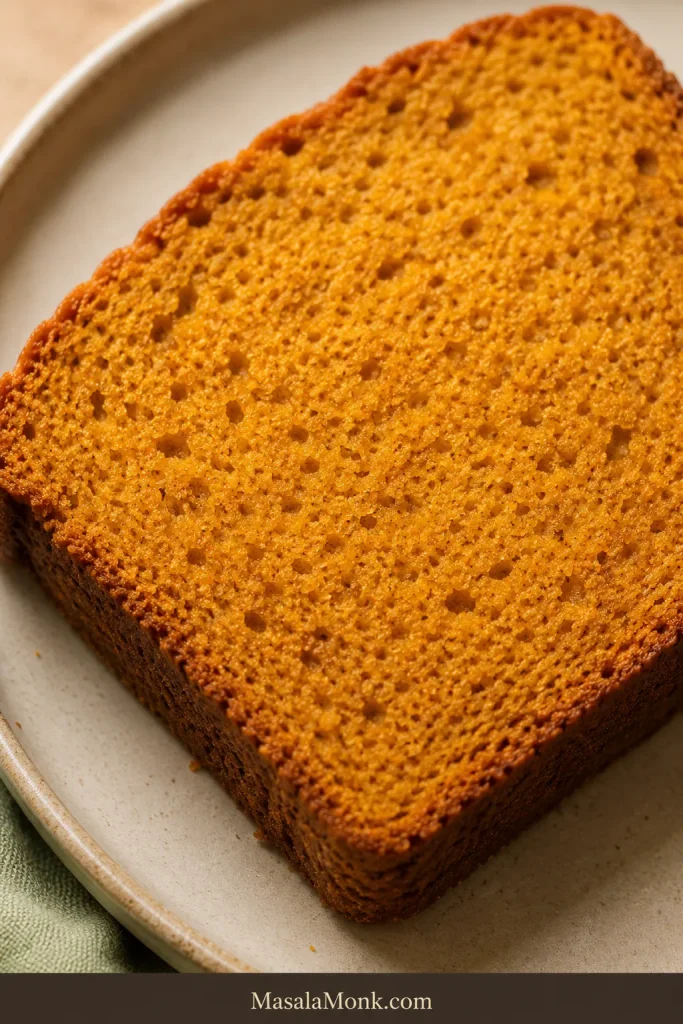
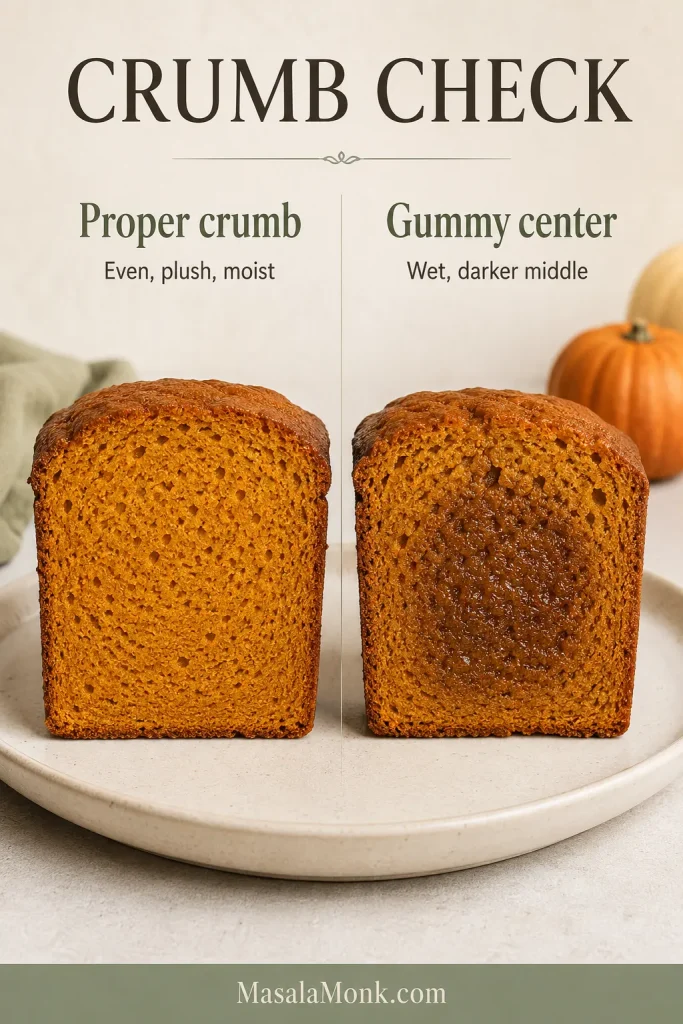
Judge the crumb after the loaf has cooled.
The crumb should look plush and moist, not shiny, wet or compressed.
Prep: 15 minutes Bake: about 55–65 minutes Cooling: 1½–2 hours
Total: about 2 hours 10 minutes–2 hours 30 minutes Yield: 1 loaf / about 10 slices Pan: 9×5 inches / 23×13 cm
Equipment
Light-colored metal 9×5-inch / 23×13 cm loaf pan
Large mixing bowl
Whisk
Flexible spatula
A kitchen scale is the most useful extra. Parchment paper and a cooling rack are strongly recommended. Use a toothpick or thin skewer for checking the middle; an instant-read thermometer is optional.
Pumpkin pie spice option: Replace the cinnamon, ginger, nutmeg and cloves with about 1 tablespoon of homemade pumpkin pie spice.
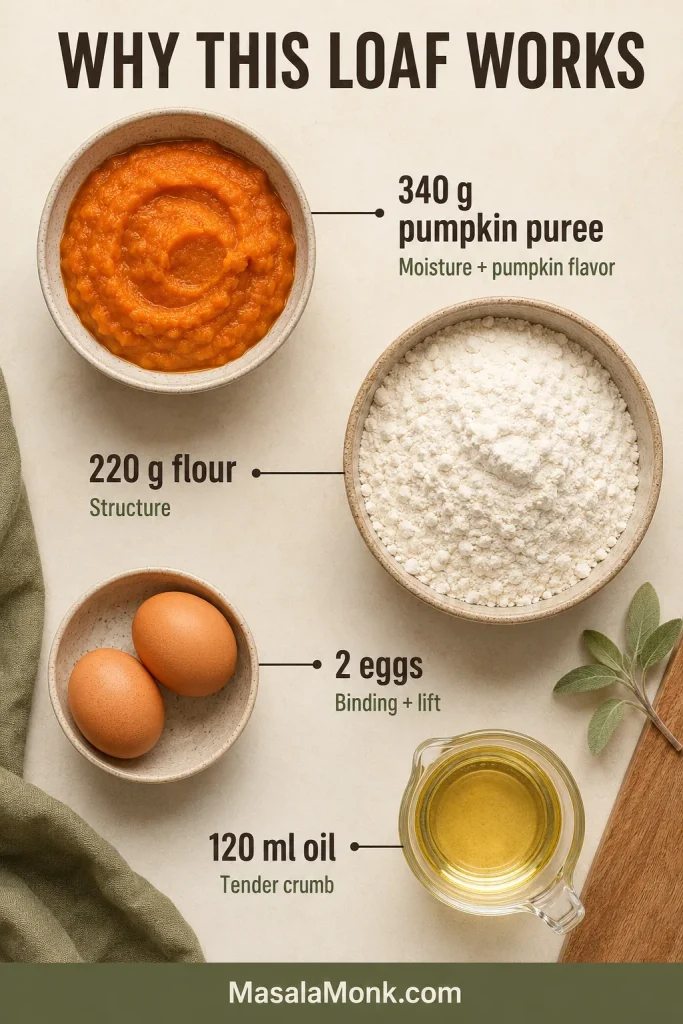
Keep the main formula steady before changing add-ins.
Pumpkin brings moisture, flour and eggs provide structure, and oil keeps the cooled crumb tender.
Instructions
Set Up the Oven and Pan
Preheat the oven. Heat the oven to 350°F / 175°C. Position a rack in the center. When the top regularly browns too quickly, move the pan one level away from the oven’s strongest heat source. In many ovens, that means one level below center.
Prepare the pan. Lightly grease a 9×5-inch loaf pan. If using parchment, line the base and long sides, leaving enough overhang to lift out the bread.
Mix the Batter
Whisk the eggs and sugars. Whisk the eggs, brown sugar and granulated sugar in a large bowl until smooth and slightly lighter.
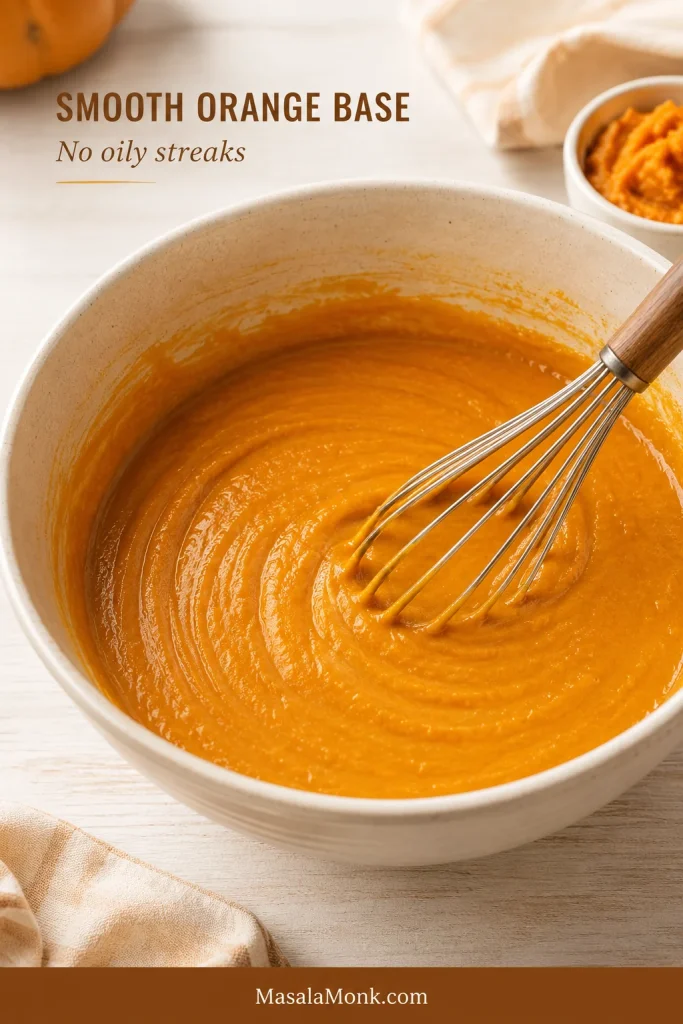
Add the pumpkin and oil. Whisk in the pumpkin puree, oil and vanilla until the mixture looks evenly orange and no oily streaks remain.
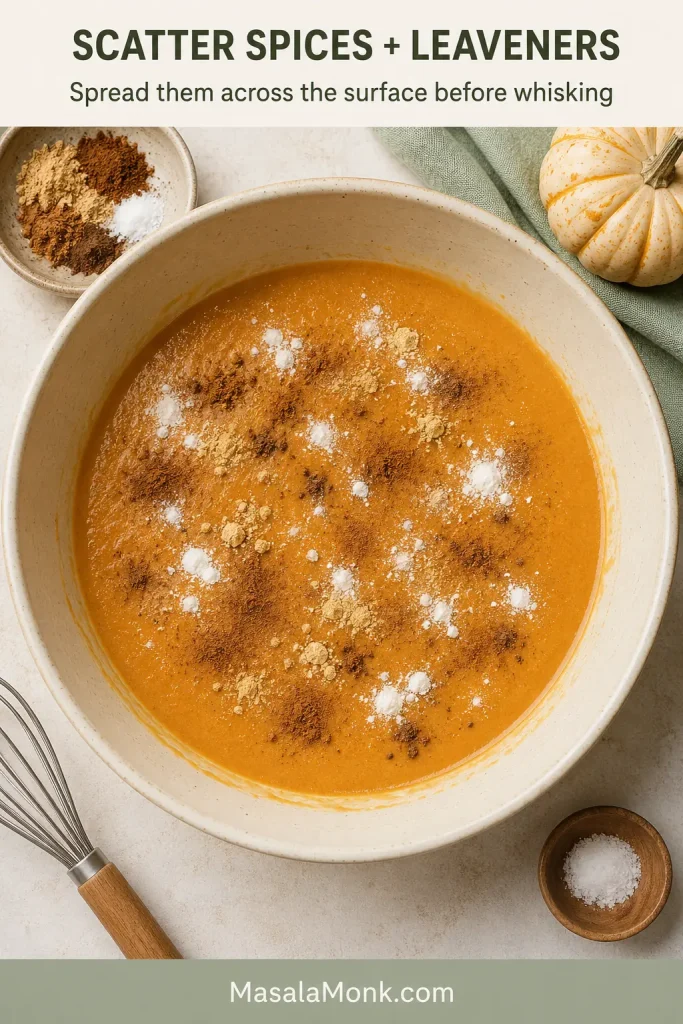
Add the leaveners and spices. Break up any lumps in the baking soda and baking powder. Sprinkle the leaveners, salt and spices across the entire surface, then whisk for about 20 seconds while scraping around the bowl.
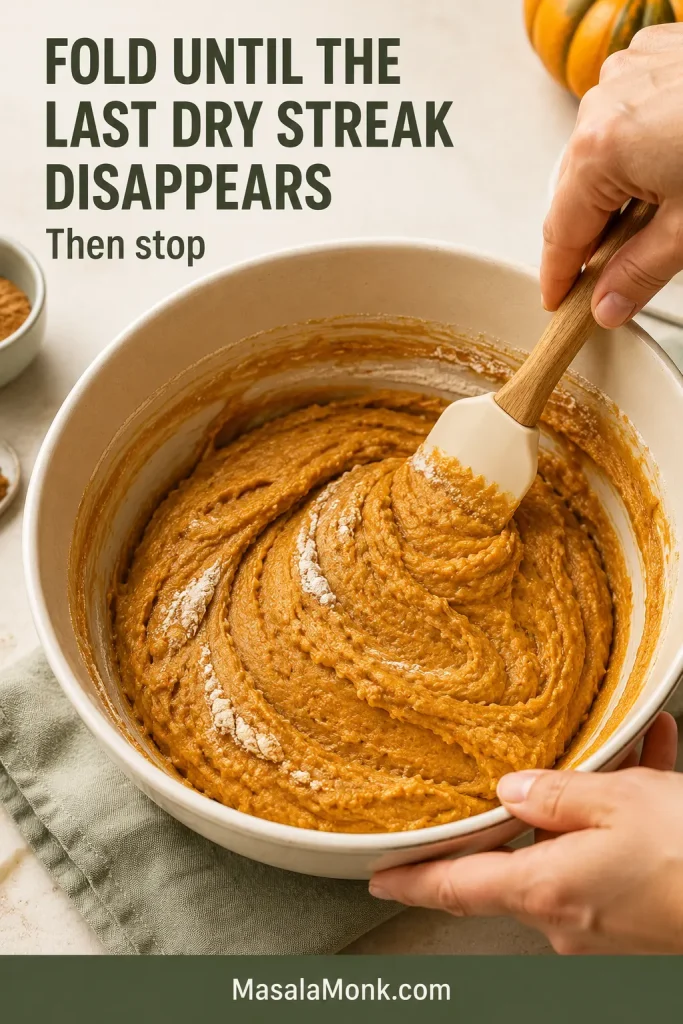
Fold in the flour. Add the flour and switch to a spatula. Fold from the bottom until the final dry streak disappears. Scrape across the base once, then stop.
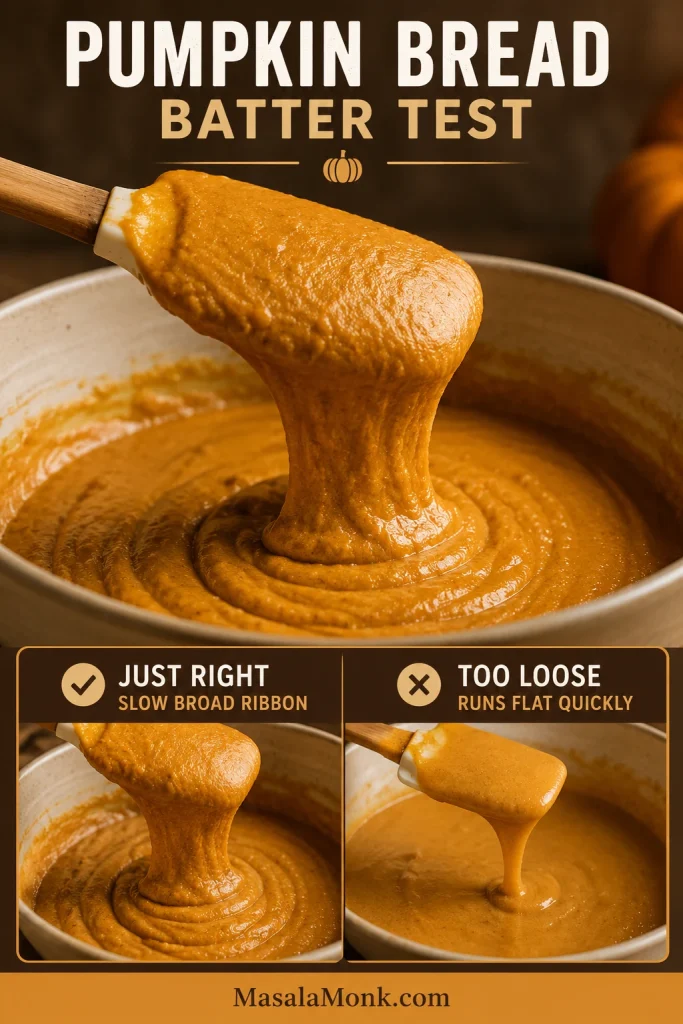
Check the batter. Lift the spatula. The mixture should fall in a slow, broad ribbon and settle back into the bowl. A rough-looking surface and a few small lumps are harmless.
Fill, Bake and Cool
Fill the pan. Scrape in the batter and level the top lightly. Leave the pan about one-quarter to one-third empty so the loaf has room to rise. Add pumpkin seeds or cinnamon sugar, if using.
Bake and protect the crust. Begin checking at 52 minutes. A 9×5-inch metal loaf generally needs about 55–65 minutes. Avoid opening the oven during the first 40 minutes. If the top has enough color before the middle is ready, tent it loosely with foil.
Check the middle. Look for a matte center crack and gentle spring beside it. A toothpick or thin skewer should show moist crumbs rather than liquid batter. If one spot looks clean but the crack still appears glossy, test again slightly beside it.
Cool completely. Leave the bread in the pan for 15 minutes, then transfer it to a wire rack or another dry, heatproof surface. Wait 1½–2 hours before judging the crumb or cutting clean slices.
A successful loaf: risen above the pan, matte inside the center crack and tender enough to bend slightly when sliced, with no wet stripe through the crumb. Moist crumbs are welcome; liquid batter or thick pumpkin paste needs more oven time.
Testing note: This loaf is written around a light-colored 9×5-inch metal pan and 340 g thick pumpkin puree. Treat other pan sizes and formats as starting windows, then finish with the center cues.
Canned Pumpkin, Fresh Pumpkin and Pumpkin Pie Filling
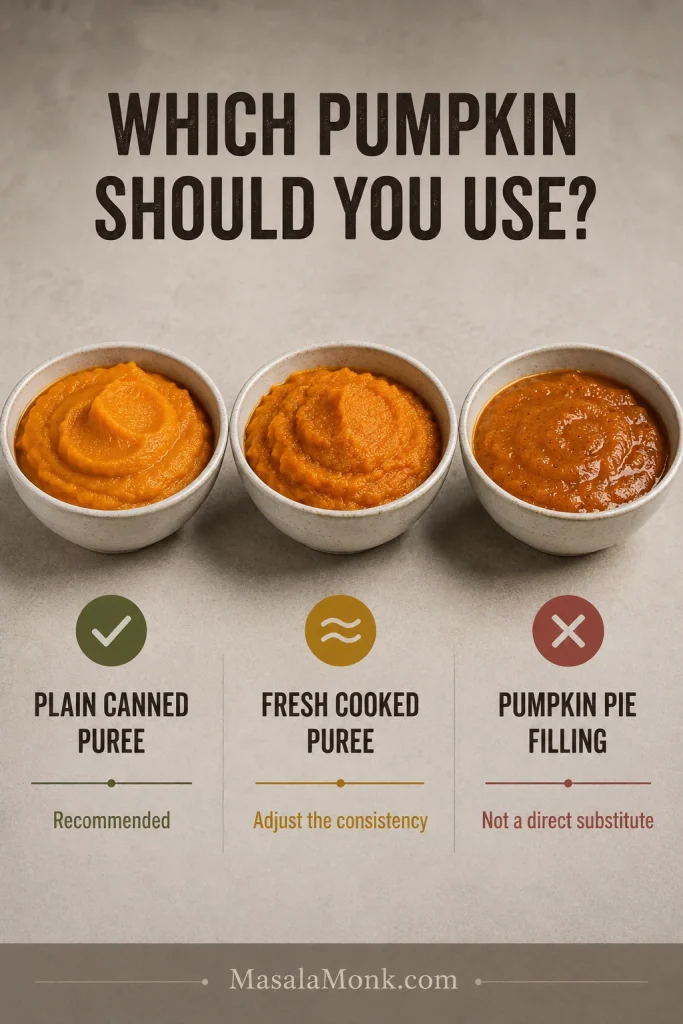
The puree controls more of the final texture than any other wet ingredient. Plain canned pumpkin is the most predictable option because it is smooth and usually thick enough for quick-bread batter. Fresh pumpkin works too, but its water content varies, so adjust the consistency before measuring.
Plain pumpkin puree and pumpkin pie filling behave differently.
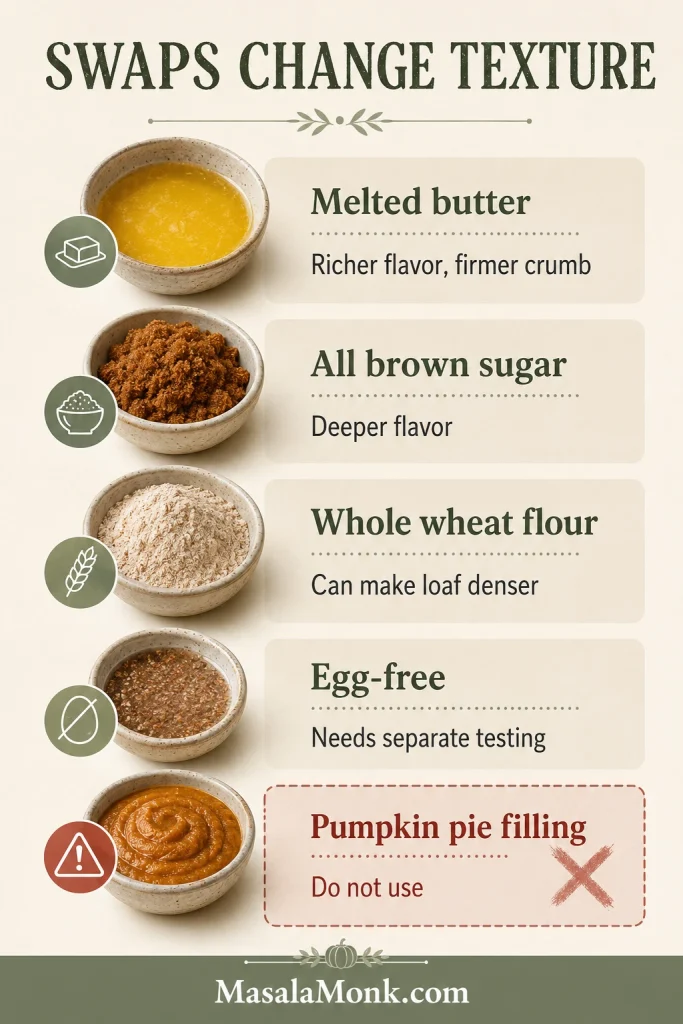
Use plain pumpkin puree; pie filling already contains sugar and spices.
Pumpkin product
Best use
Preparation
Plain canned pumpkin puree
Recommended first choice
Measure 340 g and use directly.
Homemade cooked puree
Good alternative
Blend until smooth, drain or loosen to match thick canned puree, then weigh 340 g.
Pumpkin pie filling
Not a direct swap
It already contains sugar, spices and other ingredients.
Fresh steamed pumpkin
Usually needs draining
Puree smoothly, drain and weigh 340 g.
Fresh roasted pumpkin
Often naturally thicker
Puree until smooth and loosen only when unusually dry.
Raw grated pumpkin
Use a different formula
It behaves differently from cooked puree.
Can You Use Pumpkin Pie Filling?
Not as a direct substitute here. Plain puree is cooked and blended pumpkin. Pumpkin pie filling has already been sweetened and seasoned and may contain additional ingredients, so it changes the flavor and moisture balance.
Look for plain pumpkin, pumpkin puree or 100% pumpkin on the label.
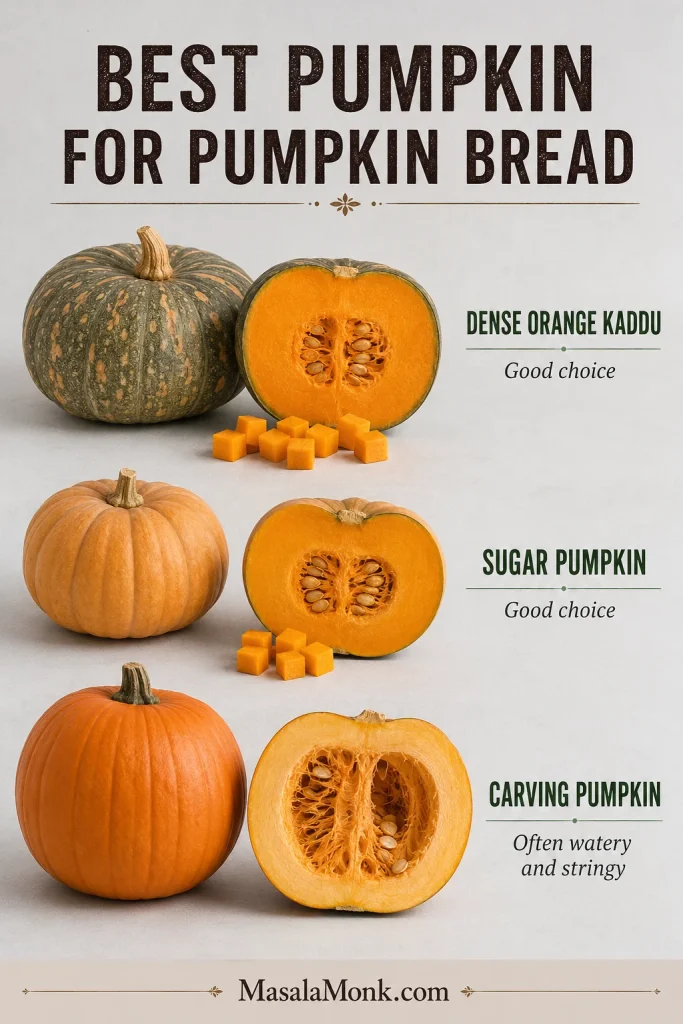
For fresh puree, choose dense cooking pumpkin when possible.
Dense cooking pumpkin makes thicker puree; watery carving pumpkin can loosen the batter.
How to Prepare Fresh Pumpkin Puree
Dense, orange-fleshed kaddu, sugar pumpkin or another cooking pumpkin works best. Large carving pumpkins tend to be stringier and more watery.
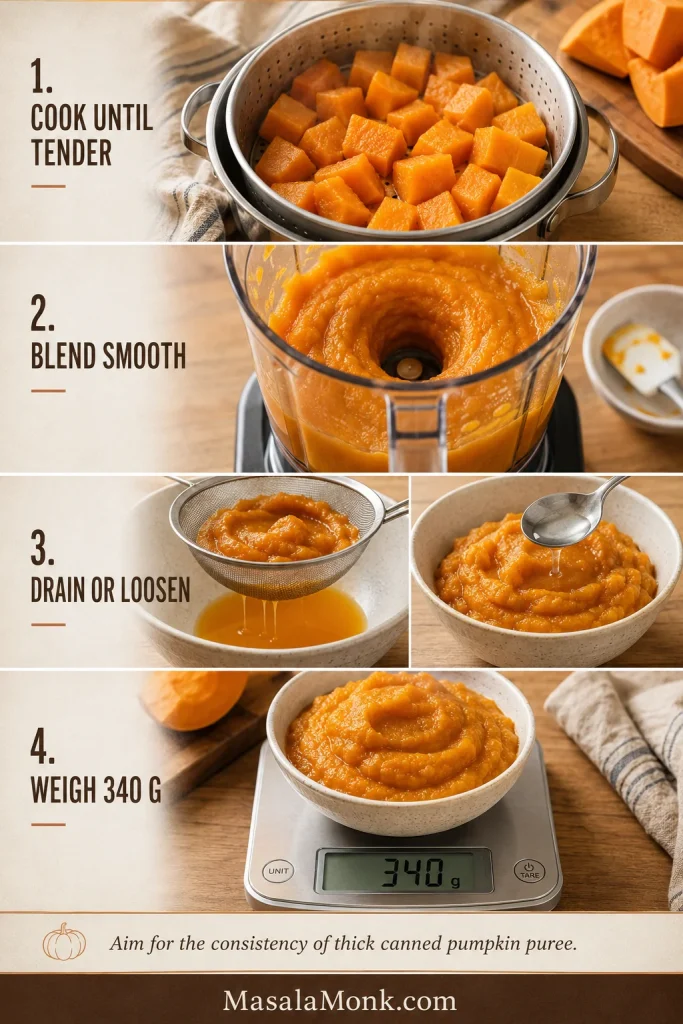
Steam or roast peeled pumpkin pieces until completely tender.
Blend until smooth.
Drain puree that pours or spreads quickly. If roasted puree is dry and pasty, blend in water 1 teaspoon at a time.
Once it resembles thick canned pumpkin, weigh 340 g.
Fresh puree needs thickness control before it goes into batter.
Cook, blend, adjust thickness and weigh 340 g before adding fresh puree to the batter.
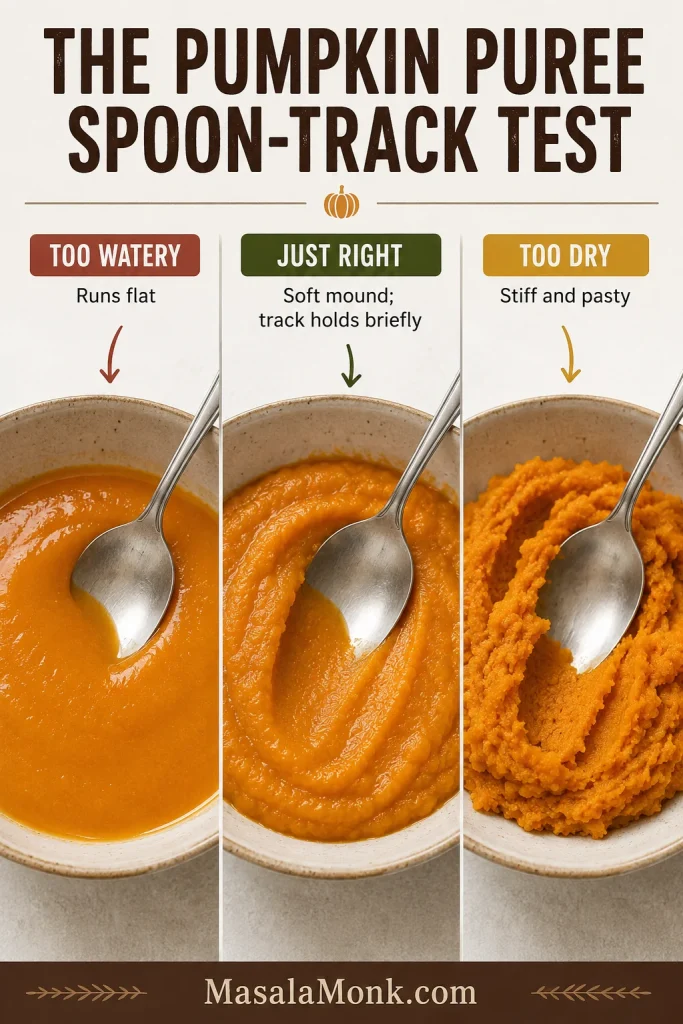
Drag a spoon through the puree. The track should remain visible for a moment. A soft mound that holds briefly is a better sign than a glossy puree that immediately runs flat.
Check the puree texture before measuring it.
A spoon track should hold briefly; runny puree can make the loaf heavy.
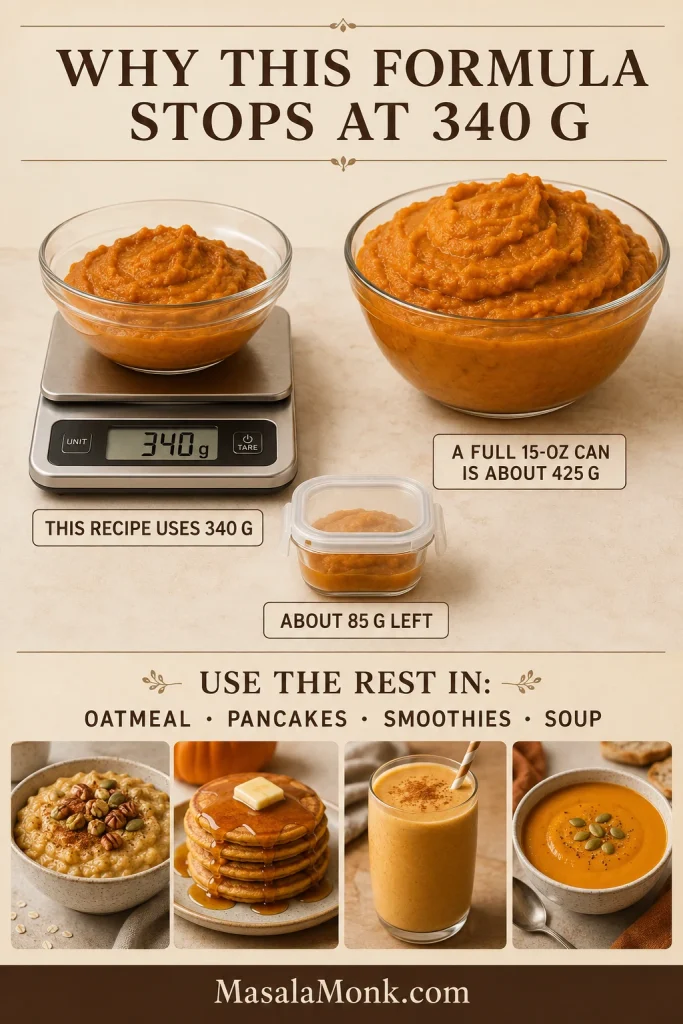
Can You Use the Whole Can? Why This Recipe Stops at 1½ Cups
A full 15-ounce / 425 g can adds more moisture and more batter than this formula is designed to hold. Whole-can pumpkin breads can be excellent, but they need their own balance of flour, egg, pan capacity and baking time.
This recipe leaves about 85 g, or roughly one-third cup. Keep it covered in the refrigerator for a few days, or freeze it in a labeled portion for oatmeal, pancakes, smoothies or soup.
The extra pumpkin is useful, but not in this loaf.
Use 340 g pumpkin puree; save the small leftover from a full can for another dish.
Why This Pumpkin Bread Stays Moist Without Turning Gummy
Using 340 g of puree keeps the pumpkin flavor clear while leaving enough flour and egg to support the moisture. The loaf stays pumpkin-first rather than tasting like a spice cake with pumpkin added to it.
Neutral oil keeps the cooled crumb soft. Brown sugar adds caramel depth and helps the bread retain moisture, while the smaller amount of granulated sugar rounds out the sweetness without bringing more molasses flavor.
Baking soda helps with early lift and browning. The small amount of baking powder supports the thick batter while the middle catches up. Because ovens and loaf pans vary, the timer tells you when to start looking; the center tells you when to stop.
This is the formula logic in one glance.
Pumpkin adds moisture, flour and eggs set structure, and oil keeps the crumb tender.
Ingredient Notes
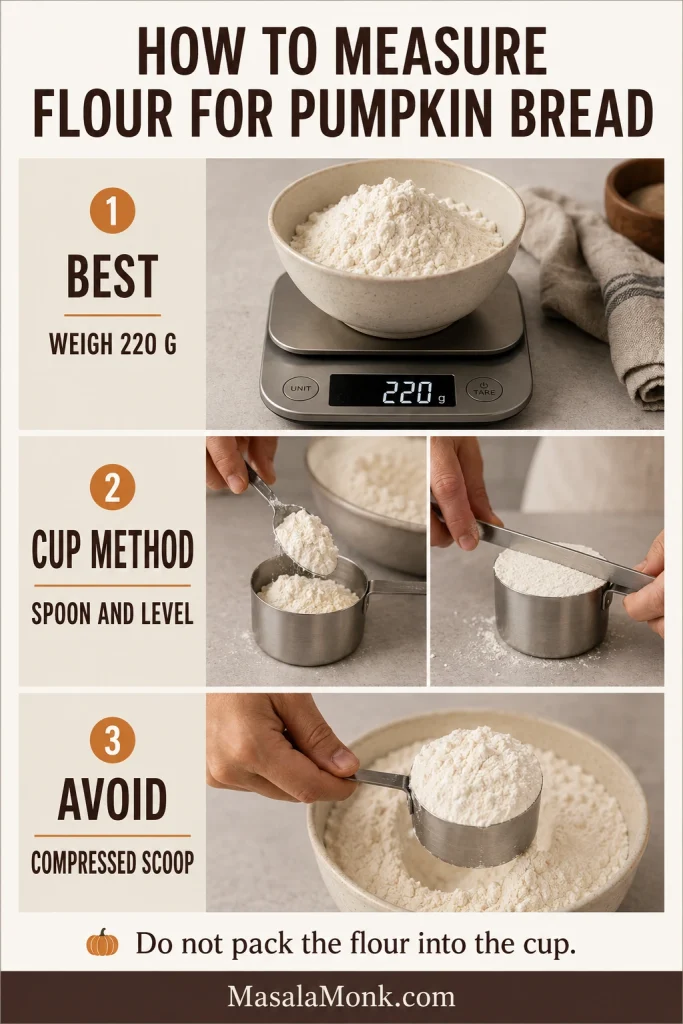
Flour: 220 g gives the most repeatable result. When measuring by cups, loosen the flour, spoon it into the measure and level without pressing.
Brown sugar: light brown sugar keeps the pumpkin and spices clear. Dark brown sugar gives the loaf a deeper molasses note and darker color.
Oil: vegetable, canola, sunflower, grapeseed or mild avocado oil all suit this loaf.
Spices: use cinnamon or a spice blend that still smells lively in the jar. Faint spices become even quieter after baking.
A packed cup can quietly change the loaf.
Weigh 220 g flour, or spoon and level it gently to avoid a dry loaf.
Apple pie spice can work when that is what you already have, although its balance is usually softer and less clove-forward. Add a tiny pinch of cloves for a more familiar pumpkin-spice finish.
The Best Pumpkin Bread Pan—and How Other Sizes Change the Bake
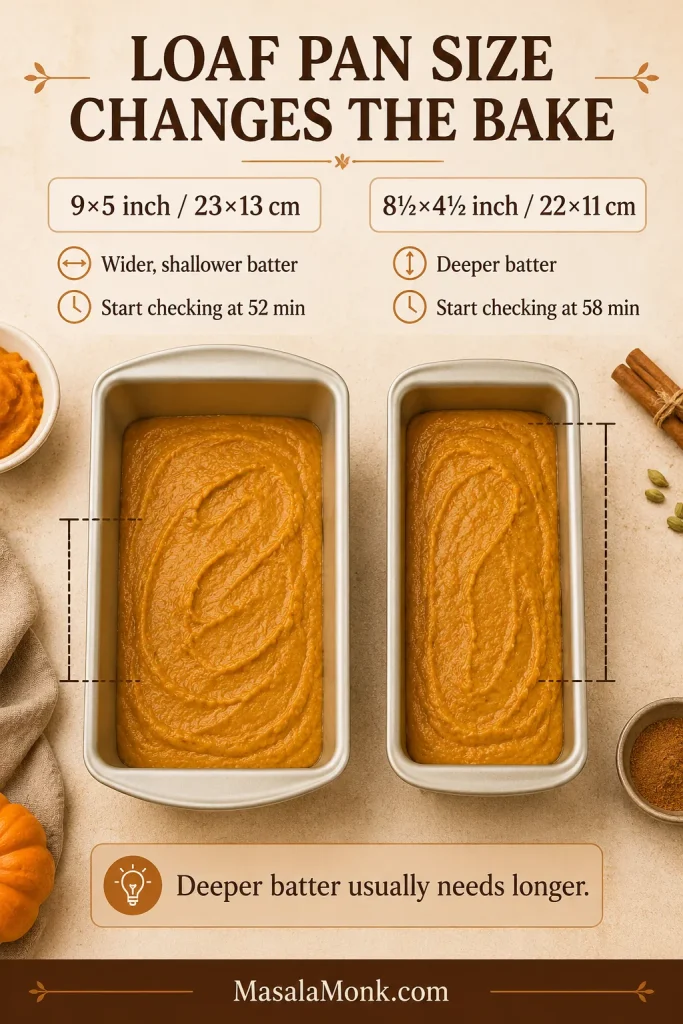
A light-colored metal 9×5-inch / 23×13 cm loaf pan is the most dependable choice. Measure across the inside of the top edge. An 8½×4½-inch pan holds the batter more deeply and usually needs extra time.
Pan Fill and Pan Size
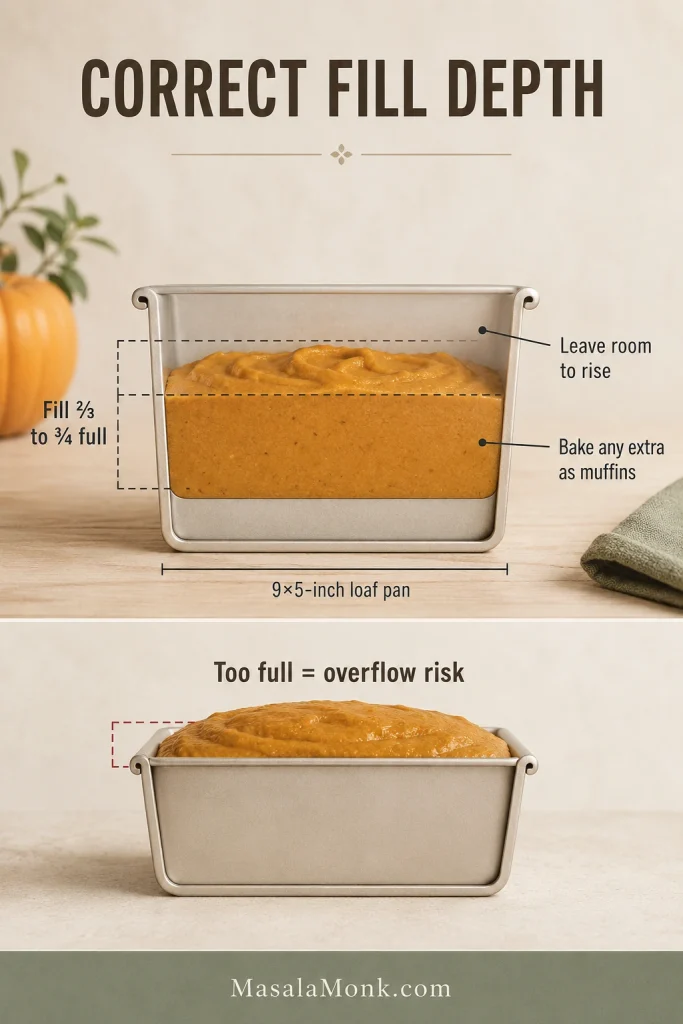
Batter depth affects both rise and bake time.
Keep the pan two-thirds to three-quarters full so the batter can rise and bake through.
Deeper batter usually needs more time in the center.
A narrower pan holds deeper batter, so the center usually needs more time.
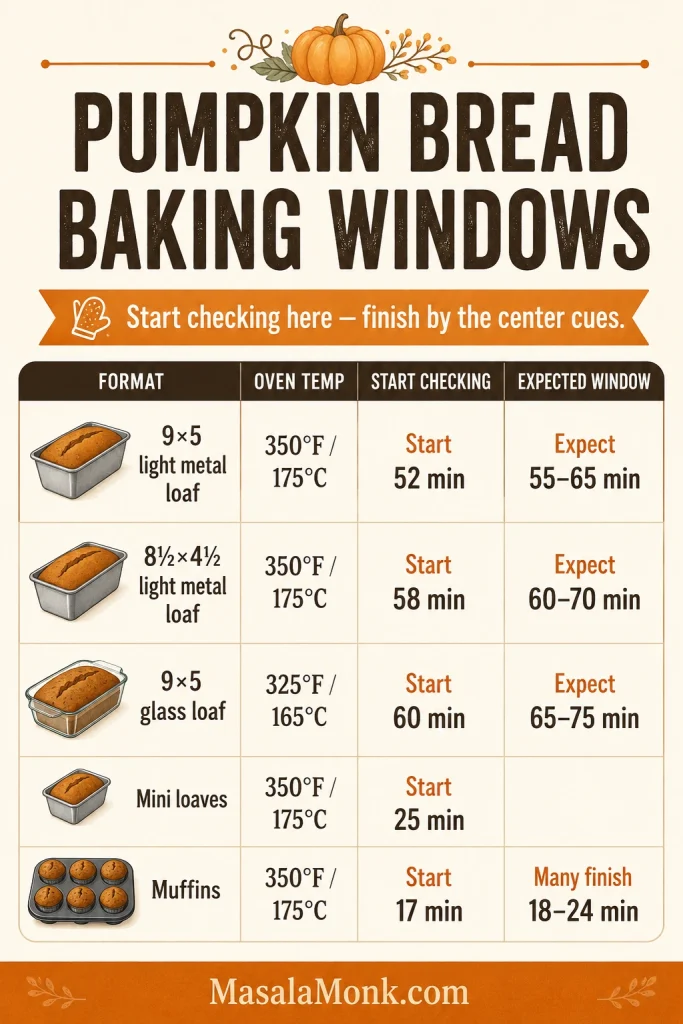
Bake Windows by Format
The following times are starting windows, not fixed finish times. How deeply the batter sits, the pan material and the behavior of your oven matter more than the label on the pan.
Format
Oven
Starting guidance
9×5-inch light metal loaf
350°F / 175°C
Start at 52 minutes; expect roughly 55–65 minutes.
8½×4½-inch light metal loaf
350°F / 175°C
Start at 58 minutes; expect roughly 60–70 minutes, with more time possible in a deep pan.
9×5-inch glass loaf
325°F / 165°C
Start around 60 minutes; expect roughly 65–75 minutes and follow the center cues.
Small 5¾×3¼-inch mini loaves
350°F / 175°C
Start at 25 minutes. Bake until the centers spring back and a tester shows moist crumbs.
Standard muffins
350°F / 175°C
Start at 17 minutes; many batches fall around 18–24 minutes.
Pan Material Notes
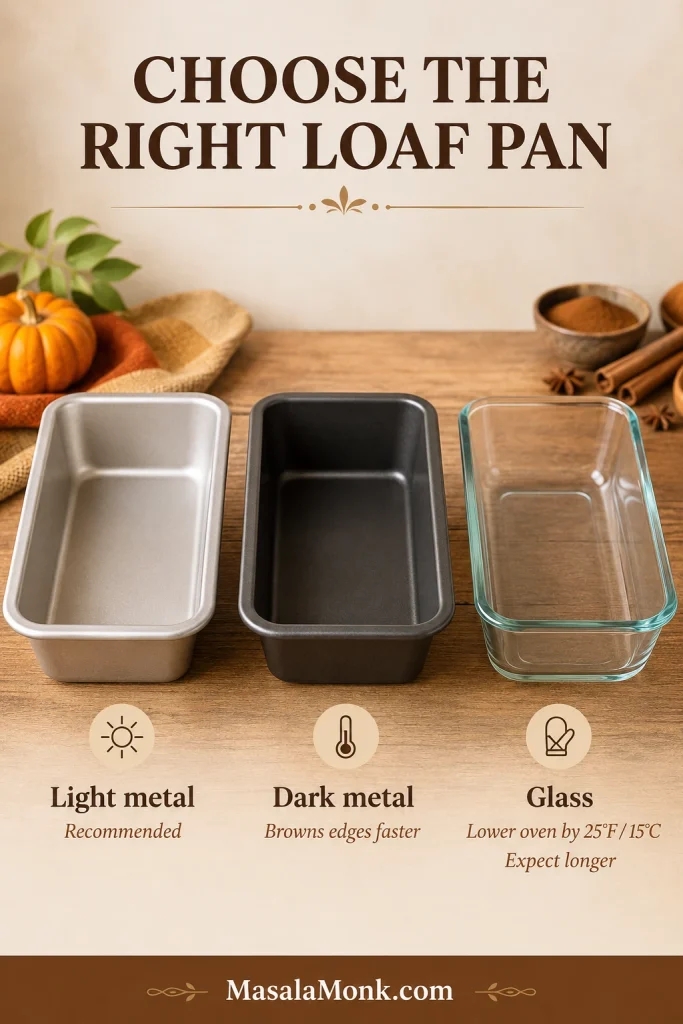
Light metal allows the middle to finish without darkening the sides too aggressively. Glass warms more slowly and retains heat for longer, so reduce the oven by 25°F and expect additional time. King Arthur Baking explains the difference in its comparison of glass, metal and stoneware baking pans.
Pan material changes browning and timing.
Light metal is the safest default; dark metal browns faster and glass bakes differently.
Fill mini loaf pans and muffin cups about two-thirds full. Move finished muffins to a rack or another dry, heatproof surface after a short rest so their bottoms do not become damp.
Bake-Windows Visual Guide
Start with the timing window, then trust the center.
Use timing as a starting window, then finish with center cues.
Four Batter and Baking Cues That Matter
What the Batter Should Look Like
Smooth orange base: the eggs, sugars, pumpkin, oil and vanilla should look evenly blended, without oily streaks around the bowl.
Thick but mobile batter: it should fall from the spatula in a slow, broad ribbon. A slightly rough surface is fine; a glossy batter that immediately runs flat may be too loose.
Safe batter depth: leave roughly one-quarter to one-third of the pan empty. A deeper layer takes longer to set through the middle.
Protected crust: the cinnamon-and-pumpkin aroma may arrive before the loaf is ready. If the top darkens early, cover it loosely with foil and let the center continue baking.
The wet base should look smooth before the flour goes in.
Whisk until the pumpkin mixture is smooth, orange and free of oily streaks.
Distribute the small dry ingredients before adding flour.
Scatter spices and leaveners across the wet mix so they distribute evenly.
Stop mixing as soon as the flour disappears.
Fold just until the last dry flour streak disappears, then stop.
The finished batter should move slowly, not pour loosely.
Finished batter should fall in a slow, broad ribbon instead of running flat.
How to Tell When Pumpkin Bread Is Done
Visual Doneness Cues
Color alone is unreliable in a loaf made with pumpkin, brown sugar and spices. Check the deepest part with these four signs:
The center crack tells you when to start checking.
A matte center crack means the loaf is ready for crumb, spring and temperature checks.
Center crack: the visible crumb looks matte and set, without a glossy pool underneath.
Gentle press: the surface beside the crack springs back instead of holding a deep indentation.
Toothpick or skewer: a few moist crumbs are ideal. Liquid batter or a thick coating of pumpkin mixture needs longer. When one spot looks clean but the crack remains glossy, test again slightly beside it.
Optional temperature: use 200–205°F / 93–96°C as final confirmation after the visual checks look right. Insert the probe through the center crack and place the tip in the deepest part of the loaf, away from the pan. ThermoWorks gives the same range in its guidance for quick-bread doneness temperatures.
Tester and Temperature Checks
Read what the tester brings out of the loaf.
Wet batter needs more time; moist crumbs usually mean the center is ready.
Temperature is most useful in the deepest center.
Check the thickest center and avoid the pan edges; aim for 200–205°F / 93–96°C.
Use the final cues together, not one by itself.
Use the cues together: matte crack, gentle spring, moist crumbs and 200–205°F.
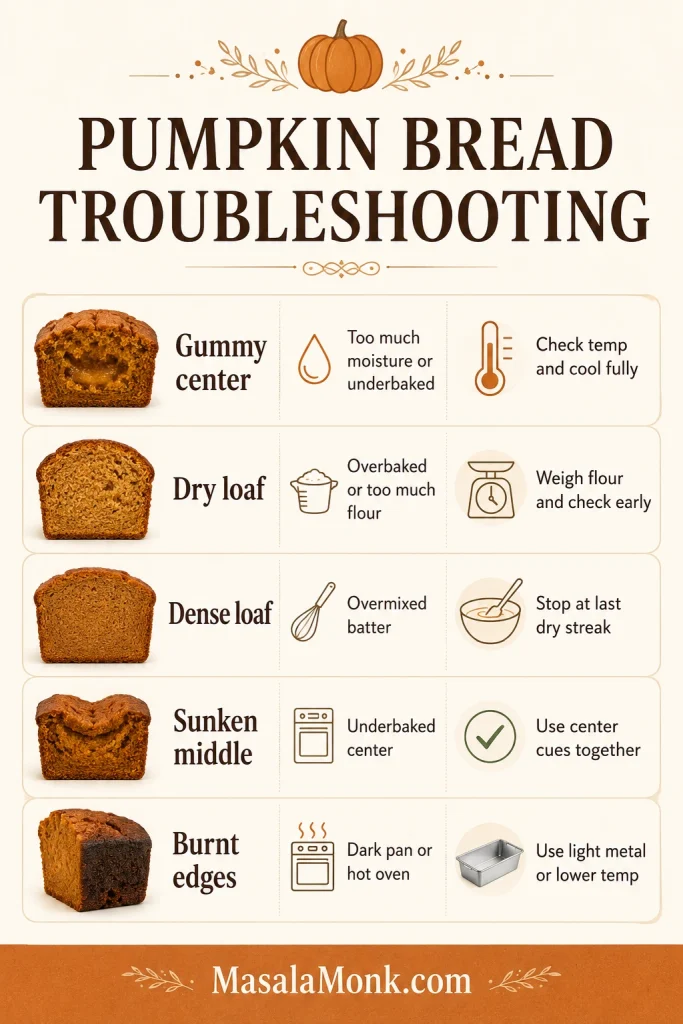
Pumpkin Bread Troubleshooting: Gummy, Sunken, Dry or Dark
Match the symptom before changing the whole recipe. Wet puree, inaccurate flour measurement, pan depth, uneven batter and an unfinished center explain many common problems.
If the loaf is still in the oven, check the doneness cues before diagnosing it as a failed loaf.
Wet, Gummy or Sunken Center
Compare the center only after the loaf has cooled.
A wet-looking, darker center usually means the loaf needed more time or thicker puree.
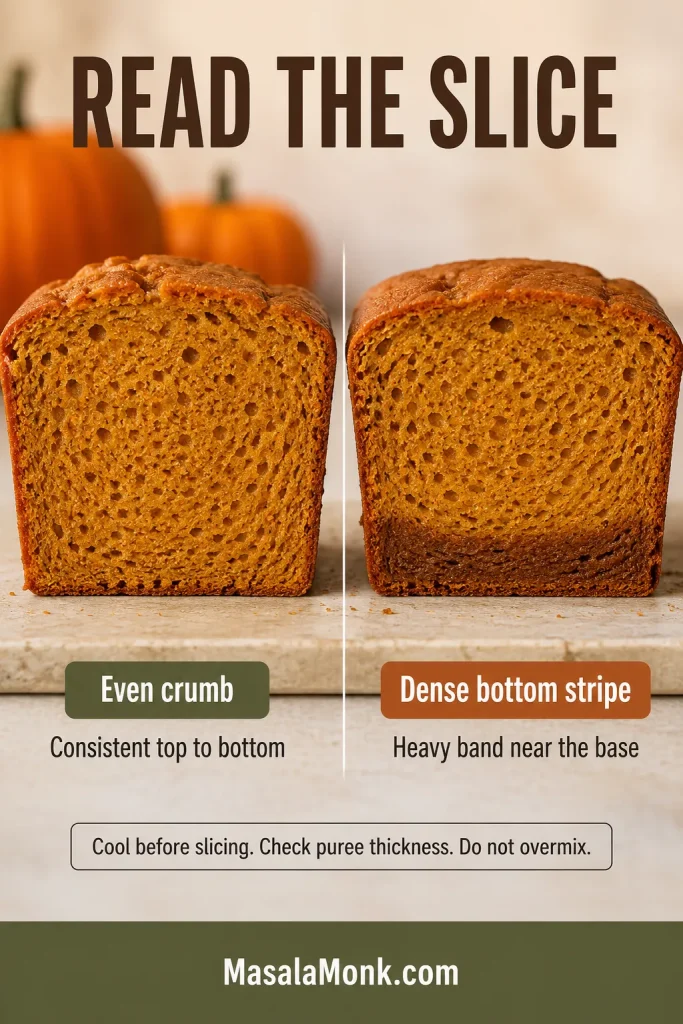
For a bottom stripe, check moisture and the lower crumb.
A dense bottom stripe usually points to excess moisture, uneven batter or an underbaked lower crumb.
Problem
Likely causes
What to do next
Wet or gummy middle
Loose puree, too much pumpkin, too little flour, deep pan, early removal or slicing while hot
Drain fresh puree, weigh the key ingredients and bake until the deepest section no longer shows liquid batter.
Dense stripe along the bottom
Excess liquid, separation in the batter or an underbaked lower crumb
Blend the wet mixture evenly, confirm the puree is thick and give the lower center enough time.
Sunken middle
Center not set, too much liquid, excess leavening or repeated early oven opening
Keep the oven closed during the rise and confirm the center before removing the pan.
Dry, Tough, Dark or Stored Too Soon
Match the symptom before changing the recipe.
Most fixes trace back to moisture, flour, mixing, pan depth or bake time.
Problem
Likely causes
What to do next
Dry or crumbly bread
Too much flour, excessive baking, dark pan or major reductions in sugar or oil
Measure flour carefully, begin checking on time and protect the crust if it darkens early.
Tough or rubbery crumb
Vigorous mixing after the flour was added
Fold only until the final dry streak disappears.
Dark crust with a wet middle
Dark pan, strong heat above the loaf, high oven temperature or batter sitting too deeply
Use light metal, move the pan one level away from the strongest heat source and tent the top once it has enough color.
Overflowing batter
Pan too small or filled too high
Keep the batter below three-quarters full and bake excess as muffins.
Repeatedly wet middle despite normal timing
Oven running cool or not fully preheated
Verify the oven temperature with a separate thermometer before changing the formula.
Sticky bottom after storage
Loaf wrapped before it was fully cool
Cool completely before storing and use parchment or a replaceable paper towel in humid conditions.
Substitutions and What They Change
Bake the original loaf once before changing several structural ingredients together. These exact substitutions have not been validated as separate versions of this formula, so change one structural ingredient at a time and expect the texture to shift.
Once the basic loaf is baking evenly, small changes are easier to judge. For topping ideas instead of structural swaps, jump to easy variations.
Use these swaps as texture direction, not tested ratios.
Texture direction, not tested ratios: change one structural ingredient at a time.
Melted butter: creates a more buttery flavor and a firmer crumb after cooling.
Applesauce: adds water and fruit solids without oil’s tenderizing effect. Replace only a small portion rather than all the oil.
Yogurt or sour cream: brings richness and acidity, but a large amount can make an already-moist batter heavier.
Less sugar: reduces browning, moisture retention and tenderness. A modest reduction is gentler than removing half.
Honey or maple syrup: adds liquid as well as sweetness, so neither should replace the granulated sugars cup for cup.
Whole-wheat flour: creates a more robust, less delicate crumb. Begin with a partial replacement.
Oat, almond or coconut flour: behaves too differently from wheat flour for a dependable cup-for-cup swap here. Use a formula designed around the flour you want.
Gluten-free, vegan, keto and high-protein conversions change several structural parts of the loaf at once. They need separate formulas rather than a chain of small swaps.
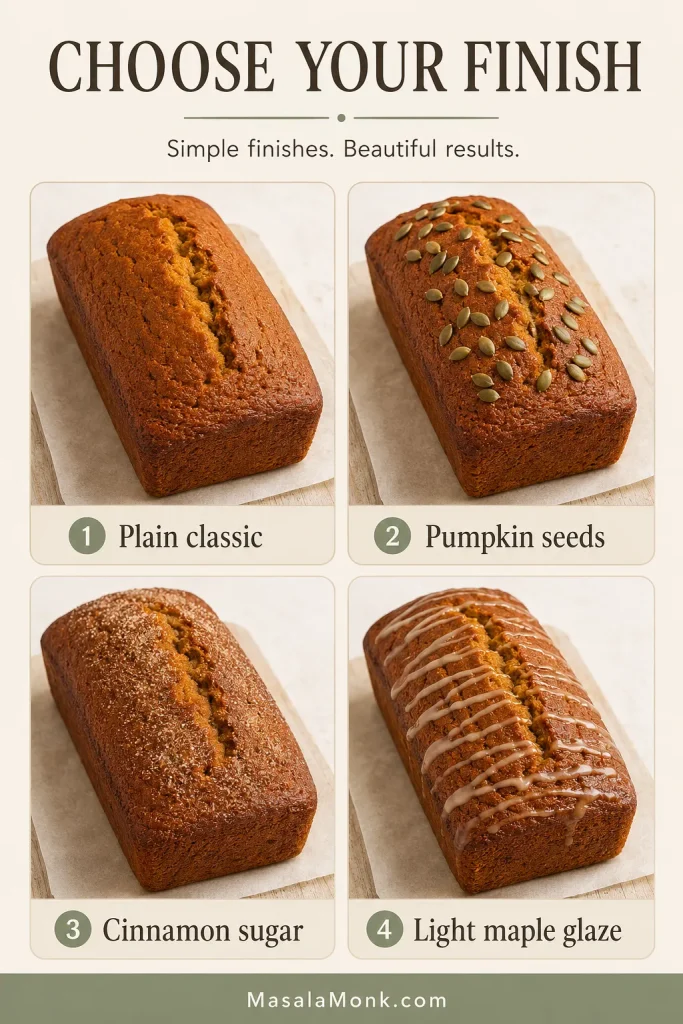
Easy Variations
Pumpkin seeds: scatter 2 tablespoons over the batter and press lightly so they stay attached.
Cinnamon-sugar top: mix 1 tablespoon sugar with ¼ teaspoon cinnamon and sprinkle evenly over the surface.
Walnuts or pecans: fold in up to ¾ cup chopped toasted nuts.
Raisins: add ½ cup. Soak very dry raisins briefly, then drain and pat them dry.
Orange zest: add the finely grated zest of one small orange.
Maple glaze: whisk ½ cup / 60 g powdered sugar with 1 tablespoon maple syrup and 1–2 teaspoons milk, adding the milk gradually.
Banana, cream-cheese filling and sourdough change the batter more substantially. For a quick bread built around discard, use this sourdough banana bread recipe.
Keep the topping simple or add nothing at all; this loaf does not need a glaze to feel complete.
Keep the batter steady and change only the finish.
Choose plain, seeded, cinnamon-sugar or lightly glazed depending on the finish you want.
How to Serve Pumpkin Bread
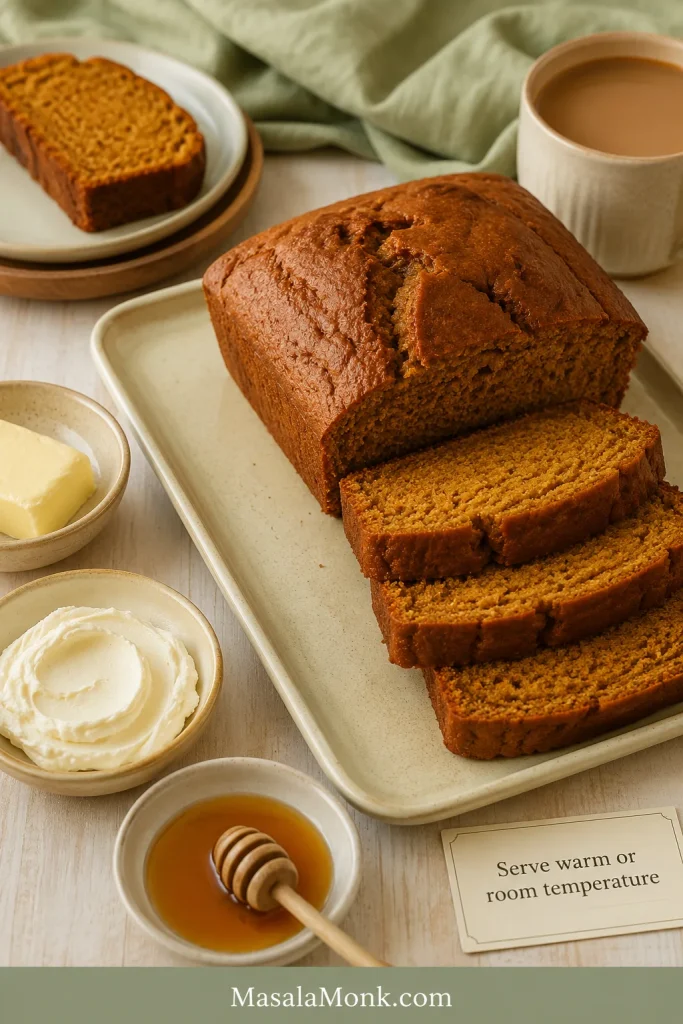
At room temperature, the pumpkin tastes fuller and the spices feel rounder. Serve the loaf plain with coffee, chai or black tea. A warm slice also works beautifully with salted butter, cream cheese or maple butter.
Cool first for clean slices, then rewarm if you like.
Cool for clean slices, then serve plain, buttered, or with cream cheese and coffee or tea.
Toast day-old slices until the edges are lightly crisp.
Use older slices for pumpkin French toast.
Wrap a fully cooled loaf as an autumn or holiday gift.
By the next morning, the crust has softened slightly and the loaf cuts more cleanly. Cinnamon, ginger and nutmeg also taste more unified. The first warm slice is hard to resist, but the loaf shows its best crumb after it has cooled completely.
Storage and Freezing
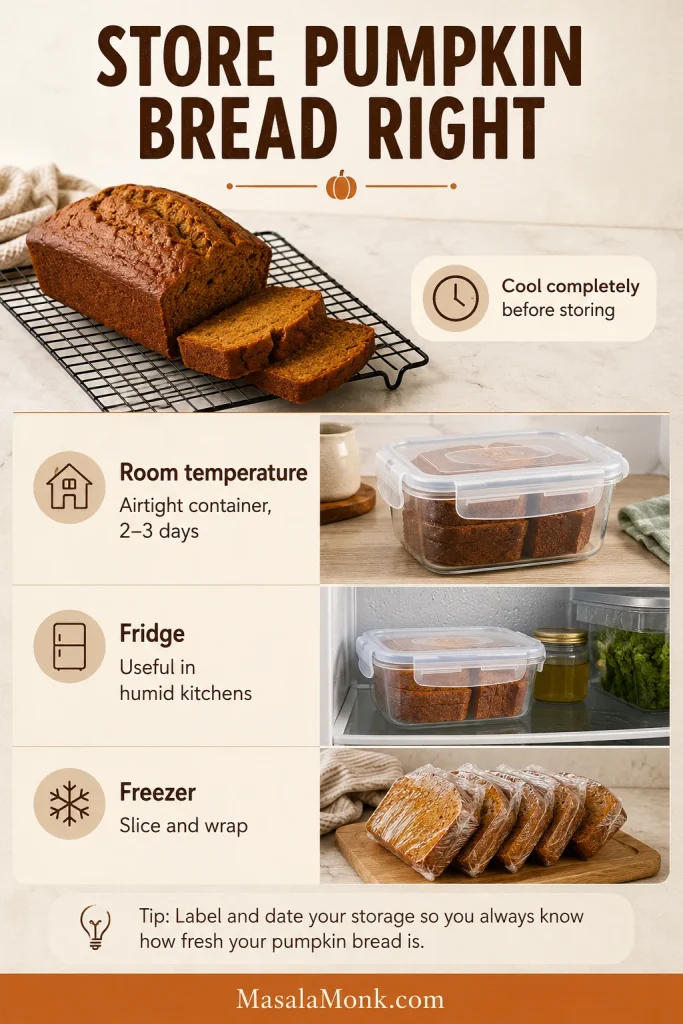
Cool room: wrap the completely cooled loaf or place it in an airtight container and keep it at room temperature for up to 3 days.
Hot or humid kitchen: refrigerate the loaf sooner. Let slices return toward room temperature or warm them gently before serving.
Freezer: wrap the loaf whole or as individual slices, place it in a freezer-safe container and label it with the date. Separate slices with parchment and use within about three months for the best texture.
Thaw pumpkin bread while it is still wrapped so condensation forms on the wrapping rather than soaking into the crumb.
Let steam escape before wrapping the loaf.
Cool completely before wrapping; then store airtight, refrigerate if humid or freeze slices.
Frequently Asked Questions
Can I Prepare the Batter Ahead?
Prepare the wet and dry components separately, then combine them shortly before baking. Once the flour and leaveners meet the wet mixture, get the batter into the oven promptly.
Can I Make Pumpkin Bread Without a Loaf Pan?
Yes. A standard muffin tin is the easiest alternative. Fill the cups about two-thirds full and begin checking at 17 minutes.
Can I Freeze Leftover Pumpkin Puree?
Yes. Freeze it in a small airtight container or measured portion, label the amount and thaw it in the refrigerator. Stir before using and drain briefly if it releases water.
Save the short version once you know the full method.
The saveable version: pumpkin amount, flour, pan size, bake window and doneness cue in one place.
Once the loaf is cool, cut a thick slice and notice the contrast: a lightly firm crust, a soft orange crumb and cinnamon arriving just after the pumpkin. Eat it plain, add a little salted butter or wrap part of the loaf for someone else.
Did you use canned or fresh pumpkin? Share your pan size, pan material and actual bake time—it may help the next reader using a similar setup.
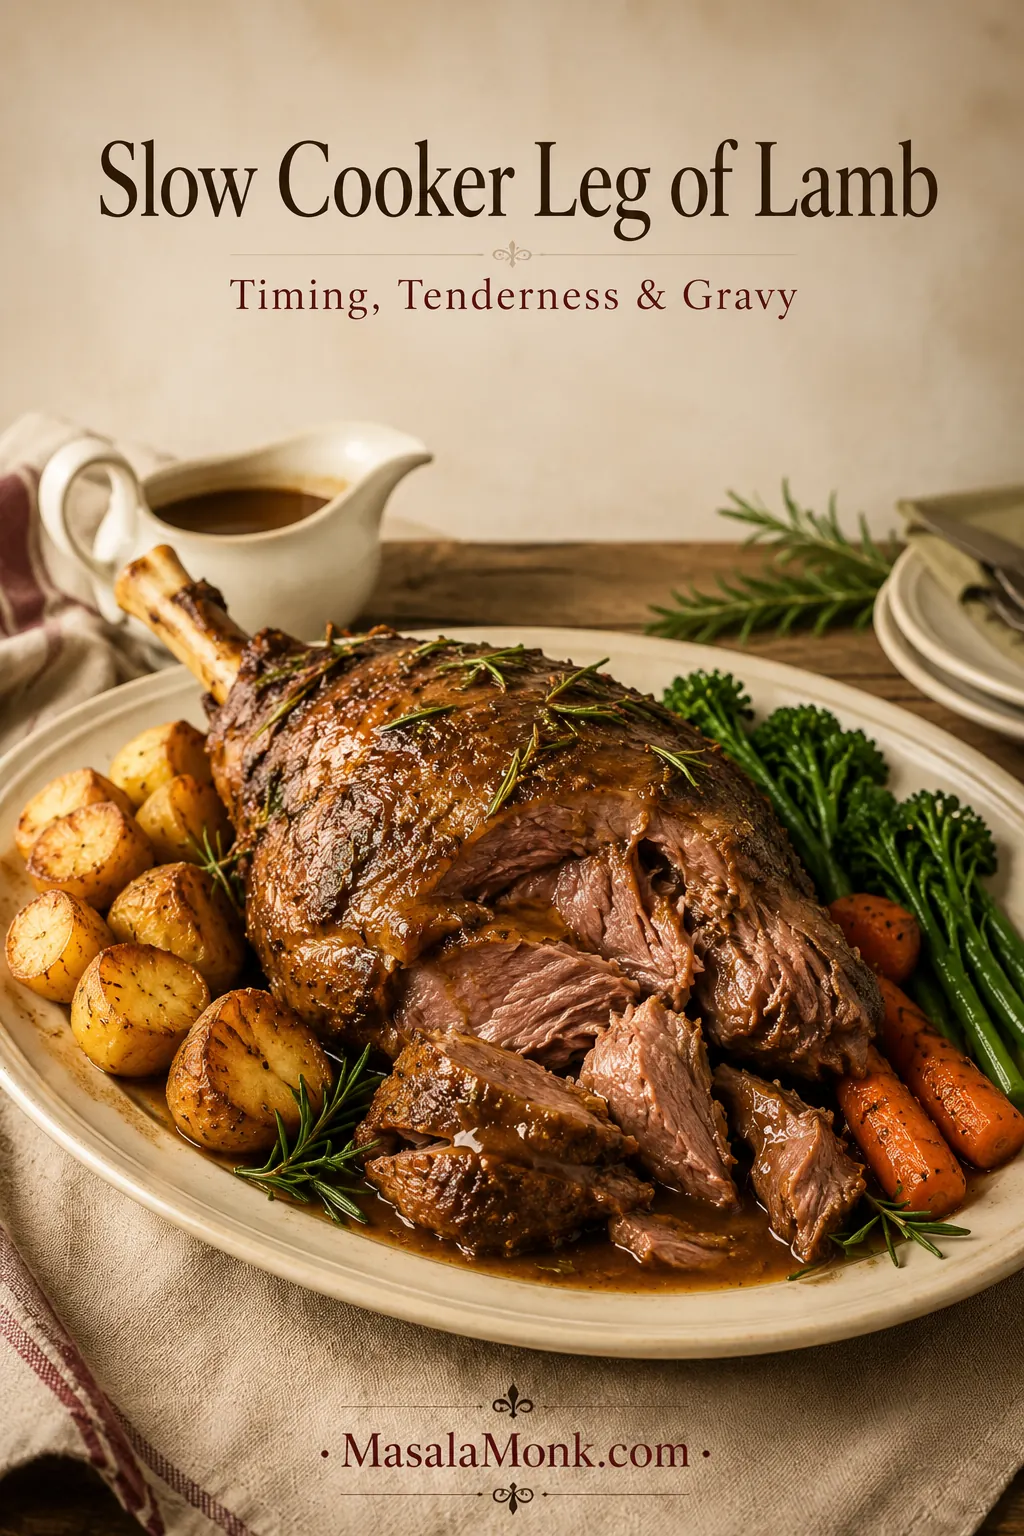
Slow cooker leg of lamb should give you three things when the lid comes off: meat that yields beneath a fork, a kitchen full of garlic and rosemary, and cooking juices already halfway to becoming gravy.
That is the calm version of Sunday lunch. Leg of lamb is not something most people want to experiment with blindly, especially when several people are waiting to eat—and a compact boneless roll, bone-in half leg and large whole leg will not all behave in exactly the same way.
The recipe below gives you a dependable starting point. Then the joint-specific guide shows when to begin checking a 1 kg half leg, a rolled boneless joint or a larger bone-in leg, because shape and thickness can matter almost as much as weight.
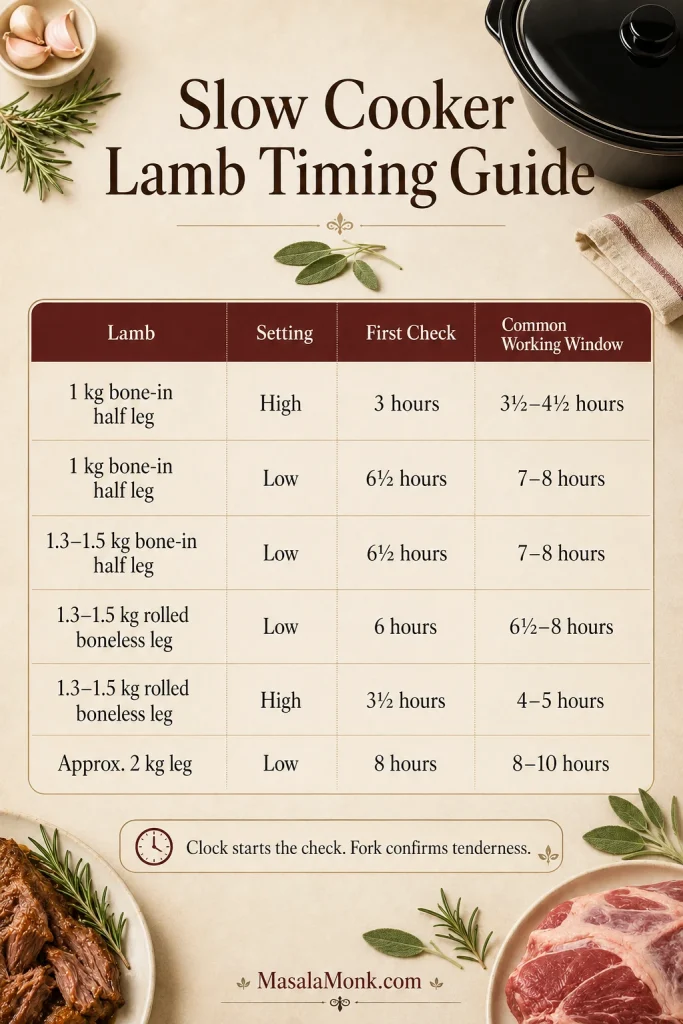
A 1.3–1.5 kg / 2.9–3.3 lb leg of lamb generally needs about 7–8 hours on low in a slow cooker or Crock-Pot. Start checking the thickest meat at around 6½ hours. A smaller 1 kg / 2.2 lb half leg can take about 3½–4½ hours on high, with the first check at three hours.
Keep most of the lamb above the liquid. Continue cooking until it has reached a safe temperature and a fork twists through the thickest section with little resistance, then brown it briefly while turning the cooking juices into gravy.
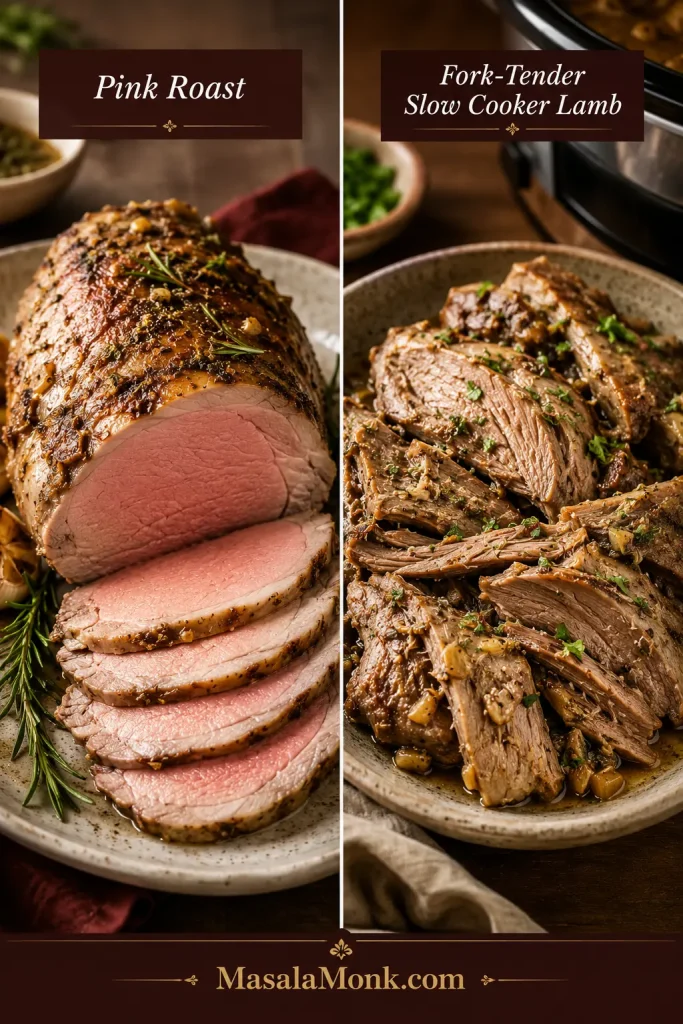
This method produces fully cooked, fork-tender lamb. It is not the right method when you want a pink or medium-rare centre with neat carved slices.
The lamb is savoury and rosemary-scented, with mellow garlic, soft sweet onions and plenty of cooking juice for gravy. A short hot-oven finish gives the pale slow-cooked surface burnished edges without drying the tender meat underneath.
Recipe at a glance: Prep: 25 minutes Slow cooking: about 7–8 hours on low Browning and gravy: 15–20 minutes Final rest: 5–10 minutes Serves: 4 generously, or 5–6 with substantial sides Slow cooker: about 5.5–6 litres / 6 quarts
Equipment: slow cooker, meat thermometer, roasting tray, broad spatula or serving spoon, heatproof jug, fine-mesh strainer and saucepan.
Choose your finish: For the best colour and a fuller gravy, brown the lamb in the oven, then defat, reduce and thicken the cooking juices. For the easiest route, skip the oven finish and serve the pale but tender lamb with defatted cooking juices or a simple gravy.
Most of the cooking time is unattended. The active work is divided between the initial preparation and the optional browning-and-gravy finish.
Using a smaller or boneless leg? Follow the same preparation and finishing method, then use the timing guide later in the article for the cooking window.
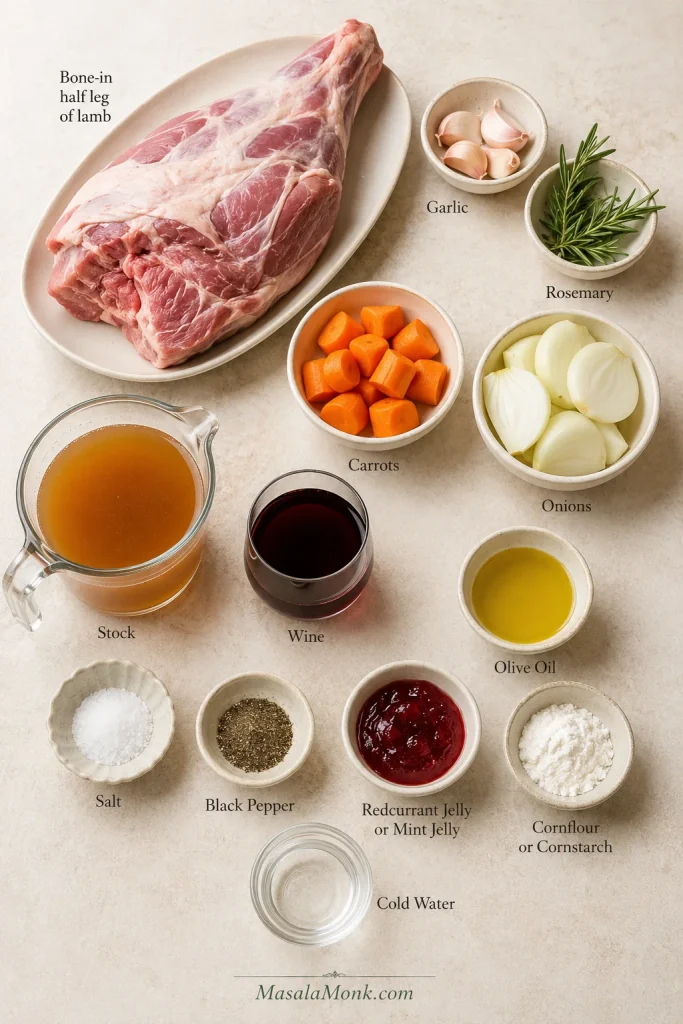
Ingredients
Ingredient
Amount
Bone-in half leg of lamb
1.3–1.5 kg / 2.9–3.3 lb
Fine sea salt
10 g / about 1¾ teaspoons
Freshly ground black pepper
About 2 g / 1 teaspoon
Garlic, finely grated or crushed
6 cloves / about 20–24 g
Fresh rosemary, finely chopped
2 tablespoons / about 6–8 g
Olive oil, divided
30 ml / 2 tablespoons
Large onions, thickly sliced
2 / about 350–400 g
Large carrots, cut into large pieces
2 / about 200–250 g
Unsalted or low-sodium lamb, beef or chicken stock
240 ml / 1 cup
Dry red wine, or additional stock
120 ml / ½ cup
Redcurrant jelly or mint jelly, optional
2 tablespoons / about 35–40 g
For the Gravy
16 g / 2 tablespoons cornflour or cornstarch
45 ml / 3 tablespoons cold water
Hot unsalted stock or water, only if needed
Salt and black pepper, added only after tasting
The ingredient set is small, but it builds both the lamb and the gravy.
Garlic, rosemary, onion, carrot, stock and wine build both lamb flavour and gravy.
Instructions
Prepare and Load the Lamb
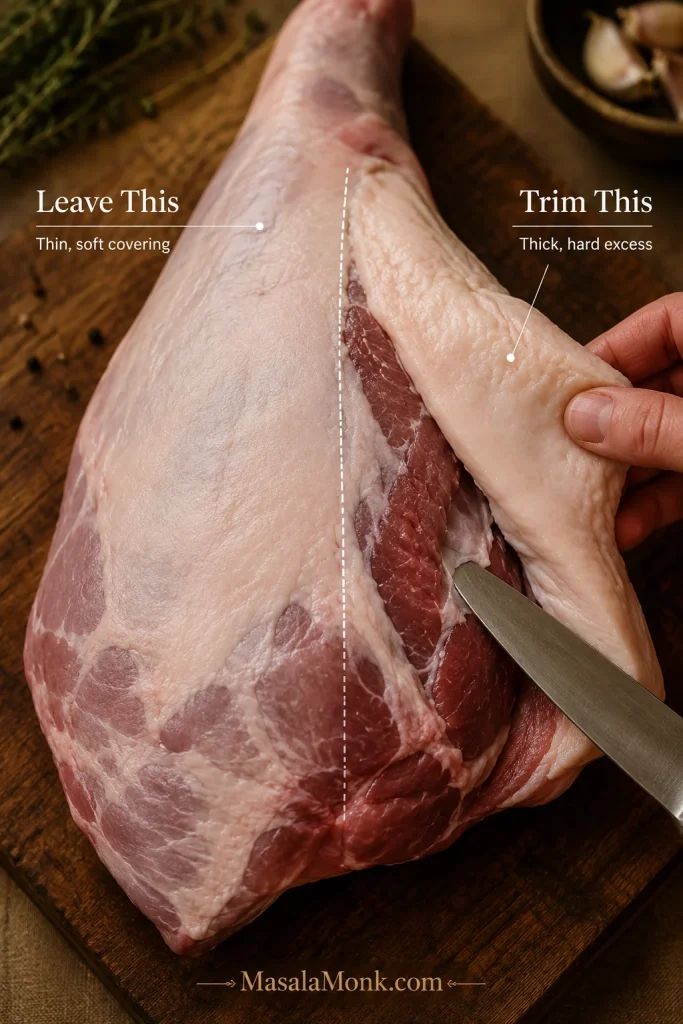
Thaw, trim and test the fit. Begin with fully thawed lamb and remove all outer packaging. Leave a thin, soft fat covering in place, but trim away any unusually thick or hard external fat. Put the unseasoned leg inside the clean cooker. The lid must close flat, with room underneath for the vegetables and cooking juices. Remove the lamb and pat it dry.
Trim only the heavy excess fat before seasoning.
Leave a thin fat cover for moisture; trim thick hard excess before it greases the gravy.
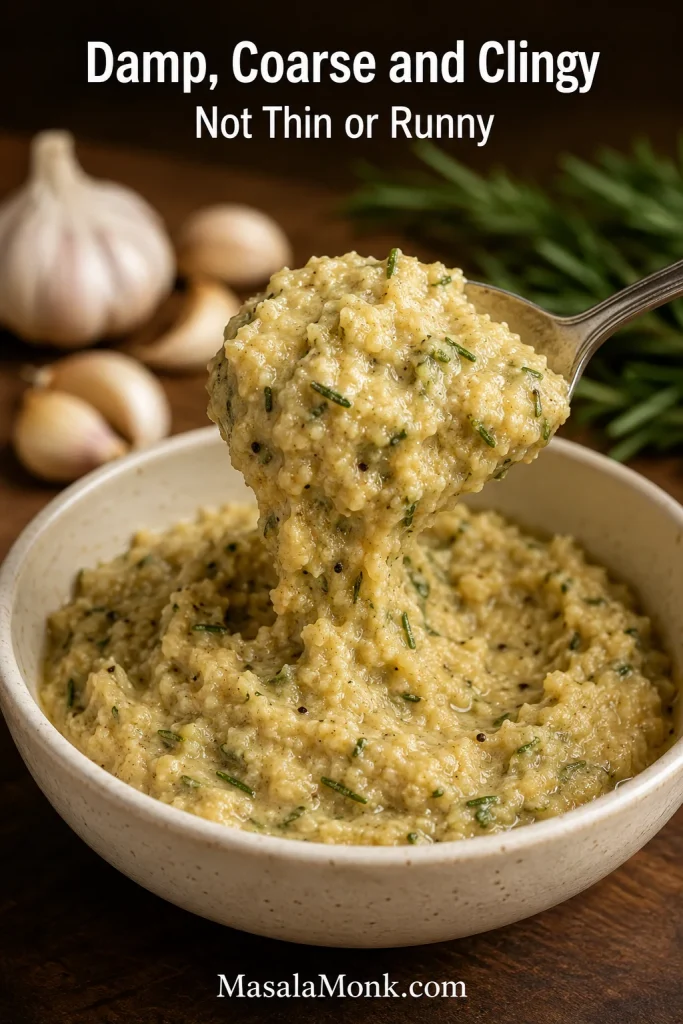
Season the lamb. Mix the salt, pepper, garlic, rosemary and 1 tablespoon of olive oil into a damp, coarse paste. It should cling to the meat rather than run off. Rub it over every exposed surface.
Aim for a paste that clings.
The rub should cling like a damp paste, not run into the cooker.
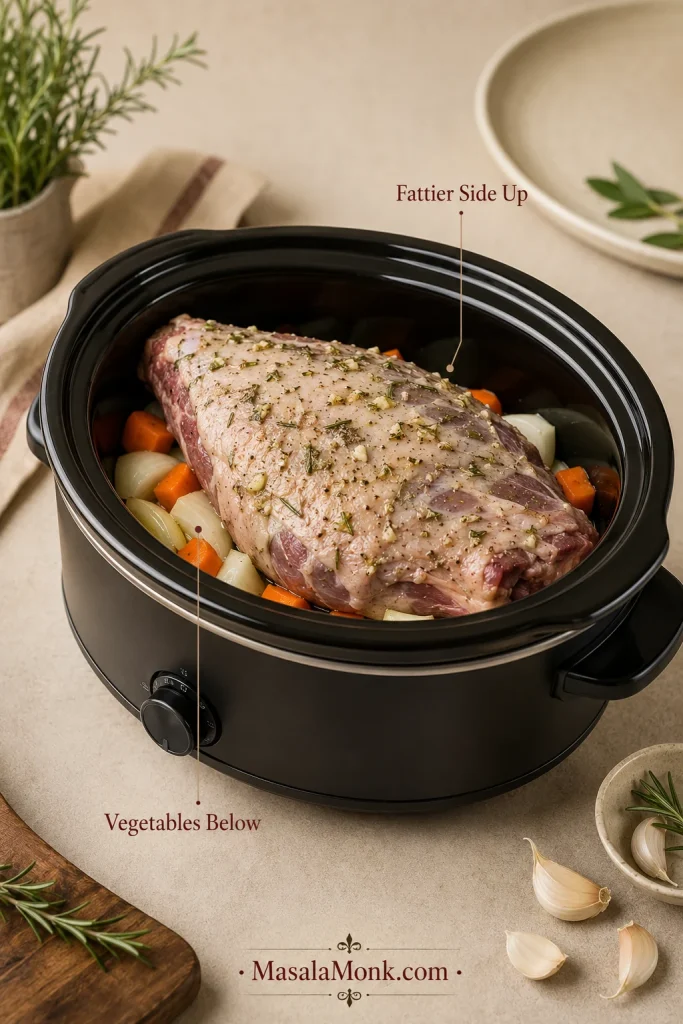
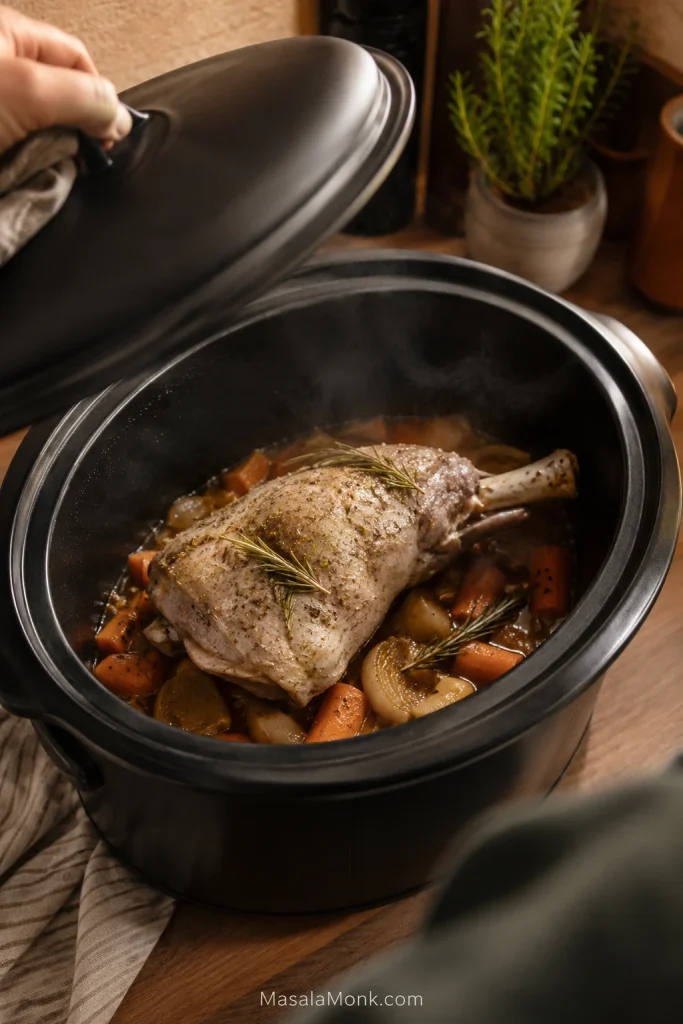
Build the cooker. Spread the onion and carrot over the base. Place the lamb on top with the fattier side facing upward where its shape allows.
This is the setup to copy before the lid goes on.
Set the lamb above the vegetables with the fattier side up where possible.
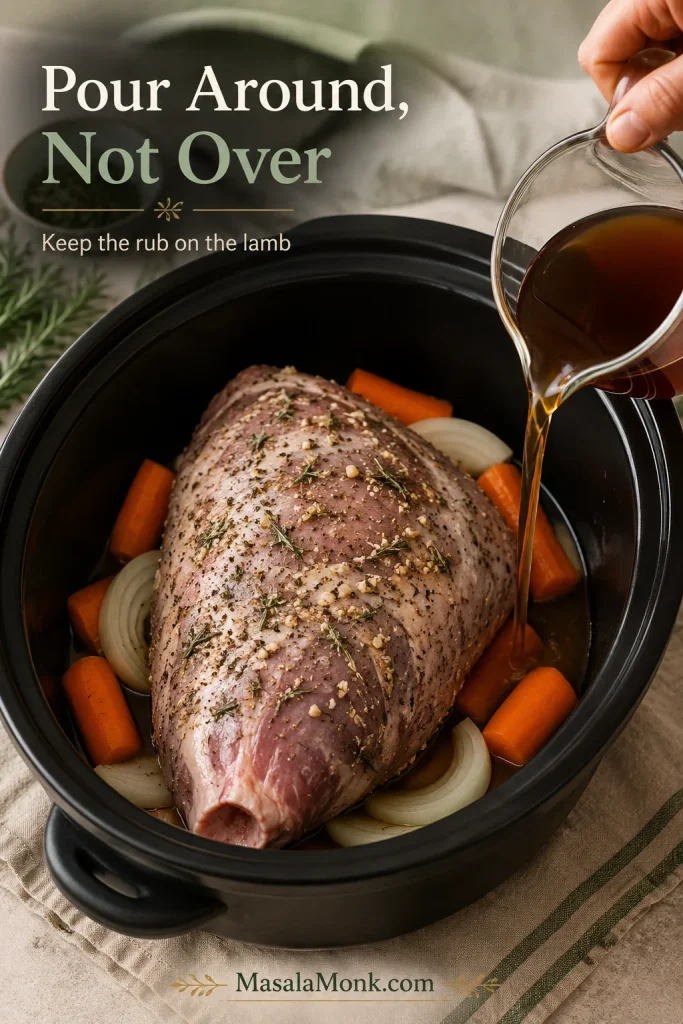
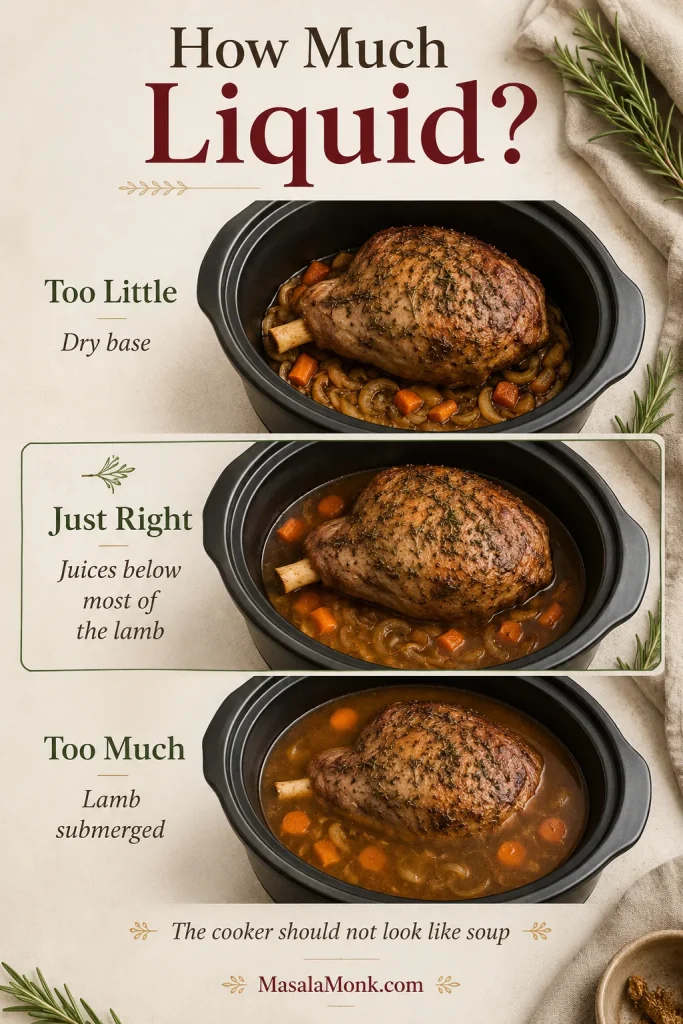
Add the stock and wine. Pour them around the sides rather than over the seasoning. Only the vegetables and lower part of the lamb should sit in the liquid; the cooker is not meant to look like soup.
Pour the liquid around the lamb, not over the rub.
Pour liquid around the edge to preserve the rub and keep the gravy base clean.
Cook and Check Doneness
Slow cook. Cover and cook the 1.3–1.5 kg / 2.9–3.3 lb bone-in half leg on low for about 7–8 hours. Keep the lid closed until the first check at around 6½ hours, because repeated lifting releases heat and can lengthen the cook.
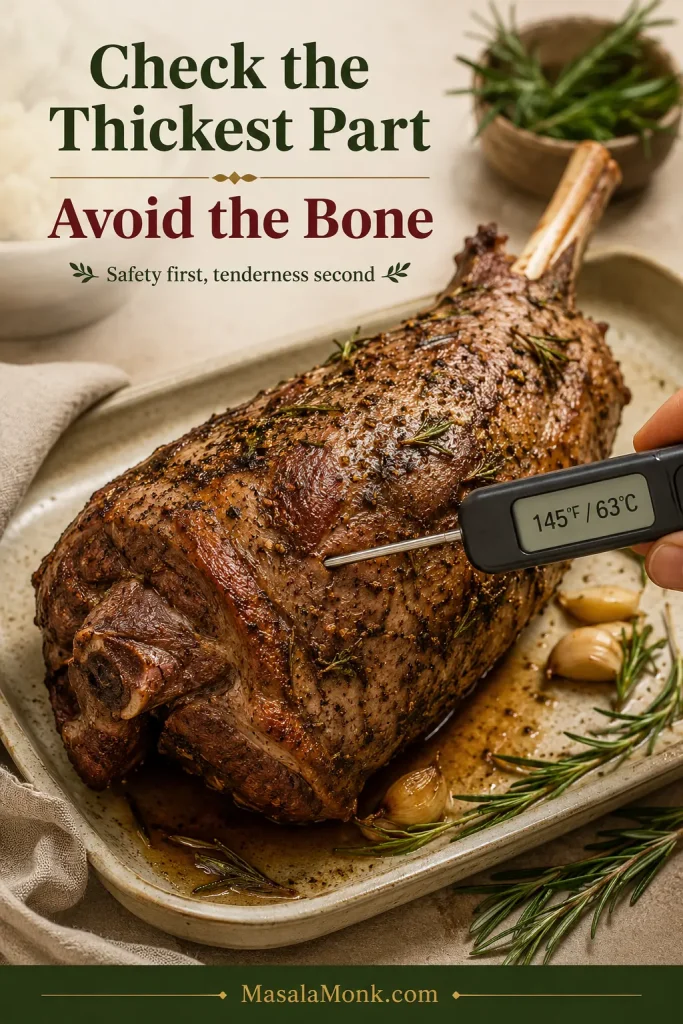
Check the thickest part. Confirm safety: Insert the thermometer into the thickest meat without touching the bone. It must reach at least 63°C / 145°F, followed by a rest of at least 3 minutes. The final 5–10-minute rest in this recipe satisfies that minimum.
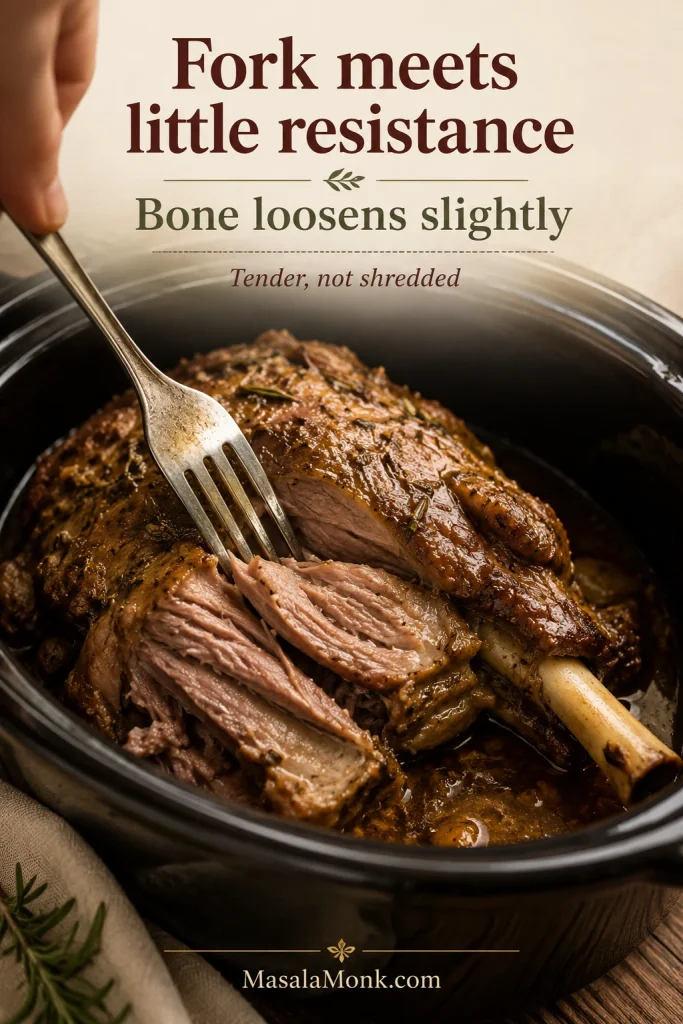
Then check tenderness: The fork should slide into the thickest section and twist easily. The fibres should begin to separate, and a bone-in leg should feel loose around the bone. Reaching the safe temperature does not automatically mean the lamb is tender.
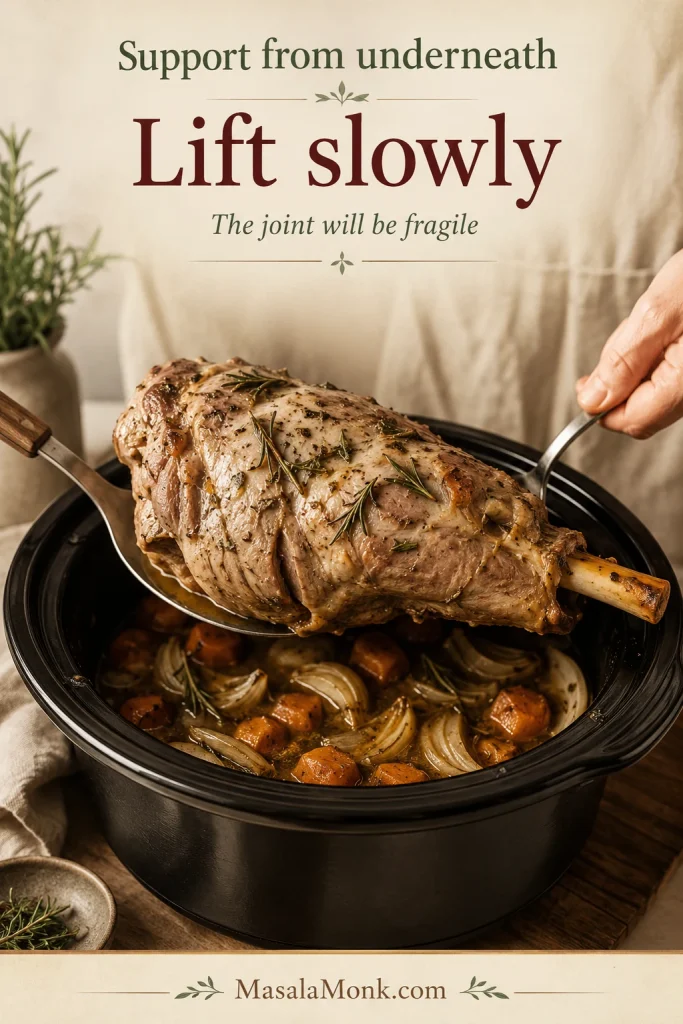
Transfer and strain. By this point the leg may feel unexpectedly fragile. Support it from underneath with a broad spatula or serving spoon rather than trusting the tongs to hold it together. Move it to a lined roasting tray, then strain the cooking juices through a fine-mesh strainer into a heatproof jug. Heat the oven to 220°C / 425°F.
Lift with support underneath once the lamb is tender.
Support tender lamb from underneath so it reaches the tray intact.
Brown the lamb. Brush the surface lightly with the remaining olive oil or a thin layer of jelly. Roast for about 10–15 minutes, stopping when the garlic-and-rosemary surface looks burnished and the edges begin to darken. A hot grill or broiler can do the same job in a few minutes, but watch continuously.
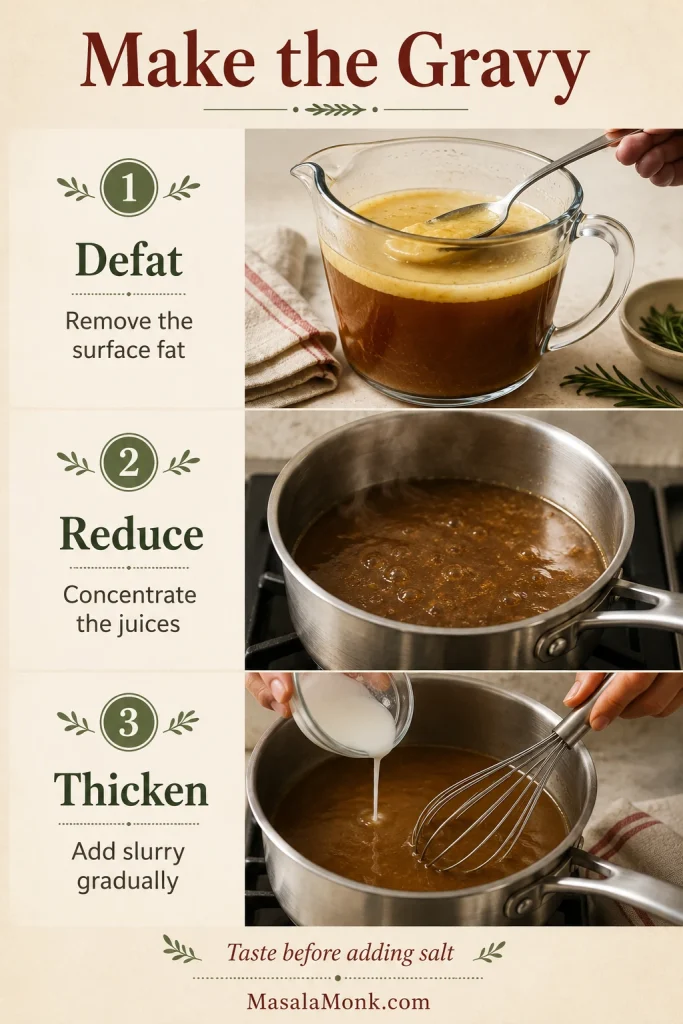
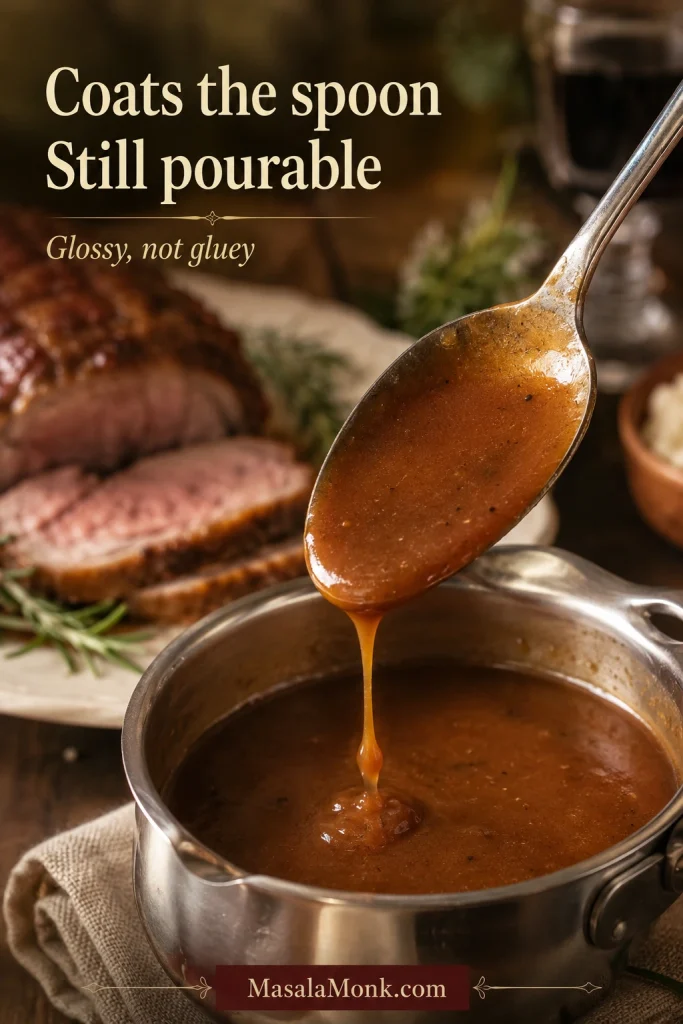
Make the gravy. Remove the surface fat from the strained juices, then simmer them in a wide saucepan. Mix the cornflour or cornstarch with the cold water and whisk the slurry in gradually. Stop when the gravy coats the back of a spoon; you may not need all of it.
Rest, portion and serve. Rest the browned lamb for 5–10 minutes. Lift away the loosened bone, discard any large pieces of fat and pull the meat into generous sections rather than fine shreds. Remove the string from a boneless roll before portioning, then serve with hot gravy.
Boneless rolled leg: leave ordinary butcher’s string in place while cooking. Follow the package instructions for elastic or synthetic netting.
Skipping wine: replace it with the same amount of unsalted or low-sodium stock.
Using dried rosemary: use 1–1½ teaspoons dried rosemary, crushed between your fingers.
Extra cooking juice is normal: the liquid level usually rises as the lamb, onions and carrots release moisture.
Gravy yield: depending on the leg and how far the juices are reduced, there should be enough for roughly 4–6 servings.
Slow-cooker safety: thaw the lamb completely, load and switch on the cooker immediately, and follow your appliance manual for large cuts and fill levels. Use the hob, oven or microwave—not the slow cooker—to reheat refrigerated leftovers.
Choose the Lamb Joint You Actually Have
Best default: use a 1.3–1.5 kg bone-in half leg and cook it on low. It fits more readily than a whole leg, still looks generous on the table and gives you a useful cue near the end as the bone begins to loosen.
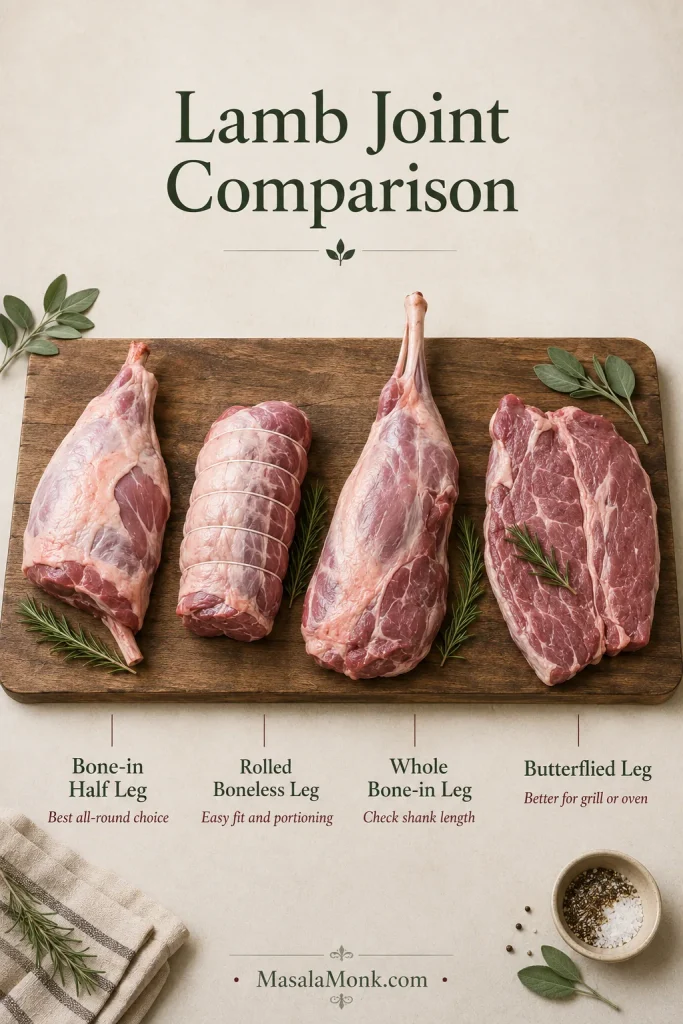
Compare Common Lamb Joints
Joint
Best for
Main caution
Bone-in half leg
Best all-round choice
The bone reduces the edible yield
Rolled boneless leg
Easy fit and simple portioning
Check it earlier than a long bone-in leg
Whole bone-in leg
A larger gathering
The long shank may prevent the lid from closing
Butterflied leg
Grilling or faster oven roasting
Uneven thickness makes it less suited to this method
A smaller 800 g–1 kg bone-in half leg works well on high when time is shorter, although there is less meat to protect from overcooking. A rolled boneless leg gives more edible meat at the same raw weight and is often the easiest choice for a compact cooker.
Whole Leg and Shoulder Cautions
Bought a whole leg? Test it before seasoning. When the shank is too long, ask a butcher whether it can be shortened or partly cut so the joint bends more easily.
Start by identifying the joint you actually bought.
Identify your joint first; the cut decides timing, fit and tenderness expectations.
Lamb shoulder contains more fat and connective tissue and is better treated as a separate recipe rather than assigned the leg timings in this guide.
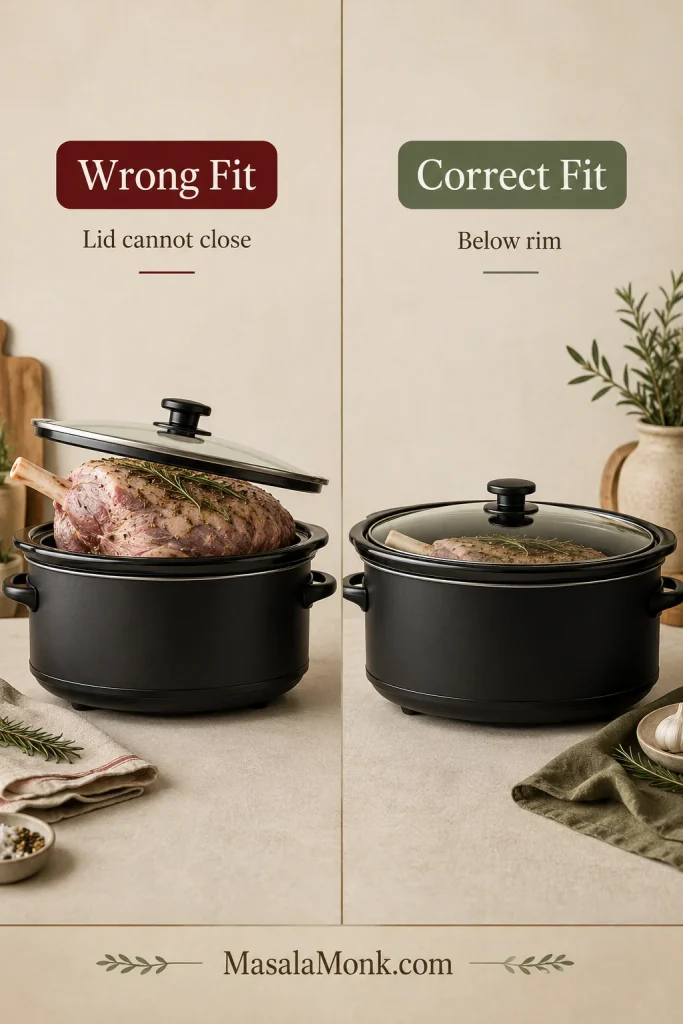
Will the Lamb Fit Your Slow Cooker?
The slow cooker does not care how elegant the leg looked in the butcher’s case. It cares whether the lid can close.
Before seasoning, place the lamb in the clean cooker insert.
Make sure the thickest part sits below the rim.
Leave room underneath for the onion, carrot and cooking liquid.
Check that the lid closes flat without touching or pressing against the meat.
Remove the lamb before preparing the recipe.
The lid must close flat.
If the lid does not close flat, the cook becomes unpredictable.
The fit test takes less than a minute and is worth doing before your hands are covered in garlic and rosemary. A 5.5–6 litre / 6-quart oval cooker is a useful starting size for many half legs, but the appliance manual should take priority for unusually large cuts.
FoodSafety.gov also recommends checking the manufacturer’s guidance for large cuts. See its slow-cooker safety advice.
Slow Cooker Leg of Lamb Cooking-Time Guide
Two legs with the same weight can still finish at different times. These conservative planning windows bring together timings used for comparable joints. Begin checking at the stated time, then let the thermometer and fork make the final decision.
Lamb
Setting
First check
Common working window
1 kg / 2.2 lb bone-in half leg
High
3 hours
About 3½–4½ hours
1 kg / 2.2 lb bone-in half leg
Low
6½ hours
About 7–8 hours
1.3–1.5 kg / 2.9–3.3 lb bone-in half leg
Low
6½ hours
About 7–8 hours
1.3–1.5 kg / 2.9–3.3 lb rolled boneless leg
Low
6 hours
About 6½–8 hours
1.3–1.5 kg / 2.9–3.3 lb rolled boneless leg
High
3½ hours
About 4–5 hours
Approximately 2 kg / 4.4 lb leg
Low
8 hours
About 8–10 hours
Use the full timing guide for planning, not final doneness.
The table tells you when to check, not when to stop cooking.
Need to use high for a 1.3–1.5 kg bone-in half leg? Treat four hours as an early check rather than a promised finishing time. The thickest meat may need closer to five or six hours before the fork turns easily. Low remains the more forgiving route.
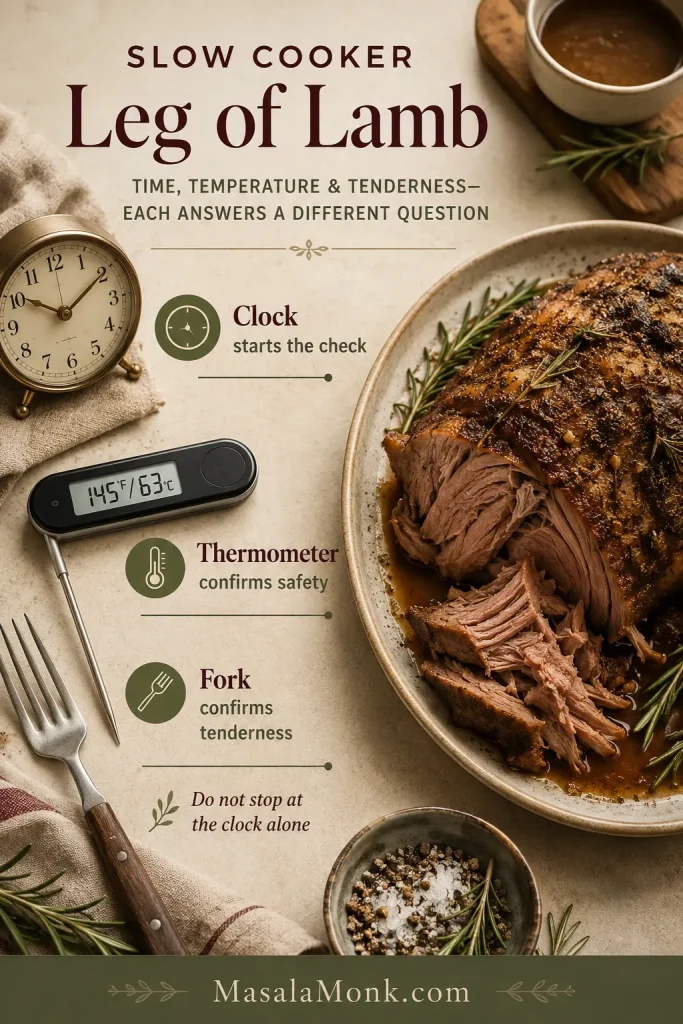
Use the clock to start checking. Confirm safety with the thermometer. Judge tenderness with the fork.
Three checks matter: time, temperature and tenderness.
Time starts the check; temperature confirms safety; the fork confirms tenderness.
A safe temperature may arrive before the fork agrees. When the thickest meat still pushes back, the connective tissue needs more time to soften.
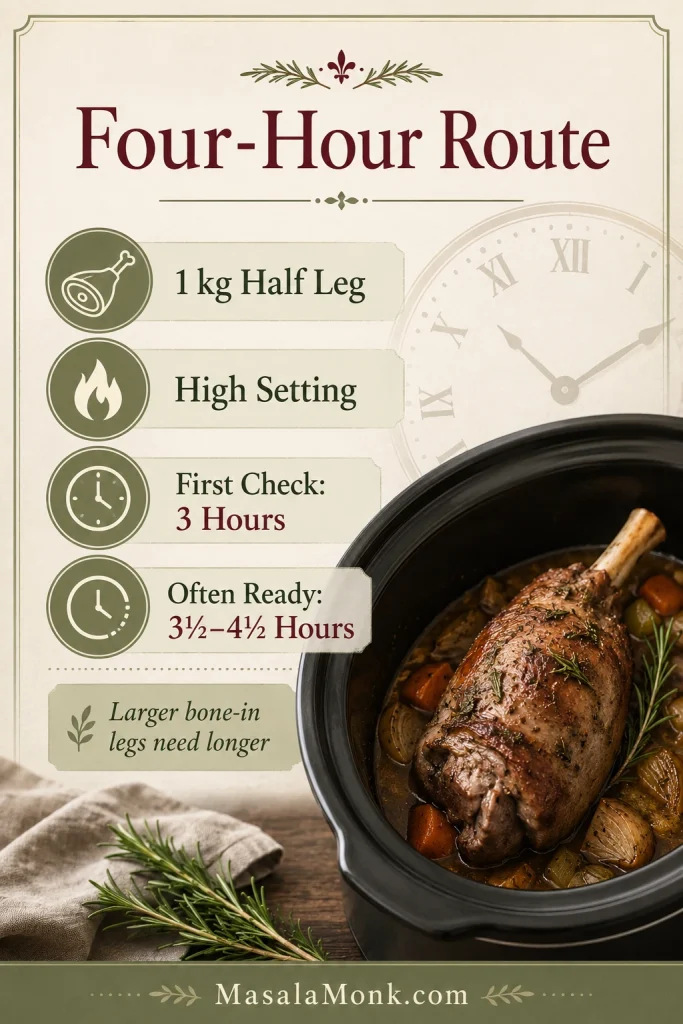
Can Leg of Lamb Be Ready in Four Hours?
Yes—for a fully thawed 1 kg half leg on high. Check the thickest section from three hours and probe more than one area when the joint is thick or uneven. A larger bone-in leg may still feel firm at four hours.
The four-hour route only suits a smaller half leg.
A four-hour route is realistic only for a smaller, fully thawed half leg on High.
Choose the setting according to the joint and time available:
Low: the most forgiving setting for a larger leg and the best default for a family meal.
High: useful for a smaller half leg, compact boneless roll or late start, but with a narrower finishing window.
Warm: for holding already-cooked food, not for beginning with raw lamb.
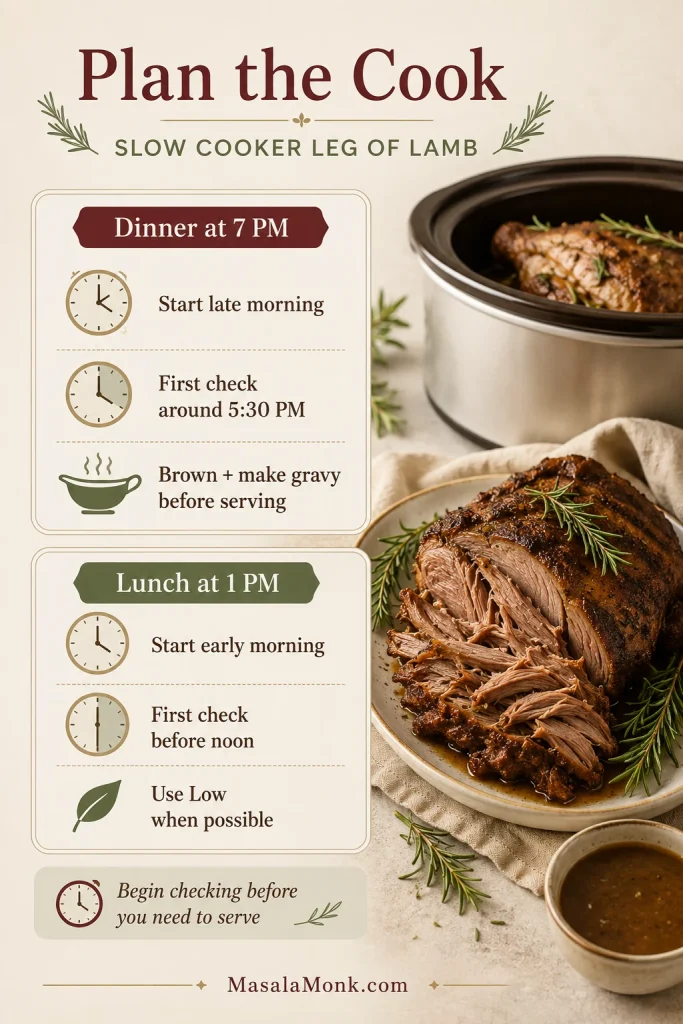
Cooking Schedules for Dinner and Sunday Lunch
Serving plan
Suggested approach
Dinner at 7 p.m.
For the main recipe joint, start on low between about 10:30 and 11:30 a.m. Check from around 5:30–6 p.m., then brown and finish the gravy shortly before serving.
Lunch at 1 p.m.
Use a smaller half leg on high, or cook the lamb the previous day and reheat it gently.
Make it the previous day
Cook until tender, cool promptly and refrigerate with some cooking juice. Reheat covered before restoring the browned surface.
Cook overnight
Reserve this for a larger leg whose low-setting window suits the time available. A small, lean joint may become soft but dry during an extreme overnight cook.
Plan backwards from the meal and leave time for checking, browning and gravy.
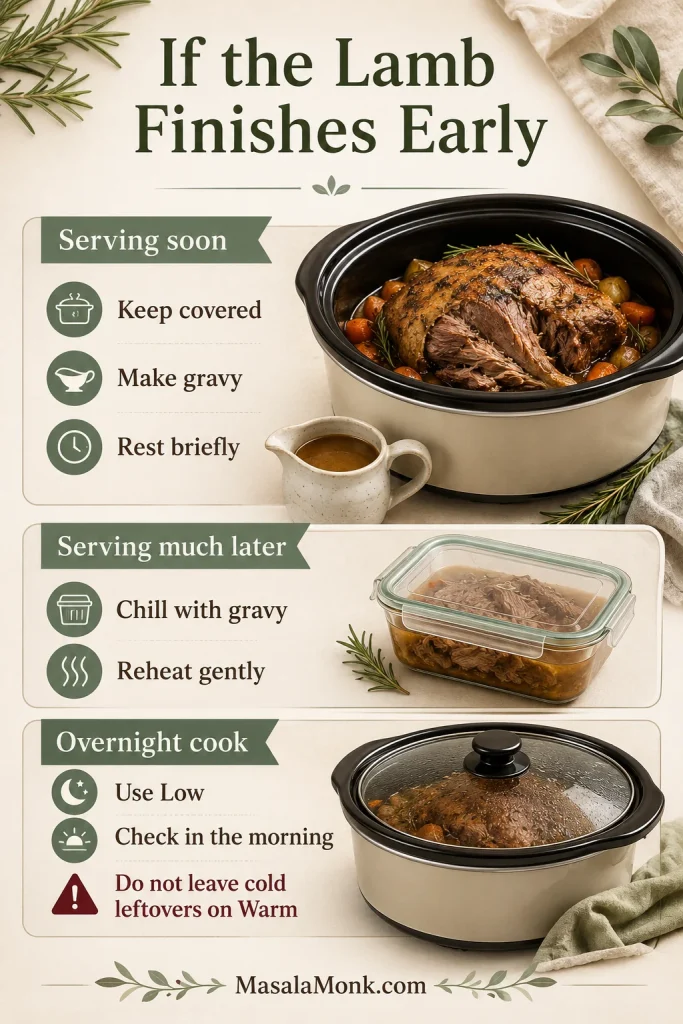
If the lamb becomes tender early: remove it from the cooker. If serving soon, keep it safely hot; if the wait will be longer, cool it promptly and refrigerate it with some cooking juice. Reheat and brown it shortly before serving.
For the previous-day route, cover the lamb and reheat it in a 163°C / 325°F oven until the centre reaches 74°C / 165°F. Uncover and increase the heat briefly to restore the browned surface, then rest the meat while warming the gravy separately.
Have a safe plan if the lamb finishes early.
Serve soon, or chill with juices and reheat safely when the wait is longer.
How Much Liquid Does Leg of Lamb Need?
During cooking, the slow cooker will usually create considerably more liquid than you put into it. The lamb should therefore sit above most of the stock rather than disappear into it.
Little or no added liquid gives concentrated juices and a more roast-like result, but may leave too little for a generous gravy.
A moderate amount gives enough cooking juice for gravy without turning the dish into a stew. The main recipe uses this middle route.
A large amount creates a wetter, more fully braised result.
Enough liquid for gravy is not the same as submerging the lamb.
Use enough liquid for gravy, but keep most of the lamb above the juices.
A larger-than-expected pool of cooking juice is normal. Strain it, remove the fat and reduce it before adding cornflour or cornstarch.
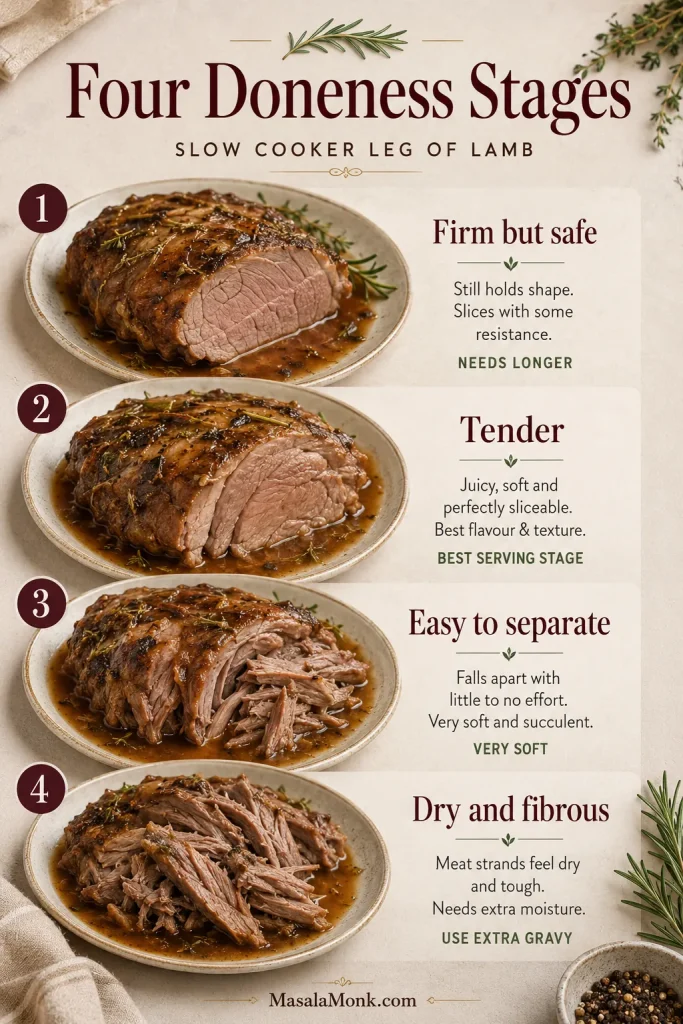
Temperature answers the safety question. The fork tells you what the meat will feel like on the plate.
This slow-cooker version is about fork-tender lamb, not pink carving slices.
Slow-cooker lamb is fully cooked and fork-tender, not a pink roast for neat slices.
Probe thick meat away from bone so the reading is useful.
Temperature vs Texture
Stage
What you notice
Result
Firm but safely cooked
The meat slices cleanly and pushes back against the fork
Suitable for firm slices
Tender
The fork enters easily but the leg still holds together
Soft carved slices
Easy to separate
The fibres part with little pressure
Fork-tender serving pieces
Dry and fibrous
The meat separates but feels cottony
Cooked beyond its best point
Doneness is a texture journey, not a single moment.
Safe lamb is not always tender; keep cooking until the texture matches your goal.
Most slow-cooker cooks are aiming for the third row: lamb that still looks like a roast on the tray but separates easily when served.
Place the thermometer in the thickest meat without touching the bone or sitting inside a large seam of fat. Whole lamb roasts should reach at least 63°C / 145°F and rest for at least 3 minutes. See the FoodSafety.gov safe-temperature chart for current official guidance.
Fork Tenderness Cues
If the fork still pushes back, dinner is not ruined. The lamb is usually asking for more time, not a rescue operation.
By the time the fork turns easily, the garlic has mellowed, the rosemary has scented the cooking juices and the onions have softened into the base of the gravy. The lamb may still look pale, but most of the flavour work is already done.
The fork test tells you what the thermometer cannot.
The best texture separates in broad tender sections, not dry strands.
Brown the Lamb and Make the Gravy
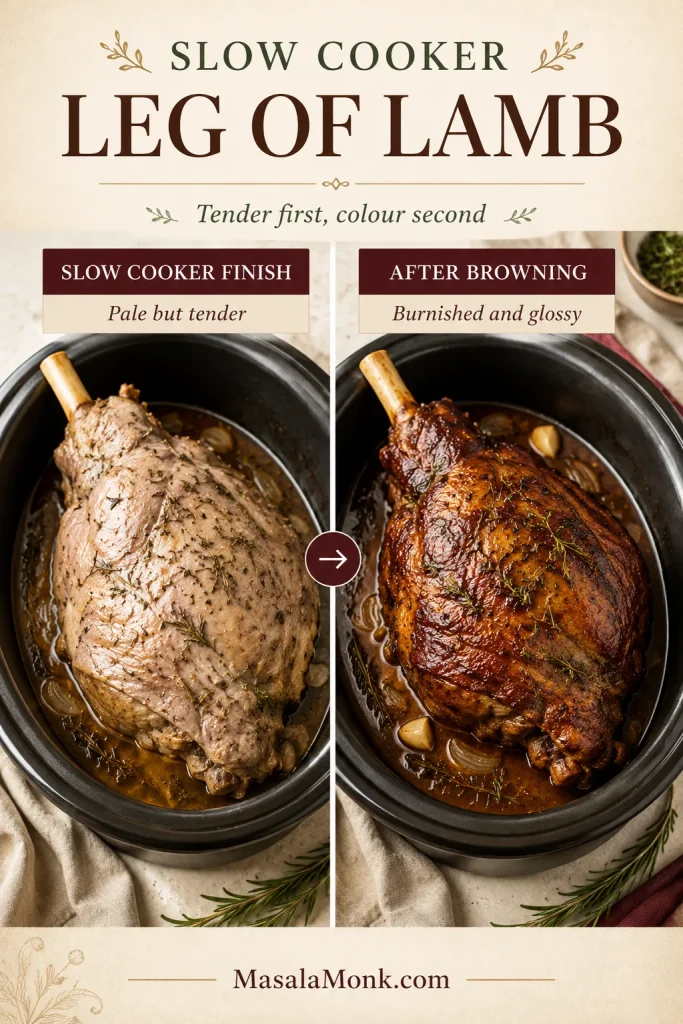
When the lid first comes off, the aroma may promise roast lamb before the surface looks the part. That is normal. The slow cooker has done the tenderising; the oven finish supplies the colour.
Do not panic if the lamb looks pale when the lid lifts.
Pale lamb from the cooker can still be tender; browning supplies the colour later.
Browning changes the finish, not the tenderness.
Tenderness comes from the slow cooker; roast-style colour comes from finishing heat.
Sear First or Brown Afterwards?
Searing first adds browned flavour to the cooking juices, but the crust softens beneath the lid. Browning afterwards gives the most visible colour and avoids handling a heavy raw leg in a hot pan.
Hot oven: brown at 220°C / 425°F for about 10–15 minutes.
Grill or broiler: use intense top heat for only a few minutes and watch continuously.
No oven available: serve the lamb directly from the cooker. It will remain pale and soft, but still taste good.
Jelly glazes contain sugar, so they can move quickly from glossy to burnt. Stop when the surface looks burnished and the edges begin to darken.
Make the Gravy
Strain the cooking juices into a heatproof jug.
Let the fat rise, then remove it with a gravy separator or large spoon.
Taste the defatted liquid before adding any salt.
Simmer it in a wide saucepan until the flavour is concentrated.
Whisk in the cornflour or cornstarch slurry gradually, stopping when the gravy coats the back of a spoon.
Make the gravy in the right order.
Defat, reduce and thicken in that order for smooth lamb gravy.
Defat, reduce, then thicken. Reducing first concentrates the flavour and helps prevent a gluey gravy—the same fix that works for a watery slow cooker beef stew.
If the juices look greasy, do not panic. That is rendered fat waiting to be separated—not a failed gravy.
Stop thickening while the gravy still pours.
Stop when the gravy coats the spoon while still pouring easily.
When to Add Potatoes and Carrots
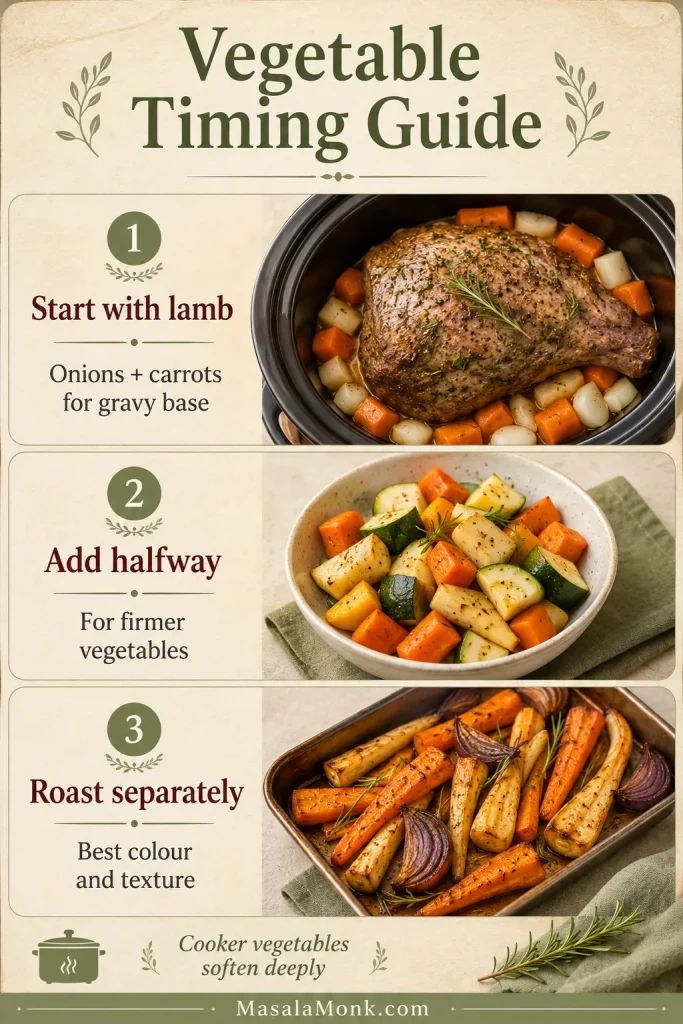
Add them at the start for flavour. Onion and large carrot pieces beneath the lamb become very soft and enrich the cooking juices.
Add them around halfway for more shape. Cut large carrots, parsnips or waxy potatoes into even 4–5 cm / 1½–2 inch pieces and test the largest piece with a knife before serving.
Cook them separately for browned edges. Vegetables underneath the lamb cannot become crisp.
Choose soft slow-cooker vegetables or firmer roasted sides.
Soft gravy vegetables go in early; firmer serving vegetables do better later or separately.
Dense potatoes can take longer than expected. Roast the vegetables separately when lunch needs to arrive on time; their doneness is much easier to control outside the slow cooker. These oven-roasted carrots can cook while the lamb browns and rests.
How to Serve Slow Cooker Leg of Lamb
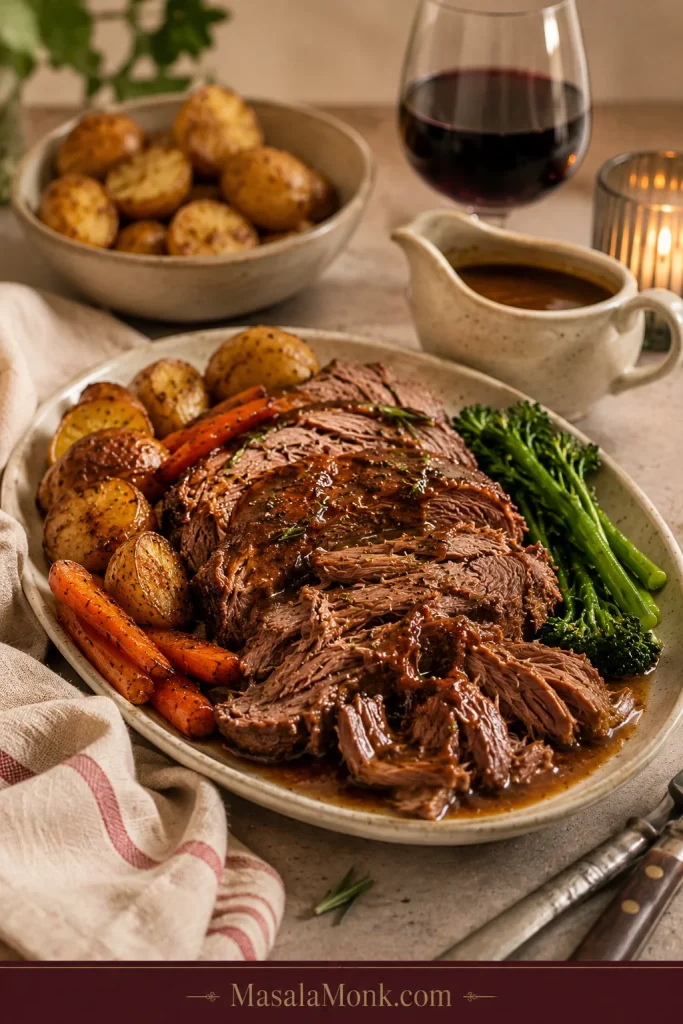
This is not a roast that needs ceremonial carving. Once the bone lifts away, arrange the meat generously on a warm platter, spoon over enough gravy to make the surface shine and bring the remaining gravy separately so everyone can help themselves.
At the table, the work should feel finished: soft lamb in generous pieces, crisp sides around it and hot gravy passed separately.
This is the payoff: generous lamb, hot gravy and simple sides that make the slow cooking feel worth it.
At the table, the lamb should feel generous and easy to serve: broad tender pieces, hot gravy and simple sides that bring colour and bite.
Rich lamb and glossy gravy are at their best with something crisp, green or sharply dressed beside them. For a classic roast-dinner plate, add creamy mashed potatoes, green beans or peas and roasted carrots.
Use the same salt, oil, vegetables and cooking liquid as the main recipe. These are flexible ways to change the flavour without turning the guide into three separate recipes.
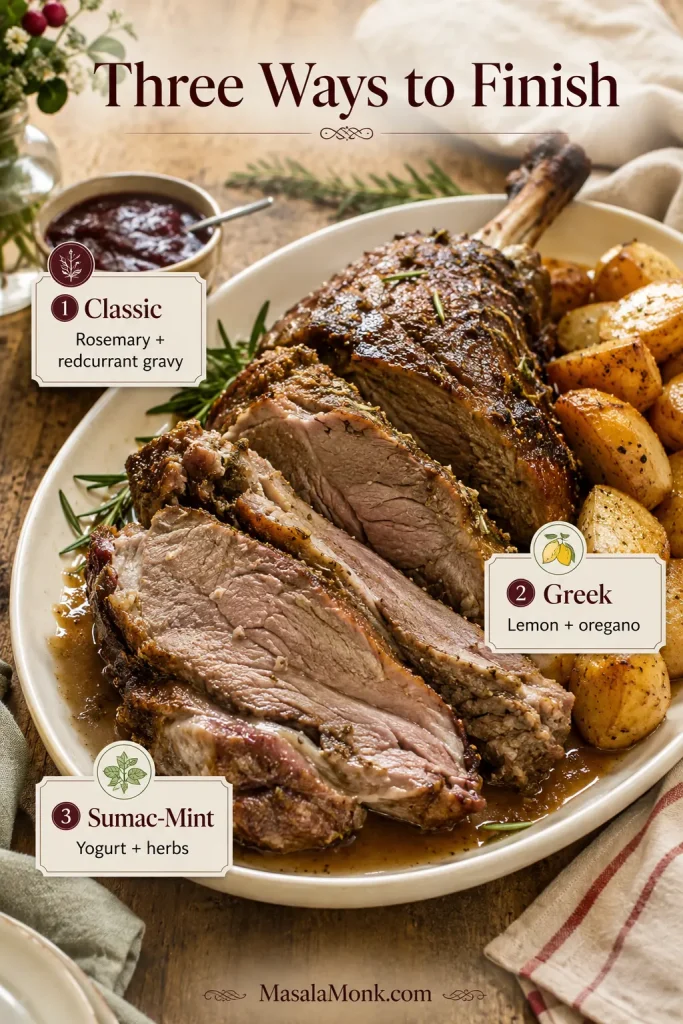
Classic rosemary and redcurrant: use the recipe as written and brush the lamb with a thin layer of redcurrant jelly before browning.
Greek lemon and oregano: use 1 tablespoon chopped rosemary, 1½ teaspoons dried oregano and the finely grated zest of 1 lemon. Finish the gravy with a small squeeze of lemon.
Sumac, mint and yogurt: add 2 teaspoons sumac and 1 teaspoon dried mint to the garlic paste, then serve with yogurt, lemon and fresh herbs. A cool cucumber salad with dill and onion adds the crispness rich lamb needs.
One method can finish three ways.
Change the finish and garnish without changing the slow-cooker method.
Slow Cooker Leg of Lamb Troubleshooting
The Meat
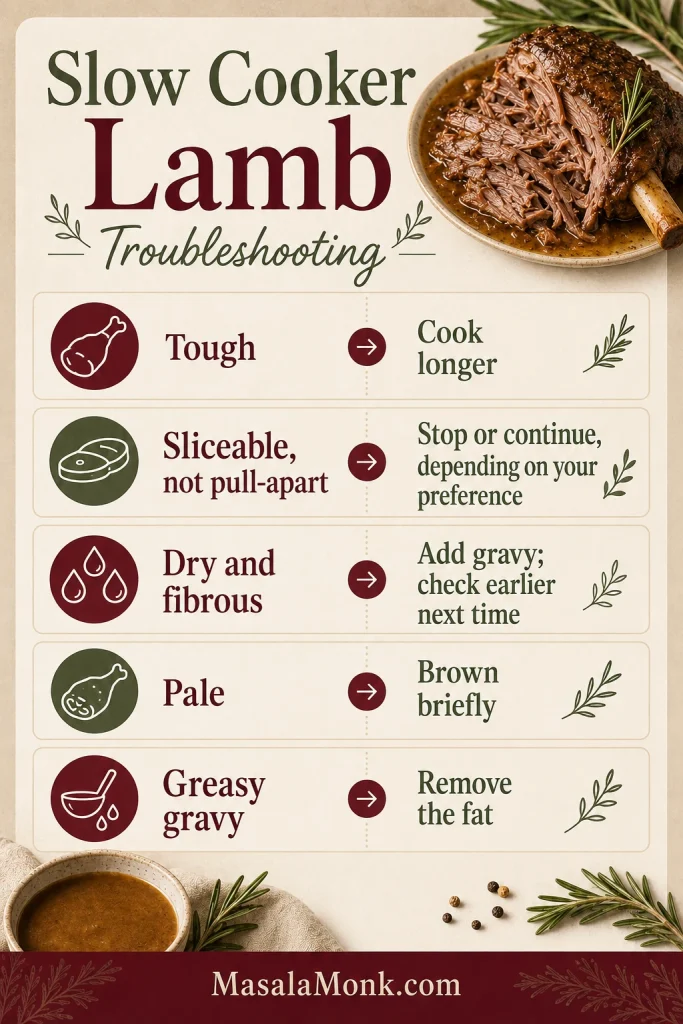
The lamb is tough. It has not softened enough. Continue cooking and check the thickest section again.
It is cooked but will not pull apart. It has reached a sliceable stage. Cook it longer only when you want softer meat.
It is dry and fibrous. A small or lean leg has cooked too long. Serve it with gravy and check it earlier next time.
The outside is soft but the centre is firm. The joint is thick, cold or unevenly shaped. Continue cooking and probe more than one thick area.
The Finish
The surface is pale. Slow cookers do not brown meat. Use a short oven or broiler finish.
The leg breaks during transfer. It has become very tender. Support it from underneath and arrange the meat directly on the serving platter.
The Cooker, Vegetables and Gravy
The leg will not fit. The cooker is too small or the bone is too long. Use a half leg or ask a butcher to shorten the shank.
There is too much cooking juice. The lamb released substantial moisture. Reduce the liquid before thickening it.
The gravy is greasy. Rendered fat remains in the liquid. Separate it before reducing or thickening.
The vegetables are mushy. Serving vegetables were added too early. Add them later or cook them separately.
Firm meat needs longer. Soft but dry meat has already had enough.
Use the texture first, then choose the fix.
Use the texture first. Tough lamb needs more time, dry lamb needs gravy, pale lamb needs browning, and greasy gravy needs the fat removed.
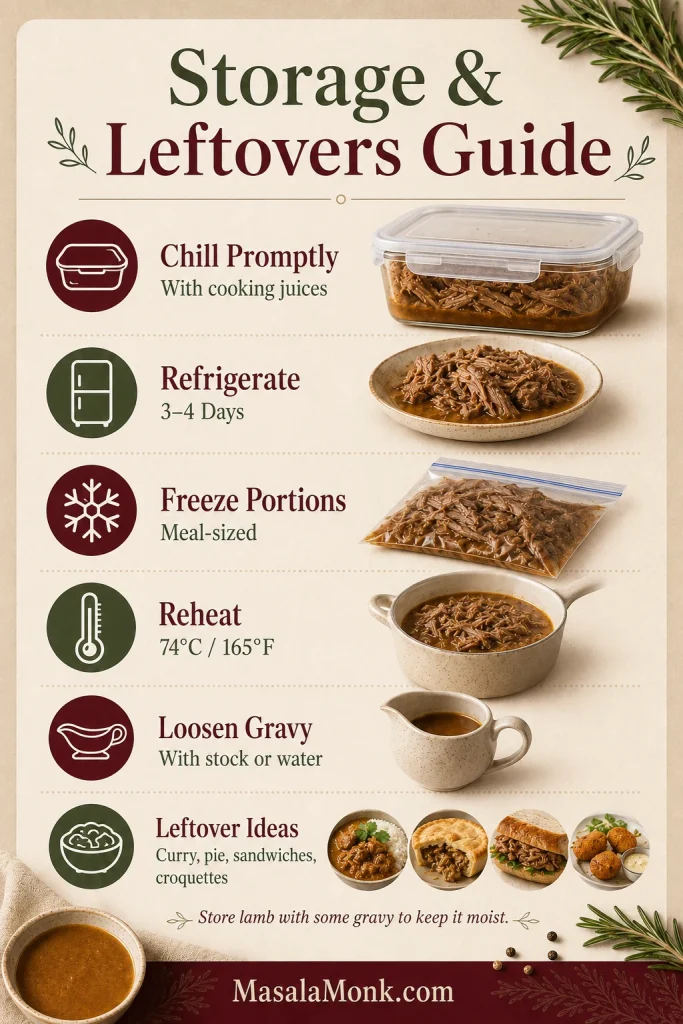
Keep a little gravy with the leftovers. It protects the meat as it reheats and makes tomorrow’s dinner much more forgiving.
Keep the storage plan simple: chill with juices, freeze in portions and reheat gently.
Store lamb with some gravy or cooking juices, then reheat gently so the leftovers stay moist instead of drying out.
Cool the lamb promptly and refrigerate it in shallow airtight containers within two hours of cooking. Use refrigerated leftovers within 3–4 days.
Freeze meal-sized portions with a little gravy for around 2–3 months for the best quality. Thaw them safely in the refrigerator.
Reheat the lamb in a saucepan with gravy, in a covered oven dish or in microwave-safe portions until it reaches 74°C / 165°F in the centre. Add a splash of stock or water if the gravy has become very thick.
Use the hob, oven or microwave for refrigerator-cold leftovers rather than warming them slowly in the slow cooker.
Ideas for Leftover Lamb
Lamb curry with some leftover gravy stirred into the sauce
Turn chopped lamb and gravy into shepherd’s pie. The gravy-first, mash-second approach in our slow cooker cottage pie guide works here too—use cooked lamb instead of beef.
Rolls or sandwiches with gravy, mint sauce, crisp lettuce or sharp pickles
Not with this method. It is designed for fully cooked, fork-tender lamb. Use a conventional oven-roasting method when you want a pink or medium-rare centre.
What if I want slices rather than pull-apart lamb?
Remove the lamb at the tender stage, when the fork enters easily but the joint still holds together. It must still reach the safe minimum temperature and complete the required rest.
Can I put frozen lamb in the slow cooker?
No. Thaw the lamb completely before slow cooking so the centre heats predictably and safely.
Can I cook the lamb the day before?
Yes. Refrigerate the cooked lamb with some of its juices, then reheat it covered until the centre reaches 74°C / 165°F. Brown the surface only after the meat is hot.
Can I cook leg of lamb without added liquid?
Some joints release enough juice to cook with little or no added liquid, but the result depends on the lamb and the appliance. The main recipe uses a moderate amount because it provides a more dependable quantity of cooking juice for gravy.
What size leg did you cook, and when did it become tender? Share the setting too—and your slow-cooker size if you know it. Those details may help the next person cooking the same joint.
When the fork meets almost no resistance, lift the lamb carefully, give it a little colour and turn the juices into gravy. That is the moment an expensive leg stops feeling risky and starts feeling like dinner is handled.
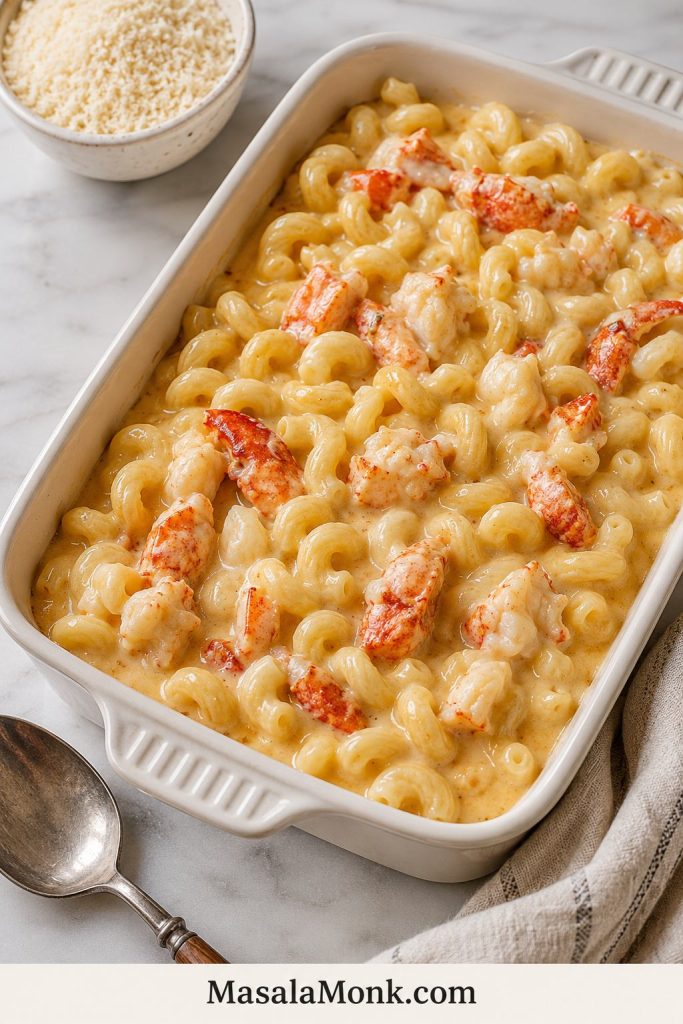
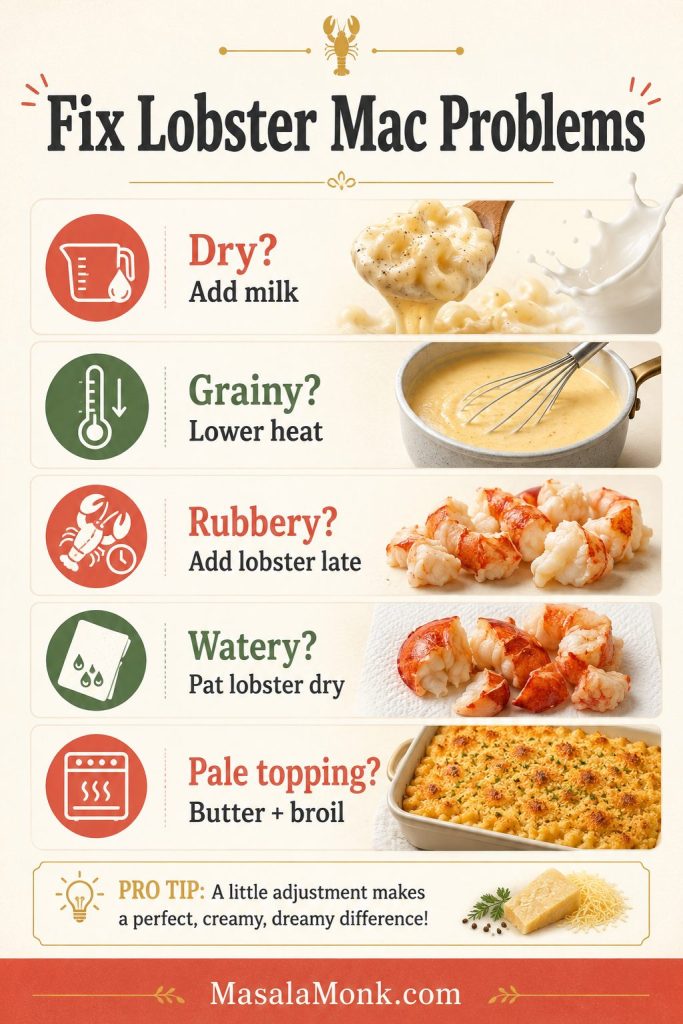
Lobster mac and cheese is what you make when regular mac and cheese is not enough. It should be creamy, buttery, golden, and generous, with real pieces of lobster in every serving — not a dry baked casserole where the seafood turns chewy and disappears into the sauce.
This version is built around three details: a smooth cheese sauce, tender lobster, and a short bake. The sauce starts a little loose, the cheese melts gently, and the lobster goes in after the pasta is already coated so it stays sweet and soft.
In the best spoonful, you get creamy pasta, buttery crumbs, and a piece of lobster you can actually see. Make it for a holiday side, a steakhouse-style dinner, a seafood night, a date night, or any meal where comfort food needs to feel special.
If lobster makes you nervous because it feels expensive or easy to overcook, this guide gives you the calm path: what to buy, how much to use, which cheese melts best, when to add the lobster, and how to bake the pan without drying it out.
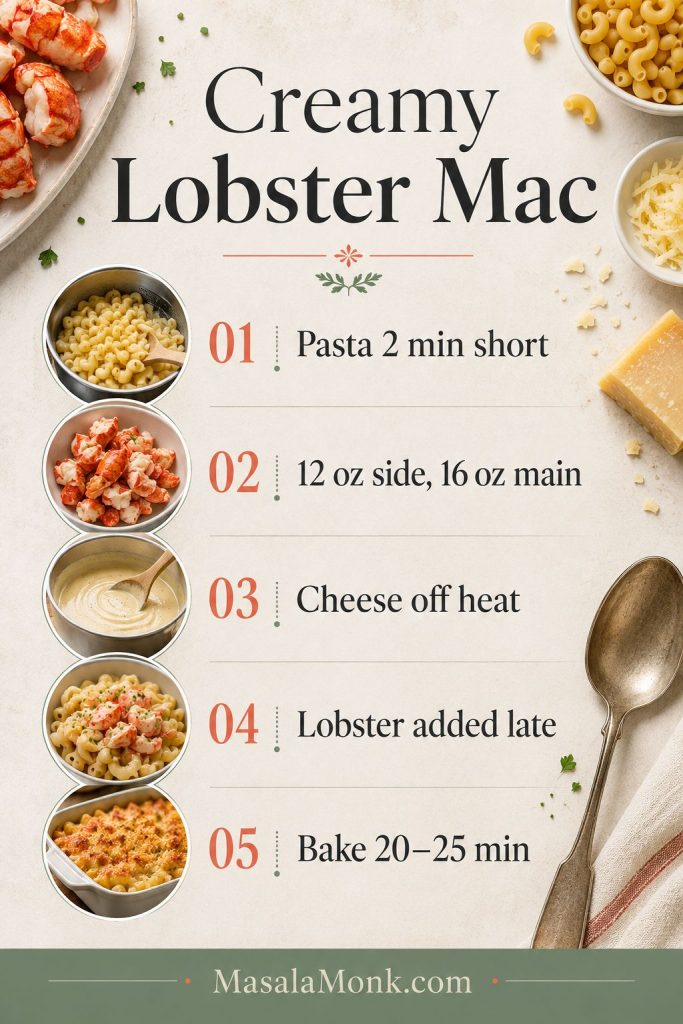
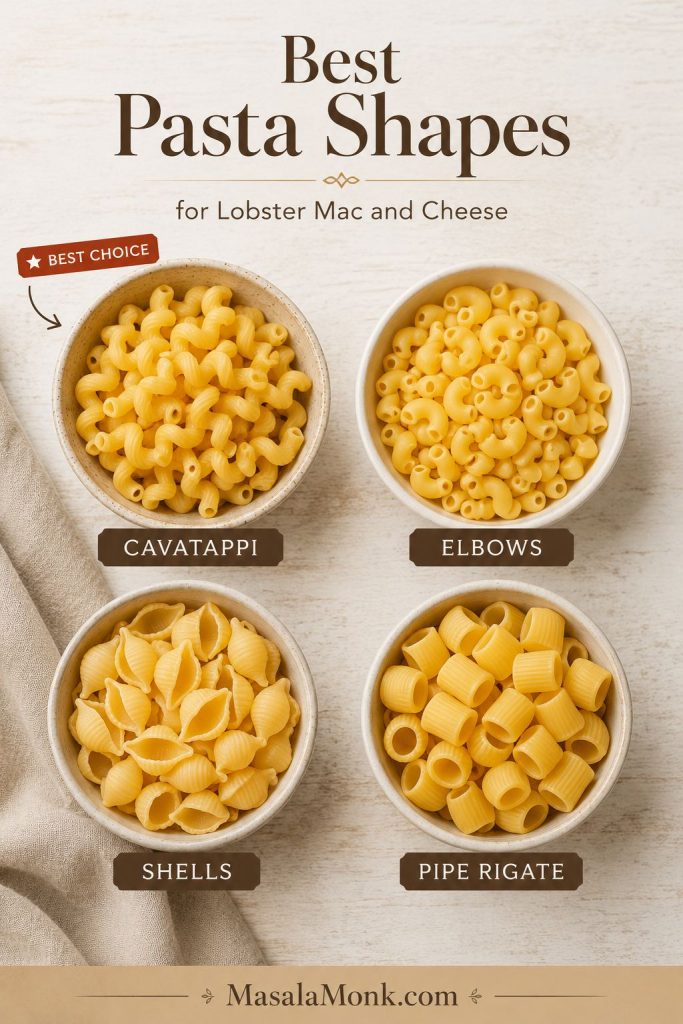
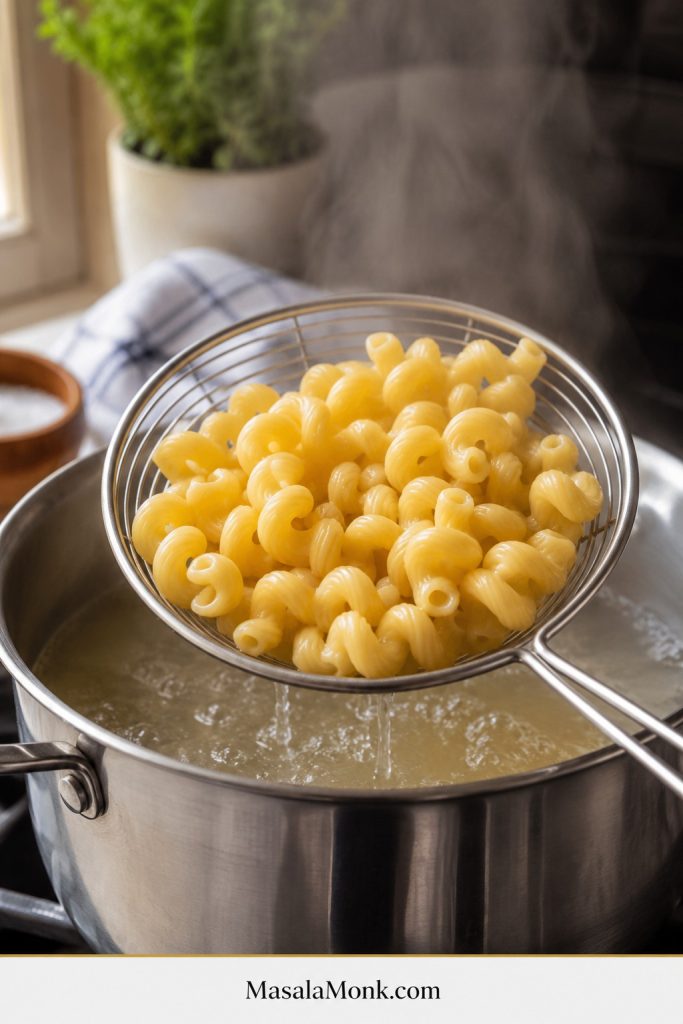
A great lobster mac and cheese starts with short pasta, a generous cheese sauce, and lobster that is treated like a finishing ingredient. Cavatappi, elbow macaroni, shells, and other short pasta shapes work well because they hold the sauce instead of letting it slide off.
Cook the pasta about 2 minutes short of al dente. Before baking, the pasta should look saucier than you want the final serving to be. Saucy before baking means creamy after baking.
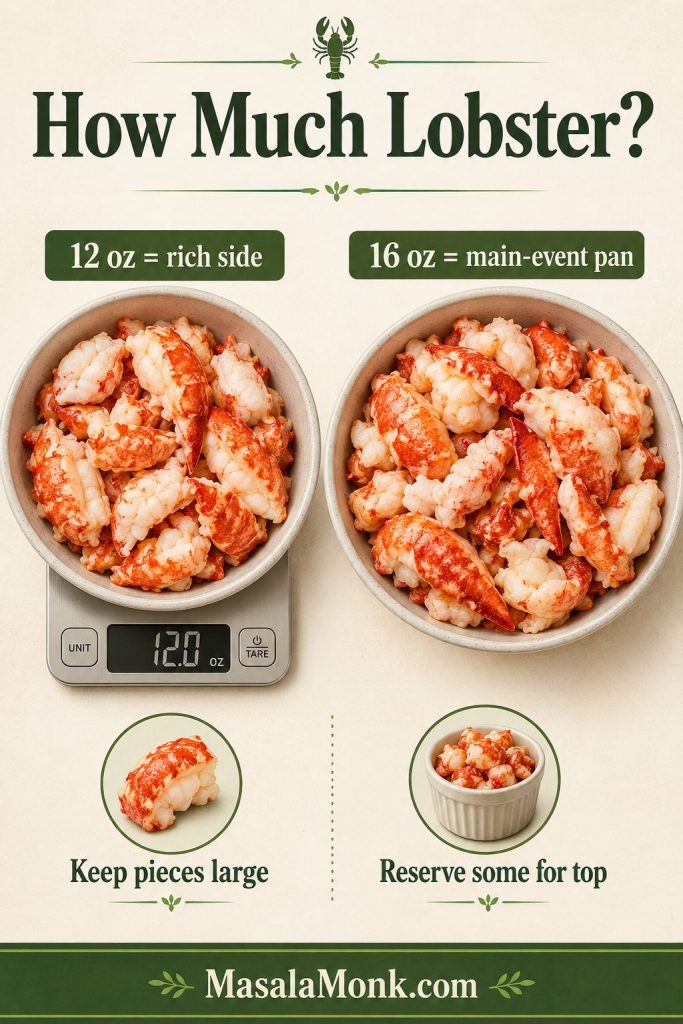
Use 12 oz / 340 g cooked lobster meat for a rich side dish, or 16 oz / 454 g when the mac is meant to feel like the main event. Keep the pieces generous and reserve a few for the top so the lobster looks as generous as it tastes.
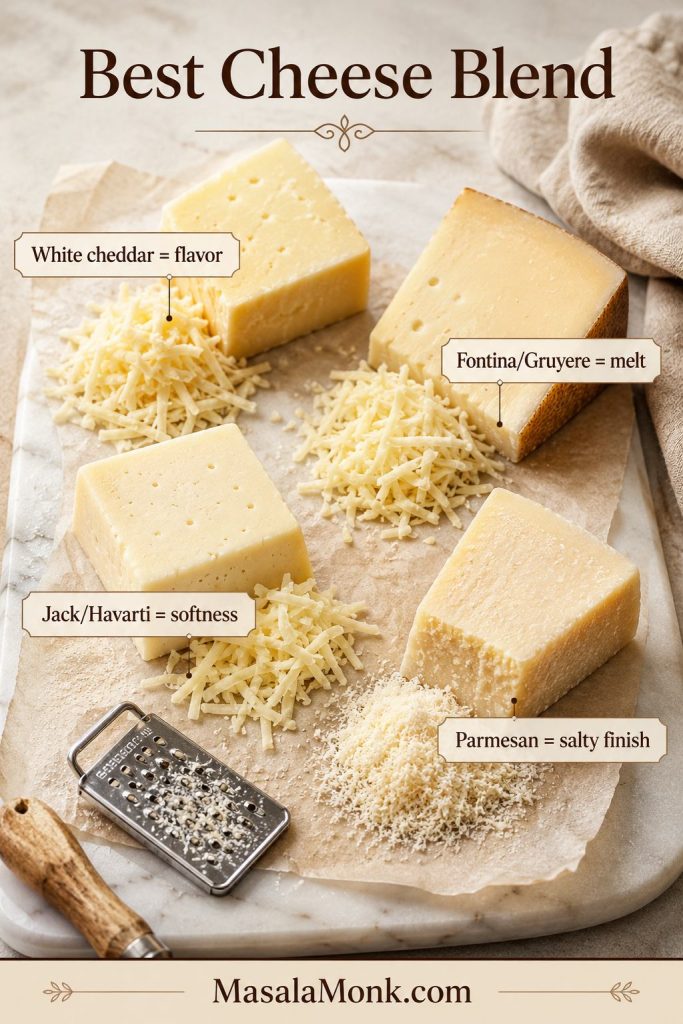
The cheese blend matters because lobster is sweet and delicate. White cheddar gives classic flavor, fontina or Gruyere gives a smooth restaurant-style melt, Monterey Jack or Havarti adds softness, and parmesan gives salty depth. Freshly grated cheese melts more smoothly than pre-shredded cheese.
Bake at 375°F / 190°C for 20 to 25 minutes, just until the edges bubble and the topping turns golden. The oven is there to finish the dish, not to cook the lobster.
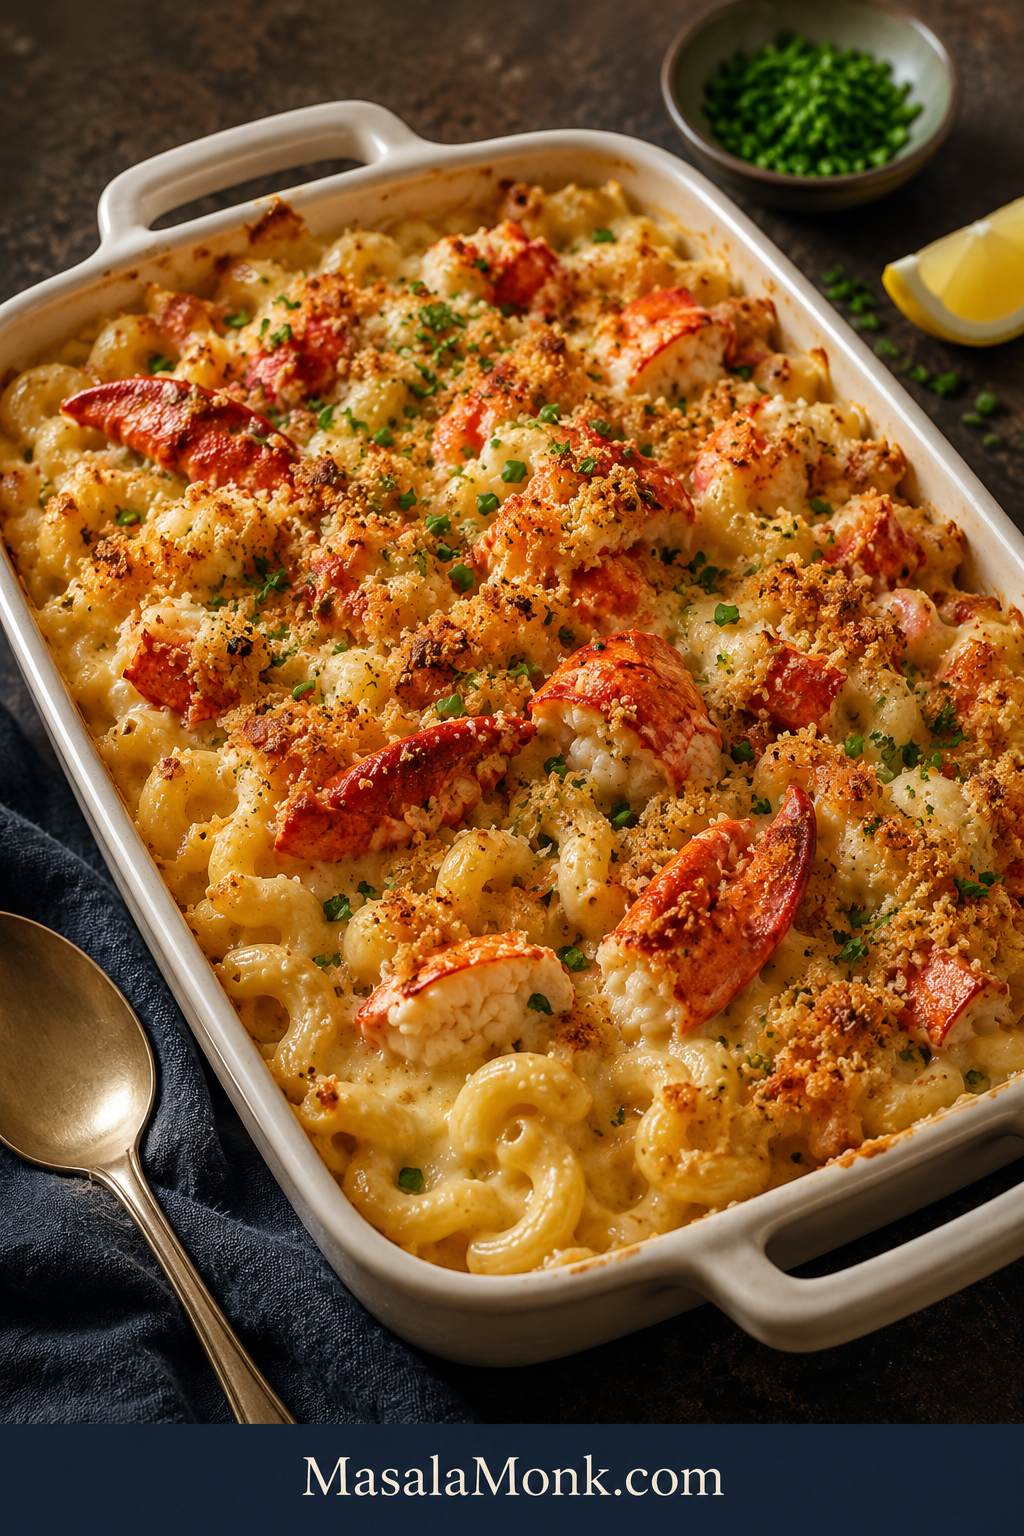
Before you start cooking, notice the texture target: the finished pan should scoop creamy, not stiff. This is the visual cue to keep in mind as you build the sauce and bake briefly.
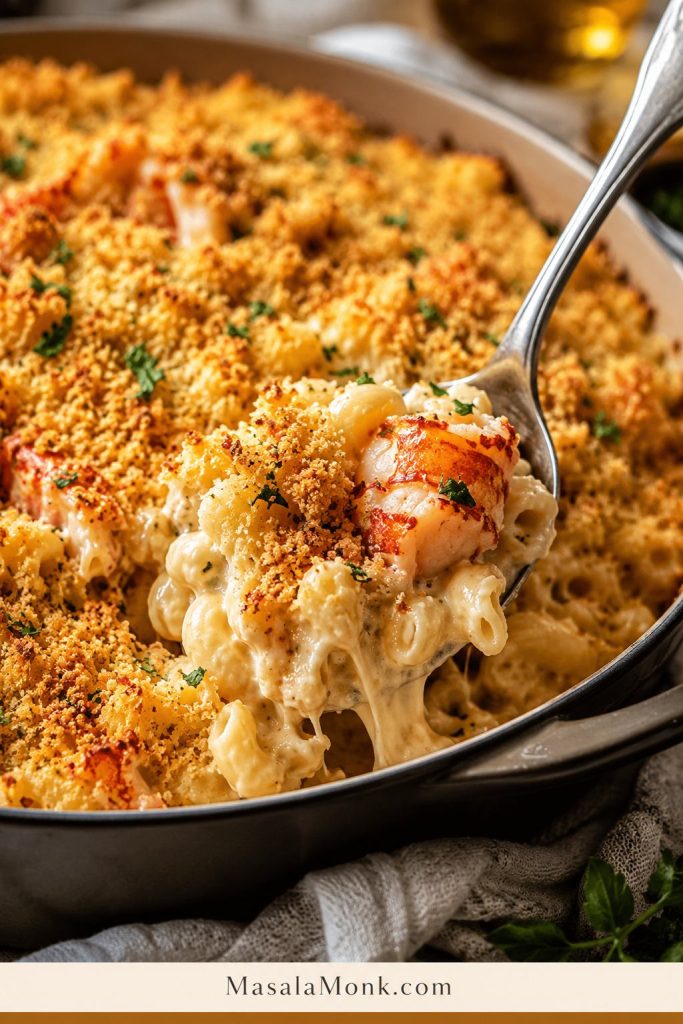
The first scoop should prove the pan is still creamy. Look for glossy pasta, visible lobster, and a soft center instead of a dry block of baked macaroni.
Lobster Mac and Cheese at a Glance
Detail
Recommendation
Pasta
1 lb / 454 g cavatappi, elbows, shells, or another short pasta
Lobster amount
12 oz / 340 g for a rich side, 16 oz / 454 g for a main-event pan
Lobster tail amount
Enough tails to yield 12 to 16 oz / 340 to 454 g cooked meat, usually 4 to 5 medium tails
Lobster tail cue
Cook gently until opaque, white, and just firm; timing is only a guide
Cheese amount
About 22 oz / 620 g freshly grated cheese total
Cheese blend
White cheddar + fontina or Gruyere + Monterey Jack or Havarti + parmesan
Oven temperature
375°F / 190°C
Bake time
20 to 25 minutes
Texture target
Sauce should look slightly loose before baking
Lobster rule
Cook gently, add after the sauce is ready, and keep the bake short
Topping
Buttered panko for crispness, crushed Ritz for buttery holiday flavor
Servings
8 main-dish servings or 10 to 12 side-dish servings
Here is the full recipe first, with the deeper lobster, cheese, and baking notes right after it.
Creamy Baked Lobster Mac and Cheese Recipe Card
Recipe name: Creamy Baked Lobster Mac and Cheese
Description: Rich, creamy baked lobster mac and cheese with tender lobster, a smooth cheese sauce, and a buttery golden topping.
Servings: 8 as a main dish, or 10 to 12 as a side
Prep time: 25 minutes
Cook time: 30 minutes
Total time: 55 minutes
Good for: holidays, date nights, steak dinners, seafood dinners, and special occasion sides
Equipment
Large pot for pasta
Large saucepan or Dutch oven for the cheese sauce
Whisk
9×13-inch baking dish
Box grater
Kitchen shears, if using lobster tails
Small bowl for the topping
Rimmed baking sheet, optional, to catch any bubbling sauce
Ingredients
For the Pasta and Lobster
1 lb / 454 g cavatappi, elbow macaroni, shells, or another short pasta
12 to 16 oz / 340 to 454 g cooked lobster meat, chopped into generous pieces
Or enough lobster tails to yield 12 to 16 oz / 340 to 454 g cooked meat, usually 4 to 5 medium tails
Salt, for the pasta water
For the Cheese Sauce
6 tbsp / 85 g unsalted butter
1/3 cup / about 42 g all-purpose flour
3 cups / 720 ml whole milk
1 cup / 240 ml heavy cream or evaporated milk
8 oz / 225 g white cheddar, freshly grated
8 oz / 225 g fontina or Gruyere, freshly grated
4 oz / 115 g Monterey Jack or Havarti, freshly grated
2 oz / 55 g parmesan, finely grated
Dijon mustard: 1 to 2 tsp, or dry mustard powder: 1 tsp
Garlic powder: 1 tsp
Onion powder: 1 tsp
Old Bay or Cajun seasoning: 1/2 to 1 tsp, optional
Paprika: 1/4 tsp, optional
Black pepper, to taste
Salt, to taste
For the Topping
3/4 to 1 cup panko breadcrumbs or crushed Ritz crackers
2 to 3 tbsp / 28 to 43 g melted butter
2 tbsp grated parmesan
1 tbsp chopped parsley or chives, plus more for serving
Optional: 1/2 tsp lemon zest
Instructions
Cook the Pasta and Lobster
Preheat the oven. Heat the oven to 375°F / 190°C. Lightly butter a 9×13-inch baking dish.
Cook the pasta. Bring a large pot of salted water to a boil. Cook the pasta about 2 minutes less than the package directions. It should still have a little firmness. Drain and set aside.
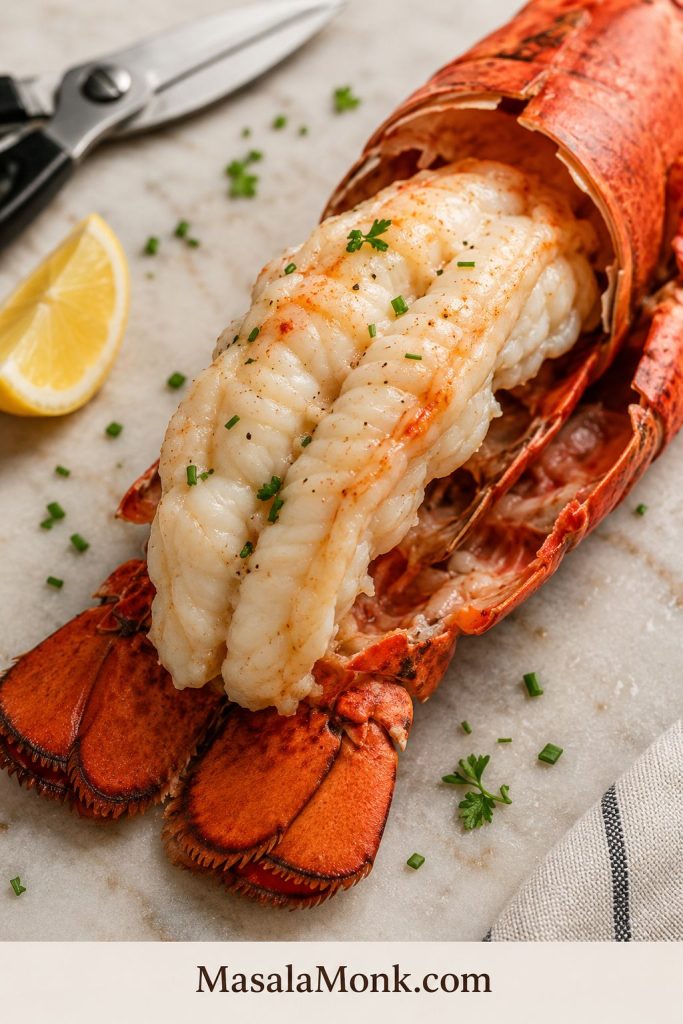
Prepare the lobster. If using cooked lobster meat, chop it into generous pieces and pat it dry. If using lobster tails, cook enough tails to yield 12 to 16 oz / 340 to 454 g cooked meat. For 4 to 6 oz tails, this often takes about 4 to 6 minutes, but trust the look and feel more than the timer. The meat should look white and opaque, not glassy. Remove the meat from the shells, chop, and set aside.
Build the Cheese Sauce
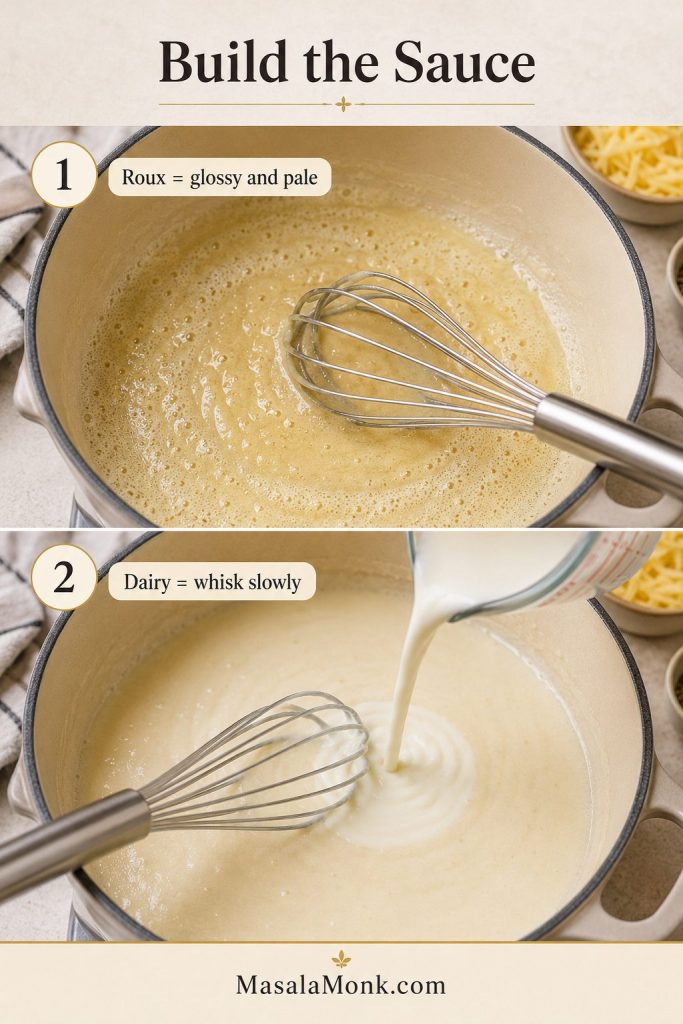
Make the roux. In a large saucepan or Dutch oven, melt 6 tbsp butter over medium heat. Add the flour and whisk for 1 to 2 minutes, until smooth and lightly foamy. The roux should look glossy, not deeply browned.
Add the dairy. Slowly whisk in the milk, then the cream or evaporated milk. Cook, whisking often, until the sauce thickens enough to lightly coat a spoon. This usually takes 3 to 6 minutes.
Season the sauce. Stir in the Dijon or dry mustard, garlic powder, onion powder, optional Old Bay or Cajun seasoning, paprika, black pepper, and a small pinch of salt. Taste before adding more salt, especially if using parmesan, Old Bay, Cajun seasoning, or salted lobster meat.
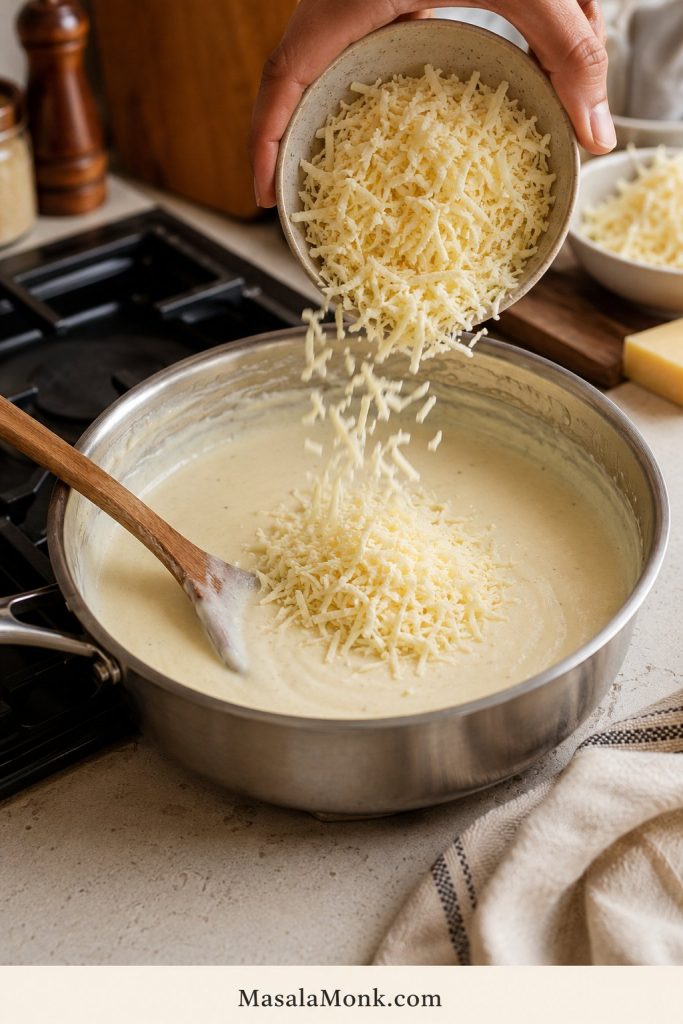
Add the cheese gently. Lower the heat or turn it off. Add the grated cheeses a handful at a time, stirring until melted before adding more. The sauce should be smooth, loose, and pourable, not stiff.
Assemble, Bake, and Rest
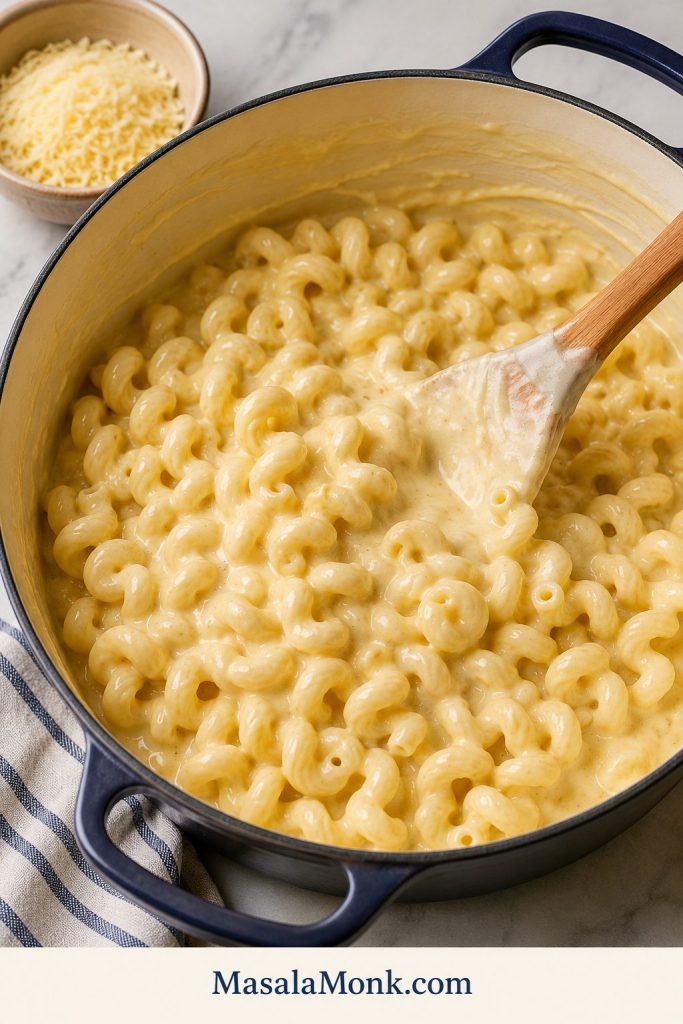
Combine pasta and sauce. Fold the drained pasta into the cheese sauce. If the mixture looks too thick, add a splash of milk. Before baking, the pasta should look a little saucier than you want the final serving to be.
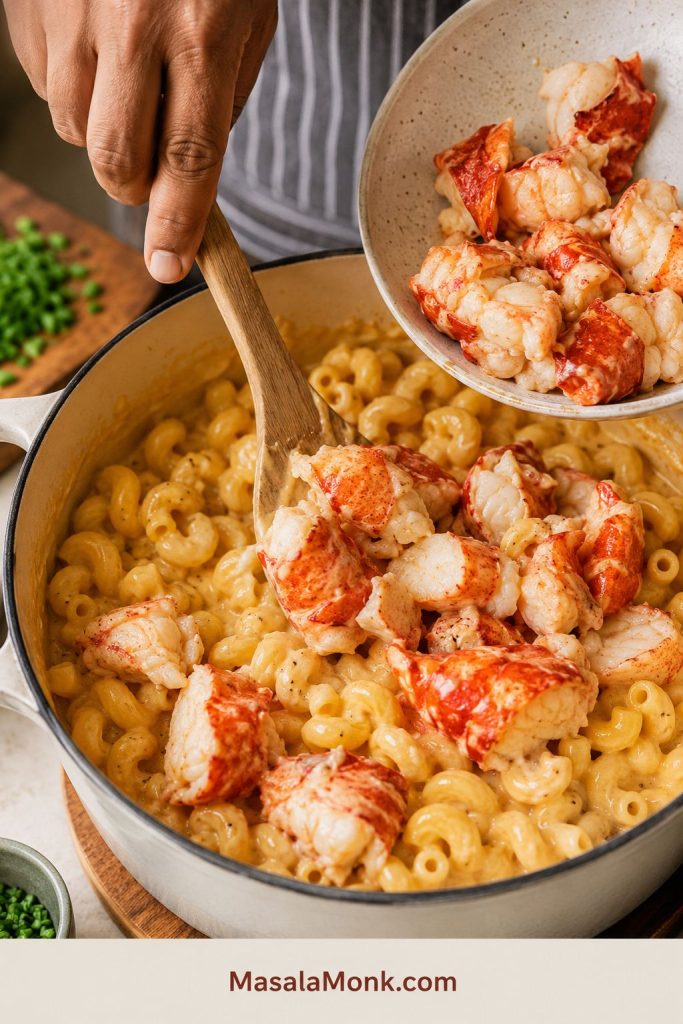
Add the lobster. Gently stir in most of the lobster once the pasta is coated. Reserve a few pieces for the top if you want the lobster to stay visible after baking.
Transfer to the baking dish. Spoon the mixture into the prepared dish. Scatter the reserved lobster pieces over the top.
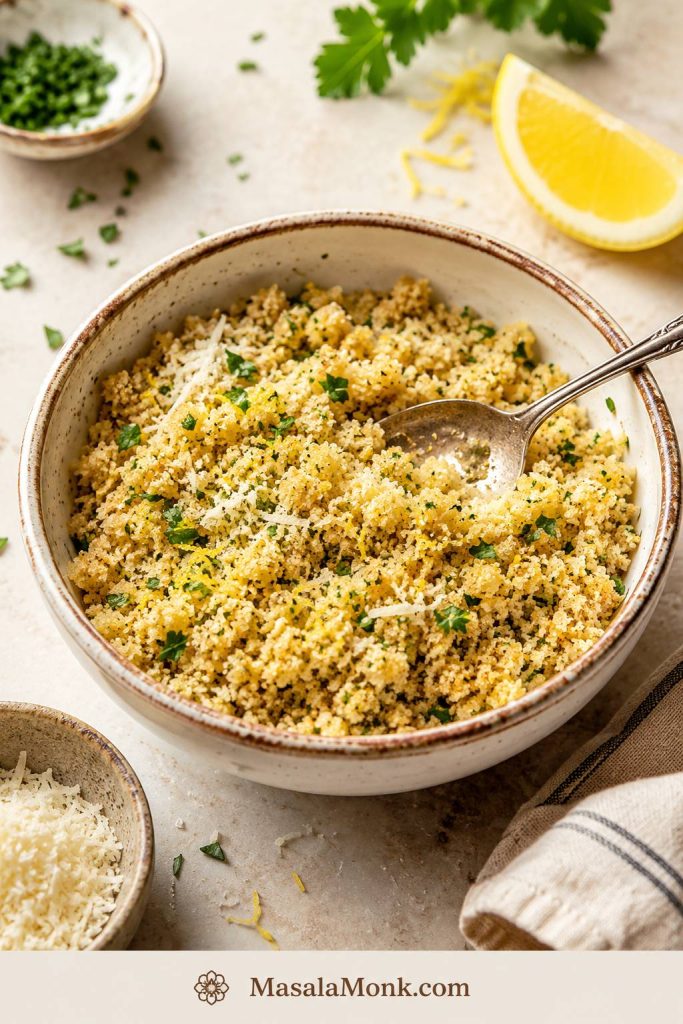
Add the topping. In a small bowl, mix panko or crushed Ritz crackers with melted butter, parmesan, parsley or chives, and optional lemon zest. Sprinkle evenly over the mac and cheese.
Bake. Bake for 20 to 25 minutes, until the edges are bubbling and the topping is golden. If you want more browning, broil for 1 to 3 minutes, watching carefully.
Rest and serve. Let the pan rest for 8 to 10 minutes before serving. This helps the sauce settle without becoming stiff.
Recipe Notes
Freshly grated cheese melts better than pre-shredded cheese.
Stop cooking lobster as soon as it is opaque and tender. It will warm again in the pasta.
Pull the dish while the center still looks creamy. The edges should bubble and the topping should be golden.
For a stovetop version, skip the baking step and top each serving with toasted buttered panko.
For deeper seafood flavor, use a small splash of seafood stock or lobster stock without thinning the sauce too much.
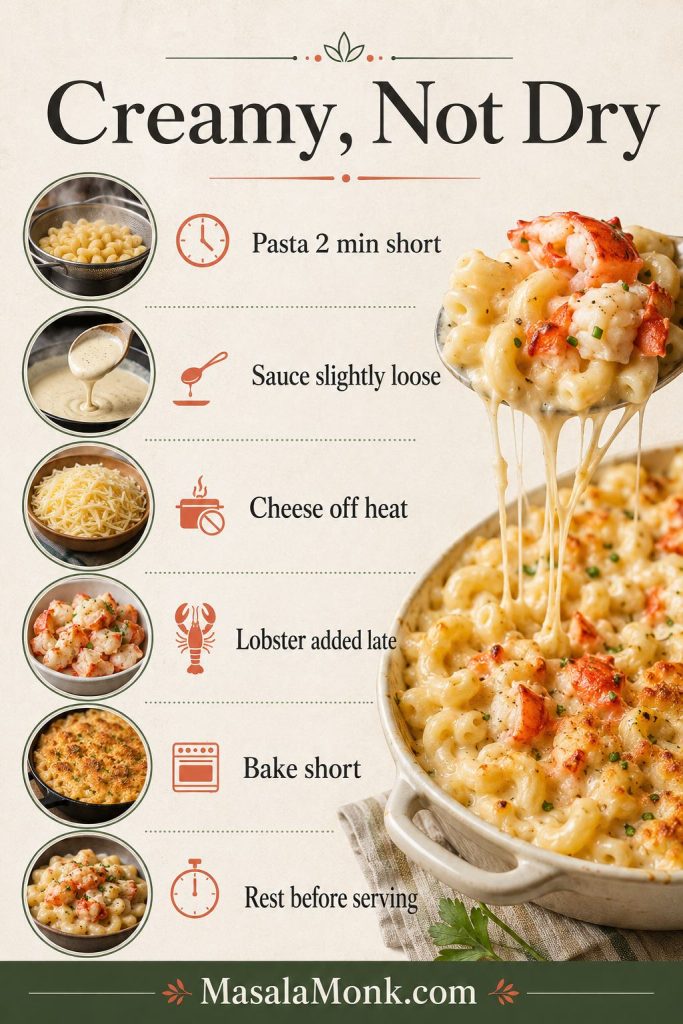
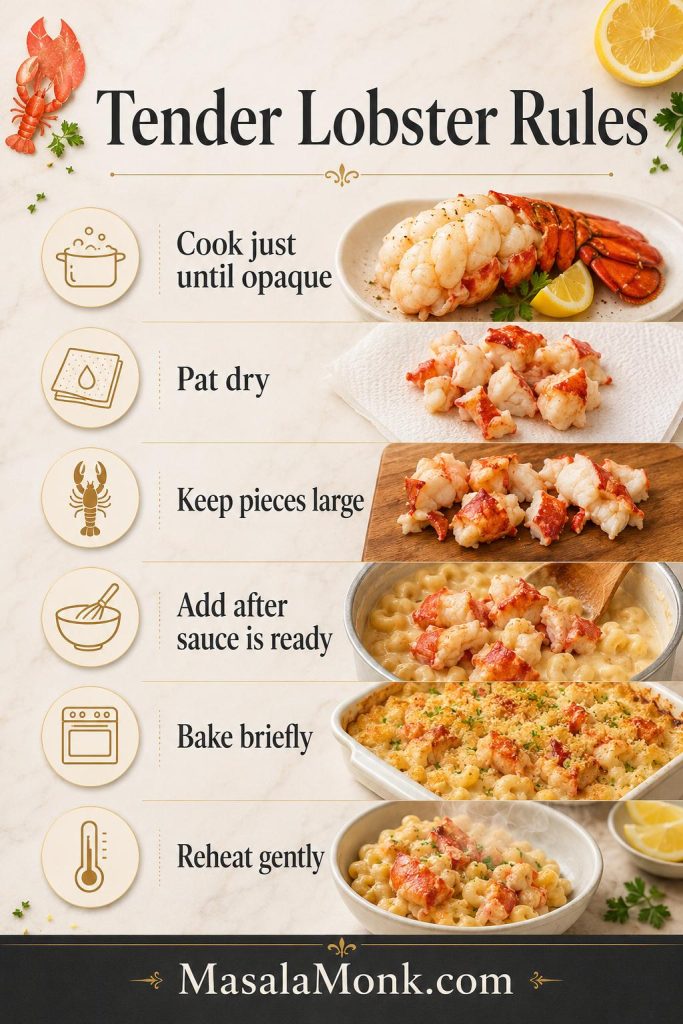
Use the guide below as the short visual version of the method before you move into the deeper lobster, cheese, and baking notes.
Use this quick method map before you start: cook pasta short, keep the sauce loose, melt cheese gently, add lobster late, and bake only until the top browns.
Why This Lobster Mac and Cheese Works
This recipe works because every part protects the final texture. The pasta starts firm, the sauce starts loose, the cheese melts gently, and the lobster warms through instead of cooking twice.
The sauce is generous. Baked mac thickens in the oven, so the sauce begins a little looser than a stovetop version.
The pasta has bite. Stopping early keeps it from turning soft after baking.
The cheese blend is balanced. White cheddar gives flavor, while fontina, Havarti, Monterey Jack, or Gruyere helps keep the sauce smooth.
The lobster stays protected. It is already tender before it reaches the oven, so the bake only warms it through.
The topping browns quickly. Buttered panko or Ritz gives crunch without forcing the casserole to bake too long.
The method gives you options. Bake it for a crisp top, or keep it stovetop for the creamiest possible finish.
If you already love classic mac and cheese, this is the richer seafood version: more luxurious, more buttery, and built for a special table.
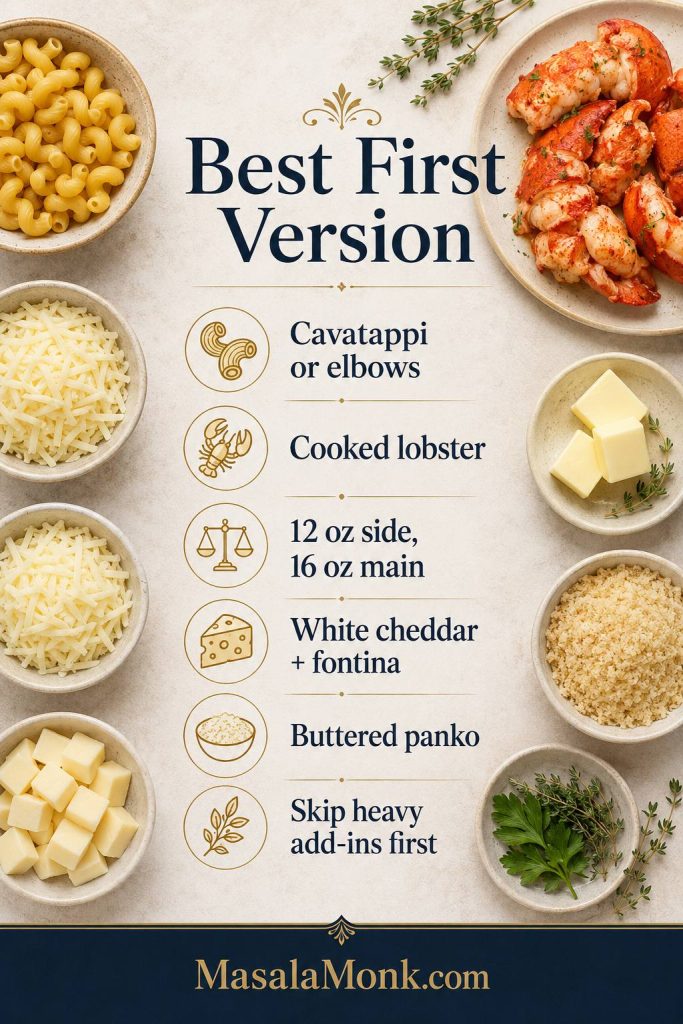
Start Here: The Best First Version
The first time you make lobster mac and cheese, keep the choices simple. This is the calmest path to a creamy, generous pan:
Best First Version
Pasta: cavatappi or elbows
Lobster: cooked lobster meat, or gently cooked lobster tails
Amount: 12 oz for a rich side, 16 oz for a main-event pan
Cheese: white cheddar + fontina, with Monterey Jack or Havarti for extra softness
Topping: buttered panko
Skip the first time: bacon, truffle oil, heavy Cajun seasoning, and too many seafood add-ins
This version lets the lobster stay visible, the sauce stay smooth, and the bake stay short. Once that base works, the variations become much easier to trust.
The first pan should be steady before it gets fancy: a simple cheese blend, cooked lobster, short pasta, and a topping that browns fast.
For the most dependable first pan, keep the formula simple: cooked lobster, short pasta, smooth-melting cheese, and buttered panko. Once that base works, upgrades are easier to control.
Make this when the mac and cheese is supposed to be part of the occasion, not just a side dish.
Holiday dinners that need something richer than regular mac and cheese
Steakhouse-style dinners at home
Seafood nights with lobster, crab, shrimp, or fish
Date nights that feel cozy but still special
Dinner parties where one dish should feel like the splurge
Meals where cooked lobster or lobster tails need to stretch into a full pan
It is the kind of dish people notice before they even take a bite. The pan looks generous, the top smells buttery, and the first scoop should feel creamy instead of heavy.
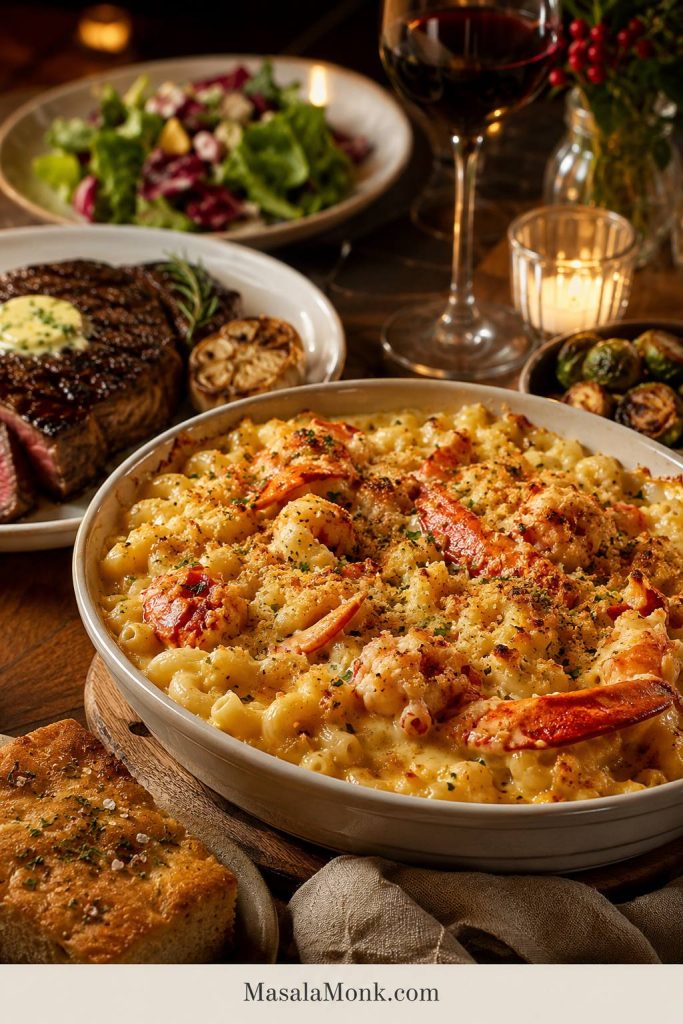
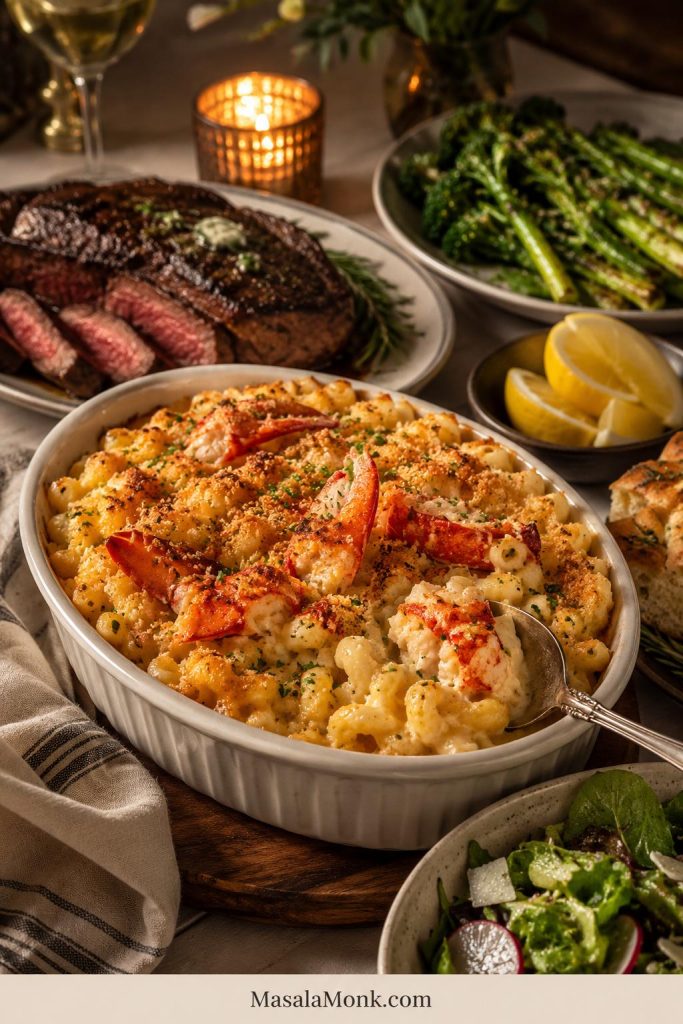
For a dinner-table version, use the mac as the rich centerpiece and let the rest of the plate bring freshness, crunch, or simple protein.
Because lobster mac is creamy and rich, it shines beside steakhouse-style sides with contrast. Think crisp greens, roasted vegetables, bread, or a simple protein.
Need a Specific Tip?
Jump to the lobster, cheese, baking, storage, and troubleshooting sections below.
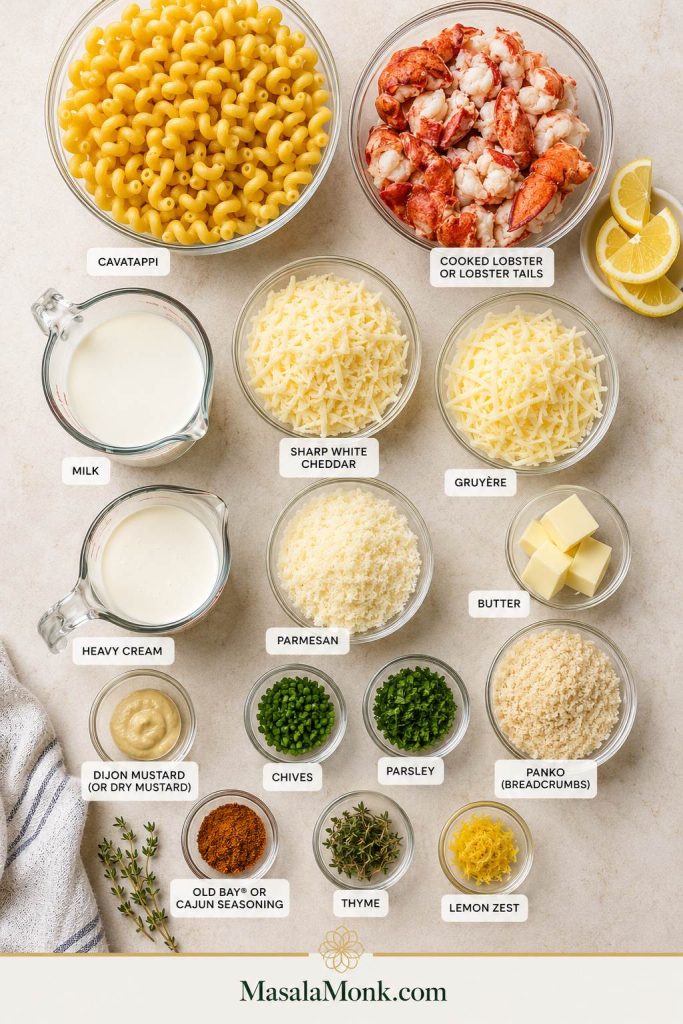
The ingredient list is not complicated, but nothing is here as filler. The pasta holds sauce, the cheese melts into the body of the dish, the lobster brings the sweetness, and the topping gives every scoop a little crunch.
Here is the ingredient logic in one place before the detailed substitutions begin.
Every ingredient has a job: pasta catches sauce, lobster adds sweetness, cheese gives body, cream keeps things loose, and panko brings the crisp finish.
Pasta
Cavatappi is worth using here because the curls and ridges hold sauce well and make the pan look a little more restaurant-style. Elbow macaroni is classic and easy to find. Medium shells, pipe rigate, small rigatoni, and other short pasta shapes also work.
Very thin pasta shapes can overcook quickly and disappear into the sauce. For a baked pan, stop cooking the pasta about 2 minutes before it reaches al dente.
Short pasta shapes make better lobster mac because they hold sauce in the curves. Cavatappi is especially helpful since its ridges catch creamy cheese sauce in every bite.
Lobster
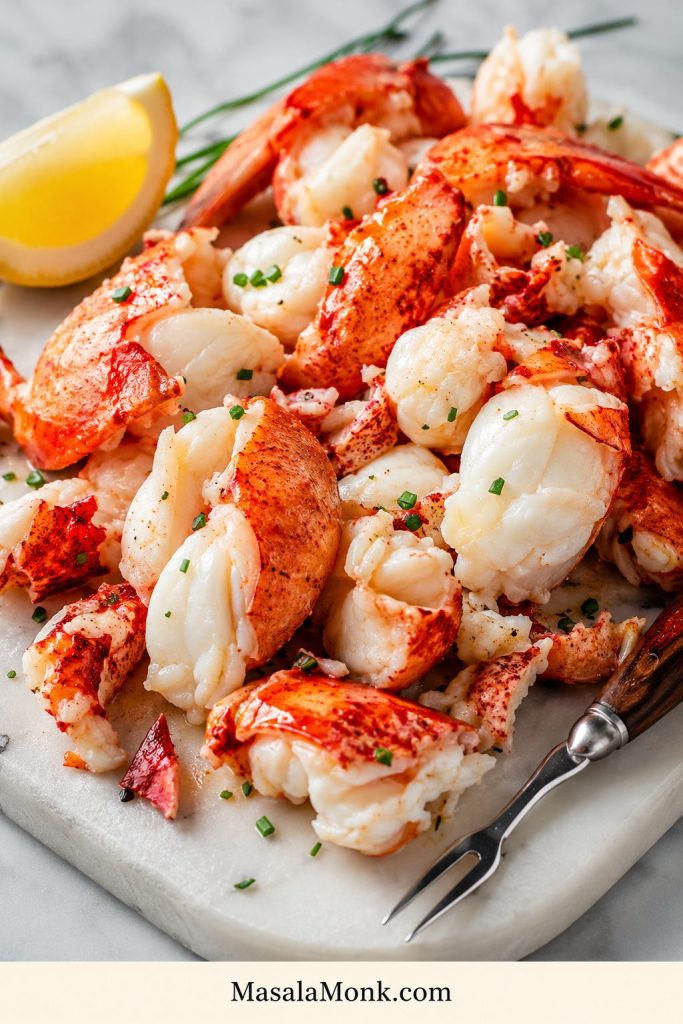
Cooked lobster meat is the easiest option. Lobster tails give you prettier, larger chunks. Claw and knuckle meat can be especially sweet and tender. Frozen lobster meat works too, but it needs to be thawed fully, drained well, and patted dry before it goes into the sauce.
For 1 lb / 454 g pasta, use 12 oz / 340 g lobster for a rich side dish or 16 oz / 454 g when the mac is meant to feel like the main event. Lobster tail yield varies, so buy by cooked meat weight when possible.
Let the lobster amount match the occasion. Use 12 ounces for a luxurious side dish, or go closer to 16 ounces when the mac is meant to be the main event.
Big pieces make the pan feel generous. Keep the lobster chunks large enough to notice, and reserve a few pieces for the top instead of chopping everything tiny.
You do not need the most expensive lobster pieces for this to work. Claw, knuckle, frozen cooked meat, or a smaller amount of tail meat can still make the pan feel special if the sauce is smooth and the lobster is treated gently.
Cheese
One cheese rarely gives you everything this dish needs. White cheddar gives familiar mac-and-cheese flavor. Fontina, Havarti, Monterey Jack, or Gruyere helps with melt and creaminess. Parmesan adds salty depth, but it should be an accent, not the main cheese.
Sharp cheddar works best when it has help from smoother melting cheeses. On its own, it can taste bold but turn heavy or grainy if the heat gets too high.
Milk, Cream, or Evaporated Milk
Whole milk gives the sauce body, while cream makes it feel more luxurious. Evaporated milk is a useful middle path: creamy, stable, and less likely to feel thin after baking. You can use all whole milk for a lighter version, but the finished sauce will be less rich.
Seasonings
Dijon or dry mustard balances the richness without making the dish taste mustardy. Garlic powder and onion powder give the sauce a familiar savory base. Old Bay or Cajun seasoning is optional, but it works beautifully with lobster. Use it lightly if you want the seafood flavor to stay delicate, and taste before adding extra salt.
For a Cajun-style seafood feel, you can use a little more seasoning and serve the mac with something like this seafood boil sauce on the side for people who want extra buttery heat.
Topping
Panko gives a crisp, light topping that lets the lobster stay the focus. Crushed Ritz crackers make the top richer, saltier, and more holiday-casserole style. Parmesan helps with browning. Lemon zest is optional, but even a small pinch makes the lobster taste brighter and keeps the cheese from feeling too heavy.
Which Lobster Should You Use?
There is no single right lobster for this dish. The right choice depends on your budget, what you can buy easily, and how showy you want the final pan to look. Fresh lobster is lovely, but it is not the only way to make a great pan. What matters more is how gently you cook it and how dry it is before it meets the sauce.
Best Lobster Options for Mac and Cheese
Use this section as the buying guide: cooked meat is easiest, tails look showy, claw and knuckle meat stay sweet, and frozen lobster works if it is thawed and dried well.
Different lobster choices solve different problems: tails look impressive, claw meat tastes sweet, cooked meat saves effort, and frozen lobster helps when time is tight.
How to Use Each Lobster Type
Lobster Type
Works Well For
How to Use It
Cooked lobster meat
Easiest method
Chop into large pieces, pat dry, and add after the pasta is coated.
Lobster tails
Showy presentation
Steam, poach, or simmer gently until opaque and just firm, then chop.
Claw and knuckle meat
Sweet, tender flavor
Use like cooked lobster meat and fold it in gently.
Frozen lobster meat
Convenience
Thaw overnight, drain well, pat dry, and stir in once the sauce is ready.
Leftover lobster
Quick upgrade
Add at the end just to warm through.
Langostino
Budget-friendly substitute
Use as a lobster-style substitute, but call it langostino clearly.
Lobster Tail and Frozen Lobster Notes
If you are using lobster tails, kitchen shears make the shells easier to open. Cook the tails only until the meat is opaque, white, and just firm. Time is only a guide; stop when the lobster looks tender and pulls from the shell easily because it will warm again in the pasta.
If lobster tails are the part that makes you nervous, this guide to grilled lobster tails goes deeper into thawing, cutting the shell, checking doneness, and avoiding rubbery lobster.
If you have extra cooked lobster after making this dish, save the larger pieces for buttery lobster rolls instead of chopping every last bit into the mac.
Raw lobster is better cooked gently first, rather than relying on the casserole to cook it evenly. That way the pasta does not have to stay in the oven too long, and the lobster can warm through without turning tough.
If you are starting with frozen lobster, thaw it overnight in the refrigerator when possible. The FDA’s seafood safety guide is a helpful reference for choosing, thawing, and handling seafood safely.
Once the lobster is dry, tender, and cut into real pieces, half the battle is already won.
The best cheese is a blend, not a single cheese. Lobster is sweet and delicate, so the sauce should be creamy, rich, and flavorful without overpowering the seafood.
The cheese should make the lobster taste richer, not cover it up. If the sauce tastes heavy before the lobster goes in, it will feel even heavier after baking.
Think of the blend as flavor, melt, and finish: one sharp cheese, one smooth melting cheese, and one salty accent cheese.
The blend should support the lobster instead of covering it. Use one cheese for flavor, one for smooth melt, and one small finishing cheese for depth.
The best cheese blend should melt smoothly without burying the lobster. Use cheddar for flavor, fontina or Gruyere for melt, Jack or Havarti for softness, and parmesan for finish.
Cheese Options and What They Do
Cheese
Use?
Why It Works or Does Not Work
White cheddar
Yes
Gives classic mac-and-cheese flavor and sharpness.
Fontina
Yes
Melts smoothly and keeps the sauce creamy.
Gruyere
Yes
Adds nutty, restaurant-style flavor.
Havarti
Yes
Mild, creamy, and smooth-melting.
Monterey Jack
Yes
Melts easily and keeps the sauce soft.
Parmesan
Accent only
Adds salty depth, but does not melt like a main sauce cheese.
Smoked Gouda
Optional
Good in small amounts, but too much can overpower lobster.
Cream cheese or mascarpone
Optional
Adds extra creaminess and helps stabilize the sauce.
Blue cheese or feta
Skip
Too strong, too crumbly, and likely to fight the lobster.
Pre-shredded cheese
Only if needed
Convenient, but anti-caking starch can make the sauce less smooth.
The finished sauce should taste rich but not loud. You should still be able to taste the sweetness of the lobster through the cheese.
What the Cheese Sauce Should Look Like
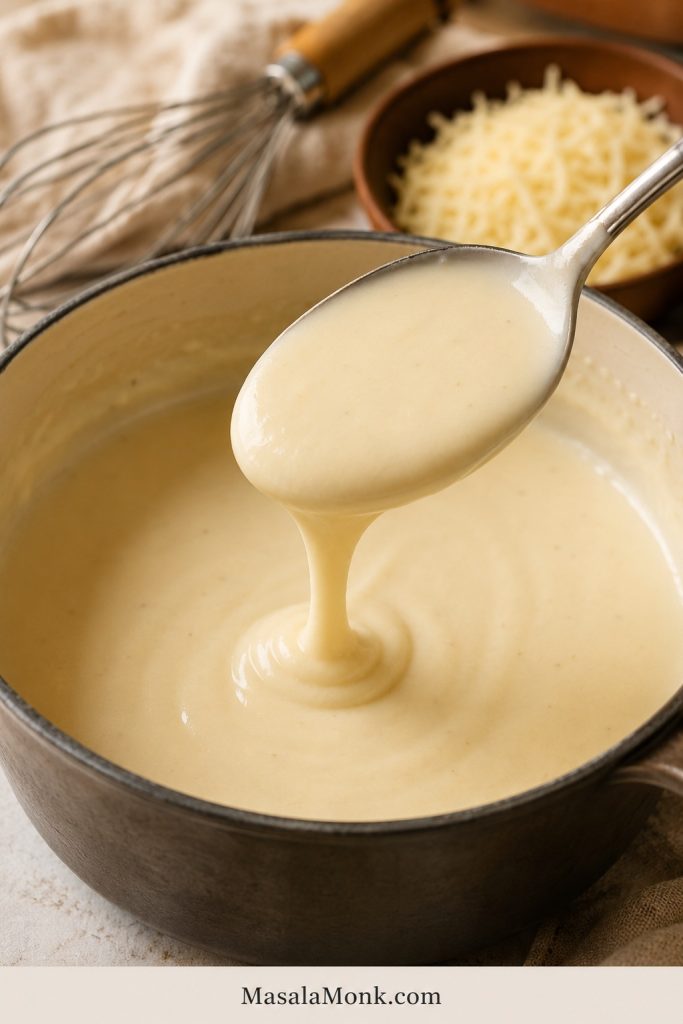
When the sauce looks glossy and loose enough to move, it has room to thicken in the oven without turning heavy.
The sauce should coat the spoon but still flow back into the pan. If it looks too thick here, the finished baked lobster mac may turn heavy.
For the smoothest sauce, grate the cheese yourself and add it off heat or over very low heat. High heat is one of the most common reasons cheese sauce turns grainy or oily.
If cheese sauce is where your mac usually goes wrong, read through the tips in this cheese sauce recipe. The same rules apply here: gentle heat, freshly grated cheese, and enough liquid to keep the sauce smooth.
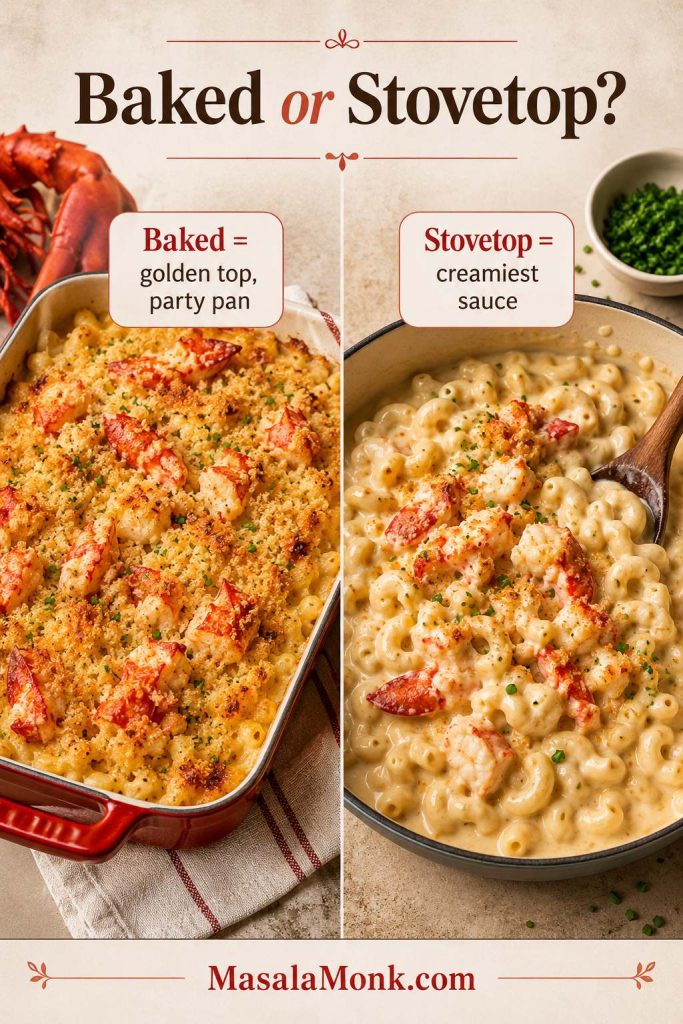
Baked lobster mac and cheese gives you the crisp top, bubbling edges, and holiday casserole feeling most people expect. It is the strongest version when you want a dramatic side dish or a special dinner centerpiece.
Stovetop lobster mac is creamier and gentler for the seafood because it avoids extra oven time. Make the pasta and sauce on the stove, add the lobster at the end, and top each serving with toasted buttered panko.
Choose the method based on the texture you want: baked for a browned top, stovetop for the softest sauce.
Choose baked lobster mac when you want a golden top and party-pan presentation. Choose stovetop when creamy sauce matters more than crunch.
Version
Works Well For
Texture Note
Baked
Golden top, holidays, parties, steak dinners
Pull the pan while the center still looks creamy.
Stovetop
Maximum creaminess and tender seafood
Add toasted crumbs separately for crunch.
Covered-then-uncovered bake
Make-ahead casseroles
Add topping near the end so it stays crisp.
This recipe uses the baked method but keeps the bake short. You still get bubbling edges and buttery crumbs, while the lobster stays tender inside the sauce.
The recipe feels much easier once you follow the right order: cook the pasta short, prepare the lobster gently, build the sauce slowly, melt the cheese off heat, fold the lobster in near the end, and bake only until the edges bubble.
Preheat the Oven and Butter the Dish
Heat the oven to 375°F / 190°C and lightly butter a 9×13-inch baking dish. Set the dish nearby so the pasta can move into it while the sauce is still loose and warm.
Cook the Pasta Short of Al Dente
Boil the pasta in salted water and stop about 2 minutes before the package says it is done. The pasta should still have a little firmness. This prevents it from turning soft after baking.
Drain the pasta and keep it nearby. Rinsing is usually unnecessary unless the pasta is sticking badly. A little starch helps the cheese sauce cling.
Pull the pasta about 2 minutes early. Then it can finish in the sauce as the casserole bakes, rather than turning swollen, soft, or mushy.
Prepare the Lobster
If using cooked lobster meat, chop it into generous pieces and pat it dry. Frozen lobster should be thawed completely and dried well so it does not water down the sauce.
If using lobster tails, cook them gently until opaque and just firm. You can steam, poach, or simmer them. Once cooked, remove the meat from the shells and cut it into bite-size chunks. Keep the lobster separate while you make the sauce.
Stop cooking lobster tails when the meat turns white, opaque, and just firm. Since the lobster warms again in the sauce and oven, this early restraint keeps it tender.
Cut the Lobster into Generous Pieces
Treat lobster like a finishing ingredient. It only needs to warm through later, after the pasta and sauce are ready, so the pieces should stay large enough to notice in every serving.
Cut lobster into pieces large enough to notice. That keeps the seafood present in each creamy scoop instead of letting it disappear into the pasta.
Make a Pale Roux
Melt butter in a large saucepan or Dutch oven, then whisk in flour. Cook for 1 to 2 minutes so the flour loses its raw taste. The roux should look smooth, glossy, and lightly foamy, not deeply browned.
Whisk in the Milk and Cream
Add the milk slowly while whisking, then add the cream or evaporated milk. Let the sauce simmer until it thickens enough to coat a spoon. Keep it loose enough to flow from the spoon; baked mac needs more moisture than it looks like it needs at first.
A smooth sauce starts before the cheese goes in. First cook a pale glossy roux, then whisk in the dairy slowly so the base thickens without lumps.
Season the Sauce
Stir in the Dijon or dry mustard, garlic powder, onion powder, optional Old Bay or Cajun seasoning, paprika, black pepper, and a small pinch of salt. Taste before adding more salt, especially if using parmesan, Old Bay, Cajun seasoning, or salted lobster meat.
Add the Cheese Off Heat
Lower the heat or turn it off before adding the cheese. Stir it in gradually, a handful at a time. This helps the sauce melt smoothly instead of separating.
Aim for creamy and pourable, not stiff. The pasta should look almost too creamy before it bakes. That is the trick.
Strong heat can make cheese sauce grainy or oily, so melt the cheese off heat or over very low heat for a smoother baked mac.
Coat the Pasta First
Fold the pasta into the sauce before the lobster goes in. This gives every curve of pasta a chance to catch the sauce and keeps the seafood from being stirred too aggressively.
Coat the pasta before the lobster goes in. This way, the sauce reaches every curve of cavatappi and the delicate seafood does not get overmixed.
Add the Lobster Last
Once the pasta is coated, gently add the lobster. This keeps the pieces from breaking apart and lets them stay sweet, soft, and noticeable in every scoop.
Lobster should be folded in late, after the pasta is already sauced. At this point, it only needs to warm through, not cook a second time.
Transfer to the Baking Dish
Spoon the mixture into the prepared dish. For a more generous-looking pan, reserve a few pieces of lobster and place them on top before adding the crumb topping.
Check the Pan Before Topping
Before the topping goes on, the pasta should look glossy and slightly loose, with lobster pieces still visible. This is the best time to add a splash of milk if the mixture already looks tight.
Before the crumbs go on, the pan should look glossy, slightly loose, and generous with lobster. That extra moisture helps protect the creamy center during baking.
Add the Buttered Panko Topping
Mix panko or crushed Ritz crackers with melted butter, parmesan, herbs, and optional lemon zest. Sprinkle the topping evenly over the pan so it can brown quickly.
Buttered panko browns faster than dry crumbs, giving the casserole a crisp golden top without keeping the lobster in the oven too long.
Bake Until Bubbling and Golden
Bake at 375°F / 190°C for 20 to 25 minutes. The edges should bubble and the topping should be golden, while the center still looks creamy when you scoop into it.
Pull the pan when the edges bubble and the topping turns golden. The center should still look soft because it will thicken slightly as it rests.
Rest Before Serving
Let the dish rest for 8 to 10 minutes before serving. A short rest helps the sauce settle so the first scoop holds together without turning stiff.
A short rest helps the first scoop hold together without losing creaminess. If the inside still looks glossy under the crumbs, the bake time was right.
The safest default oven temperature is 375°F / 190°C. It is hot enough to brown the topping and bubble the sauce, but not so hot that the lobster is likely to overcook before the casserole is ready.
350°F / 175°C is gentler and useful for reheating or make-ahead pans, but browning takes longer.
375°F / 190°C gives this recipe the best balance: bubbling edges, toasted crumbs, and a creamy center.
400°F / 200°C can brown quickly, but it gives you less room for error with lobster and cheese sauce.
For this recipe, bake at 375°F / 190°C for 20 to 25 minutes. If the topping needs more color, broil briefly at the end instead of baking the whole dish longer.
How to Keep Lobster Mac and Cheese Creamy
If baked mac turns dry, it is usually a few small things adding up: pasta cooked too far, sauce too thick, cheese overheated, or the pan left in the oven too long.
Use these visual checks before the pan goes into the oven and again when it comes out.
For creamy baked lobster mac, start saucier than expected, melt cheese gently, add lobster late, bake briefly, and rest the pan before serving.
Use enough sauce. Pasta absorbs moisture in the oven, so the mixture should look a little loose before baking.
Undercook the pasta. Stop about 2 minutes before al dente for a baked pan.
Grate the cheese yourself. Freshly grated cheese melts more smoothly.
Add cheese off heat. Gentle heat keeps the sauce smoother and less oily.
Add seafood after the sauce is ready. Lobster only needs to warm through inside the pasta.
Pull it at the right moment. The edges should bubble, the topping should brown, and the center should still look creamy.
Rest before serving. A short rest helps the sauce settle without becoming watery.
A thick-looking pan needs help before it reaches the oven. Add 1/4 cup / 60 ml milk at a time until the pasta looks glossy and saucy again.
Lobster gets rubbery when it is cooked too long or reheated too aggressively. Since it warms again inside the mac, it should stay on the tender side before it goes into the dish.
The easiest way to protect the lobster is to cook it gently first, add it late, and avoid repeated high heat.
Tender lobster is mostly about timing. Cook it just until opaque, pat it dry, keep the pieces large, and fold it in only after the sauce is ready.
Cook lobster tails only until the meat turns opaque and just firm.
Use cooked lobster meat if you want the easiest method.
Pat lobster dry so extra moisture does not thin the sauce.
Cut lobster into generous chunks instead of tiny bits.
Add the lobster after the pasta is already coated in sauce.
Keep the uncovered bake short.
Reheat leftovers gently with a splash of milk or cream.
Lobster should feel like the prize in the bite, not the thing you have to chew around. If it is already tender before baking, your job is to protect it.
How to Make It Taste Restaurant-Style
Restaurant-style lobster mac and cheese usually feels more polished because of the pasta shape, the cheese blend, the visible lobster pieces, and the finishing touches. The dish should look generous before anyone tastes it.
Use cavatappi. The curls hold sauce and make the pan look special.
Choose a white cheese blend. White cheddar, Gruyere, fontina, and parmesan give a steakhouse-style look and flavor.
Keep some lobster visible. A few reserved pieces on top make the whole pan feel more generous.
Finish with chives or parsley. A little green makes the rich sauce look brighter.
Add a small splash of sherry, seafood stock, or lobster cooking liquid. Use just enough to add depth, not enough to make the sauce taste boozy or fishy.
Broil briefly if needed. A quick 1 to 3 minute broil can give the topping a golden steakhouse finish.
Optional Lobster-Shell Flavor Boost
If you cooked lobster tails yourself, you can use the shells for a subtle restaurant-style boost. Simmer the shells gently in the milk and cream for about 10 minutes with a small piece of onion or a bay leaf, then strain before making the sauce. Keep the heat gentle and do not reduce the dairy too much.
For deeper restaurant-style flavor, steep lobster shells gently in the dairy, then strain before making the cheese sauce. It adds seafood depth without overpowering the pan.
This step is optional. The base recipe works without it, but it adds a little more lobster depth when you want the dish to feel extra special.
For a bigger seafood-table mood, serve it next to a Cajun seafood boil and keep the mac slightly milder so the lobster flavor still comes through.
Make-Ahead Lobster Mac and Cheese
The safest plan is to prep the lobster, cheese, and topping ahead, but assemble and bake the pasta fresh when possible. That gives you the creamiest sauce and the most tender lobster.
For hosting, the goal is to reduce last-minute work without sacrificing the fresh-baked texture.
For make-ahead lobster mac, prep the components early but bake fresh when possible. Keeping the topping separate preserves crunch and protects the creamy sauce.
Recommended Make-Ahead Method
Grate the cheese up to 1 day ahead.
Cook and chop the lobster up to 1 day ahead.
Mix the panko or Ritz topping ahead and refrigerate it separately.
Cook the pasta and make the sauce closer to baking time for the best texture.
Assemble and bake just before serving.
For guests, prepping the parts early and baking the pan fresh is the sweet spot: less last-minute work, but still a creamy center and tender lobster.
If You Need to Assemble It Ahead
If you need to assemble the whole dish ahead, transfer the pasta, sauce, and lobster to the baking dish, but keep the topping separate. Cover and refrigerate for up to 24 hours. Before baking, let the dish sit at room temperature for about 30 minutes while the oven heats.
Bake covered at 350°F / 175°C until warmed through, then uncover, add the topping, and continue baking until golden. Add a splash of milk or cream if the pasta looks dry before baking.
Fully baking, chilling, and rebaking the whole pan is less ideal for a special meal because the lobster and sauce both lose some tenderness. It can work for leftovers, but fresh assembly gives the best texture.
This mac is at its best when it is freshly baked and creamy, but leftovers can still be good if you reheat them gently and add moisture back into the sauce.
Storage
Cool leftovers, then transfer to an airtight container.
Refrigerate for up to 3 days, though the texture is best within the first 1 to 2 days. For general leftover safety timing, see the USDA leftover food safety guide.
Keep the topping if already baked, but know it will soften in the fridge.
Freezing is possible, but not ideal because creamy cheese sauces can separate after thawing.
Oven Reheating
Place leftovers in a baking dish and add a splash of milk or cream. Cover with foil and reheat at 300°F to 325°F / 150°C to 165°C until warmed through. Remove the foil for the last few minutes if you want to refresh the topping.
Microwave Reheating
For single servings, add a splash of milk or cream and microwave in short bursts, stirring gently between each one. Use lower power if possible. Heating it until boiling can toughen the lobster and make the sauce split.
Try to reheat only what you plan to eat. Repeated reheating is hard on both lobster and cheese sauce.
Lobster Mac and Cheese Variations
Once the base pan works, the variations become fun — not stressful experiments with expensive seafood. Keep the same sauce logic: gentle cheese heat, gently warmed seafood, and a sauce that stays slightly loose if the pan will be baked.
Use the base method first, then change one flavor direction at a time so the seafood and sauce stay balanced.
Once the base recipe is reliable, variations become easier. Add crab for sweetness, shrimp for extra seafood, Cajun seasoning for heat, or Ritz crumbs for buttery crunch.
Lobster Crab Mac and Cheese
Choose this version when you want the pan to feel softer, sweeter, and more holiday-table than steakhouse. Use half lobster and half lump crab meat, then fold the crab in gently at the end so the pieces stay intact.
Lobster Shrimp Mac and Cheese
Choose this when you want a fuller seafood mac without buying more lobster. Add cooked medium or large shrimp near the end, and chop them only if they are very large so they stay juicy instead of tight.
Seafood Mac and Cheese
Use lobster, crab, and shrimp when you want the pan to feel more like a seafood feast than a side dish. Old Bay, Cajun seasoning, or a small pinch of cayenne can push it toward seafood-boil flavor.
Cajun Lobster Mac and Cheese
Choose this version when you want seafood-boil energy: a little bolder, a little warmer, and still creamy underneath. Pepper Jack can replace part of the Monterey Jack or Havarti if you want gentle heat.
Truffle Lobster Mac and Cheese
Choose this for steakhouse polish. Add a small amount of truffle butter or truffle oil at the end, and use restraint; too much truffle can take over before the lobster has a chance to shine.
Bacon Lobster Mac and Cheese
Keep bacon on top, where it gives smoky crunch without taking over the whole sauce. Stirring too much bacon into the cheese sauce can make the dish taste saltier and heavier than it needs to be.
Ritz Cracker Topping
Choose Ritz when you want buttery, nostalgic holiday-casserole flavor. The crumbs brown beautifully and make the top taste richer than panko.
Extra Creamy Stovetop Lobster Mac
Choose stovetop when sauce texture matters more than a baked crust. Make the sauce, add the pasta and lobster, and serve immediately with toasted buttered panko on top.
What to Serve With Lobster Mac and Cheese
This dish is rich, so the right sides either make the meal feel more special or cut through the creaminess with freshness.
For the most balanced table, pair the creamy pasta with something crisp, green, lemony, roasted, or simply cooked.
Since lobster mac is rich, serve it with contrast. Steak, roasted greens, crisp salad, bread, or lemony vegetables make the meal feel complete without becoming too heavy.
If you want a lighter seafood main beside a smaller scoop of mac, baked tilapia keeps the plate from feeling too heavy. For a full seafood dinner, pair smaller portions with lobster bisque and something bright on the side.
For a lighter starter before a rich pan of lobster mac, tomato soup, cucumber salad, or a bright vinaigrette salad works better than adding another heavy cream-based dish.
Homemade vs Frozen Lobster Mac and Cheese
Frozen and prepared lobster mac and cheese can be convenient, especially from grocery stores like Costco, Whole Foods, or Aldi. Homemade gives you more control over the lobster pieces, cheese blend, sauce texture, and topping.
The biggest difference is the lobster. In a homemade pan, the pieces can stay larger and sweeter instead of disappearing into the sauce. To improve a store-bought version, add a splash of cream, a handful of freshly grated cheese, extra lobster if you have it, and a fresh buttery breadcrumb topping.
Troubleshooting Lobster Mac and Cheese
If something feels off, it is usually fixable. Most problems come down to heat, moisture, or timing.
Use the guide below as the quick fix map before you adjust the sauce, seafood, or topping.
Most lobster mac problems come from heat, moisture, or timing. Dry mac needs milk, grainy sauce needs gentler heat, and rubbery lobster needs to be added later next time.
Problem
Likely Cause
Fix
Mac and cheese is dry
Not enough sauce, pasta overcooked, or baked too long
Add more milk before baking and pull the dish when edges bubble.
Cheese sauce is grainy
Cheese was overheated or pre-shredded cheese was used
Add cheese off heat and use freshly grated cheese next time.
Cheese sauce is oily
Heat was too high or cheese separated
Lower the heat, add cheese gradually, and avoid boiling the sauce.
Lobster is rubbery
Lobster was overcooked or baked too long
Cook lobster gently, add it late, and bake briefly.
Sauce is watery
Frozen lobster was not drained or sauce was too thin
Pat lobster dry and simmer the sauce until it lightly coats a spoon.
Mac tastes bland
Not enough salt, mustard, or seasoning
Season the sauce before adding pasta; use Dijon, garlic powder, and a little seafood seasoning.
Topping is pale
Not enough butter or too little oven time
Use buttered crumbs and broil briefly at the end.
Topping burns before center is hot
Oven too hot or topping added too early for make-ahead bake
Bake covered first, then add topping near the end.
What is the best cheese for lobster mac and cheese?
Use white cheddar, fontina or Gruyere, Monterey Jack or Havarti, and a little parmesan. White cheddar gives flavor, the smoother cheeses keep the sauce creamy, and parmesan adds salty depth.
Do lobster tails work in mac and cheese?
Yes. Lobster tails give you large, impressive pieces. Cook them gently until opaque, white, and just firm, then chop the meat and add it after the sauce is ready.
Should lobster be cooked before adding it?
Yes. Cook the lobster gently first, then let it warm through in the sauce. The oven should not be responsible for cooking raw lobster inside the casserole.
How much lobster do I need per person?
For this recipe, 12 to 16 oz / 340 to 454 g cooked lobster meat gives about 1.5 to 2 oz lobster per main-dish serving, or less if served as a holiday side. Use 16 oz if you want visible lobster in every scoop.
How do you keep baked lobster mac from drying out?
Use enough sauce, cook the pasta 2 minutes short of al dente, melt the cheese gently, and pull the pan while the center still looks creamy. The pasta should look slightly loose before it goes into the oven.
Why did my cheese sauce turn grainy?
Cheese sauce usually turns grainy when the cheese is overheated or when pre-shredded cheese is used. Lower the heat or turn it off before adding cheese, and stir in freshly grated cheese a handful at a time.
What is the best make-ahead method?
Prep the components ahead and bake fresh. Grate the cheese, cook the lobster, and prepare the topping in advance. If assembling the whole dish ahead, keep the topping separate and add it near the end of baking.
Is frozen lobster meat okay?
Yes. Thaw frozen lobster meat overnight in the refrigerator, drain it well, and pat it dry before adding it. Extra moisture can make the sauce watery.
Can I use imitation lobster or imitation crab?
You can, but the flavor and texture will be different from real lobster. Add imitation lobster or imitation crab near the end just to warm through.
Is stovetop lobster mac better than baked?
Stovetop lobster mac is usually creamier because it avoids oven time. Baked lobster mac gives you a crisp topping and bubbling casserole texture. Choose stovetop for maximum creaminess and baked for special-occasion presentation.
What pasta shape works best?
Cavatappi is one of the best choices because the curls hold sauce and make the finished pan look restaurant-style. Elbow macaroni, shells, and other short pasta shapes also work well.
Can you freeze lobster mac and cheese?
You can freeze it, but it is not ideal. Creamy cheese sauces can separate after thawing, and lobster can become tougher when reheated. Thaw overnight, add milk or cream, cover, and reheat gently.
How do I turn this into seafood mac and cheese?
Use a mix of lobster, crab, and shrimp. Keep the seafood cooked gently and add it after the sauce is ready so it stays tender. Add Old Bay or Cajun seasoning for a stronger seafood-style flavor.
Lobster mac and cheese is rich, cozy, and impressive, but it should not feel risky. Once you know the three main rules — keep the sauce loose, melt the cheese gently, and add the lobster after the sauce is ready — the dish becomes much easier. Serve it bubbling from the oven, or keep it stovetop and extra silky. Either way, the goal is the same: tender lobster, smooth sauce, buttery crumbs, and a first scoop that makes the whole pan feel worth the occasion.
A good tomato bisque should feel like tomato soup got dressed up for grilled cheese night: glossy, velvety, rich enough to comfort you, but still bright enough to taste like tomatoes. This is the bowl you make when classic tomato soup sounds good, but you want it creamier, smoother, and a little more special.
The main recipe starts with canned tomatoes because they are reliable, pantry-friendly, and easy to turn into a rich, blended soup. When fresh tomatoes are ripe and sweet, you can use those too. Either way, the method is simple: cook the vegetables, deepen the tomato paste, simmer the tomatoes, blend, then finish gently with cream.
The one rule to remember is this: blend first, loosen later, cream last. That keeps the soup silky instead of watery, rounded instead of heavy, and creamy without splitting.
If you want the lightest fresh-tomato bowl, make this fresh tomato soup recipe. This one is the richer lane: blended, cream-softened, spoon-coating, and built for a grilled cheese dunk.
For most home cooks, tomato bisque means tomato soup made smoother, richer, and creamier. It is blended until silky and finished with cream, milk, butter, or a creamy dairy-free alternative.
Tomato soup can be light, brothy, chunky, or fresh-tasting. A bisque is usually smoother, thicker, fuller-bodied, and more rounded. Some restaurant-style versions use a roux, but you do not need one for a good homemade bowl.
The promise: This recipe stays spoon-coating because the broth is controlled early, the vegetables are blended into the base, and the cream goes in only after the soup is already smooth. It is better to start slightly thick; the blender will tell you what the soup needs.
Texture Cue Before You Start
Before serving, check the spoon. The bisque should cling in a smooth layer instead of running off like broth or sitting thick like sauce.
At a Glance
Here is the recipe logic before you start.
Main version
Easy creamy canned tomato bisque
Total time
About 40 minutes
Servings
4 large bowls or 6 smaller bowls
Yield
About 6 to 7 cups soup
Tomatoes
1 can whole peeled or crushed tomatoes, 28 oz / about 794 g
Fresh tomato swap
2.5 lb / about 1.1 kg ripe tomatoes, or up to 3 lb / 1.35 kg if watery
Broth for canned tomatoes
Start with 2 cups / 480 ml
Broth for fresh tomatoes
Start with 1 to 1 1/2 cups / 240 to 360 ml because fresh tomatoes release liquid
Cream
1/2 cup / 120 ml heavy cream, half-and-half, or cashew cream
Best tool
Immersion blender
Texture cue
Smooth, glossy, spoon-coating, and pourable
Best pairing
Grilled cheese
Recipe Card
Prep time: 10 minutes Cook time: 30 minutes Total time: 40 minutes Servings: 4 large bowls or 6 smaller bowls Yield: About 6 to 7 cups Method: Stovetop Difficulty: Easy
Ingredients
2 tablespoons olive oil or butter, about 30 ml oil or 28 g butter
1 medium onion, chopped, about 150 g
1 medium carrot, chopped, about 70 to 80 g
1 celery rib, chopped, about 40 to 50 g
3 garlic cloves, minced, about 9 to 12 g
2 tablespoons tomato paste, about 30 g
1 can whole peeled tomatoes or crushed tomatoes, 28 oz / about 794 g
Fresh tomato option: use 2.5 lb / about 1.1 kg ripe tomatoes, or up to 3 lb / 1.35 kg if watery
2 cups vegetable broth or chicken broth, 480 ml, for canned tomatoes
For fresh tomatoes, start with 1 to 1 1/2 cups broth, 240 to 360 ml, plus more as needed
1 teaspoon dried basil or Italian seasoning
1/2 teaspoon dried oregano or thyme
1/2 teaspoon salt, then more to taste
1/4 teaspoon black pepper
Pinch of red pepper flakes, optional
1/2 cup heavy cream, half-and-half, or cashew cream, 120 ml
1 tablespoon butter, optional, for finishing, about 14 g
Fresh basil, Parmesan, croutons, or grilled cheese, for serving
Instructions
Warm the olive oil or butter in a large non-reactive soup pot or Dutch oven over medium heat.
Add the onion, carrot, and celery. Cook for 6 to 8 minutes, stirring often, until the vegetables soften and the onion turns translucent.
Add the garlic and cook for about 30 seconds, just until fragrant.
Stir in the tomato paste. Cook for 1 to 2 minutes, until it darkens slightly and smells deeper. If it starts sticking, splash in a spoonful of broth and scrape the bottom of the pot.
Add the canned tomatoes with their juices. If using whole peeled tomatoes, crush them lightly with a spoon in the pot.
Add 2 cups broth for canned tomatoes, or 1 to 1 1/2 cups broth for fresh tomatoes. Stir in the dried basil or Italian seasoning, oregano or thyme, salt, black pepper, and red pepper flakes if using.
Bring to a gentle boil, then reduce the heat and simmer uncovered for 20 to 25 minutes, until the vegetables are very soft and the tomato flavor tastes less sharp.
Blend the soup until smooth with an immersion blender. For an extra-silky texture, use a countertop blender in batches.
Check the texture. If the soup is too thick, add broth a little at a time until it is spoon-coating and pourable.
Lower the heat. Stir in the cream and warm gently for 2 to 3 minutes. Do not boil hard after adding cream.
Taste and adjust with more salt first. Add butter or Parmesan for richness, or basil for freshness.
Serve hot with fresh basil, croutons, Parmesan, or grilled cheese.
Recipe Notes
Best tomato choice: whole peeled tomatoes or crushed tomatoes.
Texture rule: blend first, loosen later, cream last.
Fresh tomato swap: use 2.5 lb / about 1.1 kg ripe tomatoes, or up to 3 lb / 1.35 kg if the tomatoes are watery.
Broth for fresh tomatoes: start with 1 to 1 1/2 cups / 240 to 360 ml broth because fresh tomatoes release more liquid.
Optional depth upgrade: simmer the soup with a small Parmesan rind, then remove it before blending. Or finish with a tiny splash of sherry vinegar or lemon juice if the soup tastes flat. Skip the Parmesan rind for dairy-free soup.
Thicker bowl: use the optional roux method or simmer uncovered a little longer.
Dairy-free soup: use vegetable broth, olive oil, and cashew cream.
This is the soup to make when you want comfort without a complicated cooking project. It works especially well when:
Tomato soup sounds good, but you want it richer and creamier.
Grilled cheese is already part of the plan.
A pantry dinner needs to feel more homemade than a plain can of soup.
Fresh tomatoes are out of season, but deep tomato flavor still matters.
Restaurant-style tomato soup sounds good, but a heavy floury roux does not.
For a lighter meal around the soup, a fresh side like this chickpea salad adds brightness and protein without making the bowl itself heavier.
Choose Your Version
The easiest reliable version starts with canned tomatoes, not fresh tomatoes and not canned tomato soup. Canned whole peeled tomatoes or crushed tomatoes give steady flavor, enough body, and repeatable results without waiting for perfect summer produce.
Make the main pot first, then choose the lane that fits your tomatoes, time, and mood. Once you make the base once, you will probably know your house version: basil-heavy, extra creamy, roasted, spicy, or built around grilled cheese.
You want…
Make this version
What to change
The easiest reliable bowl
Canned tomato bisque
Use 28 oz / 794 g canned whole peeled or crushed tomatoes
Fresh garden flavor
Fresh tomato bisque
Use 2.5 lb / 1.1 kg ripe tomatoes and start with less broth
Deeper fresh tomato flavor
Roasted tomato bisque
Roast fresh tomatoes before simmering
Brighter herb flavor
Tomato basil bisque
Add fresh basil near the end, then blend
Smoky-sweet flavor
Roasted red pepper tomato bisque
Add one drained 12 oz / 340 g jar roasted red peppers
Restaurant-style thickness
Roux-thickened tomato bisque
Add a small butter-and-flour roux
Dairy-free creaminess
Vegan tomato bisque
Use vegetable broth and cashew cream
A quick pantry shortcut
Canned tomato soup bisque
Upgrade condensed tomato soup with milk or half-and-half, butter, herbs, and Parmesan
Visual Guide to Tomato Bisque Versions
Use this guide to choose your tomato bisque style, from classic and fresh to basil, roasted, red pepper, or dairy-free.
The recipe is not trying to be fancy. It is trying to keep the tomato flavor deep, the texture smooth, and the cream from taking over.
Tomato paste adds depth. Give it a minute in the pot and it stops tasting raw, turning deeper and almost sweet.
Onion, carrot, and celery soften the acidity. The carrot especially helps balance sharp tomatoes naturally.
Canned tomatoes make the result reliable. You do not have to wait for peak-season tomatoes to make a good bowl.
Blending creates body. The vegetables become part of the texture, not just flavor in the background.
Gentle cream keeps the flavor balanced. It should soften the tomato edge, not make the soup pale and sleepy.
Equipment You Need
The only tool that really changes the experience is the blender. Everything else is basic soup-pot cooking.
Large non-reactive soup pot or Dutch oven: stainless steel, enamel-coated cast iron, or a heavy nonstick soup pot works well.
Immersion blender: the easiest tool because you can blend directly in the pot.
Countertop blender: gives the silkiest texture, but hot soup must be blended carefully in batches.
Fine mesh sieve, optional: use it only if you want an ultra-smooth restaurant-style finish.
Hot blender safety: If using a countertop blender, do not fill the jar more than halfway. Vent the lid, cover it with a towel, and start on low speed. Hot soup expands quickly in a sealed blender.
Ingredients You Need
The ingredients are simple, but each one has a job in the pot.
Ingredient Snapshot
Each ingredient has a job: aromatics build body, tomato paste adds depth, and cream finishes the soup.
Tomatoes
A 28 oz / 794 g can of whole peeled or crushed tomatoes is the easiest starting point. Whole peeled tomatoes usually give the best balance of flavor and body. Crushed tomatoes are convenient and blend quickly. Diced tomatoes can work, but they may need longer blending. Fire-roasted tomatoes add smoky depth if you want a bolder bowl.
If you are choosing between whole, crushed, diced, and fire-roasted tomatoes, this guide to canned tomato types is helpful.
Onion, Carrot, Celery, and Garlic
This is the flavor base. Onion brings sweetness, carrot helps soften tomato acidity, celery adds savory depth, and garlic makes the soup taste fuller. Cook them until the pot smells sweet and savory before the tomatoes go in.
Tomato Paste
Tomato paste is the little shortcut to deeper flavor. Stir it into the softened vegetables and let it cook for 1 to 2 minutes before adding broth. When it is ready, it should smell less sharp and more like roasted tomatoes.
Broth
Vegetable broth keeps the recipe vegetarian. Chicken broth gives a slightly deeper savory flavor. Canned tomatoes need about 2 cups / 480 ml broth to start. Fresh tomatoes release more liquid, so they need less at first.
Cream
Heavy cream gives the most classic finish. Half-and-half makes it lighter. Cashew cream gives the best neutral dairy-free texture. The color should turn slightly softer after cream, not pale orange.
Herbs and Finishes
Dried basil or Italian seasoning can simmer with the tomatoes. Fresh basil tastes best near the end, when it still smells bright. Parmesan, butter, croutons, black pepper, and grilled cheese all make the finished bowl more satisfying.
Canned Tomatoes vs Fresh Tomatoes
Both canned and fresh tomatoes can work. The best choice depends on what you have and how the tomatoes taste before they go into the pot.
Canned vs Fresh Tomato Guide
Canned tomatoes are the reliable year-round choice. Fresh tomatoes work best when they smell sweet, taste ripe, and are in season.
Canned tomatoes work best when…
Fresh tomatoes work best when…
You want reliable flavor year-round
Tomatoes are ripe, sweet, and in season
You want the easiest version
You want a brighter garden-style bowl
You want less prep
You do not mind peeling, grating, roasting, or simmering longer
Your fresh tomatoes are bland or watery
Your fresh tomatoes smell sweet and taste good raw
One 28 oz can of tomatoes is about 794 g. For the closest fresh swap, use 2.5 lb / about 1.1 kg ripe tomatoes. If your tomatoes are watery or you want a fuller fresh-tomato base, use up to 3 lb / 1.35 kg.
Fresh Tomato Grating Shortcut
For the smoothest fresh version, peel the tomatoes first or roast them before blending. If you do not want to peel tomatoes, halve them and grate the cut side on the large holes of a box grater. The pulp goes into the bowl, and most of the skin stays in your hand. Use that pulp in place of peeled chopped tomatoes.
For fresh tomato bisque, grate ripe tomatoes when you want the pulp without peeling. Most of the skin stays behind on the grater.
If fresh tomatoes taste watery raw, roast them or use canned tomatoes instead. A soup that looks thick before blending is usually on the right track. Adjust the body after it has been blended.
If you have more ripe tomatoes than this soup needs, turn the rest into this tomato sauce from fresh tomatoes for pasta, pizza, or freezer meals.
How to Make Tomato Bisque
The tricky part is not the cooking. It is adding too much liquid before the soup has a chance to blend smooth. Keep the order simple: build the base, deepen the tomato paste, simmer, blend, adjust the body, then add cream.
Step 1: Soften the Vegetables
Warm olive oil or butter in a large non-reactive pot over medium heat. Add the onion, carrot, and celery. Cook for 6 to 8 minutes, stirring often, until the onion is translucent and the vegetables are softening. The carrot should be tender enough to blend cleanly later.
First, soften the onion, carrot, celery, and garlic until the pot smells sweet and savory. This gives the soup body before tomatoes go in.
Step 2: Cook the Tomato Paste
Add the garlic and cook for about 30 seconds. Stir in the tomato paste and cook for 1 to 2 minutes. It should darken slightly and leave rusty streaks on the vegetables. If the bottom of the pot gets sticky, add a spoonful of broth and scrape it clean as you stir.
Next, cook the tomato paste into the vegetables until rusty red-orange streaks appear. That small step makes the tomato flavor deeper.
Step 3: Simmer the Tomatoes
Add the tomatoes with their juices. Crush whole peeled tomatoes lightly with a spoon so they simmer evenly. Add broth, herbs, salt, pepper, and red pepper flakes if using. Simmer uncovered for 20 to 25 minutes, until the vegetables are very soft and the tomato flavor tastes rounder.
Before blending, the soup base should look thick and concentrated. A slightly thick pot is easy to loosen; a watery one is harder to fix.
Step 4: Blend and Adjust
Blend until smooth. An immersion blender is easiest; a countertop blender gives a silkier finish. After blending, the soup should fall from a spoon in a smooth ribbon, not splash like broth. If it is too thick, add broth a splash at a time.
Once the vegetables are soft, blending turns the tomato base into one smooth, creamy body.
Step 5: Finish Gently
Lower the heat and stir in the cream. Warm gently for 2 to 3 minutes. Taste and adjust with salt first, then richness or brightness if needed. The final spoonful should feel rounded, not heavy, with enough tomato brightness to make you want the next bite.
Add cream only after the soup is blended, then warm it gently. This keeps the bisque smooth instead of grainy or split.
Success Cues
Vegetables: the carrot and celery should be soft enough to mash against the side of the pot.
Tomato paste: it should smell deeper and less metallic.
After simmering: the tomato flavor should taste rounder, not raw or sharp.
Blended texture: the soup should be glossy, smooth, and spoon-coating.
Before serving: if it tastes flat, add salt first; if it tastes sharp, add butter, cream, or a very small pinch of sugar.
Smooth Ribbon Texture
After blending, look for a smooth ribbon from the spoon. That means the soup is creamy, spoon-coating, and still pourable.
Creaminess is mostly about restraint. You want the finish to soften the tomato edge, not bury the tomato flavor.
If you want…
Use…
Watch for…
Classic richness
Heavy cream
Warm gently after adding
A lighter finish
Half-and-half
The soup may be slightly thinner
Dairy-free creaminess
Cashew cream
Blend the cashew cream completely smooth
More gloss
Butter
Add near the end
More savory depth
Parmesan
Add less salt first
A green finish
Basil pesto
Use a small spoon on top, not too much
A small spoon of basil pesto works well on top, especially if you want more basil flavor without adding more cream.
Optional Restaurant-Style Roux
You do not need a roux for this recipe. The blended vegetables and tomatoes already give the soup body. Use a small roux only if you want a thicker, restaurant-style bowl.
For that version, use 2 tablespoons butter / 28 g and 2 tablespoons flour / about 16 g. After the vegetables soften, melt the butter, stir in the flour, and cook for 1 to 2 minutes. Slowly add the broth while stirring, then add the tomatoes and continue with the recipe.
Keep the roux small. Too much flour can mute tomato brightness and make the soup taste more like cream sauce. To keep it gluten-free, skip the roux and control thickness with less broth, longer simmering, and good blending.
For a restaurant-style finish, blend until completely smooth, strain only if you want it extra silky, then serve with a small swirl of cream, cracked black pepper, basil oil, or Parmesan. Aim for a glossy bowl, not a grainy one.
Variations
You do not need any of these to make a good bowl. They are simply easy ways to steer the same base in a different direction.
Tomato Basil
For a brighter, greener bowl, add 1 cup loosely packed fresh basil, about 20 to 25 g, after simmering. Blend it into the hot soup, then save a few leaves for garnish if you like. Long simmering can make fresh basil taste dull.
For tomato basil bisque, add fresh basil near the end so the flavor stays green, fragrant, and bright instead of cooked down.
If you want a lighter basil-forward soup rather than a creamier bisque, use this tomato basil soup recipe.
Roasted Tomato
Roasting is best when fresh tomatoes are ripe but a little watery. It concentrates their flavor, softens acidity, and gives the soup deeper sweetness.
Use 2.5 to 3 lb / 1.1 to 1.35 kg fresh tomatoes. Halve them and roast with olive oil, onion, and garlic at 400°F / 200°C for 25 to 35 minutes, until the tomatoes collapse and the edges start to caramelize. Add the roasted tomatoes to the pot with broth and continue with the main recipe.
Roasting the tomatoes first concentrates their sweetness, giving the bisque deeper flavor and a softer acidic edge.
If you are building a fuller soup-night meal, these roasted carrots keep the table warm, sweet, and simple without making the soup heavier.
Roasted Red Pepper
Roasted red peppers make the bowl sweeter, deeper, and slightly smoky. Add one drained 12 oz / 340 g jar with the tomatoes before simmering. Blend until smooth, then finish with cream. A small pinch of smoked paprika works well, but keep it light.
Roasted red peppers bring smoky sweetness to the bowl, making tomato bisque taste richer without relying on extra cream.
Can You Make Tomato Bisque From Canned Tomato Soup?
Yes. You can turn canned tomato soup into a quick pantry version when speed matters more than full homemade flavor. Think of the can as the foundation, not the finished soup: a little fat, dairy, seasoning, and a fresh garnish can make it taste more intentional.
Shortcut From Condensed Tomato Soup
For 1 can condensed tomato soup, add:
1 can milk or half-and-half, or milk with a splash of cream
1 tablespoon butter
1/4 teaspoon garlic powder
1/4 teaspoon onion powder
1/2 teaspoon dried basil or Italian seasoning
Black pepper to taste
1 to 2 tablespoons Parmesan, optional
Simmer gently for 8 to 10 minutes, stirring often. Finish with fresh basil, croutons, Parmesan, or grilled cheese.
When using canned tomato soup, treat it as a base. Milk or half-and-half, butter, herbs, pepper, and Parmesan make it taste more intentional.
For the best flavor, start with canned tomatoes or fresh tomatoes instead of canned tomato soup. When speed matters, the shortcut works. To make a true homemade bowl, use the main recipe.
Dietary Options
The creamy finish is flexible, so no one has to miss the comfort of the bowl. Once the broth, fat, cream, and toppings match your needs, the recipe still works.
Need
How to adjust
Vegetarian
Use vegetable broth. The rest of the main recipe can stay the same.
Vegan
Use vegetable broth, olive oil instead of butter, and cashew cream instead of heavy cream.
Dairy-free
Cashew cream or a plain unsweetened plant-based cream works best. Leave out Parmesan and the Parmesan rind.
Gluten-free
Skip the optional roux, or use a gluten-free thickener if needed. Check broth and toppings.
Lower sodium
Use no-salt-added canned tomatoes and low-sodium broth, then season at the end.
Dairy-Free Cashew Cream
To make cashew cream, soak 1/2 cup cashews in hot water for 20 to 30 minutes. Drain, then blend with 1/2 cup fresh water until completely smooth. Add about 1/2 cup to the soup, then add more only if needed.
For dairy-free tomato bisque, cashew cream gives the soup a smooth, neutral finish without coconut flavor.
Slow Cooker, Instant Pot / Pressure Cooker, and Blender Notes
The stovetop method gives the most control, but the recipe adapts well when you need a more hands-off path. These versions are best for the days when you want the same cozy bowl without standing over the stove.
Keep the same order in mind: cook for flavor, blend for body, then add cream at the end.
Slow Cooker and Pressure Cooker Tomato Bisque
Slow cooker or Instant Pot / pressure cooker both work, but the rule stays the same: blend the tomato base first, then add cream last.
For best flavor, sauté the onion, carrot, celery, garlic, and tomato paste first. Add them to the slow cooker with the tomatoes, herbs, and broth. Cook on low for 6 to 8 hours or high for 3 to 4 hours. Blend until smooth, then stir in the cream at the end.
For a heartier tomato-rich slow cooker dinner, this crock pot lasagna soup goes in a pasta-and-ricotta direction instead of a smooth creamy bisque.
Instant Pot or Pressure Cooker
Use the sauté function for the onion, carrot, celery, garlic, and tomato paste. Add the tomatoes, broth, and herbs. Pressure cook for 8 to 10 minutes, let the pressure release naturally for 5 minutes, then quick release. Blend smooth and stir in the cream after cooking.
Countertop Blender
If blending hot soup in a countertop blender, work in batches, vent the lid, cover with a towel, and start slowly. A high-speed blender gives the smoothest texture.
What to Serve With Tomato Bisque
This is where the soup turns into dinner. Grilled cheese is the classic pairing for a reason: the soup is creamy and tangy; the sandwich is crisp, buttery, and salty. The best bite is the corner of grilled cheese after it has been dipped: crisp at the edge, soft where it meets the soup, salty enough to make the tomato taste brighter.
Grilled Cheese Dunk
Serve tomato bisque with grilled cheese for contrast: crisp bread, melted cheese, and creamy soup clinging to the corner.
If you want bread on the side instead of a sandwich, this homemade garlic bread loaf is a natural fit with a creamy tomato bowl. For a grilled cheese upgrade, a thin layer of garlic aioli adds savory depth without needing another filling.
Classic cheddar grilled cheese
Sourdough grilled cheese
Garlic bread
Parmesan croutons
Toasted cheese sandwich
Basil oil or fresh basil
Simple green salad
Roasted vegetables
Crusty bread
Parmesan toast
Mistakes to Avoid
Adding too much broth early: start with the listed amount, then adjust after blending.
Using bland fresh tomatoes without roasting: watery tomatoes make watery soup.
Adding cream before blending: the base should be smooth first.
Boiling after adding cream: gentle heat keeps the texture creamy.
Under-seasoning: tomato-based soups often taste flat until they have enough salt.
Overdoing the roux: too much flour can dull the tomato flavor.
Troubleshooting
Most problems come down to the same three things: acidity, thickness, and heat. If your first taste seems too sharp, do not panic. Tomato soups often settle after a few more minutes of simmering and a small amount of cream or butter.
Tomato Bisque Troubleshooting Guide
Most tomato bisque problems have simple fixes: simmer thin soup, soften sharpness with butter or cream, and lower the heat if cream splits.
Simmer it a little longer, then taste again. If it still tastes sharp, add a pinch of sugar, a little more cream, or a tablespoon of butter. A very small pinch of baking soda can also help, but use less than 1/8 teaspoon to start. Too much baking soda can make the soup taste dull.
How do I fix thin soup?
Simmer uncovered for a few more minutes. For a thicker version, use the optional roux, add cream or cashew cream, or blend in a little more cooked carrot.
How do I thin it without making it watery?
Add broth or water a little at a time until it reaches the texture you like. Warm gently and taste again after thinning because you may need more salt or pepper.
Why did the cream split?
The heat was probably too high. Add cream after blending, lower the heat, and warm the soup gently. Avoid boiling once the cream is in the pot.
How do I make it smoother?
Blend it longer. A countertop blender gives a silkier texture than an immersion blender. For a very smooth restaurant-style finish, strain the blended soup through a fine mesh sieve before adding cream.
Why does it taste flat?
Add salt first. If it still needs brightness, add black pepper, fresh basil, Parmesan, or a tiny splash of lemon juice.
Storage, Freezing, and Reheating
This soup reheats well, especially if you store the tomato base before adding cream. Reheated gently, it makes tomorrow’s lunch feel planned instead of leftover.
How long does it last in the fridge?
Cool the soup before storing, and refrigerate leftovers within 2 hours. Store it in an airtight container for 3 to 4 days. For general leftover safety, the USDA’s leftovers and food safety guide also recommends using refrigerated leftovers within 3 to 4 days.
Can you freeze it?
It freezes best before cream is added. Freeze the blended tomato base for up to 3 months, then thaw, reheat, and stir in the cream at the end. If the soup already has cream in it, you can still freeze it, but the texture may be less smooth after thawing.
How should you reheat it?
Reheat over low to medium-low heat, stirring often. Do not boil hard after cream has been added. Add a splash of broth or water if the soup thickens in the fridge.
If you want a chunkier tomato-broth soup with beans, vegetables, and pasta, this minestrone soup recipe is the better direction for another night.
FAQs
What is the difference between tomato soup and tomato bisque?
Tomato bisque is usually smoother, creamier, and richer than basic tomato soup. It is blended until silky and finished with cream, butter, milk, or a creamy alternative. Some restaurant-style versions also use a roux.
Are canned tomatoes or fresh tomatoes better?
Canned tomatoes are better for reliable flavor and easy cooking. Fresh tomatoes are best when they are ripe, sweet, and in season. If fresh tomatoes taste watery, roast them first or combine them with canned tomatoes.
What kind of canned tomatoes should I use?
Whole peeled tomatoes are the best first choice because they usually bring the best balance of flavor and body. Crushed tomatoes are the easier shortcut when you want less blending. Diced tomatoes can work, but they may need more blending.
How many fresh tomatoes replace a 28 oz can?
Start with about 2.5 lb / 1.1 kg ripe tomatoes to replace one 28 oz / 794 g can. Go up to 3 lb / 1.35 kg if your tomatoes are watery or you want a fuller fresh-tomato base.
Does tomato bisque need cream?
Classic tomato bisque is usually creamy, but you have options. Heavy cream is richest, half-and-half is lighter, and cashew cream works well for dairy-free soup.
What is the best way to thicken tomato bisque?
Blend the vegetables into the soup, start with controlled broth, and simmer uncovered if needed. For a restaurant-style texture, use a small roux with butter and flour. A dairy-free thicker soup can use cashew cream.
Can you make tomato bisque from canned tomato soup?
Yes. Add milk or half-and-half to condensed tomato soup, then season it with butter, garlic powder, onion powder, basil, black pepper, and Parmesan. A splash of cream can make it richer, but a full can of cream may be too heavy.
How do I make vegan tomato bisque?
Use vegetable broth, olive oil instead of butter, and cashew cream or another dairy-free cream instead of heavy cream. Cashew cream gives the most neutral creamy texture.
Can you freeze tomato bisque without ruining the texture?
Freeze the blended tomato base before adding cream. Thaw, reheat gently, and stir in the cream at the end. If the soup already contains cream, the texture may change slightly after freezing.
What goes well with tomato bisque?
Grilled cheese is the classic pairing. It also goes well with garlic bread, Parmesan croutons, sourdough toast, basil oil, a green salad, roasted vegetables, or a toasted cheese sandwich.
The Bowl You’re Aiming For
Once you understand the method, this soup becomes flexible. Make it richer, make it fresher, add basil, roast the tomatoes, or rescue a can on a busy night. As long as you smooth the base before thinning and add cream gently at the end, you are in control of the bowl.
Are you making the classic creamy version, the fresh tomato version, or the canned-soup shortcut tonight? Whichever way you go, keep the order gentle: blend the base smooth, adjust the body slowly, and add the cream at the end. Do that, and you get a glossy, velvety bowl with enough richness for comfort and enough brightness to keep every spoonful alive.
Ladle it into a warm bowl, add basil or a swirl of cream, and keep the grilled cheese close.
Slow cooker pot roast sounds simple until you are standing in the kitchen with a big piece of beef, wondering if you bought the right cut, added too much liquid, or started too late for dinner. This version is built to remove that guesswork: tender chuck roast, soft potatoes and carrots, and cooking juices that become real gravy instead of thin broth.
The method keeps the liquid controlled, uses the fork test instead of blind timing, and finishes the juices properly so the whole meal tastes complete. You get the comfort of classic pot roast without the usual problems: a tough roast, watery sauce, mushy vegetables, or broth pretending to be gravy.
By the end, the onions should have melted into the sauce, the carrots should taste sweet and savory, the potatoes should catch the sauce, and the beef should feel like it finally relaxed. This is the kind of dinner where the gravy disappears first.
Use LOW when you can. Use HIGH when you need to. Sear the roast for deeper flavor, or skip the sear if the day is already busy. Pot roast is forgiving once you know what to look for; a firm roast usually needs more time, not more panic.
Quick Answer: Slow Cooker Pot Roast
For the best slow cooker pot roast, use a 3 to 4 lb / 1.4 to 1.8 kg beef chuck roast. Season it well, sear it if possible, then cook it with onions, carrots, potatoes, garlic, beef broth, Worcestershire sauce, tomato paste, thyme, rosemary, and bay leaves.
Cook on LOW for 8 to 10 hours or HIGH for 5 to 6 hours, until the roast is tender enough for a fork to slide in easily and the beef gives with gentle pressure. The fork test is the real timer.
Use 1½ cups / 360 ml beef broth for rich, concentrated cooking juices. Use up to 2 cups / 480 ml if you want extra sauce for the table. Keep the roast partly surrounded by liquid, not buried in it. The beef and vegetables release moisture as they cook.
When the beef is tender, remove the roast and vegetables, then thicken the juices with a cornstarch slurry or a quick flour gravy. That final step is what turns a slow cooker full of beef and vegetables into proper pot roast dinner.
Slow Cooker Pot Roast Recipe Card
Recipe at a Glance
Prep time
20 minutes
Cook time
8 to 10 hours on LOW, or 5 to 6 hours on HIGH
Total time
5 hours 20 minutes to 10 hours 20 minutes, depending on HIGH or LOW setting
Servings
6 to 8
Best slow cooker size
6-quart for a 3 to 4 lb roast; 7 to 8-quart for a 5 lb roast with vegetables
Best cut
Beef chuck roast
Best setting
LOW
Texture
Tender, sliceable, or shreddable
Equipment
6-quart slow cooker
Large skillet or Dutch oven for searing
Tongs
Cutting board
Small bowl and whisk for the cornstarch slurry
Ladle or measuring cup for the cooking juices
Ingredients
For the pot roast:
Ingredient
Amount
Beef chuck roast
3 to 4 lb / 1.4 to 1.8 kg
Olive oil or avocado oil
2 tbsp / 30 ml
Fine salt
1½ to 2 tsp / 9 to 12 g
Black pepper
1 tsp / 2 to 3 g
Garlic powder
1 tsp / about 3 g
Onion powder
1 tsp / about 2 to 3 g
Paprika, sweet or smoked
1 tsp / about 2 to 3 g
Dried thyme
1 tsp / about 1 g
Dried rosemary
½ tsp / about 0.5 g
Yellow onion, sliced thick
1 large / about 250 g
Garlic cloves, minced or smashed
4 to 6 cloves / about 15 to 25 g
Carrots, cut into large pieces
1 lb / 450 g
Baby potatoes, Yukon gold, or red potatoes
1½ to 2 lb / 680 to 900 g
Beef broth
1½ cups / 360 ml
Worcestershire sauce
1 to 2 tbsp / 15 to 30 ml
Tomato paste
1 to 2 tbsp / 16 to 32 g
Bay leaves
1 to 2
For the gravy:
Ingredient
Amount
Hot cooking juices
1½ to 2 cups / 360 to 480 ml
Cornstarch
2 tbsp / about 16 g
Cold water
3 tbsp / 45 ml
Instructions
Dry and season the roast. Pat the chuck roast dry. Mix the salt, pepper, garlic powder, onion powder, paprika, thyme, and rosemary, then rub the seasoning over every side of the beef.
Sear for deeper flavor. Heat oil in a large skillet over medium-high heat. Brown the roast for 3 to 4 minutes per side. Skipping the sear still works; the finished flavor will simply be lighter.
Layer the vegetables. Add the onion, carrots, and potatoes to the slow cooker. Keep the pieces large so they hold up during the long cook.
Add the roast. Place the roast on top of or slightly between the vegetables. The lid should close easily.
Add the broth mixture. Stir together the beef broth, Worcestershire sauce, tomato paste, garlic, and bay leaves. Pour around the roast. The beef should sit in some liquid but not be fully covered.
Cook low and slow. Cover and cook on LOW for 8 to 10 hours, or on HIGH for 5 to 6 hours. Keep the lid on as much as possible.
Check for tenderness. The roast is ready when a fork slides in easily and the meat pulls apart with gentle pressure. A tight or rubbery roast needs more cooking time.
Rest the beef. Transfer the roast to a cutting board and the vegetables to a serving dish. Rest the beef for about 10 minutes while you make the gravy.
Make the gravy. Ladle 1½ to 2 cups hot cooking juices into a saucepan. Whisk cornstarch with cold water, then whisk the slurry into the simmering liquid. Cook for 2 to 3 minutes, until glossy and thickened.
Slice or shred. Slice across the grain for neat pieces, or pull into large chunks for a fall-apart pot roast.
Serve. Spoon the gravy over the beef, potatoes, and carrots.
Recipe Notes
Start with thawed beef, not frozen.
Use 1½ cups / 360 ml broth for balanced flavor and a concentrated gravy base. Use up to 2 cups / 480 ml if you want more sauce, but plan to simmer and thicken it.
For best cooking, the slow cooker should be about half to two-thirds full. A tightly packed cooker or barely closed lid can slow the recipe down.
For firmer potatoes and carrots, add them after the first 2 to 3 hours instead of at the beginning.
Reduce the salt if using salted broth, bouillon, onion soup mix, ranch seasoning, au jus mix, or brown gravy packets.
The No-Guesswork Pot Roast Method
Pot roast is not difficult, but a few choices decide whether it turns out rich and tender or thin and disappointing. This method keeps the recipe simple by focusing on the four things that matter most.
Choose chuck roast. It has the marbling and connective tissue that soften during long cooking.
Use controlled liquid. The slow cooker gives liquid back to you as the beef and vegetables cook.
Cook until the fork test works. The timer is a guide; tenderness is the goal.
Finish the juices into gravy. Simmer and thicken them so they taste like sauce, not plain broth.
The no-guesswork method is simple: choose chuck roast, control the liquid, trust the fork test, and finish the juices into gravy.
The biggest mistake with slow cooker pot roast is treating the liquid like soup. A little broth is enough to braise the beef; the real magic happens when those juices are finished into gravy.
Your Pot Roast Is Right When…
A fork slides into the beef with little resistance.
The roast separates into large tender chunks instead of springing back.
The potatoes and carrots are soft but not completely collapsed.
The gravy coats the back of a spoon after thickening.
The finished sauce tastes savory and concentrated, not weak or broth-like.
The best moment is when the roast stops resisting. The fork goes in, the beef pulls into soft pieces, and the onions have almost disappeared into the sauce. That is when the slow cooker has done its job.
Pot roast becomes tender because a tougher, well-marbled cut of beef cooks gently for a long time. Chuck roast has connective tissue that softens during slow cooking. That is what gives you the rich, fall-apart texture people want from a classic slow cooker pot roast.
The controlled liquid matters too. A slow cooker traps steam, and the beef, onions, carrots, and potatoes all release moisture. Starting with 1½ cups / 360 ml broth gives you enough moisture for cooking and enough concentrated flavor for the sauce at the end.
Searing adds deeper color and a more roasted flavor, but it is not what makes the roast tender. Tenderness comes from the cut, the gentle heat, and enough time. The final sauce step is where the meal comes together: thin juices become a glossy finish that coats the beef and vegetables instead of running past them.
The clock gets you close, but the fork tells you the truth. Once the beef gives, the whole slow-cooker promise finally pays off.
Best Cut for Slow Cooker Pot Roast
The best cut for slow cooker pot roast is beef chuck roast. It has the right balance of beefy flavor, fat, and connective tissue. When cooked low and slow, it becomes tender enough to slice into soft pieces or pull apart into large chunks.
Labels may say chuck roast, chuck shoulder, shoulder roast, arm roast, blade roast, or pot roast. Look for visible marbling and a roast meant for slow cooking or braising. A very lean, smooth-looking roast may be better sliced than shredded.
Clear marbling is what helps chuck roast stay moist and tender during long slow cooking.
Cut of Beef
Good for Slow Cooker Pot Roast?
Best Result
Chuck roast
Best choice
Tender, juicy, classic fall-apart pot roast
Chuck shoulder roast
Yes
Similar to chuck roast, rich and tender
Arm roast
Yes
Good slow-cooker cut, often sliceable
Blade roast
Yes
Flavorful and tender when cooked low and slow
Brisket
Yes
Rich, beefy, usually better sliced
Rump roast
Works, but leaner
Better sliced than shredded
Bottom round roast
Works carefully
Leaner, can dry out; slice thinly across the grain
Eye of round
Not ideal
Too lean for classic fall-apart pot roast
Which Beef Cuts Work Best for Pot Roast?
This comparison separates classic fall-apart pot roast cuts from leaner roasts that usually need slicing, careful timing, and extra sauce.
Chuck roast is the safest pick, while leaner cuts usually work best when sliced instead of shredded.
For the most forgiving result, choose chuck roast. Shoulder roast or arm roast can still make a good dinner. Rump roast and bottom round work better when sliced thinly with plenty of sauce.
Before the slow cooker starts, the recipe is really about balance: a marbled roast, sturdy vegetables, savory broth, and a few small ingredients that make the sauce taste complete.
Keeping the ingredients organized makes the whole pot roast feel easier before it even starts cooking.
Beef
A 3 to 4 lb chuck roast fits well in a 6-quart slow cooker with vegetables. Smaller roasts cook faster. Larger roasts may need a bigger cooker and more time.
Some visible marbling is a good thing. Trim large hard fat caps if needed, but keep enough marbling to help the roast stay moist and flavorful.
If you prefer smaller beef pieces instead of one large roast, MasalaMonk’s slow cooker beef stew recipe is a better fit than cutting this pot roast into small cubes.
Vegetables
Baby potatoes, Yukon gold potatoes, and red potatoes hold their shape well. Cut larger potatoes into big chunks so they stay intact during the long cook.
Thick-cut carrots give the best texture. Baby carrots are fine when convenience matters; they will be softer, but they still belong in a cozy pot roast.
Onion and garlic build the base of the sauce. Slice the onion thick so it softens into the sauce without disappearing too early.
Flavor Builders
Beef broth gives the cooking juices body and flavor. Low-sodium broth is best if you plan to add bouillon, onion soup mix, ranch seasoning, au jus mix, or brown gravy packets.
Worcestershire sauce adds savory depth, while tomato paste gives the sauce color and richness without making the pot roast taste like tomato sauce. Thyme, rosemary, and bay leaf keep the flavor classic; go easy on dried rosemary because it can take over.
Mushrooms can release a lot of moisture in the slow cooker. Add them halfway through for better shape, or use MasalaMonk’s creamy mushroom sauce as a separate finish for potatoes, rice, or leftover roast.
Gravy Ingredients
Cornstarch makes a quick glossy gravy. Always mix it with cold water first, then whisk the slurry into hot juices. For a more old-fashioned gravy, use butter and flour instead.
How to Make Slow Cooker Pot Roast Step by Step
Step 1: Season the Roast
Pat the roast dry, then coat it with salt, pepper, garlic powder, onion powder, paprika, thyme, and rosemary. Season every side so each slice or shredded piece tastes finished.
Season every side well so the beef tastes finished all the way through, not just on the outside.
Step 2: Sear for Deeper Flavor
Heat oil in a skillet until hot, then brown the roast for 3 to 4 minutes per side. Let the crust form before turning. A good sear gives the gravy a deeper, roasted flavor.
Searing is optional, but it adds a deeper browned flavor that carries into the sauce.
Skipping the sear is still okay. On a busy morning, a well-seasoned no-sear pot roast is better than no pot roast at all.
Step 3: Layer the Vegetables
Add the onion, potatoes, and carrots to the slow cooker. Keep the pieces large. Place the roast on top of or slightly between the vegetables, leaving enough space for the lid to close comfortably.
Large vegetable pieces go in first so they can hold their shape during the long cook.
A roast that does not fit can be cut into 2 or 3 large pieces. Large pieces still cook like pot roast; small stew-sized chunks cook differently.
Step 4: Add the Broth Mixture
Stir together beef broth, Worcestershire sauce, tomato paste, garlic, and bay leaves. Pour it around the roast. The beef should sit in some liquid, but the top does not need to be covered.
Some recipes use enough broth to nearly cover the roast. This version uses less liquid on purpose so the juices stay concentrated enough to become sauce. Pot roast should braise gently, not cook like soup.
The broth should braise the beef, not bury it; that balance keeps the flavor concentrated.
Step 5: Cook Until the Beef Gives
Cover and cook on LOW for 8 to 10 hours, or on HIGH for 5 to 6 hours. LOW gives chuck roast more time to soften and usually creates the best texture.
The roast is ready when a fork slides in easily and the meat pulls apart with gentle pressure. A tight or springy roast needs more time in the cooker.
When the fork slides in easily, the roast is ready and the texture should feel soft, not tight.
Step 6: Rest, Make Gravy, and Serve
Move the roast to a cutting board and the vegetables to a serving dish. Rest the beef for 10 minutes while you make the sauce.
Ladle the cooking juices into a saucepan, skim excess fat if needed, and simmer. Whisk in a cornstarch slurry or make a flour gravy. Once the sauce coats the spoon, the whole dish changes from cooked beef and vegetables into proper pot roast dinner.
Slice across the grain for neat pieces, or pull the beef into large chunks. Spoon the glossy sauce over everything before serving.
What the Finished Slow Cooker Should Look Like
Before serving, the beef should look relaxed and tender, the vegetables should still be recognizable, and the cooking juices should be ready to finish into sauce.
This is the slow-cooker checkpoint: tender beef, intact vegetables, and enough juices to finish the meal.
Slow Cooker Pot Roast Cook Time Chart
Cook time depends on the size, thickness, cut, slow cooker, and how full the cooker is. Use this chart as a guide, then let tenderness decide.
Roast Size
LOW Setting
HIGH Setting
Best Result
2 lb / 900 g
6 to 7 hours
3½ to 4½ hours
Tender, usually sliceable
3 lb / 1.4 kg
8 to 9 hours
4½ to 5½ hours
Best standard family size
4 lb / 1.8 kg
9 to 10 hours
5 to 6 hours
Classic fall-apart pot roast
5 lb / 2.25 kg
10 to 11 hours
6 to 7+ hours
Large roast, needs patience
A thick 3 lb roast can take longer than a flatter 4 lb roast. Older slow cookers, very full cookers, and leaner cuts can also change the timing. The clock gets dinner close; the fork tells you when the beef is really ready.
Is It Better to Cook Pot Roast on LOW or HIGH?
LOW is better for slow cooker pot roast because chuck roast has more time to soften. LOW is the comfort setting. HIGH is the schedule setting.
HIGH works when dinner needs to happen faster, but it is less forgiving. The roast may still need extra time if it feels tight at the end.
Setting
Time for 3 to 4 lb Chuck Roast
Result
LOW
8 to 10 hours
Best tenderness and texture
HIGH
5 to 6 hours
Faster, still good when cooked until tender
How Much Liquid to Use for Slow Cooker Pot Roast
Use less liquid than you might think. A slow cooker traps steam, and the beef and vegetables release moisture as they cook. The visual cue from Step 4 still applies here: the roast should be partly surrounded by liquid, not submerged. Starting with too much broth can leave you with thin flavor and extra reducing at the end.
Goal
Liquid Amount
Rich, concentrated pot roast
1 to 1½ cups / 240 to 360 ml
Balanced pot roast with gravy
1½ cups / 360 ml
Extra gravy
2 cups / 480 ml
Very large 5 lb roast
2 to 2½ cups / 480 to 600 ml
Keep the roast partly surrounded by liquid, not submerged. Extra broth is fine when you love a spoonable sauce, but plan to simmer and thicken the juices before serving.
How to Turn the Slow Cooker Juices into Gravy
The juices in the slow cooker are one of the best parts of pot roast, but they need finishing. Straight from the cooker, they may be thin. After simmering and thickening, they become the rich sauce that pulls the plate together.
Simmering and thickening turn thin cooking juices into a spoonable sauce.
Cornstarch Slurry Gravy
Choose this for a fast, glossy gravy.
Ingredient
Amount
Hot cooking juices
1½ to 2 cups / 360 to 480 ml
Cornstarch
2 tbsp / about 16 g
Cold water
3 tbsp / 45 ml
Whisk the cornstarch and cold water in a small bowl until smooth. Bring the cooking juices to a simmer in a saucepan. Whisk in the slurry and cook for 2 to 3 minutes, until the sauce thickens and turns glossy.
Flour Gravy
Choose this for a more old-fashioned gravy.
Ingredient
Amount
Butter
2 tbsp / about 28 g
Flour
2 tbsp / about 16 g
Hot cooking juices
1½ to 2 cups / 360 to 480 ml
Melt the butter in a saucepan. Whisk in the flour and cook for 1 to 2 minutes. Slowly whisk in the hot juices, then simmer until thickened.
Gravy Fixes
Problem
Fix
Gravy is watery
Simmer the juices to reduce, then thicken with slurry
Gravy is greasy
Skim fat before thickening
Gravy is bland
Add salt after reducing, plus pepper, Worcestershire sauce, or a pinch of bouillon
Gravy is too salty
Add unsalted broth or potato water; avoid reducing further
Gravy tastes flat
Add a small splash of Worcestershire sauce or a pinch of thyme
Gravy is too thick
Whisk in warm broth, a little at a time
Taste the gravy after it has reduced and thickened. The flavor is easier to judge once the sauce has body, and that glossy finish is what makes the beef, potatoes, and carrots feel like one complete dinner.
How the Finished Gravy Should Look
Once the gravy coats the beef and vegetables instead of running past them, the pot roast tastes richer and the whole plate feels finished.
The finished sauce should coat the beef and vegetables instead of running off like broth.
When to Add Potatoes and Carrots
Most people expect slow cooker pot roast to come with soft carrots and potatoes. Add them at the beginning for that classic comfort-food texture, or add them later when you want more bite.
Desired Texture
When to Add Potatoes and Carrots
Soft, classic pot roast vegetables
Add at the beginning
Medium-soft vegetables
Add after 2 hours
Firmer potatoes and carrots
Add halfway through
Very soft carrots
Use baby carrots from the beginning
Less mushy potatoes
Use baby potatoes, Yukon gold, or red potatoes in large pieces
Large pieces hold up better during a long LOW cook. Thin carrot coins and small potato cubes soften quickly.
Bigger carrot and potato pieces hold up better during long cooking and are less likely to turn mushy.
No-Sear Slow Cooker Pot Roast
You can make slow cooker pot roast without searing it first. The roast will still become tender; the flavor will be lighter and less roasted.
Method
Result
Sear first
Deeper flavor, darker gravy, richer finish
No sear
Easier, still tender, lighter flavor
Sear vs No-Sear Comparison
This comparison shows why searing gives a darker finish, while the no-sear version still works when convenience matters most.
Searing gives deeper flavor, but skipping it still works when you need the easier route.
For a no-sear pot roast, season the beef well and lean on Worcestershire sauce, tomato paste, onion, garlic, and good broth for flavor. A busy morning version can still become a generous dinner by evening.
Homemade Pot Roast Seasoning
This blend gives you familiar packet-style comfort without making the gravy too salty.
Seasoning
Amount
Fine salt
1½ tsp
Black pepper
1 tsp
Garlic powder
1 tsp
Onion powder
1 tsp
Paprika
1 tsp
Dried thyme
1 tsp
Dried rosemary
½ tsp
Dried parsley, optional
½ tsp
Bouillon powder, optional
½ tsp
Use this blend for a 3 to 4 lb roast. Use less salt when cooking with salted broth, onion soup mix, ranch seasoning, au jus mix, bouillon, or gravy packets.
For stronger flavor, season the roast up to 24 hours ahead and refrigerate it covered. Even 30 minutes helps. This blend also works for slow cooker beef stew, beef shoulder roast, and other slow-cooked beef dinners.
Shortcut Variations
There is nothing wrong with a packet-style pot roast if that is the flavor your family loves. Think of these as quick variations; the same rules still apply — use the right cut, control the salt, and finish the juices like gravy.
Shortcut versions can still taste rich when the salt, liquid, and final sauce stay controlled.
Onion Soup Mix Pot Roast
Use 1 packet onion soup mix with a 3 to 4 lb chuck roast, 1 to 1½ cups beef broth or water, potatoes, carrots, onions, and optional Worcestershire sauce. Treat the packet as seasoning, not as the whole gravy plan.
For another dinner built around onion soup mix and a proper gravy finish, MasalaMonk’s slow cooker French onion chicken is a good companion recipe.
3 Packet Pot Roast
A common 3-packet pot roast uses ranch seasoning mix, Italian dressing mix, and brown gravy mix. It is very flavorful, but salt can build fast, so use low-sodium broth and season carefully.
Mississippi Pot Roast Style
Mississippi pot roast usually uses ranch seasoning, au jus mix, pepperoncini, butter, and chuck roast. It is tangy, rich, and usually served shredded over mashed potatoes, rice, noodles, or sandwich rolls.
Cream of Mushroom Pot Roast
For an old-fashioned creamy version, add cream of mushroom soup and reduce the broth. Canned soup adds both liquid and body, so the recipe needs less extra broth.
Red Wine Pot Roast
Replace ½ cup / 120 ml of the broth with dry red wine. Keep the total liquid controlled so the sauce does not become thin.
Keto or Low-Carb Pot Roast
Skip the potatoes and use celery, mushrooms, turnips, radishes, or cauliflower mash. The beef and gravy are still the center of the meal.
Fixes for Tough, Watery, Bland, or Mushy Pot Roast
Most pot roast problems come down to cut, time, liquid, salt, or how the gravy was finished. Start with the simple fix before changing the whole recipe.
Use this as a quick rescue map for cut, time, liquid, salt, texture, and flavor.
Problem
Most Likely Cause
Best Fix
Roast is tough
Needs more time or is too lean
Keep cooking if it is chuck; slice thinly if it is lean
Roast is dry
Lean cut, overholding, or not enough sauce
Slice thinly and serve with plenty of sauce
Too much liquid
Beef and vegetables released moisture
Simmer the juices down before thickening
Gravy is weak
Too much broth or not reduced
Reduce, thicken, then season
Vegetables are mushy
Pieces were small or cooked too long
Use larger pieces or add them later next time
Pot roast is bland
Not enough seasoning or browning
Season the finished sauce and add Worcestershire sauce if needed
Too salty
Packets, bouillon, salted broth, or reduced gravy
Add unsalted broth or potato water; avoid further reducing
Most pot roast problems feel bigger in the moment than they really are. Once the beef is tender and the sauce has body, dinner usually comes back together.
Why Is My Slow Cooker Pot Roast Tough?
A chuck roast that feels tight, chewy, or hard to pull apart usually needs more time. The connective tissue has not softened yet. Keep the lid on, cook longer, and check again near the end.
A leaner cut like rump roast or bottom round may never shred like chuck. Slice it thinly across the grain and serve it with sauce.
What If Dinner Is Close and the Roast Is Still Tough?
Move the vegetables out if they are ready, then let the beef keep cooking in the juices. For a stovetop rescue, transfer the beef and liquid to a covered pot and keep it at a gentle simmer. A hard boil can tighten the outside before the inside softens.
Why Is My Roast Chewy Even Though It Reached a Safe Temperature?
Safe temperature and tender pot roast are not the same thing. Beef roast can reach a safe temperature before chuck roast has cooked long enough to become soft and pull-apart tender.
Why Is There So Much Liquid in My Slow Cooker?
The roast and vegetables release moisture as they cook. Remove the meat and vegetables, simmer the juices in a saucepan, then thicken them into gravy. Next time, start with less broth unless extra sauce is the goal.
Why Are My Potatoes and Carrots Mushy?
They cooked too long or were cut too small. Large pieces of carrot and sturdy potatoes like baby potatoes, Yukon gold, or red potatoes hold up better. For firmer vegetables, add them after the first 2 to 3 hours.
Can I Cook a Frozen Roast in the Slow Cooker?
It is better to thaw the roast first. USDA guidance says to thaw meat or poultry before putting it into a slow cooker, because frozen meat can take too long to heat safely and may cook unevenly. You can read more in the USDA’s slow cooker food safety guidance.
How to Store and Reheat Without Drying It Out
Pot roast keeps best when the beef is stored with sauce. That moisture protects the meat from drying out and makes reheating easier.
Store leftovers with sauce so the beef reheats gently instead of drying out.
Storage Method
Best Practice
Refrigerator
Store beef, vegetables, and gravy in airtight containers for 3 to 4 days
Freezer
Freeze beef with gravy for 2 to 3 months
Best freezer method
Freeze sliced or shredded beef with gravy, not dry
Reheating
Reheat gently with gravy on the stovetop or in the microwave
Potatoes after freezing
Potatoes may soften after thawing
For the best freezer result, freeze the beef with its sauce and make fresh potatoes later.
Can You Make Pot Roast Ahead?
Yes. Pot roast is one of those dinners that often tastes even better the next day, especially when the beef is stored with sauce. Cook it fully, cool it, and refrigerate the beef with the cooking juices. The next day, skim any hardened fat from the top and reheat gently until hot.
The beef and sauce usually hold up better than the potatoes after chilling, so fresh potatoes or a fresh side can make leftovers feel new again.
Can You Hold Pot Roast on Warm?
You can hold pot roast on WARM for 1 to 2 hours after it is tender, as long as the food stays hot and the beef remains moist. Use LOW or HIGH until the roast is actually tender; WARM is for holding, not finishing.
Leftover Pot Roast Ideas
Leftover pot roast is one of the best reasons to make a large roast. Keep the beef with sauce, then turn it into easy meals for the next day.
Pot roast sandwiches with melted cheese
Pot roast grilled cheese
Beef over mashed potatoes
Pot roast tacos
Rice bowls with sauce and vegetables
Pot roast soup
Pot roast stroganoff
Loaded baked potatoes
Breakfast hash with eggs
Sliders with horseradish sauce
Egg noodles with beef and sauce
Leftover pot roast makes a great sandwich when the beef stays moist and the filling is warmed through.
If you are turning leftovers into rice bowls, MasalaMonk’s how to cook rice guide helps keep the grains fluffy enough to catch the sauce without turning gummy.
If leftover sandwiches, sliders, bowls, and loaded potatoes are what you like most, MasalaMonk’s slow cooker pulled pork follows that same make-once, eat-many-ways comfort-food logic.
What to Serve With Pot Roast and Gravy
This recipe already includes potatoes and carrots, so it can be a full meal on its own. To stretch it or make the plate feel more complete, serve it with something that catches the sauce or balances the richness.
By the time it reaches the table, the meal should feel complete without needing anything fancy: tender beef, sweet carrots, soft potatoes, and enough sauce to pull it all together.
Mashed potatoes
Dinner rolls
Egg noodles
Rice
Green beans
Buttered peas
Roasted broccoli
Simple green salad
Creamed spinach
Biscuits
The final plate should feel complete without fuss: tender beef, sweet carrots, soft potatoes, and sauce in every bite.
If you skip the potatoes in the slow cooker, serve the beef and gravy over MasalaMonk’s mashed potatoes recipe for the most classic plate.
Because pot roast is rich and gravy-heavy, a cold side can help the plate feel fresher. This cucumber salad recipe gives you that crisp, tangy contrast.
If you want another slow-cooker beef dinner with brown gravy, MasalaMonk’s crock pot Salisbury steak keeps the same mashed-potatoes-and-gravy comfort.
FAQs
What is the best cut of meat for slow cooker pot roast?
Chuck roast is the best cut for slow cooker pot roast. It has enough marbling and connective tissue to become tender during long cooking. Chuck shoulder, arm roast, and blade roast can also work well. Rump roast and bottom round are leaner, so they are better sliced than shredded.
Is this the same as Crock Pot pot roast?
Yes. Crock Pot is a popular slow cooker brand, so this recipe works as a Crock Pot pot roast or any 6-quart slow cooker pot roast. The timing and tenderness cues are the same.
Is it better to cook pot roast on LOW or HIGH?
LOW is better for the most tender pot roast. A 3 to 4 lb chuck roast usually needs 8 to 10 hours on LOW. HIGH works when needed and usually takes 5 to 6 hours, but the texture is often better on LOW.
How long does a 3 lb chuck roast take in the slow cooker?
A 3 lb chuck roast usually takes 8 to 9 hours on LOW or about 4½ to 5½ hours on HIGH. The exact time depends on the thickness of the roast and your slow cooker. Cook until a fork slides in easily.
How much liquid should I add to slow cooker pot roast?
For a rich, concentrated pot roast, start with 1 to 1½ cups / 240 to 360 ml. Use 2 cups / 480 ml for extra gravy. The slow cooker will create more liquid as the beef and vegetables cook, so the meat does not need to be fully covered.
How full should my slow cooker be?
For best results, aim for the slow cooker to be about half to two-thirds full. A cooker packed to the top can heat unevenly and may slow the recipe down.
Do potatoes and carrots go in at the beginning?
They can. Add potatoes and carrots at the beginning for soft, classic pot roast vegetables. For firmer vegetables, add them after the first 2 to 3 hours or halfway through cooking.
Do I have to sear the roast first?
No. Searing adds deeper flavor and a richer gravy, but the roast can still become tender without it. Season the beef well and use good broth, Worcestershire sauce, tomato paste, onion, and garlic.
What if the roast does not fit in the slow cooker?
Cut it into 2 or 3 large pieces. Avoid cutting it into small cubes unless you want a stew-like texture instead of classic pot roast.
How do I make gravy from the slow cooker juices?
Remove the meat and vegetables, then ladle 1½ to 2 cups of hot cooking juices into a saucepan. Simmer them, then whisk in a slurry made from 2 tablespoons cornstarch and 3 tablespoons cold water. Cook for 2 to 3 minutes until thickened.
Why is my pot roast still tough?
It usually needs more time. Chuck roast becomes tender after long, slow cooking. If it does not pull apart easily, keep cooking and check again near the end of the cooking window.
Can I use onion soup mix for slow cooker pot roast?
Yes. Use 1 packet onion soup mix with the broth, but reduce the added salt. Onion soup mix is already salty and flavorful, so taste the gravy before adding more seasoning.
Can I make pot roast ahead of time?
Yes. Pot roast often tastes even better the next day when the beef is stored with gravy. The sauce keeps it moist and makes reheating easier. Cook it fully, refrigerate the beef with the gravy, skim any hardened fat the next day, and reheat gently until hot.
Can I hold pot roast on warm?
Yes, once the roast is already tender. Keep it on WARM for 1 to 2 hours with gravy, as long as the food stays hot. Use LOW or HIGH to finish cooking a firm roast.
What if my slow cooker turns off during cooking?
If the slow cooker turns off during cooking and you do not know how long the food sat without heat, it is safest to discard it. If the interruption was very brief and the food is still steaming hot, restart cooking and use a thermometer, but do not guess with meat that may have cooled for a long time.
Can I freeze leftover pot roast?
Yes. Freeze sliced or shredded pot roast with gravy for the best texture. The gravy helps protect the beef so it reheats more gently. Use within 2 to 3 months. Potatoes can soften after freezing, so freeze the beef and gravy separately if you want the best reheated result.
What internal temperature should pot roast reach?
Beef roasts are safely cooked at 145°F / 63°C with a 3-minute rest, according to FoodSafety.gov’s safe minimum internal temperature chart. For pot roast, safe temperature is not the same as tenderness. Chuck roast usually needs much longer cooking before it becomes tender enough to pull apart.
Final Note
Slow cooker pot roast is at its best when it feels calm and generous: tender beef, soft vegetables, and enough gravy to spoon over every bite. Choose chuck roast when you can, keep the liquid controlled, and let the fork, not the clock, tell you when dinner is ready.
If you make it, leave a comment with your roast size, cut, slow cooker setting, liquid amount, and cook time — especially if you adjusted anything. Those details help other readers and make pot roast problems much easier to solve.