Posted on — Leave a comment

Basque Cheesecake Recipe (Burnt Basque Cheesecake): Creamy, Caramelized & Easy

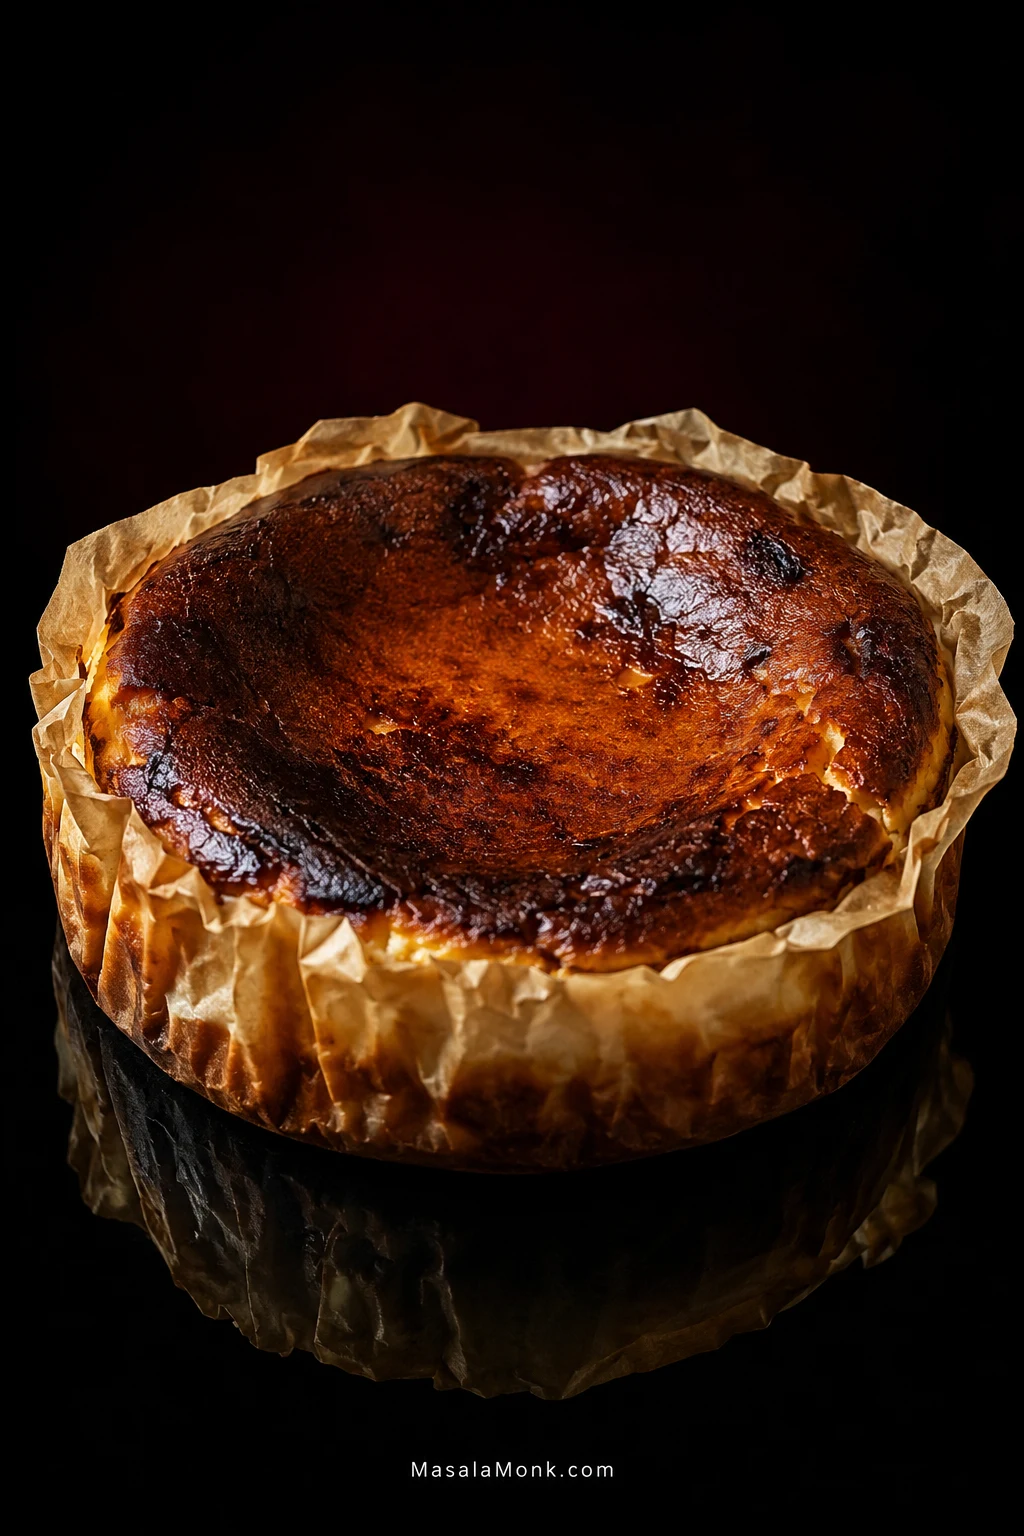
Whole burnt Basque cheesecake in crinkled parchment on a dark reflective surface, with a blistered mahogany top and sunken center.

Basque cheesecake spends much of its time in the oven looking as though something has gone wrong. The top turns far darker than you would allow on an ordinary cheesecake. The batter climbs inside its wrinkled parchment collar, may crack across the surface, and then sinks again as it cools.

Cut through that dark top and the logic becomes clearer: a bittersweet, toasted-sugar surface over a rich, tangy cream-cheese filling that is still soft and silky.

This version sits between an almost molten restaurant-style Basque cheesecake and the dense, clean set you might expect from a New York cheesecake. The goal is a creamy, custard-like center that still holds a slice after chilling.

The mixing is straightforward. Reading the bake is the part worth understanding. The surface needs enough heat to become deeply caramelized while the center stays soft—and those two things do not always happen at exactly the same time.

Quick answer

Judge the top and the center separately.

Use a deep 8-inch/20 cm metal pan at least 2½ inches/6 cm high, full-fat cream cheese and a thoroughly preheated 425°F/220°C conventional or 390°F/200°C fan oven. Start checking at 40 minutes.

You’re looking for a deeply browned top and a center that still wobbles as one mass. If the middle is ready while the top is pale, treat that as a browning problem rather than simply baking the whole cheesecake much longer.

No crust. No water bath. Cracks, a dramatic rise and a sunken center after cooling are all normal territory here.
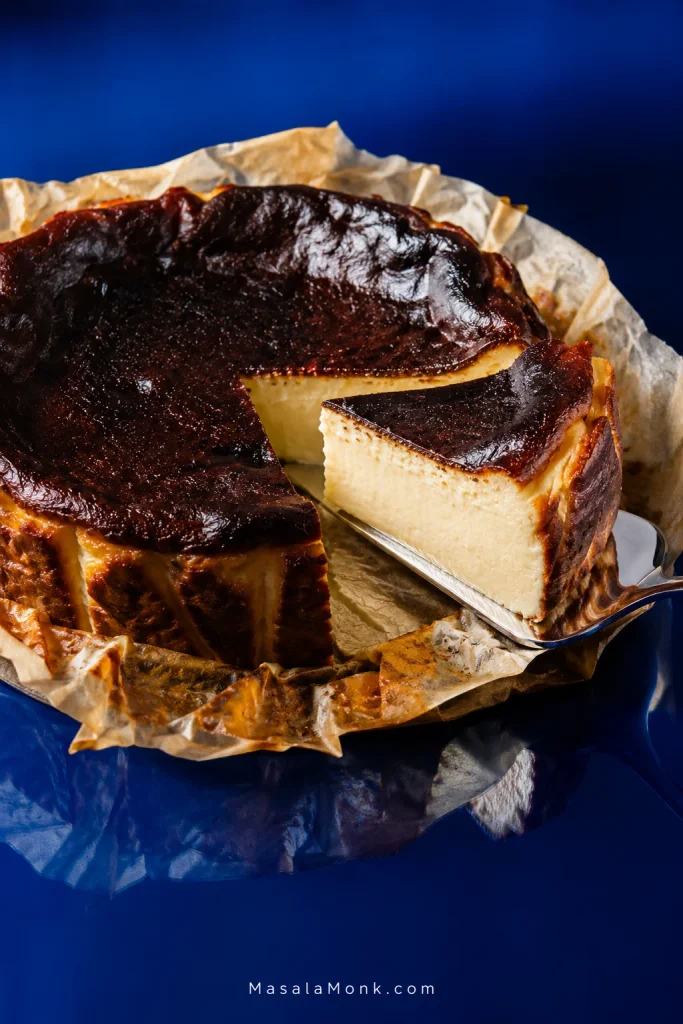
Basque cheesecake slice lifted on a silver server, showing a pale creamy center beneath a dark caramelized top.
Look at the slice, not just the wobble: after chilling, the custard can hold a clean wedge and still stay visibly soft. A little time out of the fridge loosens it further without making it run.

Creamy Burnt Basque Cheesecake Recipe
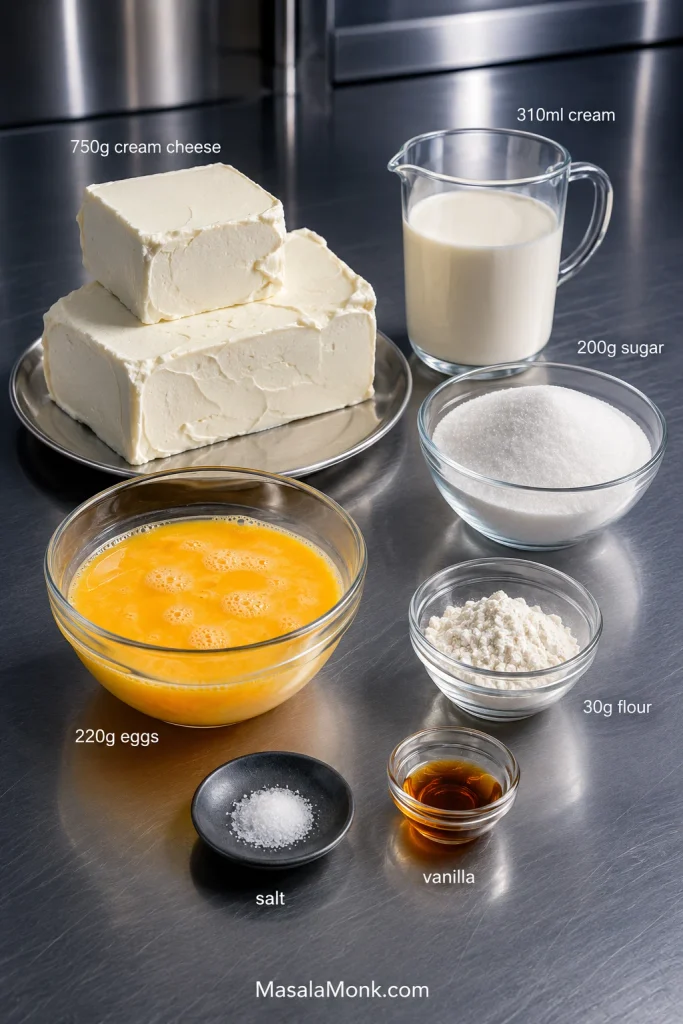
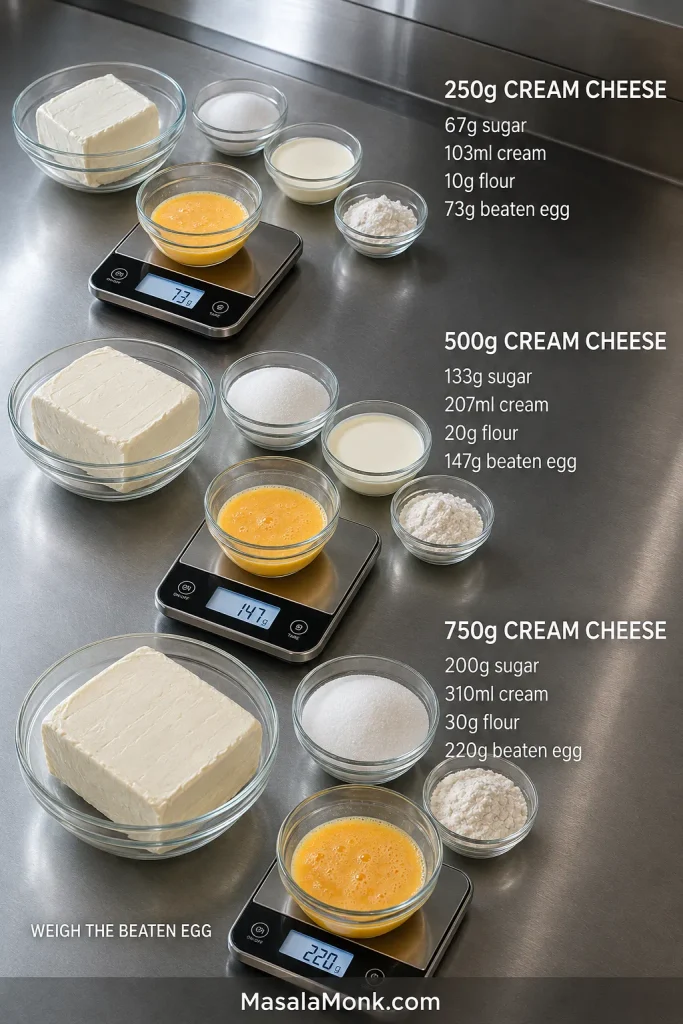
Cream cheese, sugar, cream, flour, beaten eggs, salt and vanilla arranged on stainless steel with their recipe quantities labeled.
This is a dairy-heavy custard, not a flour-led cake: 750 g cream cheese and 310 ml cream are supported by only 30 g flour. That small amount of starch helps without making the center cakey.
Yield10–12 slices
Pan8-inch / 20 cm springform, at least 2½ in / 6 cm deep
Prep20 minutes
BakeAbout 55 minutes; typically 45–65
Chill8 hours or overnight
Plan aheadBake the day before serving

The goal isn’t a perfectly neat cheesecake. Aim for a deeply caramelized top over a tangy, creamy custard that still holds a slice after chilling. Wrinkles, cracks and a sunken middle are part of the style.

Ingredients

  • 750 g full-fat cream cheese26.5 oz; softened. Block-style cream cheese gives the most reliable set.
  • 200 g caster or superfine sugarAbout 1 US cup / 7 oz. Regular granulated sugar also works.
  • 310 ml heavy or whipping creamAbout 1⅓ US cups; 35% milk fat or higher. Let it sit out for 15 minutes before mixing.
  • 30 g all-purpose flourAbout ¼ US cup / 1.1 oz.
  • 220 g lightly beaten eggs4–5 large eggs / 7.8 oz. Weigh without shells; bring to room temperature.
  • ¼ teaspoon fine salt
  • 1 teaspoon vanilla extract, optional

Scaling the recipe? Use the metric quantities; the cup measures are approximate.

Method

Prepare the pan and batter

  1. Preheat the oven. Set a rack in the middle and heat to 425°F/220°C conventional or 390°F/200°C fan/convection. Give the oven a full 30-minute preheat.
  2. Prepare the pan. Crumple two generous sheets of parchment, open them again and overlap them inside the springform. Leave enough paper above the rim to contain the rise, but fold extreme excess outward so it does not shade the top. No greasing needed. The folds can be messy.
  3. Mix the cream cheese. Use the paddle attachment or standard hand-mixer beaters. Beat the softened cream cheese gently until smooth, then mix in the sugar and salt. This is the easiest point to fix any firm bits before the liquids thin the batter.
  4. Add the cream. Whisk the flour with a splash of cream to make a smooth paste. Then whisk in the remaining cream and vanilla before pouring this into the cream cheese. From here, keep the mixing gentle; the goal is a smooth batter, not an airy one.
  5. Eggs go in last. Add the beaten eggs gradually and stop mixing as soon as they are incorporated. Extra mixing only beats in more air.
  6. Pour the batter. A sieve is useful only if the batter is still visibly lumpy. Otherwise, pour it straight into the lined pan. Tap the pan a few times to release large trapped bubbles. Tiny bubbles are fine.

Bake, cool and serve

  1. Bake by what you see. Start checking at 40 minutes, but judge the cheesecake by color and movement rather than the clock. The top should be deep mahogany with darker patches, the outer edge should look set, and the center should still be visibly soft. Nudge the pan: the center should wobble as one mass rather than ripple like liquid. When the color and movement are both there, take it out.

    Most ovens finish around 45–55 minutes, although some need closer to 65. If one side is browning much faster, rotate the pan once near the end.

    Using a thermometer? 150–155°F / 66–68°C at the actual center can be a useful secondary cue for this softer style. Color and movement remain the primary cues. See the food-safety note below for general egg-dish guidance and softer-center options.

  2. Cool, then chill. Cool the cheesecake in its pan on a rack for 1½–2 hours. It will rise dramatically in the oven and sink again as it cools; that’s normal.

    Refrigerate uncovered for at least 8 hours or overnight, then cover once cold. The chill finishes the set, turning the soft custard creamy but sliceable.
  3. Before serving. Cold cheesecake cuts more firmly. Let it sit out for 20–45 minutes, depending on the room temperature. As the chill eases, the filling becomes softer and more custard-like, sharpening the contrast with the dark caramelized top.

Recipe basis: The core 8-inch formula, base mixing method, oven temperature and cooling/chilling framework are adapted from RecipeTin Eats’ Basque cheesecake. Metric quantities are used for scaling; US cup measures are conversions. The doneness model, texture targeting, pan and package scaling, substitution guidance and troubleshooting below are expanded for the creamy, sliceable endpoint used here.

In this Basque cheesecake guide

Why gentle mixing matters

The batter itself is simple. Gentle mixing is mostly about avoiding excess air: once the cream cheese is smooth, you are combining rather than whipping.
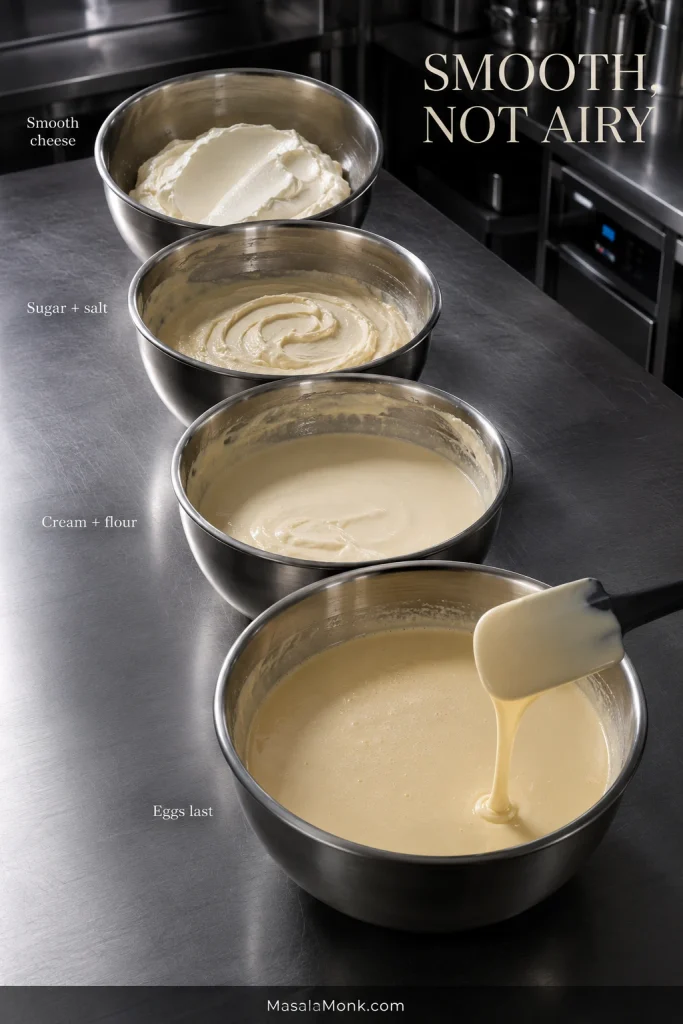
Four bowls show Basque cheesecake batter changing from smooth cream cheese to the finished glossy batter.
Air is the thing you cannot see on an ingredient list. Aim for a glossy, flowing batter rather than a whipped one; excess aeration often shows up later as holes through the chilled center.

The top and the center are on different clocks

Basque cheesecake becomes easier to read when you stop asking only, “Is it done?” and look at the surface and middle separately.

The odd sweet spot is that the top can look almost too done while the center still looks almost too soft. That tension is exactly what gives the cheesecake its dark caramel edge and tender middle.
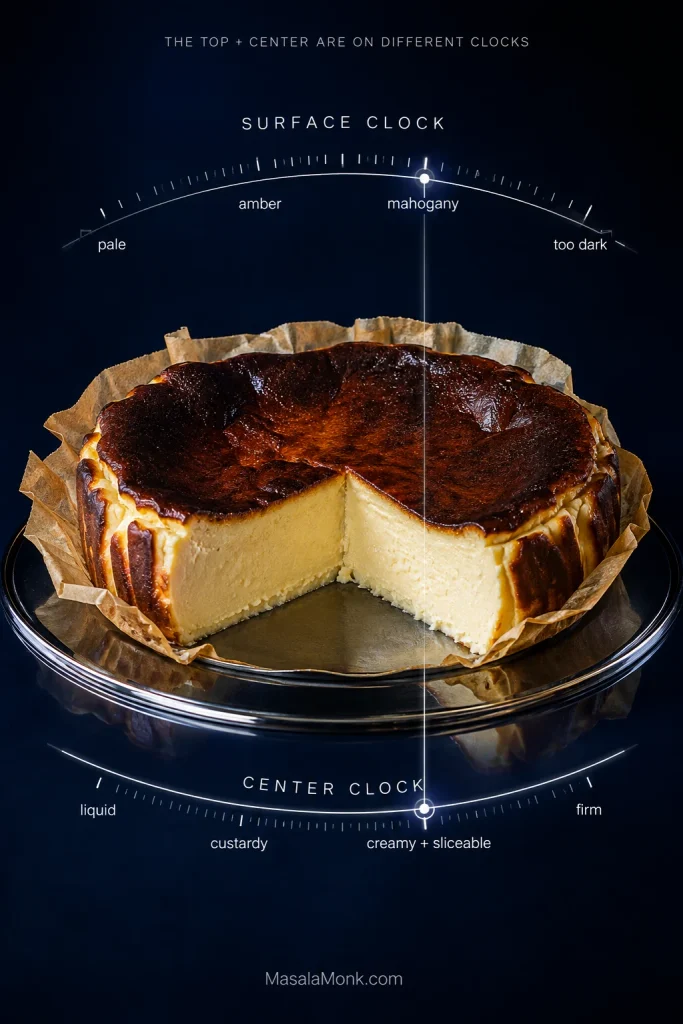
Cobalt graphic with a Basque cheesecake cross-section and separate scales for surface browning and center texture.
When one clock gets ahead, work on the lagging problem instead. Protect an already-dark surface while the middle finishes, or correct weak browning without blindly extending the custard’s bake.
What you seeWhat it meansWhat to do now
Pale top + liquid centerBoth surface and middle need more timeKeep baking and check frequently
Pale top + cohesive, creamy centerThe filling is ready while browning is behindFinish the surface with closely watched top heat rather than extending the whole bake unnecessarily
Dark top + liquid centerThe surface is racing ahead of the middleMove the cake lower. If the top is already dark enough, loosely shield it with foil and continue in short intervals until the center moves cohesively.
Dark top + cohesive, creamy centerTarget zoneTake it out
Dark top + firm or grainy centerThe filling has cooked too farPull earlier next time

Chasing a darker top with another ten or fifteen minutes of whole-cake baking is one of the easiest ways to lose the creamy center. The reverse matters too: a dark surface does not make a liquid middle ready.

What if the center is ready but the top is still pale?

Do not sacrifice the center just to chase color. If the movement is already right, look at the oven setup before giving the entire custard much more time.
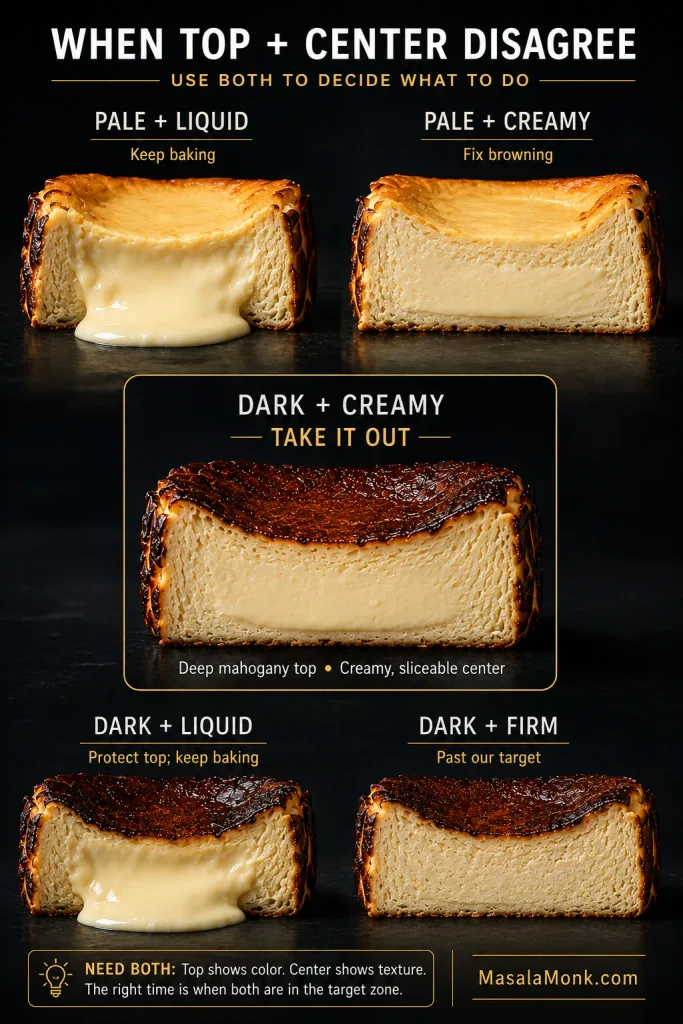
Five Basque cheesecakes compare combinations of pale or dark tops with liquid, creamy or firm centers and corresponding actions.
Once either color or center texture is ready, stop treating “more oven time” as the only solution. The useful question becomes: which part of the bake still needs fixing?
  • Did the oven get a full 30-minute preheat?
  • Does an oven thermometer show that it is actually reaching the set temperature?
  • Is the cheesecake sitting unusually low in the oven?
  • Is a very tall parchment collar shading the surface?
  • Did a wider or shallower pan make the middle cook faster?

A center that already has the movement you want can be finished with a brief, closely watched burst of top heat or the broiler.

Watch the parchment around direct top heat. Fold excessive paper safely away from the element and stay with the cake. Both parchment and surface color can change quickly.

How jiggly should Basque cheesecake be?

“Bake until jiggly” is not especially helpful when you have never seen the right jiggle.

Give the pan a small shake. The outside should look set while the center is still visibly soft.

Now watch the movement. A ready center wobbles together as one mass. Batter that sends loose ripples across the middle still needs more time.

The first can be exactly right. The second is still too loose.
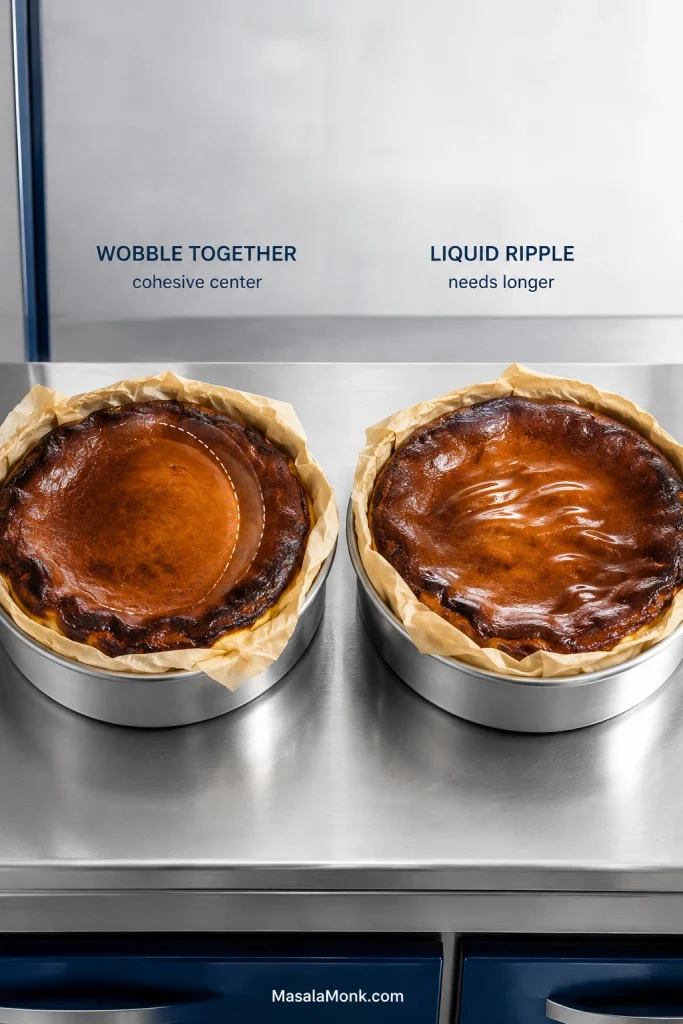
Two cheesecake pans compare cohesive center movement with looser liquid ripples using subtle motion graphics.
Give the pan only a gentle nudge. A hard shake can manufacture movement in any soft custard; what matters is whether the center shifts together or sends loose waves across the surface.

Skip the clean-skewer test. This is a soft custard, not a sponge cake. Waiting for a toothpick or skewer to emerge clean can leave the chilled cheesecake much firmer than intended.

Pull it while the middle still looks soft. A center that looks almost fully set in the oven will become considerably firmer after cooling and chilling.

Choose the center texture you want

There is a whole range of good Basque-cheesecake centers. An earlier pull can leave the filling loose, oozy or almost spoonable; a little more baking moves it toward custardy, then creamy and sliceable. Keep going and it becomes firmer.

This recipe lands in the middle of that range: creamy and sliceable once thoroughly chilled, then noticeably softer as the fridge chill wears off.

If what you want is the almost-flowing center seen in some restaurant-style versions, that is a different endpoint rather than proof that every firmer slice was overbaked.
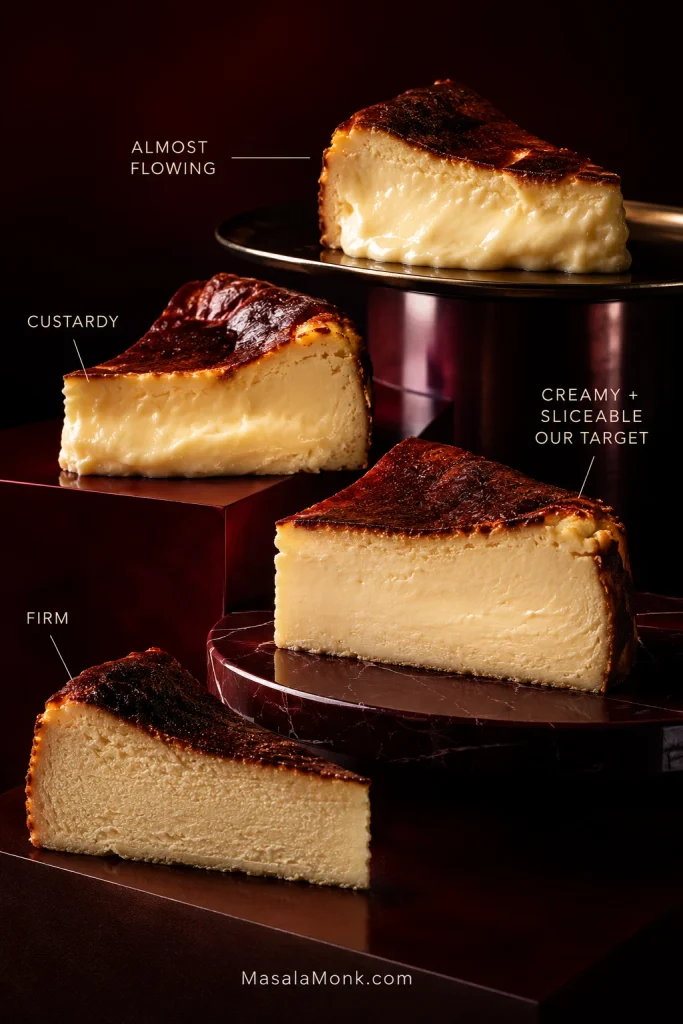
Four Basque cheesecake wedges compare almost flowing, custardy, creamy and sliceable, and firm center textures.
Compare texture at the same serving temperature. Every version firms in the refrigerator, so a custardy slice served slightly warmer can look softer than an equally well-baked slice straight from the fridge.

How dark should the top be?

Much darker than an ordinary cheesecake.

Look for deep amber through mahogany, with darker patches rather than a uniformly black surface. Those darkest areas bring toasted-sugar bitterness; underneath, the filling should still be pale, creamy and soft.

Flavor-wise, the cake should still taste unmistakably of cream cheese: mild tang, rich dairy and controlled sweetness under the caramelized top. The slight bitterness at the surface is useful—it keeps the filling from tasting simply rich and sweet. Vanilla, if you use it, rounds the edges rather than becoming the main flavor.

Those bittersweet caramel notes against soft custard are also why crème brûlée works so well, even though the cooking method is completely different.

A pale-golden surface misses some of that flavor. At the other extreme, a dry, acrid black crust has gone too far. “Burnt” is the style name; the goal is deep caramelization, not charcoal.
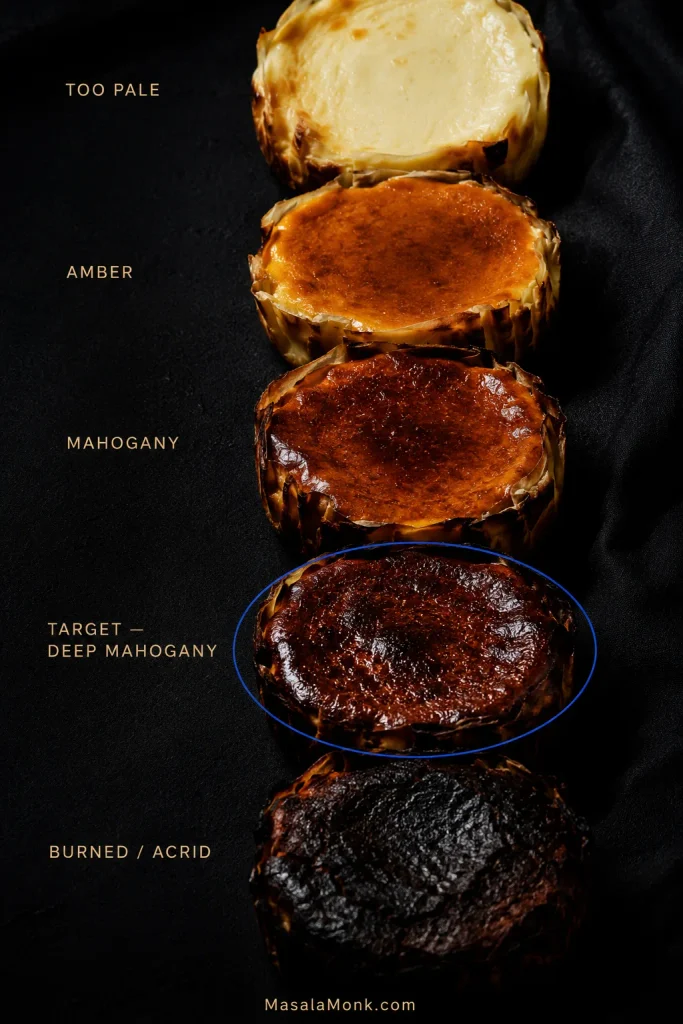
Five Basque cheesecake surfaces progress from pale through amber and mahogany to the target color and an excessively burned stage.
Judge the whole top, not its darkest blister. A few nearly black patches can belong on a properly caramelized Basque cheesecake while the larger surface still reads as deep mahogany.

Using a thermometer without confusing yourself

You do not need a thermometer. It is simply another way to check yourself when the wobble still makes you nervous.

Probe the actual center. For the softer style used here, 150–155°F / 66–68°C can be a useful secondary cue.

The outside inch can be dramatically hotter at the same moment. That is why cheesecake temperatures quoted in different recipes can look wildly inconsistent when the probes are sitting in different places.

For this cake, color and movement come first. Temperature is optional.

Food safety: some soft-centered Basque cheesecakes are pulled below 160°F at the center for a softer texture. General U.S. FDA guidance for egg dishes uses 160°F / 71°C. For anyone at higher risk from foodborne illness, use pasteurized eggs for a softer center or bake to 160°F.
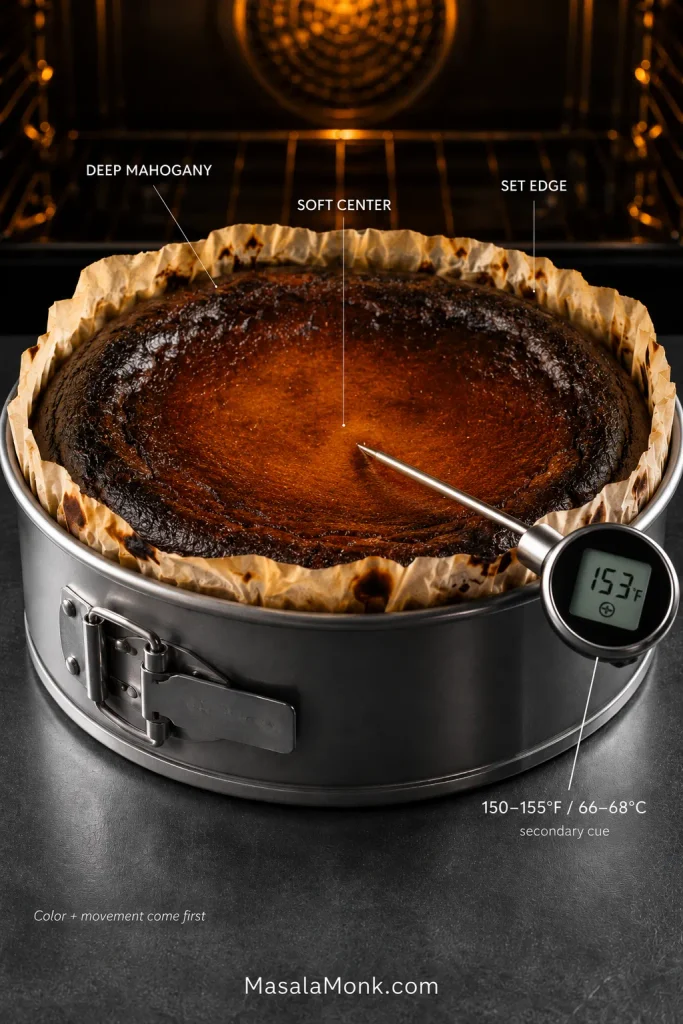
Basque cheesecake in a pan with a thermometer reading 153°F at the center and labels marking the top, edge and soft middle.
Probe location can change the number dramatically. The true center may sit around 150–155°F / 66–68°C while the outer inch is already much hotter, which helps explain conflicting Basque cheesecake temperature advice.

As the cheesecake approaches its endpoint, shorten the gaps between checks. The timer is only a cue to look; color, movement and the center texture still decide when the cake comes out.

The cheesecake is still changing after it leaves the oven

The cake that leaves the oven is not yet showing you its final center.

Heat keeps moving through the filling for a while, and the custard firms as it cools. Meanwhile the dramatic rise relaxes into the shallow crater that gives Basque cheesecake so much of its character.

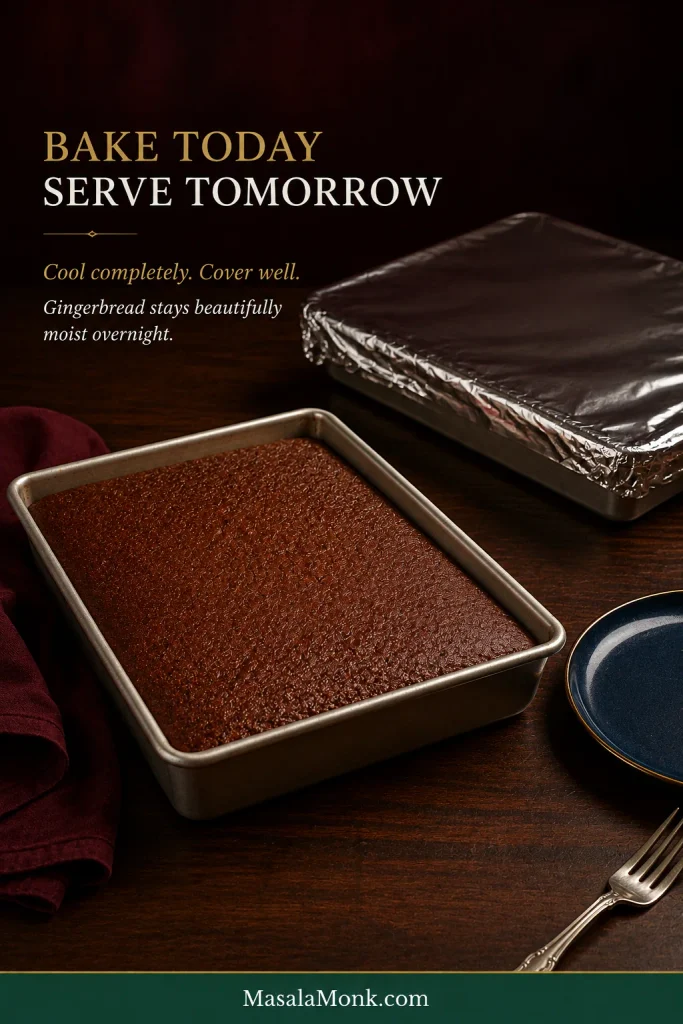
Cool it at room temperature for about 1½–2 hours, then refrigerate uncovered for at least 8 hours or overnight. For the texture used here, the easiest plan is simply to bake it the day before you want to serve it.

The overnight chill is not just storage. It finishes the set. What looked almost worryingly soft when the cheesecake left the oven becomes creamy enough to slice without turning dense.
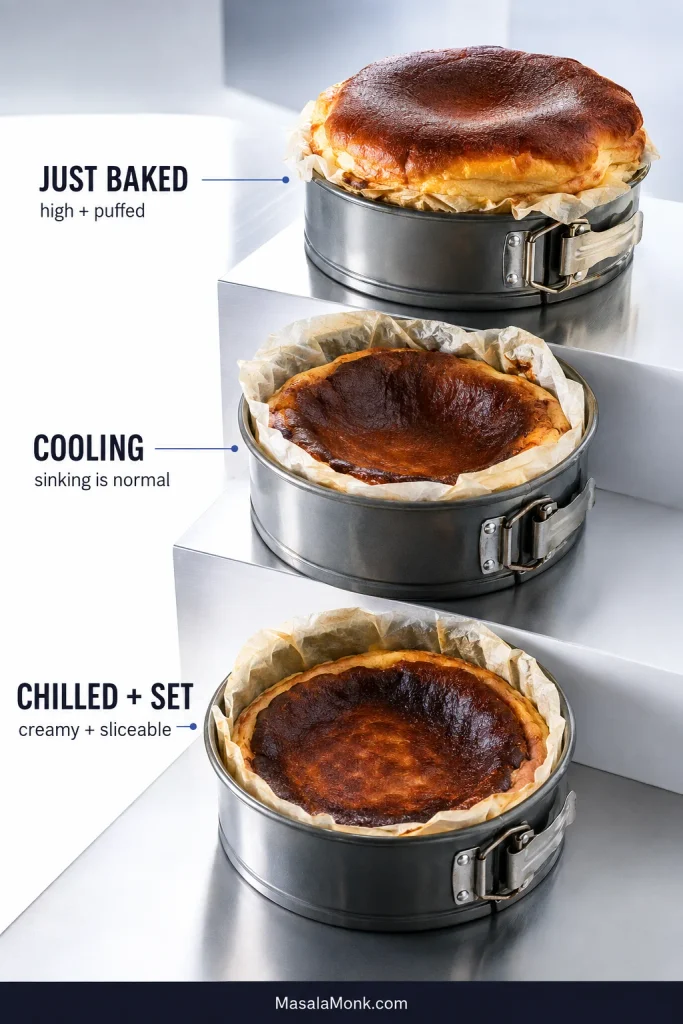
Three Basque cheesecakes show the puffed just-baked stage, the cooling and sinking stage, and the chilled final stage.
Do not grade the finished cake by crater depth. Some Basque cheesecakes sink more dramatically than others; the more useful question is whether the cooled center reaches the texture you wanted.

How serving temperature changes the texture

Fridge-cold slices are neat and firm. Give them a little time on the counter and the filling relaxes, the cream-cheese flavor becomes rounder, and the contrast with the bittersweet top becomes more obvious.

For a creamier, more custard-like slice, let the cheesecake stand for 20–45 minutes. Use the shorter end in a warm kitchen and the longer end in a cool room.
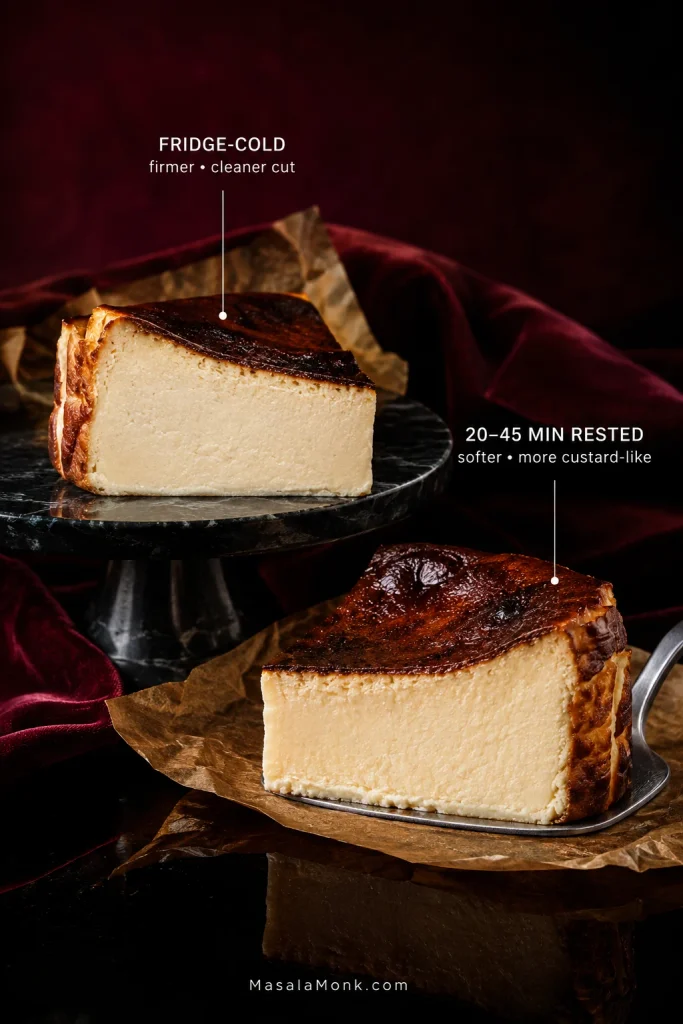
Two Basque cheesecake slices compare a firmer refrigerator-cold slice with a slightly softer rested slice.
Temper the slices you are serving, not necessarily the whole cake. That keeps the stored cheesecake cold while letting each portion soften to the texture you prefer.

This is worth remembering with leftovers: a very cold slice can seem much firmer than the cake you remember cutting the day before.

What should you serve with it?

Try the first slice plain. The dark top, cream-cheese tang and soft dairy center already have plenty going on.

After that, acidity is usually more useful than another layer of sweetness. Fresh berries, raspberry or blackberry compote, macerated strawberries, passionfruit or a small spoonful of lemon curd all work beautifully. Salted caramel is good too; just use a light hand.
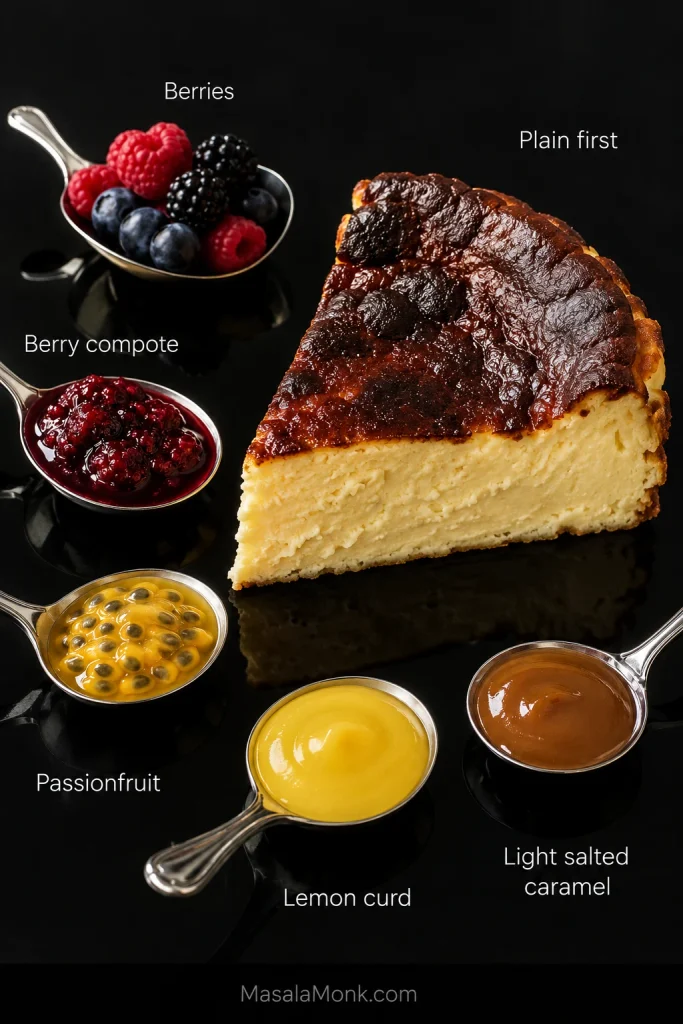
Plain Basque cheesecake slice with berries, berry compote, passionfruit, lemon curd and salted caramel arranged around it.
Think about contrast before sweetness. Tart berries, passionfruit and lemon curd refresh the palate between rich bites; sweeter sauces such as salted caramel are better used in smaller amounts.

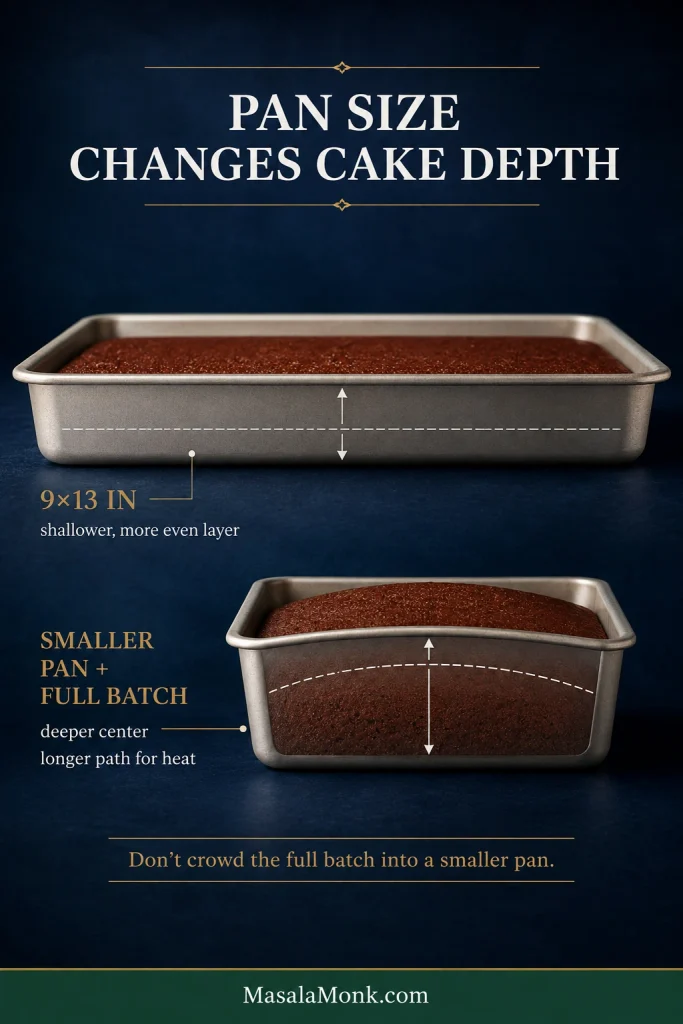
The pan changes the cheesecake

Same batter. Wider pan. Thinner cheesecake.

That changes more than its appearance. The exposed top and outer edge get intensely hot while the deeper middle warms more slowly. Spread the batter over a wider area and there is less protected center left to stay soft.

Use diameter, depth and batter quantity together

For the full recipe, use a deep 8-inch/20 cm metal pan at least 2½ inches/6 cm high. A pan closer to 3 inches/7.5 cm deep gives even more headroom for the rise. Roughly 2–2.5 liters capacity is the right neighborhood.

A springform is the easiest default. A deep fixed-sided cake pan works too when the parchment gives you enough to lift the chilled cheesecake out.

The full batch makes about 1.5 kg / 3.3 lb batter.

The jump from 8 inches to 9 inches is larger than it looks. A 9-inch pan gives the batter roughly 27% more surface area. With the same quantity of batter, the cake becomes noticeably shallower and the center warms sooner.

Keep batter depth in mind when changing pans. Split one batch between two shallow pans and the original bake time no longer tells you much.
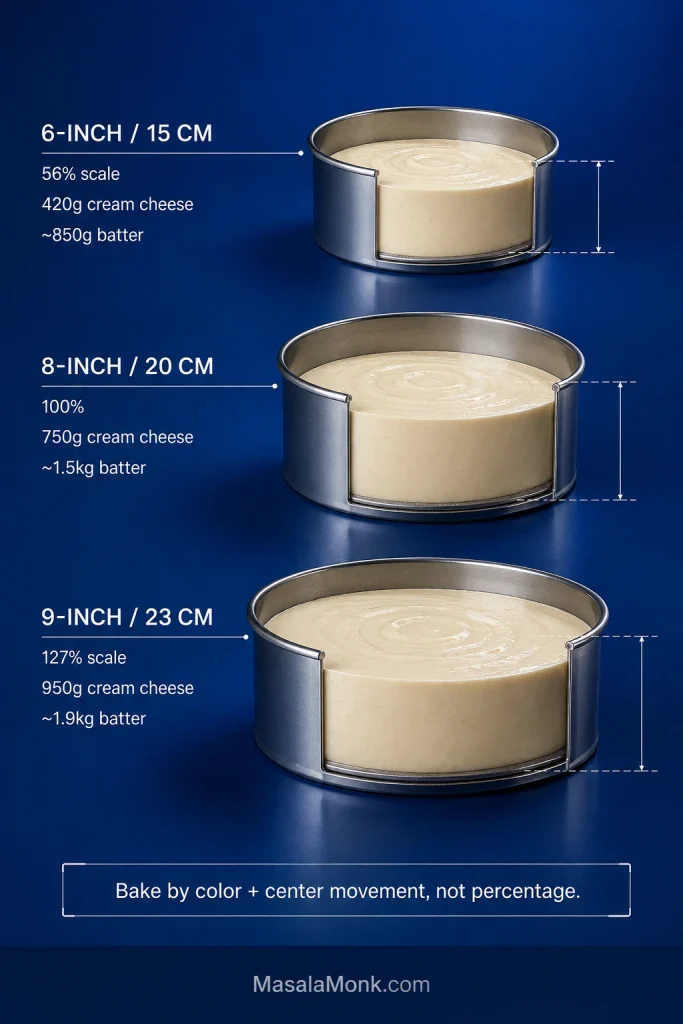
Cutaway 6-inch, 8-inch and 9-inch pans show proportional Basque cheesecake batter amounts and depths.
Batter depth is the hidden variable in Basque cheesecake scaling. Change the pan without changing the batch and you have changed how quickly the protected center heats—even before the timer starts to matter.

Basque cheesecake depends on aggressive dry heat. Japanese cheesecake takes almost the opposite route, using gentler heat and a water bath to protect its airy texture.

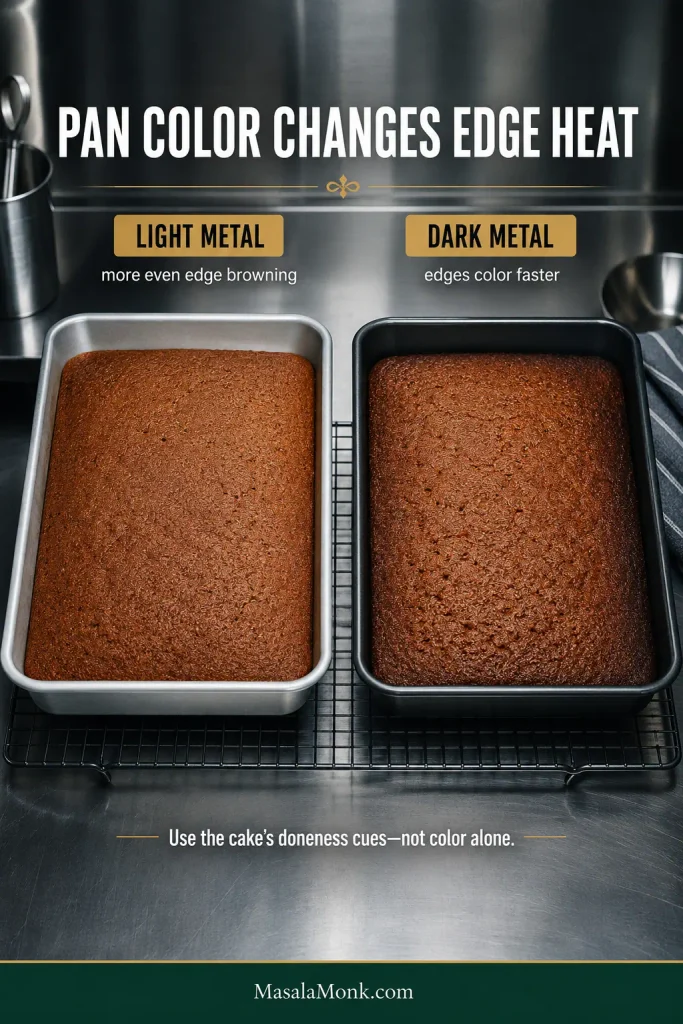
Light, dark, glass or ceramic?

Light-colored metal is the easiest baseline. Very dark metal absorbs heat more aggressively, so the outer edge can get ahead of the middle sooner.

Glass and ceramic store and transfer heat differently. They can bake good desserts, but metal is easier to predict when you are deliberately trying to create a very dark top around a soft center.

The parchment can affect browning

Crumpled parchment gives Basque cheesecake its recognizable wrinkled sides and makes a round pan easy to line without careful cutting.

Leave enough above the rim to catch the rise. A towering paper collar, though, can shade the cheesecake from some of the heat you actually need. Loose parchment close to the upper element can scorch as well.
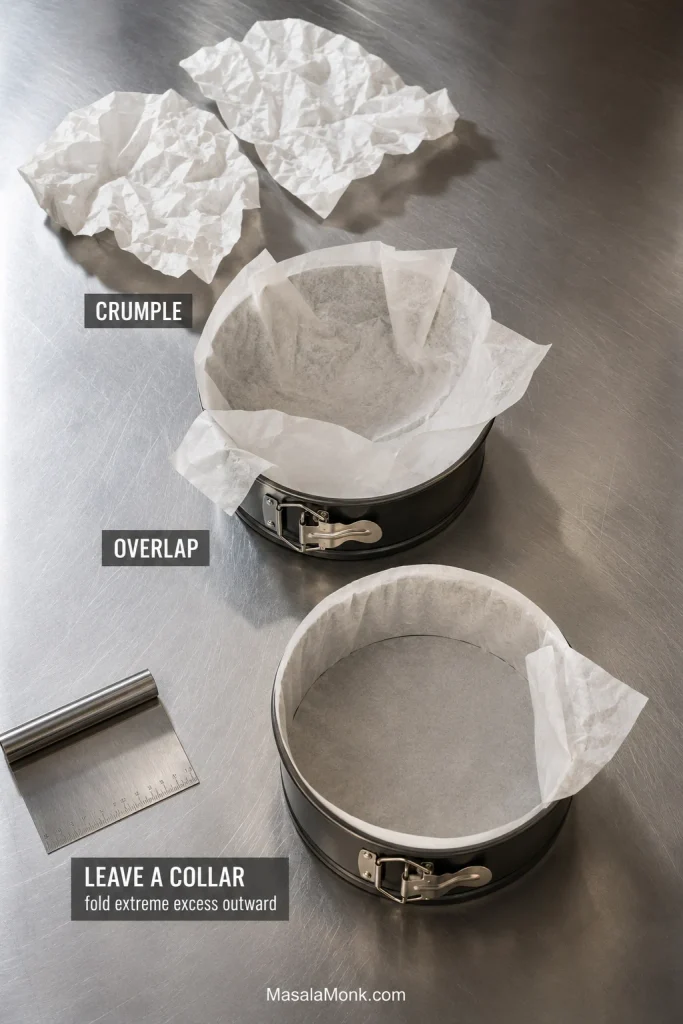
Three stages show crumpled parchment, overlapping sheets in a springform pan and a finished parchment collar.
Two overlapping sheets are easier than trying to tailor parchment perfectly to a round pan. Keep the useful height for the rise, then fold towering excess away from the heat path.

Equipment that actually helps: a digital scale, deep metal pan, parchment, large bowl, silicone spatula and either a stand mixer with the paddle attachment or a hand mixer with standard beaters. A sieve is useful for stubborn lumps, an instant-read thermometer gives you another doneness cue, and an oven thermometer helps when your cakes repeatedly finish pale or take much longer than expected.

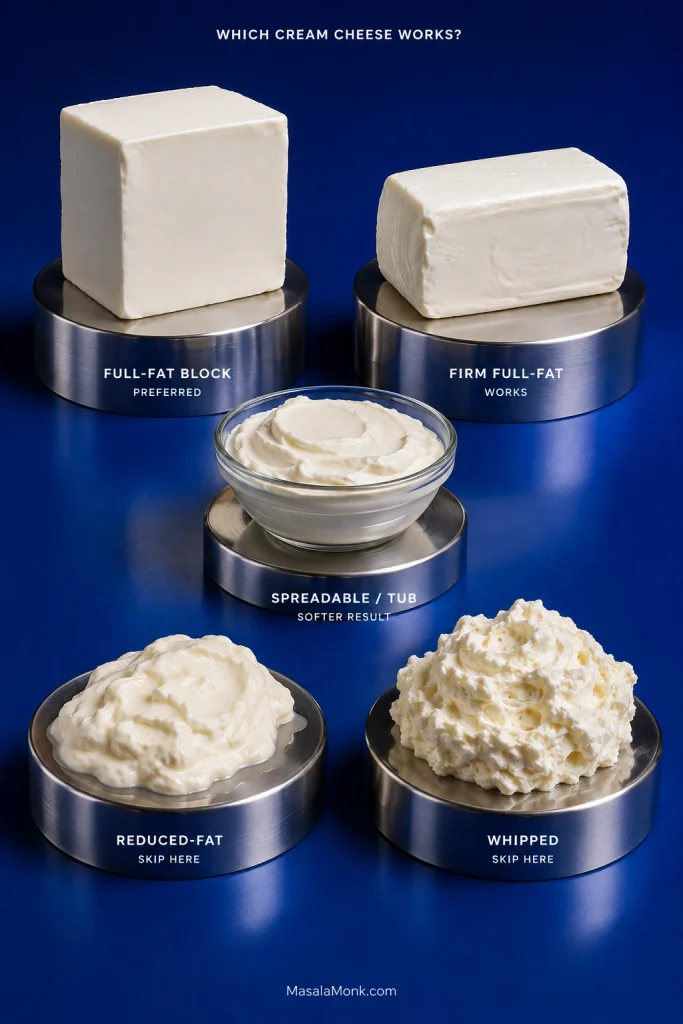
Which cream cheese works best for Basque cheesecake?

You do not need one magical brand. Full-fat block-style cream cheese gives the most reliable set.

Philadelphia is a useful reference because many established recipes are built around a similarly firm, full-fat cheese. Another brand with similar richness and moisture can work perfectly well.

TypeUse it?What to expect
Full-fat block cream cheeseYes—preferredRich, firm and reliable
Another firm full-fat cream cheeseUsuallyGood when its fat and moisture are similar
Full-fat tub/spreadable cream cheesePossibleOften softer; moisture and stabilizers vary by brand and country
Reduced-fat cream cheeseSkip it hereExtra water and less fat can change the set noticeably
Whipped cream cheeseNoIts different density and incorporated air make the result harder to predict
Cheese already releasing obvious wheyNot idealThat extra free liquid can make the filling looser
Five cream cheese types compare full-fat block, firm full-fat, spreadable, reduced-fat and whipped textures.
For this Basque cheesecake recipe, shop by fat, firmness and free moisture rather than one specific brand. A full-fat cheese that holds its shape and is not leaking whey is the safest starting point.

Looking for something lighter or higher in protein? Cottage cheese cheesecake is a better starting point than trying to make reduced-fat cream cheese behave like the full-fat cheese used here.

Whatever brand you choose, soften it first. Firm cold pieces are easy to spot while the cheese is thick and much harder to deal with once cream and eggs have thinned the batter.

A smaller pan is not just a smaller recipe

You do not need to do pan geometry every time you bake this. The useful rule is simply smaller batch, smaller pan; the numbers below do the arithmetic for you.

The percentages use pan area to keep the cakes reasonably close in depth. Baking time does not shrink by the same percentage, so let the cake tell you when it is ready.

Why the eggs are given in grams

The eggs are where small-batch arithmetic gets awkward.

“4–5 large eggs” is perfectly useful when you’re shopping for the full cake. In a 250 g cream-cheese batch, however, rounding 73 g of beaten egg up to two whole eggs changes the balance much more dramatically.

Weighing the beaten egg removes that guesswork.

PanAmount of full recipeCream cheeseApprox. batterHow to approach the bake
6-inch / 15 cm deep panAbout 56%About 420 gAbout 850 gStart looking considerably earlier; the smaller center heats quickly
8-inch / 20 cm deep pan100%750 gAbout 1.5 kgFull recipe; begin checking at 40 minutes
9-inch / 23 cm deep panAbout 127%About 950 gAbout 1.9 kgUse a genuinely deep pan and follow color and center movement

Put half the batter into the original 8-inch pan and you have made a much thinner cheesecake with a center that will heat through sooner. Start watching small cakes early rather than trying to subtract a fixed number of minutes.

If you have a 250 g or 500 g pack of cream cheese

These smaller batches keep the same ingredient proportions as the full cake. Their pan and bake still need to change with them.

Ingredient250 g cheese batch500 g cheese batch750 g full batch
Cream cheese250 g500 g750 g
Sugar67 g133 g200 g
Heavy/whipping cream103 ml207 ml310 ml
Flour10 g20 g30 g
Lightly beaten egg73 g147 g220 g
Approx. finished batterAbout 500 gAbout 1 kgAbout 1.5 kg
Three ingredient stations show scaled Basque cheesecake amounts for 250, 500 and 750 grams of cream cheese.
Ingredient math is only half the scale-down: roughly 250 g cream cheese suits a deep 4½–5-inch pan, while 500 g is closer to a deep 6½–7-inch pan. Match batch and pan together.

For a 250 g cream-cheese batch, use roughly a deep 4½–5-inch pan. Because a 5-inch cake is a touch shallower than a perfectly proportional scale-down, start watching it early.

With a 500 g batch, roughly a 6½-inch deep pan comes closest to the full cake’s depth. A 7-inch pan is practical too; expect a slightly shallower cheesecake.

Weigh the beaten egg for both smaller batches. Salt and vanilla matter far less to the set, so scaling those approximately is fine.

What you can change—and what is better left alone

Vanilla is optional. Lemon or orange zest is easy to add. Fruit and sauce beside the cheesecake can change freely. Those choices mostly change flavor.

Cheese, eggs, cream, sugar and starch are different. Change one substantially and you change the balance of water, fat and protein that determines how the filling sets.
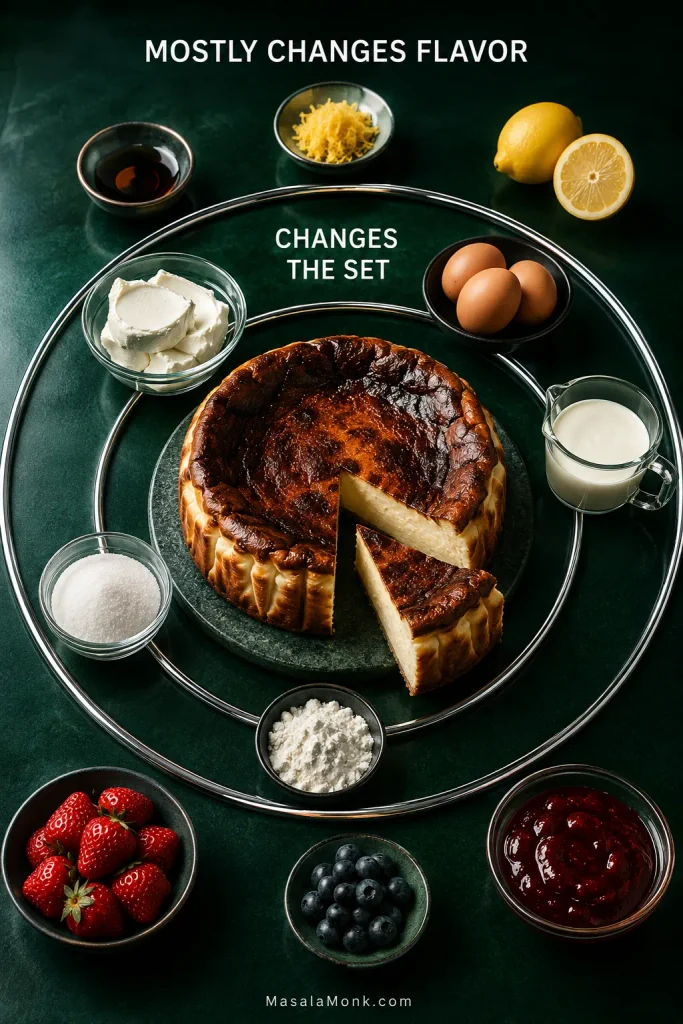
Emerald diagram groups cream cheese, eggs, cream, sugar and flour near the cheesecake and flavor additions farther outside.
Making a structural substitution? Change one major variable at a time. Swapping the cheese, cream and eggs together may work, but it also makes a soft, wet or split result much harder to diagnose.

For a big swap, use a recipe built around it

Low-fat cream cheese, a complete mascarpone replacement, egg substitutes, coconut cream, yogurt or large amounts of liquid sweetener all deserve more than a one-line substitution. Starting with a recipe built around that ingredient is much more reliable.

Does Basque cheesecake need flour?

No—but flourless is not the same thing as traditional.

The published La Viña recipe contains a small amount of flour. Plenty of modern Basque cheesecakes leave it out entirely.

A little flour or starch gives the soft filling some extra support. Remove it and the cake can still be excellent, but the rest of the recipe should be built for that looser set.

Can you make Basque cheesecake without heavy cream?

Yes. There are versions specifically made without heavy cream.

The cream here contributes both fat and moisture, so simply omitting it changes the set. If the labels themselves are confusing, our guide to heavy cream and whipping cream explains the common names and fat levels used in different countries. For a genuinely cream-free version, start with a recipe formulated that way.

If the real goal is to skip the oven, a no-bake cheesecake is a much better starting point than trying to turn this high-heat custard into something it isn’t.

Basque cheesecake troubleshooting

Start with what the cake is actually showing you. “Wet,” “jiggly” and even “burnt” can mean very different things depending on what the rest of the cheesecake looks like.

Read the whole cake before diagnosing one symptom

ProblemLikely explanationWhat to do
Top pale, center creamyBrowning is behind the fillingCheck oven heat, rack position and parchment before extending the whole bake
Top pale, center rippling like liquidGenuinely underbakedContinue baking and check frequently
Top very dark, center still liquidTop heat is outrunning the middleMove the cake lower and loosely shield a dark-enough top with foil while the center finishes
Dark top, grainy centerOften overbakedPull earlier next time
Too firmOverbaked, too shallow or simply fridge-coldLet a slice warm slightly before judging the bake
Still very loose after overnight chillingThe center may genuinely have been underbaked, or a substitution may have changed the setReview the bake cues, pan depth and any dairy or egg substitutions
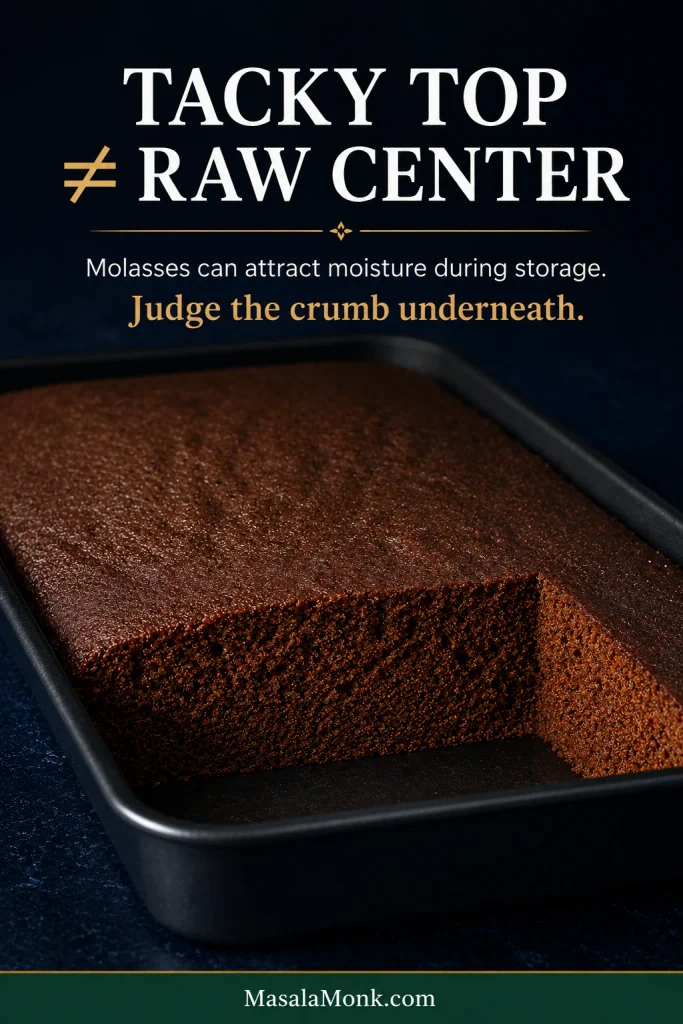
Wet parchmentCondensation or water squeezed from the fillingLook at the cheesecake itself before assuming it is raw
Visible oily liquidThe fat-and-water mixture may have separatedReview the dairy and any major substitutions
Lumpy batterCream cheese too cold or liquid added before it was smoothSmooth the cheese completely while the mixture is thick
Many holes / very airy textureToo much air mixed into the batterMix more gently once the eggs enter
Rose dramatically then sankUsually normalDo nothing
Minor cracksUsually normalDo nothing

Why is my cheesecake grainy or curdled?

Heat tightens the egg and dairy proteins that hold the filling together. Take them too far and a silky custard can turn coarse or almost scrambled-looking.

One common route to that texture is leaving the cheesecake in the oven after the center is ready because the top still looks too pale. A cake spread too shallowly can end up in the same place: the middle heats through before the surface has had enough time to develop its dark caramel color.
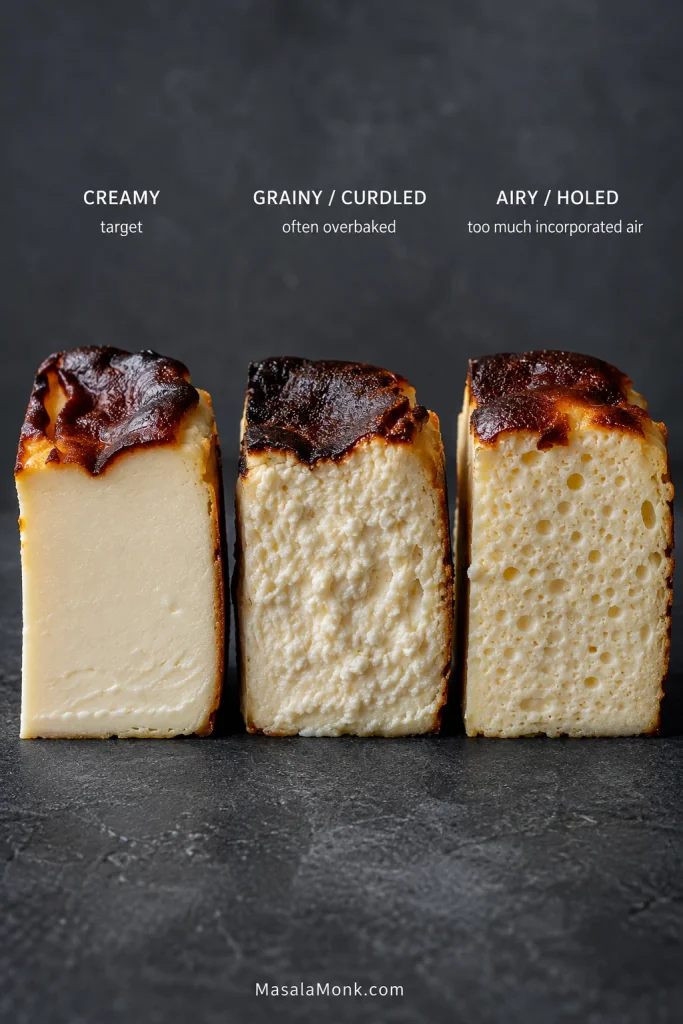
Three Basque cheesecake cross-sections compare smooth creamy, grainy or curdled, and airy or holed textures.
Use the cut face as a starting clue rather than a verdict. Coarse curds send you first toward heat and overbaking; lots of holes send you first toward how much air entered during mixing.

Why is liquid coming out of the cheesecake?

Wet does not automatically mean underbaked.

  • Condensation: steam collected after a warm cheesecake was covered or chilled too quickly.
  • Water squeezed from the custard: when the proteins tighten too much, they can push moisture back out. Bakers sometimes call this syneresis.
  • High-moisture cream cheese: cheese already releasing visible whey brings more free water into the cake.
  • Oily separation: visible fat pooling around a broken-looking filling suggests the fat and water have stopped holding together properly.

Damp parchment around an otherwise smooth cheesecake is very different from a puddle of oil around a visibly split filling. Look at both before deciding what failed.

Why is it too firm?

Give a cold slice 20 or 30 minutes before deciding. If it softens nicely, serving temperature was part of the problem. A center that stays dry or dense points more strongly toward too much baking, a cake that was too shallow, or simply a firmer style than the one you wanted.

Why does it taste eggy?

Egginess can come from the ingredient balance and often becomes more obvious when the cheesecake is cooked very firmly. Small batches make this particularly easy because rounding the egg changes the proportions quickly. Weighing the beaten egg removes most of that guesswork.

Why did it puff like a soufflé?

Some rise is completely normal. A very foamy batter and extreme ballooning suggest that more air went into the mixture than necessary. Once the eggs enter, mix only until everything comes together.

Change one big thing at a time. Halving the batch, changing the pan and swapping the cheese all at once makes a disappointing cheesecake almost impossible to diagnose.

Make ahead and storage

This is an especially good make-ahead dessert because the long chill is part of finishing the texture rather than an inconvenience added afterward.

  • Best plan: bake the cheesecake the day before you want to serve it.
  • Cool, then chill: after 1½–2 hours at room temperature, refrigerate uncovered for at least 8 hours or overnight. Once cold, cover it.
  • Best quality: use within about 3–4 days.
  • For a softer slice: take out only what you plan to serve and let it sit for 20–45 minutes depending on room temperature.
  • Freezing: not my first choice for this soft-centered style; thawing can noticeably change the creamy texture.

Where La Viña fits in

Basque cheesecake became internationally associated with La Viña in San Sebastián, where Santiago Rivera’s crustless, dark-topped cheesecake developed a following far beyond Spain’s Basque Country.

San Sebastián’s official tourism site publishes the La Viña recipe as 1 kg cream cheese, 7 eggs, 400 g sugar, 500 ml cream and about 1½ tablespoons flour, baked at roughly 210°C / 410°F for about 40 minutes.

That is useful context because many recipes described online as “original” change those quantities substantially.

Modern versions also chase different textures. Some reduce the sugar, while others add a little more structure for cleaner slices. Others remove the flour or push the oven hotter to emphasize the contrast between the dark exterior and the soft middle.

So two good Basque cheesecakes can look surprisingly different when cut: one almost spoon-soft, another much neater and more stable. This recipe deliberately sits between those extremes.

Compared with the published La Viña formula, this version uses proportionally less sugar and cream and more flour, nudging the chilled texture toward a slightly more supported slice while keeping the center creamy.

How to read a Basque cheesecake: quick recap

If you remember one sequence, make it this: read the surface and center in the oven, expect sinking during cooling, and judge the final set only after the long chill.
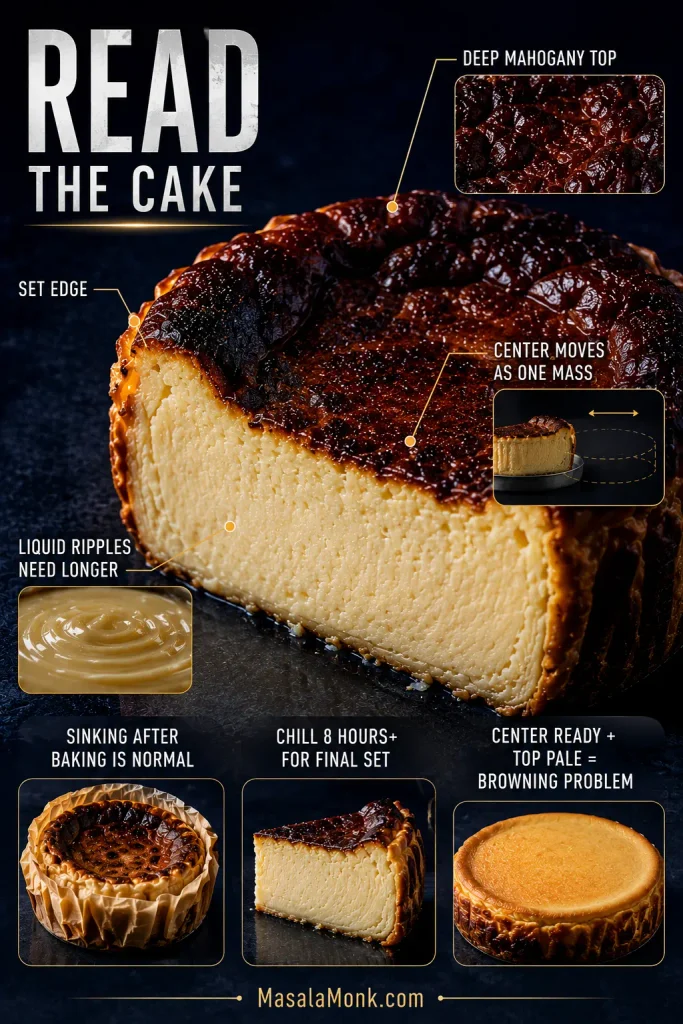
Annotated Basque cheesecake graphic showing browning, edge set, center movement, liquid ripples, sinking and chilling cues.
Think in sequence: color and center movement guide the oven decision; sinking and chilling happen afterward. Mixing those stages together is how normal cooling changes get mistaken for baking failures.

A few final Basque cheesecake questions

Is Basque cheesecake supposed to taste burnt?

It should taste deeply caramelized, with a slight bittersweet edge in the darkest areas. Dry, acrid or charcoal-like flavors mean the surface went too far. The famous “burnt” name describes the unusually dark style; it is not a reason to bake the whole top to carbon-black.

Is Basque cheesecake the same as San Sebastián cheesecake?

In modern recipe usage, Basque cheesecake, burnt Basque cheesecake and San Sebastián cheesecake generally refer to the same broad crustless, dark-topped style associated with San Sebastián in Spain’s Basque Country.

Can Basque cheesecake be gluten-free?

Yes. Wheat flour is not a defining requirement of the style. Use a suitable gluten-free starch conversion or a recipe already designed without flour rather than assuming every Basque cheesecake is automatically flourless.


After the cheesecake has cooled and settled, its wrinkled paper collar and sunken middle can make it look even less polished than it did in the oven.

Then the knife breaks through the dark caramelized surface, meets that slightly resistant top, and moves into the cool, creamy filling underneath.

That contrast is the point: cook the outside boldly enough to become Basque cheesecake without cooking the middle until it stops being creamy.
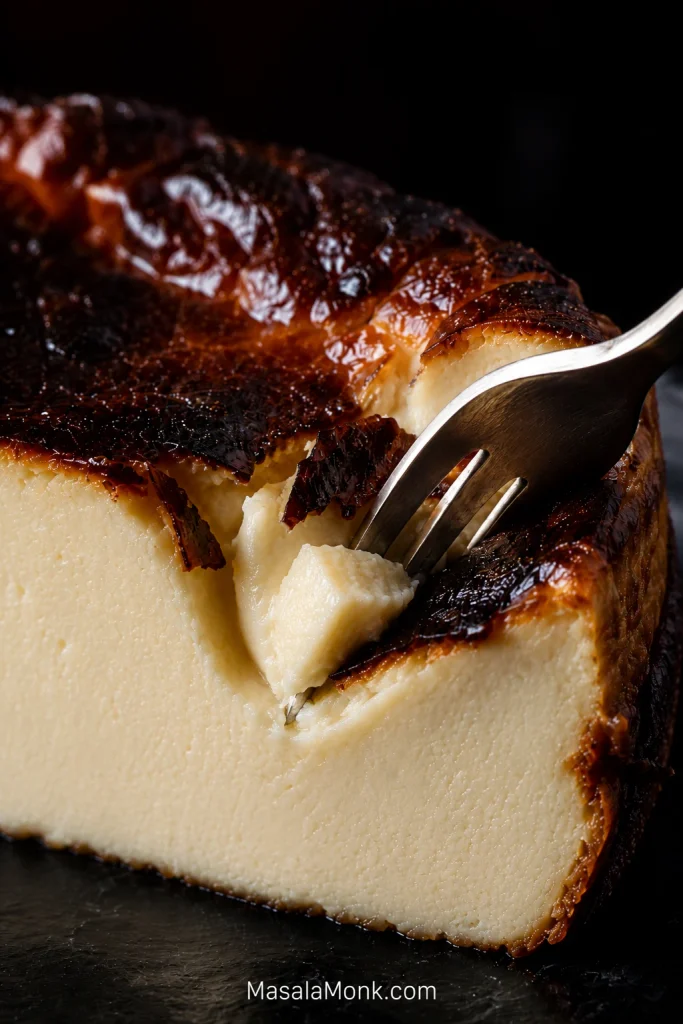
Extreme close-up of a stainless fork breaking through the dark caramelized top and lifting a creamy Basque cheesecake bite.
A well-tempered slice should give under the fork without slumping. The custard stays cohesive while the thin caramelized top provides the sharper, bittersweet contrast.
Posted on — Leave a comment

Hummingbird Cake Recipe (Old-Fashioned Southern Classic)

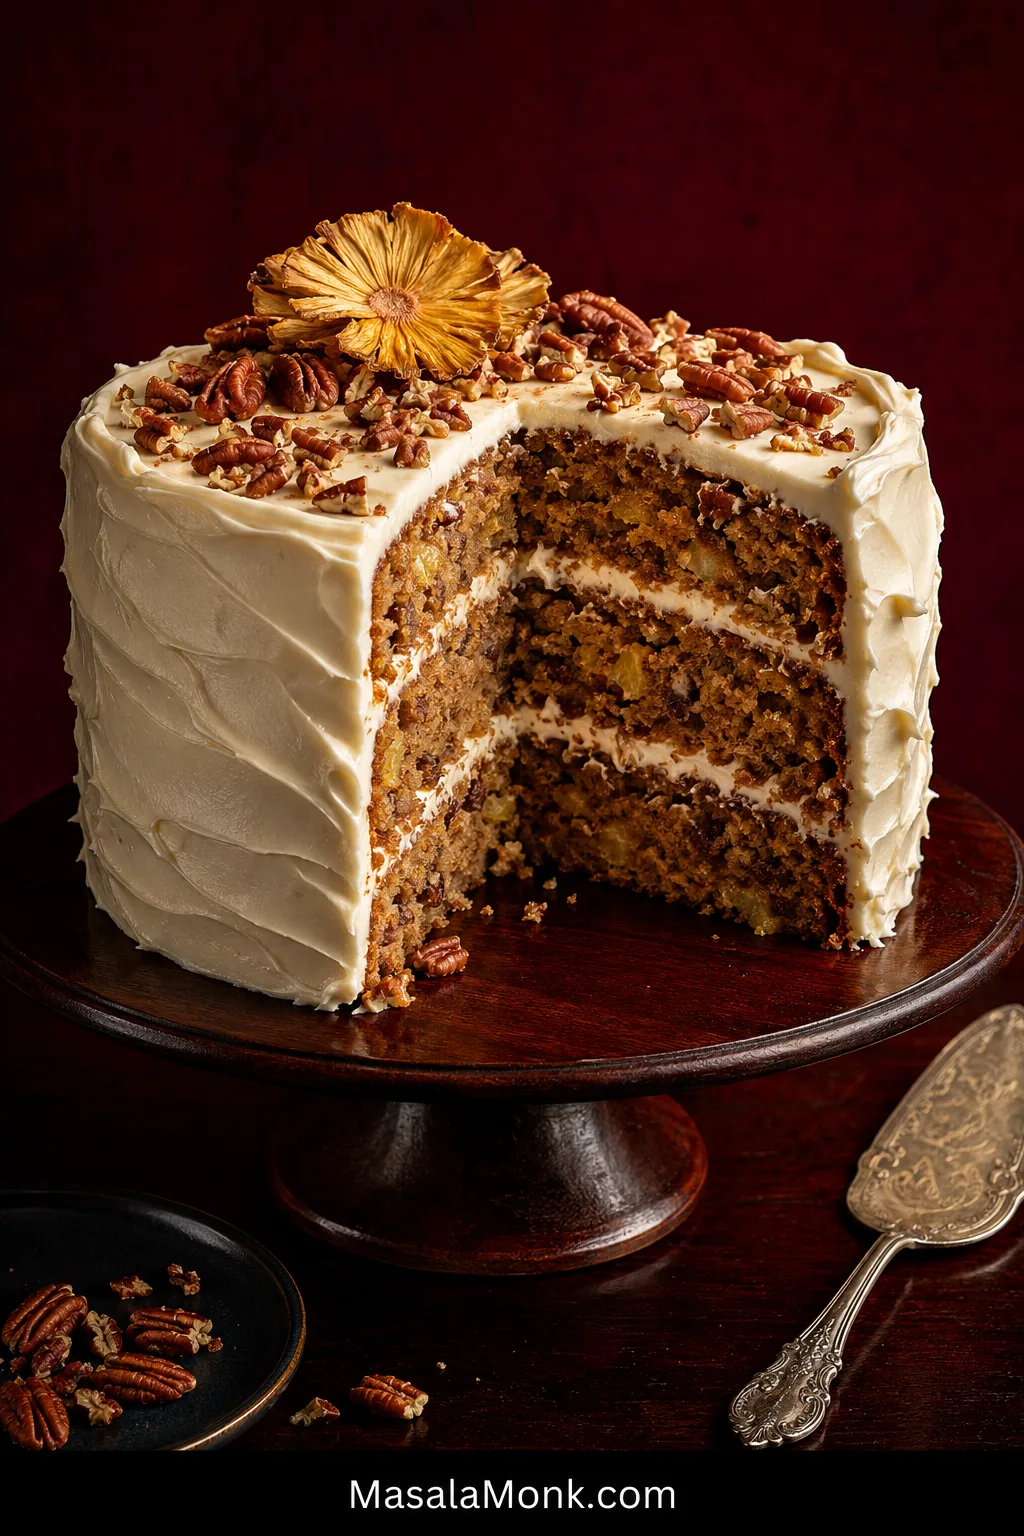
Three-layer Hummingbird Cake with cream cheese frosting and pecans, with a wedge removed to reveal golden fruit-and-nut cake layers.

Hummingbird Cake has a delicate name for a decidedly generous cake. Beneath the cream cheese frosting are three fruit-rich layers where ripe banana leads, pineapple brings a little brightness, and toasted pecans break up the moist crumb with roasted crunch.

All that fruit is part of the appeal. It also leaves less room for guesswork: extra banana, too much free pineapple liquid, very deep pans or an underbaked center can take the crumb from lush to sticky. What you want is an abundant old-fashioned cake that stands tall enough to slice cleanly.

Rich is right. Gummy isn’t.

What Does Hummingbird Cake Taste Like?

Hummingbird Cake is a banana-and-pineapple spice layer cake with pecans and cream cheese frosting, now a Southern classic with roots in Jamaica’s Doctor Bird Cake.

Banana is usually the first flavor you notice, but it shouldn’t flatten everything else. Pineapple gives the crumb a brighter fruitiness, toasted pecans add little pockets of crunch, and cinnamon stays comfortably in the background. Cream cheese frosting brings the tang that keeps a generous slice from feeling simply sweet.

Carrot cake is an easy comparison, although the two eat quite differently. Carrot cake gets much of its character from grated carrot and a stronger spice profile; Hummingbird Cake is fruitier and more tropical, with banana and pineapple doing most of the work. If spice cake is your other reference point, Hummingbird Cake is its fruitier, less spice-led cousin.

Jump to: Recipe · Is it supposed to be dense? · Drain the pineapple? · Fix the frosting · Fix my cake

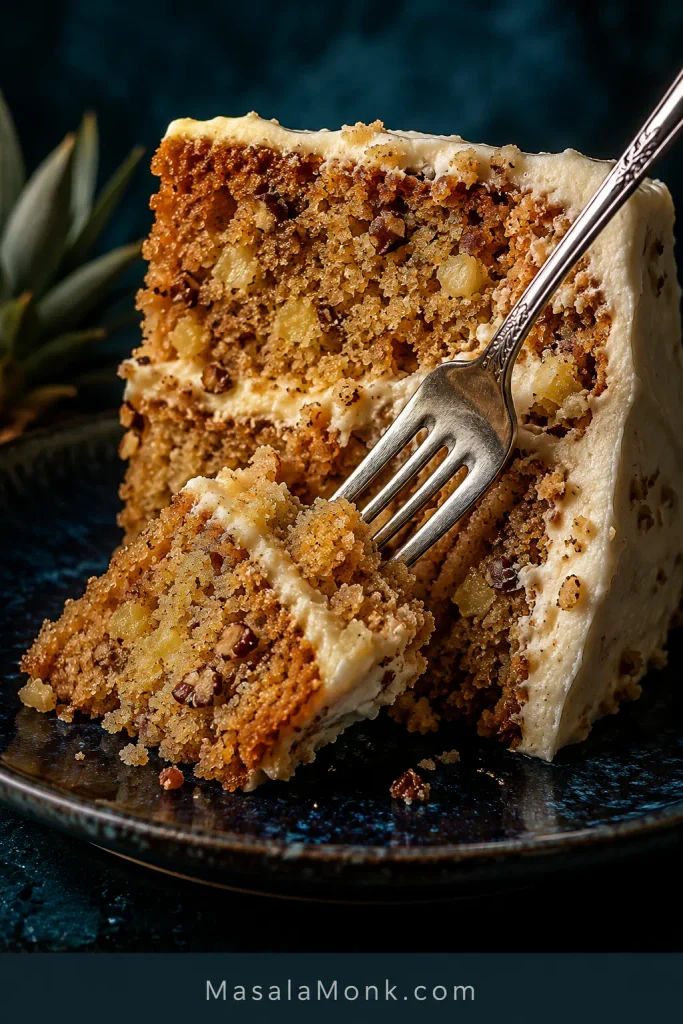
Close-up of a fork cutting into Hummingbird Cake, showing golden crumb, pineapple pieces, pecans and cream cheese frosting between the layers.
A moist pocket beside pineapple is normal; a wet, paste-like center is not. Judge the crumb around the fruit.

The Short Version

Despite the three layers, the cake batter itself is straightforward: two bowls, mixed by hand, no mixer needed. Most of the roughly four-hour total is waiting for the cake to bake, cool and firm up; the hands-on work is much shorter.

Use 360 g mashed very ripe banana, one 8-ounce / 227-g can crushed pineapple with its juice, neutral oil, cinnamon and toasted pecans. Divide the batter between three 8-inch / 20-cm pans and bake at 350°F / 177°C conventional / about 160°C fan. Start checking at 28 minutes; expect a bake somewhere around 28–34 minutes, depending on your pans and oven.

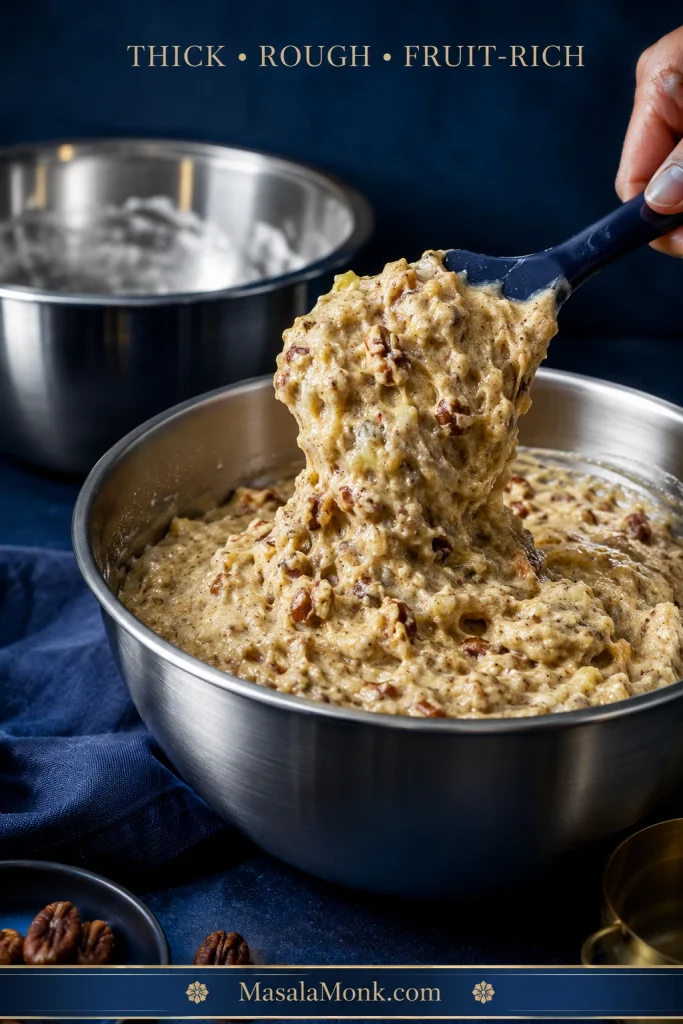
The batter should look thick, rough and visibly full of fruit. Stop folding once the flour disappears. The layers are ready when the centers look set, spring back gently under a fingertip and a skewer comes out without wet batter. Once cool, the crumb should be moist and tender, not glossy, gluey or pudding-like.


Three-Layer Hummingbird Cake: The Recipe

What this version is aiming for: the rich, fruit-heavy character that makes Hummingbird Cake distinctive, with a clear line between deeply moist and gummy. The banana is weighed, one small can of pineapple goes in with its juice, and the batter is spread across three relatively shallow layers. The cream cheese frosting relies on butter and cool handling for much of its structure, so its tang doesn’t have to disappear under a mountain of powdered sugar.
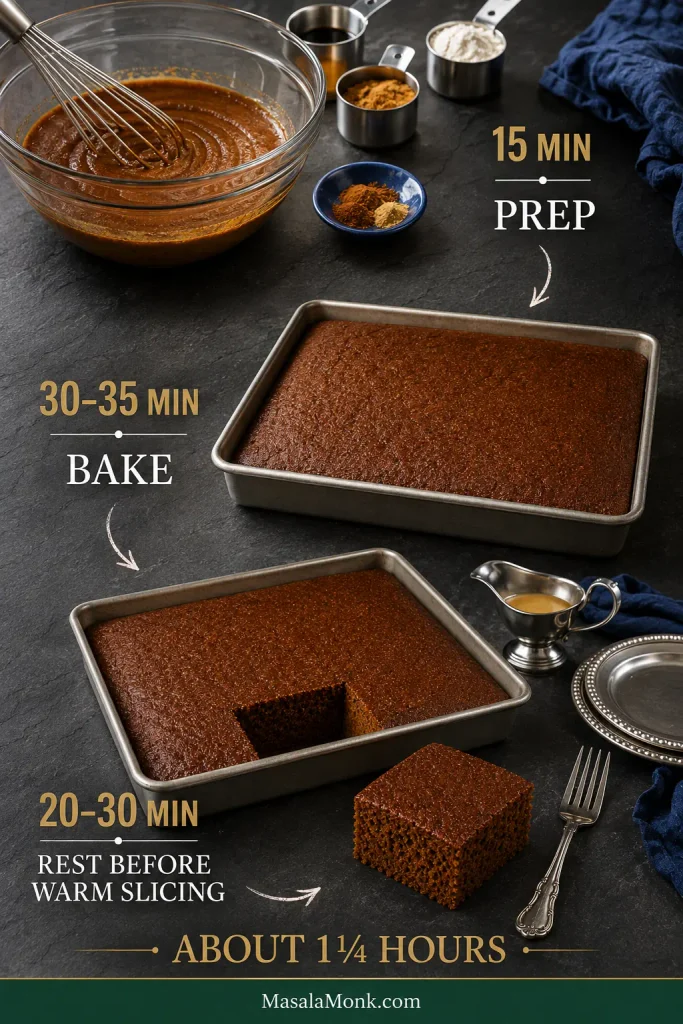
YieldOne three-layer 8-inch / 20-cm cake
Serves12 generous or about 16 smaller slices
Active timeAbout 50 minutes
Bake28–34 minutes; begin checking at 28
Total timeAbout 4 hours, including cooling and chilling
Oven350°F / 177°C conventional / about 160°C fan
Make aheadExcellent prepared a day before serving

Ingredients

Use the gram amounts if you have a kitchen scale. Cup measurements are included for convenience, but flour and mashed banana are both easy to misjudge by volume.

For the Cake

  • 150 g chopped pecans — about 1⅓ cups, divided
  • 375 g all-purpose flour — 3 cups, spooned and leveled
  • 1 teaspoon baking soda
  • 1 teaspoon baking powder
  • ¾ teaspoon fine salt
  • 1½ teaspoons ground cinnamon
  • ¼ teaspoon ground allspice
  • 3 large eggs, preferably at room temperature
  • 1 cup / 240 ml neutral oil, such as vegetable or canola oil
  • 1 cup / 200 g granulated sugar
  • 125 g packed light brown sugar — about ½ cup + 2 tablespoons
  • 2 teaspoons vanilla extract
  • 360 g mashed very ripe banana — about 1½ cups or roughly 3 large bananas after peeling; use bananas that are soft, deeply spotted and fragrant
  • 1 x 8-ounce / 227-g can crushed pineapple in juice, undrained; with a larger can, weigh out 227 g of fruit and juice together

For the Cream Cheese Frosting

  • 300 g unsalted butter — about 1⅓ cups, softened but still cool
  • 300 g confectioners’ / powdered sugar — about 2½ cups, sifted if lumpy
  • 2 teaspoons vanilla extract
  • ¼ teaspoon fine salt
  • 16 ounces / 452 g full-fat block-style cream cheese, chilled and cut into small pieces

The frosting amount is enough for two sensible filling layers and a comfortable rustic coat over the top and sides. Make extra only if you want an unusually thick coat or elaborate piping.

Equipment: three 8-inch / 20-cm round cake pans, parchment, two large bowls, a whisk, flexible spatula, cooling racks and preferably a kitchen scale. The batter is mixed by hand; use a hand or stand mixer for the frosting.

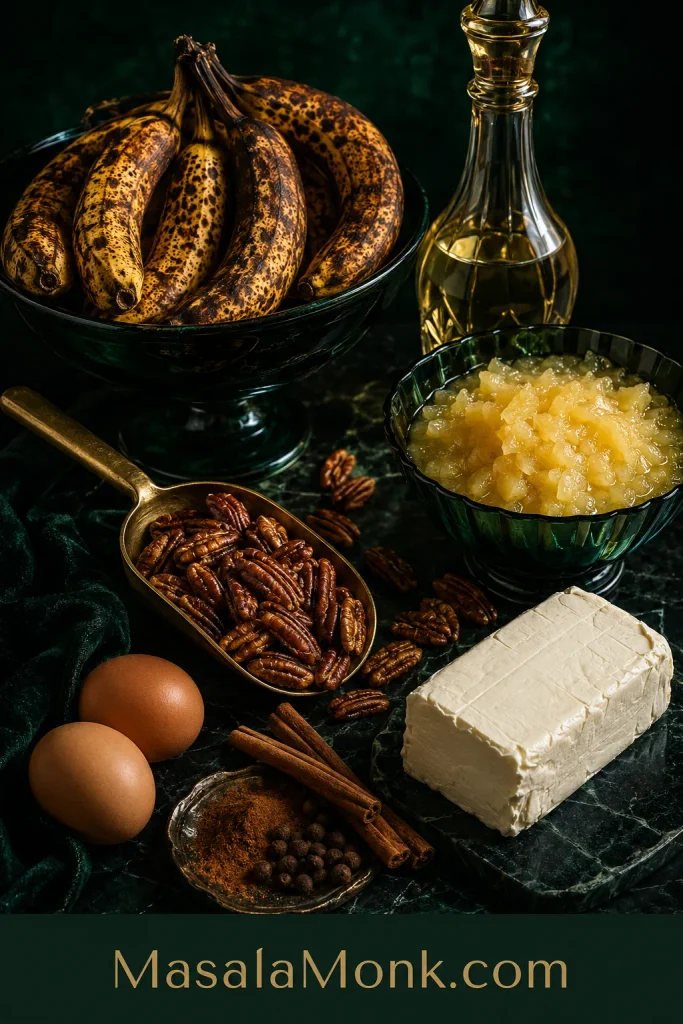
Dark green still life with very ripe bananas, crushed pineapple and juice, toasted pecans, eggs, oil, spices and a block of cream cheese.
Weigh the mashed banana when you can; fruit count varies too much to be a reliable moisture measure.

Method

Prepare the Batter

  1. Heat the oven and prepare the pans. Preheat to 350°F / 177°C conventional / about 160°C fan. Grease three 8-inch / 20-cm round pans, line the bottoms with parchment and lightly grease the parchment.
  2. Toast the pecans. Spread the chopped pecans on a baking sheet and toast for 5–7 minutes, starting to watch closely at 5. Stir or shake the tray once. Take them out when they smell deeply nutty and have darkened slightly. Cool completely. Reserve about 30 g for the finished cake and use the remaining 120 g in the batter.
  3. Mix the dry ingredients. Whisk the flour, baking soda, baking powder, cinnamon, allspice and salt in a large bowl, breaking up any obvious flour lumps.
  4. Mix the wet ingredients. In another large bowl, whisk the eggs and oil together. Add both sugars and the vanilla, then stir in the mashed banana and crushed pineapple with all of its measured juice.
  5. Fold the batter gently. Pour the wet mixture into the flour mixture and fold with a flexible spatula. Add the 120 g toasted pecans while a few dry streaks remain, then stop as soon as the flour disappears. The finished batter should look thick, rough and crowded with fruit.
  6. Divide it evenly. The batch makes roughly 1.8 kg of batter, so aim for about 600 g per pan. Exact grams are not important; similar layer depths are.
Thick Hummingbird Cake batter lifted on a spatula from a metal bowl, with visible fruit and pecan pieces and a second bowl in the background.
Before the pans go in, scrape the bowl once more. Thick batter can hide dry flour at the bottom.

Bake and Cool the Layers

  1. Bake the layers. Put all three pans on one rack near the center of the oven when they fit with some air around them. Otherwise stagger them across two racks. Begin checking at 28 minutes; expect the bake to fall somewhere around 28–34 minutes.
    Using two racks? Leave the pans alone during the early bake. Once the centers have visibly begun to set, swap the upper and lower pans if your oven is browning unevenly.
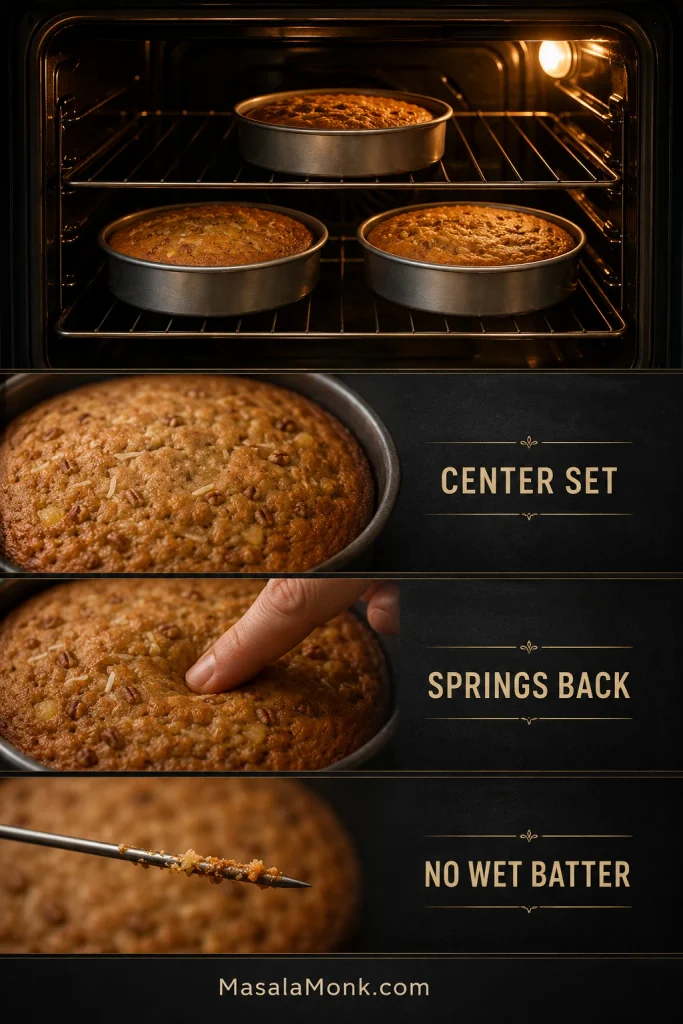
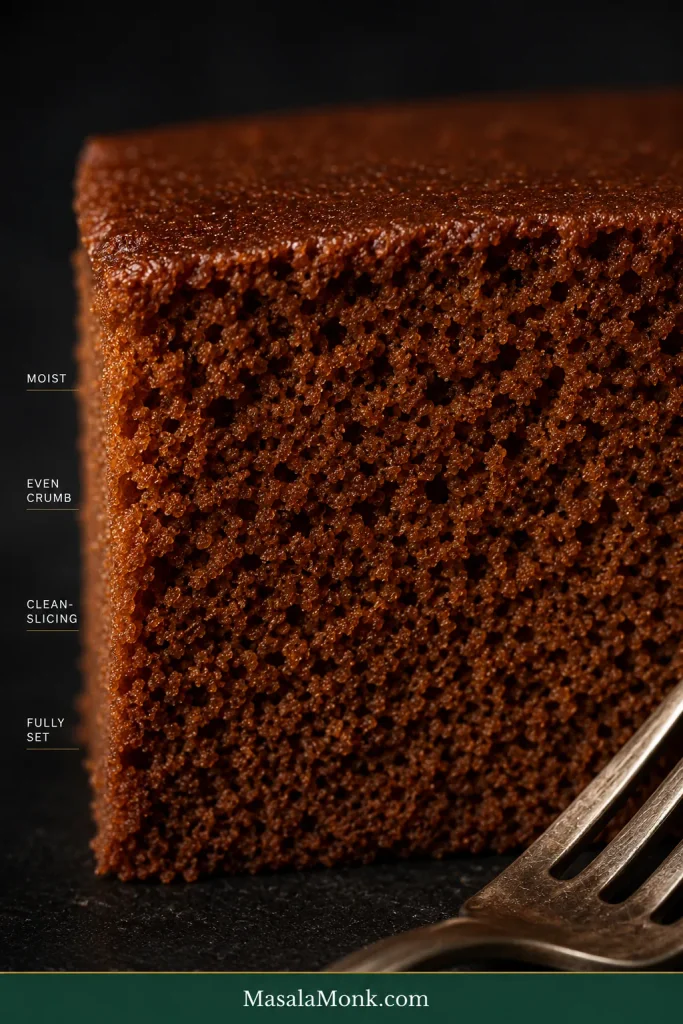
    They’re done when: the wet shine in the center has disappeared, a light fingertip press springs back and a thin skewer comes out without wet batter. A few moist crumbs are fine.
  2. Cool completely. Leave the layers in their pans for about 10 minutes, then turn them onto wire racks and peel away the parchment. Let them cool fully before frosting. A 30–60 minute chill afterward can make the layers easier to handle and stack, but it isn’t a substitute for cooling them first.
Cake doneness guide showing pans in an oven, a set cake center, a fingertip springback test and a skewer checking the crumb.
Matching pans can finish a few minutes apart. Check each center for set, springback and no wet batter.

Make the Cream Cheese Frosting

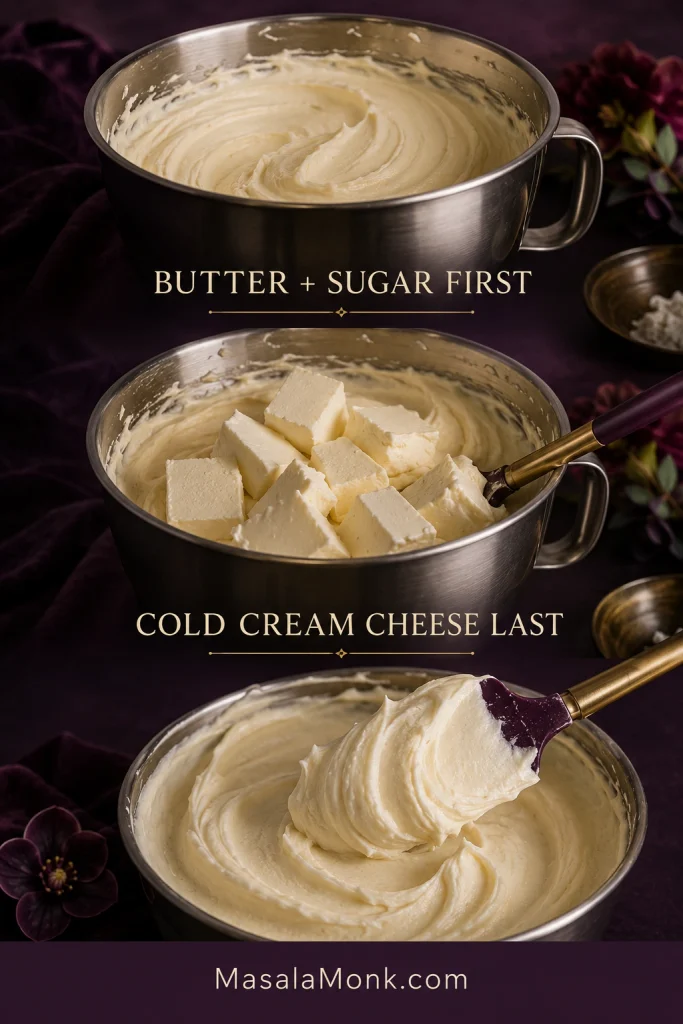
  1. Make the frosting base. Beat the slightly cool butter until smooth. Gradually beat in the powdered sugar, then add the vanilla and salt.
  2. Add the cream cheese last. Take the cream cheese from the refrigerator when you begin making the frosting. Add it to the finished butter-sugar base a few pieces at a time on low to medium-low speed. Stop once the frosting is smooth. Longer beating can make cream cheese frosting softer.
  3. Check the consistency. Lift your spatula. A soft peak should hold and a swipe of frosting should stay where you put it. When the frosting slowly slumps, refrigerate it for 20–30 minutes before deciding it needs more sugar.
Three-stage cream cheese frosting guide showing butter and powdered sugar first, cold cream cheese pieces added afterward, and finished thick frosting.
Smaller pieces of cold block cream cheese incorporate faster, limiting mixer time and helping the frosting stay thick.

Stack and Finish the Cake

  1. Stack the cake. Put the first layer on a cake plate or board and spread about 170 g frosting over the top. Repeat with the second layer, then add the third. Should the stack begin drifting sideways, refrigerate it for about 20 minutes before continuing.
  2. Frost and finish. Cover the top and sides with the remaining frosting. A relaxed coat suits Hummingbird Cake; nothing has gone wrong because the sides are not ruler-straight. Scatter over the reserved pecans, or add dried pineapple flowers for a more celebratory finish.

Refrigerate the assembled cake for about 20–30 minutes, or until the frosting feels firm enough for a clean first cut. For the best eating texture, give chilled slices about 15–20 minutes at a comfortable room temperature before eating.

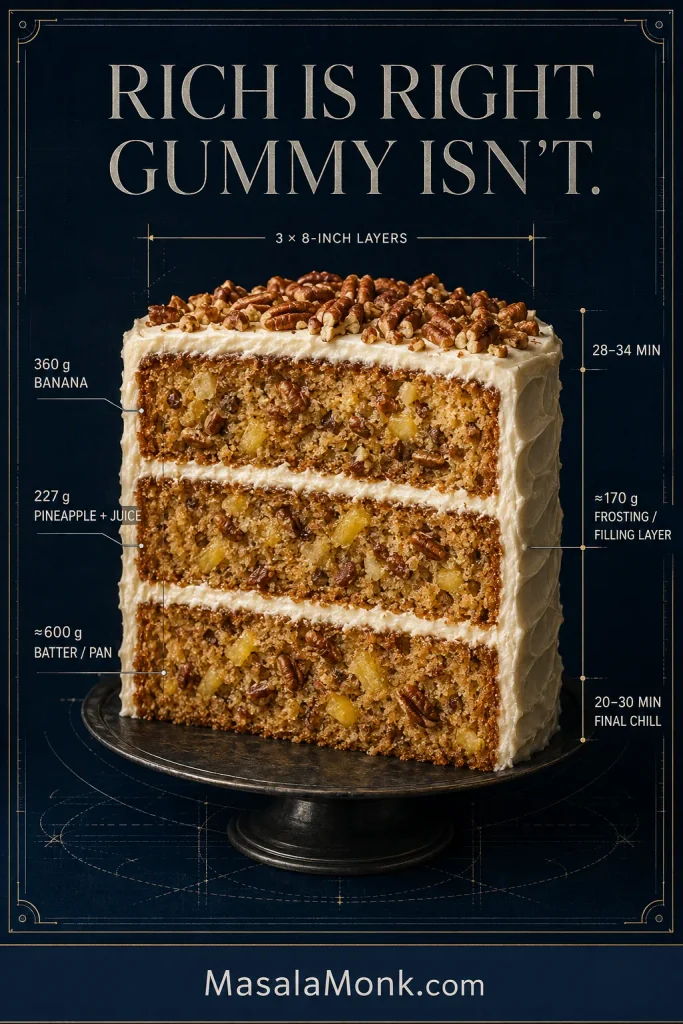
Hummingbird Cake blueprint centered on a three-layer cutaway with measurements for banana, pineapple, batter per pan, bake time, frosting and final chilling.
The structural numbers matter most: fruit, batter depth, bake cues and frosting consistency. Perfectly straight sides do not.

If your pans are ready, that’s everything you need to bake the cake. The rest is here for the moment you cut into it and wonder whether the crumb looks right, where the pineapple went, or why the frosting isn’t behaving the way you expected.

Already baked it? Check the crumb · Find the pineapple · Fix the frosting · Troubleshooting


Is Hummingbird Cake Supposed to Be Dense?

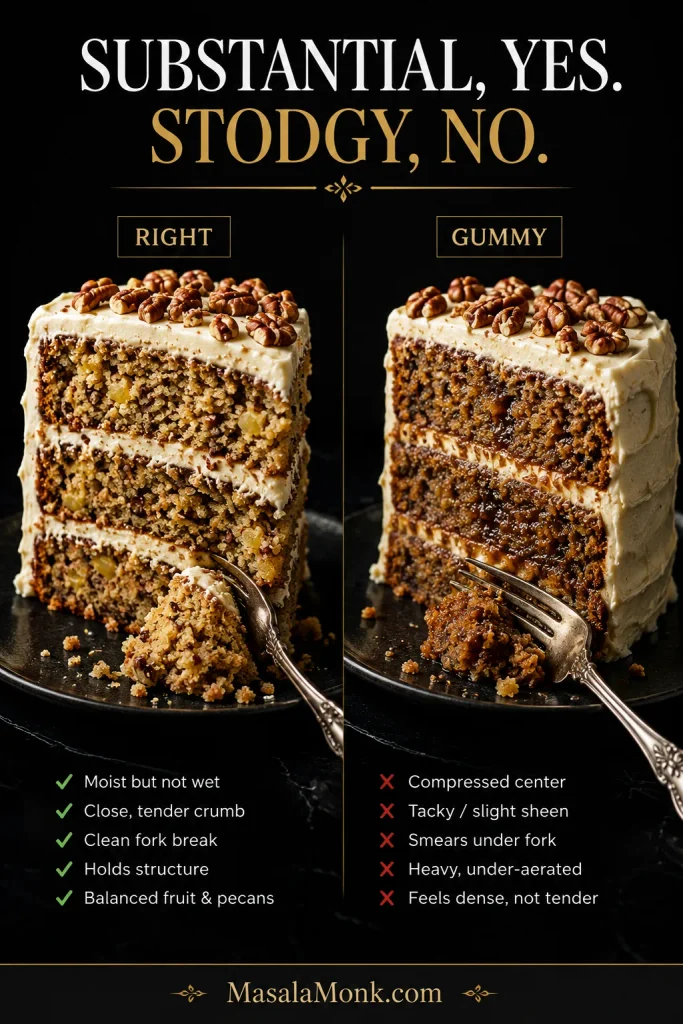
Substantial, yes. Stodgy, no. Hummingbird Cake naturally has more heft than a fluffy vanilla butter cake. Banana, pineapple, oil, eggs and pecans all contribute to a richer, closer crumb.

A good slice looks moist without looking shiny. Press a fork through the center and a piece comes away cleanly, with the occasional bit of pineapple or toasted pecan along the way. That’s the texture worth aiming for: generous and substantial, but still unmistakably cake.

A center that smears into paste is different. So is a rubbery, compressed crumb. Wetness usually points back toward bake time, fruit quantity or layers that were too deep; a tight, rubbery texture can point toward excess flour or too much mixing. A substantial layer that slices neatly and tastes good needs no fixing.

That’s the reassuring part of this cake: a layer can look lower and richer than the sponge cakes you may know and be exactly as it should be. The fork should meet cake, not wet paste.

Side-by-side Hummingbird Cake slices comparing a moist structured crumb with a darker, compressed gummy crumb that smears under a fork.
Let the cake cool before diagnosing it. Warm fruit-heavy crumb can feel wetter than the same layer once settled.

Center looks genuinely wet or gummy? Jump to troubleshooting.

Why Does Hummingbird Cake Sometimes Taste Like Banana Bread?

Banana is the loudest fruit in the room. It brings aroma, sweetness, moisture and fruit solids all at once, which makes it easy for the pineapple to disappear into the background.

Hummingbird Cake shouldn’t simply eat like frosted banana bread. A wet or underbaked crumb can push it in that direction even when the banana quantity is reasonable, and extra banana makes the effect stronger.

Weigh the mashed banana and stop at 360 g. Any extra is better used in banana bread, where a strongly banana-forward crumb is exactly the point.

Pineapple in Hummingbird Cake: Drain It or Don’t?

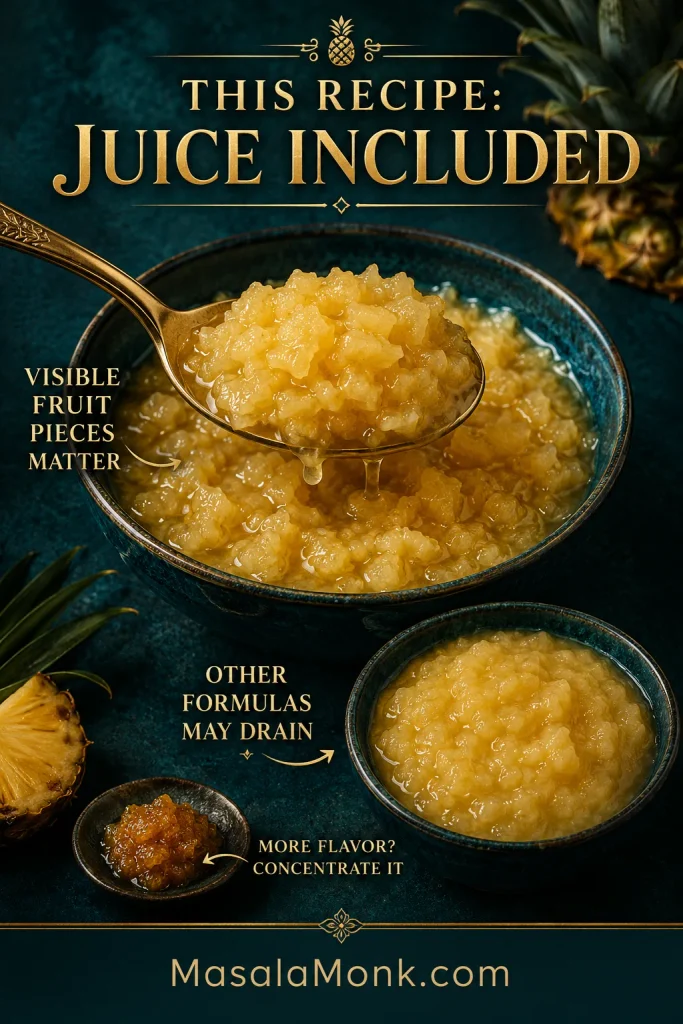
Use all 227 g here, juice included.

That isn’t a universal Hummingbird Cake rule. A wetter formula or one with more fruit may need the pineapple drained.

The stranger problem is putting a whole can of pineapple into a cake and barely tasting it afterward. Choose crushed pineapple that still resembles tiny pieces of fruit instead of smooth pulp. Those fragments have a better chance of surviving the bake as something you can actually notice in a slice.

For stronger pineapple flavor, concentrate it instead of making the batter wetter. A very thin layer of thick pineapple jam or pineapple curd between the layers gives you a brighter burst of fruit. Keep the filling restrained so the layers still stack comfortably.

The pineapple doesn’t need to dominate. Finding a small piece here and there against banana and toasted pecan is enough to keep the slice changing as you eat it.

Fresh pineapple: use it in a recipe designed for it. Chopped fresh pineapple does not bring exactly the same balance of fruit and liquid as canned crushed pineapple with juice, so canned remains the predictable choice for this batter.

Pineapple guide showing crushed pineapple with juice, visible fruit pieces, smoother pineapple pulp and concentrated pineapple filling.
Using a larger can? Stir fruit and juice together before weighing 227 g so the moisture ratio stays consistent.

Ready to bake? Back to the ingredient amounts.

Cream Cheese Frosting Should Taste Like Cream Cheese

Hummingbird Cake is already sweet and fruit-rich, so the frosting needs contrast. Its cream-cheese tang should be obvious when you eat it with the cake.

Runny frosting often sends bakers straight to the powdered-sugar bag. Temperature is a better first lever here. The generous amount of butter and cool cream cheese give the frosting the body it needs for a layer cake while letting the cream-cheese flavor remain clear.

Getting the Consistency Right

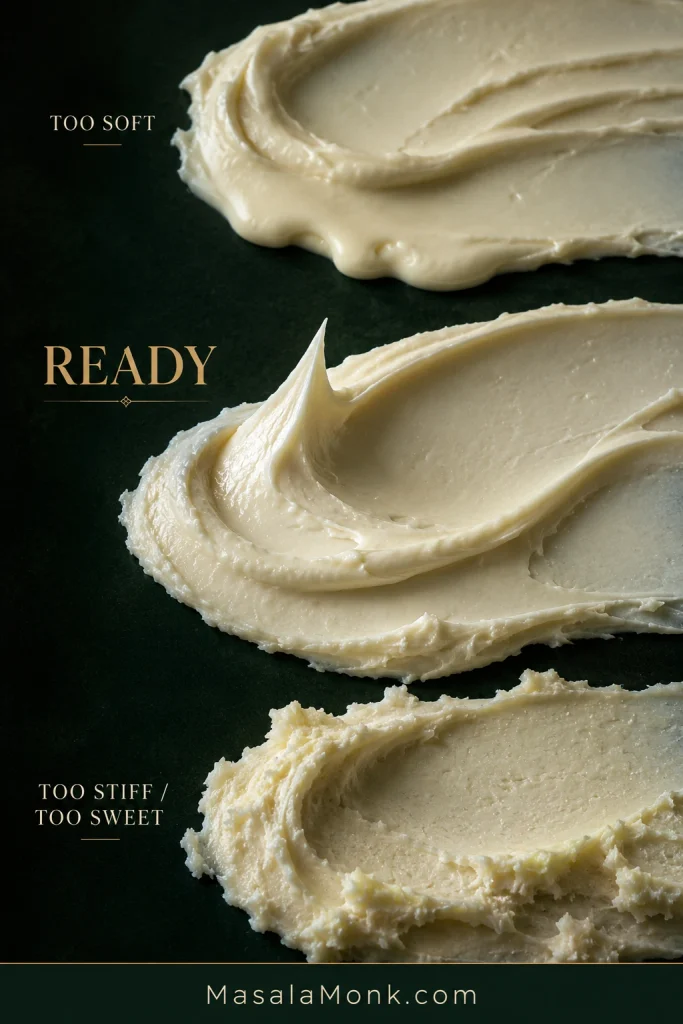
  • Too soft: a swipe slowly slumps or the frosting creeps down the bowl. Refrigerate it for 20–30 minutes.
  • Ready: a lifted spatula leaves a soft peak that holds, and the frosting spreads across a cooled layer without tearing it.
  • Too stiff or too sweet: it becomes very firm or grainy and powdered sugar starts drowning out the cream-cheese flavor.
Three swipes of cream cheese frosting labeled Too Soft, Ready, and Too Stiff or Too Sweet, showing their different consistencies.
Ready frosting should spread over a cool layer without tearing crumbs or losing the ridges you leave behind.

Firm American block cream cheese is easiest to work with. Where only softer spreadable cream cheese is available, choose the firmest full-fat version you can find and keep the frosting cool. Sometimes twenty minutes in the refrigerator is all a loose bowl needs.

The finished frosting should feel creamy against the fruit-rich crumb, not like a thick layer of sweetness sitting on top of it. For detailed piping or sharp edges that must hold for a long time at room temperature, a more structured buttercream is the better choice.

Frosting the cake now? Back to the frosting steps · Stack and finish · Troubleshooting

Hummingbird Cake Pan Sizes: Why Layer Depth Matters

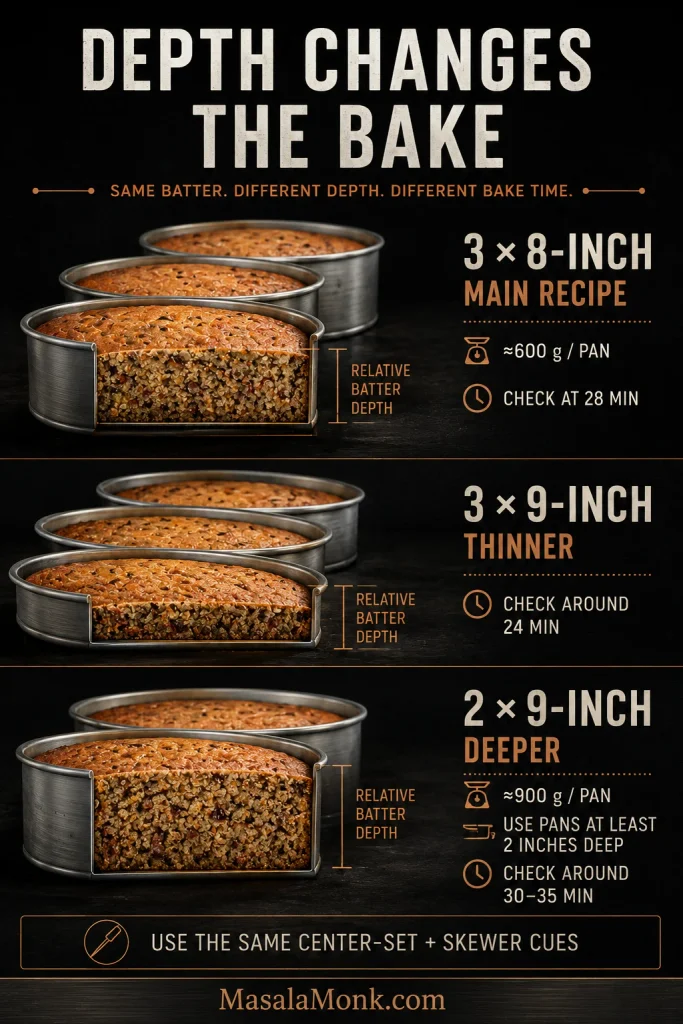
Three layers aren’t only about appearance. They keep this fruit-heavy batter relatively shallow, allowing the center to set before the outside has spent too long in the oven.

Pan setupWhat to expect
3 x 8-inch / 20-cm roundsMain recipe. About 600 g batter per pan; begin checking at 28 minutes.
3 x 9-inch / 23-cm roundsThinner layers. Begin checking around 24 minutes and use the same center-set and skewer cues.
2 x 9-inch / 23-cm roundsUse pans at least 2 inches deep. Begin checking around 30–35 minutes and rely on the center-set cues for the endpoint.

A 9×13 sheet cake, Bundt cake, cupcakes or a smaller 6-inch cake changes the layer depth enough to deserve directions written for that format instead of a guessed conversion.

The timer tells you when to start looking. Batter depth and the cake tell you when to stop baking.

Pan-depth guide comparing three 8-inch cake pans, three shallower 9-inch pans and two deeper 9-inch pans with batter amounts and suggested check times.
When changing pans, compare batter weight and depth—not fill lines alone. Shallower layers usually reach the center sooner.

Using the main three 8-inch pans? Back to baking the layers.

Troubleshooting: What Went Wrong?

If you’ve already cut the cake and something looks wrong, start here. The longer sections explain the details; this table is for the ten-second diagnosis.

ProblemMost likely causeTry this
Tastes like banana breadBanana dominates or crumb is too wetWeigh the banana; choose pineapple with visible fruit pieces
Dense but tenderOften normalJudge the crumb, not the height
Gummy or stodgyUnderbaked, too wet, too deep or overmixedCheck fruit amounts, pan depth and doneness
Wet centerNeeds more baking or batter is too deepKeep baking until the center sets
Dry and heavyToo much flour or oven timeWeigh flour; check earlier
Pineapple disappearsFruit is mild or too finely processedUse visible fruit pieces or concentrated filling
BlandUnripe banana, weak pineapple, untoasted nuts or low seasoningUse deeply spotted bananas and toast the pecans
Tastes too much like carrot cakeSpices are crowding out the fruitKeep secondary spices restrained
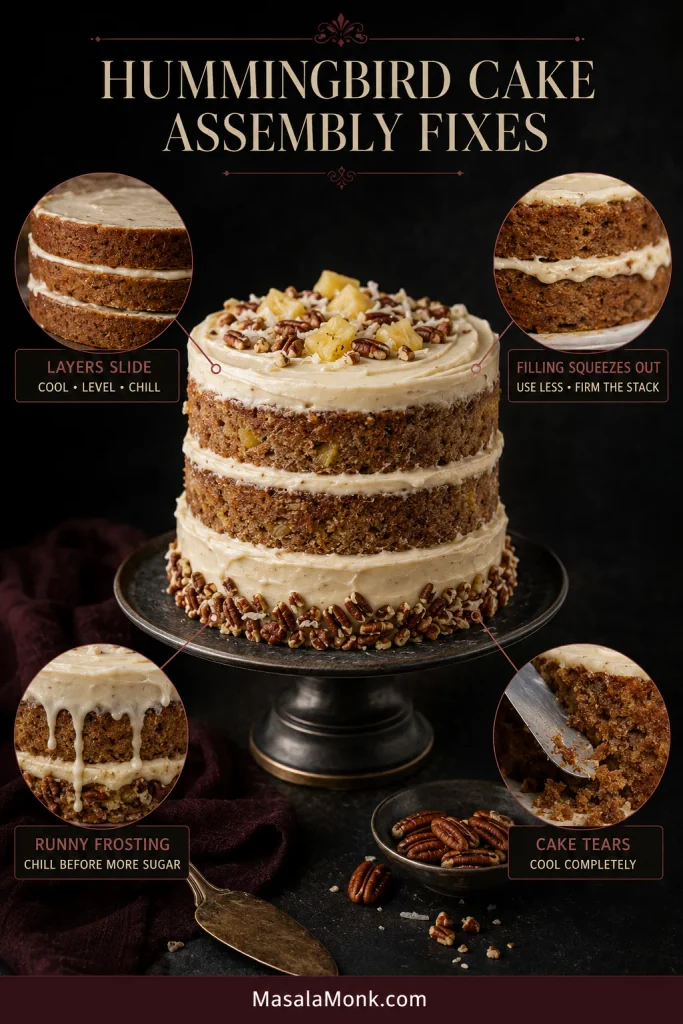
Runny frostingWarm/soft cream cheese, warm room or overmixingRefrigerate before adding more sugar
Filling squeezes outToo much loose frostingUse less filling; firm the stack before continuing
Layers slideWarm cake/frosting, domes or overfillingCool, level if needed, then continue
Cake tears while frostingLayers are too warm or delicateCool completely; chill briefly if needed
Outside done, center rawDeep batter or hot ovenCheck pan setup; tent a browning top if needed

Assembly Problems: Fix the Stack First

Hummingbird Cake troubleshooting graphic with a central layer cake and close-ups showing sliding layers, squeezed filling, runny frosting and cake tearing.
A warm layer can soften frosting, which squeezes outward and lets the stack slide. Fix the earliest problem first.

Back to the recipe method · Back to top

What You Can Change

  • Walnuts: swap them for the pecans in the same amount and toast them first.
  • No nuts: leave them out. Nothing structural needs replacing.
  • Coconut: common in some versions, but not essential to the classic banana-pineapple-pecan cake.
  • Frozen bananas: thaw completely, mash them with the liquid they release, then weigh out 360 g.
  • Butter instead of oil: use a recipe built around butter or a butter-oil blend. Neutral oil is one reason these refrigerated layers remain moist.
  • More pineapple: put concentrated fruit between the layers instead of another can of liquid-heavy pineapple in the batter.

Gluten-free, vegan and substantially reduced-sugar Hummingbird Cakes change the structure enough to deserve recipes of their own. At some point a substitution list simply becomes a different cake.

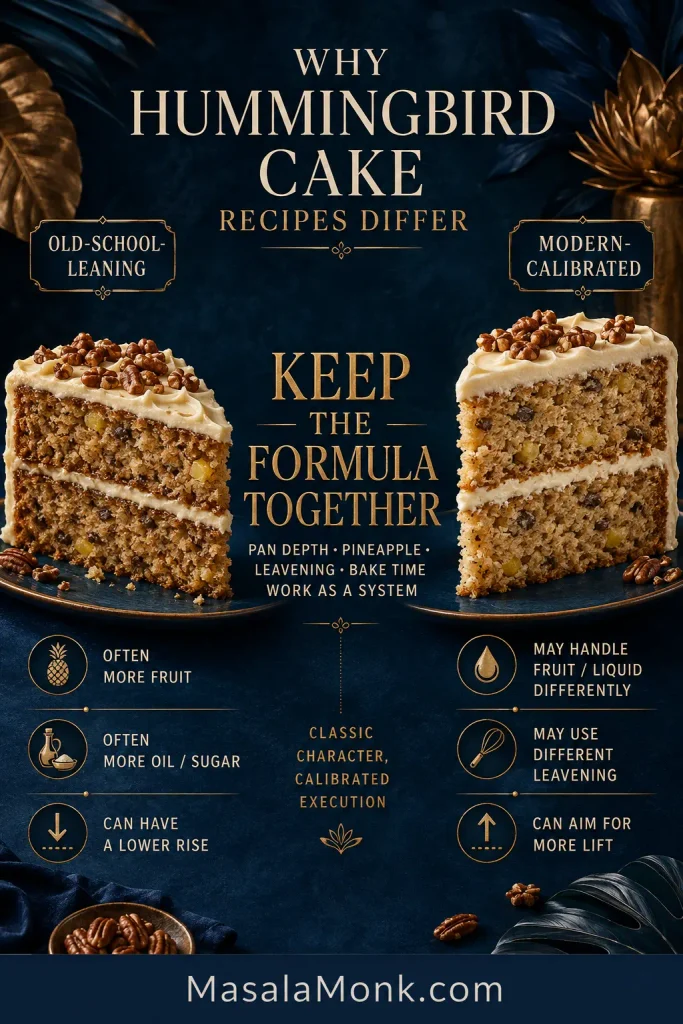
Why Hummingbird Cake Recipes Differ

Hummingbird Cake recipes can look surprisingly different because they aren’t all working with the same balance of fruit, fat and liquid. Some old-school versions are exceptionally rich, with more banana, oil and sugar and sometimes no baking powder. Others pull back a little and rise somewhat higher.

The 1978 Hummingbird Cake made famous by Southern Living belongs firmly to that lavish old-school tradition. Modern versions may handle the pineapple, leavening or pans differently because the rest of the recipe changed too.

Keep the formula together. Pineapple handling, leavening, pan depth and bake time only make sense alongside the rest of the recipe they belong to. Borrow one instruction from a very different version and an otherwise sensible piece of advice can suddenly work against you.

Comparison of old-school-leaning and modern-calibrated Hummingbird Cake formulas with notes about fruit, fat, leavening, pan depth and bake time.
Different pineapple instructions often reflect different formulas. Compare fruit, liquid, flour and batter depth before borrowing one rule.

Bake It Today, Serve It Tomorrow

Hummingbird Cake is unusually friendly for a three-layer celebration cake. The oil and fruit help the crumb stay moist, and an overnight rest does it no harm. That’s useful when the cake is for a birthday, holiday table or gathering and serving day already gives you plenty to think about.

Does Hummingbird Cake need to be refrigerated? Once it is covered with cream cheese frosting, yes. Keep the finished cake refrigerated and give chilled slices about 15–20 minutes at room temperature before serving.

Storage, Freezing and Serving

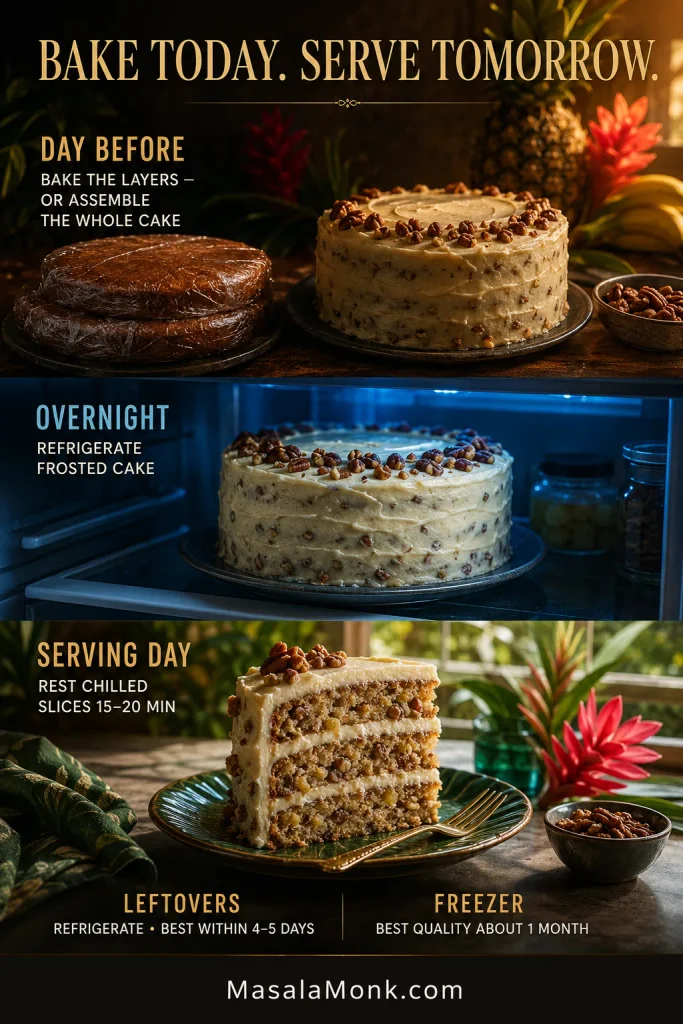
  • The day before: bake and cool the layers completely, wrap them well and refrigerate. Or assemble and frost the entire cake, cover it and refrigerate overnight.
  • Serving day: keep the cake cool until you need it, especially in a warm room. That short rest before eating brings the crumb and frosting back to a much better texture.
  • Leftovers: cover and refrigerate. For the best texture and flavor, aim to finish the cake within about 4–5 days.
  • Freezing: unfrosted layers are easiest. Cool them, wrap tightly and freeze, then thaw in the refrigerator while still wrapped. Firm chilled slices of frosted cake can also be wrapped and frozen. For best quality, use frozen cake or slices within about 1 month.

This is one of those celebration cakes that does not punish you for getting ahead. There is a great deal to be said for opening the refrigerator the next day and finding the difficult part already done.

Make-ahead Hummingbird Cake guide showing wrapped cake layers, a frosted cake refrigerated overnight, a serving-day slice and leftover and freezer guidance.
Cold keeps the cake stable; a short room-temperature rest restores a softer crumb and creamier frosting before serving.

Back to the recipe · Back to top

Why Is It Called Hummingbird Cake? The Jamaican Doctor Bird Story

For a cake now so strongly associated with Southern baking, the earlier trail is wonderfully tropical. Its name points back to Jamaica and its national bird, the red-billed streamer-tail hummingbird known as the Doctor Bird.

The Jamaican Doctor Bird Cake

Versions of Doctor Bird Cake were already circulating in Jamaica-related promotional material by the late 1960s. Visit Jamaica’s archival account preserves an Air Jamaica recipe published in The Daily Gleaner on February 4, 1971. The feature covered dishes served on the airline’s in-flight menu, and the cake took its name from the Doctor Bird — both Jamaica’s national bird and a symbol used by Air Jamaica.

That version was described as a rich pineapple-and-banana dessert loaf. It’s a wonderful contrast with the cake many people picture today: the tropical fruit was already there, but the towering American layer cake came later.

The 1978 Southern Living Cake

In 1978, Mrs. L.H. Wiggins of Greensboro, North Carolina, submitted her Hummingbird Cake to Southern Living. The three-layer recipe became one of the magazine’s best-known desserts and helped turn Hummingbird Cake into a fixture of Southern celebration tables.

That gives the cake an identity that is hard to squeeze into one place. Its name and tropical fruit reach back toward Jamaica; the towering cream-cheese-frosted layer cake became deeply Southern. Both histories are sitting in the same slice.

Food-history poster showing Jamaica's Doctor Bird hummingbird, a 1971 Air Jamaica ring-style Doctor Bird Cake and a 1978 Southern three-layer Hummingbird Cake.
The Jamaican Doctor Bird trail predates the Southern layer cake; the tall cream-cheese-frosted version came later.

For a cake named after something as tiny as a hummingbird, there is nothing timid about it. Three generous layers, soft under a fork and sturdy enough to stand proudly on the plate. Then someone cuts the first slice, and suddenly the cake doesn’t look quite so enormous after all.

Posted on — Leave a comment

Pumpkin Cream Cheese Muffins Recipe: Moist, Spiced & Cream Cheese-Filled

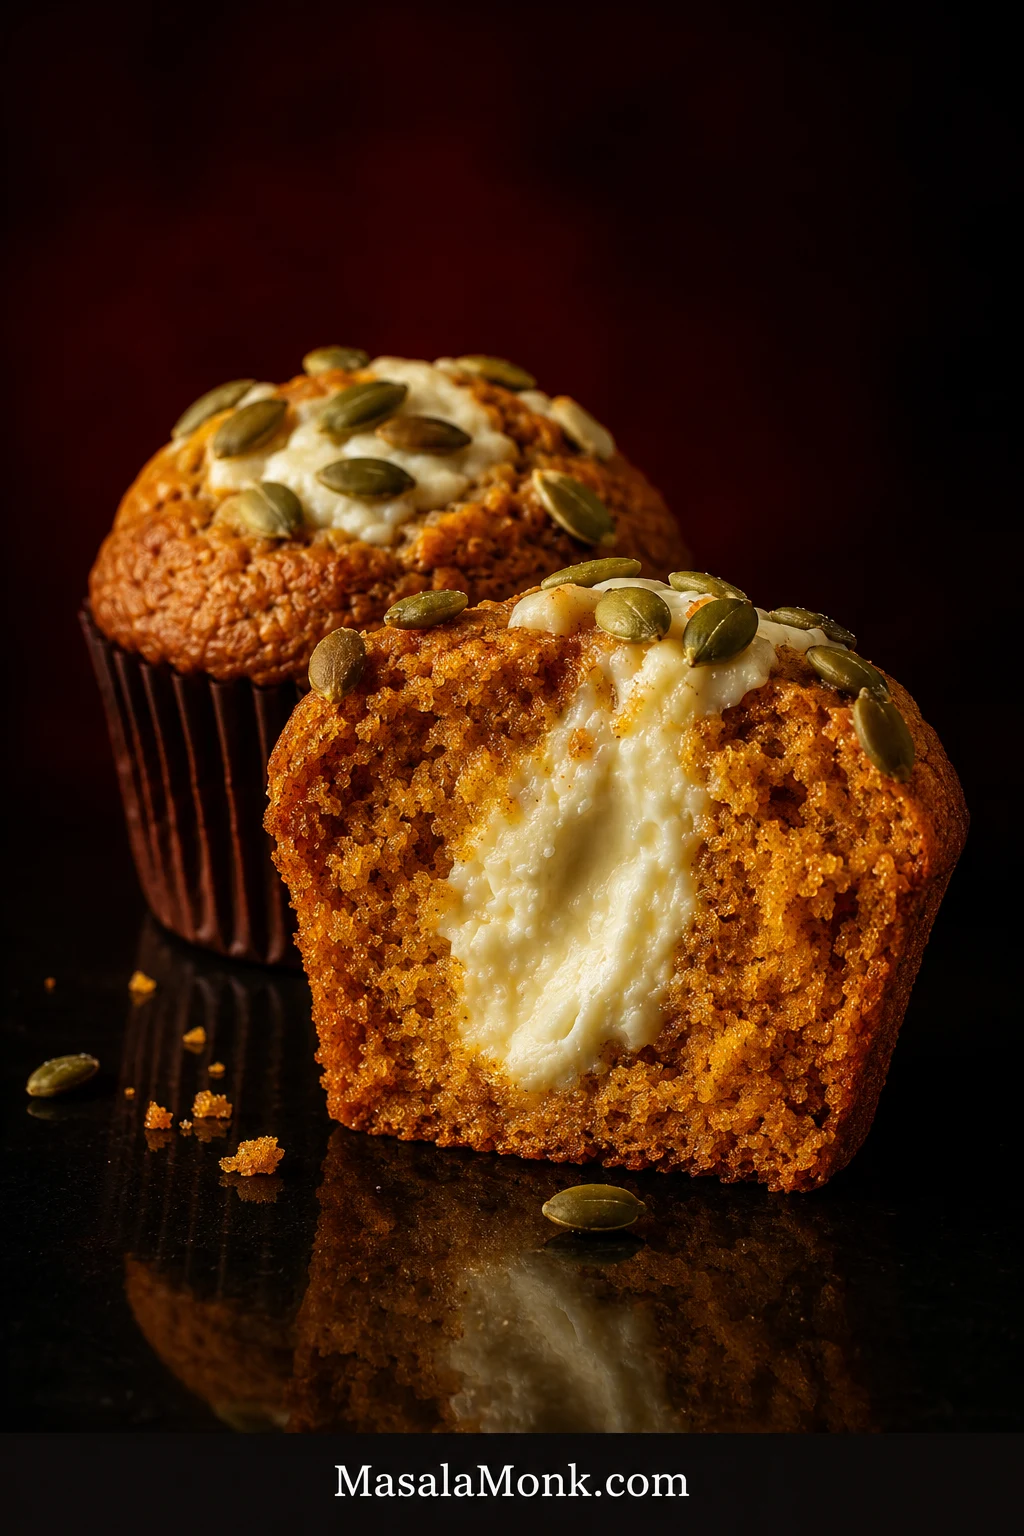
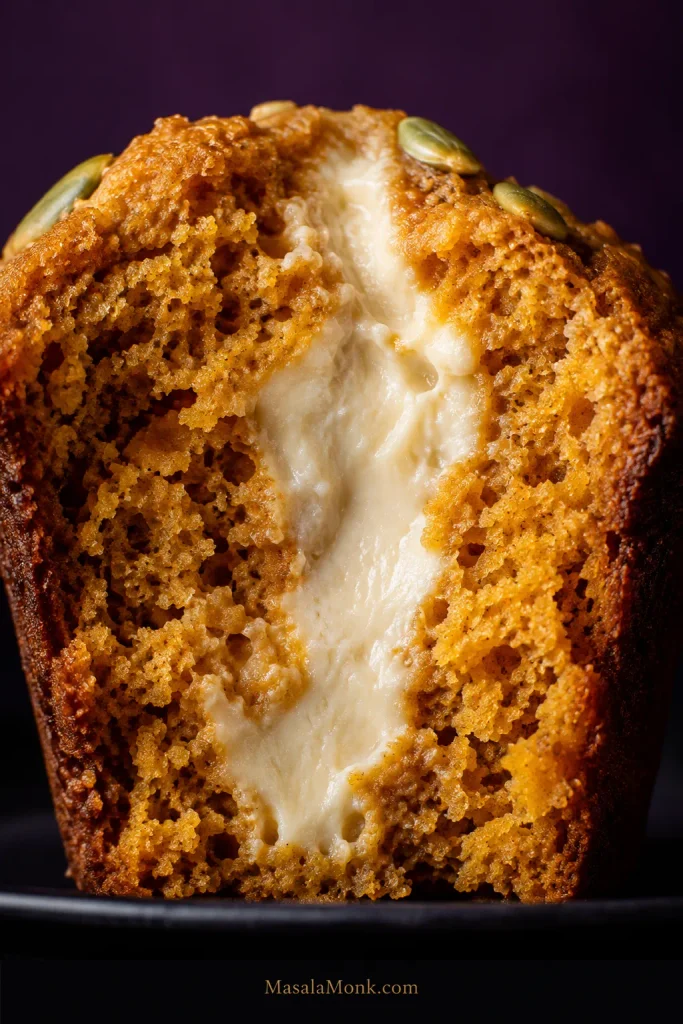
Cut-open pumpkin cream cheese muffin showing a generous white cream cheese center inside orange pumpkin crumb, with a whole pepita-topped muffin behind it.

Cut one of these pumpkin cream cheese muffins open after it has cooled a little and the best part should be obvious: a creamy white filling inside a tender, warmly spiced pumpkin muffin. Roasted pepitas bring a salty crunch to the top, while tangy cream cheese keeps the sweetness in balance.

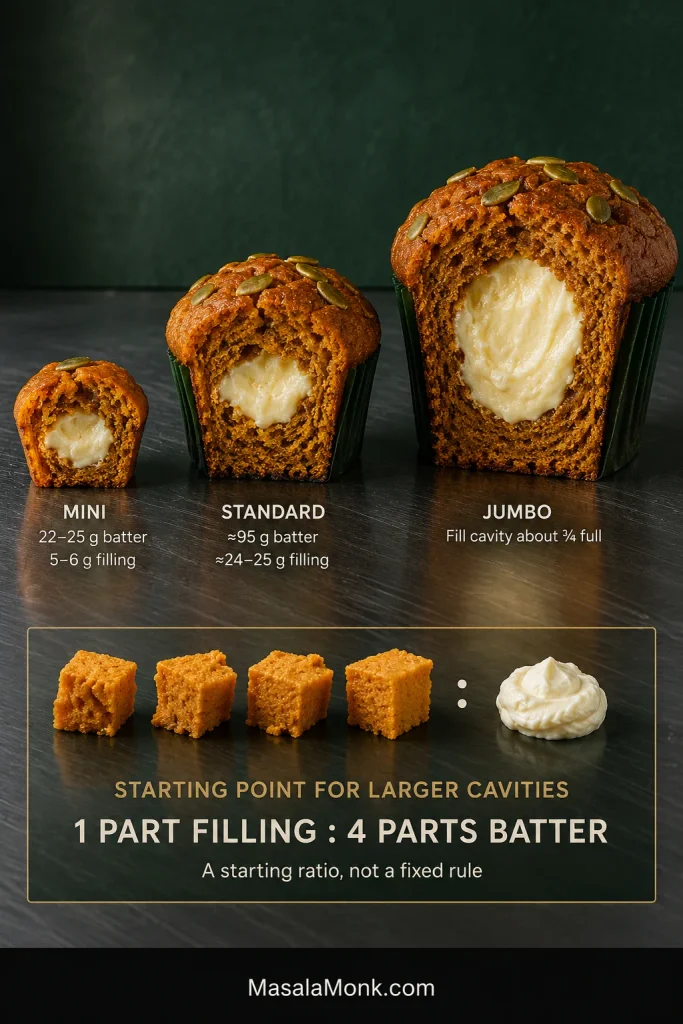
The disappointing version looks promising from above and then gives you bite after bite of pumpkin with barely a streak of cream cheese inside. Here, each standard muffin gets about 1 1/2 tablespoons of filling, piped into the raw batter rather than left as a small dollop at the crown.

There’s no need to freeze the filling first or rest the batter. Once the cream cheese is smooth, the rest is whisk, fold, pipe and bake.

Pumpkin Cream Cheese Muffins Recipe

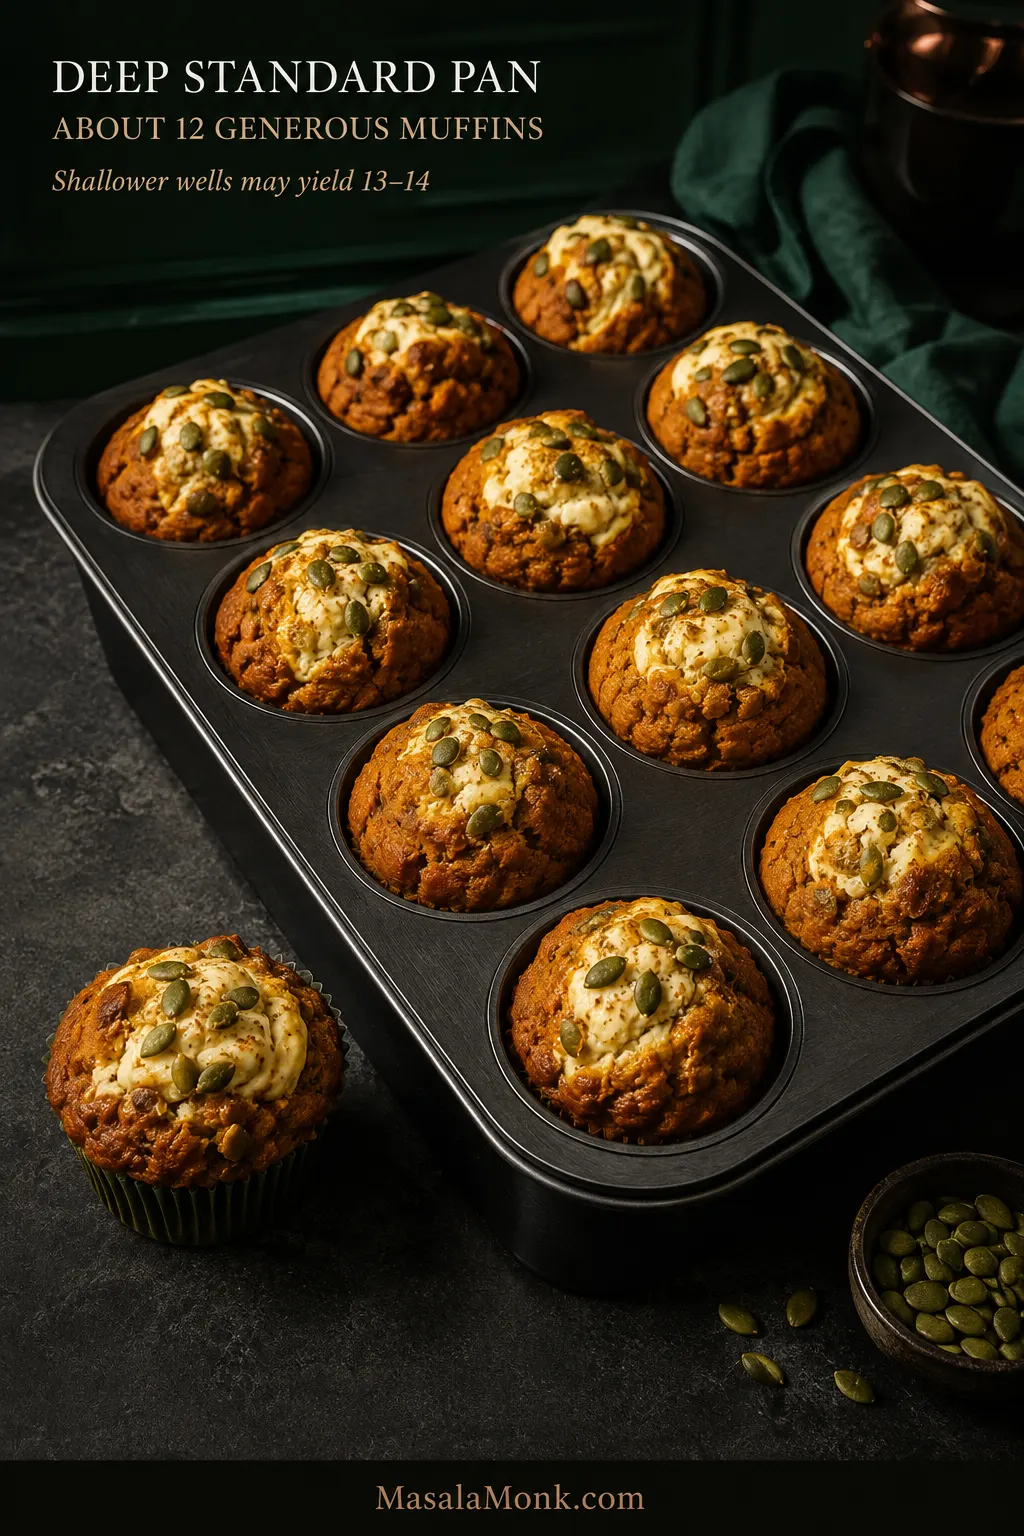
This batch makes about 12 generously filled muffins in a deep standard 12-cup pan. Shallower wells may give you 13 or 14. Let the pan decide the final yield instead of forcing every bit of batter into 12 cups.

Deep 12-cup muffin pan filled with pumpkin cream cheese muffins, with batter portioned high in each lined well.
Use the pan, not the recipe yield, as the final portioning guide. If a shallower cup already looks comfortably full around 85–90 g of batter, move the rest into another liner rather than forcing a taller muffin into too little space.

The target is a tender, warmly spiced pumpkin crumb with enough structure to hold the cream cheese without turning dense or gummy.

  • Yield: about 12 standard muffins; 13–14 in shallower wells
  • Prep: about 25 minutes
  • Bake: about 19–23 minutes
  • Cool before a clean first cut: about 20–30 minutes
  • Conventional oven: 425°F / 220°C, then 350°F / 175°C
  • Fan/convection: as a starting point, reduce both temperatures by about 25°F / 15°C—roughly 400°F / 205°C, then 325°F / 165°C—and begin checking a little earlier; ovens vary
  • Batter rest: none

You will need: a standard muffin pan, liners, two large mixing bowls, a small bowl for the filling, a whisk, a flexible spatula and a piping bag or sturdy zip-top bag. A handheld mixer is convenient for smoothing the cream cheese, but properly softened cream cheese can also be stirred smooth by hand. A kitchen scale is especially useful for the flour and filling.

Cream Cheese Filling

  • 8 oz (226 g) full-fat block cream cheese, softened until pliable but still cool
  • 1/2 cup (60 g) confectioners’ sugar (powdered or icing sugar)
  • 1 tablespoon (8 g) all-purpose flour
  • 1 teaspoon (5 ml) vanilla extract
  • 1/8 teaspoon fine salt

Pumpkin Muffin Batter

  • 2 1/4 cups (280 g) all-purpose flour
  • 2 teaspoons pumpkin pie spice
  • 1 teaspoon ground cinnamon
  • 1 teaspoon baking powder
  • 1 teaspoon baking soda
  • 1/2 teaspoon fine salt
  • 2 large eggs
  • 3/4 cup packed light brown sugar (150 g); dark brown sugar also works
  • 1/3 cup granulated sugar (67 g)
  • 1 1/3 cups (330 g) 100% pumpkin purée
  • 1/2 cup (120 ml) neutral oil, such as vegetable, canola, sunflower or mild avocado oil
  • 1/3 cup (80 ml) whole milk
  • 2 teaspoons (10 ml) vanilla extract

For the Top

  • 1/4 cup (about 30 g) roasted salted pepitas (hulled pumpkin seeds)
  • 1/4 teaspoon pumpkin pie spice, optional

How to Make Pumpkin Cream Cheese Muffins

Prep, Mix the Filling and Batter

  1. Heat the oven. Position a rack in the middle and preheat a conventional oven to 425°F / 220°C. Line the muffin pan.
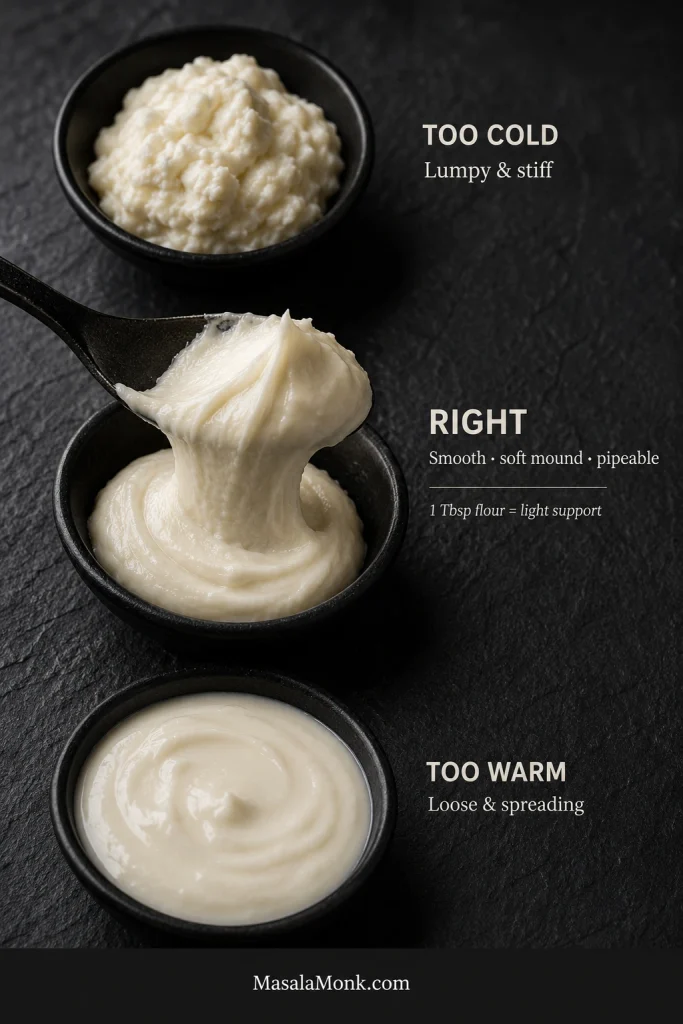
  1. Mix the filling. Smooth the softened cream cheese, then mix in the confectioners’ sugar, flour, vanilla and salt. Scoop some up with a spoon: it should sit in a soft mound briefly instead of running flat. Chill for 15–20 minutes if it has become loose. Transfer to a piping bag or sturdy zip-top bag and cut an opening about 1/2 inch / 1–1.5 cm wide.
Three cream cheese filling consistencies comparing stiff and lumpy, smooth and pipeable, and loose spreading filling.
Temperature usually explains the filling before flour does. Lumpy filling is often still too cold; filling that spreads immediately has usually become too warm. Correct the temperature first so the center stays creamy rather than turning pasty.
  1. Whisk the dry ingredients. Combine the flour, pumpkin pie spice, cinnamon, baking powder, baking soda and salt.
  2. Mix the pumpkin base. In the second large bowl, whisk the eggs and both sugars until smooth. Add the pumpkin purée, oil, milk and vanilla and whisk again.
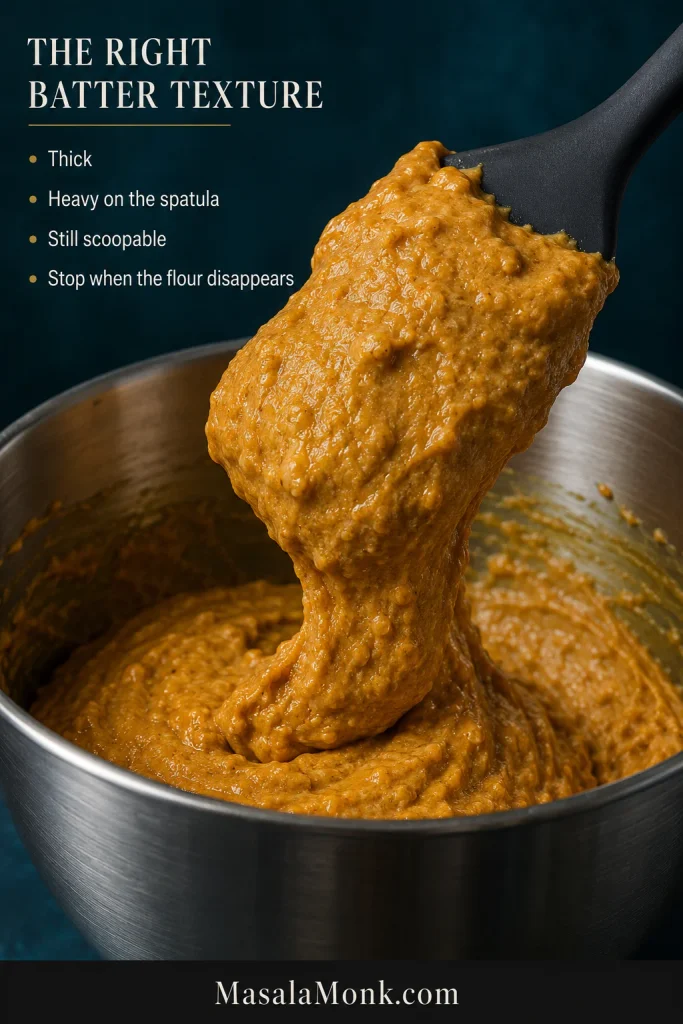
  1. Fold the batter. Add the dry ingredients to the pumpkin mixture and switch to a spatula. Fold until the last visible flour disappears. The batter should sit heavily on the spatula but still scoop easily. A few small lumps are fine. Stop there.
Thick orange pumpkin muffin batter held on a spatula above a mixing bowl, showing a heavy but scoopable consistency.
A few small lumps are a better stopping point than a perfectly smooth batter. Once the flour is incorporated, extra folding can tighten the pumpkin crumb long before the batter starts looking obviously overmixed.

Fill and Top the Muffins

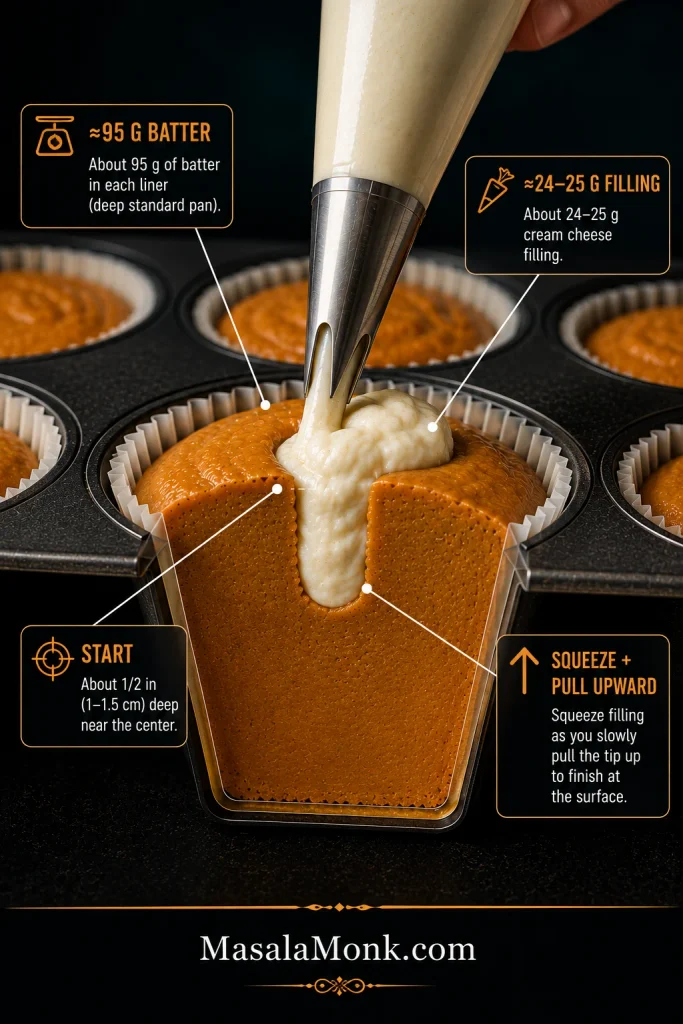
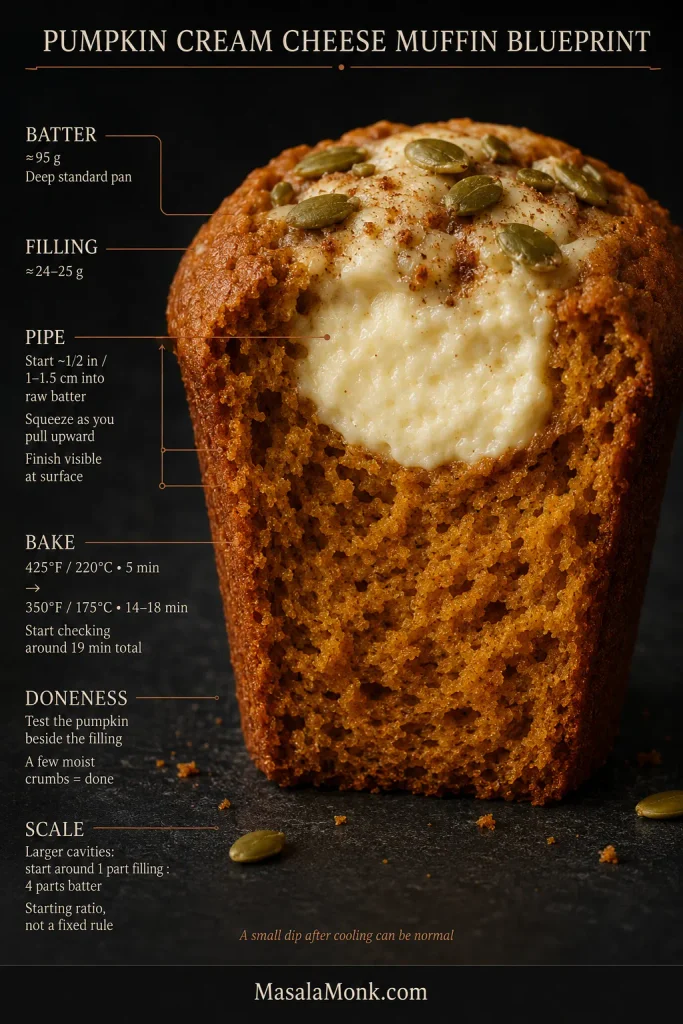
  1. Fill the muffin wells. In a deep standard pan, divide the batter among 12 wells, about 95 g each. Shallower cups may already look full at 85–90 g; use a 13th or 14th liner instead of squeezing in the rest.
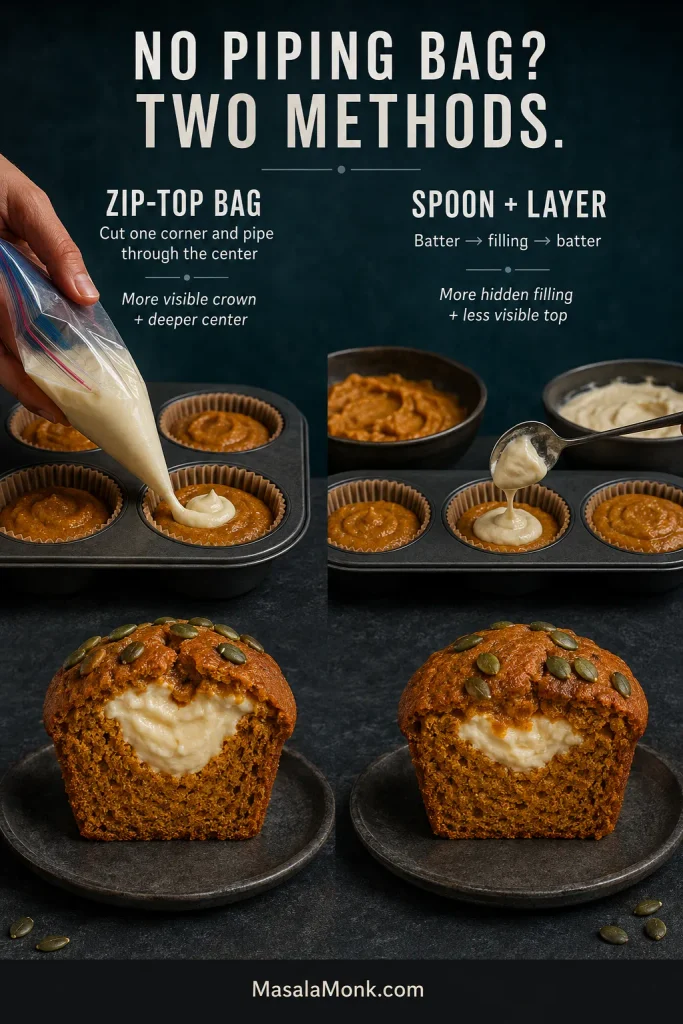
  1. Pipe in the cream cheese. Divide the filling among the muffins, about 24–25 g each when making 12. Insert the tip about 1/2 inch / 1–1.5 cm into the batter. Squeeze as you slowly pull the bag upward, finishing with some cream cheese visible at the surface. Keep the filling away from the liner.
Cutaway of raw pumpkin muffin batter showing cream cheese piped near the center and pulled upward, with pumpkin batter left beneath the filling.
Piping upward creates a narrower vertical pocket instead of a broad cheese layer. That helps preserve pumpkin underneath and around the filling, which matters just as much as getting plenty of cream cheese into the muffin.
  1. Add the pepitas. Toss the pepitas with the optional 1/4 teaspoon pumpkin pie spice, if using, then scatter them around the exposed cream cheese and press very lightly. The white crowns will vary a bit from muffin to muffin. That’s fine.

Bake, Check and Cool

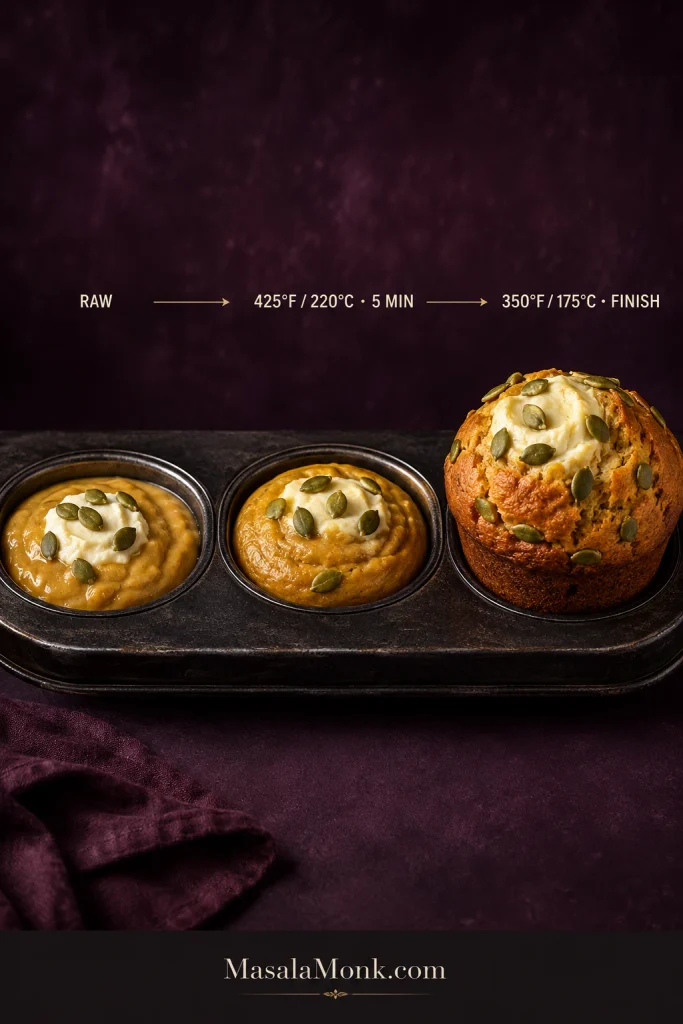
  1. Start hot. Bake at 425°F / 220°C for 5 minutes. The early heat encourages the thick batter to rise quickly. Without opening the oven, reduce the temperature to 350°F / 175°C so the centers can finish without overbaking the tops.
  2. Finish baking. Continue for another 14–18 minutes. Start checking near the early end of the range.
Three stages of a pumpkin cream cheese muffin showing raw batter, early rise after five minutes at 425°F, and the finished muffin at 350°F.
The two-temperature bake works as part of the whole system, not as a shortcut. Thick batter, sensible portioning and fresh leaveners still determine whether the muffin rises well; the hot start simply gives them an early advantage.
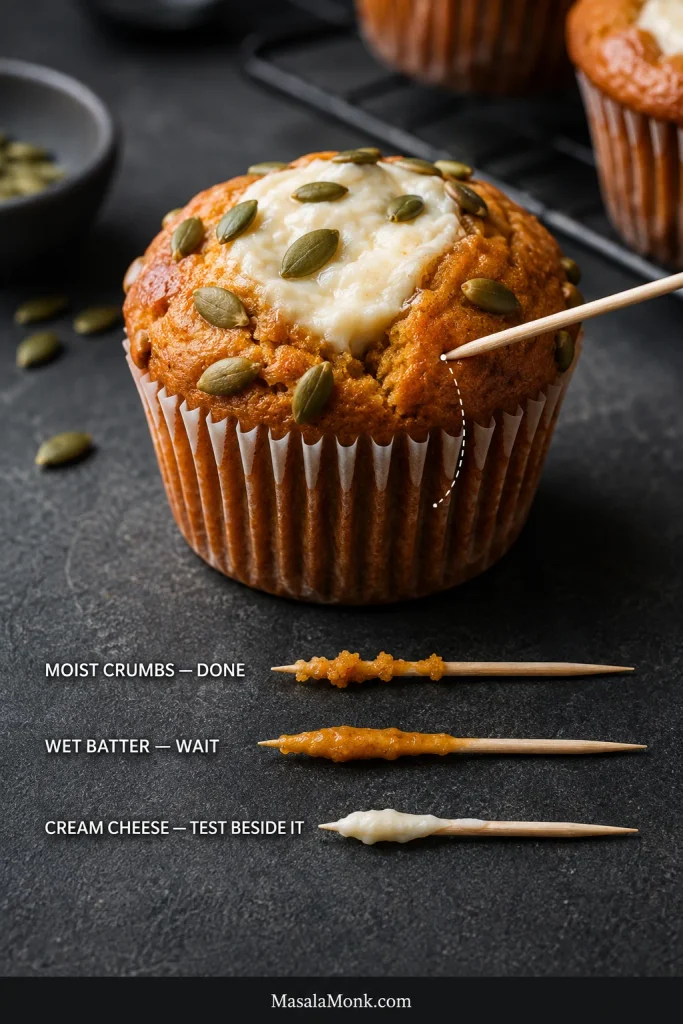
  1. Check beside the filling. Insert a toothpick into the pumpkin portion just off-center. A few moist crumbs are fine; wet batter isn’t. The top should spring back lightly and the exposed cream cheese should look set and more matte than glossy.
  2. Cool before cutting. Leave the muffins in the pan for about 5–10 minutes, then move them to a wire rack. Give the filling another 15–20 minutes to settle if you want a cleaner first cut.

That first cut tells you more than the top does. Cream cheese settling slightly to one side is normal; a deep crater or filling pooled near the bottom is a different story.

Macro cross-section of a pumpkin cream cheese muffin showing a creamy white center surrounded by tender orange crumb with open, baked pores.
The pumpkin crumb around the center should stay open and tender; a shiny, compressed band suggests excess moisture or underbaking.

That white center and pepita crown may look familiar.

Are These Starbucks Pumpkin Cream Cheese Muffins a Copycat?

They’re Starbucks-inspired rather than an exact replica. Starbucks’ 2026 Pumpkin Cream Cheese Muffin combines spiced pumpkin muffin, sweet cream-cheese filling and spiced pepitas. This recipe keeps that recognizable white center and pumpkin-seed top while using its own eggless filling, proportions and method.

If that seasonal coffee-shop muffin is what brought you here, homemade has one obvious advantage: you decide when the season starts—and how much cream cheese goes into the middle.

What Keeps the Muffins Tender and the Filling Creamy

A few ingredient choices do most of the work here: thick pumpkin keeps excess water in check, block cream cheese makes the center more predictable, oil helps the crumb stay tender after chilling, and fresh spices keep the pumpkin tasting lively after baking.

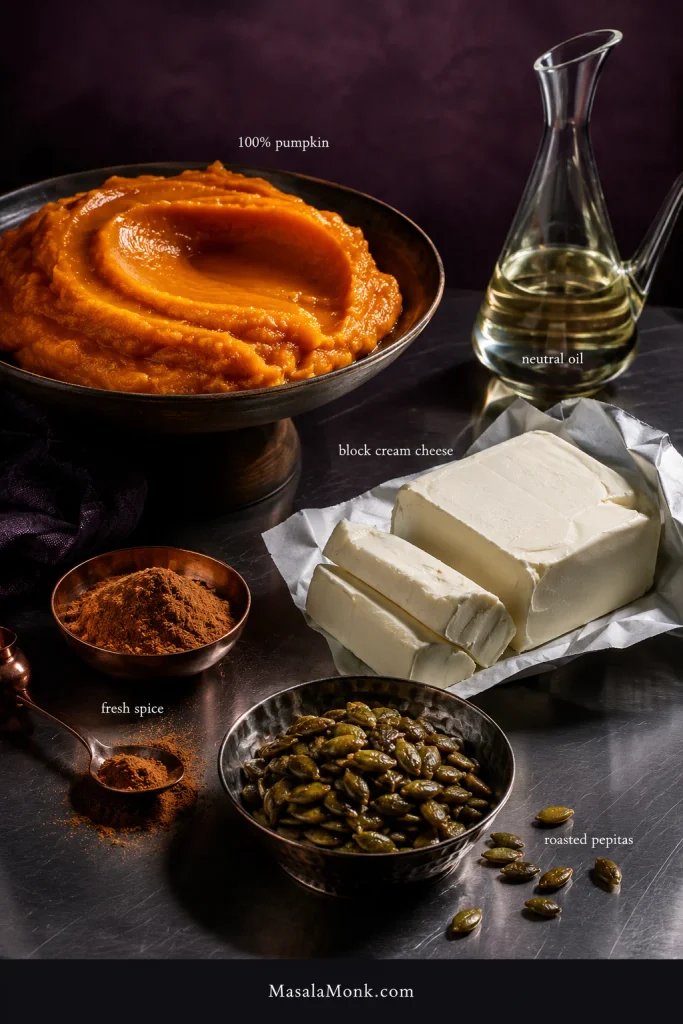
Editorial still life of thick pumpkin purée, block cream cheese, neutral oil, spices and green pepitas used for pumpkin cream cheese muffins.
Ingredient form matters more than brand here: thick purée, block cream cheese and neutral oil give the recipe its intended balance.

Use Thick Pumpkin Purée

Use plain 100% pumpkin purée, not pumpkin pie filling. Pie filling already contains sugar, spices and other ingredients, so it changes both flavor and moisture.

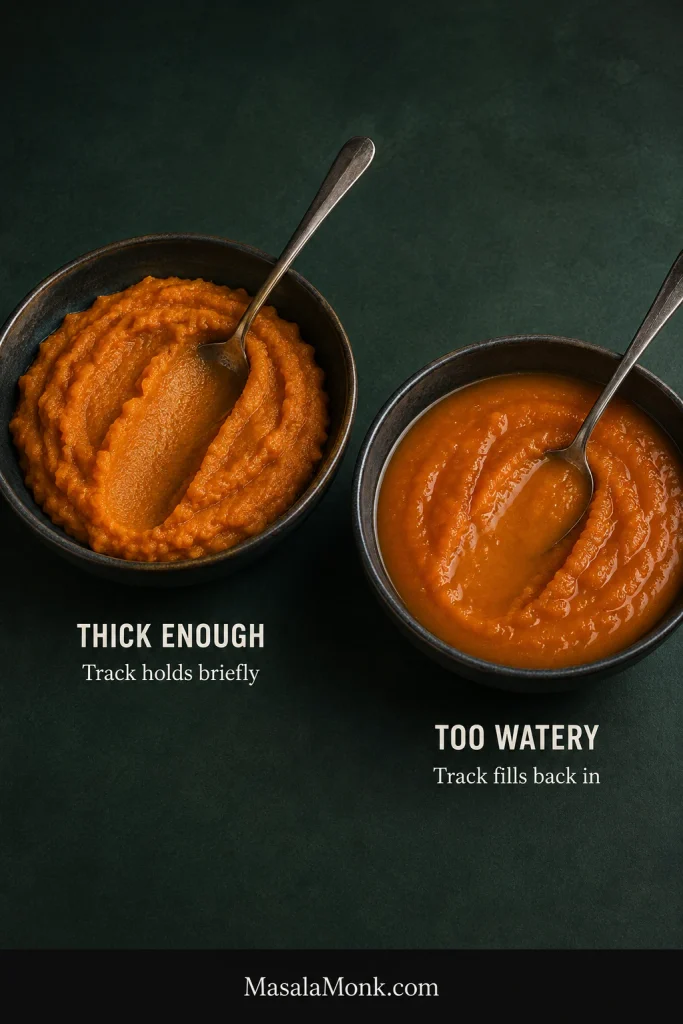
Homemade purée works when it is roughly as thick as canned pumpkin. Drag a spoon through it; the track should stay visible briefly instead of flooding straight back in. Our pumpkin bread recipe has more detail on canned versus fresh pumpkin and handling a watery homemade purée.

Two bowls comparing thick pumpkin purée that holds a spoon track with watery purée whose track quickly fills back in.
If homemade pumpkin purée closes over the spoon track almost immediately, deal with the excess water at the source. Draining or gently reducing it protects pumpkin flavor better than correcting a wet batter later with extra flour.

A typical 15 oz / 425 g can leaves roughly 95 g after you measure what this recipe needs. Save it for oatmeal, pancakes, soup, smoothies or a healthy pumpkin spice latte. Adding the remainder here would throw off the moisture balance.

Keep the Cream Cheese Cool Enough to Hold Its Shape

Use full-fat block or brick-style cream cheese. Tub-style, whipped and reduced-fat products may contain more water, stabilizers or incorporated air, making the filling less predictable.

You want the block pliable enough to mix without stubborn lumps while it still feels cool. Leave it in a hot kitchen too long and the mixture loosens noticeably.

Oil for Tenderness, Flour Measured Carefully

Neutral oil helps these muffins stay tender after cooling and refrigeration. Melted butter brings more buttery richness, but the texture firms more once chilled.

Weigh the flour if you can: 280 g. With cups, loosen it, spoon it in and level without packing. Extra flour makes this batter heavy surprisingly quickly.

Use Spices You Can Actually Smell

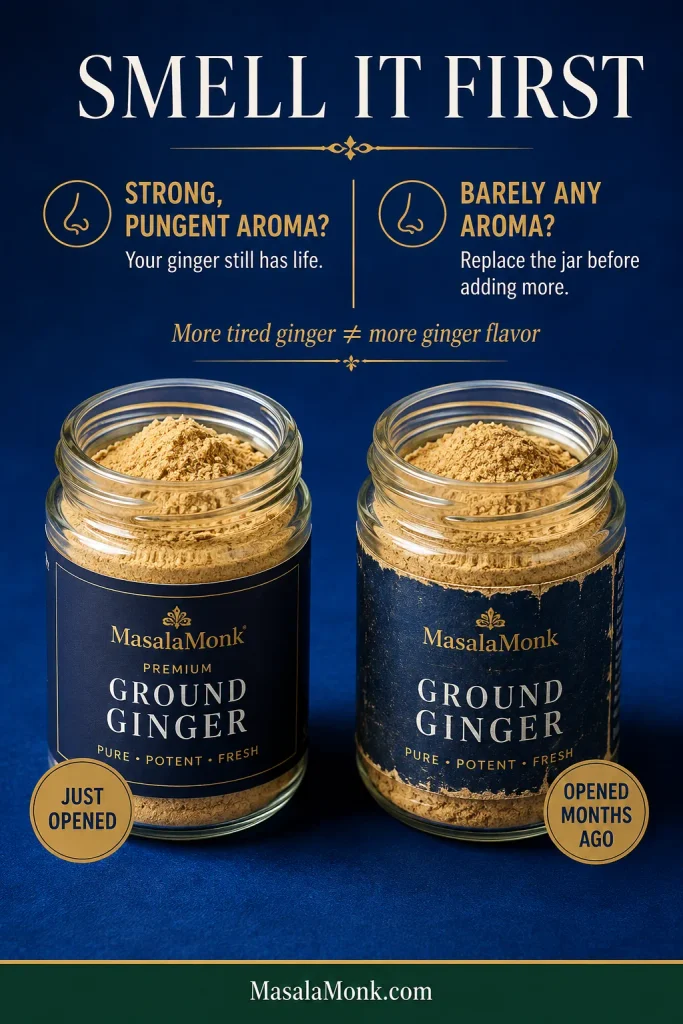
Smell your pumpkin pie spice before measuring it.

Pumpkin and cream cheese can mute a timid blend, so stale spices leave the finished muffins noticeably flat. Fresh cinnamon and ginger should announce themselves as soon as the jar opens and become even more noticeable once the pan is in the oven.

If you need a fresh blend, use our homemade pumpkin pie spice. In a pinch, replace the 2 teaspoons here with approximately 1 teaspoon cinnamon, 1/2 teaspoon ginger, 1/4 teaspoon nutmeg, 1/8 teaspoon cloves and 1/8 teaspoon allspice, then keep the additional teaspoon of cinnamon already listed in the batter.

How to Get a Creamy Center That Stays Put

Keep the filling creamy but pipeable. The tablespoon of flour already in the recipe gives the eggless center enough support; adding more can make it pasty. If the mixture stops holding a soft mound in a warm kitchen, chill it briefly instead of adding extra flour.

Pipe through the center. Start around the middle and squeeze as you pull upward, keeping pumpkin batter between the filling and liner. A small dip or slightly off-center cream-cheese crown after cooling is normal.

Filling sank, leaked or cratered? Jump to troubleshooting →

How to Tell When Pumpkin Cream Cheese Muffins Are Done

A toothpick pushed straight through the cream cheese may come back coated even when the muffin is fully baked. Test just beside it.

  • Press the top. It should spring back lightly.
  • Check the pumpkin portion. A few moist crumbs are fine; wet batter isn’t.
  • Look at the exposed cream cheese. It should appear set and more matte than glossy.
Pumpkin cream cheese muffin with a toothpick inserted beside the filling, plus examples of moist crumbs, wet batter and cream cheese on testers.
Do not wait for a bone-dry tester. A few moist crumbs from the pumpkin portion are a better endpoint than baking until every trace disappears, especially with a cream cheese center that naturally stays soft.

Troubleshooting Pumpkin Cream Cheese Muffins

The hardest part is sometimes knowing when to stop fixing something that isn’t broken. A small dip, an off-center white crown or two muffins that rise differently can still be completely good muffins.

For a real problem, match the symptom you saw and change one thing at a time.

Cream Cheese Filling Problems: Sinking, Leaking, Craters & Lumps

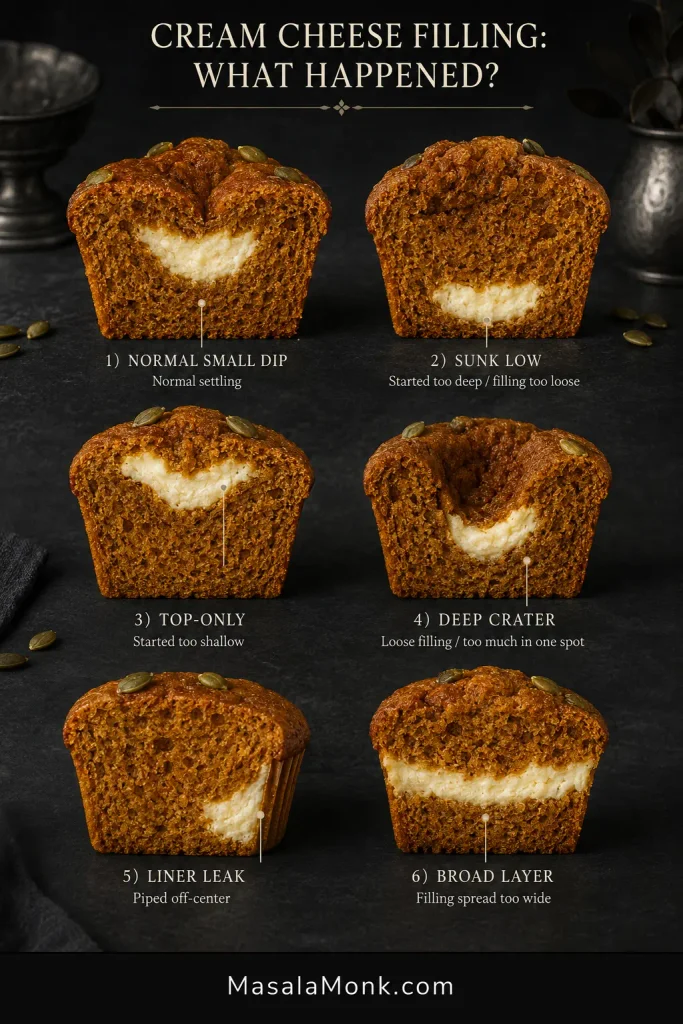
What you seeLikely causeNext time
Small dip after coolingNormal settlingLeave it alone if the surrounding muffin is baked.
Cream cheese sinks toward the bottomPiping started too deep, or the filling was very looseStart nearer the middle and briefly chill loose filling.
Most cream cheese stays on topPiping began too close to the surfaceInsert the bag a little farther before squeezing.
Deep craterLoose filling or too much filling concentrated in one spotChill the filling and spread it vertically as you withdraw the bag.
Filling leaks to the linerIt was piped off-centerKeep pumpkin batter between the cream cheese and paper.
Lumpy fillingCream cheese was too coldSoften it until pliable before mixing.
Muffin separates around the cream-cheese layerThe filling spread into a broad horizontal layerKeep the pocket narrower and more central.
Six pumpkin cream cheese muffin cross-sections comparing normal settling, sunk filling, top-only filling, a crater, liner leakage and a broad cream cheese layer.
Treat filling position as evidence. A problem that is mostly about where the cream cheese ended up usually points toward piping depth or direction; a loose cratered center suggests you should look at filling consistency instead.

Muffin Texture & Rise Problems: Dense, Gummy, Dry or Flat

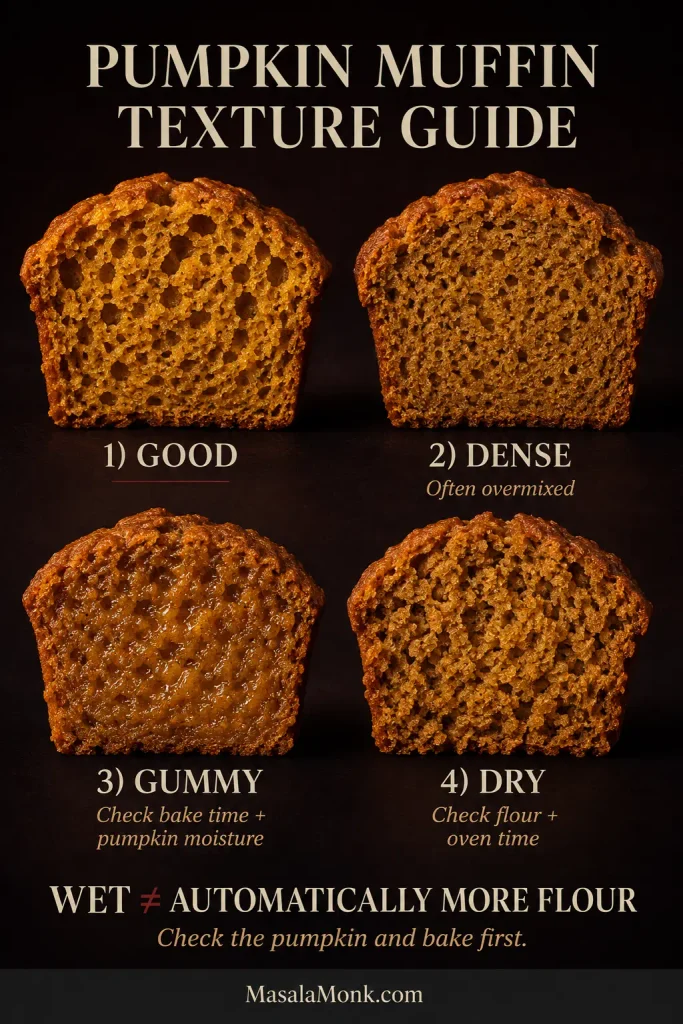
What you seeLikely causeNext time
Dense or rubberyToo much mixing after the flour went inFold only until the last dry streak disappears.
Dry and heavyToo much flour or too much oven timeWeigh the flour and begin checking earlier.
Wet or gummyUnderbaking or watery pumpkin puréeUse thick purée and test beside the filling.
Flat topsWeak leavener, underheated oven or very loose batterUse fresh baking powder and soda and fully preheat the oven.
Lopsided topsUneven portions, off-center filling or uneven oven heatPortion carefully and keep the filling near the middle.
Four pumpkin muffin crumb examples labeled good, dense, gummy and dry, with visibly different pore structure and moisture.
The crumb tells you which direction to investigate. Tight pores suggest density, a shiny compressed interior points toward gumminess, and rough fragile crumb suggests dryness—three different problems that should not receive one generic fix.

A wet, heavy muffin doesn’t automatically need more flour. Check the pumpkin and baking time first, or an underbaking problem can easily become a dry-muffin problem on the next batch.

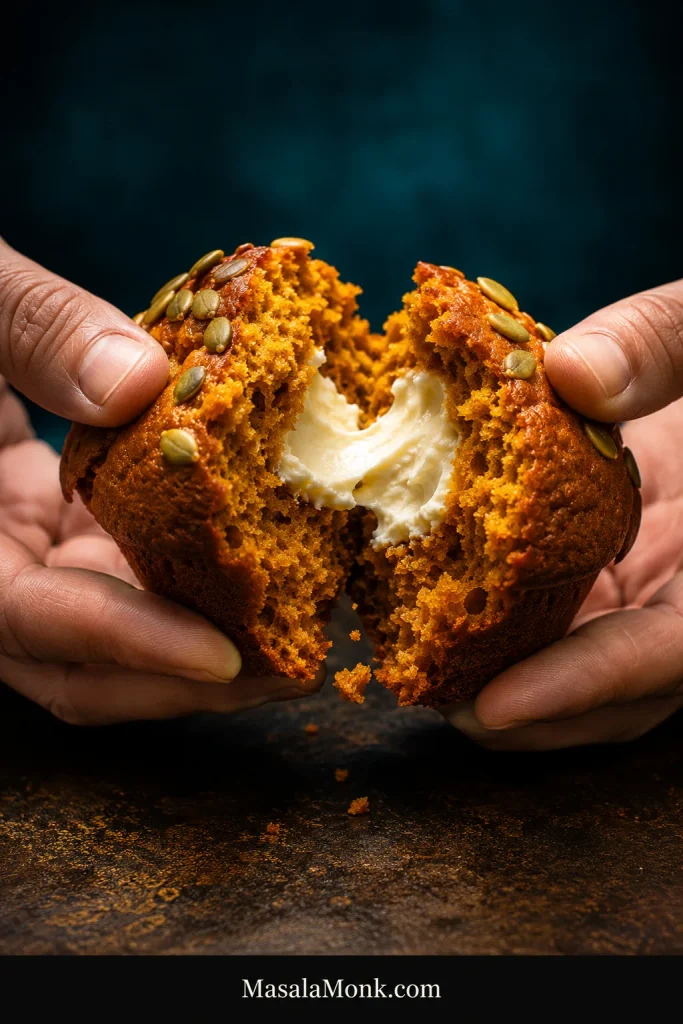
Once the muffin is baked through, the center should still be creamy while the pumpkin around it pulls apart cleanly rather than compressing into a wet, gummy band.

Hands breaking apart a pumpkin cream cheese muffin to reveal tender orange crumb, a thick white cream cheese center and pepitas on top.
This is the payoff: soft pumpkin crumb pulling away from a thick creamy center, with pepitas adding crunch at the top.

Back to the recipe ↑

Pumpkin Cream Cheese Muffin Variations

Once the base muffin works for you, these variations change one element at a time—the center, the crown or the mix-ins—without rebuilding the whole recipe.

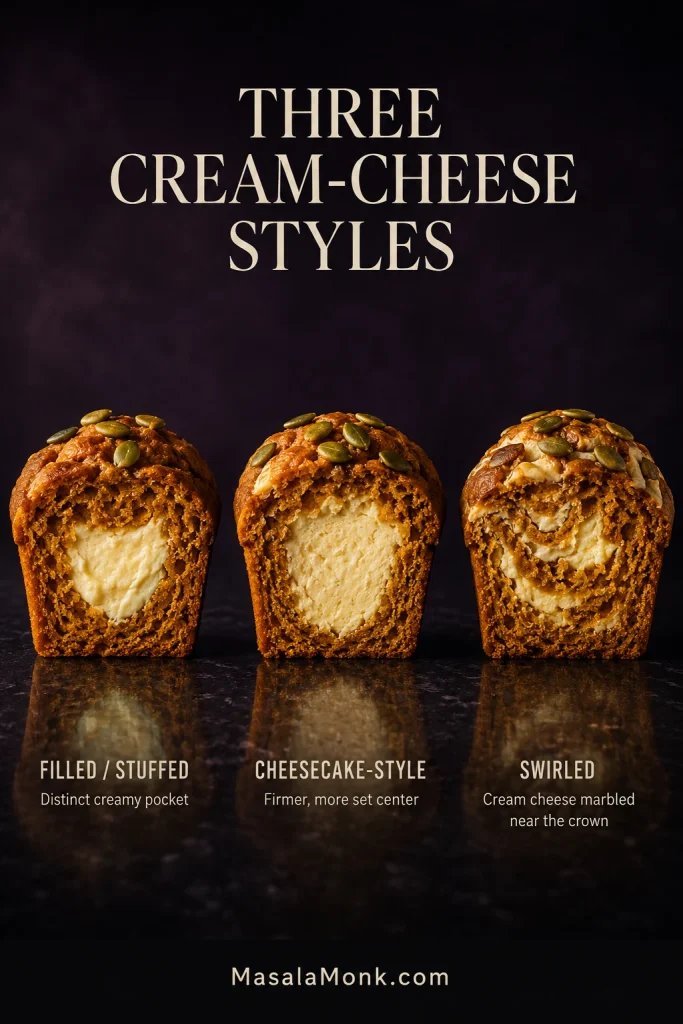
Filled, Cheesecake-Style or Swirled?

They’re related, but they don’t give you the same muffin. The main recipe is a filled or stuffed pumpkin cream cheese muffin with a distinct creamy pocket inside. Add egg or egg yolk to a filling and it sets more firmly, closer to baked cheesecake. A surface swirl keeps more of the cream cheese near the top and gives the crown a marbled look.

Three cut pumpkin muffins comparing a soft filled center, a firmer cheesecake-style center and cream cheese swirled through the crown.
Filled gives the strongest cream-cheese pocket, cheesecake-style sets firmer, and a swirl spreads the tangy richness through more of the crown.

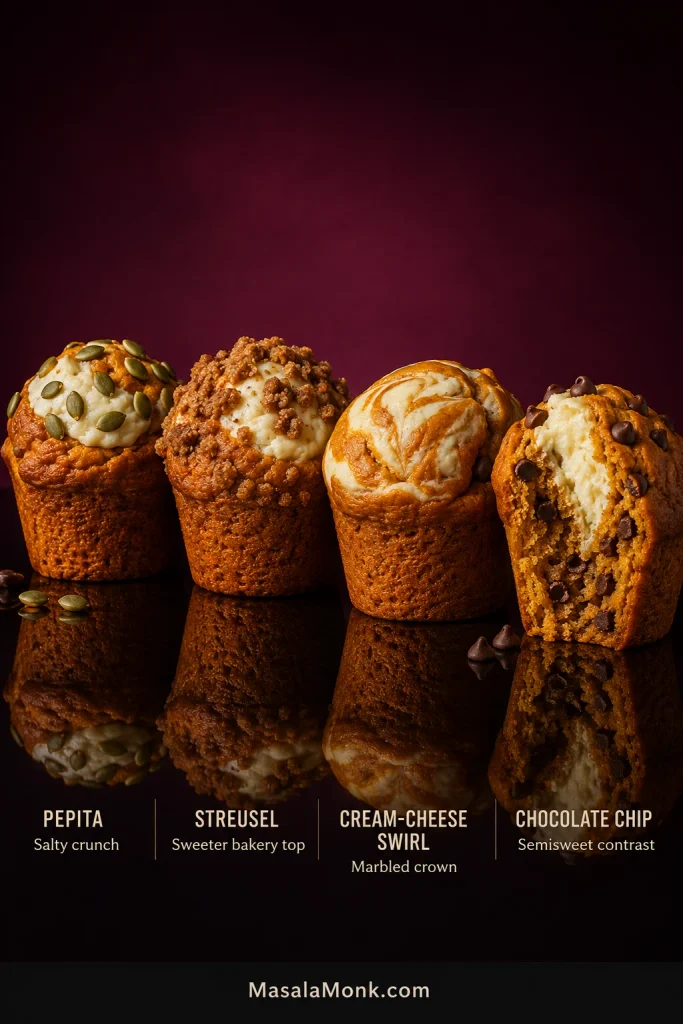
Keep the Pepitas for Salty Crunch

The muffin and filling are already sweet, so roasted salted pepitas bring welcome contrast without adding another sugary layer. Toss them with the optional pumpkin pie spice for a slightly more aromatic top.

Use Streusel for a Sweeter Bakery Muffin

Leave off the pepitas and mix:

  • 1/2 cup (63 g) all-purpose flour
  • 1/4 cup packed brown sugar (50 g)
  • 1 teaspoon cinnamon
  • 3 tablespoons (42 g) melted unsalted butter

Stir with a fork until irregular crumbs form, then divide the streusel evenly among the muffins, scattering it around rather than directly over the cream cheese.

Swirl the Cream Cheese for a Creamier Crown

A surface swirl needs only half of the main filling: 113 g cream cheese, 30 g confectioners’ sugar, about 1 1/2 teaspoons (4 g) flour, 1/2 teaspoon vanilla and a pinch of salt.

Divide it over the pumpkin batter and make a few loose passes with a toothpick or thin skewer. Stop while clear streaks of white and orange remain. Bake on the same standard-muffin schedule and test the pumpkin portion for doneness.

Chocolate Chip Pumpkin Cream Cheese Muffins

Fold 1/2 cup (about 85 g) semisweet chocolate chips into the pumpkin batter before filling the pan. Keep the cream-cheese quantity and baking method unchanged.

If you’re deciding which version to make, this final lineup shows how the four easiest finishes change the look and balance of the same pumpkin cream cheese muffin.

Four pumpkin cream cheese muffin variations topped with pepitas, streusel, a cream cheese swirl and chocolate chips.
Pepitas keep the top least sweet; streusel makes it richer, a cream-cheese swirl emphasizes tang, and semisweet chocolate adds deeper contrast.

Mini and Jumbo Pumpkin Cream Cheese Muffins

The standard and mini portions suggest a useful starting point for larger muffins: roughly 1 part cream-cheese filling for every 4 parts batter by weight. Use that as a starting point for larger cavities, not a fixed rule.

Cut-open mini, standard and jumbo pumpkin cream cheese muffins with portion guidance and a one-part filling to four-parts batter scaling ratio.
Scaling up is not just a matter of adding more filling. If cream cheese increases faster than the pumpkin batter around it, the shell becomes thinner and craters or leaks become more likely—so both parts should grow together.
SizeStarting pointBake
StandardAbout 95 g batter + 24–25 g filling in a deep 12-cup pan425°F / 220°C for 5 min, then 350°F / 175°C; start checking around 19 min total
MiniAbout 22–25 g batter + 5–6 g filling; roughly 48 minis from the full batch, depending on the pan350°F / 175°C throughout; start checking at 11–12 min, with many pans finishing around 12–14 min
JumboFill each cavity roughly three-quarters full, then use the 1:4 filling-to-batter ratio as a starting point425°F / 220°C for 5 min, then 350°F / 175°C; begin checking around 27 min total, with deeper pans sometimes needing longer

Jumbo cavities vary too much for one universal gram amount or bake time to be genuinely useful. Let the pan and the same doneness cues from the standard muffins guide you.

Back to the main recipe ↑

How to Store Pumpkin Cream Cheese Muffins

Because the filling is dairy-based, the timeline below separates cooling, refrigeration, serving and freezing so each stage is easy to follow.

Storage guide showing pumpkin cream cheese muffins cooling, refrigerated in a sealed container, served after tempering and individually wrapped for freezing.
Storage changes texture as well as shelf life. Once chilled, the pumpkin crumb firms and the cream cheese loses some softness; a short temper at room temperature restores much of the freshly baked eating texture.

Do Pumpkin Cream Cheese Muffins Need to Be Refrigerated?

Yes. Let the muffins stop steaming and cool enough to cover, then refrigerate them while keeping the total room-temperature time under 2 hours. If the room or outdoor temperature is above 90°F / 32°C, keep that time under 1 hour. The FDA recommends keeping the refrigerator at 40°F / 4°C or below.

For the best quality, use the refrigerated muffins within about 3–4 days, consistent with USDA guidance for refrigerated leftovers. Give a chilled muffin 20–30 minutes at room temperature and it softens again while the filling loses its hard chill. A brief 10–15 second microwave warm-up works too.

Can You Freeze Pumpkin Cream Cheese Muffins?

Yes. Cool them completely, wrap well and freeze airtight for up to about 2 months for best quality. The filling may thaw slightly softer or a bit more granular than it was fresh.

Can You Make Them Ahead?

The cream-cheese filling can be mixed ahead and refrigerated separately; let it loosen just enough to pipe before assembling. For the muffins themselves, bake ahead rather than holding the fully mixed pumpkin batter overnight.

Pumpkin Cream Cheese Muffins FAQ

Can I Make Them Without a Piping Bag?

Yes. A sturdy zip-top bag with a corner cut off works well. You can also spoon in some pumpkin batter, add cream cheese to the middle and cover it with more batter. That gives you a more hidden pocket with less filling visible on top.

Two methods for filling pumpkin muffins without a piping bag: piping with a cut zip-top bag and spooning cream cheese between layers of batter.
Choose the workaround according to the result you want. A cut zip-top bag gives better control over a visible crown and central filling path; spoon-and-layer assembly is simpler when a hidden cream cheese pocket is perfectly fine.

Can I Replace the Oil With Butter?

Yes. Replace the 1/2 cup oil with 1/2 cup (113 g) melted unsalted butter and let it cool slightly before mixing it with the wet ingredients. You’ll get more buttery richness, but the muffin will firm somewhat more after cooling and refrigeration.

Can I Add Even More Cream Cheese?

The main recipe already uses a generous amount. Packing substantially more cream cheese into the same-size muffin leaves less pumpkin batter around it and makes craters, leaks and gummy edges more likely. For a bigger cream-cheese pocket, move to a larger muffin and scale the batter and filling together.

If you want one visual reference to keep beside the pan, the blueprint below is the most useful place to start.

Annotated cutaway pumpkin cream cheese muffin showing batter and filling amounts, piping position, two-stage baking temperatures, doneness test and scaling ratio.
Use this as a troubleshooting map rather than a second recipe card. When a batch looks different, compare the batter-to-filling balance, piping position, bake sequence and doneness check before changing the formula itself.

Let the first one cool enough for the filling to settle, then cut straight through the middle. The tender pumpkin crumb should pull apart around a creamy white center, with salty pepitas cracking across the top. Take another bite, and there should still be cream cheese there.

Jump to the recipe ↑ · Troubleshooting · Back to top ↑

Posted on — Leave a comment

Gingerbread Cake Recipe: Moist, Easy & Perfectly Spiced

Square of mahogany gingerbread cake cut from a light metal 9×13 pan, showing a moist, evenly baked crumb beside a silver fork.

A good gingerbread cake announces itself before you cut it. The kitchen fills with the deep smell of molasses and warm ginger, the top settles into a rich mahogany brown, and a square gives easily under the fork while the crumb holds together.

Its middle is soft and moist, the edges stay tender, and once cooled the crumb cuts cleanly. Ginger comes through clearly against the molasses.

This is old-fashioned gingerbread in the best sense: one uncomplicated 9×13-inch molasses cake, mixed by hand, cut into squares and perfectly happy without decoration. It has the easygoing feel of a snacking cake—good with coffee in the afternoon, comfortable after dinner, and simple enough to sit beside richer desserts on a holiday table.

Quick Answer: How to Make Moist Gingerbread Cake

For moist gingerbread cake, bake a fluid molasses batter in a light-colored 9×13-inch pan at 350°F / 175°C for about 30–35 minutes, until the center is set and springy and a tester carries moist crumbs but no wet batter.

Mix regular unsulphured molasses with brown sugar, melted butter, a little neutral oil and hot water. Once the mixture feels comfortably warm, with no steam rising, add the eggs, then mix in the dry ingredients until evenly combined and no dry flour remains.

The batter will be dark and unusually fluid. Pour it into the prepared pan promptly and start checking around 28–30 minutes. Let the cake itself—not the timer alone—tell you when it is ready.

Thin batter is normal here. It will look much looser than ordinary butter-cake batter. Do not add extra flour to make it look more familiar.

Gingerbread Cake Recipe

Moist & Easy Gingerbread Cake

A soft, ginger-forward molasses cake baked in one 9×13-inch pan, with a tender crumb that stays moist into the next day.

Hands-on prep15 minutes
Bake time30–35 minutes
Minimum cooling20–30 minutes
Total to warm servingAbout 1¼ hours
Yield12 generous or 15 smaller squares
Pan9×13 in / 23×33 cm light-colored metal, about 2 in / 5 cm deep
Oven350°F / 175°C conventional / 160°C fan
MixerNot needed
Make aheadExcellent 1 day ahead

Cool completely before frosting or cutting especially neat squares.

Equipment

  • 9×13-inch / 23×33 cm light-colored metal baking pan, about 2 inches / 5 cm deep
  • Parchment paper, with enough overhang for a sling if you want to lift the whole cake out
  • Large mixing bowl
  • Medium mixing bowl
  • Whisk
  • Flexible silicone or rubber spatula
  • Digital kitchen scale, preferably
  • Kettle or small saucepan for the hot water
  • Wire cooling rack

Dry ingredients

  • 320 g all-purpose flour (2⅔ cups)
  • 2½ teaspoons ground ginger
  • 1½ teaspoons ground cinnamon
  • ¼ teaspoon ground cloves
  • ¼ teaspoon ground nutmeg
  • 1 teaspoon baking soda
  • 1 teaspoon baking powder
  • ½ teaspoon fine salt

Wet ingredients

  • 150 g packed dark brown sugar (¾ cup)
  • 330 g regular/original unsulphured molasses (about 1 cup / 240 ml)
  • 113 g unsalted butter (½ cup / 4 oz), melted
  • 60 ml neutral oil (¼ cup), such as sunflower, canola or vegetable oil
  • 240 ml hot water (1 cup)
  • 2 large eggs
  • 1 teaspoon vanilla extract

Using a scale? Set the large mixing bowl on it, tare to zero and pour the molasses directly into the bowl. It is much easier than scraping sticky molasses from a measuring cup.

Mix and assemble

  1. Prepare the oven and pan. Heat the oven to 350°F / 175°C conventional / 160°C fan with a rack in the center. Lightly grease the pan and line the base with parchment. If you want to lift the whole cake out before cutting, leave parchment overhang along two opposite sides to form a sling.
  1. Mix the dry ingredients. Whisk the flour, ginger, cinnamon, cloves, nutmeg, baking soda, baking powder and salt together thoroughly.
  1. Make the molasses mixture. Whisk the brown sugar, molasses, melted butter and oil in a large bowl. Slowly whisk in the hot water. Let the mixture stand for a few minutes, until comfortably warm and no longer steaming, then whisk in the eggs one at a time and add the vanilla.
  1. Bring the batter together. Add the dry ingredients and mix until evenly combined and no dry flour remains. Sweep a flexible spatula around the sides and firmly across the bottom to catch hidden pockets. There is no need to beat the batter for volume.
  1. Pour the batter. It will be dark and easily pourable. Resist the urge to thicken it with extra flour. Pour it straight into the prepared pan.

Bake and cool

  1. Bake. Transfer the pan directly to the oven. Avoid opening the door during roughly the first 25 minutes. Begin checking around 28–30 minutes; most cakes will finish in about 30–35 minutes.
  1. Check the center. The middle should look set and spring back gently when touched. A tester may carry a few moist crumbs but should not have wet batter. The edges may also begin to pull slightly from the pan; consider that an extra clue, not something you have to wait for.
  1. Let the crumb settle. Cool on a wire rack for at least 20–30 minutes before cutting. Let the cake cool completely for the neatest slices or before frosting. If you made a parchment sling, wait until the cake is completely cool before lifting it from the pan; warm gingerbread is softer and easier to break.

To serve: enjoy it plain, dust it with powdered sugar, add softly whipped cream, spread on a restrained layer of cream cheese frosting, or spoon over lemon sauce.

Timeline showing gingerbread cake preparation, baking, cooling and serving stages.
For gingerbread cake, baking time and serving time are not the same thing. Build the cooling rest into the plan so the crumb can settle before the first clean slice.

The Slice We’re Aiming For

  • Soft with a little body: tender enough for the fork to slide through easily, but not airy like sponge cake.
  • Moist and clean-slicing: the crumb feels almost plush and still holds together once cooled.
  • Ginger-forward: ginger reaches you first; cinnamon warms it; clove and nutmeg stay in the background.
  • Deeply colored: expect a rich mahogany-brown crumb with the rounded caramel edge of molasses.

After its initial rest, the crumb is especially yielding. Once fully cool, it cuts into neat, dark squares.

Close-up of gingerbread cake with a fine, evenly baked mahogany crumb that looks moist, tender and fully set.

Gingerbread Cake vs Ginger Cake vs Sticky Ginger Cake

American-style gingerbread cake is usually a soft molasses cake with ginger leading the spice. “Ginger cake” is a broader term; sticky ginger cake usually points toward a darker, denser British-style cake.

Three cakes labeled gingerbread cake, ginger cake and sticky ginger cake, showing differences in shape, crumb and surface.
When a recipe is called simply “ginger cake,” check its syrup, pan and intended texture before assuming it will behave like American gingerbread cake.

Gingerbread cake: this is the family our recipe belongs to—molasses-rich, ginger-led and commonly baked as a straightforward single layer.

Ginger cake: a broader name that can describe molasses gingerbread, a loaf, a fresh-ginger cake or another regional style altogether.

Sticky ginger cake: usually a more British style, often made with black treacle, golden syrup or stem ginger and intended to become darker, denser and stickier as it rests.

If it is the same molasses-and-ginger family you want in a completely different texture, the Gingerbread Cookies Recipe turns those flavors into soft-centered cut-outs that roll cleanly and hold their shapes.

Why This Recipe Works

Molasses does more than sweeten the cake. It gives gingerbread its deep color, caramelized flavor and characteristic moisture. Regular unsulphured molasses brings plenty of depth and still leaves room for the ginger to stay clear.

Butter brings fuller cake flavor; the smaller amount of neutral oil helps the crumb stay tender after cooling.

Baking soda and baking powder share the lifting work. Baking soda reacts with acidity in the molasses-rich batter, while baking powder supplies additional lift. Together they help this substantial, fluid batter rise without turning the crumb light and sponge-like.

Hot water thins the molasses so it mixes evenly through the batter. The heavy, sticky mixture becomes much easier to combine by hand.

Cinnamon adds warmth around the ginger. Clove and nutmeg stay quieter. If you prefer several warm spices to share the spotlight more evenly, the Spice Cake Recipe takes that broader approach.

Ingredients That Matter Most

Infographic of measured ingredients for a 9×13 gingerbread cake, including flour, molasses, sugar, butter, oil, eggs, hot water and spices.
Treat the 9×13 gingerbread formula as a system: flour, molasses, fat and pan depth all push the final crumb in different ways, so one change can affect more than one trait.

Which Molasses Should You Use?

The best molasses for this gingerbread cake is regular/original unsulphured molasses. Dark or robust molasses makes a stronger, less sweet cake; blackstrap is considerably more bitter and is not the best choice here.

Regular, dark and blackstrap molasses shown side by side in glass containers with spoons displaying their different colors.
Molasses strength changes more than sweetness: as the syrup grows darker and more bitter, ginger has to compete harder to stay distinct in the finished cake.
MolassesHow it tastes hereBest use
Regular/original unsulphuredDeep, rounded and pleasantly sweetBest default
Dark/robustDarker, stronger and somewhat less sweetGood if you already enjoy assertive molasses
BlackstrapMuch more bitter, mineral-forward and intenseNot recommended as a straight 1:1 swap

Outside the US, the labels change. Canadian fancy molasses is generally closest to the flavor we’re after. In the UK, black treacle is a practical related substitute when American-style molasses is hard to find, but it is not identical. Some black treacles taste somewhat sweeter and rounder, so expect a slightly different cake.

Guide comparing common molasses labels in the United States, Canada and United Kingdom with bottles and small pitchers of dark syrup.
Regional names are only a starting point. When buying molasses for gingerbread outside the US, match flavor intensity first; equally dark syrups can still taste very different.

If the labels on different jars are confusing, King Arthur Baking has a useful guide to light, dark and blackstrap molasses.

Ground, Fresh and Crystallized Ginger

Ground ginger gives the whole cake its broad, familiar ginger warmth. Fresh ginger is brighter and sharper. Use it as a boost; keep the ground ginger as the foundation.

Ground ginger powder, grated fresh ginger and chopped crystallized ginger displayed together on a dark surface.
Think of the three forms as different kinds of ginger impact: ground spreads through every bite, fresh flashes brighter, and crystallized ginger creates concentrated sweet-hot pockets.

To make a stronger cake, increase the ground ginger to about 3 teaspoons. For brighter, fresher heat, keep the ground ginger and add 1 tablespoon finely grated fresh ginger to the wet mixture.

Before adding more: smell the ground ginger already in your jar. Fresh spice smells warm and pungent as soon as you open it. A faint aroma means a new jar will do more for the cake than another spoonful of tired ginger.

Fresh and older ground ginger shown in an aroma comparison with open spice containers.
Aroma can fade long before ground ginger looks stale. Smell it before measuring; pungency matters when the spice has to stand up to molasses.

If you want to experiment with crystallized ginger, dice it finely and fold in only a small amount. It creates concentrated sweet-hot pockets through the cake. In a batter this fluid, some pieces may settle toward the bottom, and tossing them in flour does not reliably prevent that.

Tempted to use a premixed warm-spice blend? Check what is actually in it first. The Apple Pie Spice Recipe, for example, is intentionally cinnamon-led; gingerbread needs ginger to lead.

As for the hot liquid, water is deliberate. Coffee can be lovely in gingerbread, but some people notice it before the ginger. Hot water loosens the molasses without introducing another strong flavor.

What the Batter Should Look Like

If this is your first molasses gingerbread, the batter may look loose enough to make you check the ingredient list again. Nothing is missing.

When the hot water reaches the molasses mixture, it loosens dramatically. After the flour goes in, mix until no dry streaks remain, then sweep the spatula firmly across the bottom of the bowl; dry pockets can hide easily in such a dark batter.

Two bowls of molasses mixture showing a thick consistency before hot water and a much looser, pourable consistency afterward.
The dramatic loosening is useful: once the molasses flows freely, it distributes more evenly through the batter without requiring aggressive mixing.

The finished batter falls easily from the spatula and spreads across the pan almost by itself. Keep that consistency rather than thickening it. Once everything is combined, pour it into the prepared pan and get it into the oven promptly.

Ready for the oven? See how to tell when the center is done.

Thin brown gingerbread batter pouring in a ribbon into a light metal rectangular baking pan.
This loose ribbon is the consistency we are looking for. Judge the finished gingerbread, not how closely the bowl resembles a conventional butter cake.

How to Tell When It’s Done

Gingerbread cake is done when the center looks set, springs back gently and a tester shows moist crumbs but no wet batter. The edges may also begin to pull slightly from the pan.

A dark cake makes the last few minutes harder to read. Use several clues together; no single one has to carry the decision.

Gingerbread cake with four doneness checks: a set center, springy touch, moist crumbs on a tester and slight edge pull.
The four doneness signals are strongest as a pattern. One odd clue can mislead; several cues arriving together are much harder to misread.

Use the Four-Signal Doneness Test

  1. Look: the center is set, with no liquid or visible rippling.
  2. Touch: a light press near the center springs back.
  3. Test: a few moist crumbs are good; wet batter means it needs longer.
  4. Check the edges: they may just begin to pull from the pan. Treat this as supporting evidence.
Three gingerbread cakes showing the center progressing from wet and rippled to almost set and fully stable.
Use this progression to calibrate your eye. Once you have seen wet → almost set → set, the final minutes of a dark gingerbread cake become much less guesswork.

Start checking around 28–30 minutes. Your oven and pan may move the finish slightly earlier or later.

What if the tester looks clean but the center still seems uncertain? Look at the whole cake. If the middle remains visibly unstable or stays indented when lightly touched, give it another few minutes.

A clean cake tester beside gingerbread whose center still appears slightly soft and unstable.
A cake tester samples one narrow path through the cake. The center’s overall movement and spring tell you something that single puncture cannot.

Moist vs Gummy: Know the Difference

Properly moist gingerbread has a soft, even crumb that holds together when sliced; underbaked gingerbread looks shiny, compressed or pasty through the center.

Properly moistGummy or underbaked
Soft, even crumbShiny or compressed strip through the center
Holds together once cooledPasty or wet-looking interior
Moist crumbs on a testerWet batter on the tester
Slices cleanly after restingKnife smears with raw-looking batter
Side-by-side gingerbread cross-sections comparing an evenly moist crumb with a darker, compressed gummy center.
Cooling clarifies the diagnosis: true moisture remains tender and structured, while an under-set center keeps its compressed or pasty look.

If the first slice looks suspiciously dense, remember when you cut it. Molasses-rich cake continues settling as steam escapes, and a slice taken too soon can look wetter and more compressed than it will after the recommended 20–30 minutes of cooling.

Still not sure what went wrong? Go to the troubleshooting guide.

What to Serve With It

A good square does not need frosting to make sense. Plain gingerbread carries plenty of ginger and molasses on its own; the options below simply take it in different directions.

Plain unfrosted gingerbread cake square on a dark blue plate with a silver fork.
  • Powdered sugar: dust the fully cooled cake shortly before serving.
  • Whipped cream: add a softly whipped spoonful beside each square.
  • Cream cheese frosting: keep the layer thin and tangy so the ginger still leads.
  • Lemon sauce: spoon it over the cut cake with the sauce still warm and pourable.
  • Vanilla ice cream or custard: let a little soften into the crumb.
Plain gingerbread square surrounded by powdered sugar, whipped cream, cream cheese, lemon sauce and vanilla ice cream.
Choose a topping by contrast, not by sweetness alone: tang, acidity and cool creaminess each change how the molasses and ginger register on the palate.

Softly whipped cream works especially well when it bends gently from the whisk. Firm decorating peaks are more than this cake needs. The Whipped Cream Recipe shows exactly what soft, medium and firm peaks look like.

Old-Fashioned Lemon Sauce for Gingerbread

Warm lemon sauce can sound unexpected if you grew up eating gingerbread with frosting, but the pairing makes immediate sense on the plate. The cake is dark and warmly spiced; lemon brings brightness. A little sauce slips into the cut face of the crumb while the zest keeps each bite lively.

Pale golden lemon sauce being poured from a silver sauce boat over the cut edge of a gingerbread cake square.
Aim warm lemon sauce at the cut face rather than flooding the top; exposed crumb takes up a small pour quickly while the cake’s surface stays intact.

Quick Warm Lemon Sauce

Makes about 1 cup / 240 ml, enough for 12–15 light servings.

  • 100 g granulated sugar (½ cup)
  • 8 g cornstarch (1 tablespoon)
  • 240 ml water (1 cup)
  • 45 ml fresh lemon juice (3 tablespoons)
  • Finely grated zest of 1 lemon
  • 28 g unsalted butter (2 tablespoons)
  • Small pinch of salt

Whisk the sugar and cornstarch together in a small saucepan, then gradually whisk in the water. Bring to a gentle boil over medium heat, stirring regularly.

Lower the heat and simmer gently for about 4–5 minutes, stirring often, until lightly syrupy. Remove from the heat and stir in the lemon juice, zest, butter and salt.

Pale yellow lemon sauce running in a thin ribbon from a spoon into a stainless steel saucepan.
Judge the lemon sauce while it is warm: it tightens as it stands, so the right stopping point is a little looser than the texture you expect on the plate.

Serve it warm and pourable. The sauce should be thin enough to slip into the cut surface of the cake. If it thickens as it stands, loosen it with a small splash of warm water.

Refrigerate leftover sauce separately in a covered container and warm it gently before serving, adding a splash of water if needed to restore its pourable consistency.

The pairing has history behind it, too. Toni Tipton-Martin’s Jubilee pays homage to an old-time ginger cake served with lemon sauce and bourbon Chantilly; the James Beard Foundation’s gingerbread with lemon sauce is a lovely place to explore that tradition further.

If Something Went Wrong

When the sunken center is wet or gummy, start with bake completion and pan depth. A cake that rises unusually high and then collapses points somewhere else: recheck the leaveners, center doneness, pan capacity and oven temperature.

Two gingerbread cakes in rectangular pans comparing a mild central dip with a much larger risen-and-collapsed center.
Failure shape is diagnostic evidence. A small settled depression points you toward a different cause than a cake that dramatically expanded before collapsing.
What happenedLikely causesWhat to change
Center sankCenter needed longer; layer too deep; oven running cool; door opened earlyUse the intended pan and judge the center with the doneness cues above
Rose dramatically, then collapsedToo much or mismeasured leavener; center not fully set; pan overfilled or too deep; oven-temperature problemRecheck the small measurements, pan and oven, then make sure the center is fully baked
Dry throughoutToo much flour; too long in the oven; oven running hotUse 320 g flour and begin checking sooner
Dry edges, damp middleLayer too deep or pan very darkUse the specified light-colored 9×13-inch pan
Gummy middleUnderbaked or sliced very hotUse the doneness guide above and allow the crumb time to settle
Dense or heavyToo much flour; old baking powder or soda; batter left standing for an extended timeMeasure flour accurately, use fresh leaveners and bake soon after mixing
BitterBlackstrap/very robust molasses; too much clove; leavener measurement errorUse regular molasses and recheck the small measurements
Not gingery enoughOld ground ginger; very mild spiceReplace stale ginger or use the stronger-ginger option above
Tacky top after storageMolasses attracting moistureOften normal; judge the crumb underneath separately

Why did the middle sink?

If the cake rose normally and later developed a gentle dip, the middle probably needed a little more time. In a deeper layer, the edges can look finished while the center is still trying to catch up.

A cake that balloons dramatically, overflows or builds a large dome before collapsing tells a different story. Recheck the baking soda and baking powder measurements, the amount of batter in the pan and the oven temperature.

Don’t blame the molasses first. A sunken middle usually sends you back to bake completion, pan depth, leaveners or oven temperature.

Why is it dry?

Start with flour. Scooping directly from the bag can pack much more into a measuring cup than the cake needs; a scale removes the guesswork at 320 g. If using cups, spoon the flour loosely into the cup and level the top.

Digital kitchen scale showing 320 grams of flour beside a measuring cup being scooped directly into a container of flour.
With 2⅔ cups of flour, a small packing error repeated cup after cup can add up. The 320 g scale target removes that cumulative drift.

Then look at the bake. Once the center has set, extra oven time mainly means more moisture leaving the cake. Dry edges around a damp middle are different: the outside has moved ahead while the center still needs time.

Two gingerbread cross-sections comparing a uniformly dry crumb with drier edges surrounding a darker, denser damp center.
Cut the cake before diagnosing dryness. Where the dry crumb appears can tell you whether the problem affected the whole batter or developed unevenly during baking.

Can You Use a Different Pan?

Change the pan and you change the bake. A deeper cake needs more time at the center; dark metal pushes the edges faster.

Light metal 9×13 pan with a shallow gingerbread layer compared with a smaller pan holding a visibly deeper layer.
Pan dimensions change the distance heat must travel. Moving the same gingerbread batter into a smaller footprint is therefore a structural recipe change, not merely a container swap.
PanWhat changesBest approach
9×13-inch light metalRelatively shallow, even layerBest choice for this recipe
Smaller square panDeeper batter and longer center bakeDon’t crowd the full batch into it; use a recipe quantity intended for that pan
Dark metalBase and edges color fasterBegin checking earlier
Glass or ceramicDifferent heat transfer and more retained heatFollow the physical doneness cues instead of copying metal-pan timing
Two rectangular gingerbread cakes baked in light and dark metal pans, with stronger edge browning visible in the dark pan.
Dark metal narrows the margin for error: faster edge heating gives the center less time to catch up before the outside looks finished.

For loaf, Bundt or layer-cake versions, use a formula written for that shape. Those pans change the depth and handling enough that borrowed bake times become unreliable.

Make It a Day Ahead

Gingerbread is unusually friendly to making ahead. Kept well covered, it stays moist overnight. The spice settles more deeply into the molasses as it rests.

Fresh gingerbread cake in a light metal 9×13 pan beside another pan tightly covered for overnight storage.

The day before

  • Bake the cake and let it cool completely.
  • Leave it whole when possible; exposed cut edges dry faster.
  • Cover the pan tightly or move the whole cake to an airtight container.
  • Keep an unfrosted cake at cool room temperature.

On serving day

  • Add powdered sugar shortly before serving.
  • Keep whipped cream chilled separately.
  • Frost only after the cake is completely cool.
  • Warm lemon sauce gently before serving.

Storage and Freezing

Store unfrosted gingerbread airtight at room temperature for about 3 days; refrigerate it once topped with cream cheese frosting, or freeze it well wrapped for up to 2 months for best quality.

Room temperature

Leave the cake whole or in larger pieces when practical. Every fresh cut gives the interior another exposed edge.

A tacky top after a day or two can be part of molasses-rich gingerbread’s character, not a sign that the cake is raw. Judge the crumb underneath separately.

Cut gingerbread cake showing a faintly tacky top surface and a fully baked, evenly set crumb underneath.
Surface feel and internal doneness are separate clues. Storage can alter the first without undoing the crumb structure established in the oven.

If your kitchen is particularly warm or humid, keep the cake tightly covered in the refrigerator and let individual slices come back toward room temperature before serving.

Refrigerator

Let refrigerated slices lose some of their chill before serving. As they move back toward room temperature, the crumb becomes more tender again.

Freezer

Cool the cake completely, wrap the whole cake or individual portions tightly, and place them in a freezer-safe container or bag.

Thaw while still wrapped so condensation collects on the wrapping instead of directly on the cake.

Wrapped gingerbread portions thawing on a metal surface with condensation droplets collected on the clear plastic wrapping.
During thawing, the wrapping becomes the colder surface where airborne moisture condenses first. That barrier helps keep condensation off the gingerbread itself.

Substitutions and Variations

Some flavor changes are easy. Once you change the main syrup, flour system or eggs, you are changing the structure of the cake too.

Light brown sugar: use the same amount. The cake will taste slightly lighter, but the molasses still provides most of its character.

Other syrups: honey, maple syrup and golden syrup are not full-cup substitutes for the molasses here. If one of those is what you have, choose a cake that uses it as the main sweetener.

Gluten-free: use a gingerbread built around a gluten-free flour blend. Different blends absorb liquid differently, so a straight cup-for-cup swap can change the center considerably.

Vegan: an egg-free gingerbread is the cleaner route. Replacing the butter is fairly straightforward; replacing the eggs changes both rise and tenderness.

A Cake That’s Even Better Tomorrow

Serve the first square slightly warm if you can. The crumb gives easily under the fork, and the smell of ginger and molasses rises as soon as you break through the top.

Add softly whipped cream if you want something cool against the spice. Warm lemon sauce brings brightness, while vanilla ice cream melting into one edge makes the dessert more indulgent.

Then cover what is left.

Partly eaten gingerbread square on a silver plate with a fork and coffee, with the remaining cake covered in a light metal pan behind it.

Tomorrow, cut another square and notice how the ginger has settled into the molasses. The crumb is still tender, the spice tastes rounder, and somehow that simple second slice can be the one that makes the recipe worth keeping.

↑ Back to recipe  ·  Back to top

Posted on — Leave a comment

Homemade Soft Pretzel Recipe: Chewy, Buttery & Easy

Several homemade soft pretzels with deep golden-brown crusts, darker raised curves, coarse salt and a light buttery sheen on a dark surface.

Pull apart a good soft pretzel and the browned crust should resist for just a moment before giving way to a warm, soft center. The surface has a little chew, salt arrives before sweetness, and enough melted butter clings to the hot crust that some of it ends up on your fingertips.

The best ones barely make it to the cooling rack. Give them five minutes, tear through the thick curve, and the center should compress gently between your fingers before slowly pushing back.

The shapes won’t all come out identical, especially on a first batch. Once a tray of browned pretzels is sitting there warm under a layer of melted butter, that suddenly matters a lot less.

Soft pretzels can look like the sort of thing that takes bakery training, but the awkward-looking parts become surprisingly ordinary once you know what to watch for. Is the dough actually too sticky? Why does the rope keep shrinking? Are those holes big enough? How long should the baking-soda bath take?

Nothing here depends on guessing what “enough flour,” “a long rope,” or “golden brown” is supposed to mean. Make a soft dough, give it time to puff, roll long ropes, dip them briefly, then bake until the crust looks properly browned.

The Method in One Minute

You don’t need lye, an egg wash, or a stand mixer.

Soft dough. Long rope. Short bath. Deep color. Hot butter. Those are the five things worth remembering.

  • Soft dough: start with 500 g flour and 315 ml warm water. Rest for 10 minutes, knead fully, then decide whether the dough needs the reserved 10 ml water or a little extra flour.
  • Long rope: divide into 8 pieces of about 110 g each. Roll partway, let them relax while you work through the batch, then finish at 25–27 inches / 64–69 cm.
  • Short bath: use 1.9 L / 8 cups water with 75 g baking soda and give each pretzel 30 seconds total.
  • Deep color: bake at 450°F / 230°C. Start checking around 11 minutes and look for deep golden-brown crust with darker raised curves.
  • Hot butter: brush immediately after baking, then let the pretzels stand for 5 minutes before serving.
Soft pretzel guide showing five checkpoints: soft dough, a long rope, a short baking-soda bath, deep browning and butter added while hot.
Think of these as a sequence, not five separate tricks. Each soft-pretzel checkpoint sets up the next, so correcting problems early makes everything downstream easier.

Homemade Soft Pretzel Recipe

These are substantial pretzels rather than thin, crisp ones: deeply browned outside, lightly chewy through the crust, tender in the middle, and brushed with butter straight from the oven.

Plan on 40–50 minutes of hands-on work and about 2 hours from start to finish. Your part comes in short bursts—mix and knead, roll and shape, dip and bake—with most of the time between those stages spent waiting for the dough or the oven.

Yield8 large pretzels
Piece weightAbout 110 g / 3.9 oz each
Active time40–50 minutes
Rise45–60 minutes
BakeUsually 11–14 minutes
Oven450°F / 230°C
Total timeAbout 2 hours

Before You Start

  • A kitchen scale is strongly recommended, especially for the flour and eight equal portions.
  • Clear about 3 feet / 90 cm of counter space for the long ropes.
  • Use a wide, high-sided pot or Dutch oven and have a broad slotted spatula or spider ready for lifting the wet pretzels.
  • Set both prepared baking sheets beside the pot before dipping. Once you start, the drain-salt-transfer rhythm moves quickly.

Ingredients

For the dough

  • 500 g / 17.6 oz all-purpose flour; if measuring by volume, expect about 4 to 4¼ cups depending on how you fill the cup, so weighing is much more reliable
  • 315 ml / 1⅓ cups warm water, 100–110°F / 38–43°C
  • 10 ml / 2 teaspoons additional warm water, reserved and used only if needed
  • 7 g / 2¼ teaspoons instant yeast
  • 18 g / about 1½ tablespoons packed light brown sugar; granulated sugar can replace it at the same weight
  • 9 g / about 1½ teaspoons fine sea salt
  • 28 g / 2 tablespoons unsalted butter, melted and cooled until just warm

For the baking-soda bath

  • 1.9 L / 8 cups water
  • 75 g / about ⅓ cup baking soda

For finishing

  • Pretzel salt or coarse sea salt, as needed
  • 42 g / 3 tablespoons unsalted or salted butter, melted

Salted finishing butter is fine; just use a lighter hand with the coarse salt on top.

Instructions

1. Mix and rest

Combine the 315 ml / 1⅓ cups warm water, yeast, brown sugar, and melted butter in a large bowl. Add the flour and fine salt and mix until no large patches of dry flour remain.

The mixture will look rough and shaggy. Cover it and leave it alone for 10 minutes. When you come back, it should already look a little calmer even though it isn’t smooth yet.

Pretzel dough immediately after mixing and after a 10-minute rest, with the rested dough looking calmer, more hydrated and less shaggy.
Before judging hydration, let the flour absorb the water it already has. That short rest can prevent an unnecessary correction later.

2. Knead and let it rise

Knead with a dough hook for 6–8 minutes, or by hand for 8–10 minutes. The finished dough should feel smooth, elastic, soft, and lightly tacky.

Press a clean fingertip onto the surface. It should feel tacky without leaving your finger heavily coated. A stiff dough can take the reserved water 1 teaspoon at a time; a mixture that still smears heavily after the full knead can take flour 1 tablespoon at a time.

Knead first. Adjust second.

Fully kneaded pretzel dough with a smooth, elastic surface being pressed to demonstrate its soft, lightly tacky texture.
A finished knead gives you a fair texture test. Look for elastic rebound and a clean release rather than chasing a perfectly polished dough ball.

Place the dough in a lightly greased bowl, cover, and let it rise until clearly puffy and substantially larger, usually 45–60 minutes. It does not need to double.

If the change is hard to judge, mark the starting height on the outside of the bowl with a small piece of tape or an elastic band. Use the mark as a visual reference, not a precise measure of volume.

3. Heat the oven and divide the dough

As the rise nears completion, heat the oven to 450°F / 230°C. If baking both trays together, position one rack in the upper-middle and one in the lower-middle of the oven.

Fill the wide pot with the 1.9 L / 8 cups water for the bath and begin heating it, but don’t add the baking soda yet. Prepare two baking sheets with silicone mats or parchment rated for 450°F / 230°C; lightly oil the parchment.

Turn out the risen dough, gently press away any obvious large gas pockets, and divide into 8 equal pieces of about 110 g / 3.9 oz each.

4. Roll and shape

Roll each portion first to 12–14 inches / 30–36 cm. Work through all eight, then return to the first and finish it at 25–27 inches / 64–69 cm, about ½ inch / 1.3 cm thick.

Treat those dimensions as a target, not a ruler test. What matters is a rope long and slender enough to leave generous openings, without thin weak spots that will bake much faster than the rest.

A rope that keeps shrinking needs another 5 minutes of rest. Shape it into a wide U, cross the ends, twist once, then bring them down onto the lower curve and press firmly.

Keep the openings larger than you think you need; they shrink as the pretzel expands. Loosely cover finished shapes while you work through the batch.

Step-by-step sequence showing a pretzel dough rope formed into a U, crossed, twisted once and attached to the lower curve.
After the twist, the attachment points matter. Secure the ends against the lower curve while preserving enough open space for the pretzel to expand cleanly.

5. Prepare the baking-soda bath

When the water is almost boiling, reduce the heat slightly and add the 75 g / about ⅓ cup baking soda gradually. It may foam. Bring the bath back to a gentle, controlled boil.

6. Dip, drain, and salt

Lower 1–2 pretzels at a time into the bath and give each one 30 seconds total. If part floats above the surface, use about 15 seconds on one side, flip, then 15 seconds on the other.

Lift with a spider or broad slotted spatula, drain briefly over the pot, then transfer to the prepared sheet and add coarse salt while the surface is still damp.

A pale soft pretzel being lifted from a baking-soda bath and allowed to drain, with a damp, slightly swollen surface.
Once the pretzel leaves the bath, drainage matters too. Let excess water run off so the treated surface reaches the tray damp rather than puddled.

They may look puffier, wrinkled, and still surprisingly pale. Leave them alone. This is the moment ordinary-looking dough starts becoming recognizably pretzel-like; the dramatic color comes next.

7. Bake until deeply browned

Arrange 4 pretzels per tray. Start checking around 11 minutes; most batches need 11–14 minutes, although two trays can take a little longer in some ovens.

Swap the trays between the upper and lower racks and rotate them front to back only if your oven browns unevenly. Take the pretzels out when the crust is deep golden-brown with darker areas over the raised curves. Pale bread-gold is too early.

Only room for one tray? Bake four first. Keep the remaining shaped pretzels loosely covered in the refrigerator while the first tray bakes, then dip them immediately before the second tray goes into the oven.

8. Butter and serve

Brush the pretzels generously with melted butter as soon as they leave the oven.

The salt looks a little less stark once the butter hits it, the crust picks up that familiar bakery-counter sheen, and some of the butter disappears straight into the hot surface.

Give them 5 minutes, then serve.

Torn soft pretzel showing a fine-to-moderately-fine, tender interior crumb beneath a deep golden-brown salted crust.
Inside, the crumb should recover rather than shred or cling. Small-to-moderate pores signal a substantial soft pretzel instead of cottony bread or an underbaked center.

Need a deeper check? Read the dough guide ↓ · Fix shaping or springback ↓ · Back to top ↑


If something in the recipe made you hesitate, start with the section that matches it below. You don’t need to read every section before baking; the deeper guide is here for the moments when you want to understand what the dough is doing or fix something that doesn’t look quite right.

Table of Contents

What Makes a Pretzel Taste Like a Pretzel?

A pretzel should taste distinct from ordinary bread before the mustard ever touches it.

The baking-soda treatment changes the outside so it browns quickly in the oven and develops more roasted flavor and surface chew than untreated bread. The middle should still tear easily and stay tender, with enough structure that the thick curve feels like a pretzel rather than a fluffy dinner roll.

This is a buttery American soft pretzel. Bavarian lye pretzels are typically darker, firmer, and more intensely flavored.

Soft, not fluffy; chewy, not tough; buttery, not brioche-like.

Too bread-like: pale surface, very little crust chew, or an unusually fluffy center.

Right: browned exterior with a slight tug at the surface and a center that compresses when pinched, then slowly pushes back.

Too aggressive: hard or dry crust, or a noticeable mineral, bitter, or baking-soda-like flavor.

Do I need lye?

No. Traditional lye treatment can produce a darker, shinier and more intensely flavored crust, but baking soda is far simpler for a home kitchen and still gives plenty of browning and chew.

That difference matters in the oven too. A baking-soda pretzel does not need to become uniformly as dark as a lye-treated Bavarian one before it is finished.

What Each Ingredient Does

Flour

All-purpose flour gives enough strength for long ropes without making the dough unnecessarily resistant. Weigh it if possible; an overfilled measuring cup is one of the easiest ways to turn a soft batch dry and stubborn.

After kneading, the ball should still yield easily when you press your palm into it. That softness makes the long ropes easier to roll later.

Warm Water and Yeast

Start with 315 ml / 1⅓ cups water and keep another 10 ml / 2 teaspoons in reserve. Flour absorption varies, so the final splash goes in only if the dough still feels too firm after kneading.

Salt bread uses a similar reserve-water approach: give the flour time to hydrate and the gluten time to develop before deciding that the mixture needs correcting.

The water should feel comfortably warm, around 100–110°F / 38–43°C. If it feels genuinely hot to your hand, let it cool.

Instant yeast goes straight into the mixture. If you have active dry yeast, use the same 7 g / 2¼ teaspoons; dissolve it in the warm water with the sugar first and allow the rise a little more time if needed.

There isn’t a direct substitute for yeast in this dough. No-yeast pretzels use a different leavening system and behave differently enough to be treated as a separate recipe.

Sugar, Butter and Salt

Eighteen grams rounds the flavor and supports browning without making the pretzels noticeably sweet. Granulated sugar can replace it at the same weight.

A small amount in the dough keeps the bite tender. Most of the obvious butter flavor comes later, when melted butter hits the crust straight from the oven.

Unsalted butter gives the most predictable seasoning, but salted butter will still work. Because brands vary and the amount used in the dough is small, keep the fine salt as written and simply avoid going too heavy with the coarse finishing salt.

Fine salt disperses through the dough. Pretzel salt or coarse sea salt belongs on the damp surface after the soda bath.

If you’re deliberately baking part of the batch for the freezer, leave those pretzels unsalted. Large crystals attract moisture during storage and can partly dissolve into the crust.

Freezing part of the batch? Jump to the freezer guide →

Baking Soda

The bath needs baking soda. Baking powder is formulated differently and will not create the same surface treatment.

All-Purpose Flour or Bread Flour?

All-purpose flour makes a softer pretzel that is easier to roll; bread flour produces a stronger dough and a chewier finished bite.

FlourHow it handlesFinished pretzel
All-purposeSofter, easier to stretchTender middle, moderate chew
Bread flourStronger, more resistantFirmer, chewier bite
Two pretzel dough portions comparing the slightly softer appearance of all-purpose flour dough with the somewhat more taut appearance of bread-flour dough.
Choose bread flour because you want a firmer chew—not because a batch feels sticky. Stickiness is better diagnosed through kneading and hydration than by changing flour mid-recipe.

Cake flour isn’t a good direct substitute here; its lower protein makes it harder to build the structure needed for long ropes. Whole-wheat and gluten-free flours change the dough enough that they are not simple 1:1 swaps.

Read the Dough Before You Add More Flour

Why is my pretzel dough so sticky?

Pretzel dough should be soft and lightly tacky, but it should hold itself together and leave your fingertip mostly clean. Rest and knead it fully before reaching for more flour.

Freshly mixed dough often looks wetter than it will ten minutes later. The flour keeps absorbing water during the rest, while kneading builds enough strength for the shaggy mixture to become smooth and elastic.

When the balance is right, press it with a finger and the surface should give easily, then slowly rebound without smearing.

Dough stateWhat it feels likeWhat to do
Too wetSmears heavily, coats fingers, struggles to hold itselfKnead fully first; then add flour 1 tbsp at a time if needed
RightSmooth, elastic, lightly tacky; fingertip releases mostly cleanStop adjusting
Too dryStiff, rough, resistant; tears instead of stretchingAdd reserved water 1 tsp at a time
Under-kneadedShaggy, uneven, quick to tearKeep kneading before changing hydration
Four pretzel dough states labeled too wet, right, too dry and under-kneaded, showing smearing, smooth elastic, stiff and rough undeveloped dough.
Diagnose soft pretzel dough after it has actually been kneaded. Before then, rough under-developed dough can easily be mistaken for a hydration problem.

How do you know when kneading is finished?

The ball should look smoother, feel elastic, and stretch noticeably farther before it tears. A flawless bakery-style windowpane isn’t required.

Once it is smooth, stretchy, lightly tacky, and holding itself together well, move on.

How Much Should Pretzel Dough Rise?

Once the dough looks clearly puffier and substantially larger, it is ready to divide. It does not need to double.

Yeast moves faster in a warm kitchen and slower in a cool one, so use 45–60 minutes as a guide and let the dough’s appearance make the final call.

Lift the cover and the compact ball you left behind should now look softer, rounder, and noticeably fuller in the bowl. You’re building the soft middle here; the distinctive pretzel crust comes later in the bath and oven.

If you’re unsure how much it has grown, a piece of tape or elastic band marking the starting height makes the change much easier to see.

Letting the dough go much farther makes long ropes harder to control and can leave the finished middle fluffier than intended.

Making the dough tonight? See the overnight method →

Pretzel dough at the beginning and end of its rise, with the ready dough visibly expanded and puffier throughout the bowl.
Watch the whole mass, not just the top of the dough. Useful fermentation shows as broader expansion and a softer, airier look throughout the bowl.

Why Rope Length Changes the Finished Pretzel

For a 110 g pretzel, aim for a rope 25–27 inches / 64–69 cm long and about ½ inch / 1.3 cm thick.

Use those dimensions as practical targets. The amount of dough, rope length, and size of the openings need to work together.

A small portion stretched to 26 inches becomes thin; a heavier piece can remain thick enough to close its own holes as it expands.

That combination keeps the loops open while leaving enough dough through the curves for a substantial soft center.

A pretzel dough portion weighing about 110 grams beside a long, evenly rolled rope illustrating the amount of dough used for one pretzel.
Consistent portions remove one shaping variable. When every piece starts around the same size, an unusually stubborn rope is easier to recognize as tension rather than a portioning problem.

How to Roll the Dough Without Fighting It

Why does the rope keep shrinking?

If the rope keeps springing shorter, stop rolling and let it rest for 5–10 minutes. Tight gluten needs time, not more force.

The same amount of pretzel dough before and after resting, with the unrested rope shorter and thicker and the rested rope longer and smoother.
Springback is tension, not a request for more flour or harder rolling. A rope that repeatedly retracts is telling you the gluten needs to relax.

Take every portion to 12–14 inches / 30–36 cm before trying to make any one rope full length. By the time you return to the first piece, it should feel noticeably less springy and much easier to stretch.

Pizza dough behaves much the same way when it tightens during stretching: a short rest fixes what more pulling usually makes worse.

Roll evenly on a mostly bare counter

Place both palms near the middle and roll outward in short passes, gradually moving your hands toward the ends. Lengthen the whole rope a little at a time; concentrating pressure on one stubborn spot can make it skinny.

Slightly tapered ends are fine. What you want to avoid is a rope with thick bulges separated by paper-thin sections.

A heavily floured counter makes the rope skid beneath your palms. Keep the work surface mostly bare so the dough has enough grip to lengthen; if it starts sliding, wipe away loose flour and lightly dampen your hands.

Two hands rolling a long pretzel dough rope from its center toward the ends on a mostly bare dark work surface.
If the rope skates instead of lengthening, think traction before flour. Even outward pressure works best when the dough can gently grip the counter.

Keep the openings generous

This is one of those moments when the raw pretzel should look slightly wrong. Leave more open space than you think you need because the dough swells in the bath and again in the oven.

What looks almost comically open on the counter becomes much more familiar after baking.

Your first pretzel may be the least photogenic one on the tray. By number three or four, your hands usually understand the twist better than your brain does. That’s when shaping starts becoming fun.

Two raw pretzels comparing a compact shape with small openings to a correctly shaped pretzel with broad open spaces.
Empty space is part of the pretzel shape. Generous raw openings give the swelling curves somewhere to expand instead of closing into a tight knot.

The Baking-Soda Bath

How long should the pretzels stay in the bath?

For this recipe, give each pretzel 30 seconds total. Keep that timing tied to the stated ratio of 75 g baking soda in 1.9 L / 8 cups water.

Baking soda being added gradually to a wide stainless-steel pot of hot water, with a digital scale displaying 75 grams.
Keep the baking-soda bath controlled rather than violent. Gradual addition and a roomy pot make the inevitable fizz easier to manage around delicate shaped pretzels.

Need less bath liquid? Keep roughly the same concentration—about 40 g baking soda per liter of water—and use enough solution for the pretzel to float freely without folding against the pot or becoming crowded. Flip it if the upper surface remains exposed.

The first bath can look dramatic, but once the pot and timer are ready, it is one of the quickest parts of the whole recipe.

What the bath actually does

The alkaline bath changes the outside of the dough so it browns faster and develops a chewier skin. Skip it and the result moves much closer to ordinary bread tied into a pretzel shape.

This is the moment the recipe stops behaving quite like ordinary bread. The dough may still look pale when it comes out of the water, but the treated surface is now ready for the rapid browning that happens in the oven.

Three pretzels showing the progression from pale raw dough to a pale, damp, slightly swollen bathed pretzel and a deep golden-brown baked pretzel.
Compare texture and expansion as well as color. The bathed pretzel changes only modestly; the oven is where the major puffing and browning finally happen.

Something went wrong in the bath? Go straight to the shaping and bath fixes →

Thirty seconds is enough for this particular bath. Leaving the pretzels in much longer can make the surface gummy or tough and may introduce an unpleasant mineral or baking-soda taste.

The soda bath already does the important browning work. Egg wash can add more shine, but it isn’t necessary here, and the hot butter supplies plenty of gloss afterward.

Bake for Color, Not Just Time

At 450°F / 230°C, start checking around 11 minutes; most batches take 11–14 minutes.

For the first few minutes they mostly puff. Then the color catches up quickly, and the smell changes with it.

The timer gets you to the window. The crust tells you when to stop.

Too pale: beige or light bread-gold. Give them more time.

Ready: deep golden-brown with darker color over the raised curves. The surface should tug slightly against your teeth before the soft middle gives way.

Too far: very dark thin areas, a dry-feeling crust, or an underside beginning to scorch.

Three baked soft pretzels comparing pale, properly browned and overly dark crust stages.
Before pulling the tray, check more than the prettiest curve. The thick center should be richly browned without the thinner tips or underside beginning to scorch.

Bottoms darkening well before the tops usually means the pan or rack is giving them too much heat from below. A lighter sheet pan, a slightly higher rack, or stacking the loaded sheet over a second empty pan can help.

Need another baking fix? Jump to baking and storage troubleshooting →

An optional temperature check

Color is the better everyday guide. If the crust looks right but you’re worried about the thickest section being underbaked, an instant-read thermometer will generally land around 195–200°F / 91–93°C.

Once the overall color looks right, look more closely at the surface. A good soft-pretzel crust can show small blisters and natural tonal variation rather than a perfectly smooth shell.

Extreme close-up of a soft pretzel crust with deep golden browning, darker raised areas, coarse salt and small natural surface blisters.
Tiny blisters and uneven browning are welcome handmade texture. The target crust looks thin and chewy—not perfectly smooth, lacquered or uniformly dark.

Troubleshooting: What Went Wrong?

Most imperfect batches are still very edible. Start with the result you can see and change one thing next time; one imperfect detail rarely means the whole recipe failed.

Dough & Rise

What happenedMost likely causeTry this
Dough smears everywhereToo wet or not kneaded enoughFinish the rest and knead before adding flour
Dough feels stiffToo much flour or too little waterAdd reserved water gradually
Dough rises very slowlyCool room or sluggish but active yeastGive it more time in a comfortably warm spot
Dough shows no riseInactive yeast or water that was too hotStart again with fresh yeast and comfortably warm water
Dense and dryToo much flour or excessive bakingKeep the dough softer or shorten the bake
Dense and gummyUnderbaked centerBake longer

Dry density and gummy density are different problems. A tight, dry crumb points toward too much flour or too much oven time. A moist, tacky center usually means the pretzel simply needed longer to bake.

Three soft pretzel cross-sections labeled right, dry and dense, and gummy and dense, showing tender, dry compact and damp compressed crumbs.
Two pretzels can both feel “dense” for opposite reasons. The cross-section helps separate a moisture-starved crumb from one that simply needed more baking.

Rolling, Shaping & Bath

What happenedMost likely causeTry this
Rope keeps shrinkingGluten is tightRest another 5–10 minutes
Rope slides under your handsToo much flour on the counterRemove loose flour and lightly dampen palms
Rope gets thin in random spotsToo much pressure in one areaRoll outward in short, even passes
Holes disappearRope too short or openings too smallRoll longer and shape more openly
Ends come looseWeak sealDab with water and press firmly
Pretzel goes limp in the bathOverproofing or weak structureStop the first rise earlier and make sure the dough is fully kneaded
Shape distorts while liftingHandling issueUse a broad spider or slotted spatula
Slight wrinkles after bathUsually normalDon’t reshape; bake as usual
Surface feels gummyToo much bath time or poor drainingKeep to 30 seconds and drain briefly
Mineral or bitter tasteToo much soda exposureUse the measured ratio and timing

Baking & Storage

What happenedMost likely causeTry this
Pale and bread-likeIncomplete bath or not enough browningUse the full dip and bake beyond pale bread-gold
Nicely browned but very fluffy insideToo much proofing or overly thick ropesStop the rise earlier and roll longer
Bottom burns before top brownsDark pan, low rack, or strong bottom heatMove higher or use a lighter/doubled sheet pan
Crust is very toughOverbaking or too much bath exposureCheck oven time and 30-second dip
Pretzels stick to parchmentUntreated paper under wet doughUse a silicone mat rated for 450°F / 230°C or lightly oil parchment
Coarse salt becomes wet laterSalt pulled moisture to the surfaceFor planned storage or freezing, leave coarse salt off; already-salted leftovers can still be frozen

If the pretzel browned well, tasted good, and simply came out a little lopsided, that’s a shaping problem—not a bad batch.

Back to recipe ↑ · Store, freeze and reheat ↓

Make Ahead, Store, Freeze and Reheat

Soft pretzels are at their best fresh from the oven, but you don’t have to arrange your whole day around that moment. The easiest make-ahead route is to bake the pretzels first and freeze them; overnight dough works too, but its next-day timing depends on how much fermentation happened in the refrigerator.

Make the dough the night before

After kneading, place the dough in a lightly greased covered bowl and refrigerate overnight. The goal is an overnight rest rather than an extended cold ferment.

The next day, divide and shape while still cool, or let the dough sit briefly at room temperature first if it feels too firm to roll comfortably.

After shaping, let the pretzels lose some of their refrigerator chill and relax slightly before dipping. Don’t wait for a pronounced second rise; once the dough is easy to handle and the shapes are no longer fridge-cold, move on to the bath.

Storing baked pretzels

Store completely cooled pretzels airtight at room temperature for up to 3 days. The crust softens during storage, so reheating gives a much better result than eating one cold the next day.

For longer storage, freeze rather than refrigerate.

Freeze them baked

For a planned freezer batch, cool the pretzels completely and leave off the coarse salt. Freeze them individually until firm, then transfer to a freezer-safe bag or container. Already-salted leftovers can still be frozen, although some salt crystals may soften or partly dissolve. For best quality, use within 2–3 months.

Unsalted baked soft pretzels shown cooling, freezing separately on a tray and then stored together in a freezer-safe bag.
Freezing individually preserves shape and gives you options later. Once firm, the pretzels can share a bag while still coming apart one at a time.

How to reheat soft pretzels

For a room-temperature pretzel, a 350°F / 175°C oven for 5–7 minutes gives the best balance of soft center and revived crust. Lightly mist or brush a dry surface with water first.

From frozen, lightly mist the surface, add fresh coarse salt if the pretzel was frozen unsalted, and heat at 350°F / 175°C for 15–20 minutes, until hot through the center.

Golden soft pretzels on a dark baking tray being lightly misted with water before reheating, with oven temperature and timings printed beside them.
Use moderate heat so the center warms before the thinner ends turn hard.

Other reheating options

Air fryer, room-temperature pretzel: start around 325°F / 165°C and check after about 3 minutes. Air fryers vary, so check early before the thinner ends dry out.

Microwave, room-temperature pretzel: start with about 15 seconds, then add another 5–10 seconds only if needed. It is fast and soft, but you lose most of the crust.

Can I double the recipe?

The ingredient math doubles easily. Mixer capacity may not.

For an ordinary home stand mixer, two separate dough batches are more predictable than asking it to knead roughly a kilogram of flour at once.

Two Easy Finishes

Cinnamon Sugar

Skip the coarse salt. Brush the baked pretzel generously with butter, then coat it with cinnamon sugar while still warm.

The butter catches the sugar in a thin sandy layer instead of letting half of it fall onto the plate. Add the cinnamon sugar only after baking so it doesn’t scorch at 450°F.

Deep golden soft pretzel coated with a fine cinnamon-sugar layer as additional cinnamon sugar falls over the surface.
A cinnamon-sugar pretzel should still look like a pretzel underneath. Aim for a fine sparkling coat that complements the browned crust rather than burying it.

Garlic Butter

Mix the finishing butter with finely grated garlic or gently cooked minced garlic and brush it over the pretzel while the crust is still hot enough to absorb it. Parsley or a little finely grated Parmesan can go on afterward.

If warm bread and garlic butter is the combination you’re really after, this homemade garlic bread loaf takes that combination further.

Freshly baked soft pretzel being brushed with melted garlic butter containing small pieces of garlic and herbs.
Garlic butter works best as a thin savory finish. You want visible garlic and a warm sheen on the crust—not a pretzel saturated with butter.

What to Serve With Them

A warm salted pretzel doesn’t need much. Yellow mustard gives you the sharp, familiar version; Dijon is tangier and more assertive.

For something sweeter, honey mustard can be mixed a little thicker so it clings to the pretzel instead of running off.

If you’re firmly in the cheese-with-pretzels camp, a warm cheddar cheese sauce is hard to argue with. The creamy sauce against that salty browned crust is the whole point.

The best serving plan is simply to have people nearby when the tray comes out. Warm pretzels lose more by waiting than they gain from having a special occasion attached to them.

Freshly baked salted soft pretzels on a dark wooden tray with an exposed interior crumb, a hand reaching for a pretzel, and bowls of mustard and cheese sauce behind.
The final contrast is simple: salty browned crust outside, a warm soft center inside, and something sharp or creamy waiting at the side.

Give them five minutes, then tear into the thick curve while it is still warm. The browned skin should pull slightly before it opens, and the middle should feel soft rather than cottony. A little butter will probably end up on your fingers.

There can be mustard waiting nearby. The first pretzel rarely needs much convincing.