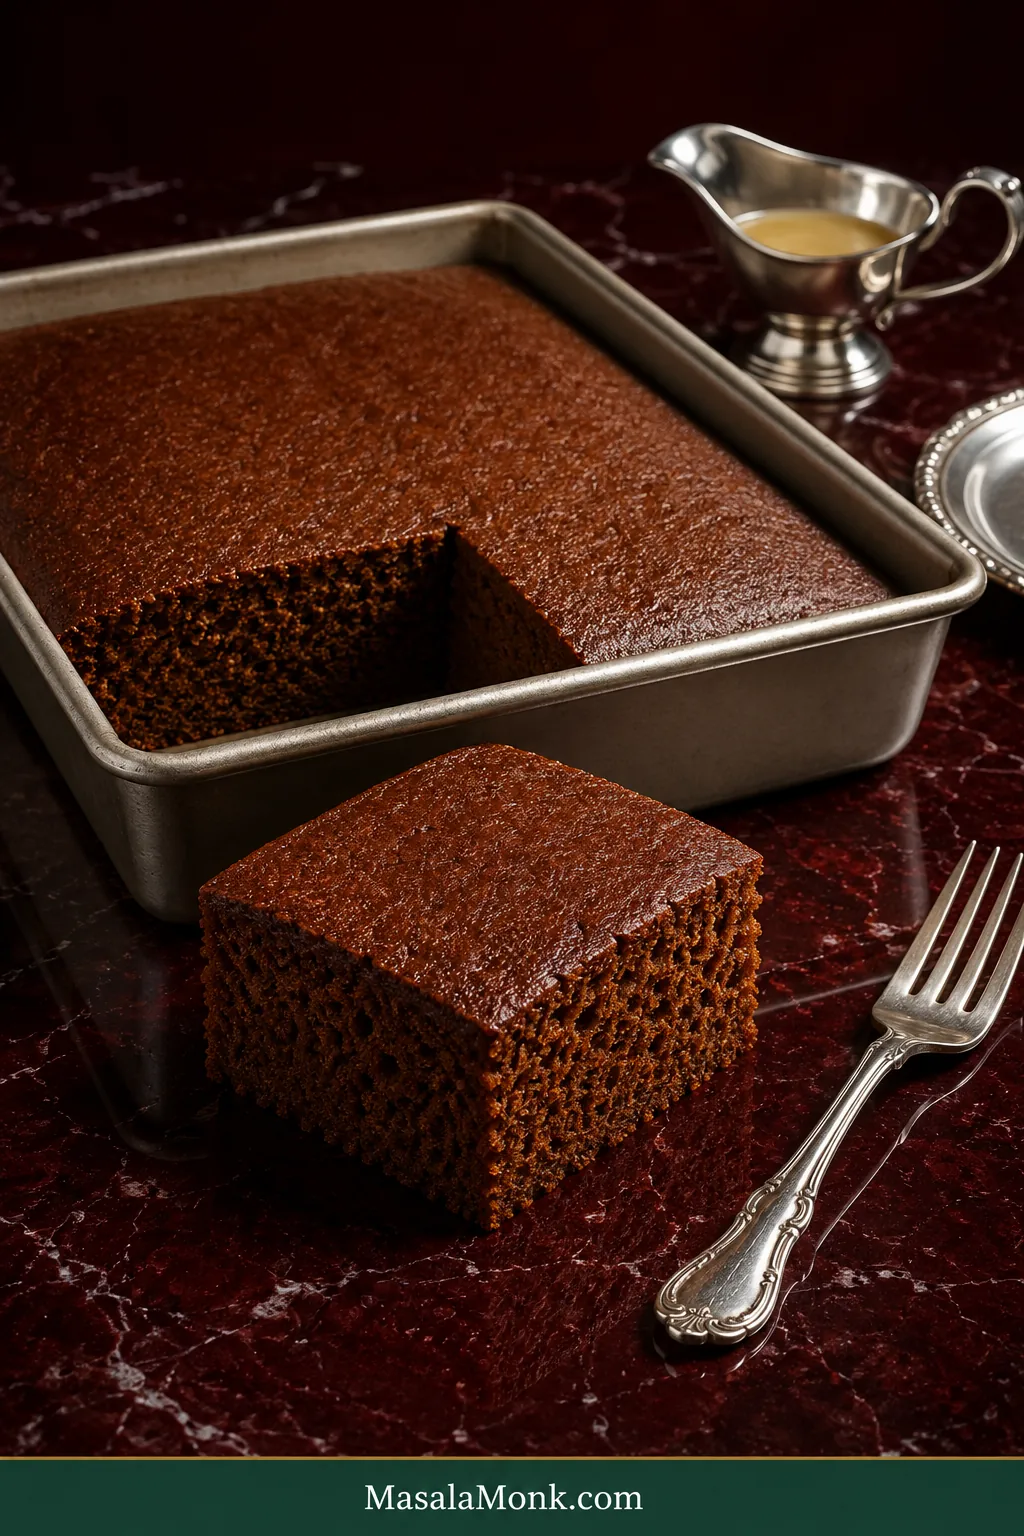
A good gingerbread cake announces itself before you cut it. The kitchen fills with the deep smell of molasses and warm ginger, the top settles into a rich mahogany brown, and a square gives easily under the fork while the crumb holds together.
Its middle is soft and moist, the edges stay tender, and once cooled the crumb cuts cleanly. Ginger comes through clearly against the molasses.
This is old-fashioned gingerbread in the best sense: one uncomplicated 9×13-inch molasses cake, mixed by hand, cut into squares and perfectly happy without decoration. It has the easygoing feel of a snacking cake—good with coffee in the afternoon, comfortable after dinner, and simple enough to sit beside richer desserts on a holiday table.
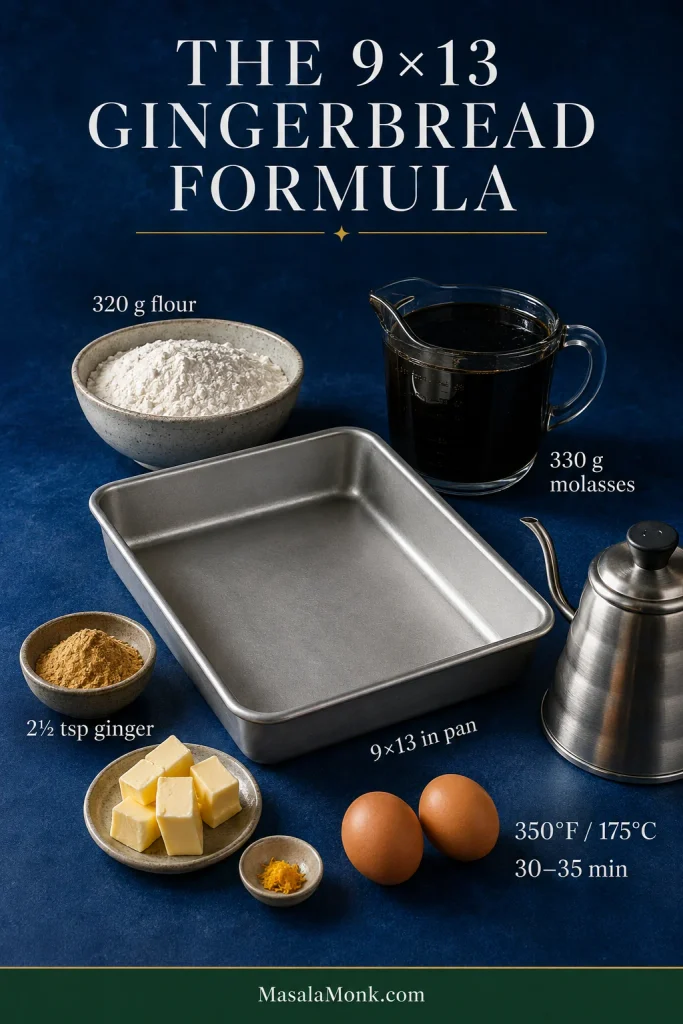
For moist gingerbread cake, bake a fluid molasses batter in a light-colored 9×13-inch pan at 350°F / 175°C for about 30–35 minutes, until the center is set and springy and a tester carries moist crumbs but no wet batter.
Mix regular unsulphured molasses with brown sugar, melted butter, a little neutral oil and hot water. Once the mixture feels comfortably warm, with no steam rising, add the eggs, then mix in the dry ingredients until evenly combined and no dry flour remains.
The batter will be dark and unusually fluid. Pour it into the prepared pan promptly and start checking around 28–30 minutes. Let the cake itself—not the timer alone—tell you when it is ready.
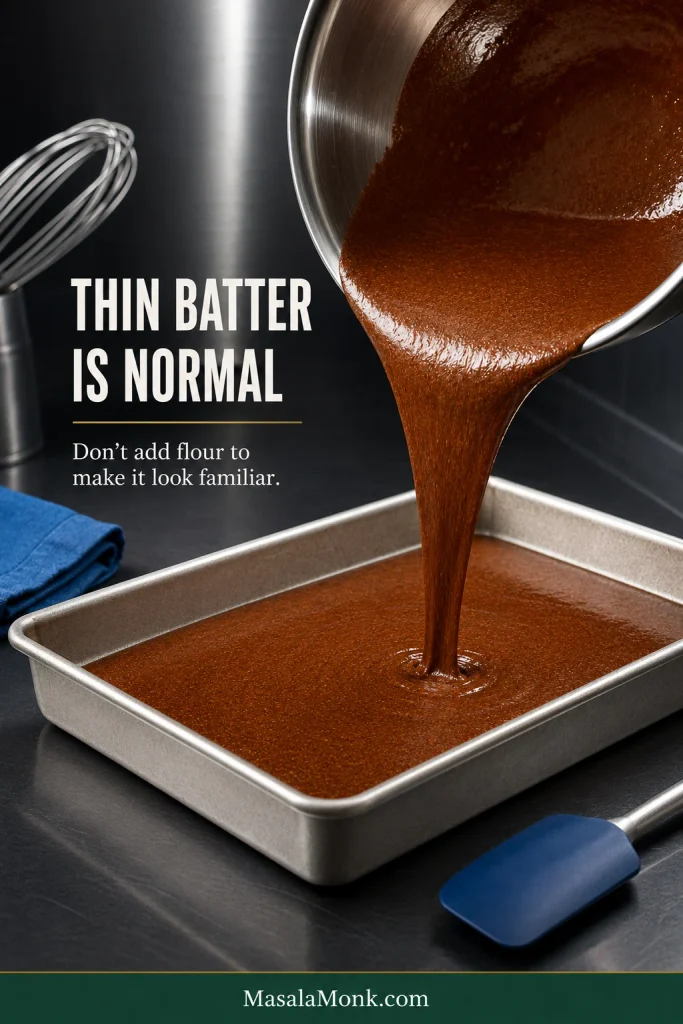
Thin batter is normal here. It will look much looser than ordinary butter-cake batter. Do not add extra flour to make it look more familiar.
Gingerbread Cake Recipe
Moist & Easy Gingerbread Cake
A soft, ginger-forward molasses cake baked in one 9×13-inch pan, with a tender crumb that stays moist into the next day.
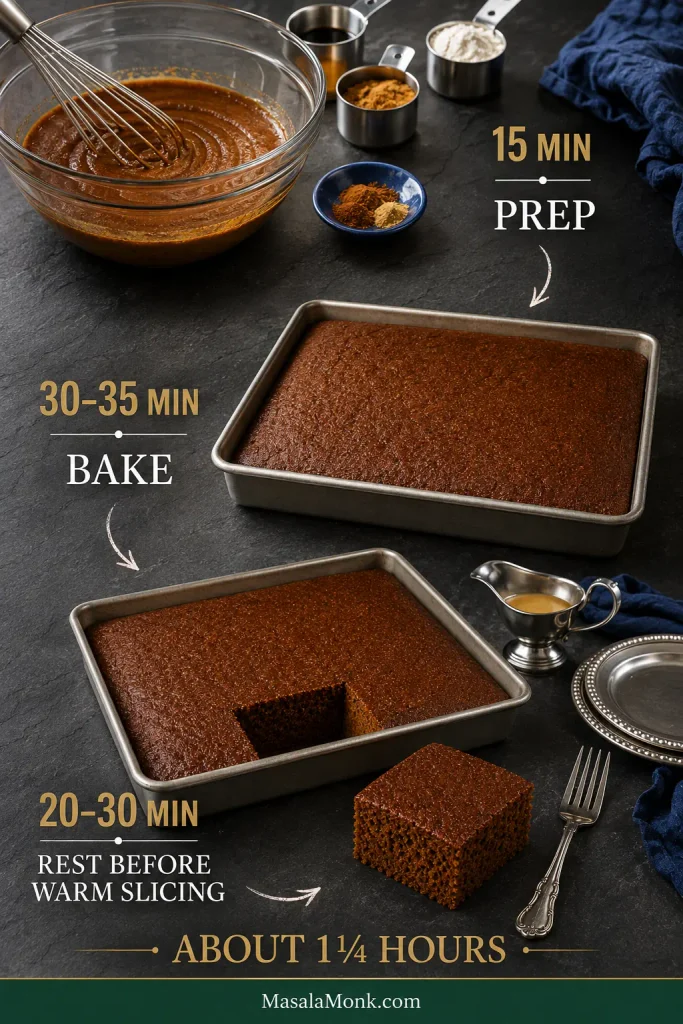
Hands-on prep
15 minutes
Bake time
30–35 minutes
Minimum cooling
20–30 minutes
Total to warm serving
About 1¼ hours
Yield
12 generous or 15 smaller squares
Pan
9×13 in / 23×33 cm light-colored metal, about 2 in / 5 cm deep
Oven
350°F / 175°C conventional / 160°C fan
Mixer
Not needed
Make ahead
Excellent 1 day ahead
Cool completely before frosting or cutting especially neat squares.
Equipment
9×13-inch / 23×33 cm light-colored metal baking pan, about 2 inches / 5 cm deep
Parchment paper, with enough overhang for a sling if you want to lift the whole cake out
Large mixing bowl
Medium mixing bowl
Whisk
Flexible silicone or rubber spatula
Digital kitchen scale, preferably
Kettle or small saucepan for the hot water
Wire cooling rack
Dry ingredients
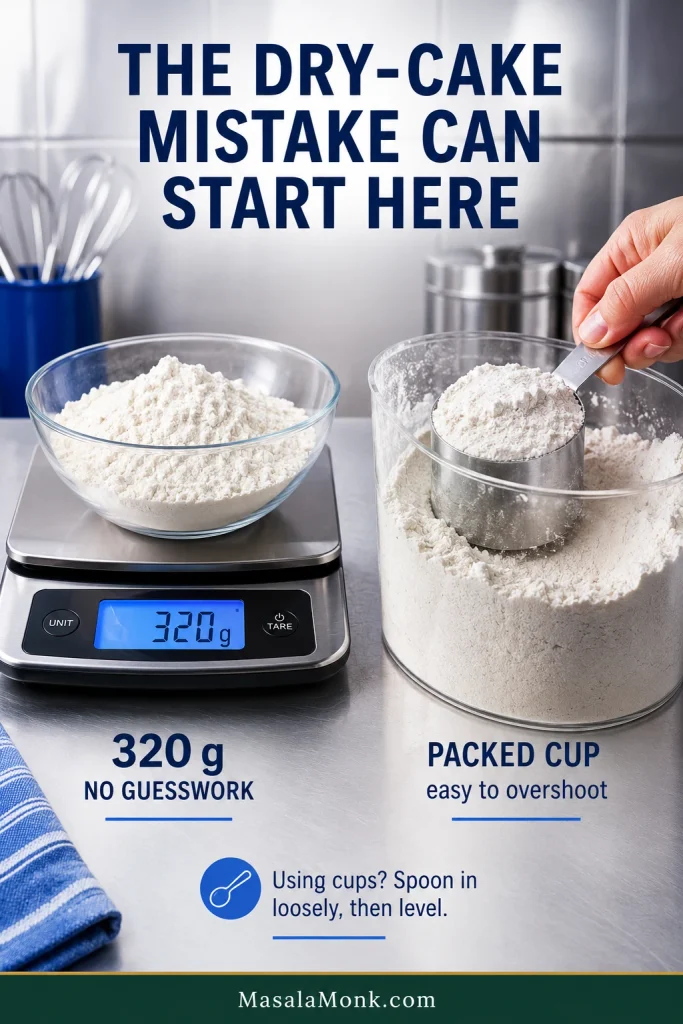
320 g all-purpose flour (2⅔ cups)
2½ teaspoons ground ginger
1½ teaspoons ground cinnamon
¼ teaspoon ground cloves
¼ teaspoon ground nutmeg
1 teaspoon baking soda
1 teaspoon baking powder
½ teaspoon fine salt
Wet ingredients
150 g packed dark brown sugar (¾ cup)
330 g regular/original unsulphured molasses (about 1 cup / 240 ml)
113 g unsalted butter (½ cup / 4 oz), melted
60 ml neutral oil (¼ cup), such as sunflower, canola or vegetable oil
240 ml hot water (1 cup)
2 large eggs
1 teaspoon vanilla extract
Using a scale? Set the large mixing bowl on it, tare to zero and pour the molasses directly into the bowl. It is much easier than scraping sticky molasses from a measuring cup.
Mix and assemble
Prepare the oven and pan. Heat the oven to 350°F / 175°C conventional / 160°C fan with a rack in the center. Lightly grease the pan and line the base with parchment. If you want to lift the whole cake out before cutting, leave parchment overhang along two opposite sides to form a sling.
Mix the dry ingredients. Whisk the flour, ginger, cinnamon, cloves, nutmeg, baking soda, baking powder and salt together thoroughly.
Make the molasses mixture. Whisk the brown sugar, molasses, melted butter and oil in a large bowl. Slowly whisk in the hot water. Let the mixture stand for a few minutes, until comfortably warm and no longer steaming, then whisk in the eggs one at a time and add the vanilla.
Bring the batter together. Add the dry ingredients and mix until evenly combined and no dry flour remains. Sweep a flexible spatula around the sides and firmly across the bottom to catch hidden pockets. There is no need to beat the batter for volume.
Pour the batter. It will be dark and easily pourable. Resist the urge to thicken it with extra flour. Pour it straight into the prepared pan.
Bake and cool
Bake. Transfer the pan directly to the oven. Avoid opening the door during roughly the first 25 minutes. Begin checking around 28–30 minutes; most cakes will finish in about 30–35 minutes.
Check the center. The middle should look set and spring back gently when touched. A tester may carry a few moist crumbs but should not have wet batter. The edges may also begin to pull slightly from the pan; consider that an extra clue, not something you have to wait for.
Let the crumb settle. Cool on a wire rack for at least 20–30 minutes before cutting. Let the cake cool completely for the neatest slices or before frosting. If you made a parchment sling, wait until the cake is completely cool before lifting it from the pan; warm gingerbread is softer and easier to break.
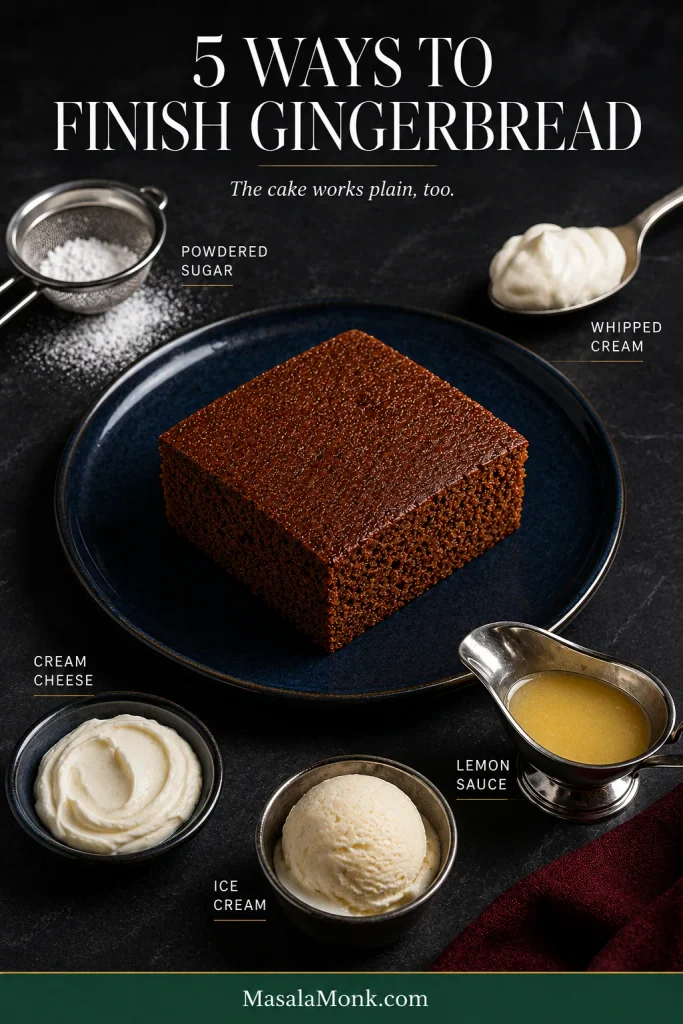
To serve: enjoy it plain, dust it with powdered sugar, add softly whipped cream, spread on a restrained layer of cream cheese frosting, or spoon over lemon sauce.
For gingerbread cake, baking time and serving time are not the same thing. Build the cooling rest into the plan so the crumb can settle before the first clean slice.
Soft with a little body: tender enough for the fork to slide through easily, but not airy like sponge cake.
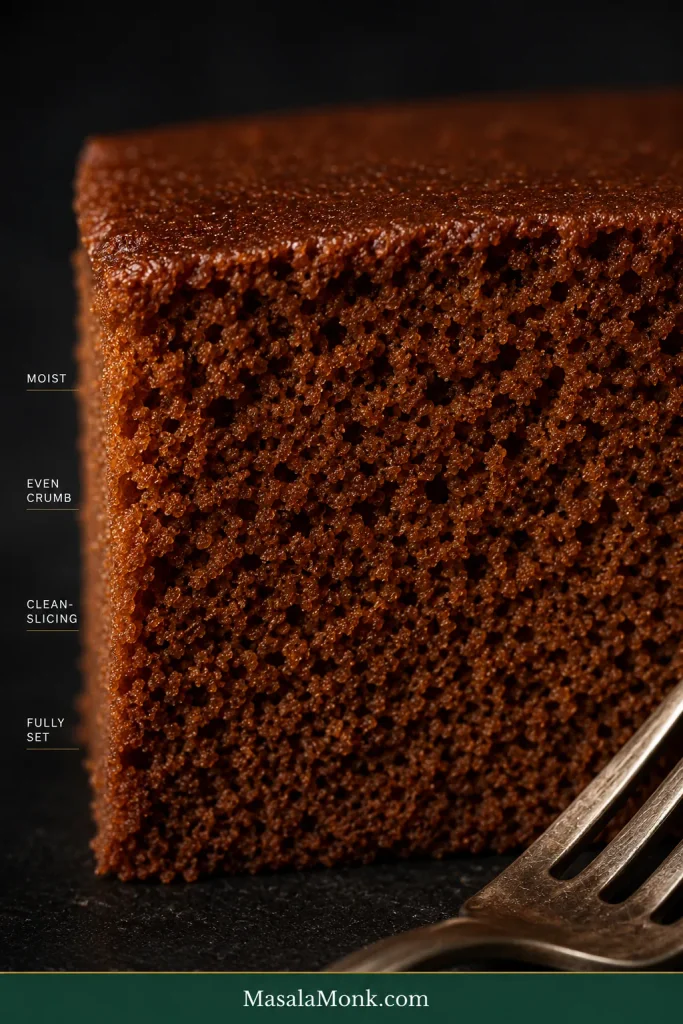
Moist and clean-slicing: the crumb feels almost plush and still holds together once cooled.
Ginger-forward: ginger reaches you first; cinnamon warms it; clove and nutmeg stay in the background.
Deeply colored: expect a rich mahogany-brown crumb with the rounded caramel edge of molasses.
After its initial rest, the crumb is especially yielding. Once fully cool, it cuts into neat, dark squares.
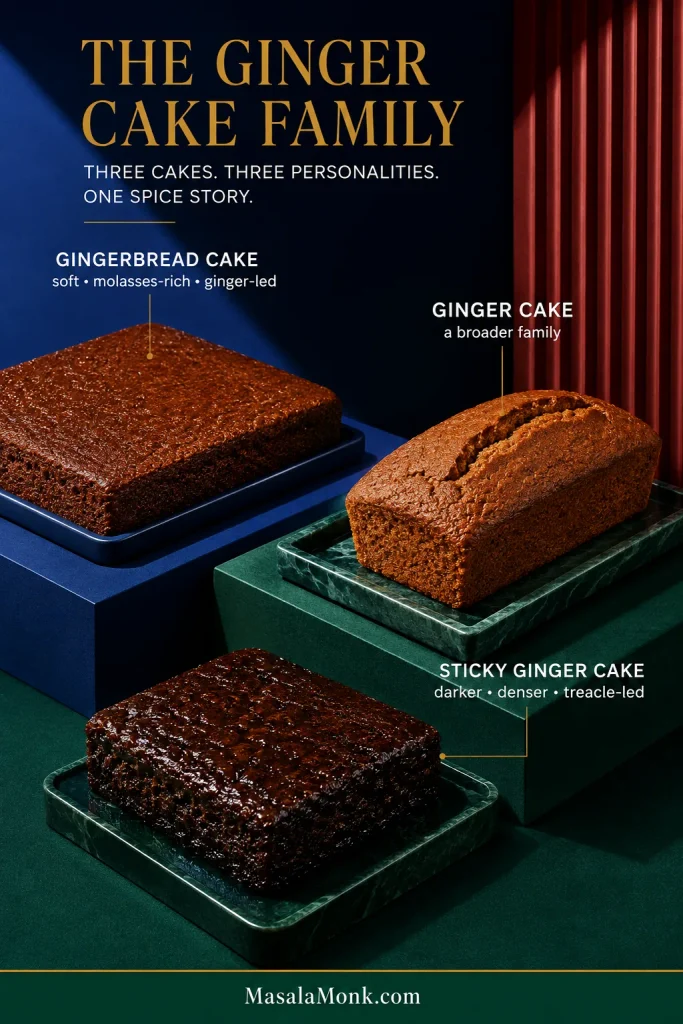
Gingerbread Cake vs Ginger Cake vs Sticky Ginger Cake
American-style gingerbread cake is usually a soft molasses cake with ginger leading the spice. “Ginger cake” is a broader term; sticky ginger cake usually points toward a darker, denser British-style cake.
When a recipe is called simply “ginger cake,” check its syrup, pan and intended texture before assuming it will behave like American gingerbread cake.
Gingerbread cake: this is the family our recipe belongs to—molasses-rich, ginger-led and commonly baked as a straightforward single layer.
Ginger cake: a broader name that can describe molasses gingerbread, a loaf, a fresh-ginger cake or another regional style altogether.
Sticky ginger cake: usually a more British style, often made with black treacle, golden syrup or stem ginger and intended to become darker, denser and stickier as it rests.
If it is the same molasses-and-ginger family you want in a completely different texture, the Gingerbread Cookies Recipe turns those flavors into soft-centered cut-outs that roll cleanly and hold their shapes.
Why This Recipe Works
Molasses does more than sweeten the cake. It gives gingerbread its deep color, caramelized flavor and characteristic moisture. Regular unsulphured molasses brings plenty of depth and still leaves room for the ginger to stay clear.
Butter brings fuller cake flavor; the smaller amount of neutral oil helps the crumb stay tender after cooling.
Baking soda and baking powder share the lifting work. Baking soda reacts with acidity in the molasses-rich batter, while baking powder supplies additional lift. Together they help this substantial, fluid batter rise without turning the crumb light and sponge-like.
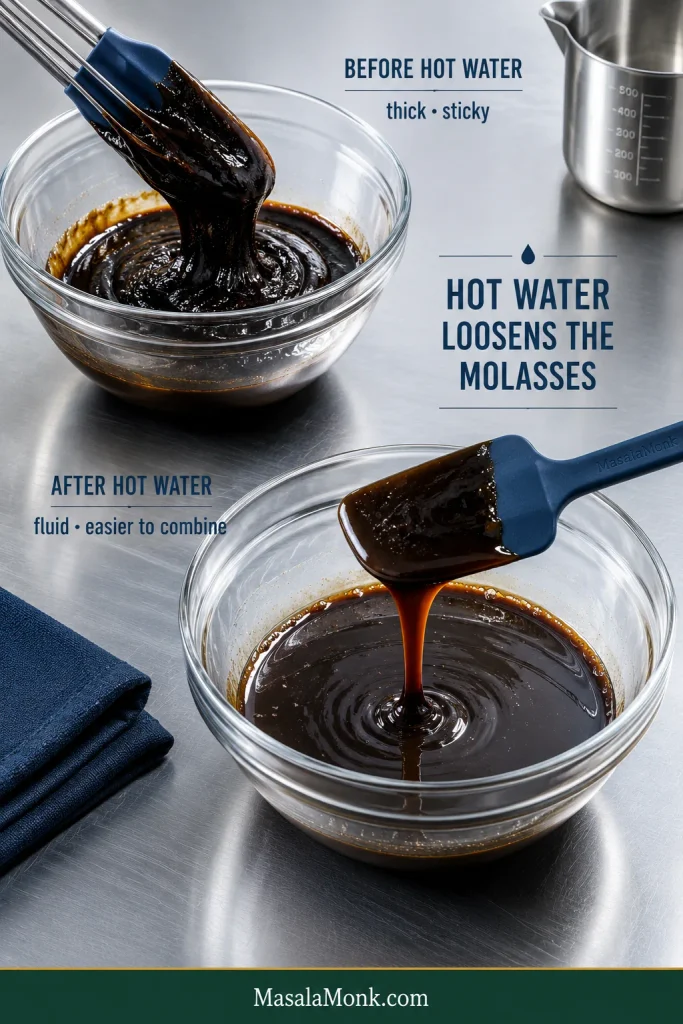
Hot water thins the molasses so it mixes evenly through the batter. The heavy, sticky mixture becomes much easier to combine by hand.
Cinnamon adds warmth around the ginger. Clove and nutmeg stay quieter. If you prefer several warm spices to share the spotlight more evenly, the Spice Cake Recipe takes that broader approach.
Ingredients That Matter Most
Treat the 9×13 gingerbread formula as a system: flour, molasses, fat and pan depth all push the final crumb in different ways, so one change can affect more than one trait.
Which Molasses Should You Use?
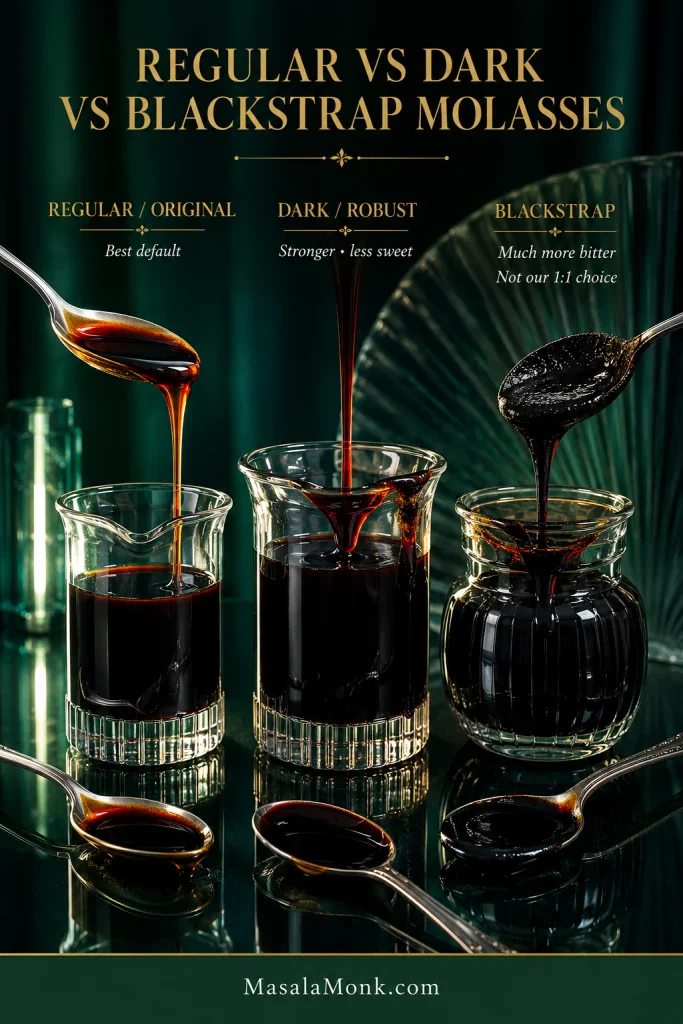
The best molasses for this gingerbread cake is regular/original unsulphured molasses. Dark or robust molasses makes a stronger, less sweet cake; blackstrap is considerably more bitter and is not the best choice here.
Molasses strength changes more than sweetness: as the syrup grows darker and more bitter, ginger has to compete harder to stay distinct in the finished cake.
Molasses
How it tastes here
Best use
Regular/original unsulphured
Deep, rounded and pleasantly sweet
Best default
Dark/robust
Darker, stronger and somewhat less sweet
Good if you already enjoy assertive molasses
Blackstrap
Much more bitter, mineral-forward and intense
Not recommended as a straight 1:1 swap
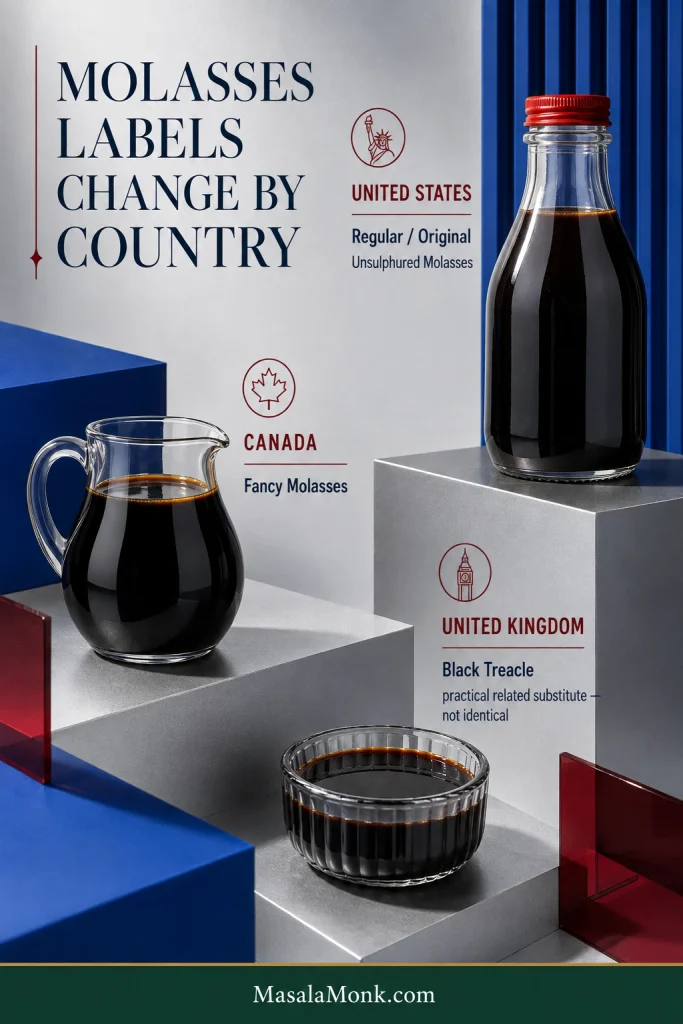
Outside the US, the labels change. Canadian fancy molasses is generally closest to the flavor we’re after. In the UK, black treacle is a practical related substitute when American-style molasses is hard to find, but it is not identical. Some black treacles taste somewhat sweeter and rounder, so expect a slightly different cake.
Regional names are only a starting point. When buying molasses for gingerbread outside the US, match flavor intensity first; equally dark syrups can still taste very different.
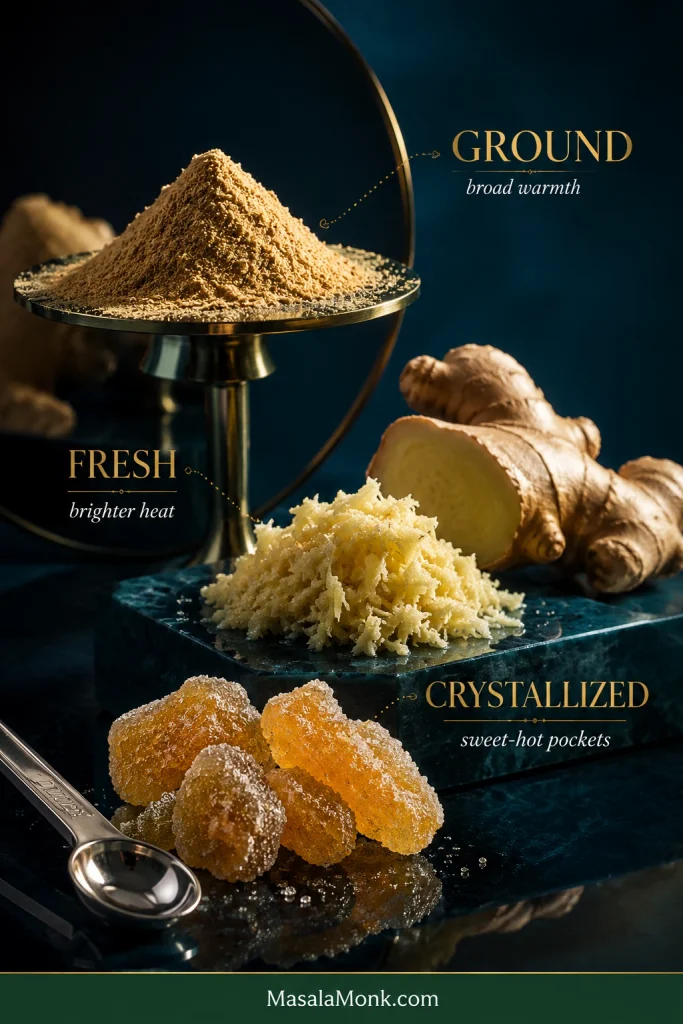
Ground ginger gives the whole cake its broad, familiar ginger warmth. Fresh ginger is brighter and sharper. Use it as a boost; keep the ground ginger as the foundation.
Think of the three forms as different kinds of ginger impact: ground spreads through every bite, fresh flashes brighter, and crystallized ginger creates concentrated sweet-hot pockets.
To make a stronger cake, increase the ground ginger to about 3 teaspoons. For brighter, fresher heat, keep the ground ginger and add 1 tablespoon finely grated fresh ginger to the wet mixture.
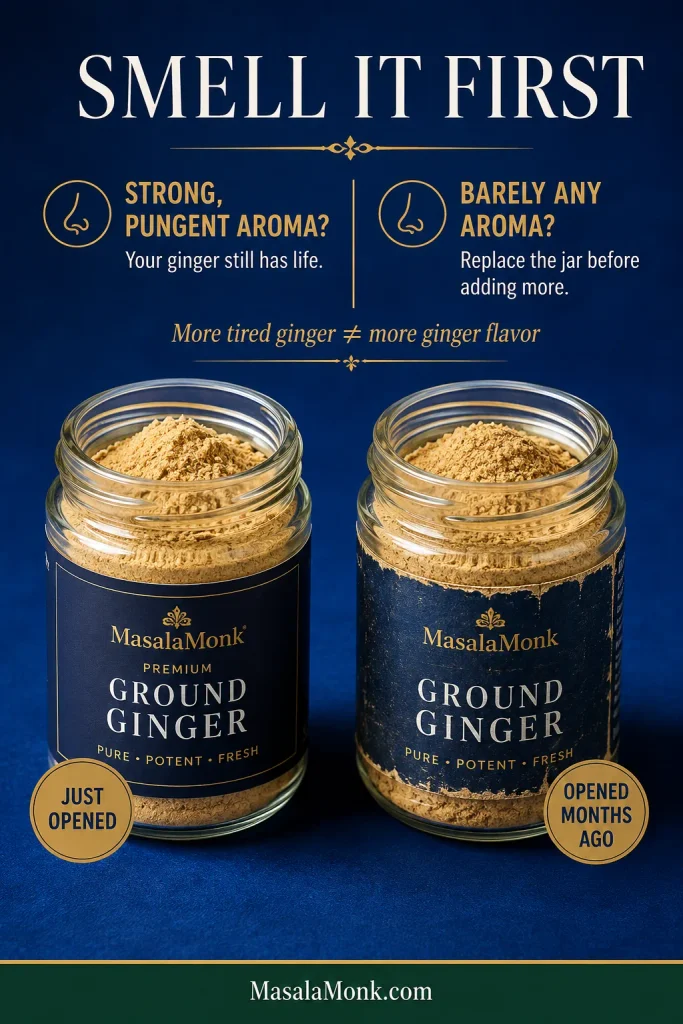
Before adding more: smell the ground ginger already in your jar. Fresh spice smells warm and pungent as soon as you open it. A faint aroma means a new jar will do more for the cake than another spoonful of tired ginger.
Aroma can fade long before ground ginger looks stale. Smell it before measuring; pungency matters when the spice has to stand up to molasses.
If you want to experiment with crystallized ginger, dice it finely and fold in only a small amount. It creates concentrated sweet-hot pockets through the cake. In a batter this fluid, some pieces may settle toward the bottom, and tossing them in flour does not reliably prevent that.
Tempted to use a premixed warm-spice blend? Check what is actually in it first. The Apple Pie Spice Recipe, for example, is intentionally cinnamon-led; gingerbread needs ginger to lead.
As for the hot liquid, water is deliberate. Coffee can be lovely in gingerbread, but some people notice it before the ginger. Hot water loosens the molasses without introducing another strong flavor.
What the Batter Should Look Like
If this is your first molasses gingerbread, the batter may look loose enough to make you check the ingredient list again. Nothing is missing.
When the hot water reaches the molasses mixture, it loosens dramatically. After the flour goes in, mix until no dry streaks remain, then sweep the spatula firmly across the bottom of the bowl; dry pockets can hide easily in such a dark batter.
The dramatic loosening is useful: once the molasses flows freely, it distributes more evenly through the batter without requiring aggressive mixing.
The finished batter falls easily from the spatula and spreads across the pan almost by itself. Keep that consistency rather than thickening it. Once everything is combined, pour it into the prepared pan and get it into the oven promptly.
This loose ribbon is the consistency we are looking for. Judge the finished gingerbread, not how closely the bowl resembles a conventional butter cake.
How to Tell When It’s Done
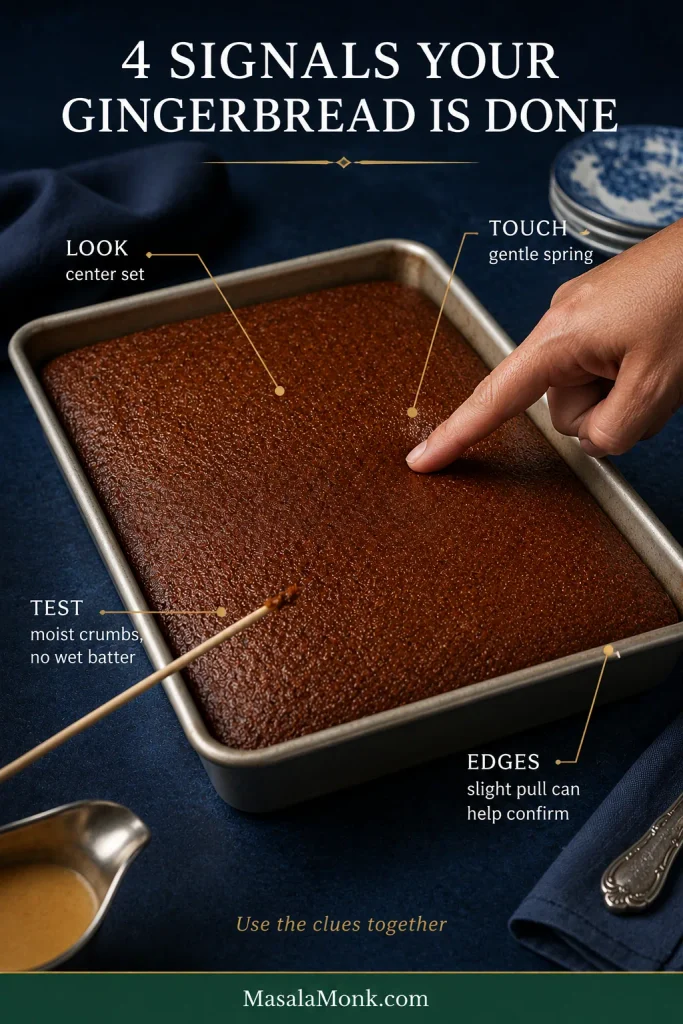
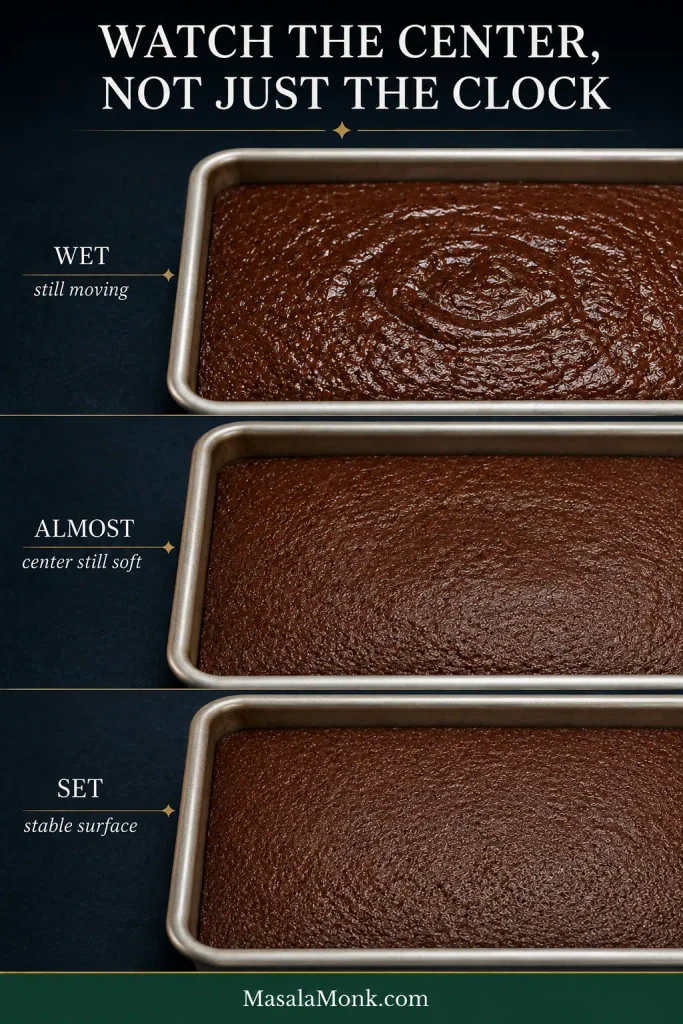
Gingerbread cake is done when the center looks set, springs back gently and a tester shows moist crumbs but no wet batter. The edges may also begin to pull slightly from the pan.
A dark cake makes the last few minutes harder to read. Use several clues together; no single one has to carry the decision.
The four doneness signals are strongest as a pattern. One odd clue can mislead; several cues arriving together are much harder to misread.
Use the Four-Signal Doneness Test
Look: the center is set, with no liquid or visible rippling.
Touch: a light press near the center springs back.
Test: a few moist crumbs are good; wet batter means it needs longer.
Check the edges: they may just begin to pull from the pan. Treat this as supporting evidence.
Use this progression to calibrate your eye. Once you have seen wet → almost set → set, the final minutes of a dark gingerbread cake become much less guesswork.
Start checking around 28–30 minutes. Your oven and pan may move the finish slightly earlier or later.
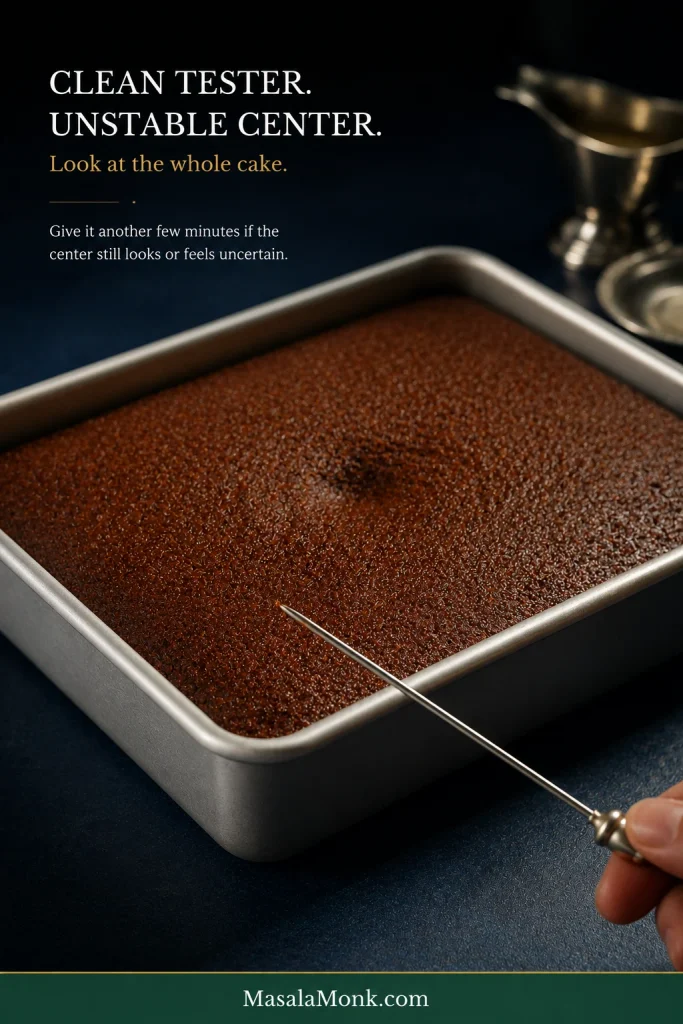
What if the tester looks clean but the center still seems uncertain? Look at the whole cake. If the middle remains visibly unstable or stays indented when lightly touched, give it another few minutes.
A cake tester samples one narrow path through the cake. The center’s overall movement and spring tell you something that single puncture cannot.
Moist vs Gummy: Know the Difference
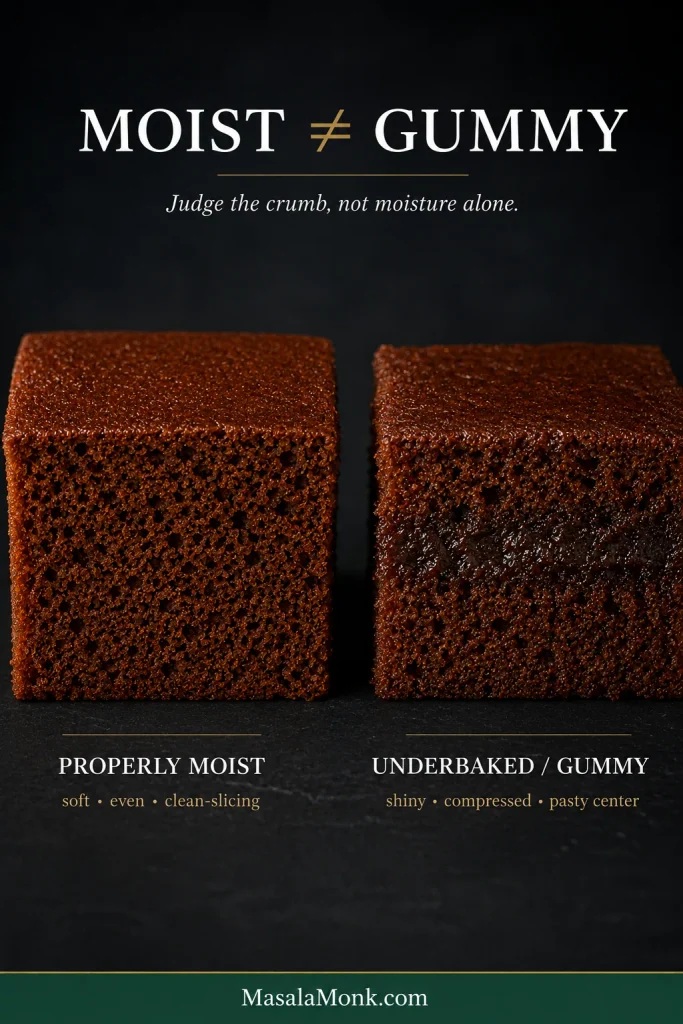
Properly moist gingerbread has a soft, even crumb that holds together when sliced; underbaked gingerbread looks shiny, compressed or pasty through the center.
Properly moist
Gummy or underbaked
Soft, even crumb
Shiny or compressed strip through the center
Holds together once cooled
Pasty or wet-looking interior
Moist crumbs on a tester
Wet batter on the tester
Slices cleanly after resting
Knife smears with raw-looking batter
Cooling clarifies the diagnosis: true moisture remains tender and structured, while an under-set center keeps its compressed or pasty look.
If the first slice looks suspiciously dense, remember when you cut it. Molasses-rich cake continues settling as steam escapes, and a slice taken too soon can look wetter and more compressed than it will after the recommended 20–30 minutes of cooling.
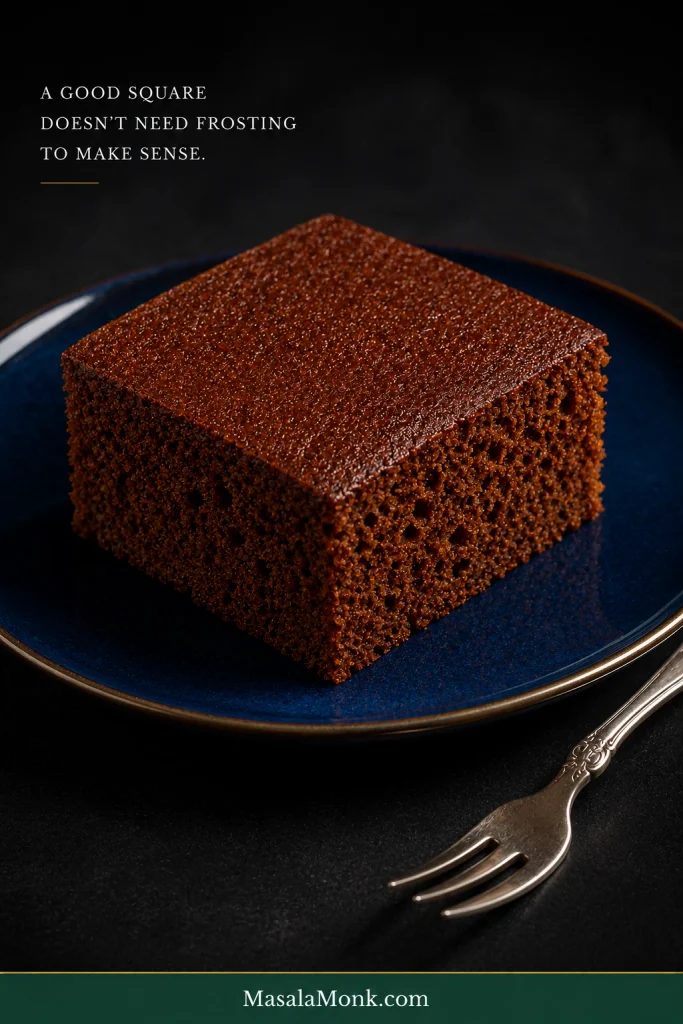
A good square does not need frosting to make sense. Plain gingerbread carries plenty of ginger and molasses on its own; the options below simply take it in different directions.
Powdered sugar: dust the fully cooled cake shortly before serving.
Whipped cream: add a softly whipped spoonful beside each square.
Cream cheese frosting: keep the layer thin and tangy so the ginger still leads.
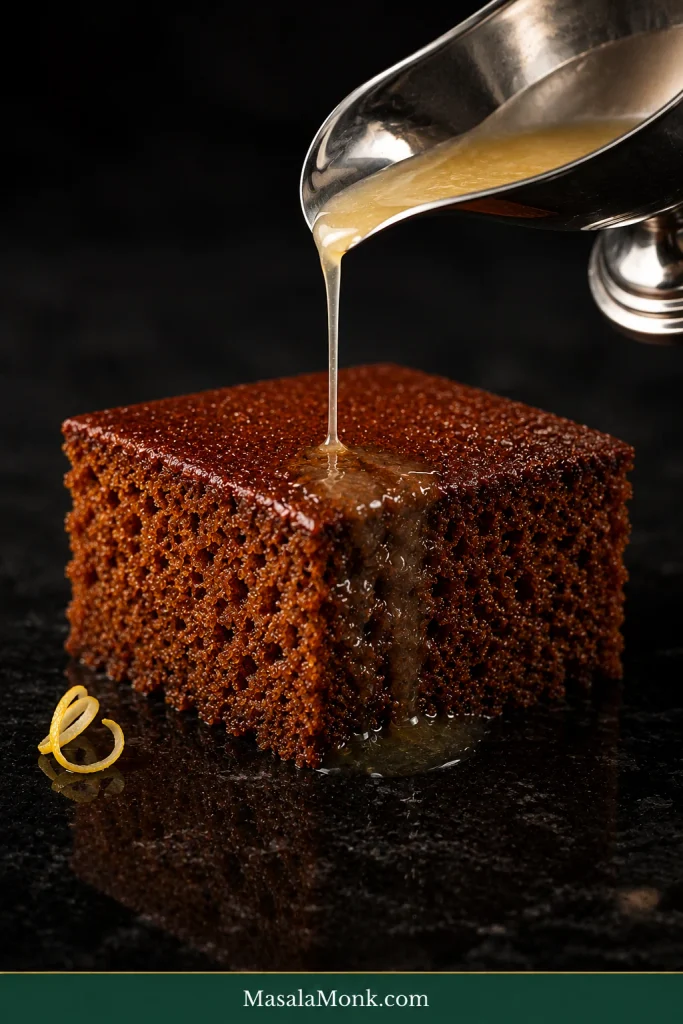
Lemon sauce: spoon it over the cut cake with the sauce still warm and pourable.
Vanilla ice cream or custard: let a little soften into the crumb.
Choose a topping by contrast, not by sweetness alone: tang, acidity and cool creaminess each change how the molasses and ginger register on the palate.
Softly whipped cream works especially well when it bends gently from the whisk. Firm decorating peaks are more than this cake needs. The Whipped Cream Recipe shows exactly what soft, medium and firm peaks look like.
Old-Fashioned Lemon Sauce for Gingerbread
Warm lemon sauce can sound unexpected if you grew up eating gingerbread with frosting, but the pairing makes immediate sense on the plate. The cake is dark and warmly spiced; lemon brings brightness. A little sauce slips into the cut face of the crumb while the zest keeps each bite lively.
Aim warm lemon sauce at the cut face rather than flooding the top; exposed crumb takes up a small pour quickly while the cake’s surface stays intact.
Quick Warm Lemon Sauce
Makes about 1 cup / 240 ml, enough for 12–15 light servings.
100 g granulated sugar (½ cup)
8 g cornstarch (1 tablespoon)
240 ml water (1 cup)
45 ml fresh lemon juice (3 tablespoons)
Finely grated zest of 1 lemon
28 g unsalted butter (2 tablespoons)
Small pinch of salt
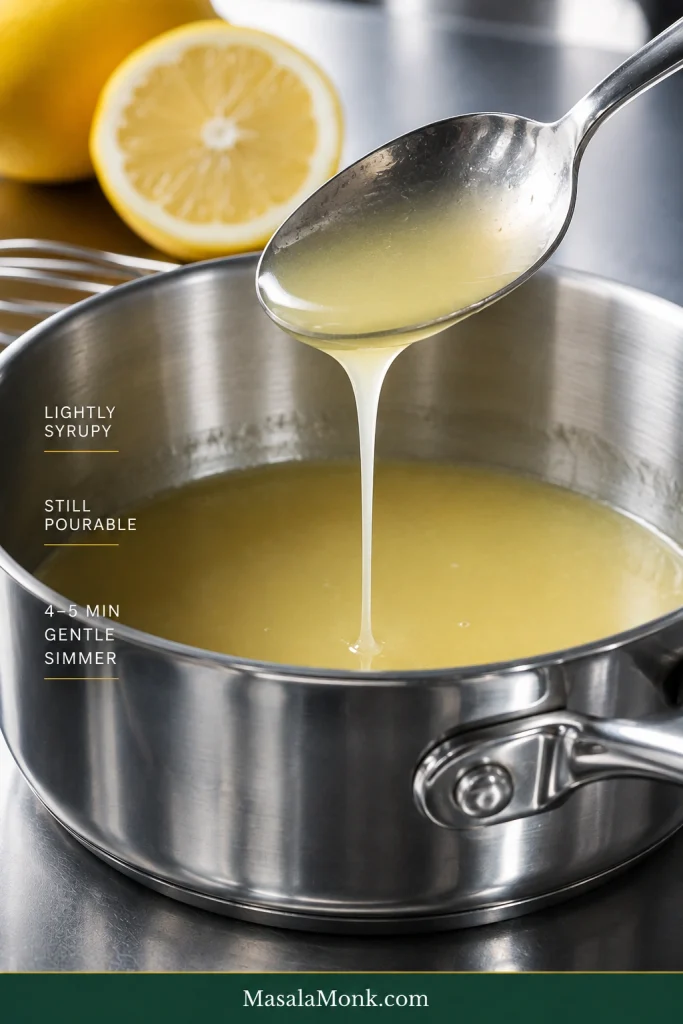
Whisk the sugar and cornstarch together in a small saucepan, then gradually whisk in the water. Bring to a gentle boil over medium heat, stirring regularly.
Lower the heat and simmer gently for about 4–5 minutes, stirring often, until lightly syrupy. Remove from the heat and stir in the lemon juice, zest, butter and salt.
Judge the lemon sauce while it is warm: it tightens as it stands, so the right stopping point is a little looser than the texture you expect on the plate.
Serve it warm and pourable. The sauce should be thin enough to slip into the cut surface of the cake. If it thickens as it stands, loosen it with a small splash of warm water.
Refrigerate leftover sauce separately in a covered container and warm it gently before serving, adding a splash of water if needed to restore its pourable consistency.
The pairing has history behind it, too. Toni Tipton-Martin’s Jubilee pays homage to an old-time ginger cake served with lemon sauce and bourbon Chantilly; the James Beard Foundation’s gingerbread with lemon sauce is a lovely place to explore that tradition further.
If Something Went Wrong
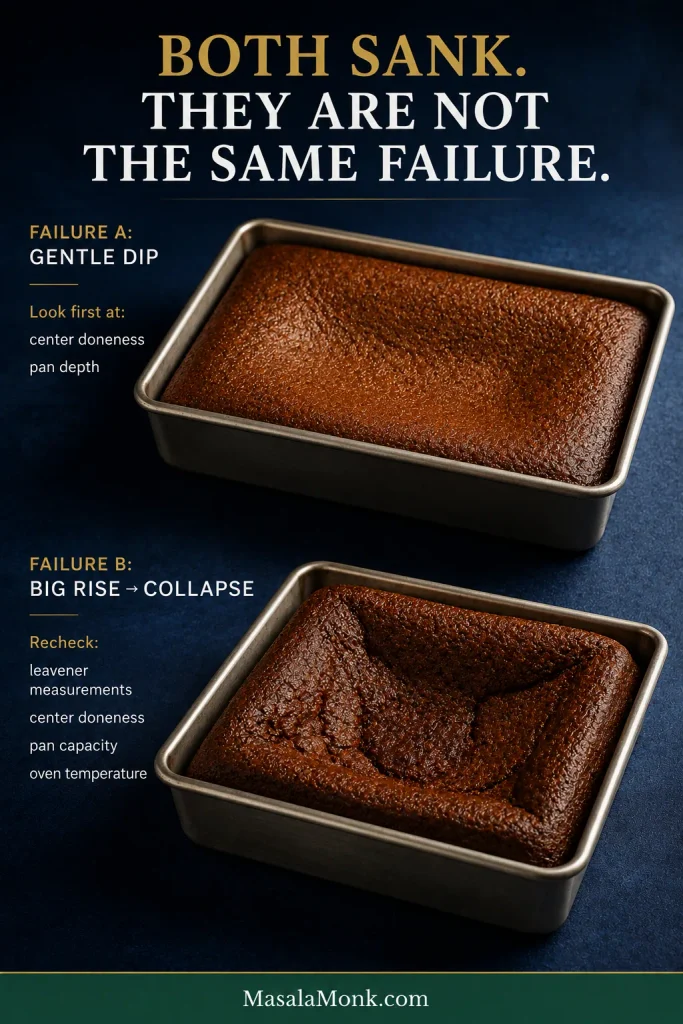
When the sunken center is wet or gummy, start with bake completion and pan depth. A cake that rises unusually high and then collapses points somewhere else: recheck the leaveners, center doneness, pan capacity and oven temperature.
Failure shape is diagnostic evidence. A small settled depression points you toward a different cause than a cake that dramatically expanded before collapsing.
What happened
Likely causes
What to change
Center sank
Center needed longer; layer too deep; oven running cool; door opened early
Use the intended pan and judge the center with the doneness cues above
Rose dramatically, then collapsed
Too much or mismeasured leavener; center not fully set; pan overfilled or too deep; oven-temperature problem
Recheck the small measurements, pan and oven, then make sure the center is fully baked
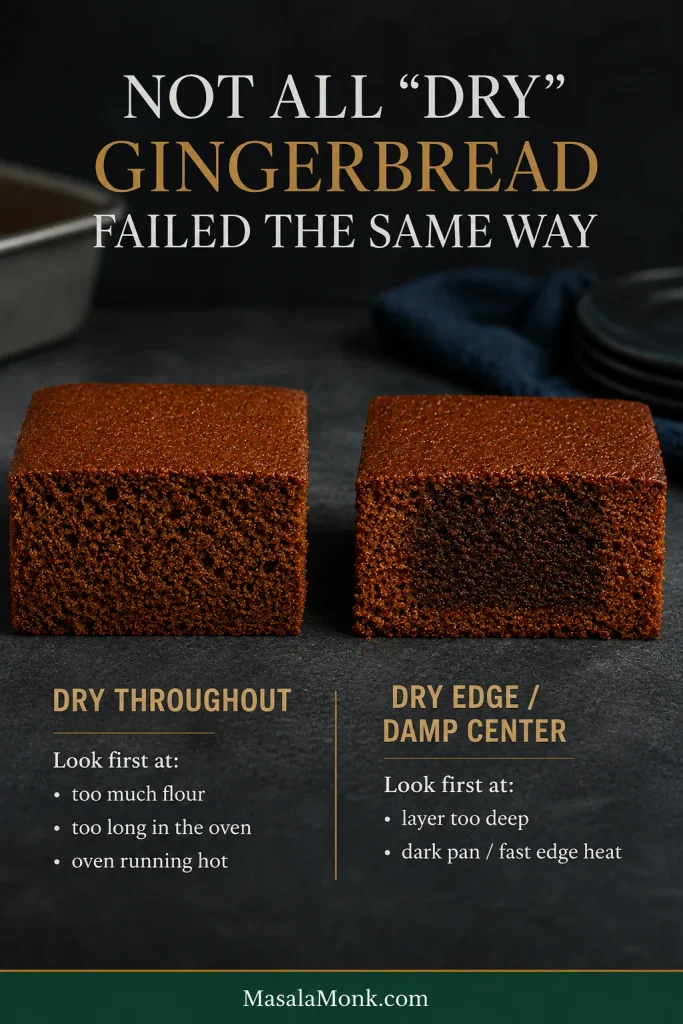
Dry throughout
Too much flour; too long in the oven; oven running hot
Use 320 g flour and begin checking sooner
Dry edges, damp middle
Layer too deep or pan very dark
Use the specified light-colored 9×13-inch pan
Gummy middle
Underbaked or sliced very hot
Use the doneness guide above and allow the crumb time to settle
Dense or heavy
Too much flour; old baking powder or soda; batter left standing for an extended time
Measure flour accurately, use fresh leaveners and bake soon after mixing
Bitter
Blackstrap/very robust molasses; too much clove; leavener measurement error
Use regular molasses and recheck the small measurements
Not gingery enough
Old ground ginger; very mild spice
Replace stale ginger or use the stronger-ginger option above
Tacky top after storage
Molasses attracting moisture
Often normal; judge the crumb underneath separately
Why did the middle sink?
If the cake rose normally and later developed a gentle dip, the middle probably needed a little more time. In a deeper layer, the edges can look finished while the center is still trying to catch up.
A cake that balloons dramatically, overflows or builds a large dome before collapsing tells a different story. Recheck the baking soda and baking powder measurements, the amount of batter in the pan and the oven temperature.
Don’t blame the molasses first. A sunken middle usually sends you back to bake completion, pan depth, leaveners or oven temperature.
Why is it dry?
Start with flour. Scooping directly from the bag can pack much more into a measuring cup than the cake needs; a scale removes the guesswork at 320 g. If using cups, spoon the flour loosely into the cup and level the top.
With 2⅔ cups of flour, a small packing error repeated cup after cup can add up. The 320 g scale target removes that cumulative drift.
Then look at the bake. Once the center has set, extra oven time mainly means more moisture leaving the cake. Dry edges around a damp middle are different: the outside has moved ahead while the center still needs time.
Cut the cake before diagnosing dryness. Where the dry crumb appears can tell you whether the problem affected the whole batter or developed unevenly during baking.
Can You Use a Different Pan?
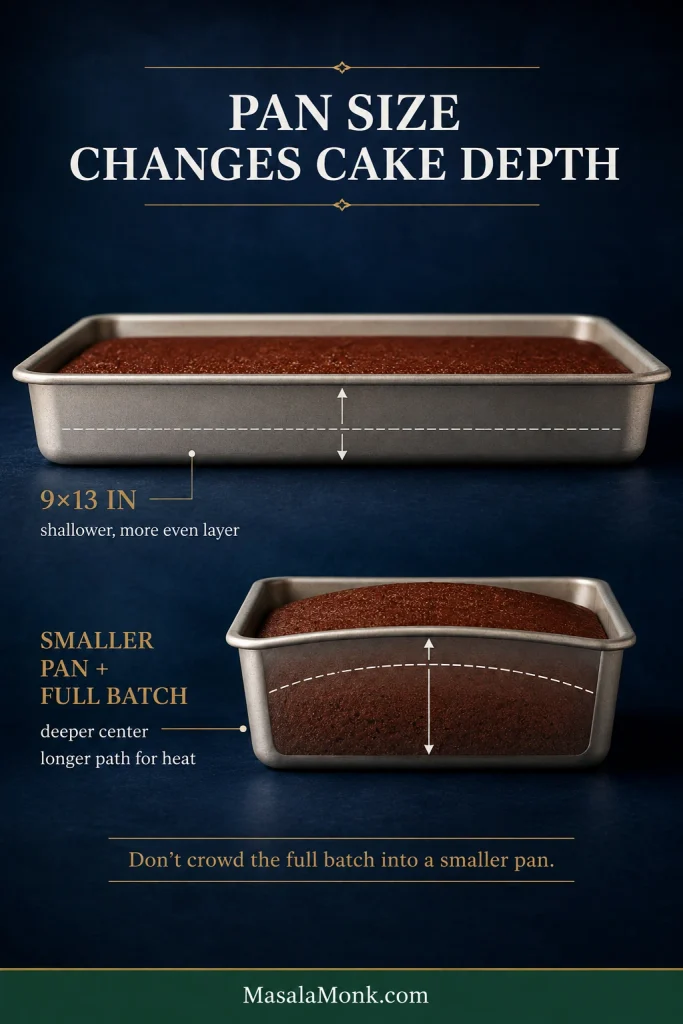
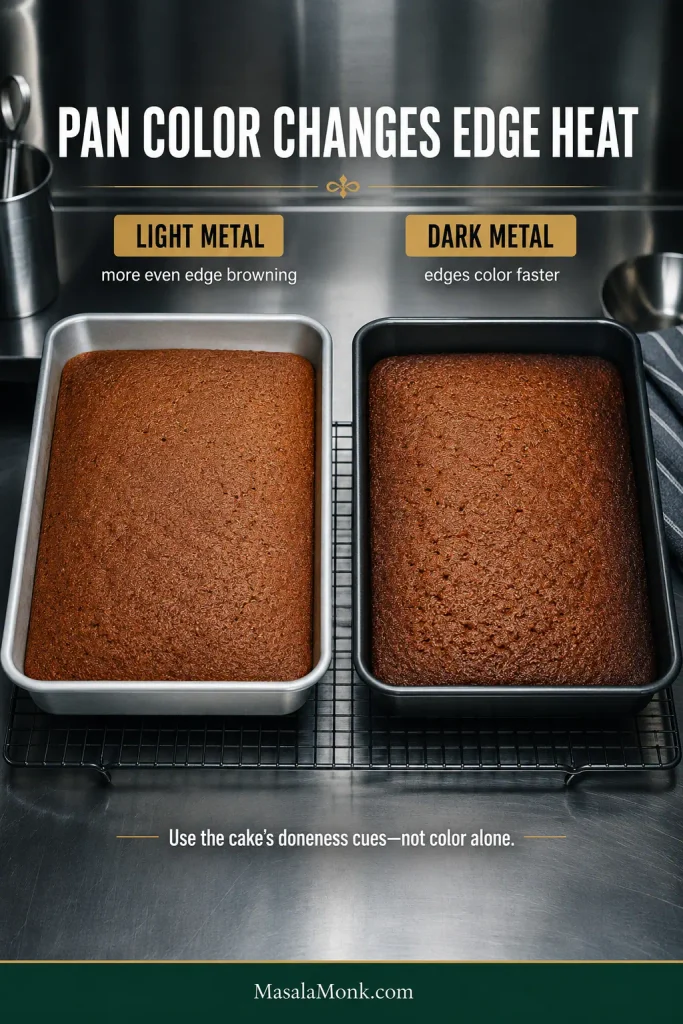
Change the pan and you change the bake. A deeper cake needs more time at the center; dark metal pushes the edges faster.
Pan dimensions change the distance heat must travel. Moving the same gingerbread batter into a smaller footprint is therefore a structural recipe change, not merely a container swap.
Pan
What changes
Best approach
9×13-inch light metal
Relatively shallow, even layer
Best choice for this recipe
Smaller square pan
Deeper batter and longer center bake
Don’t crowd the full batch into it; use a recipe quantity intended for that pan
Dark metal
Base and edges color faster
Begin checking earlier
Glass or ceramic
Different heat transfer and more retained heat
Follow the physical doneness cues instead of copying metal-pan timing
Dark metal narrows the margin for error: faster edge heating gives the center less time to catch up before the outside looks finished.
For loaf, Bundt or layer-cake versions, use a formula written for that shape. Those pans change the depth and handling enough that borrowed bake times become unreliable.
Make It a Day Ahead
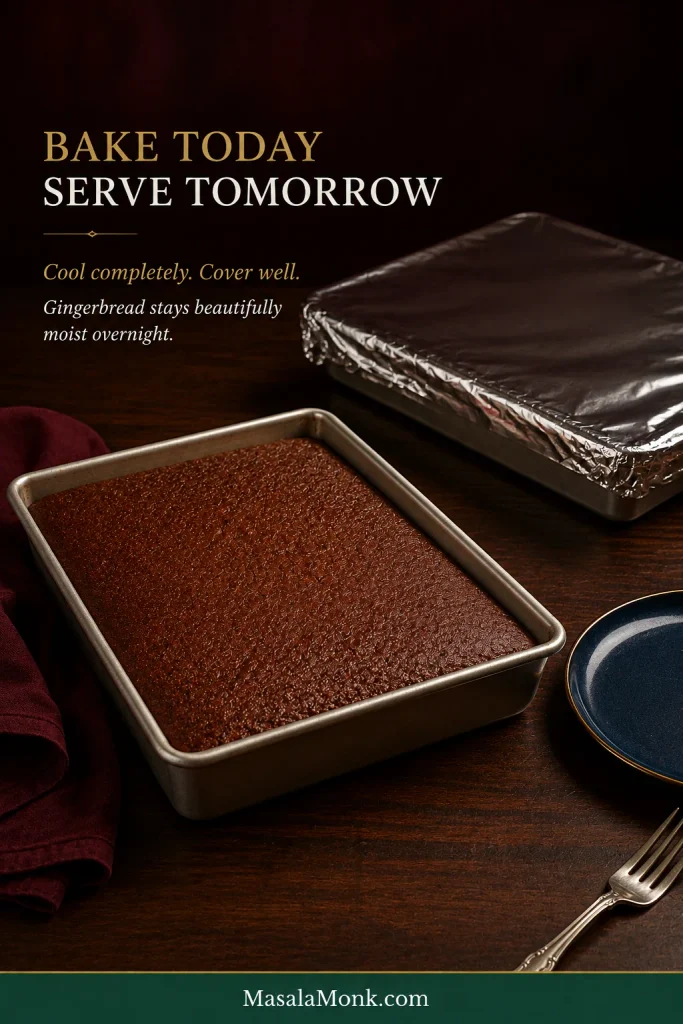
Gingerbread is unusually friendly to making ahead. Kept well covered, it stays moist overnight. The spice settles more deeply into the molasses as it rests.
The day before
Bake the cake and let it cool completely.
Leave it whole when possible; exposed cut edges dry faster.
Cover the pan tightly or move the whole cake to an airtight container.
Keep an unfrosted cake at cool room temperature.
On serving day
Add powdered sugar shortly before serving.
Keep whipped cream chilled separately.
Frost only after the cake is completely cool.
Warm lemon sauce gently before serving.
Storage and Freezing
Store unfrosted gingerbread airtight at room temperature for about 3 days; refrigerate it once topped with cream cheese frosting, or freeze it well wrapped for up to 2 months for best quality.
Room temperature
Leave the cake whole or in larger pieces when practical. Every fresh cut gives the interior another exposed edge.
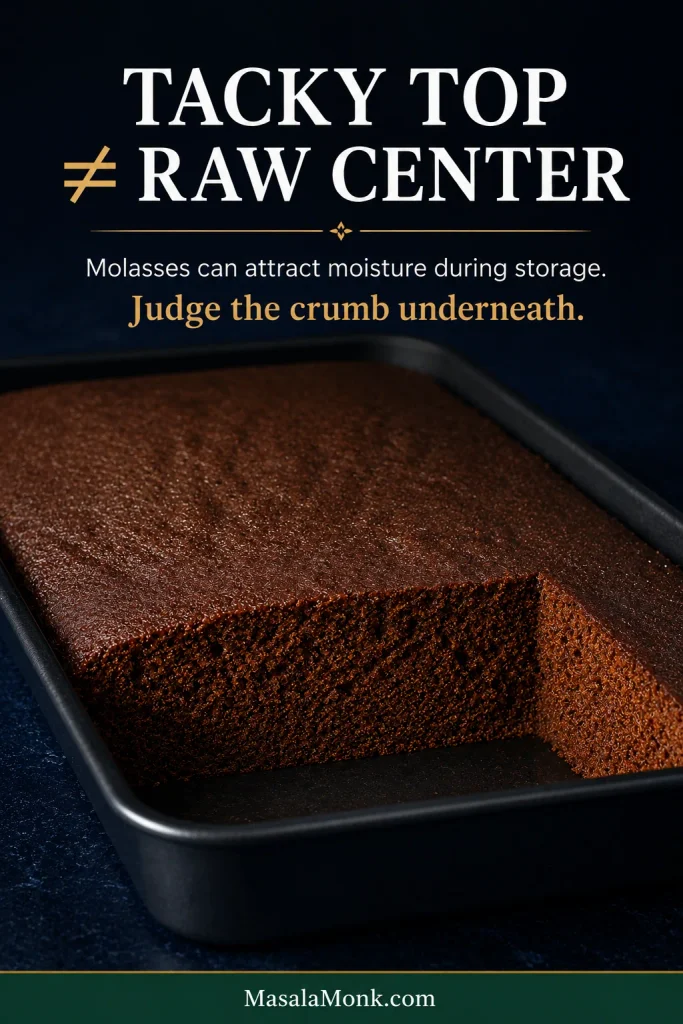
A tacky top after a day or two can be part of molasses-rich gingerbread’s character, not a sign that the cake is raw. Judge the crumb underneath separately.
Surface feel and internal doneness are separate clues. Storage can alter the first without undoing the crumb structure established in the oven.
If your kitchen is particularly warm or humid, keep the cake tightly covered in the refrigerator and let individual slices come back toward room temperature before serving.
Refrigerator
Let refrigerated slices lose some of their chill before serving. As they move back toward room temperature, the crumb becomes more tender again.
Freezer
Cool the cake completely, wrap the whole cake or individual portions tightly, and place them in a freezer-safe container or bag.
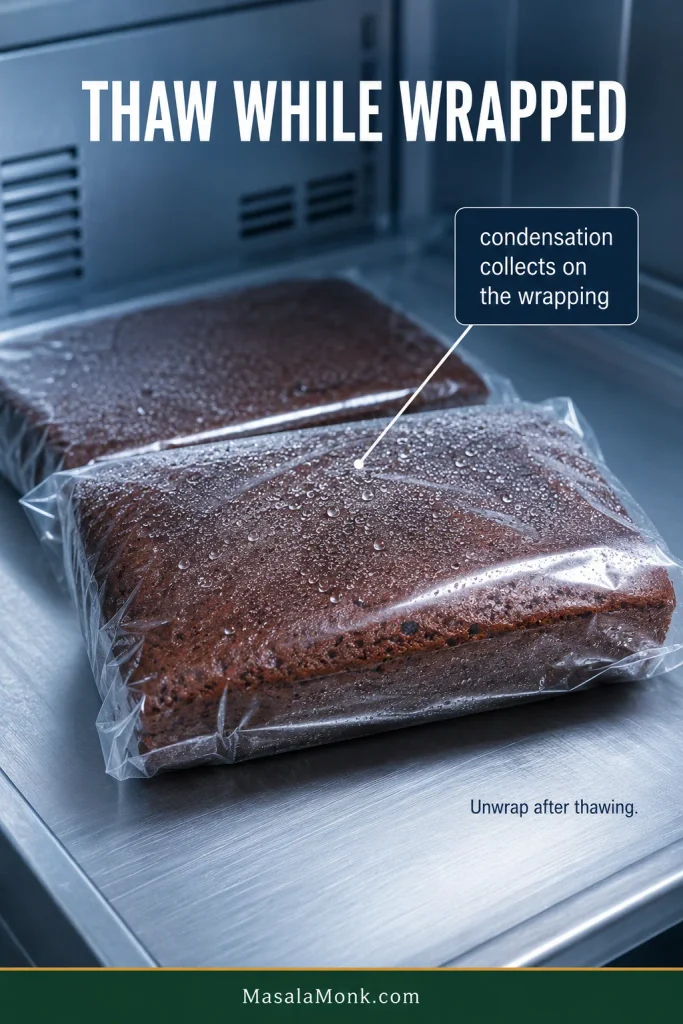
Thaw while still wrapped so condensation collects on the wrapping instead of directly on the cake.
During thawing, the wrapping becomes the colder surface where airborne moisture condenses first. That barrier helps keep condensation off the gingerbread itself.
Substitutions and Variations
Some flavor changes are easy. Once you change the main syrup, flour system or eggs, you are changing the structure of the cake too.
Light brown sugar: use the same amount. The cake will taste slightly lighter, but the molasses still provides most of its character.
Other syrups: honey, maple syrup and golden syrup are not full-cup substitutes for the molasses here. If one of those is what you have, choose a cake that uses it as the main sweetener.
Gluten-free: use a gingerbread built around a gluten-free flour blend. Different blends absorb liquid differently, so a straight cup-for-cup swap can change the center considerably.
Vegan: an egg-free gingerbread is the cleaner route. Replacing the butter is fairly straightforward; replacing the eggs changes both rise and tenderness.
A Cake That’s Even Better Tomorrow
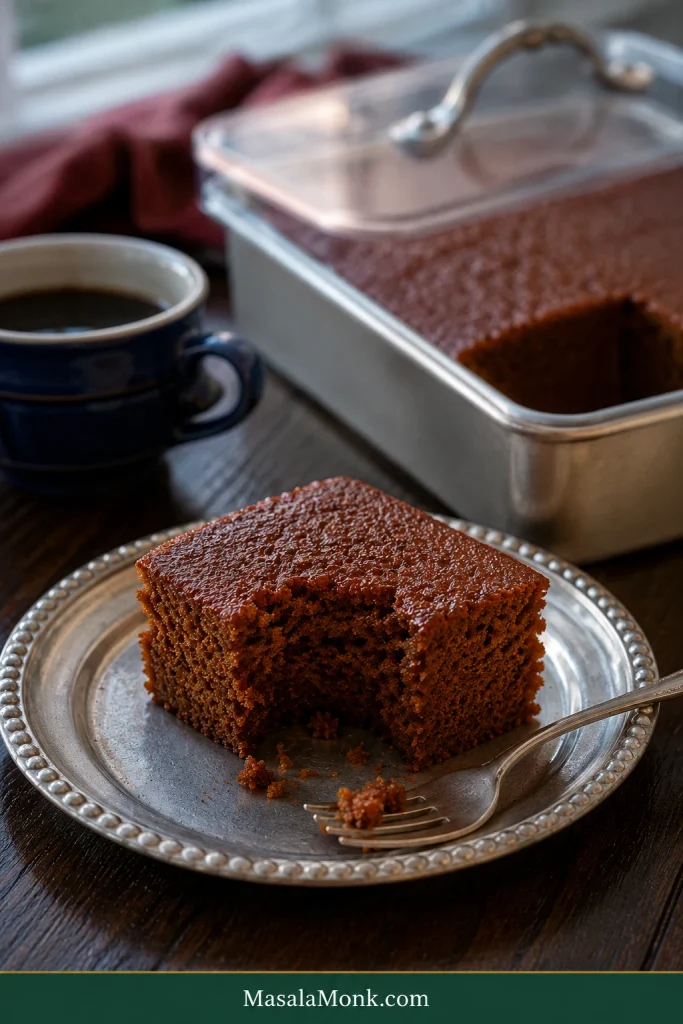
Serve the first square slightly warm if you can. The crumb gives easily under the fork, and the smell of ginger and molasses rises as soon as you break through the top.
Add softly whipped cream if you want something cool against the spice. Warm lemon sauce brings brightness, while vanilla ice cream melting into one edge makes the dessert more indulgent.
Then cover what is left.
Tomorrow, cut another square and notice how the ginger has settled into the molasses. The crumb is still tender, the spice tastes rounder, and somehow that simple second slice can be the one that makes the recipe worth keeping.
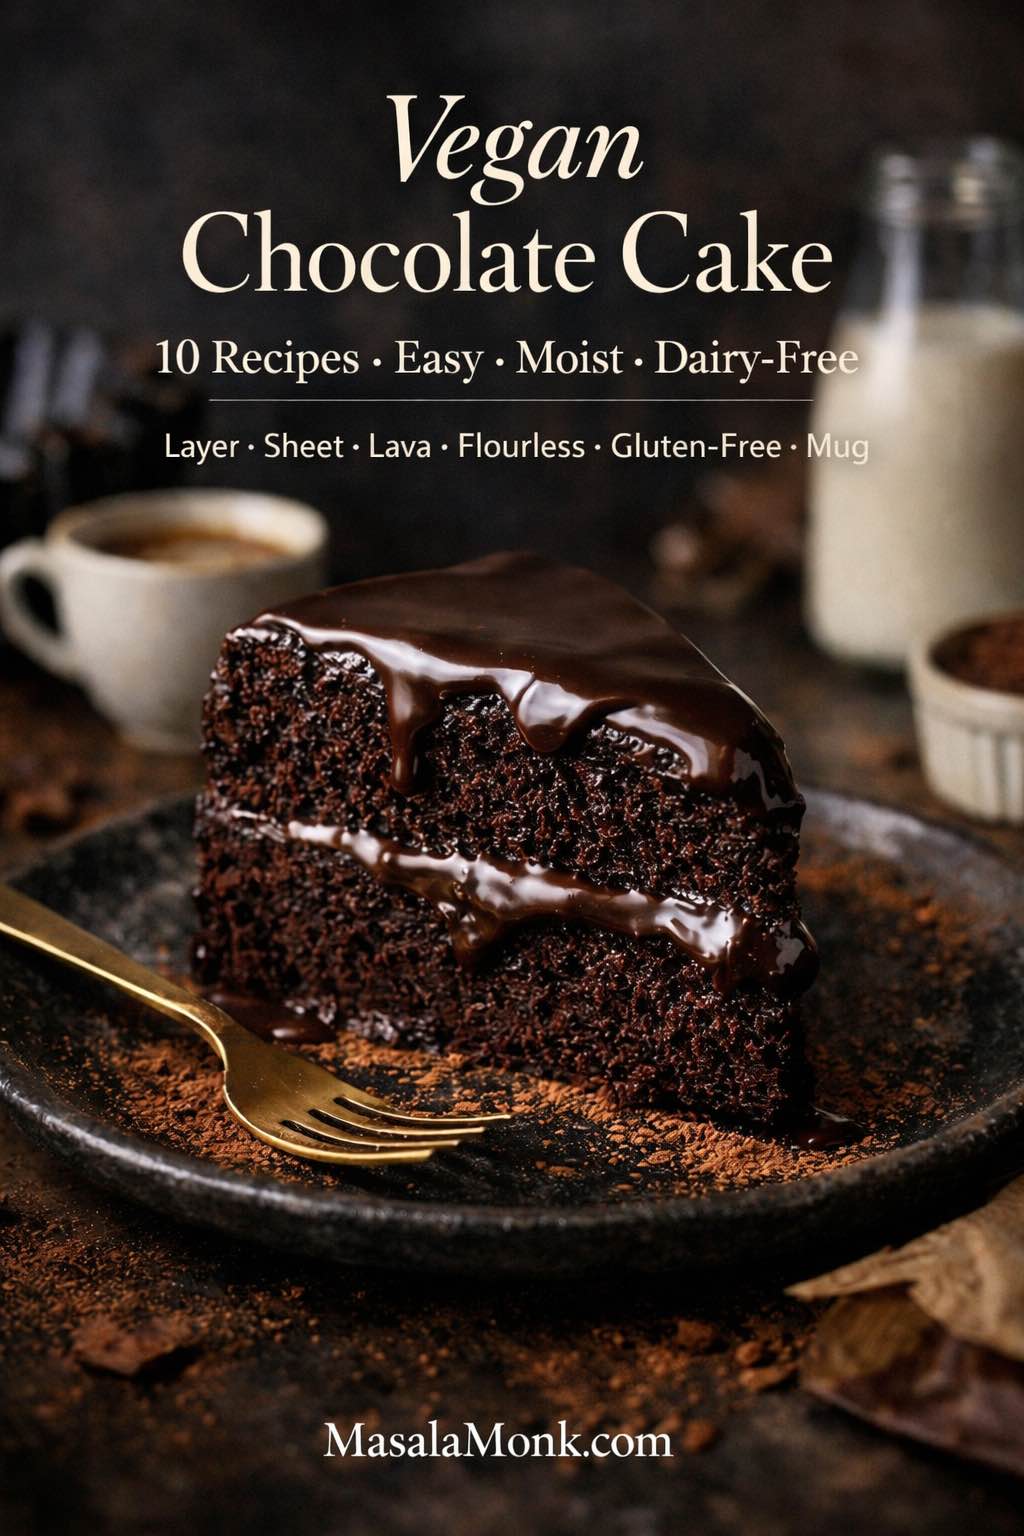
If you want vegan chocolate cake that tastes like the real thing—deep cocoa aroma, soft crumb, and a finish that feels genuinely indulgent—this roundup of Vegan Chocolate Cake Recipes is for you. Not “good for vegan,” not “surprisingly decent,” but the kind of cake you’d happily serve to anyone who loves chocolate. Better still, these recipes are built to be repeatable, so you can bake a simple vegan chocolate cake on a quiet evening, then turn around and make a party-ready vegan chocolate layer cake the next weekend without relearning everything from scratch.
Chocolate cake has a strange superpower: it can be both nostalgic and endlessly new. On one day, you want a plush slice with frosting and candles. On another, you want a quick vegan chocolate mug cake with a spoon straight from the cup. Meanwhile, when you’re feeding a crowd, a vegan chocolate sheet cake is often the most sensible move—easy to transport, easy to portion, and still every bit as satisfying. And then there are the cakes that feel like a dessert menu finale: a flourless vegan chocolate cake that slices like a torte, or vegan chocolate lava cakes that spill molten chocolate onto a plate.
Because each craving has its own logic, the ten recipes below cover a range of textures and formats—layer, sheet, bundt, loaf, flourless, molten, gluten-free, mug, beetroot, and avocado—while staying anchored in the same promise: strong chocolate flavour, reliable structure, and a moist crumb that doesn’t dry out by tomorrow.
Before we start baking, though, it’s worth getting a few fundamentals in place. Once those are clear, every recipe becomes easier, and every variation feels less like guesswork and more like cooking.
Vegan chocolate cake basics that make everything easier
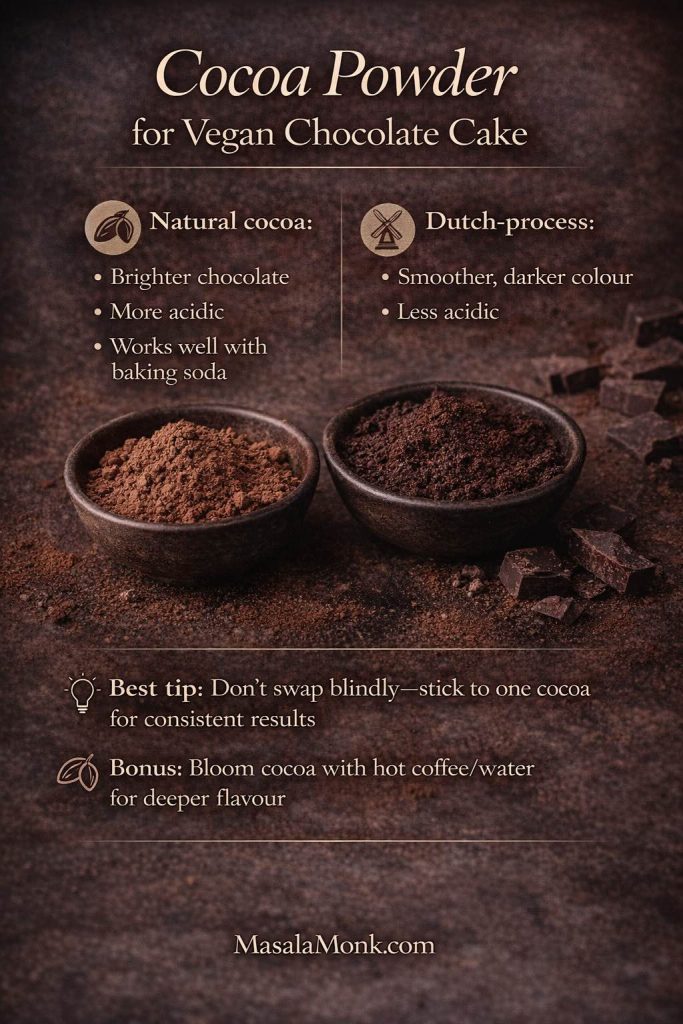
1) Cocoa powder: the flavour choice that also affects rise
Cocoa powder isn’t just flavour. It changes how a cake behaves, especially when baking soda is involved.
Natural cocoa is typically more acidic. It can taste brighter, sometimes slightly sharper, and it often plays very nicely with baking soda.
Dutch-process cocoa is alkalised. It tends to taste smoother and darker, and it can make cakes look deeper in colour.
Natural vs Dutch-process cocoa for vegan chocolate cake: use this quick guide to choose the flavour you want—and bloom cocoa with hot coffee or water for deeper chocolate.
Both are excellent, yet they don’t always perform identically if you swap one for the other without adjusting anything else. If you enjoy knowing the “why” (without it turning into a science lesson), these two guides are genuinely helpful: Dutch-process vs. natural cocoa and The A-B-C’s of cocoa. If you want a broader, easy read on cacao vs cocoa vs chocolate, MasalaMonk’s breakdown is a great companion: What is Cacao?: Cacao vs. Chocolate vs. Dark Chocolate.
Practical way to think about it: pick a cocoa you love, then bake with it consistently. Once you know how that cocoa behaves in your oven, you’ll get “your” signature vegan chocolate cake every time.
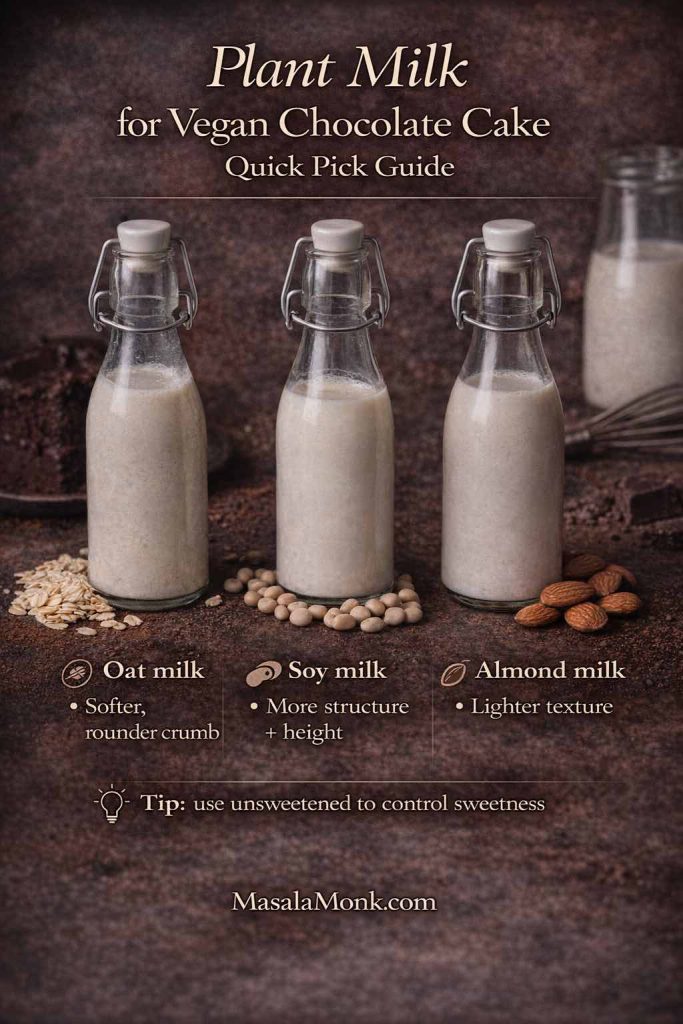
2) Plant milk: use what you like, but know what it nudges
Most plant milks will work. Still, they can push texture subtly:
Oat milk often gives a softer, rounder crumb.
Soy milk can build structure and height.
Almond milk is lighter, so cakes may feel a touch less plush (not bad—just different).
Best plant milk for vegan chocolate cake: choose oat for a softer crumb, soy for more structure and height, or almond for a lighter texture—then use unsweetened to control sweetness.
If you like making basics at home, Easy Homemade Oats Milk is a handy internal reference, especially when you want a neutral, budget-friendly baking milk.
3) Oil vs vegan butter: choose based on the texture you want
For many vegan chocolate cake recipes, oil is the shortcut to moisture. Cakes stay tender longer, they resist drying out, and they’re forgiving if you slightly overbake. Vegan butter can be lovely too; however, it firms up in the fridge, so butter-based cakes can feel denser when cold.
If you’ve ever noticed how oil-based cakes stay moist, you’ll see that principle clearly in Orange Olive Oil Cake – Ridiculously Easy and Super Moist. Even though it’s citrus rather than chocolate, the crumb logic carries over perfectly.
4) The acid trick: why vinegar appears in so many dairy-free chocolate cake recipes
A small amount of vinegar (or lemon juice) shows up in vegan baking because it helps baking soda do its job. It isn’t there to make cake taste sour; rather, it supports lift and tenderness. As a result, cakes rise more evenly and feel lighter.
5) “Blooming” cocoa: the easiest way to make chocolate taste bigger
You’ll notice several recipes use hot coffee or hot water. This is one of the simplest upgrades in chocolate baking: hot liquid helps cocoa dissolve and intensifies aroma.
If you love deep chocolate, use coffee.
If you don’t like coffee, use hot water. You’ll still get the cocoa bloom effect; you just won’t add coffee’s roast notes.
6) Mixing: stop sooner than your instincts suggest
Chocolate batter often looks gorgeous long before it’s actually mixed evenly, which is why it tempts you to keep going. Nevertheless, overmixing can tighten crumb. Instead, aim for smooth and combined, then stop.
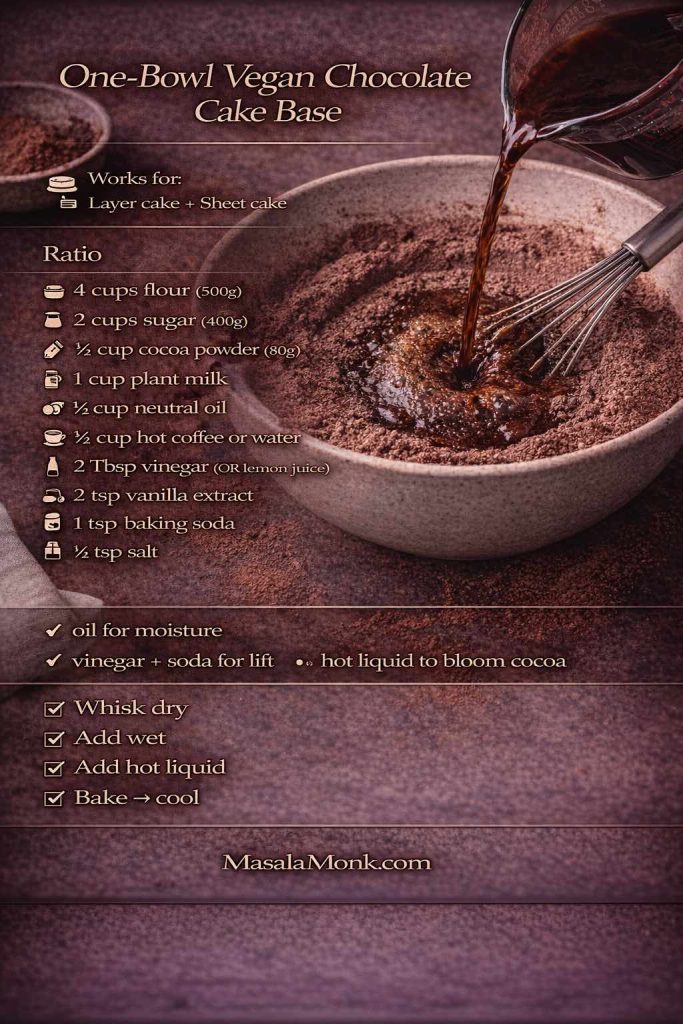
One-bowl vegan chocolate cake base you can reuse: this quick ratios card works for layer cake or sheet cake, with the simple ‘hot liquid to bloom cocoa’ step for deeper chocolate flavour.
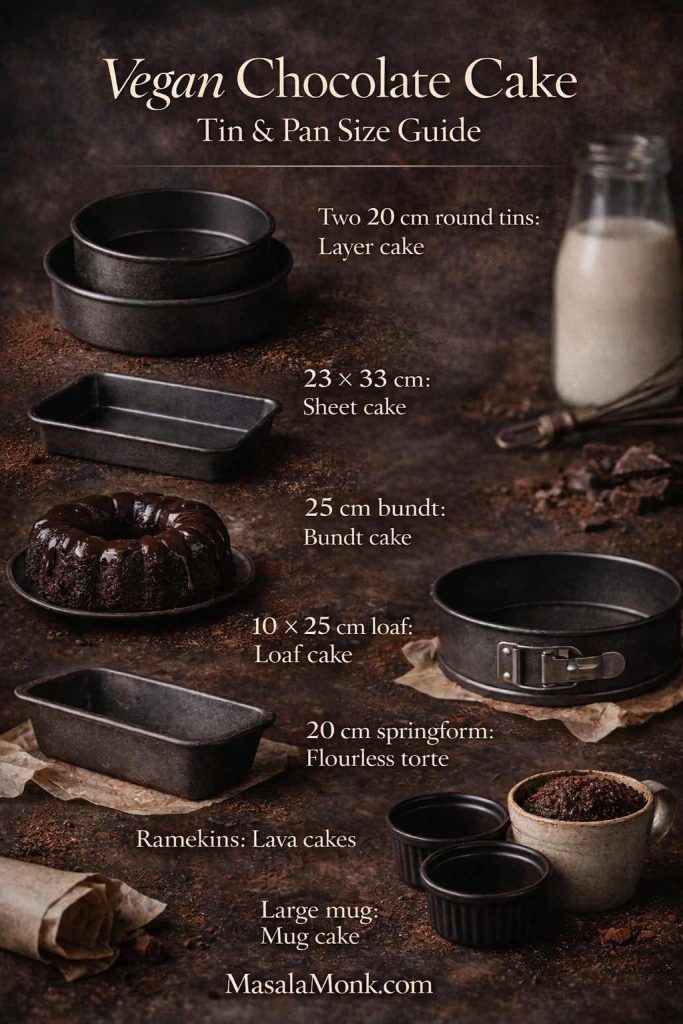
Torte (20 cm springform): intense, truffle-like, small slices.
Mug cake: instant comfort.
Baking pan confusion solved: use this tin-size guide to pick the right format for your vegan chocolate cake—layers, sheet cake, bundt, loaf, flourless torte, lava cakes, or a quick mug cake.
9) A note on “eggless” and “dairy-free”
Every cake here is vegan, which means it’s inherently eggless and dairy-free. That said, textures can vary depending on which binder you use (if any). Some recipes rely purely on flour structure and leavening; others use starch or purée for a fudgier crumb. Either way, the outcome is meant to feel like cake—not a compromise.
If you want a clear, trustworthy overview of vegan egg replacers and what each one is best at, this guide is a useful reference: Egg substitutes for baking.
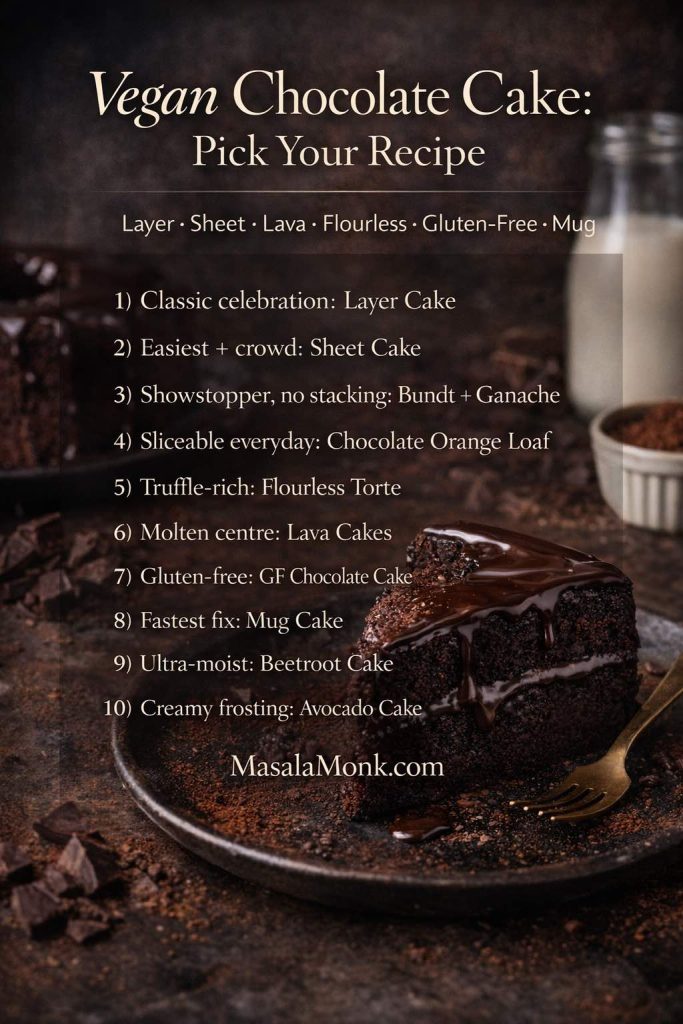
Want the classic? Make the vegan chocolate layer cake (#1).
Want the easiest? Make the easy vegan chocolate sheet cake (#2).
Want “wow” without stacking? Make the vegan chocolate bundt cake (#3).
Want bright flavour? Make the chocolate orange vegan chocolate loaf (#4).
Want truffle intensity? Make the flourless vegan chocolate cake (#5).
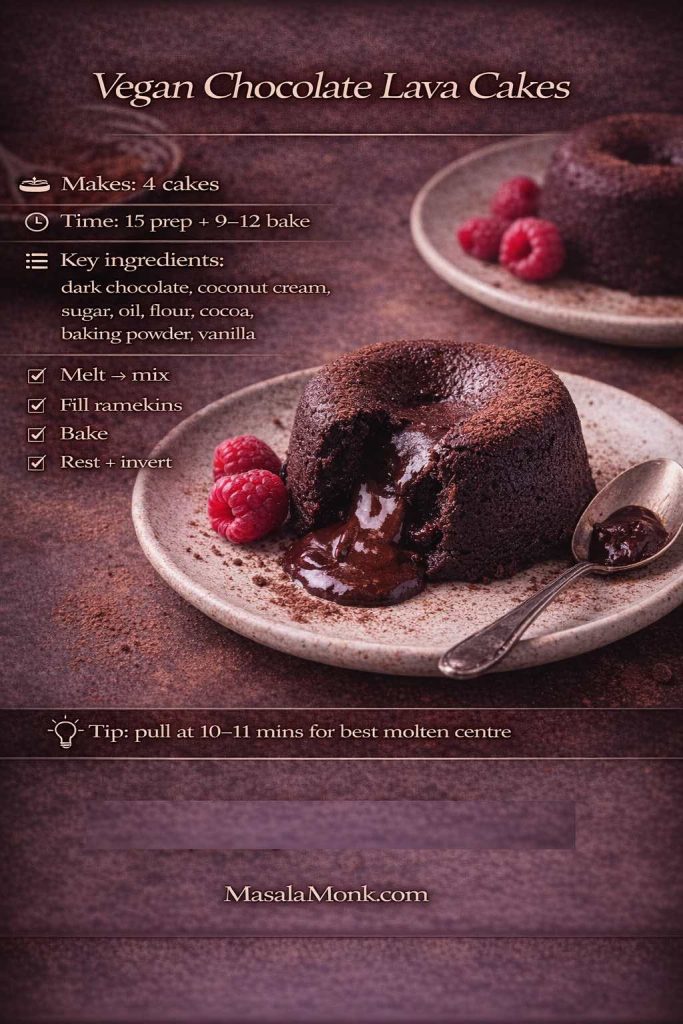
Want molten drama? Make the vegan chocolate lava cakes (#6).
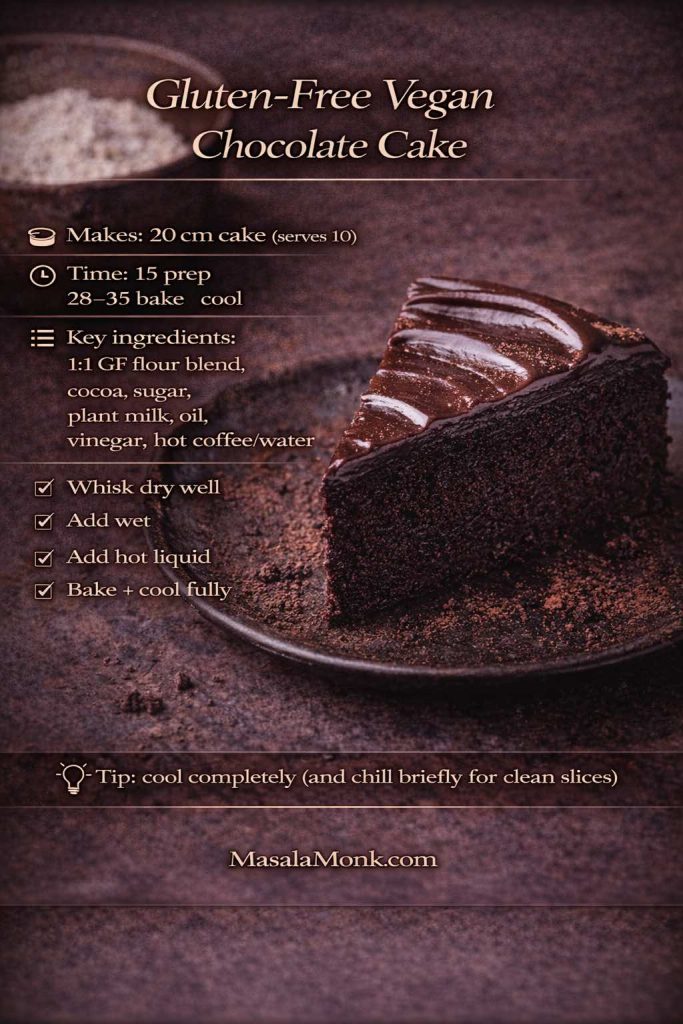
Need gluten-free? Make the vegan gluten-free chocolate cake (#7).
Want instant comfort? Make the vegan chocolate mug cake (#8).
Want ultra-moist? Make the beetroot vegan chocolate cake (#9).
Want creamy frosting that isn’t sugar-bomb sweet? Make the avocado vegan chocolate cake (#10).
Not sure which vegan chocolate cake to bake? Use this quick picker to match your craving—classic layers, easiest sheet cake, molten lava, flourless torte, gluten-free, or a fast mug cake.
This is the cake you bake when you want that unmistakable “proper chocolate cake” moment: soft crumb, even rise, and enough structure to stack confidently. At the same time, it’s forgiving—so even if you’re not a frequent layer-cake maker, you’ll still land somewhere delicious.
What makes it work so well
To begin with, oil keeps the crumb tender for longer than butter typically does. In addition, a small amount of vinegar supports lift and keeps the flavour clean. Finally, hot coffee (or hot water) blooms cocoa, so the chocolate aroma feels bigger without adding extra sweetness.
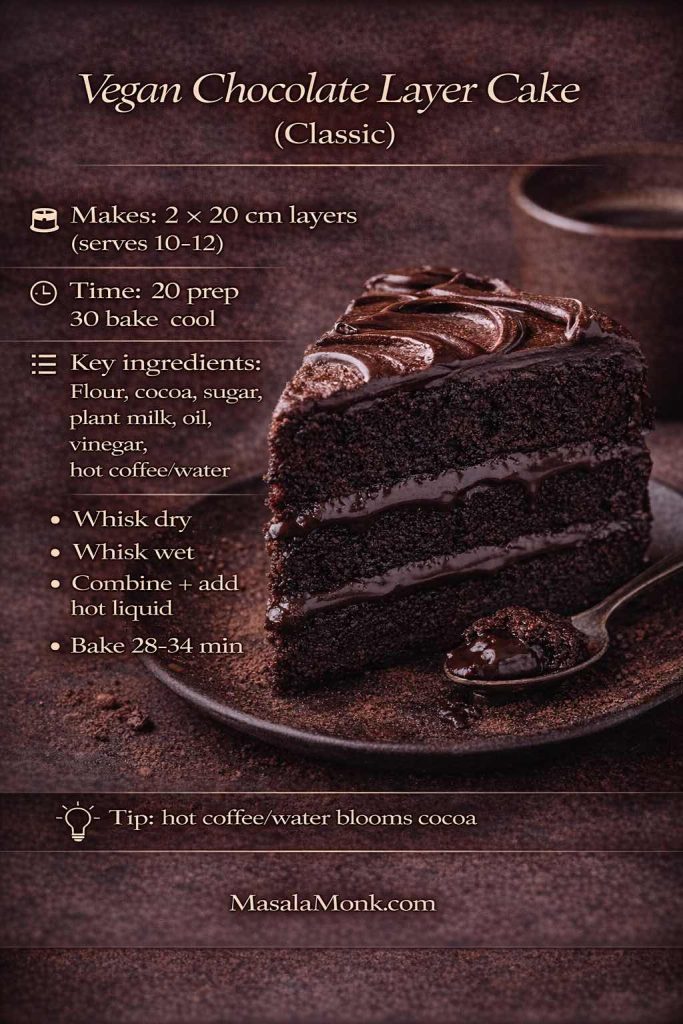
Makes: 1 layer cake (two 20 cm rounds) | Serves: 10–12 Time: 20 mins prep + 28–34 mins bake + 60–90 mins cooling | Difficulty: Easy–Medium Oven/Tin: 175°C | two 20 cm round tins
Dry
250 g plain flour
300 g caster sugar
70 g cocoa powder
10 g baking powder
5 g bicarbonate of soda
3 g fine salt
Wet
420 ml plant milk
120 ml neutral oil
15 ml vinegar (apple cider or white)
10 ml vanilla extract
Bloom
180 ml hot coffee or hot water
Classic vegan chocolate layer cake, made repeatable: this quick recipe card covers the essentials—key ingredients, simple steps, and bake time—for a moist, dairy-free celebration cake.
Method (detailed, step-by-step)
Prep your tins before anything else. Heat the oven to 175°C. Line two 20 cm tins with baking paper on the base, then lightly oil the sides. If you want extra insurance against sticking, dust the oiled sides with a teaspoon of cocoa powder and tap out the excess.
Make cocoa behave. In a large bowl, whisk the flour, sugar, cocoa powder, baking powder, bicarbonate of soda, and salt for a full 30–45 seconds. This isn’t busywork—cocoa clumps are stubborn, and thorough whisking prevents bitter pockets.
Mix your wet ingredients until they look unified. In a jug, whisk plant milk, oil, vinegar, and vanilla until the mixture looks uniform rather than separated. That little bit of emulsifying up front helps the batter come together quickly.
Combine without overworking. Pour the wet mixture into the dry. Whisk gently—just until the batter looks smooth and you don’t see dry flour at the bottom. If you’re tempted to keep whisking because the batter looks glossy, pause and check the bowl instead: scrape down the sides, then stop.
Bloom the cocoa at the end. Pour in the hot coffee (or hot water) and whisk briefly until the batter turns evenly silky and slightly looser. Thin batter is normal here, and it bakes up surprisingly plush.
Divide evenly for level layers. Split the batter between tins. If you have a kitchen scale, weigh the tins so the layers bake to the same height. Next, tap each tin once on the counter to release large air bubbles.
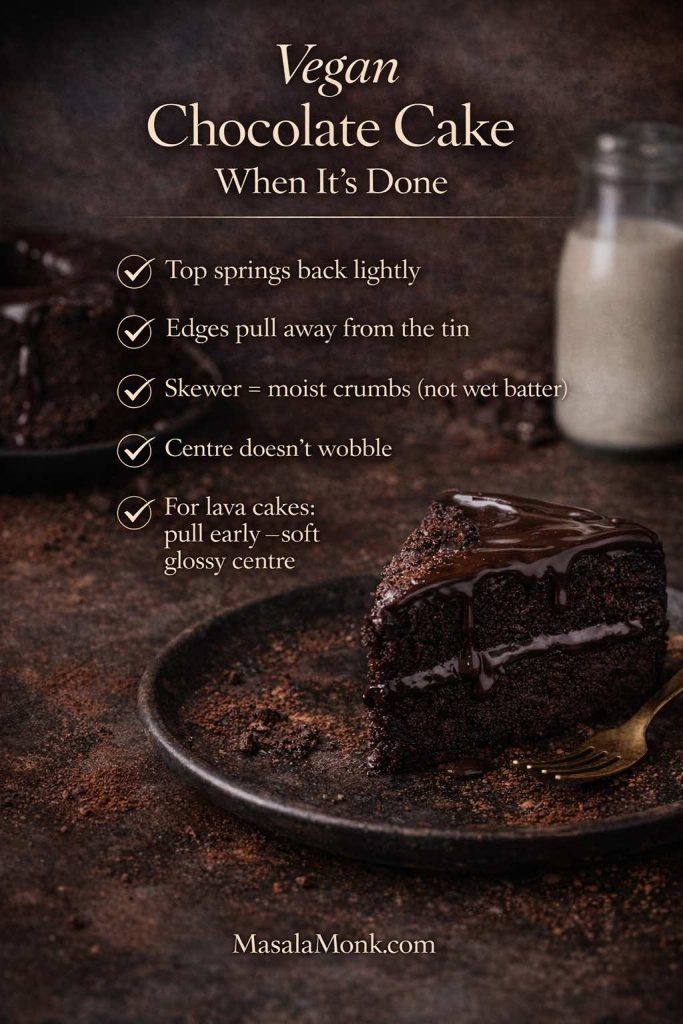
Bake with cues, not only time. Bake 28–34 minutes. Start checking at 28 minutes:
The centre should spring back lightly when pressed.
The edges should pull away slightly from the tin.
A skewer should come out with moist crumbs, not wet batter.
Cool in stages (this matters for texture). Let the cakes cool in the tins for 10 minutes. Then turn them out onto a rack, peel off the base paper, and cool completely before frosting. If you frost while warm, you’ll get melting and sliding instead of clean layers.
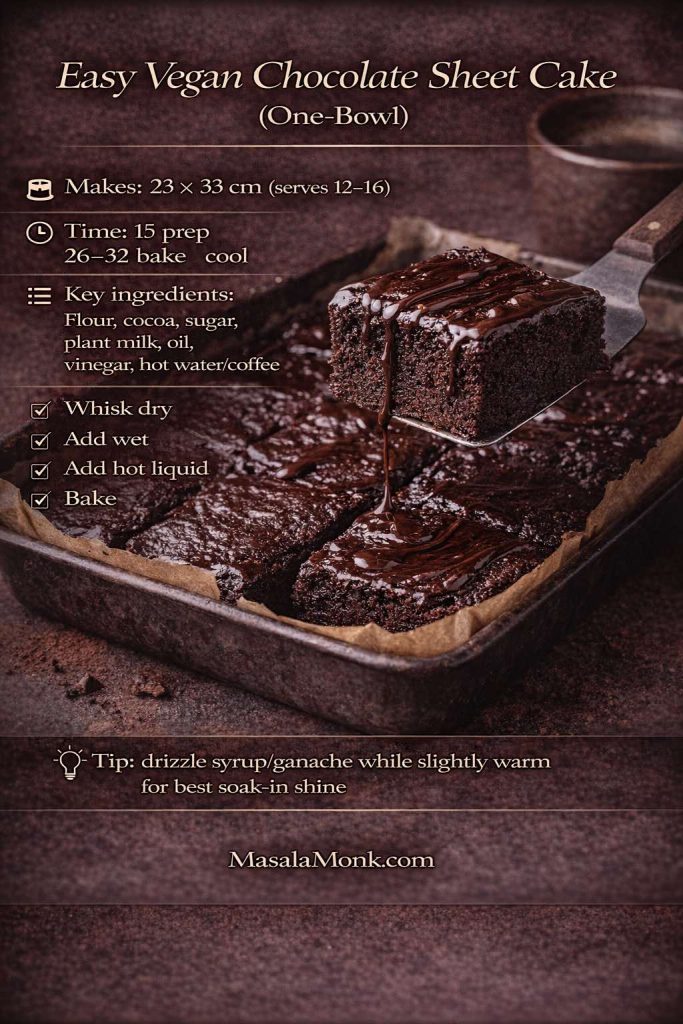
This is the unfussy hero: mix, pour, bake, slice. It’s the kind of cake that makes you look organised even if you aren’t. Because it bakes in one layer, you get even doneness, easy portions, and less risk of drying out. Furthermore, it’s perfect for quick toppings—drizzle, glaze, or syrup.
Makes: 1 sheet cake (23 × 33 cm) | Serves: 12–16 Time: 15 mins prep + 26–32 mins bake + 45–60 mins cooling | Difficulty: Easy Oven/Tin: 175°C | 23 × 33 cm tin
Ingredients
250 g plain flour
250 g caster sugar
55 g cocoa powder
10 g baking powder
3 g bicarbonate of soda
3 g fine salt
360 ml plant milk
120 ml neutral oil
15 ml vinegar
10 ml vanilla extract
120 ml hot water or hot coffee
Easy vegan chocolate sheet cake (one-bowl): this recipe card gives the essentials—pan size, timing, and quick steps—for a moist, dairy-free cake that slices beautifully for a crowd.
Method (Eggless Cake Recipe with extra clarity)
Set up first. Heat oven to 175°C. Line a 23 × 33 cm tin with baking paper, leaving a bit of overhang on the long sides so you can lift the cake out later.
Whisk dry ingredients thoroughly. In a large bowl, whisk flour, sugar, cocoa, baking powder, bicarbonate of soda, and salt. Keep going until the cocoa looks evenly dispersed; that’s the difference between “good” and “wow” in a sheet cake.
Add wet ingredients in one go. Pour in plant milk, oil, vinegar, and vanilla. Whisk until smooth. If the batter looks a little thick at this stage, that’s fine.
Finish with hot liquid. Add hot water or coffee and whisk briefly. The batter will loosen and look glossy.
Bake and check the centre. Pour into the tin and bake 26–32 minutes. Start checking at 26 minutes; the middle should spring back lightly and a skewer should show moist crumbs.
Cool for clean slices. Cool in the tin for at least 20 minutes. If you want very neat squares, let it cool fully before cutting.
Fast topping that makes it feel finished
A simple drizzle can transform the whole cake. MasalaMonk’s 3 Minutes Homemade Chocolate Syrup is ideal here—especially if you drizzle it over slightly warm cake so it sinks in just a little.
Variations (easy changes to Vegan Chocolate Sheet Cake, big payoff)
Fudgier sheet cake: fold in 150 g chopped dark chocolate before baking.
Chocolate oat cake direction: swap 50 g flour for 50 g oat flour for a softer, warmer crumb.
Quick party finish: sprinkle chopped toasted nuts or cocoa nibs over syrup while it’s still tacky.
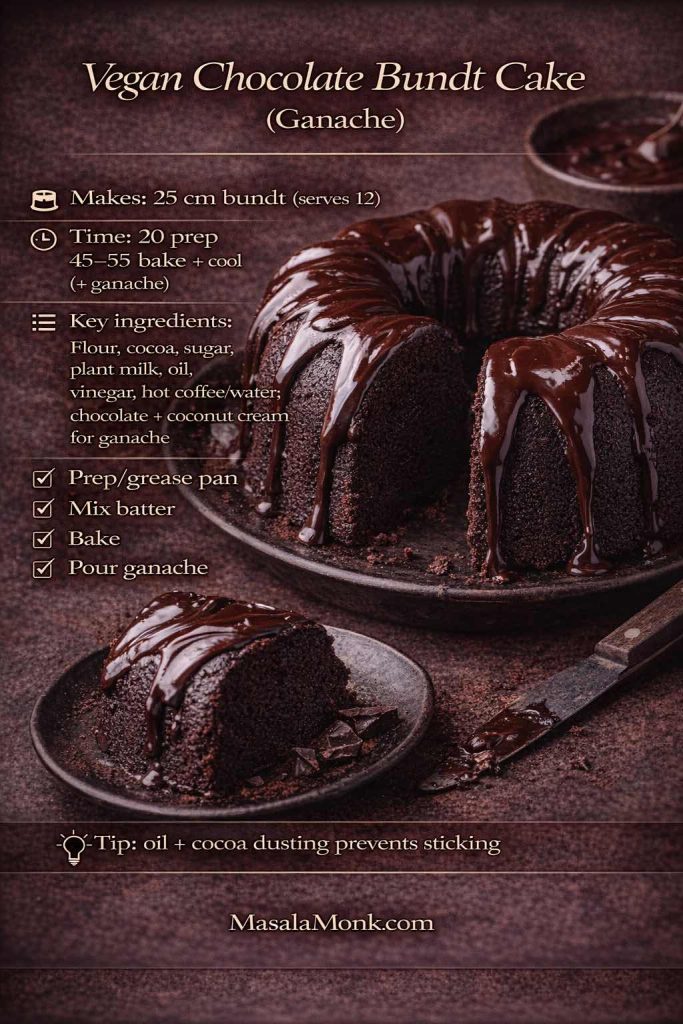
Bundt cakes feel festive without asking you to frost and stack. As long as you grease the pan properly, the rest is straightforward. Afterwards, ganache does the styling for you—no piping bag required.
Makes: 1 bundt cake (25 cm bundt pan) | Serves: 12 Time: 20 mins prep + 45–55 mins bake + 60–90 mins cooling (+ 10 mins ganache) | Difficulty: Easy–Medium Oven/Tin: 175°C | 25 cm bundt pan
Ingredients
Cake
310 g plain flour
350 g caster sugar
75 g cocoa powder
10 g baking powder
5 g bicarbonate of soda
4 g fine salt
480 ml plant milk
180 ml neutral oil
15 ml vinegar
10 ml vanilla extract
120 ml hot coffee or hot water
Ganache
200 g dark chocolate, chopped
200 ml coconut cream (or thick plant cream)
Vegan chocolate bundt cake with ganache, made stress-free: this recipe card covers pan size, timing, and the no-stick tip (oil + cocoa dusting) for clean release and a glossy finish.
Method (Dairy-Free & Eggless with bundt-specific detail)
Grease like you mean it. Heat oven to 175°C. Coat every ridge of the bundt pan with oil. Then dust lightly with cocoa powder and tap out the excess. This two-step is worth it.
Whisk the dry ingredients. Combine flour, sugar, cocoa, baking powder, bicarbonate of soda, and salt. Whisk well so cocoa is evenly distributed.
Add wet, then bloom. Add plant milk, oil, vinegar, and vanilla. Whisk until smooth. Then pour in hot coffee/water and whisk briefly again.
Bake until the cake tells you it’s ready. Bake 45–55 minutes. Start checking at 45:
The cake should spring back when pressed.
A skewer should come out with moist crumbs.
The edges often pull away slightly from the pan.
Cool in the pan, but not forever. Let the bundt cool 15 minutes, then invert onto a rack. Too soon and it can tear; too late and it may stick.
Ganache Recipe (silky, shiny, not grainy)
Chop the chocolate finely; smaller pieces melt more evenly.
Warm the coconut cream until steaming (not boiling).
Pour over chocolate, wait 2 minutes, then stir gently from the centre outward.
Let it thicken slightly, then pour over the cooled cake.
If you like understanding how cocoa type shifts colour and flavour, this is a good companion: Types of cocoa, explained.
Variations of Vegan Chocolate Bundt Cake
Add orange zest for a chocolate-orange bundt mood.
Add espresso powder for a darker, roastier finish.
Sprinkle chopped nuts on the ganache before it sets for texture.
Notes / substitutions for Vegan Chocolate Bundt Cake Recipe
Pan release is everything: oil + cocoa dusting prevents sticking better than flour for chocolate cakes.
Coconut cream: use thick plant cream if preferred; thinner milks won’t set ganache as well.
No bundt pan? Bake as a 23 × 33 cm sheet (reduce bake time; check at ~30 mins).
Chocolate: choose one you’d happily eat straight—ganache shows quality.
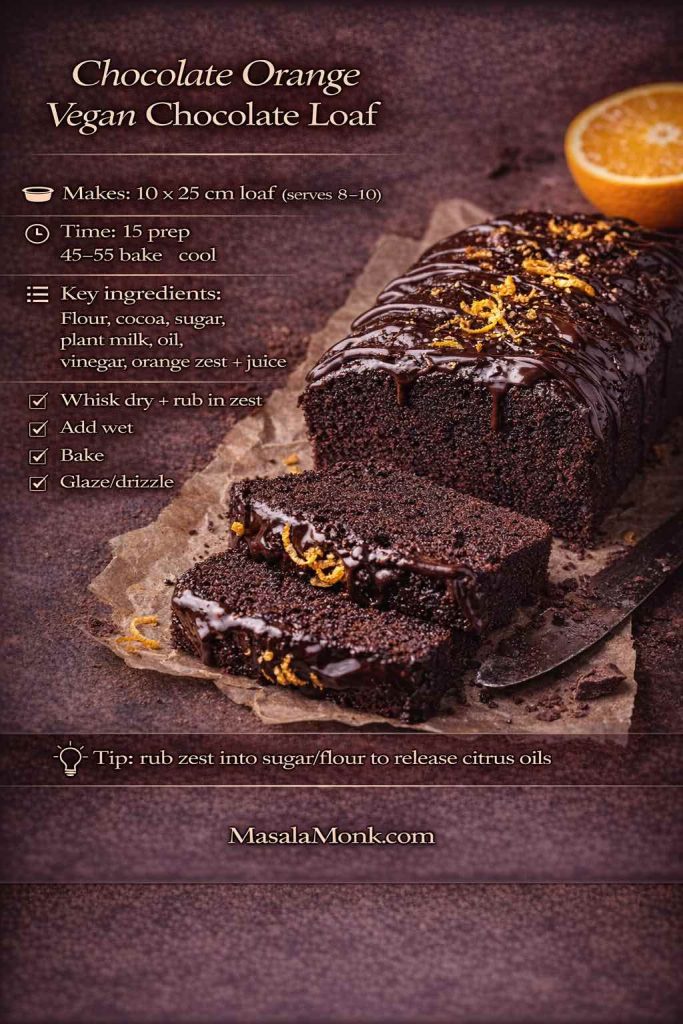
This loaf is for the days you want chocolate but also want lift—something fragrant and slightly fresh. Orange zest does that beautifully. Because it’s a loaf, it slices neatly and travels well, which makes it a great “bring along” cake.
Makes: 1 loaf (10 × 25 cm) | Serves: 8–10 Time: 15 mins prep + 45–55 mins bake + 60 mins cooling | Difficulty: Easy Oven/Tin: 175°C | 10 × 25 cm loaf tin
Ingredients
220 g plain flour
200 g caster sugar
55 g cocoa powder
10 g baking powder
3 g bicarbonate of soda
3 g fine salt
Zest of 2 oranges
300 ml plant milk
120 ml neutral oil
30 ml orange juice
15 ml vinegar
10 ml vanilla extract
Chocolate orange vegan chocolate loaf, simplified: this recipe card includes the loaf tin size, timing, and quick steps—plus the zest-rubbing tip that makes the citrus flavour pop.
Method (extra loaf guidance that is Eggless & Dairy Free)
Heat oven to 175°C. Line the loaf tin with baking paper, leaving overhang for easy lifting.
Whisk flour, sugar, cocoa, baking powder, bicarbonate of soda, and salt. Then rub the orange zest into the dry mixture with your fingertips. This small step releases citrus oils and makes the loaf smell incredible.
Whisk plant milk, oil, orange juice, vinegar, and vanilla. Pour into the dry ingredients and whisk just until smooth.
Pour batter into the tin and level the top. Bake 45–55 minutes. Start checking at 45 minutes; loaf cakes often need the full time.
Cool in the tin for 15 minutes, then lift out and cool fully before glazing.
Finish options for Chocolate Orange Vegan Chocolate Loaf Cake
Orange glaze: 180 g icing sugar + 25–35 ml orange juice + zest.
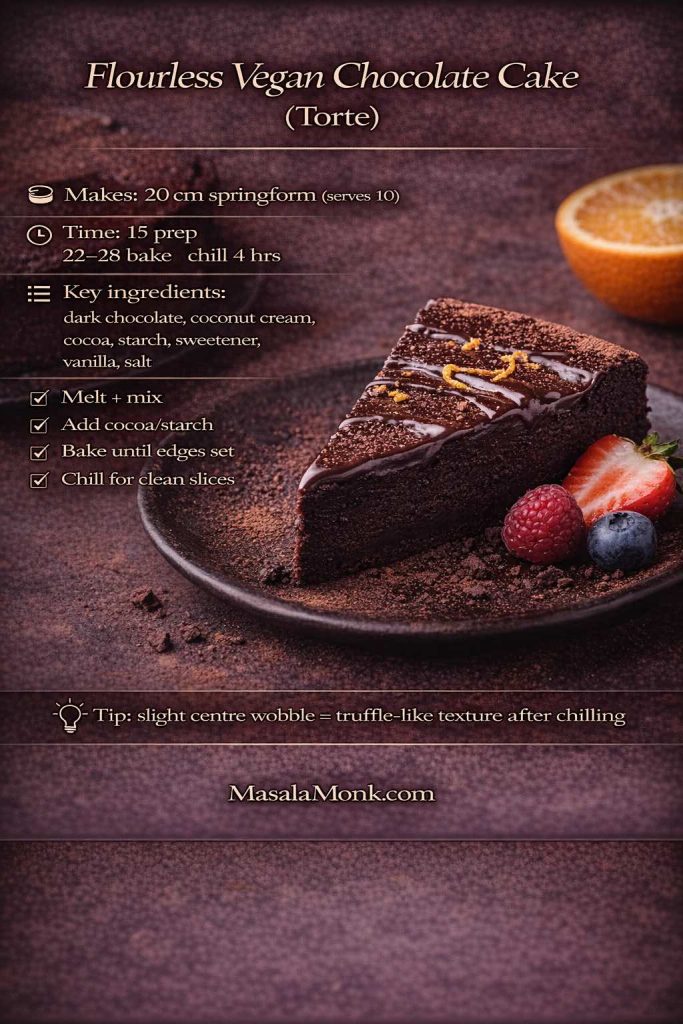
This is the “dessert menu” cake: dense, glossy, and intensely chocolatey. Since it’s so rich, smaller slices feel generous. Additionally, it’s great for hosting because you can make it ahead, chill it, then slice cleanly when guests arrive.
Makes: 1 torte (20 cm springform) | Serves: 10 Time: 15 mins prep + 22–28 mins bake + 4 hrs chilling | Difficulty: Easy–Medium Oven/Tin: 165°C | 20 cm springform tin
Ingredients
300 g dark chocolate, chopped
180 ml coconut cream
60 ml maple syrup (or 70 g caster sugar)
20 g cocoa powder
20 g cornflour (cornstarch) or potato starch
10 ml vanilla extract
2 g fine salt
Flourless vegan chocolate cake (torte) made simple: this recipe card highlights the chill-and-slice method for a truffle-rich, dairy-free dessert with clean, glossy slices.
Method (with torte cues)
Heat oven to 165°C. Line the base of a 20 cm springform tin and lightly oil the sides.
Melt the chocolate and coconut cream gently. Stir until smooth and glossy, then remove from heat.
Whisk in maple syrup (or sugar) while the mixture is still warm. Then whisk in cocoa powder, starch, vanilla, and salt until fully smooth. If you see tiny lumps, whisk a little more—but avoid vigorous beating.
Pour into the tin and smooth the top. Bake 22–28 minutes. The edges should look set while the centre can still wobble slightly.
Cool at room temperature, then chill at least 4 hours. This chilling step is what turns it into clean, truffle-like slices.
Serving ideas for Egg & Flourless Vegan Chocolate Cake
These are dramatic in the best way: warm edges, molten centres, and a spoon-breaking moment that feels like a reward. Even though lava cakes look fancy, the batter is straightforward. The real skill is pulling them at the right moment.
Vegan chocolate lava cakes with a molten centre: this recipe card gives the essentials—ingredients, timing, and the 10–11 minute cue—for a reliable lava moment every time.
Method (timing-focused Recipe for Vegan Chocolate Lava Cakes)
Heat oven to 220°C. Grease four ramekins thoroughly. For extra release, dust with cocoa powder and tap out excess.
Melt chocolate and coconut cream until smooth. Let it cool for 2–3 minutes so it doesn’t overheat the flour later.
Whisk in sugar, oil, and vanilla. Then add flour, cocoa, baking powder, and salt. Whisk until smooth and thick.
Divide batter evenly between ramekins. Place ramekins on a tray for easy movement.
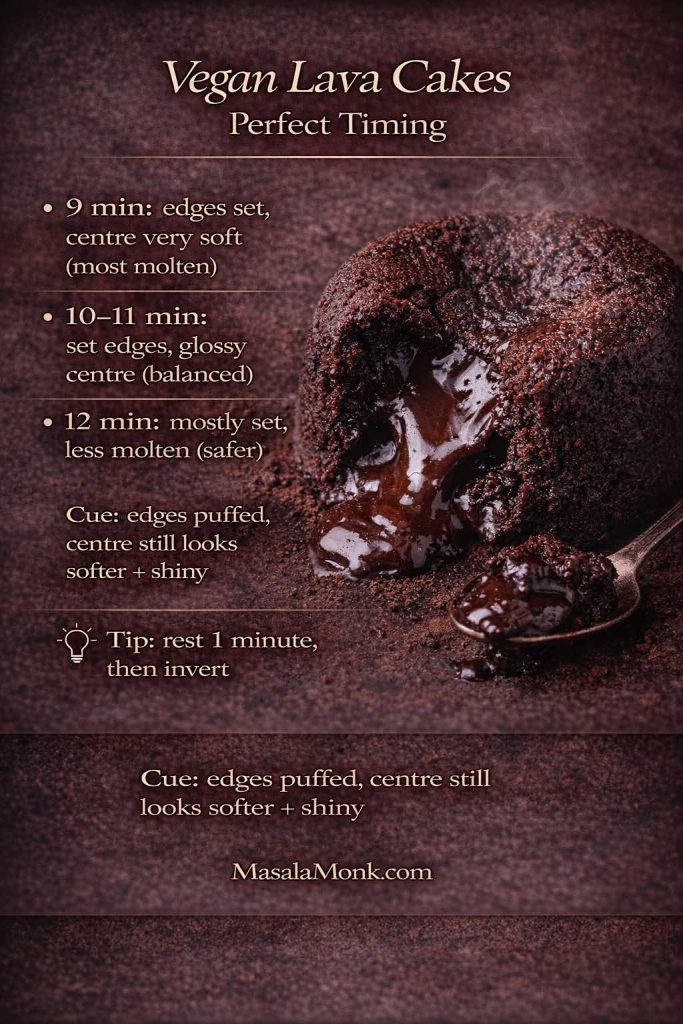
Bake 9–12 minutes. Start checking at 9 minutes:
Edges should look set and slightly puffed.
Centres should still look softer and a little glossy.
Rest 1 minute. Run a thin knife around the edge, invert onto a plate, then lift off the ramekin.
Vegan chocolate lava cakes made predictable: use this timing guide and visual cues to get a molten centre every time—then rest 1 minute before inverting.
Gluten-free cakes can be gorgeous when they’re built intentionally. Here, a 1:1 blend handles most of the work, while careful mixing and cooling ensure the crumb stays cohesive.
Makes: 1 cake (20 cm) | Serves: 10 Time: 15 mins prep + 28–35 mins bake + 60–90 mins cooling | Difficulty: Easy Oven/Tin: 175°C | 20 cm round tin
Ingredients
245 g gluten-free 1:1 flour blend
200 g caster sugar
55 g cocoa powder
10 g baking powder
3 g bicarbonate of soda
3 g fine salt
1 g xanthan gum (skip if blend already contains it)
300 ml plant milk
80 ml neutral oil
15 ml vinegar
10 ml vanilla extract
120 ml hot coffee or hot water
Gluten-free vegan chocolate cake, made reliable: this recipe card includes the 20 cm cake size, timing, and the key cooling tip so slices stay neat, tender, and moist.
Method (gluten-free friendly)
Heat oven to 175°C. Line a 20 cm tin.
Whisk dry ingredients thoroughly. With gluten-free flour, this step matters even more because you want the leaveners and cocoa evenly distributed.
Add plant milk, oil, vinegar, and vanilla. Whisk smooth. Then add hot coffee/water and mix briefly.
Bake 28–35 minutes. Cool fully in the tin for 15 minutes, then transfer to a rack and cool completely before slicing.
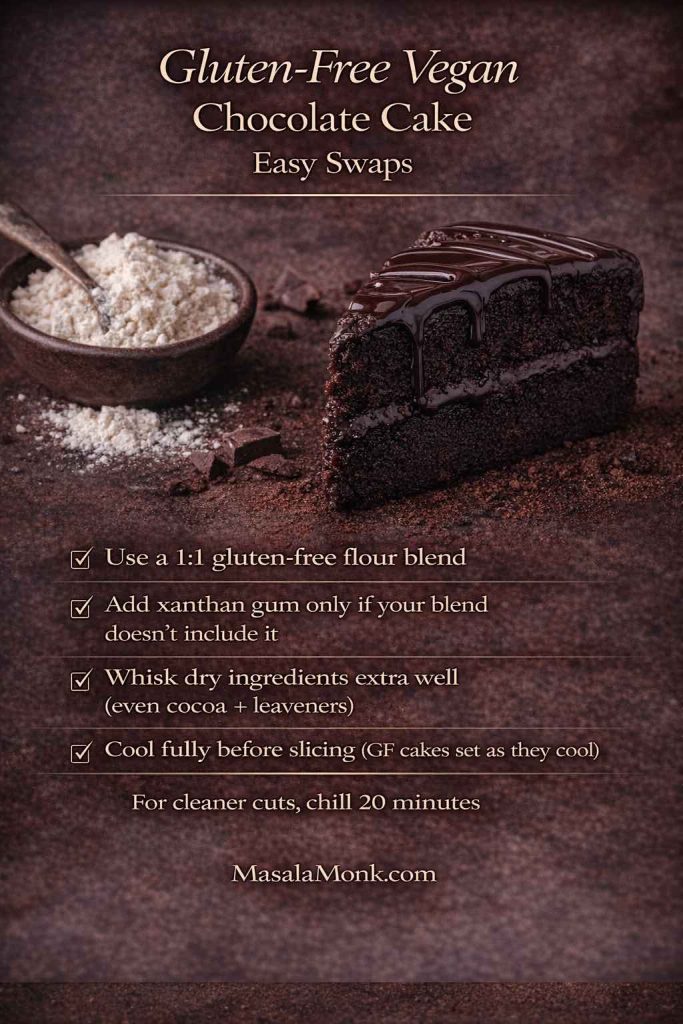
Gluten-free Vegan Chocolate Cake success cues
Let it cool fully before cutting; warm gluten-free cake is more fragile.
If you want extra security, chill the cooled cake briefly before slicing.
Gluten-free vegan chocolate cake made easier: use a 1:1 flour blend, add xanthan gum only if your mix needs it, and let the cake cool completely for neat, tender slices.
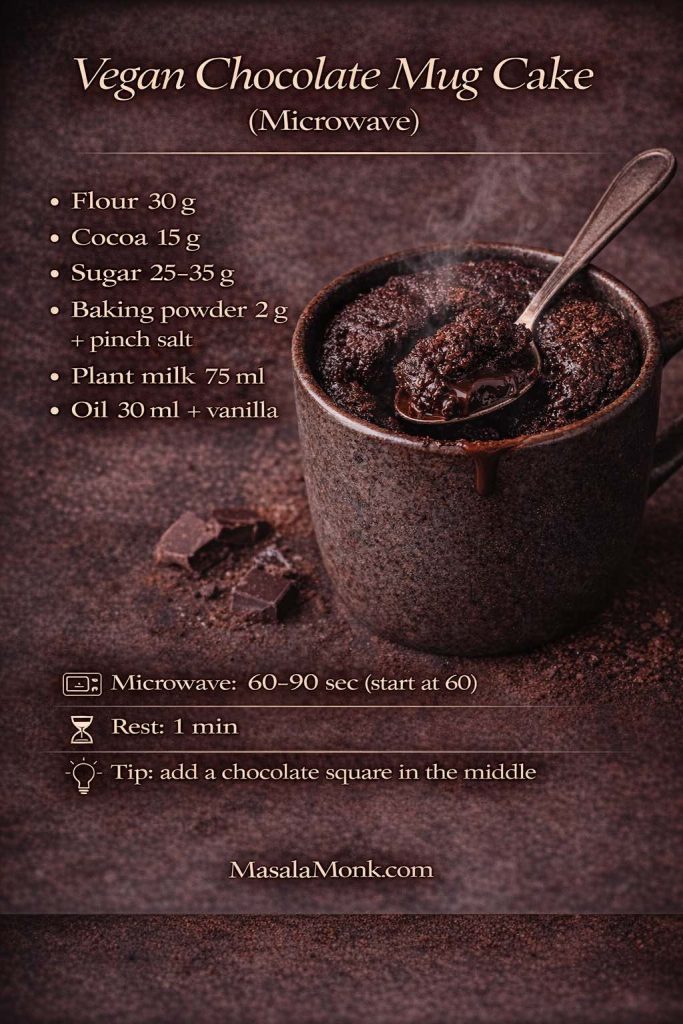
This is warm, quick comfort—nothing more and nothing less. It’s also the easiest way to experiment with cocoa, sweetness, or add-ins without committing to an entire cake.
Makes: 1 mug cake | Serves: 1 Time: 5 mins prep + 60–90 secs cook + 1 min rest | Difficulty: Easy Microwave/Mug: 1 large microwave-safe mug (350–400 ml)
Ingredients
30 g plain flour
15 g cocoa powder
25–35 g caster sugar (to taste)
2 g baking powder
1 g fine salt
75 ml plant milk
30 ml neutral oil
5 ml vanilla extract
Vegan chocolate mug cake in minutes: this microwave recipe card gives the exact ratios, cook time, and a molten-centre tip for a quick dairy-free chocolate fix.
Method (so it stays tender, eggless and dairy free)
Whisk flour, cocoa, sugar, baking powder, and salt in a microwave-safe mug.
Add plant milk, oil, and vanilla. Stir until smooth, scraping the bottom so no flour hides.
Microwave 60–90 seconds. Start at 60 seconds, then add 10-second bursts as needed. Overcooking is the fastest route to a rubbery mug cake.
Rest 1 minute. This short rest helps the crumb settle and stay softer.
Upgrades for Vegan Chocolate Mug Cake
Add a square of dark chocolate in the middle for a molten pocket.
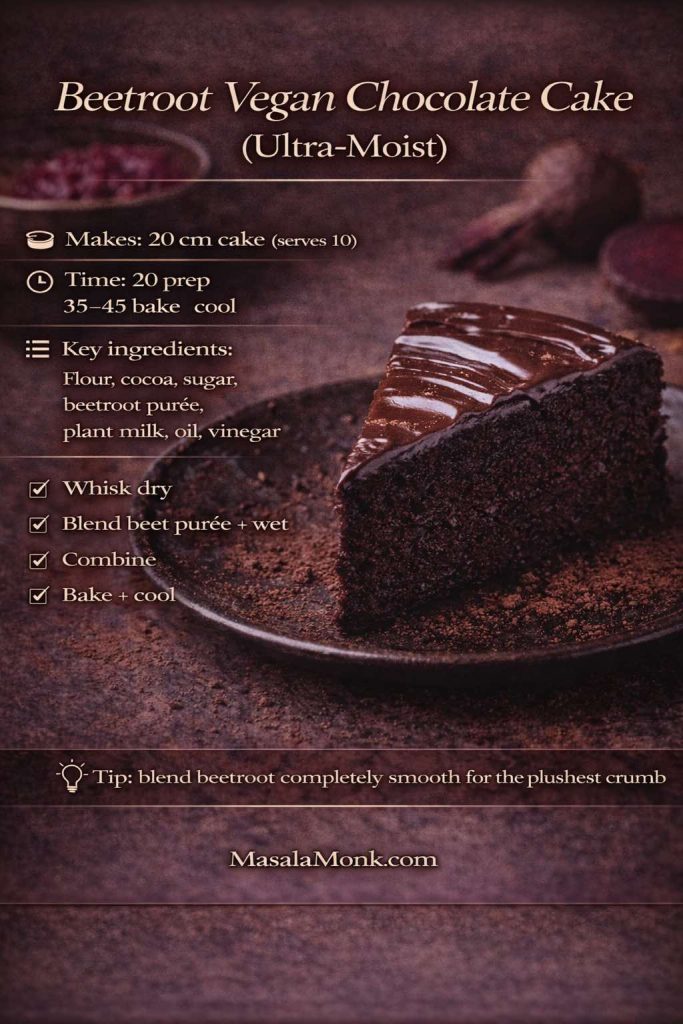
Beetroot adds moisture and depth, so this cake stays tender for days. In other words, it’s ideal when you’re baking ahead. The key is blending the beetroot purée until silky smooth so the crumb feels plush rather than fibrous.
Makes: 1 cake (20 cm) | Serves: 10 Time: 20 mins prep + 35–45 mins bake + 60–90 mins cooling | Difficulty: Easy Oven/Tin: 175°C | 20 cm round tin
Ingredients
220 g plain flour
180 g caster sugar
55 g cocoa powder
10 g baking powder
3 g bicarbonate of soda
3 g fine salt
250 g beetroot purée (cooked beetroot, blended smooth)
180 ml plant milk
80 ml neutral oil
15 ml vinegar
5 ml vanilla extract
Beetroot vegan chocolate cake, ultra-moist and surprisingly chocolate-forward: this recipe card gives the key ratios, bake time, and the blend-it-smooth tip for the plushest crumb.
Method
Heat oven to 175°C. Line a 20 cm tin.
Whisk dry ingredients thoroughly so cocoa disperses evenly.
Whisk beetroot purée, plant milk, oil, vinegar, and vanilla until smooth. If the purée is thick, whisk a little longer to loosen it.
Combine wet and dry until the batter is smooth, then pour into the tin.
Bake 35–45 minutes. Cool fully before slicing.
Beetroot-specific cues for Vegan Chocolate Cake
If you want the cake to read “pure chocolate,” use a darker cocoa and consider adding 2 g espresso powder.
For a brighter edge, add orange zest—especially lovely if you glaze it.
If you want more cozy baking ideas after this, MasalaMonk’s Baking category is a great place to keep exploring.
Notes / substitutions for Beetroot Vegan Chocolate Cake
Beetroot prep: blend until completely smooth; texture depends on a silky purée.
Flavour balance: add ½ tsp espresso powder for deeper chocolate (optional).
Moisture: beetroot varies—if batter seems very thick, add a splash more plant milk.
Make-ahead: this one stays moist for days; great for baking ahead.
10) Avocado Vegan Chocolate Cake (Recipe With Creamy Chocolate Frosting)
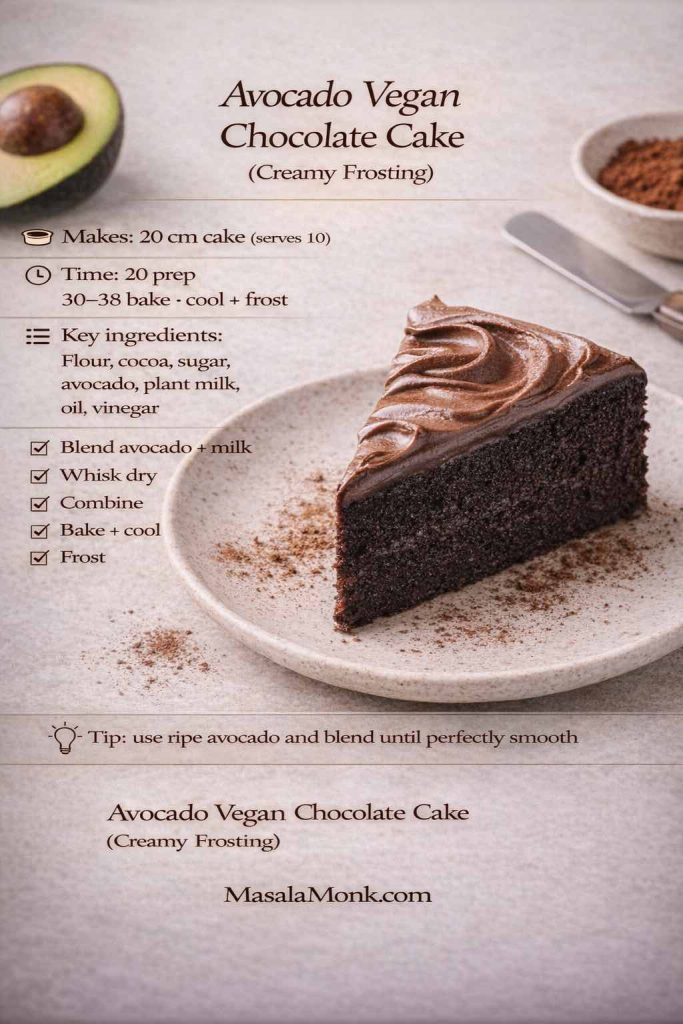
Avocado brings softness and a creamy mouthfeel. Done well, it doesn’t dominate the flavour—it simply makes the cake feel richer. In addition, the frosting can be silky without relying heavily on icing sugar.
Makes: 1 cake (20 cm) | Serves: 10 Time: 20 mins prep + 30–38 mins bake + 60–90 mins cooling (+ 10 mins frosting) | Difficulty: Easy Oven/Tin: 175°C | 20 cm round tin
Cake
220 g plain flour
200 g caster sugar
55 g cocoa powder
10 g baking powder
3 g bicarbonate of soda
3 g fine salt
150 g ripe avocado flesh
300 ml plant milk
80 ml neutral oil
15 ml vinegar
10 ml vanilla extract
Creamy avocado frosting
150 g ripe avocado flesh
25 g cocoa powder
60 ml maple syrup (to taste)
5 ml vanilla extract
1–2 g fine salt
Avocado vegan chocolate cake with creamy frosting: this recipe card gives the quick steps and timing for a moist dairy-free cake—plus the key tip for silky-smooth avocado frosting.
Method
Heat oven to 175°C. Line a 20 cm tin.
Blend avocado with plant milk until completely smooth. This matters—any lumps will show up in texture.
Whisk dry ingredients in a bowl.
Whisk the avocado mixture with oil, vinegar, and vanilla. Then pour into dry ingredients and whisk until smooth.
Bake 30–38 minutes. Cool completely before frosting.
Frosting
Blend avocado, cocoa, maple syrup, vanilla, and salt until silky. Chill 10–15 minutes to thicken. Spread over cooled cake.
Serving ideas
Finish with cocoa dusting for a clean look.
Add orange zest for brightness.
Add chopped toasted nuts for crunch.
If you like making plant milk at home for baking, MasalaMonk’s Easy Homemade Oats Milk is a handy reference.
Notes / substitutions for Avocado Vegan Chocolate Cake Recipe
Avocado must be ripe: blend until totally smooth or you’ll feel lumps.
Frosting storage: because it’s fresh avocado, keep frosted cake refrigerated; bring slices to room temp before serving.
Sweetness: maple syrup in frosting is adjustable—start lower, then add to taste.
No avocado frosting? Use ganache (from #3) or the buttercream (from #1).
Before you go: serving ideas that keep vegan chocolate cake feeling new
Even a truly excellent vegan chocolate cake can start to feel familiar if it always shows up the same way. Fortunately, you don’t need a new recipe to make it feel different—you just need a new finish. With that in mind, rotate your toppings and pairings so each bake has its own personality, even when the cake underneath is a repeat favourite.
Switch the finish, change the whole vibe
Syrup drizzle (quick, glossy, instantly dessert-like): Warm a spoonful of 3 Minutes Homemade Chocolate Syrup and let it ribbon over slices. As it cools, it clings beautifully, so every bite gets a little shine.
Ganache pour (sleek, dramatic, surprisingly easy): If you’ve made the bundt ganache, you’re already set. Instead of saving it only for bundt cakes, pour it over sheet cake, loaf cake, or even a simple single-layer round. Better still, if you let the ganache thicken slightly before pouring, you’ll get a slow, elegant drape rather than a runaway puddle.
Citrus lift (bright, fragrant, not overly sweet): Orange zest over chocolate is a small move with a big payoff. It’s particularly lovely on beetroot cake, where the zest adds sparkle and keeps the chocolate tasting lively rather than heavy.
Salt finish (tiny detail, big flavour shift): A pinch of flaky salt over warm slices doesn’t make the cake salty—it makes the chocolate taste clearer. In the same way that salt sharpens caramel, it pulls chocolate into focus.
Add texture and contrast without extra work
If you want a little more than a topping, a few low-effort contrasts can make the plate feel complete:
Crunch: chopped toasted nuts or cocoa nibs scattered over syrup or ganache while it’s still tacky.
Creamy + cool: a spoon of thick coconut yoghurt or a scoop of dairy-free ice cream next to warm cake.
Fresh: berries or orange segments to lighten the richness, especially with flourless torte or lava cakes.
Building a dessert table that complements chocolate
When you’re putting together a dessert spread, variety matters more than quantity. So instead of adding another cake, choose one contrasting sweet that brings a different texture—creamy, crisp, or bite-sized.
Storage, chilling, and freezing vegan chocolate cake
Because most of these cakes lean on oil for tenderness, they keep beautifully. Even so, storage still makes a difference—especially once frosting enters the picture. The goal is simple: protect moisture, prevent off-flavours, and keep texture as close to fresh-baked as possible.
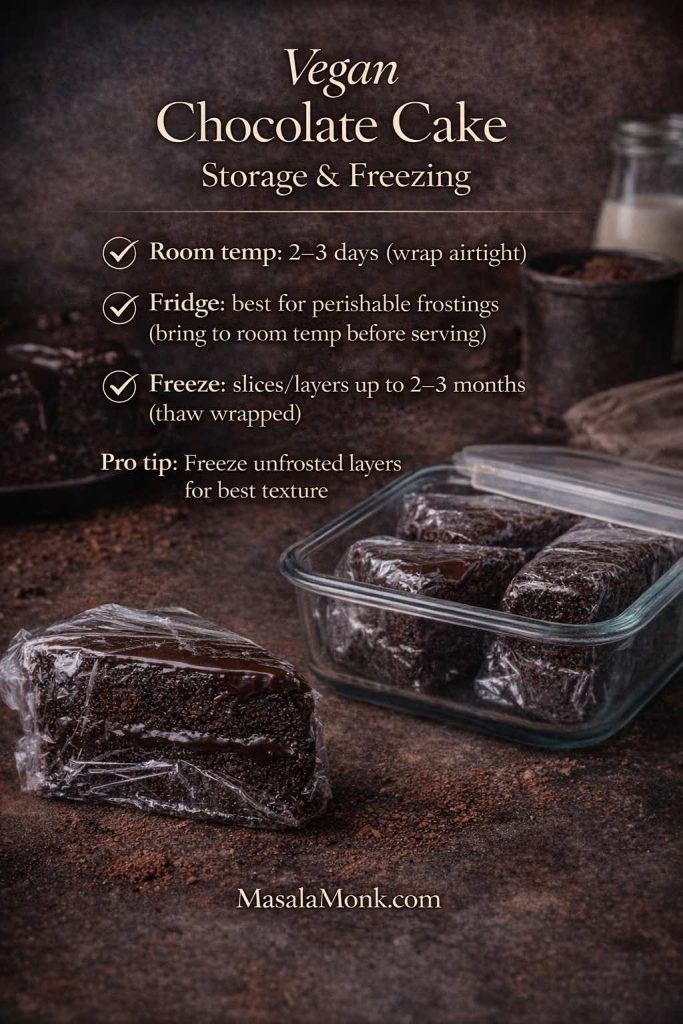
Store vegan chocolate cake the smart way: keep it wrapped airtight at room temp for 2–3 days, chill cakes with perishable frostings, or freeze slices/layers for an anytime chocolate fix.
Room temperature (best for most unfrosted cakes)
If the cake is unfrosted—or topped with something stable like a syrup drizzle—wrap it tightly and store it at room temperature for 2–3 days. For loaf and sheet cakes in particular, this often preserves softness better than refrigeration.
How to wrap it well: once the cake is fully cool, wrap it snugly so air can’t circulate. If you’ve sliced it, press a piece of baking paper against the cut side first, then wrap.
Refrigeration (best for perishable toppings)
If you’ve used avocado frosting or you simply prefer a chilled finish, refrigerate the cake. However, for the best flavour and texture, bring slices back to room temperature before serving. Otherwise, the crumb can feel firmer and the chocolate can taste muted.
A good rhythm: slice what you need, then let those pieces sit out for 20–30 minutes before eating.
Freezing (best for planning ahead)
If you like having cake “on standby,” freezing is your friend. Wrap slices or layers tightly, then seal in an airtight container. When you’re ready, thaw at room temperature while still wrapped; that way, condensation forms on the wrap instead of soaking into the cake.
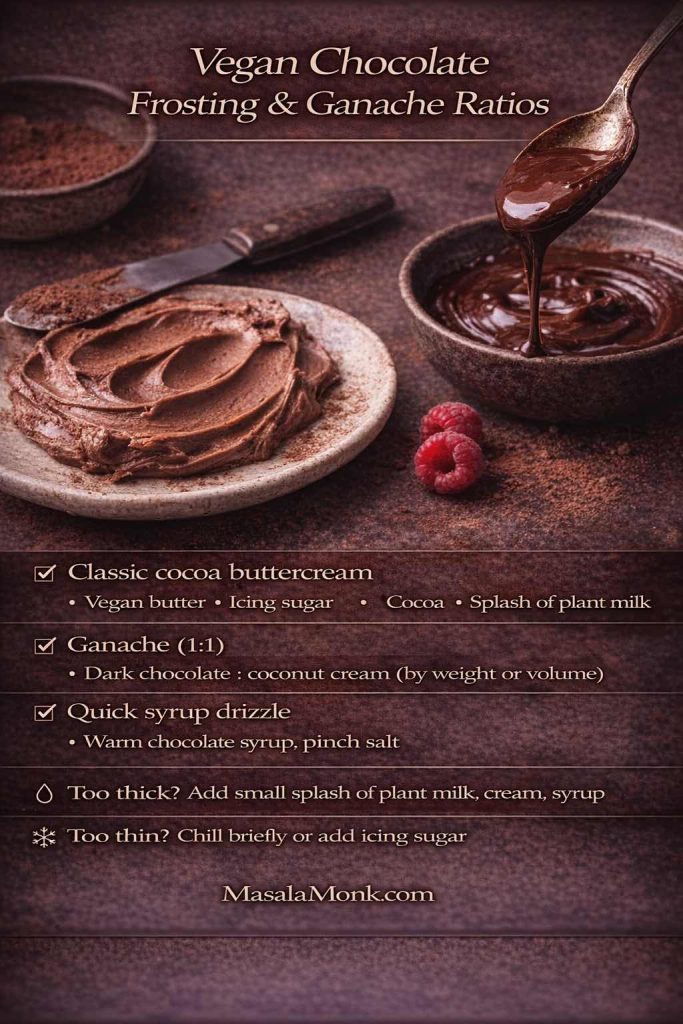
If you’re ever unsure what topping fits which cake, this quick guide helps you decide without overthinking:
Vegan chocolate frosting made easy: use this quick ratios card for cocoa buttercream, 1:1 ganache, or a fast syrup drizzle—plus simple fixes if your topping turns out too thick or too thin.
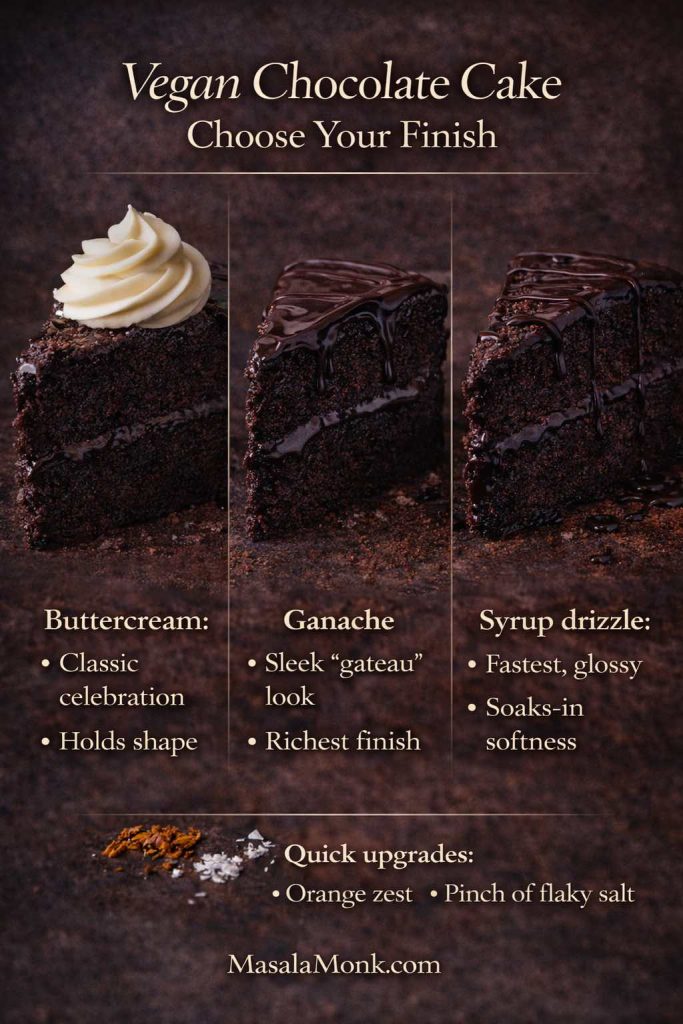
Not sure how to finish vegan chocolate cake? Choose buttercream for a classic celebration look, ganache for a sleek rich finish, or a syrup drizzle for the fastest glossy upgrade.
Layer cake: buttercream for classic celebration, ganache for a sleek “gateau” mood.
Sheet cake: syrup drizzle for speed, quick glaze for neat slices, ganache if you want it to feel more formal.
Bundt cake: ganache is the easiest way to make the shape look intentional; meanwhile, a light dusting of cocoa keeps it elegant.
Loaf cake: citrus glaze or syrup drizzle for simple charm; ganache if you want it to look like a gift cake.
Flourless torte: cocoa dusting plus berries keeps it refined; alternatively, a thin ganache layer makes it feel ultra-luxurious.
Lava cakes: keep toppings minimal—syrup, berries, or a pinch of salt—so the molten centre stays the star.
Mug cake: syrup and salt are all you need; if you want more, add a square of chocolate inside next time.
One last nudge (because variations are the fun part)
Once you’ve baked one of these cakes, it’s surprisingly satisfying to remix it. Swap the shape. Change the topping. Add orange zest one time and espresso the next. Suddenly, you’re not repeating yourself—you’re building a repertoire.
If you enjoy that “one dependable base, then smart variations” energy, you might also like Double Chocolate Chip Cookies – One Dough, 7 Ways. It’s the same spirit: familiar comfort first, then playful twists that keep baking exciting.
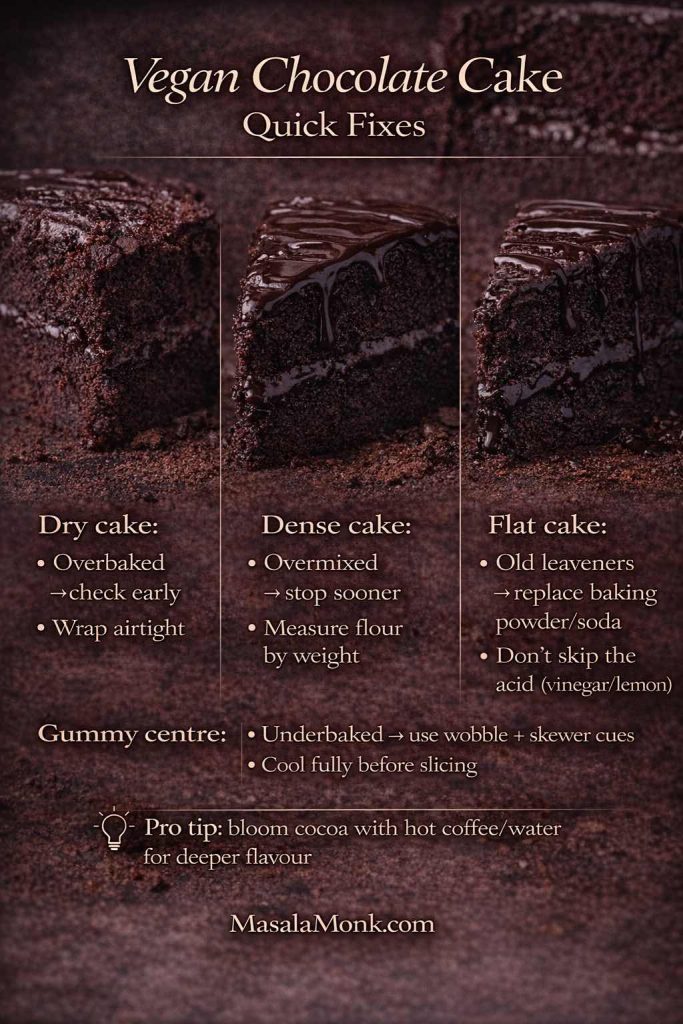
Vegan chocolate cake troubleshooting made simple: fix dry cake, dense crumb, flat rise, or gummy centres with these quick checks—so your next bake stays moist and reliable.
Vegan Chocolate Cake FAQ
1) What’s the best vegan chocolate cake recipe if I want it truly moist?
Go for an oil-based batter and a “bloom” step with hot coffee or hot water. Oil keeps the crumb tender for longer, while hot liquid wakes up cocoa so the chocolate tastes bigger. Also, bake to cues: stop when a skewer shows moist crumbs rather than waiting for it to come out completely clean.
2) Are vegan chocolate cake recipes automatically dairy-free and eggless?
Yes—vegan means no dairy and no eggs by definition. Still, “eggless” texture can vary because structure comes from different places: sometimes it’s mostly flour + leavening, while other recipes add starch, avocado, or beetroot for a fudgier, denser feel.
3) What’s the easiest vegan chocolate cake for beginners?
A one-bowl sheet cake is usually the simplest starting point. Because it bakes in a single layer, you get more even doneness, fewer steps, and less risk of overhandling. Plus, you can finish it with a quick drizzle or ganache and it still feels special.
4) Can I make a vegan chocolate cake without coffee?
Definitely. Coffee intensifies cocoa, yet hot water gives you the same “blooming” effect without any coffee notes. In other words, you’ll still get a deep chocolate aroma—just cleaner and more neutral.
5) Which cocoa powder should I use: natural or Dutch-process?
Natural cocoa tends to taste brighter and slightly sharper, while Dutch-process usually tastes smoother and looks darker. Either can work, although results won’t be identical. Consequently, once you find a cocoa you love, stick with it so your cake becomes consistent from bake to bake.
6) What plant milk is best for vegan chocolate cake?
Soy milk often gives a bit more structure and height, oat milk tends to make the crumb softer and rounder, and almond milk is lighter and can feel slightly less plush. That said, any unsweetened plant milk will generally work—choose based on what you keep in the fridge.
7) How do I make a vegan chocolate cake more “fudgy” instead of fluffy?
Use more melted chocolate or add chopped dark chocolate to the batter, then avoid overbaking. Additionally, choose a sheet cake format or a flourless/torte-style recipe, since both naturally lean richer and denser. Finally, let the cake cool fully—fudgy texture often sets as it rests.
8) Can I make vegan chocolate cake gluten-free and still keep it tender?
Yes, especially with a good 1:1 gluten-free flour blend. Because gluten-free cakes are more fragile when warm, let it cool completely before slicing. If you want extra neat slices, chill the cooled cake briefly—texture tightens and cuts cleaner.
9) Why do so many dairy-free chocolate cake recipes use vinegar?
Vinegar (or lemon juice) reacts with baking soda, which helps the cake rise and keeps the crumb lighter. Importantly, it shouldn’t make the cake taste sour—the amount is small and it disappears into the chocolate.
10) Why is my vegan chocolate cake dry, and how do I prevent it next time?
Dryness usually comes from overbaking or measuring too much flour. Next time, weigh ingredients if you can, start checking earlier, and pull the cake when the centre springs back and the skewer shows moist crumbs. Moreover, wrap the cooled cake well—air is what steals softness fastest.
11) Can I bake vegan chocolate cake as cupcakes, a loaf, or a bundt?
Yes—this batter family is flexible. Cupcakes bake faster (start checking around 18–22 minutes), loaf cakes need longer and benefit from a foil tent if the top browns early, and bundt cakes demand thorough greasing for clean release. As a result, the format you choose should match your time and how you plan to serve it.
12) How long does vegan chocolate cake last, and can I freeze it?
Most oil-based vegan chocolate cakes keep well at room temperature for 2–3 days if wrapped tightly. For frosted cakes—especially avocado frosting—refrigerate, then bring slices back to room temp for the best flavour. For longer storage, freeze slices or layers tightly wrapped; thaw while still wrapped so condensation stays on the wrap, not in the cake.
13) What’s the quickest vegan chocolate dessert when I want chocolate right now?
A vegan chocolate mug cake is the fastest option. It’s ready in minutes, and you can adjust sweetness or add a chocolate square in the centre for a molten pocket. Just microwave in short bursts, since overcooking is the main reason mug cakes turn rubbery.
14) Which vegan chocolate cake is best for birthdays and celebrations?
A classic vegan chocolate layer cake is the most “party-ready” because it stacks well and holds frosting cleanly. Alternatively, a bundt cake looks festive with almost no decorating—ganache does the work and the shape carries the drama.