Posted on Leave a comment

Chocolate Cream Cheese Frosting Recipe: Smooth, Pipeable & Not Too Sweet

Chocolate cupcakes topped with soft swirls of chocolate cream cheese frosting on a light wooden board.

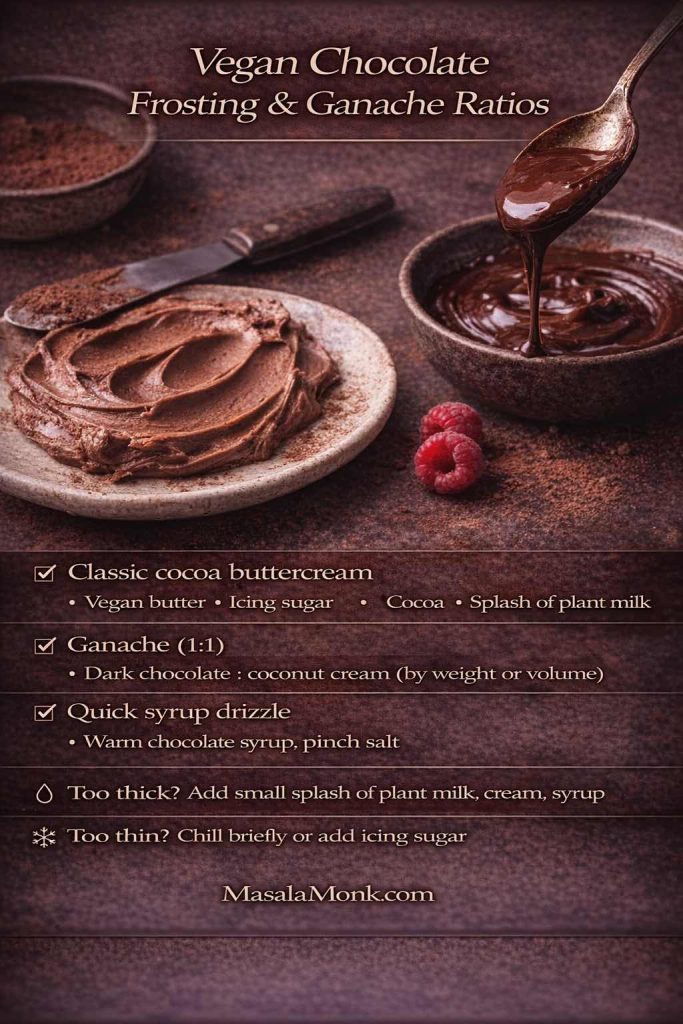
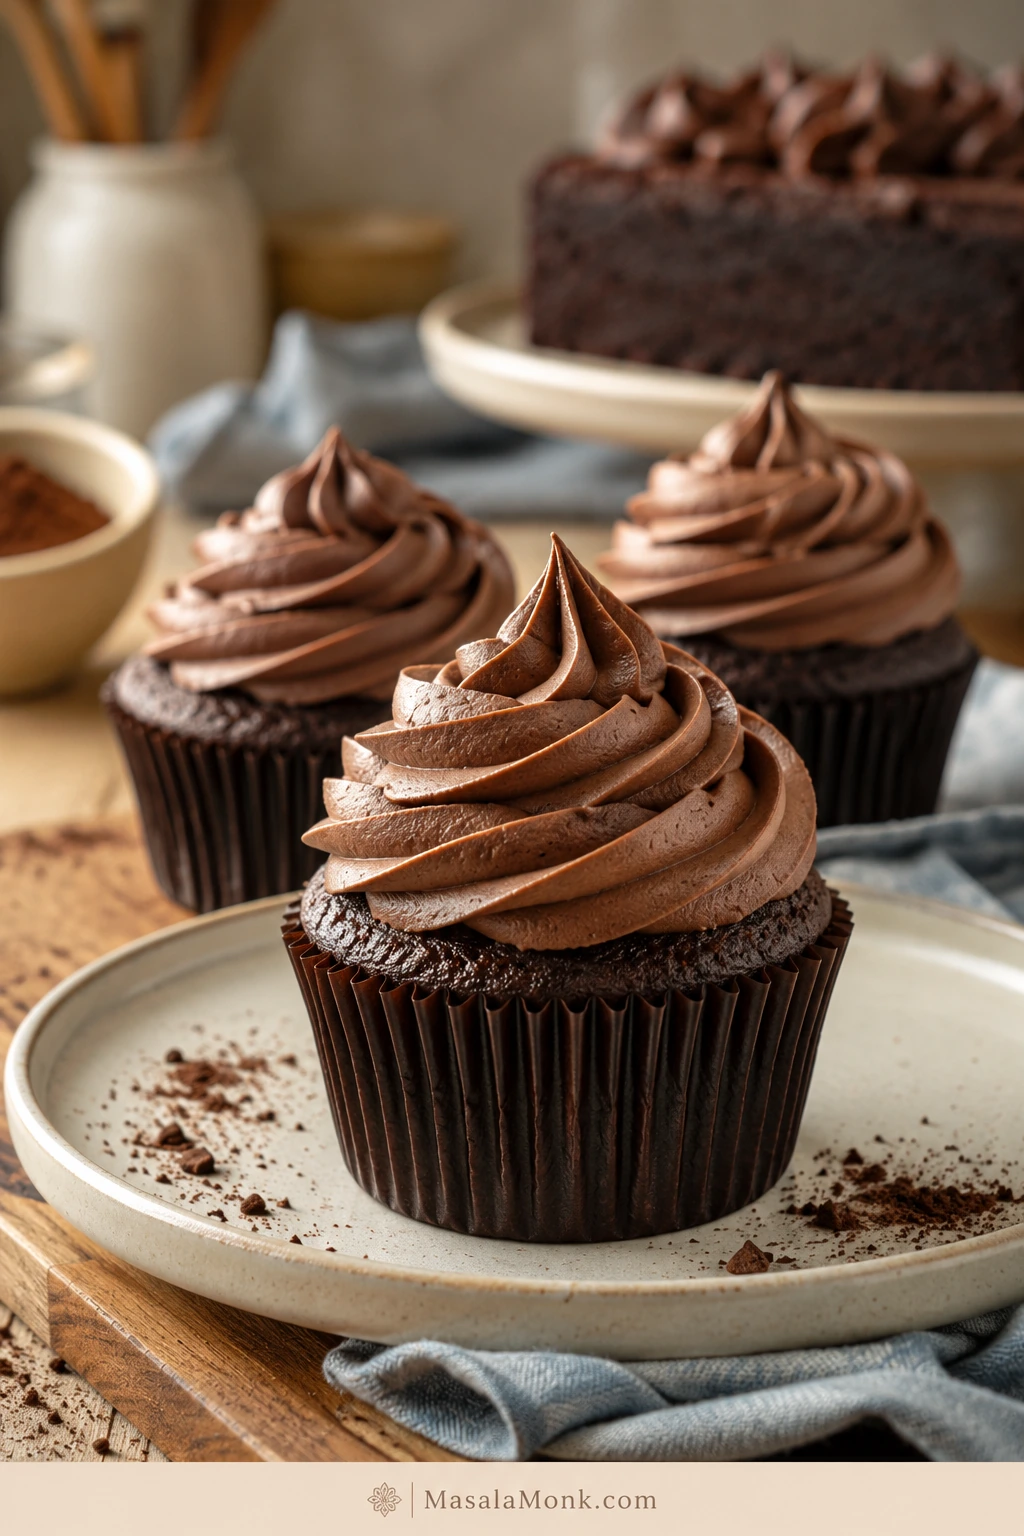
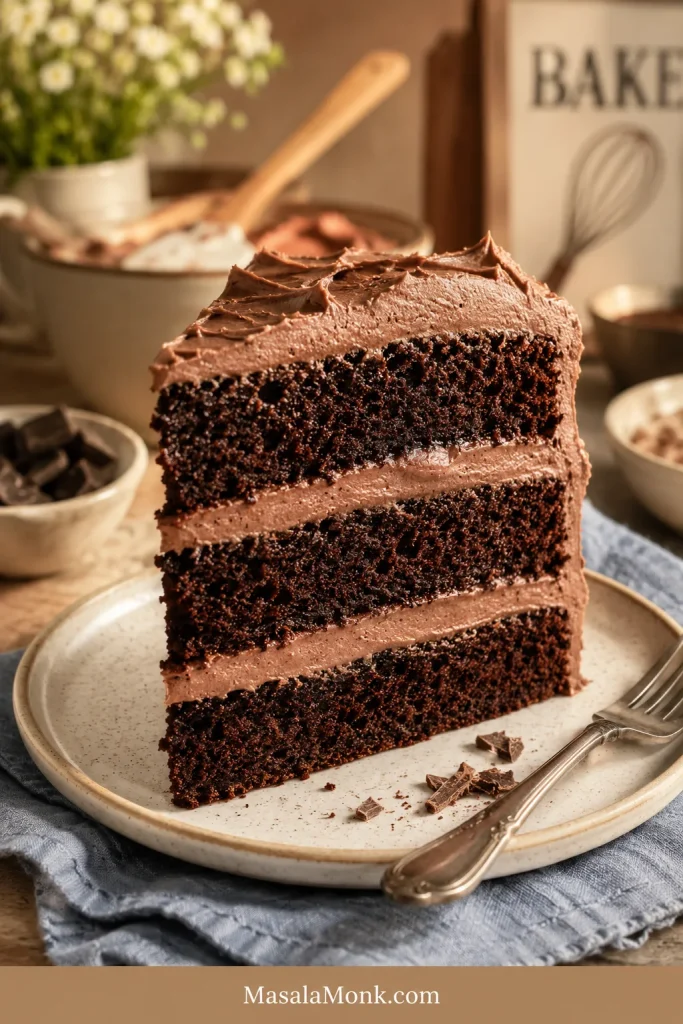
Frosting is the part everyone sees first, which is why it can make even a simple cake feel a little high-pressure. This chocolate cream cheese frosting keeps that final step calm: smooth enough to spread, thick enough to chill and pipe, and chocolatey without tasting like straight sugar.

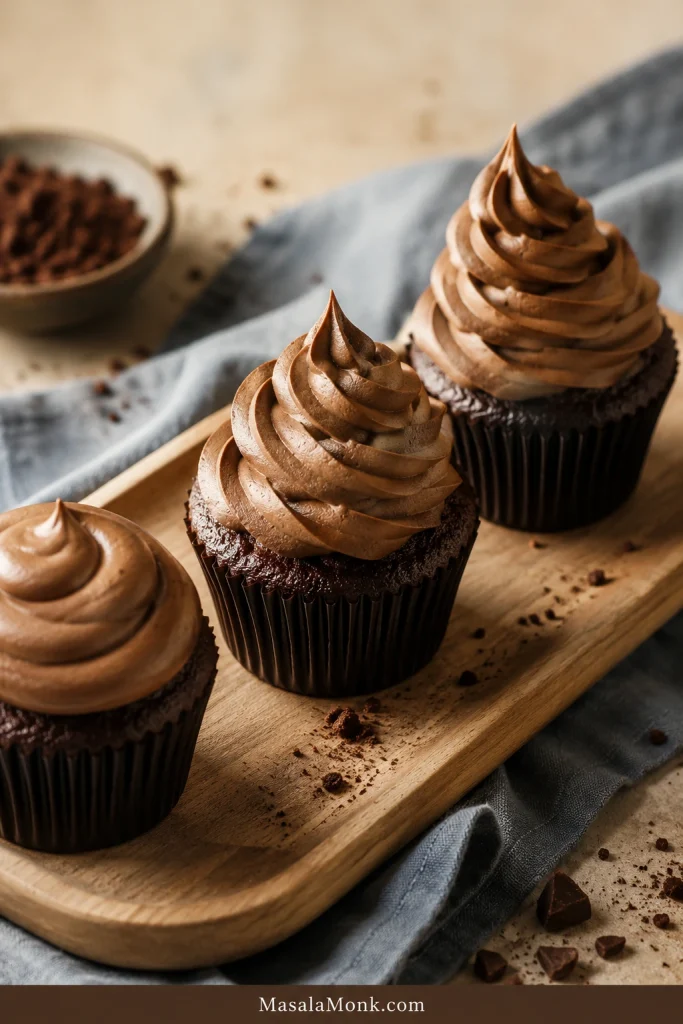
The finished topping is thick and creamy, with deep cocoa flavor, a gentle cream cheese tang, and a soft matte finish. At its best, each bite tastes like chocolate first, cream cheese second, and sugar last.

This version is built for the frosting problems people actually run into: cream cheese that turns loose, chocolate that tastes flat, cupcake swirls that slump, and “not-too-sweet” frosting that still needs enough structure to behave.

It is not sugar-free, and it is not trying to be. It is balanced instead of candy-sweet: less sugary than classic chocolate buttercream, with enough powdered sugar to stay smooth, spreadable, and pipeable.

Use it right away when you want a spreadable frosting. A short chill turns the same bowl from creamy and spreadable to swirl-ready. The recipe itself takes about 10 minutes; the extra time is only for cleaner cupcake swirls or a firmer layer-cake finish.

Need the fast path? Jump to the recipe. Trying to fix soft frosting? Start with the Texture Rule.

It is especially useful for birthday cupcakes, simple sheet cakes, bake-sale brownies, red velvet cake, and casual layer cakes where you want chocolate frosting that tastes rich but not candy-sweet.

Contents

Chocolate Cream Cheese Frosting Recipe

This recipe makes a smooth, chocolatey cream cheese frosting for cupcakes, brownies, 9×13 cakes, and simple layer cakes. It spreads as soon as it is mixed and becomes firm enough for soft swirls after 15 to 30 minutes in the refrigerator.

The mixing is quick; the chill is only there when you want cleaner piping. For a generously frosted 9-inch layer cake or bakery-style cupcake swirls, make extra because piping always uses more than it looks like.

PrepChillYieldBest For
10 minutesOptional 15 to 30 minutesAbout 3½ to 4 cupsCupcakes, brownies, 9×13 cakes, casual layer cakes

Choose your texture: 3 cups powdered sugar gives a softer, tangier frosting. 3½ cups gives firmer swirls. Chill before piping, and reach for milk or cream only when the frosting is truly too thick. For visual checkpoints, see the Success Cues.

Recipe Ingredients

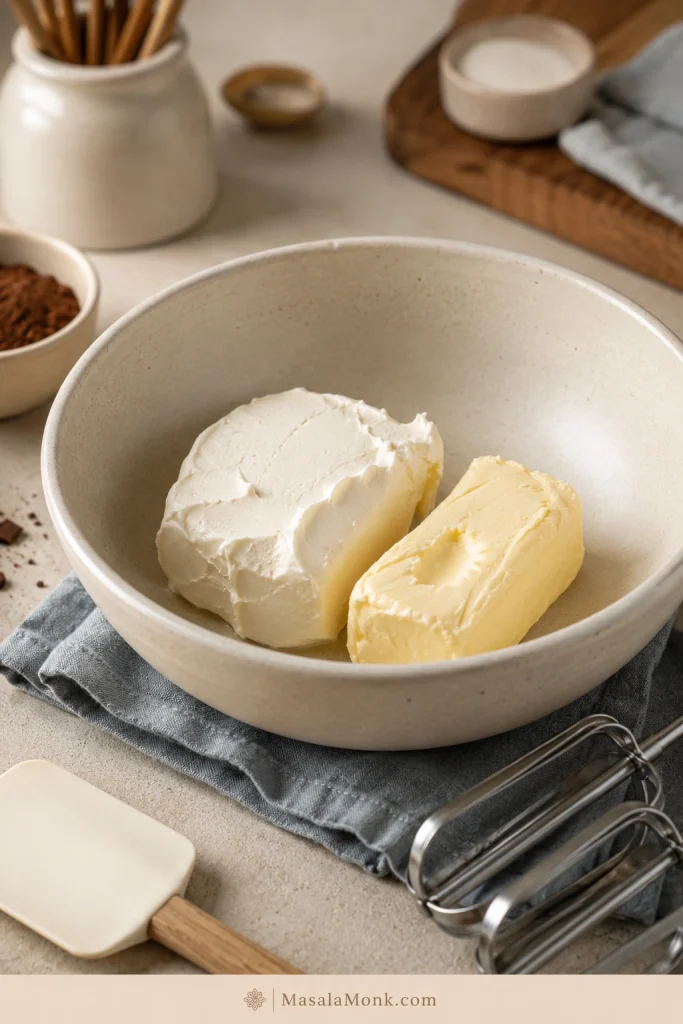
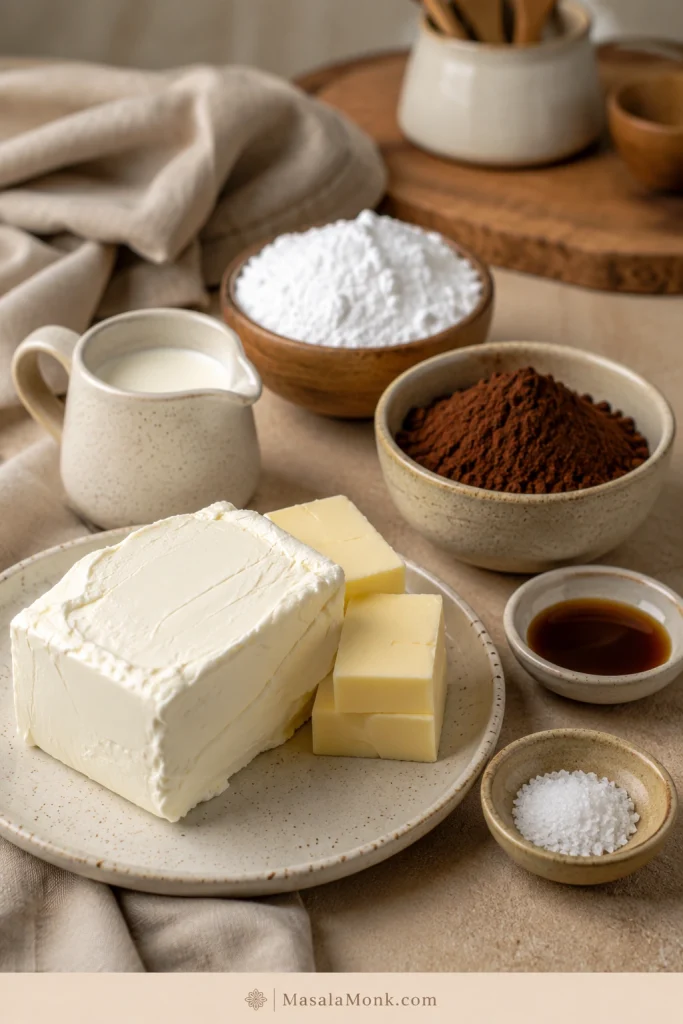
  • 8 oz / 226 g full-fat brick cream cheese, softened but still cool
  • ½ cup / 113 g unsalted butter, softened but not melted
  • 3 to 3½ cups / 360 to 420 g powdered sugar / icing sugar, sifted if lumpy
  • ½ cup / about 50 g unsweetened cocoa powder, natural or Dutch-process
  • 1 teaspoon vanilla extract
  • ¼ teaspoon fine salt, plus a tiny pinch more to taste
  • 1 to 4 teaspoons milk or cream, only when the mixture is too thick; many batches need none

Note: Depending on the brand and how tightly it is packed, ½ cup cocoa powder may weigh around 45 to 55 g. About 50 g is a reliable working amount here.

Optional: For a fudgier version, beat in 3 to 4 oz / 85 to 115 g cooled melted dark chocolate after the base is smooth.

Before Mixing Checkpoint

The cream cheese should press in but still hold its block shape. The butter should dent but not shine. If either one looks greasy, chill it briefly before starting.

Cool-soft cream cheese and softened butter holding their shape in a mixing bowl before beating.
Before mixing, the cream cheese should press in but still hold shape, while the butter should dent without looking greasy.

Recipe Instructions

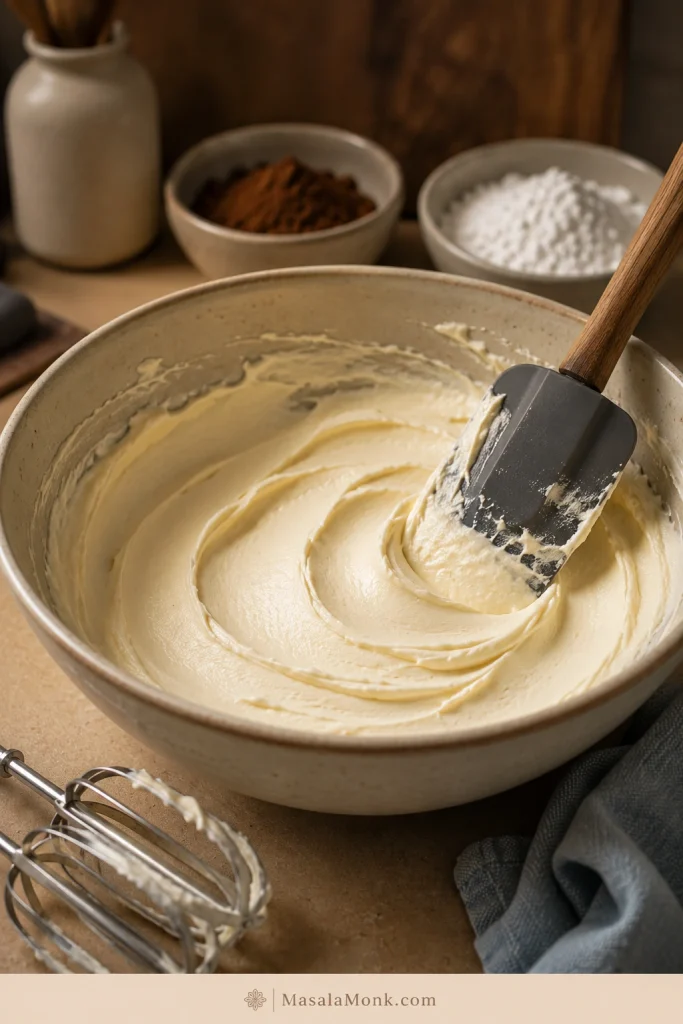
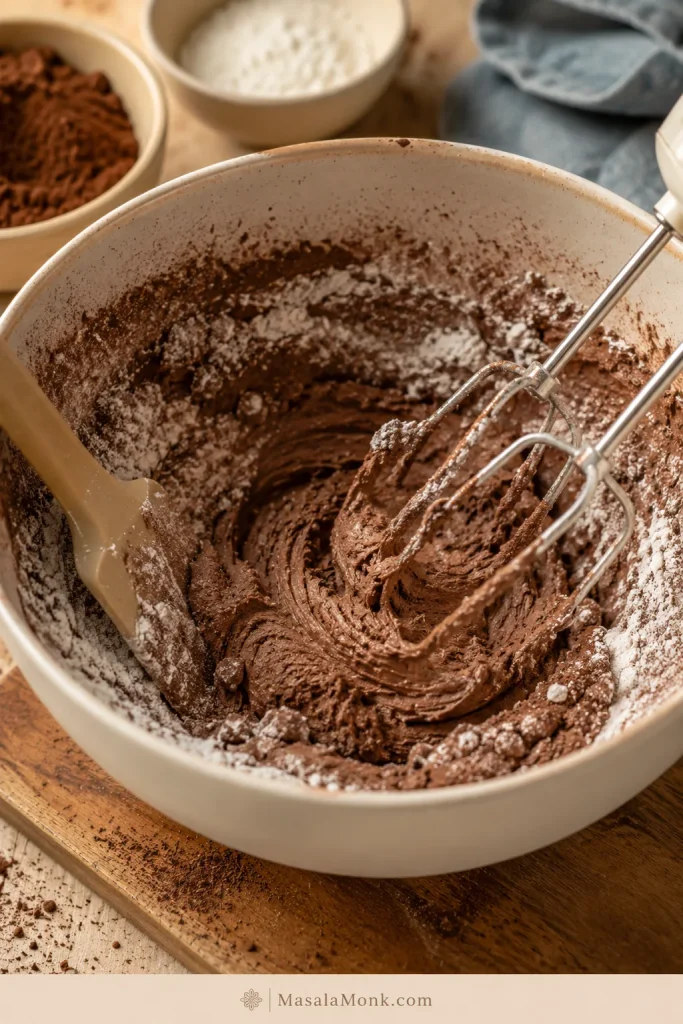
  1. Add the softened cream cheese and softened butter to a large mixing bowl. Beat on medium speed until completely smooth and creamy, about 1 to 2 minutes. Scrape down the sides and bottom of the bowl.
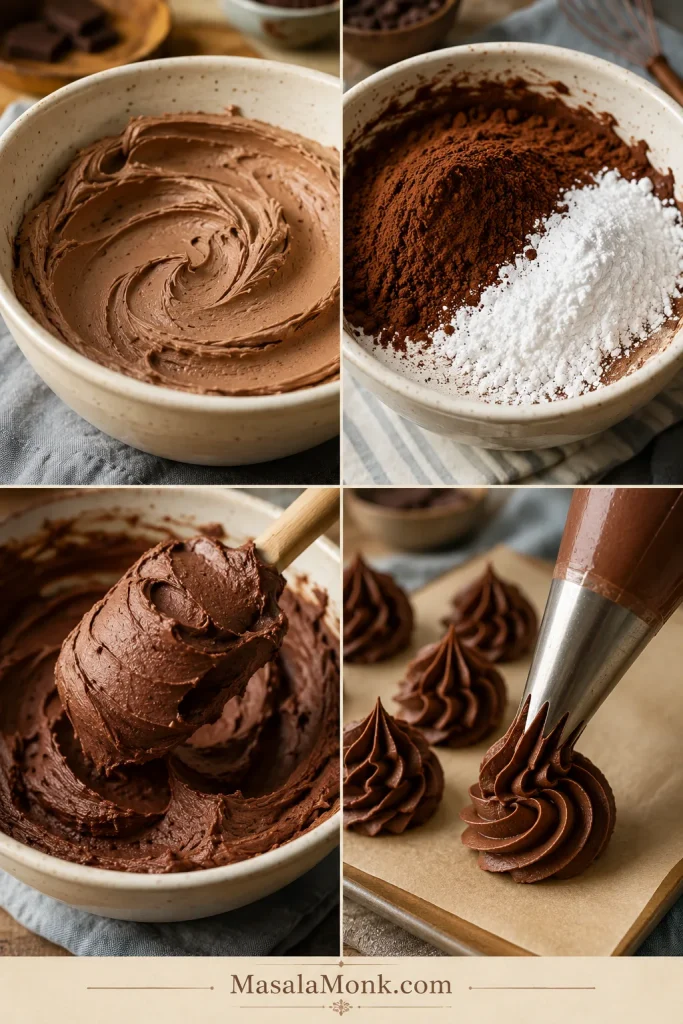
  2. Add the cocoa powder, 3 cups powdered sugar, salt, and vanilla. Mix on low speed until the dry ingredients are mostly absorbed.
  3. Increase to medium-low or medium speed and beat just until smooth. Scrape again so no cocoa, sugar, or cream cheese is hiding at the bottom or sides.
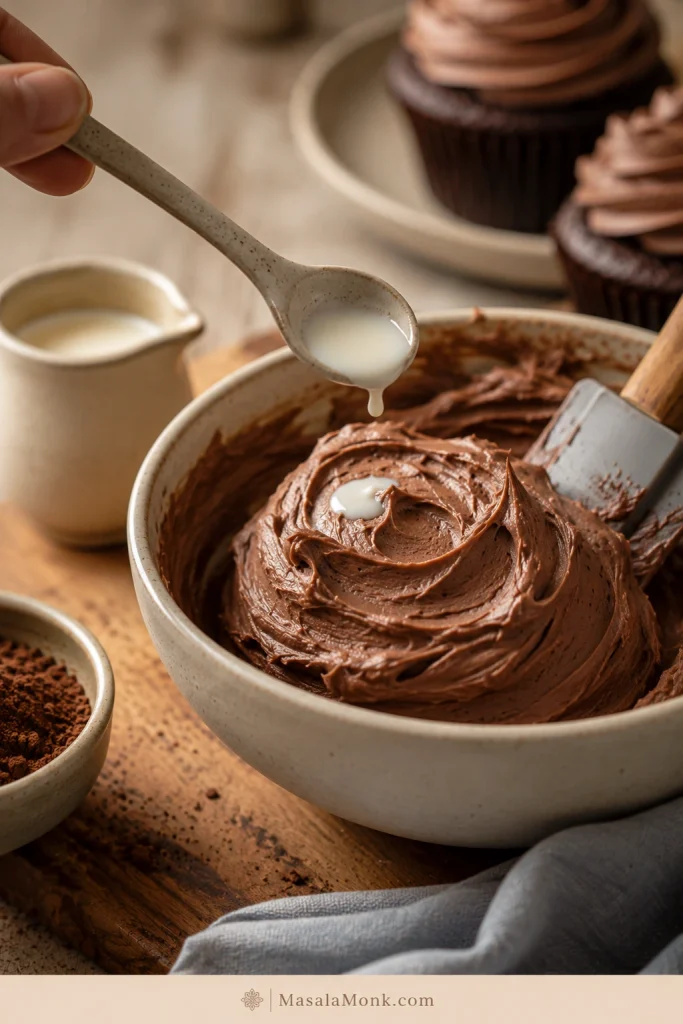
  4. Beat until the cocoa and sugar disappear and the mixture turns creamy. Add milk or cream only when it still feels too thick.
  5. Taste before adding the last ½ cup powdered sugar. Add it only for a sweeter or stiffer texture. When the mixture tastes sweet but flat, add a tiny pinch more salt.
  6. Use it right away when you want a spreadable frosting. To pipe soft swirls, chill it for 15 to 30 minutes before filling the bag.
  7. To make the optional fudgy version, mix in the cooled melted chocolate after the base is smooth. Beat briefly, just until combined.
  8. If the mixture is fridge-firm, let it sit for 10 to 15 minutes so it softens enough to mix smoothly before re-beating.

Recipe Notes

  • Full-fat block-style cream cheese gives the frosting its most reliable structure.
  • Sift cocoa powder and powdered sugar when they look lumpy, especially for piping.
  • Milk or cream should go in slowly. Most batches need little or no added liquid.
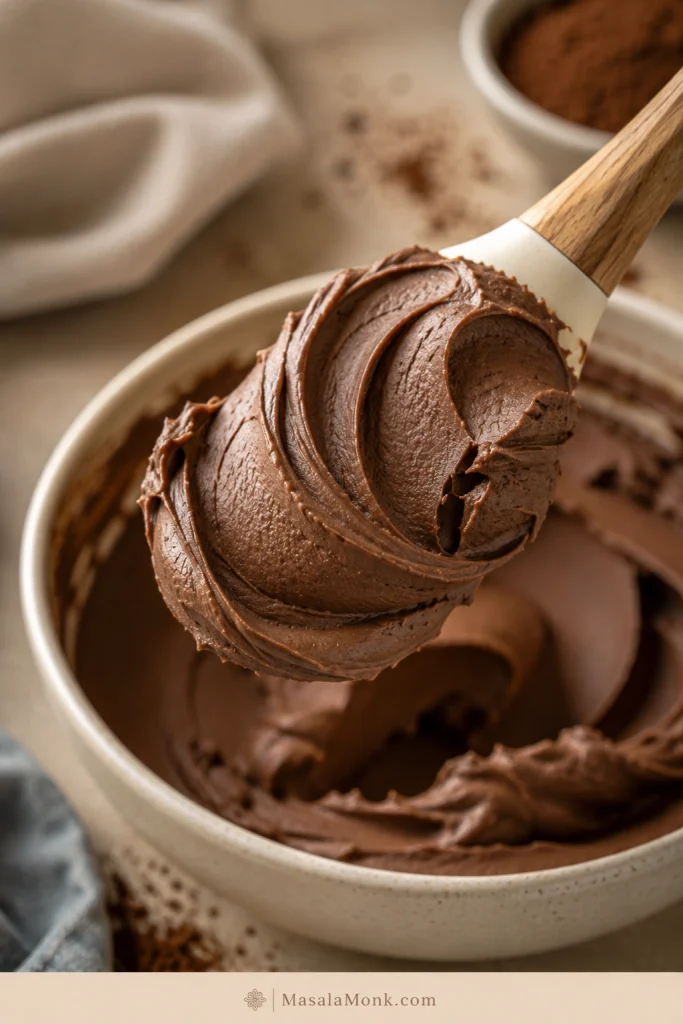
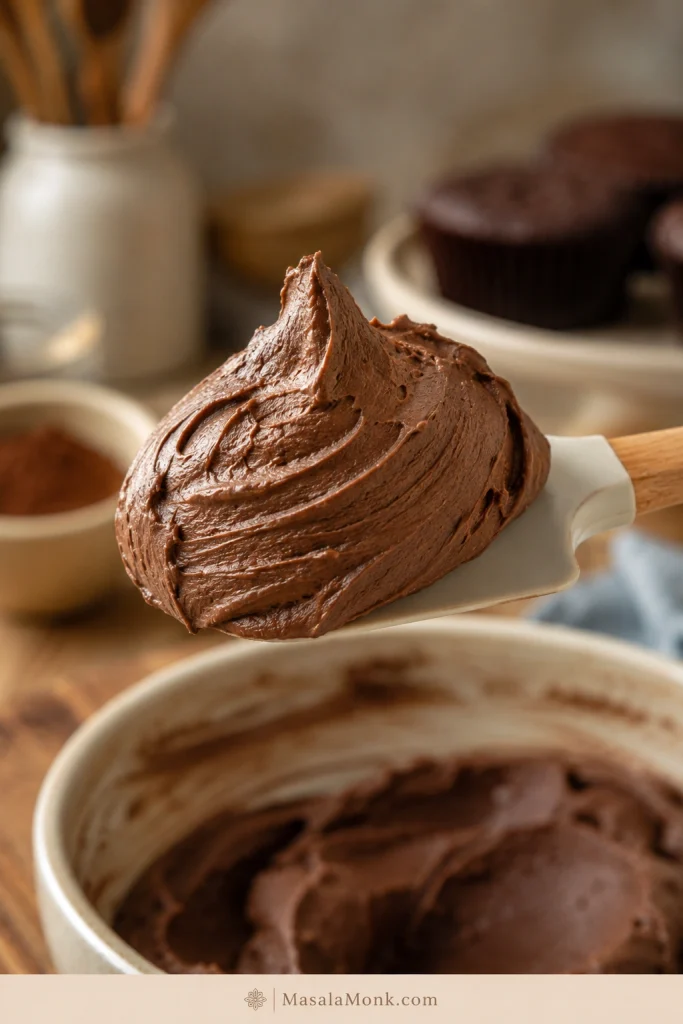
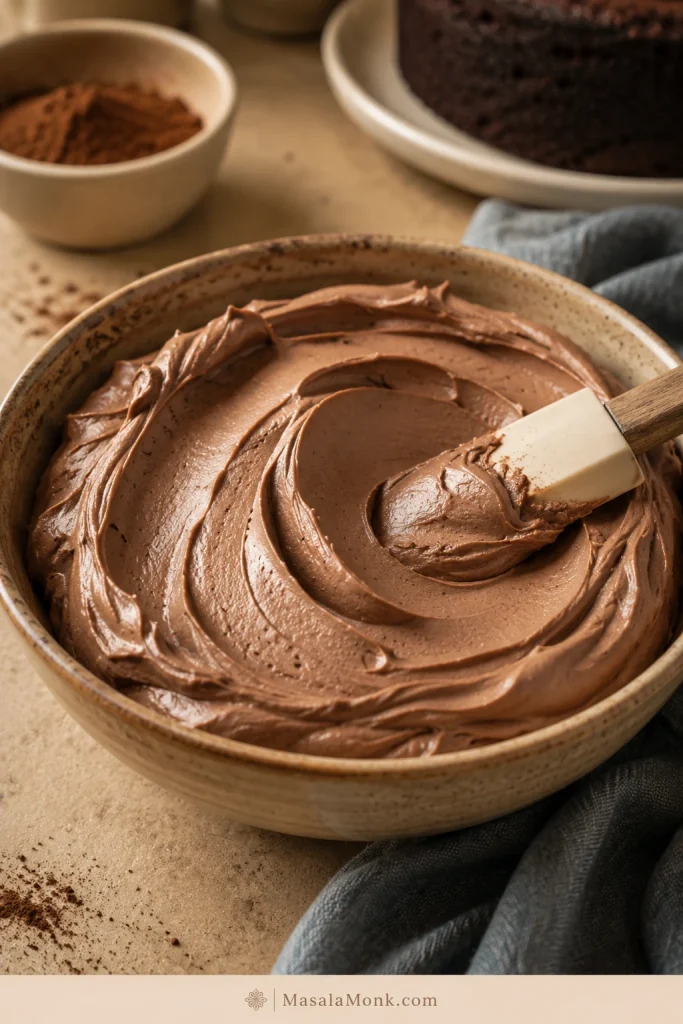
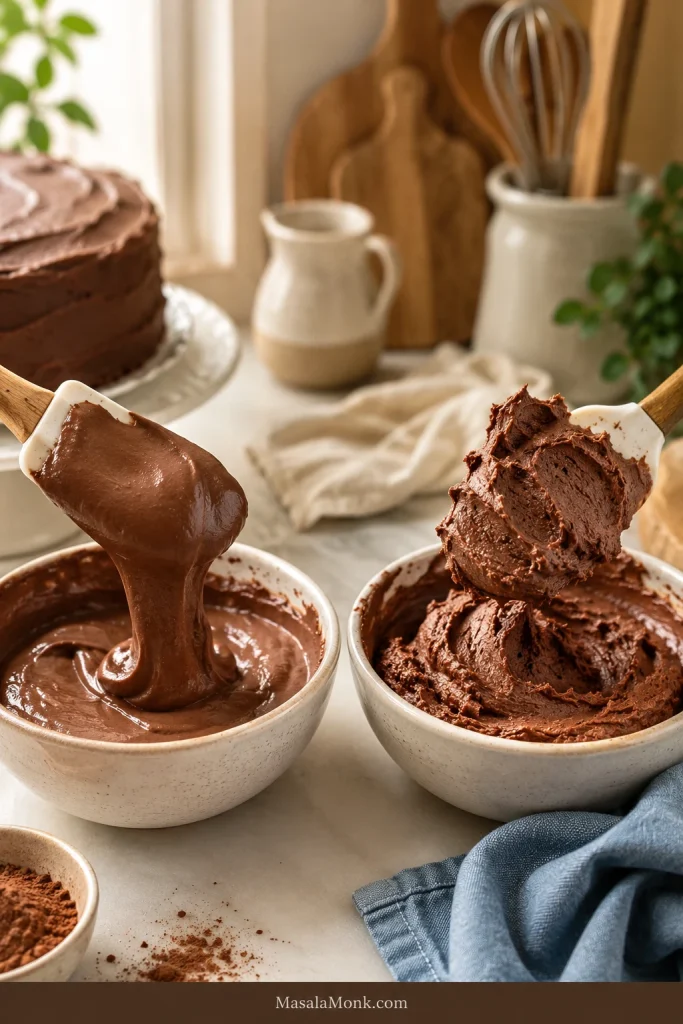
  • The mixture is ready when it looks smooth, thick, and holds soft ridges from the beaters.
  • On a spatula, it should mound softly instead of running off.
  • Let cakes, cupcakes, and brownies cool completely so the chocolate layer sits on top instead of melting in.

When spread thinner over brownies or sheet cakes, some bakers call this chocolate cream cheese icing. In everyday use, frosting usually means a thicker topping that can be spread or piped, while icing often means something thinner. This recipe sits on the frosting side, but the same creamy, tangy topping may be called icing when it is spread over a pan dessert.

Before You Start

This is a simple recipe, but texture matters. Soft frosting is not a disaster. Most of the time, you are adjusting temperature, not rescuing a ruined batch.

The biggest difference in testing was not the cocoa or the mixer. It was temperature. When the cream cheese and butter were cool-soft, the frosting turned thick and smooth without much help. When either one was warm, the same recipe softened quickly and needed chilling before it behaved again.

The mixture should look thick before you decide it needs liquid. Many batches look too stiff at first and then turn creamy once the sugar and cocoa fully mix in.

The Thick Swoop Test

Before you decide the frosting needs more sugar or liquid, lift a small amount with a spatula. A good batch should mound softly and hold a clean swoop for a moment.

A spatula lifting a thick swoop of chocolate cream cheese frosting from an ivory mixing bowl.
Before you spread or pipe, look for a thick frosting swoop that lifts cleanly instead of sliding back into the bowl.

The Texture Rule: Spread, Chill, or Fix

Chocolate cream cheese frosting changes with temperature. Before adding more sugar or liquid, look at the bowl and decide what you need it to do next.

Thick chocolate cream cheese frosting mounding on a spatula above a mixing bowl.
When the frosting mounds softly on the spatula, it is usually ready for spreading, filling, or a short chill before piping.
If it looks like thisDo thisWhy it works
Thick, creamy, and mounds on a spatulaUse it for spreadingIt is ready for brownies, sheet cakes, and simple cakes
Smooth but too soft for swirlsChill 15 to 30 minutesCold firms the butter and cream cheese without adding sweetness
Dry or stiff after mixingAdd milk or cream 1 teaspoon at a timeSmall amounts loosen the texture without making it runny
Loose even after chillingAdd powdered sugar or cocoa graduallyOnly adjust after temperature has had a chance to help

The whole recipe comes down to one rhythm: mix until smooth, pause before adding liquid, chill before fixing softness, and stop once it holds its shape.

Is This the Right Frosting for You?

Think of it as the middle ground between chocolate buttercream and cheesecake: richer than whipped cream, tangier than buttercream, and softer than ganache.

It is made for soft swirls, creamy layers, and tangy chocolate balance. For sharp decorative edges, tiny detailed piping, or long room-temperature display cakes, a firmer buttercream or ganache will be easier to manage.

  • Use this frosting for cupcakes, brownies, sheet cakes, yellow cake, chocolate cake, red velvet cake, and casual layer cakes.
  • Choose buttercream frosting when you want a sweeter, firmer, classic birthday-cake topping.
  • Use homemade whipped cream when pies, fruit desserts, hot chocolate, or no-bake desserts need something lighter.
  • Reach for ganache when you need a glossy drip or smooth cake covering.
  • Pick royal icing when cookie icing needs to dry hard for stacking.

Ingredients You Need

Good frosting starts before the mixer turns on. The texture is mostly decided by the cream cheese, butter, and how quickly you add liquid.

Cream cheese, butter, cocoa powder, powdered sugar, vanilla, salt, and cream arranged on a kitchen counter.
Start with firm cream cheese, cool-soft butter, sifted dry ingredients, and only a small amount of liquid when needed.

Cream Cheese for Frosting

Full-fat brick cream cheese gives the topping body and stability, mixes smoothly with butter and powdered sugar, and helps the finished texture hold after chilling.

Outside the US, look for full-fat block-style cream cheese or the firmest full-fat cream cheese available. Avoid whipped, spreadable, low-fat, or very soft cream cheese when you want piping.

Firm block-style cream cheese beside softer spreadable tub cream cheese on a warm kitchen counter.
Block-style cream cheese gives better structure; in contrast, softer tub cream cheese can make frosting loosen faster.

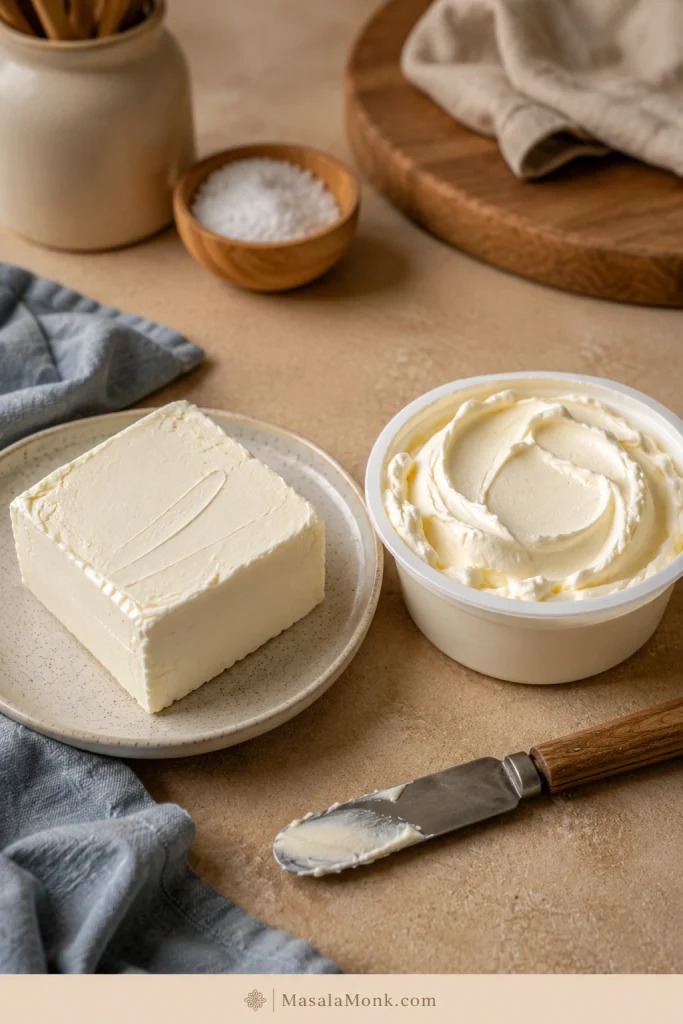
If your cream cheese comes in a tub but feels firm and dense rather than airy or spread-like, keep it cold, skip extra liquid, and chill the frosting before piping. The issue is moisture and structure: spreadable cream cheese is usually softer, so the mixture can loosen before it ever gets cold enough to hold a swirl.

If the frosting has already turned loose, jump to the runny frosting fix before adding more sugar.

The same full-fat cream cheese logic shows up in chilled desserts too. This no bake cheesecake recipe is a good example of how cream cheese structure and chilling decide the final texture.

Butter

Butter makes the mixture smoother, richer, and more stable. It should dent when pressed but should not look oily. Overly warm butter makes the bowl soft before you even start.

Unsalted butter gives you the cleanest control over flavor. If using salted butter, reduce the added salt to a small pinch and taste before adding more.

Powdered Sugar / Icing Sugar

Powdered sugar, also called icing sugar in many countries, does more than sweeten here. It helps the cream cheese hold a swirl, gives the chocolate layer body, and keeps the finished texture from sliding.

Three cups gives a tangier, less sweet result. Closer to 3½ cups gives firmer cupcake swirls, borders, or layer-cake decorating. Sift it first when it looks clumpy.

Cocoa Powder

Unsweetened cocoa powder gives the chocolate flavor and helps thicken the texture. Natural cocoa gives a familiar, slightly sharper flavor and a lighter brown color. Dutch-process cocoa tastes smoother, darker, and less sharp.

Both work here because this is frosting, not cake batter. The more important step is sifting the cocoa when it looks lumpy. Cocoa lumps can hide in the bowl and show up later as dry specks.

Vanilla, Salt, and Liquid

Vanilla rounds out the chocolate. Salt makes the chocolate taste stronger and keeps the sweetness from feeling flat. Milk or cream is optional and should be added only after the mixture has fully come together.

Heavy cream gives a richer finish, while milk thins the texture more quickly. Sweetened whipped topping and non-dairy topping belong to a different frosting style.

Equipment You Need

A hand mixer or stand mixer gives the smoothest texture, but you can still make this with a sturdy spatula if the ingredients are properly softened and the dry ingredients are sifted.

  • Electric mixer: Best for the smoothest result.
  • Rubber spatula: Essential for scraping the bowl.
  • Fine-mesh sieve: Helpful for cocoa and powdered sugar.
  • Offset spatula or piping bag: Use for spreading or soft swirls.

When using a stand mixer, choose the paddle attachment over the whisk. It keeps the mixture creamy without whipping in too much extra air.

Why This Frosting Works

This frosting works because it balances water, fat, sugar, and temperature. Cream cheese gives tang, but it also brings softness. Butter adds body. Cocoa thickens while deepening the chocolate flavor. Powdered sugar stabilizes the mixture, but too much can make the taste flat and overly sweet.

That is why this recipe uses enough powdered sugar to hold shape, then relies on cocoa, salt, and chilling for balance. You get a frosting that tastes chocolate-first and cream-cheese-tangy, not one that is dominated by powdered sugar.

The most reliable batches came from controlling temperature before changing ingredients. Cool-soft cream cheese mixed smoothly without turning loose; butter that dented but did not look oily gave the frosting body; and waiting before adding milk kept the mixture from thinning too early.

Cocoa Powder vs Melted Chocolate

Use cocoa powder for the easiest, steadiest batch. Add cooled melted chocolate when you want a deeper, fudgier version.

Cocoa powder keeps the base simple, stable, and deeply chocolatey. Melted chocolate makes the topping silkier and richer, but the chocolate needs to be cool enough that it does not melt the butter.

Chocolate OptionResultBest For
Cocoa powder onlyQuick, stable, chocolatey, easy to pipe after chillingEveryday cupcakes, cakes, brownies
Melted chocolate onlySmooth, silky, richer, slightly more delicateBakery-style frosting and fillings
Cocoa powder + melted chocolateDeepest and fudgiest chocolate flavorSpecial cakes, brownies, richer desserts
Two spatulas showing lighter cocoa frosting and darker melted chocolate cream cheese frosting.
Compared with cocoa powder, cooled melted chocolate gives a darker, fudgier frosting, while cocoa keeps the texture steadier.

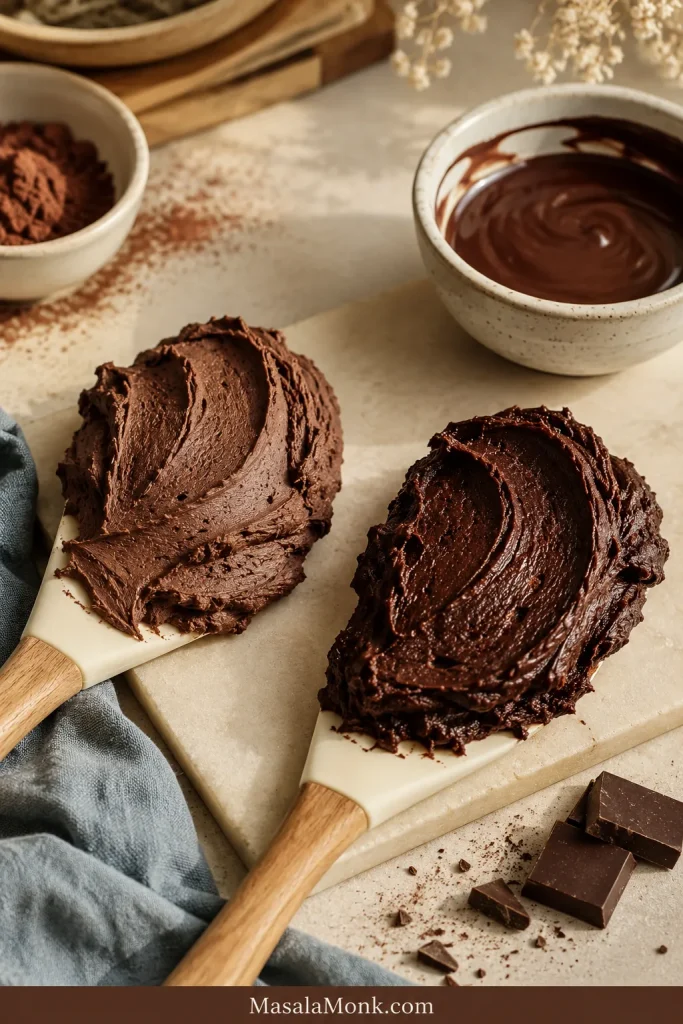
For the most reliable version, make the cocoa powder base first. For a darker, fudgier finish, add cooled melted dark chocolate at the end. A 55% to 70% dark chocolate works well; very bitter chocolate can taste harsh, while very sweet chocolate can push the frosting closer to buttercream sweetness. Want the richer path? Use the dark chocolate variation below.

Still choosing between cocoa, cacao, and dark chocolate? This cacao vs chocolate vs dark chocolate guide explains how those ingredients differ in everyday cooking.

Need something pourable instead of creamy? This 3-minute homemade chocolate syrup is better for drizzling over cake, ice cream, pancakes, or dessert plates.

How to Make Chocolate Cream Cheese Frosting

For the smoothest frosting, beat the cream cheese and butter first, then mix in the cocoa, powdered sugar, salt, and vanilla before making any texture adjustments.

Not sure whether to chill, thicken, or loosen it? Use the Texture Rule before changing the ingredients.

1. Beat the Cream Cheese and Butter First

Add the softened cream cheese and softened butter to a mixing bowl. Beat on medium speed until smooth before adding anything else. Scrape more than you think you need to; cream cheese likes to hide under the paddle and along the sides of the bowl.

The base should look creamy, pale, and smooth before you move on.

Smooth pale cream cheese and butter mixture in a bowl before cocoa powder and powdered sugar are added.
A smooth cream cheese and butter base keeps tiny lumps from hiding once the cocoa and powdered sugar go in.

2. Add Cocoa Powder and Powdered Sugar Gradually

Add the cocoa powder, powdered sugar, salt, and vanilla. Start the mixer on low speed so the dry ingredients do not puff out of the bowl.

If it looks dusty for a minute, stay with it. That dry stage is normal before the frosting turns creamy. Keep mixing on low, scrape the bowl, and give it a moment before adding liquid.

Cocoa powder and powdered sugar partly mixed into a cream cheese butter base in a mixing bowl.
At this stage, the mixture can look dry and dusty; keep mixing before deciding it needs milk or cream.

3. Mix Until Smooth

Once the dry ingredients disappear, increase to medium-low or medium speed and beat only until smooth.

Smooth chocolate cream cheese frosting in a bowl with a spatula creating soft ridges.
Once the dry ingredients disappear, look for smooth chocolate frosting with soft ridges and no dusty cocoa streaks.

4. Adjust the Texture Carefully

Once the base is made, the rest is adjustment. Use the Texture Rule above: spread it when it mounds, chill it when it is too soft, loosen it only when it is truly stiff, and thicken it only after temperature has had a chance to help.

  • A soft, spreadable finish works best with 3 cups powdered sugar and little or no chill.
  • Cleaner swirls usually need closer to 3½ cups powdered sugar plus a short chill.
  • Cooled melted dark chocolate makes the texture darker, smoother, and more fudgy.
  • Dutch cocoa, salt, and the lower sugar amount create a more balanced, less sugary result.
  • To thicken the frosting, add powdered sugar 2 tablespoons at a time.
  • To soften the frosting, add milk or cream 1 teaspoon at a time.

At the right texture, the frosting should look like soft chocolate cheesecake filling: creamy, cool, and thick enough to sit in a mound on the spatula.

A small spoonful of cream being added to thick chocolate cream cheese frosting in a bowl.
Use teaspoons of milk or cream only after the frosting is fully mixed, because extra liquid softens cream cheese frosting quickly.

Success Cues

This is the section to check when you are staring into the bowl wondering if it looks right.

StageWhat you should see
After beating cream cheese and butterSmooth, pale, creamy, with no visible lumps
After adding cocoa and powdered sugarDry at first, then creamy as it mixes
Ready to spreadThick, smooth, and mounding on a spatula
Ready to pipeCool, firm but squeezable, and holding soft ridges
Too softGlossy, loose, and sliding off the spatula
Four visual stages of chocolate cream cheese frosting showing smooth base, dry stage, mounded texture, and piped ridges.
Use these visual cues to decide whether your chocolate cream cheese frosting needs more mixing, chilling, or piping time.

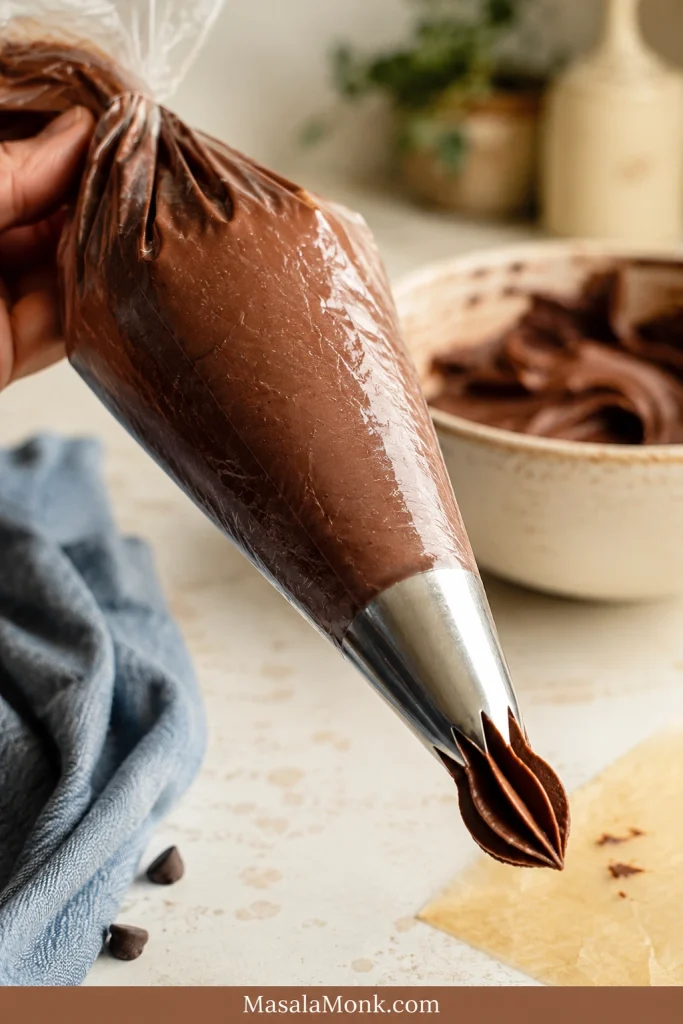
How to Make It Pipeable

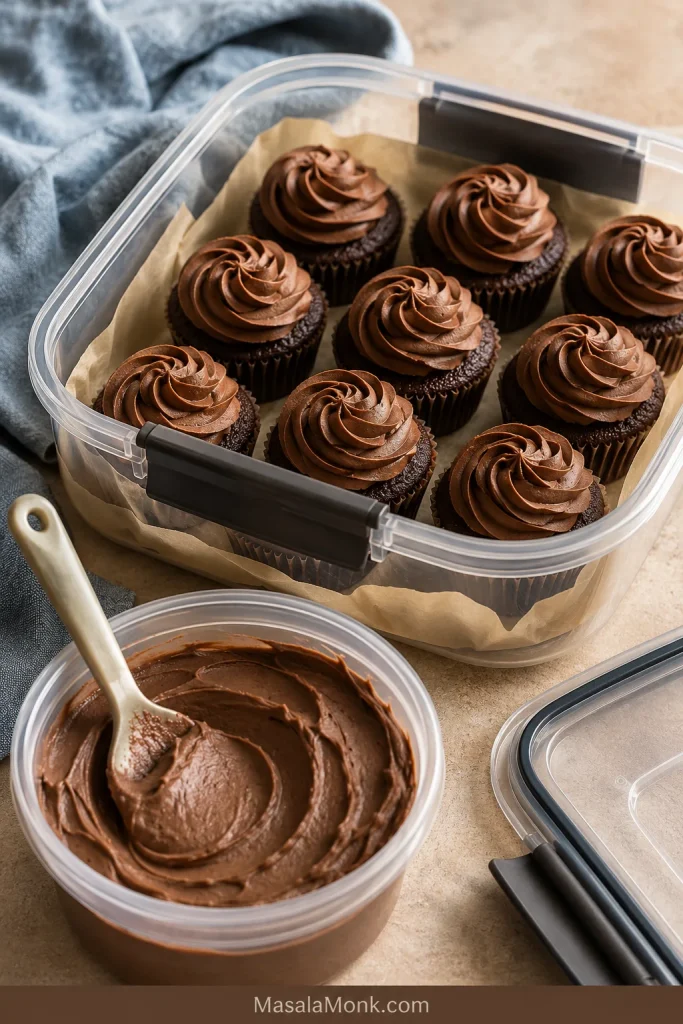
For soft, reliable swirls, use full-fat block-style cream cheese, the higher amount of powdered sugar, and chill the frosting for 15 to 30 minutes before piping.

This is a soft-swirl frosting, not a sharp-edge decorating buttercream. After chilling, it works well for cupcake swirls, simple borders, filling a casual layer cake, and generous swoops.

It is not the best choice for flowers, tiny detailed piping, or a cake that has to sit warm for hours. For tall cupcake swirls, sift the cocoa and sugar well, and choose a large star tip, open star tip, or large round tip.

When it is ready to pipe, the bag should feel cool in your hands and the frosting should move with pressure, not pour. A short chill gives you soft matte swirls that look finished without turning stiff or crusty.

If the piping bag starts to feel soft in your hands, use the short chill reset before continuing.

Chocolate cream cheese frosting inside a piping bag with a large star tip on a kitchen counter.
Before piping, the filled bag should feel cool, full, and steady, with frosting that moves under pressure but does not flow.

Once the mixture looks smooth and holds soft ridges, stop mixing. It can look perfect, then loosen if you keep beating.

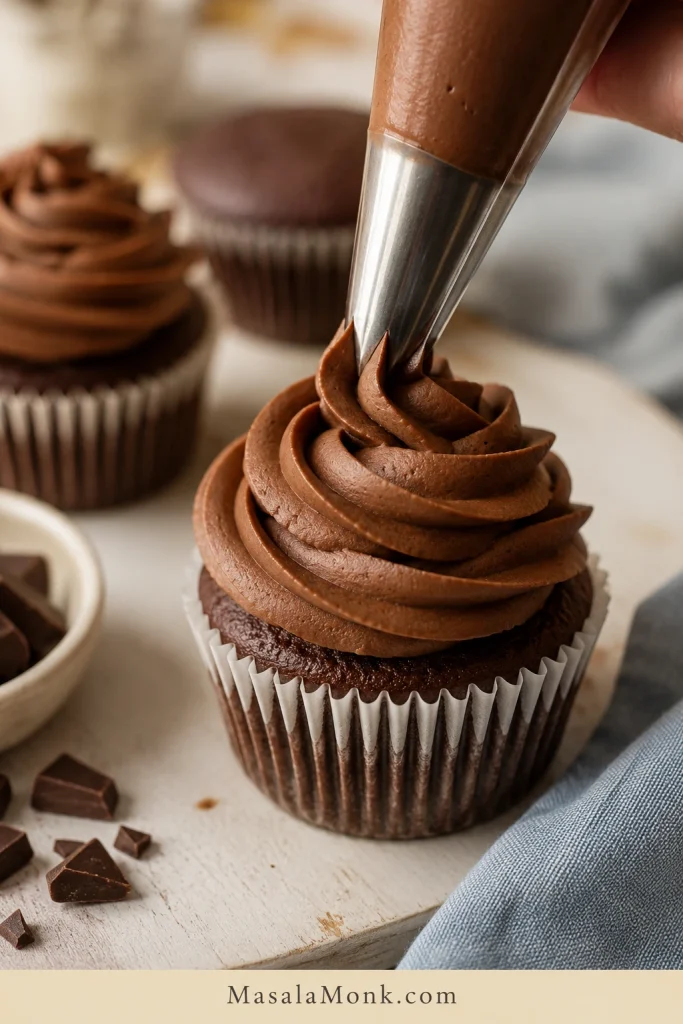
How the Frosting Should Pipe on Cupcakes

Use a large star tip or large round tip for soft swirls. The frosting should move with steady pressure and keep rounded ridges after you lift the tip.

Chocolate cream cheese frosting being piped into a soft swirl on a chocolate cupcake.
After chilling, the frosting pipes into rounded cupcake swirls that look finished without turning stiff, crusty, or overly sweet.

How to Make It Less Sweet

This is not a low-sugar frosting. It is less sugary than classic chocolate buttercream because cream cheese, cocoa, and salt keep the sweetness balanced.

AdjustmentWhat it changes
Add salt firstMakes chocolate taste fuller without changing the texture
Add 1 to 2 tablespoons cocoaDeepens flavor and slightly thickens the mixture
Use Dutch-process cocoaMakes the chocolate taste smoother and darker
Use 3 cups powdered sugarTangier, softer, less sweet
Use 3½ cups powdered sugarFirmer, sweeter, better for tall swirls

For tall cupcake swirls, avoid reducing the powdered sugar too far. Powdered sugar is not only for sweetness; it also gives structure.

How Much Frosting Do You Need?

The right amount depends less on the cake and more on how generous you want the finished dessert to look. If you love big cupcake swirls, make more than you think; piping always eats frosting faster than spreading.

This recipe makes about 3½ to 4 cups of chocolate cream cheese frosting, depending on how much powdered sugar you use and whether you add melted chocolate.

DessertAmount NeededNotes
12 cupcakes with tall swirls3 to 3½ cupsOne batch works well
24 cupcakes with light swirls3½ to 4 cupsPipe modestly
9×13 sheet cakeAbout 3 cupsSpread with an offset spatula
8×8 or 9×9 brownies1½ to 2 cupsHalf batch is usually enough
8-inch 2-layer cake3½ to 4 cupsEnough for filling and outside
9-inch 2-layer cake4 to 5 cupsMake 1.25x when decorating heavily
3-layer cake4½ to 5 cupsMake extra for safety

Use a half batch for brownies, a small cake, or 6 to 8 cupcakes. Use the full batch for 12 tall cupcake swirls, 24 lighter cupcake swirls, or a 9×13 sheet cake. Make 1.25x for a 9-inch two-layer cake with decoration, or 1.5x for a heavily frosted layer cake.

Where This Frosting Tastes Best

Use this frosting when you want chocolate flavor without the heavy sweetness of buttercream. It works especially well on desserts that are already sweet and need a little tang to balance them.

Once you know where you want to use it, check how much frosting you need before you start decorating.

The best matches are soft cakes, fudgy brownies, and cupcakes that need a cool, creamy swoop instead of a stiff sugar crust.
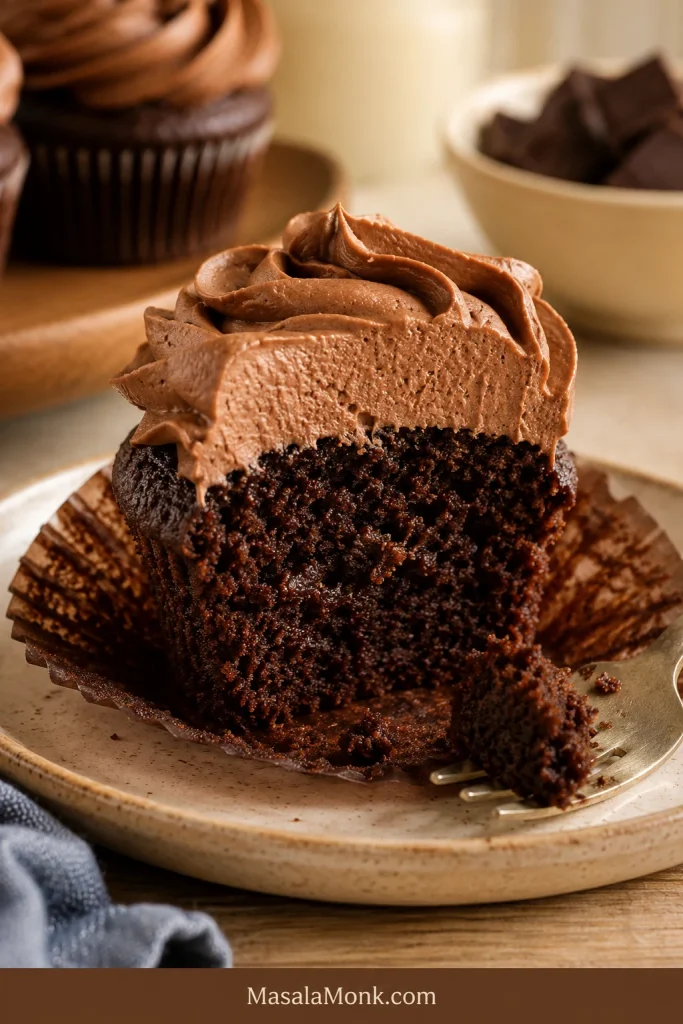
Chocolate Cupcakes

On chocolate cupcakes, the tang keeps the cocoa from feeling heavy. The swirl should taste like a cool chocolate cheesecake cap on top of soft cake, not a pile of powdered sugar.

Three chocolate cupcakes with different heights of chocolate cream cheese frosting swirls.
From modest swirls to taller chilled swirls, this is the realistic range for pipeable cream cheese frosting on cupcakes.

What the Frosting Should Feel Like on a Cupcake

The best bite is cool, creamy, and lightly tangy against the cake. It should feel like a soft cap of chocolate cheesecake, not a hard sugar crust.

Cut chocolate cupcake with a thick creamy cap of chocolate cream cheese frosting on top.
Because cream cheese adds tang, the frosting should taste like a cool chocolate cheesecake cap rather than a hard sugar crust.

Yellow Cake with Chocolate Cream Cheese Frosting

This is where the frosting really shines: soft yellow cake, cool tangy chocolate, and just enough cocoa bitterness to keep the bite from turning candy-sweet.

Yellow cake slice with chocolate cream cheese frosting between the layers and on top.
Yellow cake works especially well because tangy chocolate cream cheese frosting balances the sweet, buttery crumb.

Chocolate Layer Cake with Chocolate Cream Cheese Frosting

Use it on chocolate cake when you want a deeper, less sugary finish than chocolate buttercream. The cream cheese tang keeps the cocoa from feeling too heavy, so the slice still tastes rich without becoming overwhelming.

Chocolate layer cake slice filled and topped with chocolate cream cheese frosting.
A moderate frosting layer keeps chocolate layer cake rich and creamy without making the slice feel heavy.

Red Velvet or Spice Cake

Cream cheese already belongs with red velvet, and cocoa makes it a stronger chocolate version. That same tang works beautifully with warm spices too. This spice cake recipe uses cream cheese frosting to balance brown sugar and baking spices.

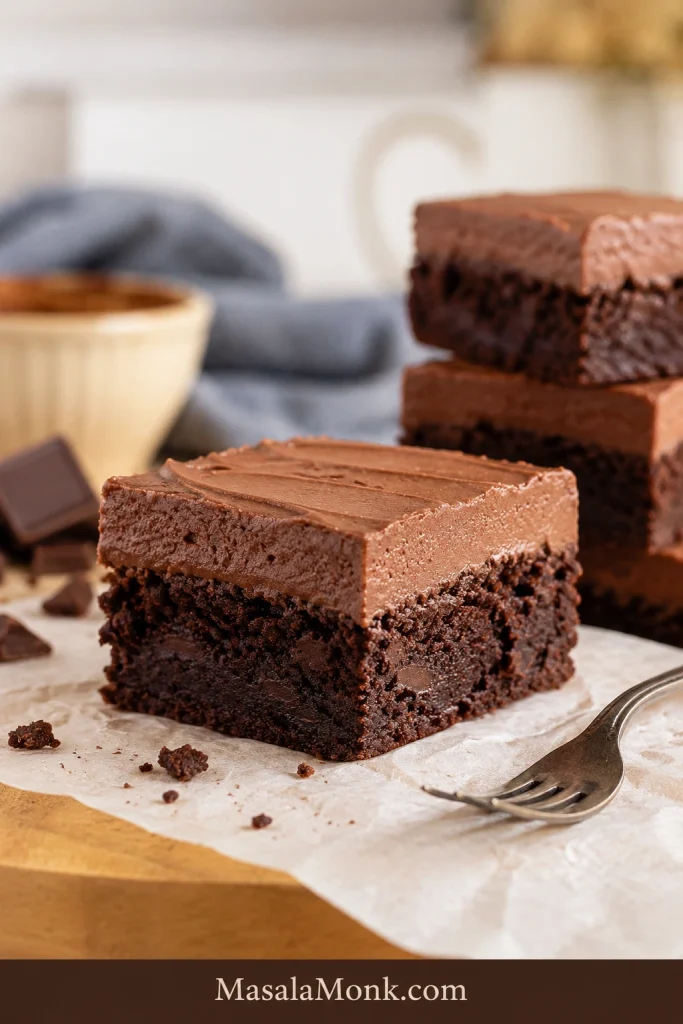
Brownies with Chocolate Cream Cheese Frosting

On brownies, it tastes like a thin chocolate cheesecake layer over a fudgy base. Let the pan cool fully before frosting, because brownies hold heat longer than they look.

Fudgy brownie square topped with a smooth layer of chocolate cream cheese frosting.
Here, the frosting sets into a smooth chocolate cheesecake-style layer over the dense fudgy base.

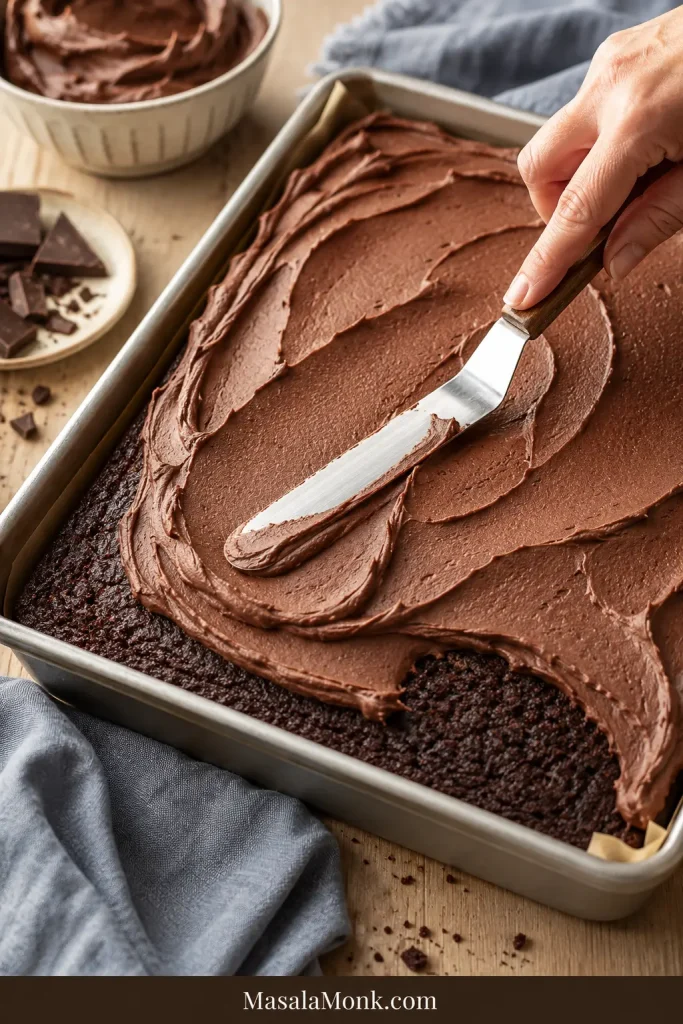
Sheet Cake with Chocolate Cream Cheese Frosting

A 9×13 sheet cake is one of the easiest places to use this frosting. It spreads smoothly, chills into clean slices, and gives a simple pan cake enough tang to balance the sweetness. For another soft pan cake that benefits from cream cheese frosting, this applesauce cake recipe is a better match than a delicate sponge.

Chocolate cream cheese frosting being spread over a rectangular sheet cake with an offset spatula.
Spread the frosting into soft swoops, then chill until the top settles into a neat sliceable layer.

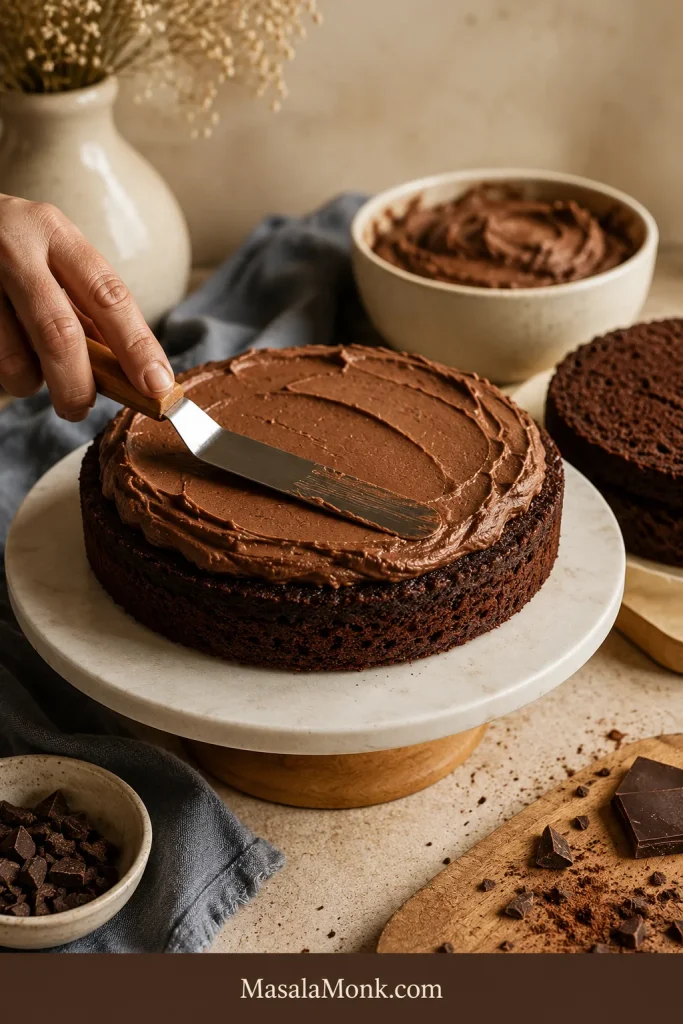
How Much Filling to Use in a Layer Cake

For a casual layer cake, chill the frosting and use a moderate filling. It gives the cake a creamy chocolate layer that cuts through sweetness without making the slice feel heavy.

After assembling the cake, check the storage and serving timing so the frosting is cool but not cold-hard.

Chocolate cream cheese frosting being spread in a moderate layer on a round chocolate cake layer.
Keep the filling moderate and level so the cake stacks cleanly instead of squeezing frosting out the sides.
  1. Make sure the cake layers are completely cool.
  2. Chill the frosting for 15 to 30 minutes before filling if it feels soft.
  3. Add a moderate layer between the cakes. Very thick, soft filling can squeeze out when the top layer goes on.
  4. For a taller cake, pipe a thicker ring around the edge before filling the center.
  5. Apply a thin crumb coat, chill for 20 to 30 minutes, then add the final coat.
  6. Refrigerate the finished cake until closer to serving.

For cleaner slices, chill the finished cake before cutting, then let slices sit briefly before serving so the texture becomes creamy again.

Cookies

This frosting works for soft sandwich cookies or chilled frosted cookies, but it does not dry hard like royal icing. Use it when the cookies will be served chilled or kept in a single layer.

Troubleshooting

If something looks off, start with temperature before assuming the recipe has gone wrong. Cream cheese frosting often looks loose before chilling brings it back.

If you are not sure whether the frosting is actually too soft, compare it with the Success Cues before adding more sugar.

Quick fix: when the texture is too soft, refrigerate the bowl for 20 minutes before changing anything else.

Use this order when the texture feels off: chill first, re-beat briefly, add powdered sugar for structure, add cocoa for thickness and chocolate flavor, and add liquid only when the mixture is too stiff.

ProblemLikely CauseFix
Runny textureTub cream cheese, warm butter, overmixing, too much liquid, or warm melted chocolateChill 20 to 30 minutes, then re-beat briefly. Add powdered sugar only when needed.
LumpsCream cheese was too cold or cocoa/sugar was not siftedBeat cream cheese and butter smooth before adding dry ingredients. Sift cocoa and powdered sugar next time.
Grainy texturePowdered sugar lumps, overmixing, or melted chocolate added badlySift powdered sugar. When using melted chocolate, cool it before adding.
Too thickToo much powdered sugar or cocoaAdd milk or cream 1 teaspoon at a time.
Too sweetToo much powdered sugar or weak cocoa flavorAdd a pinch of salt or a little more cocoa.
Not chocolatey enoughMild cocoa or too little cocoaAdd 1 to 2 tablespoons more cocoa, or add cooled melted dark chocolate.
Will not hold pipingToo warm, too soft, or not enough powdered sugarChill the mixture and piping bag. Add more powdered sugar only when chilling does not help.
Split or loosenedOverbeaten cream cheese or warm melted chocolateChill until firmer, then re-beat gently on low speed.

Why Did My Frosting Turn Runny?

Chocolate cream cheese frosting usually turns runny because the cream cheese or butter was too warm, the cream cheese was too soft, too much liquid was added, or the mixture was overbeaten. Start with chilling before changing the recipe.

Loose chocolate cream cheese frosting beside thicker frosting that holds shape after chilling.
Instead of adding more sugar right away, chill soft frosting first; temperature often fixes the texture without making it too sweet.

How to Thicken It Without Making It Too Sweet

To thicken chocolate cream cheese frosting without making it too sweet, chill it first, then add a little cocoa powder before adding more powdered sugar. Add powdered sugar 2 tablespoons at a time only when the frosting still feels too soft after chilling.

How to Fix Lumps for a Smoother Texture

Lumps usually start at the beginning. Cream cheese that is too cold does not beat smoothly, and once powdered sugar and cocoa are added, the lumps become harder to remove. Beat the cream cheese and butter until completely smooth before adding anything else, and sift dry ingredients when they look clumpy.

6 Small Mistakes That Make Frosting Soft

  1. Using tub cream cheese when you want clean piping.
  2. Letting the butter become oily or melted.
  3. Adding milk or cream before the mixture has fully come together.
  4. Adding warm melted chocolate.
  5. Keeping the mixer running after the texture is smooth.
  6. Frosting warm cakes, cupcakes, or brownies.

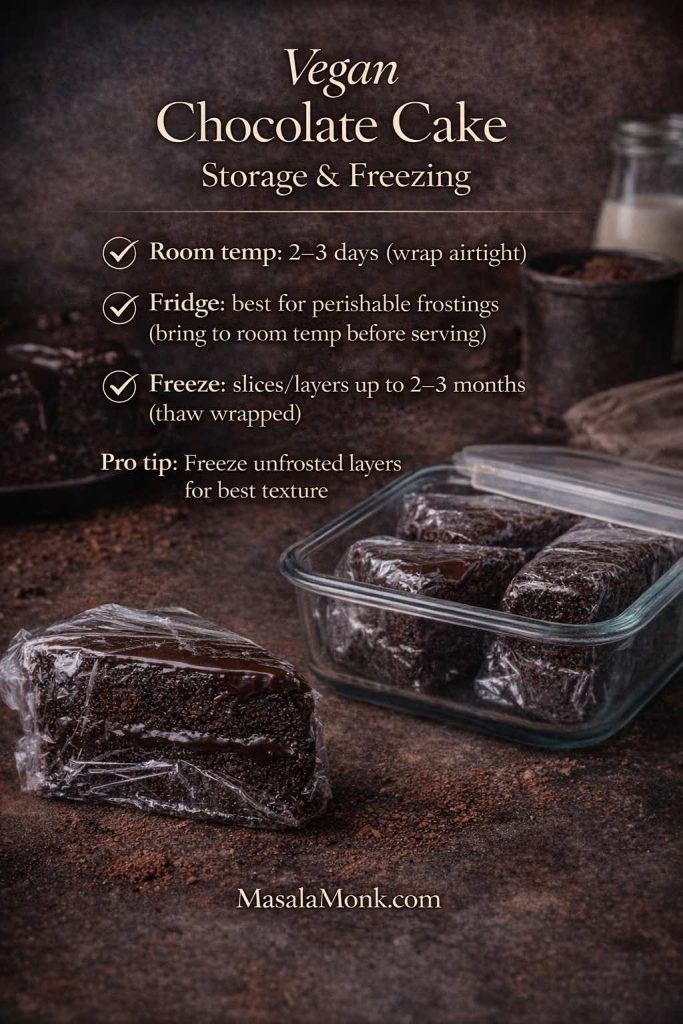
Storage, Freezing, and Making Ahead

Because this has cream cheese in it, keep the frosting and frosted desserts refrigerated. It tastes best cool but not cold-hard.

How to Store Chocolate Cream Cheese Frosting

As a practical rule, do not leave it at room temperature for more than about 2 hours, or more than about 1 hour when the room is very warm, such as above 90°F / 32°C. The FDA’s two-hour rule for refrigerated foods is a good safety reference here.

For leftovers, transfer the mixture to an airtight container and refrigerate for up to 5 days. Before using, let it sit at cool room temperature until it softens slightly, then re-beat gently until smooth.

For frosted cakes, cupcakes, or brownies, refrigerate the finished dessert in a covered container. Cover it well so the surface does not dry out or pick up fridge odors.

Frosted chocolate cupcakes stored in a covered container beside extra chocolate cream cheese frosting.
Covered cupcakes stay fresher in the refrigerator, but the best bite comes after the frosting loses its hard chill.

Serve cool, not cold-hard. For the best texture, take frosted cupcakes or cake slices out of the refrigerator about 15 to 25 minutes before serving, depending on room temperature.

You can make the frosting 1 to 2 days ahead. On decorating day, let it soften slightly, re-beat gently, and chill again if it feels too soft for piping. The chocolate flavor often tastes a little more rounded after a night in the fridge.

Decorating in a warm kitchen? Use the chill reset whenever the bag or swirls start to soften.

Can You Freeze It?

Yes. Chocolate cream cheese frosting freezes well in an airtight container for up to 2 to 3 months. Thaw overnight in the refrigerator, then let it soften slightly and re-beat gently before spreading or piping.

Warm Weather Chill Reset

Warm hands, warm rooms, and sunny tables soften this frosting faster than the recipe itself does.

  • Start with chilled frosting before piping.
  • Rest the filled piping bag in the refrigerator when it starts feeling soft in your hands.
  • Keep frosted cake or cupcakes cold until closer to serving.
  • Avoid direct sunlight and long outdoor buffet conditions.
  • Transport cakes cold when possible.
  • Choose a firmer chocolate buttercream or ganache when a cake must sit outside for hours.
Filled piping bag of chocolate cream cheese frosting resting on a chilled tray with frosted cupcakes nearby.
A short chill helps pipeable chocolate cream cheese frosting hold soft ridges again when hands or the room are warm.

Variations

Dark Chocolate Version for Rich Cakes

Choose this when you want the frosting to taste more like a bakery chocolate layer than a simple cocoa frosting. Add 3 to 4 oz / 85 to 115 g melted dark chocolate, cooled until barely warm.

Chocolate bars usually melt more smoothly than chocolate chips, but chips work when melted gently. Compound chocolate also works in a pinch, though the flavor and texture will be slightly different from real dark chocolate.

Mocha Version for Deeper Chocolate Flavor

Use this when the frosting tastes chocolatey but a little flat. Espresso powder makes the cocoa taste deeper without turning the frosting into coffee frosting. Add ½ to 1 teaspoon instant espresso powder with the cocoa.

Extra Tangy Version for Sweet Cakes

This version works best with yellow cake, vanilla cake, red velvet cake, or very sweet cupcakes that need balance. Use the lower amount of powdered sugar and skip extra liquid.

Stiffer Version for Cupcake Swirls

Choose this when looks matter as much as flavor: birthday cupcakes, party trays, or anything that needs to hold a soft swirl. Use the full 3½ cups powdered sugar, skip extra milk or cream, and chill for 20 to 30 minutes before piping.

Softer Brownie Frosting

Choose this when you want the frosting to eat like a creamy chocolate layer, not a tall decoration. Use 3 cups powdered sugar and add 1 to 2 teaspoons cream only when needed. Make sure the brownies are completely cool before frosting.

A whipped chocolate cream cheese frosting is a different style made with cream. It is lighter and softer. This butter-based version is the one to use when you want a topping that spreads cleanly, chills well, and holds soft swirls. For that softer spreadable style in a natural context, this cinnamon roll recipe shows how cream cheese icing behaves when it is meant to be looser.

Save watery flavorings and fruit purees for another frosting style; they can loosen this one faster than you expect.

FAQs

Can chocolate cream cheese frosting be piped?

Yes. Use full-fat block-style cream cheese, softened butter, enough powdered sugar, and chill for 15 to 30 minutes before piping. A large star tip works especially well for cupcakes.

Why did my frosting turn runny?

Usually, it is too warm, overmixed, made with very soft cream cheese, or loosened with too much liquid. Chill first; add powdered sugar only when it still feels loose after 20 to 30 minutes.

What is the fastest way to thicken it?

Chill it for 20 to 30 minutes first. If it is still soft, beat briefly and add powdered sugar 2 tablespoons at a time. For a less sweet fix, add a little cocoa powder first.

Is tub cream cheese okay?

Tub cream cheese is not ideal when you want piping because it is usually softer. If it is firm and dense, keep it cold, skip extra liquid, and chill before piping.

Can I make it without an electric mixer?

You can, but the texture will be smoother with a mixer. If mixing by hand, use very soft but not warm butter, cool-soft cream cheese, sifted cocoa and powdered sugar, and a sturdy spatula. Beat the cream cheese and butter completely smooth before adding dry ingredients.

Does it need to be refrigerated?

Yes. Because it contains cream cheese, store it in the refrigerator. Let refrigerated cake or cupcakes sit briefly before serving so the topping tastes creamy, not fridge-hard.

How long can frosted cupcakes sit out?

Keep them out for no more than about 2 hours, or about 1 hour in very warm conditions above 90°F / 32°C. Refrigerate covered cupcakes until closer to serving.

When should I add melted chocolate?

Add melted chocolate only after the base is already smooth. Cool it until barely warm first, because warm chocolate can loosen the texture.

What happens if I skip the butter?

You can make a softer spread-style version without butter, but it will not behave like this recipe. Butter is strongly recommended for piping or holding shape.

Can I make it less sweet and still pipe it?

Yes, but do not reduce the powdered sugar too far if you want tall swirls. Use 3 cups powdered sugar for a tangier, less sweet frosting, then rely on Dutch cocoa, salt, and chilling for balance. For the firmest cupcake swirls, use closer to 3½ cups.

What happens without powdered sugar?

Powdered sugar thickens and stabilizes this style of frosting. Granulated sugar can make it gritty; for a no-powdered-sugar chocolate frosting, use a cooked ermine-style frosting instead.

How well does it freeze?

It freezes well in an airtight container for up to 2 to 3 months. Thaw overnight in the refrigerator, then let it soften slightly and re-beat gently before using.

If you make it, I’d love to know where you used it: cupcakes, brownies, a sheet cake, or a layer cake. Also tell me whether you stayed with cocoa only or added melted chocolate for the fudgier version.

The best version of this frosting comes from not rushing the bowl. Let the cream cheese and butter stay cool-soft, let the dry stage turn creamy before adding liquid, and let a short chill do its work before you reach for more sugar.

Once you know that rhythm, chocolate cream cheese frosting becomes easy to trust: creamy, tangy, chocolate-first, and firm enough to sit where you put it.

Posted on 7 Comments

10 Vegan Chocolate Cake Recipes (Easy, Moist, & Dairy-Free)

Slice of vegan chocolate cake with glossy ganache, cocoa dusting, and coffee—cover image for 10 vegan chocolate cake recipes (easy, moist, dairy-free).

If you want vegan chocolate cake that tastes like the real thing—deep cocoa aroma, soft crumb, and a finish that feels genuinely indulgent—this roundup of Vegan Chocolate Cake Recipes is for you. Not “good for vegan,” not “surprisingly decent,” but the kind of cake you’d happily serve to anyone who loves chocolate. Better still, these recipes are built to be repeatable, so you can bake a simple vegan chocolate cake on a quiet evening, then turn around and make a party-ready vegan chocolate layer cake the next weekend without relearning everything from scratch.

Chocolate cake has a strange superpower: it can be both nostalgic and endlessly new. On one day, you want a plush slice with frosting and candles. On another, you want a quick vegan chocolate mug cake with a spoon straight from the cup. Meanwhile, when you’re feeding a crowd, a vegan chocolate sheet cake is often the most sensible move—easy to transport, easy to portion, and still every bit as satisfying. And then there are the cakes that feel like a dessert menu finale: a flourless vegan chocolate cake that slices like a torte, or vegan chocolate lava cakes that spill molten chocolate onto a plate.

Because each craving has its own logic, the ten recipes below cover a range of textures and formats—layer, sheet, bundt, loaf, flourless, molten, gluten-free, mug, beetroot, and avocado—while staying anchored in the same promise: strong chocolate flavour, reliable structure, and a moist crumb that doesn’t dry out by tomorrow.

Before we start baking, though, it’s worth getting a few fundamentals in place. Once those are clear, every recipe becomes easier, and every variation feels less like guesswork and more like cooking.


Vegan chocolate cake basics that make everything easier

1) Cocoa powder: the flavour choice that also affects rise

Cocoa powder isn’t just flavour. It changes how a cake behaves, especially when baking soda is involved.

  • Natural cocoa is typically more acidic. It can taste brighter, sometimes slightly sharper, and it often plays very nicely with baking soda.
  • Dutch-process cocoa is alkalised. It tends to taste smoother and darker, and it can make cakes look deeper in colour.
Natural cocoa vs Dutch-process cocoa infographic for vegan chocolate cake, explaining flavour and acidity differences plus tips for consistent results and blooming cocoa with hot coffee or water.
Natural vs Dutch-process cocoa for vegan chocolate cake: use this quick guide to choose the flavour you want—and bloom cocoa with hot coffee or water for deeper chocolate.

Both are excellent, yet they don’t always perform identically if you swap one for the other without adjusting anything else. If you enjoy knowing the “why” (without it turning into a science lesson), these two guides are genuinely helpful: Dutch-process vs. natural cocoa and The A-B-C’s of cocoa. If you want a broader, easy read on cacao vs cocoa vs chocolate, MasalaMonk’s breakdown is a great companion: What is Cacao?: Cacao vs. Chocolate vs. Dark Chocolate.

Practical way to think about it: pick a cocoa you love, then bake with it consistently. Once you know how that cocoa behaves in your oven, you’ll get “your” signature vegan chocolate cake every time.


2) Plant milk: use what you like, but know what it nudges

Most plant milks will work. Still, they can push texture subtly:

  • Oat milk often gives a softer, rounder crumb.
  • Soy milk can build structure and height.
  • Almond milk is lighter, so cakes may feel a touch less plush (not bad—just different).
Plant milk guide for vegan chocolate cake comparing oat milk, soy milk, and almond milk, with notes on crumb texture, structure, and a tip to use unsweetened milk.
Best plant milk for vegan chocolate cake: choose oat for a softer crumb, soy for more structure and height, or almond for a lighter texture—then use unsweetened to control sweetness.

If you like making basics at home, Easy Homemade Oats Milk is a handy internal reference, especially when you want a neutral, budget-friendly baking milk.


3) Oil vs vegan butter: choose based on the texture you want

For many vegan chocolate cake recipes, oil is the shortcut to moisture. Cakes stay tender longer, they resist drying out, and they’re forgiving if you slightly overbake. Vegan butter can be lovely too; however, it firms up in the fridge, so butter-based cakes can feel denser when cold.

If you’ve ever noticed how oil-based cakes stay moist, you’ll see that principle clearly in Orange Olive Oil Cake – Ridiculously Easy and Super Moist. Even though it’s citrus rather than chocolate, the crumb logic carries over perfectly.


4) The acid trick: why vinegar appears in so many dairy-free chocolate cake recipes

A small amount of vinegar (or lemon juice) shows up in vegan baking because it helps baking soda do its job. It isn’t there to make cake taste sour; rather, it supports lift and tenderness. As a result, cakes rise more evenly and feel lighter.


5) “Blooming” cocoa: the easiest way to make chocolate taste bigger

You’ll notice several recipes use hot coffee or hot water. This is one of the simplest upgrades in chocolate baking: hot liquid helps cocoa dissolve and intensifies aroma.

  • If you love deep chocolate, use coffee.
  • If you don’t like coffee, use hot water. You’ll still get the cocoa bloom effect; you just won’t add coffee’s roast notes.

6) Mixing: stop sooner than your instincts suggest

Chocolate batter often looks gorgeous long before it’s actually mixed evenly, which is why it tempts you to keep going. Nevertheless, overmixing can tighten crumb. Instead, aim for smooth and combined, then stop.

One-bowl vegan chocolate cake base recipe card showing a mixing bowl with cocoa and hot coffee being poured in, plus ingredient ratios, quick steps, and tips for moisture and lift.
One-bowl vegan chocolate cake base you can reuse: this quick ratios card works for layer cake or sheet cake, with the simple ‘hot liquid to bloom cocoa’ step for deeper chocolate flavour.

A calm sequence helps:

  1. Whisk dry ingredients thoroughly (especially cocoa).
  2. Whisk wet ingredients thoroughly.
  3. Combine wet into dry until smooth.
  4. Add hot liquid last, then mix briefly.

7) Baking cues: what “done” looks like in chocolate cake

Because chocolate cakes are dark, they can hide underbaking. Use multiple cues:

  • The top springs back lightly when pressed.
  • The edges pull slightly away from the tin.
  • A skewer comes out with a few moist crumbs (not wet batter).
  • The centre doesn’t wobble like liquid.
Vegan chocolate cake doneness checklist graphic showing baking cues: top springs back, edges pull away, skewer has moist crumbs, centre doesn’t wobble, plus a lava cake timing note.
How to tell when vegan chocolate cake is done: use these quick baking cues for a moist crumb—and pull lava cakes early for that soft, glossy centre.

Molten cakes are different—there, you want underdone centres. We’ll cover that later.


8) Tin guide: choose the format that fits your day

Sometimes the best cake is the one that matches your schedule:

  • Layer cake (20 cm rounds): celebration vibe, frosting-friendly.
  • Sheet cake (23 × 33 cm): effortless portions, travel-friendly.
  • Bundt cake (25 cm bundt pan): looks fancy with minimal decorating.
  • Loaf cake (10 × 25 cm): sliceable, giftable, everyday perfect.
  • Torte (20 cm springform): intense, truffle-like, small slices.
  • Mug cake: instant comfort.
Vegan chocolate cake tin and pan size guide showing two 20 cm round tins for layer cake, 23 × 33 cm for sheet cake, 25 cm bundt, 10 × 25 cm loaf, 20 cm springform, ramekins for lava cakes, and a large mug for mug cake.
Baking pan confusion solved: use this tin-size guide to pick the right format for your vegan chocolate cake—layers, sheet cake, bundt, loaf, flourless torte, lava cakes, or a quick mug cake.

9) A note on “eggless” and “dairy-free”

Every cake here is vegan, which means it’s inherently eggless and dairy-free. That said, textures can vary depending on which binder you use (if any). Some recipes rely purely on flour structure and leavening; others use starch or purée for a fudgier crumb. Either way, the outcome is meant to feel like cake—not a compromise.

If you want a clear, trustworthy overview of vegan egg replacers and what each one is best at, this guide is a useful reference: Egg substitutes for baking.

Also Read: Strawberry Smoothie Recipes (12 Easy Blends + Bowls & Protein Shakes)


A quick way to choose your recipe today

If you’d rather not overthink it, start here:

  • Want the classic? Make the vegan chocolate layer cake (#1).
  • Want the easiest? Make the easy vegan chocolate sheet cake (#2).
  • Want “wow” without stacking? Make the vegan chocolate bundt cake (#3).
  • Want bright flavour? Make the chocolate orange vegan chocolate loaf (#4).
  • Want truffle intensity? Make the flourless vegan chocolate cake (#5).
  • Want molten drama? Make the vegan chocolate lava cakes (#6).
  • Need gluten-free? Make the vegan gluten-free chocolate cake (#7).
  • Want instant comfort? Make the vegan chocolate mug cake (#8).
  • Want ultra-moist? Make the beetroot vegan chocolate cake (#9).
  • Want creamy frosting that isn’t sugar-bomb sweet? Make the avocado vegan chocolate cake (#10).
Vegan chocolate cake recipes guide card showing how to pick the right recipe—layer, sheet, bundt, loaf, flourless, lava, gluten-free, mug, beetroot, and avocado.
Not sure which vegan chocolate cake to bake? Use this quick picker to match your craving—classic layers, easiest sheet cake, molten lava, flourless torte, gluten-free, or a fast mug cake.

Now, let’s bake.


1) Vegan Chocolate Layer Cake Recipe (Classic, Moist, Celebration-Ready)

This is the cake you bake when you want that unmistakable “proper chocolate cake” moment: soft crumb, even rise, and enough structure to stack confidently. At the same time, it’s forgiving—so even if you’re not a frequent layer-cake maker, you’ll still land somewhere delicious.

What makes it work so well

To begin with, oil keeps the crumb tender for longer than butter typically does. In addition, a small amount of vinegar supports lift and keeps the flavour clean. Finally, hot coffee (or hot water) blooms cocoa, so the chocolate aroma feels bigger without adding extra sweetness.

If you ever want the quick explanation of cocoa differences—especially if you’re deciding between natural cocoa and Dutch-process—the two clearest guides are Dutch-process vs. natural cocoa and The A-B-C’s of cocoa. For a broader foundation, MasalaMonk’s What is Cacao?: Cacao vs. Chocolate vs. Dark Chocolate is a satisfying read.

Makes: 1 layer cake (two 20 cm rounds) | Serves: 10–12
Time: 20 mins prep + 28–34 mins bake + 60–90 mins cooling | Difficulty: Easy–Medium
Oven/Tin: 175°C | two 20 cm round tins

Dry

  • 250 g plain flour
  • 300 g caster sugar
  • 70 g cocoa powder
  • 10 g baking powder
  • 5 g bicarbonate of soda
  • 3 g fine salt

Wet

  • 420 ml plant milk
  • 120 ml neutral oil
  • 15 ml vinegar (apple cider or white)
  • 10 ml vanilla extract

Bloom

  • 180 ml hot coffee or hot water
Vegan chocolate layer cake recipe card showing a sliced chocolate layer cake with frosting, plus key ingredients, simple steps, bake time, and a tip to bloom cocoa with hot coffee or water.
Classic vegan chocolate layer cake, made repeatable: this quick recipe card covers the essentials—key ingredients, simple steps, and bake time—for a moist, dairy-free celebration cake.

Method (detailed, step-by-step)

  1. Prep your tins before anything else. Heat the oven to 175°C. Line two 20 cm tins with baking paper on the base, then lightly oil the sides. If you want extra insurance against sticking, dust the oiled sides with a teaspoon of cocoa powder and tap out the excess.
  2. Make cocoa behave. In a large bowl, whisk the flour, sugar, cocoa powder, baking powder, bicarbonate of soda, and salt for a full 30–45 seconds. This isn’t busywork—cocoa clumps are stubborn, and thorough whisking prevents bitter pockets.
  3. Mix your wet ingredients until they look unified. In a jug, whisk plant milk, oil, vinegar, and vanilla until the mixture looks uniform rather than separated. That little bit of emulsifying up front helps the batter come together quickly.
  4. Combine without overworking. Pour the wet mixture into the dry. Whisk gently—just until the batter looks smooth and you don’t see dry flour at the bottom. If you’re tempted to keep whisking because the batter looks glossy, pause and check the bowl instead: scrape down the sides, then stop.
  5. Bloom the cocoa at the end. Pour in the hot coffee (or hot water) and whisk briefly until the batter turns evenly silky and slightly looser. Thin batter is normal here, and it bakes up surprisingly plush.
  6. Divide evenly for level layers. Split the batter between tins. If you have a kitchen scale, weigh the tins so the layers bake to the same height. Next, tap each tin once on the counter to release large air bubbles.
  7. Bake with cues, not only time. Bake 28–34 minutes. Start checking at 28 minutes:
    • The centre should spring back lightly when pressed.
    • The edges should pull away slightly from the tin.
    • A skewer should come out with moist crumbs, not wet batter.
  8. Cool in stages (this matters for texture). Let the cakes cool in the tins for 10 minutes. Then turn them out onto a rack, peel off the base paper, and cool completely before frosting. If you frost while warm, you’ll get melting and sliding instead of clean layers.

Vegan chocolate cake frosting (classic cocoa buttercream)

This buttercream is dependable and not overly fussy. It also holds its shape well, which helps if you’re doing swirls or a slightly thicker coat.

  • 115 g vegan butter, softened
  • 300 g icing sugar, sifted
  • 50 g cocoa powder, sifted
  • 10 ml vanilla extract
  • 30–60 ml plant milk (as needed)
  • 1–2 g salt (to taste)

How to make it smoothly

  1. Beat vegan butter for 2–3 minutes until creamy and lighter in colour.
  2. Add cocoa and icing sugar in 3 additions, mixing gently at first so you don’t get a sugar cloud.
  3. Add vanilla and salt.
  4. Add plant milk gradually until spreadable. Stop when it feels soft and swoopy, not runny.

Assemble like a pro (without overthinking it)

  • If your layers have a dome, trim the top lightly with a serrated knife for a stable stack.
  • Spread a thin layer of frosting on the first layer, add the second layer, then cover the cake.
  • For cleaner slices, chill the frosted cake 20–30 minutes before cutting.

Optional upgrade: glossy ganache finish

If you want a more “gateau” look, skip buttercream and use the ganache from recipe #3 instead.

A gentle internal detour (if you love moist oil-based cakes)

If this cake’s tenderness makes you happy, you’ll probably enjoy MasalaMonk’s Orange Olive Oil Cake – Ridiculously Easy and Super Moist. Different flavour, same kind of soft crumb logic.

Notes / substitutions for Vegan Chocolate Layer Cake Recipe

  • Plant milk: soy = tallest structure; oat = softer crumb; almond = lighter texture.
  • Coffee: hot water works if you don’t want coffee flavour (still blooms cocoa).
  • Cocoa: natural cocoa gives brighter chocolate; Dutch-process tastes smoother/darker (either works—stick to one for consistency).
  • No 2 tins? Bake in one 20 cm tin longer (expect ~45–55 mins), then slice into layers once fully cool.

Also Read: 7 Pizza Sauce Recipes | Marinara, White Garlic, Alfredo, Buffalo, BBQ, Vodka & Ranch


2) Easy Vegan Chocolate Sheet Cake Recipe (One Bowl, Crowd-Friendly)

This is the unfussy hero: mix, pour, bake, slice. It’s the kind of cake that makes you look organised even if you aren’t. Because it bakes in one layer, you get even doneness, easy portions, and less risk of drying out. Furthermore, it’s perfect for quick toppings—drizzle, glaze, or syrup.

Makes: 1 sheet cake (23 × 33 cm) | Serves: 12–16
Time: 15 mins prep + 26–32 mins bake + 45–60 mins cooling | Difficulty: Easy
Oven/Tin: 175°C | 23 × 33 cm tin

Ingredients

  • 250 g plain flour
  • 250 g caster sugar
  • 55 g cocoa powder
  • 10 g baking powder
  • 3 g bicarbonate of soda
  • 3 g fine salt
  • 360 ml plant milk
  • 120 ml neutral oil
  • 15 ml vinegar
  • 10 ml vanilla extract
  • 120 ml hot water or hot coffee
Easy vegan chocolate sheet cake recipe card showing moist chocolate cake squares with glossy drizzle, plus pan size, bake time, key ingredients, simple steps, and a tip to drizzle ganache or syrup while warm.
Easy vegan chocolate sheet cake (one-bowl): this recipe card gives the essentials—pan size, timing, and quick steps—for a moist, dairy-free cake that slices beautifully for a crowd.

Method (Eggless Cake Recipe with extra clarity)

  1. Set up first. Heat oven to 175°C. Line a 23 × 33 cm tin with baking paper, leaving a bit of overhang on the long sides so you can lift the cake out later.
  2. Whisk dry ingredients thoroughly. In a large bowl, whisk flour, sugar, cocoa, baking powder, bicarbonate of soda, and salt. Keep going until the cocoa looks evenly dispersed; that’s the difference between “good” and “wow” in a sheet cake.
  3. Add wet ingredients in one go. Pour in plant milk, oil, vinegar, and vanilla. Whisk until smooth. If the batter looks a little thick at this stage, that’s fine.
  4. Finish with hot liquid. Add hot water or coffee and whisk briefly. The batter will loosen and look glossy.
  5. Bake and check the centre. Pour into the tin and bake 26–32 minutes. Start checking at 26 minutes; the middle should spring back lightly and a skewer should show moist crumbs.
  6. Cool for clean slices. Cool in the tin for at least 20 minutes. If you want very neat squares, let it cool fully before cutting.

Fast topping that makes it feel finished

A simple drizzle can transform the whole cake. MasalaMonk’s 3 Minutes Homemade Chocolate Syrup is ideal here—especially if you drizzle it over slightly warm cake so it sinks in just a little.

Variations (easy changes to Vegan Chocolate Sheet Cake, big payoff)

  • Fudgier sheet cake: fold in 150 g chopped dark chocolate before baking.
  • Chocolate oat cake direction: swap 50 g flour for 50 g oat flour for a softer, warmer crumb.
  • Quick party finish: sprinkle chopped toasted nuts or cocoa nibs over syrup while it’s still tacky.

If you enjoy the “one base, multiple personalities” style, MasalaMonk’s Double Chocolate Chip Cookies – One Dough, 7 Ways scratches the same itch.

Notes / substitutions for Vegan Chocolate Sheet Cake Recipe

  • Tin size: if smaller/deeper, bake longer; start checking +5 mins and use skewer cues.
  • Sweeter/fudgier: fold in 150 g chopped dark chocolate.
  • Oil: any neutral oil works; olive oil gives a noticeable flavour (nice if you want it).
  • Topping: syrup drizzle for fastest finish; ganache if you want “party cake” vibes.

Also Read: Sandwich for Breakfast: Breakfast Sandwich Recipe + 10 Variations


3) Vegan Chocolate Bundt Cake (With Glossy Vegan Chocolate Ganache)

Bundt cakes feel festive without asking you to frost and stack. As long as you grease the pan properly, the rest is straightforward. Afterwards, ganache does the styling for you—no piping bag required.

Makes: 1 bundt cake (25 cm bundt pan) | Serves: 12
Time: 20 mins prep + 45–55 mins bake + 60–90 mins cooling (+ 10 mins ganache) | Difficulty: Easy–Medium
Oven/Tin: 175°C | 25 cm bundt pan

Ingredients

Cake

  • 310 g plain flour
  • 350 g caster sugar
  • 75 g cocoa powder
  • 10 g baking powder
  • 5 g bicarbonate of soda
  • 4 g fine salt
  • 480 ml plant milk
  • 180 ml neutral oil
  • 15 ml vinegar
  • 10 ml vanilla extract
  • 120 ml hot coffee or hot water

Ganache

  • 200 g dark chocolate, chopped
  • 200 ml coconut cream (or thick plant cream)
Vegan chocolate bundt cake with ganache recipe card showing a sliced bundt cake with glossy chocolate ganache, plus pan size, timing, key ingredients, simple steps, and a tip to oil and cocoa-dust the pan to prevent sticking.
Vegan chocolate bundt cake with ganache, made stress-free: this recipe card covers pan size, timing, and the no-stick tip (oil + cocoa dusting) for clean release and a glossy finish.

Method (Dairy-Free & Eggless with bundt-specific detail)

  1. Grease like you mean it. Heat oven to 175°C. Coat every ridge of the bundt pan with oil. Then dust lightly with cocoa powder and tap out the excess. This two-step is worth it.
  2. Whisk the dry ingredients. Combine flour, sugar, cocoa, baking powder, bicarbonate of soda, and salt. Whisk well so cocoa is evenly distributed.
  3. Add wet, then bloom. Add plant milk, oil, vinegar, and vanilla. Whisk until smooth. Then pour in hot coffee/water and whisk briefly again.
  4. Bake until the cake tells you it’s ready. Bake 45–55 minutes. Start checking at 45:
    • The cake should spring back when pressed.
    • A skewer should come out with moist crumbs.
    • The edges often pull away slightly from the pan.
  5. Cool in the pan, but not forever. Let the bundt cool 15 minutes, then invert onto a rack. Too soon and it can tear; too late and it may stick.

Ganache Recipe (silky, shiny, not grainy)

  1. Chop the chocolate finely; smaller pieces melt more evenly.
  2. Warm the coconut cream until steaming (not boiling).
  3. Pour over chocolate, wait 2 minutes, then stir gently from the centre outward.
  4. Let it thicken slightly, then pour over the cooled cake.

If you like understanding how cocoa type shifts colour and flavour, this is a good companion: Types of cocoa, explained.

Variations of Vegan Chocolate Bundt Cake

  • Add orange zest for a chocolate-orange bundt mood.
  • Add espresso powder for a darker, roastier finish.
  • Sprinkle chopped nuts on the ganache before it sets for texture.

Notes / substitutions for Vegan Chocolate Bundt Cake Recipe

  • Pan release is everything: oil + cocoa dusting prevents sticking better than flour for chocolate cakes.
  • Coconut cream: use thick plant cream if preferred; thinner milks won’t set ganache as well.
  • No bundt pan? Bake as a 23 × 33 cm sheet (reduce bake time; check at ~30 mins).
  • Chocolate: choose one you’d happily eat straight—ganache shows quality.

Also Read: Vodka Pasta (Penne alla Vodka) + Spicy Rigatoni, Chicken, and Gigi Recipes


4) Chocolate Orange Vegan Chocolate Loaf Cake (Bright, Sliceable)

This loaf is for the days you want chocolate but also want lift—something fragrant and slightly fresh. Orange zest does that beautifully. Because it’s a loaf, it slices neatly and travels well, which makes it a great “bring along” cake.

Makes: 1 loaf (10 × 25 cm) | Serves: 8–10
Time: 15 mins prep + 45–55 mins bake + 60 mins cooling | Difficulty: Easy
Oven/Tin: 175°C | 10 × 25 cm loaf tin

Ingredients

  • 220 g plain flour
  • 200 g caster sugar
  • 55 g cocoa powder
  • 10 g baking powder
  • 3 g bicarbonate of soda
  • 3 g fine salt
  • Zest of 2 oranges
  • 300 ml plant milk
  • 120 ml neutral oil
  • 30 ml orange juice
  • 15 ml vinegar
  • 10 ml vanilla extract
Chocolate orange vegan chocolate loaf recipe card showing a sliced chocolate loaf with glossy drizzle and orange zest, plus loaf tin size, timing, key ingredients, quick steps, and a tip to rub zest into sugar or flour.
Chocolate orange vegan chocolate loaf, simplified: this recipe card includes the loaf tin size, timing, and quick steps—plus the zest-rubbing tip that makes the citrus flavour pop.

Method (extra loaf guidance that is Eggless & Dairy Free)

  1. Heat oven to 175°C. Line the loaf tin with baking paper, leaving overhang for easy lifting.
  2. Whisk flour, sugar, cocoa, baking powder, bicarbonate of soda, and salt. Then rub the orange zest into the dry mixture with your fingertips. This small step releases citrus oils and makes the loaf smell incredible.
  3. Whisk plant milk, oil, orange juice, vinegar, and vanilla. Pour into the dry ingredients and whisk just until smooth.
  4. Pour batter into the tin and level the top. Bake 45–55 minutes. Start checking at 45 minutes; loaf cakes often need the full time.
  5. Cool in the tin for 15 minutes, then lift out and cool fully before glazing.

Finish options for Chocolate Orange Vegan Chocolate Loaf Cake

  • Orange glaze: 180 g icing sugar + 25–35 ml orange juice + zest.
  • Chocolate drizzle: a spoonful of MasalaMonk’s homemade chocolate syrup over slices.

If you love citrus bakes in general, MasalaMonk’s Wholewheat Carrot Orange Tea Cake is another bright, cosy option.

Notes / substitutions for Chocolate Orange Vegan Chocolate Loaf Cake

  • Orange intensity: use zest + a little juice; for extra punch, add ½ tsp orange extract (optional).
  • Loaf pan sizes vary: if your pan is smaller/deeper, bake longer; tent with foil if top browns early.
  • Chocolate chips: 100–150 g chips make it more “dessert loaf.”
  • Glaze options: orange glaze = bright; chocolate drizzle = richer.

Also Read: Tomato Sauce From Fresh Tomatoes (Food Mill Method & Recipe)


5) Flourless Vegan Chocolate Cake (Torte-Style, Truffle-Rich)

This is the “dessert menu” cake: dense, glossy, and intensely chocolatey. Since it’s so rich, smaller slices feel generous. Additionally, it’s great for hosting because you can make it ahead, chill it, then slice cleanly when guests arrive.

Makes: 1 torte (20 cm springform) | Serves: 10
Time: 15 mins prep + 22–28 mins bake + 4 hrs chilling | Difficulty: Easy–Medium
Oven/Tin: 165°C | 20 cm springform tin

Ingredients

  • 300 g dark chocolate, chopped
  • 180 ml coconut cream
  • 60 ml maple syrup (or 70 g caster sugar)
  • 20 g cocoa powder
  • 20 g cornflour (cornstarch) or potato starch
  • 10 ml vanilla extract
  • 2 g fine salt
Flourless vegan chocolate cake torte recipe card showing a glossy chocolate torte slice with berries, plus springform size, timing, key ingredients, quick steps, and a tip to chill for clean truffle-like slices.
Flourless vegan chocolate cake (torte) made simple: this recipe card highlights the chill-and-slice method for a truffle-rich, dairy-free dessert with clean, glossy slices.

Method (with torte cues)

  1. Heat oven to 165°C. Line the base of a 20 cm springform tin and lightly oil the sides.
  2. Melt the chocolate and coconut cream gently. Stir until smooth and glossy, then remove from heat.
  3. Whisk in maple syrup (or sugar) while the mixture is still warm. Then whisk in cocoa powder, starch, vanilla, and salt until fully smooth. If you see tiny lumps, whisk a little more—but avoid vigorous beating.
  4. Pour into the tin and smooth the top. Bake 22–28 minutes. The edges should look set while the centre can still wobble slightly.
  5. Cool at room temperature, then chill at least 4 hours. This chilling step is what turns it into clean, truffle-like slices.

Serving ideas for Egg & Flourless Vegan Chocolate Cake

Notes / substitutions for Flourless Vegan Chocolate Cake

  • Sweetener: maple syrup or sugar both work—maple adds a gentle caramel note.
  • Starch: cornflour/cornstarch or potato starch works; it helps slice cleanly.
  • Texture control: slightly underbake (wobbly centre) for truffle-soft slices after chilling.
  • Serving: bring to room temp 15–20 mins for best flavour.

Also Read: Green Chutney Recipe (Coriander–Mint / Cilantro Chutney)


6) Vegan Chocolate Lava Cakes (Molten Centres)

These are dramatic in the best way: warm edges, molten centres, and a spoon-breaking moment that feels like a reward. Even though lava cakes look fancy, the batter is straightforward. The real skill is pulling them at the right moment.

Makes: 4 lava cakes | Serves: 4
Time: 15 mins prep + 9–12 mins bake | Difficulty: Easy–Medium
Oven/Tin: 220°C | 4 ramekins

  • 120 g dark chocolate
  • 80 ml coconut cream
  • 50 g caster sugar
  • 60 ml neutral oil
  • 65 g plain flour
  • 15 g cocoa powder
  • 5 g baking powder
  • 1 g fine salt
  • 5 ml vanilla extract
Vegan chocolate lava cakes recipe card showing a molten-centre lava cake with raspberries, plus makes 4, bake time 9–12 minutes, key ingredients, quick steps, and a tip to pull at 10–11 minutes for best molten centre.
Vegan chocolate lava cakes with a molten centre: this recipe card gives the essentials—ingredients, timing, and the 10–11 minute cue—for a reliable lava moment every time.

Method (timing-focused Recipe for Vegan Chocolate Lava Cakes)

  1. Heat oven to 220°C. Grease four ramekins thoroughly. For extra release, dust with cocoa powder and tap out excess.
  2. Melt chocolate and coconut cream until smooth. Let it cool for 2–3 minutes so it doesn’t overheat the flour later.
  3. Whisk in sugar, oil, and vanilla. Then add flour, cocoa, baking powder, and salt. Whisk until smooth and thick.
  4. Divide batter evenly between ramekins. Place ramekins on a tray for easy movement.
  5. Bake 9–12 minutes. Start checking at 9 minutes:
    • Edges should look set and slightly puffed.
    • Centres should still look softer and a little glossy.
  6. Rest 1 minute. Run a thin knife around the edge, invert onto a plate, then lift off the ramekin.

If you like understanding vegan structure tricks, Serious Eats has excellent aquafaba resources: The Science Behind Vegan Meringues and Aquafaba meringue frosting.

Vegan chocolate lava cakes perfect timing guide showing 9 minutes for most molten, 10–11 minutes balanced, 12 minutes safer, plus doneness cues and a rest-then-invert tip.
Vegan chocolate lava cakes made predictable: use this timing guide and visual cues to get a molten centre every time—then rest 1 minute before inverting.

Notes / substitutions for Dairy & Egg Free Vegan Chocolate Lava Cakes

  • Molten centre depends on timing: start checking at 9 mins; pull when edges set but centre looks softer/glossy.
  • Ramekins: grease thoroughly + cocoa dusting = clean unmoulding.
  • Make-ahead: chill filled ramekins 30 mins; add ~1 minute bake time.
  • No ramekins: use a muffin tray (grease well); bake time usually similar—watch cues.

Also Read: Iced Coffee: 15 Drink Recipes—Latte, Cold Brew, Frappe & More


7) Vegan Gluten-Free Chocolate Cake (Tender, Balanced)

Gluten-free cakes can be gorgeous when they’re built intentionally. Here, a 1:1 blend handles most of the work, while careful mixing and cooling ensure the crumb stays cohesive.

Makes: 1 cake (20 cm) | Serves: 10
Time: 15 mins prep + 28–35 mins bake + 60–90 mins cooling | Difficulty: Easy
Oven/Tin: 175°C | 20 cm round tin

Ingredients

  • 245 g gluten-free 1:1 flour blend
  • 200 g caster sugar
  • 55 g cocoa powder
  • 10 g baking powder
  • 3 g bicarbonate of soda
  • 3 g fine salt
  • 1 g xanthan gum (skip if blend already contains it)
  • 300 ml plant milk
  • 80 ml neutral oil
  • 15 ml vinegar
  • 10 ml vanilla extract
  • 120 ml hot coffee or hot water
Gluten-free vegan chocolate cake recipe card showing a frosted chocolate cake slice with cocoa dusting, plus makes/serves, bake time, key ingredients, quick method steps, and a tip to cool completely for clean slices.
Gluten-free vegan chocolate cake, made reliable: this recipe card includes the 20 cm cake size, timing, and the key cooling tip so slices stay neat, tender, and moist.

Method (gluten-free friendly)

  1. Heat oven to 175°C. Line a 20 cm tin.
  2. Whisk dry ingredients thoroughly. With gluten-free flour, this step matters even more because you want the leaveners and cocoa evenly distributed.
  3. Add plant milk, oil, vinegar, and vanilla. Whisk smooth. Then add hot coffee/water and mix briefly.
  4. Bake 28–35 minutes. Cool fully in the tin for 15 minutes, then transfer to a rack and cool completely before slicing.

Gluten-free Vegan Chocolate Cake success cues

  • Let it cool fully before cutting; warm gluten-free cake is more fragile.
  • If you want extra security, chill the cooled cake briefly before slicing.

For clear guidance on conversions and xanthan gum, these are helpful: Gluten-free baking conversion conundrum and A guide to xanthan gum.

Gluten-free vegan chocolate cake swaps graphic showing tips to use a 1:1 gluten-free flour blend, add xanthan gum only if needed, whisk dry ingredients well, and cool fully before slicing.
Gluten-free vegan chocolate cake made easier: use a 1:1 flour blend, add xanthan gum only if your mix needs it, and let the cake cool completely for neat, tender slices.

Notes / substitutions fo Vegan Gluten-Free Chocolate Cake

  • GF flour blend: use a 1:1 blend; if it already has xanthan gum, skip extra.
  • Cooling matters: GF cakes slice best fully cool (even chilled 20 mins for neat cuts).
  • Plant milk: soy helps structure; oat keeps it softer.
  • Pan swap: works as cupcakes too—start checking at ~18 mins.

Also Read: Cold Brew Espresso Martini: How to Make It (Step-by-Step Recipe)


8) Vegan Chocolate Mug Cake Recipe (Microwave Comfort)

This is warm, quick comfort—nothing more and nothing less. It’s also the easiest way to experiment with cocoa, sweetness, or add-ins without committing to an entire cake.

Makes: 1 mug cake | Serves: 1
Time: 5 mins prep + 60–90 secs cook + 1 min rest | Difficulty: Easy
Microwave/Mug: 1 large microwave-safe mug (350–400 ml)

Ingredients

  • 30 g plain flour
  • 15 g cocoa powder
  • 25–35 g caster sugar (to taste)
  • 2 g baking powder
  • 1 g fine salt
  • 75 ml plant milk
  • 30 ml neutral oil
  • 5 ml vanilla extract
Vegan chocolate mug cake recipe card for the microwave showing ingredients, 60–90 second cook time, 1 minute rest, and a tip to add a chocolate square for a molten centre.
Vegan chocolate mug cake in minutes: this microwave recipe card gives the exact ratios, cook time, and a molten-centre tip for a quick dairy-free chocolate fix.

Method (so it stays tender, eggless and dairy free)

  1. Whisk flour, cocoa, sugar, baking powder, and salt in a microwave-safe mug.
  2. Add plant milk, oil, and vanilla. Stir until smooth, scraping the bottom so no flour hides.
  3. Microwave 60–90 seconds. Start at 60 seconds, then add 10-second bursts as needed. Overcooking is the fastest route to a rubbery mug cake.
  4. Rest 1 minute. This short rest helps the crumb settle and stay softer.

Upgrades for Vegan Chocolate Mug Cake

  • Add a square of dark chocolate in the middle for a molten pocket.
  • Drizzle with homemade chocolate syrup and finish with a pinch of salt.
  • Add orange zest for a brighter aroma.

Notes / substitutions Vegan Chocolate Mug Cake Recipe

  • Microwave power varies: start at 60 secs; add 10-sec bursts—overcooking makes it rubbery.
  • Oil: keeps it tender; melted vegan butter works but firms as it cools.
  • Add-ins: chocolate square in the middle = molten pocket.
  • Mug size: use a large mug (at least 350–400 ml) to prevent overflow.

Also Read: Manhattan Cocktail Recipe (Classic + 6 Variations)


9) Beetroot Vegan Chocolate Cake (Ultra-Moist)

Beetroot adds moisture and depth, so this cake stays tender for days. In other words, it’s ideal when you’re baking ahead. The key is blending the beetroot purée until silky smooth so the crumb feels plush rather than fibrous.

Makes: 1 cake (20 cm) | Serves: 10
Time: 20 mins prep + 35–45 mins bake + 60–90 mins cooling | Difficulty: Easy
Oven/Tin: 175°C | 20 cm round tin

Ingredients

  • 220 g plain flour
  • 180 g caster sugar
  • 55 g cocoa powder
  • 10 g baking powder
  • 3 g bicarbonate of soda
  • 3 g fine salt
  • 250 g beetroot purée (cooked beetroot, blended smooth)
  • 180 ml plant milk
  • 80 ml neutral oil
  • 15 ml vinegar
  • 5 ml vanilla extract
Beetroot vegan chocolate cake recipe card showing a glossy ganache-topped chocolate cake slice, with makes/serves, timing, key ingredients including beetroot purée, quick steps, and a tip to blend beetroot smooth for a plush crumb.
Beetroot vegan chocolate cake, ultra-moist and surprisingly chocolate-forward: this recipe card gives the key ratios, bake time, and the blend-it-smooth tip for the plushest crumb.

Method

  1. Heat oven to 175°C. Line a 20 cm tin.
  2. Whisk dry ingredients thoroughly so cocoa disperses evenly.
  3. Whisk beetroot purée, plant milk, oil, vinegar, and vanilla until smooth. If the purée is thick, whisk a little longer to loosen it.
  4. Combine wet and dry until the batter is smooth, then pour into the tin.
  5. Bake 35–45 minutes. Cool fully before slicing.

Beetroot-specific cues for Vegan Chocolate Cake

  • If you want the cake to read “pure chocolate,” use a darker cocoa and consider adding 2 g espresso powder.
  • For a brighter edge, add orange zest—especially lovely if you glaze it.

If you want more cozy baking ideas after this, MasalaMonk’s Baking category is a great place to keep exploring.

Notes / substitutions for Beetroot Vegan Chocolate Cake

  • Beetroot prep: blend until completely smooth; texture depends on a silky purée.
  • Flavour balance: add ½ tsp espresso powder for deeper chocolate (optional).
  • Moisture: beetroot varies—if batter seems very thick, add a splash more plant milk.
  • Make-ahead: this one stays moist for days; great for baking ahead.

Also Read: Cappuccino Recipe: How to Make a Perfect Cappuccino at Home


10) Avocado Vegan Chocolate Cake (Recipe With Creamy Chocolate Frosting)

Avocado brings softness and a creamy mouthfeel. Done well, it doesn’t dominate the flavour—it simply makes the cake feel richer. In addition, the frosting can be silky without relying heavily on icing sugar.

Makes: 1 cake (20 cm) | Serves: 10
Time: 20 mins prep + 30–38 mins bake + 60–90 mins cooling (+ 10 mins frosting) | Difficulty: Easy
Oven/Tin: 175°C | 20 cm round tin

Cake

  • 220 g plain flour
  • 200 g caster sugar
  • 55 g cocoa powder
  • 10 g baking powder
  • 3 g bicarbonate of soda
  • 3 g fine salt
  • 150 g ripe avocado flesh
  • 300 ml plant milk
  • 80 ml neutral oil
  • 15 ml vinegar
  • 10 ml vanilla extract

Creamy avocado frosting

  • 150 g ripe avocado flesh
  • 25 g cocoa powder
  • 60 ml maple syrup (to taste)
  • 5 ml vanilla extract
  • 1–2 g fine salt
Avocado vegan chocolate cake recipe card showing a slice of chocolate cake with creamy chocolate frosting, plus makes/serves, bake time, key ingredients including avocado and plant milk, quick steps, and a tip to blend avocado until perfectly smooth.
Avocado vegan chocolate cake with creamy frosting: this recipe card gives the quick steps and timing for a moist dairy-free cake—plus the key tip for silky-smooth avocado frosting.

Method

  1. Heat oven to 175°C. Line a 20 cm tin.
  2. Blend avocado with plant milk until completely smooth. This matters—any lumps will show up in texture.
  3. Whisk dry ingredients in a bowl.
  4. Whisk the avocado mixture with oil, vinegar, and vanilla. Then pour into dry ingredients and whisk until smooth.
  5. Bake 30–38 minutes. Cool completely before frosting.

Frosting

Blend avocado, cocoa, maple syrup, vanilla, and salt until silky. Chill 10–15 minutes to thicken. Spread over cooled cake.

Serving ideas

  • Finish with cocoa dusting for a clean look.
  • Add orange zest for brightness.
  • Add chopped toasted nuts for crunch.

If you like making plant milk at home for baking, MasalaMonk’s Easy Homemade Oats Milk is a handy reference.

Notes / substitutions for Avocado Vegan Chocolate Cake Recipe

  • Avocado must be ripe: blend until totally smooth or you’ll feel lumps.
  • Frosting storage: because it’s fresh avocado, keep frosted cake refrigerated; bring slices to room temp before serving.
  • Sweetness: maple syrup in frosting is adjustable—start lower, then add to taste.
  • No avocado frosting? Use ganache (from #3) or the buttercream (from #1).

Also Read: Baked Ziti Recipe Collection: 15 Easy Variations


Before you go: serving ideas that keep vegan chocolate cake feeling new

Even a truly excellent vegan chocolate cake can start to feel familiar if it always shows up the same way. Fortunately, you don’t need a new recipe to make it feel different—you just need a new finish. With that in mind, rotate your toppings and pairings so each bake has its own personality, even when the cake underneath is a repeat favourite.

Switch the finish, change the whole vibe

  • Syrup drizzle (quick, glossy, instantly dessert-like): Warm a spoonful of 3 Minutes Homemade Chocolate Syrup and let it ribbon over slices. As it cools, it clings beautifully, so every bite gets a little shine.
  • Ganache pour (sleek, dramatic, surprisingly easy): If you’ve made the bundt ganache, you’re already set. Instead of saving it only for bundt cakes, pour it over sheet cake, loaf cake, or even a simple single-layer round. Better still, if you let the ganache thicken slightly before pouring, you’ll get a slow, elegant drape rather than a runaway puddle.
  • Citrus lift (bright, fragrant, not overly sweet): Orange zest over chocolate is a small move with a big payoff. It’s particularly lovely on beetroot cake, where the zest adds sparkle and keeps the chocolate tasting lively rather than heavy.
  • Salt finish (tiny detail, big flavour shift): A pinch of flaky salt over warm slices doesn’t make the cake salty—it makes the chocolate taste clearer. In the same way that salt sharpens caramel, it pulls chocolate into focus.

Add texture and contrast without extra work

If you want a little more than a topping, a few low-effort contrasts can make the plate feel complete:

  • Crunch: chopped toasted nuts or cocoa nibs scattered over syrup or ganache while it’s still tacky.
  • Creamy + cool: a spoon of thick coconut yoghurt or a scoop of dairy-free ice cream next to warm cake.
  • Fresh: berries or orange segments to lighten the richness, especially with flourless torte or lava cakes.

Building a dessert table that complements chocolate

When you’re putting together a dessert spread, variety matters more than quantity. So instead of adding another cake, choose one contrasting sweet that brings a different texture—creamy, crisp, or bite-sized.


Storage, chilling, and freezing vegan chocolate cake

Because most of these cakes lean on oil for tenderness, they keep beautifully. Even so, storage still makes a difference—especially once frosting enters the picture. The goal is simple: protect moisture, prevent off-flavours, and keep texture as close to fresh-baked as possible.

Vegan chocolate cake storage and freezing guide showing how long it keeps at room temperature, when to refrigerate for perishable frostings, and how to freeze slices or layers for later.
Store vegan chocolate cake the smart way: keep it wrapped airtight at room temp for 2–3 days, chill cakes with perishable frostings, or freeze slices/layers for an anytime chocolate fix.

Room temperature (best for most unfrosted cakes)

If the cake is unfrosted—or topped with something stable like a syrup drizzle—wrap it tightly and store it at room temperature for 2–3 days. For loaf and sheet cakes in particular, this often preserves softness better than refrigeration.

How to wrap it well: once the cake is fully cool, wrap it snugly so air can’t circulate. If you’ve sliced it, press a piece of baking paper against the cut side first, then wrap.

Refrigeration (best for perishable toppings)

If you’ve used avocado frosting or you simply prefer a chilled finish, refrigerate the cake. However, for the best flavour and texture, bring slices back to room temperature before serving. Otherwise, the crumb can feel firmer and the chocolate can taste muted.

A good rhythm: slice what you need, then let those pieces sit out for 20–30 minutes before eating.

Freezing (best for planning ahead)

If you like having cake “on standby,” freezing is your friend. Wrap slices or layers tightly, then seal in an airtight container. When you’re ready, thaw at room temperature while still wrapped; that way, condensation forms on the wrap instead of soaking into the cake.

If you want clear, official guidance, here are the references that keep things straightforward: USDA Freezing and Food Safety, the UK’s How to chill, freeze and defrost food safely, and the FDA’s Refrigerator & Freezer Storage Chart (PDF).

Also Read: Hot Chocolate Coffee: 3 Easy Recipes (Cocoa, Mix, or Espresso)


A simple “choose your finish” guide

If you’re ever unsure what topping fits which cake, this quick guide helps you decide without overthinking:

Vegan chocolate frosting and ganache ratios guide showing classic cocoa buttercream, 1:1 chocolate ganache with coconut cream, and a quick chocolate syrup drizzle, with tips for fixing too-thick or too-thin toppings.
Vegan chocolate frosting made easy: use this quick ratios card for cocoa buttercream, 1:1 ganache, or a fast syrup drizzle—plus simple fixes if your topping turns out too thick or too thin.
Vegan chocolate cake finish guide comparing buttercream frosting, chocolate ganache, and syrup drizzle, with quick upgrades like orange zest and flaky salt.
Not sure how to finish vegan chocolate cake? Choose buttercream for a classic celebration look, ganache for a sleek rich finish, or a syrup drizzle for the fastest glossy upgrade.
  • Layer cake: buttercream for classic celebration, ganache for a sleek “gateau” mood.
  • Sheet cake: syrup drizzle for speed, quick glaze for neat slices, ganache if you want it to feel more formal.
  • Bundt cake: ganache is the easiest way to make the shape look intentional; meanwhile, a light dusting of cocoa keeps it elegant.
  • Loaf cake: citrus glaze or syrup drizzle for simple charm; ganache if you want it to look like a gift cake.
  • Flourless torte: cocoa dusting plus berries keeps it refined; alternatively, a thin ganache layer makes it feel ultra-luxurious.
  • Lava cakes: keep toppings minimal—syrup, berries, or a pinch of salt—so the molten centre stays the star.
  • Mug cake: syrup and salt are all you need; if you want more, add a square of chocolate inside next time.

Also Read: Cranberry Moscow Mule Recipe: A Festive Holiday Cocktail With Easy Variations


One last nudge (because variations are the fun part)

Once you’ve baked one of these cakes, it’s surprisingly satisfying to remix it. Swap the shape. Change the topping. Add orange zest one time and espresso the next. Suddenly, you’re not repeating yourself—you’re building a repertoire.

If you enjoy that “one dependable base, then smart variations” energy, you might also like Double Chocolate Chip Cookies – One Dough, 7 Ways. It’s the same spirit: familiar comfort first, then playful twists that keep baking exciting.

Also Read: Kahlua Drinks: 10 Easy Cocktail Recipes (Milk, Vodka, Coffee)

Vegan chocolate cake troubleshooting graphic with quick fixes for dry cake, dense cake, flat cake, and gummy centre, including tips on mixing, leaveners, baking cues, and blooming cocoa.
Vegan chocolate cake troubleshooting made simple: fix dry cake, dense crumb, flat rise, or gummy centres with these quick checks—so your next bake stays moist and reliable.

Vegan Chocolate Cake FAQ

1) What’s the best vegan chocolate cake recipe if I want it truly moist?

Go for an oil-based batter and a “bloom” step with hot coffee or hot water. Oil keeps the crumb tender for longer, while hot liquid wakes up cocoa so the chocolate tastes bigger. Also, bake to cues: stop when a skewer shows moist crumbs rather than waiting for it to come out completely clean.

2) Are vegan chocolate cake recipes automatically dairy-free and eggless?

Yes—vegan means no dairy and no eggs by definition. Still, “eggless” texture can vary because structure comes from different places: sometimes it’s mostly flour + leavening, while other recipes add starch, avocado, or beetroot for a fudgier, denser feel.

3) What’s the easiest vegan chocolate cake for beginners?

A one-bowl sheet cake is usually the simplest starting point. Because it bakes in a single layer, you get more even doneness, fewer steps, and less risk of overhandling. Plus, you can finish it with a quick drizzle or ganache and it still feels special.

4) Can I make a vegan chocolate cake without coffee?

Definitely. Coffee intensifies cocoa, yet hot water gives you the same “blooming” effect without any coffee notes. In other words, you’ll still get a deep chocolate aroma—just cleaner and more neutral.

5) Which cocoa powder should I use: natural or Dutch-process?

Natural cocoa tends to taste brighter and slightly sharper, while Dutch-process usually tastes smoother and looks darker. Either can work, although results won’t be identical. Consequently, once you find a cocoa you love, stick with it so your cake becomes consistent from bake to bake.

6) What plant milk is best for vegan chocolate cake?

Soy milk often gives a bit more structure and height, oat milk tends to make the crumb softer and rounder, and almond milk is lighter and can feel slightly less plush. That said, any unsweetened plant milk will generally work—choose based on what you keep in the fridge.

7) How do I make a vegan chocolate cake more “fudgy” instead of fluffy?

Use more melted chocolate or add chopped dark chocolate to the batter, then avoid overbaking. Additionally, choose a sheet cake format or a flourless/torte-style recipe, since both naturally lean richer and denser. Finally, let the cake cool fully—fudgy texture often sets as it rests.

8) Can I make vegan chocolate cake gluten-free and still keep it tender?

Yes, especially with a good 1:1 gluten-free flour blend. Because gluten-free cakes are more fragile when warm, let it cool completely before slicing. If you want extra neat slices, chill the cooled cake briefly—texture tightens and cuts cleaner.

9) Why do so many dairy-free chocolate cake recipes use vinegar?

Vinegar (or lemon juice) reacts with baking soda, which helps the cake rise and keeps the crumb lighter. Importantly, it shouldn’t make the cake taste sour—the amount is small and it disappears into the chocolate.

10) Why is my vegan chocolate cake dry, and how do I prevent it next time?

Dryness usually comes from overbaking or measuring too much flour. Next time, weigh ingredients if you can, start checking earlier, and pull the cake when the centre springs back and the skewer shows moist crumbs. Moreover, wrap the cooled cake well—air is what steals softness fastest.

11) Can I bake vegan chocolate cake as cupcakes, a loaf, or a bundt?

Yes—this batter family is flexible. Cupcakes bake faster (start checking around 18–22 minutes), loaf cakes need longer and benefit from a foil tent if the top browns early, and bundt cakes demand thorough greasing for clean release. As a result, the format you choose should match your time and how you plan to serve it.

12) How long does vegan chocolate cake last, and can I freeze it?

Most oil-based vegan chocolate cakes keep well at room temperature for 2–3 days if wrapped tightly. For frosted cakes—especially avocado frosting—refrigerate, then bring slices back to room temp for the best flavour. For longer storage, freeze slices or layers tightly wrapped; thaw while still wrapped so condensation stays on the wrap, not in the cake.

13) What’s the quickest vegan chocolate dessert when I want chocolate right now?

A vegan chocolate mug cake is the fastest option. It’s ready in minutes, and you can adjust sweetness or add a chocolate square in the centre for a molten pocket. Just microwave in short bursts, since overcooking is the main reason mug cakes turn rubbery.

14) Which vegan chocolate cake is best for birthdays and celebrations?

A classic vegan chocolate layer cake is the most “party-ready” because it stacks well and holds frosting cleanly. Alternatively, a bundt cake looks festive with almost no decorating—ganache does the work and the shape carries the drama.