Posted on — Leave a comment

S’mores Lava Cake Recipe: Gooey Chocolate & Marshmallow Center

S’mores lava cake split open on a dark plate, with glossy chocolate and marshmallow flowing from the center, toasted marshmallow on top, and graham crumbs scattered around the cake.

The spoon breaks through the warm chocolate cake and the middle gives. Glossy chocolate slips onto the plate, a streak of marshmallow follows, and toasted graham gives the soft cake a little crackle.

That reveal is half the fun of this S’mores Lava Cake. For it to actually taste like a s’more, the chocolate, marshmallow and graham need to stay recognizable instead of disappearing into one very sweet chocolate dessert.

If Domino’s S’mores Lava Cakes sent you looking, think of this as a homemade take rather than an exact copycat. Here, the center is molten chocolate, the marshmallow gets properly toasted, and some of the graham stays crisp.

Once the cakes reach the oven, remember one thing: set outside, moving inside.


S’mores Lava Cake Recipe

This recipe makes 4 individual cakes in 6-ounce / 175–180 ml ramekins. Bake at 425°F / 218°C. Start checking at 11 minutes; most should be ready somewhere around 11–13 minutes. Let the cake, not the clock, decide that final minute.

The separate chocolate center earns its extra step. It lets the outside become cake while melted chocolate waits in the middle instead of asking barely baked batter to provide all the lava.

Yield4 individual cakes
Ramekins4 × 6 oz / 175–180 ml
GanacheChill until thick enough to portion and shape
BakeAbout 11–13 minutes; start checking at 11
Rest1–2 minutes before unmolding
Best servedImmediately

You need 220 g / about 8 oz semisweet or bittersweet chocolate altogether, ideally around 60–65% cacao. Chop it all at once, set aside 50 g for the ganache, and use the remaining 170 g in the cake.

Chocolate choices for lava cake shown side by side: a 60–65% cacao chocolate bar marked as the balanced choice, milk chocolate marked sweeter, and chocolate chips shown as less fluid when melted.
If you’re choosing one chocolate for the whole recipe, 60–65% semisweet or bittersweet chocolate is the useful middle ground: dark enough to balance the marshmallow while still working smoothly in both the cake and ganache. Chopped bar chocolate also melts more freely than chips.

For the molten chocolate centers

  • 50 g (1¾ oz) of the chopped semisweet or bittersweet chocolate
  • 30 ml (2 tablespoons) heavy cream
  • Small pinch of fine salt

For the graham cracker layer and crunch

  • 45 g (about ½ cup) graham cracker crumbs
  • 18 g (about 1¼ tablespoons) unsalted butter, melted
  • 5 g (about 1¼ teaspoons) granulated sugar
  • Small pinch of fine salt

For the chocolate cake

  • 170 g (6 oz) of the chopped chocolate
  • 113 g (½ cup / 4 oz) unsalted butter, plus more for the ramekins
  • 2 large eggs
  • 2 large egg yolks
  • 55 g (about ¼ cup plus 1 teaspoon) granulated sugar
  • 24 g (about 3 tablespoons) all-purpose flour
  • 1 teaspoon (5 ml) vanilla extract
  • ¼ teaspoon fine salt
  • 26 g marshmallow creme or fluff, divided among the 4 cakes; if you are not weighing it, divide into 4 small, roughly equal spoonfuls
  • Unsweetened cocoa powder, for the ramekins

For finishing

  • 4 large marshmallows, or enough mini marshmallows or marshmallow creme to top 4 cakes
  • Reserved toasted graham cracker crumbs
  • Dark or semisweet chocolate shavings, or a light chocolate drizzle
  • Optional tiny pinch of flaky salt

What you need

Use four 6-ounce / 175–180 ml ceramic ramekins, a baking sheet, heatproof bowl, whisk and silicone spatula. A kitchen scale gives the most even results, but the cakes can still be divided carefully by eye. A thin knife or small offset spatula helps with unmolding, and you will want an oven mitt or folded dry kitchen towel for the hot ramekins.

If your oven tends to run hot or cool, an oven thermometer is worth using. In a bake this short, a minute can change the center noticeably.

Not sure how large your ramekins are? Fill one to the rim with water, then pour that water into a measuring jug.

Using an unfamiliar dish? See why ramekin shape changes the bake as well as capacity.

1. Make the chocolate centers

Put the reserved 50 g chopped chocolate in a small heatproof bowl.

Heat the cream until steaming. Pour it over the chocolate, wait about a minute, then stir slowly from the middle until smooth and glossy. Add a small pinch of salt.

Let the ganache cool for a few minutes, then refrigerate it until thick enough to scoop and hold a shape. How quickly that happens depends on the bowl, the chocolate and the refrigerator, so judge the texture rather than the clock.

Divide the thickened ganache into 4 roughly equal portions and flatten each into a small, low disc.

They don’t need to be perfect circles. Small and flat matters more.

Chocolate ganache shown in a bowl and on a spoon, with a small flat ganache disc presented as the preferred shape and a thick round portion marked as the shape to avoid.
For a lava cake ganache center, that low shape is about heat rather than neatness. A flat disc gives the oven less cold thickness to warm through than a round ball, so the surrounding cake can set while the middle melts.

If shaping softens them, return the discs to the refrigerator until they are firm enough to lift cleanly.

2. Toast the graham cracker crumbs

Mix the graham cracker crumbs with the melted butter, sugar and salt. Toast over medium-low heat for a few minutes, stirring often, until the crumbs smell nutty and deepen slightly in color.

Reserve roughly half for serving. The other half will be divided among the four ramekins in thin layers.

3. Prepare the oven and ramekins

Place an oven rack in the middle of the oven and heat to 425°F / 218°C. The timing here assumes a conventional oven. With fan or convection, use your oven’s usual adjustment and start looking sooner.

Set the ramekins on a baking sheet. Butter the interiors thoroughly, including around the upper edge, then dust lightly with cocoa and tap out the excess.

Divide the graham mixture meant for baking among the four ramekins and press it into thin layers across the bottoms. Once the cakes are inverted, the graham ends up on top beneath the marshmallow.

This is lava cake, not a miniature pie crust, so don’t build the layer up thickly.

Blue ramekin with a thin graham cracker crumb layer labeled as flavor inside the cake, beside reserved toasted crumbs labeled for added crunch at serving.
Graham has two different jobs in this recipe. The thin baked layer carries graham flavor into the cake; meanwhile, the crumbs saved for serving restore the crisp texture that warm chocolate and marshmallow quickly soften.

4. Make the chocolate batter

Melt the remaining 170 g chocolate with the 113 g butter, either over barely simmering water or in short microwave bursts. Stir until smooth and let it cool for a few minutes.

In another bowl, whisk the whole eggs, yolks and sugar until the mixture looks smooth, slightly paler and a little thicker than when you started. Whisk in the vanilla and salt, then the warm chocolate mixture.

Two metal bowls compare the egg-and-sugar mixture before whisking and when ready; the finished mixture is visibly paler and slightly thicker and falls from the whisk in a broader ribbon.
The side-by-side comparison is the checkpoint for this chocolate lava cake batter. Judge the eggs by the change from the starting bowl—not a fixed whisking time—and move on once they have reached the slightly paler, thicker stage the recipe calls for.

Add the flour and fold just until the last dry streak disappears.

Twenty-four grams looks like very little flour. It is. A heavy scoop can make a real difference in a cake this small, so weigh it if you can.

5. Fill the ramekins

For the most even cakes, weigh the finished batter and divide it into 4 equal portions. No scale? Divide the batter as evenly as you can by eye.

Put roughly half of one batter portion into a ramekin. Set a chilled ganache disc in the middle, then add one-quarter of the marshmallow filling. Cover the center with the remaining batter from that portion, then repeat with the other ramekins.

Before they go into the oven, look around the sides. If chocolate or marshmallow is touching the ramekin wall, nudge it inward and cover the spot with batter.

That border lets the cake survive the flip and still spill warm chocolate when the spoon reaches the middle.

Blue ramekin filled with chocolate batter around centered marshmallow filling, with a clean border of batter around the edge; three assembled ramekins below are ready for baking.
Before baking, treat any s’mores lava cake filling visible at the side or surface as a warning sign. Re-center it and cover it with batter now, because leaks later usually begin where ganache or marshmallow reaches the edge.

Want the filling logic in one place? Jump to Keep the Lava in the Middle.

6. Bake

Start checking at 11 minutes.

The outer edge should look set and most of the wet shine on top should be gone. Movement should be concentrated in the middle rather than running across the entire surface.

Many 6-ounce ramekins will land somewhere around 11–13 minutes, but don’t force the cake to match the clock. A completely firm, motionless top usually means the center is already thickening.

Top view of a baked chocolate lava cake in a blue ramekin, annotated with a set outer edge, a mostly matte top, and remaining movement concentrated in the center.
Use this visual as the endpoint for lava cake doneness, not the 11–13 minute range as a promise. Because ovens and ramekins vary, the appearance of the cake is what tells you whether that final minute belongs in the oven or not.

Still unsure whether the center is molten or simply underbaked? Compare the doneness signs side by side.

7. Rest, flip and finish

Rest the cakes for 1–2 minutes. If one spot is hanging on, loosen it gently with a thin knife.

The flip is the slightly nerve-racking bit. Using an oven mitt or folded dry kitchen towel to protect your hand, put a serving plate over the hot ramekin, hold the two firmly together and turn them in one confident motion. Leave the ramekin upside down for about 10 seconds, then lift it straight up.

If the cake stands cleanly, finish it while the middle is still hot. If it feels too fragile to turn out, do not destroy dessert for the sake of presentation. Leave it in the ramekin and serve it warm there.

Three-step sequence showing a plate placed over a hot ramekin, the plate and ramekin turned over together, and the ramekin lifted straight upward to release the lava cake.
A clean lava cake release starts before the flip. Thorough buttering and cocoa dusting help, while an exterior that is still too soft is more likely to stick—so a difficult unmolding is not always a problem with the flipping motion itself.

Cake stuck, collapsed or leaked? Go straight to the troubleshooting guide.

Toast and finish the s’mores topping

Top with a large marshmallow, a few minis or a spoonful of marshmallow creme and toast until browned in spots. Scatter over the reserved graham crumbs and, if you like, add chocolate shavings or a light drizzle of homemade chocolate syrup.

No kitchen torch? Brown whole or mini marshmallows briefly on lightly greased foil under a hot broiler, watching constantly, then move them onto the cakes.

Two marshmallow-toasting methods: a kitchen torch browning marshmallow directly on a lava cake, and a no-torch method showing marshmallows browned separately under a broiler before being transferred onto the cake.
A torch browns the marshmallow exactly where it sits. No torch? Broil the marshmallows separately and transfer them afterward, so you still get the toasted s’mores finish without exposing an already-baked lava cake to another blast of intense heat.

Add a tiny pinch of flaky salt if the sweetness needs it.

Serve immediately. Put the cakes down whole and let everyone break into their own.


The Moment to Pull Them From the Oven

A lava cake is ready when the outer edge is set, the top has mostly lost its wet shine, and the remaining movement is concentrated in the center.

Molten, Not Raw: Read the Crumb

Don’t wait for the middle to become as still as the edge. The cakes keep cooking while they rest and while you get them onto the plate.

When you break it openWhat happenedNext batch
Glossy melted chocolate flows from the middle, with some marshmallow through it; the cake around it looks bakedRight where you want itKeep the timing
The cake itself looks wet, thin or streaky with uncooked batterIt came out too soonGive the next batch about 1 minute more
The middle is soft and fudgy, but the chocolate barely spreadsA little too long in the ovenCheck about 1 minute earlier
The middle looks much like the outsideThe cake baked throughStart checking earlier and check the oven temperature
Three chocolate lava cakes compared as too soon, ready, and too long; the ready cake has a baked exterior with a flowing center, the too-soon cake looks wet around the center, and the too-long cake has a mostly set middle.
For lava cake doneness, remember one useful rule: flow belongs to the filling, not the crumb. A dramatic molten center is right only when the chocolate cake surrounding it looks baked rather than wet or streaky.

The liquid you want is melted chocolate and marshmallow from the middle. The cake around it should look cooked.

If you have made fudgy brownies, the judgment is similar: soft and chocolatey is not the same thing as wet, uncooked batter.

If you’re using an unfamiliar oven for an important dinner, a trial bake on another day is more useful than sacrificing one of the four cakes at serving time.

↑ Back to the recipe

Keep the Lava in the Middle

A large frozen ball of ganache can still be cold when the cake around it is ready. A small, flat chilled piece warms more readily.

The marshmallow doesn’t need to be generous either. A small portion gives you the sticky streak without crowding the chocolate filling.

Then give both fillings room: batter underneath, batter above, clean batter around the sides.

Cutaway diagram of a s’mores lava cake showing chocolate cake around a chocolate ganache center and marshmallow filling, with a thin graham cracker layer at the base and a clean cake border around the filling.
Think of the center as architecture: chocolate cake forms the shell, ganache creates the molten flow, marshmallow adds the sticky pull, and the thin graham layer keeps the s’mores flavor recognizable instead of letting everything merge into one texture.

Chocolate, Marshmallow & Graham Each Need a Job

Semisweet or bittersweet chocolate around 60–65% cacao is a good middle ground. Milk chocolate can work, but beside marshmallow it pushes the finished cake much sweeter.

Chocolate chips can work in a pinch, though chopped bar chocolate usually melts more freely—especially useful in a molten chocolate cake where you actually want movement in the middle.

Marshmallow creme gives you the sticky pull inside. Browned marshmallow on top gives you something else entirely: caramelized edges and the toasted smell that makes the dessert register as s’mores before the first bite.

Close-up of a cut s’mores lava cake showing baked chocolate crumb surrounding glossy melted chocolate and a white marshmallow streak in the center.
The center works because the chocolate and marshmallow stay distinct: one flows, the other stretches, while the surrounding cake gives the spoon something to break through.

Graham is the awkward one because moisture wins eventually. The thin baked layer carries the graham flavor; the crumbs saved for serving bring back the crunch. Trying to keep buried cracker crumbs crisp inside warm chocolate and marshmallow is a losing argument with physics.

Your Ramekin Changes the Bake

Two 6-ounce ramekins are not necessarily the same bake. A broad, shallow dish spreads the batter thinner; a narrow, deeper one puts more distance between the heat and the middle.

The 11–13 minute range above is meant for the stated 6-ounce capacity, but even within that size the physical cues matter more than hitting one exact minute.

How to measure your ramekin

Fill it to the rim with water, then pour that water into a measuring jug.

  • 4 oz ramekin: roughly 120 ml
  • 6 oz ramekin: roughly 175–180 ml
  • 8 oz ramekin: roughly 235 ml

Use those numbers to identify what you own. The 4-ounce and 8-ounce sizes are not direct substitutes for the timing above; changing the capacity changes the depth of the cake and therefore the bake.

Two 6-ounce ramekins shown side by side: a broad, shallow blue ramekin and a narrower, deeper white ramekin, demonstrating that the same capacity can have different shapes and depths.
Capacity tells you what the dish holds; shape tells you how that capacity is distributed. That is why two 6-ounce lava cake ramekins can reach the same visual doneness cues at different moments even though both pass the water test.

No ramekins? A muffin pan is possible

A metal muffin pan is a possible variation, but this recipe’s timing is written for 6-ounce ceramic ramekins. Standard muffin wells are smaller and metal heats faster.

If you try it, use smaller portions of cake and filling and begin checking several minutes earlier. Treat the first batch as a separate variation rather than borrowing another lava-cake recipe’s timing.

↑ Back to the recipe

Make Them Ahead, Then Move Fast

Most of this dessert can be organized before the moment you want to serve it. The few minutes after baking are the part you can’t pause.

You can assemble the cakes earlier the same day, cover them and refrigerate them. Let them lose some of their refrigerator chill before baking, and expect fully cold cakes to behave differently from freshly assembled ones.

I wouldn’t promise a fixed extra bake time for a fully chilled cake. Use the set edge and movement in the middle to decide when it is ready.

Set out the plates, marshmallow and graham crumbs before the tray goes in. You don’t want to be hunting through a cupboard while four lava cakes quietly become four chocolate cakes.

Fix the Cake in Front of You

No flowing center? The usual culprits are too much oven time, an oven running hot, too much flour, or simply waiting too long to serve.

Six-panel lava cake troubleshooting chart showing examples labeled raw shell, collapsed, stuck, leaked, thick center, and right.
The fastest way to troubleshoot lava cake is to ask where the failure happened: the outer cake, the release, the filling or the center. Each points toward a different adjustment, so simply baking every failed batch longer can create a new problem.
What you seeLikely causeWhat to change
The cake around the filling looks rawIt needed a little longerAdd about 1 minute to the next batch
The cake collapses when flippedThe outside needed longer, or there was too much fillingGive it a little more oven time or reduce the filling next time
The cake sticksThe ramekin was not coated thoroughly, or the outside is very softLoosen the stuck area; serve in the ramekin if necessary
Chocolate or marshmallow leaks during bakingThe filling reached the side or topCenter the filling more carefully next time
The chocolate barely meltsThe ganache piece was too large, thick or very coldMake smaller, flatter chilled pieces

Too sweet? Use bittersweet rather than milk chocolate, measure the marshmallow instead of heaping it in, and skip powdered sugar unless you specifically want it. A little salt usually helps more.

Chocolatey, but not really s’mores? One of the three has probably gone quiet. Brown the marshmallow more deeply, bring back the reserved graham crumbs, or use chocolate with a little more cocoa character.

Graham went soft? Some softening is normal anywhere crumbs touch warm cake or marshmallow. Add the reserved crumbs at the very end for the contrast that matters.

↑ Back to the recipe

Swaps Worth Knowing

Chocolate chips: yes, though chopped bar chocolate generally melts more freely in both the batter and ganache.

Digestive biscuits: yes. Use plain digestives by weight. If yours are already quite sweet and buttery, leave the extra sugar out of the crumb mixture.

Cocoa powder for the melted chocolate: not gram for gram. Melted chocolate contributes cocoa butter as well as cocoa solids, so a direct dry-cocoa swap changes the way the cake sets.

Regular marshmallows inside: possible, but less predictable. They expand and melt unevenly. I would rather put them on top, where those toasted edges are useful.

Eggless, vegan or gluten-free: those versions need their own formula rather than a casual swap. If eggs or dairy are the issue, this vegan chocolate cake collection includes a dedicated vegan chocolate lava cake.

Leftovers & Reheating

These are much better freshly baked. The contrast between set cake and a flowing middle does not last forever.

Refrigerate leftovers once cool. For the best texture, keep it short and eat them within 1–2 days. Reheat gently in short microwave bursts until warm. The middle can become gooey again, but it won’t be quite the same cake.

If you’re planning ahead, assembling and baking later makes more sense than baking the cakes early and trying to rebuild the lava at serving time.


Take the cakes to the table while the centers are still loose. The marshmallow should smell toasted, the graham should crackle here and there, and once the spoon breaks through the cake, the chocolate should not need much introduction.

Partly eaten s’mores lava cake on a light plate with melted chocolate and marshmallow spreading from the center, toasted marshmallow and graham crumbs on top, and a spoon beside it.
The payoff is contrast: a cake that stands long enough to serve, then gives way when the spoon reaches the center.

↑ Back to the recipe · ↑ Back to top

Posted on — Leave a comment

Oatmeal Cream Pies Recipe: Soft, Chewy Little Debbie Copycat

Stack of homemade oatmeal cream pies with thin brown oatmeal cookies and pale creme filling, including one pie cut open to show the soft interior.

A Little Debbie-style oatmeal cream pie has a very particular texture. The cookie bends around the creme. The oats almost disappear into the crumb, while brown sugar and molasses come through before cinnamon. There is hardly any resistance when you bite through it. The cookie and filling give together.

Plenty of homemade oatmeal sandwich cookies are thicker, oatier and piled much higher with frosting. They can be wonderful. They just eat differently.

Here, the oats are finer, raisin paste disappears into the dough, the spice stays quiet, and the creme is light enough to belong between two cookies. Before the whole batch goes into the oven, bake one cookie and see what it does. That one cookie can save the rest.

In This Guide

Oatmeal Cream Pies Recipe

Yield: About 15–16 oatmeal cream pies

Prep time: About 30 minutes

Bake time: About 9–11 minutes per batch

Total time: About 1 hour 20 minutes, depending on whether you bake one or two sheets at a time

Oven: 350°F / 175°C

Dough: 30 g per cookie

Target size: About 3 inches / 7.5 cm across after cooling

Creme: About 17–18 g per sandwich

A digital scale is strongly recommended here. Small changes in flour, oats and portion size can noticeably change how the cookies spread, and sticky ingredients such as shortening and Marshmallow Fluff are easier to measure by weight.

What You’re Aiming For

Cut-open oatmeal cream pie labeled with a soft fine-oat cookie, light creme filling and a thin, bendable sandwich profile.
Three visual clues work together here: finer oats smooth the chew, the low cookie profile keeps the sandwich flexible, and a restrained creme layer prevents the filling from taking over.
  • 60 g raisins
  • 30 ml (2 tablespoons) hot water, for soaking
  • 140 g (about 1¾ cups) quick oats, measured before processing
  • 210 g (1¾ cups) all-purpose flour
  • 1½ tablespoons cornstarch (12 g)
  • ¾ teaspoon baking soda (about 3 g)
  • ¾ teaspoon fine salt (about 4 g)
  • ¼ teaspoon ground cinnamon
  • 180 g unsalted butter, cool room temperature
  • 160 g (¾ cup packed) dark brown sugar
  • 50 g (¼ cup) granulated sugar
  • 20 g (1 tablespoon) regular unsulphured molasses
  • 1 large egg
  • 1 large egg yolk
  • 2 teaspoons vanilla extract

For the Creme Filling

  • 70 g vegetable shortening
  • 35 g unsalted butter, cool room temperature
  • 110 g Marshmallow Fluff or another thick marshmallow creme
  • 80 g confectioners’ sugar, sifted
  • 1 teaspoon vanilla extract
  • ⅛ teaspoon fine salt (about 1 g)

Useful equipment: a digital kitchen scale, food processor or small chopper, electric mixer, parchment-lined baking sheets, cooling rack, and piping bag or small offset spatula.

No food processor? Finely mince the softened raisins and use the quick oats as they are. The cookies will have a more obvious oat texture and look a little less like the packaged version, but it is a perfectly workable shortcut.

Method

1. Heat the Oven and Soak the Raisins

Heat the oven to 350°F / 175°C. If baking one sheet at a time, place a rack in the center. With two sheets, position racks in the upper and lower thirds. Line the baking sheets with parchment.

Pour the hot water over the raisins, stir so they are evenly moistened, and leave them for about 10 minutes. While they soften and the oven heats, prepare the oats.

2. Process the Oats

Add the quick oats to the food processor and pulse until they resemble coarse meal. Rub a pinch between your fingers: you want tiny pieces with very few intact flakes. Stop before the oats become powdery, then transfer them to a bowl.

Three oat textures compared side by side: intact quick oats, the target coarse meal with tiny oat pieces and few whole flakes, and oats ground too finely into powder.
The processor is changing the finished chew, not just the appearance of the oats. Smaller pieces blend into the crumb, while intact flakes make the cookie feel more like a rustic oatmeal cookie.

3. Make the Raisin Paste

Drain the softened raisins, keeping the soaking water nearby. Put the raisins into the same processor and puree until thick and mostly smooth.

If the blades need help, add some of the reserved water 1 teaspoon at a time, using only enough to keep things moving. Tiny flecks are fine; obvious pieces of raisin need another spin.

Softened raisins beside a food processor containing thick, mostly smooth raisin paste, with a small smear showing tiny flecks in the finished paste.
Use the smear as the texture check: the raisin paste should hold its shape rather than run, with tiny flecks still visible.

Whisk the processed oats, flour, cornstarch, baking soda, salt and cinnamon together.

In another bowl, beat the butter with both sugars at medium speed for about 2 minutes, until creamy and slightly lighter. Soft butter is fine; shiny or greasy butter is getting too warm.

Beat in the molasses and raisin paste. Add the egg, yolk and vanilla and mix until smooth. Add the dry ingredients and mix on low just until the last flour streaks disappear. Scrape across the bottom of the bowl once before you stop.

The dough should be soft and easy to scoop. Leave it unchilled for the first cookie.

Weigh one 30 g piece of dough. Roll it gently, then flatten it to roughly 1¾ inches / 4.5 cm across and about ½ inch / 1.25 cm thick.

Thirty-gram oatmeal cookie dough ball on a digital scale beside the same portion flattened to about 1¾ inches wide and ½ inch thick.
Keep every test portion at 30 g before judging cookie spread. Otherwise, a larger scoop can masquerade as a dough problem and send you toward an adjustment the recipe does not need.

Bake for about 9–11 minutes. Pull the cookie when the edges are set but the center still looks slightly underdone. Leave it on the hot sheet for 4–5 minutes, then move it to a rack and let it finish cooling.

Too thick? Let firm dough warm briefly or flatten the next piece slightly more.

Too wide? Chill the dough for 10–15 minutes and try again.

Close to the target? Portion the rest while the dough is still in roughly the same state.

Three oatmeal cookies showing different spread: a thick domed cookie, a target cookie about 3 inches wide, and an overly flat cookie that spread too far.
Do not judge width alone: an oatmeal cookie can cool close to 3 inches across and still sit too domed. In that case, change the starting shape rather than extending the bake.

Divide the dough into 30 g portions, flatten them as you did the test cookie, and leave at least 2½ inches / 6 cm between them on parchment-lined sheets.

Bake one sheet at a time on the center rack for the most even results, or bake two sheets together on racks positioned in the upper and lower thirds, swapping their positions halfway through. Either way, judge doneness by the cookies rather than the clock.

Pull them while the centers still look soft. They continue setting during the 4–5 minutes they spend on the hot pan.

Two oatmeal cookies on a parchment-lined baking sheet: one with set edges and a soft center labeled as ready to pull, and a darker, drier cookie shown as overbaked.
The center is the better doneness signal than overall browning: once it looks dry in the oven, the cookie is likely to cool firmer than the soft sandwich texture we’re after.

Later batches may spread a little less as the oats continue absorbing moisture and the butter cools. If that happens, flatten the next portions slightly more rather than simply baking them longer.

7. Make the Creme

Beat the shortening and butter for about 2 minutes, until smooth and lightly aerated. Add the Marshmallow Fluff, vanilla and salt, beat until combined, then gradually add the confectioners’ sugar and continue for another 1–2 minutes.

Lift the beater. The creme should hold a soft peak. Press a dab between two fingers: it should feel smooth and soft enough to give easily, but not so loose that it stretches away in long sticky strings.

Three creme filling consistencies compared with mixer beaters and bowls: too stiff, the target smooth soft peak, and filling that is too loose and stringy.
The two consistency checks answer different questions: the beater tells you whether the creme filling can hold its shape, while the fingertip test tells you whether it will yield easily when the sandwich is bitten.

Creme not matching the soft-peak texture? See the filling fixes →

8. Fill the Pies

Pair the completely cooled cookies by size and turn half of them flat-side up. Pipe or spread about 17–18 g of creme onto each bottom cookie, leaving a narrow border around the edge. Add the matching top and press gently until the filling moves close to the perimeter.

Three-step oatmeal cream pie assembly showing measured creme on a bottom cookie, a narrow empty border around the filling, and a matching top cookie pressed gently into place.
Matching cookies by size is not cosmetic: with the same 17–18 g of creme, an undersized top pushes filling outward sooner, while a well-matched pair lets it spread more evenly.

This is the one to taste before you start cleaning up. The pies are good straight away, but if you’re chasing the softer packaged-style texture, keep the rest tightly covered for about 2–4 hours before eating another. The creme gradually softens the inside of the cookies as they sit.

Cut-open oatmeal cream pies compared side by side: one freshly assembled and another rested covered for 2–4 hours with a softer, more unified cookie-and-creme texture.
Don’t judge the final texture too early. If a fresh pie feels slightly firmer than expected, compare it again after 2–4 covered hours before changing the recipe.

Making them ahead? See how storage changes the texture →


Where That Familiar Flavor Comes From

The surprise is the raisin paste.

A McKee Foods product sheet for Oatmeal Creme Pies lists rolled oats, molasses and raisin paste among the ingredients. Pureeing the raisins lets the fruit itself disappear into the dough while leaving a faint dark-fruit note behind the molasses. You should never bite into one and think “raisin cookie.”

Why the Oats Are So Fine

Quick oats give a finer cookie. Whole rolled oats still work, but their flakes remain much more obvious. Processing the quick oats into smaller pieces keeps the oat flavor while smoothing out the chew.

The differences between quick, rolled, instant and steel-cut oats matter more in cookies like these than their similar names suggest.

Molasses Matters More Than Cinnamon

Use ordinary unsulphured molasses. Blackstrap is much more bitter and can overpower a small cookie quickly. The ¼ teaspoon of cinnamon adds warmth in the background without turning this into a spice-forward oatmeal cookie.

If you want molasses and spice to take over, our soft gingerbread cookies head deliberately in that direction.

Some spread is what keeps these cookies relatively thin instead of turning them into thick oatmeal rounds. If the test cookie barely moves, start with dough temperature: cool, firm dough spreads less. If it races across the parchment, a short chill is usually more useful than adding extra flour.

Flour measurement matters too. A heavily packed cup can stiffen the dough surprisingly quickly. That’s another reason the scale earns its place here.

Ready to try another? Back to the test cookie →

Getting the Creme Filling Right

The filling changes the whole character of the pie. Butter brings flavor, shortening keeps the creme paler and steadier in a warm room, and Marshmallow Fluff gives it a lighter texture with some spring.

The finished creme should stay between the cookies without eating like dense cake frosting.

How Much Filling Is Enough?

About 17–18 g per sandwich gives you creme in every bite without losing the oatmeal cookie underneath it. Keep the filling just short of the perimeter so it has somewhere to move when the top goes on.

A towering layer looks great in a cut-open cookie. Try to eat it and the glamour disappears pretty quickly.

Prefer an All-Butter Filling?

You can replace the shortening with butter. Expect more butter flavor, a more ivory-colored filling and less firmness in a warm room.

An open jar of Marshmallow Fluff also works well in fudge if you want to use up the rest.

Need the mixing-stage reference? Back to making the creme →

When the Cookies or Creme Misbehave

They barely spread. If warming and slightly flattening the test piece did not solve it, recheck the flour amount, how finely you processed the oats, and how long the dough has been sitting.

They spread into puddles. Give the dough 10–15 minutes in the refrigerator and bake another single cookie. Resist fixing the problem with handfuls of flour; that can trade an over-spreading cookie for a cakey one.

They turned crisp after cooling. Pull the next batch sooner. Once the centers look completely dry in the oven, the soft-cookie window is probably behind you.

Four oatmeal cookies compare common results: barely spread, overly spread and flat, crisp and overbaked, and the target cookie with set edges and a soft center.
Start with the smallest fix first—temperature, flattening or bake time—before changing the dough itself with more flour.

If It’s the Creme

It slumps. Give it a few cool minutes before adding more sugar. Warm butter can make a workable filling look much looser than it really is. If it still will not hold a soft peak, add confectioners’ sugar one tablespoon at a time.

It feels stiff and sugary. Beat it another 30 seconds. If it still feels dense, work in a small spoonful of Marshmallow Fluff. Liquid can take a sandwich filling from stiff to slippery very quickly.

It squeezes out when you eat the pie. The creme may be warm, there may be too much of it, or the cookies may have baked too firm. Start with less filling before changing anything else.

The whole pie tastes too sweet. Check the amount of filling first. An overloaded sandwich can taste cloying even when the creme itself is well balanced.

Four oatmeal cream pies compare filling problems: slumping creme, stiff sugary filling, creme squeezing from the sides, and a balanced sandwich with soft, stable filling.
Start with temperature, then mixing, and change the formula only if neither solves it. That way a warm or under-mixed creme does not get “fixed” with ingredients it never needed.

Storage, Make-Ahead and How the Texture Changes

Freshly assembled pies have more contrast between cookie and filling. Leave them covered for a few hours and the creme gradually softens the inside of the cookies, giving the sandwich a more unified, packaged-style texture.

How to Store Oatmeal Cream Pies

Storage guide showing oatmeal cream pies kept tightly covered at room temperature, refrigerated, and frozen, with the different storage periods and texture notes shown beside each option.
Airtight storage protects the softness you worked for: exposed oatmeal cookies dry faster, while refrigerated pies need some time back at room temperature before their softer texture returns.

At room temperature: Keep the pies tightly covered in a cool room for up to 2 days. Refrigerate them if keeping them longer. Leaving them exposed will dry the cookies much faster.

In the refrigerator: Store them airtight for up to 5 days. Let a cold pie sit at room temperature for 20–30 minutes before eating if you want it softer again.

For freezing: Unfilled cookies or assembled pies can be frozen for up to 2 months. Freeze assembled pies in a single layer until firm, then wrap individually or transfer them to an airtight container. Thaw in the refrigerator, then let them come closer to room temperature before eating.

Make Them Ahead Without Losing the Texture

The assembled pies are well suited to making earlier in the day because a few covered hours soften the cookie around the creme. The dough can also be refrigerated, but a long rest gives the oats more time to absorb moisture, so chilled dough may spread less. Let it lose some of its chill and use the test cookie to recalibrate before baking.


Take a normal bite.

Hand holding a bitten oatmeal cream pie, showing soft brown oatmeal cookies around an even layer of pale creme filling.

The cookie bends, the creme stays with it, and oats and molasses are still there after the sweetness arrives.

Back to recipe ↑ · Back to guide ↑

Posted on — Leave a comment

Brookies Recipe: Fudgy Brownie & Chewy Chocolate Chip Cookie Bars

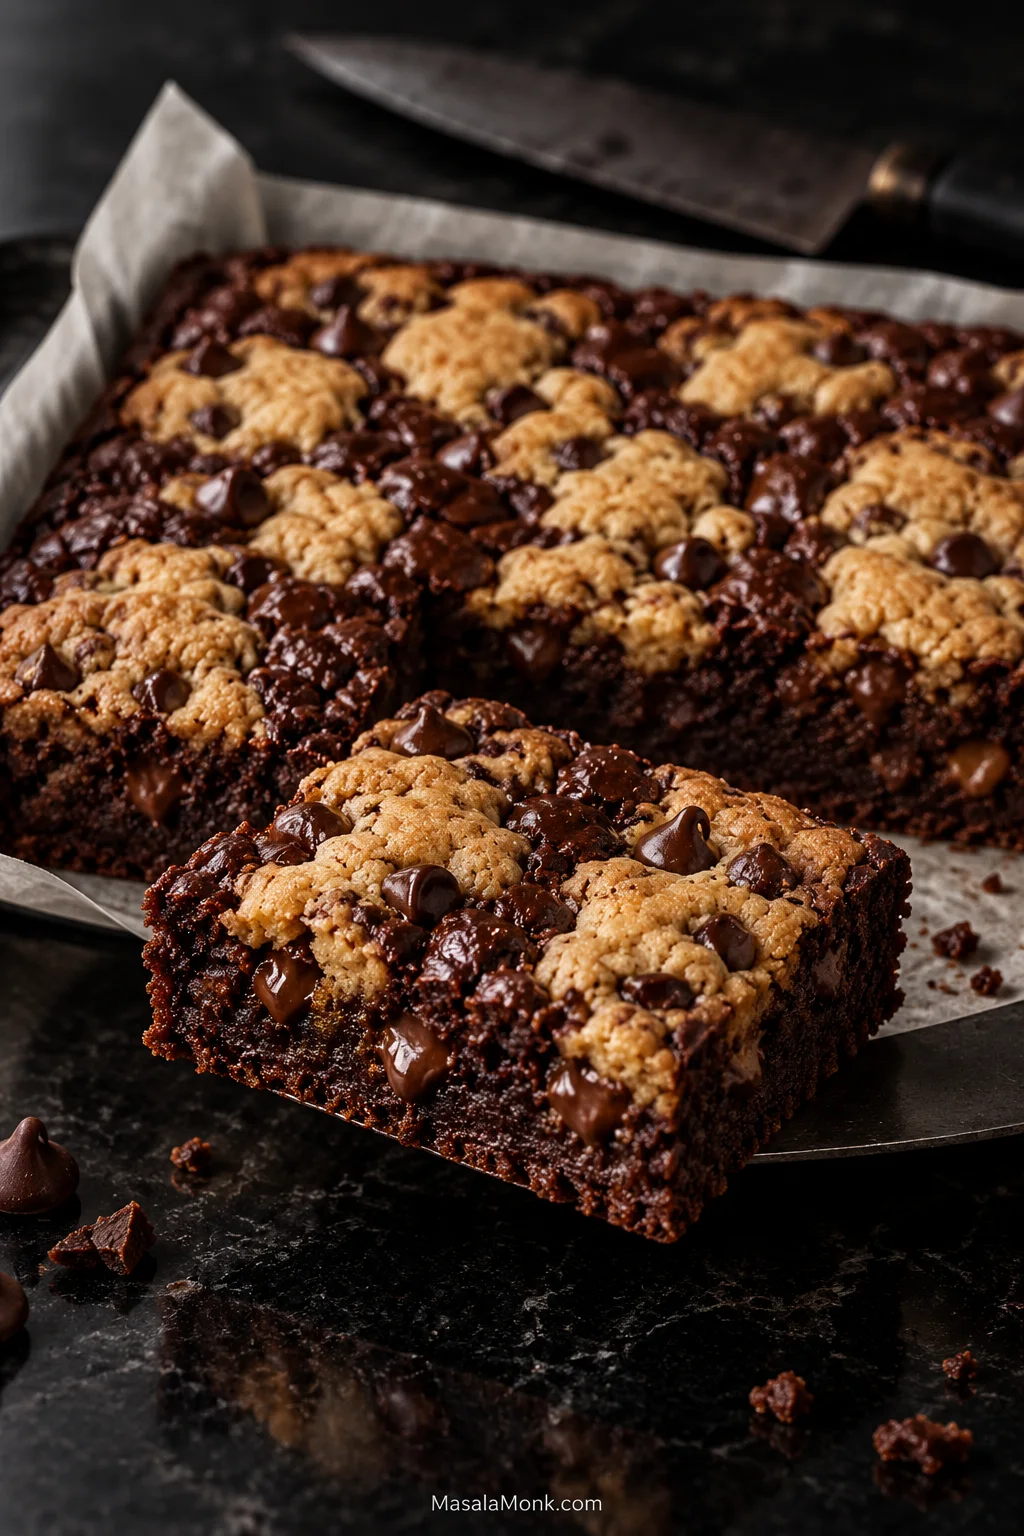
A cut Brookie with golden chocolate chip cookie patches, dark fudgy brownie and melted chocolate visible through the center.

A good brookie should give you chewy chocolate chip cookie, dense fudgy brownie and melted chocolate in the same bite—not a finished cookie sitting over a brownie that is still raw underneath.

Brookies are brownie-cookie bars made by baking brownie batter and chocolate chip cookie dough together in one pan. The tricky part is getting both ready at the same time. This version keeps the brownie fairly shallow and scatters flattened cookie dough over the top, leaving dark brownie visible between the pieces.

Those open patches darken and turn glossy in the oven as the cookie picks up golden edges around them. The brownie should finish fudgy rather than fluid: soft while warm, dense after cooling, and sturdy enough to pick up without losing that moist center.

The Brookie Control Panel

Pan9 × 13-inch (23 × 33 cm) light-colored metal pan
Oven350°F / 175°C conventional / 160°C fan
Cookie coverage20 flattened pieces with plenty of brownie still visible
BakeStart checking around 28 minutes; expect about 30–36 minutes
Ready whenCookie edges are lightly golden and brownie near the middle gives moist crumbs, not wet batter
CoolingAbout 1 hour for fudgy squares; longer for especially neat cuts
Cut into16 larger squares or 24 smaller bars

Contents

Ingredients

Measure the brownie and cookie ingredients separately. Grams are the most dependable measure for flour, cocoa and chocolate; volume measures are included as a practical backup.

For the fudgy brownie

  • 113 g (½ cup) unsalted butter, melted
  • 40 mL (about 2 tablespoons + 2 teaspoons) neutral oil, such as sunflower or canola oil
  • 200 g (1 cup) granulated sugar
  • 50 g (¼ cup packed) light brown sugar
  • 2 large eggs + 1 large egg yolk
  • 2 teaspoons vanilla extract
  • 50 g (about ½ cup + 1½ tablespoons) unsweetened cocoa powder
  • 75 g (about ½ cup + 2 tablespoons) all-purpose flour (plain flour)
  • ½ teaspoon fine salt
  • 140 g (5 oz / about ¾ cup + 1 tablespoon) semisweet or bittersweet chocolate chips or chopped chocolate

The modest amount of flour keeps the brownie dense. The extra yolk adds richness, and the oil helps it stay soft after cooling. Semisweet chocolate gives you a sweeter, more familiar bar; bittersweet takes the flavor darker and reins in some of the sweetness from the brownie and cookie together.

Use unsweetened cocoa powder, not drinking chocolate.

  • 85 g (6 tablespoons) unsalted butter, softened
  • 100 g (½ cup packed) light brown sugar
  • 50 g (¼ cup) granulated sugar
  • 1 large egg
  • 1 teaspoon vanilla extract
  • 160 g (about 1⅓ cups) all-purpose flour (plain flour)
  • ½ teaspoon baking soda / bicarbonate of soda
  • ½ teaspoon fine salt
  • 115 g (4 oz / about ⅔ cup) semisweet chocolate chips or chopped chocolate

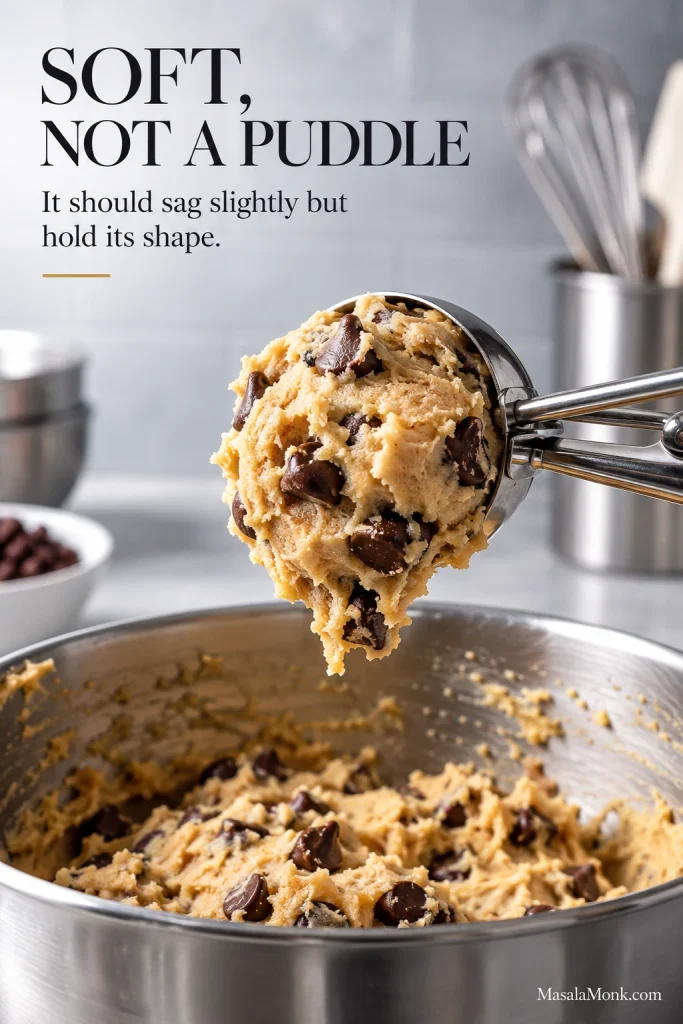
The two mixtures start differently: use melted butter in the brownie and softened butter in the cookie dough. The finished cookie dough should sag slightly when scooped but hold its shape rather than spreading immediately.

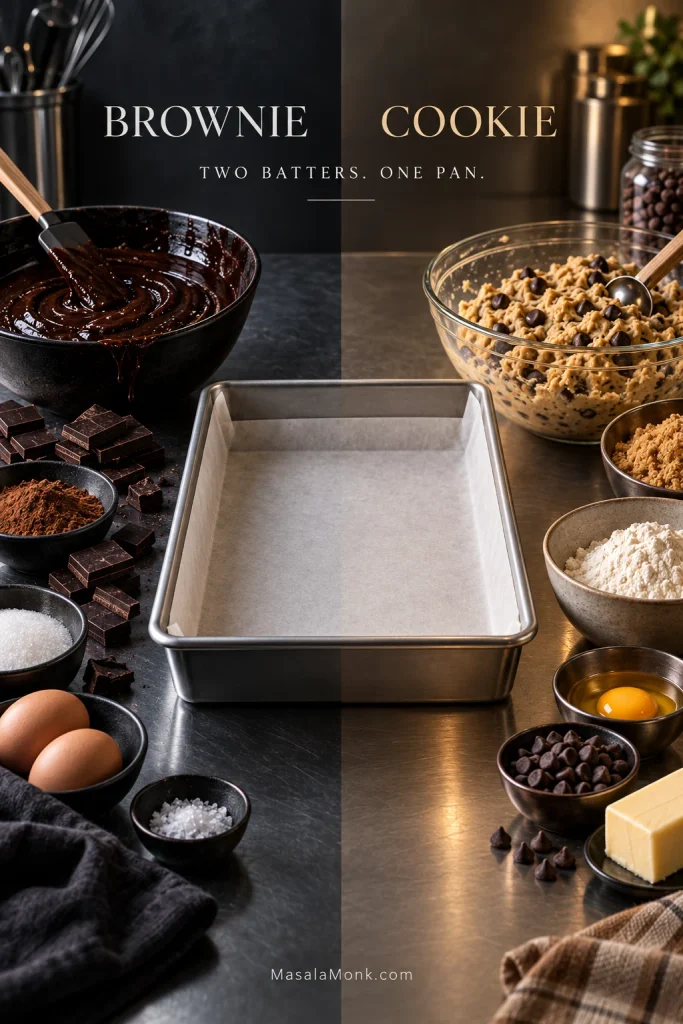
Dark brownie batter and chocolate chip cookie dough in separate bowls beside a parchment-lined metal baking pan.
Brookies only become one dessert at assembly. Until then, the brownie needs to stay spreadable while the cookie dough needs enough body to portion and place—two textures heading toward the same finish line by different routes.

How to Make Brookies

1. Prepare the pan and oven

Heat the oven to 350°F / 175°C conventional / 160°C fan. Line a light-colored metal 9 × 13-inch (23 × 33 cm) pan with parchment, leaving enough overhang on two sides to lift out the cooled slab. Lightly grease any exposed sides.

Use the stated pan size for this batch. In a smaller square pan, the brownie becomes much thicker and takes longer to set while the exposed cookie keeps browning.

2. Make the brownie batter

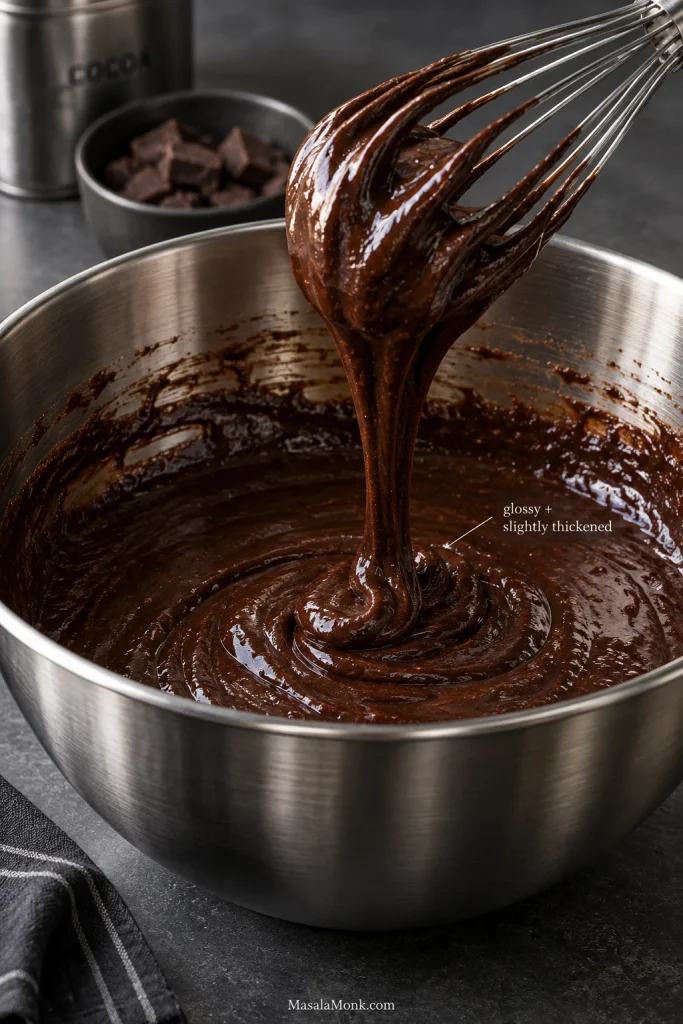
Whisk the melted butter, oil and both sugars until glossy and evenly combined. Add the eggs, extra yolk and vanilla and whisk vigorously for 60–90 seconds, until the mixture looks smoother and slightly thicker.

Glossy chocolate brownie batter falling in a thick ribbon from a whisk into a stainless-steel bowl.
Use the sheen and the thick ribbon from the whisk as your checkpoint here. Once the dry ingredients go in, the goal changes from building the batter to folding only until the flour disappears.

Add the cocoa, flour and salt. Fold until the last dry streaks disappear, then fold in the chocolate. Stop there.

Spread the batter evenly through the pan, right into the corners. One thicker pocket can remain soft after the brownie around it is ready.

Mix the softened butter with both sugars for 1–2 minutes, until creamy. A hand mixer is convenient, though a sturdy spoon or spatula works too. Mix in the egg and vanilla, followed by the flour, baking soda and salt. Fold in the chocolate as soon as the flour disappears.

A scoop of soft chocolate chip cookie dough holding a rounded mound above a mixing bowl.
Meanwhile, the dough needs enough structure to stay where you place it. A soft mound can spread into the brownie during baking; a loose dough can spread too far and close the gaps you deliberately left between the cookie pieces.
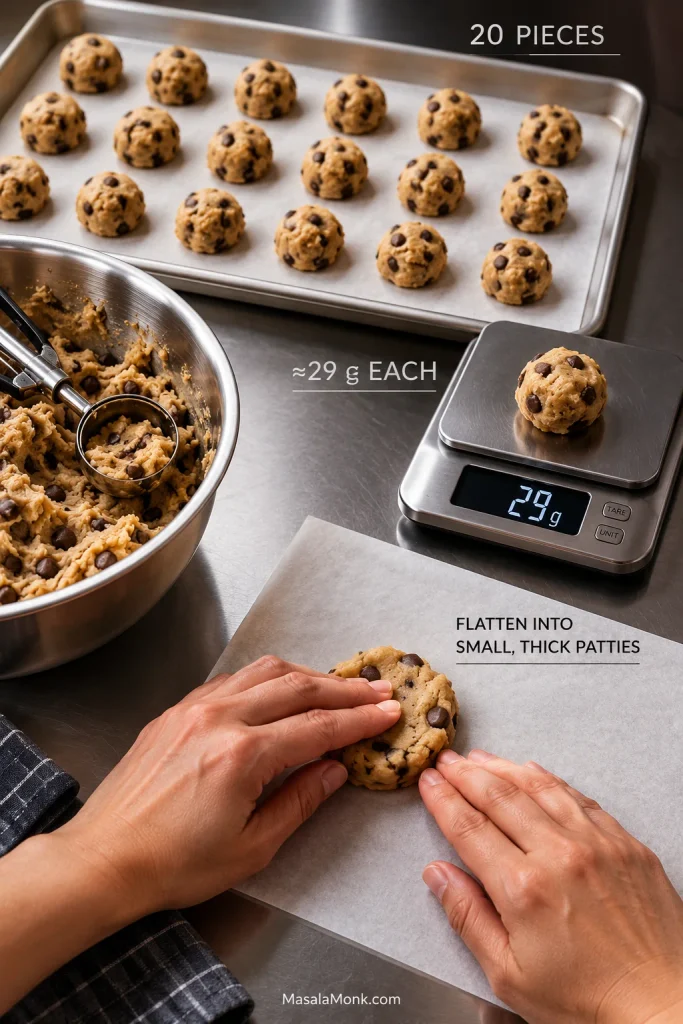
Twenty cookie dough portions total: 18 on a tray, one 29-gram portion on a scale, and one portion being flattened by hand.
Portioning before assembly keeps the cookie load distributed across the pan instead of concentrating it in a few heavy spots. Roughly 28–30 g per piece gives you a repeatable starting point without requiring perfectly identical patties.

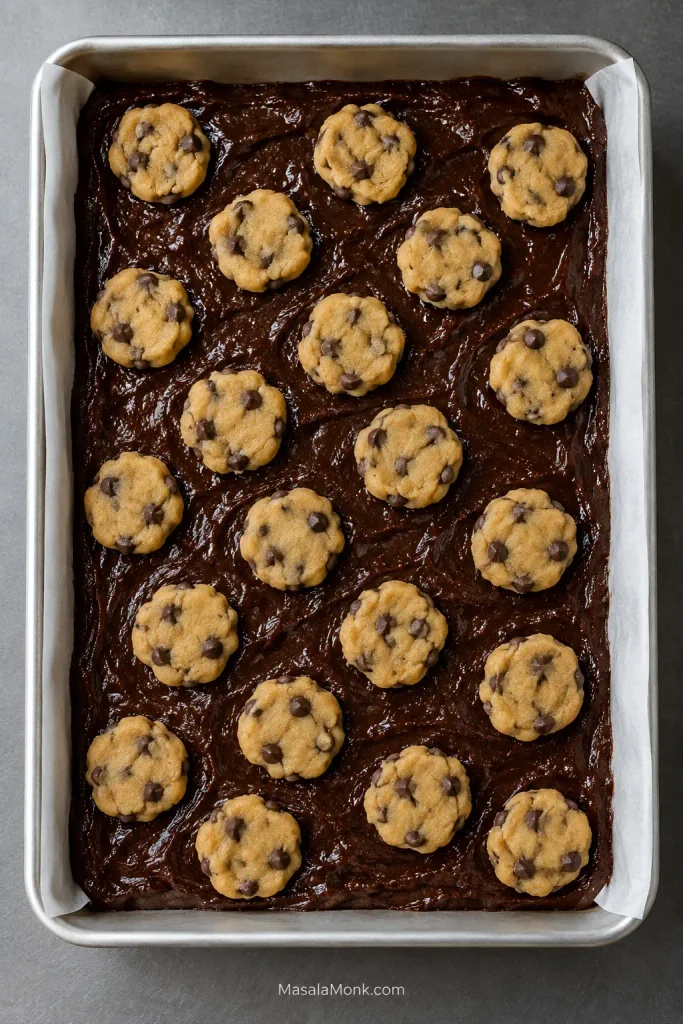
Scatter them across the brownie so cookie reaches every part of the pan while plenty of dark brownie remains visible.

Overhead view of brownie batter in a light metal pan topped with 20 flattened cookie dough pieces, with brownie visible between them.
Before baking, those dark channels of exposed brownie are doing useful work. They give you unobstructed places to watch the surface change, insert a tester and judge the brownie itself rather than relying on the cookie color above it.

The surface may look slightly unfinished. Leave it that way.

5. Bake

Bake on the center rack. Start checking at about 28 minutes; expect about 30–36 minutes in a light-colored metal pan.

As the pan bakes, the pale cookie pieces spread and pick up color. Brownie showing between them turns darker and glossy; melted chocolate gathers along the places where the two meet.

The cookie edges should look set and lightly golden, and the brownie between them should no longer look fluid. Push a tester into one of the brownie patches near the middle: you want moist crumbs, not wet batter. A small tremble is fine; a loose wave through the middle needs more time.

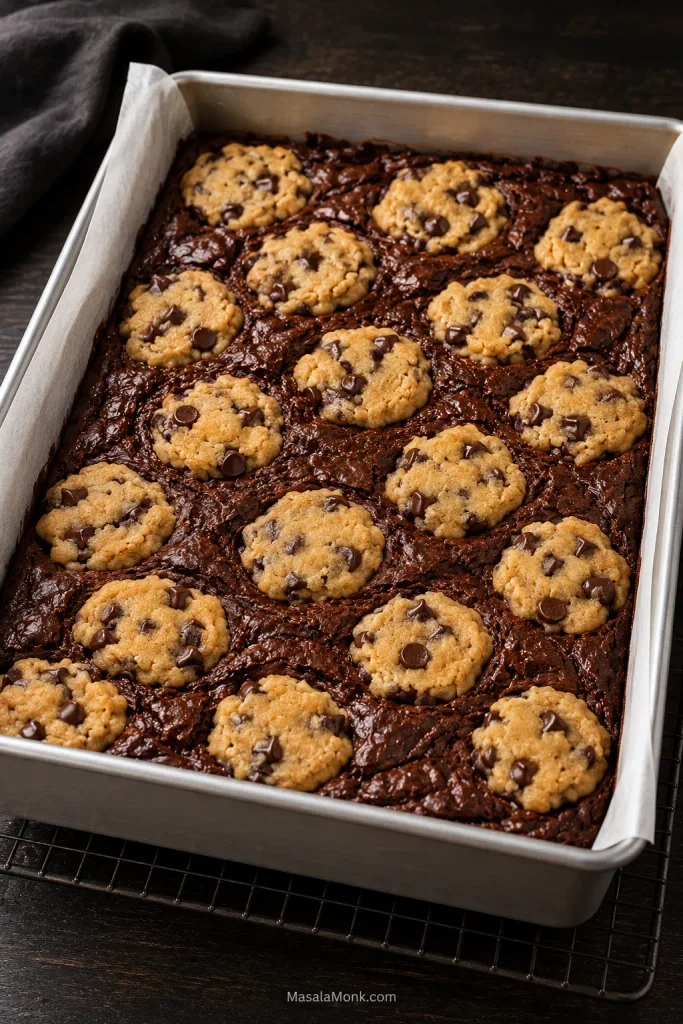
Baked Brookies in a light metal pan with golden cookie patches separated by dark set brownie and melted chocolate.
Compare this with the pre-bake pan: the cookie islands have widened, but the brownie windows have not disappeared. That mottled surface is more useful than waiting for the top to become one uniformly browned layer.

If the cookie already has enough color, lay foil loosely over the pan and keep baking. Leave the sides open so steam can escape, and rotate the pan late in the bake if one side of your oven consistently browns faster.

If the center is hard to read, use the full Brookies doneness guide before taking the pan out.

6. Cool before cutting

Set the pan on a wire rack. Straight from the oven, the chocolate is molten and the brownie is fragile; even a properly baked middle will look much softer than it does later. About an hour gives you fudgy squares that hold together well enough to pick up. Going in sooner is completely reasonable when what you want is a warm brookie and a fork.

How to Tell When Brookies Are Done

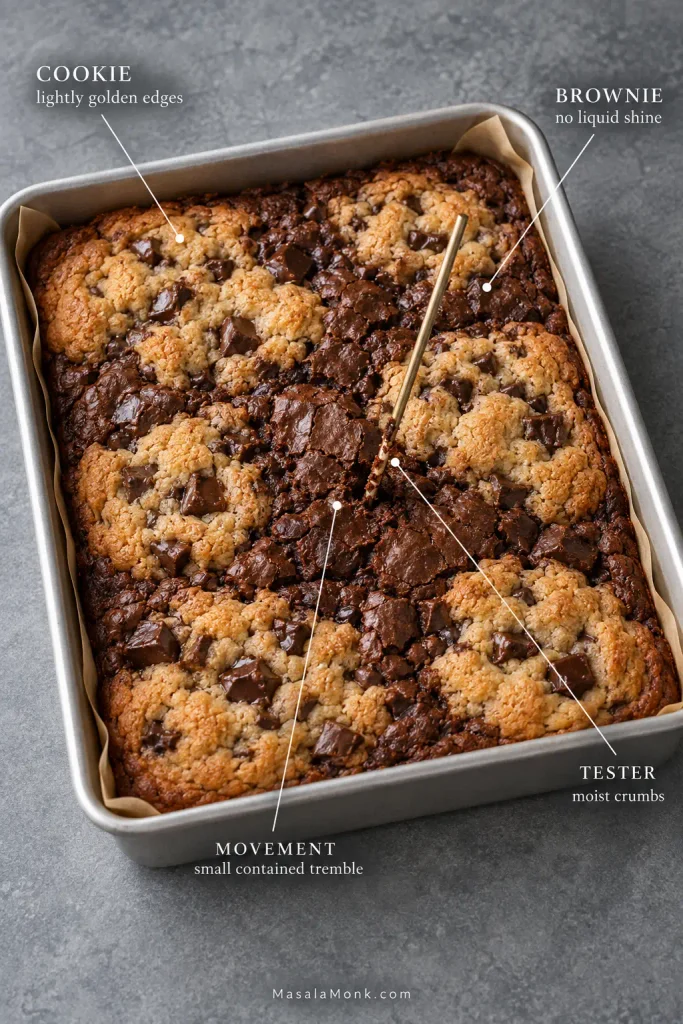
Brookies are done when the cookie edges are lightly golden, the brownie between them has lost its liquid shine, the middle gives only a small contained tremble, and a tester inserted into brownie brings up moist crumbs rather than wet batter.

Baked Brookies in a light metal pan with callouts marking cookie color, brownie surface, center movement and a tester with moist crumbs.
Read the signals together rather than letting one overrule the others. Start with the surface, check how the center moves, then use a tester in an exposed brownie patch to confirm what the pan is already telling you.

The timer tells you when to start looking. The cookie and brownie tell you when to stop.

  • Cookie: the edges look set and lightly golden; the middle of each patch can remain soft.
  • Brownie: a little gloss is fine, but there should be no loose batter between the cookie pieces.
  • Movement: a contained tremble is fine. A loose wave through the middle needs more time.
  • Tester: use a brownie patch near the middle and avoid an obvious pool of melted chocolate.

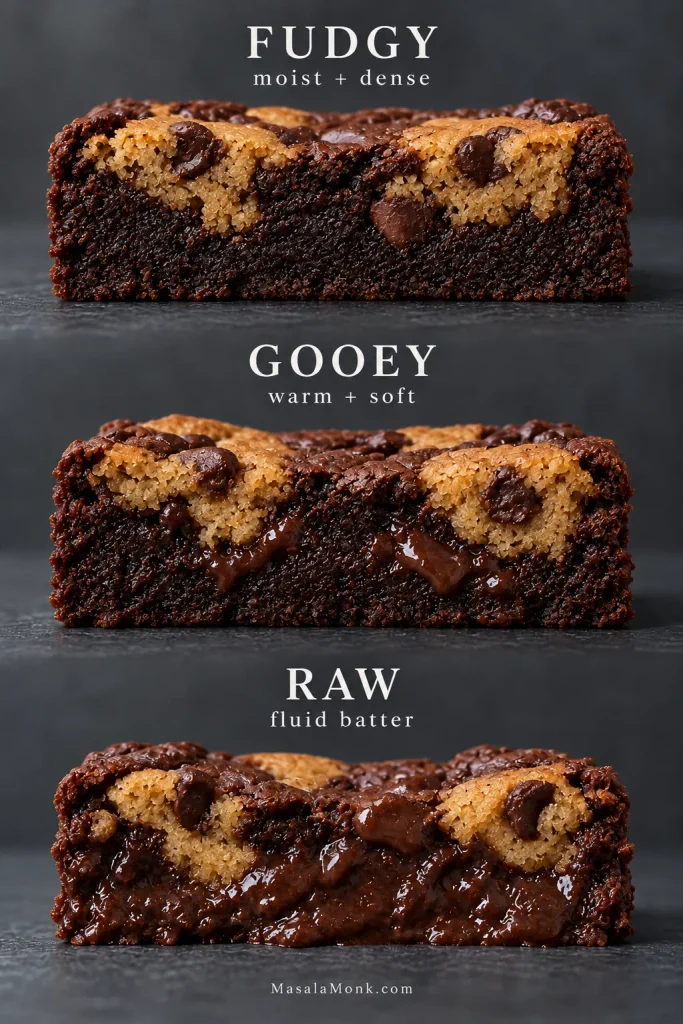
Fudgy, gooey or actually raw?

Fudgy brookies are moist and dense, but the brownie itself is baked. They may look very soft while hot and become properly sliceable as they cool.

Gooey brookies are softer when served warm: the brownie is very moist, melted chocolate runs through the crumb, and the bar is messy without behaving like batter.

Raw brookies are different. The brownie remains fluid, leaves obvious batter on the tester and can collapse or flow instead of firming up.

Three Brookie cross-sections showing a dense fudgy center, a softer gooey center and an underbaked fluid brownie center.
Cooling can firm a properly baked fudgy or gooey center, but it cannot turn fluid batter into crumb. If the middle still flows rather than holding structure, waiting longer on the counter is not the fix.

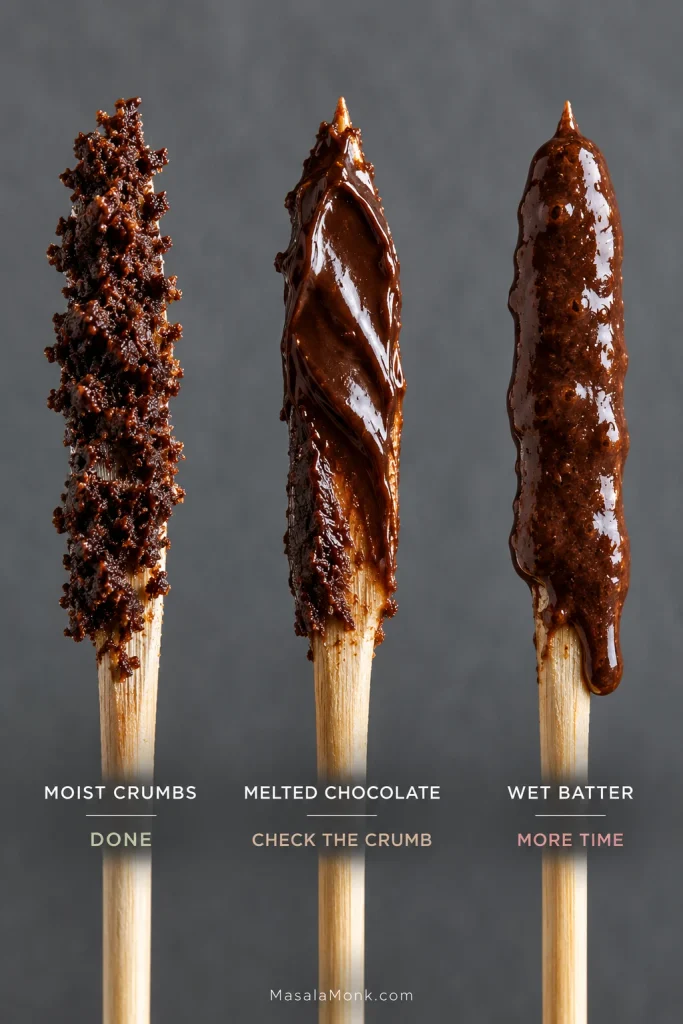
How to Read the Tester

Melted chocolate can smear across a tester or knife even when the brownie is baked. Look at the crumb around that chocolate before deciding the pan needs longer.

Three wooden testers showing moist brownie crumbs, a smooth melted chocolate coating and wet brownie batter.
If your tester lands in melted chocolate, move a little and test an exposed brownie patch again. A second location is more useful than adding several unnecessary minutes simply because the first tester came out dark and glossy.

If a second brownie-patch test still shows wet batter, go straight to raw-middle troubleshooting.

For a deeper look at that sometimes-frustrating line between fudgy and underbaked, see our fudgy brownie recipe and doneness guide.

If your cookie repeatedly reaches the right color well before the brownie, the pan is the first thing worth examining.

What Pan Should You Use for Brookies?

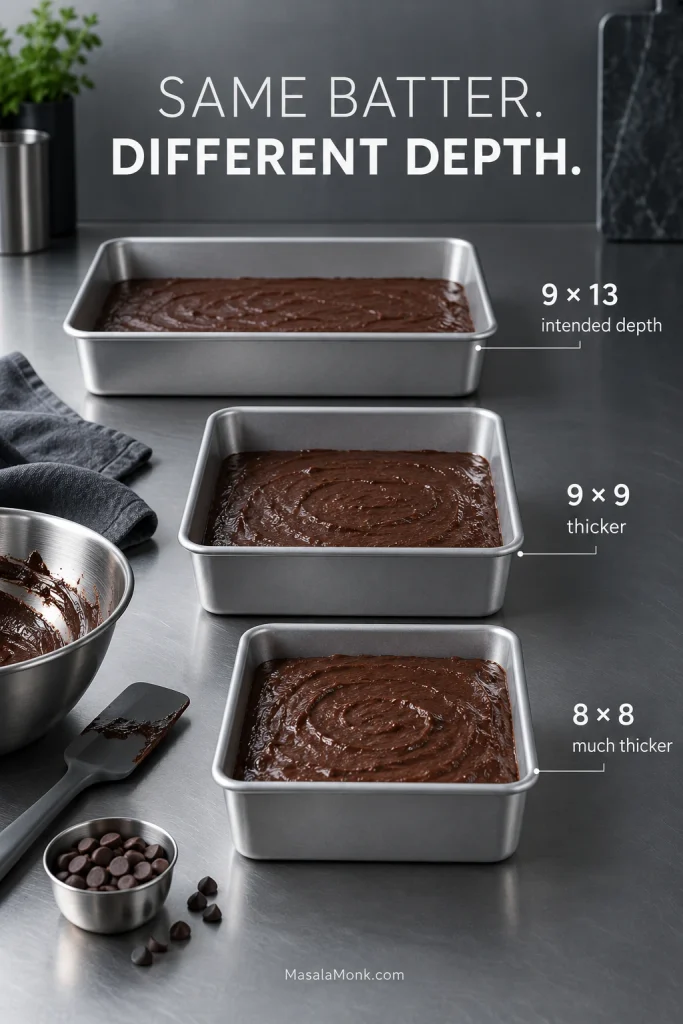
Use a light-colored metal 9 × 13-inch (23 × 33 cm) pan for this recipe.

The same batch becomes much thicker in an 8 × 8 or 9 × 9-inch pan, which means the brownie needs more oven time underneath cookie dough already exposed directly to the heat.

Three light metal pans labeled 9 by 13, 9 by 9 and 8 by 8, illustrating progressively greater batter depth as the pan gets smaller.
Surface area drops faster than the side lengths suggest: a 9 × 13-inch pan gives 117 square inches, 9 × 9 gives 81, and 8 × 8 only 64. With the same batter, that makes the brownie substantially deeper in a square pan.

Very dark metal can brown the bottom and edges faster. Glass and ceramic may not follow the same timing either, so watch the brownie rather than assuming the clock transfers unchanged.

For the deeper baking science behind those differences, King Arthur has a useful guide to glass, metal and stoneware pans.

Thick square-pan brookies can be excellent. They just need a recipe developed for that deeper pan.

If the batch in front of you already has hard edges, a wet middle or one strangely soft patch, the pattern can usually tell you what happened.

Brookies Troubleshooting

Raw Centers

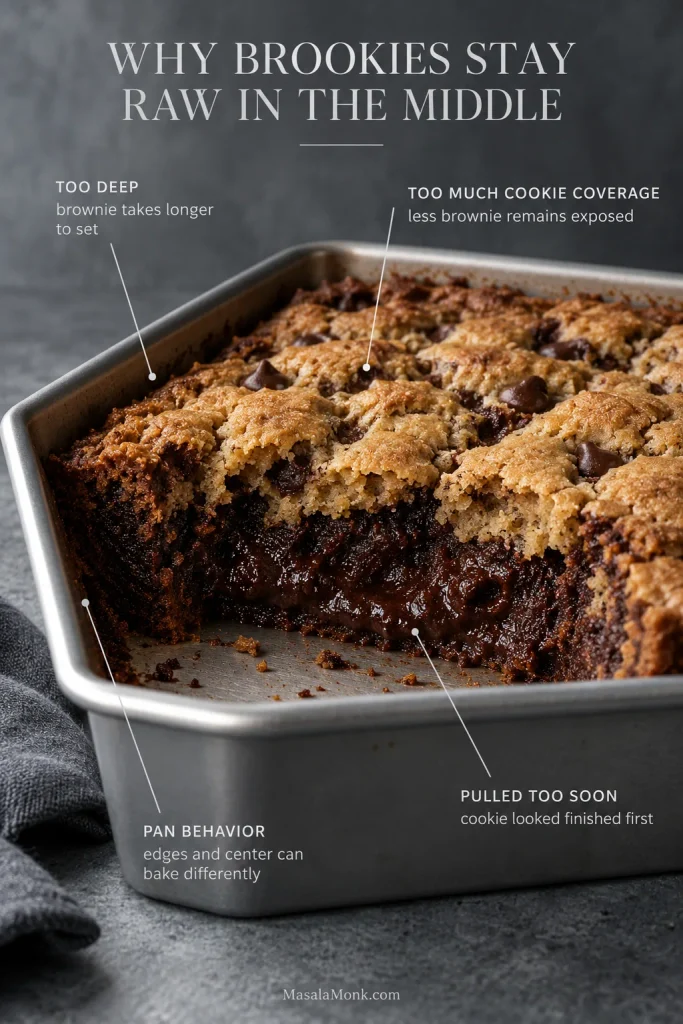
Why are my brookies raw in the middle?

The usual causes are too much brownie depth, very heavy cookie coverage, bakeware that leaves the middle lagging behind, or simply taking the pan out because the cookie looked finished first.

Golden cookie over wet brownie still needs more oven time. Cover the top loosely with foil and continue in short intervals.

A cut pan of Brookies with a visibly underbaked center and callouts identifying possible reasons the middle stayed raw.
The cookie is exposed directly to oven heat while the brownie center has to set underneath and between it. As a result, a golden top can arrive before a deep or heavily covered middle has finished baking.
The edges are hard but the middle is raw

This is frustrating because the pan can look completely finished around the outside. A thick brownie layer, dark or glass bakeware, or an oven running hot can all push the perimeter ahead.

Protect anything already browned and give the middle more time. If cakes and brownies behave this way in your oven too, check the actual oven temperature with a thermometer.

Uneven Baking

Only one part of the pan is underbaked

One soft patch usually means the batter was thicker there, a large cookie piece covered that spot, or the oven has a hot or cool area. The whole pan may not need more time.

Spread the brownie carefully into the corners next time, and rotate late in the bake if your oven has a familiar hot side.

Texture, Sinking and Cutting Problems

The cookie dough sank into the brownie

A little sinking is exactly what you want—the brownie and cookie should meet.

If the cookie dough almost disappears, it was probably very warm or divided into pieces that were too small. A short chill gives it more body.

They look raw as soon as I cut them

Warm brookies are supposed to be messy. An early slice can look alarmingly soft while the chocolate is molten.

Leave the rest of the slab alone for a while. A brownie that firms into a dense slice was still setting; one that continues to flow was underbaked.

The brownie is cakey, dry or crumbly

Start with the flour measurement and bake time. Extra flour and a few unnecessary minutes can move the brownie away from fudgy surprisingly quickly.

Once you have identified the problem, return to the method or back to the contents.

Flavor Changes That Won’t Overload the Bake

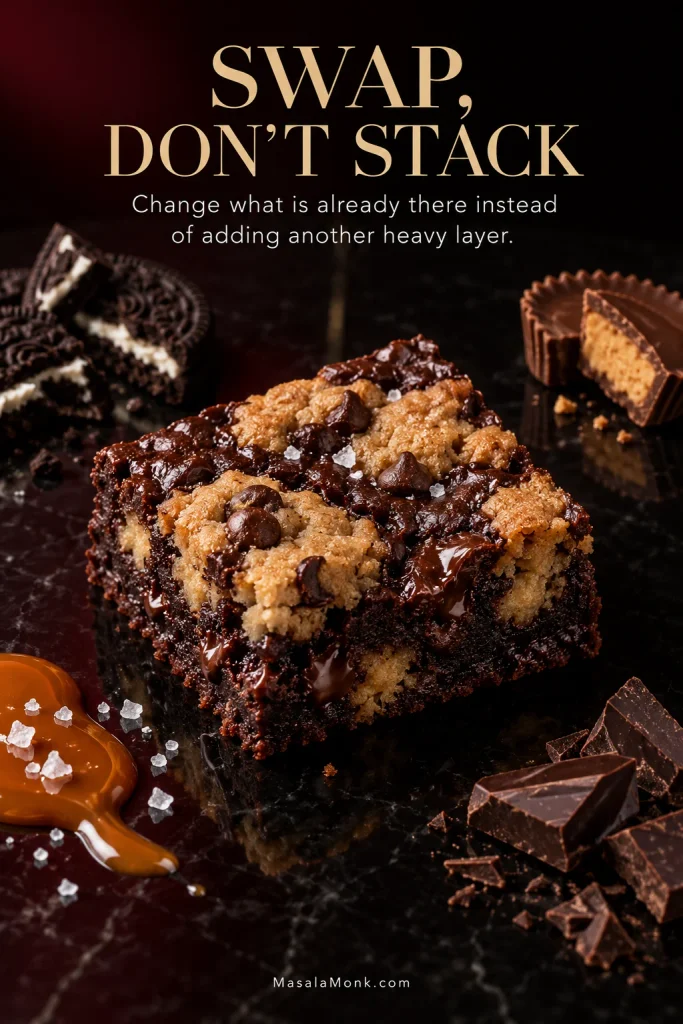
There is already plenty happening in this pan. The safest changes replace part of what is already there instead of adding another heavy layer: swap, do not stack.

A Brookie surrounded by Oreo pieces, peanut butter cups, caramel with flaky salt and chopped chocolate on a dark red and black surface.
For Brookie variations, think about structure before flavor: is the new ingredient replacing something already in the dough, or adding extra mass or moisture? A replacement usually preserves the original bake more predictably than another full layer.

Oreos or Peanut Butter Cups

Replace part of the chocolate in the cookie dough with chopped Oreos or peanut butter cups, keeping the overall quantity of chunky add-ins about the same. You still want the cookie dough to spread normally and leave brownie showing between the pieces.

Caramel and Flaky Salt

Caramel is easier to control after baking. Drizzle a little over the cooled slab and add flaky salt instead of putting a wet caramel layer through the middle before it goes into the oven.

Change the Chocolate

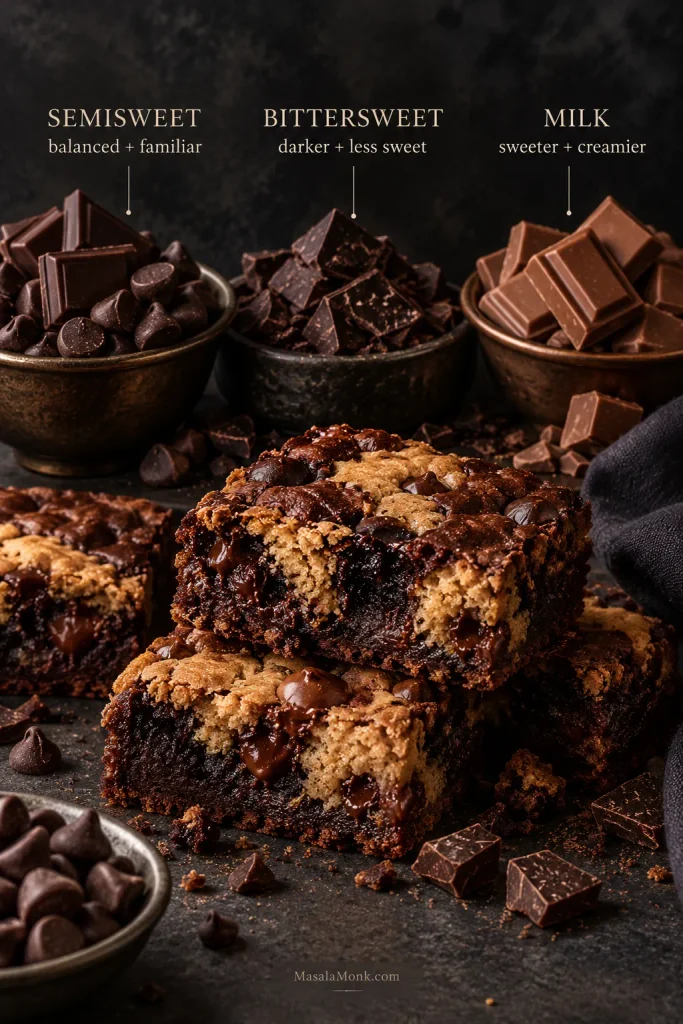
Bittersweet chocolate gives the bars a darker, less sweet finish; milk chocolate takes them in the other direction. Chopped chocolate mixed with chips gives you larger melted pockets alongside smaller pieces running through the crumb.

Semisweet, bittersweet and milk chocolate arranged with Brookies in three labeled sections.
There are really two chocolate decisions here. Chocolate type changes sweetness and cocoa intensity, while chocolate form changes the pockets you bite into—chips tend to stay smaller, whereas chopped chocolate can melt into broader streaks.

Changes That Need Their Own Recipe

Brown butter changes more than flavor because some of its water disappears during browning. That affects the way cookie dough spreads, so it is not a casual one-for-one swap. Our brown butter chocolate chip cookies go deeper into the moisture loss and what it does to the dough.

Brownie mix and refrigerated cookie dough need their own quantities and timing too. Box sizes, fat levels and intended pan sizes vary enough that dropping random packaged products into this method would be guesswork.

For a different shape altogether, the Brookie Pie variation in our cookie pie recipe turns the same brownie-cookie idea into a deeper dessert for slicing and sharing.

Cooling, Cutting, Storing & Freezing Brookies

For warm dessert tonight

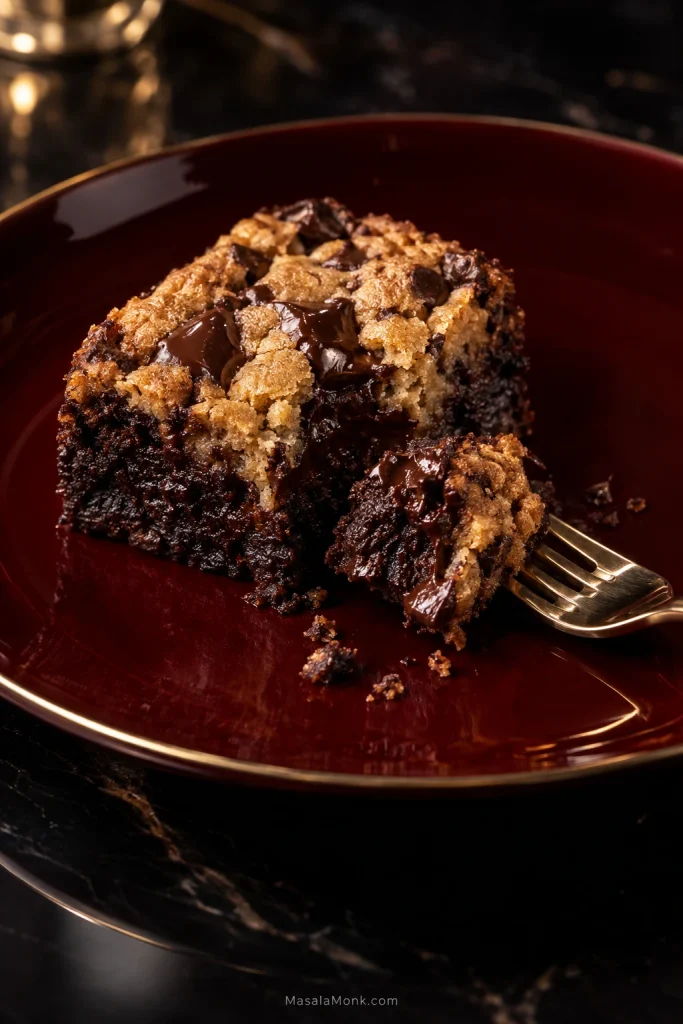
Give the pan about 30–45 minutes. The brownie will have started to firm, but the chocolate will still be soft and the middle deliberately messy. This is the fork version: tender cookie, brownie at its softest and melted chocolate running through the places where the two meet.

A warm Brookie on a deep red plate with a fork breaking off a soft piece and melted chocolate visible inside.
Warm serving is a texture choice, not a shortcut around doneness. Bake the Brookies fully first; the 30–45 minute rest simply catches them while the brownie is especially soft and the chocolate is still loose enough for a fork.

For neat fudgy squares

Wait about an hour, or until the slab feels stable enough to lift with the parchment. Move it to a board and cut with a large sharp knife.

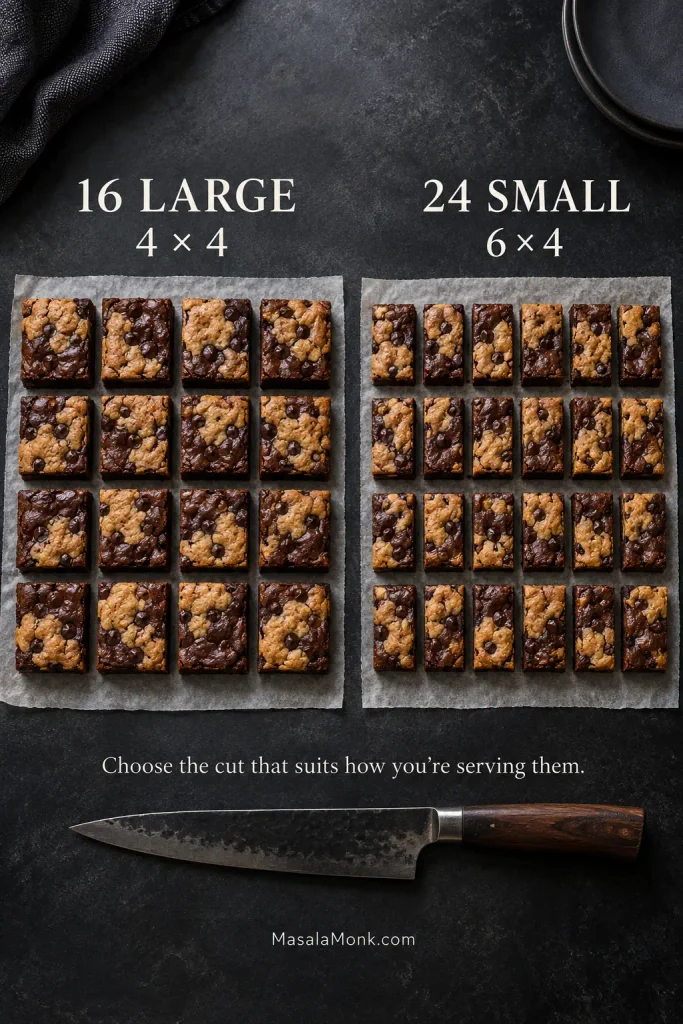
A little chocolate on the blade is perfectly normal. Cut into 16 larger squares for dessert portions or 24 smaller bars for sharing, wiping the knife between cuts when clean edges matter.

Sixteen large Brookie squares arranged in a 4-by-4 grid beside 24 smaller Brookie pieces arranged in a 6-by-4 grid.
For serving, choose the grid before making the first cut: 4 × 4 gives 16 larger squares, while 6 × 4 gives 24 smaller pieces. Planning the pattern first also helps avoid narrow leftover strips at the edge.

For very clean cuts tomorrow

Cool the slab completely and chill it briefly before slicing. Bring the bars back toward room temperature before serving for a softer brownie and less-firm chocolate.

That also makes brookies easy to prepare a day ahead: bake the slab, let it cool, and save the cutting for when everything is firm and easy to handle.

Storage and freezing

Once the brookies are cool, keep them in an airtight container at room temperature for about 3–4 days. Refrigerated bars keep for roughly a week, though the brownie and chocolate both become firmer when cold.

For longer storage, wrap individual bars well and freeze them airtight for up to about 2 months. Thaw at room temperature.

Two Brookie halves placed close together, showing golden cookie sections embedded irregularly in dark fudgy brownie with softened chocolate at the center seam.
Cool enough to cut cleanly, the Brookie still keeps both textures visible: chewy cookie folded into fudgy brownie, with softened chocolate at the seam.

Warm a square just enough for the chocolate to loosen and the boundary between the two almost disappears again. Both are good—it simply depends whether you want a neat bar in your hand or the softer version that needs a fork.

↑ Back to top

Posted on — Leave a comment

Pecan Pie Recipe: Easy, Classic & Perfectly Gooey

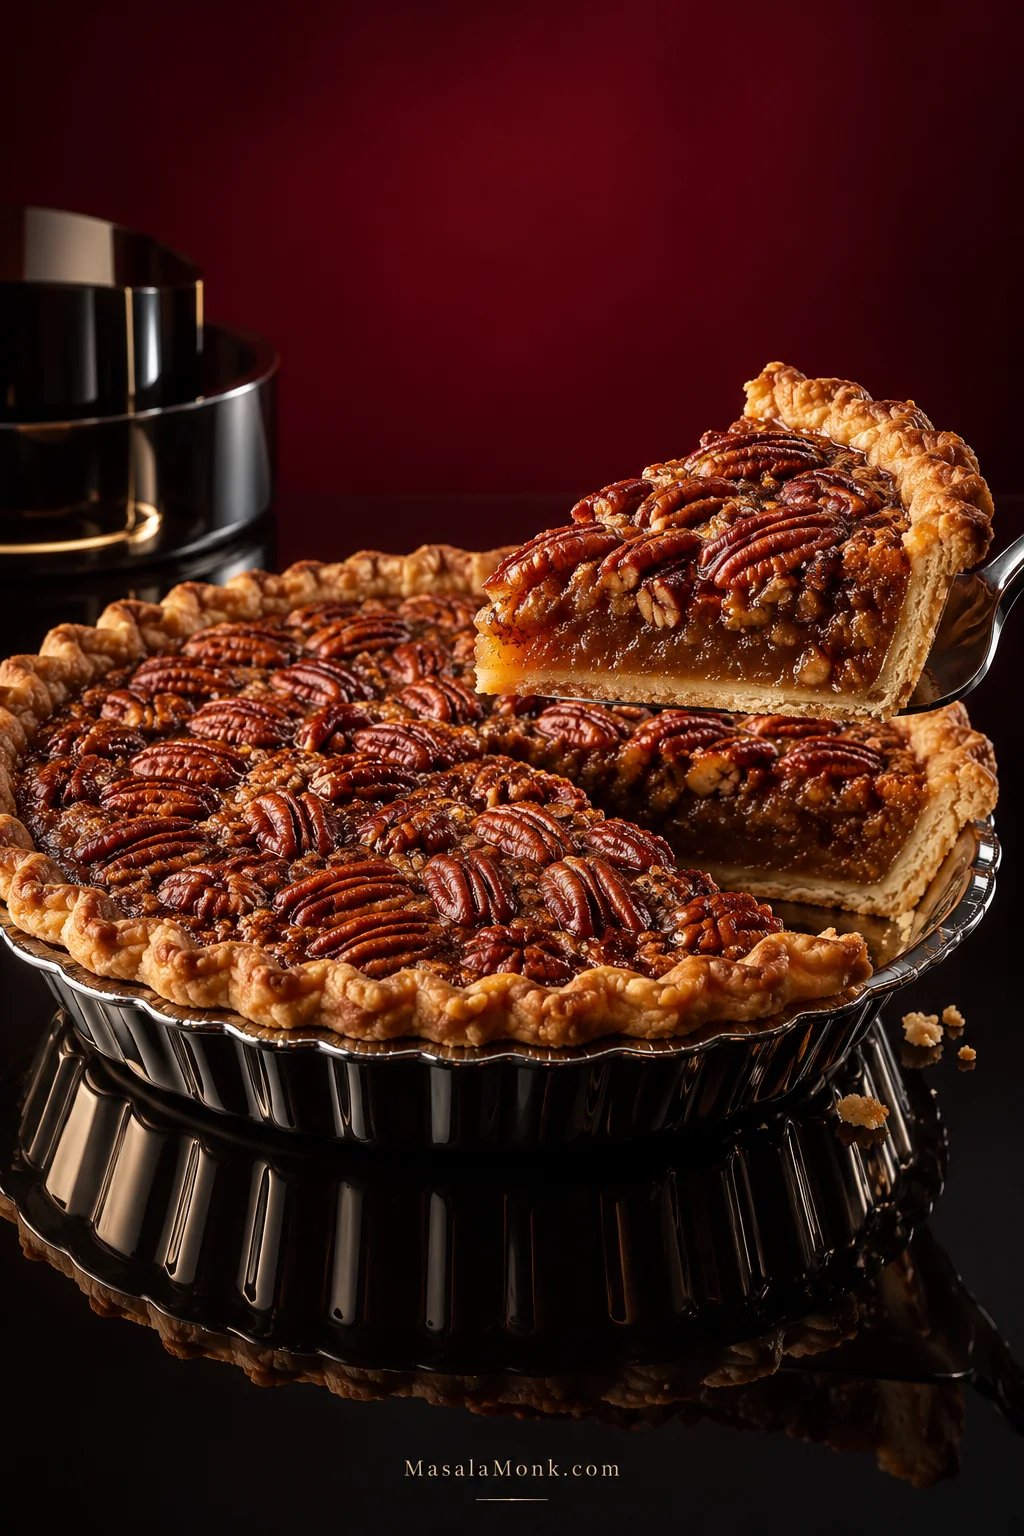
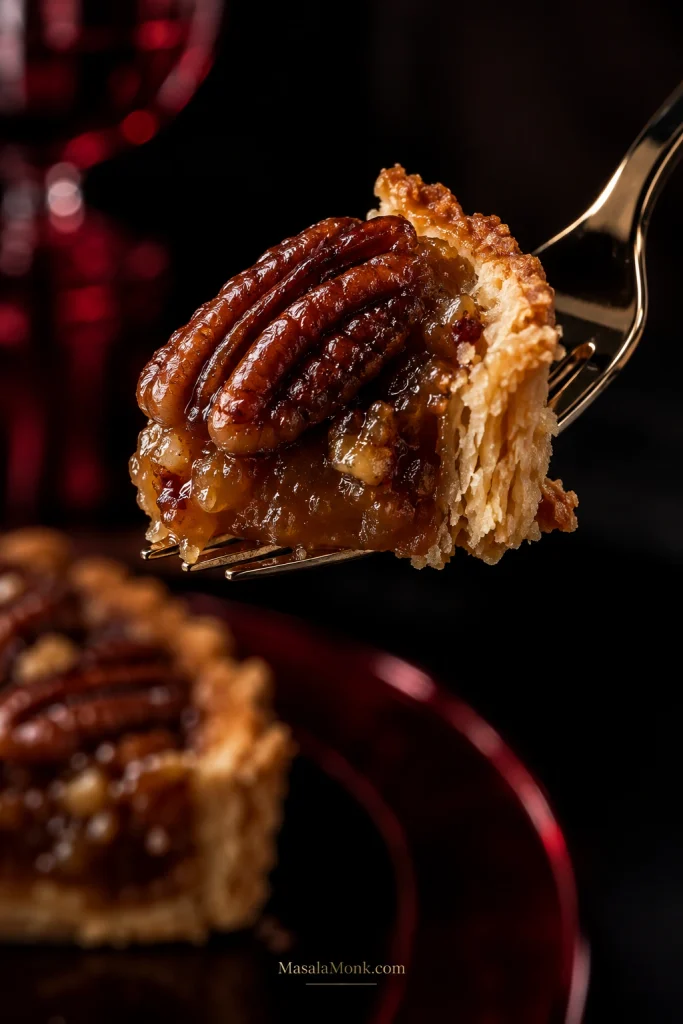
A slice of pecan pie lifted on a metal server above the remaining pie, showing flaky golden crust, toasted pecans and glossy caramel filling that holds its shape.

There is a moment with pecan pie when all the confidence disappears. The crust is browned, the pecans are glossy, the kitchen smells like butter and toasted nuts—and you still do not know what the middle will do when that first wedge comes out.

The goal with this pecan pie recipe is a soft, caramel-rich center that stays with the slice. It should not pour across the plate, but it should not be baked so firm that it eats like candy either. You want crisp pastry underneath, plenty of pecans in every forkful and a filling that gives easily when a fork goes in.

This is the familiar classic American holiday style: eggs, corn syrup, brown sugar, butter and plenty of pecans baked in a single pastry shell. The filling itself uses just seven ingredients. There is no stovetop caramel, no mandatory crust prebake and no need to arrange a perfect mosaic of pecan halves.

The important parts are simpler than that: the crust needs to bake through, the pecans need to taste toasted and the center needs to set soft.

Bake for the wobble. Cool for the slice.

Pecan Pie at a Glance

Quick answer: Pecan pie is done when the filling around the outside is set and the center moves together in one gentle wobble rather than sloshing. Bake this 9-inch / 23-cm pie at 350°F / 177°C on a rack in the lower third of the oven. Start checking around 45–50 minutes; most pies finish in about 50–60 minutes. Around 200°F / 93°C near the center is a useful extra check. Give the pie about 2 hours to cool and set before slicing.

Easy Classic Pecan Pie Recipe

A flaky 9-inch pie packed with buttery pecans and a glossy brown-sugar filling that stays gooey without flowing across the plate.

Yield: 1 9-inch pie

Serves: 8 generous or about 10 smaller slices

Prep: about 20 minutes with a prepared crust

Bake: about 50–60 minutes

Cool: about 2 hours

Total: about 3 hours 10–20 minutes with a prepared crust, including cooling

Oven: 350°F / 177°C

Before you start: Not every 9-inch pie plate holds the same amount. This filling fits most comfortably in a shell about 9 inches / 23 cm across and roughly 1½ inches / 3.8 cm deep. A shallow ready-made shell may need less filling.

Pecan Pie Ingredients

For the crust

  • 1 unbaked single 9-inch / 23-cm pie crust, homemade, refrigerated or frozen. Making the pastry yourself? Use one disc of our homemade flaky pie crust.

For the pecan pie filling

  • 8 oz / 225 g pecans, about 2 cups, divided between chopped nuts and larger pieces
  • 3 large eggs
  • 1 cup / 240 ml / 312 g corn syrup, light or dark
  • ½ cup packed light brown sugar / about 100 g
  • 4 tbsp / 2 oz / 56 g unsalted butter, melted and cooled until warm
  • 2 tsp / 10 ml vanilla extract
  • ½ tsp fine salt
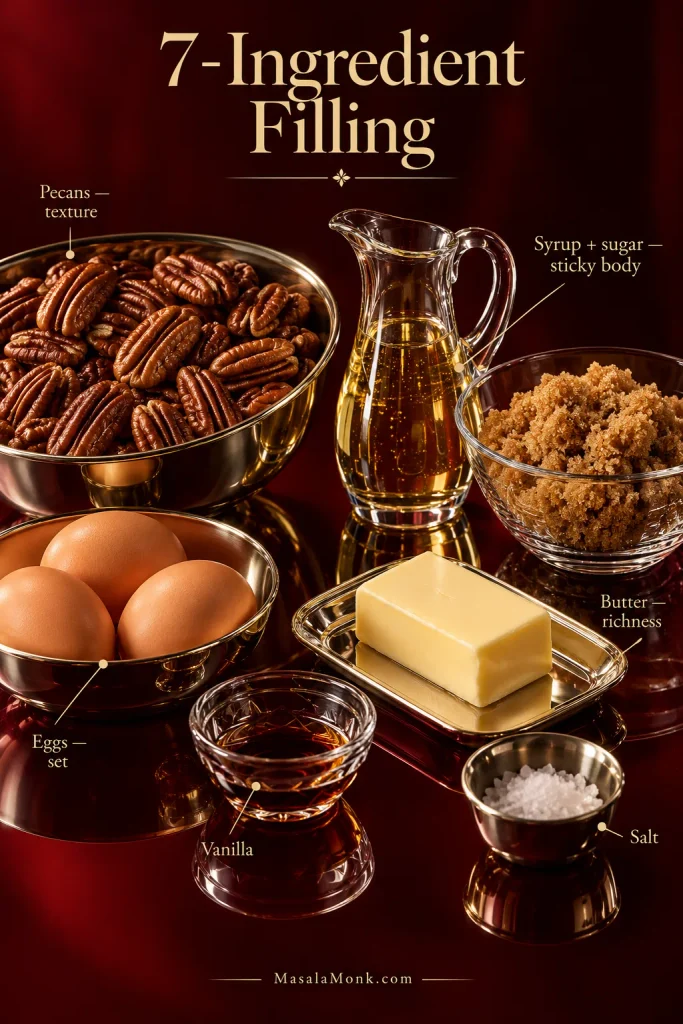
Pecans, eggs, corn syrup, brown sugar, butter, vanilla and salt arranged as the seven filling ingredients, with small labels showing the roles of eggs, syrup, sugar, butter and pecans.
A short pecan pie filling formula still depends on balance: eggs give it structure, syrup and sugar create body, and generous pecans keep the finished pie textured rather than simply sweet.

Equipment

  • 9-inch / 23-cm pie plate or deep-dish frozen pie shell
  • Rigid rimmed baking sheet if using a flexible disposable shell
  • Foil or pie-crust shield
  • Instant-read thermometer, optional

How to Make Pecan Pie

Prepare the Crust and Pecans

  1. Heat the oven. Set a rack in the lower third and heat to 350°F / 177°C. If you are using a flexible disposable pie shell, place it on a sturdy rimmed baking sheet before filling it.
  2. Fit and chill the crust. Press or roll homemade or refrigerated pastry into the plate and crimp the rim. Check the bottom and sides for cracks or paper-thin patches. For this method, do not prick or dock the raw shell; the liquid filling does not need extra openings where syrup could seep underneath. If the pastry has softened, refrigerate it for 15–20 minutes.
  3. Using a frozen shell? Follow its package directions for thawing. Some are filled from frozen; others are thawed first. Keep a flexible foil tin on its baking sheet while you fill and carry it.
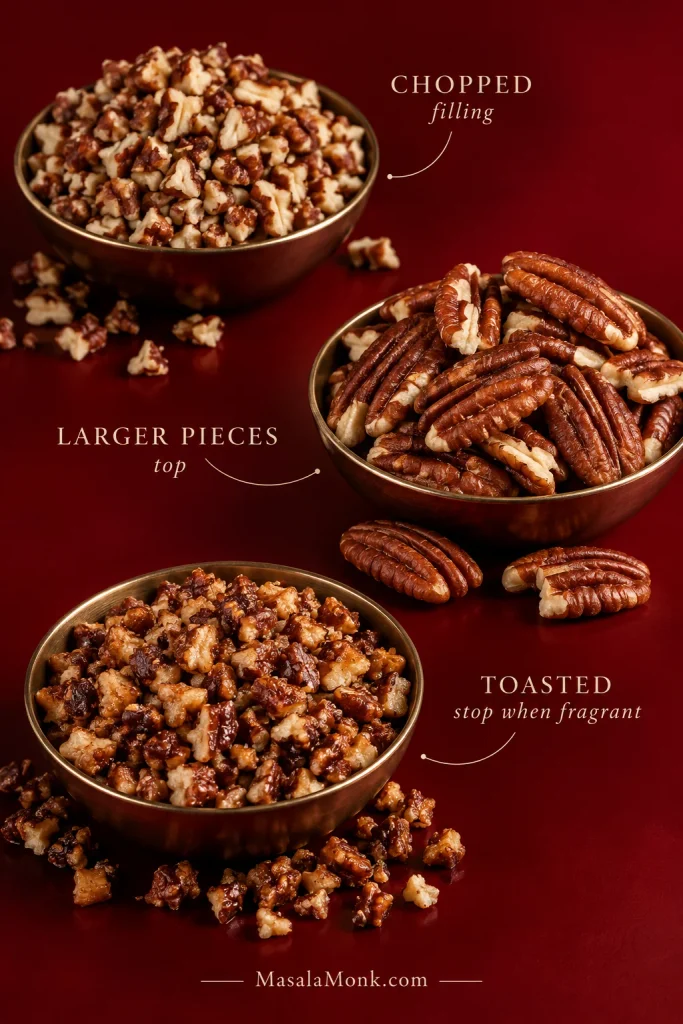
  4. Prepare the pecans. Coarsely chop about two-thirds and leave the rest in larger pieces or halves. For deeper roasted flavor, toast the chopped nuts for 6–8 minutes at 350°F / 177°C, just until the kitchen smells distinctly nutty. Let them cool briefly. This step is optional.
Three pecan preparations shown separately: coarsely chopped pecans for the filling, larger pecan pieces for the top and toasted chopped pecans.
Chopping most of the pecans does two useful things at once: it distributes nuts through more bites and makes clean slices easier; meanwhile, larger pieces give the top its crunch.

Mix, Fill and Bake

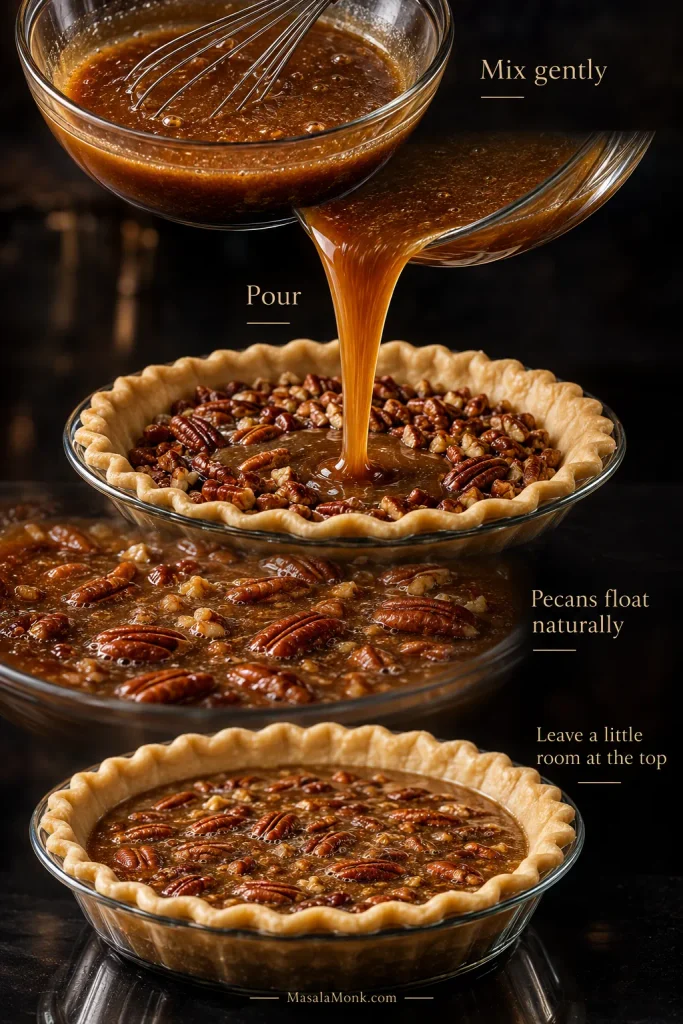
  1. Mix the filling gently. Whisk the eggs only until blended. Add the corn syrup, brown sugar, warm melted butter, vanilla and salt. Whisk until smooth and glossy. Too much beating can leave the filling pale and foamy.
  2. Fill the pie. Scatter the chopped pecans across the bottom, pour over the filling, then place the larger pieces loosely on top. Many pecans will rise or shift as the pie bakes. That is normal. There is no need to press them down.
  3. Leave a little room at the top. A shallow commercial shell may not take every last spoonful. Stop before the filling reaches the top of the pastry.
Vertical process showing pecan pie filling being mixed, poured over chopped pecans, pecans rising naturally toward the surface and the filled shell with space below the crust rim.
As pecans rise, they create the classic nut-heavy top without arranging a mosaic; meanwhile, chopped nuts left below keep pecans distributed through the filling.
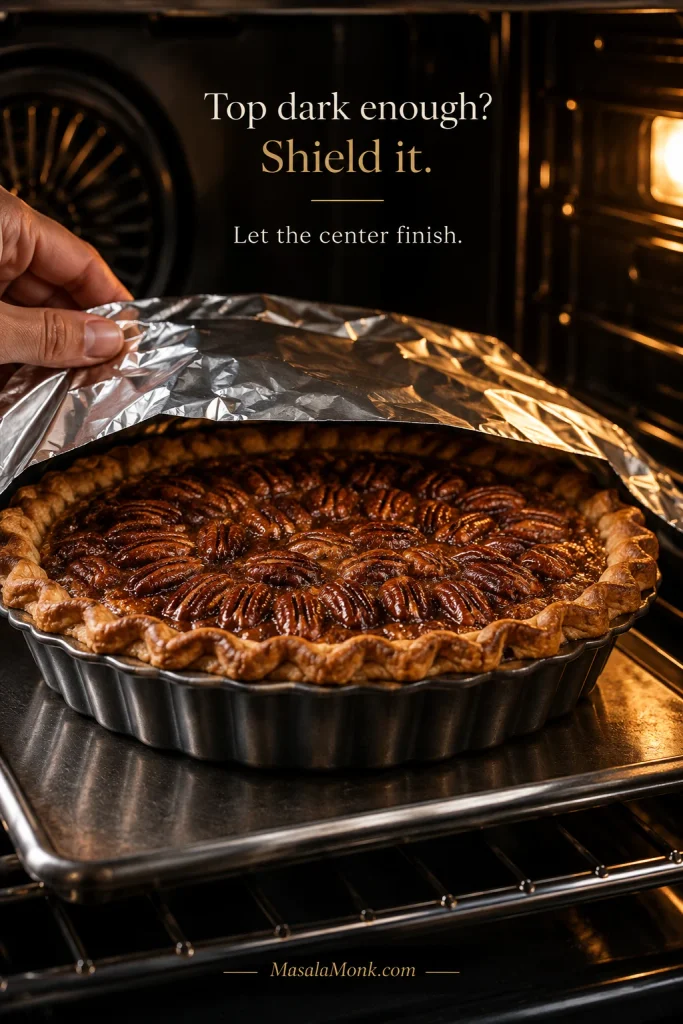
  1. Bake. Put a sturdy metal, glass or ceramic pie plate directly on the lower-third rack. Keep a flexible disposable shell on its baking sheet for support. Begin checking around 45–50 minutes; most pies of this depth finish in roughly 50–60 minutes. Shield the rim once it is brown enough. If the pecans are getting dark first, tent the top loosely with foil and let the middle keep baking.

Read the Center, Then Let It Set

  1. Check the middle. The outer filling should look set and slightly puffed. Give the pan a gentle nudge. The center should move together in one gentle wobble. Loose syrup shifting independently under the pecans means it needs more oven time. For another check, look for roughly 200°F / 93°C near the center.
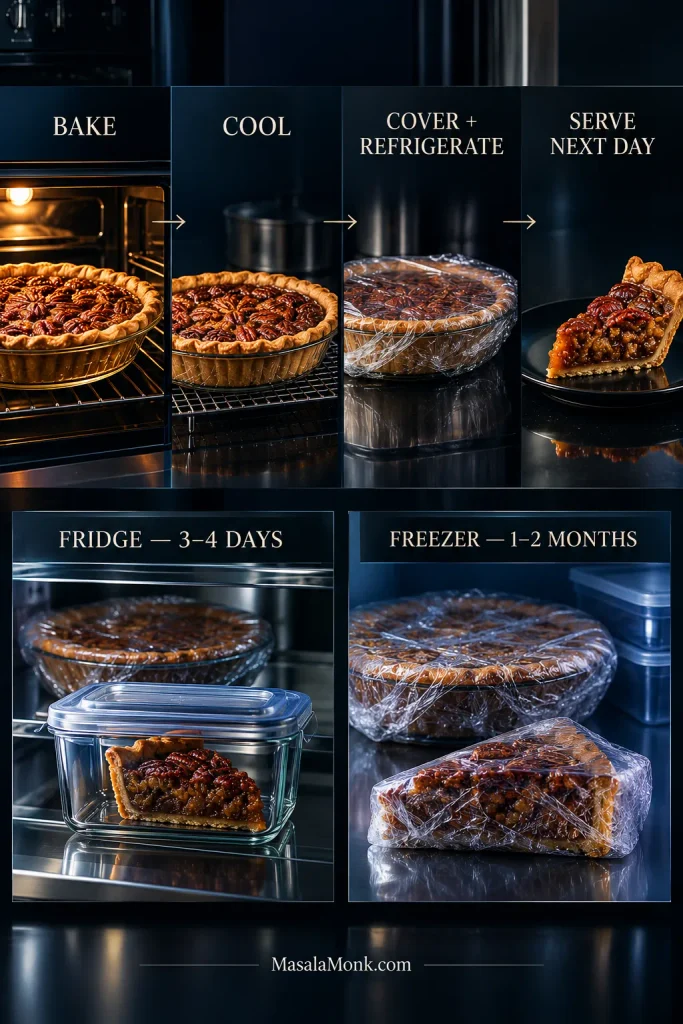
  2. Cool before cutting. Set the pie on a rack and let it cool for about 2 hours. That gives the filling time to finish setting. If you are not serving it after the cooling period, cover and refrigerate it promptly.

If the pie came out with that gentle wobble, the hard part is over.

Leave it alone.

A tiny “test slice” cut from a hot pie can make a perfectly good filling look underdone. The recipe above is all most bakers will need. The rest is here for the moments when the center, crust or timing has you wondering what to do next.

Need More Help With Your Pie?

How to Tell When Pecan Pie Is Done

Pecan pie is done when the filling around the edge is set and the center moves together in a gentle wobble, with no loose liquid sloshing underneath the pecans.

The timer tells you when to start paying attention. The center tells you when to stop.

Pecan Pie Bake Time: Start Looking Around 45–50 Minutes

At 350°F / 177°C, this 9-inch pie generally takes about 50–60 minutes. A shallow foil shell can finish sooner; a deeper pie or slower-heating dish may take longer.

A browned pecan pie in the oven with aluminum foil shielding the crust and top while the center continues baking.
Browning and doneness do not always arrive together. Once the surface has enough color, foil buys the center more baking time without asking the crust and pecans to take more heat.

Look for a wobble, not a slosh. Nudge the plate. A ready center moves together like thick custard and settles quickly. If syrup shifts independently under or between the pecans, keep baking. The top may already look finished, so shield it if necessary and give the middle the time it needs.

Two pecan pies compare doneness: one shows a gentle cohesive wobble in the center, while the other shows loose liquid moving independently between and beneath the pecans.
A gentle pan nudge reads the whole center without piercing or cutting a filling that is still setting; instead, the movement gives you a non-destructive doneness check.

What Temperature Is Pecan Pie Done? About 200°F / 93°C

An instant-read thermometer is useful when the visual cue still leaves you unsure. Check near the center and use the reading as confirmation. Avoid touching the pie plate with the probe.

An instant-read thermometer inserted near the center of a pecan pie reads about 200°F and 93°C, with guidance that temperature is a confirmation of doneness.
Because the center is the last part to set, that is where a temperature check is most useful. Around 200°F / 93°C can confirm what the wobble is already telling you.

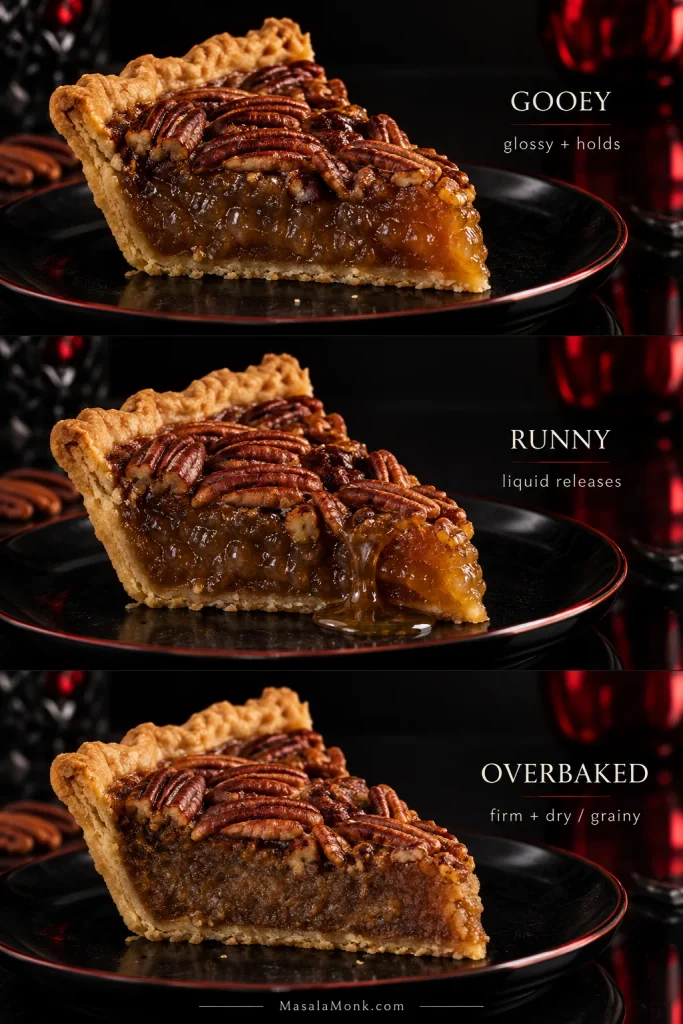
Gooey, Runny and Overbaked

A gooey pie keeps its shape when cut but stays moist and glossy at the edge. The filling yields under the fork without flowing into the space left behind.

A runny pie still releases syrupy filling after it has cooled. Take the bake too far and the center becomes firm, grainy, eggy or almost candy-like.

Skip the clean-knife test. This is not cake.

Back to Recipe Cooling & Slicing Fix a Runny Pie

How Long to Cool Pecan Pie Before Slicing

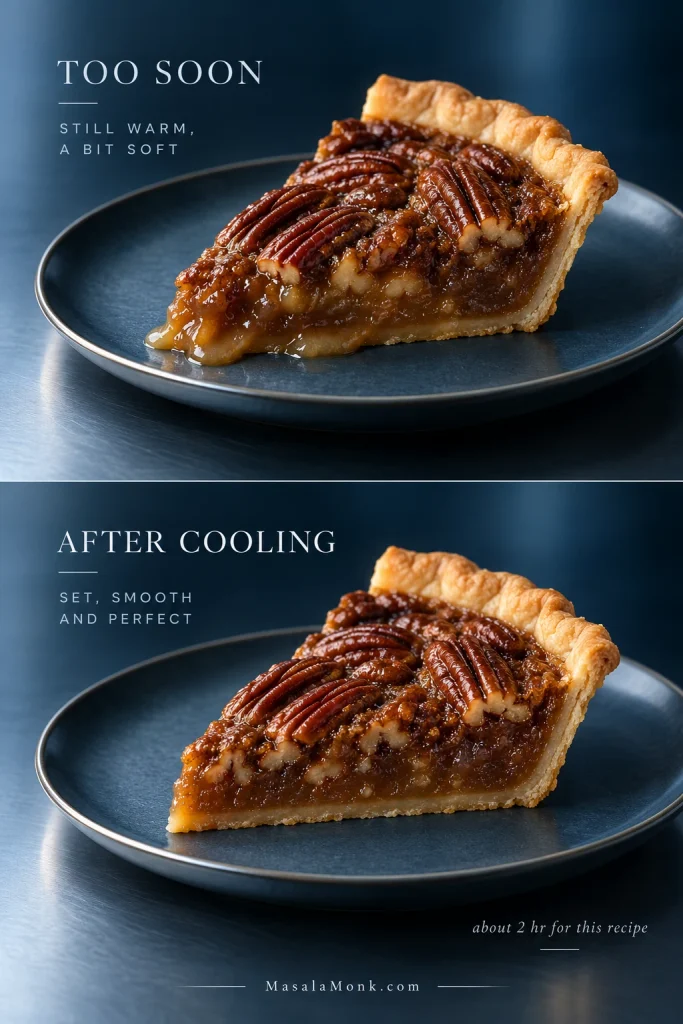
Give the pie about 2 hours on a cooling rack before cutting it. The filling is still settling as heat leaves the pie, so a center that looked soft from the oven can become exactly the texture you wanted.

Leave it uncovered while it is hot so steam can escape. If you are serving it after that cooling period, slice and serve. Otherwise, cover and refrigerate once it has cooled enough; treat roughly two hours at room temperature as the outer cooling window, not a minimum wait before refrigeration.

Matching pecan pie slices compare a softer, looser slice cut too soon with a cooled slice that has a cleaner edge while remaining glossy inside.
Warm filling can imitate underbaking. After the pie has cooled, however, the cut edge becomes more defined while retaining the moist gloss that separates a gooey center from a dry one.

Want the slice warm? Let the pie set first, then gently warm the wedge you are serving. A brief warm-up brings the butter and toasted-pecan aroma forward again without loosening the entire pie.

Vanilla ice cream gives you the classic hot-cold contrast. When the pie already feels sweet enough, lightly sweetened or unsweetened homemade whipped cream keeps the finish cooler and lighter.

Pecan Pie Crust: Crisp Underneath and Strong Enough for the Filling

A good bottom crust lifts with the filling instead of remaining glued to the plate.

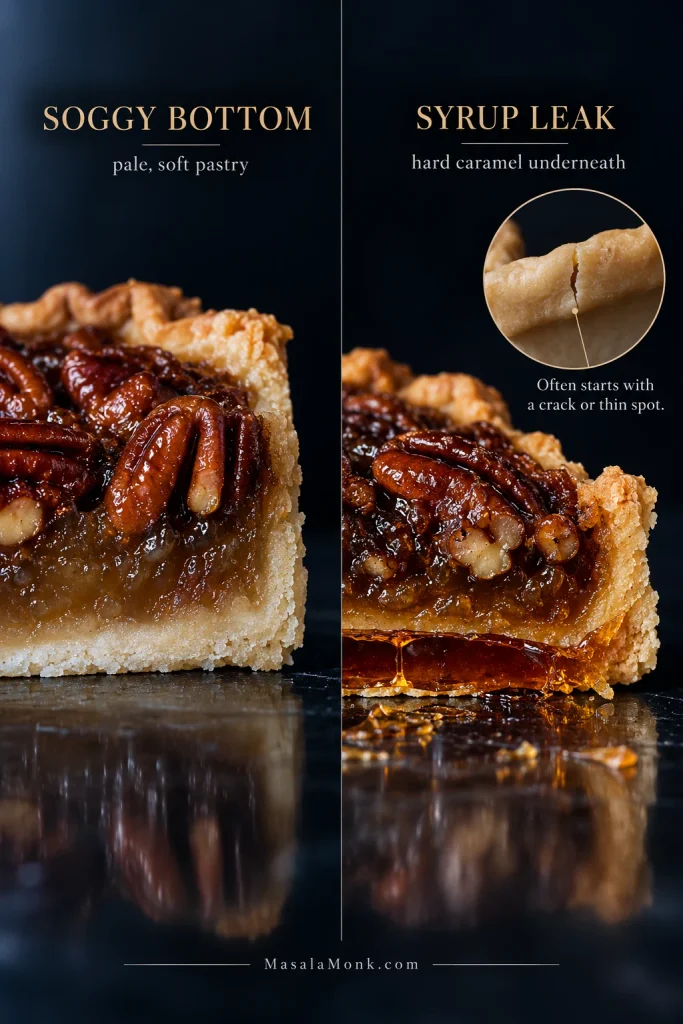
If the underside looks wrong, notice what is actually there. Pale, soft pastry points toward weak bottom heat. A hard layer of caramelized syrup under the crust means the filling found a route beneath it.

Pan Depth Matters More Than “9 Inch”

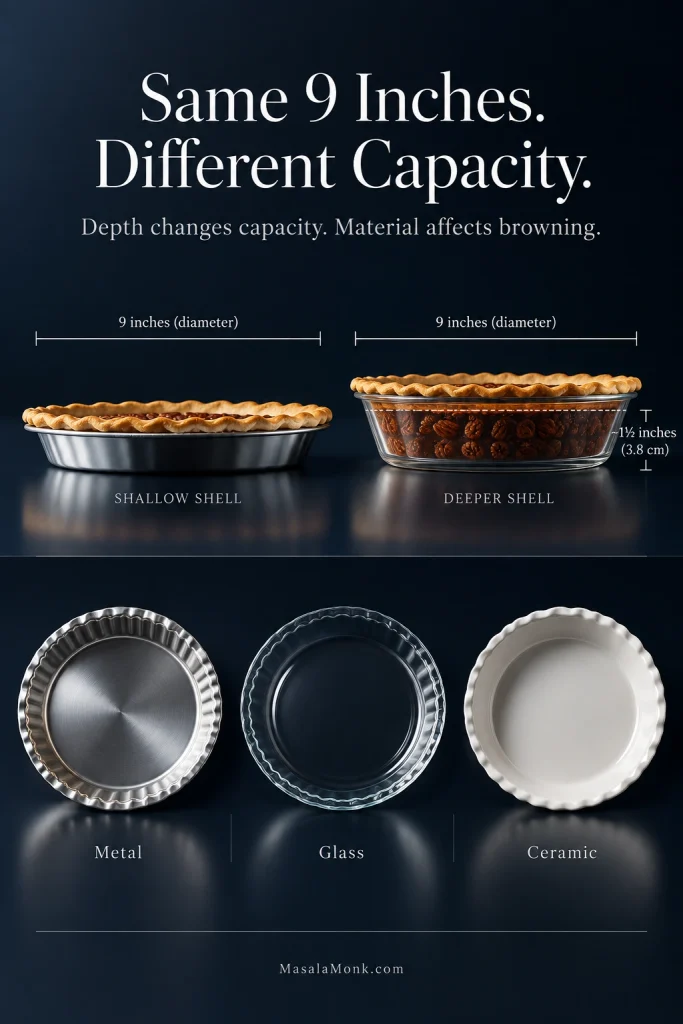
A shallow 9-inch shell holds much less than a deeper plate with the same diameter. Around 1½ inches / 3.8 cm deep is comfortable for this filling. With a shallower shell, stop before the filling reaches the top.

Metal pie plates usually brown the bottom most readily. Glass and ceramic work too, although the underside may take longer. A sturdy pie plate bakes directly on the lower-third rack; a flexible foil shell stays on its baking sheet for support.

Pie pan guide comparing shallow and deeper 9-inch dishes, including a deeper dish about 1½ inches or 3.8 centimeters deep, with metal, glass and ceramic pan examples.
Before pouring the filling, look at the pan from the side. Two 9-inch dishes can have very different capacities, and metal generally gives the bottom crust a head start on browning.

Using a Frozen Pie Crust for Pecan Pie? Keep It Supported

Yes, a frozen pie crust works for pecan pie. Choose a deep-dish shell when possible, follow its package directions for thawing and inspect the pastry before filling it. A tiny crack can look harmless until syrup finds it.

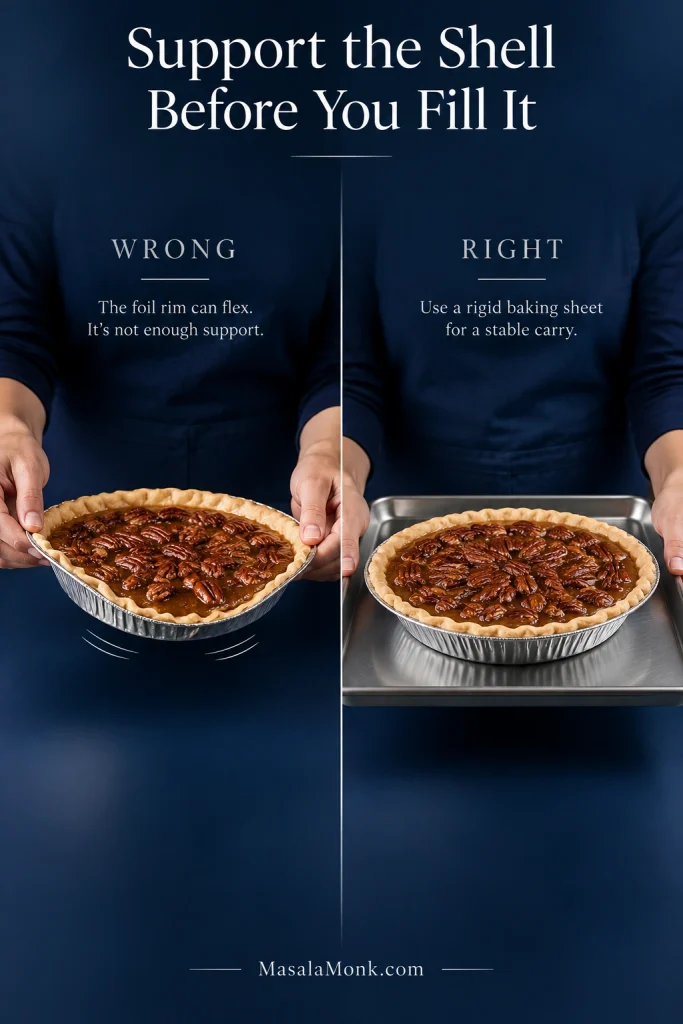
Disposable foil shells become surprisingly floppy once they are full. Put the empty shell on a rigid baking sheet before adding the filling, then carry the pie by the sheet.

Comparison showing a filled disposable foil pie shell flexing when lifted by its rim and the stable method of supporting and carrying the shell on a rigid baking sheet.
With a frozen pie crust in a foil shell, support is preventive rather than cosmetic: once the pan flexes, a tiny crack can become a leak path during filling or transfer.

Blind bake? Not for this pie. This filling can go straight into a cold, unbaked shell. The lower-third rack gives the bottom useful heat without adding another pastry stage. A partial blind bake can help if your usual pie dish repeatedly leaves the bottom pale or if you switch to a thinner filling, but it also creates another chance for warm pastry to slump or shrink.

Soggy Bottom or Syrup Under the Crust?

Pale, soft pastry usually needs better bottom heat, colder dough or more time.

A hard, shiny layer of baked sugar underneath tells a different story. The filling probably found a crack, thin patch or opening and slipped below the crust.

Two pecan pie cross-sections compare a pale, soft bottom crust with a hard caramelized syrup layer beneath the pastry; a small inset shows a crack where filling can leak through.
Use the underside to choose the fix: soft pastry points to a baking problem, while a hard amber sheet means syrup crossed the crust and set underneath.

Back to Recipe Pecan Pie Filling Troubleshooting

Pecan Pie Filling: Rich, Gooey and Packed With Pecans

Once the crust is sorted, the filling itself is simple: eggs, syrup, brown sugar, butter, vanilla, salt and pecans. Eggs are what let the filling set, while the syrup and sugar create its sticky body. Butter adds richness, and the pecans bring most of the texture and bulk. Corn syrup also reduces the chance of the sugar crystallizing as the filling cooks, helping the syrupy part of the filling stay smooth.

Many pecan pieces naturally rise toward the surface while the pie bakes. That is part of the classic look. What matters is using enough nuts that every forkful gets pecans along with the filling.

A good forkful catches crisp pastry, sticky filling and toasted pecan in the same bite.

The Best Pecans for Pecan Pie—and Which Ones to Toast

Start with fresh pecan halves or large pieces. Taste one before the bag goes into the recipe. Good pecans are sweet, buttery and clean; stale or paint-like flavors only become louder once the nuts are warm.

Use most of them coarsely chopped inside the filling, then save a smaller handful of halves or larger pieces for the top. Chopped nuts give you more pecan in each bite and make the finished pie easier to cut.

The nuts on top toast in the oven anyway. The chopped pecans under the syrup do not get that same exposure, so they are the ones worth toasting first. Give them 6–8 minutes at 350°F / 177°C and pull them when the aroma turns distinctly nutty; pecans can move from toasted to bitter quickly.

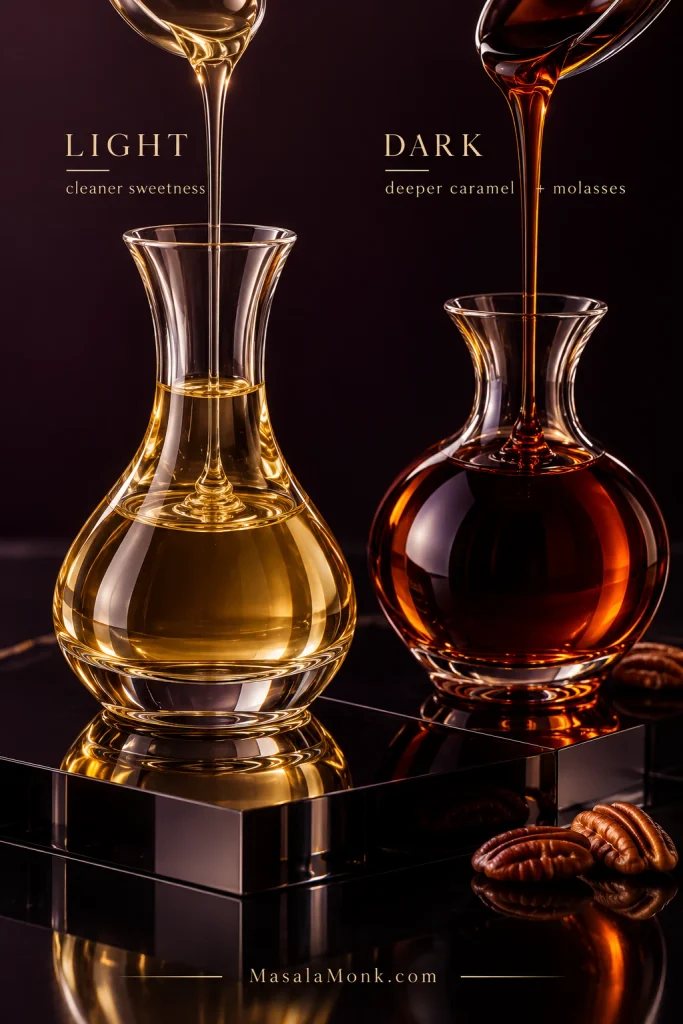
Light or Dark Corn Syrup?

Light corn syrup gives a cleaner sweetness and keeps vanilla and pecans prominent. Dark corn syrup brings a deeper, almost toffee-like flavor with some molasses character. Both work here, and dark brown sugar can also replace the light brown sugar when you want a stronger caramel note.

Two glass vessels compare pale golden light corn syrup with deeper mahogany dark corn syrup, labeled with their different flavor profiles.
Both light and dark corn syrup use the same 1 cup / 240 ml / 312 g amount in this pecan pie, so switching between them changes flavor rather than the mixing or baking method.

Pecan pie is supposed to be sweet. It just should not taste as though sweetness is the only thing happening.

Roasted pecan flavor, salt and darker syrup add contrast. Smaller slices suit a pie this rich. The generous 8 oz / 225 g pecans also keep the dessert tasting like pecans rather than simply sweet syrup in a crust.

Cut the sugar or syrup too far and the center can set differently, so save those changes for a formula built around them.

Making Pecan Pie Without Corn Syrup

Yes, you can make pecan pie without corn syrup—but use a filling built for the sweetener you choose. Golden syrup is a proven alternative in pecan-pie fillings, but do not assume every liquid sweetener can replace corn syrup cup for cup. Recipes built around golden syrup, maple syrup or honey may use different egg and sugar proportions.

Golden syrup, maple syrup and honey displayed in separate glass vessels, with text advising that pecan pie fillings should be formulated for the chosen sweetener rather than swapped cup for cup.
When making pecan pie without corn syrup, the key question is not which liquid looks similar; it is whether the filling’s egg-and-sugar balance was designed for that sweetener.

Pecan Pie Troubleshooting: Runny Filling, Soggy Crust & More

If a fully cooled pecan pie still pours from the cut edge, it was usually underbaked, or the amounts of eggs, sugar or syrup were changed enough to affect the set.

“Runny” is not much of a diagnosis on its own. What matters is when the filling looks loose and what the rest of the pie is doing.

Three matching pecan pie slices compare a glossy gooey filling that holds, a runny filling releasing liquid and an overbaked filling with a firmer, drier, grainier texture.
The useful comparison happens after cooling: gooey filling remains soft but contained, runny filling still releases syrup, and an overbaked center has lost moisture and tenderness.
What You SeeLikely CauseWhat to Do
Center sloshes in the ovenUnderdoneShield browned areas and keep baking
Pie looks very soft while hotMay be completely normalGive it the full cooling time before judging the set
Cold pie still pours from the cut edgeUnderdone or filling amounts changedNext time, bake until the middle moves together in one gentle wobble
Top is dark, middle is liquidThe surface finished firstTent with foil and continue baking
Filling is pale and foamyToo much air was beaten inUsually still edible; whisk gently next time
Baked filling is grainy or eggyEggs overheated during bakingPull the next pie sooner; use the gentle wobble as the doneness cue
Bottom crust is pale and gummyWeak bottom heatUse the lower rack, colder dough or a metal pan
Hard syrup is baked under the pastryCrack, hole or thin spot in the crustKeep the shell intact and avoid unnecessary docking
Pie overflowedShell too shallow or overfilledUse a deeper plate or leave some filling behind
Pie is hard rather than gooeyOverbakedPull the next pie sooner
Top puffed dramatically or crackedFilling may have baked too farStart checking earlier and rely on the center movement

If the Filling Still Looks Wrong

If the raw filling curdles before it reaches the oven, the melted butter was probably too hot; starting again is usually simpler. An eggy or grainy baked filling points more toward too much heat during baking.

If your oven regularly finishes much earlier or later than recipes suggest, check it with an oven thermometer. Sometimes the problem really is the oven.

Serve It, Keep Baking or Start Again?

A slightly uneven top, an imperfect crimp or a pecan that browned more than its neighbors does not make a bad pie. If the filling holds and tastes good, serve it.

Keep baking while liquid still moves freely in the oven. Start again if you have time when the eggs scrambled badly before baking or a major break in the crust sent much of the filling underneath it. Everything else deserves a little perspective before it gets called a failure.

High-altitude note: Baking above about 3,000 feet / 915 metres? Pie pastry generally needs less adjustment than cakes or breads. Colorado State University Extension’s high-elevation baking guide notes that slightly more liquid can sometimes improve pastry texture and recommends baking pies in the lower third of the oven. Judge this filling by its center rather than borrowing adjustments from an unrelated recipe.

Back to Recipe Check Doneness Make Ahead & Store

Make-Ahead Pecan Pie: Bake It Before Thanksgiving Gets Busy

Bake it the day before and dessert is already handled before the Thanksgiving oven gets crowded.

After cooling, cover and refrigerate the pie. By the next day the filling will be thoroughly set and easy to portion. Serve it chilled or let some of the refrigerator chill come off before dessert.

Pecan pie make-ahead guide showing bake, cool, cover and refrigerate, then serve the next day, with storage guidance of 3–4 days refrigerated and 1–2 months frozen.
For cleaner portions, serve the pie chilled or let some refrigerator chill come off first; if you want it warm, reheat individual wedges rather than loosening the whole pie.

Does Pecan Pie Need to Be Refrigerated?

Yes. The FoodSafety.gov cold-storage chart gives baked pecan pie about 3–4 days in the refrigerator. Because the filling contains eggs, cover and refrigerate it promptly once cooled; do not leave it sitting at room temperature overnight.

Can You Freeze Pecan Pie?

Yes. Cool the pie, wrap it well and freeze it whole or in portions. For best quality, use it within about 1–2 months. Thaw it in the refrigerator while still wrapped.

Need something easier to carry? Our pecan pie bars with shortbread crust turn the buttery pecan-and-caramel idea into sturdy squares. They are easier to pack, portion and pass around when a round pie would have twelve people negotiating wedges.

Pecan Pie FAQs

1. Can pecan pie sit out overnight?

No. Homemade pecan pie contains eggs. Cool it, cover it and refrigerate it; do not leave it on the counter overnight.

2. Why do pecans float to the top of pecan pie?

That is normal. Many pecan pieces rise through the egg-and-syrup filling as the pie bakes, which is how the familiar nut-heavy top forms. Chopping most of the nuts and using plenty of them still gives every forkful pecans with the filling.

3. Can I make pecan pie two days ahead?

Yes. Bake the pie, cool it and refrigerate it well covered. Two days ahead fits comfortably within the recommended 3–4-day refrigerated storage window, and the filling will be fully set by serving day.

The Slice You’re Waiting For

Extreme close-up of a fork holding pecan pie with visible flaky pastry, glossy caramel filling and toasted pecan against a dark garnet background.
The best bite starts with crisp, flaky pastry, moves into soft caramel filling and finishes with toasted pecan crunch, so the sweetness never lands by itself.

When the first wedge comes out, the crust lifts with it and the exposed edge of the filling stays moist and glossy instead of slowly spreading across the plate.

Once that first slice holds, you can stop thinking about temperatures and wobble. What’s left is crisp pastry, toasted pecans and a soft caramel middle that gives under the fork.

Back to Recipe Troubleshooting Back to Top

Posted on — Leave a comment

Pumpkin Pie With Sweetened Condensed Milk: Easy One-Bowl Recipe

Whole pumpkin pie with a golden crimped crust and one lifted slice showing smooth orange pumpkin custard against a dark oxblood set.

Pumpkin pie with sweetened condensed milk keeps the filling simple. If condensed milk is the can you already have, yes—it works here. Build the pie around it from the start and skip the separate sugar an evaporated-milk recipe would normally need.

The ratio is easy to remember: 15 oz / 425 g pumpkin + one 14 oz / about 397 g can sweetened condensed milk + 2 large eggs. Add warm spices, salt, and vanilla if you like it, then pour the filling into a cold 9-inch / 23-cm pie crust.

A good slice should feel like custard, not cheesecake: soft pumpkin filling once chilled, with warm cinnamon and ginger in the background. Enough pastry underneath keeps the condensed-milk richness from feeling heavy. The bake is where judgment matters most, because the filling can be ready while the bottom crust still needs help. A center that moves a little isn’t necessarily underdone, either.

See the full pumpkin pie guide

Make It Now: Pumpkin Pie With Sweetened Condensed Milk

The filling itself is one-bowl simple. Most of the judgment comes later, when you’re deciding whether the custard and crust are done.

Cobalt still life showing 15 ounces pumpkin purée, 14 ounces sweetened condensed milk, and two eggs arranged around the numbers 15, 14, and 2.
The 15 / 14 / 2 ratio has a practical advantage: it uses two standard cans without leftovers. One 15 oz can of pumpkin, one 14 oz can of sweetened condensed milk, and two eggs complete the core formula.
At a glanceWhat to know
Active prepAbout 10–15 minutes
BakeAbout 50–60 minutes: 425°F / 220°C for 15 minutes, then 350°F / 180°C for 35–45 minutes
CrustCold unbaked crust works; partially prebake if you want a crisper bottom
DonenessSet outer filling + a small, controlled center wobble
YieldAbout 8 slices
For slices that hold wellCool, then refrigerate for about 4 hours; overnight is easiest
Optional partial prebakeAdds about 30 minutes chilling + 25–30 minutes baking

Ingredients

  • 15 oz / 425 g 100% pure pumpkin purée — about 1¾ cups; use plain pumpkin, not pumpkin pie filling
  • 1 × 14 oz / about 397 g can sweetened condensed milk — different from evaporated milk
  • 2 large eggs / about 100 g without shells
  • 2½ teaspoons pumpkin pie spice
  • ½ teaspoon fine sea salt or table salt / about 2.5–3 g
  • 1 teaspoon / 5 ml vanilla extract, optional
  • 1 cold, unbaked 9-inch / 23-cm single pie crust

No ready-made spice blend? Use 1½ teaspoons cinnamon + ½ teaspoon ginger + ¼ teaspoon nutmeg + ⅛ teaspoon allspice + ⅛ teaspoon cloves. You can also make a batch of homemade pumpkin pie spice and adjust it from there.

Method

  1. Heat the oven and ready the crust. Put a rack in the lower third and preheat fully to 425°F / 220°C. Set the cold shell on a rimmed baking sheet.

Make the Filling

  1. Mix the pumpkin, condensed milk, and seasonings. Whisk the pumpkin, condensed milk, spice, salt, and vanilla until evenly colored and smooth.
  2. Add the eggs last. Whisk in both eggs just until combined. The filling should look glossy and loose enough to pour easily. That’s normal; pumpkin custard is much thinner before baking than it will be once set. Tap the bowl gently and pop any large bubbles on the surface.
Three-step sequence showing pumpkin and condensed milk with spices, a smooth orange base, and exactly two eggs added last.
Before the eggs go in, you can safely taste the pumpkin-condensed base and decide whether the optional brown sugar is actually needed. Afterward, whisk in the eggs only until combined.

Pour Into the Shell

  1. Fill the shell. Pour in the custard, leaving a little headroom because 9-inch pie shells vary in depth. If you have extra filling, bake it in a lightly greased ramekin alongside the pie, but start checking it earlier. Take it out when the edges are set and the middle has the same small, controlled wobble.
Smooth orange pumpkin custard pouring into a cold unbaked pie shell, with a glossy fluid texture and visible space below the crust rim.
A loose pumpkin pie filling does not need flour or cornstarch just to look thicker. The eggs provide the set in the oven, so look for a smooth, evenly mixed filling rather than judging it by how thick it seems in the bowl.

Bake and Cool

  1. Start hot. Bake at 425°F / 220°C for 15 minutes. Leave the pie inside and lower the oven to 350°F / 180°C.
  2. Finish gently. Bake for about 35–45 minutes more, checking before the upper end of the range.
    Ready: the outer filling is set and the center has a small, controlled wobble.
    Needs longer: a broad section ripples or sloshes like liquid.
    If the rim is already deep golden, cover it with foil or a pie shield while the center finishes.
  3. Cool safely. Let the pie cool uncovered on a rack and refrigerate it within 2 hours of leaving the oven. If it is still warm when refrigerated, leave it uncovered or loosely tented until chilled, then cover it once cold.

Fan or Convection Ovens

Start around 400°F / 200°C for 15 minutes, then lower to about 325°F / 160°C. If your oven already compensates automatically for fan heat, use its normal conversion setting. Countertop ovens deserve an earlier look because the top element can sit much closer to the pie.

Ingredient questions · Check doneness · Crisp the crust · Fix a problem

Pumpkin Purée, Condensed Milk, and Spice

There aren’t many ingredients here, which makes the two common supermarket mix-ups more important than they might seem.

Use Pure Pumpkin, Not Pie Filling

Choose a can labeled 100% pure pumpkin or pumpkin purée. Pumpkin pie filling or pumpkin pie mix already contains sweeteners and seasoning, so it would make this pie sweeter and change the spice balance.

A standard 15 oz can gives the 425 g needed here. Straight from the can, the purée should be thick enough to hold soft spoon marks.

Sweetened Condensed or Evaporated Milk?

Not 1:1. In this pumpkin pie with sweetened condensed milk, the condensed milk is thick and already contains sugar; evaporated milk is unsweetened and much thinner. Each needs a recipe with a different sugar and dairy balance.

FeatureSweetened condensed milkEvaporated milk
Sweet?YesNo
TextureThick and syrupyFluid and pourable
What it bringsDairy, sweetness, richness, bodyDairy and moisture
Extra sugar usually needed?NoUsually yes
Four-part comparison showing pure pumpkin, pumpkin pie filling, sweetened condensed milk, and evaporated milk with visibly different textures.
If evaporated milk is the can you have, switch to an evaporated-milk pumpkin pie formula rather than trying to sweeten or thicken it until it behaves like condensed milk.

The finished pies differ too. A condensed-milk version is usually richer and sweeter; an evaporated-milk version tends to feel lighter and gives you separate control over the sugar. Either can make a soft custard—the eggs and final bake also determine how firmly it sets.

Opened sweetened condensed milk by mistake? You’re already in the right place. Use this formula and leave the separate sugar out.

Do You Need Extra Sugar?

No. The condensed milk already makes the standard filling clearly sweet. If you deliberately want a sweeter pie with a mild molasses note, taste the pumpkin-and-condensed-milk mixture before adding the eggs. Then add 1–2 tablespoons packed brown sugar only if you want it.

Once chilled, the pumpkin should lead the flavor, with cinnamon and ginger behind it and the pastry giving the soft custard some needed contrast.

Choosing Your Spice Level

The 2½ teaspoons in the recipe is a balanced starting point. Use about 2 teaspoons for a milder, more pumpkin-forward pie or 3–3½ teaspoons for something bolder. Go slowly with clove-heavy blends; the spice should sit behind the pumpkin, not bury it.

Once the cans and seasoning are right, the biggest remaining decision is when to stop baking. That matters more than another half-teaspoon of spice.

How to Tell When Pumpkin Pie Is Done

Pumpkin pie is done when the outer 2 inches / 5 cm are set. A smaller center should still wobble softly as one piece when you nudge the plate. Broad liquid ripples or sloshing mean it needs more time.

The middle will move, and the instinct is often to give it another ten minutes “just to be safe.” That’s exactly where a good custard pie can go too far. Start checking within the suggested bake-time range and let the pie itself make the decision.

Underbaked, Ready, or Overdone?

StageWhat you seeWhat to do
Too earlyA broad part of the center ripples, waves, or sloshes like liquidKeep baking
ReadySet perimeter + a contained wobble in the middleTake the pie out
Too farThe center is rigid, strongly puffed, cracked, or beginning to pull from the crustRemove it immediately
Three matched pumpkin pies labeled underbaked, ready, and overdone, showing a loose wet center, a softly set center, and a firmer cracked surface.
Surface color is a poor guide to how to tell when pumpkin pie is done because pumpkin and spice can darken before the center sets. Use movement, not browning, to decide when to pull the pie.

Jiggly is not the problem. Liquid is. A small, controlled movement in the middle is what you want; the pie keeps setting as it cools.

You don’t need a perfectly clean knife test. Waiting for the center to look completely firm is more likely to push the custard too far.

Use a Thermometer When the Wobble Is Hard to Read

If you’ve been staring at the center and can’t decide whether that wobble is enough, an instant-read thermometer can break the tie. Roughly 160–170°F / 71–77°C in the middle is a useful secondary check, not a replacement for looking at the pie.

Top-down pumpkin pie diagram showing a set outer 2-inch or 5-centimeter ring, contained center wobble, broad slosh needing more time, and 160–170°F as a secondary check.
Use a simple hierarchy for pumpkin pie doneness: movement first, thermometer if you are unsure, bake time last. That keeps a clock or temperature reading from overruling what the custard is visibly telling you.

King Arthur Baking’s pumpkin pie doneness guide shows the same progression from liquid to softly wobbly to overbaked, alongside temperature cues.

What the Finished Custard Should Feel Like

Once thoroughly chilled, that softly set center should hold a slice but yield easily under a fork. If the filling eats firm and bouncy like cheesecake, it probably went farther than it needed to in the oven.

Close-up of a fork pressing into a chilled pumpkin pie slice with softly set orange custard and a golden layered crust.
A clean slice does not require a dry custard. Chilling provides much of the structure, so the filling can stay tender enough to yield under a fork without sacrificing a neat wedge.

But doneness is only half the timing problem because the pastry underneath can be on a different schedule entirely.

Recipe card · Crisp the crust · Fix a problem

The Crust and Filling Are on Different Clocks

A pumpkin pie can have an overbaked filling and a pale bottom at the same time. More baking isn’t always the answer. Once the custard is done, chasing a darker base can turn a good filling dry before the pastry catches up.

That is also why the recipe starts hot and then drops the temperature. The first 15 minutes give the cold pastry an early burst of heat and get crust browning underway; the lower oven then lets the egg custard finish more gently.

Cutaway pumpkin pie showing set custard labeled ready above a paler bottom crust labeled still browning.
A deeply browned rim does not guarantee a browned bottom: exposed pastry gets direct oven heat, while the base sits beneath wet custard, so judge the filling and bottom crust separately.

For the easiest improvement, bake the pie on a lower rack. If you want a distinctly crisper bottom, partially bake the shell first.

Cold, Unbaked Crust: The Standard Route

The main recipe uses a cold raw crust on a lower oven rack, and that isn’t the inferior version. A refrigerated or frozen store-bought shell is completely fine. Partial prebaking is an extra step for people who care especially about bottom-crust crispness; you don’t need to turn a simple pie into a project.

Prefer making the pastry yourself? This flaky homemade pie crust makes enough for two single-crust 9-inch / 23-cm pies, so one disk can go into this pie and the other can be frozen. Ease the dough into the plate instead of stretching it, then chill the shaped shell again if it has softened.

For a Crisper Bottom, Partially Bake the Shell

You do not have to prebake the crust for this pumpkin pie. Do it when a distinctly crisp bottom matters enough to add the extra step. The key is giving the base a few dry minutes after the weights come out, before wet custard goes in.

Two-route crust guide showing a cold raw shell filled directly and a partial-prebake route with chilling, weights, and a final dry matte base.
You are not trying to fully brown the empty shell. Instead, the useful checkpoint is a base that has lost its damp sheen, because the crust will keep baking after the pumpkin custard goes in.

Partial Prebake, Step by Step

  1. Fit and crimp the pastry, then chill the shaped shell for about 30 minutes.
  2. Heat the oven to 375°F / 190°C.
  3. Line the shell with parchment and fill it about two-thirds full with pie weights, dried beans, uncooked rice, or granulated sugar. Keep the weights against the sides as well as the base.
  4. Bake for about 20 minutes.
  5. Remove the parchment and weights, then bake the empty shell for another 5–10 minutes. The bottom should lose its damp shine and look dry and matte.
  6. Raise the oven to 425°F / 220°C, add the pumpkin filling, and continue with the main recipe.

The rim has already had a head start, so shield it with foil or a pie shield once the color looks right.

Instead of chasing a cracker-dry bottom, aim for enough crispness underneath to give the soft custard some contrast.

Metal, Glass, or Ceramic Pie Plates?

Pan material can help too. A metal pie plate generally gives the bottom heat more quickly and is the easiest choice when browning is the priority. Glass lets you see how the base is coloring. Ceramic works well but usually heats more slowly.

Comparison of pumpkin pies in metal, clear glass, and ceramic pie plates, with labels explaining bottom-browning speed and the ability to inspect the crust base.
Pan material mostly changes the crust side of the equation. The pumpkin custard still needs the same set-edge and center-wobble cues whether the pie sits in metal, glass, or ceramic.

Raw, Soggy, or Simply Soft?

The pastry directly under pumpkin custard will usually be softer than the exposed rim. That doesn’t automatically mean it is raw.

Raw pastry feels gummy, floury, and dough-like. Soggy but cooked pastry has set but absorbed moisture. The layer where the custard meets the crust may simply be soft and tender.

Three pumpkin pie crust cross-sections labeled raw, soggy, and cooked plus soft, showing gummy dough, moisture-softened pastry, and tender baked layers.
Look at the cut edge as well as the color: raw dough smears and compresses, while cooked-soft pastry shows set layers even when it bends instead of snapping.

If the filling is properly done, much more oven time is unlikely to rescue the bottom without hurting the custard. Prevention works better: use a lower rack, choose a metal pie plate, or partially prebake the shell.

Recipe card · Fix a problem · Fresh pumpkin · Make ahead

If the Pie in Front of You Looks Wrong

Got set edges, a softly moving center, and a crust you’re happy with? You’re done here. This section is for the moment something looks off.

Most pumpkin-pie problems don’t ruin dessert. A crack, soft crust, or condensation can look worse than it actually is, so start with what you can see.

If the Filling or Top Looks Wrong

Four pumpkin pie surfaces showing a fine crack, a puffed dry top, small bubbles or foam, and condensation droplets.
Surface flaws and doneness are not the same diagnosis. Cracks, puffing, bubbles, and condensation tell you something about heat, air, or cooling; a genuinely underbaked center is better recognized by broad liquid movement.

Match What You See to the Fix

What you seeLikely causeWhat to do
Center still sloshesUnderbaked custard.Now: If you just removed it, return it to the oven in 5-minute increments.
Next time: Wait for set edges and a smaller soft wobble.
A warm slice is very softIt may only need more cooling.Now: Chill the rest before judging it.
Next time: Give the pie plenty of refrigerator time before slicing.
The chilled filling is runnyUnderbaking, wet homemade pumpkin, or changed ratios.Now: A cold sliced custard is difficult to repair neatly.
Next time: Control pumpkin moisture and use the doneness cues.
The surface crackedThe custard baked too far.Now: Chill and serve; the crack is mostly cosmetic.
Next time: Pull the pie while the center moves slightly.
The top puffed or looks dryToo much heat or bake time.Now: Let it cool; mild puffing often settles.
Next time: Check sooner, especially in fan or countertop ovens.
The top is foamy or bubblyToo much air entered during mixing.Now: Leave it alone; surface bubbles mainly affect appearance.
Next time: Whisk gently and clear large bubbles before baking.
The custard is grainyThe eggs overheated.Now: The texture can’t really be reversed.
Next time: Remove the pie sooner.
Water droplets appeared after chillingSteam condensed on the surface.Now: Blot large droplets gently.
Next time: Cool uncovered and cover only once thoroughly cold.

Too sweet? Serve it cold with unsweetened or barely sweetened whipped cream. Tastes flat? Check the age of your spices before adding more; fresh cinnamon and ginger often help more than another spoonful of a tired blend.

If the Crust Isn’t Behaving

Three crust problems showing a pale gummy bottom, an overly dark rim, and pastry that has shrunk down and away from the pan sides.
Use the location of the problem as the clue: base issues point toward bottom heat, rim issues toward exposure, while shrinkage points back to dough handling or support.

Match the Crust Problem to the Fix

What you seeLikely causeWhat to do
Bottom crust is pale and gummyNot enough bottom heat.Now: It’s hard to fix once the custard is done.
Next time: Use a metal pan, lower rack, or partial prebake.
Bottom is soft but cookedThe custard softened the pastry.Now: Soft doesn’t necessarily mean raw. If the pastry has set and isn’t gummy or floury, serve it.
Next time: Partially bake the shell if you want more crispness.
Crust rim is too darkThe exposed edge finished first.Now: Cover with foil and let the center finish.
Next time: Shield the rim once the color looks right.
The crust shrankThe pastry was stretched, warm, or poorly supported.Now: There isn’t much to reverse after baking.
Next time: Fit gently, chill thoroughly, and support the sides with weights.
The filling overflowedThe shell was too shallow or too full.Now: Let the baking sheet catch it.
Next time: Leave more headroom.

If the custard is set and tastes good, don’t let a crack or a softer-than-perfect bottom turn dessert into a post-mortem. Some problems are worth learning from without needing to rescue the pie in front of you.

Whole pumpkin pie with a visible cosmetic crack and one slice removed, beside an intact slice with smooth orange custard and golden crust.
If appearance matters, cut the first serving from an intact section and leave the cracked area for later. Chilled pumpkin custard is usually stable enough that a cosmetic crack will not prevent clean wedges.

Recipe card · Check doneness · Cooling & serving · Back to top

Using Fresh Pumpkin

Working with canned pumpkin? You can skip this section. With fresh pumpkin, moisture is the variable that matters most.

A small pie or sugar pumpkin—or another dense, sweet cooking pumpkin—is usually a better choice than a large carving pumpkin, which tends to be wetter and stringier. Roast it when possible, then purée until smooth. If liquid gathers around the purée or it pours instead of mounding from a spoon, it is too wet. Drain it through a fine sieve or cook it gently until some of that water evaporates.

You want something thick, spoonable, and spreadable, with no watery pooling. Once it reaches that point, weigh 15 oz / 425 g for the pie. Fix the excess water before mixing the custard; adding flour later changes the texture without fixing why the purée was loose in the first place.

Petrol-teal process scene showing roasted pumpkin, smooth purée, watery purée that pours and pools, and thick ready purée that mounds on a spoon.
For slightly wet fresh pumpkin purée, draining removes free water without concentrating the flavor as much. A clearly loose purée benefits more from gentle stovetop reduction.
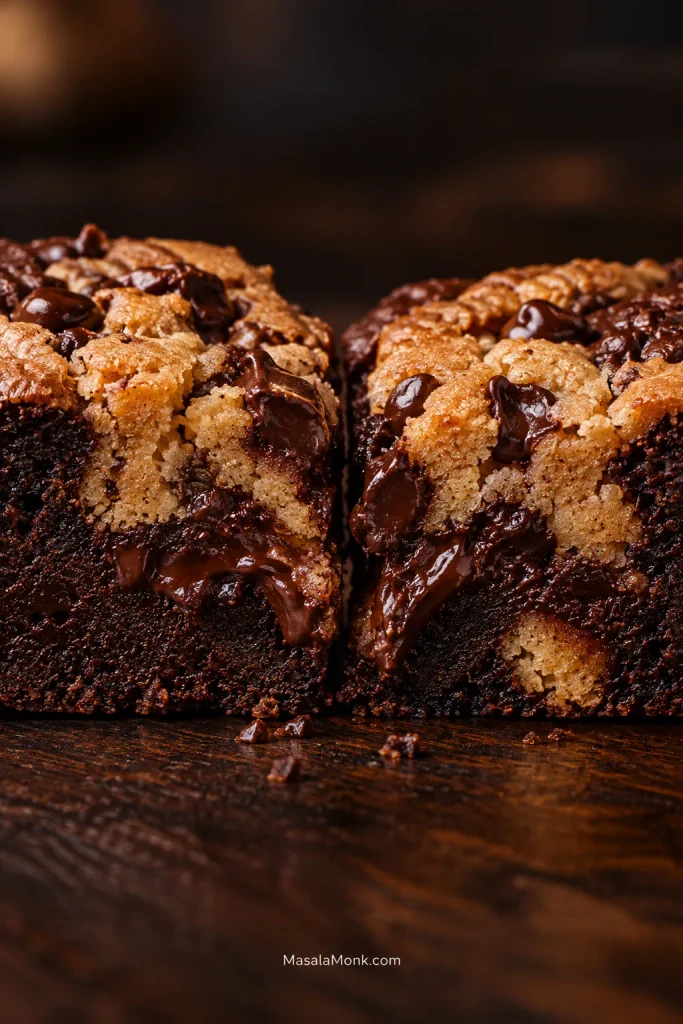
Any thick purée left after weighing can go into this moist pumpkin bread.

Two Ways to Change the Basic Pie

Two changes are especially useful here: swap the pastry for a graham cracker crust, or warm the pumpkin and spices first for a deeper, more concentrated filling.

Graham Cracker Crust

The same filling works with graham cracker crust. Use a prepared shell or make a simple homemade graham cracker crust for a 9-inch / 23-cm plate.

For a homemade crust, bake the empty shell at 350°F / 180°C for about 10 minutes, then cool it before adding the filling. Bake the filled pie at the same 350°F / 180°C and begin checking around 35–40 minutes. A standard prepared 9-inch shell may be ready around 40 minutes; a deeper homemade crust can take longer. Let the same set-edge and soft-center cues decide.

Prepared graham shells can be shallow, so don’t be surprised if all of the filling doesn’t fit.

Pumpkin pie with a golden graham cracker crumb crust and one slice removed, with text noting 350°F or 180°C and checking around 35–40 minutes.
A graham cracker crust skips the 425°F / 220°C hot start used for pastry. Bake the filled pie at 350°F / 180°C and begin checking around 35–40 minutes, using the same soft-center wobble to judge doneness.

Want Deeper Pumpkin Flavor? Warm the Purée First

Cook the pumpkin, salt, and spices over low heat for about 4–5 minutes, stirring steadily. You’ll smell the change before you see much of one: the cinnamon and ginger become clearer as some moisture cooks away and the pumpkin loses its raw canned edge.

Let the mixture cool until it is warm rather than hot, then stir in the condensed milk. Add the eggs last and mix gently before filling the crust.

Thick orange pumpkin purée with spice flecks being stirred in a copper saucepan, with text indicating a 4–5 minute warming step.
Let warmed pumpkin cool before the eggs go in; otherwise, residual heat can start setting the egg proteins before the pie reaches the oven. Warm is fine, but hot is not.
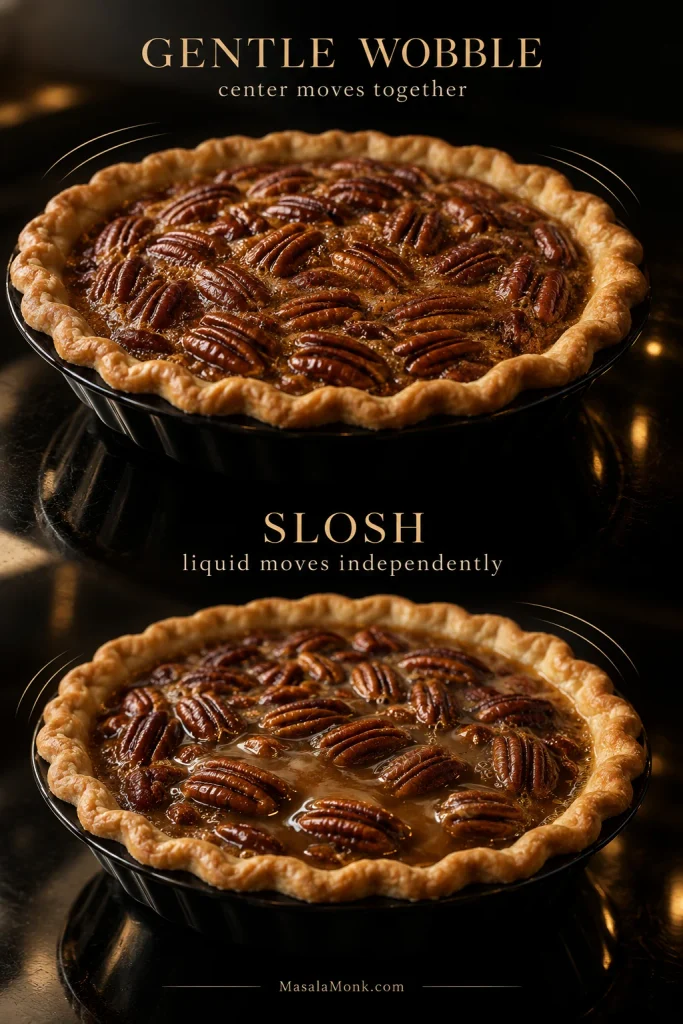
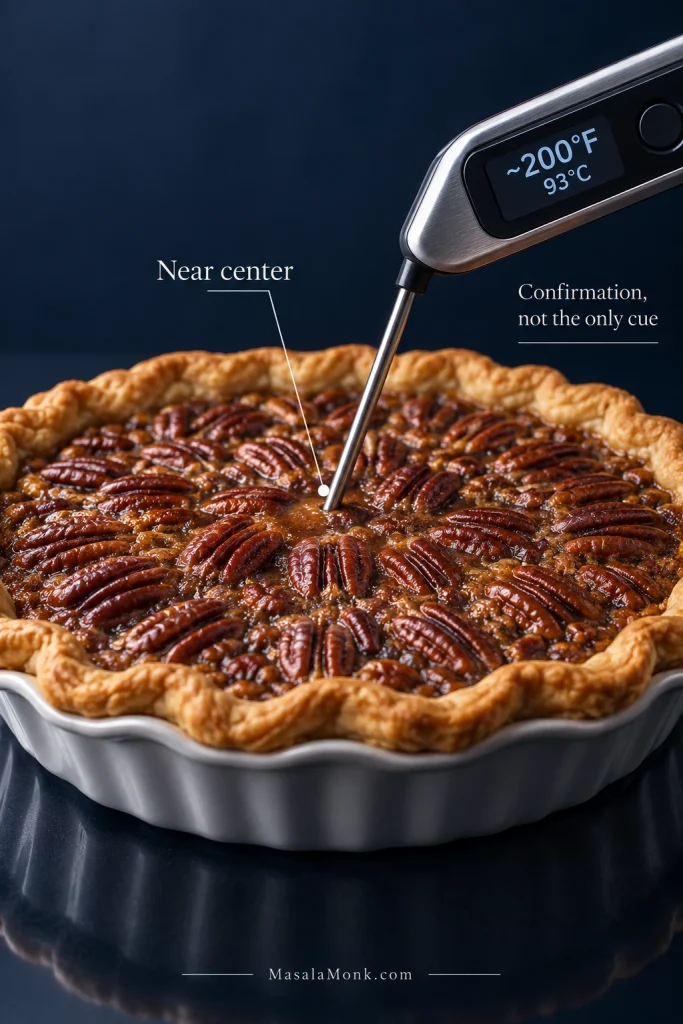
Bake Today, Slice Tomorrow

Yes, pumpkin pie can be baked a day ahead. An overnight chill gives the custard time to settle and makes the next day’s slicing much easier.

A day-ahead pie buys you convenience; a same-day bake buys you the crispest crust. If you want both, partially prebake the shell before baking the pie the day before.

When several dishes are competing for oven space, baking the pie the night before also leaves the oven free for food that needs to reach the table hot.

Split scene showing a whole pumpkin pie cooling at night and a clean chilled slice the next day, contrasting day-ahead convenience with same-day crust crispness.
For the best make-ahead pumpkin pie crust, let the pie cool before covering it. Otherwise, trapped steam under wrap or a lid can soften the pastry faster.

Can You Make the Filling Ahead?

Yes. Mix the filling the night before, cover it, and refrigerate it separately from the unbaked crust. The resting time also gives the spices a chance to meld. Give the mixture a gentle stir before pouring it into the cold shell.

Cooling and Serving

Let the baked pie cool uncovered on a rack, but refrigerate it within 2 hours of leaving the oven. It does not need to be completely cold first; if it is still slightly warm, leave it uncovered or loosely tented until chilled. Cover it once cold.

For slices that hold together well, give the pie about 4 hours in the refrigerator after that cooling period. Overnight is easiest. If you prefer the pie less cold, let individual slices stand for 15–30 minutes before serving.

By then the center should cut cleanly but stay soft under a fork, with warm spice and pastry giving the richer filling some contrast. Barely sweetened or unsweetened homemade whipped cream works especially well because it lightens the condensed-milk richness without piling on more sweetness.

Single pumpkin pie slice with softly set orange custard, fine spice specks, golden flaky crust, and one polished fork on a dark smoked-glass plate.
For cleaner pumpkin pie wedges, use a thin sharp knife, wipe the blade between cuts, and then slide a pie server fully beneath the crust before lifting.

Storage and Freezing

Keep the cooled pie covered in the refrigerator and use it within about 3–4 days. FoodSafety.gov gives the same refrigerator window for baked pumpkin and pecan pies in its cold food storage guidance.

You can freeze the pie too. For the best texture, aim to use it within about 1 month; roughly up to 2 months can work, but the custard may separate slightly and the crust can soften. Wrap the thoroughly cold pie well and thaw it overnight in the refrigerator.

Vertical post-bake timeline showing cooling uncovered, refrigeration within 2 hours, chilling about 4 hours or overnight, then serving, refrigerating, or freezing.
If you freeze only a few servings, freeze individual pumpkin pie slices until firm and wrap them separately. Then you can thaw only what you need overnight in the refrigerator.

Pumpkin Pie Questions That Still Come Up

1. Can I bake two pumpkin pies at once?

Usually, as long as both pans fit with room for air to circulate. Two cold pies can slow the oven’s recovery, so the finish time may shift. Rotate them carefully later in the bake if your oven has obvious hot spots, and check each center separately.

2. Can pumpkin pie sit out overnight?

No. Pumpkin pie is an egg-and-dairy custard, so refrigerate it within 2 hours of leaving the oven. If a baked pumpkin pie has been left at room temperature overnight, the safest choice is to discard it.

3. What if my 9-inch crust doesn’t hold all the filling?

That’s common because 9-inch pie shells vary in depth. Stop before the shell becomes awkwardly full and bake the extra custard in a lightly greased ramekin. Start checking the ramekin earlier than the pie and remove it when the edges are set and the center has the same small, controlled wobble.

Recipe card · Cooling & serving · Storage & freezing · Back to top