
Posted on — Leave a comment

Chocolate Lava Cake Recipe: Easy Molten Chocolate Cakes with Gooey Centers

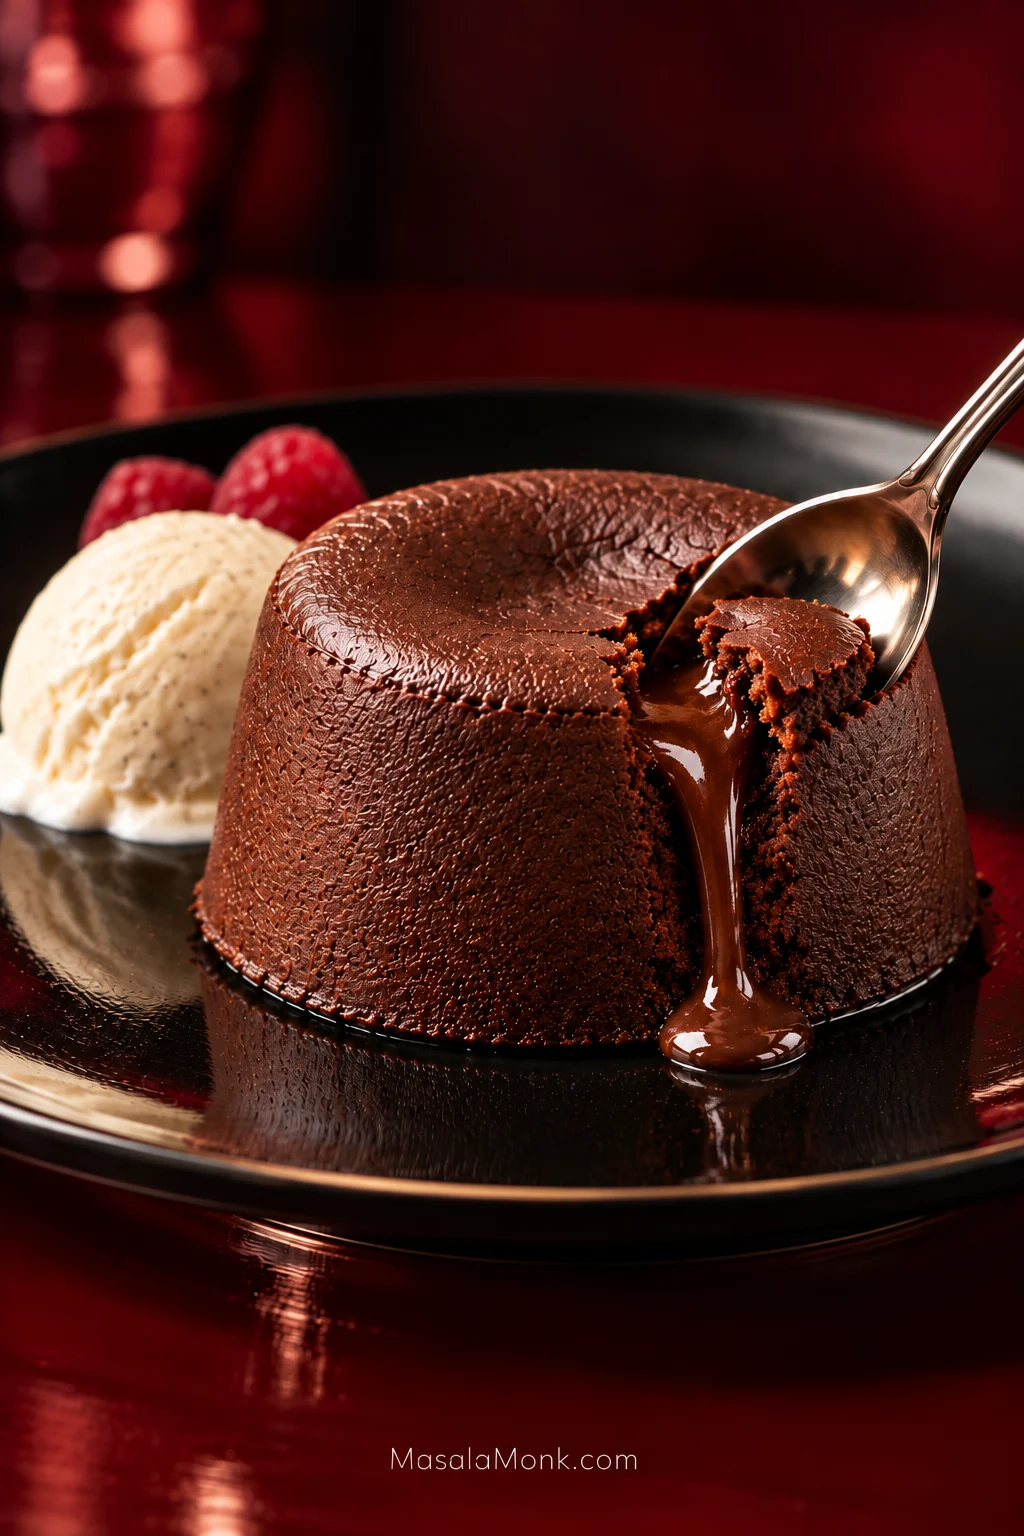
Individual chocolate lava cake on a glossy black plate as a silver spoon breaks the shell and molten chocolate begins to flow out, with vanilla ice cream and raspberries behind it.

Break into one while it is still warm and the spoon should meet a little resistance from the tender outer cake, then almost none as it reaches the molten chocolate middle. Add cold vanilla ice cream beside it and the first spoonful gives you warm cake, flowing chocolate and melting ice cream all at once.

This chocolate lava cake recipe uses the classic method: real chocolate, butter, two whole eggs plus two extra yolks, and just enough flour to help the outside hold together. There is no hidden square of chocolate or separate ganache filling. The batter itself creates the molten center.

Mixing is straightforward; the bake deserves your attention. Ramekin shape, batter depth and even another 30–60 seconds in the oven can change what happens when you cut into the cake.

You’re looking for the moment when the cake can stand on the plate while the middle is still soft enough to flow.
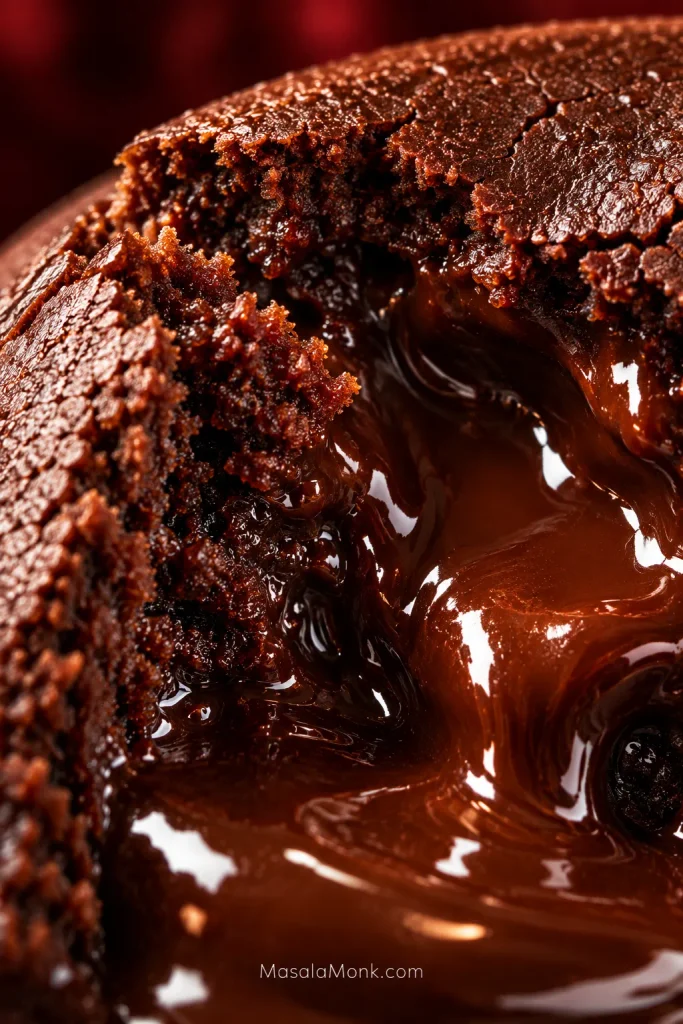
Extreme close-up of a broken chocolate lava cake showing baked crumb surrounding a glossy, fluid chocolate center.
Look at the transition, not just the pool of chocolate. The crumb becomes progressively softer as it approaches the molten center, so a properly baked cake has distinct textures rather than one uniformly fudgy interior.

Chocolate Lava Cake Recipe

Yield
4 cakes

Prep
About 15 minutes

Bake
About 10–12 minutes

First check
9 minutes

Ramekins
6 oz / 180 ml

Total
About 25–30 minutes

Oven: 425°F / 220°C, conventional. Best served: immediately.

Ingredients

  • 6 oz / 170 g semisweet or 60–70% bittersweet chocolate, preferably a bar suitable for melting, finely chopped
  • ½ cup / 4 oz / 113 g unsalted butter, plus more for the ramekins
  • 2 large eggs, ideally not refrigerator-cold
  • 2 additional large egg yolks, ideally not refrigerator-cold
  • ¼ cup / 50 g granulated sugar
  • 1 teaspoon vanilla extract
  • ¼ teaspoon fine salt
  • 3 tablespoons / 24 g all-purpose flour
  • Unsweetened cocoa powder, for coating the ramekins
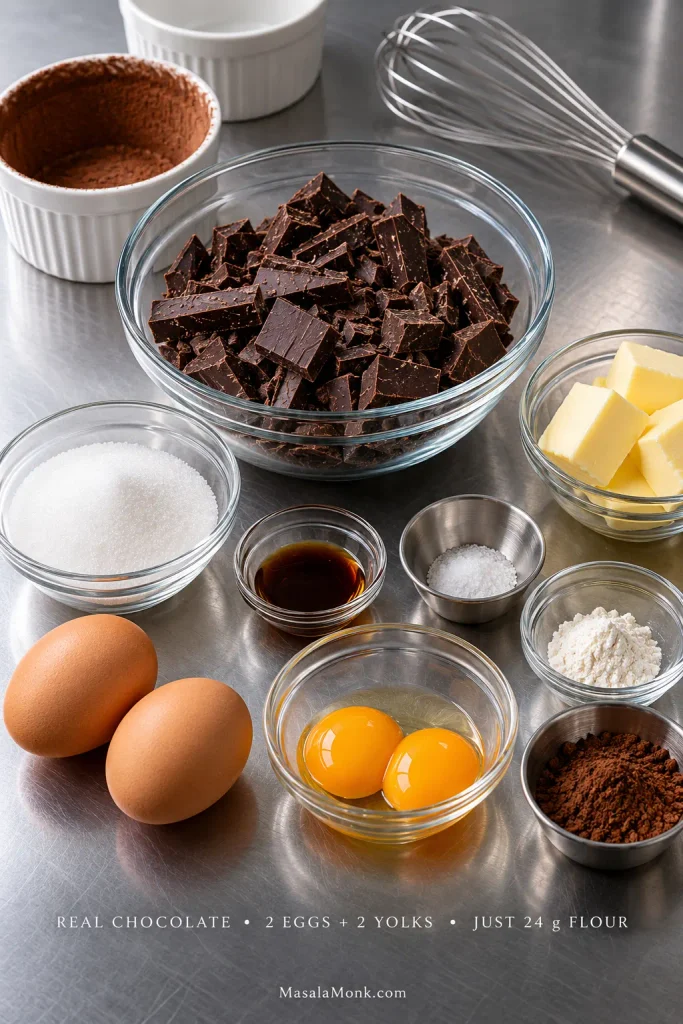
Chocolate lava cake ingredients arranged on a stainless-steel surface, including chopped chocolate, butter, two whole eggs, two extra yolks, sugar, vanilla, salt, a small amount of flour and cocoa powder.
Chocolate, eggs and butter dominate this formula, while the flour stays deliberately low. That helps explain why this dessert can behave like a cake at the edge and something much softer in the middle.

Equipment

  • 4 oven-safe 6 oz / 180 ml ramekins
  • Baking sheet
  • 2 mixing bowls, including one heatproof bowl
  • Electric hand mixer or stand mixer
  • Silicone spatula
  • Digital kitchen scale, if available

Method

1. Heat the oven and prepare the ramekins

Heat a conventional oven to 425°F / 220°C. Butter the bottom and sides of four ramekins thoroughly, including the corner where the base meets the wall.

Add a little unsweetened cocoa powder and turn each ramekin until the butter has a thin coating. Tip out the loose excess. A light film is enough.

Set the ramekins on a baking sheet so all four can go into the oven together.
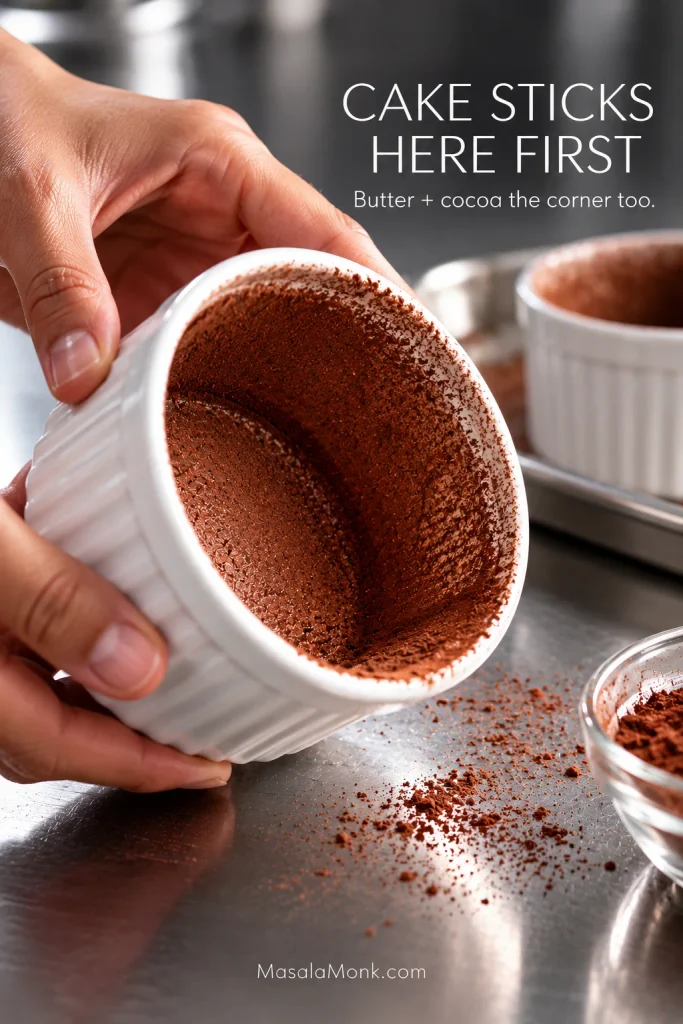
Hands holding a white ramekin with a thin cocoa coating over the bottom, sides and lower corner where the base meets the wall.
Think of the butter-and-cocoa coating as one continuous release layer. Excess powder on an already-covered wall cannot compensate for a bare patch where the base meets the side.

2. Melt the chocolate and butter

Put the chopped chocolate and butter in a heatproof bowl. Microwave in short bursts, stirring well between each one, until almost completely melted. Stop while a few small pieces remain and let the residual heat take care of them.

You can also melt them gently over barely simmering water. Once smooth, leave the mixture for 2–3 minutes. It should still be warm and fluid when it meets the eggs, but it shouldn’t be steaming.
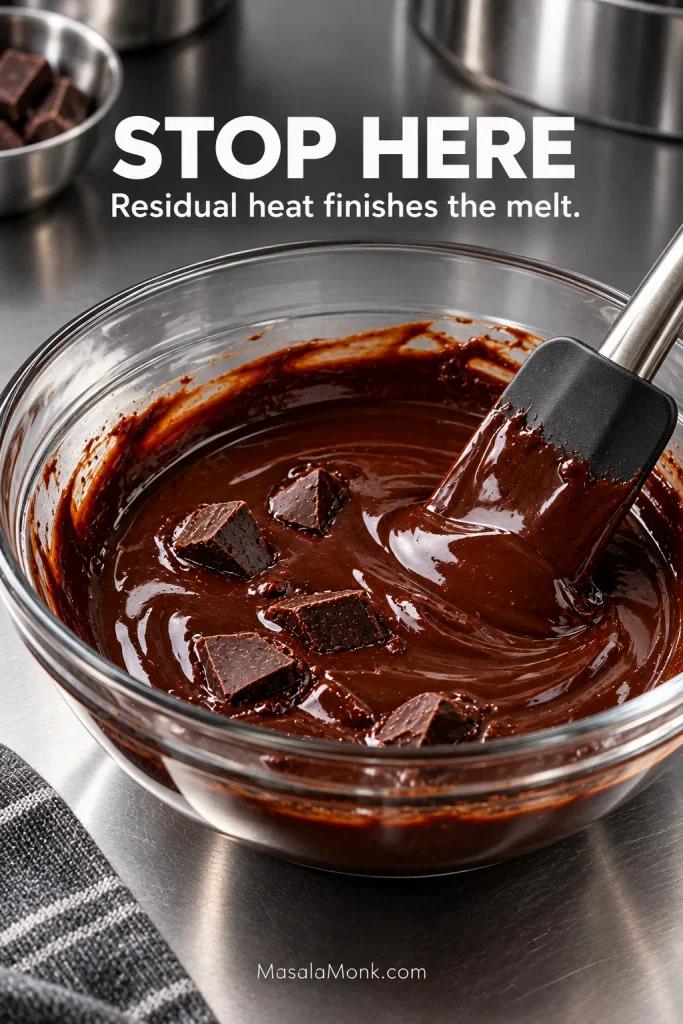
Glass bowl of mostly melted chocolate and butter with a few small solid chocolate pieces still visible in the glossy mixture.
Complete smoothness does not have to come from more heat. Once most of the chocolate is fluid, stirring can finish the last pieces while keeping the mixture warm rather than excessively hot before it meets the eggs.

3. Beat the eggs, yolks and sugar

Combine the 2 whole eggs, 2 extra yolks and sugar in a second bowl. Beat with an electric mixer for about 2–3 minutes, until the mixture looks noticeably paler and slightly thicker.

You don’t need the volume of a sponge-cake batter. Beat in the vanilla and salt.

If the eggs are straight from the refrigerator, give them a little time to lose the hard chill before mixing. Very cold eggs can make the warm chocolate mixture thicken more quickly as the two come together.
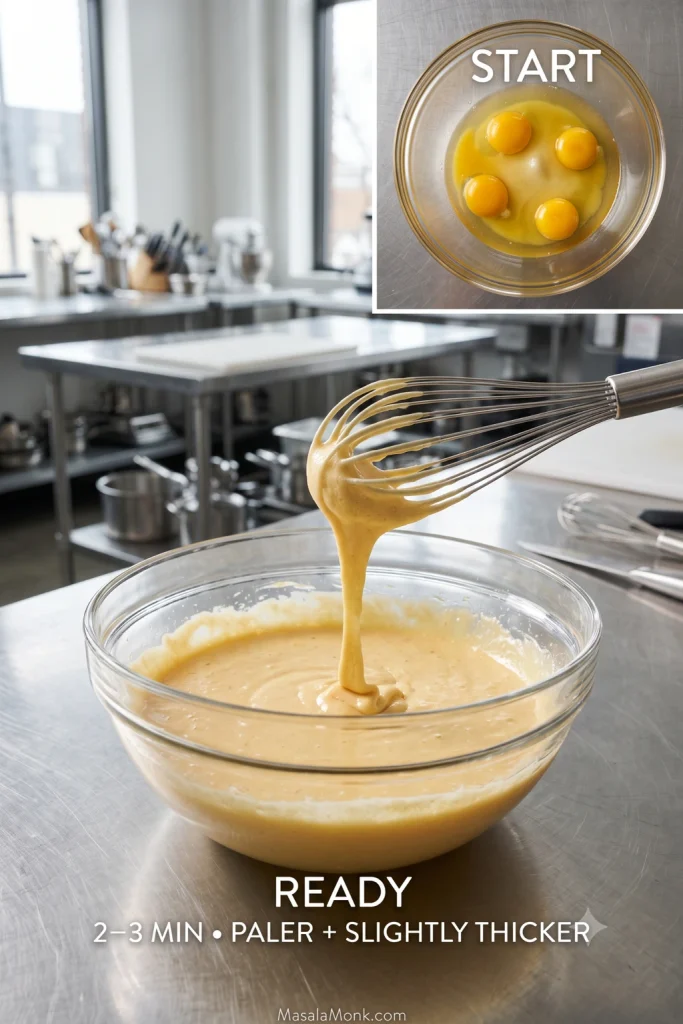
Before-and-after comparison of an egg, yolk and sugar mixture, changing from deep golden and fluid to paler and slightly thicker with a short ribbon falling from a whisk.
Judge this stage by how the mixture moves, not by how tall it becomes. The ready mixture falls from the whisk with more cohesion than the starting eggs while remaining fluid rather than foamy.

4. Fold the batter together

Pour the warm chocolate-butter mixture into the eggs in two additions, folding gently with a flexible spatula after each. The batter will turn darker and glossy as the chocolate goes in.

Sprinkle the flour over the surface and fold until the dry streaks disappear. Scrape along the bottom once or twice in case any flour is hiding there, then stop.

The finished batter should be thick and smooth but still pour easily.
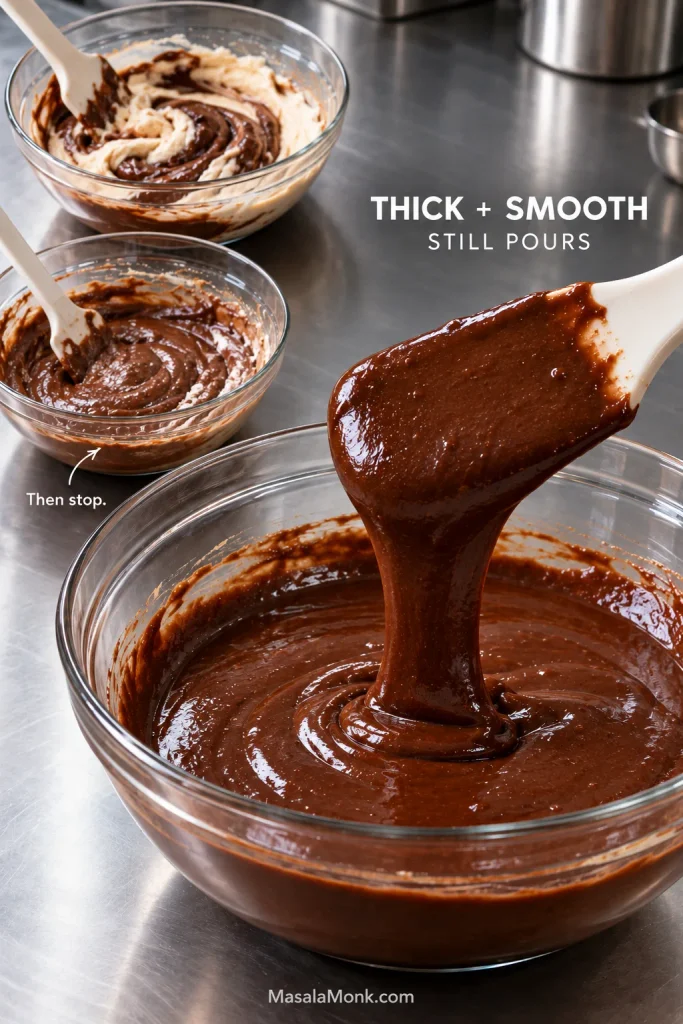
Three stages of chocolate lava cake batter, ending with thick, smooth, glossy batter flowing from a spatula into a glass bowl.
Finished chocolate lava cake batter should move as a broad, glossy ribbon and begin settling back into itself.

5. Portion the batter

Divide the glossy batter among the four ramekins. If you’re weighing the portions, aim for about 120 g in each. Don’t worry about chasing the last gram left on the bowl or spatula; equal portions matter more than an exact number.
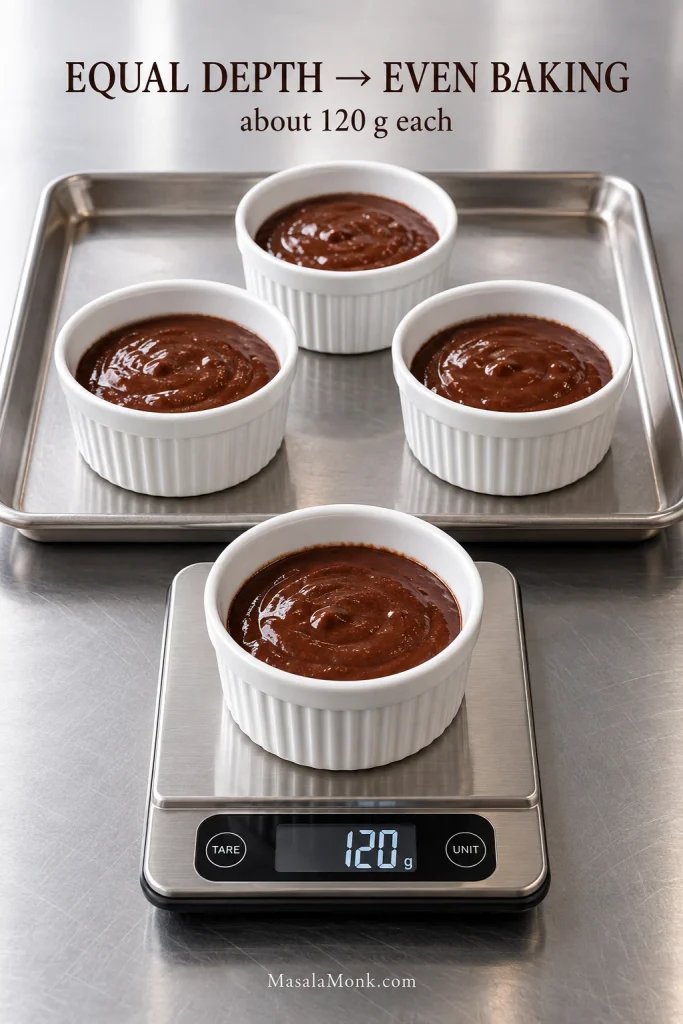
Four matching white ramekins filled with chocolate batter to similar depths, with one ramekin sitting on a digital scale at about 120 grams.
The scale provides a useful starting number, but the matching fill line is what you can keep checking at a glance. Similar batter depths reduce one source of variation when four cakes bake side by side.

6. Bake

Put the baking sheet in the oven. At 9 minutes, look before you touch anything. Nine minutes is the first check, not the finish line.

With 6-ounce ramekins, expect the cakes to reach the right stage around 10–12 minutes. Watch the surface as much as the clock: the edge should look set and less glossy while a smaller area in the middle still moves when you gently nudge the baking sheet.

Don’t wait for the entire top to become firm.

7. Rest, invert and serve

Take the cakes from the oven and leave them in their ramekins for about 1 minute. Put a serving plate over one ramekin, hold both securely with oven mitts and turn them over together.

Leave the ramekin upside down for about 10 seconds, then lift it straight up. If the cake stays standing, the most uncertain part is over. Serve it while the center is still at its softest.

Those last few minutes are what separate a cake that collapses from one that flows and one that has already turned fudgy. Fortunately, the change isn’t invisible. You can watch it happen.

The Lava Window: How to Tell When Chocolate Lava Cake Is Done

The top doesn’t finish all at once. At the edge, the wet shine disappears first and the surface begins to look more matte. Meanwhile, the middle catches up later. That short gap between the two is the window you’re trying to catch.
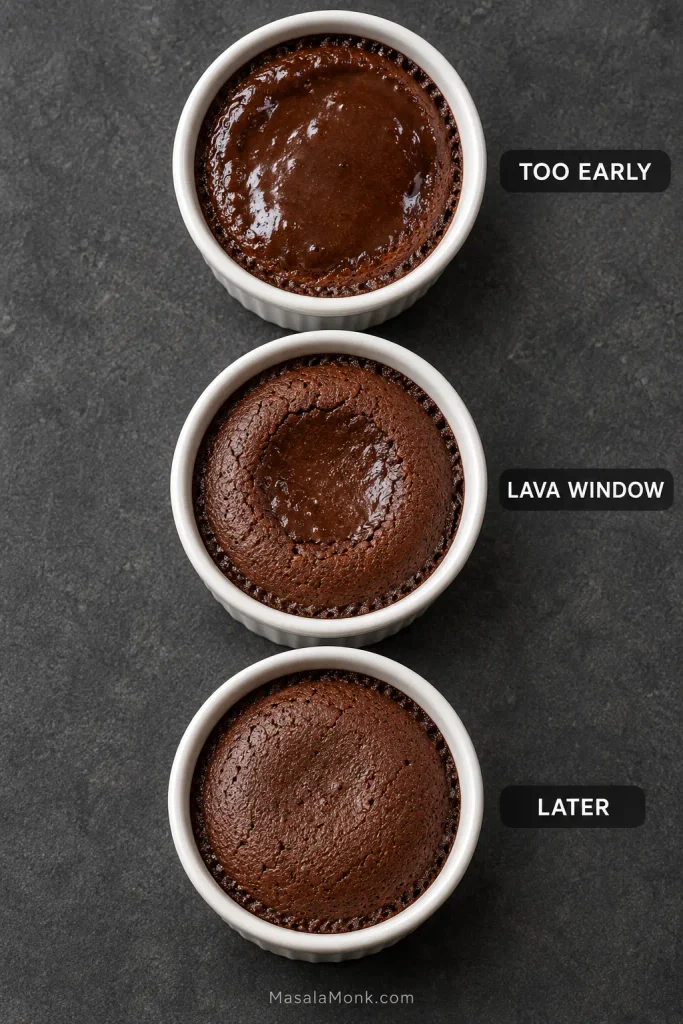
Three identical ramekins viewed from above showing chocolate lava cakes at too-early, lava-window and later stages with progressively firmer top surfaces.
Read these surfaces by where the softness remains. As lava cake doneness advances, the unsettled area contracts toward the center until eventually there is very little visual difference between edge and middle.
What you seeWhat it meansLikely result
The edge still looks weak and most of the top ripples when nudgedThe cake needs more timeIt may collapse when inverted
The outer ring is set, most of the wet shine is gone and only a smaller central area givesThe cake can support the softer middleMolten or very soft center
The surface is firm almost all the way acrossThe middle has cooked furtherThicker, fudgy center with little visible flow

Watch Where the Cake Still Moves

Pull the cake toward the earlier side of that window and the center will be looser, although the cake will also be more delicate. Another minute can turn flowing chocolate into something much thicker.
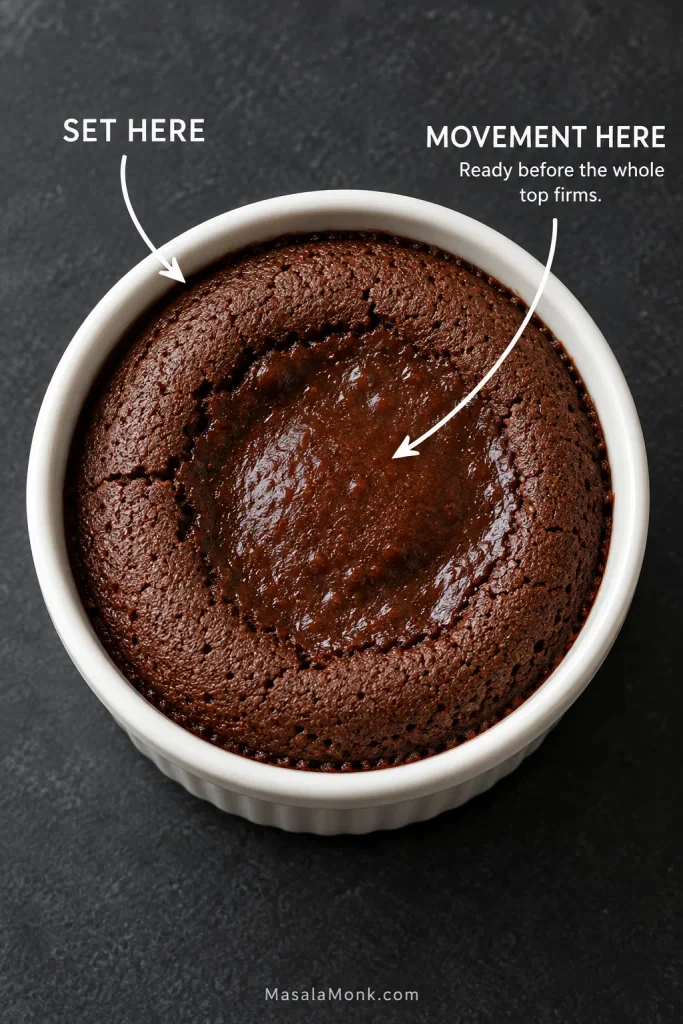
Overhead chocolate lava cake in a white ramekin with annotations marking the set outer area and the smaller softer center where movement remains.
A little movement is not the problem; movement across too much of the cake is. The useful cue is a small softer center surrounded by enough set cake to support it after inversion.

If you cut into one and find a rich, fudgy middle instead of a dramatic flow, dessert isn’t ruined. You simply baked it a little past the flowing stage. Start checking the next batch 30–60 seconds sooner.
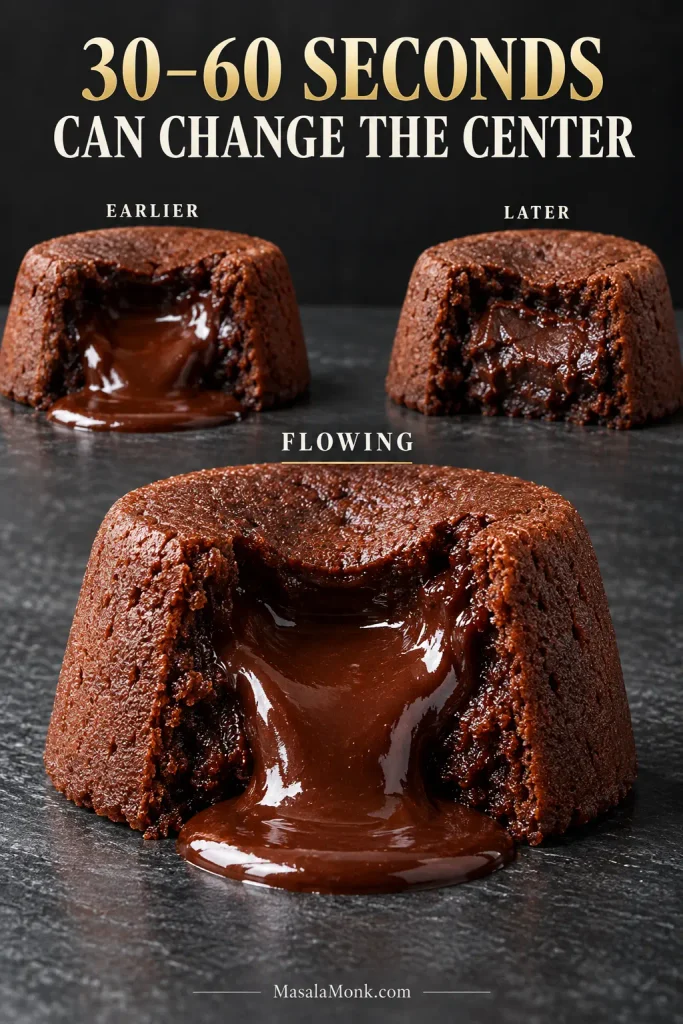
Three opened chocolate lava cakes showing looser, flowing and fudgier centers, with the ideal flowing center shown most prominently.
The oven may show only a subtle change, while the cut cake reveals a dramatic one. Therefore, adjust future batches relative to the center you actually got rather than treating somebody else’s minute mark as absolute.

With an unfamiliar oven or ramekin, one tester cake can tell you more than another paragraph of timing advice. Cut into it, see where the center landed, then adjust the remaining cakes in small increments.

Your Ramekin Changes the Clock

Two ramekins can both hold 6 ounces and still bake differently. A wide, shallow dish and a narrow, deep one put the same amount of batter into different shapes. The deeper fill will generally take longer for heat to reach the middle.

Not sure what your ramekin holds? Fill it to the rim with water, pour that water into a measuring jug and check the volume. Then notice how deeply the batter sits once the ramekin is filled. Capacity is useful; batter depth often tells you more about how that particular cake is likely to bake.
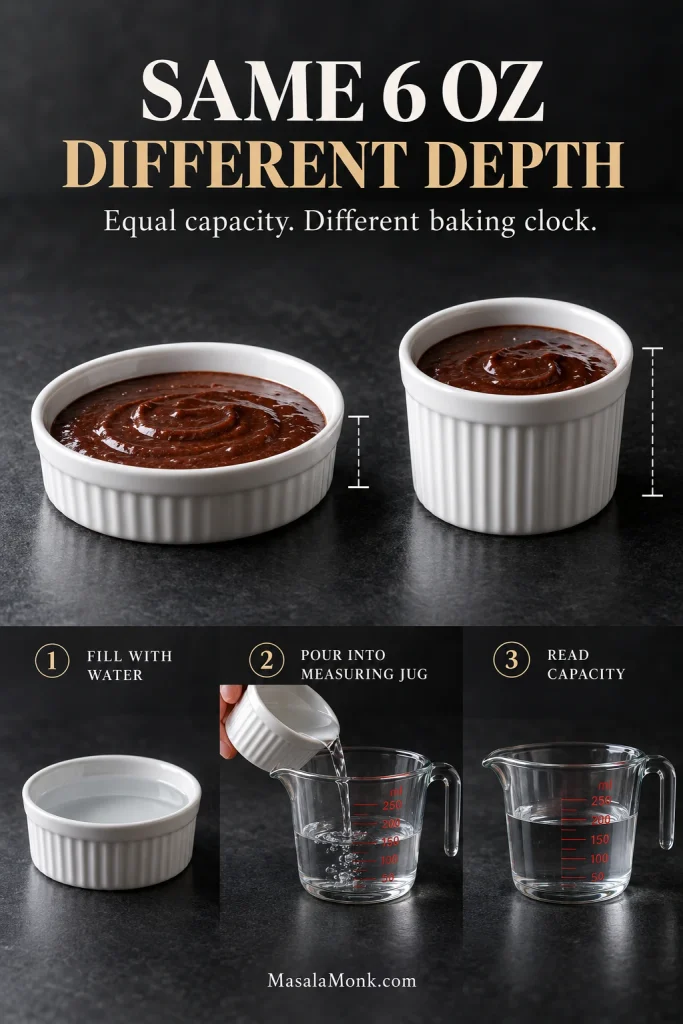
Wide shallow and narrow deep white ramekins holding equal amounts of chocolate batter, plus a small sequence showing ramekin capacity measured with water and a measuring jug.
Equal capacity does not mean heat travels the same distance to the center. A wider ramekin spreads the batter out; a narrower one stacks it deeper, which is why ramekin shape matters for lava cake baking time.
VesselHow to portionWhat to expect
6 oz / 180 ml ceramic ramekinAbout 120 g batterMain method; first check at 9 minutes
Smaller ramekinKeep some headroom rather than filling to the rimA shallower or smaller portion may reach the molten stage sooner
Standard metal muffin wellDivide the batch evenly among 6 wells without filling to the rimMetal and shallower portions can change the bake considerably; begin checking earlier
Larger or deeper ramekinJudge by batter depth, not capacity aloneA deeper cake generally needs more time

No ramekins? Use a muffin pan

Butter and lightly cocoa-coat six standard metal muffin wells, then divide the batter evenly among them without filling to the rim. Skip paper liners.

Muffin pans vary in both metal thickness and well size, so don’t give them the 9-minute ramekin clock. Start checking earlier and use the same visual cue: set edges with movement still confined to the middle.
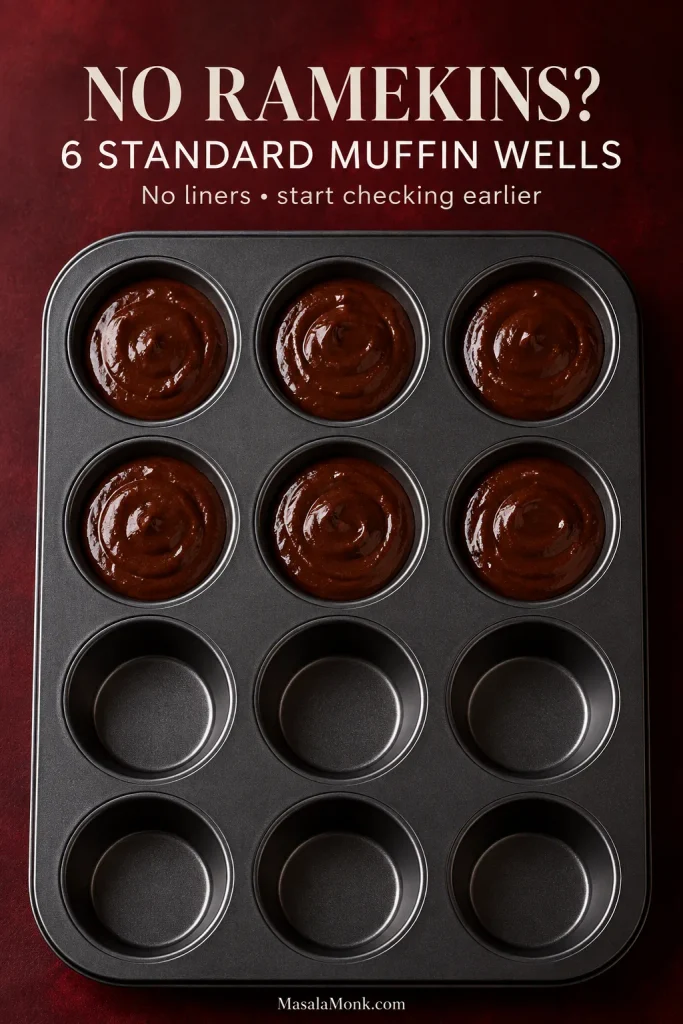
Dark 12-cup muffin pan with chocolate lava cake batter divided evenly among six unlined wells while the remaining six wells are empty.
Switching to a muffin pan changes two things at once: the batter becomes shallower and the baking vessel becomes conductive metal. That combination matters more than the simple fact that the cakes are no longer in ramekins.

When the cakes are ready, put a flat baking sheet or board over the pan and invert the whole thing at once. Lift the pan away rather than trying to pry six delicate cakes from their wells one by one.

Getting the Lava Cake Out Is Part of the Recipe

The flip is the moment that makes many people hesitate, because it immediately reveals whether the cake has enough structure. The shell has to earn the flip.
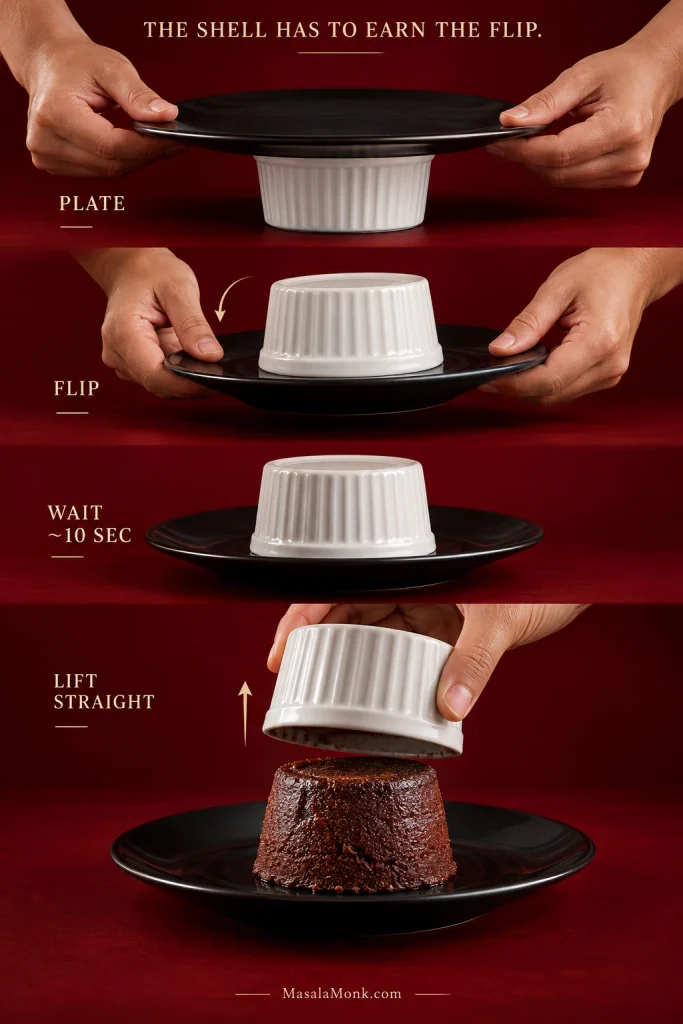
Four-step sequence showing a plate placed over a ramekin, both flipped together, the inverted ramekin resting briefly, and the ramekin lifted straight up to reveal the cake.
The safest flip keeps the cake supported through the entire change of orientation. Once inverted, the short pause lets gravity assist the release before the ramekin is lifted away.

If the cake stays behind in the ramekin, look first at the butter-and-cocoa coating. When the ramekin lifts cleanly but the cake immediately slumps, it probably needed a little more time in the oven.

For a cake that sticks, turn the ramekin upright rather than shaking it. Run a thin knife gently around the top edge, replace the plate and invert again.

After flipping, leave the ramekin in place for about 10 seconds. Lift it straight up and let the cake be.

No Lava? Chocolate Lava Cake Troubleshooting

If something went wrong, start with the cake you actually got. Its center, shape and release usually tell you where to look next.
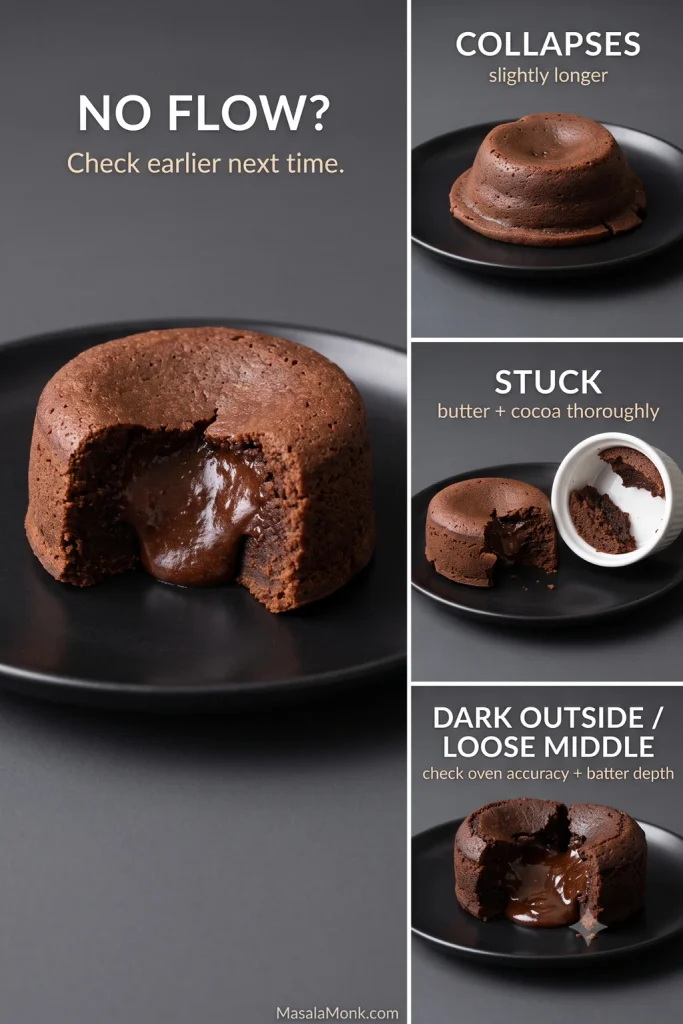
Chocolate lava cake troubleshooting graphic showing a non-flowing fudgy center, a collapsed cake, a cake torn because part remained stuck inside a ramekin, and a dark exterior with an excessively loose center.
Start by identifying which part of the cake failed: the center, the outer structure or the release. That distinction usually points you toward timing, batter depth or ramekin preparation faster than simply adding or subtracting minutes.
What happenedLikely place to lookNext time
No flowing centerBake time or batter depthBegin checking earlier
Soft and fudgy, but not flowingJust beyond the molten windowPull the cakes 30–60 seconds earlier
Cake releases but slumps or collapsesNot enough of the cake has setBake slightly longer
Outside gets very dark while the middle stays extremely looseOven heat or a particularly deep vesselCheck oven accuracy and batter depth
Cake stays in the ramekinButter-and-cocoa coatingCoat the base, walls and bottom corner thoroughly
Muffin-pan cakes bake throughSmaller, shallower portions in conductive metalStart checking earlier

Why This Lava Cake Batter Works

The proportions give the cake enough structure to hold together while keeping the middle exceptionally soft. Whole eggs help the cake hold together, while the extra yolks keep it rich and tender. Briefly beating the eggs with the sugar adds a little air before the chocolate and butter go in.

The entire batch contains only 24 g of flour. Weigh it if you can; an extra spoonful matters more here than it would in a forgiving everyday cake. You can see the same sensitivity to flour and bake time in a fudgy brownie recipe.

Real chocolate also gives the batter body as well as flavor. Semisweet and bittersweet bars contain cocoa solids, cocoa butter and sugar, which is why cocoa powder can’t simply replace them gram for gram. This guide to cacao, chocolate and dark chocolate explains what those labels mean.

Make Them Ahead, Bake Them at the Last Minute

Lava cakes are easiest to make ahead as unbaked batter. For make-ahead planning, keep the filled ramekins covered and refrigerated and use within 2 days.
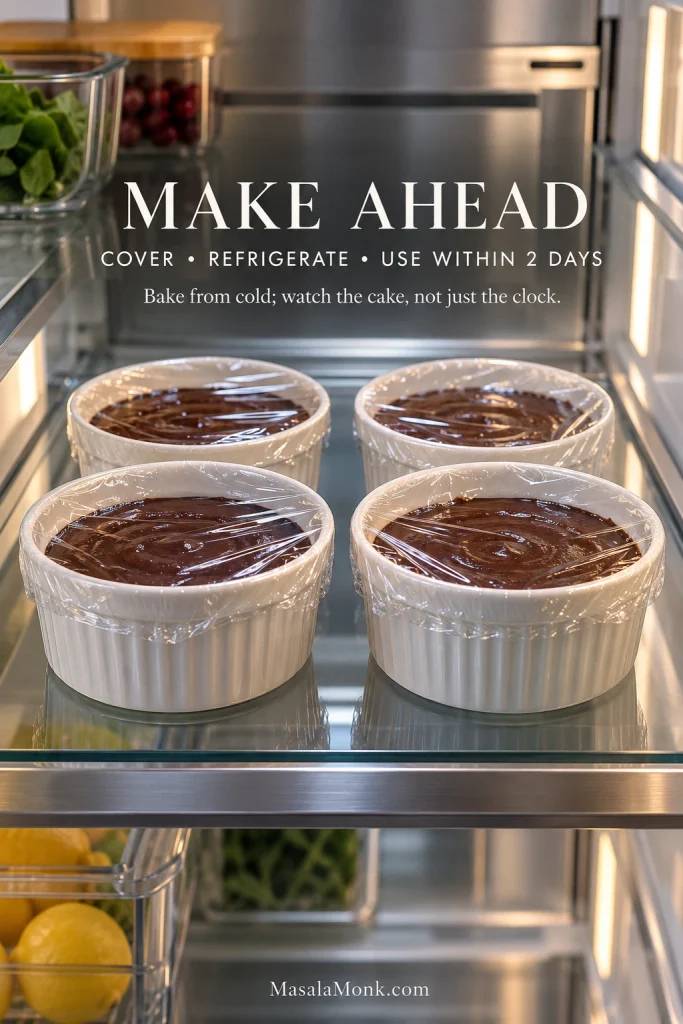
Four white ramekins filled with chocolate lava cake batter, covered with clear wrap and stored on a glass shelf inside a stainless-steel refrigerator.
Chilling changes the batter’s starting temperature, but it does not change the visual definition of ready. A make-ahead lava cake still needs the same relationship between a set perimeter and a softer center before it comes out.

Bake them directly from the refrigerator when dessert is getting close. Cold batter will generally need longer than the fresh-batter 10–12 minute range, so use the same visual cues rather than automatically adding a fixed number of minutes. Look for a set, less-glossy edge with movement still confined to the middle.

The mixing bowls can already be washed and put away; only the short bake, the flip and the ice cream are left when everyone is ready for dessert.

Choosing the Chocolate

Semisweet chocolate is the easiest all-round choice. A bar around 60–70% cacao gives you a darker, less sweet cake. Both work with the same basic method, although the sweetness and flavor of the center will change with the chocolate you use.
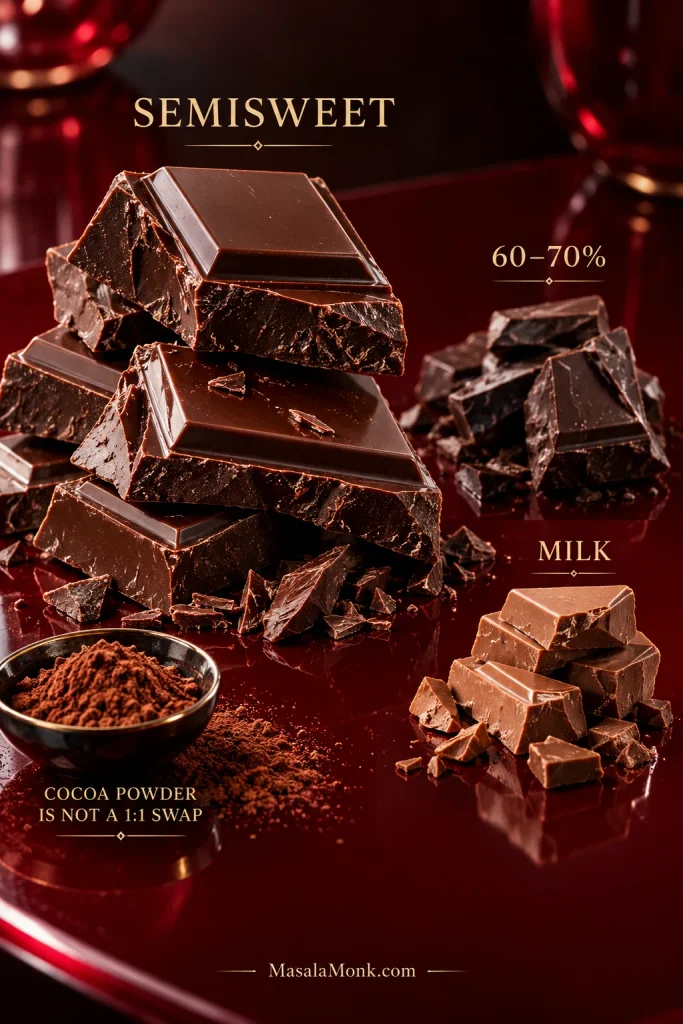
Semisweet, 60–70 percent dark and milk chocolate arranged on a garnet surface, with semisweet most prominent and cocoa powder shown as a separate non-equivalent ingredient.
Chocolate choice changes the character of the center before you change anything about the method. Semisweet keeps sweetness and cacao intensity balanced, while darker chocolate pushes intensity upward and milk chocolate pushes sweetness much further.

Chopped bar chocolate is the most predictable choice for melting. Chocolate chips can work, but many are formulated to hold their shape during baking and may not melt as fluidly. Milk chocolate makes the cake considerably sweeter and changes the balance of cocoa solids, sugar and fat.

Can you use cocoa powder instead of chocolate?

Not in the same amount and with the same formula. Unsweetened cocoa powder doesn’t bring the cocoa butter and sugar contained in a chocolate bar, so swapping one for the other changes more than the chocolate flavor.

For this style of inverted lava cake, keep real chocolate in the batter. A cocoa-based version needs its own formula.

A filled-center lava cake behaves differently because some of the flow comes from a separate filling rather than the point at which you stop baking. Our S’mores Lava Cake uses a separate chilled chocolate center along with marshmallow, so its molten middle doesn’t depend on the cake batter alone.

Chocolate Lava Cake FAQs

Are lava cake and molten chocolate cake the same thing?

Usually. The names are commonly used for the same general dessert: an individual chocolate cake with a set exterior and a much softer center. Exact recipes and techniques vary.

Is chocolate lava cake supposed to be raw in the middle?

The goal here is a very soft, molten center, but that isn’t the same thing as deliberately eating raw cake batter. Standard flour is a raw food, and raw or undercooked eggs can also carry food-safety risk. The FDA advises against eating raw flour, dough or batter.

Pasteurized shell eggs or pasteurized egg products can reduce the egg-related risk in recipes served with undercooked egg, but they do not make raw flour safe. People at higher risk from foodborne illness—including young children, older adults, pregnant people and people with weakened immune systems—should avoid raw or undercooked egg and raw-flour preparations.

Can I make one large lava cake instead of individual cakes?

Not by simply moving this batter to a large pan and keeping the same timing. A larger cake heats differently, so use a recipe developed for a large-format molten cake.

Why doesn’t chocolate lava cake need baking powder?

The eggs, brief aeration and small amount of flour provide the structure this cake needs. The goal isn’t a tall, airy crumb; it is enough cake around the outside to hold a much softer middle.

Get the Ice Cream Ready Before the Cakes Come Out

Vanilla ice cream is hard to beat here. It starts melting as soon as it touches the warm cake, while raspberries or strawberries bring a little acidity against all that chocolate. A small pinch of flaky salt works too.
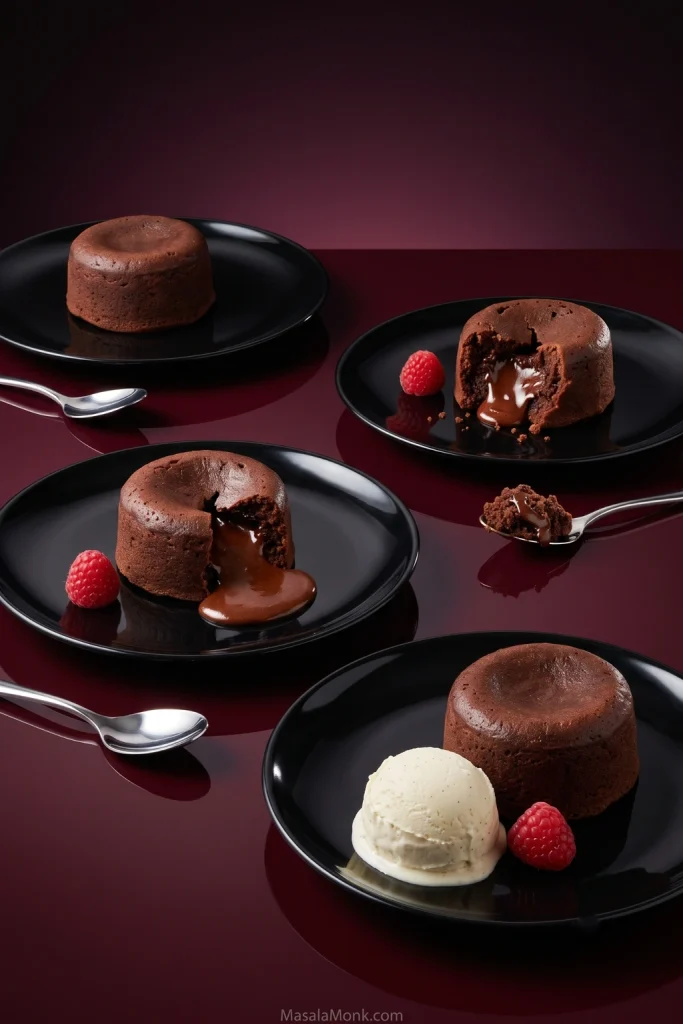
Four chocolate lava cakes on glossy black plates over an oxblood surface at different serving stages, including intact and opened cakes, a spoonful of cake, vanilla ice cream and raspberries.
The cakes keep setting after they leave the oven, so the serving window is part of the recipe too. By the time the cold accompaniments begin melting, the warm center should still be fluid enough to create the contrast the dessert was built around.

If you want to make the ice cream as well, this KitchenAid vanilla ice cream guide gives you a base you can finish well before the cakes go into the oven.

Leftover cakes can be cooled, covered and refrigerated. Reheat them gently if you like, but expect the center to be soft and fudgy rather than flowing again. These are at their best the first time they leave the oven.

Have the plates, ice cream and berries ready before the cakes come out. Invert them and eat while the cake is still warm and the middle is still doing exactly what you baked it to do.

Posted on — Leave a comment

S’mores Lava Cake Recipe: Gooey Chocolate & Marshmallow Center

S’mores lava cake split open on a dark plate, with glossy chocolate and marshmallow flowing from the center, toasted marshmallow on top, and graham crumbs scattered around the cake.

The spoon breaks through the warm chocolate cake and the middle gives. Glossy chocolate slips onto the plate, a streak of marshmallow follows, and toasted graham gives the soft cake a little crackle.

That reveal is half the fun of this S’mores Lava Cake. For it to actually taste like a s’more, the chocolate, marshmallow and graham need to stay recognizable instead of disappearing into one very sweet chocolate dessert.

If Domino’s S’mores Lava Cakes sent you looking, think of this as a homemade take rather than an exact copycat. Here, the center is molten chocolate, the marshmallow gets properly toasted, and some of the graham stays crisp.

Once the cakes reach the oven, remember one thing: set outside, moving inside.


S’mores Lava Cake Recipe

This recipe makes 4 individual cakes in 6-ounce / 175–180 ml ramekins. Bake at 425°F / 218°C. Start checking at 11 minutes; most should be ready somewhere around 11–13 minutes. Let the cake, not the clock, decide that final minute.

The separate chocolate center earns its extra step. It lets the outside become cake while melted chocolate waits in the middle instead of asking barely baked batter to provide all the lava.

Yield4 individual cakes
Ramekins4 × 6 oz / 175–180 ml
GanacheChill until thick enough to portion and shape
BakeAbout 11–13 minutes; start checking at 11
Rest1–2 minutes before unmolding
Best servedImmediately

You need 220 g / about 8 oz semisweet or bittersweet chocolate altogether, ideally around 60–65% cacao. Chop it all at once, set aside 50 g for the ganache, and use the remaining 170 g in the cake.

Chocolate choices for lava cake shown side by side: a 60–65% cacao chocolate bar marked as the balanced choice, milk chocolate marked sweeter, and chocolate chips shown as less fluid when melted.
If you’re choosing one chocolate for the whole recipe, 60–65% semisweet or bittersweet chocolate is the useful middle ground: dark enough to balance the marshmallow while still working smoothly in both the cake and ganache. Chopped bar chocolate also melts more freely than chips.

For the molten chocolate centers

  • 50 g (1¾ oz) of the chopped semisweet or bittersweet chocolate
  • 30 ml (2 tablespoons) heavy cream
  • Small pinch of fine salt

For the graham cracker layer and crunch

  • 45 g (about ½ cup) graham cracker crumbs
  • 18 g (about 1¼ tablespoons) unsalted butter, melted
  • 5 g (about 1¼ teaspoons) granulated sugar
  • Small pinch of fine salt

For the chocolate cake

  • 170 g (6 oz) of the chopped chocolate
  • 113 g (½ cup / 4 oz) unsalted butter, plus more for the ramekins
  • 2 large eggs
  • 2 large egg yolks
  • 55 g (about ¼ cup plus 1 teaspoon) granulated sugar
  • 24 g (about 3 tablespoons) all-purpose flour
  • 1 teaspoon (5 ml) vanilla extract
  • ¼ teaspoon fine salt
  • 26 g marshmallow creme or fluff, divided among the 4 cakes; if you are not weighing it, divide into 4 small, roughly equal spoonfuls
  • Unsweetened cocoa powder, for the ramekins

For finishing

  • 4 large marshmallows, or enough mini marshmallows or marshmallow creme to top 4 cakes
  • Reserved toasted graham cracker crumbs
  • Dark or semisweet chocolate shavings, or a light chocolate drizzle
  • Optional tiny pinch of flaky salt

What you need

Use four 6-ounce / 175–180 ml ceramic ramekins, a baking sheet, heatproof bowl, whisk and silicone spatula. A kitchen scale gives the most even results, but the cakes can still be divided carefully by eye. A thin knife or small offset spatula helps with unmolding, and you will want an oven mitt or folded dry kitchen towel for the hot ramekins.

If your oven tends to run hot or cool, an oven thermometer is worth using. In a bake this short, a minute can change the center noticeably.

Not sure how large your ramekins are? Fill one to the rim with water, then pour that water into a measuring jug.

Using an unfamiliar dish? See why ramekin shape changes the bake as well as capacity.

1. Make the chocolate centers

Put the reserved 50 g chopped chocolate in a small heatproof bowl.

Heat the cream until steaming. Pour it over the chocolate, wait about a minute, then stir slowly from the middle until smooth and glossy. Add a small pinch of salt.

Let the ganache cool for a few minutes, then refrigerate it until thick enough to scoop and hold a shape. How quickly that happens depends on the bowl, the chocolate and the refrigerator, so judge the texture rather than the clock.

Divide the thickened ganache into 4 roughly equal portions and flatten each into a small, low disc.

They don’t need to be perfect circles. Small and flat matters more.

Chocolate ganache shown in a bowl and on a spoon, with a small flat ganache disc presented as the preferred shape and a thick round portion marked as the shape to avoid.
For a lava cake ganache center, that low shape is about heat rather than neatness. A flat disc gives the oven less cold thickness to warm through than a round ball, so the surrounding cake can set while the middle melts.

If shaping softens them, return the discs to the refrigerator until they are firm enough to lift cleanly.

2. Toast the graham cracker crumbs

Mix the graham cracker crumbs with the melted butter, sugar and salt. Toast over medium-low heat for a few minutes, stirring often, until the crumbs smell nutty and deepen slightly in color.

Reserve roughly half for serving. The other half will be divided among the four ramekins in thin layers.

3. Prepare the oven and ramekins

Place an oven rack in the middle of the oven and heat to 425°F / 218°C. The timing here assumes a conventional oven. With fan or convection, use your oven’s usual adjustment and start looking sooner.

Set the ramekins on a baking sheet. Butter the interiors thoroughly, including around the upper edge, then dust lightly with cocoa and tap out the excess.

Divide the graham mixture meant for baking among the four ramekins and press it into thin layers across the bottoms. Once the cakes are inverted, the graham ends up on top beneath the marshmallow.

This is lava cake, not a miniature pie crust, so don’t build the layer up thickly.

Blue ramekin with a thin graham cracker crumb layer labeled as flavor inside the cake, beside reserved toasted crumbs labeled for added crunch at serving.
Graham has two different jobs in this recipe. The thin baked layer carries graham flavor into the cake; meanwhile, the crumbs saved for serving restore the crisp texture that warm chocolate and marshmallow quickly soften.

4. Make the chocolate batter

Melt the remaining 170 g chocolate with the 113 g butter, either over barely simmering water or in short microwave bursts. Stir until smooth and let it cool for a few minutes.

In another bowl, whisk the whole eggs, yolks and sugar until the mixture looks smooth, slightly paler and a little thicker than when you started. Whisk in the vanilla and salt, then the warm chocolate mixture.

Two metal bowls compare the egg-and-sugar mixture before whisking and when ready; the finished mixture is visibly paler and slightly thicker and falls from the whisk in a broader ribbon.
The side-by-side comparison is the checkpoint for this chocolate lava cake batter. Judge the eggs by the change from the starting bowl—not a fixed whisking time—and move on once they have reached the slightly paler, thicker stage the recipe calls for.

Add the flour and fold just until the last dry streak disappears.

Twenty-four grams looks like very little flour. It is. A heavy scoop can make a real difference in a cake this small, so weigh it if you can.

5. Fill the ramekins

For the most even cakes, weigh the finished batter and divide it into 4 equal portions. No scale? Divide the batter as evenly as you can by eye.

Put roughly half of one batter portion into a ramekin. Set a chilled ganache disc in the middle, then add one-quarter of the marshmallow filling. Cover the center with the remaining batter from that portion, then repeat with the other ramekins.

Before they go into the oven, look around the sides. If chocolate or marshmallow is touching the ramekin wall, nudge it inward and cover the spot with batter.

That border lets the cake survive the flip and still spill warm chocolate when the spoon reaches the middle.

Blue ramekin filled with chocolate batter around centered marshmallow filling, with a clean border of batter around the edge; three assembled ramekins below are ready for baking.
Before baking, treat any s’mores lava cake filling visible at the side or surface as a warning sign. Re-center it and cover it with batter now, because leaks later usually begin where ganache or marshmallow reaches the edge.

Want the filling logic in one place? Jump to Keep the Lava in the Middle.

6. Bake

Start checking at 11 minutes.

The outer edge should look set and most of the wet shine on top should be gone. Movement should be concentrated in the middle rather than running across the entire surface.

Many 6-ounce ramekins will land somewhere around 11–13 minutes, but don’t force the cake to match the clock. A completely firm, motionless top usually means the center is already thickening.

Top view of a baked chocolate lava cake in a blue ramekin, annotated with a set outer edge, a mostly matte top, and remaining movement concentrated in the center.
Use this visual as the endpoint for lava cake doneness, not the 11–13 minute range as a promise. Because ovens and ramekins vary, the appearance of the cake is what tells you whether that final minute belongs in the oven or not.

Still unsure whether the center is molten or simply underbaked? Compare the doneness signs side by side.

7. Rest, flip and finish

Rest the cakes for 1–2 minutes. If one spot is hanging on, loosen it gently with a thin knife.

The flip is the slightly nerve-racking bit. Using an oven mitt or folded dry kitchen towel to protect your hand, put a serving plate over the hot ramekin, hold the two firmly together and turn them in one confident motion. Leave the ramekin upside down for about 10 seconds, then lift it straight up.

If the cake stands cleanly, finish it while the middle is still hot. If it feels too fragile to turn out, do not destroy dessert for the sake of presentation. Leave it in the ramekin and serve it warm there.

Three-step sequence showing a plate placed over a hot ramekin, the plate and ramekin turned over together, and the ramekin lifted straight upward to release the lava cake.
A clean lava cake release starts before the flip. Thorough buttering and cocoa dusting help, while an exterior that is still too soft is more likely to stick—so a difficult unmolding is not always a problem with the flipping motion itself.

Cake stuck, collapsed or leaked? Go straight to the troubleshooting guide.

Toast and finish the s’mores topping

Top with a large marshmallow, a few minis or a spoonful of marshmallow creme and toast until browned in spots. Scatter over the reserved graham crumbs and, if you like, add chocolate shavings or a light drizzle of homemade chocolate syrup.

No kitchen torch? Brown whole or mini marshmallows briefly on lightly greased foil under a hot broiler, watching constantly, then move them onto the cakes.

Two marshmallow-toasting methods: a kitchen torch browning marshmallow directly on a lava cake, and a no-torch method showing marshmallows browned separately under a broiler before being transferred onto the cake.
A torch browns the marshmallow exactly where it sits. No torch? Broil the marshmallows separately and transfer them afterward, so you still get the toasted s’mores finish without exposing an already-baked lava cake to another blast of intense heat.

Add a tiny pinch of flaky salt if the sweetness needs it.

Serve immediately. Put the cakes down whole and let everyone break into their own.


The Moment to Pull Them From the Oven

A lava cake is ready when the outer edge is set, the top has mostly lost its wet shine, and the remaining movement is concentrated in the center.

Molten, Not Raw: Read the Crumb

Don’t wait for the middle to become as still as the edge. The cakes keep cooking while they rest and while you get them onto the plate.

When you break it openWhat happenedNext batch
Glossy melted chocolate flows from the middle, with some marshmallow through it; the cake around it looks bakedRight where you want itKeep the timing
The cake itself looks wet, thin or streaky with uncooked batterIt came out too soonGive the next batch about 1 minute more
The middle is soft and fudgy, but the chocolate barely spreadsA little too long in the ovenCheck about 1 minute earlier
The middle looks much like the outsideThe cake baked throughStart checking earlier and check the oven temperature
Three chocolate lava cakes compared as too soon, ready, and too long; the ready cake has a baked exterior with a flowing center, the too-soon cake looks wet around the center, and the too-long cake has a mostly set middle.
For lava cake doneness, remember one useful rule: flow belongs to the filling, not the crumb. A dramatic molten center is right only when the chocolate cake surrounding it looks baked rather than wet or streaky.

The liquid you want is melted chocolate and marshmallow from the middle. The cake around it should look cooked.

If you have made fudgy brownies, the judgment is similar: soft and chocolatey is not the same thing as wet, uncooked batter.

If you’re using an unfamiliar oven for an important dinner, a trial bake on another day is more useful than sacrificing one of the four cakes at serving time.

↑ Back to the recipe

Keep the Lava in the Middle

A large frozen ball of ganache can still be cold when the cake around it is ready. A small, flat chilled piece warms more readily.

The marshmallow doesn’t need to be generous either. A small portion gives you the sticky streak without crowding the chocolate filling.

Then give both fillings room: batter underneath, batter above, clean batter around the sides.

Cutaway diagram of a s’mores lava cake showing chocolate cake around a chocolate ganache center and marshmallow filling, with a thin graham cracker layer at the base and a clean cake border around the filling.
Think of the center as architecture: chocolate cake forms the shell, ganache creates the molten flow, marshmallow adds the sticky pull, and the thin graham layer keeps the s’mores flavor recognizable instead of letting everything merge into one texture.

Chocolate, Marshmallow & Graham Each Need a Job

Semisweet or bittersweet chocolate around 60–65% cacao is a good middle ground. Milk chocolate can work, but beside marshmallow it pushes the finished cake much sweeter.

Chocolate chips can work in a pinch, though chopped bar chocolate usually melts more freely—especially useful in a molten chocolate cake where you actually want movement in the middle.

Marshmallow creme gives you the sticky pull inside. Browned marshmallow on top gives you something else entirely: caramelized edges and the toasted smell that makes the dessert register as s’mores before the first bite.

Close-up of a cut s’mores lava cake showing baked chocolate crumb surrounding glossy melted chocolate and a white marshmallow streak in the center.
The center works because the chocolate and marshmallow stay distinct: one flows, the other stretches, while the surrounding cake gives the spoon something to break through.

Graham is the awkward one because moisture wins eventually. The thin baked layer carries the graham flavor; the crumbs saved for serving bring back the crunch. Trying to keep buried cracker crumbs crisp inside warm chocolate and marshmallow is a losing argument with physics.

Your Ramekin Changes the Bake

Two 6-ounce ramekins are not necessarily the same bake. A broad, shallow dish spreads the batter thinner; a narrow, deeper one puts more distance between the heat and the middle.

The 11–13 minute range above is meant for the stated 6-ounce capacity, but even within that size the physical cues matter more than hitting one exact minute.

How to measure your ramekin

Fill it to the rim with water, then pour that water into a measuring jug.

  • 4 oz ramekin: roughly 120 ml
  • 6 oz ramekin: roughly 175–180 ml
  • 8 oz ramekin: roughly 235 ml

Use those numbers to identify what you own. The 4-ounce and 8-ounce sizes are not direct substitutes for the timing above; changing the capacity changes the depth of the cake and therefore the bake.

Two 6-ounce ramekins shown side by side: a broad, shallow blue ramekin and a narrower, deeper white ramekin, demonstrating that the same capacity can have different shapes and depths.
Capacity tells you what the dish holds; shape tells you how that capacity is distributed. That is why two 6-ounce lava cake ramekins can reach the same visual doneness cues at different moments even though both pass the water test.

No ramekins? A muffin pan is possible

A metal muffin pan is a possible variation, but this recipe’s timing is written for 6-ounce ceramic ramekins. Standard muffin wells are smaller and metal heats faster.

If you try it, use smaller portions of cake and filling and begin checking several minutes earlier. Treat the first batch as a separate variation rather than borrowing another lava-cake recipe’s timing.

↑ Back to the recipe

Make Them Ahead, Then Move Fast

Most of this dessert can be organized before the moment you want to serve it. The few minutes after baking are the part you can’t pause.

You can assemble the cakes earlier the same day, cover them and refrigerate them. Let them lose some of their refrigerator chill before baking, and expect fully cold cakes to behave differently from freshly assembled ones.

I wouldn’t promise a fixed extra bake time for a fully chilled cake. Use the set edge and movement in the middle to decide when it is ready.

Set out the plates, marshmallow and graham crumbs before the tray goes in. You don’t want to be hunting through a cupboard while four lava cakes quietly become four chocolate cakes.

Fix the Cake in Front of You

No flowing center? The usual culprits are too much oven time, an oven running hot, too much flour, or simply waiting too long to serve.

Six-panel lava cake troubleshooting chart showing examples labeled raw shell, collapsed, stuck, leaked, thick center, and right.
The fastest way to troubleshoot lava cake is to ask where the failure happened: the outer cake, the release, the filling or the center. Each points toward a different adjustment, so simply baking every failed batch longer can create a new problem.
What you seeLikely causeWhat to change
The cake around the filling looks rawIt needed a little longerAdd about 1 minute to the next batch
The cake collapses when flippedThe outside needed longer, or there was too much fillingGive it a little more oven time or reduce the filling next time
The cake sticksThe ramekin was not coated thoroughly, or the outside is very softLoosen the stuck area; serve in the ramekin if necessary
Chocolate or marshmallow leaks during bakingThe filling reached the side or topCenter the filling more carefully next time
The chocolate barely meltsThe ganache piece was too large, thick or very coldMake smaller, flatter chilled pieces

Too sweet? Use bittersweet rather than milk chocolate, measure the marshmallow instead of heaping it in, and skip powdered sugar unless you specifically want it. A little salt usually helps more.

Chocolatey, but not really s’mores? One of the three has probably gone quiet. Brown the marshmallow more deeply, bring back the reserved graham crumbs, or use chocolate with a little more cocoa character.

Graham went soft? Some softening is normal anywhere crumbs touch warm cake or marshmallow. Add the reserved crumbs at the very end for the contrast that matters.

↑ Back to the recipe

Swaps Worth Knowing

Chocolate chips: yes, though chopped bar chocolate generally melts more freely in both the batter and ganache.

Digestive biscuits: yes. Use plain digestives by weight. If yours are already quite sweet and buttery, leave the extra sugar out of the crumb mixture.

Cocoa powder for the melted chocolate: not gram for gram. Melted chocolate contributes cocoa butter as well as cocoa solids, so a direct dry-cocoa swap changes the way the cake sets.

Regular marshmallows inside: possible, but less predictable. They expand and melt unevenly. I would rather put them on top, where those toasted edges are useful.

Eggless, vegan or gluten-free: those versions need their own formula rather than a casual swap. If eggs or dairy are the issue, this vegan chocolate cake collection includes a dedicated vegan chocolate lava cake.

Leftovers & Reheating

These are much better freshly baked. The contrast between set cake and a flowing middle does not last forever.

Refrigerate leftovers once cool. For the best texture, keep it short and eat them within 1–2 days. Reheat gently in short microwave bursts until warm. The middle can become gooey again, but it won’t be quite the same cake.

If you’re planning ahead, assembling and baking later makes more sense than baking the cakes early and trying to rebuild the lava at serving time.


Take the cakes to the table while the centers are still loose. The marshmallow should smell toasted, the graham should crackle here and there, and once the spoon breaks through the cake, the chocolate should not need much introduction.

Partly eaten s’mores lava cake on a light plate with melted chocolate and marshmallow spreading from the center, toasted marshmallow and graham crumbs on top, and a spoon beside it.
The payoff is contrast: a cake that stands long enough to serve, then gives way when the spoon reaches the center.

↑ Back to the recipe · ↑ Back to top








