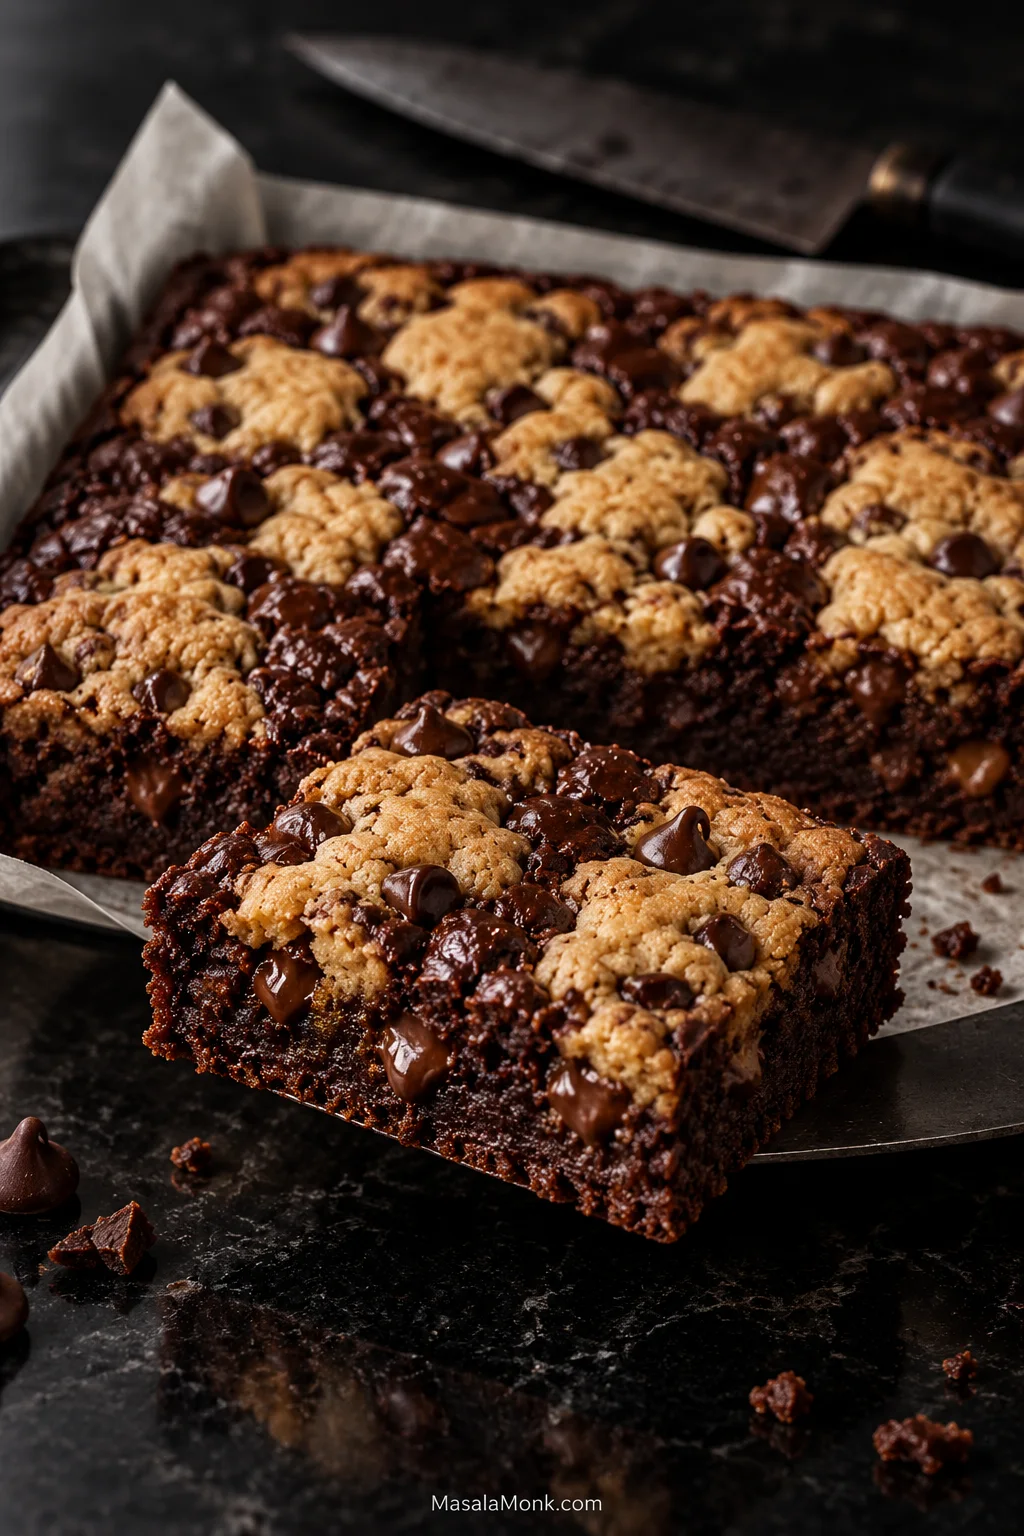
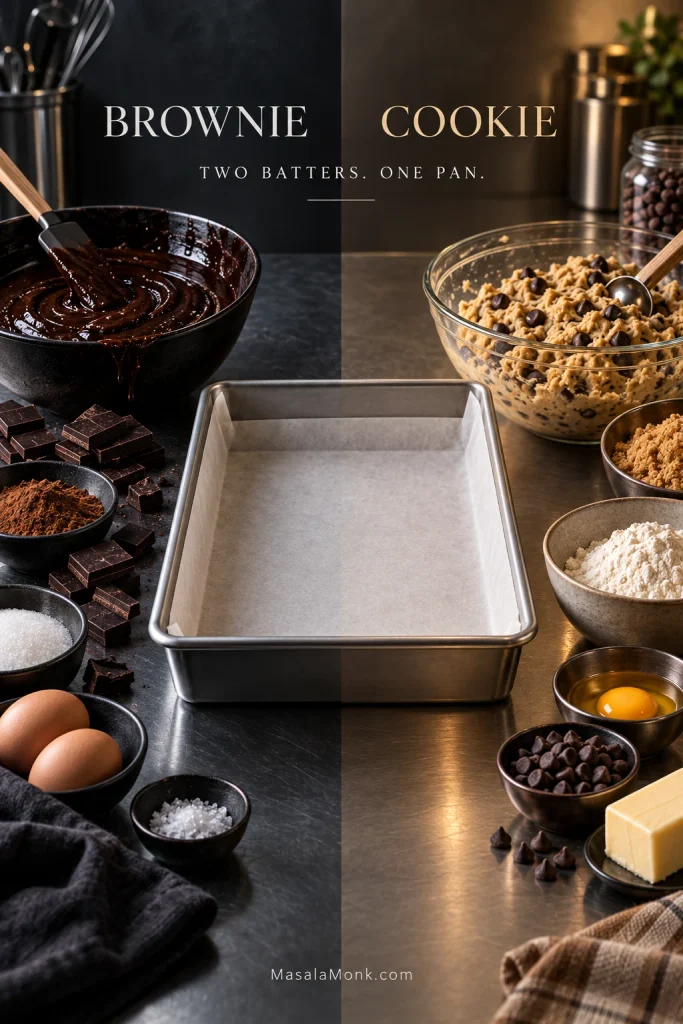
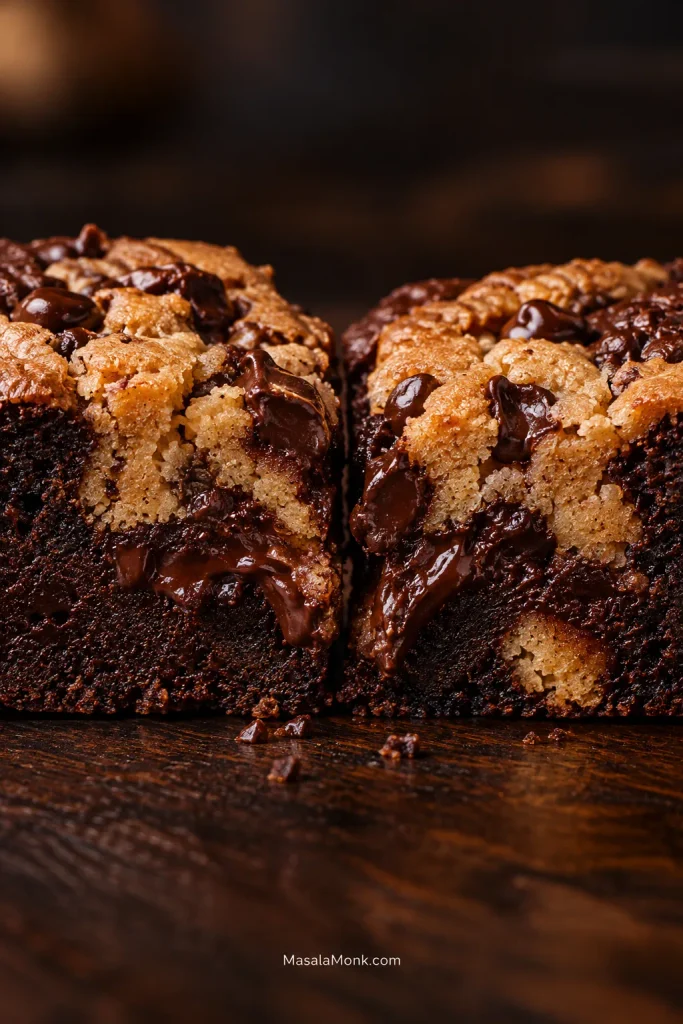
A good brookie should give you chewy chocolate chip cookie, dense fudgy brownie and melted chocolate in the same bite—not a finished cookie sitting over a brownie that is still raw underneath.
Brookies are brownie-cookie bars made by baking brownie batter and chocolate chip cookie dough together in one pan. The tricky part is getting both ready at the same time. This version keeps the brownie fairly shallow and scatters flattened cookie dough over the top, leaving dark brownie visible between the pieces.
Those open patches darken and turn glossy in the oven as the cookie picks up golden edges around them. The brownie should finish fudgy rather than fluid: soft while warm, dense after cooling, and sturdy enough to pick up without losing that moist center.
The Brookie Control Panel
Pan
9 × 13-inch (23 × 33 cm) light-colored metal pan
Oven
350°F / 175°C conventional / 160°C fan
Cookie coverage
20 flattened pieces with plenty of brownie still visible
Bake
Start checking around 28 minutes; expect about 30–36 minutes
Ready when
Cookie edges are lightly golden and brownie near the middle gives moist crumbs, not wet batter
Cooling
About 1 hour for fudgy squares; longer for especially neat cuts
Measure the brownie and cookie ingredients separately. Grams are the most dependable measure for flour, cocoa and chocolate; volume measures are included as a practical backup.
For the fudgy brownie
113 g (½ cup) unsalted butter, melted
40 mL (about 2 tablespoons + 2 teaspoons) neutral oil, such as sunflower or canola oil
200 g (1 cup) granulated sugar
50 g (¼ cup packed) light brown sugar
2 large eggs + 1 large egg yolk
2 teaspoons vanilla extract
50 g (about ½ cup + 1½ tablespoons) unsweetened cocoa powder
75 g (about ½ cup + 2 tablespoons) all-purpose flour (plain flour)
½ teaspoon fine salt
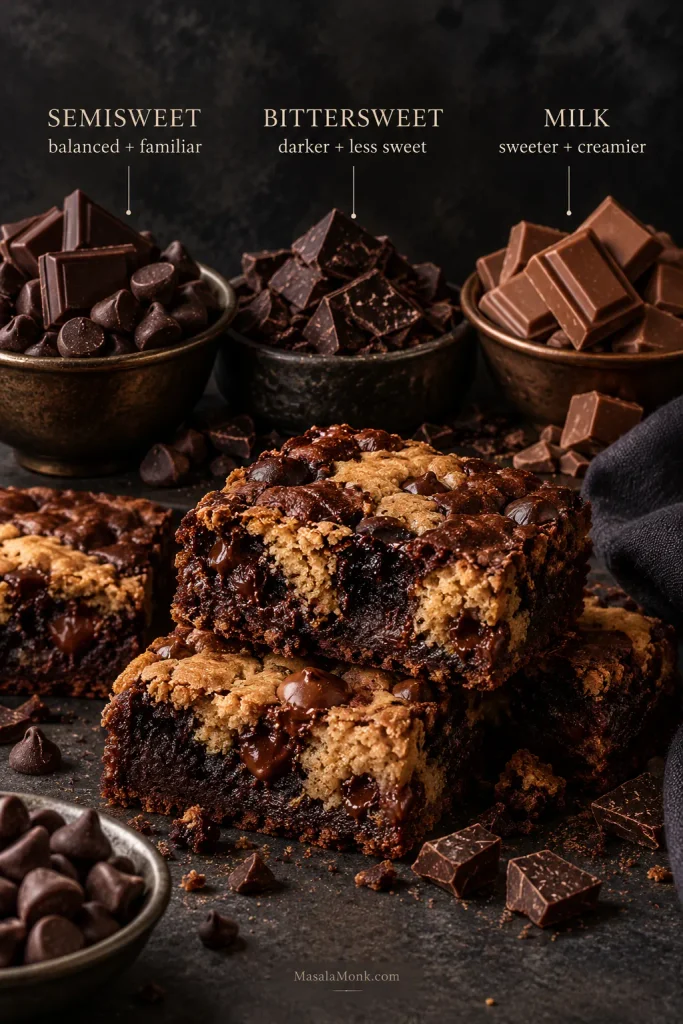
140 g (5 oz / about ¾ cup + 1 tablespoon) semisweet or bittersweet chocolate chips or chopped chocolate
The modest amount of flour keeps the brownie dense. The extra yolk adds richness, and the oil helps it stay soft after cooling. Semisweet chocolate gives you a sweeter, more familiar bar; bittersweet takes the flavor darker and reins in some of the sweetness from the brownie and cookie together.
Use unsweetened cocoa powder, not drinking chocolate.
For the chewy chocolate chip cookie
85 g (6 tablespoons) unsalted butter, softened
100 g (½ cup packed) light brown sugar
50 g (¼ cup) granulated sugar
1 large egg
1 teaspoon vanilla extract
160 g (about 1⅓ cups) all-purpose flour (plain flour)
½ teaspoon baking soda / bicarbonate of soda
½ teaspoon fine salt
115 g (4 oz / about ⅔ cup) semisweet chocolate chips or chopped chocolate
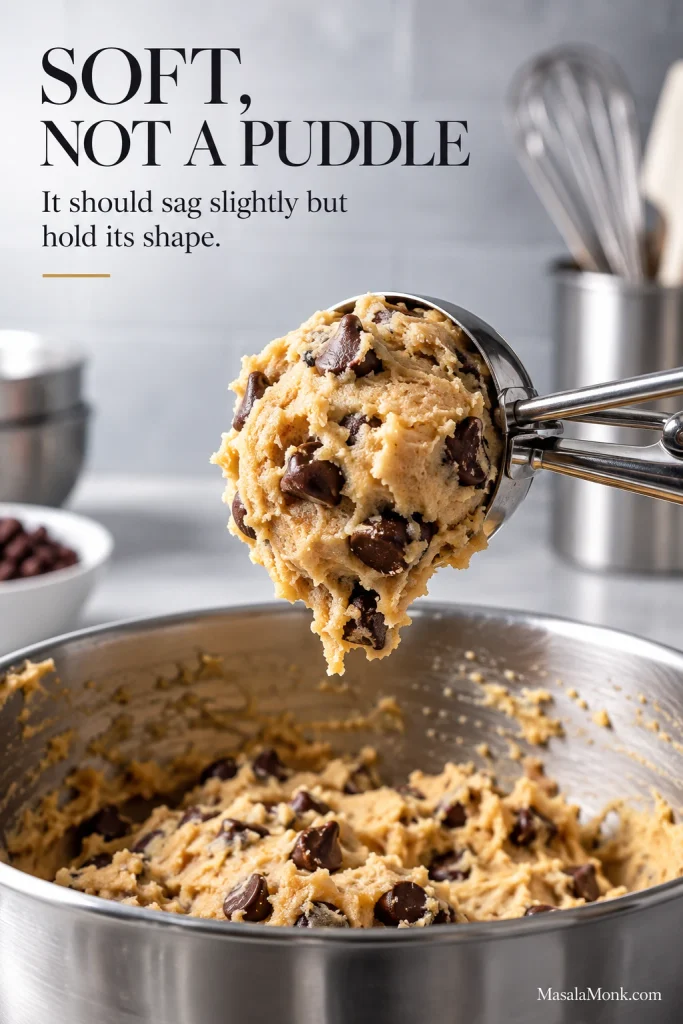
The two mixtures start differently: use melted butter in the brownie and softened butter in the cookie dough. The finished cookie dough should sag slightly when scooped but hold its shape rather than spreading immediately.
Brookies only become one dessert at assembly. Until then, the brownie needs to stay spreadable while the cookie dough needs enough body to portion and place—two textures heading toward the same finish line by different routes.
How to Make Brookies
1. Prepare the pan and oven
Heat the oven to 350°F / 175°C conventional / 160°C fan. Line a light-colored metal 9 × 13-inch (23 × 33 cm) pan with parchment, leaving enough overhang on two sides to lift out the cooled slab. Lightly grease any exposed sides.
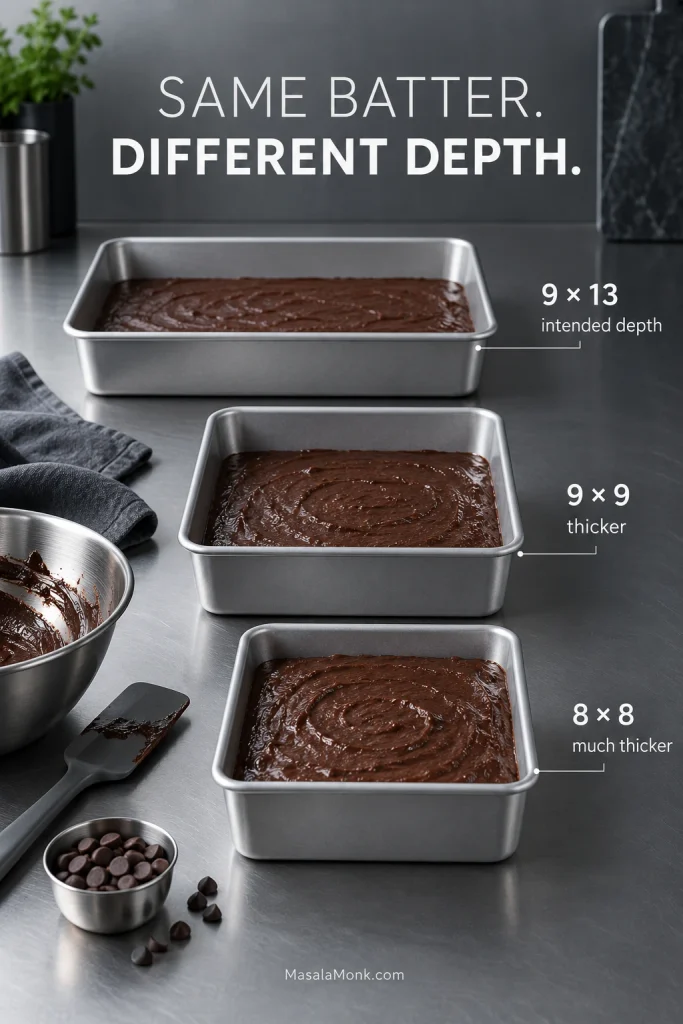
Use the stated pan size for this batch. In a smaller square pan, the brownie becomes much thicker and takes longer to set while the exposed cookie keeps browning.
2. Make the brownie batter
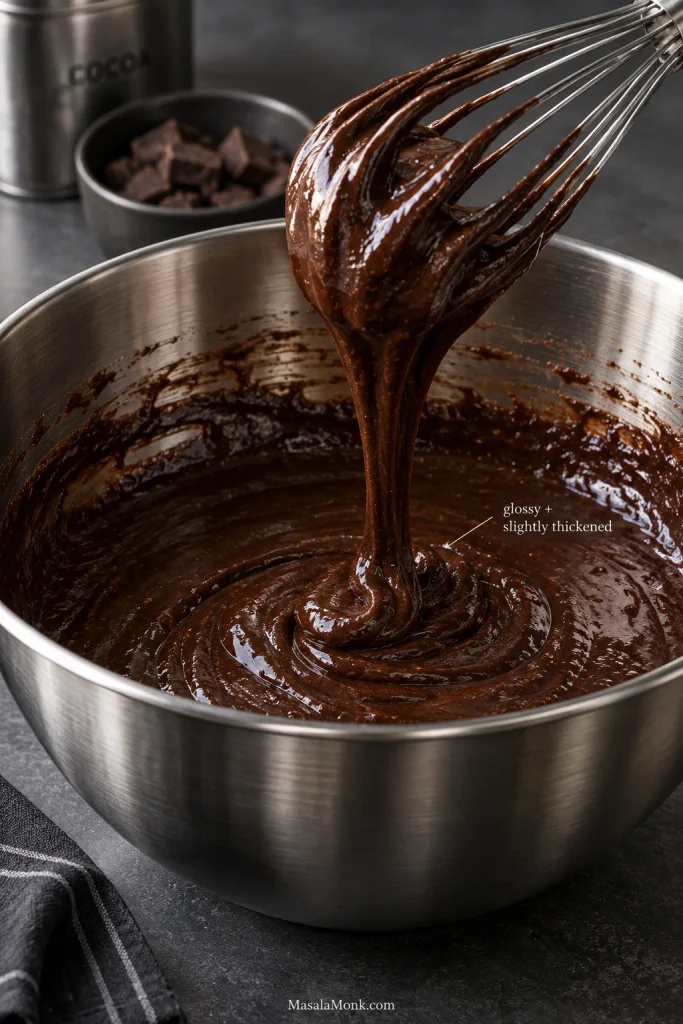
Whisk the melted butter, oil and both sugars until glossy and evenly combined. Add the eggs, extra yolk and vanilla and whisk vigorously for 60–90 seconds, until the mixture looks smoother and slightly thicker.
Use the sheen and the thick ribbon from the whisk as your checkpoint here. Once the dry ingredients go in, the goal changes from building the batter to folding only until the flour disappears.
Add the cocoa, flour and salt. Fold until the last dry streaks disappear, then fold in the chocolate. Stop there.
Spread the batter evenly through the pan, right into the corners. One thicker pocket can remain soft after the brownie around it is ready.
3. Make the cookie dough
Mix the softened butter with both sugars for 1–2 minutes, until creamy. A hand mixer is convenient, though a sturdy spoon or spatula works too. Mix in the egg and vanilla, followed by the flour, baking soda and salt. Fold in the chocolate as soon as the flour disappears.
If a scoop of dough immediately slumps flat, refrigerate the bowl for about 10 minutes. You want soft dough, not a puddle.
Meanwhile, the dough needs enough structure to stay where you place it. A soft mound can spread into the brownie during baking; a loose dough can spread too far and close the gaps you deliberately left between the cookie pieces.
4. Add the cookie dough
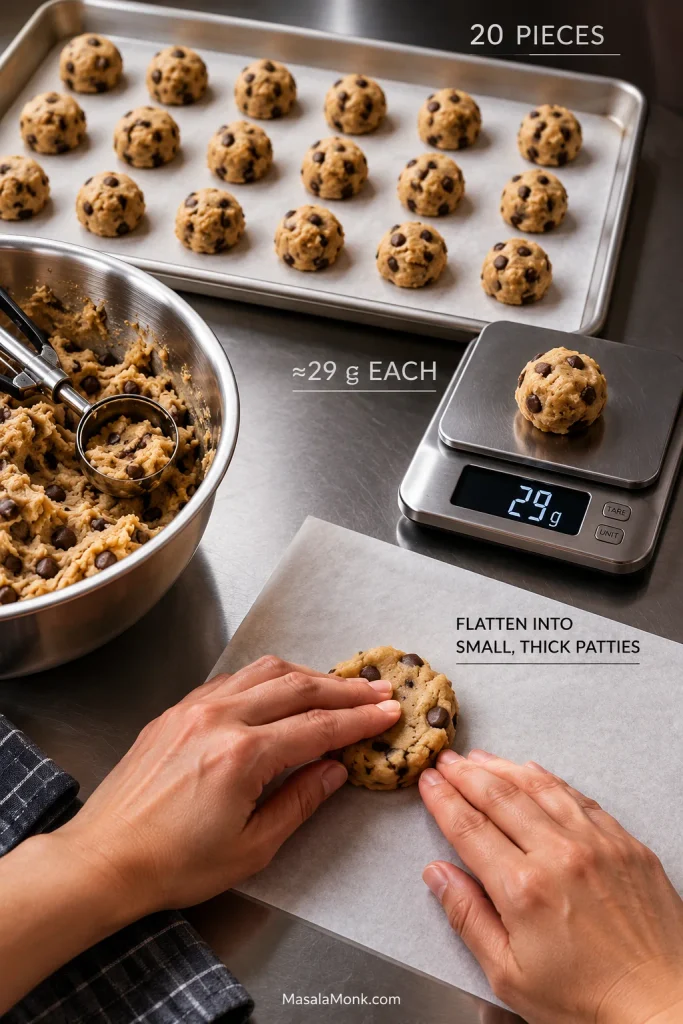
Divide the dough into 20 portions, about 28–30 g each, and flatten them into small, thick patties. They do not need to be identical.
Portioning before assembly keeps the cookie load distributed across the pan instead of concentrating it in a few heavy spots. Roughly 28–30 g per piece gives you a repeatable starting point without requiring perfectly identical patties.
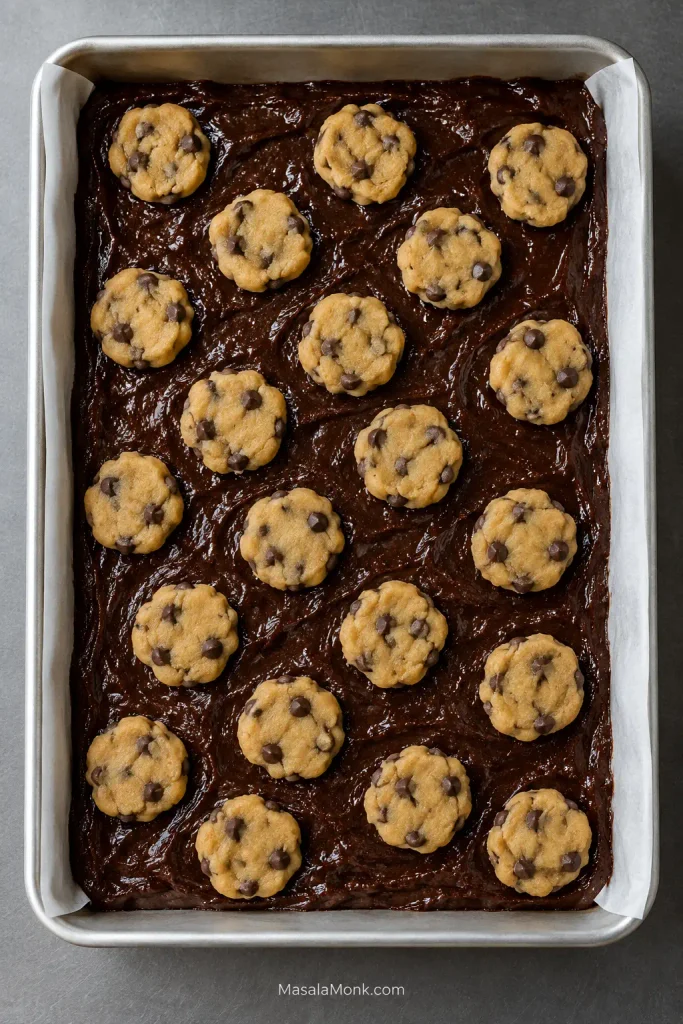
Scatter them across the brownie so cookie reaches every part of the pan while plenty of dark brownie remains visible.
Before baking, those dark channels of exposed brownie are doing useful work. They give you unobstructed places to watch the surface change, insert a tester and judge the brownie itself rather than relying on the cookie color above it.
The surface may look slightly unfinished. Leave it that way.
5. Bake
Bake on the center rack. Start checking at about 28 minutes; expect about 30–36 minutes in a light-colored metal pan.
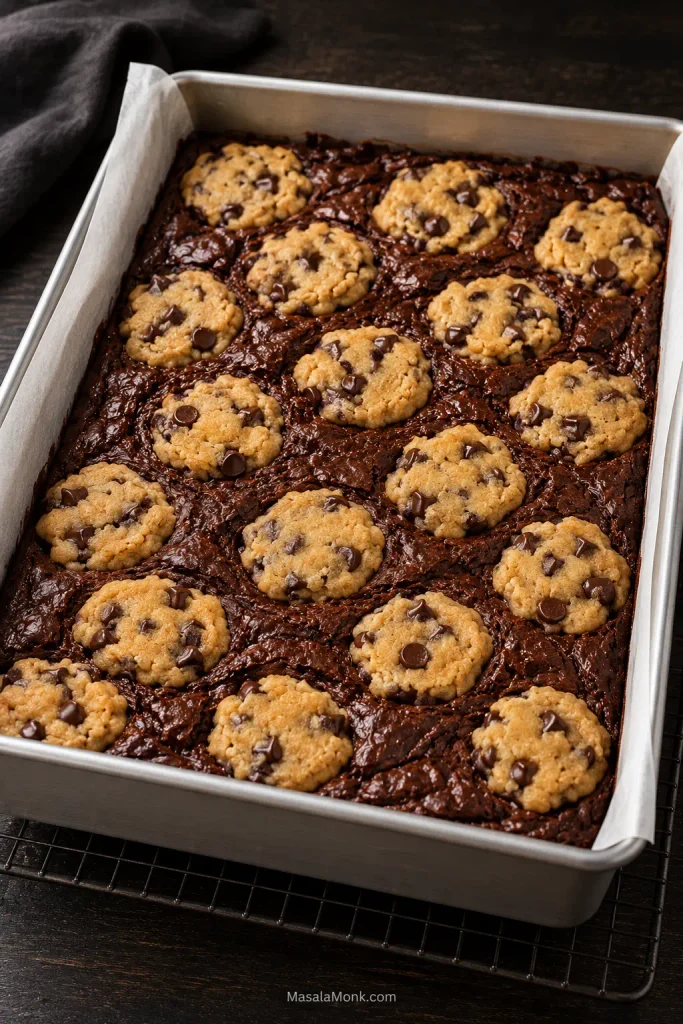
As the pan bakes, the pale cookie pieces spread and pick up color. Brownie showing between them turns darker and glossy; melted chocolate gathers along the places where the two meet.
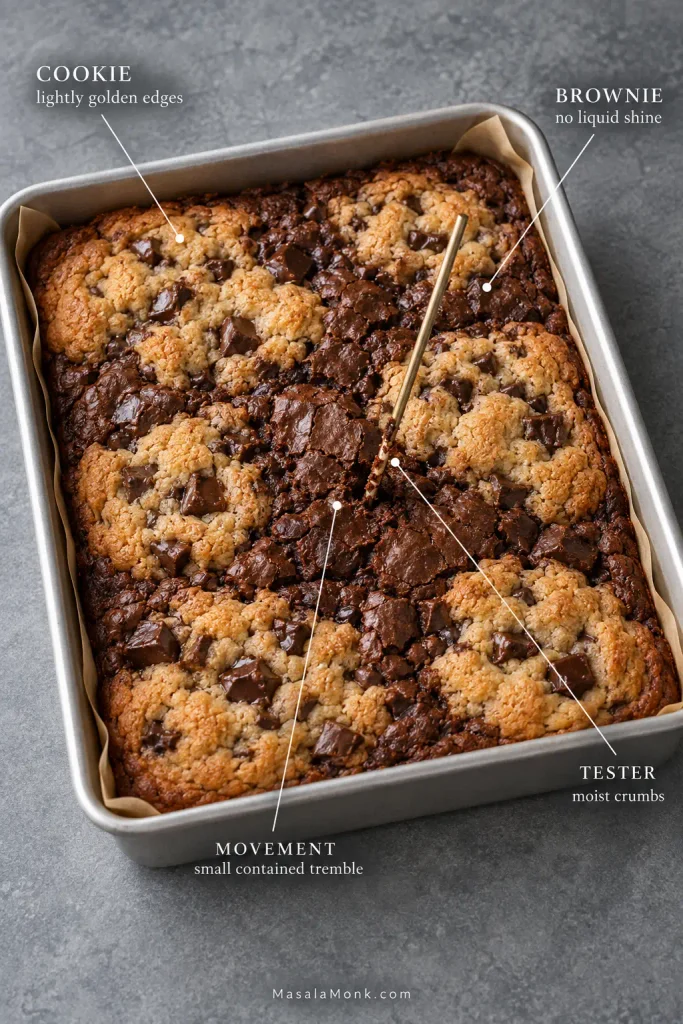
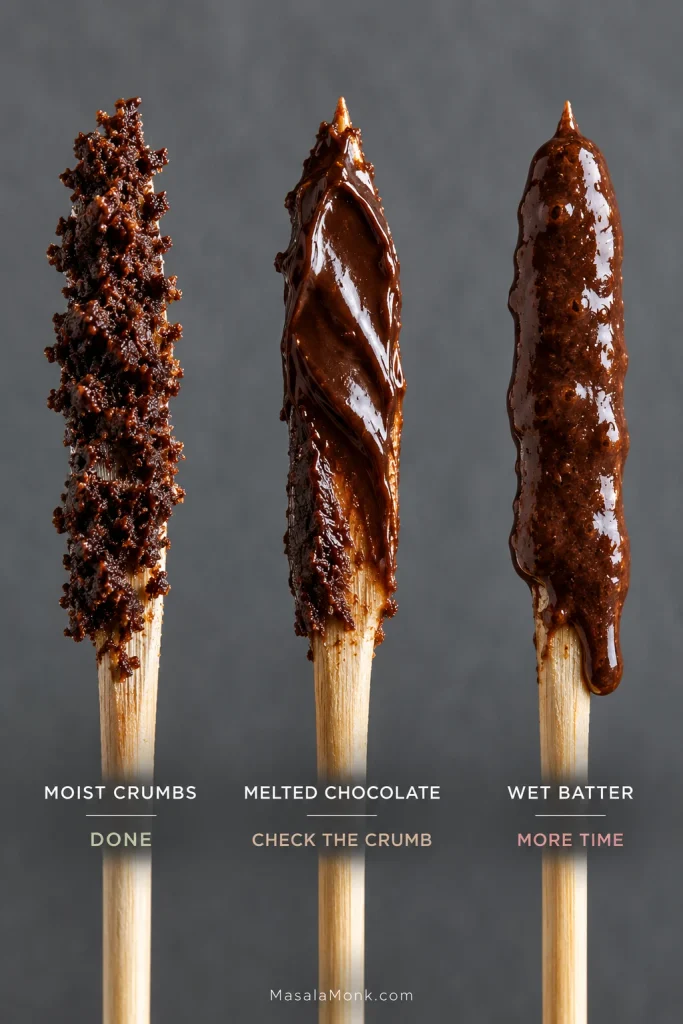
The cookie edges should look set and lightly golden, and the brownie between them should no longer look fluid. Push a tester into one of the brownie patches near the middle: you want moist crumbs, not wet batter. A small tremble is fine; a loose wave through the middle needs more time.
Compare this with the pre-bake pan: the cookie islands have widened, but the brownie windows have not disappeared. That mottled surface is more useful than waiting for the top to become one uniformly browned layer.
If the cookie already has enough color, lay foil loosely over the pan and keep baking. Leave the sides open so steam can escape, and rotate the pan late in the bake if one side of your oven consistently browns faster.
Set the pan on a wire rack. Straight from the oven, the chocolate is molten and the brownie is fragile; even a properly baked middle will look much softer than it does later. About an hour gives you fudgy squares that hold together well enough to pick up. Going in sooner is completely reasonable when what you want is a warm brookie and a fork.
How to Tell When Brookies Are Done
Brookies are done when the cookie edges are lightly golden, the brownie between them has lost its liquid shine, the middle gives only a small contained tremble, and a tester inserted into brownie brings up moist crumbs rather than wet batter.
Read the signals together rather than letting one overrule the others. Start with the surface, check how the center moves, then use a tester in an exposed brownie patch to confirm what the pan is already telling you.
The timer tells you when to start looking. The cookie and brownie tell you when to stop.
Cookie: the edges look set and lightly golden; the middle of each patch can remain soft.
Brownie: a little gloss is fine, but there should be no loose batter between the cookie pieces.
Movement: a contained tremble is fine. A loose wave through the middle needs more time.
Tester: use a brownie patch near the middle and avoid an obvious pool of melted chocolate.
Fudgy, gooey or actually raw?
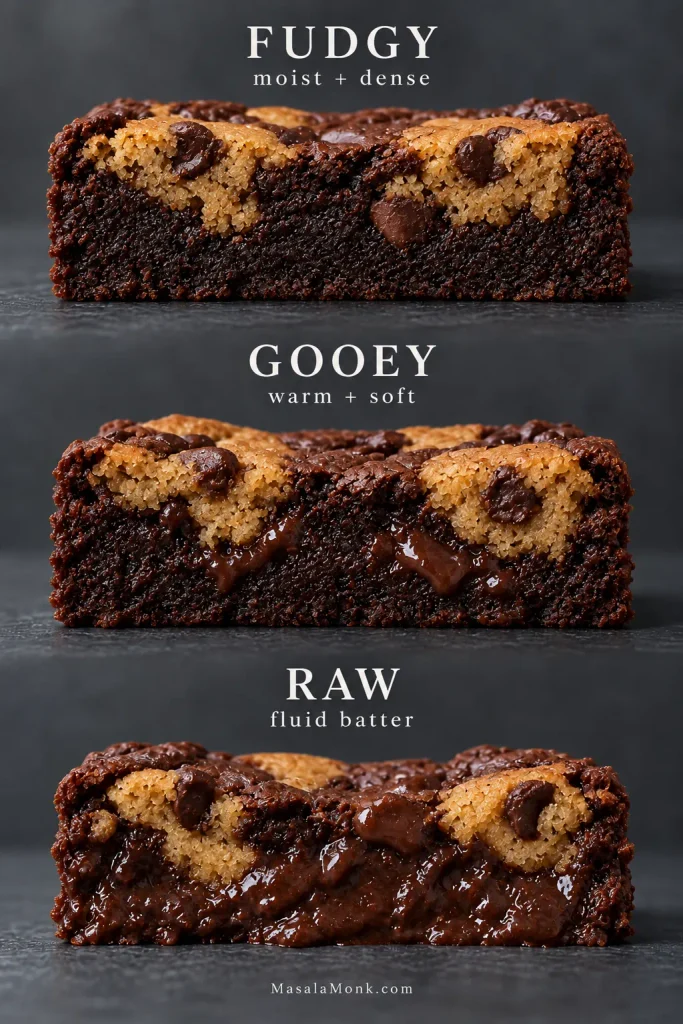
Fudgy brookies are moist and dense, but the brownie itself is baked. They may look very soft while hot and become properly sliceable as they cool.
Gooey brookies are softer when served warm: the brownie is very moist, melted chocolate runs through the crumb, and the bar is messy without behaving like batter.
Raw brookies are different. The brownie remains fluid, leaves obvious batter on the tester and can collapse or flow instead of firming up.
Cooling can firm a properly baked fudgy or gooey center, but it cannot turn fluid batter into crumb. If the middle still flows rather than holding structure, waiting longer on the counter is not the fix.
How to Read the Tester
Melted chocolate can smear across a tester or knife even when the brownie is baked. Look at the crumb around that chocolate before deciding the pan needs longer.
If your tester lands in melted chocolate, move a little and test an exposed brownie patch again. A second location is more useful than adding several unnecessary minutes simply because the first tester came out dark and glossy.
If your cookie repeatedly reaches the right color well before the brownie, the pan is the first thing worth examining.
What Pan Should You Use for Brookies?
Use a light-colored metal 9 × 13-inch (23 × 33 cm) pan for this recipe.
The same batch becomes much thicker in an 8 × 8 or 9 × 9-inch pan, which means the brownie needs more oven time underneath cookie dough already exposed directly to the heat.
Surface area drops faster than the side lengths suggest: a 9 × 13-inch pan gives 117 square inches, 9 × 9 gives 81, and 8 × 8 only 64. With the same batter, that makes the brownie substantially deeper in a square pan.
Very dark metal can brown the bottom and edges faster. Glass and ceramic may not follow the same timing either, so watch the brownie rather than assuming the clock transfers unchanged.
Thick square-pan brookies can be excellent. They just need a recipe developed for that deeper pan.
If the batch in front of you already has hard edges, a wet middle or one strangely soft patch, the pattern can usually tell you what happened.
Brookies Troubleshooting
Raw Centers
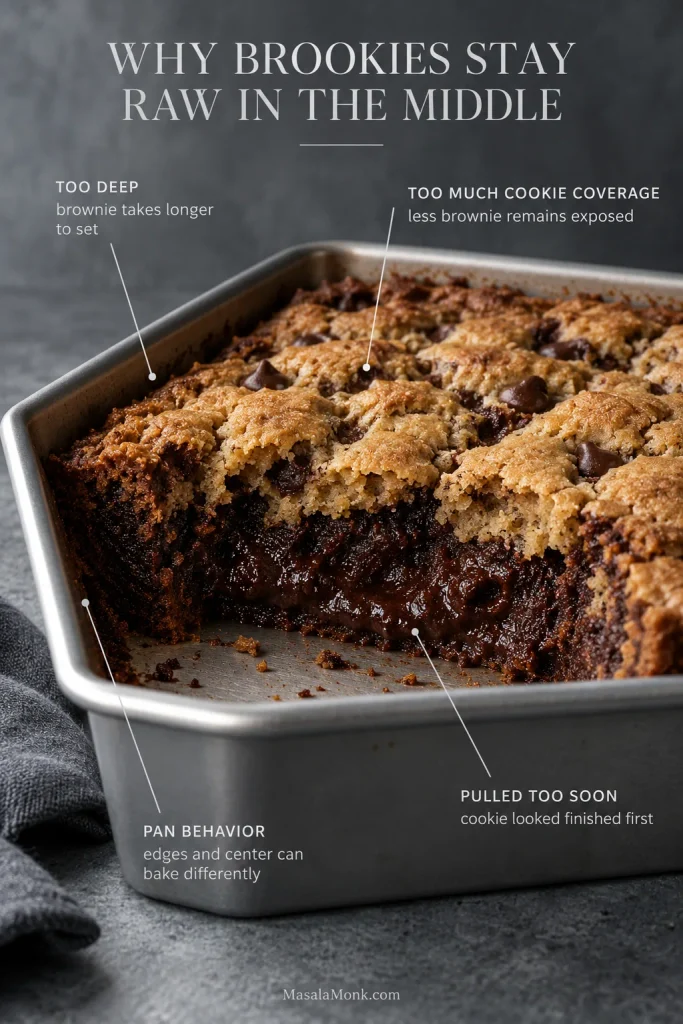
Why are my brookies raw in the middle?
The usual causes are too much brownie depth, very heavy cookie coverage, bakeware that leaves the middle lagging behind, or simply taking the pan out because the cookie looked finished first.
Golden cookie over wet brownie still needs more oven time. Cover the top loosely with foil and continue in short intervals.
The cookie is exposed directly to oven heat while the brownie center has to set underneath and between it. As a result, a golden top can arrive before a deep or heavily covered middle has finished baking.
The edges are hard but the middle is raw
This is frustrating because the pan can look completely finished around the outside. A thick brownie layer, dark or glass bakeware, or an oven running hot can all push the perimeter ahead.
Protect anything already browned and give the middle more time. If cakes and brownies behave this way in your oven too, check the actual oven temperature with a thermometer.
Uneven Baking
Only one part of the pan is underbaked
One soft patch usually means the batter was thicker there, a large cookie piece covered that spot, or the oven has a hot or cool area. The whole pan may not need more time.
Spread the brownie carefully into the corners next time, and rotate late in the bake if your oven has a familiar hot side.
Texture, Sinking and Cutting Problems
The cookie dough sank into the brownie
A little sinking is exactly what you want—the brownie and cookie should meet.
If the cookie dough almost disappears, it was probably very warm or divided into pieces that were too small. A short chill gives it more body.
They look raw as soon as I cut them
Warm brookies are supposed to be messy. An early slice can look alarmingly soft while the chocolate is molten.
Leave the rest of the slab alone for a while. A brownie that firms into a dense slice was still setting; one that continues to flow was underbaked.
The brownie is cakey, dry or crumbly
Start with the flour measurement and bake time. Extra flour and a few unnecessary minutes can move the brownie away from fudgy surprisingly quickly.
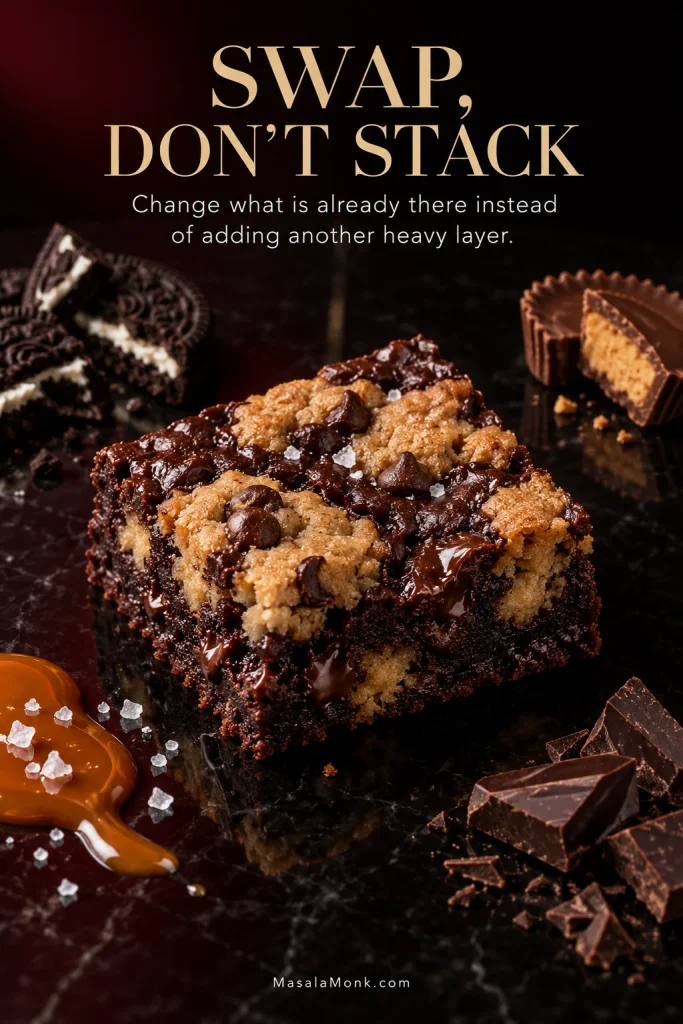
There is already plenty happening in this pan. The safest changes replace part of what is already there instead of adding another heavy layer: swap, do not stack.
For Brookie variations, think about structure before flavor: is the new ingredient replacing something already in the dough, or adding extra mass or moisture? A replacement usually preserves the original bake more predictably than another full layer.
Oreos or Peanut Butter Cups
Replace part of the chocolate in the cookie dough with chopped Oreos or peanut butter cups, keeping the overall quantity of chunky add-ins about the same. You still want the cookie dough to spread normally and leave brownie showing between the pieces.
Caramel and Flaky Salt
Caramel is easier to control after baking. Drizzle a little over the cooled slab and add flaky salt instead of putting a wet caramel layer through the middle before it goes into the oven.
Change the Chocolate
Bittersweet chocolate gives the bars a darker, less sweet finish; milk chocolate takes them in the other direction. Chopped chocolate mixed with chips gives you larger melted pockets alongside smaller pieces running through the crumb.
There are really two chocolate decisions here. Chocolate type changes sweetness and cocoa intensity, while chocolate form changes the pockets you bite into—chips tend to stay smaller, whereas chopped chocolate can melt into broader streaks.
Changes That Need Their Own Recipe
Brown butter changes more than flavor because some of its water disappears during browning. That affects the way cookie dough spreads, so it is not a casual one-for-one swap. Our brown butter chocolate chip cookies go deeper into the moisture loss and what it does to the dough.
Brownie mix and refrigerated cookie dough need their own quantities and timing too. Box sizes, fat levels and intended pan sizes vary enough that dropping random packaged products into this method would be guesswork.
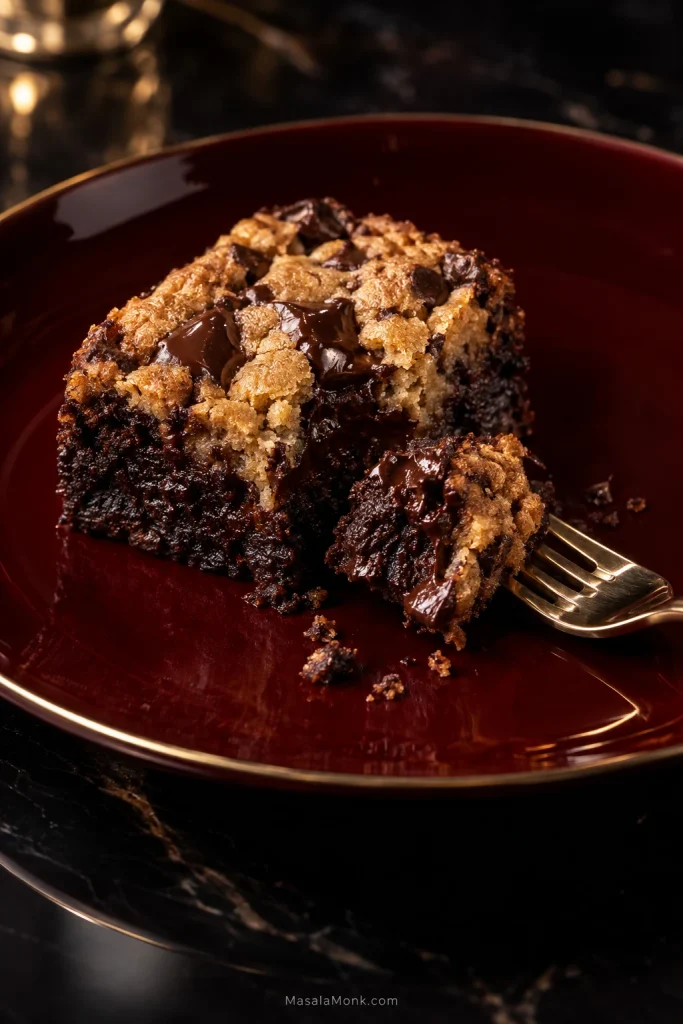
Give the pan about 30–45 minutes. The brownie will have started to firm, but the chocolate will still be soft and the middle deliberately messy. This is the fork version: tender cookie, brownie at its softest and melted chocolate running through the places where the two meet.
Warm serving is a texture choice, not a shortcut around doneness. Bake the Brookies fully first; the 30–45 minute rest simply catches them while the brownie is especially soft and the chocolate is still loose enough for a fork.
For neat fudgy squares
Wait about an hour, or until the slab feels stable enough to lift with the parchment. Move it to a board and cut with a large sharp knife.
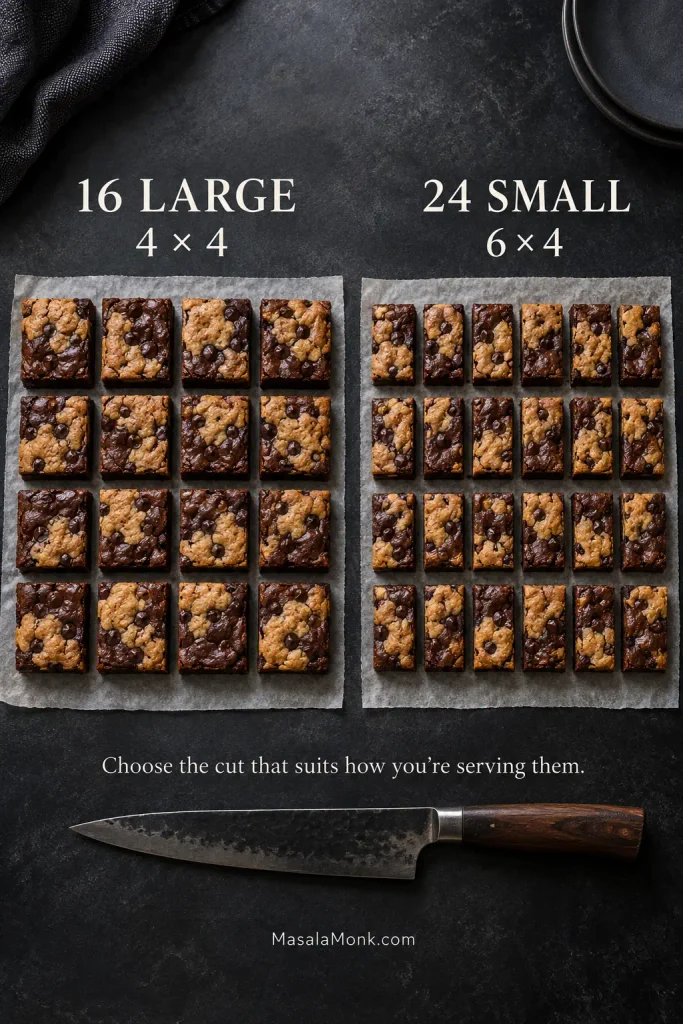
A little chocolate on the blade is perfectly normal. Cut into 16 larger squares for dessert portions or 24 smaller bars for sharing, wiping the knife between cuts when clean edges matter.
For serving, choose the grid before making the first cut: 4 × 4 gives 16 larger squares, while 6 × 4 gives 24 smaller pieces. Planning the pattern first also helps avoid narrow leftover strips at the edge.
For very clean cuts tomorrow
Cool the slab completely and chill it briefly before slicing. Bring the bars back toward room temperature before serving for a softer brownie and less-firm chocolate.
That also makes brookies easy to prepare a day ahead: bake the slab, let it cool, and save the cutting for when everything is firm and easy to handle.
Storage and freezing
Once the brookies are cool, keep them in an airtight container at room temperature for about 3–4 days. Refrigerated bars keep for roughly a week, though the brownie and chocolate both become firmer when cold.
For longer storage, wrap individual bars well and freeze them airtight for up to about 2 months. Thaw at room temperature.
At room temperature, the cookie stays chewy against a soft, fudgy brownie.
Cool enough to cut cleanly, the Brookie still keeps both textures visible: chewy cookie folded into fudgy brownie, with softened chocolate at the seam.
Warm a square just enough for the chocolate to loosen and the boundary between the two almost disappears again. Both are good—it simply depends whether you want a neat bar in your hand or the softer version that needs a fork.
These are the brownies for the person who does not want chocolate cake pretending to be a brownie. The knife should crack through a thin shiny top, the edges should have a little pull, and the center should stay dense, soft, and deeply chocolatey without tasting raw.
If you have ever pulled a pan from the oven and wondered whether the middle was still underbaked or already past fudgy, this recipe is for that exact moment. It is a no-guesswork brownie guide: one bowl, no mixer, clear batter cues, and a simple way to know when to stop baking.
The rule is this: pull the brownies before they look completely finished. A toothpick should show crumbs or a light chocolate smear — not wet batter, and not a completely dry stick. Cooling turns that soft center into a fudgy slice.
This homemade brownie recipe from scratch uses melted chocolate, cocoa powder, butter, sugar, eggs, and a small amount of flour to give you boxed-brownie comfort with deeper chocolate flavor, chewy edges, and fewer last-minute doubts at the oven.
Fudgy brownies come from more fat and chocolate, less flour, no leavening, gentle mixing after flour, and a bake that stops before the center looks fully done. Use an 8-inch / 20 cm light metal pan, bake at 350°F / 175°C, and start checking early. The best cue is crumbs clinging to the toothpick, not a clean, dry one.
Best pan
8-inch / 20 cm light metal square pan
Oven
350°F / 175°C, or about 160°C fan-forced
Texture goal
Thin crackly top, chewy edges, dense chocolate center
Best cue
Crumbs or a light smear on the toothpick, not wet batter
If this is your first time baking brownies from scratch, do not try to memorize every detail. Remember one thing: the right moment looks slightly early.
Use this close-up before you slice the pan. the middle should look compact and set, not loose like batter.
A properly baked fudgy brownie looks moist and compact inside; if it looks loose, shiny, or batter-like, it needs more time.
Fudgy Brownie Recipe Card
Fudgy Brownies
A from-scratch batch of brownies with a thin shiny crust, chewy edges, and a dense chocolate center that firms as it cools. The key is simple: stop before the toothpick comes out clean, then let the brownies cool before slicing.
Prep Time
15 minutes
Bake Time
27–31 minutes
Cooling Time
At least 1 hour
Active + Bake Time
About 45 minutes
Yield
16 brownies
Difficulty
Easy to moderate
Pan
8-inch / 20 cm square metal pan
Oven
350°F / 175°C conventional, or about 160°C fan-forced
Equipment
8-inch / 20 cm square metal baking pan
Parchment paper
Heatproof mixing bowl or saucepan
Whisk
Rubber spatula
Fine mesh sieve
Digital kitchen scale, recommended
Sharp knife for slicing
No mixer is needed. The batter comes together in one main bowl: melt, whisk, fold, bake.
Ingredients
Ingredient
Amount
Unsalted butter
170g / 6 oz / 12 tbsp
Semi-sweet or dark chocolate, chopped
100–113g / 3.5–4 oz
Granulated or caster sugar
250g / 1¼ cups
Large eggs
2 whole eggs + 1 egg yolk
Vanilla extract
2 tsp / 10ml
Unsweetened cocoa powder
50g / about ½ cup, spooned and leveled
All-purpose flour / maida
65g / ½ cup, spooned and leveled
Fine salt
½–¾ tsp
Chocolate chips or chopped chocolate
100–120g / 3.5–4.25 oz
Instant coffee or espresso powder, optional
½–1 tsp
Instructions
Prepare the pan. Preheat the oven to 350°F / 175°C. Line an 8-inch / 20 cm square metal pan with parchment paper, leaving overhang on two sides for lifting.
Melt the butter and chocolate. Add the butter and chopped chocolate to a heatproof bowl. Melt gently in short microwave bursts, stirring between each, or use a bowl over barely simmering water. Stir until smooth and glossy, then let it stand until warm, not hot.
Whisk in the sugar. Add the sugar while the chocolate-butter mixture is still warm. Whisk for 45–60 seconds. It may look slightly grainy at first, then heavier and shinier as you whisk.
Add the eggs, yolk, and vanilla. Whisk in the 2 whole eggs, extra yolk, and vanilla until the batter looks smoother, thicker, and glossier. You want shine and structure, not cake-like air.
Fold in the dry ingredients. Sift in the cocoa powder, flour, salt, and optional coffee powder. Fold gently just until the dry streaks disappear.
Add more chocolate. Fold in the chocolate chips or chopped chocolate. The batter should be thick, slow-moving, and glossy when it falls from the spatula.
Bake. Spread the batter evenly into the prepared pan. Bake for 27–31 minutes, checking from 24 minutes. Look for set edges, a dry-shiny top with fine cracks, and a middle that still looks a touch underfinished. Do not wait for a clean toothpick.
Cool before slicing. Let the brownies cool for at least 1 hour. The soft middle turns sliceable as it rests. For the cleanest squares, cool completely, chill for 30–60 minutes, and cut with a sharp knife.
Recipe Notes
For best texture, use grams for the flour and cocoa powder. Brownies are sensitive to small changes in dry ingredients. The King Arthur Baking ingredient weight chart is useful if you often convert cups to grams.
Use maida as the all-purpose flour if baking in India.
A light metal pan gives the most reliable texture. Glass and dark pans can change the timing.
Use baking chocolate or a good dark/semi-sweet chocolate bar, not filled chocolate candy. Compound chocolate can behave differently because it uses different fats.
Do not reduce the sugar heavily on the first bake. Sugar helps moisture, chew, and the delicate top crust.
If your oven runs hot or your pan is dark, start checking around 22–23 minutes. For an OTG, preheat fully and bake on the middle rack.
First-bake non-negotiables: keep the flour low, use granulated or caster sugar, include the melted chocolate, skip leaveners, and pull the brownies before they look fully done. Once you know the texture, you can experiment more safely.
Quick bake targets: bake 27–31 minutes, start checking at 24 minutes, and cool at least 1 hour before judging the final texture. For hot ovens or dark pans, start checking at 22–23 minutes.
If you are baking right now, the recipe card has everything you need. The rest of this guide helps you read the cues in the bowl, in the pan, and on the toothpick, especially that strange little moment when the brownies look slightly underdone but are actually ready.
A good brownie is a balancing act: enough structure to slice, enough fat to stay fudgy, and enough sugar to give that thin top crust. The flour stays low compared with the chocolate, cocoa, butter, and eggs, so the brownies set dense instead of fluffy.
A little extra flour, a wider pan, or two extra minutes in the oven can change the whole bite. That is why this recipe leans on visual cues instead of asking you to trust the timer alone.
The finished square should feel dense in your fingers, bend slightly before it breaks, and taste like soft chocolate rather than cake.
What Makes Brownies Fudgy?
Fudgy brownies come from more fat and chocolate, less flour, no leavening, gentle mixing after the flour, and a bake that stops while the center is still soft-set. The texture finishes as the brownies cool.
Low Flour Keeps the Center Dense
Flour gives structure, but extra flour quickly moves the texture toward cake. This recipe uses just enough to hold the squares together while keeping the crumb compact and tender.
Butter, Chocolate, and Cocoa Build the Flavor
Melted butter and chocolate create the rich base. Butter makes the chocolate taste full and rounded, while cocoa powder gives the flavor depth. Chocolate chips or chopped chocolate add soft pockets through the batch, especially when served slightly warm.
The Extra Egg Yolk Helps With Chew
The extra yolk adds richness without adding too much lift. It helps the center feel softer and gives the edges a little more pull.
Sugar Helps Moisture and Shine
Sugar is not only there for sweetness. It helps the batch stay moist and supports the thin shiny crust on top. These taste sweetest while warm; once the brownies cool and set, the salt, cocoa, and darker chocolate balance the sugar better.
No Baking Powder or Baking Soda
A brownie is not trying to rise like cake. That is the whole point. Skipping baking powder and baking soda keeps the texture dense, rich, and compact.
Fudgy vs Chewy vs Cakey Brownies
Brownie texture sits on a spectrum. Some batches are almost like chocolate fudge, some are chewy like a boxed mix, and some are light enough to feel like cake. This version sits between fudge and chew: dense through the center, with enough edge pull to make each square satisfying.
Brownie Style
Texture
What Creates It
Fudgy brownies
Dense, moist, rich center
More fat and chocolate, less flour, shorter bake
Chewy brownies
Set edges with a little pull
Sugar, eggs, egg yolk, and enough structure
Cakey brownies
Lighter, taller, more open crumb
More flour, more air, leavening, longer bake
A brownie can be both fudgy and chewy. If you came here looking for a chewy brownie recipe, this version still gives you edge chew without giving up the dense chocolate middle.
Start by choosing the texture you actually want. because small changes in flour, fat, mixing, and bake time push brownies in different directions.
Before changing the recipe, choose the texture you want: fudgy brownies bake dense, chewy brownies pull slightly, and cakey brownies rise lighter.
Ingredients That Shape the Texture
Once you understand the texture goal, the ingredient choices make more sense. Butter and chocolate bring richness, eggs help the brownies set, sugar helps shine and chew, and flour decides whether the brownie stays dense or drifts toward cake.
Before the ingredient notes get detailed. this visual shows why each item matters to the final brownie texture.
Every ingredient has a job: fat adds richness, sugar helps the crust, eggs bind the batter, and flour decides how firm the brownie crumb becomes.
Butter
Butter is what makes the chocolate taste round instead of sharp. Melt it with the chopped chocolate so the batter starts smooth and glossy. Unsalted butter gives the most control, but salted butter can work if you reduce the added salt slightly.
Chocolate
Use semi-sweet or dark baking chocolate for the melted base. If you want brownies that taste nostalgic and sweet, choose semi-sweet chocolate. For a darker, more grown-up batch, choose chocolate closer to 70%. If cocoa, cacao, and dark chocolate labels ever feel confusing, MasalaMonk’s cacao vs chocolate vs dark chocolate guide is a useful companion.
Sugar
Granulated sugar or caster sugar both work. Caster sugar dissolves more easily, which can help the top bake up shinier. Brown sugar gives a softer, more caramel-like result, but it can make the crust less crackly. If the sweetness worries you, go darker with the chocolate before you start cutting sugar.
Eggs and Extra Yolk
The whole eggs help the brownies set, while the extra yolk adds richness and softness without making the batter too airy. Whisk until the mixture looks glossy before adding the dry ingredients.
Cocoa Powder
Unsweetened cocoa powder deepens the chocolate flavor. Natural cocoa gives a classic brownie taste; Dutch-process cocoa usually gives a darker color and smoother flavor. Sifting matters more here than fussing over the cocoa. Since the batter already contains melted chocolate and butter, the cocoa blends into a rich base; sifting simply prevents dry pockets.
All-Purpose Flour or Maida
Use all-purpose flour or maida. This is the ingredient to measure most carefully. A packed half cup can push the texture toward cake, so use grams when possible. If using cups, spoon the flour into the cup and level it instead of scooping straight from the bag. Do not use self-rising flour here.
Salt
Salt sharpens the chocolate flavor and keeps the sweetness from feeling flat. Use ½ teaspoon for a softer balance or ¾ teaspoon for a deeper bakery-style flavor.
Chocolate Chips or Chopped Chocolate
Chocolate chips give you little set pockets of chocolate. Chopped chocolate melts more lazily into the batter, which is lovely if you want soft streaks when the brownie is still slightly warm.
Coffee or Espresso Powder
A little instant coffee or espresso powder is optional. It does not make the brownies taste like coffee when used lightly; it simply makes the chocolate taste deeper.
Cocoa Powder vs Melted Chocolate in Brownies
Brownies can be cocoa-based, melted-chocolate based, or both. Cocoa powder brings strong chocolate flavor and keeps the recipe pantry-friendly; melted chocolate brings richness and a softer, more fudge-like center. This recipe uses both, and the visual below makes that split easier to understand before you compare the methods.
Look at the role of each chocolate ingredient first. cocoa brings intensity, while melted chocolate helps the brownie set softer.
For a deeper chocolate brownie, use cocoa for intensity and melted chocolate for softness; together, they build flavor without making the crumb cakey.
Brownie Method
Best For
Result
Cocoa powder only
Simple pantry brownies
Deep cocoa flavor, slightly lighter body
Melted chocolate only
Rich dessert-style brownies
Softer, denser, more fudge-like
Cocoa + melted chocolate
Classic fudgy brownies
Rich, balanced, chocolatey, reliable
Cocoa + chocolate chips
Easy chocolate pockets
Extra texture and melted chocolate bits
A cocoa-only brownie can still be excellent, but this recipe is designed for the deeper flavor and softer set that come from cocoa powder and melted chocolate together. For this version, keep the melted chocolate. If you want a cocoa-only brownie, it is better to use a recipe built for that style.
How to Make Fudgy Brownies
Now that the texture pieces are clear, the method is mostly about keeping the batter glossy, folding gently, and stopping the bake at the right moment.
1. Prepare the Pan and Oven
Preheat the oven to 350°F / 175°C. Line an 8-inch / 20 cm square metal pan with parchment paper, leaving overhang on two sides. A light metal pan gives the most predictable edge-to-center contrast.
2. Melt the Butter and Chocolate
Melt the butter and chopped chocolate gently until smooth. The mixture should look glossy and fluid. Let it stand briefly before adding eggs; warm is good, hot is not.
This is the foundation stage: smooth, glossy chocolate and butter before sugar, eggs, cocoa, or flour change the batter.
Once the chocolate and butter look smooth and glossy, stop heating; overheating can dull the flavor and make the base separate.
3. Whisk in the Sugar
Add the sugar while the chocolate mixture is still warm and whisk for 45–60 seconds. It may still look a little grainy, but it should feel heavier and shinier. This helps the surface bake into a thin crust.
The shiny-top work starts here. while the chocolate mixture is still warm enough to help the sugar begin dissolving.
While the chocolate mixture is still warm, whisk in the sugar so it starts dissolving and helps form that shiny crackly brownie top.
4. Add the Eggs, Yolk, and Vanilla
Whisk in the eggs, extra yolk, and vanilla until the batter looks smoother and slightly thicker. You are not trying to whip in cake-like air; you are trying to make the mixture glossy and well combined.
Before adding dry ingredients, look for a cohesive glossy base. that shine tells you the eggs and chocolate mixture are properly combined.
After the eggs go in, the batter should turn smoother and glossier; that change tells you the base is properly combined.
5. Fold in the Cocoa, Flour, and Salt
Sift in the cocoa powder, flour, salt, and optional coffee powder. Fold with a spatula until the last dry streaks disappear. Stop there. Overmixing at this stage can make the texture tougher and more cake-like.
Once flour enters the bowl. switch from whisking to gentle folding so the batter stays dense and tender.
Sift first, then fold gently; this keeps cocoa pockets out of the batter and protects the dense, tender brownie bite.
6. Add Chocolate Chips or Chopped Chocolate
Fold in the chocolate chips or chopped chocolate. When you lift the spatula, the batter should fall slowly, not pour like cake batter.
Lift the spatula before filling the pan. the way the batter falls tells you whether it is thick enough for fudgy brownies.
When the batter falls in a slow heavy ribbon, it has the thickness you want for fudgy brownies, not a light cake-style pour.
7. Bake Until the Center Is Soft-Set
Spread the batter evenly into the prepared pan. Bake for 27–31 minutes, checking from 24 minutes. Look for set edges, a thin shiny top, and a center that still looks slightly underfinished. Wet batter means it needs more time. If the toothpick is dry, do not panic; the brownies will still be good, but next time you can pull them a few minutes earlier.
Level the batter from corner to corner so timing. pan material, and toothpick checks can do their job fairly.
Spread the batter into the corners and level the surface; uneven batter thickness can make the edges dry before the middle sets.
The hardest part is that the right moment can look a little wrong. That softness becomes the dense chocolate middle later, once the brownies have cooled.
Let the brownies cool for at least 1 hour. Warm brownies lie; cooled brownies tell the truth. For clean bakery-style squares, cool completely, chill briefly, then slice with a sharp knife.
How to Get the Shiny Crackly Top
The shiny crackly top comes from sugar, eggs, fat, and heat working together. It is not just decoration; it is a sign that the batter was mixed well before the flour went in and baked hot enough for the surface to set into a thin crust.
Use enough sugar. Heavy sugar reduction can make the top dull and the texture drier.
Whisk sugar while the chocolate mixture is warm. Warm fat helps the sugar begin dissolving.
Whisk the eggs until the batter looks glossy. The mixture should look thicker before the dry ingredients go in.
Choose caster sugar if you have it. It dissolves more easily than coarse granulated sugar.
Fold gently after flour. Once flour is added, more mixing will not improve the top.
Preheat the oven fully. A properly hot oven helps the surface set at the right time.
Read the surface first: set edges and a dry-shiny top mean it is time to check the inside instead of baking by color alone.
First check the surface: a dry-shiny top and set edges mean it is time to test the inside, not keep baking by color alone.
Do not chase perfection here. A shiny crust is lovely, but it is not the only sign of a good brownie. Even a slightly duller top can still hide a beautiful fudgy middle.
How to Tell When Fudgy Brownies Are Done
Fudgy brownies are done when the edges are set, the top looks dry and lightly crackled, and a toothpick near the center comes out with crumbs or a light chocolate smear rather than wet batter.
This is the most important part of the recipe, especially if you usually second-guess brownies at the oven. You are pulling them while they still look a little soft, then trusting the cooling time to finish the texture. Test near the center, or halfway between the edge and center if the brownies look very soft. Do not test only at the edge, because the edge sets first.
Use this toothpick guide before adding more oven time. the sweet spot is a few crumbs with a light chocolate smear.
For the brownie toothpick test, aim for crumbs with a light chocolate smear; wet batter is underdone, but a clean pick often means overbaked.
Toothpick Result
Texture Result
What to Do
Wet raw batter
Raw middle
Bake 2–3 minutes more and check again
Thick chocolate smear, no raw batter
Softer middle
Remove if you like a softer middle, then cool fully
Crumbs with a light smear
Classic fudgy brownie
Best default point to remove from the oven
Mostly crumbs, little smear
Firmer square
Good for cleaner packed brownies
Completely dry toothpick
Likely overbaked
Still edible; next time, check earlier
Do not cut the pan right away to check if it is done. Freshly baked brownies can look too soft while warm, then set into clean squares once cooled. If your first slice is messy, the batch probably needed more time to firm up, not a different recipe.
Gooey vs Fudgy vs Underbaked Brownies
This is where many brownie mistakes happen. A fudgy center can look soft when warm, but raw batter is different. Use the visual first, then the table when you are not sure whether to pull the brownies or give them a few more minutes.
When softness makes you second-guess the pan, compare structure first: set brownies hold shape, raw batter does not.
The easiest clue is structure: gooey and fudgy brownies still hold shape, while underbaked brownies collapse or smear like batter.
State
What It Looks Like
What To Do
Gooey
Soft, sticky, and rich, but not liquid
Cool fully or chill before slicing
Fudgy
Dense, moist, sliceable, with a soft-set center
Ideal for this recipe
Underbaked
Wet batter, unstable middle, or liquid streaks
Bake a few minutes longer
Overbaked
Dry interior, hard edges, clean toothpick
Serve warm with sauce or ice cream
If the center looks slightly underfinished but not wet, you are usually in the fudgy window. When it looks liquid, it needs more time. This is the moment when the edges chew, the top cracks, and the inside still eats like chocolate fudge.
Pan Size, Oven Temperature, and Bake Time Guide
Best Pan and Size
A light metal 8×8-inch pan is the safest choice for this recipe because it gives set edges without overcooking the middle.
Pan size changes texture quickly. A wider pan spreads the batter thinner and bakes faster. With a smaller pan, the squares are thicker and need more time.
If your timing feels inconsistent, check the pan material before blaming the recipe. heat transfer changes the edge-to-center balance.
If your brownies overbake at the edges, check the pan first; light metal is usually the best pan for even fudgy brownies.
Timing Changes by Pan and Oven
Pan or Oven Setup
What Happens
What to Do
8×8-inch / 20 cm light metal pan
Best default texture
Use the recipe as written
9×9-inch metal pan
Thinner brownies, faster bake
Start checking 3–5 minutes earlier
7×7-inch pan
Thicker brownies
Bake slightly longer and check the center carefully
8×8-inch glass pan
Slower heat transfer, softer edges
Expect timing differences and watch the center
Dark metal pan
Edges can bake faster
Check early and avoid overbaking
9×13-inch pan
Different thickness and timing
Use a properly scaled version instead of guessing
Fan-forced oven
Stronger heat movement
Use about 160°C and check early
OTG
Heat can vary by rack and rod setting
Preheat fully and bake on the middle rack
In an OTG. rack position matters because the top and bottom rods can heat the pan unevenly if it sits too high or too low.
For OTG brownies, the middle rack gives steadier heat so the top does not overcook before the inside reaches the right set.
If a 9×9-inch pan is all you have, the recipe will still work, but the squares will be thinner and less plush. Start checking early.
For extra-thick bakery-style brownies, do not simply overfill the pan or guess the bake time. Use a smaller pan only if you are ready to bake longer and check carefully near the center.
Time is a range, not a command. Your pan, oven, chocolate, and batter thickness all affect the final bake. The best square should feel dense in your fingers, not springy like cake.
Homemade Brownies With Boxed-Brownie Comfort
Boxed brownies are not the enemy. They train us to expect chew, shine, sweetness, and a predictable center. The real frustration is spending more time on homemade brownies and ending up with dry chocolate cake.
This recipe keeps those comforts — set edges, soft center, and a crackly top — but builds deeper flavor with real chocolate and cocoa powder. The trick is not to imitate the box exactly; it is to keep the comfort while learning the one cue the box cannot teach you: when to stop baking.
You get the comfort of the box, but with a darker, fuller chocolate bite. For another easy cut-and-share dessert, MasalaMonk’s sweetened condensed milk fudge leans more candy-like while still giving you neat chocolatey squares.
Why Brownies Turn Cakey, Dry, or Too Gooey
When a batch goes wrong, it is usually not mysterious. It is almost always flour, mixing, pan size, chocolate temperature, or a few extra minutes in the oven.
Common Brownie Problems and Fixes
Problem
Likely Reason
Fix Next Time
Brownies turned cakey
Too much flour, overmixing, leaveners, or overbaking
Measure flour carefully, fold gently, skip leaveners, and check earlier
Brownies are dry
Overbaked, pan too large, or too much flour
Pull the brownies before the toothpick is completely dry
Brownies are too soft
Underbaked or sliced while warm
Cool fully; bake a few minutes longer next time if the center was truly raw
No crackly top
Sugar was not whisked well or was reduced too much
Whisk sugar well into the warm mixture and avoid heavy sugar cuts
Brownies sank in the middle
Center was underbaked or the pan was moved too early
Bake until the edges are set and the center is soft-set
Hard edges
Overbaking, dark pan, or strong side heat
Use a light metal pan and start checking earlier
Brownies look oily
Chocolate mixture was too hot or batter did not emulsify smoothly
Let melted chocolate stand briefly and whisk eggs in well before adding flour
Top looks done but center is raw
Oven heat too high, dark pan, or pan too small
Use a light metal pan, test nearer the center, and lower the oven slightly next time if needed
Brownies crumble when cut
Cut too warm or flour/fat balance changed
Cool completely and chill briefly before slicing
Brownies taste too sweet
Chocolate was mild or salt/cocoa balance was low
Use darker chocolate, add salt, or add a little espresso powder instead of cutting sugar heavily
When in doubt, protect two things: the flour measurement and the bake time. Those details decide whether the finished squares stay dense and soft or drift into dry cake territory.
Even a batch that did not bake exactly as planned can usually be served well. Brownies are forgiving once you know how to use the texture you have.
If the center is liquid batter rather than soft brownie, return the pan to the oven for a few minutes if it is still warm. Once the pan has cooled, serve it only if the texture is set, not raw.
Problem After Baking
Save It Today
Too soft to slice
Cool fully, then chill 1–2 hours before cutting
Slightly underbaked but set
Serve chilled in small squares or warm as dessert bowls
Dry edges
Trim the edges and serve the softer center pieces
Overbaked batch
Warm slightly and serve with chocolate syrup, ice cream, or whipped cream
Messy cuts
Chill, wipe the knife between cuts, and cut smaller squares
Too sweet
Serve with unsweetened whipped cream, coffee, or a pinch of flaky salt
Before you write off the batch, match the fix to the problem you have. soft, dry, and overbaked brownies each need a different save.
If the batch is not perfect, adjust the serving: chill soft brownies, trim dry edges, or warm an overbaked piece with sauce.
A slightly imperfect batch is still dessert. Sometimes the save is not a new recipe; it is more chilling time, a sharper knife, or a scoop of ice cream.
Easy Brownie Variations
Once the base recipe works for you, use simple mix-ins and toppings. Keep the batter formula the same so the texture stays reliable.
Walnut brownies: fold in ¾ cup chopped toasted walnuts with the chocolate chips.
Double chocolate brownies: use both chocolate chips and chopped dark chocolate for extra pockets of melted chocolate. For a cookie version of that same deep chocolate mood, try these double chocolate chip cookies.
Espresso brownies: add 1 teaspoon instant espresso powder to deepen the chocolate flavor.
Sea salt brownies: sprinkle flaky salt on top just before baking or right after the brownies come out.
Orange chocolate brownies: rub a little fresh orange zest into the sugar before whisking it into the chocolate mixture.
Peanut butter swirl brownies: swirl a few spoonfuls of softened peanut butter into the top before baking. If that salty-sweet flavor is what you are craving, MasalaMonk’s peanut butter fudge guide is another easy square-cut dessert to try.
Avoid heavy wet toppings on the first try. Extra moisture changes the bake time and makes the center harder to judge.
Need Eggless Brownies?
Do not simply remove the eggs from this recipe. Eggs affect structure, shine, and the way the center sets. Without them, the batter needs a different balance of moisture and binding, usually from yogurt, curd, milk, or another tested substitute.
A proper eggless brownie needs its own formula, not just one missing ingredient. For general egg-substitute ratios in baking, MasalaMonk’s flax egg guide is useful, but brownies need more care than a simple one-for-one swap because the texture is so dependent on how the center sets.
How to Serve These as Hot Fudge Brownies
These brownies are excellent at room temperature, but they also make a rich hot fudge brownie dessert. Warm one square gently, place it in a bowl, add vanilla ice cream, and spoon over hot fudge sauce or MasalaMonk’s 3-minute homemade chocolate syrup. A pinch of flaky salt or chopped toasted nuts makes the chocolate taste even deeper.
Use this serving idea when a square tastes better warm than perfectly neat. sauce and ice cream turn softness into an advantage.
To make hot fudge brownies, warm the square gently first, then add ice cream and sauce so the dessert stays creamy, rich, and soft.
For chilled frosted brownies, let the pan cool completely, then spread a thin layer of chocolate cream cheese frosting over the top before slicing.
To serve it sizzling-style, warm the brownie and sauce separately, then bring them together in a heated skillet or dessert plate. The brownie should be warm and soft, not reheated so long that the edges dry out.
How to Store and Freeze Brownies
Room Temperature
Store brownies in an airtight container at room temperature for 3–4 days. Place parchment between layers if stacking them.
Refrigerator
Refrigerating makes the squares firmer and even fudgier. Chilled brownies become denser and almost truffle-like, which is why some people like them even better the next day. Bring them back to room temperature before serving if you want a softer bite.
Freezer
Freeze individual squares. Wrap each piece tightly, then place them in a freezer-safe container or bag. Thaw at room temperature, or warm gently for a softer dessert-style brownie.
Separate the squares before freezing so the brownies stay easy to pull apart. thaw, and serve later.
Before you freeze brownies, separate the squares with parchment; this prevents sticking and lets you thaw one fudgy piece at a time.
Make-Ahead Tip
This is one dessert that rewards patience. Bake the pan earlier in the day, chill briefly for clean cuts, then bring the squares back to room temperature before serving. They also travel well once fully cooled, which makes them easy for lunch boxes, potlucks, or gifting.
Serving Temperature
Warm: soft, melty, and messier; best for dessert bowls, ice cream, and hot fudge.
Room temperature: balanced, fudgy, and sliceable; best for everyday serving.
Chilled: firmest, neatest, and extra dense; best for clean squares and packed desserts.
Clean Cutting Tip
For neat squares, cool completely, chill briefly, and slice with a sharp knife. Wipe the blade between cuts so the edges stay clean. Warm serving gives softer edges; chilled brownies give neater squares.
Fudgy Brownie FAQs
Why did my brownies turn cakey instead of fudgy?
A cakey batch usually comes from too much flour, overmixing, leavening, or overbaking. Measure flour carefully, fold only until combined, skip baking powder and baking soda, and check earlier next time.
What cocoa powder works best for brownies?
Use unsweetened cocoa powder. Natural cocoa gives a classic brownie flavor, while Dutch-process cocoa gives a darker color and smoother chocolate taste. Either works in this recipe.
How soft should brownies be when they come out?
The center should be soft but not raw. If the toothpick comes out covered in wet batter, bake a little longer. When only crumbs and a light smear cling to it, the brownies are ready to cool.
Do brownies continue baking as they cool?
Yes. The center continues to set from residual heat after the brownies leave the oven. That is why they can look slightly soft at first but slice cleanly after cooling.
What pan is best for fudgy brownies?
A light metal 8-inch / 20 cm square pan is the best default. It gives reliable heat, set edges, and a soft middle. Glass pans can work, but they heat differently and may change the timing.
How do you cut clean brownie squares?
Cool completely, then chill for 30–60 minutes if needed. Lift the brownies out with the parchment overhang and cut with a sharp knife, wiping the blade between cuts.
Is melted chocolate necessary for fudgy brownies?
No, but it matters in this recipe. Cocoa-only brownies can also be fudgy, but this formula uses melted chocolate for a richer, softer center and a more dessert-like flavor. For this version, keep it. If you want a cocoa-only brownie, use a recipe built for that style.
Brown sugar or oil: are those swaps okay?
Brown sugar can make brownies softer and more caramel-like, but it may reduce the shiny crackly top. Oil can add moisture, but butter gives this recipe its rounded flavor and structure. Try the recipe as written before experimenting.
What makes the top of brownies crackly?
The crackly top comes from sugar, eggs, fat, and proper whisking. Whisk the sugar into the warm butter-chocolate mixture, then whisk the eggs in until the batter looks glossy before adding the flour.
Final Brownie Success Checklist
Look for batter that is thick, glossy, and slower than cake batter.
Fold only until the flour disappears; do not beat the batter heavily.
Use a light metal pan if possible.
Check for crumbs or a light chocolate smear on the toothpick, not wet batter and not a dry stick.
Cool the brownies before the first serious cut.
Wipe the knife between slices for clean edges.
Use this final visual check to keep the recipe simple at the oven: batter, pan, toothpick, and cooling time.
Before slicing, remember the winning cues: thick batter, a light metal pan, crumbs or a light smear on the toothpick, and enough cooling time.
The best fudgy brownies are a small exercise in stopping at the right moment. Stop mixing when the flour disappears. Pull the pan while the middle still looks a little underfinished. Hold back from cutting too soon. Give the brownies that little bit of patience, and you get the square people actually hope for: a thin crackly top, a soft chocolate middle, and edges that make every piece feel like the corner.