Posted on — Leave a comment

Oatmeal Cream Pies Recipe: Soft, Chewy Little Debbie Copycat

Stack of homemade oatmeal cream pies with thin brown oatmeal cookies and pale creme filling, including one pie cut open to show the soft interior.

A Little Debbie-style oatmeal cream pie has a very particular texture. The cookie bends around the creme. The oats almost disappear into the crumb, while brown sugar and molasses come through before cinnamon. There is hardly any resistance when you bite through it. The cookie and filling give together.

Plenty of homemade oatmeal sandwich cookies are thicker, oatier and piled much higher with frosting. They can be wonderful. They just eat differently.

Here, the oats are finer, raisin paste disappears into the dough, the spice stays quiet, and the creme is light enough to belong between two cookies. Before the whole batch goes into the oven, bake one cookie and see what it does. That one cookie can save the rest.

In This Guide

Oatmeal Cream Pies Recipe

Yield: About 15–16 oatmeal cream pies

Prep time: About 30 minutes

Bake time: About 9–11 minutes per batch

Total time: About 1 hour 20 minutes, depending on whether you bake one or two sheets at a time

Oven: 350°F / 175°C

Dough: 30 g per cookie

Target size: About 3 inches / 7.5 cm across after cooling

Creme: About 17–18 g per sandwich

A digital scale is strongly recommended here. Small changes in flour, oats and portion size can noticeably change how the cookies spread, and sticky ingredients such as shortening and Marshmallow Fluff are easier to measure by weight.

What You’re Aiming For

Cut-open oatmeal cream pie labeled with a soft fine-oat cookie, light creme filling and a thin, bendable sandwich profile.
Three visual clues work together here: finer oats smooth the chew, the low cookie profile keeps the sandwich flexible, and a restrained creme layer prevents the filling from taking over.
  • 60 g raisins
  • 30 ml (2 tablespoons) hot water, for soaking
  • 140 g (about 1¾ cups) quick oats, measured before processing
  • 210 g (1¾ cups) all-purpose flour
  • 1½ tablespoons cornstarch (12 g)
  • ¾ teaspoon baking soda (about 3 g)
  • ¾ teaspoon fine salt (about 4 g)
  • ¼ teaspoon ground cinnamon
  • 180 g unsalted butter, cool room temperature
  • 160 g (¾ cup packed) dark brown sugar
  • 50 g (¼ cup) granulated sugar
  • 20 g (1 tablespoon) regular unsulphured molasses
  • 1 large egg
  • 1 large egg yolk
  • 2 teaspoons vanilla extract

For the Creme Filling

  • 70 g vegetable shortening
  • 35 g unsalted butter, cool room temperature
  • 110 g Marshmallow Fluff or another thick marshmallow creme
  • 80 g confectioners’ sugar, sifted
  • 1 teaspoon vanilla extract
  • ⅛ teaspoon fine salt (about 1 g)

Useful equipment: a digital kitchen scale, food processor or small chopper, electric mixer, parchment-lined baking sheets, cooling rack, and piping bag or small offset spatula.

No food processor? Finely mince the softened raisins and use the quick oats as they are. The cookies will have a more obvious oat texture and look a little less like the packaged version, but it is a perfectly workable shortcut.

Method

1. Heat the Oven and Soak the Raisins

Heat the oven to 350°F / 175°C. If baking one sheet at a time, place a rack in the center. With two sheets, position racks in the upper and lower thirds. Line the baking sheets with parchment.

Pour the hot water over the raisins, stir so they are evenly moistened, and leave them for about 10 minutes. While they soften and the oven heats, prepare the oats.

2. Process the Oats

Add the quick oats to the food processor and pulse until they resemble coarse meal. Rub a pinch between your fingers: you want tiny pieces with very few intact flakes. Stop before the oats become powdery, then transfer them to a bowl.

Three oat textures compared side by side: intact quick oats, the target coarse meal with tiny oat pieces and few whole flakes, and oats ground too finely into powder.
The processor is changing the finished chew, not just the appearance of the oats. Smaller pieces blend into the crumb, while intact flakes make the cookie feel more like a rustic oatmeal cookie.

3. Make the Raisin Paste

Drain the softened raisins, keeping the soaking water nearby. Put the raisins into the same processor and puree until thick and mostly smooth.

If the blades need help, add some of the reserved water 1 teaspoon at a time, using only enough to keep things moving. Tiny flecks are fine; obvious pieces of raisin need another spin.

Softened raisins beside a food processor containing thick, mostly smooth raisin paste, with a small smear showing tiny flecks in the finished paste.
Use the smear as the texture check: the raisin paste should hold its shape rather than run, with tiny flecks still visible.

Whisk the processed oats, flour, cornstarch, baking soda, salt and cinnamon together.

In another bowl, beat the butter with both sugars at medium speed for about 2 minutes, until creamy and slightly lighter. Soft butter is fine; shiny or greasy butter is getting too warm.

Beat in the molasses and raisin paste. Add the egg, yolk and vanilla and mix until smooth. Add the dry ingredients and mix on low just until the last flour streaks disappear. Scrape across the bottom of the bowl once before you stop.

The dough should be soft and easy to scoop. Leave it unchilled for the first cookie.

Weigh one 30 g piece of dough. Roll it gently, then flatten it to roughly 1¾ inches / 4.5 cm across and about ½ inch / 1.25 cm thick.

Thirty-gram oatmeal cookie dough ball on a digital scale beside the same portion flattened to about 1¾ inches wide and ½ inch thick.
Keep every test portion at 30 g before judging cookie spread. Otherwise, a larger scoop can masquerade as a dough problem and send you toward an adjustment the recipe does not need.

Bake for about 9–11 minutes. Pull the cookie when the edges are set but the center still looks slightly underdone. Leave it on the hot sheet for 4–5 minutes, then move it to a rack and let it finish cooling.

Too thick? Let firm dough warm briefly or flatten the next piece slightly more.

Too wide? Chill the dough for 10–15 minutes and try again.

Close to the target? Portion the rest while the dough is still in roughly the same state.

Three oatmeal cookies showing different spread: a thick domed cookie, a target cookie about 3 inches wide, and an overly flat cookie that spread too far.
Do not judge width alone: an oatmeal cookie can cool close to 3 inches across and still sit too domed. In that case, change the starting shape rather than extending the bake.

Divide the dough into 30 g portions, flatten them as you did the test cookie, and leave at least 2½ inches / 6 cm between them on parchment-lined sheets.

Bake one sheet at a time on the center rack for the most even results, or bake two sheets together on racks positioned in the upper and lower thirds, swapping their positions halfway through. Either way, judge doneness by the cookies rather than the clock.

Pull them while the centers still look soft. They continue setting during the 4–5 minutes they spend on the hot pan.

Two oatmeal cookies on a parchment-lined baking sheet: one with set edges and a soft center labeled as ready to pull, and a darker, drier cookie shown as overbaked.
The center is the better doneness signal than overall browning: once it looks dry in the oven, the cookie is likely to cool firmer than the soft sandwich texture we’re after.

Later batches may spread a little less as the oats continue absorbing moisture and the butter cools. If that happens, flatten the next portions slightly more rather than simply baking them longer.

7. Make the Creme

Beat the shortening and butter for about 2 minutes, until smooth and lightly aerated. Add the Marshmallow Fluff, vanilla and salt, beat until combined, then gradually add the confectioners’ sugar and continue for another 1–2 minutes.

Lift the beater. The creme should hold a soft peak. Press a dab between two fingers: it should feel smooth and soft enough to give easily, but not so loose that it stretches away in long sticky strings.

Three creme filling consistencies compared with mixer beaters and bowls: too stiff, the target smooth soft peak, and filling that is too loose and stringy.
The two consistency checks answer different questions: the beater tells you whether the creme filling can hold its shape, while the fingertip test tells you whether it will yield easily when the sandwich is bitten.

Creme not matching the soft-peak texture? See the filling fixes →

8. Fill the Pies

Pair the completely cooled cookies by size and turn half of them flat-side up. Pipe or spread about 17–18 g of creme onto each bottom cookie, leaving a narrow border around the edge. Add the matching top and press gently until the filling moves close to the perimeter.

Three-step oatmeal cream pie assembly showing measured creme on a bottom cookie, a narrow empty border around the filling, and a matching top cookie pressed gently into place.
Matching cookies by size is not cosmetic: with the same 17–18 g of creme, an undersized top pushes filling outward sooner, while a well-matched pair lets it spread more evenly.

This is the one to taste before you start cleaning up. The pies are good straight away, but if you’re chasing the softer packaged-style texture, keep the rest tightly covered for about 2–4 hours before eating another. The creme gradually softens the inside of the cookies as they sit.

Cut-open oatmeal cream pies compared side by side: one freshly assembled and another rested covered for 2–4 hours with a softer, more unified cookie-and-creme texture.
Don’t judge the final texture too early. If a fresh pie feels slightly firmer than expected, compare it again after 2–4 covered hours before changing the recipe.

Making them ahead? See how storage changes the texture →


Where That Familiar Flavor Comes From

The surprise is the raisin paste.

A McKee Foods product sheet for Oatmeal Creme Pies lists rolled oats, molasses and raisin paste among the ingredients. Pureeing the raisins lets the fruit itself disappear into the dough while leaving a faint dark-fruit note behind the molasses. You should never bite into one and think “raisin cookie.”

Why the Oats Are So Fine

Quick oats give a finer cookie. Whole rolled oats still work, but their flakes remain much more obvious. Processing the quick oats into smaller pieces keeps the oat flavor while smoothing out the chew.

The differences between quick, rolled, instant and steel-cut oats matter more in cookies like these than their similar names suggest.

Molasses Matters More Than Cinnamon

Use ordinary unsulphured molasses. Blackstrap is much more bitter and can overpower a small cookie quickly. The ¼ teaspoon of cinnamon adds warmth in the background without turning this into a spice-forward oatmeal cookie.

If you want molasses and spice to take over, our soft gingerbread cookies head deliberately in that direction.

Some spread is what keeps these cookies relatively thin instead of turning them into thick oatmeal rounds. If the test cookie barely moves, start with dough temperature: cool, firm dough spreads less. If it races across the parchment, a short chill is usually more useful than adding extra flour.

Flour measurement matters too. A heavily packed cup can stiffen the dough surprisingly quickly. That’s another reason the scale earns its place here.

Ready to try another? Back to the test cookie →

Getting the Creme Filling Right

The filling changes the whole character of the pie. Butter brings flavor, shortening keeps the creme paler and steadier in a warm room, and Marshmallow Fluff gives it a lighter texture with some spring.

The finished creme should stay between the cookies without eating like dense cake frosting.

How Much Filling Is Enough?

About 17–18 g per sandwich gives you creme in every bite without losing the oatmeal cookie underneath it. Keep the filling just short of the perimeter so it has somewhere to move when the top goes on.

A towering layer looks great in a cut-open cookie. Try to eat it and the glamour disappears pretty quickly.

Prefer an All-Butter Filling?

You can replace the shortening with butter. Expect more butter flavor, a more ivory-colored filling and less firmness in a warm room.

An open jar of Marshmallow Fluff also works well in fudge if you want to use up the rest.

Need the mixing-stage reference? Back to making the creme →

When the Cookies or Creme Misbehave

They barely spread. If warming and slightly flattening the test piece did not solve it, recheck the flour amount, how finely you processed the oats, and how long the dough has been sitting.

They spread into puddles. Give the dough 10–15 minutes in the refrigerator and bake another single cookie. Resist fixing the problem with handfuls of flour; that can trade an over-spreading cookie for a cakey one.

They turned crisp after cooling. Pull the next batch sooner. Once the centers look completely dry in the oven, the soft-cookie window is probably behind you.

Four oatmeal cookies compare common results: barely spread, overly spread and flat, crisp and overbaked, and the target cookie with set edges and a soft center.
Start with the smallest fix first—temperature, flattening or bake time—before changing the dough itself with more flour.

If It’s the Creme

It slumps. Give it a few cool minutes before adding more sugar. Warm butter can make a workable filling look much looser than it really is. If it still will not hold a soft peak, add confectioners’ sugar one tablespoon at a time.

It feels stiff and sugary. Beat it another 30 seconds. If it still feels dense, work in a small spoonful of Marshmallow Fluff. Liquid can take a sandwich filling from stiff to slippery very quickly.

It squeezes out when you eat the pie. The creme may be warm, there may be too much of it, or the cookies may have baked too firm. Start with less filling before changing anything else.

The whole pie tastes too sweet. Check the amount of filling first. An overloaded sandwich can taste cloying even when the creme itself is well balanced.

Four oatmeal cream pies compare filling problems: slumping creme, stiff sugary filling, creme squeezing from the sides, and a balanced sandwich with soft, stable filling.
Start with temperature, then mixing, and change the formula only if neither solves it. That way a warm or under-mixed creme does not get “fixed” with ingredients it never needed.

Storage, Make-Ahead and How the Texture Changes

Freshly assembled pies have more contrast between cookie and filling. Leave them covered for a few hours and the creme gradually softens the inside of the cookies, giving the sandwich a more unified, packaged-style texture.

How to Store Oatmeal Cream Pies

Storage guide showing oatmeal cream pies kept tightly covered at room temperature, refrigerated, and frozen, with the different storage periods and texture notes shown beside each option.
Airtight storage protects the softness you worked for: exposed oatmeal cookies dry faster, while refrigerated pies need some time back at room temperature before their softer texture returns.

At room temperature: Keep the pies tightly covered in a cool room for up to 2 days. Refrigerate them if keeping them longer. Leaving them exposed will dry the cookies much faster.

In the refrigerator: Store them airtight for up to 5 days. Let a cold pie sit at room temperature for 20–30 minutes before eating if you want it softer again.

For freezing: Unfilled cookies or assembled pies can be frozen for up to 2 months. Freeze assembled pies in a single layer until firm, then wrap individually or transfer them to an airtight container. Thaw in the refrigerator, then let them come closer to room temperature before eating.

Make Them Ahead Without Losing the Texture

The assembled pies are well suited to making earlier in the day because a few covered hours soften the cookie around the creme. The dough can also be refrigerated, but a long rest gives the oats more time to absorb moisture, so chilled dough may spread less. Let it lose some of its chill and use the test cookie to recalibrate before baking.


Take a normal bite.

Hand holding a bitten oatmeal cream pie, showing soft brown oatmeal cookies around an even layer of pale creme filling.

The cookie bends, the creme stays with it, and oats and molasses are still there after the sweetness arrives.


Back to recipe ↑ · Back to guide ↑

Posted on — Leave a comment

Gingerbread Cookies Recipe

Gingerbread cookies recipe with soft cut-out gingerbread men and iced holiday cookies.

If you want a gingerbread cookies recipe that rolls cleanly, holds its shape, and still stays soft enough to enjoy, this is the one to make. These cookies bake with soft centers, lightly crisp edges, deep molasses-and-spice flavor, and enough structure for gingerbread men and other cut-out shapes. In other words, you get the classic holiday look without ending up with dry, hard cookies.

The best gingerbread cookies are not just the ones that look neat on the tray. They also need dough that stays manageable, cut-outs that hold their edges, and a texture that still tastes good once the icing dries. This dough is built to give you that balance.

The dough chills well, handles easily once firm, and gives you a smooth surface for glaze or royal icing. So whether you want homemade gingerbread cookies for gifting, simple gingerbread man cookies for family baking, or soft gingerbread cookies for a holiday tray, this guide walks you through the method, decorating options, make-ahead timing, and the fixes that matter most.

Gingerbread Cookies Recipe Quick Answers

These are soft gingerbread cookies made for cut-outs. They are tender enough to enjoy plain, yet firm enough to hold the shape of gingerbread men, stars, trees, and other holiday cookies without spreading into rounded blobs.

The dough is rich with molasses, brown sugar, ginger, and cinnamon, and it becomes much easier to handle after chilling. Once baked, the cookies stay fairly flat, so they work especially well for glaze, royal icing, or simple sugar decoration.

  • Yield: 24 medium cookies
  • Prep time: 25 minutes
  • Chill time: 1 hour
  • Bake time: 8 to 10 minutes per batch
  • Total time: about 1 hour 35 minutes
  • Texture: soft centers, lightly crisp edges
  • Best for: gingerbread men, cut-out cookies, and icing
  • Make-ahead friendly: yes

If you need a gingerbread cookies recipe that works for both decorating and eating, this one lands in the sweet spot. It gives you enough structure for clean cut-outs and enough tenderness to keep the cookies enjoyable after they cool.

Why this gingerbread cookies recipe works graphic showing clean cut-out shape, soft centers with crisp edges, easy decorating, and make-ahead dough.
This gingerbread cookies recipe works especially well when you want dough that rolls cleanly, keeps cut-out edges neat, stays soft in the center, and still handles decorating and make-ahead baking with less stress.

Gingerbread Cookies Recipe Card

Soft Gingerbread Cookies with clean cut-out edges, soft centers, lightly crisp edges, and classic molasses-spice flavor. This is the fast-scan version for baking day.

  • Yield: 24 medium cookies
  • Prep time: 25 minutes
  • Chill time: 1 hour
  • Bake time: 8 to 10 minutes per batch
  • Total time: about 1 hour 35 minutes
  • Best for: soft cut-outs, decorating, gifting, and make-ahead holiday baking

Before You Start Baking

  • Use regular unsulphured molasses, not blackstrap.
  • Weigh the flour if you can, or spoon and level it.
  • Chill the dough until firm before rolling.
  • Pull the cookies when the centers look matte and set, not dark brown.
Soft gingerbread cookies recipe card image with decorated gingerbread cookies, quick ingredients, method, and tips for soft centers and clean cut-out edges.
Here is a soft gingerbread cookies recipe card that gives you the quick-save version: the key ingredients, short method, and a few tips that help the cookies stay soft in the center while keeping neat cut-out edges.

Ingredients

  • 170 g unsalted butter, softened (3/4 cup)
  • 150 g packed dark brown sugar (3/4 cup)
  • 170 g unsulphured molasses (1/2 cup)
  • 1 large egg
  • 1 teaspoon vanilla extract
  • 360 g all-purpose flour (3 cups)
  • 1 teaspoon baking soda
  • 1/2 teaspoon fine salt
  • 1 tablespoon ground ginger
  • 2 teaspoons ground cinnamon
  • 1/4 teaspoon ground cloves
  • 1/4 teaspoon ground nutmeg
  • 1 to 2 teaspoons milk, only if the dough seems unusually dry

Method

  1. Beat the softened butter and brown sugar until creamy and smooth, about 2 minutes.
  2. Mix in the molasses, egg, and vanilla until fully combined.
  3. Whisk together the flour, baking soda, salt, ginger, cinnamon, cloves, and nutmeg in a second bowl.
  4. Add the dry ingredients to the wet mixture and stir just until a soft dough forms. Add 1 teaspoon of milk at a time only if the dough feels unusually dry.
  5. Divide into 2 discs, wrap, and chill for at least 1 hour.
  6. Heat the oven to 350°F / 175°C and line baking sheets with parchment paper.
  7. Roll one disc at a time on a lightly floured surface. For softer cookies, aim for about 1/4 inch thick.
  8. Cut shapes, transfer to the tray, and chill the tray briefly if the dough has softened.
  9. Bake for 8 to 10 minutes, until the centers look matte and set and the edges feel lightly firm.
  10. Cool on the tray for 5 minutes, then move to a wire rack and cool completely before decorating.

Ingredients for This Gingerbread Cookies Recipe

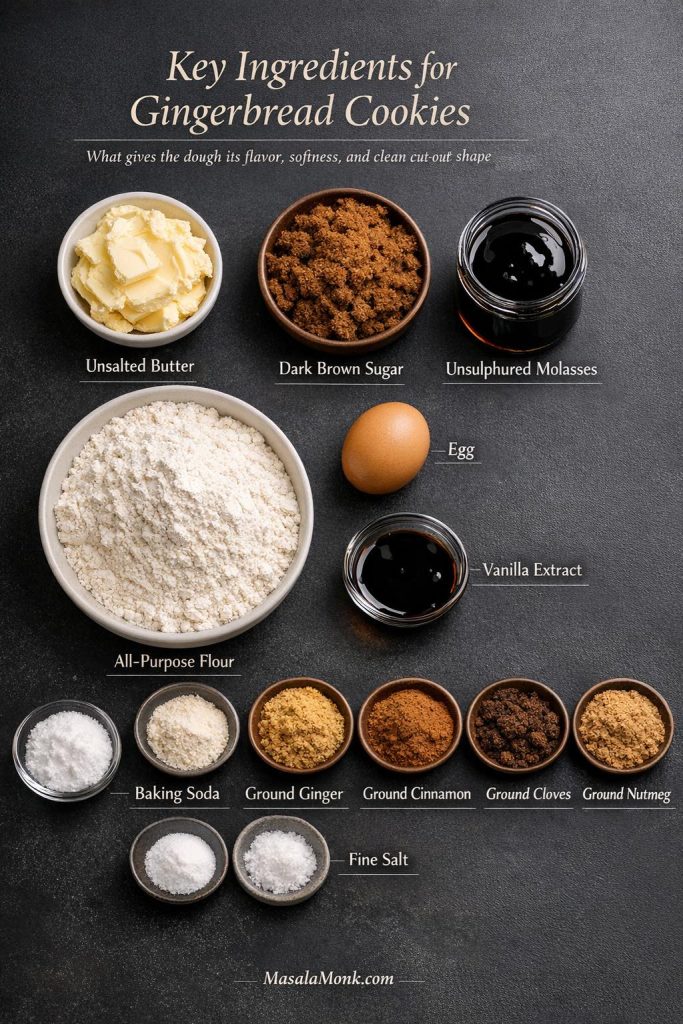
This ingredient list is simple, but each part has a job. The butter and brown sugar keep the cookies tender, the molasses gives classic depth and color, and the flour-to-fat balance keeps the dough sturdy enough for cut-out shapes once chilled.

Labeled gingerbread cookies ingredient guide showing unsalted butter, dark brown sugar, unsulphured molasses, all-purpose flour, egg, vanilla extract, baking soda, ground ginger, ground cinnamon, ground cloves, ground nutmeg, and fine salt.
This gingerbread cookies ingredient guide shows the key ingredients that shape the dough’s flavor, softness, and clean cut-out structure, from unsulphured molasses and dark brown sugar to the warm spice blend and careful flour balance.
  • 170 g unsalted butter, softened (3/4 cup)
  • 150 g packed dark brown sugar (3/4 cup)
  • 170 g unsulphured molasses (1/2 cup)
  • 1 large egg
  • 1 teaspoon vanilla extract
  • 360 g all-purpose flour (3 cups)
  • 1 teaspoon baking soda
  • 1/2 teaspoon fine salt
  • 1 tablespoon ground ginger
  • 2 teaspoons ground cinnamon
  • 1/4 teaspoon ground cloves
  • 1/4 teaspoon ground nutmeg
  • 1 to 2 teaspoons milk, only if the dough seems unusually dry

Important: Use regular unsulphured molasses here, not blackstrap. In a gingerbread cookies recipe like this one, regular molasses gives you the best balance of sweetness, color, and classic gingerbread depth without dragging the flavor into bitterness.

If you can, weigh the flour. If not, spoon and level it rather than scooping straight from the bag. That one habit alone makes it much easier to avoid dry dough and hard cookies.

How to Make This Gingerbread Cookies Recipe Step by Step

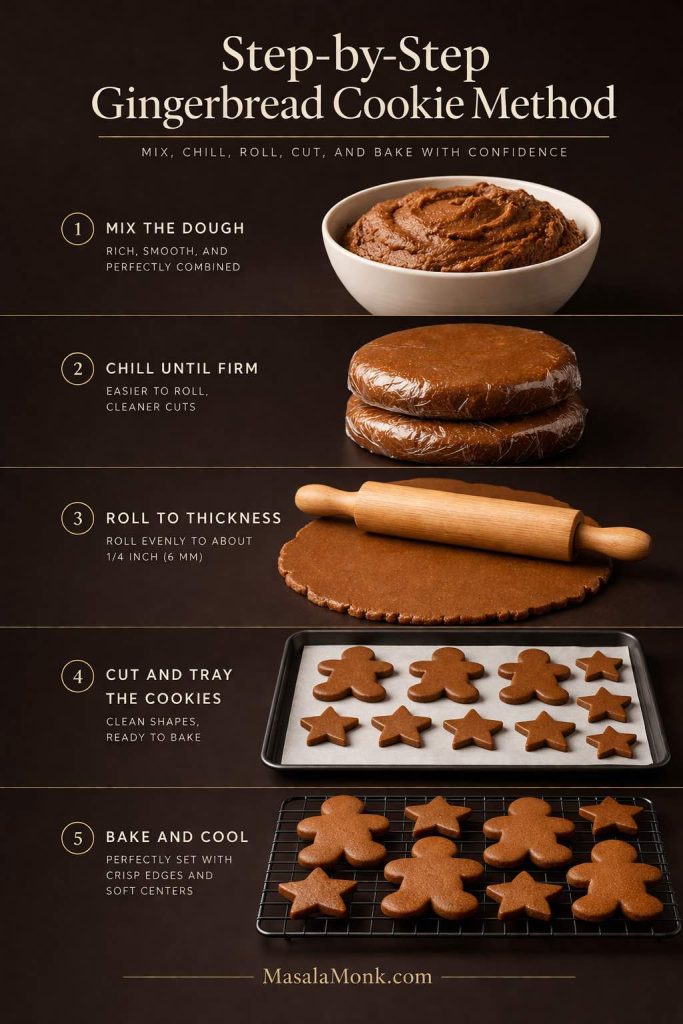
The method is straightforward, but temperature and dough feel matter more than speed. So the goal is not to rush through the steps. Instead, mix until the dough comes together, chill it properly, and keep it cold enough that the cut-outs stay neat.

Step-by-step gingerbread cookie method graphic showing how to mix the dough, chill until firm, roll to thickness, cut and tray the cookies, then bake and cool.
This step-by-step gingerbread cookie method shows exactly how the dough should look at each stage, so it is easier to mix, chill, roll, cut, and bake cookies that hold their shape and stay soft in the center.
  1. In a large bowl, beat the softened butter and brown sugar until creamy and smooth, about 2 minutes. You want the mixture lightened and well combined, but not so whipped that it looks fluffy and airy.
  2. Add the molasses, egg, and vanilla, then mix until fully combined. At this stage, the mixture will look glossy, rich, and a little loose, which is exactly what you want.
  3. In a second bowl, whisk together the flour, baking soda, salt, ginger, cinnamon, cloves, and nutmeg.
  4. Add the dry ingredients to the wet mixture and stir just until a soft dough forms. If the dough seems crumbly rather than soft, add 1 teaspoon of milk at a time until it comes together. The finished dough should feel soft and a little sticky before chilling, not dry and not stiff.
  5. Divide the dough into 2 discs, wrap them well, and chill for at least 1 hour.

Once the dough is properly chilled, it becomes much easier to roll and cut cleanly. More than anything else, this gingerbread cookies recipe depends on cold dough rather than extra flour for sharp cut-outs. If it still feels sticky after chilling, return it to the fridge for 15 to 20 minutes instead of forcing in more flour.

Gingerbread cookies recipe dough rolled out and cut into gingerbread men and stars, with clean shapes transferred to a parchment-lined baking tray before baking.
Cold dough is what keeps a gingerbread cookies recipe like this one easy to roll, cut, and transfer. Once the dough is firm, the shapes stay cleaner on the tray and bake with sharper edges instead of softening into blurred outlines.

This is the stage where many bakers accidentally add too much flour. Cold gingerbread dough should feel firm and workable, not dry.

If the dough cracks hard as soon as you try to roll it, let it sit on the counter for 5 to 10 minutes and try again. Usually that means it is slightly too cold, not ruined. On the other hand, if it sticks to everything, it is usually too warm, not under-floured.

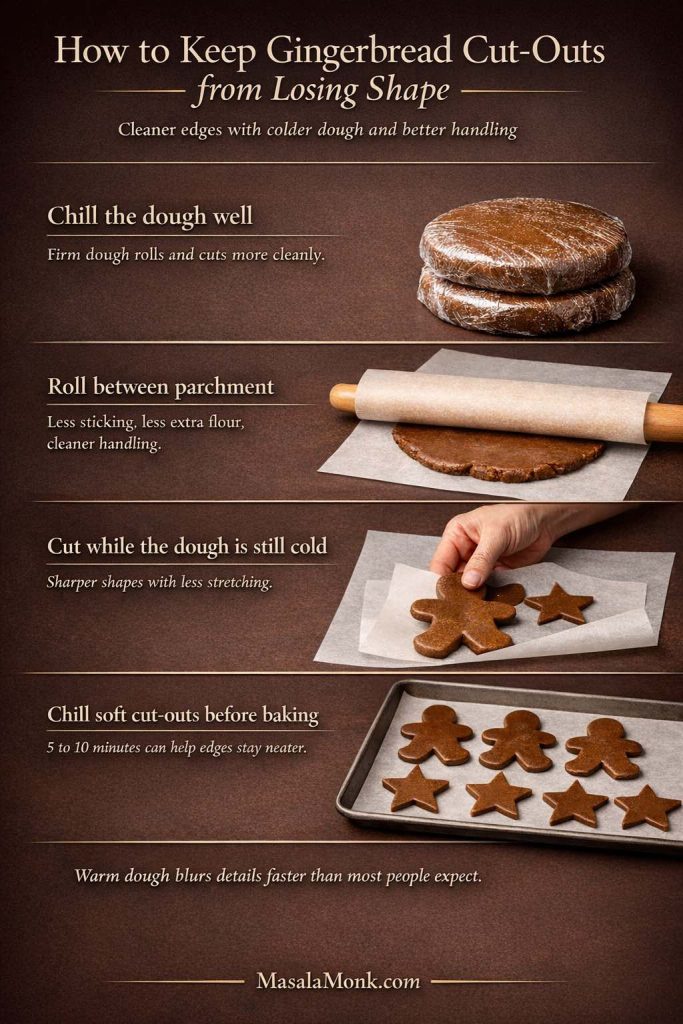
For even cleaner edges, you can also roll the dough between sheets of parchment, chill or briefly freeze it flat, and then cut shapes from the cold sheet. If you want a useful visual on that method, King Arthur explains it well here: how to help cut-out cookies hold their shape.

Shape-retention guide for gingerbread cut-out cookies showing chilled dough, rolling between parchment, cutting while cold, and chilling the tray before baking.
The sharpest gingerbread men usually come from colder dough, not more flour. Keep the dough firm, roll and cut it while cold, and give the tray a short chill if the shapes start softening before they go into the oven.
  1. Heat the oven to 350°F / 175°C. Line baking sheets with parchment paper.
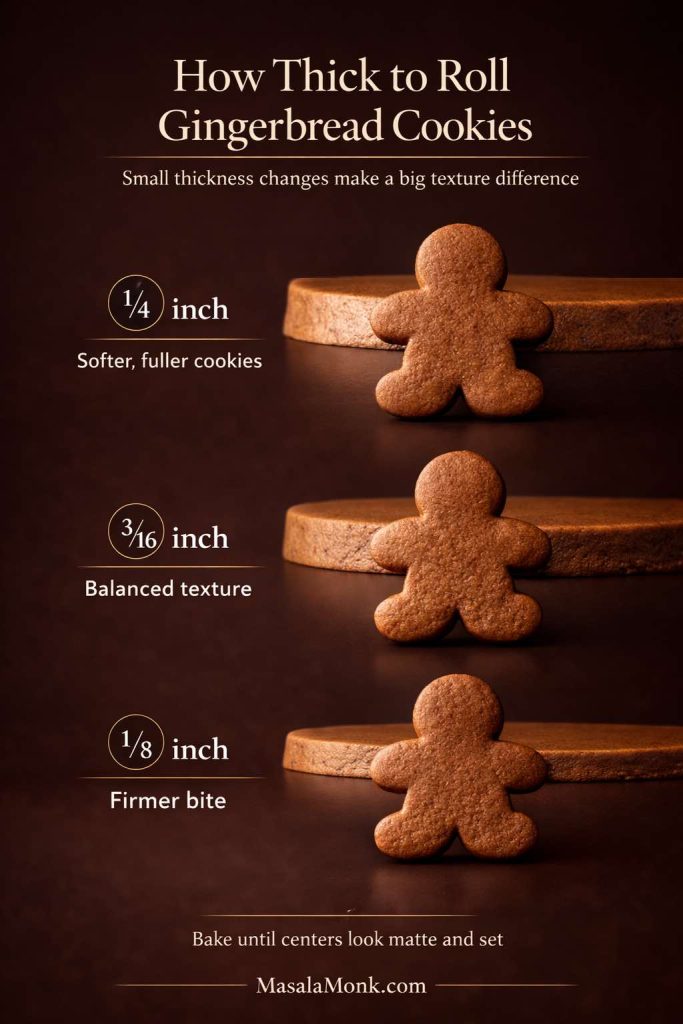
  2. Roll one disc of dough at a time on a lightly floured surface. For softer cookies, roll to about 1/4 inch thick. For a firmer bite, roll a little thinner, around 1/8 to 3/16 inch.
  3. Cut shapes and transfer them to the prepared baking sheets, spacing them about 1 to 2 inches apart. If the dough softens too much while you work, chill it again before baking. If the cut-outs feel especially soft, a quick 5 to 10 minute tray chill helps them hold sharper edges.
  4. Bake for 8 to 10 minutes. A 3-inch gingerbread man rolled to 1/4 inch thick usually takes about 8 minutes for a softer result. A slightly thinner cookie often needs 9 to 10 minutes.
Thickness guide for gingerbread cookies showing 1/4 inch for softer fuller cookies, 3/16 inch for balanced texture, and 1/8 inch for a firmer bite.
For softer gingerbread men and fuller cut-outs, stay close to 1/4 inch; go a little thinner only if you want a firmer bite, and pull the cookies once the centers look matte and set rather than waiting for deep browning.

The cookies are done when the centers look matte and set, the edges feel lightly firm, and the color is only a touch darker around the outer edge. Because they continue to firm up as they cool, do not wait for deep browning. When they are right, they should smell deeply spiced and look set without turning dark brown.

  1. Let the cookies cool on the tray for 5 minutes, then move them to a wire rack. Cool completely before decorating.
  2. Reroll scraps only after gathering them gently. If they have warmed up and turned sticky, chill them again before rolling so the second round stays easier to handle.
Thickness guide for gingerbread cookies showing about 1/4 inch dough for softer, fuller cookies and slightly thinner dough for a firmer bite, with baked gingerbread men and broken cookie cross-sections for comparison.
This gingerbread cookie thickness guide shows the tradeoff clearly: roll the dough about 1/4 inch thick for softer, fuller cookies, or go slightly thinner when you want a firmer bite and a flatter finished texture.

Why This Gingerbread Cookies Recipe Works

A really good gingerbread cookies recipe has to get three things right at once: flavor, texture, and handling. This one does. More importantly, it does so without making the dough fussy or the finished cookies dry, which is why it feels dependable from the first batch onward.

Soft gingerbread cookies without cakey puffiness

The butter, brown sugar, egg, and molasses keep the cookies tender, while the modest amount of baking soda keeps them from rising too much. That is what gives you a soft bite without thick, puffy shapes.

Soft gingerbread cookies recipe close-up with a bitten gingerbread man cookie in front and a whole iced cookie behind, showing a tender center, clean cut-out shape, and lightly crisp edges.
This is the texture you want from a good gingerbread cookies recipe: a tender center, lightly set edges, and enough structure for gingerbread men to stay neat without turning dry or cakey.

Why these gingerbread cookies hold their shape

Once chilled, the dough is firm enough to roll and cut neatly. As a result, hands, feet, stars, and tree points stay more defined in the oven instead of softening into rounded outlines.

Deep gingerbread flavor without bitterness

Molasses, ginger, and cinnamon do most of the heavy lifting, while clove and nutmeg stay in the background. The result is rich and classic, not bitter or overpowering.

Gingerbread cookies that decorate cleanly

Because the cookies bake relatively flat, the icing sits more neatly on top. As a result, both simple glaze and detailed royal icing are easier to manage, especially when you want gingerbread men that still look clear and readable after decorating.

Gingerbread Cookie Ingredient Notes That Matter

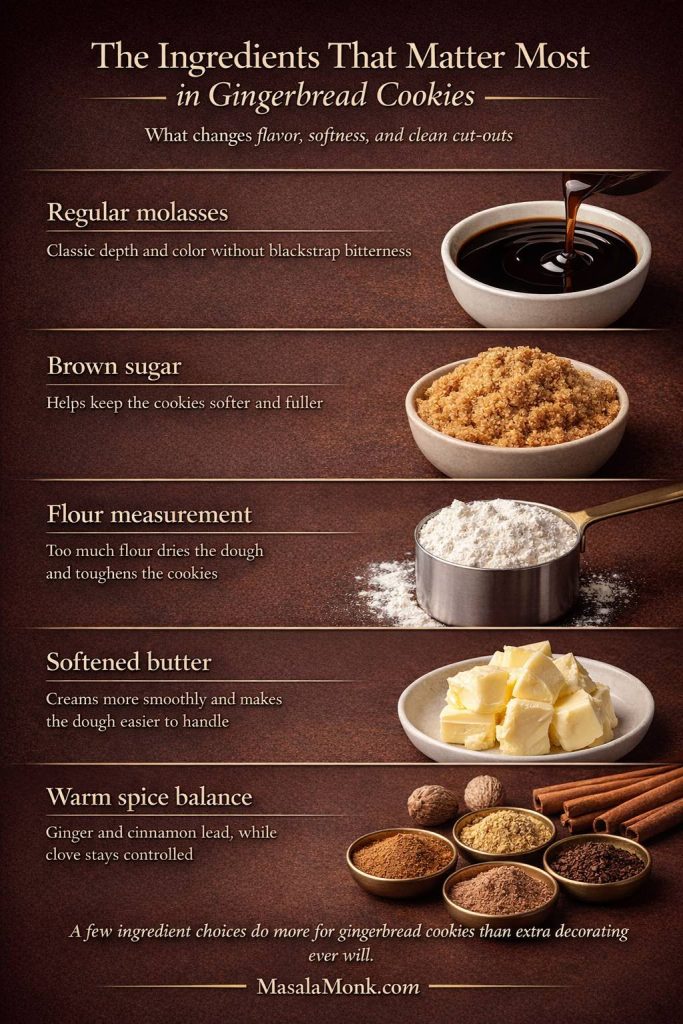
A few ingredient choices can make or break a gingerbread cookies recipe. In particular, the molasses, flour, butter texture, and spice balance affect both flavor and handling.

Ingredient guide for gingerbread cookies showing regular molasses, brown sugar, careful flour measurement, softened butter, and warm spice balance for better flavor and cleaner cut-outs.
A few ingredient choices do more for gingerbread cookies than extra decorating ever will: the right molasses, brown sugar, flour measurement, softened butter, and spice balance are what keep the dough flavorful, softer, and easier to handle.

The best molasses for gingerbread cookies

Use regular unsulphured molasses. It gives the cookies their classic depth and color without pushing them into bitterness. If you want a quick breakdown of light, dark, and blackstrap molasses, King Arthur’s guide is genuinely useful: light, dark, and blackstrap molasses.

Brown sugar keeps soft gingerbread cookies tender

Brown sugar adds moisture and a warmer flavor. As a result, the cookies stay softer and taste fuller than they would with a more neutral sugar base.

Too much flour makes the cookies dry

Too much flour is one of the fastest ways to ruin the texture. If you can, weigh it. If not, spoon and level rather than scooping straight from the bag.

Softened butter gives the dough the right feel

Softened butter should cream smoothly with the sugar, not look greasy or melted. Otherwise, the dough becomes much harder to control once you start rolling and cutting, and the cookies are more likely to lose those cleaner edges.

Keep the spice balance warm, not harsh

Ginger and cinnamon should lead. Clove and nutmeg should stay in supporting roles. Otherwise, the whole dough can start tasting medicinal instead of festive.

Vanilla or orange zest can round things out

A little vanilla rounds out the spice. Orange zest can brighten the dough too, although it should stay in the background so the classic gingerbread flavor stays in charge.

Decorating Gingerbread Cookies and Easy Variations

Once the dough is working well, the next choice is simple: decorate the cookies more neatly or tweak the batch slightly for a softer, darker, or faster finish. This section keeps those adjustments practical so the dough stays reliable.

For softer gingerbread cookies

For a softer result, roll the dough closer to 1/4 inch thick and bake just until the centers are set. That gives you a fuller cookie with a more bakery-style feel.

For faster holiday cookies

Choose simpler cutters, skip detailed piping, and finish the cookies with a quick glaze or sanding sugar. Even so, the batch still looks festive and feels finished. This is the easiest route when you want holiday cookies that still look good without turning decorating into a separate project.

For a darker, more old fashioned gingerbread flavor

Lean a little harder on ginger and use dark brown sugar if you want the cookies to taste deeper and more old fashioned. Just keep the clove controlled so the flavor stays warm and balanced rather than harsh. Do not swap in blackstrap molasses here unless you specifically want a more bitter result.

Best icing for gingerbread cookies

  • Choose royal icing when: you want cleaner outlines, button details, faces, or cookies you can decorate more precisely.
  • Choose simple glaze when: you want a faster, easier finish for a holiday tray, gifting, or casual family baking.

How to decorate gingerbread cookies without making it fussy

Use royal icing when you want clean outlines, button details, smiles, and defined flooding. Use a simple glaze when you want faster cookies that still look finished. In both cases, decorate only once the cookies are completely cool, or the icing can turn patchy and slide.

Decorating guide for gingerbread cookies showing outline first, let the icing set briefly, add dots or buttons, use royal icing for cleaner lines, and simple glaze for a faster finish.
Neat gingerbread cookies do not need complicated piping. Start with a simple outline, let it set briefly, then add a few dots, stripes, or buttons and choose royal icing or glaze based on how detailed you want the finish.

For the neatest beginner-friendly finish, start with three easy moves: outline the cookie first, let that line set briefly, then add dots, stripes, or a small flood rather than covering every inch. That keeps gingerbread men readable, faster to decorate, and less messy for family baking.

Simple decorated gingerbread cookies recipe on a dark plate with gingerbread men, star, and tree cookies finished with easy white icing details.
For a gingerbread cookies recipe like this one, a few clean outlines, dots, and smiles are enough to make the tray look festive without turning decorating into a fussy piping project.

Royal Icing vs Simple Glaze

Quick glaze: Stir 1 cup confectioners’ sugar with 1 1/2 to 2 teaspoons milk and a small splash of vanilla until thick but spreadable. Quick royal icing note: Use a thicker consistency for outlines, then thin it slightly with drops of water for flooding. If you plan to stack or gift the cookies, let royal icing dry fully for several hours or overnight first. If you want a useful visual guide to outline and flooding consistency, King Arthur’s cookie decorating guide is worth a look: cookie decorating guide.

A simple glaze is the better choice when you want an easier finish for a holiday tray, cookie box, or last-minute batch. It should be thick enough to coat the back of a spoon, but loose enough to spread without tearing the cookie surface. So if you want easy gingerbread cookies that still look festive, glaze is often the better call. Meanwhile, it keeps the decorating process much faster and less fussy.

Comparison guide for gingerbread cookies showing royal icing for cleaner lines and simple glaze for a quicker finish.
Royal icing makes more sense when you want crisp outlines and button details, while simple glaze is the easier choice for a faster tray of gingerbread cookies that still looks polished and festive.

If you are putting together a holiday cookie tray, these double chocolate chip cookies are another easy homemade bake to pair with gingerbread.

Troubleshooting Gingerbread Cookies

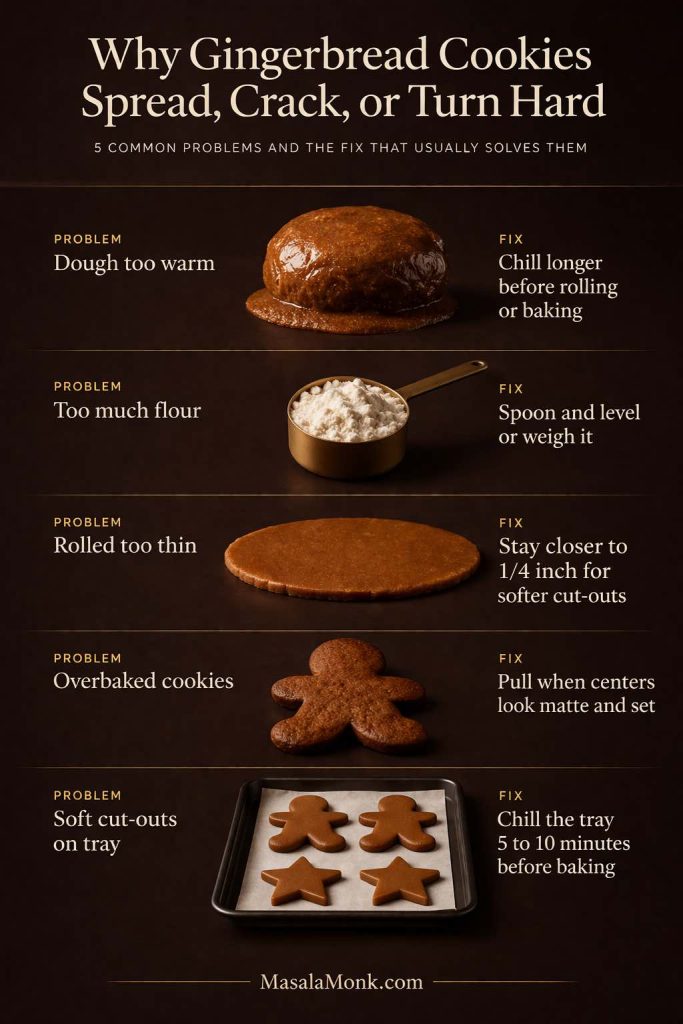
Most gingerbread cookie problems come down to temperature, flour balance, thickness, or bake time. Once you spot the cause, the fix is usually simple. In fact, many common issues are solved by chilling longer, measuring more carefully, or pulling the cookies a little earlier.

Troubleshooting guide for gingerbread cookies showing how to fix warm dough, too much flour, thin rolled dough, overbaking, and soft cut-outs on the tray.
When gingerbread cookies spread, crack, or bake up hard, the fix is usually simple: colder dough, lighter flour handling, a slightly thicker roll, and pulling the cookies once the centers look matte and set.

Why did my gingerbread cookies spread?

The dough was probably too warm, or the cut shapes sat out too long before baking. So chill the dough longer, work in smaller batches, and never bake on a still-warm sheet pan.

Why did they puff up too much?

Too much baking soda, dough rolled too thick, or over-creaming the butter and sugar can all cause extra puffing. Therefore, measure carefully and keep the mixing simple.

Why is my dough too sticky?

That usually means it needs more chill time. Because molasses-rich dough is often soft before chilling, this is one step you do not want to rush.

Why did the dough crack while rolling?

It is usually a little too cold or a little too dry. Let it sit for 5 to 10 minutes, then try again. On your next batch, make sure you are not over-measuring the flour.

Why did the cookies turn hard?

Overbaking and too much flour are the two most common reasons. Remember, too, that gingerbread cookies firm up more as they cool.

Why did my gingerbread men lose shape?

Warm dough, dull cutters, or too many rerolls usually cause blurred shapes. In many cases, chilling the cut cookies for 5 to 10 minutes before baking is enough to help.

Why is my icing too runny or too stiff?

Add more confectioners’ sugar if it runs everywhere. Add water a few drops at a time if it is too stiff to pipe or spread. After all, small changes go a long way with icing.

How to Store Gingerbread Cookies

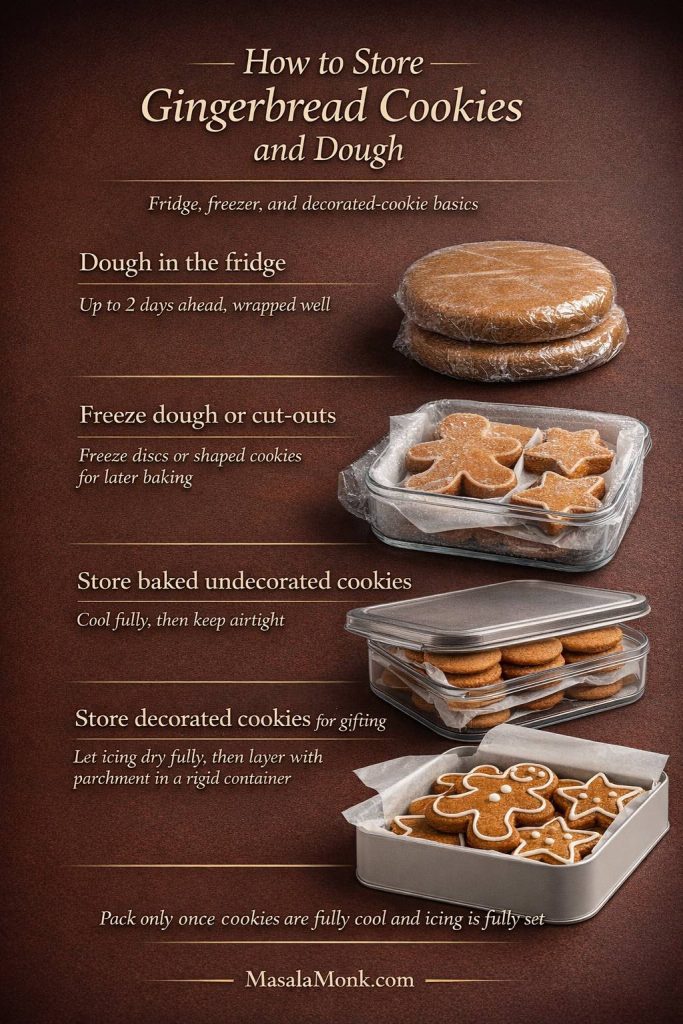
This dough and the baked cookies both hold up well, which makes the recipe easy to split across a few days of holiday baking. Whether you want to prep the dough early, freeze cut-outs, or box up decorated cookies later, each stage stores well when handled the right way.

Storage guide for gingerbread cookies and dough showing how to refrigerate dough, freeze cut-outs, store baked cookies airtight, and pack decorated cookies for gifting.
Gingerbread cookies are much easier to fit into holiday baking when you store each stage the right way: chill dough for short-term prep, freeze cut-outs for later baking, and pack decorated cookies only after the icing is fully dry and set.
  • Dough in the fridge: up to 2 days, tightly wrapped
  • Dough in the freezer: up to 2 months, well wrapped
  • Unbaked cut-outs in the freezer: freeze until firm, then bag and bake from cold with a little extra time if needed
  • Baked undecorated cookies: 4 to 5 days airtight at room temperature, or freeze for up to 2 months
  • Decorated cookies: store only after the icing is fully dry and set

How far ahead you can make gingerbread cookie dough

You can make the dough up to 2 days ahead and keep it wrapped in the refrigerator. If it gets very firm, let it sit out briefly before rolling. That way, it softens just enough to handle without turning sticky again.

How to freeze cut dough vs baked cookies

Freeze dough discs or freeze cut shapes on a tray first, then transfer them to a freezer bag. Baked cookies also freeze well, especially if they are undecorated. Thaw them at room temperature before decorating or serving so condensation does not spoil the finish.

Best container for decorated gingerbread cookies

Let the icing dry fully, then store the cookies in a rigid airtight container. If you need layers, separate them with parchment. A shallow tin or hard-sided box is usually safer than a soft bag once the cookies are decorated.

Decorated gingerbread cookies packed in a parchment-lined tin for gifting after the icing has fully dried and set.
Once the icing is fully dry, gingerbread cookies are much easier to pack neatly in a rigid tin lined with parchment, which helps them travel better and keeps the finished details from smudging.

How to store homemade gingerbread cookies for gifting

Pack them only once the icing is dry and the cookies are fully cool. As a result, they stay neater, travel better, and look more polished when they reach the box or tray. In addition, they are less likely to smudge or stick together. For another festive edible gift idea, these easy festive Irish rum truffles are a natural holiday add-on too.

For the most natural cold-weather pairing, serve these cookies with homemade hot chocolate with cocoa powder.

Gingerbread cookies served with hot chocolate in a black mug, with a gingerbread man, tree, and star cookies decorated with simple white icing on a dark surface.
Serve gingerbread cookies with hot chocolate when you want the coziest cold-weather pairing: the warm drink softens the spice notes beautifully, and the simple decorated cookies still feel festive without turning the serving moment fussy.

Gingerbread Cookies Recipe FAQs

Are gingerbread cookies supposed to be soft or crisp?

They can be either, depending on the style. In this recipe, though, the goal is soft centers with lightly crisp edges. If you want them softer, roll a little thicker and pull them as soon as the centers look set. If you want them firmer, roll slightly thinner and bake a touch longer.

Do I need to chill cut gingerbread cookies before baking?

Not always, but it helps a lot when the dough has softened on the counter. If the cut-outs feel soft, sticky, or hard to transfer cleanly, chill them for 5 to 10 minutes before baking so the edges stay sharper.

Can I make gingerbread dough ahead of time?

Yes. In fact, gingerbread dough is one of the easiest cookie doughs to make ahead because chilling actually improves how it handles. A day or two in the fridge often makes rolling and cutting easier, not harder, as long as you let very firm dough sit briefly before rolling.

Can I freeze gingerbread cookies?

Yes. You can freeze the dough, unbaked cut-outs, or baked cookies. However, undecorated cookies usually freeze best if appearance matters most. Wrap them well, store them airtight, and let them come back to room temperature before decorating or serving so condensation does not ruin the finish.

What icing is best for gingerbread men?

Royal icing is best for detailed outlines, faces, buttons, and cleaner decorative lines. A simple glaze is better when you want a faster, easier finish. So the best choice really depends on whether you care more about precision or speed.

How thick should I roll gingerbread cookie dough?

About 1/4 inch is a strong starting point for softer cut-out cookies. Slightly thinner works if you want a firmer bite. If you are making gingerbread men for decorating, staying close to 1/4 inch usually gives the best balance of shape, softness, and sturdiness.

Can I decorate them the next day?

Yes. In many cases, decorating the next day is even easier because the cookies are fully cool and settled. That is especially helpful if you want cleaner royal icing lines or you are splitting the baking and decorating into two easier sessions.

↑ Back to top