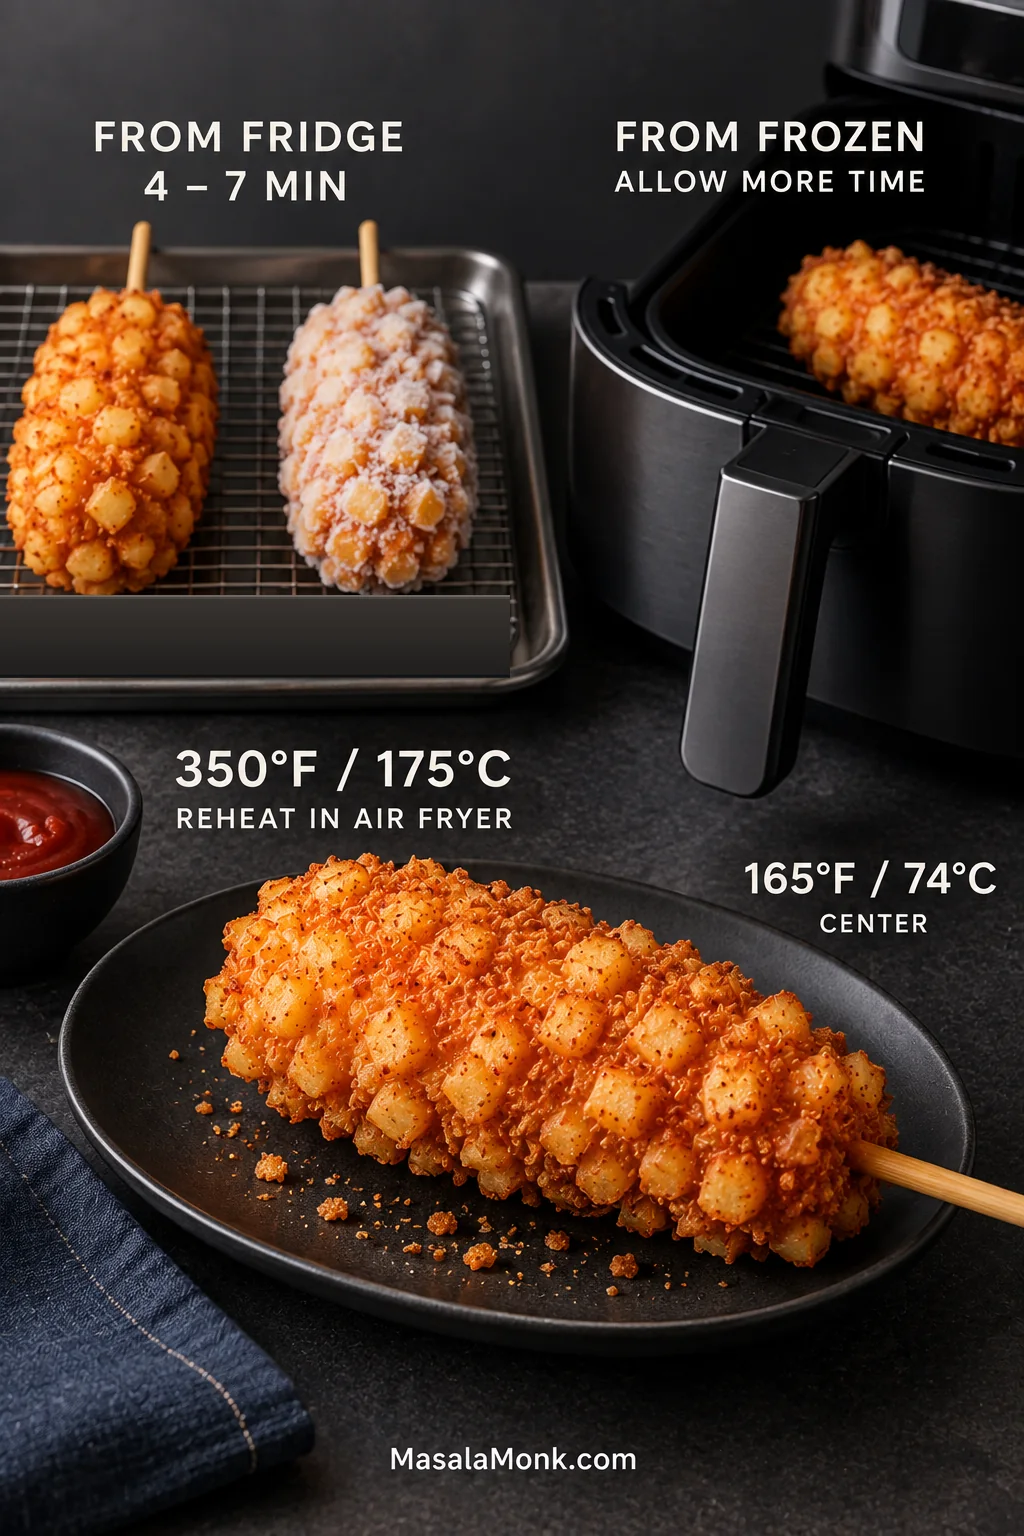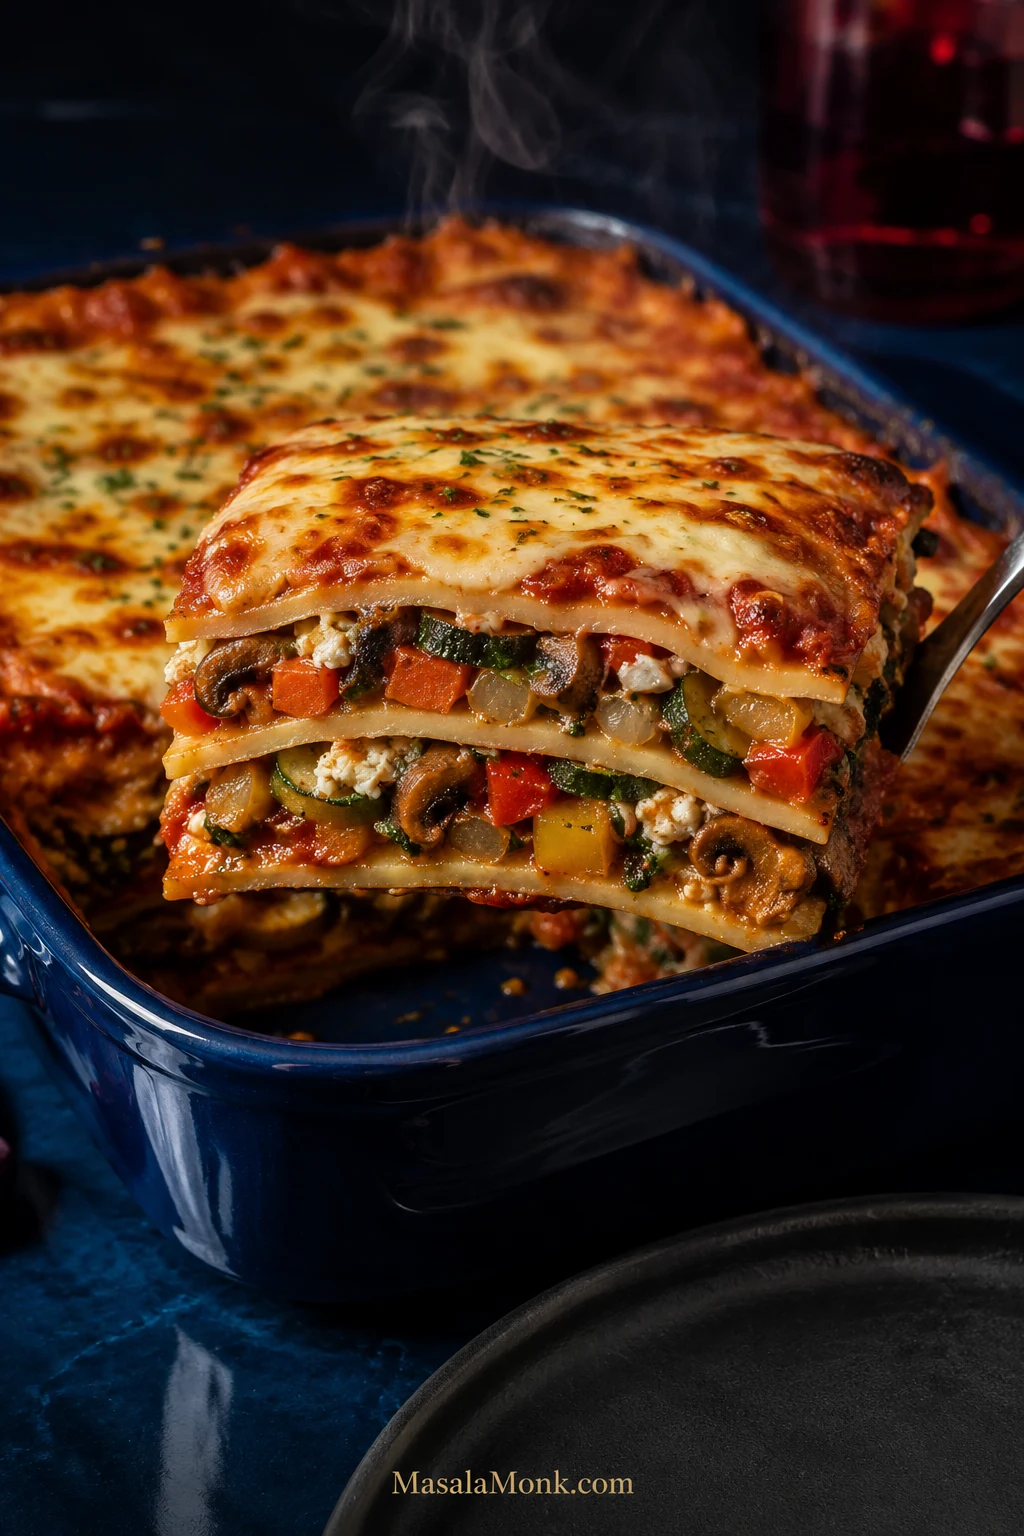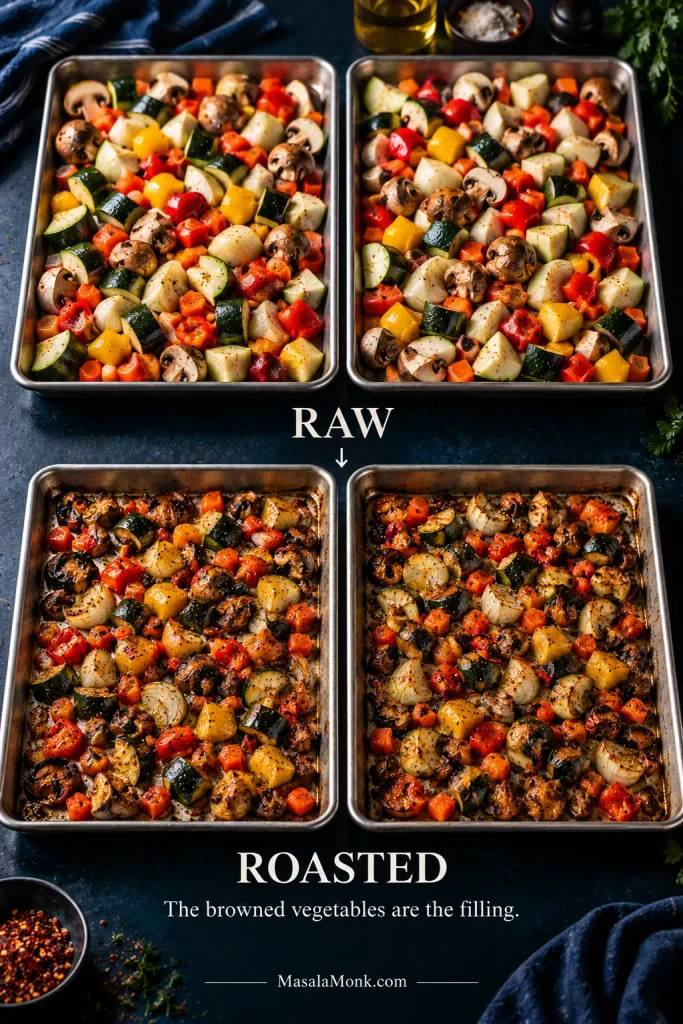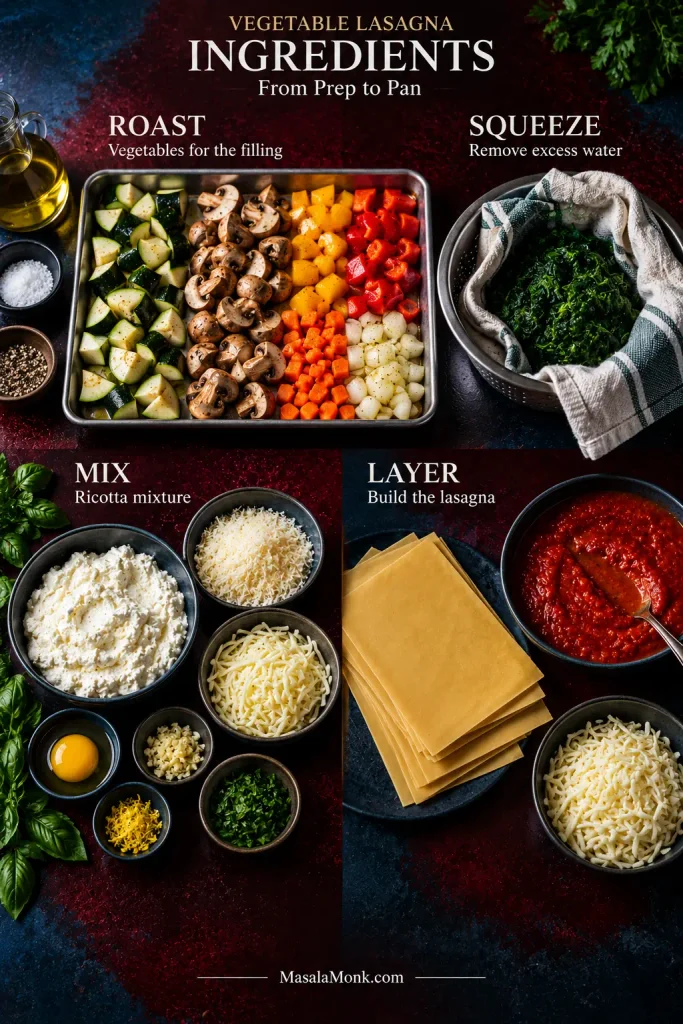
Posted on — Leave a comment

Muhammara Recipe: Syrian Roasted Red Pepper & Walnut Dip

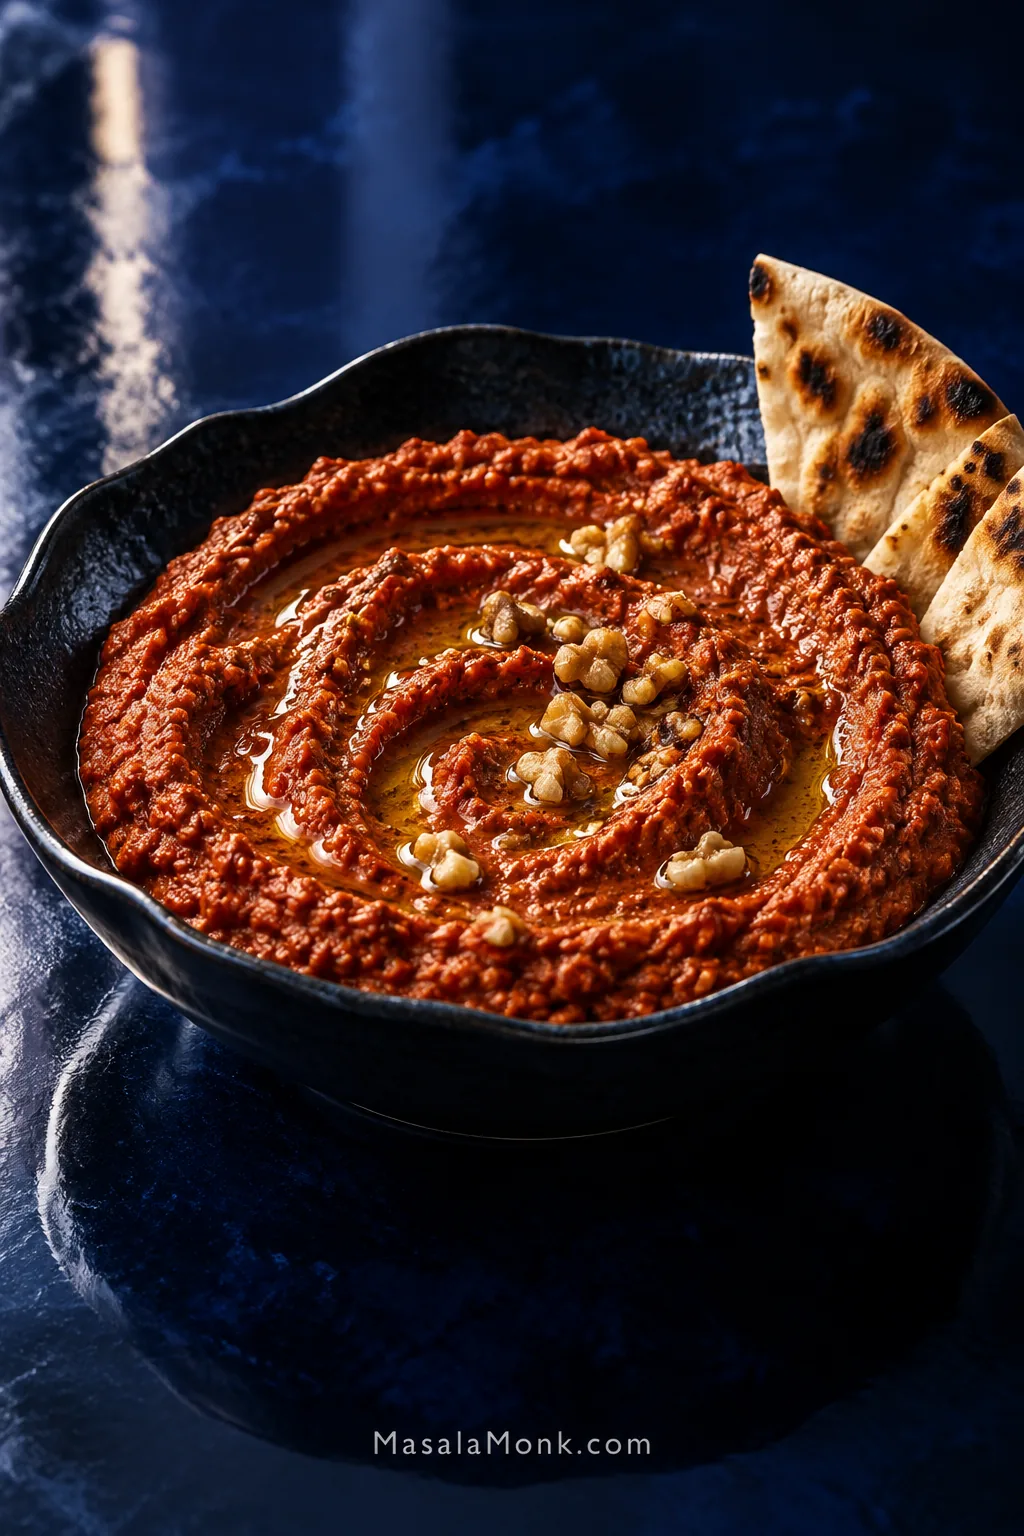
Brick-red muhammara in a dark scalloped bowl with olive oil in spoon ridges, walnut pieces and charred pita on a glossy cobalt-blue surface.

Muhammara is a thick Syrian roasted red pepper and walnut dip from Aleppo, traditionally made with pomegranate molasses, breadcrumbs, olive oil and gently warming Aleppo pepper. It is rich and savory but still bright enough to keep you reaching for the bread.

When it is right, a spoon leaves a groove through the dip and a piece of warm homemade pita picks it up cleanly. Roasted pepper comes through first, followed by walnut richness, fruity pomegranate tang and mild chile warmth.

The number that matters in this muhammara recipe is not how many peppers you buy. It is 350 g / about 12 oz of roasted, peeled and well-drained pepper flesh. Starting there makes the rest of the recipe much easier to control.

Muhammara at a Glance

OriginAleppo, Syria
Hands-on timeAbout 20–25 minutes with fresh peppers
Fresh-pepper routeAbout 1 hour before resting
Jarred-pepper routeAbout 15 minutes of prep before resting
Recommended restAt least 30 minutes when possible
YieldAbout 2 cups; 6–8 mezze servings
Taste & textureRoasted, walnut-rich, sweet-tart and mildly spicy; thick and lightly coarse

Syrian-Style Muhammara Recipe

This version keeps roasted pepper firmly in front. The walnuts add depth and the breadcrumbs help the dip cling to bread, but neither should take over. Muhammara is forgiving; the two things most worth watching are excess pepper moisture and how far you process the walnuts.

Muhammara Ingredients

  • 900 g–1 kg / about 2–2¼ lb ripe red peppers; exact pepper count varies considerably by size. After roasting, peeling, seeding and draining, you need 350 g / about 12 oz prepared pepper flesh
  • 85 g / 3 oz walnuts, about ¾ cup loosely measured
  • 30 g / 1 oz plain dry breadcrumbs or panko, plus up to another 10 g if needed; fresh breadcrumbs also work but absorb differently
  • 1½ tbsp / about 22 ml pomegranate molasses, plus more to taste if needed
  • 2 tbsp / 30 ml extra-virgin olive oil, plus a little extra for adjusting and serving
  • 1½–2 tsp Aleppo pepper, the dried crushed chile seasoning, to taste
  • ¾ tsp ground cumin
  • 1 small garlic clove, finely grated or minced
  • 1 tbsp / 15 ml fresh lemon juice
  • ½ tsp fine salt, then more as needed

The raw pepper weight is a shopping estimate. Different peppers lose very different amounts of water as they roast, which is why the prepared weight matters more than pepper count.
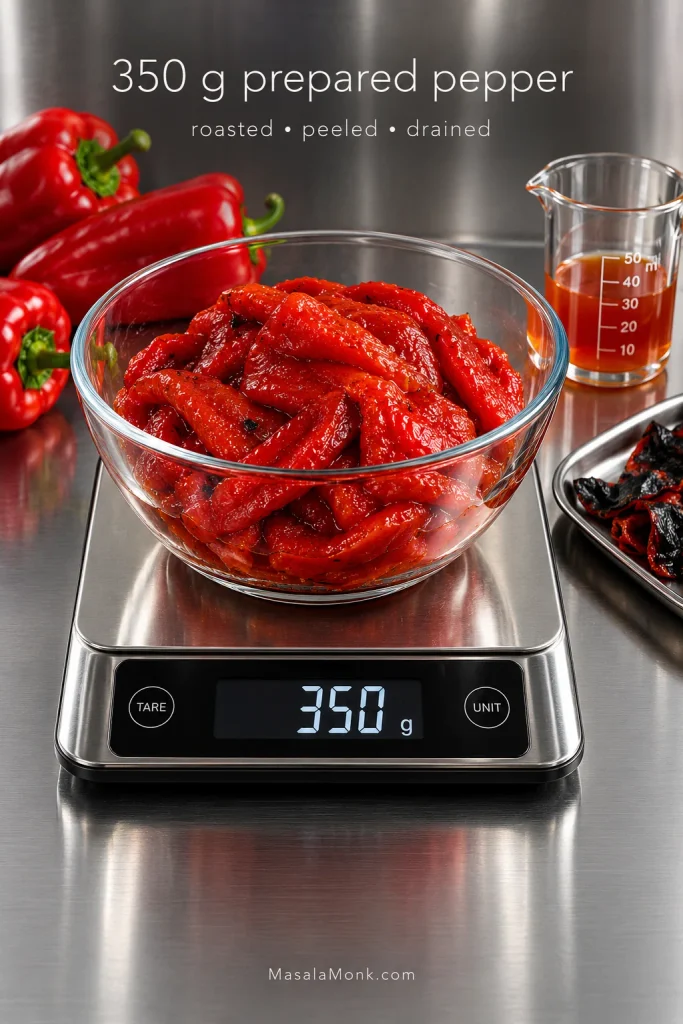
Digital kitchen scale reading 350 g beneath a glass bowl of roasted, peeled and drained red pepper flesh, with whole peppers, charred skins and collected pepper juice nearby.
The 350 g is the weight after roasting, peeling, seeding and draining. Skins, seeds and pooled liquid do not count—the useful weight is the roasted red pepper flesh that actually goes into the muhammara.

No added sugar is needed here; ripe peppers and pomegranate molasses provide enough sweetness, though molasses brands vary.

Missing something? See the ingredient substitutions →

How to Make Muhammara

Moisture → structure → balance. Drain the peppers well, add just enough body, then adjust the seasoning. That is the method in miniature.

1. Roast the Peppers

Heat the oven to 425°F / 220°C conventional / 200°C fan. Put the whole peppers on a rimmed baking sheet and roast for about 30–35 minutes, turning once or twice, until they are soft and slumped with blistered skins and plenty of dark patches.

Ready when: the peppers have collapsed and smell deeply roasted. They do not need to be black from end to end.
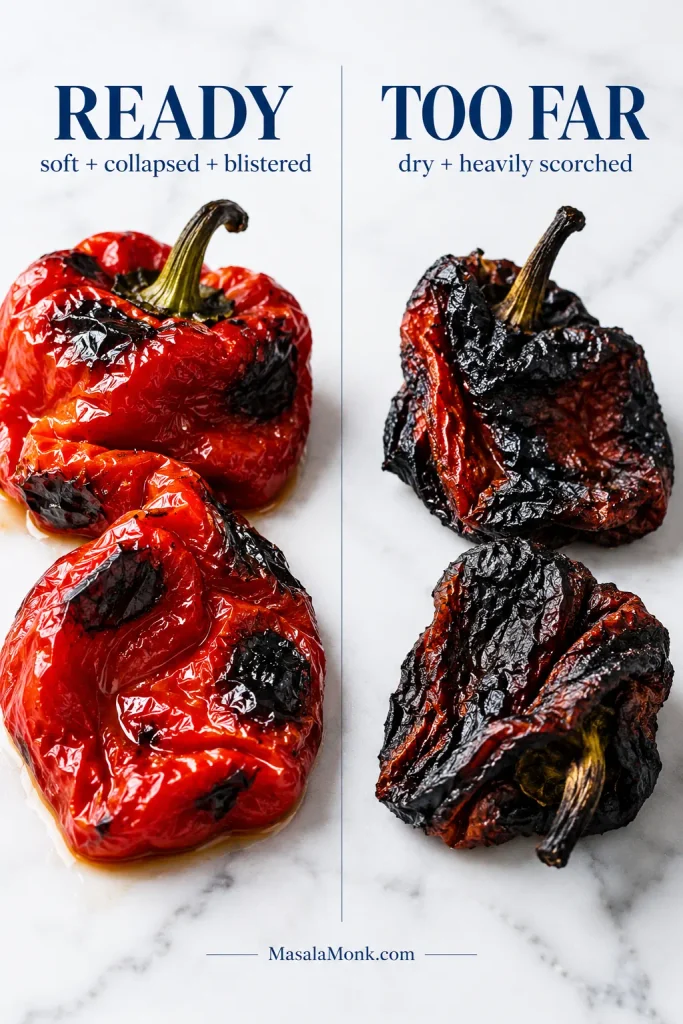
Split roasting guide labeled Ready and Too Far: the ready red pepper is soft, collapsed and blistered, while the over-roasted pepper is heavily scorched, dry and shriveled.
Watch the pepper flesh more than the skin. Dark blisters are useful because they peel away; underneath, the pepper should still be supple and juicy rather than dry at the edges.

For a faster route, char them beneath a very hot broiler/grill, turning as the skins blacken, usually for 12–15 minutes in total. Direct flame works too if that is already a method you use comfortably.

2. Steam, Peel, Drain and Weigh

Move the hot peppers to a bowl and cover for 10–15 minutes. The trapped steam loosens the skins. Remove the stems and seeds, then peel away most of the blackened skin.

Peeling roasted peppers is messy, and they do not need to look immaculate. Don’t chase every last black fleck. A little char belongs here; large sheets of burnt skin do not.

Avoid rinsing the peppers under running water; it washes away some of the concentrated roasted flavor. Set the cleaned flesh in a sieve over a bowl for several minutes, then blot away obvious surface moisture.

Save the pepper juice underneath. It may be exactly what you need if the fresh batch becomes too stiff.
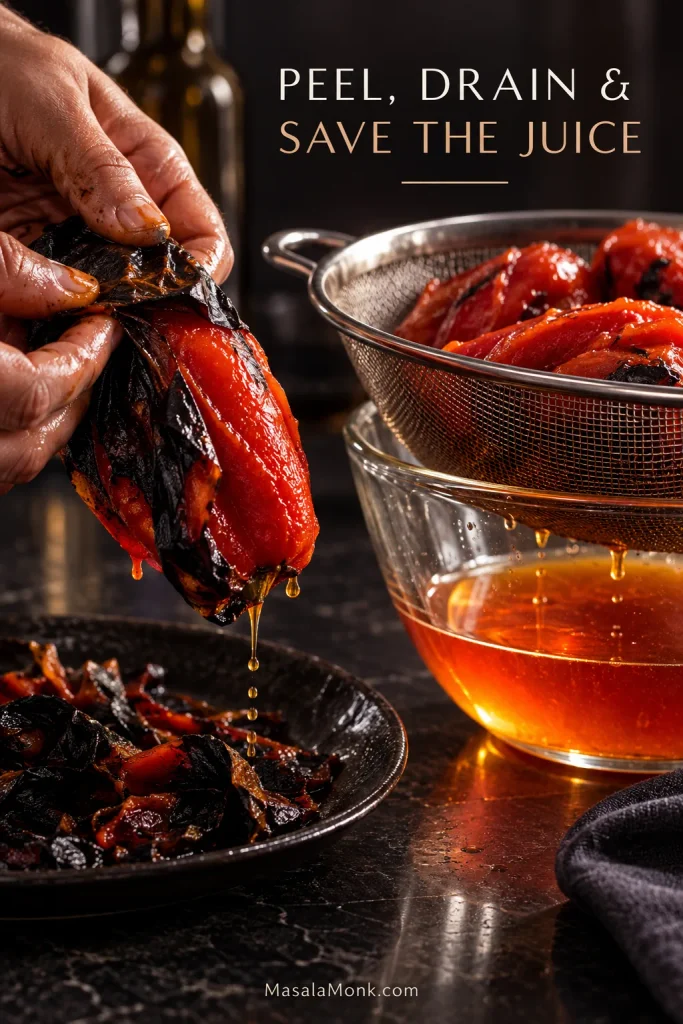
Hands peeling blackened skin from a roasted red pepper beside a metal sieve of peeled peppers, with red-orange pepper juice collecting in a glass bowl underneath.
Drain, don’t wring. Squeezing roasted peppers can remove flavorful juice along with excess water; instead, a short rest in a sieve followed by light blotting gives you much better moisture control.

Now weigh 350 g / about 12 oz roasted, peeled, seeded and well-drained pepper flesh. Anything around 325–375 g is close enough; the breadcrumb adjustment later absorbs that small difference.

The fiddly part is over. From here, the dip comes together quickly.

3. Toast the Walnuts and Prepare the Garlic

Taste one walnut before using the batch. If it tastes stale or rancid, replace the nuts. Check briefly for stray shell fragments too.

Toast the walnuts in a dry skillet over medium-low heat for 3–5 minutes, stirring often, just until fragrant and lightly darkened. Or toast them at 350°F / 175°C conventional / 160°C fan for 8–10 minutes. Let them cool.

Raw walnuts work too; light toasting gives this version a deeper walnut flavor. For particularly pungent garlic, stir it into the lemon juice for about 5 minutes to soften the raw edge.

4. Build the Muhammara

Add the peppers, garlic and lemon juice, 1½ tbsp pomegranate molasses, Aleppo pepper, cumin and salt to the food processor. Pulse until the peppers have broken down into a thick, fairly even mixture, scraping down the sides when needed.

For a more distinct walnut texture, finely chop the toasted walnuts by hand and keep them aside. Process the pepper base with the breadcrumbs and olive oil, then fold the chopped walnuts in at the end.

For the simpler food-processor route, add the cooled walnuts, 30 g breadcrumbs and 2 tbsp olive oil to the pepper base. Pulse in short bursts until everything comes together and small walnut flecks remain.

This is the point where it should begin to look unmistakably like muhammara: deep brick-red, cohesive and softly glossy, with tiny walnut flecks still visible. It should look like a spread, not a silky purée.

Stop there. Taking the walnuts much further can release more oil, making the dip heavier and its color muddier.
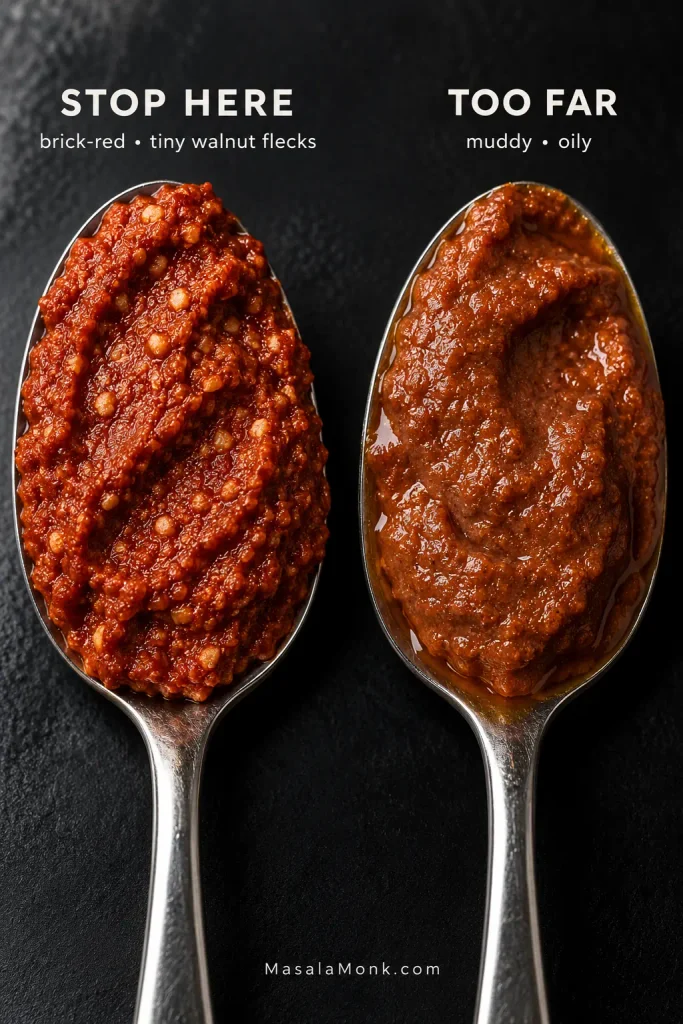
Two spoons compare properly processed brick-red muhammara with small walnut flecks against an overprocessed version that appears smoother, browner and oilier.
If coarse pieces are clinging to the processor wall, scrape them down instead of simply blending longer. Short pulses give you far more control over the walnut texture in muhammara than one continuous run.

5. Wait and Check the Texture

Leave the muhammara for 5–10 minutes before deciding whether it needs more bread. The breadcrumbs are still absorbing pepper juice, and a mixture that initially looks loose may settle perfectly on its own.

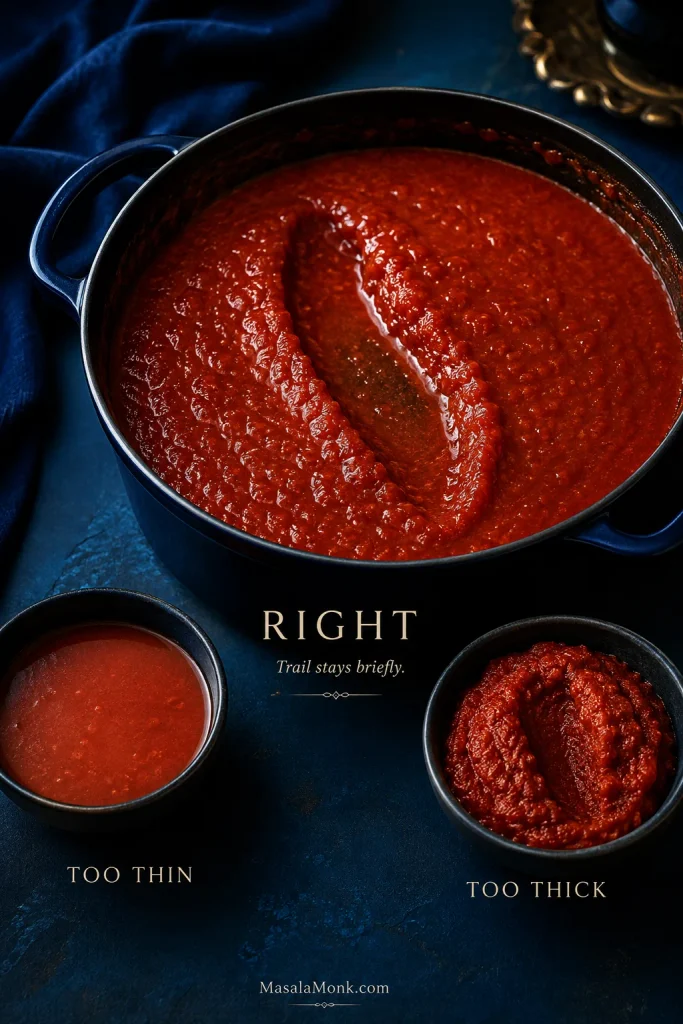
Drag the back of a spoon through it.

  • A groove that disappears quickly means the dip still needs more body. Add some of the reserved breadcrumbs, pulse briefly and wait again.
  • A stiff fresh batch needs moisture. Add reserved roasted-pepper juice 1 teaspoon at a time.
  • A groove that already holds means no more breadcrumbs are needed.

The last spoonful of breadcrumbs should earn its way in.
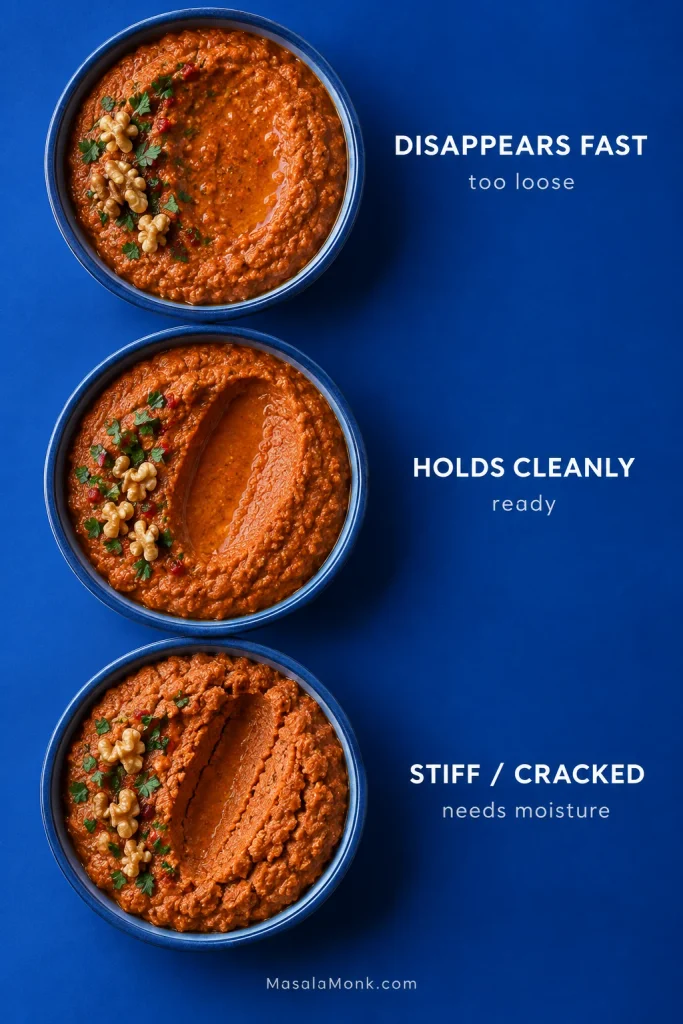
Three bowls demonstrate the muhammara spoon-groove test: a groove disappears in loose dip, holds cleanly in the correct texture, and cracks in dip that is too stiff.
The middle bowl is the target: the groove holds, but the edges stay soft rather than cracked.

6. Season and Rest

A sweet, flat dip usually needs salt before anything else. Add a pinch, taste, and then use a small squeeze of lemon if it still feels heavy. Add more Aleppo pepper if you want a warmer finish; it should still taste of roasted pepper first.

The muhammara should already be close. Cover it and let it rest for at least 30 minutes when possible; the flavors settle and the crumbs finish hydrating as it sits.

Before You Serve It

Drag a spoon through the muhammara once more. The groove should hold while the dip still scoops easily. Before you add the finishing olive oil, the dip itself should look cohesive, not oily or separated.

Muhammara is best after it has lost the refrigerator chill. The roasted pepper should still lead, with walnut underneath and enough pomegranate acidity to keep the sweetness lively. If you’re close, leave it alone.

If the texture or balance still feels wrong, jump to Fix My Muhammara →

Quick Muhammara With Jarred Roasted Peppers

Jarred roasted peppers cut the preparation to about 15 minutes, plus resting time. Fresh peppers give you more control over the char, but the texture can be every bit as good with jarred peppers when they are drained thoroughly.
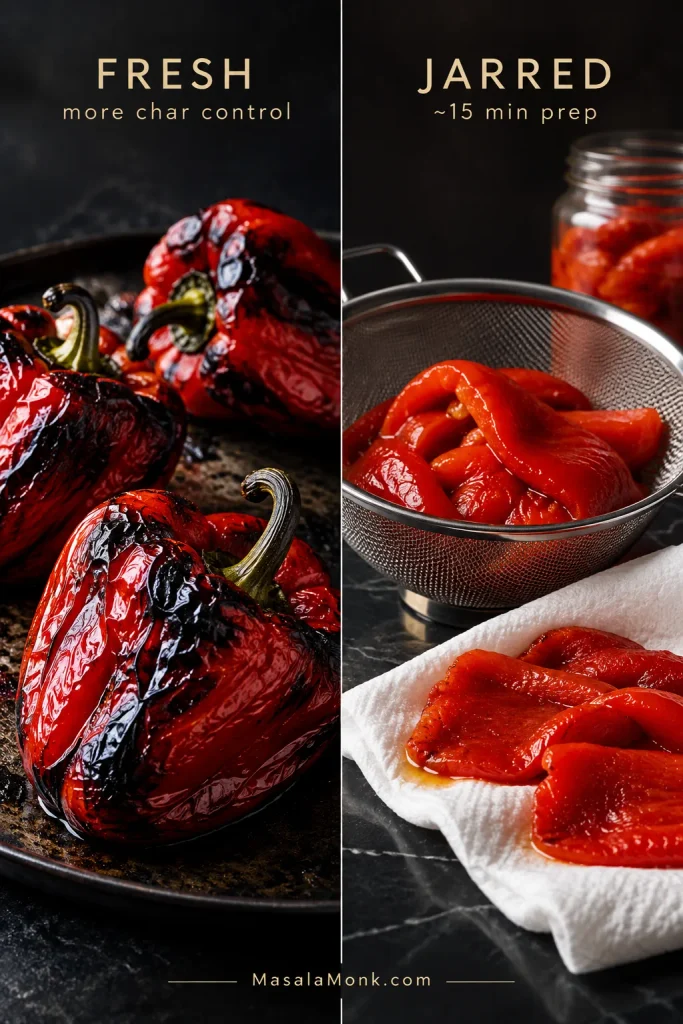
Split comparison showing blistered freshly roasted red peppers on one side and drained jarred roasted pepper pieces in a metal sieve on the other.

Taste a pepper first. If the packing liquid has left it unusually salty, acidic or strongly flavored, rinse the peppers briefly. Then drain thoroughly, blot dry and weigh 350 g / about 12 oz. Oil-packed peppers should be drained especially well so they do not bring extra oil into the dip.

For more char, blister the drained peppers briefly beneath a hot broiler/grill or in a dry grill pan, then continue with the walnut step.

Continue at Step 3: Toast the walnuts →

What to Eat With Muhammara

Muhammara makes the most sense as shared food: a shallow plate in the middle, warm bread within reach and a few other dishes around it.
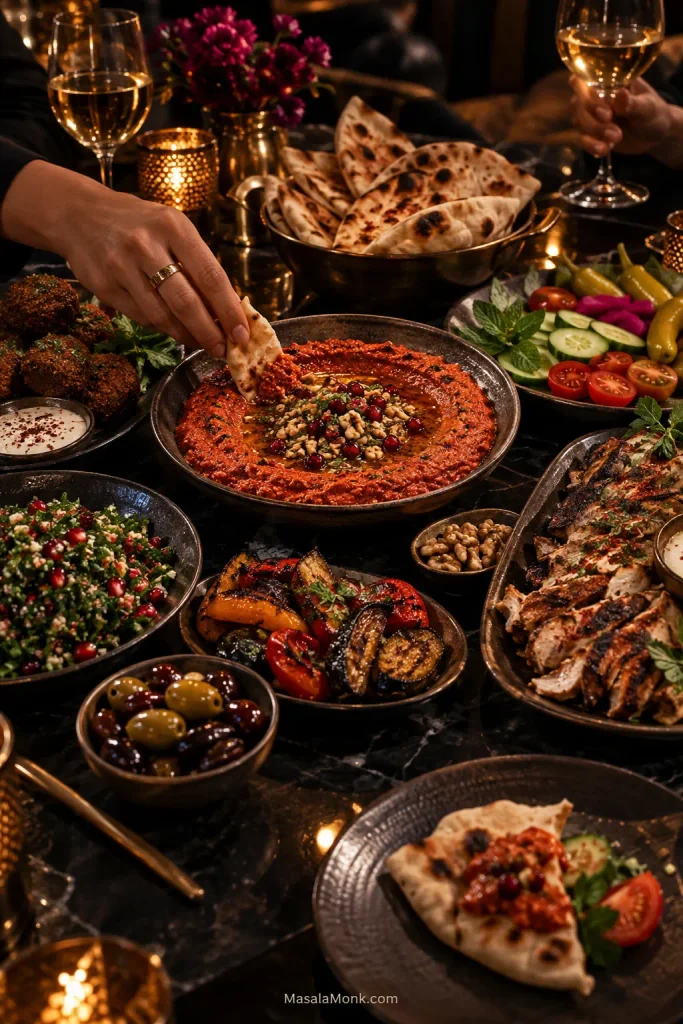
Shared mezze table centered on muhammara with pita, falafel, tabbouleh, olives, pickled vegetables, grilled vegetables and sliced grilled chicken, with a hand dipping bread.
Build a mezze plate by contrast rather than quantity. Muhammara supplies richness and sweet-tart depth, so crisp vegetables, pickles and herb-heavy salads keep each scoop lively while warm pita does the carrying.

Pita is the classic choice. On a larger mezze table, muhammara’s richer sweet-tart flavor works especially well beside something fresh and herb-heavy such as tabbouleh, plus olives, pickles, cucumber, tomato and other crisp vegetables.

Spread it inside pita or flatbread with homemade falafel, herbs and pickles. One spoonful gives the sandwich pepper, walnut, tang and chile without needing several separate sauces.

It is equally good beside chicken shawarma, grilled chicken or lamb. The pomegranate cuts through richer bites while the walnuts give the dip enough weight to sit beside charred meat.

Roasted eggplant, cauliflower, carrots and squash work well too. Spread the muhammara beneath the vegetables and let the hot browned edges pick up the cooler dip as you eat.

Leftovers belong on toast and sandwiches, in grain or lentil bowls, swirled through labneh or thick yogurt, or thinned with a splash of pasta water into a quick sauce.

For serving, spread the muhammara over a shallow plate and make loose ridges with the back of a spoon. Add a small drizzle of olive oil. Chopped walnuts, Aleppo pepper or pomegranate seeds are optional.

Fix My Muhammara

Most batches are fixable. Change one thing at a time so you do not lose the roasted pepper while chasing the problem.

ProblemQuick diagnosis & fix
Too thinRest it first. Still loose after 5–10 minutes? Add breadcrumbs gradually.
Too thick immediatelyThe crumbs may be very absorbent or the peppers unusually dry. Loosen a fresh batch with reserved pepper juice, 1 teaspoon at a time.
Perfect yesterday, thick todayBreadcrumbs kept absorbing moisture. Let it warm slightly, stir, then loosen with water a teaspoon at a time.
Too sweetAdd a pinch of salt first, then a small squeeze of lemon if needed.
Too sourFold in more roasted pepper and walnut if available. Once the dip is sharply sour, there is no clean way to take that acidity back out.
Too hotAdd more roasted pepper, walnut and a little breadcrumb to dilute the heat. Without more of the base ingredients, a big correction is difficult.
BitterCheck for stale walnuts, burnt nuts or too much scorched pepper skin.
GreasyThe walnuts may have been processed too far or too much oil was added. More pepper mixture can help if available.
Brown or muddyVery finely ground walnuts can darken the dip. The flavor may still be fine.
Harsh garlicLet the dip rest. Use a smaller or fresher clove next time.

Why Is My Muhammara Too Runny?

First make sure it is actually too runny. Breadcrumbs need time to hydrate, so a loose-looking dip straight from the processor can become properly scoopable after a 5–10 minute rest.

Still flowing instead of holding a spoon mark? The pepper flesh probably carried in more water than usual. Add a small amount of the reserved breadcrumbs, wait again and stop as soon as the groove holds. A large handful added all at once can take the dip from loose to heavy very quickly.

Why Did It Get Thicker Overnight?

This is different from muhammara that starts out too thick. Dry breadcrumbs and panko can continue taking up moisture for hours, and refrigeration firms the dip further.

Let it lose some of its chill and stir before changing anything. If you refrigerated some of the reserved roasted-pepper juice, use that first; otherwise loosen the dip with water, 1 teaspoon at a time. Use olive oil when it needs more richness as well as a softer consistency.

Why Does My Muhammara Taste Bitter?

Bitterness has several possible sources, and they do not taste the same. Fresh walnuts naturally have a mild tannic edge; rancid walnuts can taste stale, soapy, chemical or paint-like. Darkly burnt nuts and large pieces of scorched pepper skin create a harsher bitterness.

A slight walnut bitterness can sit comfortably inside the finished dip. Rancid nuts or strongly burnt flavors are much harder to disguise, which is why tasting one walnut before you begin is worth the few seconds it takes.

Ingredient Substitutions

What Can I Use Instead of Pomegranate Molasses?

Nothing quite duplicates pomegranate molasses. If you need a homemade substitute, reduced unsweetened pomegranate juice is the closest route worth making. Simmer ½ cup / 120 ml until you have roughly 2 tablespoons / 30 ml and the juice is lightly syrupy. Cool it before using; it will thicken further as it cools.

Substitution guide showing pomegranate molasses as the best option, reduced unsweetened pomegranate juice as the homemade alternative, and balsamic reduction as an emergency substitute.
A useful pomegranate molasses substitute has to replace concentration and acidity, not sweetness alone. That is why reduced unsweetened pomegranate juice is a closer fit for muhammara than an ordinary sweet syrup.

A small amount of balsamic reduction is the emergency option. It provides sweet-sour intensity, although the flavor is different. Plain molasses, maple syrup and date syrup are not direct substitutes because they bring sweetness without the same acidity.

What Can I Substitute for Aleppo Pepper?

Use mostly sweet paprika with a very small pinch of cayenne or ordinary chile flakes. That comes closer to Aleppo pepper’s fruitiness, color and gentle heat than replacing it 1:1 with a much hotter chile.

Kashmiri chile powder or gochugaru can also work, but start cautiously because products vary.

Gluten-Free or Bread-Free Muhammara

For gluten-free muhammara, use gluten-free dry breadcrumbs or panko in the same gradual way as regular breadcrumbs.

For a bread-free version, replace the 30 g breadcrumbs with about 25–30 g ground almonds, or begin with roughly 15–20 g additional walnuts. Either route makes the dip more nut-forward, so keep the peppers in front and judge the final thickness after a short rest.

Why Muhammara Recipes Vary

This version starts from fresh-roasted peppers rather than concentrated pepper paste. Turkish preparations related to acuka often lean much more heavily on pepper paste, so two related recipes can look surprisingly different before they even reach the walnuts.

Muhammara itself has strong roots in Aleppo and Syrian cooking, but variation from kitchen to kitchen is normal. Some versions use fresh bread, others dry crumbs or panko. Walnuts may be raw or toasted, and the texture can range from coarse to nearly smooth. Tahini, onion, tomato paste, concentrated pepper paste or sumac appear in some recipes and not in others.

Sami Tamimi describes muhammara as Syrian in origin while also placing it within the wider cooking of Palestine and Lebanon. That overlap helps explain why one family’s muhammara can look quite different from another’s and still be recognizably the same dish.

Muhammara vs Hummus: What’s the Difference?

Muhammara is built from roasted peppers and walnuts; hummus is built from chickpeas and tahini. That difference changes the flavor and texture completely.

Hummus is usually smooth, creamy and mellow. Muhammara is fruitier, tangier and more textured. That texture is part of the distinction: hummus is usually served silky-smooth, while this muhammara is better with a little walnut and pepper texture still intact.
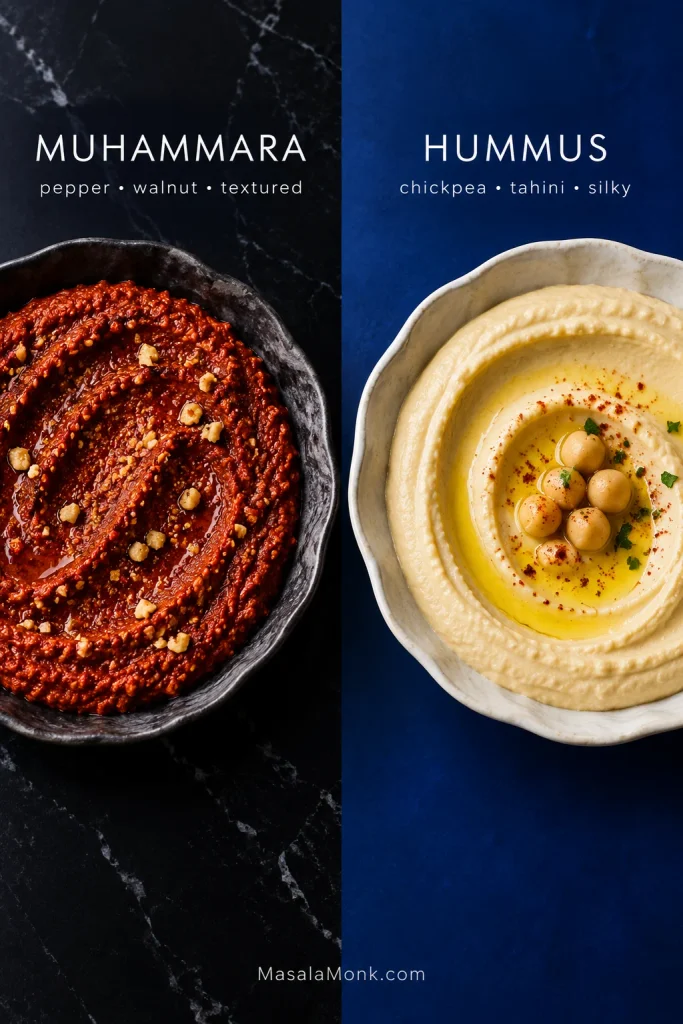
Side-by-side bowls compare textured brick-red muhammara made from roasted peppers and walnuts with pale, smooth hummus made from chickpeas and tahini.
Same food processor, different endpoint: hummus benefits from sustained blending for silkiness, whereas muhammara keeps more character when you stop before its walnut texture disappears.

Put both on the table and they do very different jobs. Our extra-creamy hummus supplies the cool, smooth side of that contrast while muhammara brings roasted pepper, walnut and pomegranate tang.

Make Ahead, Storage & Freezing

Make Ahead

Muhammara benefits from resting. Thirty minutes helps; several hours give the flavors more time to settle. Making it the day before works well too, although the breadcrumbs may make it slightly firmer overnight.

Refrigerate

Store the dip in a clean airtight container in the refrigerator for about 3–4 days, in line with USDA guidance for refrigerated leftovers.

Let it warm slightly before serving. Stir first; a dip that is still too firm can be loosened with water 1 teaspoon at a time, or with a small amount of olive oil when it also needs more richness.

Freeze

Finished muhammara can be frozen, although it may be slightly softer after thawing. Defrost it in the refrigerator, stir well and check the consistency before serving.

Another option is to freeze roasted, peeled and drained pepper flesh in 350 g portions. Thaw one, drain any liquid released during freezing and make the muhammara fresh.

↑ Back to top

A Few Common Questions

1. How Do You Pronounce Muhammara?

English pronunciations vary slightly, but moo-HAM-ma-ra is a good approximation. The Arabic name is commonly glossed as “reddened” or “reddish.”

2. Is Muhammara Spicy?

Usually only mildly. Aleppo pepper brings gentle warmth and fruity chile flavor rather than aggressive heat.

3. Should Muhammara Be Served Warm or Cold?

Cool room temperature is ideal. Straight-from-the-fridge muhammara feels firmer and its flavors are more muted, so give it a little time before serving.
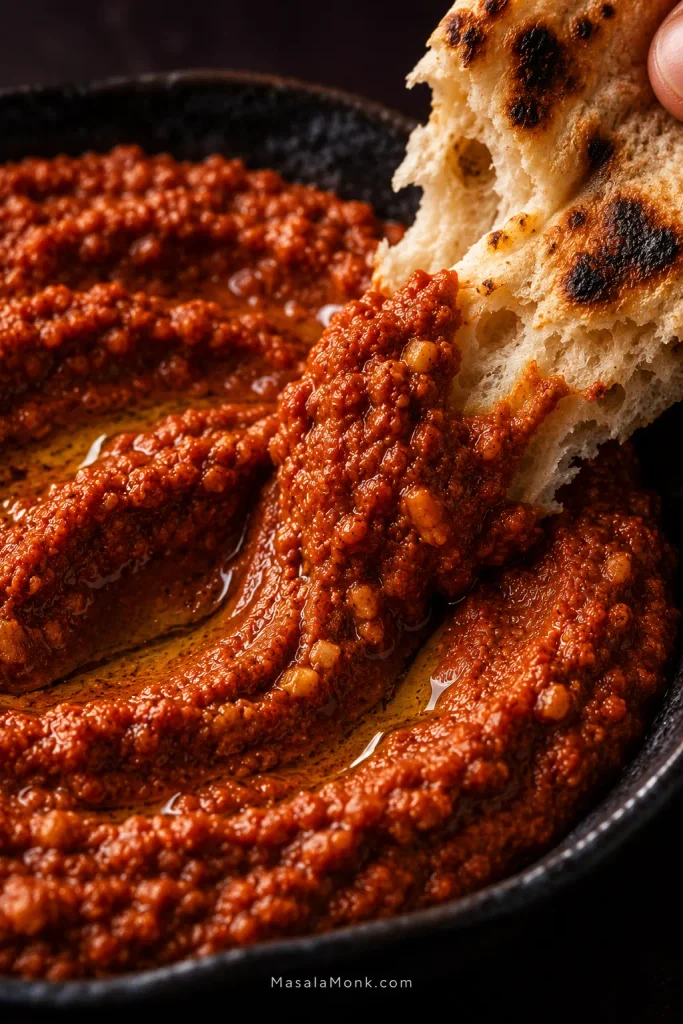
Close-up of torn, blistered pita dragging through thick brick-red muhammara, with the dip clinging to the bread and olive oil shining in its ridges.

Tear the bread, set the muhammara in the middle of the table and eat it while the flavors are awake.
Posted on — Leave a comment

Vegetarian Enchiladas Recipe: Easy Black Bean & Veggie Enchiladas

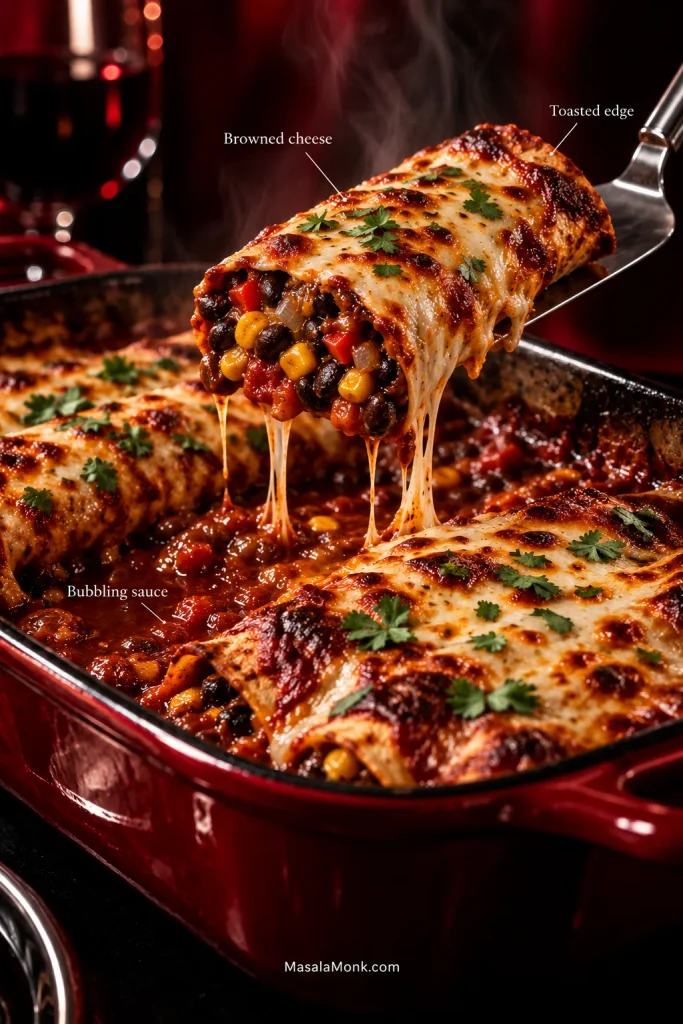
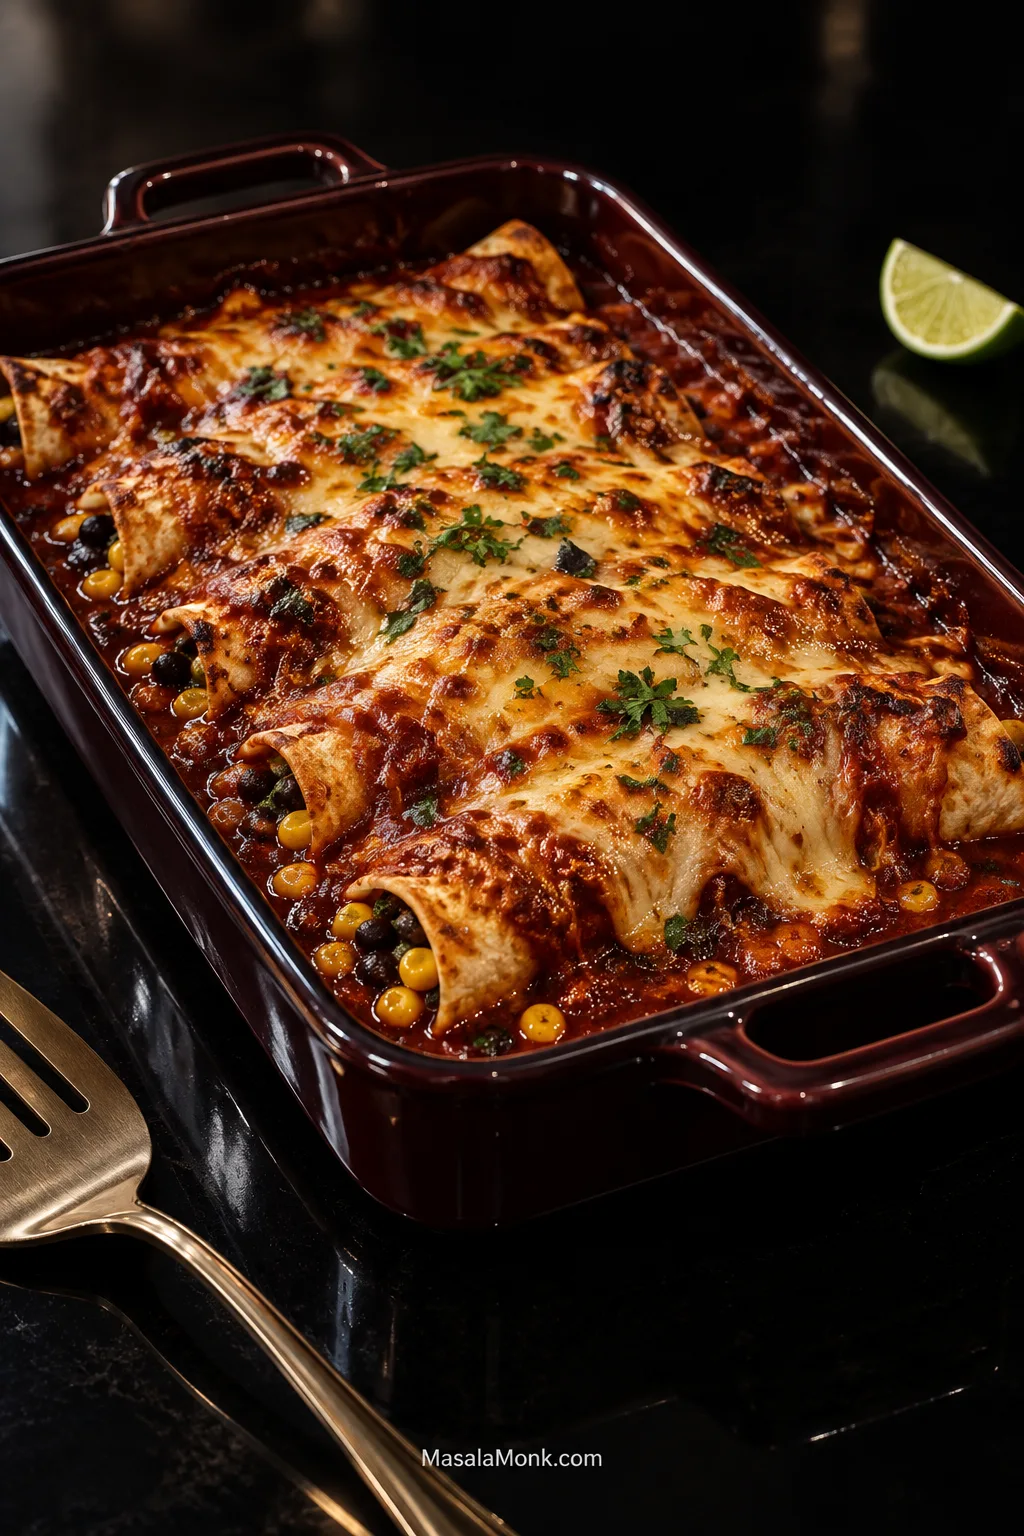
Baked vegetarian enchiladas in a dark red casserole dish with glossy red sauce, browned melted cheese, and black beans and corn visible around some tortilla edges.

A good pan of vegetarian enchiladas comes to the table still bubbling: red sauce in the seams, browned patches of cheese, sweet corn, toasty cumin and lime underneath. The tortillas stay soft through the middle, while a few exposed edges catch enough oven heat to toast.

Keep the easy parts easy. The filling cooks in one skillet, store-bought enchilada sauce works perfectly well, and there is no need to dip every tortilla individually before rolling. What matters more is how wet the filling is, whether the tortillas bend cleanly and how long they sit in sauce.

Black beans, corn, bell pepper, onion and garlic make up the filling. A few of the beans get crushed against the skillet so everything holds together inside the tortilla; the rest stay whole, giving you a hearty center without turning the filling into bean paste.

Saucy, not soggy is the aim. The recipe itself is straightforward; the extra guidance farther down is there for the few places enchiladas tend to get awkward.

Quick answer: To make vegetarian enchiladas, sauté onion, bell pepper and corn until tender and no loose water remains. Add black beans, lightly crush some of them, then season with cumin, chile, lime and a little red enchilada sauce. Taste before rolling. Fill 8 medium flour tortillas or 10–12 small corn tortillas, arrange them in a lightly sauced 9 × 13-inch / 23 × 33-cm dish, top with the remaining sauce and cheese, and bake at 400°F / 200°C for 18–22 minutes.

Jump to: the recipe · corn or flour · prevent sogginess · make ahead & freeze · troubleshooting · what to serve

Black Bean & Veggie Enchiladas

If you have never rolled enchiladas before, don’t let that make the recipe look fussy. Once the tortillas are flexible and you know how much filling they comfortably hold, the rest of the pan goes quickly.

Recipe at a Glance

Yield8 medium flour-tortilla enchiladas or about 10–12 smaller corn-tortilla enchiladas; about 4 servings
Total timeAbout 50–60 minutes, including resting
Active timeAbout 30 minutes
Pan9 × 13 inches / 23 × 33 cm
Bake400°F / 200°C for 18–22 minutes
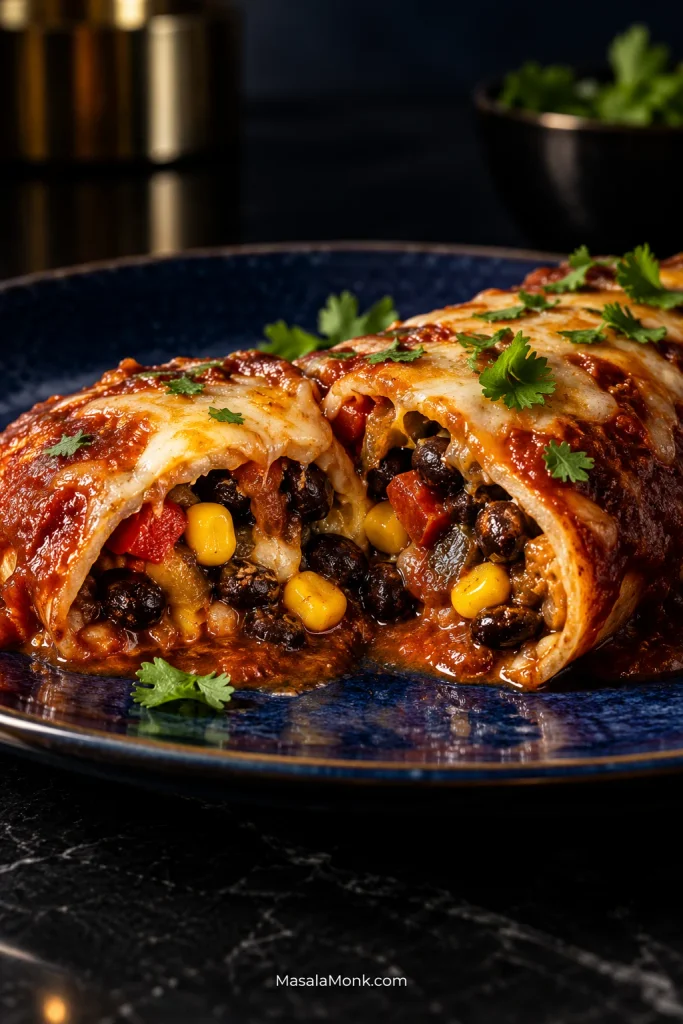
Two cut-open enchiladas on a deep blue plate showing black beans, corn, red bell pepper, onion, melted cheese and red sauce inside the tortillas.
A useful filling should hold together without becoming dense. You still want to see whole black beans, corn and peppers when the enchilada is cut, rather than one compact paste.

Ingredients

  • 1 tablespoon / 15 ml olive oil or neutral cooking oil
  • ½ medium onion, finely diced, about 80 g. Red, yellow or white all work.
  • 1 medium red bell pepper, diced, about 150 g. A small dice makes enchiladas easier to roll and eat.
  • 1 cup corn, about 160 g. Fresh, frozen or well-drained canned corn all work.
  • 3 garlic cloves, minced
  • 1½ teaspoons ground cumin
  • 1 teaspoon American-style chili powder. Use the relatively mild seasoning blend sold as “chili powder” in the US, not pure cayenne or another very hot ground chile.
  • ½ teaspoon smoked or sweet paprika
  • ½ teaspoon dried oregano
  • 1 (15-ounce / 425-g) can black beans, rinsed and thoroughly drained, about 240–260 g drained
  • 2 cups / 475 ml red enchilada sauce, divided. One 19-ounce can usually gives enough. Packaged sauce keeps this easy; this red enchilada sauce recipe makes about the right amount.
  • 1 tablespoon / 15 ml fresh lime juice, plus wedges for serving
  • Fine salt, as needed after tasting
  • 8 ounces / 225 g / about 2 cups shredded melting cheese, divided roughly in half. Monterey Jack is an easy choice; Jack with sharp cheddar adds bite; Oaxaca works well too. Any mild cheese or blend that melts smoothly can stand in.
  • 8 flour tortillas, about 8 inches / 20 cm each
  • Or 10–12 corn tortillas, about 6 inches / 15 cm each. Expect closer to 12 at roughly ⅓ cup filling each; capacity varies with size and thickness.
  • Neutral oil as needed, optional, for corn tortillas that remain fragile after warming

Cooking for vegetarians? Check enchilada sauce for meat stock and choose cheese made with vegetarian or microbial rennet if that matters to you. Canned refried beans may contain lard too, so check the label if using them as a swap.

Before You Start

  • Taste the sauce. A salty or very spicy sauce means the filling needs more cautious seasoning.
  • Bend one corn tortilla. A cracked edge tells you the batch needs warming before you start filling.
  • Drain the beans and canned corn well. Water carried into the filling eventually reaches the tortilla.

1. Sauce the Baking Dish

Heat the oven to 400°F / 200°C.

Spread about ⅓ cup / 80 ml enchilada sauce across the bottom of the baking dish. A thin coating is enough to flavor the underside and prevent sticking.

2. Cook the Vegetables Until the Pan Looks Dry

Heat the oil in a large skillet over medium to medium-high heat. Add the onion and bell pepper and cook for 5–7 minutes, stirring occasionally, until tender and beginning to color.

Add the corn and cook for another 2–3 minutes.

Lower the heat to medium and stir in the garlic, cumin, chili powder, paprika and oregano. Within about 30 seconds the pan should smell warmer and toastier, with the cumin and chile coming through before anything has a chance to scorch.

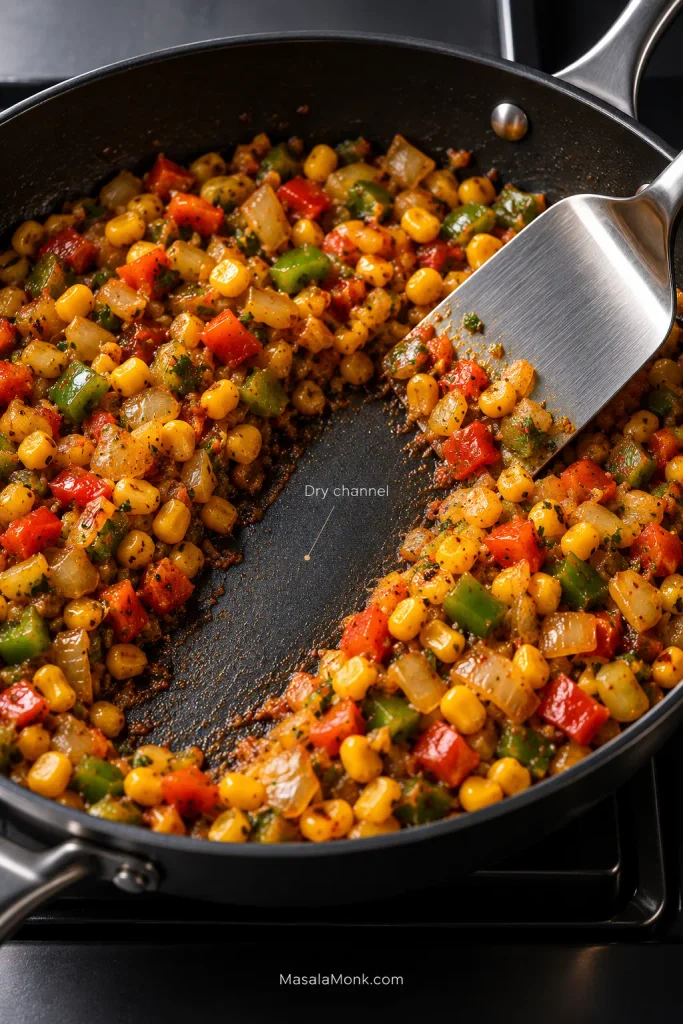
Drag the spatula through the vegetables. Water should not immediately flood back into the cleared path. You want glossy, juicy vegetables with a fairly dry skillet underneath them.

Cooked corn, onion and bell pepper pushed aside by a metal spatula in a dark skillet, leaving a dry strip of pan with no loose liquid running back into it.
This is the easiest moment to catch excess moisture. Once beans and sauce go in, extra vegetable water is harder to recognize—and much more likely to end up inside the tortilla.

3. Add the Black Beans and Finish the Filling

Add the drained black beans. Lightly crush about one-third against the skillet with the back of your spoon; leave the rest whole.

Stir in another ⅓ cup / 80 ml enchilada sauce and the lime juice. Scoop up a spoonful. It should stay together as you carry it to a tortilla, with no watery liquid left behind in the skillet.

If the filling loosens after the sauce goes in, cook it for another minute or two until the excess liquid has reduced and the spoonful holds together again.

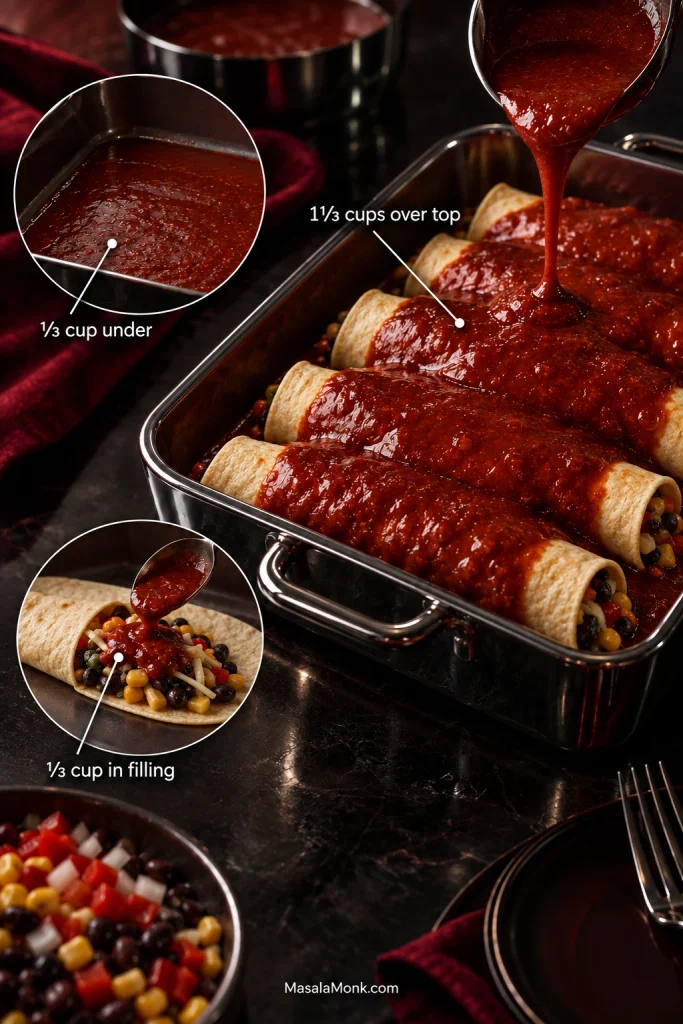
Keep the sauce split simple: ⅓ cup under the rolls, ⅓ cup in the filling and about 1⅓ cups over the top.

Enchilada sauce guide showing one-third cup beneath the rolls, one-third cup mixed into the filling, and one and one-third cups spread over the top while the tortilla ends remain exposed.
The same amount of enchilada sauce behaves very differently depending on where it goes. Distribution matters more than simply cutting the quantity: too much underneath creates pooling, while most belongs over the rolls.

4. Taste Before You Roll

Taste the filling now. Beans soften seasoning, and both the sauce and cheese will add salt later.

Add salt if it needs it. A little more lime can wake up a heavy filling; another small pinch of cumin or chili powder can deepen one that tastes flat. Adjust it now, before the filling disappears inside the tortillas.

5. Warm the Tortillas

Flour tortillas: soft and flexible straight from the packet? Use them. There is no prize for adding an unnecessary warming step.

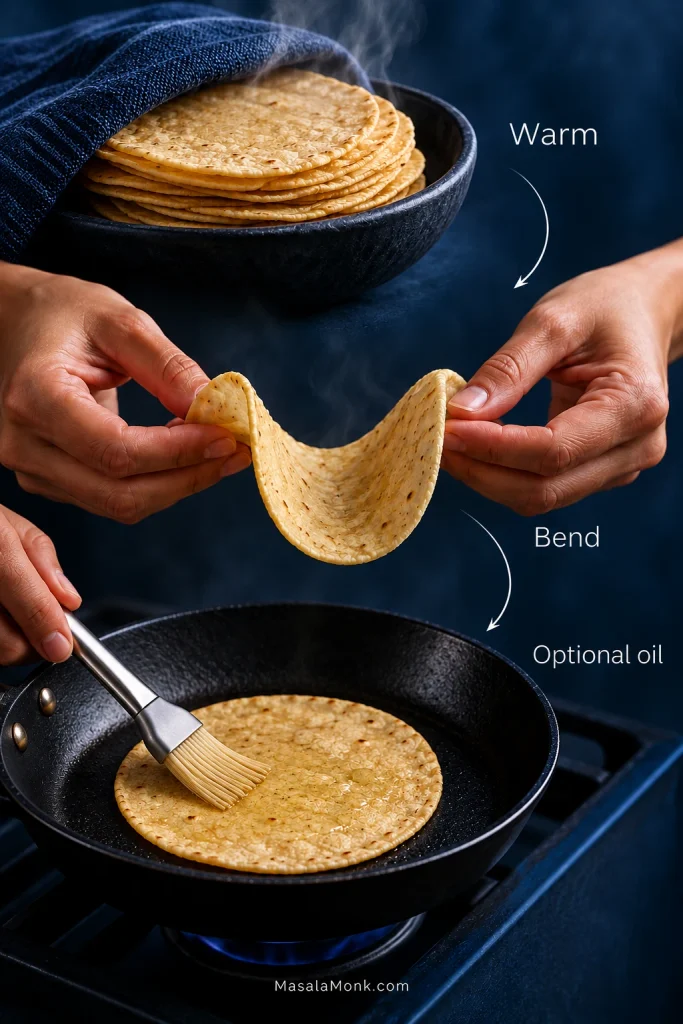
Corn tortillas: wrap the stack in a slightly damp kitchen towel or paper towel and microwave for about 20–30 seconds. Bend one. A batch that still cracks usually needs another 10 seconds. You can also use a hot skillet for about 10–20 seconds per side. Keep the warmed stack covered while you work.

Particularly brittle tortillas may benefit from a very light brush of neutral oil and another few seconds in the skillet. Pull them while they still bend easily.

Three-step corn tortilla guide showing warmed tortillas, one bending into a U shape without cracking, and another being lightly brushed with oil in a skillet as an optional step.
Corn tortillas need enough flexibility to roll, not a mandatory oil treatment. If warmth alone gets them there, stop—extra steps should solve a problem, not become ritual.

6. Fill and Roll

The first tortilla is your test enchilada. A crack means the remaining tortillas need more warmth; filling bulging heavily from both ends means the next one needs a smaller scoop.

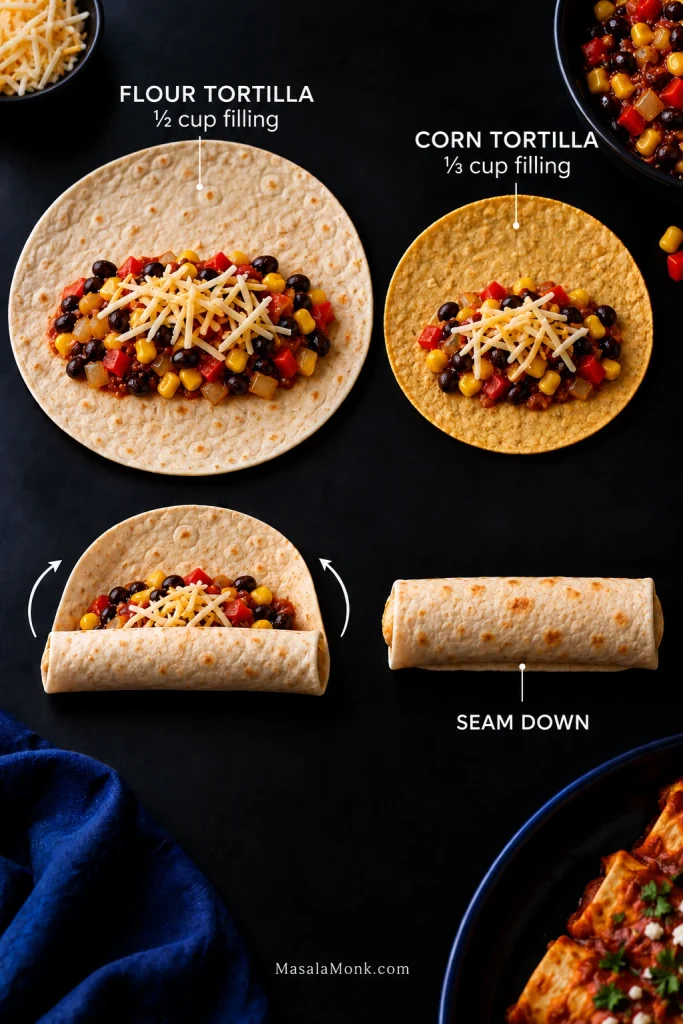
Use about ½ cup / 120 ml filling for each 8-inch / 20-cm flour tortilla or about ⅓ cup / 80 ml for each 6-inch / 15-cm corn tortilla.

Divide about half of the shredded cheese among the tortillas, roughly 1 cup in total.

Roll and place seam-side down in the dish. Don’t chase perfectly tight cylinders. Once the rolls are tucked beside one another, the baking dish does most of the holding. A small split is not a crisis; turn that side down and carry on.

By the third or fourth tortilla, the amount usually starts to feel obvious. From there, the pan fills quickly.

Overhead guide comparing a large flour tortilla with about half a cup of black bean and corn filling and a smaller corn tortilla with about one-third cup, followed by rolling and seam-down placement.
Treat the filling amount as a comfortable maximum, not a target you must force into every tortilla. If the seam strains to close, the better fix is a smaller scoop, not a tighter roll.

7. Add Sauce and Cheese

Sauce the centers and leave a little tortilla exposed at the ends. Spoon over the remaining sauce, about 1⅓ cups / 315 ml, then scatter the remaining half of the cheese over the top.

8. Bake Until Bubbling, Then Rest

Bake uncovered for 18–22 minutes. Look for red sauce bubbling between the rolls, melted cheese with a few golden patches and tortilla tips beginning to toast.

A hot pan with a pale top only needs a minute or two under the broiler/grill. Leaving the whole dish in the oven longer will only dry the filling and exposed tortilla edges.

Rest for 5–10 minutes. While the pan settles, cut the lime and get any toppings ready. The enchiladas will lift more cleanly when you come back to them.

A spatula lifting a baked enchilada from a red casserole dish, with black beans, corn, red pepper and onion visible inside, surrounded by bubbling sauce, browned cheese and a toasted tortilla edge.
Use a broad spatula when serving: supporting the whole softened roll from underneath matters more than trying to lift it by one end, especially with corn tortillas.

If the pan is already in the oven, dinner is handled. Everything below is optional. Use it when you want to change the tortillas or filling, make the pan ahead, or work out why an earlier batch behaved differently.

Corn or Flour Tortillas for Enchiladas?

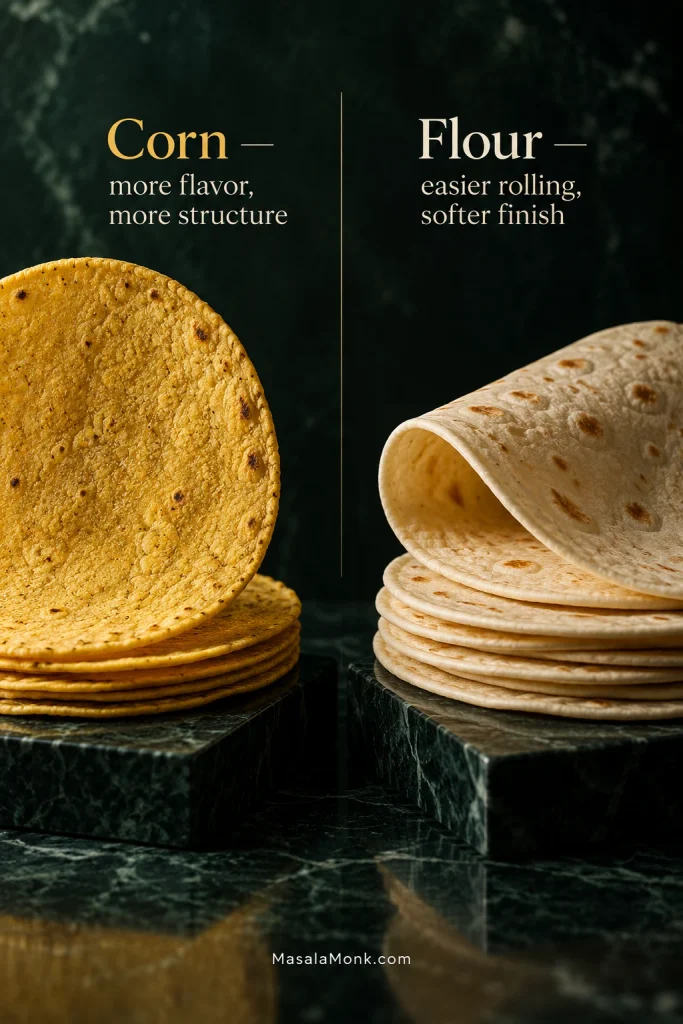
Corn tortillas are the traditional Mexican starting point for enchiladas. For this baked home-style version, flour tortillas are also useful when easy rolling matters more than pronounced corn flavor.

If you want…ChooseWhat changes
More corn flavorCornYou still taste the corn tortilla underneath the sauce.
Firmer tortilla texture under sauceCornProperly warmed corn tortillas keep more of their own texture as they bake.

The easiest rollingFlourThey are soft and forgiving.
A very soft finished enchiladaFlourFlour tortillas soak up sauce faster as they bake and sit.
Side-by-side stacks of yellow corn tortillas and pale flour tortillas, labeled that corn offers more flavor and structure while flour is easier to roll and gives a softer finish.
Think about when you plan to eat them. Flour tortillas are wonderfully forgiving for same-day enchiladas, while corn usually keeps more of its own character after longer contact with sauce.

Do Corn Tortillas Have to Be Fried?

Not for this baked version. A quick oil pass makes corn tortillas easier to roll and gives them a little more protection from the sauce. If yours already bend cleanly after warming, you can skip it.

Freshness, thickness and brand all matter. If you’ve got masa harina and want to make the tortillas too, this homemade corn tortilla recipe explains what properly hydrated, flexible dough should feel like.
For especially fragile tortillas, Bon Appétit also describes a brief oil treatment for sturdier enchiladas. Whatever method you use, the tortilla should still bend easily when it reaches the filling.

Whichever tortilla you choose, moisture eventually matters more than the label on the packet.

Saucy, Not Soggy: How to Keep Enchiladas From Falling Apart

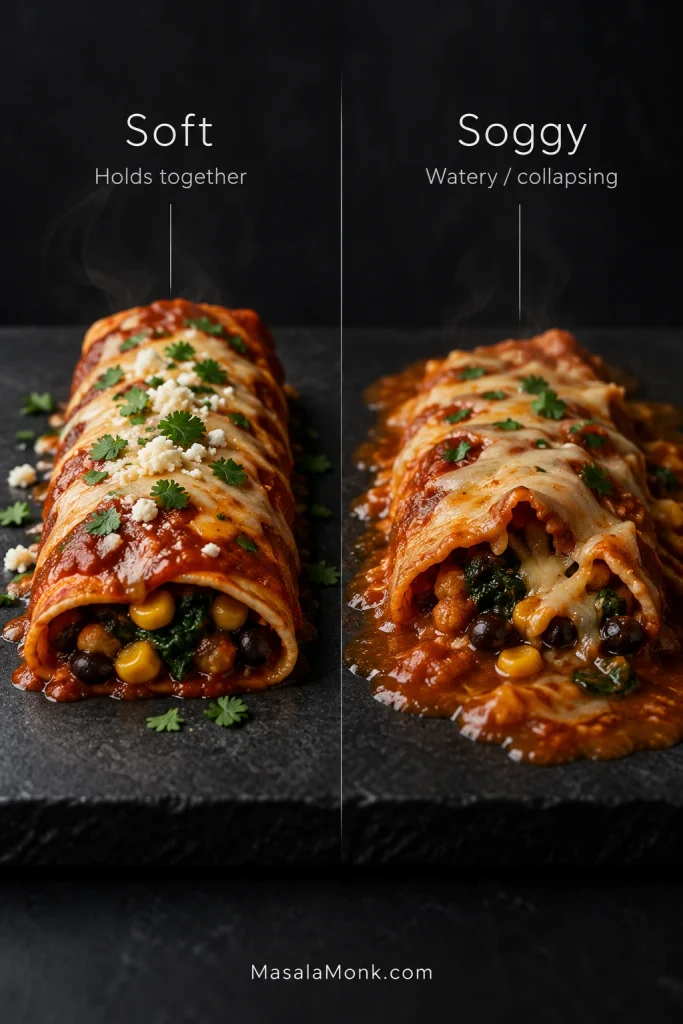
Soggy enchiladas usually come down to moisture and time: a wet filling, sauce pooling underneath, or tortillas sitting in sauce for hours before they bake.
Soft is not the enemy here. A good enchilada should be tender where tortilla meets sauce. The trouble starts when the tortilla becomes watery, gummy or so fragile that it cannot make the trip from baking dish to plate.
Two enchiladas compared side by side: the soft example remains intact, while the soggy example sits in excess watery sauce with a visibly collapsing tortilla.
For vegetarian enchiladas, the useful test is whether the tortilla still has structure. Tender tortillas are normal; pooling liquid plus a roll that collapses when lifted signals a moisture problem.

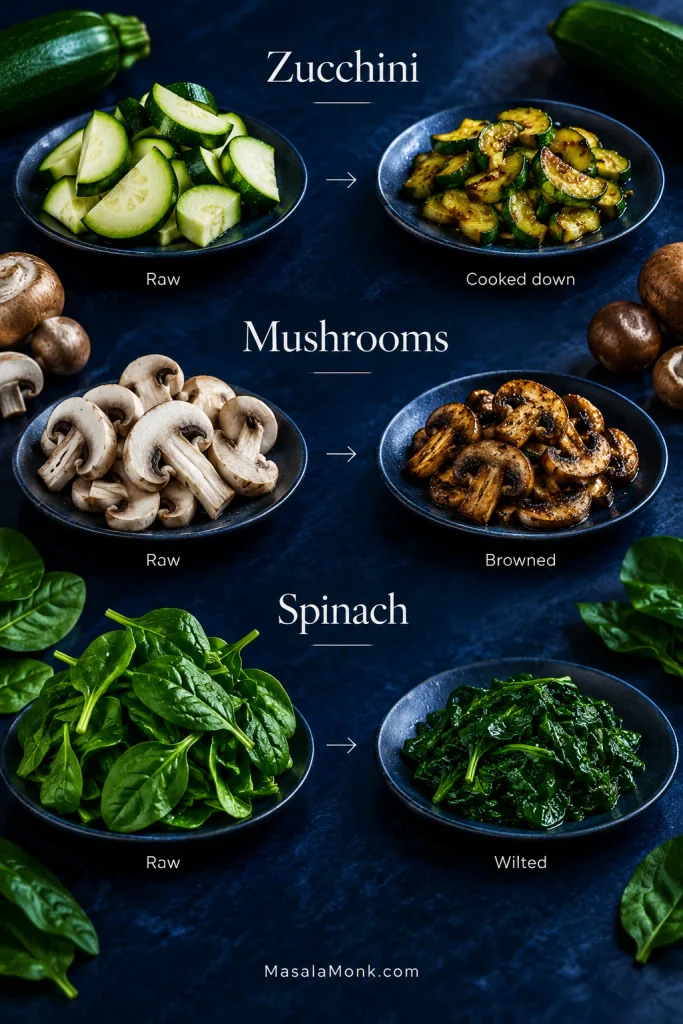
Most of the solution happens before the pan reaches the oven. Corn and peppers are fairly forgiving. Zucchini, mushrooms and spinach release much more water, so give those vegetables enough time in the skillet for that moisture to cook away.

Corn tortillas have the opposite problem at first: too dry and they crack. Warm them until they bend cleanly. Flour tortillas need almost no persuasion to roll, though they soften more quickly once they spend hours in sauce.

With the sauce, restraint underneath matters more than restraint on top. Give the bottom of the dish a thin coating, put a little sauce in the filling, then let most of it sit over the rolls. For a saucier serving, warm extra sauce separately and spoon it on at the table.

Sauce contact matters too. A pan rolled and baked now behaves differently from one that sits sauced for hours before it reaches the oven. If you are assembling ahead, the make-ahead method keeps that exposure under control.

Changing the Vegetarian Enchilada Filling

Poblano is the easiest place to start if you want to change the base without changing its character too much. It brings more chile flavor without adding much extra moisture. Extra corn makes the filling sweeter.

The important thing is volume: replace rather than endlessly add. A cup of something new should take the place of roughly the same amount of the original filling. Otherwise a flexible recipe quietly becomes enough for a second baking dish.

Vegetables That Need More Cooking

Wetter vegetables need a little more care before they go inside a tortilla.

  • Zucchini: dice it small and cook until the water it releases has evaporated.
  • Mushrooms: let them move past the wet, steaming stage and give them time to brown. Once browned, they make the filling much more savory.
  • Spinach: wilt thoroughly. Drain or squeeze frozen spinach before it reaches the filling.
Before-and-after guide showing raw and cooked-down zucchini, raw and browned mushrooms, and fresh spinach beside a much smaller portion of wilted spinach.
Different vegetables change appearance in different ways, so color alone is a poor guide. For an enchilada filling, the more reliable endpoint is simple: the skillet should no longer be releasing loose water.

Sweet potato and butternut squash need a head start too. Cook them until tender before assembly; the short oven bake here is enough to heat the filling and melt the cheese, not enough to soften raw chunks of squash.

Black, Pinto or Refried Beans?

Black beans work especially well here because they hold their shape but crush easily enough to help bind the filling. Pinto beans are softer and milder and can replace them 1:1.

Refried beans give you a denser, creamier center. Check canned versions for lard if you are cooking for vegetarians. If you’d rather keep them on the side, this refried beans recipe from a can is a quick option.

Leaving beans out entirely calls for more cooked vegetables to take their place. Browned mushrooms with roasted cauliflower are one option. The tortillas should still feel properly filled when you roll them.

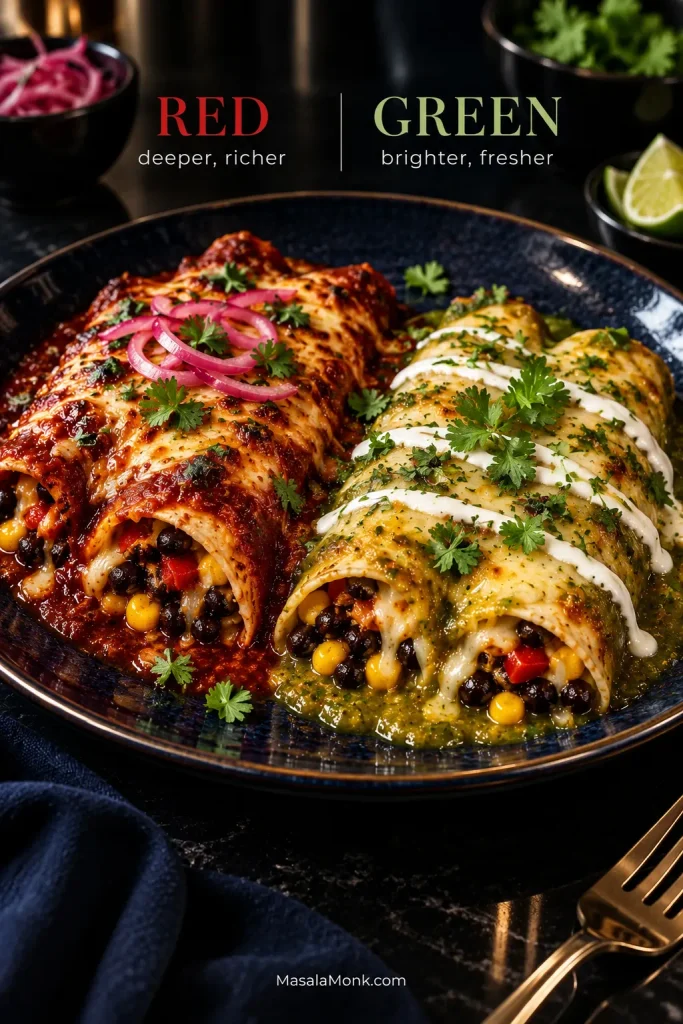
Red or Green Enchilada Sauce?

Red is the natural fit for the base recipe. Cumin, black beans and browned cheese sit especially well with its deeper chile flavor.

Green sauce changes what you notice. Lime, sweet corn, cilantro and the fresh toppings come forward, giving the same filling a brighter finish.

Two enchiladas with the same black bean, corn and red pepper filling; one has deep red sauce and pickled onion, while the other has green tomatillo sauce, crema and cilantro.
If you swap red for green enchilada sauce, keep the filling unchanged the first time. That makes it easier to taste what the sauce itself changes before adjusting lime, cumin or toppings.

Swap green sauce for red roughly 1:1. A pourable bottled green enchilada sauce can go straight in. If you’re using a thicker salsa verde, loosen it with a little water, vegetable broth or cooking liquid until it pours easily and coats the tortillas. This roasted salsa verde explains that adjustment as well.

Give any sauce a taste before it reaches the pan. One that pours almost like broth benefits from a short simmer. A salty sauce means the bean filling will need less salt.

Homemade sauce is worth making when you feel like the extra project. It should not be the admission price for enchiladas on a Wednesday night. Ready to cook? Return to the recipe and assemble the pan as written.

How to Make Vegetarian Enchiladas Ahead Without Getting Soggy

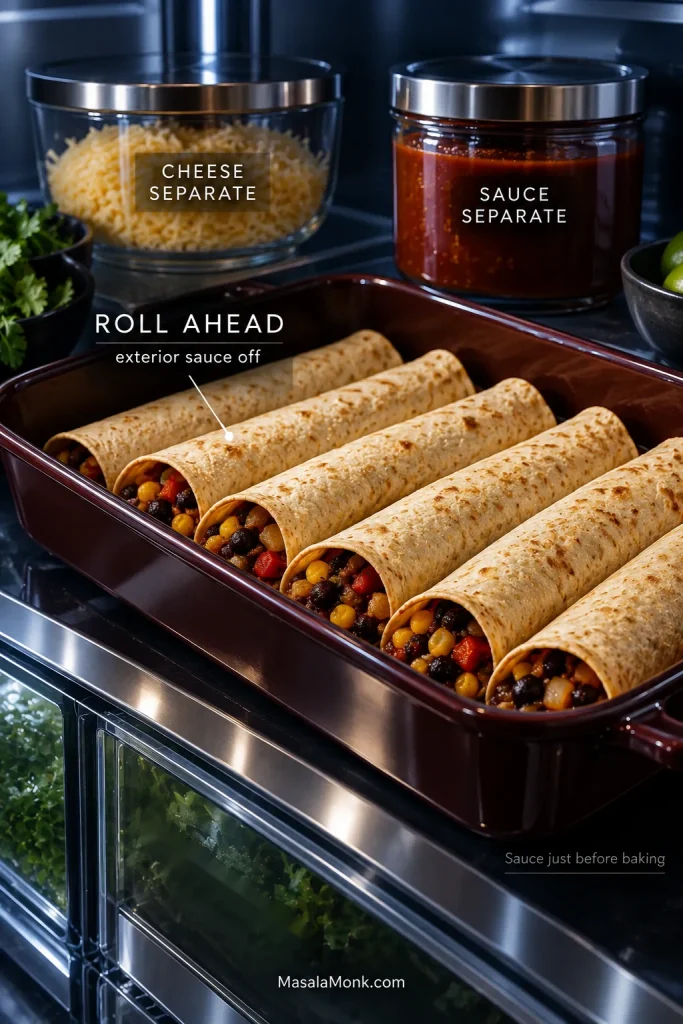
For an overnight pan, use the finished filling exactly as written but keep the exterior sauce off until baking time. That means no sauce in the baking dish and no sauce over the rolled tortillas while they sit in the refrigerator.

Let the cooked filling stop steaming, transfer it to a shallow container and refrigerate promptly. Once chilled, fill and roll the tortillas and keep them covered in the refrigerator. Store the sauce and cheese separately.

A refrigerator shelf holding rolled unsauced enchiladas in a baking dish with separate containers of red enchilada sauce and shredded cheese.
Cooling the filling before rolling keeps residual steam from condensing inside the covered pan. Then hold back the exterior sauce so the tortillas spend less time absorbing liquid before baking.
Prep styleWork before bakingWhat to expect
Components kept separateWarm tortillas, roll, sauce and add cheeseClosest to freshly assembled
Roll ahead; sauce laterAdd sauce and cheeseVery good texture with little work left
Fully assemble overnightBakeLeast work, but noticeably softer tortillas

Baking Chilled Enchiladas

A pan going into the oven straight from the refrigerator will usually need about 25–35 minutes. Cover loosely for the first 15 minutes, then uncover and continue until the sauce is bubbling through the pan and the center is hot. Cooking them fresh instead? Use the standard bake cues and timing.

Refrigerated glass bakeware needs a little extra care. Follow the manufacturer’s instructions before moving a cold glass dish into a hot oven because thermal-shock tolerance varies by product.

How to Freeze Vegetarian Enchiladas

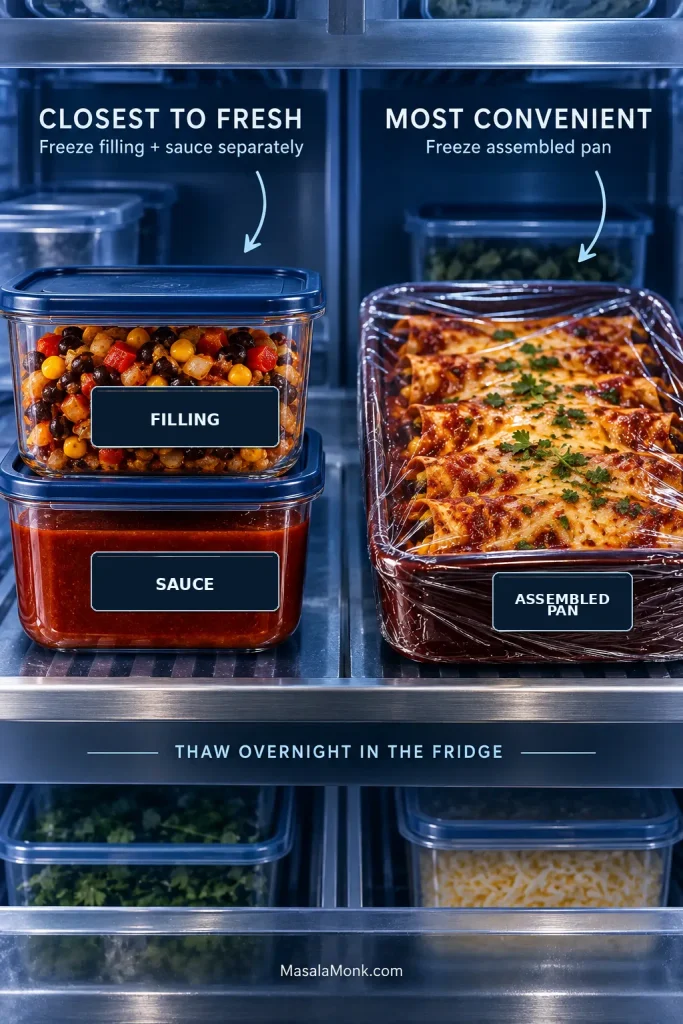
For the closest texture to a fresh pan, freeze the cooked filling and sauce separately. For best quality, use them within 2–3 months. Thaw overnight in the refrigerator, then assemble with tortillas and cheese and bake as written.

A fully assembled pan works too. Chill the cooked filling first, assemble the enchiladas in a freezer-safe baking dish, add the sauce and cheese, wrap tightly and freeze. The tortillas will be softer after thawing, but almost all of the work is already done.

Thaw the assembled pan overnight in the refrigerator, then use the chilled-pan timing above. Straight-from-frozen baking is possible, but timing varies with the pan, its depth and how solidly everything is frozen. Thawing first gives you a more even bake.

Freezer comparison showing cooked black bean and vegetable filling stored separately with red sauce on one side and a wrapped fully assembled pan of sauced, cheese-topped enchiladas on the other.
The freeze-thaw cycle is gentler on tortilla texture when the filling and sauce stay separate. An assembled frozen pan saves more work later, but the tortillas go through that cycle already sauced.

Store and Reheat Leftovers

Refrigerate leftovers promptly. USDA recommends getting perishable cooked food into the refrigerator within 2 hours and using leftovers within 3–4 days. Reheat them to 165°F / 74°C.

For freezer quality, USDA guidance lists casseroles at about 2–3 months. See its food-safety guidance for the broader recommendations.

An oven or toaster oven keeps more texture around exposed edges. The microwave is quicker and gives you a softer tortilla. At lunch, speed may win.

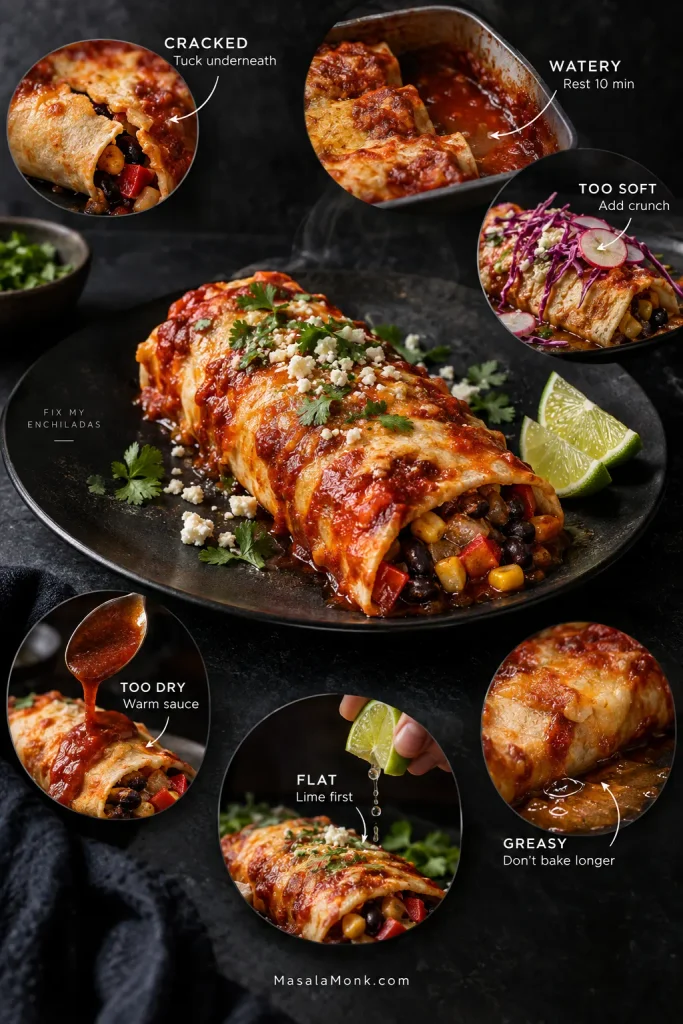
Fix My Enchiladas

Troubleshooting guide around a baked enchilada showing six problems and fixes: cracked, watery, too soft, too dry, flat and greasy.
Most rescue moves change one thing at a time: structure, moisture, brightness or contrast. More oven time is rarely the answer once the enchiladas are already cooked.

My Corn Tortilla Cracked While I Was Rolling It

Tuck the split side underneath and keep going; a small crack rarely matters once the rolls are sitting snugly together. Before you roll the rest, revisit the tortilla warming method.

There Is Water Under the Enchiladas

Give the pan a full 10 minutes to rest before judging it. Some loose liquid may settle as the enchiladas cool slightly. Lift the rolls with a wide spatula and leave excess liquid in the dish. A very watery pan usually traces back to wet vegetables, unusually thin sauce or too much sauce underneath. For prevention next time, the Saucy, Not Soggy section brings those moisture points together.

The Tortillas Have Turned Very Soft

That doesn’t mean the pan is ruined. Let it rest a little longer, lift portions with a wide spatula and add something crisp such as cabbage, radish or pickled onion for contrast. For another overnight batch, use the make-ahead method and keep the exterior sauce separate until baking time.

The Enchiladas Are Too Dry

Warm some extra enchilada sauce and spoon it onto each plate. Crema, salsa or guacamole can bring moisture back too. On another pan, use the full sauce amount and stop baking once the center is hot and the sauce is bubbling.

The Filling Tastes Flat

At the table, lime is the fastest fix. Salsa, pickled onion, jalapeño or Cotija can help too. Next time, taste after the beans, sauce and lime are all together in the skillet.

If the filling falls out: don’t try to re-roll a hot, sauced enchilada. Spoon the filling back beside or over the tortilla and eat it as it is. During assembly, a little less filling and a few lightly crushed beans make the rolls easier to manage.

If the pan looks greasy: that sheen is often fat released by the cheese. Let the pan rest and spoon off any obvious excess around the edges if you want to. Extra oven time usually makes the problem worse.

What to Serve With Vegetarian Enchiladas

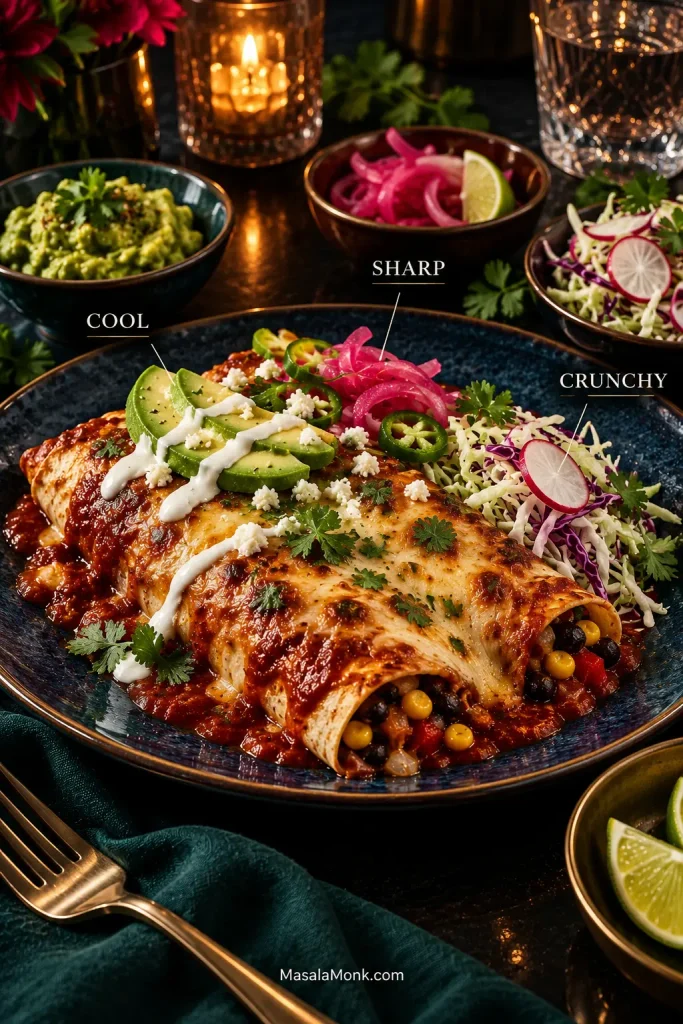
The enchiladas already bring warm tortillas, beans, chile sauce and cheese. You don’t need every topping in the refrigerator. Pick one cool thing, one sharp thing and, if you want it, something crunchy.

  • Cool: avocado, guacamole, sour cream or crema
  • Sharp: lime wedges, pickled red onion, salsa or fresh/pickled jalapeño
  • Crunchy: shredded cabbage, radish or a simple cabbage slaw
  • Cheese at the table: Cotija for a salty, assertive finish or queso fresco for a milder fresh-cheese crumble

Finish with cilantro if you like it. For a fuller meal, Mexican-style rice or a simple salad is enough.

Plated vegetarian enchiladas with avocado and crema marked as cool, pickled red onion and lime marked as sharp, and cabbage and radish marked as crunchy.
Add contrast at the table, not before the bake. Cool crema, sharp lime or pickles, and crisp cabbage or radish stay useful precisely because they have not spent twenty minutes softening in the oven.

Vegetarian Enchiladas FAQs

Can I Use Black Beans Cooked From Dried?

Yes. Use about 1½ cups / 250 g cooked, well-drained black beans in place of the canned beans.

Can I Make These Gluten-Free?

Yes. Use certified gluten-free corn tortillas and check the labels on the enchilada sauce and any packaged seasoning blends.

Can I Make These Vegan?

Yes. The black bean and vegetable filling is already plant-based. Choose an enchilada sauce made without meat stock and use a dairy-free cheese that melts well, or leave the cheese off and finish with avocado, salsa and vegan crema. Without cheese, taste the filling carefully before rolling because you lose some salt and richness.

How Many Enchiladas Should I Serve Per Person?

For a main meal, plan on about 2 medium flour-tortilla enchiladas or 2–3 smaller corn-tortilla enchiladas per person. Substantial sides may bring that down; larger appetites may want more.

Back to the recipe · Back to top


When the pan comes out of the oven, give it those few minutes to settle. The sauce will still be bubbling between the rolls, the cheese will have browned in patches, and a few tortilla corners will be darker and drier than the sauced centers.

At the table, add the cold things: avocado against hot chile sauce, crema melting into the cheese, sharp pickled onion, a squeeze of lime over warm black beans and sweet corn.

Then it is simply dinner: bubbling sauce, browned cheese, lime, sweet corn, and a second enchilada that suddenly seems like a very good idea.

Posted on — Leave a comment

Sambar Recipe – Authentic South Indian Sambar for Idli, Dosa & Rice

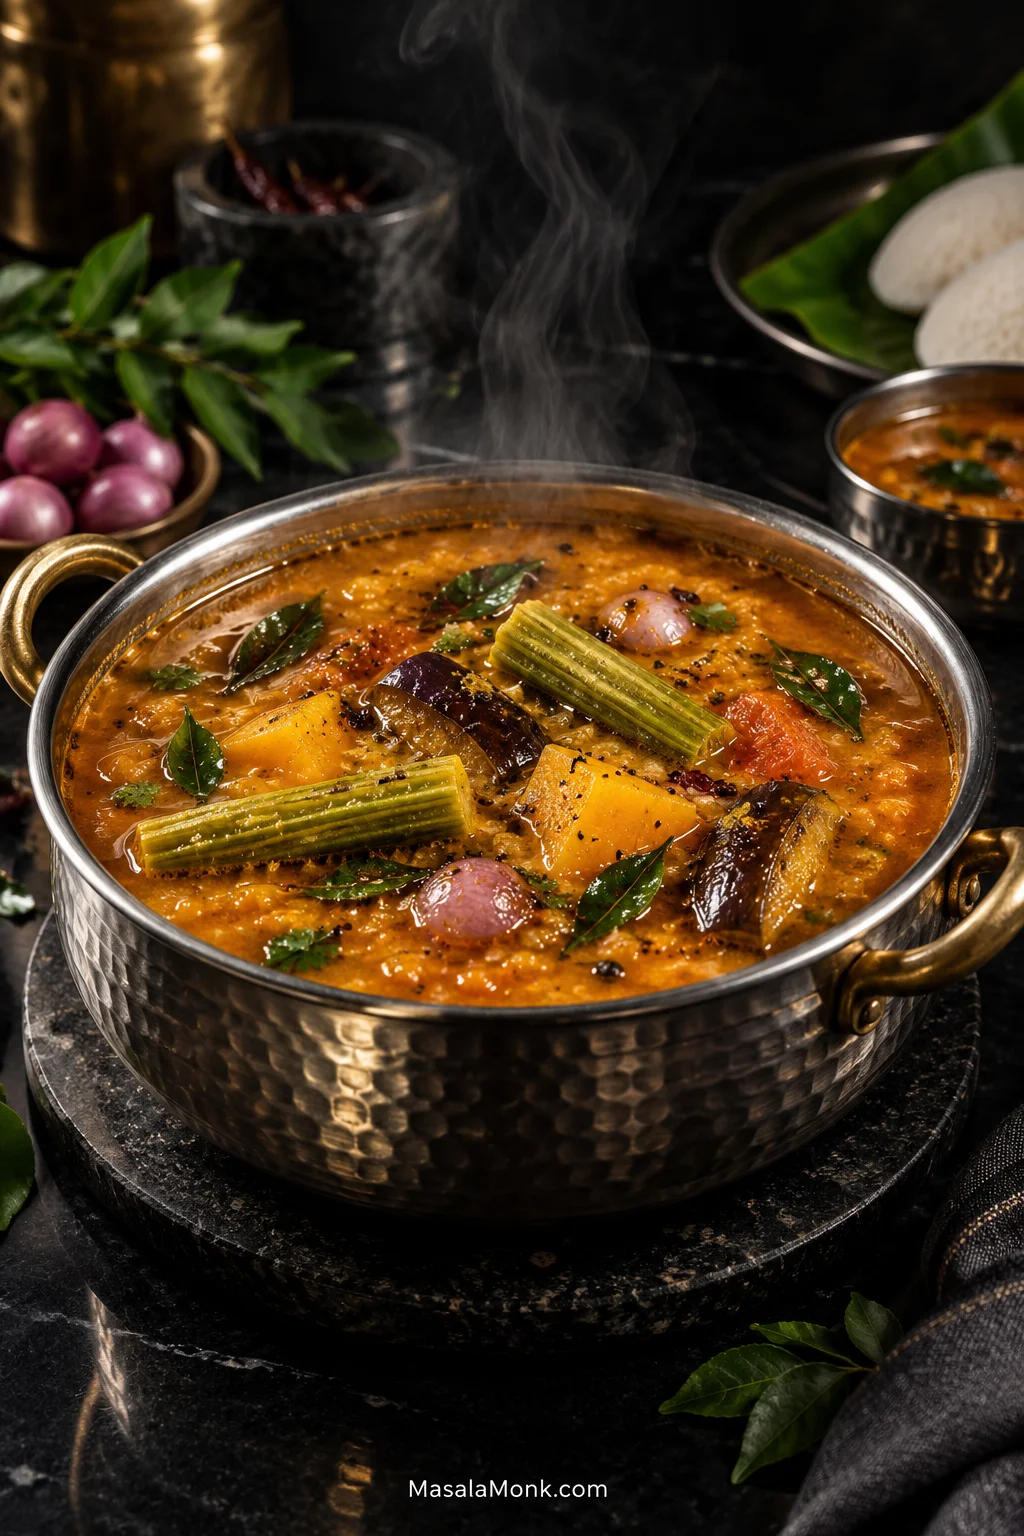
Steaming sambar in a metal pot with drumstick, pumpkin, eggplant, shallots, curry leaves, mustard seeds and dried chilli visible in the orange lentil broth.

This sambar recipe makes a South Indian lentil-and-vegetable stew with soft toor dal, vegetables, tamarind, sambar powder and a fragrant final tadka (tempering). A good sambar tastes savoury and lentil-rich, then tangy from tamarind, with curry leaves and toasted spices rising above the broth. The chilli heat can be mild or quite assertive depending on the sambar powder.

Keep it a little fuller and it can sit at the centre of a rice meal. Loosen the same sambar for idli or medu vada and the broth sinks into every porous bite. That ability to move with the meal is part of what makes sambar so useful in a home kitchen.

The frustrating version is the one that contains all the “right” ingredients and still tastes mostly like dal. Or it comes out chilli-hot but flat, sharply sour, watery, or full of pumpkin and brinjal that disappeared while the carrots were still catching up. The method below focuses on the few things that actually decide whether the sambar comes together.

Sambar is more vegetable-heavy and tangy than a simple dal, while rasam is usually much thinner and more pepper-forward. There is no single formula that represents every South Indian region or household, so this version is a dependable mixed-vegetable method rather than a claim to represent every style. You may also see the name written as sambhar.

The Sambar Rule

Balance the sambar before reaching for more powder.

A hot but flat-tasting sambar rarely needs another spoonful of chilli-heavy masala first. Check the salt and tamarind. Make sure the dal has cooked completely, the vegetables are tender and the broth has not been diluted too far.

Once the dal is soft and the tang tastes right, don’t fuss over every last detail. Sambar is everyday food. It has plenty of room to adjust.


Everyday South Indian Sambar Recipe

Serves4
DifficultyEasy; vegetable timing is the main trick
Hands-onAbout 25–30 minutes
TotalAbout 60 minutes; typically 50–65 minutes depending on the dal and vegetables
ConsistencyMedium-thick for rice; loosen for idli, dosa or vada

With rice, count on four generous servings. Beside idli, dosa or vada, the same amount naturally feeds more.

Equipment

  • Stovetop pressure cooker or Instant Pot
  • 3–4-litre (3–4-quart) saucepan or kadai with a lid
  • Small tadka pan
  • Knife and cutting board
  • Ladle or wooden spoon
  • Whisk, dal masher or potato masher
  • Small strainer for tamarind, optional

Ingredients

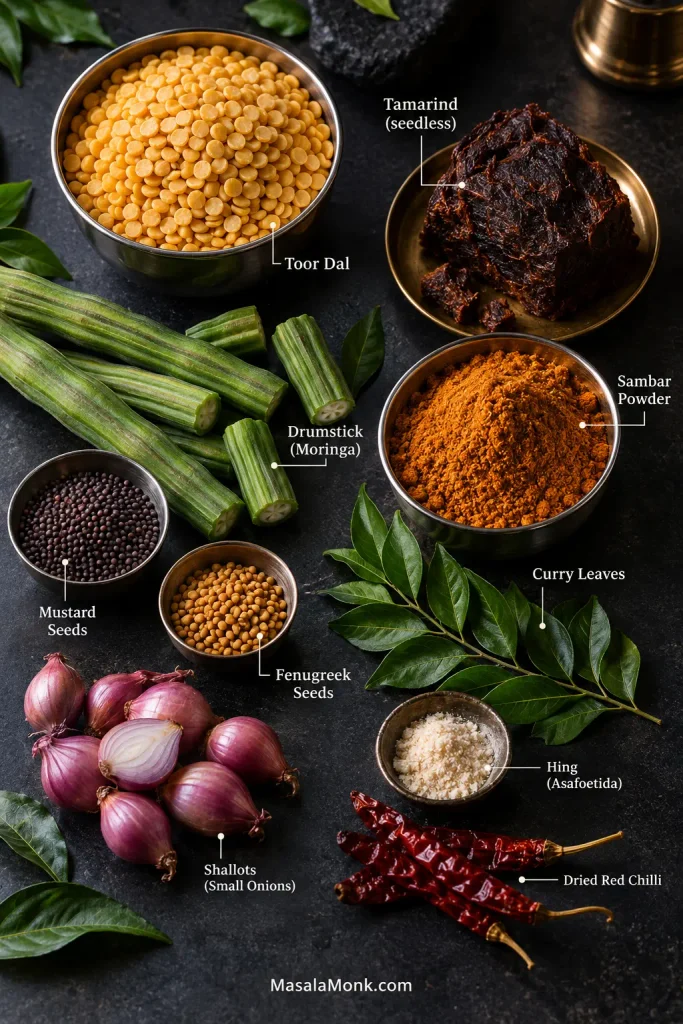
Labeled sambar ingredients including toor dal, seedless tamarind, sambar powder, moringa pods, curry leaves, mustard seeds, fenugreek seeds, shallots, asafoetida and dried red chillies.
These ingredients are not interchangeable sources of “more flavour.” Toor dal builds the base, tamarind changes acidity, sambar powder brings the spice profile, while mustard, fenugreek, curry leaves and hing contribute aromas that extra chilli cannot replace.

Dal

  • 100 g toor dal (tur, tuvar or arhar dal; split pigeon peas), about ½ US cup
  • 420 ml water (1¾ cups)
  • ¼ teaspoon ground turmeric

Vegetables and Sambar Base

Use about 350 g (12 oz) vegetables in total, including the shallots, plus the tomato.

  • 100 g drumstick (moringa pod), roughly 1–2 medium pods, cut into 5 cm (2-inch) pieces; lightly scrape very tough mature fresh pods if needed
  • 70 g carrot, about 1 small carrot, cut into small chunks
  • 70 g pumpkin, cut into larger chunks
  • 50 g brinjal (eggplant/aubergine), cut into chunks
  • 60 g small onions or shallots, roughly 6–8 small shallots, peeled
  • 100 g tomato, about 1 small to medium tomato, chopped
  • 240 ml water (1 cup) to start the vegetables, plus a splash more if needed
  • 15 g (½ oz) seedless tamarind block
  • 120 ml hot water (½ cup) for soaking the tamarind
  • 1–1½ tablespoons sambar powder
  • 1 teaspoon jaggery, optional
  • 1 teaspoon fine salt to start, divided, plus more to taste
  • 120–300 ml hot water (½–1¼ cups) for the final consistency
  • 2 tablespoons chopped coriander leaves (cilantro), optional

Bottled tamarind paste and concentrate can be far stronger than block tamarind. There is no dependable spoon-for-spoon conversion, so use less to begin with.

Tempering

  • 1 tablespoon gingelly (Indian sesame) oil, neutral oil or ghee; not toasted sesame oil
  • ½ teaspoon black or brown mustard seeds
  • Small pinch fenugreek seeds, roughly 6–10 seeds
  • 1 dried red chilli, broken in half
  • 10–12 curry leaves
  • ⅛ teaspoon hing (asafoetida)

A useful cooking baseline: 100 g dry toor dal : about 350 g vegetables : 15 g block tamarind : 1–1½ tablespoons sambar powder. Taste the tamarind and powder rather than treating those last two numbers as law.

How to Make Sambar

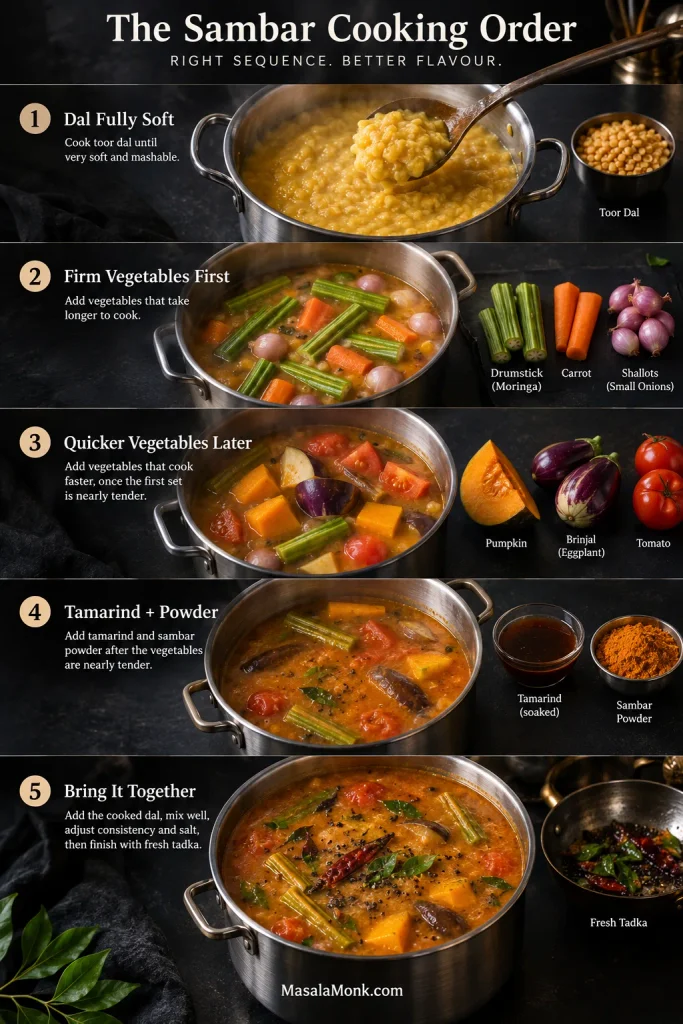
Five-stage sambar cooking guide showing fully softened toor dal, firm vegetables cooked first, quicker vegetables added later, tamarind and sambar powder added near the end, then dal and fresh tadka combined.
This sambar recipe is easier to control when you treat the order as texture management. In particular, letting firmer vegetables soften before acidic tamarind enters gives them a better chance to cook through; meanwhile, delaying pumpkin and brinjal helps them stay intact.

Cook the Dal and Build the Vegetable Base

  1. Cook the dal until completely soft. Rinse the toor dal well. Combine it with 420 ml (1¾ cups) water and turmeric. Bring a stovetop cooker to pressure, reduce the heat as needed to maintain pressure and cook for about 8–10 minutes. Let the pressure settle naturally. Press a grain against the side of the cooker; it should smear into a paste with no chalky centre.
  2. Start the firm vegetables. Put the shallots, carrot and drumstick in a saucepan or kadai with 240 ml (1 cup) water and a pinch taken from the measured salt. Cover and simmer for about 6–8 minutes. Check once and add a small splash of water if the pan begins to dry. The carrot should be getting close to tender.
  3. Meanwhile, make the tamarind extract. Soak the tamarind in 120 ml (½ cup) hot water for 10–15 minutes. Squeeze well and strain. Keep some extract aside rather than assuming it all belongs in the sambar.
  4. Add pumpkin, brinjal and tomato. Stir them into the firm vegetables and simmer for about 3–4 minutes. The tomato should begin to slump into the broth, while the pumpkin and brinjal become almost tender without collapsing.
  5. Add tamarind and sambar powder. Stir in about two-thirds of the tamarind extract and 1 tablespoon sambar powder. Simmer gently for 4–6 minutes. Pay more attention to the pan than the clock: the tomato should no longer taste raw, the sharp smell of fresh tamarind should have faded and the powder should no longer taste dusty.

Balance, Finish and Rest the Sambar

  1. Stir in the mashed dal. Give everything another 1–2 minutes together. Press a piece of pumpkin with the side of the ladle; it should yield without disappearing into the broth.
  2. Taste for salt, sourness and spice. Add the rest of the measured salt, then taste. Use more reserved tamarind when the sambar needs extra tang. A mild powder may need up to another ½ tablespoon. Add jaggery only if you want a faint sweet-sour note.
  3. Loosen it only at the end. Add hot water in 60 ml (¼ cup) increments. Keep the sambar fuller for rice and more flowing for idli, dosa or vada. Pour a ladleful back into the pan: the mashed dal and broth should fall together instead of separating into thick lentils and thin water.
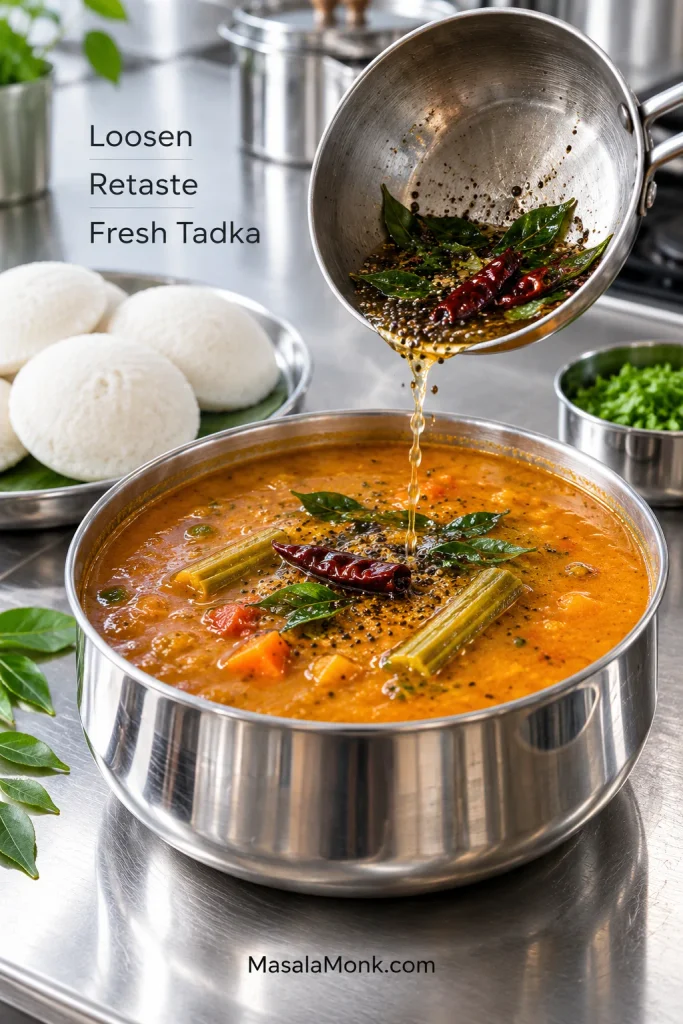
  4. Finish with the tadka. Heat the oil or ghee in a small pan and add the mustard seeds. Once they crackle, add the fenugreek and dried chilli. Add the curry leaves; when they hiss and begin to crisp at the edges, stir in the hing and immediately pour the tadka over the sambar. Burnt tadka is worth remaking; thirty seconds of fresh tempering is better than a bitter pot.
  5. Rest for 5–10 minutes. Stir and taste once more. The sambar may need a splash of hot water or another pinch of salt after resting. Finish with coriander if using.

Instant Pot: cook the rinsed dal, 420 ml water and turmeric on High Pressure for 9 minutes. Allow 10–15 minutes of natural pressure release before venting any remaining pressure.

How to Know When Sambar Is Ready

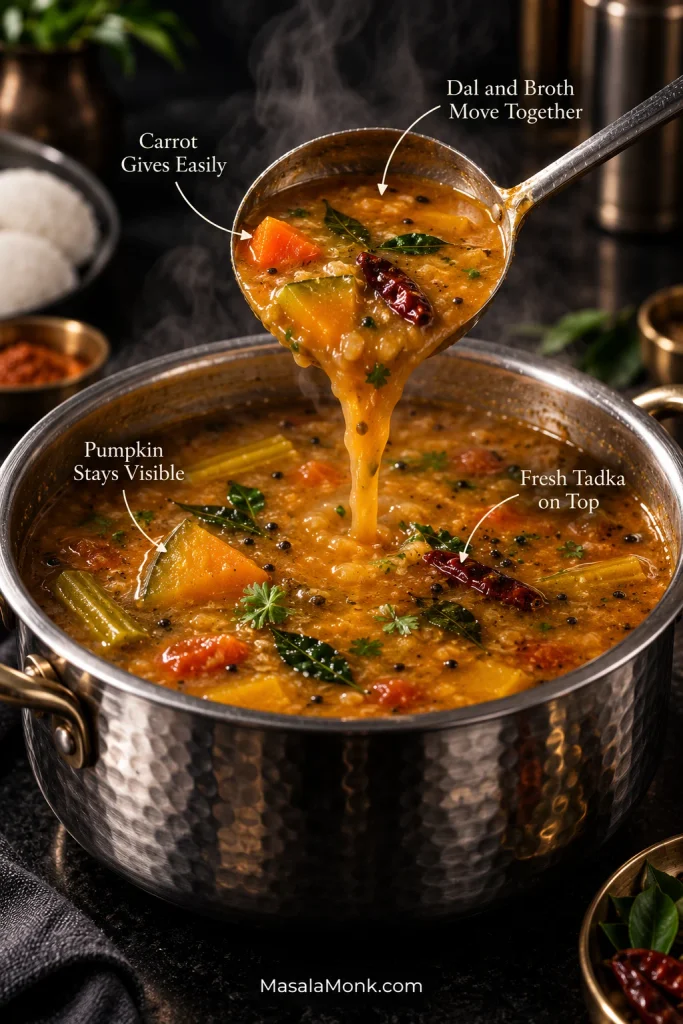
Ladle some up. The mashed dal should seem part of the broth rather than settling separately underneath it. By now, the sharp raw edge of the tamarind has mellowed. A carrot piece gives when pressed with a spoon, while pumpkin and brinjal remain visible instead of dissolving into the pan.

Ladle lifting finished sambar above a metal pot, with callouts showing integrated dal and broth, tender carrot, intact pumpkin and fresh mustard seed and curry leaf tadka.
No single cue proves the sambar is ready. Instead, look for several things at once: integrated broth, properly tender vegetables and a fresh aromatic finish. When those agree, the clock matters much less.

Pour the ladleful back. The broth and dal should move together. Then smell the sambar: fresh mustard, curry leaves and hing should reach you before the spoon does.

At that point, all it really needs is hot rice.

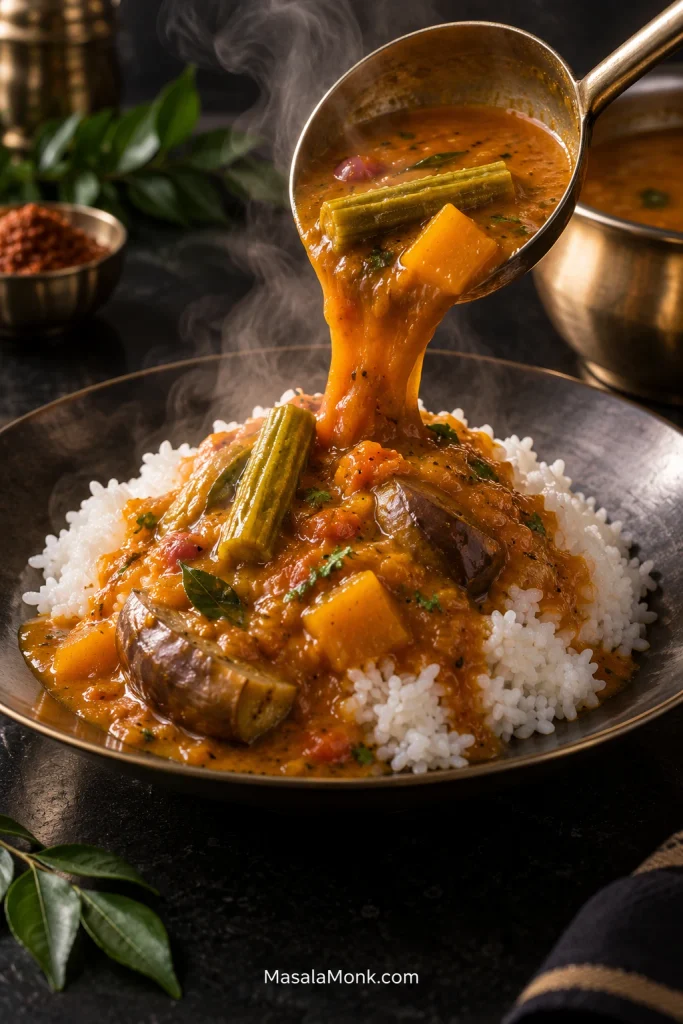
Hot sambar being poured over white rice, with drumstick, pumpkin, eggplant, shallots and curry leaves visible in the lentil and vegetable stew.
Judge sambar for rice on the plate rather than in the pot. It should spread slowly through the grains and carry vegetables with it; if thin broth immediately collects underneath, the consistency has probably gone too far.

Dal, Tamarind and Sambar Powder

Toor dal is the standard base here. The same lentil may be sold as tur dal, tuvar dal, arhar dal or split pigeon peas. Cook it until the grains practically disappear when mashed. Older dal may simply need more time. Moong dal makes a lighter sambar; masoor changes both the flavour and texture more noticeably.

Tamarind is less predictable. A pale seedless block may be mild, while a darker aged block can push the sambar sour much sooner. Bottled concentrates vary even more. Fresh tamarind changes as it simmers too: its sharp raw acidity settles into the broth instead of sitting on top of the other flavours.

Sambar powder varies just as much. Some blends lean towards coriander and roasted spices; others announce themselves mostly through chilli. Old powder can remain hot after much of its fragrance has faded.

Homemade sambar powder gives you more control over both the roast and the chilli level.

Jaggery is optional; the final tadka matters much more to this version. Some Karnataka and Udupi sambars lean sweeter, while many other styles use little or no jaggery.

Best Vegetables for Sambar

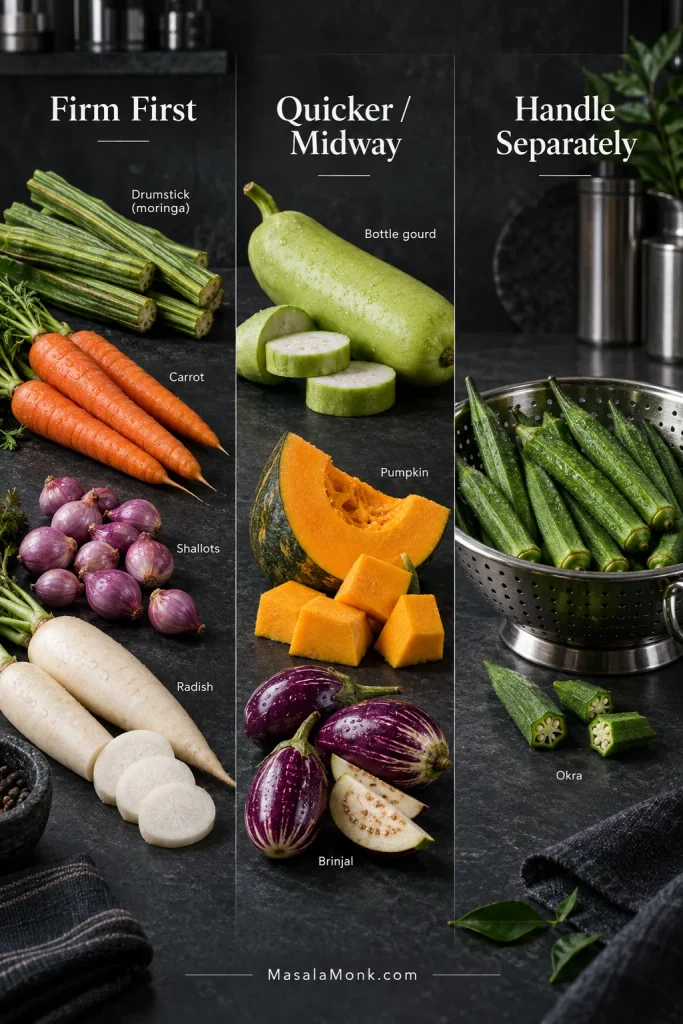
Good sambar vegetables include drumstick, shallots, carrot, pumpkin, brinjal, green beans, radish, okra and bottle gourd. Three or four are plenty. There is no prize for emptying the whole vegetable drawer into one pan.

Drumstick gives the broth a distinctive green, gently earthy flavour. Pumpkin brings sweetness and can melt slightly into the liquid at the edges. Brinjal absorbs the seasoned broth and turns silky, while carrot and beans give the spoon something firmer to find.

When to Add Vegetables to Sambar

VegetableWhat it bringsWhen to add it
Drumstick (moringa)Earthy-green flavour; scents the brothFirm-vegetable stage
CarrotMild sweetness with a firmer biteFirm-vegetable stage
Small onions or shallotsSweet-savoury onion flavourFirm-vegetable stage
Green beansFresh green flavour and biteFirm-vegetable stage
Radish (mullangi)Peppery biteFirm-vegetable stage
PotatoMild starchiness; makes the bowl heartierFirm-vegetable stage
Bottle gourdMild flavour with juicy, tender piecesAfter the firm vegetables have started
PumpkinGentle sweetness; can soften into the broth at the edgesQuick-vegetable stage
Brinjal (eggplant)Silky pieces that absorb the brothQuick-vegetable stage
Okra (bhindi)Earthy-green flavour; turns silkySauté separately; add near the end

A good mixed combination might use drumstick, pumpkin, brinjal and small onions. Carrot, beans, eggplant and onion are easier to find in many supermarkets. Even onion, tomato and one substantial vegetable can make a satisfying sambar.

Cut for cooking time instead of symmetry. Smaller carrot pieces and larger pumpkin chunks have a much better chance of becoming tender together.

Vegetable timing guide showing drumstick, carrot, shallots and radish under Firm First; bottle gourd, pumpkin and eggplant under Quicker or Midway; and okra under Handle Separately.
This sambar recipe is easy to adapt when you swap vegetables by cooking speed rather than by name. Once you understand the slow, medium and quick groups, it becomes much easier to use whatever vegetables are in the kitchen.

Frozen drumstick can go straight into the simmer. No drumstick at all? Use the other vegetables and carry on.

Outside India, remember that drumstick means moringa pod, brinjal means eggplant or aubergine, hing means asafoetida, and toor/tur/tuvar/arhar are names for split pigeon peas. If drumstick is new to you, scrape or suck the soft flesh and seeds from the cooked pod and leave the fibrous outer shell behind.

Cooking with these vegetables now? Return to the step-by-step method.

Pressure Cooker, Instant Pot or Stovetop?

Choose the method according to what matters tonight: distinct vegetables, fewer dishes or speed.

MethodBest when…Trade-off
Dal and vegetables separateYou want the clearest vegetable texturesTwo vessels
Instant Pot, dal onlyYou want hands-off, repeatable dal cookingVegetables still simmer separately
Same cooker, used in stagesYou want fewer dishes without pressure-cooking tender vegetablesDal waits briefly in a bowl
True one-pot pressure methodSpeed and cleanup matter mostSofter vegetables
StovetopYou do not have a pressure cookerLongest dal cooking time

On the stovetop, soaking the dal for 1–2 hours can shorten the wait, although it is not essential. Simmer until the lentils mash without resistance; depending on their age, that may take 35–50 minutes or longer.

Sambar for Rice, Idli, Dosa and Vada

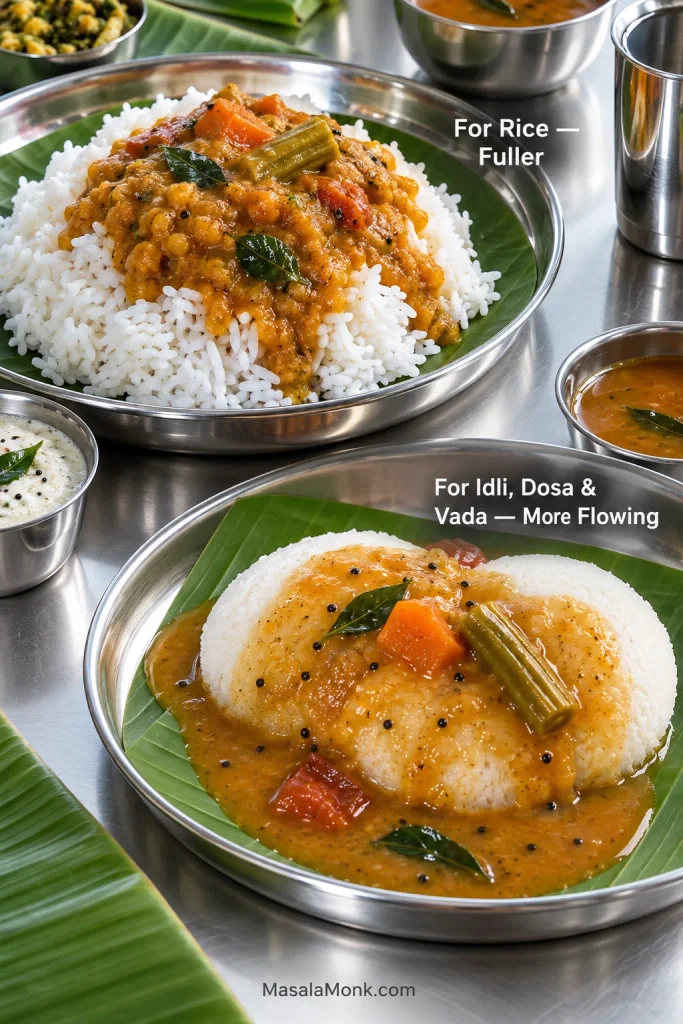
Keep sambar medium to medium-thick for rice and more flowing for idli, dosa or vada. Thin is fine; watery is not. Even when loosened, the mashed dal should travel with the broth.

Two stainless-steel plates compare thicker sambar coating white rice with more flowing sambar surrounding and soaking into soft idlis on banana leaf.
Make the final consistency decision late. It is easy to loosen sambar gradually for idli, dosa or vada; by contrast, correcting an over-thinned pot requires more simmering, which can soften the vegetables further.

With rice, spoon enough sambar over the top that the grains are coated instead of sitting dry underneath the vegetables. A dry poriyal or thoran on the side is often all the contrast the plate needs; papad, pickle and curd can round things out. This guide covers fluffy steamed rice if you need the base sorted too.

With idli, don’t be stingy. Pour the sambar over, leave the idli for a moment so the broth can soak in, then add more at the table. The separate soft idli recipe covers batter, fermentation and steaming.

Dosa wants a flowing sambar that’s easy to scoop or dip. Medu vada is even better when the outside begins to absorb the broth while the centre keeps a little of its texture. A cool South Indian coconut chutney works naturally alongside all three.

Pongal and upma are comfortable companions too. Change the pour according to the plate, not the basic balance of the sambar.

A true tiffin sambar can differ in much more than water. Some versions use moong dal or a dal blend, potato and shallots, fresh-ground masala, coconut, fried gram or a more obvious sweet note. It is its own recipe family, not diluted rice sambar.

What You Can Substitute—and What Changes

Leaving out drumstick changes one note. Replacing tamarind changes the direction of the whole sambar. No drumstick? Carrot, beans, pumpkin, brinjal and shallots can carry it perfectly well; you simply lose the characteristic moringa note.

Tomato, raw mango and other sour ingredients appear in regional sambars, but they bring their own flavour instead of imitating tamarind spoon for spoon. Treat them as a different direction for the dish, not an exact conversion.

No sambar powder? A simple emergency blend for this four-serving sambar recipe is about 2 teaspoons ground coriander, ½ teaspoon ground cumin, ¼–½ teaspoon chilli powder and a very small pinch of ground fenugreek. It moves the broth in the right direction; it does not reproduce a full roasted sambar podi. For the fuller version, use the homemade sambar powder recipe. Fresh-ground arachuvitta sambar follows another route entirely.

Curry leaves and hing shape the top notes of the finished sambar. Missing either changes the smell, but extra chilli or masala will not replace them. A simple version with few substantial vegetables also works; start with less water because the vegetables would normally contribute moisture of their own.

Why Sambar Recipes Can Look Completely Different

One recipe contains coconut. Another has no onion. One is noticeably sweet; another uses no jaggery. A third does not use packaged powder at all. Regional sambar styles vary across South India in sweetness, tang, vegetables, spice blends and serving context.

These labels point towards recipe families, not rigid formulas.

  • Everyday or rice sambar: broadly the family this recipe belongs to—dal, vegetables, tamarind and a familiar sambar-spice base.
  • Idli or tiffin sambar: usually more flowing and sometimes built with different dal, vegetables or fresh masala.
  • Arachuvitta sambar: uses freshly roasted and ground spices, often with coconut.
  • Udupi sambars: often use freshly ground spice-and-coconut mixtures; sweetness varies by recipe.
  • Kerala sambars: some styles, including varutharacha preparations, use roasted coconut and a different spice structure.
  • Sambar sadam: cooks rice and the sambar base together into a distinct one-pot dish.

Vegetable-led branches go further from there, including vengaya sambar built around small onions and mullangi sambar with radish. Authenticity makes more sense when it is attached to a place, household or particular style.

Fix My Sambar

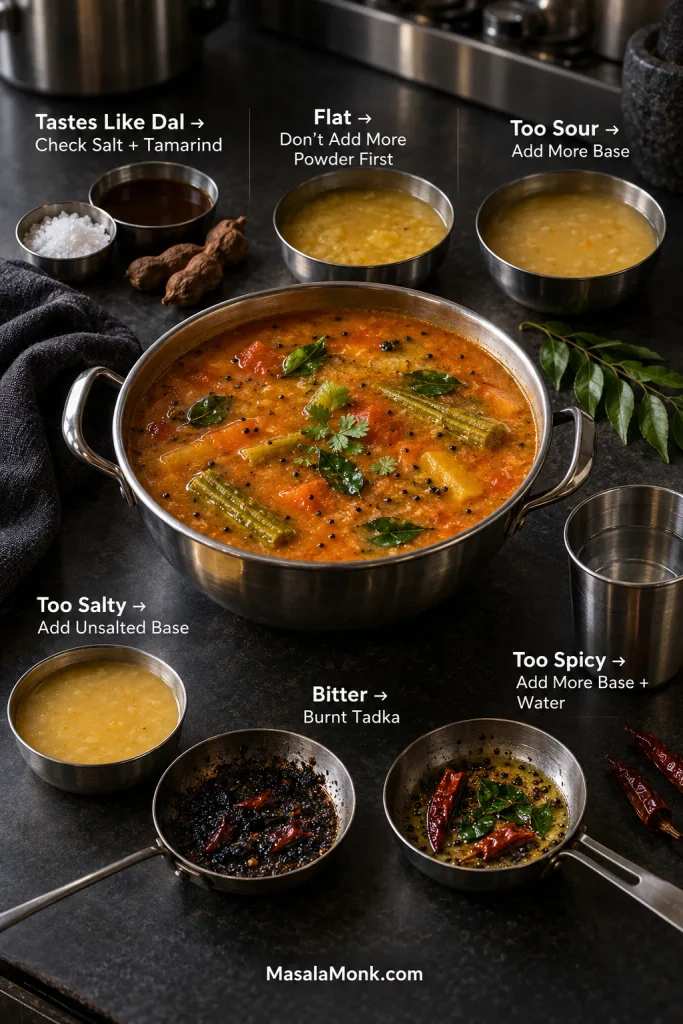
Tastes like plain dal? Check salt and tamarind. Hot but flat? Stop adding powder. Watery? Reduce it or add mashed dal. Bitter? Suspect the tadka.

Change one thing at a time. Throwing salt, tamarind, powder and water into the pan together only hides which adjustment actually worked.

Flavour Problems

Sambar flavour troubleshooting visual showing fixes for sambar that tastes like plain dal, tastes flat, is too sour, too salty, too spicy or bitter from burnt tadka.
Flavour problems are easier to fix when you separate heat from seasoning. A sambar can be very spicy and still need salt, acidity or concentration, so adding more sambar powder may intensify the wrong thing.
ProblemLikely causeWhat to do
Tastes like dal, not sambarWeak sourness, too little salt or the sambar has not simmered together long enoughCheck salt and tamarind, then give it a brief simmer before changing anything else
Bland or flatToo much water, too little salt, stale powder or weak tadkaCorrect the salt first; reduce an over-diluted sambar; refresh the tadka when its fragrance is weak
Very hot but flavourlessChilli-heavy powder is bringing heat without much flavourLeave the powder alone and check tamarind, salt, concentration and tadka
Too sourToo much tamarind or a particularly strong productAdd unsoured cooked dal or sambar base, then rebalance the seasoning
Too saltyToo much salt or too much reductionAdd unsalted cooked dal/base and a little hot water. Sugar or extra tamarind will not remove excess salt
Too sweetToo much jaggeryAdd unsweetened base and cautiously restore sourness and spice
Too spicyStrong powder, extra chilli or bothAdd more dal/base and a little hot water, then taste again
BitterBurnt fenugreek, chilli or tadkaDiscard burnt tempering before it reaches the sambar; severe burnt bitterness is difficult to hide
Raw tamarind tasteTamarind has not simmered enoughGive it a few more gentle minutes until the sharp raw smell fades
Dusty spice tasteSambar powder needs more cooking or has gone staleSimmer a little longer; replace very dull old powder next time

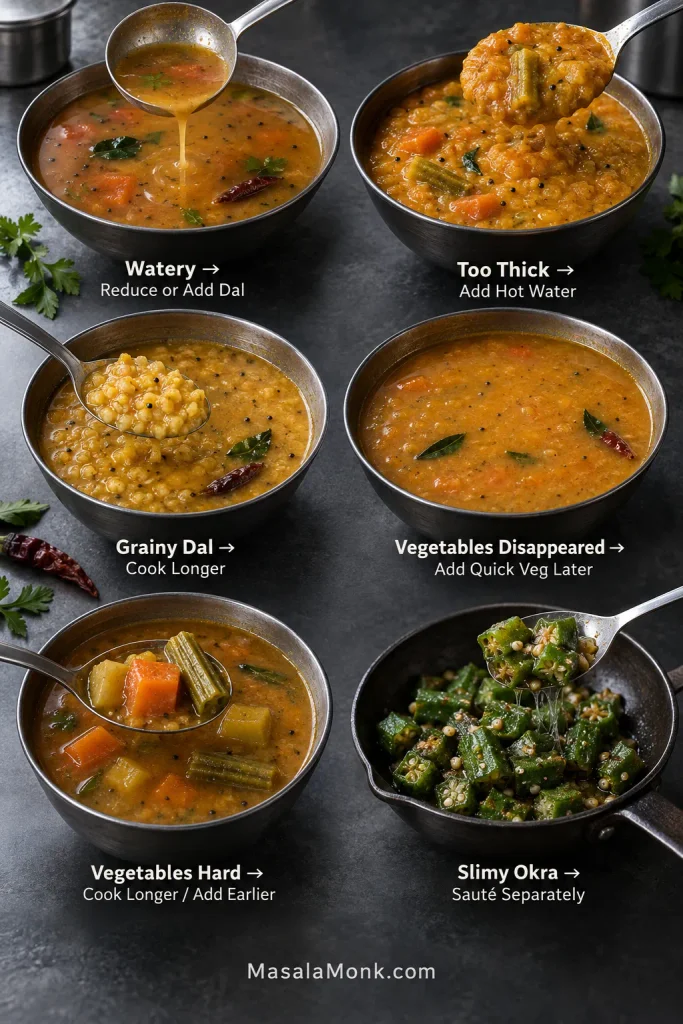
Texture and Cooking Problems

Sambar texture troubleshooting guide showing watery sambar, overly thick sambar, grainy dal, vegetables cooked until they disappear, vegetables left too firm and slimy okra.
Some texture mistakes are reversible and others are not. Thick sambar can be loosened easily; however, collapsed vegetables cannot regain their shape, which is why vegetable timing matters more than chasing an exact number of minutes.
ProblemLikely causeWhat to do
WateryToo much liquid or too little mashed dalSimmer uncovered or add more cooked dal
Too thickHigh dal concentration or normal thickening as it coolsAdd hot water in 60 ml (¼ cup) increments
Dal stays grainyOlder lentils or insufficient cookingCook longer; soaking can help older dal
Vegetables disappearFirm and quick-cooking vegetables spent the same amount of time in the panAdd pumpkin and eggplant later next time
Vegetables stay hardPieces are too large, firm vegetables started late or tamarind went in too soonKeep simmering; start the firm vegetables earlier next time
Okra is very slimyToo much mucilage entered the brothSauté the okra separately before adding it
Tadka smells weakOil was not hot enough, spices were stale or the tempering sat too longMake a small fresh tadka and pour it over hot sambar

Don’t chase the colour either. Tamarind, chilli, vegetables and sambar powder all shift the final shade. If the sambar tastes balanced, don’t fix it just because another photograph looks redder or darker.

Storing, Reheating and Freezing Sambar

Sambar thickens in the refrigerator as the dal keeps absorbing liquid. The flavours often settle nicely overnight too.

Cool leftovers promptly and refrigerate them in a covered container. The USDA leftovers guidance recommends using refrigerated leftovers within 3–4 days.

How to Reheat Sambar for Idli or Rice

A little hot water brings cold, thickened sambar back quickly. Taste after loosening it because the water softens the salt and tang too. A small fresh tadka can make yesterday’s sambar smell newly made again.

Fresh mustard seed, curry leaf and dried chilli tadka being poured into reheated sambar in a steel pot, with white idlis waiting beside it.
For leftovers, reheat only as much sambar as you need when possible. Gentle reheating protects already-soft vegetables, while a small fresh tadka restores aromas that fade during chilling and reheating.

Freeze finished sambar in meal-sized portions for roughly 2–3 months for best quality. Thaw overnight in the refrigerator when practical. Eggplant and other tender vegetables become softer after freezing. Freeze the cooked dal on its own when you’d rather add fresh vegetables to a future sambar.

Dietary and Ingredient Notes

  • Vegan: use oil instead of ghee for the tadka.
  • Gluten-free: the basic dish can be gluten-free, but check packaged sambar powder and commercial hing when strict avoidance matters. Some compounded asafoetida products contain wheat flour or another carrier.
  • No onion or garlic: entirely possible; many household, temple and regional versions omit one or both. This no-onion, no-garlic peanut chutney also works well beside idli and dosa.

Back to recipe · Back to top


Your vegetables will change, one packet of sambar powder will be hotter than another, and one block of tamarind will be sharper than the next. That’s normal.

Keep the sambar a little fuller and spoon it over hot rice tonight. Loosen the leftovers tomorrow morning and let them soak into soft idli.

Posted on — Leave a comment

Korean Corn Dog Recipe: Crispy, Cheesy Korean Hot Dogs

Golden panko-coated Korean corn dog on a wooden skewer with ketchup and mustard, beside a cut corn dog with sausage, melted mozzarella and a crisp breadcrumb shell.

A good Korean corn dog recipe is really about that first bite: crisp, craggy panko; a soft, slightly chewy layer underneath; then hot mozzarella stretching away from the skewer while ketchup and mustard cut through the richness.

Korean corn dogs look wonderfully simple when someone else is making them. At home, trouble tends to start somewhere less glamorous: condensation beads on the cheese, sticky dough slides down the skewer, the coating gets much thicker than expected, or the mozzarella finds a way into the frying oil.

Most of those problems are easier to fix before the next skewer goes in. Dry damp cheese, adjust dough that has gone too loose, and give cooled oil another minute instead of carrying the same problem through the whole batch. This recipe uses a lightly sweet yeasted dough, low-moisture mozzarella, fully cooked hot dogs and panko to get you there.

Make It Now: Korean Corn Dogs

Recipe at a Glance

Makes6 large corn dogs
Active prep25–30 minutes
Rise45–60 minutes, or until doubled and bubbly
Fry3–5 minutes per corn dog; about 20–30 minutes for the batch
Total elapsedAbout 1 hour 30 minutes to 1 hour 45 minutes
Oil350°F / 175°C

Some skewer prep happens while the dough rises, so the prep and rise times overlap.

Three Things Before You Start

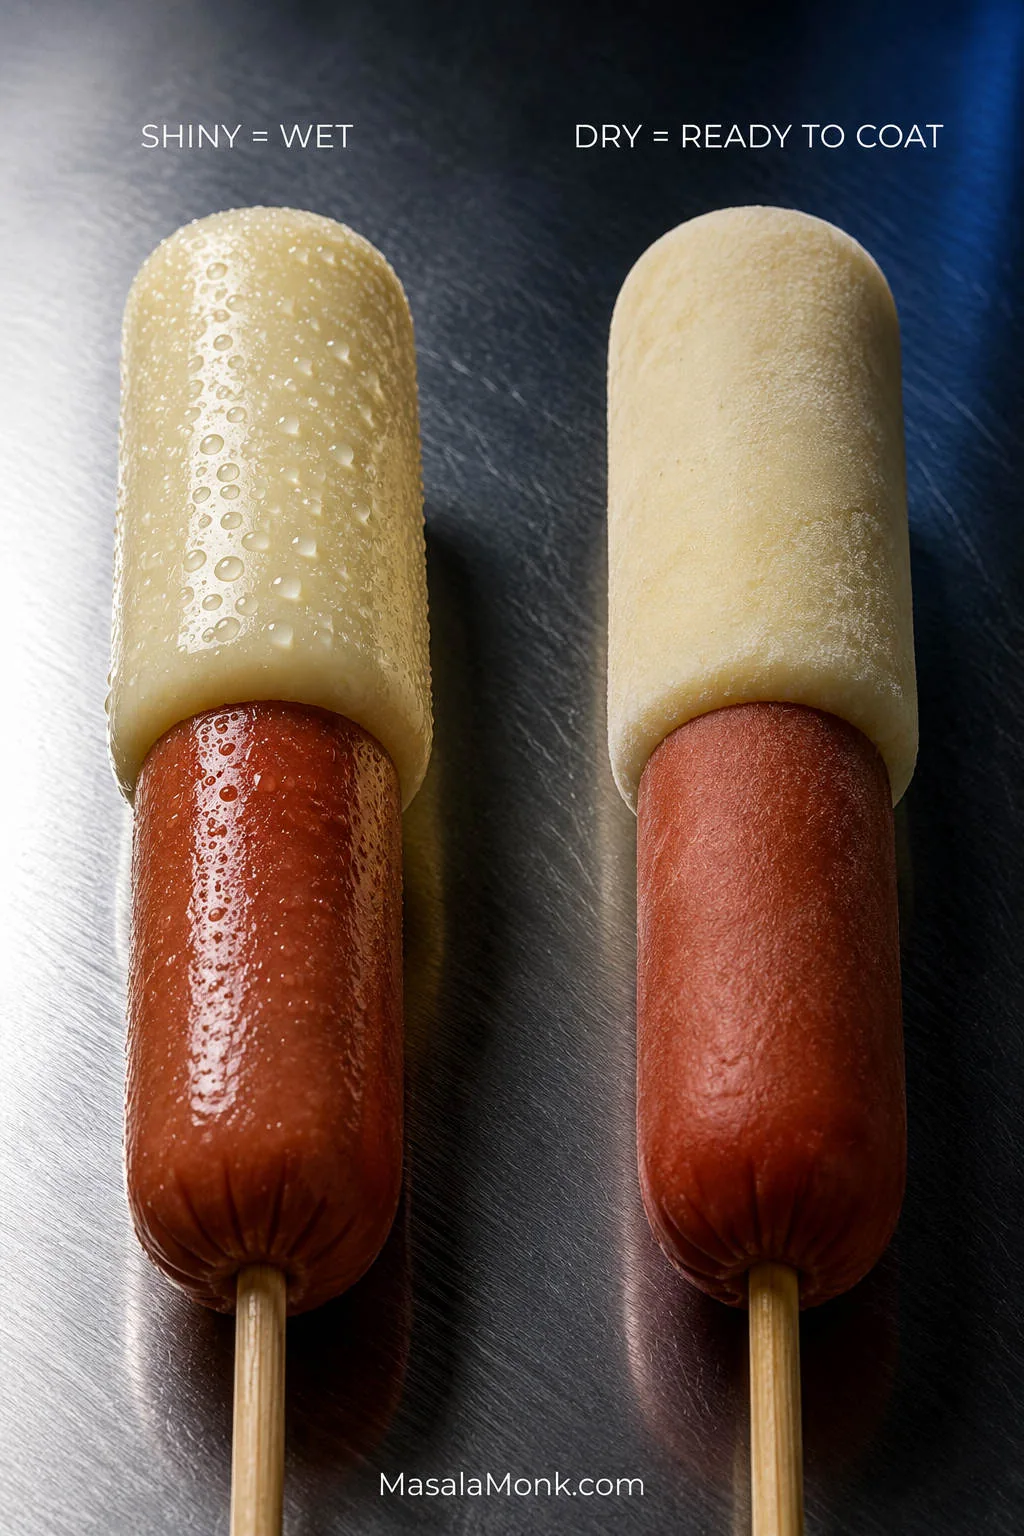
  • Keep the filling cold and dry. Condensation makes sticky dough much harder to keep in place.
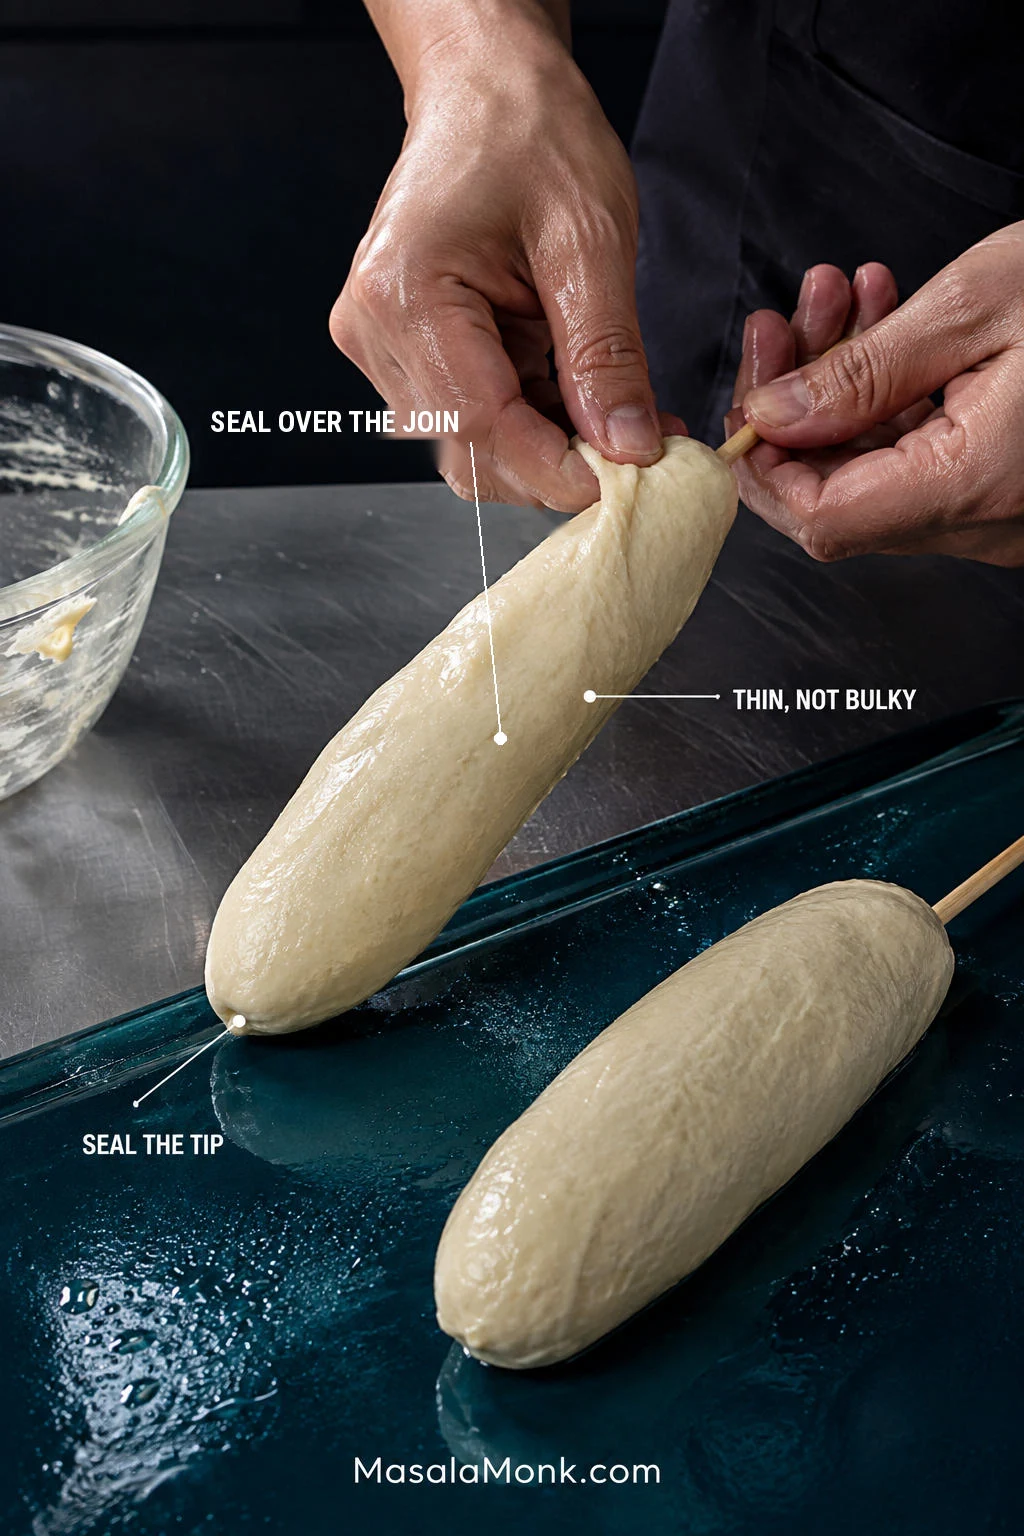
  • Keep the dough layer thin. It needs to cling and stretch now because it will puff in the oil.
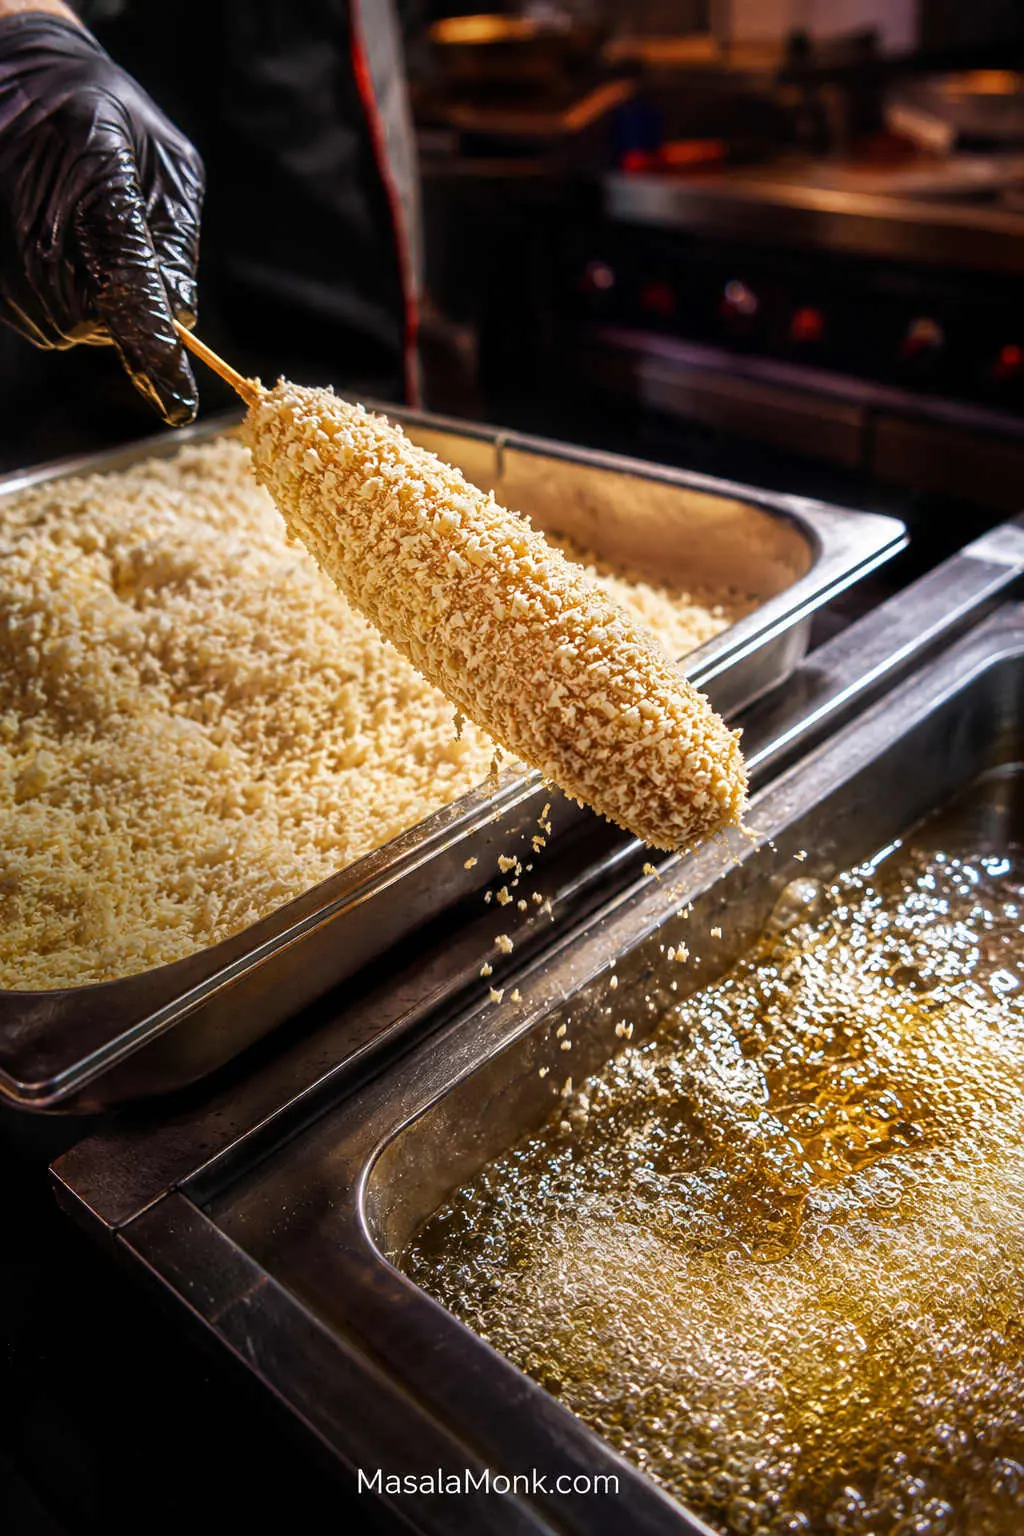
  • Coat and fry one at a time at first. Once the panko is on, get that skewer into the oil.

Get those three things right and the rough panko shell crackles over soft, chewy dough. More importantly, there is still plenty of sausage or cheese inside—not a giant piece of fried bread with the filling lost somewhere in the middle.

Pick Your Filling

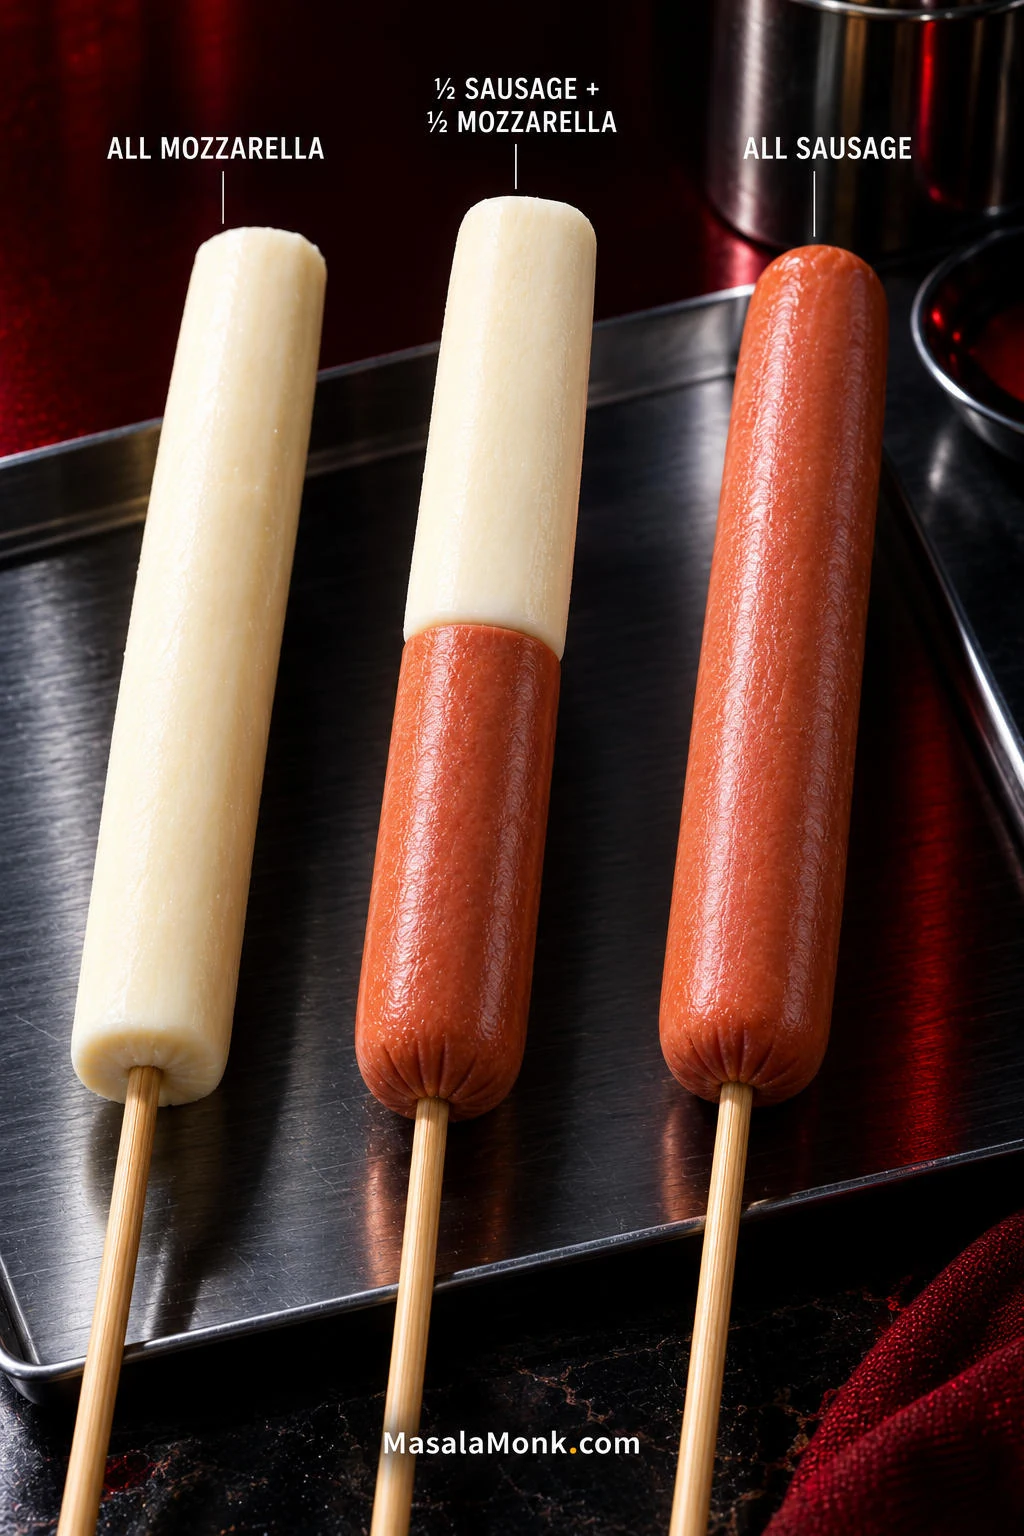
For a first batch, put half a hot dog and one mozzarella baton on each skewer, end to end. You get the signature cheese pull without making the entire filling as leak-prone as an all-cheese corn dog. For 6 corn dogs, that means 3 fully cooked hot dogs, halved, plus 170–180 g / 6–6½ oz mozzarella.

Three uncooked Korean corn dog skewers showing all mozzarella, half sausage and half mozzarella, and all sausage filling options on a metal tray.
Arrange the hot dog and mozzarella end to end on the skewer, keeping both centered so the filling stays balanced while you wrap it in sticky dough. A centered skewer is also easier to rotate evenly during coating.
  • All mozzarella: use 330–360 g / 12–13 oz. Cut 6 longer batons about the same overall length and thickness as the standard sausage-and-cheese filling.
  • All sausage: use 6 fully cooked hot dogs. This is the easiest filling to fry and the least likely to leak.
  • Mozzarella + cheddar: keep mozzarella as the main cheese and add a smaller amount of firm cheddar when stronger cheese flavor matters more than the longest possible pull.

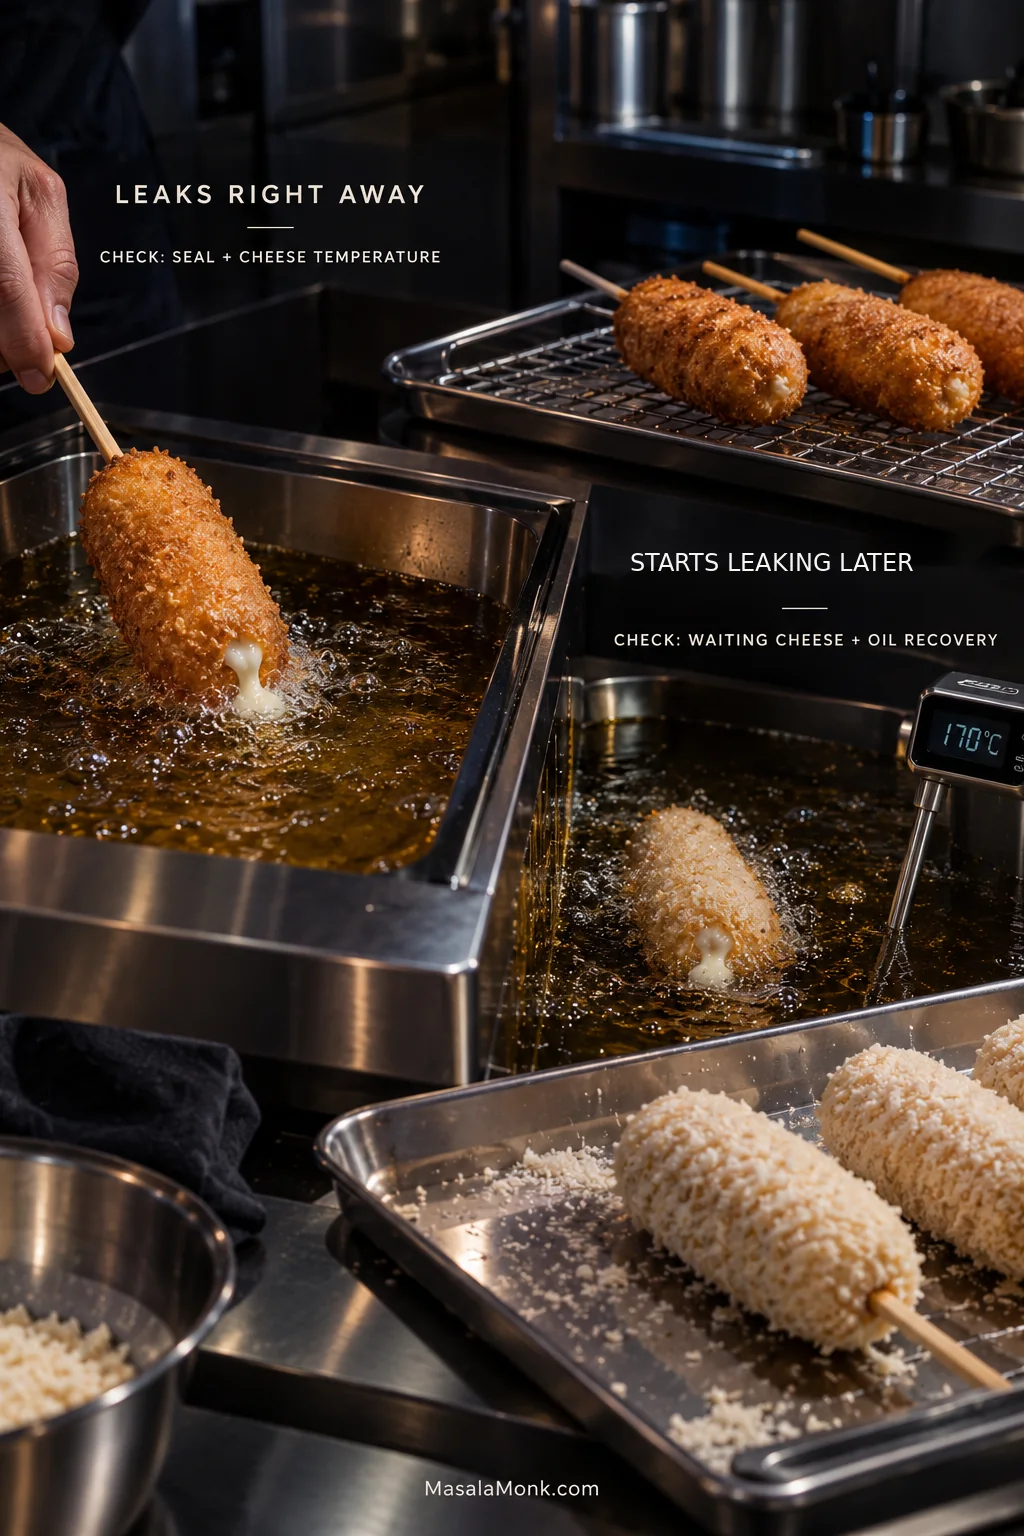
Going all-in on cheese? See what a cheese leak can tell you before you fry the rest of the batch.

Ingredients

Sticky Yeast Dough

  • 220 g (7¾ oz / 1¾ cups + 1 tablespoon) all-purpose flour, plus a little more only if needed
  • 225 ml (scant 1 cup) warm water, 100–110°F / 38–43°C
  • 25 g (2 tablespoons) granulated sugar
  • 5 g instant yeast
  • 4 g fine salt

Filling

  • 3 fully cooked hot dogs, cut in half crosswise
  • 170–180 g (6–6½ oz) firm low-moisture mozzarella, cut into 6 sturdy batons 2–2½ inches / 5–6 cm long

Look for a firm block labeled low-moisture mozzarella; in some shops it is sold as pizza mozzarella. Whole-milk mozzarella gives especially good flavor and stretch, but low moisture matters more than the exact label. Fresh mozzarella packed in water or brine is much harder to keep inside the crust.

Mozzarella string cheese is a handy fallback, though its thinner shape gives you a smaller cheese center.

Coating and Frying

  • 30 g (¼ cup) all-purpose flour, for dusting
  • 120–140 g panko, enough for a generous shallow tray
  • Neutral frying oil such as canola, vegetable or rice-bran oil, enough for 3 inches / 7–8 cm depth
  • Granulated sugar, optional
  • Ketchup and yellow mustard, for serving

Panko’s larger flakes give the shell its rough, brittle crunch. Regular breadcrumbs can substitute, but the crust will be finer and less craggy.

Useful equipment: a kitchen scale, deep-fry thermometer, heavy deep pot, 6 sturdy wooden chopsticks or thick bamboo skewers, a shallow dish for the dough and a wire rack. Before adding oil, check that the coated part of a full skewer can lie comfortably inside the pot.

1. Mix a Sticky, Stretchy Dough

Stir together the flour, sugar, instant yeast and salt. Add the warm water and mix firmly until no dry flour remains.

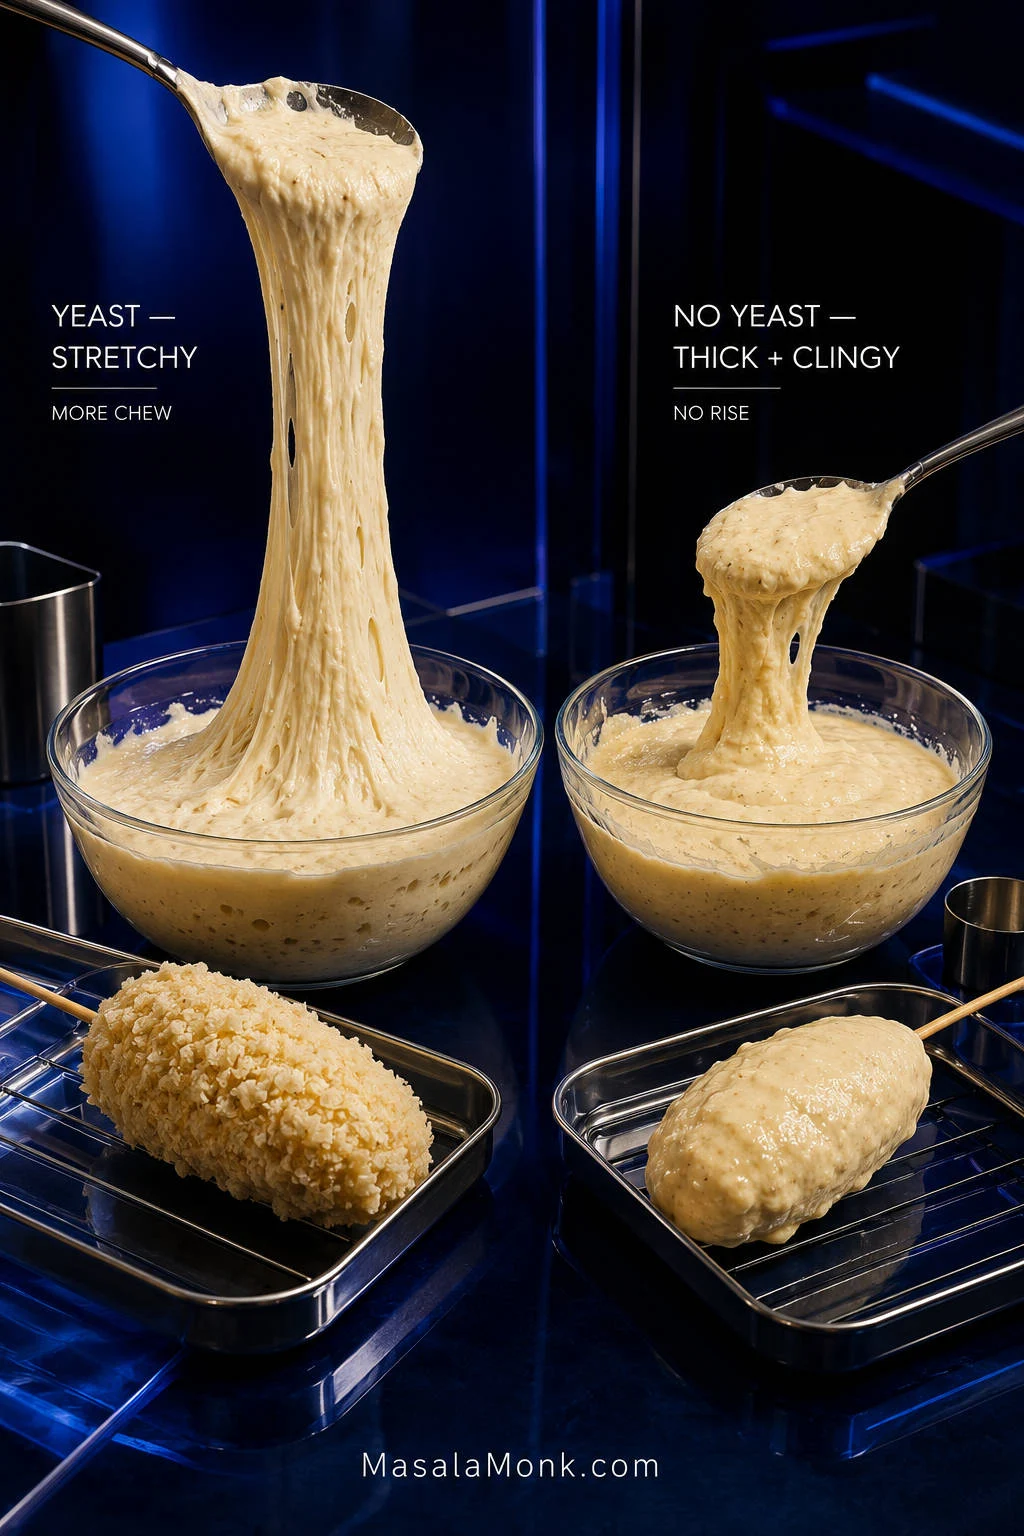
Instant yeast does not need to sit in the water waiting to foam. What you want now is very wet bread dough: sticky, stretchy and slightly unruly.

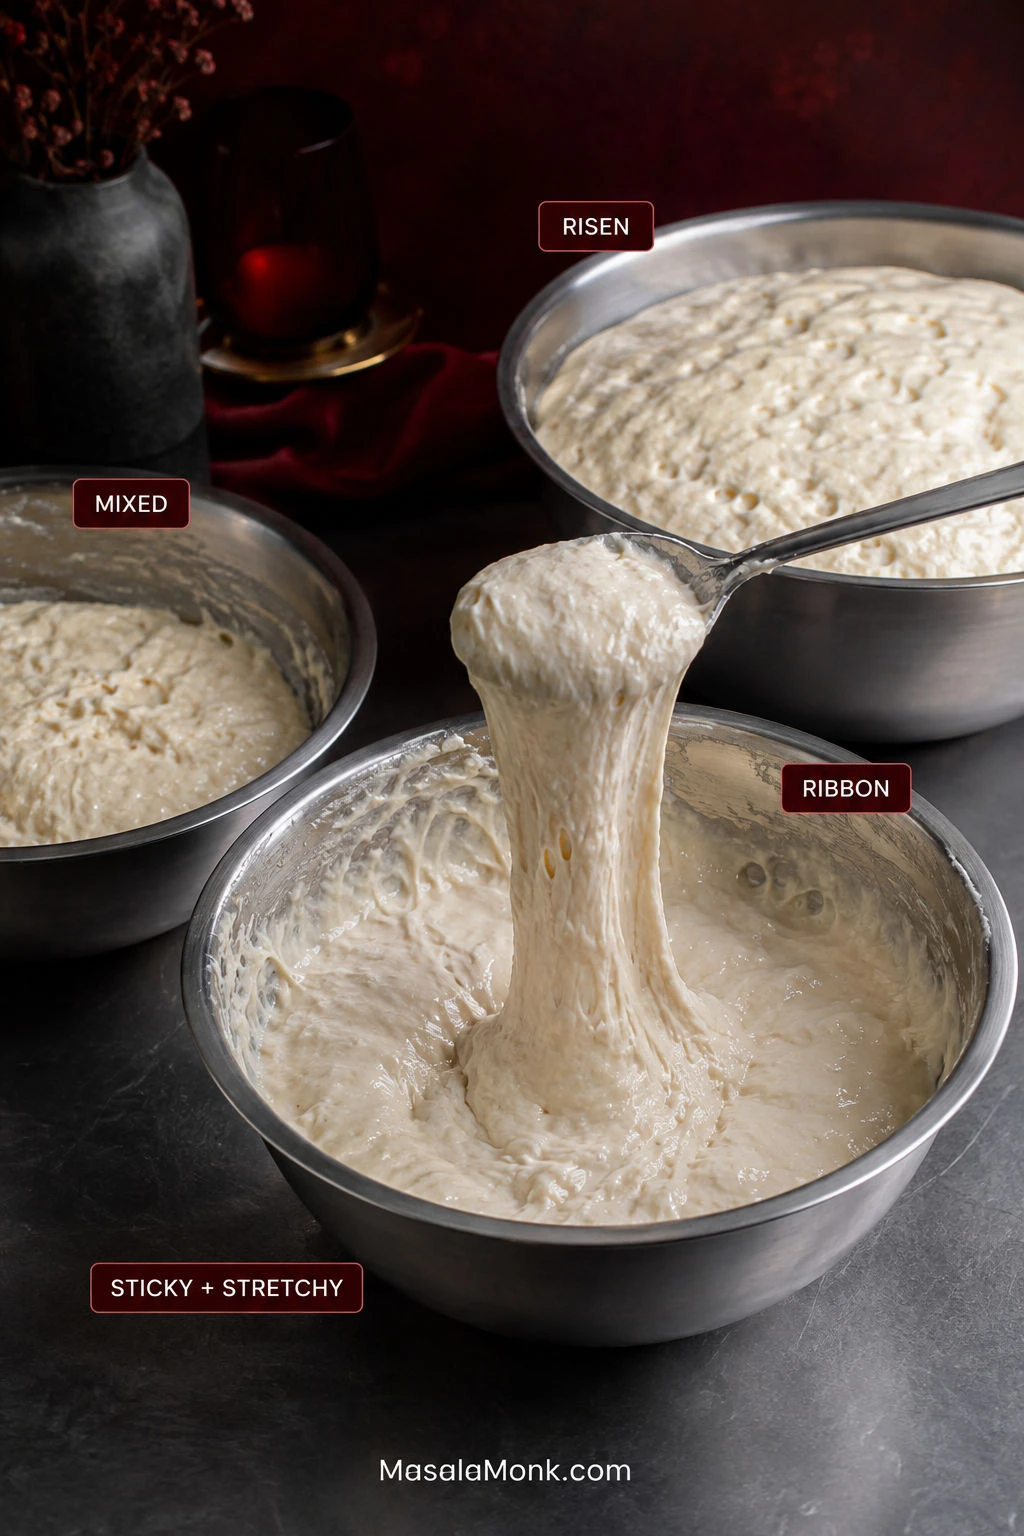
Lift some with a spoon. It should pull into a sticky ribbon and cling to itself.

  • Flowing instead of stretching? Add flour 1 tablespoon / 8 g at a time.
  • Tearing instead of stretching? Add water 1 teaspoon / 5 ml at a time.

Humidity changes how this dough feels. Let the cling and stretch guide you; it does not have to look identical from one kitchen to the next.

2. Let It Rise Until Puffy

Cover the bowl and leave it for 45–60 minutes, until the dough has doubled and looks visibly bubbly and aerated.

Watch the dough more closely than the clock. A cool room can take longer. Active dry yeast can replace instant yeast in the same weight; give it whatever extra time it needs to reach the same puffy stage.

Three metal bowls showing Korean corn dog yeast dough freshly mixed, stretching in a thick ribbon, and risen with visible bubbles.
The dough starts very sticky, stretches into a ribbon, then becomes visibly bubbly and aerated after rising. Use the ribbon stage as your consistency checkpoint before proofing: it should stretch rather than simply pour.

3. Build and Chill the Skewers

While the dough rises, thread half a hot dog onto each skewer, followed by one mozzarella baton so the cheese sits toward the eating end.

Keep the sausage and mozzarella fairly similar in thickness. A skinny strip of cheese melts much faster than a substantial baton.

If firm mozzarella cracks when you push in the wooden skewer, make a narrow pilot hole with a thin metal skewer first. Thin, smooth barbecue skewers can also spin inside the sausage while you try to coat it; a wooden chopstick or broader bamboo skewer gives you much better control.

Keep the assembled skewers refrigerated until the dough is ready. In a hot kitchen, or with all-cheese corn dogs, a 10-minute freezer chill immediately before coating can help. The cheese needs to be very cold, not frozen solid.

4. Heat the Oil and Set Up the Coating Line

Pour 3 inches / 7–8 cm of oil into a heavy pot, leaving plenty of empty space above it. Heat to 350°F / 175°C.

Keep water away from the pot and never leave heating oil unattended. If deep frying is unfamiliar, the USDA deep-fat frying safety guidance is worth reading before you start.

Set everything up in this order: cold skewers → flour → dough → panko → oil → wire rack.

5. Dry, Flour and Wrap One Skewer

Take one cold skewer from the refrigerator and look at it before it touches the dough. A shiny surface means condensation.

Blot the cheese and sausage dry, dust with just enough flour to remove the shine, then tap off anything loose.

Two sausage-and-mozzarella skewers side by side, one shiny with visible condensation and the other dry and matte before coating.
Before changing an entire bowl of Korean corn dog batter, test one properly dried skewer. If that one coats cleanly, moisture—not the dough—was the problem. It is a useful way to avoid “fixing” a batter that was already working.

Now comes the messy bit. Lay the skewer in the dough and rotate it while pulling and stretching the dough around the filling. Your fingers may get sticky and the first wrap may look uneven. Keep turning, patch thin spots and smooth them with slightly damp fingertips.

Think thin shell—roughly ⅛ inch / 3 mm as a visual guide, not a thick blanket of dough. Seal the cheese tip and the join between cheese and sausage particularly well.

Hands wrapping sticky dough around a sausage-and-mozzarella skewer, showing a thin coating with the tip and filling join fully covered.
Use the silhouette as a final check before adding panko. The coated skewer should still resemble the filling underneath rather than developing thick shoulders around the mozzarella tip or sausage-cheese join; smooth excess away while every part of the cheese remains enclosed.

If the corn dog already looks enormous, take some dough off.

6. Press On the Panko

Set the dough-covered skewer in the panko and press the crumbs over the entire surface. Look for complete coverage, especially around the cheese tip—no shiny patches of sticky dough peeking through.

Once the panko is on, fry it straight away.

Coat one → panko one → fry one.

Panko-coated Korean corn dog lifted from breadcrumbs beside a pot of bubbling frying oil, ready to fry.
Panko coverage doubles as a last leak check. Pay particular attention to any shiny dough near the mozzarella tip or join: if a bare patch is easy to see now, it is also one of the first places worth inspecting if cheese escapes during frying.

7. Fry the First One and Calibrate the Batch

Lower the first corn dog gently into the oil away from you. Fry at 350°F / 175°C for 3–5 minutes, turning as needed.

Look for steady bubbles around the shell. Violent, racing bubbles mean things are moving too fast. Weak bubbling and a pale coating tell you the oil has cooled.

The clock gives you a window. Browning tells you what the oil is actually doing.

  • Dark brown in only 2 minutes: check both the oil temperature and whether the dough layer is too thick.
  • Pale and increasingly oily: let the oil recover before continuing.
  • Deep golden in 3–5 minutes: that’s what you’re looking for.
Three fried Korean corn dogs with pale blond, deep golden, and dark brown panko crusts for comparison.
Good frying is about the speed of browning as well as the final color. If one side darkens while another stays pale, think turning and oil contact; if the entire Korean corn dog races toward brown, check the heat before coating the next one.

Let the First One Teach You Something

The first corn dog is allowed to be wonky.

Fry it anyway.

While it cools, keep an eye on the thermometer and adjust the burner as needed to hold the oil around 350°F / 175°C. Do not leave the hot oil unattended while you inspect the first corn dog.

If it browned at a normal pace, stayed intact and still looks reasonably thin around the filling, there is no need to cut it just for the sake of checking. Keep going.

If it browned strangely, leaked, or looks thicker than you expected, let it cool enough to handle and cut it open. Under the panko, you’re looking for soft, bread-like dough rather than a wet or pasty layer. The filling should still look substantial, surrounded by a relatively thin band of dough.

A cheese leak shows you where the next skewer needs a better seal. Heavy bread around the filling means less dough next time. Fast browning means checking both the oil temperature and the thickness of the coating before the next one goes in.

Three Korean corn dog cross-sections showing a thin cooked dough layer, an overly thick bread layer, and a browned crust with wet dough inside.
If the first Korean corn dog needs investigating, cut through the middle third rather than judging it at the sealed tip. The center gives you a fairer look at how much cooked dough actually surrounds the filling—and therefore a better guide for the remaining batch.

Once the first one is right, you can fry two at a time if the pot is roomy and you can get both coated and into the oil promptly. Otherwise, keep working one at a time. Skim dark panko and dough fragments from the oil between batches.

8. Finish With Sugar and Sauce

Let each corn dog drain briefly on a wire rack, then dust or lightly roll the hot shell in granulated sugar if you want the sweet-savory shop-style finish.

A little sugar lands first, then the salty sausage and molten cheese take over; sharp yellow mustard keeps the whole thing from feeling too rich. Ketchup and mustard are hard to beat, but the sugar can stay off entirely if savory is more your thing.

Add the toppings while the shell is hot, then let the center cool just enough to bite safely. Molten mozzarella can stay much hotter than the crust around it.

Serving Six at Once

The best corn dog is the one that just left the fryer. If people are already hovering near the stove, hand them out as they come. That’s when the panko is crispest, the little crust shards break away at the first bite and the cheese still pulls.

If they need to wait, keep them uncovered on a wire rack in a 200°F / 95°C oven for 5–10 minutes. Stacking or covering them traps steam and softens the crust.

Several freshly fried Korean corn dogs on a wire rack, some drizzled with ketchup and mustard, while hands reach toward the batch.
Hold first, sauce last. Korean corn dogs waiting briefly on a rack keep their panko crisper when they remain unsauced; add ketchup, mustard or creamy toppings only as each one is about to be eaten rather than dressing the entire batch in advance.

Once the classic batch is finished, the other options become much easier to play with: try the no-yeast version, potato corn dogs, or one of the crunchier coatings below.


Korean Corn Dog Batter and Cheese

Why the “Batter” Behaves Like Dough

The word batter is a little misleading here. This yeasted coating behaves more like very wet bread dough: it stretches around the skewer instead of pouring over it.

That is why the method focuses on cling and stretch rather than a perfectly smooth consistency. The corrections in Step 1 are simply there to bring the dough back to that behavior.

Some Korean hotdog recipes include rice flour or glutinous rice flour alongside wheat flour; plenty do not. This all-purpose-flour dough gives you a soft, chewy layer without requiring either one.

Can You Make Korean Corn Dogs Without Yeast?

Yes. You lose some of the yeasted chew, but you also lose the hour-long wait.

Use this batter in place of the yeast dough. Keep the same cold skewers, light flour dusting, panko coating and frying setup.

For 6 corn dogs, mix:

  • 160 g (1⅓ cups) all-purpose flour
  • 18 g (1½ tablespoons) sugar
  • 8 g (2 teaspoons) baking powder
  • 3 g fine salt
  • 1 large cold egg
  • 100–120 ml cold milk, starting with 100 ml

Whisk the dry ingredients, then add the egg and 100 ml milk. Add more milk only until the batter is thick enough to cling to a cold, lightly floured skewer instead of running off it.

If it softens while you work in a warm kitchen, chill it briefly. There is no proofing step. Fry at 350°F / 175°C until the coating is browned and set, with a bread-like interior rather than a wet or pasty layer.

Two bowls comparing stretchy bubbly yeast dough and a thicker smooth no-yeast batter for Korean corn dogs.
Don’t force the quick batter to imitate the yeast dough. No-yeast Korean corn dogs begin with a thicker, colder coating, while the yeasted version relies more on stretch; what matters is that each formula stays evenly attached to a cold skewer in its own way.

Prefer the classic yeasted version? Go back to the main Korean corn dog method.

Choosing Cheese for Stretch or Flavor

Mozzarella gives you the longest pull. Keep it as the main cheese when stretch matters most.

For stronger cheese flavor, add a smaller piece of firm cheddar alongside it. The center tastes richer, but the pull becomes a little shorter.

What Makes a Korean Corn Dog Different?

Korean hotdogs differ most clearly from American corn dogs in their coating, fillings and finish.

Korean corn dogAmerican corn dog
CoatingWheat- or rice-based, often with pankoUsually cornmeal-based batter
FillingSausage, mozzarella or both; other fillings existUsually a hot dog
CrunchPanko, potato and other coatingsUsually comes from the fried batter itself
FinishOften sugar plus savory saucesUsually savory condiments

In Korea, these battered snacks on sticks are commonly called hotdogs (핫도그). Gamja (감자) means potato, so gamja-hotdog refers to the potato-coated style. Maangchi’s gamja-hotdog recipe is a useful Korean reference for both the terminology and the potato variation.

Korean Potato Corn Dogs (Gamja Hotdogs)

Golden Korean potato corn dog on a wooden skewer covered with small crisp potato cubes and panko against a dark restaurant-style background.
Gamja changes more than the appearance of the corn dog. Once fresh potato becomes part of the coating, the vegetable needs time to soften before the outside goes too far—which is why a Korean potato corn dog benefits from gentler frying than the plain panko version.

Prep the Potato

To make 3 of the 6 corn dogs potato-coated, use 250 g / 9 oz peeled potato and 1–2 tablespoons flour or cornstarch, plus panko. Double the potato if you want all six coated this way.

Cut the potato into ¼-inch / 6-mm cubes. Big chunks are harder to attach, slower to soften and awkward to bite once fried.

Rinse the cubes, blanch for 2–3 minutes, then drain and dry them very well. The edges are just beginning to soften, but the cubes still hold their shape. Toss with a light dusting of flour or cornstarch.

Small diced potato cubes beside a ruler, blanched potatoes drying on paper, lightly dusted cubes, and hands pressing them onto a dough-covered skewer.
After blanching, spread the potato cubes out instead of leaving them in a steaming pile. Trapped moisture can wet their surfaces again; letting that steam escape gives the small cubes a drier exterior before they are pressed onto the dough.

Coat and Fry

Wrap the skewer with dough, press the potato cubes firmly into the surface, then fill exposed sticky gaps with panko.

Once the little cubes cover the whole skewer, a couple of playful Korean nicknames Maangchi records—roughly “ugly hotdog” and “goblin’s club hotdog”—suddenly make sense.

A few cubes may fall into the oil. Skim them out and press the next coating more firmly.

For fresh potato, lower the oil to 330–340°F / 165–170°C and begin checking near 5 minutes. Many take 5–7 minutes.

The best bite has crisp potato corners and panko ridges outside, then tender potato, soft dough and hot filling underneath. With cheese-heavy corn dogs, take them out as soon as the potato and dough are done; extra frying rarely does molten mozzarella any favors.

Frozen French Fry Shortcut

Chop frozen French fries into small pieces and press them into the dough straight from frozen. Because the fries are already partially cooked, skip the blanch and use the regular 350°F / 175°C frying temperature. Cook until the dough is set and the outside is crisp.

Back to the main method or see more coatings and toppings.

Coatings, Sauces and Other Variations

Flamin’ Hot Cheetos Coating

For a modern shop-style variation, Flamin’ Hot Cheetos make the coating loud on purpose: bright red, salty and spicy.

Keep enough panko in the mixture to build a complete shell, then add finely crushed Cheetos until the color and seasoning are where you want them. For the brightest red finish, you can fry in panko first, then press fine Cheeto crumbs onto the hot finished crust while there is still enough surface oil for them to cling.

If the red crumbs go into the fryer, watch the crust itself instead of waiting for ordinary golden-brown color; the seasoning makes color a poor doneness guide.

Korean corn dog coated in irregular red-orange crushed spicy corn snack crumbs on a glossy black surface against a deep red background.
In a Flamin’ Hot Cheetos Korean corn dog, let the two crumbs do different jobs: panko helps build a complete shell, while the crushed snack brings the intense red color, salt and chile flavor. That balance works better than asking Cheetos alone to provide all the structure.

Ramen and Crispy Rice Coatings

Crushed uncooked ramen gives the outside a jagged, extra-crunchy shell. Break it fairly small so the pieces can press into the sticky dough. Crispy or puffed rice makes a lighter coating; press it on firmly and use some panko to cover any bare sticky patches.

Two Korean corn dogs side by side, one coated with jagged crushed dry ramen pieces and the other with pale puffed crispy rice.
Choose by how much you want the coating to dominate the bite. Crushed ramen gives a Korean corn dog a more aggressive, jagged crunch, whereas crispy rice is lighter and lets the dough and filling stay more prominent underneath.

More Sauces and Toppings

For something creamy, try spicy mayo or gochujang mayo. Sweet chili sauce gives you a sweeter, tangier option without hiding the fried crust.

Our homemade mayonnaise guide includes spicy mayo and gochujang-mayo options if you want to make those yourself.

Something not behaving? Jump to the troubleshooting guide for coating, frying and cheese problems.

When Something Goes Wrong

Start with the moment the problem appeared. That often tells you more than the problem itself.

ProblemWhat to Check or Do
Dough slides offTouch the filling first. If it is shiny or damp, blot it dry and dust lightly with flour. Only then adjust the dough if it still will not cling.
Cheese leaks immediatelyChill the filling well and look for an exposed patch around the cheese tip or join.
Later corn dogs start leakingKeep waiting skewers cold and let the oil return to frying temperature.
Corn dog becomes mostly breadUse less raw dough on the next skewer.
Dark outside, gummy insideVery fast browning points to excessive heat; normal browning with a pasty center points more toward too much dough.
Pale and greasyLet the oil recover before continuing.
Potato falls offDry the cubes thoroughly, dust lightly and press them firmly into the dough.
Potato stays hardCut smaller cubes and give them the brief blanch before coating.
Skewer spins inside the sausageSwitch to a wooden chopstick or broader bamboo skewer.
Black flecks appear on later batchesSkim burnt crumbs from the oil between batches.
Weak cheese pullUse a substantial mozzarella baton and serve while the center is still hot.

Why Did the Cheese Start Leaking Later?

An immediate leak and one halfway through the batch tell different stories. Cheese escaping almost at once points toward warmth or a hole in the coating. If the first few work and later corn dogs begin leaking, something changed while you were frying: the waiting cheese may have warmed, or the oil may need another minute to recover.

Two frying scenes showing mozzarella leaking from a Korean corn dog immediately and after later batches, with finished corn dogs, waiting skewers, and an oil thermometer nearby.
One leak is a skewer clue; several later leaks are a batch clue. An isolated failure sends you back to that corn dog’s seal and filling, whereas repeated problems after earlier successes suggest something in the working conditions has changed.

Back to the main method · Skip to storage and reheating · Back to top

Make Ahead, Air Fry, Freeze and Reheat

You can assemble the sausage-and-cheese skewers earlier the same day, cover them and keep them refrigerated. Make the dough on frying day too; this dough is built for a short same-day rise rather than an overnight rest. Keep dough, panko and filling separate until close to frying time.

Can You Air Fry Homemade Korean Corn Dogs?

For this raw sticky yeast dough, deep frying works better. Hot oil sets the soft exterior quickly; in an air fryer, the coating has more time to sag before it firms.

The air fryer becomes much more useful after the corn dogs are already cooked. It crisps refrigerated leftovers well and is also a good fit for commercially frozen corn dogs designed for reheating.

Leftovers

Refrigerate cooked corn dogs within 2 hours. They are at their best within 2–3 days. For longer storage, freeze them after cooling and use them within 1–2 months for best quality.

Reheating

When reheating a refrigerated corn dog, air fry at 350°F / 175°C for 4–7 minutes, continuing until the shell is crisp again and the center reaches 165°F / 74°C. An oven works too; a microwave warms the center quickly but softens the panko.

Frozen leftovers can go into the air fryer from frozen at the same starting temperature. Give them more time until the outside is crisp and the center reaches 165°F / 74°C. For broader storage and reheating guidance, see the USDA leftovers and food-safety guidance.

A cooked corn dog in an open air fryer beside refrigerated and frozen examples, with a crisp reheated potato-coated corn dog in the foreground.
A crisp-looking shell is not proof that the center is hot. When you reheat Korean corn dogs in the air fryer, treat exterior crunch and internal temperature as two separate checks—the panko can recover before a cold sausage-and-cheese center has fully reheated.

Once the coating rhythm clicks, the rest of the batch moves surprisingly quickly. The panko is at its crispest and the cheese at its most satisfying when you eat the corn dogs soon after frying—just give the molten center a moment before the first bite.

What did your first one do when it hit the oil? Tell us what happened.

Back to top

Posted on — Leave a comment

Vegetable Lasagna Recipe (Best Vegetarian Lasagna)

Finished vegetable lasagna in a deep blue baking dish with a lifted slice showing pasta, ricotta, spinach, zucchini, mushrooms, peppers and tomato sauce.

Before this becomes lasagna, the vegetables should already taste worth eating. The mushrooms need to be dark and savory, the zucchini smaller and browned at the edges, the onion sweet, and the peppers and carrots properly tender. If the filling tastes flat before it goes between the noodles, another layer of cheese will not magically make it exciting.

A deep 9 × 13-inch pan holds about 2 pounds / 910 g of roastable vegetables, plus spinach, layered with ricotta, mozzarella, tomato sauce and pasta. The finished lasagna is deeply cheesy, but the roasted vegetables are what give each layer its character. The browned vegetables are the filling.

Timings help, but watch the food too: mushrooms that release their water and begin browning again, marinara that clings to a spoon, and a knife that passes through the middle without catching on firm pasta.

Raw zucchini, mushrooms, bell pepper, yellow onion and carrot on sheet pans beside the same vegetables roasted until smaller and browned.
Raw vegetable volume can be misleading: moisture loss dramatically reduces zucchini, mushrooms, peppers and onions during roasting. That is why a generous raw quantity can become two balanced filling layers without making the finished lasagna overwhelmingly vegetable-heavy.

Jump to: Make the lasagna · Choose your vegetables · Why it gets watery · Troubleshoot the pan

Open the full table of contents

Vegetable Lasagna Recipe

This version uses roasted vegetables, ricotta, low-moisture mozzarella, tomato sauce and oven-ready lasagna sheets. There is no separate pot of noodles to boil.

Allow about 2 hours from the first chop to the first slice, with a little extra breathing room the first time you make it. You are not working for all of that: the ricotta, spinach and sauce can be handled while the vegetables roast, and the final 20 minutes belong to the lasagna, not you.

Pan9 × 13 inches / 23 × 33 cm, ideally at least 2½ inches / 6 cm deep
Yield8 main-dish servings or 10–12 smaller servings with sides
Hands-on prepAbout 45–50 minutes, with some work happening while the vegetables roast
Vegetable roast20–25 minutes using two pans; add about 20–25 minutes if you need to roast in two batches
Covered bake40 minutes, then check; some pans need another 5–10 minutes
Uncovered bake10–15 minutes
Rest20 minutes; 25–30 minutes for particularly neat slices

Cooking for more people? Make two regular 9 × 13-inch pans rather than one unusually deep double batch. They bake more evenly, are easier to move, and give you more browned edges.

Ingredients

Vegetables

  • 9 oz / 250 g zucchini, about 1 medium-large or 2 small, unpeeled and cut into roughly ½-inch / 1–1.5 cm pieces
  • 8 oz / 225 g mushrooms, about one 8-ounce package, quartered if small or thickly sliced if larger
  • 6 oz / 170 g red or yellow bell pepper, about 1 large, cut into roughly ½-inch / 1–1.5 cm pieces
  • 5 oz / 150 g yellow onion, about 1 medium, cut into roughly ½-inch / 1–1.5 cm pieces
  • 4 oz / 115 g carrot, about 1 large or 2 small, cut into smaller ¼-inch / 6 mm dice
  • 5 oz / 140 g frozen chopped spinach, thawed; or about 8 oz / 225 g fresh spinach
  • 3 tablespoons / 45 ml olive oil
  • 1 teaspoon fine salt
  • 1 teaspoon Italian seasoning
  • ½ teaspoon garlic powder
  • ½ teaspoon freshly ground black pepper

Ricotta Filling

  • 15 oz / 425 g whole-milk ricotta, drained if whey is visibly pooling around it
  • 1 large egg
  • 1½ oz / 42 g Parmesan or another hard Italian-style cheese, finely grated
  • 1 small garlic clove, finely grated
  • 1 teaspoon finely grated lemon zest
  • 2 tablespoons finely chopped fresh basil or flat-leaf parsley
  • ¼ teaspoon fine salt, or to taste depending on the cheese
  • ¼ teaspoon black pepper

For the Layers

  • 4 cups / 950 ml thick marinara sauce, homemade or jarred
  • 8–9 oz / 225–255 g oven-ready/no-boil lasagna sheets, or enough for 3 complete pasta layers; sheet count varies by brand
  • 12 oz / 340 g low-moisture mozzarella, shredded, about 3 cups
  • ½ oz / 14 g Parmesan or another hard Italian-style cheese, finely grated, for the top
  • Optional: red pepper flakes and fresh basil for serving

If you avoid animal rennet, check the cheese labels. Traditional Parmigiano Reggiano uses animal rennet, while vegetarian alternatives may use microbial or other non-animal coagulants. The Vegetarian Society’s guide to vegetarian cheese can help when the label is unclear.

Lightly oil the bottom and sides of a deep 9 × 13-inch / 23 × 33 cm baking dish. You will also need two large rimmed sheet pans; half-sheet pans, roughly 13 × 18 inches / 33 × 46 cm, are ideal. Have a mixing bowl, clean kitchen towel and foil ready too.

If the trays need separate oven racks, you will swap their positions halfway through roasting. Only one suitably large tray? Roast the vegetables in two batches rather than crowding them, and allow another 20–25 minutes.

Lasagna can bubble over as it bakes. If the assembled filling sits close to the rim, put the baking dish on a rimmed sheet pan before it goes into the oven.

Vegetable lasagna ingredients grouped by preparation: vegetables for roasting, spinach for squeezing, ricotta ingredients for mixing, and sauce, pasta and mozzarella for layering.
Think of the recipe as four checkpoints rather than one long ingredient list: control vegetable moisture, control spinach moisture, season the cheese, then balance the pasta with sauce. Catching a problem at its own checkpoint is much easier than fixing it after assembly.

1. Roast the Vegetables Until They Taste Finished

Heat the oven to 425°F / 220°C.

Divide the zucchini, mushrooms, bell pepper, onion and carrot between the two sheet pans. Add the olive oil, salt, Italian seasoning, garlic powder and black pepper. Toss well and spread everything out.

Crowded vegetables steam. Give these some room.

Chopped vegetables spread with space between them on two rimmed sheet pans for roasting and browning.
If the trays still look wet halfway through roasting, extending the timer is not always the best first move. Redistributing crowded pieces can expose more surface to hot air, helping evaporation and browning happen together instead of simply cooking the vegetables softer.

Roast for 20–25 minutes, stirring once. If the pans are on separate racks, swap the upper and lower pans and turn them front-to-back when you stir.

How to Know the Vegetables Are Ready

What looked like an unreasonable amount of vegetables at the beginning will look much more manageable now. The onion smells sweeter and the zucchini has shrunk. Peppers are tender, carrot pieces nearly cooked through, and dark edges have started appearing across both trays.

Mushrooms are especially easy to read. First they soften. Then they release enough liquid to make the pan look wetter than it did before. Keep going. The liquid disappears, the pan dries, and the mushrooms begin to brown again.

Mushrooms shown softening, releasing water, cooking until the pan dries, and finally becoming deeply browned.
When mushrooms release a panful of liquid, keep cooking rather than draining it away. Once the pan dries, the concentrated flavor has a chance to brown.

Taste one.

Then taste a piece of zucchini and some onion. If those bites are not good now, fix the seasoning before they disappear between pasta and cheese.

Reduce the oven to 375°F / 190°C.

2. Dry the Spinach

Put the thawed spinach in the center of a clean kitchen towel, gather the towel around it and twist firmly over the sink. Keep squeezing until very little more liquid comes out.

Using fresh spinach? Wilt the 8 oz / 225 g in a large pan, let it cool enough to handle, squeeze out the excess liquid and chop it.

Hands twisting cooked spinach in a dark towel over a stainless-steel bowl to squeeze out excess water.
After squeezing, loosen the compact spinach with your fingers or a fork before mixing it into the roasted vegetables. That small step distributes the greens through both filling layers instead of leaving dense wet pockets in only a few slices.

Break the spinach apart and mix it through the roasted vegetables.

3. Check the Sauce

A good jarred marinara keeps this dinner practical.

Drag a spoon through the sauce. The trail should remain for a moment before slowly closing, and the sauce needs to be loose enough to spread easily across the dry noodles. If it runs like tomato juice, simmer it uncovered for a few minutes.

Marinara showing the correct thick, spreadable consistency and separate examples of sauce that is too thin and too thick.
For no-boil lasagna noodles, sauce is part of the cooking system as well as the flavor. If a thin marinara needs reducing, judge and measure the sauce after reduction so you still have enough finished sauce to hydrate the pasta properly.

Stop before it becomes heavily reduced or pasty. Oven-ready sheets need enough sauce around them to become tender.

Taste the sauce too. Ricotta, mozzarella and pasta soften its seasoning once everything is layered.

Making the sauce from fresh tomatoes? They carry more water, so reduction matters. The fresh tomato sauce recipe shows the consistency to look for before measuring the 4 cups / 950 ml.

4. Mix the Ricotta

Stir together the ricotta, hard cheese, garlic, lemon zest, herbs, salt and pepper without the egg first.

Taste it. The ricotta needs enough seasoning to remain noticeable once it is surrounded by pasta, vegetables and tomato sauce. The lemon zest is there for brightness rather than obvious lemon flavor.

Once the seasoning is right, stir in the egg. It helps the cheese layer set; without it, the ricotta simply stays softer.

The messy part is mostly over now. The trays are roasted, the spinach is squeezed, the sauce is ready and the ricotta is mixed.

From here, you’re building.

5. Build the Layers

The vegetables, sauce and ricotta should each taste properly seasoned on their own before you layer them.

Divide the vegetables and ricotta mixture roughly in half. Keep the marinara, noodles and mozzarella beside the baking dish. You are making three pasta layers and two filling layers.

Exploded vegetable lasagna showing three pasta layers, two vegetable-and-ricotta filling layers, marinara between the noodles and cheese on top.
Layering evenly matters more than making every spoonful mathematically identical. Broad, fairly level filling layers heat more predictably than thick vegetable mounds, while three complete pasta layers give the finished lasagna structure without turning it into an unnecessarily tall stack.

Bottom

  • ½ cup marinara
  • Enough oven-ready pasta to cover the pan

First Filling Layer

  • ½ cup marinara, spread over the noodles
  • Half the ricotta filling
  • Half the vegetables
  • Another ½ cup marinara
  • About 1 cup mozzarella

Second Filling Layer

  • A second complete pasta layer
  • ½ cup marinara
  • Remaining ricotta filling
  • Remaining vegetables
  • Another ½ cup marinara
  • About 1 cup mozzarella

Top

  • Final complete pasta layer
  • Remaining 1½ cups marinara
  • Remaining mozzarella
  • ½ oz / 14 g grated hard cheese

Dollop the ricotta onto the sauced noodles and spread it before adding the vegetables. It is much easier to move ricotta across a flat sheet of pasta than across a pile of zucchini and mushrooms.

Hands spreading ricotta over a sauced pasta layer in a blue lasagna dish, with marinara reaching the edges and corners.
Do not chase a perfectly smooth ricotta layer. A lightly spread, mottled layer lets the roasted vegetables settle into the cheese instead of sliding across a slick surface, while sauce at the perimeter protects the pasta where drying happens fastest.

Set the next pasta layer down and press gently over any obvious vegetable mounds. Don’t pack the filling.

Sheet sizes vary, sometimes a lot. Three complete pasta layers are the useful target. Break sheets to fill a real gap, but avoid thick patches of overlapping dry pasta.

Cover the final noodle layer completely with the last 1½ cups of marinara, right into the corners. Pasta left exposed here is likely to stay hard.

The two trays of vegetables, bowl of ricotta and stack of pasta have finally become one pan of lasagna.

6. Cover and Cook the Pasta

Cover the dish tightly with foil. Lightly oil the underside if it sits close to the cheese.

Bake at 375°F / 190°C for 40 minutes.

Forget about browning for now. The middle of the pan and the dry noodles need the covered heat first.

7. Check the Middle, Then Brown the Top

Push a thin knife through the middle after 40 minutes.

If it slides through without catching on firm pasta, you’re ready to uncover. If the knife catches, nothing has gone wrong. Cover the pan again and give it another 5–10 minutes.

Two lasagna pans compare a knife stopping in firm pasta with a knife sliding deeply through tender noodles before final browning.
When checking doneness, distinguish firm pasta resistance from simply bumping into a piece of carrot or another vegetable. A hydrated noodle gives way smoothly; an undercooked sheet feels broader, firmer and more leathery against the knife.

A refrigerator-cold pan or thicker oven-ready sheets may need closer to 50 minutes covered.

Once the pasta is tender, remove the foil and bake for another 10–15 minutes. Tomato sauce will bubble around the perimeter. The mozzarella picks up golden patches, darker freckles and, here and there, a crisp edge.

If your baking dish is broiler-safe, a pale but fully cooked top can have a brief broil. Stay close—the distance between bronzed mozzarella and burned cheese is surprisingly short.

8. Give It 20 Minutes Before You Ask It to Be a Slice

Take the pan out and leave it alone for 20 minutes.

The furious bubbling subsides, the ricotta firms a little and the sauce stops running quite so freely when you cut.

For particularly clean slices, wait 25–30 minutes. The middle will remain plenty hot.

Vegetable lasagna shown steaming and loose straight from the oven beside the same lasagna after 20 minutes, when the layers hold together more cleanly.
Resting changes mobility more than moisture quantity. The liquid has not vanished after 20 minutes; rather, the sauce, cheese and filling have cooled just enough to move less freely, which is why the same lasagna becomes noticeably easier to portion.

Need help with the pan? Choose or swap vegetables · Make it ahead · Fix excess moisture · Troubleshoot what you see

Easy Shortcuts

This is not a 30-minute dinner. It does not need to become an all-afternoon project either.

  • Jarred marinara: use one that passes the consistency check above and move on.
  • Oven-ready noodles: no boiling, draining or handling floppy sheets.
  • Frozen spinach: excellent here once thoroughly squeezed.
  • Pre-shredded low-moisture mozzarella: a perfectly reasonable place to save a few minutes.
  • Vegetables roasted a day ahead: the most useful shortcut when tomorrow’s assembly needs to be quick.

Best Vegetables for Lasagna

For this style of lasagna, cook the vegetables before layering them. Raw zucchini and mushrooms can release too much liquid in the pan, while dense vegetables may still be firm by the time the pasta is done.

Zucchini can become eggplant without much trouble. Carrot is different. It carries far less water and takes longer to soften, so replacing vegetables cup-for-cup can change the filling more than expected.

The base recipe uses about 2 pounds / 910 g of trimmed roastable vegetables, plus spinach. Raw weight is a useful rough guide for substitutions; then account for how dense and watery the replacement is.

Zucchini, mushrooms, eggplant, carrot and spinach shown with guidance to cook watery vegetables down, cut dense vegetables smaller and brown for flavor.
The best vegetables for lasagna are often the ones that can be swapped for something with similar density and water content. Zucchini and eggplant behave more alike than zucchini and carrot, for example, so matching cooking behavior makes substitutions far more predictable.

How to Swap Vegetables Without Throwing Off the Filling

VegetableHow to Use It
ZucchiniTender and fairly watery. Roast until smaller and browned. Eggplant is an easy replacement.
MushroomsDeeply savory. Keep cooking until their released liquid is gone and browning starts again.
SpinachWilt fresh or thaw frozen, then squeeze firmly. Kale works too but needs more cooking.
Bell peppersSweet and forgiving. Roast until tender. Well-drained roasted red peppers also work.
CarrotsSweet and relatively dry. Cut them smaller so they become tender at roughly the same time as the other vegetables.
OnionGive it enough time to soften and brown. Large undercooked pieces are distracting in the finished slice.
EggplantSilky and savory after roasting. Excellent in place of some or all of the zucchini.
Butternut squashDense and sweet. Use small cubes and roast until nearly tender.
Broccoli or cauliflowerUse small pieces and roast first. Better as part of a mixed filling than the entire filling.
KaleMore robust than spinach. Remove tough stems and cook it until properly tender.

No mushrooms? Replace their 8 oz / 225 g with eggplant, extra pepper, zucchini or a mixture. You lose some savory depth, so give the tomato sauce a final taste before assembly.

For a smoother, more hidden-vegetable filling, grate zucchini into the marinara and simmer until tender and its extra moisture has cooked away. Browned mushrooms can be chopped very finely, and spinach can simply be minced before mixing it through.

Vegetable Lasagna With Frozen Vegetables

Frozen spinach is excellent here. Frozen zucchini is not. Most other frozen vegetables fall somewhere between those two.

Prepared frozen spinach labeled best, cooked broccoli and cauliflower labeled workable, and soft wet zucchini labeled a weak choice for lasagna.
With frozen vegetables for lasagna, fix excess moisture at the vegetable stage rather than compensating by cutting back too aggressively on marinara. That distinction matters with oven-ready pasta, which can still need plenty of sauce even when the filling itself started wet.
Frozen VegetableBest Approach
SpinachThaw completely and squeeze firmly until very little more water comes out.
Broccoli or cauliflowerThaw, drain and blot. Roast or sauté briefly if the pieces still look wet.
Peppers or pepper-and-onion mixesSauté until released water evaporates and some color starts developing.
Mixed vegetablesThaw, then sauté until the pan no longer looks wet. Choose the blend for flavor as well as convenience.
ZucchiniIt can be used, but the texture is considerably softer and wetter. Fresh zucchini is much better here.

If most of the filling comes from frozen vegetables, cook and drain them before assembly. Aim for about 5 cups total cooked, well-drained vegetables across the two filling layers, including spinach if you’re using it.

The volume does not need to be exact. Two full, fairly level layers are enough.

Still dealing with excess liquid? See why vegetable lasagna gets watery.

Ricotta and Cottage Cheese in Vegetable Lasagna

Ricotta leaves soft, creamy pockets between the roasted vegetables, sauce and pasta. A very loose tub needs draining first.

Using Cottage Cheese Instead

Cottage cheese is tangier, with visible curds unless you blend it. Swap it for the ricotta by weight—15 oz / 425 g—and make the rest of the filling exactly the same way. Blend the cottage cheese before adding the other ingredients when you want a smoother texture, and drain off obvious liquid first.

Ricotta and cottage cheese shown in bowls and lasagna slices, comparing smooth creamy ricotta with more visible cottage-cheese curds.
For ricotta vs cottage cheese in lasagna, neither option is automatically “drier” across every brand. Choose the cheese for the texture you want, then judge the tub in front of you: visible pooled whey matters more to the finished pan than the name on the label.

The cottage cheese lasagna is built around that cheese from the start rather than treating it as a substitution.

For a different style altogether, béchamel gives you a softer, silkier lasagna with creaminess spread more evenly through the layers. The béchamel sauce for lasagna is the better starting point for that version.

No-Boil and Regular Lasagna Noodles

This version is built for oven-ready/no-boil sheets. Keep every sheet well covered with sauce and give the pan the full covered bake before checking the pasta.

Using Pre-Cooked Regular Noodles

Cook enough regular noodles for the same three complete pasta layers; sheet dimensions and package sizes vary. Boil them only until flexible and a little firmer than you would serve as finished pasta.

For cooked noodles, reduce the sauce over each vegetable layer from ½ cup to ¼ cup. Keep every other sauce amount the same; this uses 3½ cups in the lasagna and leaves ½ cup to warm for serving if you want extra sauce at the table.

Dry no-boil lasagna sheets and a saucier pan compared with flexible pre-cooked regular noodles and a slightly less saucy assembly.
Changing noodle type changes more than bake time. No-boil lasagna noodles arrive dry and take part of their hydration from the sauce, whereas pre-cooked noodles bring water into the pan themselves; therefore, the sauce quantity should change with the pasta method.

Pre-cooked noodles do not need the full 40–50 minute hydration stage. Cover the freshly assembled lasagna and start checking it after 25–30 minutes at 375°F / 190°C. Once the middle is hot and bubbling, uncover and brown the cheese for another 10–15 minutes.

A refrigerator-cold pan will take longer. Judge it by a thoroughly hot, bubbling middle rather than the clock alone.

Gluten-free sheets vary too much by brand for one universal method. Follow the package directions, keep dry sheets well sauced and check the pasta before uncovering.

Pasta still firm? Return to the knife doneness test · ↑ Back to top

Why Vegetable Lasagna Gets Watery

Most watery lasagnas are not ruined by one dramatic mistake. They get there by accumulation: spinach that still held water, mushrooms that never reached the browning stage, unusually loose ricotta and thin tomato sauce all meeting in the same pan.

  • Vegetables: zucchini, mushrooms and spinach can release plenty of water. Roasting, sautéing and squeezing deal with much of it before layering.
  • Cheese: ricotta and cottage cheese vary by brand. If whey is pooling, drain it. Fresh mozzarella contains considerably more water than low-moisture mozzarella and is not a straightforward 1:1 substitute here unless it is drained and blotted extremely well.
  • Sauce: very thin marinara loosens the whole pan. Sauce reduced too far creates the opposite problem when dry noodles need liquid.
  • Pasta: oven-ready sheets absorb liquid while they cook. Boiled noodles arrive in the pan already hydrated.
Vegetable lasagna surrounded by four moisture sources: wet vegetables, watery cheese, thin marinara and pasta with different hydration needs.
The useful distinction in watery vegetable lasagna is not simply “more liquid versus less liquid.” It is controlled moisture versus uncontrolled moisture: pasta needs deliberate hydration, while vegetable water, cheese whey and excessively thin sauce can accumulate where the recipe does not need them.

A lasagna also looks looser when it is extremely hot. Straight from the oven, the sauce moves more freely; after 20 minutes, the layers hold themselves together much better.

A spoonful of juices around a very hot first slice is not a failed lasagna.

A lake underneath it is something worth fixing.

Already have a pan in front of you? Troubleshoot what you’re seeing.

Make Ahead, Freeze and Reheat

Assemble It the Night Before

Cover the assembled pan tightly and refrigerate overnight. The next day, start checking the pasta after about 45 minutes covered. The whole dish begins cold, so it usually needs longer than a freshly assembled pan.

Three vegetable lasagna workflows show refrigerating an assembled pan overnight, freezing and thawing it in the refrigerator, and reheating leftovers to 165°F or 74°C.
With make-ahead vegetable lasagna, watch the center rather than trusting the browned edges. A refrigerator-cold or fully thawed pan can look active around the perimeter while the middle is still catching up, so doneness cues remain more reliable than adding one fixed number of minutes.

Opening the refrigerator and finding dinner already built is one of the better rewards for doing the chopping a day early.

Prep the Components Earlier

The roasted vegetables and tomato sauce can be made up to 2 days ahead and refrigerated separately. Mix the ricotta and assemble closer to baking.

Freeze the Whole Pan or Individual Slices

A tightly wrapped assembled lasagna can be frozen before baking. Thaw it fully in the refrigerator; a deep frozen 9 × 13-inch pan may take longer than one night to thaw through.

Once fully thawed, treat it like any other refrigerator-cold assembled lasagna: bake covered at 375°F / 190°C and start checking the pasta after about 45 minutes. Uncover once the noodles are tender and brown the top.

For leftover slices, cool the lasagna first, divide it into individual portions, wrap well and freeze. Thawing in the refrigerator gives the most even reheating.

Leftovers and Reheating

Refrigerate leftovers promptly in covered containers and use them within 3–4 days, or freeze them for longer storage. The USDA’s leftover-safety guidance has additional storage and reheating advice.

For several refrigerated slices or a larger portion, cover and reheat at about 350°F / 175°C until hot through the middle. Uncover for the last few minutes if you want to refresh the cheese on top.

For a measurable food-safety endpoint, USDA recommends reheating leftovers to 165°F / 74°C in the center.

A single slice usually does better with gentler staged microwave heating than one long blast at maximum power. Chilled lasagna has another advantage: the layers often cut even more cleanly the next day.

Cooking it now? Return to the main recipe · ↑ Back to top

Read the Pan: What Went Wrong?

Do not chase architectural perfection.

A good lasagna can slump a little at the edge of the plate and still be exactly right. What deserves attention is a real pool of liquid, genuinely hard pasta, a dry top, a cold middle or vegetables that never became tender.

If the first slice collapses, give the pan another few minutes before deciding anything dramatic. The first piece out of a very hot lasagna is often the least tidy one.

What You SeeWhat to Do
Thin puddle around the edgesRest the pan first. If a genuine pool remains, carefully spoon off a little before serving. Next time, cook more moisture out of the vegetables or reduce an unusually thin sauce.
Noodles hard throughoutCover the pan again and give the pasta another 5–10 minutes, then check once more.
Mushy pastaThere is no real rescue once pasta is over-softened. Next time, boil regular noodles less or adjust the amount of liquid or baking time for very thin oven-ready sheets.
Lasagna slides apartGive it more time to rest before cutting another slice. Very wet cheese, loose sauce and excessively thick filling layers can make the problem worse.
Lasagna is dryServe it with warm marinara. Next time, keep the pasta fully covered and check the bake earlier.
Everything tastes flatAdd grated hard cheese, herbs, black pepper or chile at the table. Next time, brown and season the vegetables properly and taste the sauce and ricotta before layering.

A Few Other Clues

  • Hard top corners: pasta was probably left exposed above the sauce.
  • Milky liquid: unusually wet ricotta, cottage cheese or mozzarella is often involved.
  • Crunchy vegetables: dense vegetables were cut too large or did not cook far enough before assembly.
Six lasagna problems shown in close-up: pooled liquid, hard pasta, sliding layers, a dry corner, milky cheese liquid and oversized firm vegetables.
Good vegetable lasagna troubleshooting starts by identifying what kind of liquid or resistance you are seeing. Tomato-colored runoff suggests a different problem from pale milky whey, while hard pasta points toward hydration rather than excess moisture—even though all three can make a slice look wrong.

Should a Watery Lasagna Stay in the Oven Longer?

Only if the pasta still needs cooking.

A slightly loose lasagna often improves more from ten minutes on the counter than ten more minutes in the oven. A flooded one can remain wet underneath while the cheese and exposed pasta get drier and drier.

What to Serve With Vegetable Lasagna

Lasagna already brings soft pasta, roasted vegetables, tomato and plenty of creamy cheese. Something crisp, green or sharply dressed beside it gives the next bite a useful contrast.

  • Cucumber salad: cold cucumber, onion, dill and vinegar cut through the richness; this cucumber salad recipe is a natural fit.
  • Roasted broccoli or broccolini: charred edges and a greener, slightly bitter contrast to the sweeter tomato sauce.
  • Garlic bread: for a full comfort-food dinner; this homemade garlic bread loaf works well alongside it.
People serving vegetable lasagna at a dark wooden table with cucumber salad, charred broccolini and garlic bread.
For what to serve with vegetable lasagna, think in terms of contrast rather than quantity. Choose something crisp and acidic, something green and charred, or garlic bread for maximum comfort; you do not need three additional rich sides around an already generous main dish.

Cut through a browned corner and lift the first piece. The cheese at the edge may be a little crisp while the layers underneath stay soft, with creamy ricotta between zucchini, mushrooms and peppers and enough tomato sauce to keep the pasta tender without running across the plate.

The vegetable lasagna worth making again is the one where the vegetables taste good before they become filling, the pasta is tender, and the whole generous pan still knows how to become a slice.

Back to the recipe · ↑ Back to top