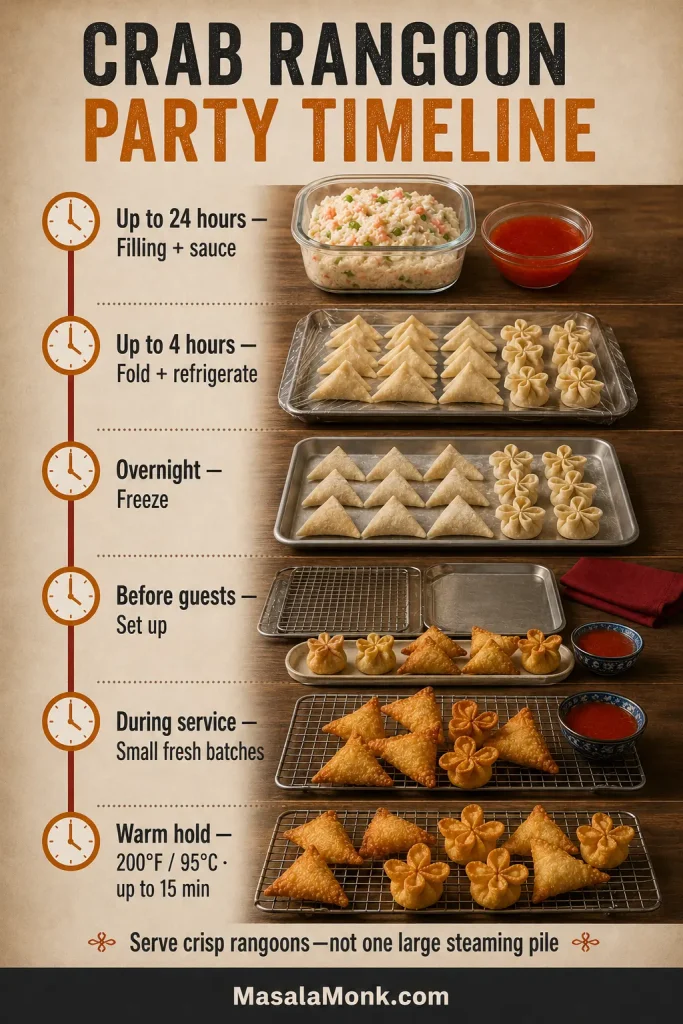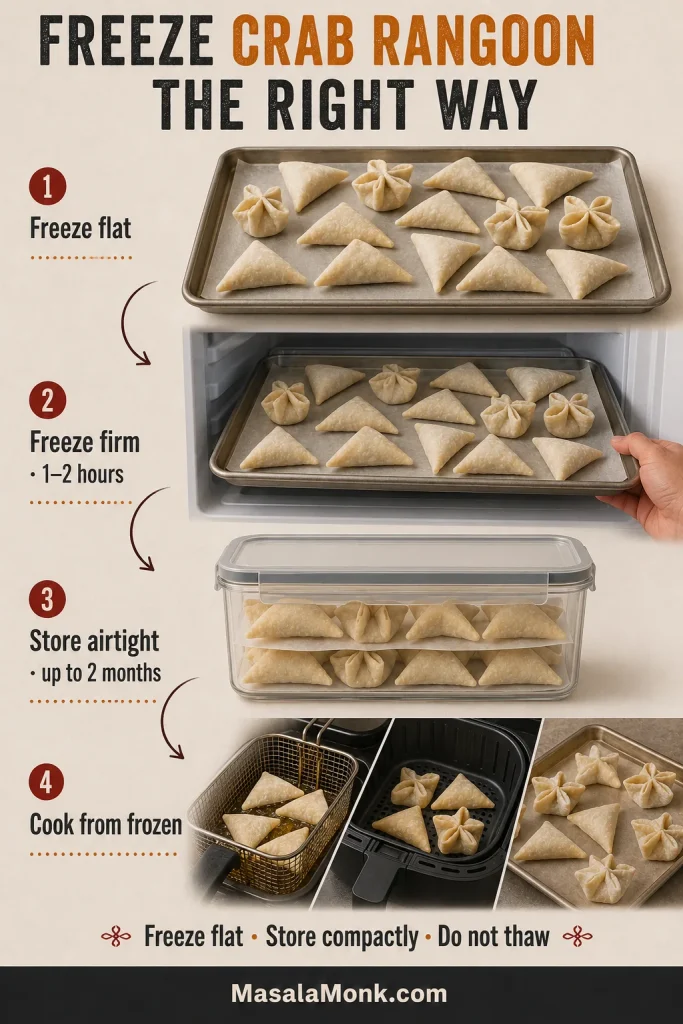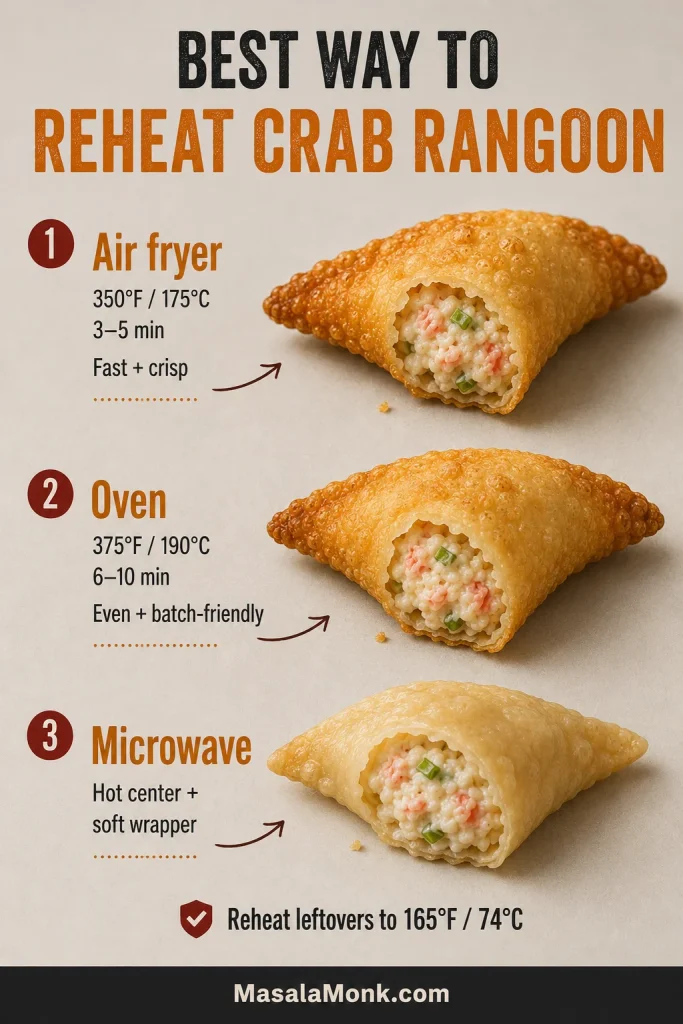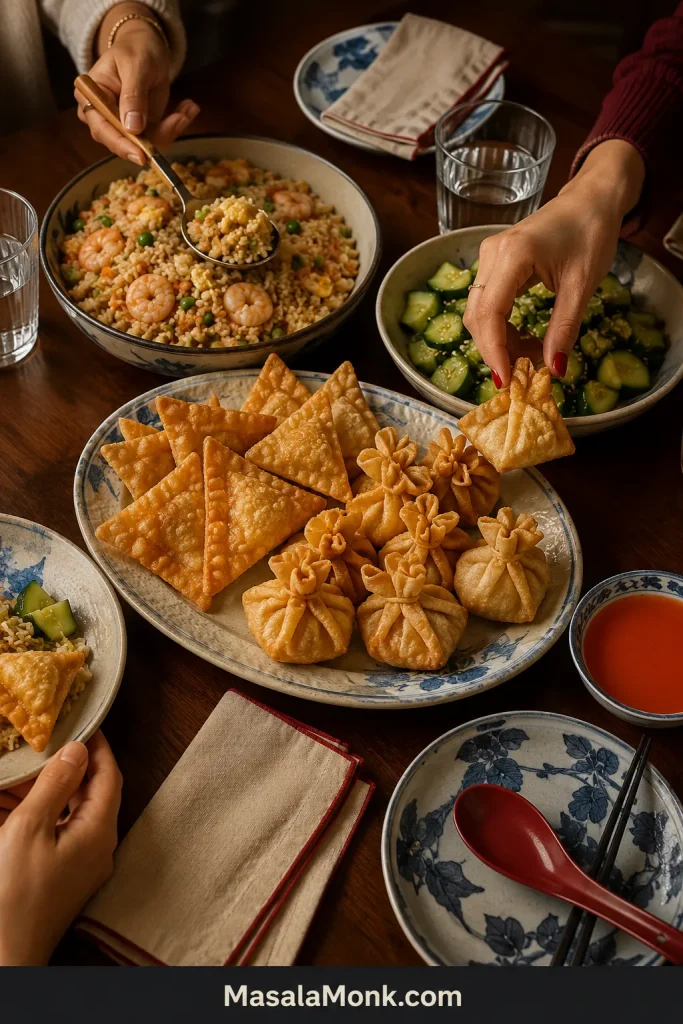
Posted on — Leave a comment

Jalapeño Popper Corn Dip Recipe: Creamy, Cheesy & Easy

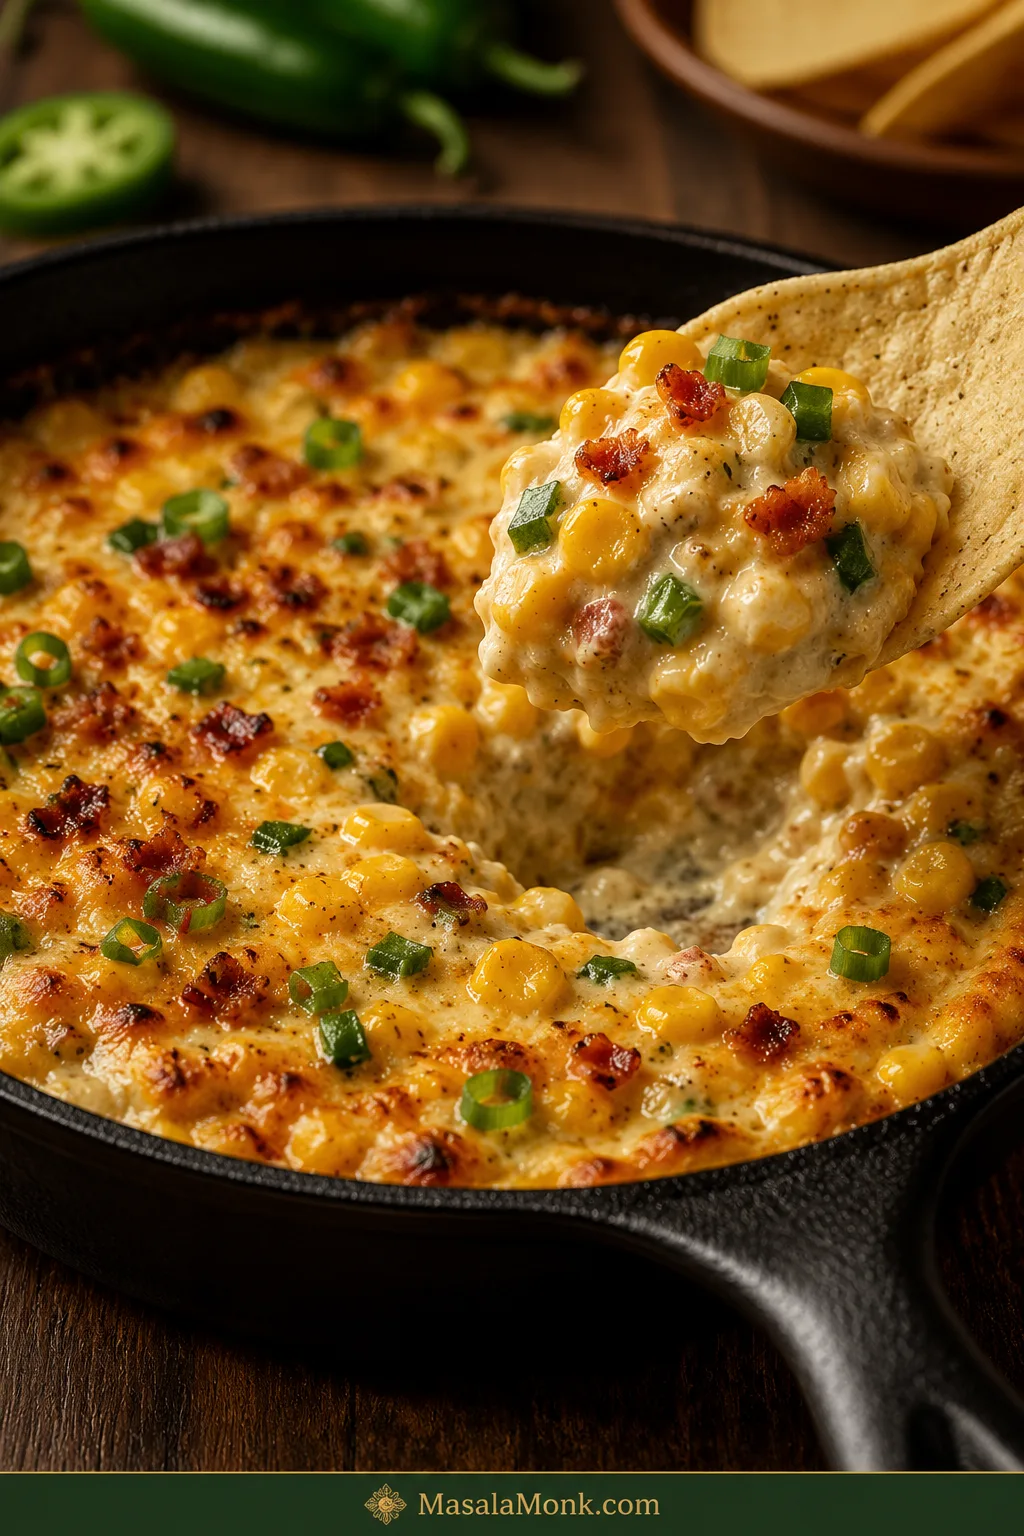
Cast-iron skillet filled with creamy baked corn dip, topped with jalapeño, scallion and bacon, with a tortilla chip lifting a scoop containing visible corn kernels.

The first scoop tells you whether jalapeño popper corn dip is working. A good one brings sweet corn, fresh jalapeño and creamy cheese up with the chip. It feels rich without turning heavy, and you taste the pepper before the heat starts to build.

The annoying batches tend to go wrong in opposite directions. Too much water and the edges turn loose. Too much cream cheese or shredded cheese—or too much time cooling on the table—and the dip firms up until even a sturdy tortilla chip has to work too hard.

This one aims for the middle: enough corn to remain unmistakably a corn dip, enough cream cheese for the jalapeño-popper character, and enough sour cream and melting cheese to keep a warm scoop creamy without swallowing the kernels. The corn and jalapeños get a quick turn in the pan first, where the peppers lose some of their raw grassy smell, the corn starts smelling sweeter and loose water has somewhere to go before the dairy arrives.

Fresh, frozen and well-drained canned corn all work, and you can keep the heat gentle or let it build. Bacon is optional, as is the crisp panko finish. For a longer gathering, the finished dip can move to a slow cooker to stay warm.

Start here

Quick Answer: How to Make Jalapeño Popper Corn Dip

To make jalapeño popper corn dip, crisp the bacon if using, sauté the corn and jalapeños, fold them into the creamy cheese base, then bake until the edges bubble and the center is hot. The quick skillet step cooks off loose corn moisture, brings out the corn’s sweetness and takes the raw edge off the jalapeños before the dairy goes in.

Cook 400 g / about 2½ cups corn kernels with chopped jalapeños until the pan has lost its wet sheen and a few kernels begin turning golden. Fold them into 227 g / 8 oz softened block cream cheese, sour cream and freshly shredded cheese, then add green onion and crisp bacon if using.

Spread the mixture in a 10-inch / 25 cm oven-safe skillet or roughly 2-quart / 2-litre baking dish. Bake uncovered at 375°F / 190°C for about 18–22 minutes, until the edges bubble gently and the center is hot and creamy. Let it rest for 5–10 minutes; that short pause takes it from molten to much easier to scoop.
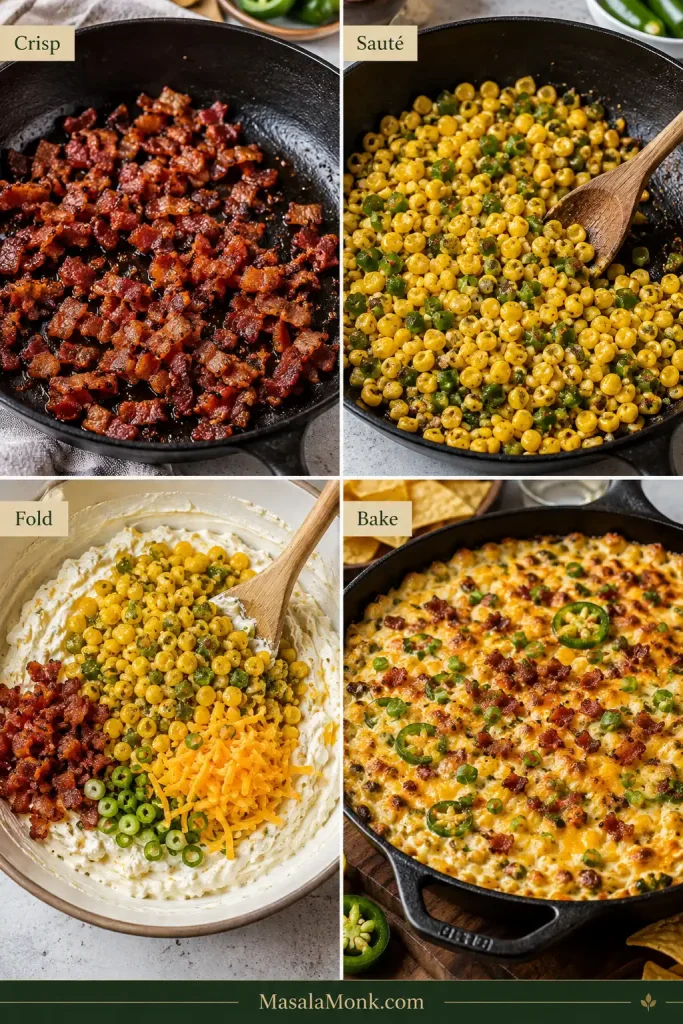
Four-step guide showing bacon crisping, corn and jalapeño sautéing, the corn mixture being folded into a creamy cheese base, and the assembled dip baking.
Keeping the early jobs separate matters: bacon can crisp and corn can shed moisture before the dairy arrives. Once the creamy base goes in, the goal shifts from evaporation to gentle heating.

Choose Your Corn, Heat and Finish

Start with the balanced combination, then change only the part that matters to you.

Swipe or scroll sideways to see the full table.

Decision Start here Change it when…
Corn Fresh or frozen Use thoroughly drained canned corn for convenience or fire-roasted corn for a smokier edge.
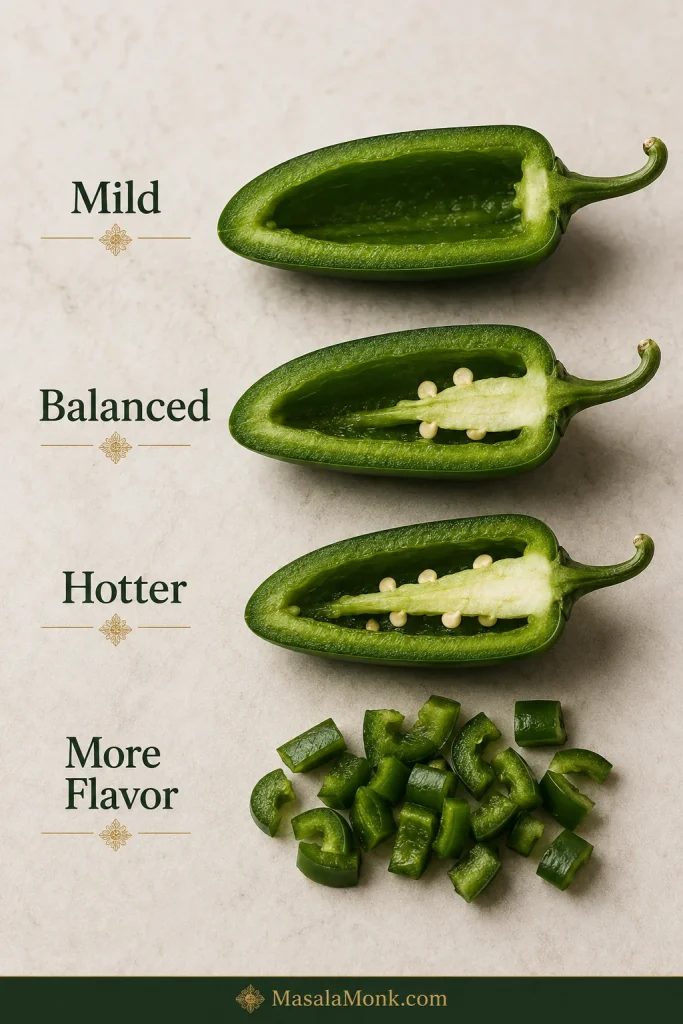
Heat As a balanced starting point, trim two jalapeños well and leave a little of the hotter inner ribs in the third Trim all three more thoroughly for mild heat, or leave more of the inner ribs attached for a hotter batch.
Bacon Optional, but good for smoky popper flavor Leave it out for a vegetarian dip; fire-roasted corn can bring back some of that smoky character.
Top Melty cheese Add buttered panko for the creamy-inside, crisp-outside contrast of a breaded popper.
Decision guide comparing fresh, frozen, canned and fire-roasted corn; mild, balanced and hotter jalapeño preparation; and melty, panko and crushed-chip toppings.
Think of these as separate levers: the corn changes bite and smokiness, jalapeño prep controls the heat, and the topping changes crunch. You can adjust one without rebuilding the dip.

The balanced version

Creamy Jalapeño Popper Corn Dip

Sweet kernels folded through a creamy jalapeño-cheese base, with bacon if you want the extra smoky edge. The bite should start sweet from the corn, turn rich and tangy through the cheese, then finish with fresh jalapeño warmth and whatever crisp edge you chose—bacon, panko or both.

Prep
About 15 minutes

Cook
About 30–40 minutes

Ready in
About 50–65 minutes, including the 5–10 minute rest

Serves
About 8–10 as one of several appetizers

Best pan
10-inch / 25 cm oven-safe skillet or about 2-quart / 2-litre baking dish

Finished texture
Creamy and corn-studded; easy to scoop while warm but substantial enough to stay on a sturdy tortilla chip

Equipment

  • 10-inch / 25 cm oven-safe skillet or roughly 2-quart / 2-litre baking dish
  • Large mixing bowl
  • Flexible spatula or sturdy spoon
  • Box grater if shredding cheese from a block

Ingredients

For the Dip

  • 400 g / about 2½ cups corn kernels, fresh, frozen or thoroughly drained canned corn
  • 15 ml / 1 tablespoon neutral oil, or reserved bacon fat
  • 3 medium fresh jalapeños, about 50–60 g total before trimming, finely chopped
  • 227 g / 8 oz full-fat block cream cheese, softened
  • 120 g / ½ cup sour cream
  • 115 g / 1 cup freshly shredded Monterey Jack or Colby Jack
  • 55 g / ½ cup freshly shredded sharp cheddar
  • ½ teaspoon garlic powder
  • ¼ teaspoon onion powder
  • ¼ teaspoon freshly ground black pepper
  • ¼ teaspoon fine salt, plus more only if needed; start lighter when the bacon or cheese is especially salty
  • 115 g / 4 oz raw bacon, optional
  • 2 green onions / scallions, thinly sliced, divided

Optional Crunchy Popper Topping

  • 25 g / ⅓ cup panko breadcrumbs
  • 14 g / 1 tablespoon butter, melted

For Serving

  • Thick tortilla chips or corn chips
  • Celery, bell pepper strips or toasted baguette, optional

Measure the corn after prep. The target is about 400 g / 14 oz ready-to-cook kernels. Fresh corn works out to roughly 4–5 medium ears, depending on size and how deeply you cut. Frozen corn is easiest to weigh at 400 g. With canned corn, use the drained kernel weight, not the weight of the can and its liquid.
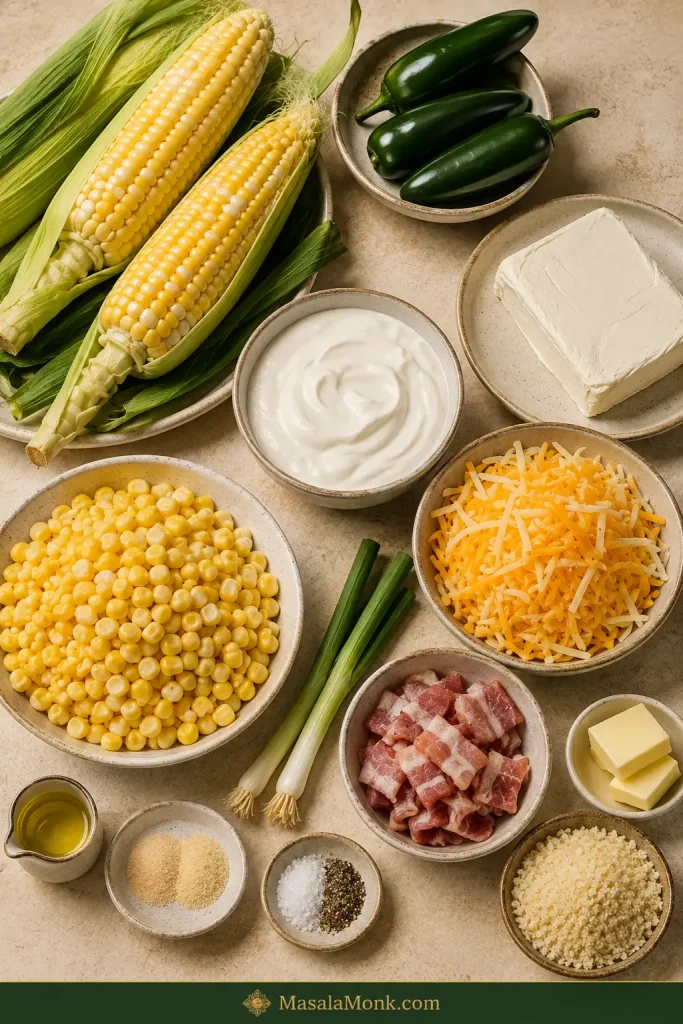
Overhead arrangement of corn, three fresh jalapeños, cream cheese, sour cream, shredded cheeses, raw bacon, scallions, panko, butter, oil and seasonings for jalapeño popper corn dip.
The useful ratio is visible even before cooking: corn should still be the dominant ingredient, while the dairy and cheeses are there to coat, bind and enrich the kernels rather than replace them.

Method

Prep and Cook Off Moisture

  1. Heat the oven. Preheat to 375°F / 190°C. If you are not using an oven-safe skillet, lightly grease a roughly 2-quart / 2-litre baking dish.
  2. Cook the bacon, if using. Cook the bacon in the skillet over medium heat until crisp. Transfer it to a paper-towel-lined plate and crumble when cool enough to handle. Reserve up to 1 tablespoon of the rendered fat for the corn if you like; otherwise discard the fat safely and use neutral oil.
  3. Cook the corn and jalapeños. Heat the oil or reserved bacon fat over medium-high. Add the corn and chopped jalapeños and cook for 4–6 minutes, stirring occasionally, until the corn is hot, the pan no longer looks watery and a few kernels begin turning golden. Fresh kernels should still look plump rather than wrinkled. Remove the skillet from the heat while you mix the dairy.
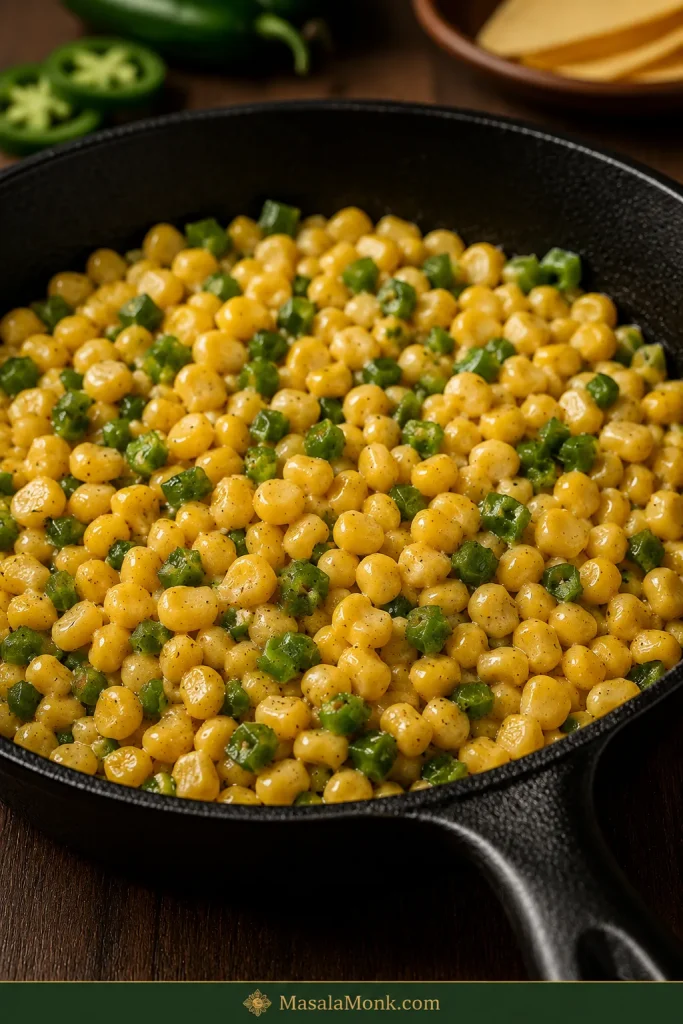
Close-up of sautéed yellow corn and chopped green jalapeño in a cast-iron skillet with a dry pan surface and a few lightly golden kernels.
A few golden spots are enough. Once the skillet is dry, chasing deeper color starts trading the plump corn bite for a drier, more roasted texture.

Build the Creamy Dip

  1. Mix the creamy base. Press the softened cream cheese with a spatula; it should yield easily without looking shiny or melted. Stir in the sour cream, then mix in about two-thirds of both shredded cheeses, the garlic powder, onion powder, black pepper and salt.
  2. Fold everything together. Add the warm corn and jalapeños, about two-thirds of the crumbled bacon if using and half of the green onions. Fold until the kernels are evenly coated. Taste before deciding whether it needs more salt.
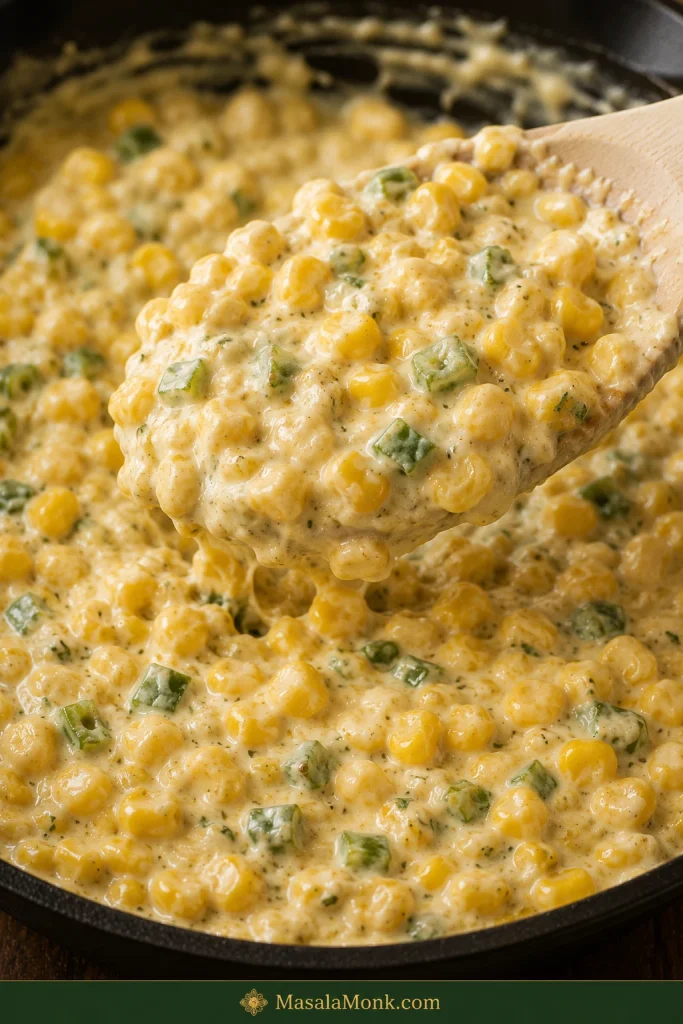
Thick creamy corn and jalapeño mixture being lifted with a spatula, with many yellow corn kernels remaining clearly visible throughout.
Drag a spatula through the mixture: it should leave a clear track but still move easily. That middle ground keeps the kernels suspended while the finished corn dip stays scoopable.

Fill, Bake and Rest

  1. Fill the pan. Spread the mixture evenly in the skillet or prepared baking dish. Scatter over the remaining shredded cheese. For the crunchy version, combine the panko and melted butter and sprinkle that over the top.

Overhead view of unbaked jalapeño corn dip spread evenly in a baking vessel and topped with shredded cheese.
Let some corn and jalapeño remain visible through the cheese. If the surface disappears beneath a thick cheese blanket, you lose one of the easiest visual checks while the dip bakes.
  1. Bake uncovered. Bake for 18–22 minutes, until the edges are gently bubbling and the center is hot and creamy. Yellow kernels and green flecks of jalapeño should still be visible through the melted cheese. If the top browns before the middle is ready, tent it loosely with foil. If the center is ready but the surface still looks pale, broil for 1–2 minutes only in broiler-safe cookware, watching continuously.
  2. Rest and serve. Leave the dip alone for 5–10 minutes. Scatter over the reserved bacon and green onions. Straight from the oven it will be looser; after a few minutes the cheese settles more closely around the kernels and the texture becomes easier to serve.

Recipe Notes

  • For a bacon-free batch: leave the bacon out and taste the salt again before baking; fire-roasted corn is especially good here.
  • For a smaller, deeper dish: expect a longer bake. A wider, shallower dish heats faster and exposes more cheese to browning.
  • To make it ahead: assemble, cover and refrigerate for up to one day. Keep any crisp topping separate until baking.

Fresh vs Frozen vs Canned Corn: Which Is Best?

Fresh corn gives the clearest bite, frozen corn is the easiest year-round choice, and well-drained canned corn is the quickest pantry option. All three work well here; the target stays at about 400 g / 14 oz prepared kernels.

Swipe or scroll sideways to see the full table.

Corn Amount for this recipe Prep What you get
Fresh About 400 g kernels; roughly 4–5 medium ears Cut from the cob and sauté until hot with a few golden spots Firm, juicy kernels and the freshest corn flavor
Frozen 400 g / 14 oz Remove loose ice or pooled thawing water, then sauté Excellent year-round texture with little prep
Canned About 400 g / 14 oz after draining Drain thoroughly before weighing, then sauté Softer kernels and the easiest pantry route
Fire-roasted 400 g / 14 oz prepared kernels Drain or thaw as needed, then heat through A smokier dip with almost no extra work
Four-part comparison of fresh corn kernels, frozen corn, drained canned corn and fire-roasted corn.
Fresh, frozen and canned corn mainly change moisture and bite; fire-roasted corn also changes the flavor. That smoky edge is especially useful when you are making the dip without bacon.

Fresh Corn

You want the kernels to keep that tiny burst when you bite them. Cook until the raw starchiness fades and a few spots turn golden, but stop while the corn still looks plump and juicy. That juicy contrast against the creamy cheese is the reason this tastes like corn dip rather than ordinary jalapeño popper dip with a handful of kernels mixed in.

Frozen Corn

Loose kernels with only a little frost can go straight into the skillet. A solid icy clump or a puddle of thawing water needs a little attention first.

Listen as it cooks. The pan starts damp and steamy, then shifts toward a clearer sizzle. That sound change is often more useful than watching the clock.
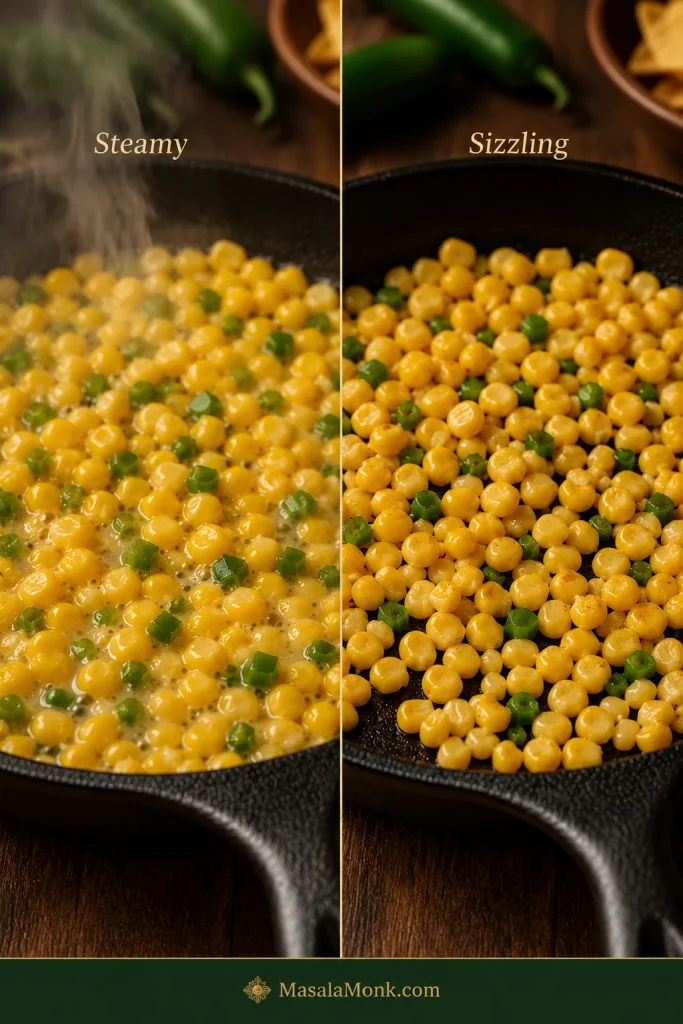
Side-by-side skillet comparison showing wet, steamy corn and jalapeño early in cooking versus a drier sizzling stage with a few golden kernels.
Sound works as a second moisture gauge when color is hard to judge: loose water muffles the pan, while a cleaner sizzle tells you evaporation is nearly finished.

Canned Corn

Measure the drained kernels, not the weight of corn plus packing liquid. Can sizes and drained yields vary enough that the scale is more dependable than promising every kitchen will need exactly two cans.

Two-step guide showing canned corn draining in a fine-mesh strainer and then being weighed after draining, with the scale reading 400 grams.
Can sizes vary, so count the prepared corn rather than the cans: after draining, the target for this recipe is about 400 g / 14 oz of kernels.

The same moisture lesson matters in other creamy vegetable dips too. In this spinach artichoke dip, loose vegetable water is much easier to deal with before it reaches the creamy base.

How to Control Jalapeño Flavor and Heat

For a milder dip, trim most of the pale inner ribs from all three jalapeños. For a balanced starting point, leave a little attached in one pepper; for a hotter batch, leave more attached.

Heat is only half the question. You may want more fresh jalapeño flavor without dramatically increasing the burn.

Why the Pale Inner Tissue Matters

Most of a jalapeño’s heat is concentrated around the pale inner placental tissue, not produced by the seeds themselves. The seeds can still taste hot because they sit against that tissue. Individual peppers vary too, which is why three jalapeños do not guarantee exactly the same heat every time. New Mexico State University’s chile research explains that anatomy and natural variation in more detail.
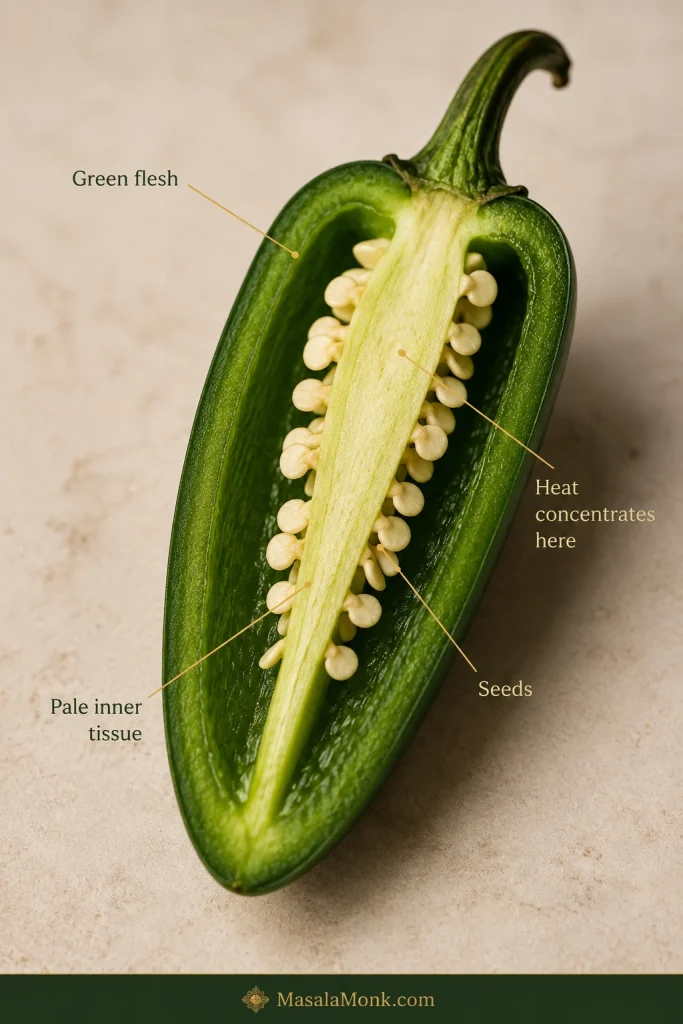
Cut-open green jalapeño labeled to show green flesh, pale inner tissue and seeds, with an annotation pointing to the pale tissue as the area where heat concentrates.
A jalapeño can be nearly seedless and still carry plenty of heat if much of the pale inner tissue remains. Conversely, a few loose seeds alone tell you very little about how hot the pepper will taste.

In kitchen terms, trimming the pale inner ribs and attached tissue changes the heat far more reliably than chasing every loose seed around the cutting board.

Control Heat Without Losing Jalapeño Flavor

Swipe or scroll sideways to see the full table.

You want… What to do What changes
Mild Trim away most of the pale inner ribs from all three peppers Fresh green-pepper character with much less heat
Balanced starting point Trim two well and leave a little inner rib attached in the third Noticeable warmth without deliberately pushing the heat
Hot Leave more of the inner ribs attached A stronger heat that builds through the bite
More jalapeño flavor, not much more heat Add more well-trimmed green flesh More fresh pepper flavor without simply turning up the burn
Tangier pepper flavor Replace part of the fresh jalapeño with well-drained pickled jalapeño More acid, salt and softness
Four-part jalapeño guide showing most inner tissue removed for mild, a little retained for balanced, more retained for hotter, and additional trimmed green flesh for more pepper flavor.
If a batch tastes hot but oddly not very jalapeño-forward, more inner rib is not the answer. Instead, add more well-trimmed green flesh for stronger fresh-pepper character without deliberately adding more burn.

When the balance is right, the jalapeño shows up before the heat does: fresh and green at first, then warmer as you finish the bite.

A hotter batch is especially good beside this cold cucumber salad, which gives the table something crisp and vinegary between rich, peppery bites.

Fresh or Pickled Jalapeño?

Fresh jalapeños give the cleanest green-pepper flavor and a little bite. Pickled jalapeños bring more acidity, salt and a softer texture, so drain them before measuring. Using mostly fresh pepper with a smaller amount of pickled jalapeño gives you both green flavor and a brighter tang.
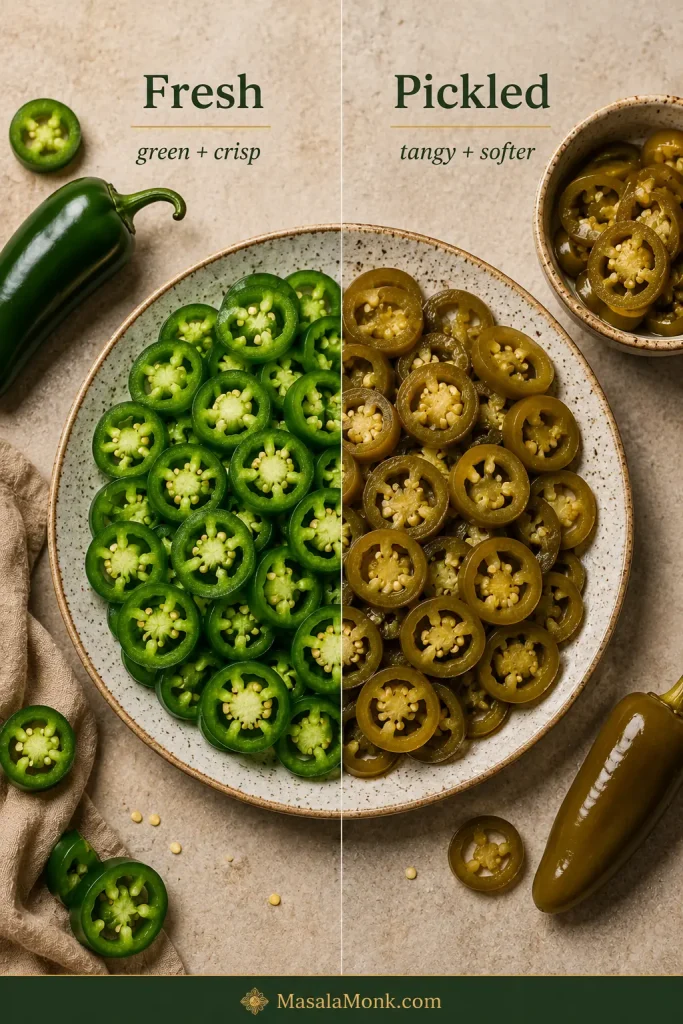
Comparison of bright fresh green jalapeño slices beside softer olive-green drained pickled jalapeño slices.
Pickled jalapeño softens into the creamy base more readily, while fresh pieces keep more bite and definition. That texture difference matters as much as the extra tang.

Handling hot peppers? Avoid touching your eyes or face while chopping. Wash your knife, board and hands well afterward; gloves are useful if chile oils tend to irritate your skin.

Why the Creamy Base Works

Cream Cheese, Sour Cream and the Right Consistency

One 227 g / 8 oz block of cream cheese gives the dip the tangy richness associated with jalapeño poppers without burying 400 g of corn. The ½ cup sour cream loosens the base just enough and adds another layer of tang, helping the warm dip stay pleasant to serve as the cream cheese naturally firms.

The result should feel creamy around the kernels rather than like the corn has disappeared into a bowl of melted cheese. The kernels should still taste sweet and distinct inside all that richness.
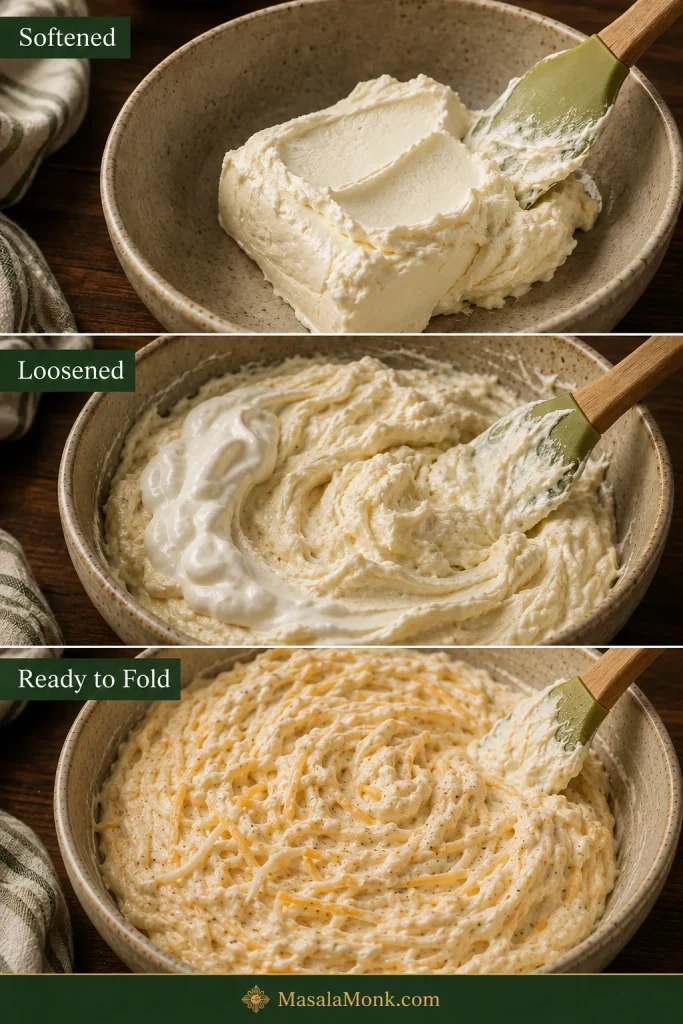
Three-stage guide showing softened cream cheese, sour cream being mixed into it, and a thick pale cheese base with shredded cheese and seasonings ready for the corn.
Look for a base that holds a soft ridge when the spatula passes through it. That gives the corn somewhere to sit rather than letting the kernels disappear into a loose cheese sauce.

Monterey Jack Melts; Cheddar Brings the Cheese Flavor

Monterey Jack or Colby Jack melts quietly into the background, while sharp cheddar brings the more noticeable cheese flavor. Freshly shredded block cheese generally melts more smoothly than heavily coated pre-shredded cheese, though bagged cheese is fine when that is what you have.

Bacon Is Here for Smoke and Crunch

Bacon is optional here. It brings smoke, salt and crisp little pieces that stand out against the creamy cheese. Stir most of it through and save a little for the top, where it has a better chance of staying crisp.

How to Make Jalapeño Popper Corn Dip: What to Look For

The timings help, but your eyes, ears and spoon tell you more.

Before the Dairy Goes In: Listen for the Sizzle

At first, especially with frozen or canned corn, the skillet may look steamy and damp. As the loose water cooks away, the sound becomes a clearer sizzle. A few kernels will catch golden spots, the corn will smell sweeter and the jalapeño will smell less raw.

Stop there. You want hot corn with some bite left, not dried-out kernels.

Before and During Baking

Before it goes into the oven, the mixture should hold kernels throughout but still spread without wrestling the spatula. A little softness is fine. A genuinely soupy mixture needs attention before baking.
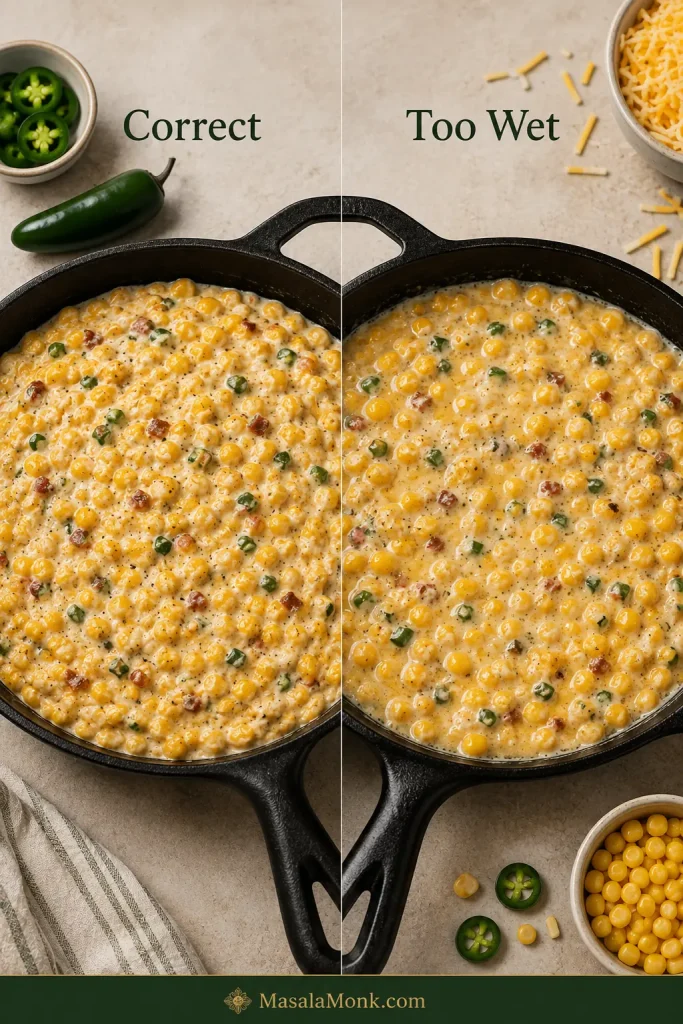
Side-by-side comparison of a thick corn-rich pre-bake dip with no pooled liquid and a looser mixture with visible liquid collecting around it.
Gloss from the dairy is normal; free liquid is the warning. Look for actual pooling around or between the kernels before deciding the pre-bake mixture is too wet.

In the oven, watch the edge and center separately. Gentle bubbles around the perimeter tell you the outside is hot. Disturb the middle with a spoon: it should feel creamy and fully heated rather than dense and cool.

The top does not need to look perfectly smooth. Yellow corn should still peek through the cheese, green jalapeño should be visible, and the skillet edge may have a few browned spots where everything met the hot pan.

Once the center is there, stop.
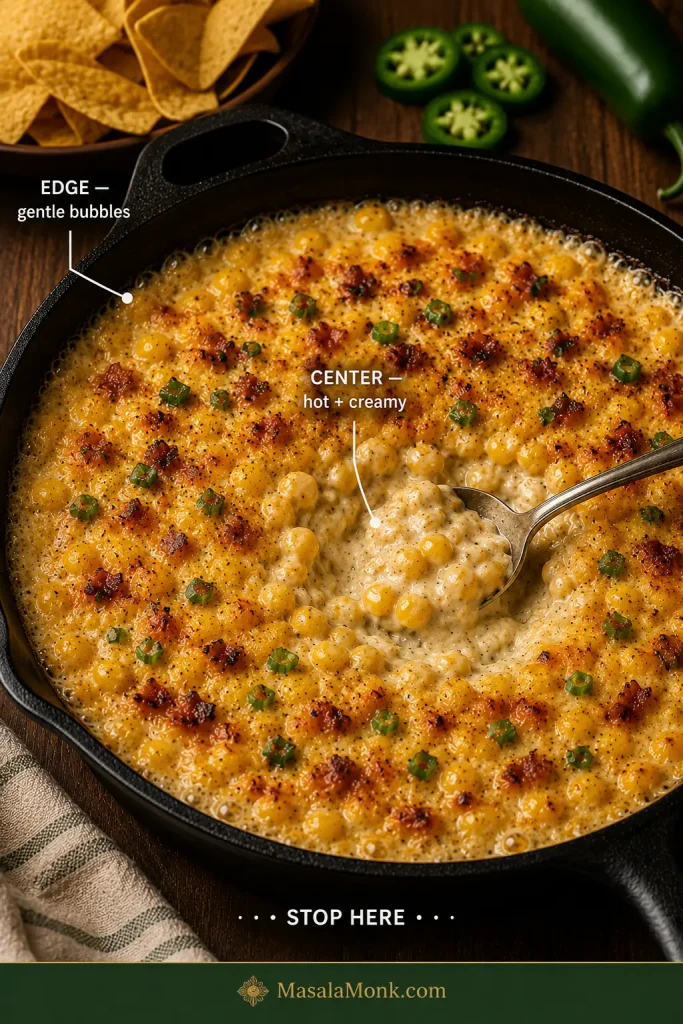
Baked corn dip in a cast-iron skillet with callouts identifying gentle bubbles at the edge and a spoon-revealed hot creamy center, plus a Stop here instruction.
Browning can lag behind doneness. If the center is already hot and creamy, waiting for a uniformly golden top can tighten the cheese and encourage greasy separation.

Give It Five Minutes Before You Judge It

Fresh from the oven, hot dairy and melted cheese are at their loosest. If the dip looks a little more relaxed than you expected, give it several minutes before changing anything.

As it settles, the cheese hugs the corn more closely and the serving texture gets fuller. Left on a cool table long enough, it eventually heads the other way and starts firming up.
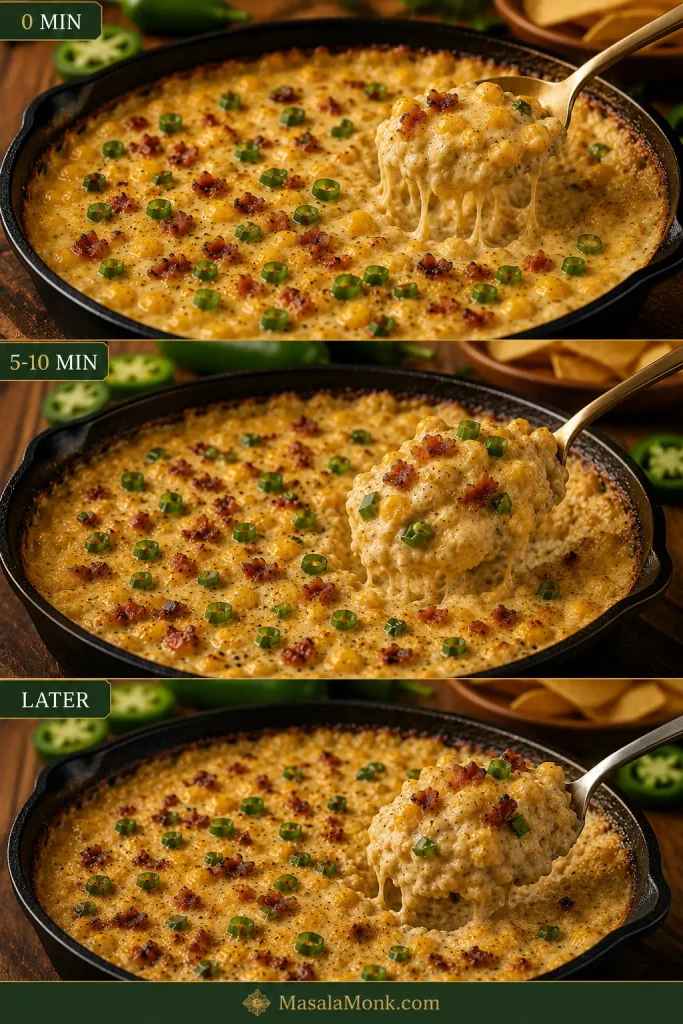
Three-stage timeline of the same baked corn dip labeled 0 minutes, 5–10 minutes and later, showing the texture becoming progressively firmer as it rests.
Resting fixes temperature-driven looseness, not excess water. If a real puddle remains after the planned rest, waiting longer is unlikely to solve the same problem.

The useful test

The Scoopability Test

Push a sturdy tortilla chip through the warm dip. A good scoop should bring up creamy cheese, several kernels and visible jalapeño.

  • A dip that runs straight off the chip may simply need the planned few minutes of rest.
  • A dip you have to force the chip through may have cooled too far.
  • A bite that is mostly cheese with almost no corn has lost the part that makes this corn dip.

The sweet spot is substantial but easy to scoop: the dip stays on the chip and the kernels come with it. That matters even more at a party, where the people coming back twenty minutes later deserve a good scoop too.
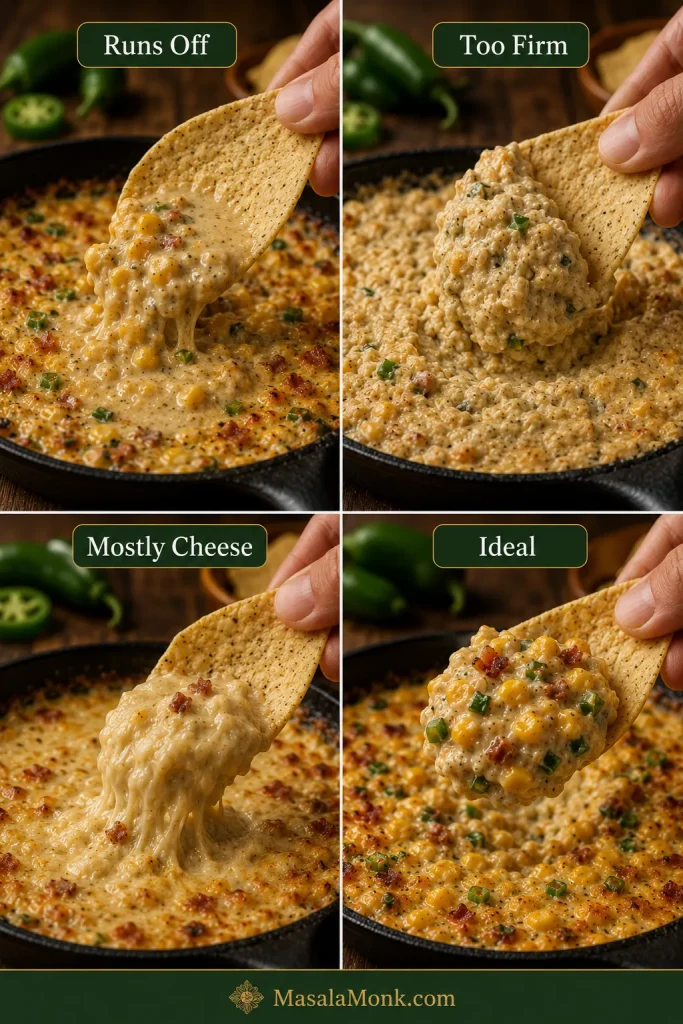
Four-panel scoopability comparison labeled Runs Off, Too Firm, Mostly Cheese and Ideal, using tortilla chips to show visibly different corn-dip textures.
This test separates temperature problems from balance problems: looseness or stiffness can change with resting and warming, while a scoop that is mostly cheese has lost the corn-dip ratio itself.

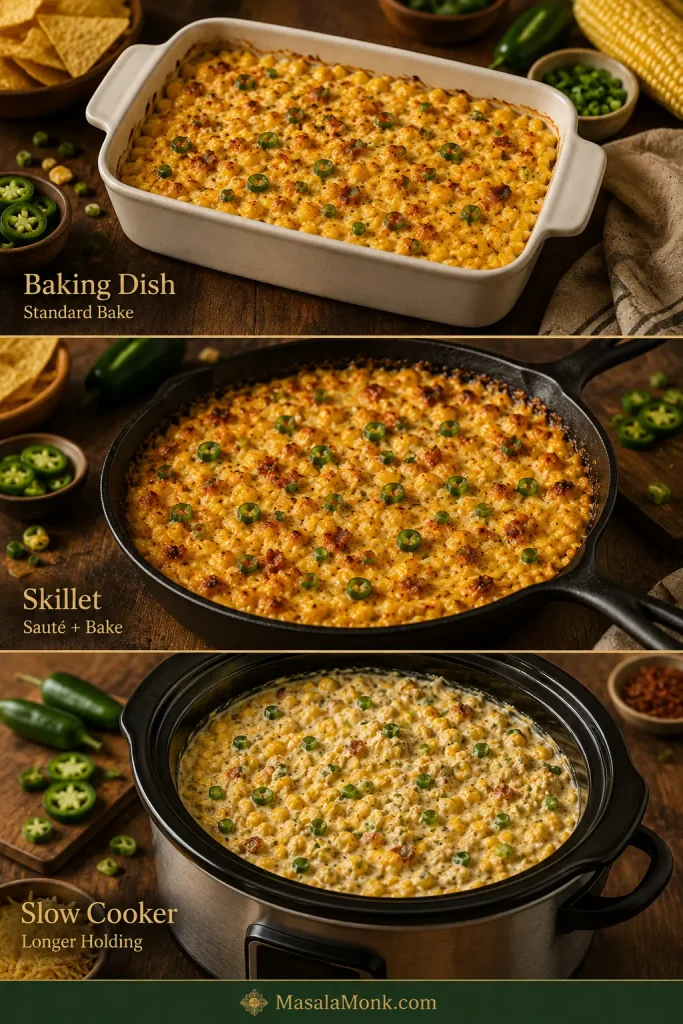
Baking Dish, Oven-Safe Skillet or Slow Cooker?

A baking dish and an oven-safe skillet both give you the oven-baked version; the difference is mostly cleanup and presentation. The slow cooker earns its place when the dip needs to stay hot for a longer gathering.

Swipe or scroll sideways to see the full table.

Setup Best for Main advantage Watch for
Baking dish The standard version Easy assembly and even oven heating A deeper dish can take longer than a wide, shallow one
Oven-safe skillet Fewer dishes Sauté and bake in the same pan Take the skillet off the burner before the dairy goes back in
Slow cooker Parties and potlucks Easy hot holding after the dip is ready Overheated edges and gradual thickening during a long hold
Three-way comparison of jalapeño corn dip in a ceramic baking dish, cast-iron skillet and slow cooker; the baked versions are browned while the slow-cooker version remains creamy.
The slow cooker is the outlier: choose it for a long, creamy serving window rather than expecting the browned surface of an oven-baked dip.

Slow Cooker: Best for a Longer Party

Use roughly a 3- to 4-quart slow cooker. Cook the corn and jalapeños first if possible, then combine them with the cream cheese, sour cream, shredded cheese, seasonings and optional cooked, crumbled bacon.

Cook on LOW and start checking around 1½ hours. Stir once the cheese has softened enough to combine, then continue until the center is thoroughly hot and creamy. Slow cookers vary enough that those cues matter more than a promised finish time.

Once hot, switch to WARM and stir periodically. Crockpot buffalo chicken dip gives the table something tangier alongside it when you want a second warm dip.

Open slow cooker containing creamy corn and jalapeño dip with visible stir marks, yellow kernels and green pepper pieces, without a browned crust.
A spoon trail should slowly fill back in rather than leaving a dry, crusted channel. Stir periodically so the hotter edges do not thicken long before the center does.

Melty Cheese or Crunchy Jalapeño Popper Finish?

A simple layer of melted cheese gives you the easiest serving texture. Nothing else is required.

If the crisp shell of a breaded jalapeño popper is part of the appeal, mix 25 g / ⅓ cup panko with 14 g / 1 tablespoon melted butter and scatter it over the cheese before baking.

Crushed tortilla chips work too. Add them closer to the end so they keep more crunch.

Three versions of baked corn dip labeled Melty, Panko and Crushed-Chip, showing melted cheese, golden breadcrumbs and irregular broken tortilla-chip toppings.
Panko gives a fine, even crunch; crushed tortilla chips give larger salty shards but soften faster. That makes the crushed-chip finish best when it goes on late.

If you would rather keep the creamy filling inside the peppers, these baked jalapeño poppers give you that crisp-edged, cheesy bite in a more traditional form.

Make Ahead, Transport and Keep Warm

A hot dip earns its place at a party when most of the work happens before people walk through the door. Ideally, you are slicing green onions or opening chips when the doorbell rings—not standing over the stove trying to rescue the texture.

Make It Up to a Day Ahead

Cook the bacon, corn and jalapeños, assemble the dip in its baking dish, cover and refrigerate for up to one day. Keep panko, crushed chips, reserved bacon and fresh green onion separate so they stay crisp and bright.

An easy cheese ball can handle the cold-appetizer slot while this dip waits for its turn in the oven.

Baking From Refrigerator-Cold

A refrigerated batch will need more time than one you have just assembled. Start checking about 5 minutes later, then follow the bubbling edges and hot, creamy center rather than adding a fixed number of extra minutes. Deep, very cold dishes can take longer.

Using glass bakeware? Follow the manufacturer’s instructions for moving it from refrigerator temperature into a hot oven; avoid sudden temperature changes unless the manufacturer specifically says the dish is designed for them.

Taking It Somewhere Else

An oven at the destination makes life easiest: carry the assembled dip cold, keep it properly chilled and bake it when you arrive.

For food that needs to travel hot, use a suitable insulated hot-food carrier and check that it stays at a safe temperature. At the destination, a plugged-in, preheated slow cooker can take over the hot-holding job.
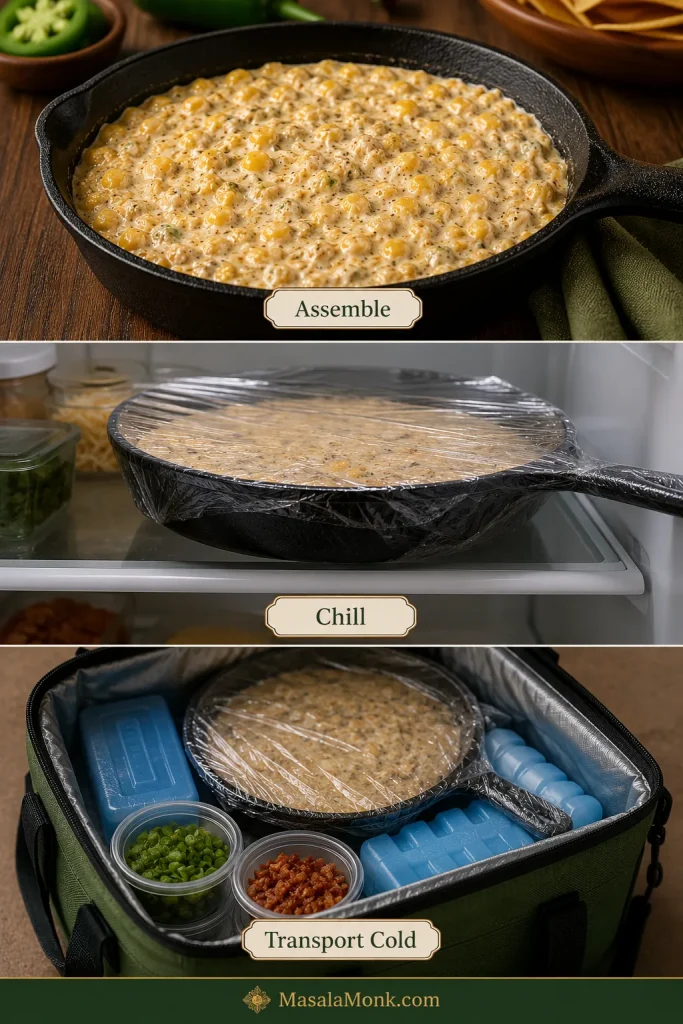
Three-stage guide showing an assembled corn dip, the covered skillet chilling in a refrigerator, and the covered dip packed in an insulated cooler with blue ice packs and separate garnish containers.
Pack garnishes and crisp toppings separately from the chilled dip. The carrier protects temperature; keeping those finishing pieces apart protects their crunch and freshness.

Keep It Safely Hot

Keeping it out for a long party?

Keep hot dip at 140°F / 60°C or warmer. A slow cooker or warmer can help, but the word Warm on the control is not a temperature reading, so use a food thermometer when the dip will be sitting for a while.
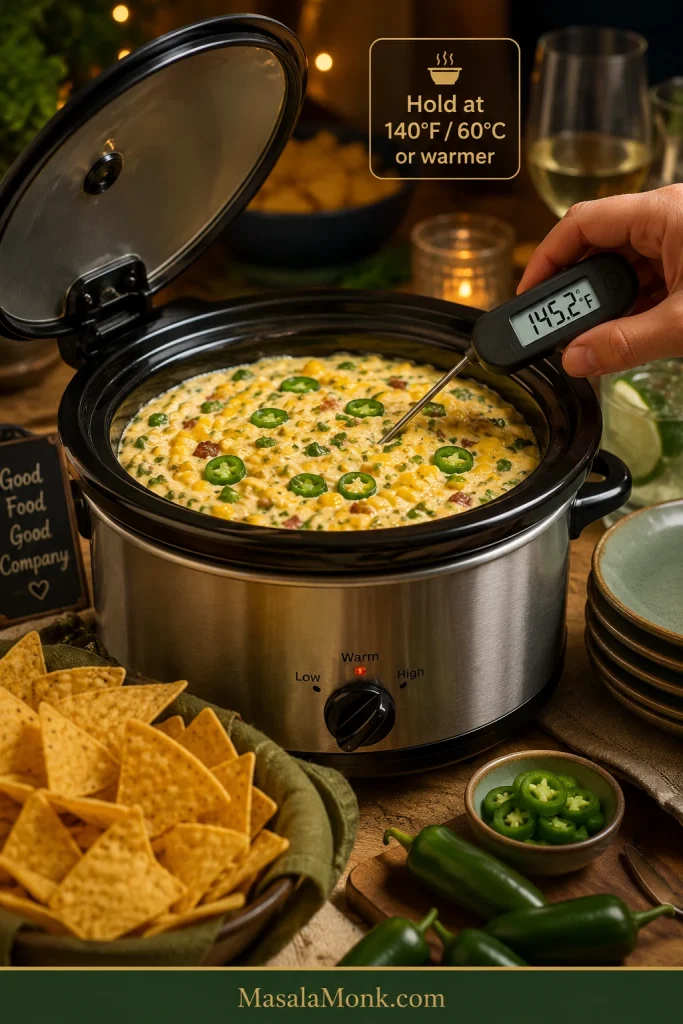
Slow cooker filled with creamy corn dip at a party table while a digital probe thermometer in the dip reads 145.2 degrees Fahrenheit; text says to hold at 140°F or 60°C or warmer.
For a long serving window, stir periodically and recheck the dip’s temperature. The slow-cooker dial tells you the appliance setting; the thermometer tells you what is happening in the dip.

If the dip is not being kept safely hot, do not leave it at room temperature for more than 2 hours; that drops to 1 hour above 90°F / 32°C. The same timing matters before leftovers return to the refrigerator. See the USDA food-safety guidance for the underlying holding and leftover recommendations.

For a second dip on a long grazing table, I would go cold rather than add another hot-holding job. A 7 layer dip gives you beans, salsa, sour cream and fresh toppings beside this hot skillet.

Reheating Leftovers for Hot Holding

Using yesterday’s dip in a slow cooker? Reheat the refrigerated dip first in the oven, microwave or on the stovetop until the center reaches 165°F / 74°C. Then transfer it to a preheated slow cooker for safe hot holding.

Jalapeño Popper Corn Dip Troubleshooting

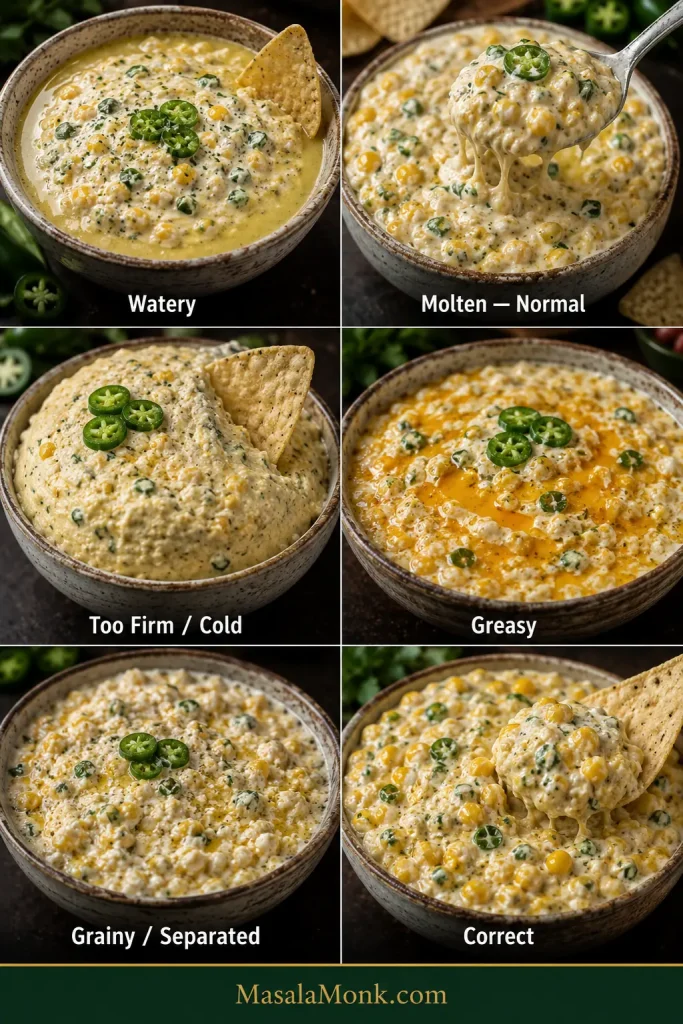
If the texture or heat is not where you wanted it, the fix is usually simple. Most problems come back to water, temperature, fat or pepper balance.

Texture and Consistency Problems

Swipe or scroll sideways to see the full troubleshooting table.

Problem Likely cause Fix now Next time
Watery Wet canned/frozen corn or another loose addition Keep it uncovered and hot briefly, then stir Drain well and sauté until the pan no longer looks wet
Loose straight from oven The dairy and cheese are extremely hot Rest 5–10 minutes first Judge the texture after the short rest
Too thick The dip has cooled or the base is overly firm Warm and stir first. If a full batch is still too thick once hot, mix in 1 tablespoon sour cream or milk and check again. Keep it warm during a longer serving window
Greasy Excess bacon fat, too much cheese or prolonged heat Blot obvious surface fat and stir gently Drain bacon well and stop baking once the center is hot
Grainy Overheated cheese or a less-smooth melting cheese Lower the heat and stir gently Use freshly shredded melting cheese and avoid extended high heat
Chips keep breaking The dip has cooled too far or the chips are too delicate Warm the dip and switch to sturdy chips Keep the dip warm and serve with thicker tortilla or corn chips
Six-panel troubleshooting guide comparing watery, molten-normal, too-firm or cold, greasy, grainy or separated, and correct jalapeño corn dip textures.
Read the appearance before choosing a fix: pooled liquid points toward water, visible oil toward fat separation, graininess toward broken cheese, while a glossy molten dip can still be completely normal.

Heat and Pepper Balance Problems

Problem Likely cause Fix now Next time
Bland Not enough seasoning or fresh pepper character Add salt cautiously, green onion or finely chopped jalapeño Taste the fully mixed base before baking
Too spicy Hot peppers or too much inner rib/tissue Fold in more corn and creamy base if available Trim the peppers more thoroughly
Not spicy enough Mild peppers or heavily trimmed jalapeños Add jalapeño, pickled jalapeño or hot sauce at the table Leave more inner rib attached in one pepper
Hot but not jalapeño-forward Heat is present but there is not enough green pepper flesh Add finely chopped, well-trimmed fresh jalapeño Increase the green flesh while controlling heat separately

Substitutions and Variations That Still Make Sense

  • Pickled jalapeño for some of the fresh: drain it well and expect more tang, salt and softness.
  • Pepper Jack for part of the Monterey Jack: adds more chile heat while keeping a similarly melty texture.
  • Crushed tortilla chips for panko: more corn flavor and a chunkier crunch. Add them late enough that they do not soften completely.

Those swaps still taste like the same dip. Once tomatoes, lime, cotija, salsa or a lot of extra liquid start piling in, you are heading toward a different recipe—and that is fine.

Can I add Rotel? You can, but tomatoes and green chiles pull the dish in a different direction and bring extra liquid with them. If that molten tomato-and-chile combination is what you are after, a Rotel dip is built around it from the start.

What to Serve With Jalapeño Popper Corn Dip

Do not overthink the dippers. Put out a generous bowl of sturdy tortilla chips and one fresh, crunchy option and you are basically done.

  • Thick tortilla chips: the default. They cut through a warm cheese dip far better than delicate restaurant-style ones.
  • Corn chips: compact, strong and especially useful once the dip becomes a little firmer.
  • Toasted baguette or crostini: substantial enough for a panko-topped batch.
  • Celery: cold and crisp against the rich dairy.
  • Bell pepper strips: sturdy, fresh and naturally sweet.
  • Carrot sticks: cut them thick enough to dip rather than into delicate matchsticks.
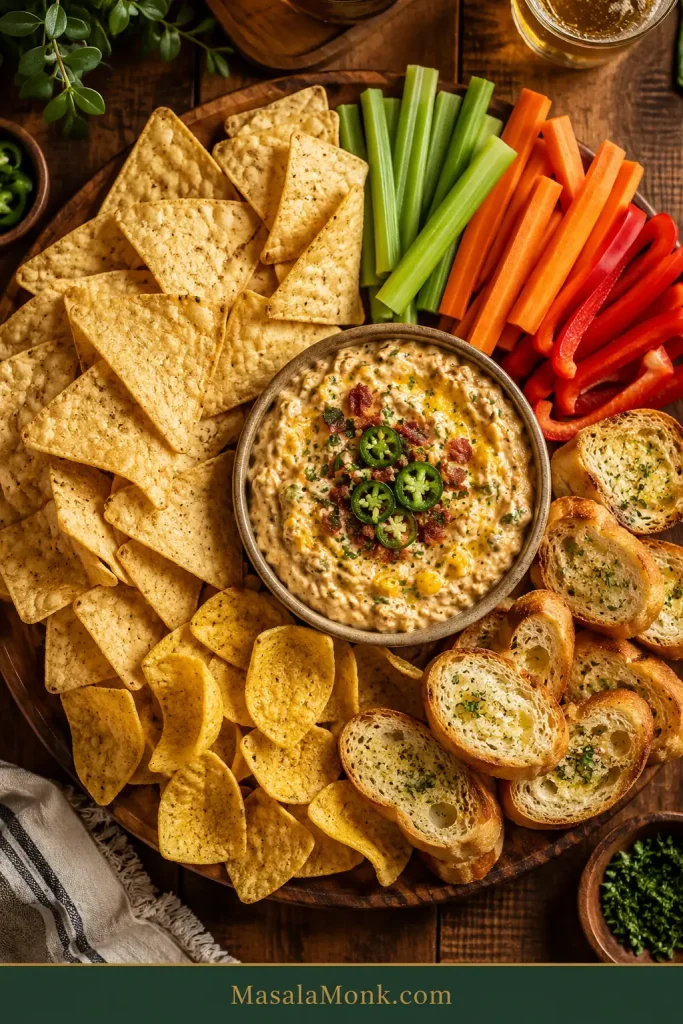
Overhead party platter with creamy jalapeño corn dip surrounded by thick tortilla chips, corn chips, celery sticks, carrot sticks, red bell pepper strips and toasted baguette slices.
As the dip cools and firms, corn chips and crostini become especially forgiving because they resist snapping better than delicate chips; crisp vegetables keep providing a fresh contrast throughout the serving window.

Air fryer chicken wings bring crackly skin and browned edges to a table that already has plenty of soft, melted cheese.

A fresh mango salsa takes things in the other direction, with lime, fruit, onion and jalapeño giving the same tortilla chips something cool and bright to pick up.

How to Store, Freeze and Reheat the Dip

Refrigerator: Refrigerate leftovers promptly in shallow covered containers and use them within 3–4 days.

Oven: Place the dip in an oven-safe dish, cover loosely and warm at about 325°F / 165°C until the center reaches 165°F / 74°C. Uncover near the end if you want to refresh the surface.

Microwave: Heat smaller portions in short bursts, stirring between rounds so the edge does not become greasy while the middle stays cold. Reheated leftovers should reach 165°F / 74°C.

If the texture needs help after reheating: stir first. If a full batch is still too thick once hot, begin with 1 tablespoon sour cream or milk. For a small bowl, start with a teaspoon and mix completely before adding more.
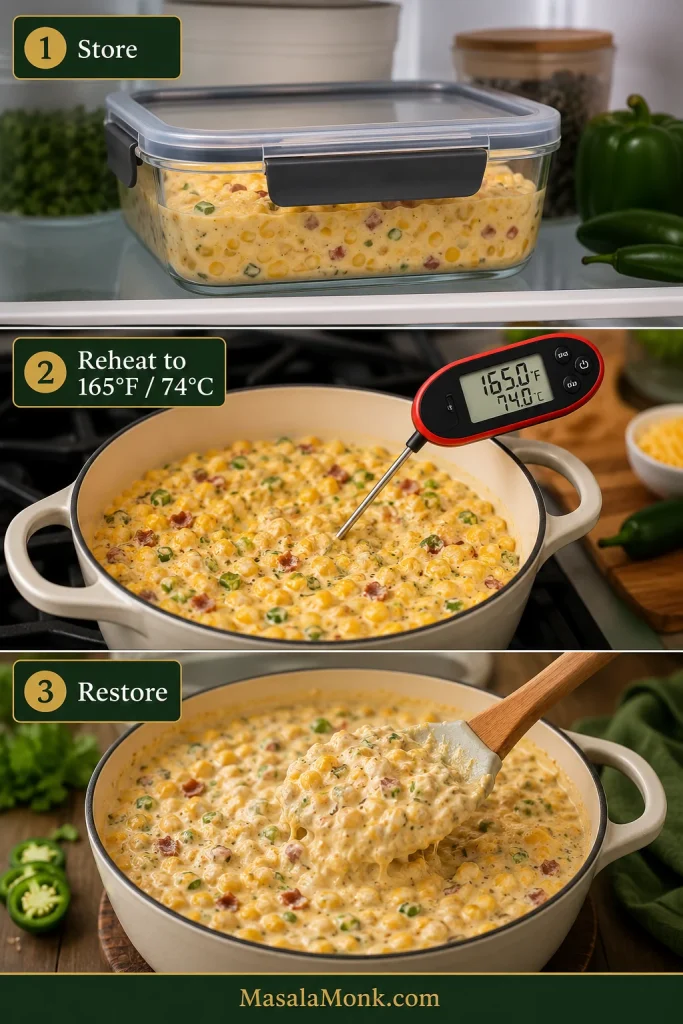
Three-step guide showing leftover corn dip in a covered glass container, reheating in a pot with a thermometer reading 165°F and 74°C, and the creamy dip being stirred after reheating.
Judge leftover texture only after reheating and stirring. A cold cream-cheese dip naturally looks firmer, so thinning it before it is fully hot can leave you with a looser dip than you intended.

Can You Freeze It?

I would not freeze this dip when the smoothest texture matters. It can be frozen, but cream cheese and sour cream may look grainier or slightly separated after freezing and thawing.

For a party, assembling the dip a day ahead and refrigerating it is the better plan. If you do freeze it, leave off the crisp topping, thaw in the refrigerator and expect some texture change after reheating.

When the First Scoop Is Right

This dip does not need the biggest possible pile of cheese to feel indulgent. It needs sweet kernels that still have a little bite, jalapeño that tastes green and lively, and enough creamy cheese to hold everything together without turning the bowl into one heavy, uniform mouthful.

When those pieces line up, you notice it immediately: corn in every scoop, jalapeño before the heat, browned cheese around the edge and little crisp bits of bacon or panko against the creamy center. Give it a few quiet minutes out of the oven, scatter over the scallions and bring it to the table warm.
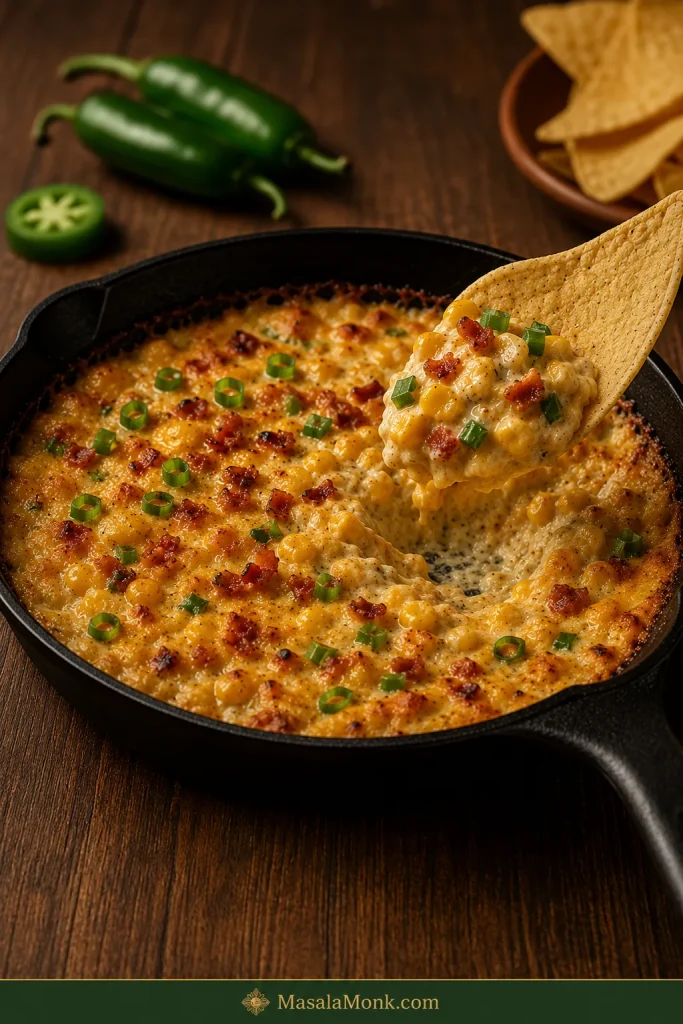
Warm baked jalapeño corn dip in a cast-iron skillet with a large scoop removed and a tortilla chip holding a creamy scoop of corn, bacon and green garnish.
The goal is not a dramatic cheese pull; it is a skillet that still gives up a clean, corn-rich scoop after the first rush at the table has passed.

And put the thicker chips out from the beginning. Nobody should have to excavate this with a broken triangle.
Posted on — Leave a comment

Slow Cooker White Chicken Chili: Creamy, Easy and Never Watery

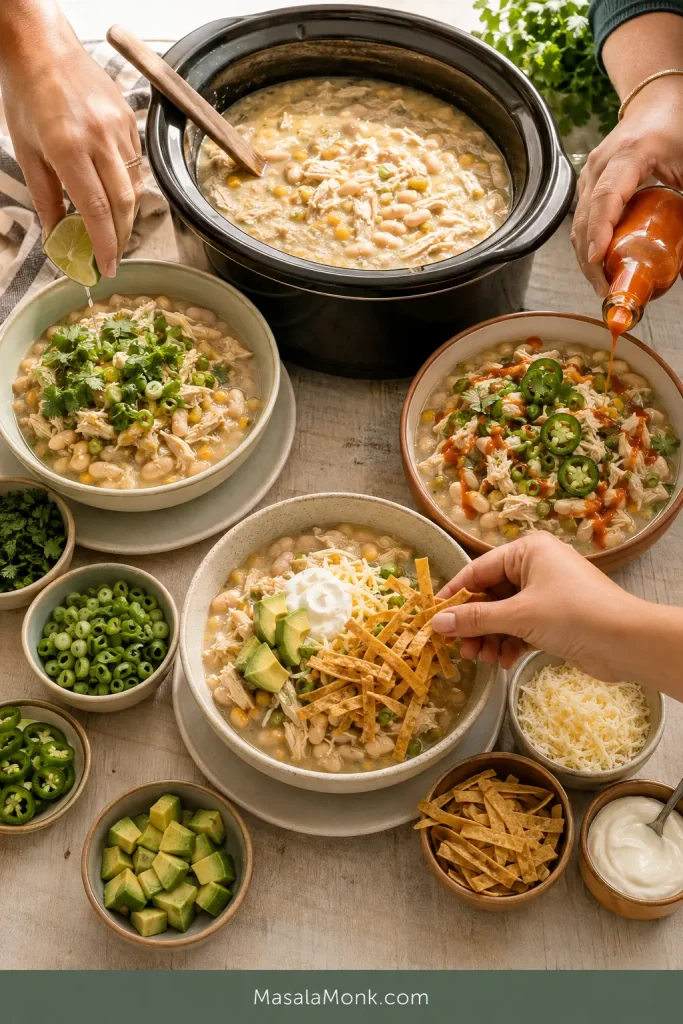
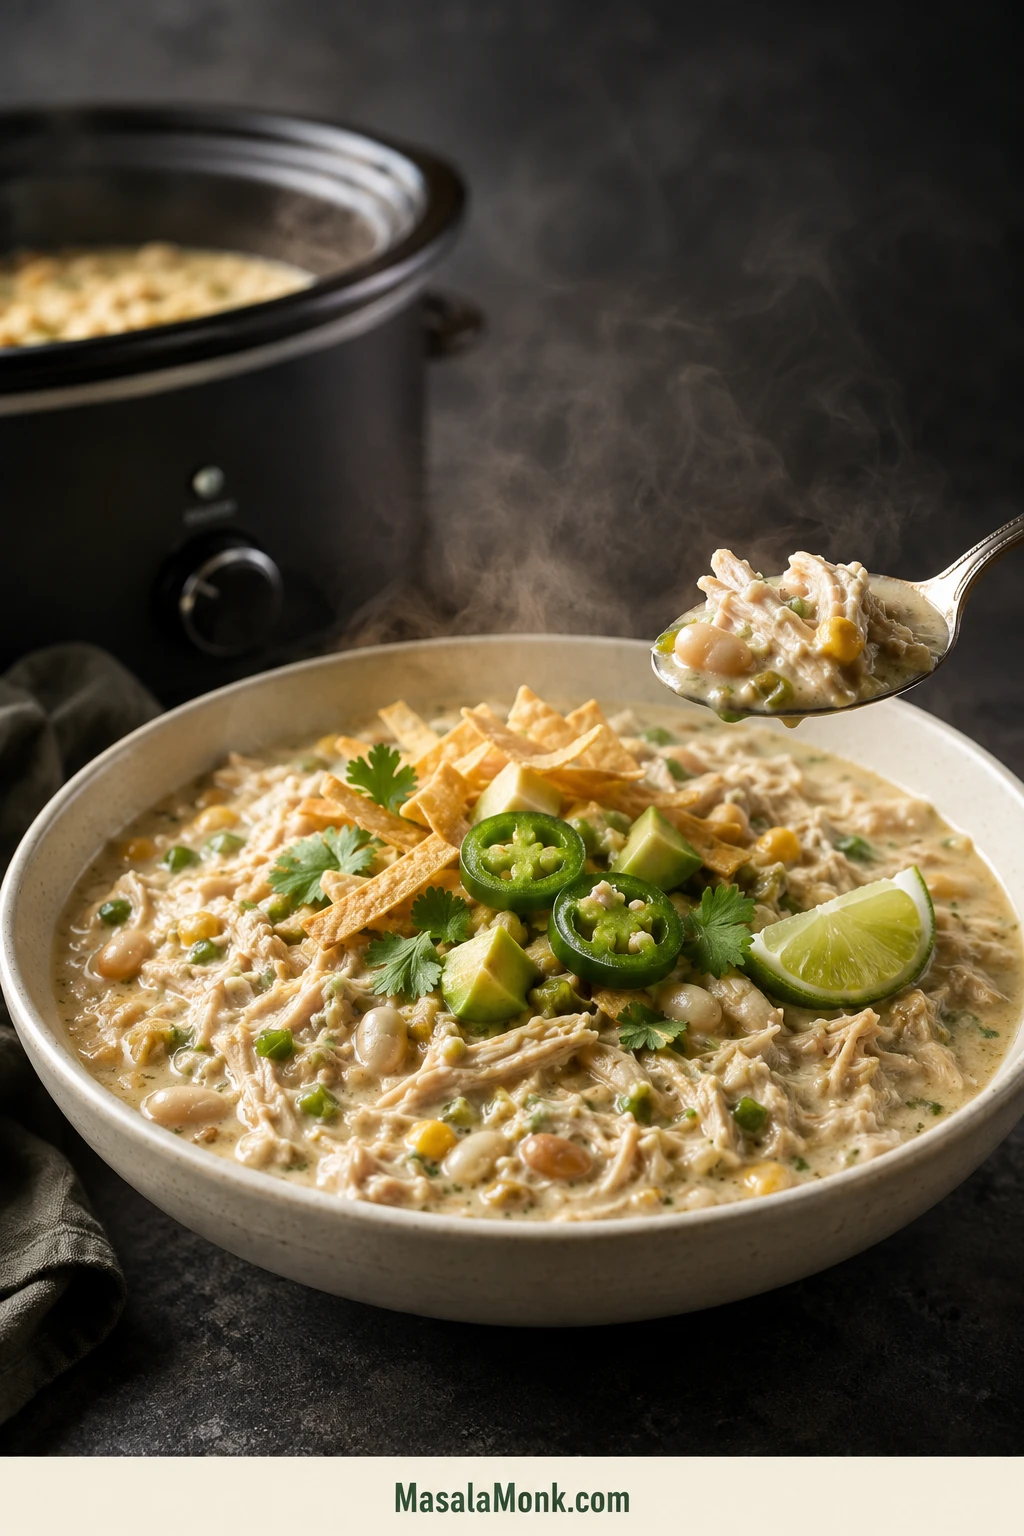
Bowl of creamy white chicken chili with shredded chicken, white beans, green chiles, corn and fresh garnishes beside the slow cooker.

Lift the slow-cooker lid and you should find creamy white chicken chili—not pale chicken soup with beans drifting through it.

This version keeps the chicken moist and gives the broth a thick, spoon-coating texture without relying on an entire block of cream cheese. The chicken comes out as soon as it is ready, while blended white beans pull the broth together near the end.

Every bowl brings tender shreds of chicken, creamy whole beans and mild green-chile warmth, with fresh lime keeping the richness lively. Set out avocado, jalapeño and tortilla chips and one mild pot can still give everyone the bowl they want.

Most of the cooking is hands-off; the useful work comes in a 10–15-minute finish.

The chicken decides when the chili is cooked. The beans and final additions decide how creamy the bowl becomes.

Quick Answer: The Thick, Creamy Route

For a 5–6 quart slow cooker, use 1½ lb / 680 g chicken, three 15 oz / 425 g cans of white beans and 2½ cups / 590 ml broth. Two cans cook in the base. From the third, one cup is blended into the broth and the remaining beans return whole.
Check the chicken pieces individually and take each one out when its thickest part reaches 165°F / 74°C. Return the shredded meat with the beans, whisk softened cream cheese with hot chili liquid and let the chili rest uncovered before adding extra broth.

Initial prep
15 minutes

Active finishing
10–15 minutes

High setting
Begin checking at 2½ hours

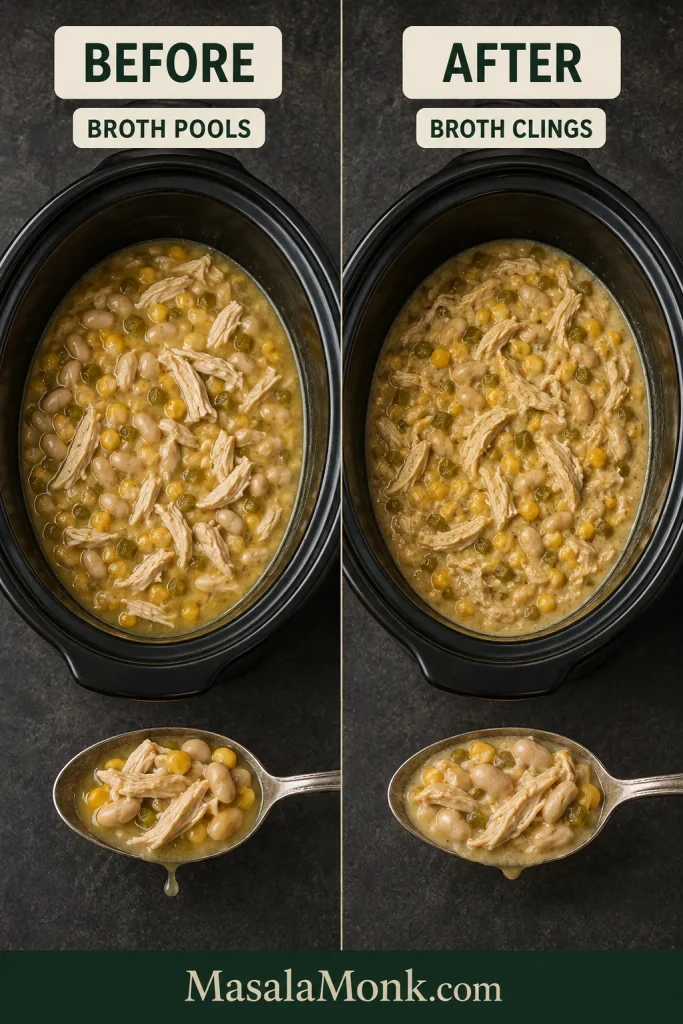
Low setting
Begin checking at 4 hours

Yield
About 8 servings

Cooker size
5–6 quart

Slow cookers and chicken pieces vary. Start checking at the earlier time; the thermometer and texture decide when each piece comes out.

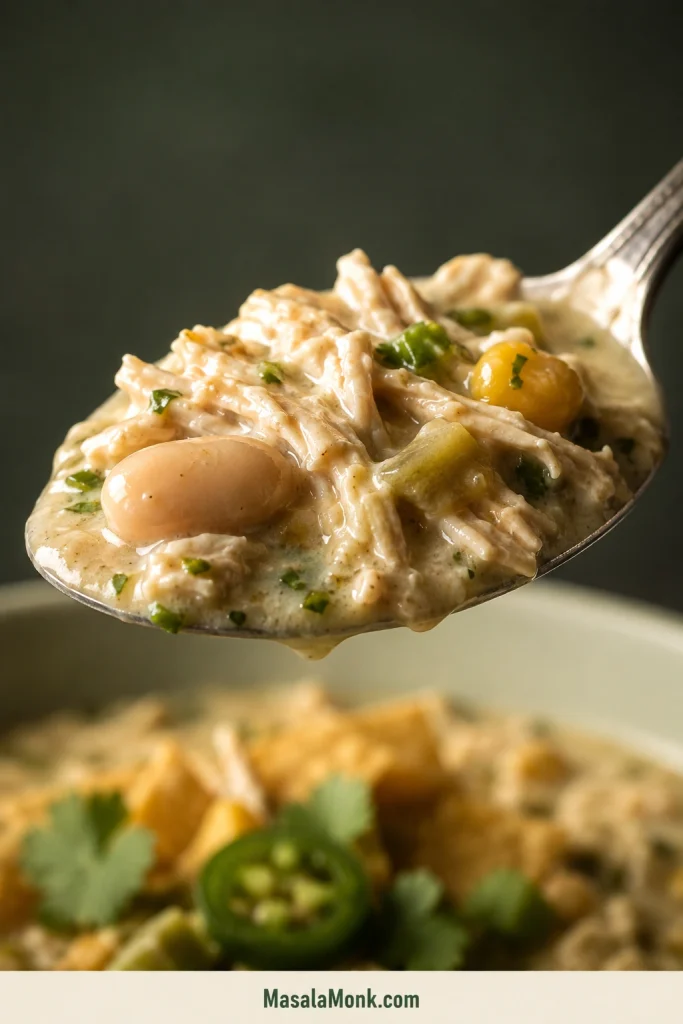
Spoonful of white chicken chili showing shredded chicken and whole white beans held together by creamy broth.
Tilt the spoon: the broth should travel briefly with the chicken and beans before slipping back into the bowl.

Slow Cooker White Chicken Chili Recipe

Most of the cooking is hands-off. The short finish leaves you with moist shredded chicken, whole creamy beans and a broth that clings rather than pools.

Prep time: 15 minutes
Slow-cooker time: About 2½–3½ hours on High or 4–6 hours on Low
Finishing time: 10–15 minutes
Rest: 10 minutes
Total time: About 3–4¼ hours on High or 4½–6¾ hours on Low
Yield: About 8 main-dish servings

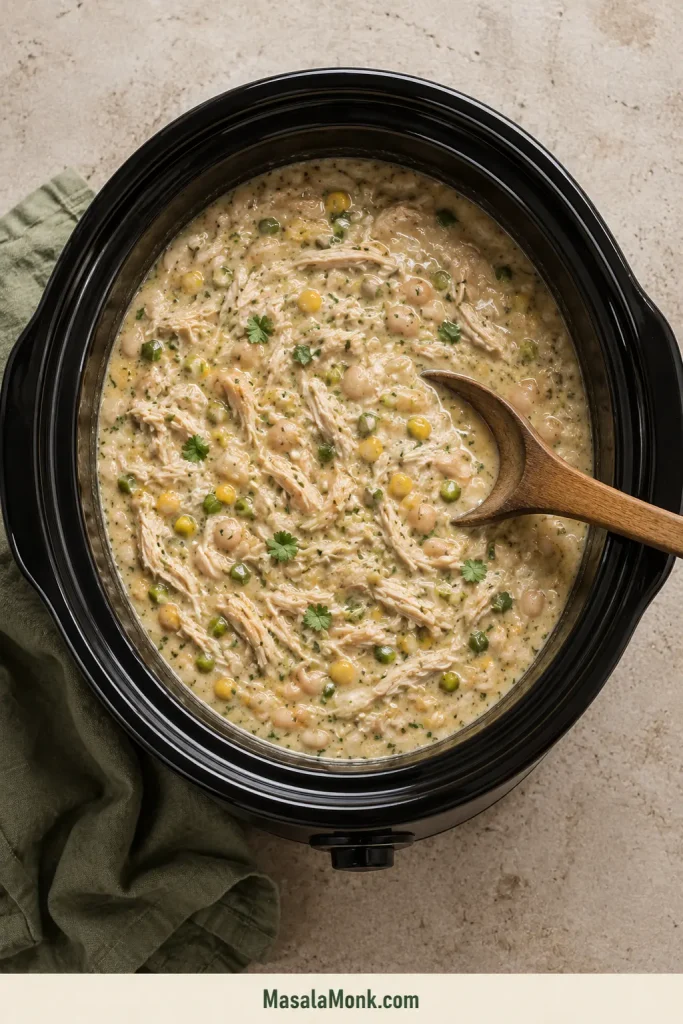
Finished white chicken chili in a black slow cooker with distinct shredded chicken, white beans, corn and green-chile pieces.
A finished pot should keep chicken and beans suspended through the creamy broth rather than beneath a layer of liquid.

Equipment

  • 5–6 quart slow cooker
  • Instant-read food thermometer
  • Can opener
  • Cutting board and two forks
  • Blender, immersion blender or potato masher
  • Medium bowl and whisk
  • Ladle

Ingredients

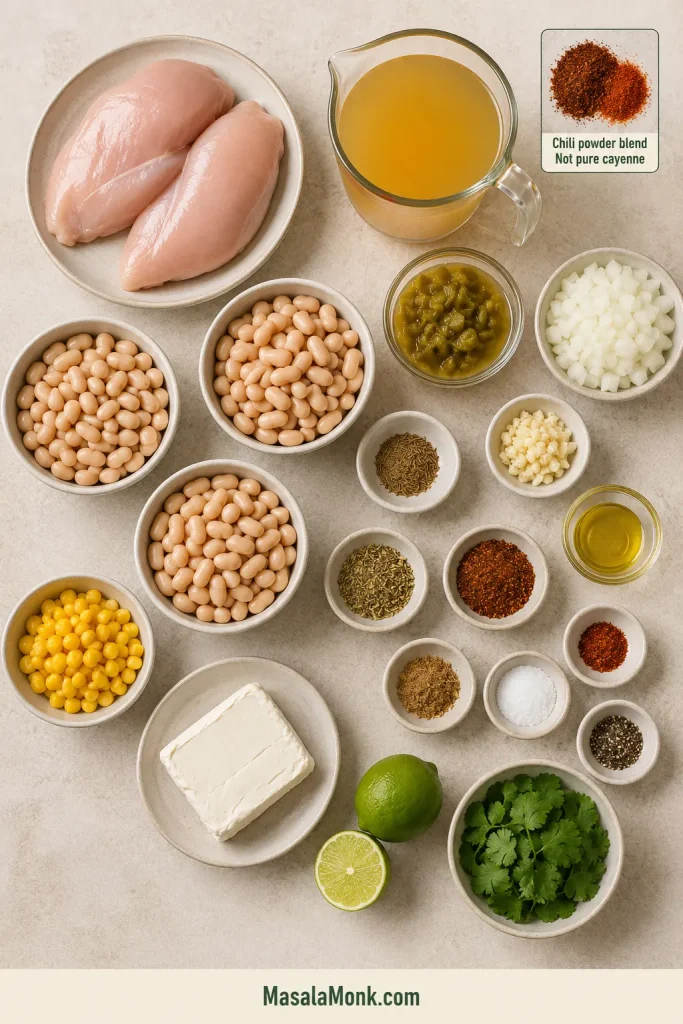
Chicken, white beans, broth, green chiles, onion, garlic, cream cheese, corn, lime and seasonings arranged for white chicken chili.
Low-sodium broth leaves room to adjust the final seasoning after the beans, green chiles and cream cheese are in.

For the slow-cooker base

  • 1½ lb / 680 g boneless, skinless chicken breasts, preferably of similar thickness
  • 2 cans white beans, 15 oz / 425 g each, drained and rinsed
  • 1 medium yellow onion, about 6–7 oz / 170–200 g, finely diced
  • 4 garlic cloves, minced
  • 2 cans mild diced green chiles, 4 oz / 113 g each, undrained
  • 2½ cups / 590 ml low-sodium chicken broth
  • 1 teaspoon / about 1 g dried oregano
  • 2 teaspoons / about 4 g ground cumin
  • 1 teaspoon / about 3 g mild US-style chili powder blend, not pure cayenne
  • ½ teaspoon / about 1 g ground coriander
  • ¼ teaspoon cayenne pepper, optional
  • 1 teaspoon / about 5 g fine sea salt, plus more to taste
  • ½ teaspoon / about 1 g black pepper
  • 2 teaspoons / 10 ml neutral oil, optional, for sautéing the onion

Kosher salt varies considerably by brand. When using it instead of fine sea salt, season by taste rather than assuming an equal-volume swap.

For thickening and finishing

  • 1 can white beans, 15 oz / 425 g, drained and rinsed
  • 1 cup / about 150 g frozen or well-drained canned corn, optional
  • 4 oz / 113 g full-fat block cream cheese, softened
  • 1–2 tablespoons / 15–30 ml fresh lime juice
  • ¼–½ cup chopped fresh cilantro
  • Additional warm low-sodium chicken broth, if needed

Corn is optional. Drained canned corn only needs to heat through; frozen corn may need a few extra minutes.

Optional toppings

  • Diced avocado
  • Sliced fresh or pickled jalapeño
  • Chopped scallions
  • Monterey Jack or Pepper Jack
  • Sour cream or plain Greek yogurt
  • Crushed tortilla chips or tortilla strips
  • Fresh cilantro
  • Lime wedges
  • Hot sauce

Instructions

1. Build the slow-cooker base

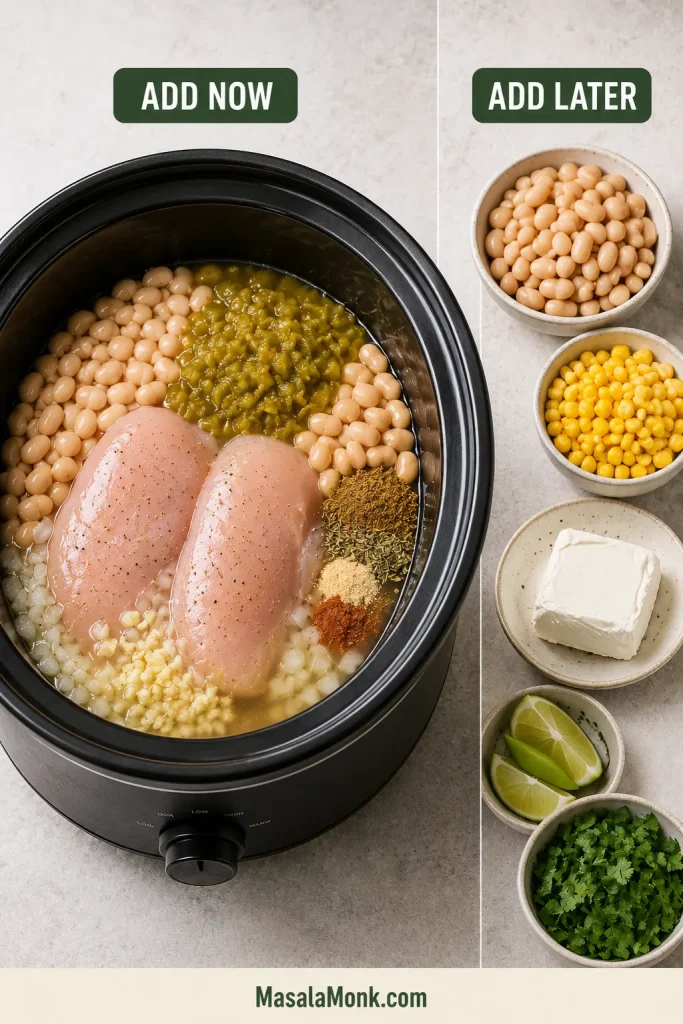
Guide separating ingredients added at the start of slow cooking from beans, corn, cream cheese, lime and cilantro added later.
Keep the third can of beans, corn, cream cheese, lime and cilantro aside for the finishing stages.

The default route is simple: use the onion, garlic and spices without sautéing them first.

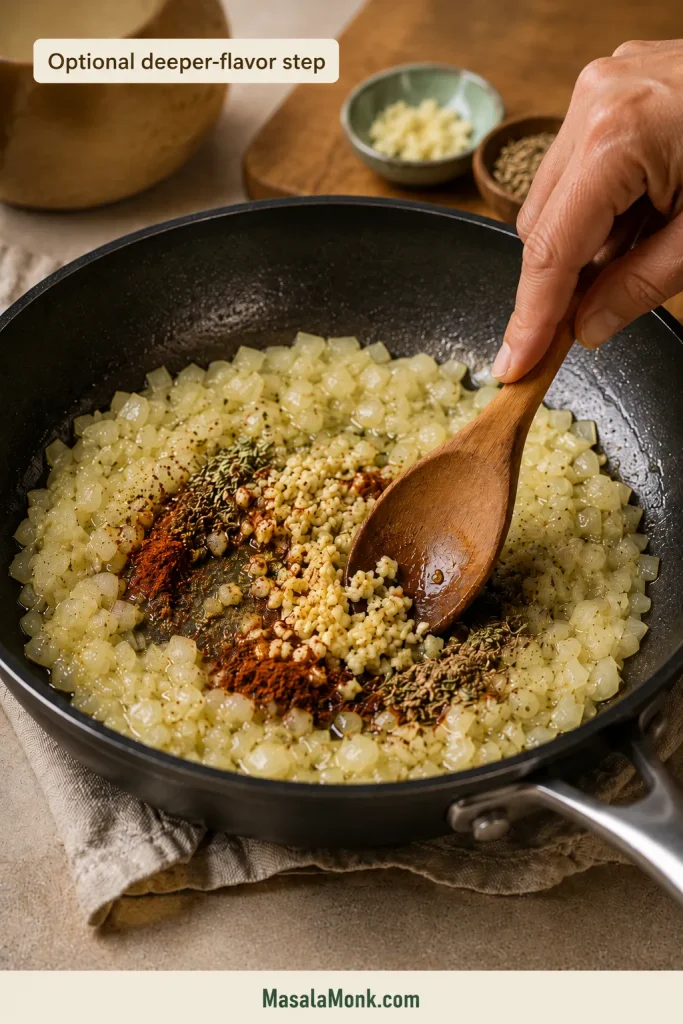
For deeper flavor and especially soft onion: heat the optional oil in a small skillet. Cook the onion for 3–4 minutes, then add the garlic and dry spices for 30 seconds. Transfer the mixture to the slow cooker.

Onion, garlic and spices sautéing in a skillet before being transferred to the slow cooker.
Aim for softened onion and fragrant spices with only light color; deep browning would shift the chili’s mild flavor.

Add the raw onion and garlic—or the sautéed mixture—to the slow cooker. Place the chicken breasts over them. If one breast is much thicker than the others, halve it horizontally or expect it to finish later.

Add two cans of beans, the undrained green chiles, broth, cumin, oregano, chili powder, coriander, cayenne if using, salt and black pepper. If the spices went into the skillet, do not add them again. Stir the beans and broth around the chicken.

Keep the third can of beans, corn, cream cheese, lime and cilantro out for now.

2. Cook until the chicken is ready

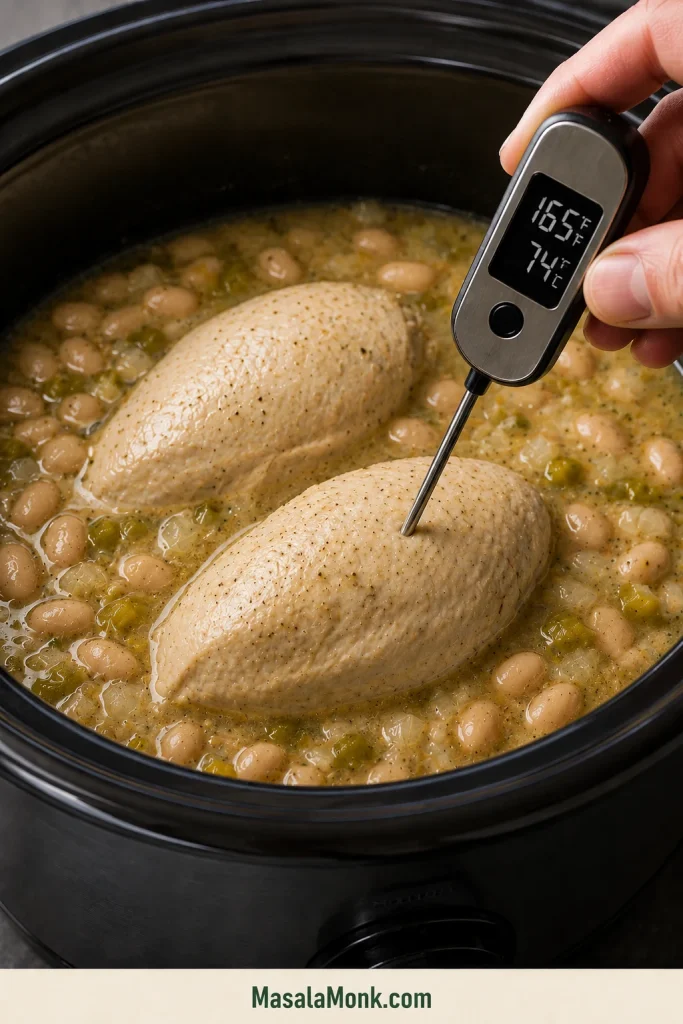
Instant-read thermometer inserted into the thickest part of chicken in the slow cooker, reading 165°F or 74°C.
Place the thermometer tip in the center of the thickest part of each chicken piece, away from the hot broth.

Cover and cook until the thickest part of each piece reaches 165°F / 74°C and separates easily under light pressure.
  • On High, begin checking at about 2½ hours.
  • On Low, begin checking at about 4 hours.

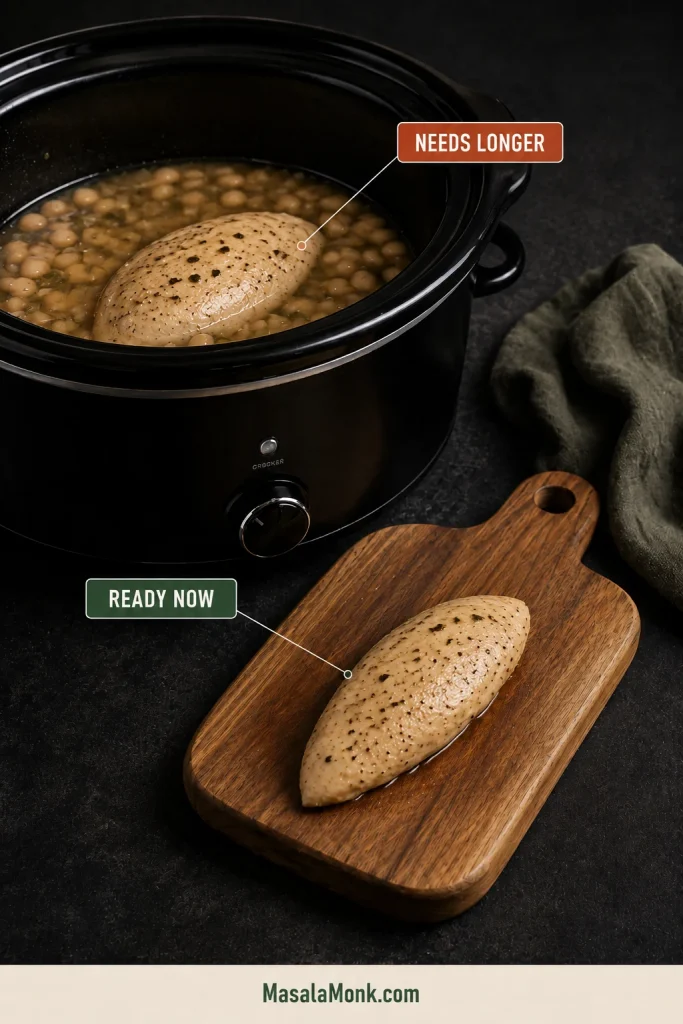
Check each piece in its thickest part, starting with the largest. Transfer pieces to a cutting board individually as they become ready. Pulling one breast out before the others can feel early, but moist shreds on the board matter more than the longest number on the timer.

Smaller cooked chicken breast resting on a cutting board while a thicker breast remains in the slow cooker.
Remove each chicken piece as it reaches 165°F / 74°C; thicker pieces can keep cooking while smaller ones rest.

3. Shred the chicken

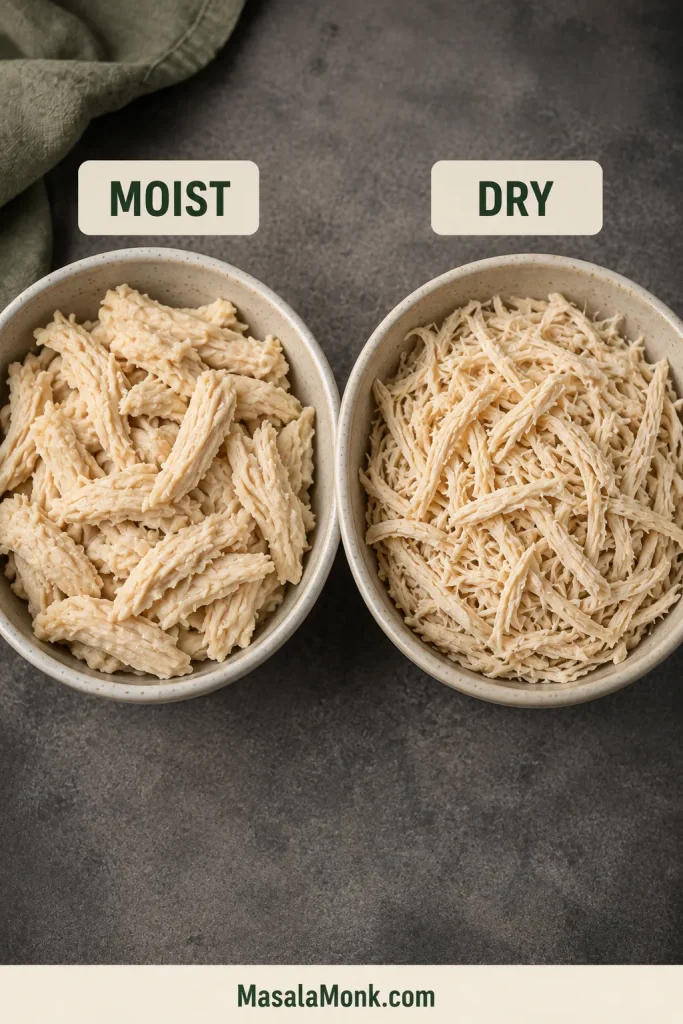
Shred the chicken with two forks. It should pull apart easily while still looking moist, not chalky or fibrous.

Broad moist shreds of cooked chicken beside finer, drier-looking shredded chicken.
Shred just to broad, bite-size strands. Stopping early keeps the chicken looking moist instead of fine and stringy.

4. Blend part of the reserved beans

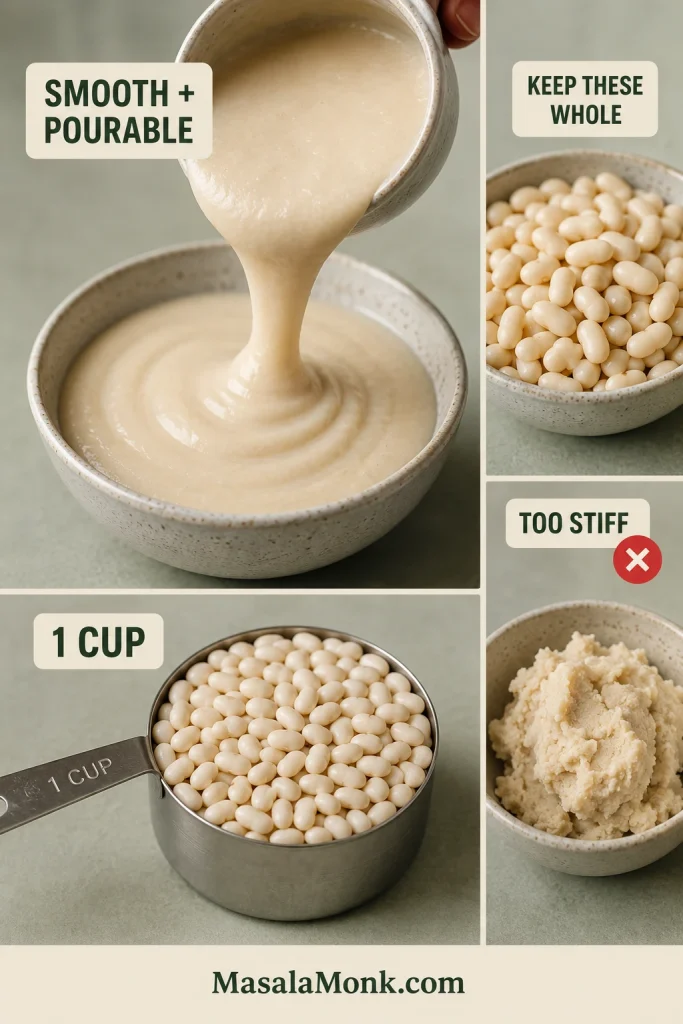
Measure 1 cup of drained beans from the third can. Blend them with ¾ cup / 180 ml hot liquid from the slow cooker until smooth and pourable.
Reserved white beans blended with hot cooking liquid into a smooth, pourable purée.
The bean purée should pour, not mound. Loosen it with a little more hot cooking liquid if needed.
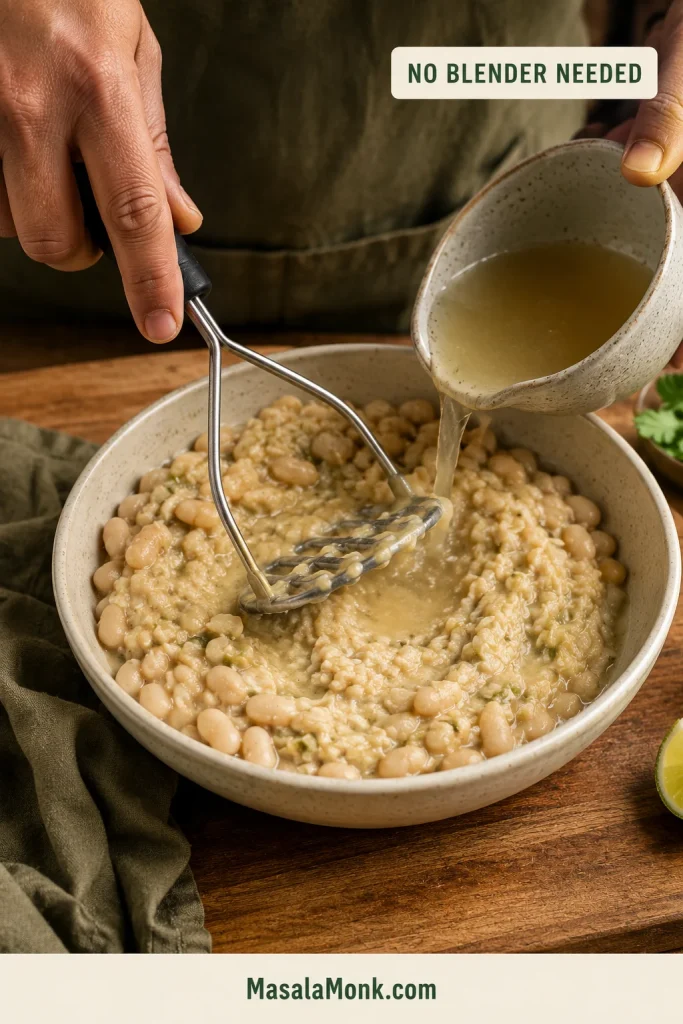
For a no-blender method, mash the measured beans and hot liquid thoroughly in a bowl. Keep the remaining beans whole.

White beans being mashed by hand into a rustic paste as a no-blender thickening method.
Mash firmly enough to break the bean skins and release starch; a few visible pieces are completely fine.

When using a countertop blender, vent hot liquid according to the manufacturer’s instructions and blend only a small amount at a time.

5. Bring the chili together

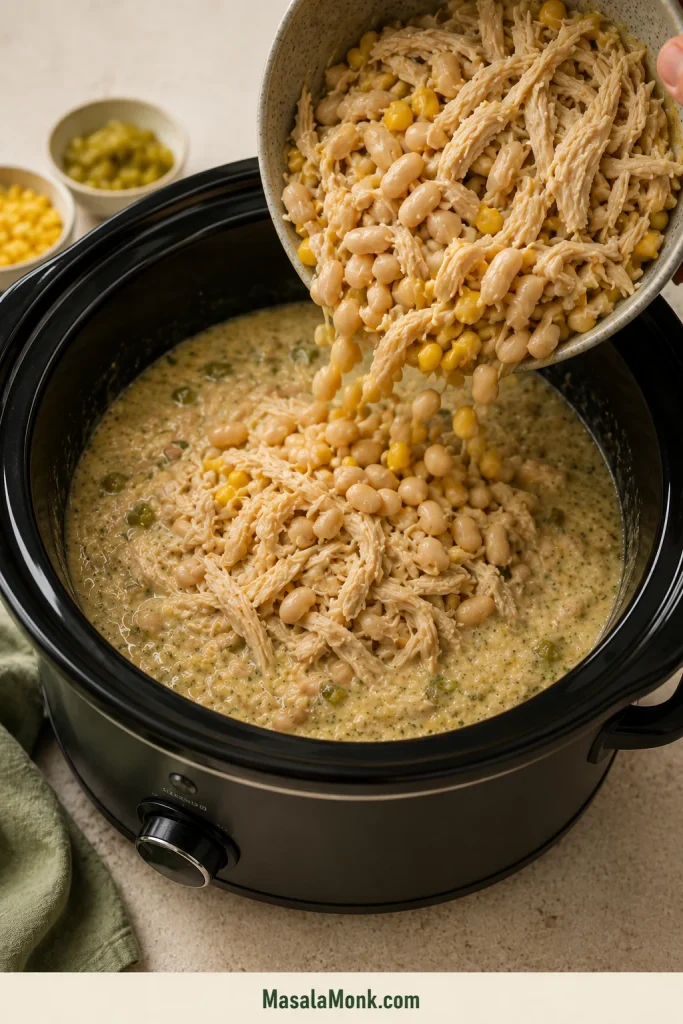
Stir in the shredded chicken, bean purée, remaining whole beans and corn.

Cooked shredded chicken, whole white beans and corn being added back to the thickened slow-cooker base.
Fold the chicken back in gently to keep broad, juicy shreds intact as the chili finishes.

Cover and cook for another 10–15 minutes, or a few minutes longer when using frozen corn. The broth should begin clinging to the chicken and beans instead of pooling beneath them.

6. Add the cream cheese gently

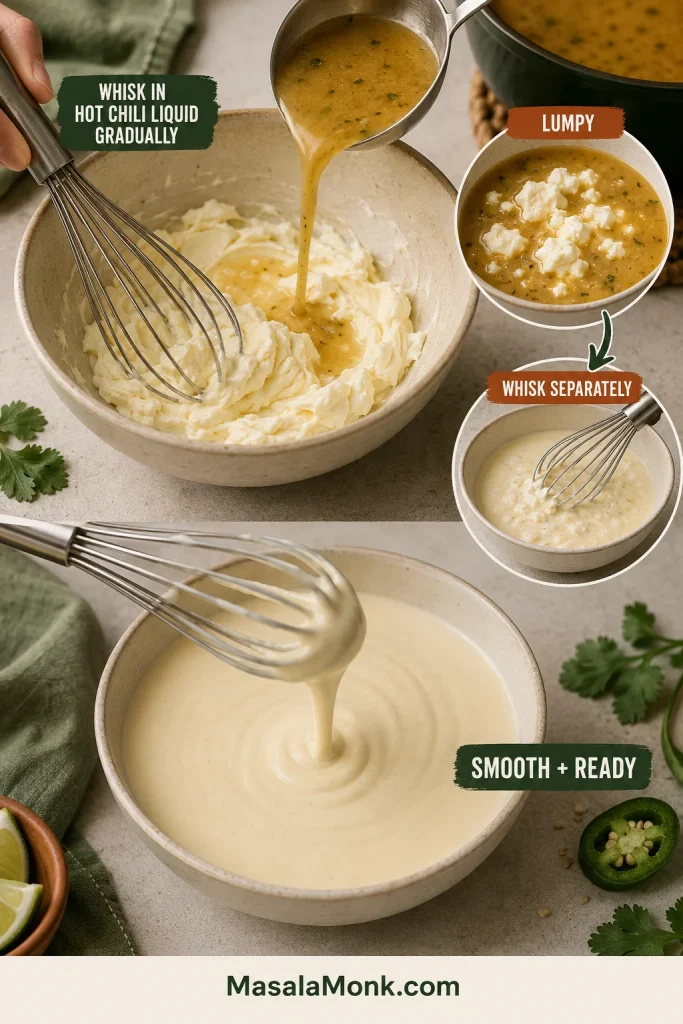
Place the softened cream cheese in a medium bowl. Add about ¾ cup / 180 ml hot chili liquid in several additions, whisking after each one until mostly smooth.

Hot chili liquid being whisked into softened cream cheese, with smooth, lumpy and rescued cream-cheese mixtures shown for comparison.
Whisk hot chili liquid into softened cream cheese first so it melts into the broth smoothly.

Stir the cream cheese mixture into the slow cooker on Low or Warm. Gentle stirring should help it melt into the broth without hard boiling.

7. Add lime, rest and taste

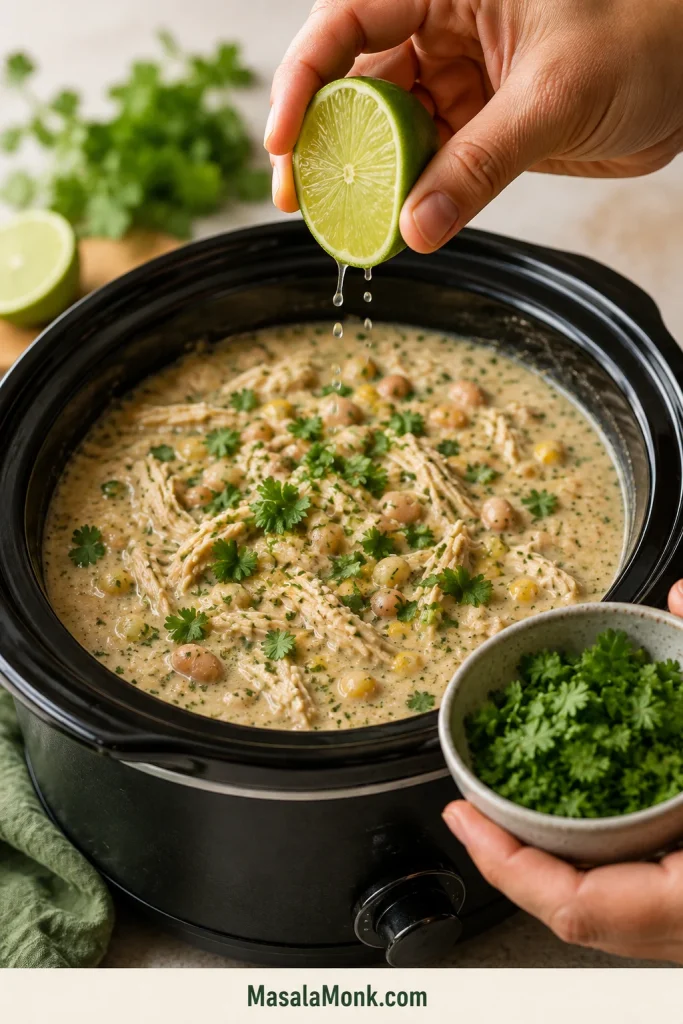
Stir in 1 tablespoon / 15 ml lime juice and the cilantro. Turn off the slow cooker and leave the lid off for 10 minutes.

Fresh lime being squeezed over finished creamy white chicken chili while chopped cilantro is ready to be added.
Add the first lime, let the chili rest, then taste again before deciding whether it needs more.

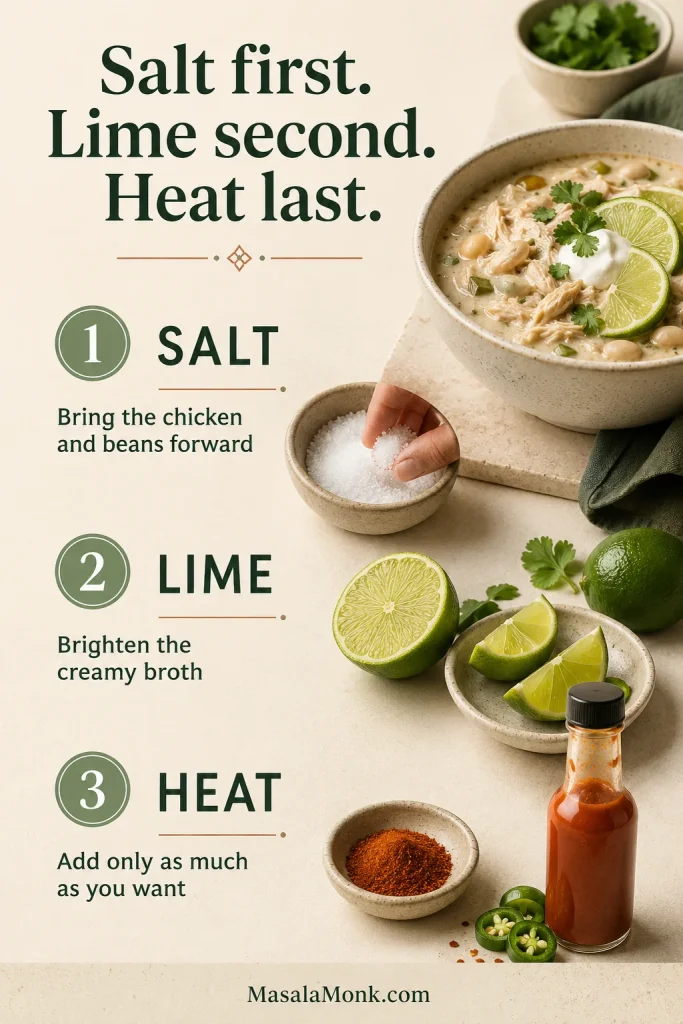
A creamy pot can taste finished before it tastes fully awake. Taste in this order: salt first, lime second and heat last. Salt brings the chicken and beans forward, lime lifts the creamy broth, and cayenne or hot sauce raises the heat without changing the whole pot.

Three-step guide showing final seasoning with salt first, lime second and additional chile heat last.
Taste in sequence—salt first, lime second, heat last—so each adjustment has a clear purpose.

If the chili is thicker than you prefer, add warm broth a quarter cup at a time.

Recipe Notes

  • Thaw raw chicken before slow cooking; see the USDA slow-cooker safety guidance.
  • Full-fat block cream cheese melts more smoothly than whipped or tub-style products.
  • Add the green chiles with their liquid; the starting broth amount already accounts for that extra moisture.
  • If the onion is still firmer than you prefer when the chicken is ready, remove the chicken and let the base continue for another 10–15 minutes. Dice the onion finely or use the sautéed route next time.
  • The chili thickens after refrigeration, so loosen leftovers gradually while reheating.

Need help while cooking? Chicken timing · Consistency cues · Fix the texture

White Chicken Chili Guide

The recipe above is all you need for dinner. Keep the guide below nearby for chicken that cooks faster than expected, a pot that looks too loose or the version you want to make next time.

Why This White Chicken Chili Stays Thick and Creamy

Very little moisture escapes beneath a slow-cooker lid. Steam condenses and falls back into the pot while the chicken, onion and green chiles release liquid of their own.

That is why white chicken chili needs a different balance from a tomato-based crockpot chili. Red chili can draw thickness from tomatoes, tomato paste, meat and reduction. Here, the beans must do more of the work.

Most of the beans remain whole. One cup is blended into the broth so it coats the chicken rather than behaving like clear stock. The cream cheese adds richness without having to do all the thickening.

Choose the Ingredients and Cook the Chicken

Chicken breasts or thighs

Chicken breasts make a leaner bowl but can dry out when left in the cooker after they are ready. Boneless thighs are juicier and more forgiving during longer cooking. Keep the total weight close to 1½ pounds whichever cut you choose.

Best beans for white chicken chili

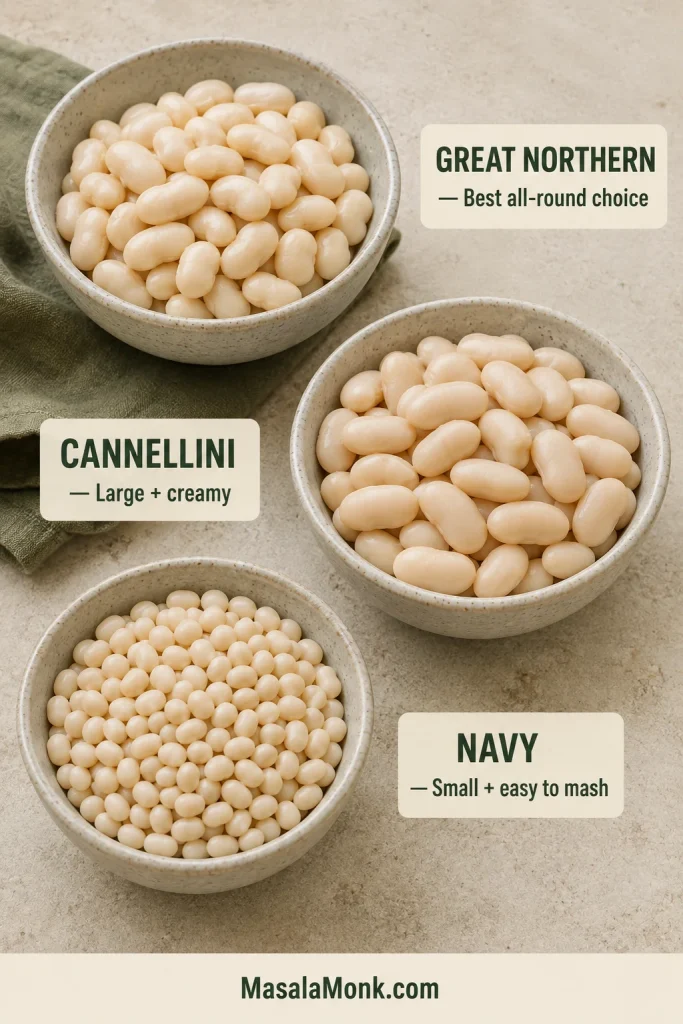
  • Great Northern beans are mild, medium-sized and a dependable default.
  • Cannellini beans are larger and especially creamy when blended.
  • Navy beans are smaller, softer and easy to mash.
Great Northern, cannellini and navy beans in separate bowls, showing their different cooked sizes and shapes.
Great Northern beans balance whole-bean texture and blending; cannellini are plumper, while navy beans mash especially easily.

Dried beans are not a direct swap because they need their own soaking, liquid and cooking-time plan.

Green chiles and lime

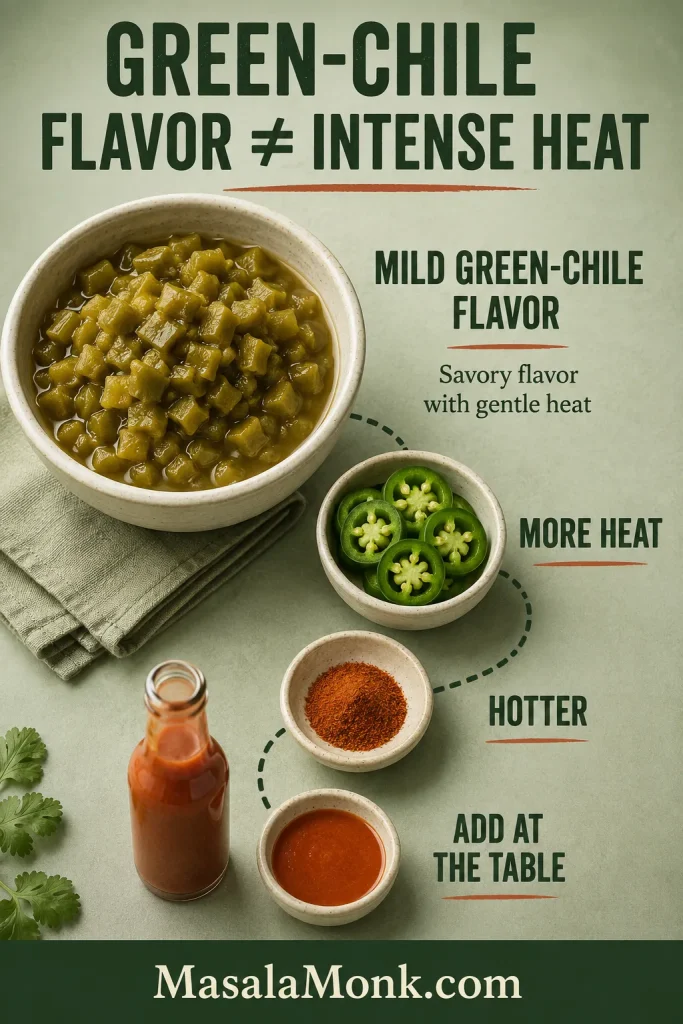
Two small cans of mild green chiles keep their flavor noticeable after the beans and cream cheese go in. Add jalapeño, cayenne or hot sauce separately when you want more heat.

Mild diced green chiles compared with jalapeño, cayenne and hot sauce as increasingly hotter chile options.
Mild green chiles build flavor in the base; jalapeño, cayenne or hot sauce can raise the heat later.

Add lime only near the end so its brightness stays clear against the beans and cream cheese.

How long to cook white chicken chili in the slow cooker

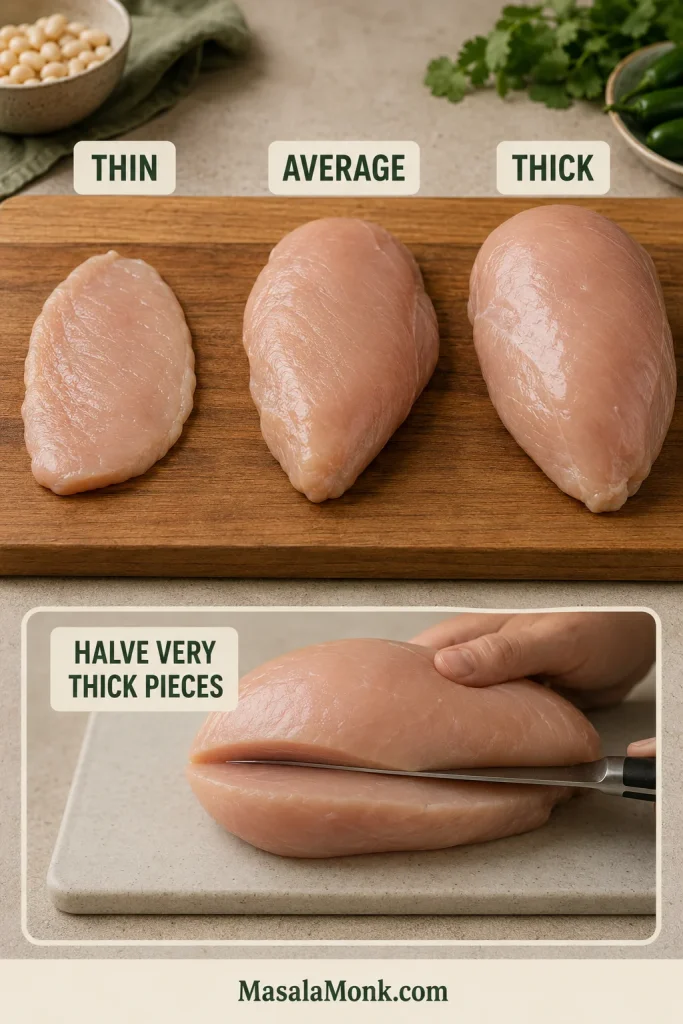
Thin, average and thick raw chicken breasts shown from the side, with a very thick breast being halved horizontally.
Compare chicken from the side: similar-looking breasts can cook differently when one is much thicker through the center.

All chicken should reach 165°F / 74°C. The ranges below tell you when to begin checking; remove each piece when it reaches temperature and still looks moist.

On a phone, swipe sideways to see every column.

ChickenSettingBegin checkingLikely rangeTexture cue
Average chicken breastsHigh2½ hoursAbout 2½–3½ hoursEasy to shred and still moist
Average chicken breastsLow4 hoursAbout 4–6 hoursEasy to shred and still moist
Boneless chicken thighsHigh3 hoursAbout 3–4 hoursTender and separating easily
Boneless chicken thighsLow4½ hoursAbout 5–6½ hoursTender and separating easily
Chicken first-check times for slow cooker white chicken chili.

Check every piece in its thickest part, starting with the largest. Remove pieces individually as they reach 165°F / 74°C and still look moist. USDA safe-temperature guidance gives 165°F / 74°C as the minimum internal temperature for poultry.

What the Chili Should Look Like at Each Stage

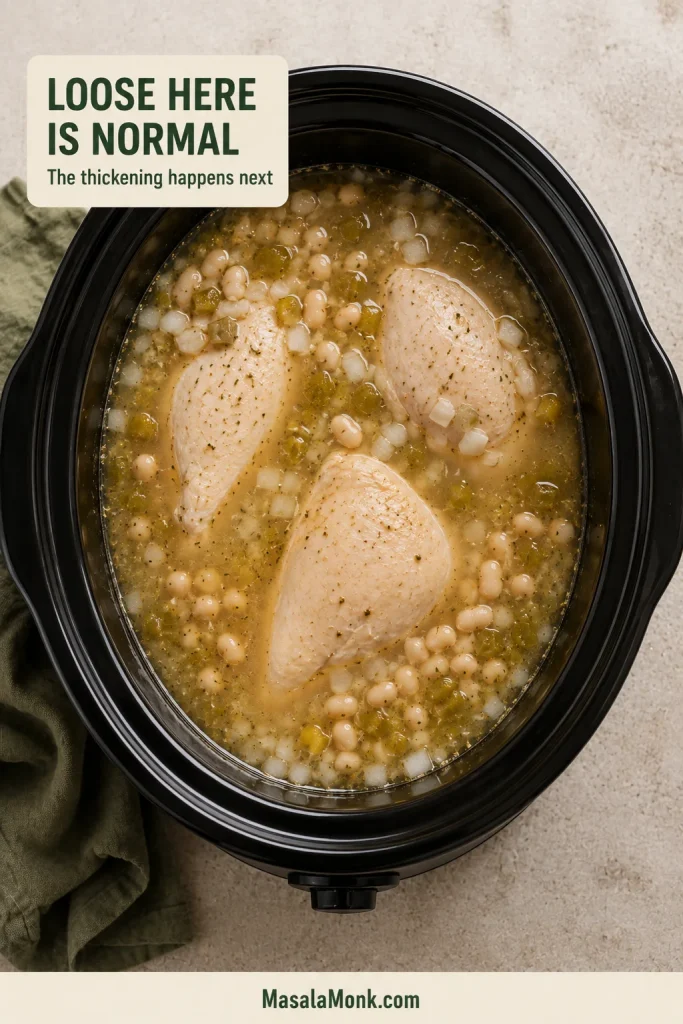
When the lid first opens

The pot may look looser than expected. The chicken is still whole, the blended beans are still outside the cooker and the final additions have not gone in. A brothier appearance here is normal.

Whole chicken, beans, onion and diced green chiles sitting in loose broth when the slow cooker is first opened.
Keep the loose liquid. It will help blend the reserved beans and temper the cream cheese before the chili thickens.

After the chicken and bean purée return

The broth becomes creamier-looking and starts clinging to the shredded chicken. The chicken and beans stop looking separate from the broth.

Matched slow-cooker comparison showing freer broth before bean purée and more suspended chicken and beans after thickening.
Watch movement more than color: after the bean purée returns, the solids should stay suspended longer while the chili still pours.

After resting

The broth should lightly coat the spoon and settle slowly when ladled. It remains looser than tomato-heavy beef chili but should be visibly thicker than chicken soup.

Once the spoon looks right, choose how rich or tangy you want the finished bowl.

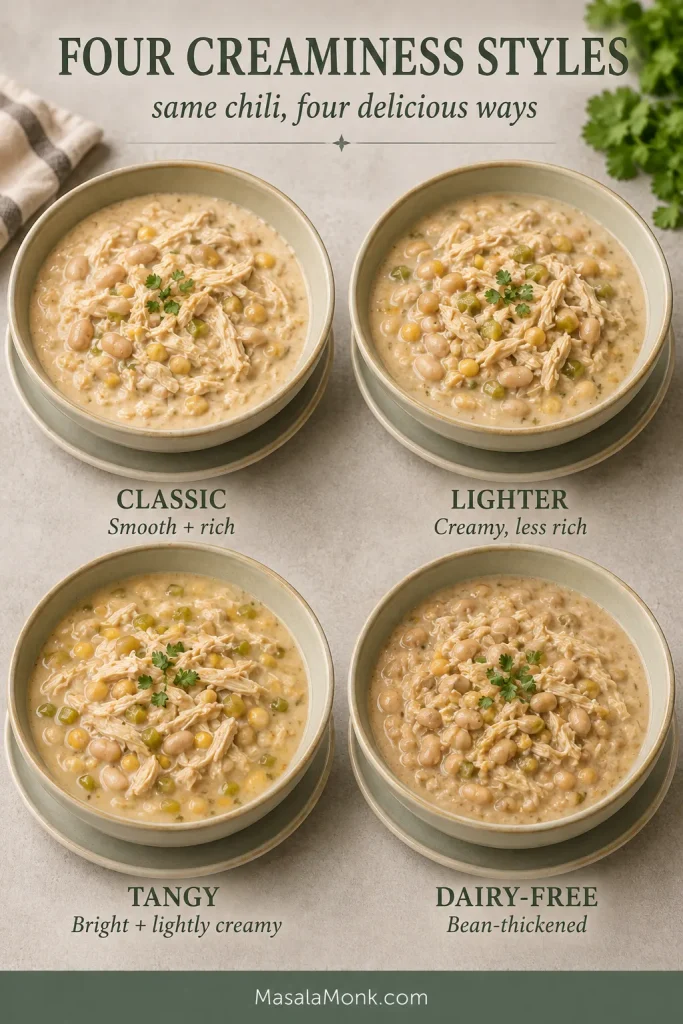
Choose Your Creamy White Chicken Chili Style

StyleUseHow to add itResult
Classic4 oz / 113 g cream cheeseWhisk with hot chili liquid before stirring it inSmooth and rich without hiding the beans and chiles
Lighter2 oz / 57 g cream cheeseAdd it using the same gentle methodCreamy with less dairy richness
Tangy¼ cup / 60 g sour cream or plain Greek yogurt instead of cream cheeseTemper with hot chili liquid, then stir it in with the cooker off or set to Warm. Do not let it boilBrighter, lighter and gently tangy
Dairy-freeNo dairyUse the bean purée; mash another ½ cup of beans only if needed after restingBean-forward and naturally creamy
Four matching bowls of white chicken chili labeled classic, lighter, tangy and dairy-free, with different creamy finishes.
Bean purée provides the body in every version; changing the dairy mainly changes richness and tang.

For sour cream or yogurt, use the gentle approach in this chicken paprikash recipe: warm the dairy gradually with hot liquid and avoid boiling it afterward.

How to Fix Thin or Overly Thick White Chicken Chili

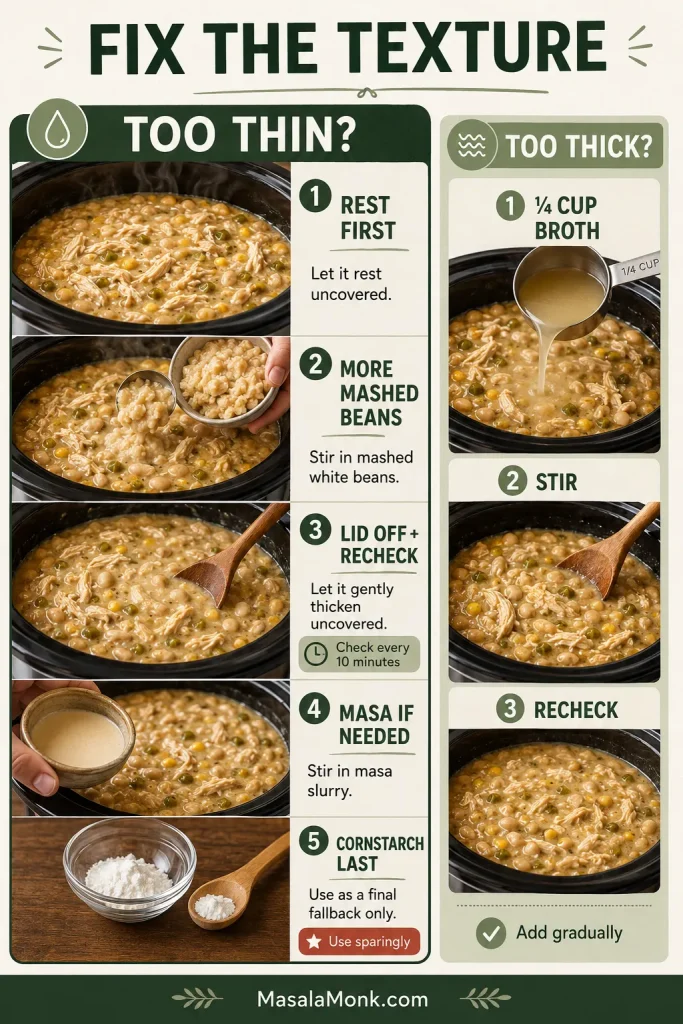
Troubleshooting guide showing a five-step route for thin chili and a separate broth-addition route for overly thick chili.
Start with the least irreversible fix: rest, beans and gentle reduction before concentrated starches.

When the chili is too thin

Give the beans the first chance to fix the pot. Reach for masa or cornstarch only when they are not enough.

  1. Finish the recipe and let the chili rest.
  2. Mash or blend another ½ cup of beans.
  3. Leave the lid off and continue cooking, stirring occasionally, until the broth coats the spoon more clearly. Check every 10 minutes rather than assuming one fixed reduction time.
  4. Whisk 1 tablespoon masa harina with 2 tablespoons cool water or broth and stir it in.
  5. Use cornstarch only as the last resort.

For a cornstarch slurry, whisk 1 tablespoon cornstarch with 1–2 tablespoons cool water. Stir it into the hot chili and allow 5–10 minutes for it to thicken.

When the chili is too thick

Add warm broth a quarter cup at a time. Stir, wait briefly and check the spoon before pouring in more.

← Compare normal consistency · Back to recipe · Shortcut options →

Shortcut White Chicken Chili Options

With rotisserie chicken

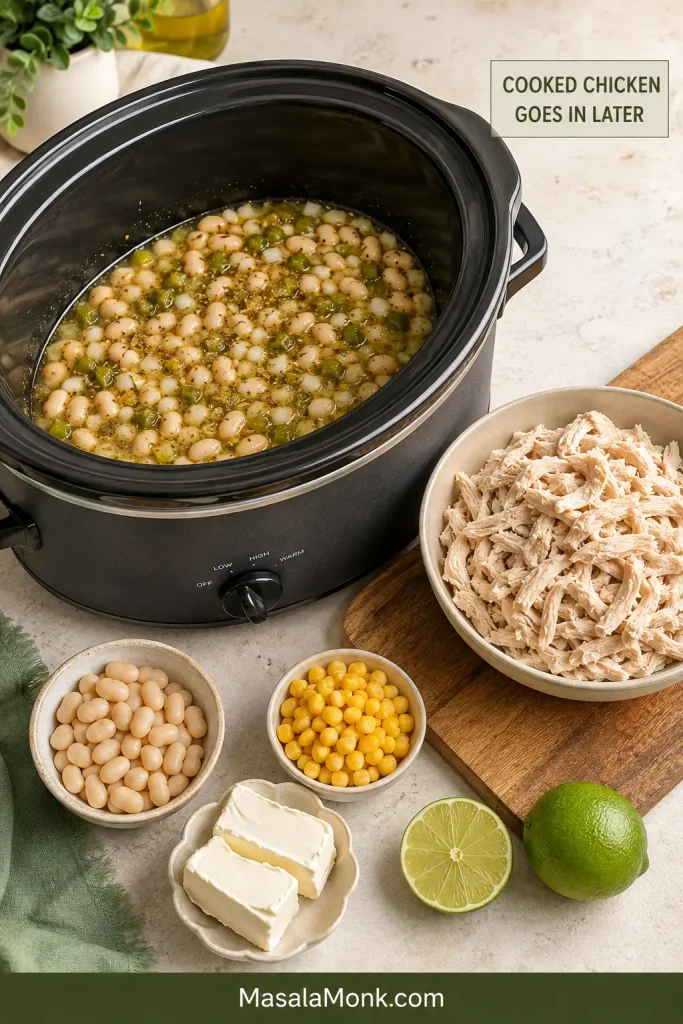
Seasoned white-bean and green-chile base in a slow cooker beside a bowl of cooked shredded chicken and later additions.
Keep rotisserie chicken in broad shreds; it will soften further as it warms in the seasoned chili.

Use the main recipe quantities, replacing the raw chicken with 3 cups / 425–450 g cooked shredded chicken and reducing the broth to 2 cups / 473 ml.

Already-cooked chicken needs seasoned broth and enough time to become hot—not another afternoon of cooking. Leftover meat from a whole chicken cooked in the Crock Pot works as well as store-bought rotisserie chicken.

  1. Sauté the diced onion in 2 teaspoons / 10 ml oil for 3–4 minutes. Add the garlic and spices for 30 seconds.
  2. Transfer to the slow cooker with two cans of beans, the green chiles and 2 cups / 473 ml broth.
  3. Cook on Low for about 2 hours, until the onion is tender.
  4. Blend one cup of beans from the third can with hot liquid from the cooker.
  5. Add the purée, remaining beans, corn and cooked chicken.
  6. Cook for another 20–30 minutes, until the chili is steaming throughout and reaches 165°F / 74°C near the center of the cooker. Stir in the cream cheese mixture, lime and cilantro.

Rotisserie chicken, canned ingredients and broth can all be salty, so taste before adding any final salt.

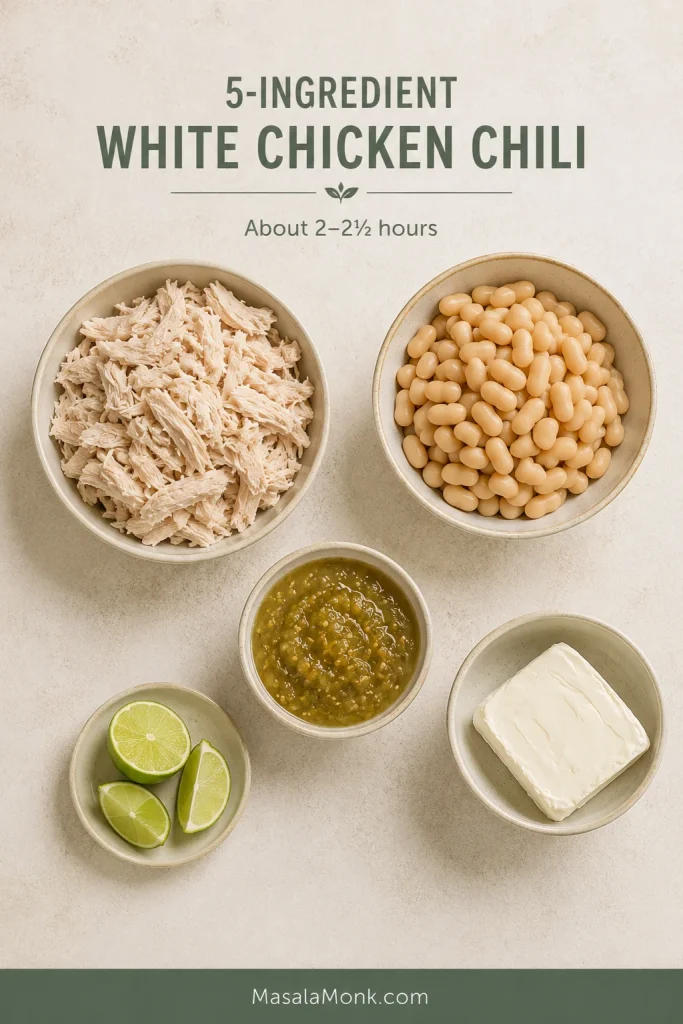
5-Ingredient White Chicken Chili With Salsa Verde

Cooked chicken, white beans, salsa verde, cream cheese and lime arranged as the five ingredients for shortcut white chicken chili.
With only five ingredients, salsa verde carries most of the seasoning. Use one you already enjoy on its own.

Prep time: About 10 minutes
Slow-cooker time: About 2–2½ hours
Yield: About 6–8 servings

  • 3 cups / 425–450 g cooked shredded chicken
  • 3 cans white beans, 15 oz / 425 g each, drained and rinsed
  • 16 oz / 454 g salsa verde
  • 4 oz / 113 g softened cream cheese
  • 1–2 tablespoons / 15–30 ml fresh lime juice

Add two cans of beans and the salsa verde to the slow cooker. Cook on Low for 1½–2 hours, until hot.

Blend one cup of beans from the third can with some of the hot salsa mixture. Return the purée with the remaining beans and chicken. Cover and cook for another 20–30 minutes, until steaming hot throughout.

Whisk the softened cream cheese with hot chili liquid, stir it into the pot and finish with lime. Begin without broth because salsa verde varies in thickness; add warm broth only if the chili needs loosening.

What the Salsa-Verde Shortcut Should Look Like

Jarred salsa keeps this route fast. For more control over acidity, heat and texture, use homemade roasted salsa verde.

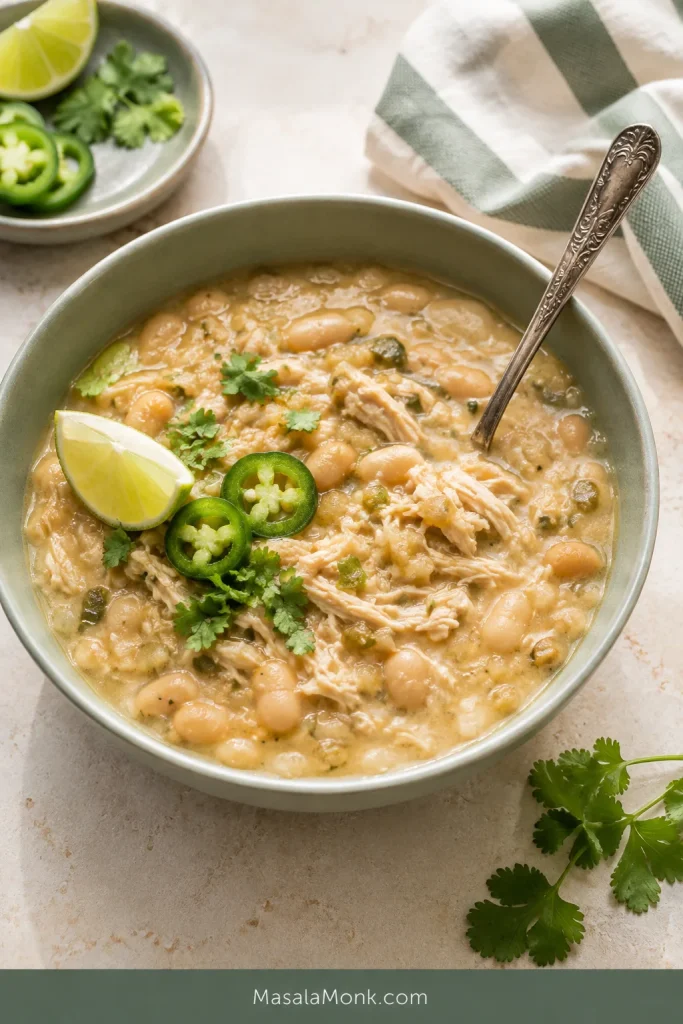
Creamy salsa-verde white chicken chili with shredded chicken and white beans in a sage bowl with lime, cilantro and jalapeño.
Salsa verde changes the flavor direction; blended white beans still give the shortcut chili most of its body.

← Back to recipe · Scaling & make ahead · Serving ideas →

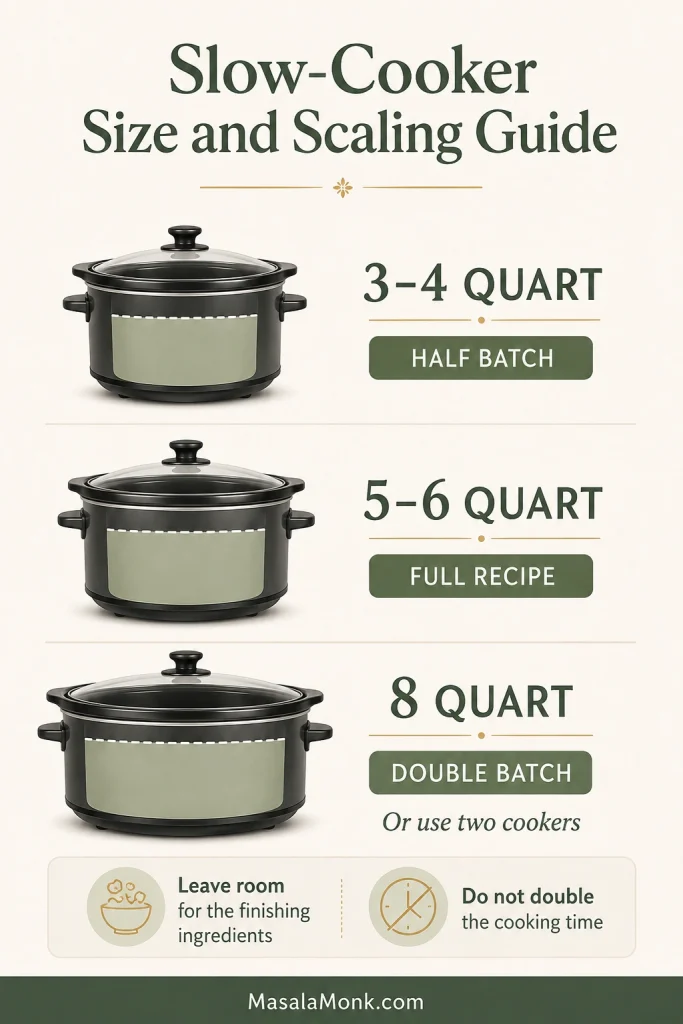
Cooker Size, Scaling and Make-Ahead Preparation

Guide matching 3–4 quart, 5–6 quart and 8 quart slow cookers with half, full and double batches.
Capacity and cooking time are separate questions; a larger batch needs room, while chicken thickness and temperature still determine doneness.
  • Half batch: use a 3–4 quart slow cooker. Keep the chicken pieces similar in thickness and use the same early checkpoints; a smaller batch may heat faster, but temperature still decides when each piece is ready.
  • Full batch: use a 5–6 quart slow cooker.
  • Double batch: use an 8 quart cooker with comfortable stirring room, or divide the recipe between two cookers. Do not double the cooking time; a fuller cooker may simply take longer to heat.

Do not fill the cooker beyond the manufacturer’s recommended level. The uncooked mixture needs room for the shredded chicken, remaining beans and purée added near the end.

Dice the onion and measure the spices the night before. Keep the raw chicken and other perishable ingredients covered and refrigerated until the cooker is ready to start.

White Chicken Chili Troubleshooting

On a phone, swipe sideways to see every column.

ProblemLikely causeWhat to do now
Dry chickenIt stayed in the cooker after it was readyShred it finely and stir in a little warm broth
Lumpy cream cheeseCold cream cheese went directly into the potLadle some hot liquid and the visible lumps into a bowl, whisk as smooth as possible, then return the mixture over gentle heat
Oily or grainy brothThe dairy boiled or overheatedTurn off the heat, whisk gently and add a small splash of warm broth; badly overheated dairy may not become completely smooth again
Creamy but blandThe pot needs sharper seasoningAdjust salt first, lime second and heat last
Too spicyHot salsa, jalapeño or too much cayenneAdd unsalted beans or broth and serve with avocado or sour cream
Too saltySalty broth, rotisserie chicken, beans or toppingsDilute with unsalted beans and broth
Common white chicken chili problems and practical ways to rescue the pot.

← Back to recipe · Fix the texture · Serving ideas →

What to Serve With White Chicken Chili

The chili already contains chicken and beans, so one simple side and a small topping bar are usually enough.

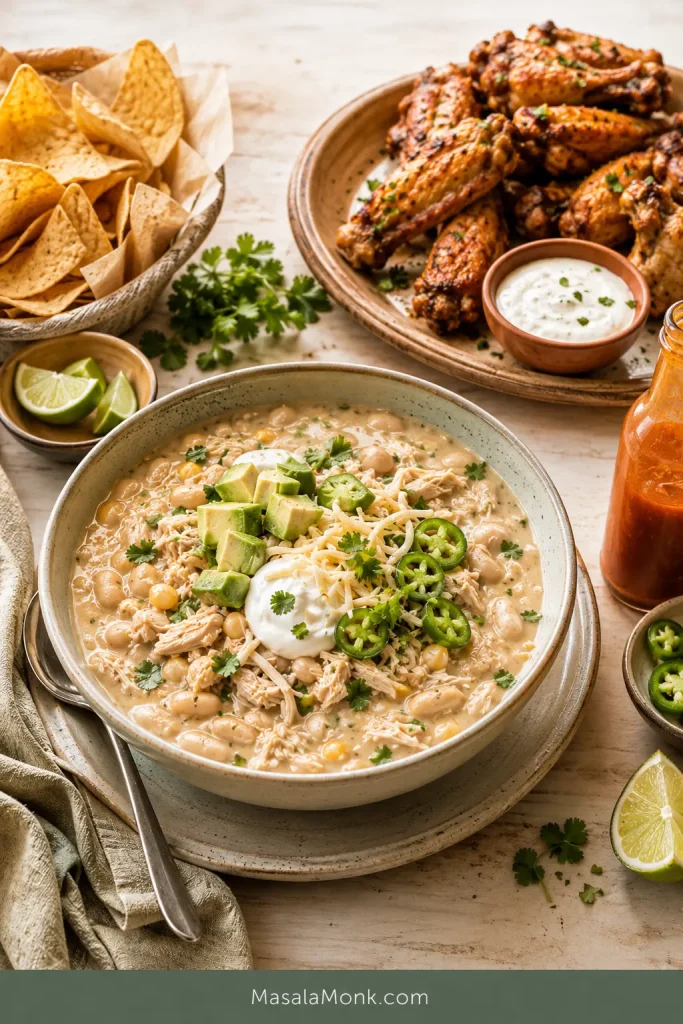
For game day, pair it with crispy air fryer chicken wings. The wings add crunch while the chili remains the warm, spoonable center of the meal.

Bowl of white chicken chili served with crisp chicken wings, tortilla chips, lime and hot sauce.
Crisp wings and tortilla chips give a creamy bowl the texture contrast that works especially well for game day.

Build a White Chicken Chili Topping Bar

  • Freshness: lime, cilantro, scallions or diced tomato
  • Creaminess: avocado, sour cream or Greek yogurt
  • Crunch: tortilla strips, crushed tortilla chips or sliced radishes
  • Heat: jalapeño, cayenne or hot sauce
  • Richness: Monterey Jack or Pepper Jack
  • Simple side: cornbread, warm tortillas, a green salad or roasted vegetables

Pass the toppings around and let each bowl lean brighter, hotter, creamier or crunchier.

Three bowls customized from one pot with lime and herbs, jalapeño and hot sauce, or avocado, sour cream and tortilla strips.
Serve dairy, chile, acid and crunch separately so one balanced pot can suit different appetites at the table.

The slow cooker has done the long work; dinner can now feel as relaxed as it was supposed to.

Keeping it warm for serving

Once the chili is completely cooked, switch the cooker to Warm. Stir periodically and add a small splash of broth if the beans continue tightening the pot.

Warm is for holding the finished chili rather than extending the chicken’s cooking time. Keep hot food at 140°F / 60°C or above; the USDA slow-cooker safety guidance uses the same threshold for hot holding.

Storage, Freezing and Reheating

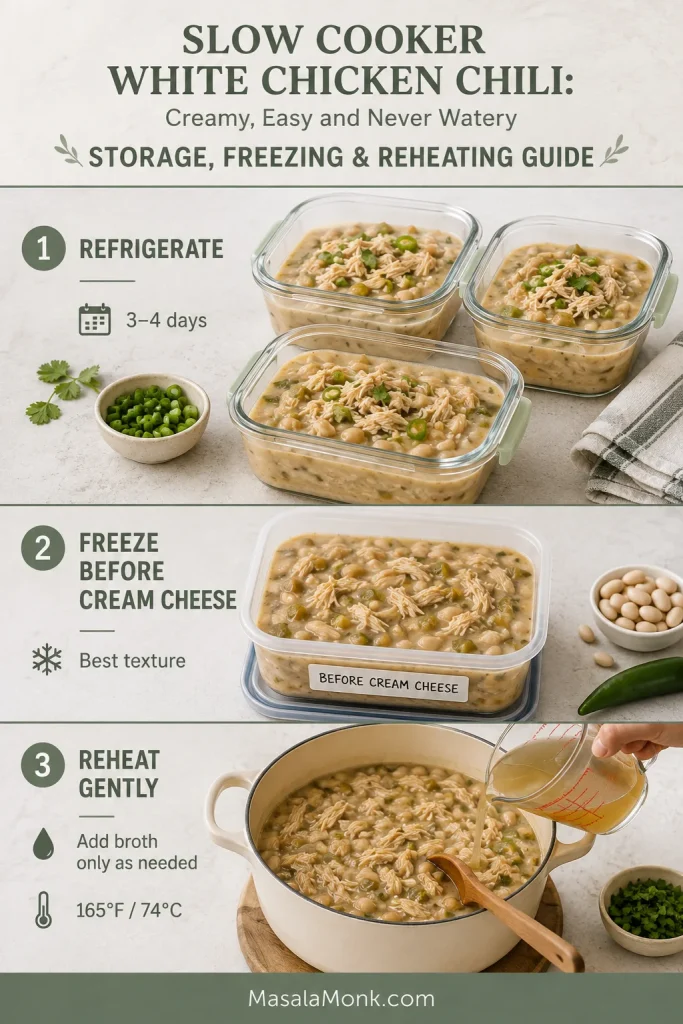
Guide showing refrigerated white chicken chili, the chicken-and-bean base prepared for freezing, and chili reheated gently with added broth.
Shallow containers cool and portion leftovers efficiently; keep avocado, herbs and crunchy toppings separate.

Once dinner is over, the same beans that thickened the broth will keep absorbing liquid in the refrigerator.

Refrigerating

Transfer the chili to shallow airtight containers and refrigerate it within two hours. Keep avocado, herbs and crunchy toppings separate and use the chili within 3–4 days.

The next-day chili will be thicker than the first bowl. That is normal.

Freezing

For the smoothest reheated texture, freeze the chicken-and-bean base before adding cream cheese, lime and cilantro. Stir those in after reheating.

A fully finished batch can also be frozen, although the dairy may look slightly grainy after thawing. For best quality, use it within about three months.

Reheating

Reheat gently on the stovetop or in the microwave, stirring occasionally and adding broth only as needed. Bring leftovers to 165°F / 74°C.

A refrigerator-cold batch should not be reheated from scratch in the slow cooker. Reheat it promptly first, then transfer the hot chili to a preheated cooker on Warm for serving. See the USDA guidance on leftovers and food safety for further storage and reheating advice.

← Back to recipe · Serving ideas · Back to top ↑

Frequently Asked Questions

Can I put frozen chicken in the slow cooker?

Thaw raw chicken before slow cooking so it heats safely and evenly. Frozen or partially frozen pieces take longer to come up to temperature and make the cooking time difficult to predict.

Can I use canned chicken?

Yes. Drain it well and add it near the end, just as you would other already-cooked chicken. Its texture will be softer, so stir gently and check the salt after it is hot.

Can I use dried beans?

Not in the same method. Dried beans need separate soaking and cooking instructions.

Is white chicken chili spicy?

The classic version is mild. The green chiles add flavor without intense heat. Add jalapeño, cayenne or hot sauce for a hotter bowl.

What makes this chili rather than chicken soup?

Chili has more bean-led thickness and less free broth than chicken soup. The liquid should cling lightly to the chicken instead of behaving like clear stock.

A Creamy Pot That Still Tastes Like Chili

There is a satisfying moment near the end when the broth begins clinging to the shredded chicken. Add the lime, leave the lid off and give the pot a few quiet minutes.

Then ladle it into bowls and set out the toppings. The chili is creamy, bright and substantial, and everyone at the table can decide how much heat, crunch or lime belongs in their bowl.

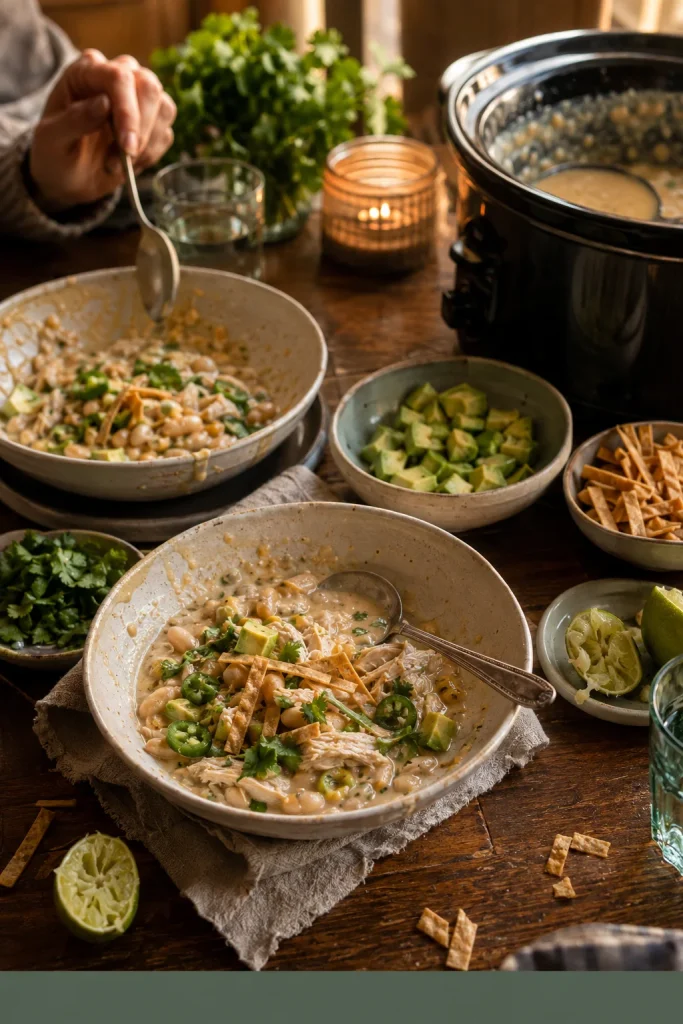
Warm table with partly eaten bowls of white chicken chili, used spoons, lime halves, avocado, tortilla strips and the slow cooker nearby.

Made it? Tell us which chicken cut and slow-cooker size you used, and whether you kept the chili thick or loosened your bowl with a little more broth.

Posted on — Leave a comment

Crab Rangoon Recipe: Crispy Cream Cheese Wontons (Fried, Baked or Air Fryer)

Golden triangle and purse-shaped crab rangoons arranged around red-orange sweet-and-sour sauce, with one broken open to reveal the creamy crab filling.

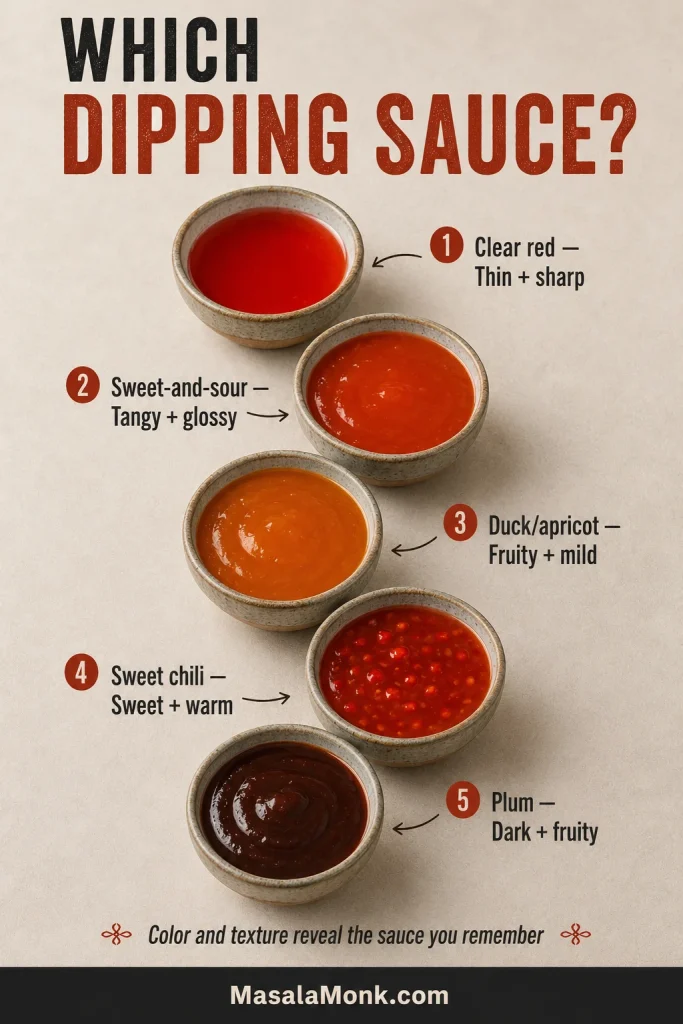
Crab rangoon is the kind of appetizer that disappears before anyone admits how many they have eaten. The wrapper cracks first, the warm cream cheese filling follows, and everyone reaches past the dipping sauce for one more.

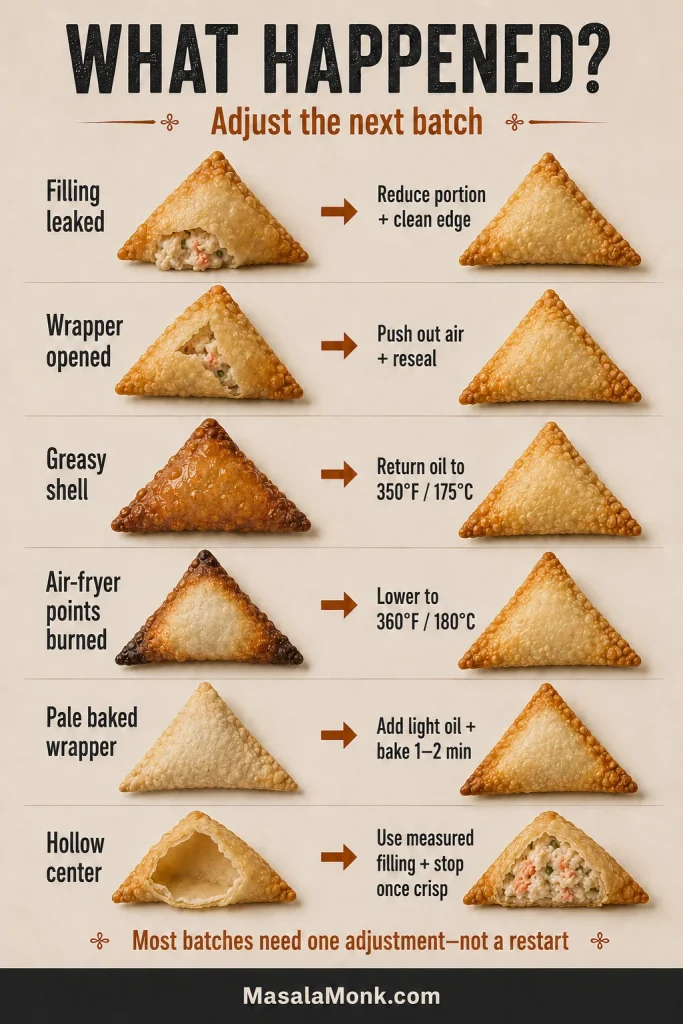
At home, though, the same little wonton can become surprisingly frustrating. One overfilled piece opens in the oil. A wet filling slips through a seam. Air-fryer corners turn dark while the middle stays pale. Or the wrapper comes out crisp but almost empty.

Here, you can match the filling to the version you remember, keep the seams closed, and choose the kind of crunch that works for your kitchen.

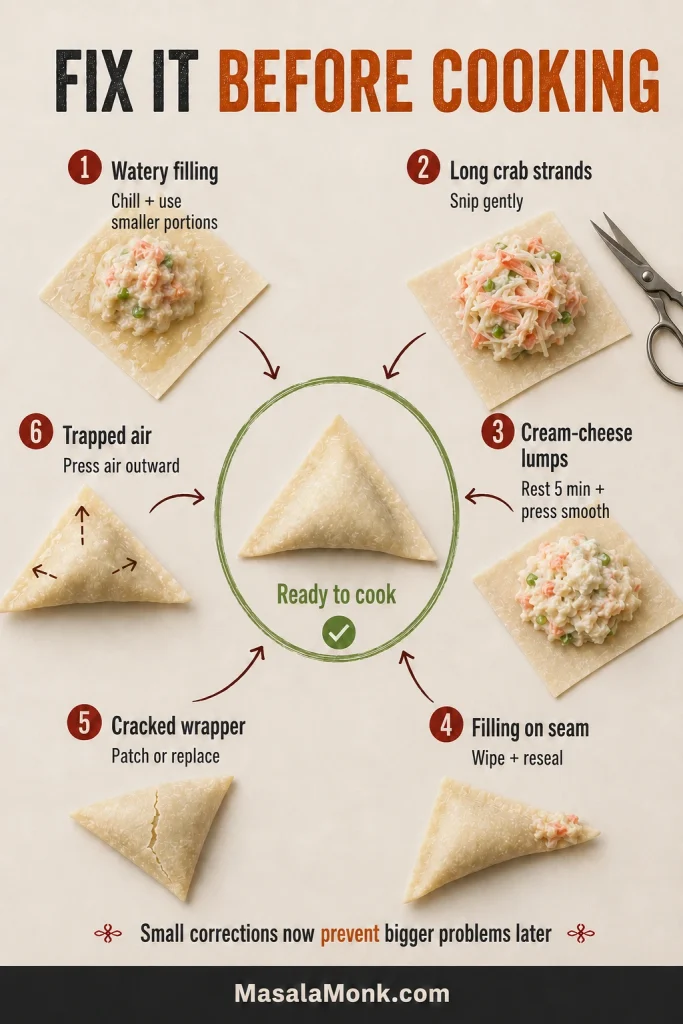
The rule that keeps everything under control is simple: thick filling, modest portions, clean seams. Drain the crab, chill the filling until it holds its shape, and leave enough bare wrapper around it to push out the air and close every edge.

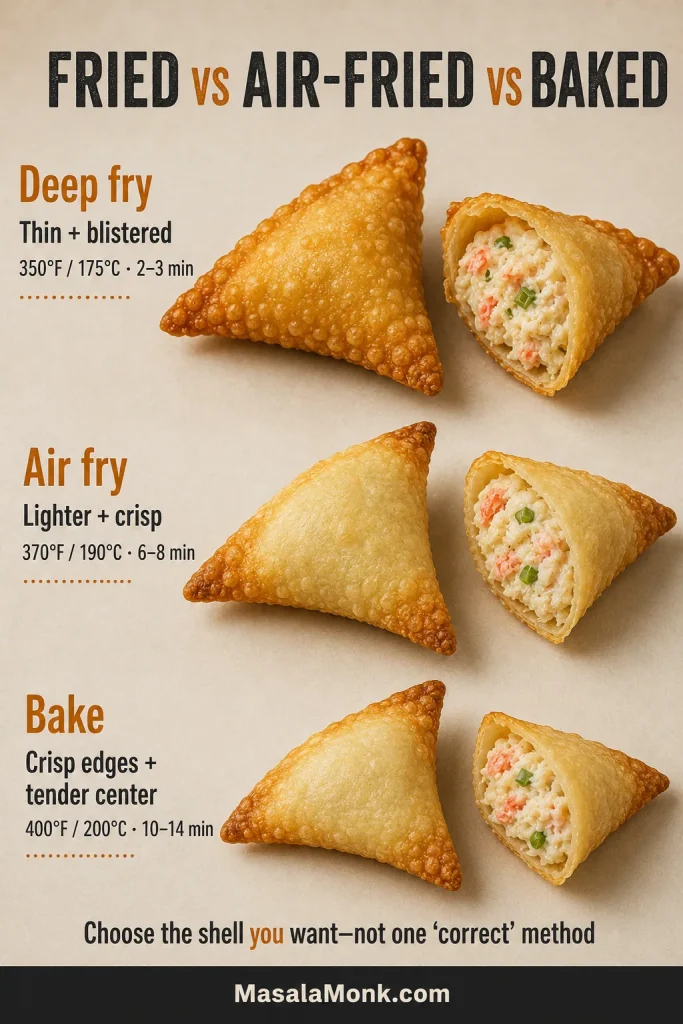
Deep frying gives you the thinnest, most blistered restaurant-style shell. The air fryer produces crisp batches with less oil. Baking lets you cook more pieces at once without standing over a pot. Each method gives you a different kind of crunch.

Best First Batch

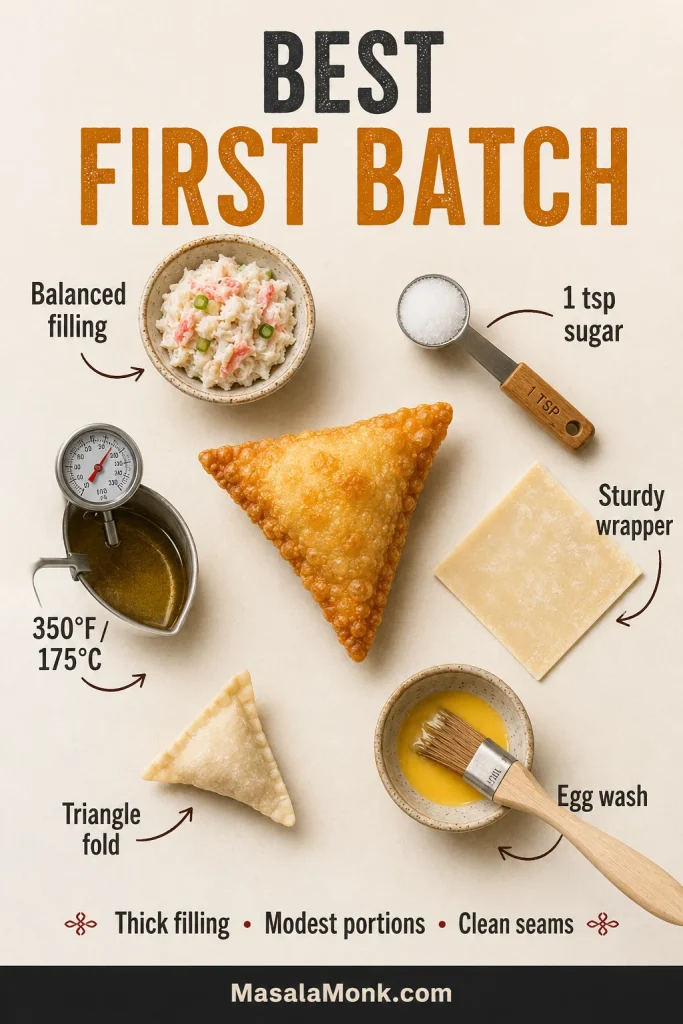
For a dependable restaurant-style first batch, use the balanced imitation-crab filling with 1 teaspoon sugar, sturdy square wonton wrappers, triangle folds, egg wash, and deep frying at 350°F / 175°C.

Keep each portion modest, press out the air before sealing, and cook one test rangoon before continuing. That first piece will tell you whether the remaining batch needs a little less filling, a firmer seam, or a shorter cooking time.

First-batch guide surrounding a finished triangle rangoon with balanced filling, one teaspoon sugar, a sturdy wrapper, egg wash, triangle folding and 350°F frying guidance.
Keep the first batch predictable. Then adjust sweetness or crab quantity without confusing the cause of any change.

Crab Rangoon Recipe

Crispy crab and cream cheese wontons, with complete instructions for deep frying, air frying, or baking.

Mix, chill, fold, then cook. The filling and sauce come together quickly. Most of the hands-on time is folding, and the first few wrappers are the slowest.

Hands-on preparation and foldingAbout 50–60 minutes
Chilling20–30 minutes, while the sauce and setup are completed
Deep-frying the full batchAbout 20–30 minutes
Resting before serving3–5 minutes
Total elapsed timeAbout 1 hour 25 minutes–1 hour 55 minutes
YieldAbout 30–35 rangoons with 3½-inch wrappers, or 36–40 smaller rangoons with thin 3-inch wrappers
Servings8 servings as written; roughly 8–10 with other appetizers, or 5–7 as the main hot appetizer

This is a party-size batch of roughly 30–40 rangoons. A half batch makes approximately 15–20 pieces—enough for about four people with other appetizers, or two to three people when these are the main hot appetizer.

For a half batch, halve the filling, sauce, and wrapper quantity, but keep the same frying-oil depth and temperature. You can still use one egg for the wash, or use plain water for simple triangle folds.

Equipment

  • All methods: mixing bowl, spatula, measuring teaspoons or a small scoop, lined tray, small bowl for egg wash, and a clean towel for covering the wrappers
  • Deep frying: heavy pot, frying thermometer, slotted spoon or spider strainer, and wire rack
  • Air frying: air fryer and oil mister or pastry brush
  • Baking: rimmed sheet pans, parchment, and oil mister or pastry brush

Ingredients

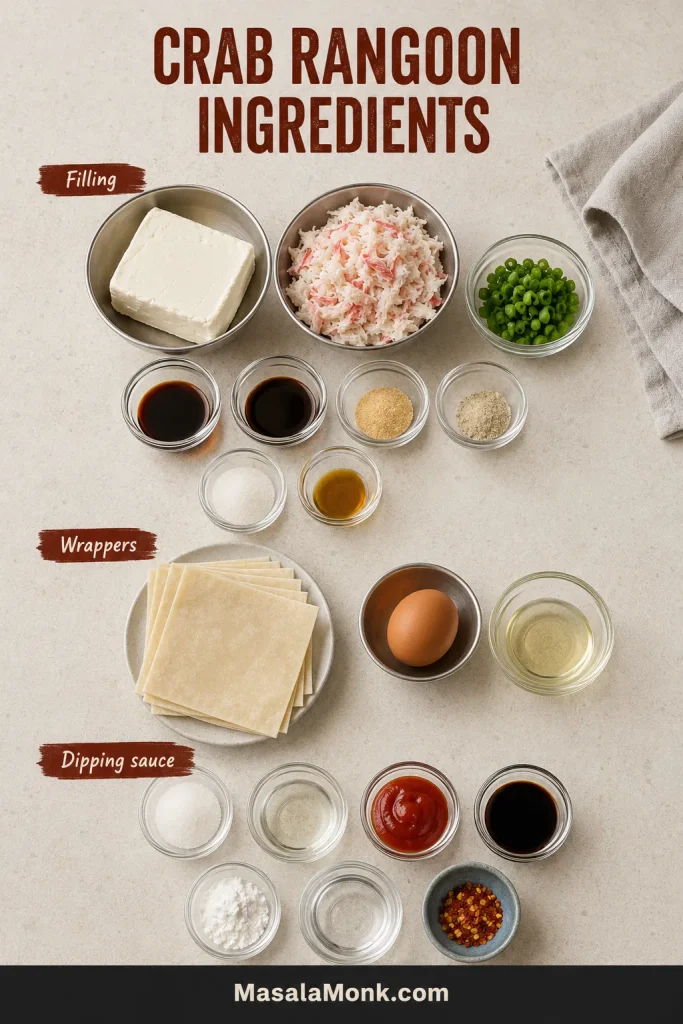
Overhead arrangement of cream cheese, crab, scallions, seasonings, wonton wrappers, egg, cooking oil and ingredients for homemade sweet-and-sour sauce.
Separate filling, sealing and sauce ingredients before mixing. Meanwhile, keep unused wrappers covered so their edges stay flexible.

Crab and Cream Cheese Filling

IngredientUS amountMetric amount
Full-fat block cream cheese, softened but not warm8 oz227 g
Ready-to-eat imitation crab, recommended for the first batch; or cooked lump or well-drained canned crab6 oz170 g
Medium scallions, very finely chopped2 mediumAbout 18–20 g
Low-sodium soy sauce1 tsp5 ml
Worcestershire sauce1 tsp5 ml
Garlic powder½ tspAbout 1.5 g
White pepper or finely ground black pepper¼ tspAbout 0.5 g
Granulated sugar—1 tsp for the recommended first batch; use 0–1 tsp to taste1 tsp4 g
Toasted sesame oil, optional¼ tsp1 ml
Fine saltSmall pinch, only if needed—

For Wrapping and Cooking

  • One 40–50-count package square wonton wrappers, approximately 3–3½ inches / 7.5–9 cm wide
  • 1 large egg mixed with 1 teaspoon water, or plain water for simple triangle folds; you may not need all the egg wash
  • For deep frying: neutral high-heat oil, approximately 1½–2 inches / 4–5 cm deep
  • For air frying or baking: enough neutral oil to mist or brush every exposed part of the wrapper lightly

Package counts vary, and a few extra wrappers are useful in case some tear, dry out, or stick together.

Quick Red-Orange Sweet-and-Sour Sauce

IngredientUS amountMetric amount
Granulated sugar⅓ cup67 g
Water¼ cup60 ml
Unseasoned rice vinegar or white vinegar3 tbsp45 ml
Ketchup1 tbsp15 g
Low-sodium soy sauce1 tsp5 ml
Cornstarch2 tspAbout 5–6 g
Cold water for the slurry1 tbsp15 ml
Chili flakes, optionalSmall pinch—

Make and Chill the Filling

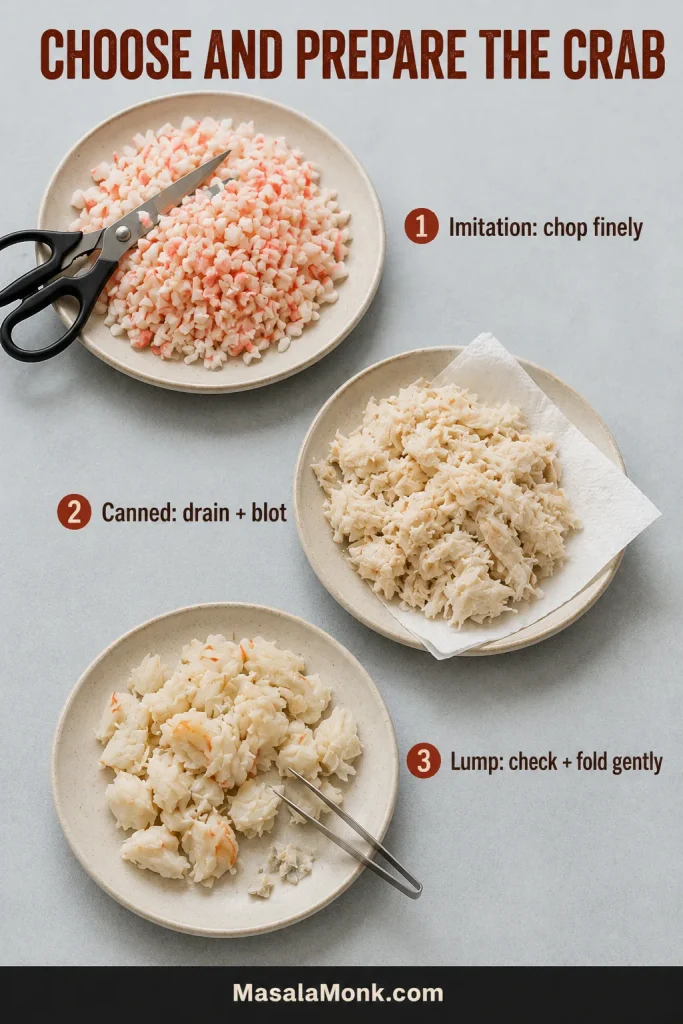
  1. Finely chop imitation crab. For canned or lump crab, drain thoroughly, blot away visible moisture, and check carefully for shell fragments. Thaw previously frozen cooked crab completely before drying it.
  2. Mix the softened cream cheese, garlic powder, pepper, and the sugar, if using, until smooth.
  3. Add the soy sauce, Worcestershire sauce, and optional sesame oil.
  4. Stir in the scallions, then fold in the crab gently so the mixture stays thick and some crab texture remains.
  5. Taste and add a small pinch of salt only when needed.
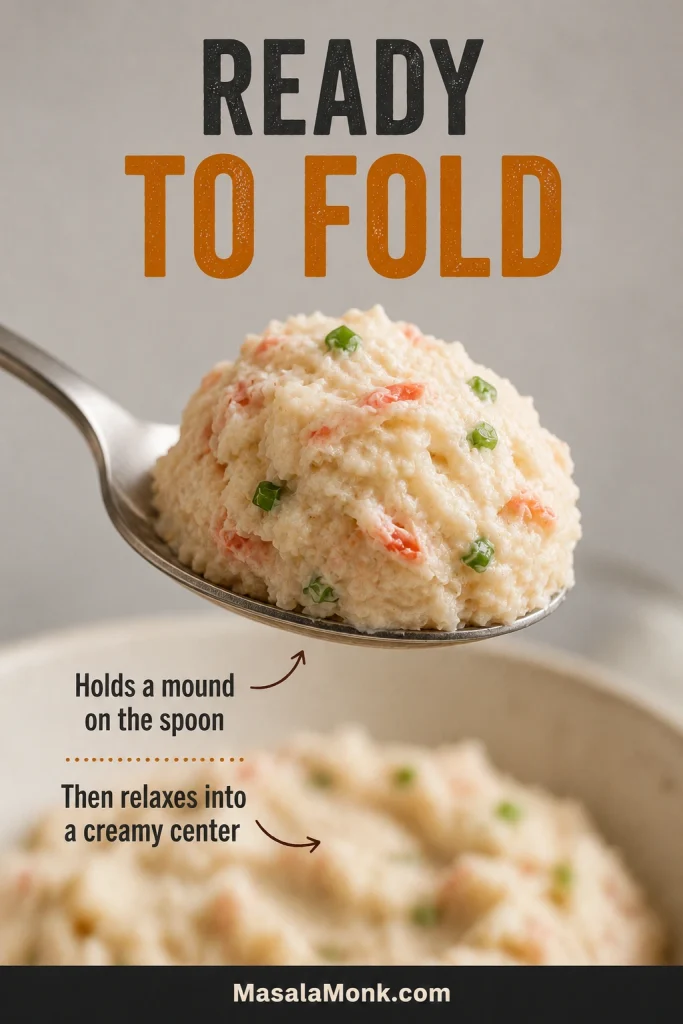
  6. Cover and refrigerate for 20–30 minutes. Properly chilled filling holds a rounded scoop on the spoon.
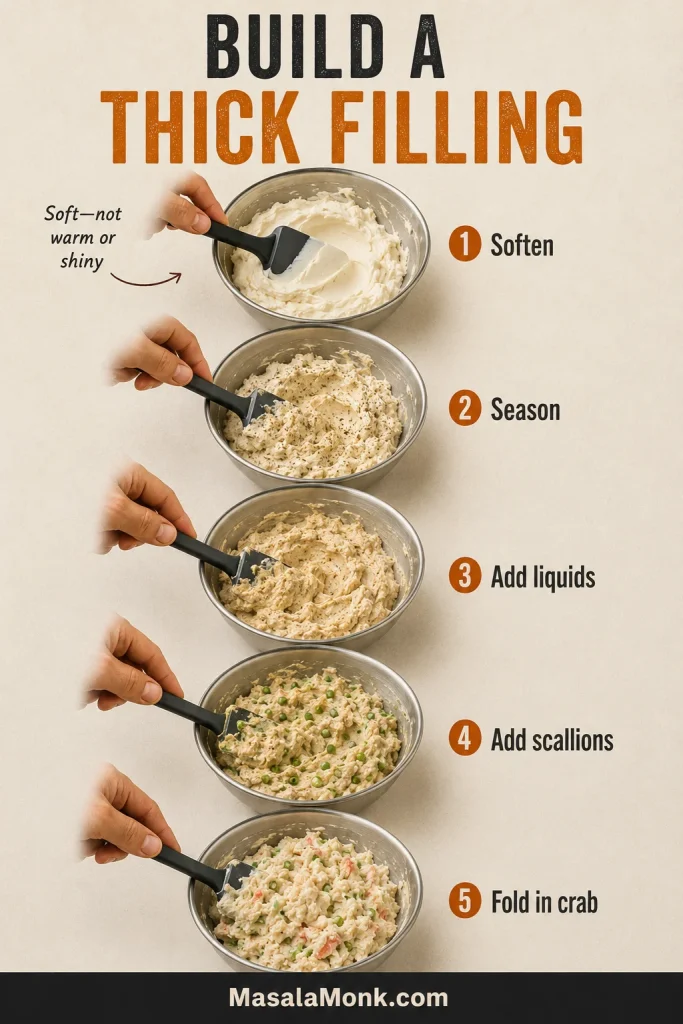
Five-stage preparation guide showing softened cream cheese combined with seasonings, liquid sauces, scallions and crab to produce a thick, evenly mixed filling.
Add sauces and seasonings before the crab. Once the seafood goes in, stir only enough to distribute it.

Use cooked crab or ready-to-eat imitation crab. These short cooking methods crisp the wrapper and warm the filling; they are not intended to cook raw seafood safely.

Make the Sweet-and-Sour Sauce

  1. Simmer the sugar, ¼ cup water, vinegar, ketchup, soy sauce, and optional chili flakes until the sugar dissolves.
  2. Mix the cornstarch with 1 tablespoon cold water, then whisk the slurry into the saucepan.
  3. Cook for 30–60 seconds, until glossy and lightly thickened. Thin the cooled sauce with warm water, 1 teaspoon at a time, if needed.
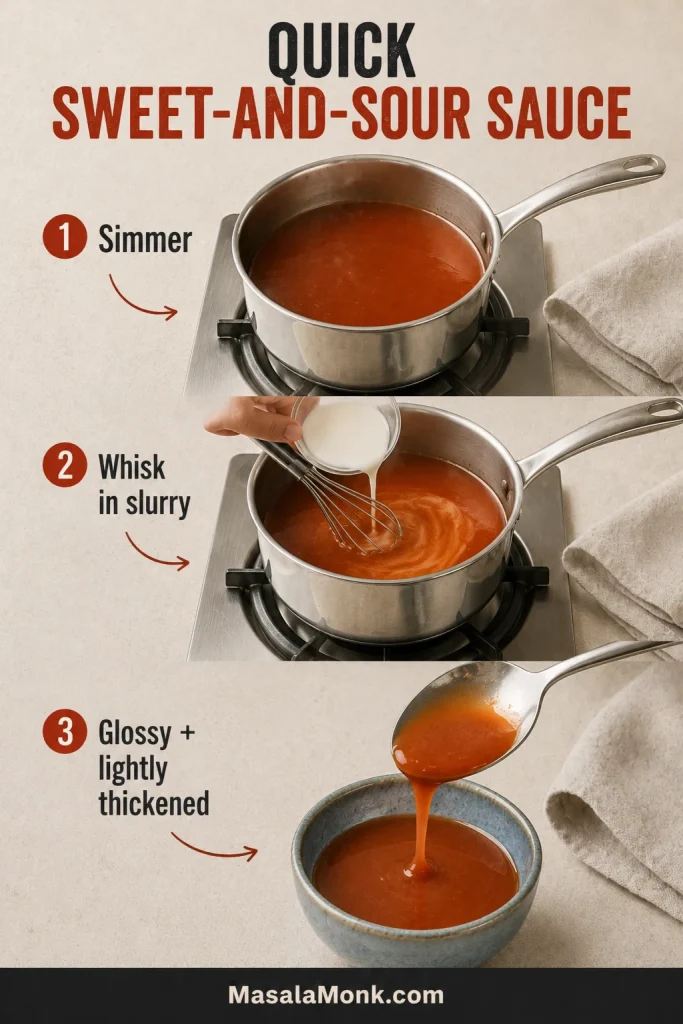
Three-stage guide showing red-orange sauce simmering, cornstarch slurry being whisked in and the finished glossy sauce lightly coating a spoon.
Sweet-and-sour sauce thickens as it cools. If it turns gel-like, whisk in warm water one teaspoon at a time.

Fill and Fold

  1. Line a tray with parchment. Keep the wrapper stack covered and remove only four to six at a time.
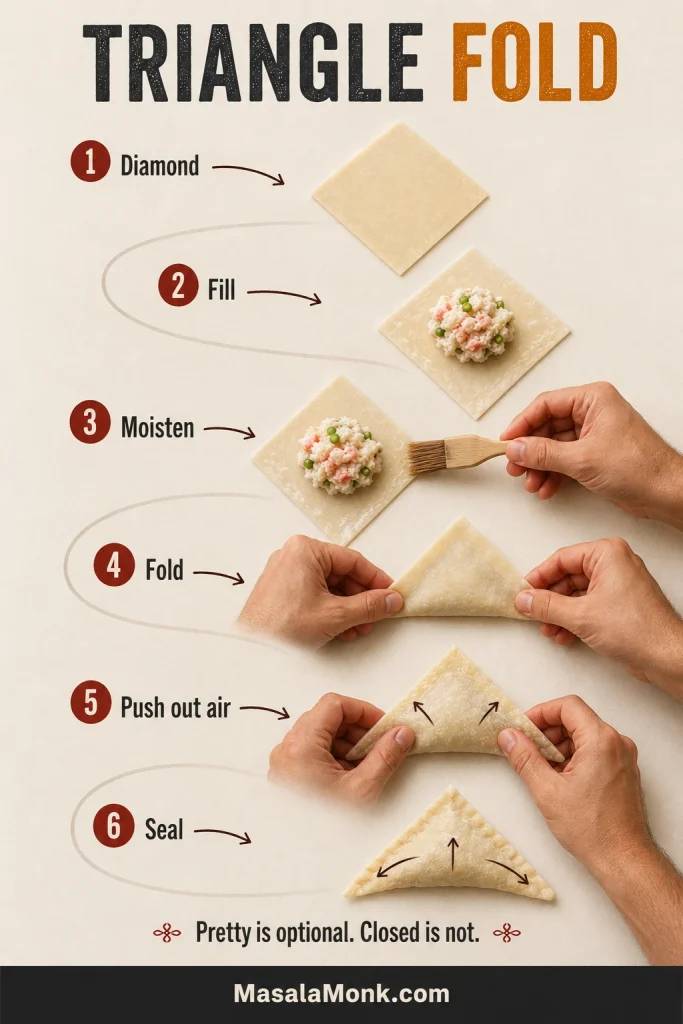
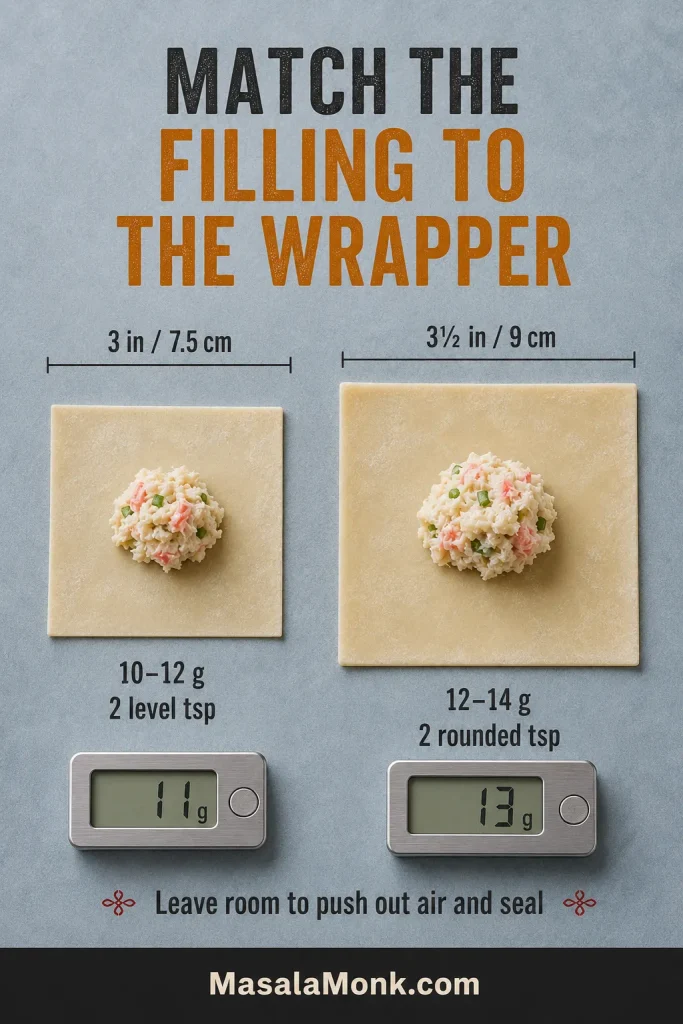
  2. Add about 2 level teaspoons, or 10–12 g, to a thin 3-inch wrapper. Use about 2 rounded teaspoons, or 12–14 g, in a sturdy 3½-inch wrapper.
  3. Lightly moisten the edge with egg wash or water.
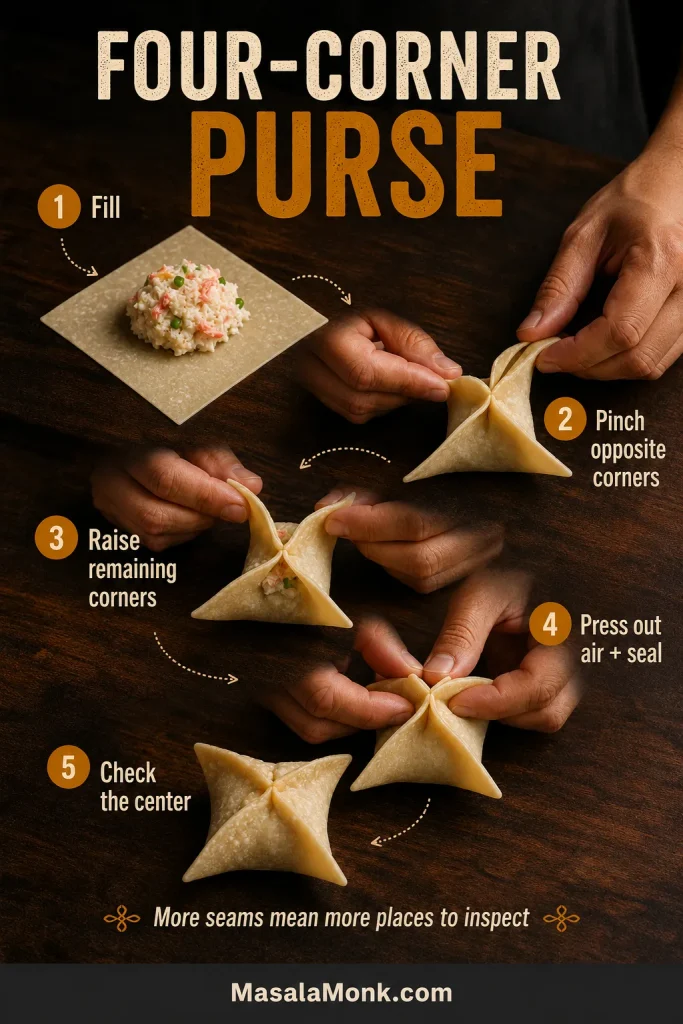
  4. Fold into a triangle or four-corner purse.
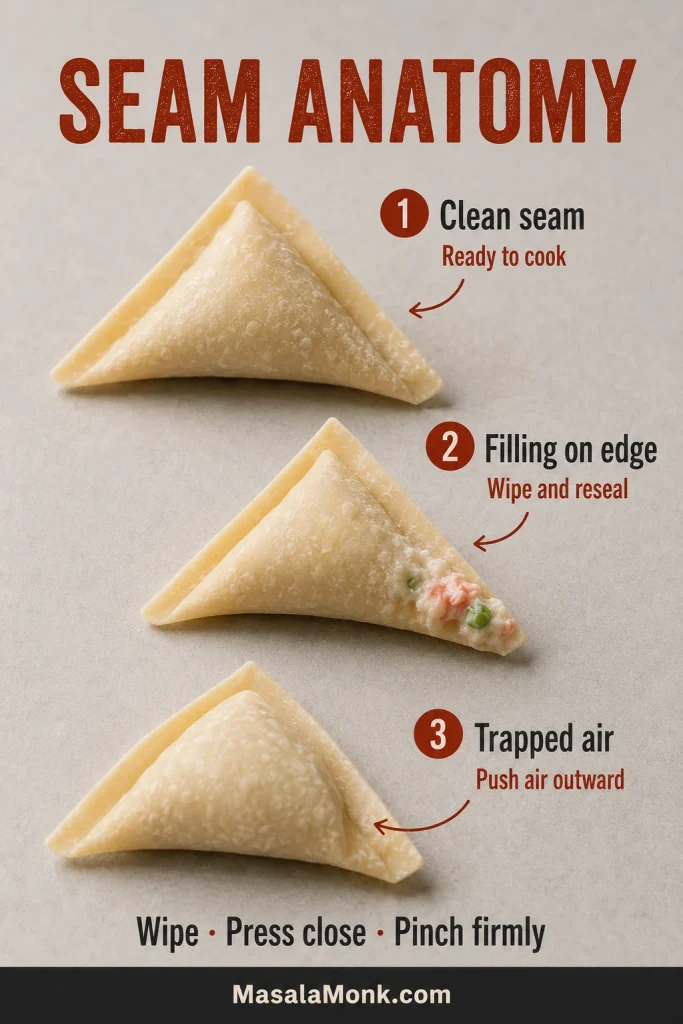
  5. Press the wrapper close around the filling, push out trapped air, and close every seam firmly.
  6. Run a fingertip along the seam. It should feel smooth and uninterrupted, with no soft air pocket beside the filling.
  7. Return each finished rangoon to the lined tray and keep it covered while you continue folding.

Deep-Fry

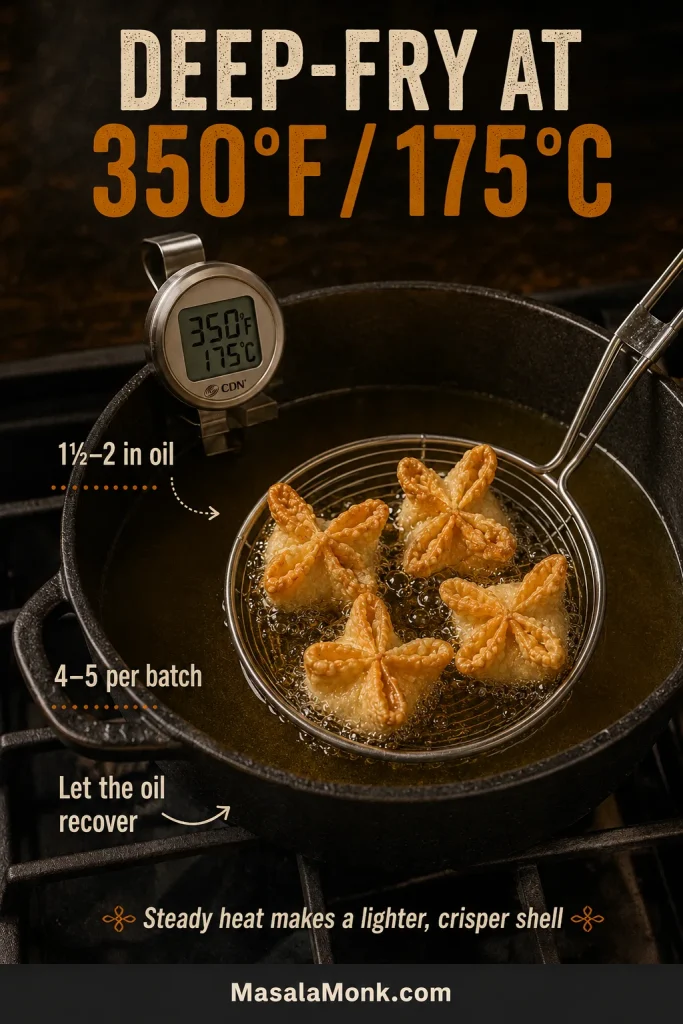
  1. Pour enough oil into a heavy pot to reach 1½–2 inches / 4–5 cm deep. Do not fill the pot more than halfway.
  2. Heat the oil to 350°F / 175°C.
  3. Lower four or five rangoons gently into the oil.
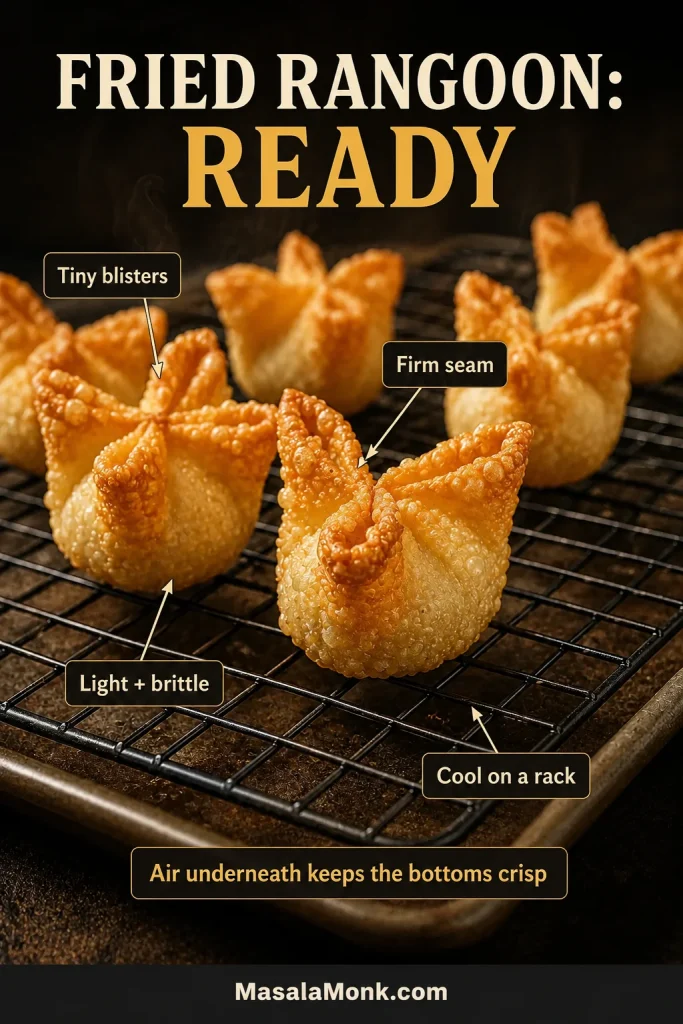
  4. Fry for approximately 2–3 minutes, turning only when needed for even color.
  5. Remove them when the wrappers are evenly golden, tiny blisters cover the flat sides, and the seams feel firm.
  6. Drain on a wire rack and let the oil return to 350°F / 175°C before the next batch.

Air Fry

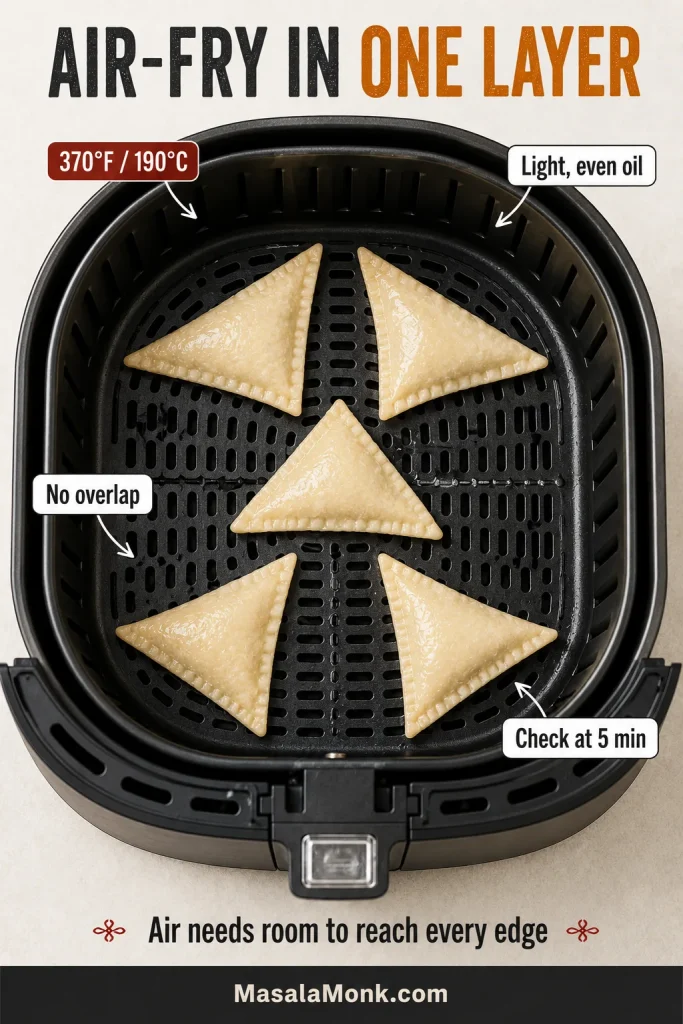
  1. Preheat the air fryer to 370°F / 190°C for about 3 minutes, unless the manufacturer advises otherwise.
  2. Coat every exposed part of the wrapper lightly with oil.
  3. Arrange the rangoons in one uncrowded layer.
  4. Air fry for 6–8 minutes, beginning to check at 5 minutes.
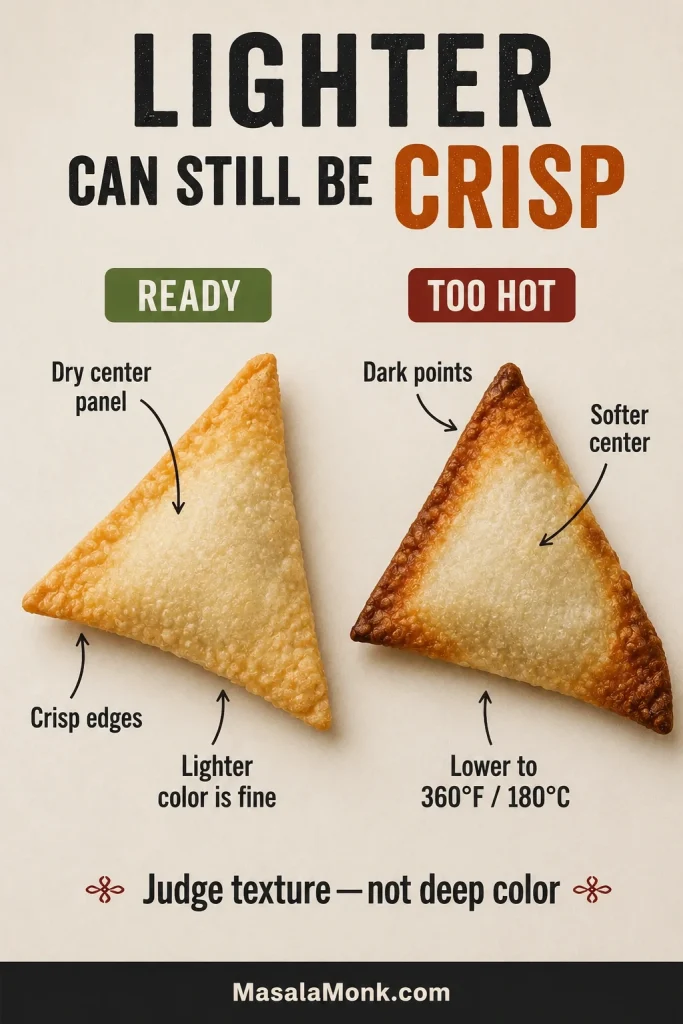
  5. Tap the center panel gently with the tongs. It should feel dry and sound crisp, even when the wrapper remains lighter than a fried one.
  6. Purse shapes usually do not need flipping. Turn flat triangles once only when their undersides remain noticeably pale.

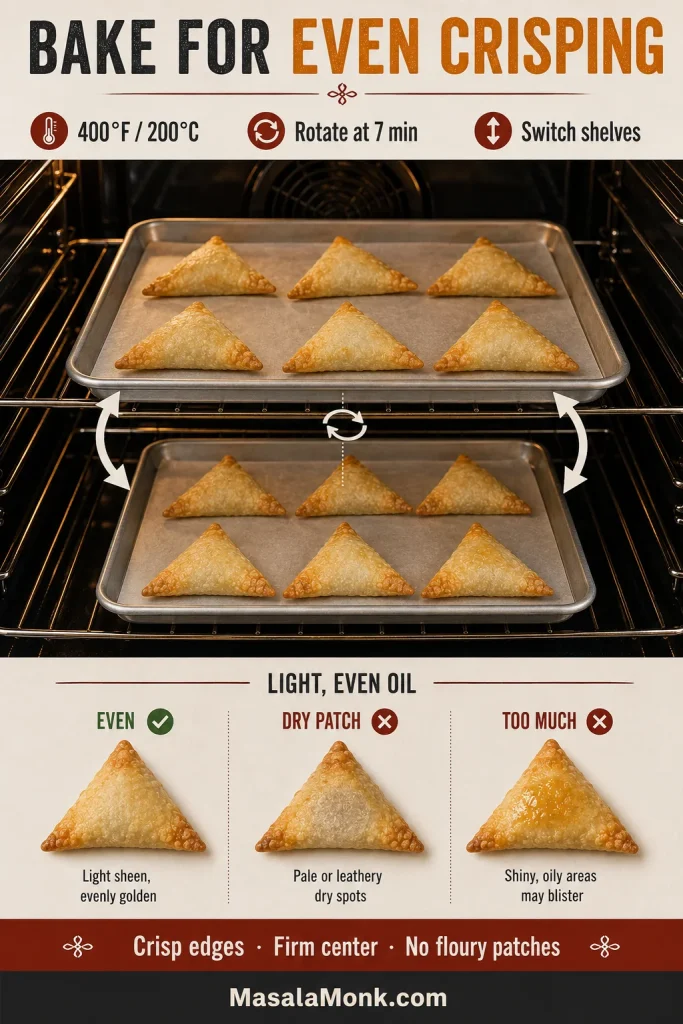
Bake

  1. Heat the oven to 400°F / 200°C. Line one or two rimmed baking sheets with parchment.
  2. Spray or brush every exposed part of the wrapper lightly with oil.
  3. Arrange the rangoons in one layer with at least 1 inch / 2.5 cm between them.
  4. Bake for 10–14 minutes, rotating the tray after about 7 minutes.
  5. When using two trays, switch their positions and turn them front to back.
  6. Remove them when the edges snap, the wrapper around the center feels firm, and no floury-looking patches remain.

Before eating: Let the rangoons rest for 3–5 minutes. The crisp shell cools before the creamy center does.

Allergen note: This recipe may contain milk, wheat, egg, soy, fish, crustacean shellfish, sesame, or peanut, depending on the packaged ingredients and cooking oil used. See the detailed allergen guidance below.

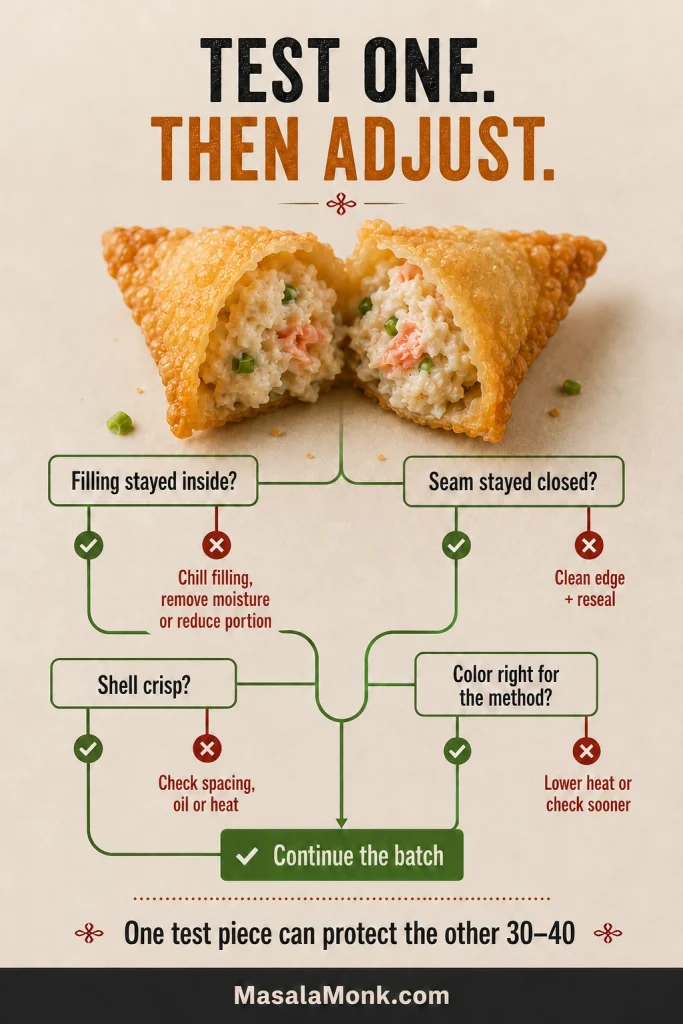
Once the first rangoon cracks cleanly and stays full, the rest of the batch becomes mostly repetition rather than guesswork. The guide below helps you choose a different filling, understand the wrappers, compare methods, or solve anything the test piece revealed.

Decision tree centered on a split-open crab rangoon, checking whether the filling stayed inside, the seam stayed closed, the shell crisped and the color suits the cooking method.
Rest the test rangoon for 3–5 minutes before opening it. Otherwise, hot filling can look looser than it will eat.
Guide contents

Choose and Prepare the Filling

Maybe the version you remember came in a paper takeout bag beside egg rolls, with a tiny cup of bright-red sauce. Maybe the center was almost entirely creamy, or full enough that you could see the crab when you broke it open. There is no single version everyone is trying to recreate.

For many people, crab rangoon is less about one official formula than a particular balance of sweetness, creaminess, and crackle attached to a familiar meal.

Crab rangoon is a Chinese-American restaurant appetizer rather than a traditional Chinese dish, which helps explain why fillings vary so widely.

Choose Your Crab Rangoon Filling

If you want…Use this fillingRecommended crab
Sweet takeout or buffet-style8 oz cream cheese + 4–5 oz crab + 1–1½ tsp sugarImitation crab
Balanced and creamy8 oz cream cheese + 6 oz crab + 0–1 tsp sugarImitation, canned, or lump crab
More distinct crab flavor8 oz cream cheese + 8 oz crab; omit sugarLump or well-drained canned crab

Because the total amount of filling changes, the sweet version makes slightly fewer rangoons and the crab-forward version slightly more. Wrapper size and portioning still have the greatest effect on yield.

Three plates showing finely chopped imitation crab, drained canned crab resting on paper towel and larger lump crab flakes being checked for shell fragments.
Treat each crab differently. Chop imitation crab, blot canned crab and fold lump crab gently to preserve texture.

Smooth takeout-style center: Finely chopped imitation crab blends into the cream cheese, while 1–1½ teaspoons of sugar recreates the gentle sweetness found at many takeout restaurants. Add ⅛–¼ teaspoon MSG (monosodium glutamate) for a slightly deeper savory note.

Balanced and creamy: The filling stays creamy while the crab remains noticeable. Omit the sugar for a savory center, or add up to 1 teaspoon for gentle sweetness.

More crab in every bite: Omit the sugar, drain the crab especially well, and fold it in at the end so some flakes remain visible.

To add a little crunch, fold in 2 tablespoons finely diced, thoroughly drained water chestnuts.

Ingredients and Why They Matter

This filling does not need a long ingredient list. Moisture and texture matter more than piling in extra seasoning.

Full-fat block cream cheese gives the filling its most stable texture. Soften it until a spatula moves through it easily, but stop before it becomes warm, shiny, or runny. Spreadable tubs and whipped cream cheese may contain more moisture or air, while reduced-fat cream cheese generally produces a softer filling.

Imitation crab gives the mild, lightly sweet flavor many people associate with takeout crab rangoon. Lump crab provides the clearest seafood flavor and more visible flakes. Canned crab is convenient and crab-forward, but it must be drained thoroughly and checked for shell fragments.

Scallions add freshness without much moisture. Garlic powder adds flavor without introducing liquid, while soy sauce and Worcestershire sauce bring salt, savoriness, and tang in small enough amounts to keep the mixture thick.

What Should the Filling Look Like?

A properly chilled filling should hold its mound on the spoon, then relax into a creamy pocket once heated. It should not run, release visible liquid, or spread across the wrapper before you begin folding.

Close-up of chilled crab and cream cheese filling holding a rounded mound on a metal spoon, with small crab pieces and scallion flecks visible.
If chilled filling slides off the spoon, chill it longer or reduce the portion. If it cracks, let it soften briefly.
  • Too soft but not watery: refrigerate for another 15–20 minutes.
  • Visibly wet: chill the filling, spoon away any liquid that gathers, and avoid adding more liquid seasoning. If it still slumps after chilling, use slightly smaller portions and choose triangle folds.
  • Too stiff: let it stand at room temperature for a few minutes.
  • Long crab strands remain: break them up gently with kitchen scissors or the edge of a spatula.
  • Large cream cheese lumps remain: let the filling stand for about five minutes, then press the remaining lumps gently against the bowl with a spatula. Avoid vigorous beating once the crab has been added.
Check allergens and packaged ingredients
  • Wheat: standard wonton wrappers and most conventional soy sauces
  • Milk: cream cheese
  • Egg: egg wash and some imitation-crab products
  • Soy: soy sauce and some imitation-crab products
  • Fish: imitation crab and some Worcestershire sauces
  • Crustacean shellfish: real crab, crab extract, and some imitation-crab products
  • Sesame: optional sesame oil
  • Peanut: only when peanut oil is chosen for frying

Check every packaged ingredient, consider cross-contact in shared cooking oil, and follow the FDA guidance on reading complete ingredient and allergen information.

Wrappers, Portions, and Folding

The wrapper is doing more than holding the filling. Its size determines how much you can add without asking the seam to stretch.

Wonton wrappers are usually sold refrigerated near tofu, fresh noodles, or produce, and may be stocked in the freezer section of Asian supermarkets. Frozen wrappers should thaw completely in their sealed package in the refrigerator before you separate the stack.

  • Standard supermarket wonton wrapper: the most manageable all-purpose choice
  • Thin Hong Kong-style wrapper: delicate and deeply blistered, but easier to tear or overfill
  • Thicker wonton wrapper: sturdier and easier to handle, with a slightly chewier shell

Egg-roll wrappers can be cut into squares, while spring-roll sheets and rice paper behave differently. MasalaMonk’s crispy vegetable spring roll guide explains those alternatives in more detail.

How Much Filling Goes in Each Wrapper?

A properly filled wrapper should feel plump but relaxed, never stretched tightly over the filling. Leave enough clean space around the mound to release trapped air and close the seam.

  • Thin 3-inch / 7.5 cm wrapper: about 2 level teaspoons, or 10–12 g
  • Sturdy 3½-inch / 9 cm wrapper: about 2 rounded teaspoons, or 12–14 g
  • Four-corner purse: stay near the lower end of the range
  • Broad triangle: a sturdy larger wrapper can usually hold the higher end
A 3-inch wonton wrapper holding 10 to 12 grams of filling beside a 3½-inch wrapper holding 12 to 14 grams, with size and weight labels.
Measure the first few portions. Once your hand recognizes the volume, you can work faster without gradually overfilling wrappers.

Which Fold Works Best?

FoldMain advantageWorks especially well forMain risk
TriangleEasiest and strongest sealBeginners, air frying, and bakingSlightly flatter filling pocket
Four-corner purseClassic shape and fuller centerDeep fryingMore seams and faster-browning points

How to Fold and Seal Them

Pretty folds are optional. Closed folds are not. The first one may look awkward; it only needs to stay sealed. Once the portion and motion feel familiar, the tray usually fills much faster.

Triangle Fold

  1. Place the wrapper like a diamond with one point facing you.
  2. Add the measured filling to the center.
  3. Brush a thin film of water or egg wash around the edges.
  4. Bring the bottom point to the top point.
  5. Press close to the filling and push air toward the open edges.
  6. Seal from the center toward each corner.
Six-step overhead guide showing a square wonton wrapper filled, moistened, folded into a triangle, pressed to remove air and sealed along the edges.
Seal a triangle with one firm pass. Repeated pinching can thin the wrapper and create tiny cracks.

Four-Corner Purse

  1. Add the measured filling to the center.
  2. Brush a thin film of egg wash around the border.
  3. Bring two opposite corners together and pinch.
  4. Bring the remaining corners to the center.
  5. Press the wrapper close around the filling to remove air.
  6. Seal the four diagonal seams from the center outward.
  7. Check the point where all four seams meet.
Five-step guide showing a filled wonton wrapper formed into a four-corner purse by joining opposite corners, raising the remaining corners and sealing the seams.
Lift each purse gently by its center junction before cooking a full tray. Weak joins usually separate there first.

Water is usually enough for fresh wrappers and simple triangles. Egg wash provides extra grip for purse folds and deep frying. Use only a thin film; a soaked edge becomes slippery.

Close comparison of a properly sealed wrapper edge, filling caught along the sealing border and an air pocket trapped beside the filling.
A slightly damp edge becomes tacky; a soaked edge slides. Apply only a thin film of egg wash.

Back to the recipe · Compare cooking methods · Troubleshoot sealing

Compare the Three Cooking Methods

The filling stays the same. What changes now is the shell you want around it and the number of pieces you need to cook at once.

MethodResultFull-batch timeWorks especially well for
Deep fryThinnest, most blistered, and evenly crispAbout 20–30 minutesRestaurant-style texture; triangles or purses
Air fryCrisp, lighter shell with faster-browning pointsAbout 25–55 minutes; allow roughly 35–55 minutes with a five-piece basketSmaller lower-oil batches; triangles
BakeCrisp edges with a more tender center10–14 minutes when two trays bake together, or 20–28 minutes in two roundsLarger batches; triangles
Fried, air-fried and baked crab rangoons shown whole and cut open, with different wrapper colors, surface textures, temperatures and cooking times.
Keep the filling amount and fold consistent when comparing methods. Otherwise, wrapper shape can be mistaken for a cooking difference.

Deep-Fried Crab Rangoon

Deep frying produces the thinnest shell and the most even blistering because the hot oil reaches the seams, points, and flat sides at the same time. Triangle folds are easy to manage, while four-corner purses give the familiar restaurant shape.

The oil temperature matters more than chasing an exact shade of gold. When the oil falls too far below 350°F / 175°C, the wrappers absorb more fat before they become crisp. Let the pot recover between batches rather than adding more pieces to save a minute.

Five folded crab rangoons being carefully lowered into a heavy pot containing 1½ to 2 inches of oil at 350°F or 175°C.
Lower each piece close to the oil surface. This reduces splashing and helps prevent the fold from striking the pot.

Properly fried wrappers should feel light and brittle rather than thick or oily. Look for tiny blisters, firm seams, and even color before the points become dark.

Golden fried crab rangoons cooling in one layer on an elevated wire rack, with small wrapper blisters, firm seams and crisp pointed edges visible.
Freshly fried crab rangoon may feel slightly flexible. It should become brittle within a minute on the rack.

Frying Safety

  • Use a stable, heavy pot and do not fill it more than halfway with oil.
  • Keep water, damp wrappers, wet utensils, children, and pets away from the cooking area.
  • Lower the rangoons gently, remove any leaking piece promptly, and keep pot handles turned away from the edge of the stove.
  • Drain the cooked rangoons on a wire rack so steam does not soften the bottoms.

Air Fryer Crab Rangoon

For the air fryer, the triangle is the more forgiving shape. It has fewer seams and fewer exposed points competing with the hot circulating air. Purse-shaped rangoons still work, but their tips may crisp before the wrapper around the center.

Five uncooked triangle crab rangoons arranged without touching in a lightly oiled air-fryer basket, with open vents and space around every piece.
Leave the basket vents exposed and space the triangles apart. Crowding blocks hot air from reaching the bottoms and center panels.

A lighter shell is not a failed shell. A pale air-fried wrapper can still crack cleanly when you bite it. Trust the dry, crisp texture rather than waiting for the deep color produced by frying.

Two air-fried crab rangoons compared: one light-golden and crisp with a firm center, and one with dark points surrounding a softer pale center.
Do not wait for deep-fried color. Instead, tap the wrapper over the filling; it should feel dry and firm.

When the tips darken too quickly, lower the setting to 360°F / 180°C. The extra minute or two gives the center panel time to crisp without hardening the points.

Baked Crab Rangoon

On a sheet pan, triangles sit steadily and expose more wrapper to the heat. Baking is also the most practical option when you want to cook a large batch without standing over oil.

The wrapper around the center stays slightly more tender than the edges. That is part of the baked texture, not a sign that the batch failed. Look for crisp points, firm seams, and no dry floury patches.

Uneven oil coverage is the usual reason baked wrappers stay pale or leathery. Mist or brush any dry-looking areas and return the tray to the oven briefly rather than continuing until the points become hard.

Two trays of triangle crab rangoons baking on different oven shelves, with arrows showing tray rotation, shelf switching and different levels of oil coverage.
Remove a finished tray instead of waiting for both to match. Oven shelves rarely brown at exactly the same rate.

Which Dipping Sauce Do You Remember?

The sauce is often the part people remember most clearly and name least accurately. The red or orange dip may be sweet-and-sour, duck sauce, sweet chili, or plum sauce.

SauceAppearanceFlavor
Clear bright-red restaurant sauceThin, translucent, glossySimple vinegar-and-sugar sweet-and-sour
Red-orange sweet-and-sourGlossy and slightly opaqueTangy, sweet, lightly tomato- or fruit-based
Duck or apricot sauceOrange and jam-likeFruity and mild
Sweet chili sauceRed with visible chili piecesSweet with gentle heat
Plum sauceDarker and thickerFruitier and less sharply acidic
Five ceramic bowls containing clear red sauce, red-orange sweet-and-sour sauce, orange duck sauce, flecked sweet chili sauce and dark plum sauce.
Identify crab rangoon dipping sauce by texture before color. Brands vary in shade, but thickness remains more revealing.

The sauce included in the recipe is glossy, red-orange, and sweet-and-sour. Its vinegar cuts through the rich cream cheese and crisp wrapper. Duck or plum sauce provides a softer fruit contrast, while sweet chili adds gentle heat.

A hand dipping one corner of a broken-open crab rangoon into smooth red-orange sweet-and-sour sauce while the creamy center remains visible.
Use a shallow bowl for crab rangoon dipping sauce. It encourages a light corner dip and preserves more crunch.

For guests who prefer a less tangy dip, homemade yum yum sauce gives the platter a cool, creamy alternative.

Troubleshooting: What to Do Now

A few imperfect rangoons do not mean the batch is lost. Start with the symptom you can see. Most batches need one adjustment, not a complete restart.

Most problems lead back to thick filling, modest portions, or clean seams. The tables below separate issues you can catch before cooking from the ones that appear after the wrappers hit the heat.

Jump to: Before cooking · After cooking · Reheat softened leftovers

Before Cooking

Pre-cooking crab rangoon troubleshooting guide showing watery filling, long crab strands, cream cheese lumps, filling on a seam, a cracked wrapper and trapped air around a correctly folded piece labelled ready to cook.
Inspect the last pieces you folded first. Wrappers exposed longest are most likely to dry, crack or need resealing.
What you seeWhat to do now
Filling is wateryThe crab may have carried too much moisture, or the filling may be warm. Chill it for 15–20 minutes, spoon away visible liquid, and avoid adding more liquid seasoning. If it still slumps, use smaller portions and triangle folds.
Long crab strands remainBreak them up gently in the mixed filling with kitchen scissors or the edge of a spatula.
Cream cheese remains lumpyLet the filling stand for about five minutes, then press the remaining lumps gently against the bowl with a spatula. Avoid vigorous beating once the crab has been added.
Seam will not stickWipe the border clean, let it dry briefly, lightly moisten it again, and pinch.
Wrapper crackedPatch a small crack with a dampened scrap of wrapper. Discard badly split pieces.
Air remains around the fillingPress the wrapper closer to the mound and push the air toward the open edge before sealing.

Most sealing problems are easier to correct before the first batch cooks. Once the rangoons hit the heat, color, texture, and leakage become the useful clues.

After Cooking

Six-row crab rangoon troubleshooting guide comparing leaked filling, an opened seam, a greasy fried shell, air-fryer points burned, a pale baked wrapper and a hollow center with corrected results.
The failure location matters. A leaking seam suggests sealing trouble, while a split panel often points to overfilling.
What happenedWhat to do now
Filling leaked outThe portion may be too large, the filling too wet, or the border dirty. Reduce the remaining portions, clean each edge, and reseal.
Wrapper openedPress the remaining wrappers close to the filling, push the air outward, and pinch every seam again.
Fried rangoons are greasyBring the oil back to 350°F / 175°C and cook smaller batches.
Outside browned too quicklyLower the heat, let the oil or appliance temperature settle, and check the next batch sooner.
Air-fryer points burnedReduce the setting to 360°F / 180°C and add 1–2 minutes if the center panel still needs crisping.
Baked wrappers stayed paleBrush or mist the dry areas lightly and bake for another 1–2 minutes.
Bottom stayed softReturn the pieces in one layer for 1–2 minutes, then cool them on a rack.
Center feels hollowUse the measured portion, press the wrapper close around it, inspect every seam, and stop cooking once the shell is crisp.
Cooked rangoons softenedRe-crisp at 350°F / 175°C in the air fryer for 2–3 minutes or at 375°F / 190°C in the oven for 4–6 minutes.

Party Timeline and Quantities

The goal is to serve crisp rangoons—not spend the whole party trapped beside the stove. Smaller fresh batches stay crisper than one large pile slowly steaming itself soft.

To reduce last-minute cooking, let a make-ahead cheese ball cover the cold-appetizer slot while the rangoons come out in smaller fresh batches.

How Many Crab Rangoons Per Person?

Plan on 3–4 rangoons per person when several appetizers are available, or 5–6 when they are the main hot appetizer. Count the recipe as 8 servings; in practice, one balanced batch usually serves about 8–10 with other appetizers or 5–7 when these are the main hot appetizer.

Serving guide showing four crab rangoons for a mixed appetizer spread and six for a main hot appetizer, with full- and half-batch quantity guidance.
Count cooking capacity as well as appetite. A small air-fryer basket may serve only a few guests at once.

For a larger group, double the filling, but open and fill the second package of wrappers only when needed so the unused stack stays supple.

Make-Ahead Crab Rangoon Timeline

Up to 24 hours ahead: Prepare the filling and store it in an airtight container in the refrigerator. Make the dipping sauce and refrigerate it separately.

For the best wrapper texture, up to four hours ahead: Fold the rangoons, arrange them on parchment-lined trays, cover them carefully so the wrappers do not dry out, and keep them refrigerated until cooking.

For overnight or longer preparation: Freeze the assembled rangoons rather than refrigerating them.

Before guests arrive: Set out wire racks, sheet pans, dipping bowls, and serving platters. Take the sauce out of the refrigerator early enough to lose its deep chill, or warm it gently if preferred. Heat the oil, oven, or air fryer shortly before cooking.

During service: Cook the first batch before everyone is waiting at the platter. After that, smaller fresh batches can arrive while people are already eating. Hold finished rangoons uncovered on a wire rack in a 200°F / 95°C oven for no more than about 15 minutes.

Party timeline showing filling and sauce prepared up to 24 hours ahead, folding up to four hours ahead, freezing, setup, fresh-batch cooking and a short warm hold.
Plan the party backward from the first serving time. Cold preparation is flexible, but crisp holding time is limited.

Freeze and Cook From Frozen

Once frozen solid, the rangoons can be stored compactly and cooked whenever needed. Keep them frozen until they go directly into the oil, air fryer, or oven.

  1. Arrange the uncooked rangoons in one layer on a parchment-lined tray.
  2. Freeze until firm, usually 1–2 hours.
  3. Transfer them to an airtight freezer container or freezer bag.
  4. Separate layers with parchment to protect the seams and points.
  5. Use within two months for the best wrapper quality.

Do not thaw before cooking. Condensation can soften the wrappers and weaken the seams.

Four-stage guide showing uncooked crab rangoons frozen flat on a tray, placed in a freezer, packed airtight with parchment and cooked directly from frozen.
Label the fold and intended cooking method before freezing. Triangles and purses may finish at different times from frozen.

When deep frying frozen rangoons: Brush away visible ice crystals, lower them into the oil carefully, and cook smaller batches because frozen pieces lower the oil temperature more sharply.

MethodTiming from frozenLook for
Deep fry at 350°F / 175°C3–4 minutesEvenly golden wrapper and firm seams
Air fry at 370°F / 190°CCheck at 8 minutes; usually 8–12 minutesDry center panel and crisp points; the shell may remain lighter than a fried rangoon
Bake at 400°F / 200°CCheck at 14 minutes; usually 14–18 minutesCrisp edges and a firm center

Cook one frozen rangoon first because wrapper thickness, fold shape, filling amount, freezer temperature, and appliance performance all affect the timing.

Storage and Reheating

Freshly cooked rangoons have the most delicate shell, but dry heat restores enough crunch to make leftovers worth saving.

Refrigerate cooked crab rangoon within two hours. Once the heaviest steam has subsided, arrange the pieces in a shallow container and refrigerate promptly. Cover the container once the rangoons have cooled.

Use refrigerated leftovers within 3–4 days, but reheat and eat them within two days for the best wrapper texture. The USDA leftovers guide recommends reheating leftovers to 165°F / 74°C.

  • Air fryer: 350°F / 175°C for 3–5 minutes
  • Oven: 375°F / 190°C for 6–10 minutes
  • Microwave: the filling becomes hot, but the wrapper remains soft
Crab rangoons compared after reheating in an air fryer, oven and microwave, with crisp dry-heat results and a visibly softer microwaved wrapper.
Leave crab rangoon uncovered while reheating. Foil and lids trap steam, undoing the wrapper’s restored crunch.

What to serve with them · Back to top

What to Serve With It

Pair the rich, creamy rangoons with one substantial dish and one sharp or vegetable-led side. That gives the meal contrast without turning the table into a list of competing fried foods.

  • Takeout-style dinner: shrimp fried rice with a cool cucumber salad
  • Noodle dinner: lo mein or chow mein with stir-fried vegetables
  • Lighter spread: hot-and-sour soup with lettuce cups or smashed cucumber salad

The cucumber salad is especially useful between rich bites: rice vinegar, sesame, garlic, and chili reset the palate before the next rangoon.

Shared dinner table with a central platter of crab rangoons, smooth red-orange sauce, shrimp fried rice, cucumber salad and several hands serving food.
Keep the crab rangoon platter away from steaming rice and dressed salad. Nearby moisture can soften wrappers before serving.

For another Chinese-American takeout classic, try MasalaMonk’s Egg Foo Young with brown gravy.

Frequently Asked Questions

Is crab rangoon made with real crab?

It can be made with real crab, canned crab, imitation crab, or a mixture. Imitation crab often gives the mild, lightly sweet flavor associated with takeout crab rangoon.

Is crab rangoon supposed to be sweet?

Some takeout and buffet versions are gently sweet, while others are savory. The filling guide includes exact sugar ranges for sweet, balanced, and crab-forward versions.

Can crab rangoon be made gluten-free?

It requires dedicated gluten-free wrappers and individually checked sauces, imitation crab, and seasonings. Standard wonton wrappers contain wheat, and packaged ingredients vary by brand.

Why does crab rangoon keep opening?

Too much filling, trapped air, or filling on the sealing edge are the usual causes. See the troubleshooting section for the correction that matches what happened.

What is the red sauce served with crab rangoon?

It is usually a sweet-and-sour sauce, although some restaurants serve duck sauce, plum sauce, or sweet chili sauce. The dipping-sauce guide can help identify the version you remember.

The last two pieces rarely stay on the platter for long.

Almost-empty platter holding one triangle crab rangoon and one purse-shaped rangoon beside crumbs and sauce streaks, with a hand reaching for a final piece.
By the time the last batch arrives, the first platter may already be down to crumbs and sauce streaks.

The Rule to Remember

Thick filling, modest portions, clean seams.

Drain the crab, chill the filling until it holds a mound, and push out trapped air before sealing. Those three decisions do more for the finished rangoon than an elaborate fold or a longer ingredient list.

After the short rest, the shell should crack cleanly around a warm, creamy center—and the person who said they only wanted one may already be reaching for another.

Which version are you making: sweet and creamy, balanced, or packed with real crab?

Back to the top · Back to the recipe

Posted on — Leave a comment

Crockpot Chili Recipe: Easy Slow Cooker Chili With Ground Beef and Beans

Bowl of crockpot chili topped with cheddar cheese, sour cream, green onions, tortilla chips, and cornbread, with a slow cooker in the background

This crockpot chili recipe is for the night you want dinner to smell like it has been simmering all day, without standing over the stove all afternoon. It is thick, beefy, tomato-rich, and built to avoid the usual slow-cooker chili problems: watery sauce, greasy beef, bland seasoning, and beans that go too soft.

You brown and drain the beef first, build a quick tomato-spice base, add beans and tomatoes, then cook everything on Low for 6 to 8 hours or High for 3 to 4 hours. The result is cozy, spoonable chili that can hold cheese, sour cream, onions, and chips without turning into soup.

This is the kind of chili that tastes right with a spoon, a handful of chips, or a pile of toppings. It is not fancy. Instead, it is dependable: rich enough for adults, familiar enough for kids, and sturdy enough for leftovers.

The secret to thick crockpot chili is starting with a pot that looks almost too thick, because the slow cooker gives moisture back. Slow cookers trap steam instead of reducing liquid like a stovetop pot, so this recipe uses less added liquid, tomato paste for body, browned beef for flavor, and a short uncovered rest at the end.

This version stays with the familiar tomato-based beef-and-bean style. White chicken chili, turkey chili, vegetarian chili, and no-bean chili all need their own balance of ingredients, so they are treated here as simple variations rather than the main recipe.

Quick Answer: How to Make Crockpot Chili

To make crockpot chili, brown ground beef in a skillet, drain the grease, then cook onion, bell pepper, garlic, tomato paste, and chili spices for a minute to build flavor. Transfer everything to a slow cooker with beans, diced tomatoes, tomato sauce, a small amount of broth or beer, and Worcestershire sauce.

Cook on Low for 6 to 8 hours for the best flavor, or on High for 3 to 4 hours when you need chili sooner. Let the chili rest uncovered for 10 to 15 minutes before serving so it thickens just enough to hold a spoonful of cheese, sour cream, onions, and chips without turning soupy.

The mistake-proof chili rule: the pot should look thick and saucy before cooking, not loose. As the tomatoes release moisture, this recipe starts with only 1/2 cup added liquid and lets tomato paste, drained beans, and resting time do the thickening work.

Once the beef is browned, the recipe becomes very hands-off. The slow cooker handles the long simmer while the base stays sturdy enough for toppings, chili dogs, baked potatoes, nachos, or tomorrow’s lunch.

Crockpot Chili Recipe Card

Easy Crockpot Chili With Ground Beef and Beans

A hearty, family-style slow cooker chili made with browned ground beef, beans, tomatoes, tomato paste, chili spices, and a 6-quart crockpot. It is easy enough for a weeknight, sturdy enough for game day, and perfect for leftovers.

Prep time20 minutes
Cook time6 to 8 hours on Low, or 3 to 4 hours on High
Total timeAbout 3 hours 20 minutes to 8 hours 20 minutes, depending on setting
Servings8 to 10 servings
YieldAbout 10 to 12 cups chili
Recommended slow cooker size6-quart slow cooker

Equipment

  • 6-quart slow cooker
  • Large skillet or frying pan
  • Wooden spoon or spatula for breaking up the beef
  • Colander or strainer for draining and rinsing beans
  • Ladle for serving
  • Airtight containers or freezer bags for leftovers
  • Optional instant-read thermometer, especially if using a dump-and-go raw beef method

Ingredients

  • 2 lb / 900 g ground beef, preferably 85/15 for richer chili or 90/10 for leaner chili
  • 1 large yellow onion, diced, about 150 to 180 g
  • 1 medium green bell pepper, diced, about 120 to 150 g
  • 4 garlic cloves, minced, about 12 to 16 g
  • 2 to 3 tablespoons / 30 to 45 g tomato paste
  • 2 1/2 to 3 tablespoons chili powder blend
  • 2 teaspoons ground cumin
  • 1 teaspoon smoked paprika
  • 1 teaspoon dried oregano
  • 1 1/2 teaspoons salt, plus more to taste
  • 1/2 teaspoon black pepper
  • 1 can kidney beans, 15 oz / 425 g, drained and rinsed
  • 1 can black beans or pinto beans, 15 oz / 425 g, drained and rinsed
  • 1 can diced tomatoes, 28 oz / 794 g, undrained
  • 1 can plain canned tomato sauce, 15 oz / 425 g
  • 1/2 cup / 120 ml beef broth or beer
  • 1 tablespoon / 15 ml Worcestershire sauce

Instructions

  1. Heat a large skillet over medium-high heat. Add the ground beef and cook for 6 to 8 minutes, breaking it into small pieces, until browned.
  2. Drain the excess grease. A little fat is fine, but too much will make the finished chili oily.
  3. Add the onion and bell pepper to the skillet. Cook for 4 to 5 minutes, until they begin to soften.
  4. Stir in the garlic, tomato paste, chili powder blend, cumin, smoked paprika, oregano, salt, and black pepper. Cook for 30 to 60 seconds, until the tomato paste darkens slightly and the spices smell warm.
  5. Transfer the beef mixture to a 6-quart slow cooker.
  6. Add the drained beans, undrained diced tomatoes, plain canned tomato sauce, Worcestershire sauce, and about half the broth or beer. Stir well.
  7. Check the texture before the lid goes on. It should look saucy and sturdy, not loose. If it looks tight and dense, add the remaining broth or beer; if it already looks loose, hold it back.
  8. Cover and cook on Low for 6 to 8 hours or High for 3 to 4 hours. At the end, the chili should bubble gently around the edges and look thicker than it did when you started.
  9. Taste near the end. Add more salt, chili powder, Worcestershire sauce, or a small splash of apple cider vinegar if the chili tastes flat.
  10. Let the chili rest uncovered for 10 to 15 minutes before serving so the sauce tightens slightly.
  11. Serve with shredded cheese, sour cream, green onions, jalapeños, tortilla chips, cornbread, or your favorite chili toppings.

Success Notes

  • Need more body? Use the full 3 tablespoons tomato paste, keep broth to 1/2 cup, and rest the chili uncovered before serving.
  • To round out the flavor: add 1 teaspoon cocoa powder for depth, 1 teaspoon brown sugar to soften acidity, or 1 teaspoon apple cider vinegar to brighten a flat pot.
  • For more smoke: try smoked paprika, chipotle powder, cooked bacon, or a tiny splash of liquid smoke.
  • To raise the heat: add jalapeño, cayenne, hot sauce, or diced tomatoes with green chiles.
  • Keeping it mild? Use mild chili powder and plain diced tomatoes.
  • Using a packet? Replace most dried spices with one chili seasoning packet, then taste before adding extra salt.

Serve when the chili looks thick, smells savory, and holds softly on a spoon after resting.

Before the deeper notes, here is the finished texture you are aiming for.

What Thick Crockpot Chili Should Look Like

Close-up of crockpot chili in a bowl with ground beef, beans, tomato sauce, melted cheddar cheese, sour cream, and green onions
Look for sauce that clings to the beef and beans instead of pooling underneath; that is the difference between cozy crockpot chili and a watery bowl.

Timing and Make-Ahead Notes

Timing at a Glance

Low is the setting to choose when the day allows it. The chili has time to settle, the tomato base tastes rounder, and the beef and beans feel like one pot instead of separate ingredients. High works for a faster batch in 3 to 4 hours. Use Warm only after the chili is fully cooked, when you are holding it for serving.

This is the chili for the day when dinner needs to take care of itself after the first 20 minutes. The pot does not need much attention, but the early browning step is what makes it taste like someone paid attention.

Can You Prep Crockpot Chili the Night Before?

Yes. Brown the beef, cook the onion, bell pepper, garlic, tomato paste, and spices, then cool the mixture and refrigerate it in an airtight container. The next day, add it to the slow cooker with the beans, tomatoes, tomato sauce, Worcestershire sauce, and broth or beer.

If you refrigerate ingredients in a removable slow cooker insert, check your manufacturer’s guidance before placing a very cold insert into the heating base. When in doubt, refrigerate the cooked beef mixture separately and load the slow cooker fresh the next day.

Make This Crockpot Chili When

  • Dinner needs to be started before the busy part of the day hits.
  • A short skillet step is fine, but the rest of the meal needs to be hands-off.
  • Classic beef-and-bean chili sounds better than white chicken chili or vegetarian chili.
  • The pot needs to hold cheese, sour cream, onions, and chips without turning soupy.
  • Game day needs something easy that still tastes homemade.
  • Leftovers should become chili dogs, nachos, baked potatoes, rice bowls, or chili mac.
  • A bigger spread is planned with other slow-cooker snacks like grape jelly meatballs.

The flavor also settles well overnight, which makes this a good make-ahead chili for parties, meal prep, and second-day leftovers.

Texture Notes for Crockpot Chili

This is a thick beef-and-bean chili, not a loose tomato soup. The balance is simple: 2 lb beef, 2 cans beans, 28 oz undrained diced tomatoes, 15 oz plain canned tomato sauce, 2 to 3 tablespoons tomato paste, and only 1/2 cup added liquid.

Texture note: the best balance for this style of crockpot chili is 2 lb beef, 2 cans beans, 28 oz diced tomatoes, 15 oz tomato sauce, 2 to 3 tablespoons tomato paste, and only 1/2 cup added liquid. More liquid can make the chili looser after several hours because the slow cooker holds onto steam instead of reducing like a stovetop pot.

The pot may look denser than you expect before cooking. That is a good sign. If your slow cooker runs hot or the mixture looks too tight, add the remaining broth or beer a splash at a time.

What the Chili Should Look Like

StageTexture cue
Before cookingThick and saucy, with visible beef and beans, not swimming in liquid
Halfway throughJuicier around the edges as the tomatoes release moisture
FinishedDarker chili bubbling gently around the sides
After restingSpoonable chili that holds toppings on top instead of swallowing them
Four-panel guide showing crockpot chili before cooking, halfway cooked, finished, and after resting
Use the texture shift as your guide: sturdy at the start, looser midway, darker when done, and spoonable again after a short uncovered rest.

What It Tastes Like: Flavor and Heat Level

This is a classic tomato-based beef chili with a mild-to-medium heat level, depending on your chili powder. Use mild chili powder and skip jalapeños or cayenne for a kid-friendly pot. Beer adds a subtle malty depth, not a boozy flavor, and broth works perfectly if you want the chili classic and alcohol-free.

The finished chili tastes savory, gently smoky, and beefy, with enough tomato to feel rich but not so much that it tastes like plain canned tomatoes. It is sturdy enough for bowls, nachos, chili dogs, baked potatoes, and leftovers.

Why This Slow Cooker Chili Works

This slow cooker chili works because it does not rely on time alone. Time helps, but the real flavor comes from building the base correctly before the lid goes on.

Browning the beef gives the chili better flavor and better texture. It also lets you drain off excess grease so the finished bowl tastes rich instead of oily. This is the step that keeps the chili from tasting like ground beef floating in tomatoes.

Tomato paste gives the chili body. It deepens the tomato flavor and helps the sauce cling to the beef and beans instead of sitting loose in the bottom of the bowl.

Two kinds of beans make the chili feel hearty without becoming heavy. Kidney beans give the familiar chili bite. Pinto or black beans add softness, body, and a slightly different texture.

A small amount of broth or beer helps everything cook evenly without thinning the chili too much. Extra liquid feels safe at the beginning, but it is usually what makes slow cooker chili soupy at the end. Start small; you can always loosen a tight pot later.

The final rest matters. Chili thickens as it sits. Ten minutes uncovered can make the difference between a loose pot and a bowl that holds nicely under cheese, sour cream, onions, and chips.

Ingredients for Crockpot Chili

The ingredient list is simple, but nothing is just filler. Each piece helps the chili taste fuller, thicker, warmer, or more balanced.

Ingredients for crockpot chili arranged on a table, including ground beef, beans, tomatoes, tomato sauce, tomato paste, onion, bell pepper, garlic, spices, Worcestershire sauce, and broth
These simple ingredients build different layers: beef gives body, beans add bite, tomatoes make the base, and spices turn the slow cooker into something deeper.

Ground Beef

Choose 2 lb / 900 g ground beef. An 85/15 blend gives a richer chili, while 90/10 makes a leaner pot. Both work well as long as you brown and drain the beef before adding it to the crockpot.

If you use very lean beef, taste the chili near the end. Lean meat can taste milder, so it may need a little more salt, Worcestershire sauce, chili powder, or tomato paste to feel full and savory.

Onion, Bell Pepper, and Garlic

Onion, bell pepper, and garlic are what make the chili smell like dinner before the tomatoes even go in. Green bell pepper tastes familiar and old-school. Red bell pepper makes the pot slightly sweeter. Jalapeño can be added here if you want more heat.

Cooking the vegetables briefly with the beef helps them lose their raw edge and melt into the base instead of tasting like separate pieces floating in tomato sauce.

Beans

This version uses one can of kidney beans and one can of black or pinto beans. Kidney gives the classic chili bite, while the second can brings a softer texture and more body. Drain and rinse both for better control over salt and texture.

If you use chili beans in sauce, you can add the sauce too, but remember that they are already seasoned. Taste before adding extra salt or chili powder.

Tomatoes

Diced tomatoes bring the chunks, tomato sauce fills in the base, and tomato paste gives the chili that deeper, thicker body you want from a slow-cooked pot. Use plain canned tomato sauce here, not ketchup or sweet table sauce.

To make the chili spicier, replace some of the diced tomatoes with diced tomatoes and green chiles. For a smoother pot, use crushed tomatoes instead of diced tomatoes.

Broth or Beer

Keep the broth or beer to 1/2 cup / 120 ml. A broth version tastes familiar and straightforward. Beer leans the pot a little deeper, with a malty background that works especially well for game day. Choose broth if you want to keep everything alcohol-free.

Extra liquid feels helpful at the start, but the slow cooker gives moisture back as the tomatoes, beef, and beans cook together. Begin with less; a thick pot is easier to loosen than a watery pot is to fix.

Chili Seasoning

Chili powder blend, cumin, smoked paprika, oregano, salt, and black pepper give this recipe its main flavor. Use a chili powder blend, not pure hot red chile powder. When your chili powder is mostly ground hot chiles, use much less and build the heat slowly.

With salted broth, chili beans, or a seasoning packet, start with a little less salt and adjust near the end. When the first spoonful tastes almost right but a little dull, it probably needs brightness, not more cooking time. A little salt, Worcestershire sauce, tomato paste, chili powder, or apple cider vinegar can wake the whole pot up.

What Size Slow Cooker to Use for Chili

A 6-quart slow cooker is the best size for this full batch of crockpot chili. It gives the beef, beans, tomatoes, and sauce enough room to heat evenly without bubbling over.

  • Half batch: use a 4-quart slow cooker.
  • Full recipe: choose a 6-quart slow cooker.
  • Larger batch or chili bar: move up to a 7- to 8-quart slow cooker.

For a half batch, use half the ingredients and keep the same cooking cues. A smaller pot can run hotter or finish a little sooner, so check the texture near the early end of the time range.

Keep the slow cooker no more than about three-quarters full so the chili has room to bubble gently and heat evenly. For a double batch, a very large cooker or two separate batches is safer than one overloaded pot.

How to Make Crockpot Chili

1. Brown the Beef

Brown the ground beef in a large skillet over medium-high heat, breaking it into small pieces as it cooks. You want browned, crumbly beef, not large soft clumps.

Drain the excess grease before adding the beef to the slow cooker. That one small step keeps the bowl cozy instead of greasy.

Browned ground beef crumbles cooking in a skillet with a wooden spoon
Well-browned beef should look crumbly and deeply colored, not gray; that early skillet color is what keeps slow cooker chili from tasting flat.

2. Soften the Vegetables

Add the onion and bell pepper to the skillet. Cook for a few minutes until they begin to soften, then add the garlic. From there, the base already starts smelling like chili before the slow cooker even takes over.

Browned ground beef cooking with diced onion, green bell pepper, and garlic in a skillet
Once the onion, bell pepper, and garlic soften around the beef, the chili base starts tasting cooked and savory instead of simply dumped together.

3. Bloom the Tomato Paste and Spices

Stir in tomato paste, chili powder blend, cumin, smoked paprika, oregano, salt, and pepper. Cook for 30 to 60 seconds. The mixture should smell warm and savory, not raw or dusty.

This small step makes the chili taste more developed. It also helps the tomato paste blend into the sauce instead of sitting in sharp little pockets.

Ground beef, onion, bell pepper, tomato paste, and chili spices cooking together in a skillet
Tomato paste should darken slightly as it hits the hot skillet, while the chili spices coat the beef instead of sitting dry on top.

4. Load the Slow Cooker

Transfer the beef mixture to the slow cooker. Add the beans, undrained diced tomatoes, plain canned tomato sauce, Worcestershire sauce, and about half the broth or beer. Stir until everything is evenly combined.

The mixture should look saucy but not loose before the lid goes on. Add the remaining broth or beer only if it looks thick and tight. Hold the rest back when the pot already looks loose.

Uncooked crockpot chili mixture in a slow cooker with ground beef, beans, tomatoes, and thick red sauce
Before cooking, the pot can look almost too dense; that is a good sign because tomatoes, beans, and beef release moisture under the lid.

5. Cook Low or High

Cook on Low for 6 to 8 hours or High for 3 to 4 hours. Low gives the best flavor, but High works when you need chili ready sooner.

Try not to keep lifting the lid. Each time the lid opens, heat escapes and the cooking time stretches. At the end, the chili should bubble gently around the edges and look darker and thicker than it did when you started.

Finished crockpot chili in an open slow cooker with ground beef, beans, tomatoes, and thick red sauce
Finished crockpot chili should look settled and darker, with beef and beans still visible instead of disappearing into thin tomato liquid.

6. Taste and Finish

Taste the chili near the end. When it tastes flat, add more salt, a small splash of Worcestershire sauce, or 1 teaspoon apple cider vinegar. If it tastes too acidic, add a tiny pinch of sugar or a little extra tomato sauce.

Let the chili rest uncovered for 10 to 15 minutes before serving. As it sits, the sauce thickens slightly and the flavors taste more complete.

The finished chili should taste savory, gently smoky, and tomato-rich, with beans that still hold their shape and a sauce thick enough to cling to the spoon. If it tastes sharp, flat, or thin, the fix is usually seasoning, acid, or a short uncovered rest.

Spoon lifting slow cooker chili with ground beef, beans, and red tomato sauce
When a spoonful holds together for a moment, the chili is sturdy enough for toppings, tortilla chips, baked potatoes, or chili mac.

Once the basic method is clear, the details below help you adjust the chili for thickness, timing, beans, toppings, leftovers, and a crowd.

Choose Your Chili Path

Once the base is right, you do not need a new recipe every time. Change the heat, toppings, beans, or shortcut ingredients around the same thick tomato-beef base.

If you want…Do this
Family-style chiliUse the recipe as written with kidney and pinto or black beans.
More spoonable chiliUse 3 tablespoons tomato paste, mash some beans, and rest uncovered.
Game-day chiliKeep it warm in the slow cooker and set toppings out separately.
Spicy chiliAdd jalapeño, chipotle, cayenne, hot sauce, or diced tomatoes with green chiles.
Mild chiliUse mild chili powder, plain diced tomatoes, and no cayenne.
No-bean chiliReplace beans with extra beef, peppers, mushrooms, or tomatoes and reduce liquid.
Leaner chiliUse 90/10 beef or ground turkey, then season a little more boldly.
Shortcut chiliUse a chili seasoning packet and keep the tomato, bean, and liquid balance the same.

Do You Have to Brown Ground Beef Before Crockpot Chili?

You do not absolutely have to brown ground beef before crockpot chili, but for the best chili, you should. Browning gives the beef better flavor, improves the texture, and lets you drain grease before it goes into the slow cooker.

If raw ground beef goes straight into the crockpot, it can cook through, but the finished chili is usually softer, greasier, and less flavorful. The beef may also clump together instead of staying in small, even pieces.

Can You Make Dump-and-Go Crockpot Chili?

You can make a dump-and-go version, but it is a compromise. Use thawed lean ground beef, break it up very well, and make sure it cooks through fully. The chili will usually be softer and a little greasier than the browned-beef version.

For the best balance of easy and flavorful, brown the beef first. It adds a few minutes, but it makes the whole pot taste better.

A Quick Safety Note

Before you change the beef, beans, or prep method, these few safety details are worth keeping in mind.

For the best texture and flavor, this recipe browns the ground beef before slow cooking. If you use a dump-and-go raw beef method, use thawed beef, break it up well, and make sure it cooks through fully. Ground beef should reach 160°F / 71°C.

Do not start with frozen ground beef in the slow cooker; it may heat unevenly. Canned beans are the easiest, most reliable choice here. Dried kidney beans need proper soaking and boiling before they go into the slow cooker.

For broader slow-cooker handling, the USDA slow cooker safety guide is a useful reference. To handle leftovers safely, cool the chili in shallow containers and refrigerate it within 2 hours rather than leaving the pot out for hours.

Crockpot Chili Cook Time: Low vs High

Crockpot chili is forgiving, but the setting changes the final texture and flavor. Low is best when you have time. High is useful when the beef is already browned and you need dinner sooner.

Cooking methodTimeResult
Low6 to 8 hoursBest flavor, thicker texture, more developed chili
High3 to 4 hoursGood for same-day cooking
Longer than 8 to 10 hoursNot idealBeans can soften too much and flavor can turn dull
Warm setting1 to 2 hours after cookingGood for serving, not endless holding

Can Chili Cook Too Long in a Crockpot?

Yes. Chili can handle slow cooking, but it is not impossible to overcook. After too many hours, canned beans can get mushy, the beef can lose texture, and the flavor can become muddy instead of bright and hearty.

Can You Leave Chili on Warm?

You can leave chili on Warm for serving, especially for a party or game day, but it should stay hot, be stirred occasionally, and not drift into lukewarm territory. If the chili is sitting out for a crowd, a food thermometer is useful. Keep it around 140°F / 60°C or above so it stays safely hot, not just warm to the touch.

For the best texture, do not treat the Warm setting as an all-day extension of cooking time. It is for serving, not for endlessly stretching the batch.

How to Thicken Crockpot Chili

If you have ever lifted the slow cooker lid and found chili that looks more like soup, this is the section that saves the pot.

The slow cooker is good at simmering; it is not good at evaporating. That is why thick chili starts with less liquid, not with a rescue mission at the end.

Do not judge the texture straight from under the lid. Slow cookers trap steam, so let the chili rest uncovered for 10 to 15 minutes before adding thickeners. If it still looks loose after resting, use one of the fixes below.

Once the chili coats the spoon and leaves a soft trail when you stir, it is thick enough.

Best Ways to Give a Loose Pot More Body

Thickening methodHow to use it
Tomato pasteAdd 2 to 3 tablespoons at the start
Cook uncoveredRemove the lid for the last 20 to 30 minutes
Mash beansMash 1/2 to 1 cup beans into the chili before serving
Refried beansStir in 1/2 cup for a creamier, fuller base
Masa harina or cornmealAdd 1 tablespoon at a time and let it cook in
Rest before servingLet chili sit uncovered for 10 to 15 minutes

Easy thick chili trick: mash some of the beans directly into the pot before serving. It gives the sauce body naturally without making the chili taste starchy. Refried beans work the same way if you want an even creamier base.

Guide showing ways to thicken crockpot chili with tomato paste, mashed beans, refried beans, masa or cornmeal, and resting uncovered
If your crockpot chili turns loose, fix the body before serving: rest it uncovered, mash beans, add tomato paste, or stir in refried beans.

For the next batch, start with less broth, drain the beans, and keep tomato paste in the recipe. The chili should look almost too dense before cooking, because the slow cooker will give moisture back.

Best Beans for Crockpot Chili

Beans make chili hearty, but the mix decides whether the bowl feels firm, creamy, or too soft. The easiest rule is to use one firm bean and one softer bean so the chili has both bite and body.

  • Kidney beans: classic chili bite, sturdy texture, and a familiar look.
  • Pinto beans: softer and creamier, especially if you like a slightly thicker-feeling bowl.
  • Black beans: darker, earthier, and a little firmer than pinto beans.
  • Chili beans: useful as a shortcut because they are already seasoned, but taste before adding more salt.
  • Refried beans: not a main bean here, but useful if you want to thicken the sauce naturally.

Kidney plus pinto gives the most classic texture. Pairing kidney with black beans makes the chili a little darker and heartier. If your family does not love kidney beans, use pinto and black beans instead.

Bowls of kidney beans, pinto beans, black beans, chili beans, and refried beans beside a slow cooker of chili
For better bean texture, mix one firm bean with one softer bean; kidney beans give bite, while pinto, black, or refried beans add body.

Should You Drain Canned Beans for Chili?

For this recipe, yes. Draining and rinsing gives you better control over salt and keeps the chili base cleaner. If you use chili beans in sauce, you can include the sauce, but reduce other seasoning until you taste the finished pot.

Can You Use Dried Beans in Crockpot Chili?

Canned beans are the easiest, most reliable choice for this slow cooker chili. They are already cooked and ready for the crockpot.

Dried kidney beans need proper soaking and boiling before they go into a slow cooker recipe. If you want to use dried beans, cook them safely first, then add them to the chili.

Flavor Upgrades for Better Crockpot Chili

Once the base tastes right, upgrades should make the chili deeper, not busier. Choose one or two, not the whole table.

UpgradeWhat it doesHow much to use
BaconAdds smoky richness4 to 6 cooked slices, chopped
Italian sausageAdds savory depthReplace 1/2 to 1 lb beef
BeerAdds a deeper, malty baseUse 1/2 cup instead of broth
Worcestershire sauceAdds umami1 tablespoon
Cocoa powderAdds dark depth, not sweetness1 teaspoon
Brown sugarBalances tomato acidity1 to 2 teaspoons
Apple cider vinegarBrightens flat chili1 teaspoon at the end
Chipotle or smoked paprikaAdds smoky heatStart with 1/2 to 1 teaspoon
Jalapeño or cayenneMakes chili spicierAdd to taste
Beef bouillonBoosts beefy flavor1 cube or 1 teaspoon paste

For a familiar family-style chili, tomato paste and Worcestershire sauce are enough. A richer game-day pot can take bacon, beer, cocoa powder, or a little chipotle. To brighten chili that tastes dull, add a small splash of vinegar at the end instead of adding more spice.

If bacon is your upgrade, making a tray of oven-cooked bacon first is easier than frying strips while the chili is coming together.

Crockpot Chili Variations

The base method is built for beef-and-bean chili, but it can still flex without turning into a completely different dinner.

No-Bean Crockpot Chili

Skip the two cans of beans and add extra ground beef, diced bell peppers, mushrooms, or more tomatoes. Reduce the broth slightly so the chili does not turn soupy. A true no-bean chili needs a meatier balance, so build the pot around beef, peppers, tomatoes, and seasoning instead of simply removing the beans.

Turkey Chili

Use ground turkey in place of the beef. Because turkey is leaner and milder, add a little extra tomato paste, Worcestershire sauce, chili powder, or smoked paprika.

Spicy Crockpot Chili

Add jalapeño, cayenne, chipotle powder, hot sauce, or diced tomatoes with green chiles. Start small because the heat spreads through the whole pot as the chili cooks.

Mild Crockpot Chili

Use mild chili powder, plain diced tomatoes, no cayenne, and only a small amount of smoked paprika. If everyone at the table likes a different heat level, keep the base mild and let toppings do the arguing with jalapeños, hot sauce, chipotle, or mango habanero sauce.

5-Ingredient Shortcut Chili

For the fastest version, use ground beef, beans, diced tomatoes, tomato sauce, and a chili seasoning packet. It will not have the same depth as the full recipe, but it works when dinner needs to be simple.

Chili Seasoning Packet Version

Use one chili seasoning packet in place of the chili powder blend, cumin, smoked paprika, oregano, salt, and pepper. Taste near the end before adding more salt because packets vary.

Vegetarian Chili

For vegetarian crockpot chili, skip the beef and add extra beans, lentils, bell peppers, corn, zucchini, mushrooms, or sweet potato. Because the beef is no longer carrying the base, vegetarian chili needs extra body from beans, lentils, mushrooms, or vegetables.

White Chicken Chili

White chicken chili follows a different path. It usually uses chicken, white beans, green chiles, broth, and often cream cheese or cream. This recipe is the tomato-based beef chili version.

Toppings for Crockpot Chili

Toppings are where the bowl gets fun: cold sour cream against hot chili, sharp cheddar melting into the top, onions for crunch, and chips for scooping.

  • Shredded cheddar cheese
  • Sour cream or Greek yogurt
  • Green onions
  • Diced red onion
  • Pickled jalapeños
  • Fresh jalapeños
  • Cilantro
  • Avocado
  • Tortilla chips
  • Corn chips
  • Lime wedges
  • Hot sauce
Chili toppings arranged on a board, including shredded cheddar, sour cream, green onions, red onion, jalapenos, avocado, cilantro, lime wedges, tortilla chips, and hot sauce
Toppings change the same pot in different ways: cheese adds richness, sour cream cools heat, onions add crunch, and lime keeps the bowl bright.

On game day, the easiest move is to keep the chili warm and let the toppings do the work. A rich, balanced pot makes every topping taste better.

If you are turning chili into nachos or chili cheese fries, a spoonable cheese sauce gives a smoother finish than shredded cheese alone.

What to Serve With Crockpot Chili

A bowl of chili can stand on its own, but the right side makes it feel like a full table instead of just a full bowl.

  • Cornbread
  • Rice
  • Baked potatoes
  • Tortilla chips
  • Nachos
  • Hot dogs
  • French fries
  • Garlic bread
  • Simple green salad
Bowl of crockpot chili served with cornbread, tortilla chips, baked potato, green salad, and macaroni and cheese
To make chili feel like a full meal, pair it with something scoopable, something soft, and something fresh: chips, cornbread, potatoes, mac and cheese, or salad.

For a bigger comfort-food table, chili pairs well with creamy sides like macaroni and cheese. Keep the chili bold and the side creamy, and the plate feels balanced instead of heavy in one note.

If the chili spread is already rich, a cold wedge salad gives the table something crisp, creamy, and fresh without competing with the chili.

Leftover Chili Ideas

Leftovers are not a compromise here. They are part of the plan. Spoon chili over baked potatoes, use it for chili dogs, turn it into chili nachos, serve it over rice, or stir it into cooked macaroni for chili mac. For another ground-beef pasta night, homemade cheeseburger macaroni keeps the same cozy skillet-dinner feeling without repeating chili.

How Much Chili Per Person?

This recipe makes about 10 to 12 cups of chili, which is enough for 8 to 10 servings. The exact amount depends on whether chili is the main meal, part of a chili bar, or a topping for potatoes, hot dogs, nachos, or fries.

Serving stylePlan for
Main meal1 to 1 1/2 cups per person
Chili bar with toppingsAbout 1 cup per person
Side dish1/2 to 3/4 cup per person
Topping for potatoes, nachos, or hot dogs1/2 cup per person

How to Set Up a Crockpot Chili Bar

For a chili bar, keep the pot hot, set toppings out separately, and plan for people to come back for a little more. Chili has a way of turning one bowl into “just one more spoonful.”

Crockpot chili bar with a slow cooker of chili, ladle, bowls, tortilla chips, cornbread, sour cream, cheese, onions, jalapenos, and serving spoons
A crockpot chili bar works best when the hot chili, bowls, toppings, chips, and cornbread are close enough for people to build their own bowls easily.

If you are feeding a crowd, keep the slow cooker no more than about three-quarters full. Make two batches if needed, or use a larger 7- to 8-quart slow cooker so the chili has room to heat evenly.

Storage, Freezing, and Reheating

How Long Does Crockpot Chili Last in the Fridge?

Store leftover chili in shallow airtight containers in the refrigerator for 3 to 4 days. Let the steam settle briefly, then refrigerate it within 2 hours rather than leaving the pot out for hours.

Leftover crockpot chili stored in glass containers with a serving of chili on a baked potato nearby
Leftover chili should feel like a second dinner, not a backup plan; store it well, then use it over baked potatoes, rice, nachos, chili mac, or hot dogs.

Can You Freeze Crockpot Chili?

Yes. Crockpot chili freezes well for up to 3 months for best quality. Freeze it in meal-size containers or freezer bags, leaving a little space at the top because chili expands as it freezes.

How to Reheat Chili

Reheat chili on the stovetop over medium-low heat or in the microwave, stirring occasionally. Add a splash of broth or water when it is too thick after chilling or freezing. When it is too thin, simmer uncovered until it tightens back up.

Is Chili Better the Next Day?

Yes, chili often tastes better the next day. The spices settle, the tomato base mellows, and the beef and beans absorb more flavor. Tomorrow’s bowl tastes like a plan, not a leftover.

Common Crockpot Chili Mistakes and Fixes

If the chili does not taste right at the end, do not panic. Most problems need a small adjustment, not a new pot. The final 15 minutes should be for toppings, not rescue work, but this table will still save a pot that needs help.

ProblemFix
Chili is wateryRest uncovered first, then cook uncovered, add tomato paste, or mash beans
Chili is greasyBrown and drain the beef before slow cooking
Chili tastes blandAdd salt, Worcestershire sauce, chili powder, or a splash of vinegar
Chili is too spicyAdd beans, tomato sauce, sour cream, or a tiny pinch of sugar
Beans are mushyAdd canned beans later next time if you prefer firmer beans
Chili is too firmAdd broth or water in small splashes
Beef is clumpyBreak it up well while browning before adding it to the slow cooker
Chili tastes acidicAdd a small pinch of sugar, more beans, or a little extra tomato sauce

The easiest way to avoid most of these problems is to brown and drain the beef, use tomato paste, avoid too much liquid, and taste the chili near the end instead of assuming it is finished. If the pot tastes flat, it usually needs salt or brightness, not more hours.

FAQ

How long does chili cook in a crockpot?

Cook crockpot chili for 6 to 8 hours on Low or 3 to 4 hours on High. Low gives deeper flavor and a more settled, spoonable texture.

Best setting for crockpot chili: Low or High?

Choose Low when you have time. High works when the beef is already browned and you need the chili ready sooner.

Do you have to brown ground beef before crockpot chili?

Yes, for the best result. Browning gives the beef better texture, adds deeper flavor, and lets you drain grease before it goes into the slow cooker.

Can raw ground beef go in the slow cooker?

Technically yes, if it is thawed, broken up well, and cooked through fully to 160°F / 71°C. Browning first gives better texture, deeper flavor, and less grease.

Night-before prep: can you start crockpot chili ahead?

Yes. Brown the beef and cook the aromatics and spices, then cool and refrigerate that mixture. Add it to the slow cooker with the canned ingredients the next day.

Is this chili spicy?

It is mild to medium, depending on your chili powder. For kid-friendly chili, use mild chili powder and skip cayenne, jalapeños, and hot sauce.

How do you thicken crockpot chili?

Rest it uncovered for 10 to 15 minutes first. If it still looks loose, add tomato paste, mash some beans, stir in refried beans, or cook uncovered briefly.

What beans are best for crockpot chili?

Kidney beans give classic bite, pinto beans make the bowl softer and creamier, and black beans add a darker, earthier flavor. A mix of one firm bean and one softer bean works well.

Should canned beans be drained for chili?

Yes. Draining and rinsing canned beans gives you better control over salt and texture. If you use chili beans in sauce, add the sauce but season carefully.

Dried beans in crockpot chili: are they safe?

No, especially not dried kidney beans. Use canned beans here, or soak and boil dried beans properly before slow cooking.

How do you make crockpot chili without beans?

Replace the beans with extra ground beef, peppers, mushrooms, or more tomatoes, and reduce the added liquid. No-bean chili needs a meatier balance.

Does beer work in crockpot chili?

Yes. Beer adds a subtle malty depth, but broth works just as well if you want a classic or alcohol-free chili.

What size slow cooker do I need for chili?

A 6-quart slow cooker is best for this full recipe. Use a 4-quart slow cooker for a half batch, or a 7- to 8-quart slow cooker for a larger batch.

Doubling crockpot chili: what should change?

You can double it only if your slow cooker is large enough. Keep it no more than about three-quarters full, or make two separate batches.

Using a chili seasoning packet: does it work?

One chili seasoning packet can replace the dried spices. Taste near the end before adding more salt because packets vary.

Why does my chili taste bland?

Bland chili usually needs salt, acidity, or deeper savory flavor. Add salt, Worcestershire sauce, tomato paste, chili powder, or a small splash of apple cider vinegar near the end.

Freezing crockpot chili: does it work?

Crockpot chili freezes well. Cool it, portion it into freezer-safe containers or bags, and freeze for up to 3 months for best quality. Thaw overnight in the fridge and reheat gently.

Is chili better the next day?

Chili often tastes better the next day because the spices, beef, beans, and tomatoes have more time to settle. That makes it ideal for parties, meal prep, and leftovers.

Final Notes for Thick Crockpot Chili

Save this one for the days when you want dinner handled early and a pot of chili waiting when everyone is hungry. Make it once as written, then adjust the heat, beans, and toppings the way your table likes it.

The base is the part that matters: browned beef, tomato paste, low liquid, and enough time for the slow cooker to turn everything thick, savory, and scoopable. When that base is right, the chili smells good before anyone asks what is for dinner and lands on the table ready for cheese, sour cream, onions, chips, or a second bowl.

Back to top

Posted on — Leave a comment

Baked Brie Recipe: Easy, Gooey, With Honey, Jam, Cranberry or Puff Pastry

Warm baked brie with honey, nuts, herbs, crackers, crostini, pear slices, grapes, and a serving knife on a wooden board.

Baked brie is the appetizer that makes people drift toward the table before dinner is ready: a warm wheel of cheese, a soft center, something glossy on top, and crackers or bread waiting for the first scoop.

The trick is not making baked brie complicated. What matters most is knowing when to stop. Brie should be warm and soft in the middle, not collapsed into oil; easy to scoop, not so runny that it escapes before guests reach the board.

Start with the easy no-pastry version. It gets to the table in about 15 minutes, teaches you exactly how baked brie should feel, and lets toppings like honey, jam, cranberry sauce, fig jam, nuts, and herbs do the work.

That kind of appetizer looks generous before anyone realizes how little work it took; most of the magic is just heat, timing, and one good topping.

Quick Answer: How to Bake Brie

For easy baked brie without pastry, bake a cold 8 oz / 225 g wheel at 350°F / 175°C for 8–12 minutes, until the center feels soft when gently pressed. Leave the rind on so the cheese holds its shape.

Finish with honey, jam, cranberry sauce, fig jam, pepper jelly, nuts, herbs, or flaky salt. Keep crackers, crostini, baguette, apples, pears, or grapes ready so the brie can be served while warm. For baked brie in puff pastry, use 400°F / 200°C, bake until the pastry is golden, usually 35–40 minutes, and rest for 5–10 minutes before cutting.

Infographic showing how to bake brie at 350°F for 8 to 12 minutes with the rind on and the center soft but not collapsed.
A standard 8 oz wheel usually needs 8–12 minutes at 350°F; then stop when the center feels soft rather than waiting for the cheese to collapse.

First-scoop check: the center should move easily while the rind still keeps the wheel mostly together.

Close-up of a cracker scooping soft baked brie with honey, nuts, herbs, and melted cheese in the center.
The first scoop should move smoothly through the creamy center while the rind keeps the baked brie neat enough for serving.

Need the next step? Go to the easy baked brie recipe, check the bake time chart, or compare baked brie toppings.

Jump to What You Need

Make It

Choose a Version

Serve and Fix

Easy No-Pastry Baked Brie

No-pastry baked brie is the best first version because it teaches timing, shows off toppings, and reaches the table fast. There is no wrapping dough, no sealing pastry, no waiting for a crust to brown — just warm cheese, a good topping, and something sturdy to scoop it with.

No-pastry baked brie in a cream ceramic dish with honey, walnuts, thyme, crackers, and a small serving knife.
Because the rind contains the cheese, no-pastry baked brie is the easiest version to master while honey, nuts, and herbs add flavor without extra dough.

Easy Baked Brie: Ingredients and Instructions

A fast no-pastry baked brie that lands on the table warm, soft-centered, and ready for crackers. This is the version to make when you want an easy appetizer that still feels generous.

  • Prep time: 5 minutes
  • Bake time: 8–12 minutes
  • Total time: 15–20 minutes
  • Servings: 4–6
  • Brie size: 8 oz / 225 g wheel
  • Oven: 350°F / 175°C
  • Texture: soft-centered, scoopable, not collapsed

Baked Brie Ingredients

Ingredients for baked brie arranged on a board, including brie, honey, jam, nuts, herbs, crackers, apples, pears, and grapes.
A reliable baked brie appetizer starts with one wheel of brie, one sweet topping, one crunchy element, fresh herbs, and dippers ready before the cheese leaves the oven.
  • 1 cold brie wheel, about 8 oz / 225 g
  • 2–3 tablespoons / 30–45 ml honey, fig jam, cranberry sauce, raspberry jam, apricot preserves, or pepper jelly
  • 2–4 tablespoons / about 15–30 g chopped pecans, walnuts, almonds, or pistachios
  • 1–2 teaspoons / about 1–2 g fresh thyme or rosemary, optional
  • Pinch of flaky salt, optional
  • Crackers, crostini, sliced baguette, apple slices, pear slices, or grapes, for serving

Instructions

  1. Preheat the oven to 350°F / 175°C.
  2. Keep the brie cold until baking. Leave the rind on; it helps contain the soft center.
  3. Place the brie on parchment, in a shallow oven-safe dish, or in a small cast iron skillet.
  4. For thick jam or cranberry sauce warmed into the top, spoon it over the brie now. Honey, loose jam, fresh herbs, and flaky salt usually look better after baking.
  5. Bake for 8–12 minutes, until the center feels soft when gently pressed.
  6. Finish with honey, jam, cranberry sauce, fig jam, nuts, herbs, and a small pinch of flaky salt as needed.
  7. Rest for 2–3 minutes if the cheese looks very runny, then serve warm with crackers, bread, or fruit.

Recipe note: Start checking early. Soft and gently wobbly is better than burst and oily. This is the part to check, not the clock.

Before you bake: Check how long to bake brie, confirm doneness cues, or jump to what to serve with baked brie.

Fastest 3-Ingredient Baked Brie

Use brie + honey or jam + nuts. Bake the cold brie until soft, spoon honey or jam over the top, add chopped pecans or walnuts, and serve warm. That is enough to put something warm, golden, and generous on the table in about 15 minutes.

Minimal three-ingredient baked brie setup with a cold brie wheel, honey, chopped walnuts, crackers, and fresh thyme.
When time is short, brie, honey or jam, and chopped nuts are enough to make a warm baked brie appetizer that still feels generous.

Bake the brie last, not first. The board can wait; the cheese cannot. Have the crackers, bread, fruit, topping, and spreader ready before the brie leaves the oven, and the whole appetizer feels calm instead of rushed.

What Makes This Baked Brie Work

Baked brie is a timing recipe more than an ingredient recipe. The cheese needs just enough heat to turn soft in the center, while the rind still holds everything together.

That is why the no-pastry version is the best place to start. It teaches you how baked brie should feel: warm, scoopable, gently wobbly, and still neat enough to bring to the table.

  • Keep the rind on: it acts like a small edible bowl.
  • Check early: soft and wobbly is better than burst and oily.
  • Use contrast: honey, jam, cranberry, fig, nuts, herbs, or flaky salt keep the cheese from feeling too rich.
  • Serve immediately: baked brie is at its best while the first scoop is still warm.
Baked brie with a soft center being scooped while the rind holds the round wheel of cheese in place.
The rind helps baked brie keep its round shape while the center warms into a creamy layer that is easy to scoop.

How Long to Bake Brie at 350°F

At 350°F / 175°C, a standard 8 oz / 225 g wheel of brie usually takes 8–12 minutes. Smaller wheels soften faster, while larger wheels need more time for the center to warm through.

Brie SizeMetricOven TempBake TimeUse For
Small wheel4–5 oz / 125 g350°F / 175°C6–8 min2–4 people
Standard wheel7–8 oz / 200–225 g350°F / 175°C8–12 min4–6 people
Medium wheel12–13 oz / 340–370 g350°F / 175°C12–18 min6–8 people
Large wheel16 oz / 450–500 g350°F / 175°C18–25 min8–10 people
Baked brie bake time chart showing small, standard, medium, and large brie wheels with baking times at 350°F.
Use the size of the wheel to choose a bake-time range, then check for a soft center before adding toppings or moving the brie to the board.

If your brie takes longer than the chart, nothing is wrong. Some wheels are thicker, colder, or packed more firmly. Use the chart as a starting point and the soft-center test as the final check.

How to Know When Baked Brie Is Done

Baked brie is done when the center feels soft under the rind and the wheel relaxes slightly at the edges. Look for wobble, not collapse.

Perfectly done baked brie with relaxed edges, a soft center, walnuts, thyme, and a serving knife in a shallow dish.
Baked brie is done when the edges relax, the center gives gently under a spoon, and the rind still looks intact.
  • Too firm: bake 2–3 minutes more and check again.
  • Soft and gently wobbly: ready.
  • Split, leaking, or oily: overbaked, but still fine to serve from the dish.

Too Firm, Perfect, or Overbaked

Use the visual cues together: a firm wheel needs a few minutes, a gentle wobble is ready, and a split rind means it is time to serve from the dish.

Doneness guide comparing three baked brie wheels labeled too firm, perfect, and overbaked.
This baked brie doneness guide shows why you want wobble, not collapse: too firm needs more time, while overbaked brie can split and turn oily.

For an 8 oz wheel, 8–10 minutes gives you a neater brie. Around 10–12 minutes gives you a gooier center. After that, leaking becomes more likely.

A tiny bit of cheese escaping is not a disaster. The real problem is when the whole wheel splits and floods the dish, so check early and stop when the center feels soft.

Should You Score Brie Before Baking?

You can score the top rind before baking brie, but keep the cuts shallow. Scoring helps honey, jam, herbs, and nuts settle into the top of the cheese, but cutting too deeply gives the melted center a place to leak.

Hand using a small knife to score shallow lines across the top rind of a cold brie wheel on parchment.
Score only the top rind lightly so honey or jam can settle in; deep side cuts can make melted brie leak too early.

For no-pastry baked brie, make shallow lines only across the top. Do not cut down the sides. For puff pastry baked brie, keep the wheel mostly intact so the cheese stays contained inside the pastry.

The rind is edible and helps the brie hold its shape. If you dislike the flavor, lightly scrape or shallow-score the top, but do not remove the rind or cut into the sides before baking.

Worried about leaks? See the puff pastry baked brie tips or jump to troubleshooting baked brie.

Choose Your Baked Brie Version

Now choose the style that fits the kind of table you are building. If you are unsure, choose honey for easy, cranberry for festive, fig jam for elegant, and puff pastry for drama.

Guide showing four baked brie versions with honey, cranberry, fig jam, and puff pastry.
Match the topping to the occasion: honey keeps things simple, cranberry adds holiday color, fig jam feels polished, and puff pastry makes it a centerpiece.
VersionUse WhenApprox. TimeTopping Idea
No-pastry baked brieYou want the fastest appetizer10–15 minHoney, nuts, thyme
Baked brie with jamYou want easy sweet-savory flavor10–15 minFig, raspberry, apricot, pepper jelly
Cranberry baked brieYou are making a holiday board15–20 minCranberry sauce, pecans, orange zest
Baked brie with honeyYou want something classic and simple10–15 minHoney, walnuts, flaky salt
Baked brie with fig jamYou want a cheese-board feel10–15 minFig jam, walnuts, rosemary
Puff pastry baked brieYou want a dramatic centerpiece35–45 minFig jam, cranberry, honey
Crescent roll baked brieYou want a shortcut dough option25–35 minJam or cranberry sauce
Phyllo baked brieYou want a crisp, flaky wrapper25–35 minHoney, fig jam, walnuts
Air fryer baked brieYou are making a small batch6–10 minHoney or jam
Brie bitesYou want party-tray finger food20–30 minCranberry, fig jam, pepper jelly

Ingredients and Topping Basics

Brie

Use a round wheel of brie if possible. A standard wheel is usually 7–8 oz / 200–225 g and serves 4–6 people as an appetizer. For a party or holiday board, a larger 12–16 oz wheel works better. Wedges can be warmed, but a wheel holds its shape better and looks cleaner when guests start scooping.

You do not need the most expensive brie for baking. A good everyday wheel works well because the cheese is being warmed and topped; save very delicate or expensive brie for a room-temperature cheese board.

Honey, Jam, Cranberry Sauce, or Fig Jam

For an 8 oz / 225 g wheel, use 2–3 tablespoons / 30–45 ml honey, jam, cranberry sauce, fig jam, or pepper jelly, plus 2–4 tablespoons / about 15–30 g chopped nuts if using. That is enough to flavor the cheese without drowning it.

If you already have homemade jam, preserves, or leftover cranberry sauce, baked brie is one of the easiest ways to turn it into an appetizer.

Nuts, Herbs, and Dippers

Pecans, walnuts, almonds, and pistachios add the crunch that keeps each bite interesting. Thyme and rosemary add aroma. Crackers, crostini, baguette, apples, pears, and grapes should be ready before the cheese goes into the oven. Warm brie should never be waiting on crackers.

Best Baked Brie Toppings

Use this chart like a shortcut to the mood you want: simple, festive, elegant, spicy, or savory.

The best bite has all three things: creamy cheese, glossy topping, and something crisp enough to carry it.

Overhead board of baked brie toppings including honey, fig jam, cranberry sauce, pepper jelly, nuts, herbs, fruit, crackers, and flaky salt.
Great baked brie toppings add contrast, so pair creamy cheese with something sweet, tart, crunchy, herby, salty, or lightly spicy.
ToppingPair WithFlavor
HoneyPecans, walnuts, thymeSweet, simple, glossy
Fig jamWalnuts, pistachios, rosemaryRich, elegant, cheese-board style
Cranberry saucePecans, orange zest, rosemaryTart, festive, holiday-ready
Raspberry jamAlmonds, pistachiosBright and sweet-tart
Apricot preservesAlmonds, honeyMild, fruity, crowd-friendly
Pepper jellyPecans, crackers, charcuterie boardsSweet-spicy and bold
Hot honeyWalnuts, pecans, plain crackersSweet-spicy and bold
Apple or pearWalnuts, honey, thymeFresh and fall-style
Garlic and herbsOlive oil, rosemary, thymeSavory and aromatic

Nut-Free Baked Brie Toppings

For a nut-free baked brie, use honey with flaky salt, cranberry sauce with orange zest, fig jam with rosemary, pepper jelly with herbs, or apple slices and pomegranate seeds around the board.

Nut-free baked brie board with honey, cranberry sauce, fig jam, pomegranate seeds, apples, pears, grapes, herbs, crackers, and crostini.
For nut-free baked brie, lean on fruit, herbs, pomegranate, honey, cranberry sauce, fig jam, and sturdy crackers to keep the board full and balanced.

Baked Brie With Jam

Jam turns warm brie into a sweet-savory appetizer with almost no extra work. When the jam warms slightly, it softens into the top of the brie and gives each cracker a little sweet-tart edge.

Baked brie with ruby red jam melting over the top, served with crostini, crackers, and fresh thyme.
A thicker jam works best here because it warms into the top of the cheese without immediately sliding off or flooding the dish.

Baked Brie With Jam: Before or After Baking?

Add thick jam before baking if you want it warmed into the top of the cheese. For a brighter, glossier finish, spoon loose jam on after baking. Either way, keep the layer modest so the topping does not slide off or flood the dish.

Split guide showing thick jam on brie before baking and loose jam spooned onto warm baked brie after baking.
Add thick jam before baking for a warmer topping; spoon loose or glossy jam on after baking when you want a cleaner finish.

Fig jam, raspberry jam, apricot preserves, cherry jam, blackberry jam, cranberry sauce, and pepper jelly all work. For a sweeter, brighter twist, especially if you like sweet-fruity pairings, a small spoon of pineapple jam can also work with plain crackers or toasted baguette.

Use fig jam with walnuts and rosemary for a deeper cheese-board flavor. Raspberry jam with pistachios makes a brighter party appetizer, while apricot preserves with almonds are mild and crowd-friendly. Pepper jelly with sturdy crackers gives the brie a sweet-spicy edge.

Baked Brie With Honey

Honey is the easiest pretty choice: simple, golden, and good with almost any cracker or bread. Bake the brie first, then drizzle honey over the top and finish with nuts, herbs, and a small pinch of flaky salt.

Honey being drizzled from a wooden dipper over baked brie with pecans, thyme, crackers, and a soft center.
After baking, drizzle honey so it stays golden on top, then add nuts, herbs, and a pinch of salt to balance the rich cheese.

The honey should sit on top in a thin shiny layer, not drown the cheese. A little flaky salt and a few toasted nuts make each scoop taste fuller.

Maple syrup can stand in for honey when you want a deeper, cozier flavor. Pair it with pecans or walnuts, especially for fall or holiday appetizer boards.

Cranberry Baked Brie

Cranberry baked brie is the holiday choice that brings color to the board. For Thanksgiving, Christmas, New Year’s Eve, or any winter table, cranberry sauce gives the cheese tartness and brightness.

Cranberry baked brie with pecans, orange zest, rosemary, crackers, and melted cheese in a cream dish.
Cranberry baked brie works especially well for holiday boards because tart cranberry sauce, orange zest, rosemary, and pecans brighten the creamy cheese.

Add chopped pecans or walnuts, a little orange zest, and a few rosemary leaves for a more holiday-ready look and flavor. Leftover cranberry sauce works beautifully here, especially with orange or warm spices.

Homemade cranberry sauce with orange juice is especially good because the orange brightens the warm cheese and keeps the topping from feeling too heavy.

Baked Brie With Fig Jam

For the most cheese-board-style choice, reach for fig jam. It tastes rich and elegant with warm brie, especially when paired with walnuts, pistachios, rosemary, thyme, apples, grapes, or crostini.

Baked brie with dark fig jam, fresh figs, pistachios, walnuts, rosemary, crostini, and melted cheese.
Fig jam gives baked brie a richer cheese-board flavor, while fresh figs, rosemary, nuts, and crostini make the board feel elegant without extra work.

Bake the brie until soft, spoon the fig jam over the top, then finish with nuts and herbs. A tiny drizzle of honey can make it glossier, but you do not need much.

This is also a useful way to turn homemade fig jam into a party appetizer without making anything complicated.

Baked Brie With or Without Puff Pastry

You can bake brie with or without puff pastry. No pastry is faster and lets the topping shine. Puff pastry turns baked brie from easy appetizer into a golden centerpiece, but it also asks for a little more patience.

VersionOven TempTimeKey Tip
No pastry350°F / 175°C8–12 minKeep brie cold and check early
Puff pastry400°F / 200°C35–40 minSeal pastry well and rest before cutting
Crescent rolls350°F / 175°C20–24 minSeal every seam
Phyllo375°F / 190°C20–30 minBrush layers with butter
Air fryer350°F / 175°C6–10 minUse parchment or a small air-fryer-safe dish
Brie bites375°F / 190°C18–22 minUse a mini muffin tin

Puff Pastry Baked Brie

Use puff pastry when you want the dramatic version. You will need 1 thawed puff pastry sheet, an 8–12 oz brie wheel, egg wash, and optional jam, honey, cranberry sauce, or nuts.

How to Wrap Brie in Puff Pastry

Keep the pastry cold and the filling thin before sealing, because puff pastry bakes cleaner when it is not stretched or overloaded.

Hands folding puff pastry around a brie wheel with egg wash, jam, parchment, flour, and a pastry brush nearby.
Keep puff pastry cold, use only a thin layer of filling, and seal the seams well so the brie stays contained while the crust turns golden.
  1. Heat the oven to 400°F / 200°C.
  2. Roll the puff pastry into a square large enough to wrap the brie, usually about 10–11 inches wide.
  3. Place the brie in the center and add a thin layer of jam, honey, or cranberry sauce if using.
  4. Wrap the pastry around the brie and seal the seams well.
  5. Brush with beaten egg.
  6. Bake for 35–40 minutes, or until the pastry is golden.
  7. Rest for 5–10 minutes before cutting.

Here is where people usually go wrong: too much filling, warm pastry, or cutting too soon. Use less jam than you think, chill the wrapped brie if the pastry gets soft, and let the baked pastry rest before slicing so the cheese does not gush out before guests can scoop it.

Warm pastry stretches and tears more easily, which is why chilling the wrapped brie helps it bake up cleaner and leak less.

Rest Before Cutting Puff Pastry Baked Brie

Resting gives the pastry a cleaner cut and gives the melted brie a moment to settle before the first scoop.

Golden puff pastry baked brie cut open with melted brie inside, crostini, cranberry jam, thyme, and a knife nearby.
After resting, puff pastry baked brie slices more neatly while the crust stays crisp and the melted cheese remains scoopable.

If you are building a non-vegetarian puff pastry appetizer tray, these puff pastry sausage rolls make a heartier companion beside the brie.

Crescent Roll Baked Brie

Crescent dough is the casual shortcut. Wrap the brie completely, add jam or cranberry sauce if you like, brush with egg wash, and bake at 350°F / 175°C for 20–24 minutes. Let it rest for about 15 minutes before cutting.

Phyllo Baked Brie

Phyllo gives baked brie a crisp, flaky shell that feels lighter than puff pastry. Brush the phyllo sheets with melted butter, layer them around the brie, add a small amount of jam or honey, and bake until golden and crisp. Keep the filling modest so the layers stay crisp.

Air Fryer Baked Brie

For a quick few-people option, air fryer baked brie works well with a small wheel. Use parchment or a small air-fryer-safe dish, keep the rind on, and air fry at 350°F / 175°C for 6–10 minutes, depending on the size and thickness of the brie. Check early because air fryers heat quickly.

Baked Brie Bites

For a grazing table or party tray, brie bites are easier than asking everyone to gather around one wheel. Cut puff pastry into small squares, press them into a mini muffin tin, add small pieces of cold brie, and bake until the pastry is golden.

For a full party tray, cut the pastry and brie into 24 small pieces, keep the brie cold until assembly, and use only a small spoon of jam, cranberry sauce, fig jam, or pepper jelly in each cup so the bites stay neat.

Air Fryer Brie or Brie Bites?

Choose air fryer brie for a small wheel, or use brie bites when you want tidy portions for a party tray.

Split guide showing air fryer baked brie in parchment and baked brie bites in a mini muffin tin with jam.
Use the air fryer for a small brie wheel, or make brie bites in a mini muffin tin when you want easier party-size servings.

What to Bake Brie In

You do not need a special brie baker, but the right dish makes serving easier. Baked brie is hot, soft, and delicate when it comes out of the oven, so use something that helps you move or serve it without stress.

Equipment guide showing parchment, shallow dish, cast iron skillet, brie baker, pie plate, and mini muffin tin for baking brie.
Choose a shallow dish, skillet, or brie baker when you want to catch melted cheese and serve the baked brie straight from oven to table.
EquipmentUse It For
Parchment-lined baking sheetEasy cleanup and transfer
Shallow oven-safe dishServing directly from the oven
Small cast iron skilletRustic presentation and better heat retention
Ceramic brie bakerHolding toppings and melted cheese neatly
Pie platePuff pastry baked brie
Mini muffin tinBaked brie bites

If you are serving guests, a small dish or skillet is less stressful than trying to move a soft wheel from a flat pan. Serve the brie straight from the dish if you are nervous; it looks relaxed, catches any melted cheese, and keeps the appetizer warmer for a little longer.

What to Serve With Baked Brie

This is the kind of appetizer people naturally gather around, so make the scooping easy and the board relaxed.

Place the brie down first, then build around it. Tuck crackers and bread close enough for scooping, add fruit where the board needs color, nuts where it needs crunch, and one salty bite so the whole board does not feel too sweet.

Baked brie serving board with crackers, sliced baguette, apples, pears, grapes, olives, dried fruit, honey, herbs, and crostini.
Build the board around the brie with sturdy crackers, bread, fruit, and savory bites so every scoop has contrast.

Keep the dippers close. People should be able to scoop without chasing the cheese across the board.

Simple Baked Brie Board Formula

Use one warm brie + one crunchy cracker + one bread + one fresh fruit + one sweet topping + one salty or savory bite. That gives the board enough contrast without making it crowded.

For a fuller grazing board, the 3-3-3-3 charcuterie board rule is a useful way to balance cheeses, crackers or breads, fruit, nuts, pickles, and savory bites without overcrowding the board.

Good Dippers for Baked Brie

  • Crunchy: water crackers, butter crackers, seeded crackers, crostini
  • Bread: sliced baguette, toasted sourdough, crusty bread
  • Fresh: apple slices, pear slices, grapes
  • Sweet: dried apricots, dried cherries, fresh figs, pomegranate seeds

Apples and pears are especially useful because they cut through the richness of the cheese, while grapes and dried fruit make the board feel fuller with almost no prep.

Savory Board Additions

  • Olives
  • Roasted nuts
  • Caramelized onions
  • Roasted peppers
  • Prosciutto or salami, if you are making a non-vegetarian board

If people are standing around the board instead of asking when dinner is ready, the brie did its job.

Back to quick answer · Jump to recipe

Make-Ahead, Storage, and Reheating

Can You Make Baked Brie Ahead?

You can do almost everything ahead except the actual melting. Get the topping, nuts, herbs, crackers, bread, and fruit ready first, then bake the cheese close to serving time.

For guests, set the board first, bake the brie 10–15 minutes before serving, and let the warm cheese be the last thing that lands on the table.

Do not fully bake no-pastry brie hours ahead for a party. It firms as it cools, and reheating works, but it never feels quite as fresh as baking it close to serving.

VersionMake-Ahead Advice
No-pastry briePrep toppings ahead; bake close to serving
Puff pastry brieWrap up to 1 day ahead; brush with egg before baking
Crescent roll brieAssemble and chill; bake fresh
Brie bitesAssemble ahead if needed; bake close to serving
LeftoversRefrigerate and reheat gently

For another appetizer that can be shaped and chilled ahead, a make-ahead cheese ball works well with many of the same crackers, nuts, herbs, and board items.

If you are building a warmer appetizer table, a creamy spinach artichoke dip gives guests another scoopable option while the brie is at its melty best.

How Long Does Baked Brie Stay Gooey?

Baked brie is at its gooey best for about 10–15 minutes after baking. It stays warm a little longer in a ceramic dish or cast iron skillet. As it cools, it becomes thicker and more spreadable rather than runny.

If the brie cools before everyone gets to it, do not worry. It becomes spreadable rather than ruined, and a few gentle minutes in the oven can soften it again.

How to Store Leftovers

Store leftover baked brie in an airtight container in the refrigerator for 2–3 days. This stays within the USDA’s general guidance for refrigerated leftovers. The texture will be firmer once chilled, but it can be warmed again.

For safety, do not leave baked brie sitting out for hours. Once the appetizer has cooled and the serving window is over, refrigerate leftovers rather than keeping the cheese on the table all evening.

How to Reheat Baked Brie

Reheat no-pastry baked brie gently in a low oven until soft again. A temperature between 300°F and 350°F / 150°C and 175°C works well. Low heat is better because brie can turn oily when it is warmed too aggressively a second time.

If the brie is wrapped in puff pastry, reheat it in the oven instead of the microwave so the pastry does not turn soft and soggy.

Troubleshooting Baked Brie

A messy baked brie is still baked brie. Most problems come from too much heat, cuts that are too deep, or a board that is not ready when the cheese is warm.

Leaked baked brie served from a shallow dish with a cracker lifting melted cheese, honey, walnuts, and herbs nearby.
A leaking brie is still useful; instead of moving it, add crackers to the dish and serve the extra-melty cheese while warm.

My Brie Did Not Melt

It probably needed more time. Larger wheels take longer, and some brie is thicker than others. Return it to the oven for 2–5 minutes and check again. The center should feel soft when gently pressed.

My Brie Leaked Everywhere

If the brie leaked everywhere, it was probably overbaked, cut too deeply, or given an escape route through an unsealed pastry seam. Next time, keep the rind intact, avoid cutting down the sides, and use a shallow dish to catch any melted cheese.

My Puff Pastry Is Soggy

The pastry may have been too warm, the filling may have been too wet, or the brie may have been cut too soon after baking. Use less jam inside, keep the pastry cold, bake until deeply golden, and let it rest before slicing.

My Brie Turned Oily or Rubbery

That usually means it was baked or reheated too long. Brie should be warmed until soft, not cooked until it fully collapses. Start checking early, especially with smaller wheels.

The Topping Slid Off

Use less topping or add some of it after baking. A small amount of jam or honey goes a long way. Chopped nuts can also help hold the topping in place.

The Brie Cooled Too Fast

Bake it close to serving time and serve it in the dish it was baked in. A small cast iron skillet or ceramic dish helps the cheese stay warm longer than a flat sheet pan.

The Flavor Is Too Sweet

Add balance. Use less honey or jam next time, finish with flaky salt, add fresh herbs, and serve with plain crackers, tart apple slices, or savory board items.

Trying again? Go back to the easy baked brie recipe, check the timing chart, or return to the quick answer.

Baked Brie FAQ

Do you remove the rind before baking brie?

No. The rind is edible and helps the brie hold its shape while the inside melts. US Dairy notes that bloomy rinds like brie are generally edible. You can lightly score or scrape the top if you prefer, but avoid cutting deeply into the sides.

How long do you bake brie?

A standard 8 oz / 225 g wheel usually takes 8–12 minutes at 350°F / 175°C. Larger wheels can take 18–25 minutes. If the center still feels firm, bake it a few minutes more and check again.

What temperature is best for baked brie?

Use 350°F / 175°C for no-pastry baked brie. Puff pastry baked brie needs 400°F / 200°C so the pastry can brown properly.

Do you bake brie covered or uncovered?

Bake no-pastry brie uncovered so you can see when the edges relax and the center softens. Puff pastry baked brie is also baked uncovered so the pastry can turn golden and crisp.

Can you bake brie without puff pastry?

Yes. No-pastry baked brie is often the easiest and most reliable version. It is usually ready in about 10–15 minutes and lets honey, jam, cranberry sauce, nuts, and herbs shine without needing dough.

What jam goes best with baked brie?

Fig jam is rich and elegant, cranberry sauce is tart and festive, raspberry jam is bright, apricot preserves are mild and crowd-friendly, and pepper jelly gives the brie a sweet-spicy edge.

Should toppings go on before or after baking?

Thick jam or cranberry sauce can go on before baking. Honey, loose sauces, fresh herbs, and flaky salt usually look better after baking. Nuts can go on before baking if you want them lightly toasted, or after baking if you want more crunch.

Can you make baked brie ahead of time?

For no-pastry brie, prep the toppings ahead but bake the cheese close to serving. Puff pastry brie can be wrapped ahead and refrigerated, then brushed with egg wash and baked fresh.

Can you bake Camembert instead of brie?

Yes. Camembert can be baked in a similar way, but it usually has a stronger, earthier flavor. Use the same soft-center test and check early, especially with small wheels.

Can you microwave brie?

You can microwave brie briefly, but the oven gives better control and presentation. If using the microwave, warm it in short bursts on a microwave-safe plate and stop as soon as the center softens.

What crackers go with baked brie?

Water crackers, butter crackers, seeded crackers, crostini, and toasted baguette all work well. Choose sturdy crackers that can scoop warm cheese without breaking.

How long does baked brie stay gooey?

Baked brie is usually gooey for about 10–15 minutes. It stays warm longer in a small cast iron skillet, ceramic dish, or brie baker.

Can you bake brie in an air fryer?

Yes. A small wheel of brie can usually be warmed in an air fryer at 350°F / 175°C for 6–10 minutes, depending on size. Use parchment or an air-fryer-safe dish to keep the cheese contained.

The Easiest Fancy Appetizer

Baked brie works because it gives you a lot of payoff for very little effort. Keep the cheese cold, bake it gently, choose one good topping, and have your crackers or bread ready before it comes out of the oven.

Bake it last, serve it warm, and let the first scoop do the work.