Posted on Leave a comment

Baked Brie Recipe: Easy, Gooey, With Honey, Jam, Cranberry or Puff Pastry

Warm baked brie with honey, nuts, herbs, crackers, crostini, pear slices, grapes, and a serving knife on a wooden board.

Baked brie is the appetizer that makes people drift toward the table before dinner is ready: a warm wheel of cheese, a soft center, something glossy on top, and crackers or bread waiting for the first scoop.

The trick is not making baked brie complicated. What matters most is knowing when to stop. Brie should be warm and soft in the middle, not collapsed into oil; easy to scoop, not so runny that it escapes before guests reach the board.

Start with the easy no-pastry version. It gets to the table in about 15 minutes, teaches you exactly how baked brie should feel, and lets toppings like honey, jam, cranberry sauce, fig jam, nuts, and herbs do the work.

That kind of appetizer looks generous before anyone realizes how little work it took; most of the magic is just heat, timing, and one good topping.

Quick Answer: How to Bake Brie

For easy baked brie without pastry, bake a cold 8 oz / 225 g wheel at 350°F / 175°C for 8–12 minutes, until the center feels soft when gently pressed. Leave the rind on so the cheese holds its shape.

Finish with honey, jam, cranberry sauce, fig jam, pepper jelly, nuts, herbs, or flaky salt. Keep crackers, crostini, baguette, apples, pears, or grapes ready so the brie can be served while warm. For baked brie in puff pastry, use 400°F / 200°C, bake until the pastry is golden, usually 35–40 minutes, and rest for 5–10 minutes before cutting.

Infographic showing how to bake brie at 350°F for 8 to 12 minutes with the rind on and the center soft but not collapsed.
A standard 8 oz wheel usually needs 8–12 minutes at 350°F; then stop when the center feels soft rather than waiting for the cheese to collapse.

First-scoop check: the center should move easily while the rind still keeps the wheel mostly together.

Close-up of a cracker scooping soft baked brie with honey, nuts, herbs, and melted cheese in the center.
The first scoop should move smoothly through the creamy center while the rind keeps the baked brie neat enough for serving.

Need the next step? Go to the easy baked brie recipe, check the bake time chart, or compare baked brie toppings.

Jump to What You Need

Make It

Choose a Version

Serve and Fix

Easy No-Pastry Baked Brie

No-pastry baked brie is the best first version because it teaches timing, shows off toppings, and reaches the table fast. There is no wrapping dough, no sealing pastry, no waiting for a crust to brown — just warm cheese, a good topping, and something sturdy to scoop it with.

No-pastry baked brie in a cream ceramic dish with honey, walnuts, thyme, crackers, and a small serving knife.
Because the rind contains the cheese, no-pastry baked brie is the easiest version to master while honey, nuts, and herbs add flavor without extra dough.

Easy Baked Brie: Ingredients and Instructions

A fast no-pastry baked brie that lands on the table warm, soft-centered, and ready for crackers. This is the version to make when you want an easy appetizer that still feels generous.

  • Prep time: 5 minutes
  • Bake time: 8–12 minutes
  • Total time: 15–20 minutes
  • Servings: 4–6
  • Brie size: 8 oz / 225 g wheel
  • Oven: 350°F / 175°C
  • Texture: soft-centered, scoopable, not collapsed

Baked Brie Ingredients

Ingredients for baked brie arranged on a board, including brie, honey, jam, nuts, herbs, crackers, apples, pears, and grapes.
A reliable baked brie appetizer starts with one wheel of brie, one sweet topping, one crunchy element, fresh herbs, and dippers ready before the cheese leaves the oven.
  • 1 cold brie wheel, about 8 oz / 225 g
  • 2–3 tablespoons / 30–45 ml honey, fig jam, cranberry sauce, raspberry jam, apricot preserves, or pepper jelly
  • 2–4 tablespoons / about 15–30 g chopped pecans, walnuts, almonds, or pistachios
  • 1–2 teaspoons / about 1–2 g fresh thyme or rosemary, optional
  • Pinch of flaky salt, optional
  • Crackers, crostini, sliced baguette, apple slices, pear slices, or grapes, for serving

Instructions

  1. Preheat the oven to 350°F / 175°C.
  2. Keep the brie cold until baking. Leave the rind on; it helps contain the soft center.
  3. Place the brie on parchment, in a shallow oven-safe dish, or in a small cast iron skillet.
  4. For thick jam or cranberry sauce warmed into the top, spoon it over the brie now. Honey, loose jam, fresh herbs, and flaky salt usually look better after baking.
  5. Bake for 8–12 minutes, until the center feels soft when gently pressed.
  6. Finish with honey, jam, cranberry sauce, fig jam, nuts, herbs, and a small pinch of flaky salt as needed.
  7. Rest for 2–3 minutes if the cheese looks very runny, then serve warm with crackers, bread, or fruit.

Recipe note: Start checking early. Soft and gently wobbly is better than burst and oily. This is the part to check, not the clock.

Before you bake: Check how long to bake brie, confirm doneness cues, or jump to what to serve with baked brie.

Fastest 3-Ingredient Baked Brie

Use brie + honey or jam + nuts. Bake the cold brie until soft, spoon honey or jam over the top, add chopped pecans or walnuts, and serve warm. That is enough to put something warm, golden, and generous on the table in about 15 minutes.

Minimal three-ingredient baked brie setup with a cold brie wheel, honey, chopped walnuts, crackers, and fresh thyme.
When time is short, brie, honey or jam, and chopped nuts are enough to make a warm baked brie appetizer that still feels generous.

Bake the brie last, not first. The board can wait; the cheese cannot. Have the crackers, bread, fruit, topping, and spreader ready before the brie leaves the oven, and the whole appetizer feels calm instead of rushed.

What Makes This Baked Brie Work

Baked brie is a timing recipe more than an ingredient recipe. The cheese needs just enough heat to turn soft in the center, while the rind still holds everything together.

That is why the no-pastry version is the best place to start. It teaches you how baked brie should feel: warm, scoopable, gently wobbly, and still neat enough to bring to the table.

  • Keep the rind on: it acts like a small edible bowl.
  • Check early: soft and wobbly is better than burst and oily.
  • Use contrast: honey, jam, cranberry, fig, nuts, herbs, or flaky salt keep the cheese from feeling too rich.
  • Serve immediately: baked brie is at its best while the first scoop is still warm.
Baked brie with a soft center being scooped while the rind holds the round wheel of cheese in place.
The rind helps baked brie keep its round shape while the center warms into a creamy layer that is easy to scoop.

How Long to Bake Brie at 350°F

At 350°F / 175°C, a standard 8 oz / 225 g wheel of brie usually takes 8–12 minutes. Smaller wheels soften faster, while larger wheels need more time for the center to warm through.

Brie SizeMetricOven TempBake TimeUse For
Small wheel4–5 oz / 125 g350°F / 175°C6–8 min2–4 people
Standard wheel7–8 oz / 200–225 g350°F / 175°C8–12 min4–6 people
Medium wheel12–13 oz / 340–370 g350°F / 175°C12–18 min6–8 people
Large wheel16 oz / 450–500 g350°F / 175°C18–25 min8–10 people
Baked brie bake time chart showing small, standard, medium, and large brie wheels with baking times at 350°F.
Use the size of the wheel to choose a bake-time range, then check for a soft center before adding toppings or moving the brie to the board.

If your brie takes longer than the chart, nothing is wrong. Some wheels are thicker, colder, or packed more firmly. Use the chart as a starting point and the soft-center test as the final check.

How to Know When Baked Brie Is Done

Baked brie is done when the center feels soft under the rind and the wheel relaxes slightly at the edges. Look for wobble, not collapse.

Perfectly done baked brie with relaxed edges, a soft center, walnuts, thyme, and a serving knife in a shallow dish.
Baked brie is done when the edges relax, the center gives gently under a spoon, and the rind still looks intact.
  • Too firm: bake 2–3 minutes more and check again.
  • Soft and gently wobbly: ready.
  • Split, leaking, or oily: overbaked, but still fine to serve from the dish.

Too Firm, Perfect, or Overbaked

Use the visual cues together: a firm wheel needs a few minutes, a gentle wobble is ready, and a split rind means it is time to serve from the dish.

Doneness guide comparing three baked brie wheels labeled too firm, perfect, and overbaked.
This baked brie doneness guide shows why you want wobble, not collapse: too firm needs more time, while overbaked brie can split and turn oily.

For an 8 oz wheel, 8–10 minutes gives you a neater brie. Around 10–12 minutes gives you a gooier center. After that, leaking becomes more likely.

A tiny bit of cheese escaping is not a disaster. The real problem is when the whole wheel splits and floods the dish, so check early and stop when the center feels soft.

Should You Score Brie Before Baking?

You can score the top rind before baking brie, but keep the cuts shallow. Scoring helps honey, jam, herbs, and nuts settle into the top of the cheese, but cutting too deeply gives the melted center a place to leak.

Hand using a small knife to score shallow lines across the top rind of a cold brie wheel on parchment.
Score only the top rind lightly so honey or jam can settle in; deep side cuts can make melted brie leak too early.

For no-pastry baked brie, make shallow lines only across the top. Do not cut down the sides. For puff pastry baked brie, keep the wheel mostly intact so the cheese stays contained inside the pastry.

The rind is edible and helps the brie hold its shape. If you dislike the flavor, lightly scrape or shallow-score the top, but do not remove the rind or cut into the sides before baking.

Worried about leaks? See the puff pastry baked brie tips or jump to troubleshooting baked brie.

Choose Your Baked Brie Version

Now choose the style that fits the kind of table you are building. If you are unsure, choose honey for easy, cranberry for festive, fig jam for elegant, and puff pastry for drama.

Guide showing four baked brie versions with honey, cranberry, fig jam, and puff pastry.
Match the topping to the occasion: honey keeps things simple, cranberry adds holiday color, fig jam feels polished, and puff pastry makes it a centerpiece.
VersionUse WhenApprox. TimeTopping Idea
No-pastry baked brieYou want the fastest appetizer10–15 minHoney, nuts, thyme
Baked brie with jamYou want easy sweet-savory flavor10–15 minFig, raspberry, apricot, pepper jelly
Cranberry baked brieYou are making a holiday board15–20 minCranberry sauce, pecans, orange zest
Baked brie with honeyYou want something classic and simple10–15 minHoney, walnuts, flaky salt
Baked brie with fig jamYou want a cheese-board feel10–15 minFig jam, walnuts, rosemary
Puff pastry baked brieYou want a dramatic centerpiece35–45 minFig jam, cranberry, honey
Crescent roll baked brieYou want a shortcut dough option25–35 minJam or cranberry sauce
Phyllo baked brieYou want a crisp, flaky wrapper25–35 minHoney, fig jam, walnuts
Air fryer baked brieYou are making a small batch6–10 minHoney or jam
Brie bitesYou want party-tray finger food20–30 minCranberry, fig jam, pepper jelly

Ingredients and Topping Basics

Brie

Use a round wheel of brie if possible. A standard wheel is usually 7–8 oz / 200–225 g and serves 4–6 people as an appetizer. For a party or holiday board, a larger 12–16 oz wheel works better. Wedges can be warmed, but a wheel holds its shape better and looks cleaner when guests start scooping.

You do not need the most expensive brie for baking. A good everyday wheel works well because the cheese is being warmed and topped; save very delicate or expensive brie for a room-temperature cheese board.

Honey, Jam, Cranberry Sauce, or Fig Jam

For an 8 oz / 225 g wheel, use 2–3 tablespoons / 30–45 ml honey, jam, cranberry sauce, fig jam, or pepper jelly, plus 2–4 tablespoons / about 15–30 g chopped nuts if using. That is enough to flavor the cheese without drowning it.

If you already have homemade jam, preserves, or leftover cranberry sauce, baked brie is one of the easiest ways to turn it into an appetizer.

Nuts, Herbs, and Dippers

Pecans, walnuts, almonds, and pistachios add the crunch that keeps each bite interesting. Thyme and rosemary add aroma. Crackers, crostini, baguette, apples, pears, and grapes should be ready before the cheese goes into the oven. Warm brie should never be waiting on crackers.

Best Baked Brie Toppings

Use this chart like a shortcut to the mood you want: simple, festive, elegant, spicy, or savory.

The best bite has all three things: creamy cheese, glossy topping, and something crisp enough to carry it.

Overhead board of baked brie toppings including honey, fig jam, cranberry sauce, pepper jelly, nuts, herbs, fruit, crackers, and flaky salt.
Great baked brie toppings add contrast, so pair creamy cheese with something sweet, tart, crunchy, herby, salty, or lightly spicy.
ToppingPair WithFlavor
HoneyPecans, walnuts, thymeSweet, simple, glossy
Fig jamWalnuts, pistachios, rosemaryRich, elegant, cheese-board style
Cranberry saucePecans, orange zest, rosemaryTart, festive, holiday-ready
Raspberry jamAlmonds, pistachiosBright and sweet-tart
Apricot preservesAlmonds, honeyMild, fruity, crowd-friendly
Pepper jellyPecans, crackers, charcuterie boardsSweet-spicy and bold
Hot honeyWalnuts, pecans, plain crackersSweet-spicy and bold
Apple or pearWalnuts, honey, thymeFresh and fall-style
Garlic and herbsOlive oil, rosemary, thymeSavory and aromatic

Nut-Free Baked Brie Toppings

For a nut-free baked brie, use honey with flaky salt, cranberry sauce with orange zest, fig jam with rosemary, pepper jelly with herbs, or apple slices and pomegranate seeds around the board.

Nut-free baked brie board with honey, cranberry sauce, fig jam, pomegranate seeds, apples, pears, grapes, herbs, crackers, and crostini.
For nut-free baked brie, lean on fruit, herbs, pomegranate, honey, cranberry sauce, fig jam, and sturdy crackers to keep the board full and balanced.

Baked Brie With Jam

Jam turns warm brie into a sweet-savory appetizer with almost no extra work. When the jam warms slightly, it softens into the top of the brie and gives each cracker a little sweet-tart edge.

Baked brie with ruby red jam melting over the top, served with crostini, crackers, and fresh thyme.
A thicker jam works best here because it warms into the top of the cheese without immediately sliding off or flooding the dish.

Baked Brie With Jam: Before or After Baking?

Add thick jam before baking if you want it warmed into the top of the cheese. For a brighter, glossier finish, spoon loose jam on after baking. Either way, keep the layer modest so the topping does not slide off or flood the dish.

Split guide showing thick jam on brie before baking and loose jam spooned onto warm baked brie after baking.
Add thick jam before baking for a warmer topping; spoon loose or glossy jam on after baking when you want a cleaner finish.

Fig jam, raspberry jam, apricot preserves, cherry jam, blackberry jam, cranberry sauce, and pepper jelly all work. For a sweeter, brighter twist, especially if you like sweet-fruity pairings, a small spoon of pineapple jam can also work with plain crackers or toasted baguette.

Use fig jam with walnuts and rosemary for a deeper cheese-board flavor. Raspberry jam with pistachios makes a brighter party appetizer, while apricot preserves with almonds are mild and crowd-friendly. Pepper jelly with sturdy crackers gives the brie a sweet-spicy edge.

Baked Brie With Honey

Honey is the easiest pretty choice: simple, golden, and good with almost any cracker or bread. Bake the brie first, then drizzle honey over the top and finish with nuts, herbs, and a small pinch of flaky salt.

Honey being drizzled from a wooden dipper over baked brie with pecans, thyme, crackers, and a soft center.
After baking, drizzle honey so it stays golden on top, then add nuts, herbs, and a pinch of salt to balance the rich cheese.

The honey should sit on top in a thin shiny layer, not drown the cheese. A little flaky salt and a few toasted nuts make each scoop taste fuller.

Maple syrup can stand in for honey when you want a deeper, cozier flavor. Pair it with pecans or walnuts, especially for fall or holiday appetizer boards.

Cranberry Baked Brie

Cranberry baked brie is the holiday choice that brings color to the board. For Thanksgiving, Christmas, New Year’s Eve, or any winter table, cranberry sauce gives the cheese tartness and brightness.

Cranberry baked brie with pecans, orange zest, rosemary, crackers, and melted cheese in a cream dish.
Cranberry baked brie works especially well for holiday boards because tart cranberry sauce, orange zest, rosemary, and pecans brighten the creamy cheese.

Add chopped pecans or walnuts, a little orange zest, and a few rosemary leaves for a more holiday-ready look and flavor. Leftover cranberry sauce works beautifully here, especially with orange or warm spices.

Homemade cranberry sauce with orange juice is especially good because the orange brightens the warm cheese and keeps the topping from feeling too heavy.

Baked Brie With Fig Jam

For the most cheese-board-style choice, reach for fig jam. It tastes rich and elegant with warm brie, especially when paired with walnuts, pistachios, rosemary, thyme, apples, grapes, or crostini.

Baked brie with dark fig jam, fresh figs, pistachios, walnuts, rosemary, crostini, and melted cheese.
Fig jam gives baked brie a richer cheese-board flavor, while fresh figs, rosemary, nuts, and crostini make the board feel elegant without extra work.

Bake the brie until soft, spoon the fig jam over the top, then finish with nuts and herbs. A tiny drizzle of honey can make it glossier, but you do not need much.

This is also a useful way to turn homemade fig jam into a party appetizer without making anything complicated.

Baked Brie With or Without Puff Pastry

You can bake brie with or without puff pastry. No pastry is faster and lets the topping shine. Puff pastry turns baked brie from easy appetizer into a golden centerpiece, but it also asks for a little more patience.

VersionOven TempTimeKey Tip
No pastry350°F / 175°C8–12 minKeep brie cold and check early
Puff pastry400°F / 200°C35–40 minSeal pastry well and rest before cutting
Crescent rolls350°F / 175°C20–24 minSeal every seam
Phyllo375°F / 190°C20–30 minBrush layers with butter
Air fryer350°F / 175°C6–10 minUse parchment or a small air-fryer-safe dish
Brie bites375°F / 190°C18–22 minUse a mini muffin tin

Puff Pastry Baked Brie

Use puff pastry when you want the dramatic version. You will need 1 thawed puff pastry sheet, an 8–12 oz brie wheel, egg wash, and optional jam, honey, cranberry sauce, or nuts.

How to Wrap Brie in Puff Pastry

Keep the pastry cold and the filling thin before sealing, because puff pastry bakes cleaner when it is not stretched or overloaded.

Hands folding puff pastry around a brie wheel with egg wash, jam, parchment, flour, and a pastry brush nearby.
Keep puff pastry cold, use only a thin layer of filling, and seal the seams well so the brie stays contained while the crust turns golden.
  1. Heat the oven to 400°F / 200°C.
  2. Roll the puff pastry into a square large enough to wrap the brie, usually about 10–11 inches wide.
  3. Place the brie in the center and add a thin layer of jam, honey, or cranberry sauce if using.
  4. Wrap the pastry around the brie and seal the seams well.
  5. Brush with beaten egg.
  6. Bake for 35–40 minutes, or until the pastry is golden.
  7. Rest for 5–10 minutes before cutting.

Here is where people usually go wrong: too much filling, warm pastry, or cutting too soon. Use less jam than you think, chill the wrapped brie if the pastry gets soft, and let the baked pastry rest before slicing so the cheese does not gush out before guests can scoop it.

Warm pastry stretches and tears more easily, which is why chilling the wrapped brie helps it bake up cleaner and leak less.

Rest Before Cutting Puff Pastry Baked Brie

Resting gives the pastry a cleaner cut and gives the melted brie a moment to settle before the first scoop.

Golden puff pastry baked brie cut open with melted brie inside, crostini, cranberry jam, thyme, and a knife nearby.
After resting, puff pastry baked brie slices more neatly while the crust stays crisp and the melted cheese remains scoopable.

If you are building a non-vegetarian puff pastry appetizer tray, these puff pastry sausage rolls make a heartier companion beside the brie.

Crescent Roll Baked Brie

Crescent dough is the casual shortcut. Wrap the brie completely, add jam or cranberry sauce if you like, brush with egg wash, and bake at 350°F / 175°C for 20–24 minutes. Let it rest for about 15 minutes before cutting.

Phyllo Baked Brie

Phyllo gives baked brie a crisp, flaky shell that feels lighter than puff pastry. Brush the phyllo sheets with melted butter, layer them around the brie, add a small amount of jam or honey, and bake until golden and crisp. Keep the filling modest so the layers stay crisp.

Air Fryer Baked Brie

For a quick few-people option, air fryer baked brie works well with a small wheel. Use parchment or a small air-fryer-safe dish, keep the rind on, and air fry at 350°F / 175°C for 6–10 minutes, depending on the size and thickness of the brie. Check early because air fryers heat quickly.

Baked Brie Bites

For a grazing table or party tray, brie bites are easier than asking everyone to gather around one wheel. Cut puff pastry into small squares, press them into a mini muffin tin, add small pieces of cold brie, and bake until the pastry is golden.

For a full party tray, cut the pastry and brie into 24 small pieces, keep the brie cold until assembly, and use only a small spoon of jam, cranberry sauce, fig jam, or pepper jelly in each cup so the bites stay neat.

Air Fryer Brie or Brie Bites?

Choose air fryer brie for a small wheel, or use brie bites when you want tidy portions for a party tray.

Split guide showing air fryer baked brie in parchment and baked brie bites in a mini muffin tin with jam.
Use the air fryer for a small brie wheel, or make brie bites in a mini muffin tin when you want easier party-size servings.

What to Bake Brie In

You do not need a special brie baker, but the right dish makes serving easier. Baked brie is hot, soft, and delicate when it comes out of the oven, so use something that helps you move or serve it without stress.

Equipment guide showing parchment, shallow dish, cast iron skillet, brie baker, pie plate, and mini muffin tin for baking brie.
Choose a shallow dish, skillet, or brie baker when you want to catch melted cheese and serve the baked brie straight from oven to table.
EquipmentUse It For
Parchment-lined baking sheetEasy cleanup and transfer
Shallow oven-safe dishServing directly from the oven
Small cast iron skilletRustic presentation and better heat retention
Ceramic brie bakerHolding toppings and melted cheese neatly
Pie platePuff pastry baked brie
Mini muffin tinBaked brie bites

If you are serving guests, a small dish or skillet is less stressful than trying to move a soft wheel from a flat pan. Serve the brie straight from the dish if you are nervous; it looks relaxed, catches any melted cheese, and keeps the appetizer warmer for a little longer.

What to Serve With Baked Brie

This is the kind of appetizer people naturally gather around, so make the scooping easy and the board relaxed.

Place the brie down first, then build around it. Tuck crackers and bread close enough for scooping, add fruit where the board needs color, nuts where it needs crunch, and one salty bite so the whole board does not feel too sweet.

Baked brie serving board with crackers, sliced baguette, apples, pears, grapes, olives, dried fruit, honey, herbs, and crostini.
Build the board around the brie with sturdy crackers, bread, fruit, and savory bites so every scoop has contrast.

Keep the dippers close. People should be able to scoop without chasing the cheese across the board.

Simple Baked Brie Board Formula

Use one warm brie + one crunchy cracker + one bread + one fresh fruit + one sweet topping + one salty or savory bite. That gives the board enough contrast without making it crowded.

For a fuller grazing board, the 3-3-3-3 charcuterie board rule is a useful way to balance cheeses, crackers or breads, fruit, nuts, pickles, and savory bites without overcrowding the board.

Good Dippers for Baked Brie

  • Crunchy: water crackers, butter crackers, seeded crackers, crostini
  • Bread: sliced baguette, toasted sourdough, crusty bread
  • Fresh: apple slices, pear slices, grapes
  • Sweet: dried apricots, dried cherries, fresh figs, pomegranate seeds

Apples and pears are especially useful because they cut through the richness of the cheese, while grapes and dried fruit make the board feel fuller with almost no prep.

Savory Board Additions

  • Olives
  • Roasted nuts
  • Caramelized onions
  • Roasted peppers
  • Prosciutto or salami, if you are making a non-vegetarian board

If people are standing around the board instead of asking when dinner is ready, the brie did its job.

Back to quick answer · Jump to recipe

Make-Ahead, Storage, and Reheating

Can You Make Baked Brie Ahead?

You can do almost everything ahead except the actual melting. Get the topping, nuts, herbs, crackers, bread, and fruit ready first, then bake the cheese close to serving time.

For guests, set the board first, bake the brie 10–15 minutes before serving, and let the warm cheese be the last thing that lands on the table.

Do not fully bake no-pastry brie hours ahead for a party. It firms as it cools, and reheating works, but it never feels quite as fresh as baking it close to serving.

VersionMake-Ahead Advice
No-pastry briePrep toppings ahead; bake close to serving
Puff pastry brieWrap up to 1 day ahead; brush with egg before baking
Crescent roll brieAssemble and chill; bake fresh
Brie bitesAssemble ahead if needed; bake close to serving
LeftoversRefrigerate and reheat gently

For another appetizer that can be shaped and chilled ahead, a make-ahead cheese ball works well with many of the same crackers, nuts, herbs, and board items.

If you are building a warmer appetizer table, a creamy spinach artichoke dip gives guests another scoopable option while the brie is at its melty best.

How Long Does Baked Brie Stay Gooey?

Baked brie is at its gooey best for about 10–15 minutes after baking. It stays warm a little longer in a ceramic dish or cast iron skillet. As it cools, it becomes thicker and more spreadable rather than runny.

If the brie cools before everyone gets to it, do not worry. It becomes spreadable rather than ruined, and a few gentle minutes in the oven can soften it again.

How to Store Leftovers

Store leftover baked brie in an airtight container in the refrigerator for 2–3 days. This stays within the USDA’s general guidance for refrigerated leftovers. The texture will be firmer once chilled, but it can be warmed again.

For safety, do not leave baked brie sitting out for hours. Once the appetizer has cooled and the serving window is over, refrigerate leftovers rather than keeping the cheese on the table all evening.

How to Reheat Baked Brie

Reheat no-pastry baked brie gently in a low oven until soft again. A temperature between 300°F and 350°F / 150°C and 175°C works well. Low heat is better because brie can turn oily when it is warmed too aggressively a second time.

If the brie is wrapped in puff pastry, reheat it in the oven instead of the microwave so the pastry does not turn soft and soggy.

Troubleshooting Baked Brie

A messy baked brie is still baked brie. Most problems come from too much heat, cuts that are too deep, or a board that is not ready when the cheese is warm.

Leaked baked brie served from a shallow dish with a cracker lifting melted cheese, honey, walnuts, and herbs nearby.
A leaking brie is still useful; instead of moving it, add crackers to the dish and serve the extra-melty cheese while warm.

My Brie Did Not Melt

It probably needed more time. Larger wheels take longer, and some brie is thicker than others. Return it to the oven for 2–5 minutes and check again. The center should feel soft when gently pressed.

My Brie Leaked Everywhere

If the brie leaked everywhere, it was probably overbaked, cut too deeply, or given an escape route through an unsealed pastry seam. Next time, keep the rind intact, avoid cutting down the sides, and use a shallow dish to catch any melted cheese.

My Puff Pastry Is Soggy

The pastry may have been too warm, the filling may have been too wet, or the brie may have been cut too soon after baking. Use less jam inside, keep the pastry cold, bake until deeply golden, and let it rest before slicing.

My Brie Turned Oily or Rubbery

That usually means it was baked or reheated too long. Brie should be warmed until soft, not cooked until it fully collapses. Start checking early, especially with smaller wheels.

The Topping Slid Off

Use less topping or add some of it after baking. A small amount of jam or honey goes a long way. Chopped nuts can also help hold the topping in place.

The Brie Cooled Too Fast

Bake it close to serving time and serve it in the dish it was baked in. A small cast iron skillet or ceramic dish helps the cheese stay warm longer than a flat sheet pan.

The Flavor Is Too Sweet

Add balance. Use less honey or jam next time, finish with flaky salt, add fresh herbs, and serve with plain crackers, tart apple slices, or savory board items.

Trying again? Go back to the easy baked brie recipe, check the timing chart, or return to the quick answer.

Baked Brie FAQ

Do you remove the rind before baking brie?

No. The rind is edible and helps the brie hold its shape while the inside melts. US Dairy notes that bloomy rinds like brie are generally edible. You can lightly score or scrape the top if you prefer, but avoid cutting deeply into the sides.

How long do you bake brie?

A standard 8 oz / 225 g wheel usually takes 8–12 minutes at 350°F / 175°C. Larger wheels can take 18–25 minutes. If the center still feels firm, bake it a few minutes more and check again.

What temperature is best for baked brie?

Use 350°F / 175°C for no-pastry baked brie. Puff pastry baked brie needs 400°F / 200°C so the pastry can brown properly.

Do you bake brie covered or uncovered?

Bake no-pastry brie uncovered so you can see when the edges relax and the center softens. Puff pastry baked brie is also baked uncovered so the pastry can turn golden and crisp.

Can you bake brie without puff pastry?

Yes. No-pastry baked brie is often the easiest and most reliable version. It is usually ready in about 10–15 minutes and lets honey, jam, cranberry sauce, nuts, and herbs shine without needing dough.

What jam goes best with baked brie?

Fig jam is rich and elegant, cranberry sauce is tart and festive, raspberry jam is bright, apricot preserves are mild and crowd-friendly, and pepper jelly gives the brie a sweet-spicy edge.

Should toppings go on before or after baking?

Thick jam or cranberry sauce can go on before baking. Honey, loose sauces, fresh herbs, and flaky salt usually look better after baking. Nuts can go on before baking if you want them lightly toasted, or after baking if you want more crunch.

Can you make baked brie ahead of time?

For no-pastry brie, prep the toppings ahead but bake the cheese close to serving. Puff pastry brie can be wrapped ahead and refrigerated, then brushed with egg wash and baked fresh.

Can you bake Camembert instead of brie?

Yes. Camembert can be baked in a similar way, but it usually has a stronger, earthier flavor. Use the same soft-center test and check early, especially with small wheels.

Can you microwave brie?

You can microwave brie briefly, but the oven gives better control and presentation. If using the microwave, warm it in short bursts on a microwave-safe plate and stop as soon as the center softens.

What crackers go with baked brie?

Water crackers, butter crackers, seeded crackers, crostini, and toasted baguette all work well. Choose sturdy crackers that can scoop warm cheese without breaking.

How long does baked brie stay gooey?

Baked brie is usually gooey for about 10–15 minutes. It stays warm longer in a small cast iron skillet, ceramic dish, or brie baker.

Can you bake brie in an air fryer?

Yes. A small wheel of brie can usually be warmed in an air fryer at 350°F / 175°C for 6–10 minutes, depending on size. Use parchment or an air-fryer-safe dish to keep the cheese contained.

The Easiest Fancy Appetizer

Baked brie works because it gives you a lot of payoff for very little effort. Keep the cheese cold, bake it gently, choose one good topping, and have your crackers or bread ready before it comes out of the oven.

Bake it last, serve it warm, and let the first scoop do the work.

Posted on 1 Comment

Easy Cheese Ball Recipe

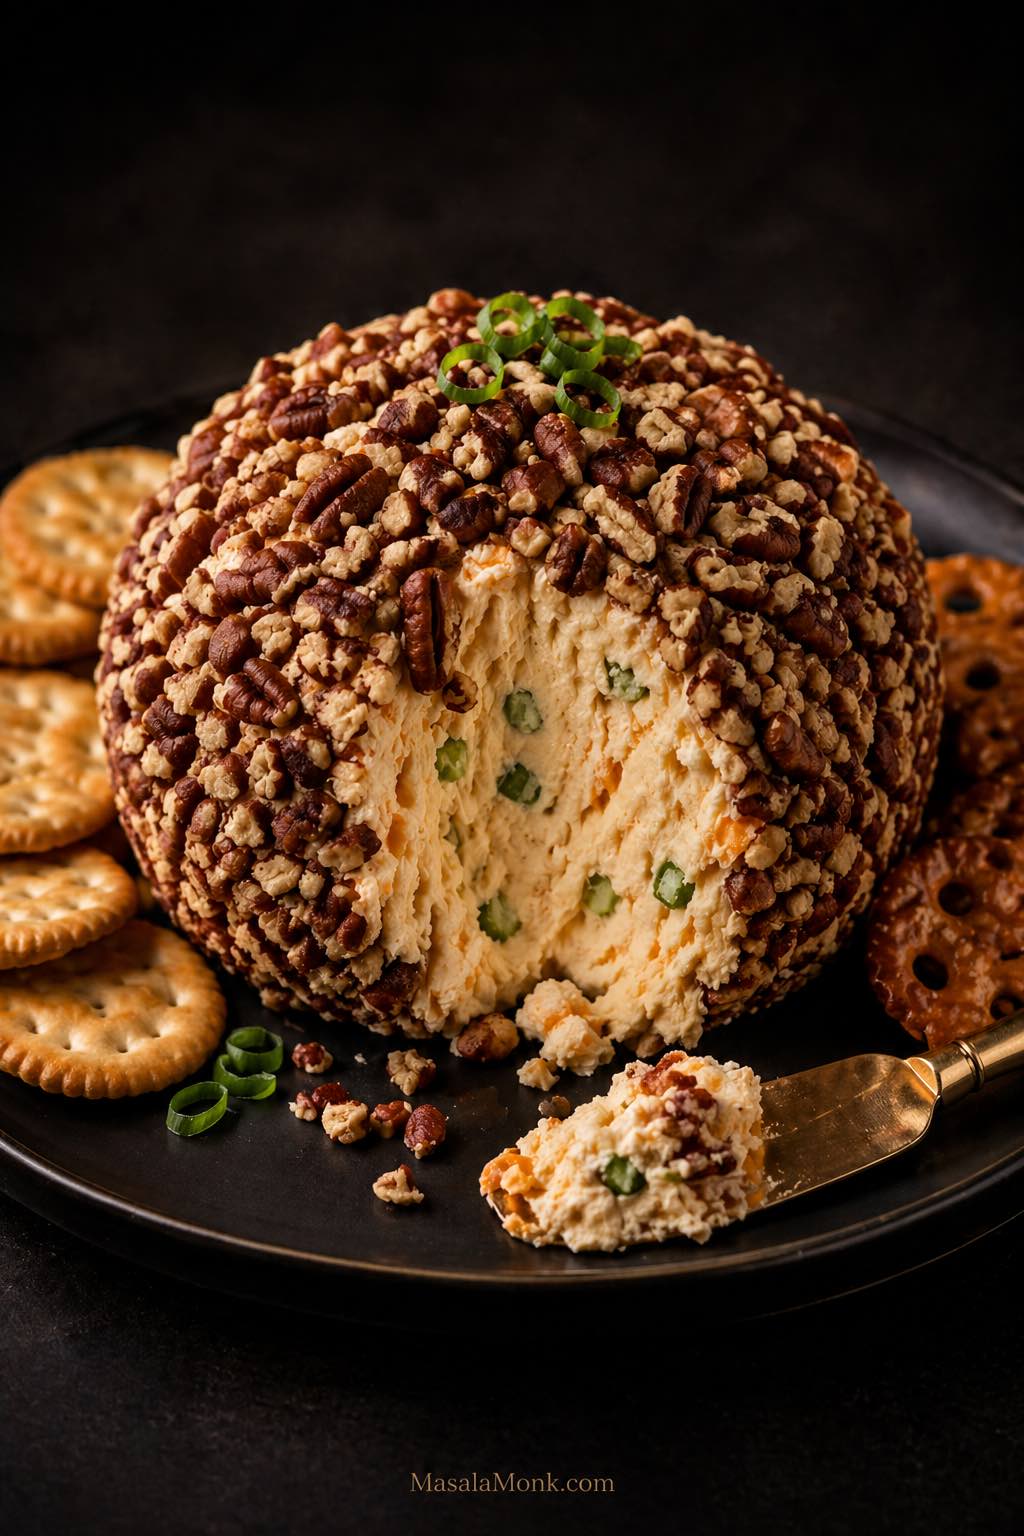
Close-up of a pecan-coated cheese ball on a dark plate with round crackers and a spreader, with a scoop taken out to show the creamy cheddar and green onion filling inside.

This easy cheese ball recipe is the classic no-cook party appetizer you want when you need something creamy, savory, make-ahead friendly, and reliable. It starts with cream cheese, sharp cheddar, green onion, simple seasonings, and a crunchy pecan coating, then chills into a firm but spreadable ball that works with crackers, pretzels, vegetables, holiday boards, game day snacks, and party platters.

A good cheese ball should not taste like plain cream cheese with nuts stuck to the outside. Instead, the filling should be creamy, savory, a little sharp from the cheddar, fresh from the green onion, and easy to scoop once it softens slightly on the platter. Since the base recipe is simple, you can also turn the same cheese mixture into a bacon ranch cheese ball, dried beef cheese ball, pineapple cheese ball, cranberry pecan cheese ball, mini cheese ball bites, cheese ball dip, or a no-nut version without starting over.

This is the chilled cream cheese appetizer, not the crispy fried snack. If you are looking for hot, fried cheese balls with an Indian-inspired flavor profile, MasalaMonk already has a guide to crispy Indian-inspired cheese balls. Here, we are making the classic cheese ball served with crackers, vegetables, and party boards.

Active prep is only about 15 minutes. The rest of the time is chilling, which makes this an easy make-ahead appetizer rather than a last-minute kitchen project.

Quick Answer: What Is a Cheese Ball?

A cheese ball is a chilled, spreadable appetizer made with cream cheese, shredded cheese, seasonings, and an outer coating such as chopped pecans, walnuts, herbs, bacon, crushed pretzels, or dried cranberries. Once the filling is mixed, it is shaped into a ball, chilled until firm, rolled in the coating, and served with crackers, vegetables, pretzels, crostini, or a party board.

Unlike fried cheese balls, this version is creamy, cold, and spreadable rather than hot, breaded, or crisp. First, the cream cheese makes it smooth. Then, the cheddar gives it sharper flavor, the seasonings keep it from tasting flat, and the coating adds crunch and color. After chilling, the ball should hold its shape on the platter; however, this recipe should still soften enough to spread after 15 to 20 minutes at room temperature.
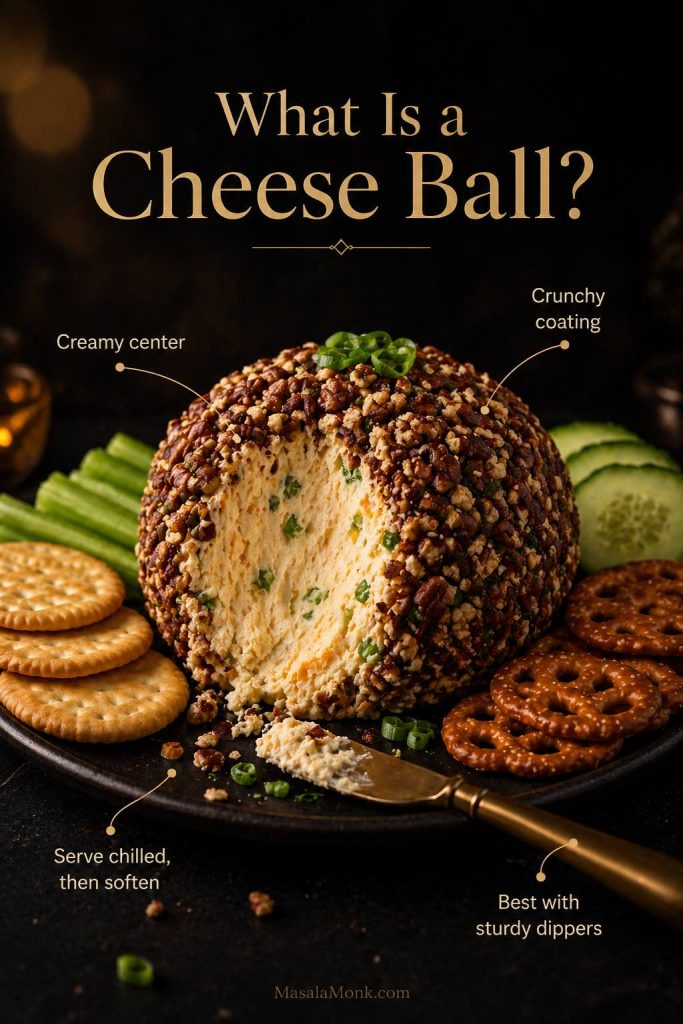
Quick answer: Mix 16 oz / 450 g softened cream cheese with 1½ to 2 cups / 170 to 225 g shredded cheddar, green onion, Worcestershire sauce, garlic powder, onion powder, and black pepper. Then shape, chill for 1 to 2 hours, and roll in chopped pecans, herbs, bacon, pretzels, or another coating.
Annotated guide showing a finished cheese ball with crackers, celery, cucumber, pretzel crisps, and a spreader, with labels noting the creamy center, crunchy coating, chilled serving style, and sturdy dippers.
A cheese ball is a chilled, spreadable appetizer with a creamy center and a textured outer coating. Because it is easier to serve once slightly softened, sturdy dippers like crackers, pretzel crisps, and crisp vegetables work especially well.

Cheese Ball Ingredients at a Glance

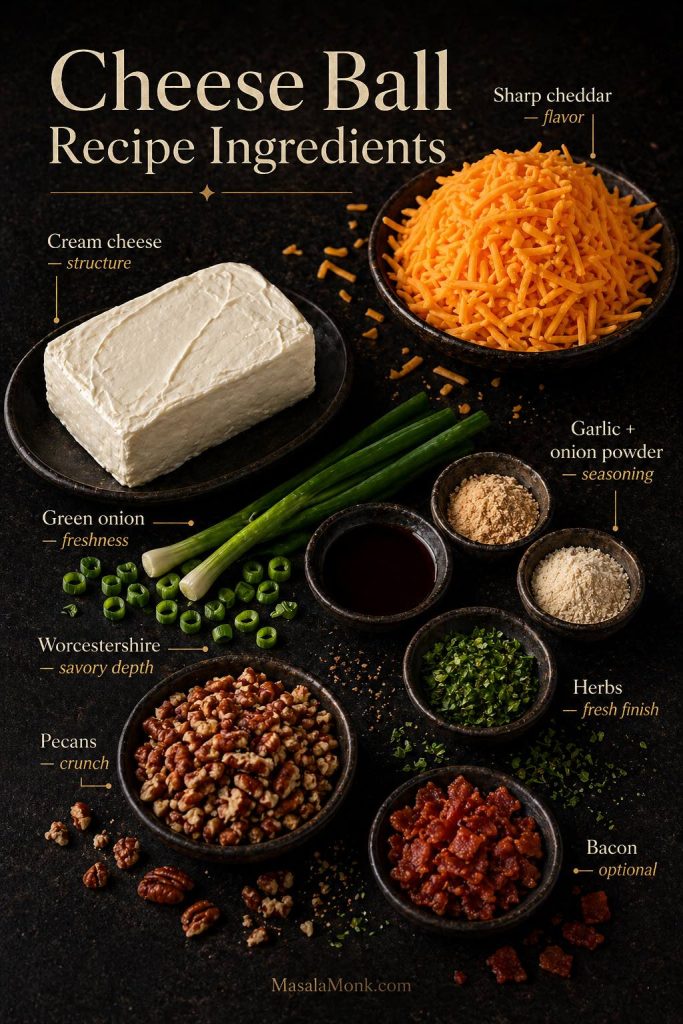
If you only remember one thing, remember this: cream cheese gives the ball body, cheddar gives this recipe sharper flavor, seasonings make it taste complete, and the coating makes it party-ready. Once those jobs are clear, it becomes much easier to adjust the recipe without making the filling too soft, salty, or bland.

Ingredient What It Does Best Tip
Cream cheese Creamy base and structure Use softened block-style cream cheese, not melted cream cheese
Sharp cheddar Real cheese flavor Freshly shredded cheddar blends best, although pre-shredded works in a pinch
Green onion Freshness and mild onion bite Slice it finely so every bite gets a little
Worcestershire sauce Savory depth Start with 1 teaspoon / 5 ml, then taste before adding more
Garlic and onion powder Even seasoning Use powders because they spread smoothly through the cream cheese
Pecans, herbs, bacon, or pretzels Crunch, color, and finish Roll the cheese ball in crunchy coatings close to serving
Ingredient guide for a cheese ball recipe showing cream cheese, shredded sharp cheddar, green onions, Worcestershire sauce, garlic powder, onion powder, black pepper, chopped pecans, herbs, and optional bacon arranged on a dark background.
The base of a classic cheese ball recipe is simple, but each ingredient has a job. Cream cheese gives structure, sharp cheddar adds flavor, Worcestershire brings savory depth, and pecans or herbs finish the outside with crunch and contrast.

How to Make a Cheese Ball

The method is easy, but the order matters. First, beat the cream cheese until smooth. Next, mix in the flavorings, shape the filling before it gets too warm, chill until firm, and add the coating close enough to serving that it stays fresh. That way, the cheese ball recipe stays simple without turning soft, lumpy, or messy.
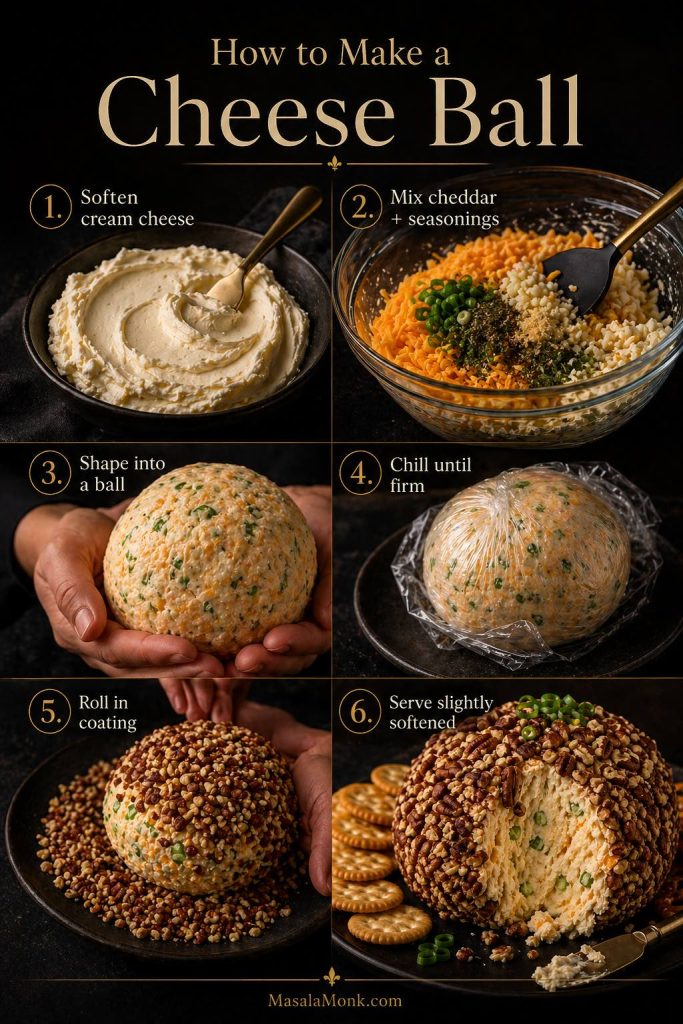
Six-step visual guide showing how to make a cheese ball: soften cream cheese, mix in cheddar and seasonings, shape into a ball, chill until firm, roll in coating, and serve with crackers.
How to make a cheese ball is easier than it looks: soften, mix, shape, chill, coat, and serve. Most important, do not skip the chilling step, because that is what helps the cheese ball hold its shape and coat cleanly.

Step 1: Soften the Cream Cheese

Start with softened cream cheese. Leave it at room temperature until it is easy to press with a spoon. If the cream cheese is too cold, it will not mix smoothly. If it is melted, the filling may become loose and harder to shape. For that reason, softened but still-cool cream cheese gives you the best balance.

Step 2: Mix the Filling

Beat the cream cheese until smooth. Then mix in shredded cheddar, green onion, Worcestershire sauce, garlic powder, onion powder, black pepper, and any add-ins. Scrape the bowl well so the seasoning is evenly spread through the filling.

Before shaping, taste the mixture. It should taste slightly bold because crackers and vegetables will soften the flavor. If it tastes flat, add a little more green onion, black pepper, garlic powder, onion powder, or Worcestershire sauce. At this stage, the recipe is easier to fix because the cheese has not yet been shaped into a ball.

Step 3: Shape and Chill

Spoon the filling onto a large piece of plastic wrap or parchment. Then, gather the wrap around the mixture and shape it into a ball. It does not need to be perfect yet because chilling will make it easier to smooth and coat. After the first chill, you can gently reshape it if needed.

Refrigerate for at least 1 hour. For a cleaner shape, chill for 2 hours. If you are making the cheese ball ahead, stop here and keep it wrapped until the day you plan to serve it.

Step 4: Roll in the Coating

Spread chopped pecans, herbs, bacon, pretzels, or your chosen coating on a plate. After that, unwrap the chilled cheese ball, then roll and press it gently into the coating until the outside is covered.

Nuts hold up better than most coatings. However, bacon, pretzels, crackers, and fresh herbs are best added closer to serving. That keeps the outside crisp, fresh, and more appetizing. The cheese ball also looks cleaner when the final coating is added after the recipe has had time to chill.

Step 5: Serve Slightly Softened

A cheese ball is usually too firm right from the refrigerator. So, let it sit for 15 to 20 minutes before serving so it becomes easier to spread. It should soften slightly, but it should not sit out for the entire party. Instead, serve it in a planned window and keep extra portions chilled if the gathering will last longer.

Texture target: Before chilling, the mixture should look thick, creamy, and scoopable. It should not be runny, greasy, or crumbly. After chilling, it should be firm enough to roll in coating, but it should still soften enough to spread after 15 to 20 minutes at room temperature. If it feels loose before chilling, add a little more cheddar; if it feels dry, let it rest briefly and mix again.

Easy Cheese Ball Recipe

Easy Cheese Ball Recipe with Cream Cheese

This classic cheese ball recipe is creamy, savory, make-ahead friendly, and perfect with crackers, vegetables, pretzels, and party boards.

YieldAbout 3 to 3½ cups
Servings16 to 20 appetizer servings
Prep Time15 minutes
Chill Time1 to 2 hours
Total Time1 hour 15 minutes to 2 hours 15 minutes
Cook Time0 minutes

Ingredients

  • 16 oz / 450 g cream cheese, softened
  • 1½ to 2 cups / about 170 to 225 g shredded sharp cheddar cheese
  • 2 to 3 green onions, finely sliced, about 20 to 30 g
  • 1 teaspoon / 5 ml Worcestershire sauce
  • ½ teaspoon garlic powder
  • ½ teaspoon onion powder
  • ¼ teaspoon black pepper
  • Pinch of salt, only if needed

For the Coating

  • ¾ to 1 cup / about 85 to 115 g finely chopped pecans or walnuts
  • 2 tablespoons chopped parsley, chives, or green onion
  • Optional: ¼ to ½ cup / about 25 to 50 g cooked crumbled bacon

Instructions

  1. Add softened cream cheese to a mixing bowl and beat until smooth
  2. Add shredded cheddar, green onion, Worcestershire sauce, garlic powder, onion powder, black pepper, and a small pinch of salt if needed
  3. Mix until evenly combined, then taste and adjust the seasoning before shaping
  4. Spoon the mixture onto plastic wrap or parchment and shape it into a ball
  5. Wrap tightly and refrigerate for at least 1 hour, or 2 hours for a firmer, cleaner shape
  6. Spread chopped pecans, herbs, and optional bacon on a plate
  7. Unwrap the chilled cheese ball and roll it in the coating, pressing gently so the outside is covered
  8. Let it sit for 15 to 20 minutes before serving with crackers, pretzels, vegetables, or crostini

Recipe Notes

  • Taste the filling before shaping. It should taste slightly bold because crackers, vegetables, and pretzels soften the flavor once served
  • For a softer spread, use 1½ cups / 170 g cheddar instead of 2 cups / 225 g
  • For a firmer cheese ball, chill longer or mix in a little more shredded cheddar
  • For a no-nut cheese ball, coat it with herbs, bacon, crushed pretzels, crushed crackers, everything seasoning, or toasted breadcrumbs
  • For mini cheese ball bites, chill the mixture, scoop into 1-tablespoon portions, roll each one in coating, and add pretzel sticks right before serving
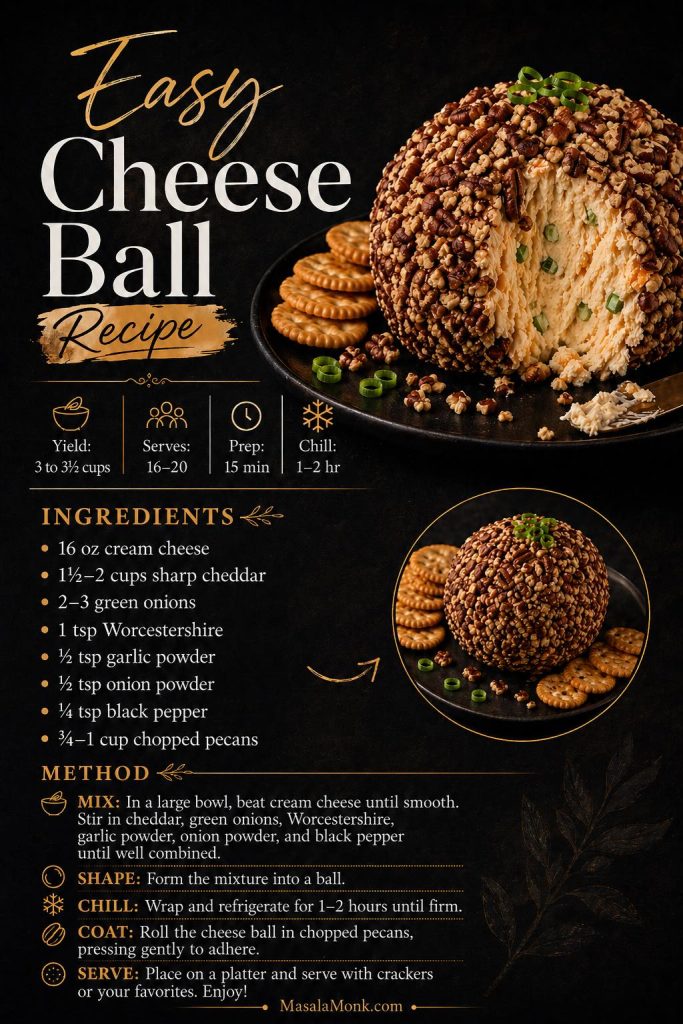
Recipe card graphic for an easy cheese ball recipe with a photo of the finished cheese ball, yield and timing details, an ingredient list including cream cheese, sharp cheddar, green onions, Worcestershire, seasonings, and pecans, plus a short method.
This easy cheese ball recipe uses a classic formula: cream cheese, sharp cheddar, green onions, Worcestershire, simple seasonings, and chopped pecans. Since it is make-ahead friendly, it is a strong choice for holidays, parties, and snack boards.

Why This Cheese Ball Recipe Works

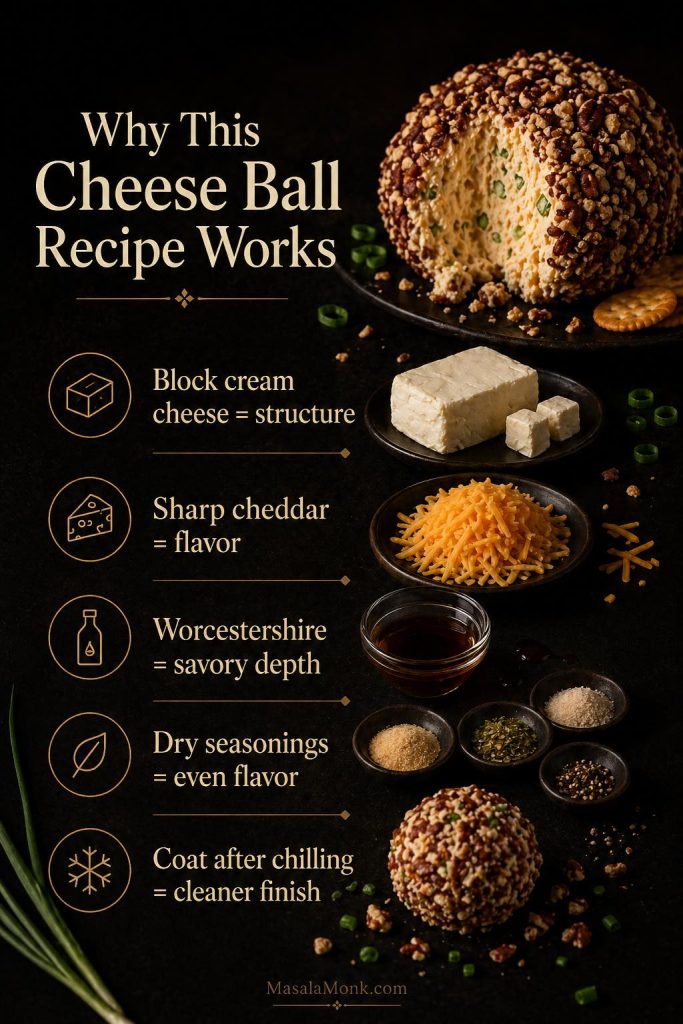
This cheese ball recipe works because it keeps the base firm, flavorful, and easy to spread. Instead of adding too many wet ingredients, it uses full-fat block cream cheese for structure, sharp cheddar for stronger cheese flavor, and dry seasonings that blend smoothly through the filling.

Also, the coating goes on after the ball has chilled. That timing matters because the outside stays cleaner, the nuts or herbs stick better, and the finished appetizer looks fresher on the platter. That way, the cheese ball stays make-ahead friendly without tasting flat or turning messy.

Recipe Choice Why It Helps
Full-fat block cream cheese Firms up enough to shape into a ball
Sharp cheddar Adds enough flavor to stand up to crackers and vegetables
Garlic powder and onion powder Season evenly without harsh raw pieces
Worcestershire sauce Adds savory depth so the filling does not taste one-note
Coating after chilling Keeps the outside fresher, cleaner, and crunchier
Explainer board showing why a cheese ball recipe works, with callouts for block cream cheese for structure, sharp cheddar for flavor, Worcestershire for savory depth, dry seasonings for even flavor, and coating after chilling for a cleaner finish.
A good cheese ball recipe works because the structure and flavor stay balanced. Block cream cheese keeps it firm, sharp cheddar keeps it from tasting flat, and coating the ball after chilling helps the outside stay cleaner and more defined.

That is what keeps the recipe flexible without making it vague. You can change the coating, the add-ins, or the serving style, while the cream cheese and cheddar base still keeps the ball structured enough to slice, scoop, and spread.

Cheese Ball Ingredient Notes

The base is simple, but each ingredient matters. Because the recipe is no-cook, the flavor comes from good cheese, proper seasoning, and the contrast between the creamy inside and the textured coating. That is why bland cheese, cold cream cheese, and watery add-ins can make the whole appetizer fall flat.

Cream Cheese

Use full-fat block-style cream cheese for the best structure. Because this is a chilled recipe, the cheese needs to firm up around the ball without turning stiff or crumbly. Block-style cream cheese softens smoothly, firms up well in the refrigerator, and gives the finished cheese ball a rich but spreadable texture. By contrast, whipped cream cheese can make the mixture looser, while cold cream cheese can leave small lumps in the filling.

Let the cream cheese soften at room temperature until it presses easily with a spoon. It should be soft enough to beat, but not melted or greasy. If it melts, the cheese mixture can become loose, and the ball may take much longer to firm up in the refrigerator. On the other hand, if it is too cold, the filling can stay lumpy even after mixing.

If your kitchen is cool, cream cheese may need 45 to 60 minutes to soften. If your kitchen is warm, check it sooner so it softens without turning greasy.

Sharp Cheddar

Sharp cheddar is the easiest choice because it brings more flavor than mild cheddar. Also, it balances the cream cheese, so the finished appetizer tastes like a proper cheddar cheese ball instead of a plain cream cheese spread. For this recipe, the cheese should be bold enough that the ball still tastes savory after it is spread onto crackers.

Whenever possible, shred the cheddar fresh because it blends more smoothly into the cream cheese base. Still, pre-shredded cheddar can work when convenience matters. If the mixture feels dry after using packaged shredded cheese, let it sit for a few minutes and mix again before shaping. In practice, the recipe is forgiving as long as the cheese tastes bold and the ball still holds together after chilling.

Best Cheese for a Cheese Ball

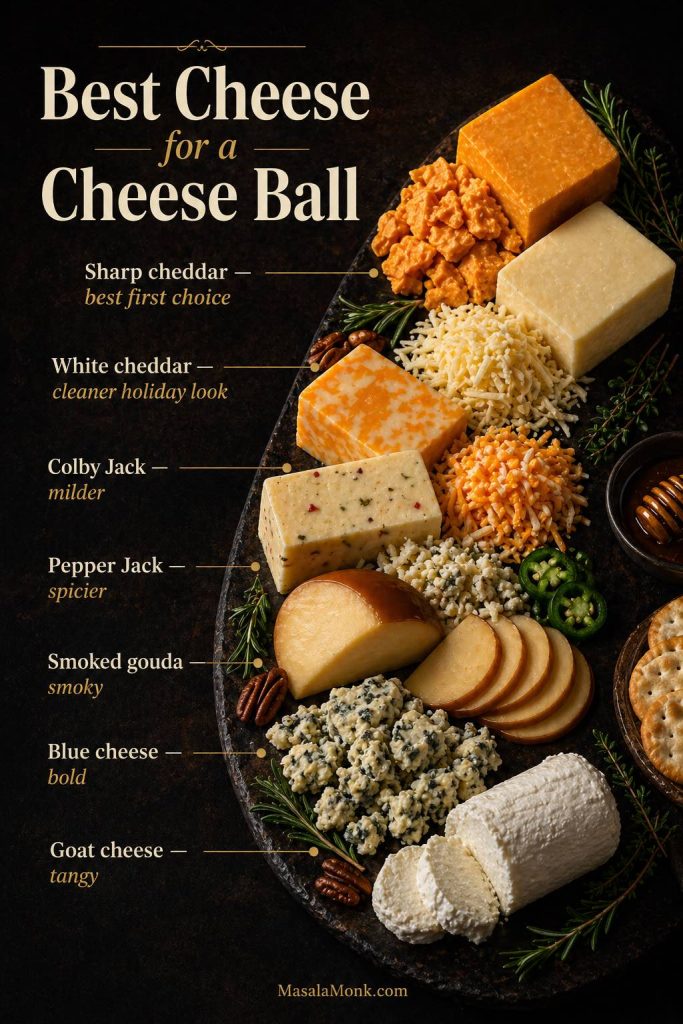
For most versions, sharp cheddar is the best first choice because it has enough flavor to balance the cream cheese. However, this recipe can move in different directions depending on the cheese you choose. If you want the ball to taste milder, sharper, smokier, or spicier, start with the guide below.

Cheese Best For How to Use It
Sharp cheddar Classic cheese ball recipe Main shredded cheese for the strongest everyday version
White cheddar Holiday boards Use like yellow cheddar for a sharper but cleaner-looking ball
Colby Jack Milder family-style cheese ball Use when you want a softer flavor
Pepper Jack Spicy cheese ball Use half pepper Jack and half cheddar
Smoked gouda Smoky party flavor Use a small amount with cheddar rather than replacing all the cheese
Blue cheese Bold retro appetizer Use a little because the flavor is strong
Goat cheese Tangier variation Use as a partial swap, but expect a softer ball
Chooser guide comparing cheeses for a cheese ball recipe, including sharp cheddar, white cheddar, Colby Jack, Pepper Jack, smoked gouda, blue cheese, and goat cheese, each labeled with its flavor style.
Sharp cheddar is the best first choice for a cheese ball because it gives strong flavor without making the filling complicated. However, white cheddar, Pepper Jack, smoked gouda, or even a little blue cheese can shift the recipe in a different direction.

When in doubt, start with sharp cheddar. After that, use the table as a flavor guide rather than a strict rule. For example, pepper Jack makes sense for a spicy cheese ball, while white cheddar looks cleaner on a holiday board.

Green Onion, Garlic, Onion, and Worcestershire

Green onion adds freshness, while garlic powder and onion powder season the filling evenly. Meanwhile, Worcestershire sauce adds a savory note that makes the cheese ball taste fuller and less one-dimensional. Together, they make the recipe taste seasoned without adding extra moisture.

Because crackers, pretzels, bacon, dried beef, and seasoning blends can all be salty, add salt carefully. Before shaping the ball, taste the cheese filling; then decide if the recipe needs even a small pinch.

Pecans, Walnuts, Herbs, Bacon, or Pretzels

Although chopped pecans are the classic coating, walnuts, herbs, bacon, and crushed pretzels can all work depending on the flavor you want. Pecans add crunch and a slightly sweet nuttiness, while herbs such as parsley, chives, and green onion make the outside fresher and brighter.

For a game-day cheese ball, add cooked crumbled bacon to the coating. For a no-nut cheese ball, use herbs, bacon, crushed pretzels, crushed crackers, everything seasoning, or toasted breadcrumbs instead.

Do You Need Sour Cream, Mayo, or Butter?

You do not need sour cream, mayo, or butter for this classic shaped cheese ball recipe. In fact, keeping them out makes the ball easier to shape because the filling stays thicker and cleaner. Full-fat cream cheese already gives the recipe enough richness, while cheddar and seasonings bring the flavor.

That said, sour cream or mayo can be useful if you are making cheese ball dip instead of a shaped appetizer. In that case, add only 1 to 2 tablespoons at first, then check the texture before adding more. Otherwise, the dip can move from creamy to loose very quickly.

Warm cheese option: If you want a pourable cheese dip instead of a chilled cream cheese appetizer, try MasalaMonk’s easy cheese sauce recipe for nachos, fries, broccoli, pasta, and dipping.

Equipment You Need

You do not need special equipment for this recipe, but a few basic tools make the cheese mixture smoother and the final ball easier to shape. If the cream cheese is properly softened, even a sturdy spatula can work. However, a hand mixer makes the filling smoother faster, especially when you are doubling the recipe.

Tool Why It Helps
Mixing bowl For beating the cream cheese and folding in cheddar
Hand mixer or sturdy spatula For a smoother filling
Box grater For freshly shredded cheddar
Plastic wrap or parchment For shaping the filling into a clean ball
Plate or shallow tray For rolling the chilled cheese ball in coating
Serving knife or spreader For easier spreading without breaking crackers

Common Mistakes to Avoid

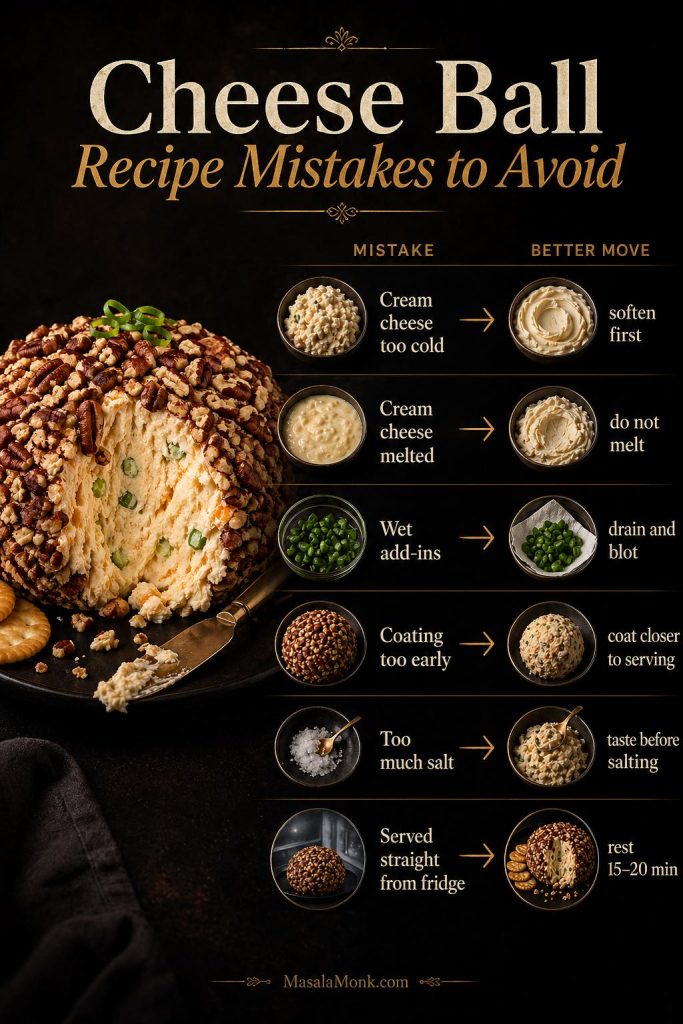
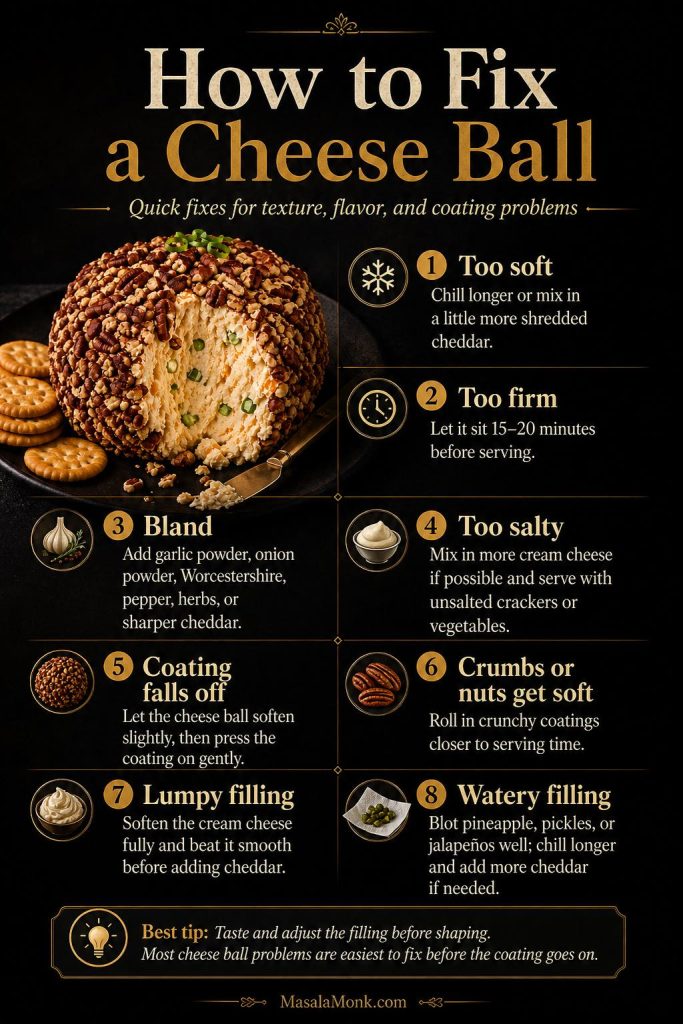
Before you start mixing, it helps to know what can go wrong. Most cheese ball problems come from cream cheese that is too cold, add-ins that are too wet, or coatings that are added too early. Fortunately, each problem is easy to avoid if you build the recipe in the right order. More importantly, fixing the filling before shaping is much easier than fixing a finished ball after the coating is already on.

Mistake What Happens Better Move
Melting the cream cheese Loose or greasy filling Soften at room temperature instead
Using cold cream cheese Lumpy cheese ball mixture Let it soften until it presses easily
Adding wet pineapple, pickles, or jalapeños Soft or watery filling Drain and blot before mixing
Coating with pretzels or bacon too early Soft outside layer Add crunchy coatings closer to serving
Adding salt too soon Overly salty cheese ball Taste first, then salt only if needed
Serving straight from the fridge Firm texture and broken crackers Rest 15 to 20 minutes before serving
Mistake-and-fix guide for a cheese ball recipe showing six common problems: cream cheese too cold, cream cheese melted, wet add-ins, coating too early, too much salt, and serving straight from the fridge.
Most cheese ball recipe problems are easy to avoid once you know what to watch for. For example, cold cream cheese causes lumps, wet add-ins can loosen the mixture, and serving the ball straight from the fridge makes it harder to spread.

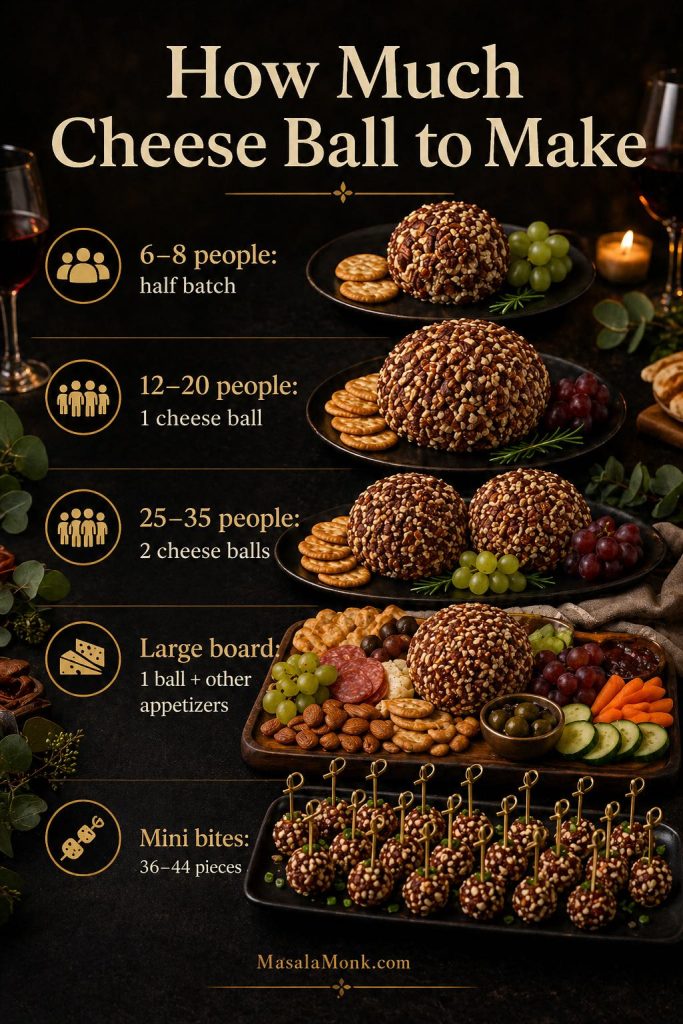
How Much Cheese Ball to Make

Because this cheese ball recipe is usually served as part of a snack table, the right amount depends on what else you are serving. If the ball is the main appetizer, plan more. However, if it sits on a board with dips, crackers, vegetables, fruit, and hot snacks, one batch can stretch further. In that case, variety matters more than making one oversized cheese ball.

Crowd Size Amount to Make Best Plan
6 to 8 people Half batch Smaller ball or full recipe as dip with leftovers planned
12 to 20 people 1 full cheese ball Crackers, vegetables, pretzels, and at least one fresh side
25 to 35 people 2 cheese balls Two flavors, such as classic pecan and bacon ranch
Large party board 1 cheese ball plus other appetizers Warm dip, crunchy snack, fruit, pickles, olives, and sturdy crackers
Individual portions 36 to 48 mini cheese ball bites 1-tablespoon portions with pretzel sticks added right before serving
Serving guide showing how much cheese ball to make for different group sizes, including half a batch for 6 to 8 people, one cheese ball for 12 to 20, two cheese balls for 25 to 35, one ball plus other appetizers for a large board, and mini bites as another option.
How much cheese ball to make depends on how you are serving it. If it is one appetizer among several, one batch goes further; however, for larger gatherings, two cheese balls or a tray of mini bites makes hosting much easier.

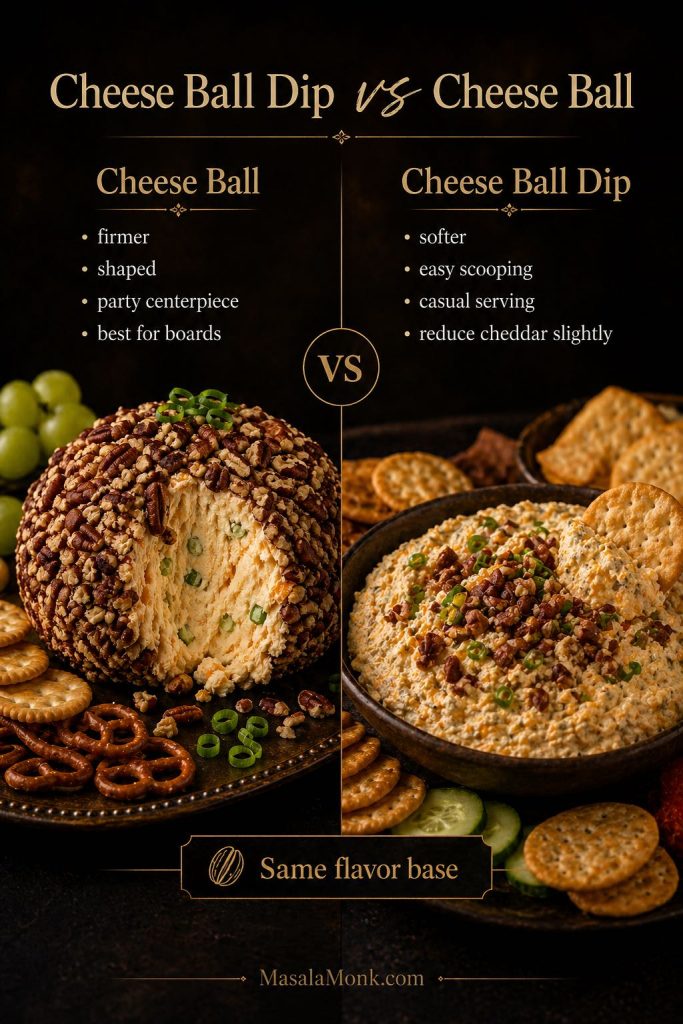
Cheese Ball Dip: How to Serve This Without Shaping It

If you want the flavor of a cheese ball without shaping it, turn the mixture into cheese ball dip. This is useful for casual parties, snack boards, and smaller gatherings where a bowl of spread is easier than a shaped appetizer. Instead of changing the whole recipe, you only need to adjust the cheese slightly so the ball mixture becomes softer and more scoopable.

To make cheese ball dip, use the same base recipe but reduce the cheddar to 1½ cups / about 170 g so the texture stays softer. Then, mix the filling, spoon it into a shallow serving bowl, smooth the top, and sprinkle the coating over the surface. Chill for 30 to 60 minutes if making it ahead; afterward, let it soften slightly before serving so you get the same flavor with less shaping and easier scooping.

For Cheese Ball Dip Use This Adjustment
Softer texture Use 1½ cups / 170 g cheddar instead of 2 cups / 225 g
Easy serving Spoon into a shallow bowl instead of shaping into a ball
Better topping Add pecans, herbs, bacon, or pretzels right before serving
Best dippers Crackers, pretzel crisps, celery, cucumber, bell pepper, crostini, or pita chips
Side-by-side comparison showing a shaped cheese ball on a platter and a bowl of cheese ball dip, with notes that the cheese ball is firmer and better for boards while the dip is softer and easier to scoop.
Cheese ball dip vs cheese ball comes down to texture and serving style. Both use a similar flavor base, yet the dip is softer and easier to scoop, while the shaped cheese ball feels more polished for a party platter or snack board.

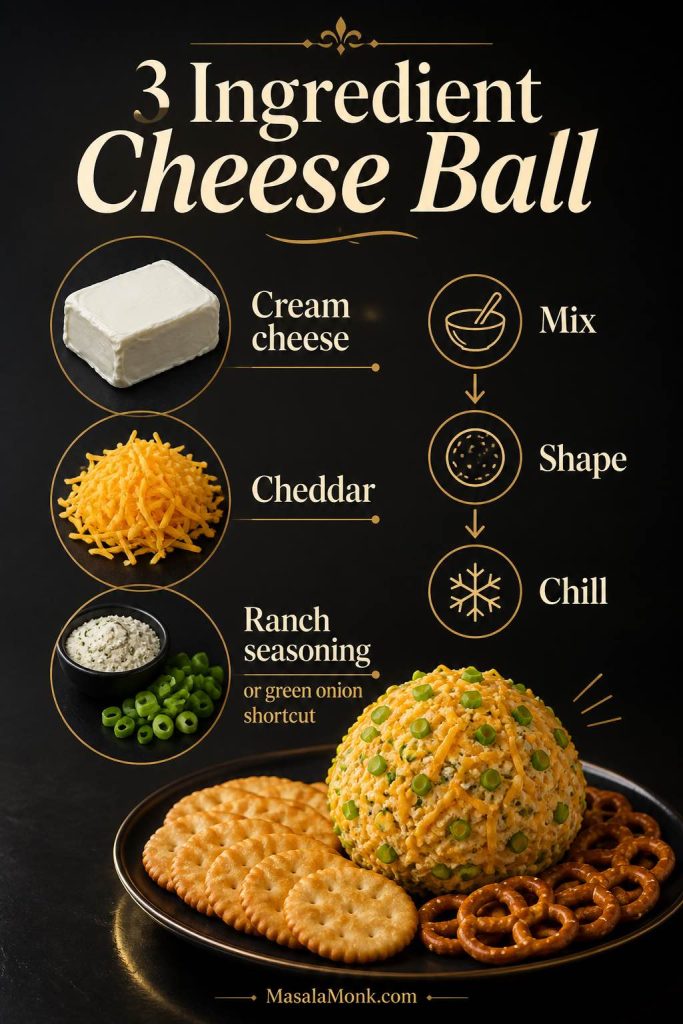
3 Ingredient Cheese Ball

A 3 ingredient cheese ball is useful when you need the fastest possible appetizer. However, it will not have the same depth as the full recipe because garlic, onion, pepper, and Worcestershire add much of the savory background flavor. Still, when time is short, cream cheese, cheddar, and one strong seasoning can form a simple ball that works with crackers and pretzels.

Version Ingredients Best Use
Classic shortcut 16 oz / 450 g cream cheese + 1½ cups / 170 g cheddar + 1 packet / about 28 g ranch seasoning Fast game-day cheese ball
No-ranch shortcut 16 oz / 450 g cream cheese + 1½ cups / 170 g cheddar + 3 sliced green onions Milder cheese ball for simple crackers
Coated shortcut 16 oz / 450 g cream cheese + 1½ cups / 170 g cheddar + ¾ cup / 85 g chopped pecans Basic party cheese ball with crunch
Guide image for a 3 ingredient cheese ball showing cream cheese, shredded cheddar, ranch seasoning or green onion, plus a finished cheese ball served with crackers and pretzels, with the steps mix, shape, and chill.
A 3 ingredient cheese ball is the fastest shortcut version when you need a party appetizer quickly. However, the full cheese ball recipe gives you better depth because Worcestershire, garlic powder, onion powder, pepper, and green onion round out the flavor.

For the best flavor, though, use the full recipe. Worcestershire sauce, garlic powder, onion powder, black pepper, and green onion make the cheese ball taste more complete without making the method harder. Still, the shortcut version is useful when speed matters more than building the most layered flavor.

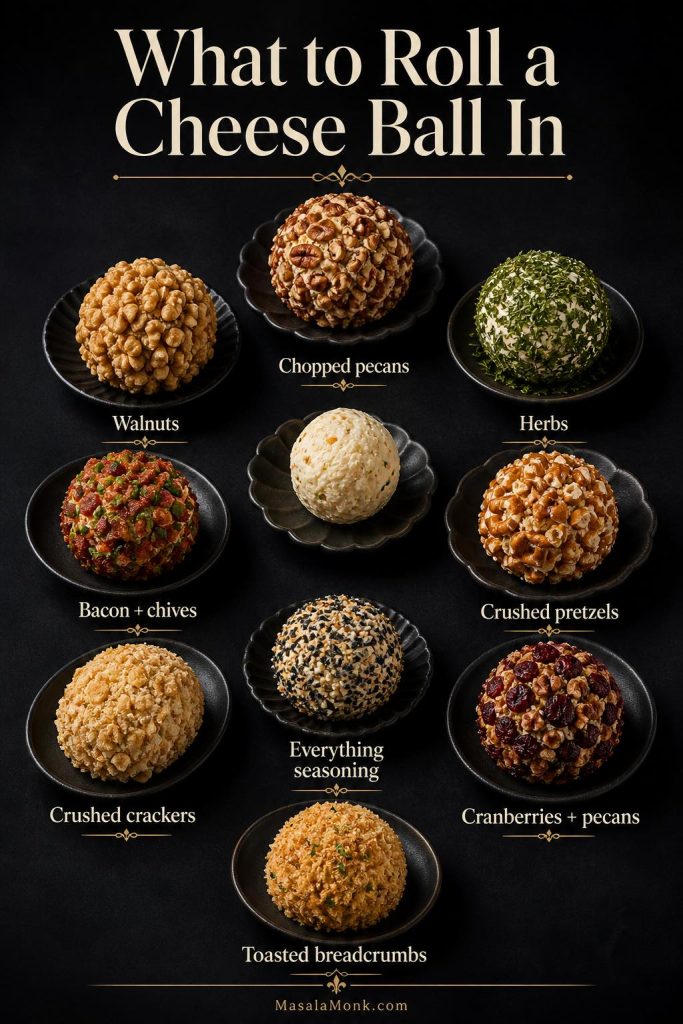
What to Roll a Cheese Ball In

The coating does more than make the cheese ball look finished. It adds texture, controls richness, and tells people what kind of flavor to expect. Although pecans are classic, there are plenty of good nut-free and holiday-friendly options. For example, this recipe can move from a classic cheese ball to a game-day ball or holiday cheese board centerpiece just by changing the outside layer.

Coating Best For Notes
Chopped pecans Classic cheese ball Toast lightly, then cool before using
Chopped walnuts Earthier flavor Chop finely so the pieces stick well
Parsley, chives, or green onion Fresh green finish Good for a lighter-looking or no-nut version
Bacon and chives Game day Add close to serving so the bacon stays crisp
Crushed pretzels No-nut crunch Add shortly before serving because pretzels soften
Crushed crackers Simple no-nut coating Use sturdy crackers and crush finely
Everything seasoning Bagel-style flavor Use lightly because it can be salty
Dried cranberries and pecans Holiday cheese ball Sweet, salty, colorful, and festive
Toasted breadcrumbs Nut-free coating Use dry crumbs and add close to serving
Coating guide showing cheese balls rolled in chopped pecans, walnuts, herbs, bacon and chives, crushed pretzels, crushed crackers, everything seasoning, cranberries and pecans, and toasted breadcrumbs.
What you roll a cheese ball in changes both texture and flavor. For example, pecans give the classic crunch, bacon and chives make it more savory, while crushed pretzels or crackers work well when you want a no-fuss party coating.

No-Nut Cheese Ball Coatings

For a cheese ball without nuts, use chopped herbs, cooked bacon, crushed pretzels, crushed crackers, everything seasoning, toasted breadcrumbs, sesame seeds, or a mix of herbs and shredded cheddar. If allergies are a concern, avoid using nut coatings anywhere near the same platter, utensils, or serving board. In that case, keep the whole platter nut-free rather than relying on separate corners of the same board.
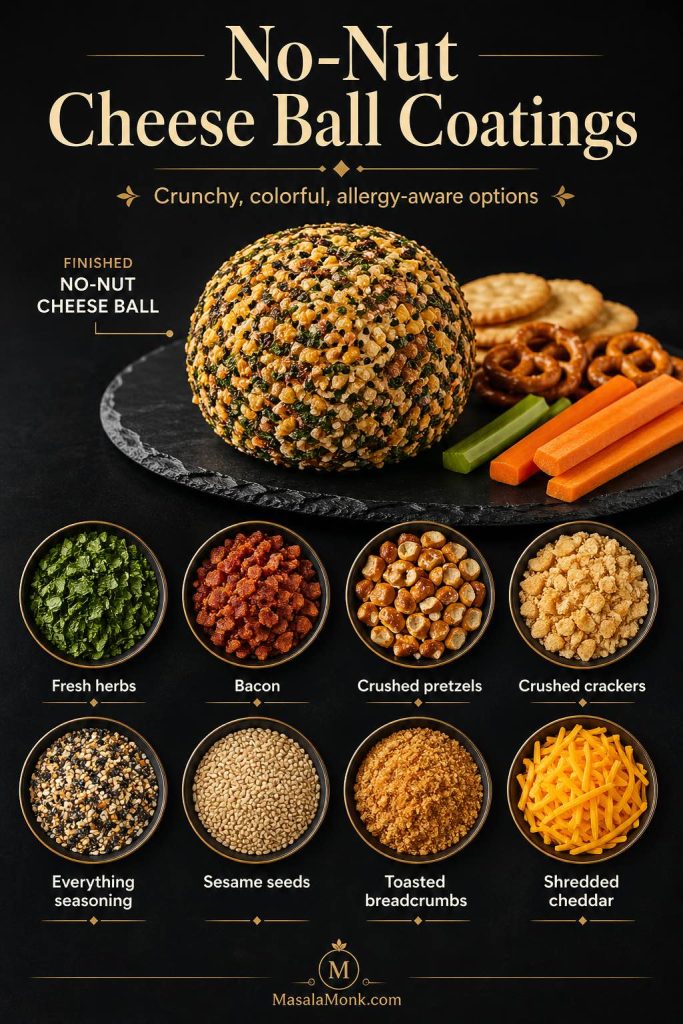
No-nut cheese ball coating guide showing a finished no-nut cheese ball with coating options including fresh herbs, bacon, crushed pretzels, crushed crackers, everything seasoning, sesame seeds, toasted breadcrumbs, and shredded cheddar.
A no-nut cheese ball can still look colorful and taste crunchy. Instead of pecans or walnuts, use fresh herbs, bacon, crushed pretzels, cracker crumbs, sesame seeds, toasted breadcrumbs, or shredded cheddar for a safer party-board option.

What to Serve With a Cheese Ball

A cheese ball works best with dippers that can handle a creamy spread. So, put out a mix of crackers, vegetables, pretzels, and a few fresh or tangy sides so the platter does not feel too heavy. Since this recipe is rich, the best cheese board pairings usually include something crisp, something salty, and something fresh. That balance keeps guests coming back without making every bite feel the same.

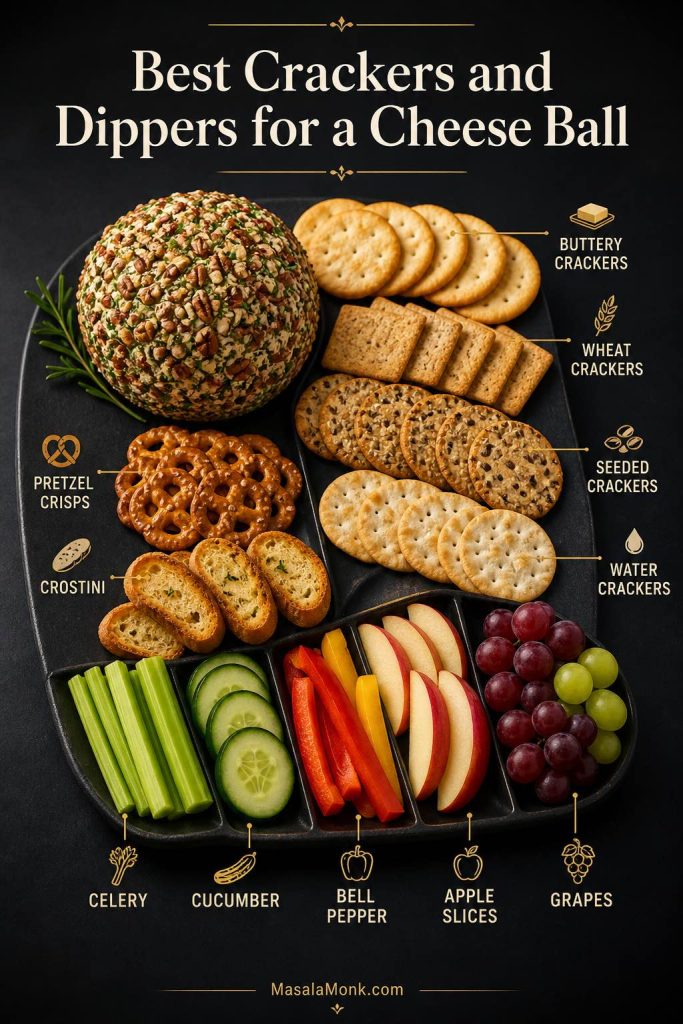
Best Crackers for a Cheese Ball

Cracker or Dipper Why It Works Best Pairing
Buttery crackers Classic party flavor and easy crunch Classic pecan or cranberry pecan
Wheat crackers Sturdy, nutty, and less fragile Dried beef or bacon ranch
Seeded crackers More texture and grown-up flavor Herb or no-nut cheese ball
Water crackers Clean flavor that lets the cheese stand out Classic cheddar once slightly softened
Pretzel crisps Salty, crunchy, and strong enough for scooping Bacon ranch, jalapeño, or dill pickle
Crostini or baguette slices Strongest option for a firmer cheese ball Party boards and holiday platters
Celery, cucumber, and bell pepper Fresh, lighter, and crisp Rich cheese balls and game-day spreads
Apple slices and grapes Sweet and fresh against savory cheese Cranberry pecan, pineapple, or classic pecan
Serving guide showing a cheese ball with buttery crackers, wheat crackers, seeded crackers, water crackers, pretzel crisps, crostini, celery, cucumber, bell pepper, apple slices, and grapes.
The best crackers and dippers for a cheese ball are sturdy enough to scoop without breaking. Since the filling is rich, a mix of crackers, pretzel crisps, fresh vegetables, apple slices, and grapes keeps the platter balanced.

Because the cheese ball can be firm when it first comes out of the fridge, sturdy crackers work better than very thin ones. So let it soften for 15 to 20 minutes before serving, or include a small spreading knife on the platter.

For a low-carb platter, serve the cheese ball with celery, cucumber rounds, bell pepper strips, cheese crisps, pork rinds, or other sturdy options from MasalaMonk’s guide to keto chips for dips. This works especially well when the cheese ball is part of a heavier game-day table and you want a few lighter, crunchier options.

Turn It Into a Party Board

For a fuller spread, place the cheese ball on a board with crackers, pretzels, fruit, nuts, pickles, olives, cured meats, and a small bowl of jam or chutney. If you want a simple layout formula, MasalaMonk’s guide to charcuterie board ideas gives you an easy structure for building a balanced board. From there, add one crunchy item, one fresh item, and one sweet or tangy item around the cheese ball.

For a game-day table, pair this cheese ball with buffalo chicken dip, crispy mozzarella sticks, or a tray of potato appetizers. That gives guests a mix of cold, creamy, hot, crispy, salty, and fresh bites.
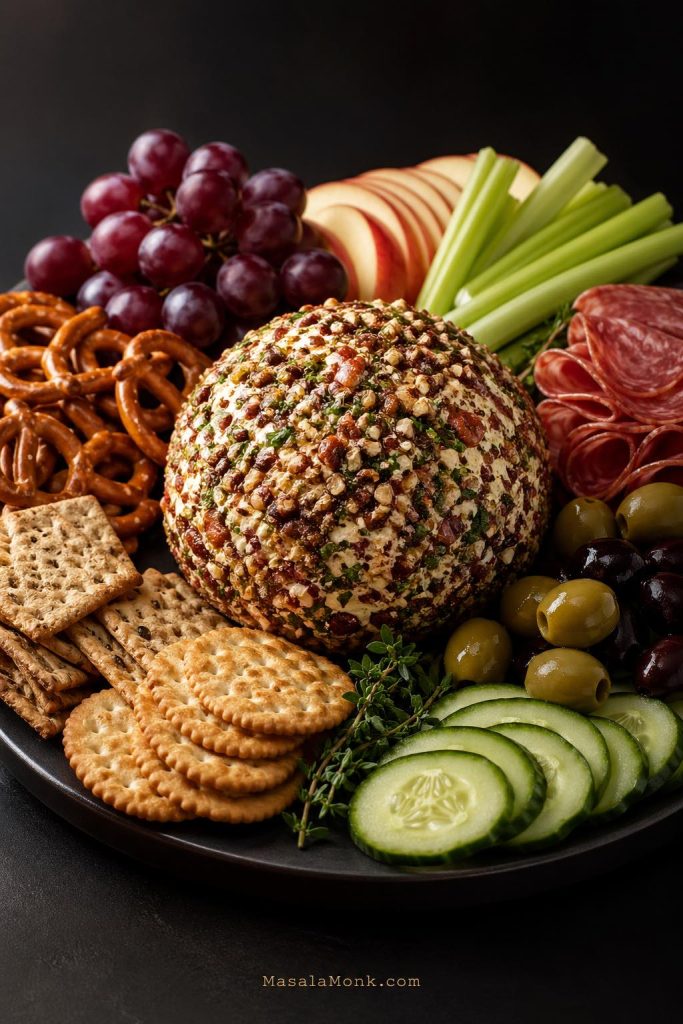
Close-up of a cheese ball party board with a nut-coated cheese ball surrounded by crackers, pretzels, grapes, apple slices, celery, cucumber slices, olives, and folded cured meat on a dark platter.
A cheese ball party board works best when it has contrast. Add salty crackers, crisp vegetables, fresh fruit, and a few briny sides so the creamy cheese ball feels like the centerpiece instead of the only thing on the platter.

Make Ahead, Storage, and Freezing

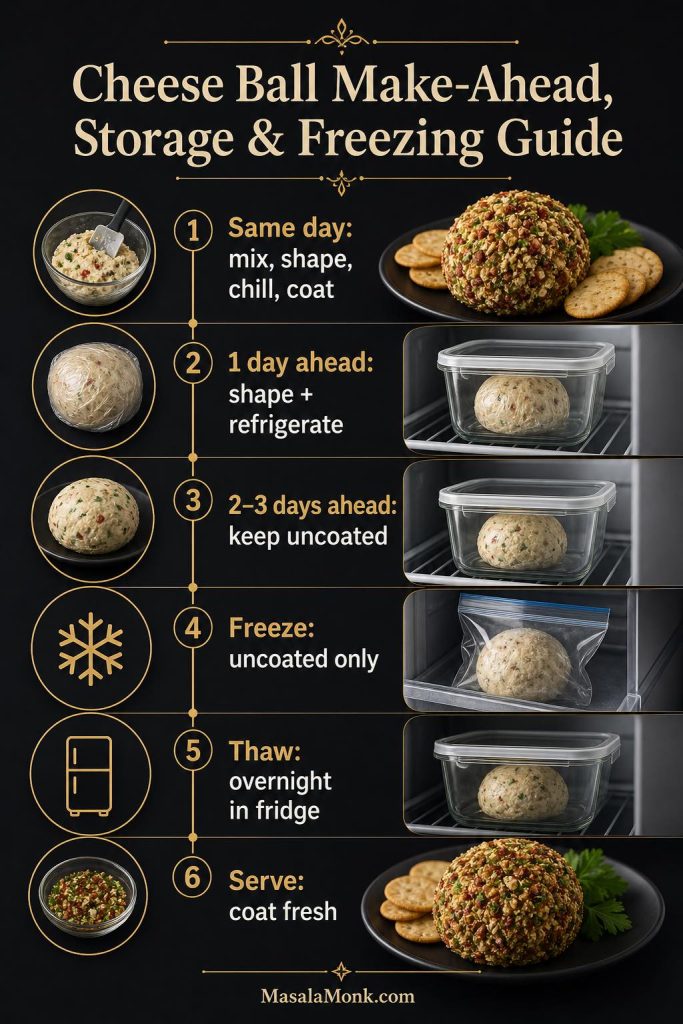
A cheese ball is one of the easiest make-ahead appetizers because chilling helps it firm up. In fact, the recipe often tastes better after a few hours because the cheese, onion, and seasonings have time to settle. The best approach is to make and shape the filling ahead, then add the coating closer to serving. That way, the inside gets time to develop flavor while the outside still tastes fresh.

Best make-ahead method: Mix and shape the cheese ball 1 day ahead, wrap tightly, and refrigerate. Then roll it in pecans, herbs, bacon, pretzels, or crumbs closer to serving so the outside stays fresh and crisp.

Make-Ahead Timeline

When You Are Serving What to Do Best Coating Timing
Same day Mix, shape, chill for 1 to 2 hours Coat after chilling
1 day ahead Mix, shape, wrap tightly, and refrigerate Coat the day you serve
2 to 3 days ahead Shape uncoated and keep tightly wrapped Coat shortly before serving
Freezer prep Freeze the shaped, uncoated cheese ball Thaw overnight, then coat fresh
Make-ahead storage and freezing guide for a cheese ball showing steps for same-day prep, making it 1 day ahead, keeping it uncoated for 2 to 3 days, freezing it uncoated, thawing overnight in the fridge, and coating fresh before serving.
For the cleanest make-ahead cheese ball, shape and chill the filling first, then add the coating close to serving. That way, the inside has time to firm up while the outside stays fresh, crisp, and party-ready.

How to Store a Cheese Ball

After shaping, wrap the cheese ball tightly in plastic wrap or store it in an airtight container in the refrigerator. If it has already been coated, use a container large enough that the outside does not get crushed.

For best texture, keep a shaped, uncoated cheese ball refrigerated for up to 3 days before serving. Once the cheese ball has been coated or served, store leftovers tightly covered in the refrigerator and use them within 3 to 4 days. For freezing, freeze the shaped, uncoated cheese ball for up to 1 month, then thaw it overnight in the refrigerator and coat it fresh before serving.

Keep the cheese ball refrigerated at 40°F / 4°C or colder. For the cleanest presentation, store the shaped cheese ball uncoated, then roll it in pecans, herbs, bacon, or crumbs shortly before serving.

Can You Freeze a Cheese Ball?

If you need to make it further ahead, freeze the cheese ball before adding the coating so the outside stays fresher after thawing. Wrap the shaped cheese ball tightly, place it in a freezer-safe bag or container, and freeze at 0°F / -18°C. Then thaw it overnight in the refrigerator and roll it in a fresh coating before serving.

Freezing works best with the plain cream cheese, cheddar, green onion, and seasoning base. Wet add-ins such as pineapple, pickles, or jalapeños can release moisture after thawing, so those versions are better made fresh or only 1 to 2 days ahead. After thawing, always add a fresh coating so the outside tastes crisp instead of stale or soft.

How Long Can a Cheese Ball Sit Out?

Because a cheese ball is made with cream cheese and shredded cheese, treat it like a perishable appetizer. According to USDA food safety guidance, perishable food should not be left out for more than 2 hours at room temperature, or more than 1 hour when the temperature is above 90°F / 32°C.

For a long party, serve a smaller cheese ball first and keep the backup chilled. Then, if the platter runs low, bring out a fresh one instead of letting the same ball sit for hours. If the cheese ball has been sitting out too long, do not wrap it back up for later. Instead, refrigerate safe leftovers promptly and discard anything that has been left out beyond the safe window.
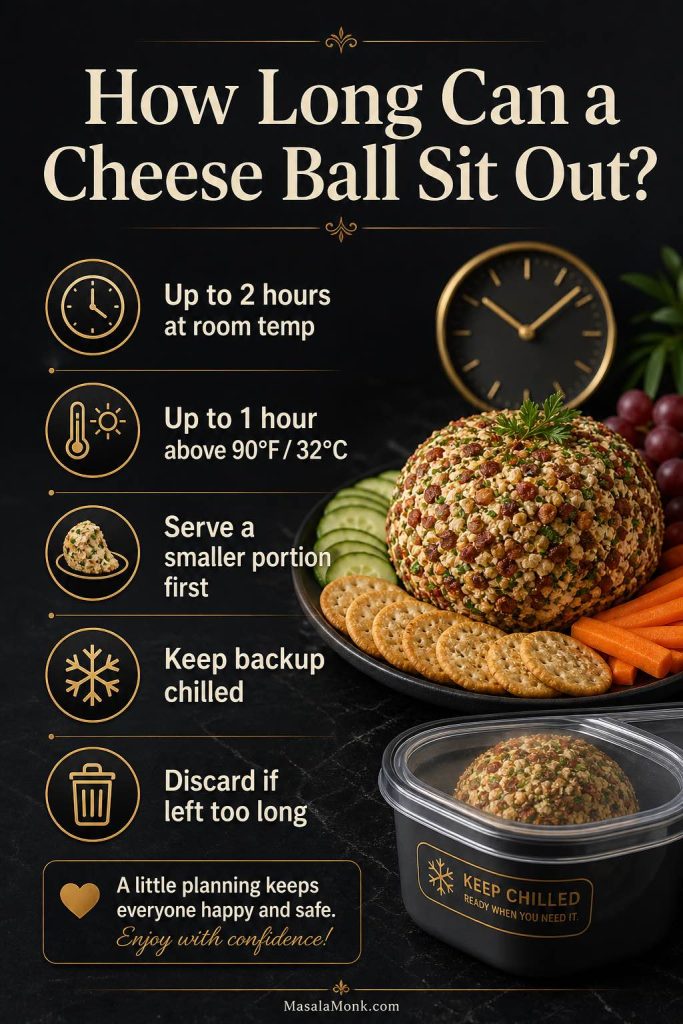
Food safety guide showing a cheese ball platter with a clock and chilled backup container, explaining that a cheese ball can sit out up to 2 hours at room temperature or 1 hour above 90°F or 32°C.
A cheese ball should not sit out all day just because it is served chilled. For safer entertaining, serve a smaller portion first, keep the backup refrigerated, and replace the platter when needed instead of leaving one ball out for hours.

Cheese Ball Variations

Once the base recipe works, the variations are easy. Instead of rebuilding the appetizer from scratch, keep the cream cheese structure, then change the cheese, seasonings, add-ins, and coating. The formulas below are designed as practical starting points, so you do not have to guess how much bacon, dried beef, pineapple, jalapeño, or cranberry to add to each ball. After that, you can adjust salt, heat, sweetness, or crunch to match the occasion.

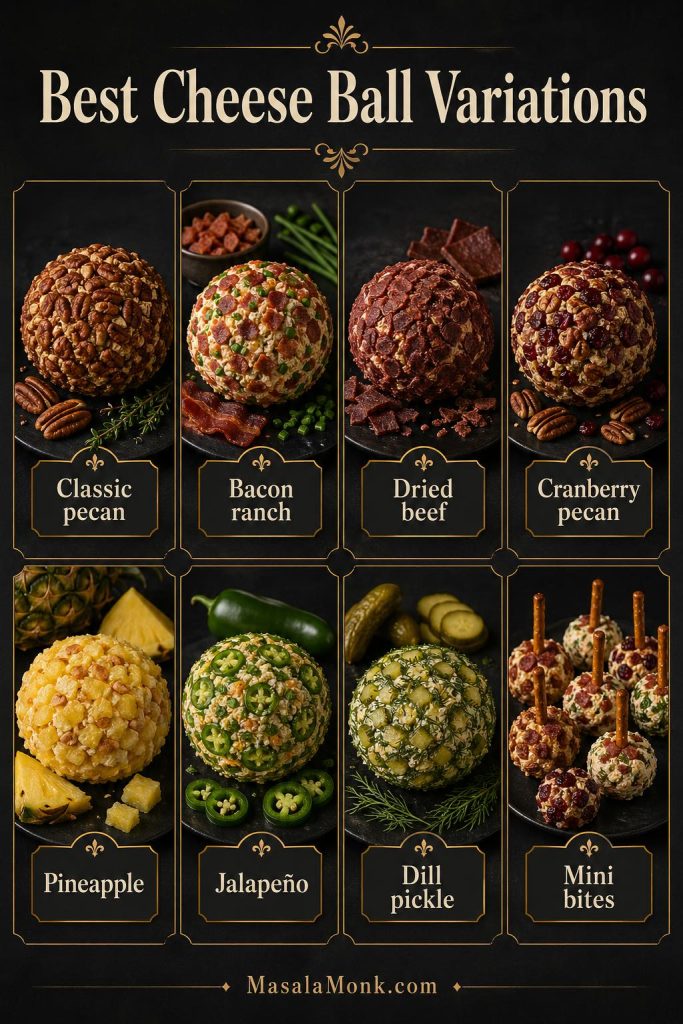
Which Cheese Ball Variation Should You Make?

Choose This Version Best For Flavor Direction
Classic pecan Safest party version Creamy, savory, nutty, familiar
Bacon ranch Game day Salty, herby, bold, snacky
Dried beef or chipped beef Old-school party flavor Salty, savory, retro
Cranberry pecan Thanksgiving or Christmas Sweet-salty, colorful, festive
Pineapple Retro sweet-savory spread Creamy, tangy, slightly sweet
Jalapeño Spicy snack table Cheesy, peppery, fresh heat
Mini bites Easy individual serving Party-friendly and mess-light
Variation guide showing eight cheese ball ideas: classic pecan, bacon ranch, dried beef, cranberry pecan, pineapple, jalapeño, dill pickle, and mini cheese ball bites with pretzel sticks.
Once the base cheese ball recipe is right, the variations are easy. Keep the cream cheese structure, then change the coating and add-ins for bacon ranch, dried beef, cranberry pecan, pineapple, jalapeño, dill pickle, or mini cheese ball bites.

Bacon Ranch Cheese Ball

For a bacon ranch cheese ball, use 16 oz / 450 g cream cheese, 1½ cups / 170 g shredded cheddar, 1 packet / about 28 g ranch seasoning, ½ cup / about 50 g cooked crumbled bacon, and 2 sliced green onions. Then roll the outside in more bacon, chopped chives, and pecans or crushed pretzels.

Because ranch seasoning and bacon are both salty, do not add extra salt until you taste the filling. If the cheese ball tastes strong on its own, serve it with celery, bell pepper strips, or unsalted crackers for balance. Otherwise, pretzel crisps, wheat crackers, and sturdy buttery crackers all work well.
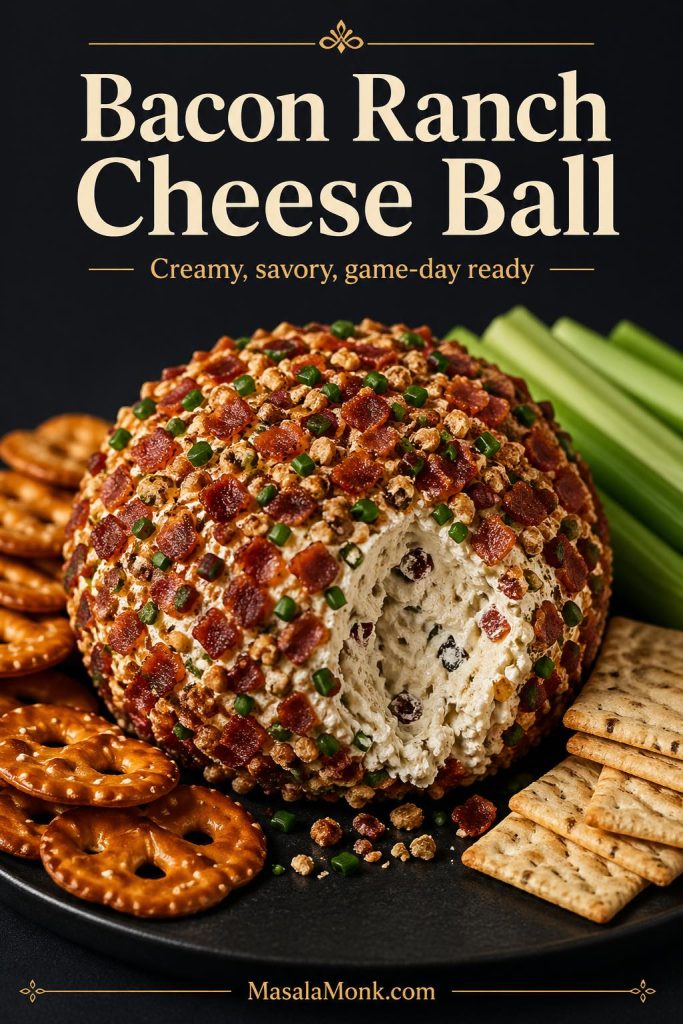
Close-up of a bacon ranch cheese ball coated with chopped bacon, chives, and crunchy bits, served with pretzels, celery sticks, and crackers on a dark platter.
A bacon ranch cheese ball is ideal for game day because it is salty, creamy, and easy to serve with pretzels, celery, and sturdy crackers. Since bacon and ranch seasoning are already flavorful, taste before adding extra salt.

Dried Beef Cheese Ball or Chipped Beef Cheese Ball

For a dried beef cheese ball, use 16 oz / 450 g cream cheese, 1½ cups / 170 g shredded cheddar, 4 to 5 oz / 115 to 140 g finely chopped dried beef or chipped beef, 2 sliced green onions, 1 teaspoon / 5 ml Worcestershire sauce, ½ teaspoon onion powder, and ½ teaspoon garlic powder.

Because dried beef is already salty, skip the added salt. Then roll the outside in chopped pecans, herbs, more finely chopped dried beef, or a mix of all three. If you like a sharper old-school flavor, add 1 to 2 teaspoons prepared horseradish, but blot any extra moisture first.
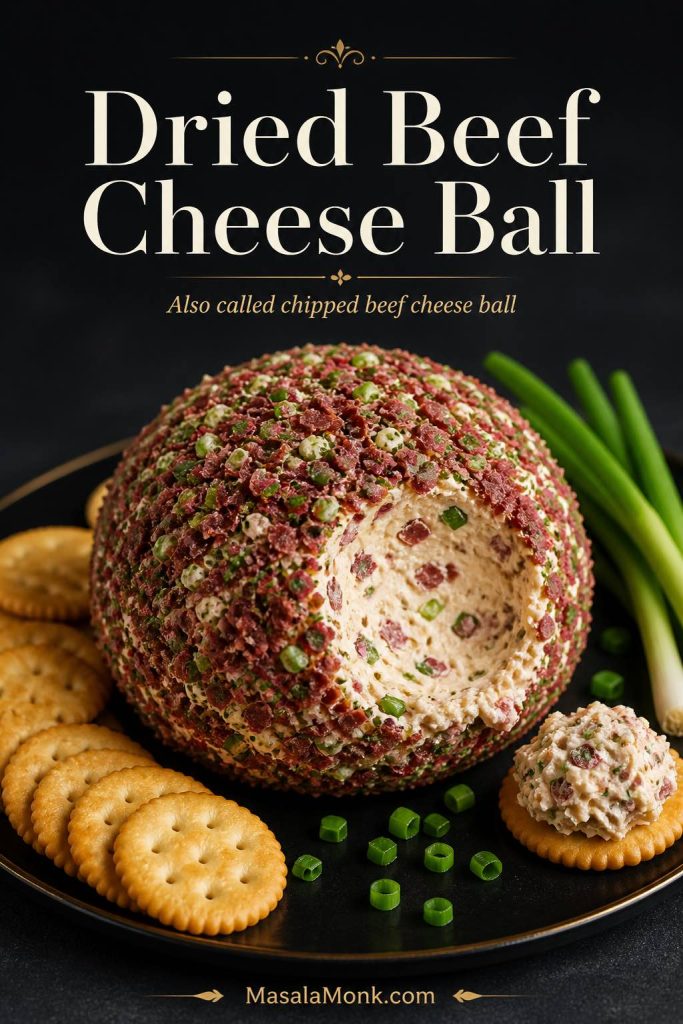
Old-school party version: Since dried beef is salty, chop it very finely and reserve a little for the outside coating. That way, the cheese ball recipe gets flavor inside and a clear visual cue outside.
Close-up of a dried beef cheese ball, also called a chipped beef cheese ball, coated with finely chopped dried beef and green onion, with crackers and a scoop of the creamy filling visible.
A dried beef cheese ball brings an old-school party flavor into a modern appetizer board. Because dried beef is naturally salty, chop it finely, skip extra salt at first, and balance the cheese ball with crackers, green onion, and fresh dippers.

Cranberry Pecan Cheese Ball

For a cranberry pecan cheese ball, use the base recipe and mix in ½ cup / about 60 g chopped dried cranberries. Then roll the outside in ½ cup / 55 g chopped pecans, ¼ cup / 30 g chopped dried cranberries, and 2 tablespoons chopped parsley or chives.

A little orange zest makes this version brighter, especially for Thanksgiving or Christmas. Because this version already has sweetness from the cranberries, salty or buttery crackers usually work better than sweet dippers. For that reason, it is especially good with apple slices, grapes, and a small bowl of pepper jelly or chutney.
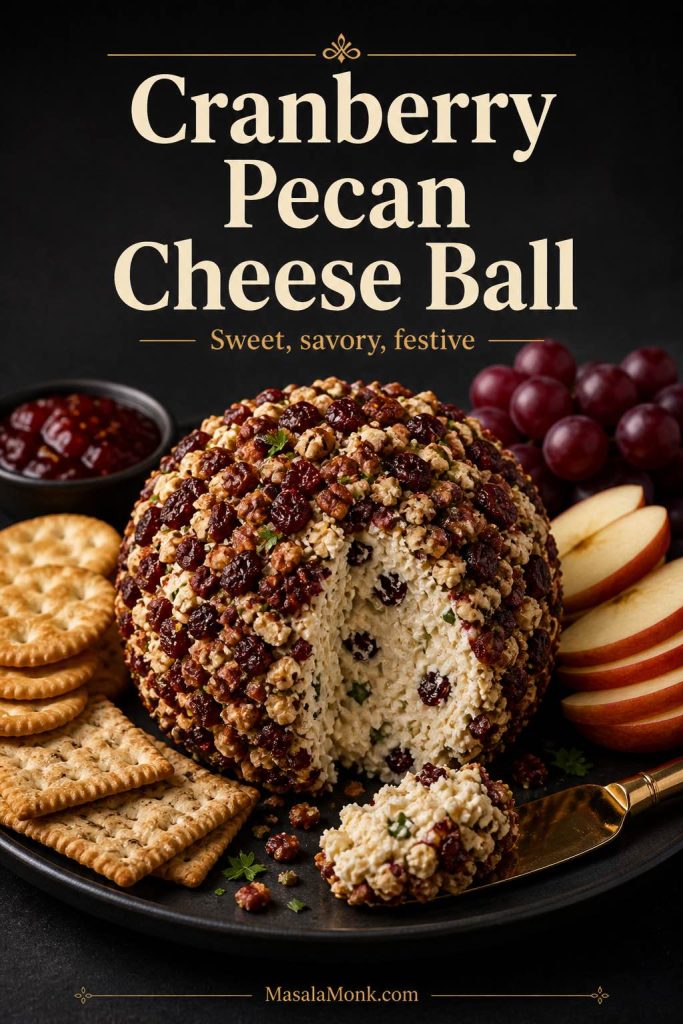
Cranberry pecan cheese ball with a creamy center, coated in chopped pecans, dried cranberries, and herbs, served with crackers, apple slices, grapes, and a small bowl of red chutney.
A cranberry pecan cheese ball is the best holiday-style variation when you want sweet, savory, creamy, and crunchy in one appetizer. Because the cranberries add sweetness, serve it with salty crackers, apple slices, grapes, or a tangy chutney for balance.

Jalapeño Cheese Ball

For a jalapeño cheese ball, add 1 to 2 finely chopped jalapeños to the base recipe. Fresh jalapeño tastes brighter, while pickled jalapeño adds tang. Either way, blot the pieces dry before mixing so the filling does not become watery.

Cheddar, bacon, smoked paprika, and chives all work well here. For more heat, add a pinch of cayenne instead of adding too much hot sauce, which can loosen the texture. If your crowd likes creamy heat, this jalapeño version also pairs well with baked jalapeño poppers on the same snack table. Meanwhile, celery and cucumber help cool the heat without making the platter boring.
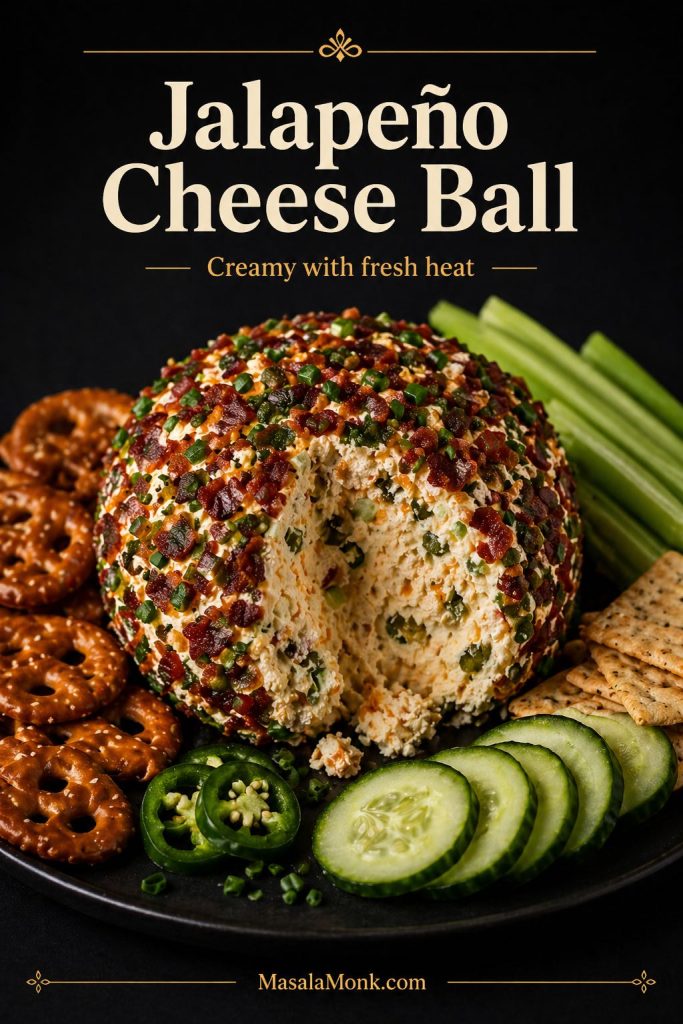
Jalapeño cheese ball with a creamy filling, chopped jalapeños, green herbs, and cheddar flecks, served with pretzels, cucumber slices, celery sticks, and crackers.
A jalapeño cheese ball should taste creamy first and spicy second. Since fresh jalapeños can vary in heat, start with a modest amount, then add more only after tasting the filling so the cheese ball stays balanced.

Pineapple Cheese Ball

For a pineapple cheese ball, use 16 oz / 450 g cream cheese, 1 to 1½ cups / 115 to 170 g shredded cheddar, ¾ cup / about 180 g crushed pineapple that has been drained and blotted very well, 2 sliced green onions, and ½ cup / about 55 g chopped pecans.

The pineapple must be very dry before it goes into the filling. If it is watery, the cheese ball will turn soft and loose. Therefore, drain it well, press out extra juice, and blot it before mixing. Since this version is sweet-savory, it works especially well with salty crackers, pretzels, and toasted baguette slices.
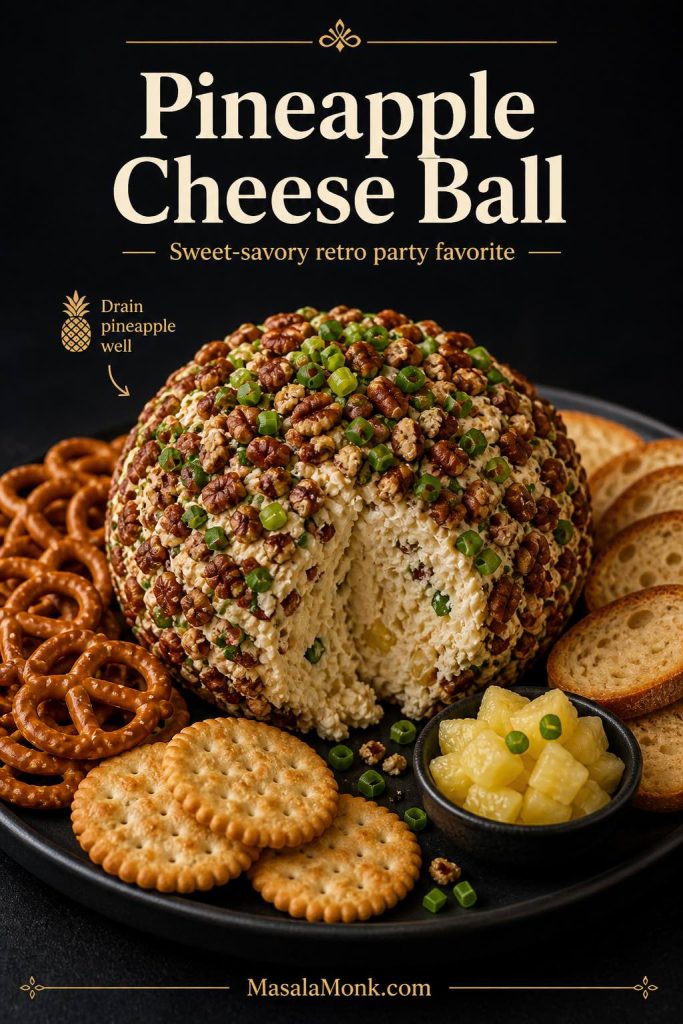
Pineapple cheese ball coated with chopped pecans and green onion, with a creamy filling and pineapple pieces inside, served with crackers, pretzels, toasted bread slices, and a small bowl of pineapple.
A pineapple cheese ball works best when the pineapple is drained very well before mixing. Otherwise, the filling can turn loose; however, when the pineapple is dry, it adds a sweet-savory flavor that pairs beautifully with salty crackers and pretzels.

Dill Pickle Cheese Ball

For a dill pickle cheese ball, add ½ cup / about 75 g finely chopped pickles, 1 to 2 teaspoons dill, 1½ cups / 170 g cheddar, garlic powder, and green onion to the cream cheese base. Before mixing, blot the chopped pickles very well so the filling stays thick.

After chilling, roll the outside in chopped herbs, crushed pretzels, or a mix of herbs and shredded cheddar. Since pickles add both salt and moisture, taste before adding extra salt and serve this version with pretzel crisps, celery, cucumber rounds, and sturdy crackers.
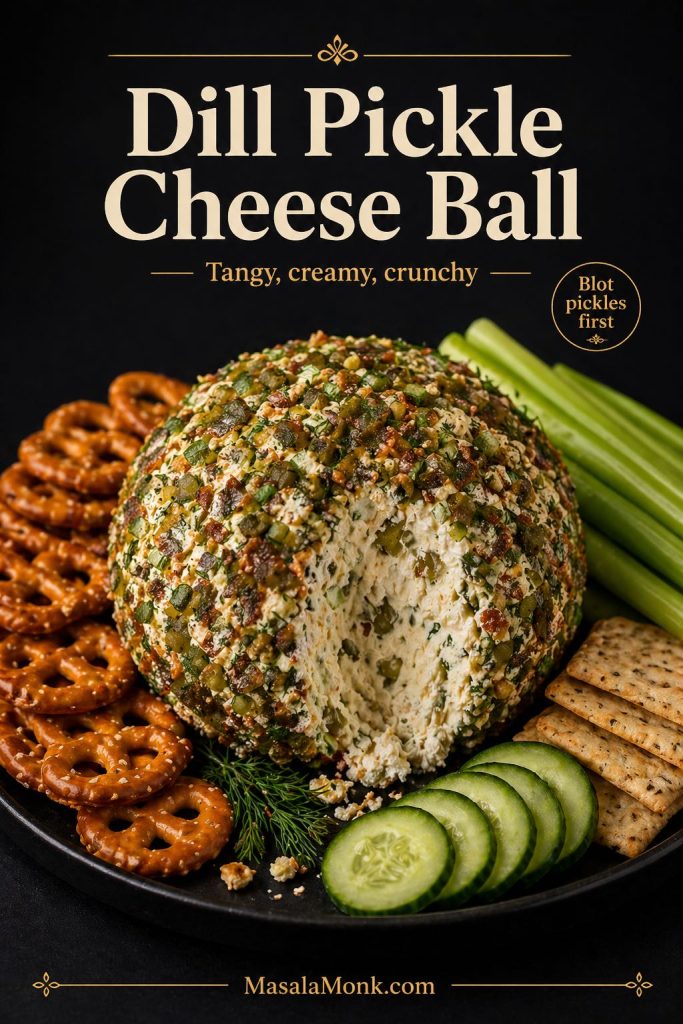
Dill pickle cheese ball with chopped pickles, dill, herbs, and a creamy center, served with pretzels, cucumber slices, celery sticks, and seeded crackers.
A dill pickle cheese ball should taste tangy and fresh without becoming watery. For that reason, blot chopped pickles before mixing them into the cream cheese base, then serve the finished ball with pretzels, celery, cucumber, or sturdy crackers.

Mini Cheese Ball Bites

Mini cheese ball bites are ideal when you want individual party portions instead of one large cheese ball. After the filling chills until firm, scoop it into generous 1-tablespoon portions. A full batch usually makes about 36 to 48 mini cheese ball bites, depending on how generously you scoop and how much coating you use.

From there, roll each mini cheese ball in chopped pecans, herbs, bacon, crushed pretzels, or dried cranberries. Then add pretzel sticks right before serving so they stay crisp and do not soften in the cheese mixture. If you are making this recipe ahead, chill the coated bites without the sticks and add the pretzels only when the platter is ready.

Tray of mini cheese ball bites in different coatings, including herbs, bacon, pecans, crushed pretzels, and dried cranberries, with some bites topped with pretzel sticks.
Mini cheese ball bites are ideal when guests need an easy one-bite appetizer. Once the mixture is chilled, scoop it into 1-tablespoon portions, roll each bite in coating, and add pretzel sticks last so they stay crisp.

Christmas Cheese Ball

For a Christmas cheese ball, use the cranberry pecan version or roll the outside in a red-and-green mix of dried cranberries, pecans, parsley, and chives. You can keep it round, shape it into a wreath, or make a simple ornament-style cheese ball for a holiday board.

Still, flavor should come first. A simple round cheese ball with cranberries, pecans, herbs, crackers, grapes, and apple slices usually looks festive without needing a complicated shape. Plus, it is easier to chill, coat, transport, and serve.

Pumpkin Cheese Ball

For Halloween or Thanksgiving, shape the cheese ball into a pumpkin. After wrapping the cheese ball, use rubber bands or kitchen twine around the outside to create pumpkin-like ridges while it chills. Once firm, remove the wrap and add a bell pepper stem or pretzel rod on top.

For a more orange look, use a cheddar-heavy filling or press finely shredded cheddar onto the outside. Since this is mostly a shaping idea, keep the flavor familiar and serve it with crackers, pretzels, and vegetables for a seasonal appetizer board.

Holiday Cheese Ball Shapes

If you want the cheese ball to match a holiday or party theme, change the shape without changing the whole recipe. The easiest approach is to keep the same cream cheese base, chill it well, and shape the ball before adding the final coating. That way, the design changes but the flavor stays reliable.

Shape Best Season How to Do It
Pumpkin Halloween or Thanksgiving Wrap, tie with twine or rubber bands, chill, then add a pepper stem or pretzel rod
Christmas wreath Christmas Shape into a ring, chill, then coat with herbs, pecans, and dried cranberries
Ornament Christmas Keep round and use a cranberry-herb coating
Football Game day Shape into an oval, coat with bacon or nuts, then add thin cheese strips as laces
Mini bites Any party Scoop into 1-tablespoon balls and serve with pretzel sticks
Holiday cheese ball shapes guide showing a pumpkin-shaped cheese ball, Christmas wreath cheese ball, ornament cheese ball, football cheese ball, and mini cheese ball bites.
Holiday cheese ball shapes let you use the same base recipe in different party styles. For example, shape it into a pumpkin for fall, a wreath or ornament for Christmas, a football for game day, or mini cheese ball bites for easy serving.

How to Fix a Cheese Ball

Most cheese ball problems are easy to fix before the coating goes on. So, taste and adjust the filling first, then shape, chill, and roll it once the texture is right. If the recipe feels off after the ball is coated, the fix usually gets messier. Use the troubleshooting table as a quick check before the cheese ball goes on the platter.

Problem Why It Happened How to Fix It
Too soft Warm cream cheese, short chill, or wet add-ins Chill longer; if needed, mix in more shredded cheddar
Too firm Too much shredded cheese or very cold serving temperature Let it sit for 15 to 20 minutes before serving
Bland Not enough seasoning Add garlic powder, onion powder, Worcestershire, pepper, herbs, or sharper cheddar
Too salty Bacon, dried beef, ranch seasoning, or everything seasoning Add more cream cheese if possible and serve with unsalted crackers or vegetables
Coating falls off Outside too cold, dry, or loosely pressed Let the cheese ball soften slightly, then press the coating on gently
Nuts, pretzels, or crumbs get soft Coated too far ahead Roll in crunchy coatings closer to serving time
Lumpy filling Cream cheese was too cold Soften fully and beat smooth before adding cheddar
Watery filling Pineapple, pickles, or jalapeños were not drained enough Blot wet add-ins well, chill longer, and mix in more cheddar if needed
Troubleshooting guide for how to fix a cheese ball, showing a cut pecan-coated cheese ball with crackers and tips for fixing a cheese ball that is too soft, too firm, bland, too salty, lumpy, watery, or has coating that falls off.
Most cheese ball problems are easiest to fix before the coating goes on. Taste and adjust the filling first, then chill, shape, and roll it once the texture is right.

More Cheese Appetizers and Party Snacks

If you are building a larger party table, this chilled cheese ball can anchor the cold, creamy side while hot appetizers bring crunch. For more cheese-forward snacks, try MasalaMonk’s mozzarella sticks or Indian-inspired cheese balls. For a broader small-plates spread, add croquettes or build an Indian-inspired tapas night. Together, those options give the table contrast instead of making everything soft, cold, or cheese-heavy.

FAQs

What is a cheese ball made of?

A classic cheese ball is usually made with cream cheese, shredded cheese, seasonings, and an outer coating. In this recipe, cream cheese gives the ball structure, while sharp cheddar, green onion, Worcestershire sauce, garlic powder, onion powder, black pepper, and pecans add flavor and texture.

What cheese is best for a cheese ball?

Because sharp cheddar has strong flavor without making the recipe complicated, it is the best first choice. However, white cheddar, Colby Jack, pepper Jack, smoked gouda, blue cheese, or goat cheese can work if you want the cheese ball to taste milder, smokier, spicier, or tangier.

How long should a cheese ball chill?

At minimum, chill a cheese ball for 1 hour. However, 2 hours is better if you want a cleaner shape and easier coating. If you make it the night before, let it soften for 15 to 20 minutes before serving so crackers do not break as easily.

Can I make a cheese ball the night before?

Yes. For the freshest texture, shape and wrap the cheese ball the night before, then refrigerate it. After that, roll it in the coating closer to serving, especially if the coating includes bacon, pretzels, crackers, or herbs.

Can you freeze a cheese ball?

Yes, but freeze it before adding the coating. That way, the outside tastes fresher after thawing. Wrap the shaped cheese ball tightly, freeze it in a freezer-safe container, thaw it overnight in the refrigerator, and then roll it in a fresh coating before serving.

How long can a cheese ball sit out?

Because it is made with cream cheese and shredded cheese, a cheese ball should not sit out for more than 2 hours at room temperature. If the temperature is above 90°F / 32°C, keep that window to 1 hour. After that, refrigerate safe leftovers promptly or discard anything that has been sitting out too long.

What crackers are best for a cheese ball?

Because the cheese ball firms up in the fridge, sturdy crackers work better than very thin ones. Buttery crackers, wheat crackers, seeded crackers, pretzel crisps, pita chips, crostini, and baguette slices all work well. If the ball is still very firm, let it soften briefly or add a small spreading knife.

Can I make a cheese ball without nuts?

Yes. Instead of pecans or walnuts, use chopped herbs, bacon, crushed pretzels, crushed crackers, everything seasoning, sesame seeds, or toasted breadcrumbs. If allergies are a concern, keep the whole platter nut-free rather than using separate sections of the same board.

Do I need sour cream or mayo in a cheese ball?

No, not for a classic shaped cheese ball recipe. Sour cream and mayo can loosen the mixture, which makes the ball harder to shape. If you are making cheese ball dip, though, a small spoonful can help make the texture softer.

Why is my cheese ball too soft?

A cheese ball is usually too soft because the cream cheese was too warm, the mixture did not chill long enough, or there were too many wet add-ins. First, chill it longer. If it is still too loose, mix in more shredded cheddar before adding the coating.

Can I serve this as cheese ball dip?

Yes. If you want cheese ball dip, use slightly less cheddar for a softer texture, spoon the mixture into a shallow bowl, and add the coating on top instead of shaping it into a ball. This works especially well for casual parties where easy scooping matters more than presentation.

Is this the same as fried cheese balls?

No. This is a chilled cream cheese appetizer served with crackers and vegetables. Fried cheese balls are a different snack style, often made with potato, cheese, breadcrumbs, and frying or baking. So, if you want a hot crispy snack, use a fried cheese ball recipe instead.

Can I make mini cheese ball bites?

Yes. After the cheese mixture chills until firm, scoop it into 1-tablespoon portions, roll each one in coating, and add pretzel sticks right before serving. A full batch usually makes about 36 to 48 mini cheese ball bites.

A classic cheese ball recipe is simple, but the small details make it better. First, soften the cream cheese properly. Then, season the filling before shaping, chill it until firm, and add the coating at the right time. Once the base is right, you can keep it classic with pecans, make it festive with cranberries, turn it bold with bacon ranch, add old-school flavor with dried beef, or serve it as mini cheese ball bites for an easy party platter. In the end, the best version is the one that tastes good, spreads easily, and fits the way you are serving it.