Posted on Leave a comment

Jalapeño Popper Corn Dip Recipe: Creamy, Cheesy & Easy

Cast-iron skillet filled with creamy baked corn dip, topped with jalapeño, scallion and bacon, with a tortilla chip lifting a scoop containing visible corn kernels.

The first scoop tells you whether jalapeño popper corn dip is working. A good one brings sweet corn, fresh jalapeño and creamy cheese up with the chip. It feels rich without turning heavy, and you taste the pepper before the heat starts to build.

The annoying batches tend to go wrong in opposite directions. Too much water and the edges turn loose. Too much cream cheese or shredded cheese—or too much time cooling on the table—and the dip firms up until even a sturdy tortilla chip has to work too hard.

This one aims for the middle: enough corn to remain unmistakably a corn dip, enough cream cheese for the jalapeño-popper character, and enough sour cream and melting cheese to keep a warm scoop creamy without swallowing the kernels. The corn and jalapeños get a quick turn in the pan first, where the peppers lose some of their raw grassy smell, the corn starts smelling sweeter and loose water has somewhere to go before the dairy arrives.

Fresh, frozen and well-drained canned corn all work, and you can keep the heat gentle or let it build. Bacon is optional, as is the crisp panko finish. For a longer gathering, the finished dip can move to a slow cooker to stay warm.

Start here

Quick Answer: How to Make Jalapeño Popper Corn Dip

To make jalapeño popper corn dip, crisp the bacon if using, sauté the corn and jalapeños, fold them into the creamy cheese base, then bake until the edges bubble and the center is hot. The quick skillet step cooks off loose corn moisture, brings out the corn’s sweetness and takes the raw edge off the jalapeños before the dairy goes in.

Cook 400 g / about 2½ cups corn kernels with chopped jalapeños until the pan has lost its wet sheen and a few kernels begin turning golden. Fold them into 227 g / 8 oz softened block cream cheese, sour cream and freshly shredded cheese, then add green onion and crisp bacon if using.

Spread the mixture in a 10-inch / 25 cm oven-safe skillet or roughly 2-quart / 2-litre baking dish. Bake uncovered at 375°F / 190°C for about 18–22 minutes, until the edges bubble gently and the center is hot and creamy. Let it rest for 5–10 minutes; that short pause takes it from molten to much easier to scoop.
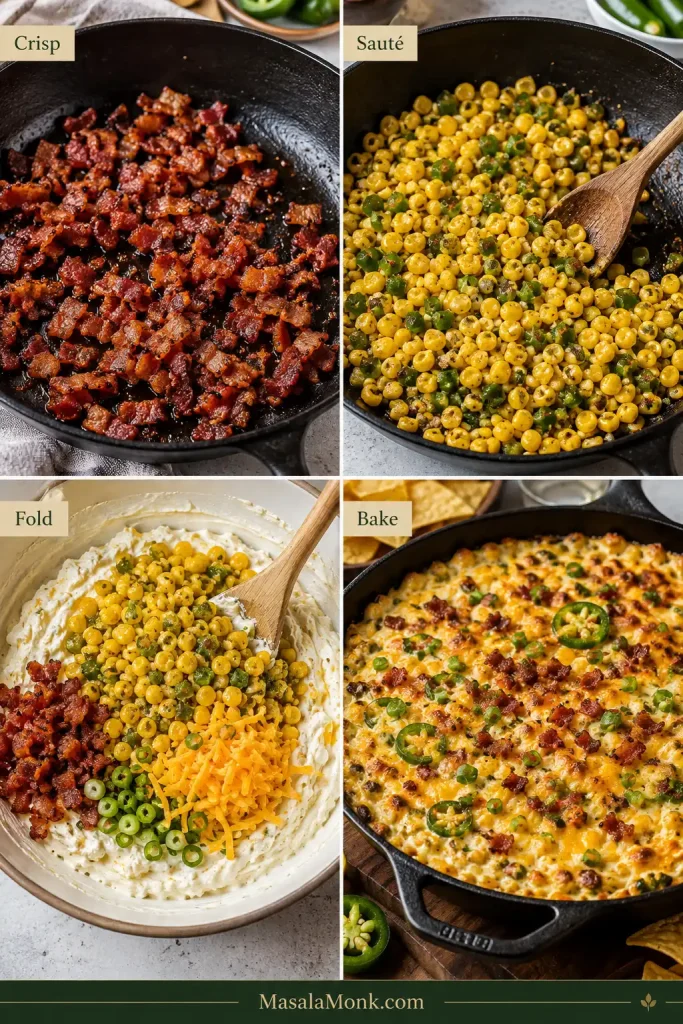
Four-step guide showing bacon crisping, corn and jalapeño sautéing, the corn mixture being folded into a creamy cheese base, and the assembled dip baking.
Keeping the early jobs separate matters: bacon can crisp and corn can shed moisture before the dairy arrives. Once the creamy base goes in, the goal shifts from evaporation to gentle heating.

Choose Your Corn, Heat and Finish

Start with the balanced combination, then change only the part that matters to you.

Swipe or scroll sideways to see the full table.

Decision Start here Change it when…
Corn Fresh or frozen Use thoroughly drained canned corn for convenience or fire-roasted corn for a smokier edge.
Heat As a balanced starting point, trim two jalapeños well and leave a little of the hotter inner ribs in the third Trim all three more thoroughly for mild heat, or leave more of the inner ribs attached for a hotter batch.
Bacon Optional, but good for smoky popper flavor Leave it out for a vegetarian dip; fire-roasted corn can bring back some of that smoky character.
Top Melty cheese Add buttered panko for the creamy-inside, crisp-outside contrast of a breaded popper.
Decision guide comparing fresh, frozen, canned and fire-roasted corn; mild, balanced and hotter jalapeño preparation; and melty, panko and crushed-chip toppings.
Think of these as separate levers: the corn changes bite and smokiness, jalapeño prep controls the heat, and the topping changes crunch. You can adjust one without rebuilding the dip.

The balanced version

Creamy Jalapeño Popper Corn Dip

Sweet kernels folded through a creamy jalapeño-cheese base, with bacon if you want the extra smoky edge. The bite should start sweet from the corn, turn rich and tangy through the cheese, then finish with fresh jalapeño warmth and whatever crisp edge you chose—bacon, panko or both.

Prep
About 15 minutes

Cook
About 30–40 minutes

Ready in
About 50–65 minutes, including the 5–10 minute rest

Serves
About 8–10 as one of several appetizers

Best pan
10-inch / 25 cm oven-safe skillet or about 2-quart / 2-litre baking dish

Finished texture
Creamy and corn-studded; easy to scoop while warm but substantial enough to stay on a sturdy tortilla chip

Equipment

  • 10-inch / 25 cm oven-safe skillet or roughly 2-quart / 2-litre baking dish
  • Large mixing bowl
  • Flexible spatula or sturdy spoon
  • Box grater if shredding cheese from a block

Ingredients

For the Dip

  • 400 g / about 2½ cups corn kernels, fresh, frozen or thoroughly drained canned corn
  • 15 ml / 1 tablespoon neutral oil, or reserved bacon fat
  • 3 medium fresh jalapeños, about 50–60 g total before trimming, finely chopped
  • 227 g / 8 oz full-fat block cream cheese, softened
  • 120 g / ½ cup sour cream
  • 115 g / 1 cup freshly shredded Monterey Jack or Colby Jack
  • 55 g / ½ cup freshly shredded sharp cheddar
  • ½ teaspoon garlic powder
  • ¼ teaspoon onion powder
  • ¼ teaspoon freshly ground black pepper
  • ¼ teaspoon fine salt, plus more only if needed; start lighter when the bacon or cheese is especially salty
  • 115 g / 4 oz raw bacon, optional
  • 2 green onions / scallions, thinly sliced, divided

Optional Crunchy Popper Topping

  • 25 g / ⅓ cup panko breadcrumbs
  • 14 g / 1 tablespoon butter, melted

For Serving

  • Thick tortilla chips or corn chips
  • Celery, bell pepper strips or toasted baguette, optional

Measure the corn after prep. The target is about 400 g / 14 oz ready-to-cook kernels. Fresh corn works out to roughly 4–5 medium ears, depending on size and how deeply you cut. Frozen corn is easiest to weigh at 400 g. With canned corn, use the drained kernel weight, not the weight of the can and its liquid.
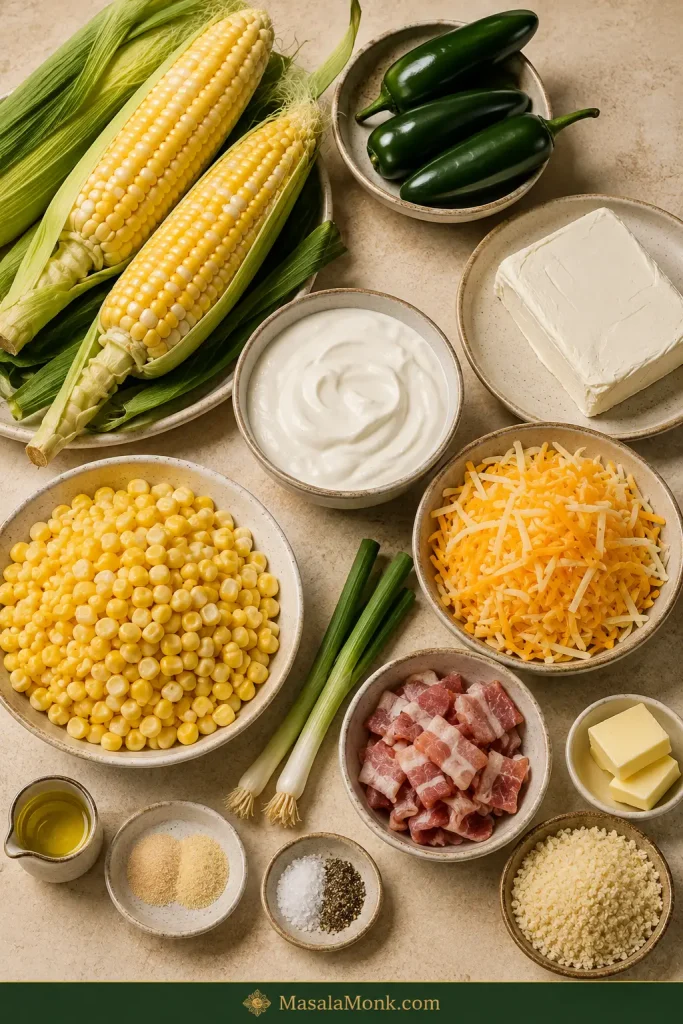
Overhead arrangement of corn, three fresh jalapeños, cream cheese, sour cream, shredded cheeses, raw bacon, scallions, panko, butter, oil and seasonings for jalapeño popper corn dip.
The useful ratio is visible even before cooking: corn should still be the dominant ingredient, while the dairy and cheeses are there to coat, bind and enrich the kernels rather than replace them.

Method

Prep and Cook Off Moisture

  1. Heat the oven. Preheat to 375°F / 190°C. If you are not using an oven-safe skillet, lightly grease a roughly 2-quart / 2-litre baking dish.
  2. Cook the bacon, if using. Cook the bacon in the skillet over medium heat until crisp. Transfer it to a paper-towel-lined plate and crumble when cool enough to handle. Reserve up to 1 tablespoon of the rendered fat for the corn if you like; otherwise discard the fat safely and use neutral oil.
  3. Cook the corn and jalapeños. Heat the oil or reserved bacon fat over medium-high. Add the corn and chopped jalapeños and cook for 4–6 minutes, stirring occasionally, until the corn is hot, the pan no longer looks watery and a few kernels begin turning golden. Fresh kernels should still look plump rather than wrinkled. Remove the skillet from the heat while you mix the dairy.

Close-up of sautéed yellow corn and chopped green jalapeño in a cast-iron skillet with a dry pan surface and a few lightly golden kernels.
A few golden spots are enough. Once the skillet is dry, chasing deeper color starts trading the plump corn bite for a drier, more roasted texture.

Build the Creamy Dip

  1. Mix the creamy base. Press the softened cream cheese with a spatula; it should yield easily without looking shiny or melted. Stir in the sour cream, then mix in about two-thirds of both shredded cheeses, the garlic powder, onion powder, black pepper and salt.
  2. Fold everything together. Add the warm corn and jalapeños, about two-thirds of the crumbled bacon if using and half of the green onions. Fold until the kernels are evenly coated. Taste before deciding whether it needs more salt.

Thick creamy corn and jalapeño mixture being lifted with a spatula, with many yellow corn kernels remaining clearly visible throughout.
Drag a spatula through the mixture: it should leave a clear track but still move easily. That middle ground keeps the kernels suspended while the finished corn dip stays scoopable.

Fill, Bake and Rest

  1. Fill the pan. Spread the mixture evenly in the skillet or prepared baking dish. Scatter over the remaining shredded cheese. For the crunchy version, combine the panko and melted butter and sprinkle that over the top.

Overhead view of unbaked jalapeño corn dip spread evenly in a baking vessel and topped with shredded cheese.
Let some corn and jalapeño remain visible through the cheese. If the surface disappears beneath a thick cheese blanket, you lose one of the easiest visual checks while the dip bakes.
  1. Bake uncovered. Bake for 18–22 minutes, until the edges are gently bubbling and the center is hot and creamy. Yellow kernels and green flecks of jalapeño should still be visible through the melted cheese. If the top browns before the middle is ready, tent it loosely with foil. If the center is ready but the surface still looks pale, broil for 1–2 minutes only in broiler-safe cookware, watching continuously.
  2. Rest and serve. Leave the dip alone for 5–10 minutes. Scatter over the reserved bacon and green onions. Straight from the oven it will be looser; after a few minutes the cheese settles more closely around the kernels and the texture becomes easier to serve.

Recipe Notes

  • For a bacon-free batch: leave the bacon out and taste the salt again before baking; fire-roasted corn is especially good here.
  • For a smaller, deeper dish: expect a longer bake. A wider, shallower dish heats faster and exposes more cheese to browning.
  • To make it ahead: assemble, cover and refrigerate for up to one day. Keep any crisp topping separate until baking.

Fresh vs Frozen vs Canned Corn: Which Is Best?

Fresh corn gives the clearest bite, frozen corn is the easiest year-round choice, and well-drained canned corn is the quickest pantry option. All three work well here; the target stays at about 400 g / 14 oz prepared kernels.

Swipe or scroll sideways to see the full table.

Corn Amount for this recipe Prep What you get
Fresh About 400 g kernels; roughly 4–5 medium ears Cut from the cob and sauté until hot with a few golden spots Firm, juicy kernels and the freshest corn flavor
Frozen 400 g / 14 oz Remove loose ice or pooled thawing water, then sauté Excellent year-round texture with little prep
Canned About 400 g / 14 oz after draining Drain thoroughly before weighing, then sauté Softer kernels and the easiest pantry route
Fire-roasted 400 g / 14 oz prepared kernels Drain or thaw as needed, then heat through A smokier dip with almost no extra work
Four-part comparison of fresh corn kernels, frozen corn, drained canned corn and fire-roasted corn.
Fresh, frozen and canned corn mainly change moisture and bite; fire-roasted corn also changes the flavor. That smoky edge is especially useful when you are making the dip without bacon.

Fresh Corn

You want the kernels to keep that tiny burst when you bite them. Cook until the raw starchiness fades and a few spots turn golden, but stop while the corn still looks plump and juicy. That juicy contrast against the creamy cheese is the reason this tastes like corn dip rather than ordinary jalapeño popper dip with a handful of kernels mixed in.

Frozen Corn

Loose kernels with only a little frost can go straight into the skillet. A solid icy clump or a puddle of thawing water needs a little attention first.

Listen as it cooks. The pan starts damp and steamy, then shifts toward a clearer sizzle. That sound change is often more useful than watching the clock.
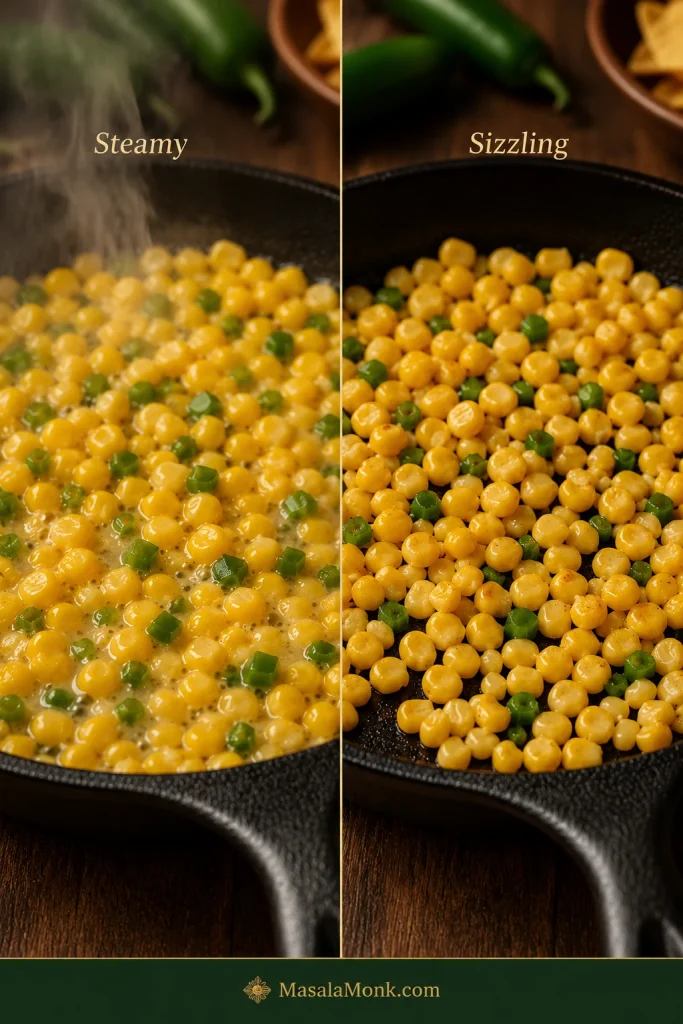
Side-by-side skillet comparison showing wet, steamy corn and jalapeño early in cooking versus a drier sizzling stage with a few golden kernels.
Sound works as a second moisture gauge when color is hard to judge: loose water muffles the pan, while a cleaner sizzle tells you evaporation is nearly finished.

Canned Corn

Measure the drained kernels, not the weight of corn plus packing liquid. Can sizes and drained yields vary enough that the scale is more dependable than promising every kitchen will need exactly two cans.

Two-step guide showing canned corn draining in a fine-mesh strainer and then being weighed after draining, with the scale reading 400 grams.
Can sizes vary, so count the prepared corn rather than the cans: after draining, the target for this recipe is about 400 g / 14 oz of kernels.

The same moisture lesson matters in other creamy vegetable dips too. In this spinach artichoke dip, loose vegetable water is much easier to deal with before it reaches the creamy base.

How to Control Jalapeño Flavor and Heat

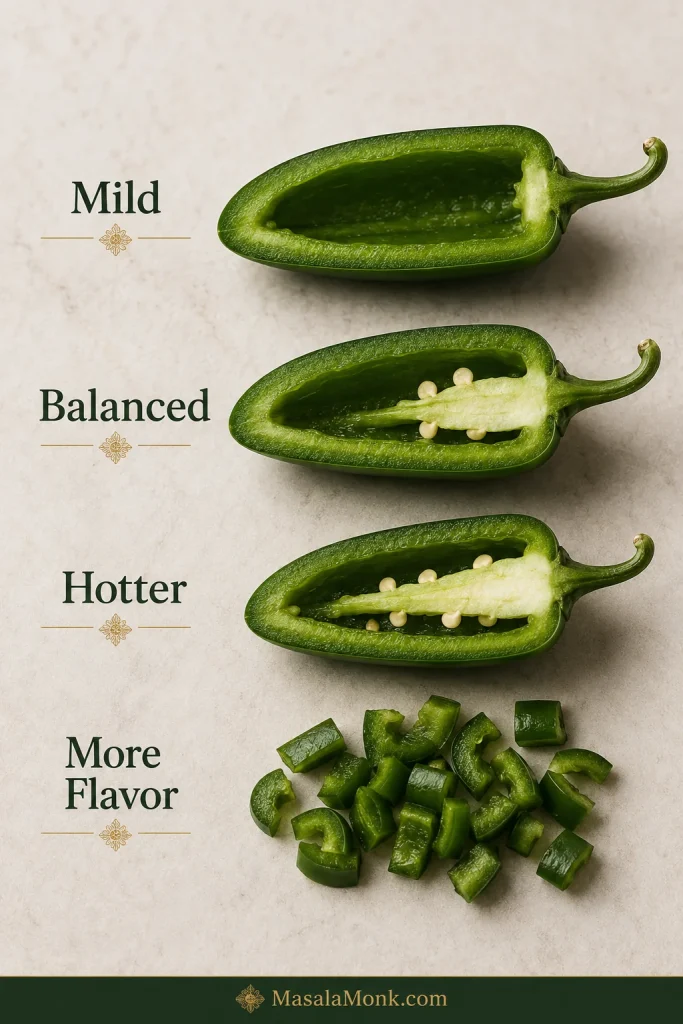
For a milder dip, trim most of the pale inner ribs from all three jalapeños. For a balanced starting point, leave a little attached in one pepper; for a hotter batch, leave more attached.

Heat is only half the question. You may want more fresh jalapeño flavor without dramatically increasing the burn.

Why the Pale Inner Tissue Matters

Most of a jalapeño’s heat is concentrated around the pale inner placental tissue, not produced by the seeds themselves. The seeds can still taste hot because they sit against that tissue. Individual peppers vary too, which is why three jalapeños do not guarantee exactly the same heat every time. New Mexico State University’s chile research explains that anatomy and natural variation in more detail.
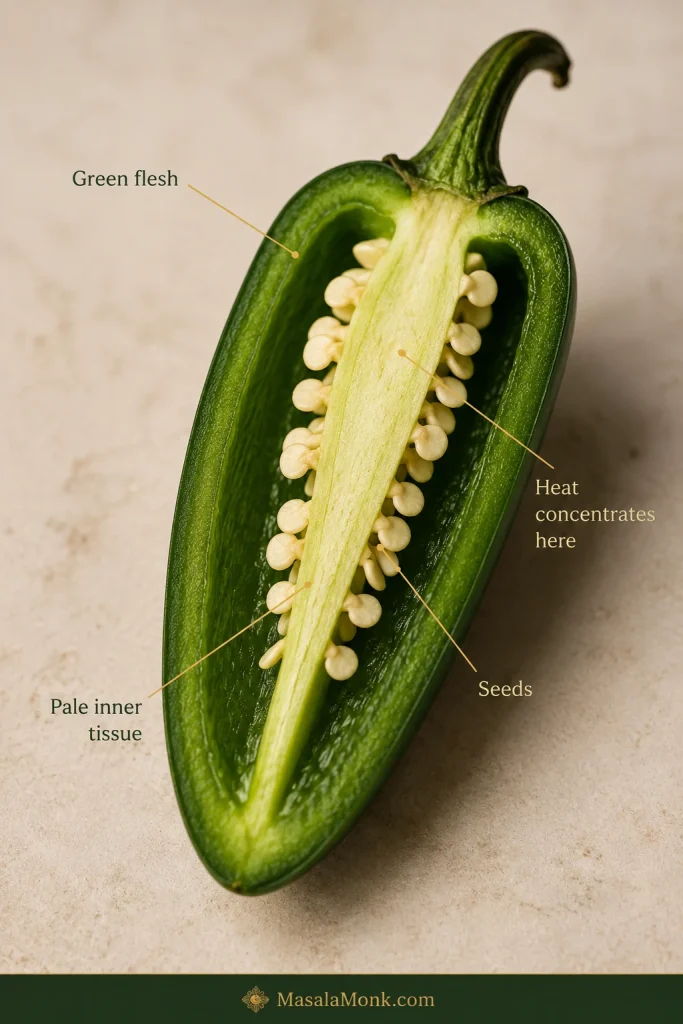
Cut-open green jalapeño labeled to show green flesh, pale inner tissue and seeds, with an annotation pointing to the pale tissue as the area where heat concentrates.
A jalapeño can be nearly seedless and still carry plenty of heat if much of the pale inner tissue remains. Conversely, a few loose seeds alone tell you very little about how hot the pepper will taste.

In kitchen terms, trimming the pale inner ribs and attached tissue changes the heat far more reliably than chasing every loose seed around the cutting board.

Control Heat Without Losing Jalapeño Flavor

Swipe or scroll sideways to see the full table.

You want… What to do What changes
Mild Trim away most of the pale inner ribs from all three peppers Fresh green-pepper character with much less heat
Balanced starting point Trim two well and leave a little inner rib attached in the third Noticeable warmth without deliberately pushing the heat
Hot Leave more of the inner ribs attached A stronger heat that builds through the bite
More jalapeño flavor, not much more heat Add more well-trimmed green flesh More fresh pepper flavor without simply turning up the burn
Tangier pepper flavor Replace part of the fresh jalapeño with well-drained pickled jalapeño More acid, salt and softness
Four-part jalapeño guide showing most inner tissue removed for mild, a little retained for balanced, more retained for hotter, and additional trimmed green flesh for more pepper flavor.
If a batch tastes hot but oddly not very jalapeño-forward, more inner rib is not the answer. Instead, add more well-trimmed green flesh for stronger fresh-pepper character without deliberately adding more burn.

When the balance is right, the jalapeño shows up before the heat does: fresh and green at first, then warmer as you finish the bite.

A hotter batch is especially good beside this cold cucumber salad, which gives the table something crisp and vinegary between rich, peppery bites.

Fresh or Pickled Jalapeño?

Fresh jalapeños give the cleanest green-pepper flavor and a little bite. Pickled jalapeños bring more acidity, salt and a softer texture, so drain them before measuring. Using mostly fresh pepper with a smaller amount of pickled jalapeño gives you both green flavor and a brighter tang.
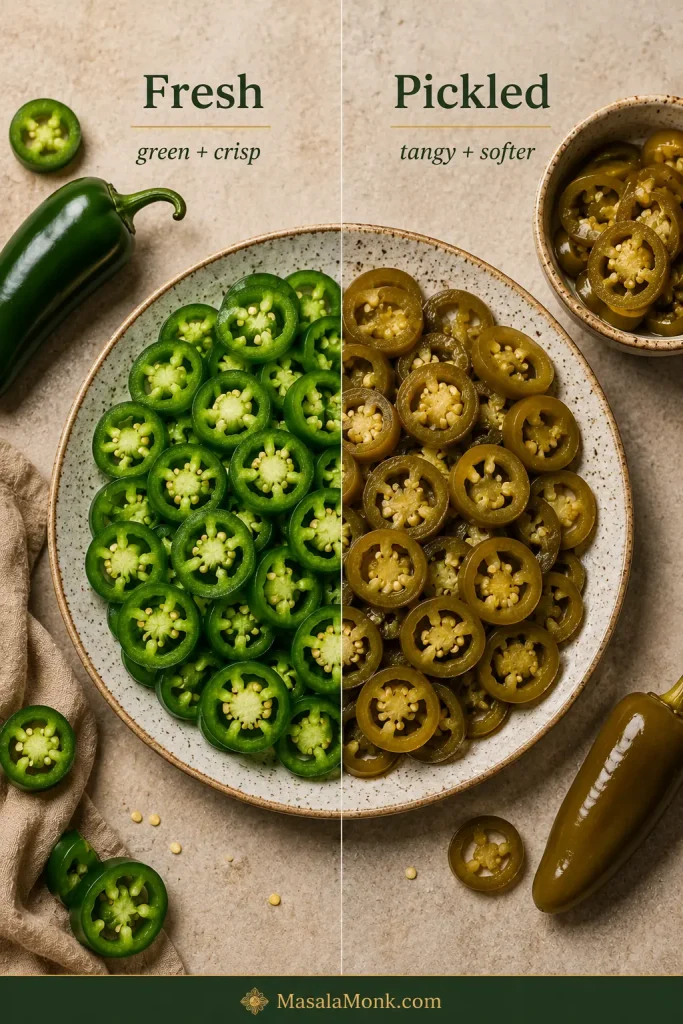
Comparison of bright fresh green jalapeño slices beside softer olive-green drained pickled jalapeño slices.
Pickled jalapeño softens into the creamy base more readily, while fresh pieces keep more bite and definition. That texture difference matters as much as the extra tang.

Handling hot peppers? Avoid touching your eyes or face while chopping. Wash your knife, board and hands well afterward; gloves are useful if chile oils tend to irritate your skin.

Why the Creamy Base Works

Cream Cheese, Sour Cream and the Right Consistency

One 227 g / 8 oz block of cream cheese gives the dip the tangy richness associated with jalapeño poppers without burying 400 g of corn. The ½ cup sour cream loosens the base just enough and adds another layer of tang, helping the warm dip stay pleasant to serve as the cream cheese naturally firms.

The result should feel creamy around the kernels rather than like the corn has disappeared into a bowl of melted cheese. The kernels should still taste sweet and distinct inside all that richness.
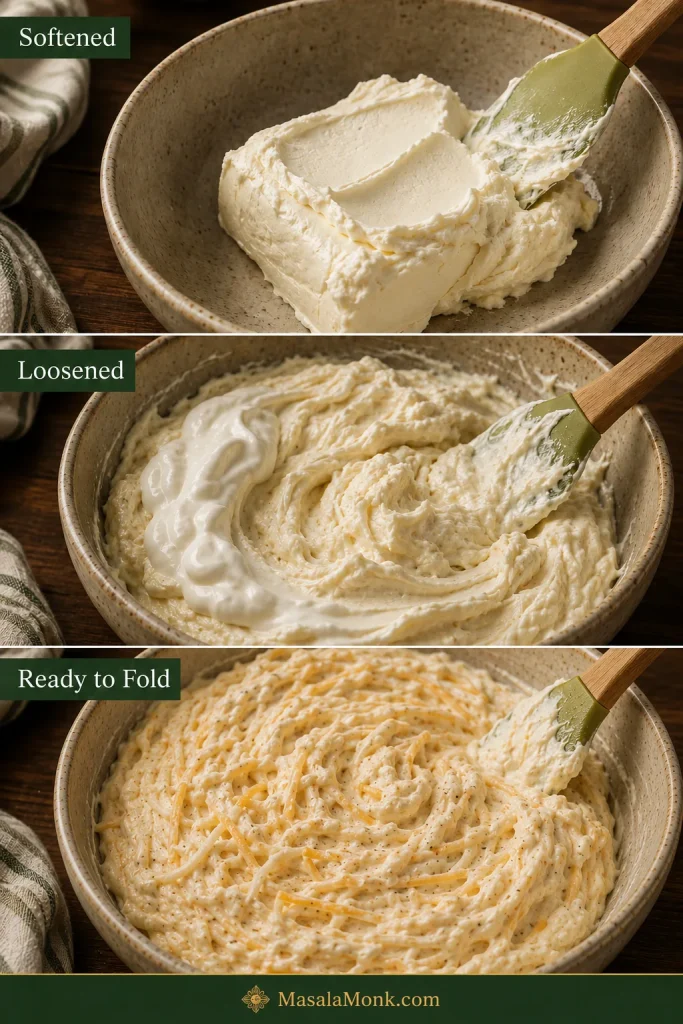
Three-stage guide showing softened cream cheese, sour cream being mixed into it, and a thick pale cheese base with shredded cheese and seasonings ready for the corn.
Look for a base that holds a soft ridge when the spatula passes through it. That gives the corn somewhere to sit rather than letting the kernels disappear into a loose cheese sauce.

Monterey Jack Melts; Cheddar Brings the Cheese Flavor

Monterey Jack or Colby Jack melts quietly into the background, while sharp cheddar brings the more noticeable cheese flavor. Freshly shredded block cheese generally melts more smoothly than heavily coated pre-shredded cheese, though bagged cheese is fine when that is what you have.

Bacon Is Here for Smoke and Crunch

Bacon is optional here. It brings smoke, salt and crisp little pieces that stand out against the creamy cheese. Stir most of it through and save a little for the top, where it has a better chance of staying crisp.

How to Make Jalapeño Popper Corn Dip: What to Look For

The timings help, but your eyes, ears and spoon tell you more.

Before the Dairy Goes In: Listen for the Sizzle

At first, especially with frozen or canned corn, the skillet may look steamy and damp. As the loose water cooks away, the sound becomes a clearer sizzle. A few kernels will catch golden spots, the corn will smell sweeter and the jalapeño will smell less raw.

Stop there. You want hot corn with some bite left, not dried-out kernels.

Before and During Baking

Before it goes into the oven, the mixture should hold kernels throughout but still spread without wrestling the spatula. A little softness is fine. A genuinely soupy mixture needs attention before baking.
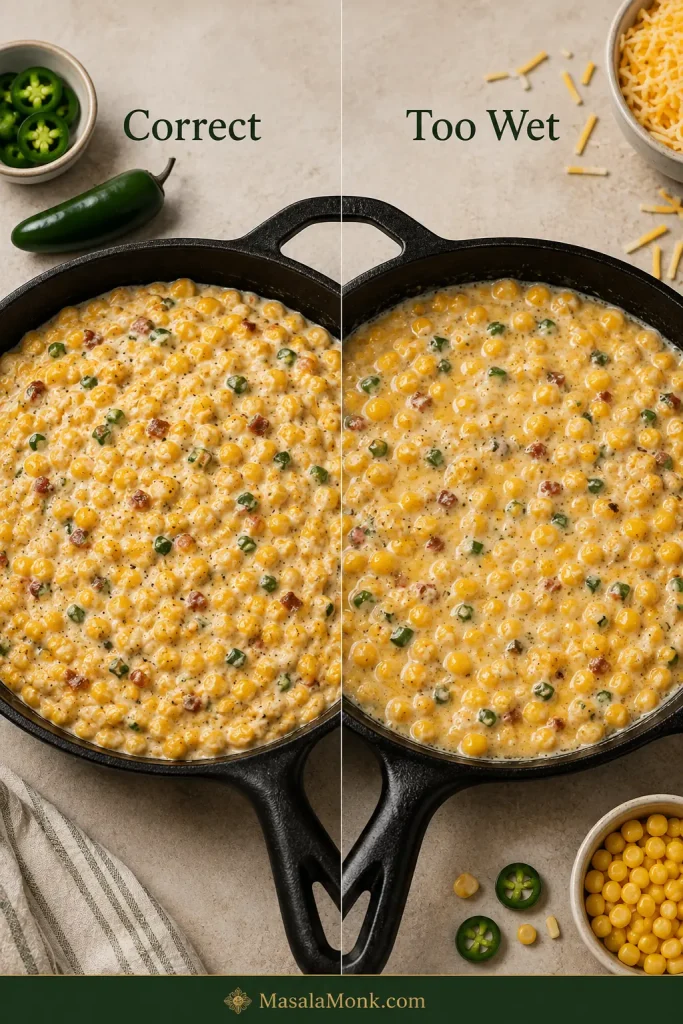
Side-by-side comparison of a thick corn-rich pre-bake dip with no pooled liquid and a looser mixture with visible liquid collecting around it.
Gloss from the dairy is normal; free liquid is the warning. Look for actual pooling around or between the kernels before deciding the pre-bake mixture is too wet.

In the oven, watch the edge and center separately. Gentle bubbles around the perimeter tell you the outside is hot. Disturb the middle with a spoon: it should feel creamy and fully heated rather than dense and cool.

The top does not need to look perfectly smooth. Yellow corn should still peek through the cheese, green jalapeño should be visible, and the skillet edge may have a few browned spots where everything met the hot pan.

Once the center is there, stop.
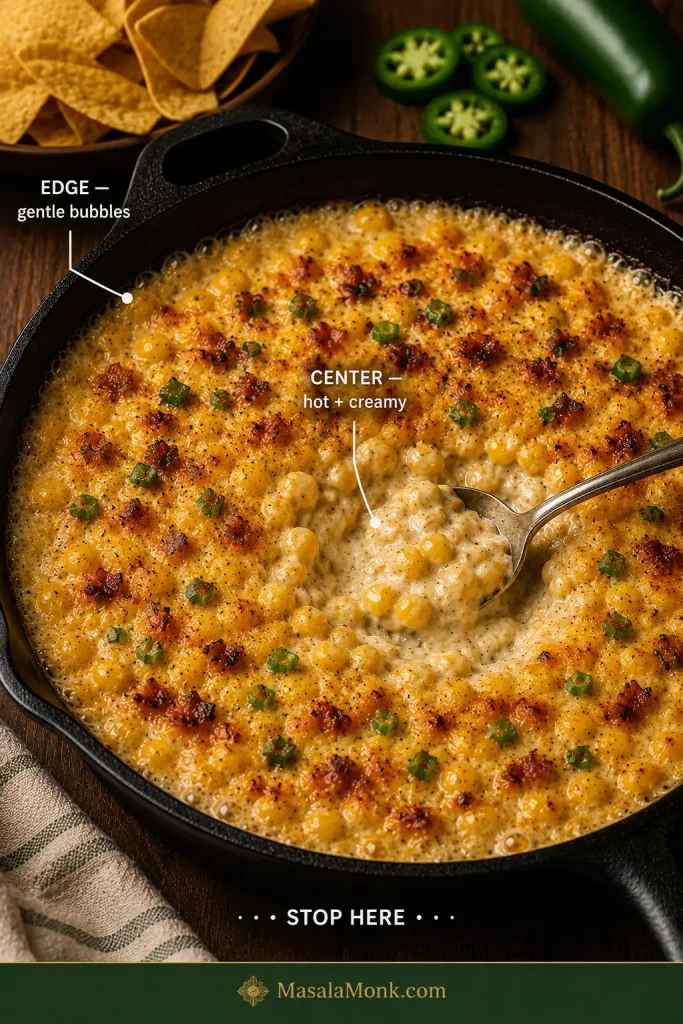
Baked corn dip in a cast-iron skillet with callouts identifying gentle bubbles at the edge and a spoon-revealed hot creamy center, plus a Stop here instruction.
Browning can lag behind doneness. If the center is already hot and creamy, waiting for a uniformly golden top can tighten the cheese and encourage greasy separation.

Give It Five Minutes Before You Judge It

Fresh from the oven, hot dairy and melted cheese are at their loosest. If the dip looks a little more relaxed than you expected, give it several minutes before changing anything.

As it settles, the cheese hugs the corn more closely and the serving texture gets fuller. Left on a cool table long enough, it eventually heads the other way and starts firming up.

Three-stage timeline of the same baked corn dip labeled 0 minutes, 5–10 minutes and later, showing the texture becoming progressively firmer as it rests.
Resting fixes temperature-driven looseness, not excess water. If a real puddle remains after the planned rest, waiting longer is unlikely to solve the same problem.

The useful test

The Scoopability Test

Push a sturdy tortilla chip through the warm dip. A good scoop should bring up creamy cheese, several kernels and visible jalapeño.

  • A dip that runs straight off the chip may simply need the planned few minutes of rest.
  • A dip you have to force the chip through may have cooled too far.
  • A bite that is mostly cheese with almost no corn has lost the part that makes this corn dip.

The sweet spot is substantial but easy to scoop: the dip stays on the chip and the kernels come with it. That matters even more at a party, where the people coming back twenty minutes later deserve a good scoop too.
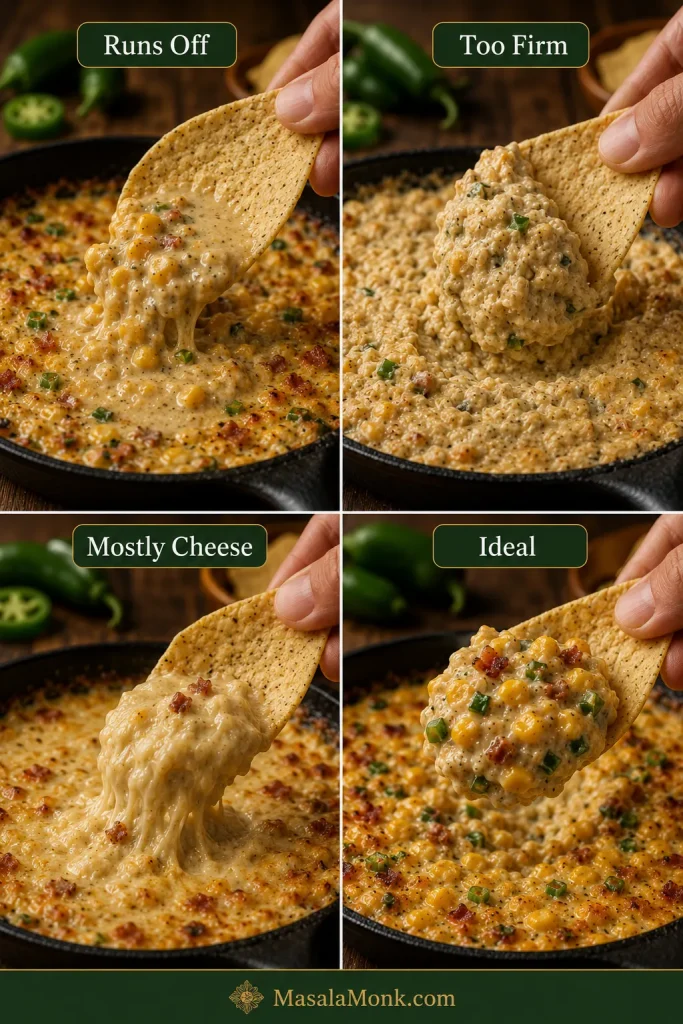
Four-panel scoopability comparison labeled Runs Off, Too Firm, Mostly Cheese and Ideal, using tortilla chips to show visibly different corn-dip textures.
This test separates temperature problems from balance problems: looseness or stiffness can change with resting and warming, while a scoop that is mostly cheese has lost the corn-dip ratio itself.

Baking Dish, Oven-Safe Skillet or Slow Cooker?

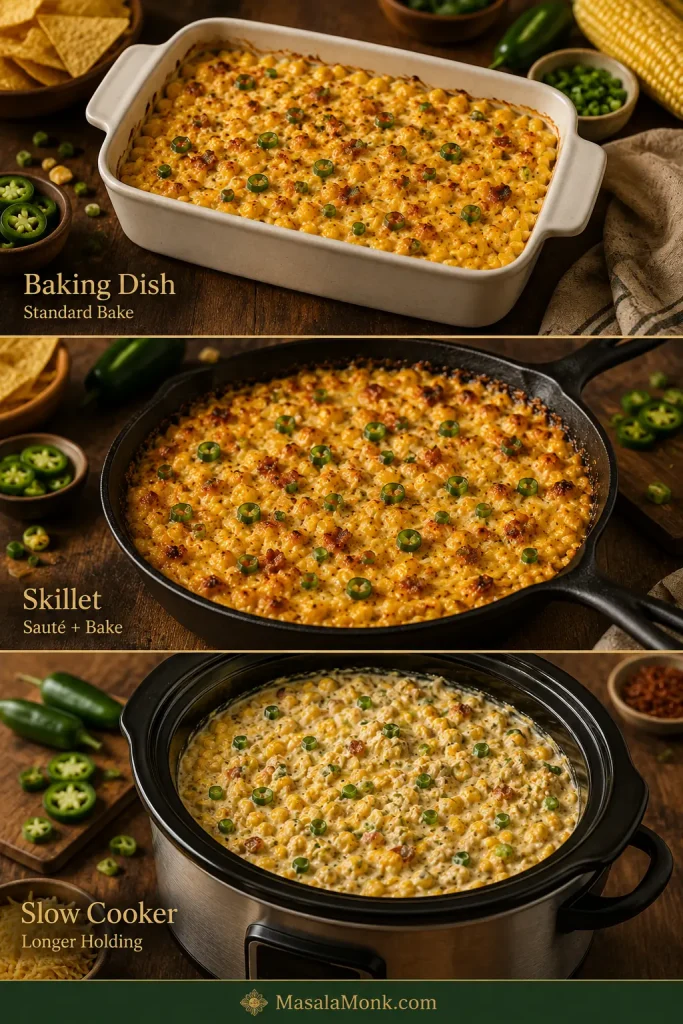
A baking dish and an oven-safe skillet both give you the oven-baked version; the difference is mostly cleanup and presentation. The slow cooker earns its place when the dip needs to stay hot for a longer gathering.

Swipe or scroll sideways to see the full table.

Setup Best for Main advantage Watch for
Baking dish The standard version Easy assembly and even oven heating A deeper dish can take longer than a wide, shallow one
Oven-safe skillet Fewer dishes Sauté and bake in the same pan Take the skillet off the burner before the dairy goes back in
Slow cooker Parties and potlucks Easy hot holding after the dip is ready Overheated edges and gradual thickening during a long hold
Three-way comparison of jalapeño corn dip in a ceramic baking dish, cast-iron skillet and slow cooker; the baked versions are browned while the slow-cooker version remains creamy.
The slow cooker is the outlier: choose it for a long, creamy serving window rather than expecting the browned surface of an oven-baked dip.

Slow Cooker: Best for a Longer Party

Use roughly a 3- to 4-quart slow cooker. Cook the corn and jalapeños first if possible, then combine them with the cream cheese, sour cream, shredded cheese, seasonings and optional cooked, crumbled bacon.

Cook on LOW and start checking around 1½ hours. Stir once the cheese has softened enough to combine, then continue until the center is thoroughly hot and creamy. Slow cookers vary enough that those cues matter more than a promised finish time.

Once hot, switch to WARM and stir periodically. Crockpot buffalo chicken dip gives the table something tangier alongside it when you want a second warm dip.

Open slow cooker containing creamy corn and jalapeño dip with visible stir marks, yellow kernels and green pepper pieces, without a browned crust.
A spoon trail should slowly fill back in rather than leaving a dry, crusted channel. Stir periodically so the hotter edges do not thicken long before the center does.

Melty Cheese or Crunchy Jalapeño Popper Finish?

A simple layer of melted cheese gives you the easiest serving texture. Nothing else is required.

If the crisp shell of a breaded jalapeño popper is part of the appeal, mix 25 g / ⅓ cup panko with 14 g / 1 tablespoon melted butter and scatter it over the cheese before baking.

Crushed tortilla chips work too. Add them closer to the end so they keep more crunch.

Three versions of baked corn dip labeled Melty, Panko and Crushed-Chip, showing melted cheese, golden breadcrumbs and irregular broken tortilla-chip toppings.
Panko gives a fine, even crunch; crushed tortilla chips give larger salty shards but soften faster. That makes the crushed-chip finish best when it goes on late.

If you would rather keep the creamy filling inside the peppers, these baked jalapeño poppers give you that crisp-edged, cheesy bite in a more traditional form.

Make Ahead, Transport and Keep Warm

A hot dip earns its place at a party when most of the work happens before people walk through the door. Ideally, you are slicing green onions or opening chips when the doorbell rings—not standing over the stove trying to rescue the texture.

Make It Up to a Day Ahead

Cook the bacon, corn and jalapeños, assemble the dip in its baking dish, cover and refrigerate for up to one day. Keep panko, crushed chips, reserved bacon and fresh green onion separate so they stay crisp and bright.

An easy cheese ball can handle the cold-appetizer slot while this dip waits for its turn in the oven.

Baking From Refrigerator-Cold

A refrigerated batch will need more time than one you have just assembled. Start checking about 5 minutes later, then follow the bubbling edges and hot, creamy center rather than adding a fixed number of extra minutes. Deep, very cold dishes can take longer.

Using glass bakeware? Follow the manufacturer’s instructions for moving it from refrigerator temperature into a hot oven; avoid sudden temperature changes unless the manufacturer specifically says the dish is designed for them.

Taking It Somewhere Else

An oven at the destination makes life easiest: carry the assembled dip cold, keep it properly chilled and bake it when you arrive.

For food that needs to travel hot, use a suitable insulated hot-food carrier and check that it stays at a safe temperature. At the destination, a plugged-in, preheated slow cooker can take over the hot-holding job.
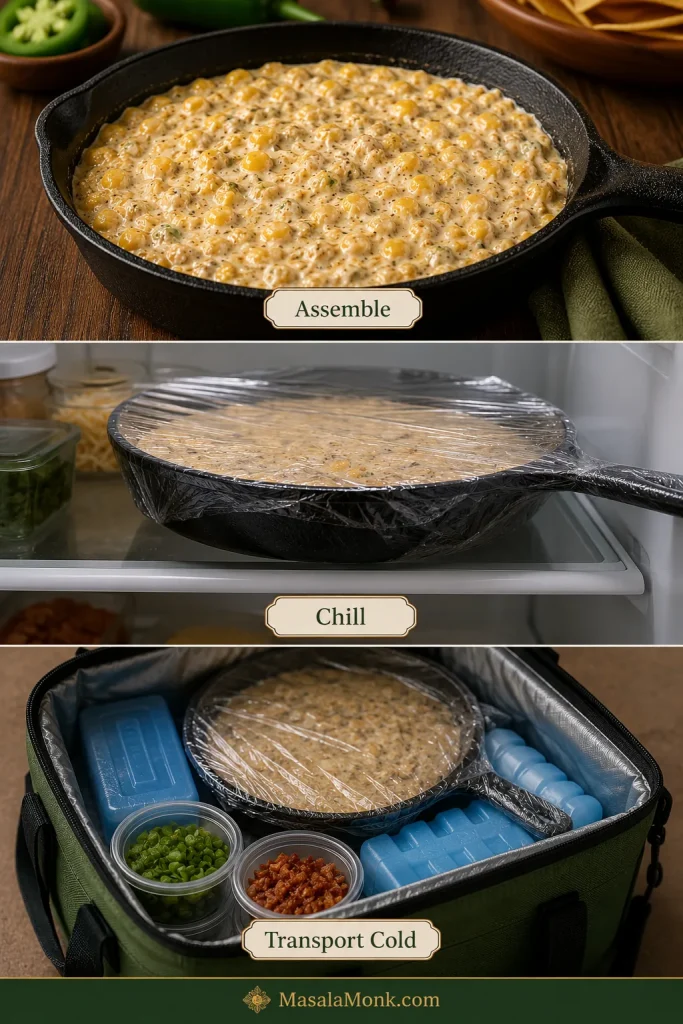
Three-stage guide showing an assembled corn dip, the covered skillet chilling in a refrigerator, and the covered dip packed in an insulated cooler with blue ice packs and separate garnish containers.
Pack garnishes and crisp toppings separately from the chilled dip. The carrier protects temperature; keeping those finishing pieces apart protects their crunch and freshness.

Keep It Safely Hot

Keeping it out for a long party?

Keep hot dip at 140°F / 60°C or warmer. A slow cooker or warmer can help, but the word Warm on the control is not a temperature reading, so use a food thermometer when the dip will be sitting for a while.
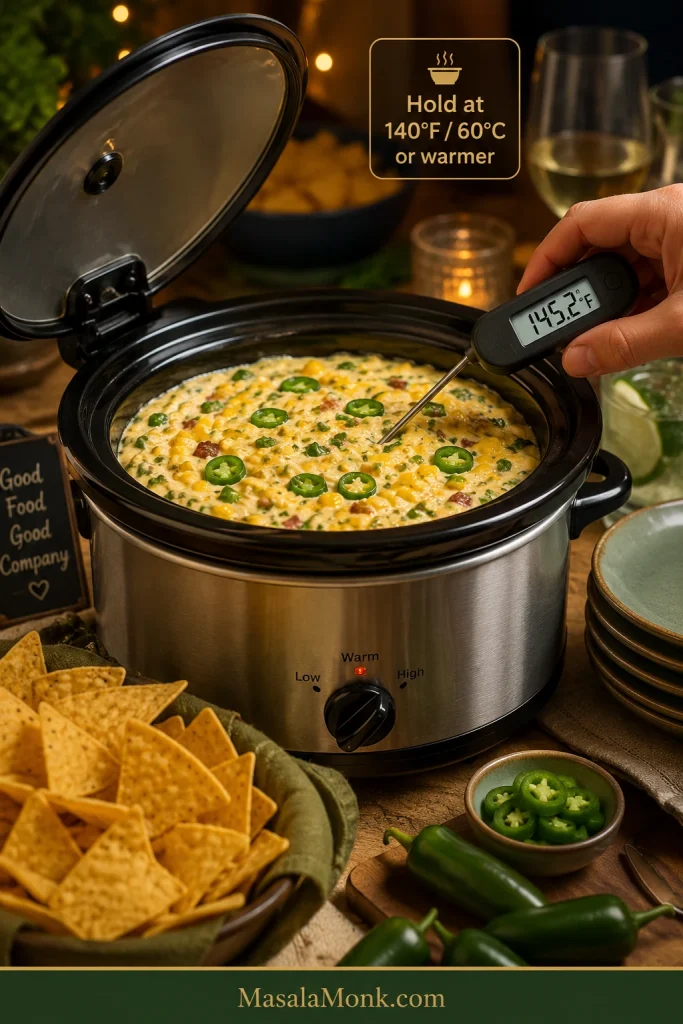
Slow cooker filled with creamy corn dip at a party table while a digital probe thermometer in the dip reads 145.2 degrees Fahrenheit; text says to hold at 140°F or 60°C or warmer.
For a long serving window, stir periodically and recheck the dip’s temperature. The slow-cooker dial tells you the appliance setting; the thermometer tells you what is happening in the dip.

If the dip is not being kept safely hot, do not leave it at room temperature for more than 2 hours; that drops to 1 hour above 90°F / 32°C. The same timing matters before leftovers return to the refrigerator. See the USDA food-safety guidance for the underlying holding and leftover recommendations.

For a second dip on a long grazing table, I would go cold rather than add another hot-holding job. A 7 layer dip gives you beans, salsa, sour cream and fresh toppings beside this hot skillet.

Reheating Leftovers for Hot Holding

Using yesterday’s dip in a slow cooker? Reheat the refrigerated dip first in the oven, microwave or on the stovetop until the center reaches 165°F / 74°C. Then transfer it to a preheated slow cooker for safe hot holding.

Jalapeño Popper Corn Dip Troubleshooting

If the texture or heat is not where you wanted it, the fix is usually simple. Most problems come back to water, temperature, fat or pepper balance.

Texture and Consistency Problems

Swipe or scroll sideways to see the full troubleshooting table.

Problem Likely cause Fix now Next time
Watery Wet canned/frozen corn or another loose addition Keep it uncovered and hot briefly, then stir Drain well and sauté until the pan no longer looks wet
Loose straight from oven The dairy and cheese are extremely hot Rest 5–10 minutes first Judge the texture after the short rest
Too thick The dip has cooled or the base is overly firm Warm and stir first. If a full batch is still too thick once hot, mix in 1 tablespoon sour cream or milk and check again. Keep it warm during a longer serving window
Greasy Excess bacon fat, too much cheese or prolonged heat Blot obvious surface fat and stir gently Drain bacon well and stop baking once the center is hot
Grainy Overheated cheese or a less-smooth melting cheese Lower the heat and stir gently Use freshly shredded melting cheese and avoid extended high heat
Chips keep breaking The dip has cooled too far or the chips are too delicate Warm the dip and switch to sturdy chips Keep the dip warm and serve with thicker tortilla or corn chips
Six-panel troubleshooting guide comparing watery, molten-normal, too-firm or cold, greasy, grainy or separated, and correct jalapeño corn dip textures.
Read the appearance before choosing a fix: pooled liquid points toward water, visible oil toward fat separation, graininess toward broken cheese, while a glossy molten dip can still be completely normal.

Heat and Pepper Balance Problems

Problem Likely cause Fix now Next time
Bland Not enough seasoning or fresh pepper character Add salt cautiously, green onion or finely chopped jalapeño Taste the fully mixed base before baking
Too spicy Hot peppers or too much inner rib/tissue Fold in more corn and creamy base if available Trim the peppers more thoroughly
Not spicy enough Mild peppers or heavily trimmed jalapeños Add jalapeño, pickled jalapeño or hot sauce at the table Leave more inner rib attached in one pepper
Hot but not jalapeño-forward Heat is present but there is not enough green pepper flesh Add finely chopped, well-trimmed fresh jalapeño Increase the green flesh while controlling heat separately

Substitutions and Variations That Still Make Sense

  • Pickled jalapeño for some of the fresh: drain it well and expect more tang, salt and softness.
  • Pepper Jack for part of the Monterey Jack: adds more chile heat while keeping a similarly melty texture.
  • Crushed tortilla chips for panko: more corn flavor and a chunkier crunch. Add them late enough that they do not soften completely.

Those swaps still taste like the same dip. Once tomatoes, lime, cotija, salsa or a lot of extra liquid start piling in, you are heading toward a different recipe—and that is fine.

Can I add Rotel? You can, but tomatoes and green chiles pull the dish in a different direction and bring extra liquid with them. If that molten tomato-and-chile combination is what you are after, a Rotel dip is built around it from the start.

What to Serve With Jalapeño Popper Corn Dip

Do not overthink the dippers. Put out a generous bowl of sturdy tortilla chips and one fresh, crunchy option and you are basically done.

  • Thick tortilla chips: the default. They cut through a warm cheese dip far better than delicate restaurant-style ones.
  • Corn chips: compact, strong and especially useful once the dip becomes a little firmer.
  • Toasted baguette or crostini: substantial enough for a panko-topped batch.
  • Celery: cold and crisp against the rich dairy.
  • Bell pepper strips: sturdy, fresh and naturally sweet.
  • Carrot sticks: cut them thick enough to dip rather than into delicate matchsticks.

Overhead party platter with creamy jalapeño corn dip surrounded by thick tortilla chips, corn chips, celery sticks, carrot sticks, red bell pepper strips and toasted baguette slices.
As the dip cools and firms, corn chips and crostini become especially forgiving because they resist snapping better than delicate chips; crisp vegetables keep providing a fresh contrast throughout the serving window.

Air fryer chicken wings bring crackly skin and browned edges to a table that already has plenty of soft, melted cheese.

A fresh mango salsa takes things in the other direction, with lime, fruit, onion and jalapeño giving the same tortilla chips something cool and bright to pick up.

How to Store, Freeze and Reheat the Dip

Refrigerator: Refrigerate leftovers promptly in shallow covered containers and use them within 3–4 days.

Oven: Place the dip in an oven-safe dish, cover loosely and warm at about 325°F / 165°C until the center reaches 165°F / 74°C. Uncover near the end if you want to refresh the surface.

Microwave: Heat smaller portions in short bursts, stirring between rounds so the edge does not become greasy while the middle stays cold. Reheated leftovers should reach 165°F / 74°C.

If the texture needs help after reheating: stir first. If a full batch is still too thick once hot, begin with 1 tablespoon sour cream or milk. For a small bowl, start with a teaspoon and mix completely before adding more.
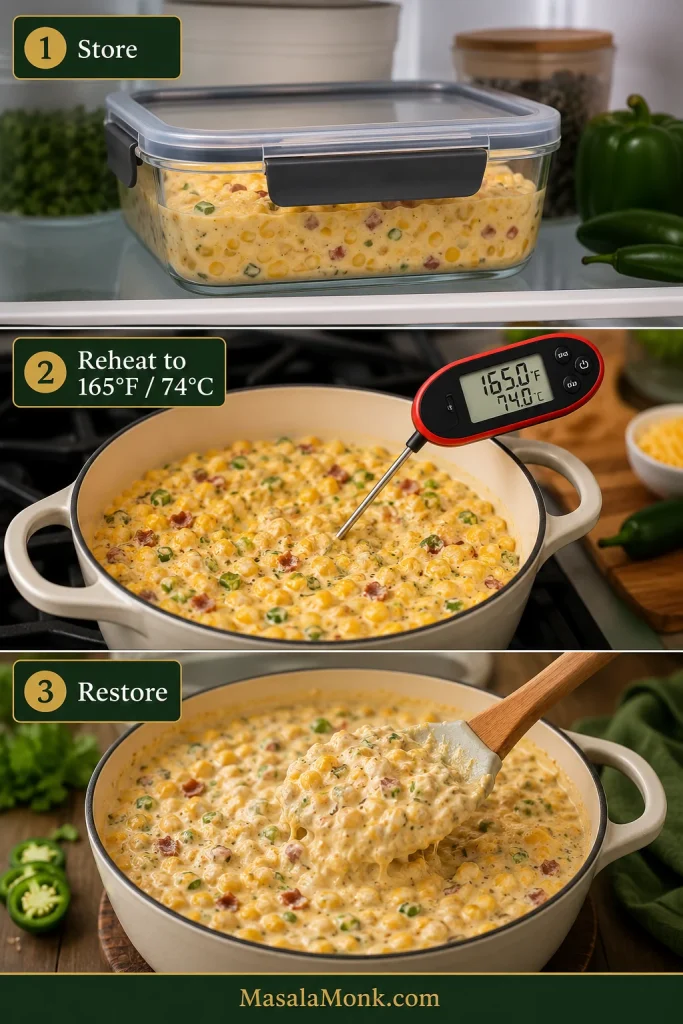
Three-step guide showing leftover corn dip in a covered glass container, reheating in a pot with a thermometer reading 165°F and 74°C, and the creamy dip being stirred after reheating.
Judge leftover texture only after reheating and stirring. A cold cream-cheese dip naturally looks firmer, so thinning it before it is fully hot can leave you with a looser dip than you intended.

Can You Freeze It?

I would not freeze this dip when the smoothest texture matters. It can be frozen, but cream cheese and sour cream may look grainier or slightly separated after freezing and thawing.

For a party, assembling the dip a day ahead and refrigerating it is the better plan. If you do freeze it, leave off the crisp topping, thaw in the refrigerator and expect some texture change after reheating.

When the First Scoop Is Right

This dip does not need the biggest possible pile of cheese to feel indulgent. It needs sweet kernels that still have a little bite, jalapeño that tastes green and lively, and enough creamy cheese to hold everything together without turning the bowl into one heavy, uniform mouthful.

When those pieces line up, you notice it immediately: corn in every scoop, jalapeño before the heat, browned cheese around the edge and little crisp bits of bacon or panko against the creamy center. Give it a few quiet minutes out of the oven, scatter over the scallions and bring it to the table warm.

Warm baked jalapeño corn dip in a cast-iron skillet with a large scoop removed and a tortilla chip holding a creamy scoop of corn, bacon and green garnish.
The goal is not a dramatic cheese pull; it is a skillet that still gives up a clean, corn-rich scoop after the first rush at the table has passed.

And put the thicker chips out from the beginning. Nobody should have to excavate this with a broken triangle.

Posted on Leave a comment

Crockpot Buffalo Chicken Dip Recipe

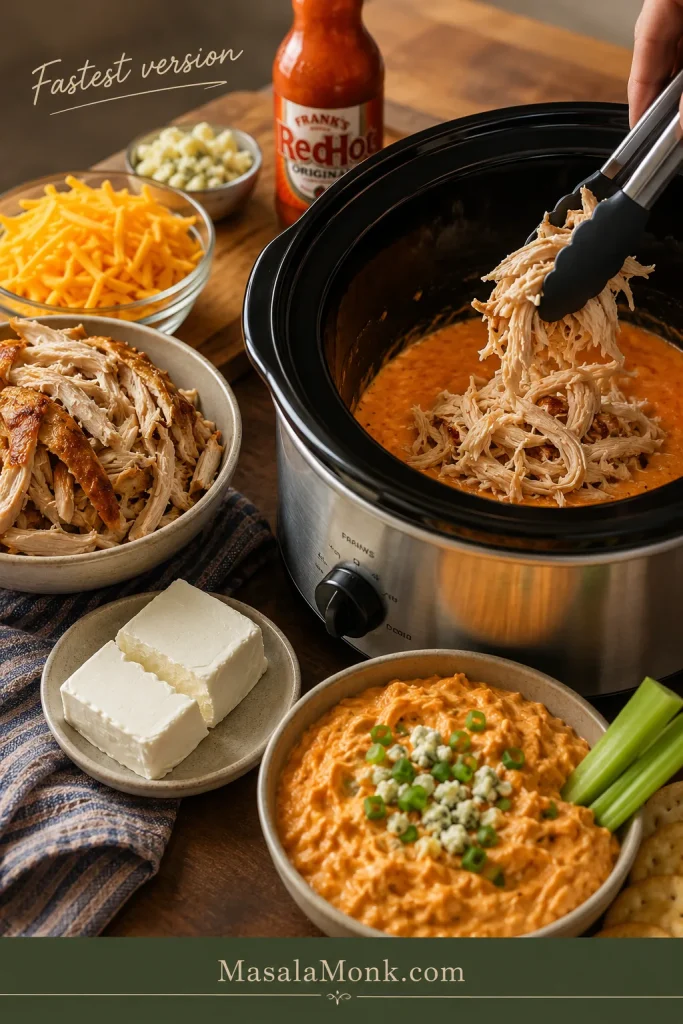
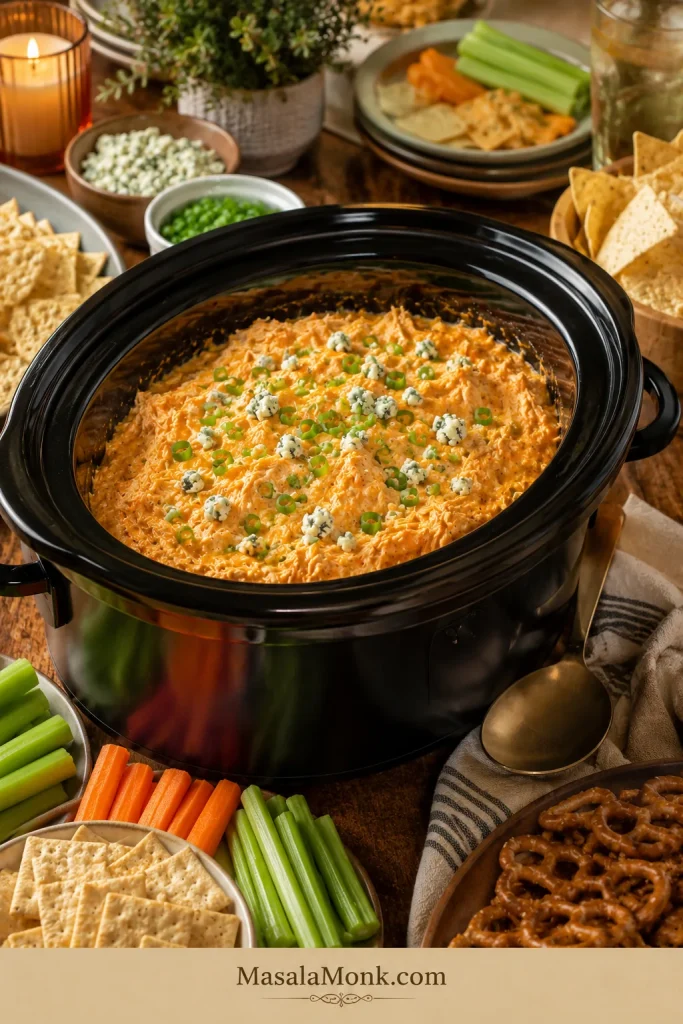
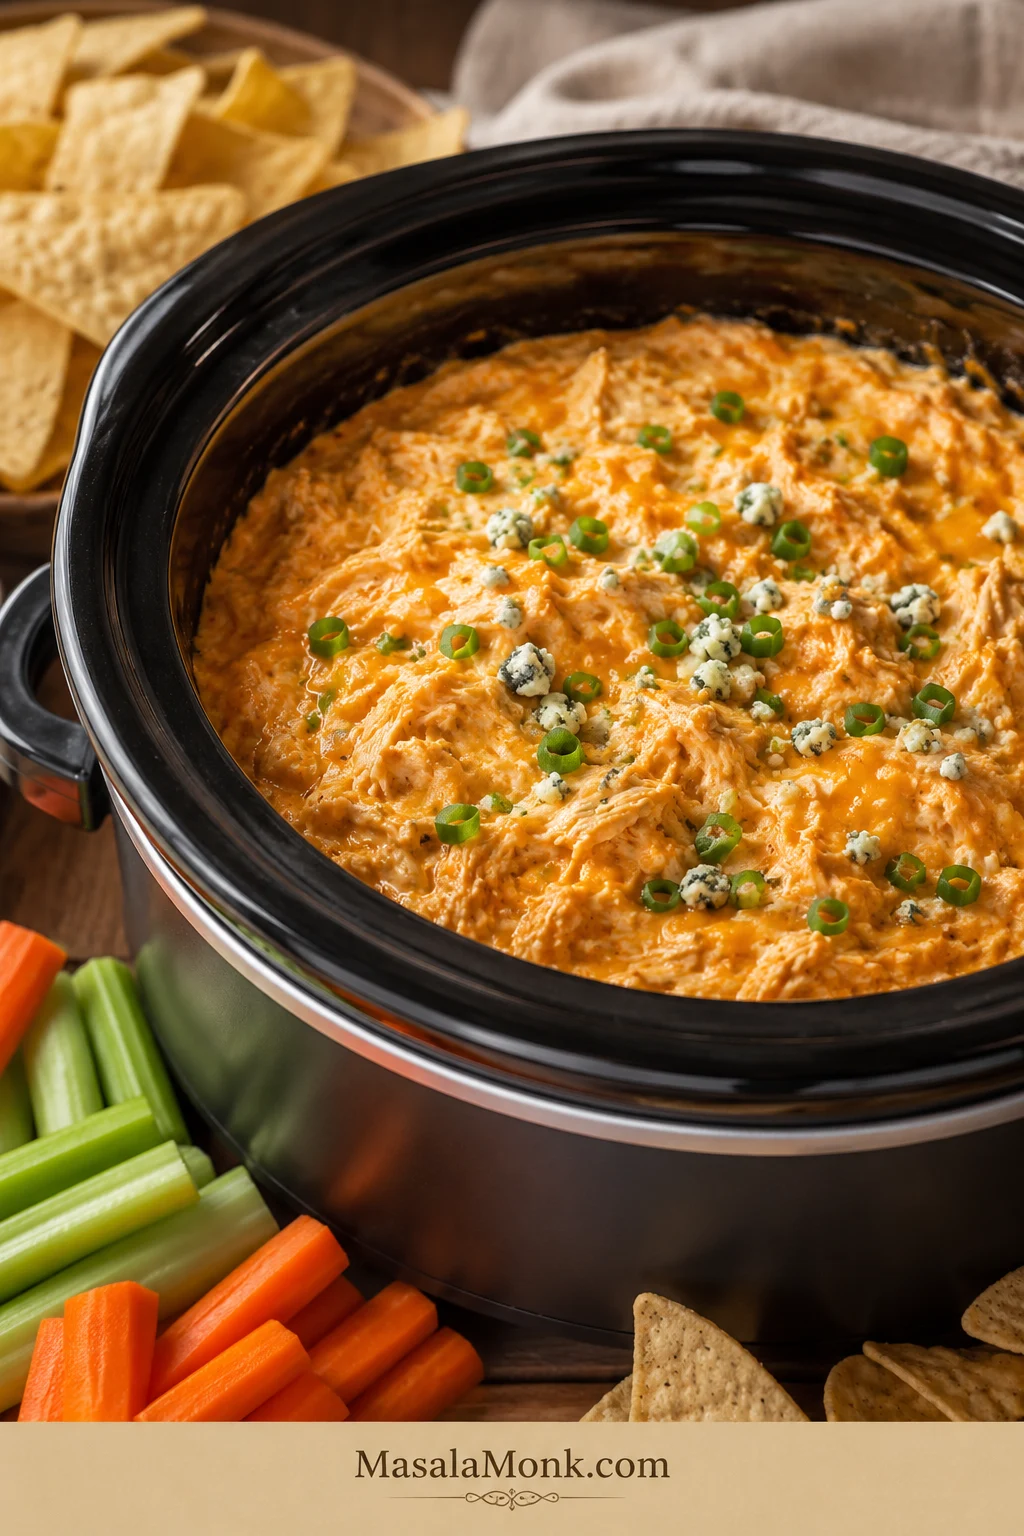
Creamy crockpot buffalo chicken dip in a dark slow cooker with green onions, blue cheese crumbles, tortilla chips, celery, and carrots.

You have people coming over, a slow cooker on the counter, and you need the dip to stay creamy instead of splitting, drying out, or turning into buffalo soup. This crockpot buffalo chicken dip is built for exactly that moment: spicy, cheesy, scoopable, and warm enough for everyone to keep coming back with “just one more chip.”

The easiest version uses cooked shredded chicken or rotisserie chicken, cream cheese, buffalo sauce, ranch or blue cheese dressing, and shredded cheese. As it heats, the slow cooker melts everything together gently, then keeps the dip warm for game day, potlucks, holidays, movie nights, and snack tables where the crockpot quietly becomes the most popular thing in the room.

When it is right, the dip should drag slowly from a chip, hold together in soft cheesy ribbons, and taste like buffalo wings turned into something warmer and easier to share. This guide also helps with the real questions that come up once the crockpot is already on: raw chicken, canned chicken, Frank’s RedHot, ranch vs blue cheese, slow cooker size, party timing, and quick fixes for watery, greasy, lumpy, thick, or too-spicy dip.

For baked, stovetop, Instant Pot, healthy, vegetarian, and vegan versions, see the full Buffalo Chicken Dip Recipe guide.

Quick Answer: The Crockpot Buffalo Chicken Dip Ratio

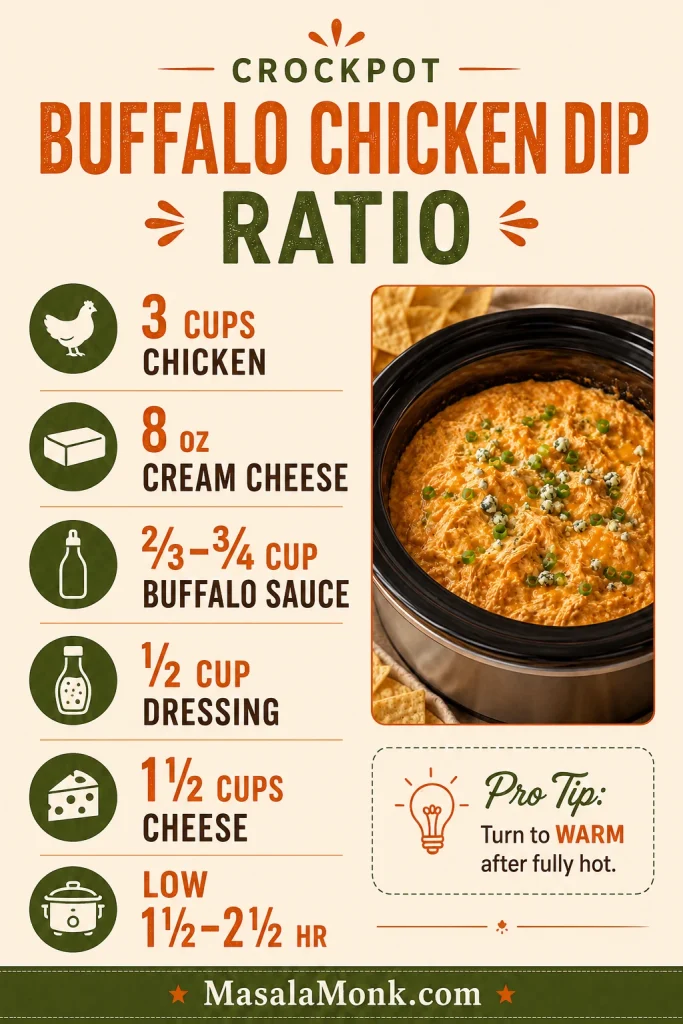
For one easy batch of crockpot buffalo chicken dip, use 3 cups cooked shredded chicken, 8 oz cream cheese, ⅔ to ¾ cup buffalo wing sauce, ½ cup ranch or blue cheese dressing, and 1½ cups shredded cheese. Cook on LOW for 1½ to 2½ hours or HIGH for 1 to 2 hours, stirring once or twice, then hold the finished dip on WARM for serving.

The dip is ready when the cream cheese has melted into the sauce, the edges are gently bubbling, the center is hot, and the texture is glossy, spoonable, and thick enough to hold on a chip. Use rotisserie chicken for the fastest version, canned chicken for a pantry shortcut, and raw thawed chicken only if you follow the raw chicken method below.

What the Finished Dip Should Look Like

Look for a dip that is melted through, glossy, and thick enough to scoop without running off the chip. That one visual check tells you more than the clock.

Tortilla chip holding a thick scoop of buffalo chicken dip with shredded chicken, melted cheese, and green onion garnish.
This chip test is the easiest doneness cue: if the dip holds its shape on a tortilla chip, the chicken, cream cheese, buffalo sauce, and cheese have melted into balance.

Need the full method? Go straight to the recipe card, or check the quick fixes if your dip is already heating.

Make This Now

  • Fastest version: rotisserie chicken + cream cheese + buffalo sauce + ranch + shredded cheese.
  • Right slow cooker size: 2 to 3 quart for one batch; 5 to 6 quart for a double batch.
  • Smoother sauce choice: buffalo wing sauce or Frank’s Buffalo Wings Sauce for a milder, rounder flavor.
  • Gentlest setting: LOW for smooth melting, then WARM after the dip is fully hot.
  • Raw chicken rule: cook thawed chicken first to 165°F / 74°C, then add the dairy.

Crockpot Buffalo Chicken Dip Recipe Card

Crockpot Buffalo Chicken Dip

A creamy, cheesy slow cooker buffalo chicken dip that melts into a thick, scoopable hot appetizer and stays warm right in the crockpot. Serve with chips, celery, carrots, crackers, or bread.

Prep Time10 minutes
Cook Time1½ to 2½ hours
Total TimeAbout 2 hours, depending on slow cooker size
Servings10 to 12 appetizer servings
Slow Cooker2 to 3 quart for one batch

Ingredients

  • 3 cups cooked shredded chicken or rotisserie chicken, about 420 g
  • 8 oz cream cheese, softened and cubed, 226 g
  • ⅔ to ¾ cup buffalo wing sauce or Frank’s Buffalo Wings Sauce, 160 to 180 ml; or ½ to ⅔ cup Frank’s RedHot Original for a sharper, hotter dip
  • ½ cup ranch dressing or blue cheese dressing, 120 ml
  • 1½ cups shredded cheddar, Colby Jack, or Monterey Jack cheese, about 170 g
  • ½ teaspoon garlic powder, optional
  • 2 tablespoons sliced green onions, optional
  • ¼ cup blue cheese crumbles, optional
  • Tortilla chips, celery sticks, carrot sticks, crackers, pita chips, or toasted bread, for serving

Instructions

  1. Add the cooked shredded chicken, softened cream cheese, buffalo sauce, ranch or blue cheese dressing, garlic powder, and 1 cup of shredded cheese to the slow cooker.
  2. Stir lightly. The mixture does not need to look smooth yet; the cream cheese will melt as it heats.
  3. Cover and cook on LOW for 1½ to 2½ hours, stirring once or twice, until the cream cheese melts into the sauce and the center is hot.
  4. Stir well, then sprinkle the remaining ½ cup shredded cheese over the top. Cover for another 10 to 15 minutes, just until the cheese melts.
  5. Turn the slow cooker down to WARM. Garnish with green onions or blue cheese crumbles if using, then serve with chips, celery, carrots, crackers, or bread.

Doneness Cue

The dip is ready when the edges bubble gently, the center is hot, and there are no cold cream cheese pockets left. It should look glossy and hold on a chip without running off.

Recipe Notes

  • Rotisserie chicken gives the fastest and most flavorful result.
  • Soften and cube the cream cheese so it melts without lumps.
  • Choose buffalo wing sauce for a milder dip and Frank’s RedHot Original for sharper heat.
  • Follow the raw chicken method below if starting with uncooked chicken.
  • Drain canned chicken very well before adding it to the slow cooker.
  • Move from cooking mode to WARM only after the center is hot and the cream cheese has melted into the sauce.

Save the Basic Dip Ratio

Once you know the basic ratio, the recipe becomes easier to scale, soften, spice up, or double for a bigger slow cooker.

Recipe ratio card for crockpot buffalo chicken dip with chicken, cream cheese, buffalo sauce, dressing, shredded cheese, and slow cooker timing.
Once the basic ratio is familiar, this crockpot buffalo chicken dip becomes easy to double, make milder, spice up, or resize for a smaller slow cooker.

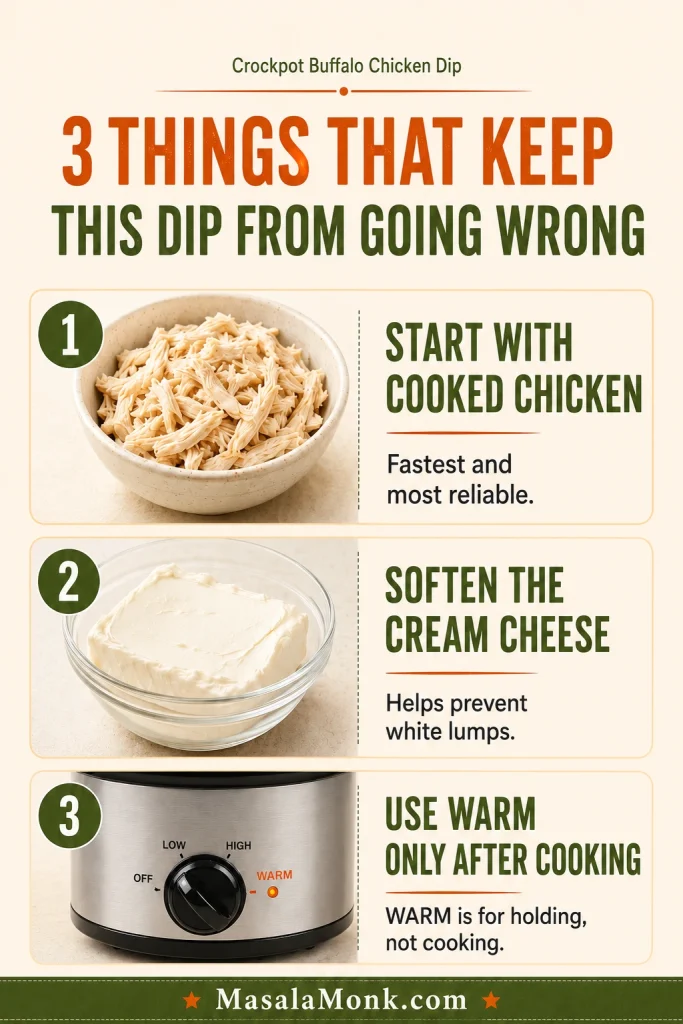
3 Things That Keep This Dip from Going Wrong

Buffalo chicken dip is easy, but a few small choices make the difference between a smooth party dip and a crockpot full of oily, lumpy sauce.

  • Start with cooked or rotisserie chicken when you can. It gives you the fastest, safest, most predictable version.
  • Soften the cream cheese first. Cold blocks melt slowly and can leave white pockets in the dip.
  • Use WARM only after the dip is finished. WARM holds the dip for serving; it does not cook raw chicken or melt a cold batch quickly.
Infographic with three crockpot buffalo chicken dip tips: use cooked chicken, soften cream cheese, and use WARM only after cooking.
Before the slow cooker starts, fix the three things that cause most failures: cold cream cheese, uncooked chicken shortcuts, and using WARM as if it were a cooking setting.

From here, use the section you need most: choose your chicken, compare wing sauce vs hot sauce, check slow cooker size, hold it on WARM for a party, or jump to quick fixes.

Choose Your Chicken

There is no single “right” chicken here. The best choice is the one that matches your time, your texture preference, and what is already in your kitchen.

Chicken TypeUse It ForHow to Use It
Rotisserie chickenFastest version with the most flavorRemove skin and bones, shred the meat, and add it directly to the slow cooker.
Cooked shredded chickenClassic homemade versionUse leftover cooked chicken breast, thighs, or poached chicken. Shred finely so it scoops well.
Raw thawed chickenWhen you want the slow cooker to cook the chicken tooCook the chicken first, shred it, then add cream cheese, dressing, and cheese near the end.
Canned chickenPantry shortcut or last-minute party dipDrain very well, flake gently, and fold into the dip without over-stirring.

Best Shortcut: Rotisserie Chicken

For the fullest flavor and easiest texture, rotisserie chicken is the move. When the pantry is doing the work, canned chicken will still get the job done. If you like cooking once and using the leftovers in several ways, a whole chicken in a crock pot gives you juicy shredded meat for dips, sandwiches, wraps, quesadillas, and easy weeknight meals.

Shredded rotisserie chicken with cream cheese, buffalo sauce, shredded cheese, and a slow cooker for buffalo chicken dip.
Rotisserie chicken is the best speed shortcut because the meat is already cooked, seasoned, and tender, so the crockpot only has to melt and marry the flavors.

Starting with raw chicken? Cook the chicken first, then add the dairy so the dip stays creamy instead of greasy or split.

Already know your chicken? Jump to the main crockpot method, the raw chicken method, or the canned chicken shortcut.

Equipment That Makes This Easier

A 2 to 3 quart slow cooker is the easiest fit for one standard batch. The slow cooker does not have to be perfect, but the dip needs enough depth to melt gently without drying around the edges.

  • 2 to 3 quart slow cooker: ideal for one standard batch.
  • 4 quart slow cooker: useful if that is what you already have.
  • 5 to 6 quart slow cooker: better for a double batch or a larger party.
  • Rubber spatula: helpful for scraping melted cheese and cream cheese from the sides.
  • Instant-read thermometer: important if making the raw chicken version.
  • Serving spoon: keep one nearby once the dip is on WARM.

A single batch in a large 6 quart slow cooker will spread thinner and may heat faster. That is not a disaster, but it asks for earlier stirring. Move to WARM as soon as the center is hot and the dairy has melted in.

Using a bigger crockpot for a party? See batch scaling and how to keep the dip warm before serving.

Ingredient Notes

What Goes Into the Dip

The ingredient list is short, but each part has a job: chicken gives structure, cream cheese gives body, buffalo sauce brings heat, dressing rounds the edges, and shredded cheese makes the dip rich.

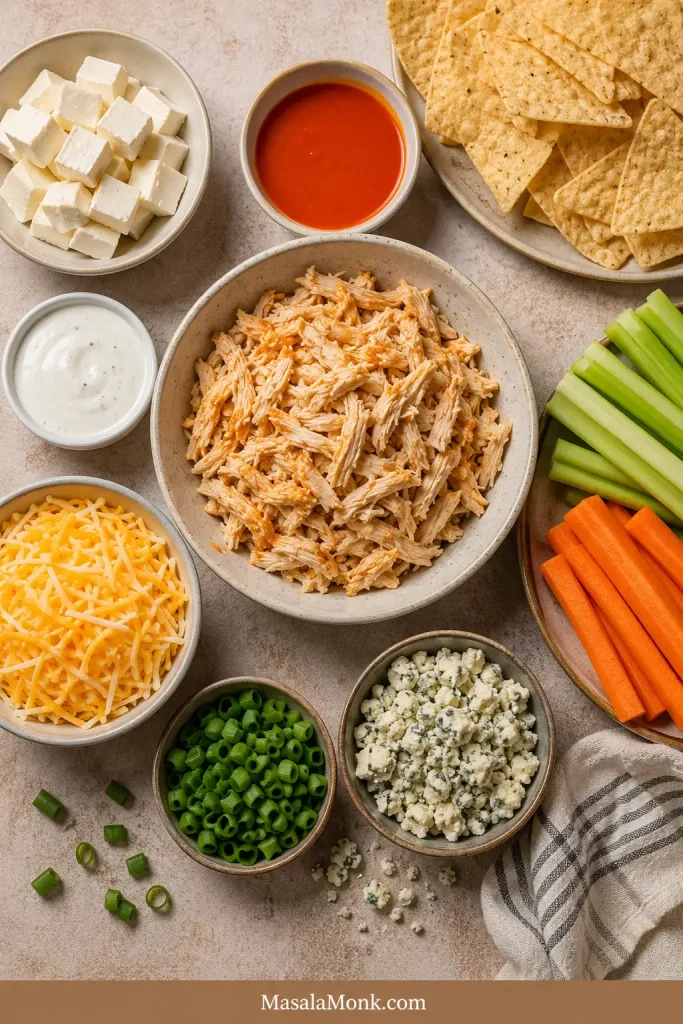
Overhead ingredient board with shredded chicken, cream cheese, buffalo sauce, ranch dressing, shredded cheese, green onions, blue cheese crumbles, chips, celery, and carrots.
Start with the core five — chicken, cream cheese, buffalo sauce, dressing, and shredded cheese — then finish with green onions or blue cheese for freshness, tang, and color.

Chicken: Cooked shredded chicken or rotisserie chicken is the easiest default. It is fast, flavorful, and less likely to make the dip watery. Canned chicken and raw thawed chicken both work, but each needs its own method.

Cream cheese: One 8 oz block gives the dip body without making it overly heavy. This is what turns the buffalo chicken mixture into a proper dip instead of saucy shredded chicken, so give it time to melt. Softened cubes disappear into the sauce faster and leave fewer stubborn white pockets.

Buffalo sauce: Buffalo wing sauce gives the smoothest flavor for a mixed crowd. Frank’s RedHot Original is sharper, hotter, and thinner, so start with a little less and adjust after the dip melts.

Ranch or blue cheese dressing: Ranch dressing is usually the easiest choice for a mixed group. Blue cheese dressing brings a sharper wing-bar flavor. For parties, put ranch in the dip and blue cheese on the side so people can choose their own level of tang.

Shredded cheese: Cheddar, Colby Jack, Monterey Jack, or a blend all work. Freshly shredded cheese usually melts smoother than bagged pre-shredded cheese. If using bagged cheese, stir gently and avoid overheating; the anti-caking starches can make the dip a little thicker.

Optional extras: Garlic powder adds depth. Green onions add freshness. Blue cheese crumbles add tang. A little extra cheese on top makes the crockpot look more finished when it hits the table.

Once the ingredients are clear, go to the main method, compare Frank’s RedHot options, or choose ranch vs blue cheese.

How to Make Crockpot Buffalo Chicken Dip

Add cooked chicken or rotisserie chicken, softened cream cheese, buffalo sauce, ranch or blue cheese dressing, garlic powder, and most of the shredded cheese to the slow cooker. Stir lightly, cover, and cook on LOW until the cream cheese loosens into the sauce.

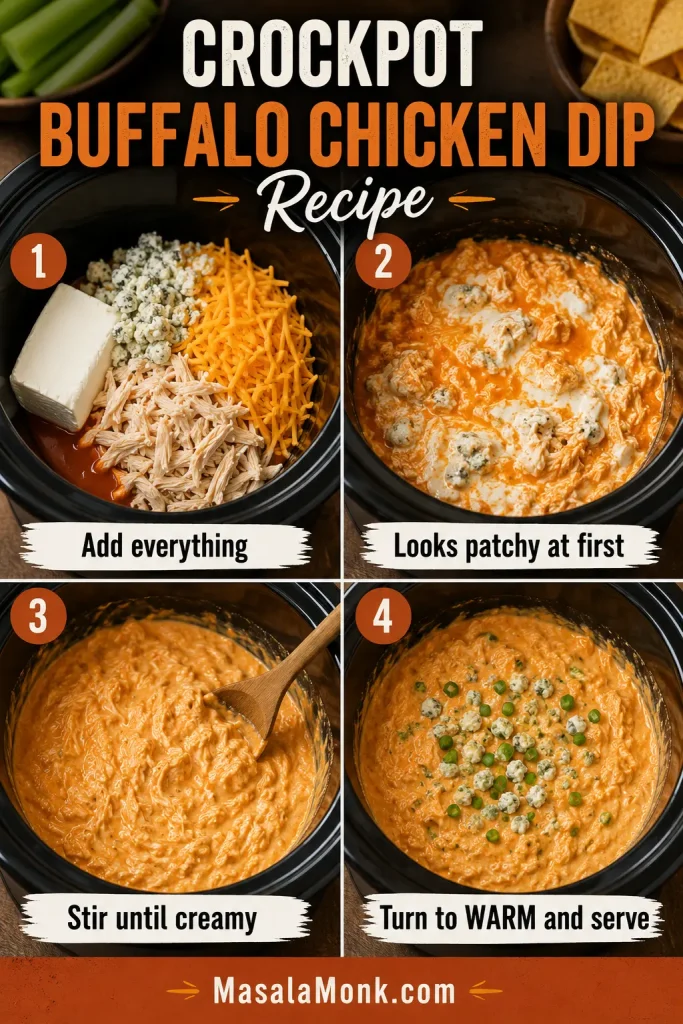
What the Dip Looks Like as It Melts

The mixture may look patchy at first. Cream cheese often sits in white pockets before it melts, and the sauce can gather near the edges before the final stir brings everything together. Scrape the sides and bottom once or twice as it warms.

Four-step collage showing buffalo chicken dip ingredients added to a slow cooker, melting, stirred smooth, and finished on WARM.
At first, the mixture can look broken or patchy; however, steady heat and a good stir turn it into the creamy slow cooker buffalo chicken dip you want.

When the center is hot and the buffalo chicken mixture looks creamy instead of patchy, scatter the last bit of cheese over the top. Cover for a few minutes, then turn the slow cooker down for serving. The finished dip should be thick enough to scoop with a chip but soft enough to drag through celery, crackers, or toasted bread.

Texture cue: Do not judge the dip too early. It can look rough before it looks delicious. Once the cream cheese melts and the chicken is evenly mixed through, it usually tightens into a smooth, dippable texture.

Why This Crockpot Buffalo Chicken Dip Works

The slow cooker acts as both the cooking vessel and the serving dish. That matters for parties because baked dip cools quickly, while crockpot buffalo chicken dip can stay warm and spoonable as people snack.

The balance is simple: cream cheese gives body, buffalo sauce brings heat and tang, dressing softens the sharpness, shredded cheese adds richness, and chicken keeps the dip from feeling like straight sauce. Aim for rounded buffalo flavor — spicy first, creamy next, then cheesy and savory enough that the celery sticks disappear too.

Call it crockpot, crock pot, or slow cooker buffalo chicken dip — the goal is the same: hot buffalo flavor, melted cheese, and a dip that holds warm without needing the oven.

Think of it as slow cooker buffalo chicken wing dip: the flavor of wings, the comfort of melted cheese, and none of the pressure of frying or baking trays of chicken while guests are already hungry.

Back to recipe card · Back to top

Crockpot Buffalo Chicken Dip with Frank’s RedHot

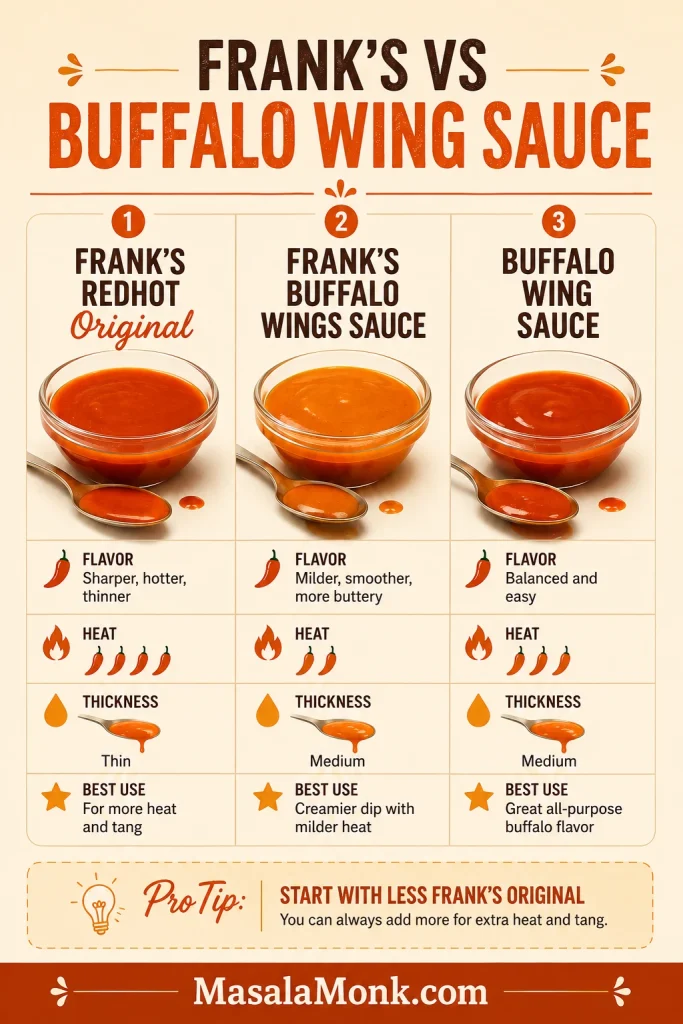
Frank’s RedHot gives buffalo chicken dip that familiar cayenne-pepper wing flavor. Reach for Frank’s Buffalo Wings Sauce when you want a smoother, milder dip. Choose Frank’s RedHot Original when you want sharper heat and a more classic hot-sauce bite.

Comparison chart of Frank’s RedHot Original, Frank’s Buffalo Wings Sauce, and buffalo wing sauce for crockpot buffalo chicken dip.
Frank’s RedHot Original gives sharper heat and tang, whereas buffalo wing sauce is smoother and milder; start with less, then adjust once the dip is melted.

If using Frank’s RedHot Original, start with ½ to ⅔ cup instead of the full ¾ cup. It is thinner and hotter than many buffalo wing sauces, so a smaller amount keeps the dip balanced. You can always stir in more after the cheese and cream cheese have melted.

SauceFlavorUse It For
Frank’s RedHot OriginalSharper, tangier, hotterClassic buffalo heat; start with less
Frank’s Buffalo Wings SauceMilder, smoother, more butteryParty dip where not everyone wants strong heat
Generic buffalo wing sauceBalanced and easyReliable everyday version
Plain hot sauceThin and sharpUse carefully, then balance with dairy if needed

Heat too strong after melting? Do not add water. Stir in more cream cheese, ranch, sour cream, Greek yogurt, or shredded chicken. Dairy and chicken calm the heat while keeping the dip thick.

If the dip tastes too hot after melting, jump to troubleshooting for ways to cool the heat without watering it down.

How to Make Crockpot Buffalo Chicken Dip with Raw Chicken

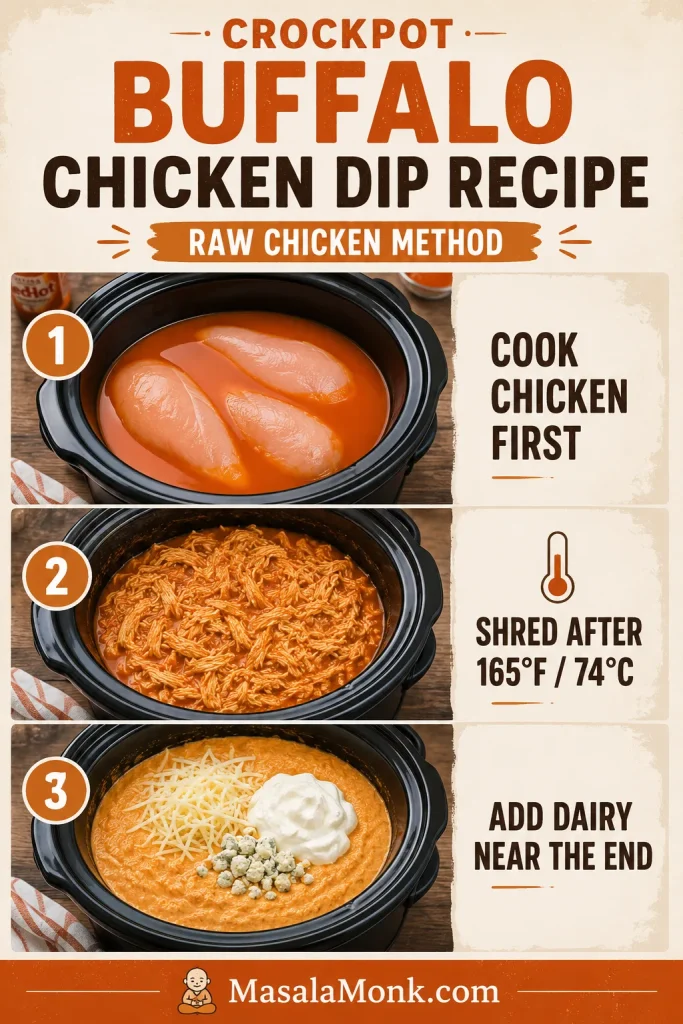
Yes, you can make crockpot buffalo chicken dip with raw chicken, but cook the chicken first and add the dairy after shredding. This keeps the chicken safe and prevents the cream cheese and shredded cheese from sitting over heat for hours.

Add 1½ pounds / about 680 g thawed boneless skinless chicken breasts or thighs to the slow cooker with ¾ cup / 180 ml buffalo sauce and ¼ cup / 60 ml broth, water, or ranch dressing. Cook on HIGH for about 2½ to 3½ hours or LOW for about 4 to 6 hours, until the chicken reaches 165°F / 74°C.

Cook the Chicken First, Then Add the Dairy

The thermometer matters more than the clock. Once the chicken is cooked, shred it with two forks. After that, the stressful part is over; the rest is just melting and stirring.

Raw chicken method for buffalo chicken dip showing chicken cooked in buffalo sauce, shredded after reaching 165°F, and mixed with dairy near the end.
For raw chicken, separate the cooking stage from the creamy stage: cook to 165°F / 74°C first, shred, then add dairy so the final dip stays safe and smooth.

Stir in 8 oz / 226 g cream cheese, ½ cup / 120 ml ranch or blue cheese dressing, and 1 to 1½ cups shredded cheese. Cook another 30 to 45 minutes, stirring once or twice, until the mixture turns smooth and dippable.

Important food safety note: Do not use the WARM setting to cook raw chicken. WARM is only for holding finished dip. For safe chicken guidance, FoodSafety.gov lists poultry at 165°F / 74°C. See the FoodSafety.gov safe minimum internal temperature chart.

For best results, thaw chicken before slow cooking. Starting with frozen chicken can make timing unpredictable, especially in a creamy dip where the dairy can overheat before the center of the chicken is safely cooked. For more slow-cooker timing ideas beyond this dip, these crock pot chicken breast recipes are useful for keeping chicken tender instead of dry.

Back to recipe card · Chicken options · Back to top

Crockpot Buffalo Chicken Dip with Canned Chicken

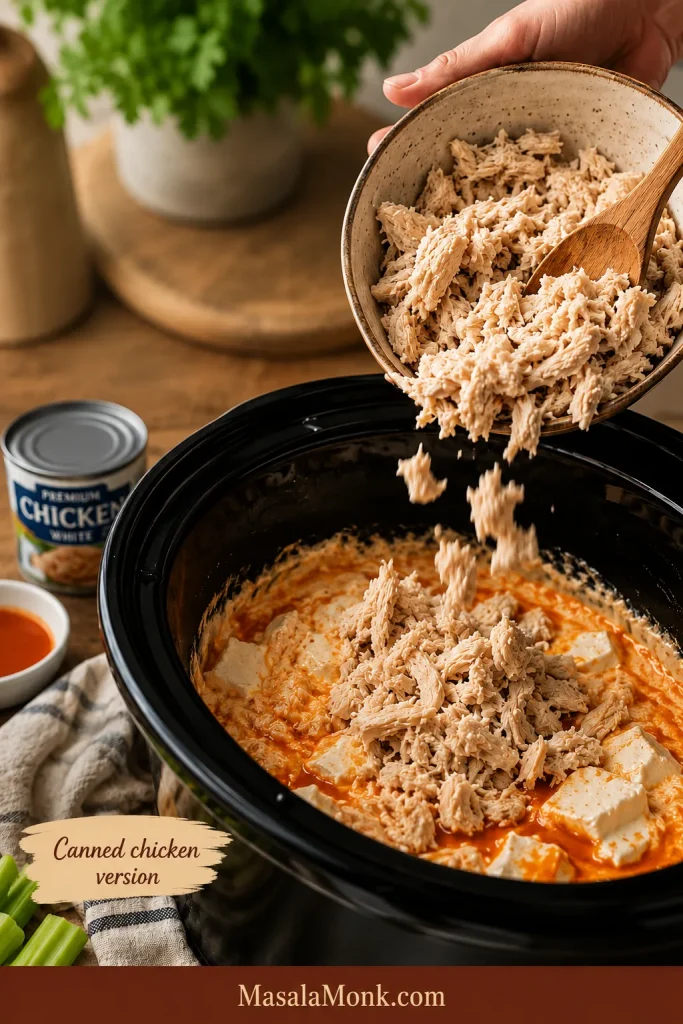
Canned chicken is the no-stress pantry route when the party snack has to happen with what is already in the cupboard. It will not give you the same chunky bite as rotisserie chicken, but it absolutely works for a quick crockpot buffalo chicken dip.

Drain the canned chicken very well. Flake it gently with a fork, then add it to the slow cooker with the cream cheese, buffalo sauce, dressing, and shredded cheese. Stir enough to combine, but do not aggressively mash it once the dip is hot.

Drained canned chicken being added to a slow cooker with cream cheese and buffalo sauce for buffalo chicken dip.
Canned chicken can save the day, but draining is the difference-maker; extra liquid thins the dip, while gently folded chicken keeps it thicker and more scoopable.

Canned chicken is softer than rotisserie chicken, so gentle folding keeps the texture better. Use canned chicken when speed matters. Reach for rotisserie chicken when you want a chunkier bite and deeper chicken flavor.

If the canned chicken made the dip softer than expected, use the watery dip fixes before serving.

Ranch or Blue Cheese Dressing?

Ranch dressing is usually the easiest choice for a mixed group. It softens the buffalo sauce, rounds out the heat, and gives the dip a familiar flavor that works for most snack tables.

Side-by-side ranch and blue cheese comparison for buffalo chicken dip with bowls of dip, vegetables, and dippers.
Ranch keeps buffalo chicken dip crowd-friendly, while blue cheese makes it taste closer to wings; for parties, ranch inside and blue cheese on the side is the safest play.

Blue cheese dressing gives the dip a tangier, more classic wing-bar taste. If your table leans more wing-night than ranch-party, this blue cheese dip for wings gives you more ways to bring that cooling, tangy flavor into the spread.

For parties, put ranch in the dip and blue cheese on the side. That keeps the dip friendly without losing the wing-bar option.

Buffalo Wing Sauce vs Hot Sauce

Buffalo wing sauce is usually thicker, smoother, and more balanced than plain hot sauce. It often has that buttery wing-sauce flavor already built in, which makes it easier for party dips.

Plain hot sauce is sharper and thinner. It can make the dip taste hotter and slightly looser if you use the same amount. Start with less, let the dip melt, then adjust with more sauce, ranch, cream cheese, or chicken until the flavor lands where you want it.

Slow Cooker Size and Timing

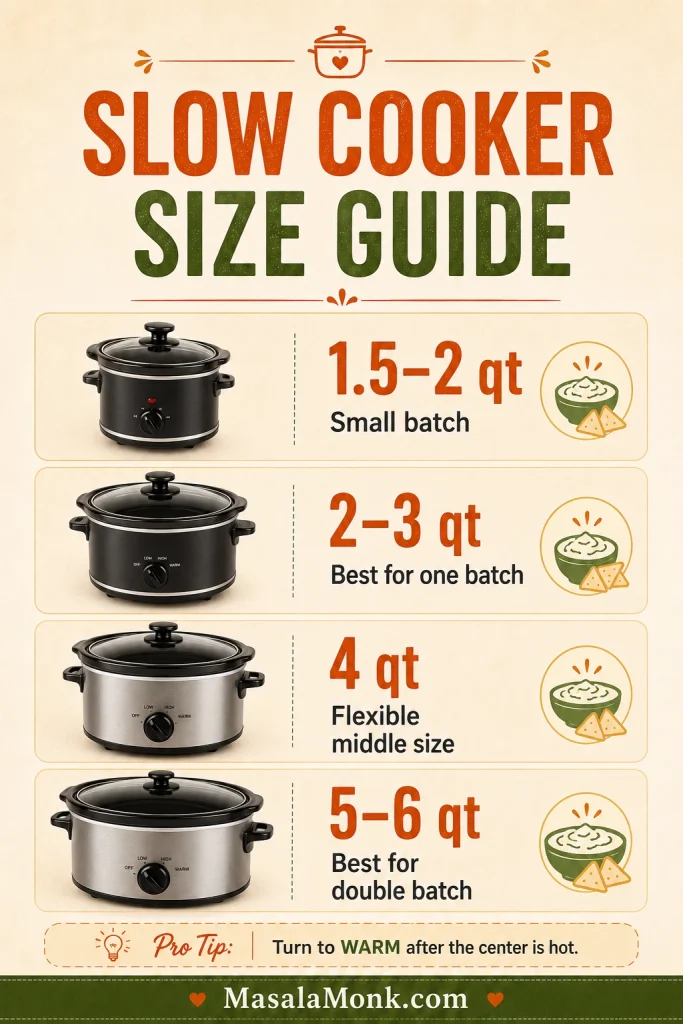
A 2 to 3 quart slow cooker is the sweet spot for one normal batch of buffalo chicken dip. That snug fit gives you a deeper, cozier dip texture; a huge cooker still works, but it asks for earlier stirring. Use a 5 to 6 quart slow cooker for a double batch.

Slow cooker size guide showing 1.5 to 2 quart, 2 to 3 quart, 4 quart, and 5 to 6 quart cookers for buffalo chicken dip.
For one standard batch, a 2 to 3 quart slow cooker usually gives the best depth, helping the dip melt evenly instead of drying out in a too-wide cooker.
Slow Cooker SizeUse It ForTiming Note
1.5 to 2 quartSmall batchGood for 6 to 8 people
2 to 3 quartOne standard batchLOW for 1½ to 2 hours
4 quartFlexible middle sizeLOW for 1½ to 2½ hours
5 to 6 quartDouble batchSingle batch may heat faster and spread thinner
Any sizeServingTurn to WARM after the center is hot and the dip has melted together

LOW is usually better for dairy-heavy dips because it melts everything more gently. HIGH works when you are short on time, but stir more often and turn the slow cooker down as soon as the center is hot. Slow cookers vary, so the visual cues matter more than the clock: melted cream cheese, bubbling edges, and a hot center.

A freshly mixed batch often melts closer to 1½ to 2 hours. Cold make-ahead batches may need closer to 2½ hours.

Batch Size and Crowd Scaling

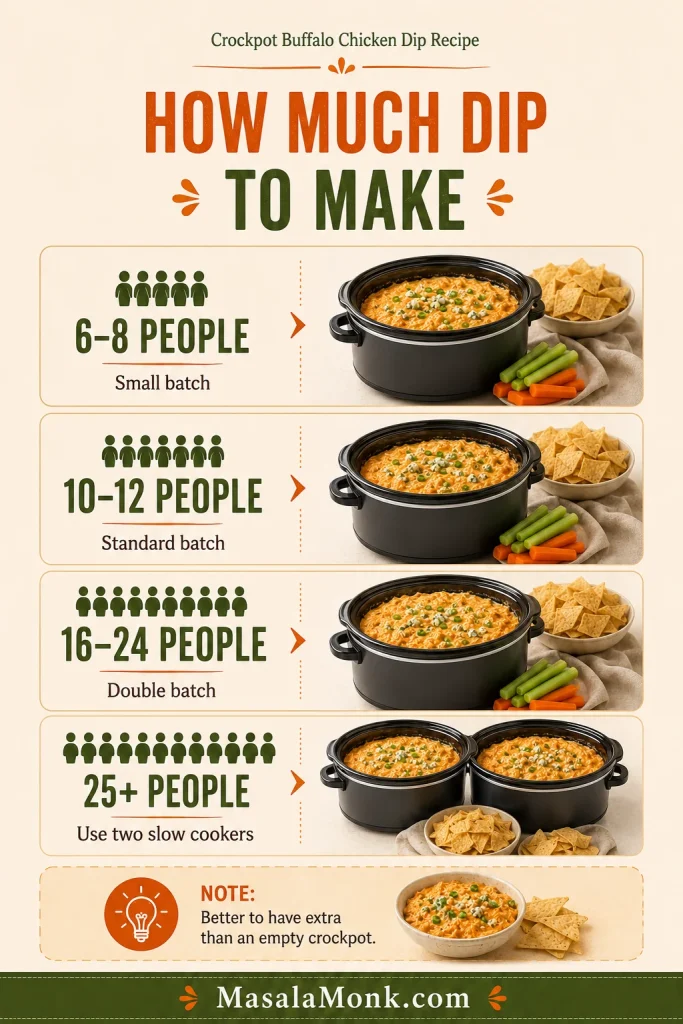
For a small gathering, one batch is usually enough. At a game-day table or potluck where this is one of the main snacks, plan more generously. Buffalo chicken dip disappears faster than people expect, especially when it stays warm in the slow cooker.

For parties, it is better to have a little extra than to watch the bottom of the crockpot get scraped clean before everyone has had a turn.

Crowd scaling guide for buffalo chicken dip showing small batch, standard batch, double batch, and two slow cookers for large parties.
Instead of guessing party portions, match the dip to the room: one batch for most snack tables, a double batch for bigger groups, and two crockpots for heavy grazing.
Crowd SizeBatch SizeSlow CookerNotes
6 to 8 peopleSmall batch1.5 to 2 quartGood when there are other appetizers.
10 to 12 peopleStandard batch2 to 3 quartMatches the recipe card.
16 to 24 peopleDouble batch5 to 6 quartStir well and allow extra time if starting cold.
25+ peopleTwo batchesTwo slow cookersBetter texture than one overloaded cooker.

Ingredient Scaling

BatchChickenCream CheeseBuffalo SauceDressingShredded Cheese
Half batch1½ cups4 oz⅓ cup¼ cup¾ cup
Standard batch3 cups8 oz⅔ to ¾ cup½ cup1½ cups
Double batch6 cups16 oz1⅓ to 1½ cups1 cup3 cups

For a double batch, stir from the bottom so the center melts evenly. A larger batch may need extra time, especially if the ingredients start cold.

Keep warm for serving · Serving ideas · Back to recipe card · Back to top

How to Keep Buffalo Chicken Dip Warm for a Party

Once the dip is hot and melted, hold it on WARM for serving. The slow cooker should make hosting easier, not give you another thing to babysit.

Crockpot buffalo chicken dip on a party table with chips, celery, carrots, crackers, pretzels, plates, napkins, and a serving spoon.
Once the center is hot, WARM becomes your serving tool: it keeps the buffalo chicken dip soft and scoopable without needing oven space or last-minute reheating.

This is the kind of dip people hover near, because it smells like wings, stays warm, and does not ask anyone to sit down with a plate. Set out the dippers, keep a spoon nearby, and let the crockpot do the quiet work.

Condensation can make the top look watery. Leave the lid slightly ajar for a few minutes and stir well. Too thick? Loosen it with a splash of ranch, milk, or buffalo sauce. Greasy around the edges? Lower the heat if possible and stir in a little extra chicken or softened cream cheese.

For a long party, give the dip a slow stir every so often. That small move keeps the edges from drying and helps the mixture stay soft instead of crusty.

If you want a second hot, cheesy dip on the same table, this Rotel dip recipe brings the same warm party energy with a different flavor profile.

Party safety note: Do not leave the dip sitting out cold. Keep it warm in the slow cooker during serving, then refrigerate leftovers once the party is over. A shallow container helps leftovers cool faster in the fridge.

Make Ahead, Transport, and Party Timing

This is the section that saves you from stirring cheese dip while people are ringing the doorbell. You can mix the dip ahead, let the slow cooker handle the heat, and focus on the rest of the table.

Mix the cooked chicken, cream cheese, buffalo sauce, dressing, garlic powder, and shredded cheese in the slow cooker insert or in a covered container. Refrigerate until you are ready to cook. A cold mixture needs extra time, so stir once the cream cheese begins to soften.

For transport, cook the dip before leaving if the party is nearby, then keep it covered and plug in the slow cooker when you arrive. Stir before serving. If it thickened on the way, loosen it with a splash of ranch, milk, or buffalo sauce once it warms again.

If you want another make-ahead party snack for the same table, this easy cheese ball recipe gives you a cold, sliceable option while the buffalo chicken dip stays warm in the slow cooker.

When Guests ArrivePlan
In 30 minutesSoften the cream cheese and warm the mixture on the stovetop or in the microwave first, then transfer to the slow cooker on WARM.
In 1 to 2 hoursUse cooked chicken and cook on HIGH, stirring often.
In 2+ hoursUse LOW for the smoothest texture.
TomorrowPrep the mixture ahead, refrigerate, and cook fresh the next day.

Troubleshooting Crockpot Buffalo Chicken Dip

Half-melted buffalo chicken dip can look alarming before it looks delicious. Cream cheese sits in white pockets, sauce gathers at the edges, and the top may look oily before the final stir. Do not panic yet — most crockpot dip problems are fixable while the dip is still warm.

Quick Fixes at a Glance

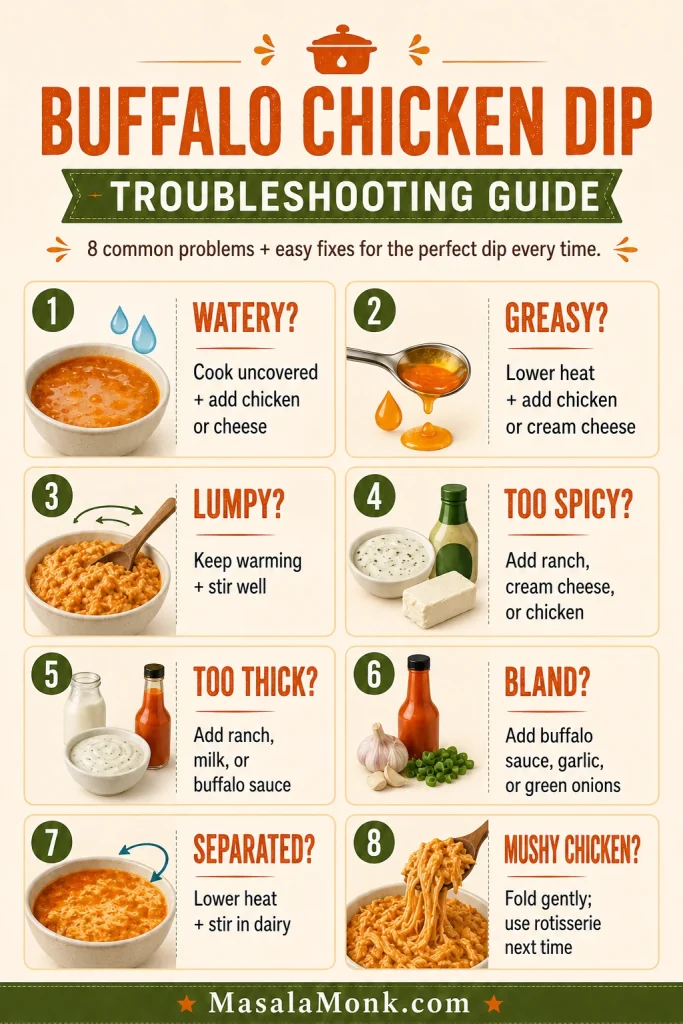
Use the visual guide first if you are standing over the crockpot and need a fast rescue. The full table below gives the likely cause and the best fix.

Troubleshooting infographic for buffalo chicken dip with fixes for watery, greasy, lumpy, too spicy, too thick, bland, separated, and mushy dip.
If the dip looks wrong, do not panic; watery, greasy, lumpy, bland, thick, or spicy buffalo chicken dip can usually be corrected while it is still warm.
ProblemLikely CauseFix
Watery dipCanned chicken was not drained, too much sauce, or lid condensationCook uncovered for 10 to 15 minutes, stir well, or add more shredded chicken or cheese.
Greasy dipCooked too hot, too much cheese, or oily dressingSwitch to LOW or WARM and stir in extra chicken, softened cream cheese, or a spoonful of Greek yogurt.
Lumpy cream cheeseCream cheese was too cold or added in large piecesLet it keep warming, then stir well. Next time, soften and cube the cream cheese first.
Too spicyHot sauce was stronger than expectedAdd ranch, cream cheese, sour cream, Greek yogurt, or more chicken.
Too thickToo much chicken or cheese, or it sat on WARM for a whileStir in a splash of ranch, milk, or buffalo sauce.
BlandNot enough buffalo sauce, salt, or tangAdd more buffalo sauce, garlic powder, green onions, or blue cheese crumbles.
SeparatedDairy sat too hot for too longLower the heat, stir well, and add a small spoonful of cream cheese, sour cream, or Greek yogurt.
Mushy chicken textureCanned chicken was over-stirred or too softFold gently and use rotisserie chicken next time for a chunkier bite.

Back to recipe card · Go to serving ideas · Back to top

What to Serve with Crockpot Buffalo Chicken Dip

Build the board around contrast: hot dip, cold crunch, salty chips, fresh vegetables, and one or two crispy sides. Tortilla chips are the classic choice, but celery, carrots, cucumber rounds, bell pepper strips, crackers, bread, soft pretzels, fries, potato skins, and slider buns all work.

Build a Better Buffalo Chicken Dip Board

Give people more than one way to scoop. Fresh vegetables cut the richness, while chips, crackers, pretzels, bread, fries, wings, or sliders make the spread feel like a real party table.

Serving board with buffalo chicken dip, tortilla chips, celery, carrots, crackers, pretzels, pita chips, toasted bread, wings, sliders, and potato skins.
Build the board with contrast in mind: rich buffalo chicken dip needs crisp vegetables, salty chips, sturdy crackers, pretzels, fries, sliders, or wings to balance each bite.

For a bigger game-day table, pair the dip with crispy air fryer chicken wings or pub-style battered fries. The dip brings the creamy buffalo flavor, while the wings and fries bring the crispy, salty bite people expect from a snack spread.

Not everything on the table has to be spicy. For contrast, add spinach artichoke dip for another hot dip or 7 layer dip for a cold, colorful chips-and-dip option.

A Final Serving Setup

When the dip is the main snack, keep the final setup simple: creamy buffalo chicken in the center, fresh crunch around it, and enough sturdy dippers for people to keep coming back.

Overhead board of finished buffalo chicken dip with tortilla chips, celery, carrots, crackers, ranch, blue cheese crumbles, and green onions.
Finally, keep the serving setup simple: creamy buffalo chicken dip in the center, fresh vegetables for crunch, and salty dippers around the edges for easy scooping.

Leftover Buffalo Chicken Dip Ideas

Leftovers are the cook’s bonus. The dip firms up in the fridge, then melts back into a spicy chicken filling the next day. It already has chicken, cheese, sauce, and seasoning, so it can turn into another snack or quick meal with very little effort.

Leftover buffalo chicken dip stored in a glass container and reused in quesadillas, sliders, and loaded fries.
After chilling, the dip firms into a ready-made filling, so leftovers can become quesadillas, sliders, wraps, baked potatoes, or loaded fries with gentle reheating.
  • Spread it inside quesadillas.
  • Spoon it onto slider buns.
  • Use it in grilled cheese.
  • Add it to wraps with lettuce and celery.
  • Spoon it over baked potatoes.
  • Use it on loaded fries.
  • Stir a little into pasta.
  • Use it as a pizza topping.
  • Stuff it into mushrooms or mini peppers.

Very thick leftover dip can be warmed gently with a splash of milk, ranch, or buffalo sauce before using it as a filling.

Storage, Reheating, and Freezing

Store leftover buffalo chicken dip in an airtight container in the refrigerator for up to 3 to 4 days. Reheat small portions in the microwave, stirring halfway through. For a larger amount, return it to the slow cooker on LOW, stir occasionally, and add a splash of milk, ranch, or buffalo sauce if it looks too thick.

Reheat gently until the dip is hot through the center. If reheating a larger batch, a food thermometer should read 165°F / 74°C in the center before serving. Gentle reheating gives the dip a better chance of coming back close to party texture instead of turning oily or tight.

You can freeze buffalo chicken dip, but the texture may change because of the cream cheese and dressing. It may look slightly grainy or separated after thawing. For best results, thaw it in the refrigerator, reheat gently, and stir in a little fresh cream cheese or dressing to bring it back together.

Back to recipe card · Leftover ideas · Back to top

Easy Variations

Extra Cheesy Buffalo Chicken Dip

Cheese-pull people can use 2 cups shredded cheese instead of 1½ cups. Stir part of it into the dip and save the rest for the top near the end.

Mild Buffalo Chicken Dip

For mixed crowds, use a mild buffalo wing sauce, reduce the sauce to ½ cup, and add an extra spoonful of ranch or cream cheese.

Spicy Buffalo Chicken Dip

Wing-night heat starts with Frank’s RedHot Original or another sharper hot sauce. Add a pinch of cayenne, then finish with blue cheese crumbles or sliced jalapeños.

High-Protein Buffalo Chicken Dip

To make it lighter but still creamy, replace part of the cream cheese with blended cottage cheese or thick Greek yogurt. Add it gently and avoid boiling or overheating so the texture stays smooth.

No Cream Cheese Buffalo Chicken Dip

Without cream cheese, the texture will be looser and tangier. Use sour cream plus a little mayo, or try blended cottage cheese for a lighter version. Keep the heat gentle so the dip does not separate.

Keto or Low-Carb Buffalo Chicken Dip

The dip itself can fit a low-carb style if your sauce and dressing are low in sugar. Serve it with celery, cucumbers, bell peppers, or low-carb crackers instead of tortilla chips.

Dairy-Free Note

A dairy-free version works best with dairy-free cream cheese, dairy-free ranch, and a dairy-free shredded cheese that melts well. The texture will vary by brand, so heat gently and stir often.

FAQs About Crockpot Buffalo Chicken Dip

How long does buffalo chicken dip take in the crockpot?

With cooked or rotisserie chicken, buffalo chicken dip usually takes 1½ to 2½ hours on LOW or 1 to 2 hours on HIGH. A cold make-ahead batch may need a little longer.

Can you make crockpot buffalo chicken dip with raw chicken?

Yes, but use thawed raw chicken and cook it first. Once the chicken reaches 165°F / 74°C, shred it, then add the cream cheese, dressing, and shredded cheese near the end.

Should frozen chicken go straight into the slow cooker?

Thaw the chicken before adding it to the slow cooker. Frozen chicken can heat unevenly, especially in a creamy dip where the dairy may overheat before the chicken is properly cooked.

Is canned chicken okay for buffalo chicken dip?

Yes. Drain canned chicken very well, flake it gently, and fold it into the dip. It gives a softer texture than rotisserie chicken, but it works well for a quick pantry version.

What cheese melts best?

Cheddar, Colby Jack, Monterey Jack, or a blend all work. Freshly shredded cheese usually melts smoother, while pre-shredded cheese is convenient but can make the dip slightly thicker because of anti-caking starches.

Does buffalo wing sauce taste different from hot sauce?

Yes. Buffalo wing sauce is usually smoother and more balanced. Plain hot sauce is sharper and thinner, so start with less and adjust after the dip melts.

How do I hold buffalo chicken dip warm?

Once the dip is hot through the center, turn the slow cooker to WARM. Stir occasionally and loosen with a splash of ranch, milk, or buffalo sauce if it thickens.

How much buffalo chicken dip should I make for a party?

One standard batch serves about 10 to 12 people as an appetizer. For 16 to 24 people, make a double batch in a 5 to 6 quart slow cooker. With a larger crowd, two separate slow cookers usually work better than one overloaded cooker.

Why did my dip turn greasy?

Greasy buffalo chicken dip usually means the dairy or cheese got too hot. Lower the heat, stir well, and add more chicken, softened cream cheese, or a spoonful of Greek yogurt to bring it back together.

Why is my buffalo chicken dip watery?

Watery dip can happen if canned chicken was not drained well, too much sauce was added, or condensation dripped from the lid. Cook uncovered briefly, stir well, or add more chicken or shredded cheese.

Can this be made ahead?

Yes. Mix the ingredients ahead, refrigerate, then cook in the slow cooker when needed. A cold mixture needs extra time, so stir once the cream cheese begins to soften.

Can buffalo chicken dip be frozen?

It can be frozen, but the texture may change because of the cream cheese and dressing. Thaw in the refrigerator, reheat gently, and stir in a little fresh cream cheese or dressing if needed.

What should I serve with it?

Serve buffalo chicken dip with tortilla chips, celery, carrots, crackers, pita chips, cucumber rounds, bell pepper strips, toasted bread, pretzels, fries, or slider buns. A mix of fresh vegetables and salty chips works best because the dip is rich, cheesy, and spicy.

Back to recipe card · Back to top

Did your crowd like it better with ranch, blue cheese, canned chicken, rotisserie chicken, or extra Frank’s? Leave a comment with what worked — it helps the next person planning a game-day table.

When the dip is melted through and clinging to every chip, turn the slow cooker to WARM, set out something crunchy, and let people gather around it. That is the whole magic of crockpot buffalo chicken dip: simple ingredients, low effort, and a party snack that keeps taking care of itself.