Posted on Leave a comment

Vegetable Pot Pie Recipe: Easy, Creamy & Flaky With Puff Pastry or Pie Crust

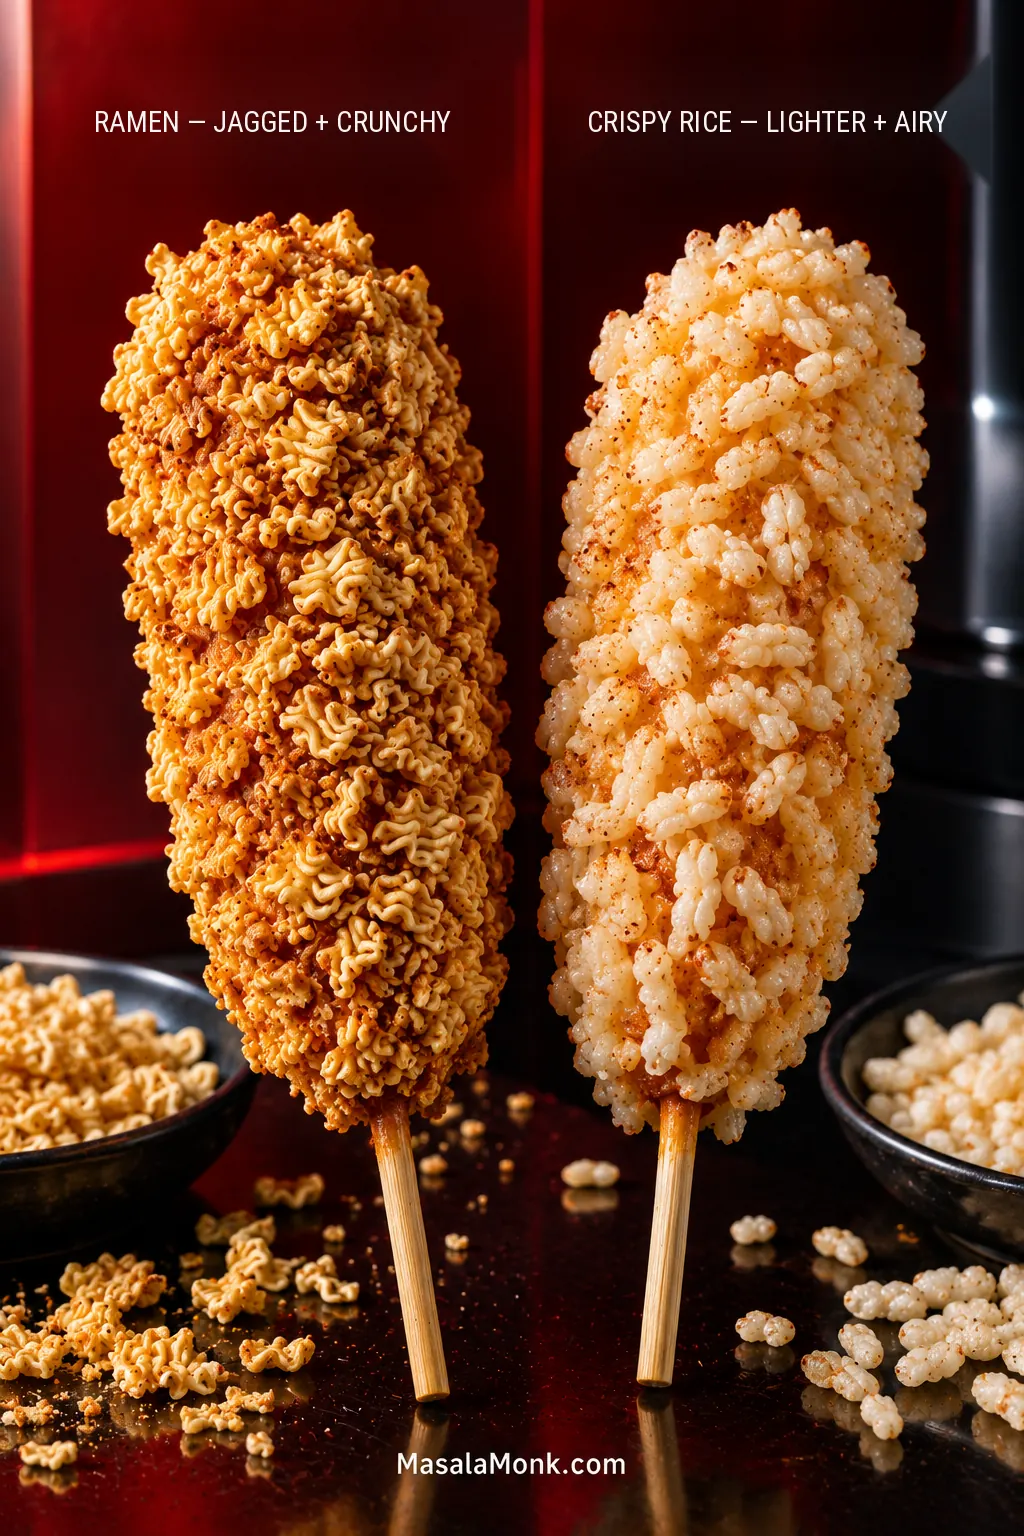
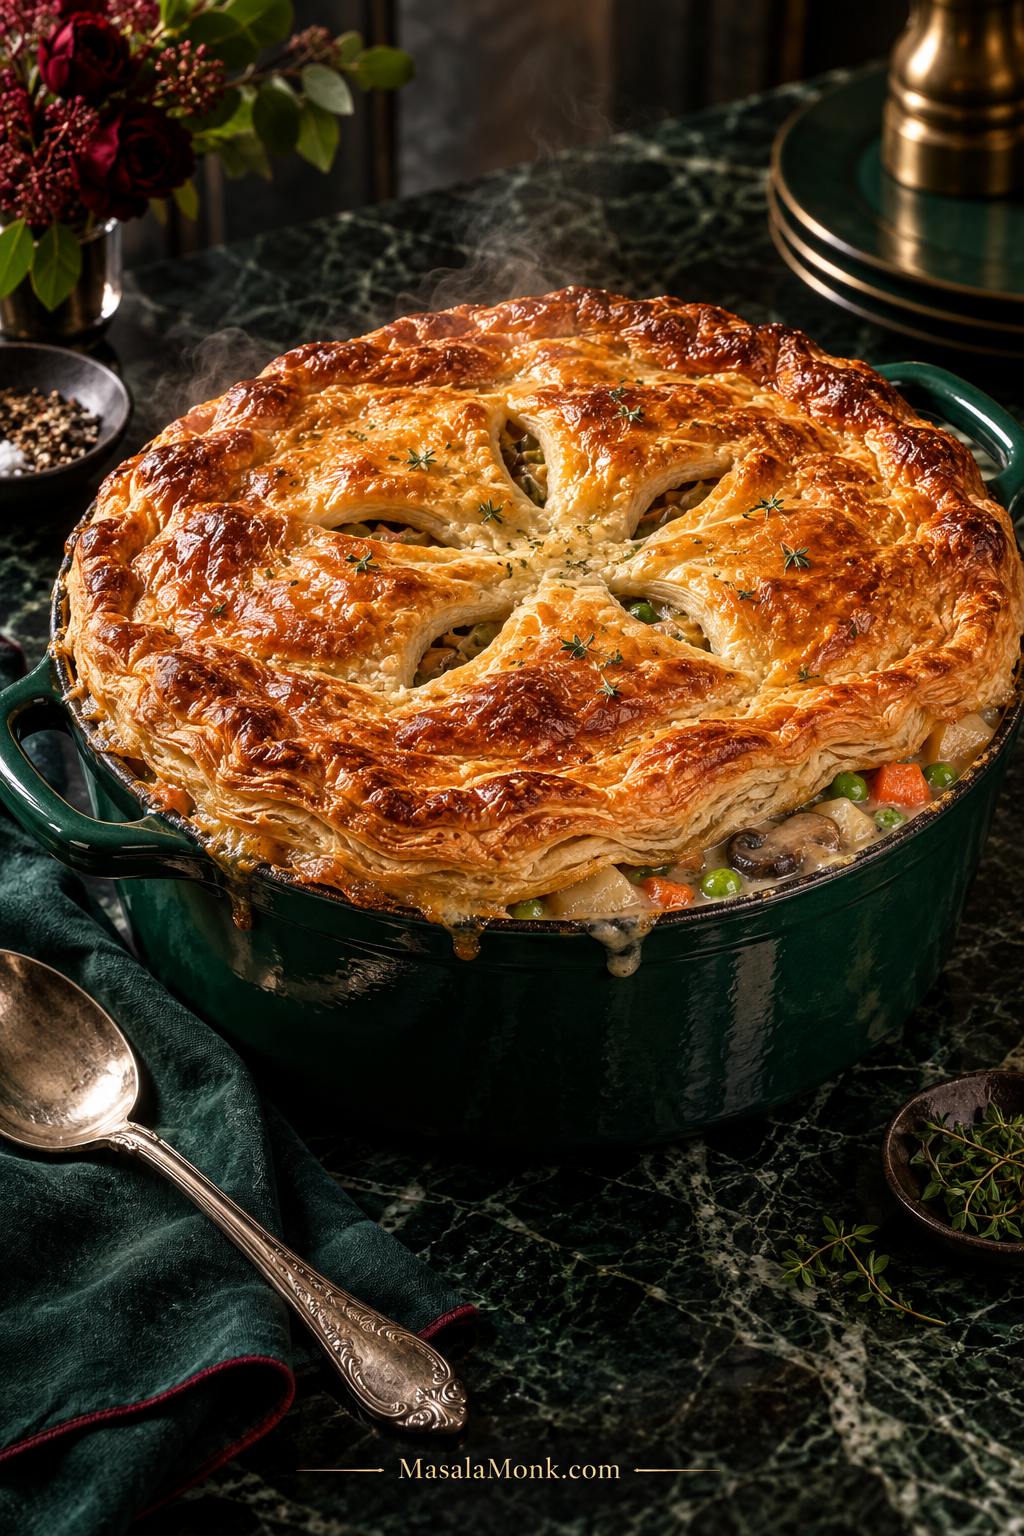
Vegetable pot pie in a deep green casserole with a deeply golden puff-pastry lid and creamy potato, carrot, pea, corn and mushroom filling visible around the rim.

Under a deeply golden pastry lid, the filling is creamy enough to cling to tender potatoes and carrots, with sweet peas, browned mushrooms and flaky crust in every spoonful.

That contrast is what makes vegetable pot pie worth baking: crisp pastry above, rich gravy underneath, and vegetables that stay distinct in the sauce. The key is getting those parts ready at the same time. Potatoes need a head start, mushroom water needs time to cook away, and puff pastry performs best when it reaches the oven still chilled.

This vegetable pot pie recipe handles most of that work before the dish reaches the oven. The cooking is straightforward: soften the vegetables, build the gravy, cover and bake. Once the filling is ready, the pastry turns a pan of creamy vegetables into a generous dinner with a crisp golden lid.

Vegetable Pot Pie Recipe

The recipe pairs a creamy thyme-and-sage vegetable filling with a deeply golden puff-pastry lid. Potatoes, mushrooms, carrots, peas and corn make this vegetarian pot pie substantial enough for dinner, while a single pie crust can replace the puff pastry for a sturdier finish.

Serves
About 6

Dish
2½–3 qt / 2.4–2.8 L

Oven
425°F / 220°C

Prep
20 minutes

Cook
60–70 minutes

Total
About 1 hr 30–1 hr 40 min

Three Checks Before the Crust Goes On

Cook firm vegetables until nearly tender, thicken the gravy until it clings, then add chilled pastry. Those three checks matter more than hitting every minute exactly.

Vegetables

Potatoes and other firm pieces are almost fork-tender. A knife meets only slight resistance.

Gravy

For the gravy, a spatula trail stays open for about 1–2 seconds before slowly closing.

Pastry

Puff pastry is cool and flexible, not sticky, greasy or floppy.
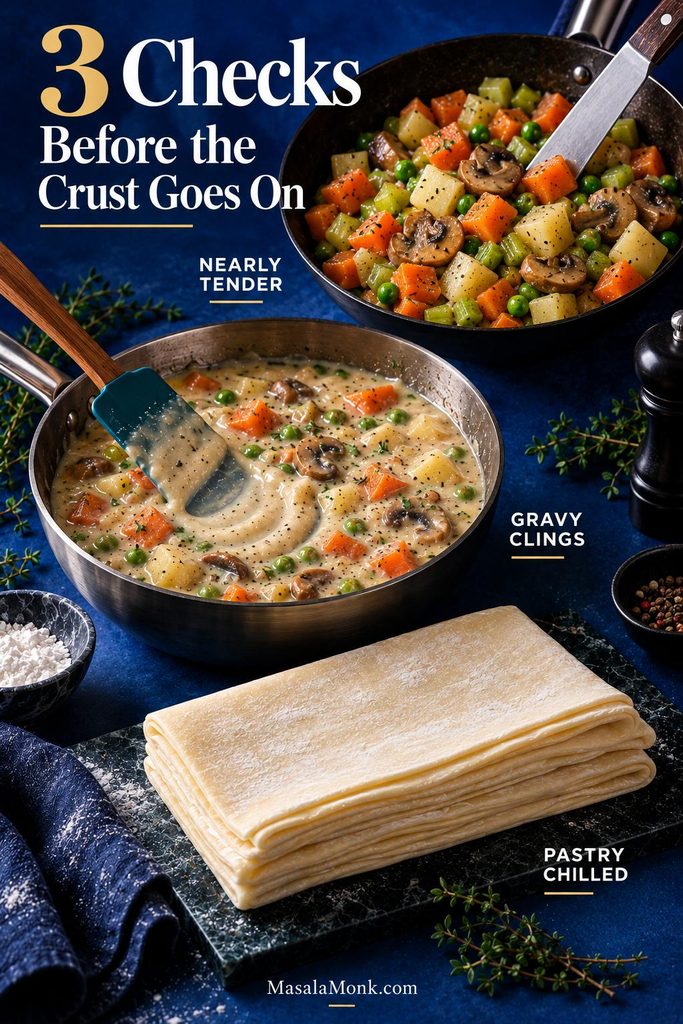
Three pre-baking checks for vegetable pot pie: nearly tender vegetables being tested, thick gravy that clings and leaves a brief trail, and chilled puff pastry ready for the dish.
These checks take pressure off the oven. Once the vegetables and gravy are ready, the bake is mainly about getting the chilled pastry properly puffed and browned.

Ingredients

Vegetables and Aromatics

  • 1 medium-large onion, diced — about 5 oz / 150 g
  • 2 medium carrots — about 5 oz / 150 gCut into ¼- to ⅜-inch / 6- to 10-mm pieces.
  • 2 celery stalks — about 3 oz / 80 gDice into small, even pieces.
  • 8 oz / 225 g mushroomsCremini or white mushrooms both work; slice or chop them.
  • 8 oz / 225 g Yukon Gold or other all-purpose potatoUsually 1 large or 2 small potatoes. Cut into ⅜- to ½-inch / 10- to 12-mm cubes.
  • 3 garlic cloves, minced
  • 1 tsp dried thyme
  • ½ tsp dried sage

For the Creamy Gravy

  • 4 tbsp / 2 oz / 56 g unsalted butter
  • ⅓ cup / about 1½ oz / 42 g all-purpose flour
  • 2 cups / 16 fl oz / 480 ml low-sodium vegetable broth, divided½ cup / 120 ml cooks the potato; the remaining 1½ cups / 360 ml builds the gravy.
  • ½ cup / 4 fl oz / 120 ml whole milkHeavy cream can replace the milk for a richer sauce.
  • 2 tsp / 10 ml soy sauce
  • 1½ cups / about 7½ oz / 210 g total frozen peas and corn
  • ¾ tsp fine salt, divided, plus more if needed
  • ½ tsp black pepper
  • 1 tsp / 5 ml apple cider vinegar or white wine vinegar

For the Puff-Pastry Top

  • Puff pastry — enough to cover the openingUsually one large sheet, often 8½–10½ oz / 240–300 g. Sheet dimensions matter more than package weight.
  • 1 large egg
  • 1 tbsp / 15 ml water or milk

Produce varies in size, so use the gram weights when your carrots, potatoes or onion look unusually large or small.
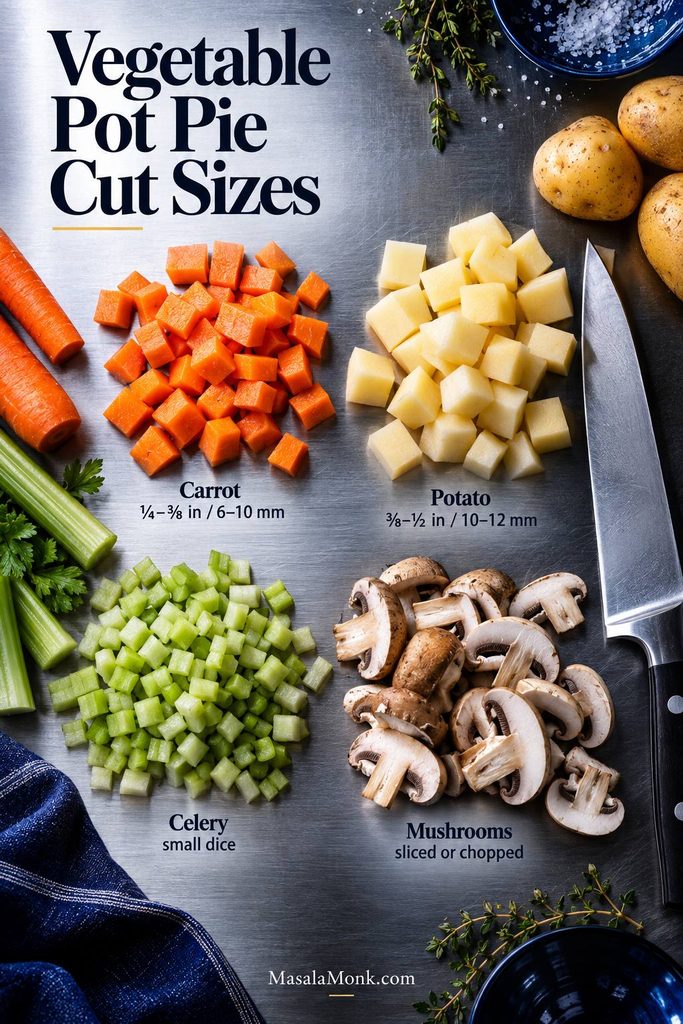
Overhead vegetable prep guide showing carrots cut about ¼ to ⅜ inch, potatoes about ⅜ to ½ inch, small-diced celery and sliced mushrooms.
Keep the firm vegetables small enough to finish before the pastry; a few oversized potato or carrot pieces can still be crunchy when the crust is already browned.

Equipment

  • Large deep skillet or Dutch oven
  • 2½–3 qt / 2.4–2.8 L oven-safe casserole or deep baking dish
  • Rimmed baking sheet
  • Whisk

A dish with an opening around 10–11 in / 25–28 cm works well with most large pastry sheets. Leave ½–¾ in / 1.25–2 cm between filling and rim so bubbling gravy has somewhere to go.

An oven-safe skillet can go straight from stovetop to oven when the filling fits with that headroom and the pastry covers the opening.

Instructions

  1. Heat the oven and chill the pastry. Preheat to 425°F / 220°C. Thaw puff pastry only until it unfolds without cracking, then return it to the refrigerator.
  2. Start the vegetables. Melt the butter over medium heat. Add onion, carrots, celery and ¼ tsp salt. Cook for 6–8 minutes, until the onion is translucent and the carrots have begun to soften.
  3. Brown the mushrooms. Add them and cook for 6–10 minutes. At first they will look wetter; keep going until that liquid evaporates and the pan returns to a clear sizzle. Add garlic, thyme, sage and pepper, then cook for 30–60 seconds, until the herbs smell distinctly savory.

Finish the Filling

  1. Get the potato nearly tender. Add potato and ½ cup / 120 ml broth. Cover for 6–8 minutes, then uncover and cook until the largest cubes offer only slight resistance and the broth has nearly disappeared. The oven is good at baking pastry; it is much less helpful with a raw potato buried under gravy.
  2. Build the gravy. Stir in the flour and cook for 1–2 minutes. Add ½ cup / 120 ml of the remaining broth and stir smooth. Gradually add the final 1 cup / 240 ml broth, then the milk, soy sauce and remaining salt. Simmer for 3–5 minutes.
  3. Add the peas and corn. Stir them in frozen and return the gravy to a gentle simmer for 2–3 minutes. Drag a spatula across the pan; the trail stays open briefly when the gravy is ready. A spoonful slumps back into the skillet, and the sauce clings to the vegetables instead of pooling underneath them.

Season and Add the Pastry

  1. Season the filling. Taste, adjust salt or pepper, then stir in the vinegar. The filling needs enough flavor to stand on its own before pastry covers it. If it is still bubbling vigorously, let it stand for about 5 minutes while the pastry stays refrigerated.
  2. Add the pastry. Transfer the filling if needed. Lay the pastry over the dish with a small overhang, press it lightly against the rim and trim only when necessary. Do not stretch the sheet to make it fit. Cut 3–5 vents, beat the egg with water or milk, and brush the top lightly.
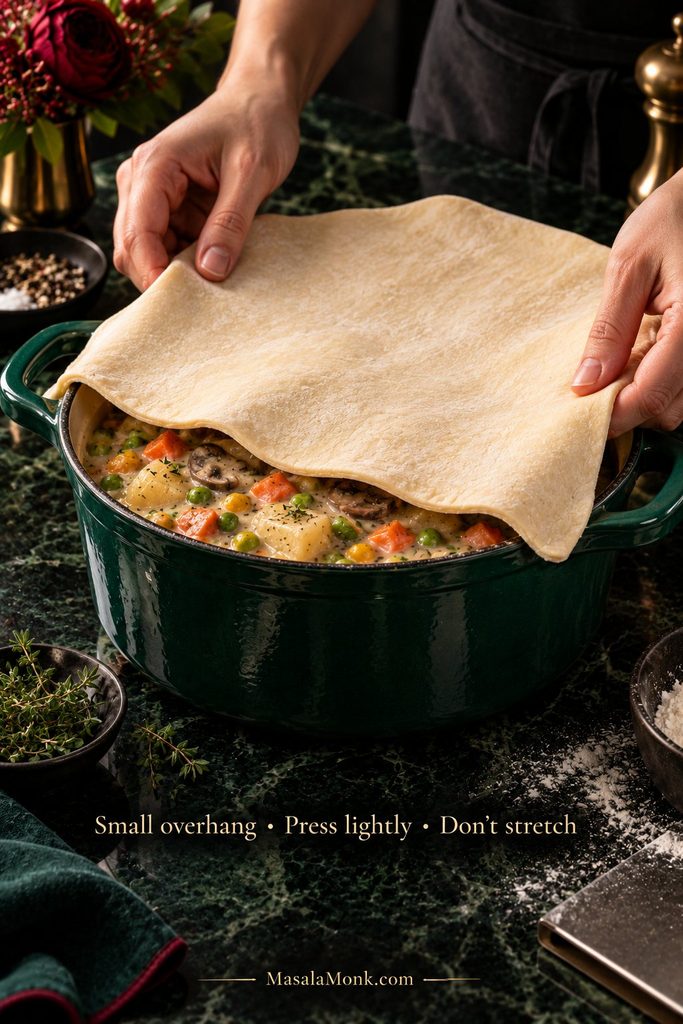
Hands laying one sheet of raw puff pastry over creamy vegetable pot pie filling with a small overhang around a deep green casserole.
If the sheet fits only when it is stretched, change the fit rather than the pastry. Taut layers have less room to separate and lift in the oven.

Bake and Rest

  1. Bake for 22–30 minutes. Look at the center as well as the edge: properly baked pastry is puffed, visibly layered and deeply golden. Gravy bubbling through the vents or around the rim is a good sign that the filling underneath is thoroughly hot. Shield dark edges loosely with foil when needed.
  2. Rest for 10 minutes. The gravy settles slightly while the lid stays crisp enough to break cleanly under a spoon.
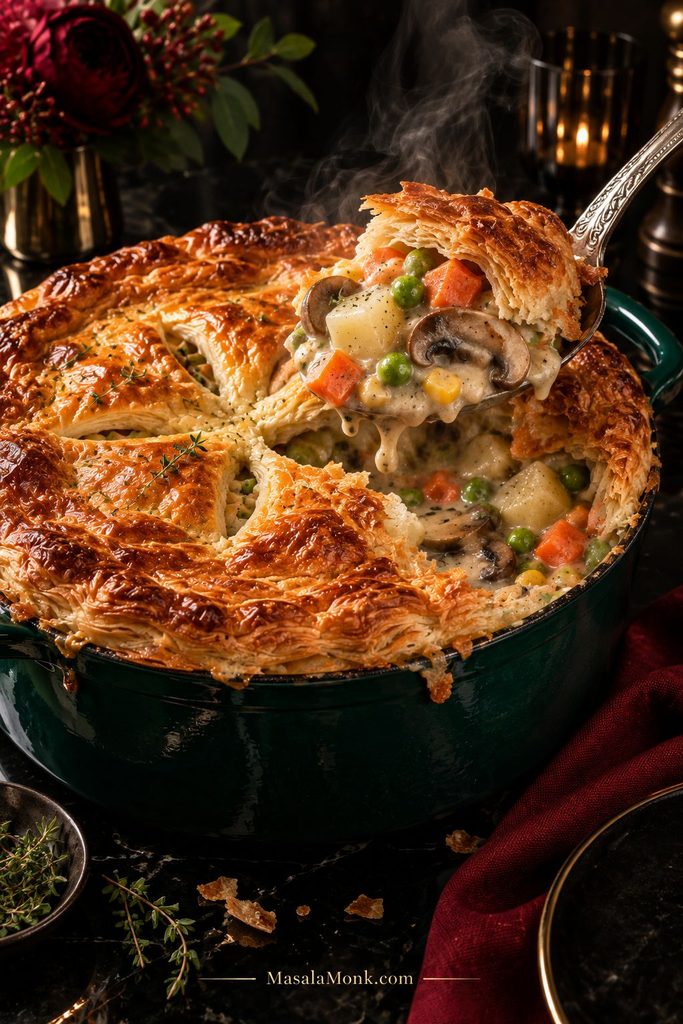
Serving spoon lifting creamy vegetable pot pie filling with potatoes, carrots, peas, corn and mushrooms beneath broken flakes of golden puff pastry.
Ten minutes after baking, look for a filling that holds briefly on the spoon before settling. That soft hold matters more than getting a perfectly tidy first serving.

Pie-crust version: cover the warm or slightly cooled filling with one prepared pie-crust round, cut several vents and brush with egg wash. Bake at 400°F / 205°C for 30–35 minutes, until deeply golden and bubbling. Check packaged crust when the dish needs to stay vegetarian, since some products use animal fat.

Best Vegetables for Pot Pie

Onion, carrots, celery, potatoes, mushrooms, peas and corn make a dependable pot-pie mix. Green beans, cauliflower, broccoli, spinach, sweet potato and squash work too. Two things matter when you swap: how long the vegetable needs to become tender and how much water it carries into the pan.

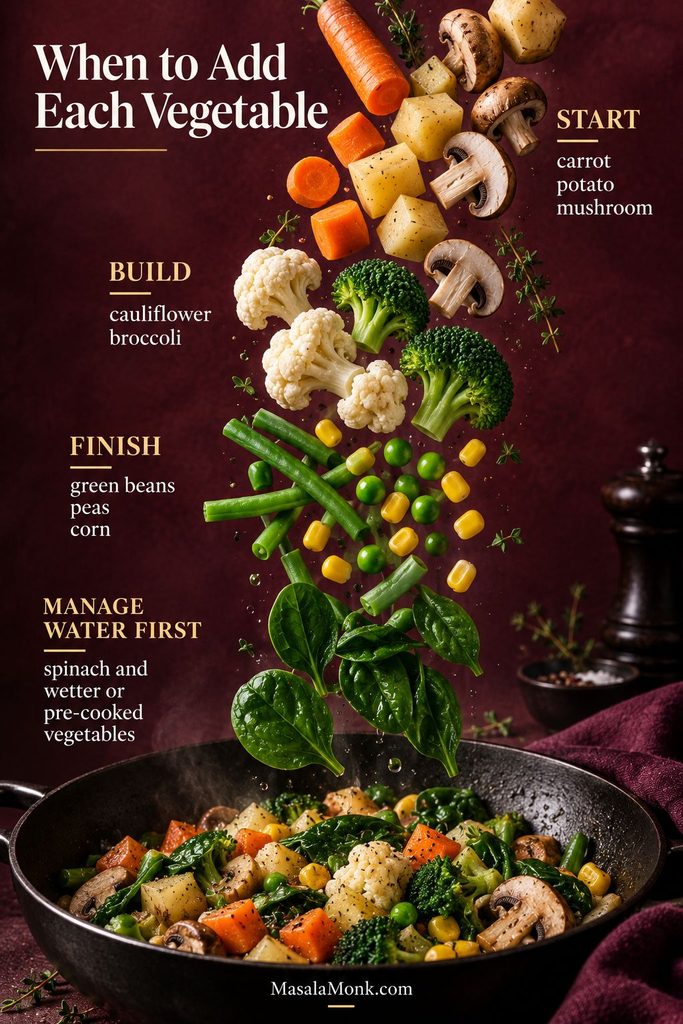
When to Add Each Vegetable

VegetableCut or PrepWhen to Add ItBefore Baking
Potato⅜–½ in / 10–12 mm diceAfter mushrooms, before flourAlmost tender
Carrot¼–⅜ in / 6–10 mm piecesWith onion and celeryMostly tender
CelerySmall diceWith onion and carrotSoftened
MushroomsSliced or choppedAfter aromatics softenWater gone; some browning
CauliflowerSmall floretsWith potato, before flourNearly tender
BroccoliSmall floretsAs the gravy thickensBright and slightly firm
Green beansShort piecesNear the end; slightly earlier if firmTender, not limp
PeasFresh or frozenAt the end, with cornHeated through
CornFresh or frozenNear the endHeated through
SpinachWilted or thawed and squeezedAt the endExcess water removed
Sweet potato½ in / 12 mm cubesWith potato; start checking earlyAlmost tender
Butternut squashSmall cubesWith potato, or roasted and added lateTender, not collapsing
Vegetable timing guide showing carrots, potatoes and mushrooms added early; cauliflower and broccoli next; green beans, peas and corn later; and spinach or wetter vegetables needing moisture control first.
Different vegetable swaps create different problems: sweet potato changes timing, spinach changes moisture, and roasted vegetables arrive with much of their cooking already finished.

Mushrooms and Potatoes Need the Head Start

Mushrooms usually get wetter before they get browner. Once their released water cooks away, the quiet bubbling changes to a sharper sizzle. That is when browning really begins, giving the finished gravy more depth. The same moisture-first sequence matters in our creamy mushroom sauce.
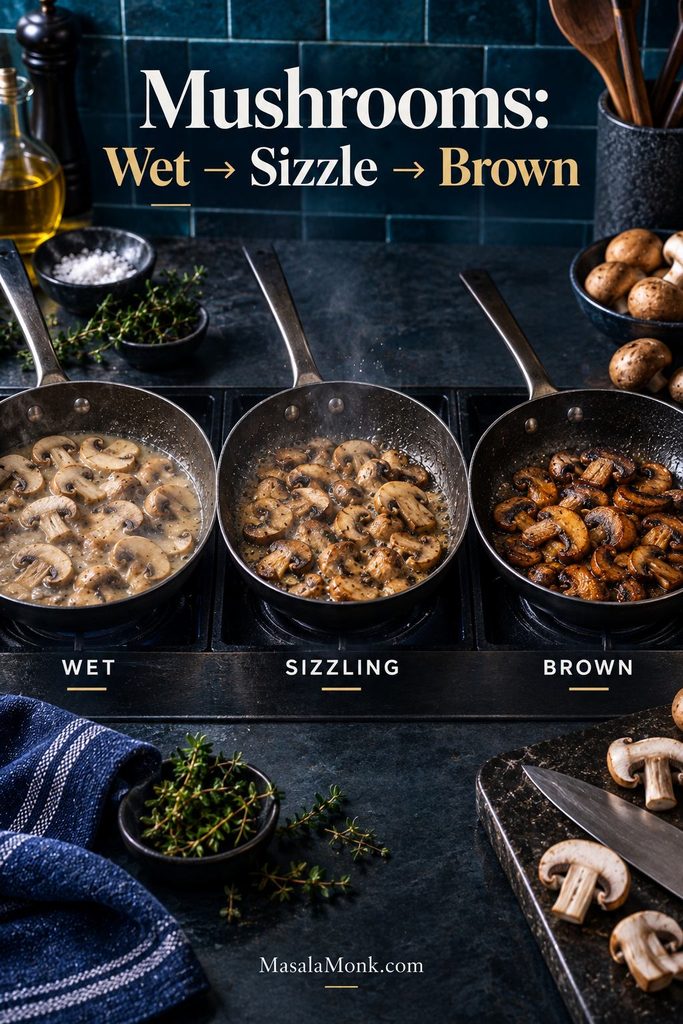
Three pans showing mushrooms releasing liquid, mushrooms sizzling as the liquid evaporates, and mushrooms deeply browned after the excess moisture is gone.
Cook the released mushroom water away before building the gravy. You get better browning now and less excess liquid to reduce later.

Potatoes have the opposite problem: they release little water but need time. Pieces around ⅜–½ inch / 10–12 mm soften efficiently without disappearing into the gravy. When potato shares the filling with cauliflower, smaller potato pieces help their cooking times meet in the middle; the same size logic appears in our roasted cauliflower and potatoes.

Swaps That Work Well

The table handles most substitutions, but a few deserve extra attention. Sweet potato softens faster than regular potato. Frozen spinach is unusually wet, so thawing and squeezing it first is worth the trouble. Already-roasted vegetables belong near the end. Roasting squash, cauliflower, Brussels sprouts or mushrooms also drives off water before it can loosen the gravy—the same moisture-control principle used in our vegetable lasagna.

Canned vegetables can work too, but their softer texture means they are best drained well and folded in late.

Build More Flavor Into the Filling

Browning does more for a meatless pot pie than simply adding extra herbs. Once the mushrooms have browned and the thyme and sage hit the pan, the filling starts smelling like pot pie before the gravy is even finished. Soy sauce gives it savory weight, while a small splash of vinegar keeps the finish lively. Mushrooms help, but cauliflower, green beans or extra potato can replace them.

Easy Vegetable Pot Pie With Frozen Vegetables

Yes. Most frozen mixed vegetables can go straight into the pot-pie filling without thawing. A few exceptions need a little prep first.

For less chopping, keep the onion, celery, mushrooms and potato, then use one 12 oz / 340 g bag of frozen peas, carrots, corn and green beans. Skip the fresh carrots and the separate peas-and-corn mixture from the main recipe.

Add the frozen mix after the gravy has thickened. The cold vegetables temporarily slow the simmer, so wait until the pan is bubbling gently again before judging thickness. Some bags barely change the sauce; heavily frosted ones can loosen it noticeably.

Straight From the Freezer

  • Peas
  • Corn
  • Small diced carrots
  • Green beans
  • Standard mixed-vegetable blends

Prep Before Adding

  • Spinach: thaw and squeeze dry.
  • Heavily frosted bags: knock away loose ice.
  • Large broccoli or cauliflower: give them more time to heat through before judging the gravy.
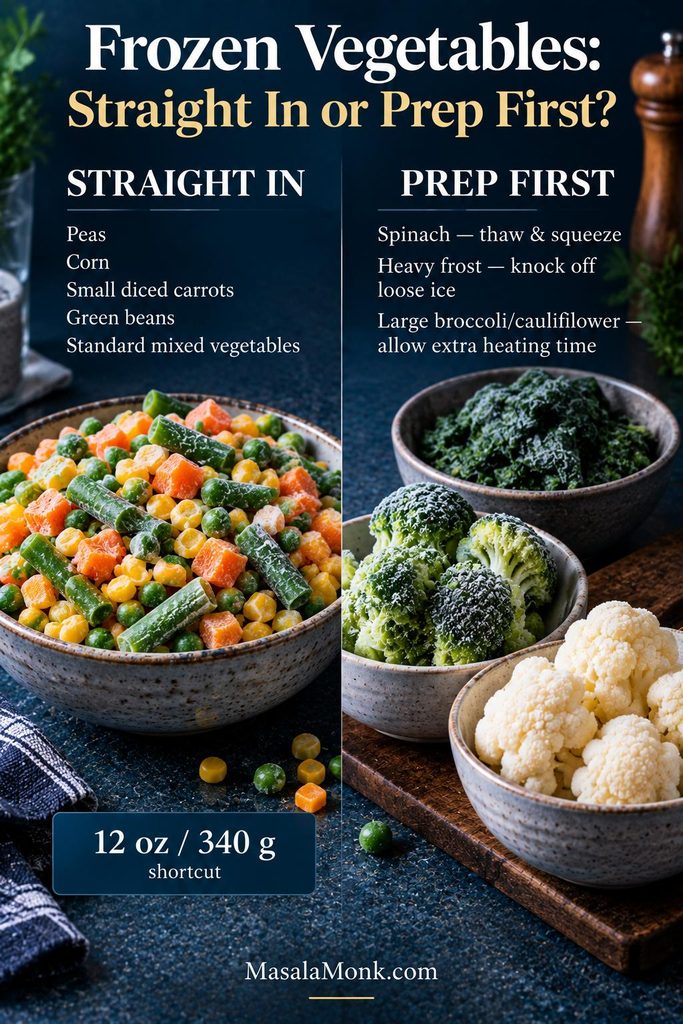
Frozen vegetable guide showing peas, corn, diced carrots and green beans used directly from frozen, while spinach, heavy frost and large broccoli or cauliflower pieces need extra preparation.
Loose freezer frost is extra water; knock it away before it reaches a gravy that is already close to finished thickness.

Jump to: Check filling thickness · Compare crusts · Back to recipe

Vegetable Pot Pie Filling: How Thick Should It Be?

The gravy should cling to the vegetables but still move slowly when you tilt the pan. Drag a spatula across the bottom; the trail should stay open for about 1–2 seconds before slowly closing.

Vegetable moisture can change a gravy that looked perfect a few minutes earlier, so judge its final thickness only after mushrooms, spinach or frozen vegetables are fully hot.
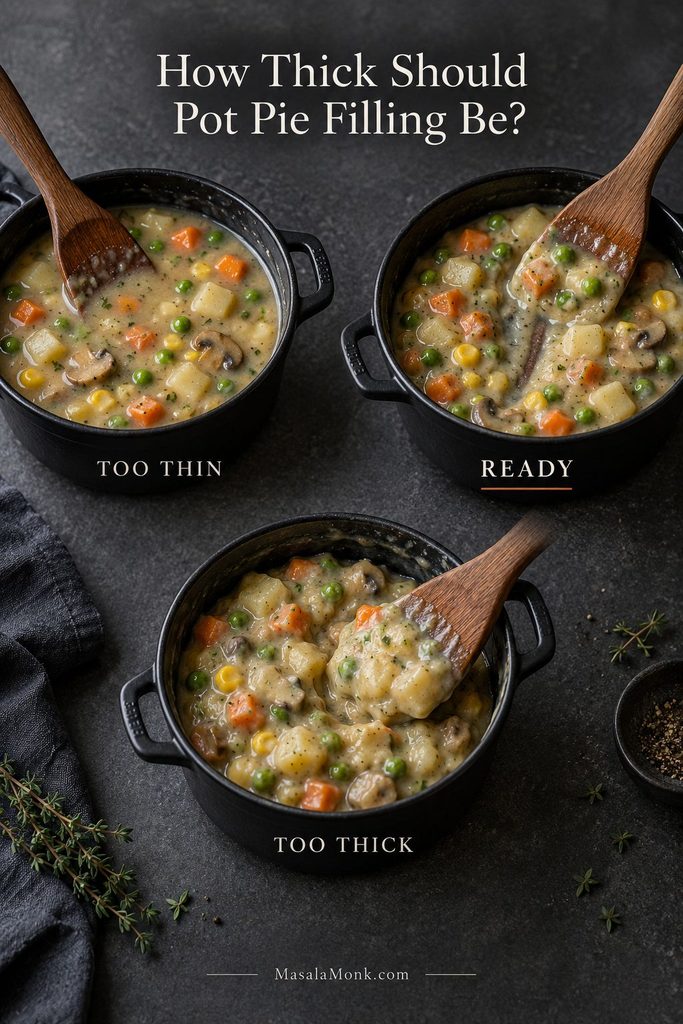
Three vegetable pot pie fillings showing a loose watery consistency, a creamy ready consistency that coats the vegetables, and an overly thick stiff consistency.
Wait for the simmer to return after adding frozen vegetables. Cold pieces can briefly make a correctly thickened pot pie filling look thinner than it really is.

When the Gravy Ends Up Too Thin

Reduce it uncovered before reaching for more starch. A few extra minutes over the heat often solve water introduced by vegetables. When reduction is not enough, mix 1 tsp / about 3 g cornstarch with 2 tsp / 10 ml cold water, stir in part of the slurry and simmer before deciding whether the rest is necessary.

When It Gets Too Thick

Add warm broth or milk 1–2 tbsp / 15–30 ml at a time. Stop once the gravy coats the vegetables easily again.

Puff Pastry, Pie Crust or Biscuits?

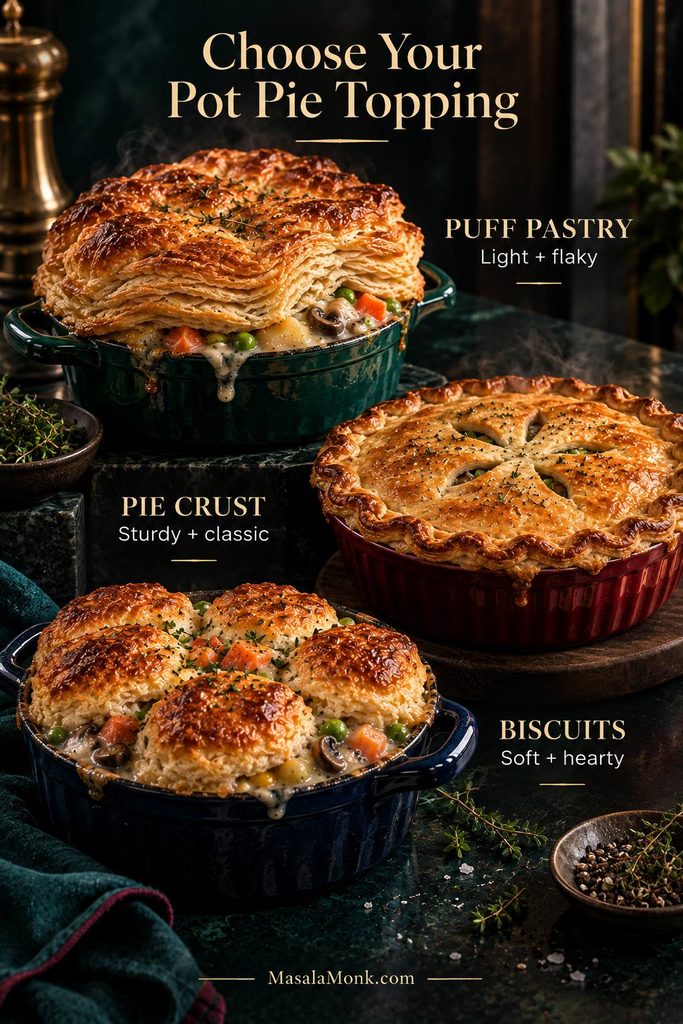
Puff pastry is the easiest default when you want a light, flaky lid without making dough. Choose pie crust for a sturdier top, or biscuits for a softer casserole-style finish. The filling itself can stay the same.

ToppingBest ForMain Adjustment
Puff pastryLight, flaky layersKeep chilled until assembly
Pie crustA sturdier classic lidBake around 400°F / 205°C
Double crustPastry underneath and on topCool filling and manage bottom moisture
BiscuitsA soft, hearty toppingCold dough over hot filling
Three vegetable pot pies comparing a tall flaky puff-pastry lid, a flatter crimped pie crust and separate golden biscuit topping.
Each topping changes the handling as well as the texture: keep puff pastry cold, use pie crust for structure, and give biscuits hot filling underneath.

Puff Pastry

For the puff pastry, the sheet is ready when it unfolds without cracking but still feels cool. Sticky, greasy or floppy pastry needs a few minutes back in the refrigerator.

Watch the middle of the lid in the oven. The edge can brown beautifully while the pastry over the wettest part of the filling remains pale and compressed. Properly baked layers look distinct and break under a spoon instead of bending together like damp dough.

Soft underneath is not the same as raw puff pastry. Steam naturally softens the side touching the gravy. Pale, sticky or floury pastry through the center is different and still needs more baking.
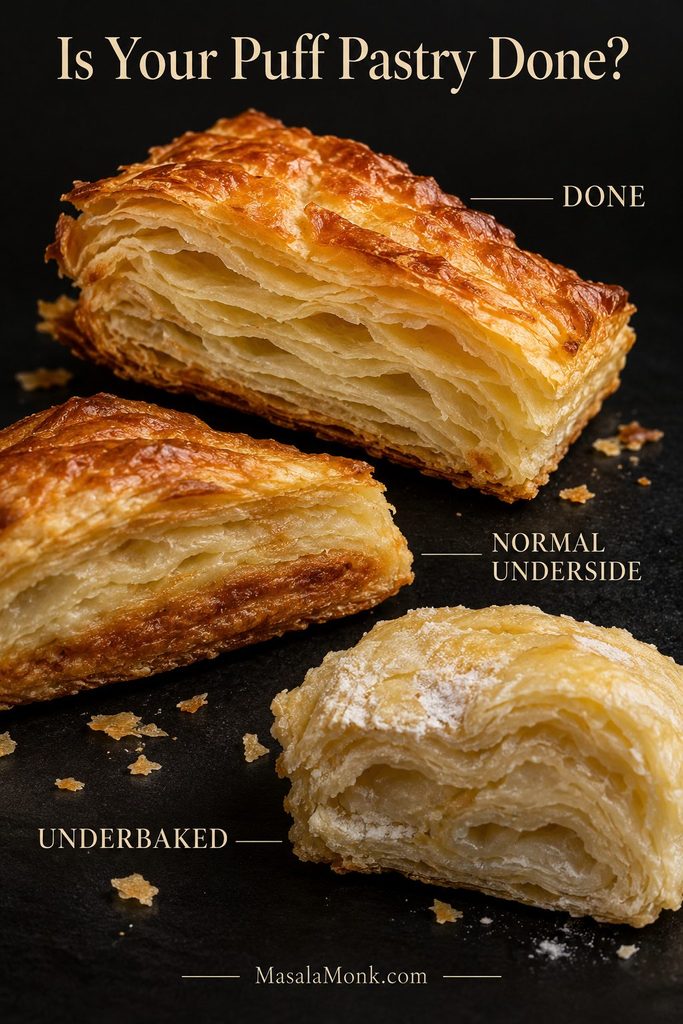
Three puff-pastry cross-sections showing fully baked separated golden layers, a cooked but softer underside, and pale compressed underbaked pastry.
If the center layers are pale, fused or tacky, keep baking—even when the edges are already deeply browned.

For crisp pastry on both sides, bake the sheet separately. Cut it into squares, brush with egg wash and bake on parchment at 400°F / 205°C, starting your check around 15 minutes. Spoon hot filling into bowls or ramekins and set the crisp pastry on top.

Puff pastry is much less forgiving on the bottom of a wet pot pie. Regular pie dough is the easier route when pastry underneath matters.

Pie Crust

For the easiest reliable pie-crust version, use a single top crust. It generally needs about 30–35 minutes at 400°F / 205°C. Cover the rim loosely with foil when it colors well ahead of the center.

Our homemade pie crust guide covers cold butter, hydration, rolling and chilling in more detail. For a double-crust pot pie, cool the filling before it meets the bottom dough and consider partial prebaking when a crisp base matters. Metal pans and stronger bottom heat also help; King Arthur Baking explains the role of pan material and bottom heat.

Using Biscuits as the Topping

Set cold biscuit dough over hot gravy with a little room between the pieces. For medium homemade biscuits, 400°F / 205°C for about 25–30 minutes is a useful starting point. Refrigerated dough should follow its package temperature and timing first.

Check a biscuit near the middle instead of judging only the browned tops. The underside is ready when it is set and no longer gummy.

Individual Pot Pies

Use six 16 oz / 475 ml ramekins, or six to eight smaller 12–14 oz / 355–415 ml dishes. Fill them no more than about three-quarters full. Puff-pastry tops often finish in roughly 18–22 minutes at 400–425°F / 205–220°C, although the center layers remain the better doneness cue.

Changing the dish changes the bake. A shallow ramekin, deep casserole, bottom crust and thick biscuit topping all move heat and steam differently. Borrow another version’s timer cautiously when the vessel or topping changes.
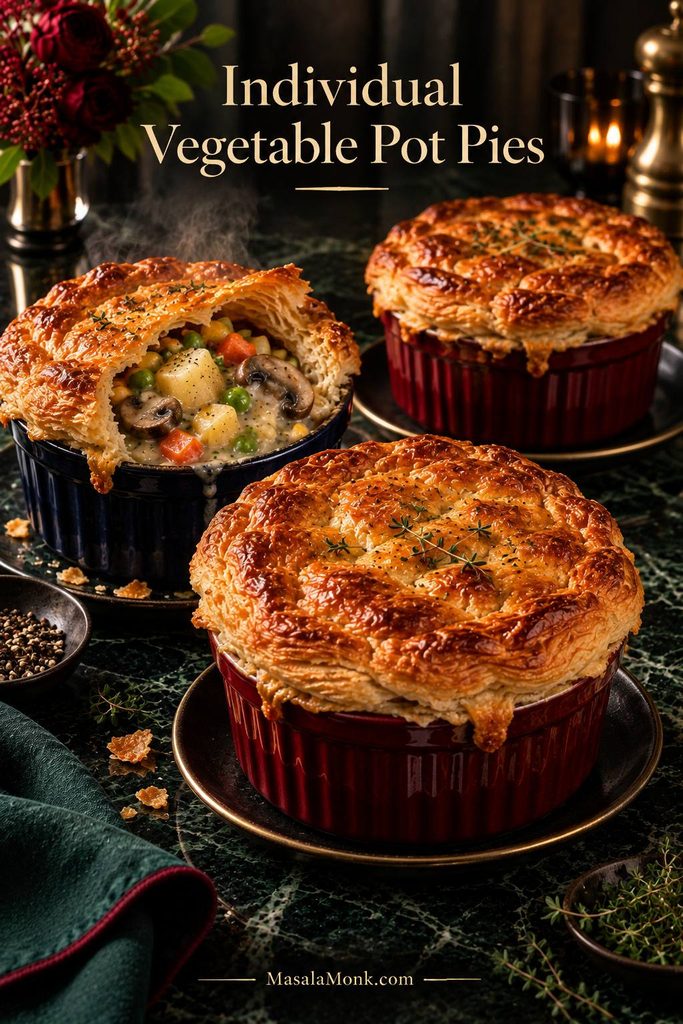
Three individual vegetable pot pies in ramekins with golden puff-pastry tops, including one opened to show creamy vegetable filling.
Three-quarter-full ramekins leave useful headroom for bubbling gravy, so the pastry edge stays cleaner and the filling stays in the dish.

Jump to: Vegetarian variations · Serving ideas · Make ahead · Back to recipe

Vegetarian Pot Pie Variations

Make It Heartier

Add 1–1½ cups / 170–255 g drained white beans or chickpeas and remove roughly the same volume of vegetables. White beans soften into the sauce; chickpeas keep more bite.

Vegan

Use vegan butter or another suitable cooking fat, vegetable broth and unsweetened oat or soy milk. Check the pastry label because prepared puff pastry and pie crusts vary in the fats they contain. Plant milk or aquafaba can replace the egg wash; nutritional yeast or a little extra soy sauce can deepen the gravy.

Gluten-Free

A gluten-free all-purpose blend designed to replace wheat flour can work in the roux. Cornstarch is another straightforward option.

For cornstarch, omit the 42 g flour. Once the vegetables are ready, add the broth and milk and bring them to a simmer. Mix 2½ tbsp / about 20 g cornstarch with 2½ tbsp cold water. Start with roughly half, simmer, then add only as much more as the gravy needs.

Use certified gluten-free tamari or soy sauce and a gluten-free topping.

Making a meat version? Cooked turkey or leftover gravy changes the liquid balance, so start with our Turkey Pot Pie Recipe instead.

What to Serve With Vegetable Pot Pie

Pot pie already brings pastry, gravy and plenty of vegetables, so the best sides add freshness. A cucumber salad with vinegar and dill gives a cold, sharp contrast, while green beans almondine add lemon and toasted-almond crunch. For the same reason, a peppery arugula salad with a bright vinaigrette works well, while simply roasted asparagus keeps the plate warm without making it heavier.
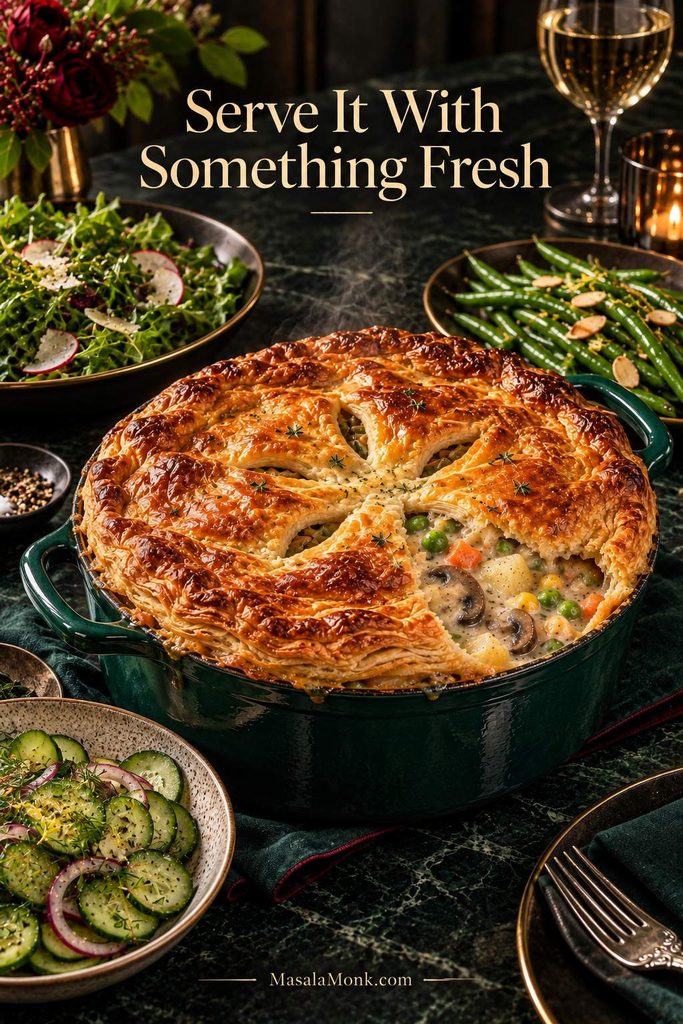
Vegetable pot pie served with fresh sides including cucumber salad, leafy greens and green beans on a dark dining table.
One crisp, fresh or acidic side is usually enough; another starch mostly competes with the pastry.

Make Ahead, Freeze and Reheat

Yes. Make the filling up to 2 days ahead, but keep the pastry separate until you’re ready to bake. Raw puff pastry gradually absorbs moisture when it sits directly against the gravy.

Reheat refrigerated filling until hot before assembly. Chilled flour-thickened gravy often firms up, so loosen it with a small splash of broth or milk when needed. If the filling is bubbling vigorously, let it stand for a few minutes before covering and baking.

Freezing

Freeze the cooked, cooled filling without the crust and aim to use it within 2–3 months for best quality. Thaw overnight in the refrigerator, reheat, adjust the consistency, then add fresh pastry. A fully baked pie can also be frozen, although the reheated crust will be softer.
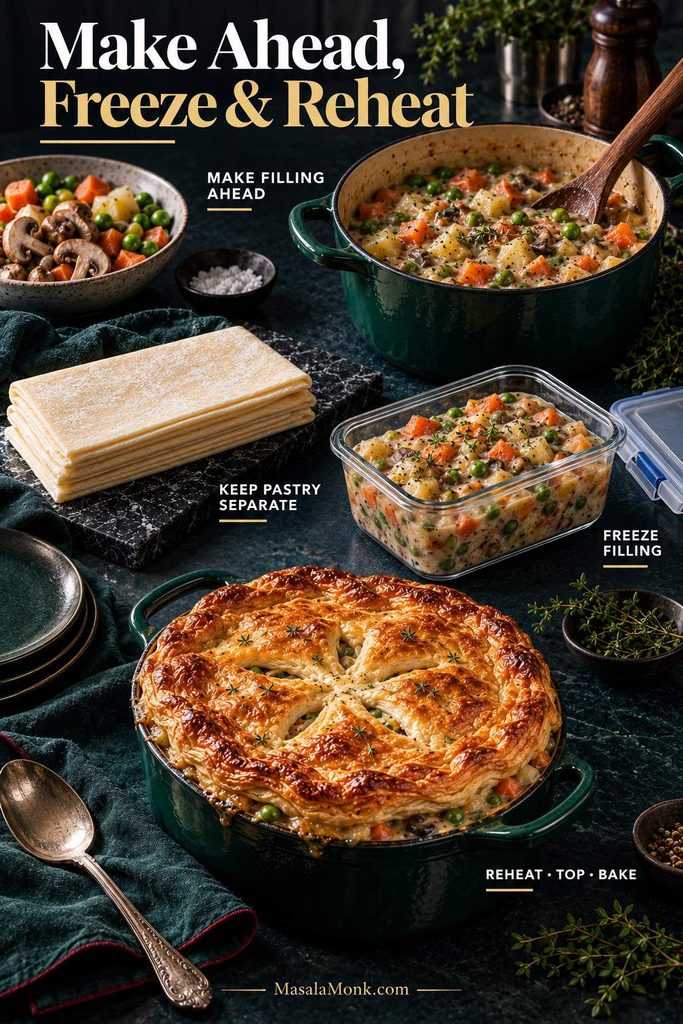
Make-ahead vegetable pot pie sequence showing cooked filling prepared and stored separately from raw puff pastry, followed by reheating, topping and baking.
For make-ahead pot pie, judge the gravy after reheating—not straight from the refrigerator, when the chilled sauce can look deceptively firm.

Leftovers

Refrigerated leftovers are best used within 3–4 days. Reheat in a 325–350°F / 165–175°C oven until the center reaches 165°F / 74°C. A microwave is quicker, but steam softens pastry. See the USDA FSIS leftovers guidance for cooling and reheating safety.

Vegetable Pot Pie Troubleshooting

A pot pie can go sideways for ordinary reasons: wetter vegetables, a deeper dish, cold filling or pastry that simply needs longer in the middle. Start with the stage where the problem appeared.

Before Baking
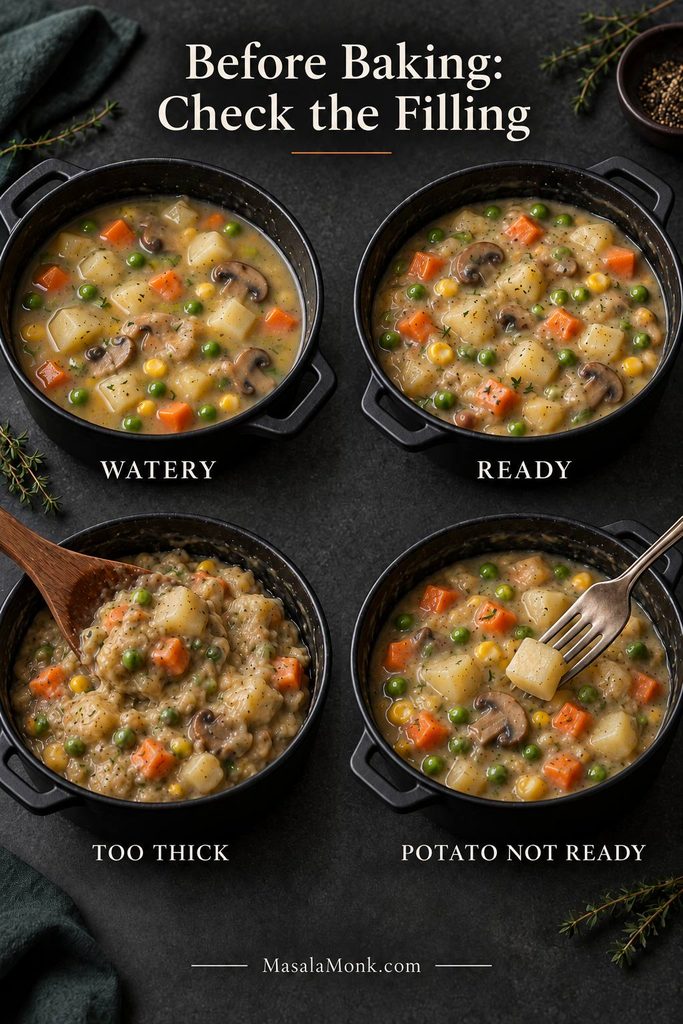
Before-baking troubleshooting guide showing watery filling, correctly thickened filling, overly thick filling and an undercooked potato being checked for tenderness.
Before the crust goes on, test the loosest-looking gravy and one of the largest potato cubes. Those are the two problems least likely to fix themselves in the oven.
What You SeeLikely CauseWhat to Do
Gravy is wateryVegetables released extra water or the sauce needs more reductionSimmer uncovered first; use a small cornstarch slurry only when reduction is not enough
Gravy is glueyToo much thickener or reductionAdd warm broth or milk 1–2 tbsp / 15–30 ml at a time
Flour formed lumpsLiquid reached the flour too quicklyWhisk if practical; next time smooth the first portion of broth in before adding the rest
Everything tastes blandNot enough salt, browning, herbs, umami or acidityCorrect the filling before pastry goes on
Potatoes still crunchPieces are too large or need longer on the stovetopCook longer and test one of the largest cubes

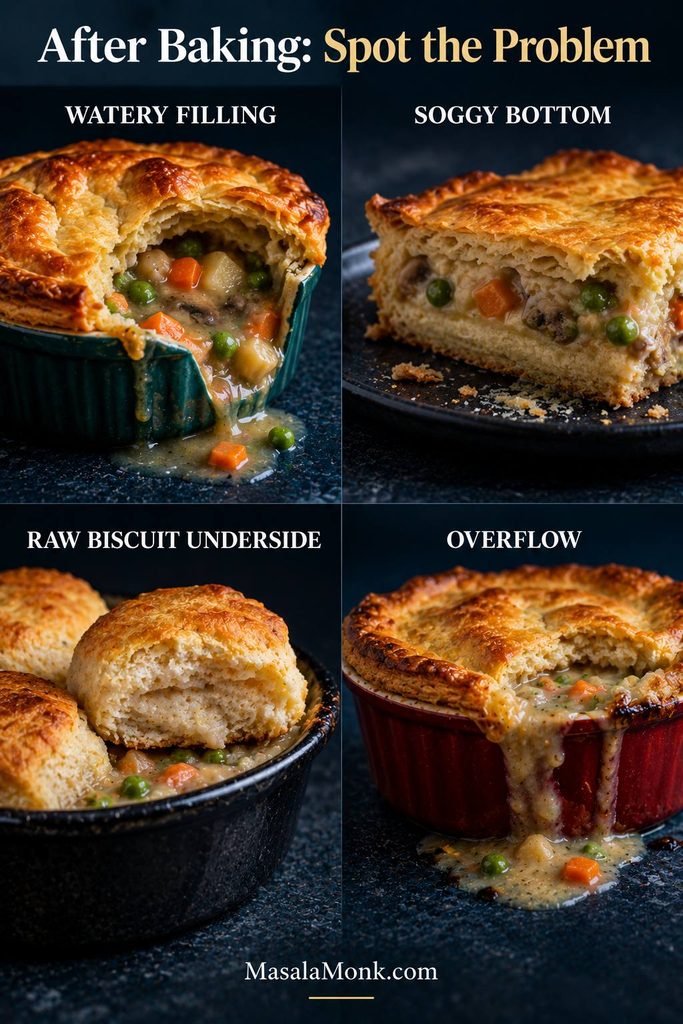
After Baking

After-baking troubleshooting guide showing watery pot pie filling, a soggy bottom crust, a biscuit with a raw or gummy underside and filling overflowing from a baking dish.
Match the symptom to the fix: more oven time can help raw dough, but it cannot undo excess liquid or an overfilled dish.
What You SeeLikely CauseWhat to Do
Gravy became wateryWet vegetables released more liquid in the ovenNext time cook them drier and judge thickness only after frozen vegetables are hot
Puff center is pale or doughyThe middle needs more time, or pastry started too warmBake longer and shield dark edges with foil
Puff is soft underneathSteam softened the side touching the gravyThis can be normal; bake pastry separately next time when a crisp underside matters
Puff is gummy or rawGravy was too wet, pastry too warm or center underbakedContinue baking when possible; next time use thicker gravy and chilled pastry
Bottom pie crust is soggyWet filling reached raw dough before the base setCool the filling and consider partial prebaking plus stronger bottom heat
Biscuits are raw underneathFilling was too cool or biscuits too thick and crowdedContinue under loose foil; next time use hot filling and leave more space
Pie overflowedDish was too small or too fullLeave ½–¾ in / 1.25–2 cm headroom and bake on a rimmed sheet

Quick links: Recipe · Make ahead & leftovers · Back to top


The first scoop does not need to be neat. Break through the lid while it is still crisp and make sure every serving gets some flaky pastry with the creamy vegetables underneath.
Posted on Leave a comment

H1: Corn Casserole Recipe: Creamy, Buttery Cornbread Casserole

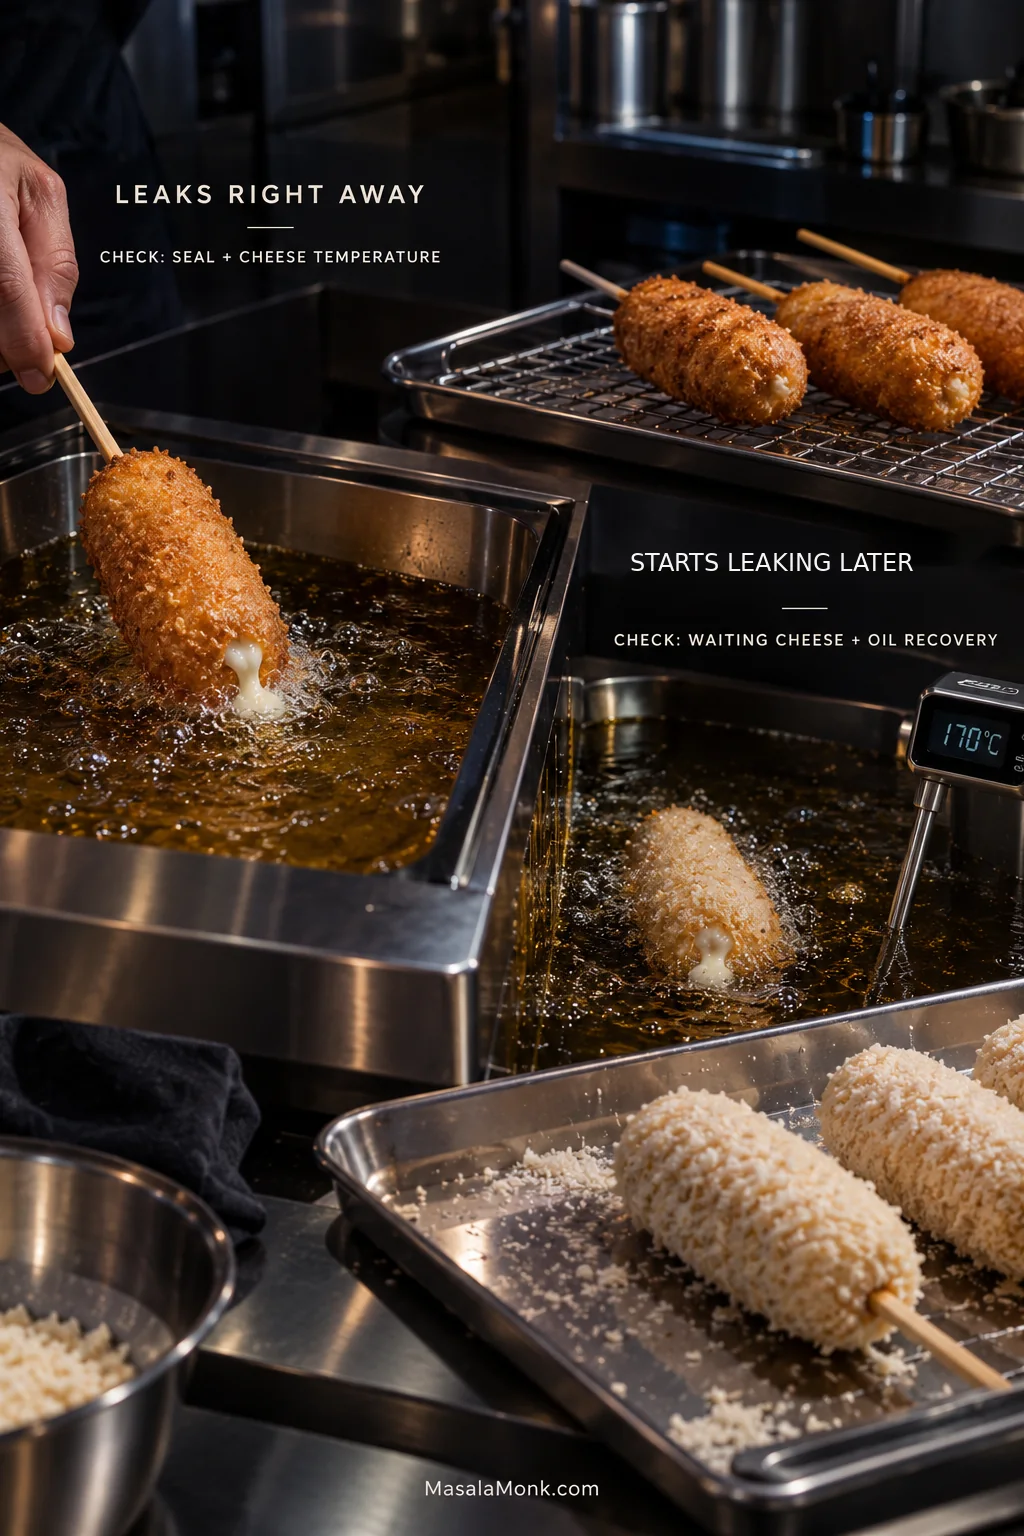
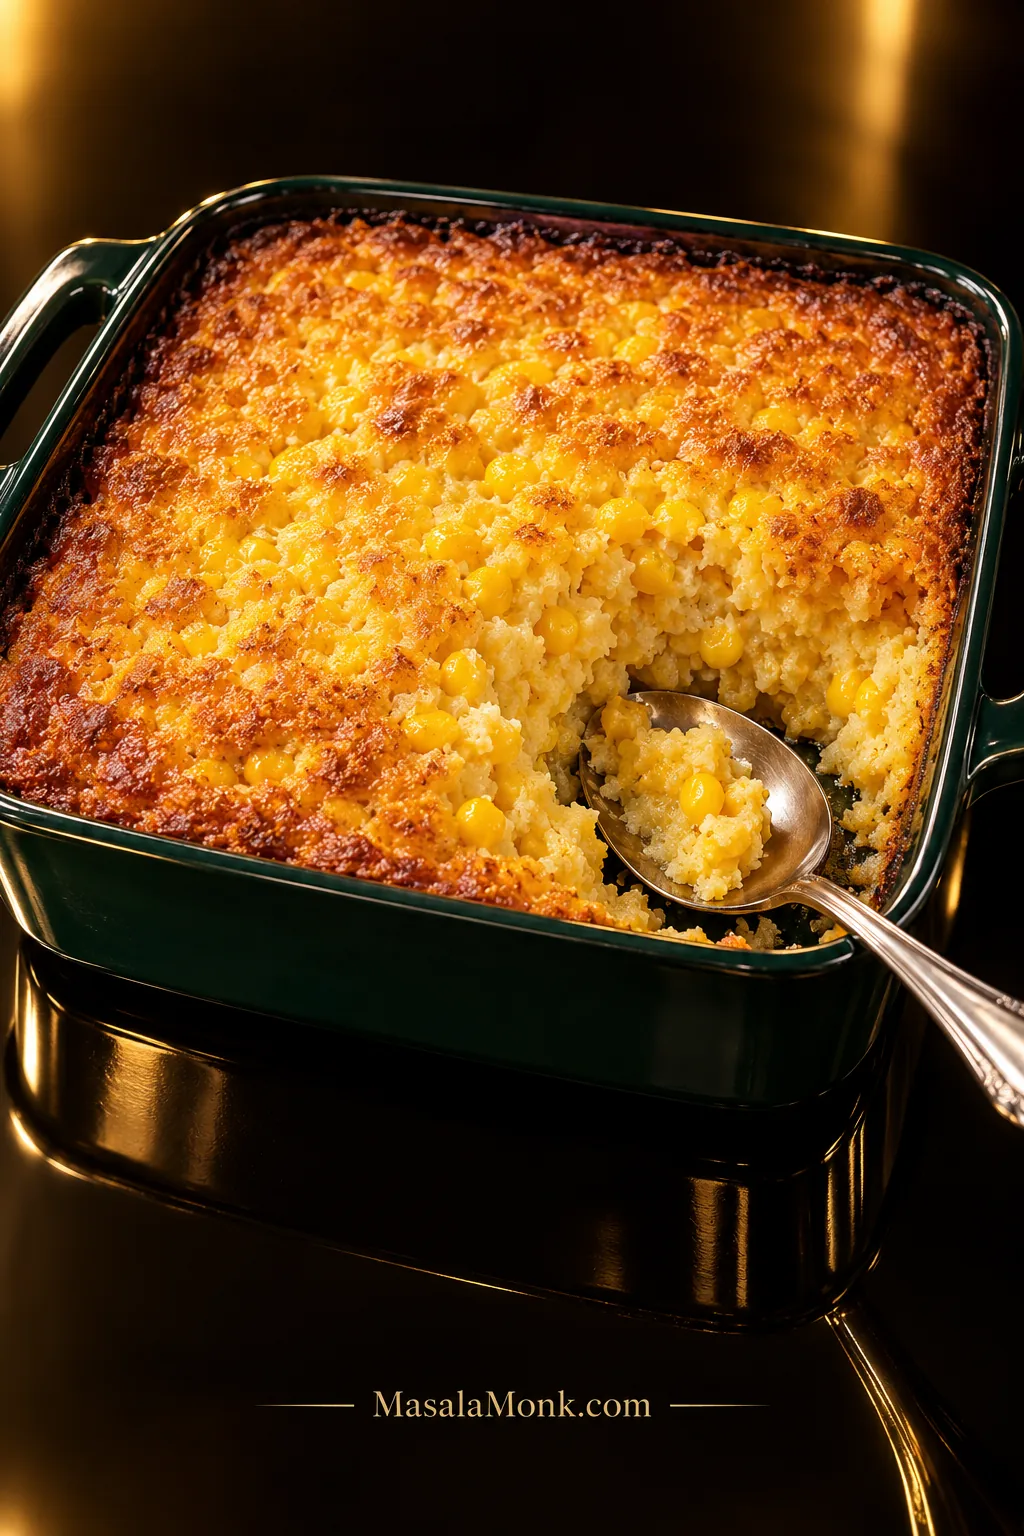
Golden corn casserole in a glossy deep-green baking dish with one serving removed, showing browned edges, visible corn kernels, and a moist, soft center beside a silver serving spoon.

A good corn casserole has browned, buttery edges and a middle soft enough for a serving spoon to sink straight through. Sweet kernels pop through the creamy base, while the top tastes closer to tender cornbread.

The tricky part is knowing when that softness is actually done. Pull it too soon and you have wet batter; leave it until it looks like ordinary cornbread and the part that makes the casserole special has disappeared.

This corn casserole recipe lands between those two extremes. Everything comes together in one mixing bowl in about 10 minutes—no stovetop step, no mixer, and no need to prepare the corn muffin mix separately.

The classic Jiffy corn casserole uses one 8.5-oz / 240-g package of mix, added dry. A from-scratch version is included farther down if you do not have Jiffy or prefer to skip the box.

Corn Casserole in 30 Seconds

Corn casserole is a soft, spoonable baked corn side that usually combines corn with a creamy base and cornmeal or cornbread mix. For this corn casserole recipe, heat the oven to 350°F / 175°C. Combine an 8.5-oz / 240-g package of dry corn muffin mix with one drained can of whole-kernel corn, one full can of cream-style corn, 1 cup sour cream, ½ cup melted butter, and 2 eggs. Bake in a 9×9-inch (23×23-cm) dish and begin checking around 45 minutes. Rest for 10 minutes before serving.

The middle should stay soft, but it should no longer behave like liquid. Soft is right. Sloshy is not.

Make It Now

Classic Creamy Corn Casserole

This corn casserole recipe gives you sweet corn in every scoop, buttery browned edges, and enough egg to hold everything together without turning the casserole cakey.

Prep: About 10 minutes

Bake: Usually 45–55 minutes in a 9×9 pan

Rest: 10 minutes

Oven: 350°F / 175°C

Pan: 9×9 in / 23×23 cm

Method: One mixing bowl

Yield: About 8 side servings

Before You Mix

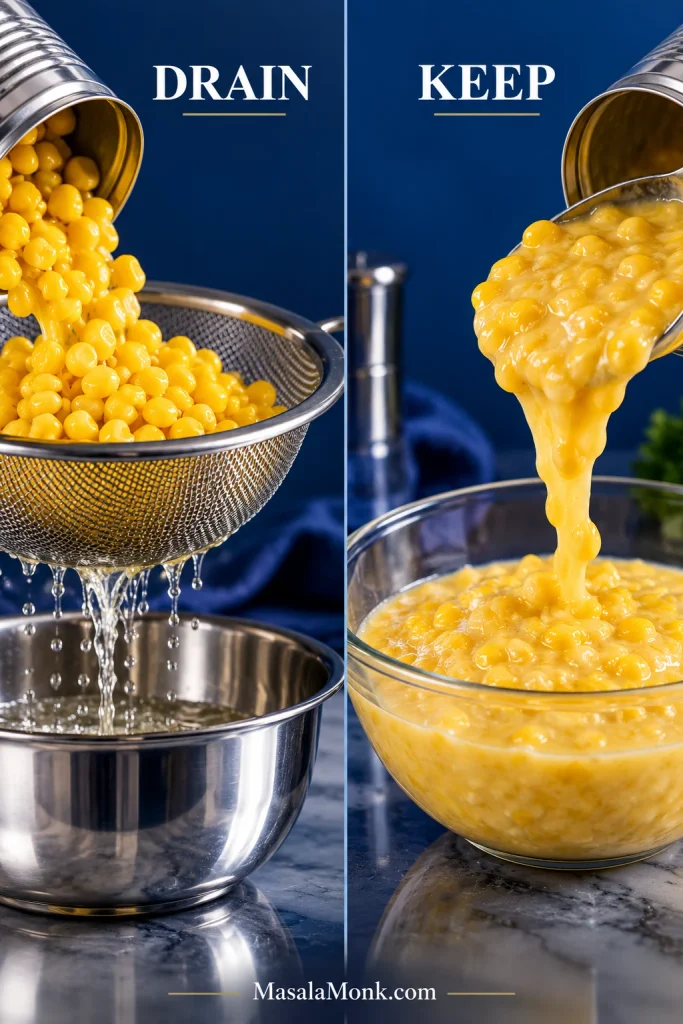
Drain the whole-kernel corn.

Keep the cream-style corn and its thick liquid.

Add the corn muffin mix dry. Do not prepare muffins according to the box directions first.

Whole-kernel corn draining in a metal sieve beside cream-style corn kept with its thick liquid.
Drain the whole-kernel corn, but keep the cream-style corn and its thick liquid. One removes excess water; the other supplies body.

Ingredients

  • 1 package corn muffin mix, 8.5 oz / 240 g
  • 1 can whole-kernel corn, about 15 oz / 425 g before draining, well drained
  • 1 can cream-style corn (often called creamed corn), 14.75–15 oz / 418–425 g, undrained
  • 1 cup full-fat sour cream, about 8 oz / 227 g
  • ½ cup unsalted butter, 4 oz / 113 g, melted and cooled slightly
  • 2 large eggs
  • ¼ teaspoon freshly ground black pepper, optional
  • Up to 1 cup shredded cheddar, about 4 oz / 113 g, optional

If you’re using a larger package of the same corn muffin mix, weigh out 240 g rather than using the whole package. The muffin mix and canned corn are already seasoned, so the base recipe does not automatically need extra salt.

Vegetarian cooks should check the package before buying. The original JIFFY Corn Muffin Mix contains lard, while its Vegetarian Corn Muffin Mix uses vegetable shortening.

Method

  1. Heat the oven. Set a conventional oven to 350°F / 175°C. Lightly grease a 9×9-inch (23×23-cm) baking dish.
  2. Mix the wet ingredients. Whisk the eggs and sour cream together. Once the melted butter has cooled from very hot to warm, whisk it in.
  3. Add the corn and muffin mix. Stir in the whole-kernel corn and cream-style corn. Fold in the dry muffin mix just until no obvious dry pockets remain. A few small lumps are fine; there is no need to keep stirring until the batter is perfectly smooth. Add cheddar now if you want cheese throughout.

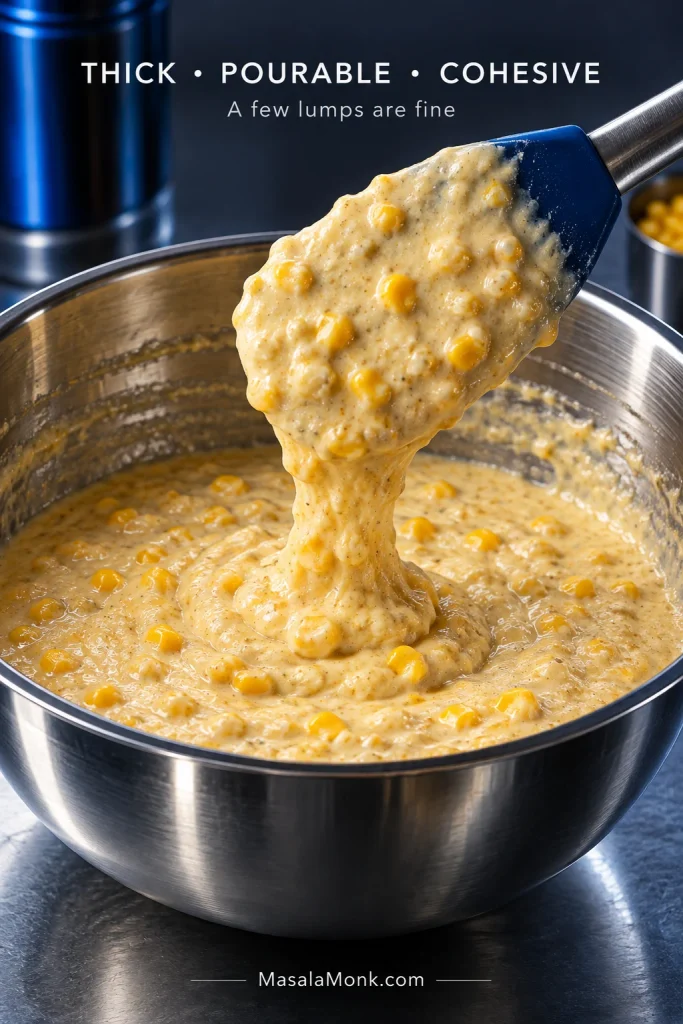
Check the batter before baking: it should be thick but still pourable or easily spoonable. It should look cohesive, not watery, with no loose liquid pooling around the corn.

Thick corn casserole batter with visible kernels falling from a spatula into a metal bowl.
The batter can stay slightly lumpy. What matters is that it looks cohesive, with no loose liquid separating around the corn.
  1. Bake. Pour or spoon the batter into the dish and bake uncovered. Begin checking around 45 minutes. The edges should be lightly golden and the surface should have lost its raw, glossy look. For an egg casserole, USDA guidance gives 160°F / 71°C as the minimum center temperature. If you want cheddar on top, add it for roughly the final 8–10 minutes.
  2. Rest. Leave the casserole in the pan for 10 minutes before scooping.

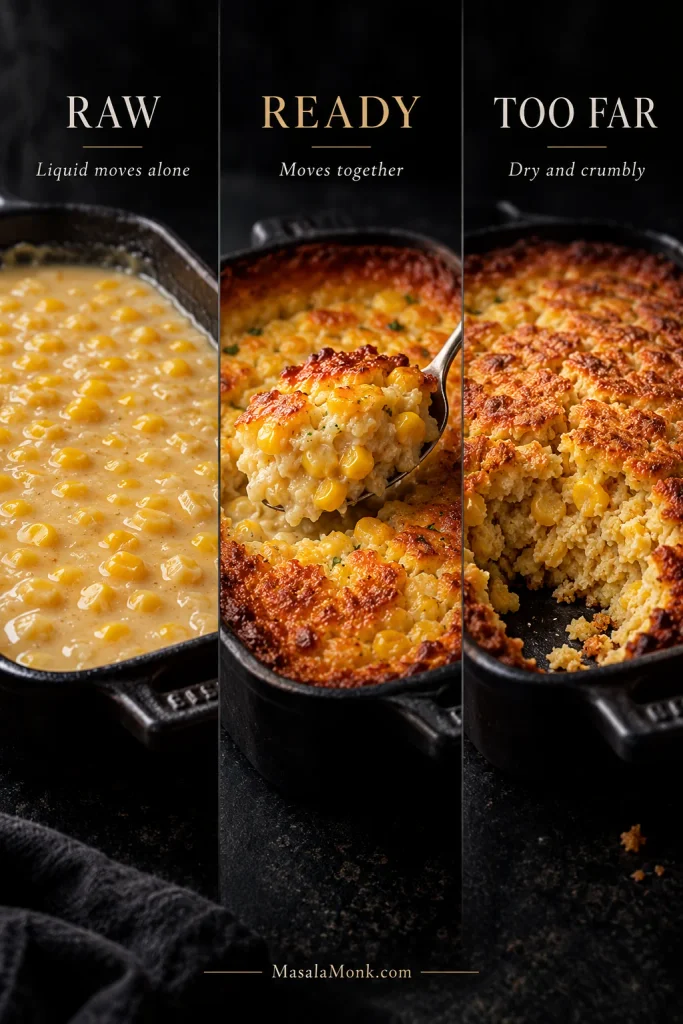
How to Tell When Corn Casserole Is Done

If you are staring through the oven door wondering whether the loose-looking middle is still raw, watch what happens when the pan moves. The top can brown before the inside is ready, so color alone is not enough.

Still Raw

The center looks glossy and loose. Nudge the dish and liquid ripples through the middle on its own. A tester comes out coated in wet batter.

Ready

The perimeter is set and beginning to brown. The middle can move gently, but it moves with the rest of the casserole instead of sloshing independently. Moist crumbs on a tester are fine.

You may also notice a toasted butter-and-corn aroma around the edge. After the rest, a serving spoon should lift a cohesive scoop rather than leave wet batter behind.

Gone Too Far

The middle has become bread-like, the perimeter feels hard, and spoonfuls crumble instead of yielding. It will still taste good, but you have lost the contrast between the browned edge and tender center.

Raw, ready and overbaked corn casserole compared by center texture, from loose and glossy to moist-set to dry and crumbly.
Watch the center, not just the color. Ready casserole moves gently as one mass; sloshing means raw, while a dry crumb means overbaked.

Why Corn Casserole Recipes Disagree

Corn casserole recipes differ mainly because they aim for different textures, carry different amounts of moisture, and sit at different depths in the pan. That is why one recipe uses no eggs while another uses two, or why a broad shallow casserole can finish much sooner than a deeper one.

If dinner is already underway, the recipe above is enough.

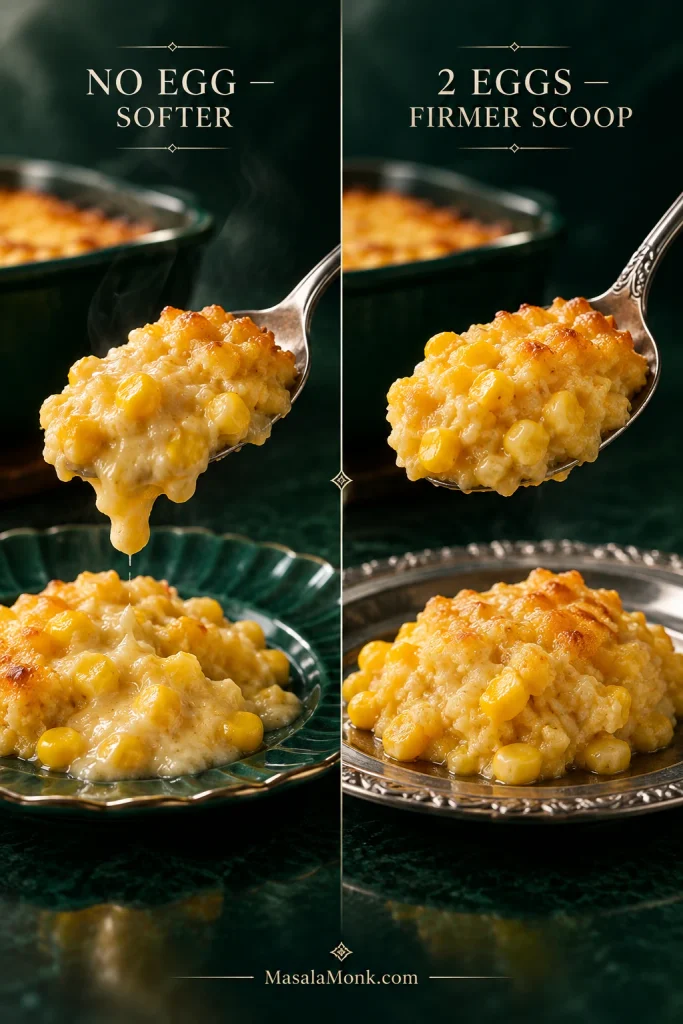
Softer or Firmer? Egg vs No Egg

Using no eggs gives you a softer, more pudding-like casserole; two eggs make it firmer and easier to scoop.

For this recipe—and especially for a holiday table—two eggs are the better default. The casserole holds together on the spoon and stays where you put it on the plate. Sour cream and cream-style corn keep it tender.

Leave the eggs out for the familiar 5-ingredient corn casserole: corn muffin mix, whole-kernel corn, cream-style corn, sour cream, and butter. It is intentionally looser and more pudding-like. One egg lands somewhere between those two styles.

Side-by-side corn casserole servings showing a softer no-egg version and a firmer, moist two-egg version.
The 5-ingredient version stays softer without eggs. Two eggs give a cleaner scoop while the creamy base keeps the center tender.

Corn Casserole vs Corn Pudding: What’s the Difference?

Ask three families for corn casserole and you may get three noticeably different dishes. One is eggless and spoon-soft, another is firmer, and a third may be called corn pudding.

The names overlap, so texture is usually more useful than the label. Cornbread casserole is often another name for this same broad family of corn-and-cornbread-mix dishes. Spoonbread is another name you may encounter for this soft corn-casserole family.

Cornbread itself is firmer and sliceable. Corn pudding usually leans softer and more custard-like. A true corn soufflé is lighter and more egg-driven, often using whipped whites for lift. Scalloped corn overlaps too, although many versions use crackers or breadcrumbs and a different creamy base.

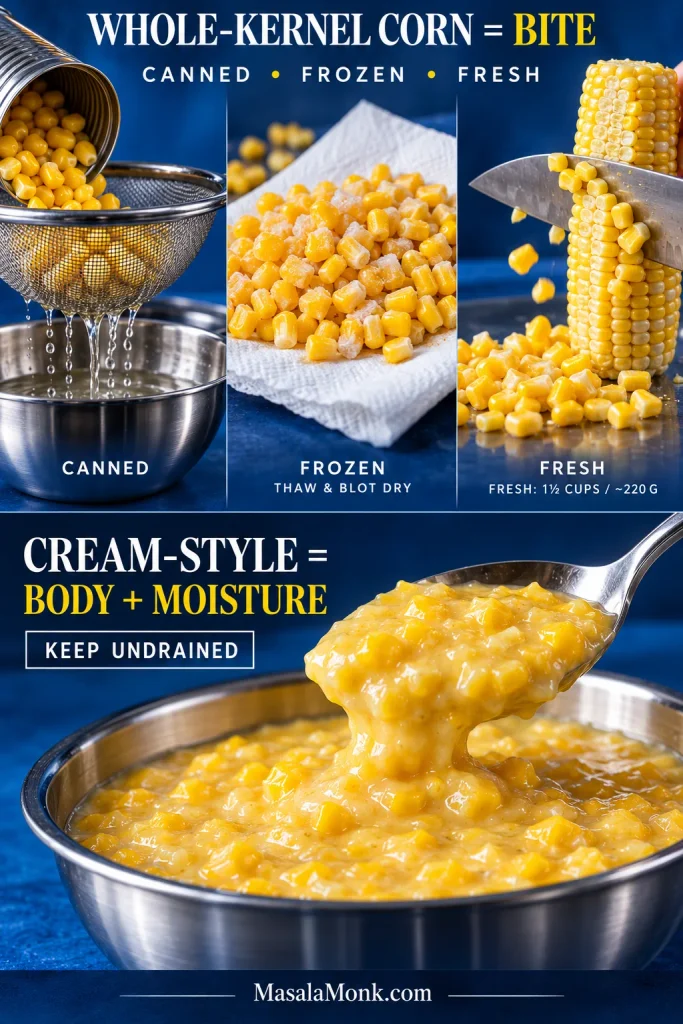
Canned, Frozen or Fresh Corn?

This recipe uses corn for two different jobs. One portion gives you whole kernels to bite into. The cream-style corn brings both corn solids and the thick liquid that keeps the casserole spoonable.

Part of the RecipeChoiceHow to Use ItResult
Whole-kernel portionCanned cornDrain wellClassic texture and the most straightforward option
Whole-kernel portionFrozen cornThaw, drain, blot if wetSimilar texture once the thawing water is removed
Whole-kernel portionFresh cornCut from the cob and measureBrighter corn flavor and more distinct kernels
Creamy corn portionCream-style cornUse the full canSupplies the thick corn-rich base

Fresh corn works at about 1½ cups / 220 g kernels in place of the drained canned whole corn. That is roughly 3 medium ears, though ear size varies enough that measuring the kernels is more dependable.

Frozen kernels work well too, but thaw them before they reach the bowl. Meltwater left clinging to the corn goes straight into the batter and can make an already-soft casserole noticeably wetter.

Why Cream-Style Corn Is Different

Another drained can of whole corn cannot replace cream-style corn by itself. You would be replacing the kernels but losing the thick corn liquid that helps produce the characteristic spoonable texture.

Canned, frozen, fresh and cream-style corn shown with their different preparation roles for corn casserole.
Canned, frozen and fresh kernels all work here. Dry thawed corn well, but keep the thick liquid that comes with cream-style corn.

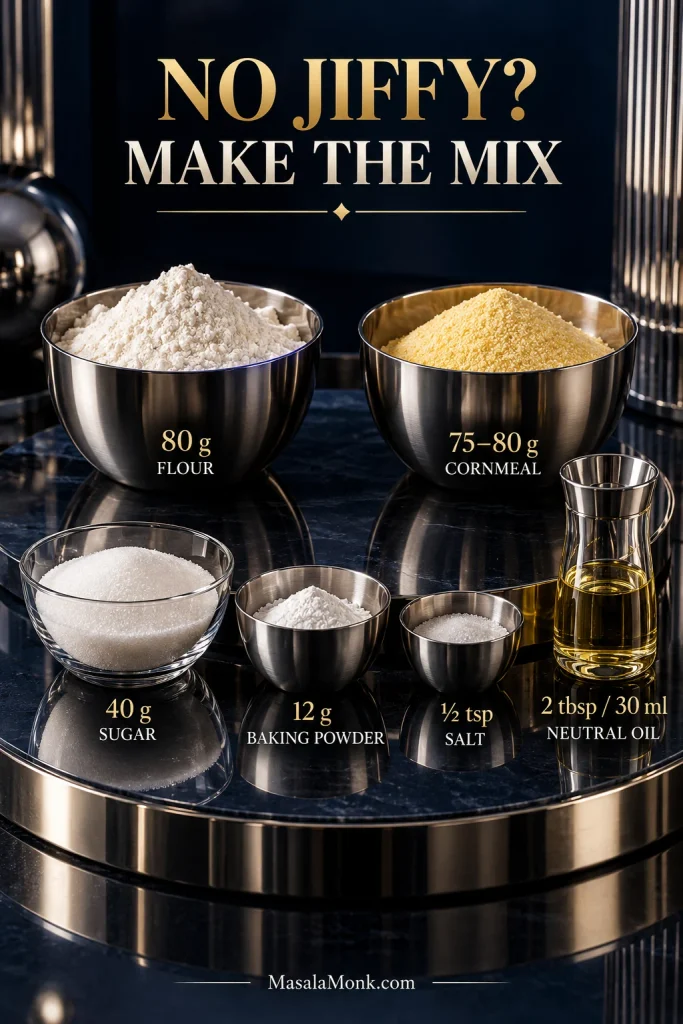
Corn Casserole Without Jiffy

To make corn casserole without Jiffy, replace the 8.5-oz / 240-g boxed mix with flour, cornmeal, sugar, baking powder, salt, and a little neutral oil.

  • 80 g all-purpose flour, about ⅔ cup
  • 75–80 g yellow cornmeal, about ½ cup
  • 40 g granulated sugar, about 3 tablespoons
  • 12 g baking powder, about 1 tablespoon
  • ½ teaspoon fine salt

Whisk those ingredients together and use them in place of the boxed mix. Add 2 tablespoons / 30 ml neutral oil with the melted butter. The boxed mix already contains added fat, so the oil replaces some of what disappears when you make the mix from scratch.

Measured flour, cornmeal, sugar, baking powder, salt and oil arranged for homemade corn muffin mix.
For corn casserole without Jiffy, only the boxed muffin mix changes. The corn, sour cream, butter and eggs stay the same.

A more savory version needs only 20–25 g sugar. Cornmeal grind varies, so follow the same doneness cues as the main recipe rather than expecting the scratch version to finish at exactly the same minute.

If what you actually want is a firm slice with a bread-like crumb, use a dedicated Southern cornbread recipe instead.

Ingredient Changes That Work

ChangeWhat to DoWhat to Expect
Full-fat Greek yogurt for sour creamUse the same amountTangier flavor and a slightly firmer scoop
Frozen corn for canned whole cornThaw and remove the water firstWorks well once excess moisture is gone
More or fewer eggsChoose deliberatelyChanges how firmly the casserole sets
Milk or half-and-half for sour creamAvoid as a direct swapThins the batter much more than yogurt does
Different gluten-free cornbread mixUse a recipe built for that mixDifferent mixes absorb liquid differently

Full-fat Greek yogurt is the cleanest sour-cream replacement; use 1 cup / about 225–230 g. It is thick enough to keep the batter from turning runny. Milk or half-and-half loosens it much more, which can leave the edges browned before the middle is ready.

If You Do Not Have Cream-Style Corn

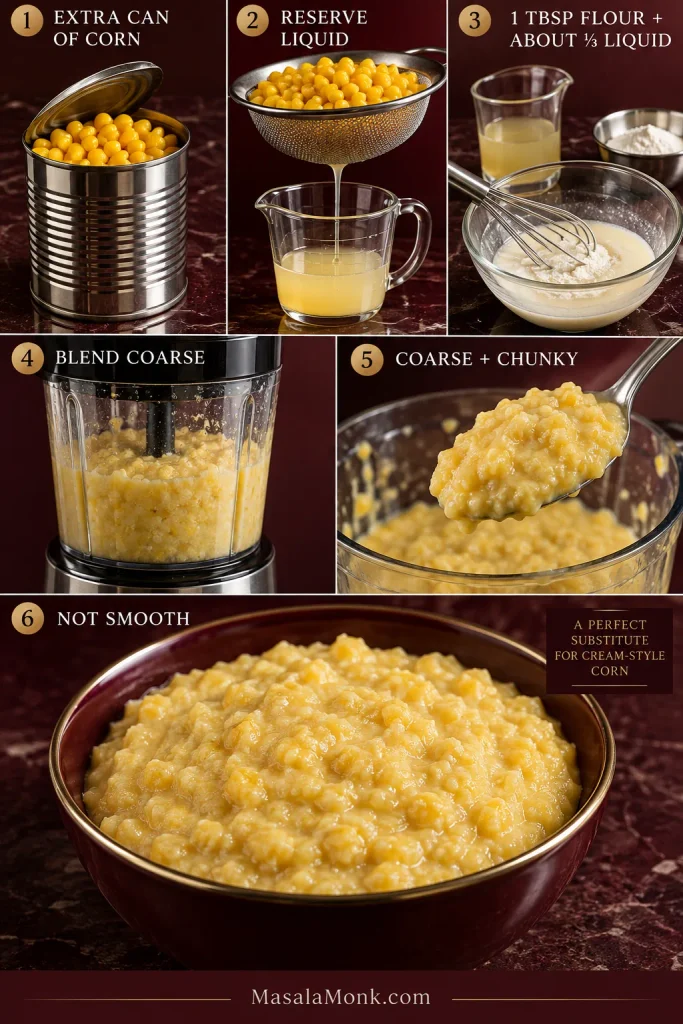
Use one additional 15-oz / 425-g can of whole-kernel corn, separate from the can used for the whole-kernel portion of the recipe. Reserve the liquid before draining it.

Blend all of those kernels with about one-third of the reserved canning liquid and 1 tablespoon all-purpose flour. Stop when no intact kernels remain but the mixture is still coarse and chunky, not smooth. If the blender needs help moving, add a little more of the reserved liquid. Use the entire mixture in place of the cream-style corn.

Cream-style corn substitute shown from whole kernels and reserved liquid to a coarse, chunky blended mixture.
The substitute needs to replace body as well as kernels, so stop blending while the mixture is still coarse and chunky.

Changing either the baking mix or the dairy is manageable. Change both at once, though, and you are better off starting with a gluten-free or dairy-free corn casserole recipe built for those ingredients.

Cheddar, Jalapeño and Other Add-Ins

For a cheesy corn casserole, add up to 1 cup / 4 oz / 113 g shredded cheddar. Fold it into the batter for cheese throughout, or add it near the end for a browned, salty layer on top.

Finely chopped jalapeño, well-drained green chiles, scallions, chives, and black pepper all work without substantially changing the batter. A cheddar-jalapeño version is especially good beside smoky food such as slow cooker pulled pork.

Extra sugar is rarely necessary with a sweet corn muffin mix. Add 1–2 tablespoons only when you deliberately want a sweeter casserole. Tart cranberry sauce with orange juice is particularly good against that buttery sweetness.

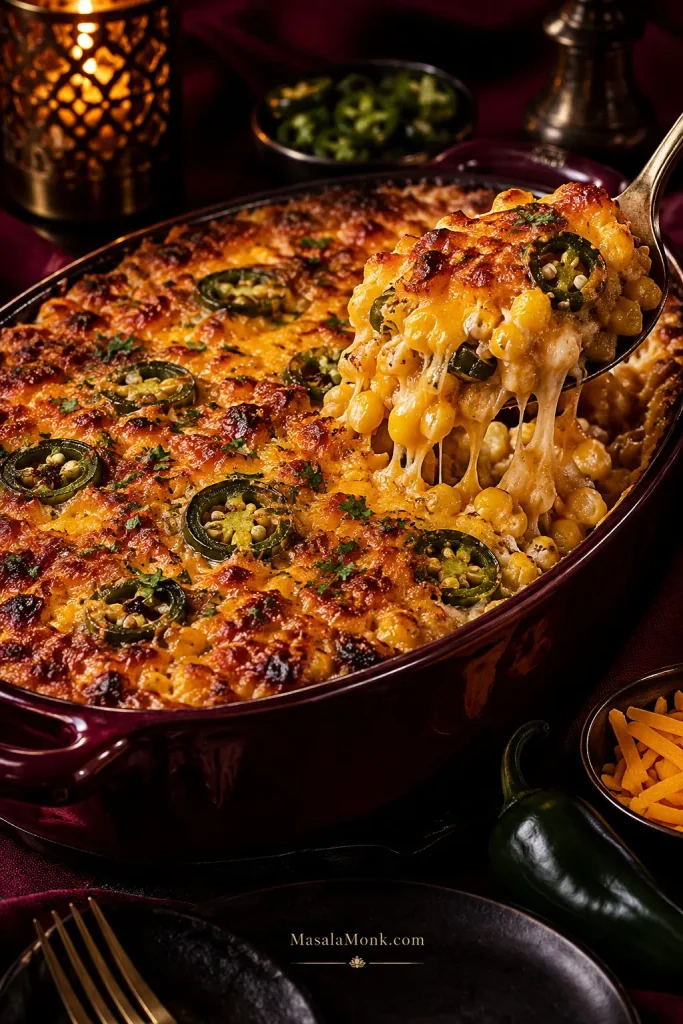
Cheddar jalapeño corn casserole with a browned cheesy top, visible corn kernels and sliced green jalapeño.
Cheddar makes the top richer and saltier; jalapeño keeps the sweetness in check. The base method stays the same.

Your Pan Is Part of the Recipe

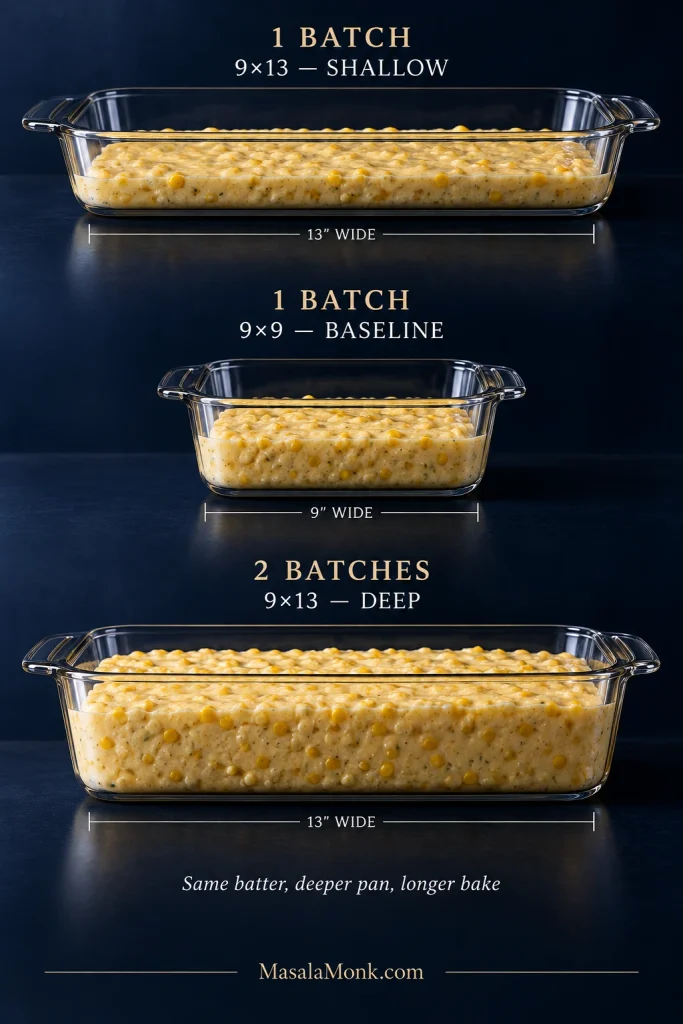
Bake time is not just about the dimensions printed on the pan. What matters is how deeply the batter sits inside it. Spread the same amount across more surface area and it heats through faster. Stack twice as much into the same footprint and the center has much farther to go.

Same batter, deeper pan, longer bake.

SetupWhat ChangesWhen to Begin Checking
1 batch in 9×9Baseline depthAbout 45 min
1 batch in 8×8Deeper than the baselineAround 45 min; it may run toward the longer end of the range
1 batch in 9×13Shallower, broader layerAround 35 min; judge by the same doneness cues
2 batches in one 9×13Much deeperAbout 55–60 min, then judge the center
2 batches in two standard pansDepth stays close to the originalAbout 45 min

Those are checkpoints, not guaranteed finish times. Pan material, starting temperature, and the behavior of your oven still matter.

Three pans compare corn casserole batter depth: shallow 9 by 13, baseline 9 by 9, and deep double-batch 9 by 13.
Pan size alone does not determine bake time. Batter depth does: a deeper center simply needs longer to heat through.

One Batch in a 9×13 Is Not the Same as Two

A single batch spread through a 9×13-inch (23×33-cm) pan is relatively shallow, so start looking at it around 35 minutes. Double the recipe in that same pan and you can end up staring at beautifully browned edges while a loose patch in the middle is still catching up.

That is why a statement such as “a 9×13 takes 30 minutes” tells you very little unless you also know how much batter was in it.

Doubling the Recipe

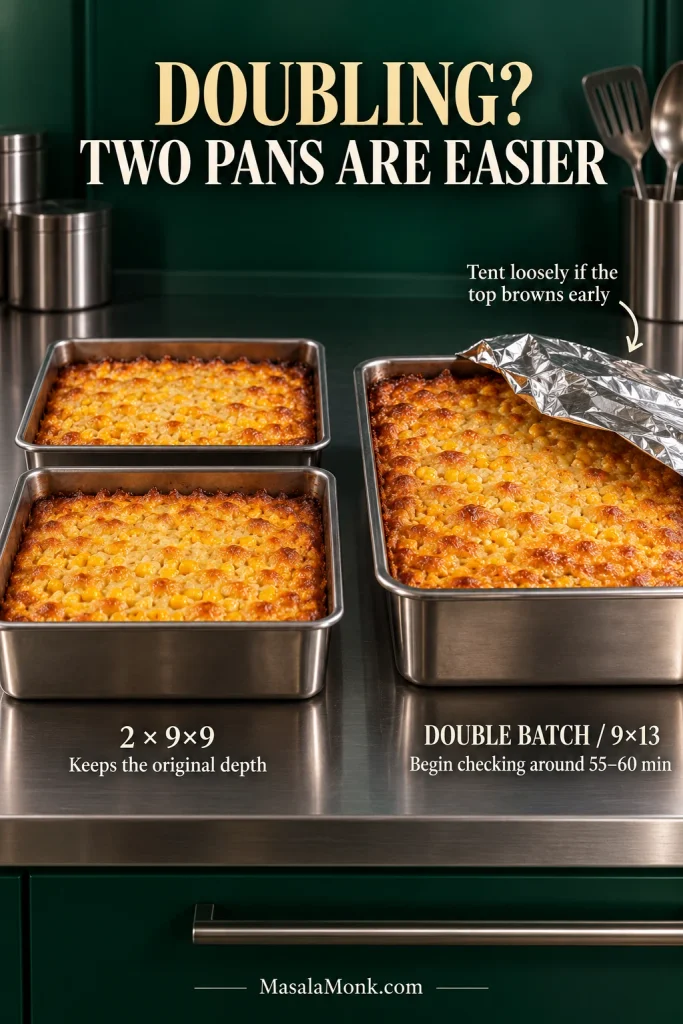
For a double batch, use two 9×9 pans if possible. One high-sided 9×13 works too; begin checking that deeper casserole around 55–60 minutes.

Keeping roughly the original batter depth makes the result easier to predict. With one deeper 9×13, leave some headroom above the batter. If the top and edges brown before the middle is ready, tent the dish loosely with foil and keep baking.

Two 9 by 9 pans beside a deeper double-batch 9 by 13 corn casserole with loose foil partly tenting the larger pan.
Two 9×9 pans keep a double batch close to the original depth. One deep 9×13 can brown before its center catches up.

One batch makes about 8 side servings. At a meal with several other sides, a double batch generally covers around 14–16 people. Two moderate pans are also easier to work around another 350°F dish such as sweet potato casserole.

Metal pans can brown the edges sooner. Heavy ceramic and glass take longer to warm but hold heat well once hot. With a fan-assisted oven, use your oven’s normal temperature conversion and start watching a little earlier.

Making Corn Casserole for Thanksgiving When the Oven Is Full

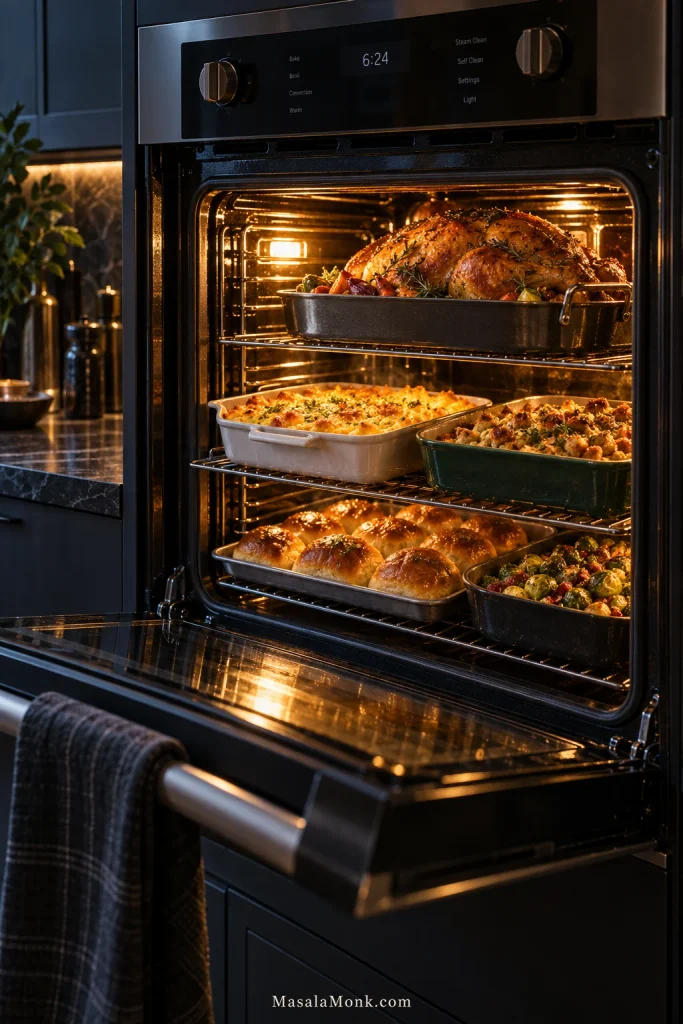
On a weeknight, the casserole can have the oven to itself. Thanksgiving is another story: the turkey is roasting, dressing needs a rack, rolls want a final blast of heat, and the door keeps opening.

The casserole does not know the recipe promised roughly 50 minutes. It only knows the oven keeps losing heat.

Crowded oven with turkey, corn casserole, another casserole, rolls and vegetables baking on several racks.
A crowded Thanksgiving oven slows heat recovery. Let the center decide when the casserole is done, not the clock alone.

Bake It Ahead

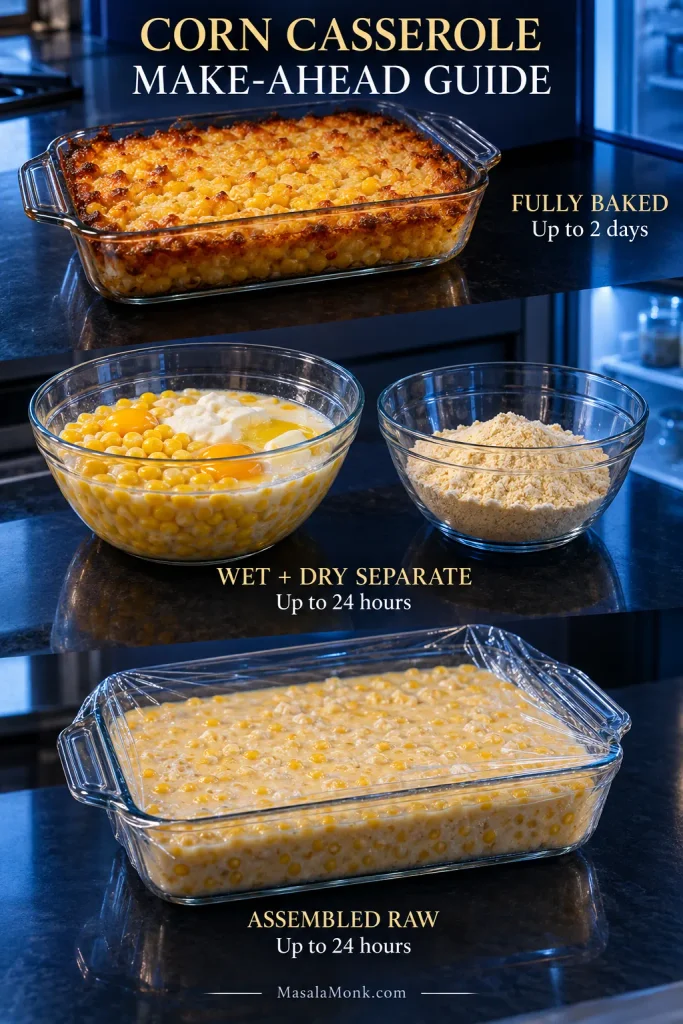
Yes—corn casserole can be fully baked up to 2 days ahead. Cool it promptly, cover, and refrigerate, then reheat before serving. This is the simplest way to remove the casserole from the holiday oven traffic jam.

If Southern cornbread dressing is also on the menu, baking the corn casserole ahead leaves valuable oven space available for the dressing closer to dinner.

If You Want to Bake It Fresh

The best texture comes from keeping the muffin mix dry until close to baking. Up to 24 hours ahead, combine the eggs, sour cream, butter, and corn, then cover and refrigerate promptly. When you are ready to bake, stir the chilled mixture well before folding in the dry mix.

You can also assemble the whole casserole the night before if convenience matters most. Cover it, refrigerate promptly, and bake it within about 24 hours. Cold batter normally needs more oven time, and batter that has sat overnight may rise a little differently from one mixed immediately before baking.

Make-ahead guide comparing fully baked casserole, separate wet and dry mixtures, and assembled raw casserole.
Want the freshest texture? Keep wet and dry separate. Want the easiest holiday? Bake the casserole ahead and reclaim oven space.

When the Oven Gets Crowded

Leave a little breathing room around the dish when possible. Adding another refrigerator-cold casserole—such as green bean casserole—at the same time slows the oven’s recovery.

The casserole can wait through its 10-minute rest, so there is no benefit in forcing every side to finish at exactly the same moment. If oven space disappears completely, use a slow-cooker corn casserole recipe built for that moist cooking environment rather than moving this exact batter straight into a slow cooker.

When Something Goes Wrong

A problem that looks mysterious in the oven is usually easier to diagnose once you separate excess moisture from insufficient baking and excessive batter depth.

What You SeeLikely CauseWhat to Do
Liquid centerNeeds more baking, too much moisture, or unusually deep batterContinue baking and review corn drainage or substitutions
Edges browned, center rawCenter is heating much more slowly than the perimeterTent loosely with foil and continue
Top browns too quicklyStrong top heat or a deep casseroleCover loosely with foil while the inside finishes
Dry or cakeyOverbaked, too much dry mix, or too much eggCheck package weight and pull the next batch sooner
Frozen-corn version is wateryThawing water went into the bowlThaw, drain, and blot before mixing
Dense or gummyDry-to-liquid ratio changedCheck the mix weight and any extra liquid or substitutions
OverflowPan is too small or too fullDivide the batter or use a larger, high-sided dish

Storage and Reheating

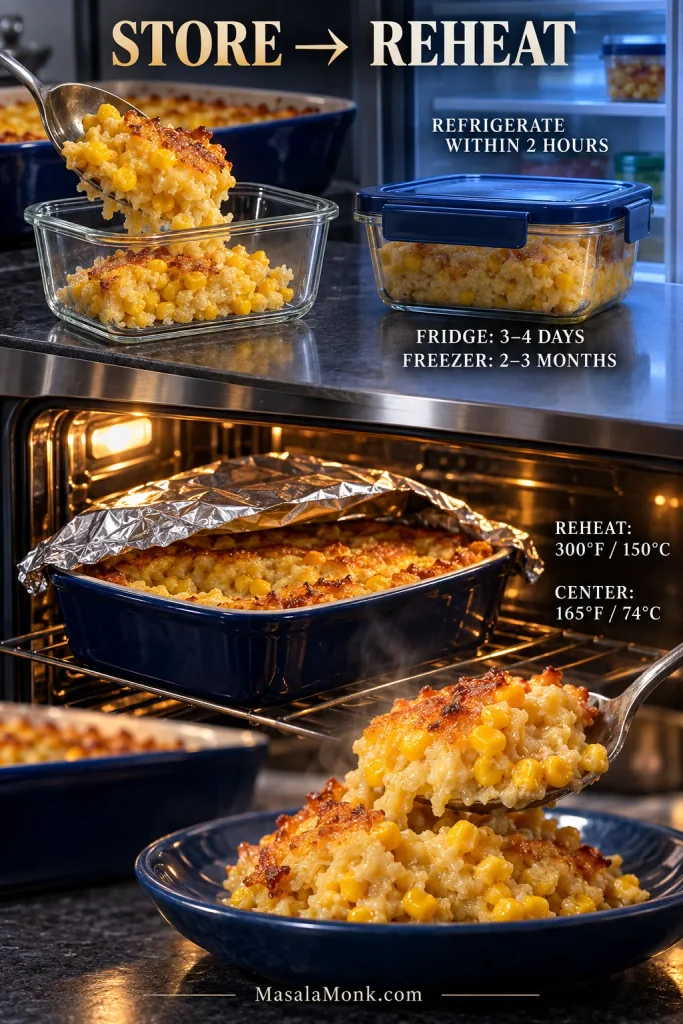
Cooked corn casserole keeps for 3–4 days in the refrigerator. Refrigerate leftovers within 2 hours of serving and keep them covered.

Reheat a larger portion covered at about 300°F / 150°C until hot through. A partially filled dish often warms in 15–20 minutes; a whole refrigerator-cold casserole takes longer. Uncover near the end if you want some color back on top. Reheated leftovers should reach 165°F / 74°C.

A single serving reheats well in short microwave bursts. The casserole will usually be a little softer after refrigeration and reheating than it was straight from the oven.

Freezing extends the useful storage window to about 2–3 months for best quality. Thaw overnight in the refrigerator before reheating.

Corn casserole leftovers shown in storage, reheating under loose foil, and served again with a moist center.
Reheat covered to protect the soft center. Uncover near the end only if you want a little browning back on top.

What to Serve With Corn Casserole

The casserole is rich, buttery, and naturally sweet. Salty gravy and tart cranberry sauce both work beautifully with it, while crisp green vegetables keep the plate fresh. Smoke and char keep the sweetness from dominating the savory side of the meal.

At Thanksgiving, it fits naturally beside turkey, dressing, green beans, cranberry sauce, and a spoonful of turkey gravy made from pan drippings. With a honey-glazed spiral ham, keep the casserole itself on the less-sweet side so the whole plate does not lean sugary.

Outside the holidays, serve it with chili, ribs, grilled chicken, pulled pork, or other smoky barbecue. Jalapeño, green chiles, or cheddar move the casserole even more comfortably in that direction.


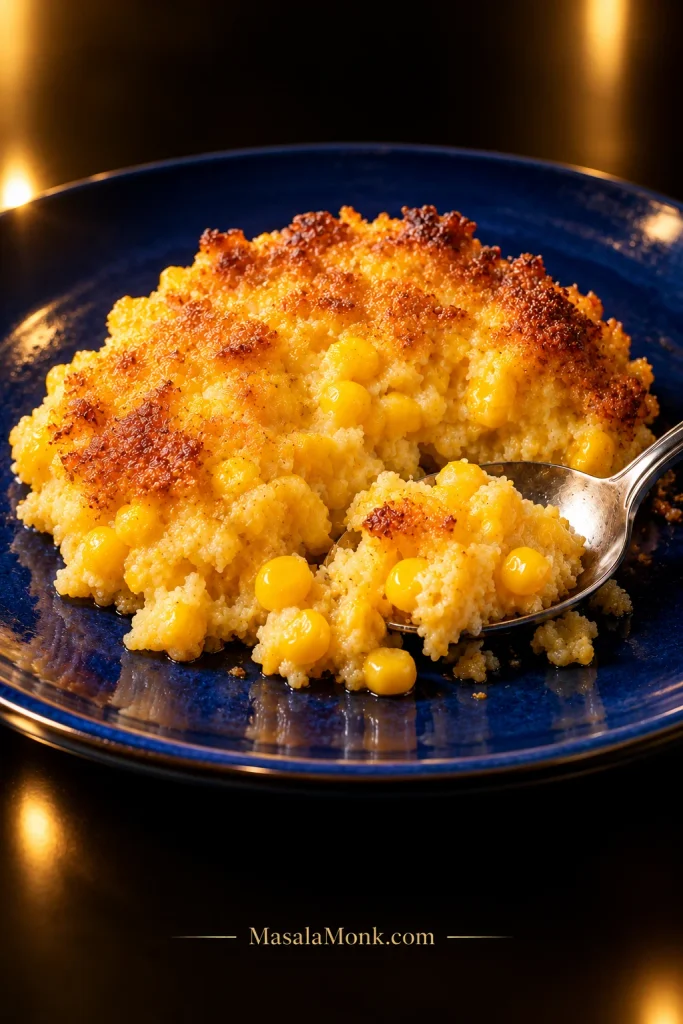
Give the casserole its 10-minute rest, then go for a browned corner and a generous scoop. It is at its best hot, when the sweet corn, butter, tender center, and lightly crisp edge all land in the same bite.

Golden corn casserole scoop on a cobalt-blue plate with browned edges, a moist center, visible kernels and a silver spoon.
Corners give you more browned crust; the center stays softer. A generous scoop can give you both in the same bite.
Posted on Leave a comment

Lamb Chops Recipe: How to Cook Juicy, Tender Lamb Chops

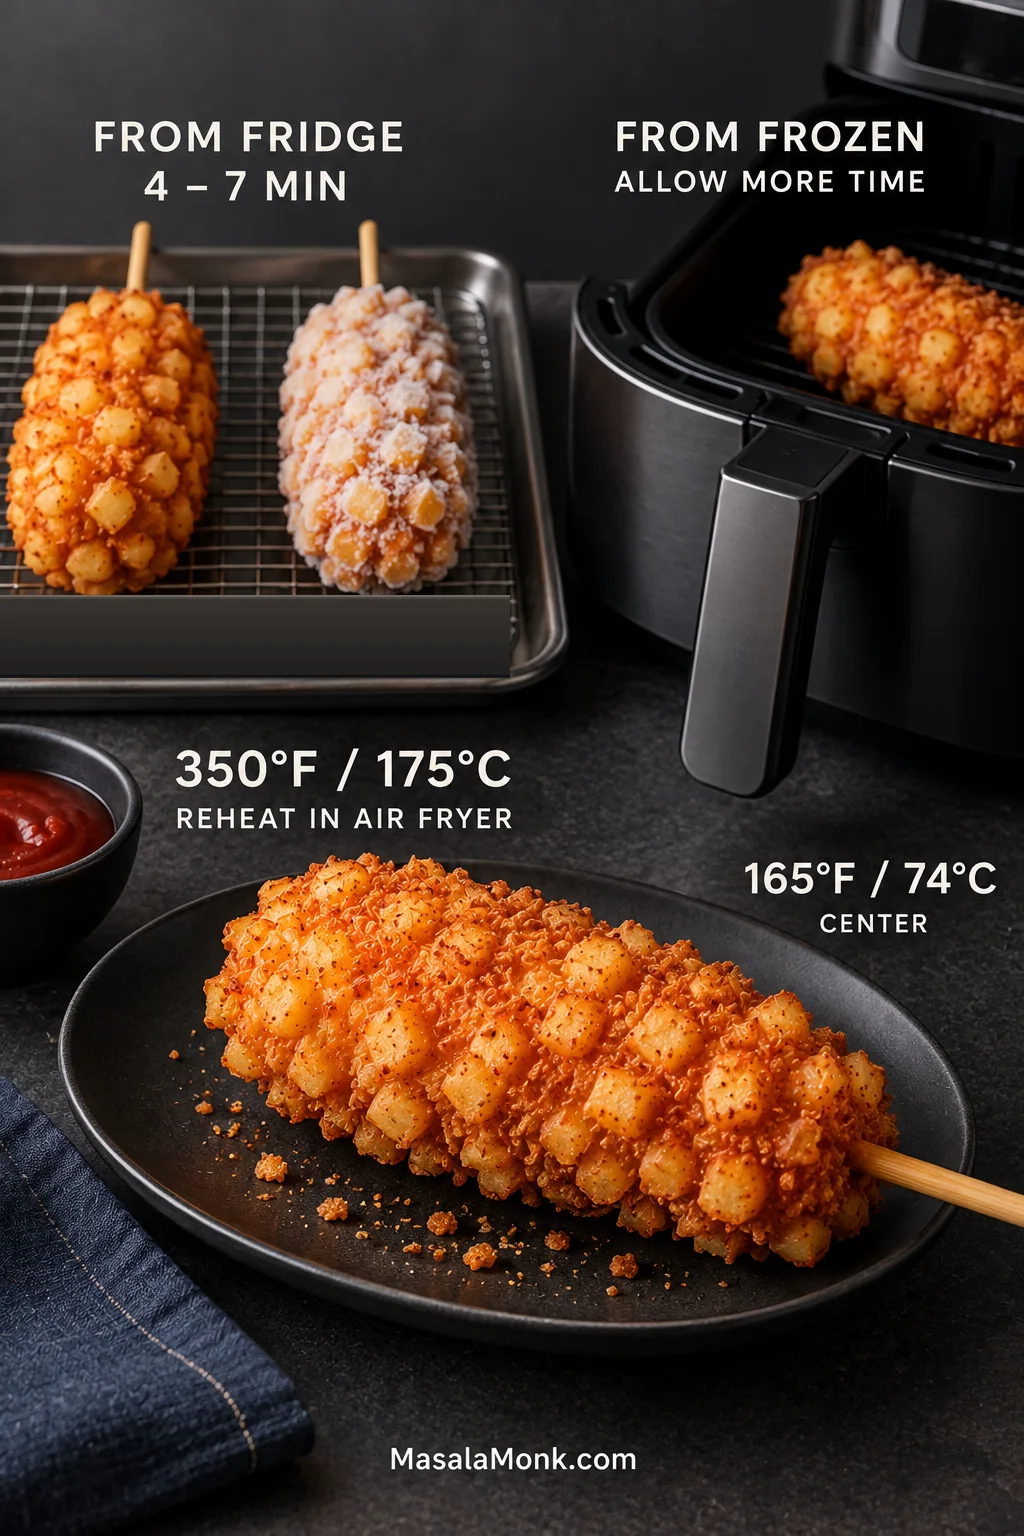
Garlic-herb lamb rib chops with dark browned crusts in a black skillet; one chop is cut open to show a warm pink center, with garlic, rosemary and pan juices around the meat.

The first minute tells you a lot about a lamb chop. It should hit the skillet with a confident sizzle. The fatty edge starts to bronze, and the broad side begins forming a crust instead of releasing a puddle of moisture into the pan.

If you do not cook lamb often, chops can feel a little unforgiving—especially when you have paid good money for them. Fortunately, most of the guesswork disappears once you know which cut you bought, how thick it is, and where to put the thermometer.

The recipe below is written for rib or loin lamb chops about 1 to 1¼ inches / 2.5 to 3 cm thick. They get a deep brown crust first, then garlic, rosemary, thyme, butter and lemon toward the end. A few minutes later, you are aiming for browned edges, juicy meat and foaming garlic butter ready to spoon over the top.

Shoulder, blade or forequarter chops need a different approach, as do chops that are unusually thin, very thick, heavily marinated or frozen. Those differences matter more than whether a recipe says three minutes or four.

Quick Answer: How to Cook Lamb Chops

For rib or loin chops about 1 to 1¼ inches / 2.5 to 3 cm thick, pat the meat dry, season with salt and pepper, and sear in a hot heavy skillet for about 3–4 minutes on the first side. Flip and begin checking the center after roughly 2 minutes; many chops need another 1–2 minutes. Cook to 145°F / 63°C in the thickest part, then rest for at least 3 minutes.

A substantial fat edge can go against the hot pan first until it browns and begins releasing clear fat. Add butter, crushed garlic, rosemary and thyme after the main crust has formed so the garlic and herbs flavor the lamb without scorching.

Thin chops need earlier checking. Very thick chops are easier to control when you brown them first and finish the center with gentler heat.

Vertical lamb chop cooking guide showing a raw chop being dried, a chop searing in a pan, a thermometer checking doneness, and a cooked chop resting. Text reads: Dry, Sear, Check, 145°F / 63°C, Rest 3 min.
Treat the clock as a reminder to look, not an instruction to keep cooking. Dry, sear, probe and rest in that order, then pull each chop when it is ready.

Garlic-Herb Lamb Chops Recipe

These are quick skillet chops, but the deep crust and garlic butter make dinner feel much more deliberate than the few minutes at the stove suggest.

Recipe at a glance

Best cutRib or loin chops
Thickness1–1¼ inches / 2.5–3 cm
Serves4
PrepAbout 10 minutes
CookAbout 25 minutes for the full cook when making two batches, including fat-edge browning where needed and the quick pan sauce
RestAt least 3 minutes
TotalAbout 38 minutes, including the minimum rest
Pan10–12 inch heavy skillet
Temperature145°F / 63°C

You will also need: sturdy tongs and an instant-read thermometer. Cast iron is excellent, but a heavy stainless-steel skillet works well too.

Ingredients

  • 8 small lamb rib chops or 4 large lamb loin chops, about 800–900 g / 1¾–2 lb total, ideally 1–1¼ inches / 2.5–3 cm thick
  • 8 g fine sea salt; weighing is especially useful with kosher salt because crystal size varies widely
  • About 1 teaspoon freshly ground black pepper
  • 15 ml / 1 tablespoon neutral high-heat cooking oil, plus more as needed between batches
  • 30 g / 2 tablespoons unsalted butter, divided between batches if needed
  • 4 garlic cloves, peeled and lightly crushed
  • 2–3 fresh rosemary sprigs
  • 4–6 fresh thyme sprigs
  • 15 ml / 1 tablespoon fresh lemon juice, for the pan sauce or finishing
  • 5 ml / 1 teaspoon Dijon mustard, optional
  • Up to 60 ml / ¼ cup unsalted or low-sodium stock or water, optional, for the pan sauce

Seasoning ahead: Salt the chops immediately before cooking, or about 45 minutes or more ahead. That avoids the awkward middle window when salt has drawn moisture onto the surface but the chop has not yet had time to dry again. For longer make-ahead preparation, refrigerate the salted chops uncovered for several hours or overnight.

How to make pan-seared lamb chops

1. Dry and inspect the chops

Do not rinse raw lamb; splashing can spread bacteria around the sink and nearby surfaces. Pat the chops thoroughly dry with paper towels and, as you do, wipe away any tiny bone fragments left on freshly cut surfaces.

Trim obvious tough, silvery membrane and unusually thick, hard or dangling pieces of exterior fat. Leave the normal softer fat edge in place so it can brown and release some of its fat into the skillet.

Take the chops from the refrigerator while you gather the ingredients and heat the pan. They do not need an hour on the counter.

Lamb chop preparation guide comparing a damp surface that steams with a dry surface that browns, with visual guidance for trimming excess hard fat while retaining useful fat.
Patting lamb chops dry does two jobs at once: it improves browning and gives you a chance to spot bone fragments, silvery membrane or hard dangling fat before the pan gets hot.

2. Season the lamb

Season both sides evenly with salt and black pepper.

Fresh rosemary, thyme and garlic can wait. They taste better after the chops have browned, when the heat is calmer and there is butter in the pan to carry their flavor.

Using marinated chops? Remove heavy clumps of yogurt, minced garlic, herbs or spice paste before they hit the skillet. A thin coating is fine; a dripping-wet one will fight you all the way to a good crust.

3. Heat the skillet

Place a heavy skillet over medium-high heat and give it time to become properly hot. Add the oil and swirl it into a thin film.

A 10–12 inch skillet usually holds four small rib chops comfortably, or fewer large loin chops. It is tempting to squeeze in one more when dinner is waiting, but crowded chops steam around the edges instead of browning cleanly. Cook another batch.

4. Brown the fat edge when there is one

Hold a chop upright with tongs and press a substantial fatty edge against the skillet for about 1–2 minutes. The edge should turn golden-brown, and you should see a little clear rendered fat collecting in the pan.

Barely any fat there? Skip it.

Metal tongs hold a raw lamb rib chop upright on its fatty edge in a black skillet while the fat begins to render and turn golden.
Think of the fat edge as a separate surface that needs its own turn against the skillet. If you ignore it, the meat can be juicy while the exterior fat remains stubbornly chewy.

5. Build the crust

Lay the chops flat with some room around each one. Start with about 3–4 minutes on the first broad side for chops around 1 inch / 2.5 cm thick.

Leave them alone long enough to brown. A properly formed crust releases more readily from the pan. A chop that still feels firmly stuck often needs another 20–30 seconds rather than being torn free.

Three-stage lamb chop searing progression showing a pale surface that is too early to turn, a partially browned surface, and a deeply browned crust ready to flip.
Use release as a clue, not force. Once the crust is properly set, the chop usually lifts more cleanly; if it still clings, give it a few more seconds instead of tearing it free.

6. Flip and start checking

Turn the chops. Start checking the thickest pieces after about 2 minutes on the second side. Many chops around this thickness need another 1–2 minutes.

Nervous about overcooking them? Check early. A thick chop can always have another minute; a dry one cannot be made juicy again.

Chops 1½ inches / 4 cm or thicker? Brown both sides, then transfer an oven-safe skillet to a 350°F / 175°C oven. Begin checking after a few minutes. Gentler heat gives the center time to catch up without pushing the crust too far.

7. Add butter, garlic and herbs

As the chops get close to temperature, reduce the heat if necessary and add the butter, crushed garlic, rosemary and thyme.

The butter should foam while the garlic and herbs become fragrant. Let the garlic turn pale golden, not dark brown. Tilt the skillet slightly and spoon the foaming butter over the lamb for about 30–60 seconds, moving the garlic and herbs through the pan as you baste.

For two batches, divide the butter, garlic and herbs between them.

Close-up of a browned lamb rib chop in a dark skillet while a spoon pours bubbling garlic-and-herb butter over the meat.
The baste works best as the handoff from searing to finishing. Once the pan calms slightly, foaming butter can carry garlic and herbs over the lamb without turning those aromatics bitter.

8. Check the thickest part

Insert the thermometer into the thickest fleshy part, keeping the sensing tip clear of the bone and large pockets of fat. With thinner chops, approaching from the side often makes the center easier to hit accurately.

Cook the chops to 145°F / 63°C. One thinner chop does not need to wait in the pan for the thickest one; remove pieces as they become ready.

Raw lamb rib chop on stainless steel with a thermometer probe entering horizontally from the side into the thickest meat. Labels identify “Thickest meat,” “Away from bone,” and “Side entry helps.”
A thermometer can be accurate and still be placed badly. Side entry helps you hit the true center, while checking lamb chops individually keeps the thinnest piece from waiting for the thickest.

9. Rest the lamb

Transfer the chops to a warm plate or rack and rest for at least 3 minutes. Cover finished chops very loosely while another batch cooks. A tight foil tent traps steam and softens the crust.

Use those few minutes to get the plates and sides ready. Get the lamb to the table while the browned edges are still hot and the garlic butter is glossy across the surface.

10. Use the browned bits for a quick pan sauce

Deep brown—not black—bits on the bottom of the skillet can become a quick sauce. A large pool of rendered lamb fat will make it greasy, so pour most of that fat away first and leave roughly a tablespoon in the pan.

Lower the heat, add the lemon juice, Dijon if using, and a splash of stock or water, then scrape up the browned bits. Those flavorful deposits are often called fond. Simmer until the liquid reduces slightly and looks glossy enough to lightly coat a spoon.

Black or bitter residue is better left alone. Skip the sauce and squeeze a little lemon over the rested chops instead.

Dark skillet guide comparing brown fond labeled “Brown → Use” with black burnt residue labeled “Black → Skip,” followed by a spoon lifting glossy brown pan sauce after deglazing.
Fond is useful only when it tastes roasted rather than burnt. Before deglazing, pour off excess lamb fat and keep the mahogany deposits; black residue is better left out of the pan sauce.

Cooking for 2, 4 or more

  • For 2: halve the lamb and seasoning. The cooking time per chop stays about the same.
  • For 4: use the recipe as written. Eight small rib chops may still require two batches.
  • For 6–8: scale the ingredients and cook more batches. More chops do not need more minutes each.

Thyme or oregano can replace rosemary. Olive oil and lemon can stand in for the butter, and water will loosen the browned bits when no stock is handy. Dijon is optional.

Changing rosemary is a substitution. Changing loin chops to shoulder chops is a change of cooking method.

Jump: Check your cut · Time by thickness · Internal temperature

Rib, Loin or Shoulder: Which Lamb Chop Do You Have?

“Lamb chop” covers several cuts, and this is where a lot of confusing cooking advice begins. Their tenderness, fat distribution and connective tissue can be quite different.

Three raw lamb cuts on a dark aubergine background: a long-boned rib chop labeled “Quick-sear,” a T-bone-shaped loin chop labeled “Quick-sear,” and an irregular multi-muscle shoulder chop labeled “Check the method.”
A curved rib bone, mini T-bone or irregular multi-muscle shoulder shape tells you more than the label “lamb chop.” Identify the anatomy first, because the cut determines which kind of heat the meat can tolerate.

What Lamb Chops Should You Buy?

For the skillet recipe above, choose rib or loin chops around 1 to 1¼ inches / 2.5 to 3 cm thick and reasonably even in size. Some soft exterior fat is useful because it can brown against the skillet. Huge hard pieces can be trimmed. Frenched bones are mainly cosmetic; they make the chop look neater but do not make it cook better.

Raw rib and loin lamb chops on a glossy blue surface with metal calipers spanning their thickness. Labels show 1–1¼ inches / 2.5–3 cm, even thickness, soft fat is useful, and Frenching is for appearance.
At the butcher counter, matching thickness across the batch matters more than cosmetic Frenching. Chops that start alike are easier to pull at the right moment without sacrificing one piece for another.

Rib chops and lamb cutlets

Rib chops have a curved rib bone and a relatively small eye of tender meat. When the exposed bone has been cleaned for presentation, they may be sold as frenched chops or lamb lollipops.

They are naturally tender and suit quick pan-searing, grilling and broiling. Small rib chops move through their cooking window quickly, so start checking early.

Double-rib chops are worth asking for when a butcher is cutting a rack to order and you want a thicker, more forgiving piece for pan-searing.

Bought the rack intact? This skillet recipe is for separated chops; cook a whole rack intact and slice it afterward.

Loin chops

Loin chops often resemble miniature T-bone steaks. They are meatier than many rib chops and work particularly well in a skillet.

Boneless loin chops use the same general approach when their thickness is similar. Their shape changes how quickly they heat through, so bone-in and boneless pieces may not finish together.

Shoulder, blade and forequarter chops

Shoulder is where “four minutes per side” starts falling apart. These chops contain more connective tissue, seams of fat and sometimes several muscles running through the same piece.

A thin shoulder chop may do well over high heat. A thick one can hit the thermometer number and still fight the knife. That is not the same failure as a dry, overcooked loin chop.

Cooking a whole leg instead? See our roast leg of lamb recipe.

How Long to Cook Lamb Chops, Based on Thickness

Once you know you have a tender rib or loin chop, thickness becomes much more useful than another generic “minutes per side” rule.

ThicknessStart withNext moveWatch for
½–¾ in / 1.25–2 cm2–3 minutes on the first sideCheck almost immediately after flippingOvercooking
About 1 in / 2.5 cm3–4 minutes on the first sideCheck at 2 minutes; many need another 1–2Going past the target
About 1¼ in / 3 cmAround 4 minutes on the first sideCheck after 2–3 minutes, then continue as neededCrust darkening before the center is ready
1½ in+ / 4 cm+Brown both broad sidesFinish with gentler heatOutside getting too dark
Four raw lamb rib chops shown from the narrow side with calipers measuring ¾ inch / about 2 cm, 1 inch / 2.5 cm, 1¼ inches / 3 cm, and 1½+ inches / 4+ cm. Cooking guidance progresses from “Check very early” to “Sear → gentler heat.”
Thickness changes the shape of the cook, not simply its length. Thin lamb chops need earlier checking, whereas very thick chops often need a shift from hard searing to gentler finishing heat.

A very thick chop does not need to stay over fierce direct heat once the crust looks right. Move to gentler heat and let the center catch up. That protects the contrast you are after: a properly browned exterior without drying the center just to get a thick chop cooked through.

Pan weight and batch size matter too. Heavy cast iron holds heat better than a thin skillet, while several cold chops cool a pan more than one or two. The table tells you when to start looking; the meat tells you when to stop.

What Temperature Should Lamb Chops Reach?

USDA whole-cut lamb benchmark: Cook lamb chops to 145°F / 63°C in the thickest part, then rest them for at least 3 minutes.

Cooked lamb rib chop with a digital thermometer inserted into the meat and a warm pink cut face visible. Large text reads “145°F / 63°C” and “Rest 3+ min.”
Use 145°F / 63°C plus a 3-minute rest as an individual finish line. If one lamb chop gets there first, remove it; a batch does not need to finish all at once.

Color or touch alone is not a reliable safety check. The USDA guidance for whole-cut lamb is the benchmark used throughout this recipe.

Why do some recipes show lower numbers? Restaurant doneness charts and the USDA benchmark are answering slightly different questions. Culinary recipes may use lower temperatures for rare or medium-rare lamb, including lower pull temperatures expected to rise during resting; the USDA figure above is the food-safety benchmark used here.

Put the probe into the thickest fleshy part and keep the sensing tip clear of bone and large pockets of fat. On a thin chop, inserting from the side often makes the center easier to hit. Once the probe is in the right place, you no longer have to guess from color, firmness or a timer.

What a Properly Cooked Lamb Chop Looks Like

Close-up of a sliced lamb rib chop with a browned exterior, warm pink interior, visible meat fibers, rendered fat and a clean bone.
A cut-open lamb chop tells you about eating quality, not safety. Look for moist fibers and rendered fat through the center; let the thermometer answer the safety question.

Why Lamb Chops Go Wrong

A chewy lamb chop does not automatically mean you cooked it badly. First notice whether the meat is dry or still juicy. Those two symptoms point to very different problems.

Four lamb chop cooking problems: a pale wet chop labeled “Gray + Wet,” a heavily blackened chop with a pink center labeled “Black Outside / Center Late,” a chop with burnt garlic and herbs, and a chop with scorched marinade.
Troubleshooting gets easier once you separate surface problems from center problems. Wet-gray meat, burnt coating and an over-dark crust each point toward a different correction rather than the same answer: more heat.
What happenedCauseNext-time fix
Tough and dryOvercooked, especially if thin or leanStart checking sooner and remove pieces individually
Juicy but chewyA connective cut such as shoulderMatch the cooking method to the cut
Black outside, center not readyToo much direct heat for the thicknessFinish the center with gentler heat
Gray and wet instead of brownedWet surface, crowded pan or insufficient heatDry the meat, heat the skillet properly and cook in batches
Garlic or herbs turned blackThey went in too earlyAdd them with the butter near the end
Wet marinade burnedToo much yogurt, garlic or spice paste remained on the surfaceRemove the excess before searing
One chop perfect, another overdoneDifferent thicknessesProbe and remove each piece separately
Meat tender, fat edge chewyThe exterior fat needed more direct heatBrown a substantial fat edge against the skillet first

Dry and Tough vs Juicy and Chewy Lamb

Done and tender are not always the same test. A rib or loin chop that is dry and tough was probably cooked too far. A shoulder chop can remain juicy yet chewy because its connective tissue has not had time to soften.

Two cooked lamb cross-sections side by side. The left is pale and dry with tight fibers, labeled “Dry + Tough — Too Far.” The right is moist with several muscle groups and connective seams, labeled “Juicy + Chewy — May Need Time.”
Two lamb chops can both be called “tough” and need opposite fixes. A dry rib or loin chop needed less cooking; a juicy, chewy shoulder chop usually needs more time under gentler, moist heat.

The meat itself varies too. Butcher trimming, the exact position of the cut, fat and connective tissue can make one batch behave differently from another. When a familiar method suddenly produces a tougher chop, recheck the cut before simply adding more high heat.

Can You Save Overcooked or Chewy Lamb Chops?

Dry, overcooked lamb will not become juicy again, but thin slices are easier to enjoy with pan sauce, yogurt sauce or another moist accompaniment. A juicy-but-chewy shoulder chop can often go back into gentle moist heat until its connective seams soften. Leave burnt garlic or black fond behind rather than scraping bitter flavors over the meat. If a pale chop has already reached temperature, do not keep cooking it only to chase a darker crust.

Lamb chop rescue guide showing dry lamb sliced and covered with sauce; a shoulder chop cooking gently in liquid; burnt garlic and fond left in a pan; and a pale but cooked lamb chop. Labels explain the corresponding rescue for each problem.
Rescue what is still fixable. Moisture and thin slicing can improve how dry lamb eats, but only connective-tissue toughness is likely to become more tender with additional cooking.

Smoke, Aroma and Spoilage: Other Lamb Chop Problems

Harsh, acrid smoke usually means something in the skillet is burning. Once the crust is established, lower the heat if necessary. Pour away a large pool of rendered fat between batches, and do not leave wet garlic or heavy marinade in the pan through the initial hard sear.

Lamb has a naturally distinctive aroma, much of it carried in the fat. For a milder result, trim an unusually heavy exterior fat layer and finish the chops with lemon, mint, parsley or yogurt.

Obviously spoiled meat should be discarded, and a normal smell or appearance cannot prove that meat is safe. If its storage history is questionable, do not use smell as reassurance.

Once you separate overcooking from connective-tissue toughness and surface problems, most lamb-chop failures become much easier to diagnose—and easier to avoid the next time you cook them.

Go to: Recipe & ingredients · Shoulder chops · Marinades · Other methods

Should You Pan-Sear or Braise Lamb Shoulder Chops?

Thin, well-marbled shoulder chops can take a fast sear. Thick chops with obvious connective seams are usually much better braised, where those chewy parts have time to soften.

For a conventional covered braise, a 325°F / 165°C oven is a useful starting point. Add enough flavorful liquid to create a shallow, moist braising environment and cover the pan.

Start checking around 1½ hours. Thick shoulder chops commonly need around 2 hours, sometimes longer. Keep cooking until a fork or knife moves through the connective seams with very little resistance.

Use the time for planning. Pull the chops when those tougher seams are genuinely tender. Hard boiling or several unnecessary extra hours can leave even softened meat dry.

Raw lamb shoulder chop with several muscle groups above a black braising pan containing a dark, tender shoulder chop being pulled apart with a fork. Text reads “Sear / Braise,” “Start checking ~1½ hr,” and “Stop when the seams soften.”
Shoulder is ready when the connective seams yield, not when the clock reaches a particular number. Start checking before the meat collapses, then stop once a knife or fork moves through those seams with little resistance.

Our Moroccan lamb tagine with apricots shows the same shoulder logic in a full slow-cooked dish.

Do Lamb Chops Need a Marinade?

No. Tender rib and loin chops do not need a marinade to become tender. Use one mainly for flavor; salt, acid and yogurt can also change seasoning and surface texture over time.

Garlic, rosemary and lemon are the simple route used here. The meat stays relatively dry while it browns, then the herbs and garlic join the butter near the end.

For Mediterranean-style chops, use oregano, garlic, lemon and olive oil. Cool Greek tzatziki sauce works naturally alongside those flavors.

Mint, parsley, lemon and olive oil make a sharper finishing sauce. Cumin, paprika and black pepper give the lamb a warmer, earthier profile. Keep sugary seasonings away from the fiercest heat because they scorch quickly.

Yogurt-spiced lamb needs a little extra care

Yogurt, ginger, garlic, cumin, coriander, garam masala and chili make a terrific base for tandoori-style or masala chops. The challenge is getting a yogurt-coated chop browned without scorching the coating.

Lift the meat from the marinade and remove thick clumps before cooking. A thin coating can stay. Yogurt and minced garlic thick enough to drip into the skillet are likely to blacken before a thick chop is ready in the center.

Two raw marinated lamb rib chops against a red background. The left has a thin speckled yogurt coating labeled “Thin coating → Browns”; the right has thick uneven yogurt clumps labeled “Heavy clumps → Burn.”
Leave flavor on the chop, not heavy pockets of marinade. A thin yogurt-spice film can brown, while thick ridges and drips are the parts most likely to blacken before the center is ready.

Reserve any marinade you plan to serve before the raw lamb goes in. If marinade has touched raw lamb, discard it or bring it to a full boil before using it as a sauce.

Marinate lamb in the refrigerator, even for a short 30-minute marinade. Thirty minutes is enough to add noticeable surface flavor to tender chops; a few refrigerated hours work well for many herb, spice and yogurt marinades. Strongly acidic mixtures left overnight can begin changing the surface texture.

Skillet, Grill, Air Fryer or Oven Finish: Which Method Fits Your Chops?

No single cooking method wins every time. Instead, start with the cut and thickness you have, then choose how much direct browning, hands-on control or gentler finishing heat the chop needs.

Lamb chop cooking-method selector beginning with raw chops and branching to four cooked examples: skillet labeled “Fast + Controlled,” grill labeled “Direct Heat + Char,” air fryer labeled “Hands-Off,” and an already-seared chop in a skillet inside an oven labeled “Thick Chops.”
Choose by trade-off: skillet for control and basting, grill for direct char, air fryer for convenience, and an oven finish when a thick center is lagging behind an already-browned crust.

Skillet and Oven Finish

For the rib and loin chops in the main recipe, skillet cooking gives the best fit. Direct contact with the pan gives you fast browning plus the option to baste with garlic and butter.

Oven finish for thick chops: useful when a very thick chop has already browned but still needs time in the center. Move an oven-safe skillet to 350°F / 175°C and start checking after a few minutes.

Grill and Air Fryer Lamb Chops

For the grill, preheat to medium-high. With rib chops around 1 inch / 2.5 cm thick, start with roughly 3–4 minutes on the first side, then flip and begin checking after about 3 minutes. Loin chops of similar thickness can fall into a similar window but are often meatier.

Keep a cooler part of the grill available because dripping lamb fat can flare suddenly. Move the chops away from fierce flame once the outside has the color you want, and cook to 145°F / 63°C. Rest at least 3 minutes. Fresh chimichurri is especially good with the smoke and char.

Air fryer: for rib or loin chops around 1 inch / 2.5 cm thick, heat the air fryer to about 375°F / 190°C and arrange the chops in a single layer. Cook for about 6 minutes, turn, then begin checking after another 4 minutes.

Many chops fall somewhere around 10–12 minutes total, but air fryers vary considerably. Continue only as needed to reach 145°F / 63°C, then rest for 3 minutes.

Next: Serving ideas · Leftovers · Back to top

What to Serve With Lamb Chops

The best sides for lamb chops include mashed or lemon-roasted potatoes, peas or green beans, tomato-cucumber salad, couscous or rice, and yogurt- or mint-based sauces.

Lamb chops are rich and deeply savory, so the easiest plates give them something comforting alongside something fresh or acidic.

Finished garlic-herb lamb chops with mashed potatoes and green vegetables on a dark plate, plus smaller pairing groups for bright sides with lemon potatoes, tomato-cucumber salad and yogurt; spiced sides with rice, mint yogurt and roasted vegetables; and quick sides with couscous and dressed greens.
A balanced lamb-chop dinner usually needs one substantial side and one fresh, sharp or cool element. That simple structure keeps rich meat satisfying without making the whole plate feel heavy.

For a classic comfort plate: serve the garlic-herb chops with creamy mashed potatoes, peas or green beans, and the warm pan juices spooned over the top.

For something brighter: add Greek lemon potatoes, tomato-cucumber salad and cool yogurt or tzatziki. Hot lamb, crisp salad and cold yogurt make a particularly good mouthful.

With cumin- or yogurt-spiced chops: basmati rice, mint yogurt and roasted vegetables work naturally. Couscous or bulgur with dressed greens is useful when dinner needs to move quickly.

Two average rib chops per person is a useful starting point when there are substantial sides. Large loin chops are meatier, so look at the amount of meat rather than simply counting bones. By weight, about 8 oz / 225 g raw bone-in lamb per person is a practical starting point; bone size and appetites vary.

Leftover Lamb Chops

Refrigerate leftover lamb within 2 hours of cooking and use it within 3–4 days. When the surrounding temperature is above 90°F / 32°C, refrigerate it within 1 hour. USDA recommends reheating leftovers to 165°F / 74°C.

To reheat whole lamb chops without drying them out: place them in a small baking dish with a splash of stock, water or leftover pan sauce. Cover with foil and warm in a 350°F / 175°C oven. Start checking after about 10 minutes and continue only as needed until heated through to 165°F / 74°C.

Sliced or chopped leftovers are often easier to warm gently than a whole chop. Tuck the meat into flatbread with yogurt and greens, or scatter thin slices over rice, couscous or a sharply dressed salad.

Three-stage leftover lamb chop guide. A cooked chop rests in a cool stainless setting, then reheats gently in a covered pan with a small amount of liquid at 165°F / 74°C, and finally appears sliced beside couscous, tomatoes, greens and yogurt sauce.
Leftover lamb chops are easier to protect than to restore. Reheat whole chops gently with a little moisture, or slice them into a new dish so the meat spends less time heating again.

Cooked lamb can also be frozen. A little sauce or cooking juice helps protect it during reheating; for best quality, use frozen cooked lamb within about 2–3 months.

Jump: Recipe & ingredients · FAQs · Back to top

Frequently Asked Questions

1. Can lamb chops still be pink when they are cooked?

Yes. Color alone does not reliably tell you internal temperature. Cook whole-cut lamb chops to 145°F / 63°C in the thickest part and rest them for at least 3 minutes.

2. Should lamb chops come to room temperature before cooking?

No long counter rest is necessary. Take the chops from the refrigerator while you prepare the ingredients and heat the skillet. A dry surface, thickness and internal temperature matter much more.

3. Can you cook lamb chops from frozen?

Yes, but the skillet timings in this recipe are written for thawed chops. Refrigerator thawing gives you a drier surface and more predictable browning. As a planning rule, meat cooked from frozen can take about 50% longer, although chop thickness and cooking method still matter. Chops thawed in cold water or in the microwave should be cooked promptly afterward. Never thaw raw lamb on the counter.

4. Can I use boneless lamb loin chops?

Yes. Use the same general skillet method and match the chops by thickness where possible. Boneless pieces can differ in shape and may finish sooner or later than bone-in chops, so begin checking rather than relying on the bone-in timing alone.

5. Are lamb chops and mutton chops the same?

Not necessarily. In standard meat terminology, lamb comes from a young sheep, while mutton comes from a mature sheep. In India and parts of South Asia, “mutton” is also commonly used for goat meat.

Check what animal and cut you actually bought before using quick lamb-chop timings. Goat chops, mature-sheep chops and tender lamb rib or loin chops can behave quite differently in the pan.


Serve the chops while the crust is still hot and the garlic butter is glossy.

Close-up of a French-cut lamb rib chop on a glossy black surface with a dark browned herb crust, rendered golden fat, clean bone and a warm pink center with visible meat fibers; one slice rests beside the chop in pan juices.
The strongest success cues travel from one batch to the next: an irregular crust, rendered edge fat and moist fibers through the center. Once those become familiar, problems are easier to spot early and correct while you still can.

Next time, look at the cut and thickness before you look at the clock. Most of the mystery disappears from there.

Recipe & ingredients ↑ · Back to top ↑

Posted on Leave a comment

Vegetarian Enchiladas Recipe: Easy Black Bean & Veggie Enchiladas

Baked vegetarian enchiladas in a dark red casserole dish with glossy red sauce, browned melted cheese, and black beans and corn visible around some tortilla edges.

A good pan of vegetarian enchiladas comes to the table still bubbling: red sauce in the seams, browned patches of cheese, sweet corn, toasty cumin and lime underneath. The tortillas stay soft through the middle, while a few exposed edges catch enough oven heat to toast.

Keep the easy parts easy. The filling cooks in one skillet, store-bought enchilada sauce works perfectly well, and there is no need to dip every tortilla individually before rolling. What matters more is how wet the filling is, whether the tortillas bend cleanly and how long they sit in sauce.

Black beans, corn, bell pepper, onion and garlic make up the filling. A few of the beans get crushed against the skillet so everything holds together inside the tortilla; the rest stay whole, giving you a hearty center without turning the filling into bean paste.

Saucy, not soggy is the aim. The recipe itself is straightforward; the extra guidance farther down is there for the few places enchiladas tend to get awkward.

Quick answer: To make vegetarian enchiladas, sauté onion, bell pepper and corn until tender and no loose water remains. Add black beans, lightly crush some of them, then season with cumin, chile, lime and a little red enchilada sauce. Taste before rolling. Fill 8 medium flour tortillas or 10–12 small corn tortillas, arrange them in a lightly sauced 9 × 13-inch / 23 × 33-cm dish, top with the remaining sauce and cheese, and bake at 400°F / 200°C for 18–22 minutes.

Jump to: the recipe · corn or flour · prevent sogginess · make ahead & freeze · troubleshooting · what to serve

Black Bean & Veggie Enchiladas

If you have never rolled enchiladas before, don’t let that make the recipe look fussy. Once the tortillas are flexible and you know how much filling they comfortably hold, the rest of the pan goes quickly.

Recipe at a Glance

Yield8 medium flour-tortilla enchiladas or about 10–12 smaller corn-tortilla enchiladas; about 4 servings
Total timeAbout 50–60 minutes, including resting
Active timeAbout 30 minutes
Pan9 × 13 inches / 23 × 33 cm
Bake400°F / 200°C for 18–22 minutes
Two cut-open enchiladas on a deep blue plate showing black beans, corn, red bell pepper, onion, melted cheese and red sauce inside the tortillas.
A useful filling should hold together without becoming dense. You still want to see whole black beans, corn and peppers when the enchilada is cut, rather than one compact paste.

Ingredients

  • 1 tablespoon / 15 ml olive oil or neutral cooking oil
  • ½ medium onion, finely diced, about 80 g. Red, yellow or white all work.
  • 1 medium red bell pepper, diced, about 150 g. A small dice makes enchiladas easier to roll and eat.
  • 1 cup corn, about 160 g. Fresh, frozen or well-drained canned corn all work.
  • 3 garlic cloves, minced
  • 1½ teaspoons ground cumin
  • 1 teaspoon American-style chili powder. Use the relatively mild seasoning blend sold as “chili powder” in the US, not pure cayenne or another very hot ground chile.
  • ½ teaspoon smoked or sweet paprika
  • ½ teaspoon dried oregano
  • 1 (15-ounce / 425-g) can black beans, rinsed and thoroughly drained, about 240–260 g drained
  • 2 cups / 475 ml red enchilada sauce, divided. One 19-ounce can usually gives enough. Packaged sauce keeps this easy; this red enchilada sauce recipe makes about the right amount.
  • 1 tablespoon / 15 ml fresh lime juice, plus wedges for serving
  • Fine salt, as needed after tasting
  • 8 ounces / 225 g / about 2 cups shredded melting cheese, divided roughly in half. Monterey Jack is an easy choice; Jack with sharp cheddar adds bite; Oaxaca works well too. Any mild cheese or blend that melts smoothly can stand in.
  • 8 flour tortillas, about 8 inches / 20 cm each
  • Or 10–12 corn tortillas, about 6 inches / 15 cm each. Expect closer to 12 at roughly ⅓ cup filling each; capacity varies with size and thickness.
  • Neutral oil as needed, optional, for corn tortillas that remain fragile after warming

Cooking for vegetarians? Check enchilada sauce for meat stock and choose cheese made with vegetarian or microbial rennet if that matters to you. Canned refried beans may contain lard too, so check the label if using them as a swap.

Before You Start

  • Taste the sauce. A salty or very spicy sauce means the filling needs more cautious seasoning.
  • Bend one corn tortilla. A cracked edge tells you the batch needs warming before you start filling.
  • Drain the beans and canned corn well. Water carried into the filling eventually reaches the tortilla.

1. Sauce the Baking Dish

Heat the oven to 400°F / 200°C.

Spread about ⅓ cup / 80 ml enchilada sauce across the bottom of the baking dish. A thin coating is enough to flavor the underside and prevent sticking.

2. Cook the Vegetables Until the Pan Looks Dry

Heat the oil in a large skillet over medium to medium-high heat. Add the onion and bell pepper and cook for 5–7 minutes, stirring occasionally, until tender and beginning to color.

Add the corn and cook for another 2–3 minutes.

Lower the heat to medium and stir in the garlic, cumin, chili powder, paprika and oregano. Within about 30 seconds the pan should smell warmer and toastier, with the cumin and chile coming through before anything has a chance to scorch.

Drag the spatula through the vegetables. Water should not immediately flood back into the cleared path. You want glossy, juicy vegetables with a fairly dry skillet underneath them.

Cooked corn, onion and bell pepper pushed aside by a metal spatula in a dark skillet, leaving a dry strip of pan with no loose liquid running back into it.
This is the easiest moment to catch excess moisture. Once beans and sauce go in, extra vegetable water is harder to recognize—and much more likely to end up inside the tortilla.

3. Add the Black Beans and Finish the Filling

Add the drained black beans. Lightly crush about one-third against the skillet with the back of your spoon; leave the rest whole.

Stir in another ⅓ cup / 80 ml enchilada sauce and the lime juice. Scoop up a spoonful. It should stay together as you carry it to a tortilla, with no watery liquid left behind in the skillet.

If the filling loosens after the sauce goes in, cook it for another minute or two until the excess liquid has reduced and the spoonful holds together again.

Keep the sauce split simple: ⅓ cup under the rolls, ⅓ cup in the filling and about 1⅓ cups over the top.

Enchilada sauce guide showing one-third cup beneath the rolls, one-third cup mixed into the filling, and one and one-third cups spread over the top while the tortilla ends remain exposed.
The same amount of enchilada sauce behaves very differently depending on where it goes. Distribution matters more than simply cutting the quantity: too much underneath creates pooling, while most belongs over the rolls.

4. Taste Before You Roll

Taste the filling now. Beans soften seasoning, and both the sauce and cheese will add salt later.

Add salt if it needs it. A little more lime can wake up a heavy filling; another small pinch of cumin or chili powder can deepen one that tastes flat. Adjust it now, before the filling disappears inside the tortillas.

5. Warm the Tortillas

Flour tortillas: soft and flexible straight from the packet? Use them. There is no prize for adding an unnecessary warming step.

Corn tortillas: wrap the stack in a slightly damp kitchen towel or paper towel and microwave for about 20–30 seconds. Bend one. A batch that still cracks usually needs another 10 seconds. You can also use a hot skillet for about 10–20 seconds per side. Keep the warmed stack covered while you work.

Particularly brittle tortillas may benefit from a very light brush of neutral oil and another few seconds in the skillet. Pull them while they still bend easily.

Three-step corn tortilla guide showing warmed tortillas, one bending into a U shape without cracking, and another being lightly brushed with oil in a skillet as an optional step.
Corn tortillas need enough flexibility to roll, not a mandatory oil treatment. If warmth alone gets them there, stop—extra steps should solve a problem, not become ritual.

6. Fill and Roll

The first tortilla is your test enchilada. A crack means the remaining tortillas need more warmth; filling bulging heavily from both ends means the next one needs a smaller scoop.

Use about ½ cup / 120 ml filling for each 8-inch / 20-cm flour tortilla or about ⅓ cup / 80 ml for each 6-inch / 15-cm corn tortilla.

Divide about half of the shredded cheese among the tortillas, roughly 1 cup in total.

Roll and place seam-side down in the dish. Don’t chase perfectly tight cylinders. Once the rolls are tucked beside one another, the baking dish does most of the holding. A small split is not a crisis; turn that side down and carry on.

By the third or fourth tortilla, the amount usually starts to feel obvious. From there, the pan fills quickly.

Overhead guide comparing a large flour tortilla with about half a cup of black bean and corn filling and a smaller corn tortilla with about one-third cup, followed by rolling and seam-down placement.
Treat the filling amount as a comfortable maximum, not a target you must force into every tortilla. If the seam strains to close, the better fix is a smaller scoop, not a tighter roll.

7. Add Sauce and Cheese

Sauce the centers and leave a little tortilla exposed at the ends. Spoon over the remaining sauce, about 1⅓ cups / 315 ml, then scatter the remaining half of the cheese over the top.

8. Bake Until Bubbling, Then Rest

Bake uncovered for 18–22 minutes. Look for red sauce bubbling between the rolls, melted cheese with a few golden patches and tortilla tips beginning to toast.

A hot pan with a pale top only needs a minute or two under the broiler/grill. Leaving the whole dish in the oven longer will only dry the filling and exposed tortilla edges.

Rest for 5–10 minutes. While the pan settles, cut the lime and get any toppings ready. The enchiladas will lift more cleanly when you come back to them.

A spatula lifting a baked enchilada from a red casserole dish, with black beans, corn, red pepper and onion visible inside, surrounded by bubbling sauce, browned cheese and a toasted tortilla edge.
Use a broad spatula when serving: supporting the whole softened roll from underneath matters more than trying to lift it by one end, especially with corn tortillas.

If the pan is already in the oven, dinner is handled. Everything below is optional. Use it when you want to change the tortillas or filling, make the pan ahead, or work out why an earlier batch behaved differently.

Corn or Flour Tortillas for Enchiladas?

Corn tortillas are the traditional Mexican starting point for enchiladas. For this baked home-style version, flour tortillas are also useful when easy rolling matters more than pronounced corn flavor.

If you want…ChooseWhat changes
More corn flavorCornYou still taste the corn tortilla underneath the sauce.
Firmer tortilla texture under sauceCornProperly warmed corn tortillas keep more of their own texture as they bake.
The easiest rollingFlourThey are soft and forgiving.
A very soft finished enchiladaFlourFlour tortillas soak up sauce faster as they bake and sit.
Side-by-side stacks of yellow corn tortillas and pale flour tortillas, labeled that corn offers more flavor and structure while flour is easier to roll and gives a softer finish.
Think about when you plan to eat them. Flour tortillas are wonderfully forgiving for same-day enchiladas, while corn usually keeps more of its own character after longer contact with sauce.

Do Corn Tortillas Have to Be Fried?

Not for this baked version. A quick oil pass makes corn tortillas easier to roll and gives them a little more protection from the sauce. If yours already bend cleanly after warming, you can skip it.

Freshness, thickness and brand all matter. If you’ve got masa harina and want to make the tortillas too, this homemade corn tortilla recipe explains what properly hydrated, flexible dough should feel like.

For especially fragile tortillas, Bon Appétit also describes a brief oil treatment for sturdier enchiladas. Whatever method you use, the tortilla should still bend easily when it reaches the filling.

Whichever tortilla you choose, moisture eventually matters more than the label on the packet.

Saucy, Not Soggy: How to Keep Enchiladas From Falling Apart

Soggy enchiladas usually come down to moisture and time: a wet filling, sauce pooling underneath, or tortillas sitting in sauce for hours before they bake.

Soft is not the enemy here. A good enchilada should be tender where tortilla meets sauce. The trouble starts when the tortilla becomes watery, gummy or so fragile that it cannot make the trip from baking dish to plate.

Two enchiladas compared side by side: the soft example remains intact, while the soggy example sits in excess watery sauce with a visibly collapsing tortilla.
For vegetarian enchiladas, the useful test is whether the tortilla still has structure. Tender tortillas are normal; pooling liquid plus a roll that collapses when lifted signals a moisture problem.

Most of the solution happens before the pan reaches the oven. Corn and peppers are fairly forgiving. Zucchini, mushrooms and spinach release much more water, so give those vegetables enough time in the skillet for that moisture to cook away.

Corn tortillas have the opposite problem at first: too dry and they crack. Warm them until they bend cleanly. Flour tortillas need almost no persuasion to roll, though they soften more quickly once they spend hours in sauce.

With the sauce, restraint underneath matters more than restraint on top. Give the bottom of the dish a thin coating, put a little sauce in the filling, then let most of it sit over the rolls. For a saucier serving, warm extra sauce separately and spoon it on at the table.

Sauce contact matters too. A pan rolled and baked now behaves differently from one that sits sauced for hours before it reaches the oven. If you are assembling ahead, the make-ahead method keeps that exposure under control.

Changing the Vegetarian Enchilada Filling

Poblano is the easiest place to start if you want to change the base without changing its character too much. It brings more chile flavor without adding much extra moisture. Extra corn makes the filling sweeter.

The important thing is volume: replace rather than endlessly add. A cup of something new should take the place of roughly the same amount of the original filling. Otherwise a flexible recipe quietly becomes enough for a second baking dish.

Vegetables That Need More Cooking

Wetter vegetables need a little more care before they go inside a tortilla.

  • Zucchini: dice it small and cook until the water it releases has evaporated.
  • Mushrooms: let them move past the wet, steaming stage and give them time to brown. Once browned, they make the filling much more savory.
  • Spinach: wilt thoroughly. Drain or squeeze frozen spinach before it reaches the filling.
Before-and-after guide showing raw and cooked-down zucchini, raw and browned mushrooms, and fresh spinach beside a much smaller portion of wilted spinach.
Different vegetables change appearance in different ways, so color alone is a poor guide. For an enchilada filling, the more reliable endpoint is simple: the skillet should no longer be releasing loose water.

Sweet potato and butternut squash need a head start too. Cook them until tender before assembly; the short oven bake here is enough to heat the filling and melt the cheese, not enough to soften raw chunks of squash.

Black, Pinto or Refried Beans?

Black beans work especially well here because they hold their shape but crush easily enough to help bind the filling. Pinto beans are softer and milder and can replace them 1:1.

Refried beans give you a denser, creamier center. Check canned versions for lard if you are cooking for vegetarians. If you’d rather keep them on the side, this refried beans recipe from a can is a quick option.

Leaving beans out entirely calls for more cooked vegetables to take their place. Browned mushrooms with roasted cauliflower are one option. The tortillas should still feel properly filled when you roll them.

Red or Green Enchilada Sauce?

Red is the natural fit for the base recipe. Cumin, black beans and browned cheese sit especially well with its deeper chile flavor.

Green sauce changes what you notice. Lime, sweet corn, cilantro and the fresh toppings come forward, giving the same filling a brighter finish.

Two enchiladas with the same black bean, corn and red pepper filling; one has deep red sauce and pickled onion, while the other has green tomatillo sauce, crema and cilantro.
If you swap red for green enchilada sauce, keep the filling unchanged the first time. That makes it easier to taste what the sauce itself changes before adjusting lime, cumin or toppings.

Swap green sauce for red roughly 1:1. A pourable bottled green enchilada sauce can go straight in. If you’re using a thicker salsa verde, loosen it with a little water, vegetable broth or cooking liquid until it pours easily and coats the tortillas. This roasted salsa verde explains that adjustment as well.

Give any sauce a taste before it reaches the pan. One that pours almost like broth benefits from a short simmer. A salty sauce means the bean filling will need less salt.

Homemade sauce is worth making when you feel like the extra project. It should not be the admission price for enchiladas on a Wednesday night. Ready to cook? Return to the recipe and assemble the pan as written.

How to Make Vegetarian Enchiladas Ahead Without Getting Soggy

For an overnight pan, use the finished filling exactly as written but keep the exterior sauce off until baking time. That means no sauce in the baking dish and no sauce over the rolled tortillas while they sit in the refrigerator.

Let the cooked filling stop steaming, transfer it to a shallow container and refrigerate promptly. Once chilled, fill and roll the tortillas and keep them covered in the refrigerator. Store the sauce and cheese separately.

A refrigerator shelf holding rolled unsauced enchiladas in a baking dish with separate containers of red enchilada sauce and shredded cheese.
Cooling the filling before rolling keeps residual steam from condensing inside the covered pan. Then hold back the exterior sauce so the tortillas spend less time absorbing liquid before baking.
Prep styleWork before bakingWhat to expect
Components kept separateWarm tortillas, roll, sauce and add cheeseClosest to freshly assembled
Roll ahead; sauce laterAdd sauce and cheeseVery good texture with little work left
Fully assemble overnightBakeLeast work, but noticeably softer tortillas

Baking Chilled Enchiladas

A pan going into the oven straight from the refrigerator will usually need about 25–35 minutes. Cover loosely for the first 15 minutes, then uncover and continue until the sauce is bubbling through the pan and the center is hot. Cooking them fresh instead? Use the standard bake cues and timing.

Refrigerated glass bakeware needs a little extra care. Follow the manufacturer’s instructions before moving a cold glass dish into a hot oven because thermal-shock tolerance varies by product.

How to Freeze Vegetarian Enchiladas

For the closest texture to a fresh pan, freeze the cooked filling and sauce separately. For best quality, use them within 2–3 months. Thaw overnight in the refrigerator, then assemble with tortillas and cheese and bake as written.

A fully assembled pan works too. Chill the cooked filling first, assemble the enchiladas in a freezer-safe baking dish, add the sauce and cheese, wrap tightly and freeze. The tortillas will be softer after thawing, but almost all of the work is already done.

Thaw the assembled pan overnight in the refrigerator, then use the chilled-pan timing above. Straight-from-frozen baking is possible, but timing varies with the pan, its depth and how solidly everything is frozen. Thawing first gives you a more even bake.

Freezer comparison showing cooked black bean and vegetable filling stored separately with red sauce on one side and a wrapped fully assembled pan of sauced, cheese-topped enchiladas on the other.
The freeze-thaw cycle is gentler on tortilla texture when the filling and sauce stay separate. An assembled frozen pan saves more work later, but the tortillas go through that cycle already sauced.

Store and Reheat Leftovers

Refrigerate leftovers promptly. USDA recommends getting perishable cooked food into the refrigerator within 2 hours and using leftovers within 3–4 days. Reheat them to 165°F / 74°C.

For freezer quality, USDA guidance lists casseroles at about 2–3 months. See its food-safety guidance for the broader recommendations.

An oven or toaster oven keeps more texture around exposed edges. The microwave is quicker and gives you a softer tortilla. At lunch, speed may win.

Fix My Enchiladas

Troubleshooting guide around a baked enchilada showing six problems and fixes: cracked, watery, too soft, too dry, flat and greasy.
Most rescue moves change one thing at a time: structure, moisture, brightness or contrast. More oven time is rarely the answer once the enchiladas are already cooked.

My Corn Tortilla Cracked While I Was Rolling It

Tuck the split side underneath and keep going; a small crack rarely matters once the rolls are sitting snugly together. Before you roll the rest, revisit the tortilla warming method.

There Is Water Under the Enchiladas

Give the pan a full 10 minutes to rest before judging it. Some loose liquid may settle as the enchiladas cool slightly. Lift the rolls with a wide spatula and leave excess liquid in the dish. A very watery pan usually traces back to wet vegetables, unusually thin sauce or too much sauce underneath. For prevention next time, the Saucy, Not Soggy section brings those moisture points together.

The Tortillas Have Turned Very Soft

That doesn’t mean the pan is ruined. Let it rest a little longer, lift portions with a wide spatula and add something crisp such as cabbage, radish or pickled onion for contrast. For another overnight batch, use the make-ahead method and keep the exterior sauce separate until baking time.

The Enchiladas Are Too Dry

Warm some extra enchilada sauce and spoon it onto each plate. Crema, salsa or guacamole can bring moisture back too. On another pan, use the full sauce amount and stop baking once the center is hot and the sauce is bubbling.

The Filling Tastes Flat

At the table, lime is the fastest fix. Salsa, pickled onion, jalapeño or Cotija can help too. Next time, taste after the beans, sauce and lime are all together in the skillet.

If the filling falls out: don’t try to re-roll a hot, sauced enchilada. Spoon the filling back beside or over the tortilla and eat it as it is. During assembly, a little less filling and a few lightly crushed beans make the rolls easier to manage.

If the pan looks greasy: that sheen is often fat released by the cheese. Let the pan rest and spoon off any obvious excess around the edges if you want to. Extra oven time usually makes the problem worse.

What to Serve With Vegetarian Enchiladas

The enchiladas already bring warm tortillas, beans, chile sauce and cheese. You don’t need every topping in the refrigerator. Pick one cool thing, one sharp thing and, if you want it, something crunchy.

  • Cool: avocado, guacamole, sour cream or crema
  • Sharp: lime wedges, pickled red onion, salsa or fresh/pickled jalapeño
  • Crunchy: shredded cabbage, radish or a simple cabbage slaw
  • Cheese at the table: Cotija for a salty, assertive finish or queso fresco for a milder fresh-cheese crumble

Finish with cilantro if you like it. For a fuller meal, Mexican-style rice or a simple salad is enough.

Plated vegetarian enchiladas with avocado and crema marked as cool, pickled red onion and lime marked as sharp, and cabbage and radish marked as crunchy.
Add contrast at the table, not before the bake. Cool crema, sharp lime or pickles, and crisp cabbage or radish stay useful precisely because they have not spent twenty minutes softening in the oven.

Vegetarian Enchiladas FAQs

Can I Use Black Beans Cooked From Dried?

Yes. Use about 1½ cups / 250 g cooked, well-drained black beans in place of the canned beans.

Can I Make These Gluten-Free?

Yes. Use certified gluten-free corn tortillas and check the labels on the enchilada sauce and any packaged seasoning blends.

Can I Make These Vegan?

Yes. The black bean and vegetable filling is already plant-based. Choose an enchilada sauce made without meat stock and use a dairy-free cheese that melts well, or leave the cheese off and finish with avocado, salsa and vegan crema. Without cheese, taste the filling carefully before rolling because you lose some salt and richness.

How Many Enchiladas Should I Serve Per Person?

For a main meal, plan on about 2 medium flour-tortilla enchiladas or 2–3 smaller corn-tortilla enchiladas per person. Substantial sides may bring that down; larger appetites may want more.

Back to the recipe · Back to top


When the pan comes out of the oven, give it those few minutes to settle. The sauce will still be bubbling between the rolls, the cheese will have browned in patches, and a few tortilla corners will be darker and drier than the sauced centers.

At the table, add the cold things: avocado against hot chile sauce, crema melting into the cheese, sharp pickled onion, a squeeze of lime over warm black beans and sweet corn.

Then it is simply dinner: bubbling sauce, browned cheese, lime, sweet corn, and a second enchilada that suddenly seems like a very good idea.

Posted on Leave a comment

Korean Corn Dog Recipe: Crispy, Cheesy Korean Hot Dogs

Golden panko-coated Korean corn dog on a wooden skewer with ketchup and mustard, beside a cut corn dog with sausage, melted mozzarella and a crisp breadcrumb shell.

A good Korean corn dog recipe is really about that first bite: crisp, craggy panko; a soft, slightly chewy layer underneath; then hot mozzarella stretching away from the skewer while ketchup and mustard cut through the richness.

Korean corn dogs look wonderfully simple when someone else is making them. At home, trouble tends to start somewhere less glamorous: condensation beads on the cheese, sticky dough slides down the skewer, the coating gets much thicker than expected, or the mozzarella finds a way into the frying oil.

Most of those problems are easier to fix before the next skewer goes in. Dry damp cheese, adjust dough that has gone too loose, and give cooled oil another minute instead of carrying the same problem through the whole batch. This recipe uses a lightly sweet yeasted dough, low-moisture mozzarella, fully cooked hot dogs and panko to get you there.

Make It Now: Korean Corn Dogs

Recipe at a Glance

Makes6 large corn dogs
Active prep25–30 minutes
Rise45–60 minutes, or until doubled and bubbly
Fry3–5 minutes per corn dog; about 20–30 minutes for the batch
Total elapsedAbout 1 hour 30 minutes to 1 hour 45 minutes
Oil350°F / 175°C

Some skewer prep happens while the dough rises, so the prep and rise times overlap.

Three Things Before You Start

  • Keep the filling cold and dry. Condensation makes sticky dough much harder to keep in place.
  • Keep the dough layer thin. It needs to cling and stretch now because it will puff in the oil.
  • Coat and fry one at a time at first. Once the panko is on, get that skewer into the oil.

Get those three things right and the rough panko shell crackles over soft, chewy dough. More importantly, there is still plenty of sausage or cheese inside—not a giant piece of fried bread with the filling lost somewhere in the middle.

Pick Your Filling

For a first batch, put half a hot dog and one mozzarella baton on each skewer, end to end. You get the signature cheese pull without making the entire filling as leak-prone as an all-cheese corn dog. For 6 corn dogs, that means 3 fully cooked hot dogs, halved, plus 170–180 g / 6–6½ oz mozzarella.

Three uncooked Korean corn dog skewers showing all mozzarella, half sausage and half mozzarella, and all sausage filling options on a metal tray.
Arrange the hot dog and mozzarella end to end on the skewer, keeping both centered so the filling stays balanced while you wrap it in sticky dough. A centered skewer is also easier to rotate evenly during coating.
  • All mozzarella: use 330–360 g / 12–13 oz. Cut 6 longer batons about the same overall length and thickness as the standard sausage-and-cheese filling.
  • All sausage: use 6 fully cooked hot dogs. This is the easiest filling to fry and the least likely to leak.
  • Mozzarella + cheddar: keep mozzarella as the main cheese and add a smaller amount of firm cheddar when stronger cheese flavor matters more than the longest possible pull.

Going all-in on cheese? See what a cheese leak can tell you before you fry the rest of the batch.

Ingredients

Sticky Yeast Dough

  • 220 g (7¾ oz / 1¾ cups + 1 tablespoon) all-purpose flour, plus a little more only if needed
  • 225 ml (scant 1 cup) warm water, 100–110°F / 38–43°C
  • 25 g (2 tablespoons) granulated sugar
  • 5 g instant yeast
  • 4 g fine salt

Filling

  • 3 fully cooked hot dogs, cut in half crosswise
  • 170–180 g (6–6½ oz) firm low-moisture mozzarella, cut into 6 sturdy batons 2–2½ inches / 5–6 cm long

Look for a firm block labeled low-moisture mozzarella; in some shops it is sold as pizza mozzarella. Whole-milk mozzarella gives especially good flavor and stretch, but low moisture matters more than the exact label. Fresh mozzarella packed in water or brine is much harder to keep inside the crust.

Mozzarella string cheese is a handy fallback, though its thinner shape gives you a smaller cheese center.

Coating and Frying

  • 30 g (¼ cup) all-purpose flour, for dusting
  • 120–140 g panko, enough for a generous shallow tray
  • Neutral frying oil such as canola, vegetable or rice-bran oil, enough for 3 inches / 7–8 cm depth
  • Granulated sugar, optional
  • Ketchup and yellow mustard, for serving

Panko’s larger flakes give the shell its rough, brittle crunch. Regular breadcrumbs can substitute, but the crust will be finer and less craggy.

Useful equipment: a kitchen scale, deep-fry thermometer, heavy deep pot, 6 sturdy wooden chopsticks or thick bamboo skewers, a shallow dish for the dough and a wire rack. Before adding oil, check that the coated part of a full skewer can lie comfortably inside the pot.

1. Mix a Sticky, Stretchy Dough

Stir together the flour, sugar, instant yeast and salt. Add the warm water and mix firmly until no dry flour remains.

Instant yeast does not need to sit in the water waiting to foam. What you want now is very wet bread dough: sticky, stretchy and slightly unruly.

Lift some with a spoon. It should pull into a sticky ribbon and cling to itself.

  • Flowing instead of stretching? Add flour 1 tablespoon / 8 g at a time.
  • Tearing instead of stretching? Add water 1 teaspoon / 5 ml at a time.

Humidity changes how this dough feels. Let the cling and stretch guide you; it does not have to look identical from one kitchen to the next.

2. Let It Rise Until Puffy

Cover the bowl and leave it for 45–60 minutes, until the dough has doubled and looks visibly bubbly and aerated.

Watch the dough more closely than the clock. A cool room can take longer. Active dry yeast can replace instant yeast in the same weight; give it whatever extra time it needs to reach the same puffy stage.

Three metal bowls showing Korean corn dog yeast dough freshly mixed, stretching in a thick ribbon, and risen with visible bubbles.
The dough starts very sticky, stretches into a ribbon, then becomes visibly bubbly and aerated after rising. Use the ribbon stage as your consistency checkpoint before proofing: it should stretch rather than simply pour.

3. Build and Chill the Skewers

While the dough rises, thread half a hot dog onto each skewer, followed by one mozzarella baton so the cheese sits toward the eating end.

Keep the sausage and mozzarella fairly similar in thickness. A skinny strip of cheese melts much faster than a substantial baton.

If firm mozzarella cracks when you push in the wooden skewer, make a narrow pilot hole with a thin metal skewer first. Thin, smooth barbecue skewers can also spin inside the sausage while you try to coat it; a wooden chopstick or broader bamboo skewer gives you much better control.

Keep the assembled skewers refrigerated until the dough is ready. In a hot kitchen, or with all-cheese corn dogs, a 10-minute freezer chill immediately before coating can help. The cheese needs to be very cold, not frozen solid.

4. Heat the Oil and Set Up the Coating Line

Pour 3 inches / 7–8 cm of oil into a heavy pot, leaving plenty of empty space above it. Heat to 350°F / 175°C.

Keep water away from the pot and never leave heating oil unattended. If deep frying is unfamiliar, the USDA deep-fat frying safety guidance is worth reading before you start.

Set everything up in this order: cold skewers → flour → dough → panko → oil → wire rack.

5. Dry, Flour and Wrap One Skewer

Take one cold skewer from the refrigerator and look at it before it touches the dough. A shiny surface means condensation.

Blot the cheese and sausage dry, dust with just enough flour to remove the shine, then tap off anything loose.

Two sausage-and-mozzarella skewers side by side, one shiny with visible condensation and the other dry and matte before coating.
Before changing an entire bowl of Korean corn dog batter, test one properly dried skewer. If that one coats cleanly, moisture—not the dough—was the problem. It is a useful way to avoid “fixing” a batter that was already working.

Now comes the messy bit. Lay the skewer in the dough and rotate it while pulling and stretching the dough around the filling. Your fingers may get sticky and the first wrap may look uneven. Keep turning, patch thin spots and smooth them with slightly damp fingertips.

Think thin shell—roughly ⅛ inch / 3 mm as a visual guide, not a thick blanket of dough. Seal the cheese tip and the join between cheese and sausage particularly well.

Hands wrapping sticky dough around a sausage-and-mozzarella skewer, showing a thin coating with the tip and filling join fully covered.
Use the silhouette as a final check before adding panko. The coated skewer should still resemble the filling underneath rather than developing thick shoulders around the mozzarella tip or sausage-cheese join; smooth excess away while every part of the cheese remains enclosed.

If the corn dog already looks enormous, take some dough off.

6. Press On the Panko

Set the dough-covered skewer in the panko and press the crumbs over the entire surface. Look for complete coverage, especially around the cheese tip—no shiny patches of sticky dough peeking through.

Once the panko is on, fry it straight away.

Coat one → panko one → fry one.

Panko-coated Korean corn dog lifted from breadcrumbs beside a pot of bubbling frying oil, ready to fry.
Panko coverage doubles as a last leak check. Pay particular attention to any shiny dough near the mozzarella tip or join: if a bare patch is easy to see now, it is also one of the first places worth inspecting if cheese escapes during frying.

7. Fry the First One and Calibrate the Batch

Lower the first corn dog gently into the oil away from you. Fry at 350°F / 175°C for 3–5 minutes, turning as needed.

Look for steady bubbles around the shell. Violent, racing bubbles mean things are moving too fast. Weak bubbling and a pale coating tell you the oil has cooled.

The clock gives you a window. Browning tells you what the oil is actually doing.

  • Dark brown in only 2 minutes: check both the oil temperature and whether the dough layer is too thick.
  • Pale and increasingly oily: let the oil recover before continuing.
  • Deep golden in 3–5 minutes: that’s what you’re looking for.
Three fried Korean corn dogs with pale blond, deep golden, and dark brown panko crusts for comparison.
Good frying is about the speed of browning as well as the final color. If one side darkens while another stays pale, think turning and oil contact; if the entire Korean corn dog races toward brown, check the heat before coating the next one.

Let the First One Teach You Something

The first corn dog is allowed to be wonky.

Fry it anyway.

While it cools, keep an eye on the thermometer and adjust the burner as needed to hold the oil around 350°F / 175°C. Do not leave the hot oil unattended while you inspect the first corn dog.

If it browned at a normal pace, stayed intact and still looks reasonably thin around the filling, there is no need to cut it just for the sake of checking. Keep going.

If it browned strangely, leaked, or looks thicker than you expected, let it cool enough to handle and cut it open. Under the panko, you’re looking for soft, bread-like dough rather than a wet or pasty layer. The filling should still look substantial, surrounded by a relatively thin band of dough.

A cheese leak shows you where the next skewer needs a better seal. Heavy bread around the filling means less dough next time. Fast browning means checking both the oil temperature and the thickness of the coating before the next one goes in.

Three Korean corn dog cross-sections showing a thin cooked dough layer, an overly thick bread layer, and a browned crust with wet dough inside.
If the first Korean corn dog needs investigating, cut through the middle third rather than judging it at the sealed tip. The center gives you a fairer look at how much cooked dough actually surrounds the filling—and therefore a better guide for the remaining batch.

Once the first one is right, you can fry two at a time if the pot is roomy and you can get both coated and into the oil promptly. Otherwise, keep working one at a time. Skim dark panko and dough fragments from the oil between batches.

8. Finish With Sugar and Sauce

Let each corn dog drain briefly on a wire rack, then dust or lightly roll the hot shell in granulated sugar if you want the sweet-savory shop-style finish.

A little sugar lands first, then the salty sausage and molten cheese take over; sharp yellow mustard keeps the whole thing from feeling too rich. Ketchup and mustard are hard to beat, but the sugar can stay off entirely if savory is more your thing.

Add the toppings while the shell is hot, then let the center cool just enough to bite safely. Molten mozzarella can stay much hotter than the crust around it.

Serving Six at Once

The best corn dog is the one that just left the fryer. If people are already hovering near the stove, hand them out as they come. That’s when the panko is crispest, the little crust shards break away at the first bite and the cheese still pulls.

If they need to wait, keep them uncovered on a wire rack in a 200°F / 95°C oven for 5–10 minutes. Stacking or covering them traps steam and softens the crust.

Several freshly fried Korean corn dogs on a wire rack, some drizzled with ketchup and mustard, while hands reach toward the batch.
Hold first, sauce last. Korean corn dogs waiting briefly on a rack keep their panko crisper when they remain unsauced; add ketchup, mustard or creamy toppings only as each one is about to be eaten rather than dressing the entire batch in advance.

Once the classic batch is finished, the other options become much easier to play with: try the no-yeast version, potato corn dogs, or one of the crunchier coatings below.


Korean Corn Dog Batter and Cheese

Why the “Batter” Behaves Like Dough

The word batter is a little misleading here. This yeasted coating behaves more like very wet bread dough: it stretches around the skewer instead of pouring over it.

That is why the method focuses on cling and stretch rather than a perfectly smooth consistency. The corrections in Step 1 are simply there to bring the dough back to that behavior.

Some Korean hotdog recipes include rice flour or glutinous rice flour alongside wheat flour; plenty do not. This all-purpose-flour dough gives you a soft, chewy layer without requiring either one.

Can You Make Korean Corn Dogs Without Yeast?

Yes. You lose some of the yeasted chew, but you also lose the hour-long wait.

Use this batter in place of the yeast dough. Keep the same cold skewers, light flour dusting, panko coating and frying setup.

For 6 corn dogs, mix:

  • 160 g (1⅓ cups) all-purpose flour
  • 18 g (1½ tablespoons) sugar
  • 8 g (2 teaspoons) baking powder
  • 3 g fine salt
  • 1 large cold egg
  • 100–120 ml cold milk, starting with 100 ml

Whisk the dry ingredients, then add the egg and 100 ml milk. Add more milk only until the batter is thick enough to cling to a cold, lightly floured skewer instead of running off it.

If it softens while you work in a warm kitchen, chill it briefly. There is no proofing step. Fry at 350°F / 175°C until the coating is browned and set, with a bread-like interior rather than a wet or pasty layer.

Two bowls comparing stretchy bubbly yeast dough and a thicker smooth no-yeast batter for Korean corn dogs.
Don’t force the quick batter to imitate the yeast dough. No-yeast Korean corn dogs begin with a thicker, colder coating, while the yeasted version relies more on stretch; what matters is that each formula stays evenly attached to a cold skewer in its own way.

Prefer the classic yeasted version? Go back to the main Korean corn dog method.

Choosing Cheese for Stretch or Flavor

Mozzarella gives you the longest pull. Keep it as the main cheese when stretch matters most.

For stronger cheese flavor, add a smaller piece of firm cheddar alongside it. The center tastes richer, but the pull becomes a little shorter.

What Makes a Korean Corn Dog Different?

Korean hotdogs differ most clearly from American corn dogs in their coating, fillings and finish.

Korean corn dogAmerican corn dog
CoatingWheat- or rice-based, often with pankoUsually cornmeal-based batter
FillingSausage, mozzarella or both; other fillings existUsually a hot dog
CrunchPanko, potato and other coatingsUsually comes from the fried batter itself
FinishOften sugar plus savory saucesUsually savory condiments

In Korea, these battered snacks on sticks are commonly called hotdogs (핫도그). Gamja (감자) means potato, so gamja-hotdog refers to the potato-coated style. Maangchi’s gamja-hotdog recipe is a useful Korean reference for both the terminology and the potato variation.

Korean Potato Corn Dogs (Gamja Hotdogs)

Golden Korean potato corn dog on a wooden skewer covered with small crisp potato cubes and panko against a dark restaurant-style background.
Gamja changes more than the appearance of the corn dog. Once fresh potato becomes part of the coating, the vegetable needs time to soften before the outside goes too far—which is why a Korean potato corn dog benefits from gentler frying than the plain panko version.

Prep the Potato

To make 3 of the 6 corn dogs potato-coated, use 250 g / 9 oz peeled potato and 1–2 tablespoons flour or cornstarch, plus panko. Double the potato if you want all six coated this way.

Cut the potato into ¼-inch / 6-mm cubes. Big chunks are harder to attach, slower to soften and awkward to bite once fried.

Rinse the cubes, blanch for 2–3 minutes, then drain and dry them very well. The edges are just beginning to soften, but the cubes still hold their shape. Toss with a light dusting of flour or cornstarch.

Small diced potato cubes beside a ruler, blanched potatoes drying on paper, lightly dusted cubes, and hands pressing them onto a dough-covered skewer.
After blanching, spread the potato cubes out instead of leaving them in a steaming pile. Trapped moisture can wet their surfaces again; letting that steam escape gives the small cubes a drier exterior before they are pressed onto the dough.

Coat and Fry

Wrap the skewer with dough, press the potato cubes firmly into the surface, then fill exposed sticky gaps with panko.

Once the little cubes cover the whole skewer, a couple of playful Korean nicknames Maangchi records—roughly “ugly hotdog” and “goblin’s club hotdog”—suddenly make sense.

A few cubes may fall into the oil. Skim them out and press the next coating more firmly.

For fresh potato, lower the oil to 330–340°F / 165–170°C and begin checking near 5 minutes. Many take 5–7 minutes.

The best bite has crisp potato corners and panko ridges outside, then tender potato, soft dough and hot filling underneath. With cheese-heavy corn dogs, take them out as soon as the potato and dough are done; extra frying rarely does molten mozzarella any favors.

Frozen French Fry Shortcut

Chop frozen French fries into small pieces and press them into the dough straight from frozen. Because the fries are already partially cooked, skip the blanch and use the regular 350°F / 175°C frying temperature. Cook until the dough is set and the outside is crisp.

Back to the main method or see more coatings and toppings.

Coatings, Sauces and Other Variations

Flamin’ Hot Cheetos Coating

For a modern shop-style variation, Flamin’ Hot Cheetos make the coating loud on purpose: bright red, salty and spicy.

Keep enough panko in the mixture to build a complete shell, then add finely crushed Cheetos until the color and seasoning are where you want them. For the brightest red finish, you can fry in panko first, then press fine Cheeto crumbs onto the hot finished crust while there is still enough surface oil for them to cling.

If the red crumbs go into the fryer, watch the crust itself instead of waiting for ordinary golden-brown color; the seasoning makes color a poor doneness guide.

Korean corn dog coated in irregular red-orange crushed spicy corn snack crumbs on a glossy black surface against a deep red background.
In a Flamin’ Hot Cheetos Korean corn dog, let the two crumbs do different jobs: panko helps build a complete shell, while the crushed snack brings the intense red color, salt and chile flavor. That balance works better than asking Cheetos alone to provide all the structure.

Ramen and Crispy Rice Coatings

Crushed uncooked ramen gives the outside a jagged, extra-crunchy shell. Break it fairly small so the pieces can press into the sticky dough. Crispy or puffed rice makes a lighter coating; press it on firmly and use some panko to cover any bare sticky patches.

Two Korean corn dogs side by side, one coated with jagged crushed dry ramen pieces and the other with pale puffed crispy rice.
Choose by how much you want the coating to dominate the bite. Crushed ramen gives a Korean corn dog a more aggressive, jagged crunch, whereas crispy rice is lighter and lets the dough and filling stay more prominent underneath.

More Sauces and Toppings

For something creamy, try spicy mayo or gochujang mayo. Sweet chili sauce gives you a sweeter, tangier option without hiding the fried crust.

Our homemade mayonnaise guide includes spicy mayo and gochujang-mayo options if you want to make those yourself.

Something not behaving? Jump to the troubleshooting guide for coating, frying and cheese problems.

When Something Goes Wrong

Start with the moment the problem appeared. That often tells you more than the problem itself.

ProblemWhat to Check or Do
Dough slides offTouch the filling first. If it is shiny or damp, blot it dry and dust lightly with flour. Only then adjust the dough if it still will not cling.
Cheese leaks immediatelyChill the filling well and look for an exposed patch around the cheese tip or join.
Later corn dogs start leakingKeep waiting skewers cold and let the oil return to frying temperature.
Corn dog becomes mostly breadUse less raw dough on the next skewer.
Dark outside, gummy insideVery fast browning points to excessive heat; normal browning with a pasty center points more toward too much dough.
Pale and greasyLet the oil recover before continuing.
Potato falls offDry the cubes thoroughly, dust lightly and press them firmly into the dough.
Potato stays hardCut smaller cubes and give them the brief blanch before coating.
Skewer spins inside the sausageSwitch to a wooden chopstick or broader bamboo skewer.
Black flecks appear on later batchesSkim burnt crumbs from the oil between batches.
Weak cheese pullUse a substantial mozzarella baton and serve while the center is still hot.

Why Did the Cheese Start Leaking Later?

An immediate leak and one halfway through the batch tell different stories. Cheese escaping almost at once points toward warmth or a hole in the coating. If the first few work and later corn dogs begin leaking, something changed while you were frying: the waiting cheese may have warmed, or the oil may need another minute to recover.

Two frying scenes showing mozzarella leaking from a Korean corn dog immediately and after later batches, with finished corn dogs, waiting skewers, and an oil thermometer nearby.
One leak is a skewer clue; several later leaks are a batch clue. An isolated failure sends you back to that corn dog’s seal and filling, whereas repeated problems after earlier successes suggest something in the working conditions has changed.

Back to the main method · Skip to storage and reheating · Back to top

Make Ahead, Air Fry, Freeze and Reheat

You can assemble the sausage-and-cheese skewers earlier the same day, cover them and keep them refrigerated. Make the dough on frying day too; this dough is built for a short same-day rise rather than an overnight rest. Keep dough, panko and filling separate until close to frying time.

Can You Air Fry Homemade Korean Corn Dogs?

For this raw sticky yeast dough, deep frying works better. Hot oil sets the soft exterior quickly; in an air fryer, the coating has more time to sag before it firms.

The air fryer becomes much more useful after the corn dogs are already cooked. It crisps refrigerated leftovers well and is also a good fit for commercially frozen corn dogs designed for reheating.

Leftovers

Refrigerate cooked corn dogs within 2 hours. They are at their best within 2–3 days. For longer storage, freeze them after cooling and use them within 1–2 months for best quality.

Reheating

When reheating a refrigerated corn dog, air fry at 350°F / 175°C for 4–7 minutes, continuing until the shell is crisp again and the center reaches 165°F / 74°C. An oven works too; a microwave warms the center quickly but softens the panko.

Frozen leftovers can go into the air fryer from frozen at the same starting temperature. Give them more time until the outside is crisp and the center reaches 165°F / 74°C. For broader storage and reheating guidance, see the USDA leftovers and food-safety guidance.

A cooked corn dog in an open air fryer beside refrigerated and frozen examples, with a crisp reheated potato-coated corn dog in the foreground.
A crisp-looking shell is not proof that the center is hot. When you reheat Korean corn dogs in the air fryer, treat exterior crunch and internal temperature as two separate checks—the panko can recover before a cold sausage-and-cheese center has fully reheated.

Once the coating rhythm clicks, the rest of the batch moves surprisingly quickly. The panko is at its crispest and the cheese at its most satisfying when you eat the corn dogs soon after frying—just give the molten center a moment before the first bite.

What did your first one do when it hit the oil? Tell us what happened.

Back to top