Posted on — Leave a comment

Bulgogi Recipe: Tender, Caramelized & Easy Korean Beef BBQ

Thin slices of cooked bulgogi in a dark skillet, browned at the edges and lifted with metal chopsticks, with rice and kimchi in the background.

Bulgogi is Korean thinly sliced marinated beef, usually seasoned with soy sauce, sweetness, garlic and sesame before being grilled or quickly pan-cooked. For this skillet version, we’re after tender ribbons of beef with a light gloss and irregular caramelized edges, with very little free liquid left in the pan.

The payoff is savory-sweet browned edges on beef that still bends easily, with hot rice ready to catch the juices clinging to each slice. Once cold, wet, very thin beef hits the skillet, slice thickness, surface moisture, pan heat and batch size decide whether it browns quickly or starts steaming.

Slice Thin. Let It Drip. Give It Space.

Slice thin: aim for 2–3 mm (about ⅛ inch), across the grain. Thin beef cooks quickly enough to stay supple.

Let it drip: the beef should reach the skillet coated in marinade, while obvious excess stays in the bowl.

Give it space: divide 24 oz / 680 g beef into 3 roughly equal batches of about 8 oz / 225 g each for a 12-inch skillet. If the pieces cannot sit loosely with visible pan around them, use smaller batches.

Bulgogi Recipe

Thinly sliced Korean-style beef in a soy, pear, garlic and sesame marinade, cooked in small hot batches so the meat stays tender while the edges caramelize.

  • Serves: 4 with rice and sides
  • Active prep: about 20–25 minutes
  • Quick route: about 60–70 minutes with pre-sliced beef and a 30-minute marinade
  • Preferred marinating time: 1–2 hours
  • Cook time: about 10–15 minutes, slightly longer if your skillet needs 4 batches
  • Preferred total time: about 1½–2¾ hours, plus optional beef-firming time if slicing the steak yourself

Equipment

  • Sharp chef’s knife
  • Cutting board
  • Large mixing bowl or covered container
  • Fine grater, microplane or small blender
  • Tongs
  • Large, heavy 12-inch skillet, such as cast iron, carbon steel or heavy stainless steel

Ingredients

For the Beef & Marinade

  • 24 oz / 680 g ribeye or top sirloin, sliced across the grain 2–3 mm (about ⅛ inch) thick
  • ¼ cup / 4 Tbsp / 60 ml regular brewed soy sauce
  • 2 Tbsp / about 25 g packed brown sugar
  • 2 Tbsp / 30 ml mirin
  • 3½ oz / 100 g peeled Asian pear, finely grated or blended
  • 2 oz / 60 g onion, finely grated or blended
  • 4–5 garlic cloves / about 15 g, finely grated or minced
  • 1 tsp / about 5 g fresh ginger, finely grated
  • 1½ Tbsp / 22 ml toasted sesame oil
  • ½ tsp freshly ground black pepper
  • 3 scallions / about 30 g, thinly sliced and divided

For Cooking & Finishing

  • Up to 1 Tbsp / 15 ml neutral high-heat oil, as needed
  • 1 Tbsp / about 9 g toasted sesame seeds

How to Make Bulgogi

1. Firm the Beef if You Are Slicing It Yourself

Place the steak in the freezer until it feels very firm but remains sliceable. Start checking after about 20–30 minutes; a thick steak may need much longer.

The beef is ready when it holds its shape under the knife without folding or compressing. Beef already sliced close to the target thickness can go straight to the marinade.

A hand steadies a partially chilled raw steak while a chef’s knife cuts a thin slice on a dark work surface.
The knife should glide through firm beef without compressing it. If you need to saw through the steak, let it soften slightly.

Frozen pre-sliced beef should thaw in the refrigerator first. Separate the slices gently and drain away obvious thawing liquid before marinating so that extra moisture does not follow the beef into the skillet.

2. Slice Across the Grain

Find the direction in which the muscle fibers run, then cut across them into slices 2–3 mm (about ⅛ inch) thick. Aim for reasonably even thickness; the pieces themselves do not need identical shapes.

Raw top sirloin being cut across visible muscle fibers into very thin slices marked as 2–3 mm, about one eighth inch thick.
A properly thin bulgogi slice should drape instead of standing like a steak strip. That flexibility is a quick visual check before the beef reaches the pan.

3. Make the Marinade

Combine the soy sauce, brown sugar, mirin, pear, onion, garlic, ginger, toasted sesame oil and black pepper. Stir until the sugar dissolves and the mixture is evenly combined.

A slightly pulpy marinade is completely fine. If using a small blender, do not add water simply to make the blades run.

Taste the marinade now, before raw beef enters the bowl. Soy should lead, followed by gentle sweetness, garlic and sesame. It should taste a little stronger than the finished meat without being aggressively salty or syrupy.

Thin dark brown bulgogi marinade with fine aromatic pulp dripping from a metal spoon into a glass bowl.
Bulgogi marinade should drain quickly from a spoon, leaving only fine pear, onion and aromatics behind. A slow, rope-like pour means the mixture is thicker than this recipe needs.

4. Marinate the Beef

Add the sliced beef and about half of the scallions. Separate folded slices as you turn everything together so the marinade reaches the hidden surfaces too. Cover and refrigerate for 1–2 hours.

Thirty minutes can still work when dinner needs to move. Tender ribeye or sirloin sliced this thin does not need an overnight soak.

5. Get the Skillet Properly Hot

Heat a wide, heavy 12-inch skillet over medium-high heat until thoroughly hot. Add about 1 tsp / 5 ml neutral oil and spread it into a thin film. Use more between batches only if the surface looks dry.

The first piece of beef should give an immediate, confident sizzle. If it lands quietly, give the skillet more time.

6. Start with One of Three Batches

Divide the marinated beef into 3 rough portions of about 8 oz / 225 g each. Lift the first portion with tongs and hold it over the bowl for several seconds so obvious excess marinade drips away.

The beef should still look glossy and coated. If an 8 oz / 225 g portion cannot sit loosely in your skillet with visible metal around it, use 4 smaller batches.

Raw marinated beef held with metal tongs above a sparsely filled 12-inch skillet, with widely spaced slices and visible bare pan.
Both moves protect skillet heat. Less clinging marinade reduces the water to boil away, while bare pan gives moisture room to evaporate.

7. Spread It Out and Give the First Side Contact

Spread the beef in a loose layer and leave it mostly undisturbed for about 45–60 seconds. Bare skillet should remain visible between at least some of the pieces.

If a puddle forms almost immediately, stop adding beef to that batch.

Thin bulgogi beef cooking in a dark skillet, with lighter reddish-brown areas and several developing caramelized patches.
Uneven browning is normal with very thin bulgogi. Chasing the same dark color on every surface can dry the smallest folds first.

8. Toss and Finish Quickly

Turn or toss the slices and continue cooking until the raw color has disappeared and some edges have browned, usually another 1–3 minutes.

Pull the beef while it is still flexible, with medium-brown surfaces and darker caramelized edges. As the wet marinade cooks away, the aroma should shift toward browned beef, garlic and toasted sesame, and the pan should have little or no free liquid.

9. Let the Skillet Heat Back Up

Transfer the cooked beef to a plate and give the empty skillet a moment over the heat before the next cold batch goes in.

Mostly empty hot skillet with a few brown fond spots while a bowl of raw marinated beef waits nearby for the next batch.
The pause matters most after the first batch. Without it, residual moisture plus another load of cold beef can turn a sear into a simmer.

A few deep-brown sticky spots are normal. Black residue tastes burnt, but it does not mean you need to abandon the next batch. Wipe those patches away carefully, add another small amount of oil if needed and let the skillet heat again.

10. Finish and Serve

Have the rice and sides ready before the final batch goes into the skillet; bulgogi is at its best served straight away.

Cook the remaining batches the same way. If the first beef needs warming, return everything to the skillet only briefly at the end. Finish with the remaining scallions and toasted sesame seeds.

Quick Recipe Notes

  • No Asian pear? Replace the 100 g Asian pear with 100 g ripe regular pear or sweet apple, or leave the fruit out and keep the sugar unchanged.
  • No mirin? Mix 2 Tbsp / 30 ml sake with 2 tsp sugar. Water can replace the sake in a pinch, although the flavor will be flatter.
  • Only have kiwi or fresh pineapple? Omit the fruit instead of substituting either one 1:1. Their natural enzymes can soften thin beef much more aggressively.
  • Using paper-thin hot-pot beef? It needs much less time in both the marinade and the skillet.
  • Discard marinade left after contact with raw beef. Do not use it uncooked as a finishing sauce.

How to Know Bulgogi Is Done

The clock tells you when to start looking closely; the beef itself tells you when to stop. A thermometer is not especially useful for slices this thin because there is too little thickness to probe reliably.

  • Beef: cooked through but still flexible, with a light surface gloss.
  • Edges: scattered caramelized brown patches rather than an even dark crust.
  • Pan: little or no free liquid around the finished batch.
A thin cooked slice of bulgogi bending into a soft curve between metal chopsticks, with browned edges and a light surface sheen.
Once the raw color is gone, look at flexibility. A bulgogi ribbon that turns rigid usually stayed over the heat too long.

If you’re cooking now, you have everything you need above. The rest of the guide explains why those choices work, what to buy when the exact ingredients are unavailable, and what to change when the pan behaves differently from the plan.

Why Bulgogi Doesn’t Always Look the Same

Bulgogi literally means “fire meat”: bul means fire and gogi means meat. Modern bulgogi can be grilled over flame, seared quickly in a skillet, or cooked more gently with enough marinade to leave flavorful juices behind.

One plate may have dark caramelized edges and almost no liquid; another may be paler and soft, with savory juices meant to meet the rice. There isn’t a single household formula for bulgogi, which is why family, restaurant and regional versions can look quite different. Maangchi’s bulgogi guide is another example of how cooking and serving styles can vary.

Here, we’re after the browned version: quick cooking, caramelized patches and very little liquid left in the pan. Beef bulgogi also tends to be sweet-savory rather than chile-hot; gochujang is an optional direction, not a requirement.

Choose the Beef, Then Slice It Right

Ribeye is the most forgiving choice; top sirloin gives you better everyday value. Slice either 2–3 mm (about ⅛ inch) thick across the grain.

Raw ribeye and top sirloin displayed side by side, showing heavier marbling in the ribeye and a leaner structure in the sirloin.
Marbling gives ribeye a wider margin during high-heat bulgogi cooking. Leaner top sirloin benefits even more from accurate slicing and an earlier pull.
Beef CutBest UseWhat to Know
RibeyeBest overallMarbled, tender and forgiving during very fast cooking.
Top sirloinBest everyday/value optionLeaner than ribeye but excellent when sliced thinly across the grain.
TenderloinMaximum tendernessVery tender but expensive and somewhat less richly beefy.
Boneless short ribRich alternativeWell marbled and flavorful; trim any obvious tough connective seams before slicing.
Hanger steakBeefy alternativeDeep beef flavor; trim the central membrane if present and slice carefully across the grain.
Flat iron or chuck eyeValue alternativesCan be excellent once obvious connective tissue is trimmed away.
Flank or skirtFirmer, beefy alternativesPronounced grain makes across-the-grain slicing and quick cooking especially important.

Marbling, Gristle, Grain and Thickness

Fine white streaks running through the muscle are marbling. They soften during cooking and help the beef stay juicy. Thick white seams of silverskin or connective tissue are different: trim them where practical because they can remain rubbery even when the surrounding meat is tender.

Close-up comparison of fine white marbling inside raw beef and a pearly sheet of silverskin being lifted from another piece of beef.
These white tissues behave differently under heat. Fine marbling softens inside the beef, whereas silverskin can stay firm enough to make a tender bite chewy.

Then find the long parallel muscle fibers and cut across them. Shortening those fibers makes each bite easier to chew. At 2–3 mm (about ⅛ inch), the slices also cook quickly enough to stay supple while the marinade on the surface reduces and browns.

Thicker pieces behave more like small steaks and have a narrower window between browned outside and chewy inside. Paper-thin shabu or hot-pot beef goes the other way: it seasons and cooks much faster, so use shorter marinade and cooking times.

Need the knife step? Return to Step 2: Slice Across the Grain.

Build a Marinade That Seasons the Beef

Beef bulgogi marinade usually starts with soy sauce, sugar, garlic and sesame oil, often with mirin or rice wine. Onion and Asian pear add aroma, sweetness and tenderness. Beef and soy should still lead, with garlic, ginger and toasted sesame behind them. Mirin rounds out the salty-sweet balance.

If you want the marinade as a standalone sauce, the bulgogi sauce recipe covers scaling, storage and other uses.

Keep the Sweetness Behind the Beef

Brown sugar is only part of the sweetness here; pear, onion and mirin contribute too. The finished beef should still taste savory and beefy first.

Sugar also helps with browning, but concentrated sugary residue moves quickly from deep brown to bitter black once the pan dries out. A thick, sticky soy-sugar glaze is a different target; teriyaki sauce is designed to cling much more heavily.

Close-up skillet comparison with deep brown sticky residue labeled ‘Keep’ and black carbonized residue labeled ‘Wipe.’
Useful fond stays deep brown and tacky. By contrast, burnt sugary residue turns opaque black, dry and bitter.

Use regular brewed soy sauce here. Dark soy sauce and sweet soy sauce change the balance, while regular soy brands can still vary noticeably in saltiness. Taste the marinade before adding raw beef and adjust while you still can.

Asian Pear and Easy Substitutes

Asian pear contributes moisture, mild sweetness and gentle tenderizing, but the recipe does not depend on it. Replace the 100 g peeled Asian pear with the same weight of ripe regular pear or sweet apple, or leave the fruit out and keep the sugar unchanged.

Kiwi and fresh pineapple behave differently: their natural enzymes soften meat much more aggressively than pear does. If either is your only fruit option, omit the fruit for this recipe. A direct 1:1 substitution can leave very thin beef soft, ragged or mushy.

Asian pear, regular pear, apple and an empty bowl shown as bulgogi marinade options, with kiwi and fresh pineapple marked as unsuitable one-to-one substitutes.
Asian pear brings mild sweetness, moisture and gentle tenderizing power to bulgogi marinade. Ripe pear or sweet apple matches that role better than kiwi or fresh pineapple.

How Long Should Bulgogi Marinate?

For ribeye or top sirloin sliced 2–3 mm thick, 1–2 hours is the preferred everyday marinating time. Thirty minutes works when you’re short on time, while 2–4 hours is fine when that better fits your schedule.

An overnight marinade is generally unnecessary for tender ribeye or sirloin. Firmer cuts can tolerate more time, but longer is not automatically better.

Ready to cook? Jump to Step 5: Get the Skillet Properly Hot.

Why Bulgogi Goes Watery Instead of Brown

Bulgogi turns watery when too much cold, wet beef cools the skillet faster than its moisture can evaporate—usually because the pan is crowded, the beef carried in too much marinade, or the skillet was not hot enough.

Marinated beef already carries water from the meat itself, soy sauce, pear and onion. Once that moisture arrives faster than the pan can get rid of it, the skillet cools down.

You’ll often hear the change before you fully see it: the sharp sizzle fades into wetter bubbling, and the beef starts turning gray instead of catching brown spots.

Keep simmering and the puddle eventually disappears, but slices this thin may already be dry by then. Meanwhile, the concentrated sugar left behind is much closer to burning.

Side-by-side skillet comparison showing browned bulgogi with little liquid under ‘Searing’ and paler beef bubbling in liquid under ‘Steaming.’
The warning arrives before a deep puddle forms. Once a sharp sizzle turns into wet bubbling, the skillet has reached its moisture capacity.

What Browning Looks Like in the Pan

When the pan is working well, the beef keeps a sharp sizzle, some bare skillet stays visible and surface moisture disappears quickly. The coating tightens into a gloss as scattered edges begin to brown.

A hot skillet is only half the equation. It also needs enough open surface to handle the cold, wet beef you add.

Think of it as a capacity problem before it is a temperature problem. Doubling the recipe does not make your skillet larger or your burner more powerful.

If the Pan Is Already Flooded

If the pan is already flooded, dinner isn’t ruined. Lift the beef out with tongs, carefully pour off the excess liquid, then put the skillet back over the heat until it is hot again.

Finish the beef briefly in smaller portions. You may not recover exactly the same crust you would have had from the beginning, but this gives you a much better chance of adding some browning without drying every slice while a puddle boils away.

Metal tongs lifting pale partially cooked beef from a skillet filled with bubbling brown liquid beneath the words ‘Flooded pan? Lift the beef out.’
Removing the beef gives the skillet time to recover. At the same time, the thin slices avoid overcooking while excess marinade and juices boil away.

Still troubleshooting? See the full Bulgogi Troubleshooting table.

Caramelized Bulgogi and Juicy Bulgogi

A wet pan is only a problem when you were trying to make browned, relatively dry-pan bulgogi. Some Korean preparations intentionally cook the beef more gently with enough marinade to leave savory juices behind for the rice.

For that style, transfer some marinade into the skillet with the raw beef at the beginning and cook the meat and liquid together thoroughly. Marinade left in the bowl after touching raw beef should never be poured uncooked over the finished dish.

Both styles are legitimate; this recipe is aimed at the browned version with very little liquid left in the pan.

Two finished bulgogi preparations, one deeply caramelized with little liquid and the other softer with visible savory cooking juices.
The difference is intent. Juicier bulgogi cooks with flavorful liquid from the start; accidental steaming happens when a browning pan loses too much heat.

Bulgogi Troubleshooting

ProblemLikely CauseWhat to Do
Watery or gray beefToo much wet beef cooled the skillet.Remove excess liquid if needed, reheat the pan and finish in smaller batches.
First batch browned; next one did notThe skillet had not heated back up.Give the empty pan a short recovery period before adding more cold beef.
Black sticky residueSugary marinade residue burned.Wipe away black patches, add fresh oil if needed and ease the heat slightly.
Flat or bland flavorThe seasoning was diluted or the amount of beef increased.Keep the stated beef-to-marinade quantities and taste the marinade before the raw beef goes in.
Too sweetSugar plus very ripe fruit or sweet mirin pushed the balance too far.Reduce the added sugar next time instead of trying to correct sweetness with extra soy.
Too saltyThe soy sauce was especially salty or there was too much marinade for the amount of beef.Use regular brewed soy sauce and keep the beef and marinade quantities proportional.
Chewy beefGristle, thick slices, cutting with the grain or overcooking.Check the cut, then thickness, grain direction and cooking time.
Dry beefThin slices stayed over the heat too long.Pull the beef sooner, especially when using a leaner cut or grill.
Mushy beefA strongly tenderizing fruit or excessive marinating time broke the meat down too far.Avoid direct kiwi or pineapple substitution and shorten exposure to strong fruit tenderizers.
Vegetables make everything wetThey released more water than the pan could evaporate.Cook larger amounts of vegetables separately and combine at the end.

For chewy beef, diagnose in this order: gristle → thickness → grain direction → cooking time. An overnight soak cannot make a thick connective seam tender.

Other Ways to Cook Bulgogi

Grill: released moisture can drain away, which helps with smoky browned edges. Because the slices are thin, use a grill topper with small openings or a grill basket and cook them quickly.

Thin slices of marinated bulgogi cooking in a metal grill basket over glowing coals while tongs turn the beef.
A grill basket changes the handling, not the cut. Keep grilled bulgogi just as thin, and watch the edges because direct heat browns them quickly.

Broiler: spread well-drained beef in a single layer on a broiler-safe pan and watch it closely from an upper rack. Oven intensity varies, so use browning rather than the skillet timing as your guide.

Change It Without Losing What Matters

More heat. Add 1–2 tsp gochugaru for mild-to-moderate chile heat. If you want gochujang to be a major flavor, you’ll also need to adjust the salt and sweetness; a large spoonful changes more than the heat.

More vegetables. Cook larger amounts of mushrooms, carrots or onion separately, let the skillet heat back up, then return them for the final 30–60 seconds after the beef is cooked.

Make Bulgogi a Meal

For the easiest dinner, serve bulgogi with hot steamed rice and kimchi. That’s enough. Lettuce or perilla leaves, ssamjang (Korean dipping paste), cucumber and other Korean side dishes (banchan) can turn it into a fuller Korean BBQ-style spread. If you want a rice refresher, the guide to how to cook rice covers stovetop and other common methods.

Thin browned bulgogi ribbons being lowered with metal chopsticks onto a blue bowl of steaming white rice, with kimchi blurred in the background.
For bulgogi over rice, serve both while hot. The warm grains catch the concentrated soy, garlic and sesame juices before the beef cools and tightens.

For lettuce wraps, set out lettuce or perilla/kkaennip leaves, rice, ssamjang, sliced garlic, kimchi and any other banchan you are serving. A little rice, one or two pieces of beef and a small dab of ssamjang make a compact bite that is easier to eat than an overloaded leaf.

A hand holds an open lettuce and perilla wrap filled with a small amount of rice, bulgogi, ssamjang and a thin slice of garlic.
Build a bulgogi ssam in the center of the leaf. Then leave a generous green border so the wrap folds closed instead of spilling.

For a rice bowl, add sliced cucumber, kimchi and scallions over warm rice, then pile the bulgogi on top. A fried egg is optional. Something cool and sharp works especially well beside the sweet-savory beef; this cucumber salad adds crunch and several vinegar-based options.

Or simply put the beef, rice, kimchi and lettuce on the table and let everyone build the bites they want. Once the beef is cooked, dinner does not need much ceremony.

Make Ahead, Freeze & Reheat

Make ahead: marinating earlier the same day is plenty for tender, thinly sliced beef. There is little advantage in leaving good ribeye in a fruit-based marinade for several days.

Freeze: for longer planning, freeze the sliced marinated beef instead of extending refrigerator marination indefinitely. Thaw it safely in the refrigerator before cooking.

Store cooked bulgogi: cool leftovers promptly, refrigerate in a covered container and use within about 3–4 days, consistent with general USDA leftovers guidance.

Reheat: reheat gently in a skillet just until hot throughout; USDA guidance for reheated leftovers uses 165°F / 74°C. Avoid trying to create a second hard sear.

Leftover bulgogi is also excellent folded into fried rice. Even a small amount carries enough garlic, soy and sesame to make tomorrow’s rice feel like a new dinner instead of a reheated copy of the first one.
Posted on — Leave a comment

Chicago Italian Beef Recipe: Juicy, Thinly Sliced & Dipped

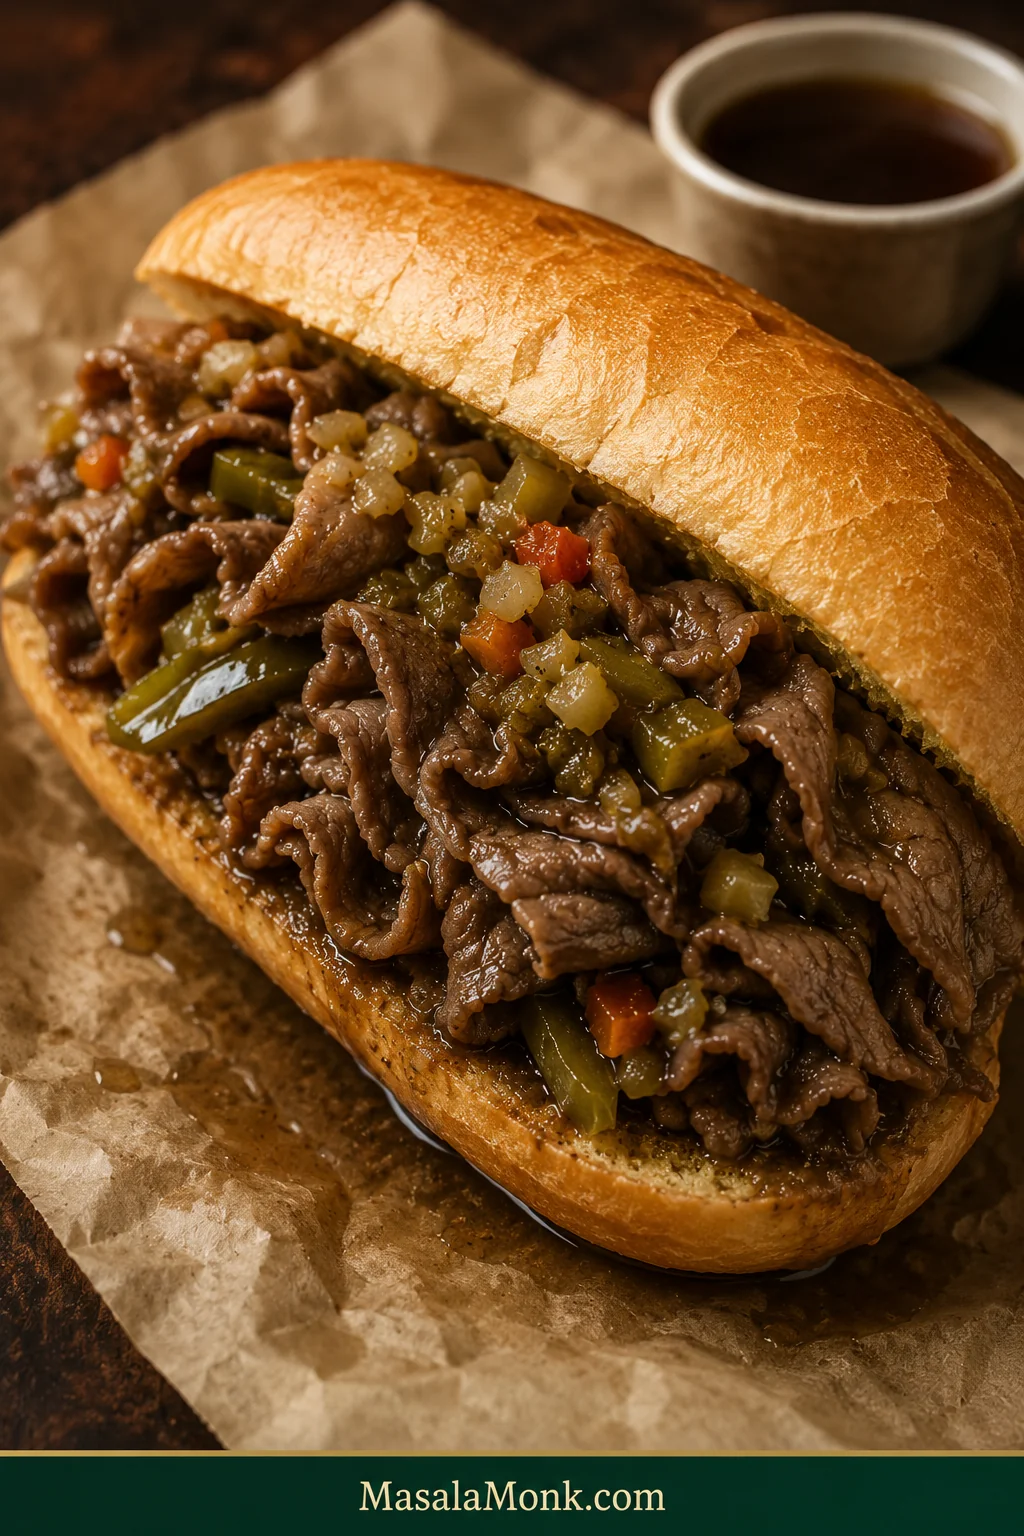
Chicago Italian beef sandwich filled with thin folded brown beef, soft green sweet peppers and chopped giardiniera in a gravy-darkened French roll.

A good Chicago Italian beef sandwich looks a little out of control before you ever take a bite. The beef sits in loose, thin folds rather than neat carved slabs. Hot, seasoned gravy has worked into the meat and the edges of the roll. Sweet peppers slump into the filling, giardiniera cuts through with crunch and heat, and if you chose yours dipped, the bread is carrying far more liquid than bread normally should.

What separates the memorable versions from ordinary roast beef on a roll is not one secret spice. Thick slices can feel chewy even when the roast itself was cooked well. Weak jus leaves everything flat. Too much reduction turns it salty. Shredded chuck can be delicious but eats like a different sandwich. And a roll that cannot handle gravy may collapse before you reach the second half.

Here, a relatively lean round roast stays sliceable, chills until firm, gets shaved very thin, then returns briefly to a deeply seasoned beef jus. Add soft sweet peppers, hot Chicago-style giardiniera, or both, and decide for yourself how far the gravy goes.

Chicago Italian beef is a Chicago-born sandwich of thinly sliced seasoned beef piled onto a French-style roll with beef gravy or jus, then often finished with sweet peppers, hot giardiniera, or both. The bread can stay relatively dry, take extra gravy, or be dipped right into the jus.

Why Chicago Italian Beef Is Built This Way

The exact origin of Italian beef is debated, but the sandwich grew out of Chicago’s Italian-American communities in the early 20th century. A commonly told history links its very thin beef and abundant gravy to feeding large wedding crowds economically: stretch the roast, put its juices back to work, and serve it on bread sturdy enough to catch them. However it began, that practical, crowd-friendly logic helped make Italian beef one of the city’s defining sandwiches.

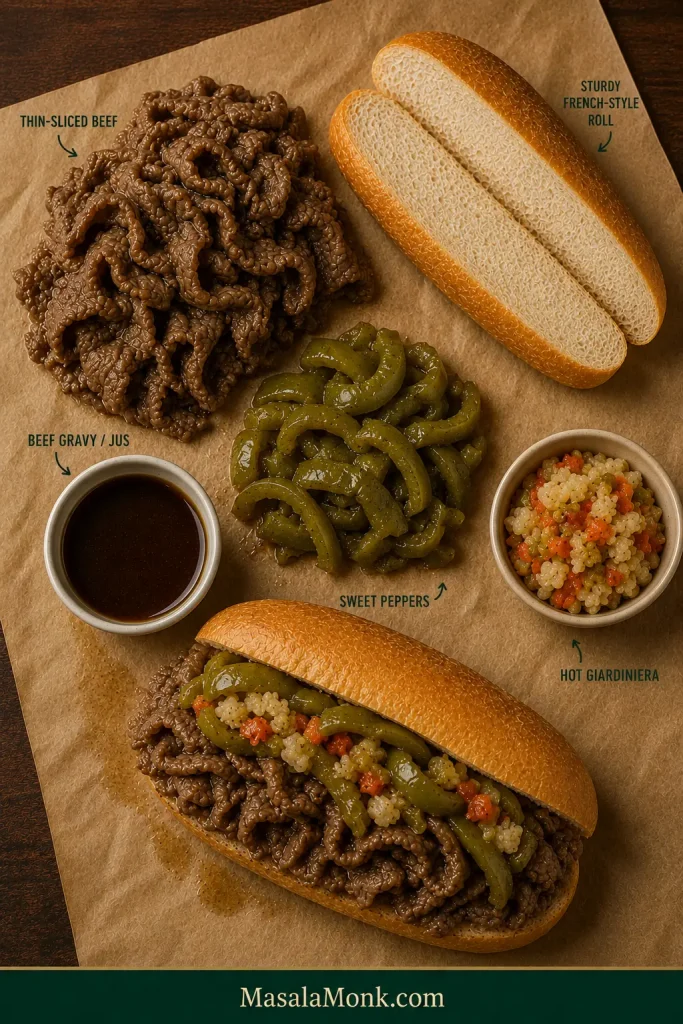
Overhead anatomy of an Italian beef sandwich showing the roll, folded beef, sweet peppers, giardiniera and beef jus as separate parts of the build.
The sandwich works as liquid management: sturdy roll, thin beef, seasoned jus and peppers all control how the bite holds together.

Which Italian Beef Are You Making?

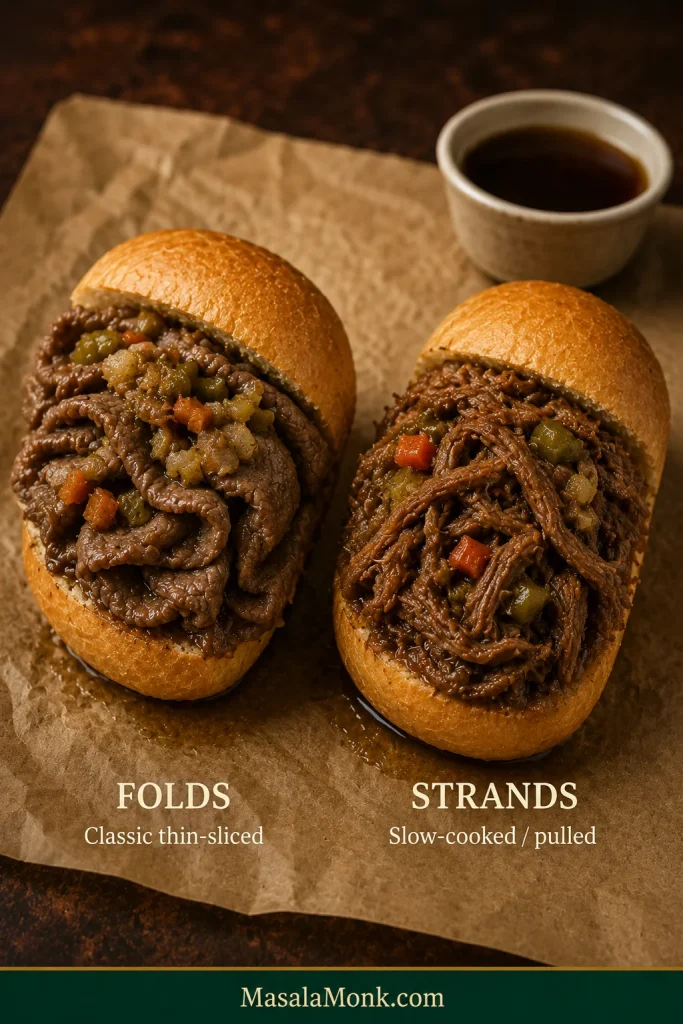
Decide first whether you want folds or strands. Slow-cooker Italian beef gives you soft pulled meat; if the sandwich in your head has thin folds, use the roast → chill → shave route below.

Side-by-side comparison of an Italian beef sandwich made with thin folded beef and one made with pulled beef strands.
Thin folds give cleaner bites and more jus control; pulled strands belong to the softer, slow-cooked route.

On a phone? Swipe sideways to see the full table.

What you wantBest routeResult
Classic thin Chicago-style beefRoast → chill → shave → warm in jusLoose, flexible slices with the most control over texture
Italian beef tonightThin cooked roast beef + quick homemade jusA practical same-day sandwich without waiting overnight
Hands-off fall-apart beefSlow cookerTender pulled or shredded beef instead of shaved slices

The full recipe below is the first route. A four-sandwich same-day shortcut appears later for the night when waiting for a roast to chill is simply not happening.


Chicago Italian Beef Recipe

Two days sounds excessive for a sandwich until you realize most of that time is the refrigerator doing something useful. Day 1 cooks the beef and builds the jus. The overnight chill makes genuinely thin home slicing much easier. Day 2 is mostly slicing, warming and assembling.

Yield
8 generous sandwiches. The 4 lb / 1.8 kg starting roast allows for cooking loss, trimming and portion flexibility; smaller sandwiches may stretch the batch further.

Active time
About 1 hour, plus extra time if slicing entirely by hand

Plan ahead
Best over 2 days; optional 4–12-hour seasoning rest before roasting

Oven
325°F / 165°C

Roast endpoint
145°F / 63°C

Slice
About 1–2 mm to start

Timing note
Begin checking around the one-hour mark; thickness and internal temperature decide when the roast is done.

Equipment

  • Roasting pan around 9 × 13 inches / 23 × 33 cm
  • Rack that fits over or inside the roasting pan
  • Instant-read or leave-in meat thermometer
  • Fine-mesh strainer
  • Large saucepan or Dutch oven for the jus
  • Long sharp slicing or carving knife
  • Meat slicer, optional but very helpful
  • Tongs and ladle

Ingredients

Beef

  • 4 lb / 1.8 kg top round or bottom round, preferably 2 similarly sized roasts
  • 14 g kosher salt, preferably weighed
  • 2 teaspoons dried oregano
  • 2 teaspoons garlic powder
  • 1 teaspoon onion powder
  • 1 teaspoon freshly ground black pepper
  • 1 teaspoon dried basil
  • 1 teaspoon fennel seeds, lightly crushed
  • ½ teaspoon red pepper flakes, optional
  • 2 tablespoons / 30 ml olive oil

Jus

  • 6 cups / 1.4 L low-sodium beef stock
  • 1 medium yellow onion, about 7 oz / 200 g, quartered
  • 6 garlic cloves, about 18 g, smashed
  • 1 teaspoon dried oregano
  • 1 teaspoon freshly ground black pepper
  • ½ teaspoon dried basil
  • ½ teaspoon fennel seeds, lightly crushed
  • ¼ teaspoon red pepper flakes, optional
  • 2 bay leaves
  • 2 teaspoons / 10 ml Worcestershire sauce, optional, added after tasting the finished jus
  • Up to 2 cups / 475 ml unsalted or low-sodium beef stock, reserved for adjusting the jus

Sweet Peppers

  • 3 large green bell peppers, about 1 lb / 450 g
  • 1 tablespoon / 15 ml olive oil
  • ¼ teaspoon / about 1 g kosher salt

Assembly

  • 8 soft, sturdy French or Italian-style rolls, about 6 inches / 15 cm each
  • 4–5 oz / 115–140 g cooked beef from the roast per sandwich
  • 1–1½ oz / 30–40 g cooked sweet peppers per sandwich, if using
  • 4–6 oz / 120–160 g Chicago-style giardiniera solids total, about ½–¾ oz / 15–20 g per sandwich
  • Hot beef jus, for warming, spooning and dipping

About the salt: weighing the 14 g is more reliable than a single spoon conversion because kosher salts differ substantially in density. The beef itself does not need to taste aggressively salty; those thin slices will later pick up seasoning from the jus.

Instructions

Day 1 — 1. Season the Beef

Pat the beef dry. Mix the salt with the oregano, garlic powder, onion powder, black pepper, basil, fennel and red pepper flakes. Rub the meat with olive oil, then coat it evenly with the seasoning.

Have extra time? Refrigerate the seasoned beef uncovered for 4–12 hours. Starting later is fine; the chill after roasting matters much more to the final slice.

2. Build the Jus in the Roasting Pan

Heat the oven to 325°F / 165°C.

Pour the 6 cups / 1.4 L stock into a roughly 9 × 13-inch / 23 × 33-cm roasting pan. Add the onion, garlic, oregano, black pepper, basil, fennel, red pepper flakes and bay leaves.

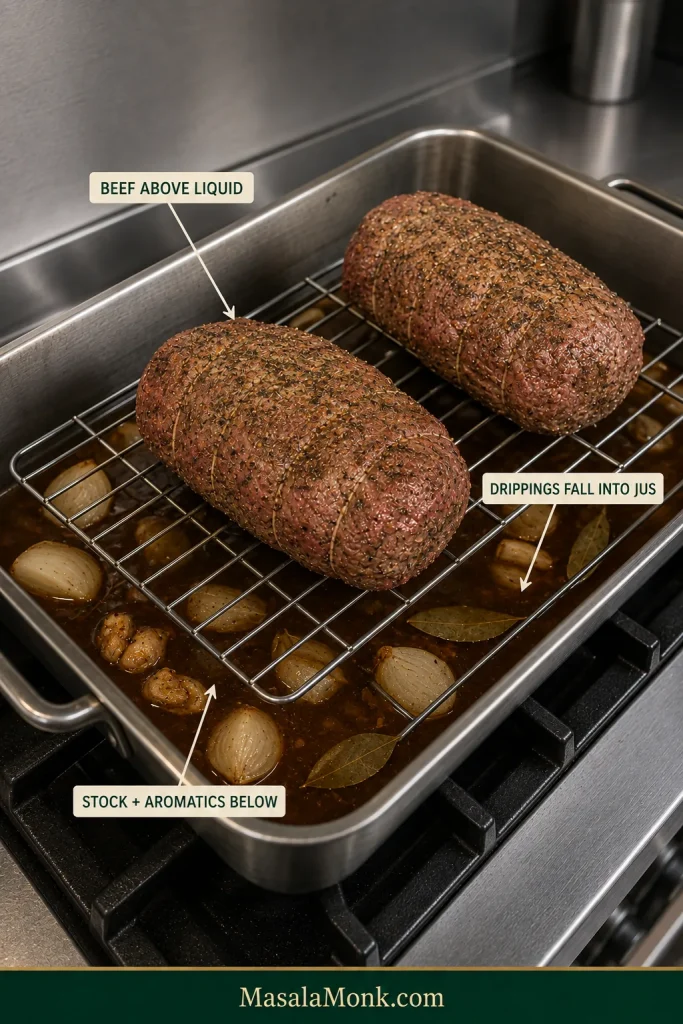
Set the rack over the liquid and arrange the beef on top. Keep the meat above the stock so its drippings fall into the seasoned liquid while the outside still roasts.

Two beef roasts resting on a rack above seasoned stock, onions, garlic and aromatics in a roasting pan.
The rack does more than hold the beef up. It keeps the roast exposed to oven heat while the liquid underneath catches drippings—so you build Italian beef jus without turning the roast into a braise.

3. Roast to 145°F / 63°C

Roast until the thickest center of each piece reaches 145°F / 63°C. With two roughly 2 lb / 900 g roasts, begin checking around the one-hour mark. Remove each piece as it reaches temperature; one may finish well before the other.

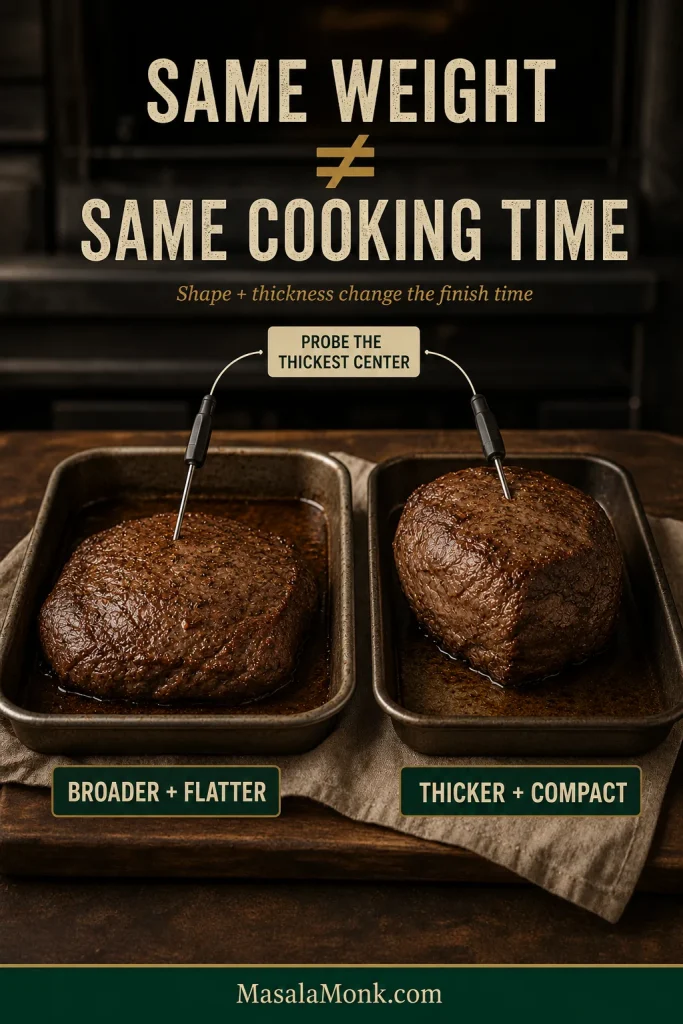
A broad, flatter roast can finish sooner than a compact thick one of the same weight. The clock tells you when to check; the thermometer tells you when to stop.

4. Rest, Portion and Chill

Rest the beef for at least 15 minutes. That comfortably exceeds the USDA minimum three-minute rest for a whole beef roast cooked to 145°F / 63°C.

Look at the grain, then divide the roast into a few slicer-friendly pieces if needed. Keep each piece oriented so tomorrow’s cuts can still run across the grain.

Arrange the pieces on a shallow tray and refrigerate promptly; don’t leave the roast sitting out to cool. Get it into the refrigerator no later than 2 hours after cooking. Cover tightly once chilled through.

The roast may look less exciting cold than it did coming out of the oven. That’s fine. Tomorrow, that firmness becomes folds.

5. Strain and Chill the Jus

Strain the roasting liquid into a shallow heat-safe container, pressing gently on the onion and garlic before discarding the solids. Refrigerate promptly.

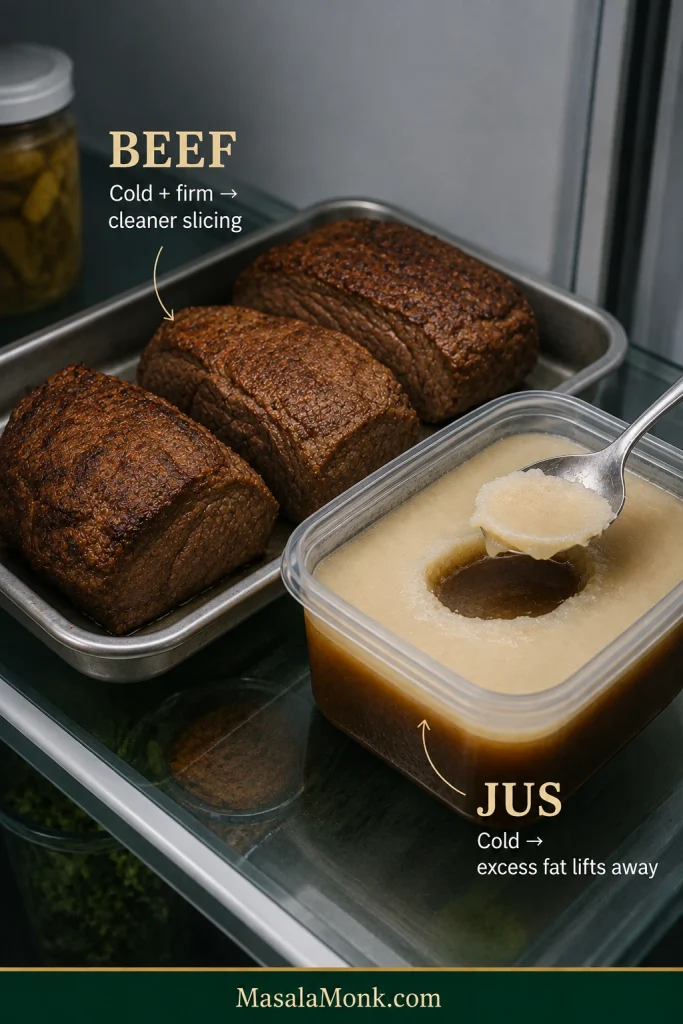
Once cold, excess fat firms on the surface and becomes easy to remove. Leave a little behind for flavor and body.

Chilled cooked beef beside cold beef jus with a firm fat layer on top, showing the two results of overnight refrigeration.
The refrigerator is doing two different jobs here: firming the roast for cleaner slicing and making excess fat easy to lift from the jus. Treat both as prep for better control tomorrow.

Day 2 — 6. Roast the Sweet Peppers

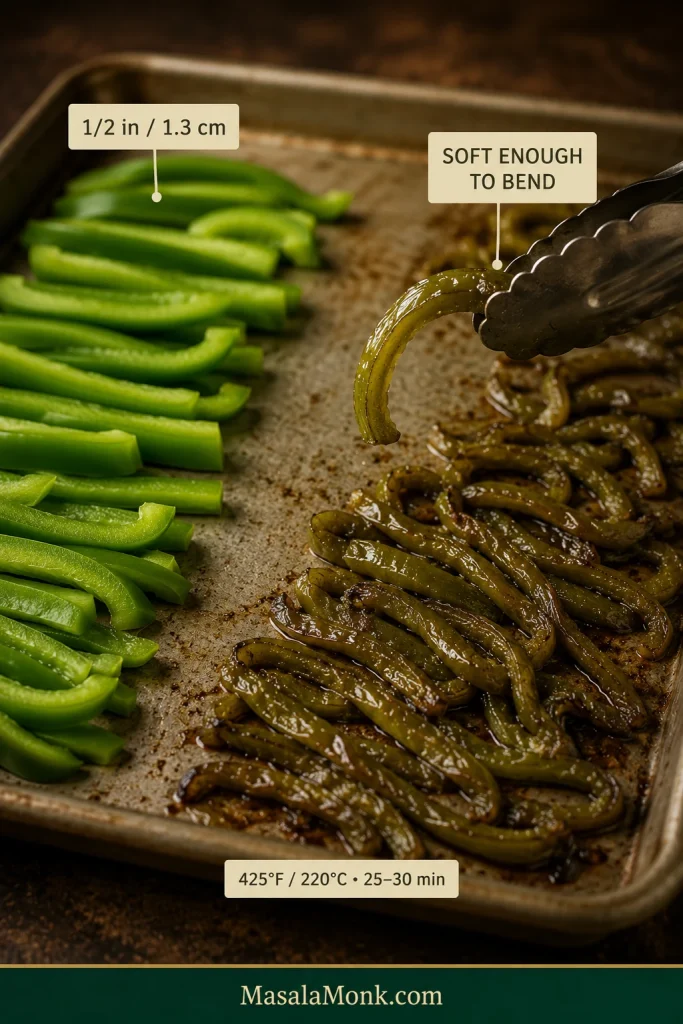
Heat the oven to 425°F / 220°C. Cut the peppers into strips about ½ inch / 1.3 cm wide, toss with the oil and salt, then roast for 25–30 minutes, stirring once.

Lift a strip. It should bend easily, with a soft collapsed texture that settles into the beef instead of crunching through the bite.

Green bell pepper strips shown raw and after roasting, with the cooked peppers soft, collapsed and flexible.
Broad bell-pepper pieces are easier to identify after roasting and less likely to disappear into stringy strips. Cook them until they fold with the beef instead of announcing themselves with a crunch.

7. Reheat and Finish the Jus

Lift away excessive hardened fat, leaving a little behind. Pour the jus into a wide saucepan or Dutch oven and bring it to a full rolling boil.

For eight sandwiches, about 5 cups / 1.2 L is usually enough for a mostly dry-or-wet table. Aim closer to 6 cups / 1.4 L when several sandwiches are likely to be dipped.

Reduce thin-tasting jus before the beef goes anywhere near it. A concentrated or salty batch needs some of the reserved unsalted or low-sodium stock instead. Taste again before adding Worcestershire or more salt.

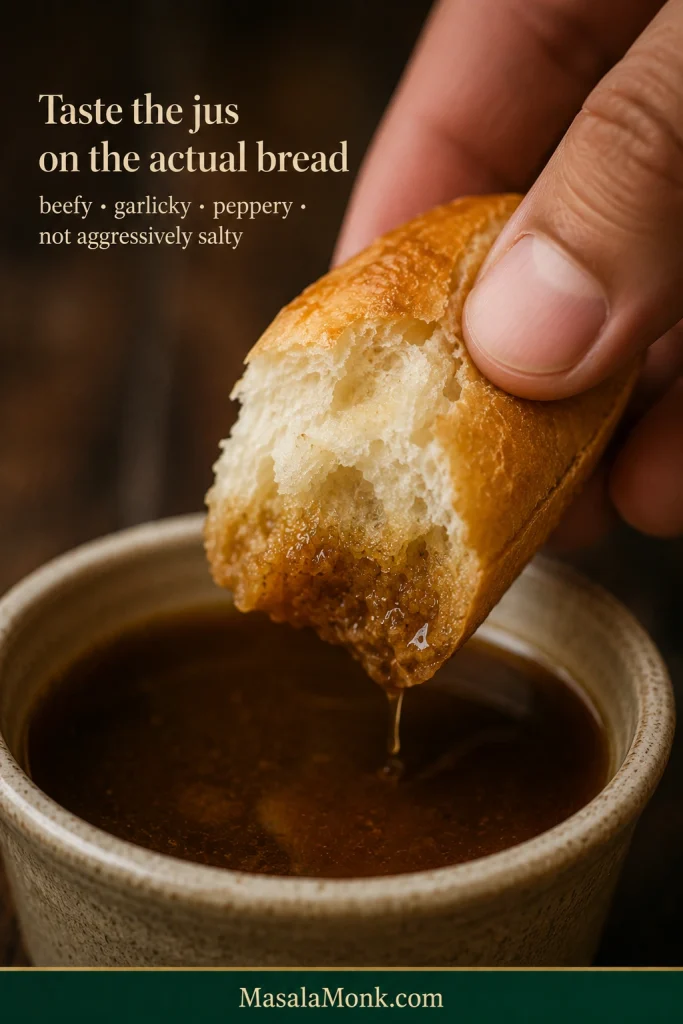
Taste the jus on the actual bread: tear off a corner of the roll and dip it into the jus. The crumb should darken quickly and taste beefy, garlicky and peppery without tasting aggressively salty once the bread has absorbed it.

Hand dipping a torn piece of French roll into a bowl of dark brown Italian beef jus as the crumb absorbs the liquid.
Use the roll to decide what happens next: bland once soaked means the jus can concentrate further; salty once soaked means dilute before the beef goes in.

When that soaked piece of bread already tastes like the sandwich you want, lower the jus to roughly 185–190°F / 85–88°C.

8. Find the Right Slice

Working with one thoroughly cold piece, slice across the grain. With a meat slicer, begin around 1–2 mm. With a knife, aim for the thinnest clean, intact slices you can comfortably manage.

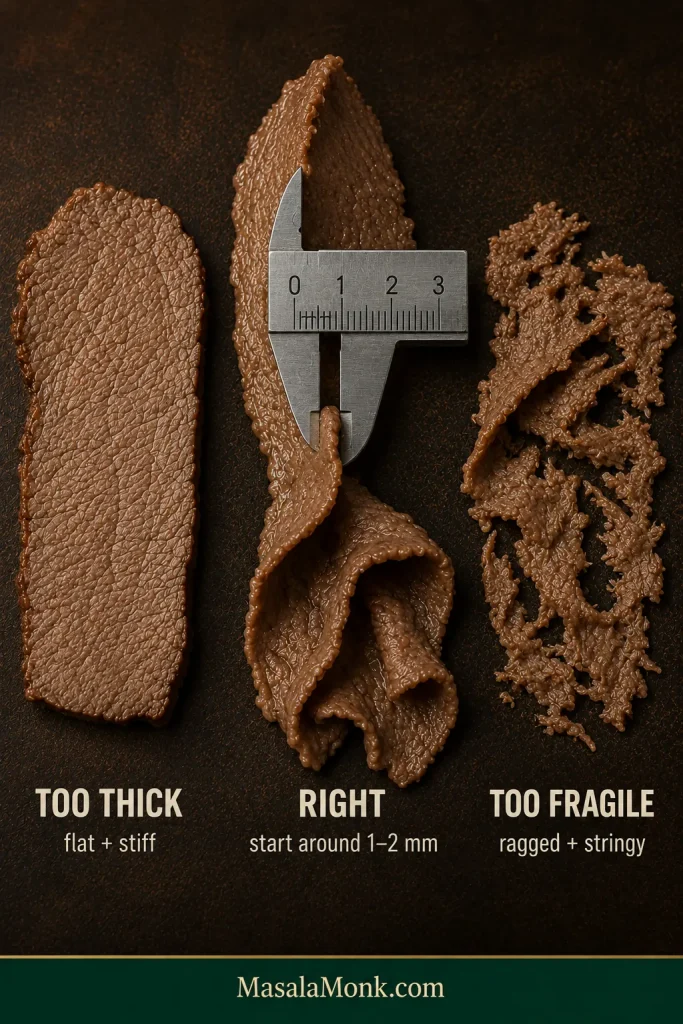
Cut three or four slices before committing the whole roast. Lift one. A good slice droops over your fingers, wrinkles and folds. A rigid, flat slice wants a thinner setting; ragged scraps mean you’ve gone a little too far.

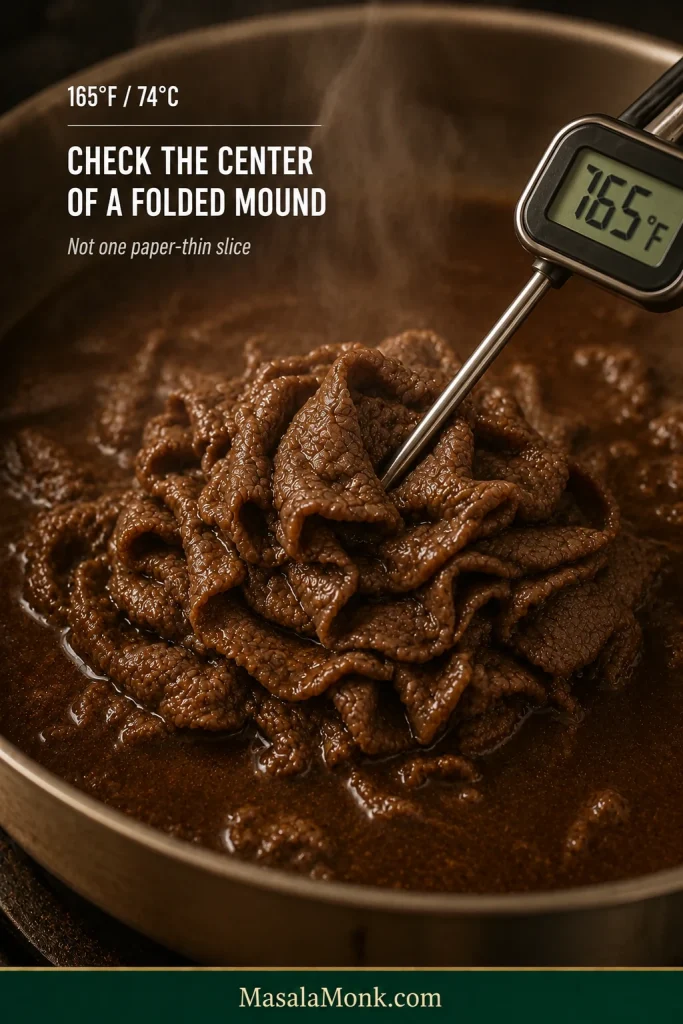
Warm a small folded handful in the jus until steaming hot throughout. To verify reheating temperature, gather the slices into a small mound and check the center for 165°F / 74°C rather than trying to probe a single paper-thin slice.

Three cooked beef slices labeled too thick, right and too fragile, with the correct thin slice hanging in soft folds.
Judge the final thickness after warming a sample, not only while the beef is refrigerator-cold. The right slice should stay intact yet bite through without dragging half the filling from the roll.

Take a bite. A long strip that pulls away from the sandwich needs thinner slicing. Beef that falls apart before the tongs can lift it cleanly can go slightly thicker. Once the bite feels right, slice the rest.

A meat slicer makes the job easier; it is not the price of admission. Hand-cut slices that fold and bite cleanly are doing their job.

9. Warm the Beef in Small Batches

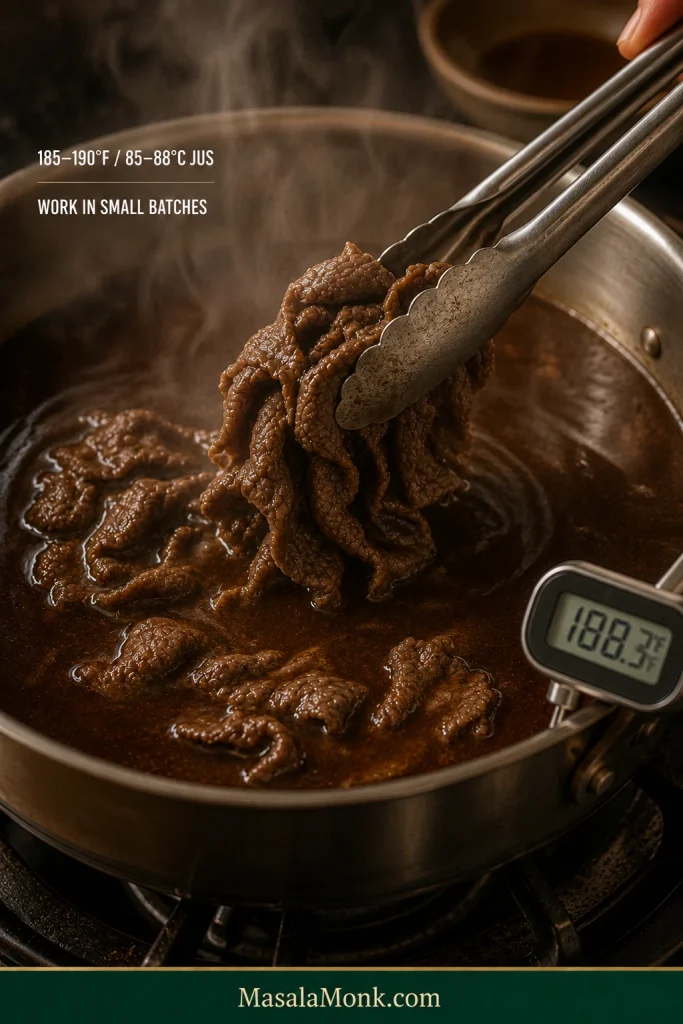
Add enough cold sliced beef for one or two sandwiches to the jus at roughly 185–190°F / 85–88°C. Loosen the slices gently with tongs and reheat each batch until steaming throughout and 165°F / 74°C at the center.

Thin cooked beef slices being loosened with tongs in a steaming pot of dark Italian beef jus.
Watch the pot when cold beef enters. If the jus loses most of its steam and takes a long time to recover, the batch is too large; smaller portions keep the folds tender and service moving.

Very thin beef may be ready in roughly 1–2 minutes, but use that only as orientation. Batch size, slice thickness, beef temperature and the amount of jus all change the timing.

The cold slices should relax, darken with gravy and hang softly from the tongs. Lift them out once they’re hot and supple.

10. Build the First Sandwich, Then Adjust

Open one roll without cutting through the hinge. Add 4–5 oz / 115–140 g hot beef in loose folds, plus 1–1½ oz / 30–40 g sweet peppers and ½–¾ oz / 15–20 g giardiniera solids if using.

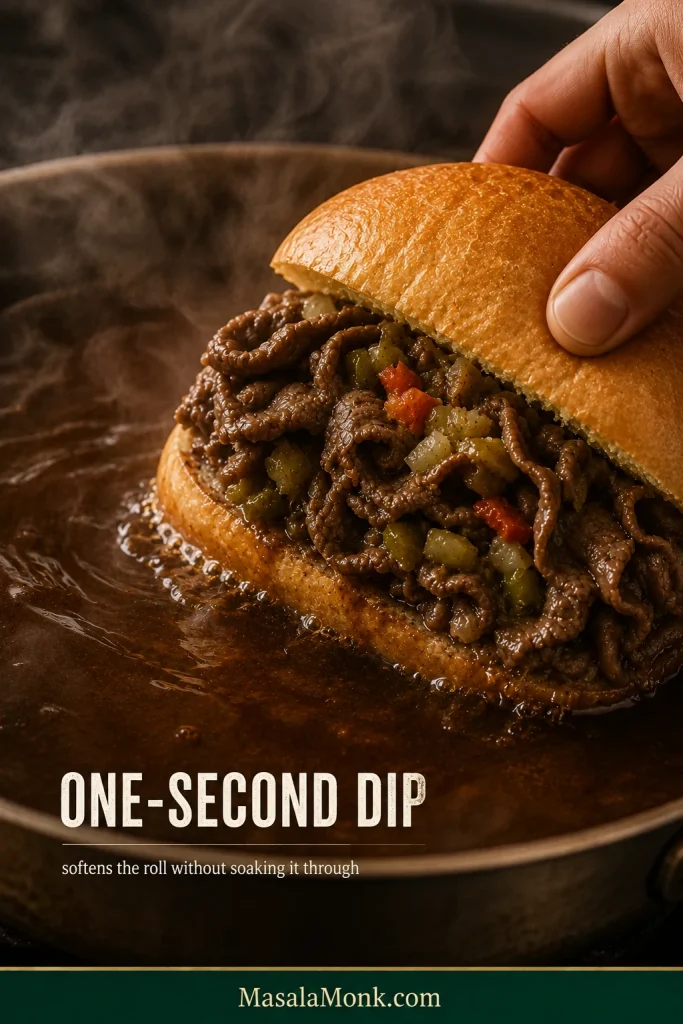
Start the first sandwich wet or give it an easy one-second dip, then take a bite.

Fully assembled Italian beef sandwich being briefly lowered into a pan of dark beef jus.
Think of the one-second dip as the middle ground: enough exterior contact to soften and season the roll, but brief enough that the hinge still has work left to do.

A dark, tender crumb with a secure hinge tells you the roll can probably take more gravy. Bread already close to collapse has shown you its limit. Build the rest to order.

Eat a fully dipped sandwich now. Good bread can survive gravy. It cannot turn today’s dunk into tomorrow’s packed lunch.

Choosing the Best Beef Cut for Italian Beef

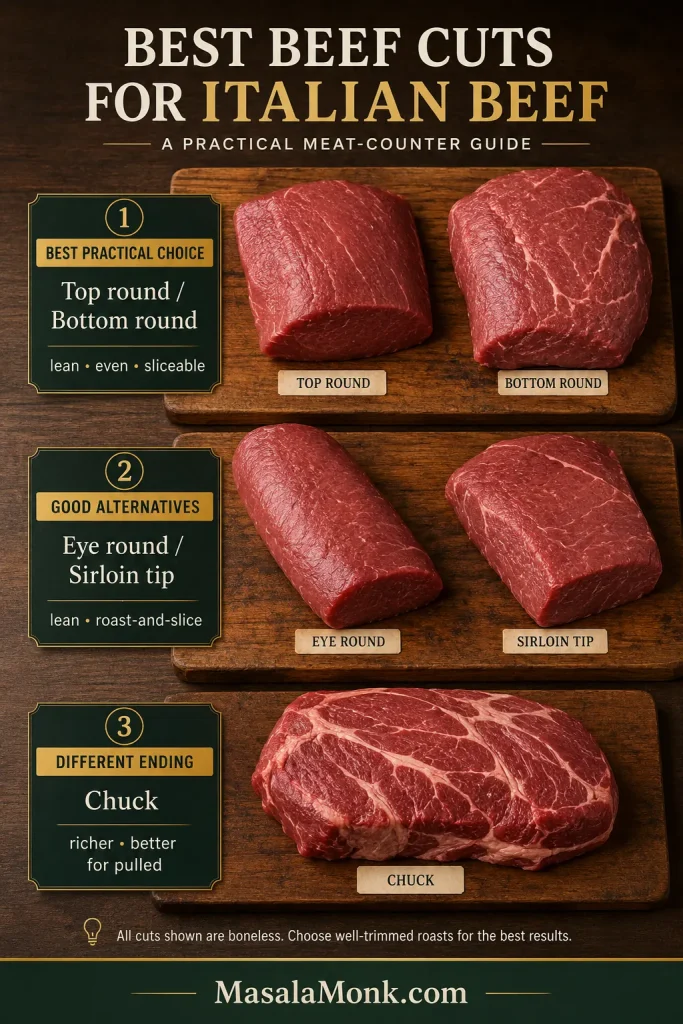
Top round and bottom round are the easiest practical choices for thinly sliced Chicago Italian beef at home. Sirloin also works well. Chuck makes more sense when the plan is long cooking and pulled beef.

On a phone? Swipe sideways to see the full table.

CutThin slicedSlow-cooked / pulledMain tradeoff
Top roundExcellentFairLean, even-grained and easy to shave once cold
Bottom roundExcellentGoodBeefy and usually economical; thin slicing matters
Eye of roundVery goodPoorVery lean and less forgiving of thick slices
Sirloin / sirloin tipExcellentFairOften naturally tender, usually more expensive
ChuckPoorer fitExcellentRich and collagen-heavy; naturally suits fall-apart cooking

Top round and bottom round can both work beautifully. At the store, look almost as closely at shape as the label: a fairly even roast with a clear grain direction cooks and slices more predictably than one with a thick center and sharply tapered tail.

Butcher-style comparison of several beef cuts for Italian beef, including round roasts, sirloin and chuck.
Choose an evenly shaped roast with a clear grain direction; shape and grain matter almost as much as the cut name.

You have not bought bad beef if chuck is already in your refrigerator; you have bought beef that wants a different ending. Its extra collagen and fat reward long cooking and naturally pull it toward shredding. If that sounds good, our slow cooker pot roast recipe is built around the same strengths.

How Long to Roast Italian Beef: Temperature, Shape and Timing

Roast weight gives you a place to start planning; thickness decides how quickly heat reaches the center. Two roasts with the same weight can finish surprisingly far apart when one is broad and flat and the other compact.

With two roughly 2 lb / 900 g roasts, begin checking around the one-hour mark. A single thick 4 lb / 1.8 kg roast will generally need longer, but the thermometer—not a predicted finish time—decides when each piece comes out.

One roast finishing well before the other does not mean anything has gone wrong. Take it out and let the thicker one catch up.

Two equal-weight beef roasts with different shapes and thermometer probes placed in their thickest centers.
A tapered roast may effectively have two cooking zones: the thin end heats faster while the thick center is still catching up. Probe where the meat is deepest, and let each roast finish on its own schedule.

Why Italian Beef Recipes Use Such Different Temperatures

Italian beef recipes can look wildly contradictory because they are not all chasing the same texture. Some keep the roast closer to conventional roast-beef doneness before chilling and shaving it. Others cook round much further toward tenderness before cooling and slicing, while slow-cooker versions deliberately head toward meat that pulls apart.

We’re roasting this beef so it can be sliced later, not cooking it until it wants to fall apart. In this recipe, the roast reaches 145°F / 63°C, chills thoroughly, gets shaved very thin and then comes back to temperature briefly in the jus. A higher-temperature, long-cooked version follows another route and produces a different texture.

How Thin to Slice Italian Beef — and What “Thin” Looks Like

Chill the Roast First

Warm roast beef compresses; cold roast beef slices. Press the center gently before you start. It should feel thoroughly cold and firm rather than soft and springy.

A short freezer chill can firm a stubbornly soft roast further. Stop while the center is still easy to slice—you want firmer beef, not a frozen block.

Start around 1–2 mm. Lift a slice and look at what it does.

Too thick: it lies flat and stiff like carved roast beef and can pull from the sandwich in one long strip.

Right: it droops, wrinkles and folds over your fingers. Several slices can pile together without becoming one heavy slab.

Too fragile: it breaks into stringy scraps before a clean slice reaches the tray. Move slightly thicker.

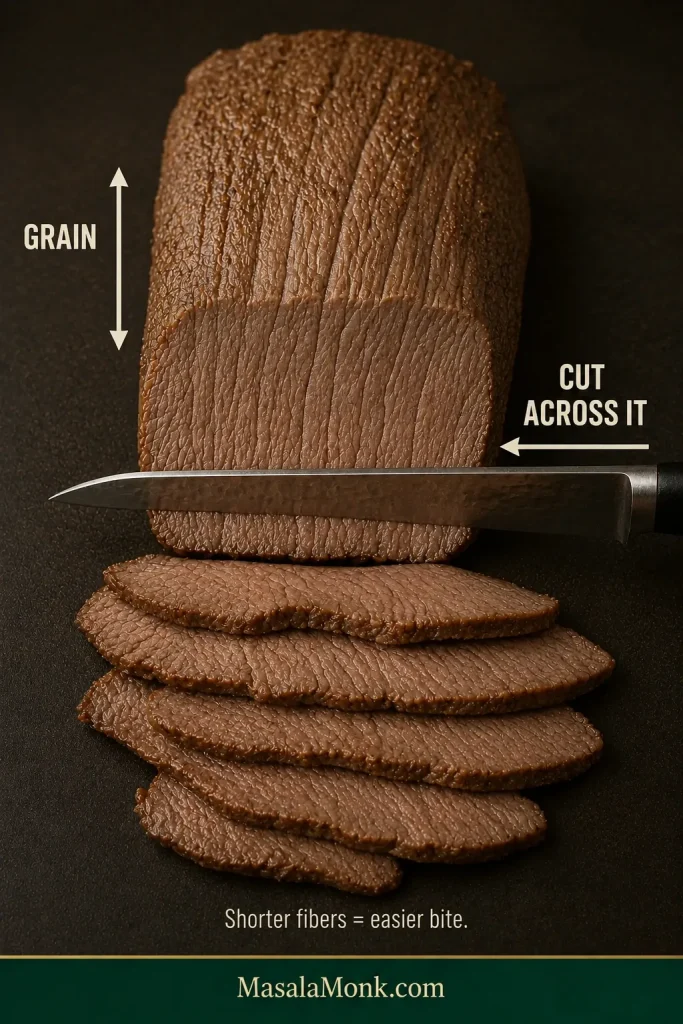
Cut Across the Grain

Look at the visible muscle fibers before you settle into a slicing rhythm. Cut across them rather than along them so the finished slices bite through more easily.

Cooked beef with visible muscle grain and a knife positioned to cut across the fibers.
If the grain changes direction, turn or divide the roast before slicing so every cut still runs across the fibers.

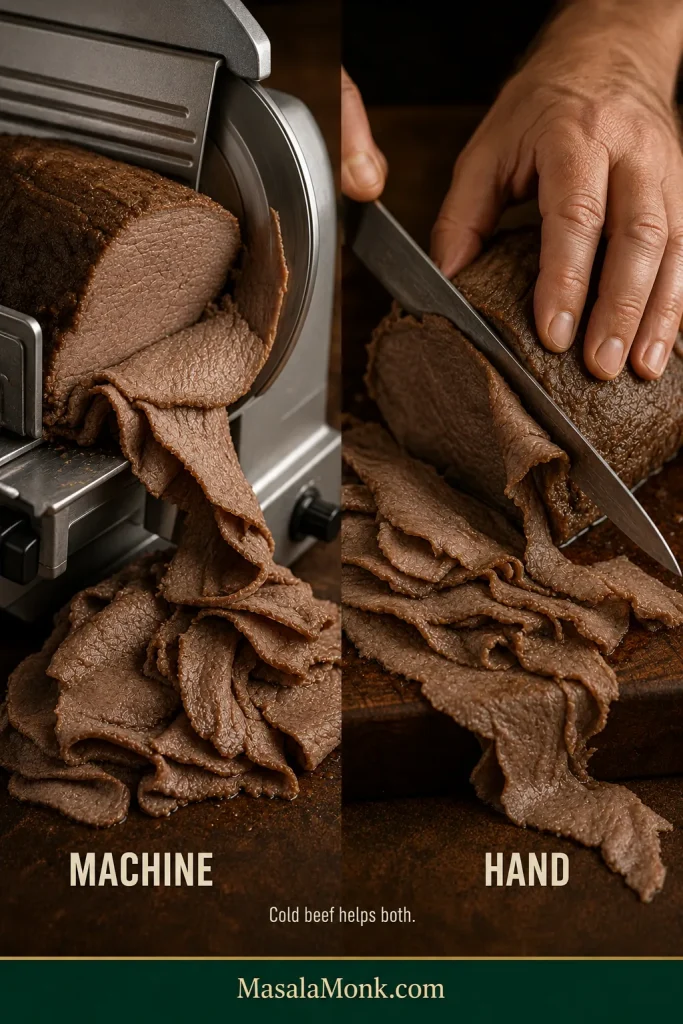
No Meat Slicer?

Yes, you can make Italian beef without a meat slicer. Chill the roast completely, use a long sharp knife and cut as thinly as you comfortably can. Slightly thicker intact slices are better than shredded scraps.

Split view of chilled Italian beef being sliced with a meat slicer and by hand with a long sharp knife.
A slicer buys repeatability; by hand, intact slightly thicker folds beat shredded scraps.

Smooth slicing strokes work better than pushing straight down. A butcher or deli may also be willing to slice chilled cooked meat, although store policies vary.

Hand-cut beef that folds and bites cleanly is thin enough, even if nobody would mistake it for commercial deli slicing.

How to Reheat Italian Beef Without Making It Tough

Cold beef drops the temperature of the jus as soon as it goes in, so give each portion enough room to loosen instead of packing the pot with a cold solid mass.

Keep the jus around 185–190°F / 85–88°C while reheating. The beef should become steaming hot throughout and reach 165°F / 74°C when checked in the center of a folded mound. Let the liquid recover before adding another cold portion.

Food thermometer inserted into the center of a small mound made from several folded slices of hot Italian beef.
The folded mound creates something a thermometer can actually measure: a real center. A single paper-thin slice is too shallow to give the probe tip a useful reading.

Hard bubbling around delicate slices or rapidly curling edges mean the heat is too aggressive. Once the beef is hot and hanging softly from the tongs, more time is not helping it.

The Jus Is Half the Sandwich

Good Italian beef jus should taste a little stronger than broth you’d happily sip from a mug. Beef and bread soften its impact, but the soaked crumb should never taste aggressively salty.

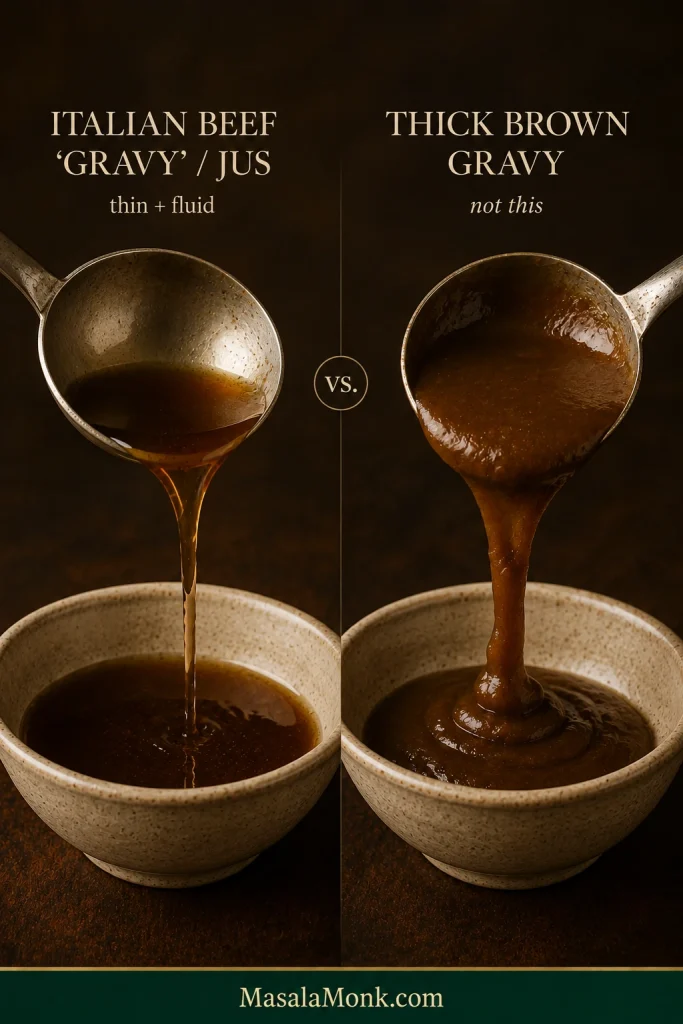
Chicago shops often call the seasoned roasting liquid gravy; cooks also say juice or jus. Here, those words mean the thin beef liquid used to warm and wet the sandwich, not a flour-thickened brown gravy.

Side-by-side comparison of fluid dark Italian beef jus and thick brown gravy clinging heavily to a spoon.
Italian beef jus should penetrate the folds and crumb, not sit on top like a thick sauce.

The jus should taste primarily of beef, garlic and pepper. Oregano, fennel and basil belong in the background. When dried herbs are the first thing you notice, they’ve become too loud.

Volume matters too. A wide pan evaporates faster, ovens vent differently and roasts release different amounts of juice. About 5 cups / 1.2 L suits a mostly dry-or-wet table; move closer to 6 cups / 1.4 L when several sandwiches will be dipped.

Weak jus needs reduction without the beef in the pan. Over-concentrated jus needs unsalted stock or water. In both cases, bread is a better judge than another spoonful straight from the pot.

Best Bread for Italian Beef: What Can Take the Jus?

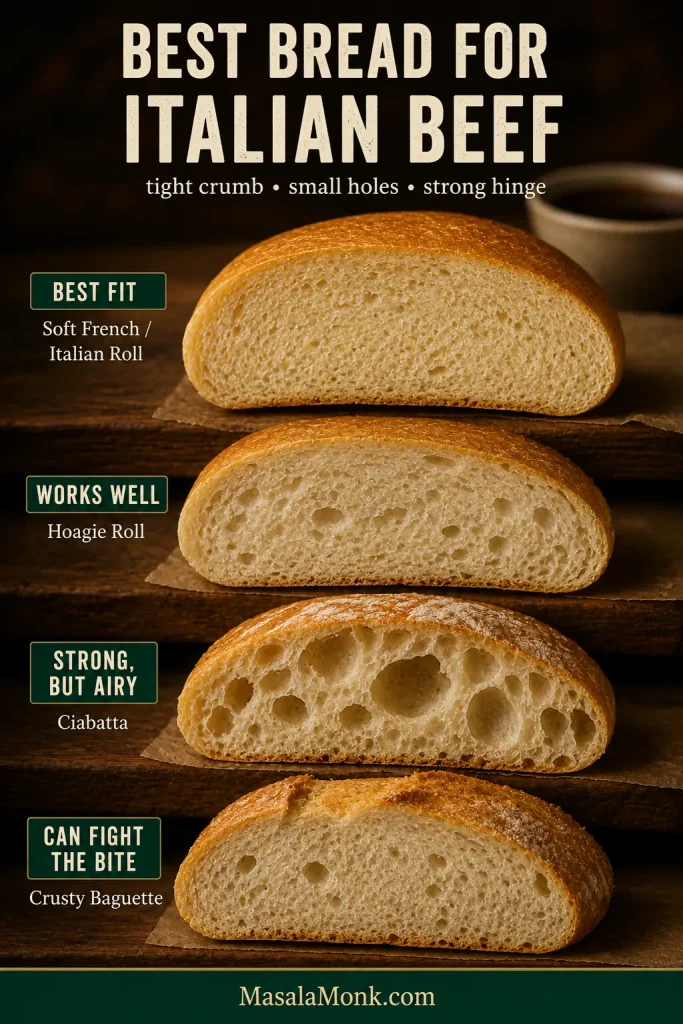
Use a soft French or Italian roll with a fairly tight crumb, light chew and strong hinge. It should absorb jus without collapsing or becoming harder to bite than the beef.

Cross-sections of several rolls compared for Italian beef, showing tight crumb, open crumb and different crust thicknesses.
The best roll has a soft, tight crumb and enough structure to absorb gravy without collapsing.

Look for a fine, relatively tight crumb with small holes. Large open pockets soak unevenly and give the gravy easier places to weaken the roll. For a concrete Chicago reference, Portillo’s serves its Italian beef on Turano French bread.

A soft French or Italian sub roll is usually the easiest substitute. Sturdy hoagie rolls can work well too. Ciabatta has enough strength but its larger holes change the way gravy travels through the bread.

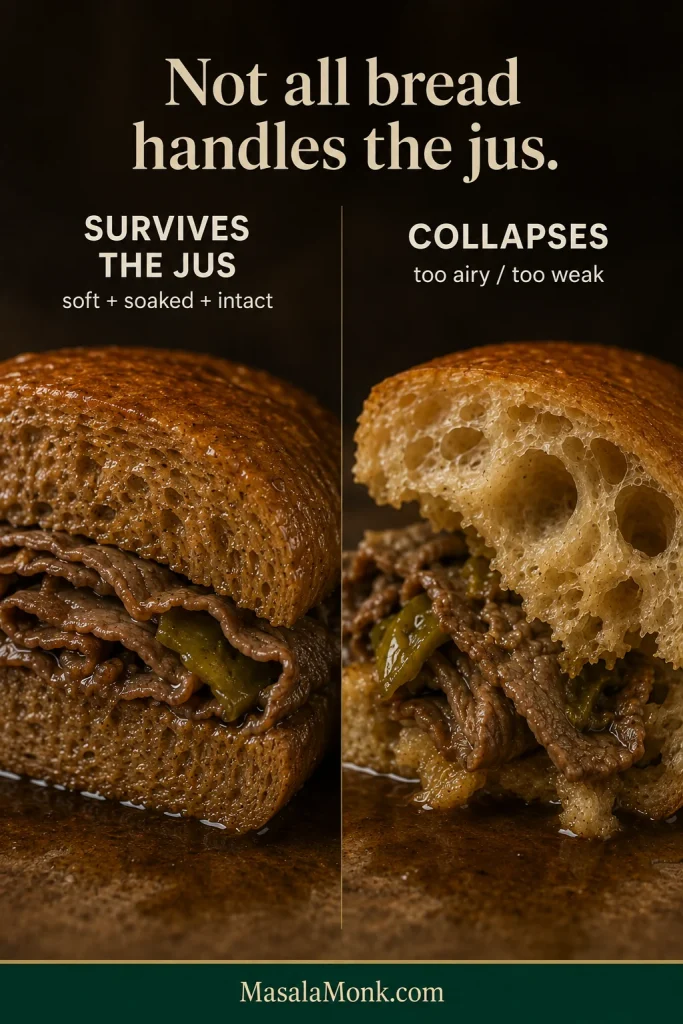
A very crusty baguette can fight the filling; an ultra-airy soft bun may absorb more than it can hold.

Comparison of a jus-soaked roll staying intact and another bread roll collapsing after absorbing too much liquid.
If a roll tastes great dry but falls apart after dipping, change the gravy exposure before changing the filling. A shorter dip can rescue a softer roll without rebuilding the whole sandwich.

Don’t toast the roll until crisp. A particularly soft substitute can benefit from brief warming or light surface-drying, but the center should still yield easily when pressed.

If you would rather make the bread yourself, our homemade hoagie and sub rolls are one route to a sturdy sandwich roll. Keep the crust on the softer side if you plan to dip it.

Dry, Wet (Juicy), Easy-Dipped or Dipped?

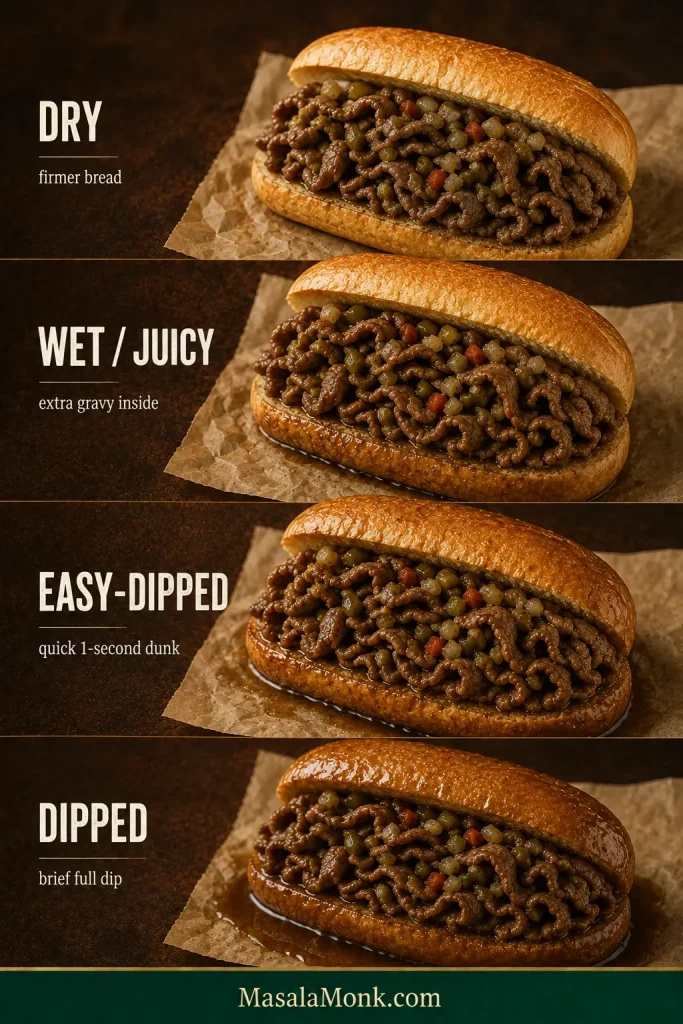
Dry keeps the roll relatively firm. Wet carries extra gravy into the bread. Easy-dipped gives the whole sandwich a quick one-second dunk. Dipped briefly submerges it for a few seconds.

How to Read a Chicago Italian Beef Order

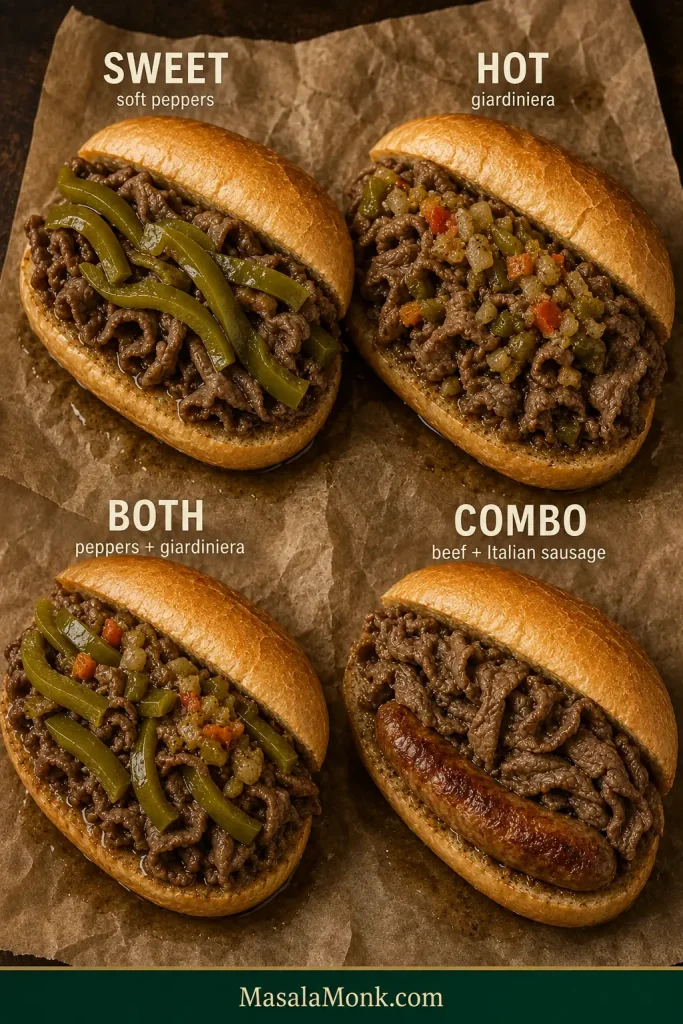
The exact wording varies from one beef stand to another, but the choice is essentially how much gravy reaches the bread. “Sweet” means cooked peppers, while “hot” points to giardiniera. If you see a combo on a Chicago beef menu, that means an Italian sausage has been added to the beef sandwich.

Four Italian beef variations showing sweet peppers, hot giardiniera, both toppings and a combo with Italian sausage and beef.
Order on three axes: peppers—sweet, hot or both; meat—beef or combo; gravy—dry, wet or dipped.

That shorthand is part of the pleasure of ordering Italian beef. This is a sandwich meant to be adjusted at the counter—sweet, hot, both, comparatively dry or soaked enough that you need to lean over the wrapper before taking the first bite. If The Bear sent you looking for it, this is the world of choices the show helped introduce to a much wider audience.

The amount of gravy is a preference, not an authenticity exam. Portillo’s ordering guide likewise distinguishes several gravy levels, including dry, easy-dipped, fully dipped and gravy on the side.

Choose Your Gravy Level

On a phone? Swipe sideways to see the full table.

StyleWhat happensBest when
DryBeef drains well before filling the rollTransporting the sandwich or keeping bread firmer
Wet / juicyPlenty of jus travels with the beef and more may be spooned insideYou want lots of gravy flavor without soaking the whole exterior
Easy-dippedThe assembled sandwich gets about a one-second dunkYou want softened bread with some structure left
DippedThe whole sandwich is briefly submerged for a few secondsYou want maximum saturation and will eat immediately
Jus on the sideThe sandwich stays comparatively dry and each bite is dippedTakeout, slow eating or maximum control
Four Italian beef sandwiches labeled dry, wet, easy-dipped and dipped, showing progressively more gravy in the bread.
Drier sandwiches travel better; easy-dipped and dipped versions are best eaten immediately.

A fully dipped sandwich is deliberately messy. Keep the wrapper or plate underneath and lean in.

When an easy dip is exactly as wet as you enjoy it, you’ve found your level. The best gravy choice is the one that makes you want the next bite.

For a full sandwich-shop plate, hot crispy homemade French fries are an easy partner—especially when there happens to be enough jus nearby for the occasional fry dip.

Sweet Peppers and Hot Giardiniera

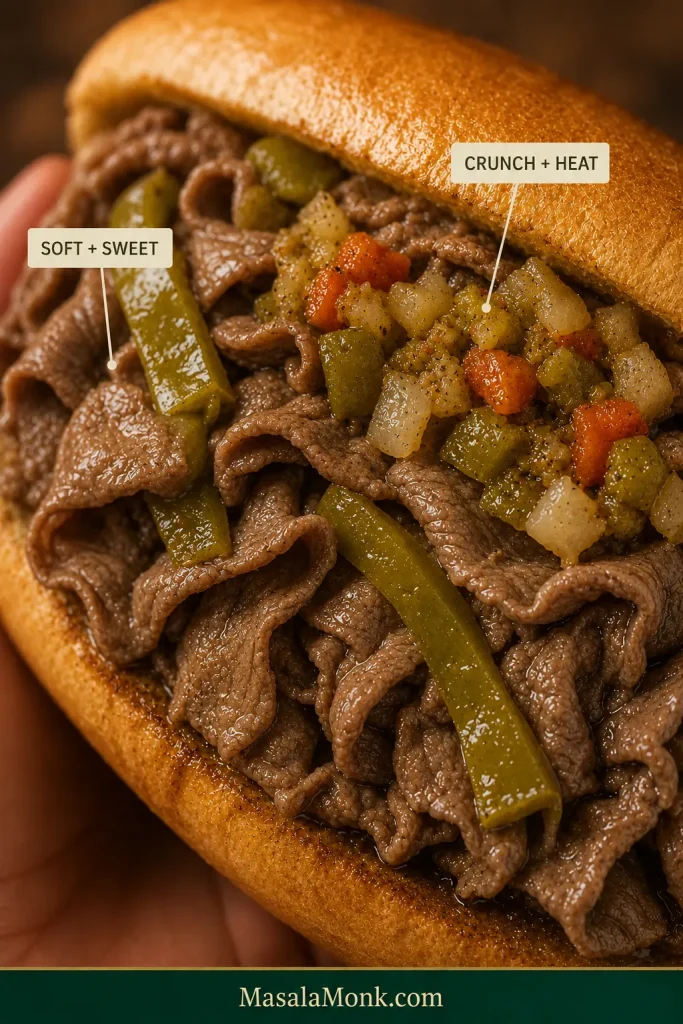
“Sweet” means soft cooked bell peppers, not a sugary sauce. They should bend easily and disappear into a bite of beef instead of crunching like fajita peppers.

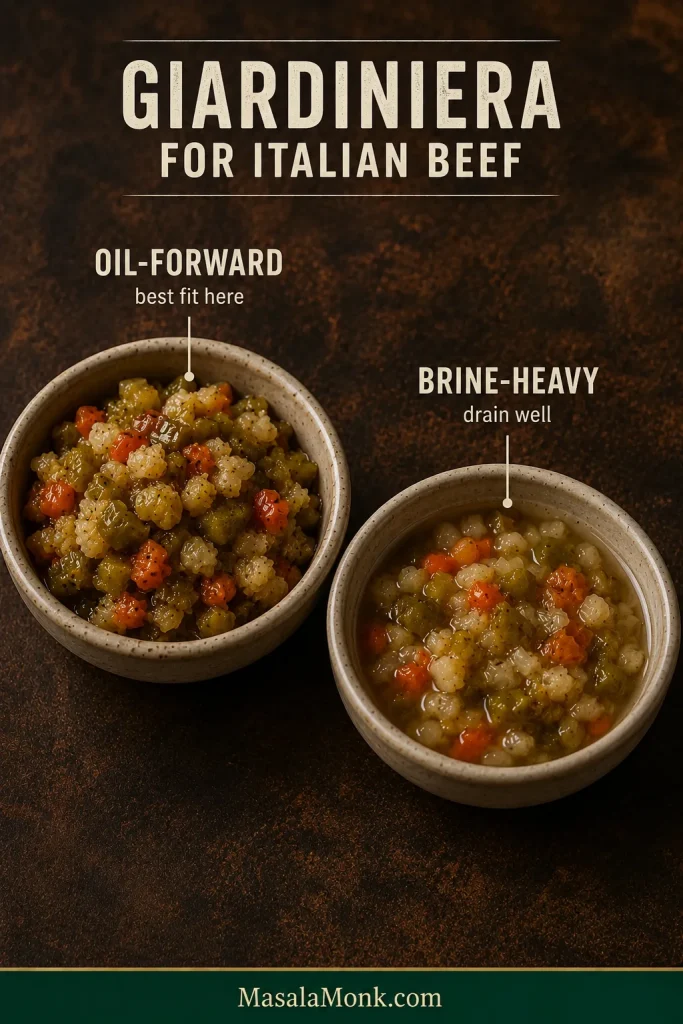
Chicago-style giardiniera is an oil-forward mix of chopped pickled vegetables and chiles that adds heat, acidity and crunch. Large cauliflower florets or chunky carrots are easier to eat when chopped finer.

Look at the liquid in the jar too. If the vegetables are swimming in sharp vinegar brine instead of seasoned oil, drain them particularly well before they reach the sandwich. Leave properly oil-packed giardiniera glossy rather than squeezing it dry.

Two bowls comparing glossy oil-packed chopped Chicago giardiniera with a wetter giardiniera sitting in vinegar-heavy brine.
Drain brine-heavy giardiniera; with oil-packed Chicago-style giardiniera, leave some seasoned oil clinging to the vegetables.

Start with about ½–¾ oz / 15–20 g per sandwich and put more at the table. It should sharpen the beef without covering up everything underneath.

Hot and sweet work especially well together: soft peppers deepen the juicy side of the sandwich while giardiniera brings crunch and brightness.

Close-up Italian beef sandwich topped with soft green sweet peppers and chopped hot giardiniera over thin folded beef.
Use the toppings as a diagnostic. If every bite feels crunchy, the sweet peppers probably need more cooking; if chile heat hides the beef, pull back the giardiniera. Contrast should sharpen the sandwich, not compete with it.

Cheese is optional. Mozzarella or provolone can both work, but beef, gravy, bread and peppers define the sandwich without either one.

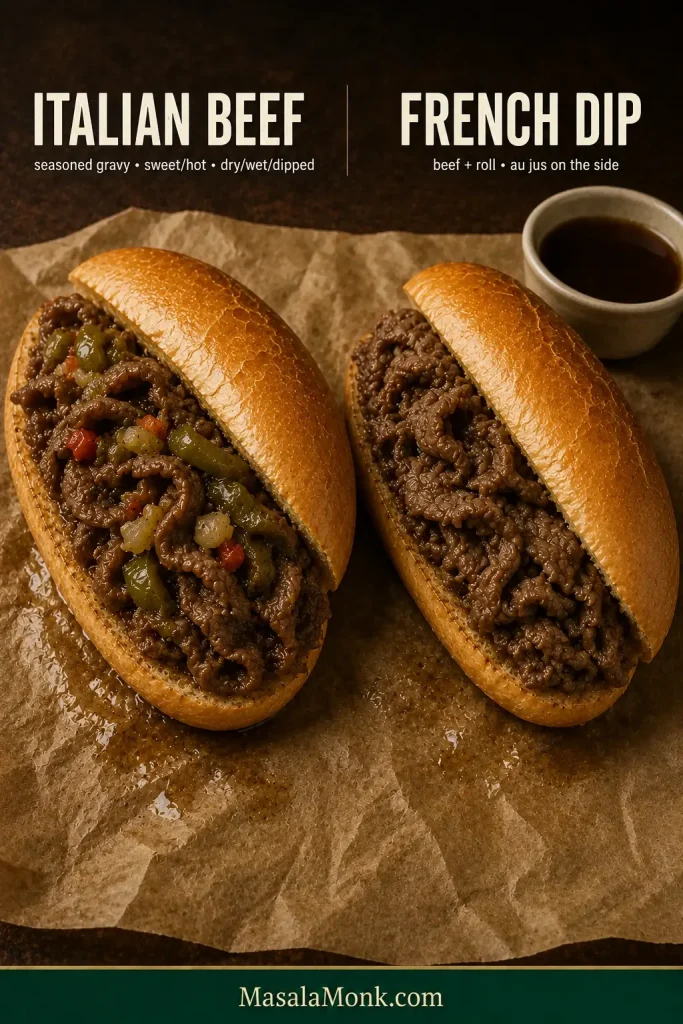
Italian Beef vs French Dip: What’s the Difference?

Both sandwiches can involve thin roast beef, a sturdy roll and beef jus, but they eat differently. Chicago Italian beef usually has a more assertively seasoned gravy, often includes sweet peppers or giardiniera, and builds the amount of gravy directly into the sandwich—dry, wet or dipped.

A French Dip is usually simpler: beef and bread with au jus served alongside for dipping. If that cleaner beef-and-jus combination is what you’re after, see our French Dip sandwich recipe.

Italian beef and French Dip sandwiches side by side, with peppers and giardiniera on the Italian beef and a separate cup of jus beside the French Dip.

Italian beef integrates seasoned gravy and peppers; French Dip keeps a simpler beef-and-bread build with jus on the side.

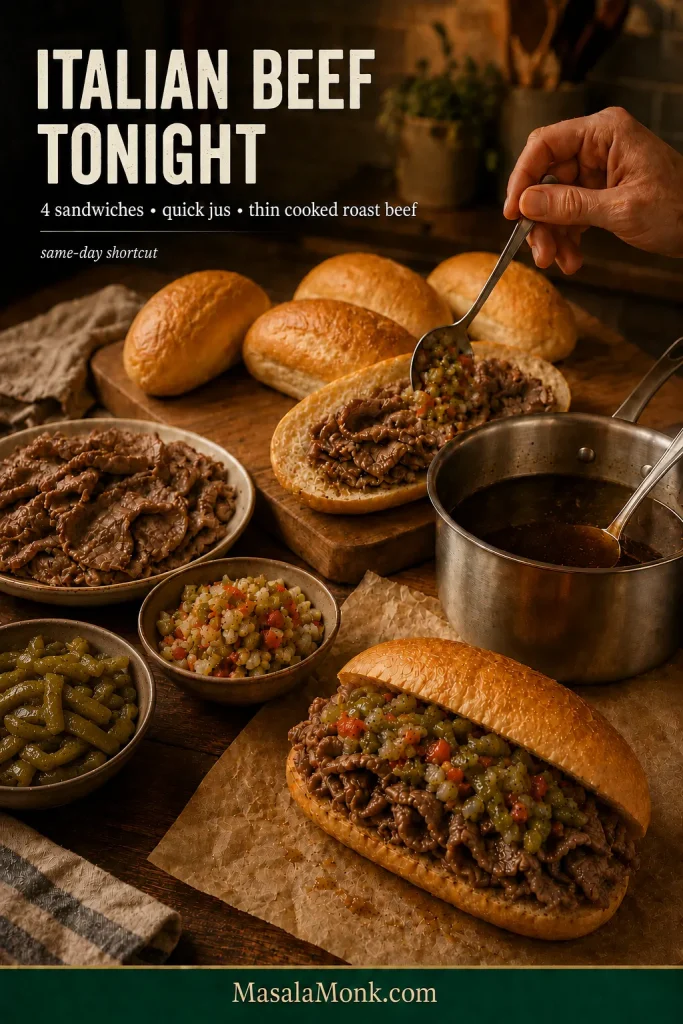
Italian Beef Tonight: A Fast 4-Sandwich Shortcut

If you found this page late in the afternoon, look for very thin plain or lightly seasoned cooked roast beef. Avoid heavily smoked, barbecue-flavored or heavily pepper-crusted versions; those flavors can pull the jus somewhere else entirely.

Same-day Italian beef setup with thin cooked roast beef, rolls, quick jus, peppers, giardiniera and a finished sandwich.
For quick Italian beef, choose plain or lightly seasoned thin roast beef so the homemade jus remains in charge.

This shortcut makes 4 sandwiches.

  • 1–1¼ lb / 450–570 g thin cooked roast beef
  • 3 cups / 700 ml low-sodium beef stock
  • ½ medium yellow onion, roughly chopped
  • 3 garlic cloves, smashed
  • ½ teaspoon dried oregano
  • ½ teaspoon black pepper
  • ¼ teaspoon dried basil
  • ¼ teaspoon fennel seeds, lightly crushed
  • Pinch red pepper flakes, optional
  • 1 bay leaf
  • 1 teaspoon Worcestershire sauce, optional, after tasting
  • Kosher salt, only if needed after tasting
  • 4 sturdy soft rolls
  • Sweet peppers and giardiniera, as desired

Build the Quick Jus

Simmer the stock, onion, garlic, herbs, spices and bay leaf for about 20–25 minutes, then strain. Dip in a piece of bread. Reduce a little longer if the jus still tastes thin.

Once the concentration tastes right, decide whether it needs Worcestershire or salt. The roast beef may already contribute plenty of seasoning, so make those adjustments at the end.

Bring the jus to a rolling boil, then lower it to about 185–190°F / 85–88°C. Reheat the beef in modest portions until steaming hot throughout and 165°F / 74°C in the center of a folded mound.

Build with the same peppers, giardiniera and gravy choices as the full version. You lose some roast-and-drippings depth, but dinner still lands in the right neighborhood. If you want the roast-and-chill method next time, return to the full Chicago Italian beef recipe.

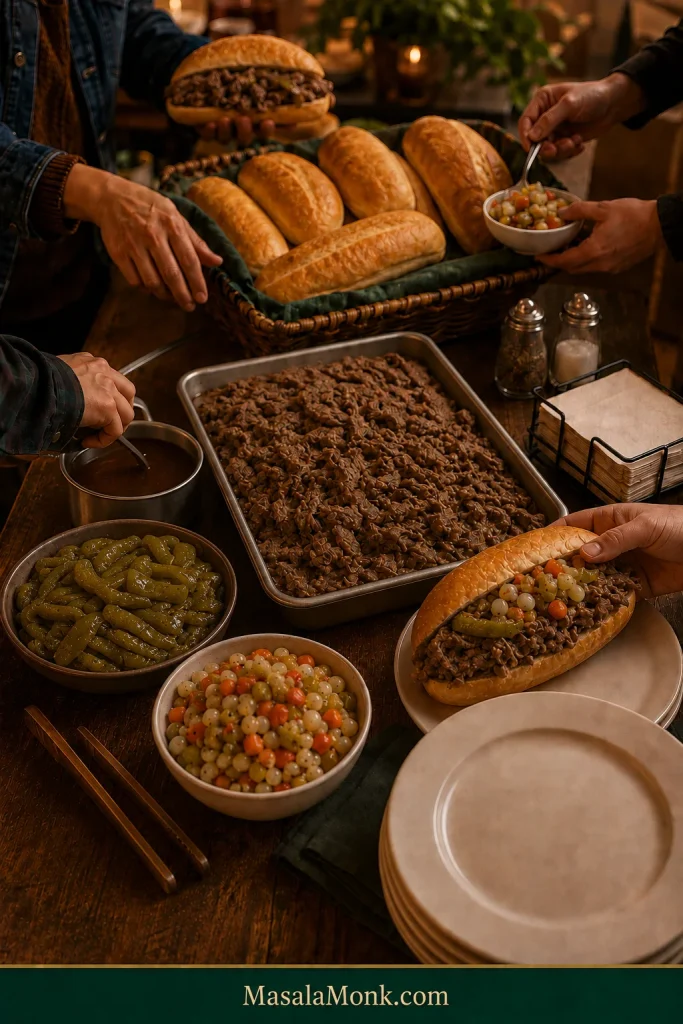
Making Italian Beef for a Crowd

Italian beef is excellent party food because nearly all the fiddly work can happen before anyone arrives. Keep plenty of gravy ready without making the entire shaved roast spend the evening sitting in it.

Italian beef party station with sliced beef, separate jus, rolls, sweet peppers and giardiniera while guests assemble sandwiches.
Build to order: beef and jus can wait hot, but gravy starts changing bread texture immediately.

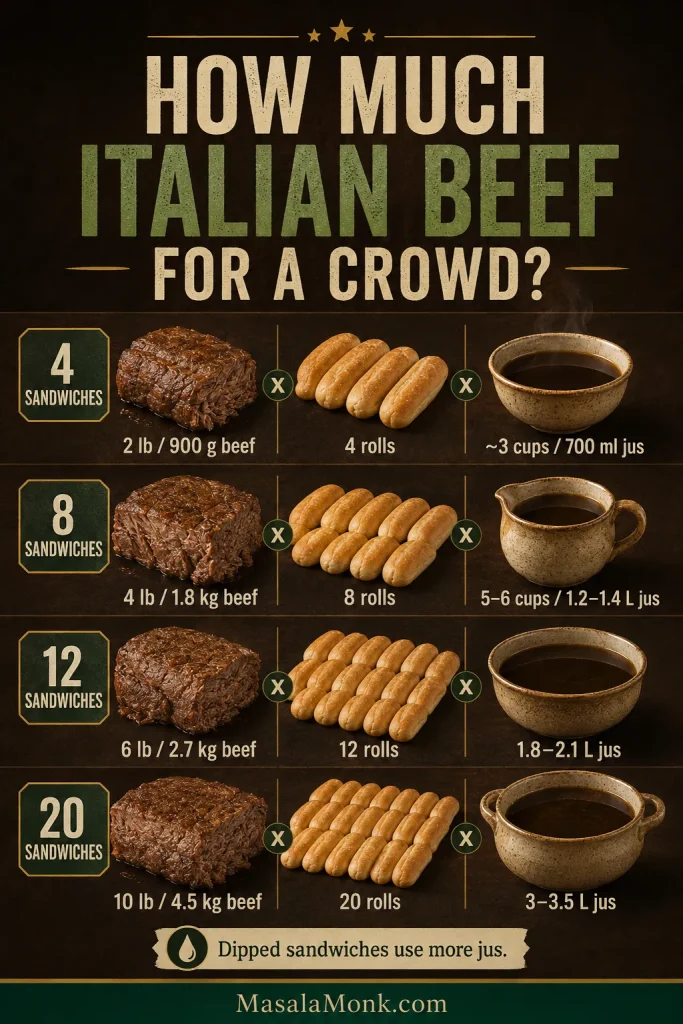
How Much Italian Beef for a Crowd?

For planning, work from the number of sandwiches you expect to serve. One sandwich per guest may be enough as part of a larger buffet. If Italian beef is the main event, extra rolls and beef give you breathing room for bigger appetites.

On a phone? Swipe sideways to see the full table.

SandwichesRaw beefRollsFinished jusRaw peppersGiardiniera
42 lb / 900 g4About 3 cups / 700 ml8 oz / 225 g2–3 oz / 60–80 g
84 lb / 1.8 kg8About 5–6 cups / 1.2–1.4 L1 lb / 450 g4–6 oz / 120–160 g
126 lb / 2.7 kg12About 1.8–2.1 L1½ lb / 675 g6–8 oz / 180–240 g
2010 lb / 4.5 kg20About 3–3.5 L2½ lb / 1.1 kg10–14 oz / 300–400 g
Quantity guide showing beef, roll and jus amounts for 4, 8, 12 and 20 Italian beef sandwiches.
For a crowd, plan extra jus—dipped sandwiches use it fast. Keep unsalted stock nearby for extending the pot.

A mostly fully-dipped crowd will use more jus. Keep extra unsalted or low-sodium stock nearby so the pot can be extended without driving the salt upward.

Cook time does not simply double with the quantity of beef. Two 4-pound roasts do not automatically need twice as long as one 4-pound roast; thickness, spacing and airflow matter far more.

Use a Reheat Pot and a Serving Pan

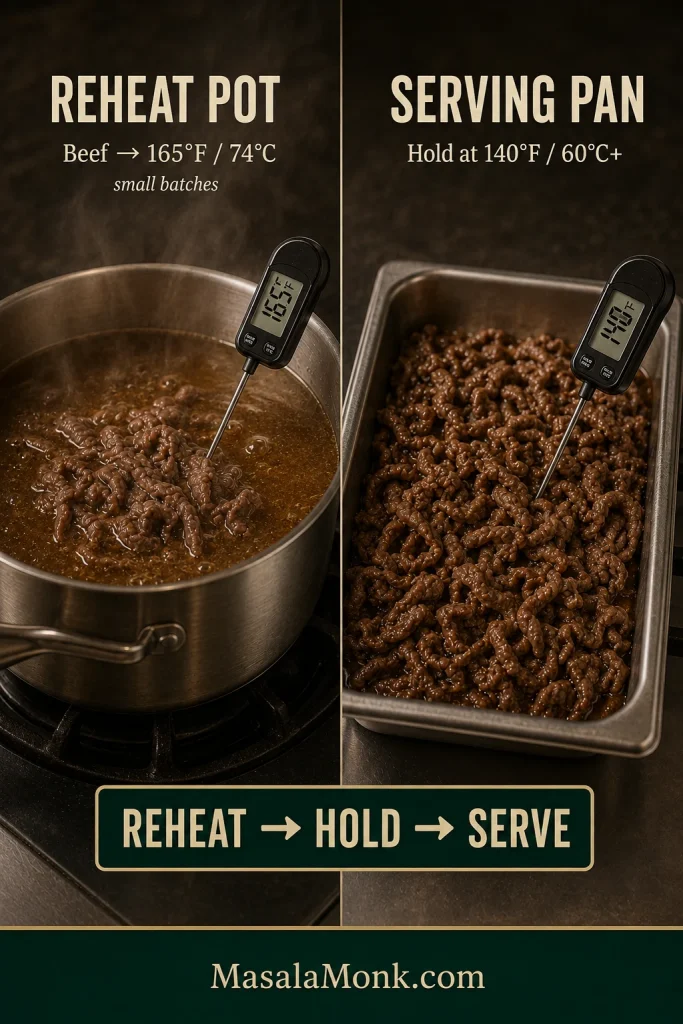
For longer service, reheat the beef in one pot and hold it in a separate pan.

  • Reheat pot: keep a working pot of jus around 185–190°F / 85–88°C. Add chilled sliced beef in modest portions and reheat to 165°F / 74°C in the center of a folded mound.
  • Serving pan: move the reheated beef with enough jus to stay moist into a preheated pan and hold it at 140°F / 60°C or warmer.
  • Remaining beef: keep it refrigerated until its turn.
  • Rolls: dry and separate.
  • Sweet peppers: warm and separate.
  • Giardiniera: separate so everyone controls their own heat.
Two-part guide showing cold Italian beef reheated in a jus pot and already-hot beef held separately in a serving pan.
Reheat cold beef fully in the jus pot; use the serving pan only to hold already-hot beef.

After a cold batch enters the reheat pot, let the jus recover toward its working temperature before adding more. That keeps service moving without turning all the thin beef into an all-evening simmer.

The person who wants a relatively dry sandwich and the person who wants to baptize theirs in gravy can still eat from the same setup without negotiating.

For a bigger spread, a make-ahead potato salad can be finished before hot service begins, leaving your last-minute attention for the beef and jus.

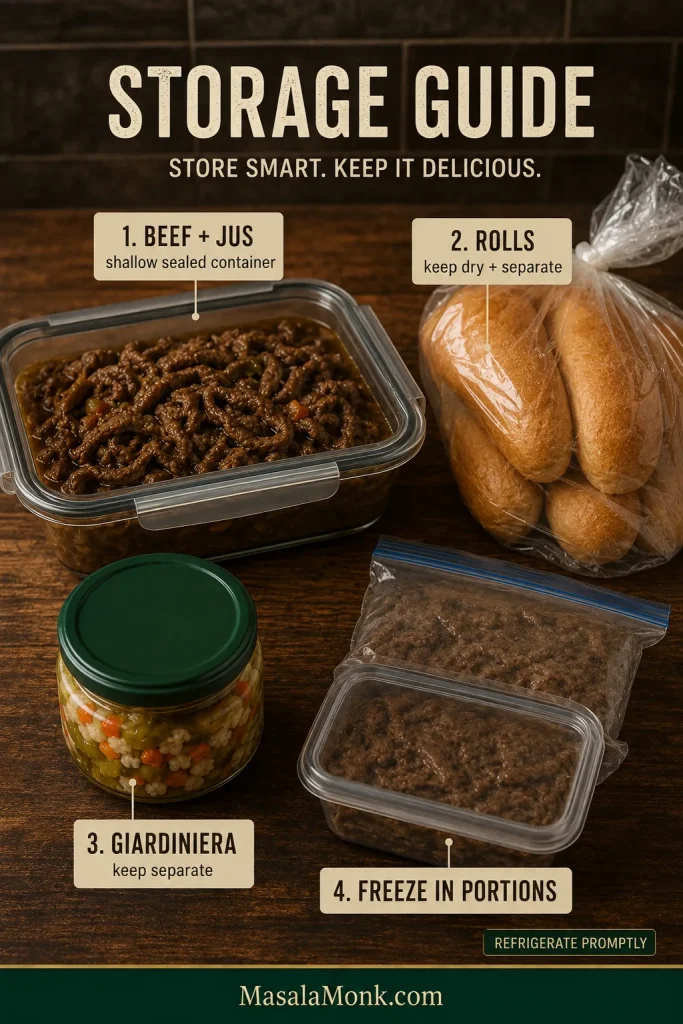
Make Ahead, Store, Freeze and Reheat

Day 1: roast the beef, divide it into manageable pieces if needed, strain the jus and refrigerate both promptly. Day 2: slice the beef, roast or reheat the peppers, finish the jus and warm the meat as needed.

Refrigerator: keep cooked beef and jus covered and refrigerated and use within 3–4 days. Keep the rolls and giardiniera separate.

Freezer: freeze sliced beef with enough jus to protect it from drying, divided into useful portions. For best quality, use frozen cooked beef within about 2–3 months. Freeze the bread separately.

Stored Italian beef and jus divided into containers, with bread, sweet peppers and giardiniera kept separately.
Store in meal-size portions so you can reheat only what you need and leave the rest untouched.

To reheat: bring the jus back to a rolling boil first and make any concentration adjustments. Lower it to the gentler working temperature, then reheat the beef until steaming throughout and 165°F / 74°C.

Troubleshooting Chicago Italian Beef

Start with the part that feels wrong: the beef, the jus or the assembled sandwich. Separating those three usually points to the useful fix much faster than throwing more seasoning at everything.

Beef Problems

On a phone? Swipe sideways to see the full table.

ProblemLikely causeRescue nowNext time
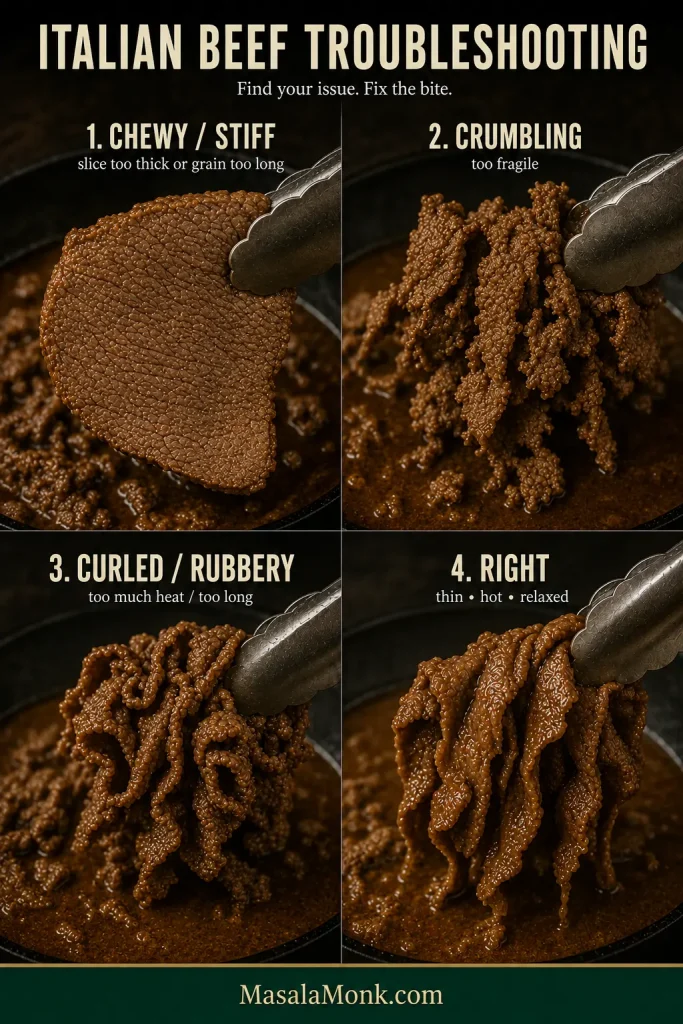
Thick and chewySlices too thick or cut with the grainCut large slices into smaller biteable pieces across the grainChill harder and slice thinner
Crumbles while slicingBeef too soft, setting too thin or roast cooked too farIncrease slice thickness slightlyChill fully and preserve a sliceable roast
Curled or rubbery in jusToo much heat or too much time after reheatingLift the beef out as soon as it is hotWork in smaller portions at gentler heat
Mushy or shreddingCut or cooking endpoint suited to pulled beefServe it as tender pulled Italian-style beefUse round or sirloin when intact slices are the goal
Four-state Italian beef troubleshooting guide showing stiff slices, crumbling beef, tightly curled beef and correct soft folds.
Watch what happens when the tongs lift the beef. Good Italian beef hangs in relaxed folds; board-stiff slices, crumbling pieces or tight curls tell you where to look before changing the seasoning.

Jus Problems

On a phone? Swipe sideways to see the full table.

ProblemLikely causeRescue nowNext time
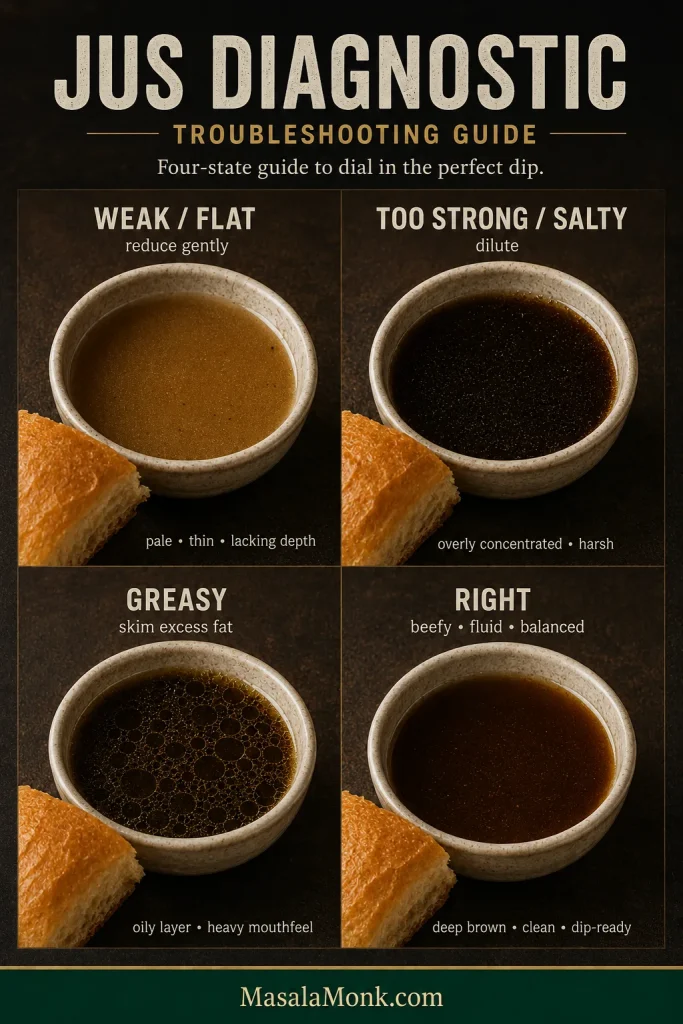
Weak or wateryToo much finished liquid or mild stockReduce the jus without the beefJudge by finished volume and the bread test
Too saltyHigh-sodium stock or too much reductionDilute gradually with unsalted stock or waterStart low-sodium and season at the end
Too greasyMore rendered fat than the liquid needsSkim the surfaceChill overnight and lift away hardened excess
Not enough for dippingWide pan or aggressive evaporationExtend with unsalted or low-sodium stockWatch pan width and target finished volume
Italian beef jus troubleshooting graphic showing weak, salty, greasy and insufficient jus with different corrective actions.
Fix one variable at a time: reduce weak jus, dilute salty jus, skim grease, or extend a short pot.

If the Beef and Jus Both Taste Right

Bread and gravy: a roll that disintegrates needs a tighter crumb or shorter dip. A sandwich that still feels dry needs more jus traveling with the beef or spooned inside. When the bread is simply wetter than you enjoy, move one step down the gravy scale next time.

Toppings: excessive chile heat calls for less giardiniera or a milder jar. A sharp black-pepper bite points back to the jus, which can be diluted now and seasoned more gently next time. Crunchy sweet peppers simply need more cooking.

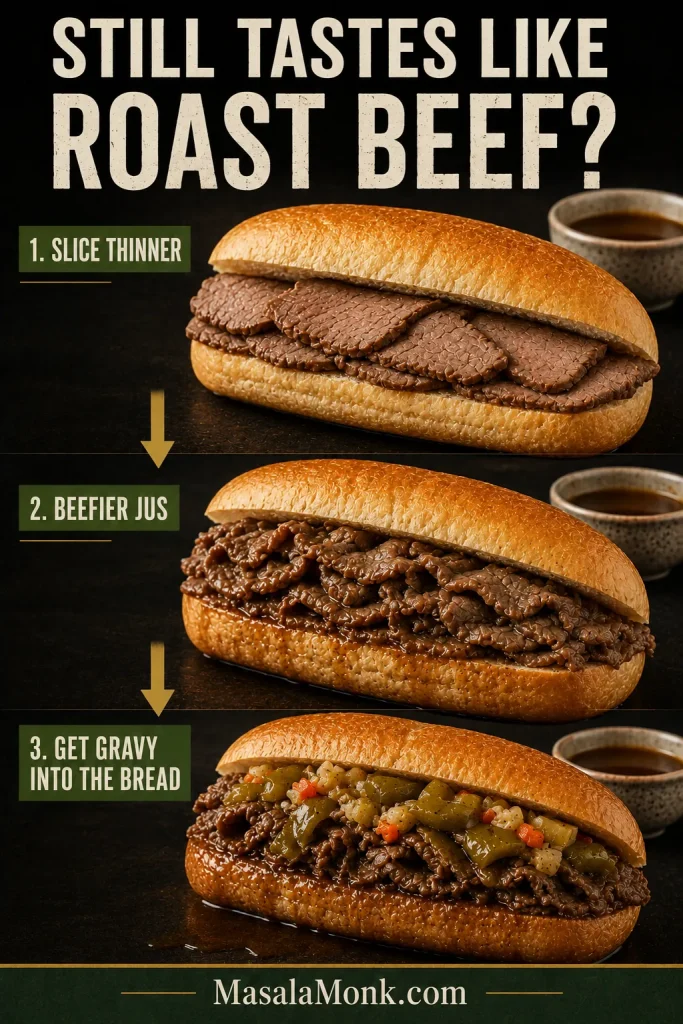
It still tastes like ordinary roast beef: look first at slice thickness, jus strength and how much gravy actually reaches the bread. Those three changes will move the sandwich further than another handful of dried herbs.

Three-stage guide progressing from thick dry roast beef to thin juicy folds and finally a gravy-soaked Italian beef sandwich with peppers and giardiniera.
The deeper goal is integration: the beef should stop feeling like a separate layer sitting on bread. When slice, jus and crumb begin working together, the whole bite tastes seasoned rather than assembled.

When the Sandwich Is Right

You notice it before the second bite. The beef no longer looks like neat carved roast; it has relaxed into loose folds. The roll is darker where the gravy reached it but still intact in your hands. Sweet peppers disappear into some bites, while giardiniera catches you in others with enough crunch and heat to keep all that beef and soaked bread lively.

Once those pieces are working, the final few seconds are personal. Keep it fairly dry. Spoon on more gravy. Give it the one-second dip. Or lower the entire sandwich into the jus and accept that dinner now requires two hands and a serious stack of napkins.

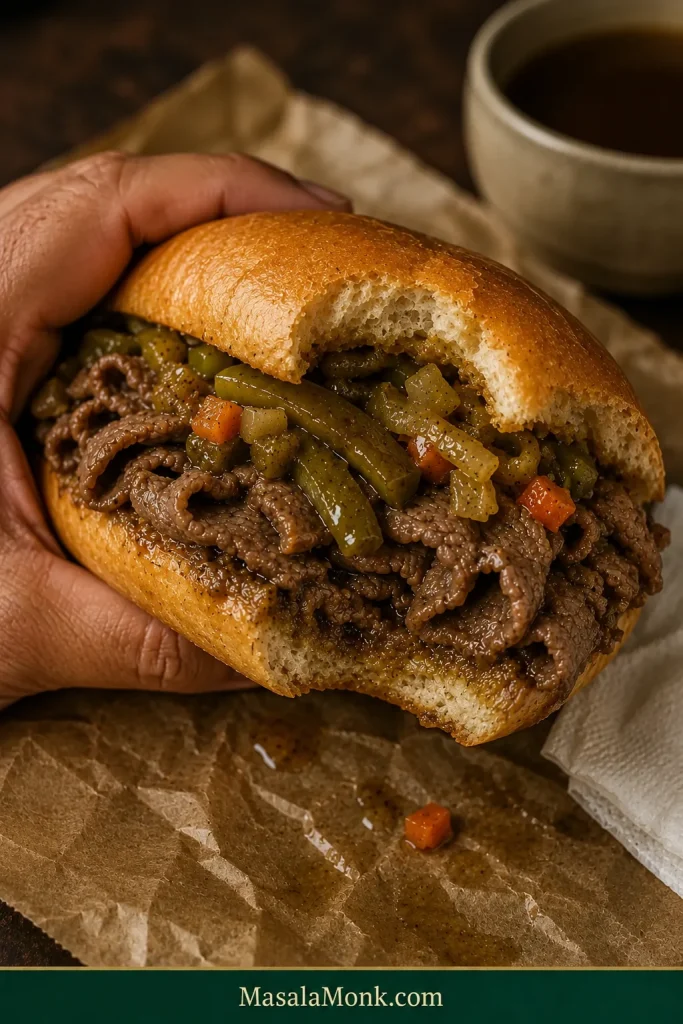
Hand holding a partially eaten Chicago Italian beef sandwich with thin folded beef, sweet peppers, giardiniera and visibly gravy-soaked bread.
At this point, stop adjusting and eat. A dipped Chicago Italian beef sandwich has a short sweet spot when the bread is thoroughly juicy but still strong enough to stay in your hands.

If you make it, tell us which beef cut you used, whether you sliced by hand or with a machine, and where you landed on the gravy scale—dry, wet, easy-dipped or fully dipped. Those details can help the next cook decide where to start.