
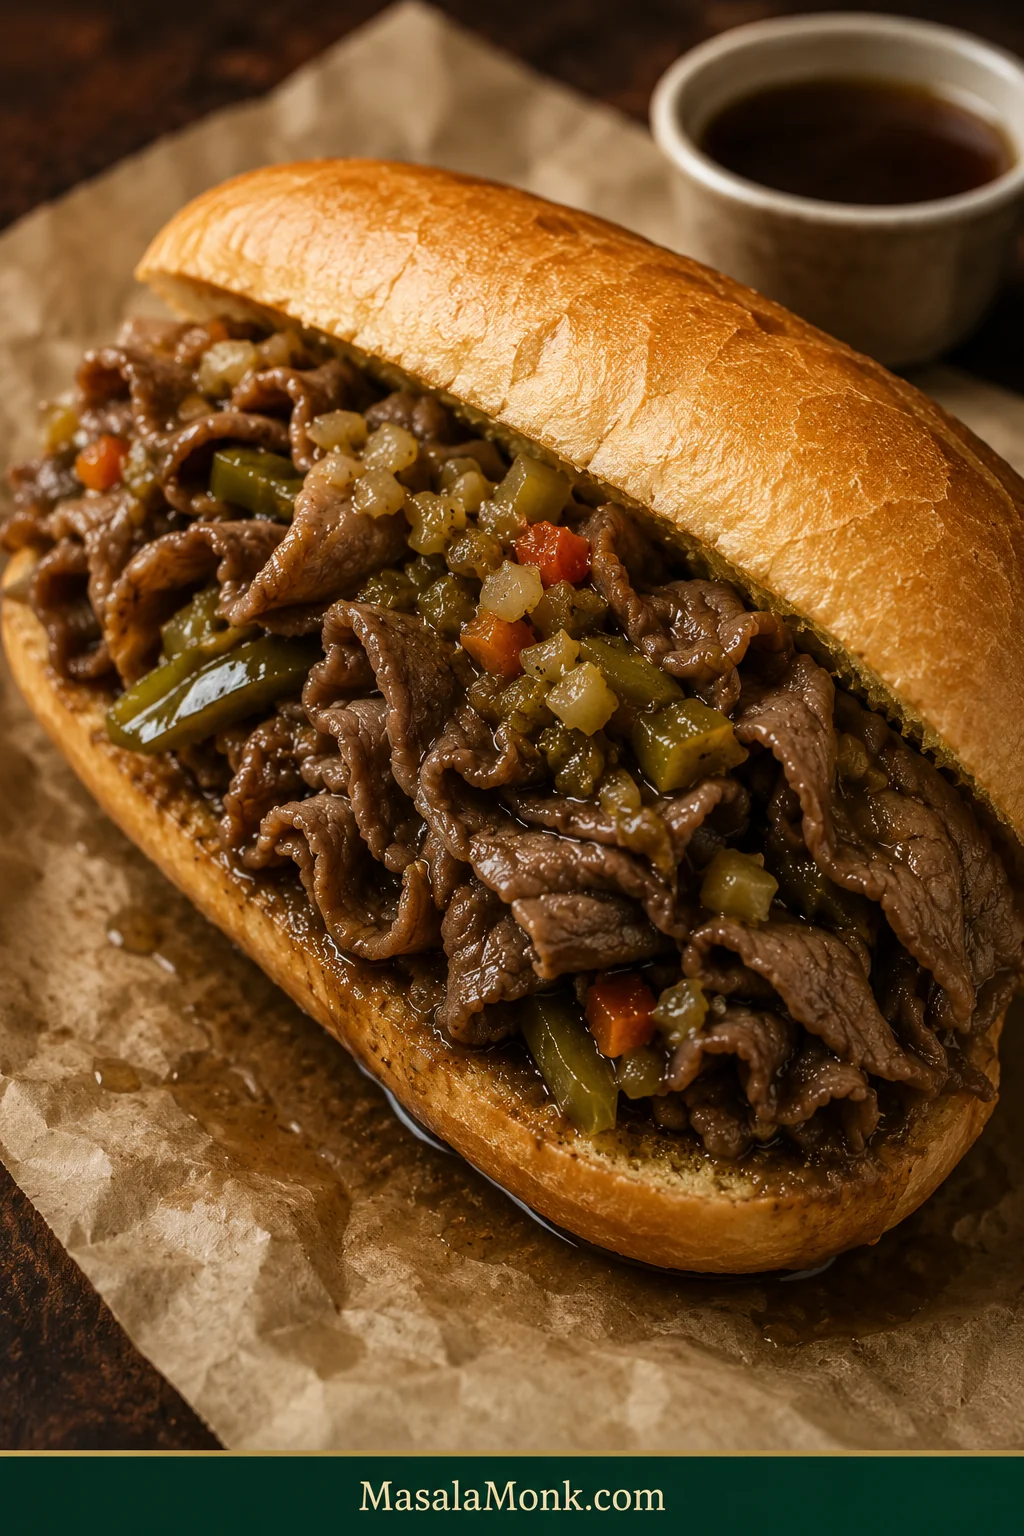
A good Chicago Italian beef sandwich looks a little out of control before you ever take a bite. The beef sits in loose, thin folds rather than neat carved slabs. Hot, seasoned gravy has worked into the meat and the edges of the roll. Sweet peppers slump into the filling, giardiniera cuts through with crunch and heat, and if you chose yours dipped, the bread is carrying far more liquid than bread normally should.
What separates the memorable versions from ordinary roast beef on a roll is not one secret spice. Thick slices can feel chewy even when the roast itself was cooked well. Weak jus leaves everything flat. Too much reduction turns it salty. Shredded chuck can be delicious but eats like a different sandwich. And a roll that cannot handle gravy may collapse before you reach the second half.
Here, a relatively lean round roast stays sliceable, chills until firm, gets shaved very thin, then returns briefly to a deeply seasoned beef jus. Add soft sweet peppers, hot Chicago-style giardiniera, or both, and decide for yourself how far the gravy goes.
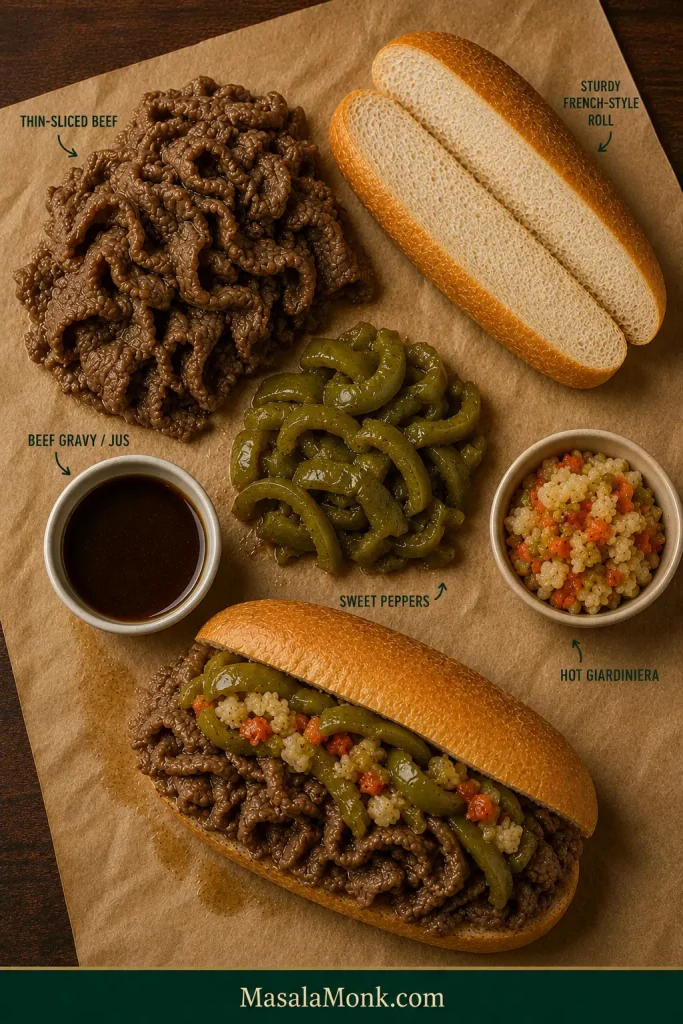
Chicago Italian beef is a Chicago-born sandwich of thinly sliced seasoned beef piled onto a French-style roll with beef gravy or jus, then often finished with sweet peppers, hot giardiniera, or both. The bread can stay relatively dry, take extra gravy, or be dipped right into the jus.
Why Chicago Italian Beef Is Built This Way
The exact origin of Italian beef is debated, but the sandwich grew out of Chicago’s Italian-American communities in the early 20th century. A commonly told history links its very thin beef and abundant gravy to feeding large wedding crowds economically: stretch the roast, put its juices back to work, and serve it on bread sturdy enough to catch them. However it began, that practical, crowd-friendly logic helped make Italian beef one of the city’s defining sandwiches.
Which Italian Beef Are You Making?
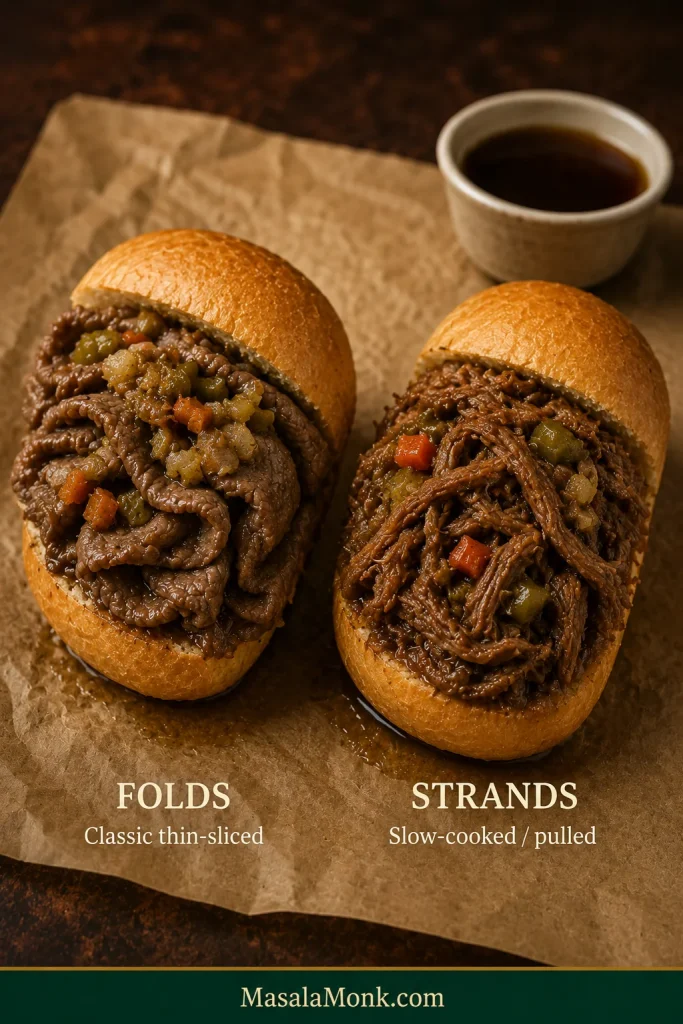
Decide first whether you want folds or strands. Slow-cooker Italian beef gives you soft pulled meat; if the sandwich in your head has thin folds, use the roast → chill → shave route below.
On a phone? Swipe sideways to see the full table.
| What you want | Best route | Result |
|---|---|---|
| Classic thin Chicago-style beef | Roast → chill → shave → warm in jus | Loose, flexible slices with the most control over texture |
| Italian beef tonight | Thin cooked roast beef + quick homemade jus | A practical same-day sandwich without waiting overnight |
| Hands-off fall-apart beef | Slow cooker | Tender pulled or shredded beef instead of shaved slices |
The full recipe below is the first route. A four-sandwich same-day shortcut appears later for the night when waiting for a roast to chill is simply not happening.
Chicago Italian Beef Recipe
Two days sounds excessive for a sandwich until you realize most of that time is the refrigerator doing something useful. Day 1 cooks the beef and builds the jus. The overnight chill makes genuinely thin home slicing much easier. Day 2 is mostly slicing, warming and assembling.
Equipment
- Roasting pan around 9 × 13 inches / 23 × 33 cm
- Rack that fits over or inside the roasting pan
- Instant-read or leave-in meat thermometer
- Fine-mesh strainer
- Large saucepan or Dutch oven for the jus
- Long sharp slicing or carving knife
- Meat slicer, optional but very helpful
- Tongs and ladle
Ingredients
Beef
- 4 lb / 1.8 kg top round or bottom round, preferably 2 similarly sized roasts
- 14 g kosher salt, preferably weighed
- 2 teaspoons dried oregano
- 2 teaspoons garlic powder
- 1 teaspoon onion powder
- 1 teaspoon freshly ground black pepper
- 1 teaspoon dried basil
- 1 teaspoon fennel seeds, lightly crushed
- ½ teaspoon red pepper flakes, optional
- 2 tablespoons / 30 ml olive oil
Jus
- 6 cups / 1.4 L low-sodium beef stock
- 1 medium yellow onion, about 7 oz / 200 g, quartered
- 6 garlic cloves, about 18 g, smashed
- 1 teaspoon dried oregano
- 1 teaspoon freshly ground black pepper
- ½ teaspoon dried basil
- ½ teaspoon fennel seeds, lightly crushed
- ¼ teaspoon red pepper flakes, optional
- 2 bay leaves
- 2 teaspoons / 10 ml Worcestershire sauce, optional, added after tasting the finished jus
- Up to 2 cups / 475 ml unsalted or low-sodium beef stock, reserved for adjusting the jus
Sweet Peppers
- 3 large green bell peppers, about 1 lb / 450 g
- 1 tablespoon / 15 ml olive oil
- ¼ teaspoon / about 1 g kosher salt
Assembly
- 8 soft, sturdy French or Italian-style rolls, about 6 inches / 15 cm each
- 4–5 oz / 115–140 g cooked beef from the roast per sandwich
- 1–1½ oz / 30–40 g cooked sweet peppers per sandwich, if using
- 4–6 oz / 120–160 g Chicago-style giardiniera solids total, about ½–¾ oz / 15–20 g per sandwich
- Hot beef jus, for warming, spooning and dipping
About the salt: weighing the 14 g is more reliable than a single spoon conversion because kosher salts differ substantially in density. The beef itself does not need to taste aggressively salty; those thin slices will later pick up seasoning from the jus.
Instructions
Day 1 — 1. Season the Beef
Pat the beef dry. Mix the salt with the oregano, garlic powder, onion powder, black pepper, basil, fennel and red pepper flakes. Rub the meat with olive oil, then coat it evenly with the seasoning.
Have extra time? Refrigerate the seasoned beef uncovered for 4–12 hours. Starting later is fine; the chill after roasting matters much more to the final slice.
2. Build the Jus in the Roasting Pan
Heat the oven to 325°F / 165°C.
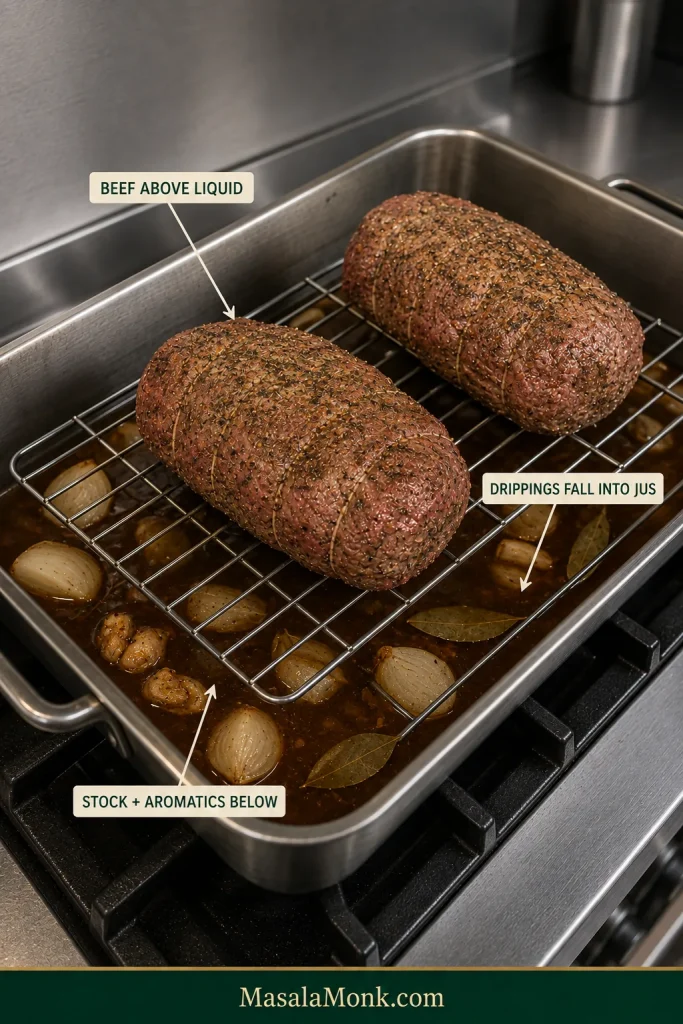
Pour the 6 cups / 1.4 L stock into a roughly 9 × 13-inch / 23 × 33-cm roasting pan. Add the onion, garlic, oregano, black pepper, basil, fennel, red pepper flakes and bay leaves.
Set the rack over the liquid and arrange the beef on top. Keep the meat above the stock so its drippings fall into the seasoned liquid while the outside still roasts.
3. Roast to 145°F / 63°C
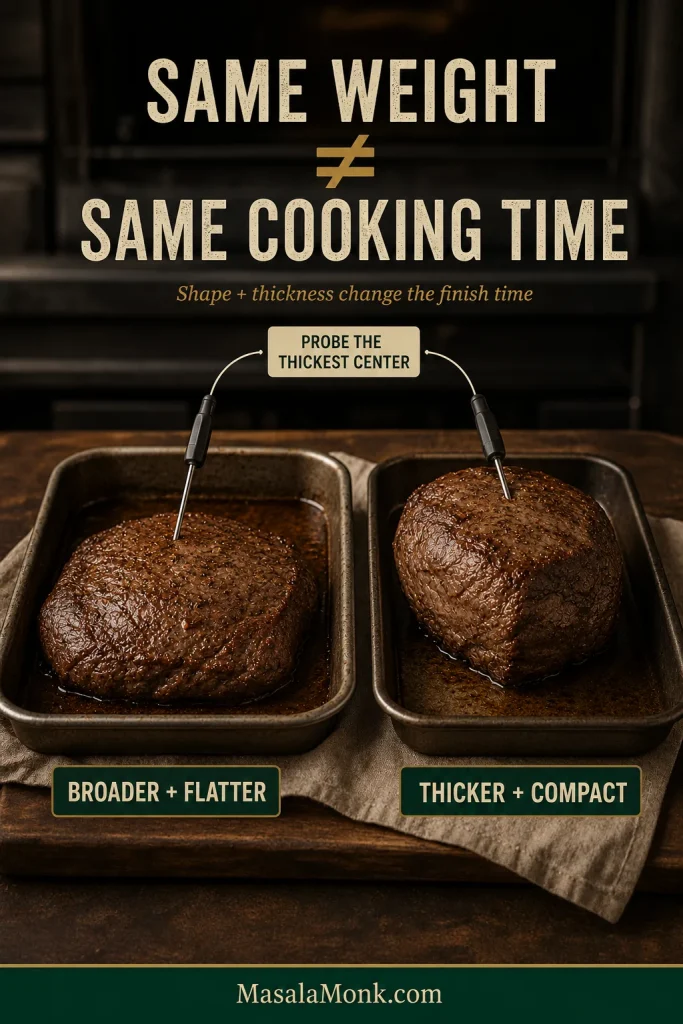
Roast until the thickest center of each piece reaches 145°F / 63°C. With two roughly 2 lb / 900 g roasts, begin checking around the one-hour mark. Remove each piece as it reaches temperature; one may finish well before the other.
A broad, flatter roast can finish sooner than a compact thick one of the same weight. The clock tells you when to check; the thermometer tells you when to stop.
4. Rest, Portion and Chill
Rest the beef for at least 15 minutes. That comfortably exceeds the USDA minimum three-minute rest for a whole beef roast cooked to 145°F / 63°C.
Look at the grain, then divide the roast into a few slicer-friendly pieces if needed. Keep each piece oriented so tomorrow’s cuts can still run across the grain.
Arrange the pieces on a shallow tray and refrigerate promptly; don’t leave the roast sitting out to cool. Get it into the refrigerator no later than 2 hours after cooking. Cover tightly once chilled through.
The roast may look less exciting cold than it did coming out of the oven. That’s fine. Tomorrow, that firmness becomes folds.
5. Strain and Chill the Jus
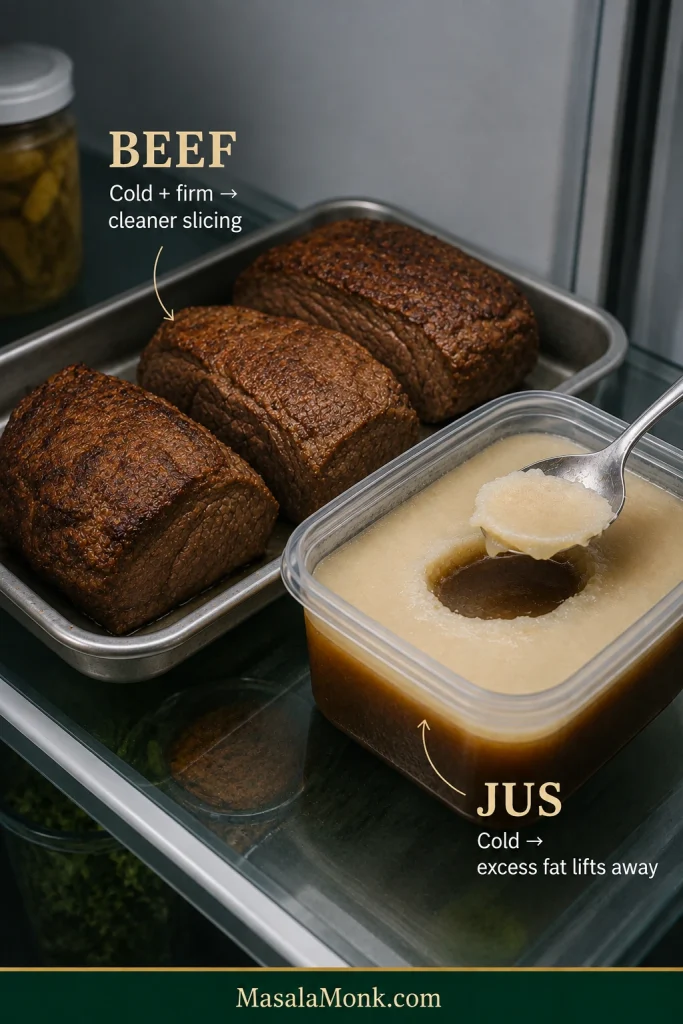
Strain the roasting liquid into a shallow heat-safe container, pressing gently on the onion and garlic before discarding the solids. Refrigerate promptly.
Once cold, excess fat firms on the surface and becomes easy to remove. Leave a little behind for flavor and body.
Day 2 — 6. Roast the Sweet Peppers
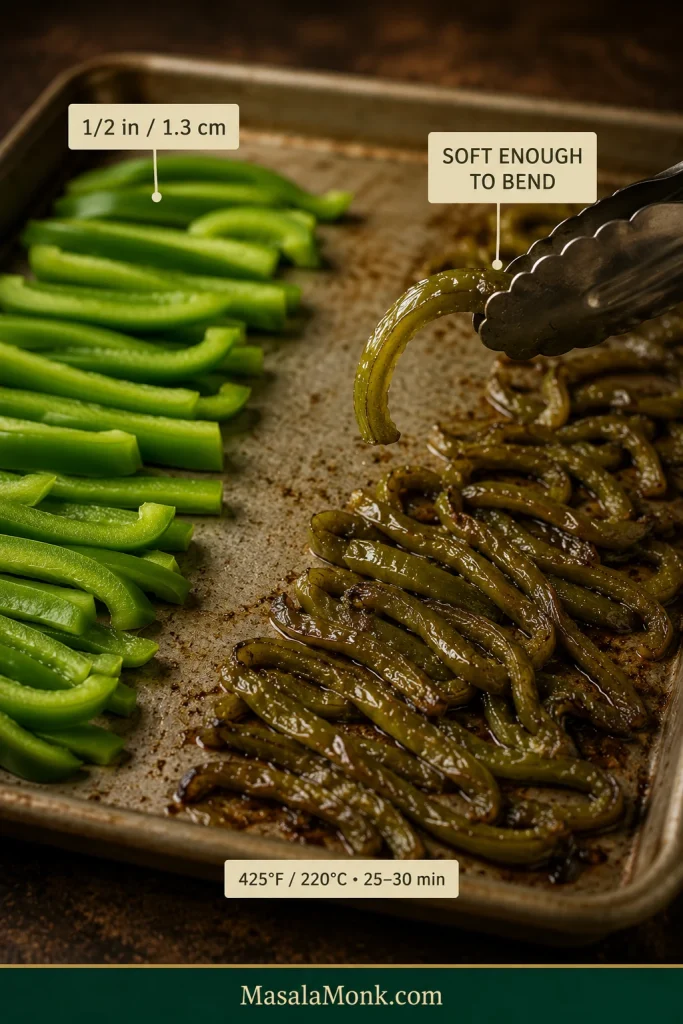
Heat the oven to 425°F / 220°C. Cut the peppers into strips about ½ inch / 1.3 cm wide, toss with the oil and salt, then roast for 25–30 minutes, stirring once.
Lift a strip. It should bend easily, with a soft collapsed texture that settles into the beef instead of crunching through the bite.
7. Reheat and Finish the Jus
Lift away excessive hardened fat, leaving a little behind. Pour the jus into a wide saucepan or Dutch oven and bring it to a full rolling boil.
For eight sandwiches, about 5 cups / 1.2 L is usually enough for a mostly dry-or-wet table. Aim closer to 6 cups / 1.4 L when several sandwiches are likely to be dipped.
Reduce thin-tasting jus before the beef goes anywhere near it. A concentrated or salty batch needs some of the reserved unsalted or low-sodium stock instead. Taste again before adding Worcestershire or more salt.
Taste the jus on the actual bread: tear off a corner of the roll and dip it into the jus. The crumb should darken quickly and taste beefy, garlicky and peppery without tasting aggressively salty once the bread has absorbed it.
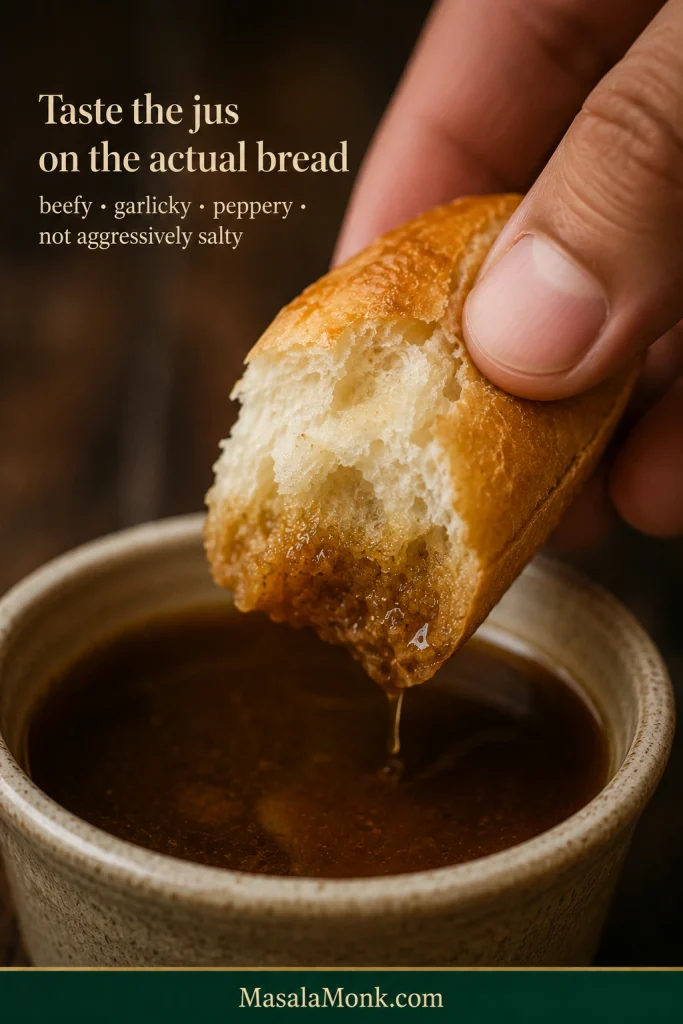
When that soaked piece of bread already tastes like the sandwich you want, lower the jus to roughly 185–190°F / 85–88°C.
8. Find the Right Slice
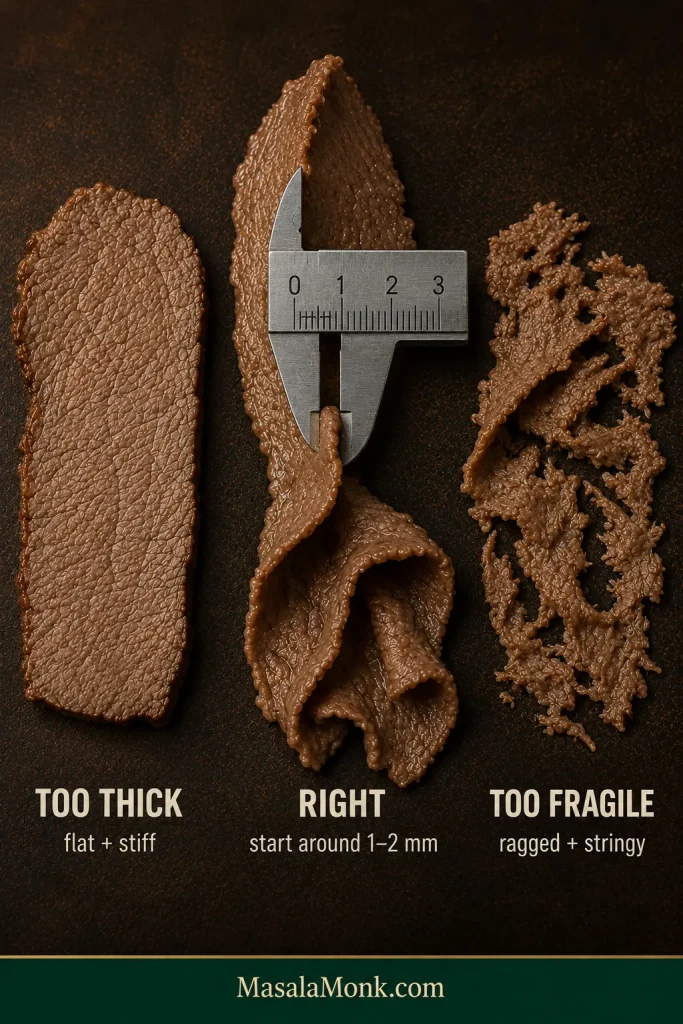
Working with one thoroughly cold piece, slice across the grain. With a meat slicer, begin around 1–2 mm. With a knife, aim for the thinnest clean, intact slices you can comfortably manage.
Cut three or four slices before committing the whole roast. Lift one. A good slice droops over your fingers, wrinkles and folds. A rigid, flat slice wants a thinner setting; ragged scraps mean you’ve gone a little too far.
Warm a small folded handful in the jus until steaming hot throughout. To verify reheating temperature, gather the slices into a small mound and check the center for 165°F / 74°C rather than trying to probe a single paper-thin slice.
Take a bite. A long strip that pulls away from the sandwich needs thinner slicing. Beef that falls apart before the tongs can lift it cleanly can go slightly thicker. Once the bite feels right, slice the rest.
A meat slicer makes the job easier; it is not the price of admission. Hand-cut slices that fold and bite cleanly are doing their job.
9. Warm the Beef in Small Batches
Add enough cold sliced beef for one or two sandwiches to the jus at roughly 185–190°F / 85–88°C. Loosen the slices gently with tongs and reheat each batch until steaming throughout and 165°F / 74°C at the center.
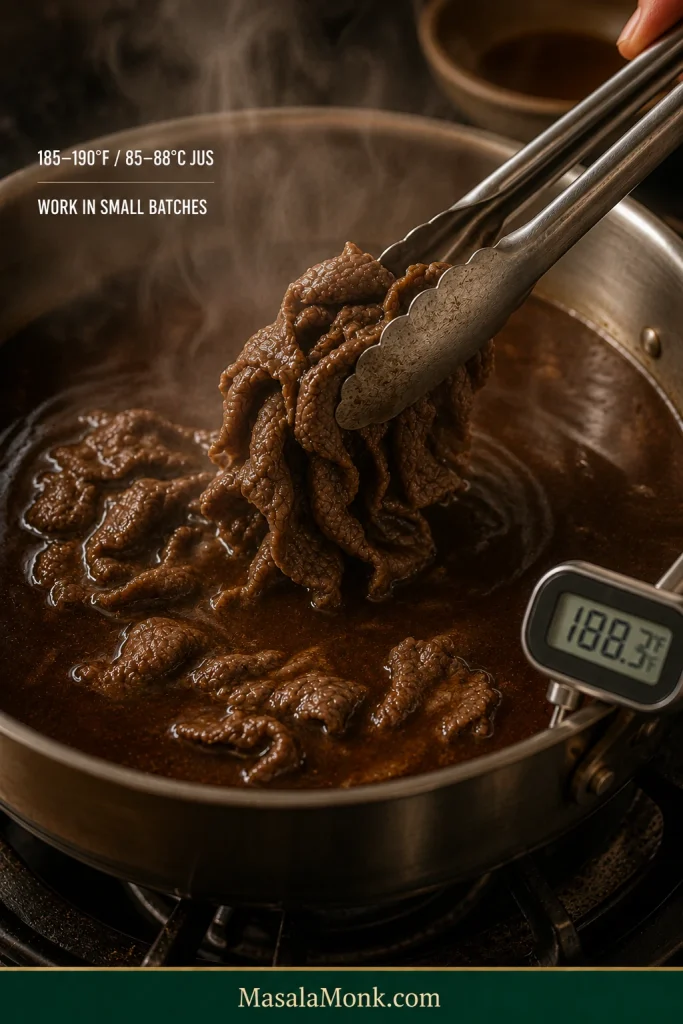
Very thin beef may be ready in roughly 1–2 minutes, but use that only as orientation. Batch size, slice thickness, beef temperature and the amount of jus all change the timing.
The cold slices should relax, darken with gravy and hang softly from the tongs. Lift them out once they’re hot and supple.
10. Build the First Sandwich, Then Adjust
Open one roll without cutting through the hinge. Add 4–5 oz / 115–140 g hot beef in loose folds, plus 1–1½ oz / 30–40 g sweet peppers and ½–¾ oz / 15–20 g giardiniera solids if using.
Start the first sandwich wet or give it an easy one-second dip, then take a bite.
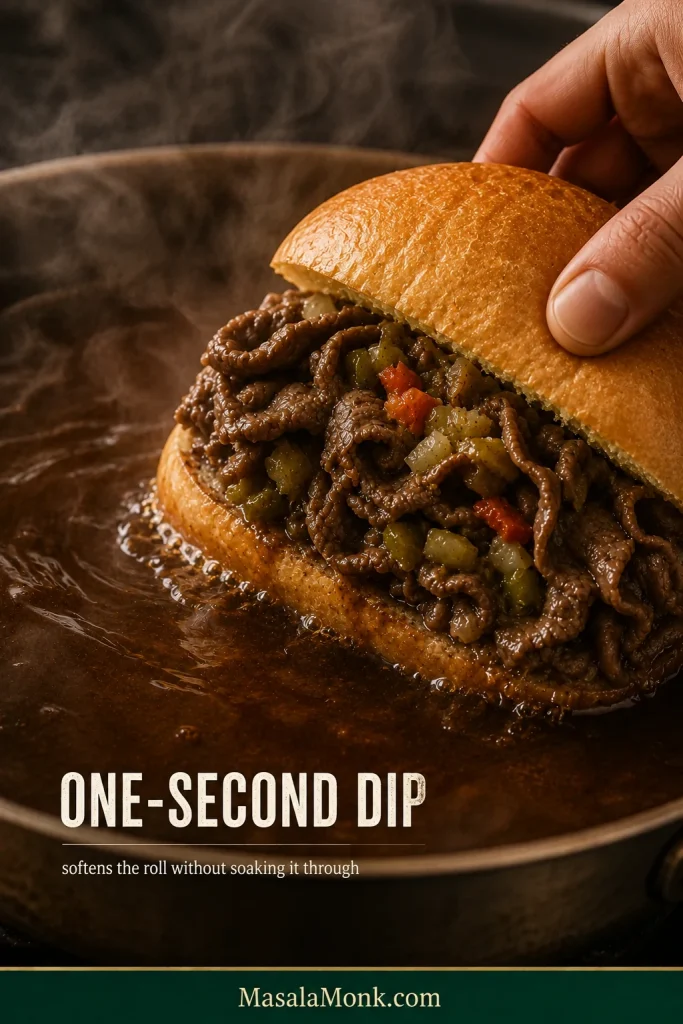
A dark, tender crumb with a secure hinge tells you the roll can probably take more gravy. Bread already close to collapse has shown you its limit. Build the rest to order.
Eat a fully dipped sandwich now. Good bread can survive gravy. It cannot turn today’s dunk into tomorrow’s packed lunch.
Choosing the Best Beef Cut for Italian Beef
Top round and bottom round are the easiest practical choices for thinly sliced Chicago Italian beef at home. Sirloin also works well. Chuck makes more sense when the plan is long cooking and pulled beef.
On a phone? Swipe sideways to see the full table.
| Cut | Thin sliced | Slow-cooked / pulled | Main tradeoff |
|---|---|---|---|
| Top round | Excellent | Fair | Lean, even-grained and easy to shave once cold |
| Bottom round | Excellent | Good | Beefy and usually economical; thin slicing matters |
| Eye of round | Very good | Poor | Very lean and less forgiving of thick slices |
| Sirloin / sirloin tip | Excellent | Fair | Often naturally tender, usually more expensive |
| Chuck | Poorer fit | Excellent | Rich and collagen-heavy; naturally suits fall-apart cooking |
Top round and bottom round can both work beautifully. At the store, look almost as closely at shape as the label: a fairly even roast with a clear grain direction cooks and slices more predictably than one with a thick center and sharply tapered tail.
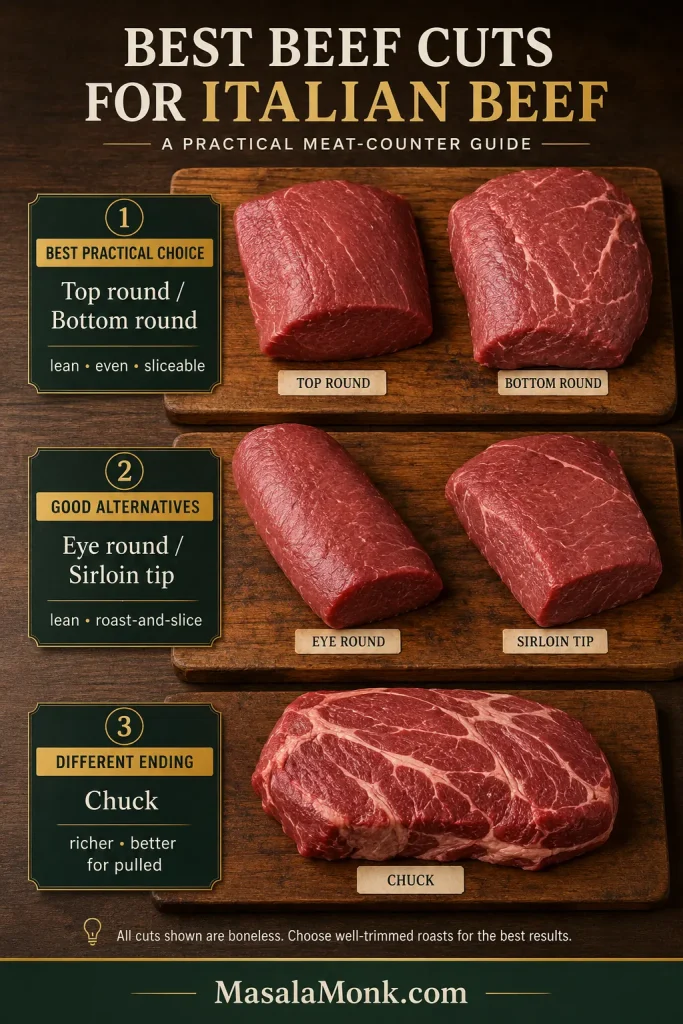
You have not bought bad beef if chuck is already in your refrigerator; you have bought beef that wants a different ending. Its extra collagen and fat reward long cooking and naturally pull it toward shredding. If that sounds good, our slow cooker pot roast recipe is built around the same strengths.
How Long to Roast Italian Beef: Temperature, Shape and Timing
Roast weight gives you a place to start planning; thickness decides how quickly heat reaches the center. Two roasts with the same weight can finish surprisingly far apart when one is broad and flat and the other compact.
With two roughly 2 lb / 900 g roasts, begin checking around the one-hour mark. A single thick 4 lb / 1.8 kg roast will generally need longer, but the thermometer—not a predicted finish time—decides when each piece comes out.
One roast finishing well before the other does not mean anything has gone wrong. Take it out and let the thicker one catch up.
Why Italian Beef Recipes Use Such Different Temperatures
Italian beef recipes can look wildly contradictory because they are not all chasing the same texture. Some keep the roast closer to conventional roast-beef doneness before chilling and shaving it. Others cook round much further toward tenderness before cooling and slicing, while slow-cooker versions deliberately head toward meat that pulls apart.
We’re roasting this beef so it can be sliced later, not cooking it until it wants to fall apart. In this recipe, the roast reaches 145°F / 63°C, chills thoroughly, gets shaved very thin and then comes back to temperature briefly in the jus. A higher-temperature, long-cooked version follows another route and produces a different texture.
How Thin to Slice Italian Beef — and What “Thin” Looks Like
Chill the Roast First
Warm roast beef compresses; cold roast beef slices. Press the center gently before you start. It should feel thoroughly cold and firm rather than soft and springy.
A short freezer chill can firm a stubbornly soft roast further. Stop while the center is still easy to slice—you want firmer beef, not a frozen block.
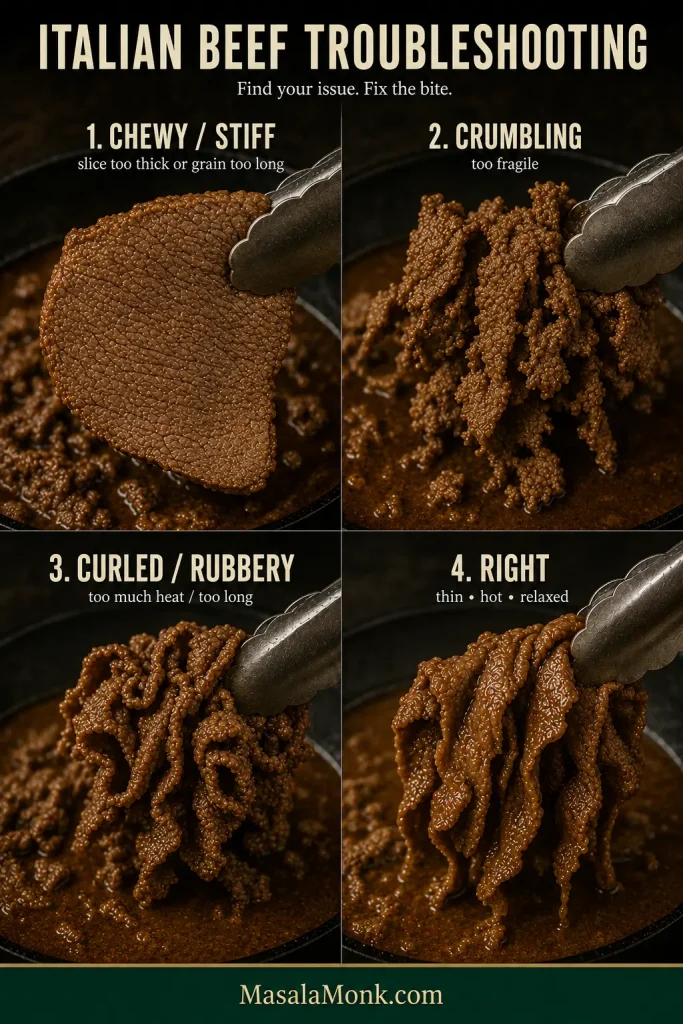
Start around 1–2 mm. Lift a slice and look at what it does.
Too thick: it lies flat and stiff like carved roast beef and can pull from the sandwich in one long strip.
Right: it droops, wrinkles and folds over your fingers. Several slices can pile together without becoming one heavy slab.
Too fragile: it breaks into stringy scraps before a clean slice reaches the tray. Move slightly thicker.
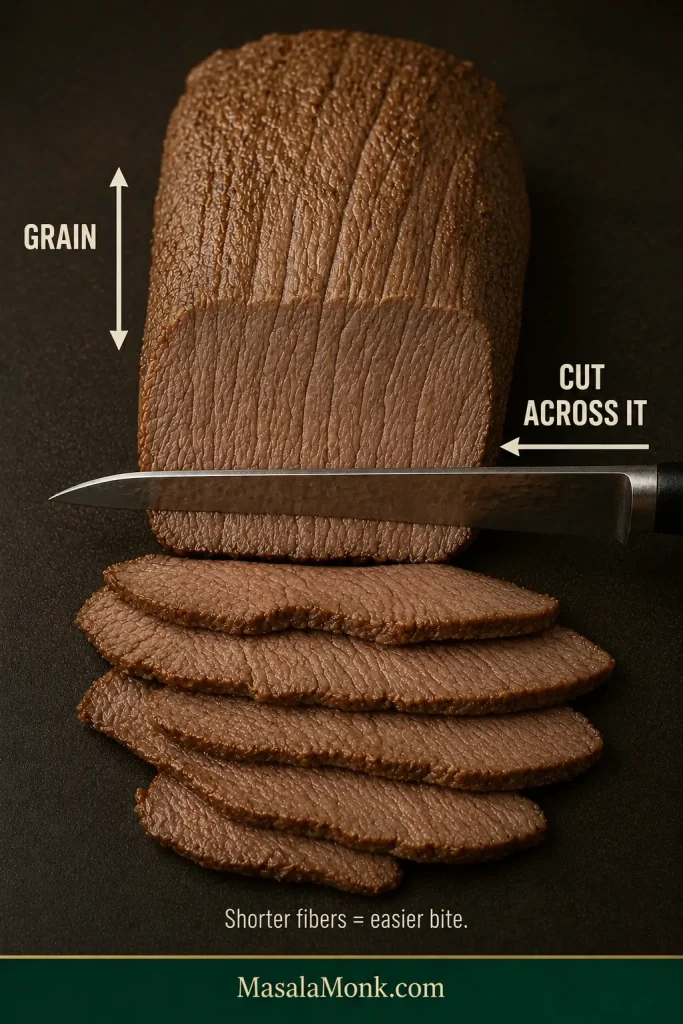
Cut Across the Grain
Look at the visible muscle fibers before you settle into a slicing rhythm. Cut across them rather than along them so the finished slices bite through more easily.
No Meat Slicer?
Yes, you can make Italian beef without a meat slicer. Chill the roast completely, use a long sharp knife and cut as thinly as you comfortably can. Slightly thicker intact slices are better than shredded scraps.
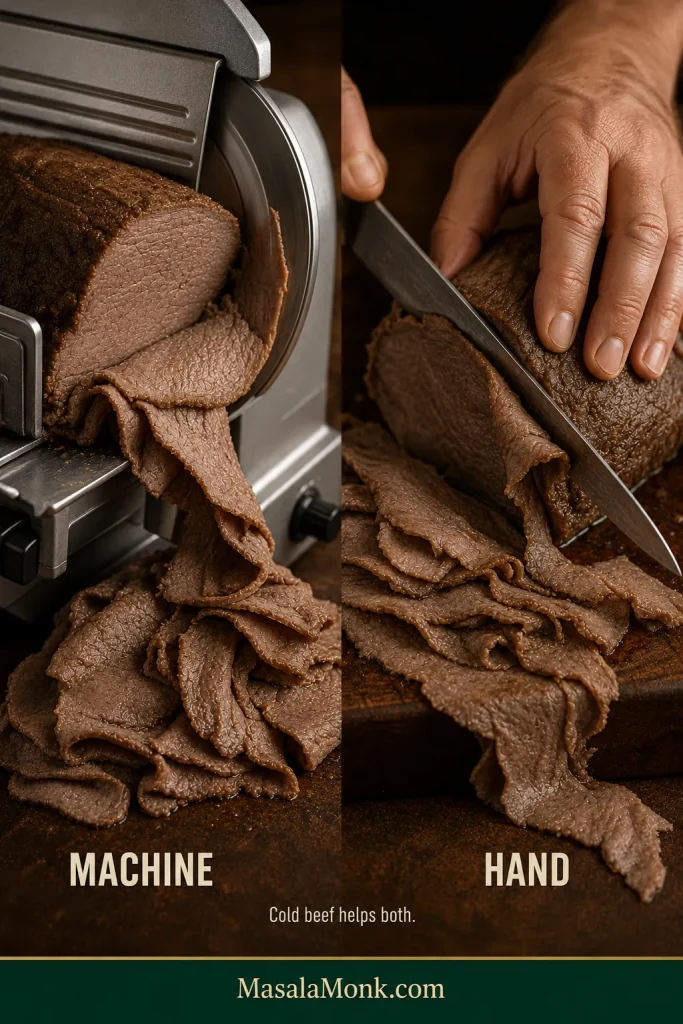
Smooth slicing strokes work better than pushing straight down. A butcher or deli may also be willing to slice chilled cooked meat, although store policies vary.
Hand-cut beef that folds and bites cleanly is thin enough, even if nobody would mistake it for commercial deli slicing.
How to Reheat Italian Beef Without Making It Tough
Cold beef drops the temperature of the jus as soon as it goes in, so give each portion enough room to loosen instead of packing the pot with a cold solid mass.
Keep the jus around 185–190°F / 85–88°C while reheating. The beef should become steaming hot throughout and reach 165°F / 74°C when checked in the center of a folded mound. Let the liquid recover before adding another cold portion.
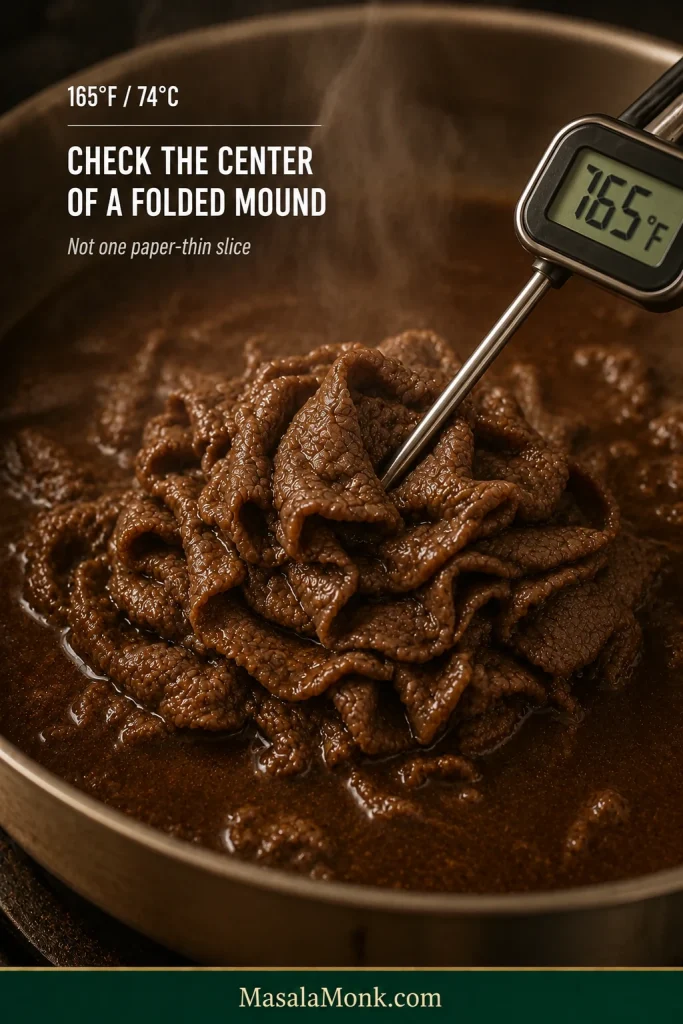
Hard bubbling around delicate slices or rapidly curling edges mean the heat is too aggressive. Once the beef is hot and hanging softly from the tongs, more time is not helping it.
The Jus Is Half the Sandwich
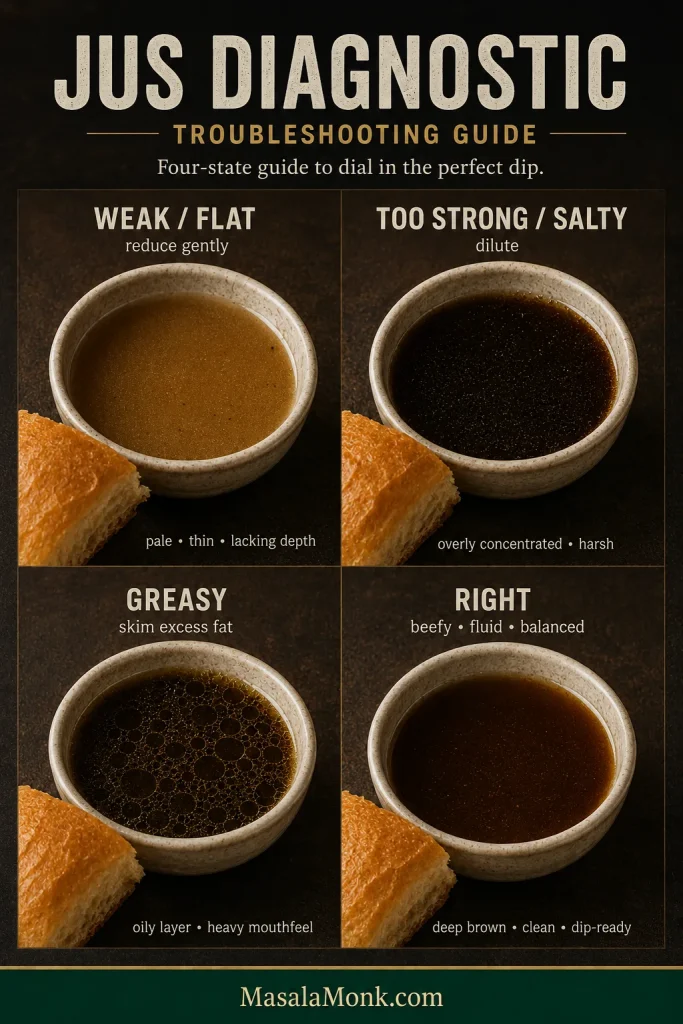
Good Italian beef jus should taste a little stronger than broth you’d happily sip from a mug. Beef and bread soften its impact, but the soaked crumb should never taste aggressively salty.
Chicago shops often call the seasoned roasting liquid gravy; cooks also say juice or jus. Here, those words mean the thin beef liquid used to warm and wet the sandwich, not a flour-thickened brown gravy.
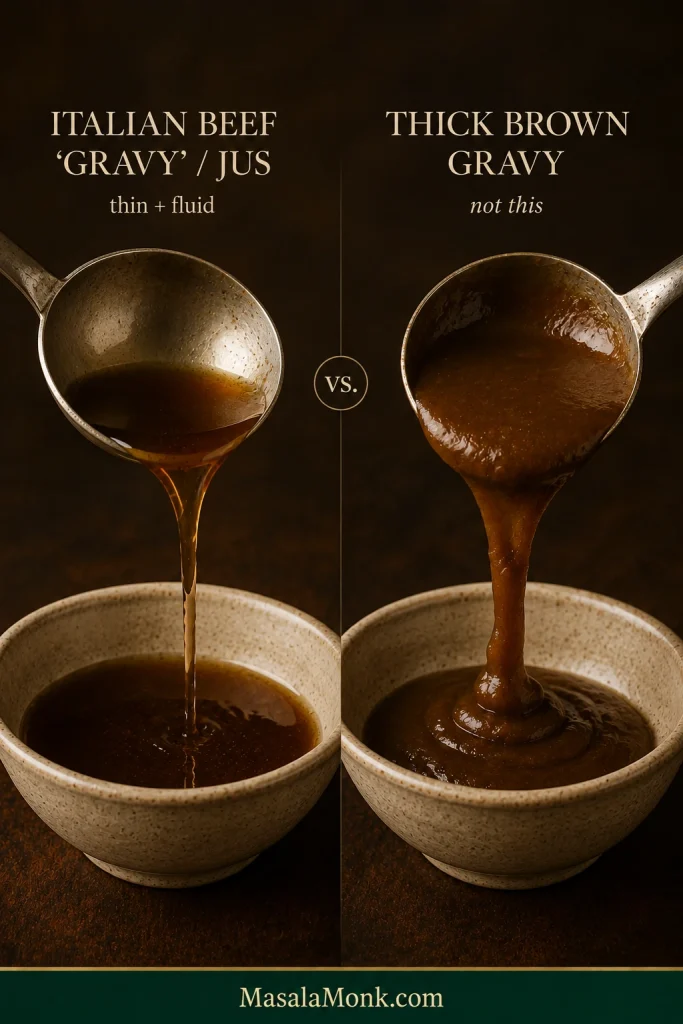
The jus should taste primarily of beef, garlic and pepper. Oregano, fennel and basil belong in the background. When dried herbs are the first thing you notice, they’ve become too loud.
Volume matters too. A wide pan evaporates faster, ovens vent differently and roasts release different amounts of juice. About 5 cups / 1.2 L suits a mostly dry-or-wet table; move closer to 6 cups / 1.4 L when several sandwiches will be dipped.
Weak jus needs reduction without the beef in the pan. Over-concentrated jus needs unsalted stock or water. In both cases, bread is a better judge than another spoonful straight from the pot.
Best Bread for Italian Beef: What Can Take the Jus?
Use a soft French or Italian roll with a fairly tight crumb, light chew and strong hinge. It should absorb jus without collapsing or becoming harder to bite than the beef.
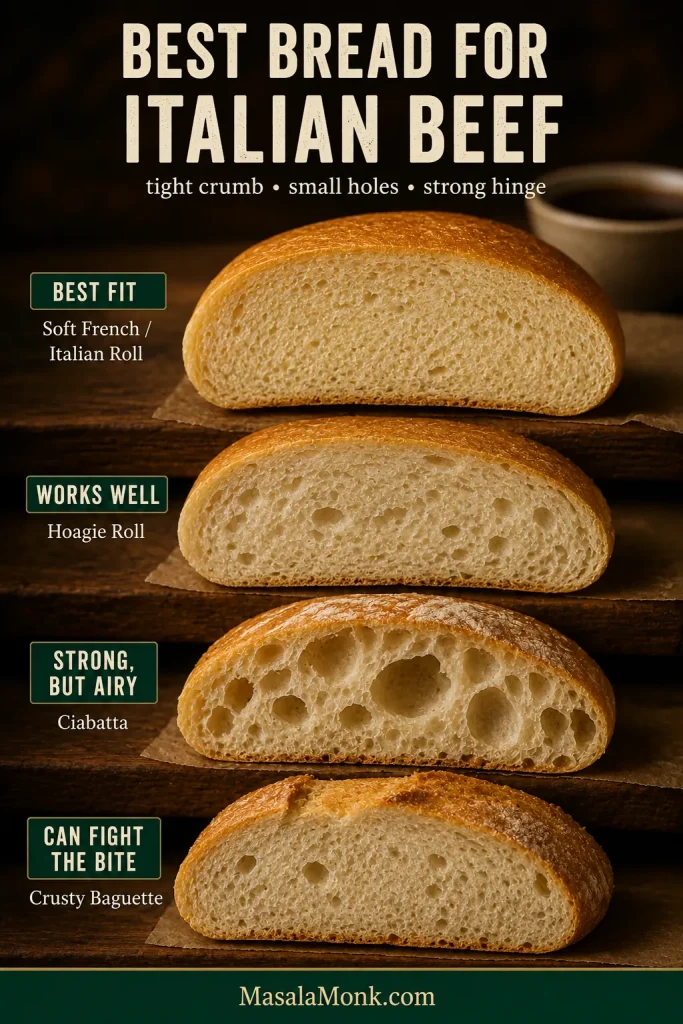
Look for a fine, relatively tight crumb with small holes. Large open pockets soak unevenly and give the gravy easier places to weaken the roll. For a concrete Chicago reference, Portillo’s serves its Italian beef on Turano French bread.
A soft French or Italian sub roll is usually the easiest substitute. Sturdy hoagie rolls can work well too. Ciabatta has enough strength but its larger holes change the way gravy travels through the bread.
A very crusty baguette can fight the filling; an ultra-airy soft bun may absorb more than it can hold.
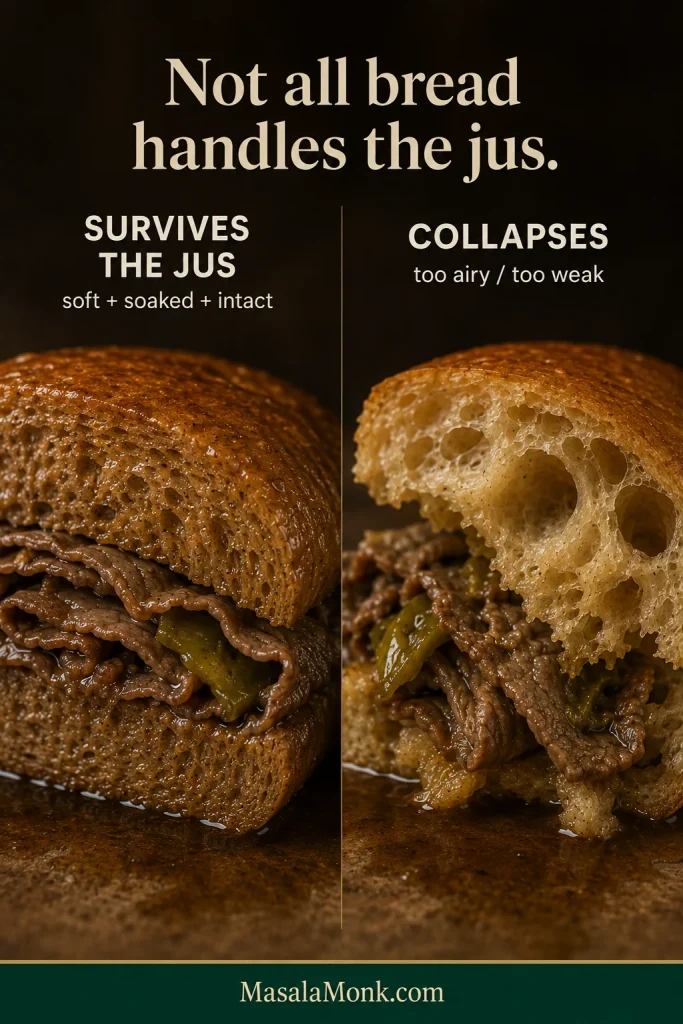
Don’t toast the roll until crisp. A particularly soft substitute can benefit from brief warming or light surface-drying, but the center should still yield easily when pressed.
If you would rather make the bread yourself, our homemade hoagie and sub rolls are one route to a sturdy sandwich roll. Keep the crust on the softer side if you plan to dip it.
Dry, Wet (Juicy), Easy-Dipped or Dipped?
Dry keeps the roll relatively firm. Wet carries extra gravy into the bread. Easy-dipped gives the whole sandwich a quick one-second dunk. Dipped briefly submerges it for a few seconds.
How to Read a Chicago Italian Beef Order
The exact wording varies from one beef stand to another, but the choice is essentially how much gravy reaches the bread. “Sweet” means cooked peppers, while “hot” points to giardiniera. If you see a combo on a Chicago beef menu, that means an Italian sausage has been added to the beef sandwich.
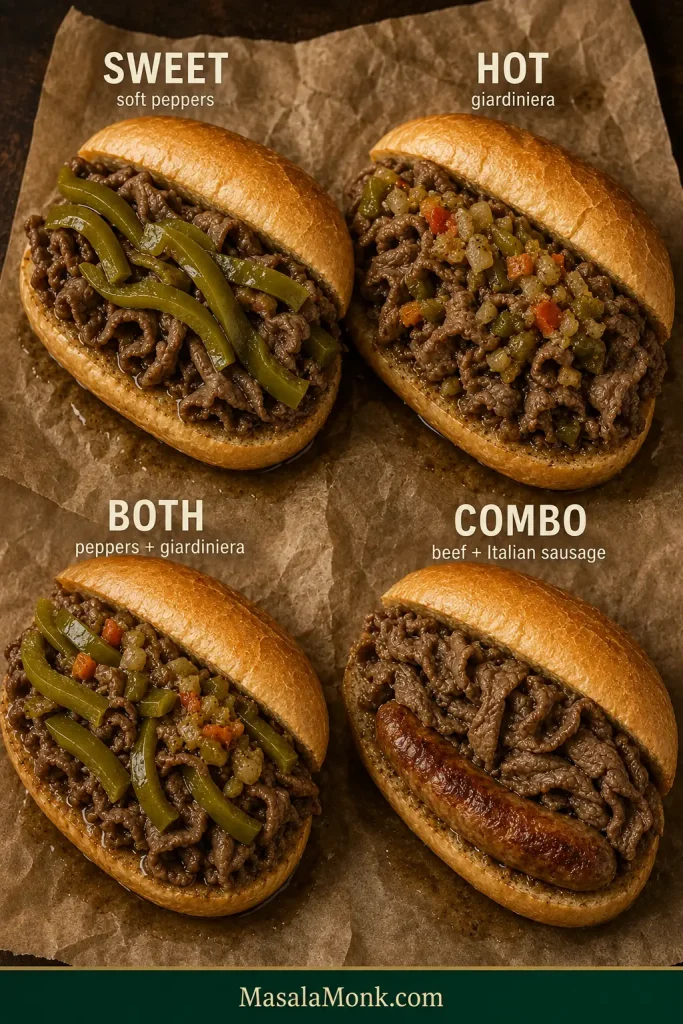
That shorthand is part of the pleasure of ordering Italian beef. This is a sandwich meant to be adjusted at the counter—sweet, hot, both, comparatively dry or soaked enough that you need to lean over the wrapper before taking the first bite. If The Bear sent you looking for it, this is the world of choices the show helped introduce to a much wider audience.
The amount of gravy is a preference, not an authenticity exam. Portillo’s ordering guide likewise distinguishes several gravy levels, including dry, easy-dipped, fully dipped and gravy on the side.
Choose Your Gravy Level
On a phone? Swipe sideways to see the full table.
| Style | What happens | Best when |
|---|---|---|
| Dry | Beef drains well before filling the roll | Transporting the sandwich or keeping bread firmer |
| Wet / juicy | Plenty of jus travels with the beef and more may be spooned inside | You want lots of gravy flavor without soaking the whole exterior |
| Easy-dipped | The assembled sandwich gets about a one-second dunk | You want softened bread with some structure left |
| Dipped | The whole sandwich is briefly submerged for a few seconds | You want maximum saturation and will eat immediately |
| Jus on the side | The sandwich stays comparatively dry and each bite is dipped | Takeout, slow eating or maximum control |
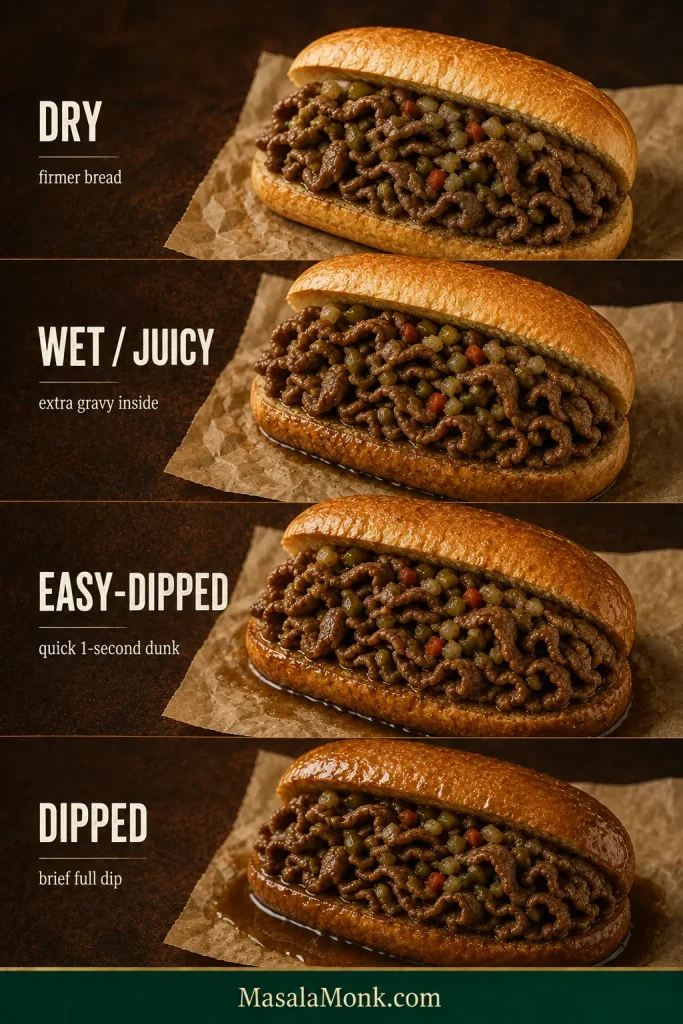
A fully dipped sandwich is deliberately messy. Keep the wrapper or plate underneath and lean in.
When an easy dip is exactly as wet as you enjoy it, you’ve found your level. The best gravy choice is the one that makes you want the next bite.
For a full sandwich-shop plate, hot crispy homemade French fries are an easy partner—especially when there happens to be enough jus nearby for the occasional fry dip.
Sweet Peppers and Hot Giardiniera
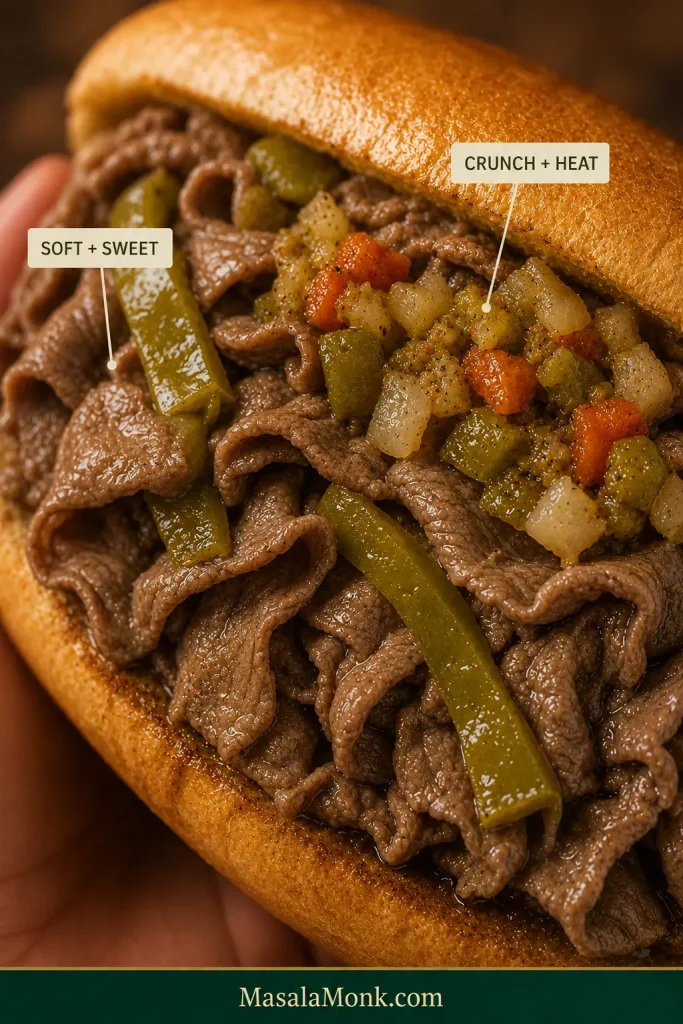
“Sweet” means soft cooked bell peppers, not a sugary sauce. They should bend easily and disappear into a bite of beef instead of crunching like fajita peppers.
Chicago-style giardiniera is an oil-forward mix of chopped pickled vegetables and chiles that adds heat, acidity and crunch. Large cauliflower florets or chunky carrots are easier to eat when chopped finer.
Look at the liquid in the jar too. If the vegetables are swimming in sharp vinegar brine instead of seasoned oil, drain them particularly well before they reach the sandwich. Leave properly oil-packed giardiniera glossy rather than squeezing it dry.
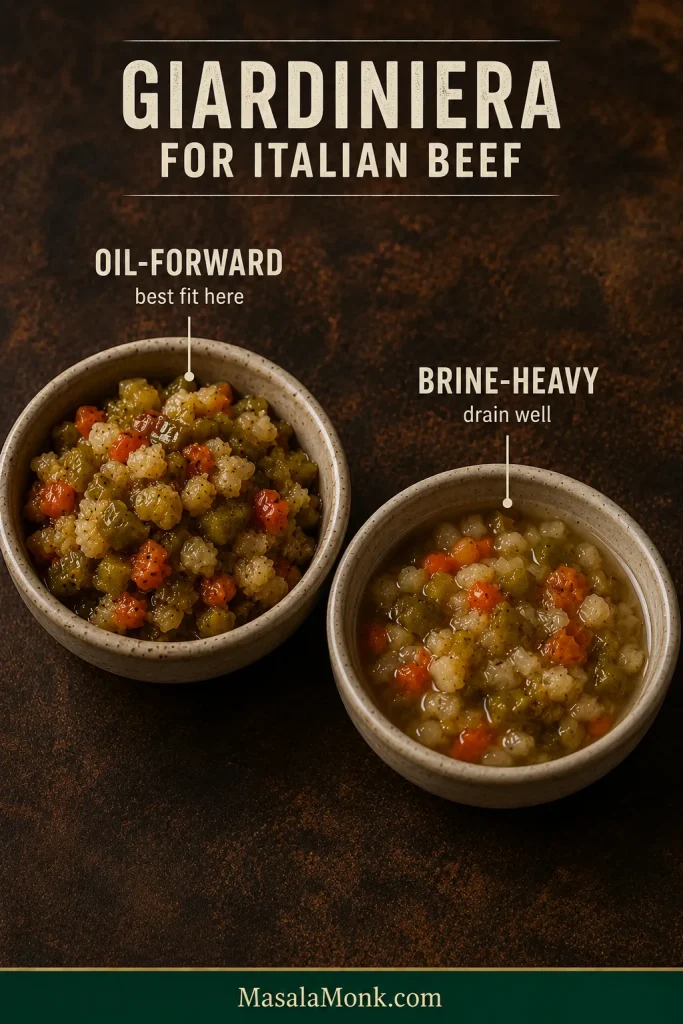
Start with about ½–¾ oz / 15–20 g per sandwich and put more at the table. It should sharpen the beef without covering up everything underneath.
Hot and sweet work especially well together: soft peppers deepen the juicy side of the sandwich while giardiniera brings crunch and brightness.
Cheese is optional. Mozzarella or provolone can both work, but beef, gravy, bread and peppers define the sandwich without either one.
Italian Beef vs French Dip: What’s the Difference?
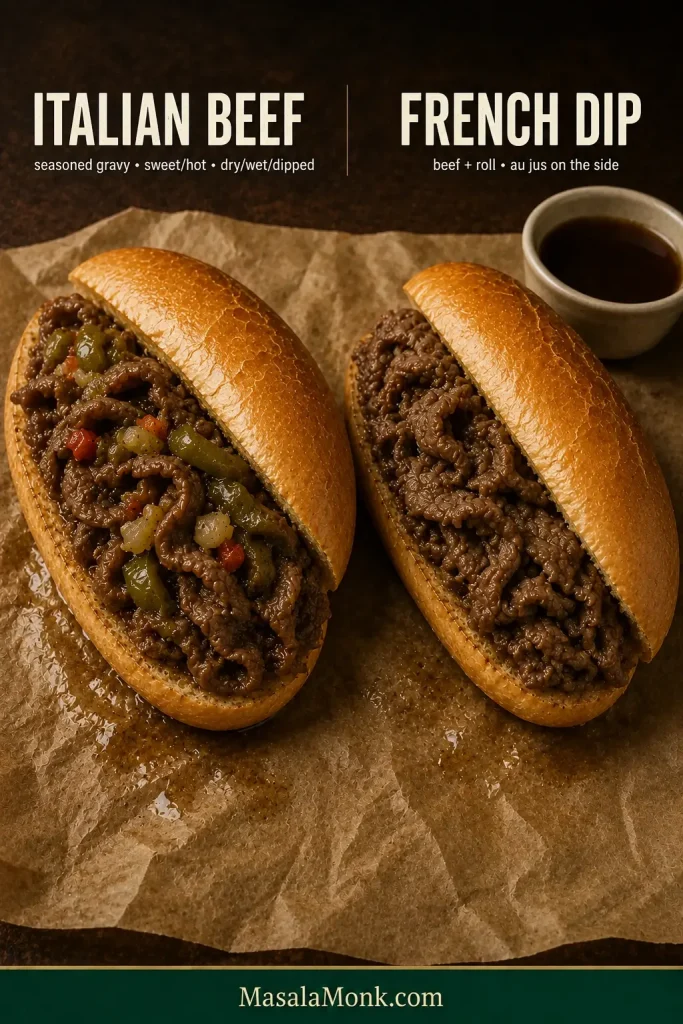
Both sandwiches can involve thin roast beef, a sturdy roll and beef jus, but they eat differently. Chicago Italian beef usually has a more assertively seasoned gravy, often includes sweet peppers or giardiniera, and builds the amount of gravy directly into the sandwich—dry, wet or dipped.
A French Dip is usually simpler: beef and bread with au jus served alongside for dipping. If that cleaner beef-and-jus combination is what you’re after, see our French Dip sandwich recipe.
Italian Beef Tonight: A Fast 4-Sandwich Shortcut
If you found this page late in the afternoon, look for very thin plain or lightly seasoned cooked roast beef. Avoid heavily smoked, barbecue-flavored or heavily pepper-crusted versions; those flavors can pull the jus somewhere else entirely.
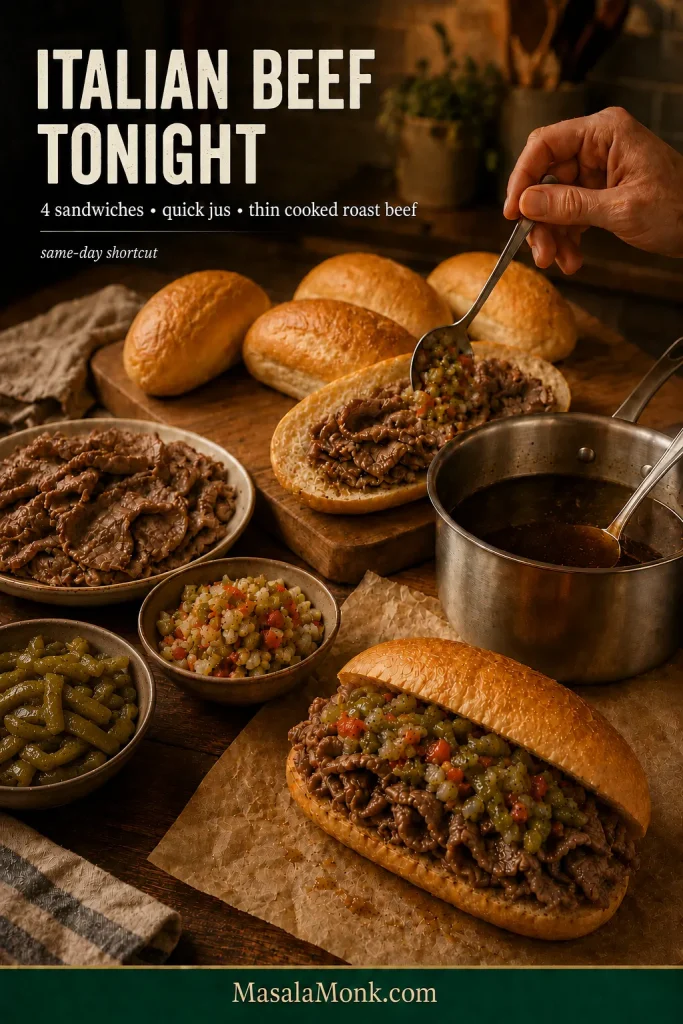
This shortcut makes 4 sandwiches.
- 1–1¼ lb / 450–570 g thin cooked roast beef
- 3 cups / 700 ml low-sodium beef stock
- ½ medium yellow onion, roughly chopped
- 3 garlic cloves, smashed
- ½ teaspoon dried oregano
- ½ teaspoon black pepper
- ¼ teaspoon dried basil
- ¼ teaspoon fennel seeds, lightly crushed
- Pinch red pepper flakes, optional
- 1 bay leaf
- 1 teaspoon Worcestershire sauce, optional, after tasting
- Kosher salt, only if needed after tasting
- 4 sturdy soft rolls
- Sweet peppers and giardiniera, as desired
Build the Quick Jus
Simmer the stock, onion, garlic, herbs, spices and bay leaf for about 20–25 minutes, then strain. Dip in a piece of bread. Reduce a little longer if the jus still tastes thin.
Once the concentration tastes right, decide whether it needs Worcestershire or salt. The roast beef may already contribute plenty of seasoning, so make those adjustments at the end.
Bring the jus to a rolling boil, then lower it to about 185–190°F / 85–88°C. Reheat the beef in modest portions until steaming hot throughout and 165°F / 74°C in the center of a folded mound.
Build with the same peppers, giardiniera and gravy choices as the full version. You lose some roast-and-drippings depth, but dinner still lands in the right neighborhood. If you want the roast-and-chill method next time, return to the full Chicago Italian beef recipe.
Making Italian Beef for a Crowd
Italian beef is excellent party food because nearly all the fiddly work can happen before anyone arrives. Keep plenty of gravy ready without making the entire shaved roast spend the evening sitting in it.
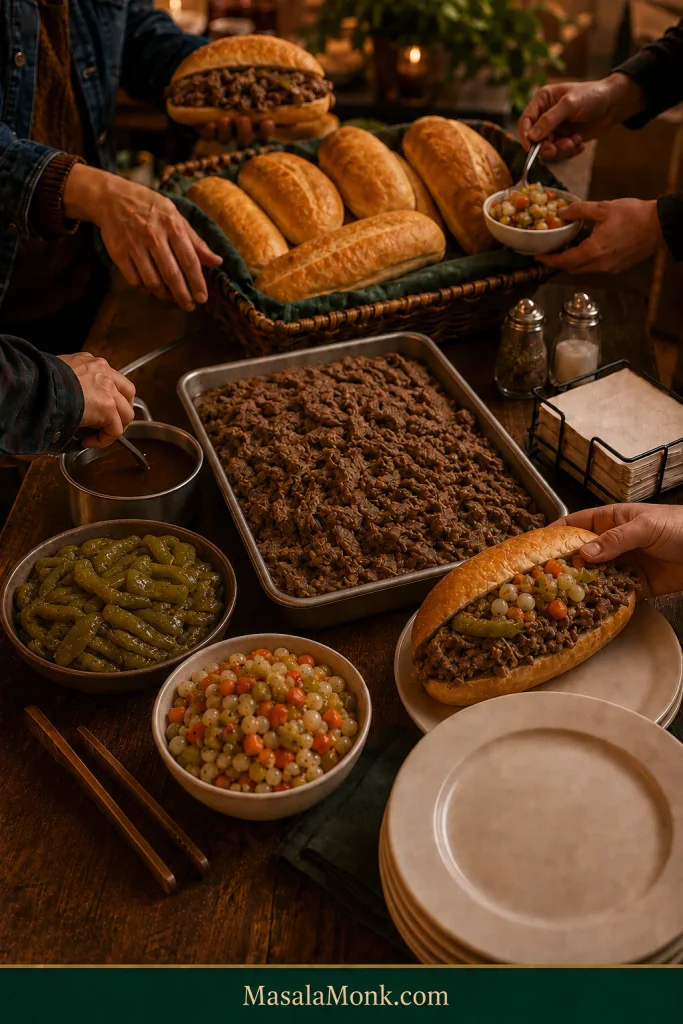
How Much Italian Beef for a Crowd?
For planning, work from the number of sandwiches you expect to serve. One sandwich per guest may be enough as part of a larger buffet. If Italian beef is the main event, extra rolls and beef give you breathing room for bigger appetites.
On a phone? Swipe sideways to see the full table.
| Sandwiches | Raw beef | Rolls | Finished jus | Raw peppers | Giardiniera |
|---|---|---|---|---|---|
| 4 | 2 lb / 900 g | 4 | About 3 cups / 700 ml | 8 oz / 225 g | 2–3 oz / 60–80 g |
| 8 | 4 lb / 1.8 kg | 8 | About 5–6 cups / 1.2–1.4 L | 1 lb / 450 g | 4–6 oz / 120–160 g |
| 12 | 6 lb / 2.7 kg | 12 | About 1.8–2.1 L | 1½ lb / 675 g | 6–8 oz / 180–240 g |
| 20 | 10 lb / 4.5 kg | 20 | About 3–3.5 L | 2½ lb / 1.1 kg | 10–14 oz / 300–400 g |
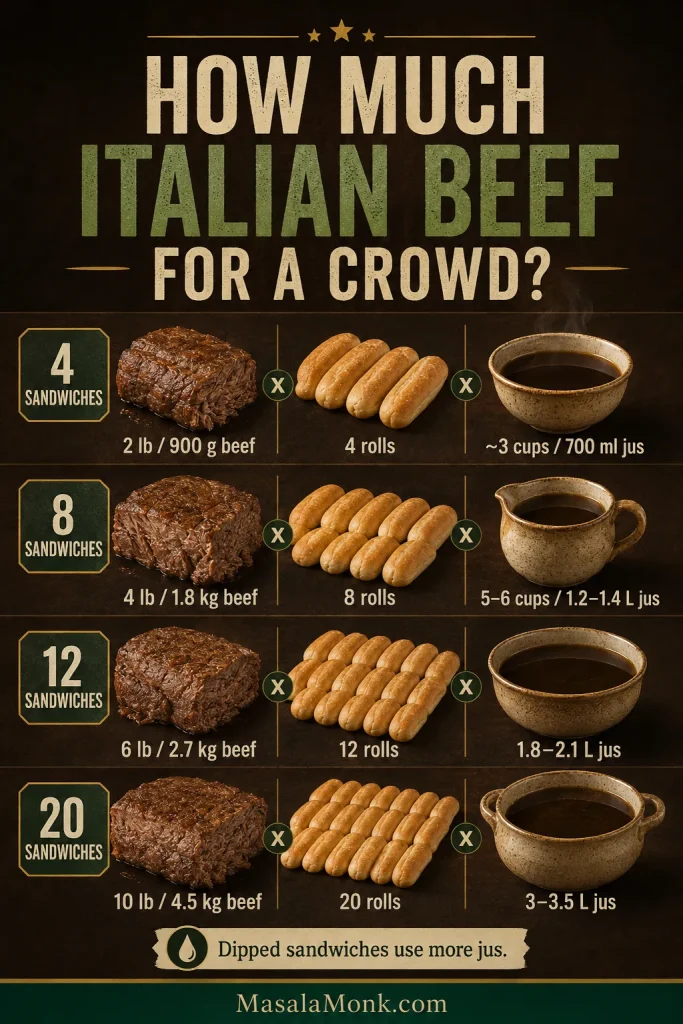
A mostly fully-dipped crowd will use more jus. Keep extra unsalted or low-sodium stock nearby so the pot can be extended without driving the salt upward.
Cook time does not simply double with the quantity of beef. Two 4-pound roasts do not automatically need twice as long as one 4-pound roast; thickness, spacing and airflow matter far more.
Use a Reheat Pot and a Serving Pan
For longer service, reheat the beef in one pot and hold it in a separate pan.
- Reheat pot: keep a working pot of jus around 185–190°F / 85–88°C. Add chilled sliced beef in modest portions and reheat to 165°F / 74°C in the center of a folded mound.
- Serving pan: move the reheated beef with enough jus to stay moist into a preheated pan and hold it at 140°F / 60°C or warmer.
- Remaining beef: keep it refrigerated until its turn.
- Rolls: dry and separate.
- Sweet peppers: warm and separate.
- Giardiniera: separate so everyone controls their own heat.
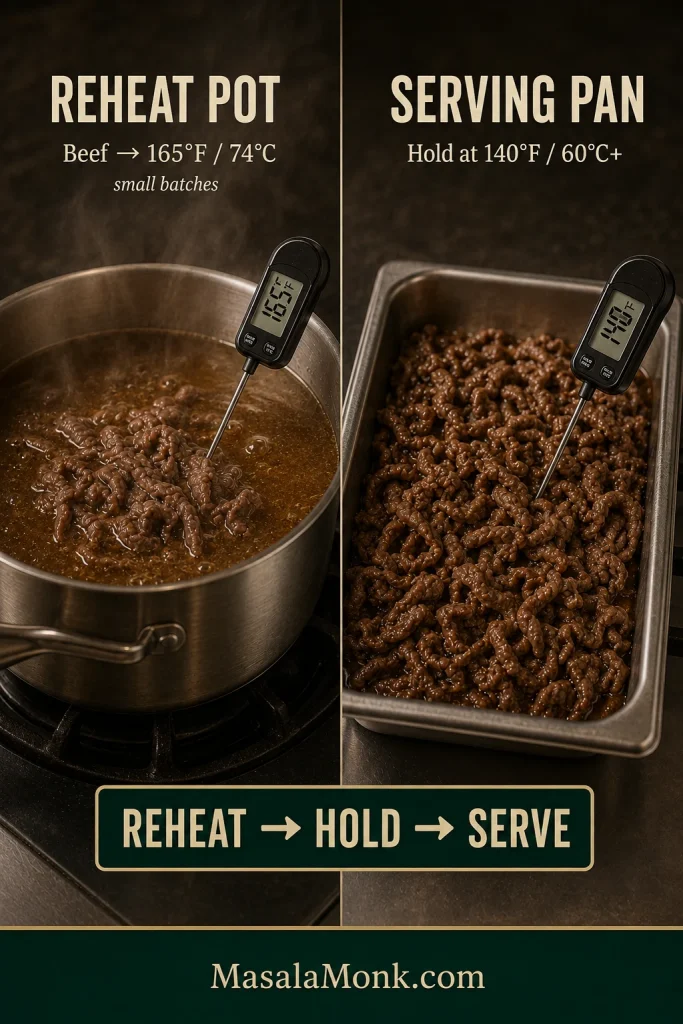
After a cold batch enters the reheat pot, let the jus recover toward its working temperature before adding more. That keeps service moving without turning all the thin beef into an all-evening simmer.
The person who wants a relatively dry sandwich and the person who wants to baptize theirs in gravy can still eat from the same setup without negotiating.
For a bigger spread, a make-ahead potato salad can be finished before hot service begins, leaving your last-minute attention for the beef and jus.
Make Ahead, Store, Freeze and Reheat
Day 1: roast the beef, divide it into manageable pieces if needed, strain the jus and refrigerate both promptly. Day 2: slice the beef, roast or reheat the peppers, finish the jus and warm the meat as needed.
Refrigerator: keep cooked beef and jus covered and refrigerated and use within 3–4 days. Keep the rolls and giardiniera separate.
Freezer: freeze sliced beef with enough jus to protect it from drying, divided into useful portions. For best quality, use frozen cooked beef within about 2–3 months. Freeze the bread separately.
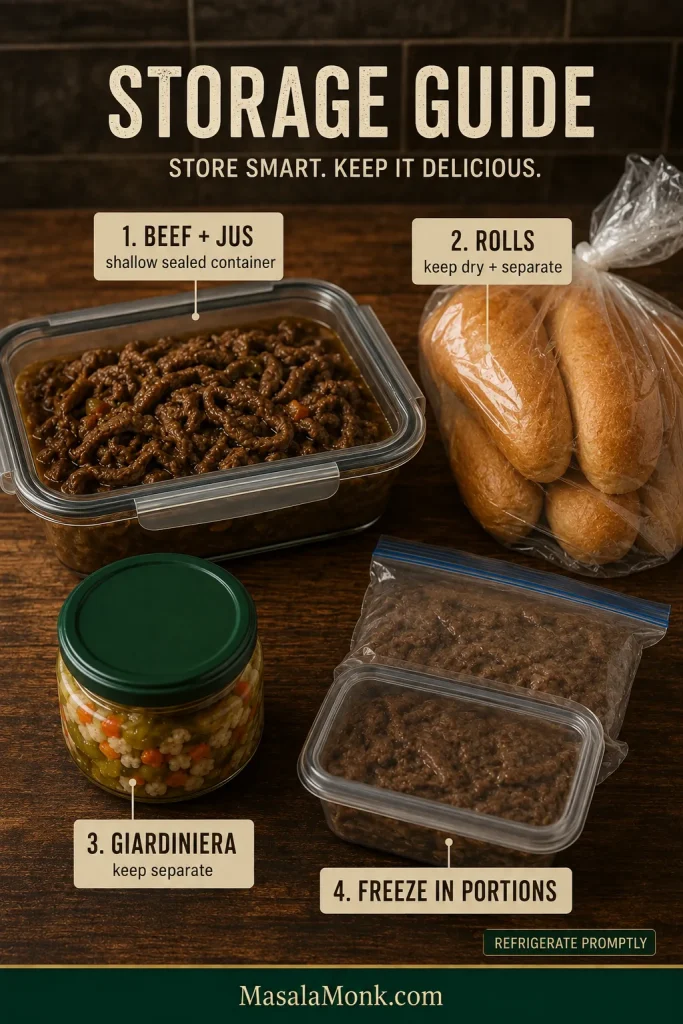
To reheat: bring the jus back to a rolling boil first and make any concentration adjustments. Lower it to the gentler working temperature, then reheat the beef until steaming throughout and 165°F / 74°C.
Troubleshooting Chicago Italian Beef
Start with the part that feels wrong: the beef, the jus or the assembled sandwich. Separating those three usually points to the useful fix much faster than throwing more seasoning at everything.
Beef Problems
On a phone? Swipe sideways to see the full table.
| Problem | Likely cause | Rescue now | Next time |
|---|---|---|---|
| Thick and chewy | Slices too thick or cut with the grain | Cut large slices into smaller biteable pieces across the grain | Chill harder and slice thinner |
| Crumbles while slicing | Beef too soft, setting too thin or roast cooked too far | Increase slice thickness slightly | Chill fully and preserve a sliceable roast |
| Curled or rubbery in jus | Too much heat or too much time after reheating | Lift the beef out as soon as it is hot | Work in smaller portions at gentler heat |
| Mushy or shredding | Cut or cooking endpoint suited to pulled beef | Serve it as tender pulled Italian-style beef | Use round or sirloin when intact slices are the goal |
Jus Problems
On a phone? Swipe sideways to see the full table.
| Problem | Likely cause | Rescue now | Next time |
|---|---|---|---|
| Weak or watery | Too much finished liquid or mild stock | Reduce the jus without the beef | Judge by finished volume and the bread test |
| Too salty | High-sodium stock or too much reduction | Dilute gradually with unsalted stock or water | Start low-sodium and season at the end |
| Too greasy | More rendered fat than the liquid needs | Skim the surface | Chill overnight and lift away hardened excess |
| Not enough for dipping | Wide pan or aggressive evaporation | Extend with unsalted or low-sodium stock | Watch pan width and target finished volume |
If the Beef and Jus Both Taste Right
Bread and gravy: a roll that disintegrates needs a tighter crumb or shorter dip. A sandwich that still feels dry needs more jus traveling with the beef or spooned inside. When the bread is simply wetter than you enjoy, move one step down the gravy scale next time.
Toppings: excessive chile heat calls for less giardiniera or a milder jar. A sharp black-pepper bite points back to the jus, which can be diluted now and seasoned more gently next time. Crunchy sweet peppers simply need more cooking.
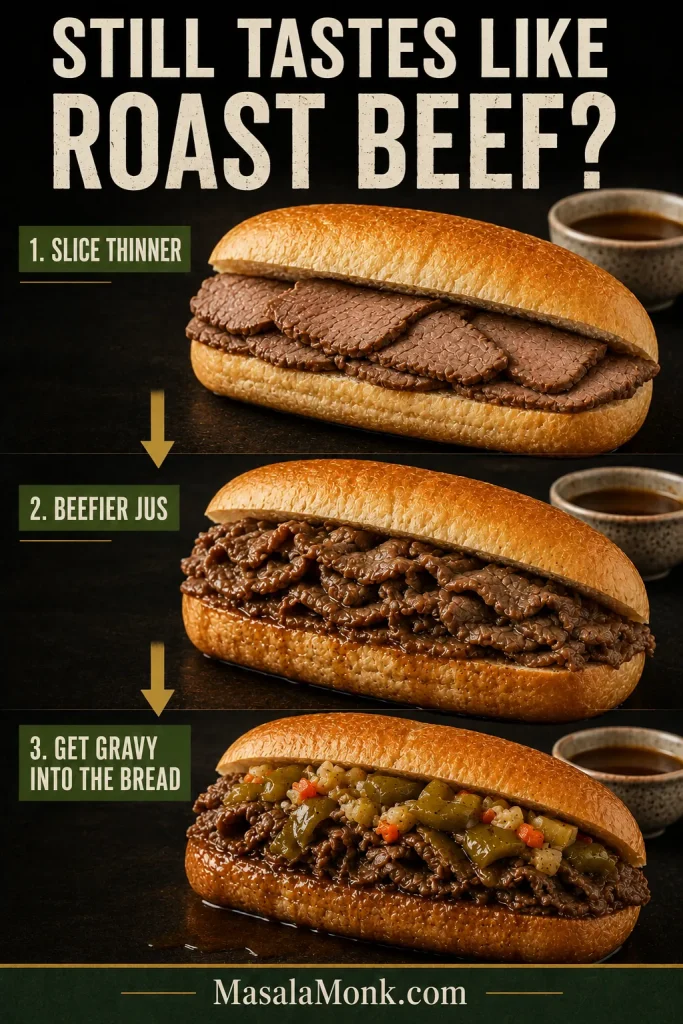
It still tastes like ordinary roast beef: look first at slice thickness, jus strength and how much gravy actually reaches the bread. Those three changes will move the sandwich further than another handful of dried herbs.
When the Sandwich Is Right
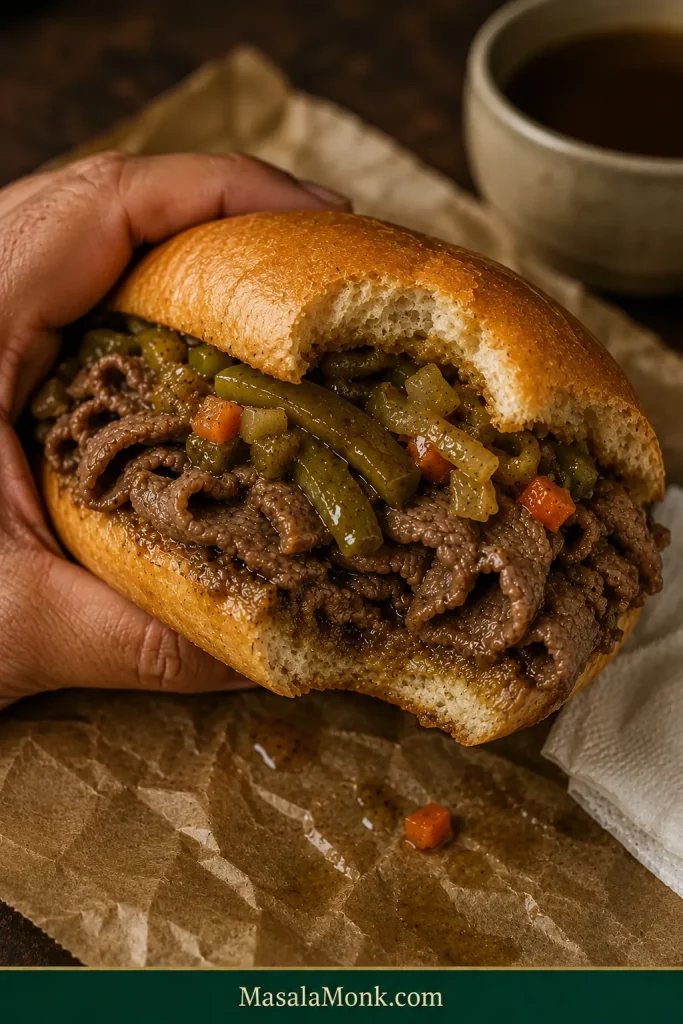
You notice it before the second bite. The beef no longer looks like neat carved roast; it has relaxed into loose folds. The roll is darker where the gravy reached it but still intact in your hands. Sweet peppers disappear into some bites, while giardiniera catches you in others with enough crunch and heat to keep all that beef and soaked bread lively.
Once those pieces are working, the final few seconds are personal. Keep it fairly dry. Spoon on more gravy. Give it the one-second dip. Or lower the entire sandwich into the jus and accept that dinner now requires two hands and a serious stack of napkins.
If you make it, tell us which beef cut you used, whether you sliced by hand or with a machine, and where you landed on the gravy scale—dry, wet, easy-dipped or fully dipped. Those details can help the next cook decide where to start.








