Posted on — 10 Comments

Sourdough Pizza Dough Recipe (Crispy Crust & Easy Pizza Base)

Sourdough pizza dough cover image showing a golden, crispy crust pizza with a cheese-pull slice lifted, plus sauce, basil, and olive oil props.

There’s a particular moment in pizza making that feels like magic: you slide a raw, slightly wobbly round of dough into a hot oven, and within minutes it turns into something alive—edges lifting, bubbles forming, the bottom taking on color, the whole kitchen smelling like toasted wheat and caramelized cheese. When that dough is sourdough pizza dough, the magic gets a little deeper. The crust tastes fuller. The aroma is richer. Even a simple topping combo feels more “finished,” as if the base itself is seasoning the pizza.

At the same time, sourdough pizza dough can feel intimidating if you’ve only made quick yeast dough before. Starter timing, fermentation windows, sticky dough, shaping fears—there are a lot of ways to overthink it. So this post is built for real life: one reliable sourdough pizza dough recipe, clear steps that don’t require fancy equipment, and enough flexibility to handle a same-day bake or a cold ferment when you have time.

Along the way, you’ll also see natural variations—thin and crisp, chewier and thicker, or even a pan-friendly version—because one good sourdough pizza base should carry you through many pizza nights. When you want extra support, you can jump to MasalaMonk’s beginner-friendly sourdough starter recipe to tighten up feeding and starter strength, or browse the broader sourdough lineup in Sourdough Bread Recipes if you’re in the mood to bake beyond pizza.

And because pizza night is never only about the crust, you’ll also find an easy way to expand your topping and sauce options using MasalaMonk’s pizza sauce recipes and pesto recipe guide, plus a few cocktail pairings that make a homemade pie feel like a proper plan.

Let’s get into it.


Why sourdough pizza dough tastes better (and how to keep it easy)

Sourdough pizza has a flavor advantage that’s hard to miss: more depth, more aroma, a little tang, and a longer finish. The reason isn’t mysterious. Fermentation changes the dough. Over time, flour and water become something else—more fragrant, more elastic, and more flavorful.

Still, flavor alone doesn’t guarantee a great crust. A sourdough pizza crust can be pale, tough, or oddly dense if the bake setup is weak or if the dough never develops enough structure. That’s why this method is built around three practical goals:

Sourdough pizza dough gets better when you nail three things: build strength early so it stretches easily, ferment until the dough is puffy (not slack), and bake hot so the crust turns crisp instead of dry.

First, develop strength early so the dough stretches into a pizza base without tearing.

Second, ferment until the dough is lively but not collapsed, so you get lift instead of flatness.

Third, bake with enough heat that the crust sets quickly, which keeps it crisp rather than dry.

Once those three pieces click, sourdough pizza dough becomes repeatable. You’re no longer gambling on vibes—you’re steering the process.

If you want your starter to feel dependable before you begin, the day-by-day routine in MasalaMonk’s sourdough starter recipe is a solid foundation. It’s especially helpful if your starter tends to be sluggish, overly sour, or inconsistent from week to week.

Also Read: Balti Paneer Gravy (Restaurant-Style, Creamy + Bold Recipe)


Ingredients for sourdough pizza dough

A reliable sourdough pizza dough recipe doesn’t need an ingredient parade. In fact, fewer ingredients usually means fewer surprises.
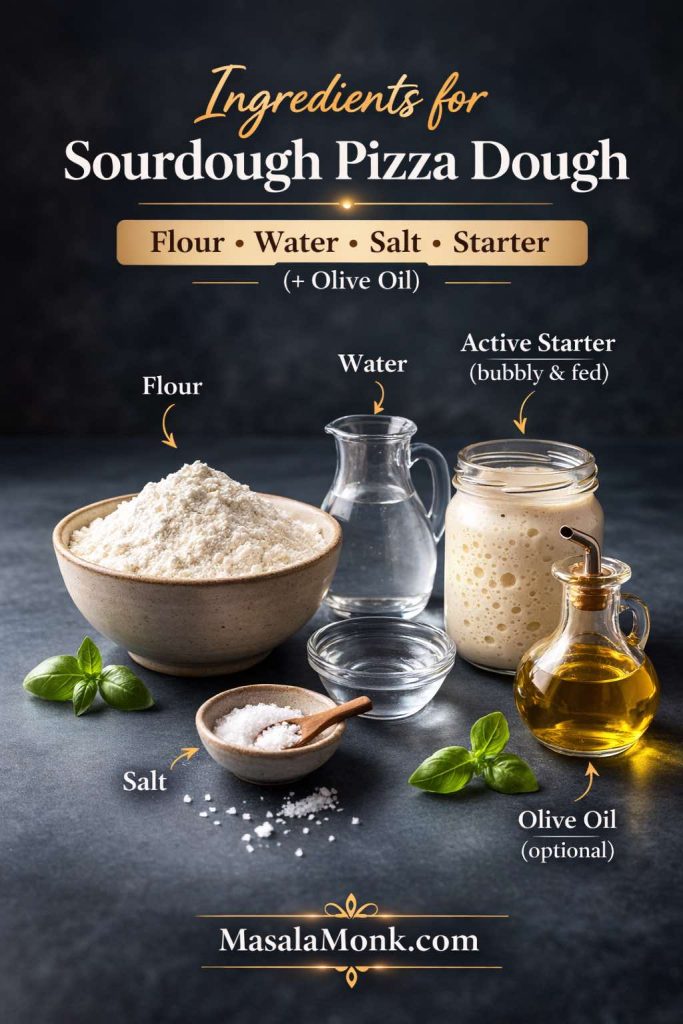
You only need flour, water, salt, and an active starter to make sourdough pizza dough—olive oil is optional, but it helps the dough handle smoothly in a home oven.

What you need

  • Flour: bread flour works beautifully; “00” flour is also excellent; a blend is ideal if you like
  • Water: room temperature for most kitchens
  • Salt: essential for flavor and dough strength
  • Active sourdough starter: bubbly and recently fed
  • Olive oil (optional): helpful for tenderness in a home oven and makes handling easier

That’s it. Everything else—sugar, honey, malt, milk—can come later if you want to experiment. For now, this base method covers the core “pizza dough with sourdough starter” approach and gives you a crust that can go thin and crisp or thicker and chewier depending on how you shape it.

About the flour choice (simple, useful guidance)

If you already have bread flour, use it. Bread flour tends to make shaping easier because it’s naturally stronger. If you have “00” flour, it can produce a beautifully tender yet crisp crust, especially in hotter bakes. If you want the best of both worlds, blend them: part bread flour for strength, part “00” for tenderness.

Meanwhile, if you only have all-purpose flour, you can still make sourdough pizza dough. You may simply need a slightly gentler hand during stretching and a little more attention to dough strength early on.

Also Read: Mojito Recipe (Classic) + Ratios, Pitcher, Mocktail & Easy Variations


Active starter vs discard for sourdough pizza

This matters, and the good news is that it’s not complicated.

Sourdough starter for pizza dough comparison showing active starter versus discard, with active starter rising faster and discard needing longer timing.
For sourdough pizza dough, an active starter gives a quicker, more predictable rise, while discard can still work—but you’ll need a longer, more flexible fermentation window.

Active starter = predictable rise, cleaner timing

For the main sourdough pizza dough recipe below, an active starter is your best friend. A starter that has been fed and is bubbling well will ferment dough in a more predictable window and usually gives better lift.

If you’re unsure whether your starter is “ready,” the quick-read approach is simple: it should look airy, smell pleasantly tangy (not harsh), and show visible activity. If it’s been in the fridge, give it a feed or two at room temperature until it behaves consistently again. The troubleshooting steps in the sourdough starter recipe guide are especially useful for this.

Discard can work too, but it’s a different lane

Sourdough discard pizza can be fantastic, particularly for bolder toppings and deeper flavor. However, discard-based dough behaves differently and often needs adjustments. If you want a dedicated discard approach, King Arthur’s sourdough discard pizza crust recipe is a trustworthy reference and a nice option when your starter is unfed but you still want pizza tonight.

For this post, though, we’ll build the primary dough with active starter, then you can branch out once you’ve nailed the method.

Also Read: Paloma Recipe: 12 Paloma Cocktail Drinks


The sourdough pizza dough recipe (makes 2 large pizzas or 3 medium)

This recipe is designed to be flexible. You can bake the same day, or you can cold ferment for deeper flavor and easier shaping.

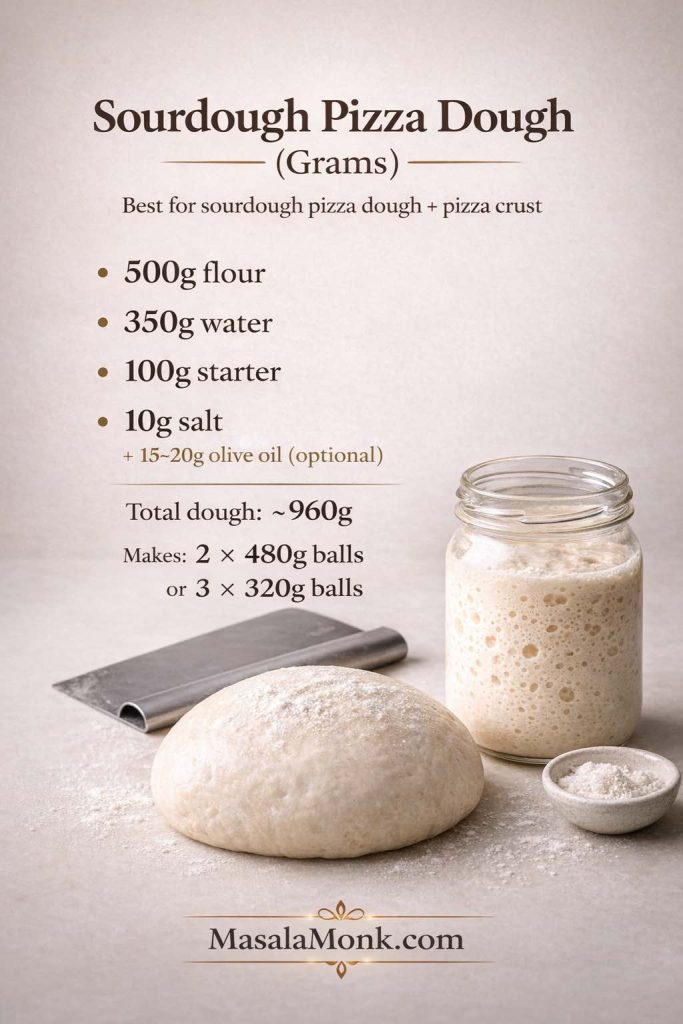
Dough formula (grams)

  • 500 g flour (bread flour, “00,” or a blend)
  • 350 g water (70% hydration; adjust slightly if needed)
  • 100 g active sourdough starter (100% hydration starter)
  • 10 g salt
  • 15–20 g olive oil (optional)
Sourdough pizza dough recipe in grams showing flour, water, starter, salt, optional olive oil, and dough ball yield for two large or three medium pizzas.
Save this grams formula as your go-to sourdough pizza dough base—then choose 480g balls for large pizzas or 320g balls for medium pizzas, depending on the crust thickness you want.

This yields about 960 g total dough, which is perfect for:

  • 2 x ~480 g dough balls (two large pies, roughly 12–14 inch depending on thickness)
  • or 3 x ~320 g dough balls (three medium pies)

If you want thinner crust, make smaller dough balls. If you want thicker, go larger. Your dough ball weight has a bigger impact on the final sourdough pizza crust than most people expect.

Also Read: Air Fryer Donuts Recipe (2 Ways): Glazed Homemade Donuts + Biscuit Donuts


How to make sourdough pizza dough step by step

1) Mix the dough (and make it easy on yourself)

In a large bowl, add the water and sourdough starter. Stir until the starter loosens into the water. It doesn’t have to dissolve perfectly—just break it up enough that it’s mostly distributed.

Next, add the flour and mix until you don’t see dry patches. At this stage the dough will look shaggy and uneven, which is exactly right.
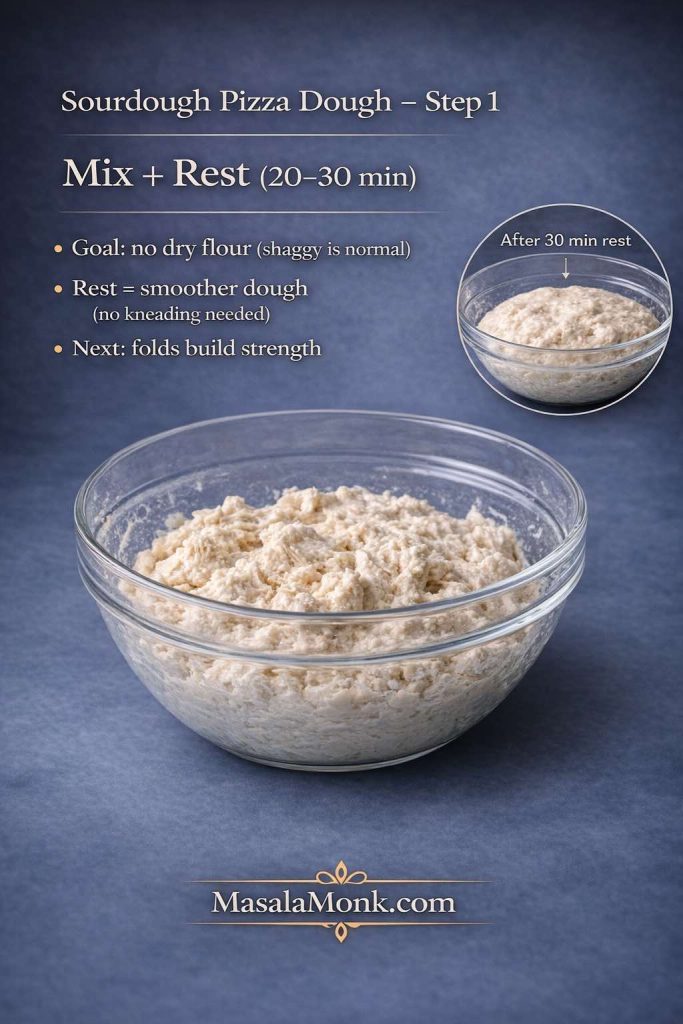
Step 1: Mix until there’s no dry flour, then rest 20–30 minutes—shaggy dough is normal, and the rest makes it noticeably smoother with no kneading.

Now pause. Let the dough rest for 20–30 minutes.

That rest matters because it hydrates the flour and starts gluten development without effort. Later on, you’ll find that the dough becomes smoother and stronger with much less work.

After the rest, sprinkle in the salt. If you’re using olive oil, add it now as well. Then mix until the salt is fully incorporated.

At first, the dough may feel slippery or messy. Keep going anyway; it comes together faster than you think.

2) Build dough strength without beating it up

Sourdough pizza dough can be strong without being overworked. Instead of kneading for a long time, use a short sequence of gentle strength-building.
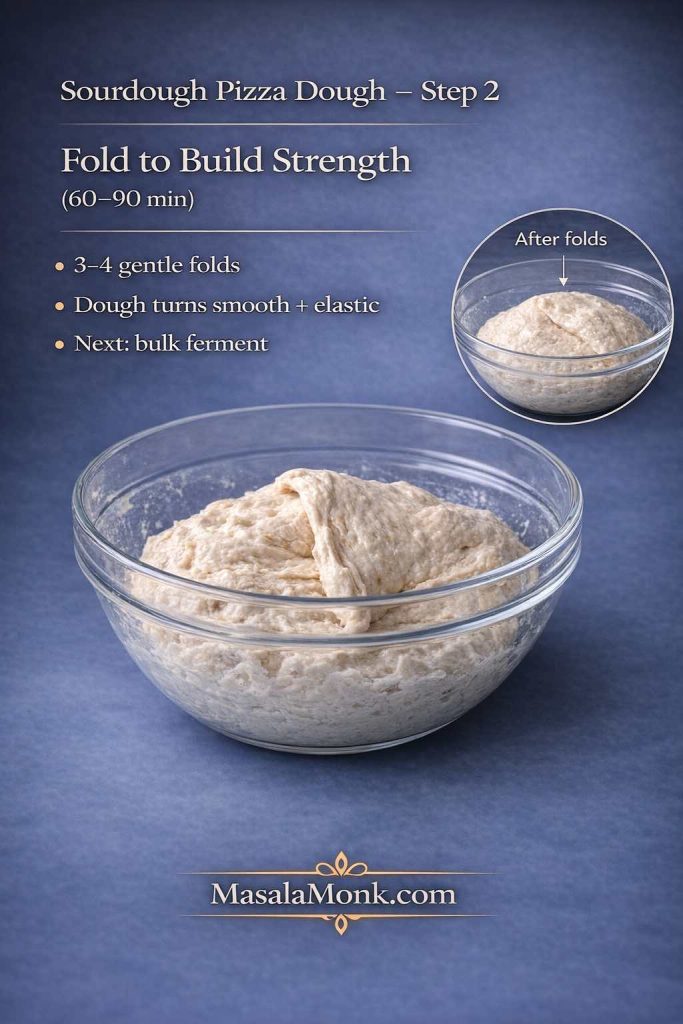
Step 2 of sourdough pizza dough showing stretch-and-folds to build strength, with dough turning smoother and more elastic before bulk fermenting.
Step 2: Do 3–4 gentle folds over 60–90 minutes—this builds strength so your sourdough pizza dough stretches more easily and bakes into a better crust.

Over the next 60–90 minutes, do 3–4 rounds of stretch-and-folds:

  • Wet your hand lightly.
  • Lift one side of the dough, stretch upward, fold it over the center.
  • Rotate the bowl and repeat a few times until the dough tightens into a smoother mound.

Between rounds, cover the bowl and let the dough relax.

With each round, you’ll notice the dough becoming more elastic and cohesive. That’s exactly what you want: a dough that will stretch into a sourdough pizza base without turning into a fragile sheet.

3) Bulk ferment until the dough is airy, not exhausted

After the final fold, cover the dough and let it rise at room temperature until it looks slightly puffed, smoother, and more alive—often 3–5 hours, depending on your kitchen and starter strength.
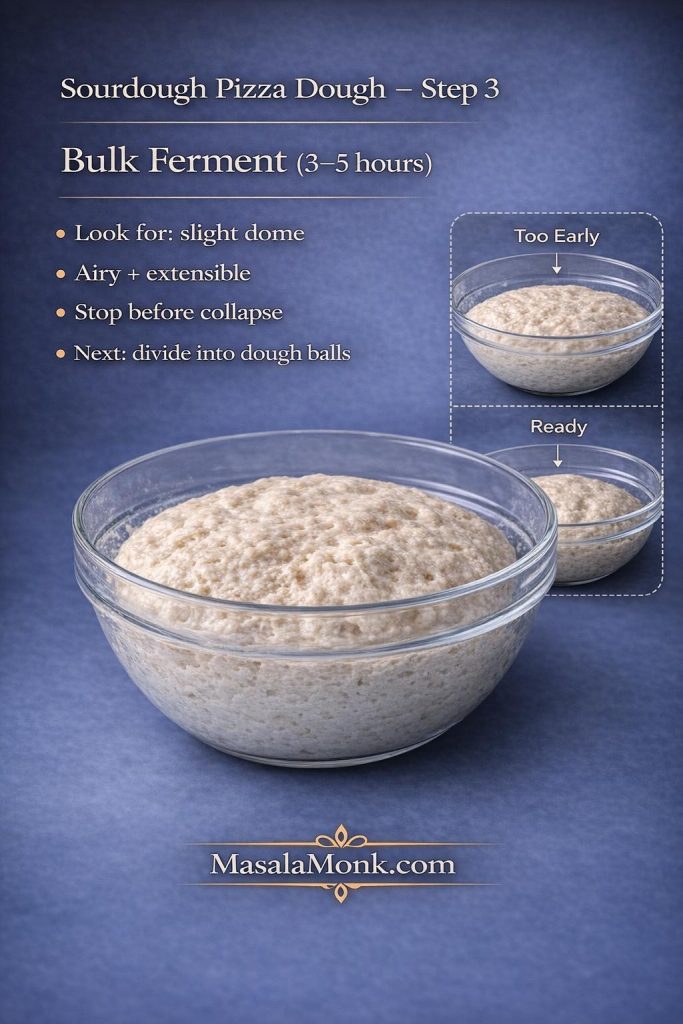
Step 3: Bulk ferment until the dough looks lightly domed and feels airy—stop before it turns overly slack, then move on to shaping sourdough pizza dough balls.

Instead of chasing a clock, watch for clues:

  • the dough looks more rounded and airy
  • the surface feels slightly domed rather than flat
  • the dough jiggles a little when you move the bowl

If your kitchen runs warm, this stage will move faster. If it’s cooler, it may take longer. Either way, your goal is fermentation that builds flavor and gas, not fermentation that collapses.

When bulk fermentation is done, the dough should feel extensible and lightly airy. If it’s already very bubbly and slack, don’t push it too far—move on to dividing.

4) Divide into sourdough pizza dough balls

Turn the dough onto a lightly floured counter. Divide into your preferred sizes.

For two larger pizzas: 2 dough balls (~480 g each).
For three medium pizzas: 3 dough balls (~320 g each).
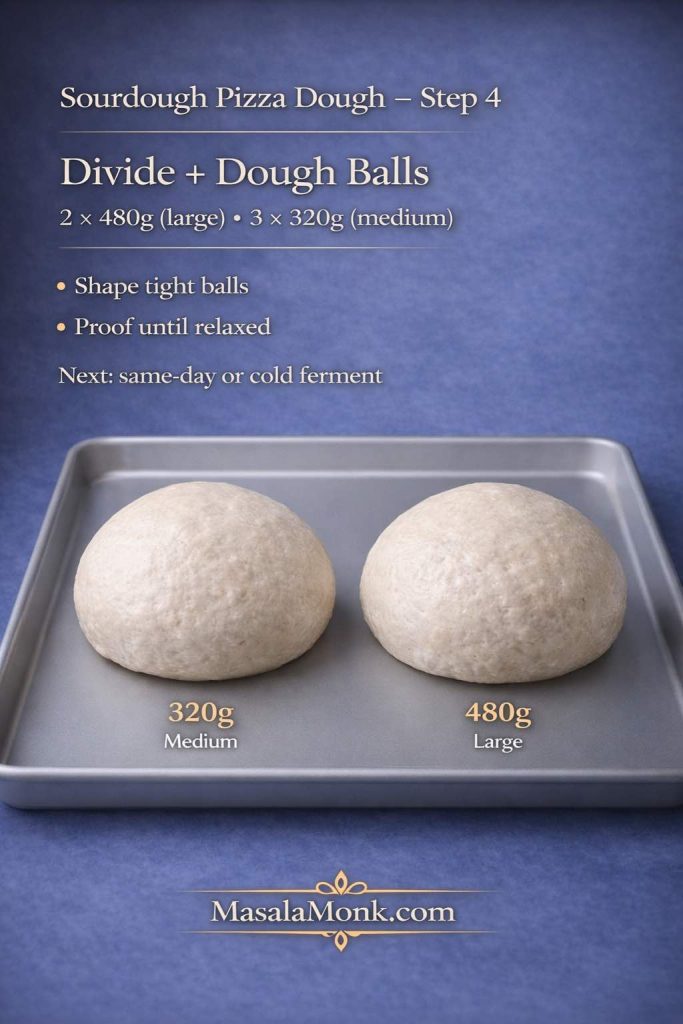
Step 4 sourdough pizza dough card showing two dough balls labeled 320g and 480g with guidance to shape tight balls and proof until relaxed before fermenting.
Step 4: Divide and shape tight sourdough pizza dough balls—use 480g for two large pizzas or 320g for three medium, then proof until relaxed so stretching is easy.

Shape each portion into a tight ball:

  • Fold edges into the center until the surface tightens.
  • Turn seam-side down.
  • Cup your hands around the dough and rotate gently to seal.

Set the dough balls into lightly oiled containers (or a covered tray) so they don’t stick.

From here, you choose your schedule: same-day baking or cold fermentation.

Also Read: Tapas Recipe With a Twist: 5 Indian-Inspired Small Plates


Same-day sourdough pizza dough (quick schedule that still works)

Sometimes you want a quick sourdough pizza dough that’s still made with starter, not commercial yeast. While sourdough naturally benefits from time, you can absolutely make a same-day version when your starter is strong and your kitchen is reasonably warm.

Use this same-day sourdough pizza dough rhythm when you want pizza tonight: mix, rest, fold, bulk ferment, shape dough balls, then bake hot for a crisp crust.

Here’s the rhythm:

  • Mix + rest + folds as written
  • Bulk ferment until lightly airy (don’t force huge rise)
  • Divide into dough balls
  • Let the dough balls rest at room temp until relaxed and slightly puffy, usually 1–2 hours

When the dough balls feel soft, supple, and easy to stretch, you’re ready to shape.

This “sourdough pizza dough same day” approach is about practicality. It won’t taste identical to a 24-hour cold ferment, yet it still delivers a flavorful sourdough pizza crust with great texture if you bake hot enough.

If you want more depth, shift to cold fermentation.

Also Read: Air Fryer Salmon Recipe (Time, Temp, and Tips for Perfect Fillets)


Cold ferment sourdough pizza dough (for better flavor and easier shaping)

Cold fermentation is where sourdough pizza dough starts feeling effortless. The dough relaxes. The flavor deepens. Stretching becomes smoother, and the crust often bakes more evenly.
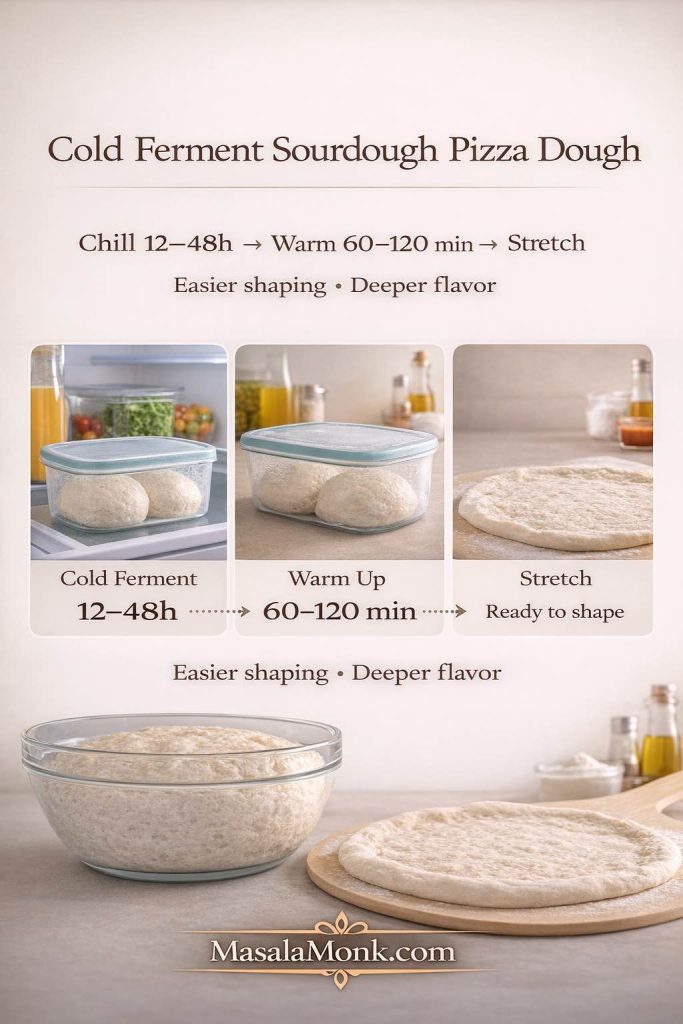
Cold fermenting sourdough pizza dough deepens flavor and makes shaping easier—chill the dough balls 12–48 hours, warm them 60–120 minutes, then stretch into your pizza base.

After you’ve shaped dough balls, cover them and refrigerate.

A common sweet spot is 12–48 hours. King Arthur’s sourdough pizza crust recipe leans into a chilled window for exactly these reasons, and it’s a great confirmation that cold time helps both schedule and results.

When you’re ready to bake:

  • remove dough balls from the fridge
  • let them sit covered at room temperature until they feel relaxed, usually 60–120 minutes

Cold dough tears easily. Warmed dough stretches willingly. So give it time to wake up.

Also Read: Masterclass in Chai: How to Make the Perfect Masala Chai (Recipe)


How to shape a sourdough pizza base without tearing

Shaping is where sourdough pizza dough goes from “maybe” to “yes.” It’s also where most frustration happens—usually because the dough is too cold, too tight, or simply handled too aggressively.
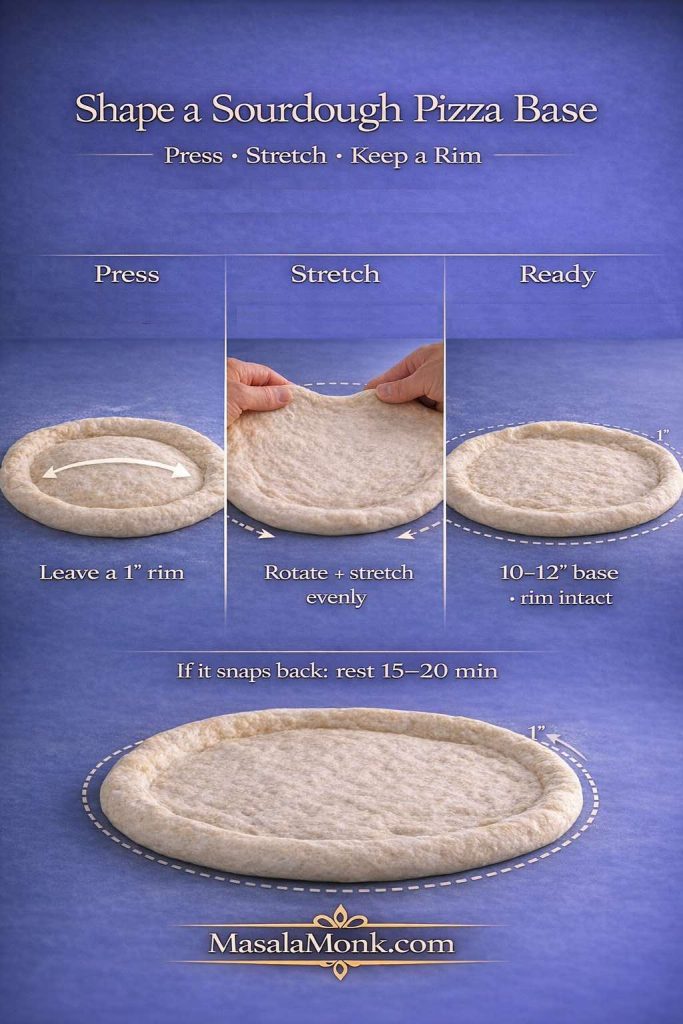
Step-by-step guide showing how to shape a sourdough pizza base: press to leave a 1-inch rim, stretch evenly, and form a 10–12 inch pizza base with the rim intact.
Press from the center outward, stretch gently and evenly, and keep a 1-inch rim—if the dough snaps back, rest it 15–20 minutes so your sourdough pizza base stretches without tearing.

Start with a relaxed dough ball

If the dough snaps back, it’s not a failure. It’s a signal.

Cover it and let it rest another 15–20 minutes. Then try again. Often, that one pause changes everything.

Press, then stretch—don’t yank

Dust the counter lightly with flour. Place the dough ball down and press from the center outward, leaving a thicker rim.

Once you’ve formed a rough disk, lift and stretch gently with your hands. Move around the edge in small steps rather than pulling hard in one spot.

If the center starts thinning too much, set the dough down and let it relax for a minute. Then continue.

Rolling pins: when they help and when they hurt

A rolling pin can be useful if you want a flatter base. However, it also pushes out gases that help the rim puff. If your dream crust includes a lively edge, skip the pin. If you’re aiming for a thinner, crisper sourdough pizza crust, a pin can be acceptable.

Either way, the dough should still feel elastic, not fragile. If it’s fragile, it’s likely under-strengthened or under-rested.

Also Read: 10 Low Carb Chia Pudding Recipes for Weight Loss (Keto, High-Protein, Dairy-Free)


How to bake sourdough pizza for a crisp crust

Your oven setup matters more than your topping choices. Even the best sourdough pizza dough recipe can bake pale and soft if the oven isn’t truly hot.

Underside view of sourdough pizza crust showing a browned, crisp bottom and airy rim on a peel, with text “Bake Hot • Preheat Long.”
Want a crisp sourdough pizza base instead of a soft bottom? Preheat your oven and baking surface longer than you think, then bake hot so the crust sets fast and stays airy at the rim.

Preheat longer than you think

Set your oven as hot as it safely goes—often 260°C / 500°F or higher if possible.

Place a pizza steel or stone inside while preheating. Then preheat for at least 45 minutes.

That long preheat isn’t extra. It’s the difference between:

  • a crust that springs and sets quickly
  • and a crust that dries out slowly while trying to color

Steel vs stone vs tray

  • Steel: strong bottom color, fast baking, excellent for crisp crust
  • Stone: great results, slightly gentler bottom heat
  • Heavy tray: workable if preheated; best for moderate thickness

Comparison guide showing pizza steel vs pizza stone vs baking tray for sourdough pizza, with notes on fast baking, balanced heat, and preheating at least 45 minutes.
A steel gives the strongest crisp bottom, a stone bakes more gently with balanced heat, and a heavy tray still works—just preheat your baking surface for at least 45 minutes.

If you’re baking with a dedicated pizza oven, timing shifts dramatically. For that environment, Ooni’s recipe page is a useful reference because it’s built for higher heat and faster bakes.

Keep toppings balanced so the base stays crisp

This is the quiet secret behind many “why is my pizza soggy?” problems. Even a great sourdough pizza base can suffer under too much sauce, too much cheese, or wet toppings.

Instead:

  • use a thin layer of sauce
  • choose low-moisture cheese when possible
  • pre-cook watery vegetables if needed
  • keep the topping load lighter for thinner crust

Comparison image showing sourdough pizza toppings balance: “too much” versus “just enough” toppings to keep the pizza base crisp, with tips for thin sauce and low-moisture cheese.
A crisp sourdough pizza crust needs breathing room—use a thin sauce layer, choose low-moisture cheese, and keep toppings balanced so the base bakes dry and golden instead of soft.

You can still make a generous pizza. You’re just aiming for balance, so the crust can crisp before the center turns heavy.

Pan-style option when you want a thicker, forgiving crust

If you want a thicker base with crisp edges, pan pizza is a beautiful direction. Even though it’s not sourdough-specific, Serious Eats’ foolproof pan pizza recipe is a great model for pan technique—how oil affects crispness, how the pan bakes the sides, and why thicker dough benefits from that environment.

Pan-style sourdough pizza baked in a cast-iron skillet with a thicker crust and crisp browned edges, labeled “Oil the pan • Bake hot.”
Want a thicker, more forgiving sourdough pizza base? Bake it pan-style—oil the skillet, use slightly thicker dough, and bake hot for crisp edges and a chewy center.

For sourdough, the idea is the same: slightly thicker dough, a well-oiled pan, and a hot bake that crisps the bottom and edges.

Also Read: Keto Hot Chocolate Recipe (Sugar-Free Hot Cocoa) + Best Homemade Mix


Sauce and topping ideas that make sourdough pizza shine

Sourdough pizza already brings flavor, so your toppings don’t need to shout. In fact, simpler combinations often taste more “complete” because the crust contributes so much.

That said, variety is what makes pizza night fun. If you want easy ways to change the mood without reinventing the whole plan, start with sauces.

Three pizza sauce options for sourdough pizza—marinara, white garlic sauce, and pesto—shown in bowls with a slice of sourdough crust.
Swap the sauce to change the whole sourdough pizza: go classic with marinara, creamy with white garlic, or bright and herby with pesto—same dough, totally different vibe.

Sauce ideas (and a way to build options fast)

A sourdough pizza recipe becomes ten recipes when you swap the sauce. That’s why MasalaMonk’s pizza sauce recipes is such a useful read: marinara, white garlic, Alfredo, buffalo, BBQ, vodka, ranch—seven directions from the same base.

Meanwhile, if you want a bright, herby route, MasalaMonk’s pesto recipe guide gives you classic basil pesto plus variations that pair beautifully with mushrooms, roasted vegetables, or even a simple mozzarella-and-tomato topping.

Topping combos that work especially well with sourdough pizza crust

Here are a few combinations that tend to harmonize with the crust rather than compete with it:

Sourdough pizza topping ideas card showing five topping combinations, including marinara and mozzarella, white garlic and mushrooms, pesto and roasted vegetables, vodka sauce with chili flakes, and BBQ chicken.
These five topping combos make sourdough pizza night easy—swap sauces, keep toppings balanced, and let the sourdough crust stay crisp while the flavors shine.
  • Marinara + mozzarella + basil
    Classic, clean, and the sourdough flavor reads clearly.
  • White garlic sauce + mushrooms + mozzarella
    Earthy toppings pair beautifully with tangy crust.
  • Pesto + mozzarella + roasted vegetables
    Bright, herby, and flavorful without heaviness.
  • Vodka sauce + mozzarella + chili flakes
    A richer sauce that still bakes cleanly if used lightly.
  • BBQ sauce + onion + chicken (light topping load)
    Best on a slightly thicker base, especially if your oven isn’t extremely hot.

If you prefer bold toppings, sourdough can take them. Just keep one thing in mind: bold topping choices often taste best when the crust is crisp enough to provide contrast.

Also Read: Dirty Martini Recipe (Classic, Extra Dirty, No Vermouth, Spicy, Blue Cheese, Tequila + Batched)


Troubleshooting sourdough pizza dough and crust (the fixes that matter)

Even with a dependable method, dough will occasionally misbehave. Instead of starting over, it’s more useful to diagnose what’s happening.

If your sourdough pizza dough feels sticky, your crust turns tough, the bottom stays pale, or the dough snaps back—use these quick fixes to get a stronger dough and a crisp, golden crust.

My sourdough pizza dough is sticky—what now?

Sticky dough often comes from one of these:

  • hydration is high for your flour
  • the dough didn’t develop enough strength early
  • the dough got too warm during fermentation
  • shaping started before the dough fully relaxed

Rather than dumping flour into the dough at the end, make two small adjustments next time:

  1. build a little more strength with one extra fold early on
  2. chill dough balls for a short cold ferment, then bring them back to room temp before shaping

In the moment, use light flour on the bench, keep your hands calm, and avoid forcing thinness too quickly.

My sourdough pizza crust is tough

A tough crust is often a bake problem, not a dough problem. It usually happens when:

  • the oven wasn’t hot enough
  • the baking surface wasn’t fully preheated
  • the pizza baked too long trying to brown

A better strategy is higher heat and faster bake. Preheat longer, use steel if you have it, and keep toppings lighter so the crust sets quickly.

The pizza base is pale and soft underneath

This almost always points to insufficient bottom heat.

Try:

  • longer preheat
  • moving the baking surface higher or lower depending on your oven’s heat pattern
  • using a steel if possible
  • par-baking the base briefly if you’re making a thicker pizza base

King Arthur also discusses how sourdough crusts can behave differently in browning and suggests practical fixes for thicker crust styles in their sourdough pizza resources, which can be reassuring when your crust looks lighter than expected but still bakes through.

The dough snaps back while stretching

Snapping back means the dough is tight. Tight dough needs time.

Cover it. Walk away for 15 minutes. Come back and stretch again.

Often, that small rest is the whole solution. If this happens frequently, a longer cold ferment usually improves extensibility dramatically.

Also Read: Fish and Chips Reimagined: 5 Indian Twists (Recipe + Method)


Pizza night pairings: cocktails that actually match sourdough pizza

When pizza is homemade, drinks become part of the atmosphere. You don’t need anything complicated—just something that plays nicely with cheese, tomato, and a toasty crust.

Pizza night pairing image with a sourdough pizza slice and four cocktail options—mule in a copper mug, punch in a tall glass, martini with olives, and an espresso cocktail.
Turn sourdough pizza night into a plan: pair your pie with a bright mule, an easy punch, a savory martini, or an espresso cocktail for dessert—pick one drink and make it feel special.

Here are a few of our blog posts that pair naturally with sourdough pizza night:

  • Fresh, fizzy, and bright: a classic Moscow Mule is hard to beat when your toppings lean spicy or rich.
  • Party-friendly pitcher option: rum punch fits perfectly when you’re feeding a crowd and want something easy to pour.
  • Savory pairing for olive-forward or salty toppings: a briny dirty martini can feel surprisingly right with mushrooms, olives, or deeply savory pizzas.
  • After-dinner move: if pizza night turns into dessert night, an espresso martini is a fun, coffee-forward finish.

You can keep it simple: pick one drink direction, make the pizza, and suddenly the whole evening feels intentional.

Also Read: Ravioli Recipe Reinvented: 5 Indian-Inspired Twists on the Italian Classic


Storing and reheating sourdough pizza (so it still tastes good tomorrow)

Leftover pizza is only disappointing when it’s handled roughly. Sourdough pizza can reheat beautifully—especially because the crust has structure—if you warm it in a way that respects the crust.

Storing leftovers safely

Let the pizza cool, then refrigerate it promptly in a covered container.

For timing and safe handling, FoodSafety.gov’s cold storage chart specifically lists pizza storage guidance, including fridge and freezer windows. It’s a helpful reference when you’re deciding whether a slice is still within a safe range. (Cold Food Storage Chart)

When reheating, the USDA recommends reheating leftovers to 165°F for safety. Their leftovers guidance is straightforward and worth keeping in mind when you’re reheating more than just a slice or two. (Leftovers and Food Safety)

Guide showing how to reheat sourdough pizza using a skillet, oven, or air fryer to restore a crisp crust, with tips for fast crisping and reheating multiple slices.
For the crispiest sourdough pizza crust, reheat in a skillet; for several slices, use the oven; for quick crunch, use an air fryer—stop as soon as it’s hot and revived.

Best ways to reheat sourdough pizza

Skillet method (best for crisp bottom):
Warm a skillet over medium heat, place the slice in, and cover loosely. The bottom crisps, while the cover helps the top warm without drying out.

Oven method (best for multiple slices):
Heat the oven and warm slices on a tray until the cheese softens and the crust crisps again.

Air fryer method (quick and crisp):
A short reheat in the air fryer works well, particularly for restoring texture.

Whichever method you use, aim for “hot and revived,” not “cooked again.” The goal is to bring the crust back to life, not to dry it out.

Guide showing how to freeze sourdough pizza slices in a container and how to freeze sourdough pizza dough balls, with tips to reheat slices crisp and thaw dough balls in the fridge overnight.
Freeze baked sourdough pizza slices for quick meals, or freeze dough balls for future pizza nights—thaw dough in the fridge overnight, then warm before stretching for the best crust.

Freezing pizza and freezing dough balls

If you want future pizza nights to be easier, freezing helps.

  • Freeze baked slices for quick lunches or fast dinners.
  • Freeze dough balls if you want fresh-baked pizza later without starting from scratch.

For dough balls, freeze after fermentation, wrap well, and thaw in the fridge overnight. Then let the dough come back toward room temperature before stretching. Cold dough is tight; warmer dough is cooperative.

Also Read: Croquettes Recipe: One Master Method + 10 Popular Variations


A calm, repeatable workflow for sourdough pizza at home

If sourdough pizza feels like a “special occasion” thing right now, here’s the shift: treat it like a rhythm, not a performance. The more familiar you get with the stages—mix, strengthen, ferment, divide, rest, bake—the less dramatic it becomes.

One week you might do a same-day sourdough pizza dough for a spontaneous dinner. Another week you might plan a cold ferment because you want deeper flavor and a smoother shaping experience. Either way, you’re building the same foundation: a sourdough pizza base that supports whatever toppings you love and bakes into a crust that tastes like you meant it.
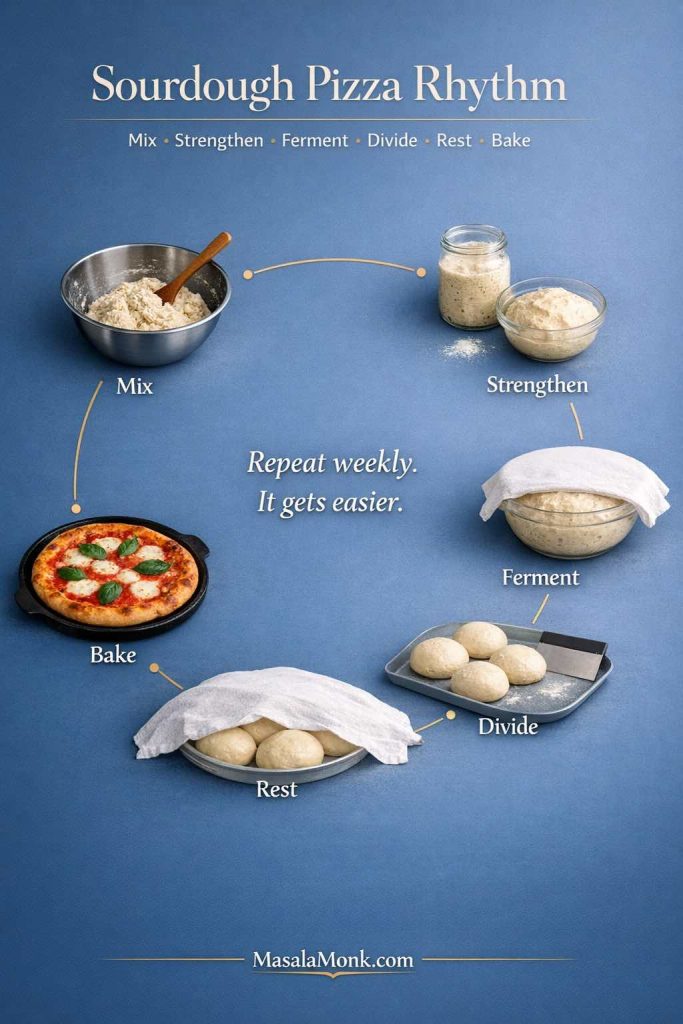
Sourdough pizza dough gets easier when you treat it like a rhythm: mix, strengthen, ferment, divide, rest, then bake—repeat weekly and your pizza base and crust improve every time.

And when you want to expand without reinventing the wheel, here are some blog posts that keep pizza night interesting:

From there, it’s simply repetition. Each bake teaches your hands what the dough should feel like. Each pizza shows you how your oven behaves. Before long, “sourdough pizza dough recipe” stops being an intimidating phrase and becomes a reliable plan.

Also Read: How to Make a Flax Egg (Recipe & Ratio for Vegan Baking)

FAQ: Sourdough Pizza Dough, Crust, and Base

1. What is the difference between sourdough pizza dough, sourdough pizza crust, and sourdough pizza base?

They usually refer to different stages of the same thing. Sourdough pizza dough is the raw dough before shaping, sourdough pizza base is the shaped round before toppings, and sourdough pizza crust often means the baked result. Even so, many recipes use the terms interchangeably, so the method is typically the same.

2. Can I make sourdough pizza dough the same day?

Yes, you can make sourdough pizza dough the same day if your starter is active and your kitchen is warm enough. In that case, give the dough enough time to bulk ferment, then let the dough balls rest until they feel soft and easy to stretch. That said, a cold ferment usually improves flavor and handling.

3. How long should I ferment sourdough pizza dough for the best flavor?

For the best balance of flavor and texture, many home bakers ferment sourdough pizza dough overnight in the fridge after dividing it into dough balls. However, a same-day sourdough pizza recipe can still work well. If you have more time, a longer cold ferment often gives a better sourdough pizza crust with easier stretching.

4. Can I use sourdough discard for pizza dough?

Yes, sourdough discard pizza dough is possible, although it behaves differently from dough made with active starter. For example, discard may ferment more slowly and produce a slightly denser result unless the recipe is designed for it. Therefore, if you use discard, expect to adjust timing and texture a little.

5. Why is my sourdough pizza dough sticky?

Most often, sticky sourdough pizza dough comes from high hydration, weak gluten development, or warm dough. In contrast, a dough with enough strength and a short rest between steps feels much easier to shape. To fix it, build more strength early, chill the dough if needed, and use only a light dusting of flour while shaping.

6. Why does my sourdough pizza dough snap back when I stretch it?

Usually, the dough is too tight or not rested enough. Instead of forcing it, let it sit covered for 10 to 20 minutes and try again. Afterward, it should stretch more easily into a sourdough pizza base without tearing.

7. What is the best flour for sourdough pizza dough?

Bread flour is a strong choice because it gives structure and makes shaping easier. Meanwhile, 00 flour can produce a tender, crisp sourdough pizza crust, especially in high-heat baking. Many bakers prefer a blend of both for a balanced result.

8. How do I get a crispy sourdough pizza crust at home?

To get a crispy sourdough pizza crust, preheat your oven longer, use a hot baking surface, and avoid overloading the pizza with sauce or toppings. In addition, a thinner stretch and a well-heated steel or stone help the base set quickly. As a result, the crust crisps before it dries out.

9. Why is my sourdough pizza base soft in the center?

A soft center usually means the dough did not get enough bottom heat or the toppings were too wet. For instance, too much sauce, fresh mozzarella, or watery vegetables can slow down browning. To improve it, preheat longer, use fewer wet toppings, and stretch the dough a little thinner.

10. What size should sourdough pizza dough balls be?

It depends on the pizza style you want. Smaller sourdough pizza dough balls make thinner, crisper pizzas, while larger dough balls create a thicker, chewier crust. As a general guide, medium dough balls work best when you want an easy-to-handle sourdough pizza recipe for a home oven.

11. Can I freeze sourdough pizza dough balls?

Yes, sourdough pizza dough balls freeze well and make future pizza nights much easier. Ideally, freeze them after fermentation, wrap them well, and thaw them in the fridge before using. Then let the dough rest at room temperature so the pizza base stretches without fighting back.

12. Can I freeze baked sourdough pizza?

Yes, baked sourdough pizza freezes well, especially if you cool the slices before storing. Later, reheat the slices in an oven, skillet, or air fryer to bring back some crispness in the crust. This way, leftover sourdough pizza still tastes good instead of turning chewy or dry.

13. Is sourdough pizza healthier than regular pizza?

Sourdough pizza can be easier for some people to digest because of the longer fermentation, and many people also prefer the flavor. Still, the overall nutrition depends on your flour, toppings, cheese, and portion size. In other words, sourdough improves the base, but the full pizza still depends on what you build on top.

14. What is the best hydration for sourdough pizza dough?

A moderate hydration is usually the easiest starting point for home bakers because it balances stretchability and control. Higher hydration can give a more open, airy crust, but it also makes shaping harder. Accordingly, if you are new to sourdough pizza dough, start in the middle and adjust after a few bakes.

15. Can I make a sourdough pizza base without a pizza stone or steel?

Absolutely. You can bake a sourdough pizza base on a preheated tray or pan and still get great results. Although a steel or stone helps with bottom heat, a hot oven and lighter toppings matter just as much. Therefore, don’t wait for perfect equipment before making your sourdough pizza recipe.

16. How do I keep the rim puffy on a sourdough pizza crust?

Leave a border when pressing the dough, and avoid flattening that edge with a rolling pin. Likewise, don’t overload the rim with sauce or cheese. Once baked, that untouched edge has room to puff and brown, which gives you a more attractive sourdough pizza crust.

17. Why does my sourdough pizza crust turn tough after reheating?

Usually, it is being reheated too long or at too high a heat without enough moisture control. Instead, warm it just until hot, then stop. A skillet method often works especially well because it re-crisps the bottom while keeping the rest of the slice from drying out.

18. Can I use this sourdough pizza dough recipe for thin crust and thick crust?

Yes, the same sourdough pizza dough recipe can produce both styles. The difference comes from dough ball size, shaping thickness, and bake method. For thin crust, stretch more and top lightly; for a thicker pizza base, use a larger dough ball and give it a little more structure during shaping.

Posted on — 2 Comments

Crock Pot Pork Chops and Sauerkraut (No Dry Chops Recipe)

Magazine-style cover image for crock pot pork chops and sauerkraut: two bone-in pork chops on a bed of sauerkraut and onions, one sliced to show juicy interior, with a left filmstrip showing “Juicy at 145°F,” crock pot layering (onion → kraut → chops), and a fork bite. Includes a tangy-to-mild dial note: “Rinse = mild • Brine = tangy,” and MasalaMonk.com branding.

There’s something quietly magical about crock pot pork chops and sauerkraut on a slow day. The kitchen smells warm and familiar, the tang settles into something rounder, and dinner feels like it’s been gently cooking in the background of your life—because it has. Even so, if you’ve ever lifted the lid and found pork chops that look perfect but chew dry, you already know the catch: pork chops aren’t one of those “leave it forever and it only gets better” cuts.

That’s exactly why this version is built around two things that actually matter: the chop you choose and when you stop cooking. Once you get those right, everything else becomes straightforward—whether you keep it classic, lean into apples and onions, or go simple and old fashioned with nothing more than onion, pepper, and kraut.

At the same time, you’ll learn how to steer the sauerkraut so it lands where you want it—bright and tangy, mellow and savory, or somewhere comfortably in between—without masking it under sugar. Plus, because pork and sauerkraut is often a meal people come back to for comfort or a New Year’s Day table, you’ll have options that scale beautifully without turning your slow cooker into a pot of boiled pork.

For doneness, we’ll stick to a clear, widely accepted standard: cook the pork to 145°F (63°C) and let it rest briefly, as outlined in the USDA safe temperature chart and echoed in the safe minimum internal temperature guidance at FoodSafety.gov. In other words, we’ll cook with confidence—then stop at exactly the right time.


Why pork chops and sauerkraut in a crock pot sometimes disappoint

A slow cooker is brilliant at turning tougher cuts into tenderness, because collagen has time to soften and melt. However, many pork chops—especially lean loin chops—don’t contain much collagen to begin with. So instead of improving endlessly, they can slide from tender to firm to dry if they sit too long.

On top of that, sauerkraut is a tricky companion. It’s salty, acidic, and wet. Those are not bad things—far from it—but they do change how pork behaves, and they can make the difference between “juicy and savory” and “tight and stringy.”

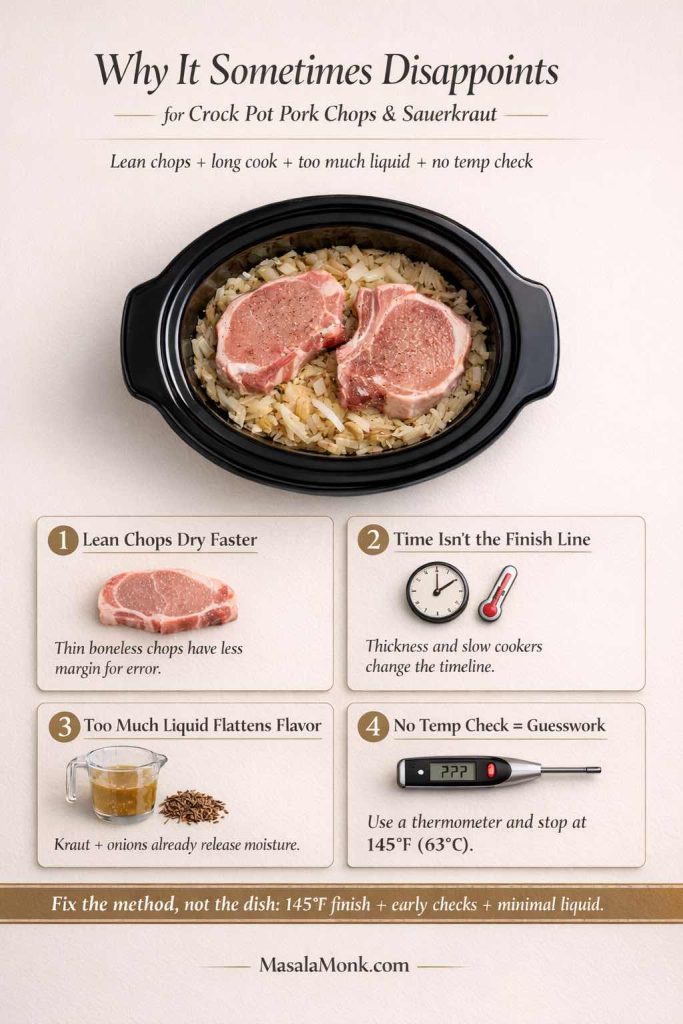
Infographic for crock pot pork chops and sauerkraut explaining why the dish sometimes turns out dry or disappointing, with four common mistakes: lean chops dry faster, time is not the finish line, too much liquid flattens flavor, and no thermometer check leads to guesswork. Includes a 145°F (63°C) finish reminder.
If crock pot pork chops and sauerkraut has ever come out dry, watery, or inconsistent, this is usually why. This prevention guide breaks down the 4 biggest mistakes—lean chops, over-relying on time, too much liquid, and skipping the thermometer—so you can fix the method before you start cooking. Save this visual, then use the step-by-step method below with LOW heat, early checks, and a 145°F (63°C) finish for tender chops and balanced kraut.

That’s why this method avoids the common trap of treating every chop the same. Rather than setting a long timer and hoping for the best, you’ll start checking earlier based on thickness, then pull at temperature. You’ll also manage the sauerkraut so it supports the pork instead of overwhelming it.

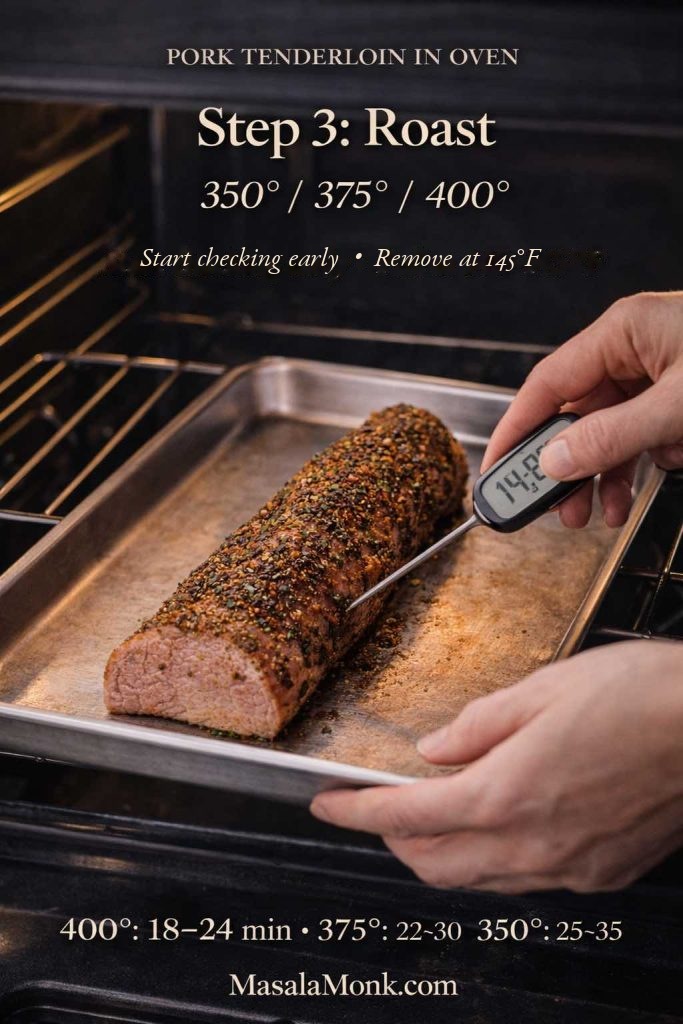
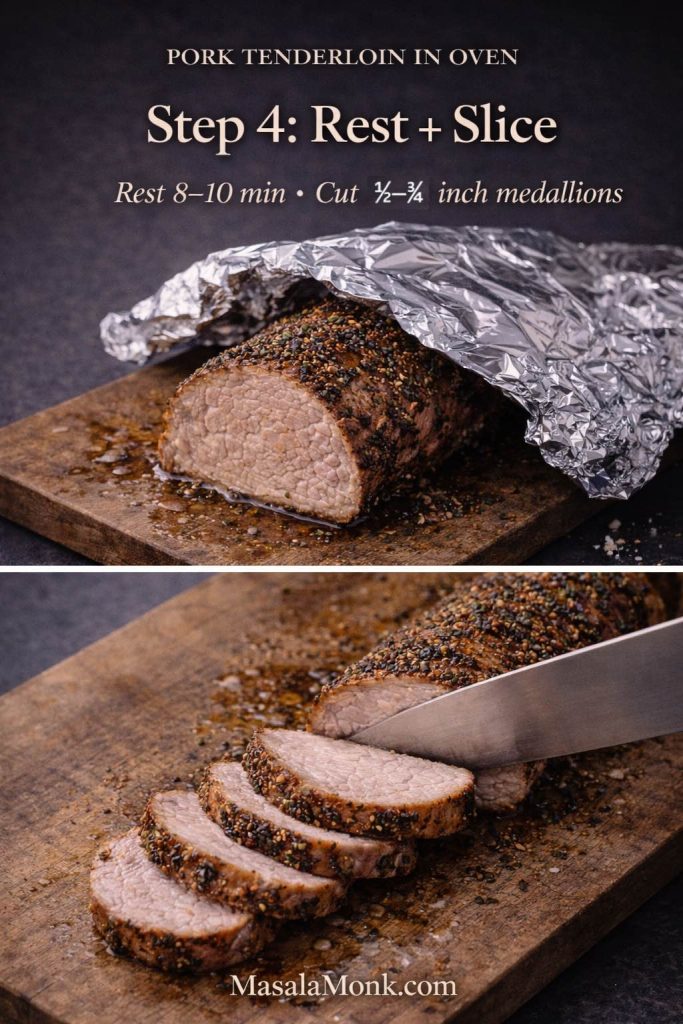
If you like this temperature-first approach, you’ll recognize the same logic used in our oven method for pork—especially the emphasis on stopping at the right moment rather than cooking “until it’s definitely done.” It’s the same idea you’ll see in pork tenderloin in oven, where the goal is juicy meat that slices cleanly without drying out.

Also Read: Keto Mocktails: 10 Low Carb, Sugar Free Recipes


Choosing the best pork chops for crock pot pork chops and sauerkraut

Before you open a jar of kraut, choose your chops. It sounds basic, yet it’s the difference between a meal that feels effortless and a meal you swear you’ll never make again.

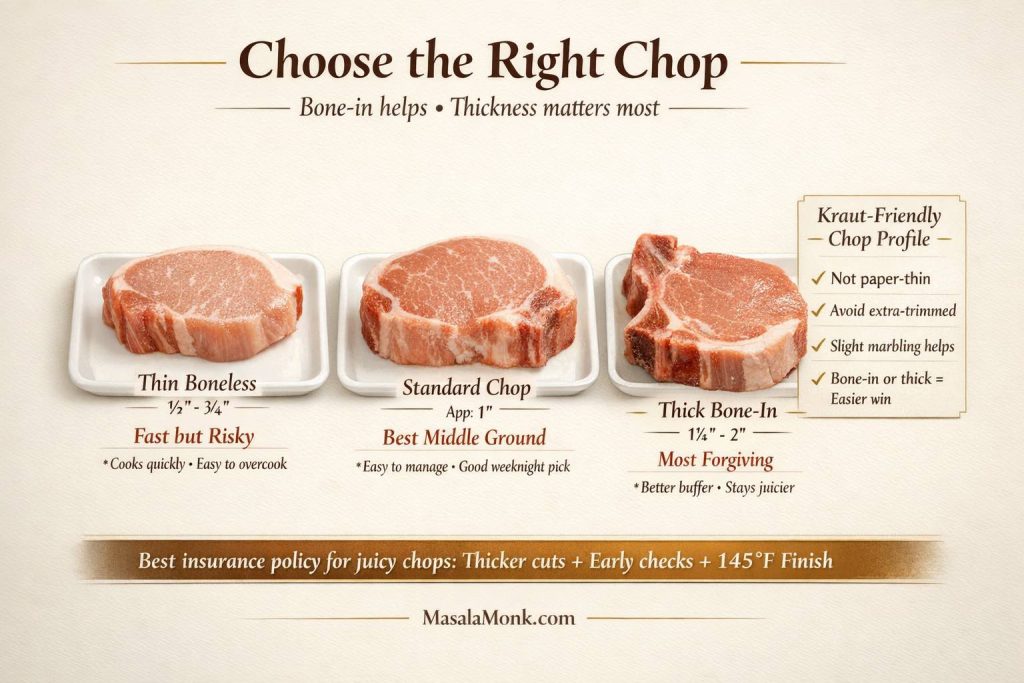
Buyer guide infographic for crock pot pork chops and sauerkraut showing three pork chop options—thin boneless, standard chop, and thick bone-in—with notes on which cuts are most forgiving, plus a kraut-friendly chop checklist and a tip to use thicker cuts, early checks, and a 145°F finish for juicy pork chops.
Before you build the crock pot, choose the right chop. This quick buyer guide shows why thickness matters more than almost anything else for crock pot pork chops and sauerkraut—thin boneless chops cook fast and can dry out, while thicker bone-in chops give you a bigger margin for error. Save this visual as your store-side reference, then use the method below (LOW heat + early checks + 145°F / 63°C) for juicy chops.

Bone-in vs boneless for crock pot pork chops and sauerkraut

Bone-in chops are often thicker and slightly more forgiving. They also tend to stay juicier in slow-cooker cooking because they’re less likely to be ultra-lean.

Boneless chops, especially boneless loin chops, can still work beautifully—provided you treat them gently and don’t let them run long. If you’re aiming for a reliable, no-drama dinner, bone-in gives you a little extra cushion. Even so, boneless can be fantastic when you want faster cooking or a cleaner slice.

Thickness matters more than almost everything else

If you take one idea from this entire post, let it be this: thickness changes the timeline.

  • Thin chops (½–¾ inch): cook quickly and can overcook quickly.
  • Standard chops (about 1 inch): the easiest middle ground.
  • Thick chops (1¼–2 inches): the best insurance policy for tenderness.

If you’re using thin chops, you can still win—yet you’ll want to start checking earlier and keep the heat gentle. Meanwhile, thick chops buy you time and keep the odds in your favor.

The “kraut-friendly” chop profile

Pork and sauerkraut is happiest when the pork has at least a little fat or marbling to balance the tang. So, if you have choices:

  • pick chops that are not paper-thin
  • avoid the leanest “extra trimmed” versions when possible
  • lean toward bone-in or thicker cuts

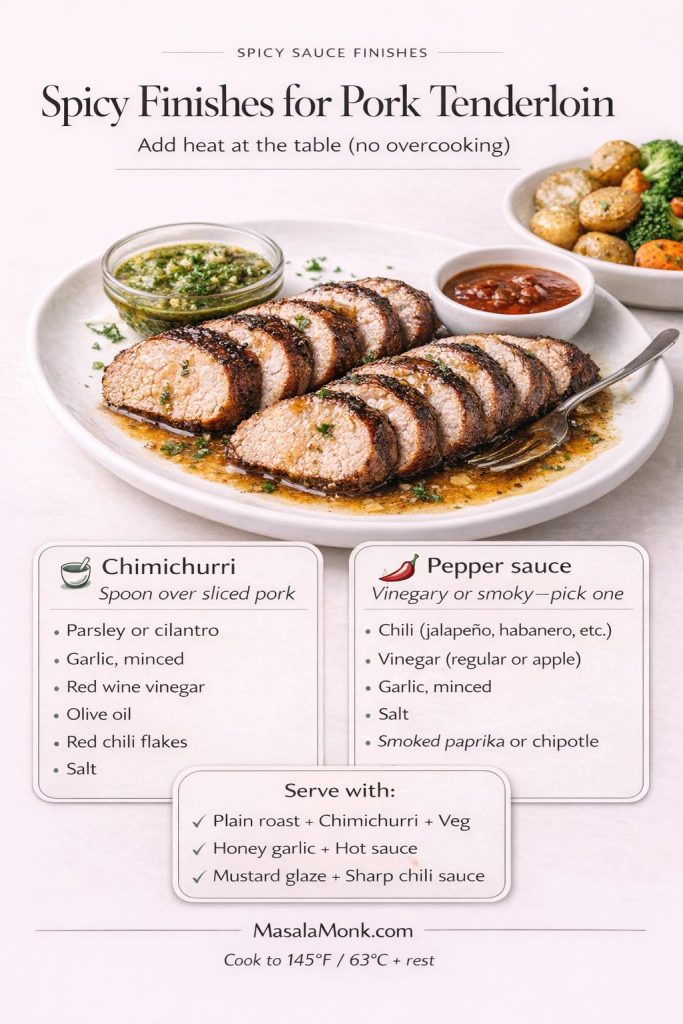
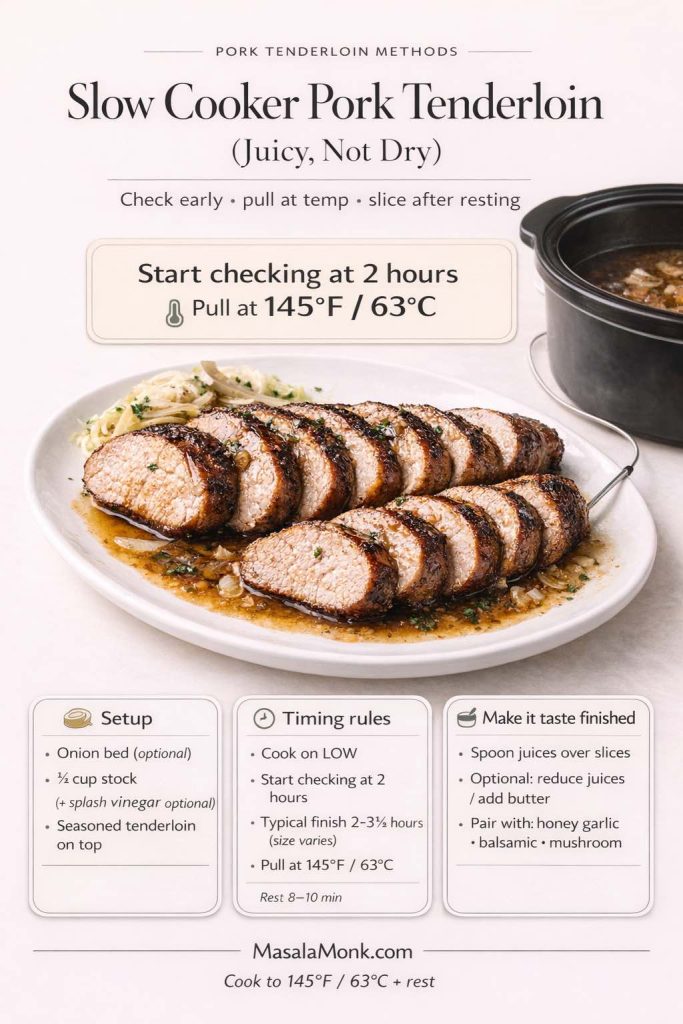
Also Read: Slow Cooker Pork Tenderloin (Crock Pot Recipe) — 3 Easy Ways


Which pork chops stay juiciest with sauerkraut (a quick buyer’s guide)

If you’ve ever had pork chops that came out oddly firm even though they were “done,” the cut is often the reason. Sauerkraut is tangy and salty, so it pairs best with chops that have a little natural richness.

If you can choose, look for chops that fall into one of these categories:

  • Shoulder or sirloin chops: these are usually a bit fattier and more forgiving, which makes them a great match for crock pot pork chops and sauerkraut. They’re the kind of chop that can handle slow heat without turning dry as easily.
  • Rib chops or center-cut bone-in chops: these are often thicker and stay tender well, especially when you pull at temperature.
  • Boneless loin chops: these are lean and can still be delicious, yet they need a shorter cook and earlier checking to avoid that dry, tight bite.

If all you have are lean boneless chops, don’t worry—just treat them gently. Keep the liquid minimal, cook on LOW, and consider the apple-and-onion variation so the dish feels balanced even with a leaner cut.

Also Read: Chicken Pesto Pasta (Easy Base Recipe + Creamy, One-Pot, Baked & More)


Ingredients for pork chops and sauerkraut crock pot style

This dish can be as spare as you want or as layered as you want. Still, the best version is always the one that tastes balanced. The ingredient list below keeps the classic soul while giving you a few optional add-ons that make it feel special without feeling sweet.

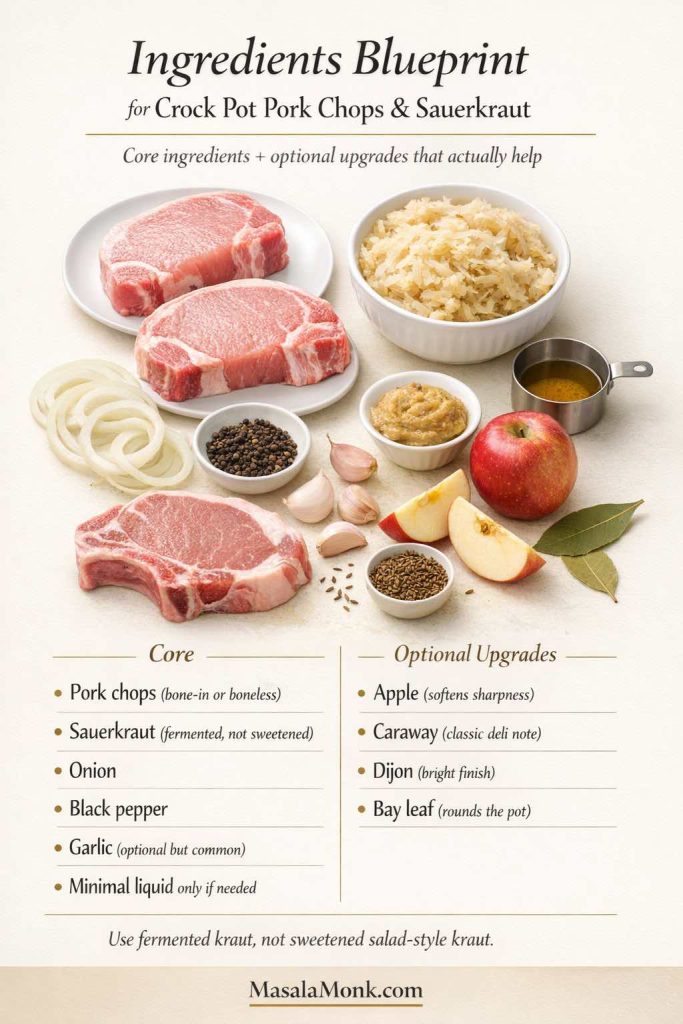
Ingredients blueprint infographic for crock pot pork chops and sauerkraut showing the core ingredients and optional upgrades, including pork chops, sauerkraut, onion, black pepper, garlic, apple, caraway, Dijon mustard, bay leaf, and a note to use fermented kraut instead of sweetened salad-style kraut.
This ingredient blueprint for crock pot pork chops and sauerkraut makes the recipe easier to shop and prep: it separates the true essentials (pork chops, sauerkraut, onion, pepper) from the optional upgrades that improve flavor without overcomplicating the pot (apple, caraway, Dijon, bay leaf). Use it as a quick visual checklist before you start, especially if you want a balanced, not-too-sour kraut and juicy chops.

Core ingredients

  • Pork chops (bone-in or boneless; thicker is better)
  • Sauerkraut (fermented kraut, not sweetened salad-style)
  • Onion, sliced (one medium onion is enough)
  • Black pepper
  • Garlic (optional, but lovely)
  • Caraway seeds (optional, classic, and surprisingly impactful)

Optional, highly recommended additions

  • One apple, sliced (for pork and sauerkraut with apples)
  • A small splash of apple juice or broth (only if needed; we’ll keep this measured)
  • Dijon mustard (for a bright finish)
  • A bay leaf (subtle, but it rounds the pot)

If you’re curious about what makes sauerkraut taste the way it does—salt levels, brine, and that sharp-tang backbone—this fermentation resource is genuinely useful: NCHFP’s sauerkraut guide. You don’t need to make homemade kraut for dinner tonight, but understanding the brine helps you adjust flavor with intention.

Also Read: Pork Tenderloin in Oven (Juicy, Easy, 350°F or 400°F) Recipe


Sauerkraut in crockpot: the “tangy vs mild” dial

Different jars and bags of sauerkraut can taste wildly different. Some are bright and briny; others are mellow and soft; a few are downright salty. Rather than guessing, you can steer it.

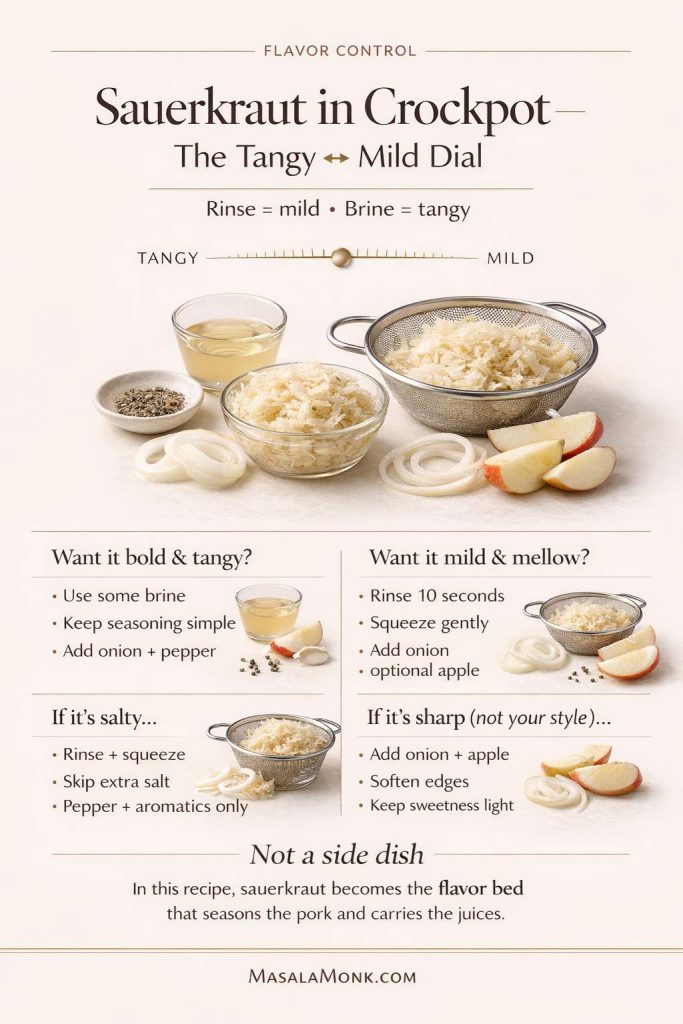
Different jars of sauerkraut can taste completely different—so don’t guess. Use this tangy vs mild dial to steer your flavor before the pork goes in: brine = tangier, quick rinse + gentle squeeze = milder. If your kraut tastes too salty, rinse and skip extra salt. If it tastes sharp, lean on onion + apple to soften the edges without turning dinner sweet. This one small adjustment makes crock pot pork chops and sauerkraut taste balanced every time.
Sauerkraut in crockpot “tangy vs mild” dial showing brine for tangier flavor and quick rinse + gentle squeeze for milder flavor, plus notes: rinse if salty, add onion and apple if the kraut tastes too sharp.

If you want it bold and tangy

Use sauerkraut with some of its brine. Keep seasoning simple. Then lean on onion and pepper to round it out.

If you want it mild and mellow

Rinse the sauerkraut quickly in a colander, then squeeze it gently. It’ll still taste like kraut—just less sharp. After that, add onion, and consider adding apple for an easy, natural balance.

If your sauerkraut is salty

Rinse and squeeze, then skip adding any extra salt. In fact, pepper and aromatics will often be enough.

If your sauerkraut tastes sharp in a way you don’t love

Add onion and apple. They soften the edges without turning dinner into something sugary. A tiny bit of sweetness is fine; a heavy hand isn’t necessary.

Because many people also cook sauerkraut in a slow cooker as a standalone side, you’ll sometimes see phrases like “sauerkraut in slow cooker” or “sauerkraut in crockpot.” In this dish, though, the sauerkraut isn’t just a side—it becomes the flavor bed that seasons the pork and carries the juices.

Also Read: How to Make a Flax Egg (Recipe & Ratio for Vegan Baking)


Step-by-step: crock pot pork chops & sauerkraut

The method is simple, yet it’s worth doing in a specific order. That way, the bottom of the slow cooker becomes a flavor base and the pork stays tender.

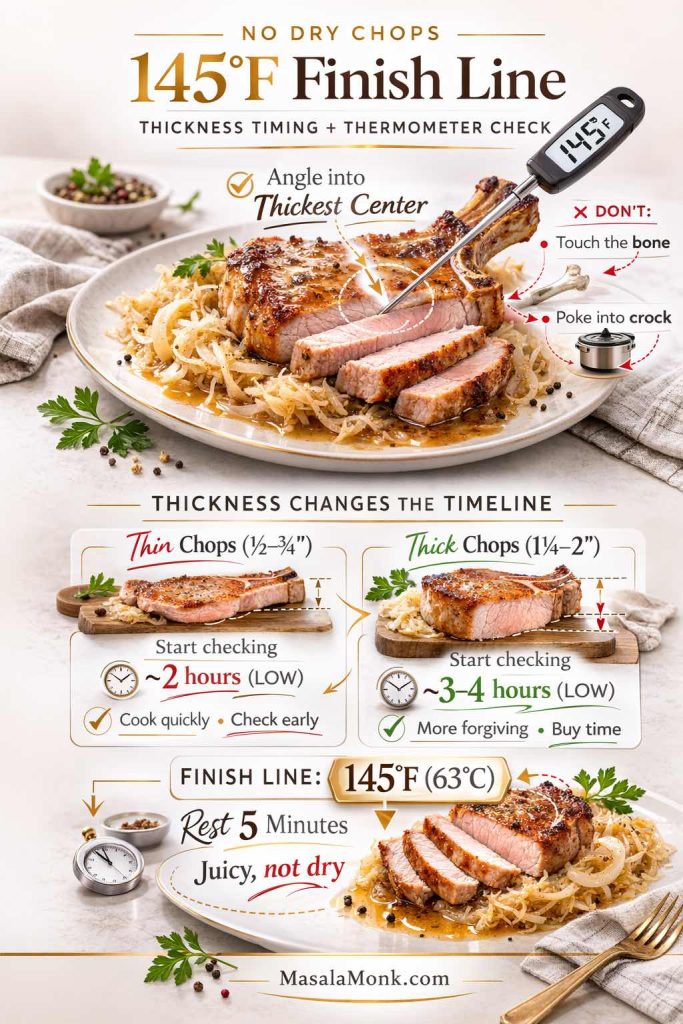
Method card for crock pot pork chops and sauerkraut showing the 145°F (63°C) finish line. A digital instant-read thermometer probes a pork chop from the side into the thickest center, with notes to avoid touching the bone or poking into the hot crock. A thickness timing strip compares thin chops (½–¾ inch, start checking ~2 hours on LOW) vs thick chops (1¼–2 inches, start checking ~3–4 hours on LOW). Bottom note: rest 5 minutes for juicy chops.
Don’t let crock pot pork chops and sauerkraut turn dry—use temperature as your finish line. Thickness changes the timeline (thin chops need earlier checks; thick chops buy you time), and a quick side-angle thermometer probe into the thickest center keeps you from overshooting. Aim for 145°F (63°C), then rest 5 minutes so the juices stay in the meat—not on the plate. This one habit is the difference between ‘perfect’ and ‘overcooked.’

Step 1: Build the base

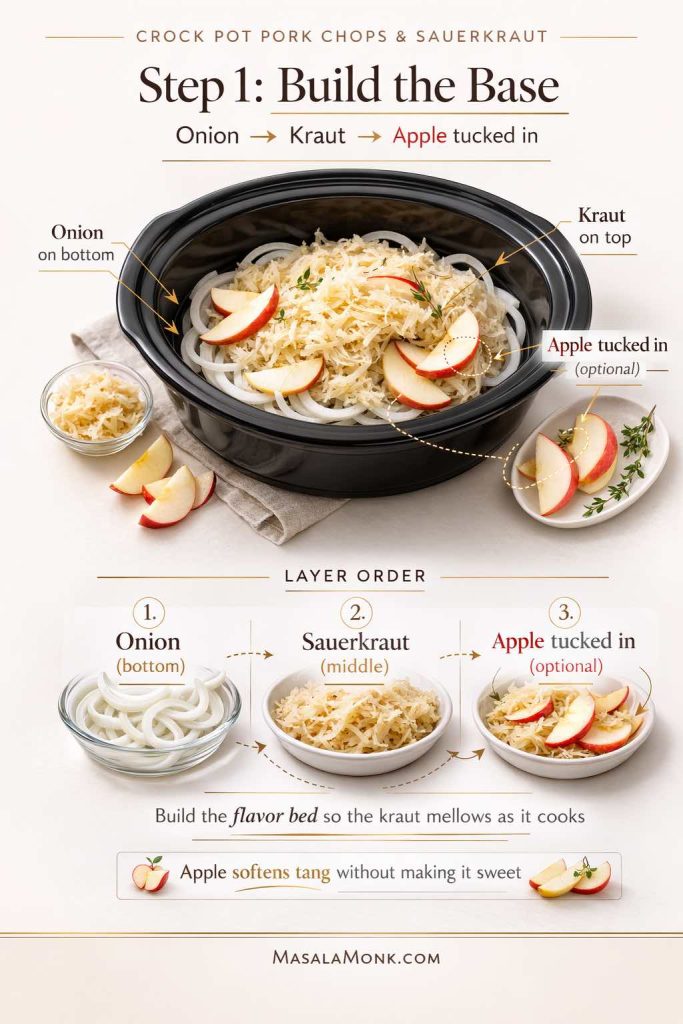
Scatter sliced onions across the bottom of your slow cooker. Then add the sauerkraut on top of the onions. This matters more than it seems because onions release moisture and sweetness, which helps the kraut mellow out as it cooks.

If you’re using apple, tuck slices through the kraut so they soften gently and perfume the pot. If you place apples directly on top, they can over-soften and feel like a separate layer. When they’re nestled in, they disappear in the best way—like you can taste the balance, but you don’t feel like you’re eating fruit for dinner.

Step 1 method card for crock pot pork chops and sauerkraut showing how to build the base in a slow cooker: sliced onions on the bottom, sauerkraut layered on top, and optional apple slices tucked into the kraut to soften tang without making the dish sweet.
Step 1: Build the flavor bed for crock pot pork chops and sauerkraut — onions go on the bottom, sauerkraut goes on top, and apple slices (optional) get tucked into the kraut to mellow sharpness without turning the dish sweet. This one layering move helps the kraut cook softer and more balanced while protecting the chops from sitting too deep in liquid. Save this step card, then read the full method here in this blog post.

Step 2: Season the pork chops

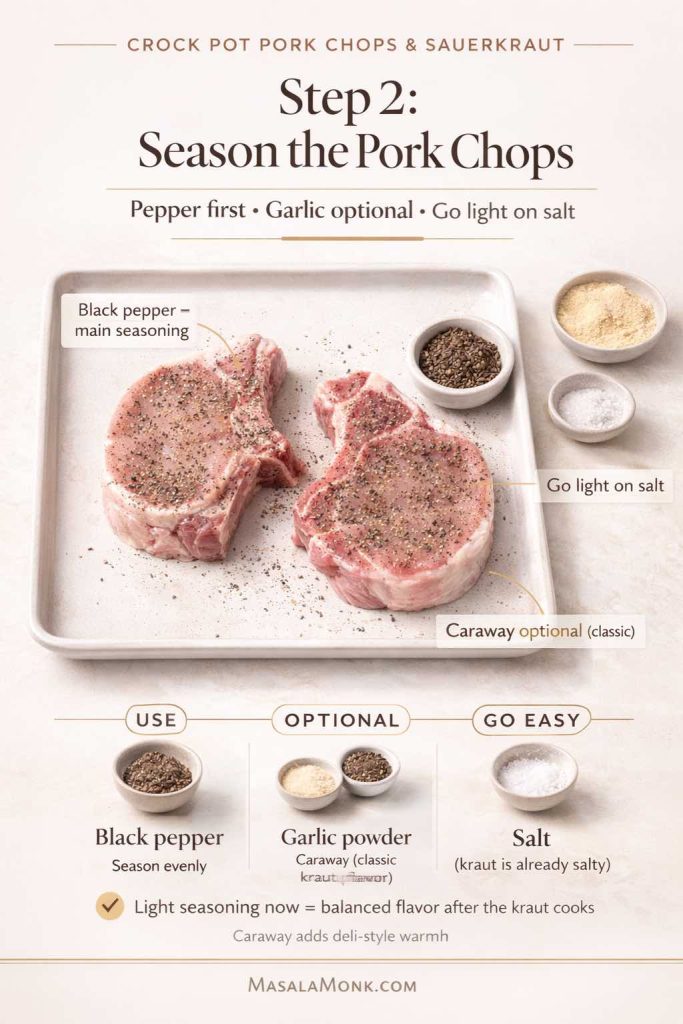
Season pork chops with black pepper. Add garlic powder if you like. Caraway is optional; if you love the deli-style character of sauerkraut dishes, you’ll appreciate it.

Go light on salt. In most cases, the sauerkraut brings enough salinity on its own.

Step 2 method card for crock pot pork chops and sauerkraut showing two raw pork chops on a tray seasoned with black pepper, with optional garlic powder and caraway, and a reminder to go light on salt because sauerkraut is already salty.
Step 2: Season the pork chops for crock pot pork chops and sauerkraut — use black pepper as the main seasoning, add garlic powder and caraway if you like that classic deli-style kraut flavor, and go light on salt since sauerkraut already brings plenty of salinity. This small step keeps the final dish balanced instead of overly salty. Save this method card and read the full recipe here in this post.

Step 3: Decide whether to sear

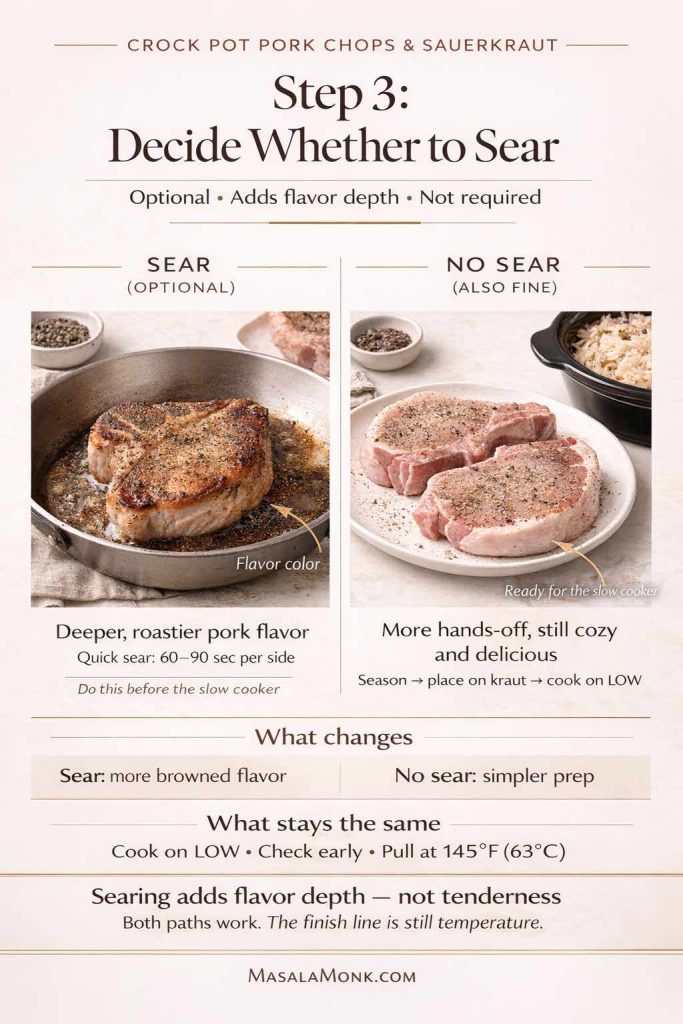
Searing is not required. Still, it adds depth and a richer pork flavor. If you have time, sear the chops quickly in a hot skillet for 60–90 seconds per side.

If you don’t have time, skip it. The dish will still be comforting and delicious. Nevertheless, searing can be the difference between “soft-cooked” and “deeper, roastier flavor.” Both are good; pick what suits your day.

Step 3 method card for crock pot pork chops and sauerkraut showing a side-by-side sear vs no sear comparison. Left panel shows a browned pork chop in a skillet labeled sear optional for deeper roastier flavor. Right panel shows seasoned raw pork chops ready for the slow cooker labeled no sear also fine. The graphic explains that searing adds flavor depth, not tenderness, and reminds cooks to use LOW heat and pull at 145°F (63°C).
Step 3 in our crock pot pork chops and sauerkraut method: decide whether to sear. This visual shows the real tradeoff clearly—searing is optional and adds deeper, roastier flavor, but skipping it still gives you a cozy, delicious result. The key is what stays the same: cook on LOW, check early, and pull at 145°F (63°C) so the chops stay juicy. Save this step card for the next time you make pork chops and sauerkraut in the slow cooker, and read the full recipe + timing guide on MasalaMonk.

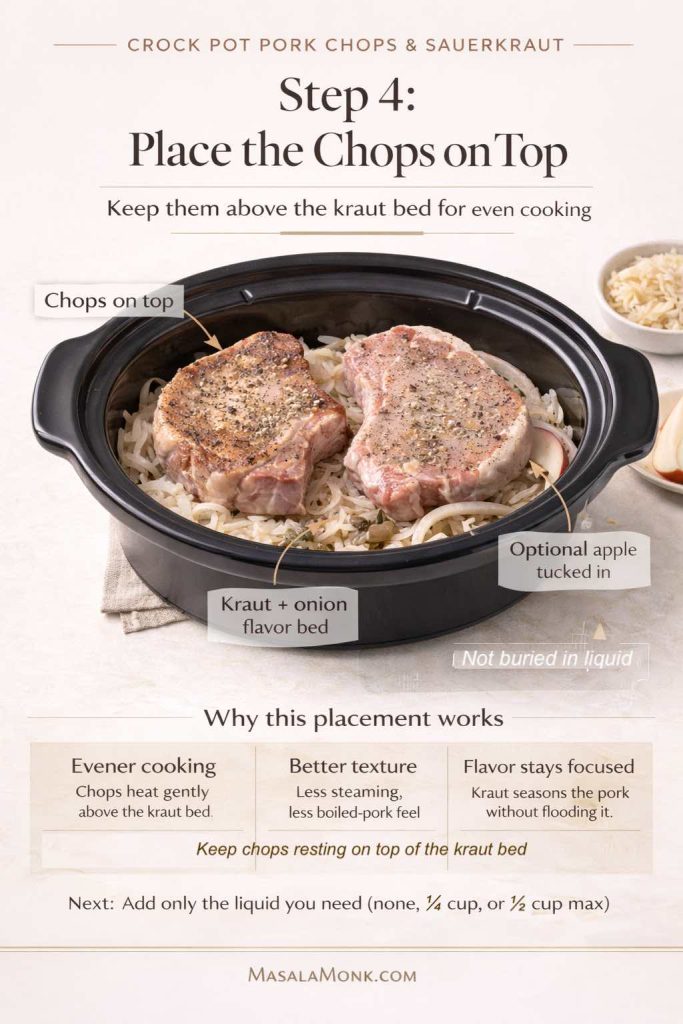
Step 4: Place the chops on top

Lay the pork chops on top of the sauerkraut mixture. Keeping them above the densest part of the kraut helps them cook more evenly and keeps the pork from sitting too deep in liquid.

At this point, you’ll see some recipes that add lots of water or broth. Instead, we’ll use a measured approach.

Infographic for crock pot pork chops and sauerkraut step 4, showing two seasoned pork chops placed on top of a sauerkraut and onion bed in a slow cooker, with optional apple slices tucked into the kraut and notes explaining why keeping chops above the kraut helps even cooking and prevents a watery texture.
Step 4 of crock pot pork chops and sauerkraut: place the pork chops on top of the kraut and onion bed (not buried in liquid). This simple placement helps the chops cook more evenly, keeps the texture tender, and lets the sauerkraut season the pork without turning it watery. Optional apple slices can be tucked into the kraut for balance. Save this step-by-step method card for your next pork and sauerkraut slow cooker dinner, and follow the full recipe in this blog post.

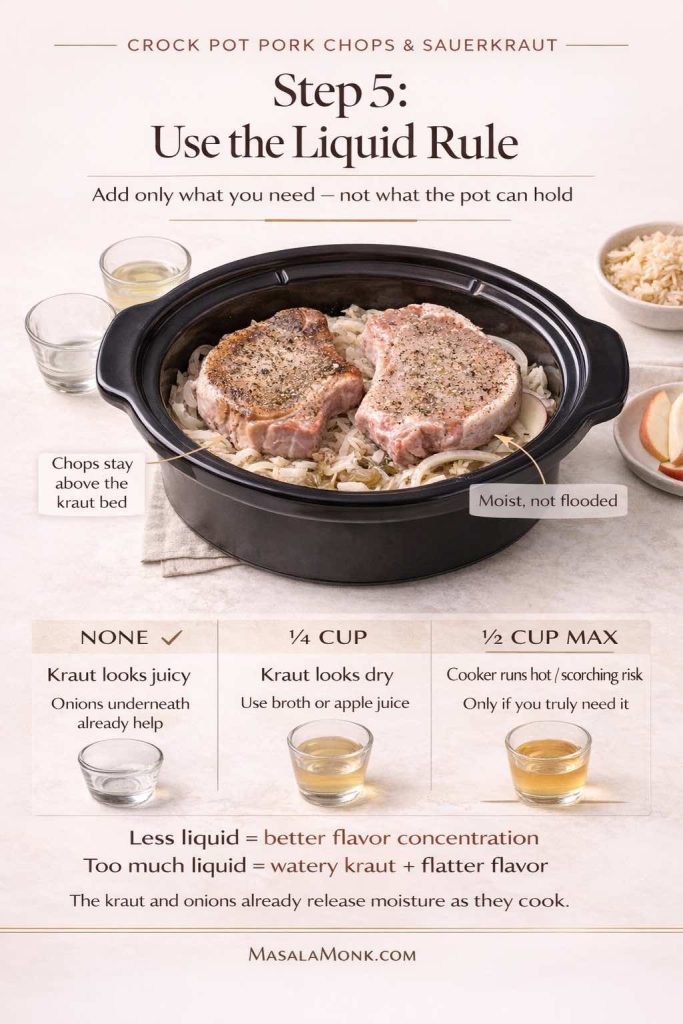
Step 5: Use the liquid rule

Here’s the clean rule: add only what you need.

  • If the sauerkraut looks juicy and you have onions underneath, you may not need any additional liquid.
  • If the kraut looks dry, add ¼ cup broth or apple juice.
  • If you’re worried your slow cooker runs hot or you’ve seen scorching before, you can go up to ½ cup—yet try not to exceed that unless you truly need to.

More liquid isn’t automatically better. Too much can flatten the flavor and leave you with watery kraut.

Step 5 (the liquid rule) is where a lot of crock pot pork chops and sauerkraut recipes go wrong. This method card shows exactly how much liquid to add based on what your kraut looks like: none if it’s already juicy, 1/4 cup if it looks dry, and 1/2 cup max only if your slow cooker runs hot. Keeping the pot moist—not flooded—helps prevent watery sauerkraut and protects flavor. Read the full recipe for the complete step-by-step method, timing, and temperature guide (145°F finish line), then save this to Pinterest so you can use it while cooking.

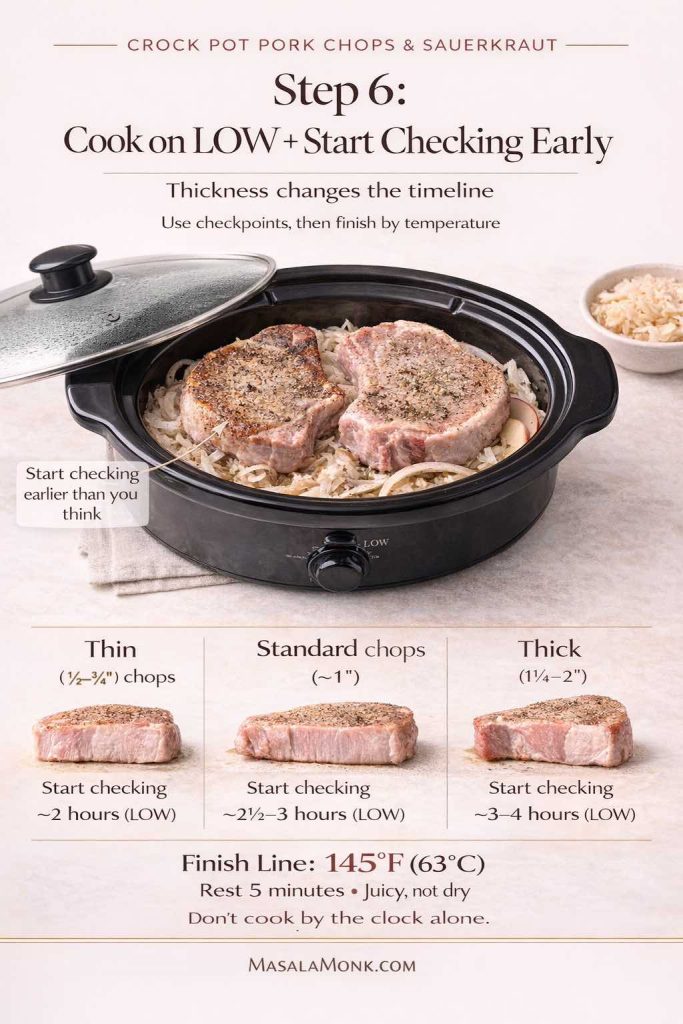
Step 6: Cook low and stop at the right time

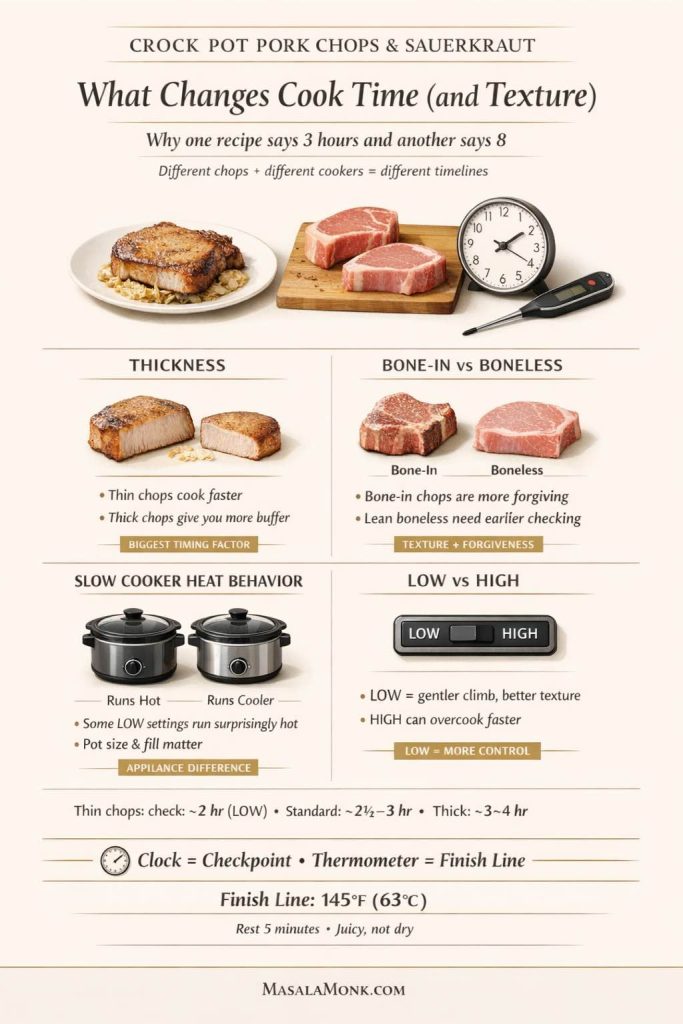
Cover the slow cooker and cook on LOW. While timing varies by slow cooker, chop thickness and whether they’re bone-in, you can use these checkpoints as your guide.

  • Thin chops (½–¾ inch): start checking around 2 hours on LOW
  • About 1 inch: start checking around 2½–3 hours on LOW
  • Thick chops (1¼–2 inches): start checking around 3–4 hours on LOW

When the thickest part hits 145°F (63°C), pull them and rest briefly. The safe temperature guidance is supported in the embedded resources: USDA safe temperature chart and FoodSafety.gov’s safe minimum internal temperature chart.

From here, let the chops rest a few minutes before serving. That short pause helps the juices settle so the pork feels tender and moist.

Step 6 method card for crock pot pork chops and sauerkraut showing pork chops on a sauerkraut and onion bed in a slow cooker, with timing checkpoints by chop thickness: thin chops start checking around 2 hours on LOW, standard chops around 2.5 to 3 hours, and thick chops around 3 to 4 hours. The card emphasizes cooking on LOW, checking early, and finishing at 145°F (63°C) with a 5-minute rest to keep pork chops juicy.
Step 6 is the part that saves this dish: cook on LOW, start checking early, and use chop thickness as your timeline. Thin pork chops finish much faster than thick ones, so this quick timing guide helps you avoid dry, overcooked meat in your crock pot pork chops and sauerkraut. Save this chart for your next slow cooker dinner, and pin/share it if you want an easy visual reminder while cooking.

How to check doneness so you don’t overcook the pork chops in crock pot

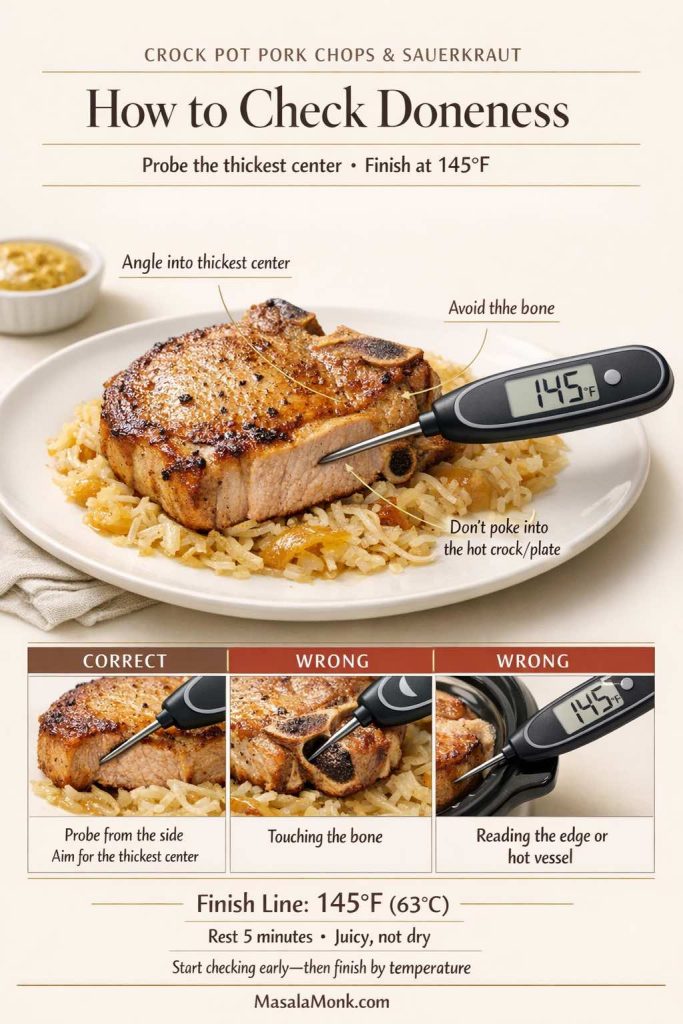
When you’re cooking pork chops with kraut, the simplest way to keep them tender is to check the thickest part of the chop—not near the bone and not poking straight through into the hot crock.

Angle the thermometer into the center from the side, aiming for the thickest spot. Once it reads 145°F (63°C, then a brief rest), you’re done. If the chop is bone-in, keep the tip slightly away from the bone, because the bone can give a misleading reading.

How to check doneness for crock pot pork chops and sauerkraut using an instant-read thermometer. The graphic shows the correct way to probe a pork chop from the side into the thickest center, plus two common mistakes to avoid: touching the bone and reading near the edge or hot crock. It highlights the safe finish line of 145°F (63°C) with a short rest for juicy pork chops.
Don’t guess doneness—probe the thickest center of the pork chop and finish at 145°F (63°C), then rest briefly for juicy results. This quick guide shows the correct thermometer angle (from the side) and the most common mistakes that cause bad readings, like touching the bone or checking too close to the edge/hot crock. If your crock pot pork chops and sauerkraut have ever turned dry, this is the one technique that fixes it. Save this guide, pin it for later, and read the full MasalaMonk recipe for timings, layering, and the tangy-vs-mild sauerkraut method.

Also, try to start checking a little earlier than you think you need to. It’s easy to cook longer; it’s impossible to “uncook” a chop that’s gone a little too far.

Also Read: Croquettes Recipe: One Master Method + 10 Popular Variations


Pork chop sauerkraut crock pot timing: what actually changes the result

You’ll see wildly different cook times for pork chops and sauerkraut in a slow cooker. Some versions run 6–8 hours and swear it’s “tender.” Others keep it shorter and insist longer is a mistake. The truth sits in the middle because different chops behave differently.

Why do some crock pot pork chops and sauerkraut recipes say 3 hours while others say 8? This visual breaks down the real factors: chop thickness, bone-in vs boneless cuts, slow cooker heat differences, and why LOW gives better control. Use the clock as a checkpoint, then finish by internal temperature (145°F / 63°C) for juicy pork chops instead of dry ones. Save this guide, pin it for later, and click through to the full MasalaMonk recipe for the complete step-by-step method, timing checkpoints, and doneness tips.
Why do some crock pot pork chops and sauerkraut recipes say 3 hours while others say 8? This visual breaks down the real factors: chop thickness, bone-in vs boneless cuts, slow cooker heat differences, and why LOW gives better control. Use the clock as a checkpoint, then finish by internal temperature (145°F / 63°C) for juicy pork chops instead of dry ones. Save this guide, pin it for later, and follow full recipe for the complete step-by-step method, timing checkpoints, and doneness tips.

Why thin pork chops don’t want a long cook in crock pot

Lean, thin chops can cook through quickly. If they keep going, they tighten, then dry out. So, for thin chops, shorter is almost always safer.

Why thick pork chops can handle more time in crock pot

Thicker chops have more thermal buffer. They don’t spike in temperature as quickly, and they’re often slightly fattier. That buys you time and makes them more forgiving.

Why bone-in chops feel different

Bone-in chops usually cook more gently and stay juicier. They can still dry out if ignored all day, yet they’re more forgiving than thin boneless chops.

Why LOW is the safer setting here

HIGH can push the outside of pork chops past the ideal point before the center is ready, especially in small slow cookers. LOW gives you a gentler climb and a more consistent result. Even if you’re in a rush, LOW plus earlier checking tends to produce a better bite than blasting it and hoping.
Also Read: Ravioli Recipe Reinvented: 5 Indian-Inspired Twists on the Italian Classic


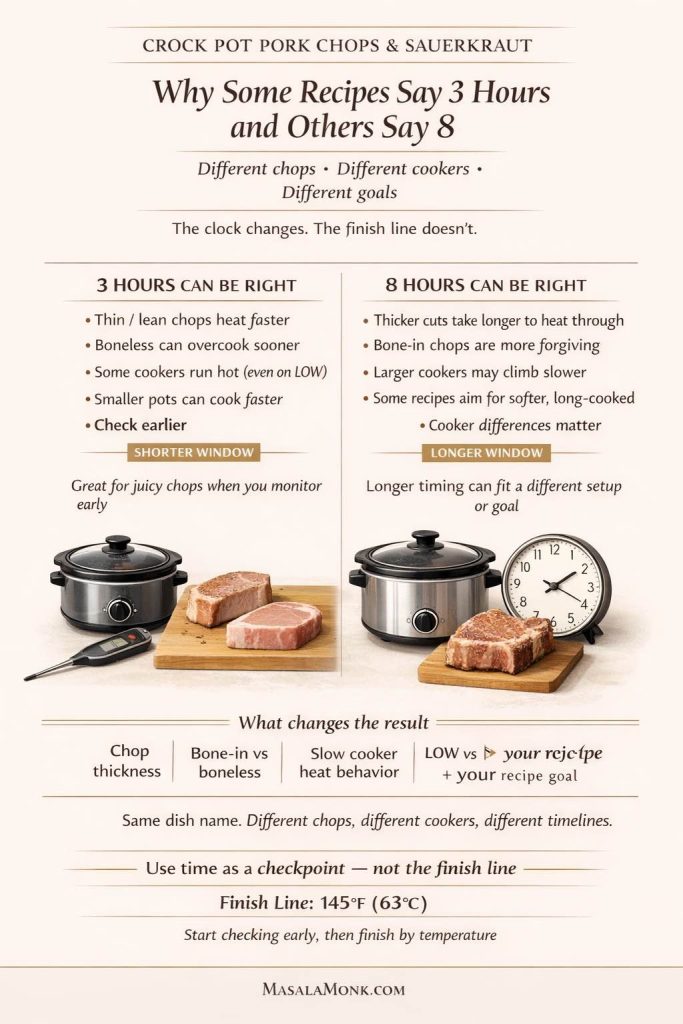
Why some recipes say 3 hours and others say 8 hours (and both can be “right”)

It’s confusing when one version of pork chop and sauerkraut slow cooker dinner says to cook for three hours, while another insists on eight. The difference usually isn’t the sauerkraut—it’s the chop and the slow cooker itself.

Infographic for crock pot pork chops and sauerkraut explaining why some recipes say 3 hours and others say 8 hours. The card compares thin lean chops vs thicker bone-in chops, smaller vs larger slow cookers, and different recipe goals, then reinforces that time is a checkpoint and the finish line is 145°F (63°C).
Why do some crock pot pork chops and sauerkraut recipes finish in 3 hours while others take 8? This visual breaks it down: chop thickness, bone-in vs boneless, slow cooker heat behavior, and recipe goals all change the timeline. The key rule stays the same—use time as a checkpoint, then finish by internal temperature (145°F / 63°C) for juicy pork chops. Save this guide for the next time you make pork chops and kraut, and bookmark this post for the full method, timing checkpoints, and doneness tips.

First, pork chops vary wildly in thickness and leanness. A thin boneless loin chop can be cooked through quickly, then spend the rest of the time drying out. Meanwhile, a thicker bone-in chop might still feel tender after a longer cook because it warms more slowly and has a little more fat to cushion the texture.

Second, slow cookers don’t run at the same heat. Some “LOW” settings run surprisingly hot, especially smaller units that fill up quickly. On the other hand, a large slow cooker that’s only half full can heat more slowly and take longer to reach the same internal temperature.

Finally, some recipes are written around a different goal. Long cook times often assume you’re cooking a fattier cut until it’s very soft, then serving it as a fall-apart comfort dish. Pork chops don’t always benefit from that approach, so if you want juicy chops that still feel like chops, you’re better off checking early and stopping at the right internal temperature instead of riding the clock.

Also Read: Fish and Chips Reimagined: 5 Indian Twists (Recipe + Method)


Crock pot pork chops and kraut: three variations that still taste classic

One of the joys of pork and sauerkraut is how easily it adapts. With only a few small changes, you can make it feel like a different dinner—yet it will still be the same comforting dish at heart.

Not sure which flavor direction to choose? This quick visual guide shows 3 classic ways to make crock pot pork chops and sauerkraut: a traditional deli-style version, an apple + onion version for a softer tang, and a mustard finish for a brighter savory finish. All three use the same base method, so you can pick the version that fits your mood (or what you have on hand). Save this card before you cook, and pin it for later so you can try all three.

1) Old fashioned pork and sauerkraut, classic style

This is the version you make when you want that traditional taste without extra sweetness.

  • Onion
  • Sauerkraut (rinsed or not, depending on your dial)
  • Caraway seeds (optional but classic)
  • Black pepper

If you want to amplify the aroma, add a bay leaf. It doesn’t scream “bay leaf,” but it smooths everything out.

2) Crock Pot Pork Chops & sauerkraut with apples (balanced, not sugary)

This variation is subtle and cozy, not dessert-like.

Add one sliced apple and keep everything else the same. If your sauerkraut is extremely sharp, you can add a teaspoon of brown sugar, but keep it restrained. The apple already does the job.

This apple-forward style also pairs beautifully with mashed potatoes or a potato salad side.

3) Mustard finish (bright and savory crock pot pork chops)

For a tangy-savory finish, stir a spoon of Dijon mustard into a small amount of hot cooking liquid, then spoon it over the chops at serving.
This works particularly well when you’ve rinsed the kraut to keep it mild. The mustard adds lift without making the dish heavy.

If you like sauces that bring freshness to rich food, an herb-forward option like chimichurri can also be a fun contrast, especially if you’re serving the pork chops with starchy sides that appreciate a bright accent.

Also Read: Sourdough Recipe: 10 Easy Bread Bakes (Loaves, Rolls & Bagels)


Crock pot pork chops & sauerkraut: serving ideas that make it feel like a full meal

Pork chops with kraut can be satisfying on its own, yet it shines even more when you pair it with the right side. Because the main dish is tangy and savory, sides that absorb juices or offer clean contrast work best.

Not sure what to serve with crock pot pork chops and sauerkraut? This pairing guide shows 3 easy ways to plate it: creamy mashed potatoes (classic comfort), potato salad (bright and traditional), or crispy croquettes (great for a leftover upgrade). Same pork + kraut base, three completely different dinner vibes. Save this for meal planning, and click through for the full recipe, timing, and doneness guide on MasalaMonk.com.

Classic comfort with Crock pot pork chops: mashed potatoes

If you want that “Sunday dinner” feeling, mashed potatoes are the obvious choice. They soak up the juices and soften the acidity.

A creamy mash option like perfect mashed potatoes turns the plate into something you’ll want to eat slowly.

Bright and traditional: potato salad with Crock pot pork chops

German-style potato salad and sauerkraut are old friends. It’s a natural pairing, especially if you want something that feels traditional but not heavy.

A collection like potato salad recipes gives you room to choose—creamy, vinegar-based, herby—depending on whether your kraut is tangy or mild.

Crispy leftover upgrade: croquettes

If you end up with leftover mash, don’t just reheat it and call it a day. Turn it into something crunchy and satisfying. Croquettes are especially good next to leftover pork and kraut because you get creamy inside, crisp outside, and tangy-salty alongside.
Build a weeknight rotation

If this dinner hits the spot and you want more slow cooker ideas that feel similarly low effort, keep the momentum going with crock pot chicken breast recipes. Different protein, same “dinner cooks itself” energy.

Also Read: Sweetened Condensed Milk Fudge: 10 Easy Recipes


Simple pork and sauerkraut recipe: quick fixes when something feels off

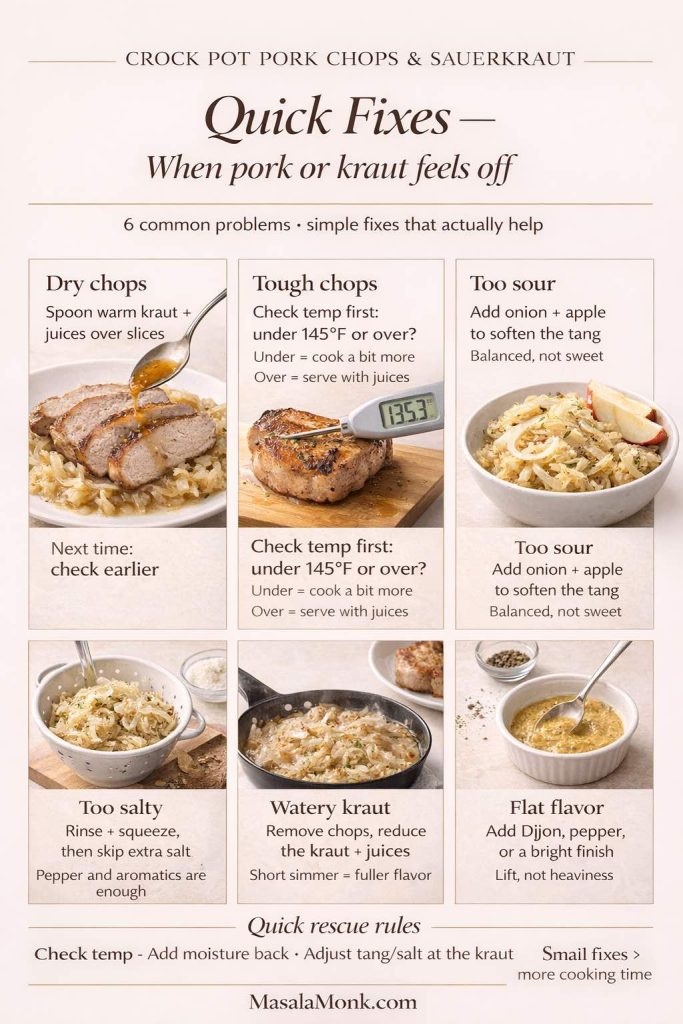
Even a great crock pot pork chops and sauerkraut setup can vary slightly depending on the slow cooker and the chops. So if dinner isn’t landing perfectly, these quick adjustments usually solve it.

Troubleshooting infographic for crock pot pork chops and sauerkraut showing quick fixes for dry chops, tough chops, sour kraut, salty kraut, watery kraut, and flat flavor, with simple rescue tips like checking temperature, adding juices, rinsing sauerkraut, reducing liquid, and finishing with Dijon or pepper.
Made crock pot pork chops and sauerkraut and something tastes “off”? This quick-fixes guide helps you troubleshoot the most common issues fast—dry pork chops, tough texture, kraut that’s too sour or salty, watery kraut, or flat flavor. Use it as a save-worthy reference while cooking, then finish by temperature (145°F) instead of guessing. Full recipe, timing tips, and doneness guidance on MasalaMonk.com — save this pin, share it, and come back when you need a fast fix.
If the pork chops are dry

Dry almost always means they went too long or the chops were too lean for the cook time. Next time, start checking earlier and pull at temperature. For tonight, slice the chops and spoon more of the warm kraut and juices over them, then serve with something that absorbs moisture—mashed potatoes are perfect for that.

If the pork chops cooked in crock pot are tough

“Tough” can mean two different things, so take a quick temperature reading:

  • If they’re under 145°F, they simply need more time—keep cooking in short bursts and re-check.
  • If they’re already past it and still feel tough, they’re likely lean chops that tightened from cooking too long. In that case, serve with extra juices, and plan a shorter cook next time.

If the sauerkraut is too sour

Next time, rinse the kraut quickly and squeeze it. For now, add apple slices (even late), let them warm through, and lean on onion and pepper to round it out.

If the sauerkraut is too salty

Rinse the kraut next time and skip added salt altogether. For tonight, add extra onion (or a few apple slices) to soften the salty edge.

If the sauerkraut is watery

Remove the chops, then reduce the kraut and liquid briefly until it tastes concentrated again. Even a short simmer makes the flavor feel fuller and less diluted.

If the flavor tastes flat

A spoon of mustard stirred into a little hot cooking liquid, extra black pepper, or a bright finish like an herb sauce can wake everything up without changing the dish into something else.

Also Read: Chicken Adobo — Step-by-Step Recipe — Classic Filipino Adobong Manok


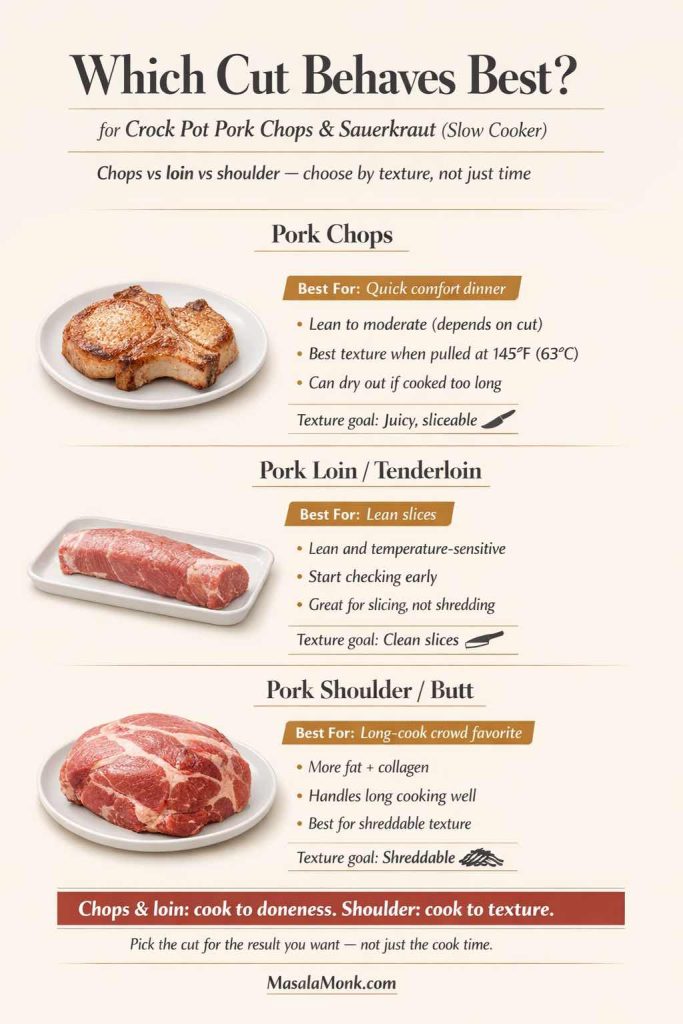
Crock pot pork loin & sauerkraut vs pork chops (a quick comparison)

Once you get comfortable with pork chops and sauerkraut in a slow cooker, it’s natural to wonder how this changes with other cuts—especially pork roast, pork loin, or tenderloin.

Cut comparison infographic for crock pot pork chops and sauerkraut showing how pork chops, pork loin or tenderloin, and pork shoulder or butt behave differently in a slow cooker. The guide explains which cuts are best for juicy slices vs shreddable texture and emphasizes that chops and loin should be cooked to doneness while shoulder is cooked to texture.
Not all pork cuts behave the same in a slow cooker—and this quick guide makes the difference clear. For crock pot pork chops and sauerkraut, pork chops and loin/tenderloin are best cooked to doneness, while pork shoulder/butt is cooked to texture for shreddable results. Use this visual to choose the right cut for the result you want before you start, then follow the timing and temperature guidance in the post so the pork stays juicy instead of overcooked.
  • Pork loin and tenderloin are leaner and more sensitive to overcooking, much like chops. The “stop at the right temp” approach matters even more.
  • Pork shoulder or pork butt has more collagen and fat, so it behaves differently. It can handle longer cooking and becomes shreddable.

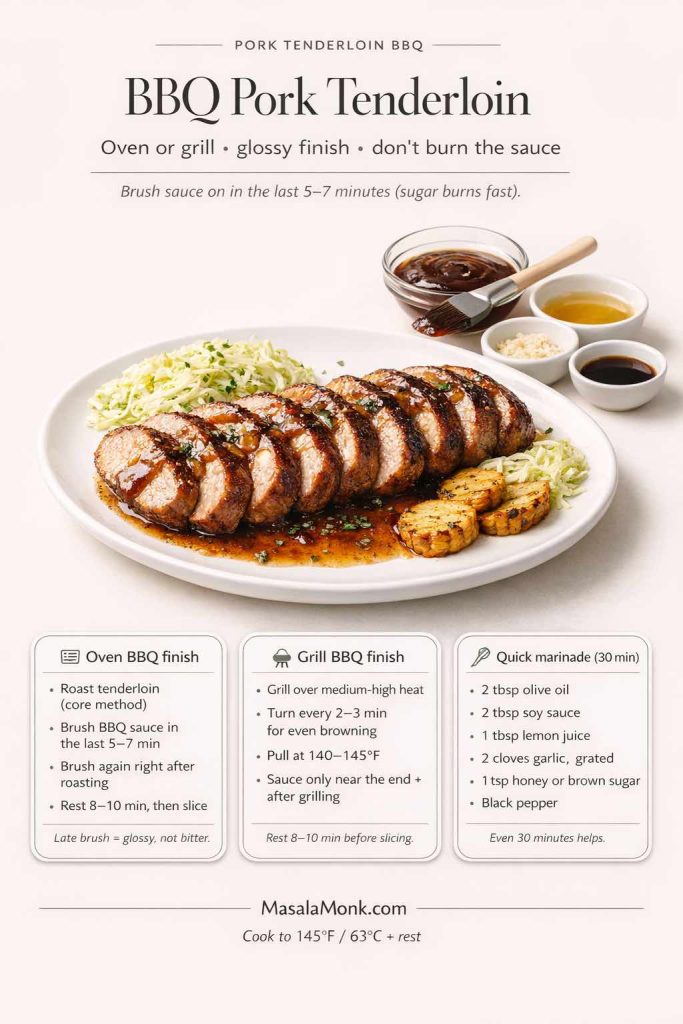
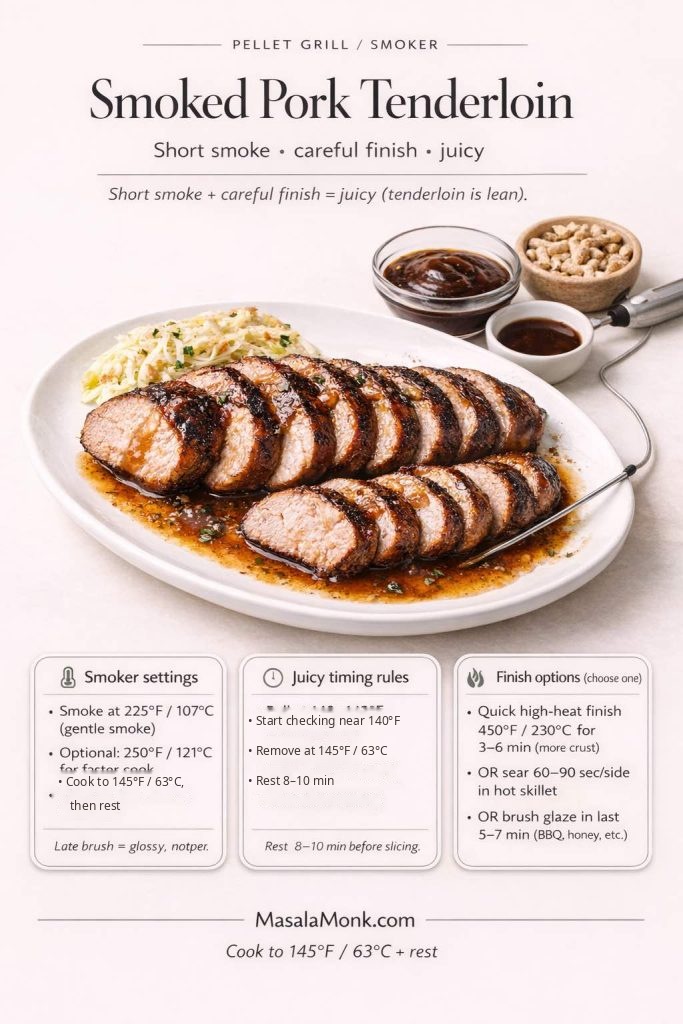
If you want to explore pork in other formats, the same “cook to temp” idea plays out in a different way in pork tenderloin in oven. Meanwhile, if you want a slow cooker pork method that’s built for tenderness and easy slicing, slow cooker pork tenderloin gives you a parallel approach that’s designed to stay juicy rather than stringy.

Also Read: How to make No-Bake Banana Pudding: No Oven Required Recipe


Pork and sauerkraut meal: making it feel special without making it complicated

Sometimes you want this dish to feel like more than a Tuesday dinner. Fortunately, the same ingredients can feel elevated with a few small touches.

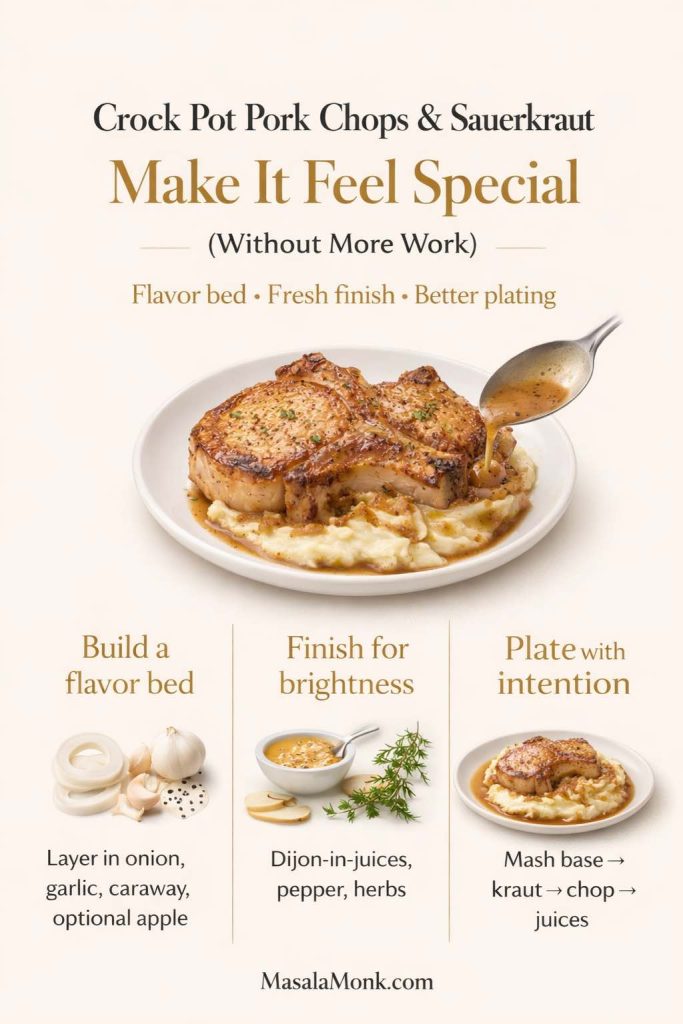
Infographic for crock pot pork chops and sauerkraut showing how to make the meal feel special without extra work: build a flavor bed with onion, garlic, caraway, and optional apple, finish with Dijon and herbs, and plate with mashed potatoes, sauerkraut, pork chops, and pan juices.
Want your crock pot pork chops and sauerkraut to feel a little more special without making the recipe harder? This visual shows 3 easy upgrades that change the final result: build a better flavor bed (onion, garlic, caraway, optional apple), add a quick bright finish (Dijon-in-juices + herbs), and plate it with intention (mash → kraut → chop → juices). Same slow-cooker method, but a much more “planned” dinner feel. Save this for the next time you make pork and kraut, and use it alongside the full MasalaMonk recipe for timing, doneness, and troubleshooting.

Add a “flavor bed” moment

Instead of just onion and kraut, add:

  • onion
  • a few smashed garlic cloves
  • a pinch of caraway
  • optional apple slices

It still looks simple, but it tastes layered.

Finish Crock Pot Pork Chops with something fresh

A bright finish helps tangy foods feel vibrant rather than heavy. Even a spoon of mustard stirred into juices counts. Alternatively, a fresh herb sauce can be fun—something like chimichurri adds a clean, lively note when you want contrast.

Serve it in a way that feels intentional

Instead of just scooping everything into a bowl, plate it:

  • a bed of mashed potatoes
  • a mound of sauerkraut and onions
  • chops on top
  • a final spoon of reduced juices

It looks like you cared, even though the slow cooker did most of the work.

Also Read: Mozzarella Sticks Recipe (Air Fryer, Oven, or Fried): String Cheese, Shredded Cheese, and Every Crunchy Variation


Sauerkraut and pork chops in oven vs crock pot (when to choose which)

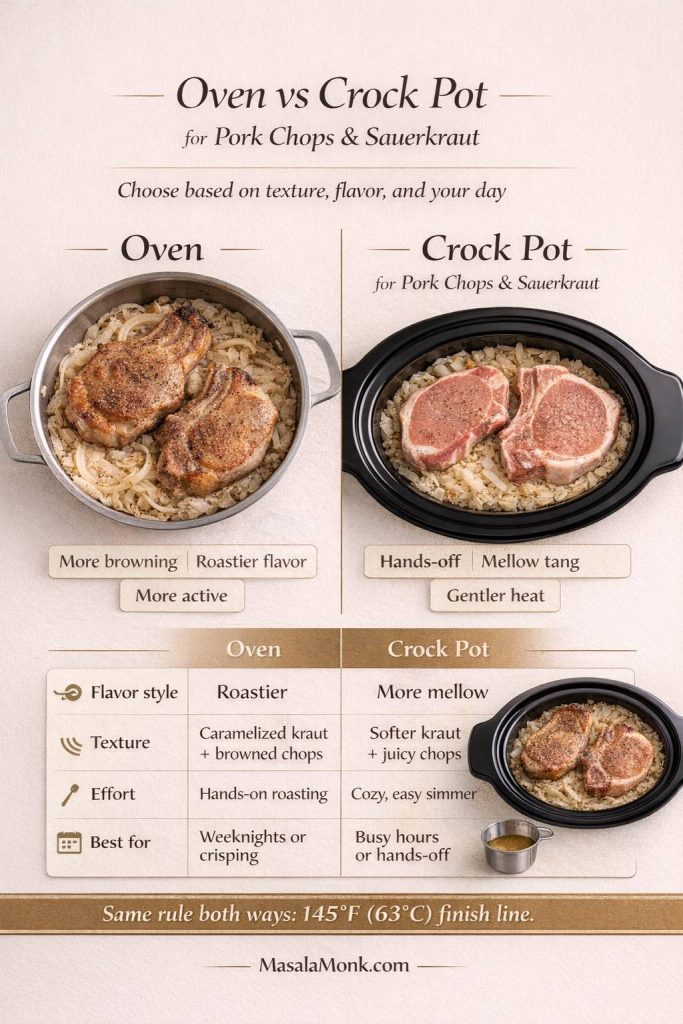
Slow cooker pork chops & sauerkraut is comfort-forward and forgiving when you manage time. The oven version tends to give more browning and a roasted character. If you crave caramelized edges, the oven is often the better fit. If you want hands-off cooking and mellowed kraut, the crock pot wins.

Comparison infographic for pork chops and sauerkraut showing oven vs crock pot cooking methods. The image compares flavor, texture, effort, and best use, with oven results labeled roastier and more browned, and crock pot results labeled mellow and hands-off. Includes a reminder to finish both methods at 145°F (63°C).
Not sure whether to make pork chops and sauerkraut in the oven or crock pot? This side-by-side comparison shows the difference in flavor, texture, effort, and best use so you can choose the version that fits your day: oven for more browning and roastier flavor, or crock pot for a hands-off, mellow finish. Either way, the same rule protects the pork from drying out—finish at 145°F (63°C) and rest briefly.

Still, the same doneness principle holds. Whether you cook pork in the oven or slow cooker, stopping at the right internal temperature is what protects the meat from drying out. That’s also why the safety guidance is helpful: FoodSafety.gov’s safe minimum internal temperature chart and the USDA safe temperature chart give you a clear, consistent endpoint.

Also Read: Crock Pot Chicken Breast Recipes: 10 Easy Slow Cooker Dinners (Juicy Every Time)


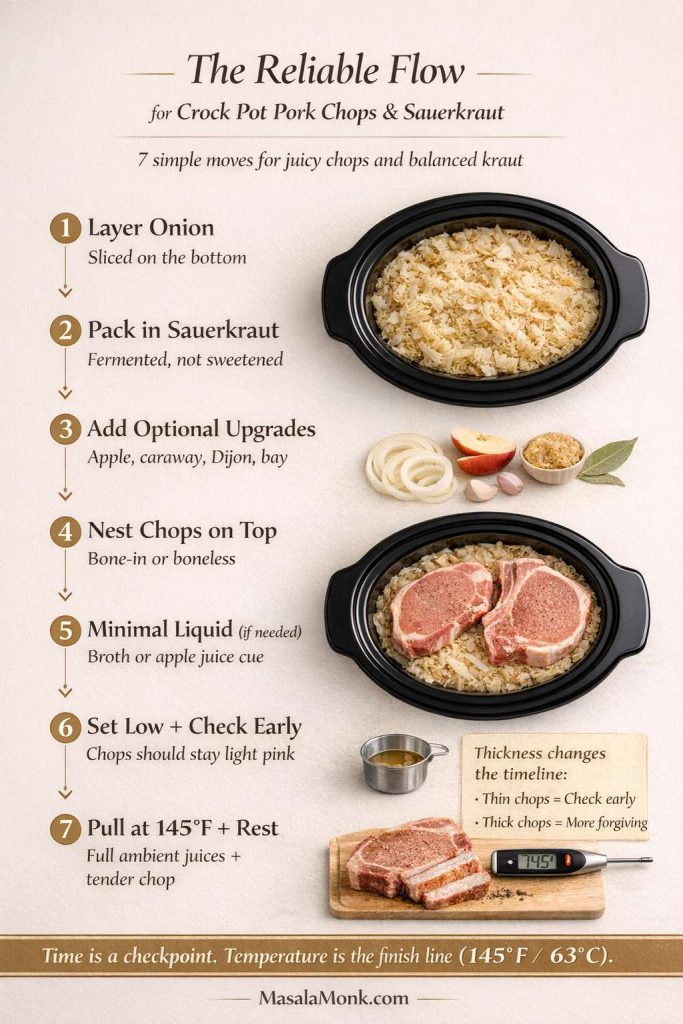
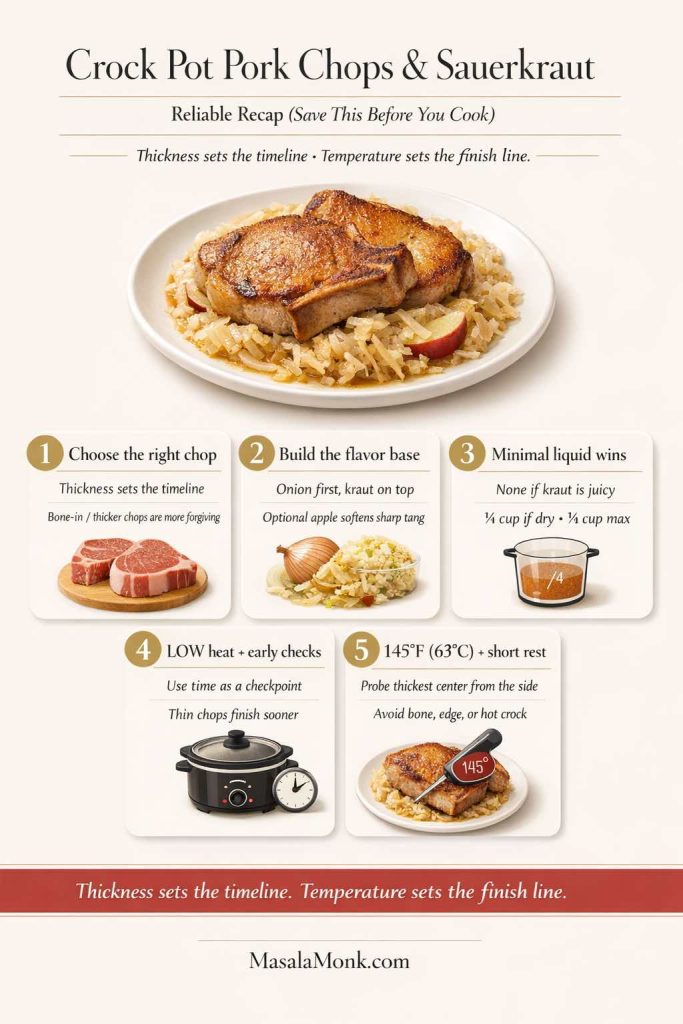
Recipe recap: crock pot pork chops and kraut, the reliable way

To make this feel simple again, here’s the flow you can keep in your head:

  1. Onion on the bottom
  2. Sauerkraut on top (rinsed or not, depending on how tangy you want it)
  3. Optional apple slices tucked in
  4. Pork chops on top
  5. Minimal liquid (none, ¼ cup, or ½ cup max)
  6. Cook on LOW, start checking early based on thickness
  7. Pull at 145°F, rest a few minutes, serve with the juices
Step-by-step infographic for crock pot pork chops and sauerkraut showing the reliable cooking flow: onion on the bottom, sauerkraut on top, optional apple and seasonings, pork chops placed on top, minimal liquid, cook on LOW and check early, then pull at 145°F (63°C) and rest. Includes a thickness timing reminder and thermometer finish-line note.
This reliable flow guide for crock pot pork chops and sauerkraut turns the whole method into one quick visual: layer onions, add kraut, tuck in optional upgrades, place the chops on top, use minimal liquid, cook on LOW, and finish at 145°F (63°C). It’s the save-and-cook version of the recipe recap, with a thickness reminder so you know when to start checking early. Save it now, then use the full post for timing details, variations, and troubleshooting.

That’s it. Everything else is seasoning and personality.

Also Read: Eggless Yorkshire Pudding (No Milk) Recipe


Storing and reheating crock pot pork chops & sauerkraut

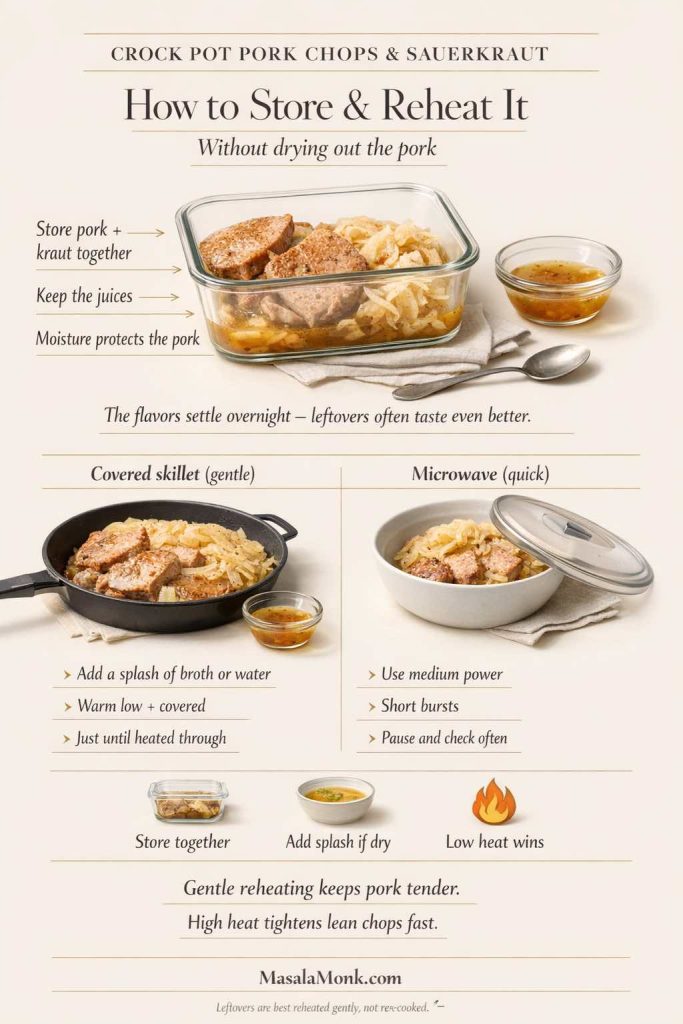
Pork chops can reheat beautifully if you keep it gentle. Since sauerkraut holds moisture, storing the chops with the kraut actually helps.

Infographic showing how to store and reheat crock pot pork chops and sauerkraut without drying out the pork, including storing pork with sauerkraut and juices, gentle skillet reheating with a splash of broth, and microwave reheating in short bursts on medium power.
Leftovers don’t have to turn dry. This quick guide shows the best way to store and reheat crock pot pork chops & sauerkraut: keep the pork with the kraut and juices, then reheat gently (covered skillet or short microwave bursts) so the chops stay tender. Save this for leftover night, and bookmark for full recipe, timing tips, and doneness guide on MasalaMonk.com. Pin it, share it, and keep it handy the next time you make a batch.
  • Cool leftovers, then store pork and kraut together in an airtight container.
  • Reheat slowly: a covered skillet with a splash of water or broth works well.
  • If microwaving, use medium power and shorter bursts so the pork warms without tightening.

The next day, this dish often tastes even better because the flavors settle.

If you’re building a comfort-food rotation, keep a few slow cooker staples in your back pocket too. On a different day, something like whole chicken in crock pot gives you the same ease with a different flavor payoff, and it fits naturally into the same kind of weeknight schedule.

Also Read: Garlic & Paprika Cabbage Rolls (Keto-Friendly Recipes) – 5 Bold Savory Twists


A gentle New Year’s nod (without turning this into a holiday-only dinner)

Pork and sauerkraut has a well-known New Year’s Day tradition in many households, and it’s easy to see why: it’s hearty, it serves a crowd, and it tastes like something you’d make on purpose. Even if you’re not cooking it for a New Year’s pork recipe moment, the same idea still applies—this is a meal that feels lucky because it’s reliable.

Infographic titled “Crock Pot Pork Chops & Sauerkraut New Year’s Crowd Guide” showing tips for scaling the recipe for a holiday meal: choose thicker bone-in chops, layer onions and sauerkraut (with optional apples), keep liquid minimal, cook by temperature not time, and finish pork at 145°F (63°C) with a short rest. Includes serving ideas like mashed potatoes, potato salad, and rye bread.
Making crock pot pork chops and sauerkraut for New Year’s or a bigger family dinner? This crowd guide keeps the method simple: choose thicker chops (bone-in if possible), scale the onion + sauerkraut flavor bed, keep extra liquid minimal, and cook to temperature (145°F / 63°C) instead of relying on the clock. It’s the easiest way to keep the pork juicy and the kraut flavorful when cooking for a group. Save this guide for holiday planning, and use the full recipe below for step-by-step timing, layering, and doneness tips.

If you want to lean into that tradition, you can make it “holiday-ready” by scaling up, choosing thicker chops, and adding apples and onions for extra depth. Then serve it with mashed potatoes or potato salad and let the table do the rest.

Also Read: 10 Low Carb Chia Pudding Recipes for Weight Loss (Keto, High-Protein, Dairy-Free)


Final thoughts

Crock pot pork chops and sauerkraut doesn’t need to be a gamble. Once you treat chop thickness as the timeline and temperature as the finish line, the dish becomes what it was always meant to be: comforting, hands-off, and surprisingly satisfying.

Closing recap infographic for crock pot pork chops and sauerkraut showing a plated pork chop and kraut dish plus 5 key steps: choose thicker chops, build onion and sauerkraut base, use minimal liquid, cook on LOW and check early, and finish at 145°F (63°C) with a short rest.
Save this recap before you cook: this closing guide for crock pot pork chops and sauerkraut sums up the full method in one glance—choose the right chop, build the onion + kraut base, keep liquid minimal, cook on LOW, and finish at 145°F (63°C) with a short rest. It’s the quick-reference version of the recipe for juicy pork chops and balanced sauerkraut every time. Pin it, save it, and use it while cooking.

Start simple, learn your sauerkraut dial, and keep your liquid minimal. Then, as you get comfortable, play with apples, mustard, or caraway until the flavor lands exactly where you want it. After all, the best version is the one you’ll actually want to make again.

And if you’re in the mood to keep building your slow cooker rotation, you’ll find plenty of weeknight-friendly ideas in crock pot chicken breast recipes, plus pork technique continuity through slow cooker pork tenderloin and pork tenderloin in oven.

Also Read: How to Cook Tortellini (Fresh, Frozen, Dried) + Easy Dinner Ideas


FAQs

1) Can I make crock pot pork chops and sauerkraut without searing the chops first?

Yes. Searing adds deeper flavor and a nicer “roasty” note, yet it isn’t required for tender results. If you skip it, focus on good seasoning, smart layering, and stopping the cook once the chops hit the right internal temperature.

2) What are the best pork chops for pork chop and sauerkraut slow cooker recipes?

Thicker chops usually win. Bone-in chops tend to stay juicier, while very lean boneless loin chops can dry out if they run too long. If you’re choosing at the store, look for chops that are at least about an inch thick for more forgiveness.

3) How long do pork chops and sauerkraut in a slow cooker usually take?

It depends on thickness, whether they’re bone-in, and how hot your slow cooker runs. In general, thinner chops finish sooner, while thicker chops take longer. Rather than relying on a single fixed time, start checking earlier than you think you need to and pull when the chops are done.

4) Can I cook pork chops and sauerkraut on HIGH instead of LOW?

You can, although LOW is more reliable for tender pork chops with kraut. HIGH can push the outside of lean chops too far before the center settles, which increases the chance of dryness. If you must use HIGH, check sooner and don’t let the chops coast once they’re done.

5) Should sauerkraut go on the bottom or the top in crock pot pork chops and sauerkraut?

Typically, sauerkraut works best on the bottom with onions underneath, then pork chops on top. This setup lets the kraut mellow as it cooks while the chops heat more evenly, instead of sitting submerged in liquid.

6) Do I drain sauerkraut for a sauerkraut crock pot recipe, or use the brine?

Either works—choose based on flavor. Using some brine makes the dish tangier. Draining keeps it more moderate. If your kraut is very salty or sharp, rinsing and squeezing it lightly can make the final pork and sauerkraut meal taste smoother.

7) How do I make crock pot pork and kraut taste less sour?

First, rinse the sauerkraut quickly and squeeze it. Next, add onions, and consider apples for natural balance. Finally, keep extra liquid to a minimum so the flavor stays concentrated rather than harsh and watery.

8) Can I make pork and sauerkraut with apples in the slow cooker?

Absolutely. Apples are one of the easiest ways to soften the tang without turning the dish sweet. Slice a crisp apple and tuck it into the kraut layer so it cooks gently and blends into the overall flavor.

9) What’s the difference between pork roast and sauerkraut in slow cooker and pork chops with sauerkraut?

A pork roast (like shoulder or butt) can handle longer cooking and can become shreddable, while pork chops are leaner and can dry out if they cook too long. So, pork roast and sauerkraut in a slow cooker is more forgiving, whereas pork chop and sauerkraut slow cooker recipes benefit from earlier checking and a shorter window.

10) Can I make crock pot pork loin and sauerkraut the same way as chops?

The layering is similar, but pork loin behaves more like chops than like shoulder—it’s lean and can dry out if it runs too long. Therefore, it’s best to treat pork loin and sauerkraut in slow cooker cooking with the same “check early and stop on time” approach.

11) Can I use pork tenderloin and sauerkraut in slow cooker recipes?

Yes, although tenderloin is very lean, so it needs an even shorter cook than most chops or loin. For pork tenderloin and sauerkraut in slow cooker cooking, plan to start checking early and avoid extended cooking times.

12) Is “pork and kraut” the same thing as pork and sauerkraut?

Yes. “Kraut” is simply shorthand for sauerkraut, so crock pot pork and kraut, pork & kraut, and pork and sauerkraut recipes often describe the same classic dish.

13) Why are my pork chops tough in a pork chop sauerkraut slow cooker dinner?

Toughness usually comes from one of two things: they’re not finished yet, or they cooked too long while being very lean. A quick temperature check helps you decide which problem you’re dealing with, and from there you can adjust with short additional cooking or serve with extra juices.

14) Why did my pork chops turn dry in crock pot pork chops and sauerkraut?

Dry chops typically mean they cooked past the ideal point, especially if they were thin or very lean. Next time, choose thicker chops, cook on LOW, and begin checking sooner so you can pull them as soon as they’re done.

15) How do I stop pork chops from tasting boiled when making pork & sauerkraut in crock pot?

The easiest fix is controlling liquid. Sauerkraut and onions already contribute moisture, so you rarely need much added broth. Keeping extra liquid minimal helps the flavor stay rich and prevents that boiled, diluted taste.

16) Can I cook pork and sauerkraut in crock pot overnight?

You can, but pork chops aren’t the best cut for very long holds. Overnight cooking works better with a pork roast (shoulder/butt) than with chops. If you want overnight timing, consider switching to a roast-focused recipe for pork roast and sauerkraut slow cooker cooking.

17) What are the best side dishes for pork and sauerkraut?

Potatoes are the classic partner—mashed, roasted, or boiled—because they absorb the tangy juices. In addition, cabbage-friendly sides like simple salads, rye bread, or dumplings pair well depending on how hearty you want the pork and sauerkraut meal to feel.

18) Can I make baked pork chop and sauerkraut instead of slow cooker?

Yes. If you prefer more browning and a roastier flavor, baked pork chop and sauerkraut in the oven can be a great alternative. That said, the slow cooker version is ideal when you want hands-off cooking and a softer, mellowed kraut.

19) Can I use ribs and sauerkraut instead of chops?

You can. Ribs tend to be fattier and can handle longer cooking times, so they often stay tender even if the cook runs longer. If you enjoy this flavor profile, recipes for ribs and sauerkraut are a natural next step.

20) How do I store and reheat pork chops with kraut without drying them out?

Cool leftovers, store chops with the sauerkraut, and reheat gently. A covered pan with a small splash of water works well, and medium microwave power prevents the pork from tightening. As a result, leftovers stay tender instead of turning dry and stringy.

Posted on — 7 Comments

Pork Tenderloin in Oven (Juicy, Easy, 350°F or 400°F) Recipe

Close-up of sliced pork tenderloin in the oven with a glossy finish; a basting brush drips sauce over the roast, with text showing 350° or 400° and 145°F for juicy slices.

This was updated on

This pork tenderloin in oven recipe gets much easier once you stop trusting the clock alone. Because the cut is lean, a few extra minutes can take it from juicy to dry. Season it well, choose the oven temperature that suits dinner, cook the thickest center to 145°F / 63°C, rest, then slice.

Once that foundation is right, the same tenderloin can go honey garlic, creamy mushroom, lemony, balsamic, mustardy or BBQ without relearning the method. The guide also covers cast iron, a sheet-pan dinner, slow cooker, Instant Pot, grill, smoker, stuffed tenderloin and leftovers—but the dependable oven method comes first.

Quick answer: pork tenderloin in the oven

For a 1–1½ lb (450–700 g) pork tenderloin, roast at 400°F for about 18–24 minutes, 375°F for 22–30 minutes, or 350°F for 25–35 minutes. Start checking early and trust the thermometer more than the clock: the finished center should reach 145°F / 63°C, followed by an 8–10 minute rest before slicing.

Recipe card for juicy pork tenderloin in the oven showing 350°F, 375°F and 400°F cook times, plus 145°F (63°C) target temperature and resting tips.
Save this quick guide: pork tenderloin in the oven at 350°F, 375°F, or 400°F—plus the exact 145°F (63°C) internal temperature and resting rule for juicy slices every time.

Take what you need tonight, then come back later when you want a different flavor without learning a new technique.


Pork tenderloin vs pork loin vs pork fillet (so timing finally clicks)

Before the oven even warms up, it helps to know what you’re cooking. Pork tenderloin and pork loin are not the same thing, and swapping them without adjusting time is one of the fastest ways to end up disappointed.

Infographic comparing pork tenderloin vs pork loin vs pork fillet, showing typical weights and why cook times differ so you don’t swap cuts without adjusting timing.
Not sure if you bought pork tenderloin or pork loin? This quick guide shows pork tenderloin vs pork loin vs pork fillet (UK/AU) and explains why cook time changes—so your oven roast stays juicy instead of overcooked.

Pork tenderloin is long, narrow, and usually weighs around 1 to 1½ pounds (about 450–700 g). It’s sometimes labeled as pork fillet, especially in the UK and Australia, which is why you’ll see phrases like “pork fillet oven time” or “roasting pork fillet UK.” In most cases, those are still talking about tenderloin.

Pork loin, on the other hand, is thicker and wider. It can show up as a whole boneless pork loin, a center cut pork loin filet, or a loin end pork roast, and it commonly weighs 2 to 5 pounds. A bone in pork loin roast will be even bigger and needs more time. When someone mentions “pork loin on the bone” or “bone in pork loin roast,” that’s a different cook altogether.

Tenderloin cooks quickly; loin cooks more slowly. That difference influences everything—temperature, timing, and how much rest you need.

If your package says pork tenderloin (sometimes labeled pork fillet), you’re in the right place. If it says pork loin roast, you can still use many flavor ideas below, but you must increase cook time and treat it like a larger roast. The flavors can transfer; the timing cannot.

If your package actually says pork loin roast, don’t stretch these tenderloin times to fit it. Switch to our Slow Cooker Pork Loin Recipe, which is built for that larger cut and gives you the right timing, moisture, and doneness guidance.

The one rule that keeps pork tenderloin juicy

If there’s a single habit that transforms pork tenderloin, it’s cooking by internal temperature instead of guessing. Whole cuts of pork are considered safe at 145°F / 63°C followed by a short rest, as shown in the official guidance on the USDA safe temperature chart and the FoodSafety.gov temperature chart.

That standard is also where tenderloin tends to be at its best: juicy, tender, and sliceable. Start checking around 140°F so you can catch the roast before it overshoots, then remove it from the heat when the thickest center reaches 145°F / 63°C. Rest for at least 3 minutes; for clean, juicy slices, 8–10 minutes works especially well.

If you’re looking for “pork fillet oven time,” use this chart first — “pork fillet” is another name for pork tenderloin in many regions. Times vary by thickness, so start checking a little early and cook to temperature.

Pork Fillet (Tenderloin) Oven Time Chart

Oven TempApprox. Cook Time*Best ForRemove At (Internal Temp)
350°F (175°C)25–35 minMost even cooking, biggest “juicy” safety margin145°F / 63°C
375°F (190°C)22–30 minBalanced: quicker, still tender145°F / 63°C
400°F (205°C)18–25 minFastest; great when finishing with a glaze145°F / 63°C
Temperature & Time Guide Table for Pork Fillet (Tenderloin) Oven

Times are a practical starting range for a typical 1–1½ lb (450–700 g) pork fillet/tenderloin. Thickness matters more than weight alone, so begin checking early and use the thermometer as the final doneness test.

Pork tenderloin internal temperature guide showing thermometer placement in the thickest center, start checking around 140°F, remove at 145°F (63°C), rest 8–10 minutes, and cook the center of stuffing in stuffed tenderloin to 165°F (74°C).
Use the thermometer, not color or the clock: start checking around 140°F, remove an unstuffed pork tenderloin at 145°F / 63°C, then rest 8–10 minutes. For stuffed tenderloin, the center of the filling must reach 165°F / 74°C.

A little pink doesn’t automatically mean undercooked. Pork tenderloin can still have a faint rosy center after the thickest part has safely reached 145°F / 63°C. Color alone is not the doneness test—the thermometer is. Some people prefer the softer, juicier texture at 145°F; others simply like taking theirs a little higher for a firmer bite.

Three small details make the biggest difference:

  • Carryover heat is real. The temperature rises slightly after you remove the roast from the oven.
  • Resting matters. It’s not a polite suggestion; it’s how juices settle back into the meat.
  • Slicing too early costs you moisture. Even a perfectly cooked tenderloin can look dry if you cut it the moment it comes out.

If you prefer a firmer, more cooked texture, let the center reach about 150°F / 66°C before removing it from the oven. Even then, resting still helps the slices stay tender.


Pork tenderloin in oven: 350°F vs 400°F vs 375°F

There’s more than one “right” oven temperature. What matters is how the heat fits your evening.

Chart comparing pork tenderloin oven temperatures 350°F, 375°F, and 400°F with when to start checking doneness and the 145°F (63°C) target internal temperature plus resting guidance.
Not sure whether to bake pork tenderloin at 350°F, 375°F, or 400°F? Use this quick chart to pick your oven temp, start checking at the right time, and pull at 145°F (63°C) for juicy pork tenderloin every time.

400°F (fast, great browning)

This is the weeknight favorite. It cooks quickly, encourages color on the outside, and works especially well with glazes—honey garlic, balsamic, maple-apricot, teriyaki-style finishes, or a BBQ brush-on at the end.

350°F (gentle, forgiving)

This is the calm, steady approach. It’s ideal when you’re also roasting vegetables and want everything to land together. It also gives you a slightly wider window before the meat goes past its sweet spot.

375°F (middle path)

This is the comfortable compromise: enough heat for browning, plus a gentler roast than 400°F.

There tend to be two strong camps here: 400°F people want browned edges and dinner sooner; 350°F people want the gentler timing window. Then 375°F sits quietly in the middle doing both reasonably well. There isn’t a single winner—the useful choice is the one that fits tonight’s dinner.

No matter which temperature you pick, the finish remains the same: cook to temperature, rest, slice.


The seasoning that makes pork taste like dinner, not “protein”

Because tenderloin is mild, seasoning is the difference between “fine” and genuinely craveable. Salt helps the meat hold onto moisture, while aromatics and spices build a crust that tastes roasted and savory.

You’ll get two approaches here:

  1. a reliable all-purpose rub
  2. targeted flavor profiles that turn the same roast into different meals
Recipe card for an all-purpose pork tenderloin rub with salt, paprika, garlic, herbs, and optional brown sugar, plus swap tips for lemon herb, glazes, and extra heat.
Use this all-purpose pork tenderloin rub for oven roasting, cast iron, grilling, or smoking—plus quick swaps for lemon herb, honey/balsamic/BBQ glazes, and extra heat for a more flavorful crust.

All-purpose tenderloin rub (recipe for 1–1½ lb / 450–700 g)

  • 1¼ tsp kosher salt (or ¾ tsp fine salt)
  • 1 tsp paprika (smoked paprika adds depth)
  • 1 tsp garlic powder (or 2–3 cloves fresh garlic, finely grated)
  • ½ tsp onion powder
  • ¾ tsp black pepper
  • 1 tsp dried thyme or dried rosemary (or 1½ tsp fresh, chopped)
  • 1 tsp brown sugar (optional, helps browning and pairs well with glazes)

This rub is flexible: it works for oven roasting, cast iron, grilling, and smoking. If you know you’re going lemon herb, you can skip the brown sugar. If you’re going honey garlic or balsamic, keep it.

A quick note on resting after seasoning

If you have time, season and let the tenderloin sit while the oven heats. Even 20 minutes helps. If you can do 45–60 minutes, the flavor tends to taste more “inside” the meat rather than just on the surface.

Want the flavor to go deeper than a surface rub? The Pork Tenderloin Marinade guide gives you quick, same-day, and overnight options, plus oven, grill, and air-fryer directions so the outside browns without the marinade scorching.


Pork tenderloin in oven: the core recipe

This is the dependable method that anchors everything else. Once it’s familiar, variations become simple choices rather than brand-new recipes.

Recipe card for pork tenderloin in the oven showing the 350°F, 375°F, and 400°F options, with guidance to start checking early, remove the tenderloin at 145°F (63°C), rest 8–10 minutes, then slice.
Save this core pork tenderloin recipe card: choose 350°, 375°, or 400°, start checking early, remove the tenderloin at 145°F / 63°C, rest 8–10 minutes, then slice into juicy medallions.

Ingredients (serves 4)

  • 1 pork tenderloin (1–1½ lb / 450–700 g), trimmed
  • 1 tbsp olive oil or neutral oil
  • All-purpose tenderloin rub (above)
  • Optional: 1 tsp Dijon mustard (subtle tang; helps seasoning cling)
  • Optional: 1 tbsp butter (useful for finishing or pan sauce)

If your package says pork fillet (UK/AU), it’s usually pork tenderloin—use the same 350/375/400 method below and remove it from the heat at 145°F / 63°C.

Step 1: Trim and dry

Pat the tenderloin dry very thoroughly. That dryness helps the seasoning stick and improves browning. If you see silver skin (a thin, shiny membrane), trim it away; it doesn’t soften with cooking.

Raw pork tenderloin being patted dry on a cutting board with a paper towel, with a small inset showing silver skin being trimmed—Step 1 for pork tenderloin in oven.
Before pork tenderloin goes in the oven, pat it very dry and trim off any silver skin—this one step improves browning and keeps the finished medallions tender instead of chewy.

If one end is thinner, tuck that end under itself and tie lightly with kitchen twine. That small adjustment helps the roast cook more evenly so you don’t end up with overdone tail slices.

Step 2: Season properly

Rub the tenderloin with oil. If using Dijon, rub it on next. Then coat all sides with the seasoning rub, pressing gently so it adheres.

Hand seasoning a raw pork tenderloin on a cutting board with oil, optional Dijon mustard, and a spice rub, labeled “Step 2: Season Properly” for pork tenderloin in oven.
For pork tenderloin in the oven that tastes seasoned all the way through, coat it evenly: oil first, a thin swipe of Dijon if you like, then press on the rub so it sticks—no patchy spots, better browning, better flavor.

At this point, the surface should look evenly coated, not patchy. The aroma should be savory and warm from paprika and garlic.

Step 3: Roast (choose one temperature)

Pork tenderloin in oven at 400°F (205°C)

  • Preheat oven to 400°F.
  • Roast 18–24 minutes, depending on thickness.
  • Start checking temperature at 18 minutes.
  • Remove from the oven when the thickest part reaches 145°F / 63°C.
  • Rest 8–10 minutes, then slice.

What you’ll notice: the outside develops a deeper color, and the kitchen smells roasted and garlicky. The surface should look set and lightly browned rather than pale. This is the classic “pork tenderloin 400” approach that works beautifully for a quick dinner and crisp edges.

Seasoned pork tenderloin roasting on a sheet pan with a thermometer probe, showing Step 3: Roast, the 350°F, 375°F, and 400°F options, and guidance to start checking early and remove at 145°F (63°C).
Roast pork tenderloin at 350°, 375°, or 400°—start checking early, then remove it at 145°F / 63°C and rest 8–10 minutes before slicing.

Pork tenderloin in oven at 350°F (175°C)

  • Preheat oven to 350°F.
  • Roast 25–35 minutes.
  • Start checking temperature at 25 minutes.
  • Remove from the heat at 145°F / 63°C.
  • Rest 8–10 minutes, then slice.

What you’ll notice: slightly gentler browning, an even roast, and a more gradual finish. This is a comfortable option when you’re coordinating sides, or when you want the tenderloin to finish more evenly across the center.

Pork tenderloin in oven at 375°F (190°C)

  • Preheat oven to 375°F.
  • Roast 22–30 minutes.
  • Start checking at 22 minutes.
  • Remove from the heat at 145°F / 63°C.
  • Rest 8–10 minutes, then slice.

What you’ll notice: a balance—good color, but still forgiving.

Step 4: Rest, then slice into medallions

Move the tenderloin to a cutting board and tent loosely with foil. While it rests, you can make a pan sauce, warm a glaze, or finish sides.

Cooked pork tenderloin resting under a foil tent on a cutting board, then being sliced into 1/2 to 3/4 inch medallions, labeled “Step 4: Rest + Slice” for pork tenderloin in oven.
Step 4 is the juiciness step: rest pork tenderloin after roasting for 8–10 minutes, then slice across the grain into 1/2–3/4 inch medallions so every piece stays tender and moist.

After resting, slice across the grain into medallions. If the knife meets resistance, your slices may be too thick or you may be cutting in the wrong direction. Aim for slices about ½ to ¾ inch thick for a tender bite.

Next method: Air Fryer Pork Tenderloin →

Want the same juicy tenderloin without heating the whole oven? Try our Air Fryer Pork Tenderloin next. It uses the same temperature-first approach—cook the thickest center to 145°F / 63°C, rest, then slice—but gives you browned edges in a smaller appliance. Most standard 1–1½ lb tenderloins take about 18–24 minutes, depending on thickness and the air fryer.


Cast iron pork tenderloin (sear + oven finish)

If you want deeper browning and a more savory “pan-roasted” flavor, start the tenderloin in a hot cast-iron skillet and finish it in the oven. The sear builds crust quickly; the oven brings the center to temperature gently.

This method is especially satisfying when serving the tenderloin plain with vegetables, because the crust brings flavor without needing a heavy sauce.

Ingredients

  • 1 seasoned pork tenderloin
  • 1 tbsp neutral oil (avocado, canola, grapeseed)
  • Optional: 1 tbsp butter + 1 smashed garlic clove + a sprig of thyme or rosemary
Infographic method card showing how to cook cast iron pork tenderloin by searing on the stove and finishing in the oven to 145°F (63°C), then resting and slicing into medallions.
Want a deeper crust? This cast iron pork tenderloin guide shows the sear + oven finish method (400°F) and the exact 145°F (63°C) target temp, so you get juicy slices with real browning—not dry pork.

Method

  1. Preheat oven to 400°F.
  2. Heat a cast-iron skillet over medium-high until hot. Add oil.
  3. Lay the tenderloin in the pan. You should hear an immediate sizzle.
  4. Sear on all sides, turning every 1–2 minutes, until browned all around (about 6–8 minutes total).
  5. Slide the skillet into the oven. Roast until the center reaches 145°F / 63°C (often 8–12 minutes depending on thickness).
  6. Rest 8–10 minutes, then slice.

If you’re adding butter, drop it in during the last minute on the stovetop. As it foams, baste the tenderloin with a spoon for 20–30 seconds. The aroma becomes richer and more “roast-like,” even before it goes into the oven.

This sear-then-finish approach mirrors classic pan-roasting logic, similar to what’s used in this pan-roasted pork tenderloin technique.

Serve-it-with ideas:

  • Creamy mushroom sauce (below) + mashed potatoes or roasted potatoes
  • Chimichurri on the side + grilled vegetables
  • Mustard glaze + carrots and onions roasted until sweet

Pork tenderloin with potatoes and carrots (sheet-pan dinner)

A sheet-pan dinner turns tenderloin into a complete meal with minimal effort. The only trick is timing: potatoes and carrots need a head start; the pork goes in later so it stays juicy.

Ingredients (serves 4)

  • 1 pork tenderloin, seasoned (use the rub or any glaze variation)
  • 500 g potatoes, cut into 1-inch chunks
  • 3–4 carrots, cut into thick coins or batons
  • 1 medium onion, cut into wedges (optional but excellent)
  • 2–3 tbsp olive oil
  • 1 tsp kosher salt
  • ½ tsp black pepper
  • 1 tsp dried thyme or rosemary
  • Optional: 1 tsp smoked paprika for the vegetables
Step-by-step sheet-pan pork tenderloin with potatoes and carrots timing guide, showing veggie head start at 400°F or 350°F and finishing pork to 145°F (63°C) with resting tips.
One-pan dinner made easy: this sheet-pan pork tenderloin with potatoes and carrots guide shows the exact veggie head start and when to add the pork, so everything finishes together and the tenderloin stays juicy at 145°F (63°C).

Method

  1. Preheat oven to 400°F for crisp edges, or 350°F for a gentler roast.
  2. Toss potatoes, carrots, and onion with oil, salt, pepper, and herbs.
  3. Roast vegetables first:
    • At 400°F: 20 minutes
    • At 350°F: 25 minutes
  4. Push vegetables to the sides, then place the seasoned tenderloin in the center.
  5. Roast until the pork reaches 145°F / 63°C.
  6. Move pork to a board to rest. Toss vegetables in the drippings and return them to the oven for 5–10 minutes if they need more color.
  7. Slice tenderloin into medallions and serve with the vegetables.

What you’ll notice: the carrots turn sweet, the onions soften and caramelize at the edges, and the potatoes soak up the meat juices like a built-in sauce.

If you like swapping potatoes, this quick read on white vs sweet potatoes can help decide what fits your flavor direction.

Serve-it-with ideas:

  • Honey garlic glaze + sweet potatoes + broccoli
  • Balsamic glaze + carrots + onions (they’re made for each other)
  • Lemon herb finish + white potatoes + green beans

Choose what you’re making tonight

Sweet & sticky: Honey garlic · Balsamic · Maple-apricot

Savory & bright: Creamy mushroom · Mustard · Lemon herb

Different cooking method: Grill · Smoker · Slow cooker · Instant Pot

Turn it into a different meal: Breaded cutlets · Stuffed tenderloin · Leftover remixes

Sauce and glaze variations that are actually worth making

A good sauce changes everything. Even if your tenderloin is perfectly cooked, a finishing glaze or pan sauce makes the meal feel intentional—like you planned it rather than stumbled into it. Each variation below is complete, flavorful, and written so you can cook it without improvising.

Infographic chart of pork tenderloin sauces and glazes, including honey garlic, creamy mushroom, brown sugar balsamic, lemon herb, mustard glaze, apples, maple-apricot, BBQ finish, and spicy table sauces with timing tips.
Pick your flavor tonight: this pork tenderloin sauces and glazes chart shows when to apply each finish—honey garlic, creamy mushroom, brown sugar balsamic, lemon herb, mustard glaze, apples, maple-apricot, BBQ, and spicy table sauces—so you get a glossy, juicy result every time.

Honey garlic pork tenderloin (sticky, glossy, crowd-pleasing)

Honey garlic is the “everyone at the table is happy” flavor. It’s sweet, savory, and especially good when the tenderloin is sliced into medallions and coated in glaze.

Honey garlic glaze (recipe for 1 tenderloin)

  • 3 tbsp honey
  • 2 tbsp soy sauce (or tamari)
  • 1 tbsp apple cider vinegar or rice vinegar
  • 4 cloves garlic, finely minced or grated
  • 1 tsp grated ginger (optional, but adds warmth)
  • ½ tsp black pepper
  • Pinch of chili flakes (optional)
  • Optional thickener: 1 tsp cornstarch + 1 tbsp water
Honey garlic pork tenderloin recipe card showing sliced tenderloin medallions with sticky glaze, the glaze ingredients, and timing tips to brush in the last 5–7 minutes and rest before slicing.
This honey garlic pork tenderloin recipe card shows the simple glaze and the exact timing that prevents burning—brush in the last 5–7 minutes, rest, then slice and spoon extra sauce for a glossy, juicy finish.

Method

  1. Cook the tenderloin using the core oven method (400°F for speed, 350°F for gentleness).
  2. While it roasts, combine honey, soy sauce, vinegar, garlic, ginger, and pepper in a small saucepan.
  3. Warm gently for 2–3 minutes, stirring. The glaze should smell sweet and garlicky, not harsh.
  4. If you want it thicker, whisk in the cornstarch slurry and simmer 30–60 seconds until glossy.
  5. During the last 5–7 minutes of roasting, brush glaze over the tenderloin.
  6. Brush again as soon as it comes out, then rest.
  7. Slice into medallions and spoon remaining glaze over the top.

If you enjoy a teriyaki direction, a thicker homemade sauce like homemade teriyaki sauce works beautifully the same way—brushed on near the end so it turns lacquered rather than burnt.

Serve-it-with ideas:

  • Roasted broccoli or green beans + rice
  • Sweet potatoes + a bright cucumber salad
  • A simple slaw tucked into sandwiches the next day

Creamy mushroom pork tenderloin recipe (deep, savory comfort)

This is comfort food that still feels like a proper dinner. The flavor comes from browning mushrooms until they’re deeply savory—so the sauce tastes rich even before the cream goes in.

Creamy mushroom sauce (serves 4)

  • 250–300 g mushrooms, sliced
  • 1 tbsp butter
  • 1 tbsp olive oil
  • 1 small onion or 2 shallots, finely chopped
  • 3 cloves garlic, minced
  • ½ cup chicken stock (or water + a pinch of salt)
  • ½ cup cream (or coconut cream for dairy-free)
  • 1 tsp Dijon mustard
  • Optional: 1 tsp Worcestershire sauce
  • ½ tsp dried thyme or 1 tsp fresh thyme leaves
  • Salt and pepper
Creamy mushroom pork tenderloin recipe card with sliced pork medallions in mushroom cream sauce, plus key steps to brown mushrooms first, deglaze with stock, and finish with cream.
This creamy mushroom pork tenderloin recipe card shows the sauce essentials and the one step that makes it taste restaurant-level—brown the mushrooms first, then deglaze with stock and finish with cream before warming sliced pork in the sauce.

Method

  1. Roast or cast-iron sear the tenderloin to 145°F / 63°C, then rest it.
  2. In the same skillet, heat butter and oil.
  3. Add mushrooms and spread them out. Let them sit undisturbed for 2 minutes so they brown instead of steaming.
  4. Stir, then keep cooking until moisture evaporates and the mushrooms deepen in color.
  5. Add onion/shallot and cook until softened.
  6. Add garlic and cook 30 seconds, just until fragrant.
  7. Pour in stock and scrape up browned bits. Simmer 2–3 minutes.
  8. Stir in cream, Dijon, thyme, and Worcestershire if using. Simmer until slightly thick.
  9. Slice tenderloin into medallions, then warm the slices in the sauce for 1–2 minutes.
  10. Taste, adjust salt and pepper, then serve.

If the sauce is the part you want to make the star of the plate, the full Creamy Mushroom Sauce Recipe goes deeper on browning the mushrooms, adjusting thickness, making it without wine or cream, and taking it toward a more gravy-like finish for pork and potatoes.

If you want a lighter vegetable side that still feels hearty, a quick mushroom and zucchini skillet fits beautifully here—especially because it keeps the plate balanced.

Serve-it-with ideas:

  • Mashed potatoes (this sauce was made for them)
  • Buttered noodles or rice
  • Roasted asparagus or green beans for contrast

Brown sugar balsamic pork tenderloin (tangy, glossy, slightly sweet)

This glaze tastes bold without requiring much effort. It’s especially good when you’re roasting vegetables on the side, because balsamic and brown sugar make carrots and onions taste even sweeter.

Balsamic glaze (recipe for 1 tenderloin)

  • 3 tbsp balsamic vinegar
  • 2 tbsp brown sugar (or honey)
  • 1 tsp Dijon mustard
  • 1 tbsp olive oil
  • ½ tsp black pepper
  • Pinch of salt
  • Optional: 1 tbsp soy sauce for extra savory depth
Recipe card for brown sugar balsamic pork tenderloin with sliced medallions, glaze ingredients, timing to brush in the last 5–7 minutes, and serving ideas like carrots, onions, and rice.
Brown sugar balsamic pork tenderloin, made the easy way: whisk the glaze, brush it on in the last 5–7 minutes (so the sugar doesn’t burn), then rest and slice for a tangy, glossy finish.

Method

  1. Whisk all glaze ingredients together.
  2. Roast the tenderloin using the core method.
  3. Brush glaze on during the last 5–7 minutes of roasting.
  4. Brush again right after it comes out.
  5. Rest, slice, and drizzle pan juices over the medallions.

Because this glaze contains sugar, it behaves best when applied late. That timing gives you caramelization instead of bitterness.

Serve-it-with ideas:

  • Roasted carrots + onions
  • Brussels sprouts or cabbage roasted until crisp
  • A simple grain like couscous or rice to soak up the glaze

Lemon pork tenderloin (bright, clean, weeknight-perfect recipe)

When you want something lighter than honey or cream, lemon brings freshness instantly. It’s also a beautiful match for potatoes and green vegetables.

Lemon herb finish

  • Zest of 1 lemon
  • 2 tbsp lemon juice
  • 1 tbsp olive oil
  • 1 small garlic clove, grated
  • ½ tsp salt
  • ½ tsp black pepper
  • 1 tbsp chopped parsley (optional)
Lemon pork tenderloin recipe card with sliced medallions, lemon herb finish ingredients, and an optional quick lemon pan sauce with butter and stock, plus a note to spoon on after slicing.
Lemon pork tenderloin, two ways: spoon on a bright no-cook lemon herb finish after slicing, or make a quick lemon pan sauce (butter + stock) for a warmer, richer drizzle—both keep the pork fresh and juicy.

Quick lemon pan sauce (optional)

  • 1 tbsp butter
  • ¼ cup stock
  • 2 tbsp lemon juice
  • 1 tsp lemon zest
  • Pinch of salt

Method

  1. Roast the tenderloin and let it rest.
  2. Stir lemon herb finish ingredients together. Spoon over sliced medallions.
  3. If you want a warm sauce, simmer butter + stock + lemon juice/zest for 1–2 minutes, then spoon over.

The scent here is bright and clean—lemon zest, garlic, and warm pork together. It’s simple, yet it tastes intentional.

Serve-it-with ideas:

  • Roasted potatoes + sautéed greens
  • Steamed rice + cucumber salad
  • Grilled vegetables for a lighter plate

Mustard glazed pork tenderloin (savory, tangy, elegant)

Mustard adds a gentle bite that makes tenderloin taste more like a classic roast dinner. It’s also a fantastic choice when you’re serving potatoes and carrots.

Mustard glaze

  • 2 tbsp Dijon mustard
  • 1 tbsp honey
  • 1 tbsp olive oil
  • 1 tsp minced garlic
  • ½ tsp dried thyme or rosemary
  • ½ tsp black pepper
  • Pinch of salt
Mustard glazed pork tenderloin recipe card with sliced medallions, Dijon honey glaze ingredients, two timing options (before roasting or brush in last 5–7 minutes), and finishing tips to cook to 145°F (63°C) and rest.
Mustard glazed pork tenderloin that actually tastes “roast-dinner” good: mix Dijon + honey glaze, spread it on before roasting or brush in the last 5–7 minutes for extra shine, then rest and slice for juicy medallions.

Method

  1. Mix glaze ingredients and spread evenly over the tenderloin before roasting.
  2. Roast until the center reaches 145°F / 63°C.
  3. Rest, slice, then spoon pan juices over the medallions.

The glaze becomes slightly darker at the edges and smells warmly herbal, especially with rosemary.

Serve-it-with ideas:

  • Sheet-pan potatoes and carrots
  • Green beans with a squeeze of lemon
  • A simple salad with crisp apples or pears

Pork tenderloin and apples (sweet-savory, cozy, balanced)

Apples and pork are a classic pairing because they bring sweetness and acidity that flatter savory meat. It feels cozy without needing cream.

Apple pan sauce (recipe serves 4)

  • 1 tbsp butter
  • 1 tbsp olive oil
  • 1 apple, thinly sliced (sweet-tart varieties work best)
  • 1 small onion or shallot, thinly sliced
  • ½ cup stock
  • 1 tsp Dijon mustard
  • 1 tbsp apple cider vinegar (optional)
  • Pinch of cinnamon (optional, use lightly)
  • Salt and pepper
Recipe card showing sliced pork tenderloin and apples with a glossy apple pan sauce, plus ingredients (butter, olive oil, apple, onion/shallot, stock, Dijon, optional cider vinegar), quick method steps, and serving ideas like roasted sweet potatoes, sautéed cabbage or kale, and rice pilaf.
Pork tenderloin and apples is the easiest “cozy but not heavy” dinner: roast the tenderloin, then spoon a quick apple pan sauce (apple + onion/shallot + stock + Dijon) over sliced medallions so the pork stays juicy. This card includes the exact ingredients, the 3–4 minute simmer method, and simple sides that fit—roasted sweet potatoes, sautéed cabbage/kale, or rice pilaf.

Method

  1. Roast the tenderloin and rest it.
  2. Heat butter and oil in a skillet. Sauté apples until lightly golden.
  3. Add onion/shallot and cook until softened.
  4. Pour in stock, scrape up browned bits, and simmer 3–4 minutes.
  5. Stir in Dijon and vinegar if using. Season well.
  6. Slice tenderloin and spoon apple sauce over the medallions.

For extra richness, add a small knob of butter at the end. For extra brightness, add a touch more vinegar.

Serve-it-with ideas:

  • Roasted sweet potatoes
  • Sautéed cabbage or kale
  • A simple rice pilaf

Maple pork tenderloin (plus a quick apricot twist)

Maple gives you a glaze that feels different from honey—more caramel, less floral. Add apricot jam and it turns into a dinner-party finish with almost no extra work.

Maple glaze

  • 3 tbsp maple syrup
  • 1 tbsp Dijon mustard
  • 1 tbsp soy sauce
  • 1 tsp apple cider vinegar
  • 1 clove garlic, grated
  • Black pepper
Maple pork tenderloin glaze recipe card showing sliced, juicy pork tenderloin medallions coated in glossy maple glaze with bowls of maple syrup, Dijon, soy sauce, vinegar, garlic, and apricot jam. Includes maple glaze ingredients, optional apricot-maple twist, and timing tips to brush glaze in the last 5–7 minutes, rest 8–10 minutes, then slice.
Maple Pork Tenderloin (with optional apricot twist): whisk the quick maple glaze, then brush it on in the last 5–7 minutes so it turns glossy instead of burning. Rest 8–10 minutes, slice into medallions, and serve with roasted carrots + onions, wild/brown rice, and broccoli or green beans. This is the easiest “dinner-party” upgrade for pork tenderloin in the oven—same method, better finish.

Apricot-maple glaze

  • Maple glaze above
    • 1 tbsp apricot jam

Brush on during the last 5–7 minutes of roasting, then brush again after it comes out. Rest, slice, and spoon any extra glaze over the top.

Serve-it-with ideas:

  • Roasted carrots and onions
  • Wild rice or brown rice
  • Broccoli or green beans for freshness

Spicy finishing options (when you want bold flavor at the table)

Some nights you want the tenderloin to stay simple, yet you still want punch. A finishing sauce on the side does that beautifully—each person can adjust heat and tang to taste.

If you love variety, pepper sauce ideas gives you multiple directions—from sharp and vinegary to smoky and deep.

For a bright, herby, garlic-forward option, a spoon of chimichurri sauce next to sliced tenderloin is especially good when the meat is simply roasted or grilled.

Spicy finishes for pork tenderloin: sliced roast pork with two sauces—chimichurri and pepper sauce—plus serving ideas for adding heat at the table.
Want bold flavor without risking dry pork? Use a spicy finishing sauce at the table. This guide shows two easy options—chimichurri (herby + garlicky) and a quick pepper sauce (vinegary or smoky)—plus serving combos that pair perfectly with roasted pork tenderloin. Pin it for later, then use it anytime you want heat without overcooking.

Serve-it-with ideas:

  • Plain roasted tenderloin + chimichurri + roasted vegetables
  • Honey garlic tenderloin + a hot sauce on the side for contrast
  • Mustard-glazed tenderloin + a sharp chili sauce for bite

BBQ pork tenderloin (oven or grill)

BBQ flavor works beautifully on tenderloin as long as the sauce is applied late. Many BBQ-style sauces contain sugar, which can burn if brushed on too early.

BBQ pork tenderloin in oven

  1. Roast the seasoned tenderloin using the core method.
  2. During the last 5–7 minutes, brush with BBQ-style sauce.
  3. Finish roasting, then brush again after it comes out.
  4. Rest and slice.
BBQ pork tenderloin sliced into medallions with glossy barbecue sauce on a white plate, plus slaw and grilled corn; text shows oven and grill BBQ finish steps, quick 30-minute marinade, and a reminder to brush sauce in the last 5–7 minutes and cook to 145°F/63°C with rest.
BBQ Pork Tenderloin (Oven or Grill): the key is timing—brush BBQ sauce in the last 5–7 minutes so the sugar doesn’t burn, then rest 8–10 minutes for juicy slices. This card includes an oven finish, a grill finish, and a quick 30-minute marinade you can use on busy nights.

Best grilled pork tenderloin

  1. Season with the base rub, or use a quick marinade.
  2. Grill over medium-high heat, turning every few minutes for even browning.
  3. Remove from the heat at 145°F / 63°C.
  4. Rest, slice, serve.

A quick marinade for grilled marinated pork tenderloin:

  • 2 tbsp olive oil
  • 2 tbsp soy sauce
  • 1 tbsp lemon juice
  • 2 cloves garlic, grated
  • 1 tsp honey or brown sugar
  • Black pepper

Even 30 minutes helps.


Smoked pork tenderloin (Traeger-style approach, without drying it out)

Smoked tenderloin tastes fantastic, although tenderloin isn’t built for hours and hours of low-and-slow cooking. Because it’s lean, it benefits from a shorter smoke and a careful finish.

Smoked pork tenderloin with a thermometer probe and pellet-smoker guidance: smoke at 225°F or 250°F, start checking near 140°F, remove at 145°F (63°C), then rest 8–10 minutes.
For smoked pork tenderloin, use 225°F for more smoke or 250°F for a faster cook, start checking near 140°F and remove at 145°F / 63°C, then rest 8–10 minutes. If you want a high-heat crust, do that finishing step before the center reaches 145°F.

Smoke at the lower temperature until the tenderloin is nearly done. If you want more crust, give it a brief higher-heat finish before the center reaches 145°F. Remove it from the heat at 145°F / 63°C, then rest.

No matter the smoker, the goal stays consistent: stop at temperature, then rest.


Slow cooker pork tenderloin (sliceable, not overcooked)

A slow cooker can be a lifesaver. With tenderloin, the main priority is avoiding overcooking. Because it’s lean, it can go from tender to dry if it stays in too long.

Photorealistic recipe card showing sliced slow cooker pork tenderloin on a plate with juices and herbs, plus a slow cooker in the background. Text highlights: start checking at 2 hours, pull at 145°F / 63°C, rest 8–10 minutes. Three tip boxes cover setup (onion bed, 1/2 cup stock), timing rules (LOW, typical 2–3.5 hours), and finishing ideas (spoon juices, optional butter, pair with honey garlic/balsamic/mushroom).
Slow cooker pork tenderloin doesn’t have to turn dry—this quick visual guide shows the only timing rule that matters: start checking at 2 hours and pull at 145°F / 63°C, then rest before slicing. Use a simple onion-and-stock base for moisture, spoon the cooking juices over the slices, and “finish” it with an easy glaze (honey garlic, balsamic, or creamy mushroom) so it tastes like a real dinner—not just leftover protein.

Simple slow cooker tenderloin recipe

  • Place sliced onions in the bottom if you like.
  • Add ½ cup stock (or stock plus a splash of vinegar for brightness).
  • Add the seasoned tenderloin.
  • Cook on LOW and start checking at 2 hours; most 1–1½ lb tenderloins finish around 2–3½ hours.
  • Remove once it reaches 145°F, rest, then slice.
  • Spoon cooking juices over the slices.

Finishing with sauce makes this feel more complete. Honey garlic, teriyaki-style, balsamic, or creamy mushroom all work well.

Cooking it this way tonight? The full Slow Cooker Pork Tenderloin guide goes further on LOW vs HIGH timing, temperature cues, saucier variations, and building the same cut into a complete slow-cooker dinner.


Instant Pot pork tenderloin (fast, useful, best with sauce)

Pressure cooking can be fast and convenient, though it benefits from a good sauce afterward.

Instant Pot pork tenderloin guide showing 3 minutes on high pressure plus a 10-minute natural release as a starting point, followed by checking the thickest center for 145°F (63°C) and resting before slicing.
A useful Instant Pot starting point is 3 minutes on HIGH + 10 minutes natural release. Tenderloins vary in thickness, so check the thickest center after releasing; the pork should reach 145°F / 63°C, then rest before slicing.
  • Sear first (optional but best): sauté 2–3 minutes per side.
  • Add liquid: 1 cup stock or water (plus onions/garlic if you want).
  • Pressure cook (High): 3 minutes for a typical 1–1½ lb tenderloin (use 4 minutes if it’s notably thick).
  • Release: 10 minutes natural release, then quick release.
  • Finish: check internal temp; rest 8–10 minutes, then slice.
  • Make it taste finished: simmer the pot juices on sauté for 2–4 minutes to reduce, then whisk in a knob of butter or stir in one of your glazes.

Because every model differs slightly, checking internal temperature remains the most reliable finish.


Pulled-style tenderloin (when you want shreddable pork)

Tenderloin is not the first choice for classic pulled pork because it’s lean. Still, if tenderloin is what you have and you want something shreddable, it can work—provided it’s protected with liquid and you stop as soon as it becomes tender.

Pulled-style pork tenderloin “keep it juicy” guide showing 3 steps: cook tenderloin in flavorful liquid (stock/broth, onion, garlic, splash of vinegar), shred as soon as it pulls (don’t cook for hours), then mix shredded pork back into the juices + sauce. Includes moisture boosters (butter, BBQ sauce, pan juices) and serving ideas (buns, wraps, rice bowls). MasalaMonk.com branding.
Pulled pork vibes without drying out lean tenderloin: cook it in a flavorful broth, shred as soon as it pulls, then stir it back into the juices so every bite stays saucy. This card doubles as a quick-reference for “pulled-style pork tenderloin” nights—use it for sliders, wraps, or rice bowls, and keep the moisture boosters (butter, BBQ sauce, pan juices) on standby.

Cook it in flavorful liquid (stock, onions, garlic, a touch of vinegar), then check for tenderness. As soon as it shreds easily, shred it and immediately mix it back into the cooking juices and sauce so it stays moist. Serve it in buns, wraps, or rice bowls.

  • Cook it in flavorful liquid.
  • Stop once it shreds easily.
  • Mix the shredded meat back into the cooking liquid and sauce immediately.

If your goal is the traditional barbecue pulled texture, pork shoulder is the best option. Pork loin can also handle longer cooking better than tenderloin. Even so, pulled-style tenderloin can be a satisfying “use what you have” dinner when it’s treated gently.


Breaded pork tenderloin and pork fillet sandwich style (crispy, hearty, different meal)

Roasted tenderloin is one personality. Crispy cutlets are another. When you slice tenderloin into medallions, pound thin, bread, and pan-fry, you get a completely different meal—crisp edges, juicy center, and the kind of sandwich that feels like comfort food.

Breaded pork tenderloin sandwich guide with crispy cutlet photo and steps: slice tenderloin into medallions, pound thin, flour–egg–breadcrumbs, pan-fry until golden, then build sandwich with bun, mayo, pickles, and onion; MasalaMonk.com branding.
Craving a crispy, diner-style pork tenderloin sandwich? This quick visual guide shows the cutlet method (slice → pound thin → bread → pan-fry) plus the easiest sandwich build with pickles and onion. Perfect for turning pork tenderloin into a totally different meal—crunchy outside, juicy center. Save it for later and use it as your weeknight blueprint.

Basic recipe for crispy cutlets

  1. Slice tenderloin into medallions, then pound each slice thin.
  2. Season with salt and pepper.
  3. Dredge in flour, dip in beaten egg, then coat in breadcrumbs.
  4. Pan-fry until crisp and cooked through.

Serve in a bun with pickles, onion, and a creamy spread such as mayonnaise.

For extra flavor, add a spoon of spicy sauce or a tangy slaw. Meanwhile, the leftover cutlets are incredible sliced into wraps.


Stuffed pork tenderloin in oven (weekend-special, still approachable)

Stuffed tenderloin looks impressive and feels festive, especially for holiday pork tenderloin dinners. It does take a bit more prep, although the technique is approachable.

Stuffed pork tenderloin recipe card with cream cheese and spinach filling, butterfly-and-roll steps, 375–400°F oven guidance, a 165°F (74°C) filling-center target, and a 10–12 minute rest.
For this cream cheese and spinach stuffed pork tenderloin, butterfly, fill, roll and tie, then roast at 375–400°F. Because it is stuffed, check the center of the filling and cook it to 165°F / 74°C, then rest 10–12 minutes before slicing.

Cream cheese stuffed pork tenderloin (savory, rich)

Filling:

  • 120 g cream cheese
  • 1 cup spinach, sautéed and squeezed dry
  • 2 tbsp chopped herbs
  • 1 clove garlic, grated
  • Salt and pepper

Butterfly the tenderloin (slice lengthwise, not all the way through), open it like a book, and flatten gently. Spread filling, then roll tightly and tie with twine at intervals. Roast at 375–400°F, checking the center of the filling with a food thermometer. Because this tenderloin is stuffed, the filling needs to reach 165°F / 74°C.

A stuffed tenderloin benefits from resting a bit longer—closer to 10–12 minutes—before slicing.


Leftover pork tenderloin (how to keep it juicy)

Leftovers are often where tenderloin truly shines, because the slices work in sandwiches, bowls, and quick skillets.

Infographic showing how to reheat leftover pork tenderloin gently in a covered pan or microwave, with a target of 165°F (74°C), plus a quick pork tenderloin sandwich idea.
Reheat leftover pork tenderloin gently so it stays as juicy as possible: use a covered pan with a splash of stock or sauce, or microwave in short bursts with sauce on top, and heat the leftovers to 165°F / 74°C.

Best ways to reheat

  • Reheat slices gently in a covered pan with a splash of stock or sauce until the leftovers reach 165°F / 74°C.
  • Alternatively, microwave in short bursts with a spoon of sauce on top, checking until the leftovers reach 165°F / 74°C.
  • Avoid high heat for a long time, since lean meat dries quickly.
Infographic showing leftover pork tenderloin sliced on a plate with a sauce cup and five quick remix meal ideas: rice bowl, wrap/taco, fried rice, creamy skillet, and salad upgrade, plus a tip to reheat gently and add sauce after slicing.
Leftover pork tenderloin doesn’t have to taste “leftover.” This quick guide gives you 5 easy remix meals—rice bowl, wrap/taco, fried rice, creamy skillet, and salad upgrade—so you can turn sliced tenderloin into fresh dinners that still stay juicy. Save it for busy nights, then grab the full pork tenderloin method + sauces on MasalaMonk.com (cook to 145°F/63°C and rest for the best texture). Pin it now so you always have a plan for tomorrow’s leftovers.

Leftover sandwich idea

Slice the tenderloin thinly, spread mayo, add crunchy pickles and onions, then finish with a spicy sauce if you like.


Putting it all together: a repeatable tenderloin template

Once you’ve cooked pork tenderloin in the oven a few times, the process becomes simple:

  1. Pat dry, season well.
  2. Roast at 400°F for speed, 350°F for gentleness, or 375°F for the middle path.
  3. Start checking before 145°F; remove from the heat at 145°F / 63°C and rest.
  4. Slice into medallions.
  5. Finish with a sauce that matches the moment: honey garlic, creamy mushroom, balsamic, lemon, mustard, apples, maple, teriyaki, or BBQ.
Pork tenderloin template infographic showing prep, 350°F, 375°F, and 400°F oven options, start checking near 140°F, remove at 145°F (63°C), rest 8–10 minutes, then choose a sauce and side.
The repeatable oven template: pat dry → season → choose 350/375/400°F → start checking before 145°F → remove at 145°F / 63°C → rest 8–10 minutes → slice → add your favorite finish.

From there, dinner becomes flexible. One night it’s pork tenderloin with potatoes and carrots. The next time it’s pork fillet in creamy mushroom sauce. Another evening, it becomes a pork fillet sandwich with crisp edges and a bright, punchy topping. Even smoked tenderloin has a place when you want that barbecue feel without committing to an all-day cook.

Most importantly, the tender result isn’t guesswork. Safe, juicy doneness comes from cooking to temperature and resting—exactly as laid out in the USDA temperature chart and the FoodSafety.gov internal temperature guide. Once that foundation is in place, everything else—glazes, sauces, sides, sandwiches—becomes a pleasure rather than a puzzle.


The part a timing chart can’t standardize

Two pork tenderloins can weigh almost the same and still finish several minutes apart. Thickness matters. So do starting temperature, oven calibration, pan material and how sharply the thin end tapers.

The most useful real-world cook record is four things:

  • weight
  • thickest point
  • oven temperature
  • minutes to 145°F / 63°C

Those four details tell another cook far more than “mine took 25 minutes.” The clock gets you close; the thermometer tells you where your particular tenderloin actually finished.

FAQs

1) What’s the difference between pork tenderloin and pork loin?

Pork tenderloin is the smaller, long, narrow cut and usually weighs about 1–1½ lb (450–700 g). Pork loin is thicker and often much larger, so it needs a different cook time. The flavor ideas can cross over; the timing cannot.

2) What temperature should pork tenderloin reach, and can it still be pink?

Cook an unstuffed whole pork tenderloin until the thickest center reaches 145°F / 63°C, then rest it before slicing. A faint rosy center can still be normal at that temperature, so use the thermometer rather than color alone as the doneness test.

3) How long does pork tenderloin take in the oven at 400°F?

A typical 1–1½ lb (450–700 g) tenderloin often takes about 18–24 minutes at 400°F, depending on thickness. Start checking early and remove it when the thickest center reaches 145°F / 63°C.

4) How long does pork tenderloin take in the oven at 350°F?

At 350°F, a typical pork tenderloin often takes about 25–35 minutes. Thickness matters more than the clock, so begin checking before the end of the range and use 145°F / 63°C as the finish point.

5) Is pork tenderloin better at 350°F or 400°F?

Both work. 400°F cooks faster and gives you more browning; 350°F gives you a gentler timing window. If you want the compromise, 375°F sits neatly between the two.

6) What’s the best way to season pork tenderloin?

Start with salt, black pepper, garlic and herbs, then decide whether dinner wants to lean smoky, tangy, sweet or spicy. Paprika adds warmth, Dijon adds tang, and a little brown sugar works well when you want a glaze-friendly crust. For deeper flavor, use a quick, same-day, or overnight marinade and blot away heavy excess before high heat so the outside browns instead of scorching.

7) Why is my pork tenderloin dry even when I follow the cook time?

Usually because it cooked a little past its sweet spot, or because it was sliced immediately. Tenderloin is lean, so a few extra minutes matter. A thermometer plus a proper rest is much more reliable than treating the timing chart as a deadline.

8) Should I sear pork tenderloin before baking it?

You don’t have to, but searing gives the outside a deeper roasted crust. If that sounds good, use the cast-iron method above: brown the tenderloin briefly on the stovetop, then finish it in the oven until the center reaches 145°F / 63°C.

9) Can I roast pork tenderloin with potatoes and carrots on one pan?

Yes. Give the vegetables a head start, then add the tenderloin later. That staggered timing lets the potatoes and carrots brown without forcing the lean pork to stay in the oven longer than it needs.

10) How do I keep honey garlic glaze from burning?

Brush a sugary glaze on near the end of roasting rather than at the beginning. Honey and brown sugar darken quickly, so the last 5–7 minutes is usually enough to make the surface glossy without scorching it.

11) What’s the best way to reheat leftover pork tenderloin?

Use gentle heat and a little moisture: a covered skillet with stock or sauce works especially well, while a microwave is fine in short bursts. Reheat cooked pork leftovers to 165°F / 74°C, then stop heating so the lean slices do not dry out further.

12) Can I slice pork tenderloin into medallions before cooking?

Yes, especially for quick pan-fried or sautéed pork medallions. For this oven method, however, roasting the tenderloin whole is easier to control and generally gives you a juicier center.

Posted on — 13 Comments

Chicken Alfredo Pasta, 5 Ways (Classic to Cajun, Veg, 15-Minute Jar, Healthy)

Cover collage for Chicken Alfredo Pasta: five bowls—classic, Cajun/blackened, broccoli, jar + rotisserie, and healthy/GF—styled in a magazine layout with the headline ‘Chicken Alfredo Pasta: 5 Ways’ and MasalaMonk.com footer.

Creamy, pepper-flecked, and weeknight-friendly—this is the chicken alfredo pasta playbook. We begin with a silky classic, then turn up the heat with Cajun and blackened spice. Next, we fold in broccoli for balance; after that, we pull off a 15-minute rotisserie upgrade; finally, we finish with a lighter, gluten-friendly bowl. If you want the Roman-style versus restaurant-style backstory first, start with our classic vs authentic primer and then come back armed with context.


Why Chicken Alfredo Pasta Endures

Even as trends swirl, chicken alfredo pasta sticks the landing because it’s comfort with polish: a glossy, luxurious sauce coating springy noodles, plus just enough peppery lift to keep each forkful alive. More importantly, it’s a technique dish rather than an ingredient flex. When butter and finely grated cheese meet starchy pasta water, the sauce clings instead of clumps, giving that lacquered sheen people crave. For a clear explanation of why this works, see the role of pasta water and finishing pasta in its sauce here: starchy pasta water and the right way to sauce pasta.

Meanwhile, because this is a chicken-forward guide, every recipe anchors to juicy, well-seasoned pieces cooked properly—no guesswork, no dryness. For safety and perfect texture, cook poultry to a 165°F safe internal temp, rest briefly, and then slice thin so it folds into the sauce without turning stringy.


Technique Primer: How to Nail Chicken Alfredo Pasta

Before we dive into recipes, a fast warm-up ensures everything that follows tastes better and cooks faster.

Emulsify, don’t reduce. Instead of boiling cream into submission, create an emulsion off heat: butter + finely grated Parmesan + hot pasta water. Consequently, you’ll get a glossy, clingy sauce that stays smooth when tossed with noodles.

Salt early, not late. Season chicken before it hits the pan and salt pasta water assertively. As a result, you can keep cheese amounts reasonable without a flat finish.

Sear, then slice. Golden edges mean flavor. Therefore, sear chicken in a wide pan, let it rest, and finally slice thin so you don’t overcook it while fussing with sauce.

Pasta water is your cheat code. Reserve at least 1 cup. Its starch turns a rough sauce silky and, additionally, lets you revive leftovers gently the next day.


Tools & Heat: The Right Setup for Chicken Alfredo Pasta

Because equipment shapes results, choose a wide sauté pan rather than a deep pot—it gives you evaporation control and tossing space. Stainless conducts heat evenly and, in turn, helps brown chicken; nonstick makes cleanup easy but can discourage browning. Furthermore, use tongs for tossing and a ladle for dosing pasta water in small additions. Keep heat medium-low once cheese enters the picture; otherwise, it can seize and turn grainy.


Shopping & Sourcing: Building Flavor Before the Pan

To make chicken alfredo pasta sing, start at the market. Choose small to medium chicken breasts (or thighs for juiciness) and trim silver skin. If you like, a brief dry brine (salt 30–60 minutes ahead) improves seasoning throughout. Freshly microplaned Parmesan melts cleaner than pre-shredded; consider 30–50% Pecorino if you want a sharper edge. Pasta-wise, fettuccine is classic; however, linguine and penne cling nicely, too. If you’re cooking gluten-free, pick a brand with structure and timing you trust. Finally, grab lemons, parsley, and good black pepper; these tiny accents keep richness lively.


30-Minute Flow: A Weeknight Timeline for Chicken Alfredo Pasta

  1. Min 0–5: Salt pasta water and bring to a boil. Season chicken; preheat a wide pan.
  2. Min 5–12: Sear chicken until bronzed; rest on a board. Drop pasta into boiling water.
  3. Min 12–18: Start the emulsion: butter + splash of pasta water; off heat, shower in cheese.
  4. Min 18–22: Toss in pasta; add hot water as needed. Slice chicken very thin.
  5. Min 22–30: Fold in chicken; adjust salt/pepper. Plate and garnish.
    Because steps overlap, you never wait around; instead, you ride momentum.

Recipe 1 — Classic Chicken Alfredo Pasta (From Scratch)

A touch of pasta water turns butter and cheese into a glossy coat instead of a heavy blanket. This is the baseline version people imagine when they search for chicken alfredo pasta—silky, never clumpy.

Ingredients (2–3 servings)

  • 250 g fettuccine (or long pasta)
  • 2 small chicken breasts, patted dry, salted
  • 2 tbsp unsalted butter + 1 tsp olive oil
  • 1 cup finely grated Parmesan (freshly microplaned)
  • ~1 cup hot starchy pasta water (reserved)
  • 1 small garlic clove, minced (optional)
  • Freshly ground black pepper; pinch of nutmeg (optional)
  • Salt, to taste; parsley, to finish
Classic chicken alfredo pasta in a shallow bowl—silky fettuccine topped with sliced seared chicken, pepper and parsley; recipe card overlay with key tips; MasalaMonk.com footer.
Classic chicken alfredo pasta, finished off-heat for a glossy emulsion. Save 1 cup pasta water, cook chicken to 165°F, and finish with pepper and parsley for restaurant-style shine.

Method

  1. Sear the chicken. Heat a wide pan over medium-high; add oil + 1 tbsp butter. Sear chicken 4–5 min/side until bronzed and just cooked through. Rest, then slice thin (aim for 165°F).
  2. Boil pasta in salted water to al dente. Reserve at least 1 cup pasta water.
  3. Start the sauce. Drop heat to low. Add remaining butter (and garlic, if using). Splash in ¼ cup pasta water.
  4. Emulsify. Off heat, rain in Parmesan while tossing; add pasta, then more hot water a little at a time until noodles are glossy and lightly coated.
  5. Finish. Fold in chicken and black pepper; adjust salt. Scatter parsley and serve immediately.

Pro tips (classic):

  • Add cheese off heat in small showers to prevent graininess.
  • Keep pasta moving in the pan; friction helps the emulsion form.
  • If it tightens, thin with hot pasta water—never cold milk.

Read: the style differences in our classic vs authentic primer.


Recipe 2 — Cajun Chicken Alfredo Pasta (with Blackened Option)

When your spoon wants smoke and heat, Cajun chicken alfredo pasta delivers. You can either bloom Cajun spice into the sauce for gentle warmth, or blacken the chicken and slice it over the creamy base for dramatic contrast.

Ingredients (2–3 servings)

  • 250 g fettuccine
  • 2 chicken breasts
  • 2 tbsp butter + 1 tbsp olive oil
  • 1 cup Parmesan, finely grated
  • 1–1½ tsp Cajun seasoning (to taste)
  • Optional blackening rub: paprika, cayenne, garlic/onion powder, dried thyme/oregano, salt, pepper
  • Hot pasta water; salt; lemon wedge
Cajun chicken alfredo pasta with blackened chicken slices over creamy, spice-tinted fettuccine; moody lighting with Cajun spices and lemon; recipe card overlay; MasalaMonk.com footer.
Cajun chicken alfredo pasta with gentle heat and charred edges. Bloom the spice in butter, blacken the chicken hot, then brighten with lemon to balance the cream.

Method A (Cajun Cream)

  1. Sear chicken; rest and slice thin.
  2. Melt butter in the pan; bloom Cajun seasoning 20–30 sec until fragrant.
  3. Add a splash of pasta water; off heat, whisk in Parmesan until creamy.
  4. Toss in pasta; loosen with more hot water as needed. Adjust salt/heat; finish with a squeeze of lemon.

Method B (Blackened Finish)

  1. Coat chicken in blackening rub; sear in a thin film of oil until charred at edges and just cooked. Slice.
  2. Make a classic emulsion (butter + cheese + pasta water), then top bowls with blackened chicken and a twist of lemon.

Pro tips (Cajun/blackened):

  • Keep spice moderate in the sauce; let the blackened crust carry the heat.
  • A hit of lemon or a few drops of vinegar brightens the cream without thinning it.

Also try: Alfredo Pasta Reinvented: 5 Indian-Inspired Twists


Recipe 3 — Chicken Alfredo Pasta with Broccoli (Veg-Forward)

Searchers for chicken alfredo pasta with broccoli want comfort and greens in the same forkful. The secret is managing broccoli’s water so the sauce stays plush, not thinned.

Ingredients (2–3 servings)

  • 250 g fettuccine
  • 2 chicken breasts
  • 2 cups small broccoli florets
  • 2 tbsp butter; 1 cup Parmesan, finely grated
  • Hot pasta water; salt; pepper; lemon zest (optional)
Chicken alfredo pasta with broccoli—creamy fettuccine topped with sliced seared chicken and bright green florets; natural light; recipe card overlay; MasalaMonk.com footer.
Chicken alfredo pasta with broccoli for balance and color. Blanch florets 1–2 minutes, dry well, fold in at the end, and finish with lemon zest and pasta water for gloss.

Method

  1. Blanch broccoli in salted boiling water 1½–2 min until bright green; drain and pat very dry.
  2. Sear chicken as before; rest and slice thin.
  3. Build the sauce (butter + splash of pasta water, then cheese off heat). Toss in pasta.
  4. Fold in broccoli at the end so it doesn’t weep into the sauce. Season to taste; add chicken, pepper, and lemon zest.

Pro tips (broccoli):

  • Dry the florets thoroughly after blanching; lingering moisture can break the emulsion.
  • Reserve a few warm florets for the top—texture and color pop on the plate.

Read more about The Broccoli – Nutrition, Benefits, and 5 Practical Ways for Weight Loss.


Recipe 4 — Chicken Alfredo Pasta with Jar Sauce (15-Minute Rotisserie)

A jar can be the base; however, technique makes it sing. Rotisserie chicken keeps prep to a minimum, and therefore this becomes your midweek lifesaver.

Ingredients (2–3 servings)

  • 250 g pasta
  • 1–1¼ cups good jarred Alfredo sauce
  • 1–1½ cups shredded rotisserie chicken
  • 1 tbsp butter; 1 small garlic clove, minced
  • ½–¾ cup hot pasta water
  • ½ cup finely grated Parmesan
  • Black pepper; parsley
Chicken alfredo pasta made with jar sauce and rotisserie chicken—creamy fettuccine in a shallow bowl with shredded chicken, jar of sauce and grated Parmesan behind; recipe card overlay; MasalaMonk.com footer.
Chicken alfredo pasta in 15 minutes: warm jar sauce gently, whisk in pasta water and Parmesan, fold in rotisserie chicken, and finish warm and glossy.

Method

  1. Boil pasta; reserve water.
  2. Warm, don’t boil. Melt butter; gently sweat garlic 30 sec. Add jarred sauce; keep heat low.
  3. Fortify. Whisk in Parmesan and enough hot pasta water to turn the sauce glossy.
  4. Fold in chicken and cooked pasta; toss 30–60 sec. Finish with pepper and parsley.

Pro tips (jar/rotisserie):

  • Reheat cream sauces gently—thin with hot water; avoid boiling.
  • For a quick “rosa,” stir in 2–3 tbsp marinara near the end.

You might enjoy: Beyond Chicken: 5 Tempting Lentil Pasta Dinner Meal Prep Ideas, Plant-Powered and Protein-Rich


Recipe 5 — Healthy Chicken Alfredo Pasta (Gluten-Free Option)

“Healthy” doesn’t have to read as thin or chalky. For healthy chicken alfredo pasta and gluten-free chicken fettuccine alfredo, technique does most of the lifting—then smart swaps take you the rest of the way.

Lighter, Creamy Base (No Heavy Cream)

  • Build a classic emulsion with butter, Parmesan, and hot pasta water; then whisk in 2–3 tbsp Greek yogurt or part-skim ricotta off heat for body and tang.
Healthy chicken alfredo pasta with zucchini noodles and sliced grilled chicken in a ceramic bowl; GF pasta box, lemon and Greek yogurt behind; recipe card overlay; MasalaMonk.com footer.

Gluten-Free Success Cues

  • Use a sturdy GF fettuccine or penne; pull a minute early and finish in the sauce.
  • Save at least 1 cup pasta water; GF starch can tighten or thin unpredictably, so adjust gradually.

Optional Add-Ins

  • Steamed peas, baby spinach, lemon zest, or thin-sliced grilled chicken. Because flavor rides on balance, finish with pepper and a whisper of nutmeg.

Also read: Finding Pasta Alternatives for the Keto Diet: Satisfying Your Cravings Without the Carbs


Make-Ahead, Storage & Reheating for Chicken Alfredo Pasta

Even the best chicken alfredo pasta firms up in the fridge. To keep tomorrow’s bowl glossy:

  • Cool quickly: Spread leftovers in a thin layer on a tray for 10 minutes, then box.
  • Fridge: Up to 3 days.
  • Reheat: Place pasta in a pan with a few tablespoons of hot water; warm on low, tossing gently. Add a small knob of butter or sprinkle of Parmesan at the end. Avoid boiling; it breaks the emulsion. For safety on chicken, reheat to steaming hot throughout; general leftovers guidance is here: USDA/FSIS leftovers & food safety.

Scaling for a Crowd (and Buffet Safety)

If you’re feeding a group, double or triple each recipe; nevertheless, resist the urge to make one massive pot of sauce. Instead, build two batches side by side; this keeps tossing manageable and, consequently, prevents clumping. Hold finished chicken alfredo pasta warm in a wide pan over the lowest heat with a lid ajar; refresh with hot pasta water and a small pat of butter just before serving. Moreover, for food safety at buffets, keep hot foods hot and, conversely, cool leftovers promptly—again, the USDA guidance is your baseline.


Serving Ideas & Pairings

Although the pasta is the hero, sides make the plate feel composed. Try a lemon-dressed arugula salad or crisp romaine; the acid brightens richness. On the vegetable front, go with steamed green beans or roasted broccoli spears; both reheat well. As for wine, a bright Pinot Grigio or a lightly oaked Chardonnay complements cream without overpowering spice. And if you’re making the Cajun variation, consider, additionally, something with a citrusy nose to echo the lemon finish.


Common Mistakes to Avoid (and Fast Fixes)

  • Grainy sauce: Cheese went in too hot or too fast. Therefore, take the pan off heat and whisk in hot pasta water; the emulsion should smooth out.
  • Watery sauce: Veg wasn’t dried or pasta water lacked starch. Consequently, blanch properly, pat dry, and save a full cup of water.
  • Dry chicken: Overcooked. Sear hot, rest, and slice; aim for 165°F—not more.
  • Split jar sauce: Boiled. Keep heat low and thin with hot pasta water, not cold milk.

Where to Next (Internal)

To go deeper on technique and regional nuance, read our classic vs authentic primer, then circle back for spicy, veg, quick, and healthy riffs whenever the craving hits. When you’re ready to expand the chicken alfredo pasta universe further (e.g., shrimp or mushroom swaps), the same emulsion rules apply—and the sauce is happy to make new friends.

Also Read: Pesto Pasta: Adding 5 Delightful Indian Twists to the Italian Classic

FAQs

1. What’s the difference between classic and “authentic” Alfredo, and how does that change my chicken alfredo pasta?

Authentic Roman Alfredo relies on pasta water, butter, and cheese—no cream—emulsified off heat. Classic restaurant‑style often uses a touch of cream for stability and richness. Practically, both paths work; however, for weeknights with chicken, the Roman approach gives you maximum gloss with minimal ingredients, while the creamy path buys you a little extra forgiveness when multitasking.

2. How do I keep the Alfredo sauce from splitting or going grainy?

First, add cheese off the heat in small showers. Next, whisk in hot pasta water a little at a time to keep the emulsion moving. Finally, avoid boiling after the cheese goes in. If it tightens, loosen with more hot water; if it looks curdly, remove from heat and keep tossing until glossy.

3. How much pasta water should I save—and when do I add it?

Save at least 1 cup for every 250 g pasta. Start with ¼ cup to bloom the emulsion, then add in 1–2 tablespoon spurts as you toss. Consequently, your chicken alfredo pasta stays silky, not heavy. Keep a splash for reheating, too.

4. What’s the best cheese (and grating style) for Alfredo?

Freshly microplaned Parmesan melts fastest and smoothest. Pecorino adds bite—use 30–50% if you like a sharper edge. Pre‑shredded blends often contain anti‑caking starches; therefore, they can make sauces dull or pasty.

5. Can I make chicken alfredo pasta without heavy cream?

Absolutely. Emulsify butter, pasta water, and finely grated cheese off heat, then finish with chicken and pepper. For a lighter texture, you can, additionally, whisk in a spoon or two of Greek yogurt or ricotta off heat for body.

6. How do I season and cook the chicken so it’s juicy every time?

Salt the chicken early, pat it dry, then sear in a wide pan until bronzed. Rest briefly and slice thin so it finishes gently in the sauce. Aim for 165°F internally; meanwhile, avoid simmering the slices in the sauce or they’ll dry out.

7. What are your best gluten‑free tips for chicken alfredo pasta?

Choose a sturdy GF fettuccine or penne and watch the clock—GF pasta swings from firm to soft quickly. Moreover, finish the last minute in the pan with the sauce, and save extra pasta water because GF starch behaves a bit unpredictably.

8. Can I use jarred Alfredo sauce and still make it taste “from scratch”?

Yes—gently warm the jar (don’t boil), then fortify with grated Parmesan and hot pasta water. Fold in rotisserie chicken and finish with cracked pepper and parsley. Consequently, you get speed and gloss without sacrificing flavor.

9. What’s the smartest way to meal‑prep and reheat chicken alfredo pasta?

Cool quickly in a thin layer, then box. To reheat, add a few tablespoons of hot water to a pan, warm on low, and toss gently until glossy; finally, add a small knob of butter or a sprinkle of cheese. Avoid boiling—high heat breaks the emulsion.

10. How can I lighten it further—keto or lower‑carb nights?

Swap part of the pasta for zoodles or shredded veg and lean on the butter‑cheese‑water emulsion. Alternatively, use grilled chicken and plenty of pepper and herbs to keep flavor high while carbs stay modest.

11. What vegetables pair best, and how do I stop them from watering down the sauce?

Broccoli, peas, and spinach are winners. Blanch firm veg briefly, then dry thoroughly before folding in at the end. As a result, your sauce stays plush and your greens stay bright.

12. How do I scale chicken alfredo pasta for a crowd without clumping?

Build two medium batches instead of one giant pot. Toss each with its own splash of pasta water, then combine in a wide pan on the lowest heat. Finally, refresh with a little hot water and a pat of butter just before serving for restaurant‑style sheen.

Posted on — Leave a comment

Keto Butter Chicken Recipe: Rich, Silky Murgh Makhani

Bowl of keto butter chicken with browned boneless chicken pieces in glossy orange-red makhani gravy, finished with a little kasuri methi.

This post was last updated on:

A good butter chicken has contrast, and keto doesn’t change that.

The chicken should have browned, sometimes lightly charred edges. The gravy should cling to those pieces and still move around them, with a soft butter sheen. Tomato gives the sauce its backbone, cream smooths the acidity, and crushed kasuri methi leaves the aroma that makes the finished curry recognizably butter chicken.

If butter chicken is one of the dinners you’ve been missing since cutting back on carbs, most of what makes it worth eating can stay. Or maybe you’ve already tried a low-carb version and ended up with perfectly decent creamy tomato chicken that somehow never quite became butter chicken. This recipe is meant to solve both problems.

This version is savory and tomato-deep, with browned chicken, a smooth orange-red gravy, moderate cream and kasuri methi still noticeable after the bite. A favourite takeaway may be much sweeter or richer. If yours is, this will taste different—and nothing has gone wrong.

Butter chicken—murgh makhani—already starts with plenty of ingredients that fit naturally into a lower-carb meal. Most of the carb difference comes from added sugar, how much tomato and onion go into the gravy, cashews or starches, prepared sauces and, very often, the rice and naan served with it.

Keep the butter chicken. Change the carbs that matter.

Jump to: Recipe · The 5 Changes · Troubleshooting · Low-Carb Sides · Nutrition · Restaurant Butter Chicken

Quick Answer: Is Butter Chicken Keto-Friendly?

Yes. Homemade butter chicken can be keto-friendly. This version comes to roughly 7g net carbs per serving, with no added sugar, cashews or flour-based thickener.

Chicken, butter, ghee, cream and spices contribute relatively little carbohydrate in the amounts used here. Tomato, onion and plain yogurt contribute some. Restaurant and packaged gravies may add sugar, ketchup, flour, cornstarch, cashews or simply a much larger amount of sauce.

Homemade is easier to calculate because you know what went into the pan. Whether roughly 7g net carbs fits your day depends on the carbohydrate target you’re following.

Ready to cook? Jump to the keto butter chicken recipe →

The 5 Changes That Matter

  1. Skip the added sugar. Give the tomato enough time to lose its raw, sharp edge before deciding the sauce needs sweetness.
  2. Keep the yogurt-and-lemon marinade. Leave only a light coating on the chicken before browning so the spices stay with the meat without flooding the pan.
  3. Let the gravy thicken through cooking. Tomato reduction and blending give this sauce plenty of body. Flour and specialty keto thickeners are unnecessary.
  4. Measure the onion; skip the cashews in this version. A modest amount of onion still gives the gravy body and sweetness, while the tomato, butter and cream supply enough richness.
  5. Look at the whole plate. Jeera cauliflower rice, greens and something crisp can save more carbohydrates than stripping character out of the curry itself.

That’s most of the keto work. From here, cook it like butter chicken.

Butter chicken surrounded by visual cues for no added sugar, a light yogurt marinade, reduced tomato gravy, measured onion and cauliflower rice.
No specialty keto thickeners are needed here: reduction, measured gravy ingredients and the plate do the work.

Keto Butter Chicken Recipe

The ingredient list looks long, but the cooking itself is straightforward. Most of the work is measuring, browning the chicken and giving the tomato enough time.

If other people at the table aren’t eating low-carb, you do not need a second curry. Put rice or naan on their side of the table and cauliflower rice or vegetables on yours.

At a Glance

DetailWhat to expect
Serves4 generous main-course portions
Chicken700g / 1½ lb boneless skinless thighs
PrepAbout 15 minutes
Marinating30 minutes minimum; 2–4 hours is better
CookAbout 30–40 minutes
Minimum elapsed timeAbout 1¼–1½ hours
Pan11–12in / 28–30cm wide, reasonably deep skillet or sauté pan
Heat levelMild to medium
Estimated net carbsAbout 7g per serving, before sides

Equipment

  • 11–12in / 28–30cm wide, reasonably deep skillet or sauté pan
  • mixing bowl
  • knife and cutting board
  • instant-read thermometer
  • immersion blender, recommended for a smoother gravy
  • digital kitchen scale, useful but not essential

A countertop blender works too. If the gravy is too shallow for an immersion blender to stay submerged, transfer it to a tall heatproof jug. Let very hot gravy settle briefly and follow your blender manufacturer’s guidance for hot liquids. A fine-mesh strainer is optional.

Overhead arrangement of chicken thighs, yogurt, passata, onion, cream, butter, ghee, ginger-garlic paste and spices for keto butter chicken.
For carb tracking, weigh the tomato and onion first; tiny spice differences matter far less.

Chicken and Marinade

  • 700g / 1½ lb boneless, skinless chicken thighs, cut into roughly 3cm / 1¼-inch pieces
  • 80g / ⅓ cup thick plain full-fat yogurt or dahi; mild full-fat Greek yogurt also works
  • 15ml / 1 tbsp lemon juice
  • 15g / 1 tbsp ginger-garlic paste
  • 1 tsp Kashmiri red chilli powder
  • 1 tsp garam masala
  • ½ tsp ground cumin
  • 4g / about ¾ tsp fine sea salt

Makhani Gravy

  • 14g / 1 tbsp ghee, for browning the chicken
  • 14g / 1 tbsp ghee or butter, for the gravy
  • 50g / roughly ½ small onion, finely chopped
  • 15g / 1 tbsp ginger-garlic paste
  • 1 tsp ground coriander
  • ½ tsp ground cumin
  • ½ tsp garam masala
  • ¼ tsp ground turmeric
  • ¼–½ tsp Kashmiri red chilli powder
  • 225g / 8oz / scant 1 cup plain passata or strained tomatoes, with no added sugar
  • 60ml / ¼ cup hot water or unsalted/lightly salted chicken stock, plus more if needed
  • 3g / about ½ tsp fine sea salt

To Finish

  • 120ml / ½ cup heavy or whipping cream
  • 14g / 1 tbsp butter
  • 1 tsp dried kasuri methi
  • fresh coriander/cilantro, optional

A fresh cream around 25% milk fat works too. The gravy will be slightly lighter and looser and may need another minute of gentle reduction. The nutrition estimate later in the post assumes heavier cream in roughly the 30–36% range.

Kashmiri chilli is being used mainly for colour and gentle warmth. Add cayenne or a hotter Indian chilli powder separately when you want more heat. For a mixed table, keeping the main pan mild and sharpening individual portions at the end is usually easier.

1. Marinate the Chicken

Mix the yogurt, lemon juice, ginger-garlic paste, Kashmiri chilli, garam masala, cumin and salt. Add the chicken and turn until every piece carries a light coating.

Cover and refrigerate for at least 30 minutes. Two to four hours works particularly well, and overnight is fine when that suits your schedule.

Before cooking, lift the chicken from the bowl and scrape or shake away the heavy excess marinade. Discard what remains after contact with the raw chicken. A little yogurt-spice coating should stay on the meat, but there should not be enough to form a puddle in the pan.

2. Brown the Chicken

Heat the pan over medium-high heat and add the ghee. If you’re cooking in two batches, divide that tablespoon between them. Arrange the chicken in a single layer with some room around the pieces.

At first you’ll hear a damp hiss as moisture leaves the surface. As the pan dries, the sound becomes sharper and the yogurt-spice coating begins catching and darkening around the edges. Give the first side roughly 2–3 minutes before checking it. Chicken that still grips the pan usually needs another few moments; once the surface has browned properly, it releases more easily.

Turn and colour the second side briefly, then transfer the chicken to a plate while the centre is still underdone. A few uneven dark patches are exactly what you want. The pieces do not need to look identical.

Pan filling with water? Stop adding chicken. Remove the pieces if necessary, let the excess liquid evaporate, add a touch of ghee once the pan is dry again and continue in smaller batches.

Step-by-step comparison showing lightly marinated chicken becoming damp, drying and browned, plus an overcrowded pan filled with excess moisture.
Between batches, let the pan get hot and dry again before adding more yogurt-marinated chicken. Otherwise, the next batch inherits the moisture from the last one.

For stronger tandoori-style edges, the marinated chicken can go under a very hot broiler/grill until a few spots blister, then finish cooking in the gravy.

3. Build the Makhani Base

Lower the heat to medium and add the second tablespoon of ghee or butter. Add the onion and measured salt and cook for about 4–6 minutes, until the onion softens and loses its sharp raw smell. A little gold around the edges is welcome.

Add the ginger-garlic paste and cook for roughly 30 seconds, until its raw aroma mellows. Stir in the coriander, cumin, garam masala, turmeric and Kashmiri chilli for another 20–30 seconds. Lower the heat if the spices begin sticking or darkening quickly.

4. Give the Tomato Enough Time

Pour in the passata and scrape the bottom of the pan to release the browned chicken and spice residue. Cook uncovered over medium to medium-low heat, stirring regularly.

Expect roughly 8–15 minutes, sometimes longer. Tomato products vary, and so do burners and pans. If yours needs 18 minutes, nothing has gone wrong.

The sauce starts bright and loose. As water cooks away, the colour deepens, the texture tightens and the obvious bottled-tomato smell fades. Draw a spoon through the pan: the trail should remain visible briefly before the sauce flows back. Small beads or streaks of fat may appear near the edges; you do not need a dramatic oil layer.

Taste a little. A sharp, raw tomato flavour means it needs more cooking. Extra tomato paste makes the colour stronger, but it can push the gravy towards a concentrated pasta-sauce flavour. Use it only when the tomato product itself is unusually pale or weak.

Four stages of tomato gravy labeled raw, reducing, developed and ready, ending with thick orange-red sauce that holds a spoon trail.
A wide pan speeds evaporation, concentrating passata without flour, cornstarch or another gravy thickener.

5. Blend the Gravy, Then Finish the Chicken

Pour in 60ml / ¼ cup hot water or stock and remove the pan briefly from the heat. Blend until smooth. For an especially silky gravy, strain it before returning it to the pan. Leaving it a little rustic is fine too.

Return the blended gravy to medium-low heat for 2–3 minutes, stirring as it comes back together and thickens slightly. Tiny beads of fat may appear around the edge.

Add the browned chicken and the juices collected on the plate. Simmer gently until the largest piece reaches 165°F / 74°C, generally another 4–7 minutes at this size. The USDA recommends 165°F as the safe minimum internal temperature for poultry.

If the gravy tightens before the chicken is ready, add hot water or stock 1 tbsp / 15ml at a time.

6. Finish With Cream, Butter and Kasuri Methi

Reduce the heat to low and let hard bubbling settle. Stir in the cream, then crush 1 teaspoon kasuri methi between your palms over the pan and add it with the finishing butter. Warm everything gently for another minute.

Cream being poured into butter chicken as butter melts and dried kasuri methi is crushed over the pan.
Once the cream is in, keep the heat gentle. A hard boil can split the dairy, while prolonged cooking also softens the fresh aroma of butter and kasuri methi.

Taste and check the salt first. After that, make only the adjustment the gravy needs: another ¼ teaspoon methi, a touch more heat, a small finishing pinch of garam masala, a spoonful of water or perhaps one more spoonful of cream.

If the tomato is still sharply acidic after it has cooked fully and the salt, butter and cream are in place, a very small amount of your preferred low-carb sweetener can help. Add it only at the end and only if the sauce genuinely needs it.

Turn off the heat and let the curry rest for about 5 minutes.

The Finished Butter Chicken

Some of the yogurt-spice coating should have darkened around the chicken while the centre stays juicy. The gravy should settle naturally around the pieces, with no watery pool underneath. The raw tomato edge should be gone, but you should still taste tomato, ginger, chilli and spice after the cream goes in.

Kasuri methi should be easy to notice when you lean over the pan. Drag a spoon through the gravy; the line should stay open for a moment and then slowly close. Lift the spoon and the sauce should cling before falling back in a slow ribbon.

Too thick? Stir in 1 tbsp / 15ml hot water. Too loose? Give it another minute or two uncovered.

Spoon lifting a browned piece of butter chicken with thick glossy sauce clinging and dripping back into the pan in a slow ribbon.
Perfect texture can still mean too much sauce. Fix the ratio, not the chicken.

Then stop adjusting.

Spoon it over hot jeera cauliflower rice and get some browned chicken and gravy in the first bite. At that point, nobody needs to be thinking about what was removed.


If dinner is already on the table, stop here and eat. Everything below is for the question that comes next: why another recipe claims fewer carbs, why a gravy tastes wrong, what changes at a restaurant or how to make the next batch easier.

Need something specific? Troubleshoot the gravy · Build the low-carb plate · Order butter chicken at a restaurant

What Makes Butter Chicken Taste Like Butter Chicken?

The hardest butter chicken to diagnose is the one that isn’t bad. The chicken is tender, the sauce is creamy and the seasoning seems reasonable, yet the first bite still tastes like generic tomato curry.

Usually there isn’t one secret ingredient missing. Tomato that has cooked far enough, properly browned chicken, enough salt and a sensible amount of cream all matter. Kasuri methi adds one of the most recognizable aromas in the finished gravy, and even a small amount can change the character of the sauce.

If the curry tastes seasoned but still smells anonymous, smell the kasuri methi before reaching for another spoonful of spice.

Butter chicken shown with developed tomato gravy, browned chicken, dried kasuri methi and a small bowl of cream as key flavour elements.
When butter chicken tastes almost right, change one variable at a time: check salt first, then char and kasuri methi before adding more cream or another spoonful of spice.

Where the Carbs in Butter Chicken Come From

Two bowls of butter chicken can look nearly identical and still produce very different nutrition numbers. Much of that variation comes from the gravy and from what somebody has decided counts as one serving.

VariableLower-carb directionHigher-carb direction
TomatoMeasured tomato baseLarge tomato-heavy gravy
OnionSmall measured amountOnion-heavy base
Added sweetnessNoneSugar, honey or ketchup
CashewsNone or a littleCashew-rich gravy
YogurtPlain and measuredSweetened or larger amounts
ThickeningReductionFlour or cornstarch
Prepared saucePlain/no-added-sugarSweetened commercial gravy
Serving sizeClearly definedTiny or vague
The plateVegetables or cauliflower riceRice plus naan

For this recipe, one serving means one-quarter of the finished curry.

The 225g / 8oz tomato gives the gravy enough acidity and fruitiness without making tomato the whole story. Once properly cooked, it tastes much less dominant than it does straight from the bottle.

Some butter chicken is sweet and some isn’t. This version starts without added sugar because cooked tomato, salt, butter and cream usually provide enough balance.

The 50g onion contributes body and natural sweetness while keeping the quantity predictable. Cashew paste can make a lovely rich butter chicken gravy, but this sauce does not need it.

Two butter chicken meals compared side by side, one with basmati rice and naan and the other with cauliflower rice, greens and cucumber.
Same curry, different plate: hold the portion steady and let the sides change the carb load.

Ingredient Notes That Change the Result

Thick yogurt helps the seasoning cling to the chicken, and lemon adds brightness. Moisture is the part to watch during browning: a heavy yogurt coating cools the pan, releases water and can leave pale coagulated clumps. Plain unsweetened yogurt or dahi works well. A particularly tangy Greek yogurt can make the finished curry noticeably more sour.

Chicken thighs are more forgiving through browning and the final simmer. Breast works too; keep the pieces evenly sized and avoid cooking them through during the first sear. MasalaMonk’s baked chicken breast recipe goes deeper into thickness, temperature and keeping lean breast meat juicy.

For the tomato, smooth plain passata is the easiest choice. Finely crushed tomatoes can be used too and may need more cooking and blending. Sweet pasta sauce, ketchup and seasoned marinara change the flavour substantially. Tomato paste is far more concentrated, so save it for the rare batch where the tomato itself seems unusually pale or weak.

Spices, Kasuri Methi and Cream

Kashmiri chilli gives deep colour with moderate heat. Paprika can provide much of that colour when Kashmiri chilli is unavailable, with stronger chilli added separately. Garam masala varies considerably from brand to brand, so a small finishing pinch can help when its aroma seems muted.

Kasuri methi is dried fenugreek leaf. Fenugreek seed and ground fenugreek are much stronger and should not replace it measure-for-measure. Start with 1 teaspoon of the leaves and increase in ¼-teaspoon steps only after tasting. If you cannot find kasuri methi, leaving it out is safer than substituting the same quantity of seed or powder.

Spice guide showing Kashmiri chilli, garam masala and kasuri methi, with dried fenugreek leaves compared with fenugreek seeds and powder.
At the shop, look for “kasuri methi” or “dried fenugreek leaves” on the packet. Then crush the leaves just before finishing the gravy to release more of their aroma.

The 120ml / ½ cup cream used here softens the tomato and carries the spices through the gravy. Add much more and the curry can turn pale while the ginger, chilli and methi recede into the background.

Want a Smoother, More Restaurant-Style Finish?

Restaurant butter chicken is not one fixed flavour. Some gravies are sweeter, some tangier and some substantially richer with cream or cashew. You can reproduce much of the char, silkiness and aroma at home, but a particular restaurant may still taste quite different.

A very hot broiler or grill gives the chicken darker blistered edges than most home pans can manage when they are full. A few charred spots are enough.

For the gravy, thorough blending makes the biggest difference. Straining takes the texture one step further when you specifically want the very smooth finish found in many restaurant versions.

Keep the butter and kasuri methi for the end so their aroma stays fresh. A brief dhungar smoke can add another layer when that is a technique you already use comfortably. Good chicken char gets you a long way without it.

Three identical bowls of orange butter chicken gravy labeled rustic, blended and strained, showing progressively smoother texture.
Blending gets you most of the silkiness; straining is optional polish.

Fix Your Butter Chicken

Butter chicken problems often sound alike. “Too tomatoey,” “bland” and “thin” can each describe more than one failure, and throwing more cream or spice at a confused gravy rarely helps. Work out what is actually wrong first.

ProblemLikely causeFirst move
Raw or harsh tomatoTomato base undercookedKeep reducing
Tastes like pasta sauceToo much concentrate or underdeveloped gravyCook the base further
BlandSalt, char or finishing aroma lackingCheck salt first
Too sourAcidic or undercooked tomatoCook, then balance
Too sweetToo much sweetenerRestore salt and spice balance
Generic creamy curryWeak char, little methi or rushed tomatoCorrect those elements
WateryToo much liquidRemove chicken and reduce
PastyOver-reducedAdd hot water 15ml at a time
Too much gravySauce volume drifted upwardRemove some sauce
Chicken released lots of waterWet coating, cool pan, crowding or high-water chickenDry the pan and brown smaller batches
White yogurt clumpsWet marinade or crowded/cool panLess coating, more heat, smaller batches
Greasy or splitExcess fat or hard boiling after dairyLower the heat
Dry chickenOvercooked during both stagesBrown first; finish only to 165°F / 74°C
Bitter methiToo much kasuri methiDilute if possible
Too spicyExcess hot chilliAdd a little cream
Too paleToo much creamUse less next time
Four butter chicken problems shown side by side: watery gravy, split greasy sauce, pale over-creamed curry and chicken with wet yogurt clumps.
Read the pan before changing the seasoning. Pooling liquid, separated fat, pale gravy and yogurt clumps describe four different failures—and therefore four different fixes.

Too Tomatoey or Too Sour

Bright, raw tomato needs more cooking. A heavy concentrated-tomato flavour is different and often comes from too much tomato paste. For sourness, make sure the tomato is fully cooked and then check the salt. Butter or a little more cream can soften what remains; sweetener comes last.

Bland—or Just Not Tasting Like Butter Chicken?

Flat flavour usually calls for salt first. A curry that is already seasoned but still tastes generic needs a different diagnosis: check the chicken browning, tomato development and kasuri methi. Smell the garam masala and methi straight from their containers too. Old spices can be present in the recipe and almost absent in the bowl.

Watery Sauce

Once the chicken reaches temperature, take it out. Reduce the gravy uncovered and return the chicken only long enough to coat and warm through.

Great Sauce, Wrong Ratio?

Sometimes the gravy is perfectly thick and there is simply too much of it. An oversized onion, extra tomato or accidentally scaled-up sauce can do that. Remove some and save it for another meal instead of continuing to cook the chicken.

White Yogurt Clumps

The pan was probably too cool, too crowded or carrying too much wet marinade. The curry is still edible. Next time, leave only a light coating on the chicken and give the pieces more space.

Bitter Kasuri Methi

Once too much methi is in the sauce, there is no clean way to remove it. Extra unsweetened gravy or a little cream can dilute the bitterness. Starting with the first teaspoon and increasing slowly is much easier than rescuing an over-methi’d pan.

← Back to the recipe · Build the low-carb dinner →

Build a Low-Carb Butter Chicken Dinner

A lower-carb butter chicken dinner does not need to look like curry surrounded by substitutes you’re merely tolerating. Give the gravy something warm to sit on, something green to cut through the richness and something cold and crisp beside it.

Jeera Cauliflower Rice

Cumin makes cauliflower rice feel like part of dinner.

Serves 4

Ingredients: 600g / about 6 cups cauliflower rice, 1 tbsp ghee or butter, 1 tsp cumin seeds, ½–¾ tsp salt, plus coriander and a small squeeze of lemon if you like.

Heat a wide pan over medium heat and add the ghee. Let the cumin seeds sizzle for 20–30 seconds, until fragrant, then add the cauliflower rice and salt. Increase the heat to medium-high and cook uncovered for about 5–7 minutes.

There will be plenty of steam at first. As it eases, the cauliflower should become tender while the small grains remain separate. Stop before it turns soft and wet.

For more ways to use it, MasalaMonk’s guide to using cauliflower on keto goes beyond cauliflower rice.

Something Green

Garlic spinach is especially good here because its slight bitterness cuts through the buttery gravy. Roasted cauliflower, cabbage, broccoli and green beans are easy alternatives.

Something Cold and Crisp

Cucumber, coriander, mint and lemon bring crunch and acidity. MasalaMonk’s cucumber salad recipe gives you several ways to build that fresh side.

If You Miss Naan

A low-carb naan or roti can make the meal feel much closer to the dinner you were craving. With packaged low-carb breads, check the actual carbohydrate amount and serving size on the label.

Cauliflower rice, one green vegetable and something cold already make a generous plate.

Low-carb butter chicken dinner with jeera cauliflower rice, dark green spinach and cucumber salad on a jewel-toned table.
Put the hot jeera cauliflower rice under the curry so it catches the makhani gravy; keep cucumber alongside it so the crunch, acidity and temperature contrast stay intact.

Is Restaurant Butter Chicken Keto?

Restaurant butter chicken is harder to calculate because the gravy has usually made most of its decisions before you sit down.

It may contain sugar or honey, ketchup, more onion, cashew paste, flour or cornstarch, sweetened tomato products or a premade curry base. Because that gravy is often prepared in a large batch, asking for “no sugar” may not change what is already in the pot.

The most useful question is simple: Does the butter chicken gravy contain added sugar or flour/cornstarch?

Can’t get a clear answer? Simpler grilled dishes are easier to judge when you’re keeping carbohydrates particularly low: tandoori chicken, chicken tikka, kebabs, grilled fish and some dry-style meat preparations. MasalaMonk’s green chutney recipe is a natural partner for those dishes.

Then look at the rest of the order. Rice, naan and sweet chutneys can change the meal far more than a measured amount of tomato in the curry.

Your favourite takeaway may taste quite different from this recipe even when both are good butter chicken. Some house gravies are much sweeter, saltier or richer. If that is exactly the butter chicken you love, a different result at home does not mean the recipe failed; you’re simply aiming at another style.

Butter chicken on a restaurant table beside a menu, with prompts asking about added sugar, flour or cornstarch, and side dishes.
Batch gravy may already contain sugar or starch; when it does, a simpler grilled dish is easier to estimate.

← Back to the recipe · Make ahead and reheat →

Shortcuts and Appliance Notes

A jarred butter chicken sauce can make dinner much faster. Check the total carbohydrates, added sugars, flour or starch, stated serving size and how much sauce you will actually use. A sauce that fits your numbers but tastes flat can often be improved with a little butter, cream and crushed kasuri methi.

The full recipe takes roughly 45–55 minutes of active work plus at least a short marinade. For a quicker weeknight, marinate the chicken first and use those 20–30 minutes to chop and measure everything else. Smooth passata and skipping the optional straining save time without giving up the chicken browning or tomato reduction.

For nights when fifteen minutes really is the limit, MasalaMonk’s 15-minute sesame ground chicken works well over cauliflower rice, sautéed cabbage or lettuce.

Instant Pot

Pressure cooking traps moisture, so the finished gravy tends to be thinner. Use Sauté for the aromatics, deglaze the pot thoroughly and follow the minimum-liquid requirement for your cooker. Once the chicken is cooked, remove it and reduce a loose sauce with Sauté uncovered before adding the chicken back with the cream, butter and kasuri methi.

Slow Cooker

Slow cooking gives tenderness but very little browning, so sear the marinated chicken first when you can. For boneless pieces, 2–3 hours on High or 4–6 hours on Low is a reasonable starting range; the chicken still needs to reach 165°F / 74°C. Add the cream and finishing butter near the end, and reduce a thin gravy separately.

Make Ahead, Store and Reheat

The chicken can be marinated the day before. The blended tomato gravy can also be cooked ahead. If dinner is for tomorrow, refrigerate the gravy before adding the final cream, butter and kasuri methi, then add those as you reheat it.

Cool leftovers promptly and refrigerate them in a covered container. Use them within 3–4 days, in line with USDA leftover-storage guidance.

Cold butter chicken will look much thicker after a night in the refrigerator. That is normal. Warm it gently and add a splash of water or stock as the gravy loosens. Bring reheated leftovers back to 165°F / 74°C.

Butter chicken freezes well too. Portion it before freezing and aim to use it within about 3 months for best quality.

Three stages labeled make ahead, chilled and reheated, showing butter chicken gravy becoming thick when cold and looser again after reheating.
Reheat first, then thin only if needed; melted fats loosen chilled gravy naturally.

Keto Butter Chicken Nutrition

Based on typical nutrition values for the ingredients listed, one-quarter of the finished curry is approximately:

Per servingEstimated amount
CaloriesAbout 500 kcal
ProteinAbout 36g
FatAbout 36g
Total carbohydratesAbout 9g
FiberAbout 2g
Estimated net carbohydratesAbout 7g

Here, net carbs means total carbohydrate minus fiber. The estimate assumes full-fat plain yogurt and heavy/whipping cream in roughly the 30–36% fat range; a lighter fresh cream will lower the fat and calorie numbers somewhat.

The calculation includes the chicken, yogurt, lemon, onion, tomato, ginger, garlic, ghee, butter, cream and measured spices. It does not include cauliflower rice, bread, optional sweetener, extra cream at serving or other sides.

1 serving = ¼ of the finished curry. If you track carbohydrates closely, the labels on the ingredients in your own kitchen are the most relevant numbers.

Frequently Asked Questions

Does Butter Chicken Usually Contain Sugar?

Sometimes. Some home and restaurant versions add sugar or honey to soften tomato acidity; many others don’t. It isn’t required here. Cook the tomato fully and balance the gravy before deciding it needs sweetness.

Do I Really Need Kasuri Methi?

You can make good creamy tomato chicken without it, but kasuri methi contributes an aroma closely associated with butter chicken. Use dried fenugreek leaves, not the same quantity of fenugreek seed or powder. If the leaves are unavailable, omission is safer than an equal substitution.

Can I Make This Dairy-Free?

Yes, although the flavour will shift. Use plain unsweetened dairy-free yogurt in the marinade and full-fat coconut cream in the gravy, along with a suitable non-dairy cooking fat. The finished sauce becomes more coconut-forward and moves away from classic murgh makhani.

If you’re avoiding dairy because of a milk allergy, don’t assume ghee is automatically suitable.

Is This Butter Chicken Gluten-Free?

The recipe itself doesn’t use wheat flour. Stocks, packaged spice blends and prepared sauces can vary, so check labels when avoiding gluten strictly.

Can I Make It Without a Blender?

Absolutely. Use smooth passata, chop the onion finely and leave the gravy a little more rustic. You lose some silkiness, not dinner.

Keep the Butter Chicken

Once the bowl reaches the table, “keto” shouldn’t be the first thing you notice.

There should be a browned edge on the chicken and enough gravy to drag through whatever is underneath it. The tomato should taste deep and fully cooked, the cream should leave the spices easy to taste, and the butter should give the sauce a soft sheen.

The kasuri methi lingers after the bite.

Close-up spoonful of browned butter chicken, glossy orange-red gravy, cumin-speckled cauliflower rice and a small piece of spinach.
Cauliflower rice does not need to impersonate basmati. Here its job is simpler: catch the silky makhani gravy and bring toasted cumin into the same bite as the charred chicken.

Keep the butter chicken. Change the carbs that matter.

← Back to the recipe · ↑ Back to top