Posted on 3 Comments

9 Keto Hamburger Recipes for Burgers, Bowls, Skillets, and Casseroles

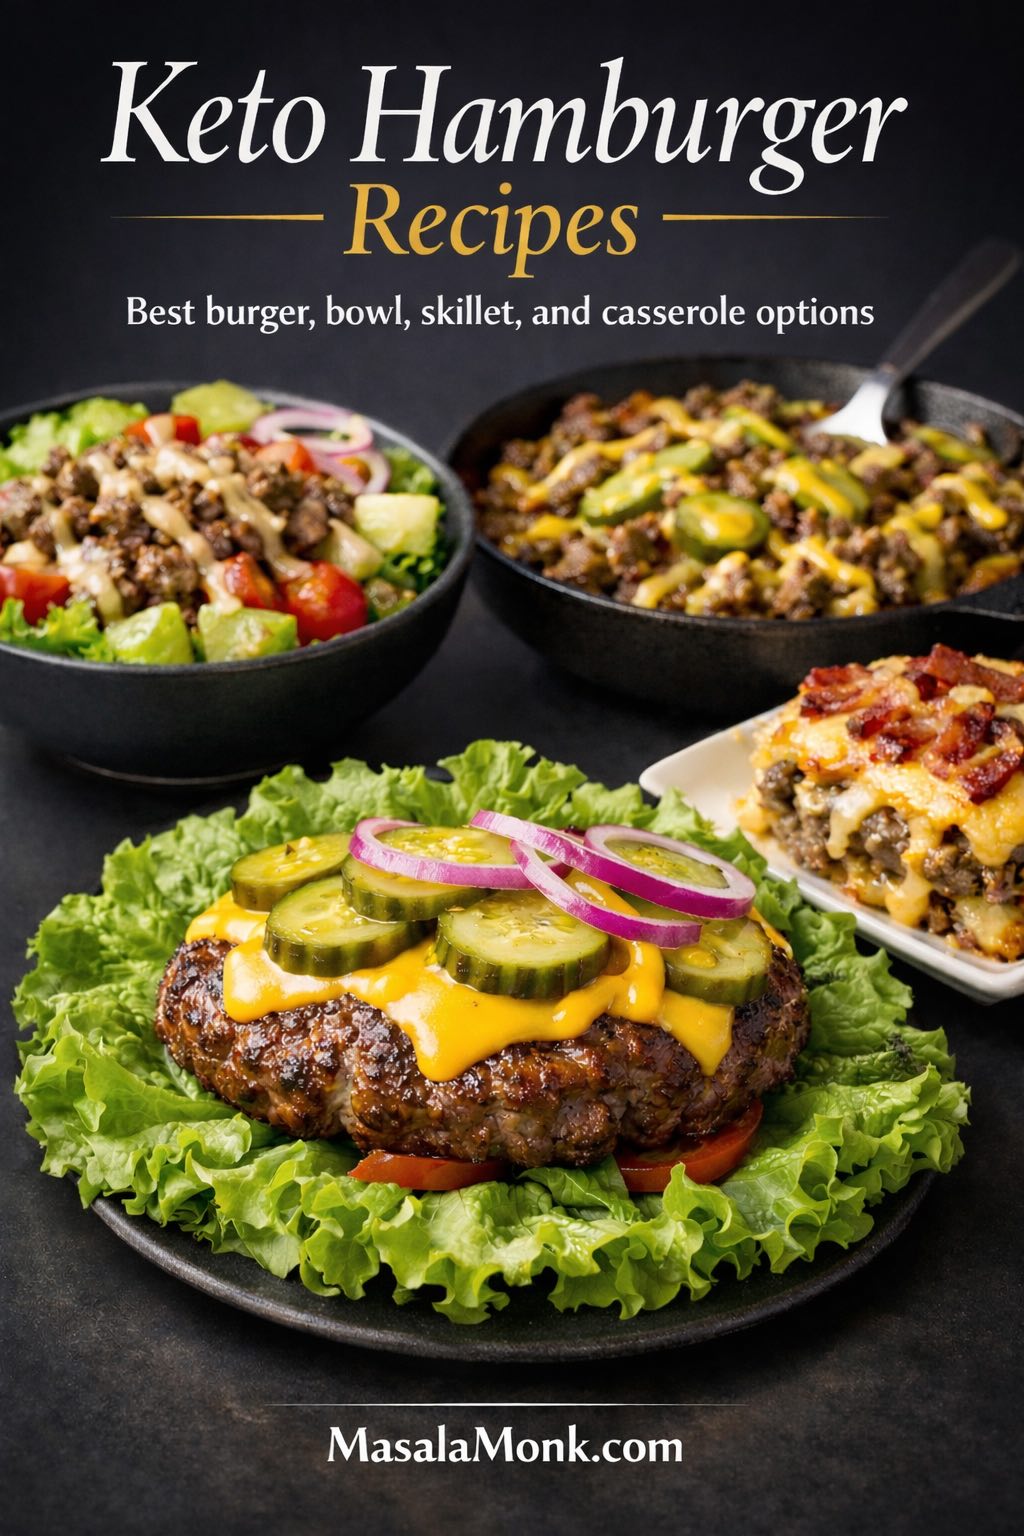
Keto hamburger recipes hero image showing a bunless cheeseburger, burger bowl, cheeseburger skillet, and bacon cheeseburger casserole

Keto hamburger recipes work best when they match the kind of dinner you actually want tonight. Sometimes that means a classic bunless cheeseburger. Other nights, a fast burger bowl, a warm cheeseburger skillet, or a bacon cheeseburger casserole makes more sense while still delivering the same savory, low-carb comfort.

Start with the best first recipe if you want the closest thing to a classic burger night, then use the comparison below to choose between a bowl, skillet, casserole, or one of the shorter variations depending on how much time you have and how well you need it to reheat. If you want extra context on why beef fits so naturally into low carb eating, MasalaMonk’s beef on keto guide is a useful companion read.

Across these formats, the same pattern shows up again and again: classic burgers need enough fat and enough sharp condiments to still feel complete without the bun, bowls need more sauce than most people expect, skillets need real browning or they slip into generic creamy beef, and casseroles need something bright on the plate so the richness does not flatten out.

For most readers, the best first recipe is the Classic Bunless Keto Cheeseburgers. It feels most like a real burger dinner, teaches the decisions that matter most, and makes it easier to decide whether you want to stay with burgers or move toward bowls, skillets, casseroles, and other burger-style formats later.

Quick Answer: Which Keto Hamburger Recipe Should You Make First?

Start with the Classic Bunless Keto Cheeseburgers if you want the closest thing to a classic burger night. Meanwhile, the Keto Burger Bowl with Homemade Burger Sauce is the fastest choice when you want a no-bun meal that still feels unmistakably like burger night. On nights when a warm hamburger-meat dinner sounds better, the One-Pan Keto Cheeseburger Skillet is the strongest pick. Finally, if you want the most filling make-ahead option, go with the Bacon Cheeseburger Casserole.

The craving may be the same, but the best answer changes with the night. Sometimes a real burger shape still matters. Sometimes speed matters more. On other nights, the smarter move is choosing the version that reheats well tomorrow instead of forcing everything into a bunless burger plate tonight.

Best First Keto Hamburger Recipe: Classic Bunless Keto Cheeseburgers

For most readers, the best first recipe is still the Classic Bunless Keto Cheeseburgers. It comes closest to a real burger dinner, teaches the decisions that matter most, and makes it easier to judge whether your next move should be a faster bowl, a warmer skillet, or a more make-ahead-friendly casserole.

  • Why start here: it stays closest to the classic burger experience while still fitting keto comfortably
  • What it teaches: beef choice, patty shaping, seasoning, cheese timing, sauce balance, and bun alternatives that actually work
  • Who it suits best: readers who want a true burger shape before branching into bowls, skillets, or casseroles
  • What to do next: stay with this if you want a burger plate, move to the burger bowl if you want speed, or shift to the skillet or casserole if you want better leftovers

Keto Hamburger Recipes Comparison Matrix

Use this matrix to choose by speed, leftovers, and how closely each option still feels like a classic burger dinner. In other words, if you already know whether you want a real burger, a fast bowl, a warm skillet, or a make-ahead casserole, this is the quickest way to land on the right recipe.

RecipeBest forTimeLeftoversHow burger-like it feels
Classic Bunless Keto CheeseburgersClosest to a real burger night20 minFairVery high
Keto Burger Bowl with Homemade Burger SauceFast lunch or easy dinner20 minVery goodHigh
One-Pan Keto Cheeseburger SkilletWarm weeknight dinner25 minExcellentMedium-high
Bacon Cheeseburger CasseroleComfort food and meal prep40 minExcellentMedium-high
Smash-Style Lettuce Wrap BurgersCrisp edges and fast cooking15 minFairVery high
Big Mac Salad BowlLighter burger-style meal20 minGoodMedium
Keto Hamburger Steak with Onions and MushroomsPlated comfort-food dinner30 minGoodMedium
Loose Meat Keto BurgersQuick scoopable beef dinner20 minVery goodMedium
Keto Cheeseburger Stuffed PeppersPortioned make-ahead meals40 minExcellentMedium
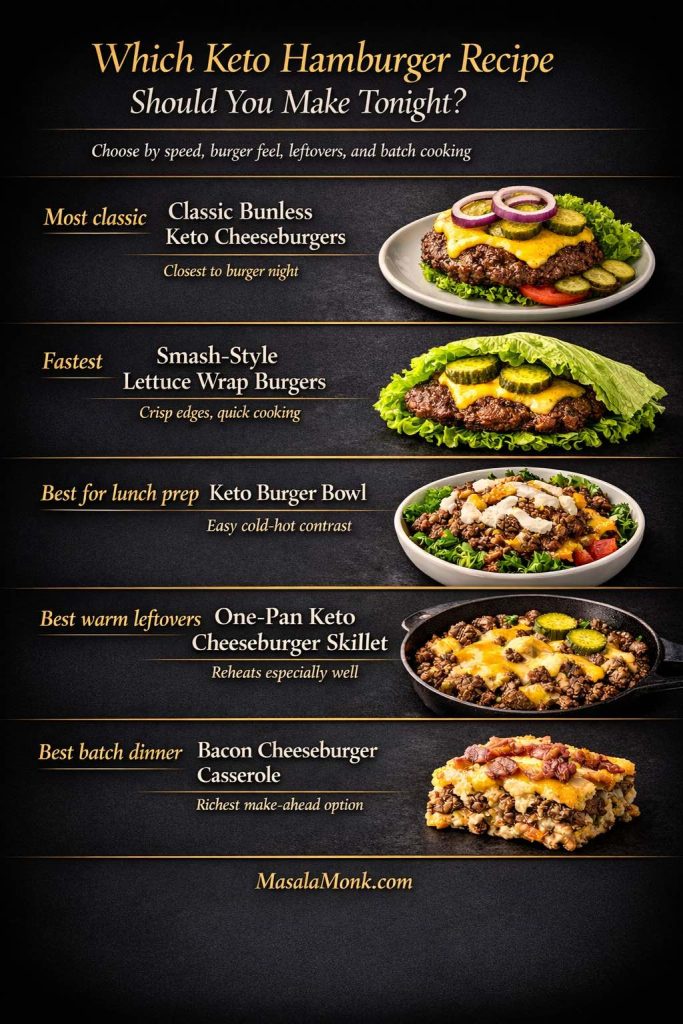
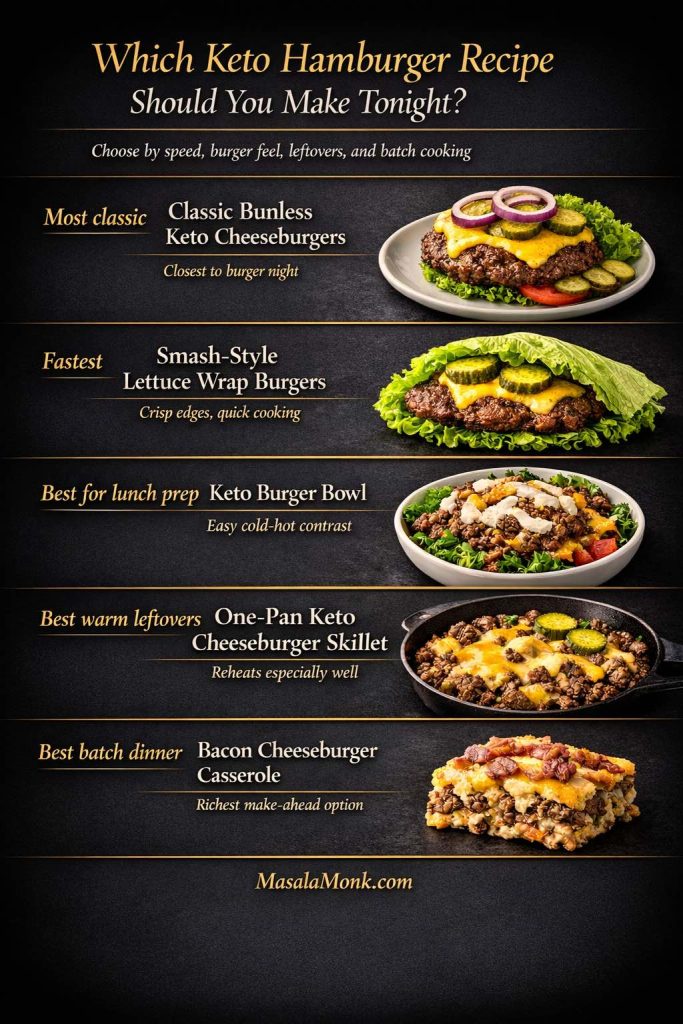
Decision guide for keto hamburger recipes showing the best option for a classic burger, fastest meal, lunch prep, warm leftovers, or batch dinner.
Use this quick chooser to decide whether tonight calls for the most classic bunless burger, the fastest lettuce-wrap option, an easy burger bowl, a reheatable skillet, or a batch-friendly casserole.

Choose Tonight’s Winner

  • Most classic: Classic Bunless Keto Cheeseburgers
  • Fastest: Smash-Style Lettuce Wrap Burgers
  • Best for lunch prep: Keto Burger Bowl with Homemade Burger Sauce
  • Best warm leftovers: One-Pan Keto Cheeseburger Skillet
  • Best batch dinner: Bacon Cheeseburger Casserole

4 Full Keto Hamburger Recipes

These four recipes cover the formats most people actually want: a classic bunless burger, a fast burger bowl, a warm cheeseburger skillet, and a richer casserole for leftovers or meal prep. So if you only cook from four sections here, start with these.

1. Classic Bunless Keto Cheeseburgers

Choose this when: you want the clearest keto burger answer and still want dinner to feel like burger night rather than a workaround.

A good bunless cheeseburger should not feel like the bun was simply removed and nothing else was adjusted. It should still eat like a full burger dinner: juicy in the center, properly seasoned, sharp from mustard and pickles, and rich enough that the missing bun stops feeling like the main story after the first bite.
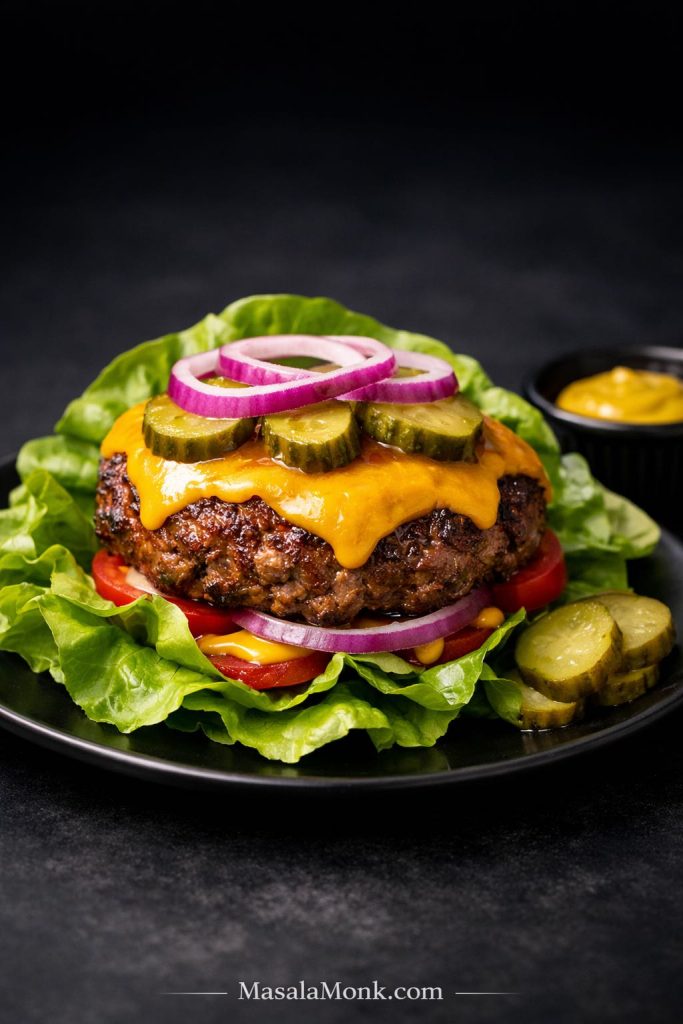
Classic bunless keto cheeseburger with melted cheddar, pickles, red onion, mustard, tomato, and lettuce leaves on a black plate.
Pickles, mustard, and onion do more of the real flavor-lifting work here than any bun substitute, which is why this bunless keto cheeseburger still feels like a full burger dinner.
  • Serves: 4
  • Prep time: 10 minutes
  • Cook time: 10 minutes
  • Estimated net carbs: about 3 to 5 grams per serving, depending on toppings and sauce
  • Best for: readers who want the clearest keto burger answer

Ingredients

  • 1 1/2 pounds ground beef, ideally 80/20 or 85/15
  • 1 1/2 teaspoons kosher salt
  • 3/4 teaspoon black pepper
  • 1 teaspoon garlic powder
  • 1 teaspoon onion powder
  • 4 slices cheddar or American cheese
  • 8 large lettuce leaves for wrapping or serving
  • 1/2 small red onion, thinly sliced
  • 8 to 12 pickle slices
  • 1 small tomato, sliced, optional
  • 2 tablespoons mustard
  • 1/4 cup burger sauce, or a mix of mayo, mustard, and finely chopped pickles

Substitutions

  • Beef: use 80/20 for a juicier burger and stronger crust, or use 85/15 if you want a slightly cleaner finish with less dripping.
  • Cheese: American melts more smoothly, while cheddar gives a sharper, more classic cheeseburger flavor.
  • Sauce: go with burger sauce for the fullest diner-style result, or keep it simpler with mustard and mayo.
  • Serving style: use lettuce wraps if you still want a hand-held burger, or plate the patties with toppings on the side if you want a less messy meal.
  • Toppings: tomato is optional, while pickles and onion do more of the real flavor-lifting work.

Method

  1. Divide the beef into 4 equal portions and shape them gently into broad patties about 1/2 to 3/4 inch thick. In a skillet, slightly flatter patties usually cook more evenly and develop better crust than very thick ones. Press a shallow dimple into the center of each one.
  2. Season both sides with salt, pepper, garlic powder, and onion powder just before cooking.
  3. Heat a cast-iron skillet or grill over medium-high heat until the surface is properly hot. Then add the patties and leave them alone long enough to develop color rather than nudging them early.
  4. Cook the patties for about 4 minutes on the first side, then flip and cook 3 to 4 minutes more depending on thickness.
  5. Add the cheese during the last minute so it melts cleanly without pushing the burgers too far.
  6. For food safety, cook the burgers to 160°F, which matches the USDA guidance for hamburgers and ground beef.
  7. Rest briefly, then serve with lettuce, onion, pickles, tomato if using, mustard, and burger sauce.

Why those small details matter: a slight center dimple helps thicker patties stay flatter, while seasoning just before cooking keeps the texture looser and juicier. If you want the deeper technique breakdown, Serious Eats has useful reads on patty shaping and salting ground beef.
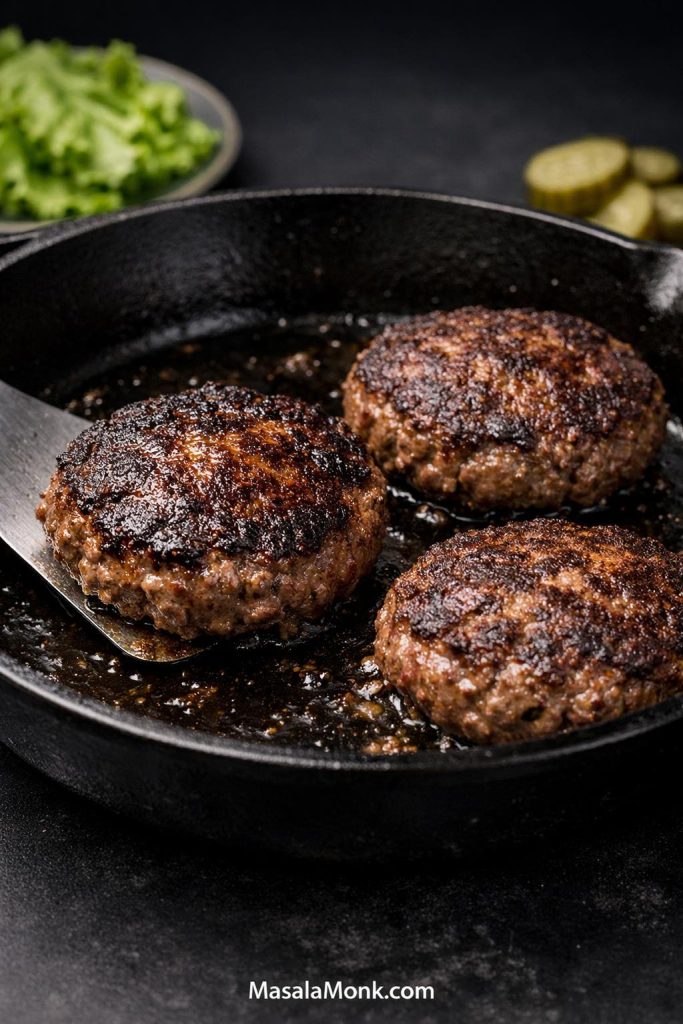
Burger patties searing in a cast-iron skillet for classic bunless keto cheeseburgers, with one patty lifted to show a deep browned crust.
The stage you want before adding cheese: a dark, even crust that keeps a classic bunless keto cheeseburger tasting like a real burger dinner instead of steamed ground beef.

Tips for Best Results

Handle the meat as lightly as possible and keep the patties cold until they hit the pan. That preserves a looser, juicier texture. Keep the topping stack restrained too. In this format, pickles usually do more flavor work than tomato, and American cheese gives a cleaner melt while cheddar gives a sharper finish.

Common Mistakes

  • Overworking the meat: that makes the patties denser and less juicy.
  • Salting too early: the texture can become tighter than you want.
  • Pressing the burgers in the pan: that pushes out the juices instead of improving browning.

Why This Format Works

What makes this one so reliable is that it keeps the classic burger logic intact instead of compensating with too many toppings. The beef stays central, the cheese rounds it out, and the pickles and mustard keep the whole thing from tasting heavy. Once that balance is right here, the bowl, skillet, and casserole versions become much easier to judge.

Best Way to Serve It

For the most classic feel, serve these as lettuce wraps or as a plated burger meal with pickles and a simple low-carb vegetable side such as sautéed cabbage or roasted broccoli.

Best with: mustard, pickles, sautéed cabbage, or roasted broccoli. Leftovers: best fresh, but patties reheat well in a covered skillet and work especially well turned into burger bowls the next day.

2. Keto Burger Bowl with Homemade Burger Sauce

Choose this when: you want the burger flavor fast, want something easier to prep ahead, or do not care about keeping a hand-held burger shape.

A burger bowl should still read clearly as a burger dinner, not just salad plus beef. That means proper browning, enough pickles and cheese, and a sauce with enough punch to keep every bite lively instead of soft and one-note.
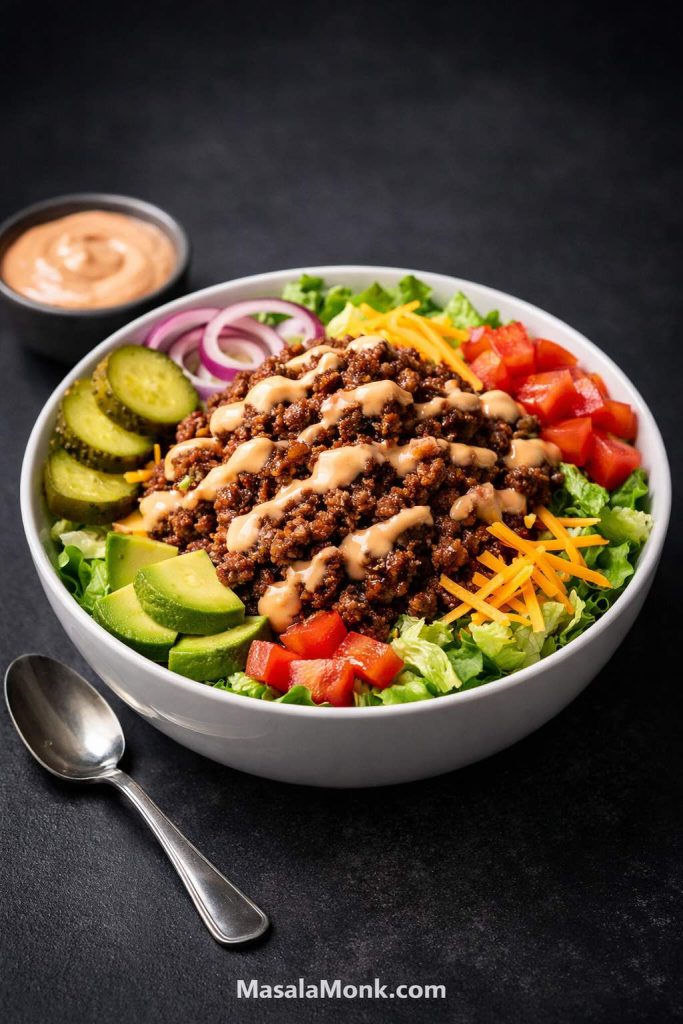
Keto burger bowl with browned ground beef, burger sauce, lettuce, pickles, red onion, cheddar, avocado, and tomato in a white bowl.
A good keto burger bowl still tastes unmistakably like burger night, which is why the browned beef, pickles, cheese, and burger sauce need to stay more prominent than the salad base.
  • Serves: 4
  • Prep time: 12 minutes
  • Cook time: 8 minutes
  • Estimated net carbs: about 5 to 7 grams per serving, depending on sauce and vegetables
  • Best for: fast dinners, lunch prep, and easy no-bun meals

Ingredients

  • 1 pound ground beef
  • 1 teaspoon kosher salt
  • 1/2 teaspoon black pepper
  • 1 teaspoon garlic powder
  • 1/2 teaspoon onion powder
  • 6 cups chopped romaine or iceberg lettuce
  • 1 cup cherry tomatoes, halved
  • 1/2 red onion, thinly sliced
  • 1/2 cup sliced pickles
  • 1 cup shredded cheddar cheese
  • 1 avocado, sliced
  • 1/2 cup burger sauce, ideally mayo-based with mustard and chopped pickles
  • Optional: 1/4 cup Greek tzatziki for a cooler variation

Substitutions

  • Greens: romaine gives more structure, while iceberg gives the cold, crunchy burger-joint feel.
  • Cheese: cheddar is the easiest default, though shredded Monterey Jack also works if you want a milder bowl.
  • Sauce: use classic burger sauce for the most familiar burger result, or switch to tzatziki if you want a cooler, tangier bowl.
  • Fat level: 85/15 often works especially well here because the beef still stays flavorful without making the bowl greasy.
  • Add-ons: avocado is optional, but pickles are harder to skip if you want the bowl to taste distinctly burger-like.

Method

  1. Brown the beef in a skillet over medium-high heat, breaking it up as it cooks.
  2. Season with salt, pepper, garlic powder, and onion powder, then cook until well browned rather than merely gray.
  3. Meanwhile, divide the lettuce among 4 bowls and top with tomatoes, onion, pickles, cheese, and avocado.
  4. Spoon the warm beef over the bowls so the cheese softens slightly and the bowl feels more like a meal than a cold salad.
  5. Finish with burger sauce. For a cooler, tangier take, add tzatziki instead of or alongside the classic burger sauce.
  6. Serve right away, or for meal prep let the beef cool slightly and store the beef, toppings, and sauce separately so the greens stay crisp.
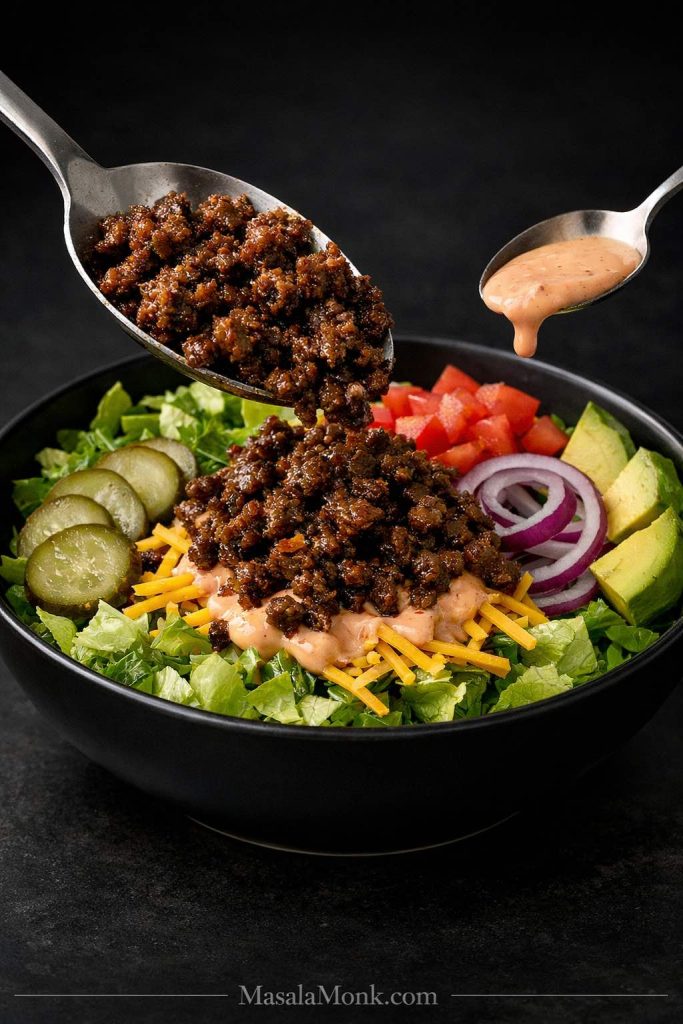
Hot browned beef and burger sauce being added to a keto burger bowl with lettuce, cheddar, pickles, red onion, tomato, and avocado.
Adding the hot browned beef and burger sauce at the end keeps this keto burger bowl tasting like burger night instead of a cold salad with beef on top.

Tips for Best Results

Keep the lettuce cold, the beef deeply browned, and the sauce slightly sharper than you think it needs to be. Burger bowls often go wrong because the components are individually fine but too quiet together. Iceberg gives the coldest burger-joint crunch, while romaine holds up better for meal prep, and a sharper sauce usually does more than extra cheese.

Common Mistakes

  • Underseasoning the beef: the bowl tastes flat even if the toppings are good.
  • Using a weak sauce: that makes the whole bowl drift toward generic salad territory.
  • Assembling too early: the lettuce softens and the bowl loses the texture contrast that makes it work.

Why This Format Works

What makes this one especially useful is that it keeps the burger profile intact while removing the part that tends to make burger meals messier to build, store, and reheat. As a result, it is one of the most practical keto hamburger recipes when you want speed and leftovers at the same time. It is also flexible enough to handle sharper sauces, more pickles, or a cooler yogurt-based topping without losing what makes the bowl satisfying.

Best Way to Serve It

Use crisp lettuce as the base, keep the sauce separate for storage, and add avocado right before serving if you want the best texture. This is one of the easiest make-ahead options because the beef, toppings, and sauce can all be stored separately and assembled in minutes.

Best with: extra pickles, avocado, or a slightly sharper burger sauce than you would use on a bunless burger. Leftovers: very good, as long as the beef, greens, and sauce stay separate until serving.

3. One-Pan Keto Cheeseburger Skillet

Choose this when: you want a warmer hamburger-meat dinner that still tastes clearly like cheeseburger dinner and holds up better than lettuce wraps in the fridge.

This is the right move on nights when a burger shape matters less than warmth, ease, and leftovers. The key is keeping the cheeseburger flavor clear. Once the beef is properly browned and the mustard, cheese, and pickles stay noticeable, the dish feels like a real burger dinner translated into spoonable form rather than a random creamy beef skillet.
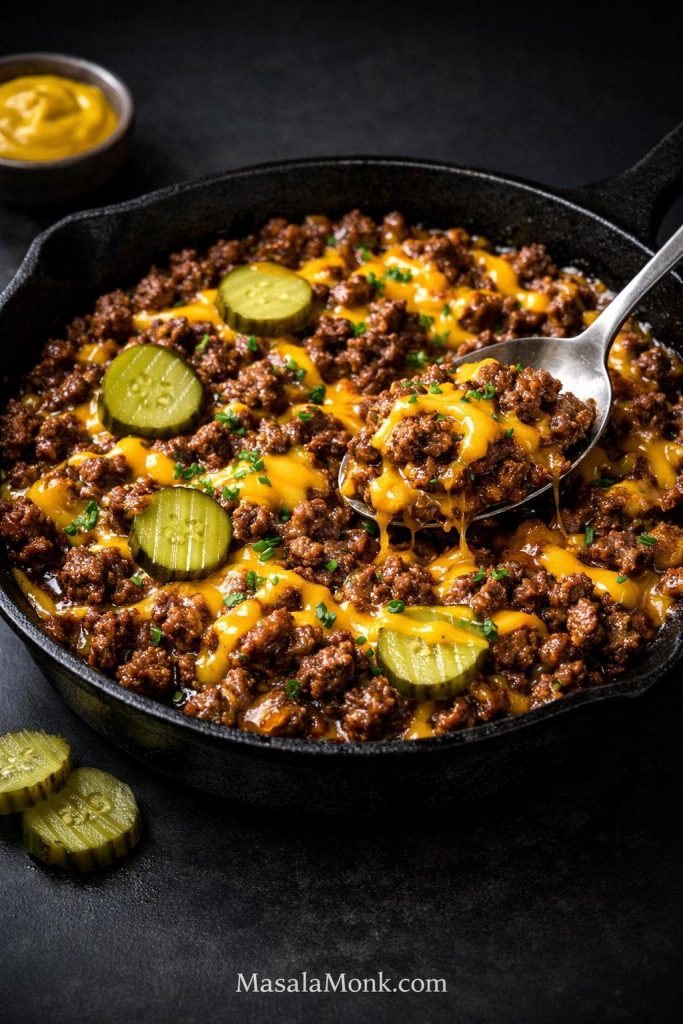
One-pan keto cheeseburger skillet with browned ground beef, melted cheddar, pickle slices, and a spoonful lifted from a cast-iron pan.
This one-pan keto cheeseburger skillet really lands when the beef is deeply browned and the cheese, pickles, and mustard cues still read clearly enough to keep the cheeseburger profile intact.
  • Serves: 4
  • Prep time: 10 minutes
  • Cook time: 15 minutes
  • Estimated net carbs: about 4 to 6 grams per serving
  • Best for: weeknight dinners and strong leftovers

Ingredients

  • 1 pound ground beef
  • 1/2 onion, diced
  • 2 cloves garlic, minced
  • 1 teaspoon kosher salt
  • 1/2 teaspoon black pepper
  • 1 teaspoon garlic powder
  • 1 tablespoon mustard
  • 2 ounces cream cheese
  • 1/2 cup heavy cream
  • 1 1/2 cups shredded cheddar cheese
  • 1/4 cup chopped pickles, optional
  • 2 tablespoons chopped parsley or chives

Substitutions

  • Beef: 85/15 is a good middle ground here, although 80/20 still works if you drain excess fat first.
  • Cheese: cheddar gives the clearest cheeseburger flavor, while pepper jack can work if you want a slightly spicier finish.
  • Cream base: use cream cheese and heavy cream for the richest version, or use a little less cream if you want the skillet tighter and meatier.
  • Flavor lift: chopped pickles are optional, but they help the skillet stay recognizably burger-like.
  • Serving shift: serve it as-is in bowls, or spoon it over sautéed cabbage if you want the meal to feel fuller.

Method

  1. Brown the beef with the onion in a large skillet over medium heat until the onion softens and the beef develops good color.
  2. If the pan looks overly greasy, drain just enough fat to keep the skillet balanced. Leave some behind, though, because that richness helps the finished dish still taste like cheeseburger instead of lean beef in sauce.
  3. Add the garlic, salt, pepper, and garlic powder, then stir briefly until fragrant.
  4. Lower the heat and stir in the mustard, cream cheese, and heavy cream until the mixture turns creamy and evenly combined.
  5. Add the cheddar and stir until melted. Fold in chopped pickles if using.
  6. Taste and adjust the salt before serving, because cheese can mute the seasoning slightly once everything comes together.
  7. Finish with parsley or chives and serve hot.
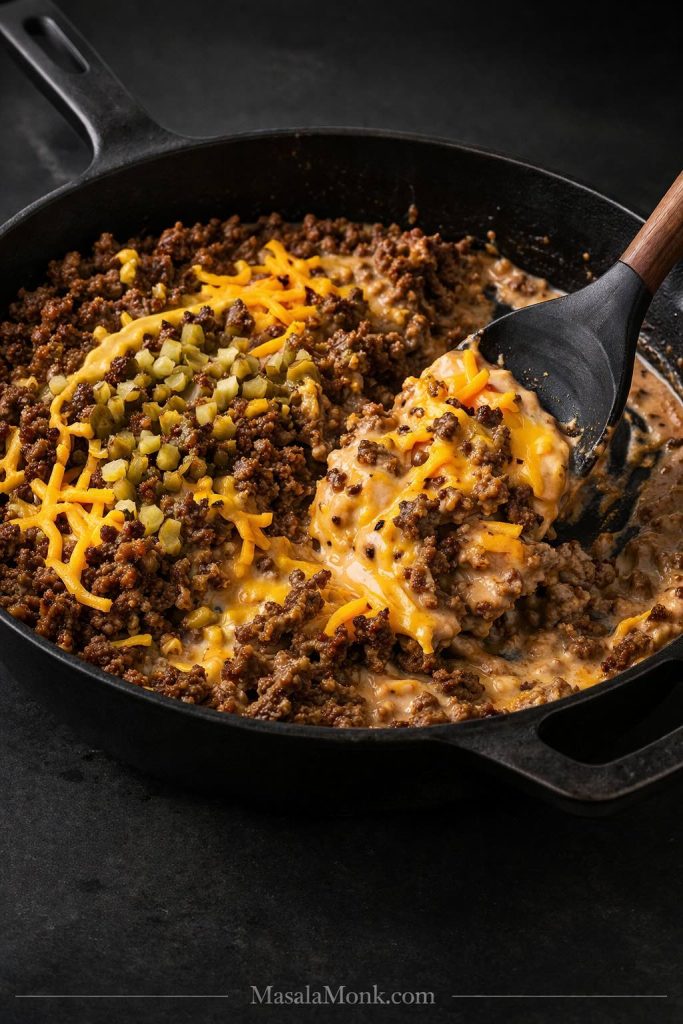
Black spatula lifting a one-pan keto cheeseburger skillet with browned ground beef, melted cheddar, chopped pickles, and creamy cheeseburger-style sauce in a cast-iron pan.
This skillet is in the right zone when the beef stays deeply browned, the cheddar melts into the pan without turning it soupy, and the pickles still cut through the richness.

Tips for Best Results

The beef needs more browning than most creamy skillet recipes ask for. That is what gives the dish backbone. Then keep the cream under control. Too much richness softens the cheeseburger profile, while a smaller amount lets the beef, mustard, cheese, and pickles stay distinct. Fold in a small amount of pickles at the end or scatter them on top, because cooked too hard into the base they lose the sharp edge that keeps the skillet tasting clearly like cheeseburger.

Common Mistakes

  • Not browning the beef enough: the skillet loses depth and starts tasting one-note.
  • Adding too much cream: the cheeseburger profile gets blurred.
  • Under-salting after the cheese goes in: the finished skillet can taste dull even though it looks rich.

Why This Format Works

What keeps this skillet satisfying is that it still reads as a cheeseburger dinner instead of drifting into generic creamy beef. The mustard, cheese, beef, and optional pickles keep the flavor profile clear, while the one-pan format makes it one of the easiest warm keto hamburger dinners to revisit during the week.

Best Way to Serve It

Serve it in bowls, over sautéed cabbage, or with a simple sharp green side. This is worth making even when you are really cooking for tomorrow as much as tonight.

Best with: sautéed cabbage, roasted mushrooms, or a simple green salad. Leftovers: excellent; reheat gently on the stove so the cheese stays smooth and the skillet does not tighten too much.

4. Bacon Cheeseburger Casserole

Choose this when: you want the richest comfort-food version, need stronger leftovers, or want a burger-style dinner that feels made for batch cooking.

This is the richest option here, so balance matters more than volume. The casserole should feel satisfying and cheesy, yet still have enough mustard, bacon, or pickle sharpness to stop the last few bites from tasting heavier than the first few. That contrast is what makes it worth baking instead of just turning dinner into another skillet.
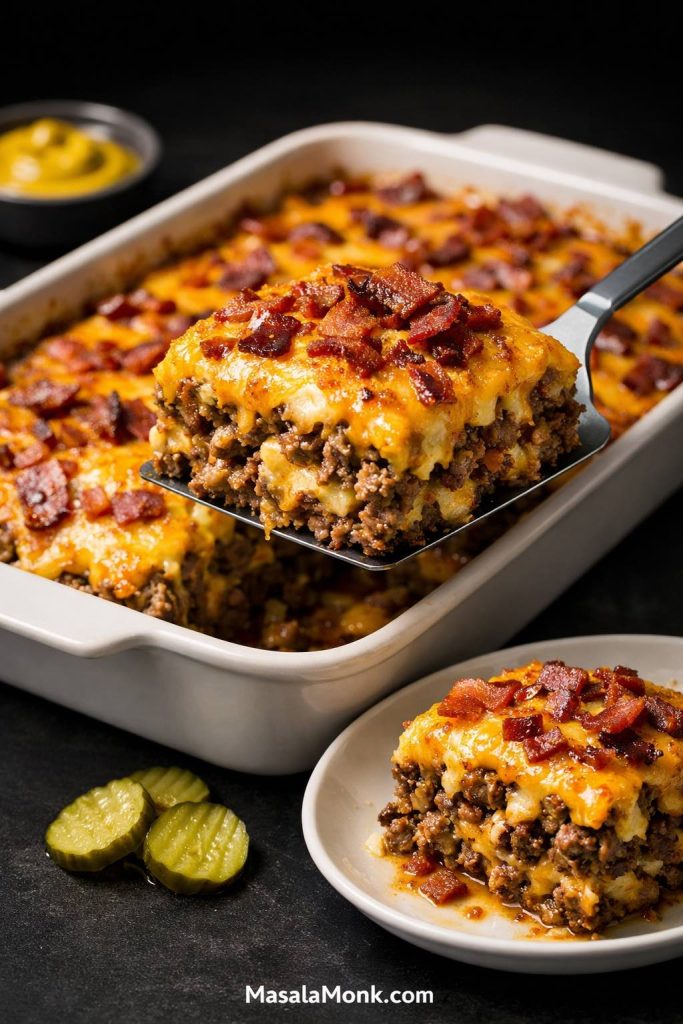
Bacon cheeseburger casserole with melted cheddar and crisp bacon, shown with a lifted square from a baking dish.
A bacon cheeseburger casserole makes the most sense when you want a richer make-ahead dinner, and the clean lifted slice shows why resting it before serving helps the texture hold together better.
  • Serves: 6
  • Prep time: 15 minutes
  • Cook time: 25 minutes
  • Estimated net carbs: about 4 to 6 grams per serving
  • Best for: meal prep, family dinners, and generous leftovers

Ingredients

  • 1 1/2 pounds ground beef
  • 6 strips bacon, cooked and crumbled
  • 1/2 onion, diced
  • 1 teaspoon kosher salt
  • 1/2 teaspoon black pepper
  • 1 teaspoon garlic powder
  • 1 tablespoon mustard
  • 4 ounces cream cheese
  • 2 large eggs
  • 1/2 cup heavy cream
  • 2 cups shredded cheddar cheese, divided
  • 2 tablespoons chopped pickles or no-sugar pickle relish, optional

Substitutions

  • Beef: 85/15 works well if you want the casserole rich but not overly heavy, while 80/20 gives the fullest comfort-food version.
  • Bacon: you can leave it out, but the casserole loses some of the smoky edge that helps it stand apart from the skillet.
  • Cheese: cheddar is the best default, though a cheddar-mozzarella mix can soften the sharpness if you want a milder finish.
  • Pickle element: chopped pickles or no-sugar relish both work, though pickles usually taste cleaner.
  • Structure: bake it in one casserole dish for family-style serving, or divide it into smaller dishes if you want easier portions for meal prep.

Method

  1. Preheat the oven to 375°F.
  2. Brown the beef with the onion, then stir in the salt, pepper, garlic powder, mustard, and cream cheese.
  3. Whisk the eggs and heavy cream in a bowl, then stir in 1 1/2 cups of the cheddar.
  4. Combine the beef mixture with the egg-cheese mixture and fold in the bacon and pickles if using.
  5. Transfer to a greased baking dish, spread it evenly, top with the remaining cheese, and bake for 20 to 25 minutes until hot and set.
  6. Pull the casserole when the center is just set rather than baking until it looks very firm. It will tighten further as it rests.
  7. Rest for 5 to 10 minutes before serving so the casserole slices more cleanly.
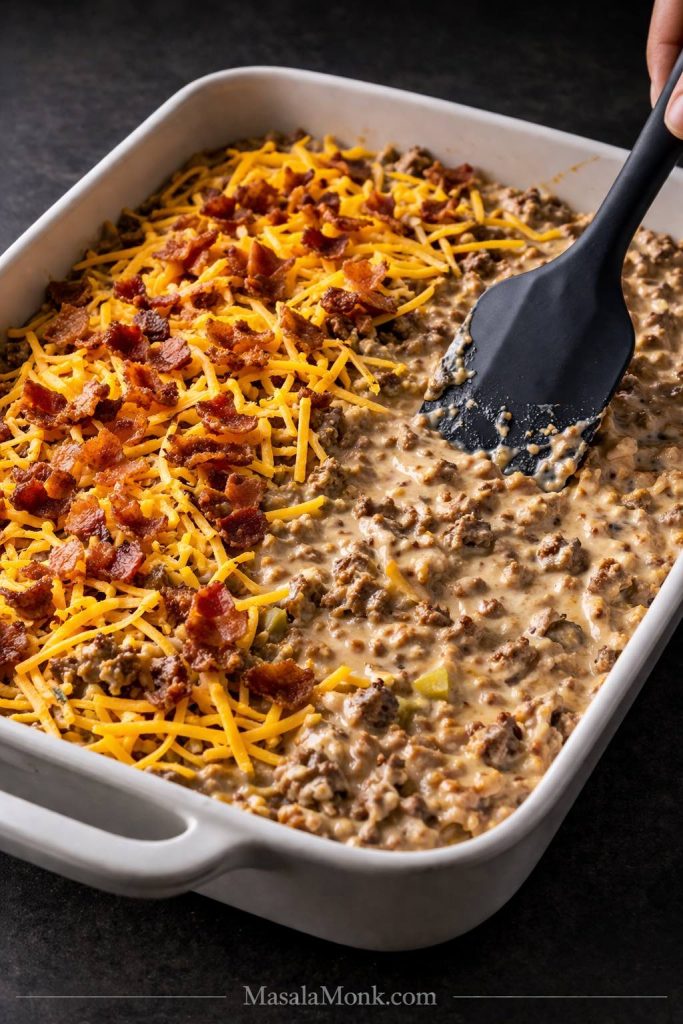
Black spatula smoothing unbaked bacon cheeseburger casserole in a baking dish, with shredded cheddar and bacon on top before baking.
Before baking, spread the casserole base evenly, then top it with cheddar and bacon so the bacon cheeseburger casserole bakes more evenly and finishes with better texture.

Tips for Best Results

Letting the casserole rest matters more than it looks on paper. A short rest firms the texture, improves the slices, and keeps the inside from feeling looser than it really is. Keep something bright nearby too. This version usually improves more from mustard, pickles, bacon, or a sharper side on the plate than from extra cheese or cream in the dish itself.

Common Mistakes

  • Overbaking: the casserole becomes tighter and less juicy than it should be.
  • Skipping the rest time: it slices messily and feels wetter than necessary.
  • Underseasoning the filling: cheese alone does not carry the whole dish.

Why This Format Works

This casserole makes the most sense when burger flavor matters more than burger shape. It portions more neatly than the skillet, survives the next day better than lettuce wraps, and feels more worth making when you already know leftovers matter. For basic fridge and freezer timing, the FoodSafety.gov cold storage chart is still the cleanest external reference to keep in mind.

Best Way to Serve It

Serve this with something sharp on the side so the richness does not flatten out.

Best with: pickles, a crisp salad, or a mustard-forward side element. Leftovers: excellent; cool fully before portioning for cleaner slices and better reheating.

5 More Keto Hamburger Recipes to Try

These shorter variations give you a few more useful ways to solve the same burger craving, especially when you want crisp edges, easier lunch prep, a plated dinner, or better portioning. So while they are shorter than the four main recipes, they should still feel like real options rather than decorative extras.

5. Smash-Style Lettuce Wrap Burgers

Choose this on nights when speed matters more than leftovers and you want the crispest crust in the group.

Use small beef balls, a very hot skillet or griddle, cheese, pickles, mustard, and sturdy lettuce leaves instead of buns. MasalaMonk’s classic smash burger method is a natural internal reference here, while Serious Eats’ smash burger technique explains why the crust develops so well.
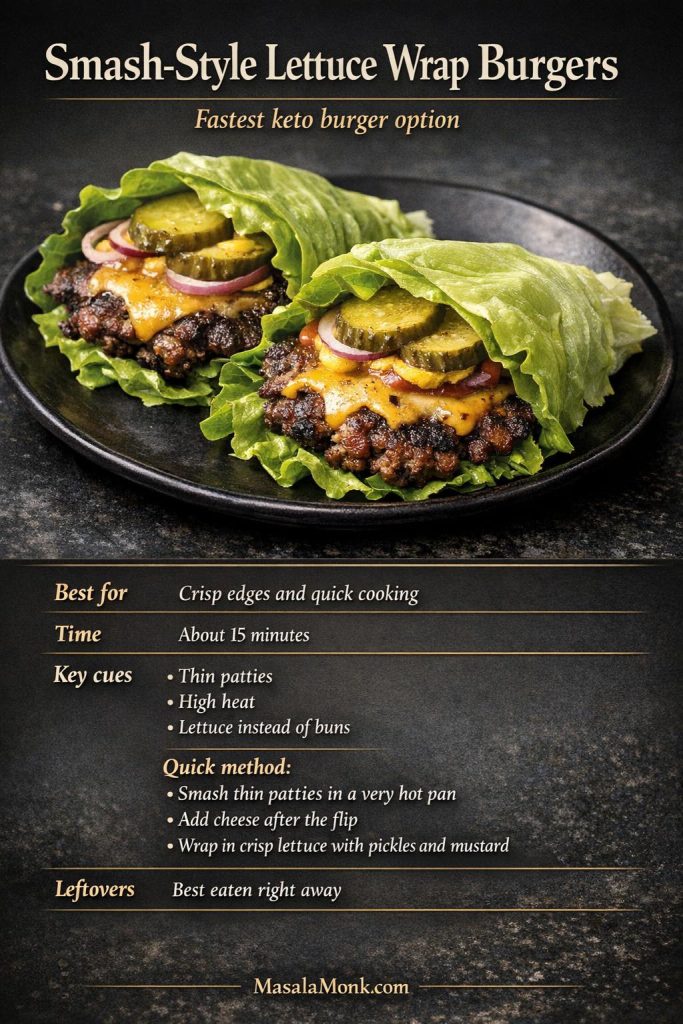
Smash-style lettuce wrap burgers with crisp-edged beef patties, melted cheese, pickles, red onion, and a mini recipe card for quick keto burger prep.
These smash-style lettuce wrap burgers are one of the fastest keto burger options when you want crisp edges, strong burger flavor, and almost no cleanup.

Smash once right away, season, then leave the patties alone until the edges turn deeply browned and crisp before flipping. Add cheese, stack into lettuce, and serve immediately. This is one of the few burger styles here that really loses its point once it sits.

Best with: mustard, pickles, and the simplest possible toppings. Leftovers: poor; this version loses its edge once it sits.

6. Big Mac Salad Bowl

This is the lighter route, but it still needs enough sauce and pickle flavor to read as a real burger-style meal rather than merely lean.

Build it with chopped lettuce, warm seasoned beef, shredded cheese, onions, pickles, and a creamy dressing that clearly tastes like burger sauce. Chop everything fairly small so each bite lands as a real mix instead of forkfuls that swing between salad and plain beef.
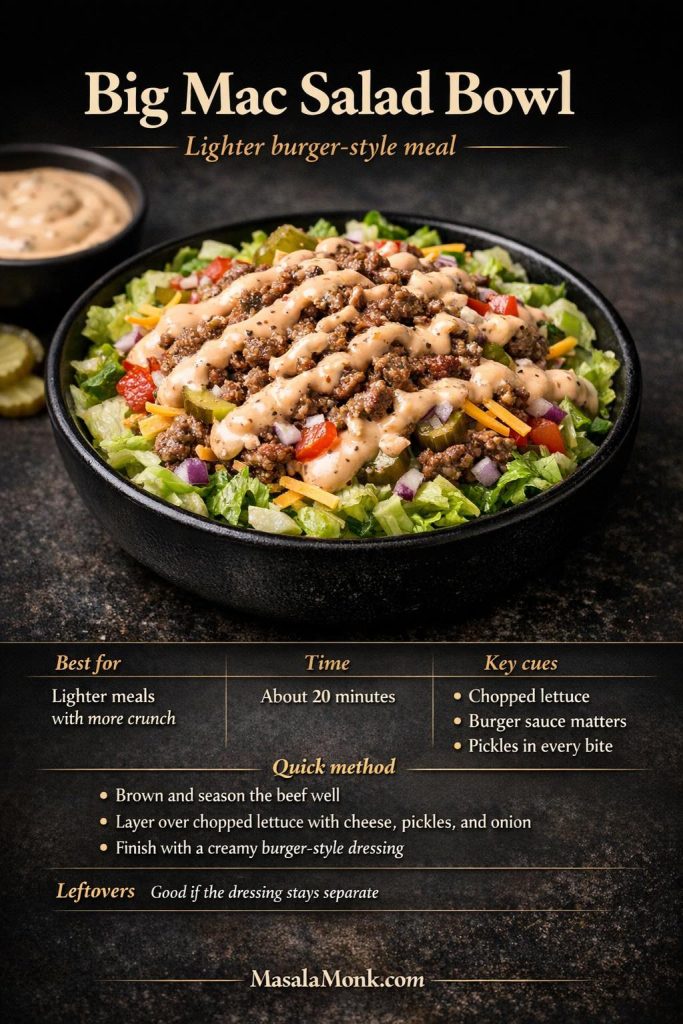
Big Mac salad bowl with chopped lettuce, browned ground beef, pickles, red onion, shredded cheddar, burger-style dressing, and a mini recipe card for a lighter keto burger meal.
Big Mac salad bowl holds up best when the lettuce is chopped, the beef is well browned, and the burger-style dressing is bold enough to keep the whole bowl tasting clearly burger-inspired instead of salad-like.

One thing that matters more than it seems: this is the easiest version to over-chill into blandness, so the dressing has to do more flavor work than in a classic burger bowl.

Fast build: keep the lettuce, beef, toppings, and dressing separate until the last minute so the bowl stays crisp and the beef does not chill the whole dish too much.

Best with: extra pickles, finely chopped onions, or avocado. Leftovers: good, but only if the dressing stays separate.

7. Keto Hamburger Steak with Onions and Mushrooms

This is the better fit when dinner should feel plated, savory, and a little more old-school than burger-like in shape.

Sear seasoned patties, then cook onions and mushrooms in the same pan until they pick up color and absorb the beef flavor left behind. A spoonful of chimichurri over the top helps a lot here, because the plate can get heavy without some freshness.
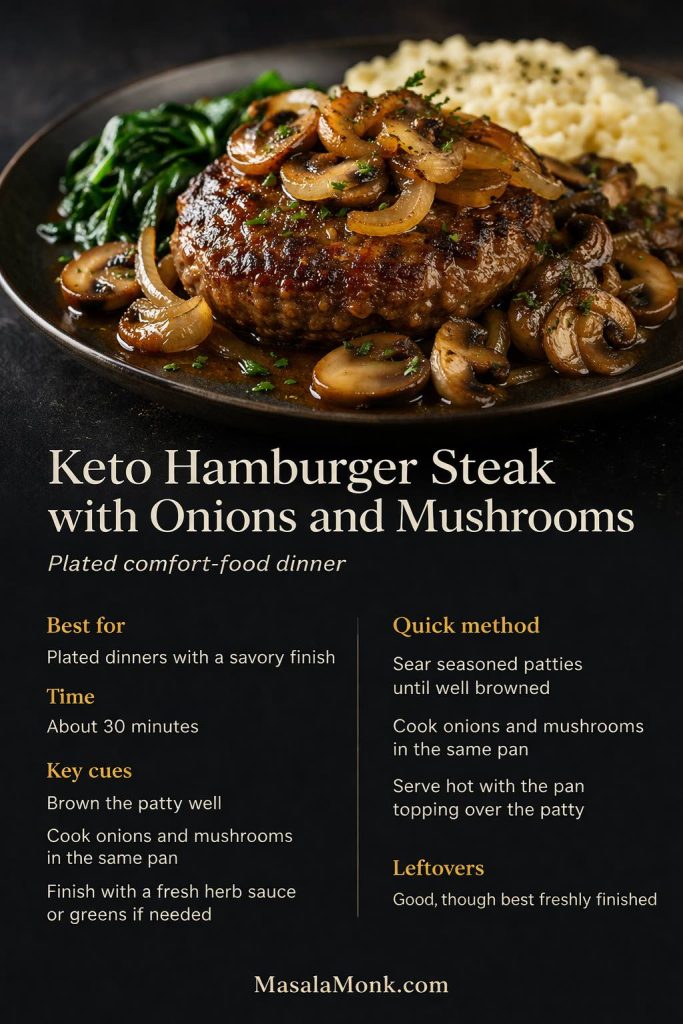
Keto hamburger steak with onions and mushrooms served as a plated comfort-food dinner, with a mini recipe card showing timing and key cues.
A keto hamburger steak does best when the onions and mushrooms are cooked in the same pan as the patty, because that is what turns it from a plain bunless burger into a more savory plated dinner.

Serve it with wilted greens, sautéed cabbage, or cauliflower mash. This one reheats reasonably well, though the onion-and-mushroom finish is best when freshly made.

Best with: cauliflower mash, wilted greens, or sautéed cabbage. Leftovers: decent, though the onion-and-mushroom finish is best fresh.

8. Loose Meat Keto Burgers

This is one of the easiest versions for flexible leftovers, because the filling stores better than assembled burgers and can move between lettuce cups, bowls, and salads without much trouble.

Brown the beef well, season it assertively, and keep it moist enough to scoop rather than dry and crumbly. A little pepper sauce stirred into mayo makes a strong spicy finish here, especially when the rest of the build is fairly simple.
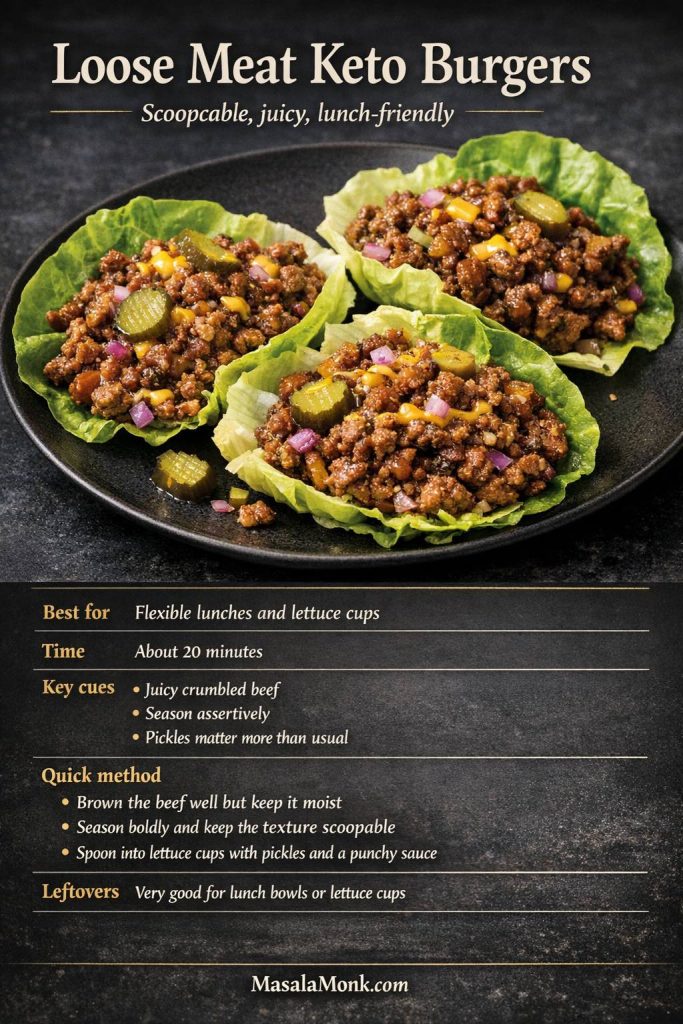
Loose meat keto burgers served in lettuce cups with juicy seasoned ground beef, pickles, red onion, and a mini recipe card for flexible low-carb lunches.
Loose meat keto burgers are at their best when the beef stays juicy and boldly seasoned, because this format depends more on scoopable texture, pickles, and sauce than on patty structure.

What makes or breaks it: the beef has to stay juicy enough to scoop and bold enough to stand on its own, because this format depends more on seasoning, pickles, and sauce than on patty structure.

Pickles matter more than usual in this format. Since there is no patty structure and no bun, that sharper edge is often what keeps the loose meat from tasting like ordinary seasoned ground beef.

Best with: pickles, crisp lettuce, and a punchy sauce. Leftovers: very good for lunch bowls or lettuce cups.

9. Keto Cheeseburger Stuffed Peppers

Choose this one when portioning and reheating matter more than speed.

Fill halved peppers with seasoned cheeseburger beef, mustard, and cheese, then bake until the peppers turn tender and the tops bubble. Because the peppers add sweetness and bulk, the filling needs more confidence than usual with salt, mustard, or pickle on the side.
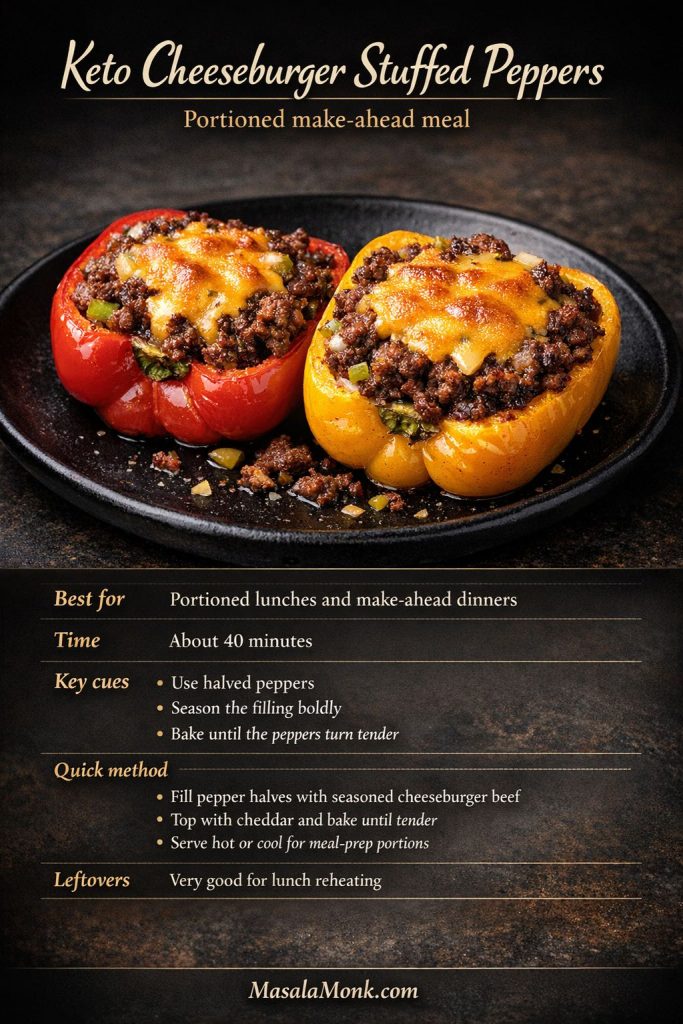
Keto cheeseburger stuffed peppers with seasoned beef and melted cheddar, shown as a mini recipe card for portioned make-ahead meals.
These keto cheeseburger stuffed peppers come out best when the filling is seasoned boldly and the peppers bake until tender, because that is what makes them feel like a real make-ahead meal instead of just peppers with beef added in.

These are especially useful for make-ahead lunches. They do not hit the same fast-burger craving as the classic or smash-style versions, but they store much better and feel more complete the next day.

Make-ahead note: bake fully, cool, then refrigerate in portions so they reheat as complete lunches without any extra assembly.

Best with: pickles on the side or a sharper green salad. Leftovers: very good; one of the best short variations for lunch reheating.

How to Keep Hamburger Recipes Keto

The beef is usually the easy part. The meal drifts off course when buns, sweet sauces, breadcrumb binders, or standard diner sides start piling onto the plate. So the real skill is not making hamburger meals feel restricted. It is making them feel complete without leaning on the parts that add most of the unnecessary carbs.
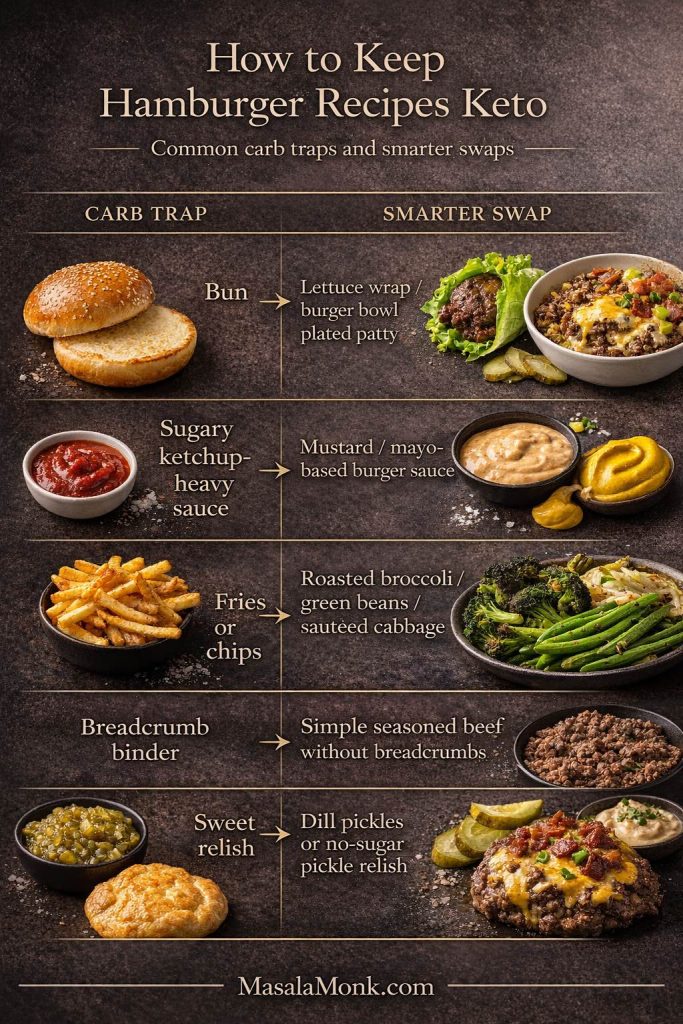
Comparison guide showing how to keep hamburger recipes keto by swapping buns, sugary ketchup-heavy sauce, fries or chips, breadcrumb binder, and sweet relish for lower-carb burger options.
The easiest way to keep hamburger recipes keto is to watch the extras: skip the bun, sugary sauces, fries, breadcrumbs, and sweet relish, then use lettuce wraps, burger bowls, mustard or burger sauce, lower-carb vegetables, and dill pickles instead.

Switch the Format Instead of Forcing a Bun

Lettuce wraps work when you still want a hand-held burger feel. Meanwhile, bowls and salads work better for speed and meal prep. Skillets and casseroles make more sense when you want a warmer, more filling hamburger-meat dinner with stronger leftovers. Once you stop forcing every meal into burger form, the rest of keto burger cooking gets easier.

Common Carb Traps

  • Breadcrumb binders: these can quietly push patties away from the simple low-carb version you actually want.
  • Sugary ketchup-heavy sauces: the sauce is often where the hidden carbs arrive first.
  • Sweet relish: even small amounts can shift the meal more than expected.
  • Too much onion: onions are useful, but in skillet and casserole versions they can add up fast.
  • Heavy bun substitutes: some “keto buns” still make the meal heavier and less clean than bowls, lettuce wraps, or plated burgers.
  • Standard diner sides: fries, chips, and similar add-ons can undo the rest of the plate quickly.

Use Smarter Condiments

Mustard, mayo-based burger sauce, pickle-forward dressings, herb sauces, and spicy mayo all work well here because they add richness and sharpness without pushing the meal toward sweetness. A good keto-friendly mustard and a simple homemade mayo base cover most of what you need for burgers, bowls, and burger sauce. When you want a cooler finish, Greek tzatziki also works especially well with burger bowls and plated patties.

Quick rule: when in doubt, keep the beef simple, skip the sweet sauces, and let acid, cheese, and a sharper sauce do the heavy lifting.

Best Ground Beef for Keto Hamburger Recipes

The best beef blend depends on the format. For burgers and smash burgers, fattier beef usually works better because it browns harder and stays juicier. By contrast, skillets, casseroles, and stuffed peppers can handle slightly leaner beef when enough cheese, cream, bacon, or sauce is already doing part of the richness work.
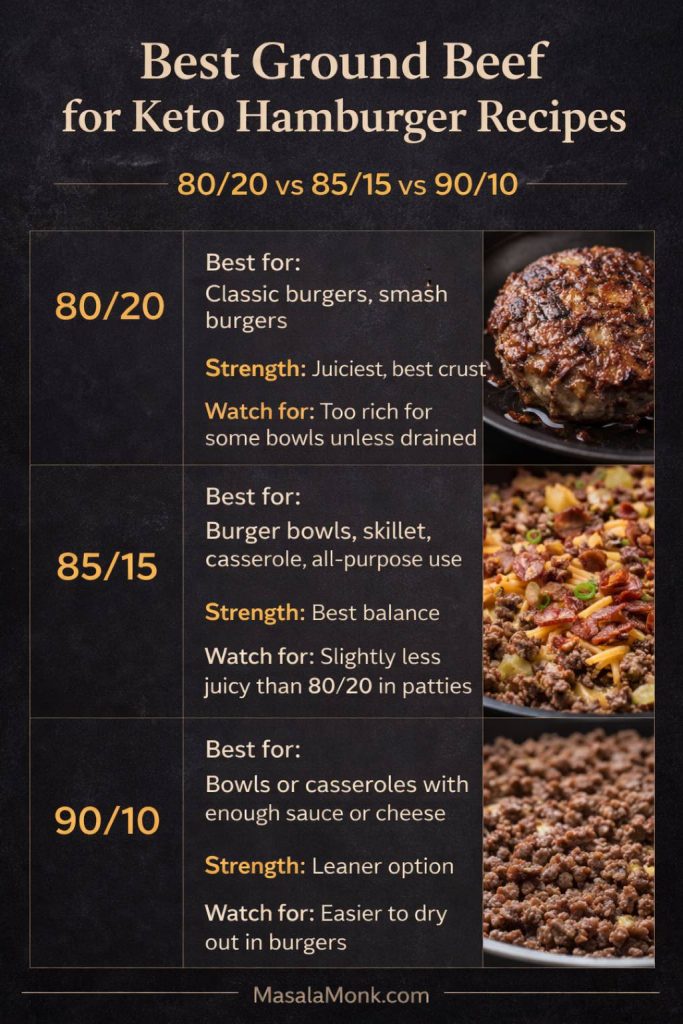
Comparison guide showing the best ground beef for keto hamburger recipes, including 80/20 for classic and smash burgers, 85/15 for bowls, skillet, and casserole, and 90/10 for leaner bowl or casserole options.
For keto hamburger recipes, 80/20 usually gives the juiciest burgers and best crust, 85/15 is the easiest all-purpose choice, and 90/10 works best when bowls or casseroles have enough sauce, cheese, or bacon to support leaner beef.
  • 80/20: best for classic burgers and smash burgers where browning and juiciness matter most.
  • 85/15: the easiest all-purpose middle ground for bowls, burgers, skillets, and casseroles.
  • 90/10: workable for bowls or casseroles only if enough sauce, cheese, bacon, or another richness source supports it.

As a rule, 80/20 gives better crust and a juicier bite in intact patties, while 85/15 often gives a cleaner balance in bowls and skillet dinners. Leaner than that can still work, yet it usually needs extra help from sauce, cheese, bacon, or careful cooking time so the meat does not dry out.

If the beef stays in patty form, fat matters more. If it gets crumbled into bowls, skillets, or casseroles, sauce and cheese can carry more of the richness without the meal feeling dry.

For general burger technique, Serious Eats’ burger fundamentals are still useful because they reinforce the big things that matter most: keep the meat cold, handle it lightly, and resist overworking it. Meanwhile, USDA FoodData Central is a handy neutral reference if you want to compare common blends like 80/20 and 90/10.

Best Sauces for Keto Hamburger Recipes
Comparison guide showing the best keto burger sauces for bunless burgers, burger bowls, cheeseburger skillet, and casserole.
The best keto burger sauce depends on the format: classic burgers want a thicker mayo-mustard-pickle finish, bowls need a looser sharper sauce, skillets benefit from a more mustard-forward edge, and casseroles usually work better with sauce served on the side.
  • For classic burgers: a simple mix of mayo, mustard, and chopped pickles gives the cleanest burger finish.
  • For burger bowls: go slightly sharper and slightly looser so the sauce spreads easily and does more flavor work in every bite.
  • For skillet: keep it mustard-forward or finish with pickles rather than pushing in more cream.
  • For casserole: sauce usually works better on the side than baked into the dish, where it can blur the texture.
  • Best cool option: tzatziki works especially well with burger bowls and plated patties.
  • Best fresh-herb option: chimichurri fits plated patties and hamburger steak better than bowls or casseroles.

What to Serve Instead of Burger Buns

The smartest move is not always replacing the bun with another bread-like stand-in. Quite often, the cleaner answer is changing the structure of the meal and letting the burger profile carry through in a form that suits the night better. That is what makes the best versions feel satisfying rather than like a workaround.
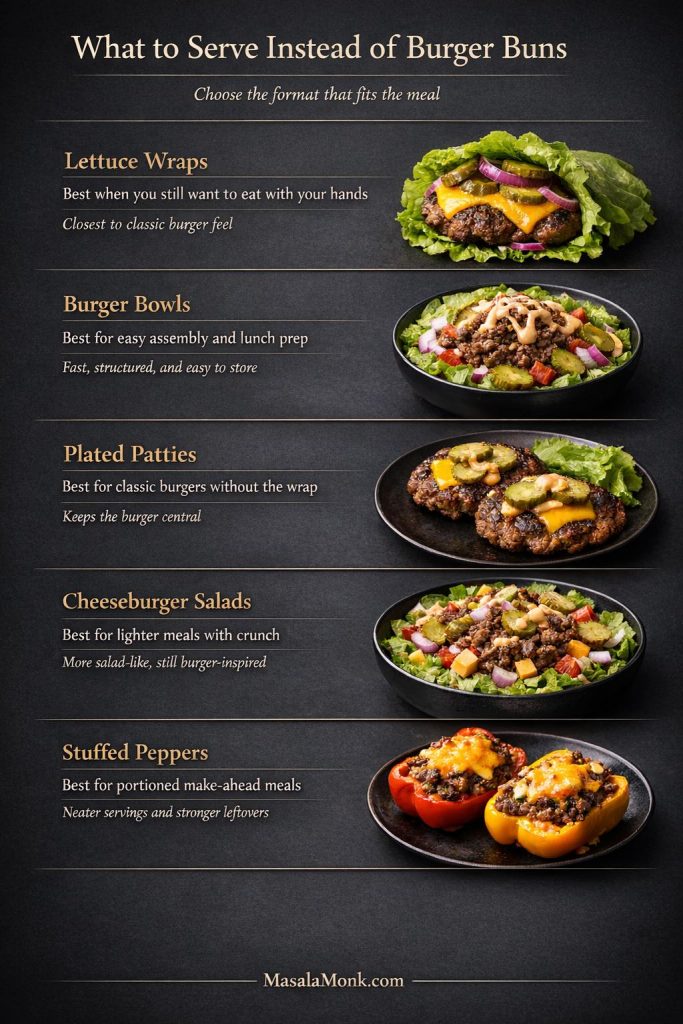
Guide showing lettuce wraps, burger bowls, plated patties, cheeseburger salads, and stuffed peppers as keto-friendly alternatives to burger buns.
Skipping burger buns works best when you change the format, not just remove the bread: lettuce wraps stay closest to the hand-held feel, bowls and salads help with assembly, plated patties keep the burger central, and stuffed peppers are the strongest make-ahead option.
  • Lettuce wraps: best when you still want to eat with your hands
  • Burger bowls: best for easy assembly and lunch prep
  • Cheeseburger salads: best for lighter meals with crunch
  • Plated patties with vegetables: best for hamburger steak or classic burgers without the wrap
  • Cauliflower mash, green beans, roasted broccoli, and sautéed cabbage: best for turning a burger plate into a full dinner

Best Sides by Format

  • With classic burgers: roasted broccoli, green beans, or sautéed cabbage
  • With burger bowls: avocado, extra pickles, and crunchy salad vegetables
  • With skillet: sautéed cabbage, roasted mushrooms, or simple greens
  • With casserole: pickles, slaw-style salad, or sharper greens
  • With hamburger steak: mushrooms, cauliflower mash, or wilted greens

This is also where sauce choice matters. For example, chimichurri works especially well on plated patties, while tzatziki fits bowls and salads better. Meanwhile, a mayo-and-mustard burger sauce remains the most classic bridge between all of these serving styles.

The best bun replacement is often not bread-like at all. More often, it is the format that suits the meal better.

Meal Prep, Storage, and Reheating

Not every hamburger-style meal behaves the same way in the fridge. Burger bowls, skillets, casseroles, stuffed peppers, and loose meat burgers all store better than fully assembled lettuce wraps. So if tomorrow’s lunch matters almost as much as tonight’s dinner, the format should influence your choice from the start.

For timing, the FoodSafety.gov cold storage chart is a good general reference. Likewise, FoodSafety.gov’s leftovers guidance is worth keeping in mind when readers are batching several meals ahead.
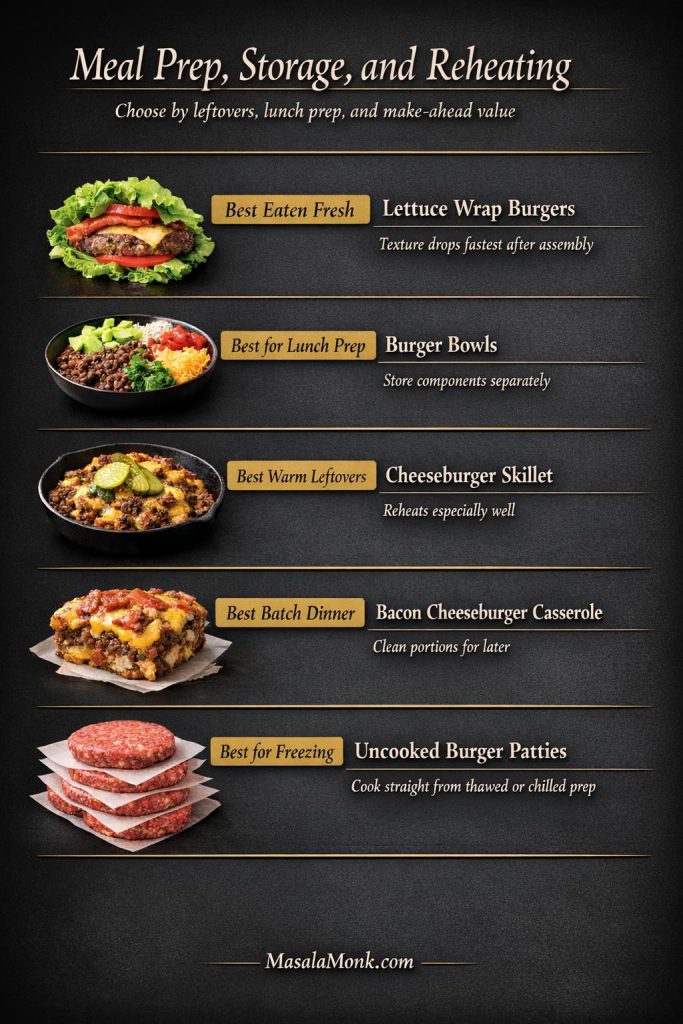
Meal prep, storage, and reheating guide for keto hamburger recipes showing the best options for fresh eating, lunch prep, warm leftovers, batch dinners, and freezing.
Not every keto hamburger format stores the same way: lettuce wraps are best eaten fresh, burger bowls work best with separate components, skillets reheat especially well, casseroles portion neatly for later, and uncooked patties are the strongest freezer option.
  • Best for leftovers: cheeseburger skillet, casserole, stuffed peppers, loose meat burgers
  • Best frozen: uncooked patties, casserole portions, stuffed peppers
  • Best eaten fresh: lettuce wraps and fully dressed cheeseburger salads
  • Best reheated gently: burger patties in a covered skillet or low oven, skillets on the stove, casseroles covered first

Store components separately whenever texture matters. Keep burger bowl beef, greens, and sauce apart until serving; reheat patties gently; and dress lettuce-based meals at the last minute. A few extra minutes of separate storage work usually pays off with much better leftovers.

Keto Hamburger Recipes FAQ

Can you eat hamburgers on keto?

Yes. In most cases, the burger itself fits easily. The bun, sugary sauces, and higher-carb sides are usually what push the meal away from keto. That is why bowls, lettuce wraps, and plated burger meals work so well here.

What is the best first keto hamburger recipe to make?

For most readers, the best first recipe is the classic bunless keto cheeseburger because it is the clearest and most direct burger answer. From there, burger bowls and cheeseburger skillets are the easiest ways to branch out without leaving the flavor profile behind.

What temperature should a hamburger reach?

Because burgers use ground beef, the safest practical target is the USDA recommendation of 160°F. That guidance comes directly from the USDA ground beef food safety page.

Which keto hamburger recipes are best for meal prep?

Burger bowls, cheeseburger skillets, bacon cheeseburger casserole, loose meat burgers, and stuffed peppers all work well for meal prep. Lettuce wraps, however, are best eaten fresh because their texture drops off quickly once assembled.
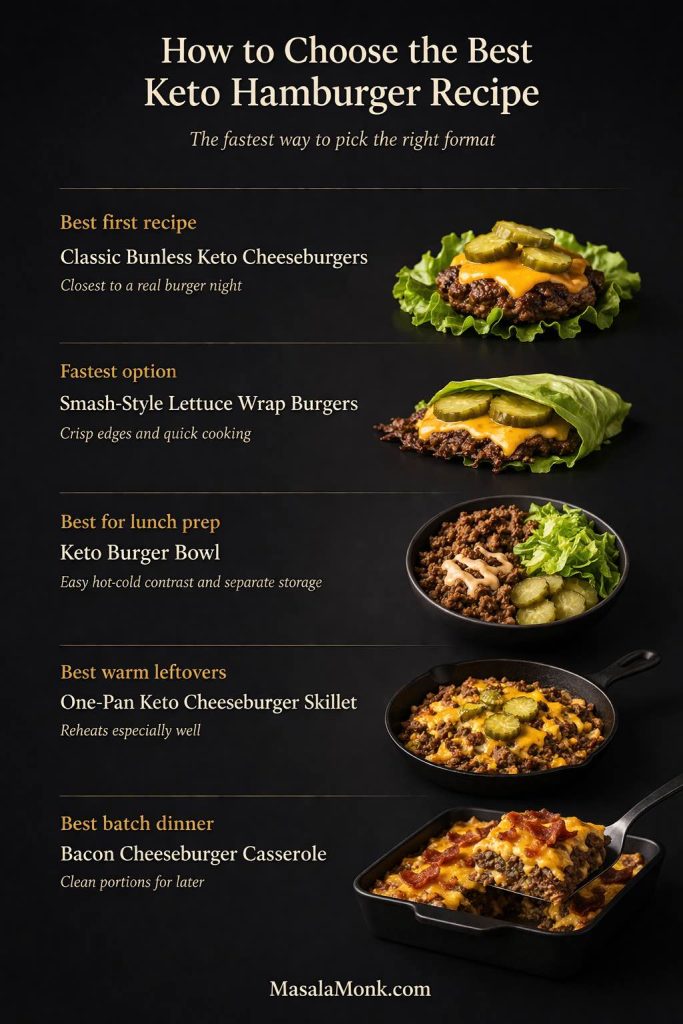
Closing recap card showing the best keto hamburger recipe choices for first recipe, fastest option, lunch prep, warm leftovers, and batch dinner.
If you only remember five things from this guide, start with the classic bunless cheeseburger for the most burger-like result, go to smash-style lettuce wraps for speed, choose the burger bowl for lunch prep, rely on the skillet for warm leftovers, and make the casserole when batch cooking matters most.

Final Thoughts on Keto Hamburger Recipes

The strongest keto hamburger recipes page is not the one that tries to force every dinner into a single burger shape. It is the one that helps readers solve the same craving in the form that actually fits the night. Sometimes that is a classic cheeseburger with enough sharpness and richness to stand on its own. Sometimes it is a fast bowl, a skillet that reheats well, or a casserole that earns its place through leftovers. Taken together, those options give readers one clear place to start, enough depth to cook from, and enough range to stay useful after the first visit.
↑ Back to top

Posted on 4 Comments

Garlic & Paprika Cabbage Rolls (Keto-Friendly Recipes) – 5 Bold Savory Twists

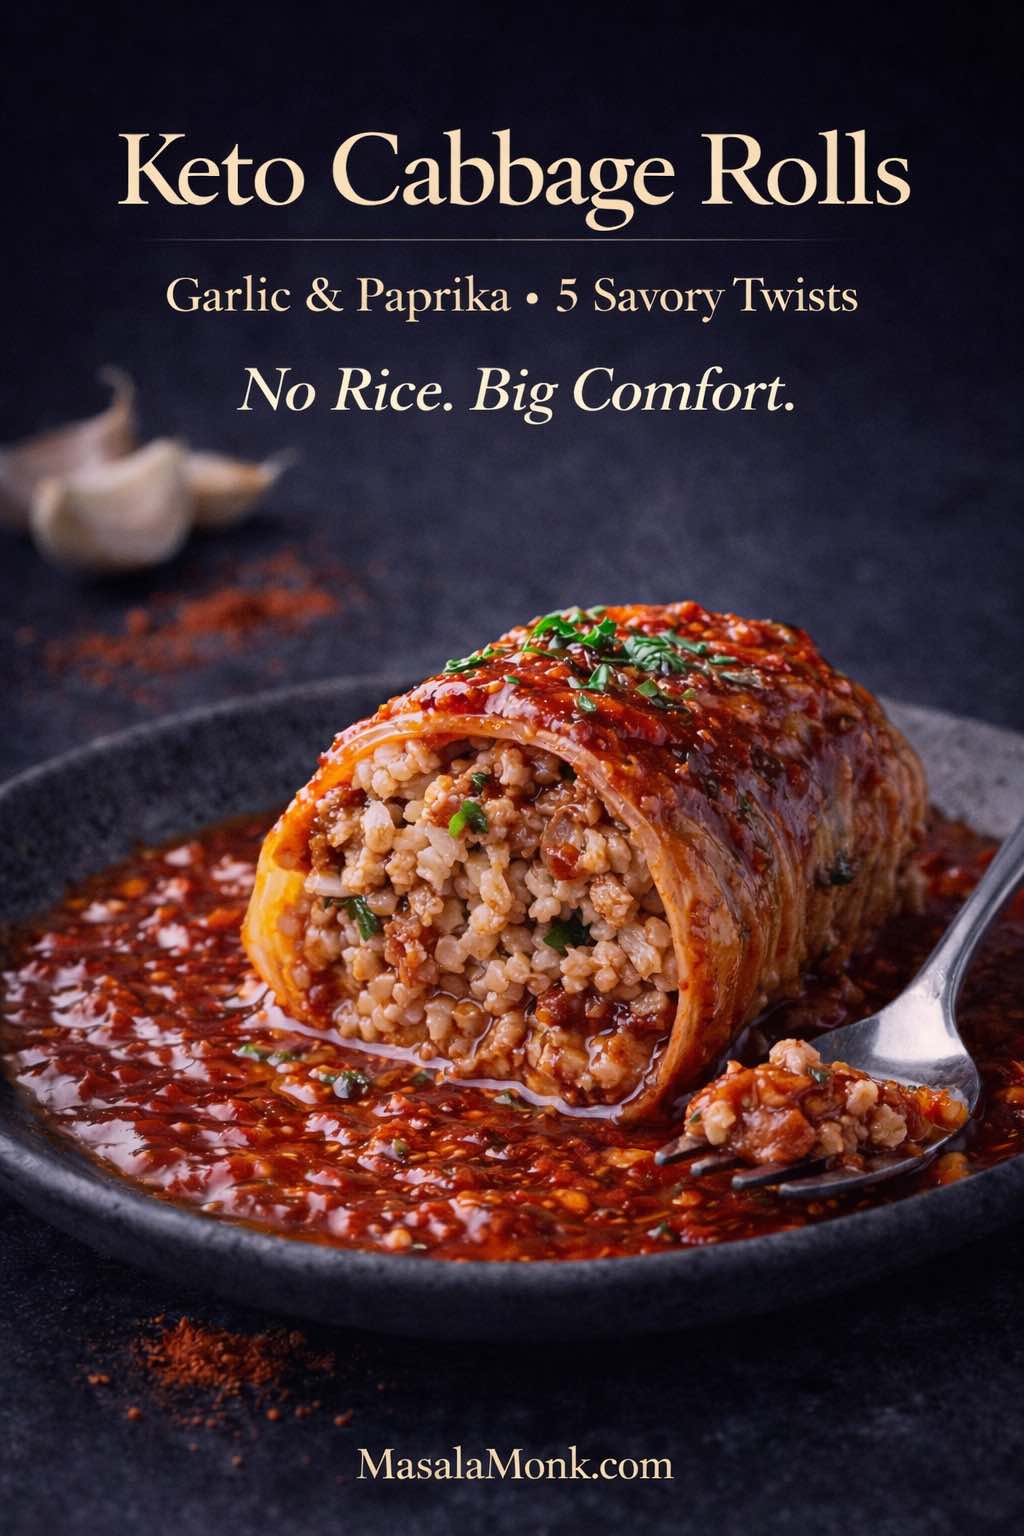
Moody close-up of a keto cabbage roll cut open to show a savory meat filling, sitting in a glossy garlic-paprika tomato sauce in a dark bowl, with a fork on the side and “Keto Cabbage Rolls” text overlay plus MasalaMonk.com at the bottom.

Stuffed cabbage rolls, keto or not keto – have a way of making a kitchen feel calm. Even before the oven is hot, the process itself—softening cabbage leaves, mixing a savory filling, rolling everything into neat parcels—turns dinner into something deliberate. Once the sauce bubbles and the cabbage goes silky at the edges, the whole dish tastes like it belongs on a table where people linger.

The classic version is famous for a reason. It’s hearty, tender, and deeply satisfying. It’s also often built around rice, which is exactly why cabbage rolls can feel tricky on a low carb diet. Still, the comfort isn’t coming from rice alone. It’s coming from the structure—cabbage wrapped around seasoned meat—plus a sauce that sinks into every fold and seam.

Keto Cabbage Rolls

That’s where these keto cabbage rolls shine. They keep everything that matters: the cozy, homey feel; the fork-tender cabbage; the rich tomato-forward sauce; the filling that tastes better the next day. The only difference is that instead of rice, the filling uses lower-carb “bulk” that still holds moisture and texture. More importantly, the flavor leans hard into garlic and paprika, so the rolls never feel like a compromise.

This is also not a one-note recipe. Cabbage rolls are a template, and once you have the core method, you can push them in completely different directions—smoky and deep, tangy with sauerkraut, bright and herb-forward, spicy, or Mediterranean-leaning. Each twist still tastes like cabbage rolls, yet each one feels like its own dinner.

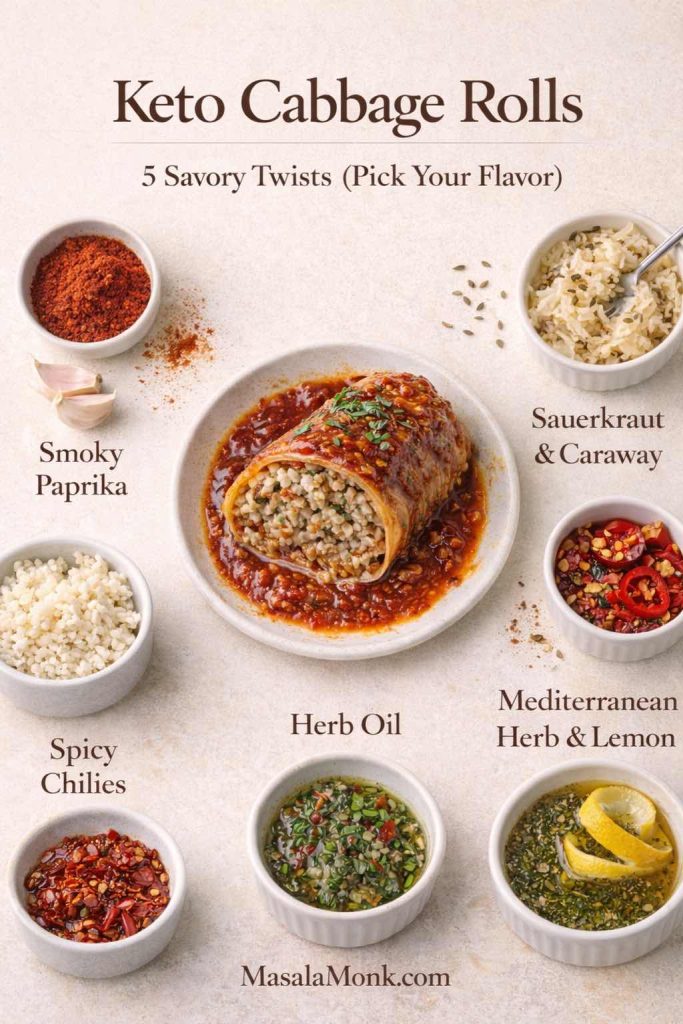
Keto cabbage rolls in garlic-paprika tomato sauce with “5 savory twists” flavor picker: smoky paprika, spicy chilies, sauerkraut & caraway, Mediterranean herb & lemon, and herb oil, arranged around one cabbage roll on a light background.
Not sure which version to make tonight? Use this “pick your flavor” guide for keto cabbage rolls—same easy roll-and-bake base, five garlic-paprika twists (smoky, spicy, sauerkraut + caraway, Mediterranean herb + lemon, and herb oil). It helps readers choose a direction fast, keeps the recipe flexible, and makes meal prep easier when you’re cooking for different taste buds.

If you’re easing into keto or simply trying to eat fewer carbs without feeling deprived, it can help to understand the bigger picture of how low-carb swaps work. MasalaMonk’s guide to keto for beginners lays out the basics in a simple way. Even if you’re already comfortable with low carb eating, it’s a useful reminder that sustainable dinners come from repeatable patterns—structure, flavor, and satisfaction—rather than strict perfection.


Why cabbage rolls work so well when you’re keeping it low carb

Cabbage is one of those ingredients that behaves like a built-in plan. It gives you volume without heaviness, structure without flour, and a gentle sweetness that plays well with savory seasonings. Because it’s naturally sturdy, it holds up to long cooking times, which is why old-fashioned cabbage rolls show up across cuisines—Polish gołąbki (often spelled golabki), Ukrainian-style cabbage rolls, Hungarian cabbage roll recipes, Jewish stuffed cabbage, German cabbage rolls (including kohlrouladen), and Balkan sarma rolls.

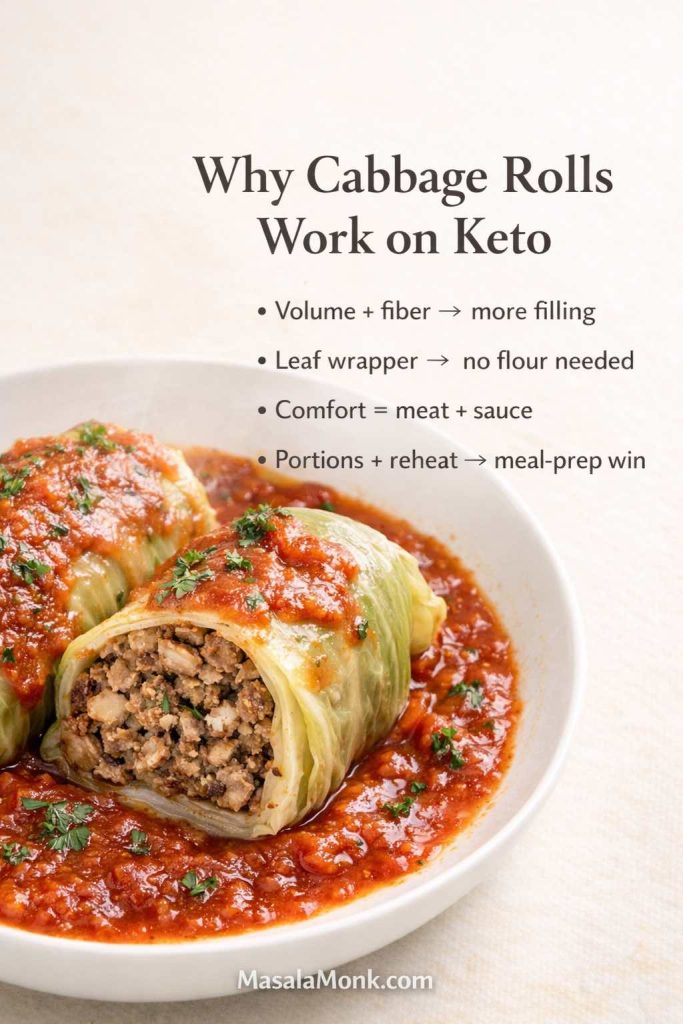
Keto cabbage rolls in a rich tomato garlic paprika sauce, one roll sliced open to show the meat filling. Text overlay reads “Why Cabbage Rolls Work on Keto” with bullets: volume + fiber = more filling, leaf wrapper = no flour needed, comfort = meat + sauce, portions + reheat = meal-prep win. MasalaMonk.com at bottom.
Why cabbage rolls work so well on keto: cabbage gives you volume + fiber without flour, and the “real comfort” still comes from meat + sauce. Use this quick cheat sheet when you’re deciding what to cook for the week—cabbage rolls portion cleanly, reheat beautifully, and stay satisfying even without rice.

Why the format stays satisfying even without rice

Even when spice blends change, the concept stays consistent: cabbage leaves stuffed with something rich, then cooked in a flavorful sauce until everything melds. That’s exactly the kind of dish that adapts beautifully to keto-friendly cooking, because the original structure doesn’t rely on breading or flour. Instead, you’re mostly adjusting the filling and the sauce while keeping the comfort intact.

From a nutrition standpoint, cabbage is also a practical base. It’s low calorie and fiber-rich, and it tends to make meals feel more filling—useful if you’re aiming for weight loss without feeling like you’re eating tiny portions. Cleveland Clinic’s overview of cabbage highlights its fiber and nutrient profile and explains why it can support a healthier eating pattern when used in satisfying meals: the health benefits of cabbage.

Meanwhile, cabbage rolls also make sense for meal prep. They portion cleanly, reheat well, and often taste even better after a rest. If you’re the kind of person who does better with a plan, they’re the sort of anchor dinner that makes the rest of the week easier.

Cabbage is one of the easiest low-carb staples to build meals around, and it does more than just “fill space.” If you want to go deeper on the nutrition side—fiber, nutrients, and why it works so well in everyday keto cooking—here’s a fuller guide on why cabbage is a staple in the keto kitchen.

Also Read: Eggless Yorkshire Pudding (No Milk) Recipe


Keto cabbage rolls versus cabbage rolls with rice: the swap that keeps the comfort

Traditional stuffed cabbage rolls with rice are built around a familiar equation: meat + rice + seasonings + cabbage + tomato sauce. Sometimes the rice goes in uncooked, sometimes it’s partially cooked first. Either way, rice is there for bulk and to absorb juices.

However, rice is not the heart of cabbage rolls. The heart is the combination of tender cabbage and savory filling, plus the sauce that soaks into everything. So the strategy here is simple: keep what matters, replace what doesn’t.

To be clear, there’s nothing wrong with classic stuffed cabbage rolls with ground beef and rice if that’s how you cook. They’re a classic stuffed cabbage recipe for a reason. Yet if you want cabbage rolls that are keto compatible, you’re looking for a filling that stays moist, holds together, and doesn’t taste “substitution-y.”

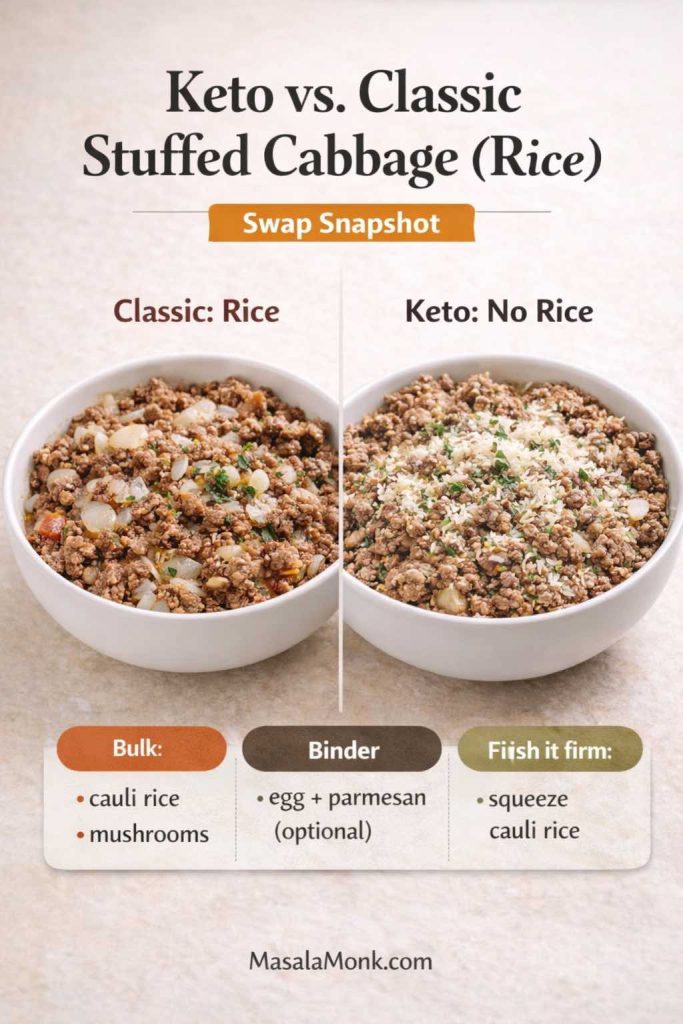
Side-by-side photo of two bowls of stuffed cabbage roll filling. Left bowl labeled “Classic: Rice” shows ground beef mixed with rice, onion, and herbs. Right bowl labeled “Keto: No Rice” shows ground beef with cauliflower rice, mushrooms, and parmesan. Text overlay says “Keto vs. Classic Stuffed Cabbage (Rice) — Swap Snapshot” with tips: bulk (cauli rice, mushrooms), binder (egg + parmesan optional), and keep it firm (squeeze cauliflower rice). MasalaMonk.com footer.
If you grew up on stuffed cabbage rolls with ground beef and rice, this is the exact swap that keeps the comfort: replace rice with squeezed cauliflower rice + finely chopped mushrooms for bulk and moisture, and use egg + parmesan (optional) when you want the filling extra tight. It tastes like the classic version—just lighter, lower carb, and less likely to turn watery in the pan.

What replaces rice in keto-friendly cabbage rolls?

You have a few excellent options, and you can mix them depending on what you like:

  • Cauliflower rice is the closest texture match. It bulks the filling without bringing carbs, and it disappears into the meat once baked.
  • Finely chopped mushrooms bring moisture and umami. They make the filling taste deeper, almost like it simmered longer.
  • Riced broccoli or finely shredded zucchini can work too, although zucchini needs to be squeezed well so it doesn’t water out the filling.
  • A small amount of grated parmesan or other hard cheese adds richness and helps bind.

Rice is mostly there for bulk and to soak up juices, not because it’s the “main flavor.” If you want a clearer sense of how rice compares to other options—and why swapping it out doesn’t change the comfort of the dish—this quick breakdown of quinoa vs rice and lower-carb alternatives

The point isn’t to mimic rice perfectly. Instead, it’s to build a filling that feels right: juicy, savory, substantial, and not crumbly. Once you do that, you’re no longer “making keto cabbage rolls.” You’re simply making cabbage rolls—ones that happen to be low carb.

Also Read: Crock Pot Chicken Breast Recipes: 10 Easy Slow Cooker Dinners (Juicy Every Time)


Ingredients for tender, flavorful keto-friendly cabbage rolls

Before the steps, it helps to understand what each ingredient is doing. That’s what makes these rolls reliable, even if you swap meats or choose a different twist.

The cabbage (and the best cabbage for cabbage rolls)

Most cabbage roll recipes start with green cabbage, and it’s still the most forgiving choice.

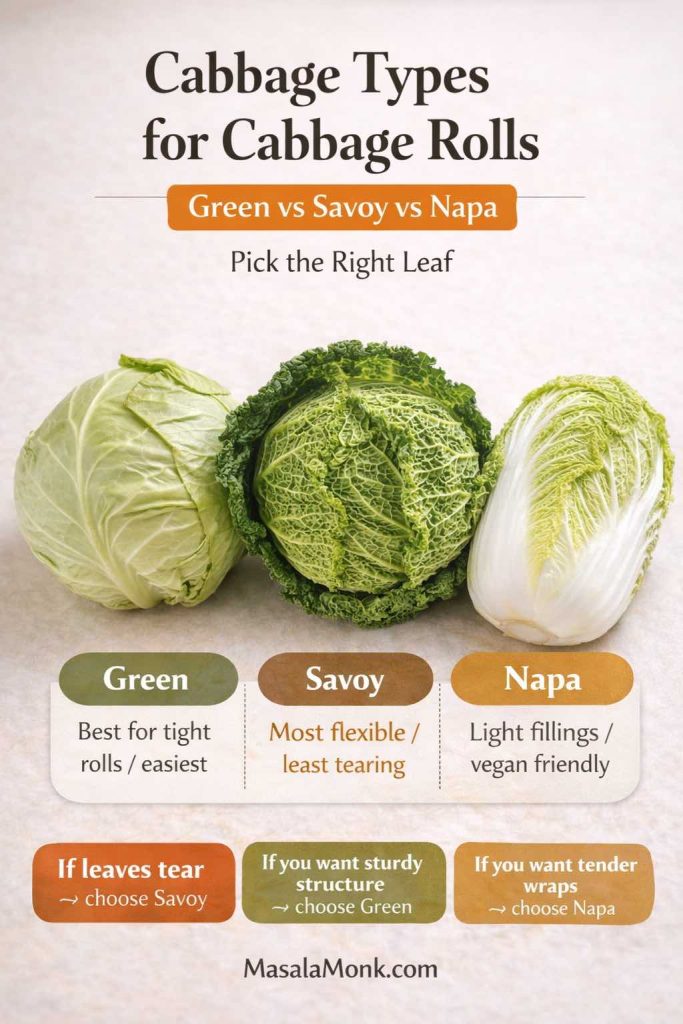
Infographic titled “Cabbage Types for Cabbage Rolls: Green vs Savoy vs Napa.” Three photos show green cabbage, savoy cabbage, and napa cabbage. Labels say: Green—best for tight rolls and easiest; Savoy—most flexible and least tearing; Napa—best for light fillings and vegan friendly. Bottom tips say: if leaves tear choose Savoy; for sturdy structure choose Green; for tender wraps choose Napa. MasalaMonk.com at bottom.
Choosing the right cabbage makes rolling feel easy. Use this quick picker: Green cabbage is the sturdy classic for tight rolls, Savoy is the most flexible (best if your leaves tear), and Napa is tender and great for lighter or vegan fillings. Pick the leaf first—then the rest of the recipe becomes simple.
  • Green cabbage: sturdy leaves, easy to roll, holds up well in oven or slow cooker.
  • Savoy cabbage: softer leaves that bend easily; it’s great if you want less wrestling while rolling.
  • Napa cabbage: thinner and more delicate; it’s especially good for vegan cabbage rolls or lighter fillings, though it can tear if overcooked.

If you’ve ever been frustrated by cabbage leaves splitting, savoy is often the answer. On the other hand, if you want maximum structure for a pan of stuffed cabbage in a thick sauce, green cabbage is the steady classic.

The filling (protein and flavor)

This recipe works with different meats, and each one gives a slightly different result:

  • Ground beef: richest flavor, most forgiving texture, classic “stuffed cabbage” taste.
  • Ground turkey: lighter but still satisfying; it benefits from extra fat and bold seasoning.
  • Ground pork: juicy and savory; paprika and garlic love pork.
  • Beef + pork blend: especially good for a more traditional European feel.
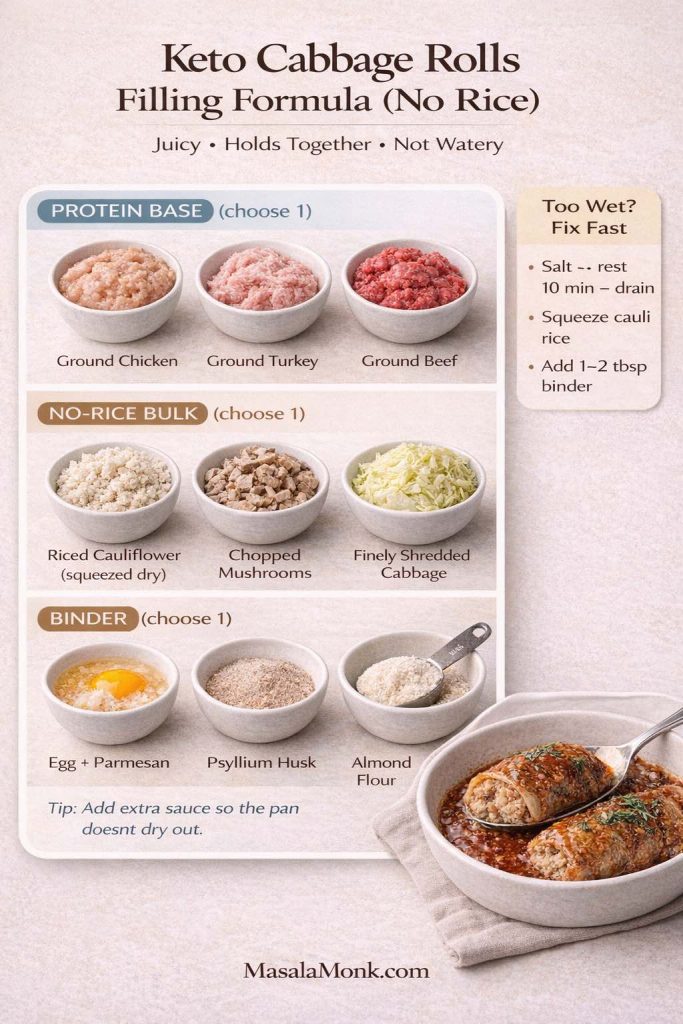
Infographic titled “Keto Cabbage Rolls Filling Formula (No Rice)” showing a mix-and-match chart: choose 1 protein (ground chicken, turkey, or beef), choose 1 no-rice bulk (riced cauliflower squeezed dry, chopped mushrooms, or finely shredded cabbage), and choose 1 binder (egg + parmesan, psyllium husk, or almond flour). Includes “Too wet? Fix fast” tips and a serving photo of cabbage rolls in tomato sauce.
This “no-rice” filling formula makes keto cabbage rolls that stay juicy without turning watery. Pick your protein, pick your bulk (cauli rice, mushrooms, or extra cabbage), then lock it together with the right binder (egg + parmesan, psyllium, or almond flour). Use the quick “too wet” fixes before you roll—so the cabbage wraps bake up neat, tender, and saucy every time.

To keep the filling cohesive without rice, you’ll use:

  • Egg as a binder (optional but helpful)
  • Cauliflower rice and/or chopped mushrooms for bulk
  • Garlic and paprika as the core flavor signature
  • Salt and pepper for structure (salt does more than people think here)

Meat choice changes the whole feel of cabbage rolls. Beef and pork tend to stay richer and more satisfying, while turkey usually needs a little extra fat and bold seasoning to keep the filling juicy. If you’ve noticed fattier meats keep you full longer, there’s a real reason for that—here’s a deeper look at beef and the keto diet.

The sauce (tomato comfort without the sugar reliance)

Many classic cabbage rolls rely on a sweet-leaning tomato sauce. On keto, you can still use tomatoes; the trick is building depth with garlic, paprika, broth, and fat rather than sugar. When done well, the sauce tastes like the cozy “cabbage rolls in tomato soup” style people love—round, mellow, and comforting.

Also Read: Sourdough Starter Recipe: Make, Feed, Store & Fix Your Starter (Beginner Guide)


How to soften cabbage leaves: three practical methods

This is where cabbage rolls either feel easy or feel impossible. The truth is that softening cabbage leaves is straightforward once you choose the method that fits your life.

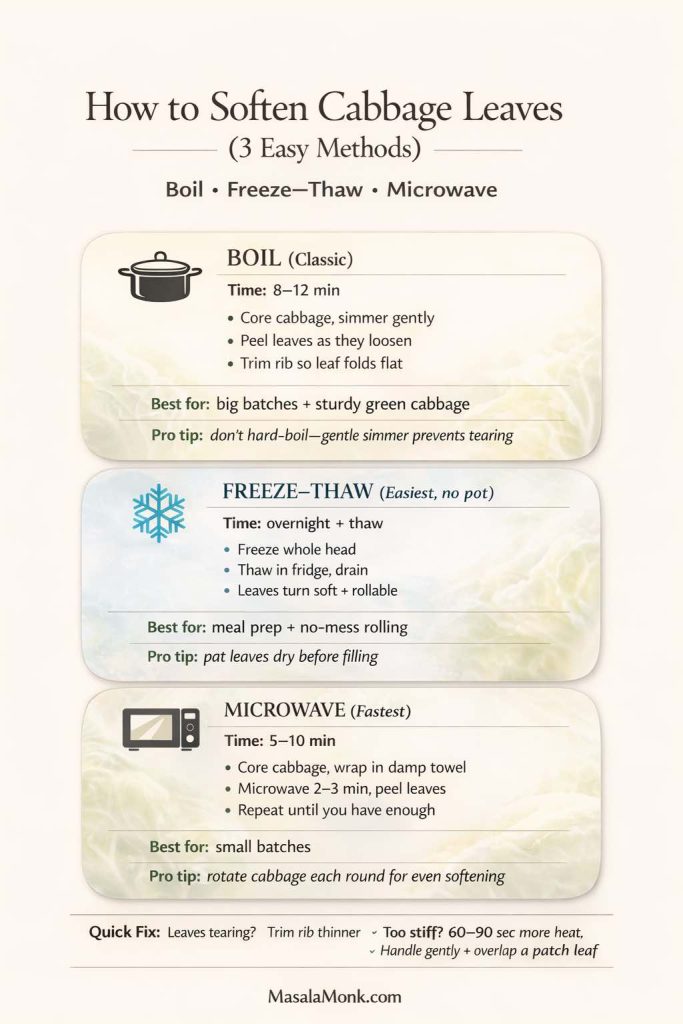
Infographic showing three ways to soften cabbage leaves for cabbage rolls: boiling (8–12 minutes), freeze–thaw method (freeze whole head, thaw to make leaves rollable), and microwave method (wrap in a damp towel and heat in short rounds). Includes quick fixes for torn leaves, stiff leaves, and overly soft leaves.
Soft cabbage leaves = rolls that don’t tear. Use this quick method picker to choose the best way to prep cabbage for cabbage rolls: boil (classic + reliable), freeze–thaw (quietly the easiest), or microwave (fastest for small batches). The “quick fix” line at the bottom saves you when leaves rip or feel stiff—so rolling stays calm and the pan bakes up neat.

Method 1: Boiling (the classic approach)

Bring a large pot of water to a gentle boil. Core the cabbage, then lower the whole head into the water. After a few minutes, the outer leaves will loosen. Use tongs to peel them off as they soften.

Once you have enough leaves, trim the thick rib at the base of each leaf. Rather than cutting it out completely (which can weaken the leaf), slice it down so the leaf lies flatter and rolls more easily.

Boiling is reliable, and it works with any cabbage variety. Still, it requires a big pot and a little patience.

Method 2: Freeze and thaw (quietly the easiest way to make cabbage rolls)

If you want the easiest way to make cabbage rolls without boiling water, freeze the whole head of cabbage overnight, then thaw it in the fridge. The freezing breaks down cell walls, which means the leaves become flexible and rollable once thawed.

This method is also excellent if you’re doing cabbage rolls for freezing later, because you’re already in a meal prep mindset. It feels like a small trick, yet it changes everything: the leaves soften without a pot of water, and you can prep when you have time rather than when you’re hungry.

Method 3: Microwave (the fastest shortcut)

Core the cabbage, wrap it in a damp towel, and microwave for a few minutes. Peel off softened leaves, then repeat until you have enough.

Microwave softening is quick and surprisingly effective. It’s also helpful if you’re making a small batch and don’t want to boil a huge pot of water.

If you’re newer to low carb cooking and want quick clarity on what counts as keto-friendly (and what doesn’t), these keto diet FAQs

Also Read: How to make No-Bake Banana Pudding: No Oven Required Recipe


The base keto cabbage rolls recipe (oven baked)

This is the core method. After you make it once, the twists become easy, because you’re no longer learning how to roll—you’re simply changing the flavor.

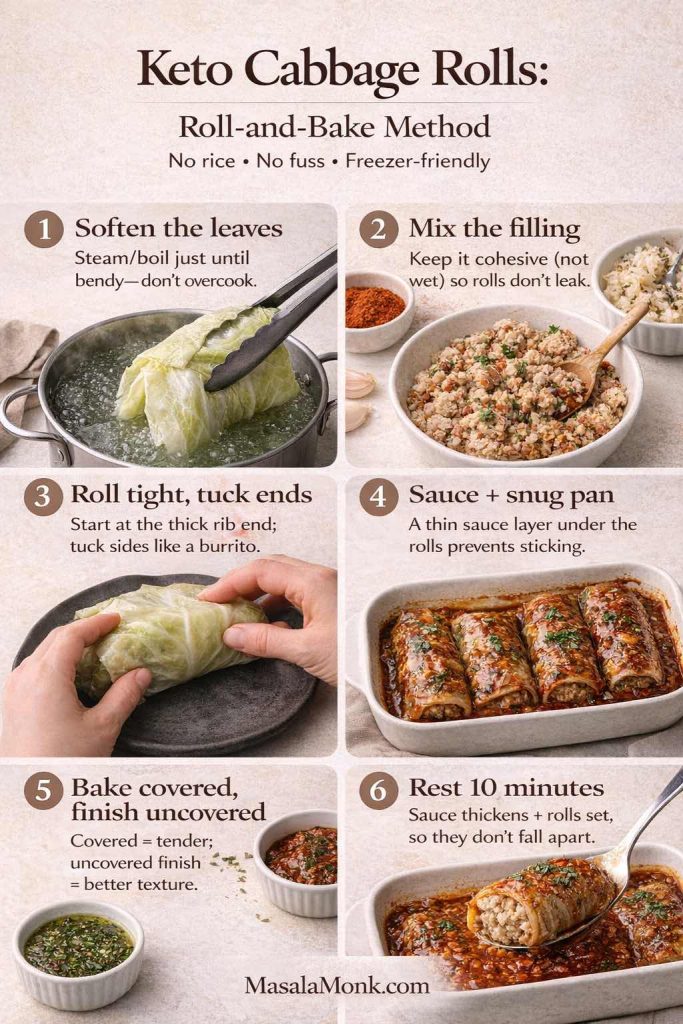
Roll-and-bake keto cabbage rolls, made simple: soften the leaves, mix a tight (not wet) filling, roll and tuck, then bake covered and finish uncovered for the best texture. This quick visual is the “don’t-mess-it-up” guide for sturdy rolls that hold together—especially if you’re meal-prepping or freezing a batch.

Ingredients (base)

For the cabbage rolls

  • 1 large green cabbage (or savoy)
  • 680 g / 1.5 lb ground beef (or turkey or pork)
  • 3–5 cloves garlic, finely minced or grated
  • 2 teaspoons paprika (sweet or smoked)
  • 1 teaspoon salt, plus more as needed
  • 1/2 teaspoon black pepper
  • 1 1/2 cups cauliflower rice (fresh, or thawed and squeezed dry)
  • 1/2 cup finely chopped mushrooms (optional but recommended for juiciness)
  • 1 egg (optional binder)
  • 1/3 cup grated parmesan (optional, helps bind and adds richness)
  • 2 tablespoons chopped parsley (optional)

For the sauce

  • 2 cups crushed tomatoes or tomato passata
  • 1 cup broth (beef or chicken)
  • 1 tablespoon tomato paste (optional, for deeper tomato flavor)
  • 1–2 tablespoons olive oil or butter
  • 1 teaspoon paprika
  • 1/2–1 teaspoon garlic powder (or another clove of garlic, minced)
  • Salt and pepper to taste
  • Optional: a splash of vinegar for balance

Step 1: Prep the cabbage leaves

Use one of the softening methods above. Once the leaves are pliable, trim the thick rib near the base so each leaf rolls without cracking.

Set leaves aside while you make the filling.

Step 2: Make the filling

In a large bowl, combine ground meat, garlic, paprika, salt, pepper, cauliflower rice, mushrooms (if using), egg (if using), and parmesan (if using). Mix gently until combined.

Mixing too aggressively can make the filling dense. Instead, fold everything together until it looks even, then stop.

Step 3: Roll

Lay a cabbage leaf flat. Place a portion of filling near the base. Fold the sides in, then roll up tightly. Place seam-side down in a baking dish.

Continue until you’ve used your leaves and filling. If you have extra small or torn leaves, tuck them around the rolls in the dish—those bits often become the best parts after baking.

Step 4: Make the sauce

In a bowl or measuring jug, whisk crushed tomatoes, broth, tomato paste, olive oil or butter, paprika, garlic, salt, and pepper. Taste it. You want it slightly stronger than you think you need, because it will mellow as it cooks.
Pour sauce over the rolls. Cover the dish tightly with foil.

Step 5: Bake

Bake at 190°C / 375°F until the cabbage is tender and the filling is cooked through. The time will vary based on roll size and meat choice, but 55–75 minutes is common for oven cabbage rolls.

For a thicker sauce, uncover the dish for the last 10–15 minutes to let it reduce slightly.

Food safety, written in a way that doesn’t interrupt dinner

Because these are rolls made with ground meat, safe internal temperature matters. USDA guidance for ground beef food safety recommends cooking ground beef to 160°F / 71°C. For ground turkey and other poultry, USDA’s turkey safe cooking guidance points to 165°F / 74°C. A thermometer makes this effortless, and it removes the guesswork.

If you’re cooking once and reheating during the week, USDA’s notes on leftovers and food safety reinforce reheating leftovers to 165°F / 74°C. That’s especially useful for soup and casserole versions, where it’s easy to assume the middle is hot when it isn’t.
Also Read: Chicken Adobo — Step-by-Step Recipe — Classic Filipino Adobong Manok


The sauce that tastes like “tomato soup” cabbage rolls—without leaning on sugar

Some cabbage roll casseroles and soups are famous for tasting like tomato soup, even when they’re not made with canned soup. That flavor comes from a few details working together: enough tomato concentration, a savory broth backbone, paprika’s gentle sweetness, and fat to round out acidity.
If your sauce tastes too sharp, a small splash of vinegar can actually help, because it adds a clean acidity that makes tomato taste more “complete.” Meanwhile, finishing with olive oil or a little butter can soften everything so the sauce tastes rich rather than harsh.

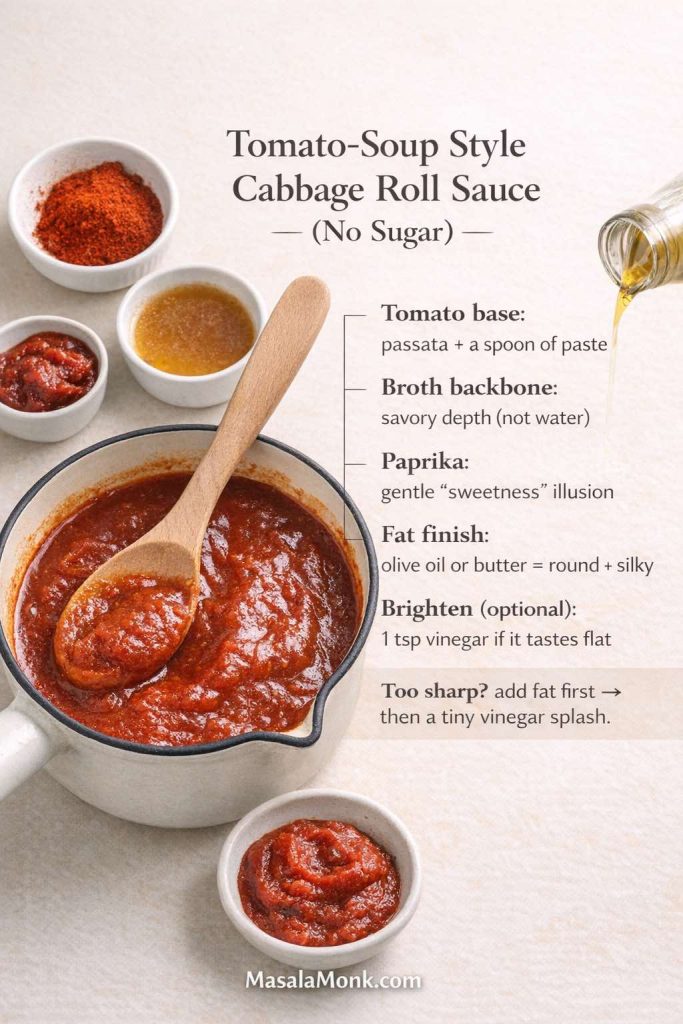
Tomato-soup style cabbage roll sauce in a small pot on a cream background with paprika, tomato paste, broth, and olive oil nearby. Text overlay lists the formula: passata + paste, broth for savory depth, paprika for “sweetness,” finish with olive oil or butter, and optional vinegar to brighten if the sauce tastes flat.
Want that cozy “tomato soup” cabbage-roll sauce without adding sugar? This visual nails the formula: concentrate the tomato base (passata + a spoon of paste), use broth for depth, lean on paprika for gentle warmth, then finish with olive oil or butter to round the acidity. If it tastes sharp or flat, add fat first—then a tiny vinegar splash to brighten.

If you want a credible external reference on why olive oil is often considered a strong everyday fat choice, Harvard Health’s article on extra-virgin olive oil offers a balanced take. For a broader “what fats matter most” reference, Harvard’s Nutrition Source overview of types of dietary fats is a solid citation that avoids fad language while still supporting a keto-friendly approach that focuses on quality.

When you’re serving cabbage rolls, something crunchy on the side is always welcome. A quick slaw is a natural pairing, and if you want a creamy base without fuss, MasalaMonk’s eggless mayonnaise makes a useful recipe – if you want want a simple dressing foundation and if you are not avoiding eggs, then have a look at Mayo Recipe: 15+ Homemade Mayonnaise Variations.


Five savory garlic and paprika twists (same method, different dinner)

Now for the fun part. Each of these twists starts from the base keto-friendly cabbage rolls recipe above. In other words, you’re not learning five different recipes. You’re choosing one flavor direction, then making small changes to the filling and sauce.

Because the base is already bold, the twists don’t need many extra ingredients. The goal is to keep the dish cohesive: cabbage, savory filling, tomato-based sauce, and one clear flavor identity.

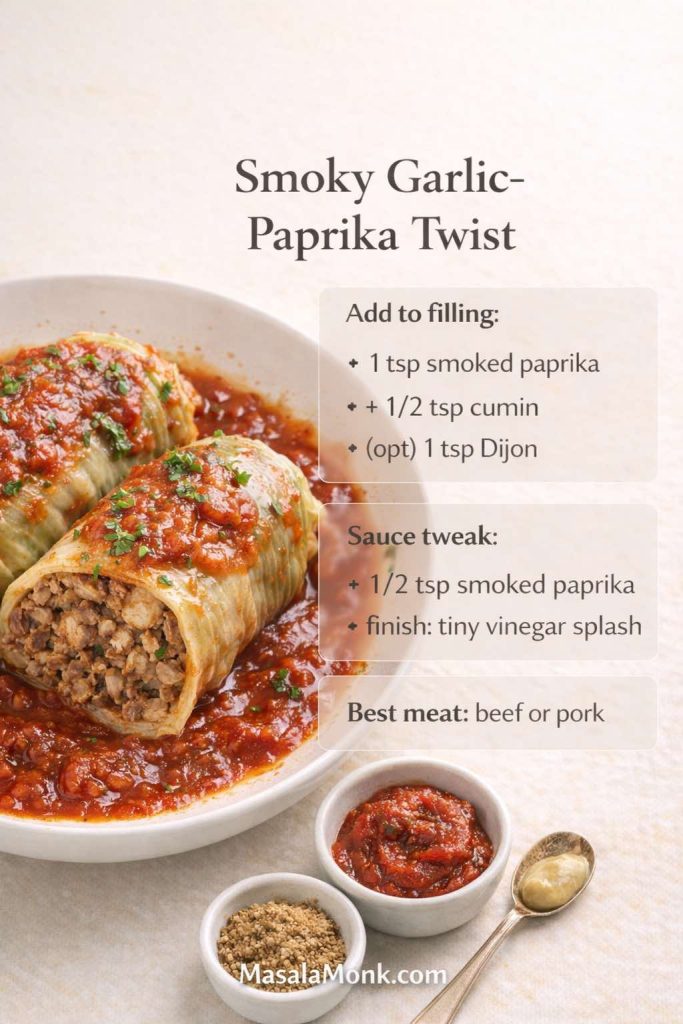
Twist 1: Smoky garlic and paprika (deep, cozy, and bold)

If you like cabbage rolls that taste almost grilled—dark, savory, and rich—this is the direction.

Best meat choice: ground beef or ground pork
Add to the filling:

  • 1 teaspoon smoked paprika (in addition to the base paprika)
  • 1/2 teaspoon cumin
  • Optional: 1 teaspoon mustard (Dijon works well)
Smoky garlic–paprika keto cabbage rolls in rich tomato sauce, shown as two rolls on a plate (one cut open). Text overlay lists the twist: add 1 tsp smoked paprika, 1/2 tsp cumin, optional 1 tsp Dijon to the filling; sauce tweak adds 1/2 tsp smoked paprika and a small vinegar splash; best meat: beef or pork. MasalaMonk.com footer.
Twist #1 (Smoky): Want cabbage rolls that taste almost “grilled”? Add smoked paprika + a touch of cumin to the filling (optional Dijon for depth), then finish the sauce with an extra pinch of smoked paprika + a tiny vinegar splash. It keeps the rolls bold and cozy—and they taste even better on day two.

Adjust the sauce:

  • Add another 1/2 teaspoon smoked paprika
  • Finish with a small splash of vinegar

Smoked paprika adds a “slow-cooked” illusion. Meanwhile, vinegar keeps the sauce from feeling heavy. This twist is particularly good if you’re someone who likes robust flavors and wants a dish that still tastes exciting on day three.

If you’re in the mood for more hearty, high-protein keto dinners that reheat well, you’ll probably like these beef recipes for a weight loss keto plan.

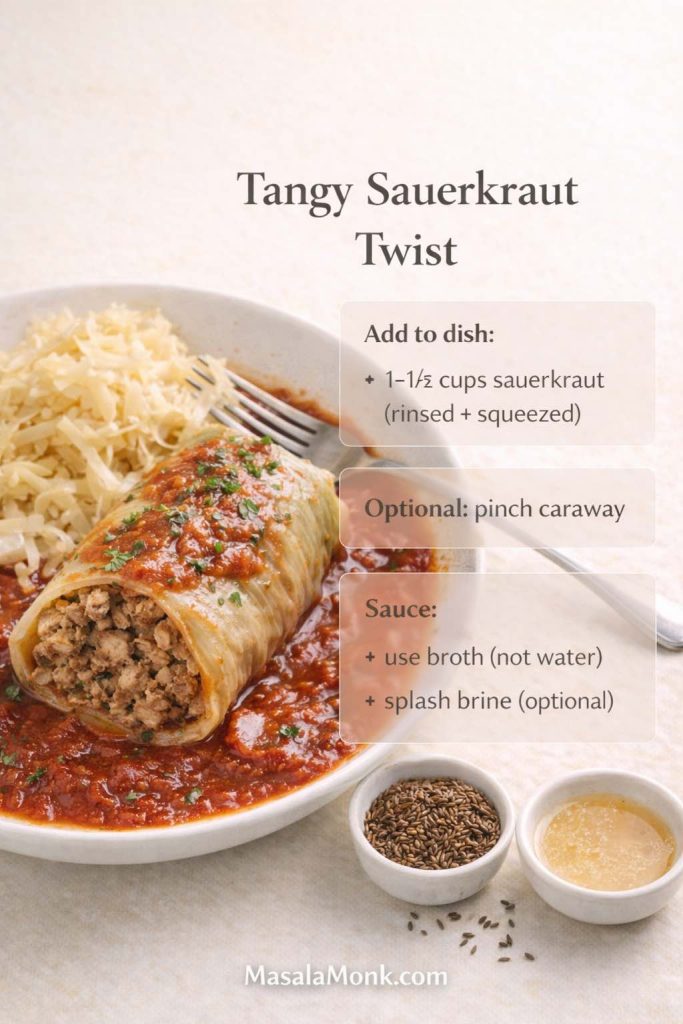
Twist 2: Tangy sauerkraut garlic paprika rolls (a nod to Polish comfort)

Sauerkraut turns cabbage rolls into a different kind of comfort—bright, tangy, and deeply savory. This twist is inspired by the flavors people love in cabbage rolls with sauerkraut, stuffed cabbage and sauerkraut bakes, and many traditional Polish-style cabbage rolls, without trying to claim one strict “authentic” blueprint.

Best meat choice: beef + pork blend, or pork alone
Add to the baking dish:

  • 1 to 1 1/2 cups sauerkraut, rinsed and squeezed dry
  • Optional: a pinch of caraway seed
Tangy sauerkraut keto cabbage rolls in rich tomato sauce on a plate, shown with a side of sauerkraut plus small bowls of caraway seeds and sauerkraut brine. Text overlay reads “Tangy Sauerkraut Twist” with notes: add 1–1½ cups rinsed, squeezed sauerkraut; optional pinch of caraway; use broth (not water) and add a splash of brine.
Want the Polish-comfort vibe without changing the base method? This tangy sauerkraut twist shows exactly what to add: 1–1½ cups rinsed + squeezed sauerkraut, an optional pinch of caraway, and a broth-based sauce with a small brine splash for brighter, deeper flavor—without turning the pan watery.

Adjust the sauce:

  • Use broth rather than water so the tang stays balanced
  • Add a splash of sauerkraut brine for more bite, if you like

Sauerkraut makes the whole dish taste brighter. It’s also a smart trick if someone in your house thinks cabbage rolls can taste “one-note.” This version is anything but.

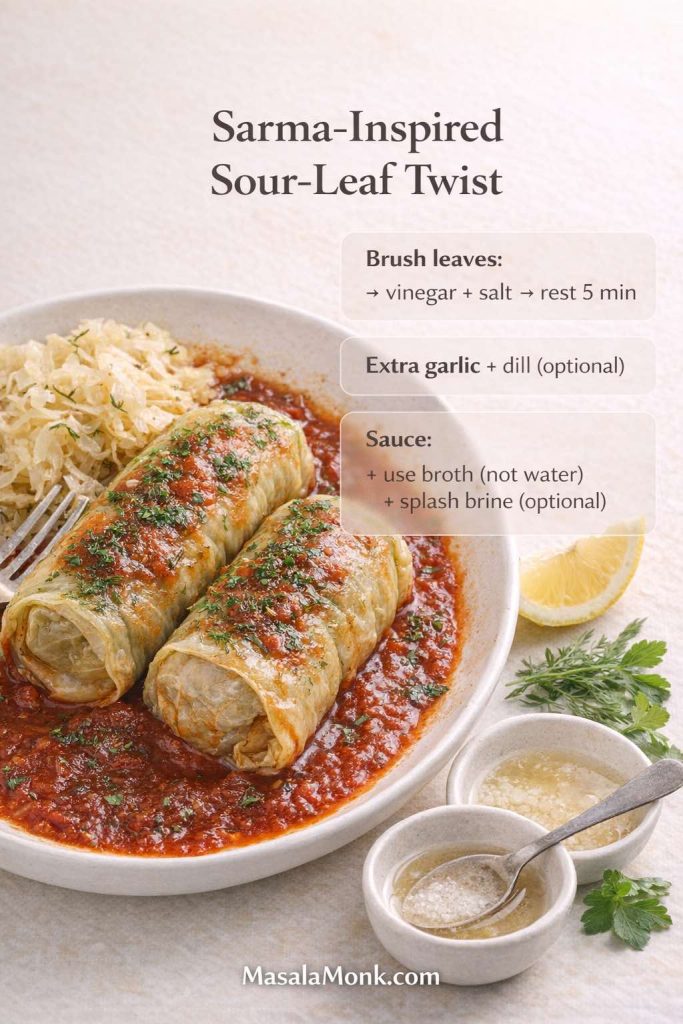
Twist 3: Sour cabbage leaves and “sarma-inspired” flavor (bright, savory, addictive)

Sarma rolls often use sour cabbage leaves, which brings a tang that feels uniquely satisfying with meat. If you can find sour cabbage leaves, use them. If not, you can mimic the effect by brushing softened cabbage leaves with a little vinegar and salt, then letting them rest briefly before filling.

Best meat choice: pork or turkey
Add to the filling:

  • Extra garlic (one more clove)
  • Optional: dried dill, mint, or parsley
Sarma-inspired keto cabbage rolls on a light plate in rich tomato sauce, topped with herbs, with a lemon wedge and small bowls of vinegar and salt beside them. Text overlay highlights the “sour-leaf” trick: brush cabbage leaves with vinegar + salt and rest briefly, plus optional extra garlic and dill.
Sarma-inspired sour-leaf twist: If you can’t find sour cabbage leaves, this is the clean workaround—brush softened leaves with vinegar + salt, rest 5 minutes, then roll as usual. The result tastes brighter and more addictive, without changing the base method.

Adjust the sauce:

  • Keep the sauce slightly looser; it will reduce as it bakes
  • Finish with a small squeeze of lemon if you want a brighter edge

The result is tangy without being sharp. It also feels lighter than a pure beef version, which makes it a strong option if you want keto cabbage rolls that don’t sit too heavy.

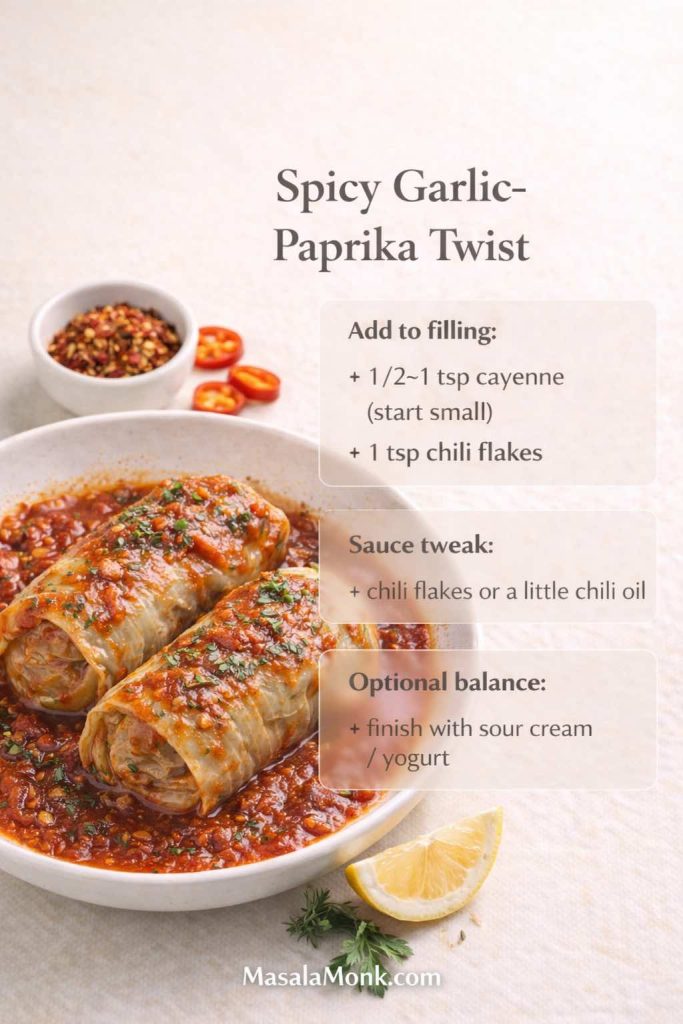
Twist 4: Spicy garlic paprika rolls (for heat lovers)

If your goal is to make cabbage rolls that feel energizing rather than sleepy, add heat. Spicy cabbage rolls can still be comforting; they just also happen to be exciting.

Best meat choice: beef or turkey
Add to the filling:

  • 1/2 to 1 teaspoon cayenne (start small)
  • 1 teaspoon chili flakes
“Two keto cabbage rolls in rich tomato sauce on a light background with chili flakes and parsley; text overlay reads ‘Spicy Garlic–Paprika Twist’ with tips: add 1/2–1 tsp cayenne (start small) + 1 tsp chili flakes, sauce tweak with chili flakes or chili oil, and optional balance with sour cream/yogurt; MasalaMonk.com footer.”
Spicy Garlic–Paprika Twist: Turn the base keto cabbage rolls into a heat-lover’s version by adding cayenne + chili flakes to the filling, then finishing the sauce with a little chili oil if you want extra punch. The “optional balance” tip (a spoon of sour cream/yogurt) is the fastest way to keep the sauce tasting rich—not harsh—while the rolls stay bold and satisfying.

Adjust the sauce:

  • Add chili flakes or a little chili oil
  • Keep garlic forward

This variation is also useful when you’re eating low carb and you miss “snacky” flavors. Heat and spice create the kind of satisfaction that helps you forget you’re even thinking about carbs.

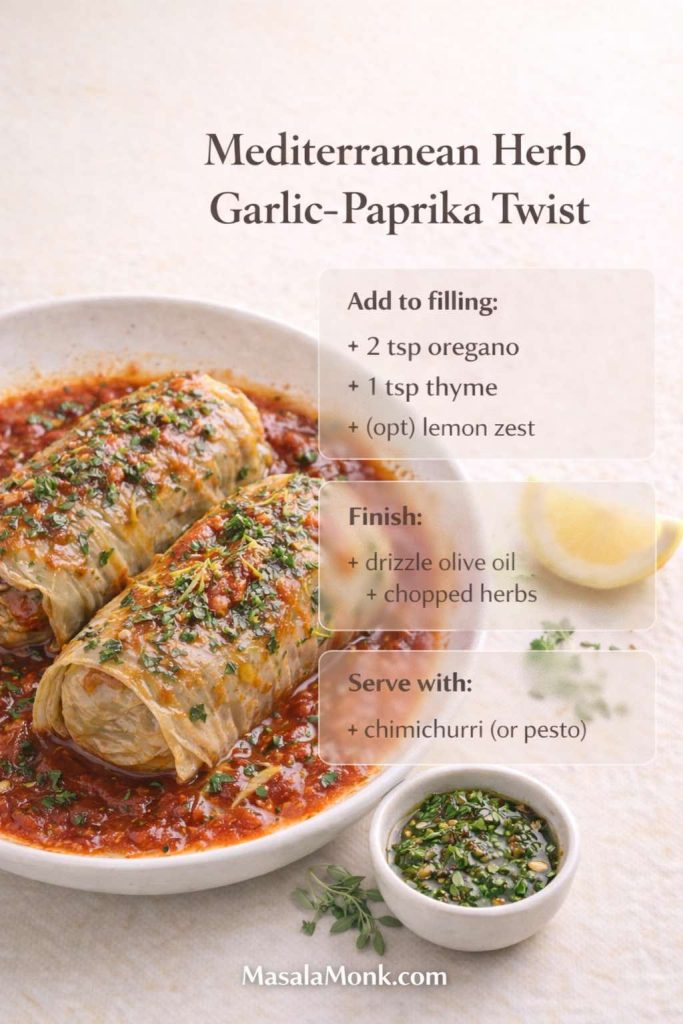
Twist 5: Mediterranean herb garlic paprika rolls (fresh, fragrant, still cozy)

This twist leans into herbs rather than tang or smoke. It’s still tomato-based and still boldly seasoned, but the finish feels brighter and more fragrant.

Best meat choice: ground turkey (or lean beef)
Add to the filling:

  • 2 teaspoons oregano
  • 1 teaspoon thyme
  • Optional: lemon zest
Mediterranean herb garlic-paprika keto cabbage rolls in rich tomato sauce, topped with chopped herbs and olive oil. Text overlay lists: add oregano, thyme, optional lemon zest; finish with olive oil and herbs; serve with chimichurri or pesto. MasalaMonk.com footer.
Mediterranean Herb Twist (fresh, fragrant, still cozy): Add oregano + thyme (and optional lemon zest) to the base garlic-paprika filling, then finish the baked rolls with a drizzle of olive oil + chopped herbs. The little bowl of chimichurri (or pesto) is the “dinner-party” shortcut—bright, garlicky, and perfect with tomato sauce. (Save/Pin this twist so you can swap flavors without relearning the recipe.)

Adjust the sauce:

  • Finish with a drizzle of olive oil and chopped herbs

For a punchy finishing sauce that fits perfectly here, a spoon of chimichurri on the side is almost unfairly good—garlic, herbs, acidity, and brightness, all in one. It’s especially helpful if you want the rolls to feel a bit more “dinner party” without changing the main recipe.

Herb-forward sauces are especially good with this version. If you like that kind of bright, garlicky finish, these pesto recipes are a great match alongside cabbage rolls.

Also Read: Sourdough Recipe: 10 Easy Bread Bakes (Loaves, Rolls & Bagels)


Cabbage roll soup and unstuffed cabbage roll soup (same flavors, easier weeknights)

Some nights, rolling feels like therapy. Other nights, it feels like too much. That’s where the soup version steps in.

Unstuffed cabbage roll soup—sometimes called unrolled cabbage soup, stuffed cabbage roll soup, or simply cabbage roll soup—is essentially the same recipe expressed differently. You still get garlic, paprika, tomato, tender cabbage, and savory meat. You’re just skipping the wrapping.

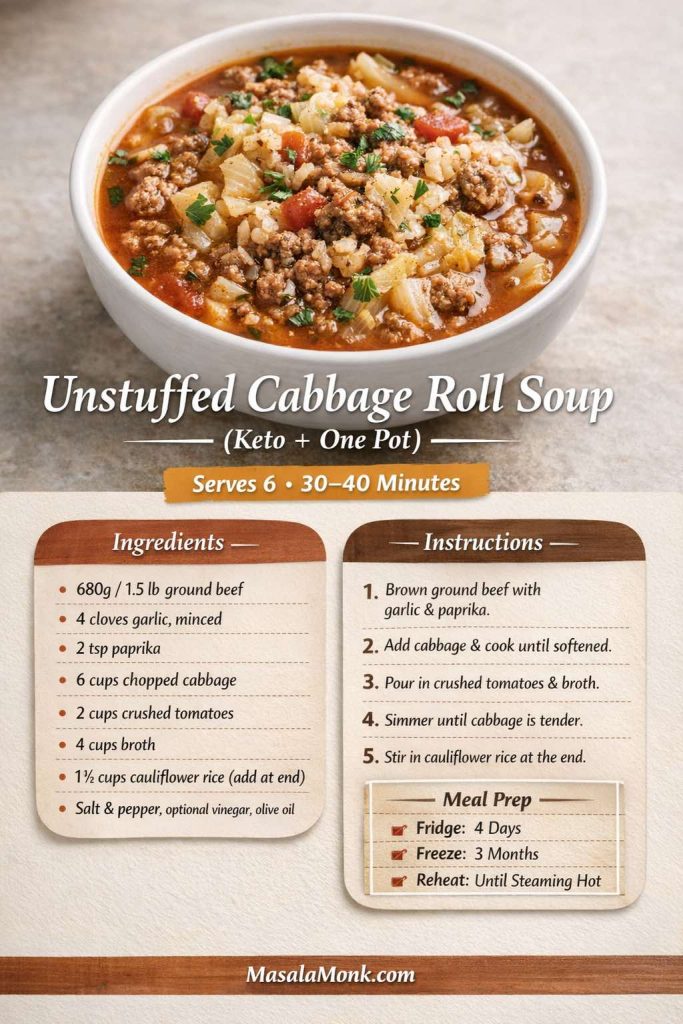
A bowl of unstuffed cabbage roll soup with ground beef, tender cabbage, tomatoes, and herbs in a tomato broth. Text overlay reads “Unstuffed Cabbage Roll Soup (Keto + One Pot)” plus a quick recipe card showing ingredients, 5 steps (brown beef with garlic and paprika, add cabbage, add tomatoes and broth, simmer, stir in cauliflower rice at end), and meal prep notes (fridge 4 days, freeze 3 months).
Want cabbage roll comfort without rolling? This unstuffed cabbage roll soup is the one-pot shortcut: ground beef + cabbage + tomato broth + garlic + paprika, finished with cauliflower rice at the end so it stays pleasantly textured. Save this card for busy nights—then scroll for baked rolls, casserole, skillet, and slow cooker versions in the same flavor family.

Unstuffed cabbage roll soup (keto-friendly method)

What you’ll do:

  1. Brown ground beef, turkey, or pork in a pot with garlic, paprika, salt, and pepper.
  2. Add chopped cabbage and stir until it begins to soften.
  3. Pour in crushed tomatoes and broth.
  4. Simmer until the cabbage is tender.
  5. Stir in cauliflower rice near the end, so it stays pleasantly textured rather than mushy.

Because this is a soup roll in spirit—cabbage roll flavors in a bowl—it works beautifully as a high-protein meal prep option. It also freezes well.

If you like cooking once and coasting for a few days, you might also enjoy these crock pot chicken breast recipes.

When you store soup for the week, safe reheating matters. FoodSafety.gov’s chart of safe minimum internal temperatures supports the common recommendation to reheat leftovers to 165°F / 74°C, which is especially relevant for meat-based soups.

Also Read: Peanut Butter Fudge: Recipes & Guide (8 Methods + Easy Variations)


Cabbage roll casserole: deconstructed, layered, and effortless

Cabbage roll casserole is the lazy cousin of stuffed cabbage rolls, and it’s a gift. It gives you the same taste profile without the rolling step. That’s why you’ll see it described as unrolled cabbage casserole, deconstructed cabbage roll casserole, or even “cabbage roll in a pan.”

This is also the format that best captures cravings for “easy cabbage casserole recipes” and “cabbage casserole with hamburger meat,” while staying firmly in keto-friendly territory.

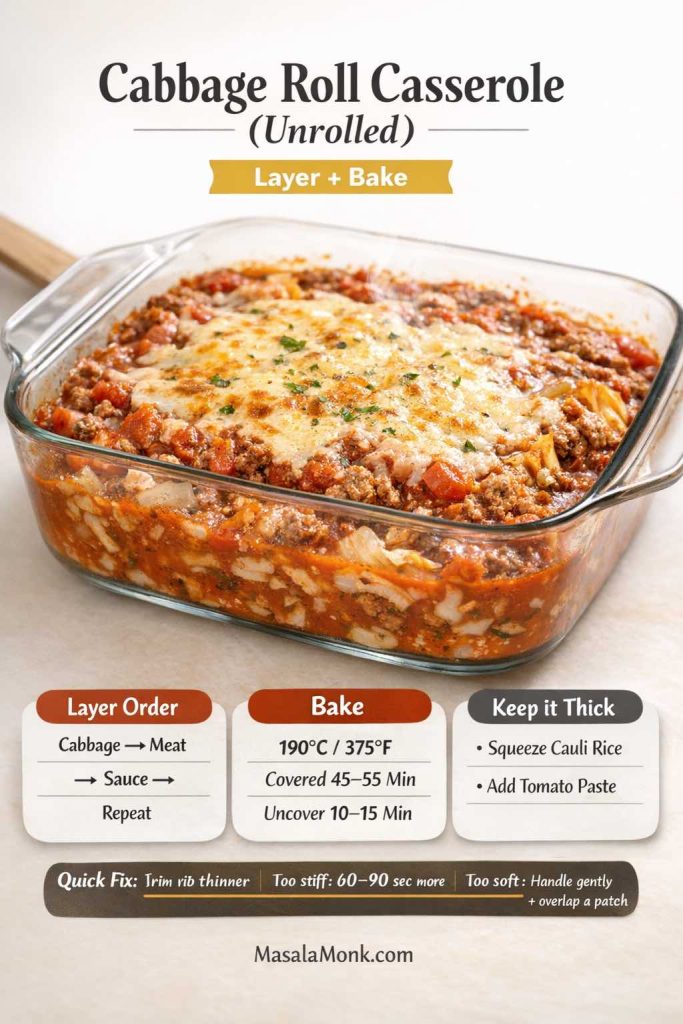
Photoreal cabbage roll casserole in a glass baking dish with saucy ground beef, tomatoes, and tender cabbage, topped with melted golden cheese. Text overlay reads “Cabbage Roll Casserole (Unrolled) — Layer + Bake” and shows quick cards: layer order (cabbage → meat → sauce → repeat), bake at 190°C/375°F covered 45–55 minutes then uncover 10–15 minutes, and “keep it thick” tips (squeeze cauliflower rice, add tomato paste). MasalaMonk.com footer.
If you want stuffed cabbage flavor without rolling, this cabbage roll casserole (unrolled) is the lazy-night win: layer cabbage + meat filling + sauce, bake covered until tender, then uncover briefly to thicken. The “keep it thick” tips prevent the #1 casserole problem (watery sauce), so you get a rich, spoonable result that reheats beautifully.

Keto cabbage roll casserole method (unrolled)

  1. Brown your ground meat with garlic, paprika, salt, and pepper.
  2. Stir in cauliflower rice and mushrooms (if using).
  3. In a baking dish, layer chopped cabbage and the meat mixture.
  4. Pour sauce over the top.
  5. Cover and bake until the cabbage is tender.
  6. Uncover near the end so the sauce thickens.

If you love a richer casserole, you can add cheese on top for a “cabbage rolls with cheese” feel—still very much in the spirit of cheese stuffed cabbage rolls, just without the fiddly wrapping.

Also Read: Best Vermouth for a Negroni Cocktail Drink Recipe


Skillet cabbage rolls and “cabbage roll in a bowl” (fast comfort)

Sometimes you want “stuffed cabbage” flavor in under 30 minutes. Skillet cabbage rolls—also described as cabbage roll in a skillet, cabbage roll skillet recipe, or cabbage roll in a bowl—deliver exactly that.

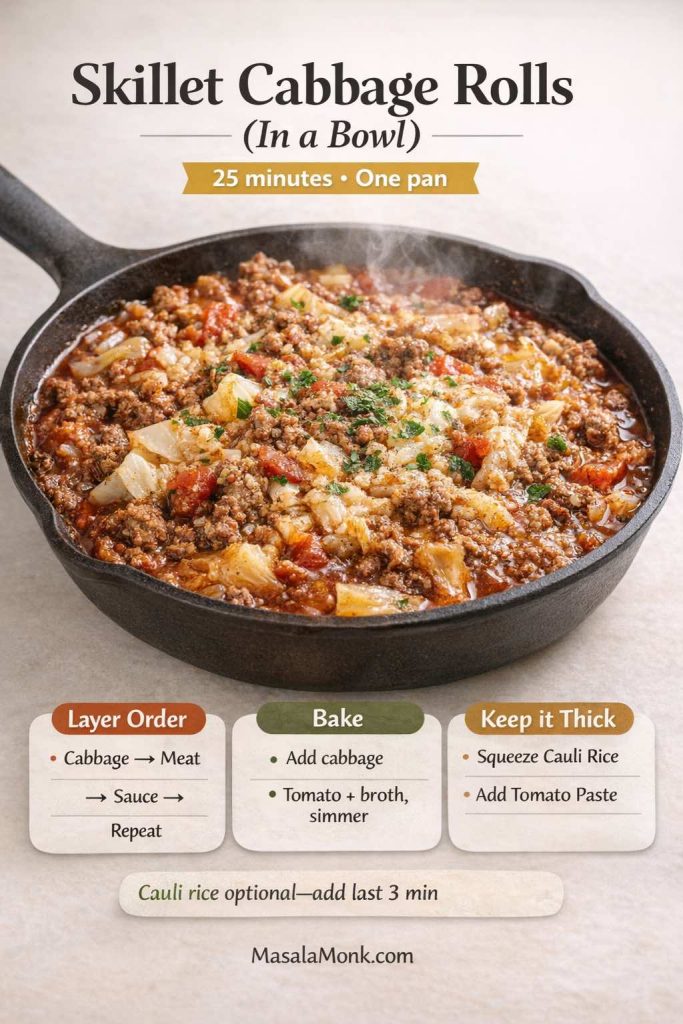
Skillet filled with “cabbage roll in a bowl” mixture: ground beef, tender cabbage, tomatoes, and herbs in a saucy garlic-paprika tomato base. Text overlay reads “Skillet Cabbage Rolls (In a Bowl) — 25 minutes • One pan” and includes quick steps: brown beef with garlic and paprika, add cabbage, add tomato + broth and simmer, finish with olive oil/sour cream/parmesan. Note says cauliflower rice is optional—add in the last 3 minutes. MasalaMonk.com footer.
When you want stuffed cabbage flavor fast, this skillet cabbage roll in a bowl hits the same comfort notes in one pan—garlic, paprika, tomato, tender cabbage, and savory beef—without rolling or baking. Keep this visual handy for weeknights, then use the rest of the post to choose your “format”: baked rolls, soup, casserole, slow cooker, and freezer-friendly prep.

The method is simple: brown meat with garlic and paprika, add shredded cabbage, pour in tomato and broth, then simmer until everything turns saucy and tender. You can finish with olive oil, sour cream, or parmesan, depending on your mood.

This is also one of the most forgiving versions if you’re using lean meat. Because the dish is saucy, you can adjust richness right at the end.

Also Read: Keto Flour: Guide to Low-Carb Flours That Bakes Like the Real Thing


Slow cooker cabbage rolls and crock pot cabbage roll casserole

Cabbage rolls in a slow cooker feel like a different kind of comfort. The cabbage becomes extra tender, the sauce sinks deeper into the filling, and the whole dish tastes like it spent the day becoming itself.

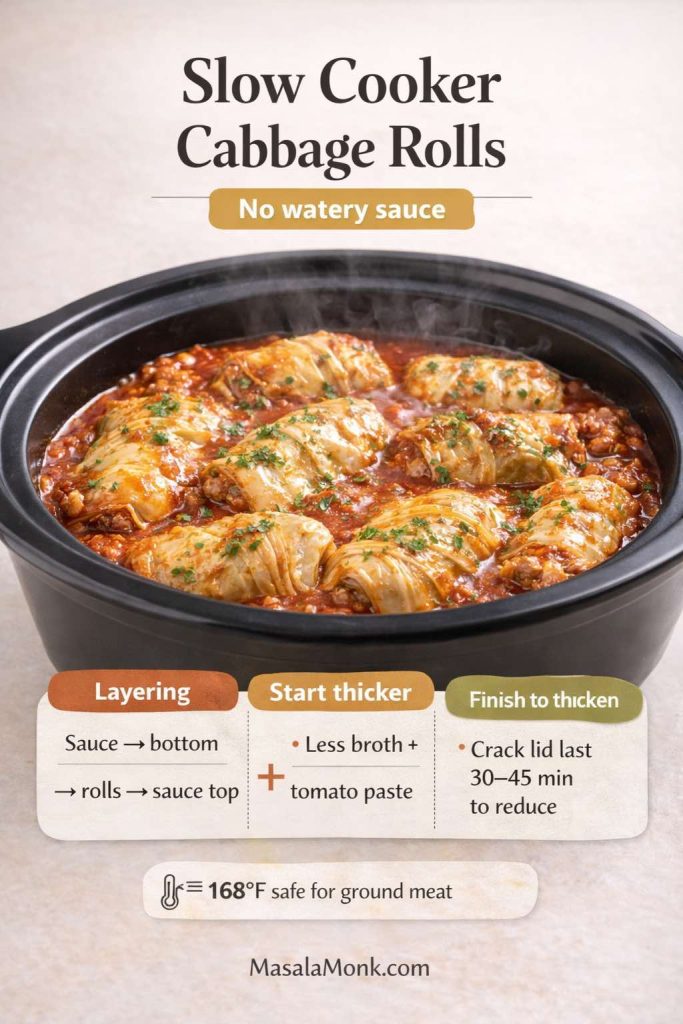
If you’re making cabbage roll crock pot style, the main difference is liquid management. Slow cookers trap moisture, so sauces tend to thin out unless they start thicker.

Photoreal slow cooker filled with cabbage rolls in rich tomato sauce, sprinkled with herbs, with steam rising. Text overlay reads “Slow Cooker Cabbage Rolls — No watery sauce” and shows three tip boxes: layering (sauce bottom → rolls → sauce top), start thicker (less broth + tomato paste), and finish to thicken (crack lid last 30–45 min to reduce). A thermometer icon notes safe internal temperature for ground meat. MasalaMonk.com footer.
Slow cooker cabbage rolls are effortless—until the sauce turns thin. Use this quick guide to keep crock pot stuffed cabbage rich and spoonable: layer sauce on the bottom and top, start with a thicker tomato base, and crack the lid near the end to reduce. It’s the easiest way to get slow-cooked tenderness without the “watery soup” problem.

Slow cooker stuffed cabbage rolls (keto-friendly)

  • Make and roll the cabbage rolls as usual.
  • Layer sauce on the bottom, then rolls, then more sauce.
  • Cook on low until the cabbage is very tender and the filling is safely cooked through.

Crock pot cabbage roll casserole (unstuffed)

  • Layer chopped cabbage, browned filling, and sauce in the slow cooker.
  • Cook on low until tender.
  • If the sauce is too thin, crack the lid for the final stretch or stir in a small amount of tomato paste near the end.

Again, safe internal temperature guidance matters, especially when cooking ground meat. USDA’s references for ground beef and poultry/ground turkey are good citations to keep the recipe grounded.

Also Read: Whole Chicken in Crock Pot Recipe (Slow Cooker “Roast” Chicken with Veggies)


Freezing cabbage rolls, freezing cabbage for cabbage rolls, and meal prep that actually works

Cabbage rolls are one of the best “cook once, eat twice” dinners. They’re also one of the best “cook once, eat six times” dinners if you freeze them.

That matters, because meal prep is often where a low carb diet either becomes easy or becomes exhausting. When you have a freezer-friendly high-protein option that you genuinely enjoy, it’s much easier to stay consistent.

Infographic titled “Keto Cabbage Rolls: Freeze • Bake • Reheat” showing three steps: freeze unbaked rolls (cool filling, roll tight, tray-freeze 45–60 minutes, layer with parchment), bake from frozen (covered at 190°C/375°F for 40–45 minutes then uncover 10–15), and reheat options (oven, stovetop simmer, microwave last resort). Photos show unbaked rolls in a container and baked rolls in sauce.
Freezer-friendly keto cabbage rolls made easy: freeze unbaked, bake from frozen, then reheat without drying out. Use this quick chart to get the timing right, keep the rolls intact, and make meal-prep weeks feel effortless—no rice needed, just big comfort. (Perfect to save/print and great for batch cooking.)
Infographic photo showing two glass meal-prep containers of cabbage rolls: left is “Freeze Uncooked (Best texture)” with raw cabbage rolls and a cup of sauce; right is “Freeze Cooked (Fastest)” with baked cabbage rolls in tomato sauce. Text overlay includes: “Bake from frozen: covered 190°C/375°F 40–45 min + uncover 10–15,” “Prevent watery: squeeze cauliflower rice + cool before freezing,” and “Reheat: oven covered or gentle simmer (keeps juicy).” MasalaMonk.com at bottom.
Freezing cabbage rolls is the difference between “I’ll cook later” and actually having dinner ready. This quick visual shows the two best options: freeze uncooked for the best texture or freeze cooked for the fastest reheat, plus the exact bake-from-frozen timing. The “prevent watery” note is the big one—squeeze cauliflower rice and cool before freezing so your rolls stay firm, saucy, and satisfying.

Freeze the cabbage (a simple prep trick)

If you haven’t tried it, freezing cabbage for cabbage rolls is one of the easiest prep hacks available. Freeze the whole head, thaw it, and the leaves become pliable. You can prep leaves on a calm day, then roll and cook later when you’re busy.

Freezing stuffed cabbage rolls (uncooked)

Freezing uncooked rolls often gives the best texture because everything cooks fresh later.

  • Assemble the rolls in a freezer-safe dish.
  • Pour sauce over.
  • Wrap tightly.
  • Freeze.

When you bake, you can cook from frozen, simply allowing extra time. Keep the dish covered so the sauce doesn’t evaporate too quickly before the center heats.

Freezing cabbage rolls (cooked)

Freezing cooked cabbage rolls is the convenience route:

  • Let rolls cool fully.
  • Portion with sauce.
  • Freeze in containers.

To reheat, warm gently so the filling stays juicy rather than drying out. USDA’s guidance on leftovers and food safety and FoodSafety.gov’s temperature chart both support reheating leftovers to 165°F / 74°C for safety.

Also Read: Frozen Chicken Wings in Air Fryer (No Thaw) — Crispy From Frozen + Time & Temp


Vegan cabbage rolls, vegetarian cabbage rolls, and meatless stuffed cabbage that still feels hearty

Even though this post is built around keto cabbage rolls, it’s useful to include an option for households that mix diets. Maybe you’re eating low carb, while someone else wants a meatless version. Maybe you want a “lighter day” dinner that still has cabbage-roll comfort.

Vegan cabbage rolls and vegetarian cabbage rolls work especially well with napa cabbage or savoy cabbage, because the leaves are tender and the filling can be softer.

Vegan cabbage rolls in a rich tomato sauce on a white plate; one roll is cut open to show a hearty filling of crumbled tofu, mushrooms, and cauliflower rice. Text overlay reads “Vegan Cabbage Rolls (Still Hearty)” with notes: “Mushrooms = depth,” “Tofu = protein,” “Cauli rice = bulk,” and “Best leaves: Savoy (flexible) • Napa (tender).” MasalaMonk.com footer.
Vegan cabbage rolls that still eat like comfort food: tofu brings protein, mushrooms add deep savory flavor, and cauliflower rice gives that “bulk” without heaviness. If you’re cooking for a mixed table (keto + vegetarian/vegan), this is the easiest way to keep the cabbage-roll vibe consistent—same sauce, same cozy payoff, just a different filling.

A vegan, cabbage-roll-style filling that works

For a plant-forward approach, the goal is to create a filling that’s savory and satisfying:

  • Finely chopped mushrooms (for depth)
  • Crumbled tofu (for protein)
  • Cauliflower rice (for bulk)
  • Garlic and paprika (for continuity with the main recipe)
  • A binder such as ground flax mixed with water, if needed

You can bake these the same way, using the tomato sauce method above.

If you’re trying to keep a few plant-based, high-protein options in rotation, this list of plant-based protein sources for high-protein meal prep is full of practical ideas.

Also Read: Innovate Your Vegan Keto Breakfast: 5 Pistachio and Sunflower Seed Smoothie Recipes for Meal Replacement


Cabbage wraps, cabbage roll ups, and “cabbage wrap meat” shortcuts

Not everyone wants full baked cabbage rolls. Sometimes you want something quicker—something closer to a cabbage wrap recipe than a casserole. That’s where cabbage wraps come in.

You can think of cabbage wraps as a lighter, fresher cousin to baked cabbage rolls. Instead of cooking the rolls in sauce for an hour, you’re wrapping a cooked filling in softened leaves, then serving with a spoonable sauce.

Top-down food graphic titled “Cabbage Wraps (Keto) — No Bake Shortcut.” It shows a plate with two cabbage wraps filled with seasoned ground meat and topped with tomato sauce. On the side are softened cabbage leaves on a board, plus step labels: “Brown filling,” “Soften leaves,” “Wrap + spoon sauce,” and “Serve (or pack for lunch).” MasalaMonk.com appears at the bottom.
When you want stuffed cabbage roll flavor without baking, these keto cabbage wraps are the fastest move: brown the garlic-paprika filling, soften a few leaves, wrap, and spoon sauce over top. The 4-step strip makes this a true weeknight shortcut—and it doubles as a lunch idea when you pack wraps with a little sauce cup on the side.

Quick cabbage wraps (keto-friendly)

  1. Brown ground beef with garlic and paprika.
  2. Make a quick sauce in the same pan (tomato + broth + paprika + olive oil).
  3. Spoon filling into softened cabbage leaves.
  4. Wrap and serve with sauce over top.

This gives you the comfort without committing to a baking dish. It’s also a great lunch format because the wraps hold together well in containers.

Also Read: Keto Fiesta: Spicing up Your Meals with Flavorful Taco Pie and Creative Toppings!


A note on “cabbage balls” and stuffed cabbage balls (when you want bite-sized comfort)

Cabbage balls show up in a few different traditions, and they’re essentially cabbage roll filling expressed as a small ball, sometimes wrapped partially in cabbage or simmered in sauce.

For a keto-friendly cabbage balls recipe approach, you can do this:

  • Make the same garlic paprika filling.
  • Roll it into small balls.
  • Brown them quickly, then simmer in the tomato sauce until cooked through.

It’s the same flavor story, just a different shape. The advantage is speed: no leaf-by-leaf rolling. The tradeoff is that you lose some of the classic cabbage roll structure. Still, if someone loves the filling more than the wrap, cabbage balls can be a satisfying variation.

Also Read: Air Fryer Hard-Boiled Eggs (No Water, Easy Peel Recipe)


Making cabbage rolls taste “traditional” without being stuck in one tradition

Cabbage rolls are one of those foods where families are fiercely loyal to what they grew up with. One home might swear by sweet-and-sour Jewish stuffed cabbage. Another might prefer a paprika-forward Hungarian stuffed cabbage rolls recipe. Someone else might love sauerkraut-heavy Polish cabbage rolls. Meanwhile, German cabbage rolls and kohlrouladen recipes often lean into deeper, darker savory notes.

Keto cabbage balls (no-rice) simmering in chunky garlic-paprika tomato sauce in a cast-iron skillet, with a small bowl of sour cream on the side. Text overlay reads ‘Keto Cabbage Balls (No-Rice)’, ‘Same filling, faster shape’, ‘Roll • Sear • Simmer’, ‘20 minutes’, and ‘Keep it firm: squeeze cauliflower rice’. MasalaMonk.com at bottom.
Keto cabbage balls are the “same filling, faster shape” version of cabbage rolls: roll the no-rice mix into balls, sear for crust, then simmer in the tomato sauce until juicy. The one tip that prevents mushy meatballs is right here—squeeze cauliflower rice dry before mixing.

This garlic and paprika foundation sits comfortably in that broader family of flavors. Garlic shows up everywhere. Paprika bridges sweet and smoky. Tomato sauce ties the whole dish to the “stuffed cabbage” comfort zone.

So if you’ve been chasing a version that feels familiar—old fashioned cabbage rolls, traditional stuffed cabbage, classic cabbage roll recipe—this approach can scratch the same itch. It doesn’t claim to replace any one grandmother’s method. Instead, it gives you a dependable base with enough flexibility to feel personal.

Also Read: Baked Jalapeño Poppers (Oven) — Time, Temp & Bacon Tips


Serving ideas that keep cabbage rolls satisfying (and keto-friendly)

A pan of cabbage rolls is already a complete meal, yet the right side can elevate it:

  • A crunchy slaw with a creamy dressing (again, eggless mayonnaise is handy as a base)
  • A spoon of herb sauce like chimichurri for brightness
  • A drizzle of olive oil and fresh herbs for the Mediterranean twist
  • A sprinkle of parmesan or feta for richness

Keeping one good red sauce around makes weeknight dinners easier—cabbage rolls, skillet cabbage, meatballs, and more. If you like having options ready in the fridge, these pizza sauce recipes are worth saving.


Troubleshooting Cabbage Rolls that are Keto Friendly

Even with a solid recipe, cabbage rolls can go sideways if a few details are off. The fixes are straightforward, though, and once you know them, you rarely run into the same problem twice.

Troubleshooting infographic for keto cabbage rolls in a glass baking dish with tomato-garlic sauce and parsley. Callouts list fixes: leaves tear (trim rib, don’t overboil, use savoy), watery filling (squeeze cauliflower rice, chop mushrooms fine), rolls fall apart (egg binder, roll tight, seam down), sauce too acidic (finish with olive oil or butter, tiny vinegar), tastes bland (salt filling and sauce separately). MasalaMonk.com footer.
Keto cabbage rolls going sideways? Save this troubleshooting visual. It covers the most common problems—torn leaves, watery “no-rice” filling, rolls that fall apart, sharp tomato sauce, and bland flavor—plus quick fixes that work fast (like squeezing cauliflower rice dry, rolling seam-side down, and balancing acidity with a little fat). Keep it right above the troubleshooting section so readers can scan, fix, and keep cooking.

If your cabbage leaves tear

The rib is usually the culprit. Trim it thinner so the leaf lies flat. Also, don’t overboil; overcooked leaves tear easily. If tearing keeps happening, switch to savoy cabbage, which folds more gently.

If your filling turns watery

Frozen cauliflower rice often holds water. Thaw and squeeze it dry. Mushrooms can also release liquid, so chop them finely and mix them with the meat so they cook evenly inside the roll.

If your rolls fall apart

Use an egg binder, roll tightly, and always place seam-side down. If you’re making a casserole or soup version, this is less of a concern, which is one reason unstuffed cabbage roll casserole is so forgiving.

If the sauce tastes too acidic

Finish with olive oil or butter, and consider a small splash of vinegar to balance. It sounds counterintuitive, yet it often makes tomato taste smoother rather than sharper. If you want a citation that supports the choice of olive oil as a staple fat, Harvard Health’s piece on extra-virgin olive oil is a useful reference.

If the dish tastes bland

Salt is not optional here. Cabbage is mild, and meat needs seasoning to taste “finished.” Season the filling well, then season the sauce separately. Paprika also needs enough salt to taste like something rather than like colored dust.

Also Read: Keto Mocktails: 10 Low-Carb Recipes for Guilt-Free Happy Hour Indulgence


Bringing it all together: one template, many dinners

Once you’ve made the base recipe, you’ve effectively unlocked multiple meals:

  • Oven baked keto cabbage rolls with garlic and paprika
  • Unstuffed cabbage roll soup for weeknights
  • Deconstructed cabbage roll casserole when you want comfort without rolling
  • Skillet cabbage rolls when time is short
  • Slow cooker cabbage rolls when you want hands-off cooking
  • Freezer-friendly cabbage rolls for meal prep
  • A vegan or vegetarian cabbage roll variation for mixed-diet households
  • Sauerkraut and sour cabbage leaf styles when you want tang
  • Spicy cabbage rolls when you want heat
  • Mediterranean cabbage rolls when you want herbs and brightness

That’s the hidden power of this dish. It isn’t just a recipe for stuffed cabbage rolls; it’s a repeatable system. You’re learning how to cook cabbage leaves, how to build a filling that stays juicy without rice, and how to make a tomato sauce that tastes like comfort without relying on sweetness.

And because these rolls are so satisfying, they also make it easier to stick with low carb eating without feeling like you’re losing your favorite foods.

If you want to keep building a keto dinner rhythm after this, it can feel natural to explore other high-protein, low carb anchors—MasalaMonk’s beef recipes for a weight loss keto plan is a solid next stop, especially if you like dinners that reheat well and feel filling without being complicated.

Also Read: Keto pancakes that actually taste like pancakes


Full printable-style recipe (base + quick twist guide)

Garlic & Paprika Keto Cabbage Rolls (Base Recipe)

Serves: 6–8
Prep time: 30–45 minutes (depending on cabbage method)
Cook time: 55–75 minutes

Ingredients

  • 1 large green cabbage (or savoy)
  • 680 g / 1.5 lb ground beef (or turkey or pork)
  • 3–5 cloves garlic, minced or grated
  • 2 teaspoons paprika
  • 1 teaspoon salt
  • 1/2 teaspoon black pepper
  • 1 1/2 cups cauliflower rice (squeezed dry if previously frozen)
  • 1/2 cup finely chopped mushrooms (optional)
  • 1 egg (optional)
  • 1/3 cup grated parmesan (optional)

Sauce

  • 2 cups crushed tomatoes or passata
  • 1 cup broth
  • 1 tablespoon tomato paste (optional)
  • 1–2 tablespoons olive oil or butter
  • 1 teaspoon paprika
  • Garlic powder or an extra clove of garlic
  • Salt and pepper
  • Optional: splash of vinegar

Method

  1. Soften cabbage leaves using boiling, freeze-thaw, or microwave. Trim ribs so leaves fold easily.
  2. Mix filling ingredients gently until combined.
  3. Roll filling in leaves; place seam-side down in a baking dish.
  4. Whisk sauce and pour over rolls. Cover tightly.
  5. Bake at 190°C / 375°F until tender and cooked through. Uncover at the end for a thicker sauce, if desired.
  6. Rest briefly before serving so the rolls hold together better.

Safety note: USDA guidance recommends cooking ground beef to 160°F / 71°C and poultry/ground turkey to 165°F / 74°C—see USDA ground beef safety and USDA poultry safety. Leftovers should be reheated to 165°F / 74°C as referenced in USDA’s leftovers guidance and FoodSafety.gov’s temperature chart.

Quick twist guide (additions only)

  • Smoky: add smoked paprika + cumin; finish sauce with vinegar
  • Sauerkraut: layer rinsed, squeezed sauerkraut in the dish; optional caraway
  • Sour-leaf style: brush leaves lightly with vinegar + salt; add dill or mint
  • Spicy: add chili flakes + cayenne; finish with chili oil
  • Mediterranean: add oregano + thyme; finish with olive oil, herbs, and optionally chimichurri or pesto

Also Read: How to Make Churros (Authentic + Easy Recipe)


FAQs

1) What are keto cabbage rolls?

Keto cabbage rolls are stuffed cabbage rolls made without rice or other high-carb fillers. Instead, the filling relies on meat, seasonings, and low-carb “bulk” like cauliflower rice or mushrooms, then everything bakes or simmers in a savory sauce until the cabbage turns tender and the filling stays juicy.

2) Can cabbage rolls be keto friendly even with tomato sauce?

Yes. Tomato-based sauce can still work for cabbage rolls that are keto compatible, especially when the flavor comes from garlic, paprika, broth, and fat—not added sugar. In practice, the sauce tastes comforting and rich without needing sweetness to feel complete.

3) What replaces rice in keto-friendly cabbage rolls?

Cauliflower rice is the closest stand-in for the texture of rice stuffed cabbage rolls. Meanwhile, finely chopped mushrooms add moisture and depth, almost like the filling simmered longer. Additionally, riced broccoli can work, and shredded zucchini can too—just squeeze it well so it doesn’t water out the filling.

4) Can I make cabbage rolls with uncooked rice on keto?

Not really. Cabbage rolls with uncooked rice (or cooked rice) are typically not low carb. If you love the “classic stuffed cabbage rolls with ground beef and rice” style, the keto approach is to keep the same seasonings and sauce while swapping rice for cauliflower rice or mushrooms.

5) Which meat works best for keto cabbage rolls: ground beef, turkey, or pork?

Ground beef gives the richest, most classic stuffed cabbage flavor and stays forgiving when baked. Ground pork turns especially juicy and savory, and paprika loves it. And then ground turkey is lighter, yet it usually benefits from extra fat and bolder seasoning so the filling doesn’t taste dry.

6) How do I keep keto cabbage rolls from falling apart?

First, roll tightly and place the rolls seam-side down. Next, trim the thick cabbage rib so the leaf folds smoothly. Also, using an egg binder can help, particularly if your filling is very lean or you’re using extra vegetables like mushrooms or zucchini.

7) What’s the easiest way to soften cabbage leaves for cabbage rolls?

Freeze-and-thaw is quietly one of the easiest methods: freeze the whole cabbage head, thaw it, and the leaves become pliable. Otherwise, boiling works reliably, and the microwave method is fast for smaller batches. Either way, trimming the rib makes rolling far easier.

8) Can I make cabbage rolls with frozen cabbage?

Yes. Cabbage rolls with frozen cabbage work well if the cabbage is thawed fully and the leaves are handled gently. In fact, freezing cabbage for cabbage rolls is a common prep trick because it softens the leaves without a big pot of water.

9) Are cabbage rolls healthy?

They can be, especially when the filling is high-protein and the sauce is balanced. Cabbage rolls healthy versions often focus on leaner meat, more vegetables, and a sauce that isn’t sugar-heavy. Even so, richer versions can still fit well in a low carb or keto diet when portions are sensible.

10) How long do cabbage rolls cook in the oven?

Cabbage rolls in oven typically take around 55 to 75 minutes at 375°F / 190°C, depending on roll size, cabbage thickness, and the meat used. If you make smaller rolls or use thinner leaves, they may finish sooner.

11) Can I make stuffed cabbage rolls in the oven ahead of time?

Absolutely. Assemble the rolls, cover tightly, and refrigerate. Then bake when needed. Because the flavors deepen after resting, homemade stuffed cabbage rolls often taste even better the next day.

12) What is unstuffed cabbage roll soup?

Unstuffed cabbage roll soup is the same comfort flavor—cabbage, meat, garlic, paprika, and tomato—without rolling. It’s also called stuffed cabbage roll soup, cabbage roll soup recipe, unrolled cabbage soup, or simply cabbage roll soup, depending on how people describe it.

13) How do I make easy cabbage roll soup recipe style but keto-friendly?

Brown ground meat with garlic and paprika, add chopped cabbage, then pour in crushed tomatoes and broth. Simmer until tender. Finally, stir in cauliflower rice near the end so it keeps a pleasant bite instead of turning mushy.

14) What is a cabbage roll casserole?

Cabbage roll casserole is a deconstructed version of stuffed cabbage—everything layered or mixed in one dish. You’ll also see it called unrolled cabbage casserole, stuffed cabbage roll casserole recipe, cabbage rolls casserole layered, or deconstructed cabbage roll casserole.

15) Can I make cabbage roll casserole crock pot style?

Yes. Slow cooker stuffed cabbage casserole is a popular option because it’s hands-off. Brown the meat first for better flavor, then layer cabbage, filling, and sauce in the crock pot. Since slow cookers trap moisture, start with a slightly thicker sauce.

16) What’s the fastest “cabbage roll in a bowl” method?

Skillet cabbage rolls—often called cabbage roll in a skillet or cabbage roll in a bowl—are the quick route. Brown meat with garlic and paprika, add shredded cabbage, stir in tomato and broth, then simmer until everything becomes saucy and tender.

17) Can I freeze cabbage rolls for meal prep?

Yes, cabbage rolls for freezing are one of the best meal-prep moves. You can freeze them cooked or uncooked. Cooked rolls are convenient for quick reheating, whereas uncooked rolls often give the best texture after baking.

18) How do I freeze stuffed cabbage rolls without getting watery?

Squeeze moisture from cauliflower rice and any watery vegetables like zucchini. Cool cooked rolls fully before freezing. Also, freeze portions with sauce so the filling stays juicy instead of drying out.

19) Can I cook frozen cabbage rolls without thawing?

Yes. Frozen cabbage rolls can bake from frozen; they simply need extra time. Keep them covered so the sauce doesn’t reduce too quickly before the center heats through.

20) What are cabbage balls, and are they keto friendly?

Cabbage balls are basically stuffed cabbage filling shaped into bite-sized portions, then simmered or baked in sauce. For a keto-friendly cabbage balls recipe, keep the same garlic-paprika filling and skip rice, using cauliflower rice or mushrooms for bulk instead.

21) Are there vegetarian cabbage rolls or vegan cabbage rolls that still feel hearty?

Yes. Vegetarian cabbage rolls and cabbage rolls vegan versions often use mushrooms for depth, cauliflower rice for bulk, and a protein base like tofu or a mix of nuts and seeds. The sauce and seasonings do a lot of the “comfort” work, so the result can still feel satisfying.

22) What’s the difference between sarma rolls, gołąbki, and galumpkis?

They’re all cabbage roll traditions with regional differences. Sarma rolls often use sour cabbage leaves and can have a tangier profile. Gołąbki refers to Polish cabbage rolls, commonly with meat and rice. Galumpkis is another name used for Polish-style stuffed cabbage rolls, especially in North American kitchens.

23) What are German cabbage rolls and kohlrouladen?

German cabbage roll recipes often lean savory and rich, and the term kohlrouladen usually refers to cabbage leaves stuffed with meat, then braised until tender. Even when the seasoning style differs, the method overlaps closely with classic stuffed cabbage.

24) What makes “old fashioned cabbage rolls” taste like the classic version?

Classic cabbage roll recipes usually rely on well-seasoned meat, tender cabbage, and a sauce that simmers long enough to meld everything. Even when you remove rice for keto-friendly cabbage rolls, keeping the same garlic, paprika, onion, and tomato comfort notes preserves that traditional feel.

25) Why do some cabbage roll recipes taste like tomato soup?

That “cabbage rolls in tomato soup” flavor happens when tomato, broth, and fat balance each other. Tomato gives sweetness and acidity, broth adds savory backbone, and fat rounds off sharpness so the sauce tastes smooth and comforting.

26) How do I make cabbage wraps instead of baked cabbage rolls?

Cabbage wraps are a quicker approach: cook the filling first, soften leaves, then wrap and serve with sauce spooned over top. It’s a useful shortcut when you want cabbage wrap meat style comfort without a long bake.

27) What’s the best cabbage for stuffed cabbage rolls?

Green cabbage is the most forgiving and sturdy for rolling. Savoy cabbage is more flexible and easier to fold, which helps if tearing is a problem. Napa cabbage is tender and great for vegan cabbage rolls, although it can be more delicate.

28) Why are my cabbage rolls bland, even with paprika?

Cabbage is mild, so seasoning has to be strong enough to carry through. Salt matters more than most people expect, and paprika needs salt to taste like something rather than just color. Also, season both the filling and the sauce separately for the best result.

29) Can I make “best cabbage roll recipe ever” style flavor on keto?

Yes—because “best stuffed cabbage recipe ever” usually means juicy filling, tender cabbage, and a sauce that tastes deep and balanced. You can keep that same goal while swapping rice for low-carb bulk and leaning into garlic and paprika for bold flavor.

30) How do I make keto cabbage rolls feel more filling for weight loss?

Prioritize protein, include enough fat to keep the filling satisfying, and don’t skimp on sauce because it prevents dryness. Also, pairing cabbage rolls with a crunchy low-carb side (like slaw) can make the meal feel larger without adding many carbs.

Posted on Leave a comment

Keto Butter Chicken Recipe: Rich, Silky Murgh Makhani

Bowl of keto butter chicken with browned boneless chicken pieces in glossy orange-red makhani gravy, finished with a little kasuri methi.

This post was last updated on:

A good butter chicken has contrast, and keto doesn’t change that.

The chicken should have browned, sometimes lightly charred edges. The gravy should cling to those pieces and still move around them, with a soft butter sheen. Tomato gives the sauce its backbone, cream smooths the acidity, and crushed kasuri methi leaves the aroma that makes the finished curry recognizably butter chicken.

If butter chicken is one of the dinners you’ve been missing since cutting back on carbs, most of what makes it worth eating can stay. Or maybe you’ve already tried a low-carb version and ended up with perfectly decent creamy tomato chicken that somehow never quite became butter chicken. This recipe is meant to solve both problems.

This version is savory and tomato-deep, with browned chicken, a smooth orange-red gravy, moderate cream and kasuri methi still noticeable after the bite. A favourite takeaway may be much sweeter or richer. If yours is, this will taste different—and nothing has gone wrong.

Butter chicken—murgh makhani—already starts with plenty of ingredients that fit naturally into a lower-carb meal. Most of the carb difference comes from added sugar, how much tomato and onion go into the gravy, cashews or starches, prepared sauces and, very often, the rice and naan served with it.

Keep the butter chicken. Change the carbs that matter.

Jump to: Recipe · The 5 Changes · Troubleshooting · Low-Carb Sides · Nutrition · Restaurant Butter Chicken

Quick Answer: Is Butter Chicken Keto-Friendly?

Yes. Homemade butter chicken can be keto-friendly. This version comes to roughly 7g net carbs per serving, with no added sugar, cashews or flour-based thickener.

Chicken, butter, ghee, cream and spices contribute relatively little carbohydrate in the amounts used here. Tomato, onion and plain yogurt contribute some. Restaurant and packaged gravies may add sugar, ketchup, flour, cornstarch, cashews or simply a much larger amount of sauce.

Homemade is easier to calculate because you know what went into the pan. Whether roughly 7g net carbs fits your day depends on the carbohydrate target you’re following.

Ready to cook? Jump to the keto butter chicken recipe →

The 5 Changes That Matter

  1. Skip the added sugar. Give the tomato enough time to lose its raw, sharp edge before deciding the sauce needs sweetness.
  2. Keep the yogurt-and-lemon marinade. Leave only a light coating on the chicken before browning so the spices stay with the meat without flooding the pan.
  3. Let the gravy thicken through cooking. Tomato reduction and blending give this sauce plenty of body. Flour and specialty keto thickeners are unnecessary.
  4. Measure the onion; skip the cashews in this version. A modest amount of onion still gives the gravy body and sweetness, while the tomato, butter and cream supply enough richness.
  5. Look at the whole plate. Jeera cauliflower rice, greens and something crisp can save more carbohydrates than stripping character out of the curry itself.

That’s most of the keto work. From here, cook it like butter chicken.

Butter chicken surrounded by visual cues for no added sugar, a light yogurt marinade, reduced tomato gravy, measured onion and cauliflower rice.
No specialty keto thickeners are needed here: reduction, measured gravy ingredients and the plate do the work.

Keto Butter Chicken Recipe

The ingredient list looks long, but the cooking itself is straightforward. Most of the work is measuring, browning the chicken and giving the tomato enough time.

If other people at the table aren’t eating low-carb, you do not need a second curry. Put rice or naan on their side of the table and cauliflower rice or vegetables on yours.

At a Glance

DetailWhat to expect
Serves4 generous main-course portions
Chicken700g / 1½ lb boneless skinless thighs
PrepAbout 15 minutes
Marinating30 minutes minimum; 2–4 hours is better
CookAbout 30–40 minutes
Minimum elapsed timeAbout 1¼–1½ hours
Pan11–12in / 28–30cm wide, reasonably deep skillet or sauté pan
Heat levelMild to medium
Estimated net carbsAbout 7g per serving, before sides

Equipment

  • 11–12in / 28–30cm wide, reasonably deep skillet or sauté pan
  • mixing bowl
  • knife and cutting board
  • instant-read thermometer
  • immersion blender, recommended for a smoother gravy
  • digital kitchen scale, useful but not essential

A countertop blender works too. If the gravy is too shallow for an immersion blender to stay submerged, transfer it to a tall heatproof jug. Let very hot gravy settle briefly and follow your blender manufacturer’s guidance for hot liquids. A fine-mesh strainer is optional.

Overhead arrangement of chicken thighs, yogurt, passata, onion, cream, butter, ghee, ginger-garlic paste and spices for keto butter chicken.
For carb tracking, weigh the tomato and onion first; tiny spice differences matter far less.

Chicken and Marinade

  • 700g / 1½ lb boneless, skinless chicken thighs, cut into roughly 3cm / 1¼-inch pieces
  • 80g / ⅓ cup thick plain full-fat yogurt or dahi; mild full-fat Greek yogurt also works
  • 15ml / 1 tbsp lemon juice
  • 15g / 1 tbsp ginger-garlic paste
  • 1 tsp Kashmiri red chilli powder
  • 1 tsp garam masala
  • ½ tsp ground cumin
  • 4g / about ¾ tsp fine sea salt

Makhani Gravy

  • 14g / 1 tbsp ghee, for browning the chicken
  • 14g / 1 tbsp ghee or butter, for the gravy
  • 50g / roughly ½ small onion, finely chopped
  • 15g / 1 tbsp ginger-garlic paste
  • 1 tsp ground coriander
  • ½ tsp ground cumin
  • ½ tsp garam masala
  • ¼ tsp ground turmeric
  • ¼–½ tsp Kashmiri red chilli powder
  • 225g / 8oz / scant 1 cup plain passata or strained tomatoes, with no added sugar
  • 60ml / ¼ cup hot water or unsalted/lightly salted chicken stock, plus more if needed
  • 3g / about ½ tsp fine sea salt

To Finish

  • 120ml / ½ cup heavy or whipping cream
  • 14g / 1 tbsp butter
  • 1 tsp dried kasuri methi
  • fresh coriander/cilantro, optional

A fresh cream around 25% milk fat works too. The gravy will be slightly lighter and looser and may need another minute of gentle reduction. The nutrition estimate later in the post assumes heavier cream in roughly the 30–36% range.

Kashmiri chilli is being used mainly for colour and gentle warmth. Add cayenne or a hotter Indian chilli powder separately when you want more heat. For a mixed table, keeping the main pan mild and sharpening individual portions at the end is usually easier.

1. Marinate the Chicken

Mix the yogurt, lemon juice, ginger-garlic paste, Kashmiri chilli, garam masala, cumin and salt. Add the chicken and turn until every piece carries a light coating.

Cover and refrigerate for at least 30 minutes. Two to four hours works particularly well, and overnight is fine when that suits your schedule.

Before cooking, lift the chicken from the bowl and scrape or shake away the heavy excess marinade. Discard what remains after contact with the raw chicken. A little yogurt-spice coating should stay on the meat, but there should not be enough to form a puddle in the pan.

2. Brown the Chicken

Heat the pan over medium-high heat and add the ghee. If you’re cooking in two batches, divide that tablespoon between them. Arrange the chicken in a single layer with some room around the pieces.

At first you’ll hear a damp hiss as moisture leaves the surface. As the pan dries, the sound becomes sharper and the yogurt-spice coating begins catching and darkening around the edges. Give the first side roughly 2–3 minutes before checking it. Chicken that still grips the pan usually needs another few moments; once the surface has browned properly, it releases more easily.

Turn and colour the second side briefly, then transfer the chicken to a plate while the centre is still underdone. A few uneven dark patches are exactly what you want. The pieces do not need to look identical.

Pan filling with water? Stop adding chicken. Remove the pieces if necessary, let the excess liquid evaporate, add a touch of ghee once the pan is dry again and continue in smaller batches.

Step-by-step comparison showing lightly marinated chicken becoming damp, drying and browned, plus an overcrowded pan filled with excess moisture.
Between batches, let the pan get hot and dry again before adding more yogurt-marinated chicken. Otherwise, the next batch inherits the moisture from the last one.

For stronger tandoori-style edges, the marinated chicken can go under a very hot broiler/grill until a few spots blister, then finish cooking in the gravy.

3. Build the Makhani Base

Lower the heat to medium and add the second tablespoon of ghee or butter. Add the onion and measured salt and cook for about 4–6 minutes, until the onion softens and loses its sharp raw smell. A little gold around the edges is welcome.

Add the ginger-garlic paste and cook for roughly 30 seconds, until its raw aroma mellows. Stir in the coriander, cumin, garam masala, turmeric and Kashmiri chilli for another 20–30 seconds. Lower the heat if the spices begin sticking or darkening quickly.

4. Give the Tomato Enough Time

Pour in the passata and scrape the bottom of the pan to release the browned chicken and spice residue. Cook uncovered over medium to medium-low heat, stirring regularly.

Expect roughly 8–15 minutes, sometimes longer. Tomato products vary, and so do burners and pans. If yours needs 18 minutes, nothing has gone wrong.

The sauce starts bright and loose. As water cooks away, the colour deepens, the texture tightens and the obvious bottled-tomato smell fades. Draw a spoon through the pan: the trail should remain visible briefly before the sauce flows back. Small beads or streaks of fat may appear near the edges; you do not need a dramatic oil layer.

Taste a little. A sharp, raw tomato flavour means it needs more cooking. Extra tomato paste makes the colour stronger, but it can push the gravy towards a concentrated pasta-sauce flavour. Use it only when the tomato product itself is unusually pale or weak.

Four stages of tomato gravy labeled raw, reducing, developed and ready, ending with thick orange-red sauce that holds a spoon trail.
A wide pan speeds evaporation, concentrating passata without flour, cornstarch or another gravy thickener.

5. Blend the Gravy, Then Finish the Chicken

Pour in 60ml / ¼ cup hot water or stock and remove the pan briefly from the heat. Blend until smooth. For an especially silky gravy, strain it before returning it to the pan. Leaving it a little rustic is fine too.

Return the blended gravy to medium-low heat for 2–3 minutes, stirring as it comes back together and thickens slightly. Tiny beads of fat may appear around the edge.

Add the browned chicken and the juices collected on the plate. Simmer gently until the largest piece reaches 165°F / 74°C, generally another 4–7 minutes at this size. The USDA recommends 165°F as the safe minimum internal temperature for poultry.

If the gravy tightens before the chicken is ready, add hot water or stock 1 tbsp / 15ml at a time.

6. Finish With Cream, Butter and Kasuri Methi

Reduce the heat to low and let hard bubbling settle. Stir in the cream, then crush 1 teaspoon kasuri methi between your palms over the pan and add it with the finishing butter. Warm everything gently for another minute.

Cream being poured into butter chicken as butter melts and dried kasuri methi is crushed over the pan.
Once the cream is in, keep the heat gentle. A hard boil can split the dairy, while prolonged cooking also softens the fresh aroma of butter and kasuri methi.

Taste and check the salt first. After that, make only the adjustment the gravy needs: another ¼ teaspoon methi, a touch more heat, a small finishing pinch of garam masala, a spoonful of water or perhaps one more spoonful of cream.

If the tomato is still sharply acidic after it has cooked fully and the salt, butter and cream are in place, a very small amount of your preferred low-carb sweetener can help. Add it only at the end and only if the sauce genuinely needs it.

Turn off the heat and let the curry rest for about 5 minutes.

The Finished Butter Chicken

Some of the yogurt-spice coating should have darkened around the chicken while the centre stays juicy. The gravy should settle naturally around the pieces, with no watery pool underneath. The raw tomato edge should be gone, but you should still taste tomato, ginger, chilli and spice after the cream goes in.

Kasuri methi should be easy to notice when you lean over the pan. Drag a spoon through the gravy; the line should stay open for a moment and then slowly close. Lift the spoon and the sauce should cling before falling back in a slow ribbon.

Too thick? Stir in 1 tbsp / 15ml hot water. Too loose? Give it another minute or two uncovered.

Spoon lifting a browned piece of butter chicken with thick glossy sauce clinging and dripping back into the pan in a slow ribbon.
Perfect texture can still mean too much sauce. Fix the ratio, not the chicken.

Then stop adjusting.

Spoon it over hot jeera cauliflower rice and get some browned chicken and gravy in the first bite. At that point, nobody needs to be thinking about what was removed.


If dinner is already on the table, stop here and eat. Everything below is for the question that comes next: why another recipe claims fewer carbs, why a gravy tastes wrong, what changes at a restaurant or how to make the next batch easier.

Need something specific? Troubleshoot the gravy · Build the low-carb plate · Order butter chicken at a restaurant

What Makes Butter Chicken Taste Like Butter Chicken?

The hardest butter chicken to diagnose is the one that isn’t bad. The chicken is tender, the sauce is creamy and the seasoning seems reasonable, yet the first bite still tastes like generic tomato curry.

Usually there isn’t one secret ingredient missing. Tomato that has cooked far enough, properly browned chicken, enough salt and a sensible amount of cream all matter. Kasuri methi adds one of the most recognizable aromas in the finished gravy, and even a small amount can change the character of the sauce.

If the curry tastes seasoned but still smells anonymous, smell the kasuri methi before reaching for another spoonful of spice.

Butter chicken shown with developed tomato gravy, browned chicken, dried kasuri methi and a small bowl of cream as key flavour elements.
When butter chicken tastes almost right, change one variable at a time: check salt first, then char and kasuri methi before adding more cream or another spoonful of spice.

Where the Carbs in Butter Chicken Come From

Two bowls of butter chicken can look nearly identical and still produce very different nutrition numbers. Much of that variation comes from the gravy and from what somebody has decided counts as one serving.

VariableLower-carb directionHigher-carb direction
TomatoMeasured tomato baseLarge tomato-heavy gravy
OnionSmall measured amountOnion-heavy base
Added sweetnessNoneSugar, honey or ketchup
CashewsNone or a littleCashew-rich gravy
YogurtPlain and measuredSweetened or larger amounts
ThickeningReductionFlour or cornstarch
Prepared saucePlain/no-added-sugarSweetened commercial gravy
Serving sizeClearly definedTiny or vague
The plateVegetables or cauliflower riceRice plus naan

For this recipe, one serving means one-quarter of the finished curry.

The 225g / 8oz tomato gives the gravy enough acidity and fruitiness without making tomato the whole story. Once properly cooked, it tastes much less dominant than it does straight from the bottle.

Some butter chicken is sweet and some isn’t. This version starts without added sugar because cooked tomato, salt, butter and cream usually provide enough balance.

The 50g onion contributes body and natural sweetness while keeping the quantity predictable. Cashew paste can make a lovely rich butter chicken gravy, but this sauce does not need it.

Two butter chicken meals compared side by side, one with basmati rice and naan and the other with cauliflower rice, greens and cucumber.
Same curry, different plate: hold the portion steady and let the sides change the carb load.

Ingredient Notes That Change the Result

Thick yogurt helps the seasoning cling to the chicken, and lemon adds brightness. Moisture is the part to watch during browning: a heavy yogurt coating cools the pan, releases water and can leave pale coagulated clumps. Plain unsweetened yogurt or dahi works well. A particularly tangy Greek yogurt can make the finished curry noticeably more sour.

Chicken thighs are more forgiving through browning and the final simmer. Breast works too; keep the pieces evenly sized and avoid cooking them through during the first sear. MasalaMonk’s baked chicken breast recipe goes deeper into thickness, temperature and keeping lean breast meat juicy.

For the tomato, smooth plain passata is the easiest choice. Finely crushed tomatoes can be used too and may need more cooking and blending. Sweet pasta sauce, ketchup and seasoned marinara change the flavour substantially. Tomato paste is far more concentrated, so save it for the rare batch where the tomato itself seems unusually pale or weak.

Spices, Kasuri Methi and Cream

Kashmiri chilli gives deep colour with moderate heat. Paprika can provide much of that colour when Kashmiri chilli is unavailable, with stronger chilli added separately. Garam masala varies considerably from brand to brand, so a small finishing pinch can help when its aroma seems muted.

Kasuri methi is dried fenugreek leaf. Fenugreek seed and ground fenugreek are much stronger and should not replace it measure-for-measure. Start with 1 teaspoon of the leaves and increase in ¼-teaspoon steps only after tasting. If you cannot find kasuri methi, leaving it out is safer than substituting the same quantity of seed or powder.

Spice guide showing Kashmiri chilli, garam masala and kasuri methi, with dried fenugreek leaves compared with fenugreek seeds and powder.
At the shop, look for “kasuri methi” or “dried fenugreek leaves” on the packet. Then crush the leaves just before finishing the gravy to release more of their aroma.

The 120ml / ½ cup cream used here softens the tomato and carries the spices through the gravy. Add much more and the curry can turn pale while the ginger, chilli and methi recede into the background.

Want a Smoother, More Restaurant-Style Finish?

Restaurant butter chicken is not one fixed flavour. Some gravies are sweeter, some tangier and some substantially richer with cream or cashew. You can reproduce much of the char, silkiness and aroma at home, but a particular restaurant may still taste quite different.

A very hot broiler or grill gives the chicken darker blistered edges than most home pans can manage when they are full. A few charred spots are enough.

For the gravy, thorough blending makes the biggest difference. Straining takes the texture one step further when you specifically want the very smooth finish found in many restaurant versions.

Keep the butter and kasuri methi for the end so their aroma stays fresh. A brief dhungar smoke can add another layer when that is a technique you already use comfortably. Good chicken char gets you a long way without it.

Three identical bowls of orange butter chicken gravy labeled rustic, blended and strained, showing progressively smoother texture.
Blending gets you most of the silkiness; straining is optional polish.

Fix Your Butter Chicken

Butter chicken problems often sound alike. “Too tomatoey,” “bland” and “thin” can each describe more than one failure, and throwing more cream or spice at a confused gravy rarely helps. Work out what is actually wrong first.

ProblemLikely causeFirst move
Raw or harsh tomatoTomato base undercookedKeep reducing
Tastes like pasta sauceToo much concentrate or underdeveloped gravyCook the base further
BlandSalt, char or finishing aroma lackingCheck salt first
Too sourAcidic or undercooked tomatoCook, then balance
Too sweetToo much sweetenerRestore salt and spice balance
Generic creamy curryWeak char, little methi or rushed tomatoCorrect those elements
WateryToo much liquidRemove chicken and reduce
PastyOver-reducedAdd hot water 15ml at a time
Too much gravySauce volume drifted upwardRemove some sauce
Chicken released lots of waterWet coating, cool pan, crowding or high-water chickenDry the pan and brown smaller batches
White yogurt clumpsWet marinade or crowded/cool panLess coating, more heat, smaller batches
Greasy or splitExcess fat or hard boiling after dairyLower the heat
Dry chickenOvercooked during both stagesBrown first; finish only to 165°F / 74°C
Bitter methiToo much kasuri methiDilute if possible
Too spicyExcess hot chilliAdd a little cream
Too paleToo much creamUse less next time
Four butter chicken problems shown side by side: watery gravy, split greasy sauce, pale over-creamed curry and chicken with wet yogurt clumps.
Read the pan before changing the seasoning. Pooling liquid, separated fat, pale gravy and yogurt clumps describe four different failures—and therefore four different fixes.

Too Tomatoey or Too Sour

Bright, raw tomato needs more cooking. A heavy concentrated-tomato flavour is different and often comes from too much tomato paste. For sourness, make sure the tomato is fully cooked and then check the salt. Butter or a little more cream can soften what remains; sweetener comes last.

Bland—or Just Not Tasting Like Butter Chicken?

Flat flavour usually calls for salt first. A curry that is already seasoned but still tastes generic needs a different diagnosis: check the chicken browning, tomato development and kasuri methi. Smell the garam masala and methi straight from their containers too. Old spices can be present in the recipe and almost absent in the bowl.

Watery Sauce

Once the chicken reaches temperature, take it out. Reduce the gravy uncovered and return the chicken only long enough to coat and warm through.

Great Sauce, Wrong Ratio?

Sometimes the gravy is perfectly thick and there is simply too much of it. An oversized onion, extra tomato or accidentally scaled-up sauce can do that. Remove some and save it for another meal instead of continuing to cook the chicken.

White Yogurt Clumps

The pan was probably too cool, too crowded or carrying too much wet marinade. The curry is still edible. Next time, leave only a light coating on the chicken and give the pieces more space.

Bitter Kasuri Methi

Once too much methi is in the sauce, there is no clean way to remove it. Extra unsweetened gravy or a little cream can dilute the bitterness. Starting with the first teaspoon and increasing slowly is much easier than rescuing an over-methi’d pan.

← Back to the recipe · Build the low-carb dinner →

Build a Low-Carb Butter Chicken Dinner

A lower-carb butter chicken dinner does not need to look like curry surrounded by substitutes you’re merely tolerating. Give the gravy something warm to sit on, something green to cut through the richness and something cold and crisp beside it.

Jeera Cauliflower Rice

Cumin makes cauliflower rice feel like part of dinner.

Serves 4

Ingredients: 600g / about 6 cups cauliflower rice, 1 tbsp ghee or butter, 1 tsp cumin seeds, ½–¾ tsp salt, plus coriander and a small squeeze of lemon if you like.

Heat a wide pan over medium heat and add the ghee. Let the cumin seeds sizzle for 20–30 seconds, until fragrant, then add the cauliflower rice and salt. Increase the heat to medium-high and cook uncovered for about 5–7 minutes.

There will be plenty of steam at first. As it eases, the cauliflower should become tender while the small grains remain separate. Stop before it turns soft and wet.

For more ways to use it, MasalaMonk’s guide to using cauliflower on keto goes beyond cauliflower rice.

Something Green

Garlic spinach is especially good here because its slight bitterness cuts through the buttery gravy. Roasted cauliflower, cabbage, broccoli and green beans are easy alternatives.

Something Cold and Crisp

Cucumber, coriander, mint and lemon bring crunch and acidity. MasalaMonk’s cucumber salad recipe gives you several ways to build that fresh side.

If You Miss Naan

A low-carb naan or roti can make the meal feel much closer to the dinner you were craving. With packaged low-carb breads, check the actual carbohydrate amount and serving size on the label.

Cauliflower rice, one green vegetable and something cold already make a generous plate.

Low-carb butter chicken dinner with jeera cauliflower rice, dark green spinach and cucumber salad on a jewel-toned table.
Put the hot jeera cauliflower rice under the curry so it catches the makhani gravy; keep cucumber alongside it so the crunch, acidity and temperature contrast stay intact.

Is Restaurant Butter Chicken Keto?

Restaurant butter chicken is harder to calculate because the gravy has usually made most of its decisions before you sit down.

It may contain sugar or honey, ketchup, more onion, cashew paste, flour or cornstarch, sweetened tomato products or a premade curry base. Because that gravy is often prepared in a large batch, asking for “no sugar” may not change what is already in the pot.

The most useful question is simple: Does the butter chicken gravy contain added sugar or flour/cornstarch?

Can’t get a clear answer? Simpler grilled dishes are easier to judge when you’re keeping carbohydrates particularly low: tandoori chicken, chicken tikka, kebabs, grilled fish and some dry-style meat preparations. MasalaMonk’s green chutney recipe is a natural partner for those dishes.

Then look at the rest of the order. Rice, naan and sweet chutneys can change the meal far more than a measured amount of tomato in the curry.

Your favourite takeaway may taste quite different from this recipe even when both are good butter chicken. Some house gravies are much sweeter, saltier or richer. If that is exactly the butter chicken you love, a different result at home does not mean the recipe failed; you’re simply aiming at another style.

Butter chicken on a restaurant table beside a menu, with prompts asking about added sugar, flour or cornstarch, and side dishes.
Batch gravy may already contain sugar or starch; when it does, a simpler grilled dish is easier to estimate.

← Back to the recipe · Make ahead and reheat →

Shortcuts and Appliance Notes

A jarred butter chicken sauce can make dinner much faster. Check the total carbohydrates, added sugars, flour or starch, stated serving size and how much sauce you will actually use. A sauce that fits your numbers but tastes flat can often be improved with a little butter, cream and crushed kasuri methi.

The full recipe takes roughly 45–55 minutes of active work plus at least a short marinade. For a quicker weeknight, marinate the chicken first and use those 20–30 minutes to chop and measure everything else. Smooth passata and skipping the optional straining save time without giving up the chicken browning or tomato reduction.

For nights when fifteen minutes really is the limit, MasalaMonk’s 15-minute sesame ground chicken works well over cauliflower rice, sautéed cabbage or lettuce.

Instant Pot

Pressure cooking traps moisture, so the finished gravy tends to be thinner. Use Sauté for the aromatics, deglaze the pot thoroughly and follow the minimum-liquid requirement for your cooker. Once the chicken is cooked, remove it and reduce a loose sauce with Sauté uncovered before adding the chicken back with the cream, butter and kasuri methi.

Slow Cooker

Slow cooking gives tenderness but very little browning, so sear the marinated chicken first when you can. For boneless pieces, 2–3 hours on High or 4–6 hours on Low is a reasonable starting range; the chicken still needs to reach 165°F / 74°C. Add the cream and finishing butter near the end, and reduce a thin gravy separately.

Make Ahead, Store and Reheat

The chicken can be marinated the day before. The blended tomato gravy can also be cooked ahead. If dinner is for tomorrow, refrigerate the gravy before adding the final cream, butter and kasuri methi, then add those as you reheat it.

Cool leftovers promptly and refrigerate them in a covered container. Use them within 3–4 days, in line with USDA leftover-storage guidance.

Cold butter chicken will look much thicker after a night in the refrigerator. That is normal. Warm it gently and add a splash of water or stock as the gravy loosens. Bring reheated leftovers back to 165°F / 74°C.

Butter chicken freezes well too. Portion it before freezing and aim to use it within about 3 months for best quality.

Three stages labeled make ahead, chilled and reheated, showing butter chicken gravy becoming thick when cold and looser again after reheating.
Reheat first, then thin only if needed; melted fats loosen chilled gravy naturally.

Keto Butter Chicken Nutrition

Based on typical nutrition values for the ingredients listed, one-quarter of the finished curry is approximately:

Per servingEstimated amount
CaloriesAbout 500 kcal
ProteinAbout 36g
FatAbout 36g
Total carbohydratesAbout 9g
FiberAbout 2g
Estimated net carbohydratesAbout 7g

Here, net carbs means total carbohydrate minus fiber. The estimate assumes full-fat plain yogurt and heavy/whipping cream in roughly the 30–36% fat range; a lighter fresh cream will lower the fat and calorie numbers somewhat.

The calculation includes the chicken, yogurt, lemon, onion, tomato, ginger, garlic, ghee, butter, cream and measured spices. It does not include cauliflower rice, bread, optional sweetener, extra cream at serving or other sides.

1 serving = ¼ of the finished curry. If you track carbohydrates closely, the labels on the ingredients in your own kitchen are the most relevant numbers.

Frequently Asked Questions

Does Butter Chicken Usually Contain Sugar?

Sometimes. Some home and restaurant versions add sugar or honey to soften tomato acidity; many others don’t. It isn’t required here. Cook the tomato fully and balance the gravy before deciding it needs sweetness.

Do I Really Need Kasuri Methi?

You can make good creamy tomato chicken without it, but kasuri methi contributes an aroma closely associated with butter chicken. Use dried fenugreek leaves, not the same quantity of fenugreek seed or powder. If the leaves are unavailable, omission is safer than an equal substitution.

Can I Make This Dairy-Free?

Yes, although the flavour will shift. Use plain unsweetened dairy-free yogurt in the marinade and full-fat coconut cream in the gravy, along with a suitable non-dairy cooking fat. The finished sauce becomes more coconut-forward and moves away from classic murgh makhani.

If you’re avoiding dairy because of a milk allergy, don’t assume ghee is automatically suitable.

Is This Butter Chicken Gluten-Free?

The recipe itself doesn’t use wheat flour. Stocks, packaged spice blends and prepared sauces can vary, so check labels when avoiding gluten strictly.

Can I Make It Without a Blender?

Absolutely. Use smooth passata, chop the onion finely and leave the gravy a little more rustic. You lose some silkiness, not dinner.

Keep the Butter Chicken

Once the bowl reaches the table, “keto” shouldn’t be the first thing you notice.

There should be a browned edge on the chicken and enough gravy to drag through whatever is underneath it. The tomato should taste deep and fully cooked, the cream should leave the spices easy to taste, and the butter should give the sauce a soft sheen.

The kasuri methi lingers after the bite.

Close-up spoonful of browned butter chicken, glossy orange-red gravy, cumin-speckled cauliflower rice and a small piece of spinach.
Cauliflower rice does not need to impersonate basmati. Here its job is simpler: catch the silky makhani gravy and bring toasted cumin into the same bite as the charred chicken.

Keep the butter chicken. Change the carbs that matter.

← Back to the recipe · ↑ Back to top