Posted on Leave a comment

Vegetable Lasagna Recipe (Best Vegetarian Lasagna)

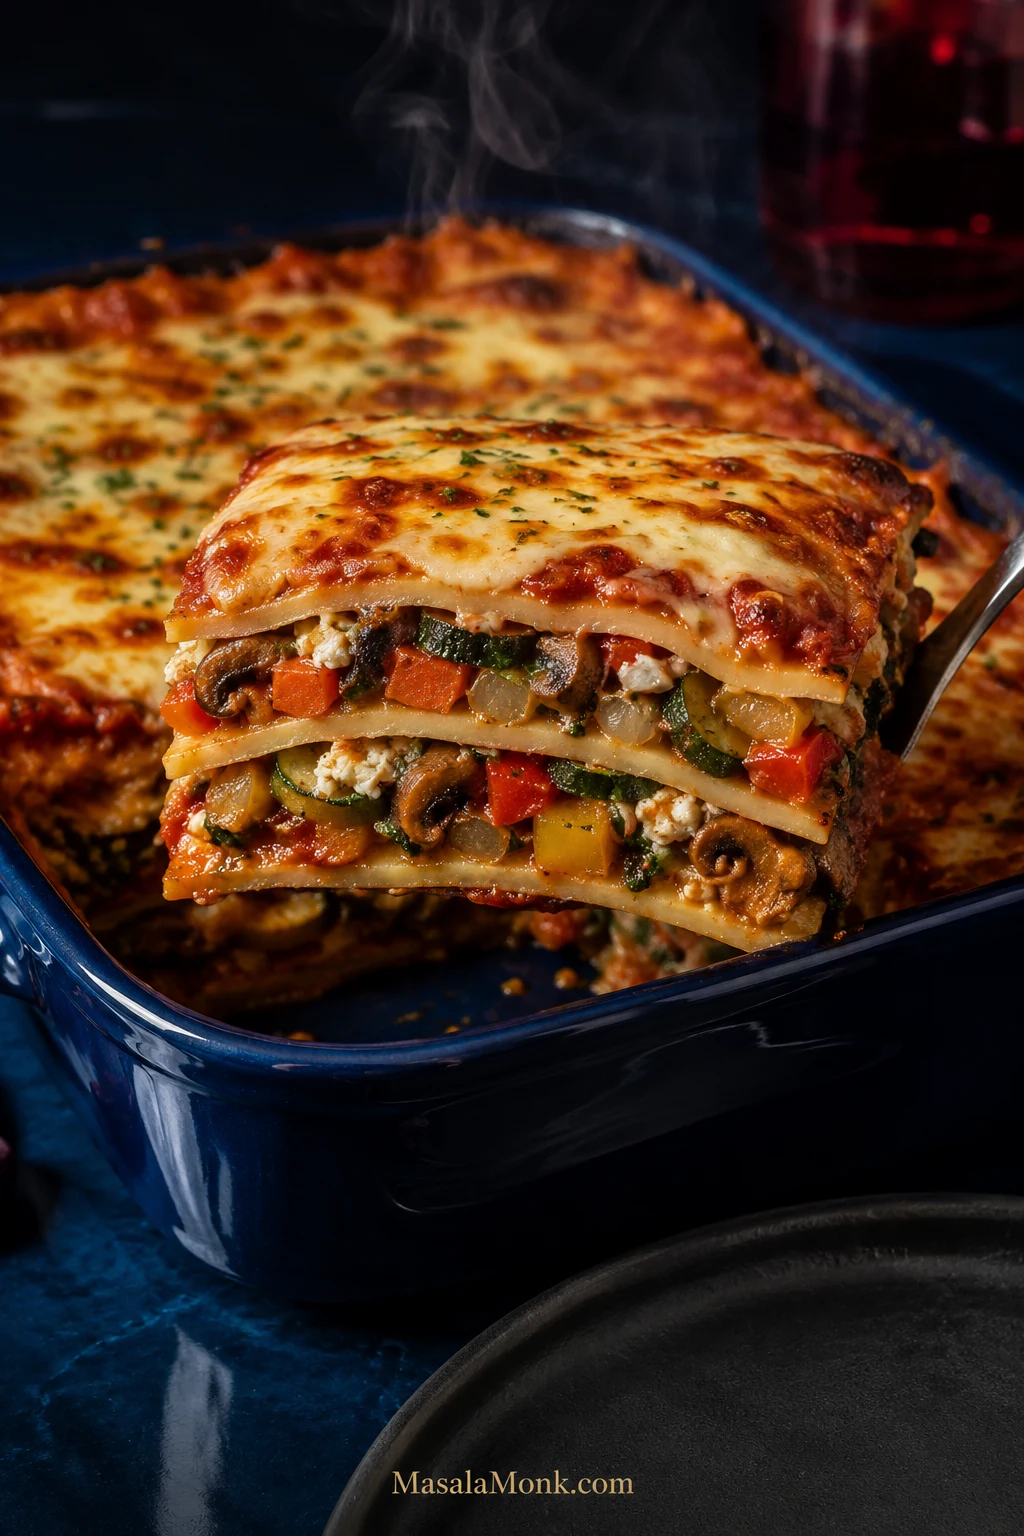
Finished vegetable lasagna in a deep blue baking dish with a lifted slice showing pasta, ricotta, spinach, zucchini, mushrooms, peppers and tomato sauce.

Before this becomes lasagna, the vegetables should already taste worth eating. The mushrooms need to be dark and savory, the zucchini smaller and browned at the edges, the onion sweet, and the peppers and carrots properly tender. If the filling tastes flat before it goes between the noodles, another layer of cheese will not magically make it exciting.

A deep 9 × 13-inch pan holds about 2 pounds / 910 g of roastable vegetables, plus spinach, layered with ricotta, mozzarella, tomato sauce and pasta. The finished lasagna is deeply cheesy, but the roasted vegetables are what give each layer its character. The browned vegetables are the filling.

Timings help, but watch the food too: mushrooms that release their water and begin browning again, marinara that clings to a spoon, and a knife that passes through the middle without catching on firm pasta.
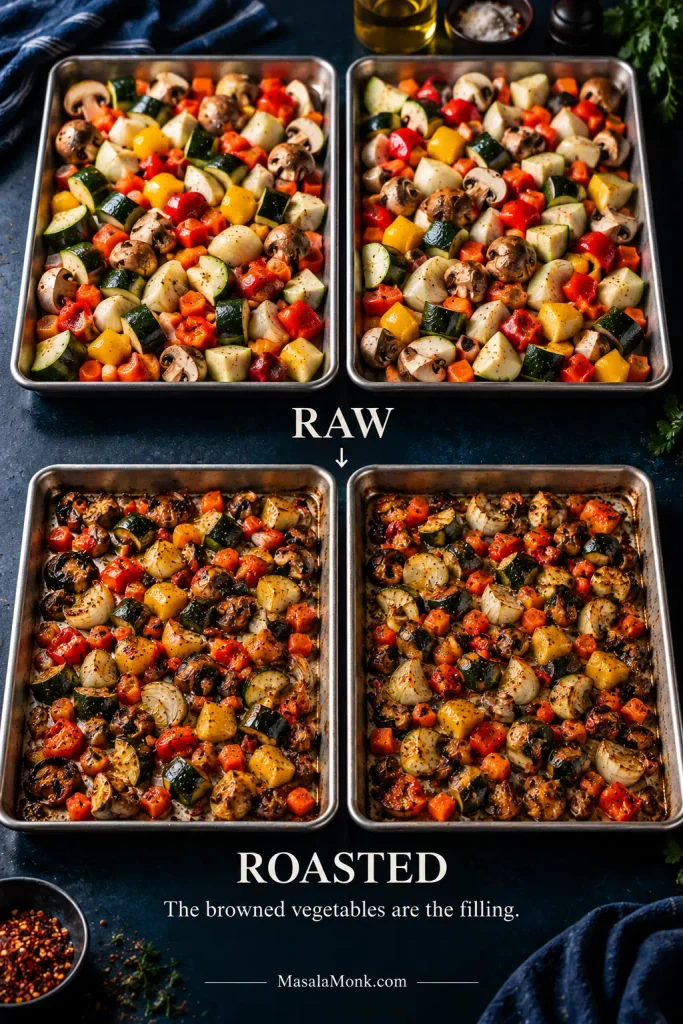
Raw zucchini, mushrooms, bell pepper, yellow onion and carrot on sheet pans beside the same vegetables roasted until smaller and browned.
Raw vegetable volume can be misleading: moisture loss dramatically reduces zucchini, mushrooms, peppers and onions during roasting. That is why a generous raw quantity can become two balanced filling layers without making the finished lasagna overwhelmingly vegetable-heavy.

Jump to: Make the lasagna · Choose your vegetables · Why it gets watery · Troubleshoot the pan

Open the full table of contents

Vegetable Lasagna Recipe

This version uses roasted vegetables, ricotta, low-moisture mozzarella, tomato sauce and oven-ready lasagna sheets. There is no separate pot of noodles to boil.

Allow about 2 hours from the first chop to the first slice, with a little extra breathing room the first time you make it. You are not working for all of that: the ricotta, spinach and sauce can be handled while the vegetables roast, and the final 20 minutes belong to the lasagna, not you.

Pan9 × 13 inches / 23 × 33 cm, ideally at least 2½ inches / 6 cm deep
Yield8 main-dish servings or 10–12 smaller servings with sides
Hands-on prepAbout 45–50 minutes, with some work happening while the vegetables roast
Vegetable roast20–25 minutes using two pans; add about 20–25 minutes if you need to roast in two batches
Covered bake40 minutes, then check; some pans need another 5–10 minutes
Uncovered bake10–15 minutes
Rest20 minutes; 25–30 minutes for particularly neat slices

Cooking for more people? Make two regular 9 × 13-inch pans rather than one unusually deep double batch. They bake more evenly, are easier to move, and give you more browned edges.

Ingredients

Vegetables

  • 9 oz / 250 g zucchini, about 1 medium-large or 2 small, unpeeled and cut into roughly ½-inch / 1–1.5 cm pieces
  • 8 oz / 225 g mushrooms, about one 8-ounce package, quartered if small or thickly sliced if larger
  • 6 oz / 170 g red or yellow bell pepper, about 1 large, cut into roughly ½-inch / 1–1.5 cm pieces
  • 5 oz / 150 g yellow onion, about 1 medium, cut into roughly ½-inch / 1–1.5 cm pieces
  • 4 oz / 115 g carrot, about 1 large or 2 small, cut into smaller ¼-inch / 6 mm dice
  • 5 oz / 140 g frozen chopped spinach, thawed; or about 8 oz / 225 g fresh spinach
  • 3 tablespoons / 45 ml olive oil
  • 1 teaspoon fine salt
  • 1 teaspoon Italian seasoning
  • ½ teaspoon garlic powder
  • ½ teaspoon freshly ground black pepper

Ricotta Filling

  • 15 oz / 425 g whole-milk ricotta, drained if whey is visibly pooling around it
  • 1 large egg
  • 1½ oz / 42 g Parmesan or another hard Italian-style cheese, finely grated
  • 1 small garlic clove, finely grated
  • 1 teaspoon finely grated lemon zest
  • 2 tablespoons finely chopped fresh basil or flat-leaf parsley
  • ¼ teaspoon fine salt, or to taste depending on the cheese
  • ¼ teaspoon black pepper

For the Layers

  • 4 cups / 950 ml thick marinara sauce, homemade or jarred
  • 8–9 oz / 225–255 g oven-ready/no-boil lasagna sheets, or enough for 3 complete pasta layers; sheet count varies by brand
  • 12 oz / 340 g low-moisture mozzarella, shredded, about 3 cups
  • ½ oz / 14 g Parmesan or another hard Italian-style cheese, finely grated, for the top
  • Optional: red pepper flakes and fresh basil for serving

If you avoid animal rennet, check the cheese labels. Traditional Parmigiano Reggiano uses animal rennet, while vegetarian alternatives may use microbial or other non-animal coagulants. The Vegetarian Society’s guide to vegetarian cheese can help when the label is unclear.

Lightly oil the bottom and sides of a deep 9 × 13-inch / 23 × 33 cm baking dish. You will also need two large rimmed sheet pans; half-sheet pans, roughly 13 × 18 inches / 33 × 46 cm, are ideal. Have a mixing bowl, clean kitchen towel and foil ready too.

If the trays need separate oven racks, you will swap their positions halfway through roasting. Only one suitably large tray? Roast the vegetables in two batches rather than crowding them, and allow another 20–25 minutes.

Lasagna can bubble over as it bakes. If the assembled filling sits close to the rim, put the baking dish on a rimmed sheet pan before it goes into the oven.
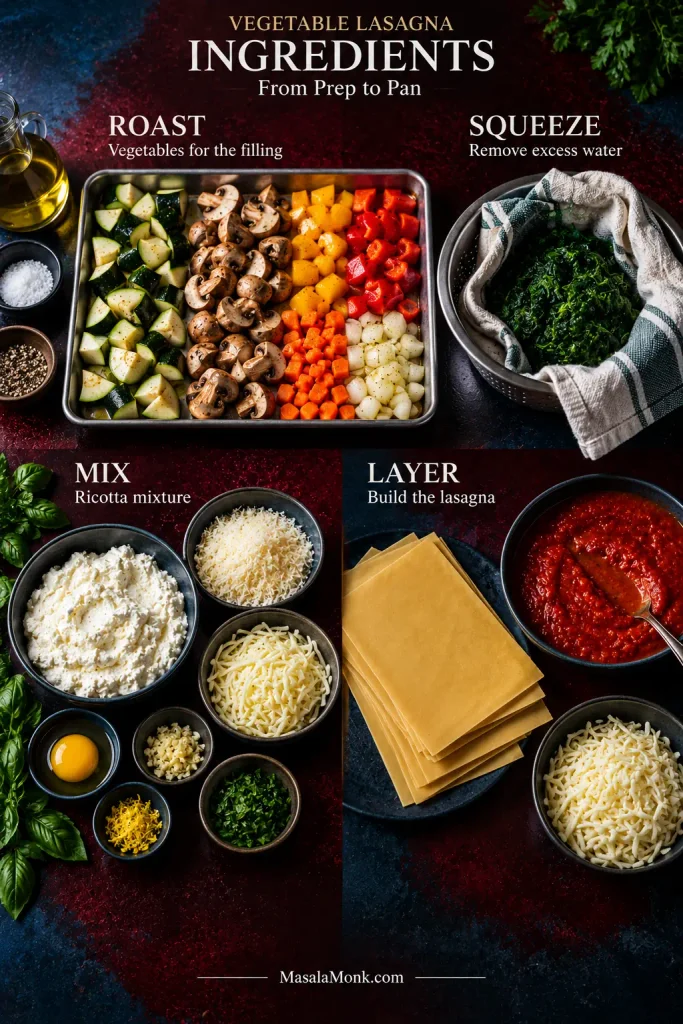
Vegetable lasagna ingredients grouped by preparation: vegetables for roasting, spinach for squeezing, ricotta ingredients for mixing, and sauce, pasta and mozzarella for layering.
Think of the recipe as four checkpoints rather than one long ingredient list: control vegetable moisture, control spinach moisture, season the cheese, then balance the pasta with sauce. Catching a problem at its own checkpoint is much easier than fixing it after assembly.

1. Roast the Vegetables Until They Taste Finished

Heat the oven to 425°F / 220°C.

Divide the zucchini, mushrooms, bell pepper, onion and carrot between the two sheet pans. Add the olive oil, salt, Italian seasoning, garlic powder and black pepper. Toss well and spread everything out.

Crowded vegetables steam. Give these some room.
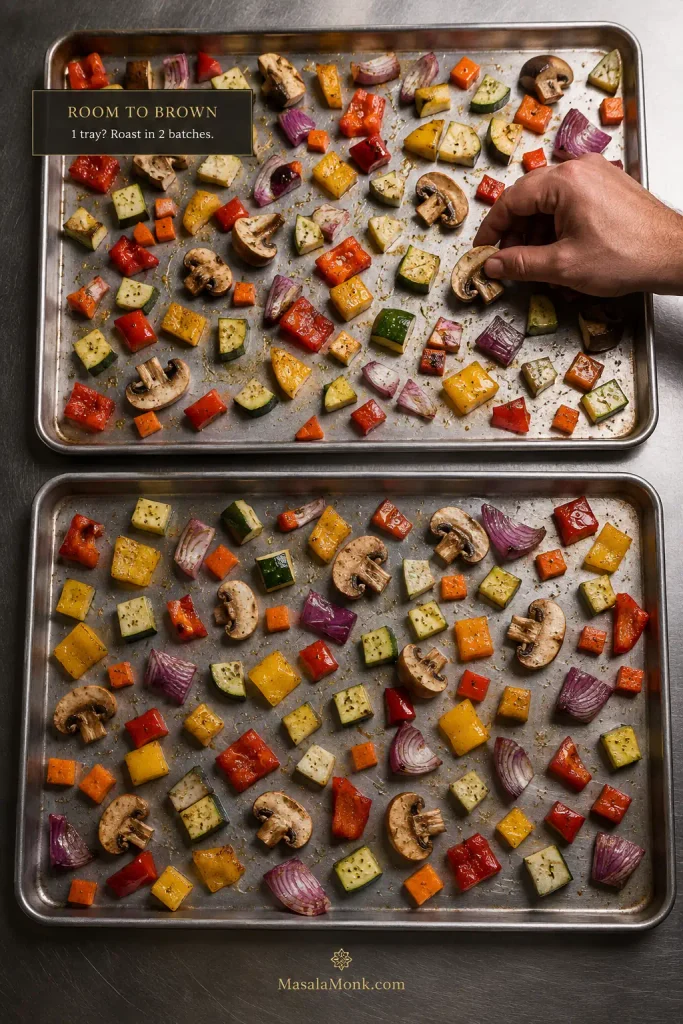
Chopped vegetables spread with space between them on two rimmed sheet pans for roasting and browning.
If the trays still look wet halfway through roasting, extending the timer is not always the best first move. Redistributing crowded pieces can expose more surface to hot air, helping evaporation and browning happen together instead of simply cooking the vegetables softer.

Roast for 20–25 minutes, stirring once. If the pans are on separate racks, swap the upper and lower pans and turn them front-to-back when you stir.

How to Know the Vegetables Are Ready

What looked like an unreasonable amount of vegetables at the beginning will look much more manageable now. The onion smells sweeter and the zucchini has shrunk. Peppers are tender, carrot pieces nearly cooked through, and dark edges have started appearing across both trays.

Mushrooms are especially easy to read. First they soften. Then they release enough liquid to make the pan look wetter than it did before. Keep going. The liquid disappears, the pan dries, and the mushrooms begin to brown again.
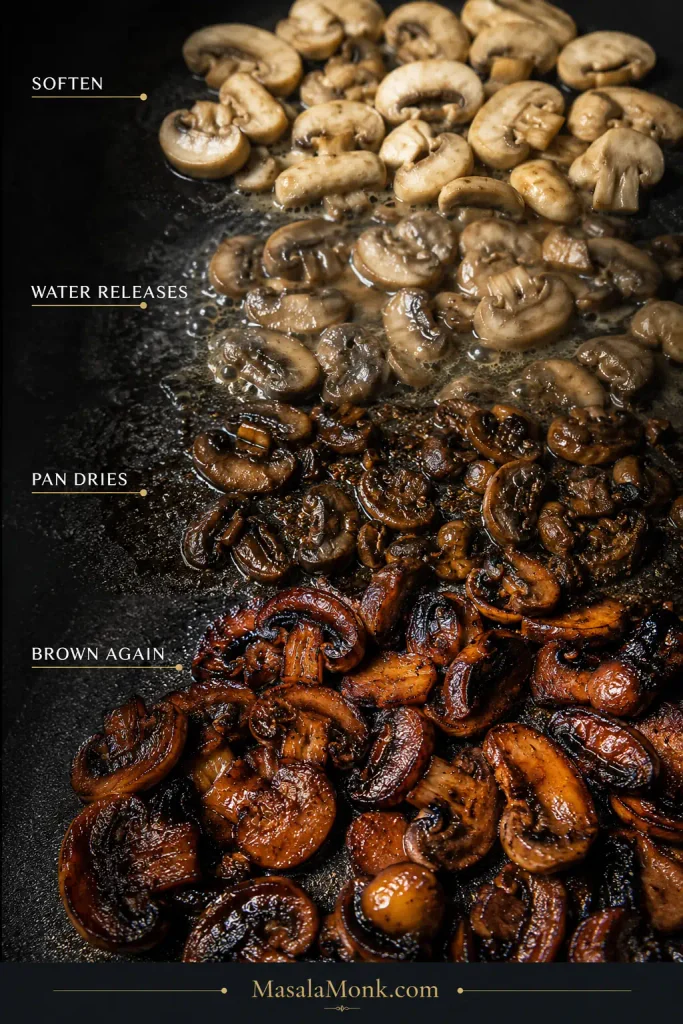
Mushrooms shown softening, releasing water, cooking until the pan dries, and finally becoming deeply browned.
When mushrooms release a panful of liquid, keep cooking rather than draining it away. Once the pan dries, the concentrated flavor has a chance to brown.

Taste one.

Then taste a piece of zucchini and some onion. If those bites are not good now, fix the seasoning before they disappear between pasta and cheese.

Reduce the oven to 375°F / 190°C.

2. Dry the Spinach

Put the thawed spinach in the center of a clean kitchen towel, gather the towel around it and twist firmly over the sink. Keep squeezing until very little more liquid comes out.

Using fresh spinach? Wilt the 8 oz / 225 g in a large pan, let it cool enough to handle, squeeze out the excess liquid and chop it.
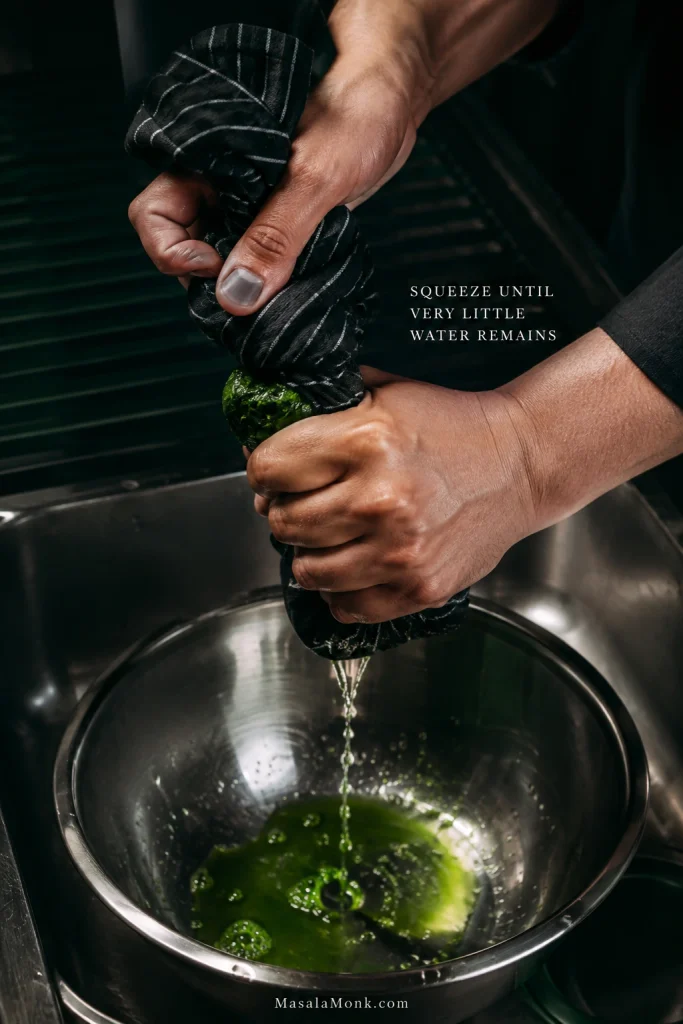
Hands twisting cooked spinach in a dark towel over a stainless-steel bowl to squeeze out excess water.
After squeezing, loosen the compact spinach with your fingers or a fork before mixing it into the roasted vegetables. That small step distributes the greens through both filling layers instead of leaving dense wet pockets in only a few slices.

Break the spinach apart and mix it through the roasted vegetables.

3. Check the Sauce

A good jarred marinara keeps this dinner practical.

Drag a spoon through the sauce. The trail should remain for a moment before slowly closing, and the sauce needs to be loose enough to spread easily across the dry noodles. If it runs like tomato juice, simmer it uncovered for a few minutes.

Marinara showing the correct thick, spreadable consistency and separate examples of sauce that is too thin and too thick.
For no-boil lasagna noodles, sauce is part of the cooking system as well as the flavor. If a thin marinara needs reducing, judge and measure the sauce after reduction so you still have enough finished sauce to hydrate the pasta properly.

Stop before it becomes heavily reduced or pasty. Oven-ready sheets need enough sauce around them to become tender.

Taste the sauce too. Ricotta, mozzarella and pasta soften its seasoning once everything is layered.

Making the sauce from fresh tomatoes? They carry more water, so reduction matters. The fresh tomato sauce recipe shows the consistency to look for before measuring the 4 cups / 950 ml.

4. Mix the Ricotta

Stir together the ricotta, hard cheese, garlic, lemon zest, herbs, salt and pepper without the egg first.

Taste it. The ricotta needs enough seasoning to remain noticeable once it is surrounded by pasta, vegetables and tomato sauce. The lemon zest is there for brightness rather than obvious lemon flavor.

Once the seasoning is right, stir in the egg. It helps the cheese layer set; without it, the ricotta simply stays softer.

The messy part is mostly over now. The trays are roasted, the spinach is squeezed, the sauce is ready and the ricotta is mixed.

From here, you’re building.

5. Build the Layers

The vegetables, sauce and ricotta should each taste properly seasoned on their own before you layer them.

Divide the vegetables and ricotta mixture roughly in half. Keep the marinara, noodles and mozzarella beside the baking dish. You are making three pasta layers and two filling layers.
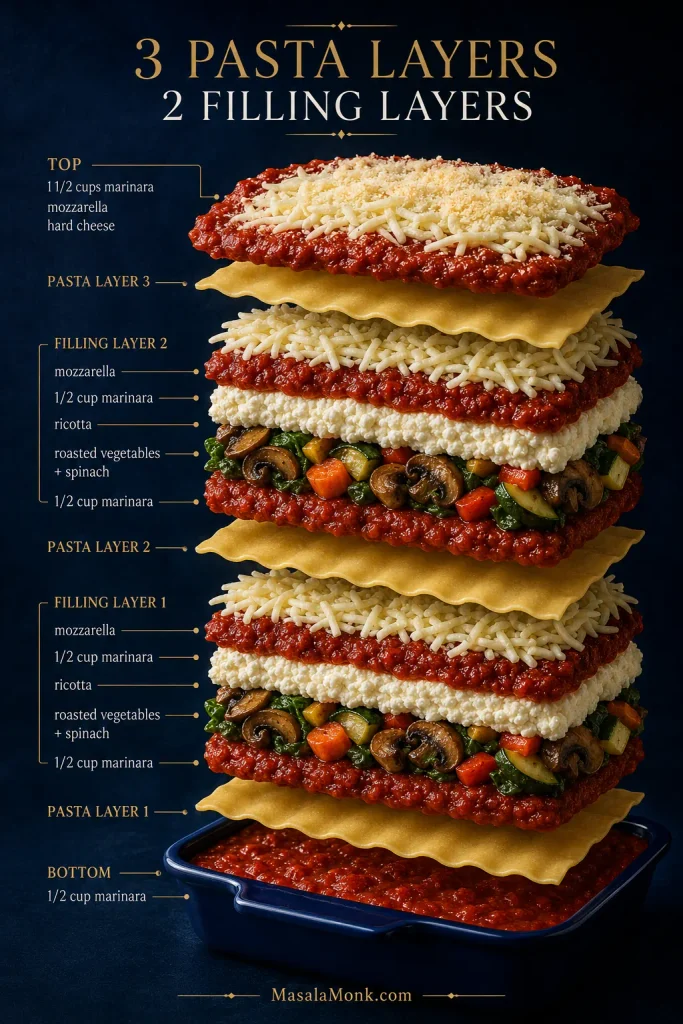
Exploded vegetable lasagna showing three pasta layers, two vegetable-and-ricotta filling layers, marinara between the noodles and cheese on top.
Layering evenly matters more than making every spoonful mathematically identical. Broad, fairly level filling layers heat more predictably than thick vegetable mounds, while three complete pasta layers give the finished lasagna structure without turning it into an unnecessarily tall stack.

Bottom

  • ½ cup marinara
  • Enough oven-ready pasta to cover the pan

First Filling Layer

  • ½ cup marinara, spread over the noodles
  • Half the ricotta filling
  • Half the vegetables
  • Another ½ cup marinara
  • About 1 cup mozzarella

Second Filling Layer

  • A second complete pasta layer
  • ½ cup marinara
  • Remaining ricotta filling
  • Remaining vegetables
  • Another ½ cup marinara
  • About 1 cup mozzarella

Top

  • Final complete pasta layer
  • Remaining 1½ cups marinara
  • Remaining mozzarella
  • ½ oz / 14 g grated hard cheese

Dollop the ricotta onto the sauced noodles and spread it before adding the vegetables. It is much easier to move ricotta across a flat sheet of pasta than across a pile of zucchini and mushrooms.
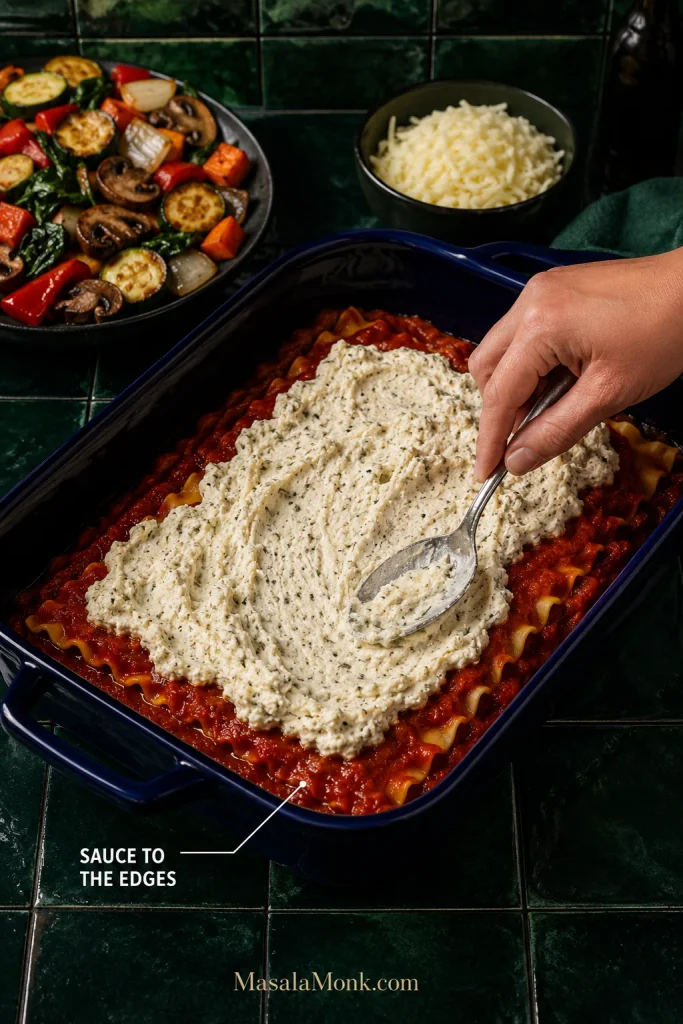
Hands spreading ricotta over a sauced pasta layer in a blue lasagna dish, with marinara reaching the edges and corners.
Do not chase a perfectly smooth ricotta layer. A lightly spread, mottled layer lets the roasted vegetables settle into the cheese instead of sliding across a slick surface, while sauce at the perimeter protects the pasta where drying happens fastest.

Set the next pasta layer down and press gently over any obvious vegetable mounds. Don’t pack the filling.

Sheet sizes vary, sometimes a lot. Three complete pasta layers are the useful target. Break sheets to fill a real gap, but avoid thick patches of overlapping dry pasta.

Cover the final noodle layer completely with the last 1½ cups of marinara, right into the corners. Pasta left exposed here is likely to stay hard.

The two trays of vegetables, bowl of ricotta and stack of pasta have finally become one pan of lasagna.

6. Cover and Cook the Pasta

Cover the dish tightly with foil. Lightly oil the underside if it sits close to the cheese.

Bake at 375°F / 190°C for 40 minutes.

Forget about browning for now. The middle of the pan and the dry noodles need the covered heat first.

7. Check the Middle, Then Brown the Top

Push a thin knife through the middle after 40 minutes.

If it slides through without catching on firm pasta, you’re ready to uncover. If the knife catches, nothing has gone wrong. Cover the pan again and give it another 5–10 minutes.
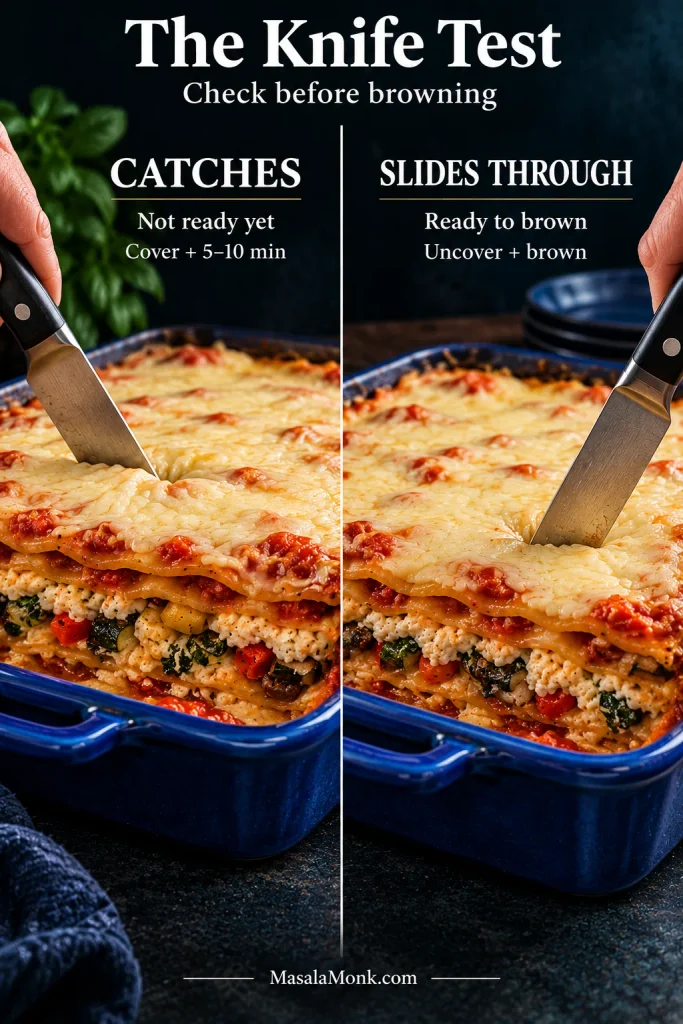
Two lasagna pans compare a knife stopping in firm pasta with a knife sliding deeply through tender noodles before final browning.
When checking doneness, distinguish firm pasta resistance from simply bumping into a piece of carrot or another vegetable. A hydrated noodle gives way smoothly; an undercooked sheet feels broader, firmer and more leathery against the knife.

A refrigerator-cold pan or thicker oven-ready sheets may need closer to 50 minutes covered.

Once the pasta is tender, remove the foil and bake for another 10–15 minutes. Tomato sauce will bubble around the perimeter. The mozzarella picks up golden patches, darker freckles and, here and there, a crisp edge.

If your baking dish is broiler-safe, a pale but fully cooked top can have a brief broil. Stay close—the distance between bronzed mozzarella and burned cheese is surprisingly short.

8. Give It 20 Minutes Before You Ask It to Be a Slice

Take the pan out and leave it alone for 20 minutes.

The furious bubbling subsides, the ricotta firms a little and the sauce stops running quite so freely when you cut.

For particularly clean slices, wait 25–30 minutes. The middle will remain plenty hot.
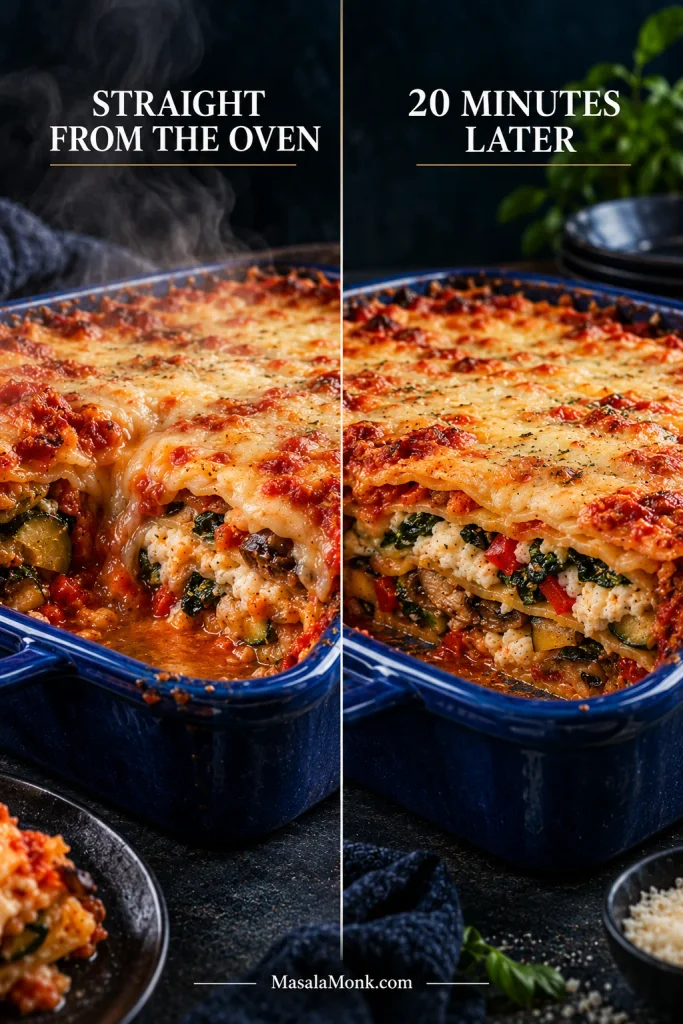
Vegetable lasagna shown steaming and loose straight from the oven beside the same lasagna after 20 minutes, when the layers hold together more cleanly.
Resting changes mobility more than moisture quantity. The liquid has not vanished after 20 minutes; rather, the sauce, cheese and filling have cooled just enough to move less freely, which is why the same lasagna becomes noticeably easier to portion.

Need help with the pan? Choose or swap vegetables · Make it ahead · Fix excess moisture · Troubleshoot what you see

Easy Shortcuts

This is not a 30-minute dinner. It does not need to become an all-afternoon project either.

  • Jarred marinara: use one that passes the consistency check above and move on.
  • Oven-ready noodles: no boiling, draining or handling floppy sheets.
  • Frozen spinach: excellent here once thoroughly squeezed.
  • Pre-shredded low-moisture mozzarella: a perfectly reasonable place to save a few minutes.
  • Vegetables roasted a day ahead: the most useful shortcut when tomorrow’s assembly needs to be quick.

Best Vegetables for Lasagna

For this style of lasagna, cook the vegetables before layering them. Raw zucchini and mushrooms can release too much liquid in the pan, while dense vegetables may still be firm by the time the pasta is done.

Zucchini can become eggplant without much trouble. Carrot is different. It carries far less water and takes longer to soften, so replacing vegetables cup-for-cup can change the filling more than expected.

The base recipe uses about 2 pounds / 910 g of trimmed roastable vegetables, plus spinach. Raw weight is a useful rough guide for substitutions; then account for how dense and watery the replacement is.
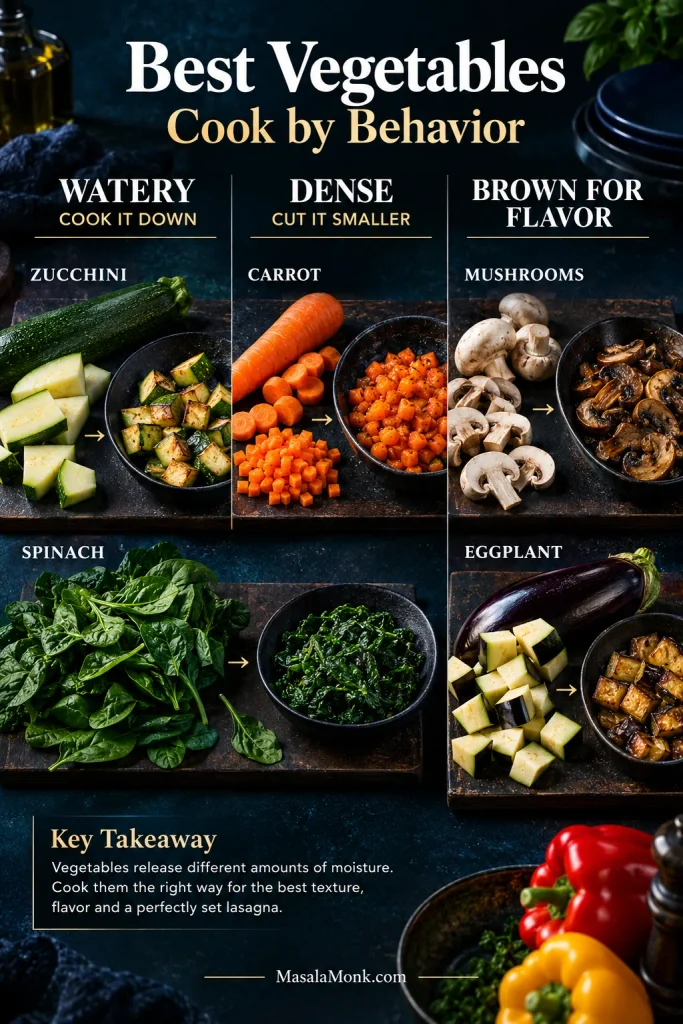
Zucchini, mushrooms, eggplant, carrot and spinach shown with guidance to cook watery vegetables down, cut dense vegetables smaller and brown for flavor.
The best vegetables for lasagna are often the ones that can be swapped for something with similar density and water content. Zucchini and eggplant behave more alike than zucchini and carrot, for example, so matching cooking behavior makes substitutions far more predictable.

How to Swap Vegetables Without Throwing Off the Filling

VegetableHow to Use It
ZucchiniTender and fairly watery. Roast until smaller and browned. Eggplant is an easy replacement.
MushroomsDeeply savory. Keep cooking until their released liquid is gone and browning starts again.
SpinachWilt fresh or thaw frozen, then squeeze firmly. Kale works too but needs more cooking.
Bell peppersSweet and forgiving. Roast until tender. Well-drained roasted red peppers also work.
CarrotsSweet and relatively dry. Cut them smaller so they become tender at roughly the same time as the other vegetables.
OnionGive it enough time to soften and brown. Large undercooked pieces are distracting in the finished slice.
EggplantSilky and savory after roasting. Excellent in place of some or all of the zucchini.
Butternut squashDense and sweet. Use small cubes and roast until nearly tender.
Broccoli or cauliflowerUse small pieces and roast first. Better as part of a mixed filling than the entire filling.
KaleMore robust than spinach. Remove tough stems and cook it until properly tender.

No mushrooms? Replace their 8 oz / 225 g with eggplant, extra pepper, zucchini or a mixture. You lose some savory depth, so give the tomato sauce a final taste before assembly.

For a smoother, more hidden-vegetable filling, grate zucchini into the marinara and simmer until tender and its extra moisture has cooked away. Browned mushrooms can be chopped very finely, and spinach can simply be minced before mixing it through.

Vegetable Lasagna With Frozen Vegetables

Frozen spinach is excellent here. Frozen zucchini is not. Most other frozen vegetables fall somewhere between those two.
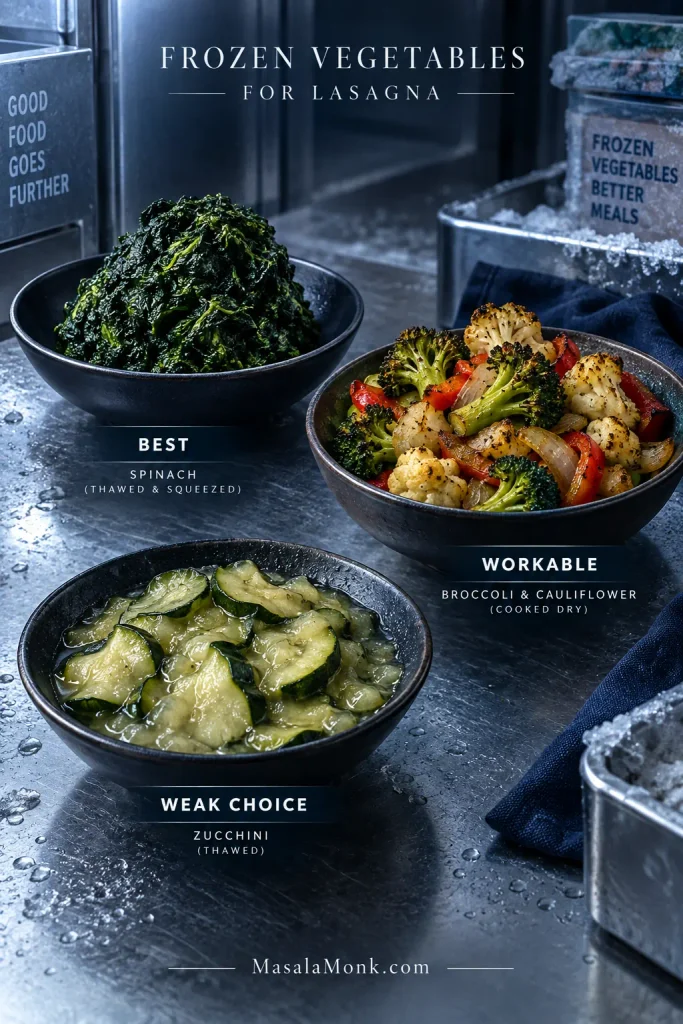
Prepared frozen spinach labeled best, cooked broccoli and cauliflower labeled workable, and soft wet zucchini labeled a weak choice for lasagna.
With frozen vegetables for lasagna, fix excess moisture at the vegetable stage rather than compensating by cutting back too aggressively on marinara. That distinction matters with oven-ready pasta, which can still need plenty of sauce even when the filling itself started wet.
Frozen VegetableBest Approach
SpinachThaw completely and squeeze firmly until very little more water comes out.
Broccoli or cauliflowerThaw, drain and blot. Roast or sauté briefly if the pieces still look wet.
Peppers or pepper-and-onion mixesSauté until released water evaporates and some color starts developing.
Mixed vegetablesThaw, then sauté until the pan no longer looks wet. Choose the blend for flavor as well as convenience.
ZucchiniIt can be used, but the texture is considerably softer and wetter. Fresh zucchini is much better here.

If most of the filling comes from frozen vegetables, cook and drain them before assembly. Aim for about 5 cups total cooked, well-drained vegetables across the two filling layers, including spinach if you’re using it.

The volume does not need to be exact. Two full, fairly level layers are enough.

Still dealing with excess liquid? See why vegetable lasagna gets watery.

Ricotta and Cottage Cheese in Vegetable Lasagna

Ricotta leaves soft, creamy pockets between the roasted vegetables, sauce and pasta. A very loose tub needs draining first.

Using Cottage Cheese Instead

Cottage cheese is tangier, with visible curds unless you blend it. Swap it for the ricotta by weight—15 oz / 425 g—and make the rest of the filling exactly the same way. Blend the cottage cheese before adding the other ingredients when you want a smoother texture, and drain off obvious liquid first.

Ricotta and cottage cheese shown in bowls and lasagna slices, comparing smooth creamy ricotta with more visible cottage-cheese curds.
For ricotta vs cottage cheese in lasagna, neither option is automatically “drier” across every brand. Choose the cheese for the texture you want, then judge the tub in front of you: visible pooled whey matters more to the finished pan than the name on the label.

The cottage cheese lasagna is built around that cheese from the start rather than treating it as a substitution.

For a different style altogether, béchamel gives you a softer, silkier lasagna with creaminess spread more evenly through the layers. The béchamel sauce for lasagna is the better starting point for that version.

No-Boil and Regular Lasagna Noodles

This version is built for oven-ready/no-boil sheets. Keep every sheet well covered with sauce and give the pan the full covered bake before checking the pasta.

Using Pre-Cooked Regular Noodles

Cook enough regular noodles for the same three complete pasta layers; sheet dimensions and package sizes vary. Boil them only until flexible and a little firmer than you would serve as finished pasta.

For cooked noodles, reduce the sauce over each vegetable layer from ½ cup to ¼ cup. Keep every other sauce amount the same; this uses 3½ cups in the lasagna and leaves ½ cup to warm for serving if you want extra sauce at the table.
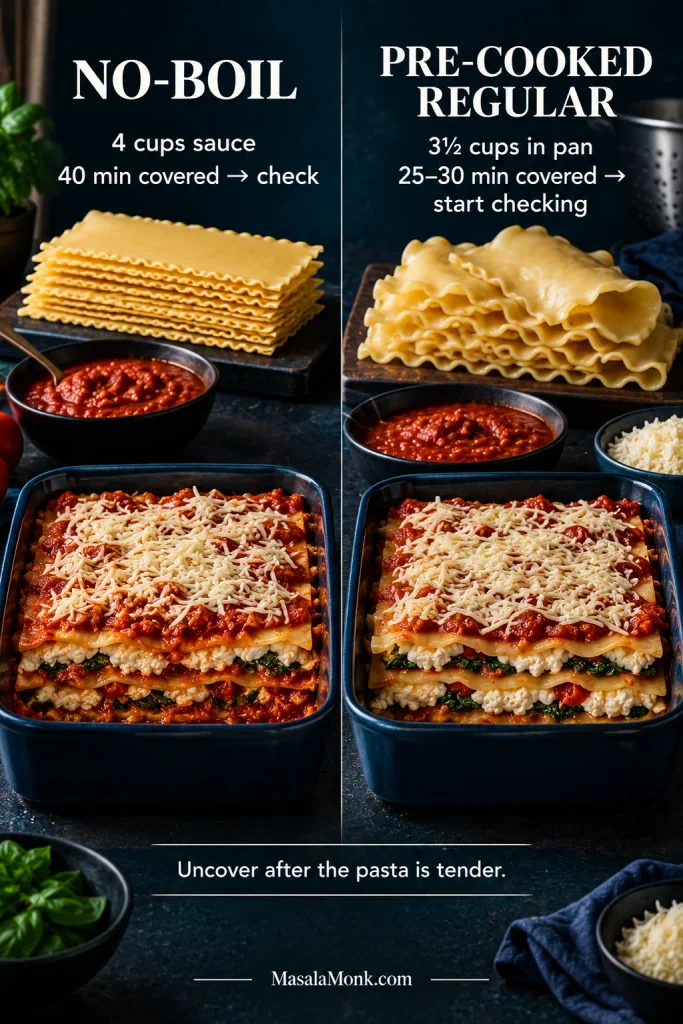
Dry no-boil lasagna sheets and a saucier pan compared with flexible pre-cooked regular noodles and a slightly less saucy assembly.
Changing noodle type changes more than bake time. No-boil lasagna noodles arrive dry and take part of their hydration from the sauce, whereas pre-cooked noodles bring water into the pan themselves; therefore, the sauce quantity should change with the pasta method.

Pre-cooked noodles do not need the full 40–50 minute hydration stage. Cover the freshly assembled lasagna and start checking it after 25–30 minutes at 375°F / 190°C. Once the middle is hot and bubbling, uncover and brown the cheese for another 10–15 minutes.

A refrigerator-cold pan will take longer. Judge it by a thoroughly hot, bubbling middle rather than the clock alone.

Gluten-free sheets vary too much by brand for one universal method. Follow the package directions, keep dry sheets well sauced and check the pasta before uncovering.

Pasta still firm? Return to the knife doneness test · ↑ Back to top

Why Vegetable Lasagna Gets Watery

Most watery lasagnas are not ruined by one dramatic mistake. They get there by accumulation: spinach that still held water, mushrooms that never reached the browning stage, unusually loose ricotta and thin tomato sauce all meeting in the same pan.

  • Vegetables: zucchini, mushrooms and spinach can release plenty of water. Roasting, sautéing and squeezing deal with much of it before layering.
  • Cheese: ricotta and cottage cheese vary by brand. If whey is pooling, drain it. Fresh mozzarella contains considerably more water than low-moisture mozzarella and is not a straightforward 1:1 substitute here unless it is drained and blotted extremely well.
  • Sauce: very thin marinara loosens the whole pan. Sauce reduced too far creates the opposite problem when dry noodles need liquid.
  • Pasta: oven-ready sheets absorb liquid while they cook. Boiled noodles arrive in the pan already hydrated.
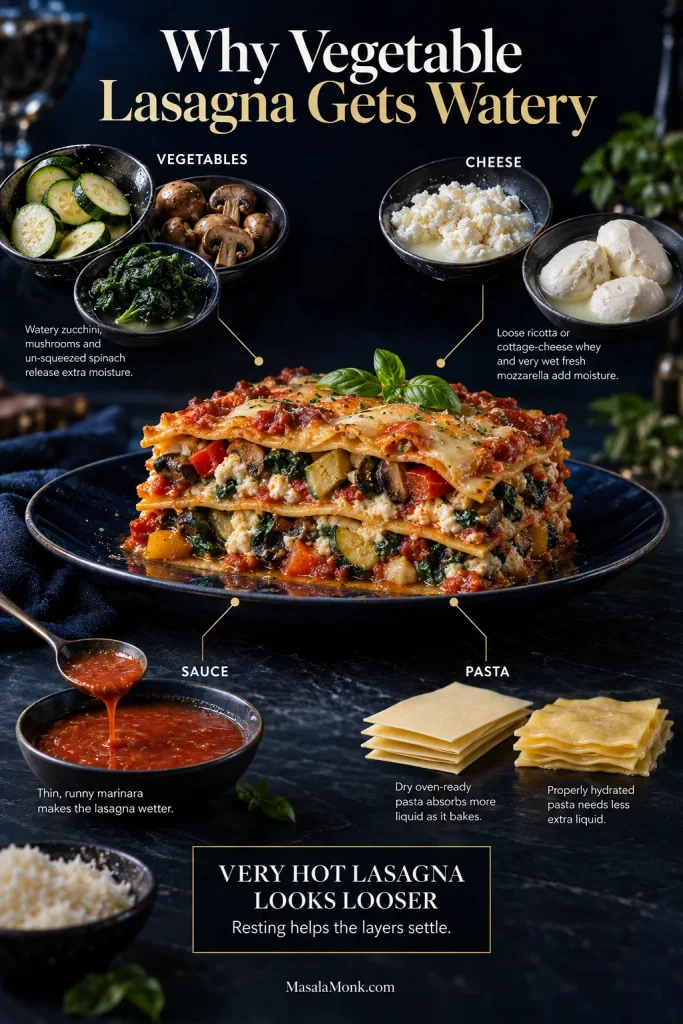
Vegetable lasagna surrounded by four moisture sources: wet vegetables, watery cheese, thin marinara and pasta with different hydration needs.
The useful distinction in watery vegetable lasagna is not simply “more liquid versus less liquid.” It is controlled moisture versus uncontrolled moisture: pasta needs deliberate hydration, while vegetable water, cheese whey and excessively thin sauce can accumulate where the recipe does not need them.

A lasagna also looks looser when it is extremely hot. Straight from the oven, the sauce moves more freely; after 20 minutes, the layers hold themselves together much better.

A spoonful of juices around a very hot first slice is not a failed lasagna.

A lake underneath it is something worth fixing.

Already have a pan in front of you? Troubleshoot what you’re seeing.

Make Ahead, Freeze and Reheat

Assemble It the Night Before

Cover the assembled pan tightly and refrigerate overnight. The next day, start checking the pasta after about 45 minutes covered. The whole dish begins cold, so it usually needs longer than a freshly assembled pan.
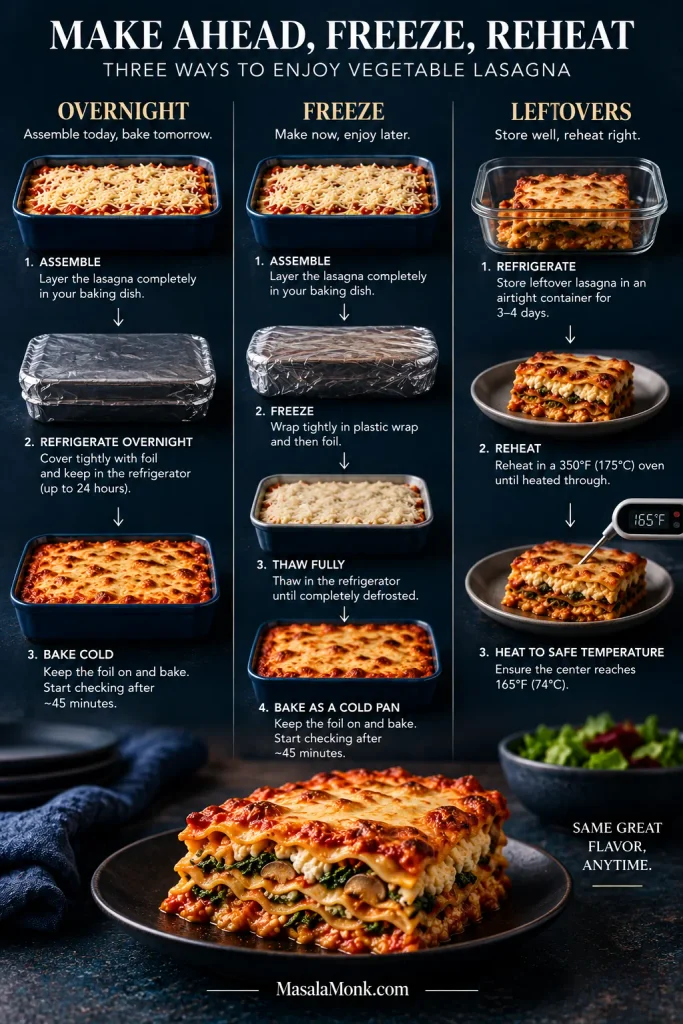
Three vegetable lasagna workflows show refrigerating an assembled pan overnight, freezing and thawing it in the refrigerator, and reheating leftovers to 165°F or 74°C.
With make-ahead vegetable lasagna, watch the center rather than trusting the browned edges. A refrigerator-cold or fully thawed pan can look active around the perimeter while the middle is still catching up, so doneness cues remain more reliable than adding one fixed number of minutes.

Opening the refrigerator and finding dinner already built is one of the better rewards for doing the chopping a day early.

Prep the Components Earlier

The roasted vegetables and tomato sauce can be made up to 2 days ahead and refrigerated separately. Mix the ricotta and assemble closer to baking.

Freeze the Whole Pan or Individual Slices

A tightly wrapped assembled lasagna can be frozen before baking. Thaw it fully in the refrigerator; a deep frozen 9 × 13-inch pan may take longer than one night to thaw through.

Once fully thawed, treat it like any other refrigerator-cold assembled lasagna: bake covered at 375°F / 190°C and start checking the pasta after about 45 minutes. Uncover once the noodles are tender and brown the top.

For leftover slices, cool the lasagna first, divide it into individual portions, wrap well and freeze. Thawing in the refrigerator gives the most even reheating.

Leftovers and Reheating

Refrigerate leftovers promptly in covered containers and use them within 3–4 days, or freeze them for longer storage. The USDA’s leftover-safety guidance has additional storage and reheating advice.

For several refrigerated slices or a larger portion, cover and reheat at about 350°F / 175°C until hot through the middle. Uncover for the last few minutes if you want to refresh the cheese on top.

For a measurable food-safety endpoint, USDA recommends reheating leftovers to 165°F / 74°C in the center.

A single slice usually does better with gentler staged microwave heating than one long blast at maximum power. Chilled lasagna has another advantage: the layers often cut even more cleanly the next day.

Cooking it now? Return to the main recipe · ↑ Back to top

Read the Pan: What Went Wrong?

Do not chase architectural perfection.

A good lasagna can slump a little at the edge of the plate and still be exactly right. What deserves attention is a real pool of liquid, genuinely hard pasta, a dry top, a cold middle or vegetables that never became tender.

If the first slice collapses, give the pan another few minutes before deciding anything dramatic. The first piece out of a very hot lasagna is often the least tidy one.

What You SeeWhat to Do
Thin puddle around the edgesRest the pan first. If a genuine pool remains, carefully spoon off a little before serving. Next time, cook more moisture out of the vegetables or reduce an unusually thin sauce.
Noodles hard throughoutCover the pan again and give the pasta another 5–10 minutes, then check once more.
Mushy pastaThere is no real rescue once pasta is over-softened. Next time, boil regular noodles less or adjust the amount of liquid or baking time for very thin oven-ready sheets.
Lasagna slides apartGive it more time to rest before cutting another slice. Very wet cheese, loose sauce and excessively thick filling layers can make the problem worse.
Lasagna is dryServe it with warm marinara. Next time, keep the pasta fully covered and check the bake earlier.
Everything tastes flatAdd grated hard cheese, herbs, black pepper or chile at the table. Next time, brown and season the vegetables properly and taste the sauce and ricotta before layering.

A Few Other Clues

  • Hard top corners: pasta was probably left exposed above the sauce.
  • Milky liquid: unusually wet ricotta, cottage cheese or mozzarella is often involved.
  • Crunchy vegetables: dense vegetables were cut too large or did not cook far enough before assembly.
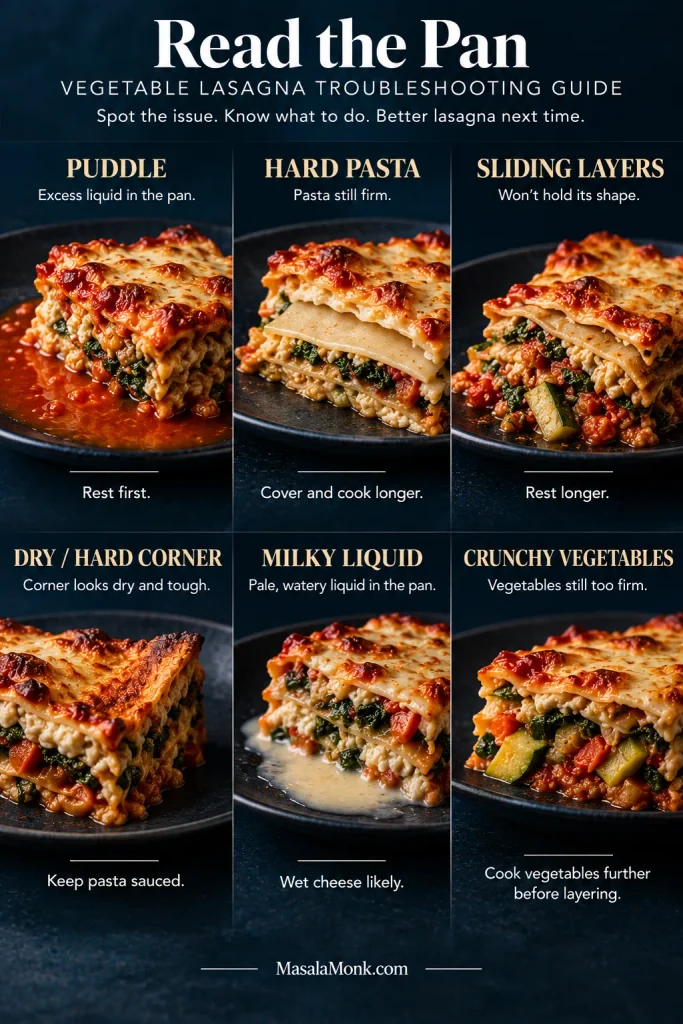
Six lasagna problems shown in close-up: pooled liquid, hard pasta, sliding layers, a dry corner, milky cheese liquid and oversized firm vegetables.
Good vegetable lasagna troubleshooting starts by identifying what kind of liquid or resistance you are seeing. Tomato-colored runoff suggests a different problem from pale milky whey, while hard pasta points toward hydration rather than excess moisture—even though all three can make a slice look wrong.

Should a Watery Lasagna Stay in the Oven Longer?

Only if the pasta still needs cooking.

A slightly loose lasagna often improves more from ten minutes on the counter than ten more minutes in the oven. A flooded one can remain wet underneath while the cheese and exposed pasta get drier and drier.

What to Serve With Vegetable Lasagna

Lasagna already brings soft pasta, roasted vegetables, tomato and plenty of creamy cheese. Something crisp, green or sharply dressed beside it gives the next bite a useful contrast.

  • Cucumber salad: cold cucumber, onion, dill and vinegar cut through the richness; this cucumber salad recipe is a natural fit.
  • Roasted broccoli or broccolini: charred edges and a greener, slightly bitter contrast to the sweeter tomato sauce.
  • Garlic bread: for a full comfort-food dinner; this homemade garlic bread loaf works well alongside it.
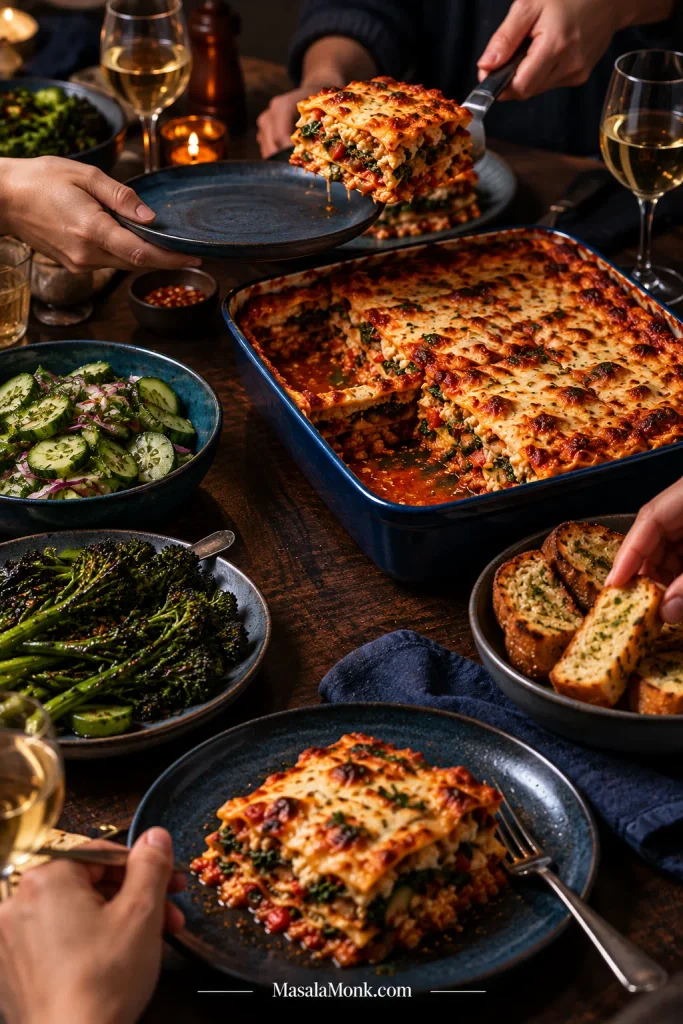
People serving vegetable lasagna at a dark wooden table with cucumber salad, charred broccolini and garlic bread.
For what to serve with vegetable lasagna, think in terms of contrast rather than quantity. Choose something crisp and acidic, something green and charred, or garlic bread for maximum comfort; you do not need three additional rich sides around an already generous main dish.

Cut through a browned corner and lift the first piece. The cheese at the edge may be a little crisp while the layers underneath stay soft, with creamy ricotta between zucchini, mushrooms and peppers and enough tomato sauce to keep the pasta tender without running across the plate.

The vegetable lasagna worth making again is the one where the vegetables taste good before they become filling, the pasta is tender, and the whole generous pan still knows how to become a slice.
Back to the recipe · ↑ Back to top

Posted on Leave a comment

Moroccan Lamb Tagine Recipe With Apricots

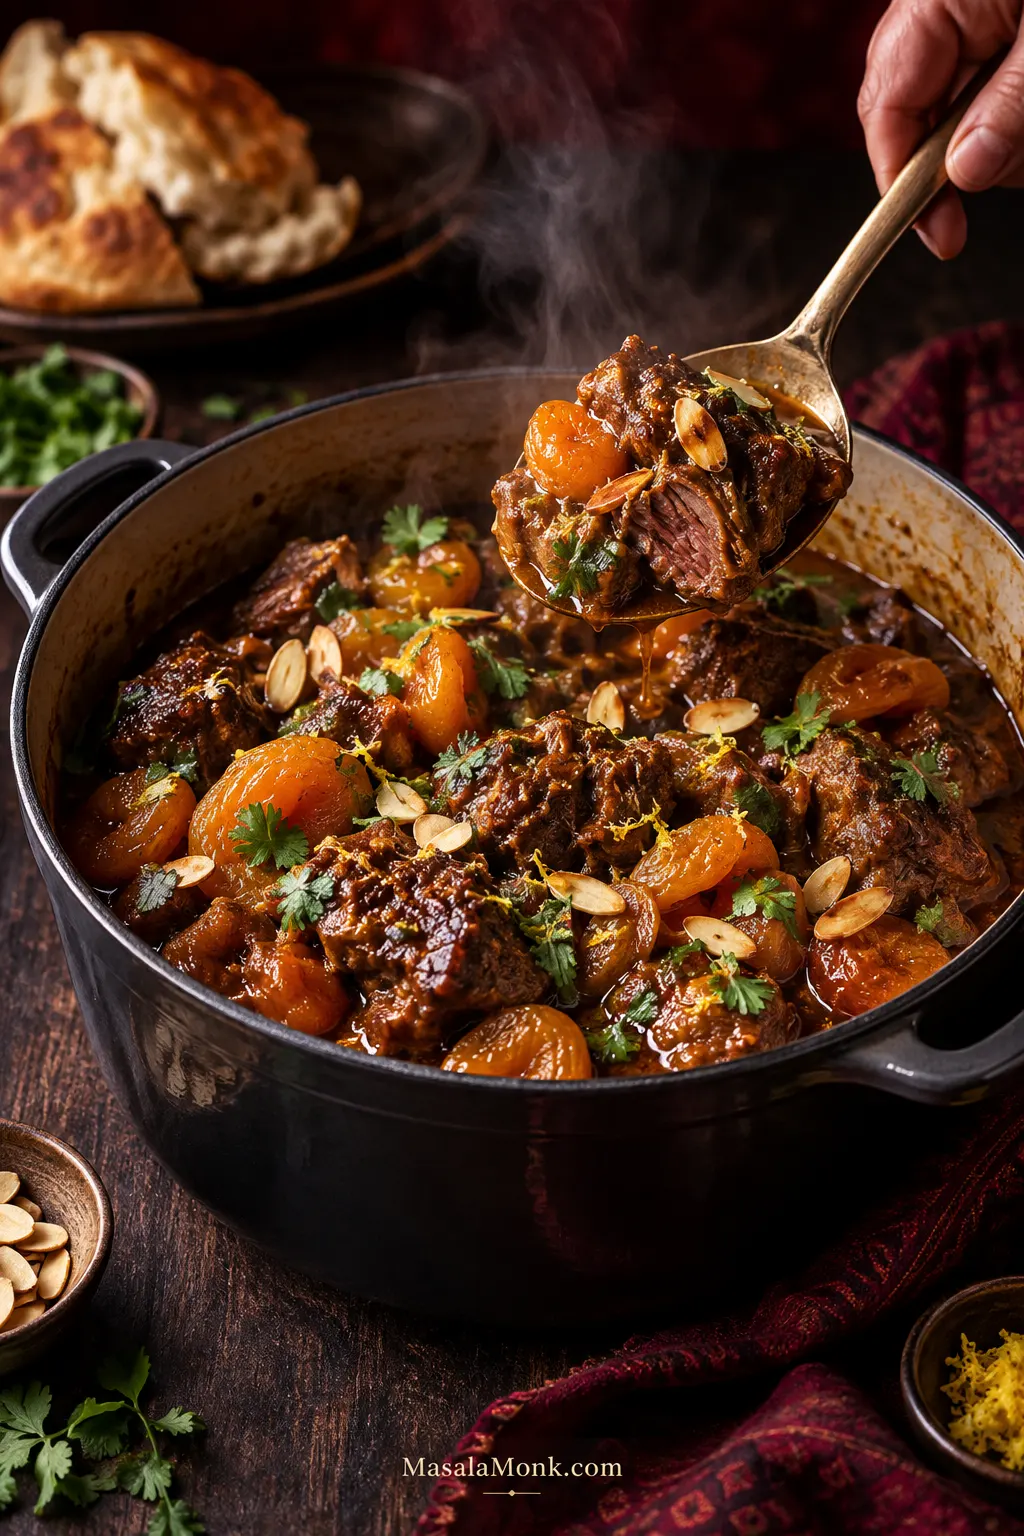
Finished Moroccan lamb tagine in a dark serving pot with braised lamb shoulder, plump dried apricots, toasted almonds, cilantro and glossy brown sauce.

A good lamb tagine announces itself before anyone takes a bite. Lift the lid and you get spice, lamb and fruit; press a fork into the meat and it gives without collapsing; spoon through the pot and the sauce clings instead of running like broth.

This Moroccan lamb tagine gets there with shoulder, onions, fragrant spices and a deliberately modest amount of braising liquid. The dried apricots wait until the lamb is almost tender, so they can soften in the sauce without spending hours dissolving into it.

Sweetness stays in the background. Most comes from the apricots, while lemon sharpens the sauce at the end. Honey is optional, and worth adding only after you taste the pot.

You don’t need a traditional tagine pot, either. A heavy Dutch oven or covered casserole handles the long braise beautifully, and the method leaves room for the reality that one shoulder, lid or oven rarely behaves exactly like another.

Quick Answer: How to Make Moroccan Lamb Tagine

Brown 1 kg / 2.2 lb lamb shoulder, soften the onions and briefly cook the spices. Add 350 ml / about 1½ cups stock or water and braise covered at 180°C / 160°C fan / 350°F until nearly tender. Add the dried apricots for about 25 minutes. Once the lamb is tender, reduce the sauce only if it needs it, then finish with lemon, toasted almonds and fresh cilantro.

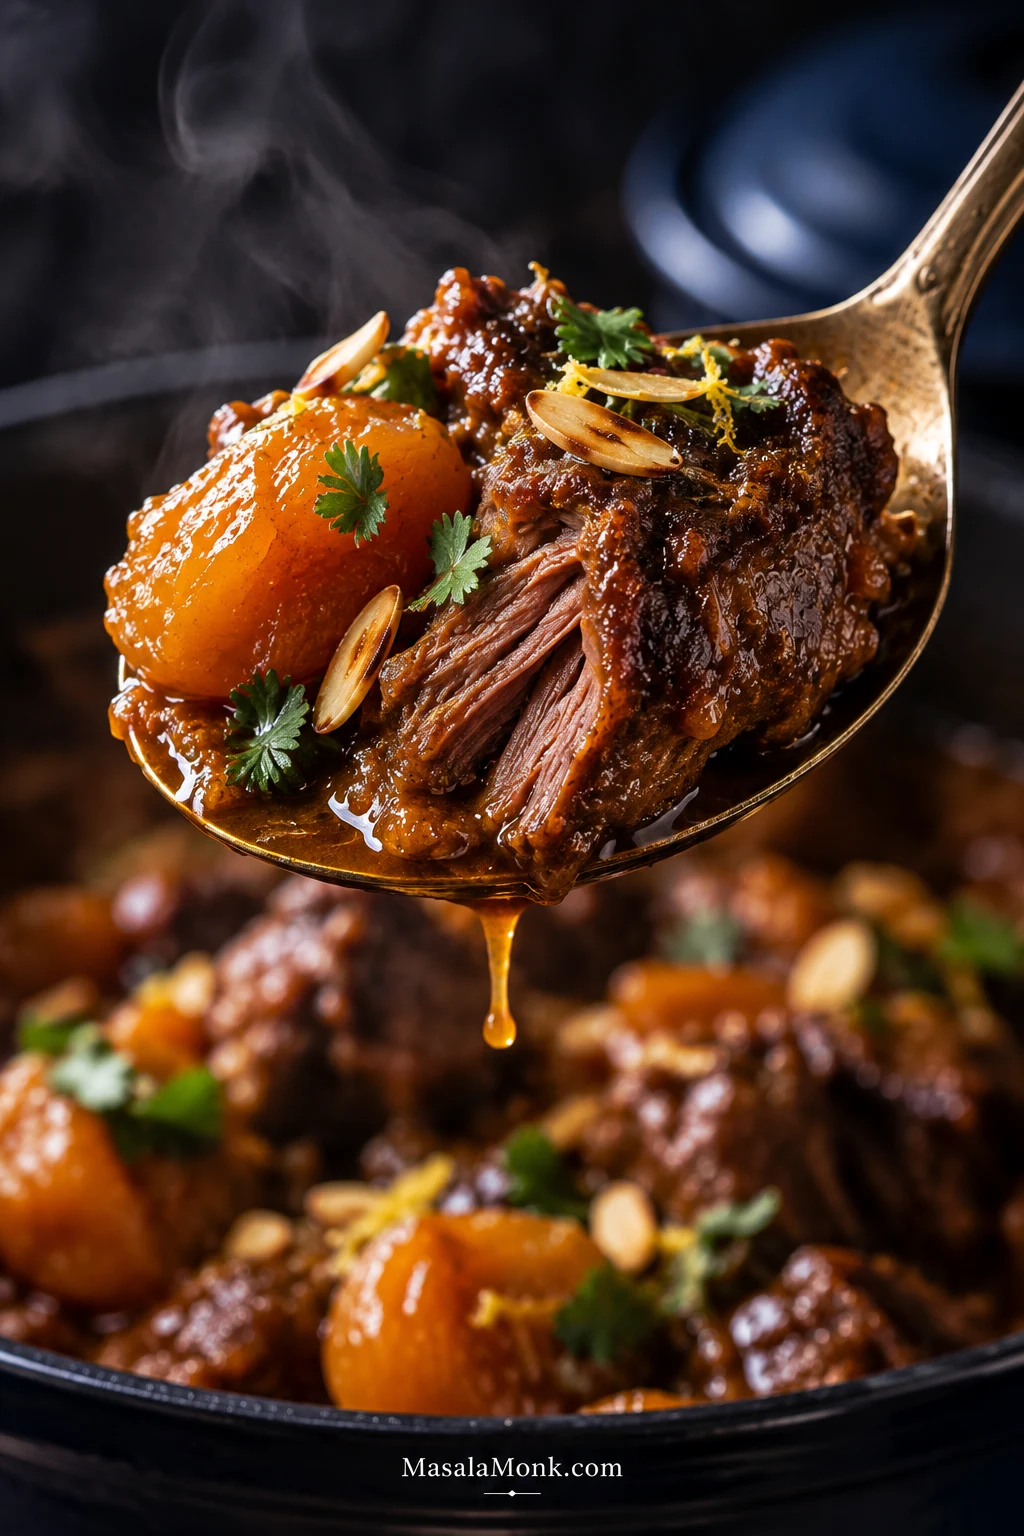
Close-up spoonful of tender braised lamb, softened apricot and glossy tagine sauce with almonds, herbs and a little lemon zest.
A finished bite should bring the lamb, apricot and sauce together at once: tender meat, soft fruit, a glossy coating and a little almond crunch. That is the texture and balance the recipe is working toward.

Moroccan Lamb Tagine Recipe With Apricots

Tender lamb shoulder braised with warm spices and dried apricots, brightened with lemon and finished with toasted almonds and fresh cilantro.

Jump to Ingredients · Jump to Instructions · Recipe at a Glance

Recipe at a Glance

Serves5 servings; up to 6 with generous bread, grain and sides
Prep time25 minutes
Cook timeUsually 2½–3¼ hours; particularly firm shoulder may take longer
Total timeAbout 3–3¾ hours, with extra time possible for firmer lamb
Oven180°C / 160°C fan / 350°F
Best potHeavy 24–26 cm / about 9½–10¼-inch Dutch oven or similar covered casserole
DonenessA fork enters the lamb easily and the meat yields while remaining in chunks

This is a patient recipe, not a complicated one. Most of the active work happens while you brown the lamb and build the onion-and-spice base; the oven handles the long middle. Keep a little extra hot water or stock nearby in case your pot loses moisture quickly.

No marinating is required. Seasoning before browning and the long braise give the lamb plenty of time with the spice base, so you can start this recipe the day you plan to eat it.

Ingredients

For the Lamb and Braise

  • 1 kg / 2.2 lb trimmed boneless lamb shoulder, cut into roughly 4 cm / 1½-inch pieces
  • 8 g fine salt (about 1¼ teaspoons; weighing is more reliable), plus more to taste
  • 2 tablespoons / 30 ml olive oil or neutral cooking oil
  • 350 g / 12 oz onions, thinly sliced
  • 5 garlic cloves, finely chopped
  • 25 g / about 1½ tablespoons tomato paste
  • 350 ml / about 1½ cups low-sodium chicken stock or water, plus more only if needed

Spices

  • 2 teaspoons ground cumin
  • 2 teaspoons ground coriander
  • 1 teaspoon ground ginger
  • 1 teaspoon ground turmeric
  • ½ teaspoon freshly ground black pepper
  • 1 teaspoon sweet paprika
  • ⅛–¼ teaspoon cayenne pepper, optional
  • 1 medium cinnamon stick
  • Small pinch saffron threads, optional; bloom for 10 minutes in 30 ml / 2 tablespoons taken from the measured stock or water

Apricots and Finishing Ingredients

  • 180 g / about 6¼ oz dried apricots; halve very large ones
  • 1 lemon, finely grated zest plus 1–2 tablespoons juice, to taste
  • 1–2 teaspoons honey, optional
  • 50 g / about 1¾ oz sliced or slivered almonds
  • Small handful fresh cilantro (coriander leaves), roughly chopped

Ingredient Notes

  • Water or stock: water works beautifully here. The lamb, onions and spices build plenty of flavor as they braise, so stock is optional rather than something you need to buy specially. With well-seasoned stock, reduce the initial salt to about 5–6 g and adjust near the end.
  • Ras el hanout: use about 1½–2 tablespoons in place of the cumin, coriander, ground ginger, turmeric, paprika, black pepper and cayenne. Begin at the lower end with a potent blend. Omit the cinnamon stick if the blend is already cinnamon-heavy, and account for any added salt.
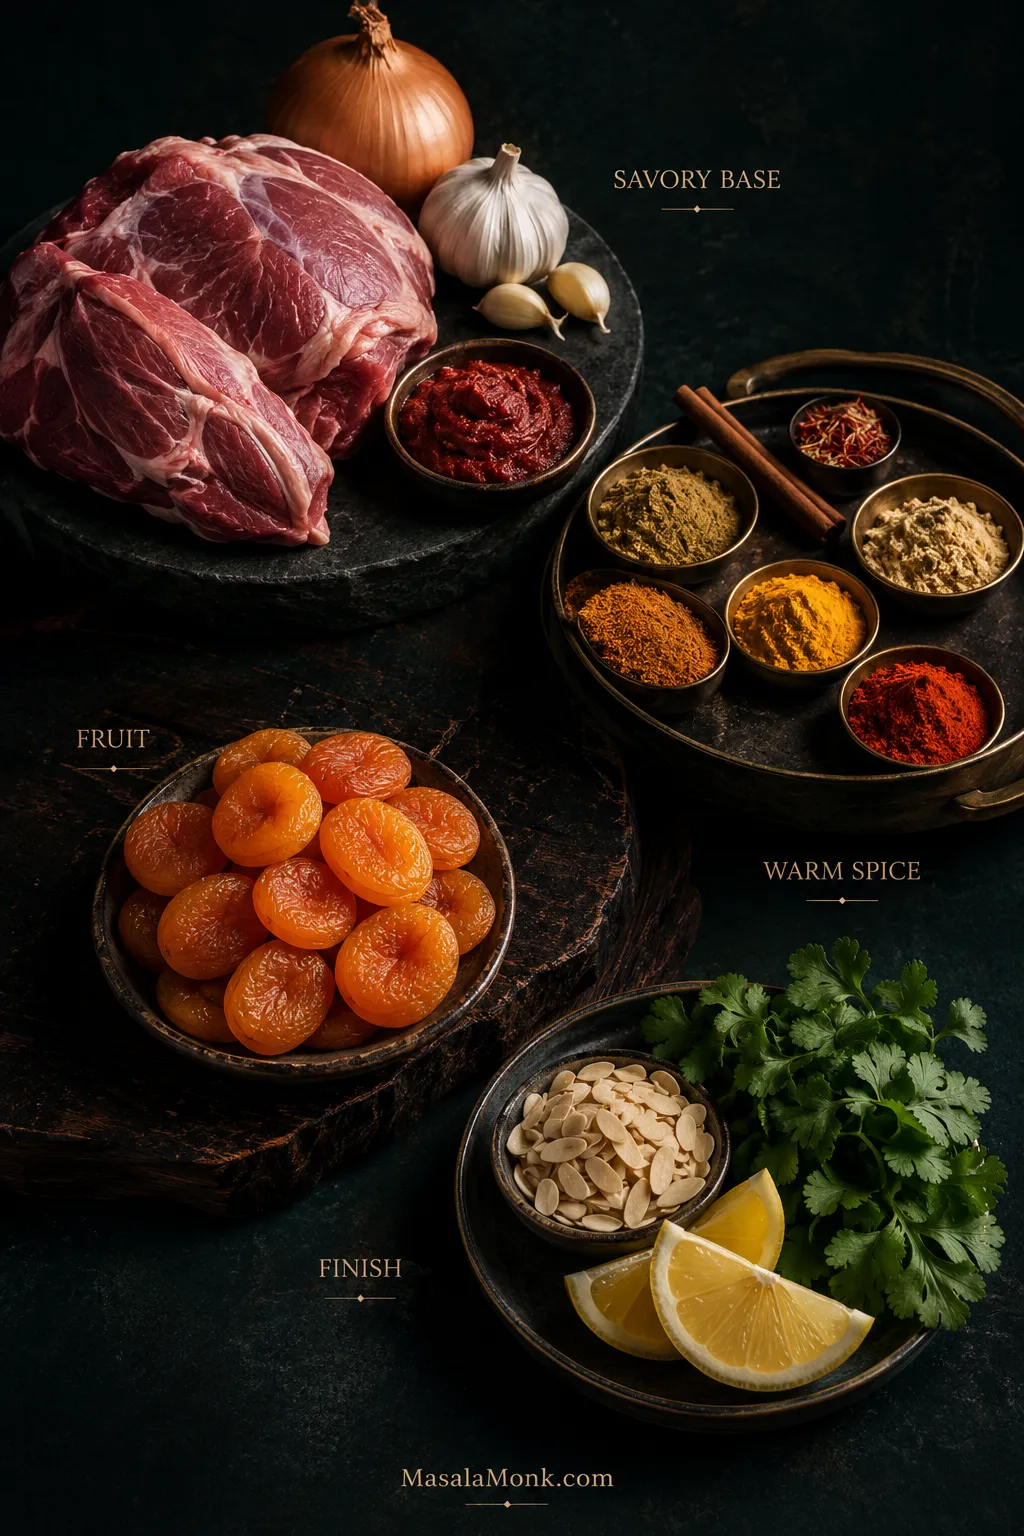
Dark editorial ingredient arrangement labeled savory base, warm spice, fruit and finish, showing the main flavor layers used in lamb tagine.
Instead of treating lamb tagine spices as one long list, think about what each layer contributes. The onion base creates savory depth, warm spices fill the aroma, dried fruit changes the middle of the bite, and the final lemon, herbs and almonds provide contrast. Complexity comes from those layers working in sequence, not from simply adding more spice.

Instructions

Prepare and Brown the Lamb

  1. Heat the oven. Heat to 180°C / 160°C fan / 350°F.
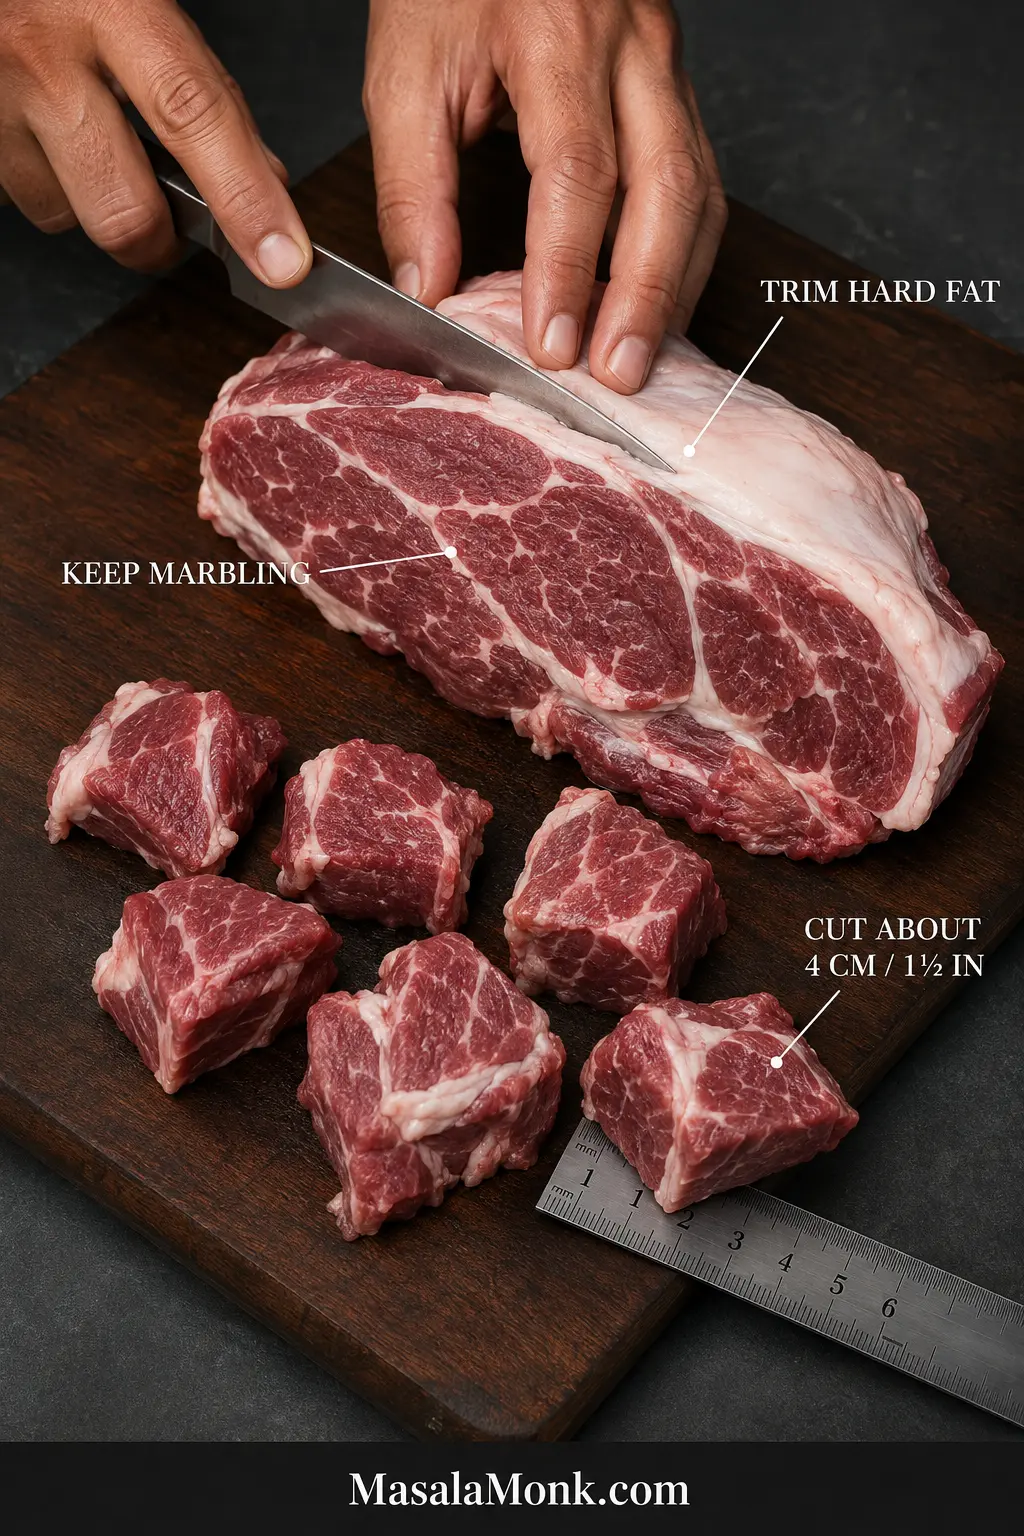
  2. Prepare the lamb. Trim away large hard deposits and seams of exterior fat, leaving the marbling within the shoulder. Cut into roughly 4 cm / 1½-inch pieces, pat dry and season with the measured salt.
Raw lamb shoulder being trimmed, with labels showing hard exterior fat to remove, marbling to keep and pieces cut to about 4 cm or 1½ inches.
With lamb shoulder for tagine, the biggest cubes effectively set the cooking clock. Keep the main pieces in roughly the same size family so one of the larger ones becomes a trustworthy tenderness benchmark later. Smaller scraps soften sooner and can make the pot appear ready before the substantial pieces have finished braising.
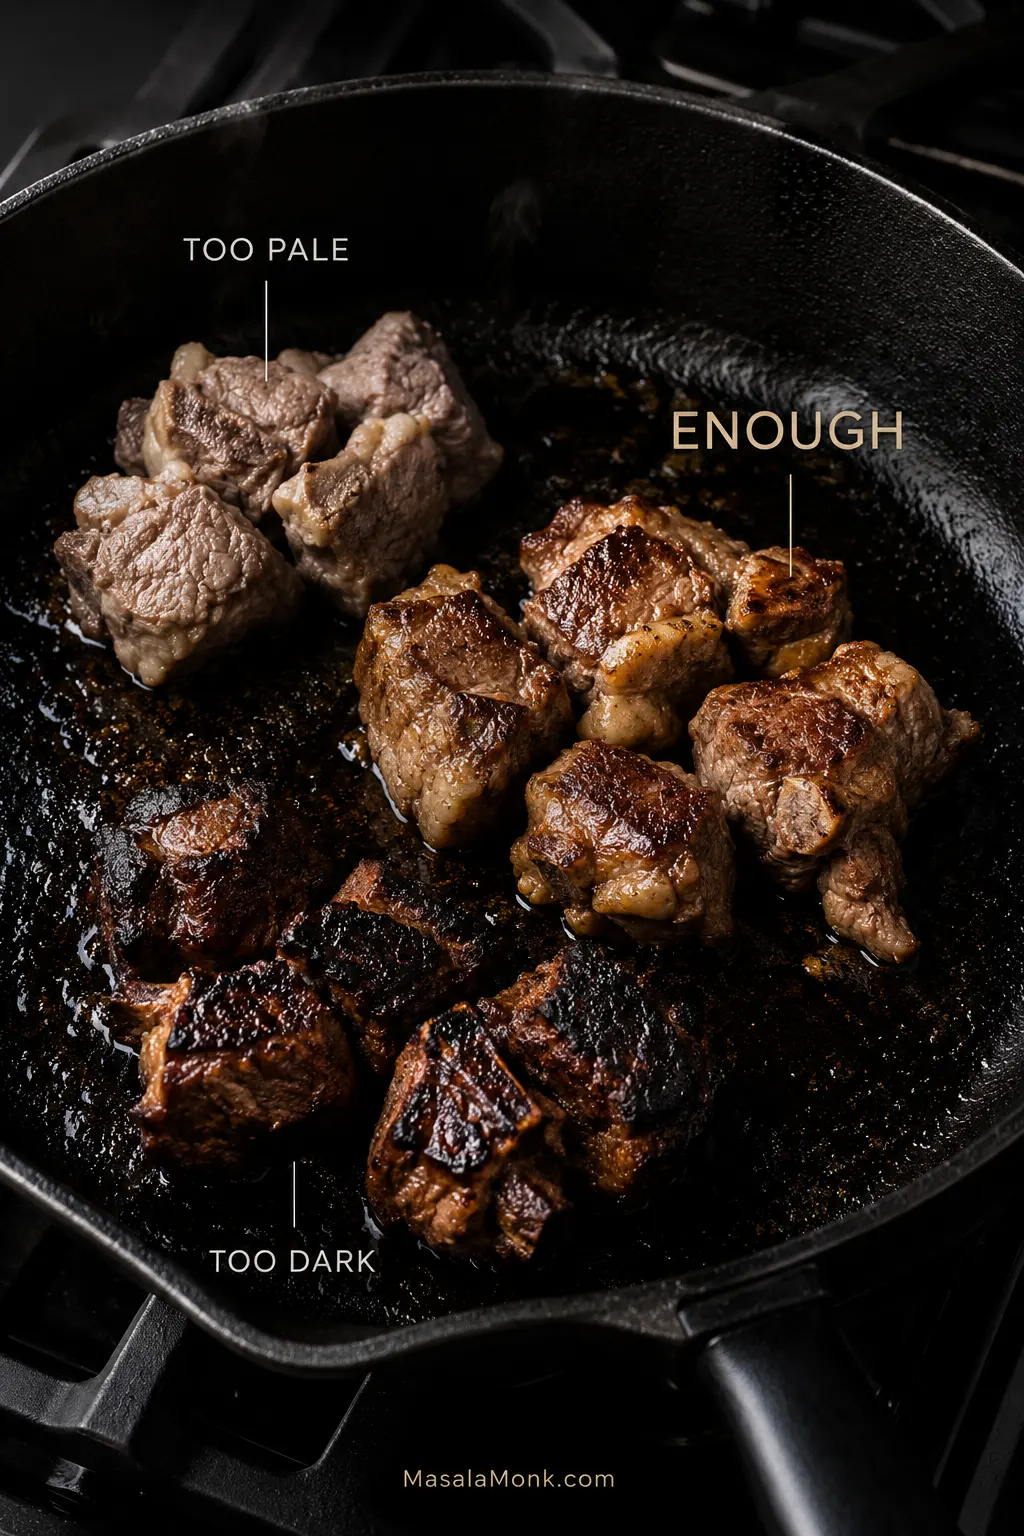
  1. Brown in batches. Heat the oil in the Dutch oven over medium-high heat. Brown the lamb in about three batches, roughly 3–4 minutes per batch. Give the pieces room to make good contact with the pot and turn them only once or twice. A few deep brown patches are enough; every surface does not need to be perfect. Transfer the lamb to a plate.
Three lamb pieces in a dark pan labeled too pale, enough and too dark, showing different levels of browning before braising.
When browning lamb for tagine, watch the bottom of the pot as well as the meat. Brown fond will loosen into the onions and eventually deepen the sauce; blackened residue brings bitterness instead. Between batches, meanwhile, give the pot a moment to recover its heat so the next pieces brown rather than release enough moisture to steam.

Build the Flavor Base

  1. Soften the onions. Reduce the heat to medium. Add the onions and cook for 7–8 minutes, scraping up the browned bits, until soft and beginning to turn golden. Deep caramelization isn’t necessary.
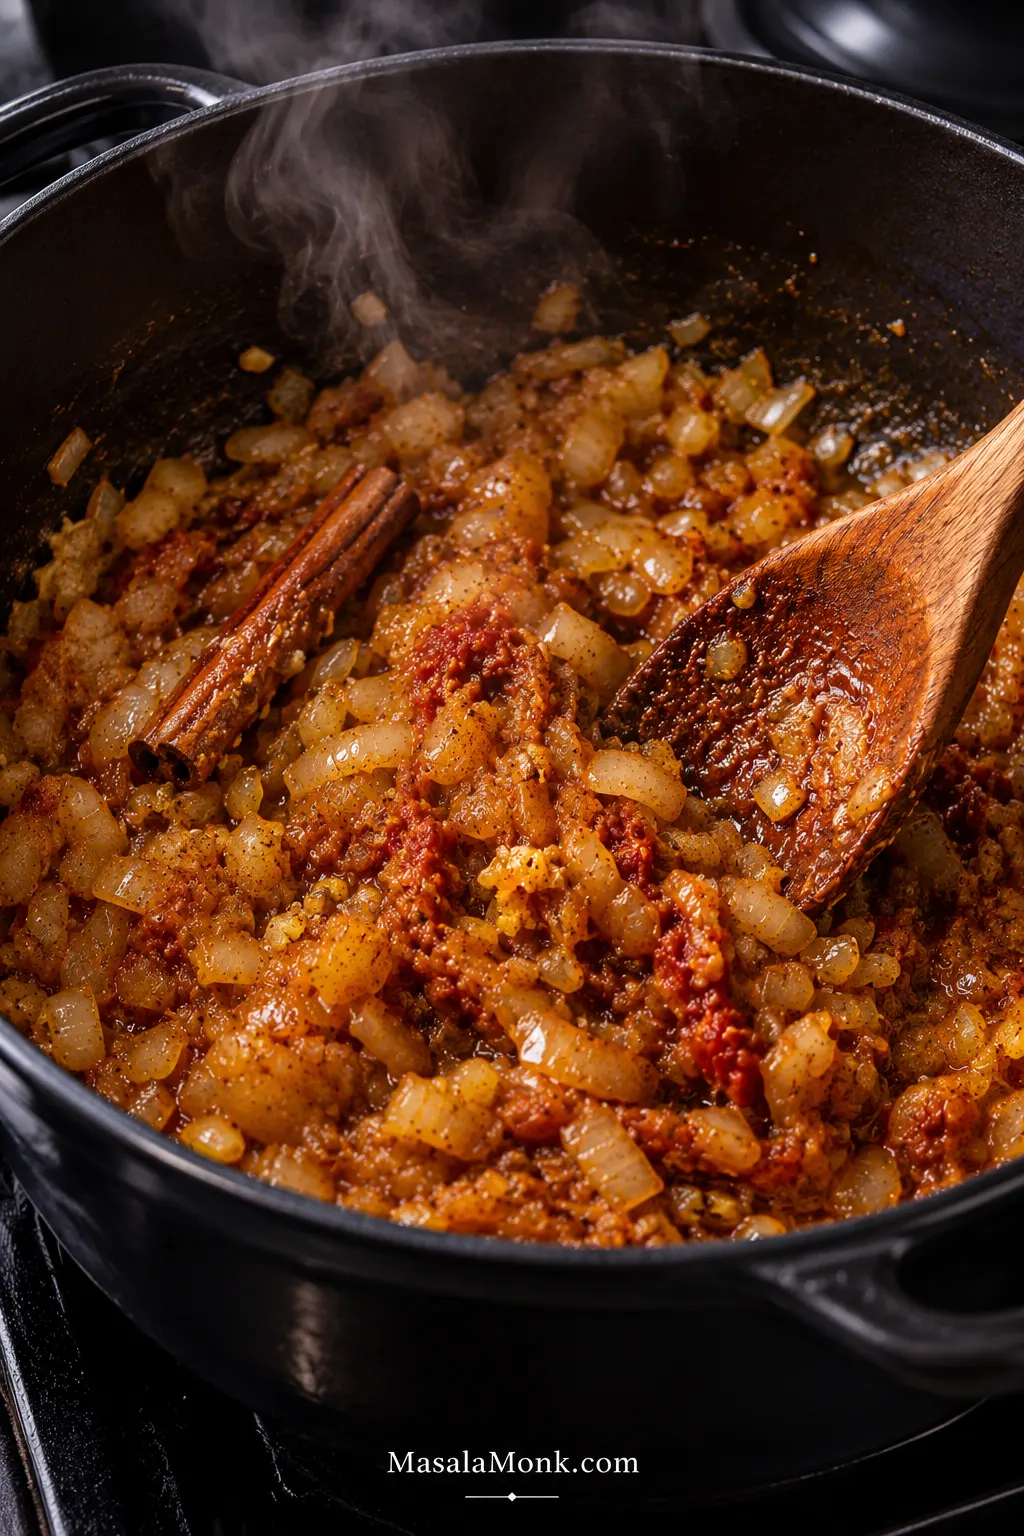
  2. Build the spice base. Add the garlic and cook for about 30 seconds. Stir in the cumin, coriander, ground ginger, turmeric, paprika, black pepper and cayenne, if using. Cook for 30–45 seconds, just until fragrant. Move on before the spices darken rapidly or smell acrid. Add the cinnamon stick and tomato paste and cook for another minute.
Soft onions, garlic, tomato paste, ground spices and a cinnamon stick cooking in a dark Dutch oven before the lamb and braising liquid are added.
A useful cue for the lamb tagine spice base is when it stops looking like separate ingredients. The ground spices lose their dusty appearance, the tomato paste blends into the onions, and the whole mixture becomes cohesive and glossy. Once that happens, add the liquid rather than extending the frying simply because the clock says you can.

Start the Braise

  1. Add the lamb and liquid. Return the lamb and any juices to the pot. Pour in the measured stock or water, including the saffron infusion if using, and bring to a gentle simmer. The liquid should sit around the meat and reach only partway up the pieces.
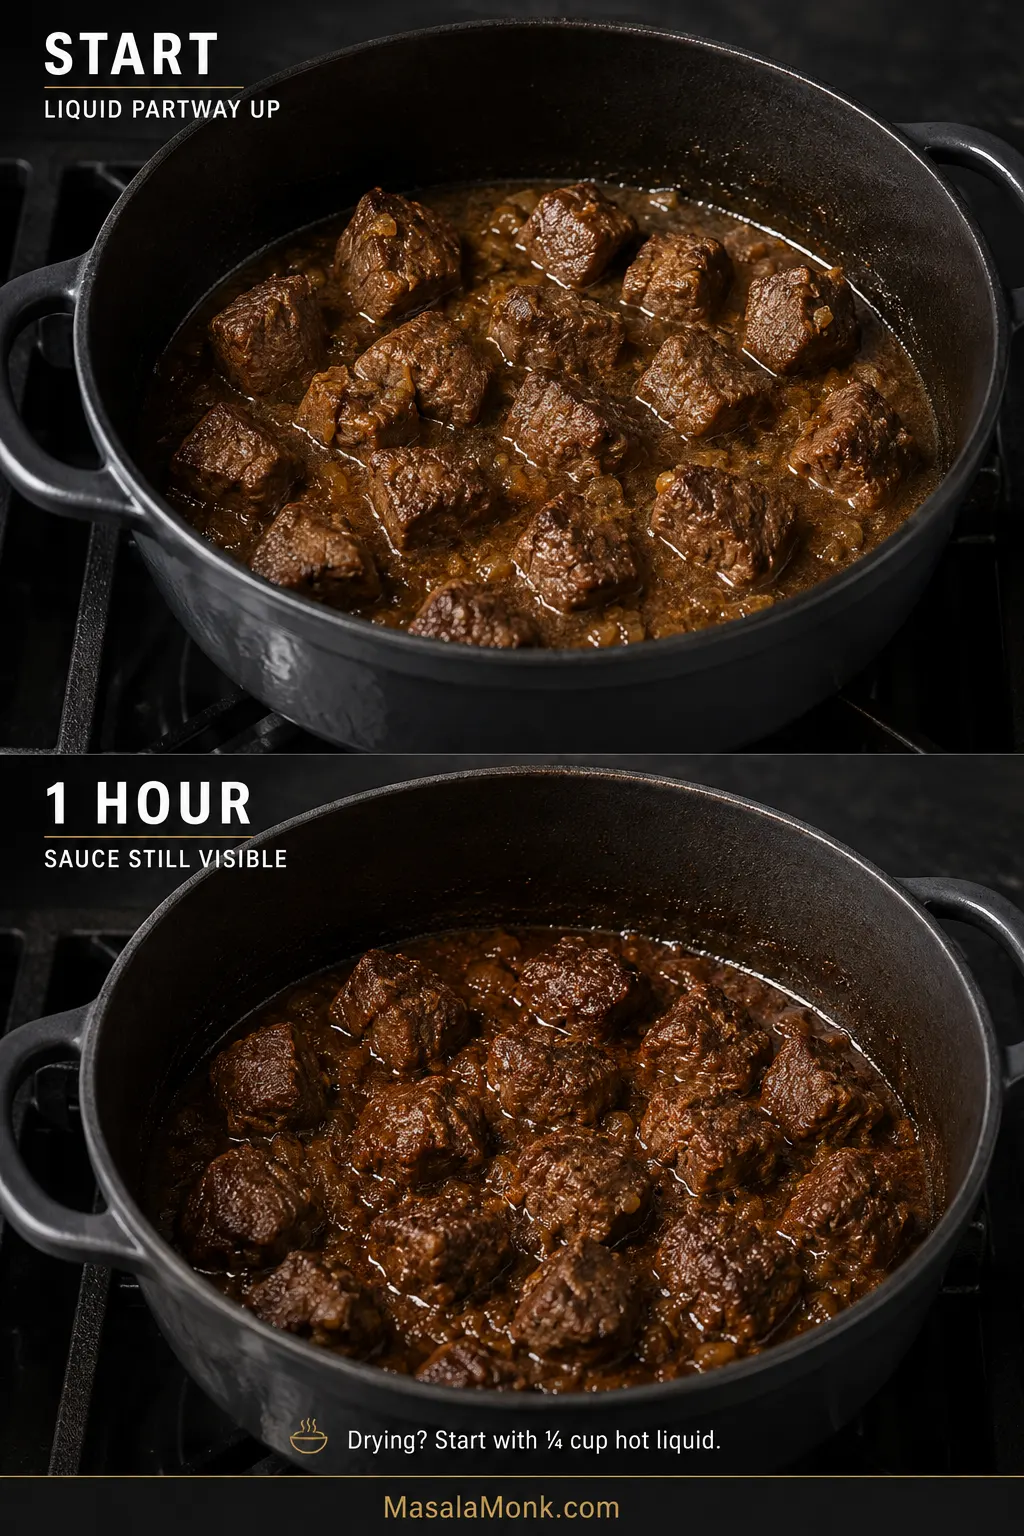
  2. Cover and braise for 60 minutes. Transfer the covered pot to the oven. The sauce will look loose at this stage. Leave it alone for now.
  3. Look at the moisture. Lift the lid after an hour. There should be sauce around the lamb and no dry, frying patches around the bottom edge. If the bottom is drying, add 60 ml / ¼ cup hot water or stock. Add up to another 60 ml / ¼ cup only if the pot still looks genuinely dry. Cover and cook for another 30 minutes.
Two braising stages showing lamb with liquid partway up the meat at the start and sauce still visible after cooking, with a note to add hot liquid only if drying.
For lamb tagine braising liquid, use the bottom edge of the pot as your warning zone. The upper surfaces of the meat can remain exposed; what matters is that the base stays moist rather than dry and frying. A broad casserole will reach that point faster than a snug Dutch oven, so pot geometry matters as much as the starting quantity.

Test Tenderness and Add the Apricots

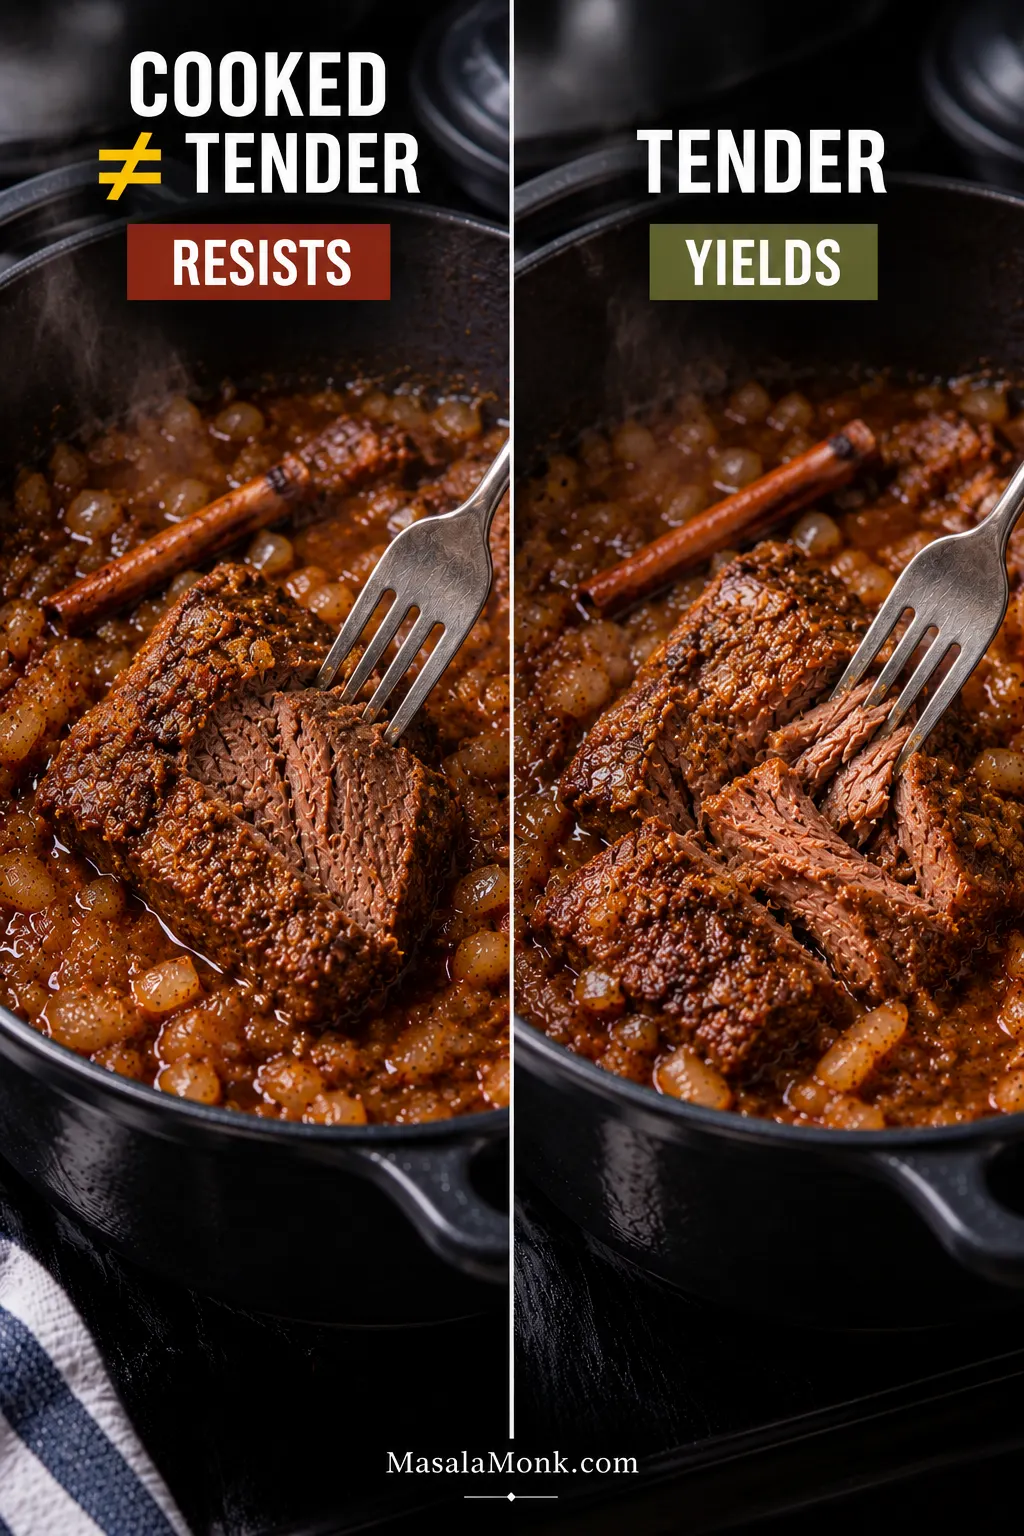
  1. Test the lamb. Push a fork into one of the largest pieces. Clear resistance means more covered cooking. Continue in 15-minute intervals until the fork enters fairly easily and the meat keeps its shape.
Side-by-side fork test of braised lamb labeled resists and yields, showing firm cooked meat compared with tender meat whose fibers open slightly while staying intact.
The target for braised lamb tenderness sits between two obvious extremes: no stubborn resistance, but no shredding on contact either. A fork should enter with little effort while the chunk keeps enough structure to reach the plate intact. Falling-apart meat can be delicious, but it is already beyond the texture this particular lamb tagine is aiming for.

Check the Finished Texture

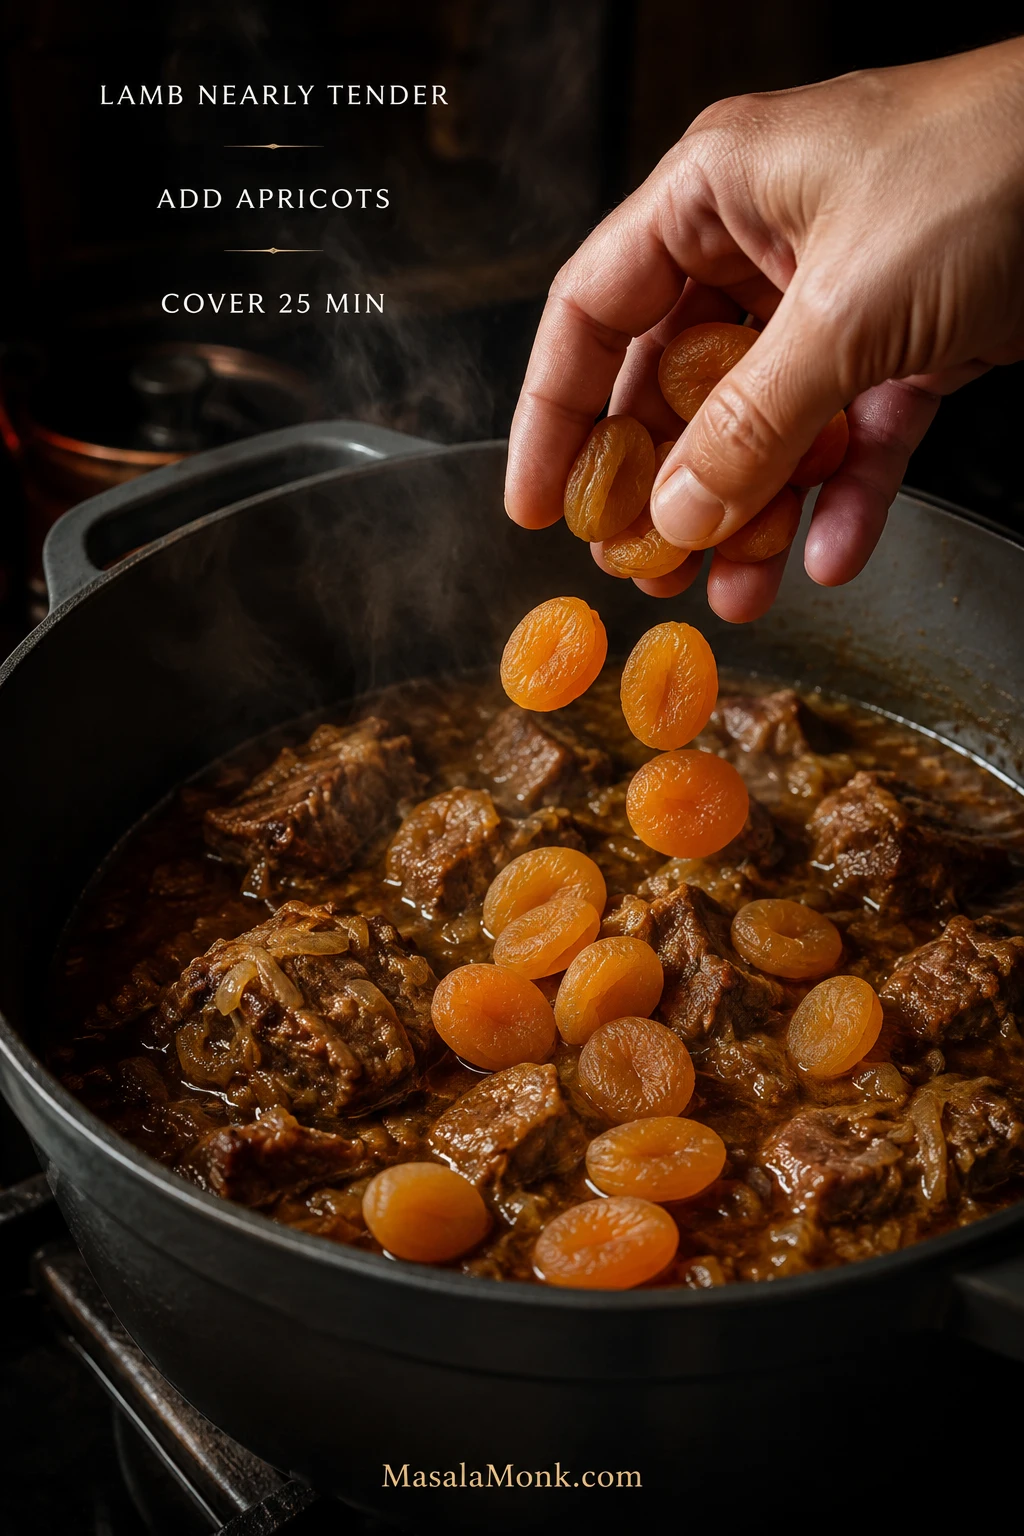
  1. Add the apricots. Stir in the dried apricots, cover and cook for 25 minutes. While they cook, toast the almonds in a dry frying pan over medium heat for 2–4 minutes, tossing often, until lightly golden and fragrant. Tip them onto a plate immediately.
A hand adding dried apricots to nearly tender braised lamb, with instructions to add the apricots near the end and cover the pot for 25 minutes.
Once dried apricots are softening in lamb tagine, handling becomes as important as timing. Stir only as much as necessary and move the fruit gently through the sauce; plumped apricots break much more easily than dry ones. Keeping them intact preserves little pockets of fruit rather than distributing all their sweetness through the entire pot.
  1. Know when to stop. Test one of the largest pieces of lamb and an apricot. The lamb should yield easily without collapsing; the apricots should be soft and full. If the lamb still resists, cover and continue in 10–15-minute intervals. If the apricots reach the texture you want before the lamb does, lift them onto a plate and return them later.
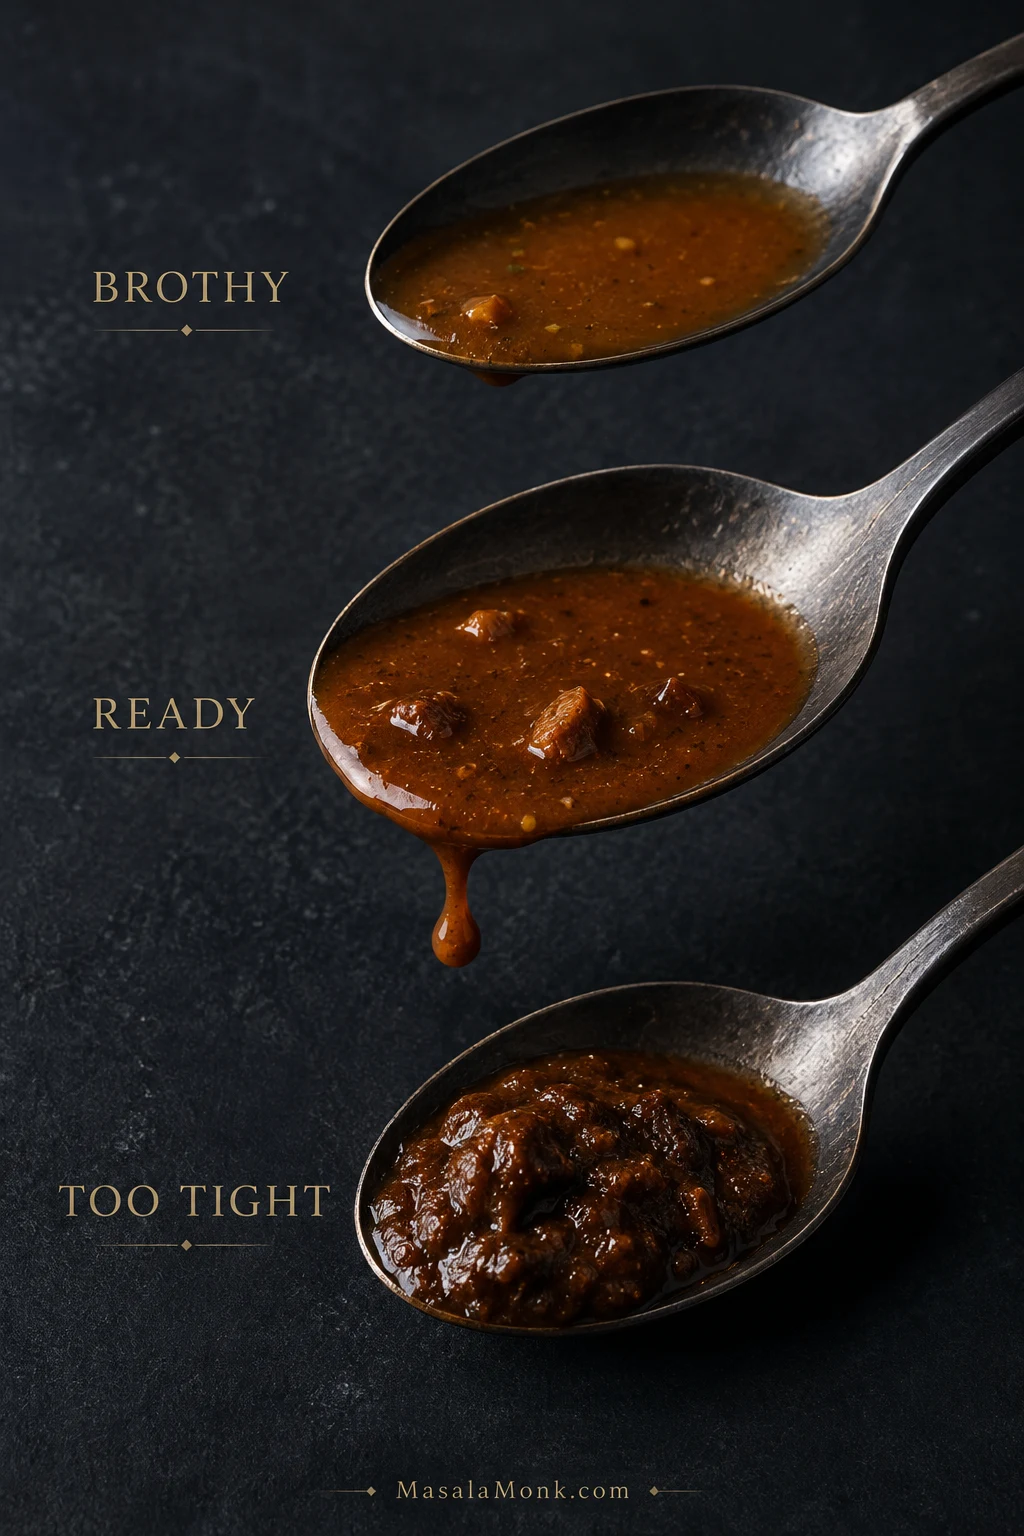
  2. Finish the sauce. If the lamb and apricots are ready and the sauce already lightly coats them, leave it alone. For a very brothy pot, lift the lamb and apricots onto a warm plate and reduce the sauce uncovered for 5–15 minutes, then return everything briefly to coat and heat through. Loosen an over-reduced sauce with hot water or stock, 30–60 ml / 2–4 tablespoons at a time. Mash two or three apricots into the sauce if you want it slightly thicker and fruitier.
Three spoonfuls of tagine sauce labeled brothy, ready and too tight, showing progressively thicker sauce textures.
The spoon gives a clearer lamb tagine sauce test than the busy surface of the pot. Brothy sauce runs off almost immediately; ready sauce leaves a thin glossy film before sliding away; over-reduced sauce sits heavily and starts to mound. That movement tells you more about concentration than color alone.

Season and Serve

  1. Season. Remove the cinnamon stick and skim excess surface fat. Check the salt first, then add lemon juice to taste. Taste before reaching for honey; the apricots may already have given you enough sweetness. Start with 1 teaspoon if you want more.
  2. Serve. Add the lemon zest, fresh cilantro and toasted almonds. Stir gently and serve hot.

Scaling up: use a larger pot as well as more ingredients. Let the liquid level around the lamb guide the extra stock or water; braising liquid rarely scales neatly with the meat.


How to Read the Pot as It Cooks

The recipe gives you the timetable. The pot tells you when that timetable needs changing.

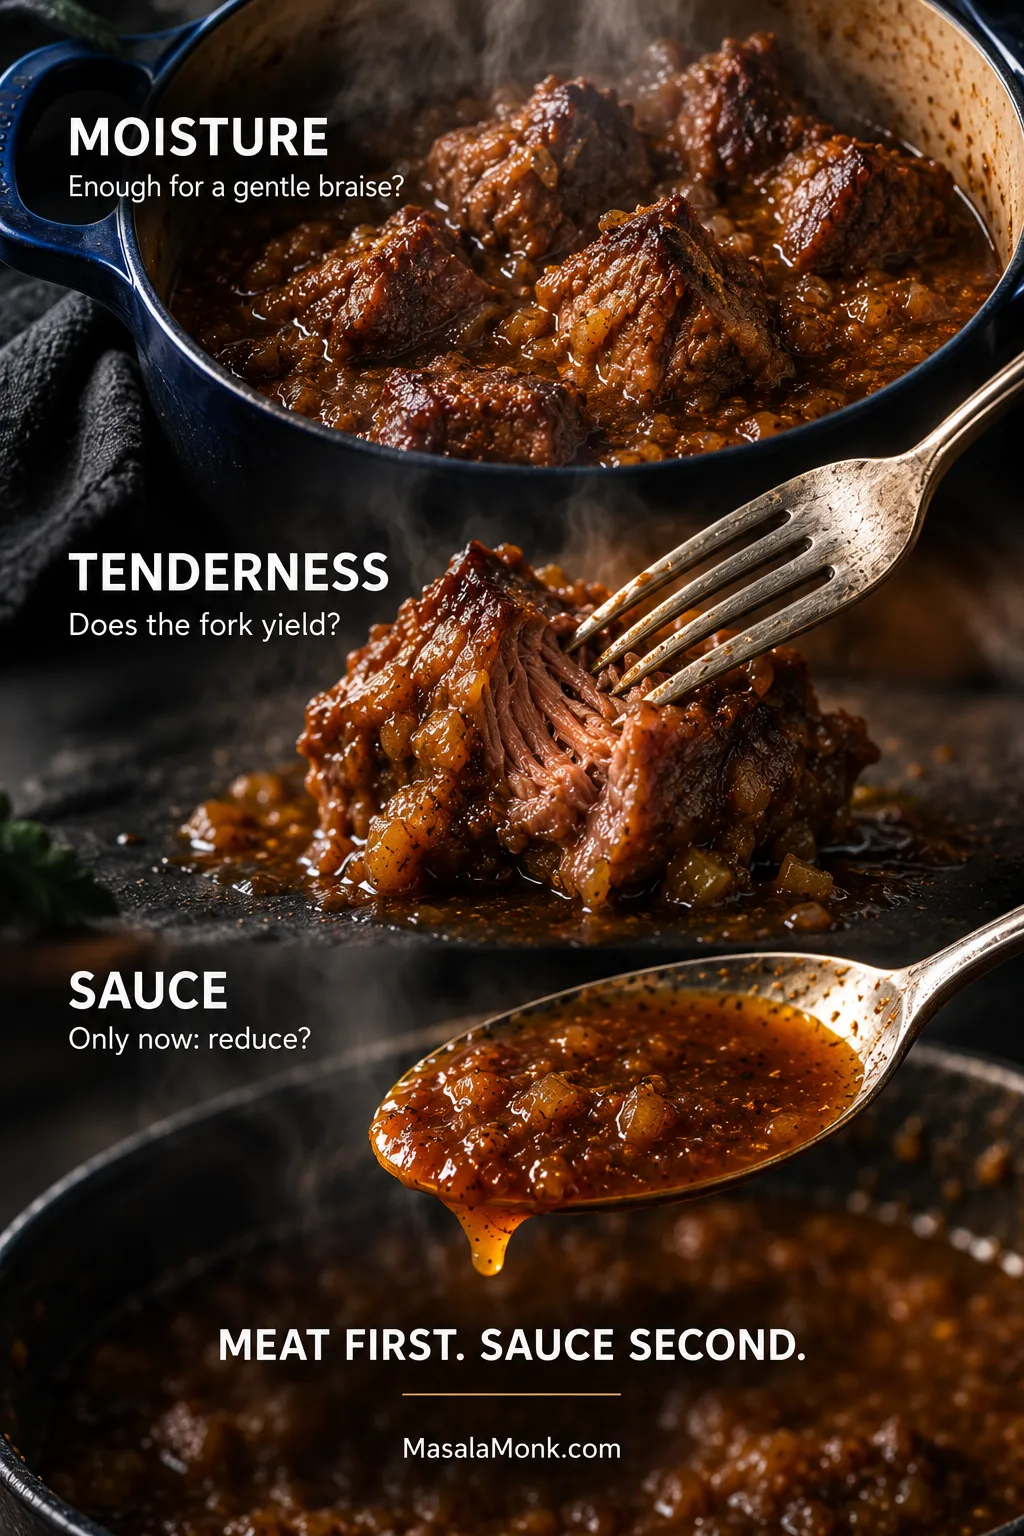
Cooking guide showing lamb braising moisture, a fork testing tenderness and sauce coating a spoon, labeled moisture, tenderness and sauce.
Think of moisture, tenderness and sauce as three separate dials on the same braise. A dry bottom is a moisture problem; a resistant fork is a tenderness problem; a spoon that will not hold a light coating is a sauce problem. Diagnose the right dial first, because fixing one automatically can make another worse.

The measured liquid is only a starting point. A broad casserole loses water faster than a snug Dutch oven with a heavy lid, while the lamb and onions contribute moisture of their own. Two cooks can start with the same amount and see very different pots an hour later.

The first hour is mostly about leaving the lamb alone. Keep enough moisture in the pot for a gentle braise while the shoulder is firm. A drying bottom is your cue for a splash of hot liquid. Starting with too much stock creates the opposite problem: plenty of water that eventually has to cook away.

Moisture buys the shoulder time. Eventually the useful question changes: has that time actually made the meat tender?

Lamb can be cooked through and still feel chewy because its connective tissue has not softened enough. Test one of the larger pieces. The fork should enter easily and gentle pressure should make the meat yield without collapsing.

If the fork still has to argue with the lamb, dinner needs more time.

Once the Lamb Is Tender, Judge the Sauce

Tender meat changes the job. A brothy pot can now spend some time uncovered; sauce that already coats the lamb lightly is close to where you want it.

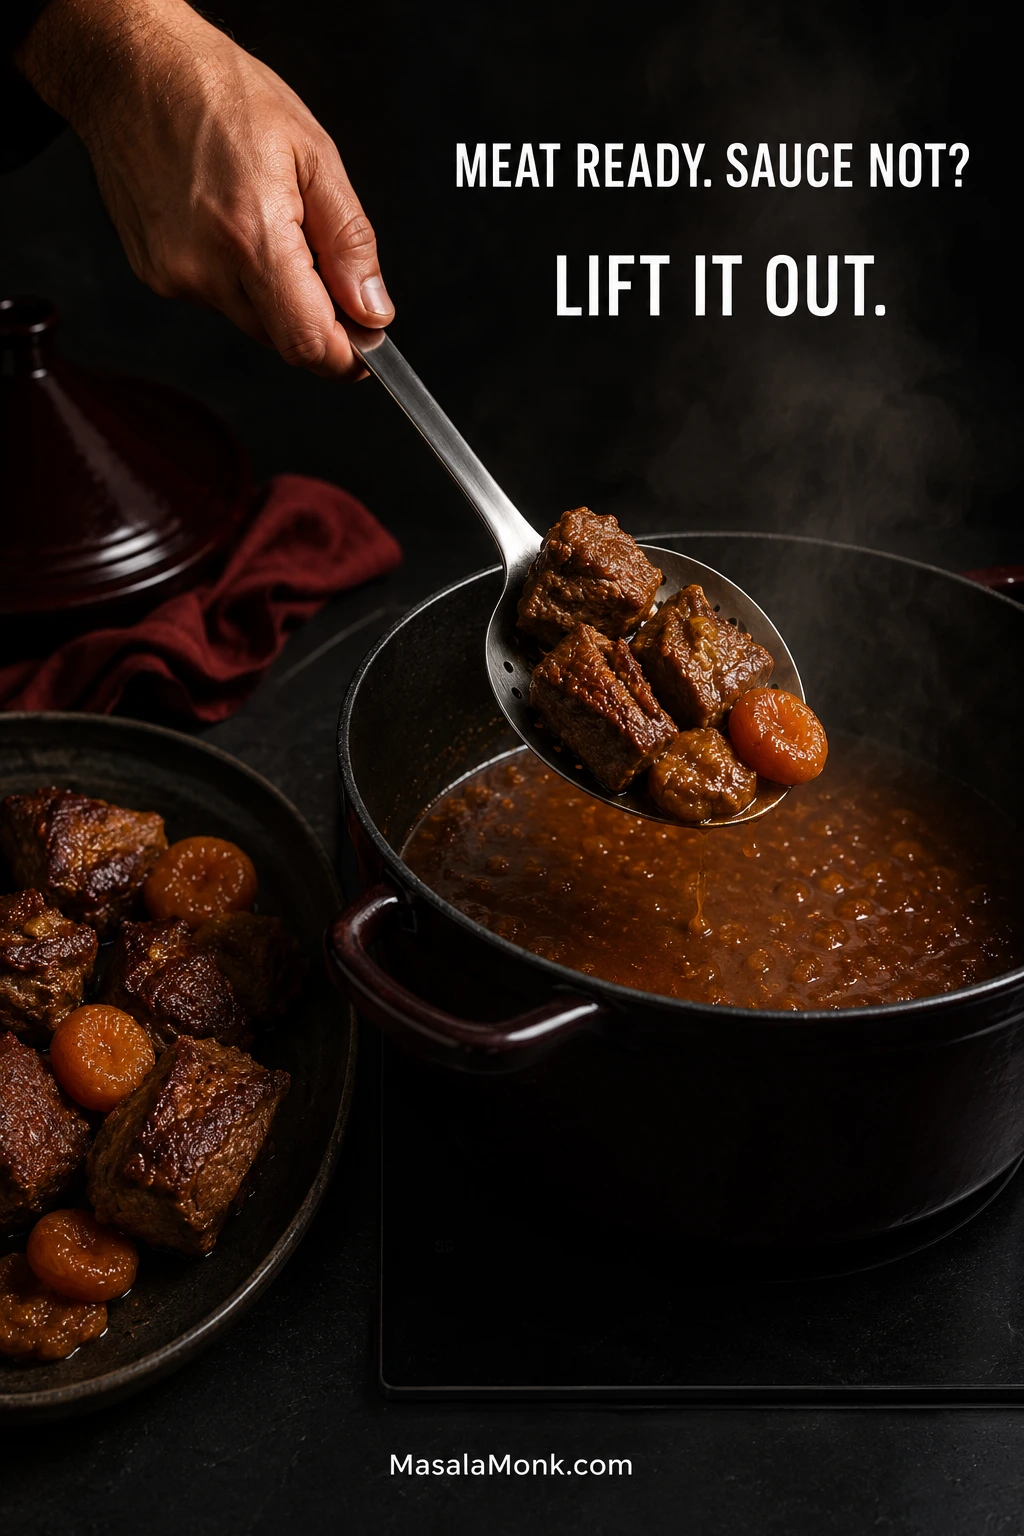
Perfect lamb and apricots in a pot with too much liquid is an easy fix. Lift the solids onto a warm plate, reduce the sauce on its own, then return everything briefly to coat and heat through.

Hand lifting tender lamb and softened apricots from a Dutch oven with a slotted spoon while loose brown sauce continues simmering in the pot.
Once the finished lamb and apricots are out of the pot, the sauce can reduce more actively without pushing either solid further. Return them only briefly when the liquid has reached the consistency you want, so the final coating stays concentrated without sacrificing tenderness.

At the table, aim for enough sauce to collect around the lamb and soak into bread or a spoonful of grain.

Fix My Lamb Tagine

Lamb Problems

ProblemWhat to do
Lamb is still toughCover and cook for another 15 minutes, then test one of the largest pieces again.
Lamb is dry and still chewyKeep it in the moist braise while a fork meets resistance. Very lean cuts and small pieces have less room for error.
Lamb is tender but dryStop cooking it and serve with plenty of sauce. Next time use shoulder or neck and keep the pieces larger.
Lamb is falling apartStir as little as possible and serve gently. Begin the tenderness checks earlier next time.

Sauce and Seasoning Problems

ProblemWhat to do
Sauce is wateryOnce the lamb is nearly tender, leave the lid off and let some water evaporate.
Lamb is ready but sauce is very wateryLift the lamb and apricots onto a warm plate, reduce the sauce separately, then return them briefly to coat and heat through.
Sauce is disappearingAdd hot water or stock 30–60 ml / 2–4 tablespoons at a time.
Tagine tastes too sweetCheck the salt first, then add lemon juice a little at a time. Leave out the honey.
Tagine tastes flatCorrect the salt, then add lemon before reaching for more ground spice.
Sauce tastes bitter or burntTransfer the unburnt upper portion to a clean pot without scraping the bottom, then reassess the seasoning.
Surface looks greasySkim the excess fat now, or chill the tagine and lift away the hardened fat before reheating.
Bottom is catchingLower the heat, add a small amount of hot liquid and leave the scorched material stuck to the pot.

Apricot Problems

ProblemWhat to do
Apricots have broken downThey’ve become part of the sauce. Add them later next time for more distinct pieces.
Apricots are still firmGive them another 10–15 minutes in the hot sauce.

The Best Lamb for Tagine

Lamb shoulder gives you the widest margin for error. It stays succulent through a long braise, while its collagen gives the sauce natural body as the shoulder softens. That also gives you some breathing room when the meat and sauce don’t reach their ideal point at exactly the same moment.

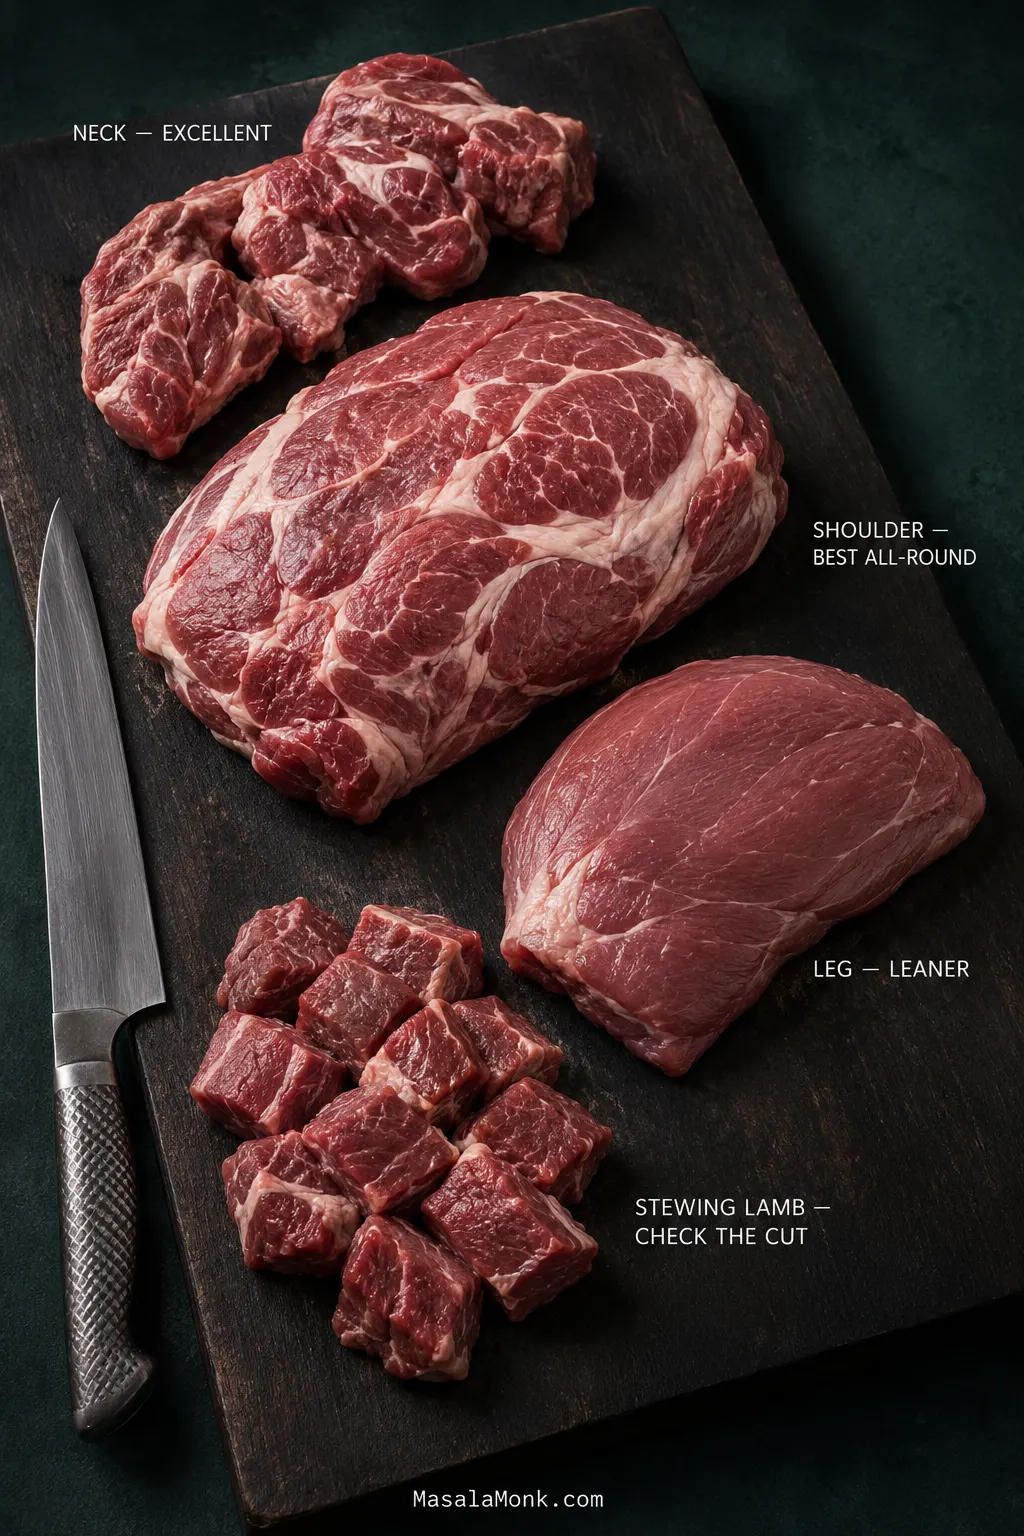
CutHow it behaves
ShoulderJuicy, well suited to a long braise and the best all-round choice.
NeckDeeply flavorful with plenty of connective tissue; allow extra time if necessary.
LegLeaner and more prone to drying during prolonged cooking.
Diced/stewing lambConvenient when the underlying cut is suitable for braising and the pieces are not too small.
Raw lamb shoulder, neck, leg and cubed stewing lamb arranged on a dark butcher board with labels describing each cut for braising.
At the butcher counter, the meat itself can tell you something the label cannot. Shoulder tends to look irregular and marbled; leg is cleaner and leaner; neck carries more compact connective tissue. Most importantly, “stewing lamb” describes how the meat has been cut, not which lamb cut it came from, so it is worth asking what is actually in the pack.

Already bought a whole leg and want to keep it intact? Our roast leg of lamb is built for browned edges, a juicy center and carving into slices.

Buying and Preparing Lamb Shoulder

The 1 kg / 2.2 lb in this recipe means shoulder after trimming. A heavy exterior fat cap means buying a little extra. Bone-in shoulder works too; allow extra purchase weight for the bone, then judge the cooking by tenderness rather than trying to match the boneless weight exactly.

Remove thick deposits and hard seams of exterior fat while keeping the marbling within the meat. Leave the chunks generous—around 4 cm / 1½ inches. Small pieces dry out more easily over a long braise.

Shanks need their own bone-in timing, while minced lamb belongs in a kefta-style tagine rather than this recipe.

Mutton and goat also suit these spices, although older meat may take longer to soften. For a completely different use of mutton—drier, darker and built around a reduced masala—see our Punjabi mutton bhuna.

Apricots, Spices and the Sweet-Savory Balance

Dried apricots soften in the sauce and pick up some of the lamb and spice around them. Their tart edge matters: the fruit tastes sweet, but the next forkful still tastes unmistakably like lamb.

For 1 kg / 2.2 lb lamb, 180 g / about 6¼ oz dried apricots gives the fruit a clear presence without dominating every bite. Adding them once the shoulder is nearly tender protects their texture if the meat takes longer than expected.

This recipe is formulated for dried apricots. Fresh apricots contain much more water and soften quickly, so add them only near the end and cook just until tender instead of making a direct gram-for-gram substitution. Drain canned apricots particularly well if they’re packed in syrup.

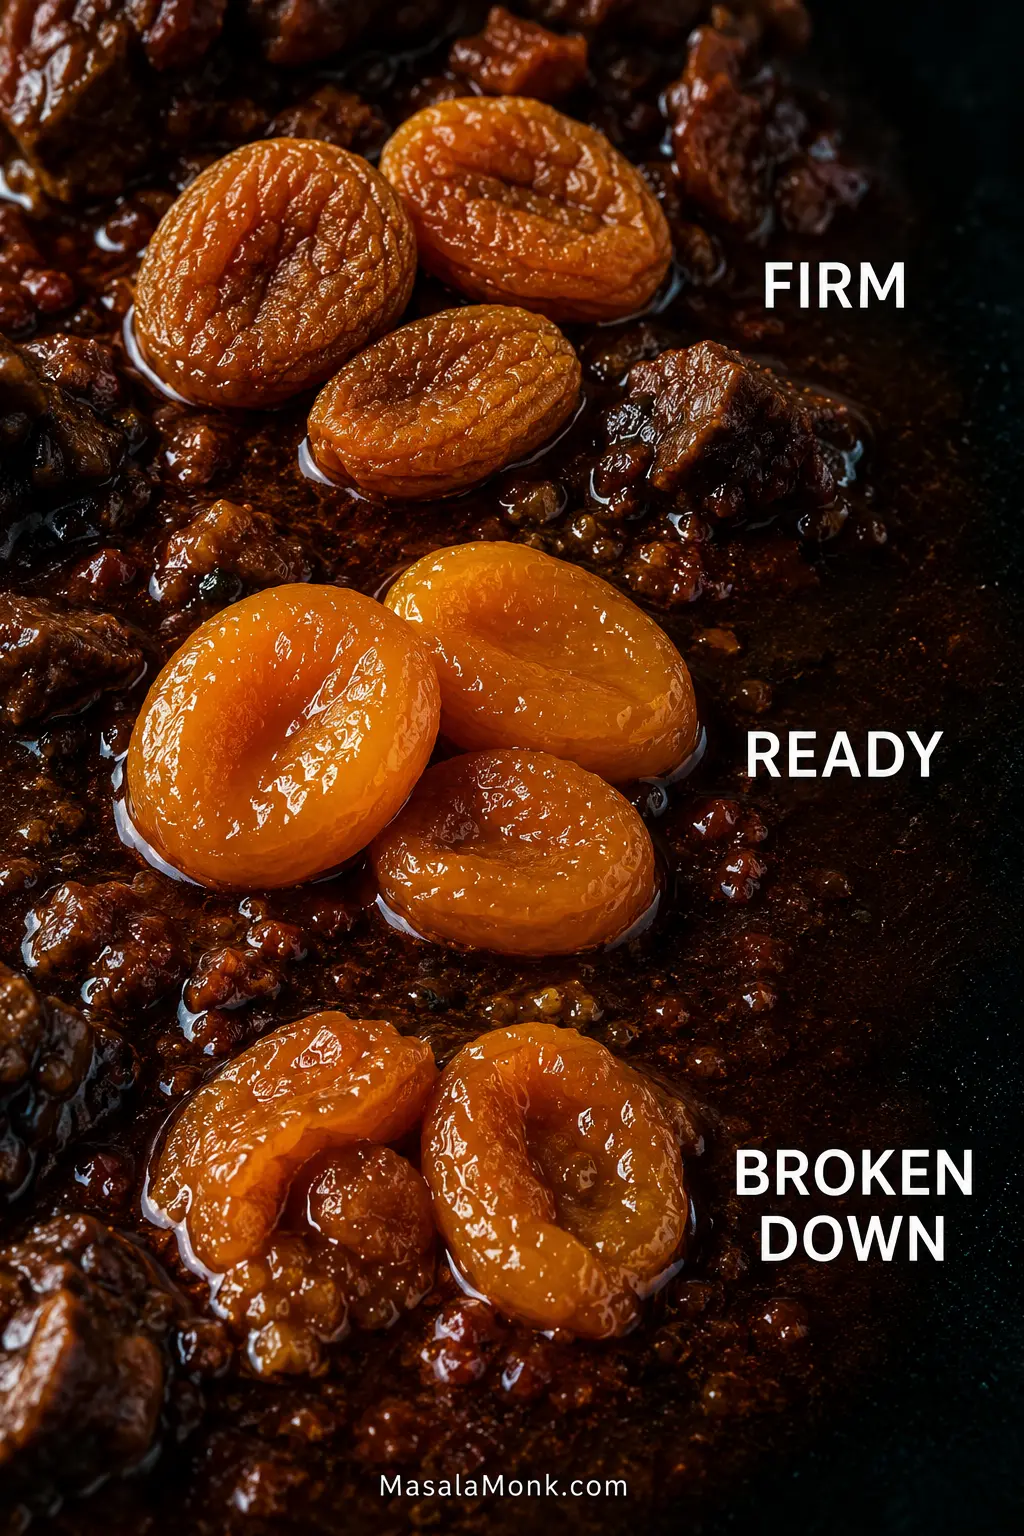
Dried apricots shown at three stages in dark sauce: firm and wrinkled, plump and ready, and partly broken down.
When judging dried apricot texture in tagine, look at shape as well as gloss. Firm fruit stays wrinkled and compact; ready fruit swells and rounds out while keeping clean edges; farther along, those edges begin feathering into the sauce. That last stage is not ruined fruit—it simply shifts more apricot flavor from distinct pieces into the braising liquid.

The Spice Blend

Cumin and coriander carry most of the earthy flavor, with ginger and black pepper adding warmth. Turmeric and paprika deepen the sauce. Cinnamon should remain a background note rather than make the lamb taste candied.

The blend is aromatic but mild rather than chile-hot. Cayenne controls the heat here, so you can leave it out for a gentler lamb tagine or increase it carefully if you prefer more warmth.

Ras el hanout can replace most of the individual ground spices, but blends vary enormously. Start around 1½ tablespoons and use up to 2 tablespoons with a milder blend, accounting for any salt, chili or cinnamon already present.

Saffron is optional. A small pinch adds a subtle floral note, but the tagine doesn’t depend on it. If that little jar rarely leaves the cupboard, our guide to saffron and how to use it explains where its flavor earns a place.

Salt and acidity become more pronounced as the sauce reduces, so make the important adjustments near the end. Check the salt first, then add lemon. Taste before reaching for honey; the apricots may already have given you enough sweetness.

What Is a Tagine—and Is There One Authentic Version?

The word tagine refers both to the distinctive lidded cooking vessel and to the family of dishes associated with it. In other words, “tagine” describes both the pot and a style of slow, gently cooked dishes. Moroccan tagine isn’t one fixed recipe: lamb may appear with prunes or apricots, while other versions feature preserved lemon and olives, vegetables, fish or kefta. For a wider look at the food tradition, the Moroccan National Tourist Office has a useful overview of tajine and other emblematic dishes.

This version is designed around a Dutch oven in a conventional home oven, with browned shoulder as its base. Those are deliberate choices for this recipe, not claims about how every Moroccan cook prepares tagine.

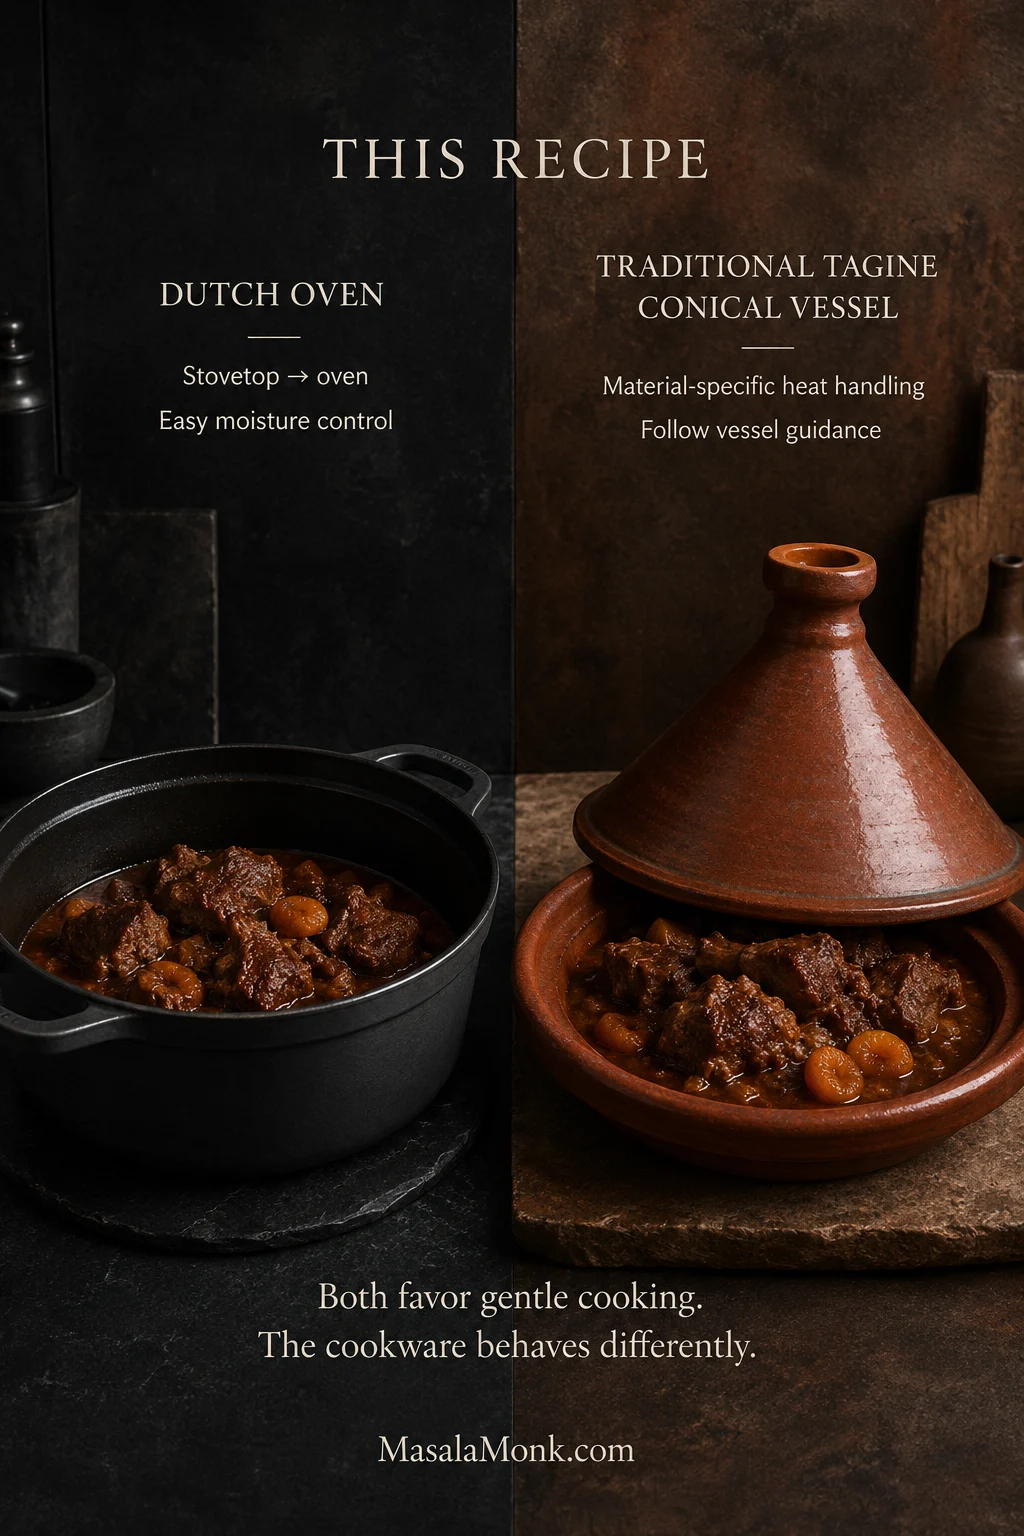
Do You Need a Tagine Pot?

No. A heavy Dutch oven you already own can make an excellent tagine. It holds the steady, covered heat the shoulder needs and moves easily from stovetop to oven.

Black enameled Dutch oven beside a traditional conical clay tagine, both containing lamb and apricot braise, with text explaining that the cookware handles heat differently.
For a tagine pot vs Dutch oven comparison, carry over the flavor idea rather than automatically carrying over the same liquid and timing. Heavy cast iron and clay manage stored heat, direct heat and evaporation differently. Therefore, the vessel is part of the cooking method—not merely a different-looking container for exactly the same instructions.

This recipe also browns the lamb first. Some tagine methods skip that step; here, the dark patches on the shoulder and the fond left in the pot create a deeper roasted base.

Cooking in an actual tagine? Make sure the vessel is intended for cooking. Glazed ceramic, unglazed clay, flameproof ceramic and cast-iron versions behave differently, so follow the manufacturer’s instructions for seasoning, direct heat and thermal shock. Some clay vessels benefit from a heat diffuser over a concentrated gas flame.

For stovetop cooking in a heavy covered pot, maintain the gentlest simmer you can. Look at the bottom and liquid a little more often than you would in the oven because concentrated sauce can catch over direct heat. Let tenderness, not the clock, decide when the lamb is ready.

Slow cooker or pressure cooker: both retain far more moisture than this Dutch-oven method, so do not carry the 350 ml / about 1½ cups liquid quantity across unchanged. For a reliable conversion, use an appliance-specific lamb-tagine formula and add the dried apricots late enough to keep their shape rather than treating this recipe as a line-by-line conversion.

Prunes, Dates, Preserved Lemon and Other Variations

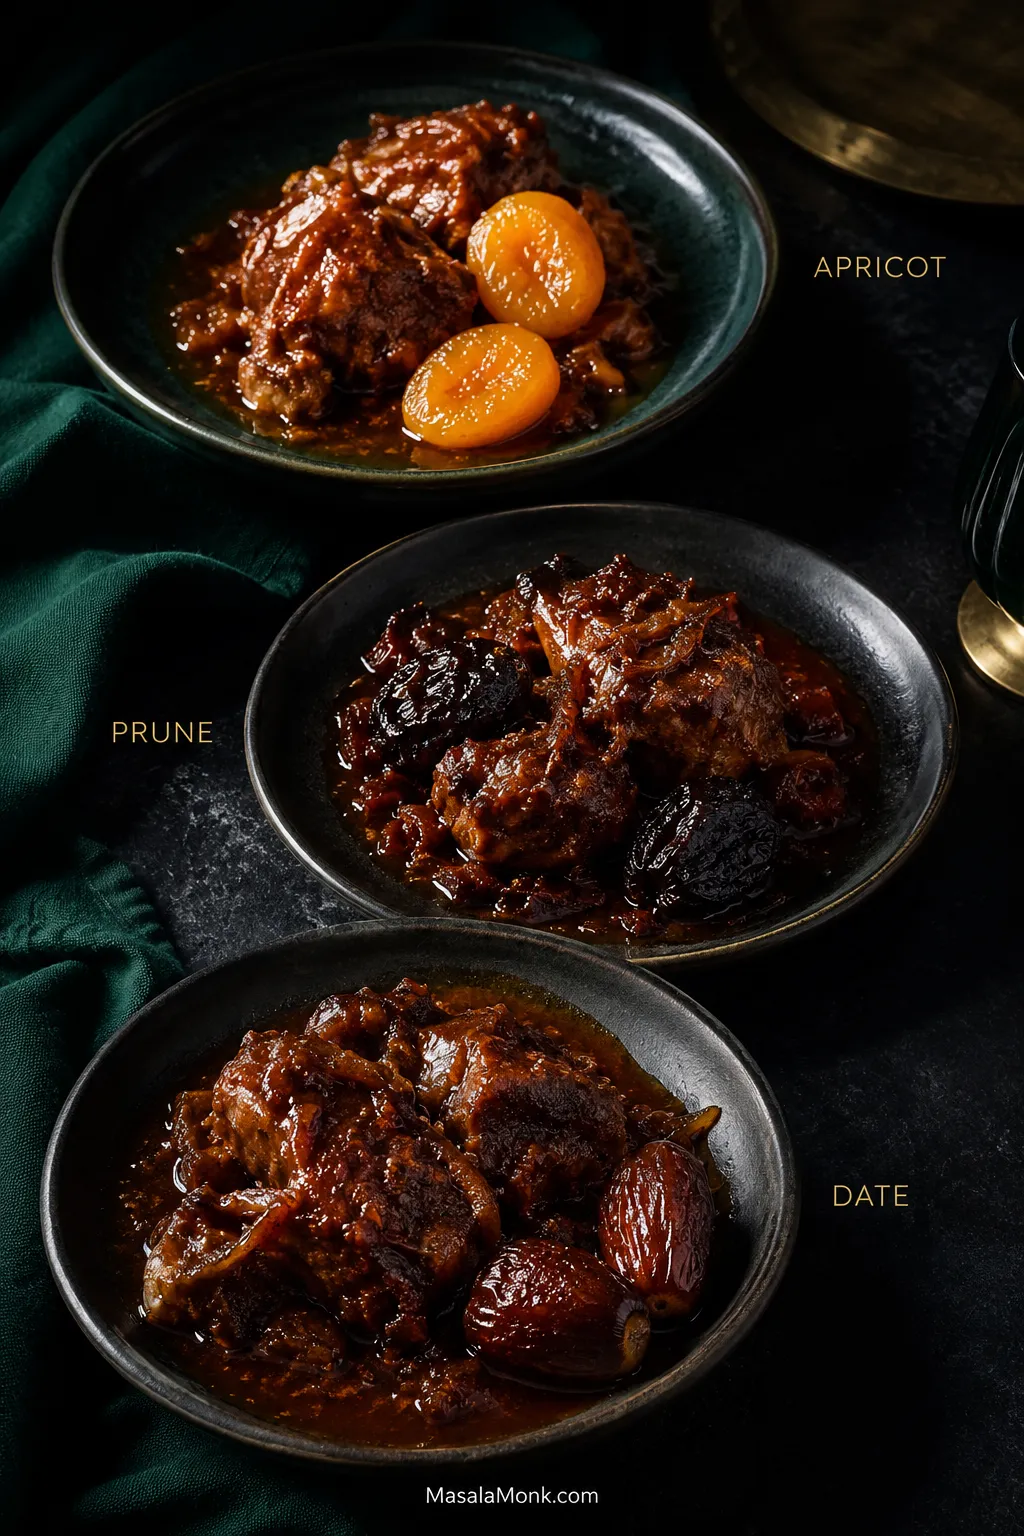
Prunes produce a darker, more jammy sauce and pair particularly well with almonds. They usually bring enough sweetness without much help from honey.

Dates are sweeter still, with more caramel depth. Use them more sparingly than apricots and keep enough lemon in the sauce to give the lamb some contrast.

Three finished lamb tagine portions made with apricots, prunes and dates, showing lighter amber, dark jammy and deep caramel fruit variations.
Switching dried fruit changes the finishing decisions as well as the flavor. Apricot keeps the sauce brighter, prune pushes it darker and jammier, and date brings deeper caramel sweetness. After changing the fruit, taste again before copying the apricot version’s honey or lemon adjustments, because the balance at the end may need to move with the substitution.

Preserved lemon and olives take the dish somewhere saltier and more intensely citrusy. Both bring seasoning of their own, so begin with less salt and use water or low-sodium stock.

Cooked chickpeas can stretch the pot; add them during the last 20–30 minutes. Carrots, squash and sweet potato in generous bite-size pieces need roughly 30–45 minutes and will absorb some of the braising liquid.

Mrouzia is a different preparation altogether, traditionally associated with lamb, honey, raisins and almonds. It deserves its own recipe.

What to Serve With Lamb Tagine

The tagine is soft, fragrant and deeply flavored, so its best partners are simple: something to catch the sauce and something fresh enough to sharpen the plate.

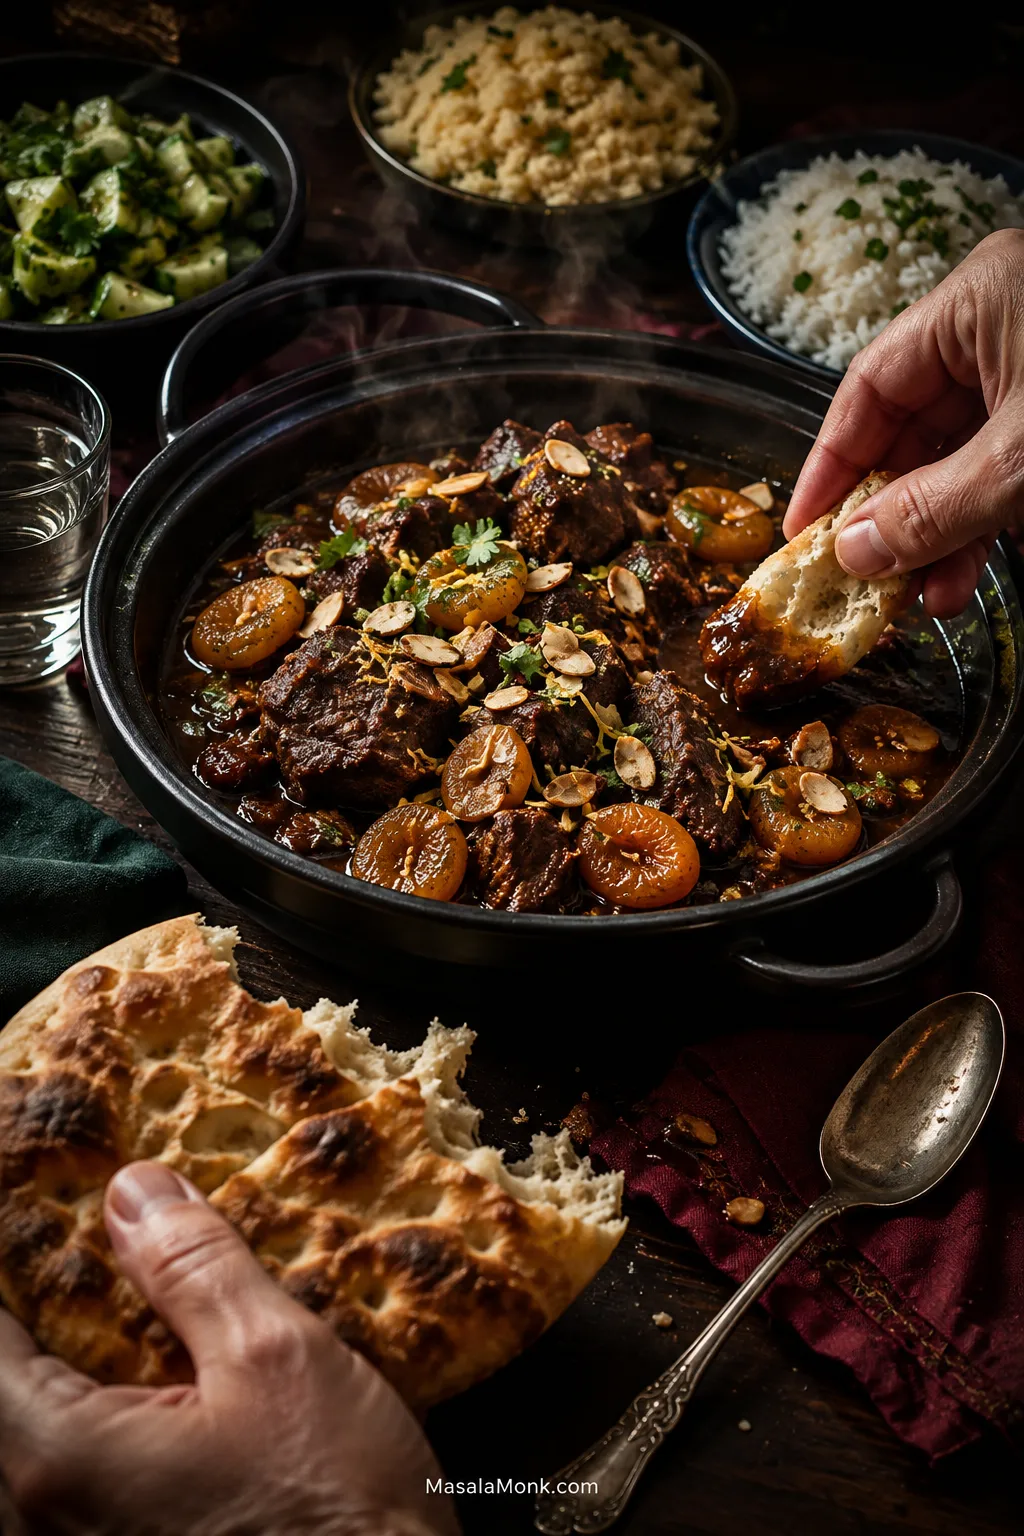
Hands tearing bread beside a large lamb and apricot tagine, with separate bowls of couscous, rice and cucumber-herb salad on a dark dining table.
When deciding what to serve with lamb tagine, organize the table around contrast. Keep bread closest for sweeping through the sauce, serve couscous or rice separately when you want a more substantial plate, and put something cool and crisp alongside. That arrangement lets each bite move between rich, absorbent and fresh instead of becoming uniformly soft.

Moroccan bread is the classic table partner. Tear it and use it to scoop the lamb and sweep through the sauce. If khobz isn’t available, homemade pita is a practical stand-in.

For a plated meal, couscous is light and excellent at absorbing the braising juices. For a gluten-free plate, choose rice; standard couscous is wheat-based. Our rice cooking guide will help if you want loose, separate grains.

A lemony salad, fresh herbs or cucumber gives the plate a cooler, sharper side. Our crisp cucumber salad works especially well against the warm lamb and fruit.

Make Ahead, Store, Freeze and Reheat

If people are coming over, this is the kind of make-ahead recipe that genuinely changes the evening. The lamb can already be tender, excess fat can be removed cleanly once chilled, and all that’s left is warming the sauce and adding the fresh garnish.

Cook the tagine completely, cool it promptly and refrigerate it. The USDA’s leftovers guidance recommends refrigerating cooked food within 2 hours and generally using refrigerated leftovers within 3–4 days.

How to Reheat and Freeze Lamb Tagine

Remove any hardened excess fat while the tagine is cold, then reheat gently with the lid on. Wait until it is hot before deciding whether the sauce needs loosening; add small splashes of water or low-sodium stock only if necessary.

Reheat until thoroughly hot throughout; if checking with a thermometer, leftovers should reach 74°C / 165°F. Add fresh cilantro, lemon zest and toasted almonds after reheating.

For freezing, cool the tagine and pack it into airtight meal-sized portions. Freeze for up to 3 months for best quality, thaw overnight in the refrigerator when possible, and reheat thoroughly.

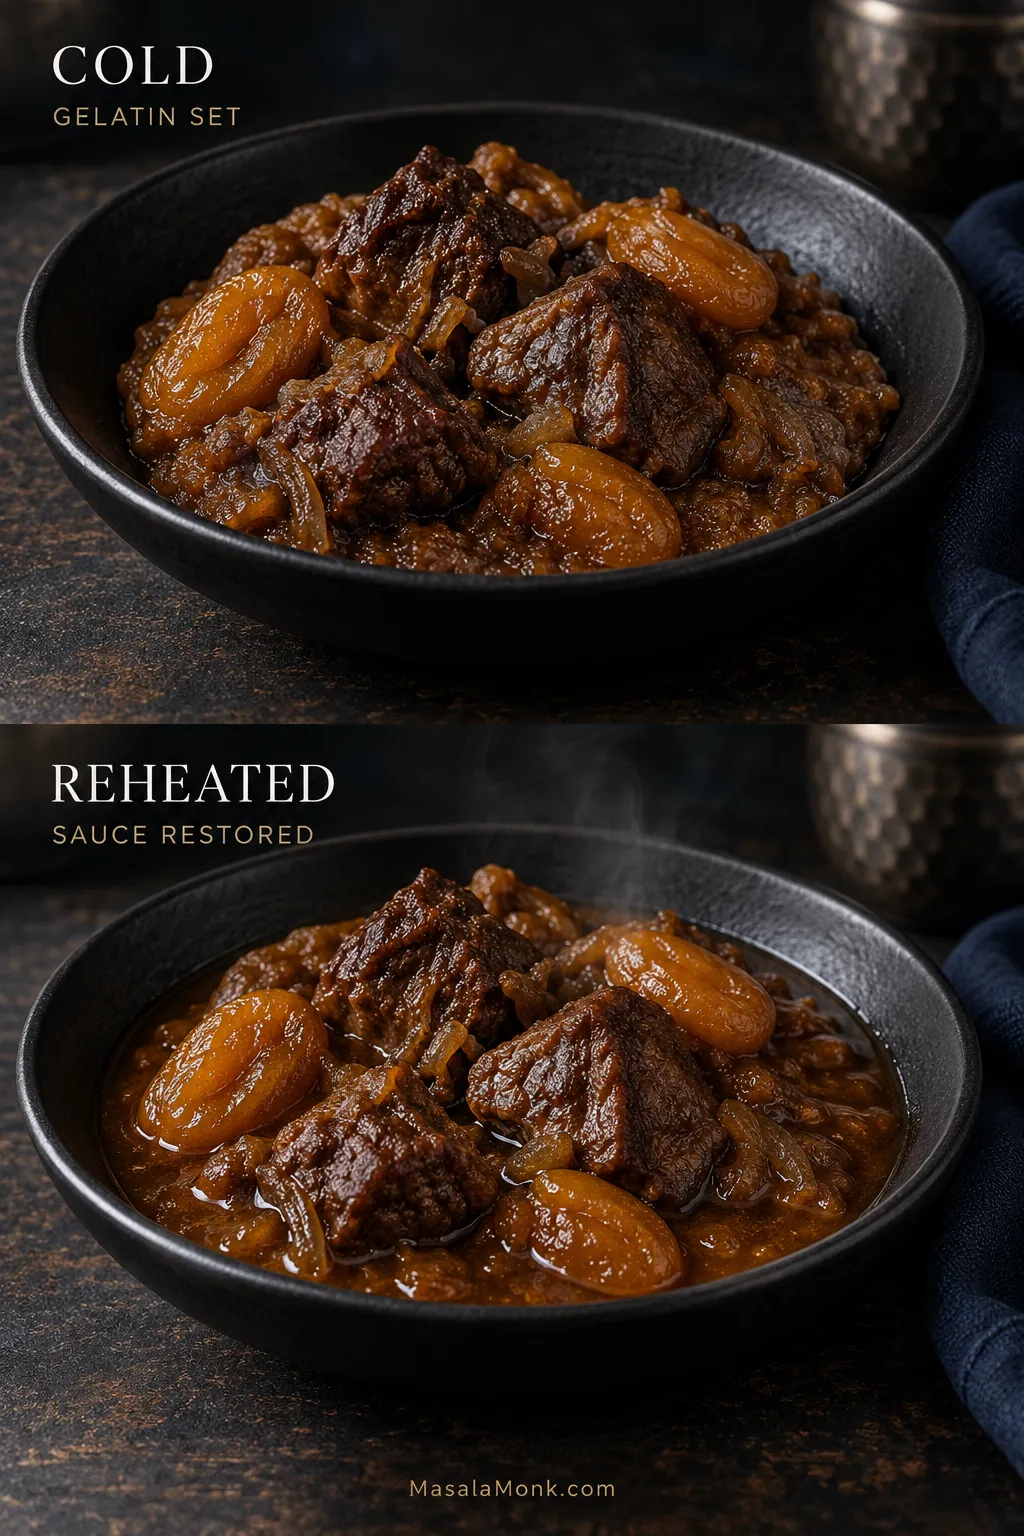
One last thing: a refrigerated tagine can look almost dry because lamb gelatin has set and the fruit is holding moisture. Give it heat before you give it stock. Much of the sauce returns as it warms.

Same bowl of lamb and apricot tagine shown cold with thick set sauce and reheated with looser glossy sauce and visible steam.
When reheating lamb tagine, judge the sauce by movement rather than shine. Cold gelatin can still catch the light and look moist even though it will not flow; once thoroughly hot, the sauce should move freely around the lamb again. Only after seeing that hot state can you tell whether refrigeration or reheating actually cost enough moisture to require extra liquid.

The useful moment to remember is not when the timer beeps. It is when you lift the lid, press a fork into one of the larger pieces and feel the lamb finally give. Lemon lifts the darker sauce, while the toasted almonds add a little crackle against all that softness.

Scatter over the cilantro, put bread within reach, and leave the serving spoon near the pot. The sauce at the bottom is worth going back for.

Posted on Leave a comment

Chicken Chow Mein Recipe: Easy Takeout-Style Noodles With Homemade Chow Mein Sauce

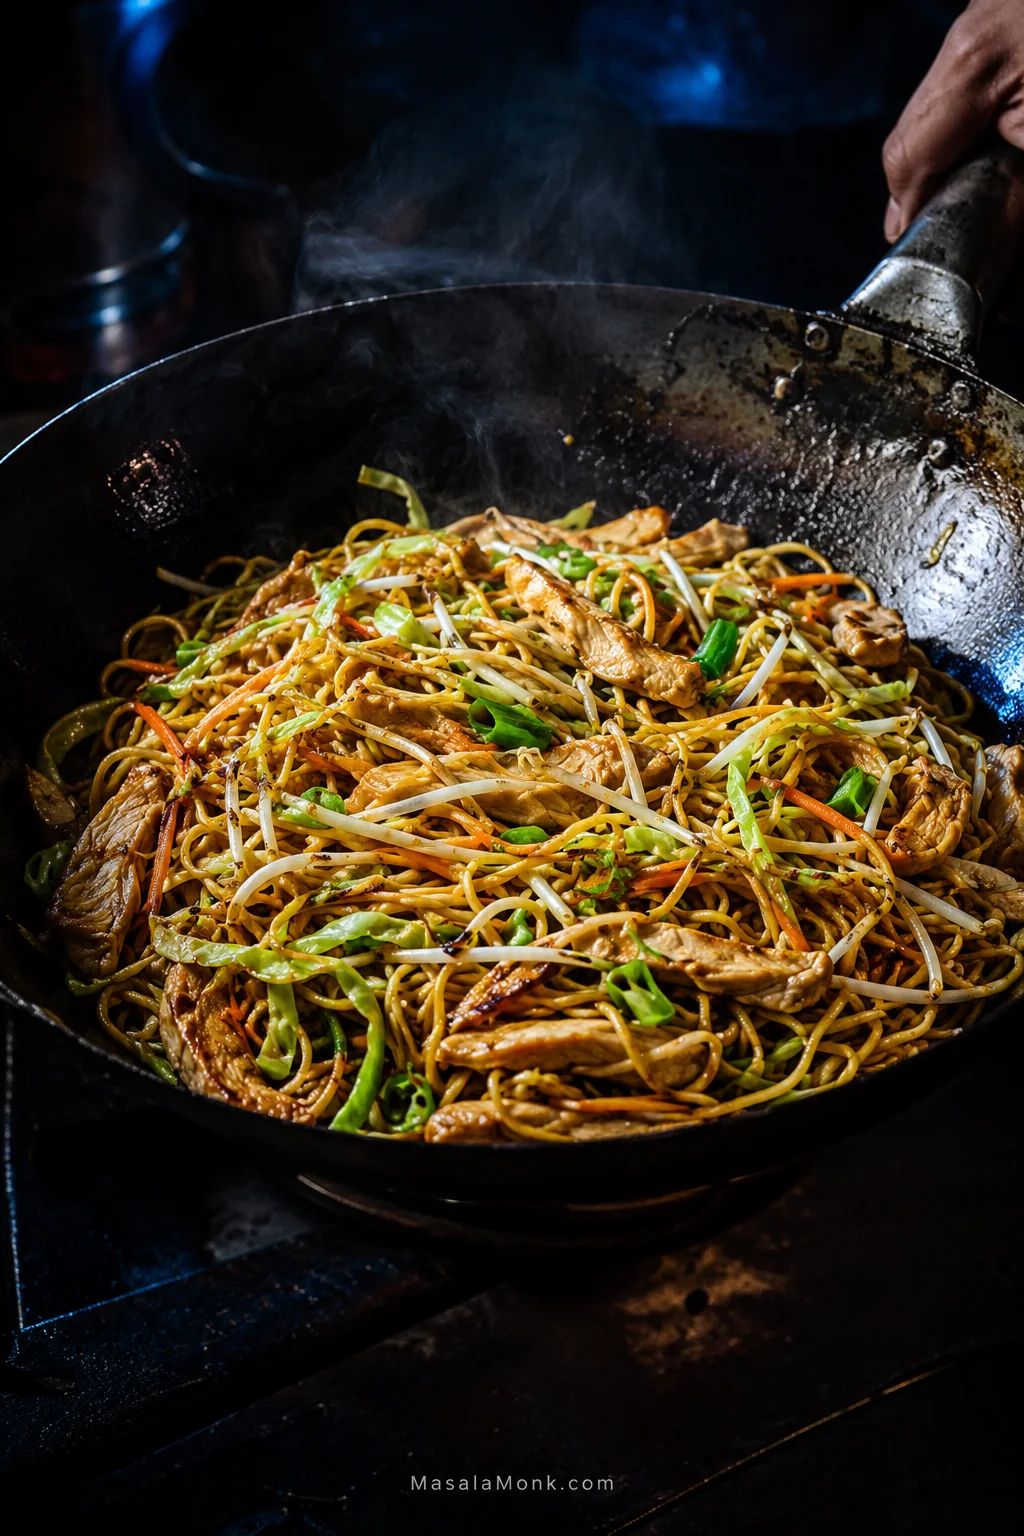
Chicken chow mein in a dark carbon-steel wok with thin chicken strips, medium-thin noodles, green cabbage, bean sprouts, carrots and scallions, with glossy strands and scattered browned edges.

Chow mein does not give you much time to think once the pan is hot. Chicken comes out, vegetables go in, noodles hit the hot surface, and the sauce has only a minute or two to turn everything glossy before dinner is ready.

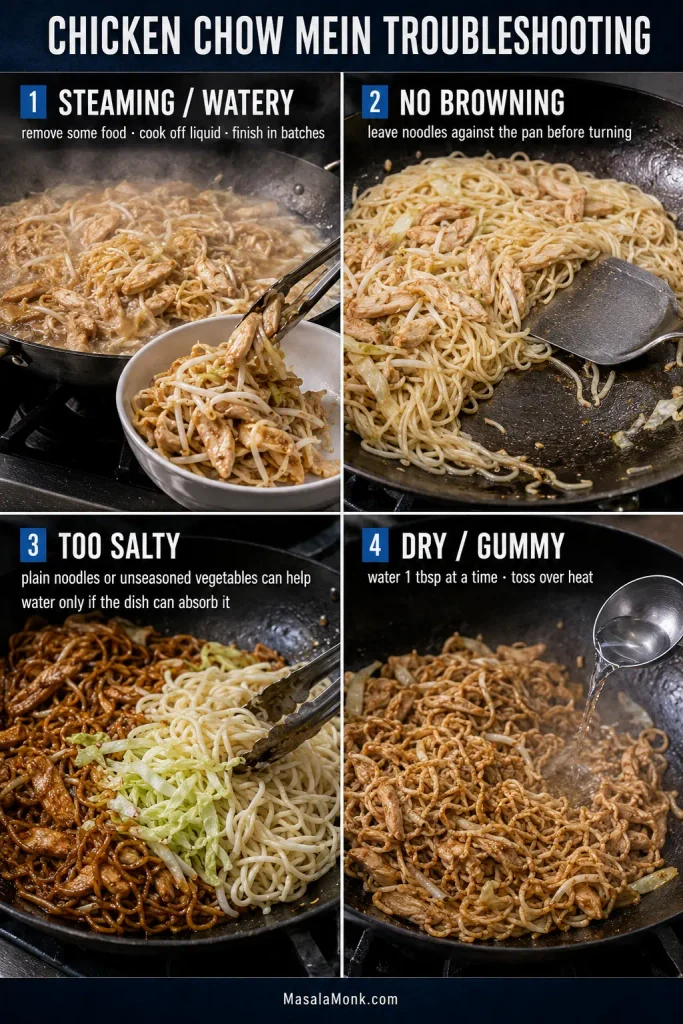
That speed is part of the appeal—and the reason homemade chicken chow mein can unravel so quickly. Noodles go in wet. Cabbage cools the pan. Chicken keeps cooking while everything else catches up. A little more sauce seems like the answer, and suddenly the noodles are soft instead of fried.

When it goes right, you can smell the difference before the pan reaches the table: toasted noodles, hot garlic and ginger, the savory edge of soy and oyster sauce. The chicken stays juicy, the vegetables snap, and a few noodle strands catch darker around the edges while the rest remain springy.

This recipe gets there by keeping the jobs separate. Thin strips of chicken get a short cornstarch marinade, the vegetables cook and come out, and the noodles get a mostly empty pan. Everything meets again only when each part is ready.

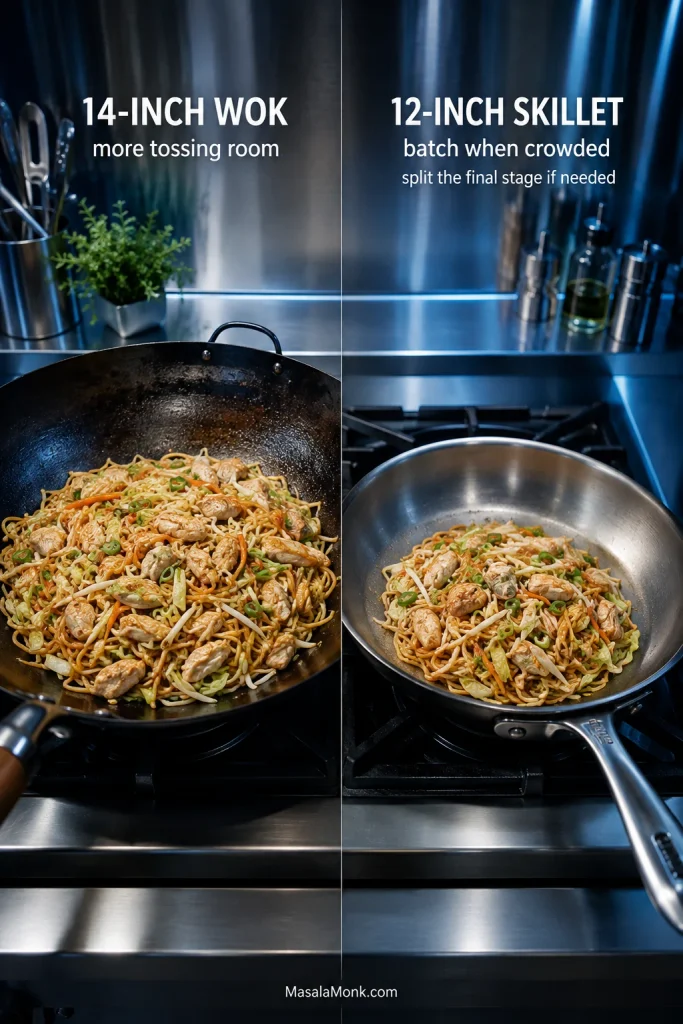
A wok is excellent, but you do not need restaurant equipment. A wide skillet works too.

Quick Answer

Good chow mein depends on timing and space as much as ingredients. The useful cue is simple: noodles should bend, separate and arrive at the wok without dripping. Anything already cooked can then make room for the next stage.


How to Make Chicken Chow Mein

Recipe card: servings, timings, ingredients, equipment and the complete method are below.

The chicken and vegetables come out before the noodles go in. It can look fussy on paper, but it makes the cooking easier: nothing sits around overcooking while you fight for space. It is one pan, just not one pile.

Once everything is sliced and the sauce is mixed, the actual stir-frying is only a handful of short stages.

Serves4 as a generous main course
DifficultyEasy, but fast-moving once the pan is hot
PrepAbout 20–25 minutes
CookingAbout 12–15 minutes
TotalAbout 35–40 minutes
Best pan14-inch / 35 cm wok; a roomy 12-inch / 30 cm skillet also works with batching

Chicken and Quick Marinade

  • 450 g / 1 lb boneless skinless chicken thighs or chicken breast
  • 1 tablespoon / 15 ml Chinese light soy sauce or regular/all-purpose soy sauce
  • 1 tablespoon / 15 ml Shaoxing wine
  • 1 tablespoon / about 8 g cornstarch (cornflour in the UK)
  • 1 tablespoon / 15 ml water
  • 1 teaspoon / 5 ml neutral cooking oil
  • ¼ teaspoon white pepper

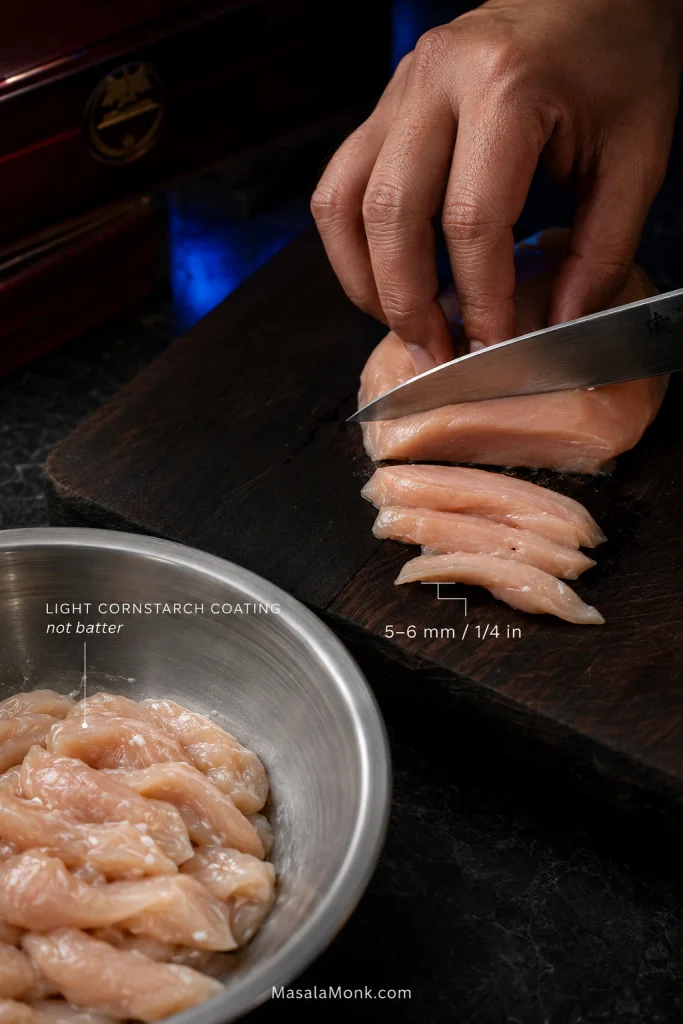
Cut the chicken about 5–6 mm / ¼ inch thick and roughly 5 cm / 2 inches long where practical. Slice chicken breast across the grain.

Thin strips of raw chicken being sliced for chow mein beside a small bowl of marinade on a dark kitchen work surface.
For cleaner, thinner chicken strips, start with meat that is very cold and slightly firm. Consistent pieces cook at a similar pace, which matters once a fast stir-fry leaves little time to chase individual pieces for doneness.

Sauce Ingredients

  • 2 tablespoons / 30 ml Chinese light soy sauce or regular/all-purpose soy sauce
  • 2 teaspoons / 10 ml dark soy sauce
  • 2 tablespoons / 30 ml oyster sauce
  • 1 tablespoon / 15 ml Shaoxing wine
  • 2 teaspoons / about 8 g sugar
  • ¼ teaspoon white pepper
  • 1 teaspoon / 5 ml toasted sesame oil
  • 1 teaspoon / about 3 g cornstarch (cornflour in the UK)
  • ¼ cup / 60 ml water or unsalted chicken stock
  • ¼ teaspoon MSG or ½ teaspoon chicken powder, optional

Keep another 2 tablespoons / 30 ml water beside the stove in case the noodles need loosening at the end.

Measured ingredients for homemade chow mein sauce arranged in small bowls and vessels, including soy-based sauces, seasonings and liquid ingredients.
Give the sauce one final stir before it hits the wok. That keeps the seasoning and cornstarch evenly dispersed, so the sauce behaves consistently from the first splash to the last.

Noodles, Vegetables and Aromatics

  • 250 g / 9 oz dried Chinese egg or dried chow mein noodles
  • Using fresh noodles? Use the package amount intended for about 4 servings. Fresh noodle products vary too much in hydration and cooking state for one reliable gram-for-gram conversion from dried noodles.
  • 3 tablespoons / 45 ml neutral high-heat oil such as peanut, canola, grapeseed or rice-bran oil, divided
  • 1 teaspoon neutral oil for drained noodles only if they are prone to sticking
  • 250 g / 9 oz green cabbage, thinly shredded
  • 1 medium carrot, about 100 g / 3½ oz, cut into fine matchsticks
  • 150 g / 5 oz bean sprouts
  • 4 scallions (spring onions), cut into 2.5–5 cm / 1–2 inch lengths
  • 3 garlic cloves, finely chopped
  • 15 g / ½ oz fresh ginger, finely grated or minced

Instructions

Have Everything Ready Before the Wok Gets Hot

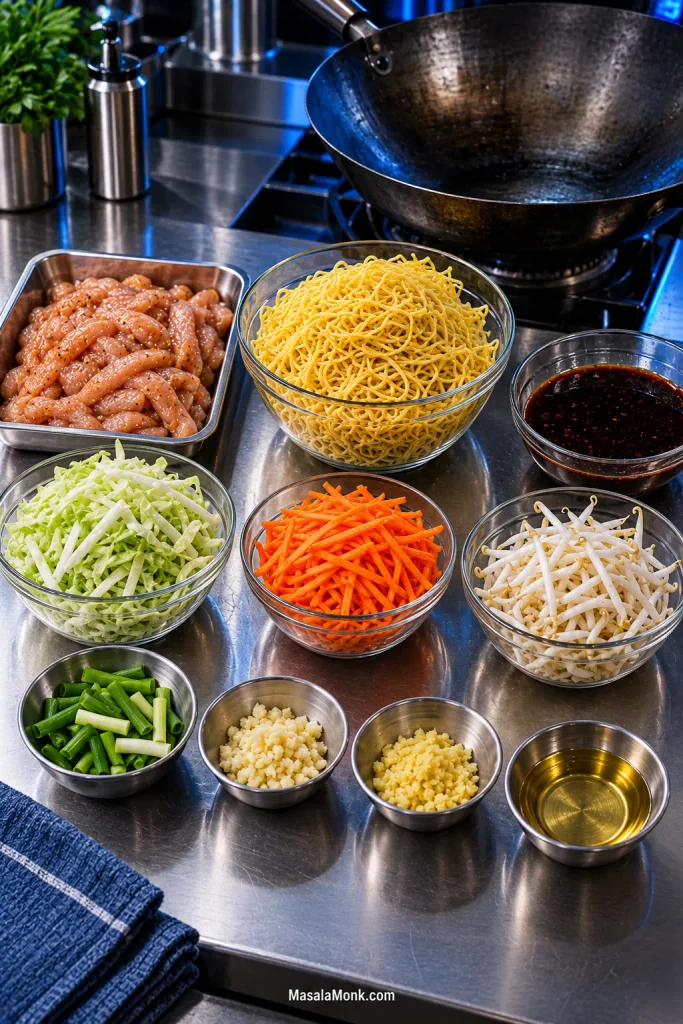
Prepared chicken chow mein ingredients beside an empty wok, including marinated chicken, noodles, sauce, cabbage, carrots, bean sprouts, scallions, garlic, ginger and cooking oil.
Arrange the station in cooking order: keep the quick finishing ingredients separate so they can hit the wok only when the final texture needs them.

Prep Before the Wok

  1. Mix the sauce. Whisk the light soy, dark soy, oyster sauce, Shaoxing wine, sugar, white pepper, sesame oil, cornstarch, water or stock, and optional MSG or chicken powder until smooth. Set it aside and stir again just before it goes into the pan; the cornstarch will settle.
  2. Cut the vegetables, then marinate the chicken. Prepare the cabbage, carrot, scallions, garlic and ginger first. On a separate or thoroughly cleaned board, slice the chicken and mix it with the marinade ingredients. Wash your hands and clean the knife, board and anything else that touched the raw chicken immediately. Leave the chicken for 10–15 minutes while you prepare the noodles.
  3. Prepare the noodles last. Start checking dried noodles about a minute before the package’s full cooking time. Stop when the strands bend and separate easily but feel firmer than you want to eat. Drain and briefly rinse under cool water, then shake the colander firmly. Spread the noodles loosely for a couple of minutes. Lift a small handful; dripping noodles need more draining or a gentle blot with a clean kitchen towel. Toss with 1 teaspoon oil only when the strands are prone to sticking.

Cook in Stages

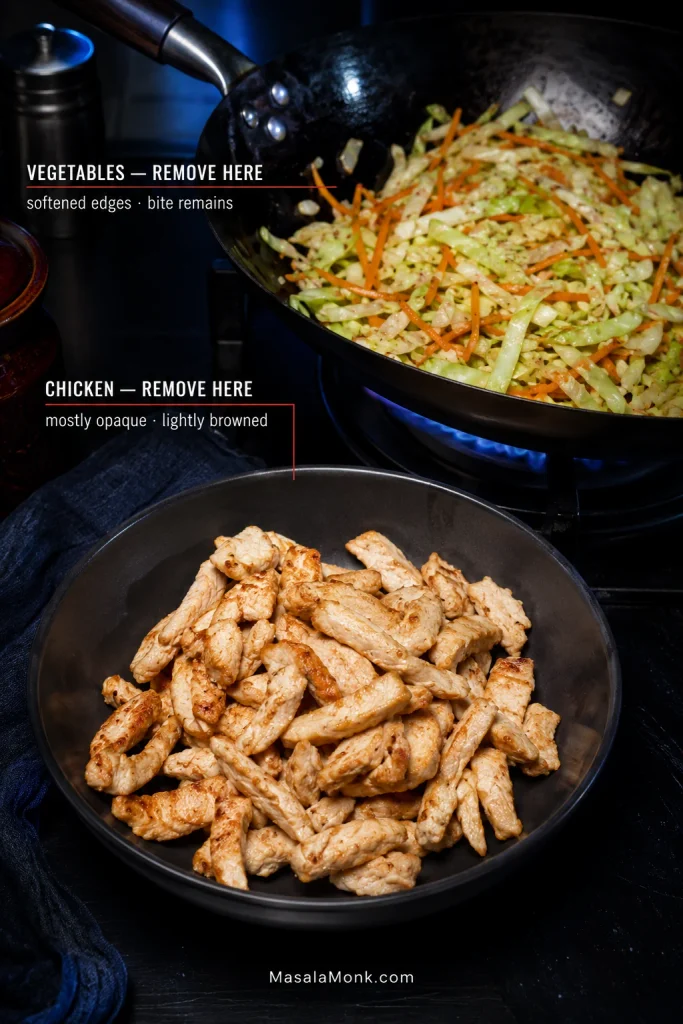
  1. Partially cook the chicken. Heat the wok or skillet over medium-high heat until hot. Add 1 tablespoon oil and spread the chicken into a loose layer. An immediate sizzle is what you want. Cook in two batches when the pieces would otherwise heavily overlap. Stir-fry for about 2 minutes, until most surfaces are opaque with a little browning. Transfer to a clean plate or bowl; the thickest pieces may remain slightly underdone inside.
  2. Cook the cabbage and carrot. Add another tablespoon oil and stir-fry for about 1½–2 minutes. The cabbage should soften at the edges while keeping some bite; the carrot should bend but not flop. Add the garlic and ginger for the final 20–30 seconds, just until their raw sharpness disappears and the aroma turns strong and savory. Let obvious liquid evaporate, then transfer everything to a bowl.
Lightly browned chicken strips and briefly stir-fried cabbage, carrots and other vegetables in a hot wok, with the vegetables still bright and structured.
Let excess cooking juices stay behind. The chicken and vegetables have already done their job; bringing that liquid back can make the final noodle toss wetter than intended.
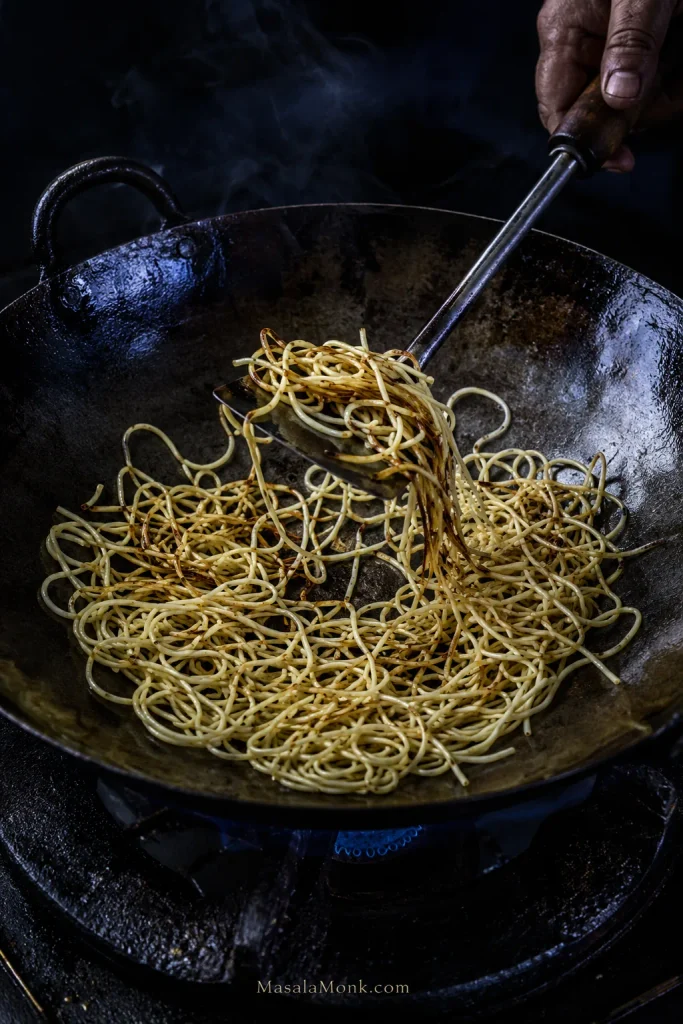
  1. Give the noodles the pan. Add the final tablespoon of oil and spread the noodles across as much hot surface as possible. Leave them alone for 30–45 seconds, then lift and turn. Continue for about 2 minutes. The pan should sound like frying, not simmering. Some strands will curl, wrinkle or darken while others stay pale. Uneven browning is fine. Those toasted patches give the noodles a deeper, nuttier edge that comes through after the sauce goes in.
Medium-thin yellow chow mein noodles spread across a dark wok with exposed metal and scattered golden-brown toasted patches, without chicken, vegetables or sauce.
Lift and turn the noodles in broad sections instead of stirring constantly. More strands get direct pan contact, so you build toasted edges without sacrificing the softer noodles underneath.

Finish and Serve

  1. Finish the stir-fry. Stir the sauce again and pour it over the noodles. Immediately return the chicken and vegetables. Leave behind any noticeable puddle of thin watery liquid on the chicken plate. Toss for 1–2 minutes, adding the reserved water 1 tablespoon at a time only when the noodles need loosening. A crowded 12-inch skillet is easier to handle as two half-batches.
  2. Add the bean sprouts and scallions. Give them 30–60 seconds. The sprouts should be hot, juicy and crisp. The thickest piece of chicken should reach 165°F / 74°C.
  3. Taste one forkful. It should be savory first, with mild sweetness and white-pepper warmth behind it. No single flavor component should dominate. The best forkful has chicken, cabbage or a crisp bean sprout tangled through noodles that are soft in places and toasted in others. Very little sauce should remain at the bottom. Turn off the heat and serve immediately.

Prefer softer noodles? Shorten the dedicated noodle-frying stage a little. For more browned edges, give them another 30–60 seconds of pan contact before the sauce goes in.

A Little Uneven Is Fine

The noodles should pull apart easily, the chicken should stay juicy, and some crunch should remain in the vegetables. Broken strands, darker patches and slightly softer cabbage are normal.

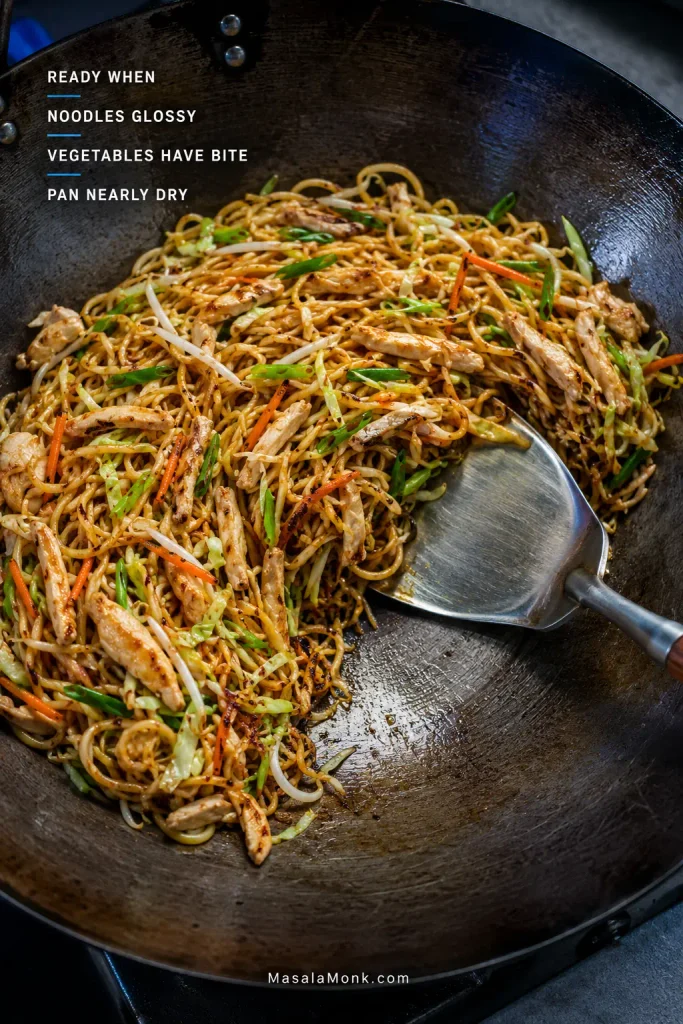
Finished chicken chow mein in a wok with separate glossy noodles, thin chicken strips, cabbage, bean sprouts, carrots and scallions, with little visible liquid underneath.
Use appearance and movement as the final check: glossy strands, little loose liquid, visible vegetables and chicken spread through the noodles. When those cues line up, turn off the heat and serve.

If this does not look like the chow mein you grew up ordering, you’re probably not misremembering it.

Why Chicken Chow Mein Looks Different Depending Where You Live

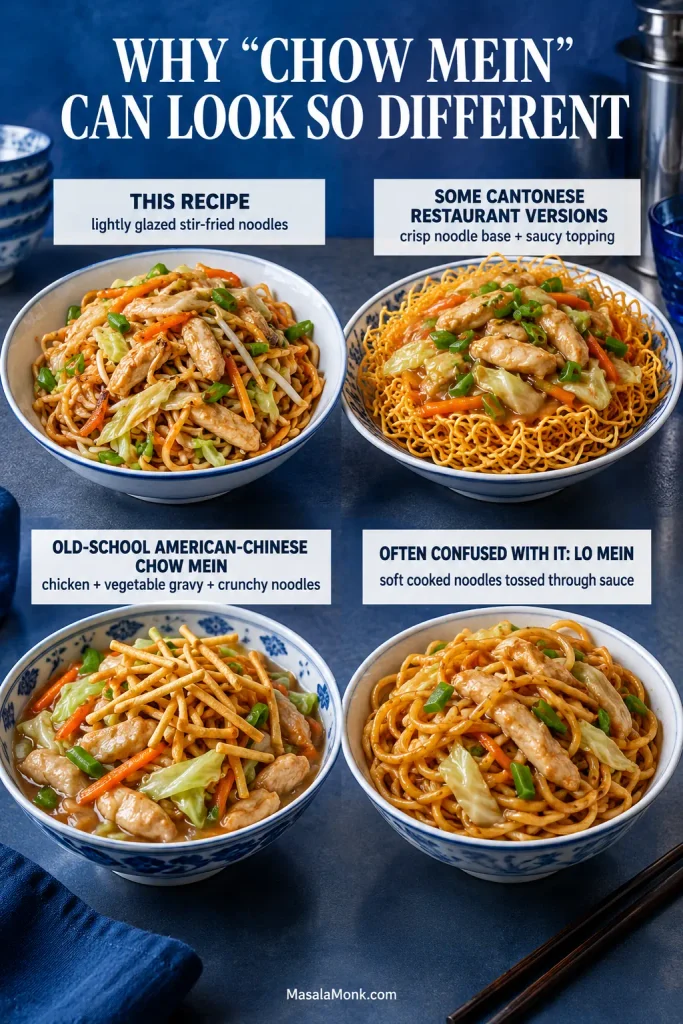
At its broadest, chow mein refers to noodles that are fried or stir-fried, but the dish can look very different depending on region and restaurant tradition. This recipe is the lightly glazed stir-fried-noodle style, with chicken and vegetables folded back through noodles that have had direct contact with the pan.

Some Cantonese restaurant versions use a crisp noodle base topped with saucy meat and vegetables. Some old-fashioned American-Chinese or Subgum-style chow mein is a chicken-and-vegetable gravy dish served with crunchy fried noodles.

Lo mein usually starts with cooked noodles that are tossed through sauce rather than deliberately fried for browned edges. It tends to be softer and more sauce-forward; this chow mein puts more emphasis on direct pan contact and noodle texture.

Here, the target is springy noodles, scattered browned edges, crisp vegetables and tender chicken.

Four noodle dishes compare lightly glazed stir-fried chicken chow mein, crisp noodles with a saucy topping, American-Chinese chow mein with gravy and crunchy noodles, and soft sauce-tossed lo mein.
Menu wording can hint at the expected texture: “crispy,” “pan-fried” or “lo mein” often point toward different noodle treatments. Regional usage varies, though, so the dish description matters more than the name alone.

The Chow Mein Noodle Guide

If you’ve ever followed the noodle packet perfectly and ended up with a sticky heap in the wok, you may not have cooked the noodles “wrong.” They may simply have been too soft—or too wet—for another round of heat.

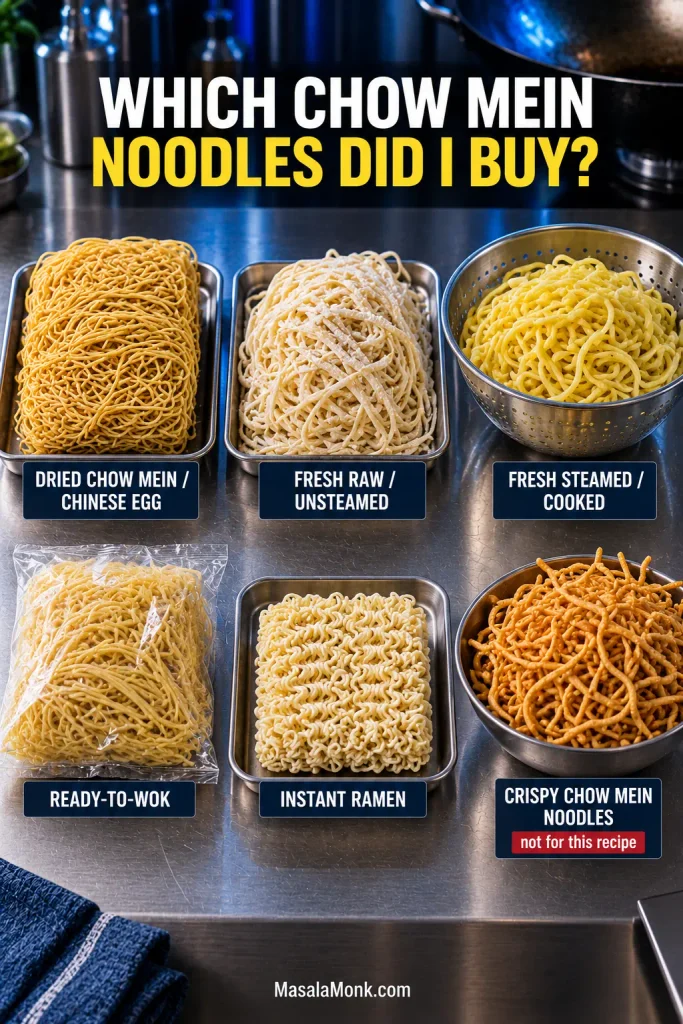
Open the packet before the water boils and see what you actually bought. Raw noodles, steamed noodles and ready-to-wok noodles can look remarkably similar while starting at very different stages of cooking.

Which Chow Mein Noodles Did I Buy?

Guide comparing several noodle products used or sold for chow mein, including fresh or steamed noodles, dried noodles and crisp fried noodles, with the crispy product identified separately.
Package names are clues, not guarantees. Two products labeled “chow mein noodles” may have undergone very different amounts of cooking, so the preparation directions on an unfamiliar packet are often more useful than the product name itself.
If the package says…What you probably haveWhat to do
Dried chow mein / Chinese egg noodlesDry and uncookedBoil until flexible but firmer than serving doneness, then cool and drain thoroughly.
Fresh raw / unsteamed egg noodlesFresh but uncookedCook according to the package, often with a brief boil or blanch. Stop while they retain some firmness.
Fresh steamed / cooked noodlesAlready substantially cookedUsually loosen or briefly blanch rather than giving them a full boil.
Ready-to-wok / straight-to-wok noodlesHydrated and prepared for quick pan cookingLoosen as directed and avoid unnecessary boiling. Watch for extra surface moisture.
Instant ramenDry and very quick-cookingDiscard the seasoning packet and cook only until barely flexible.
Crispy chow mein noodlesAlready fried and crunchyNot the noodle for this recipe.

A note on “Hong Kong-style” noodles: the name describes a noodle style, not one universal preparation state. They may be sold raw, steamed or dried, so the package directions matter more than the words “Hong Kong-style” on the front.

Fresh noodle labels can be maddeningly vague. One yellow packet wants several minutes in boiling water; the packet beside it wants to go almost straight into the wok. The Woks of Life’s Chinese noodle guide (opens in a new tab) is useful when the refrigerated case looks like a wall of nearly identical noodles.

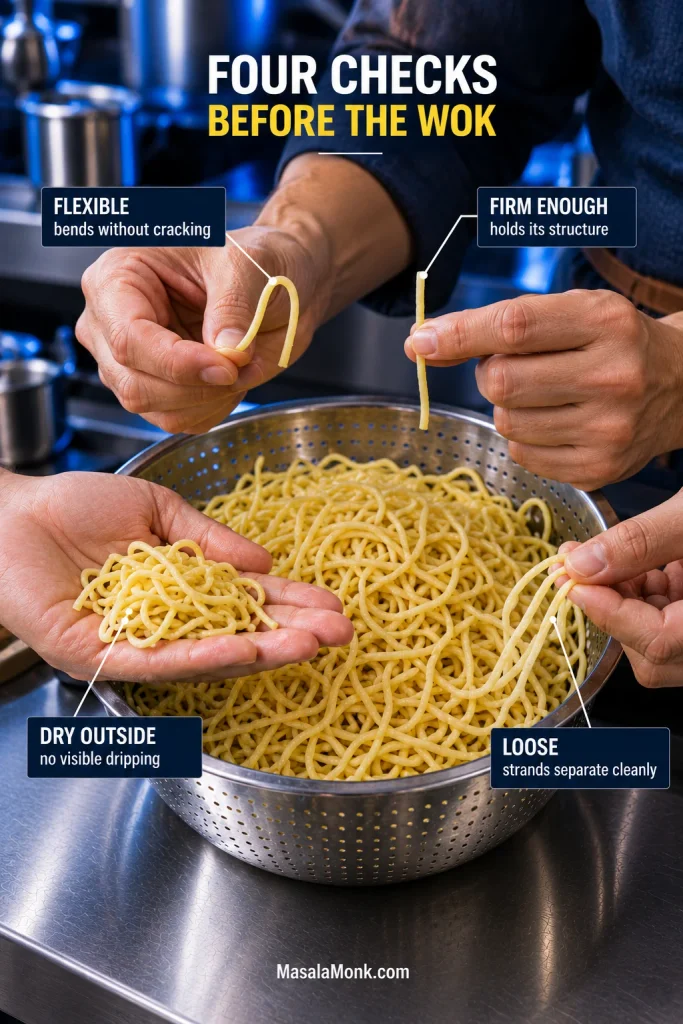
Four Things to Check Before the Wok

  1. Flexible: the noodle bends and separates without cracking.
  2. Firm enough: noodles you boil yourself should remain slightly underdone; pre-cooked noodles need enough firmness to handle another brief cook.
  3. Dry outside: the strands are not carrying obvious water into the pan.
  4. Loose: the noodles are separate instead of compressed into one warm, starchy block.
Four noodle readiness checks labeled Flexible, Firm Enough, Dry Outside and Loose, showing a bent strand, an intact strand, surface-dry noodles and separated strands.
Each noodle check guards against a different failure: flexibility limits breakage, firmness survives the second cook, a dry exterior protects pan heat, and loose strands expose more noodle surface to the wok. Together, they predict behavior rather than merely doneness.

Doneness and dryness are separate problems. A noodle can be cooked correctly and still be wet enough to cool the pan. It can also be dry and separate but already too soft to handle another few minutes of heat.

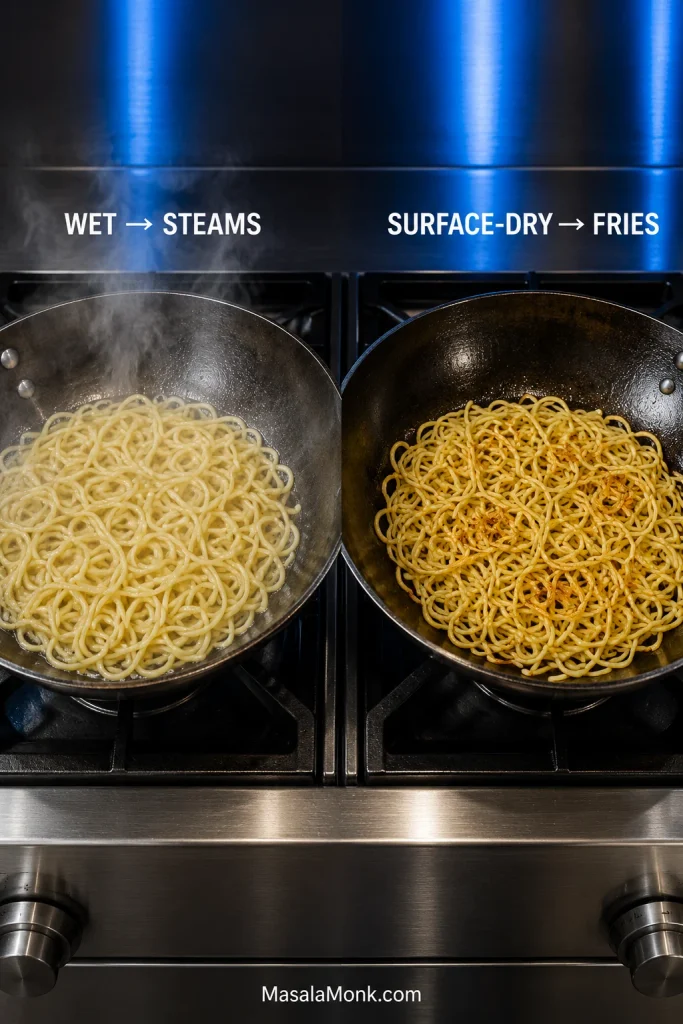
If water drips when you lift a handful, give the noodles more time in the colander or blot them gently. Wet noodles steal heat.

Two woks compare wet noodles producing heavy steam with surface-dry noodles making direct pan contact and developing browned patches; labels read “Wet → Steams” and “Surface-Dry → Fries.”
“Surface-dry” does not mean dehydrated, cold or stiff. Chow mein noodles can still be warm and flexible; the useful difference is that free water is no longer coating them and consuming the wok’s heat before frying can begin.

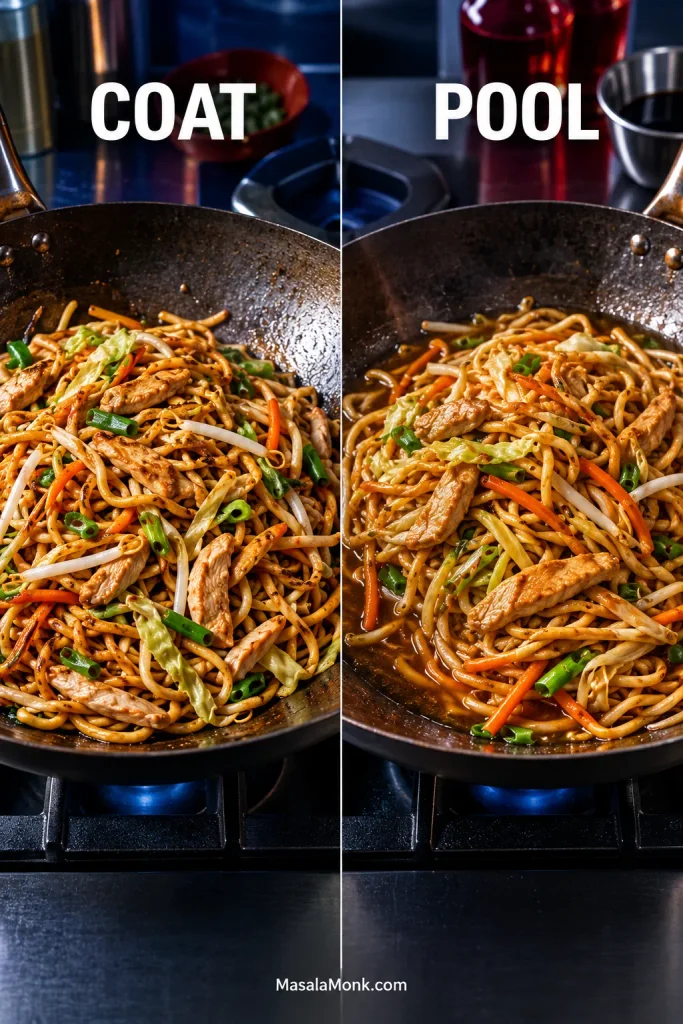
Homemade Chow Mein Sauce: Coat, Don’t Pool

For this version, a good chow mein sauce is almost invisible once dinner is finished. You should taste it everywhere without seeing much of it underneath.

Matched pans labeled Coat and Pool compare glossy separated chicken chow mein with little liquid underneath against wetter noodles sitting in visible dark sauce.
Judge chow mein sauce after it has been tossed over heat for a moment, not at the instant it enters the wok. Cornstarch thickens as it heats, while chicken and vegetables can release moisture of their own, changing the final consistency.

If the noodles taste salty but flat, more soy only pushes the salt higher. Deeper flavor also comes from oyster sauce, Shaoxing wine, white pepper, aromatics and the browning the noodles picked up in the pan.

Light or all-purpose soy does most of the seasoning. Dark soy is there mainly for color and deeper soy flavor. Oyster sauce gives the noodles body and a little sweetness; Shaoxing brings an aromatic note that suits this version. White pepper adds warm, earthy background heat.

One label is worth checking closely here: Shaoxing products sold specifically as cooking wine sometimes contain added salt. That can push an otherwise balanced sauce much farther than expected.

Toasted sesame oil goes into the sauce for aroma, not into the wok as the main frying oil. Sugar softens the salty edges, while the small amount of cornstarch helps the sauce cling. MSG or chicken powder is optional for extra savory depth. You do not need a separate seasoning packet; this sauce already does that job.

The homemade stir-fry sauce guide (opens in a new tab) uses many of the same building blocks for other stir-fries.

When the balance is right, the noodles remain the main event—only darker, fuller and more savory, with an occasional toasted edge coming through.

Tender Chicken, Vegetables With Some Bite

Chicken thigh gives you a little more margin before it dries out. Breast works well too, especially when thinly sliced across the grain. The cornstarch leaves a light coating around either cut during both trips through the heat; baking soda is not necessary for this method.

Keep the vegetables long and fairly thin. Cabbage works well in narrow ribbons, carrots in matchsticks and scallions in 1–2 inch lengths. Once everything comes back together, the chicken and vegetables should weave through the noodles rather than sitting in separate piles on top.

Wok or Skillet?

On a normal home stove, listen to the pan. A sharp sizzle means the food is frying; a wet, quiet simmer means moisture is taking over.

  • 14-inch / 35 cm flat-bottom carbon-steel wok: the best size for the full recipe. Wok shape and burner strength vary, so split the final stage if it feels cramped.
  • 12-inch / 30 cm large skillet: completely workable. Batch the chicken when needed and expect two half-batches when everything goes back in if the skillet is shallow.
  • Coated nonstick pan: usable, but follow the manufacturer’s heat guidance rather than automatically heating it until it smokes.
Large carbon-steel wok holding chicken chow mein beside a 12-inch stainless skillet with a smaller batch, illustrating the difference in usable cooking and tossing space.
A wok gives you more vertical room to move food; a skillet depends more on its flat cooking surface. That makes spreading and batching especially useful as the pan fills.

A home burner will not give you exactly the same smoky char and aroma as very high-heat restaurant wok cooking. That’s fine. Good direct pan contact gives the noodles plenty of toasted character.

Cooking for more people? Make two complete batches. Double the ingredients, not the pan load.

Chicken Chow Mein Troubleshooting

If dinner is already in the pan, don’t start over. Find the problem that looks familiar and fix that first. You can analyze dinner later.

Four troubleshooting scenes show watery steaming chow mein with food being removed, pale noodles resting against the pan, plain noodles and cabbage added to an overly seasoned batch, and water added to dry clumped noodles.
Before changing the seasoning, identify the actual failure: too much moisture, poor pan contact, too much salt or dry/tight noodles. Fix the physical problem first; otherwise one rescue can create another.

Before the wok

ProblemFix
Noodles already too softCool and drain immediately. Keep their later frying and saucing brief.
Noodles stuck in one blockLoosen gently. A quick cool rinse can help boiled dried noodles; drain and dry them again afterward.
Vegetables dripping wetPat them dry before they enter the pan.
Sauce tastes far too saltyDilute it slightly with water before cooking. Check the stock, chicken powder and cooking wine too.
Cornstarch lumpyWhisk the lumps smooth with a small amount of liquid before mixing them back into the sauce.

While frying

ProblemFix
Pan filling with water / everything steamingStop adding food. Remove some if needed and let the liquid cook off before continuing; finish in batches.
Noodles stickingCheck crowding and moisture before adding more liquid. Lift gently instead of scraping hard.
No noodle browningGive the strands 30–45 seconds of contact before turning instead of stirring continuously.
Chicken cooking too fastTake it out and return it near the end.
Noodles and vegetables will not mixLift and toss. Loosen clumps gently instead of chopping through the strands.

After the sauce goes in

ProblemFix
Too saltyAdd plain noodles or extra unseasoned vegetables if you have them, or a small splash of water if the dish can absorb it. Sugar will not remove salt.
Too sweetAdd a small splash of water and toss. Extra plain noodles or vegetables help even more.
BlandCheck salt first. Then try a little oyster sauce, white pepper or optional MSG/chicken powder. Add soy only a teaspoon at a time.
Too dry or sauce gummyAdd water 1 tablespoon at a time and toss over heat until the noodles loosen and regain their gloss.
Too wetKeep the pan uncovered and reduce the liquid. Remove some food first if necessary.
Chicken toughNext time, slice it thinner and remove it sooner during the first fry.

Substitutions and Variations

Chow mein substitution guide showing Chinese noodles with instant ramen and thin pasta, dark soy sauce, oyster-style sauces and small vessels representing Shaoxing wine alternatives.
When using instant ramen, the noodle block is the useful substitute—not the seasoning packet. The packet can push the dish far saltier than the homemade sauce is designed to be.
Instead of…Try…Expect…
Chow mein / Chinese egg noodlesInstant ramen — the closer quick substituteThinner, softer noodles. Discard the seasoning packet and cook only until barely flexible.
Chow mein / Chinese egg noodlesThin spaghetti or angel hair — a pantry fallbackA firmer, more pasta-like chew.
Dark soy sauceOmit it rather than replacing it volume-for-volume with regular soyThe noodles will be paler, but the sauce balance stays closer to the original.
Oyster sauceVegetarian mushroom oyster-style sauceThe closest straightforward replacement.
Oyster sauceHoisin sauceNot a neutral swap; the result will be sweeter. Reduce or omit the sugar.
Shaoxing wineDry sherryA similar aromatic role.
Shaoxing wineStock or waterLess aromatic depth, but the method works.
Bean sproutsExtra cabbage, bok choy or another crisp vegetableA different crunch without changing the basic method.

For chicken and mushroom chow mein: add about 150 g / 5 oz sliced mushrooms and reduce the cabbage to about 150 g / 5 oz. Cook the mushrooms until most of the water they release has evaporated. Keeping the full cabbage quantity as well works better when the mushrooms get their own turn in the pan.

Make it spicy

Add chili crisp, chili oil, sliced fresh chili or a little chili-garlic sauce at the end. Sweet chili sauces change the balance, so use less sugar in the chow mein sauce when needed.

Dietary adjustments

Lower sodium: use lower-sodium soy sauce and unsalted stock, skip the chicken powder, and compare the sodium on the noodles, oyster sauce and cooking wine. Some Shaoxing cooking wines contain added salt.

Gluten-free: use noodles labeled for a gluten-free diet, certified gluten-free tamari or soy sauce, and a gluten-free oyster-style sauce. Check the Shaoxing wine and optional chicken powder too; many Shaoxing products are not gluten-free. Use a verified gluten-free dry sherry or sake, or replace the wine with stock or water when needed.

Halal: use halal-certified chicken and check the noodles, sauces and stock according to the requirements you follow. Replace Shaoxing wine with stock, water or an appropriate certified alcohol-free cooking seasoning.

Using leftover cooked chicken: skip the raw-chicken marinade and add sliced cooked chicken near the end, giving it enough time to reheat fully to 165°F / 74°C. Adding it much earlier usually dries it out.

Make-Ahead, Storage and Reheating

The sauce, cabbage and carrot can be prepared up to a day ahead and refrigerated separately. Raw chicken can be sliced ahead too, but keep it covered and completely separate from the vegetables. Leave the bean sprouts and scallions until close to cooking time.

If you need to boil the noodles ahead, cool them promptly, drain and surface-dry them well, toss with a very small amount of neutral oil and refrigerate them separately.

Cool leftover chicken chow mein promptly and refrigerate it in a covered container for up to 3–4 days. The USDA’s food-safety guidance (opens in a new tab) recommends reheating leftovers to 165°F / 74°C.

A skillet or wok gives chilled noodles the best chance of loosening without turning mushy. Add about 1 tablespoon water per serving and toss over medium-high heat until steaming hot and the added water has mostly evaporated.

Leftover chicken chow mein reheating in a dark skillet while a hand adds a tablespoon of water near the pan edge, with steam rising from noodles, chicken and vegetables.
Let steam loosen cold noodle clumps first rather than forcing them apart with a spatula. Once the strands relax, gentle tossing reheats them with less tearing.

For the microwave, cover loosely and heat in short intervals, stirring between them.

Freezing is possible but not ideal. The noodles soften and bean sprouts lose much of their crunch after thawing.

What to Serve With Chicken Chow Mein

Chicken chow mein is already a full meal, so sides work best when they bring a different texture or temperature rather than more heaviness. A small bowl of egg drop soup (opens in a new tab) keeps things light and broth-based, while a cool cucumber salad (opens in a new tab) gives the hot, savory noodles a crisp, sharp contrast.


Once the noodles are glossy, the vegetables still have some bite and the pan is nearly dry, dinner is done.

Get the chow mein onto plates while it still looks a little unruly. Browned strands, crisp bean sprouts and chicken tucked through the noodles are exactly where they should be.

Close-up chopsticks lifting glossy chow mein noodles with a thin browned chicken strip, cabbage, bean sprout and scallion against a dark background.
The best bite is intentionally varied: toasted noodle edges beside softer strands, tender chicken and a crisp sprout. Serve immediately, while those contrasts are still distinct.
Posted on Leave a comment

Chile Relleno Casserole Recipe: Easy, Cheesy & Full of Roasted Poblano Flavor

A lifted square of chile relleno casserole showing two broad roasted poblano layers, melted pale cheese, tender egg binder and a browned cheese top.

Cut into a good chile relleno casserole and you should still know where the poblanos are. Broad layers of roasted green chile run through the slice, molten cheese sits between them, and the egg around everything is tender and lightly puffed rather than taking over the plate.

Traditional chiles rellenos ask you to roast, peel, stuff, batter and fry individual peppers without letting them split or spill their cheese. This casserole is much less demanding. A poblano tears while you peel it? Piece it together in the dish and keep going. No toothpicks, no coating peppers one by one, and no pot of frying oil.

The payoff is a forkful with soft roasted poblano, stretchy Oaxaca or Monterey Jack and just enough tender egg around the edges to hold everything together.

The Chile Relleno Casserole Formula

Chile first. Cheese second. Eggs hold it together.

Roast 6–8 medium-large poblanos / about 700–900 g (1½–2 lb), open them flat and use enough for two nearly complete chile layers. Layer with 400 g / 14 oz Oaxaca or Monterey Jack, or a mixture of the two.

Whisk 6 large eggs + 60 ml / ¼ cup milk + 40 g / about ⅓ cup flour + ½ teaspoon baking powder until completely blended with a light layer of foam across the surface. Pour over the chile and cheese and bake in a 9-inch / 23 cm square dish at 350°F / 175°C conventional / 160°C fan.

Start checking at 35 minutes. Many casseroles in this pan finish around 35–45 minutes. The center should be set rather than wet or sloshy and should reach 160°F / 71°C if checked with a thermometer. Rest for 10 minutes before slicing.

Labeled casserole cross-section with two dominant roasted poblano layers, generous melted cheese and small pockets of tender egg binder between them.
Poblano should read as the structure of the slice; cheese fills the seams, while the egg binder nearly disappears between them.

Choose Your Chile: Fresh, Canned or Frozen

Fresh poblanos give you the strongest roasted-pepper character. Whole canned green chiles turn the dish into a genuine shortcut. Frozen roasted green chiles save the roasting and peeling.

Easy does not mean instant when you start with fresh poblanos. They still need time to blister, steam and peel. The easy part is skipping the fiddly stuffing, battering and frying.

Canned chiles have their own good reason to exist. This is the route for a night when roasting peppers is the difference between making the casserole and not making it.

How Each Green Chile Changes the Casserole

Guide comparing fresh poblanos, whole canned green chiles, frozen roasted green chiles and diced canned chiles for flavor, convenience and layer definition.
Whole chiles preserve recognizable layers; diced chiles disappear into the binder much more easily.
ChileBest forWhat to expect
Fresh poblanosRoasted-pepper depthFirm, distinct chile layers; requires roasting, steaming and peeling.
Whole canned green chilesThe fastest routeSofter and milder, with broad pieces that still layer well.
Frozen roasted green chilesSkipping the roasting and peelingAlready roasted and convenient; thaw completely before using.
Diced canned green chilesUsing what you already haveThe least layered choice. Small pieces mingle more readily with the egg.

Hatch chile can be used fresh, frozen roasted or canned; there is a fuller Hatch variation below. Whatever form you use, opened whole chiles should give you enough flesh to cover the baking dish twice with only small gaps.

Using canned or thawed frozen chiles? Drain them thoroughly and blot away surface moisture before layering.

Whole square chile relleno casserole in a cobalt baking dish with a golden, blistered melted-cheese surface and browned edges.
Look for a deeply golden, blistered cheese top with dark roasted poblano edges peeking through around the pan.

Make It Now: Chile Relleno Casserole

Recipe at a Glance

Yield
6 generous or 8 smaller servings

Prep
About 30–40 minutes

Bake
About 35–45 minutes

Rest
10 minutes

Oven: 350°F / 175°C conventional / 160°C fan
Pan: 9-inch / 23 cm square baking dish
Total from raw poblanos: about 1 hour 15 minutes to 1 hour 35 minutes
Canned-chile shortcut: about 10–15 minutes prep and roughly 55–70 minutes total including the rest

Ingredients

  • 6–8 medium-large poblano peppers, about 700–900 g / 1½–2 lb
  • For the canned shortcut, use instead: 3–4 (7-ounce / about 200 g) cans whole green chiles, drained very well, or enough for two substantial layers
  • 400 g / 14 oz Oaxaca or Monterey Jack cheese, or a mixture of the two, shredded and divided
  • 6 large eggs
  • 60 ml / ¼ cup whole milk
  • 40 g / about ⅓ cup all-purpose flour
  • ½ teaspoon baking powder
  • ¾ teaspoon fine salt. Use closer to ½ teaspoon when both the canned chiles and cheese are particularly salty.
  • ¼ teaspoon freshly ground black pepper
  • ½ teaspoon garlic powder, optional
  • Butter or neutral oil, for the baking dish

For serving, optional: red chile or tomato sauce, salsa verde, avocado, crema or sour cream, cilantro and warm homemade corn tortillas.

Useful equipment: tongs, a rimmed sheet pan, a covered bowl for steaming, a 9-inch square baking dish and a whisk. An instant-read thermometer is handy but optional.

Making the canned-chile version? Drain the whole chiles very well and blot them dry. Skip Steps 1 and 2 and begin with Step 3: Layer the chile and cheese.

How to Make It

1. Char the poblanos

Set the broiler to high and arrange an oven rack about 5–6 inches / 13–15 cm from the heat. Line a rimmed sheet pan with foil and arrange the poblanos on it.

Broil, turning as needed, until the skins are well blistered and blackened in patches. Depending on pepper size and your broiler, this usually takes 8–15 minutes.

The skin should look loose and charred while the flesh underneath still has enough body to pick up with tongs. By now the kitchen should smell roasted and a little smoky. Stop before the peppers slump into shapeless bags.

No broiler? Char the poblanos directly over a gas flame or on a hot grill, turning with tongs until the skins blister well. A very hot oven works too; it usually takes longer and gives less concentrated charring.

Three poblano peppers labeled too pale, ready and too far, showing the progression from lightly browned skin to well-blistered skin to a collapsed over-roasted pepper.
Use char coverage, not the clock: broad blistering with a pepper that still holds its shape is the target.

2. Steam, peel and dry

Move the hot peppers into a bowl and cover tightly with a plate, lid or foil. Leave them for about 10 minutes.

Peel away the loosened skin, then open each poblano lengthwise. Remove the stems, seeds and thick pale ribs.

A few stubborn black flecks are fine. Your fingers will probably get messy; that’s still easier than scraping so hard that half the pepper comes away with the skin. Lay the opened poblanos on paper towels and blot both sides well.

Anyone sensitive to chile oils may prefer kitchen gloves here, especially when cleaning a large batch. Either way, avoid touching your eyes until your hands are washed.

Hands peeling loosened blackened skin from a steamed roasted poblano, revealing the soft dark-green pepper underneath.
Don’t sacrifice pepper flesh for perfectly bare skin; a few charred flecks are harmless.

Are the skins still clinging? See why roasted poblanos sometimes refuse to peel cleanly.

3. Layer the chile and cheese

Lower the oven to 350°F / 175°C conventional / 160°C fan. Lightly grease the baking dish.

Cover the bottom with half of the opened chiles, overlapping torn pieces where needed. Scatter over about one-third of the cheese. Add the remaining chile layer, then another third of the cheese. Save the final third for the top.

It does not need to look tidy. The peppers can overlap and the cheese can fall where it falls; once everything melts and puffs in the oven, those rough edges disappear into the slice.
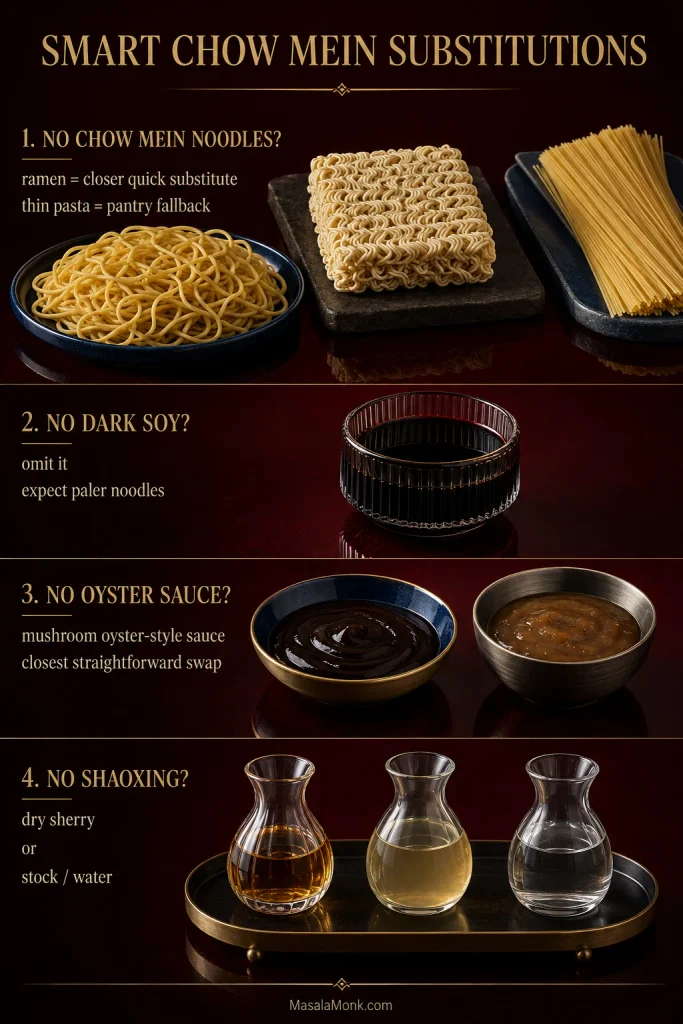
Layering guide showing two layers of broad roasted poblano pieces with shredded pale cheese, plus an assembled baking pan with overlapping torn peppers.
Aim for broad coverage rather than neat symmetry; overlaps and torn poblano pieces disappear into the finished casserole.

4. Mix the eggs last

With the casserole layered and the oven ready, whisk the flour, baking powder, salt, pepper and optional garlic powder together in a large bowl. Whisk in the milk until smooth, then add the eggs.

Whisk vigorously for about a minute, until everything is completely blended and a light layer of foam sits across much of the surface. There is no need to separate the eggs.

5. Pour, top and bake

Pour the egg mixture slowly over the chile and cheese, moving around the baking dish so it reaches the gaps. Give the dish a gentle jiggle, scatter over the remaining cheese and put it straight into the oven.

Lightly foamy egg mixture being poured from a glass bowl into a casserole layered with broad roasted poblanos and shredded pale cheese.
Fine bubbles are enough; pour slowly so the egg mixture slips into the gaps instead of forming a thick layer on top.

Start checking at 35 minutes. Many casseroles in this pan finish around 35–45 minutes. A refrigerator-cold casserole, juicier peppers or a heavy ceramic dish can push the bake a little longer.

Look past the melted cheese on top. The edges should be puffed and lightly golden. The middle should be set, with no obvious liquid sloshing when the dish moves gently. An instant-read thermometer should register 160°F / 71°C near the center.

A browned top with a loose middle simply needs more time. Cover loosely with foil if the color is already where you want it.

Unsure about the center? See the detailed doneness cues before you pull the casserole.

6. Rest before slicing

Leave the casserole alone for 10 minutes. Ten minutes feels annoyingly long when the cheese is bubbling, but cutting immediately is how a good casserole turns into a soft heap on the plate.

Wait closer to 15 minutes when neat slices matter more than maximum cheese stretch.

Comparison of a soft chile relleno casserole slice cut too soon and a cleaner, more structured slice after resting.
Resting can organize an already-set casserole, but it cannot rescue a liquid center. Ten minutes keeps more cheese stretch; 15 gives cleaner cuts.

Changing the Pan or Scaling the Recipe

The recipe is built around a 9-inch / 23 cm square dish. A deeper casserole takes longer to set in the middle; a shallower one gets there faster.

Comparison of chile relleno casserole in 8×8, 9×9 and 9×13 pans, showing the 8×8 as deepest and the 9×13 as shallowest.
Depth changes bake time: deeper casseroles need longer; shallower ones should be checked earlier.
ChangeWhat to expect
8-inch / 20 cm squareA deeper casserole. Expect the middle to need longer even after the top looks ready.
9×13-inch / 23×33 cmOne batch will be shallower, so begin checking earlier and expect thinner layers.
Half batchUse a smaller dish instead of spreading the mixture thinly across the standard pan.
Double batchTwo 9-inch square dishes are easier to judge than one very deep casserole. A full double batch in one 9×13 can brown well before the middle sets.

Once the depth changes, forget the original timer and watch the middle.

Choosing the Poblanos and Cheese

How Much Chile, and How Hot?

How much chile? Use the recipe count as a shopping guide, then let the baking dish make the final decision. Once the roasted peppers are opened flat, you want enough to cover the pan twice. Six big poblanos can easily give you more usable chile than eight small ones. Large bare patches in the second layer are a better reason to roast another pepper than any particular number.

How hot? Poblanos are generally much milder than jalapeños, though individual peppers vary. Most of the heat is concentrated around the pale inner ribs, so trim those away if you want a gentler casserole. Taste a little roasted chile when heat matters to your table; salsa or a few drops of pepper sauce can make one serving hotter without changing the whole pan.

Which Cheese Melts Best?

Oaxaca and Monterey Jack are the two choices that matter most here. Oaxaca gives you a soft, stretchy melt; Monterey Jack melts smoothly into creamy pockets and is easy to find. Asadero works well too. Use Pepper Jack when you deliberately want more heat.

Cheddar is best used in a blend rather than as the only cheese; too much shifts the flavor away from the mild melting-cheese profile. Cotija belongs on top after baking, not in place of the molten layer inside.

Block cheese generally melts more smoothly than pre-shredded cheese. Pre-shredded will still work, so use whichever makes sense for the night you’re cooking.

Cheese guide showing stretchy Oaxaca, smooth Monterey Jack, Cheddar used in a pale cheese blend and crumbled Cotija used as a topping.
For both creamy melt and stretch, combine Monterey Jack with Oaxaca; use Cheddar or Cotija as accents.

What the Egg Mixture Is Doing

The eggs settle into the spaces around the chile and cheese and hold the slice together. A little milk keeps them tender, flour helps the mixture set around the layers, and baking powder gives it some lift. The finished egg layer should fill the gaps rather than forming a thick, separate layer over the chiles.

Whisking whole eggs until lightly foamy is the easier route used in the recipe. Separating the eggs and whipping the whites can produce a lighter, more soufflé-like layer, though the method becomes more delicate. It is an option, not something this version needs.

Why Won’t My Roasted Poblanos Peel Cleanly?

Easy peeling starts during roasting. Skin that has only softened or lightly browned will still cling after steaming. Look for broad blistered, blackened areas while the flesh underneath still holds together, then cover the peppers while they are hot so the trapped steam can do its work.

New Mexico State University recommends the same basic sequence for green chile: blister the skin first, then place the hot chiles in a covered heat-safe container to help loosen it. Their green-chile handling guide has more detail.

A few patches may still refuse to cooperate. Leave them. Scraping aggressively just to get a perfectly bare pepper can remove more flesh than skin, and a few tiny charred flecks disappear into the finished casserole anyway.

How to Know When It’s Done

The top can fool you. If the cheese is already browned and the middle still ripples or sloshes when the pan moves gently, tent the dish with foil and keep baking. For certainty, the center should reach 160°F / 71°C, consistent with USDA guidance for egg dishes.

Three casserole doneness stages labeled too soon, ready and too far, with the ready center checked at 160°F / 71°C.
The center, not the browned top, decides doneness: stop when it no longer sloshes and reaches 160°F / 71°C.

After the rest, a good slice should lift cleanly without feeling stiff. The poblano should cut softly under the fork, the cheese should still pull a little from the middle, and there should be no puddle gathering at the cut edge. Spoon a little salsa around it and there is not much else it needs.

← Back to recipe · Something still wrong? Fix my casserole

Fix My Chile Relleno Casserole

Four chile relleno casserole problems: released water, too much egg, a browned top with a loose center, and a dry overcooked slice.
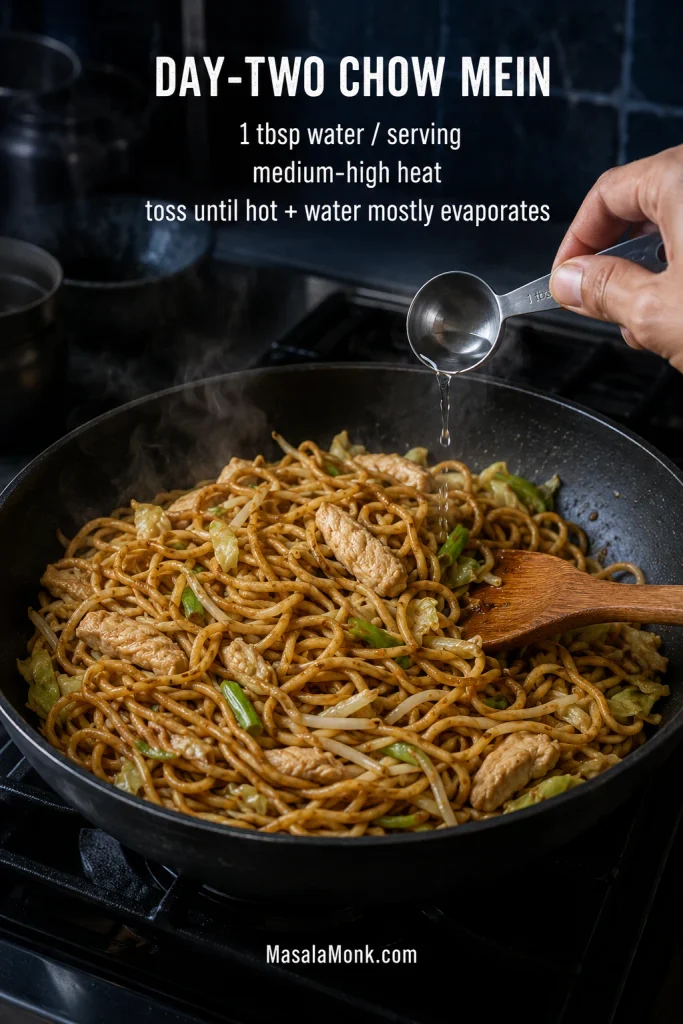
Troubleshoot in order: is the center set, is moisture inside or around the slice, and is the egg tender or firm? Those clues separate the main failure modes.

Watery Casserole: Loose Center or Released Moisture?

A wet casserole, a dry one and an egg-heavy one are different problems. Look at what is actually happening before changing the recipe.

Comparison showing an underbaked casserole with a wet unset center beside a fully set slice with separate liquid pooled around the edge.
A loose wet center needs more heat; clear liquid around a slice that already holds together points to moisture released by chiles or add-ins.

Other Common Casserole Problems

ProblemLikely causeWhat to do
It tastes mostly like eggsToo little chile or cheese, extra milk or finely diced chile disappearing into the eggNow: a chile-forward salsa can bring some balance. Next time: build two generous pepper layers and don’t increase the dairy.
Brown top, loose middleA deep pan, cold ingredients, a larger batch or extra moistureNow: tent loosely with foil and continue baking. Next time: use the specified pan depth or adjust the bake for the new one.
Dense egg layerLittle aeration, weak or old baking powder, or too many heavy or wet additionsNow: once cooked through it is still perfectly usable; it simply will not be as light. Next time: use fresh baking powder, whisk until lightly foamy and bake shortly after mixing.
Poblanos won’t peelThe skins did not blister enough or the peppers cooled without steamingCover them while still hot and remove whatever skin releases easily. Do not scrape the flesh to pieces.
Greasy casseroleFatty meat, excess cheese or rendered fat left in an additionNow: blot obvious surface fat. Next time: drain meat before layering and keep additions modest.
Dry or rubberyThe eggs baked too long or leftovers were overheatedNow: serve with sauce or salsa. Next time: pull the casserole when the middle has just set.
Flavor seems flatIt may need salt or acidity rather than more dry spiceTaste with lime, salsa or a little additional salt before changing the base seasoning.

← Back to recipe · ↑ Back to help menu

Is Chile Relleno Casserole the Same as Chiles Rellenos?

No. Traditional chiles rellenos generally begin with whole roasted chiles that are peeled, stuffed and commonly coated in an airy egg batter before frying. Depending on the style, they may then be served with a tomato-based sauce or another accompaniment.

A casserole rearranges the same broad idea—roasted chile, melting cheese and egg—for a baking dish. You lose the crisp fried exterior. In return, you stop worrying about keeping every pepper whole or getting batter to cling in hot oil. Torn roasted poblanos simply disappear into the layers.

Traditional whole fried chile relleno with cheese and red sauce beside a baked chile relleno casserole with two roasted poblano layers and melted cheese.
Traditional rellenos keep the pepper whole and battered; the casserole opens roasted poblanos into broad baked layers.

Variations

The base casserole is vegetarian as written. Meat is entirely optional. If you do add anything, keep cooked additions to about 1½ cups or less. Much more makes the standard pan deeper, wetter and slower to set.

Hatch green chile

Fresh roasted, thawed and well-drained frozen roasted, or whole canned Hatch green chiles can replace the poblanos. Blot thawed or canned chile before layering, and taste it first: Hatch heat varies considerably from batch to batch. Cool avocado, crema or fresh salsa on the side is plenty when the chiles run hot.

Adding meat or vegetables

Chicken: about 1½ cups / 7 oz / 200 g cooked shredded chicken is plenty. Keep it fairly dry rather than adding meat dripping with broth or sauce.

Ground beef or chorizo: start with about 8 oz / 225 g, cook it fully and drain excess fat before layering. A full pound is too much for the standard pan if you want the original baking time to remain useful.

Tomatoes, spinach and mushrooms: deal with their water first. Cook tomatoes and mushrooms until obvious moisture has cooked away. Wilt spinach, cool it and squeeze it dry. Choose one or two additions rather than packing the dish with everything at once.

Prepared casserole add-ins including dry shredded chicken, drained chorizo, browned mushrooms, squeezed spinach and cooked-down tomatoes, with a 1½-cup total limit.
If an add-in leaves water or grease in the skillet, remove that excess before it reaches the casserole; keep total cooked add-ins near 1½ cups.

Did an add-in make the casserole wet? Use the watery-casserole diagnostic to tell excess moisture from underbaking.

Gluten-free

Replace the wheat flour with a gluten-free all-purpose blend intended for 1:1 baking. Different blends can give slightly different textures, but no other part of the method needs to change.

Sauce and Serving

Sauce works better on the plate than poured heavily through the casserole. You get cleaner slices, clearer poblano flavor and control over how saucy each serving becomes.

For a warm red option, spoon a little homemade red enchilada sauce onto the plate before setting the slice on top. For a brighter finish, roasted salsa verde brings tomatillo acidity and green-chile freshness.

Ranchero sauce, salsa roja, pico de gallo and a favorite hot sauce are easy alternatives.

What to serve with it

A scoop of creamy refried beans turns a slice into an easy dinner. Add Mexican-style or cilantro-lime rice when you want something more substantial.

Avocado or fresh guacamole is especially good beside a hot, sauced slice. A cabbage slaw or simple green salad brings the crispness the soft casserole itself does not have.
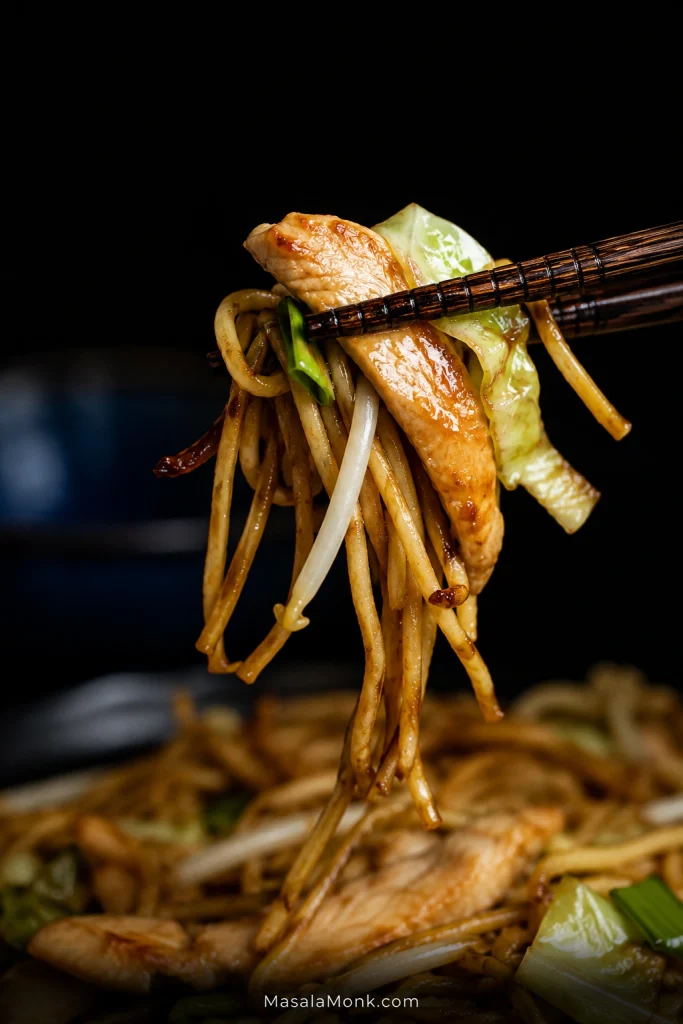
Black or pinto beans, pico de gallo and warm corn or flour tortillas fit easily on the table too. At brunch, add breakfast potatoes and fruit; at dinner, beans, rice and something fresh or acidic are usually enough.

Chile relleno casserole slice with visible poblano and cheese layers, plated with red chile sauce and green salsa verde, with beans and rice in the background.
Keep red chile sauce and salsa verde outside the bake, then spoon either around each slice for richness or bright acidity.

Planning for leftovers? Jump to make-ahead, storage, freezing and reheating.

Make Ahead, Storage, Freezing and Reheating

Make-Ahead Prep

To get ahead: roast, peel, seed and dry the poblanos 1–2 days ahead. Cool and refrigerate the roasted peppers within 2 hours, then keep them covered in the refrigerator. You can also shred the cheese and arrange the chile-and-cheese layers in the baking dish the night before. Whisk and pour the egg mixture shortly before baking.

A refrigerator-cold casserole may need a little longer in the oven. Let the middle, rather than the original timer, decide when it is ready.

Store, Freeze and Reheat

For leftovers: cool the casserole promptly, cover and refrigerate for 3–4 days.

To freeze: cool the casserole promptly and refrigerate until chilled. Then cut it into portions, wrap well and freeze for about 2–3 months for best quality. Thaw overnight in the refrigerator. The egg layer may release a little moisture after freezing, so expect a softer slice than when freshly baked.

To reheat: microwave individual slices in short intervals, or cover several portions loosely and warm them in a 325–350°F / 165–175°C oven. Reheat leftovers to 165°F / 74°C; once they’re hot, more time only makes the egg firmer.

Storage guide showing chile relleno casserole refrigerated for 3–4 days, wrapped for freezing for 2–3 months, and reheated to 165°F / 74°C.
Chill before portioning so slices hold together cleanly; reheat only until the center is hot to avoid firming the egg further.

A leftover slice is also most of the filling for a breakfast burrito already done: chop it, warm it and roll it into a tortilla with salsa, avocado or beans.

FAQ

Can I use Anaheim peppers instead of poblanos?

Yes. Roast, steam, peel, seed and dry them the same way. Anaheims are often narrower, so judge the amount by how much roasted chile flesh you need to cover the pan rather than by pepper count.

Can I make chile relleno casserole without eggs?

Not by simply leaving the eggs out. They are the binder in this version, so an egg-free casserole needs a different binding system and different ratios.


Traditional chiles rellenos still have that crisp, just-fried coating a casserole cannot reproduce. Make them when that’s the experience you’re after.

But when what you really want is roasted poblano, molten cheese and that soft chile-filled middle—without stuffing and frying six individual peppers—this is the version to make. Give it those ten quiet minutes after the oven, then cut the first slice.
↑ Back to top · Back to recipe

Posted on Leave a comment

Beef and Broccoli Recipe: Tender Beef, Crisp Broccoli & Chinese-Style Stir-Fry Sauce

Finished beef and broccoli stir-fry with browned beef strips and bright green broccoli coated in glossy brown sauce, served with white rice.
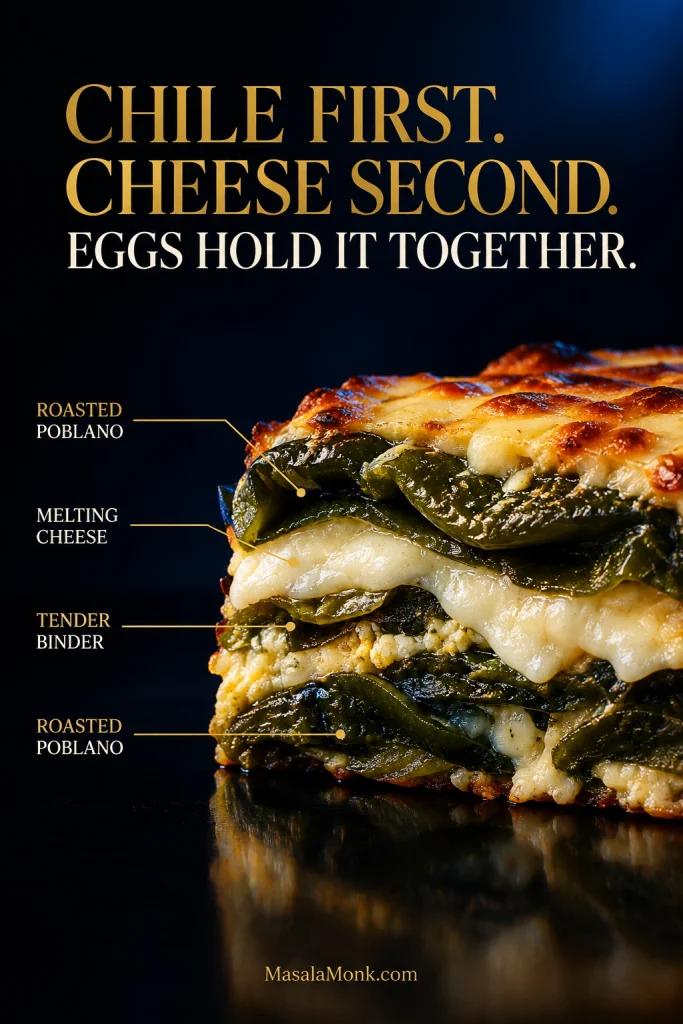
When beef and broccoli is right, the beef bends easily under your fork, the broccoli stays bright with some bite in the stalks, and the brown sauce catches along the edges before slipping into the hot rice underneath.

It can also look perfectly respectable and disappoint at the first bite. Pink beef can be chewy. Wet broccoli can loosen a sauce that seemed fine moments earlier. And a skillet set to “high” can cool so quickly under a pile of cold meat that searing quietly turns into steaming.
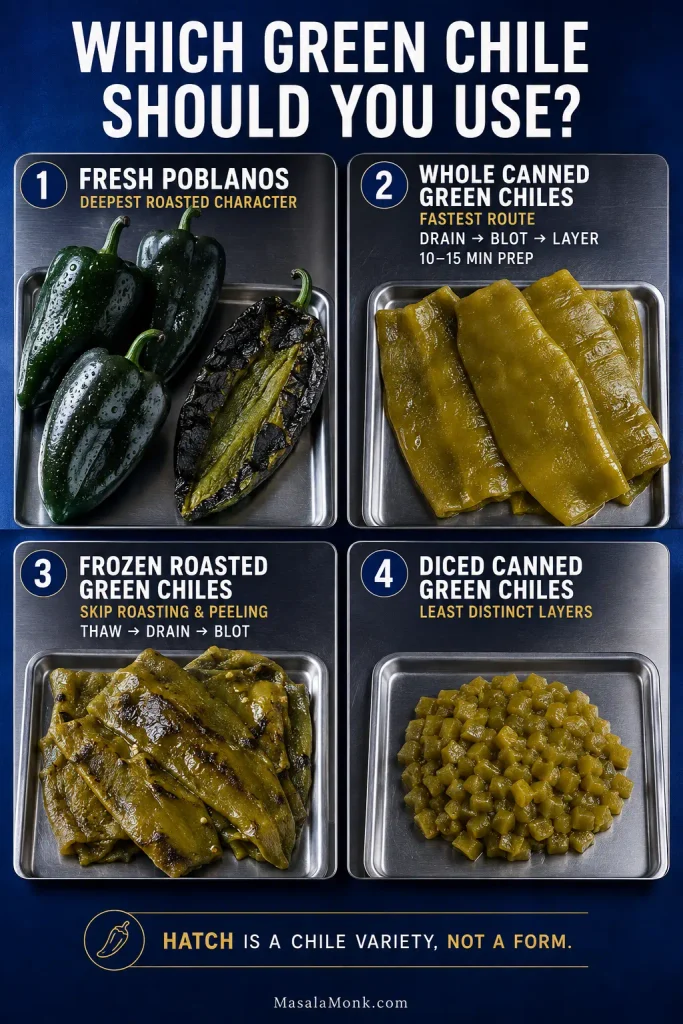
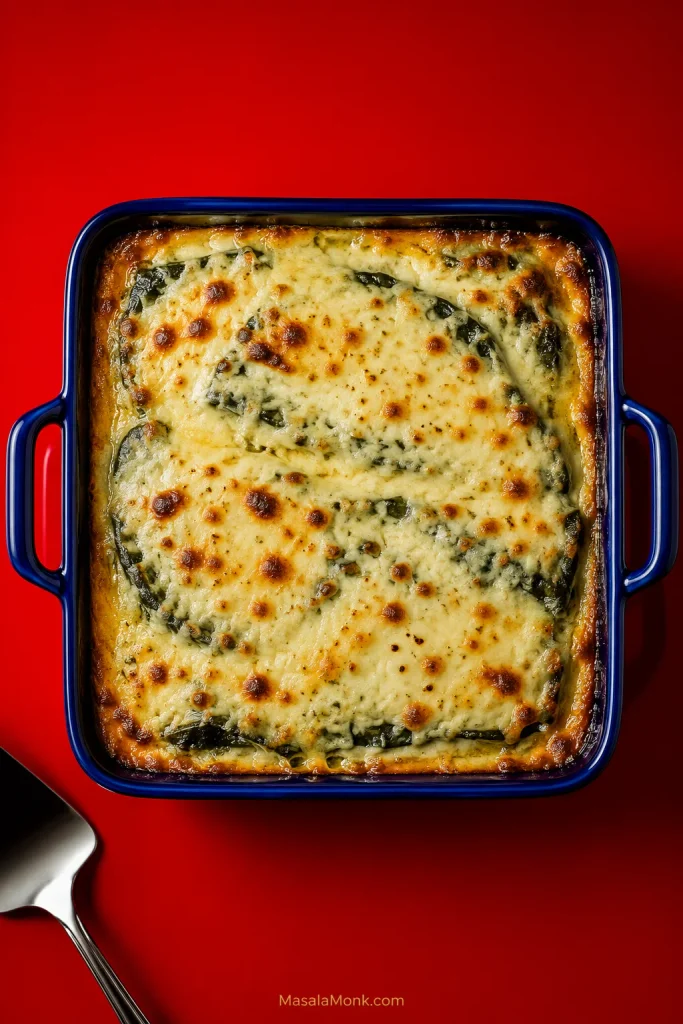
Only a few things really need your attention: thin slices across the grain, enough heat under the pan, dry broccoli and sauce that thickens before the final toss. This version of the Chinese-American takeout staple keeps the brown sauce savory rather than sweet, with oyster sauce, soy sauce and Shaoxing wine plus a brief tenderizing marinade for flank steak.

It is built for an ordinary home stove, whether you’re using a wok or a wide skillet. Keeping the pan hot matters more than trying to imitate a restaurant wok. The beef rests while you prepare everything else, so dinner can be on the table in about 30 minutes once the steak is ready to slice.

How to Make Beef and Broccoli Stir Fry

Serves4 with rice
DifficultyEasy, but fast-moving
PrepAbout 20 minutes
CookingAbout 10 minutes
Elapsed timeAbout 30 minutes once the steak is ready to slice
Best pan12-inch (30-cm) heavy skillet or well-heated wok

Beef and Marinade

  • 1 lb (450 g) flank steak
  • 1 tablespoon (15 ml) water
  • 1 teaspoon light or regular soy sauce
  • ¼ teaspoon (about 1 g) baking soda
  • 1 tablespoon (about 8 g) cornstarch
  • 1 teaspoon neutral cooking oil

Using sirloin or flat iron? Both are naturally tender, so you can reduce or omit the baking soda. Firmer cuts need more care; chuck steak can work, while round and stew meat are less forgiving.

Stir-Fry Sauce

  • ½ cup (120 ml) unsalted or low-sodium chicken stock, beef stock or water
  • 2 tablespoons (30 ml) oyster sauce
  • 1 tablespoon (15 ml) light or regular soy sauce
  • 1 tablespoon (15 ml) Shaoxing wine
  • 1 teaspoon dark soy sauce
  • 1½ teaspoons (about 6 g) sugar
  • ½ teaspoon toasted sesame oil
  • ⅛ teaspoon white pepper, or a small pinch

Cornstarch slurry: mix 2 teaspoons (about 6 g) cornstarch with 1 tablespoon (15 ml) cold water.

Broccoli, Aromatics and Oil

  • 1 lb (450 g) broccoli florets, weighed after trimming and cut into fairly even pieces
  • 2–3 tablespoons (30–45 ml) neutral high-heat cooking oil, divided as needed
  • 3 garlic cloves, finely chopped or minced
  • 2 teaspoons finely grated fresh ginger
  • Steamed rice, for serving

Before the pan gets hot: have the beef, broccoli, sauce, slurry, garlic and ginger beside you. Once stir-frying starts, there is very little waiting around.

1. Slice and Marinate the Beef

If the steak is already cold and easy to slice, go straight to the knife. Very soft steak is easier to cut after 15–30 minutes in the freezer, just until it firms up. That optional firming time is extra and is not included in the roughly 30-minute recipe time.

Find the long muscle fibers and cut across them into strips about ⅛–¼ inch (3–6 mm) thick. Keep the slices reasonably even so they cook at about the same rate.

Put the beef in a bowl. Add the water, soy sauce and baking soda and mix until the liquid coats the meat. Mix in the cornstarch, then work in the teaspoon of oil. Leave the beef for about 20 minutes while you prepare the sauce and broccoli.

Two-panel guide showing flank steak sliced perpendicular to its visible grain into thin strips, beside raw beef strips with a light glossy marinade coating in a stainless-steel bowl.
Across the grain shortens the long muscle fibers; after marinating, the strips should still separate easily with only a light sheen.

2. Mix the Sauce

Check your Shaoxing bottle first. Some bottles sold as cooking wine contain added salt; if yours does, use unsalted stock and be cautious with any extra soy later.

Combine the stock, oyster sauce, light soy sauce, Shaoxing wine, dark soy, sugar, sesame oil and white pepper.

Taste only to catch an obviously over-salty combination—the uncooked sauce should taste stronger than the finished dish. Don’t worry about the sharp edge of the Shaoxing; that softens as it cooks.

Give the slurry a quick stir and leave it beside the stove. The cornstarch will settle again before you use it. That’s normal.

3. Give the Broccoli a Head Start

Bring a large saucepan or pot of unsalted water to a strong boil. Add the broccoli and cook for about 30–60 seconds for small-to-medium florets. Larger pieces can need closer to 90 seconds.

Trust the stalk more than the clock. Take the broccoli out when it has turned vivid green and looks almost ready to eat, but the stalks still have some firmness.

Drain thoroughly and let the steam escape. If the florets still look wet, spread them over a clean kitchen towel or paper towels for a minute.

Two-panel comparison showing bright green broccoli just after blanching in a stainless strainer and drained broccoli resting on a rack with dry-looking surfaces.
Pull the broccoli while the stalks still resist slightly, then spread it out so steam and surface moisture can escape.

Water on the broccoli becomes water in the sauce.

4. Sear the Beef

Heat a 12-inch (30-cm) heavy skillet over medium-high to high heat until hot. A carbon-steel wok can go hotter; with nonstick cookware, stay within the manufacturer’s recommended heat range.

Add about 1 tablespoon oil and spread the beef into a mostly single layer. Your first batch will tell you a lot about the pan. If the beef keeps sizzling, carry on. When the sound dies and liquid gathers around the slices, cook less meat at once.

Side-by-side skillets showing crowded beef strips steaming in released liquid and spaced beef strips browning against a drier hot pan.
Use exposed pan as a batch-size check: if the beef would cover almost the whole skillet, split the batch. Open hot metal gives moisture somewhere to escape, helping the beef sear instead of steam.

Give the first side a moment of uninterrupted contact, then toss. Cook until the surfaces are browned and the meat is nearly done, usually about 2 minutes for thin slices.

Transfer the first batch to a plate. Wipe away blackened marinade residue, add fresh oil if the pan looks dry, then cook the remaining beef in another batch if needed.

5. Finish the Sauce

Turn the heat down slightly if the empty pan is fiercely hot. Add a splash of oil when needed, followed by the garlic and ginger. Stir for about 15 seconds. The kitchen should smell of garlic and ginger almost immediately. That’s enough.

Pour in the sauce and bring it to a lively simmer. As it bubbles, the color deepens and the sharp edge of the Shaoxing softens.

Stir the slurry again—cornstarch settles quickly—then pour in about three-quarters while stirring the bubbling sauce. Give it 20–30 seconds before deciding whether it needs the rest.

Glossy brown stir-fry sauce simmering in a black wok while a metal spoon moves through the thickening sauce.
A spoon trail should close again quickly. If the channel stays sharply open behind the spoon, stop adding slurry—the sauce is already heading toward too thick.

The sauce is ready when it leaves a light coating on a spatula and moves easily around the skillet. Don’t chase thickness after that point.

6. Bring Everything Together

Return the broccoli and beef, along with any small amount of juices on the plate, while the sauce is bubbling. If there is an unusually large watery puddle from the beef, leave most of it behind. Toss until the beef has just cooked through and everything is evenly coated, usually 30–60 seconds.

Thin beef strips and bright green broccoli being tossed above a hot wok with glossy brown sauce droplets and visible steam.

The sauce should catch along the edges of the broccoli and beef without burying them. Take the pan off the heat while it is slightly looser than you want on the plate; cornstarch sauces tighten as they cool.

Taste before adding more seasoning. A few drops of soy can fix a sauce that needs salt; a tablespoon of hot water or unsalted stock can loosen one that has become too intense or thick.

Serve Over Hot Rice

Spoon it over hot rice. The best bites have a strip of beef, a floret and enough sauce underneath to soak into the grains.

A spoonful of beef and broccoli held above white rice as glossy brown sauce flows from the spoon into the rice.
The finished sauce should slip between the rice grains rather than sit on top in a sticky mound.

How to Keep the Beef Tender

Velveting helps, but beef that stays chewy even with a pink center usually points to the cut, slicing direction or thickness. A thick strip cut with the grain won’t become tender just because it spent a few fewer seconds in the skillet.

What Is the Best Steak for Beef and Broccoli?

CutWhat to expectHow to use it
Flank steakLean, beefy, clearly grainedThe default here. Slice thinly across the grain and use the light marinade.
SirloinTender and forgivingAn easy substitute; little or no baking soda is needed.
Flat ironVery tenderExcellent for quick cooking; little or no baking soda is needed.
Skirt steakDeep flavor, strong visible grainSlice thinly and clearly across the grain.
Chuck steakBeefy and firmer than flank or sirloinSlice very thinly across the grain. It can work here, but expect a little more chew with this light marinade.
RoundLean and fairly firmSlice very thinly. Flank or sirloin is easier for this quick method.
Pre-cut stir-fry stripsConvenient, variable qualityChoose thin, even strips intended for fast cooking.
Chuck roast or stew beefUsually better suited to slower cookingSkip it for this quick stir-fry.
Beef grain guide showing flank and skirt with strong visible grain, sirloin and flat iron with finer grain, firmer chuck steak and round, and chuck roast or stew beef for slower cooking.
Use the label to identify the cut, then use the visible fibers to decide slicing direction. Grain direction matters more than the steak’s trimmed shape.

What the Beef Marinade Actually Does

This is a light velveting treatment, not an aggressive tenderizing soak. Soy seasons the surface, water gives the beef some moisture to absorb, and the modest amount of baking soda helps flank steak stay tender during fast cooking. Cornstarch forms a thin coating before the oil goes in.

Baking soda tenderizes. Cornstarch coats. That’s the useful distinction.

For flank steak, ¼ teaspoon baking soda for 1 lb (450 g) is deliberately modest. Sirloin or flat iron may not need it. Too much baking soda—or leaving the beef in it much longer than intended—can create an alkaline taste and an unnaturally soft texture.

Beef and Broccoli Sauce: Savory and Not Too Sweet

Oyster sauce does most of the heavy lifting here, giving the brown sauce its depth and body. Soy brings the salt, while the teaspoon of dark soy is mainly there for deeper color. Shaoxing adds its characteristic wine aroma, and the small amount of sugar rounds everything without turning the sauce sweet.

If you want a sweeter, more glaze-like sauce, that’s closer to homemade teriyaki sauce. Here, the sauce stays looser and less sweet so it can coat the beef, broccoli and rice without turning sticky.

How Thick Should the Sauce Be?

Think coating, not pudding. The sauce should cling lightly to the beef and broccoli, then flow back into the pan when you move a spatula through it. If it barely moves, loosen it before the final toss.

Three-panel comparison showing thin brown sauce running quickly from a spoon, correctly thickened sauce lightly coating and flowing, and overly thick sauce clinging in a slow heavy ribbon.
Thin sauce usually needs more simmering before more starch; overly thick sauce needs hot water or unsalted stock. The middle is the stopping point.

Want Extra Sauce for Rice?

Increase the stock to ¾ cup (180 ml) and the oyster sauce to 2½ tablespoons. Keep the light soy, Shaoxing wine, dark soy, sugar, sesame oil and white pepper at their original amounts.

This version is deliberately a little lighter rather than simply scaling every salty ingredient upward. You get more for the rice without making the whole bowl overly salty.

For the larger slurry, mix 1 tablespoon (about 8 g) cornstarch with 2 tablespoons (30 ml) cold water. Add it gradually; you may not need all of it. The consistency should still be glossy and coating, but you’ll have more left in the pan to spoon over the rice.

Fresh or Frozen Broccoli?

Frozen broccoli is useful here too. Skip the blanch. Heat it separately only until thawed and barely hot, then drain and blot away obvious moisture before it meets the sauce.

It won’t have the firmness of fresh broccoli, and that’s fine. The important part is keeping its extra water out of the skillet.

Side-by-side comparison of fresh broccoli after a brief blanch and thawed frozen broccoli with visible released water on a stainless-steel tray.
With frozen broccoli, moisture control matters more than extra cooking: thaw, drain and blot before the florets meet the sauce.

Wok or Skillet?

A carbon-steel wok shines over a strong gas flame. On many electric and induction stoves, a broad 12-inch (30-cm) skillet gives the beef a larger hot surface underneath it. If your burner is weaker, smaller batches matter more than pan shape.

Doubling the recipe means doubling the batches too. The skillet doesn’t get larger because the ingredient list did.

Side-by-side comparison of beef and broccoli cooking in a carbon-steel wok over a strong blue gas flame and in a broad skillet on a flat electric or induction cooktop.
Strong gas suits a wok; flat electric or induction heat often gives a broad skillet the more useful contact area.

Ingredient Substitutions

Some swaps barely change the dish; others can throw off the beef texture or the balance of the sauce.

Instead of…Try…What changes
Flank steakSirloin or flat ironUsually needs little or no baking soda.
Oyster sauceMushroom-style vegetarian oyster sauceThe closest easy substitute; use it in roughly the same way. Check labels if allergies matter.
Oyster sauceHoisinNot a direct substitute. If it is all you have, expect a sweeter, different sauce and reduce or omit the added sugar.
Soy sauceCoconut aminosSweeter and usually less salty. Reduce the sugar. Check the other condiments too if the entire dish needs to be soy-free.
Shaoxing wineDry sherryThe easiest close substitute.
Shaoxing wineMirinSweeter and less savory. Start with slightly less than the Shaoxing amount and omit the recipe sugar; adjust after tasting.
No cooking wine availableUnsalted stockThe sauce will be simpler and less aromatic.
Dark soyOmit itThe sauce will be lighter. Don’t replace it measure-for-measure with regular soy.

Don’t confuse rice wine with rice vinegar. Rice vinegar is much more acidic and is not a substitute for Shaoxing wine here.

For a gluten-free version: use gluten-free tamari, a gluten-free oyster-style sauce and gluten-free stock. Shaoxing wine is traditionally made with a wheat-based starter, so dry sherry is the simpler choice unless you know your bottle is gluten-free. Check the other packaged sauces too, since brands vary.

Variations

Mushrooms. After the beef comes out of the pan, brown sliced mushrooms until their released water has cooked away. Then continue with the garlic, ginger and sauce.

Carrots. Slice them thin and add them to the blanching water shortly before the broccoli so they get extra time to soften.

Bell peppers. After the beef comes out, stir-fry thinly sliced bell pepper briefly, then continue with the garlic and ginger; leave the pepper slightly crisp.

Spicy. Add crushed red pepper with the garlic and ginger, or finish individual bowls with chili oil or chili crisp.

What to Serve With Beef and Broccoli

Steamed jasmine rice or long-grain white rice is the easiest pairing. Brown rice works too. If you’d rather not guess at the rice, the guide to cooking rice has ratios and timings for the common varieties.

A cold cucumber salad gives the meal something completely different: crisp, cool and acidic against the warm brown sauce.

Complete beef and broccoli dinner with glossy beef strips and green broccoli on a dark serving plate, with white rice and a separate cucumber salad.

Storage, Reheating and Prep Ahead

This stir-fry is best straight from the pan. The next day it can taste very good, but the broccoli softens and the sauce loses some of its freshly cooked texture.

Refrigerate leftovers within 2 hours of cooking, or within 1 hour when the surrounding temperature is above 90°F / 32°C. Use refrigerated leftovers within 3–4 days.

The USDA leftovers guidance recommends reheating leftovers to 165°F / 74°C.

Warm only what you plan to eat. A skillet over moderate heat gives you good control, and a spoonful of water or unsalted stock can loosen sauce that tightened in the refrigerator.

You can cut the broccoli, slice the steak and mix the sauce earlier in the day and refrigerate them separately. Add the baking soda and the rest of the short beef marinade closer to cooking.

Freezing works, but it isn’t the best storage choice for this dish. The broccoli softens noticeably after thawing, which takes away much of the texture that makes the stir-fry good.

Troubleshooting Beef and Broccoli

Start with what changed. Did the sauce thin only after the broccoli went in? Did the beef turn gray as soon as it hit the pan? Is it chewy even though the center isn’t overcooked? Those clues tell you more than simply adding heat, starch or cooking time.

Beef Problems

What happenedWhat to do
The beef is chewy, even though it may still be pink inside.
A firmer cut, slices running with the grain or pieces that are too thick can all stay chewy before the beef looks obviously overcooked. Dry, gray beef may simply have cooked too long.
Now: If the beef is still underdone, finish cooking it only as much as needed; extra cooking won’t fix chewiness caused by the cut, grain or thickness. Keep it well coated with sauce and cut unusually large strips smaller before serving.
Next time: Choose a suitable cut, slice about 3–6 mm across the grain and remove the beef while it is still just shy of done.
Some pieces are tender and others are tough.
Uneven slicing is the usual reason.
This can’t really be evened out after cooking. Next time, keep the slices as consistent in thickness as practical.
The beef tastes alkaline or feels strangely soft.
Too much baking soda was used, or the beef sat in it for too long.
The texture can’t really be reversed. Extra unsalted sauce, vegetables and rice may soften an alkaline taste. Next time, measure the baking soda carefully and keep to the short marinade rest.
The beef is gray and sitting in liquid.
The pan lost too much heat.
Now: Stop adding beef, let the moisture cook away and finish the remaining meat separately.
Next time: Use smaller batches and let the pan recover between them.

Sauce Problems

Thickness and Texture Problems

What happenedWhat to do
The sauce won’t thicken.
The slurry may have settled, the sauce may not be simmering, or there may be too little starch for the liquid in the pan.
Now: Remove already-cooked beef and broccoli if necessary. Mix 1 teaspoon cornstarch with 2 teaspoons cold water and add it gradually to the bubbling sauce.
Next time: Re-stir the slurry immediately before pouring and give it a moment to cook.
The sauce was thick until the broccoli went in.
The vegetables probably carried water into the skillet.
Now: Remove finished beef and broccoli and reduce the sauce briefly before reaching for more starch.
Next time: Drain and dry the broccoli thoroughly.
The sauce is gummy.
Too much starch went in, or the sauce reduced too far.
Now: Add unsalted stock or water 1 tablespoon (15 ml) at a time until it flows again.
Next time: Add the slurry gradually.

Flavor Problems

What happenedWhat to do
The sauce is too salty.
Soy, oyster sauce, stock and sometimes salted Shaoxing cooking wine can add up.
Now: Slightly salty? Loosen it with unsalted stock or water. Badly oversalted? Spoon out some sauce first, then replace that volume with unsalted liquid. Plain rice or extra unseasoned broccoli can soften the overall saltiness.
Next time: Check condiment labels and taste the uncooked sauce only for an obviously over-salty combination.
The sauce is too sweet.
Too much sugar went in, or a sweeter substitute such as hoisin or mirin wasn’t accounted for.
Now: Add a splash of unsalted stock or water first. If the sauce then tastes flat, add oyster sauce or soy a few drops at a time.
Next time: Reduce the added sugar when using sweeter substitutes.
The sauce tastes bitter.
The garlic, ginger or dark residue in the pan probably scorched.
Now: Remove the burned pieces and taste. A few scorched flecks may not ruin the sauce. If the bitterness has spread through it, wipe the pan clean and remake the sauce mixture.
Next time: Lower the heat before adding the aromatics and move on as soon as they smell fragrant.

Broccoli and Pan Problems

What happenedWhat to do
The broccoli is hard.
The florets were large or needed more of a head start.
Now: Take the beef out, add a splash of water, cover the pan briefly and let the broccoli steam until the stalks begin to yield. Uncover, let excess water cook away, then return the beef.
Next time: Cut the florets more evenly and use stalk tenderness as the cue, not only the clock.
The broccoli is mushy.
It cooked too far before or during the final toss.
The texture can’t be restored once it becomes soft. Next time, take it out of the blanching water earlier and remember that it cooks again during the final toss.
The second beef batch tastes burned.
Marinade residue from the first batch scorched in the pan.
Now: Remove burned solids before continuing.
Next time: Wipe away blackened residue between batches and add fresh oil when needed.
A doubled recipe turns watery.
Twice the cold food went into the same-size skillet.
Now: Remove some of the food and finish it in batches.
Next time: Double the ingredients, not the amount your pan is expected to sear at once.

Once it looks right, stop fussing with it. Spoon everything over hot rice and eat it while the pan is still steaming.