Posted on — Leave a comment

Air Fryer Chicken Tenders Recipe: Crispy, Juicy & Easy

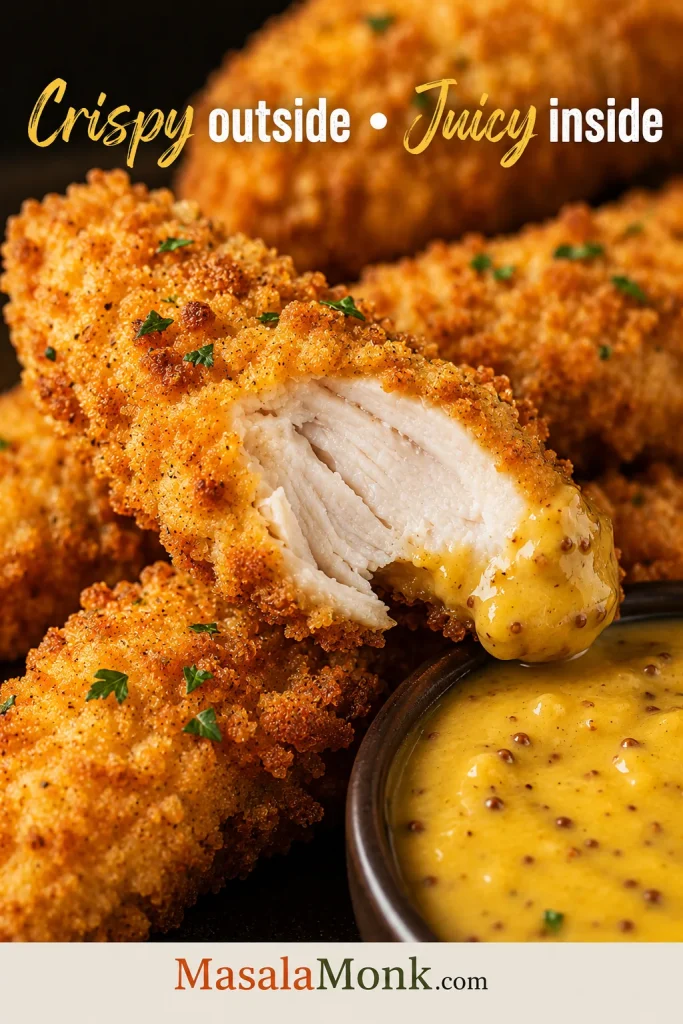
Golden air fryer chicken tenders with a crisp breadcrumb crust, including one split open to show the juicy white chicken inside.

Good air fryer chicken tenders should make a little noise when you bite through them: rough golden crumbs first, then juicy chicken underneath. The crust should stay attached instead of peeling away with the first bite, and the meat should still feel tender inside.

This recipe starts with raw chicken tenders and a classic breading system: a very light coat of flour, a thin layer of egg, then panko mixed with finer breadcrumbs. Panko gives you the rough, crunchy edges; the finer crumbs fill the gaps so the crust stays craggy without feeling sparse.

The method is easier to remember as three jobs: attach the crust, brown the crust, stop the chicken. Thickness, breading and temperature checks matter more than chasing one exact minute for every piece.

Check These 3 Things Before You Start Air Frying

CheckWhat You Want to See
ChickenPieces reasonably close in thickness, without one oversized tender holding up the batch
BreadingCrumbs firmly attached, with no glossy egg patches or large bare spots
OilNo powdery dry patches, while the individual crumbs still look distinct rather than soaked

Those three checks tell you more than a timer can. Once they look right, leave enough room around the tenders for hot air to move. Watch the thinner pieces first.

Raw breaded chicken tenders with a pale, shaggy panko and fine breadcrumb coating ready to go into the air fryer.
A ready-to-cook coating should look pale, shaggy and uneven in texture, with distinct crumb ridges rather than a smooth, paste-like shell.

Air Fryer Chicken Tenders Recipe

A 400°F breaded-tender method built around thin coating layers, firmly pressed crumbs and individual temperature checks.

Chicken1½ lb / 24 oz / 680 g raw chicken tenders
Air fryer400°F / 204°C
First temperature checkAbout 8–9 minutes for average tenders
Typical finishAbout 9–12 minutes per batch
Done165°F / 74°C in the thickest part
BasketSingle layer with visible space between pieces

Yield: about 10–12 tenders
Servings: 4
Hands-on prep: about 20 minutes
Total time: about 45–65 minutes, depending mainly on basket size and whether the recipe takes 2 or 3 batches

Useful equipment: air fryer, instant-read thermometer, three shallow dishes, tongs, a plate or rack for the raw breaded chicken, a separate clean plate or rack for the cooked tenders, and a fine oil mister or cooking spray suitable for your air fryer.

Ingredients

  • 1½ lb / 24 oz / 680 g raw chicken tenders, fresh or fully thawed
  • 3 tablespoons / about 24 g all-purpose flour, plus 1 tablespoon if needed
  • 2 large eggs
  • 1 tablespoon / 15 ml water, to loosen the eggs
  • 1 cup / about 60 g panko breadcrumbs
  • ½ cup / about 55 g fine plain dry breadcrumbs
  • 1 teaspoon / about 6 g fine salt, divided
  • 1½ teaspoons paprika
  • 1 teaspoon garlic powder
  • ½ teaspoon each onion powder and freshly ground black pepper
  • Neutral cooking oil in a fine mister, or cooking spray, enough to remove dry powdery patches from the crumbs

Instructions

Prep & Bread the Chicken

  1. Trim, size and dry the chicken. Trim away any loose or particularly tough exposed tendon, but there is no need to dig out every white strand. Pat the tenders thoroughly dry. Flatten an unusually thick piece enough to bring it closer to the rest of the batch, then season the chicken with about ¾ teaspoon of the salt and half the black pepper.
  2. Set up the breading station. Put the flour in one shallow dish. In a second, whisk the eggs with 1 tablespoon / 15 ml water. In a third, combine the panko, fine breadcrumbs, paprika, garlic powder, onion powder, remaining salt and remaining pepper. Reserve roughly one-third of the clean crumb mixture. Use one hand for egg and the other for flour and crumbs so the dry breading does not gradually turn pasty.
  3. Coat the first tender with flour and egg. Turn one tender in the flour just until the outside looks matte, then tap away everything loose. Dip it into the egg, turn once, and hold it over the dish for a moment so the excess can drip away.
  4. Press on the crumbs, then repeat. Move that tender straight into the crumb mixture and press firmly on both sides. The raw breading should look rough and shaggy, with no slick patches of egg showing through. Lift it onto the plate or rack reserved for raw chicken, then repeat the flour → egg → crumbs sequence with each remaining tender. Add some of the reserved clean crumbs whenever the working mixture becomes damp or clumpy.
  5. Give the breading a few minutes to settle. Let the breaded tenders stand for 5–10 minutes. Meanwhile, preheat the air fryer to 400°F / 204°C if your model normally needs preheating.

Air Fry, Check & Serve

  1. Load and mist the first batch. Lightly grease the basket first only if yours tends to stick. Arrange the tenders in one layer without touching. Mist until the powdery spots disappear while the rough crumb texture remains easy to see.
  2. Cook until the first side releases. Air fry at 400°F / 204°C for about 5 minutes, then test an edge with the tongs. The breading should look dry and set; wet or gummy patches need a little longer. Some of the highest crumbs should be beginning to deepen in color. Turn when the crust releases cleanly. Give a stubborn tender another minute if it still clings to the basket.
  3. Finish the second side. Mist only the spots that still look pale or dry after turning. Begin checking thin breast strips around 7 minutes total and average natural tenders around 8–9 minutes. A very thin piece can reach temperature early, so remove it rather than waiting for the rest of the batch.
  4. Remove each tender when it is done. Slide an instant-read thermometer sideways into the thickest part so the tip reaches the center. Take each tender out as it reaches 165°F / 74°C. Average pieces often finish in roughly 9–12 minutes; thicker ones may need longer.
  5. Rest briefly and serve. Move the cooked chicken to the separate clean plate or rack and give it 2–3 minutes before serving. Keep the tenders spread out so their own steam does not soften the crust. They are at their best while the outside is still crisp and the center is piping hot.

Recipe Notes

  • Using chicken breast: Cut it into strips around ½ inch / 1.25 cm thick where practical.
  • Very small tenders: More pieces mean more surface area, so you may use the extra tablespoon of flour and a little more crumb mixture.
  • Smokier flavor: Replace ½ teaspoon of the paprika with smoked paprika.
  • Seasoned breadcrumbs: Reduce the added salt when your crumbs are already noticeably salty.
  • Raw-chicken cleanup: Discard flour, egg and crumbs that have touched raw chicken. Wash the thermometer probe with hot, soapy water after checking chicken that has not yet reached a safe temperature.

Chicken Tenders, Tenderloins & Breast Strips

The names overlap enough that they cause more confusion than they deserve. A chicken tenderloin is the narrow muscle attached beneath the breast, and packages labeled chicken tenders often contain these natural tenderloins. Chicken strips or fingers are frequently breast meat cut into a similar shape.

Either works here. Similar thickness matters much more than whether the package says tender, tenderloin, strip or finger.

Raw natural chicken tenderloins beside hand-cut chicken breast strips labeled about half an inch or 1.25 centimeters thick.
Natural chicken tenderloins taper, whereas hand-cut breast strips stay straighter. That shape difference helps explain why pieces of the same length can still finish at different times.

Cutting your own from chicken breast? Aim for strips around ½ inch / 1.25 cm thick through most of their length. A thin tapered end may finish earlier, which is fine; take it out when it is ready.

If nine tenders are fairly slim and one looks almost twice as thick through the middle, deal with that one before breading. Place the thick section between two pieces of parchment and give it a few light taps with the flat side of a meat mallet or a rolling pin. You are evening it out, not turning it into a cutlet.

A thick raw chicken tender between parchment being gently flattened with a rolling pin to match the thickness of nearby pieces.
Flatten the thick middle rather than the pointed ends; changing the thickest cross-section is what brings one oversized chicken tender closer to the rest of the batch.

If broad breaded cutlets are what you actually want, the air fryer fried chicken breast uses thin breast pieces and a different low-mess coating system.

If your batch mixes thin strips and thicker tenders, the time-by-thickness guide shows when to start checking each size.

How to Keep the Breading From Falling Off

Breading usually falls off because the chicken was still wet, the flour or egg went on too heavily, the crumbs were loose, or the crust was moved before it had set.

If you have ever turned a tender and left a patch of breading stuck to the basket, the problem often started before the flip. A properly dried tender should look matte. The flour only needs to dull any remaining surface tack, and the egg should leave a thin film rather than thick drips.

Raw chicken tenders showing a dry surface, a very light flour coating and a tender lifted from beaten egg with a thin film.
The chicken’s outline should remain obvious through every breading layer. If flour hides the pink surface or egg hangs in ridges, the coating is already too heavy.

Press the crumbs firmly onto both sides. When you lift the tender, that rough layer should travel with it. Keep some clean crumbs aside too; once the working bowl becomes damp and clumpy, the final few tenders are harder to coat evenly.

A hand pressing panko and fine breadcrumbs onto a raw chicken tender beside another coated tender and a bowl of clean reserved crumbs.
A finished raw coating should show high panko ridges over a finer breadcrumb layer, with no glossy bare spots; meanwhile, reserved dry crumbs keep that texture consistent.

Why Use Both Panko and Fine Breadcrumbs?

Panko gives the crust its jagged crunch. Fine breadcrumbs fill the spaces between those larger flakes, giving the chicken a more continuous crust.

Two bowls labeled panko and fine breadcrumbs, showing larger irregular panko flakes beside much smaller fine breadcrumb particles.
Panko should look like irregular, airy flakes; fine breadcrumbs should look much smaller and sandier. Keeping that size contrast gives the finished crust two levels of texture.

A few tablespoons of finely grated Parmesan can replace the same amount of fine crumbs when you want a more savory crust; trim the salt slightly. If you want to take those flavors all the way to marinara and melted cheese, the chicken Parmesan sandwich starts with a thinner breaded cutlet.

Let the breaded chicken stand for 5–10 minutes before cooking. Before loading the basket, scan the batch once more: correct any obvious thickness outlier and note any dry crumb patches that will need a light mist. A longer refrigerated rest is mainly worth trying when your breading repeatedly gives you trouble.

If the crumbs are attached but the coating still looks pale or dusty, go to Getting the Oil Right rather than adding another breading layer.

Getting the Oil Right

Mist until the powdery dry patches disappear; stop before the crumbs look shiny or wet.

Air-fried breadcrumbs can turn crisp while staying surprisingly pale. Let the crumbs tell you whether they have enough oil; an exact spray volume is less useful because mister nozzles and basket shapes vary.

Too dry: obvious white or powdery patches remain between the crumbs.

Ready: the crumbs look lightly moistened but still rough and separate.

Too much: the breading looks shiny, wet or clumped together.

Three raw breaded chicken tenders labeled Too Dry, Ready and Too Much Oil to compare oil coverage before air frying.
Look for slightly deeper crumb color while the panko ridges remain distinct.

Crisp and golden are not exactly the same thing. Once the chicken is done, take it out. If the crumbs were too pale, correct the oil coverage on the next batch. A fryer that repeatedly leaves panko pale can also benefit from crumbs that have been lightly toasted with a little oil and cooled before breading.

If the crust looks right but you are unsure whether the chicken is finished, jump to Time, Temperature & Doneness.

How Long to Air Fry Chicken Tenders

At 400°F / 204°C, average breaded chicken tenders usually take about 9–12 minutes. Begin checking around 8–9 minutes.

Thickness decides where in that range each tender finishes. Two pieces can be the same length and still cook at different speeds.

PieceFirst Temperature CheckLikely Total Window
Thin breast stripAbout 7 minutesAbout 8–10 minutes
Average natural tender8–9 minutesAbout 9–12 minutes
Thicker tender9–10 minutesAbout 11–14 minutes

The skinny tapered tender may be ready before the chunkier one beside it. If a thin piece already reads 165°F / 74°C at that first check, take it out. The rest can keep going.

Check the Thickest Part From the Side

Slide an instant-read thermometer sideways into the thickest part of the chicken and aim for the center. A shallow reading immediately beneath the hot crust can be misleading.

An instant-read thermometer inserted horizontally through the side of a cooked breaded chicken tender toward its thickest center.
On a narrow tender, approaching from the side gives the probe tip more chicken around it and makes the true center easier to hit.

The USDA safe minimum temperature for poultry is 165°F / 74°C. Check tenders individually and remove them as they finish.

A 10-Minute Batch Does Not Mean a 10-Minute Recipe

A smaller basket may comfortably hold only four or five tenders. Those pieces might cook in about 10 minutes while the full 1½ lb / 680 g recipe takes two or three rounds.

The quart number alone does not tell you how many tenders will fit. Look at the flat cooking area: leave visible gaps, and once another piece would close most of them, start another batch. Those gaps also make the first-side release easier to judge without prying the crust loose.

Breaded chicken tenders spaced apart in an air fryer basket while tongs lift one tender to check whether the crust has released.
In the air fryer basket, visible space protects airflow. If an edge begins to lift but the crust still grips, give it more time instead of forcing the flip.

If Your Chicken Tenders Did Not Come Out Right

What HappenedLikely CauseTry This Next Time
Crust fell offWet chicken, heavy flour or egg, loose crumbsDry the chicken well, keep the layers thin, press the crumbs and allow the breading to set
Crust stuck to basketMoved too early, or a basket surface that tends to grab the breadingGive the first side more time to release; lightly grease baskets that regularly stick
Crumbs stayed paleUneven oil coverage or an air fryer that browns crumbs slowlyMist dry patches more evenly or pre-toast the crumbs
Bottom stayed softCrowding or trapped moistureLeave more room between tenders and keep basket openings exposed
Chicken became dryTemperature checks started too lateBegin testing sooner, especially with thin strips or small batches
Breading felt greasyToo much oil or a heavy egg layerLet more egg drip away and use a finer mist of oil
Tenders finished at different timesUneven thicknessEven out obvious outliers before breading and remove individual tenders as they finish

When something goes wrong, ask which part actually needs fixing: the chicken or the crust. Pale crumbs can be improved on the next batch. Chicken that has already gone dry only gets drier with more time.

Two cut breaded chicken tenders comparing a lighter crisp crust with juicy meat against a darker crust with drier chicken.
Compare the cut surfaces, not only the crust: juicy chicken keeps plump, moist-looking fibers, while overcooked meat tightens and looks noticeably drier.

Changing the Breading: No Breadcrumbs, Fewer Dishes & Other Swaps

Once the base coating is working, most variations are simply a matter of changing one part of the system: the dry layer, the binder or the outer crust. Keep the same thickness and doneness rules while you change the coating.

Chicken Tenders With Flour, No Breadcrumbs

For the same 1½ lb / 680 g chicken, combine 1¼ cups / about 150 g all-purpose flour with 1 teaspoon paprika, 1 teaspoon garlic powder, ½ teaspoon onion powder, ½ teaspoon black pepper and 1 teaspoon fine salt. Put about 1 cup / 120 g in the working dish and keep the remaining ¼ cup / 30 g clean as reserve. This is a completely different amount from the 3 tablespoons used as a light primer in the main recipe.

Beat 2 eggs with 1 tablespoon / 15 ml water in a second shallow dish.

Coat each tender lightly in the seasoned flour, dip it in egg, then return it to the flour for a second thin coat:

flour → egg → flour again

Shake off loose flour, then mist both sides until the obvious powdery patches disappear. Air fry in a single layer at 400°F / 204°C, turning once. Begin checking thin pieces around 7 minutes and average tenders around 8 minutes. Remove each one when the center reaches 165°F / 74°C; many pieces will finish in roughly 8–12 minutes.

The result is a thinner, smoother crust than the panko version. Do not try to stretch the main recipe’s 3 tablespoons of flour across two full coats.

Golden flour-coated air fryer chicken tenders with a thinner crust and one piece cut open to show the cooked white chicken inside.
Flour-only chicken tenders will never look as jagged as panko-coated ones; instead, aim for an even, lightly craggy shell with no dusty flour patches after oiling.

Skip the Separate Egg Bowl? Use a Mayo or Mustard Binder

A thin layer of mayonnaise or mustard can hold the crumbs without a separate flour-and-egg dredge. Keep it thin; you only need enough binder to make the crumbs stick. A heavy layer does not improve adhesion.

A thin layer of mustard being brushed over a raw chicken tender with breadcrumbs visible nearby.
You should still see the chicken’s surface through a mayo or mustard binder. If the coating sits in ridges, scrape some off before adding breadcrumbs.

For a sweet-tangy version, the honey mustard chicken tenders build that binder directly into the flavor of the breading.

Other Useful Breading Swaps

Crushed unsweetened cornflakes give you a chunkier, louder crunch. Keep the pieces irregular and press them firmly into the binder. For Parmesan tenders, replace a few tablespoons of fine breadcrumbs with finely grated Parmesan and trim the salt a little.

For gluten-free tenders, use gluten-free all-purpose flour or cornstarch for the first layer and certified gluten-free panko or crumbs outside. If the coating feels fragile, give it the extra few minutes to settle. Moving it early will cost more than the wait.

Using buttermilk or a brine? Either can add seasoning and a little moisture insurance, but it is optional here. Drain the chicken thoroughly afterward and dry the outside before beginning the flour layer.

If you would rather skip the coating entirely, jump to Air Fryer Chicken Tenders Without Breading.

Air Fryer Chicken Tenders Without Breading

If you would rather skip the coating entirely, cook unbreaded chicken tenders at about 380–400°F / 193–204°C and take the first temperature reading around 7–8 minutes. Average pieces often finish in 8–11 minutes.

Pat the chicken dry, toss it with a small amount of oil, salt and your preferred seasonings, then arrange the tenders in one layer. Plain seasoned chicken works particularly well in salads, wraps, grain bowls and meal prep. The crunchy shell is gone, but the cooking becomes much simpler.

Cooked unbreaded chicken tenders with a browned seasoned surface and one cut open to show the moist white interior.
Unbreaded air fryer chicken tenders brown in patches rather than forming an even crust; therefore, use center temperature—not surface color—as the finish signal.

Want the same no-breading approach with lemon-pepper flavor? The lemon pepper chicken includes air-fryer guidance for tenders as well as other chicken pieces.

Using Frozen Chicken Tenders Instead?

Read the package before choosing a cooking time. Frozen breaded chicken may be fully cooked or raw and ready to cook, and the outside can look browned in either case.

USDA warns that frozen breaded poultry can look cooked even when it is still raw. Labels such as “Ready to Cook,” “Cook and Serve,” or “Oven Ready” do not necessarily mean the chicken is ready to eat.

Fully cooked frozen tenders: use the package’s air-fryer directions when available and heat them from frozen in a single layer.

Raw frozen breaded chicken: follow the manufacturer’s cooking directions and verify safe doneness. A browned exterior does not make the shorter reheating time for fully cooked products appropriate.

Plain frozen raw tenderloins: thaw them safely in the refrigerator first if you want to use the breaded recipe on this page. Dry them thoroughly after thawing; an icy or waterlogged outside makes the breading much harder to attach.

Frozen chicken shown in three labeled groups: fully cooked breaded tenders, raw breaded tenders and plain raw chicken tenderloins.
Treat the package wording as the deciding clue: “fully cooked” belongs on a reheating path, while “raw” or “ready to cook” belongs on a full cooking path.

Using fresh or thawed chicken instead? Back to the main recipe.

Batching, Serving & Leftovers

Keep Earlier Batches Crisp

Set finished tenders on a wire rack over a sheet pan in a low 200°F / 93°C oven while the next batch cooks. The rack lets steam escape from underneath the crust. Keep the hold as short as practical, especially for thinner tenders, and avoid piling hot pieces into a bowl where the breading will soften against the steam.

Cooked breaded chicken tenders arranged in one layer on a wire rack raised above a sheet pan.
On the wire rack, leave a little space between chicken tenders too; otherwise, the crust softens fastest where hot pieces sit directly against one another.

What to Serve With Chicken Tenders

For the classic plate, serve them with crispy homemade French fries. Add something cool and tangy such as creamy coleslaw when you want a fresher contrast beside the hot breading.

Ranch, barbecue sauce, buffalo sauce and ketchup all work, but keeping sauce beside the chicken lets everyone decide how much crispness they want to trade for sauce. For a thicker sweet-tangy dip, the honey mustard dressing works well with both tenders and fries.

A crisp golden chicken tender being dipped into thick honey mustard sauce with more chicken tenders in the background.
Dip only the bite you are about to eat; honey mustard clings well to the crisp breadcrumb coating, but coating the whole tender would soften it quickly.

Store, Reheat & Reuse Leftovers

Refrigerate leftover chicken within 2 hours—or within 1 hour if the surrounding temperature is above 90°F / 32°C. Keep it covered in the refrigerator for up to 3–4 days. If you need to stack the tenders, separate the layers so the crusts are not pressed directly against one another.

For better texture than the microwave gives you, reheat refrigerated tenders in the air fryer at about 375°F / 191°C. Start around 3–5 minutes and continue only as needed until the center reaches 165°F / 74°C and the crust is crisp again.

Reheated breaded chicken tenders in an air fryer basket with a crisp golden coating and one piece showing the cooked interior.
When reheating chicken tenders in the air fryer, use a single layer and check the thinnest pieces first; reheating is faster and less forgiving than cooking from raw.

Leftovers can also become a different meal entirely. Re-crisp the chicken first, then slice it over a salad, tuck it into a wrap, or use it in one of these chicken sandwich ideas—Buffalo, Parmesan and slaw-topped versions are especially easy when the chicken is already breaded.

Stop reheating once the center is hot and the crust is crisp again. The chicken is better eaten then than left in the fryer chasing one more shade of brown.

Posted on — Leave a comment

Honey Mustard Chicken Tenders Recipe

Golden panko-coated honey mustard chicken tenders on a plate with dip, pickles, crumbs, and a cut-open cooked tender.

These honey mustard chicken tenders are for the night you want crispy chicken strips, a creamy sweet-tangy dip, and zero deep-frying drama. The chicken stays juicy, the panko turns golden, and every piece is made for dragging through honey mustard sauce.

They are the kind of tenders people pick from the tray before dinner is even on the table: crisp edges, juicy centers, and just enough honey mustard to keep everyone reaching for one more.

Here, the goal is simple: no pale panko, no soggy bottoms, no dry chicken, and no wasted dipping sauce because it touched raw chicken. Everything runs on one simple system: creamy honey mustard as the binder, panko as the crunch, clean dip reserved first, then an oven or air fryer finish.

Remember the signature rule: mix once, divide first — one clean bowl for dipping, one bowl for coating raw chicken. For the best all-around tray, use chicken strips about 3/4 inch thick, press them into panko, and bake at 425°F / 220°C until golden and cooked through. It is the kind of dinner that feels fun without asking you to set up a frying station or babysit a pan of oil.

Quick Answer: How to Make Honey Mustard Chicken Tenders

To make crispy honey mustard chicken tenders, pat chicken tenderloins or chicken breast strips dry, coat them in a creamy mustard-honey mixture, reserve clean sauce before raw chicken touches the rest, press the coated chicken into panko breadcrumbs, then bake at 425°F / 220°C for 16–20 minutes or air fry at 390°F / 200°C for 10–12 minutes.

The chicken is done when the thickest piece reaches 165°F / 74°C. For the best texture, keep the strips evenly sized, spray the crumb layer lightly with oil, leave space between pieces, and dip at the table instead of pouring sauce over the crust too early.

Jump to recipe card · Oven method · Air fryer method · Fix a problem

Honey Mustard Chicken Tenders Recipe Card

Recipe: Crispy Honey Mustard Chicken Tenders

Main method: Oven baked
Alternate method: Air fryer
Servings: 4
Yield: About 10–12 chicken tenders

Prep Time15 minutes
Optional Rest15–30 minutes
Cook Time16–20 minutes oven / 10–12 minutes air fryer
Total Time35–45 minutes, plus optional 15–30 minute rest
Chicken Doneness165°F / 74°C internal temperature

Ingredients

For the Chicken and Coating

  • 1 1/2 lb / 680 g / 24 oz chicken tenderloins, or boneless chicken breast sliced into strips about 3/4 inch thick
  • 1 1/2 cups / 75–90 g panko breadcrumbs
  • Fine salt, 1 teaspoon / 5–6 g, divided
  • Black pepper, 1/2 teaspoon
  • Garlic powder, 1 teaspoon
  • Onion powder, 1/2 teaspoon
  • Smoked paprika or sweet paprika, 1 teaspoon
  • Oil spray, or 1 tablespoon / 15 ml olive oil for drizzling

For the Honey Mustard Coating and Dipping Sauce

  • 1/4 cup / 60 ml / about 60 g Dijon mustard, yellow mustard, or a mix of both
  • 3 tablespoons honey / 45 ml / about 60 g
  • 3 tablespoons mayonnaise or Greek yogurt / 45 ml / about 45 g
  • 1 tablespoon / 15 ml lemon juice or apple cider vinegar
  • 1/4 teaspoon garlic powder
  • Pinch of salt and black pepper, to taste

Sauce note: This amount gives enough sauce to coat the chicken and reserve a small dipping bowl. For sauce-heavy serving, make a second half-batch of honey mustard or reserve more before raw chicken touches it.

Instructions

Prepare the Sauce

  1. In a bowl, mix the mustard, honey, mayonnaise or Greek yogurt, lemon juice or vinegar, garlic powder, salt and pepper.
  2. Taste and adjust. Make it sweeter with more honey, sharper with extra Dijon, or brighter with a little more lemon juice.
  3. Mix once, divide first: reserve about one-third to one-half of the sauce in a clean bowl for dipping. Keep this portion away from raw chicken.

Coat the Chicken

  1. Pat the chicken tenders dry with paper towels. The surface should look dry, not shiny-wet.
  2. Season the chicken lightly with some of the salt, pepper, garlic powder, onion powder and paprika.
  3. Add the chicken to the remaining honey mustard mixture and turn until each piece is coated.
  4. Let the chicken sit for 15–30 minutes if you have time. Avoid a long acidic marinade for very thin strips because the surface can soften and the coating may not grip as well.
  5. Place the panko breadcrumbs in a shallow bowl. Season with the remaining salt and spices.
  6. Press each honey mustard-coated chicken tender firmly into the panko, turning to coat all sides.

Bake the Chicken Tenders

  1. Preheat the oven to 425°F / 220°C. Line a baking sheet with parchment paper. For crispier bottoms, place a wire rack over the baking sheet.
  2. Arrange the coated tenders in a single layer with space between them.
  3. Spray the tops lightly with oil, or drizzle with a small amount of olive oil.
  4. Bake for 16–20 minutes, flipping once if needed, until the edges are golden and the chicken is cooked through.
  5. Check the thickest tender for doneness.
  6. Rest for 3–5 minutes on a rack or plate, then serve with the reserved clean honey mustard dipping sauce.

Air Fryer Method

  1. Preheat the air fryer to 390°F / 200°C.
  2. Arrange the chicken tenders in a single layer. Do not overcrowd the basket.
  3. Spray lightly with oil.
  4. Air fry for 10–12 minutes, flipping halfway, until crisp and cooked through. Check around 9–10 minutes the first time because air fryers brown at different speeds.
  5. Cook in batches if needed. Two lighter batches will beat one crowded batch every time.

Recipe Notes

  • No egg is needed here because the honey mustard mixture acts as the binder.
  • Very thin strips cook quickly, so start checking early.
  • Thicker tenders may need the full 20 minutes, or a gentler 400°F / 200°C bake for a few extra minutes.
  • For the crunchiest crust, use a wire rack and oil spray.
  • To get a familiar fast-food-style honey mustard, use more yellow mustard and mayonnaise.
  • Prefer a sharper Dijon-style sauce? Use more Dijon and a little extra lemon juice.

Choose Your Version

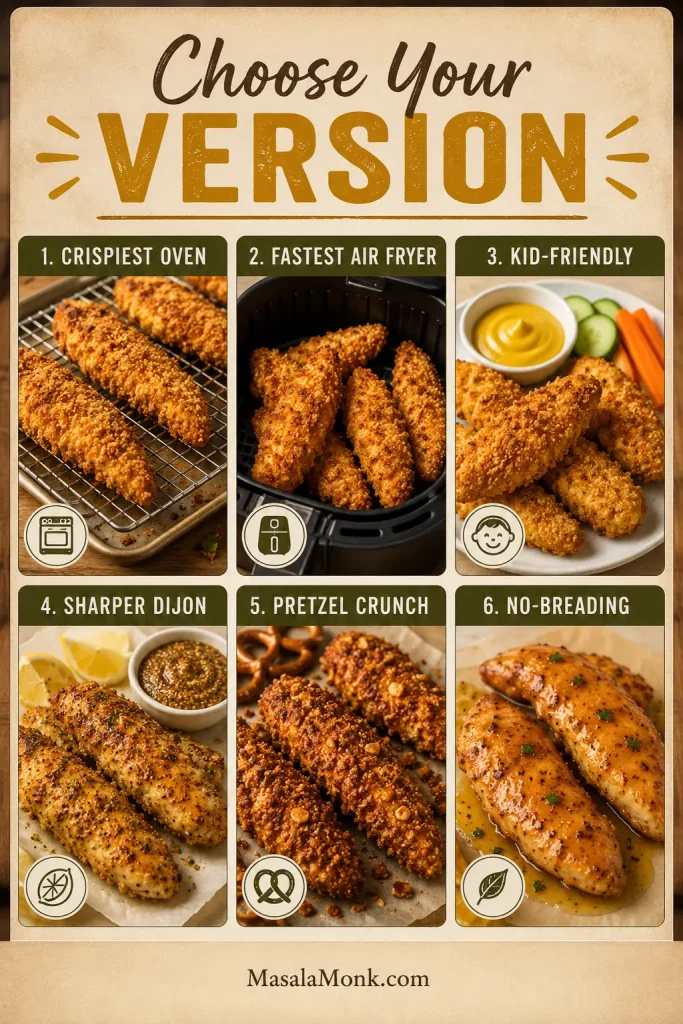
Already know what kind of tray you want? Use this table to steer the recipe. The base method stays the same; the small changes below make the tenders crunchier, faster, milder, sharper, party-style, or gluten-free.

Six-panel board comparing honey mustard chicken tender versions: oven, air fryer, kid-friendly, Dijon, pretzel crunch, and no-breading.
Choose the version that fits your night: oven-baked for maximum crunch, air fryer for speed, Dijon for a sharper bite, pretzel crumbs for texture, or no-breading for a lighter option.
Want This Result?Do This
Crispiest oven tendersUse panko, toast it first if you can, spray with oil, and bake on a wire rack.
Fastest versionUse the air fryer at 390°F / 200°C in a single layer.
Kid-friendly flavorUse yellow mustard, mayonnaise, and a little extra honey.
Sharper Dijon versionUse more Dijon, Greek yogurt, and extra lemon juice.
Party-style crunchReplace panko with crushed pretzels and reduce added salt.
Gluten-free versionUse gluten-free panko or crushed gluten-free rice cereal.
No-breading versionSkip the panko and bake lightly coated honey mustard tenderloins.

Time and Temperature Guide

Chicken tenders cook quickly, so timing matters. Use the table below as a guide, then check the thickest piece before serving.

MethodTemperatureTimeBest For
Oven, standard tenders425°F / 220°C16–20 minutesFull batch, golden crumb crust
Oven, thick tenders400°F / 200°C20–25 minutesLarger chicken strips
Air fryer390°F / 200°C10–12 minutesFast crisping, smaller batches
Reheat375–390°F / 190–200°C5–8 minutes, or until hot and crispLeftovers

Chicken should reach 165°F / 74°C in the thickest part. The tenders should also look golden at the edges and feel firm when lifted with tongs, but the thermometer is the safest check.

Once the timing is clear, the next thing is texture. These tenders work because the coating is built to cling, brown, and stay crisp long enough to dip.

Why This Recipe Works

The best honey mustard chicken tenders are not just sweet chicken in breadcrumbs. They need a coating that stays put, a crust that browns before the chicken dries out, and a dipping sauce that does not soften the crunch too early.

The magic is not complicated, but it does depend on a few small choices that keep baked tenders from tasting like soft breaded chicken.

  • Dry chicken helps the coating grip. You want the mustard-honey layer to cling, not slide around.
  • Honey mustard replaces egg. It gives the crumbs something to hold onto and adds flavor at the same time.
  • Panko gives the oven-fried bite. It is lighter and flakier than regular breadcrumbs.
  • Oil spray brings the color. Dry crumbs stay pale; a little oil helps them turn golden.
  • Space and a rack fight steam. Give the tenders a little breathing room so they brown instead of softening together.
  • Reserved sauce stays clean. Moving the dip to a separate bowl before coating the chicken keeps serving simple and safe.

When those pieces work together, you get the comfort of chicken fingers, the brightness of honey mustard, and a crisp bite that still tastes juicy underneath.

The best part is the contrast: the craggy panko shell, the tender strip of chicken inside, and that cool-sweet honey mustard dip catching in all the little crispy edges.

Crispy Outside, Juicy Inside

This is the texture target to keep in mind before you start coating: crisp crumbs on the outside, tender chicken in the middle, and sauce served on the side so the crust stays lively.

Close-up of a cut-open crispy chicken tender with golden panko coating, white cooked chicken inside, and honey mustard dip nearby.
Aim for contrast in every bite: a crunchy panko shell outside and moist white chicken inside. Pull the tenders once they are cooked through so the center stays juicy.

Ingredients You Need

Most of the flavor comes from the ingredients. Simple tools and small technique choices handle the texture.

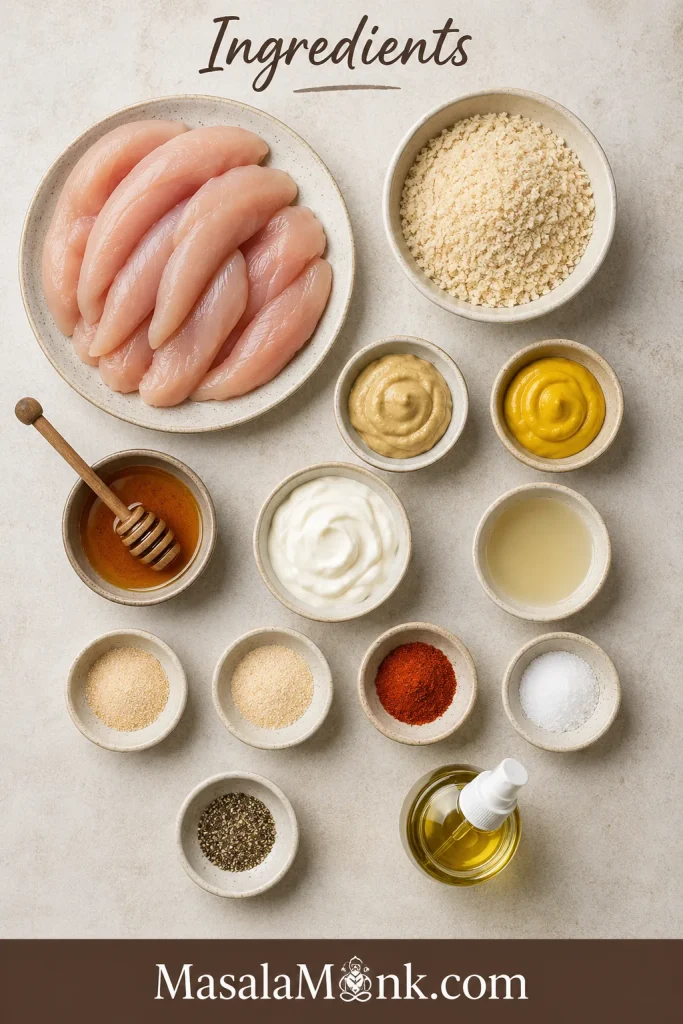
Overhead layout of ingredients for honey mustard chicken tenders, including raw chicken, panko, mustard, honey, yogurt or mayo, spices, and oil.
Set out the chicken, panko, sauce ingredients, seasonings, and oil spray before you start. It keeps the coating step smooth and makes it easier to reserve a clean dipping bowl.

Chicken Tenderloins or Chicken Breast

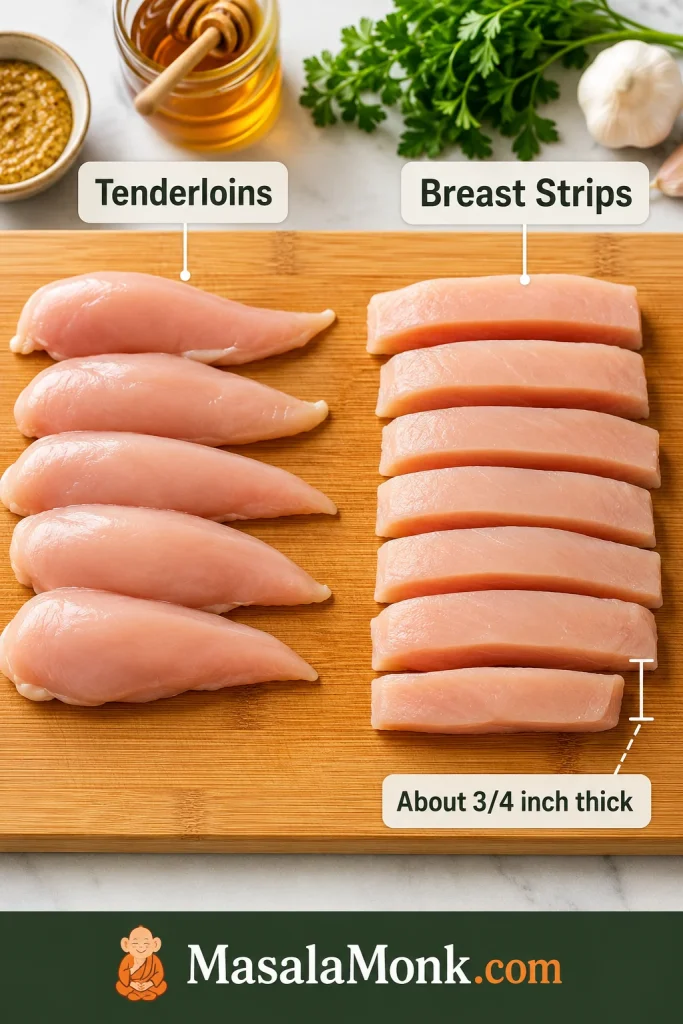
Chicken tenderloins are easiest because they are already shaped like strips. Boneless chicken breast works too; just slice it lengthwise into even pieces about 3/4 inch thick at the widest part. Very thin strips cook before the crumbs brown, while very thick strips need more time and can darken the honey before the center is done.

Raw chicken tenderloins and sliced chicken breast strips arranged side by side on a cutting board with a 3/4 inch thickness label.
Even thickness matters more than perfect shape. Keep chicken tenderloins or breast strips close to 3/4 inch thick so the coating can brown before the center dries out.

If you are starting with full chicken breasts and want more detail on keeping them juicy, this baked chicken breast recipe goes deeper into timing, thickness, and avoiding dry chicken.

Mustard

Dijon brings bite; yellow mustard brings nostalgia. Use Dijon for a sharper sauce, yellow mustard for a milder dipping-sauce flavor, or a mix of both for the best middle ground.

Honey

Honey gives the sauce its classic sweetness, but this is not a sticky glaze recipe. The honey mustard flavors the chicken while the panko does the crisping, so the tenders stay crunchy instead of turning syrupy.

Mayonnaise or Greek Yogurt

Mayonnaise makes the sauce creamy and familiar. Greek yogurt gives you a lighter, tangier version. Both help the mustard-honey coating cling to the chicken and hold the crumbs in place.

If you like making creamy sauces from scratch, this homemade mayonnaise guide gives you a richer base for dips.

Panko Breadcrumbs

Panko is what keeps baked tenders from feeling like soft breaded chicken. The flakes are light and uneven, so they create a craggy shell that feels much closer to fried chicken fingers.

This recipe skips the classic flour-and-egg dredge to keep the coating simple. The mustard-honey layer works as the glue. For a firmer, more restaurant-style crust, lightly dust the chicken with flour before dipping it into the sauce, then press it into the panko.

Seasonings

Garlic powder, onion powder, paprika, salt and pepper are enough. They make the coating savory without hiding the honey mustard flavor.

Equipment That Helps

You can make these with a baking sheet and a bowl, but a few simple tools make the difference between “good enough” tenders and crisp, golden ones.

  • Rimmed baking sheet: Keeps crumbs and oil contained.
  • Parchment paper: Helps prevent sticking and makes cleanup easier.
  • Wire rack: Gives the bottoms a better chance to crisp.
  • Shallow bowl: Makes pressing the panko onto the chicken easier.
  • Oil spray: Helps the crumbs turn golden without deep frying.
  • Air fryer: Optional, but excellent for smaller batches.
  • Instant-read thermometer: Helpful for avoiding dry or undercooked chicken.

Honey Mustard Sauce: Dip, Binder or Marinade?

Honey mustard does three jobs here: it helps the crumbs stick, flavors the chicken, and gives you that creamy dipping bowl at the end. The only rule is that the dip must be reserved before raw chicken touches the rest.

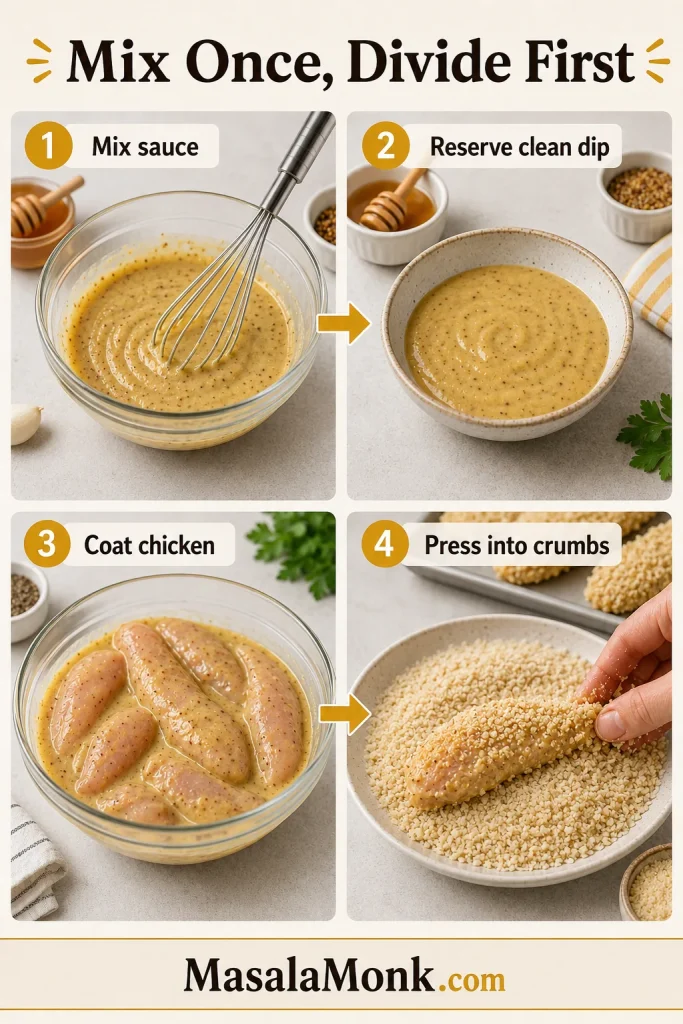
Sauce safety rule: mix once, divide first. Make one batch of honey mustard, then immediately move the dipping portion to a clean bowl before raw chicken touches the rest.

Mix Once, Divide First

This visible split is what keeps dinner simple: one bowl becomes the clean dip, while the rest of the sauce seasons and coats the raw chicken before breading.

Four-panel guide showing honey mustard sauce mixed, clean dip reserved, raw chicken coated, and chicken pressed into panko crumbs.
Mix once, then divide before raw chicken touches the sauce. This keeps one bowl safe and clean for dipping while the remaining honey mustard becomes the flavorful coating binder.

The sauce has three jobs. First, it helps the crumb layer stick. At the table, it gives the cooked tenders that creamy sweet-tangy finish. If the chicken rests for 15–30 minutes before breading, the same sauce also works as a short flavor boost.

Honey Mustard Sauce Spoon Test

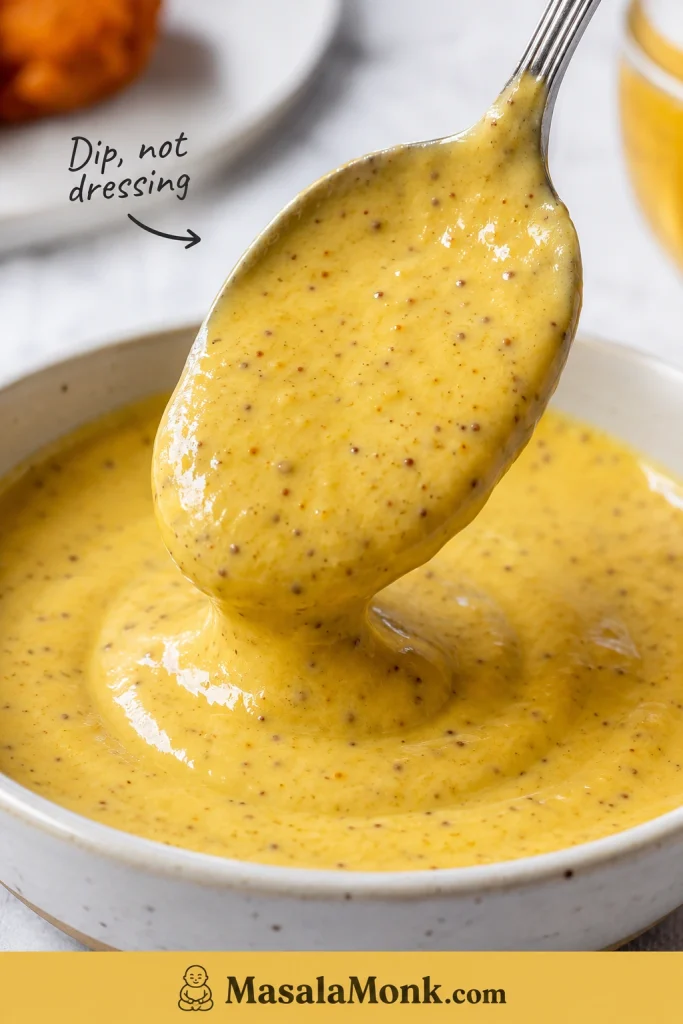
Before the chicken goes in, lift a spoon through the sauce and check the texture. It should coat the spoon in a creamy layer, not run off immediately.

Thick creamy honey mustard sauce clinging to the back of a spoon above a bowl with visible mustard specks.
Look for a spoon-coating texture: thick enough to cling, creamy enough to dip. If the honey mustard looks runny, thicken it slightly before coating the chicken.

For a loose sauce, whisk in another spoonful of mayo or Greek yogurt before breading. A thicker sauce grips the chicken better and protects the panko from turning wet.

Very thin strips do not need an overnight marinade, especially if your sauce is tangy with lemon juice or vinegar. Too much time in an acidic sauce can soften the surface and make the coating less secure.

Simple Honey Mustard Dipping Sauce Ratio

  • 1/4 cup / 60 ml mayonnaise or Greek yogurt
  • 2 tablespoons / 30 ml Dijon or yellow mustard
  • 2 tablespoons honey / 30 ml / about 40 g
  • 1–2 teaspoons lemon juice or apple cider vinegar
  • Pinch of garlic powder
  • Salt and pepper to taste

Make it sweeter with more honey, sharper with extra Dijon, or more familiar and restaurant-style with yellow mustard and mayo. Greek yogurt plus a little extra lemon juice gives you the lighter, tangier version.

If you enjoy this sweet-tangy lane, mango mustard sauce is a fun next dip for fries, wraps and sandwiches.

Next: press into panko · Bake the tenders · Air fry the tenders · Back to recipe card

How to Make Honey Mustard Chicken Tenders

Once the recipe card is open, these are the small visual cues that make the tray come out right: dry surface, spoon-coating sauce, firmly pressed crumbs, enough space, and golden edges.

1. Dry and Season the Chicken

The chicken should look dry before the sauce goes on. You want the mustard-honey coating to cling, not slide around.

2. Mix, Taste and Divide the Sauce

The sauce should taste sweet first, tangy next, and creamy enough to dip. Once it tastes right, reserve the clean dipping portion before you coat the raw chicken.

3. Coat Lightly, Not Heavily

You want a thin layer of honey mustard clinging to the chicken, not a heavy blanket of sauce. Too much sauce can make the crumbs wet and slow down browning.

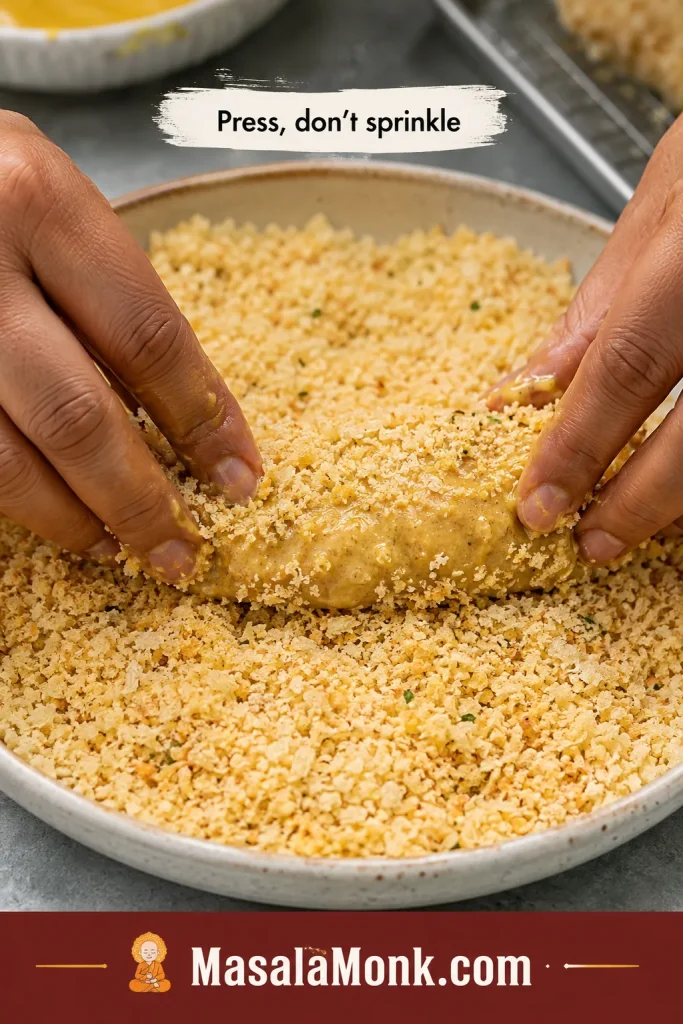
4. Press the Panko

Press the crumbs onto the chicken instead of sprinkling them over the top. The coating should look attached before it goes into the oven or air fryer.

Hands pressing a honey-mustard-coated chicken tender into coarse panko breadcrumbs in a shallow bowl.
After coating the chicken, press it firmly into the panko instead of sprinkling crumbs over the top. This helps the breadcrumb crust grip better during baking or air frying.

5. Space, Spray and Cook

Leave gaps between the tenders and give the crumb layer a light spray of oil. This is the step that makes the tray look like dinner instead of pale baked chicken: the crumbs need both heat and a little fat to turn golden.

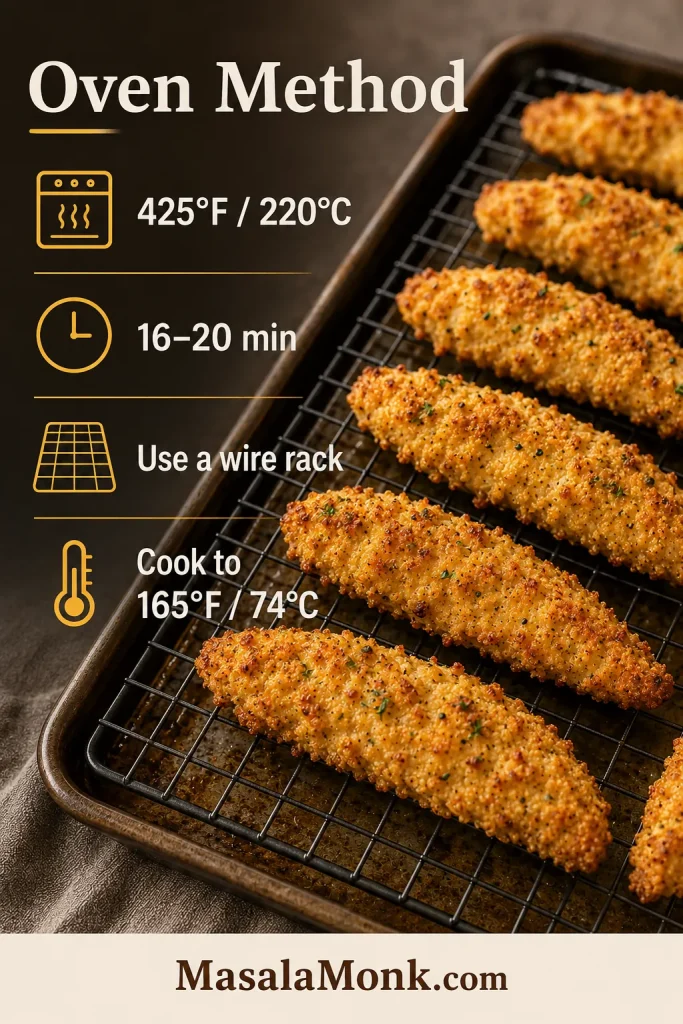
Oven Method

Use the oven when you want the whole tray ready together, with enough tenders for dinner plates and a few “just one more” pieces.

  • Temperature: 425°F / 220°C
  • Time: 16–20 minutes
  • Best setup: parchment-lined baking sheet or a wire rack over a baking sheet
  • Texture goal: golden crumbs, juicy chicken, crisp edges
Oven method guide for panko honey mustard chicken tenders showing baking temperature, time, wire rack use, and safe doneness.
For the oven method, high heat and rack spacing do most of the work. The rack helps the panko crisp underneath while the quick bake keeps the chicken tender.

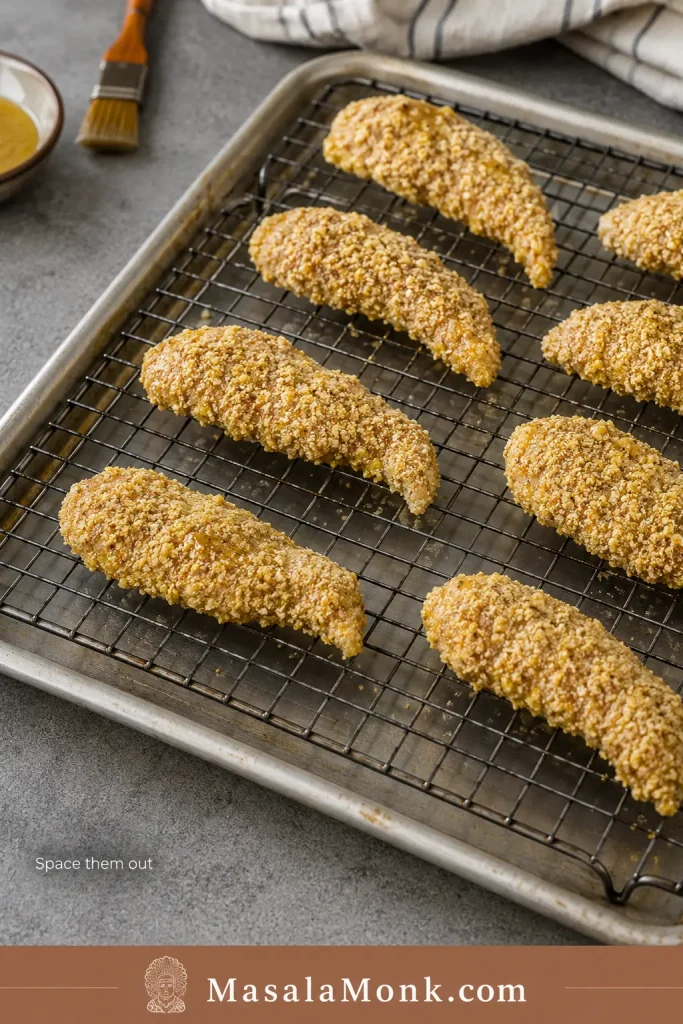
Why Use a Wire Rack?

A wire rack helps hot air reach the bottom of the tenders, which keeps them from steaming against the pan. When baking directly on parchment, flip the tenders once for better bottom color. With a rack, flipping is optional.

Breaded chicken tenders spaced apart on a wire rack over a rimmed baking sheet before baking.
A wire rack gives baked chicken tenders an instant crispness boost. Because heat can move underneath the pieces, the bottoms stay drier and the panko browns more evenly.

Thick tenders can bake at 400°F / 200°C for about 20–25 minutes. Thin strips may be ready closer to 14–16 minutes, so start checking early.

Compare the air fryer method · Make them extra crispy · See serving ideas · Back to recipe card

Air Fryer Method

Use the air fryer when speed matters more than cooking the whole batch at once. It crisps the crumb layer quickly, but only if the basket has enough space.

Air Fryer Single Layer Setup

Before starting the timer, check the basket. The pieces should sit in one layer with visible gaps, even if that means cooking two smaller batches.

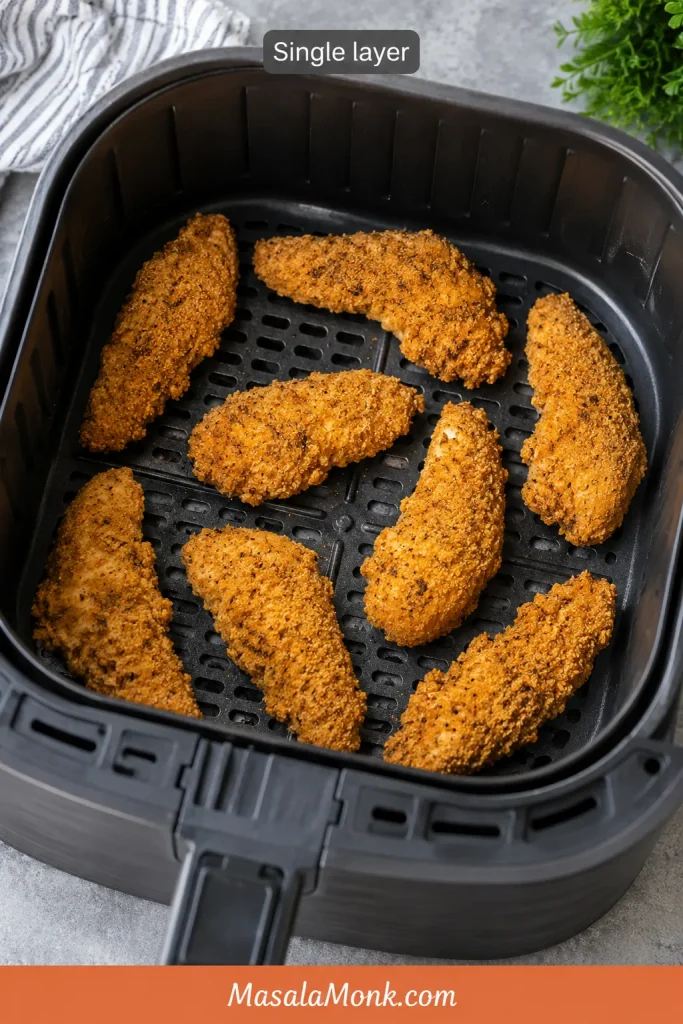
Breaded chicken tenders arranged in a single layer inside a black air fryer basket with space between each piece.
In the air fryer, crowding turns crisping into steaming. Therefore, leave small gaps between the tenders so the hot air can brown the panko coating properly.
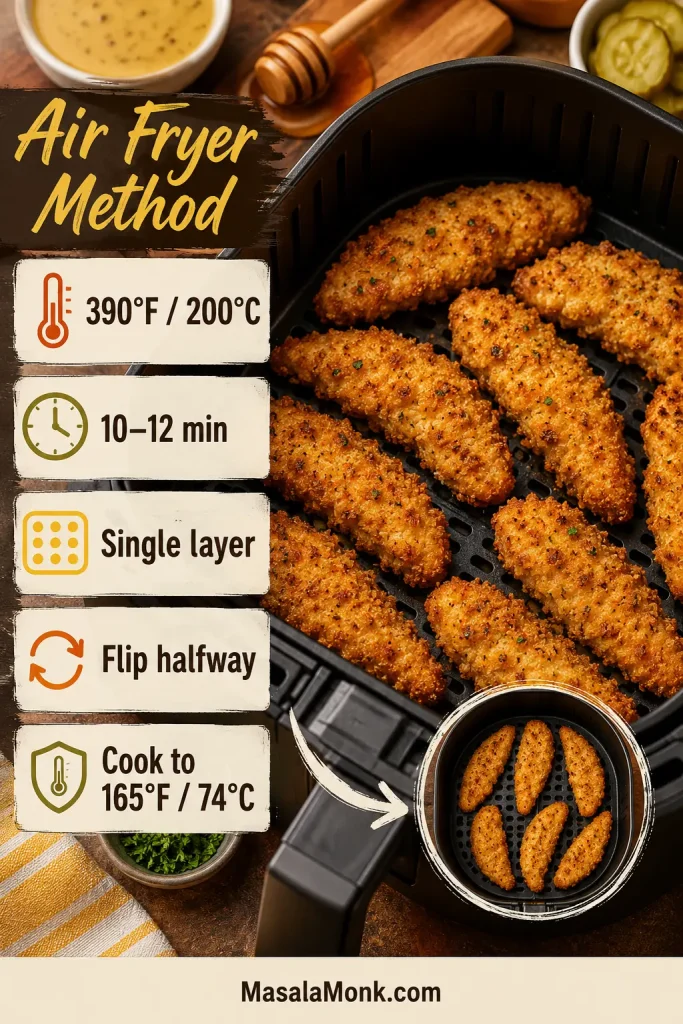
  • Temperature: 390°F / 200°C
  • Time: 10–12 minutes
  • Flip: halfway through
  • Oil: light spray on both sides
  • Best rule: cook in batches if the basket is small

Air Fryer Time and Temperature Guide

Use this quick visual check when you want the air fryer version: moderate-high heat, a halfway flip, and enough space for the crumbs to crisp.

Air fryer method guide with breaded chicken tenders in a basket and text for temperature, time, flipping, single-layer spacing, and doneness.
Give every tender room in the air fryer basket. Meanwhile, flipping halfway helps both sides get direct heat so the coating crisps instead of softening.

Different air fryers brown at different speeds, so check around 9–10 minutes the first time. Keep the first batch warm on a rack in a low oven while the rest cook, and avoid stacking hot tenders in a bowl because steam will soften the crust.

The same air-flow rule shows up in crispy recipes like air fryer chicken wings: dry surfaces, space between pieces, and late saucing protect the crunch.

Make them extra crispy · Try another coating · See serving ideas · Back to recipe card

Extra Crispy Upgrades

Once the basic method is in place, these upgrades take baked chicken tenders from good to properly crisp. They are especially helpful if your baked tenders usually come out pale or soft.

  • Toast the panko first. This is the best color upgrade. Toasting gives baked tenders a golden head start before the chicken has a chance to overcook.
  • Use a wire rack. It lets heat move around the tenders instead of trapping steam underneath.
  • Spray both sides lightly. A little oil helps the crumbs brown and gives the crust a more oven-fried texture.
  • Rest cooked tenders on a rack. If you have a rack, use it even after baking. It keeps the bottoms from softening while everyone is getting plates ready.
  • Avoid stacking. Hot tenders piled together will soften quickly.
  • Dip, do not drown. Let the crust stay in charge until the moment you eat.

Best Coatings for Honey Mustard Chicken Tenders

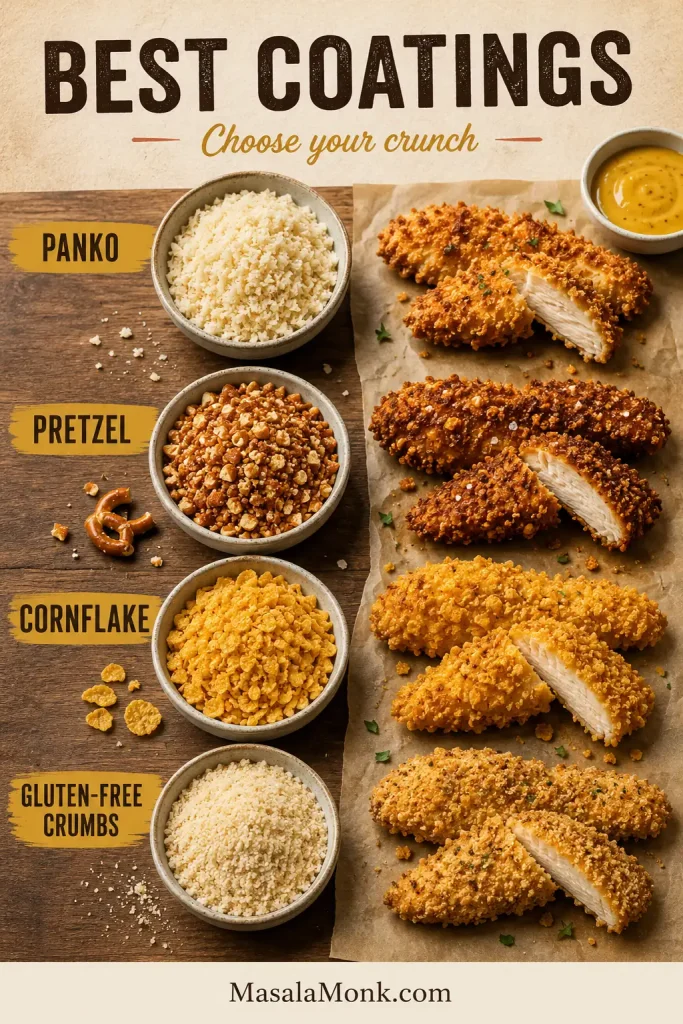
Panko is the easiest default, but honey mustard chicken tenders are flexible. Use this quick guide to choose the coating that fits the meal.

Coating comparison board showing panko, pretzel, cornflake, and gluten-free crumbs with chicken tender samples.
Each coating changes the crunch. Panko stays light and flaky, pretzel crumbs add salty depth, cornflakes create a bigger golden crust, and gluten-free crumbs keep the recipe flexible.
CoatingBest ForNotes
Panko breadcrumbsClassic crispy baked tendersBest default choice
Crushed pretzelsSalty, crunchy party-style tendersUse less added salt
Crushed cornflakesExtra crisp kid-friendly tendersCrush finely but not into powder
Regular breadcrumbsSofter chicken stripsWorks, but less crisp than panko
Gluten-free pankoGluten-free versionCheck labels on mustard and seasonings too
Crushed rice cerealEmergency gluten-free crunchBest with a little extra seasoning

If you use pretzels or cornflakes, crush them into small uneven crumbs. A little texture is good, but a fine powder will not give the same crunch.

Variations

Once the basic tray works, this recipe is easy to bend toward the people eating it — sweeter for kids, sharper for Dijon lovers, spicier for game day, crunchier with pretzels, or lighter without mayo.

Spicy Hot Honey Mustard Chicken Tenders

This is the game-day version: still sweet and creamy, but with enough heat to keep people dipping. Add a pinch of cayenne, chili powder or hot sauce to the honey mustard mixture. You can also finish the cooked tenders with a tiny drizzle of hot honey, but add it at the table so the coating stays crisp.

For a fruitier heat, borrow the sweet-spicy direction from this mango habanero sauce and add only a small amount to the honey mustard dip.

Pretzel-Crusted Honey Mustard Tenders

Replace the panko with crushed pretzels for a salty snack-style crust that feels made for a party tray. Reduce the salt in the crumb mixture because pretzels are already salty.

Buttermilk Honey Mustard Chicken Tenders

For a more tender, classic chicken-finger texture, soak the chicken in buttermilk for 30 minutes before coating. Pat off the excess before adding the honey mustard mixture so the panko does not slide off.

No-Mayo Honey Mustard Sauce

Use Greek yogurt when you want the dip tangier and lighter without losing the creamy coating. Add a little extra honey if you want it sweeter. For an egg-free creamy base, eggless mayonnaise also works well.

Kid-Friendly Yellow Mustard Version

Use yellow mustard instead of Dijon, skip the cayenne or spicy seasonings, and keep the sauce a little sweeter. This version tastes closer to familiar fast-food honey mustard.

Gluten-Free Honey Mustard Chicken Tenders

Use gluten-free panko or crushed gluten-free rice cereal. Also check the mustard, mayonnaise and seasonings to make sure they fit your needs.

No-Breading Honey Mustard Tenderloins

This version is not trying to be crispy. It is for the night you want juicy honey mustard tenderloins over rice, salad, or roasted vegetables. Skip the panko, coat the chicken lightly in honey mustard, and bake on parchment until cooked through, starting to check around 14–16 minutes depending on thickness.

Green Chutney Mayo Dip

For an Indian-style dipping sauce, stir a spoonful of green chutney into mayo or Greek yogurt. It gives the tenders a fresh coriander-mint bite without changing the main recipe.

Shallow-fried note: If you want a more classic chicken-finger texture, shallow fry the coated tenders in a thin layer of neutral oil until golden and cooked through. Keep the heat moderate so the honey in the coating does not brown too fast.

What to Serve with Honey Mustard Chicken Tenders

Once the tray is done, the only real question is whether this is a cozy dinner, a game-day snack, or a wrap-and-leftovers situation. Keep the dip close and build the meal around something crisp, creamy, tangy or fresh.

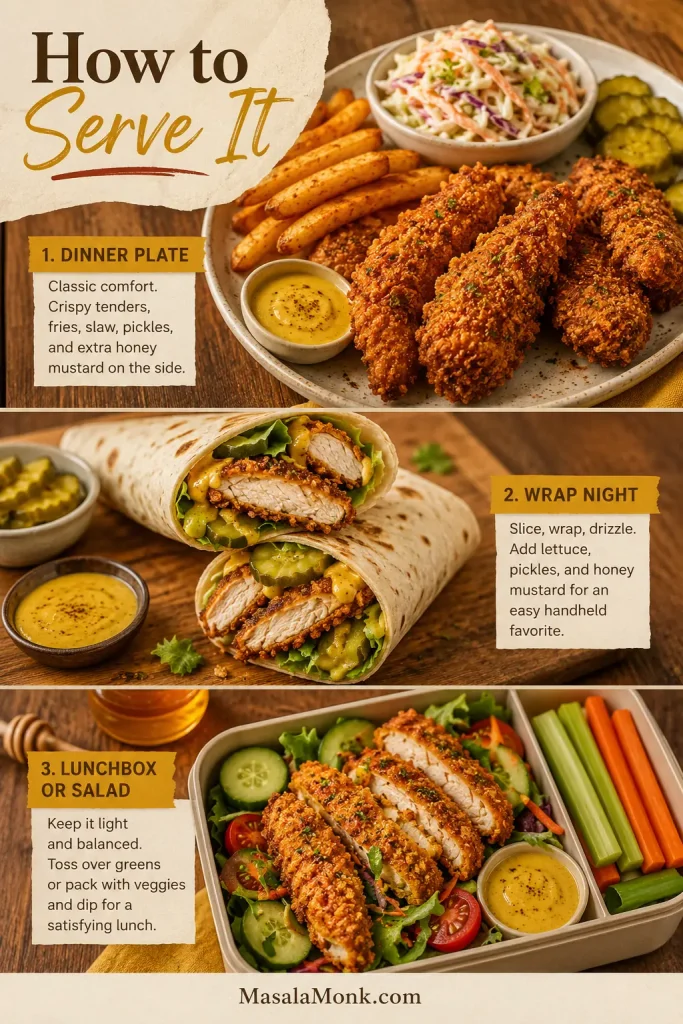
Three serving ideas for honey mustard chicken tenders: dinner plate with fries and slaw, chicken wrap, and lunchbox salad.
These tenders can move from snack to full meal with the right sides. Try them with fries and slaw, tuck them into wraps, or slice them over salad with extra honey mustard.
  • Weeknight dinner: roasted broccoli, green beans, mashed potatoes, or macaroni and cheese.
  • Diner-style plate: crispy homemade French fries, creamy coleslaw, pickles, and extra honey mustard.
  • Game-day tray: buffalo chicken dip, potato wedges, celery sticks, and a pile of napkins.
  • Lunchbox or salad bowl: cucumber salad, green salad, crunchy vegetables, and sliced cold tenders.
  • Wrap or sandwich night: lettuce, pickles, soft buns or tortillas, and enough sauce to swipe through every bite.

Leftover tenders are great sliced over salad, tucked into wraps, or layered into sandwiches with lettuce, pickles and extra honey mustard. For more lunch ideas, these chicken sandwich recipes are a useful next stop.

Storage, Freezing and Reheating

The main rule for leftovers is simple: keep the sauce separate and bring the crunch back with dry heat.

Storing Leftovers

Store cooked chicken tenders in an airtight container in the fridge for 3–4 days. Keep the honey mustard sauce in a separate container so the coating does not soften. That 3–4 day window matches the FoodSafety.gov cold storage chart for cooked meat and poultry leftovers.

Reheating

For the best texture, reheat the tenders in an oven or air fryer at 375–390°F / 190–200°C for about 5–8 minutes, or until hot and crisp. The microwave works if you are in a hurry, but it will soften the coating.

Freezing

For easiest freezing, freeze cooked tenders. Raw breaded tenders can also be frozen if the chicken was handled cold and clean, but cooked leftovers are simpler and safer for most home kitchens. Freeze in a single layer first, then move to a freezer-safe bag or container.

Do not freeze the dipping sauce with the chicken. Make fresh sauce or store it separately in the fridge.

Troubleshooting

Most honey mustard chicken tender problems come down to moisture, crowding, or too much sauce. If baked tenders have ever come out pale, soft, or half-naked on the pan, this is the section that saves the next batch.

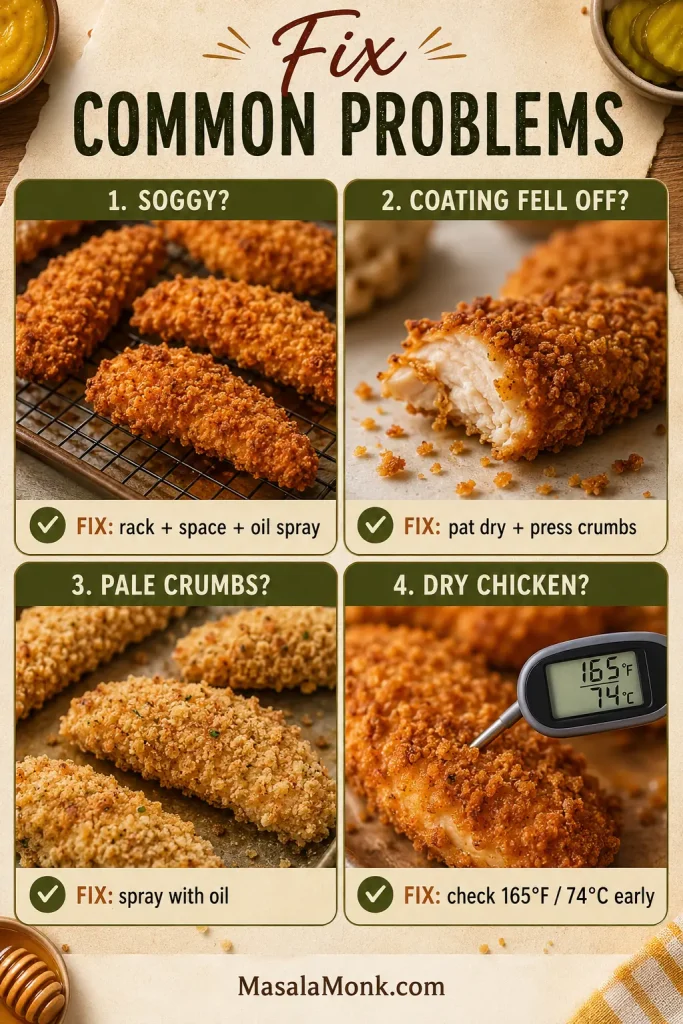
Troubleshooting board showing fixes for soggy chicken tenders, coating falling off, pale crumbs, and dry chicken with temperature guidance.
For soggy coating, fix the airflow first with a rack, spacing, and oil spray. When crumbs fall off, start earlier by patting the chicken dry and pressing the panko firmly.

Why Are My Chicken Tenders Soggy?

Likely causes: crowding, too much sauce, not enough oil on the crumbs, or stacking hot tenders after cooking.

Fix: leave space between pieces, use a rack if possible, spray lightly with oil, rest cooked tenders without stacking, and dip at the table instead of saucing early.

Why Did My Coating Fall Off?

Likely causes: wet chicken, thin sauce, loose crumbs, or not enough pressing.

Fix: pat the chicken dry, use a creamy coating that clings, and press each tender into the panko until the crumbs look attached.

Why Is My Panko Pale?

Likely causes: dry breadcrumbs, low browning, or not enough time for color before the chicken is done.

Fix: spray or drizzle the panko lightly with oil. For deeper color, toast the panko before coating the chicken.

Why Did the Honey Burn?

Likely causes: a sauce layer that is too heavy, very small chicken pieces, or cooking too long.

Fix: use a thin coating, rely on panko for crunch, and start checking thin strips early.

Why Is the Chicken Dry?

Likely causes: thin strips, uneven sizes, or cooking past the safe internal temperature.

Fix: cut even pieces, start checking early, and use a thermometer in the thickest tender.

Why Is the Sauce Too Sweet or Too Sharp?

Likely causes: too much honey for your taste, too much Dijon, or not enough creamy base.

Fix: add mustard or lemon juice if it is too sweet. Add honey, mayo, or Greek yogurt if it is too sharp. Honey mustard should taste sweet first, tangy next, and creamy enough to dip.

Back to recipe card · Review oven method · Review air fryer method · Back to top

FAQs

Are Chicken Tenders and Chicken Strips the Same Thing?

They are often used the same way in recipes. Tenderloins are the small natural strips attached to the chicken breast. Strips are usually sliced from boneless chicken breast. Both work as long as the pieces are similar in size.

Can I Use Chicken Breast Instead of Tenderloins?

Yes. Slice boneless chicken breast into even strips about 3/4 inch thick at the widest part. Try not to make them too thin, because thin strips can dry out before the coating gets crisp.

Do I Need Flour or Egg for These Chicken Tenders?

No. The honey mustard mixture works as the binder in this recipe. For a firmer restaurant-style crust, lightly dust the chicken with flour before adding the sauce and panko.

Can I Make Honey Mustard Chicken Tenders in the Air Fryer?

Yes. Air fry at 390°F / 200°C for 10–12 minutes, flipping halfway, until the chicken is crisp and cooked through. Cook in batches so the basket is not crowded.

How Do I Keep Baked Chicken Tenders Crispy?

Use panko breadcrumbs, spray or drizzle the coating lightly with oil, leave space between the tenders, and bake at high heat. A wire rack helps too. Keep the sauce on the side until serving.

Can I Make These Gluten-Free?

Yes. Use gluten-free panko or crushed gluten-free rice cereal. Check your mustard, mayonnaise, and seasonings as well if gluten-free cooking is important for your household.

Can I Make the Sauce Without Mayo?

Yes. Use Greek yogurt for a tangier, lighter sauce. Add a little extra honey if you want it sweeter, or use eggless mayonnaise if you want a mayo-style sauce without egg.

Can I Use the Same Honey Mustard as Marinade and Dip?

Only if you divide it first. Reserve the dipping portion in a clean bowl before raw chicken touches the rest. The sauce used on raw chicken should not be served as a dip unless it is cooked safely.

How Do I Reheat or Freeze Honey Mustard Chicken Tenders?

Reheat cooked tenders in an oven or air fryer at 375–390°F / 190–200°C for 5–8 minutes, or until hot and crisp. For freezing, cooked tenders are the easiest option. Freeze in a single layer first, then store in a freezer-safe bag or container.

Final Bite

The win here is simple: no frying pot, no soggy tray, no dry chicken, and no wasted dipping sauce because it touched raw chicken.

Just golden panko, juicy strips, and a clean bowl of sweet-tangy honey mustard that somehow disappears faster than expected. Keep the sauce creamy, the crumbs well-pressed, and the dip on the side until the moment everyone starts reaching.