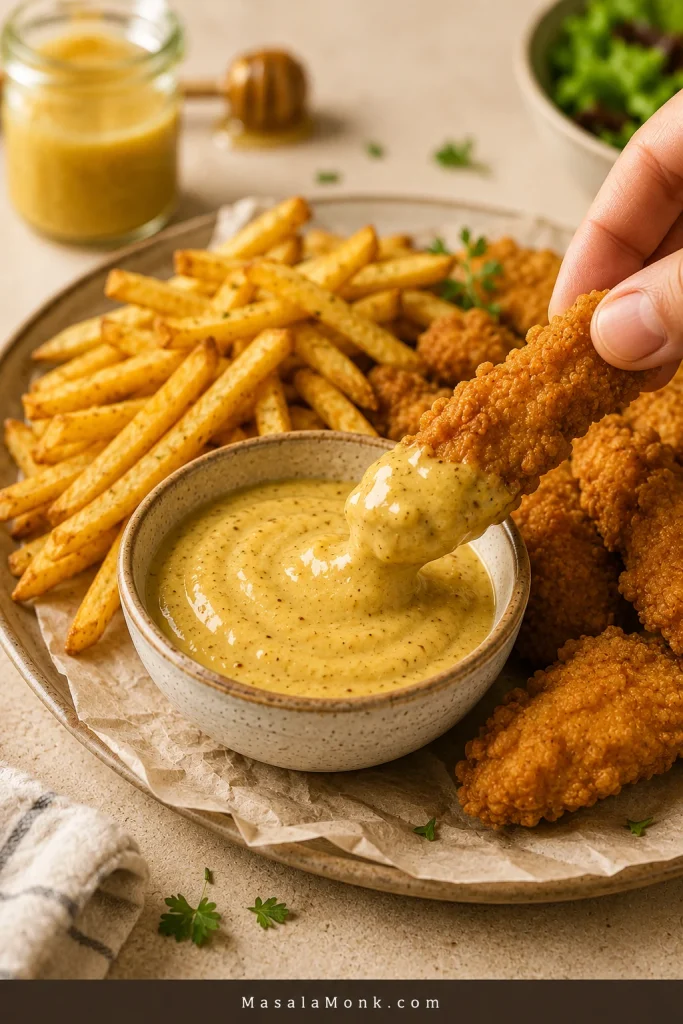
These honey mustard chicken tenders are for the night you want crispy chicken strips, a creamy sweet-tangy dip, and zero deep-frying drama. The chicken stays juicy, the panko turns golden, and every piece is made for dragging through honey mustard sauce.
They are the kind of tenders people pick from the tray before dinner is even on the table: crisp edges, juicy centers, and just enough honey mustard to keep everyone reaching for one more.
Here, the goal is simple: no pale panko, no soggy bottoms, no dry chicken, and no wasted dipping sauce because it touched raw chicken. Everything runs on one simple system: creamy honey mustard as the binder, panko as the crunch, clean dip reserved first, then an oven or air fryer finish.
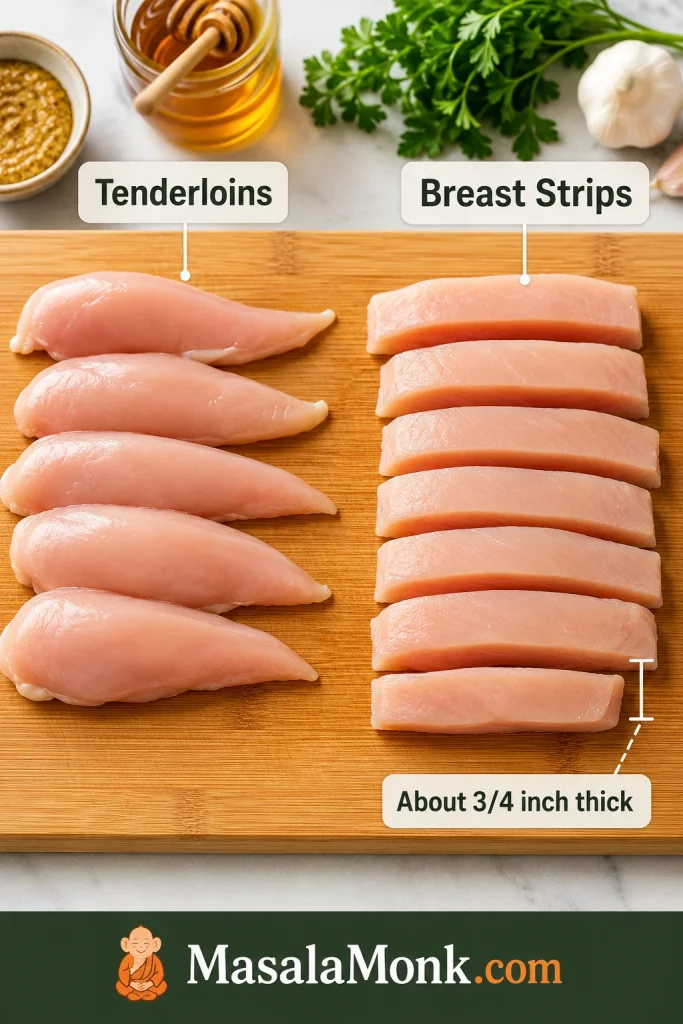
Remember the signature rule: mix once, divide first — one clean bowl for dipping, one bowl for coating raw chicken. For the best all-around tray, use chicken strips about 3/4 inch thick, press them into panko, and bake at 425°F / 220°C until golden and cooked through. It is the kind of dinner that feels fun without asking you to set up a frying station or babysit a pan of oil.
In This Honey Mustard Chicken Tenders Guide
Cook Them Right
Quick Answer: How to Make Honey Mustard Chicken Tenders
To make crispy honey mustard chicken tenders, pat chicken tenderloins or chicken breast strips dry, coat them in a creamy mustard-honey mixture, reserve clean sauce before raw chicken touches the rest, press the coated chicken into panko breadcrumbs, then bake at 425°F / 220°C for 16–20 minutes or air fry at 390°F / 200°C for 10–12 minutes.
The chicken is done when the thickest piece reaches 165°F / 74°C. For the best texture, keep the strips evenly sized, spray the crumb layer lightly with oil, leave space between pieces, and dip at the table instead of pouring sauce over the crust too early.
Jump to recipe card · Oven method · Air fryer method · Fix a problem
Honey Mustard Chicken Tenders Recipe Card
Recipe: Crispy Honey Mustard Chicken Tenders
Main method: Oven baked
Alternate method: Air fryer
Servings: 4
Yield: About 10–12 chicken tenders
| Prep Time | 15 minutes |
| Optional Rest | 15–30 minutes |
| Cook Time | 16–20 minutes oven / 10–12 minutes air fryer |
| Total Time | 35–45 minutes, plus optional 15–30 minute rest |
| Chicken Doneness | 165°F / 74°C internal temperature |
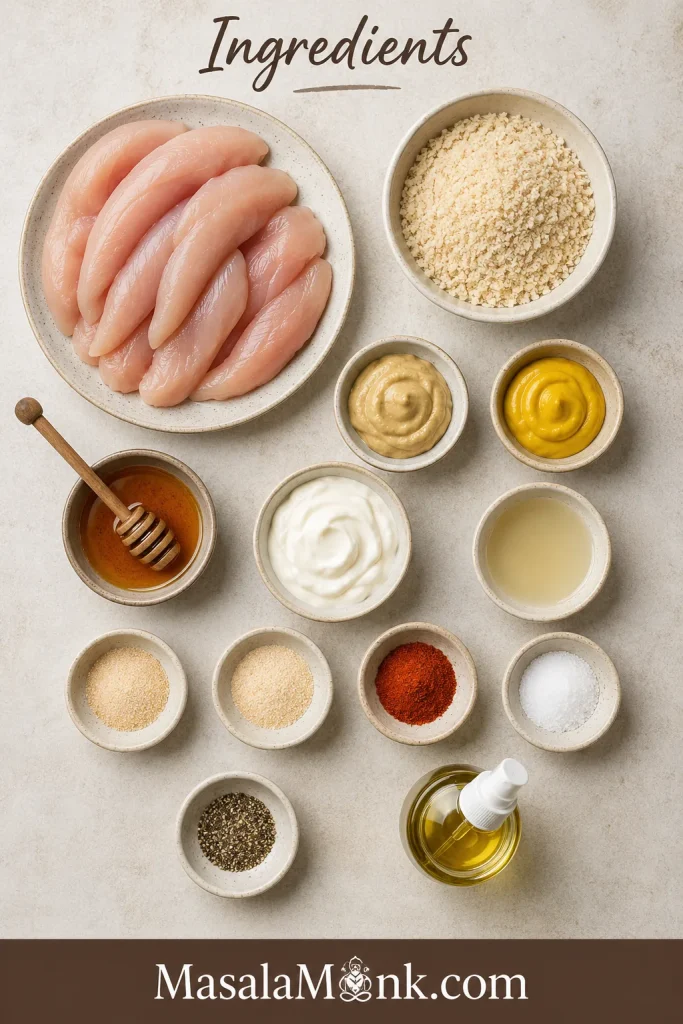
Ingredients
For the Chicken and Coating
- 1 1/2 lb / 680 g / 24 oz chicken tenderloins, or boneless chicken breast sliced into strips about 3/4 inch thick
- 1 1/2 cups / 75–90 g panko breadcrumbs
- Fine salt, 1 teaspoon / 5–6 g, divided
- Black pepper, 1/2 teaspoon
- Garlic powder, 1 teaspoon
- Onion powder, 1/2 teaspoon
- Smoked paprika or sweet paprika, 1 teaspoon
- Oil spray, or 1 tablespoon / 15 ml olive oil for drizzling
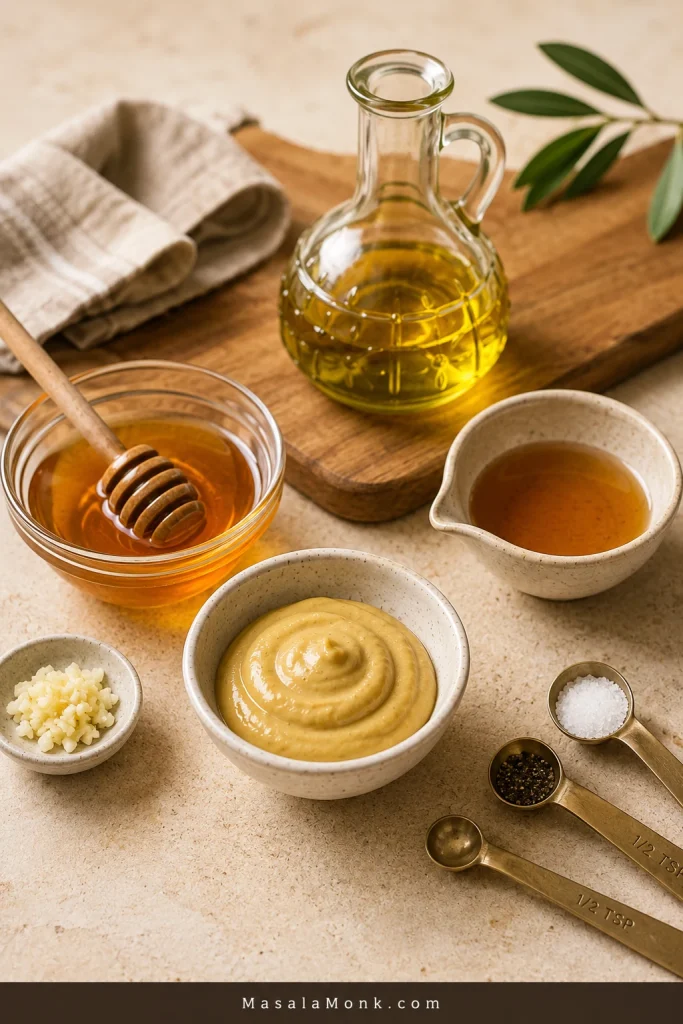
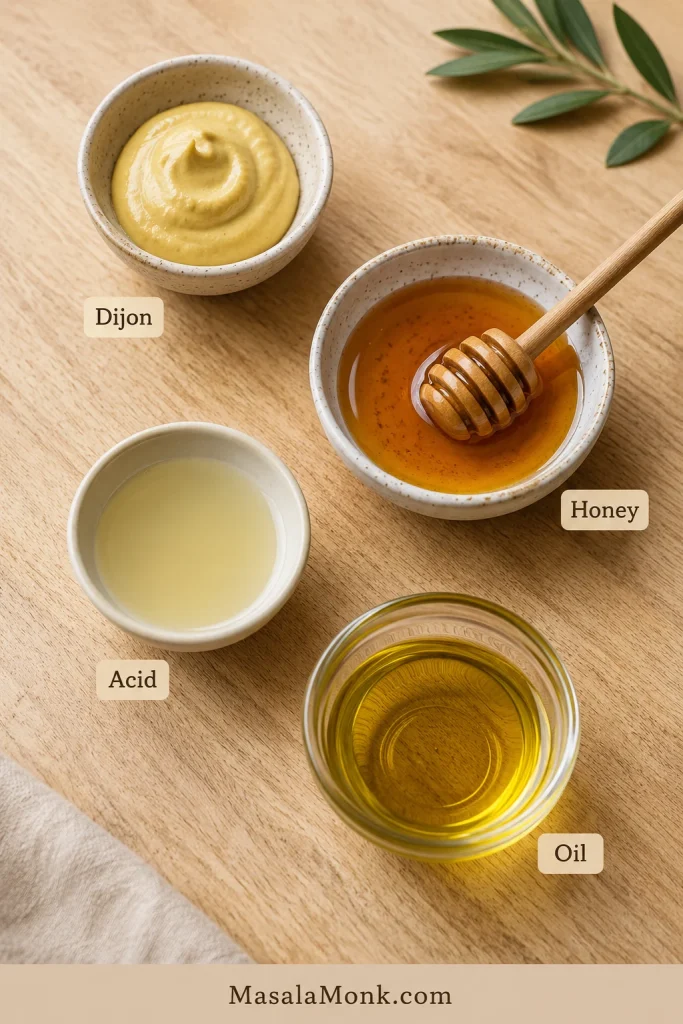
For the Honey Mustard Coating and Dipping Sauce
- 1/4 cup / 60 ml / about 60 g Dijon mustard, yellow mustard, or a mix of both
- 3 tablespoons honey / 45 ml / about 60 g
- 3 tablespoons mayonnaise or Greek yogurt / 45 ml / about 45 g
- 1 tablespoon / 15 ml lemon juice or apple cider vinegar
- 1/4 teaspoon garlic powder
- Pinch of salt and black pepper, to taste
Sauce note: This amount gives enough sauce to coat the chicken and reserve a small dipping bowl. For sauce-heavy serving, make a second half-batch of honey mustard or reserve more before raw chicken touches it.
Instructions
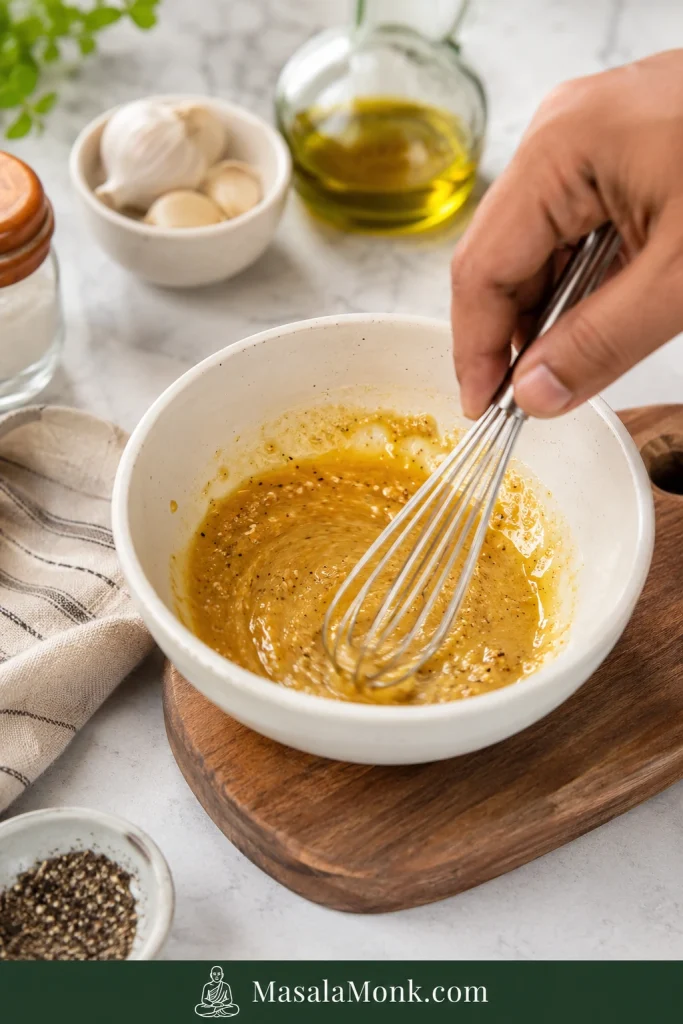
Prepare the Sauce
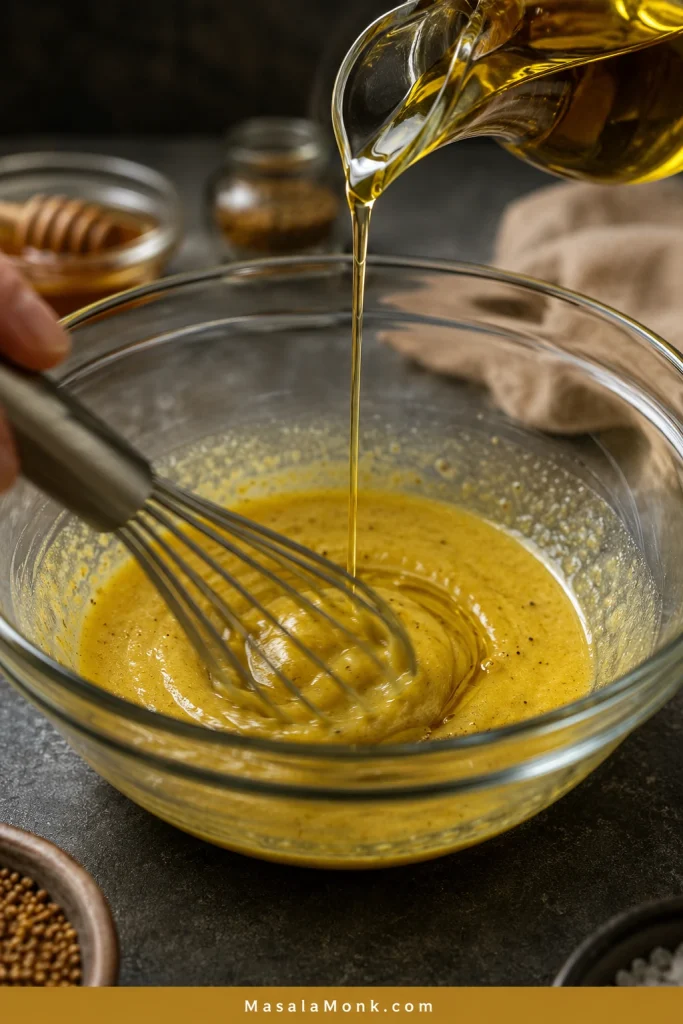
- In a bowl, mix the mustard, honey, mayonnaise or Greek yogurt, lemon juice or vinegar, garlic powder, salt and pepper.
- Taste and adjust. Make it sweeter with more honey, sharper with extra Dijon, or brighter with a little more lemon juice.
- Mix once, divide first: reserve about one-third to one-half of the sauce in a clean bowl for dipping. Keep this portion away from raw chicken.
Coat the Chicken
- Pat the chicken tenders dry with paper towels. The surface should look dry, not shiny-wet.
- Season the chicken lightly with some of the salt, pepper, garlic powder, onion powder and paprika.
- Add the chicken to the remaining honey mustard mixture and turn until each piece is coated.
- Let the chicken sit for 15–30 minutes if you have time. Avoid a long acidic marinade for very thin strips because the surface can soften and the coating may not grip as well.
- Place the panko breadcrumbs in a shallow bowl. Season with the remaining salt and spices.
- Press each honey mustard-coated chicken tender firmly into the panko, turning to coat all sides.
Bake the Chicken Tenders
- Preheat the oven to 425°F / 220°C. Line a baking sheet with parchment paper. For crispier bottoms, place a wire rack over the baking sheet.
- Arrange the coated tenders in a single layer with space between them.
- Spray the tops lightly with oil, or drizzle with a small amount of olive oil.
- Bake for 16–20 minutes, flipping once if needed, until the edges are golden and the chicken is cooked through.
- Check the thickest tender for doneness.
- Rest for 3–5 minutes on a rack or plate, then serve with the reserved clean honey mustard dipping sauce.
Air Fryer Method
- Preheat the air fryer to 390°F / 200°C.
- Arrange the chicken tenders in a single layer. Do not overcrowd the basket.
- Spray lightly with oil.
- Air fry for 10–12 minutes, flipping halfway, until crisp and cooked through. Check around 9–10 minutes the first time because air fryers brown at different speeds.
- Cook in batches if needed. Two lighter batches will beat one crowded batch every time.
Recipe Notes
- No egg is needed here because the honey mustard mixture acts as the binder.
- Very thin strips cook quickly, so start checking early.
- Thicker tenders may need the full 20 minutes, or a gentler 400°F / 200°C bake for a few extra minutes.
- For the crunchiest crust, use a wire rack and oil spray.
- To get a familiar fast-food-style honey mustard, use more yellow mustard and mayonnaise.
- Prefer a sharper Dijon-style sauce? Use more Dijon and a little extra lemon juice.
Choose Your Version
Already know what kind of tray you want? Use this table to steer the recipe. The base method stays the same; the small changes below make the tenders crunchier, faster, milder, sharper, party-style, or gluten-free.
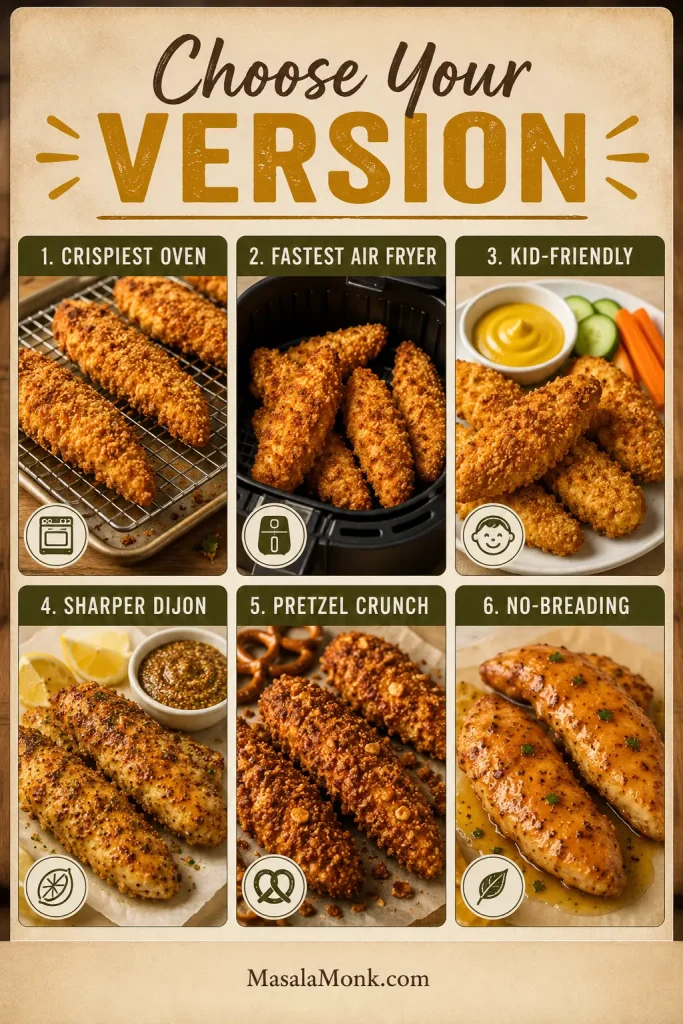
| Want This Result? | Do This |
|---|---|
| Crispiest oven tenders | Use panko, toast it first if you can, spray with oil, and bake on a wire rack. |
| Fastest version | Use the air fryer at 390°F / 200°C in a single layer. |
| Kid-friendly flavor | Use yellow mustard, mayonnaise, and a little extra honey. |
| Sharper Dijon version | Use more Dijon, Greek yogurt, and extra lemon juice. |
| Party-style crunch | Replace panko with crushed pretzels and reduce added salt. |
| Gluten-free version | Use gluten-free panko or crushed gluten-free rice cereal. |
| No-breading version | Skip the panko and bake lightly coated honey mustard tenderloins. |
Time and Temperature Guide
Chicken tenders cook quickly, so timing matters. Use the table below as a guide, then check the thickest piece before serving.
| Method | Temperature | Time | Best For |
|---|---|---|---|
| Oven, standard tenders | 425°F / 220°C | 16–20 minutes | Full batch, golden crumb crust |
| Oven, thick tenders | 400°F / 200°C | 20–25 minutes | Larger chicken strips |
| Air fryer | 390°F / 200°C | 10–12 minutes | Fast crisping, smaller batches |
| Reheat | 375–390°F / 190–200°C | 5–8 minutes, or until hot and crisp | Leftovers |
Chicken should reach 165°F / 74°C in the thickest part. The tenders should also look golden at the edges and feel firm when lifted with tongs, but the thermometer is the safest check.
Once the timing is clear, the next thing is texture. These tenders work because the coating is built to cling, brown, and stay crisp long enough to dip.
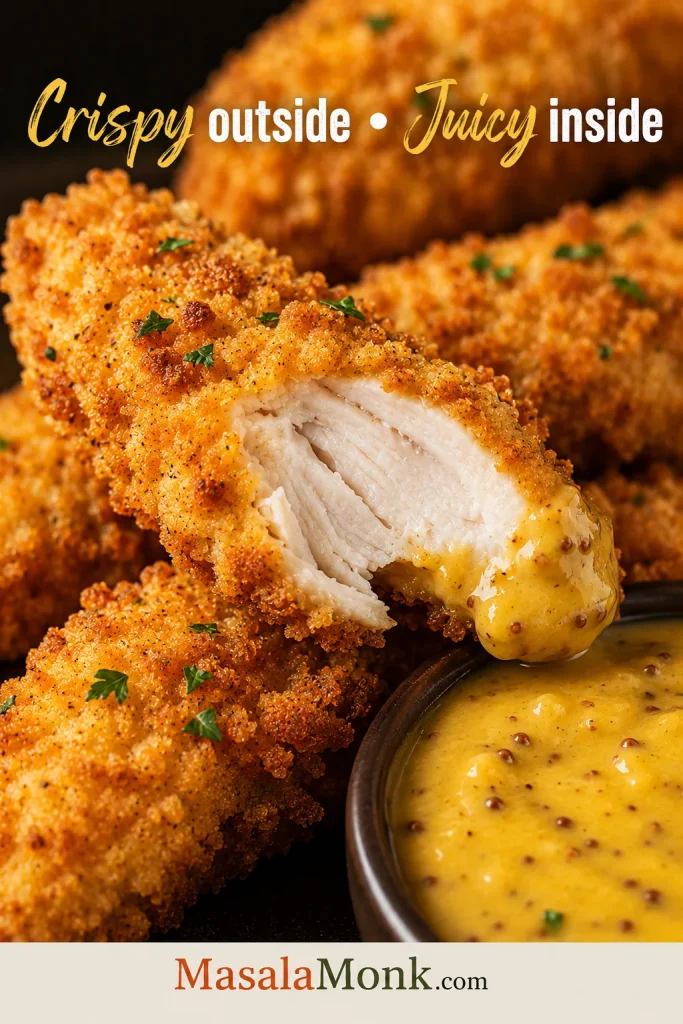
Why This Recipe Works
The best honey mustard chicken tenders are not just sweet chicken in breadcrumbs. They need a coating that stays put, a crust that browns before the chicken dries out, and a dipping sauce that does not soften the crunch too early.
The magic is not complicated, but it does depend on a few small choices that keep baked tenders from tasting like soft breaded chicken.
- Dry chicken helps the coating grip. You want the mustard-honey layer to cling, not slide around.
- Honey mustard replaces egg. It gives the crumbs something to hold onto and adds flavor at the same time.
- Panko gives the oven-fried bite. It is lighter and flakier than regular breadcrumbs.
- Oil spray brings the color. Dry crumbs stay pale; a little oil helps them turn golden.
- Space and a rack fight steam. Give the tenders a little breathing room so they brown instead of softening together.
- Reserved sauce stays clean. Moving the dip to a separate bowl before coating the chicken keeps serving simple and safe.
When those pieces work together, you get the comfort of chicken fingers, the brightness of honey mustard, and a crisp bite that still tastes juicy underneath.
The best part is the contrast: the craggy panko shell, the tender strip of chicken inside, and that cool-sweet honey mustard dip catching in all the little crispy edges.
Crispy Outside, Juicy Inside
This is the texture target to keep in mind before you start coating: crisp crumbs on the outside, tender chicken in the middle, and sauce served on the side so the crust stays lively.
Ingredients You Need
Most of the flavor comes from the ingredients. Simple tools and small technique choices handle the texture.
Chicken Tenderloins or Chicken Breast
Chicken tenderloins are easiest because they are already shaped like strips. Boneless chicken breast works too; just slice it lengthwise into even pieces about 3/4 inch thick at the widest part. Very thin strips cook before the crumbs brown, while very thick strips need more time and can darken the honey before the center is done.
If you are starting with full chicken breasts and want more detail on keeping them juicy, this baked chicken breast recipe goes deeper into timing, thickness, and avoiding dry chicken.
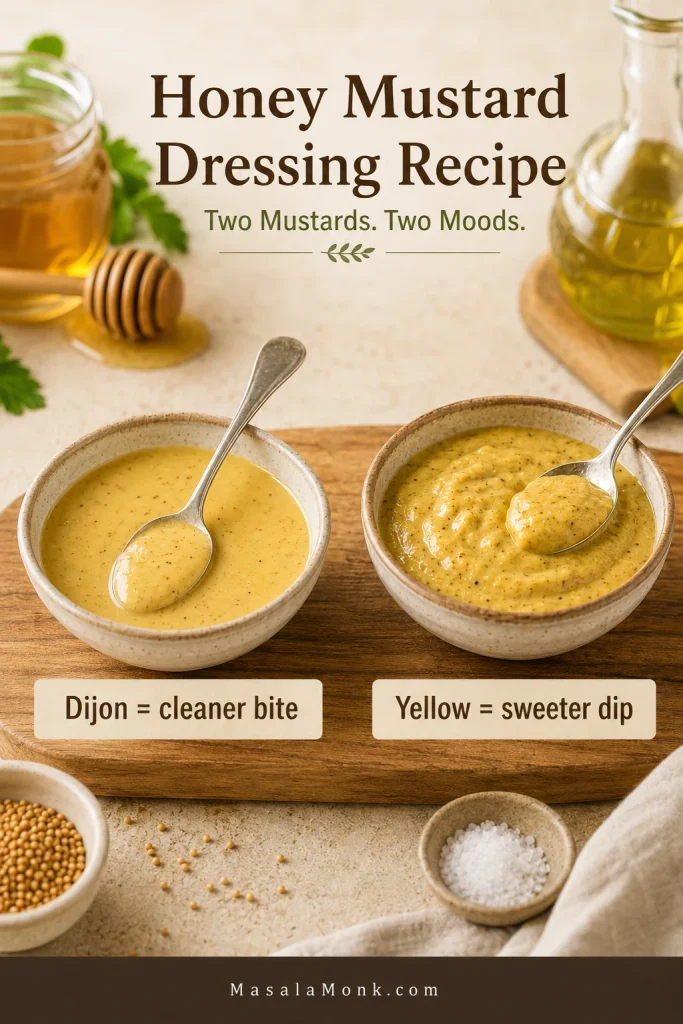
Mustard
Dijon brings bite; yellow mustard brings nostalgia. Use Dijon for a sharper sauce, yellow mustard for a milder dipping-sauce flavor, or a mix of both for the best middle ground.
Honey
Honey gives the sauce its classic sweetness, but this is not a sticky glaze recipe. The honey mustard flavors the chicken while the panko does the crisping, so the tenders stay crunchy instead of turning syrupy.
Mayonnaise or Greek Yogurt
Mayonnaise makes the sauce creamy and familiar. Greek yogurt gives you a lighter, tangier version. Both help the mustard-honey coating cling to the chicken and hold the crumbs in place.
If you like making creamy sauces from scratch, this homemade mayonnaise guide gives you a richer base for dips.
Panko Breadcrumbs
Panko is what keeps baked tenders from feeling like soft breaded chicken. The flakes are light and uneven, so they create a craggy shell that feels much closer to fried chicken fingers.
This recipe skips the classic flour-and-egg dredge to keep the coating simple. The mustard-honey layer works as the glue. For a firmer, more restaurant-style crust, lightly dust the chicken with flour before dipping it into the sauce, then press it into the panko.
Seasonings
Garlic powder, onion powder, paprika, salt and pepper are enough. They make the coating savory without hiding the honey mustard flavor.
Equipment That Helps
You can make these with a baking sheet and a bowl, but a few simple tools make the difference between “good enough” tenders and crisp, golden ones.
- Rimmed baking sheet: Keeps crumbs and oil contained.
- Parchment paper: Helps prevent sticking and makes cleanup easier.
- Wire rack: Gives the bottoms a better chance to crisp.
- Shallow bowl: Makes pressing the panko onto the chicken easier.
- Oil spray: Helps the crumbs turn golden without deep frying.
- Air fryer: Optional, but excellent for smaller batches.
- Instant-read thermometer: Helpful for avoiding dry or undercooked chicken.
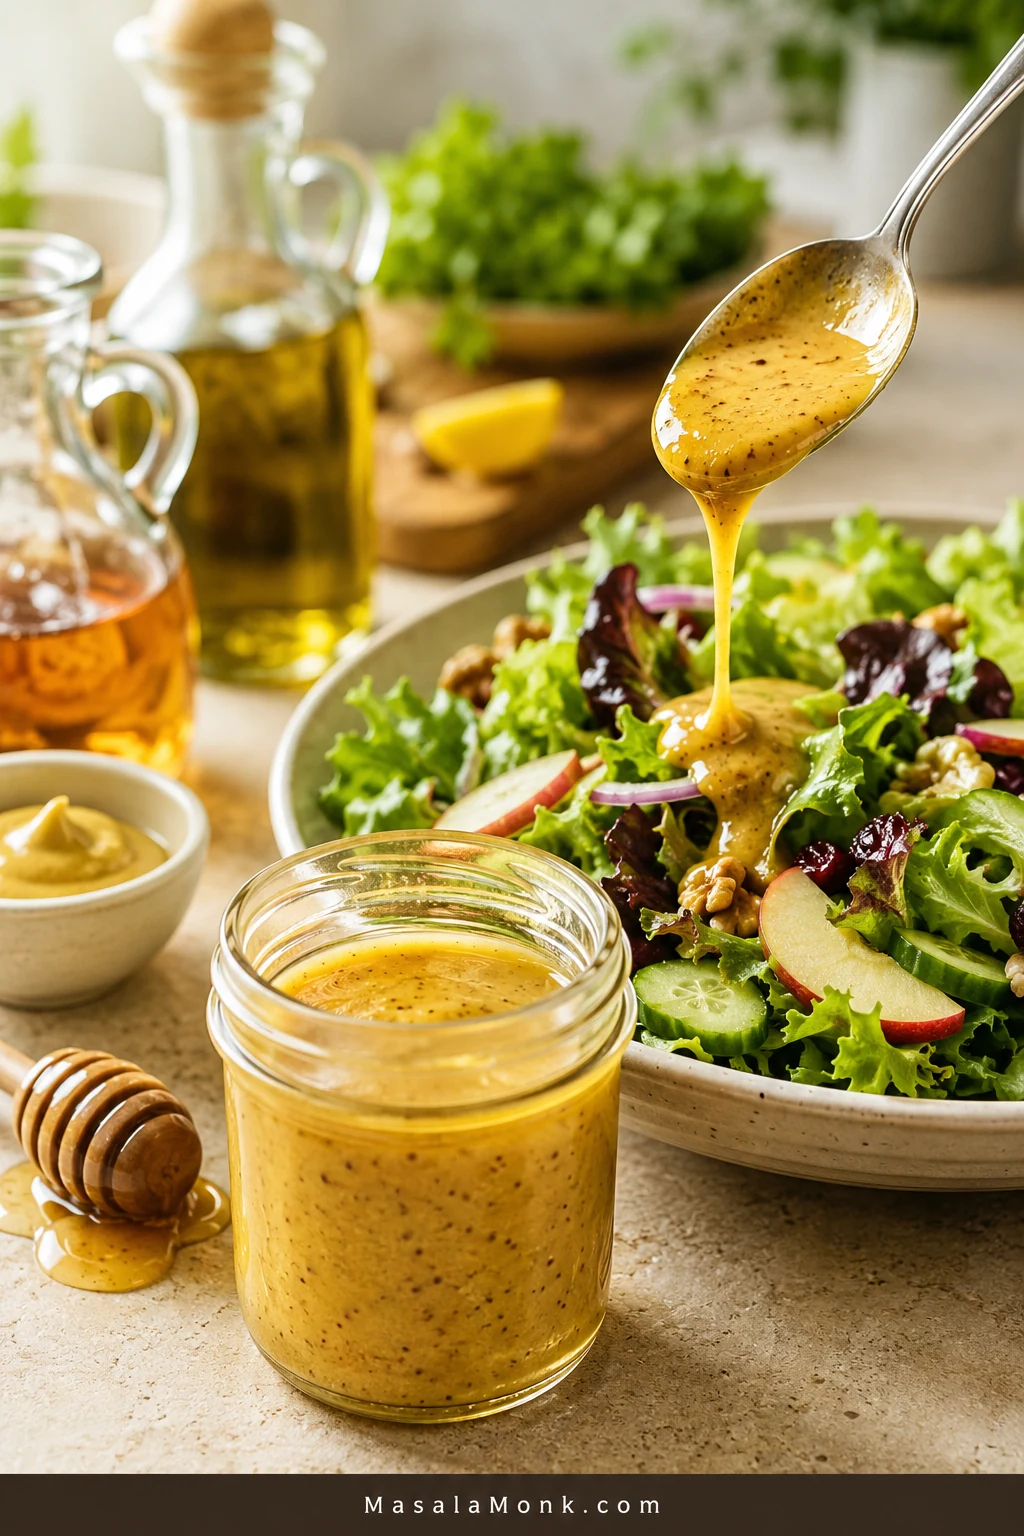
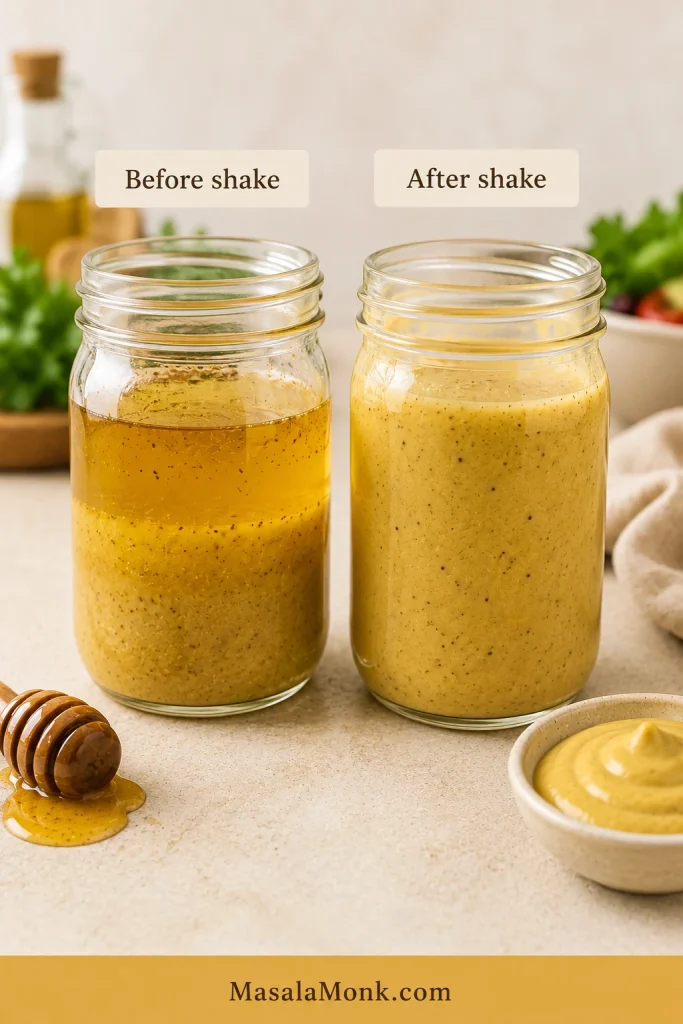
Honey Mustard Sauce: Dip, Binder or Marinade?
Honey mustard does three jobs here: it helps the crumbs stick, flavors the chicken, and gives you that creamy dipping bowl at the end. The only rule is that the dip must be reserved before raw chicken touches the rest.
Sauce safety rule: mix once, divide first. Make one batch of honey mustard, then immediately move the dipping portion to a clean bowl before raw chicken touches the rest.
Mix Once, Divide First
This visible split is what keeps dinner simple: one bowl becomes the clean dip, while the rest of the sauce seasons and coats the raw chicken before breading.
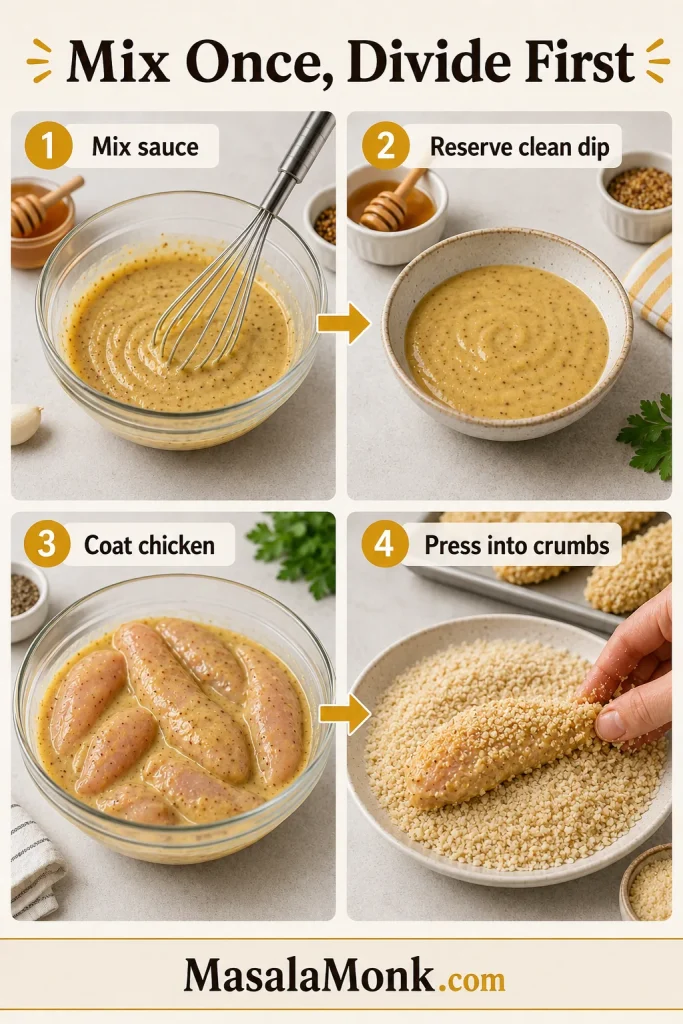
The sauce has three jobs. First, it helps the crumb layer stick. At the table, it gives the cooked tenders that creamy sweet-tangy finish. If the chicken rests for 15–30 minutes before breading, the same sauce also works as a short flavor boost.
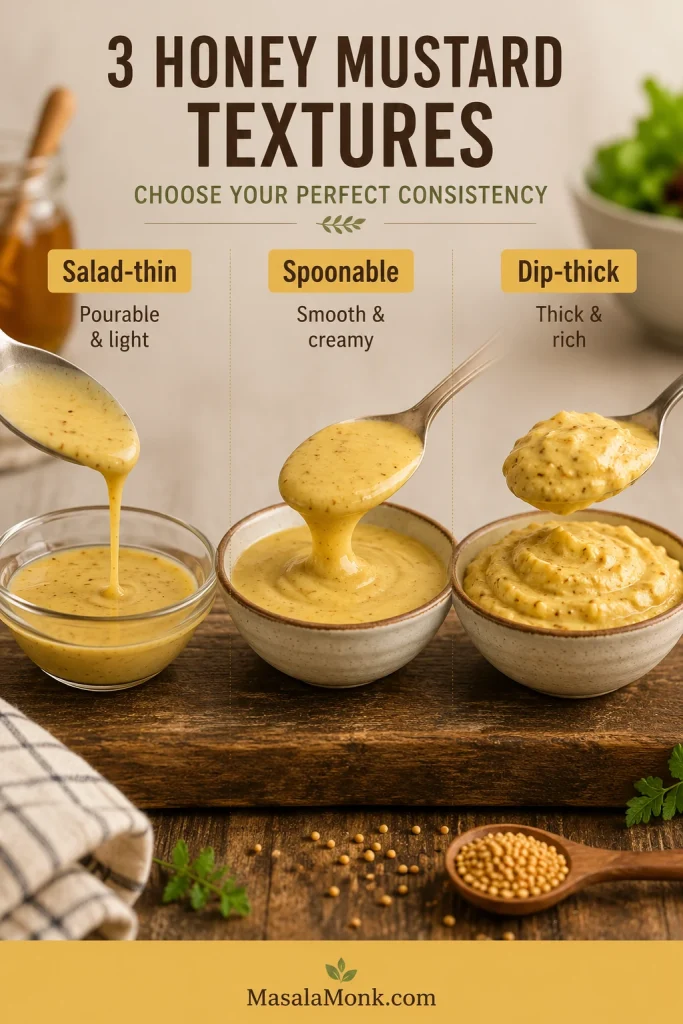
Honey Mustard Sauce Spoon Test
Before the chicken goes in, lift a spoon through the sauce and check the texture. It should coat the spoon in a creamy layer, not run off immediately.

For a loose sauce, whisk in another spoonful of mayo or Greek yogurt before breading. A thicker sauce grips the chicken better and protects the panko from turning wet.
Very thin strips do not need an overnight marinade, especially if your sauce is tangy with lemon juice or vinegar. Too much time in an acidic sauce can soften the surface and make the coating less secure.
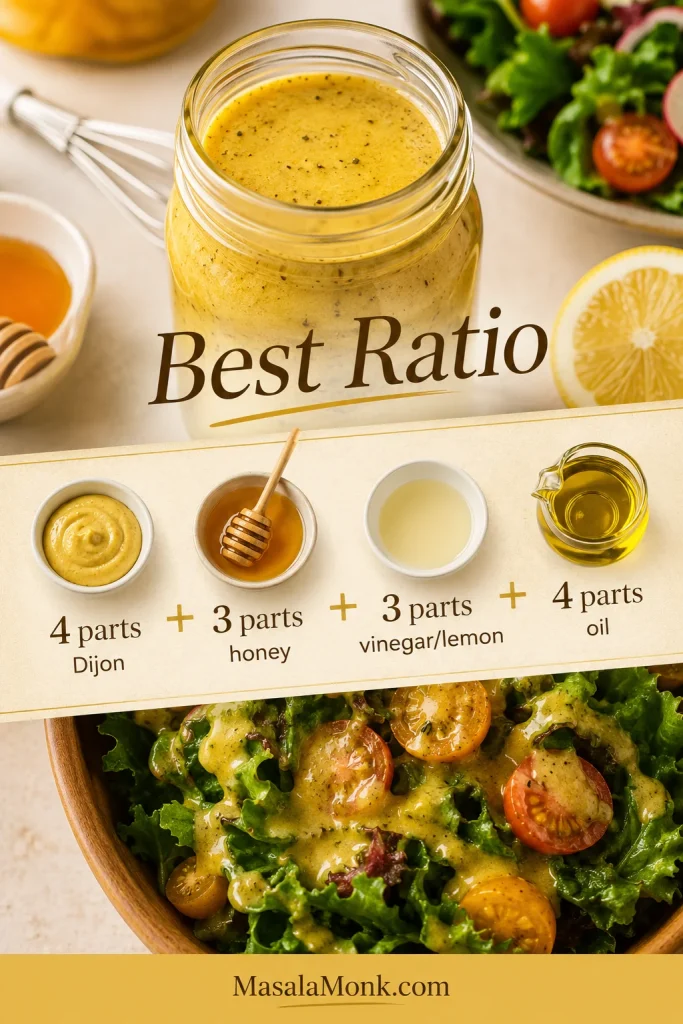
Simple Honey Mustard Dipping Sauce Ratio
- 1/4 cup / 60 ml mayonnaise or Greek yogurt
- 2 tablespoons / 30 ml Dijon or yellow mustard
- 2 tablespoons honey / 30 ml / about 40 g
- 1–2 teaspoons lemon juice or apple cider vinegar
- Pinch of garlic powder
- Salt and pepper to taste
Make it sweeter with more honey, sharper with extra Dijon, or more familiar and restaurant-style with yellow mustard and mayo. Greek yogurt plus a little extra lemon juice gives you the lighter, tangier version.
If you enjoy this sweet-tangy lane, mango mustard sauce is a fun next dip for fries, wraps and sandwiches.
Next: press into panko · Bake the tenders · Air fry the tenders · Back to recipe card
How to Make Honey Mustard Chicken Tenders
Once the recipe card is open, these are the small visual cues that make the tray come out right: dry surface, spoon-coating sauce, firmly pressed crumbs, enough space, and golden edges.
1. Dry and Season the Chicken
The chicken should look dry before the sauce goes on. You want the mustard-honey coating to cling, not slide around.
2. Mix, Taste and Divide the Sauce
The sauce should taste sweet first, tangy next, and creamy enough to dip. Once it tastes right, reserve the clean dipping portion before you coat the raw chicken.
3. Coat Lightly, Not Heavily
You want a thin layer of honey mustard clinging to the chicken, not a heavy blanket of sauce. Too much sauce can make the crumbs wet and slow down browning.
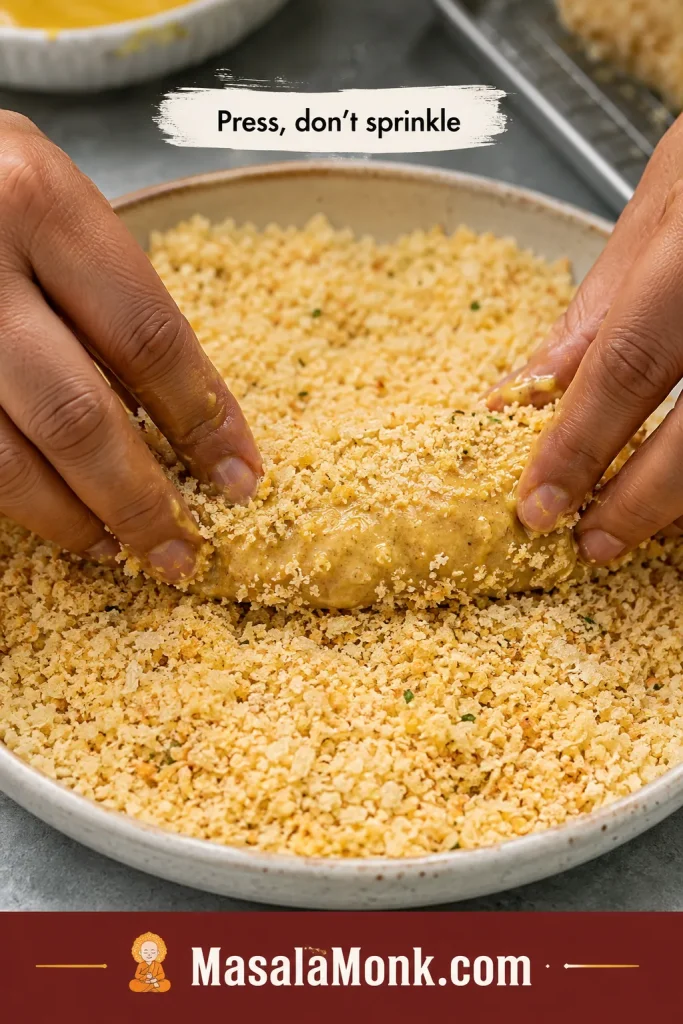
4. Press the Panko
Press the crumbs onto the chicken instead of sprinkling them over the top. The coating should look attached before it goes into the oven or air fryer.
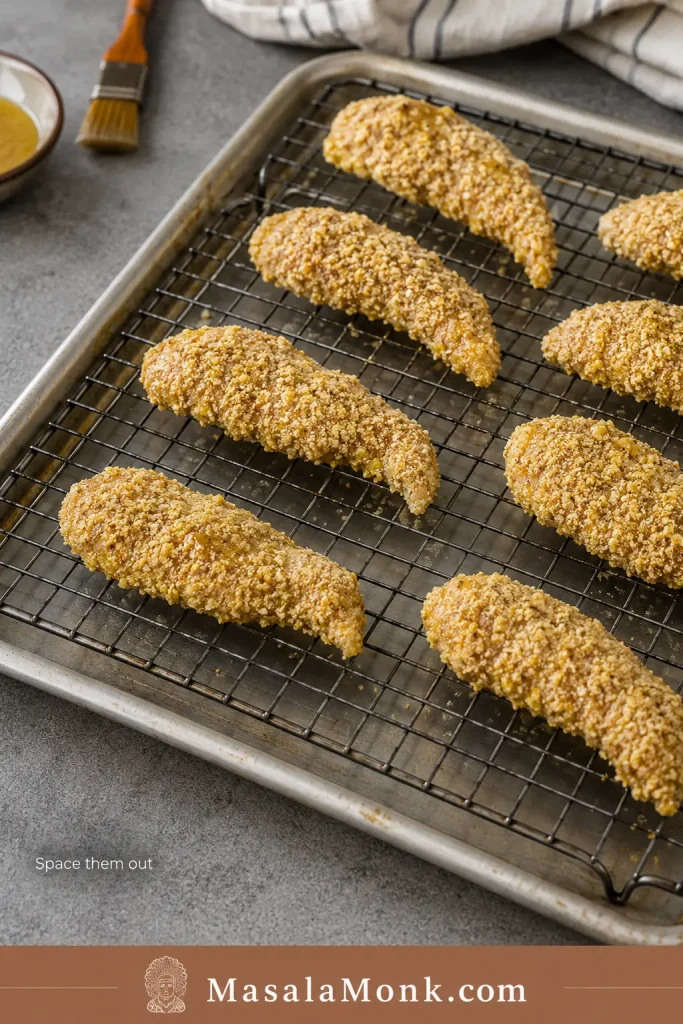
5. Space, Spray and Cook
Leave gaps between the tenders and give the crumb layer a light spray of oil. This is the step that makes the tray look like dinner instead of pale baked chicken: the crumbs need both heat and a little fat to turn golden.
Oven Method
Use the oven when you want the whole tray ready together, with enough tenders for dinner plates and a few “just one more” pieces.
- Temperature: 425°F / 220°C
- Time: 16–20 minutes
- Best setup: parchment-lined baking sheet or a wire rack over a baking sheet
- Texture goal: golden crumbs, juicy chicken, crisp edges
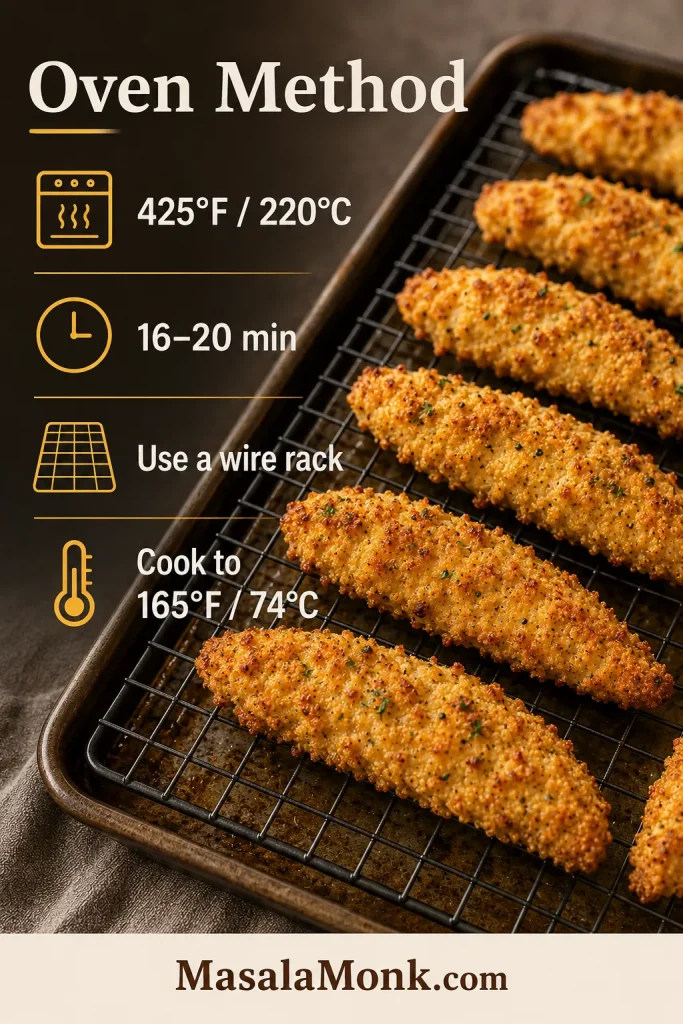
Why Use a Wire Rack?
A wire rack helps hot air reach the bottom of the tenders, which keeps them from steaming against the pan. When baking directly on parchment, flip the tenders once for better bottom color. With a rack, flipping is optional.
Thick tenders can bake at 400°F / 200°C for about 20–25 minutes. Thin strips may be ready closer to 14–16 minutes, so start checking early.
Compare the air fryer method · Make them extra crispy · See serving ideas · Back to recipe card
Air Fryer Method
Use the air fryer when speed matters more than cooking the whole batch at once. It crisps the crumb layer quickly, but only if the basket has enough space.
Air Fryer Single Layer Setup
Before starting the timer, check the basket. The pieces should sit in one layer with visible gaps, even if that means cooking two smaller batches.
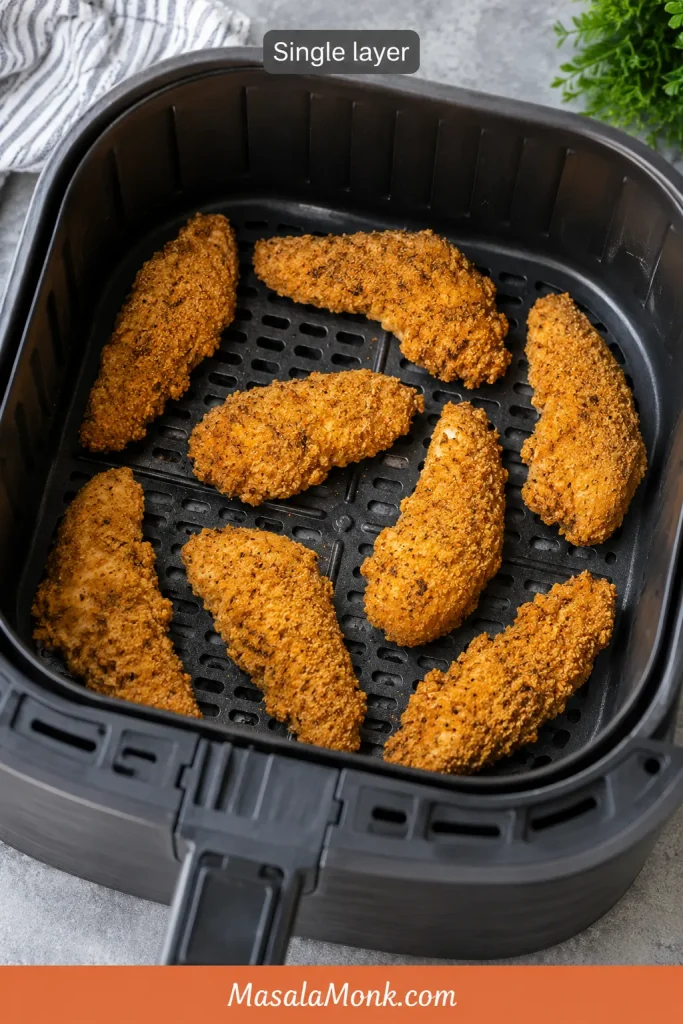
- Temperature: 390°F / 200°C
- Time: 10–12 minutes
- Flip: halfway through
- Oil: light spray on both sides
- Best rule: cook in batches if the basket is small
Air Fryer Time and Temperature Guide
Use this quick visual check when you want the air fryer version: moderate-high heat, a halfway flip, and enough space for the crumbs to crisp.

Different air fryers brown at different speeds, so check around 9–10 minutes the first time. Keep the first batch warm on a rack in a low oven while the rest cook, and avoid stacking hot tenders in a bowl because steam will soften the crust.
The same air-flow rule shows up in crispy recipes like air fryer chicken wings: dry surfaces, space between pieces, and late saucing protect the crunch.
Make them extra crispy · Try another coating · See serving ideas · Back to recipe card
Extra Crispy Upgrades
Once the basic method is in place, these upgrades take baked chicken tenders from good to properly crisp. They are especially helpful if your baked tenders usually come out pale or soft.
- Toast the panko first. This is the best color upgrade. Toasting gives baked tenders a golden head start before the chicken has a chance to overcook.
- Use a wire rack. It lets heat move around the tenders instead of trapping steam underneath.
- Spray both sides lightly. A little oil helps the crumbs brown and gives the crust a more oven-fried texture.
- Rest cooked tenders on a rack. If you have a rack, use it even after baking. It keeps the bottoms from softening while everyone is getting plates ready.
- Avoid stacking. Hot tenders piled together will soften quickly.
- Dip, do not drown. Let the crust stay in charge until the moment you eat.
Best Coatings for Honey Mustard Chicken Tenders
Panko is the easiest default, but honey mustard chicken tenders are flexible. Use this quick guide to choose the coating that fits the meal.
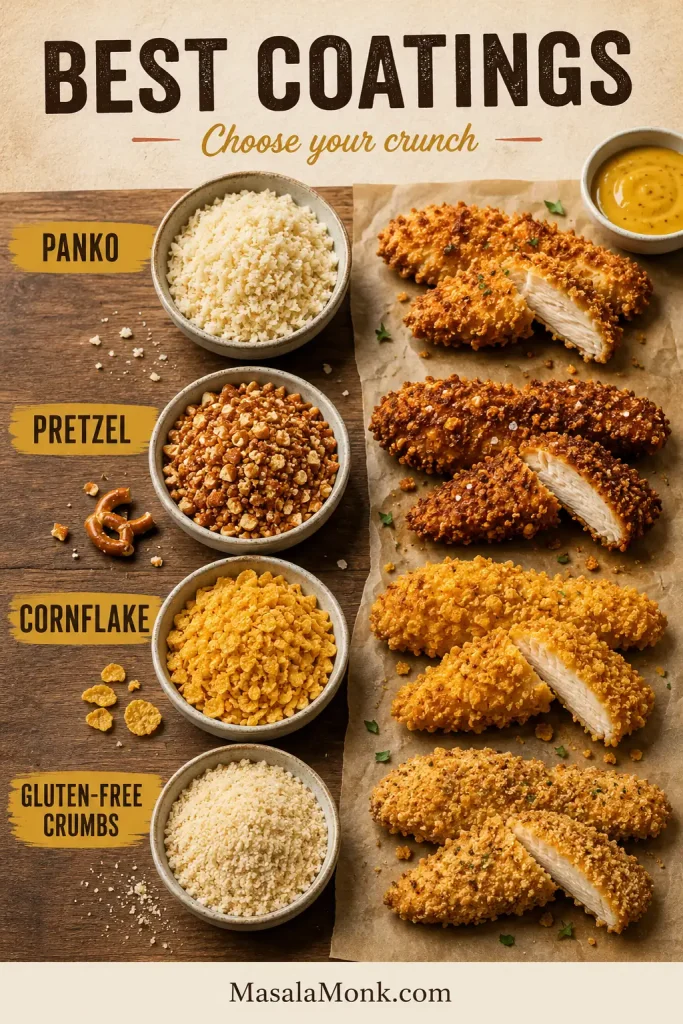
| Coating | Best For | Notes |
|---|---|---|
| Panko breadcrumbs | Classic crispy baked tenders | Best default choice |
| Crushed pretzels | Salty, crunchy party-style tenders | Use less added salt |
| Crushed cornflakes | Extra crisp kid-friendly tenders | Crush finely but not into powder |
| Regular breadcrumbs | Softer chicken strips | Works, but less crisp than panko |
| Gluten-free panko | Gluten-free version | Check labels on mustard and seasonings too |
| Crushed rice cereal | Emergency gluten-free crunch | Best with a little extra seasoning |
If you use pretzels or cornflakes, crush them into small uneven crumbs. A little texture is good, but a fine powder will not give the same crunch.
Variations
Once the basic tray works, this recipe is easy to bend toward the people eating it — sweeter for kids, sharper for Dijon lovers, spicier for game day, crunchier with pretzels, or lighter without mayo.
Spicy Hot Honey Mustard Chicken Tenders
This is the game-day version: still sweet and creamy, but with enough heat to keep people dipping. Add a pinch of cayenne, chili powder or hot sauce to the honey mustard mixture. You can also finish the cooked tenders with a tiny drizzle of hot honey, but add it at the table so the coating stays crisp.
For a fruitier heat, borrow the sweet-spicy direction from this mango habanero sauce and add only a small amount to the honey mustard dip.
Pretzel-Crusted Honey Mustard Tenders
Replace the panko with crushed pretzels for a salty snack-style crust that feels made for a party tray. Reduce the salt in the crumb mixture because pretzels are already salty.
Buttermilk Honey Mustard Chicken Tenders
For a more tender, classic chicken-finger texture, soak the chicken in buttermilk for 30 minutes before coating. Pat off the excess before adding the honey mustard mixture so the panko does not slide off.
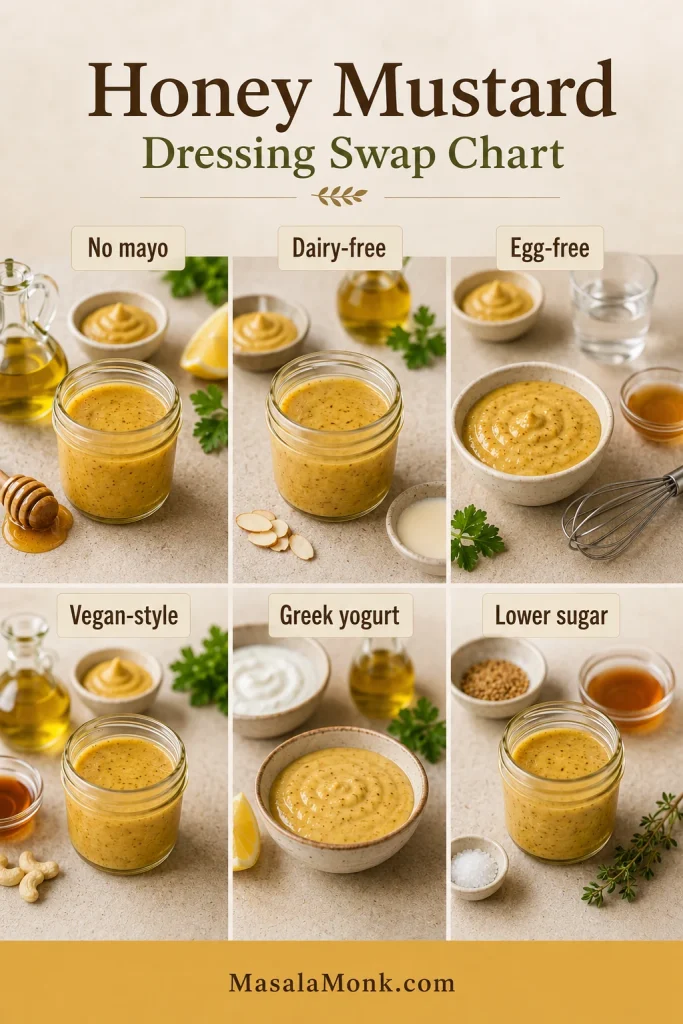
No-Mayo Honey Mustard Sauce
Use Greek yogurt when you want the dip tangier and lighter without losing the creamy coating. Add a little extra honey if you want it sweeter. For an egg-free creamy base, eggless mayonnaise also works well.
Kid-Friendly Yellow Mustard Version
Use yellow mustard instead of Dijon, skip the cayenne or spicy seasonings, and keep the sauce a little sweeter. This version tastes closer to familiar fast-food honey mustard.
Gluten-Free Honey Mustard Chicken Tenders
Use gluten-free panko or crushed gluten-free rice cereal. Also check the mustard, mayonnaise and seasonings to make sure they fit your needs.
No-Breading Honey Mustard Tenderloins
This version is not trying to be crispy. It is for the night you want juicy honey mustard tenderloins over rice, salad, or roasted vegetables. Skip the panko, coat the chicken lightly in honey mustard, and bake on parchment until cooked through, starting to check around 14–16 minutes depending on thickness.
Green Chutney Mayo Dip
For an Indian-style dipping sauce, stir a spoonful of green chutney into mayo or Greek yogurt. It gives the tenders a fresh coriander-mint bite without changing the main recipe.
Shallow-fried note: If you want a more classic chicken-finger texture, shallow fry the coated tenders in a thin layer of neutral oil until golden and cooked through. Keep the heat moderate so the honey in the coating does not brown too fast.
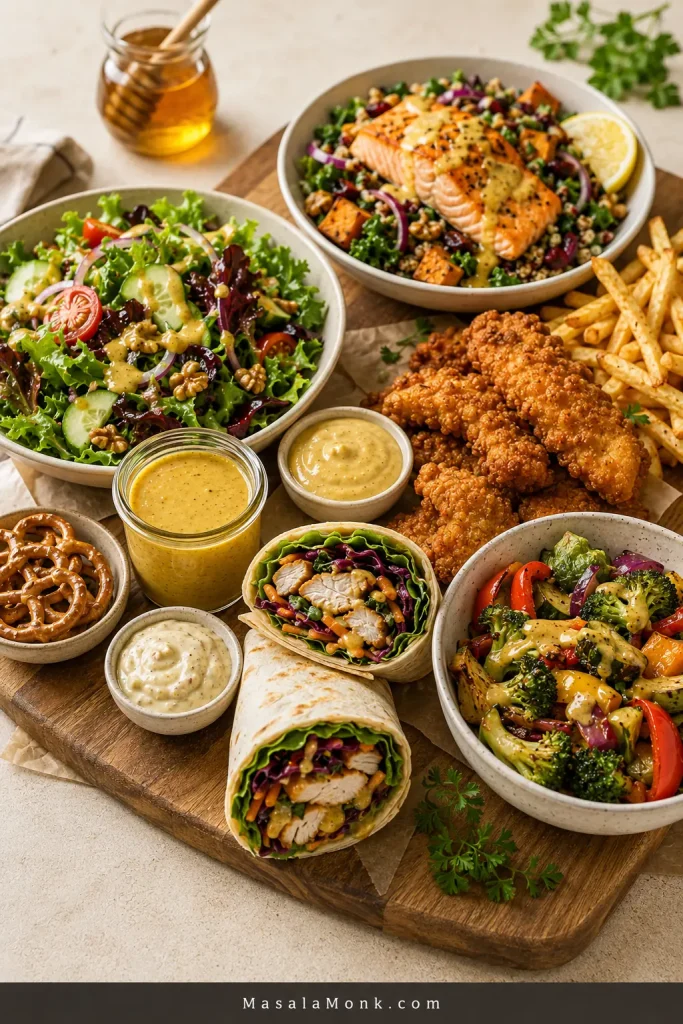
What to Serve with Honey Mustard Chicken Tenders
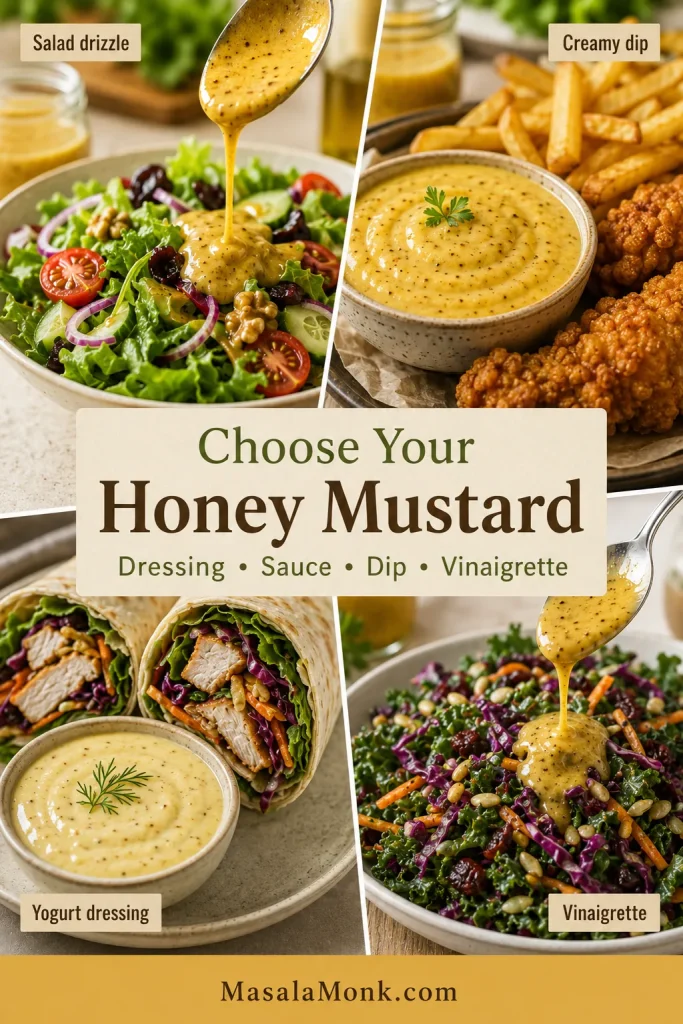
Once the tray is done, the only real question is whether this is a cozy dinner, a game-day snack, or a wrap-and-leftovers situation. Keep the dip close and build the meal around something crisp, creamy, tangy or fresh.
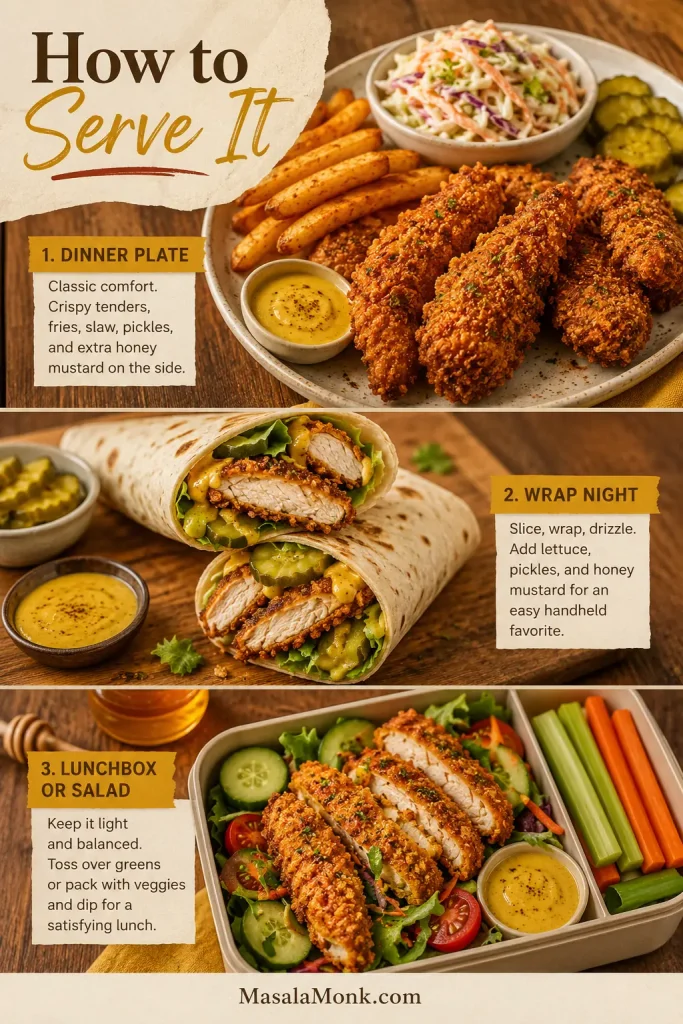
- Weeknight dinner: roasted broccoli, green beans, mashed potatoes, or macaroni and cheese.
- Diner-style plate: crispy homemade French fries, creamy coleslaw, pickles, and extra honey mustard.
- Game-day tray: buffalo chicken dip, potato wedges, celery sticks, and a pile of napkins.
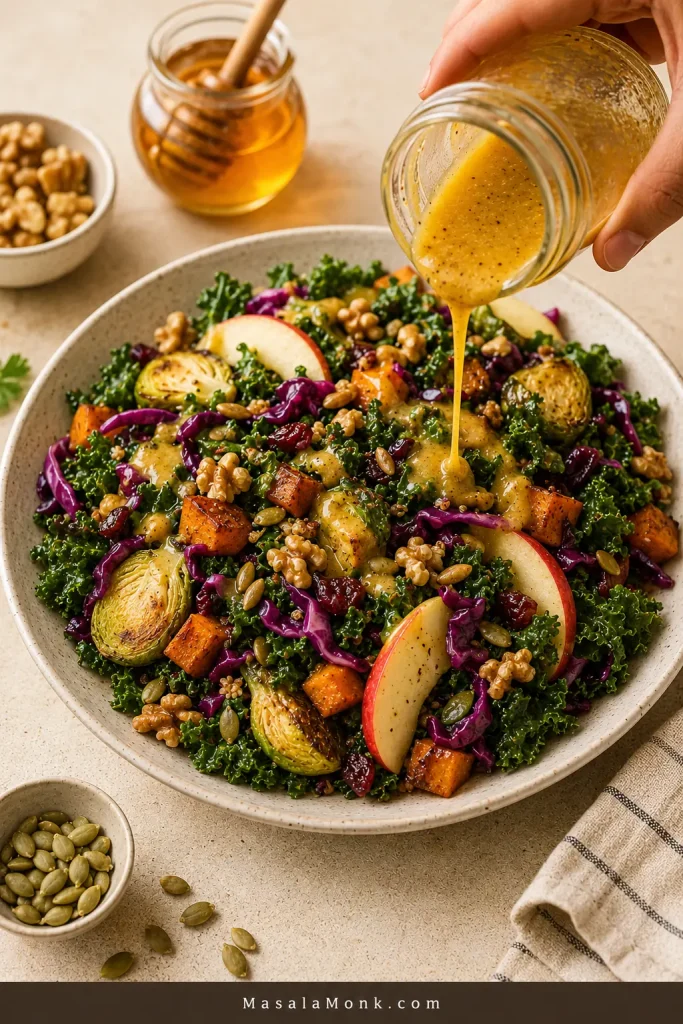
- Lunchbox or salad bowl: cucumber salad, green salad, crunchy vegetables, and sliced cold tenders.
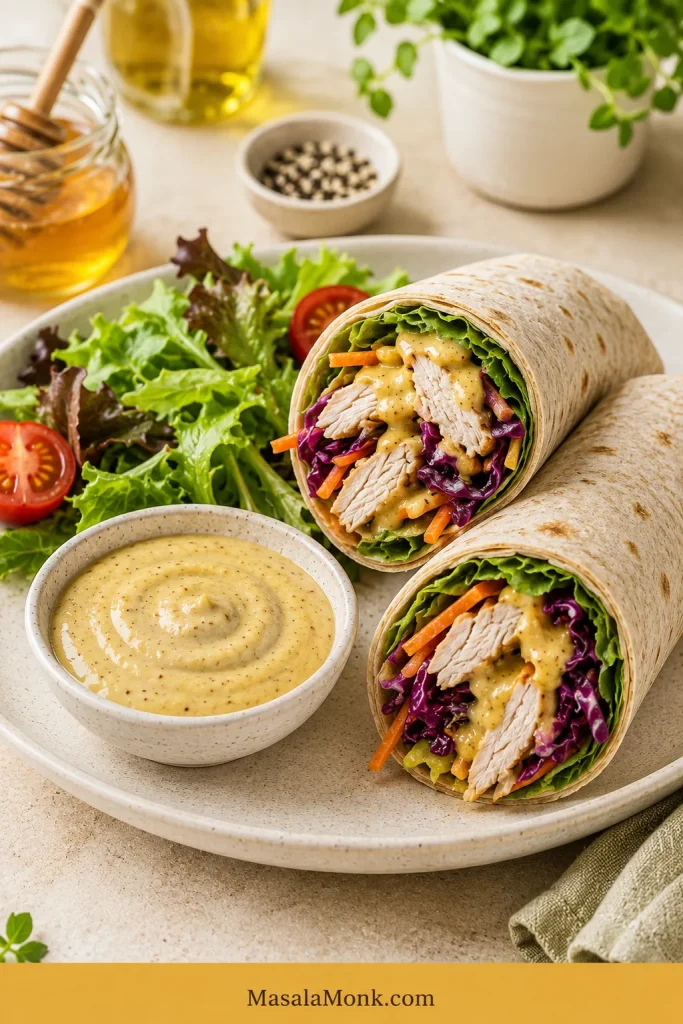
- Wrap or sandwich night: lettuce, pickles, soft buns or tortillas, and enough sauce to swipe through every bite.
Leftover tenders are great sliced over salad, tucked into wraps, or layered into sandwiches with lettuce, pickles and extra honey mustard. For more lunch ideas, these chicken sandwich recipes are a useful next stop.
Storage, Freezing and Reheating
The main rule for leftovers is simple: keep the sauce separate and bring the crunch back with dry heat.
Storing Leftovers
Store cooked chicken tenders in an airtight container in the fridge for 3–4 days. Keep the honey mustard sauce in a separate container so the coating does not soften. That 3–4 day window matches the FoodSafety.gov cold storage chart for cooked meat and poultry leftovers.
Reheating
For the best texture, reheat the tenders in an oven or air fryer at 375–390°F / 190–200°C for about 5–8 minutes, or until hot and crisp. The microwave works if you are in a hurry, but it will soften the coating.
Freezing
For easiest freezing, freeze cooked tenders. Raw breaded tenders can also be frozen if the chicken was handled cold and clean, but cooked leftovers are simpler and safer for most home kitchens. Freeze in a single layer first, then move to a freezer-safe bag or container.
Do not freeze the dipping sauce with the chicken. Make fresh sauce or store it separately in the fridge.
Troubleshooting
Most honey mustard chicken tender problems come down to moisture, crowding, or too much sauce. If baked tenders have ever come out pale, soft, or half-naked on the pan, this is the section that saves the next batch.
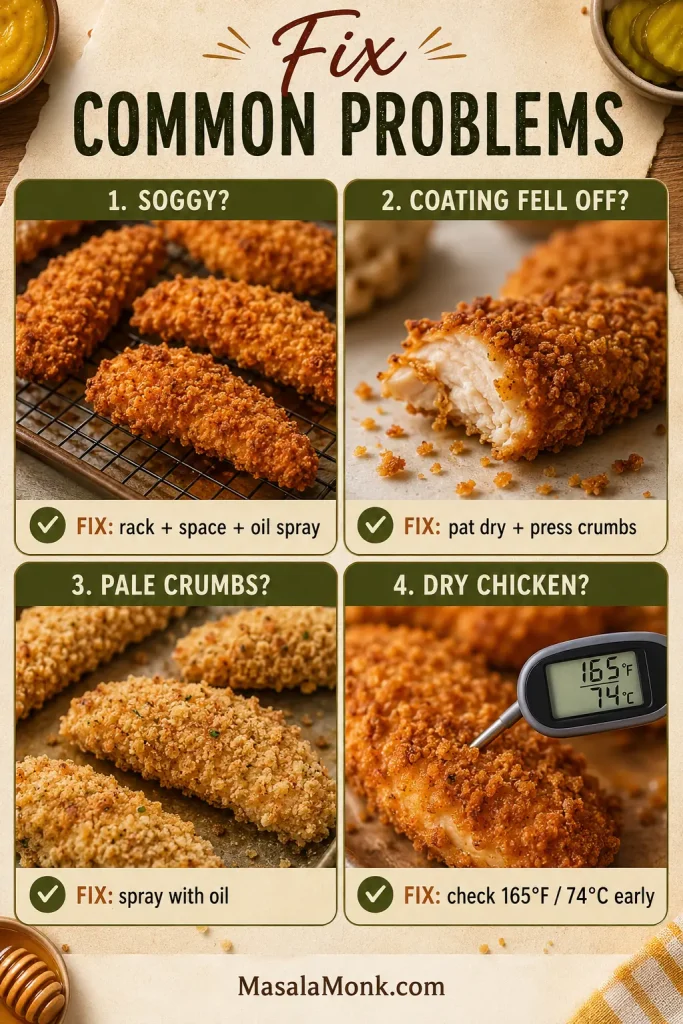
Why Are My Chicken Tenders Soggy?
Likely causes: crowding, too much sauce, not enough oil on the crumbs, or stacking hot tenders after cooking.
Fix: leave space between pieces, use a rack if possible, spray lightly with oil, rest cooked tenders without stacking, and dip at the table instead of saucing early.
Why Did My Coating Fall Off?
Likely causes: wet chicken, thin sauce, loose crumbs, or not enough pressing.
Fix: pat the chicken dry, use a creamy coating that clings, and press each tender into the panko until the crumbs look attached.
Why Is My Panko Pale?
Likely causes: dry breadcrumbs, low browning, or not enough time for color before the chicken is done.
Fix: spray or drizzle the panko lightly with oil. For deeper color, toast the panko before coating the chicken.
Why Did the Honey Burn?
Likely causes: a sauce layer that is too heavy, very small chicken pieces, or cooking too long.
Fix: use a thin coating, rely on panko for crunch, and start checking thin strips early.
Why Is the Chicken Dry?
Likely causes: thin strips, uneven sizes, or cooking past the safe internal temperature.
Fix: cut even pieces, start checking early, and use a thermometer in the thickest tender.
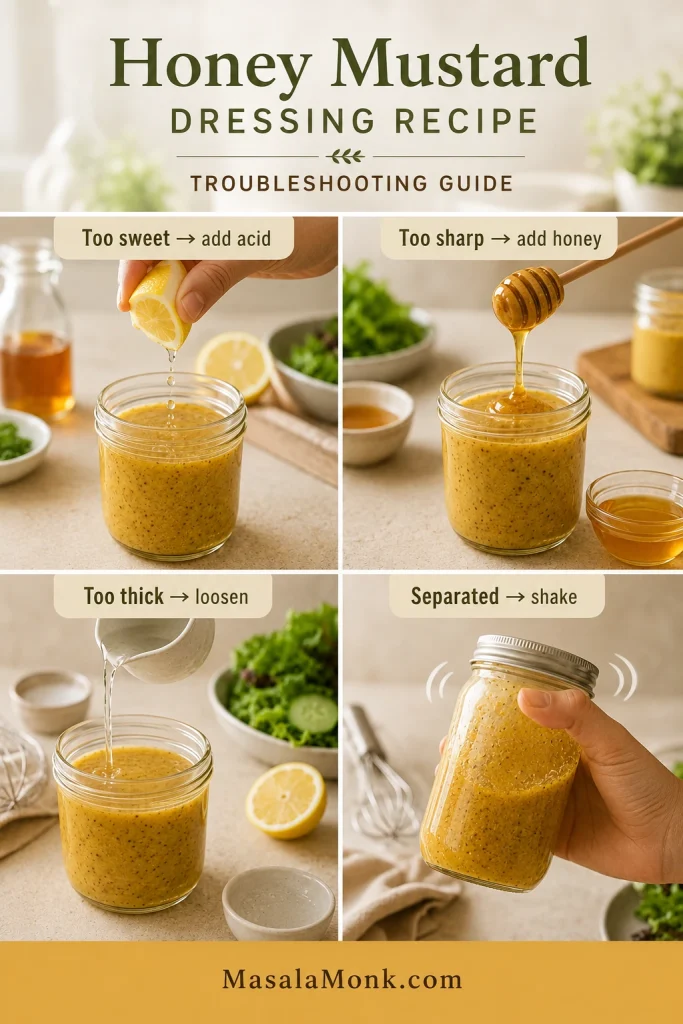
Why Is the Sauce Too Sweet or Too Sharp?
Likely causes: too much honey for your taste, too much Dijon, or not enough creamy base.
Fix: add mustard or lemon juice if it is too sweet. Add honey, mayo, or Greek yogurt if it is too sharp. Honey mustard should taste sweet first, tangy next, and creamy enough to dip.
Back to recipe card · Review oven method · Review air fryer method · Back to top
FAQs
Are Chicken Tenders and Chicken Strips the Same Thing?
They are often used the same way in recipes. Tenderloins are the small natural strips attached to the chicken breast. Strips are usually sliced from boneless chicken breast. Both work as long as the pieces are similar in size.
Can I Use Chicken Breast Instead of Tenderloins?
Yes. Slice boneless chicken breast into even strips about 3/4 inch thick at the widest part. Try not to make them too thin, because thin strips can dry out before the coating gets crisp.
Do I Need Flour or Egg for These Chicken Tenders?
No. The honey mustard mixture works as the binder in this recipe. For a firmer restaurant-style crust, lightly dust the chicken with flour before adding the sauce and panko.
Can I Make Honey Mustard Chicken Tenders in the Air Fryer?
Yes. Air fry at 390°F / 200°C for 10–12 minutes, flipping halfway, until the chicken is crisp and cooked through. Cook in batches so the basket is not crowded.
How Do I Keep Baked Chicken Tenders Crispy?
Use panko breadcrumbs, spray or drizzle the coating lightly with oil, leave space between the tenders, and bake at high heat. A wire rack helps too. Keep the sauce on the side until serving.
Can I Make These Gluten-Free?
Yes. Use gluten-free panko or crushed gluten-free rice cereal. Check your mustard, mayonnaise, and seasonings as well if gluten-free cooking is important for your household.
Can I Make the Sauce Without Mayo?
Yes. Use Greek yogurt for a tangier, lighter sauce. Add a little extra honey if you want it sweeter, or use eggless mayonnaise if you want a mayo-style sauce without egg.
Can I Use the Same Honey Mustard as Marinade and Dip?
Only if you divide it first. Reserve the dipping portion in a clean bowl before raw chicken touches the rest. The sauce used on raw chicken should not be served as a dip unless it is cooked safely.
How Do I Reheat or Freeze Honey Mustard Chicken Tenders?
Reheat cooked tenders in an oven or air fryer at 375–390°F / 190–200°C for 5–8 minutes, or until hot and crisp. For freezing, cooked tenders are the easiest option. Freeze in a single layer first, then store in a freezer-safe bag or container.
Final Bite
The win here is simple: no frying pot, no soggy tray, no dry chicken, and no wasted dipping sauce because it touched raw chicken.
Just golden panko, juicy strips, and a clean bowl of sweet-tangy honey mustard that somehow disappears faster than expected. Keep the sauce creamy, the crumbs well-pressed, and the dip on the side until the moment everyone starts reaching.