Posted on Leave a comment

Ravioli Recipe: Easy Homemade Ravioli With Classic Cheese Filling

Plate of pale golden homemade cheese ravioli coated lightly in brown butter and Parmesan, with one raviolo cut open to show creamy ricotta filling.

A good ravioli recipe should give you pasta that feels almost delicate on the plate: thin sheets that give easily under a fork, a creamy cheese center, and edges that are tender instead of thick and chewy.

Cut one open and the warm ricotta should stay tucked inside the pasta, with nutty brown butter clinging lightly to the folds.

The disappointing batch is usually only a few decisions away from that. The pasta stays too thick. The filling leaves no room to close the edges. Air gets trapped around the cheese. Or the ravioli are knocked around in aggressively boiling water until the weakest seam opens.

This ravioli recipe uses a simple egg pasta dough, a classic ricotta-Parmesan filling and brown butter for the finish. A pasta machine makes even rolling easier, but a rolling pin and sharp knife are enough. You don’t need a ravioli mold.

Learning how to make ravioli from scratch is mostly about learning what to notice: dough becoming smooth under your hands, the first shadow showing through a thin sheet, filling that stays in a mound, and the pocket of air moving toward the edge as you seal.

Homemade ravioli isn’t a 30-minute dinner. Give a first batch an unhurried couple of hours, with extra time if you’re rolling entirely by hand. That pace isn’t unusual.

The Four Things That Make Homemade Ravioli Work

How to make ravioli: Roll rested egg pasta into thin sheets, add a filling that holds its shape, push out the trapped air and seal, then cook until the thickest sealed edge, where the two pasta sheets overlap, is tender.

What makes it work: supple, thin pasta → filling that holds a mound → an air-free seal → a pot that’s active, not violent.

The sheet should be slightly translucent but sturdy enough to lift. Leave a clean border around each mound, work the trapped air toward the edge before cutting, and regulate the heat so the pasta moves gently in the pot.

Dough: 240 g / 8.5 oz flour + 3 large eggs   •   Rest: 30 minutes   •   Yield: 28–30 thinly rolled ravioli   •   Cooking: start checking one test piece at about 3 minutes

Four-stage ravioli guide showing a translucent pasta sheet, mound of ricotta filling, hands removing trapped air, and ravioli cooking gently in water.
This recipe gets easier once you see how four ravioli cues connect: thick pasta needs more cooking, loose filling steals clean sealing room, trapped air adds pressure, and rough water finds the weakest point.

Classic Cheese Ravioli Recipe

Thin egg pasta filled with creamy ricotta and Parmesan, then finished with glossy brown butter, more Parmesan and black pepper.

Yield28–30 ravioli when rolled quite thin; thicker hand-rolled sheets may produce fewer
Finished sizeAbout 2¼ in / 5.7 cm
Serves4 generously, or 5–6 as a lighter course
Prep & shapingAbout 1½–2 hours, including the 30-minute dough rest
Cook & finishAbout 15–20 minutes
First-batch totalAbout 1¾–2½ hours; hand rolling usually puts you toward the upper end
Make aheadFreeze shaped ravioli uncooked; cook straight from frozen

Equipment

  • Large bowl or clean work surface
  • Pasta machine or rolling pin
  • Digital kitchen scale, optional but useful
  • Fine-mesh sieve for wet ricotta
  • Piping bag, zip-top bag or two teaspoons
  • Ravioli wheel, pizza cutter or sharp knife
  • Parchment-lined tray
  • Large pot, slotted spoon and large skillet

For the Ravioli Dough

  • 240 g / 8.5 oz / 2 cups all-purpose flour, plus a little for dusting
  • 3 large eggs, about 150 g / 5.3 oz without shells
  • ½ teaspoon fine salt
  • Up to 15 ml / ½ fl oz / 1 tablespoon cold water, only as needed

For the Cheese Filling

  • 450 g / 16 oz / about 2 cups whole-milk ricotta
  • 60 g / 2.1 oz / about ½ cup finely grated Parmesan
  • 1 large egg
  • ¼ teaspoon fine salt to start, plus more as needed
  • ¼ teaspoon freshly ground black pepper
  • Small pinch ground nutmeg

For the Brown Butter Parmesan Finish

  • 56 g / 2 oz / 4 tablespoons unsalted butter
  • 30–40 g / 1–1.4 oz finely grated Parmesan
  • Up to 120 ml / 4 fl oz / ½ cup pasta water
  • Freshly ground black pepper
  • Optional: sage leaves, chopped parsley or finely grated lemon zest

For Cooking and the Tray

  • 3–4 L / 3–4 qt water
  • 8–10 g fine salt per liter of water, adjusted for the saltiness of the cheese and sauce
  • Semolina or flour for dusting the tray

Instructions

1. Check the Ricotta and Start the Dough

Thick ricotta that stands on a spoon can go straight into the filling. Visible whey means it needs draining; place it in a fine-mesh sieve while you make the dough.

Combine the flour and salt. Make a well, add the eggs and draw the surrounding flour into them with a fork. Switch to your hands when the mixture becomes too thick to stir.

2. Knead and Rest

Knead for 8–10 minutes. The beginning can look discouragingly rough; keep working and the separate floury pieces should gradually become one smooth, springy dough.

Dry fragments that still refuse to join after several minutes need a little water. Add it one teaspoon at a time and knead before adding more.

Cover the dough and rest for 30 minutes. A sheet that keeps snapping back later needs another 10–15 minutes under cover.

Rough, shaggy yellow pasta dough beside a smooth, firm ball of kneaded dough on a dark blue surface.
For this recipe, ravioli dough is ready when the rough pieces have become one smooth, elastic mass that bends cleanly; chasing bread-dough softness with extra water usually creates stickiness instead.

3. Make the Filling During the Rest

Mix the ricotta, Parmesan, pepper, nutmeg and ¼ teaspoon salt. Taste and adjust the seasoning, then add the raw egg. Stir well and refrigerate; the filling should be creamy but still sit in a soft mound.

4. Set Up, Then Roll Two Sheets

Before you start rolling, put the chilled filling, prepared tray, cutter and something to cover the waiting sheets within reach. Thin pasta is much easier to work with when you aren’t stopping midway to hunt for equipment.

Divide the dough into 4 pieces and keep the pieces you aren’t working with covered.

With a pasta machine: flatten one piece enough to enter the widest setting. Pass it through, fold it and repeat at the widest setting until the dough looks smoother and more rectangular. Move through progressively narrower settings, one step at a time, dusting only when the sheet begins to stick. A very long sheet becomes awkward quickly, so cut it into manageable lengths when needed and continue thinning those pieces separately.

With a rolling pin: work from the center outward, turning and repositioning the dough so the sheet thins evenly.

Stop by feel and appearance, not by machine number. A ready sheet is roughly 0.6–1 mm thick, slightly translucent and strong enough to lift. The first faint shadow of your hand through the pasta is a satisfying little shift: the dough finally looks like the wrapper your filling needs.

Two methods for rolling fresh pasta dough: one sheet passing through a pasta machine and another being rolled thin with a rolling pin.
Even translucency matters more than the machine number; if only the center turns thin, reposition the sheet before rolling everything further.

Cover that sheet loosely while you roll a second piece to a similar size.

5. Add the Filling

For ravioli about 2¼ in / 5.7 cm wide, pipe or spoon 18–20 g filling—about one rounded tablespoon—onto the bottom sheet. Leave about ½ inch / 1.3 cm of bare pasta around each mound.

Weigh the first two or three portions if you have a scale. After that, you’ll have a much better visual reference for a mound that feels generous but still leaves room to seal.

Three ricotta filling portions on a pasta sheet showing too little, a correct 18–20 gram mound with a half-inch border, and too much filling.
Use 18–20 g as a starting reference, not a challenge to fit in more. A slightly smaller mound leaves noticeably more room to remove air and build a reliable seam.

6. Cover, Remove the Air and Seal

Lay the second sheet loosely over the filling. Press close to each mound first, then move your fingers outward so the air escapes toward the open edge. This is the moment the sheet begins to look unmistakably like ravioli: distinct little mounds with relaxed pasta around them, not tight domes stretched over cheese.

Brush flour from the edges that need to meet. Pasta that has started to dry may need the thinnest film of water.

Seal first. Cut second.

Hands pressing air outward around filled ravioli dough before the sealed pasta is cut with a pastry wheel.
Before cutting, trace the perimeter with a fingertip; one loose section can become the opening point once the pasta starts moving in hot water.

7. Cut and Tray

Cut ravioli about 2¼ in / 5.7 cm wide. Thinly rolled dough should give 28–30 ravioli; a thicker hand-rolled batch may yield fewer. Arrange them in one layer on a parchment-lined tray lightly dusted with semolina or flour and cover loosely while you shape the rest.

Don’t trim aggressively just to make every piece symmetrical. Preserve enough pasta around the filling for a secure seam.

Large clean scraps can be pressed together, covered for 10–15 minutes and rolled once more. Tiny scraps make perfectly good rough noodles; repeated rerolling only toughens them.

8. Brown the Butter While the Water Heats

Bring the pasta water to a full boil. Meanwhile, melt the butter in a large skillet over medium heat. It will foam first; keep watching until the milk solids at the bottom turn golden and the smell becomes warm and toasted. Add sage here if using.

A full batch is easier to finish in two rounds. Pour about half the browned butter into a small bowl and keep the skillet nearby.

9. Cook One Test Piece

Salt the water, add one test piece and adjust the heat so it moves gently in active water rather than being tossed around.

Start checking at about 3 minutes. Taste through the doubled seam; thicker pasta may need several minutes more. A tender, sealed test piece gives you the timing for the remaining batch.

10. Cook in Batches

Add the remaining ravioli in manageable batches and adjust the heat as needed to keep the water active but calm. Floating is only a reason to check. The pasta is done when the thickest part of the doubled edge is tender and no raw, chalky or floury center remains.

Reserve 120 ml / 4 fl oz / ½ cup pasta water before removing the first full batch. Lift the ravioli with a slotted spoon.

11. Finish With Parmesan

Transfer a comfortable batch of ravioli to the skillet. Add a splash of pasta water and move the pan gently, take it off the heat, then add about half the Parmesan. A little more pasta water pulls the butter and cheese into a light, glossy coating.

Move that batch to a warm platter, return the reserved brown butter to the skillet and repeat with the remaining ravioli. Finish with black pepper; a little lemon zest wakes up the rich butter without covering the mild ricotta.

Fresh cheese ravioli in a stainless pan with a light brown-butter coating, Parmesan, pepper, sage and browned milk solids.
If the brown-butter finish looks oily rather than lightly glazed, add pasta water a splash at a time and move the pan. More butter usually makes the separation worse.

The recipe gives you the sequence. The guide below explains the decisions behind it—how to read the dough, filling, seal and cooking process as you work.

Ravioli dough · Cheese filling · Shape & seal · Cook fresh ravioli · Fix a problem

Ravioli Dough: Feel, Flour and Thickness

Fresh pasta dough often looks worse before it looks better.

At first, flour and egg can feel reluctant to become one dough. Give kneading time to do its work before reaching for water. Finished dough should be smooth, firm and elastic, with a surface that bends without splitting. Sticky dough needs only a light dusting of flour; heavy dusting can solve today’s sticking problem and create dry sealing edges later.

Three pasta dough samples labeled too dry, ready and too sticky, showing cracked, smooth and tacky surface textures.
Persistent cracks point toward dryness, smeared residue toward excess tack; ready dough bends cleanly and releases from your hands without turning rigid.

Resting Solves Springback

The 30-minute rest gives the gluten time to relax. Dough that immediately shrinks every time you roll it is asking for another 10–15 minutes, not more force.

All-Purpose Flour or 00 Flour?

All-purpose flour is the simplest reliable choice for this ravioli dough. Tipo 00 also works, but “00” alone doesn’t tell you the flour’s protein level or strength. It is an Italian grade for highly refined white flour, and different 00 flours can behave differently with the same amount of egg. Whichever flour you use, judge the finished dough in front of you.

A beautifully kneaded dough can still make heavy ravioli if the sheet isn’t rolled far enough.

How Thin Should Ravioli Dough Be?

Aim for 0.6–1 mm. The pasta should be flexible and slightly translucent, with the shadow of your hand visible through it, but it still needs enough strength to lift cleanly.

What You SeeWhat It Means
Opaque sheet with a bulky doubled edgeKeep rolling
Flexible, slightly translucent sheetReady to fill
Stretches or tears when liftedUse a slightly thicker sheet

The doubled border tells the truth quickly. Pasta that looked acceptable as one layer can turn into a heavy, chewy rim once two sheets meet.

Follow the sheet, not the dial.

Pasta-machine settings vary between models, which is why the hand-shadow and lifting cues matter more than a universal final number.

Backlit fresh pasta sheet showing a hand shadow, a 0.6–1 mm target, and examples of too thick, ready and too thin dough.
Evenness matters as much as the 0.6–1 mm target: opaque outer edges can still become a thick, stubborn seam once two sheets are doubled together.

No Pasta Machine or Ravioli Mold?

A rolling pin and sharp knife are enough. Smaller portions are easier to roll evenly by hand.

  • No ravioli mold? Shape directly on the work surface.
  • No ravioli wheel? Use a pizza cutter or sharp knife.
  • No piping bag? Use a zip-top bag or two teaspoons.

A pasta roller improves thickness consistency. A ravioli mold mainly helps with spacing, speed and uniformity. Neither is required.

Back to recipe · Cheese filling · Shape & seal · Back to top

Cheese Filling: Moisture, Seasoning and Amount

Open two tubs of ricotta and they can behave like completely different ingredients. One stands firmly on a spoon. Another sits in a puddle of whey.

Ricotta keeps the center soft and mild; Parmesan brings the salty, savory depth that keeps the filling from tasting flat inside plain egg pasta.

Drain Wet Ricotta, Not Thick Ricotta

Visible whey is the reason to reach for the sieve. Drain wet ricotta until it holds a soft mound instead of slumping—often 20–30 minutes, though very wet ricotta may need longer. Thick ricotta that already holds a mound can go straight into the filling.

Wet ricotta that spreads and releases whey beside thicker ricotta that remains creamy while holding a soft mound.
Watch the bowl more than the clock: visible whey or a spreading mound means keep draining, while ricotta that stays softly piled is ready to portion.

The same moisture problem matters in our classic homemade lasagna, but ravioli gives excess whey less room to hide: a loose filling quickly smears into the border you need to seal.

Season Before Adding the Raw Egg

Parmesan varies in saltiness, so mix the ricotta, Parmesan, pepper, nutmeg and starting salt first. Taste and adjust the seasoning, then add the egg. Keep the finished filling cold until shaping time; chilled ricotta portions more cleanly.

How Much Filling Goes in Ravioli?

For ravioli about 2¼ inches (5.7 cm) wide, use 18–20 g filling and leave about ½ inch (1.3 cm) of bare pasta around the mound.

Test one mound before filling an entire sheet. The top pasta should drape comfortably around the cheese. If the top sheet has to stretch tight, the mound is too large for a comfortable seal.

A filling that holds its mound gives you room to shape without smearing the border.

Two covered ravioli mounds on a red surface comparing a relaxed pasta drape with an overfilled mound stretching the top sheet tightly.
A taut top sheet steals sealing room and puts the pasta over the filling under strain. Removing a little filling fixes both problems at once.

Shape and Seal Homemade Ravioli

Roll, Fill and Shape

Work with two sheets at a time: one below the filling and one above it. Keep unused dough and the waiting top sheet covered. Portion the filling, drape the second sheet over the mounds and let the pasta fall into place around them.

Don’t spend all your patience making perfect squares. Save it for the seam.

The first sheet is usually the awkward one. By the second pair, your hands already know more about the dough than they did ten minutes ago: how thin it feels and how much filling fits without a fight.

Seal First, Cut Second

To seal ravioli, press beside the filling and push trapped air outward before closing the edge. Start close to the mound and move your fingertips toward the open border; you should be able to feel the air travelling ahead of your hands.

Flour caught between the pasta edges interferes with the seal, so brush it away. A dry edge can take the lightest film of water.

Seal first. Cut second.

Cutting while air is still trapped closes off the escape route. Get the pasta snug around the filling first; shape the individual ravioli afterward.

Bon Appétit’s ravioli-shaping guide is helpful for seeing the hand movement. Their method uses egg wash at the seam; this recipe uses only a trace of water when the pasta needs it.

Fix a Trapped Air Bubble

Move a visible bubble toward an open edge before cutting. A stubborn pocket inside an otherwise sealed piece can be released through the smallest possible puncture, then pinched closed.

The 20-Second Ravioli Check

Pick up one piece before the batch enters the pot.

  • It lifts cleanly from the tray.
  • The seam is closed all the way around.
  • No obvious air pocket remains.
  • The border doesn’t look unusually thick.

Cook that piece first. It will tell you more about the batch than the clock can.

Uncooked handmade raviolo held between fingers with callouts identifying a clean lift, closed seam, no trapped air and a thin border.
Think of this as the last check before the pot. If one piece reveals trapped air, a weak seam or a bulky border, correct the tray before the same flaw reaches the water.

A strong seam still needs a pot that won’t undo it.

Back to recipe · Cook fresh ravioli · Fix a problem · Back to top

Cook and Finish Fresh Ravioli

How to Cook Fresh Ravioli

Fresh homemade ravioli don’t have one universal cook time. Start checking around 3 minutes and judge doneness at the doubled seam. Thickness, dough and filling all affect how long the pasta needs, so a thicker batch can take several minutes longer.

Bring the water to a full boil, add the ravioli in batches and adjust the heat as needed so the pot stays active but calm. The pieces should move freely without being battered around the pot.

Three-stage cooking guide showing one test raviolo, several ravioli moving in gently active water, and a floating raviolo lifted with a slotted spoon.
One test piece sets the timing for the batch. After that, let the water recover gently rather than turning up the heat until the pasta is being thrown around.

Floating Is a Cue, Not a Finish Line

Floating doesn’t mean the ravioli are automatically done. Taste the thickest part of the seam. Tender pasta with no raw or floury center is the real finish line.

A cooked center with a stubbornly chewy rim points back to sheet thickness. Finish the current batch, then roll the next sheets thinner.

Macro comparison of two cooked ravioli seams: one tender and translucent, the other with a pale, opaque, doughy center.
The filling can be hot before the pasta is done; judge doneness at the doubled seam, usually the last place an opaque, floury center disappears.

Brown Butter Parmesan for Cheese Ravioli

Brown butter gives the mild ricotta a toasted, nutty edge without turning the plate into a heavy sauce. Finish the ravioli in two rounds so the skillet stays roomy: brown all the butter, reserve half, and coat the first portion of pasta with a little pasta water and Parmesan. Move it to a warm platter and repeat.

Watch what happens when the pasta water reaches the butter and cheese: separate ingredients pull into a glossy coating that clings to the folds.

Choose Another Sauce by What the Plate Needs

  • Want more acidity? Homemade marinara sauce cuts through the ricotta and Parmesan.
  • Want something lighter? Lemon butter keeps the finish simple and bright.
  • Want herbs to lead? Use pesto sparingly so the ravioli still taste like ravioli.
  • Want tomato without a heavy coating? Use a loose tomato-basil sauce.
Four servings of cheese ravioli finished separately with brown butter, marinara, lemon butter and a restrained amount of pesto.
Because the cheese filling is mild, sauce quantity matters as much as flavor. Pesto needs only a light touch; looser marinara or lemon butter can coat more generously without hiding the pasta.

Back to recipe · Fix a ravioli problem · Try another filling

Ravioli Troubleshooting: Read the Failure

A failed piece usually leaves a clue. Where it opened, tore, stuck or stayed tough points back to a different part of the process.

What HappenedLikely CauseWhat to Change
Pasta sticks while rollingDough is tacky or needs a little dustingDust lightly and keep rolling; don’t bury the dough in flour
Seam opens in the potFlour on the edge, dried pasta or weak pressureClean the edges and seal more firmly
Ravioli burst over the fillingTrapped air, too much filling or fragile doughLeave more sealing room and push the air outward
Filling squeezes out while shapingToo much fillingUse a smaller mound
Edges stay toughPasta sheet too thickRoll the next batch thinner
Dough keeps shrinkingNot rested enoughCover for another 10–15 minutes
Dough tears around the fillingToo thin, dry or stretched tightUse a slightly stronger sheet and drape it loosely
Ravioli stick to the trayMoisture, crowding or too little dustingUse parchment, a little semolina and one layer
Ravioli break in the waterWeak seam or overly aggressive boilingCheck the seam and calm the pot
Ravioli float but taste doughyNot cooked throughGive them more time and taste again
Five uncooked ravioli problems: pasta sticking while rolling, shrinking dough, a torn sheet, an overfilled raviolo and a seam blocked by flour or filling.
Correct the earliest problem first: get the dough rolling cleanly and staying relaxed before changing the filling or seal, otherwise one fault can masquerade as another.

Why Ravioli Burst

The usual causes are trapped air, too much filling, a weak or floury seam, fragile pasta and overly aggressive boiling. These problems can pile onto one another: a large mound leaves less pasta to seal, trapped air puts pressure behind that seam, flour weakens the grip between the sheets, and vigorous water finds the weakest point.

Ravioli troubleshooting examples showing an open seam, burst top, broken raviolo, thick rim and a floating raviolo with an undercooked doughy seam.
Where the failure appears narrows the cause: an open edge points toward sealing, a burst crown toward pressure, and a heavy rim toward thickness or doneness.

A Seam That Refuses to Close

Look at the edge before pressing harder. Flour, dried pasta or a smear of filling is often the culprit. Clean it first; add a trace of water only when the pasta is too dry to grip.

Loose Cheese Filling

Filling that spreads across the sheet points back to the ricotta. Drain visible whey. A soft but not watery filling may only need more chilling time.

A bad piece isn’t wasted information. The shape of the failure often tells you what to change before the next sheet reaches the pot.

Back to recipe · Filling ideas · Freeze ravioli · Back to top

Change the Filling, Keep the Moisture Under Control

The flavor can change completely; the moisture rule does not. A filling still needs to sit in a mound and leave the border clean.

  • Spinach and ricotta: squeeze cooked spinach very dry before mixing it with the cheese; lemon or sage butter works especially well here.
  • Mushroom: cook until the pan stops giving off water; brown butter suits the deeper savory filling.
  • Butternut squash: roast it for a thicker, sweeter center; sage is a natural partner.
  • Chicken: use finely chopped or shredded cooked chicken and keep the mixture cohesive.
  • Lobster: use cooked lobster meat and season lightly enough for the seafood to stay distinct.
Five cut-open ravioli showing spinach ricotta, cooked mushroom, butternut squash, cooked chicken and cooked lobster fillings.
Once the base recipe feels familiar, ravioli fillings can change completely without changing the structural rule. Keep them dry enough to mound and fine enough that hard pieces are not pressing against the thin pasta.

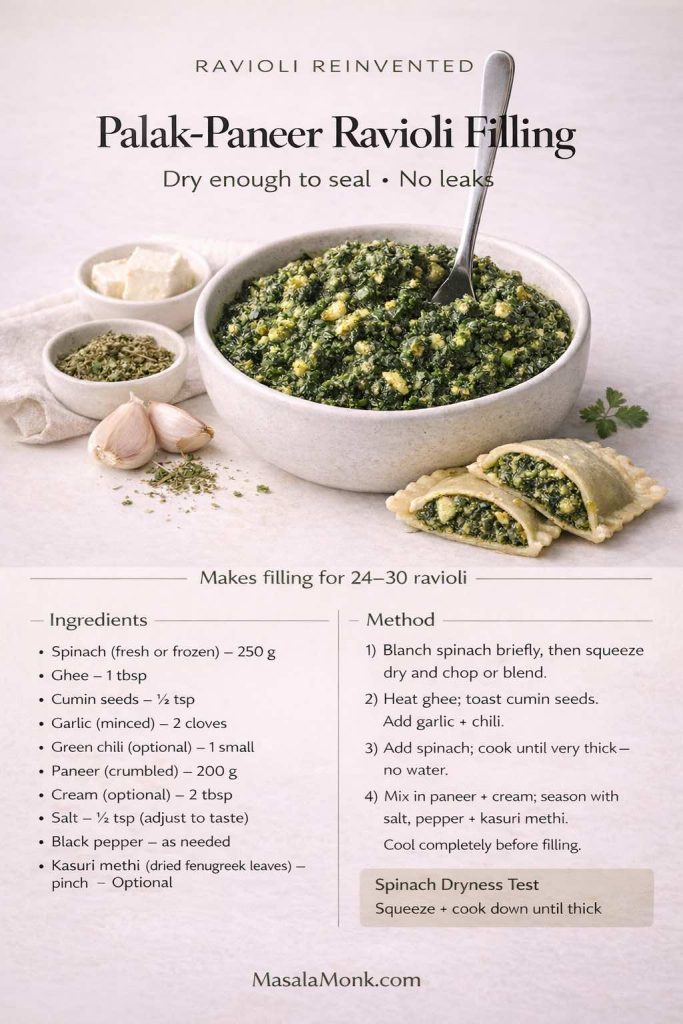
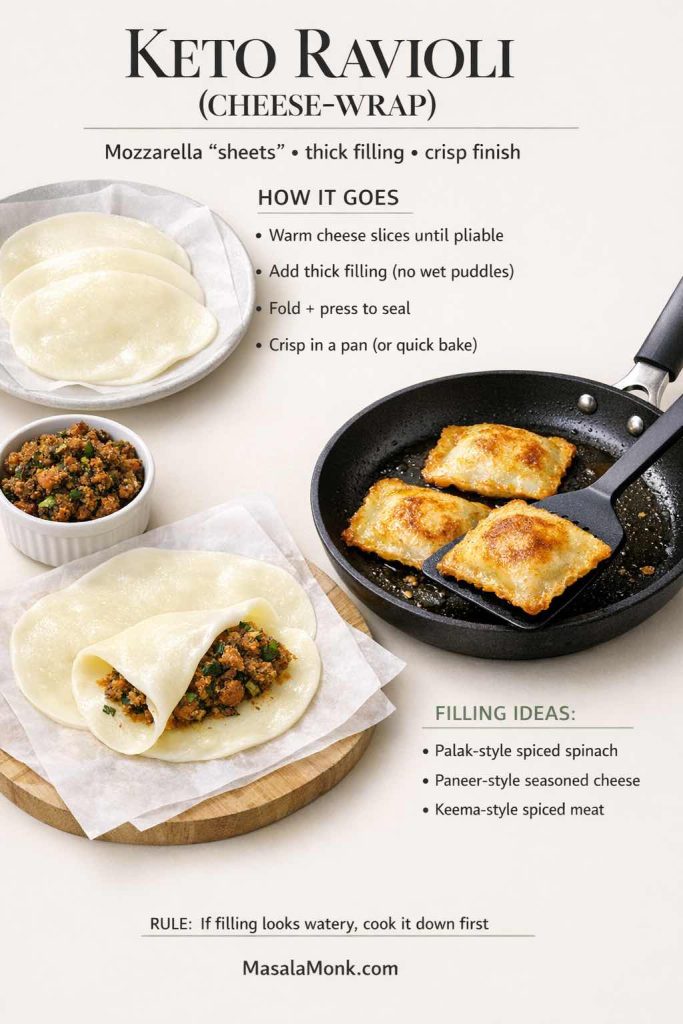
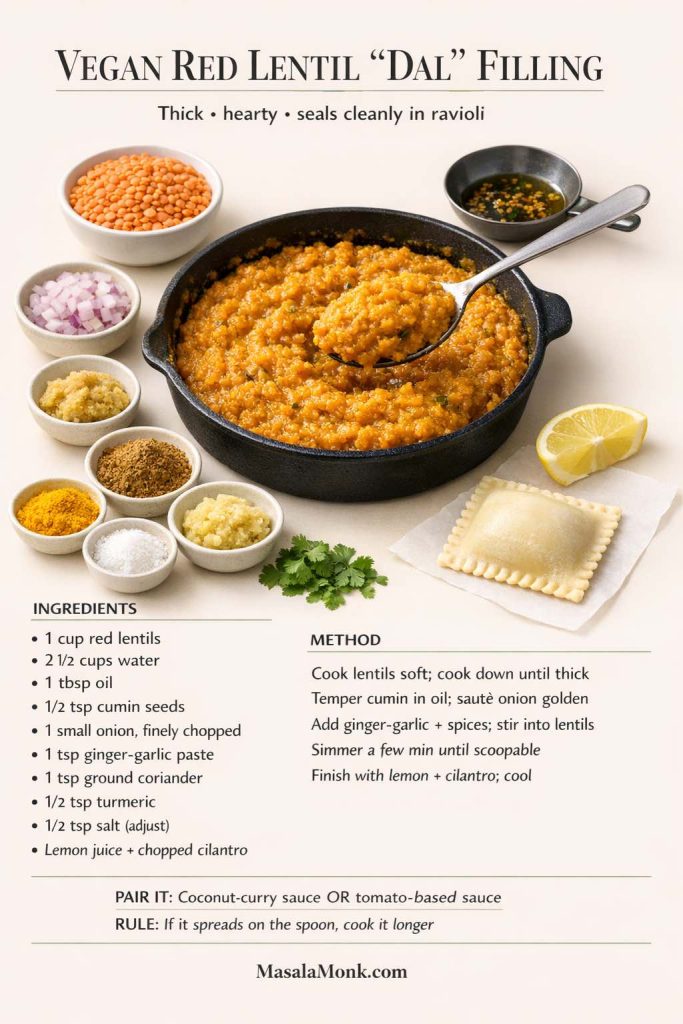
For paneer, spice-forward fillings and less traditional sauces, see our Indian-inspired ravioli guide.

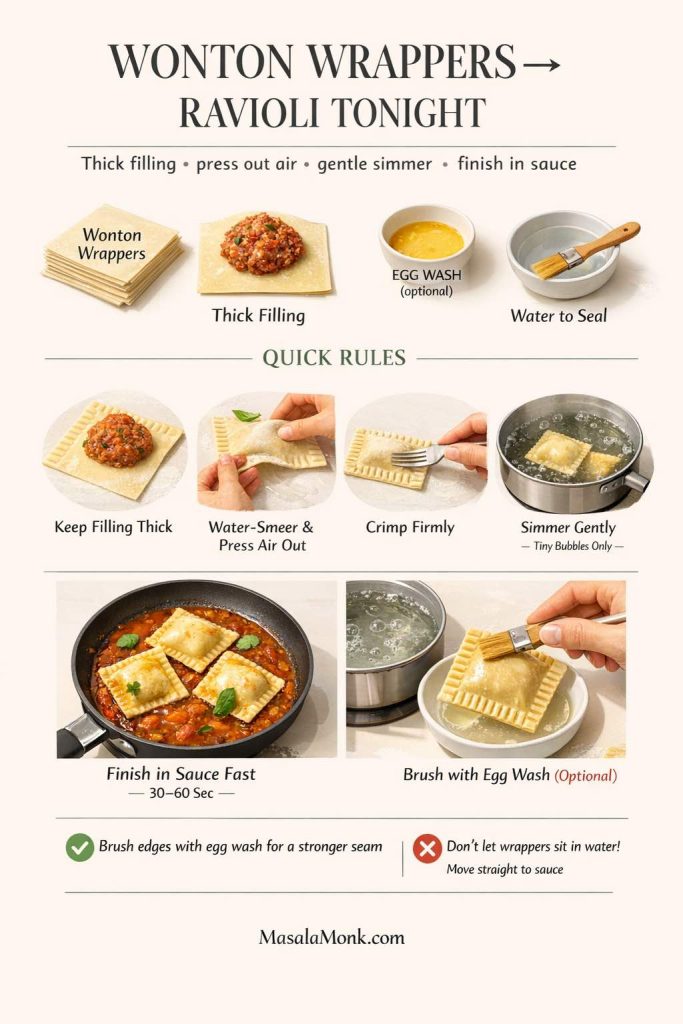
Shortcut: Wonton Wrapper Ravioli

Wonton wrappers give up some of the tender egg-pasta character in exchange for speed. Use about 1 teaspoon filling per standard wrapper, moisten the edge lightly, push out the air and seal firmly. They are thinner than homemade pasta, so start checking early.

Make Ahead, Refrigerate and Freeze Ravioli

When Are You Cooking?Best Move
ShortlyKeep the shaped ravioli separated while you finish the batch
Later todayRefrigerate and aim to cook within 3–4 hours
Tomorrow or laterFreeze uncooked
From frozenCook without thawing
Already cookedRefrigerate for 3–4 days

Holding Ravioli for Later the Same Day

Keep shaped ravioli in one layer while you finish the batch. Refrigerate the tray when you aren’t cooking them shortly afterward, keeping the pieces separated and protected from excessive drying. For best pasta quality, aim to cook refrigerated raw ravioli within 3–4 hours; filled pasta held overnight can soften as moisture migrates from the filling into the dough, so freezing is the better route.

Food-safety note: Filled ravioli are perishable. Don’t leave them at room temperature for more than 2 hours, or more than 1 hour above 90°F / 32°C. These are the standard limits in the USDA’s food-safety guidance.

Freezing Homemade Ravioli

  1. Arrange uncooked ravioli in one layer on a parchment-lined tray lightly dusted with semolina.
  2. Freeze until firm.
  3. Transfer to an airtight freezer bag or container and label it.
Four-step ravioli freezing guide showing uncooked ravioli in one layer, frozen firm on a tray, stored in a container and added to hot water from frozen.
Freeze the pieces on a tray first; once firm, they can share a container without fusing into one block or pressing fresh seams together.

For best texture, aim to use frozen homemade ravioli within about 1 month. Food kept continuously frozen at 0°F / −18°C can remain safe longer; the shorter window is about pasta and filling quality, not a sudden safety cutoff.

Cook frozen ravioli straight from the freezer. Start checking 1–2 additional minutes later than you would for the fresh batch, then taste through the seam.

Cooked leftovers keep in a covered refrigerator container for 3–4 days. Reheat them gently in sauce.

Back to recipe · Ravioli troubleshooting · Guide contents · Back to top

Frequently Asked Questions

1. Can I Make Ravioli Dough Ahead?

Yes. Wrap the dough well and refrigerate it overnight. Let it lose some of its chill before rolling so it flexes without cracking at the edges.

2. Should I Use Water or Egg White to Seal Ravioli?

Firm pressure matters most. Fresh pasta usually needs only a trace of water when the edge has begun to dry. Egg white adds adhesion but isn’t necessary for this method.

3. How Many Ravioli Should I Serve Per Person?

For ravioli around 2¼ in / 5.7 cm wide, 5–8 per person works well. Serve toward the higher end when the pasta is the whole meal and fewer with bread, vegetables or something fresh such as a crisp cucumber salad.


The first piece that comes out of the pot intact changes the mood of the whole project. After that, you are no longer wondering whether the method works; you are adjusting the next batch.

A slightly crooked edge is cosmetic. A good seal is structural.

Three handmade ravioli on a burgundy surface, including a visibly crooked piece with an intact, well-sealed edge beside neater ravioli.
For homemade ravioli, a secure border matters more than perfect geometry; aggressive trimming can turn a harmless crooked edge into a weak seam.

After a few pieces, the physical signs become familiar: the lightness of a properly rolled sheet, the amount of filling it can comfortably hold, and the small movement of air beneath your fingers before the seam closes.

When those things start to feel familiar, ravioli stops being a one-off challenge and becomes a pasta method you can return to with an entirely different filling.
Back to recipe · Guide contents · Back to top

Posted on Leave a comment

Cacio e Pepe Recipe: Silky, Authentic Roman Pasta Without Cream

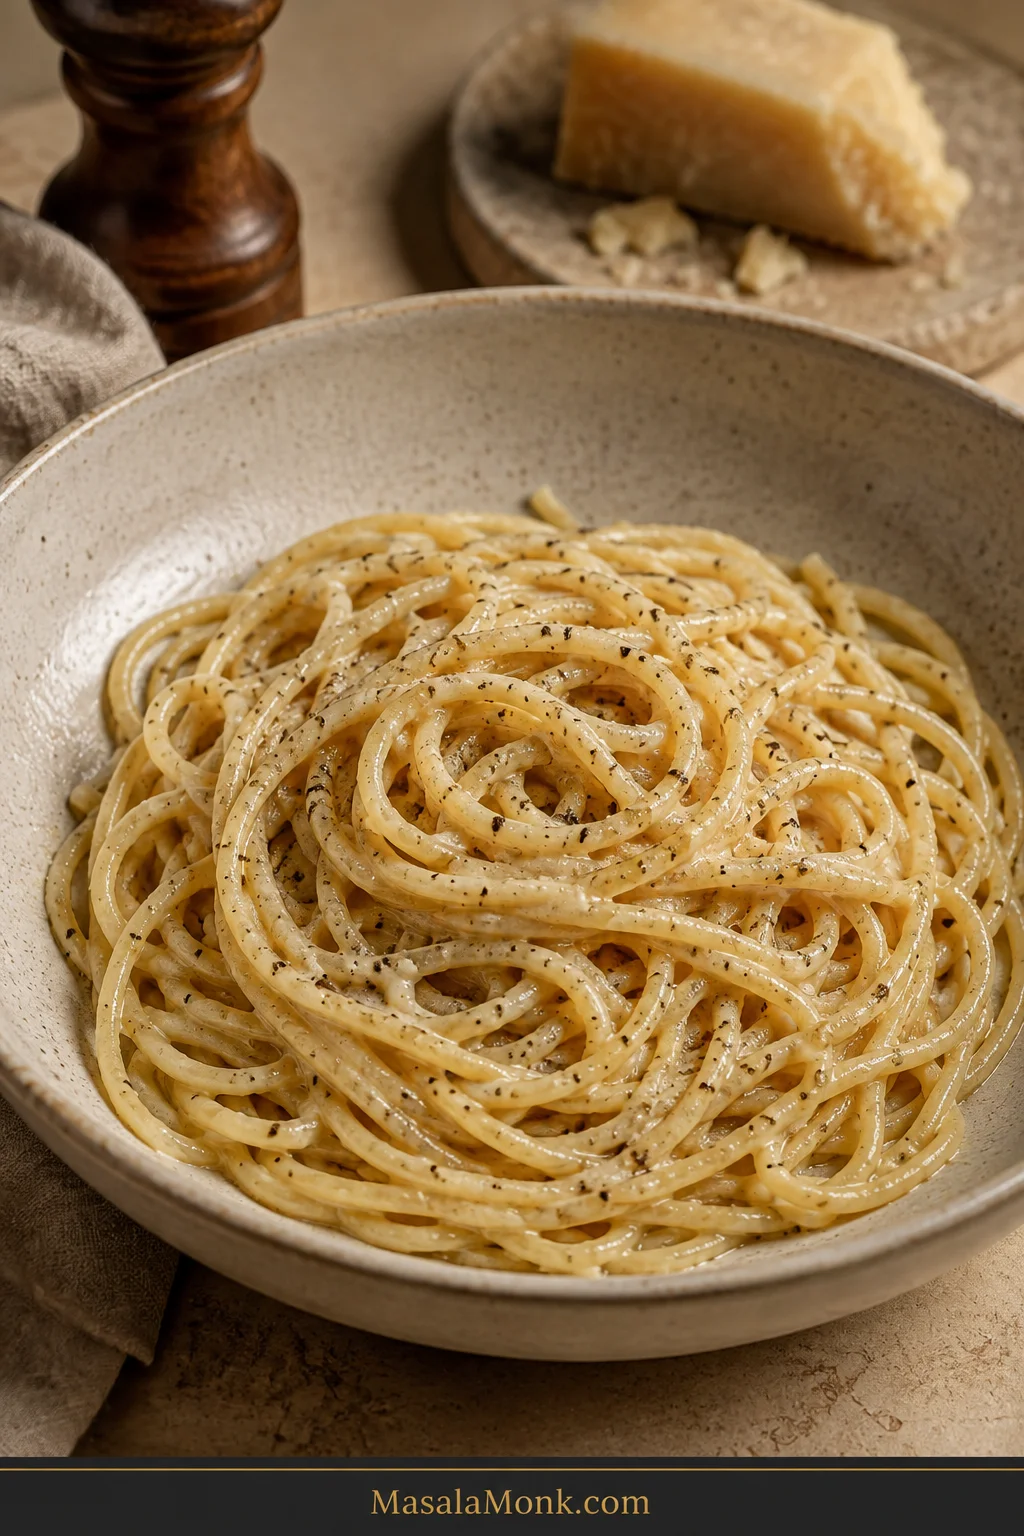
Bowl of glossy cacio e pepe spaghetti lightly coated with Pecorino Romano and speckled with cracked black pepper, with cheese and a pepper mill in the background.

Cacio e pepe looks like the sort of pasta you should be able to make half-awake: noodles, Pecorino Romano, black pepper. Then the cheese hits a pan that is a little too hot and suddenly you are staring at rubbery knots surrounded by watery pasta.

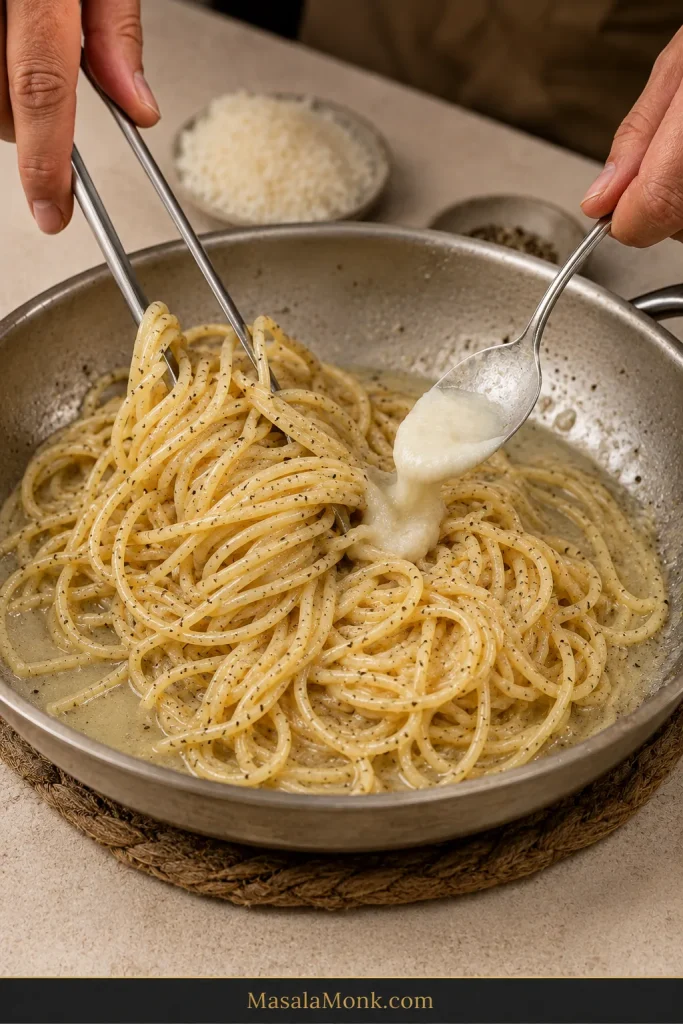
When it works, nothing looks forced. The spaghetti still moves under the tongs, pepper freckles the strands, and the Pecorino turns the cloudy pasta water into a glossy coating that feels creamy even though it contains no cream, butter or oil.

Fixing it does not take another ingredient. It means giving these simple ingredients the right conditions: finely grated cheese, concentrated pasta water, gentler finishing heat and small adjustments instead of big ones. This recipe stays with the Roman essentials and gives you visible cues for the moments when a clock alone is not enough.

Quick Answer: The Cacio e Pepe Method in One Minute

The method at a glance

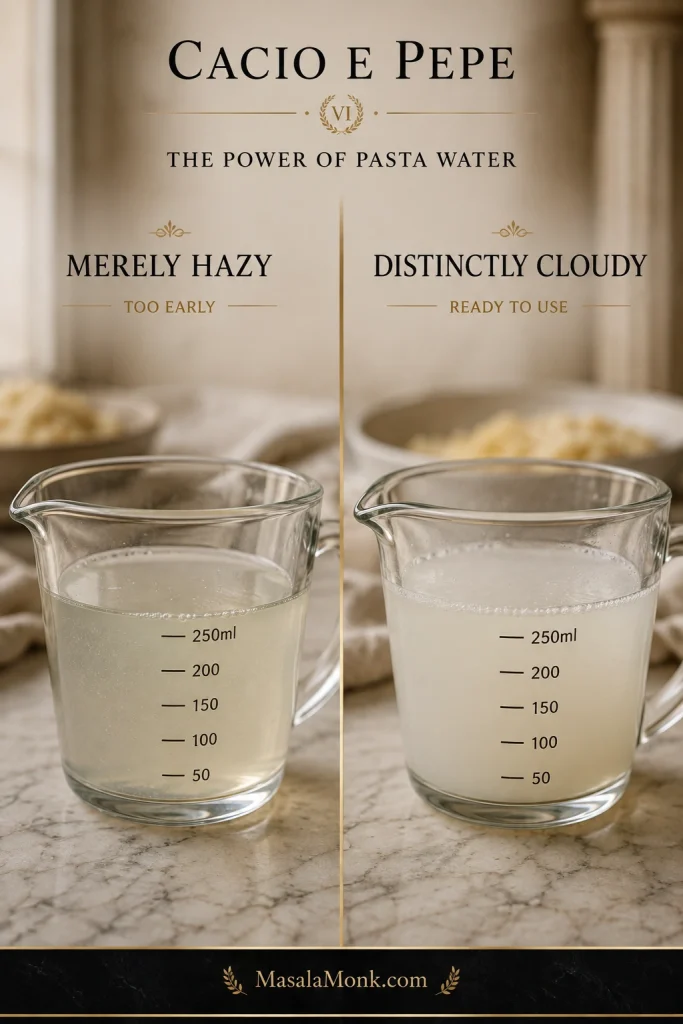
Cook the pasta in relatively shallow water so the liquid becomes properly cloudy and starchy. While the pasta still has time, use some of that water—cooled until warm and only faintly steaming—to turn finely grated Pecorino into a thick paste.

Toast the pepper just before the skillet stage, then finish the underdone pasta in the peppery starch. Once the pasta is al dente, move the skillet completely off the burner and give the pan a brief cooling pause before adding the cheese.

Rule to remember: build the starch while the pan is hot; build the cheese sauce after the harsh heat has passed. Add any extra pasta water by tablespoons and stop while the sauce still looks a touch loose.

Two measuring jugs of pasta water compared side by side: lightly hazy water on the left and noticeably cloudier, starchier water on the right.
Watch the opacity change as the pasta cooks. Merely hazy water is still relatively weak; noticeably cloudier water carries more suspended starch and gives the cacio e pepe emulsion more support.

Cacio e Pepe Recipe

This cacio e pepe recipe uses dried bronze-cut spaghetti, Pecorino Romano, black pepper and concentrated pasta water to make a silky sauce. The quantities make two generous bowls. Build the starch first, have the Pecorino paste ready, then bring everything together only after the pan is away from direct heat.

Prep Time10 minutes
Cook Time12–15 minutes
Total TimeAbout 25 minutes
Yield2 generous servings

Also serves: 3 smaller first-course portions
Method: Stovetop
Best starting pasta: Bronze-cut dried spaghetti
Final cue: Glossy, fluid sauce that is slightly looser than serving consistency

Ingredients

  • 200 g / 7 oz bronze-cut dried spaghetti (dried tonnarelli also works; fresh tonnarelli needs different timing)
  • 110 g / 3.9 oz Pecorino Romano PDO, very finely grated
  • 3 g whole black peppercorns, about 1½ teaspoons before crushing, plus more to finish
  • About 1 L / 4¼ cups water, or just enough to cover the pasta in a wide pan
  • 4 g fine sea salt, about ¾ teaspoon, using less if your Pecorino tastes especially salty

Equipment

  • Wide pan for cooking the pasta in relatively shallow water
  • 10- to 12-inch / 25- to 30-cm skillet for finishing
  • Fine or star side of a box grater
  • Heatproof bowl plus a small heatproof cup for cooling pasta water
  • Tongs and a ladle or heatproof measuring cup
  • Digital scale, strongly recommended for the Pecorino

Instructions

Build the starch and Pecorino base

  1. Grate and divide the Pecorino. Finely grate all 110 g. Reserve about 10 g for serving and put the remaining 100 g in a heatproof bowl. It should look fine and powdery, not like long shreds.
  2. Start the pasta in shallow water. Bring about 1 L / 4¼ cups water to a boil in a wide pan. Add the measured salt and the pasta. Stir frequently during the first few minutes. If the tips sit above the water at first, let the submerged ends soften briefly and ease the rest under instead of breaking the spaghetti. If your pan still needs more water to cover the strands, add only what is necessary.
  3. Make the Pecorino paste while the pasta still has time. Once the pasta has cooked long enough for the water to become distinctly cloudy—not merely hazy—scoop some into a small heatproof cup and let it cool until warm and only faintly steaming. Gradually stir about 3 tablespoons / 45 ml into the 100 g Pecorino. Add another tablespoon only if needed. The paste should be smooth, thick and spreadable, with enough body to hold its shape on a spoon. Set it beside the stove.
  4. Toast the pepper just before the skillet stage. Coarsely crush the peppercorns. Warm the finishing skillet over medium-low heat and toast the pepper for about 45–60 seconds, stirring or shaking, until deeply aromatic. Stop before it smokes or develops a burnt smell.
  5. Start the pepper base and transfer the pasta. Add about ¼ cup / 60 ml cloudy pasta water to the toasted pepper and let it bubble gently. When the dried spaghetti is still about 2–3 minutes shy of al dente, transfer it to the skillet with tongs.

Finish the pasta and make the sauce off heat

  1. Finish the pasta in the skillet. Toss while it finishes cooking, adding small splashes of pasta water only when needed. At al dente, you want a shallow amount of glossy, cloudy liquid slipping around the strands—not a dry pan and not pasta swimming in water.
  2. Let the skillet cool. Move it completely off the burner. Start checking after about 30 seconds and wait until the strongest steaming has visibly eased; a heavy skillet may need closer to a minute or longer.
  3. Make the sauce off heat. Add the Pecorino paste in two or three additions, tossing vigorously after each. If the sauce tightens, add warm pasta water 1 tablespoon / 15 ml at a time, tossing fully before adding more.
  4. Plate it loose. Stop when every strand is glossy and coated, the pasta still moves easily under the tongs, and there are no visible cheese clumps or watery puddles. Taste one strand: the pepper should be clearly present and the Pecorino sharp and salty without becoming harsh. If it needs more punch, reach for pepper before automatically adding more salt or cheese. Take cacio e pepe to the table a little too loose rather than a little too tight—the trip from skillet to fork fixes the first problem and worsens the second. Serve immediately on warm plates with the reserved Pecorino and more pepper.

Recipe Notes

  • Keep the cheese step off direct heat. Residual heat is enough; if your skillet is heavy and holds heat well, give it a longer cooling pause.
  • Weigh the Pecorino when possible. Grated-cheese volume changes dramatically with grater style and packing.
  • Salt lightly. Pecorino Romano supplies much of the final seasoning.

What should good cacio e pepe taste like? The first bite should have a clear black-pepper bite, followed by the salty, savory sharpness of Pecorino. Richness should come from the way the sauce clings to the pasta, not from a buttery or creamy taste. A good bowl still tastes unmistakably of pasta underneath all that cheese and pepper.

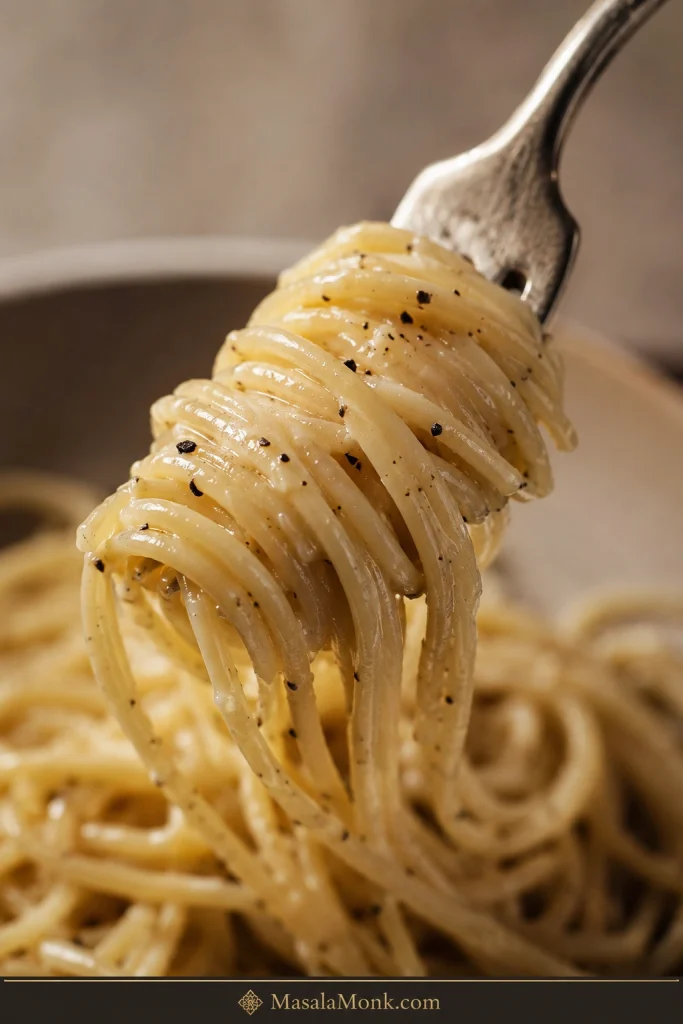
Close-up of cacio e pepe spaghetti twirled around a fork, showing separate glossy strands with a light cheese coating and black pepper flecks.
Lift a forkful and the coating becomes easier to judge. Look for separate spaghetti strands carrying the same thin, silky Pecorino emulsion from center to edge, without bare noodles or thick cheese patches.

Cacio e Pepe Guide: Jump to What You Need

What Makes This Cacio e Pepe Authentic?

Here, “authentic” refers to the ingredient core, not one rigid motion every Roman cook must follow. The classical dish is built from pasta, Pecorino Romano and black pepper, with starch-rich pasta water helping those ingredients become sauce. This recipe does not add cream, butter, olive oil, garlic or Parmesan.

Cacio e pepe is commonly grouped with carbonara, amatriciana and gricia as Rome’s four classic pasta dishes. They share a Roman pantry and a knack for turning a short ingredient list into something much larger than it looks.

The technique can vary. Some cooks work grated Pecorino directly into the pasta; others make a cheese paste first or cool the pan for longer.

Making a Pecorino paste and finishing off heat gives the cheese a gentler path into the sauce while keeping the Roman essentials intact. Butter, Parmesan, cream and added starch can all make good pasta too; they simply lead to different versions of the dish.

Cacio e Pepe Ingredients: Choosing Pecorino, Pepper and Pasta

Before you cook, two choices matter disproportionately: use real Pecorino Romano and grate it much finer than you might expect. Pasta shape matters too, while water management becomes the bigger decision once you start cooking.

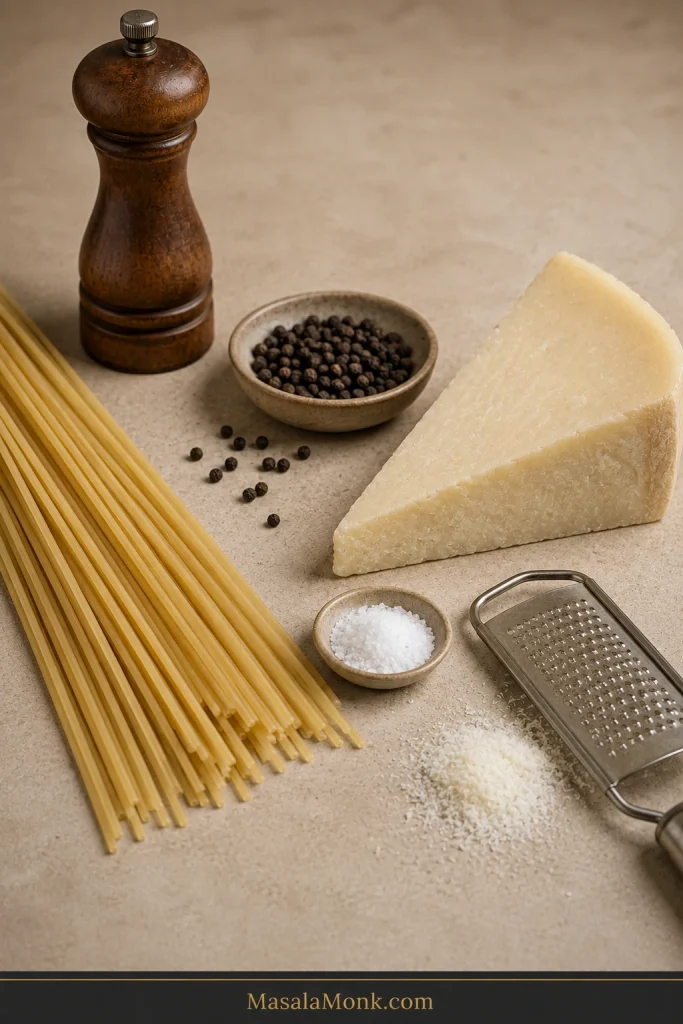
Dried spaghetti, a wedge of hard Pecorino Romano cheese, finely grated cheese, black peppercorns, salt, a pepper mill and a fine grater arranged on a neutral work surface.
With so little in the recipe, preparation matters as much as shopping: grate Pecorino Romano fresh, crack whole black pepper when needed, and use concentrated pasta water as the sauce’s built-in source of starch.

Best Cheese for Cacio e Pepe: Pecorino Romano PDO

Use Pecorino Romano PDO (DOP on Italian labels): the firm, salty sheep’s-milk cheese that defines the Roman sauce. Its sharp, savory bite is a big reason such a short ingredient list tastes so full.

Buy a wedge and grate it shortly before cooking when you can. You do not need to hunt down Pecorino of one particular age; genuine Pecorino Romano PDO, very fine grating and careful heat matter more here.

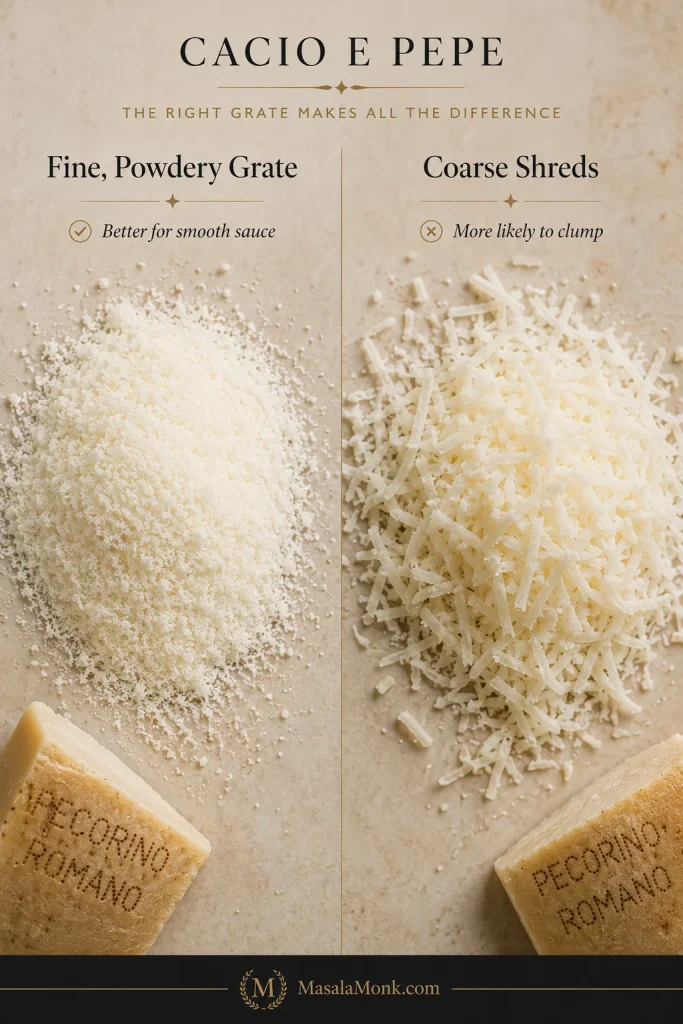
Use the fine or star side of a box grater and aim for small, powdery particles rather than long ribbons. A Microplane can work, though its very fluffy shreds make volume especially misleading. That is why the recipe uses grams first. If you are comparing Pecorino with Parmigiano Reggiano, Grana Padano or generic Parmesan, MasalaMonk’s Parmesan vs. Parmigiano Reggiano guide explains how those hard cheeses differ.

Side-by-side comparison of very finely grated powdery Pecorino on the left and long coarse cheese shreds on the right, labeled “Fine, Powdery Grate” and “Coarse Shreds.”
Fine Pecorino is easier to disperse evenly—it hydrates quickly, before individual pieces have time to seize together. Coarse shreds need longer to soften, which narrows the margin for a smooth emulsion.

Black pepper should taste like an ingredient. Use whole peppercorns and crush them shortly before cooking. The measured amount gives the sauce a clear pepper bite; you can always grind more over the finished bowl. You want coarse, irregular flecks that stay aromatic in the pasta. As they toast, the skillet should smell unmistakably peppery before the color changes much. Stop there; once pepper starts smelling scorched, there is nowhere for that bitterness to hide.

Use less water than a normal pasta pot

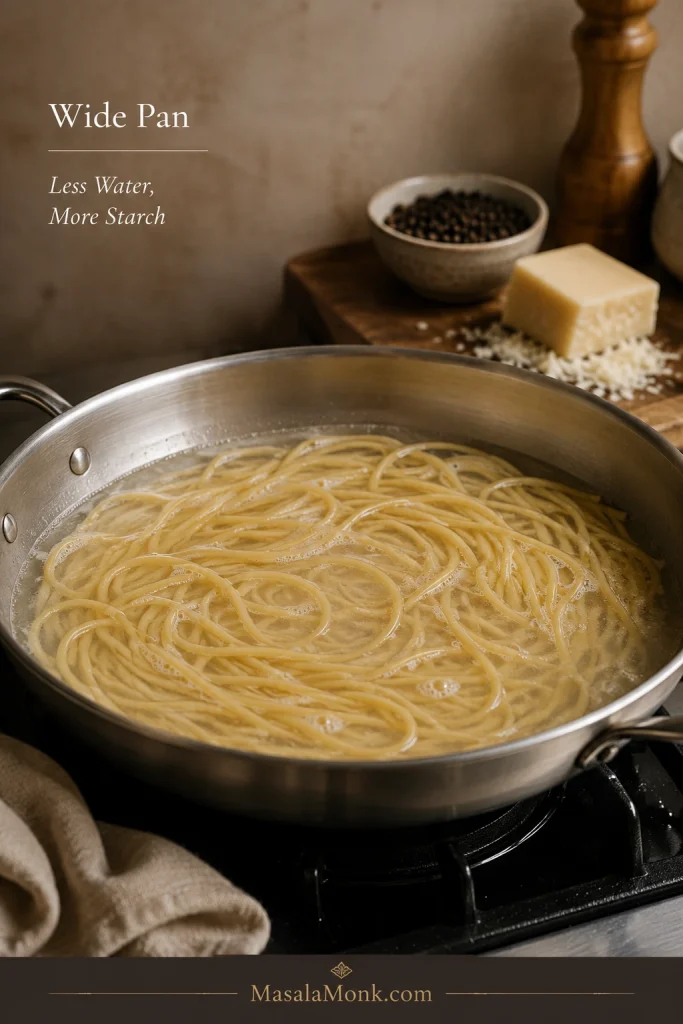
Spaghetti cooking in a wide shallow stainless-steel pan with a relatively low level of water, with Pecorino cheese and black pepper in the background.
The smaller water volume has one useful purpose: stronger pasta water. A wide pan keeps the spaghetti workable while concentrating the starch that later helps Pecorino and water behave like one sauce.

For 200 g / 7 oz pasta, start with about 1 L / 4¼ cups water in a wide pan. Pan shape matters, so use more if the spaghetti needs it to soften, submerge and move freely. Keep the volume low enough that the cooking water grows distinctly cloudy as the pasta cooks. The same concentrated-water habit is useful in our vodka pasta, where the tomato-and-dairy base gives you more room for correction.

Salt with the Pecorino in mind

This is not the pasta for aggressive “salt it like the sea” advice. Pecorino Romano supplies a large part of the seasoning, so start light and taste the cheese before the water boils. It is much easier to add more Pecorino at the table than to rescue an oversalted sauce.

Cacio e Pepe Sauce: Why It Gets Creamy Without Cream

The sauce forms when finely grated Pecorino, water and pasta starch are tossed together until they cling to the strands as one silky coating. Pre-hydrating the cheese into a thick paste gives that dispersion a controlled starting point instead of asking dry Pecorino to meet the pan all at once.

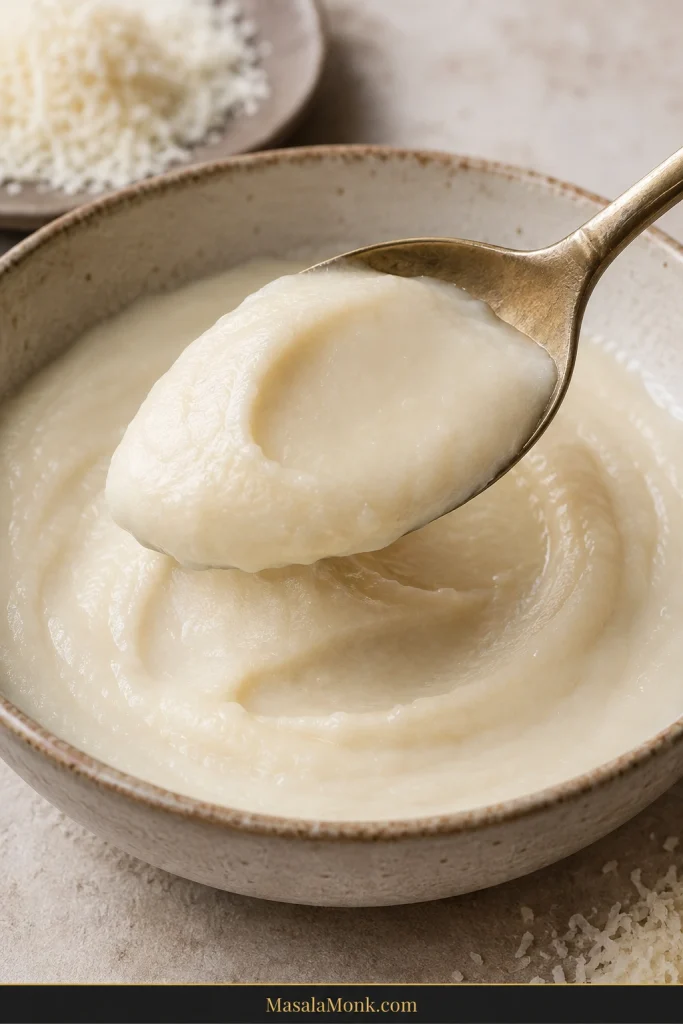
Spoon holding a thick, smooth, pale Pecorino paste above a bowl, with the mixture forming a soft mound and holding its shape.
A thick Pecorino paste keeps the final adjustment in your hands. Once it reaches the spaghetti, you can loosen the sauce gradually; a runny mixture has already used much of that flexibility.

Why the pan needs to cool before the cheese goes in

Heat is the awkward part. Pecorino needs warmth to soften and disperse, but too much heat is the moment smooth cheese starts turning grainy or pulling into rubbery clumps. So the recipe uses the hottest part of cooking for the pasta and starch, then lets the pan settle before the cheese joins in.

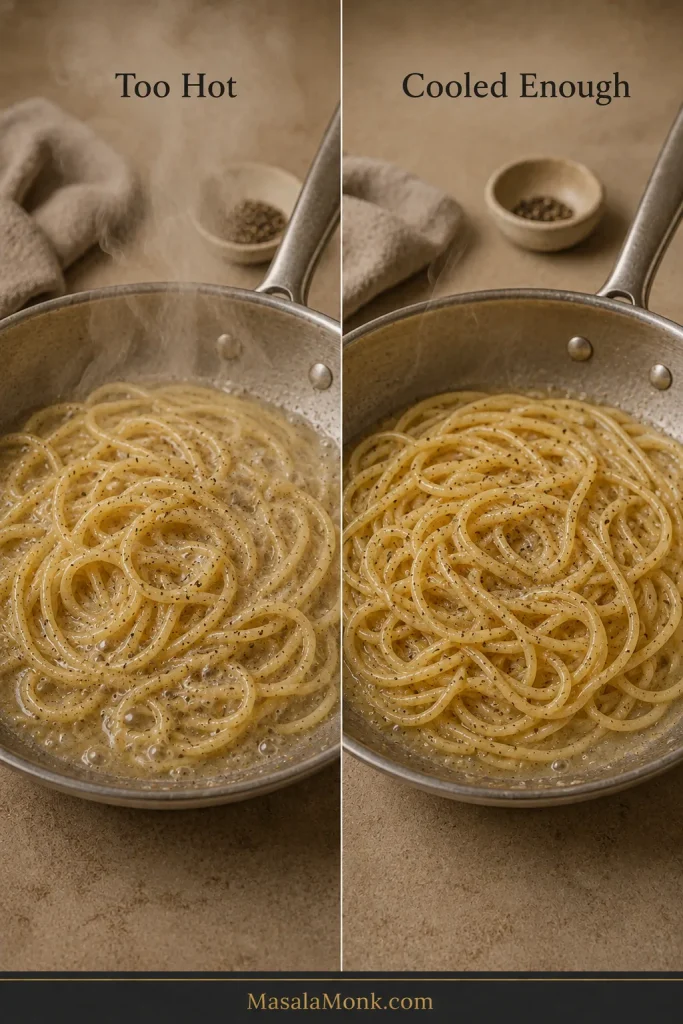
Side-by-side skillets of peppered spaghetti labeled “Too Hot” and “Cooled Enough,” with stronger visible steam over the hotter pan and only faint steam over the cooled pan.
Turning off the burner removes direct heat, not stored heat. Give the skillet time to settle until vigorous steaming fades; the pasta stays warm while the Pecorino gets a gentler place to emulsify.

A 2025 Physics of Fluids paper, “Phase behavior of Cacio e Pepe sauce”, mapped this interaction experimentally and found starch concentration to be a major factor in sauce stability. The researchers also built an optimized version with measured added starch.

We do not add starch here, and you do not need to add any to use the lesson. Concentrate what the pasta already releases, keep a shallow film of cloudy liquid around the strands, and keep the Pecorino away from direct heat.

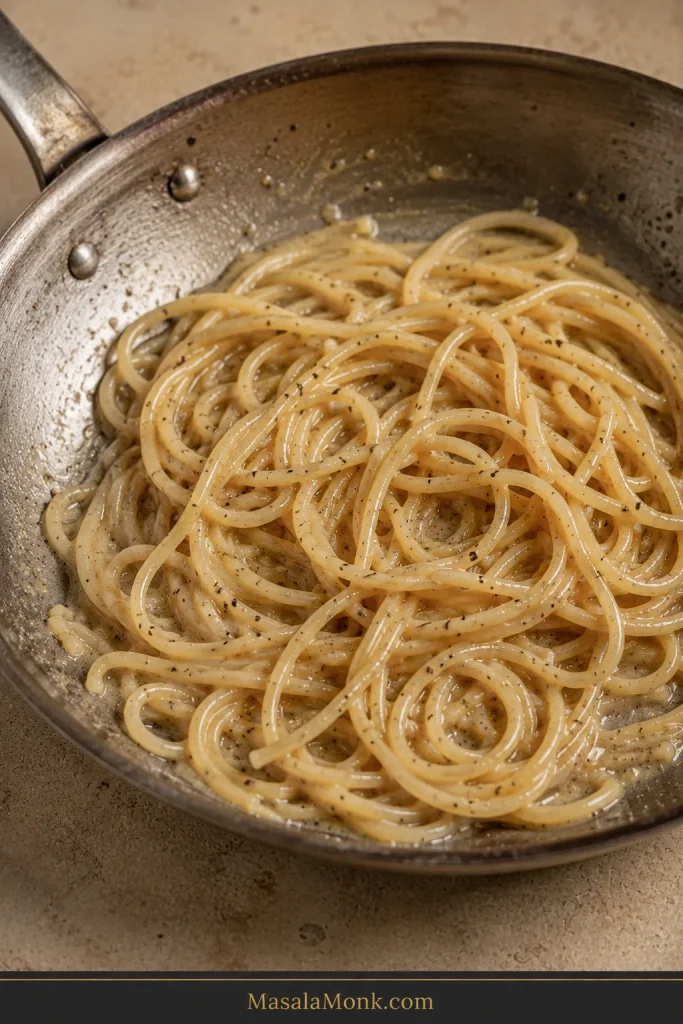
Pepper-speckled spaghetti in a skillet before cheese is added, with a thin layer of starchy liquid visible between the glossy strands but no deep pool.
At this stage, moisture should live between the strands rather than underneath them. That thin starchy film gives Pecorino somewhere to disperse without turning the skillet into a pool of cheese water.

About temperature: there is no single number that makes every Pecorino, pan and starch concentration behave identically. Use the clock only as a starting point: move the skillet off the burner, let the strongest steam ease, then add the cheese in stages.

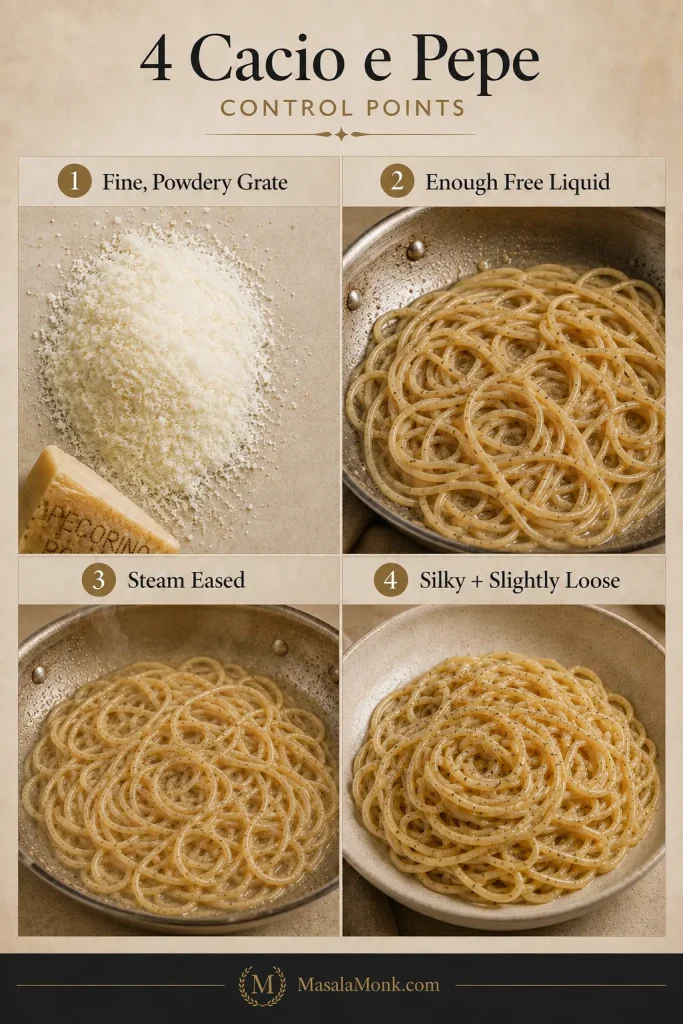
How to Make Cacio e Pepe Without Clumps: 4 Cues to Watch

Moment What you want Warning sign
Grated Pecorino Fine, powdery particles that hydrate quickly Long coarse shreds that hydrate unevenly and clump more easily
Pasta before cheese Al dente strands with a shallow amount of cloudy liquid still moving around them A bone-dry pan or pasta swimming in clear water
Pan before Pecorino Off the burner with the most aggressive steaming visibly eased Roaring steam and a pan still acting like it is over direct heat
Finished sauce Glossy, fluid and clinging; pasta moves easily under the tongs Stiff, pasty coating or watery liquid collecting underneath
The timer tells you when to look. These cues tell you whether to continue.
Four-panel cacio e pepe guide showing finely grated Pecorino, spaghetti with a small amount of free liquid, a skillet after steam has eased, and finished pasta with a silky, slightly loose coating.
Read the four checks as a sequence: prepare the cheese correctly, preserve enough moisture, let harsh heat pass, then stop while the sauce still moves. Together, they are more useful than chasing perfect timing.

When those four cues line up, the final toss is usually almost uneventful: the Pecorino disappears into the cloudy liquid and the strands turn silky as you keep them moving. One last judgment remains: knowing when the sauce is loose enough to leave the pan.

A spoon adding a small amount of smooth Pecorino paste to peppered spaghetti while tongs lift and toss the pasta in a skillet off the burner.
Small additions make the transformation easier to read. Toss until each addition has nearly disappeared into the glossy spaghetti before adding the next; if the coating tightens, correct with a little warm pasta water before continuing.

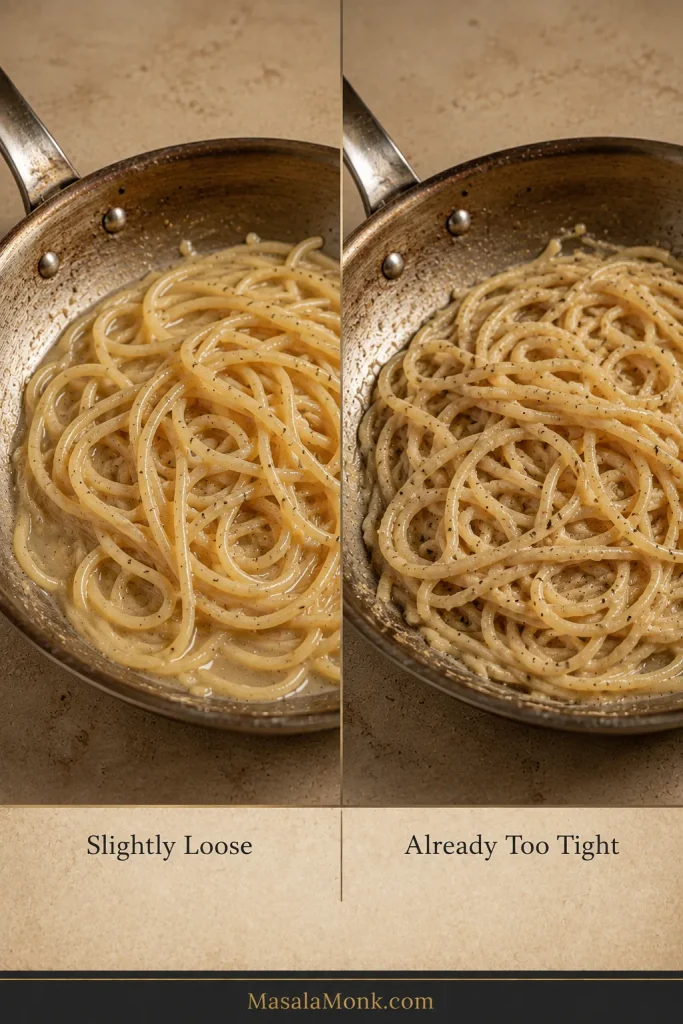
Stop while the sauce still moves

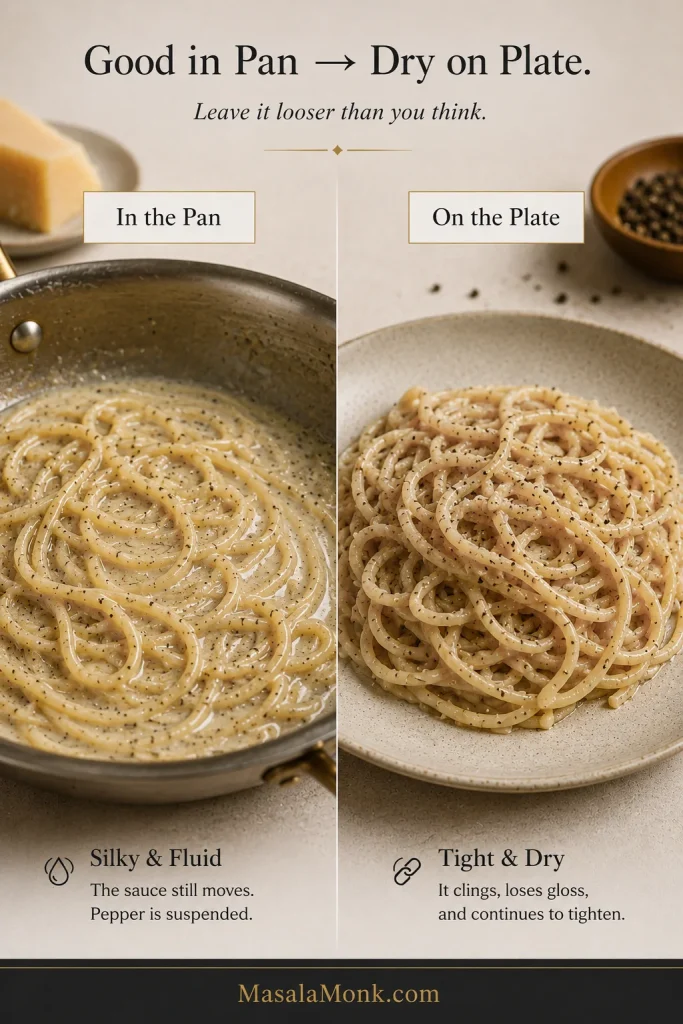
The skillet should look a little looser than the plate you ultimately want. Residual heat and the short trip to the table keep tightening the coating, so waiting for perfect serving consistency in the pan usually means serving cacio e pepe too tight.

Side-by-side skillet comparison showing glossy, fluid cacio e pepe labeled “Slightly Loose” on the left and a thicker, less mobile but still smooth sauce labeled “Already Too Tight” on the right.
Finish for the plate you are about to serve, not the skillet you are looking at. Cacio e pepe continues tightening as it cools, so a little movement now protects the texture later.

Cacio e Pepe Troubleshooting: Clumps, Graininess, Watery Sauce and Gluey Texture

If the sauce still goes sideways, “it clumped” is not yet a diagnosis. Look at what the cheese and liquid are actually doing before you decide what the pan needs.

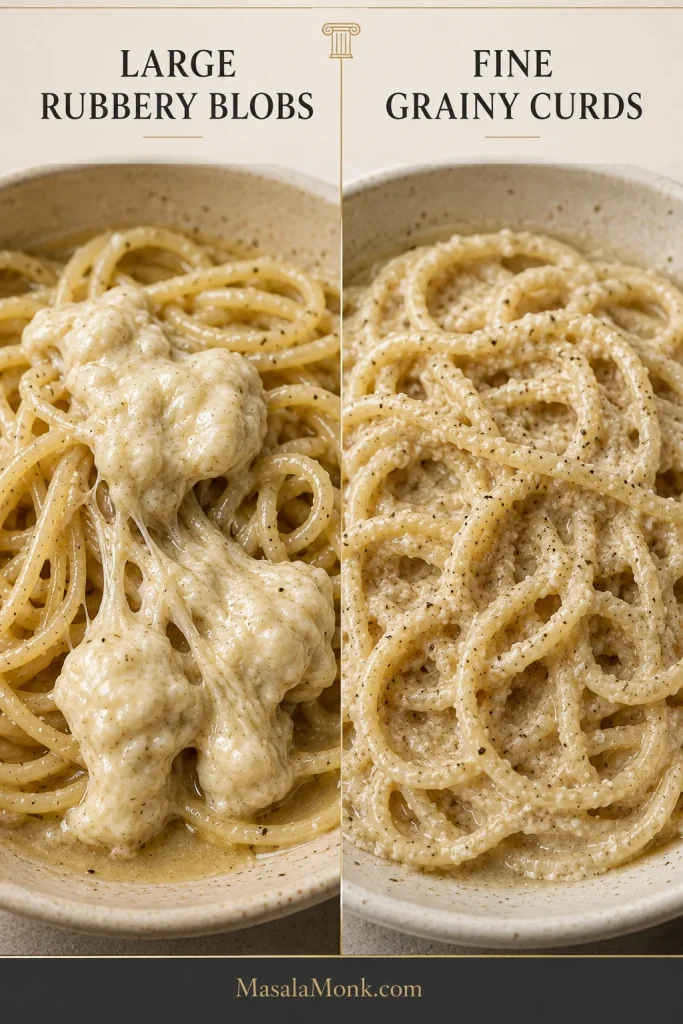
Cheese clumps: rubbery blobs vs. grainy curds

Split comparison of failed cacio e pepe: large stretchy cheese blobs coating spaghetti on the left and many tiny grainy cheese curds dispersed through the sauce on the right.
“Clumpy” is only the symptom. Large stretchy masses point to cheese that seized together, while tiny sandy curds reveal a finer break in the emulsion—two failures that call for different corrections next time.
What you see Most likely cause What to do now What to change next time
Large rubbery cheese blobs Pan too hot; cheese added too quickly; weak starch base Get completely off heat. If clumping has only started, add 1 tablespoon warm starchy water and toss hard. A fully elastic mass is difficult to reverse. Cool longer, grate finer and add Pecorino in stages.
Tiny grainy curds Excess heat or an unstable emulsion Move away from heat and toss with a very small splash of starchy water. Use finer cheese, starchier water and a longer cooling pause.
Large blobs and tiny curds are different cheese failures; their shape gives you a clue about what went wrong.

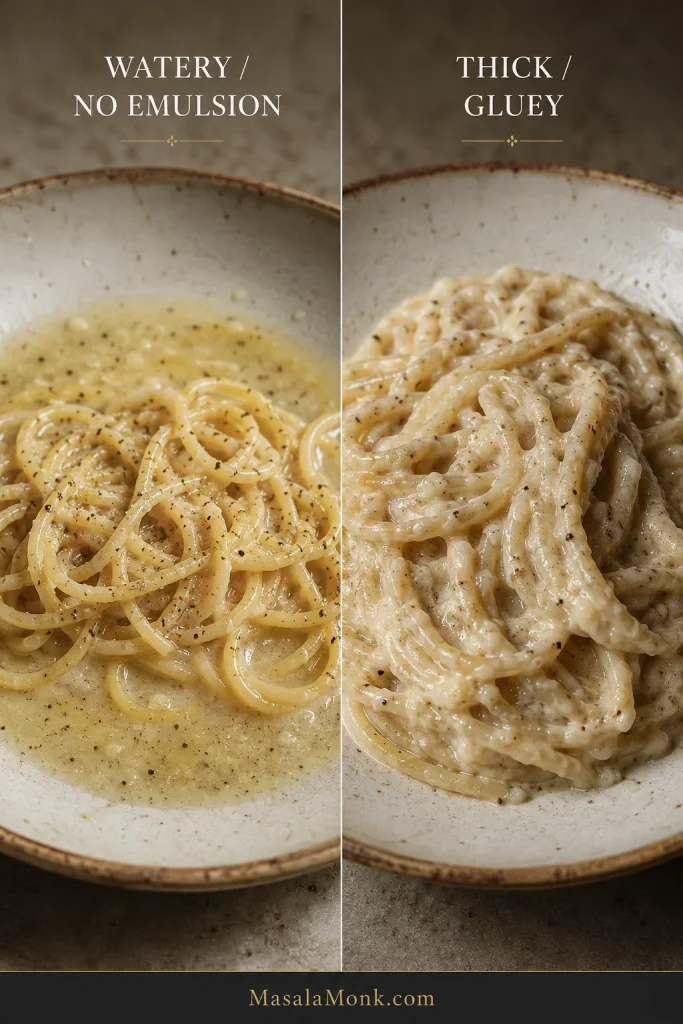
Watery, gluey, dry or too-salty sauce

What you see Most likely cause What to do now What to change next time
Watery pasta with cheese stuck to the pan or tongs The emulsion never formed—often excess liquid, weak starch concentration or too much heat Get completely off heat, stop adding water and toss vigorously. If the cheese has already seized into clumps, use the clump rescue below. Use starchier water, cool the pan more and make smaller liquid corrections.
Thick, gluey sauce Too little water, too much evaporation or sauce cooled too far Add warm pasta water 1 tablespoon at a time while tossing. Leave slightly more free liquid before the cheese step and plate looser.
Good in the skillet, dry on the plate Sauce left the pan too tight Loosen immediately if you still have warm pasta water. Stop when the sauce is more fluid than the final texture you want.
Too salty Heavily salted water plus salty Pecorino There isn’t a clean fix once the finished pasta is too salty; avoid adding more cheese or salt. Salt the cooking water much more lightly.
Diagnose the texture you actually see; not every cacio e pepe failure needs more water.
Side-by-side failed cacio e pepe showing watery separated liquid around loosely coated spaghetti on the left and a thick, gluey coating binding the strands together on the right.
In a watery sauce, free liquid has failed to become part of the coating; a gluey sauce has tightened too far in the opposite direction. The useful target sits between separation and over-concentration.
Before-and-after comparison showing glossy, fluid cacio e pepe in a skillet on the left and the same style of pasta looking tighter, drier and less glossy after plating on the right.
A warm plate can slow cooling, but it cannot restore moisture already lost in the skillet. The better safeguard is plating while the sauce still looks slightly more fluid than your ideal first bite.

Can a clumped cacio e pepe sauce be rescued?

Sometimes, if you catch it while the cheese is only beginning to grain or tighten. Get the pan away from heat, add a spoonful of warm starchy water and toss hard. Once the Pecorino has pulled into one elastic mass, more heat usually makes things worse. If the pasta still tastes good, eat it; give the next batch a cooler pan and starchier water.

If you want to practise the same off-heat cheese finish in a more forgiving sauce, our broccoli pasta gets extra body from the soft broccoli.

Once you can tell a too-hot pan from a too-dry one, cacio e pepe stops feeling temperamental and starts feeling readable.

Back to recipe ↑ · Back to top ↑

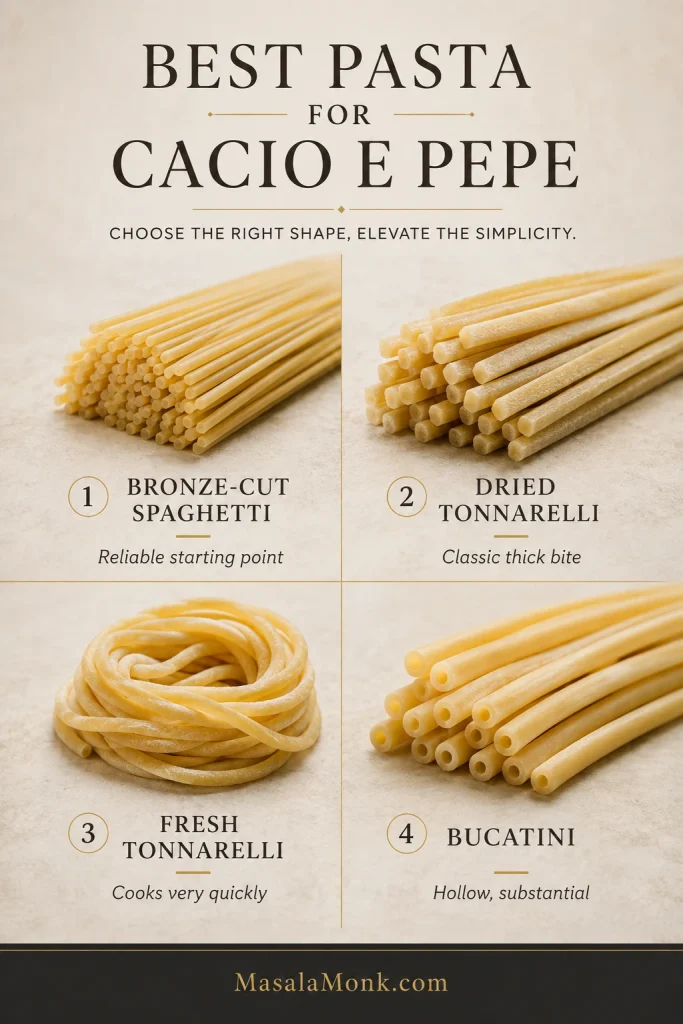
Best Pasta for Cacio e Pepe: Tonnarelli, Spaghetti or Bucatini?

There is no single pasta shape you need for a good bowl. Timing matters more, especially when you move between dried and fresh pasta.

Four-part pasta comparison showing bronze-cut spaghetti, thick dried tonnarelli, a nest of fresh tonnarelli and hollow bucatini, each labeled by pasta type.
Choose pasta partly by how much working time you want. Bronze-cut spaghetti gives you more working time, dried tonnarelli gives a thicker bite, fresh tonnarelli moves quickly, and bucatini brings extra heft.
Pasta Why use it Watch out for
Dried tonnarelli Strong Roman association; thick, chewy strands; works with the same general method as dried spaghetti Use its own package timing; do not assume it cooks at the same speed as spaghetti
Fresh tonnarelli Classic Roman shape with a tender, substantial bite Usually cooks much faster than dried spaghetti; stage everything first, reserve cloudy cooking water early and give it only a brief skillet finish
Bronze-cut spaghetti Best practical default; easy to find, toss and coat Choose a good-quality pasta that releases plenty of starch
Bucatini Thick, substantial and delicious with Pecorino Heavier hollow strands can be more awkward to toss quickly
For a first attempt, bronze-cut spaghetti gives the best balance of availability and easy handling.

Its longer cooking window gives you time to build concentrated pasta water and finish the strands in the skillet. Dried tonnarelli can follow the same general route.

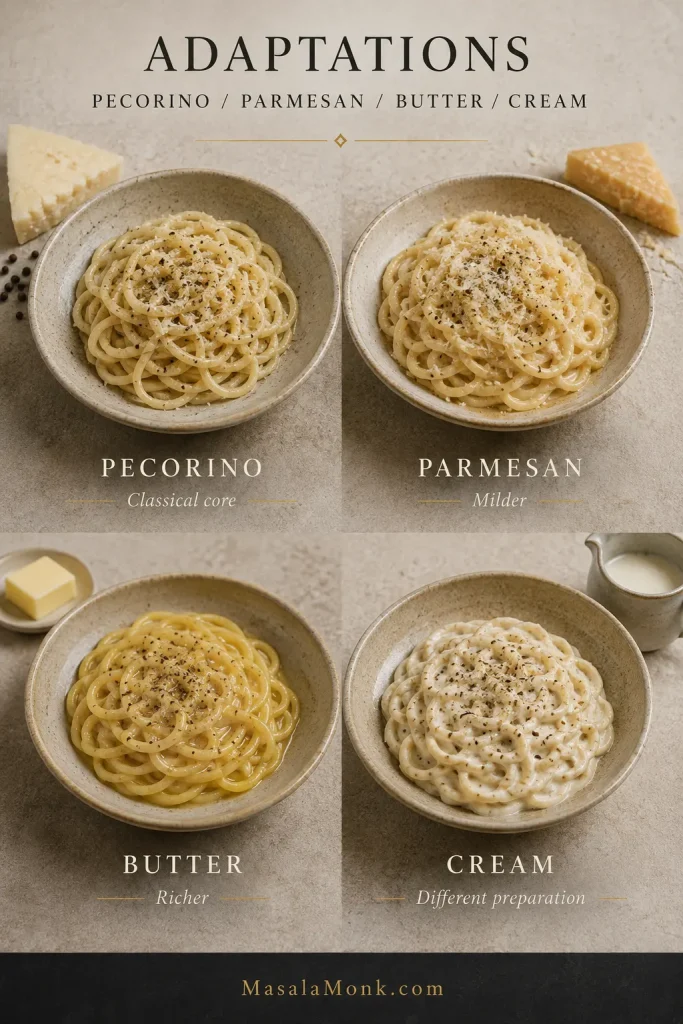
Parmesan, Butter, Cream and Other Cacio e Pepe Adaptations

Butter, Parmesan, cream and other additions can make excellent pasta, but they move the dish away from the Pecorino-and-water formula used here.

Four bowls of peppered pasta compared as Pecorino, Parmesan, butter and cream versions, with the butter version glossier and the cream version noticeably thicker and paler.
The visual differences become stronger as the recipe moves away from its classical core: Parmesan stays relatively close, butter adds extra gloss, and cream produces the most opaque, visibly heavier coating.
Addition Will it work? In this recipe? What changes
Parmigiano Reggiano / Parmesan Yes No Milder, nuttier and usually less sharply salty than Pecorino Romano
Butter Yes No Adds richness and helps the sauce come together more easily
Olive oil Yes No Adds richness and olive-oil flavor; changes the character of the sauce
Heavy cream Yes No Adds richness and stability, but turns it into a different preparation
Garlic Yes No Adds a strong aromatic flavor to an intentionally spare dish
Cornstarch or potato starch Yes No Can strongly stabilize the sauce, but changes the traditional ingredient approach

Roman Alfredo solves a related emulsion differently: Parmigiano, butter and pasta water create its glossy coating without cream.

What to Serve With Cacio e Pepe

Cacio e pepe is salty, rich, peppery and starchy. A good side brings contrast: something fresh, green, bitter or acidic. That contrast makes the next forkful of pasta taste sharper and more alive.

  • Lemony arugula or rocket salad
  • Broccoli rabe or other bitter greens
  • Roasted asparagus, broccoli or zucchini with lemon
  • Fennel, citrus or tomato salad with enough acidity to cut the Pecorino

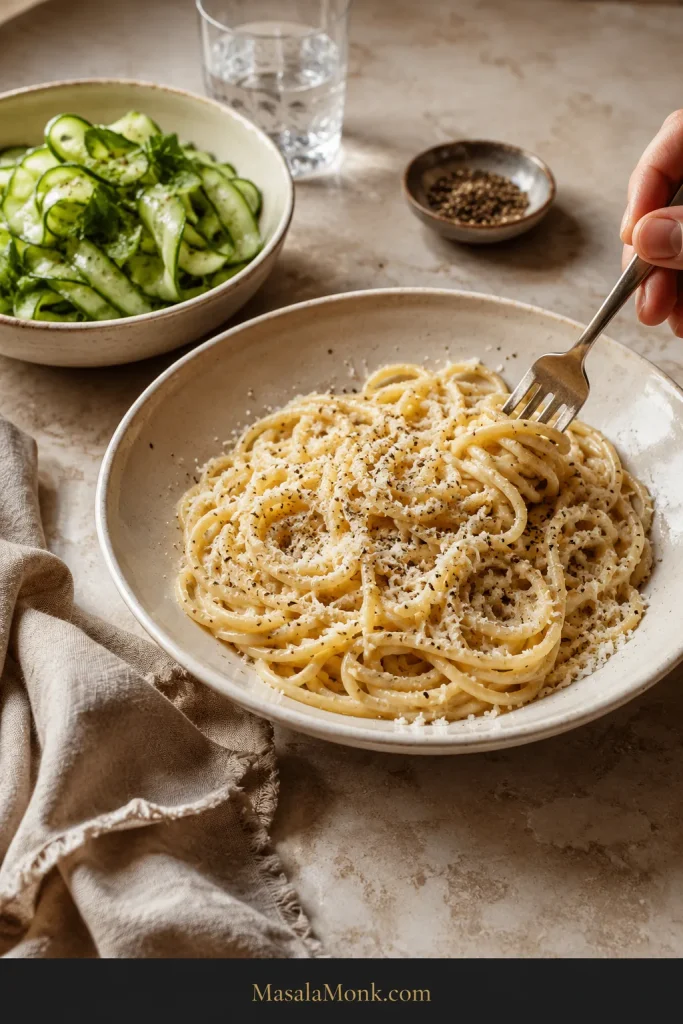
A cold cucumber salad with vinegar, dill and onion works especially well here: crisp, sharp and light beside the salty Pecorino.

Plate of cacio e pepe beside a bowl of fresh ribboned cucumber salad, with a hand holding a fork over the peppered pasta and a glass of water in the background.
Contrast does more for this pasta than another rich side. Crisp cucumber, bitter greens or a lightly acidic salad reset the palate, letting the Pecorino and black pepper feel vivid again on the next forkful.

Serve a smaller portion as a Roman-style first course before a simple meat, fish or vegetable main. If cacio e pepe is dinner on its own, keep the side crisp, green or acidic and let the pasta remain the reason you sat down.

Storage and Reheating

Cacio e pepe is at its best within minutes of leaving the skillet. Grate the Pecorino, crush the pepper and set out the pans ahead of time, but cook the pasta and form the sauce close to serving.

Refrigerate leftovers promptly in an airtight container and, for the best texture, eat them within about 2–3 days. Reheat only the portion you plan to eat in a skillet over low heat with a small splash of water. Toss constantly and add more water only if the coating still feels tight.

Reheated cacio e pepe can still be good, but the coating will never be quite as fluid as it was fresh, and high heat makes the Pecorino more likely to tighten or separate. Treat leftovers as a good second bowl, not a recreation of the first one.

Back to recipe ↑ · Back to top ↑

Is Cacio e Pepe Really a Roman Shepherd’s Dish?

Cacio e pepe is deeply associated with Rome and Lazio. A popular story links the dish to shepherds carrying durable pasta, Pecorino and pepper during seasonal grazing journeys. Italian food historian Massimo Montanari has argued that this neat origin story is misleading, placing pasta with grated cheese inside a much longer Italian culinary history and pepper inside an older history of prized spices.

The dish is unmistakably Roman; the tidy shepherd-invention story is better treated as culinary legend than settled fact. That uncertainty does not make cacio e pepe any less Roman—it simply makes its history less neat than the story often told about it.

Cacio e Pepe FAQs

What does cacio e pepe mean?

It literally means “cheese and pepper.” In the Roman dish, the cheese is Pecorino Romano and the pepper is black pepper.

How do you pronounce cacio e pepe?

A close English approximation is KAH-cho eh PEH-peh. It is closer than pronouncing “cacio” like “Casio.”

Is cacio e pepe vegetarian?

It contains no meat, but traditional Pecorino Romano PDO is made with animal rennet. The official Pecorino Romano PDO consortium specifies lamb’s rennet in paste form. If you avoid animal rennet, use a suitable vegetarian hard cheese and understand that it will not be traditional Pecorino Romano PDO.

Can I use pre-grated Pecorino?

Freshly grated Pecorino gives you much better control over particle size and weight. If pre-grated is your only option, choose refrigerated Pecorino that is finely grated; skip coarse shreds and shelf-stable shaker cheese.

Can I use fresh tonnarelli?

Yes, but do not follow the dried-spaghetti timing literally. Fresh tonnarelli usually cooks much faster than dried spaghetti, so have the Pecorino grated, the pepper crushed, the skillet ready and all your tools within reach before the pasta goes into the water.

Because it cooks quickly, reserve some water once it is noticeably cloudy enough to use; do not wait for the later timing you would with dried spaghetti. Toast the pepper immediately before adding pasta water to form the pepper base, then give the fresh pasta only a brief skillet finish. Move the pan off the heat, use the same cooling cue as the main recipe and make the sauce as usual.

Can I make cacio e pepe for one?

Yes. For the dried-spaghetti version, halve the recipe: 100 g / 3.5 oz pasta, 55 g / 1.9 oz Pecorino total (reserve about 5 g for finishing), and about 1½ g pepper, plus more to finish. Use a smaller wide pan and enough water for the pasta to cook freely; the visual cues matter more than forcing exactly half the original water into different cookware. Salt the water lightly using the same Pecorino-first approach as the main recipe.

Can I make cacio e pepe for a crowd?

Yes, but smaller batches are easier. A large mass of pasta holds heat longer and is harder to toss quickly, leaving less room to adjust the cheese step. For a dinner party, two smaller batches are usually easier than one enormous skillet.

Can I make the sauce separately?

You can pre-hydrate the Pecorino into a paste, as this recipe does, but do not make a finished cacio e pepe sauce hours ahead and expect it to wait like a cream sauce. The final texture depends on hot pasta, fresh starchy water and immediate tossing.

When the Bowl Is Ready

The sauce should follow every strand in a light, silky coating. Fresh pepper should reach you before the fork does, followed by the sharp Pecorino; the pasta should still move freely instead of sitting in a stiff mound.

Bring people to the table before the final toss; cacio e pepe gives you its best few minutes first. If you make it, tell me what changed the sauce for you—the water, the heat, the cheese, or simply knowing when to stop. That detail is often more helpful to the next cook than another timer.

Back to recipe ↑ · Back to top ↑

Posted on 10 Comments

Ravioli Recipe: 6 Fillings + 4 Sauces with Indian Twists

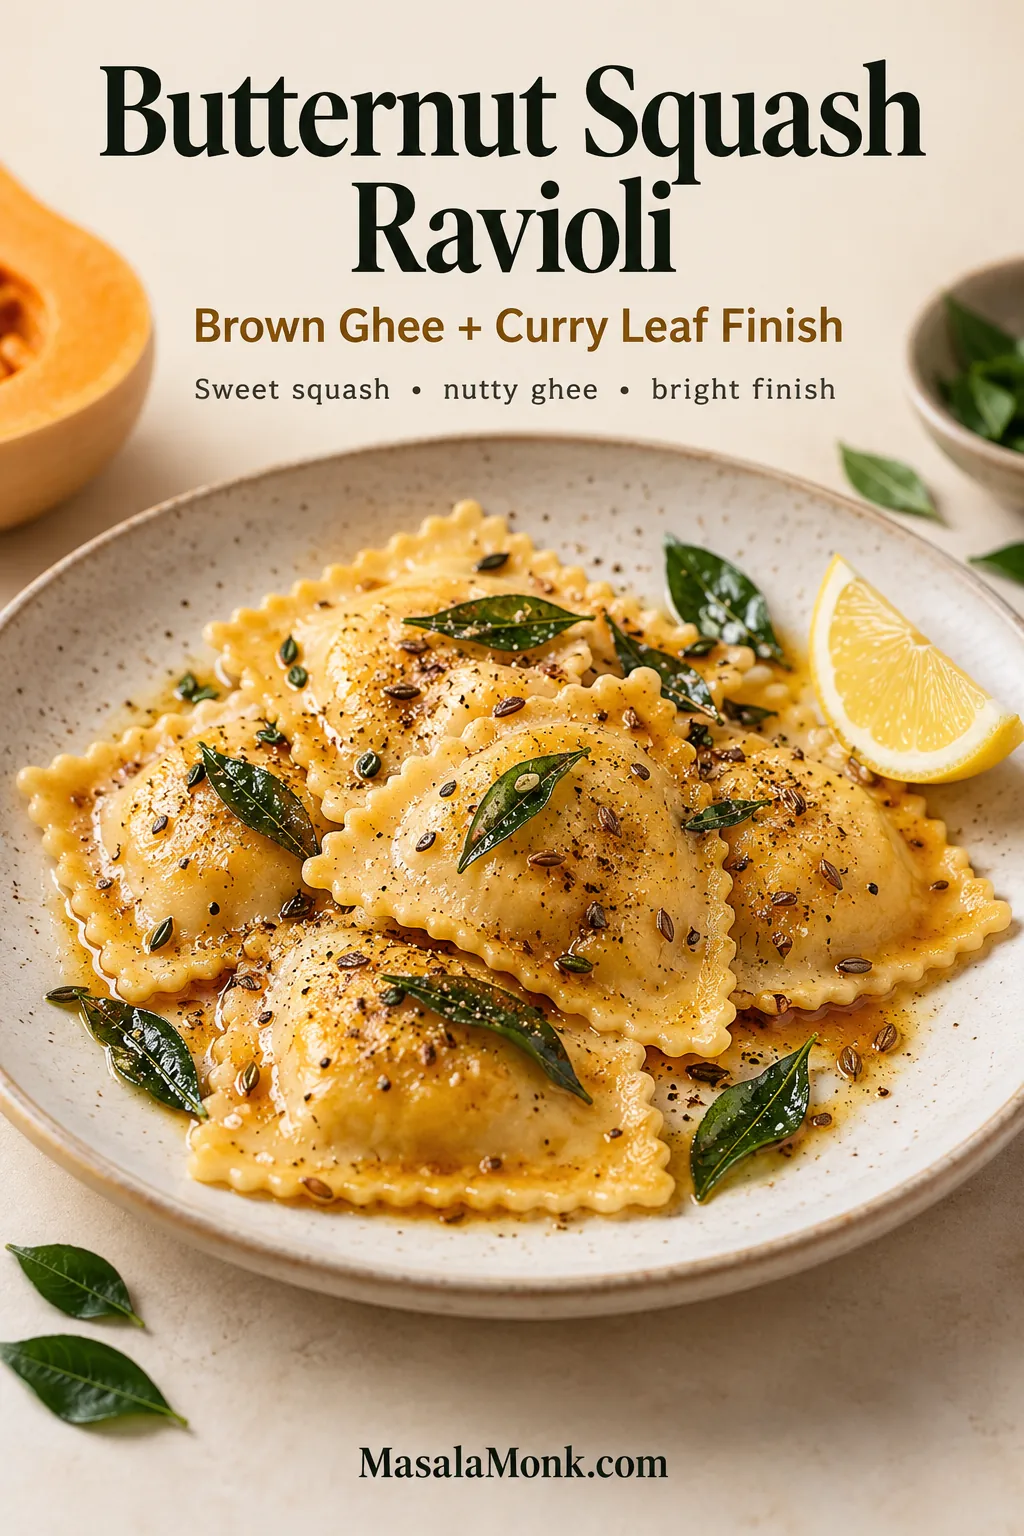
Butternut squash ravioli finished with nutty ghee, curry leaves, cumin, black pepper and lemon.

This post was last updated on

• Recipe research and editorial by MasalaMonk.com.

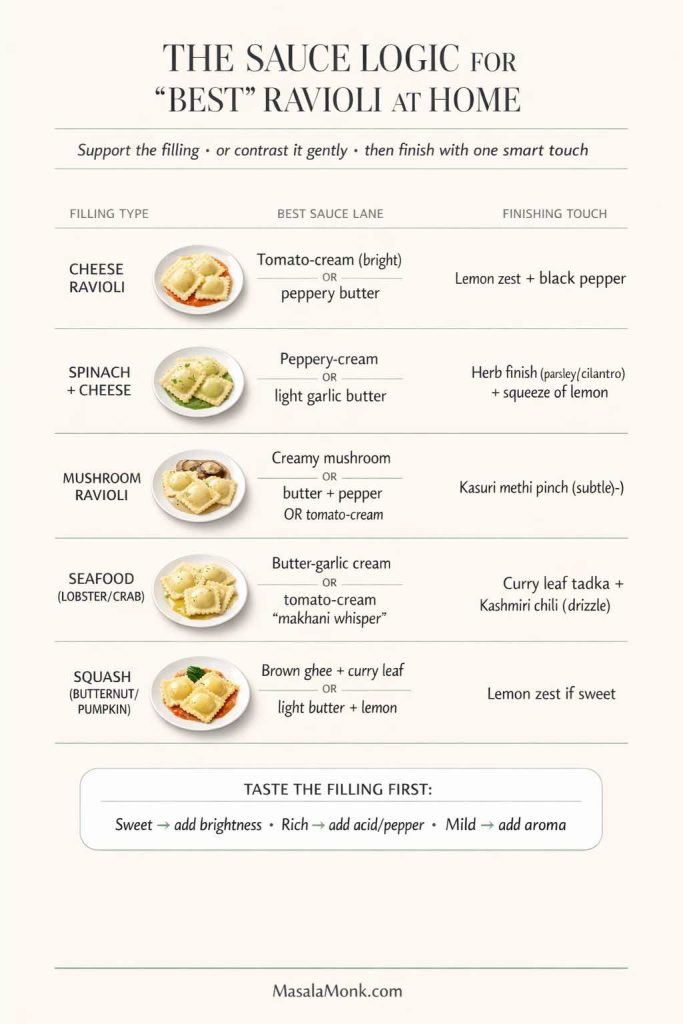
Ravioli can be a quiet bowl of buttered pasta on a Tuesday or the dish you bring out when dinner deserves a little ceremony. Either way, a good ravioli recipe lives or dies on surprisingly small details: cook the pasta gently, keep the filling inside it, and use a sauce that coats rather than floods. This guide covers those basics first, then takes ravioli in a distinctly MasalaMonk direction with ghee, curry leaves, kasuri methi, paneer, keema and chutneys.

Making everything from scratch? Start with the egg dough, sealing guide and six filling ideas. Using refrigerated or frozen ravioli? Skip straight to the cooking times and sauces.

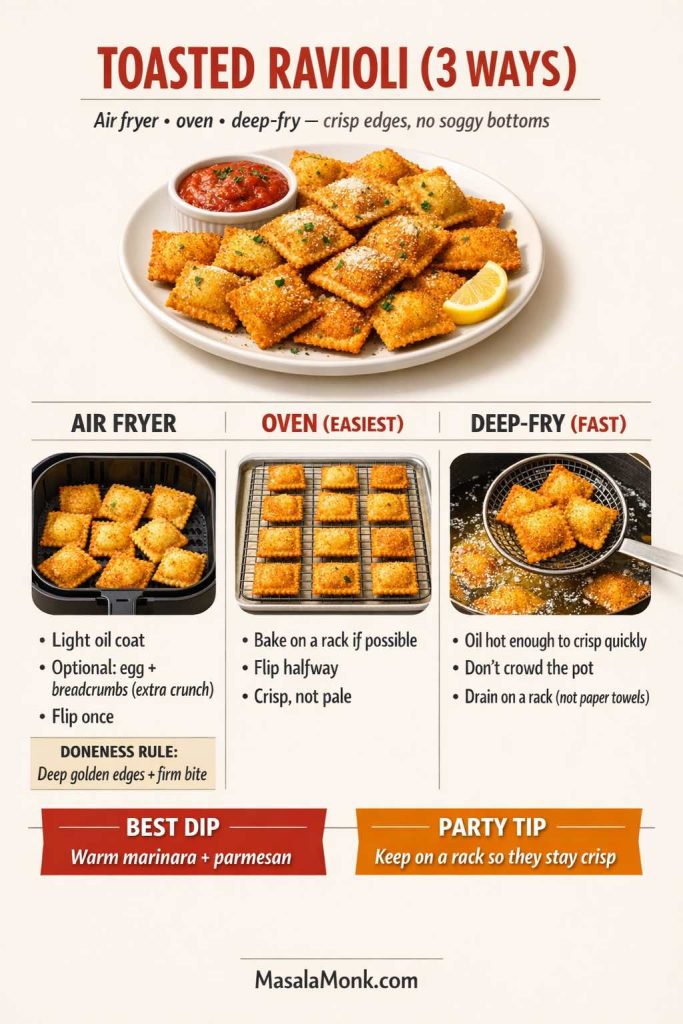
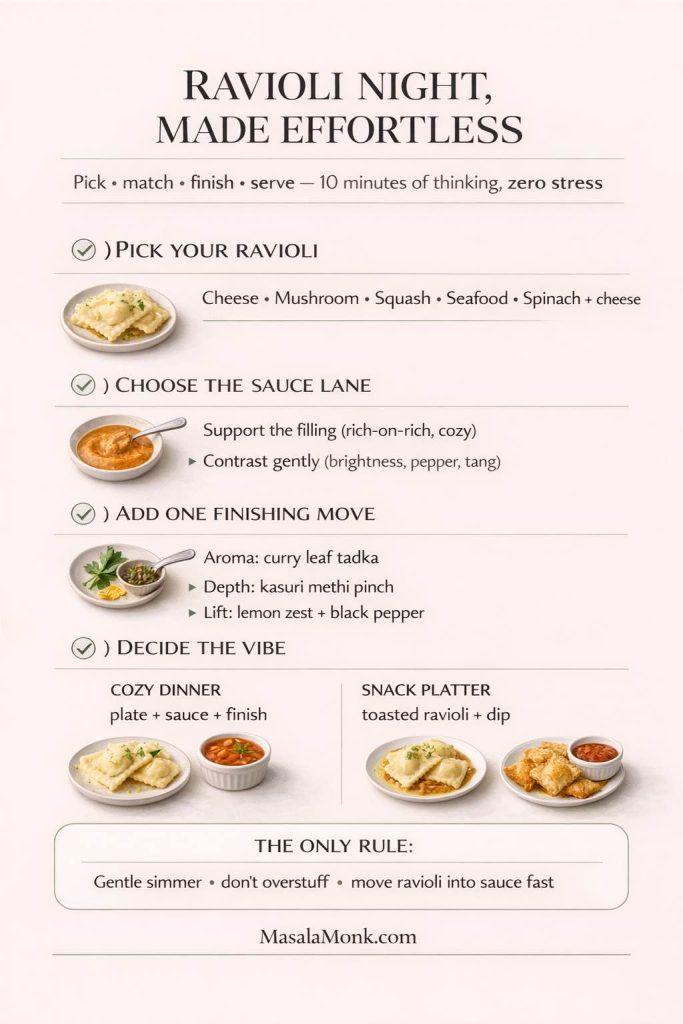
The five main twists move from butternut squash with brown ghee and curry leaves to mushroom malai, lobster with a curry-leaf tadka, makhani-style tomato cream and crisp toasted ravioli with Indian chutneys. None of them needs a long spice list. One or two well-chosen Indian flavors are enough when they make sense with the filling already inside.

The same approach runs through our Indian-inspired Alfredo pasta. For a brighter, herb-led pasta night, the pesto pasta guide is a useful companion—especially for the pasta-water and sauce-cling techniques that come up here too.

One thing is worth settling before the flour comes out: ravioli does not need to look factory-perfect. A slightly wonky edge is harmless. Trapped air, watery filling and a violent boil are the things that cause trouble. Get those under control and the rest becomes much more forgiving.


Ravioli Cooking Times: Fresh, Frozen & Refrigerated

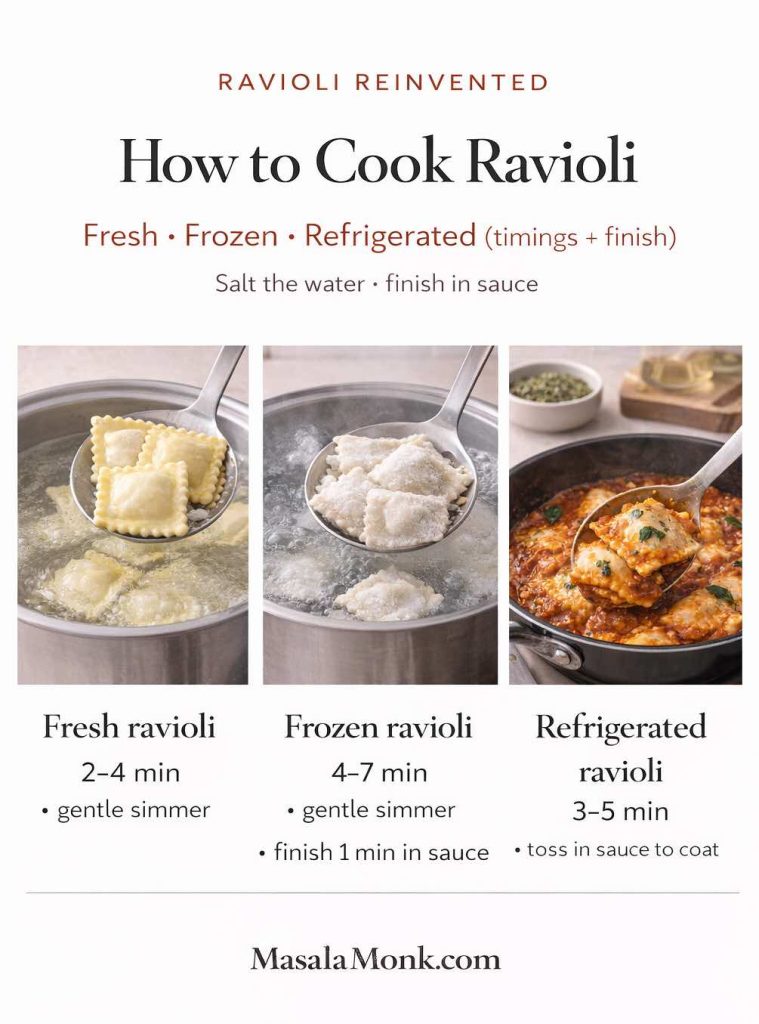
The package matters less than the water and the finish. Fresh ravioli needs the gentlest handling; frozen ravioli needs a little more time without a hard boil; refrigerated ravioli sits somewhere in between. In all three cases, have the sauce warm before the pasta is done. Filled pasta deteriorates quickly when it sits wet in a colander.

Infographic comparing ravioli cook times: fresh 2–4 minutes, refrigerated 3–5 minutes, and frozen 4–7 minutes.
Use the clock as a starting point, not the finish line. Keep the water at a controlled simmer and check the wrapper and filling before lifting the ravioli into sauce.

Treat the timings below as check windows, not a stopwatch. Ravioli size, wrapper thickness and filling all change the final minute, so use the clock to know when to start checking and texture to decide when to stop.

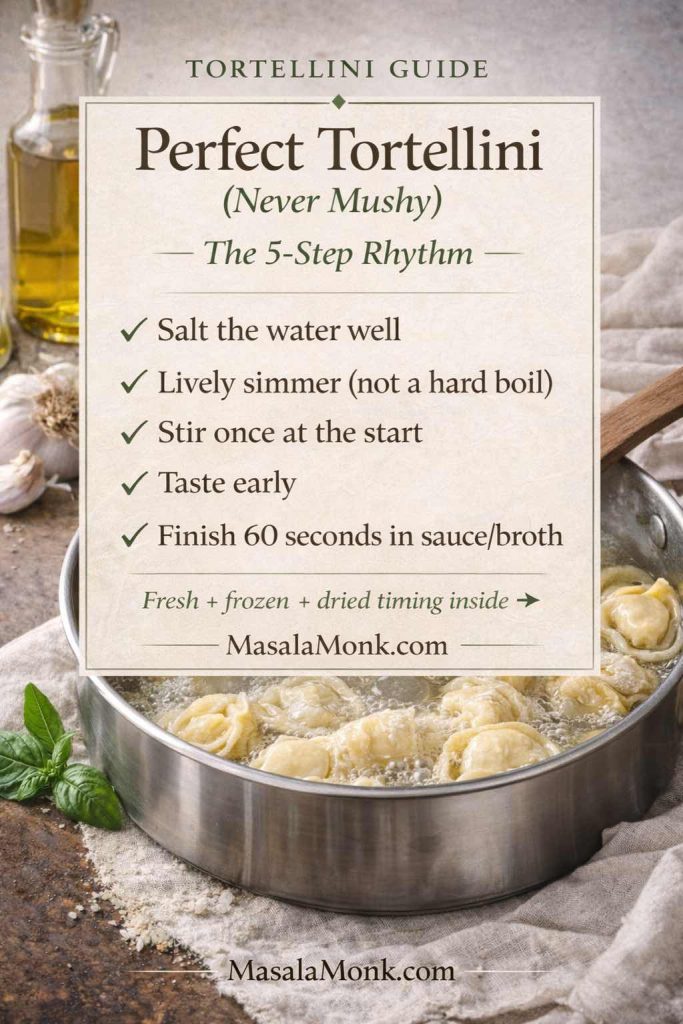
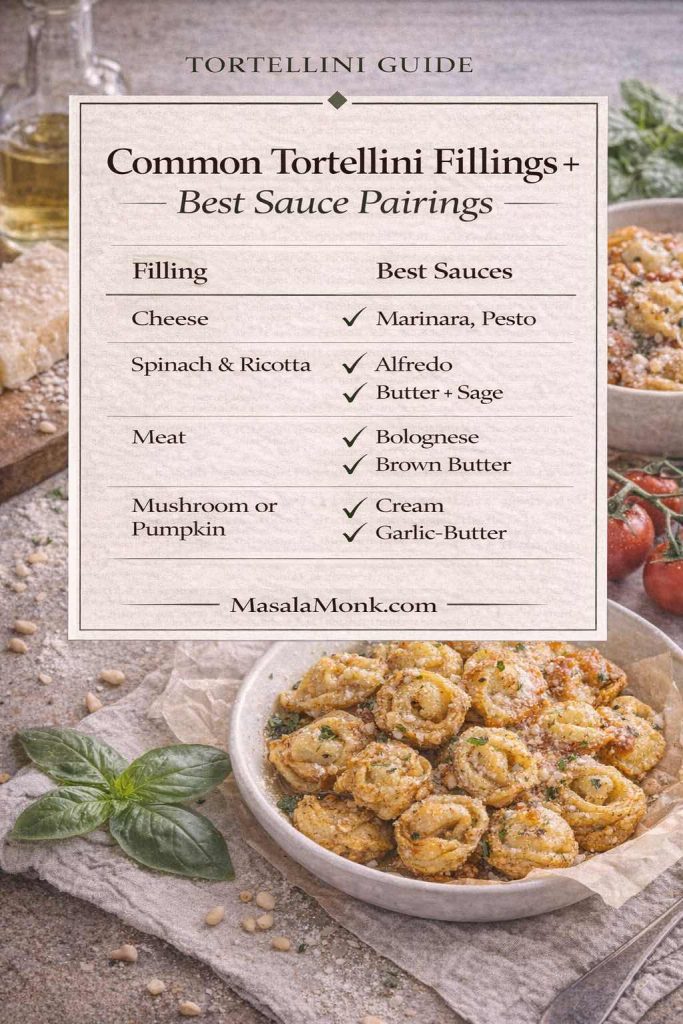
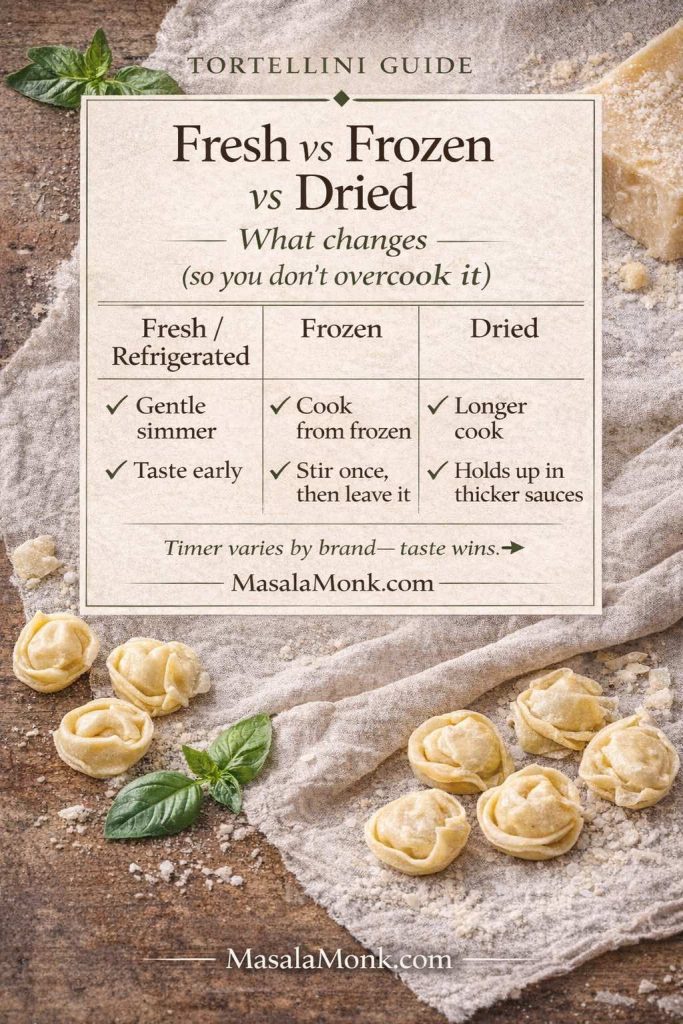
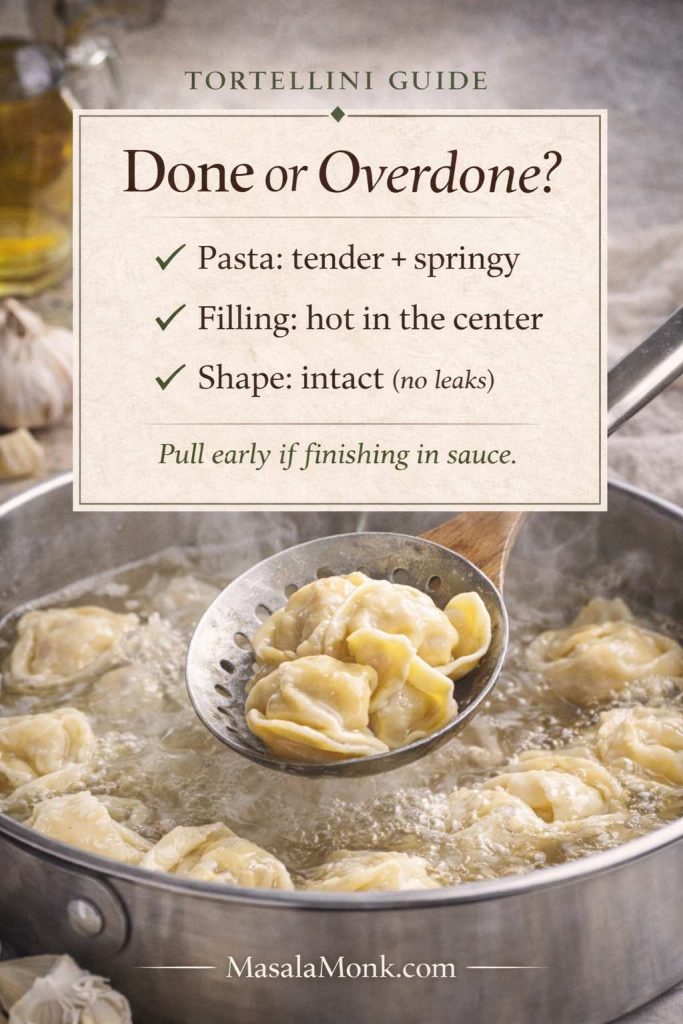
For a second visual reference on rolling, filling and shaping handmade pasta, King Arthur’s ravioli guide is a useful companion. If you cook stuffed pasta often, our tortellini cooking guide covers the same fresh-versus-frozen timing problem in a different shape.

How to Cook Fresh Ravioli Without Bursting

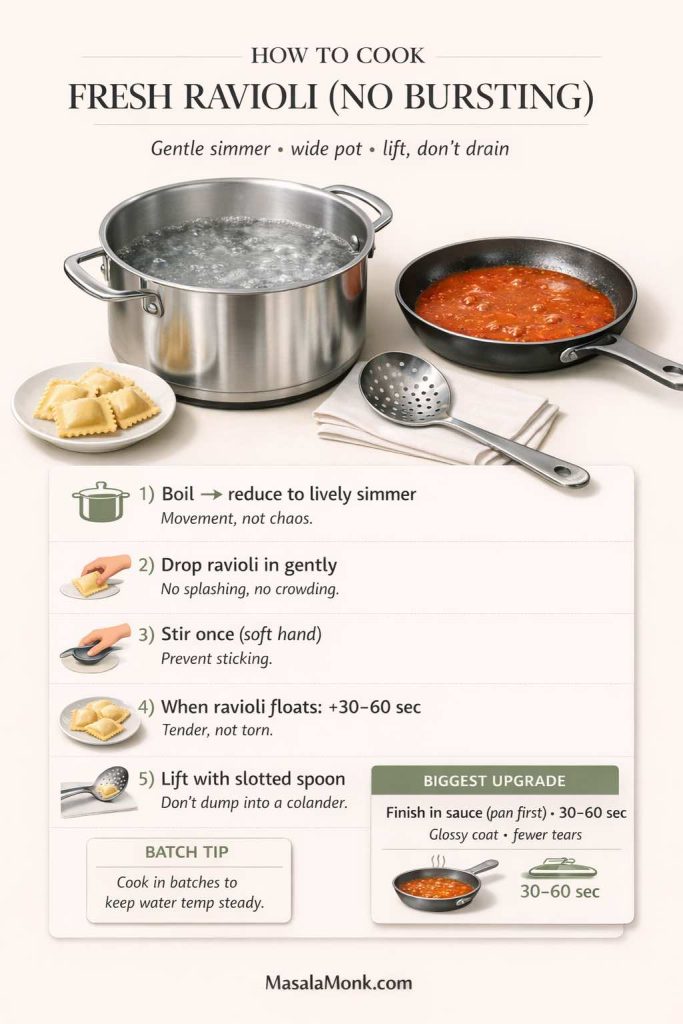
Fresh ravioli is delicate enough that a wide pot helps. Salt the water, bring it to a boil, then ease it back to a lively simmer before the pasta goes in. You want small, steady bubbles moving the ravioli around—not a rolling boil that throws one piece into another.

Five-step fresh ravioli guide from gentle simmer to slotted-spoon transfer and finishing in sauce.
A wide pot gives delicate seams room to move. Stir once, check 30–60 seconds after floating, then lift each piece with a slotted spoon.

Use this simple rhythm:

  • Bring water to a boil, then reduce to a lively simmer.
  • Drop ravioli in gently.
  • Stir once with a soft hand to prevent sticking.
  • When ravioli floats, give it another 30–60 seconds.
  • Lift out with a slotted spoon, not a colander.

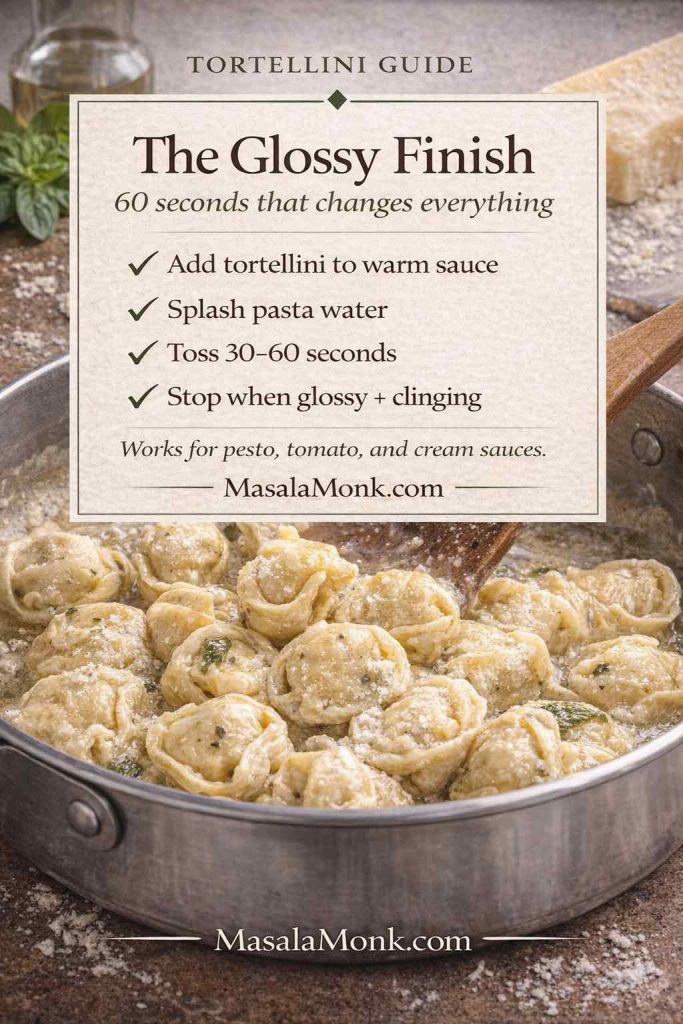
Warm the sauce in a wide skillet before the ravioli is ready. Lift the pasta straight into that pan, add a spoonful of cooking water if the sauce needs loosening, and spoon the sauce over gently. Aggressive tossing is what stresses delicate seams; thirty to sixty seconds is usually enough to coat the surface.

Very delicate handmade ravioli is easier to manage in batches. The water temperature recovers faster, the pieces have room to move, and you can lift them out without fishing through a crowded pot.

How to Cook Frozen Ravioli So It Stays Tender

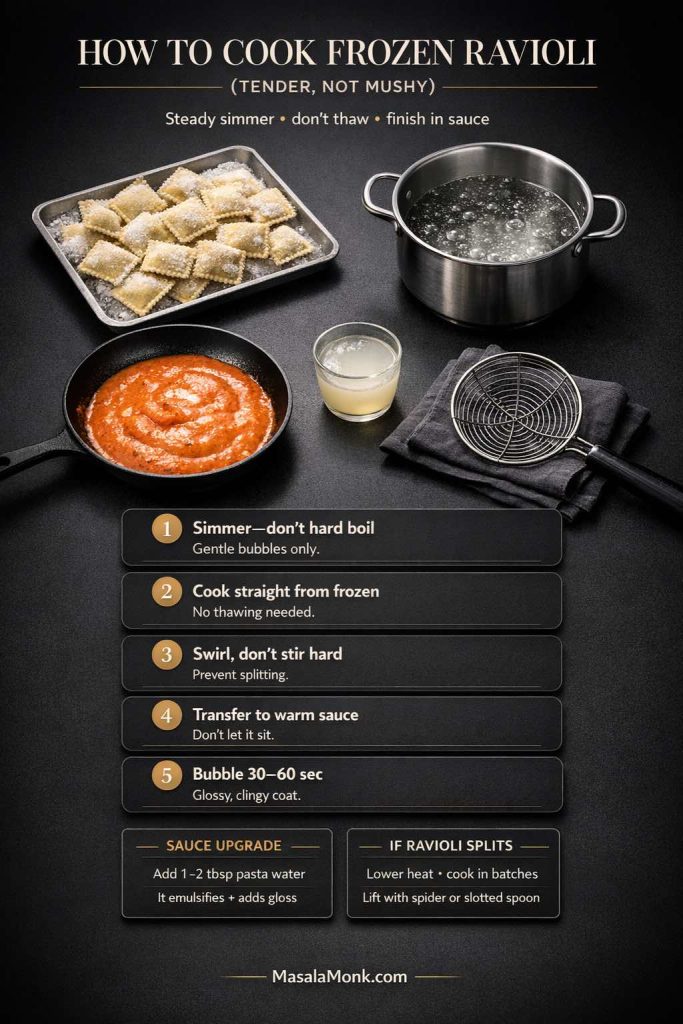
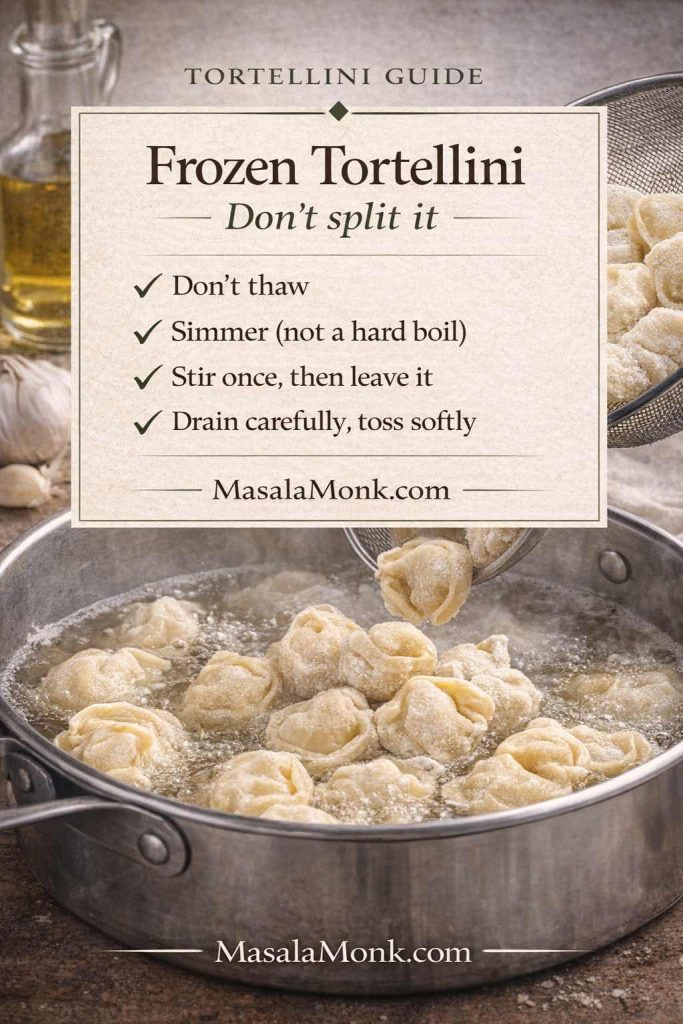
Cook frozen ravioli straight from the freezer. Thawing softens the wrapper before the filling is hot and makes sticking more likely. Once the pieces go into the pot, keep the water at a steady simmer and stir only enough to stop them settling on the bottom.

Frozen ravioli cooked from frozen, then moved from a gentle simmer into warm sauce with pasta water.
Frozen ravioli does better with steady heat than a hard boil. A spoonful of starchy water in the sauce helps it coat the pasta instead of collecting underneath.

Lift frozen ravioli directly into warm sauce and let it bubble there for 30–60 seconds. A tablespoon or two of starchy cooking water helps butter, tomato or cream sauce cling to the wet wrapper instead of pooling underneath. That brief pan finish does more for the bowl than an elaborate garnish.

If frozen ravioli splits, lower the heat first. A gentle swirl is often enough to prevent sticking, and a spider or slotted spoon is kinder than pouring the whole pot through a colander.

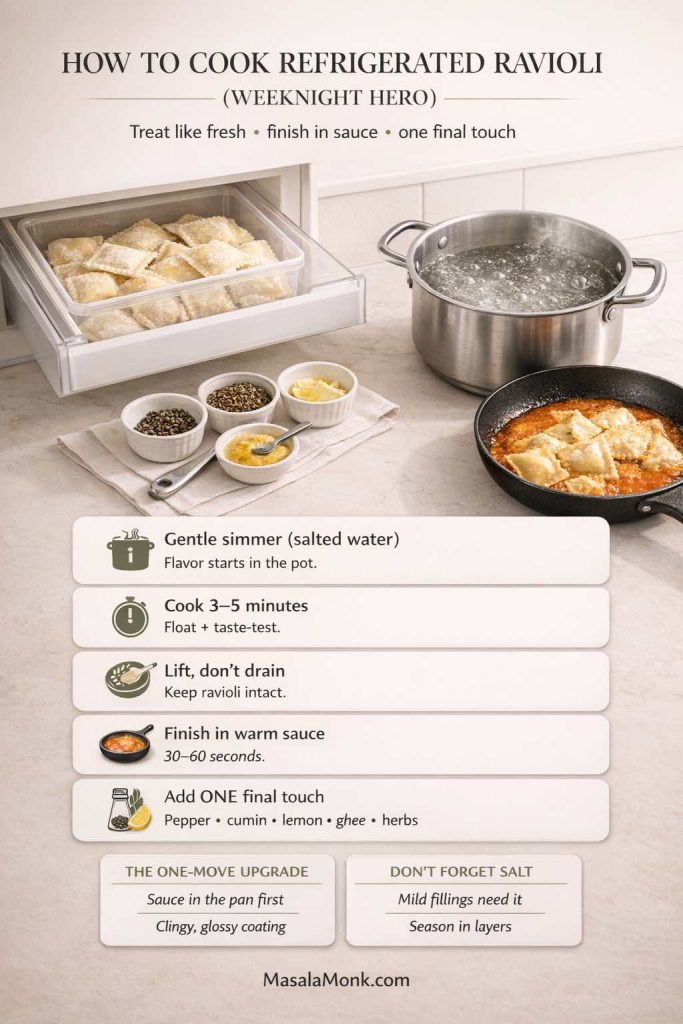
How to Cook Refrigerated Ravioli

Refrigerated ravioli is quick but usually sturdier than handmade pasta. Treat it much like fresh ravioli: salted water, a controlled simmer and an early check for doneness.

Refrigerated ravioli guide with a 3–5 minute simmer, slotted-spoon transfer, and simple finishing accents.
Three to five minutes is a useful check window for refrigerated ravioli. Finish it in warm sauce, then choose one accent—pepper, lemon, herbs or spiced ghee.

Once it reaches the sauce, choose one finishing note: black pepper for bite, lemon for acidity, toasted cumin for warmth, spiced ghee for aroma, or fresh herbs for lift. The filling is already seasoned; several accents at once usually blur it.

That small finish is often all a refrigerated packet needs to feel like a composed dinner.

Do not leave all the seasoning to the sauce. A mild cheese or spinach filling benefits from properly salted cooking water; otherwise the wrapper can taste flat even when the sauce is well balanced.

↑ Back to Ravioli Recipe Contents


Ravioli Dough, Sealing & Shortcut Wrappers

Homemade dough is worth doing when the making is part of the evening. On a busy night, wonton wrappers are a completely different—but useful—route. Whichever path you take, the same rules decide whether the ravioli survives: a dry-enough filling, clean edges, trapped air pressed out and a firm seal.

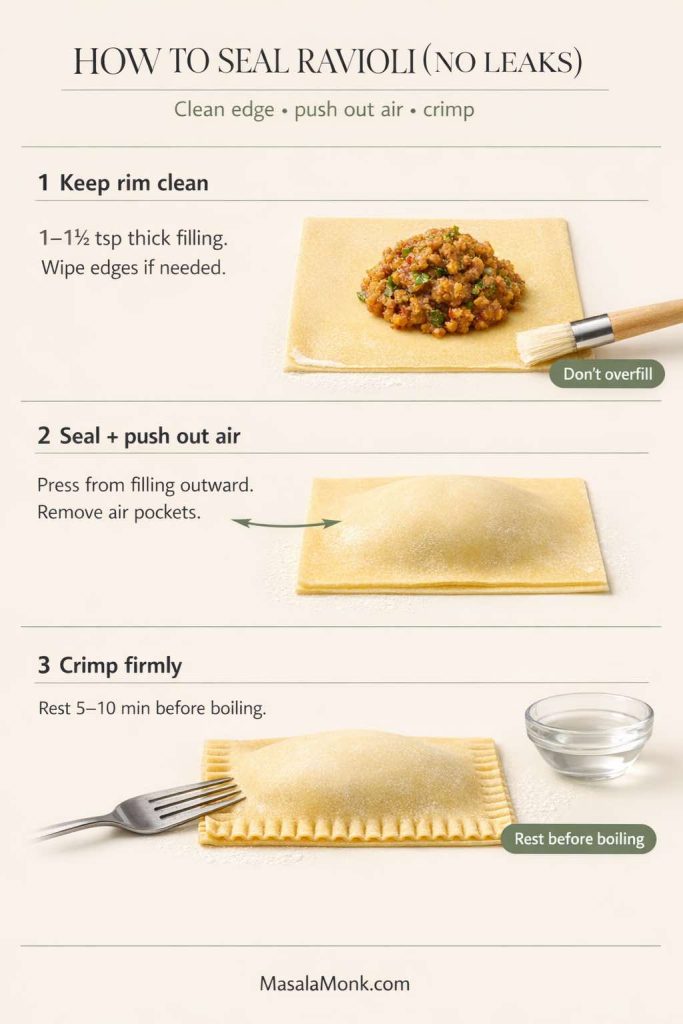
How to Seal Ravioli Without Leaks

Most leaks begin before the ravioli reaches the pot. Keep the border free of filling, press outward from the center to remove trapped air, and use a modest amount of filling so the dough is not stretched tight. A short 5–10 minute rest after shaping helps the seam settle before cooking.

Ravioli sealing infographic: clean borders, 1–1½ teaspoons filling, air pressed out, crimped edges, and a 5–10 minute rest.
Most leaks start before the pot. Keep filling off the rim, press air outward, crimp firmly and give the shaped pasta a short rest.

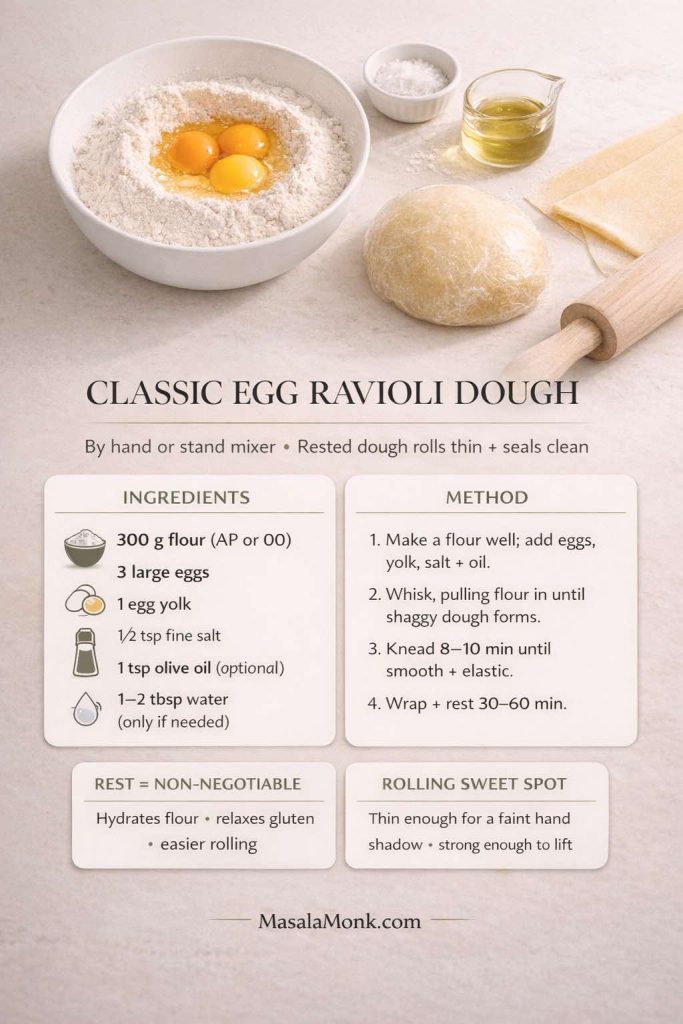
Classic Egg Ravioli Dough

By hand or in a mixer, the dough needs to become smooth enough to stretch without tearing and relaxed enough to roll thin. The 30–60 minute rest does more for easy rolling than adding extra water to a tight dough.

Ingredients

  • 300 g flour (all-purpose works; 00 flour is lovely if you have it)
  • 3 large eggs
  • 1 egg yolk (for elasticity and richer color)
  • 1/2 tsp fine salt
  • 1 tsp olive oil (optional, helps handling)
  • 1–2 tbsp water only if needed
Egg ravioli dough card with flour, eggs, yolk, salt, optional olive oil, kneading and resting.
The dough should feel smooth and elastic after kneading. Rest it for 30–60 minutes before rolling; a faint shadow of your hand through the sheet is a useful thickness cue.

Method

  1. Make a mound of flour, create a well, add eggs, yolk, salt, and oil.
  2. Whisk inside the well, slowly pulling flour inward until a shaggy dough forms.
  3. Knead 8–10 minutes until smooth and elastic.
  4. Wrap and rest 30–60 minutes.

During the rest, the flour finishes hydrating and the gluten relaxes. The dough should roll with much less spring-back afterward. Keep the sheets thin and the filling modest; thick pasta and overfilled centers are two common reasons homemade ravioli feels heavy.

The dough itself is covered in full here; use the sealing guide above when you start shaping so the filling stays away from the border.

A useful visual test: hold the sheet over your hand. You should be able to see a faint shadow through it, but the sheet should still lift without stretching under its own weight. If it feels leathery, keep rolling; if it looks translucent and fragile around the edges, stop.

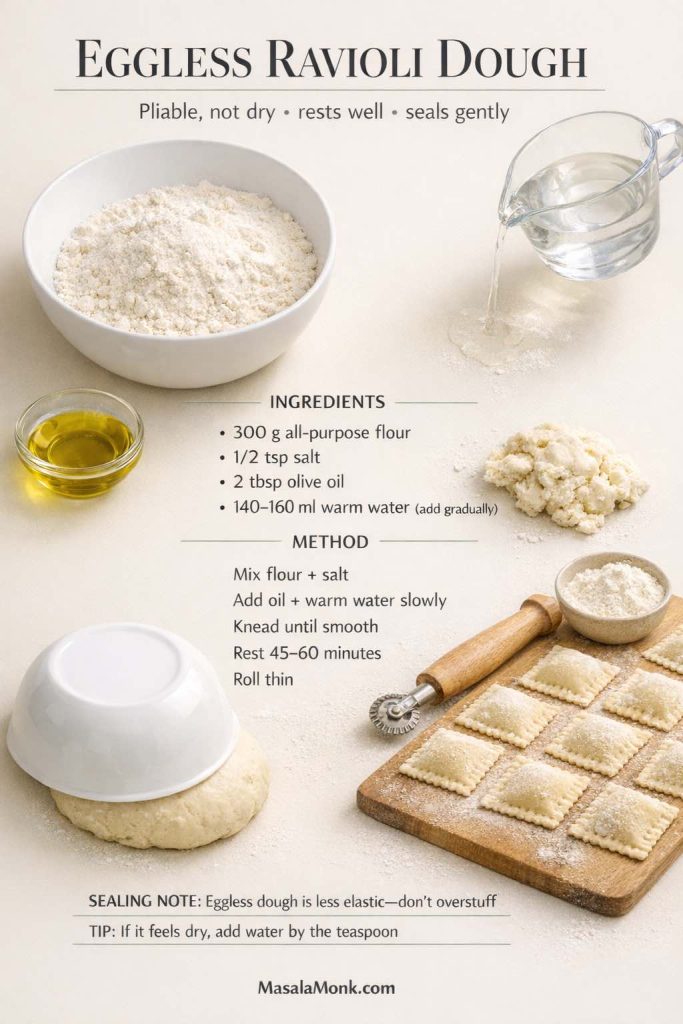
Eggless Ravioli Dough

Eggless dough has less built-in elasticity, so hydration matters more. Add the warm water gradually and stop when the dough is smooth and pliable rather than sticky.

Eggless ravioli dough card with flour, salt, olive oil, warm water, kneading and a 45–60 minute rest.
Add the water a little at a time and stop as soon as the dough turns pliable. Rest it well, then avoid stretching the wrapper around too much filling.

Ingredients

  • 300 g all-purpose flour
  • 1/2 tsp salt
  • 2 tbsp olive oil
  • ~140–160 ml warm water (add gradually)

Knead until smooth, rest 45–60 minutes, and roll thin. Eggless dough can be slightly less elastic, so seal carefully and avoid overstuffing.

Wonton-Wrapper Ravioli for a Faster Night

Wonton wrappers do not taste exactly like fresh pasta, but they solve the hardest part of homemade ravioli: getting thin, even sheets. They work best with a thick filling and a gentle simmer.

Wonton-wrapper ravioli guide covering filling, wetting the edge, removing air, crimping, simmering and saucing.
Wonton wrappers save the rolling step, but they soften faster than egg pasta. Keep the filling thick, seal carefully and serve soon after cooking.

For the cleanest seals:

  • Keep filling thick, not wet.
  • Seal with a thin smear of water, press out air, and crimp firmly.
  • Simmer gently—don’t boil hard.
  • Finish in sauce quickly; don’t let wrappers sit too long in water.

Expect a softer, slightly more delicate wrapper than classic pasta dough. That difference matters less once the ravioli is filled well and moved straight from the pot into sauce.

A thin brush of egg wash gives the seam a little more insurance, particularly with wetter fillings. Keep the water gentle and serve soon after cooking; wonton wrappers soften faster than egg-pasta sheets.

↑ Back to Ravioli Recipe Contents


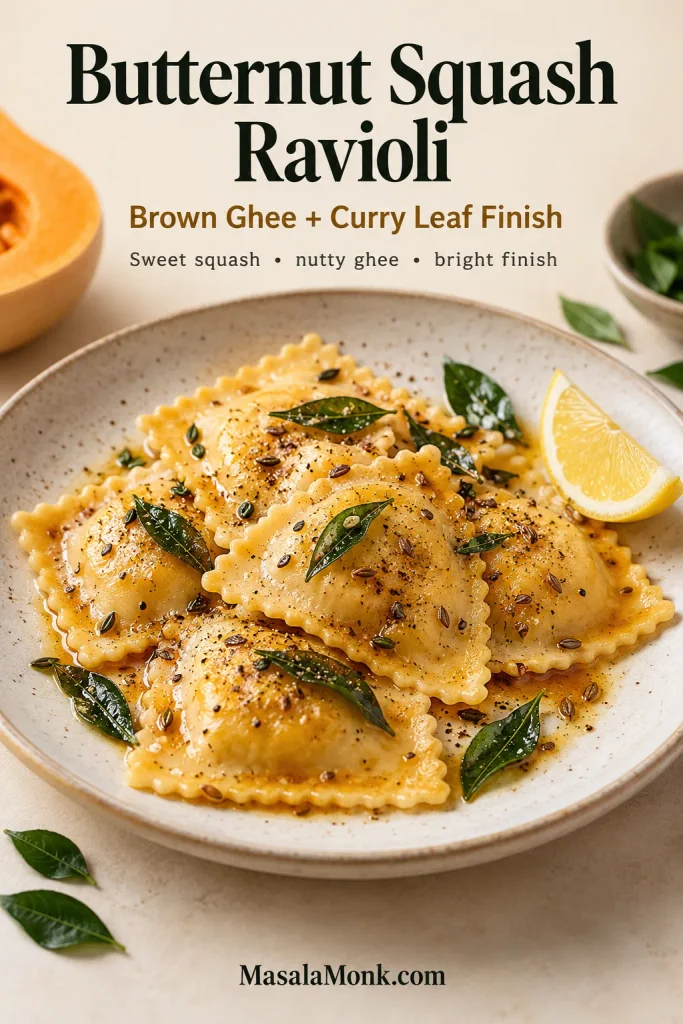
Twist 1: Butternut Squash Ravioli with Brown Ghee & Curry Leaves

Butternut squash is naturally sweet, so it needs nuttiness, aroma and a little acidity around it. Brown butter and sage do that beautifully. Here, ghee brings its own toasted, nutty character while curry leaves add a sharper, citrusy-herbal edge.

Butternut squash ravioli finished with nutty ghee, curry leaves, cumin, black pepper and lemon.
Sweet squash gets its contrast from fragrant ghee, crisp curry leaves, cumin and black pepper. Add lemon at the end only when the filling needs a brighter edge.

The result should still read as squash ravioli first. Here, “brown ghee” means ghee warmed until fragrant and slightly deeper in color—not butter browned with its milk solids, because finished ghee has already had most of those removed. Let the curry leaves splutter in the hot fat, add cumin and black pepper, and reach for lemon only if the filling needs a brighter edge.

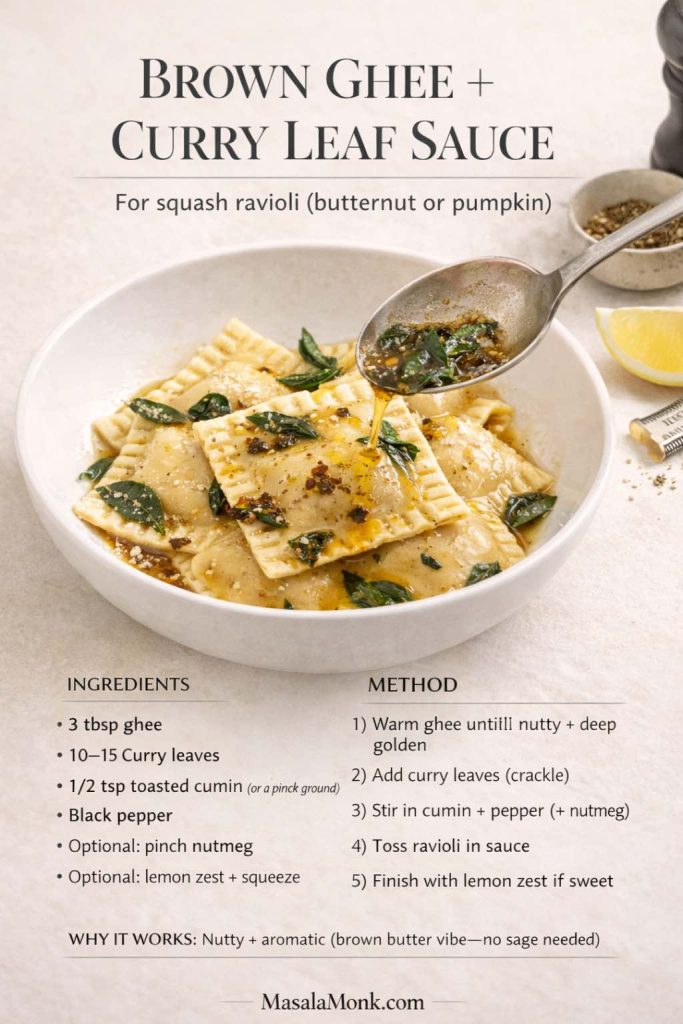
Brown Ghee & Curry Leaf Sauce for Squash Ravioli

Use this finish with homemade or store-bought squash ravioli, and with pumpkin ravioli too. It is especially useful when the filling tastes sweeter than expected.

Brown ghee and curry leaf sauce card for squash ravioli with cumin, black pepper and optional lemon.
Warm the ghee until fragrant, let the curry leaves crackle, then add cumin and pepper. Toss the ravioli gently and adjust with lemon only if the squash reads too sweet.

Ingredients

  • 3 tbsp ghee
  • 10–15 curry leaves (fresh is best; dried works in a pinch)
  • 1/2 tsp toasted cumin seeds or a pinch of ground cumin
  • Black pepper
  • Optional: pinch of nutmeg
  • Optional: lemon zest + a squeeze of lemon

Method

  1. Warm ghee in a small pan until fragrant and slightly deeper in color; do not try to brown it like whole butter.
  2. Add curry leaves. They’ll crackle and perfume the ghee.
  3. Stir in cumin and black pepper.
  4. Add nutmeg for a warmer, slightly sweet background note.
  5. Toss cooked ravioli in the sauce and finish with lemon zest if the ravioli is very sweet.

Ghee already brings toasted, nutty flavor; blooming curry leaves and cumin in it adds aroma without turning the finish into a gravy. That is enough contrast for sweet squash, with lemon as an optional final correction.

Pumpkin Ravioli Variation

Pumpkin ravioli can take a small pinch of Kashmiri chili in the ghee. Use it for color and gentle warmth, not enough to turn the sauce hot.

A few roasted pistachios are optional but useful: the crunch gives very soft pumpkin ravioli some texture, and their nuttiness echoes the nutty ghee.

Butternut Squash & Cumin-Paneer Ravioli Filling

For homemade squash ravioli, the filling needs to sit in a mound rather than spread. Roasting concentrates the squash; a short cook after mashing removes more moisture; paneer adds body without making the center runny.

Yield: enough filling for roughly 24–30 standard ravioli.

Butternut squash ravioli filling guide showing thick mashed squash, an open ravioli wrapper, finished ravioli and filling quantities.
A spoonful should stay where you put it. Roast the squash well, cook off excess moisture and use about 1–1½ teaspoons for each standard ravioli.

Ingredients

  • 2 cups roasted butternut squash (roast cubes until caramelized, then mash)
  • 1/2 cup paneer, finely crumbled (optional but excellent)
  • 1 tbsp ghee
  • 1/2 tsp cumin seeds
  • 1/2 tsp ground coriander
  • 1/4 tsp black pepper
  • 1/4 tsp nutmeg (optional, but gorgeous with squash)
  • 1/2 tsp salt (adjust)
  • 1 tbsp finely chopped toasted nuts (optional)
  • 1–2 tsp lemon juice (optional, for brightness)

Method

  1. Roast squash until edges caramelize, then mash until smooth.
  2. Heat ghee, add cumin seeds, let them sizzle briefly.
  3. Stir in mashed squash and spices, cook 2–3 minutes to evaporate excess moisture.
  4. Fold in paneer off heat so it stays creamy.
  5. Let cool completely before filling ravioli.

Vegan swap: replace the paneer with a small amount of thick cashew cream, coconut cream or mashed white beans. Add only enough to bind; a loose filling is much harder to seal.

Assembly: use about 1 to 1½ teaspoons for a standard ravioli. It should look slightly underfilled before sealing. Press out the air and use the no-leak sealing method above.

For a tangier variation, replace part of the paneer with goat cheese. Keep the amount modest so the filling remains squash-forward and the curry-leaf ghee still has room to come through.

Twist 2: Mushroom Ravioli with a Peppery Malai-Style Sauce

Mushroom ravioli already carries plenty of earthiness, so the sauce does not need a large spice list. Brown more mushrooms, use black pepper generously and let a small pinch of kasuri methi sit in the background.

Mushroom ravioli in creamy malai-style sauce with browned mushrooms, black pepper and kasuri methi.
This one should taste mushroom-first. Brown the mushrooms well, keep the cream loose, and add kasuri methi near the end so it stays in the background.

This is closer to a peppery mushroom cream than a curry. Cream rounds the browned mushrooms, cumin adds warmth, and crushed kasuri methi gives the finish a dry, savory aroma that works unexpectedly well with ricotta or cheese-filled pasta.

Creamy Mushroom Malai Sauce

The sauce suits mushroom ravioli best, but it is also good with cheese or spinach-filled ravioli. Once the mushrooms are sliced, the sauce itself usually comes together in about 15 minutes; wetter mushrooms may need a little longer to give up their water and brown. For a more classic version without the Indian finish, see our creamy mushroom sauce guide.

Ingredients

  • 2 tbsp butter or ghee
  • 250–300 g mushrooms, sliced
  • 2 cloves garlic, minced
  • 1/2 tsp black pepper (more if you love peppery sauces)
  • Pinch of cumin (or a few cumin seeds toasted first)
  • 1/2 cup cream (or cashew cream for a plant-based ravioli dinner)
  • 1/4 tsp kasuri methi, crushed between your palms
  • Salt
  • A splash of pasta water
Mushroom ravioli sauce card with browned mushrooms, garlic, cream, pasta water, pepper and kasuri methi.
Watch the spoon: once the sauce coats it lightly, stop reducing. Pasta water can loosen the cream without muting the mushroom flavor.

Method

  1. Sauté mushrooms in butter/ghee until they release water and start browning.
  2. Add garlic and pepper; cook until fragrant.
  3. Add a splash of pasta water to create a glossy base.
  4. Stir in cream; simmer until thick enough to coat a spoon.
  5. Finish with kasuri methi and adjust salt.

Crush the kasuri methi between your palms before adding it at the end. Heat softens its aroma quickly, so a late addition gives you the most character without making the sauce taste medicinal or dusty.

For a Darker, More Savory Mushroom Finish

For a darker, more savory finish, push the mushrooms further. Let them brown until their edges are dark, use a little more black pepper, and finish with butter or ghee and Parmesan.

Three small changes are enough:

  • Brown mushrooms harder for deeper savoriness.
  • Use more black pepper than you normally would.
  • Finish with a small gloss of butter/ghee and a sprinkle of Parmesan.

The sauce ends up darker, nuttier and more savory without one perfume dominating the bowl.

Because the sauce is rich, a bitter green salad or simply dressed vegetables make a better counterpoint than another creamy side. Keep the plate fairly spare and let the mushrooms do the work.

Mushroom Masala & Ricotta Ravioli Filling

Mushrooms can look ready while they are still steaming out water. Keep cooking until the pan stops looking wet and the chopped mushrooms begin to brown; only then cool them completely before folding in the ricotta.

Mushroom masala and ricotta filling card with dry-cooked mushrooms and a thick, scoopable finished texture.
The pan should look nearly dry before the ricotta goes in. Cool the mushrooms completely, then fold in the cheese until a spoonful holds its shape.

Ingredients

  • 350–400 g mushrooms, finely chopped (a mix is best, but even one type works)
  • 1 tbsp ghee or butter
  • 1 small onion, finely chopped
  • 2 cloves garlic, minced
  • 1/2 tsp cumin seeds
  • 1/2 tsp ground coriander
  • 1/2 tsp black pepper
  • 1/4 tsp chili flakes (optional)
  • 1/2 tsp salt (adjust)
  • 1/2 cup ricotta (or thick hung curd; ricotta is classic)
  • 2 tbsp grated Parmesan (optional, but helps structure)
  • 1 tbsp chopped herbs (parsley or cilantro—either works)
  • 1 tsp lemon zest (optional)

Method

  1. Heat ghee, toast cumin seeds briefly.
  2. Add onion, cook until translucent, then add garlic.
  3. Add mushrooms and cook until moisture evaporates and the mixture browns.
  4. Stir in spices and salt, cook another minute.
  5. Cool completely.
  6. Fold in ricotta and Parmesan; mix until thick and scoopable.

Vegan option: use thick cashew cream, a spoonful of nutritional yeast and a little mashed tofu. Add them after the mushrooms cool, and stop as soon as the filling holds its shape.

Pair the filling with the mushroom malai sauce for a deep, earthy plate, or use a lighter butter-and-pepper finish when you want the filling to stand out more.

Twist 3: Lobster Ravioli with Butter-Garlic Cream & Curry Leaves

Lobster and crab ravioli need a lighter hand than meat or mushroom fillings. The seafood is delicate, the filling is usually already rich, and a heavy sauce can flatten both. Butter, garlic, cream and lemon make a familiar base; the Indian turn comes from a small curry-leaf and Kashmiri-chili tadka at the end.

Lobster ravioli in loose butter-garlic cream with curry leaves, Kashmiri chili, black pepper and lemon.
Keep the cream sauce fluid enough to move when the pan tilts. Lemon lifts the seafood; the curry-leaf tadka belongs at the very end so its aroma stays vivid.

Keep the garlic pale; browned garlic becomes too assertive here. Use pasta water to loosen the cream until the sauce moves around the ravioli when the pan tilts instead of hiding the filling.

Butter-Garlic Cream Sauce for Lobster Ravioli

This sauce is deliberately short: butter, garlic, cream, pasta water, lemon and black pepper.

Ingredients

  • 2 tbsp butter (or ghee)
  • 2 cloves garlic, minced
  • 1/2 cup cream
  • Lemon zest + a squeeze of lemon
  • Black pepper
  • A splash of pasta water

Method

  1. Melt butter, sauté garlic gently (don’t brown it aggressively).
  2. Stir in cream and a splash of pasta water.
  3. Simmer until slightly thick and glossy.
  4. Finish with lemon and pepper.

Make the tadka separately so the curry leaves stay crisp and aromatic.

Lobster ravioli sauce card with butter, garlic, cream, pasta water, lemon and curry-leaf chili tadka.
Pale garlic gives a softer base than browned garlic here. Loosen the cream with pasta water, finish with lemon, then spoon the tadka over just before serving.

Curry Leaf & Kashmiri Chili Tadka

In a separate small pan:

  • Warm 1 tsp ghee.
  • Add a handful of curry leaves (they crackle instantly).
  • Add a pinch of Kashmiri chili.

Drizzle the tadka over the plated ravioli at the last moment. Simmering it into the cream dulls the curry-leaf aroma; the hot ghee should stay distinct while the chili adds color and mild warmth.

If you are preparing the seafood filling from scratch, keep cooked lobster or crab cold until you mix the filling and refrigerate shaped ravioli promptly. FoodSafety.gov’s fish and shellfish guidance is the external safety reference used for this section.

How to Balance a Butter-Garlic Ravioli Sauce

Butter and cream can make seafood ravioli taste dull if there is no acidity. Add lemon zest first, then a small squeeze of juice after the pan comes off the heat. Black pepper gives the sauce bite; pasta water keeps the fat and cream from feeling greasy.

The same base also works with cheese or spinach ravioli, although the curry-leaf tadka is especially good with lobster and crab.

Lobster or Crab Ravioli Filling

For homemade seafood ravioli, chop the cooked lobster or crab finely enough that the filling can be portioned cleanly. Ricotta or cream cheese binds the pieces and reduces free liquid; the short chill makes the mixture easier to seal.

Lobster or crab ravioli filling card with shallot, ricotta or cream cheese, herbs, lemon zest and chilling.
Finely chopped seafood plus a little soft cheese makes a cohesive center. Chill the mixture for 20–30 minutes so it portions cleanly and stays away from the seams.

Ingredients

  • 250 g cooked lobster meat (or crabmeat), finely chopped
  • 2 tbsp butter
  • 1 small shallot (or very finely chopped onion), sautéed until soft
  • 1 clove garlic, minced (optional)
  • 1/4 cup ricotta (or cream cheese for a firmer set)
  • 2 tbsp grated Parmesan (optional)
  • 1 tbsp chopped chives or cilantro
  • Zest of 1/2 lemon
  • Black pepper
  • Salt to taste

Method

  1. Sauté shallot in butter until soft; add garlic briefly if using.
  2. Cool slightly, then combine with chopped lobster/crab.
  3. Stir in ricotta and Parmesan until the mixture holds together.
  4. Add herbs, lemon zest, pepper, and salt.
  5. Chill 20–30 minutes so it firms up before filling.

Texture check: the chilled filling should hold on a teaspoon without dripping. If it looks loose, chill it longer before adding more cheese or binder.

Pair it with the butter-garlic cream sauce for the lightest treatment, or move to the tomato-cream sauce below for more acidity.

Twist 4: Makhani-Style Tomato-Cream Sauce for Ravioli

The tomato base should look dark and concentrated before the cream ever goes in. Cream then turns it glossy without washing out the tang, while kasuri methi arrives as a dry, savory aroma at the end; use garam masala only as a tiny background note.

Ravioli in tomato-cream sauce with butter, cream, kasuri methi and a restrained garam masala finish.
Reduce the tomato base first; cream should enrich it, not rescue a watery sauce. Kasuri methi and garam masala belong in small amounts so tomato remains the lead flavor.

Tomato-Cream Sauce That Clings to Ravioli

A ravioli sauce should leave a thin coating on the pasta when you lift it from the pan. If tomato liquid runs straight back to the bottom, reduce it longer before adding cream.

Ingredients

  • 2 tbsp butter or ghee
  • 2 cloves garlic
  • 2 tbsp tomato paste
  • 1/2 cup crushed tomatoes or passata
  • 1/2 cup cream (or cashew cream)
  • Pinch of kasuri methi
  • Pinch of garam masala (optional, keep it light)
  • Salt, pepper
  • Pasta water
Tomato-cream ravioli sauce card with tomato paste, crushed tomato, cream, pasta water and kasuri methi.
Cling comes from reduction. Cook the tomato base until concentrated, stir in cream, and add pasta water only when the sauce needs loosening.

Method

  1. Heat butter/ghee, sauté garlic.
  2. Add tomato paste and cook it for a minute until it darkens slightly.
  3. Add crushed tomatoes; simmer until thicker than you think it needs to be.
  4. Add cream/cashew cream and a splash of pasta water to emulsify.
  5. Finish with kasuri methi and, optionally, a tiny pinch of garam masala for a more distinctly makhani finish.

Use it with lobster, crab, cheese or meat-filled ravioli. A brighter homemade tomato base also works here; our fresh tomato sauce guide explains how to reduce tomatoes without losing their clean flavor.

Keep Tomato-Cream Sauce Rich but Balanced

When the sauce tastes heavy, adjust the edges before changing the whole recipe:

  • lemon zest
  • black pepper
  • a hint of heat
  • or simply more reduction before adding cream

Taste again after each adjustment. Often a little acid or pepper is enough to make the tomato and cream feel separate and clear rather than muddy.

For a dairy-free version, cashew cream gives the sauce body without introducing a strong coconut flavor. Add it after the tomato has reduced and keep the heat gentle once it is in the pan.

Keema Ravioli Filling

Keema makes a naturally good ravioli filling because minced meat can be cooked down until dry, finely textured and intensely seasoned. The important part is evaporating the tomato and meat juices before the mixture cools.

Yield: enough filling for roughly 24–30 standard ravioli.

Keema ravioli filling guide with dry spiced minced meat, filled ravioli wrappers, ingredients, method and texture check.
Cook the keema until a spoon leaves a clear trail and no liquid pools back into the pan. Cool it completely before filling so the ravioli seals cleanly.

Ingredients

  • 300 g ground meat (lamb, beef, or chicken)
  • 1 tbsp ghee or oil
  • 1 small onion, very finely chopped
  • 1 tsp ginger-garlic paste (or minced ginger + garlic)
  • 1/2 tsp cumin seeds
  • 1 tsp ground coriander
  • 1/2 tsp garam masala
  • 1/2 tsp Kashmiri chili (optional)
  • 1/2 tsp salt (adjust)
  • 2 tbsp tomato paste (or finely chopped tomato cooked down)
  • 2 tbsp peas (optional, classic keema touch)
  • 1 tbsp chopped cilantro
  • 1 tbsp breadcrumbs or finely grated Parmesan (optional binder)

Method

  1. Heat ghee, toast cumin seeds.
  2. Add onion, cook until golden.
  3. Add ginger-garlic, cook until fragrant.
  4. Add meat, break it up, cook until browned.
  5. Stir in spices, salt, and tomato paste; cook until the mixture looks dry and cohesive.
  6. Add peas if using; cook briefly.
  7. Cool completely; fold in cilantro and a binder if needed.

Texture check: drag a spoon through the pan. The path should stay visible and no liquid should run back into it. If the keema is dry but too crumbly, bind it with a spoonful of ricotta, cream or finely grated Parmesan.

Two sauces work particularly well:

  • butter-garlic cream with curry leaf tempering for a luxurious feel, or
  • tomato-cream makhani style for a warmer, more tomato-forward finish.

Twist 5: Toasted Ravioli with Chutney Dips

Toasted ravioli changes the texture completely: the wrapper becomes crisp, the filling stays soft, and suddenly a pasta dinner can be eaten with your fingers. Cheese, meat and mushroom fillings all work; very delicate seafood ravioli is better saved for a sauce.

Crisp toasted ravioli served with coconut chutney, kara chutney and thecha.
The dips work because they do different jobs: coconut cools, kara chutney brings roasted chili depth, and thecha adds sharp garlic heat. Two contrasting dips are usually enough.

Marinara still works, but chutneys are what make this feel different from a standard toasted-ravioli plate; the detailed dip pairings come later.

For one batch

  • 450 g / 1 lb ravioli (cheese, meat or mushroom; refrigerated or frozen)
  • 1 tbsp neutral oil or cooking spray, plus more as needed
  • 1 large egg, beaten (optional, for breading)
  • 1 cup breadcrumbs or panko (optional, for breading)
  • Coconut chutney, kara chutney, thecha or marinara, for serving

For meat-filled ravioli, follow the package directions and make sure the filling is fully cooked before serving. The times below are crisping ranges; they are not a substitute for safely cooking a raw meat filling.
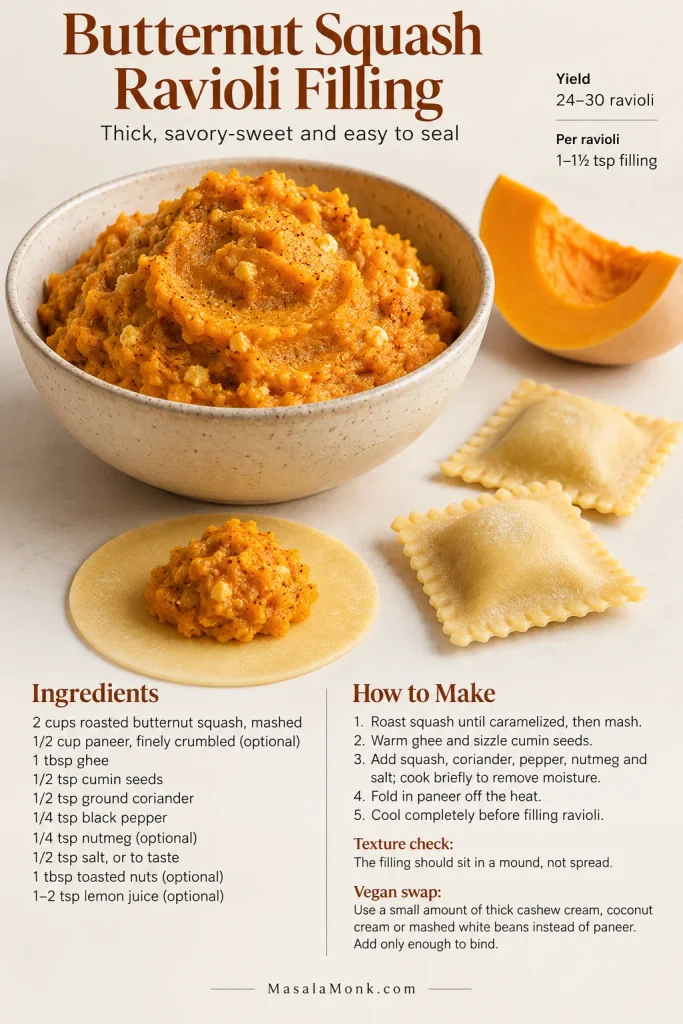
Air-Fryer Toasted Ravioli

Refrigerated ravioli is easiest to bread because the surface is pliable. Frozen ravioli can work too; if the coating will not adhere while it is rock-hard, thaw it only long enough to become easy to handle. Ravioli size and package directions still take priority.

Method

  1. For a breaded crust, dip the ravioli in beaten egg, coat in breadcrumbs or panko and mist lightly with oil. For an unbreaded version, toss the ravioli with a thin film of oil.
  2. Air fry in a single layer at 390°F / 200°C for 6–10 minutes, flipping halfway. Start checking at 6 minutes.
  3. Remove the ravioli when the edges are deep golden and the shell feels crisp; serve while the coating is still dry and crunchy.

Air fryers vary in fan strength and basket size, so the range matters more than one exact minute. Small refrigerated ravioli may finish near the lower end; larger or frozen pieces can take longer.

Oven-Baked Toasted Ravioli

Heat the oven to 425°F / 220°C. A rack over a sheet pan keeps hot air moving around both sides; without a rack, flip the ravioli halfway so the underside does not steam against the tray.

  1. Arrange breaded ravioli in a single layer on a lightly oiled rack or sheet pan and mist the tops with oil.
  2. Bake for 10–15 minutes, flipping halfway if the ravioli sits directly on the tray.
  3. Pull the tray when the crumb coating is dry, crisp and golden at the edges.

Quick comparison: toasted ravioli three ways. Air frying is the easiest small-batch option, the oven handles a tray with less fuss, and deep-frying gives the crispest shell.

Comparison infographic for air-fried, oven-baked and deep-fried toasted ravioli.
For a starting point, air fry at 390°F / 200°C for 6–10 minutes, bake at 425°F / 220°C for 10–15 minutes, or deep-fry at 350°F / 175°C for about 2–4 minutes. Stop at deep-golden edges.

Deep-Fried Ravioli

Deep-frying gives the most even, brittle crust. Use a thermometer if you have one and give the oil time to return to temperature between batches; each new handful cools it quickly.

  1. Heat about 2 inches / 5 cm neutral oil to 350°F / 175°C.
  2. Fry in uncrowded batches for about 2–4 minutes, turning as needed, until the coating is evenly deep golden.
  3. Lift to a wire rack and let the oil return to 350°F / 175°C before adding the next batch.

The rack matters because steam can escape from underneath; a flat paper-lined plate softens the crust more quickly.

Chutney Dips for Toasted Ravioli

Choose dips with different jobs—one cool, one tangy or roasted, and one hot:

  • For cool, creamy contrast: South Indian coconut chutney, especially with cheese or spinach ravioli.
  • For roasted chili and tomato depth: kara chutney.
  • For sharper garlic heat: thecha; serve a smaller spoonful because it can dominate a mild filling.
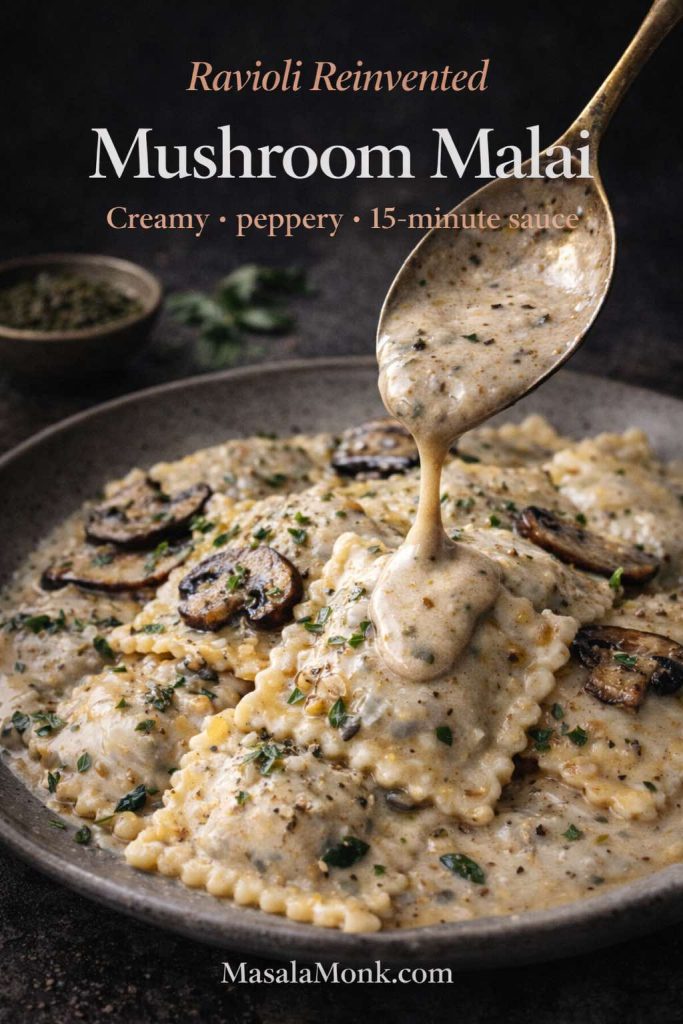
A platter works best when one dip cools, one brings acidity and one brings heat. That gives each bite somewhere different to go without burying the ravioli.

Palak-Paneer Ravioli Filling

Palak-paneer filling works because both components help with structure: squeezed spinach loses the water that causes leaks, while crumbly paneer absorbs moisture and keeps the center tender.

Yield: enough filling for roughly 24–30 standard ravioli.

Palak-paneer ravioli filling card with squeezed spinach, paneer, cumin, garlic, chili, cream and kasuri methi.
Squeeze the spinach before it ever reaches the pan, then cook until no water remains. Paneer gives the filling body without making the center heavy.

Ingredients

  • 250 g spinach (fresh or frozen)
  • 1 tbsp ghee
  • 1/2 tsp cumin seeds
  • 2 cloves garlic, minced
  • 1 small green chili (optional, adjust)
  • 200 g paneer, crumbled finely
  • 2 tbsp cream (optional, for richness; use only if the filling remains thick)
  • 1/2 tsp salt (adjust)
  • Black pepper
  • Optional: pinch of kasuri methi

Method

  1. Blanch spinach quickly, squeeze out moisture, then chop finely or blend.
  2. Heat ghee, toast cumin seeds, add garlic and chili.
  3. Add spinach and cook until thick and not watery.
  4. Mix in paneer, salt, pepper and kasuri methi. Add cream only if wanted and the filling is still thick enough to hold its shape.
  5. Cool completely before filling ravioli.

Squeezed spinach and crumbly paneer leave very little free liquid, which is why this filling seals so reliably. For softer homemade paneer, our homemade paneer guide explains how pressing time changes the texture.

It also holds up well in the baked ravioli casserole later in the post because the filling remains cohesive under longer heat.

↑ Back to Ravioli Recipe Contents


Ravioli Variations: Keto, Low-Carb, Vegan & Gluten-Free

Ravioli is a three-part construction: wrapper, filling and sauce. Change one of those and the other two need to carry a little more of the texture or flavor. That is the useful way to think about keto, vegan and gluten-free versions.

Keto Ravioli with a Cheese Wrapper

With a mozzarella wrapper, the filling has to do more of the structural work. Keep it compact and fairly dry, and work while the cheese is just pliable enough to fold without cracking.

Keto ravioli card using warmed mozzarella slices as wrappers for thick spinach, paneer or keema-style fillings.
Look for flexibility, not a full melt: the mozzarella should bend around a thick filling without cracking before you seal and crisp it.

How it goes

  • Use thin mozzarella slices as “sheets.”
  • Warm until pliable.
  • Add a thick filling, fold, and seal.
  • Crisp lightly in a pan or bake briefly.

Thick, strongly seasoned fillings work best:

  • palak-style spiced spinach
  • paneer-style seasoned cheese
  • keema-style spiced meat

A Lower-Carb Ravioli Plate

If you are lowering carbs without replacing the pasta wrapper, treat ravioli as a smaller part of the plate:

  • choose a richer sauce (butter-garlic cream, mushroom malai, tomato-cream)
  • add protein and vegetables on the side
  • serve fewer ravioli, but make each bite count

Vegan Ravioli Filling Ideas

Vegan fillings are easiest to seal when they are naturally thick:

  • lentil filling (dal-style, reduced until thick)
  • spiced mushroom-onion filling
  • coconut vegetable filling with mustard seeds and curry leaves

Pair lentil or mushroom fillings with tomato sauce for contrast, or use a coconut-based sauce when you want a softer, rounder finish.

Gluten-Free Ravioli

Gluten-free ravioli is more sensitive to hydration and handling than the egg dough above. Use a gluten-free pasta dough or wrapper formula designed for filled pasta rather than simply swapping flour cup-for-cup, then keep the filling thick and the simmer gentle.

The mechanics do not change: clean border, modest filling, trapped air pressed out, firm seal. Use the same sealing checklist and handle the gluten-free wrapper with less stretching.

Vegan Red Lentil Dal Ravioli Filling

Red lentils are unusually well suited to ravioli because they become cohesive as they cook down. The filling should mound on a spoon; if it spreads, keep reducing it.

Ingredients

  • 1 cup red lentils
  • 2 1/2 cups water
  • 1 tbsp oil
  • 1/2 tsp cumin seeds
  • 1 small onion, finely chopped
  • 1 tsp ginger-garlic paste
  • 1 tsp ground coriander
  • 1/2 tsp turmeric
  • 1/2 tsp salt (adjust)
  • Lemon juice
  • Chopped cilantro
Vegan red-lentil ravioli filling card with cumin, onion, ginger-garlic, spices, lemon and cilantro.
Cook the lentils past soft until they hold a mound on the spoon. Once cool, the filling should be easy to portion without spreading toward the dough edge.

Method

  1. Cook lentils until soft; then cook down until thick.
  2. In a separate pan, temper cumin in oil, sauté onion until golden.
  3. Add ginger-garlic and spices, then stir into lentils.
  4. Cook another few minutes until the mixture is scoopable.
  5. Finish with lemon and cilantro, then cool.

Use a tomato-based sauce for acidity or a coconut-based sauce for a softer finish. Let the lentils provide the body rather than trying to mimic cheese.


How to Match Ravioli with the Right Sauce

There is no single best sauce because the filling has already done half the seasoning. Ask what it needs next: sweet squash likes nutty fat and acid, mushrooms like pepper and restrained cream, seafood wants brightness, and mild cheese is flexible.

Decision chart matching cheese, spinach-cheese, mushroom, seafood and squash ravioli with compatible sauces.
Use the chart as a troubleshooting shortcut: sweet fillings often need acidity, earthy ones like pepper, and seafood usually benefits from the lightest finish.

Sauces for Cheese Ravioli

Mild cheese fillings are flexible. Good options include:

  • tomato-cream sauce with a little brightness
  • butter sauce with black pepper and lemon zest
  • a thin drizzle of spiced ghee for an Indian accent without changing the whole dish

Cheese ravioli is also one of the easiest choices for toasting because the filling usually stays stable while the wrapper crisps.

Sauces for Spinach & Cheese Ravioli

Spinach-and-cheese ravioli usually needs pepper, acid or garlic more than extra richness:

  • cream sauce that’s peppery and not too thick
  • a light garlic butter sauce
  • or a spinach-forward sauce that feels palak-inspired

If the bowl tastes flat, add black pepper and a little lemon before adding more cheese or cream.

Sauces for Mushroom Ravioli

Mushroom ravioli can go rich or spare:

Sauces for Seafood Ravioli

For lobster or crab fillings, keep the sauce bright:

  • butter-garlic cream with curry leaf tadka
  • tomato-cream makhani style for a richer, warmer finish

Sauces for Squash Ravioli

For butternut or pumpkin fillings, balance the sweetness:

Taste the filling before deciding on the finish. Sweet fillings need brightness, rich fillings need acid or pepper, and mild fillings benefit from aroma. That small check prevents most sauce mismatches.

↑ Back to Ravioli Recipe Contents

Build a Ravioli Dinner Without Overthinking It

Once the ravioli and sauce are decided, the rest of dinner should get simpler. Rich or creamy bowls benefit from something sharp and green; crisp ravioli can stand on its own as a snack; and a crowd is usually easier to feed with a baked or slow-cooker version than with individual plates.

Ravioli dinner planning infographic: choose filling, sauce, one finishing accent, then plated or snack style.
Use the graphic as a stop rule, not a shopping list: choose the filling, sauce and one finishing accent, then decide whether the meal needs a side at all.

Toasted ravioli with two contrasting chutneys is enough for a snack plate. Mushroom ravioli with the malai-style sauce needs little more than a bitter salad or green vegetable; squash or lobster ravioli can take a lemony salad when the sauce is rich.

When the job is feeding more people, move away from individual plating. The baked casserole and slow-cooker versions below trade delicacy for convenience and are much easier to serve at the table.


Baked Ravioli Casserole

Baked ravioli uses the filled pasta as both noodle and filling layer, which is why it comes together faster than lasagna. Frozen cheese or meat ravioli is the most forgiving choice. Keep the sauce thick enough to coat the layers, cover for most of the bake, then uncover only long enough to brown the top.

Baked ravioli casserole with tomato sauce and melted cheese, a spoon lifting a cheesy portion.
This is the crowd-friendly branch of ravioli night: assemble it earlier, refrigerate, then bake when you need it. Because each ravioli already carries a filling, the casserole stays simpler than lasagna.

Baked Ravioli Casserole Recipe

Ingredients

  • 1 to 1.5 kg ravioli (frozen or refrigerated)
  • 3–4 cups sauce (choose one below)
  • 2 cups shredded mozzarella (or a mix of mozzarella + cheddar)
  • 1/2 cup Parmesan (optional)
  • 1 tbsp butter or ghee (for greasing)
  • Optional: sautéed mushrooms, spinach, or cooked keema as an extra layer

Sauce options

  1. Tomato-cream makhani-style sauce: thick, glossy, clingy
  2. Mushroom malai sauce: rich and earthy
  3. Simple marinara-style tomato sauce finished with curry leaf tempering (lighter, still special)
Baked ravioli casserole with thick tomato sauce, melted cheese and curry leaves, with a cheesy ravioli portion being lifted.
Layer sauce, ravioli, then sauce and cheese; repeat and bake at 375°F / 190°C. Keep the sauce thick so the casserole sets instead of turning soupy.

For meat-filled ravioli, use commercially prepared ravioli whose package directions allow this baking method, or make sure a homemade meat filling is fully cooked. The casserole times below are baking ranges, not a substitute for safely cooking a raw meat filling.
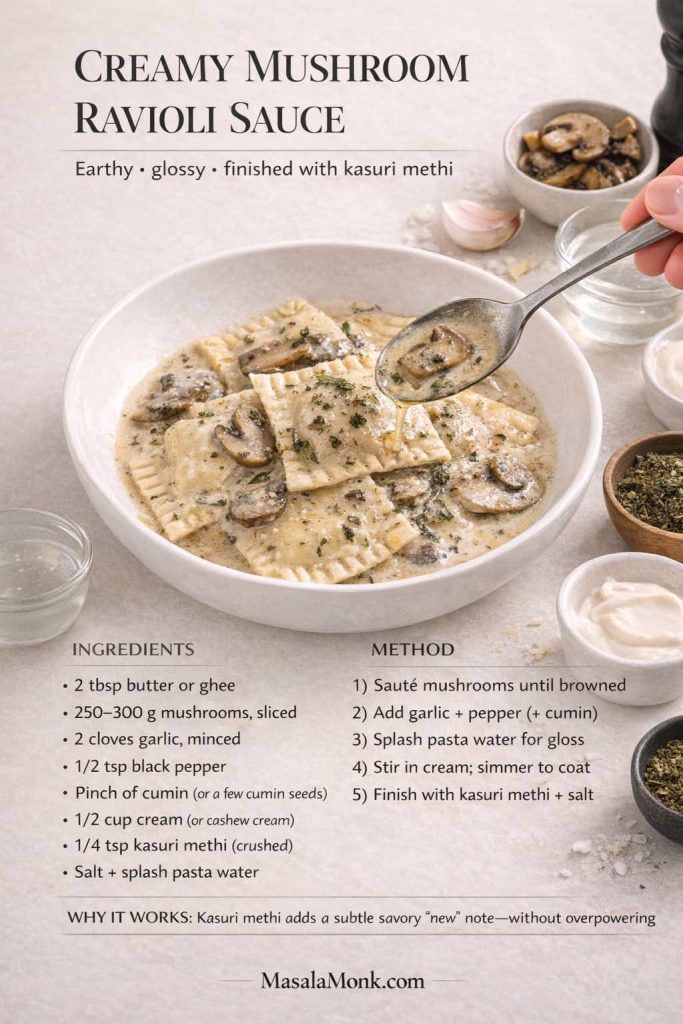
Method

  1. Heat oven to 190°C / 375°F.
  2. Grease a baking dish with butter/ghee.
  3. Add a thin layer of sauce.
  4. Layer ravioli in a single layer.
  5. Spoon sauce over, then add cheese.
  6. Repeat layers until you’re done, finishing with sauce and cheese.
  7. Cover with foil and bake 25–30 minutes.
  8. Uncover and bake another 10–15 minutes until bubbly and browned.

Make ahead: assemble the casserole earlier in the day, cover and refrigerate it, then bake when needed. A chilled casserole may take a little longer; use a hot, bubbling center and browned top as the final cues.

Each ravioli already contains a filling, so the casserole does not need a separate ricotta layer. For a fuller bake, add one thin layer of keema or browned mushrooms between the ravioli; too many extras make the layers heavy and wet.

Finish after baking, not before: a spoonful of curry-leaf ghee keeps its aroma, while crushed kasuri methi gives a tomato-cream casserole a drier, savory edge. If baked pasta is the format you cook most often, our baked ziti guide goes deeper on saucy layers and preventing a dry bake.

Baking Lobster Ravioli

Lobster ravioli needs enough sauce to stay moist in the oven. Use:

  • a gentle tomato-cream sauce
  • or a butter-cream sauce with lemon

Do not chase a dark crust with seafood-filled ravioli. Bake only until the center is hot and the sauce bubbles; prolonged heat can make the lobster or crab filling firm and dry.

Crock Pot Ravioli / Slow Cooker Ravioli Lasagna

Slow-cooker ravioli is essentially a shortcut lasagna: frozen ravioli, thick sauce and cheese layered directly in the crock pot. It is less precise than boiling ravioli to order, but useful when the meal needs to hold for a group.

Slow-cooker ravioli lasagna with layers of sauce, ravioli and melted cheese.
A slow cooker traps more steam than an oven, so start with sauce that looks slightly too thick for stovetop pasta. That extra body helps the finished layers hold.

Crock Pot Ravioli Recipe

Ingredients

  • 1 kg frozen ravioli (cheese ravioli is the easiest starting point)
  • 4 cups sauce (thicker is better)
  • 2 cups shredded mozzarella
  • 1/2 cup Parmesan (optional)
  • Optional add-ins: cooked keema, sautéed mushrooms, spinach, or roasted vegetables

Method

  1. Lightly grease the slow cooker.
  2. Spread a thin layer of sauce on the bottom.
  3. Add a layer of frozen ravioli.
  4. Add sauce, then cheese.
  5. Repeat layers.
  6. Cook on LOW for 3–4 hours or HIGH for 1.5–2.5 hours, depending on your slow cooker.
  7. Let it sit 10–15 minutes before serving so it sets.

Use a thick sauce. The slow cooker traps steam, so a loose sauce becomes thinner as the ravioli cooks. Start thicker than you would for stovetop pasta and let the finished dish rest before serving.

Slow-cooker ravioli card with frozen ravioli, thick tomato sauce, mozzarella, low/high times and resting guidance.
Layer sauce, frozen ravioli and cheese, then leave the finished dish alone for 10–15 minutes before serving. The rest is what turns bubbling layers into cleaner portions.

Indian-Inspired Slow Cooker Variations

  • Makhani-style: use the tomato-cream sauce and add a light kasuri methi finish at the end.
  • Keema ravioli lasagna: add the cooked keema filling as a thin layer between ravioli.
  • Palak-paneer: layer the spinach-paneer filling lightly between ravioli, or use spinach-and-cheese ravioli with a creamy sauce.

Skip seafood-filled ravioli in the slow cooker. Cheese, mushroom, spinach, squash and cooked-keema versions tolerate the longer holding time far better.

↑ Back to Ravioli Recipe Contents


Why These Indian-Inspired Ravioli Twists Work

These five combinations work because the Indian element answers something the ravioli already needs:

  • Curry leaves take over sage’s aromatic role with squash, while ghee keeps the nutty richness that sweet fillings already like.
  • Mushrooms can handle kasuri methi because both lean earthy; cream keeps the combination familiar rather than turning it into a heavy curry.
  • Lobster gets the tadka at the very end, so aroma arrives on top of the butter-garlic sauce without burying the seafood.
  • Tomato and cream already sit close to makhani territory; a little dried fenugreek nudges the sauce in that direction without changing its basic identity.
  • Crisp ravioli needs contrast more than another heavy sauce, which is why coconut chutney, kara chutney and thecha work so well beside it.

Use the same logic beyond these recipes: identify whether the filling is sweet, earthy, rich or mild; choose a sauce with the right weight; then add one Indian accent only where it improves aroma, acidity or texture.

Infographic explaining the pairing logic behind five Indian-inspired ravioli variations.
The common thread is restraint: use the Indian accent to solve a flavor problem already on the plate—more aroma, more depth, more brightness or sharper contrast.

That restraint is what keeps the crossover coherent. Curry leaves take over the aromatic job sage often does with squash. Kasuri methi deepens cream without taking over the sauce, and chutneys sit beside crisp ravioli because contrast is the point. The pasta should still taste like ravioli when you are done.

Ravioli FAQs

The full methods live above; these are the few questions that still benefit from a quick answer.

Cooking & Timing

1) How do you cook ravioli so it doesn’t fall apart?

Use a wide pot and keep the water at a lively simmer, not a rolling boil. Stir once, then lift cooked ravioli with a slotted spoon straight into warm sauce. Handmade ravioli also depends on clean seams and pressed-out air; see How to Seal Ravioli Without Leaks.

Dough & Sealing

2) What flour is best for ravioli dough?

All-purpose flour works well in most kitchens, while Italian “00” flour can give a silkier sheet. A little semolina can add chew, but good kneading and enough rest matter more than chasing one perfect flour.

3) How thin should ravioli dough be?

Thin enough that you can see a faint shadow of your hand through the sheet, but sturdy enough to lift without stretching or tearing. Thick dough makes the seams bulky; paper-thin dough is more likely to split around the filling.
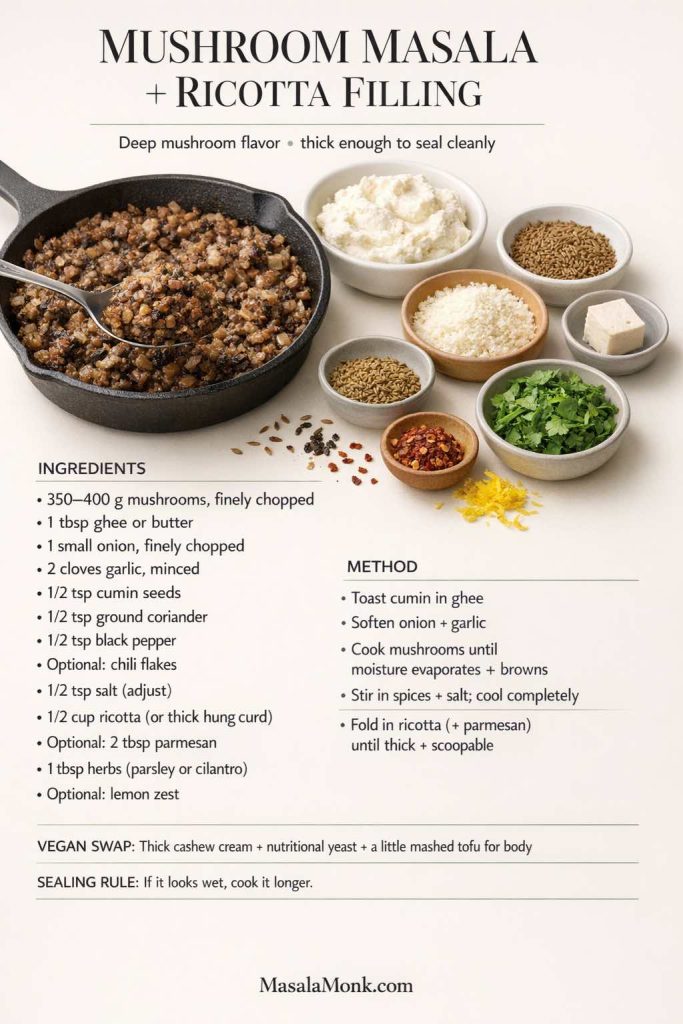
Sauces & Fillings

4) What is the best sauce for ravioli?

Match the sauce to the filling: cheese is flexible, mushroom likes pepper and restrained cream, squash likes nutty fat and acidity, and seafood benefits from butter and lemon. Use the ravioli sauce chart for a quick match.

5) What makes a good homemade ravioli filling?

Flavor matters, but texture decides whether the ravioli survives. A good filling is cool, thick and scoopable with no loose liquid. The squash-paneer, mushroom-ricotta, lobster, keema, palak-paneer and red-lentil fillings in this guide all follow that rule.

Serving & Leftovers

6) Is ravioli healthy?

It depends on the wrapper, filling, sauce and portion. For a lighter plate, choose a vegetable or lean-protein filling, use a less-heavy sauce and serve a modest ravioli portion with vegetables or salad.

7) What is the best way to reheat ravioli?

For sauced ravioli, warm it gently in a covered skillet with a spoonful of water or extra sauce. For toasted ravioli, use the oven or air fryer so the coating crisps again. Avoid high microwave heat for long stretches; filled pasta dries at the edges quickly.

8) How should cooked ravioli be stored?

Cool leftovers promptly, refrigerate them in a covered container and keep enough sauce with the pasta to prevent the wrapper drying out. Seafood-filled ravioli deserves extra care with chilling and reheating; use the FoodSafety.gov seafood guidance linked in the lobster section for handling details.

↑ Back to Ravioli Recipe Contents

Posted on 5 Comments

How to Cook Tortellini (Fresh, Frozen, Dried) + Easy Dinner Ideas

Magazine-style cover showing cheese tortellini in rich tomato sauce topped with basil and Parmesan, titled “How to Cook Perfect Tortellini” (MasalaMonk.com).

If you’re figuring out how to cook tortellini so it stays tender, bouncy, and intact—without turning mushy or splitting open—you’re about to make tortellini nights much easier. Cooking tortellini is mostly about a few small, repeatable moves: salted water, a controlled simmer, early tasting, and a quick finish in sauce or broth. Once those habits click, you can cook tortellini confidently whether it’s fresh tortellini from the fridge, frozen tortellini from the freezer, or dried tortellini from the pantry.

Because tortellini is stuffed pasta, it brings its own richness and seasoning. As a result, dinner doesn’t need a complicated plan. On one night, cheese tortellini can become pesto tortellini with chicken and tomatoes. On another, spinach and ricotta tortellini can turn into a bright, simple pomodoro bowl. Meanwhile, meat tortellini in broth can feel soothing in the best way. And when you want something snacky, you can air fry tortellini until crisp and dip it into marinara.

This is a practical, reader-first guide to how to cook tortellini in the formats you actually buy, followed by dinner frameworks you can reuse without boredom—one pot tortellini, slow cooker tortellini, creamy tortellini pasta, tortellini pomodoro, bolognese tortellini, tortellini in brodo, and tortellini prosciutto e panna.


Tortellini basics that make everything else easier

Tortellini is a small, ring-shaped stuffed pasta with deep roots in Bologna and the surrounding region. Traditionally, tortellini in brodo—tortellini served in broth—is one of the most iconic ways to eat it. If you’re curious about the cultural side, the Dotta Confraternita del Tortellino shares the tradition around the “registered” tortellino filling on their site. You don’t need that history to cook well; still, it explains why tortellini is designed to taste complete with simple treatment.

In everyday cooking, tortellini’s superpower is this: the filling is already seasoned, and the pasta shape catches sauce naturally. Therefore, you can keep your sauce straightforward and still end up with a bowl that feels finished.

Tortellini vs ravioli: why shape changes how you cook and serve

Ravioli is larger and often more delicate, so it’s commonly served with sauce spooned over the top. Tortellini is smaller, which makes it easy to toss in sauce and easy to serve in soups. If you enjoy stuffed pasta in general, you might like MasalaMonk’s playful take on variation and filling ideas in this ravioli piece. It’s a nice reminder that stuffed pasta can be flexible and fun.

Also Read: Manhattan Cocktail Recipe (Classic + 6 Variations)


How to cook tortellini every time: the universal method

Before you choose pesto or cream or broth, lock in the basics. This is how to cook tortellini successfully no matter what the filling is—cheese tortellini, spinach tortellini, meat tortellini, mushroom tortellini, or pumpkin tortellini.

  1. Use a roomy pot and plenty of water
    Stuffed pasta needs space. When the pot is crowded, tortellini sticks and cooks unevenly. More water also helps the temperature recover quickly after you add the pasta.
  2. Salt the water generously
    This matters more than people expect. Tortellini is thick and filled, so the outer pasta can taste bland if the water isn’t seasoned. With salted water, even simple sauces taste better.
  3. Choose a lively simmer over a violent boil
    A roaring, chaotic boil can knock tortellini around and encourage splitting. Instead, keep the water bubbling actively but not aggressively—especially for fresh tortellini and refrigerated tortellini.
  4. Stir early, then back off
    Stir gently right after adding tortellini so it doesn’t stick to itself or to the pot. After that, let it cook. Too much stirring can tear delicate pasta.
  5. Reserve pasta water—every time
    Before draining, scoop out a mug of cooking water. That starchy water helps sauces cling and emulsify. Consequently, pesto turns glossy instead of oily, cream sauces loosen without thinning, and tomato sauces coat instead of sliding.
  6. Finish in sauce or broth for 30–60 seconds
    Instead of draining and pouring sauce over the top, toss cooked tortellini in a warm pan of sauce for a minute. This short finish is a major part of how to cook tortellini so it tastes cohesive rather than assembled.

You’ll see these steps repeated throughout the recipes below because they’re the foundation.

Tortellini guide card showing the 5-step rhythm for how to cook tortellini so it stays tender and not mushy: salt water, simmer, stir once, taste early, finish in sauce or broth.
Save this: the 5-step rhythm for how to cook tortellini (fresh, frozen, or dried) so it stays tender—then finish it in sauce or broth for a glossy, restaurant-style bite.

Also Read: Green Chutney Recipe (Coriander–Mint / Cilantro Chutney)


Tortellini you’ll see most often: fillings and formats

Knowing what you bought makes “what should I do with it?” instantly easier.

Common fillings and what they naturally like

  • Cheese tortellini is the weeknight workhorse. It might be labeled three cheese tortellini, 3 cheese tortellini, four cheese tortellini, 4 cheese tortellini, five cheese tortellini, or 5 cheese tortellini. It also shows up as tortellini formaggi or tortellini formaggio. Because it’s rich, it pairs beautifully with pesto, tomato sauce, or broth. It also works in a cream sauce, especially with pepper.
  • Spinach tortellini often appears as spinach and ricotta tortellini, ricotta spinach tortellini, or tortellini ricotta spinaci. It’s excellent with lighter sauces: butter and garlic, bright tomato, or a gentle cream finish.
  • Meat tortellini can be labeled meat filled tortellini, meat stuffed tortellini, beef tortellini, or veal tortellini. It shines in broth and also works in ragù when the sauce is balanced.
  • Specialty fillings like mushroom tortellini, porcini tortellini, gorgonzola tortellini, pumpkin tortellini, lobster tortellini, and truffle tortellini (tortellini tartufo) usually taste best with a restrained sauce so the filling remains the star.
Guide card showing common tortellini fillings and best sauce pairings: cheese tortellini with marinara or pesto, spinach and ricotta tortellini with alfredo or butter and sage, meat tortellini with bolognese or brown butter, and mushroom or pumpkin tortellini with cream or garlic butter.
Quick pairing chart: match cheese, spinach & ricotta, meat, and mushroom/pumpkin tortellini to the sauce that flatters the filling—an easy way to pick pesto, marinara, cream, or bolognese without overthinking dinner.

Formats: fresh, refrigerated, frozen, dried

  • Fresh tortellini / refrigerated tortellini cooks quickly and needs gentle heat.
  • Frozen tortellini cooks straight from frozen and benefits from careful tasting.
  • Dried tortellini takes longer and holds up well in thicker sauces.

Once you identify the format, how to cook tortellini becomes far more predictable.

Infographic comparing how to cook fresh tortellini, frozen tortellini, and dried tortellini: gentle simmer and taste early for fresh, cook from frozen and stir once for frozen, longer cook and thicker sauces for dried.
Quick cheat sheet: how to cook fresh, frozen, and dried tortellini without overcooking—use this guide to choose the right simmer style and finish based on what you bought.

Also Read: Best Vermouth for a Negroni Cocktail Drink Recipe


How to cook fresh tortellini and refrigerated tortellini

Fresh and refrigerated tortellini cook fast, so the goal is to hit tender-and-bouncy rather than soft-and-saggy.

Bring salted water to a gentle boil. Then reduce slightly to a lively simmer. Add tortellini and stir gently once or twice. Start checking early and keep tasting.

A lot of refrigerated “fresh style” tortellini lines cook in just a few minutes. For an example of clear brand timing, Giovanni Rana shares cooking guidance on this product page. If you’re cooking rana tortellini, rana cheese tortellini, or a similar refrigerated pack, that’s a helpful reference point.

How to tell it’s done:
The pasta should feel tender but still springy, and the filling should be hot through the center. If the pasta feels floppy or waterlogged, it’s gone too far.

Done-or-overdone tortellini doneness test card showing how to tell tortellini is done: pasta should be tender and springy, filling hot in the center, and the tortellini shape intact without leaks.
Don’t rely on floating alone—use this quick doneness test to know when tortellini is perfectly cooked (tender, springy, hot in the center) before you finish it in sauce.

What to do immediately after draining:
Fresh tortellini keeps cooking from residual heat. Therefore, have your sauce ready before you drain. Toss it in warm sauce right away and loosen with pasta water until glossy. This is a crucial detail in how to cook tortellini well, and it’s also the easiest improvement to make.

Also Read: Sandwich for Breakfast: Breakfast Sandwich Recipe + 10 Variations


How to cook frozen tortellini so it doesn’t split

Frozen tortellini is convenient, but it’s easiest to ruin by treating it roughly.

Don’t thaw it first. Instead, cook it straight from frozen in salted water. Stir gently at the beginning to prevent sticking. Then let it cook and start tasting early. Since frozen tortellini thickness varies by brand and style, tasting beats guessing.

Frozen tortellini cooking guide card with tips to prevent splitting: cook from frozen, simmer not a hard boil, stir once then leave it, drain carefully and toss softly.
Frozen tortellini tip sheet: cook straight from frozen and keep the water at a steady simmer—this prevents splitting and keeps the filling where it belongs.

If you’re using a refrigerated line that’s meant to be cooked from frozen with a simple adjustment, follow the package guidance. Giovanni Rana notes a cook-from-frozen timing approach on the same instruction page.

Once tender, drain carefully and finish gently in sauce. A soft toss matters because hot tortellini is delicate; consequently, aggressive stirring can cause splits right at the end.

That “gentle finish” is central to how to cook tortellini from frozen with consistent results.

Also Read: Rob Roy Drink Recipe: Classic Scotch Cocktail (Perfect + Dry + Sweet Variations)


How to cook dried tortellini and keep it tender

Dried tortellini behaves more like pantry pasta. It needs longer cooking and tolerates a stronger boil, yet it still benefits from tasting near the end.

Bring salted water to a boil. Add tortellini and stir gently. Maintain a steady boil until the pasta is fully tender and the filling is hot through the center.

If you want a reference point for timing expectations, Barilla provides context on this tortellini recipe page. It’s especially useful if you’re cooking barilla tortellini or another shelf-stable tortellini.

After draining, finish the tortellini in sauce for a minute with pasta water. Because dried tortellini is sturdy, it’s excellent for marinara tortellini, bolognese tortellini, and baked pasta dinners.

Also Read: Strawberry Smoothie Recipes (12 Easy Blends + Bowls & Protein Shakes)


How to cook tortellini in broth and tortellini in brodo

Broth is one of the most satisfying ways to serve stuffed pasta. It’s light, soothing, and surprisingly elegant. Better still, broth allows the filling to shine rather than competing with it.

Warm good broth gently. Add aromatics if you like—garlic, onion, pepper, herbs, or a Parmesan rind. Then add tortellini and cook until tender. Finish with Parmesan and pepper.

Tortellini in broth guide card showing how to cook tortellini in brodo: warm broth gently, add aromatics if desired, add tortellini near the end, finish with greens and parmesan.
Tortellini in broth (brodo) template: keep the broth at a gentle simmer and add tortellini near the end so it stays intact—then finish with greens, parmesan, and pepper.

Tortellini in broth with greens and herbs

To make it feel more complete, add greens near the end. Spinach is easiest because it wilts quickly. Kale works too, although it benefits from a little more time. Finish with herbs and a squeeze of lemon if you want extra lift.

Meat tortellini in broth is especially satisfying. However, cheese tortellini in broth can be wonderful too, particularly when you want comfort without heaviness.

Tortellini in brodo: the classic style

Tortellini in brodo is a traditional presentation associated with Bologna. For a cultural reference and overview, Bologna Welcome shares an explanation on this page. At home, keep it simple: good broth, gently cooked tortellini, Parmesan, and pepper. That restraint is what makes it special.

If you’re learning how to cook tortellini for soups, remember this: add the tortellini near the end and keep the simmer gentle so the pasta stays intact.

Also Read: Paper Plane Cocktail Recipe + Best Amaro Substitutes & Tips


Pesto tortellini: bright dinners in minutes

Pesto tortellini is fast, vibrant, and forgiving. It’s especially good with cheese tortellini because the basil and garlic cut the richness. Spinach tortellini works too, although a lighter coating tends to taste better.

Cook tortellini, drain, and reserve pasta water. Warm pesto gently in a pan without boiling it. Toss in tortellini and add pasta water a spoonful at a time until the sauce becomes glossy and clings.

Pesto tortellini pairings guide card showing what to add to pesto tortellini: cheese tortellini with tomatoes and chicken, spinach and ricotta tortellini with peas and asparagus, and a pepper and lemon finish.
Save this pairing guide for pesto tortellini: add tomatoes + chicken to cheese tortellini, pair spinach and ricotta tortellini with peas/asparagus, then finish with pepper and lemon for a brighter bowl.

For pesto inspiration and variations, these MasalaMonk posts fit naturally, and you might want to have a look:

Chicken pesto tortellini with tomatoes

To make chicken pesto tortellini, add shredded chicken at the end and toss briefly. Then add cherry tomatoes or roasted peppers for sweetness. Finish with pepper and a squeeze of lemon. As a result, the bowl stays bright rather than heavy.

Pesto and tortellini with vegetables

For a lighter dinner, add vegetables. Broccoli, peas, asparagus, and zucchini all work. Add sturdy vegetables earlier and leafy greens later. Meanwhile, keep the pesto coating light and glossy.

This is a simple way to practice how to cook tortellini while also making it feel fresh and varied.

Also Read: 7 Pizza Sauce Recipes | Marinara, White Garlic, Alfredo, Buffalo, BBQ, Vodka & Ranch


Creamy tortellini pasta that tastes rich but not heavy

Creamy tortellini is comfort food. Still, it doesn’t have to feel overly heavy. The trick is using pasta water to create a silky sauce rather than a thick one.

Start with butter and garlic in a pan. Add cream and warm gently. Then add tortellini and toss. Finally, loosen with pasta water until glossy. Finish with Parmesan and pepper.

For creamy pasta technique and variations, these MasalaMonk resources are excellent companions:

Tortellini guide card showing how to finish tortellini in sauce with pasta water for a glossy coating: add to warm sauce, splash pasta water, toss 30–60 seconds, stop when glossy and clinging.
The easiest upgrade: finish tortellini in warm sauce with a splash of pasta water for 30–60 seconds—this makes pesto, tomato, and creamy tortellini cling beautifully instead of sliding off.

Cream cheese tortellini for weeknights

Cream cheese tortellini is a fast shortcut that still tastes luxurious. Warm a splash of broth or milk, whisk in cream cheese, and then loosen with pasta water. Add garlic, pepper, and Parmesan. Toss in tortellini and finish with spinach.

Because spinach adds freshness, the bowl feels balanced. Moreover, it turns “creamy” into “creamy but not too much.”

Creamy chicken tortellini and creamy sausage tortellini

To make creamy chicken tortellini, stir shredded chicken in at the end and finish with lemon zest or herbs. For creamy sausage tortellini, brown sausage first, then build the cream sauce around it. Add spinach near the end for color and contrast.

When you’re building these bowls, you’re practicing how to cook tortellini and how to finish it properly—two skills that make the whole category easier.

Also Read: Oat Pancakes Recipe (Healthy Oatmeal Pancakes)


Tortellini pomodoro and marinara tortellini for classic comfort

Tomato sauce is one of the easiest ways to balance rich fillings. Tortellini pomodoro tastes bright and simple, while marinara tortellini leans more cozy and savory.

Warm tomato sauce in a pan. Cook tortellini. Add it to the sauce and toss gently. Use pasta water to help the sauce cling. Finish with Parmesan and a drizzle of olive oil.

If you like making sauce from scratch, MasalaMonk has a helpful guide to tomato sauce from fresh tomatoes. If you want multiple sauce styles for different moods, this roundup is useful: sauce variations including marinara and vodka.

How to cook tortellini and mushrooms in tomato sauce

Sauté mushrooms until browned. Add them to the sauce. Then toss in tortellini and finish with Parmesan and pepper. This works especially well with mushroom tortellini, but it upgrades plain cheese tortellini too.

Tortellini and spinach in tomato sauce

Add spinach at the end so it stays green. Meanwhile, keep the sauce bright with a little basil or oregano.

In both cases, the key is the finish: that quick toss is still how to cook tortellini so it tastes unified.

Also Read: Double Chocolate Chip Cookies – Easy Recipe with 7 Variations


Bolognese tortellini, ground beef tortellini, and sausage tortellini

Ragù-style sauces pair beautifully with tortellini, particularly meat tortellini and cheese tortellini. However, because tortellini filling is already rich, the sauce should be savory and balanced rather than greasy.

For a solid ragù foundation, MasalaMonk’s bolognese sauce recipe is a great internal reference.

How to cook ground beef and tortellini: weeknight ragù energy

Brown ground beef with onion and garlic. Add tomato sauce and herbs. Simmer briefly. Cook tortellini separately, then toss it into the sauce for a minute with a splash of pasta water. Finish with Parmesan.

Italian sausage and tortellini: deeper flavor, same method

Brown sausage first. Add onion and garlic. Add sauce and a splash of broth. Toss in cooked tortellini and finish with spinach and Parmesan. Consequently, sausage and tortellini tastes hearty without feeling clumsy.

Tortelloni bolognese note

If you’re using tortelloni (larger stuffed pasta), keep the stirring gentle and taste early. Tortelloni can be slightly more delicate when hot, so finishing carefully matters even more.

In every case, you’re applying the same idea: cook tortellini gently, then finish it briefly in sauce. That’s how to cook tortellini so it stays intact and tastes cohesive.

Also Read: 10 High Calorie Protein Shakes & Smoothie Recipes for Healthy Weight Gain


How to cook one pot tortellini that doesn’t feel like a shortcut

One pot tortellini is popular because it saves dishes, but it can also taste genuinely good when the sauce and pasta finish together.

Start by sautéing onion and garlic in olive oil. Add broth and sauce. Bring to a gentle simmer. Add tortellini and cook until tender. Finish with Parmesan and herbs.

One-pot tortellini guide card showing the correct order: sauté aromatics, add sauce and broth, simmer gently, add tortellini, add greens last and finish with parmesan.
One-pot tortellini works when the order is right—sauté first, simmer the liquid, then add tortellini and finish with greens so it stays tender instead of overcooking.

If you like the general one-pot structure, MasalaMonk’s one-pot chicken bacon ranch pasta shows the comfort-forward approach in a way that’s easy to adapt.

One pot tortellini and sausage

Brown sausage first to build flavor. Then add onion and garlic, pour in marinara and broth, and add tortellini. Finish with spinach and Parmesan.

One pot chicken and tortellini

Build a lighter base with broth and a spoonful of tomato sauce. Add tortellini, then stir in shredded chicken near the end. Finish with basil and pepper. Alternatively, swap the tomato base for pesto and you’ve got chicken tortellini with pesto in a one-pot lane.

One pot tortellini and vegetables

Add broccoli, peas, asparagus, or zucchini. Add sturdy vegetables earlier and greens later. Meanwhile, keep the sauce simple so the bowl stays clean.

These dinners reinforce how to cook tortellini while also keeping the routine interesting.

Also Read: Healthy Pumpkin Spice Latte (Low Cal, Real Pumpkin)


Slow cooker tortellini and crock pot chicken tortellini that stays tender

Slow cooker tortellini can be excellent, yet timing matters. Tortellini cooks quickly, so it should go in near the end. Add it too early and it turns soft. Therefore, build the base first, then add tortellini late.

Slow cooker tortellini guide card explaining when to add tortellini: build the base first, cook chicken and vegetables until tender, add tortellini near the end, and serve soon to prevent mush.
Slow cooker rule: add tortellini at the end so it stays tender—this is the key to crock pot chicken tortellini and slow cooker tortellini that doesn’t turn mushy.

For a useful internal reference on slow cooker soup structure, MasalaMonk’s crock pot lasagna soup is a strong companion.

How to cook chicken tortellini crock pot style (brothy or creamy)

Add chicken, broth, aromatics, and vegetables to the slow cooker. Cook until the chicken is tender, then shred it. Add tortellini during the final stretch. Finish with spinach and Parmesan.

For a creamy version, stir in cream cheese or a splash of cream right before serving. This approach naturally covers chicken tortellini crock pot, chicken tortellini in crock pot, chicken tortellini slow cooker, and crockpot chicken and tortellini without forcing anything.

How to cook slow cooker tortellini with sausage

Brown sausage if you can; it adds depth. If you’re short on time, it still works, although the flavor is milder. Add sauce and broth, let the base cook, then add tortellini near the end. Finish with Parmesan and pepper.

Again, the principle holds: timing is the heart of how to cook tortellini in slow cooker meals.

Also Read: Mayo Recipe: 15+ Homemade Mayonnaise Variations


How to cook instant Pot tortellini with better control

Stuffed pasta can overcook under pressure, so a controlled simmer often works better than a long pressure cook.

Use sauté mode to cook onion and garlic. Add broth and sauce. Bring to a simmer. Add tortellini and cook until tender, tasting early. Finish with Parmesan and herbs.

It’s simple, yet it’s reliable. In other words, it’s a practical way to apply how to cook tortellini when you want speed without guesswork.

Also Read: Instant Pot Lentil Recipes for Effortless Weight Loss and Quick Meals


Air fry tortellini: crunchy snacks and easy appetizers

Air fried tortellini is crunchy, salty, and perfect for dipping. It’s also a great way to make a simple package feel like a fun event.

Cook tortellini first. Drain thoroughly and pat dry. Toss lightly with oil and seasoning. Air fry until crisp, shaking occasionally for even browning.

Crispy tortellini air fryer guide card showing how to air fry tortellini: boil first, dry very well, toss with light oil and seasoning, air fry until crisp, then serve with marinara or pesto for dipping.
Air fried tortellini tip: boil, then dry it really well before air frying—this is the key to crispy tortellini (not soggy), perfect with marinara or pesto for dipping.

For a tested external reference, The Kitchn shares a method and review on air-fried cheese tortellini.

Air fryers vary, so technique matters. If you run into uneven browning or sogginess, MasalaMonk’s air fryer mistakes guide helps you troubleshoot quickly.

For another crisp snack companion, MasalaMonk’s air fried chilli garlic potato bites is a fun pairing idea for parties.

Serve air fry tortellini with marinara, pesto, or a creamy dip. If you want “fried tortellini” vibes without deep frying, this method hits that craving.

Also Read: French Toast Sticks (Air Fryer + Oven Recipe) — Crispy Outside, Custardy Inside


Tortellini prosciutto e panna: How to cook the creamy classic

Tortellini prosciutto e panna is one of those dishes that tastes like you ordered it, even though it comes together quickly. You get a silky cream sauce, savory prosciutto, tender pasta, and a peppery finish.

For a traditional reference, La Cucina Italiana shares a classic approach on tortellini panna e prosciutto.

To make it at home, cook tortellini gently and reserve pasta water. Warm butter in a pan, sizzle chopped prosciutto briefly, then add cream. Toss in tortellini and loosen with pasta water until glossy. Finish with black pepper and Parmesan.

If you enjoy understanding how different Parmesan styles affect flavor, MasalaMonk’s Parmesan guide is a great companion.

This dish is also a reminder that how to cook tortellini for cream sauces is mostly about the finish: gentle toss, glossy coating, and serving promptly.

Also Read: Peanut Butter Cookies (Classic Recipe & 3 Variations)


Store-bought tortellini: Rana, Barilla, Buitoni, and what really matters

Store-bought tortellini can taste excellent. The secret isn’t magic—it’s matching format to method and finishing properly.

  • For refrigerated rana tortellini or giovanni rana tortellini, keep the simmer gentle and taste early. If you want a concrete reference for timing, check Giovanni Rana’s instructions.
  • For pantry-style products such as barilla tortellini (where available), longer boiling and sturdier sauces work well. Timing expectations are reflected on Barilla’s recipe page.
  • For buitoni tortellini, the same logic applies: salted water, gentle simmer, early tasting, and a brief finish in sauce.

If you like browsing for variation ideas, these external sources are useful for inspiration:

The big takeaway is simple: brands vary, but how to cook tortellini successfully is consistent—gentle cooking and a smart finish.

Also Read: Moscow Mule Recipe (Vodka Mule): The Master Formula + 9 Variations


Dietary versions: vegan tortellini, vegetarian tortellini, gf tortellini, eggless, non-dairy

Tortellini can fit many diets if you choose the right product and pair it with the right sauce.

  • Vegan tortellini / non dairy tortellini: finish in tomato sauce, broth, or dairy-free pesto. For pesto flexibility, MasalaMonk’s pesto hub is a helpful starting point.
  • Vegetarian tortellini: cheese tortellini and spinach and ricotta tortellini work beautifully in pesto, tomato, and light cream lanes.
  • GF tortellini: keep the simmer gentle and stir carefully, since gluten-free pastas can be more delicate.
  • Eggless tortellini: treat it like delicate fresh pasta and avoid aggressive boiling.

If you occasionally enjoy pasta alternatives, MasalaMonk has thoughtful reads on lentil pasta and keto-friendly pasta alternatives.

No matter the diet, the method stays the same. In other words, how to cook tortellini still comes down to gentle heat, tasting early, and finishing properly.

Also Read: Blueberry Pancakes (6 Recipes) + Homemade Pancake Mix


Troubleshooting: quick fixes when tortellini misbehaves

Even when you’ve learned how to cook tortellini, a few common problems can pop up. Fortunately, most fixes are simple.

Tortellini troubleshooting guide card with quick fixes: tortellini sticks (use a bigger pot and stir once early), splits (simmer and drain gently), turns mushy (taste earlier and serve fast), and sauce slides (use pasta water and toss longer).
If tortellini sticks, splits, or turns mushy, it’s usually a heat-and-handling issue—use these quick fixes to keep stuffed pasta intact and perfectly tender.

Tortellini sticks together
Use a larger pot and more water. Stir gently right after adding it. If it clumps anyway, don’t force it aggressively; often it loosens as it cooks.

Tortellini splits or leaks filling
Lower the boil to a lively simmer. Stir less. Drain gently. If it’s frozen, don’t thaw first.

Tortellini turns mushy
It likely overcooked or sat too long in hot sauce. Next time, taste earlier and serve soon after finishing.

Sauce is thin or slides off
Use reserved pasta water and toss longer. The starch helps emulsify. As a result, the sauce clings instead of slipping.

Also Read: Baked Jalapeño Poppers (Oven) — Time, Temp & Bacon Tips


Leftovers: storing and reheating without ruining the texture

Tortellini is best fresh, yet leftovers can still be enjoyable when reheated gently.

Reheat tortellini guide card with tips for leftovers: for creamy tortellini add a splash of milk or water and warm gently, for tomato-based tortellini add a spoon of water and stir, and for tortellini in broth reheat without hard boiling.
Leftover tortellini reheats best with gentle heat and a splash of liquid—use this quick guide to keep creamy, tomato, and broth-based tortellini from turning dry or mushy.

For safety guidance, these references are reliable:

For texture, reheat slowly and add a splash of liquid:

  • For creamy tortellini pasta, add a little milk or water and warm gently.
  • For tomato-based tortellini, add a spoonful of water and stir.
  • For tortellini in broth, warm slowly without boiling hard.

This approach preserves the “just cooked” feel as much as possible.

Also Read: Classic Deviled Eggs (Easy) + 8 Flavorful Variations


What to serve with tortellini so dinner feels complete

A good side dish doesn’t need to be complicated. It just needs to complement the bowl.

Garlic bread is a classic with marinara tortellini and bolognese tortellini. If you want a homemade option, MasalaMonk’s garlic bread loaf recipe fits naturally.

What to serve with tortellini pairing guide card suggesting sides for different sauces: tomato sauces with garlic bread and salad, cream sauces with roasted vegetables and lemony greens, broth/brodo with crusty bread and herbs, and pesto with tomatoes and simple vegetables.
Not sure what to serve with tortellini? Use this quick pairing guide to build a complete dinner—match your sauce (tomato, creamy, broth, or pesto) with an easy side that balances the bowl.

If you’re building a more social meal—especially with tortellini prosciutto e panna—a small board works beautifully. MasalaMonk’s charcuterie board guide can help you set that up with confidence.

For quick seasoning support in soups and sauces, an herb blend can help. MasalaMonk’s Italian seasoning mix is a simple pantry staple.

If you want baked-pasta comfort on another night, MasalaMonk’s baked ziti recipes can offer inspiration, while their béchamel sauce guide and cottage cheese lasagna are excellent for creamy, layered comfort.


A simple dinner “template” that makes tortellini nights effortless

When you’re holding a pack of tortellini and don’t want to overthink, use this quick template:

  1. Pick the format: fresh/refrigerated, frozen, or dried.
  2. Pick the lane: pesto, creamy, tomato, broth, or ragù.
  3. Pick one add-in: chicken, sausage, mushrooms, or greens.
  4. Pick a finish: Parmesan, pepper, lemon, or herbs.
Tortellini dinner template guide card showing a simple build-your-own dinner method: pick the format (fresh, frozen, dried), pick the lane (pesto, cream, tomato), pick one add-in (chicken, sausage, mushrooms, greens), and pick a finish (parmesan, pepper, lemon, herbs).
Save this “pick 4” tortellini dinner template: choose your tortellini format, sauce lane, one add-in, and a finishing touch—an easy way to turn any pack of tortellini into dinner without overthinking.

That’s it. With those four choices, you’ll never feel stuck—and you’ll naturally practice how to cook tortellini in ways that keep getting easier.

Also Read: Sheet Pan Chicken Fajitas Recipe (Easy One-Pan Oven Fajitas)


The bottom line on how to cook tortellini

The best way to master how to cook tortellini isn’t memorizing an exact number of minutes. It’s repeating the same handful of habits until they become automatic: salt the water, keep the simmer controlled, taste early, reserve pasta water, and finish in sauce or broth.

From there, tortellini becomes endlessly flexible. Pesto tortellini can become a bright chicken dinner. Creamy tortellini pasta can become a cozy bowl with spinach. Tortellini pomodoro can become a reliable classic. Tortellini in brodo can become your comforting reset meal. One pot tortellini can become your low-dishes routine. Slow cooker tortellini can become your hands-off plan. Air fry tortellini can become your crunchy appetizer.

Once you have the rhythm, you won’t just know how to cook tortellini—you’ll know how to turn it into dinner, almost any way you want, whenever you need it.

Also Read: How to Make Churros (Authentic + Easy Recipe)

FAQs about How to Cook Tortellini

1) How long does it take to cook tortellini?

Most tortellini cooks quickly, yet the exact time depends on whether it’s fresh tortellini, refrigerated tortellini, frozen tortellini, or dried tortellini. In practice, the best approach is to taste early and keep checking until the pasta is tender and the filling is hot through the center. If you’re learning how to cook tortellini consistently, tasting is more dependable than relying on one fixed number.

2) How do I know when tortellini is done cooking?

Tortellini is done when the pasta feels tender but still springy and the filling tastes fully warmed. Also, the pieces usually look slightly plumper. If the pasta feels firm at the edges, it needs a bit more time. Conversely, if it feels floppy or waterlogged, it likely cooked too long.

3) Should tortellini float when it’s finished?

Often, tortellini will float as it nears doneness, although floating alone isn’t a guarantee. Instead, treat floating as a sign to start tasting. That way, you’ll learn how to cook tortellini to the exact texture you like.

4) Do I cook frozen tortellini without thawing?

Yes—cook frozen tortellini straight from frozen. Thawing can weaken the pasta and increase the chance of splitting. Rather than thawing, add the frozen tortellini to salted water at a controlled boil and taste early as it cooks.

5) Why does my tortellini break or leak filling?

Tortellini may split if the boil is too aggressive, if it’s stirred roughly, or if it’s overcooked. For better results, keep the water at a lively simmer, stir gently only at the start, and drain carefully. In addition, finishing tortellini in sauce with a light toss helps prevent tearing.

6) What’s the best way to cook cheese tortellini?

Cheese tortellini tastes best when the water is salted and the pasta is finished briefly in sauce. After draining, toss it in marinara, pesto, or a light cream sauce with a splash of pasta water to help the sauce cling. If you’re focusing on how to cook tortellini for weeknights, cheese-filled tortellini is the easiest place to start.

7) How do I cook spinach and ricotta tortellini without making it soggy?

For spinach and ricotta tortellini (also called ricotta spinach tortellini or tortellini ricotta spinaci), use a gentle simmer and start tasting early. Then, avoid letting it sit in a colander. Instead, transfer it straight into a warm sauce so it stays tender yet not mushy.

8) Can I cook tortellini in broth?

Absolutely. Tortellini in broth is a classic way to serve stuffed pasta. Warm the broth gently, then cook tortellini at a mild simmer until tender. Afterwards, add herbs or spinach near the end for a fresher bowl.

9) What is tortellini in brodo?

Tortellini in brodo is tortellini served in broth, traditionally associated with Bologna. Even at home, it’s straightforward: a flavorful broth, tender tortellini, and a simple finish like Parmesan and pepper.

10) How do I make pesto tortellini without it turning oily?

To keep pesto tortellini glossy, warm the pesto gently instead of boiling it. Then, add a splash of reserved pasta water while tossing. As a result, the sauce emulsifies and coats the tortellini evenly.

11) What’s the easiest creamy tortellini pasta for beginners?

A simple creamy tortellini pasta often starts with butter, garlic, and cream, finished with pasta water for a silky texture. Alternatively, cream cheese tortellini is even simpler: melt cream cheese with a little milk or broth, then loosen with pasta water before tossing in tortellini.

12) Can I make one pot tortellini?

Yes—one pot tortellini is a practical dinner. Simmer your sauce with broth, then add tortellini and cook until tender. Finally, finish with Parmesan or herbs. This method works particularly well for cheese tortellini pasta and tortellini with veggies.

13) Can I make tortellini in a slow cooker or crock pot?

Yes, though timing matters. For slow cooker tortellini or crock pot tortellini, build the soup or sauce base first and add tortellini near the end so it doesn’t overcook. The same idea applies to chicken tortellini crock pot and chicken tortellini slow cooker recipes.

14) How do I make chicken tortellini in a crock pot without mushy pasta?

Cook the chicken and broth base first, shred the chicken, then add tortellini during the last part of cooking. That way, the tortellini stays tender. Likewise, add spinach at the end so it remains bright.

15) Can I cook tortellini in an Instant Pot?

Yes, although it’s easy to overcook stuffed pasta under pressure. For better control, use sauté mode to build flavor, then simmer tortellini gently until tender. This approach fits how to cook tortellini when you want speed without guesswork.

16) How do I make air fryer tortellini?

To make air fry tortellini (or air fried tortellini), cook tortellini first, drain well, pat dry, then toss lightly with oil and seasoning. Next, air fry until crisp, shaking occasionally for even browning. Serve with marinara, pesto, or a creamy dip.

17) What’s the difference between tortellini and tortelloni?

Tortelloni is larger than tortellini and often has a softer, more delicate feel. Because of its size, it may need a bit more time to heat through. Still, the same principles for how to cook tortellini apply: gentle simmer, early tasting, and a careful finish in sauce.

18) How do I cook store-bought tortellini like Rana tortellini or Buitoni tortellini?

For rana tortellini, giovanni rana tortellini, and buitoni tortellini, follow the package timing as a baseline, then taste to confirm doneness. Usually, refrigerated styles cook quickly, whereas dried versions take longer. In all cases, finishing in sauce with pasta water improves texture and flavor.

19) How do I keep tortellini from sticking together?

Use plenty of water, stir gently right after adding tortellini, and avoid overcrowding the pot. Additionally, don’t drain and let it sit too long; transferring into sauce promptly helps keep pieces separate.

20) Can I reheat tortellini without it turning mushy?

Yes. Reheat gently with a splash of liquid—water for tomato sauces, milk or broth for creamy sauces, and extra broth for soups. Then warm slowly rather than boiling hard. This method helps preserve texture when you’re practicing how to cook tortellini for leftovers, too.

21) Can tortellini be vegetarian or vegan?

Yes. Vegetarian tortellini often includes cheese or spinach and ricotta. Vegan tortellini and non dairy tortellini are also available depending on brand and store. Even so, the cooking method stays similar: gentle simmer, early tasting, and a careful finish.

22) Is there gluten-free tortellini?

Yes—gf tortellini exists, although it can be more delicate than wheat-based pasta. Therefore, keep the simmer controlled, stir minimally, and taste early so it doesn’t overcook.

23) Can I make tortellini with sausage or ground beef?

Definitely. Sausage tortellini works well in tomato sauce, creamy sauces, or one-pot dinners. Similarly, ground beef tortellini pairs nicely with a bolognese-style sauce. For best texture, cook tortellini separately and toss it in the sauce briefly right before serving.

24) What are the best sauces for tortellini?

The best sauces depend on the filling. Cheese tortellini suits pesto, marinara, pomodoro, and cream sauces. Spinach and ricotta tortellini often shines with lighter tomato or butter-garlic sauces. Meat tortellini is excellent in broth and also works in ragù. When in doubt, keep the sauce balanced and let the filling lead.
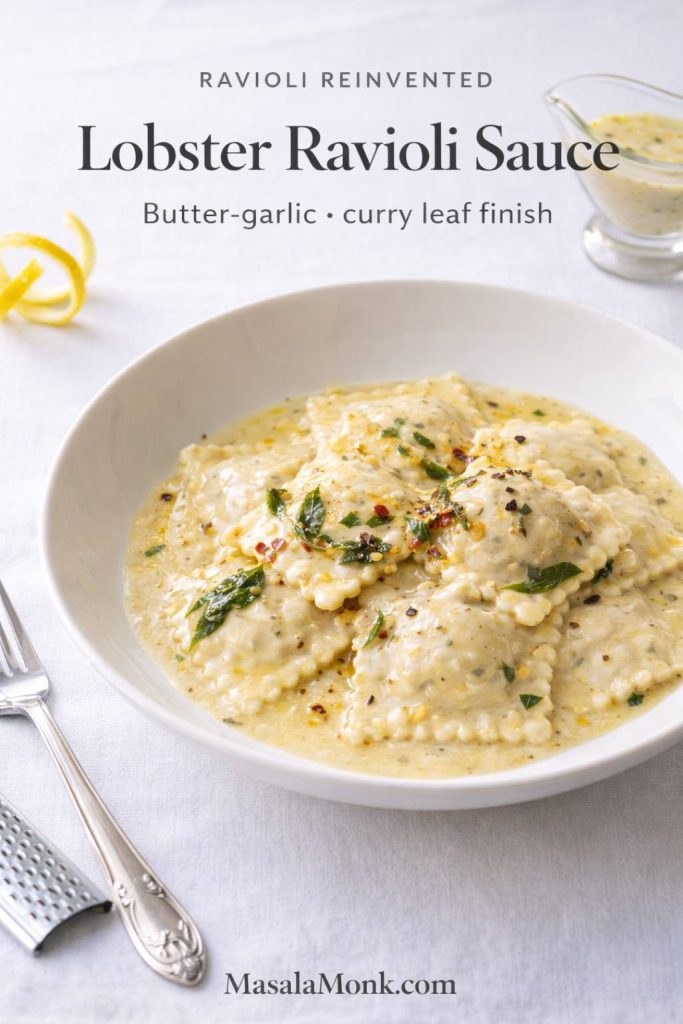
25) Why does my tortellini taste bland even when the sauce is good?

Usually, the cooking water wasn’t salted enough, or the tortellini wasn’t finished in sauce. Salted water seasons the pasta itself, while a short toss in sauce helps the flavors stick. Together, those steps are the simplest upgrade in how to cook tortellini so it tastes fully seasoned.

Posted on 13 Comments

Vodka Pasta (Penne alla Vodka) + Spicy Rigatoni, Chicken, and Gigi Recipes

Penne alla vodka in a creamy tomato vodka sauce, with a fork lifting glossy pasta in a moody restaurant-style setting.

Vodka pasta is the kind of dinner that looks and tastes like you planned ahead—even when you absolutely didn’t. A good vodka pasta sauce is silky and tomato-forward, softened by cream, and finished in a way that makes it cling to the pasta instead of sliding off. Make it once and you’ll understand why penne alla vodka became a modern classic, why spicy rigatoni vodka is so hard to stop eating, and why chicken vodka pasta feels like a complete meal without extra fuss.

Vodka isn’t there to make anything taste boozy. Used correctly, it subtly lifts aroma and rounds the sauce into something that feels brighter and more “restaurant.” If you like reading the why behind the method, Serious Eats explains what vodka contributes (and what happens when you skip it). Does vodka sauce really need vodka?

Now let’s cook a vodka sauce pasta that tastes like the one you crave, then turn it into the versions people actually make at home: rigatoni alla vodka, spaghetti vodka, linguine alla vodka, spicy vodka rigatoni, gigi pasta style, and chicken and vodka pasta.

Also Read: Authentic Louisiana Red Beans and Rice Recipe (Best Ever)


Vodka Pasta Sauce: The Flavor You’re Aiming For

A proper vodka pasta sauce has a very particular balance:

  • Tomatoes taste deep, not raw because tomato paste is cooked until it smells rich and slightly sweet.
  • Cream softens edges so the sauce feels luxurious without turning heavy.
  • Vodka adds a subtle lift—not a vodka flavor, but a brighter finish and aroma.
  • Pasta water ties everything together so the sauce coats the noodles in a glossy layer.

When it’s right, vodka sauce and pasta tastes cohesive—like every component was meant to be together. When it’s “almost right,” the sauce usually falls into one of these traps: the tomato paste wasn’t cooked enough, the cream was added over too-high heat, the sauce wasn’t seasoned in stages, or the pasta wasn’t finished in the pan with pasta water.

You don’t need fancy ingredients to fix any of that. You just need a steady method.

Also Read: Vodka with Lemon: Easy Cocktails, Martini Twist & DIY Infusion


Penne alla Vodka Ingredients for Classic Vodka Pasta

This is written as penne alla vodka because it’s the classic, but the sauce is equally good for pasta penne alla vodka variations, penne and vodka nights, and even spaghetti and vodka sauce.

Pasta

  • 350–400 g penne (or see the pasta-shape section for rigatoni/spaghetti/linguine swaps)

Vodka pasta sauce

  • 2–3 tbsp olive oil (or 1 tbsp olive oil + 1 tbsp butter)
  • 1 small onion, finely chopped (or 2 shallots)
  • 4–6 garlic cloves, minced
  • 2–3 tbsp tomato paste
  • ½ to 1 tsp chilli flakes (optional; you’ll adjust later for spicy vodka pasta)
  • ½ cup (120 ml) vodka
  • 1 can (400 g) crushed tomatoes or passata
  • ½ cup (120 ml) cream (heavy cream or cooking cream)
  • ½ cup grated Parmesan (plus extra to serve)
  • Salt and plenty of black pepper

To finish

  • 1–2 cups reserved pasta water (hot)

If you like the idea of building your tomato foundation from scratch, a smooth homemade base makes the final sauce feel especially clean: Tomato sauce from fresh tomatoes
And if you want a simple tomato sauce reference that’s useful across many dinners—not just vodka pasta—this is a strong baseline: Marinara sauce recipe

For cheese, a proper grating-style Parmesan melts smoothly and adds the savory depth vodka and cream sauces need. If you’ve ever wondered why some “Parmesan” behaves differently (melting well vs turning grainy), this internal guide is genuinely helpful: Parmesan cheese and its varieties


How to Make Vodka Pasta Step by Step

Start the pasta water for vodka sauce pasta

Bring a large pot of water to a boil. Once boiling, salt it well. Drop in the pasta and cook it until it’s just shy of al dente—because it’s going to finish in the sauce.

Hand sprinkling coarse salt into a steaming pot of boiling water before cooking pasta for penne alla vodka.
Salt early so the pasta is seasoned from within—then reserve a mug of starchy water to make the sauce cling later.

Before draining, reserve at least 1 cup of pasta water (2 cups is even better). This isn’t optional; it’s how vodka pasta becomes glossy and cohesive. Barilla’s explanation of why pasta water matters is one of the clearest practical references out there: How to use pasta water

Drain the pasta, but don’t rinse it. That surface starch helps the sauce cling.
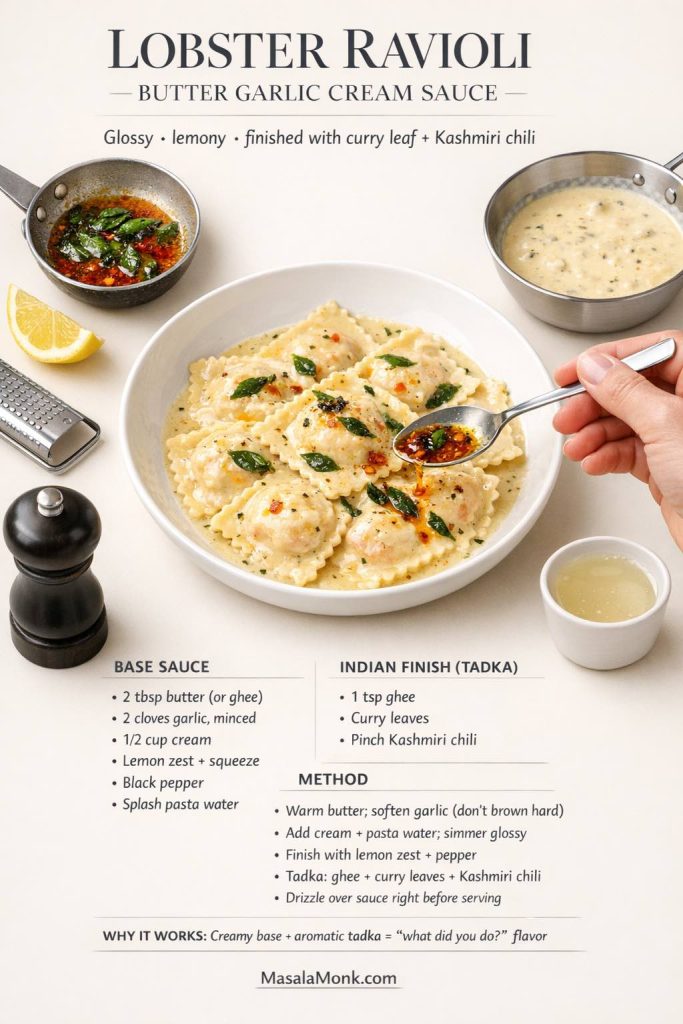
Prepped ingredients for penne alla vodka—chopped onion, minced garlic, tomato paste, chilli flakes, cream, vodka, and grated Parmesan arranged on a dark countertop.
Having everything measured and within reach prevents scorched garlic and overcooked tomato paste—two small mistakes that can dull the sauce.

Build the base: onion, garlic, chilli

While the pasta cooks, warm olive oil (and butter if using) in a wide pan over medium heat.

Add onion with a pinch of salt. Let it soften slowly until translucent and lightly golden. This step quietly shapes the entire sauce—rush it and the sauce can taste sharp; do it properly and the sauce tastes rounded.

Chopped onions gently sautéing in olive oil in a skillet, stirred with a wooden spoon to build the base for penne alla vodka sauce.
Cook the onion until it turns translucent and smells sweet—this mellow base keeps the finished sauce smooth instead of sharp.

Stir in the garlic and cook until fragrant. Keep it moving and keep the heat moderate. Garlic should smell sweet and warm, not toasted.

If you want a gentle baseline heat, add chilli flakes now. If you’re aiming for a crowd-pleasing pot and a separate spicy rigatoni vodka variation, hold most of the heat until later.

Minced garlic and red chilli flakes sizzling in olive oil in a skillet, stirred quickly to release aroma without browning.
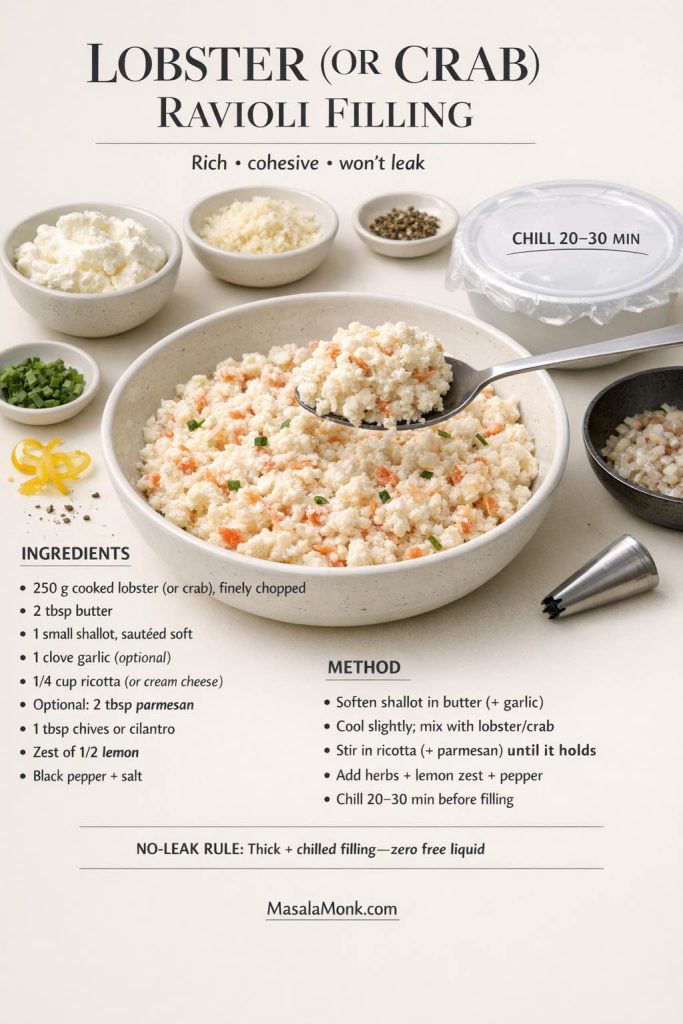
Keep this step short—once the garlic turns fragrant, move on immediately so the flavor stays sweet instead of bitter.

Toast the tomato paste for depth

Add tomato paste and cook it for 2–3 minutes, stirring frequently. This is where penne alla vodka gets its backbone. Tomato paste transforms as it cooks: the raw tang fades, the flavor deepens, and the aroma turns rich.

This “tomato paste first” approach is also common in well-tested vodka sauce methods, because it builds depth before the tomatoes and cream arrive.

Tomato paste being stirred and toasted in a skillet until dark and glossy, building depth for penne alla vodka sauce.
Keep stirring until the paste turns deeper and smells caramelized—this is what makes the sauce taste slow-cooked, even on a weeknight.

Add vodka, simmer briefly, and let it mellow

Pour in the vodka and stir immediately, scraping up any browned bits stuck to the bottom of the pan. Let it simmer for a couple of minutes so the initial sharpness softens.

If you want a well-tested reference for the classic order of operations—paste, vodka, tomatoes, cream—Serious Eats lays it out clearly: Pasta with vodka sauce

A quick real-world note: alcohol doesn’t always “cook off completely,” and retention varies by cooking method and time. If that’s important to you, these explain the nuance plainly.

Vodka being poured into a skillet with toasted tomato paste while a wooden spoon scrapes the pan to deglaze and loosen the sauce base.
Let the vodka simmer briefly while you scrape—those browned bits dissolve into the sauce and give the base a cleaner, brighter finish.

Add tomatoes and simmer until balanced

Stir in crushed tomatoes or passata. Bring the sauce to a gentle simmer and cook about 8–12 minutes.

During this simmer, taste and season. Tomatoes often taste flat until they’re salted properly. Add salt in small pinches, stir, and taste again. If the sauce still feels sharp, give it a few more minutes rather than trying to “fix” it with extra cream too soon.

Tomato vodka sauce base simmering in a skillet with a wooden spoon, steam rising as the tomatoes reduce and deepen in color.
Keep the simmer gentle—this short reduction softens acidity and concentrates flavor before the cream goes in.

If you’re using a homemade tomato base, the sauce can feel especially smooth and clean; this is a good internal reference for that foundation: Tomato sauce from fresh tomatoes

Add cream gently for vodka and cream sauce

Lower the heat before adding cream. Pour it in slowly while stirring. The sauce turns blush-pink and suddenly smells like vodka pasta.
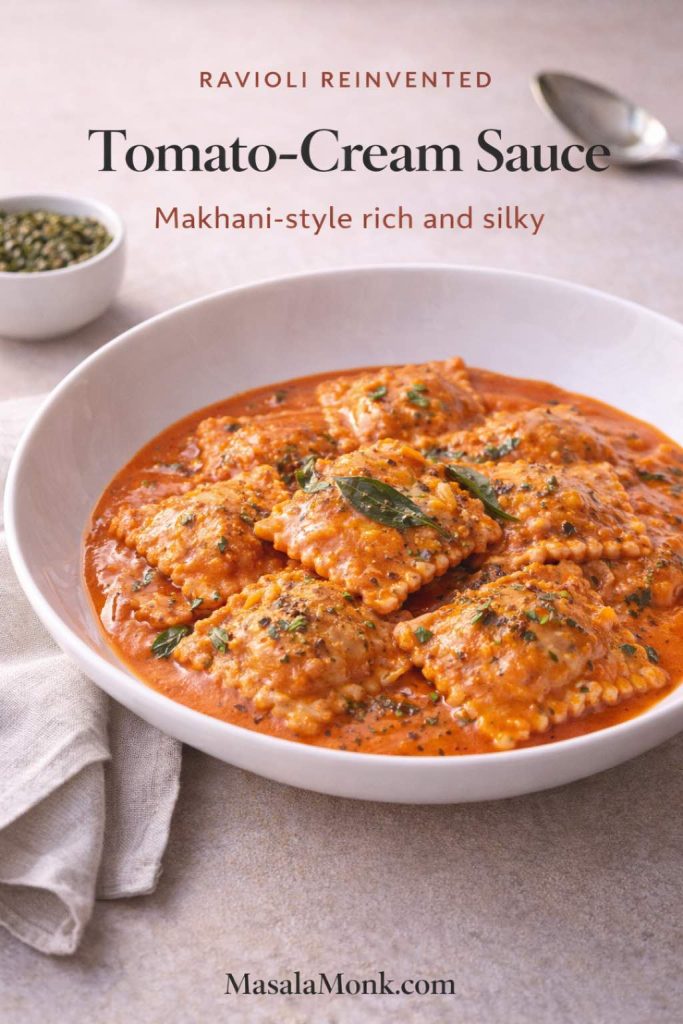
Cream being poured into a simmered tomato vodka sauce in a skillet while a spoon swirls it into a smooth blush-orange sauce.
Pour slowly over low heat and stir continuously—the gentle swirl is what keeps the sauce velvety instead of separating.
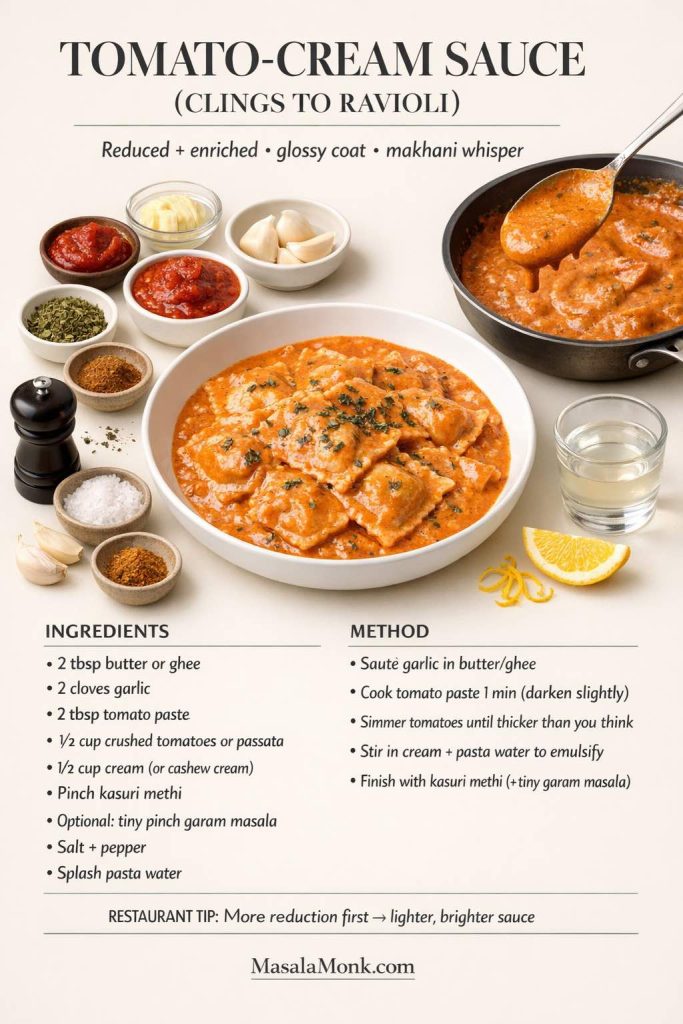
Now add black pepper generously—pepper matters here. It adds warmth that lifts the sauce differently than chilli heat.
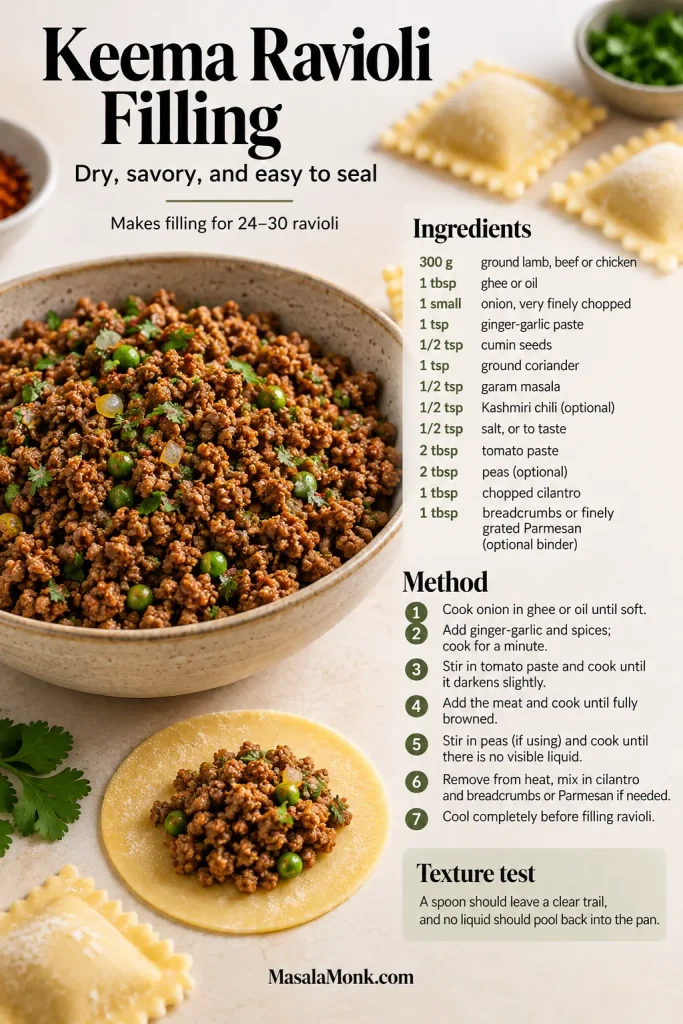
Then stir in Parmesan a handful at a time until smooth. If you’ve ever had a creamy sauce turn grainy, it’s often heat plus cheese choice. This internal guide helps you understand your options: Parmesan cheese and its varieties

Grated Parmesan melting into creamy tomato vodka sauce in a skillet while freshly ground black pepper is added and stirred.
Add cheese in a light snowfall and stir until it disappears—this builds savory depth while keeping the sauce smooth.

Finish the pasta in the pan for glossy vodka sauce and pasta

Add the drained pasta directly into the sauce. Toss well.

Now add reserved pasta water a splash at a time while tossing, until the sauce coats the pasta in a glossy layer. The sauce should look slightly loose in the pan and then tighten as it clings to the noodles.

Starchy pasta water being poured into a pan of creamy tomato vodka sauce while pasta is tossed with tongs to create a glossy coating.
Add pasta water in small splashes while tossing—this is the moment the sauce turns silky and starts clinging to every tube.

This is the difference between “vodka sauce poured over pasta” and vodka sauce pasta that tastes integrated.

Barilla’s pasta water guide is worth revisiting here because it explains what you’re doing in plain kitchen logic: How to use pasta water

Serve immediately with extra Parmesan and black pepper.


Vodka Pasta Finish: Why Pasta Water Makes It Restaurant-Glossy

If you’ve ever wondered why your home sauces sometimes feel separate—fat floating, liquid pooling, cheese clumping—the answer is often emulsification. Pasta water helps because it carries starch, salt, and heat. That starch encourages the sauce to bind into a cohesive coating rather than splitting into components.

This is especially important for vodka pasta because the sauce includes fat (oil, dairy, cheese) and liquid (tomatoes, vodka). Pasta water is the bridge that brings it together.

A reliable pattern helps:

  1. Toss pasta with sauce first.
  2. Add pasta water in small splashes.
  3. Toss again and again until the sauce coats.

When it works, the sauce looks like it has been “whipped” into the pasta. When it doesn’t, it tends to sit heavy at the bottom. The fix, most of the time, is simply more tossing and a little more pasta water.

Also Read: Waffle Recipe Without Milk: Fluffy, Golden, and Crisp


Pasta Shapes for Vodka Pasta Sauce: Penne, Rigatoni, Spaghetti, Linguine

The same vodka pasta sauce feels different on different pasta shapes. That’s not marketing—it’s texture.

Penne alla vodka

Penne is classic for a reason: the sauce fills the tubes and clings to the outside, so each bite feels saucy. If you’re making pasta penne alla vodka for the first time, penne is the most forgiving starting point.

Rigatoni alla vodka

Rigatoni alla vodka is bolder. The ridges grip sauce and the hollow center becomes a reservoir. If you want the full comfort-food effect, rigatoni is hard to beat.

Spaghetti vodka

Spaghetti vodka feels sleeker and a little lighter. Because the sauce coats strands instead of pooling in tubes, the sauce should be slightly looser—so you’ll usually use an extra splash of pasta water during the toss.

Linguine alla vodka

Linguine alla vodka is a beautiful middle ground. The strands have enough width to carry a creamy sauce well, yet it still feels elegant.

If you’re feeding people with different preferences, you can keep the sauce constant and vary the pasta shape. The method stays the same, and the final vibe changes.

Also Read: What to Mix with Jim Beam: Best Mixers & Easy Cocktails


Spicy Rigatoni Vodka: Heat That Feels Rounded, Not Harsh

Spicy rigatoni vodka is popular because it hits comfort and heat at the same time. Done well, it tastes warm and addictive, not aggressively spicy or sharp.

Hand sprinkling chilli flakes over creamy rigatoni in tomato vodka sauce in a skillet to adjust spice at the end.
Dial up the chilli after the sauce turns creamy—late heat tastes warmer and more balanced than spice cooked too early.

How to make spicy vodka rigatoni taste balanced

The key is when you add extra heat.

Start the base with a modest amount of chilli flakes, then taste again after the cream is added and the sauce has simmered. Add more chilli gradually near the end. That timing matters because the cream mellows spice, and the tomato base becomes more rounded after simmering.

Black pepper also matters more than you’d expect here. It brings a different kind of warmth that lifts the sauce rather than just increasing burn.

Adding deeper “pepper heat” without ruining the sauce

If you like experimenting with heat profiles—bright, smoky, vinegary, peppery—this internal guide is a good place to explore: Pepper sauce recipe

Instead of dumping extra heat into the whole pot, a pepper sauce at the table lets people customize their bowl. That’s especially helpful if you’re cooking for mixed spice tolerance.

Spicy vodka pasta with a cleaner finish

A small handful of extra Parmesan and a splash of pasta water during the final toss can make spicy vodka pasta feel smoother and more cohesive. When spice climbs, sauce can feel thicker and “stuck.” Pasta water fixes that by restoring glide.

Also Read: Healthy Tuna Salad – 10 Easy Recipes (Avocado, Mediterranean, No Mayo & More)


Chicken Vodka Pasta: The Creamy Protein Version That Still Feels Light

Chicken vodka pasta is what you make when you want vodka pasta comfort plus a full-meal feel. The goal is tender chicken that tastes integrated into the sauce—not dry chunks dropped on top.

Bite-size chicken pieces searing in a skillet while tongs turn one piece, with creamy tomato vodka sauce visible in the background.
Sear chicken until golden, then add it back only at the end—this keeps it juicy while the pan drippings deepen the sauce.

Chicken vodka pasta method that keeps chicken juicy

  1. Slice chicken breast thin (or use boneless thighs for a more forgiving texture).
  2. Season with salt and pepper.
  3. Sear in oil over medium-high heat until cooked through.
  4. Remove chicken to a plate.
  5. Build the vodka pasta sauce in the same pan.
  6. Add chicken back near the end, then toss pasta with sauce and pasta water.

This creates chicken and vodka pasta where everything tastes unified. It also works beautifully for chicken penne vodka pasta because penne holds sauce and chicken in the same bite.

If you want to compare another tested approach, Serious Eats has a dedicated recipe for chicken and penne in vodka cream sauce.

Chicken vodka pasta with penne vs rigatoni vs spaghetti

  • Chicken penne vodka pasta: classic, balanced, very satisfying.
  • Chicken rigatoni alla vodka: bolder, heartier, especially good if you’re going spicy.
  • Chicken spaghetti vodka: lighter, but easier to make messy—slice chicken smaller if you go this route.

If you love creamy chicken pasta nights in general, these internal posts fit naturally into your rotation:


Gigi Pasta Style: A Close Cousin of Vodka Pasta Sauce

Gigi pasta sits extremely close to vodka pasta in technique and comfort level. It’s still a tomato-cream sauce with spice and gloss; the difference is that many gigi pasta versions skip vodka, leaning more into a spicy tomato cream finish.

The method is familiar once you’ve mastered pasta alla vodka:

  • soften onion
  • warm garlic
  • toast tomato paste
  • simmer tomatoes
  • add cream gently
  • toss pasta with pasta water until glossy

Gigi pasta style with vodka

If you include vodka, you’re basically steering it toward vodka pasta sauce with a little extra heat. Keep the base spicy and finish with plenty of pepper and Parmesan.

Gigi pasta style without vodka

If you skip vodka, cook the tomato paste a touch longer and simmer the tomatoes a bit more before cream. That extra time gives you depth and mellowness. A tiny squeeze of lemon at the end can bring lift if you want a brighter finish.

If you’re curious what vodka specifically changes in the aroma and overall taste, Serious Eats’ explanation is still one of the clearest.

Also Read: Love Mangoes? Try These 5 Delicious Mango Dessert Recipes


Vodka and Cream: Getting the Texture Right Every Time

Vodka and cream can sound heavy, yet the best vodka pasta doesn’t eat like a brick of richness. The sauce stays light enough to keep you reaching for another bite because pasta water and technique do the work that people often try to force with extra cream.

If vodka pasta sauce feels too thick

Add pasta water while tossing. Keep going until the sauce clings without feeling stodgy. A sauce that looks slightly loose in the pan often coats perfectly on the plate.

If the vodka sauce pasta feels too thin

Next time, simmer the tomato-vodka base a bit longer before adding cream. For the current pot, toss longer and add a touch more Parmesan; the starch plus cheese often builds body quickly.

If the sauce looks like it might split

Lower the heat immediately and stir gently. Add pasta water gradually. Often, it comes back together once the temperature drops and the emulsion stabilizes.

If you want deeper instincts for creamy sauce behavior, these internal guides help build confidence around heat control and smooth texture:


Vodka Pasta Without Vodka: A Delicious Tomato-Cream Alternative

Sometimes you want the penne alla vodka vibe but prefer not to cook with alcohol. You can still make a creamy tomato pasta that scratches the same itch.

Creamy tomato sauce in a skillet being finished with a squeeze of lemon, showing a no-vodka option for a bright, glossy pasta sauce.
When you skip vodka, a tiny citrus finish brings lift—use just enough to brighten the sauce without making it taste lemony.

The “bright finish” approach

Skip vodka. Build the sauce with onion, garlic, tomato paste, and tomatoes. Simmer until mellow, add cream gently, then toss with pasta water until glossy. Finish with a small squeeze of lemon to lift the sauce.

The “extra depth” approach

Skip vodka again, but cook the tomato paste slightly longer and simmer the tomato base a few extra minutes before adding cream. That extra time adds the depth people often associate with vodka pasta.

If alcohol content matters for your household, it’s worth knowing that cooking doesn’t always reduce alcohol to zero, and retention varies widely depending on method and time.

Also Read: High-Protein Pasta Dishes: 10 Plant-Based Meal Prep Ideas

Bowl of penne alla vodka coated in creamy tomato sauce, topped with grated Parmesan and herbs, styled in a moody restaurant-like setting.
Look for a satin sheen on the pasta—when the sauce clings like this, you’ve nailed the finish and the bowl won’t taste heavy.

More Vodka Pasta Versions That Still Taste Like Vodka Pasta

Once you understand the base, vodka pasta becomes a flexible weeknight template rather than a one-off recipe.

Mushroom vodka pasta

Sauté mushrooms until browned before you start the onion. Then proceed with the vodka pasta sauce as written. The sauce becomes deeper and more savory without adding meat.

Shrimp vodka pasta

Cook shrimp separately and fold it in near the end so it stays tender. This version is especially good with linguine alla vodka because the strands carry a slightly looser sauce beautifully.

Spicy vodka pasta with greens

Add spinach or baby kale at the end of tossing. It wilts instantly and makes the dish feel fresher against the creaminess.

Baked vodka pasta

Toss cooked pasta with sauce, add mozzarella, and bake until bubbly. Keep the sauce slightly looser before baking so it doesn’t dry out.

If baked creamy pasta is your comfort lane, the internal sauce structure guides above (béchamel and mac & cheese) are genuinely useful for building intuition about how dairy behaves under heat.

Also Read: Cheesy Chicken Broccoli Rice – 4 Ways Recipe (One Pot, Casserole, Crockpot & Instant Pot)


What to Serve with Vodka Pasta

Vodka pasta is rich enough that sides should either cut through the sauce or echo it simply.

Garlic bread with vodka sauce pasta

Garlic bread is the classic partner because it lets you scoop up extra sauce and makes the meal feel complete. If you want a homemade version, this internal recipe is a strong one: Homemade garlic bread loaf

A cool side for spicy rigatoni vodka

If you’re going spicy, a cool tangy side can be a lifesaver at the table. A cucumber-yogurt sauce works as a palate reset between bites: Greek tzatziki sauce recipes

A simple salad that keeps the meal feeling light

Even a basic salad with lemon and olive oil is enough to keep creamy vodka pasta from feeling heavy halfway through.


Fork-twirled spaghetti coated in creamy tomato vodka sauce, served in a bowl with grated Parmesan and herbs in a moody setting.
On spaghetti, the sauce feels lighter and silkier—use an extra splash of pasta water while tossing so it coats the strands instead of pooling.

Storing and Reheating Vodka Pasta

Vodka pasta reheats well if you treat it gently. Cream sauces tighten in the fridge, so you’ll usually need a splash of water or milk to loosen the texture again.

How long leftovers keep

USDA FSIS guidance for leftovers is a practical baseline: Leftovers and food safety

Reheating vodka sauce pasta without breaking it

Reheat over low heat on the stovetop with a splash of water or milk, stirring frequently. Finish with black pepper and a little Parmesan again. The sauce often tastes surprisingly close to the original once it’s loosened and re-seasoned.

Also Read: 10 Best Espresso Martini Recipe Variations (Bar-Tested)


Close-up of rigatoni alla vodka coated in creamy tomato vodka sauce, topped with grated Parmesan and black pepper to show how ridges hold sauce.
Rigatoni’s ridges and hollow center trap more sauce per bite, which is why this version tastes extra indulgent even with the same recipe.

More Pasta Night Comfort After Vodka Pasta

If vodka pasta is your comfort zone, these internal posts fit naturally into the same rotation:


A Final Bowl: Why Vodka Pasta Becomes a Habit

Vodka pasta becomes a repeat dinner because it’s dependable and adaptable. Once you’ve cooked tomato paste until it turns rich, simmered tomatoes until they mellow, added cream gently, and finished everything with pasta water until glossy, you’ve learned the entire trick. From there, you can make penne alla vodka for classic comfort, swap to rigatoni alla vodka for a bigger bite, choose spaghetti vodka or linguine alla vodka for a sleeker feel, turn it into spicy rigatoni vodka when you want heat, fold in chicken for chicken vodka pasta, or pivot into a gigi pasta style sauce when you want the same tomato-cream comfort tuned differently.

Also Read: Blueberry Pancakes (6 Recipes) + Homemade Pancake Mix

FAQs

1) What is vodka pasta?

It’s pasta tossed in a creamy tomato-vodka sauce made with tomato paste, tomatoes, vodka, and cream. The finished dish is meant to taste rich and balanced—never “boozy.”

2) Does penne alla vodka taste like vodka?

No. When the sauce is simmered and balanced with tomatoes and cream, the vodka doesn’t taste like a shot; instead, it adds a subtle lift to aroma and finish.

3) Can I make this without vodka?

Yes. Skip the spirit and build flavor by cooking the tomato paste until deeper in color, simmering the tomatoes until mellow, then finishing with cream and starchy pasta water for a smooth coating.

4) What can I substitute for vodka in pasta alla vodka?

For a similar brightness, use a small splash of pasta water earlier to loosen the tomato paste, then add a tiny squeeze of lemon at the end. As another option, a teaspoon of mild vinegar can add lift—use a light hand so it doesn’t turn tangy.

5) Does alcohol cook off completely in the sauce?

Not always. Alcohol retention depends on time and method. If you need to avoid alcohol entirely, choose the no-vodka approach rather than relying on simmering.

6) Which pasta shape is best for vodka sauce?

Penne is classic because the tubes catch sauce. Rigatoni feels heartier and holds more sauce per bite, while spaghetti and linguine give a sleeker, silkier coating.

7) Is rigatoni alla vodka different from penne alla vodka?

The sauce style is the same, but the texture changes. Rigatoni is larger with ridges, so it grabs more sauce and often tastes more “substantial” in each mouthful.

8) How do I make spicy rigatoni vodka without it tasting harsh?

Add extra chilli gradually after the cream goes in. That way, the heat feels rounded rather than sharp. Also, extra black pepper and Parmesan help keep the sauce balanced as spice increases.

9) What’s the difference between spicy vodka rigatoni and spicy vodka pasta?

Spicy vodka rigatoni refers to using rigatoni specifically. Spicy vodka pasta is broader and can include penne, rigatoni, spaghetti, or other shapes—so the sauce may be similar, but the eating experience changes.

10) How do I keep chicken tender in chicken vodka pasta?

Sear the chicken first, remove it, make the sauce in the same pan, then add the chicken back near the end. That sequence keeps it juicy and prevents overcooking.

11) Can I use rotisserie chicken for this?

Definitely. Shred it and stir it into the sauce during the final simmer, just long enough to warm through.

12) Why is my sauce too thick?

It can thicken from too much reduction, too much cheese added quickly, or cooling in the pan. To fix it, loosen with reserved pasta water a splash at a time until it turns glossy again.

13) Why is my sauce watery?

Usually the tomato base didn’t simmer long enough, or the pasta wasn’t finished in the sauce. Simmer until the tomatoes taste mellow, then toss pasta in the pan and use pasta water to help the sauce cling.

14) Why did my sauce split after adding cream?

Most often the heat was too high. Lower the heat right away, stir gently, and add a little pasta water to help it come back together.

15) How do I make a smoother vodka and cream sauce?

Add cream over low heat and stir in cheese gradually. Then finish the pasta in the sauce with pasta water so everything emulsifies into a silky coating.

16) Can I make it without cream?

Yes. You can use a plant-based cream alternative, or rely on pasta water plus grated cheese for body. Even so, it will taste less “lush” than the classic version.

17) Can I make a vegan version?

Yes—use a thick dairy-free cream (like cashew or oat-based) and a vegan Parmesan-style topping. Additionally, pasta water becomes even more important for texture.

18) Is gigi pasta the same as this?

They’re closely related. Gigi-style pasta is typically a spicy tomato cream pasta that may skip vodka, while the classic version uses vodka as part of the sauce method.

19) Can I make the sauce ahead of time?

Yes. Make it, cool it, refrigerate, then reheat gently and loosen with a splash of water or pasta water before tossing with freshly cooked pasta.

20) How long will leftovers keep?

Stored properly in the fridge, it’s best within 3–4 days for flavor and texture.

21) Can I freeze the sauce?

You can, though creamy sauces sometimes change texture after thawing. If you plan to freeze, freezing the sauce (without pasta) tends to work better.

22) What should I serve with penne alla vodka?

Garlic bread and a simple salad are classic. Alternatively, if you made it spicy, a cool side can be a refreshing contrast.

23) Why isn’t my sauce turning pink?

Either the sauce needs more cream, or the tomato base is too light. Let the tomatoes simmer briefly before adding cream, and the color usually turns that signature blush tone.

24) How do I make it taste more like a restaurant version?

Cook the tomato paste until rich, season in layers, keep heat gentle after adding cream, and finish the pasta in the sauce with pasta water until glossy and clingy.