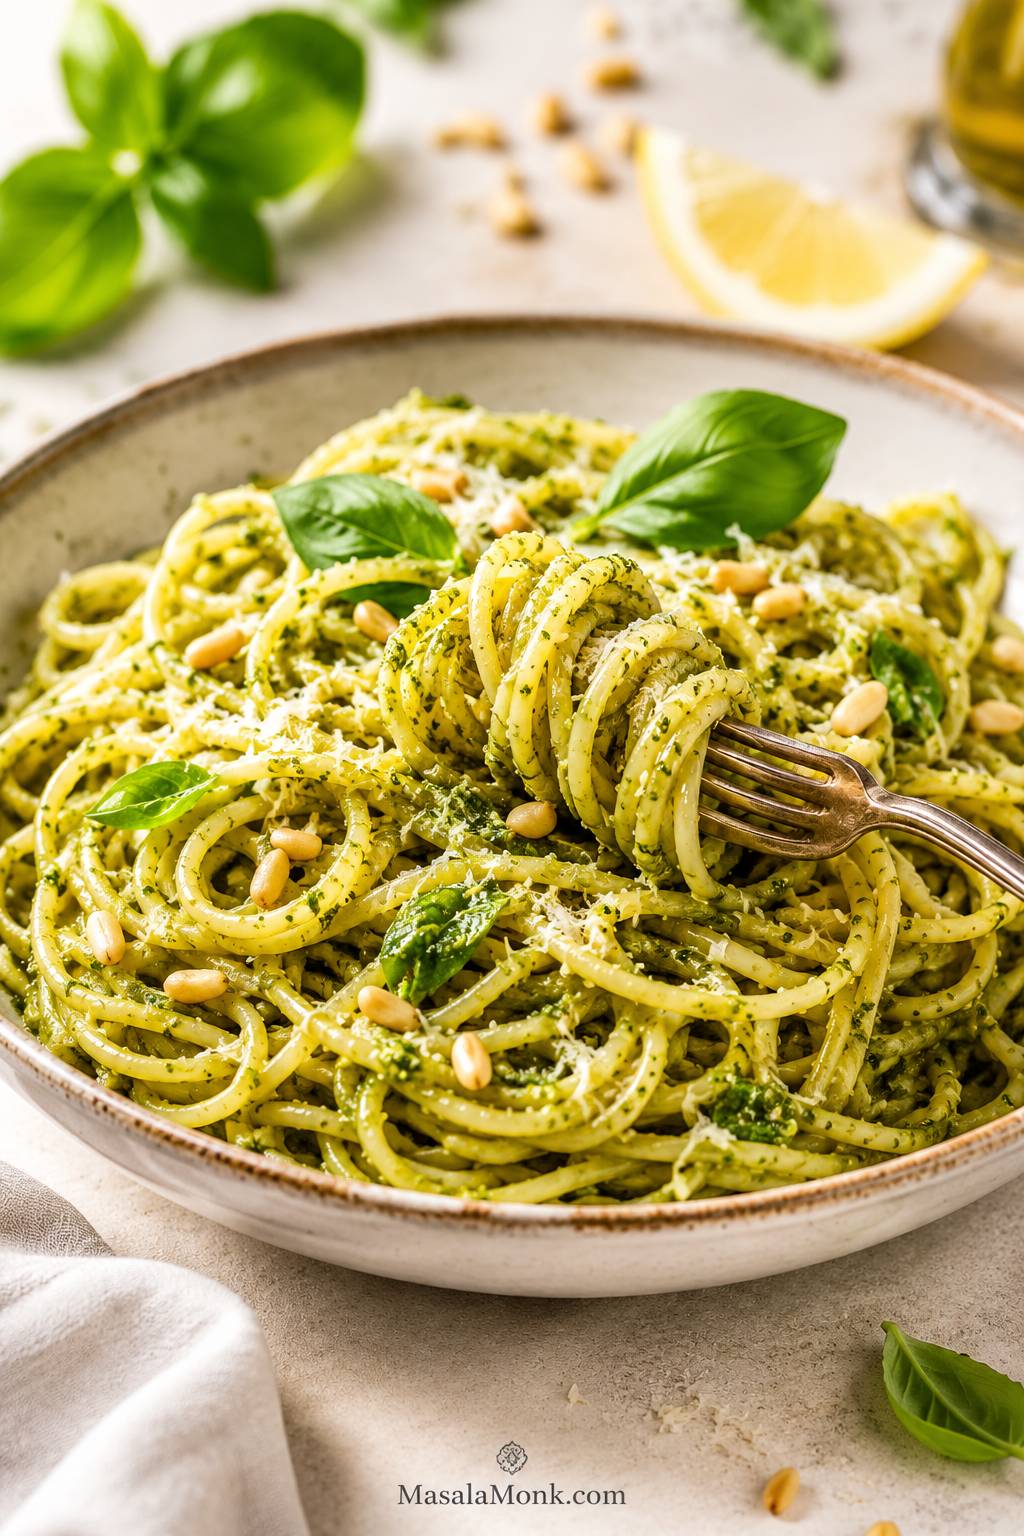
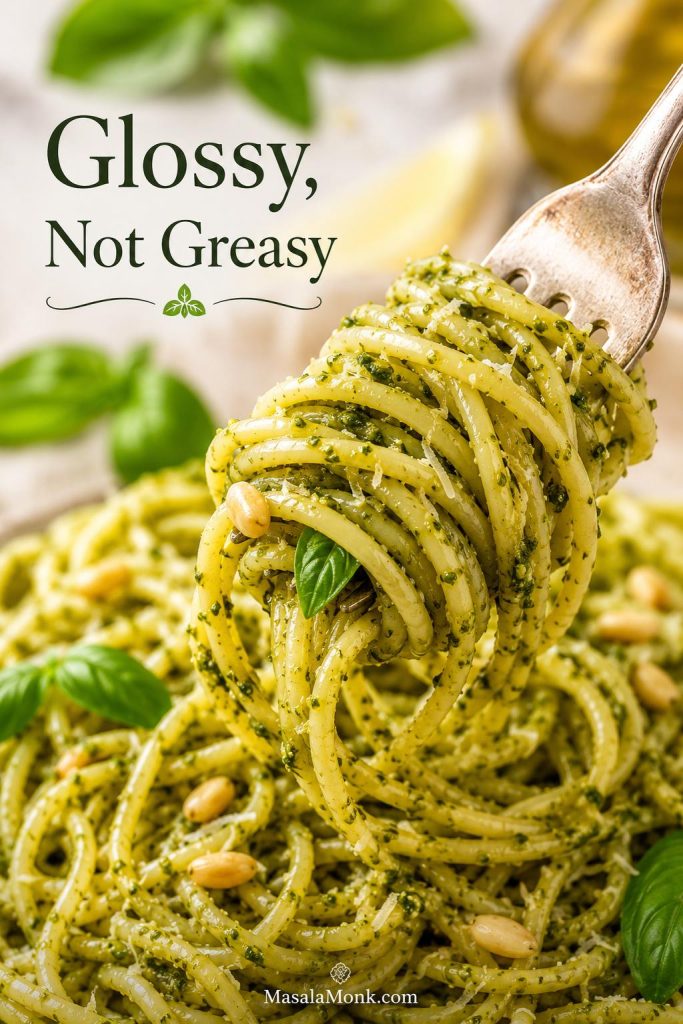
A good pesto pasta recipe should feel effortless: hot pasta, fresh basil, salty Parmesan, and a green sauce that clings lightly to every piece instead of pooling at the bottom of the bowl. The problem is that pesto is not a cooked sauce. When it gets too hot, too dry, or tossed without enough starch, it can turn dull, oily, or clumpy fast.
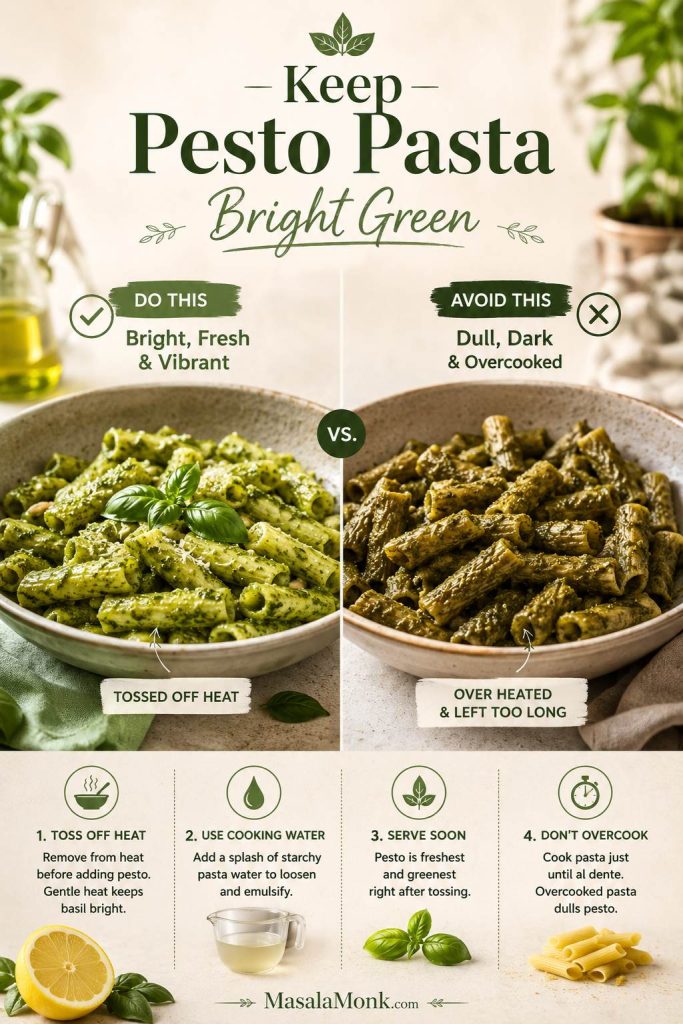
The fix is simple: toss the pesto off the heat, loosen it with a splash of starchy cooking water, and stop when the pasta looks glossy, loose, and lightly coated. You do not need extra oil, and you usually do not need more pesto.
This easy 20-minute version works with homemade basil pesto or a good store-bought pesto. Once you understand the basic ratio, you can use the same method for spaghetti, penne, quick pesto noodles, creamy pesto pasta, chicken pesto pasta, or a cold pesto pasta salad — all with a bright, basil-forward sauce that tastes alive instead of flat.
Pesto Pasta at a Glance
What You’ll Find in This Pesto Pasta Guide
Make the Base Recipe
Variations, Fixes and Storage
Quick Answer: How to Make Pesto Pasta
Cook the pasta until al dente, then save about 1 cup / 240 ml of the starchy cooking water before draining. Toss the hot pasta with pesto away from direct heat. Add a few spoonfuls of the cooking water until the sauce loosens, turns glossy, and clings lightly to the pasta.
For exact amounts by serving size, use the pesto pasta ratio guide before you start adjusting the sauce.
Basic Pesto Pasta Ratio
For 4 servings, use 12 oz / 340 g pasta, ½ to ¾ cup / 120–180 ml pesto, and ¼ to ½ cup / 60–120 ml starchy cooking water, added gradually.
Start with ½ cup / 120 ml pesto if using a salty or oily store-bought pesto. Start closer to ¾ cup / 180 ml if using a fresh homemade pesto that is softer, greener, and less concentrated.
If the bowl already looks dry, oily or too thin, check the pesto pasta troubleshooting guide before adding more pesto.
Choose Your Version
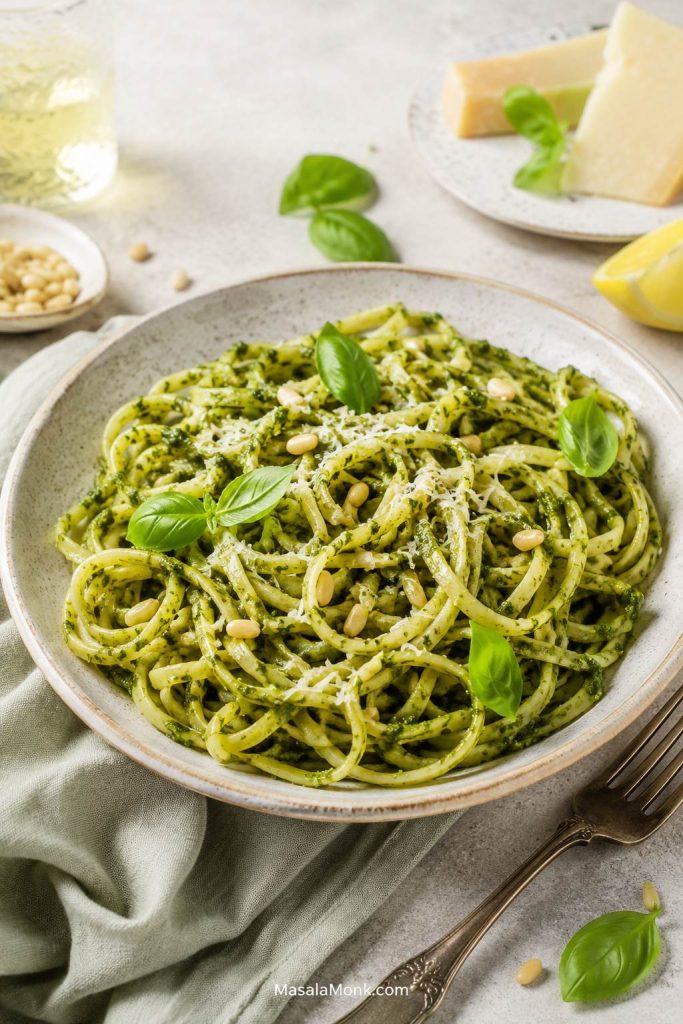
- Classic: basil pesto, fusilli or spaghetti, Parmesan, black pepper, and lemon.
- Store-bought: start with less pesto, loosen first, then add more after tasting.
- Creamy: add ricotta, cream cheese, Greek yogurt, or cream off the heat.
- Dinner bowl: fold in cooked chicken, shrimp, salmon, chickpeas, tofu, paneer, or white beans.
- Leftovers: serve cold as pesto pasta salad with tomatoes, cucumber, mozzarella, peas, or olives.
Why This Pesto Pasta Works
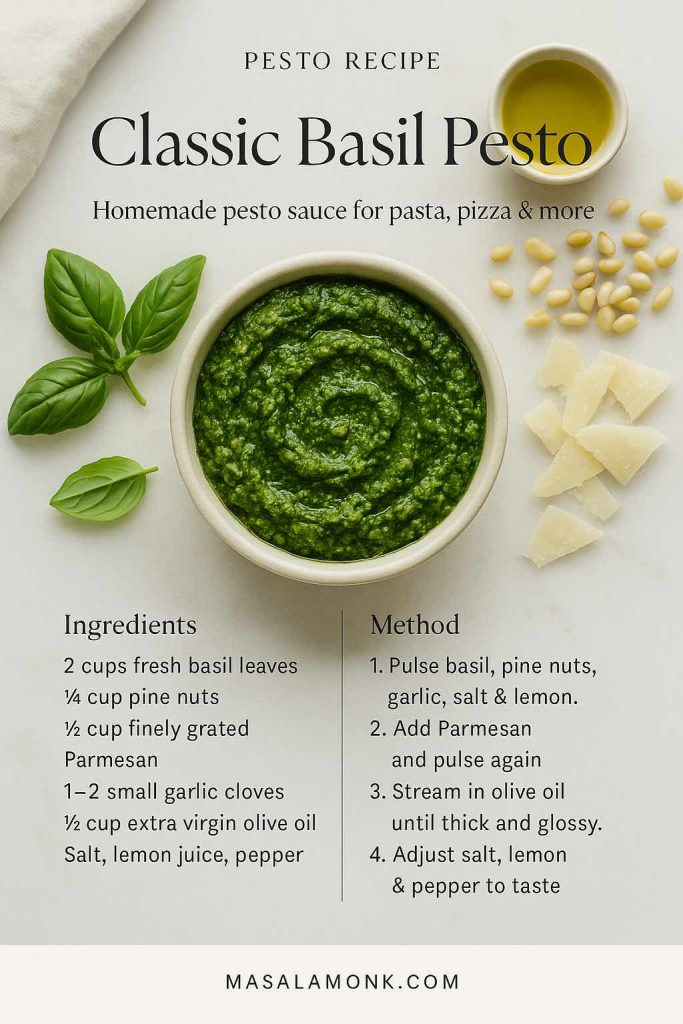
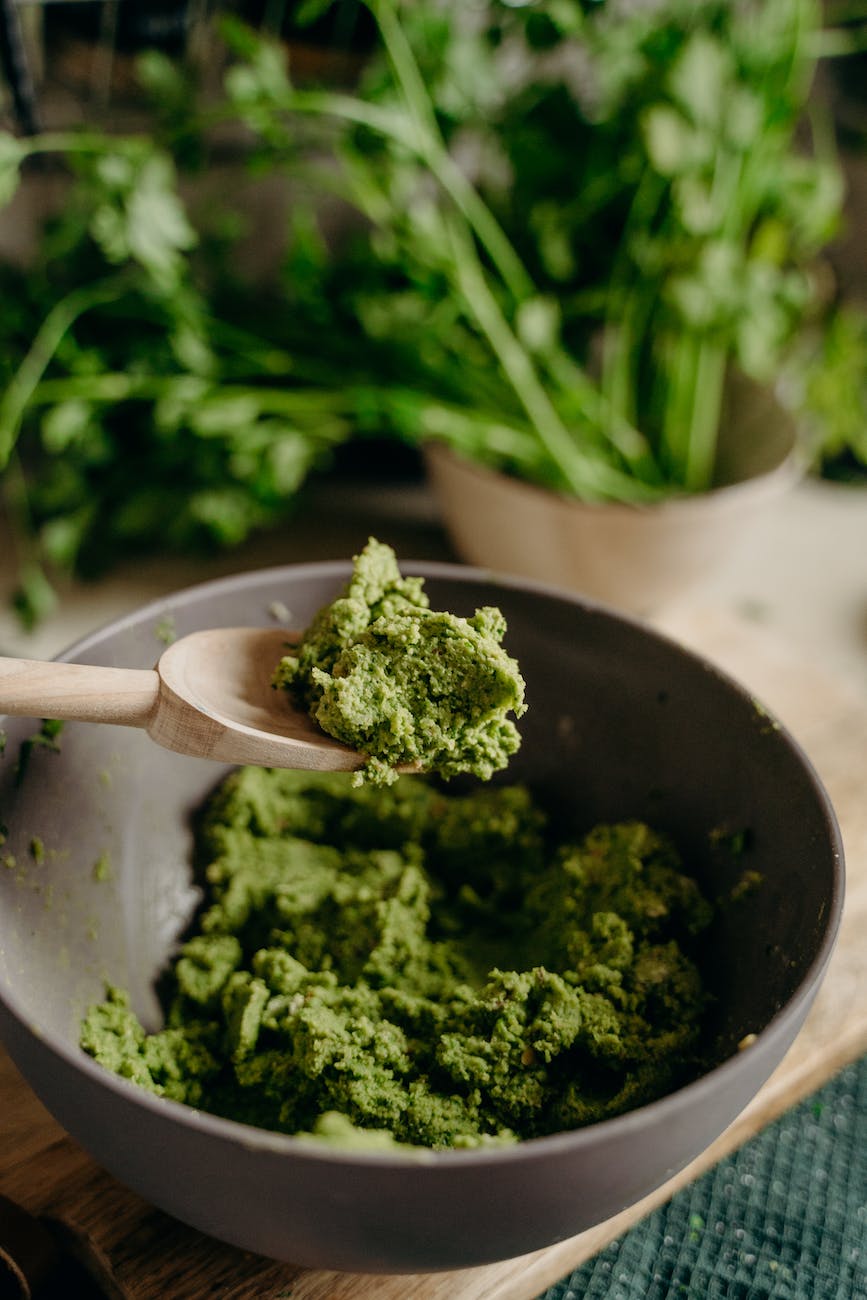
Pesto is not like marinara or Alfredo. It does not need to simmer, reduce, or thicken in a pan. It is already a finished sauce, usually made with olive oil, basil or other herbs, garlic, cheese, nuts or seeds, and salt.
Because of that, too much heat can flatten the basil, sharpen the garlic, and separate the oil from the rest of the sauce. This method treats pesto gently. The hot pasta warms the sauce just enough, while the starch from the cooking water helps the oil, cheese, herbs, and pasta come together.
Gentle Tossing, Not Simmering
Pesto does not need to reduce like a tomato sauce. Once the pasta is drained, the goal is gentle tossing, not simmering. The heat from the noodles is enough to wake up the sauce without flattening the basil.

Keep Pesto Pasta Bright Green
The Three Things That Matter Most
When it works, the bowl should feel almost effortless: warm noodles, a green sauce that moves with the pasta, Parmesan melting into the edges, and just enough lemon or pepper to keep everything from tasting heavy.
- Save the cooking water. It is the easiest fix for a sauce that turns tight, patchy, or greasy.
- Avoid harsh heat after adding pesto. Let the hot pasta warm the sauce instead.
- Add liquid gradually. Start with a splash, toss well, then add more only if the bowl needs it.
Ingredients for Pesto Pasta
You do not need many ingredients for pesto pasta, which is why each one matters. Pasta gives structure, pesto brings the flavor, the starchy water turns it into a sauce, and Parmesan or lemon balances the final bowl.
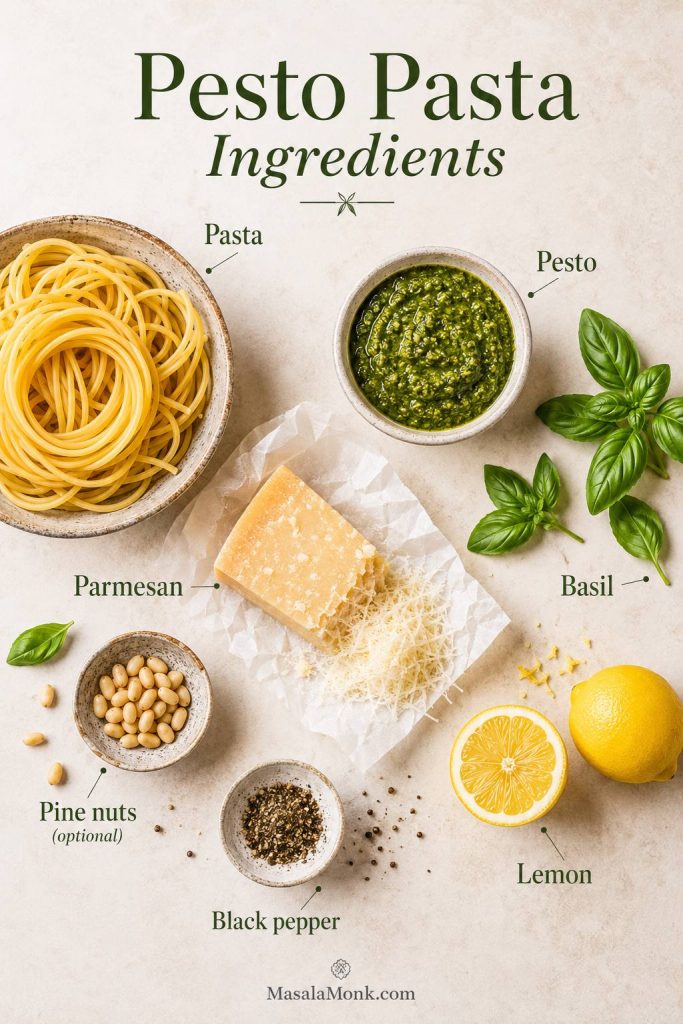
Pasta
For 4 servings, 12 oz / 340 g dried pasta gives you enough room for pesto, cheese, and add-ins without overcrowding the bowl. Fusilli, rotini, penne, ziti, spaghetti, linguine, trofie, shells, and rigatoni all work, although short shapes are usually easier because they catch pesto and toss evenly.
Pesto
Use ½ to ¾ cup / 120–180 ml pesto for 12 oz / 340 g pasta. Homemade basil pesto gives the freshest flavor, but store-bought pesto works well when you start with less and adjust after tossing.
If your jarred pesto tastes great on a spoon, it will usually work well here. When it tastes very salty, oily, bitter, or garlicky straight from the jar, start small and let a small splash of the cooking water do more of the work. For more detail, see the store-bought pesto tips before adding the full amount.
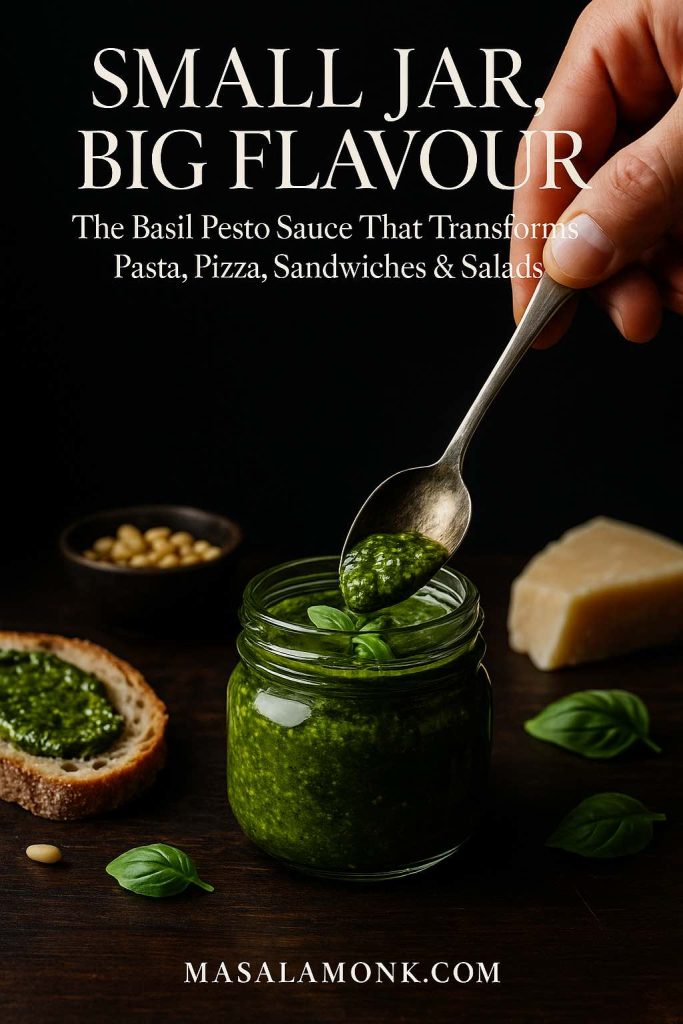
If you want to make the sauce from scratch, choose a nut-free version, or move beyond classic basil pesto, use MasalaMonk’s full pesto recipe and pesto variations guide.
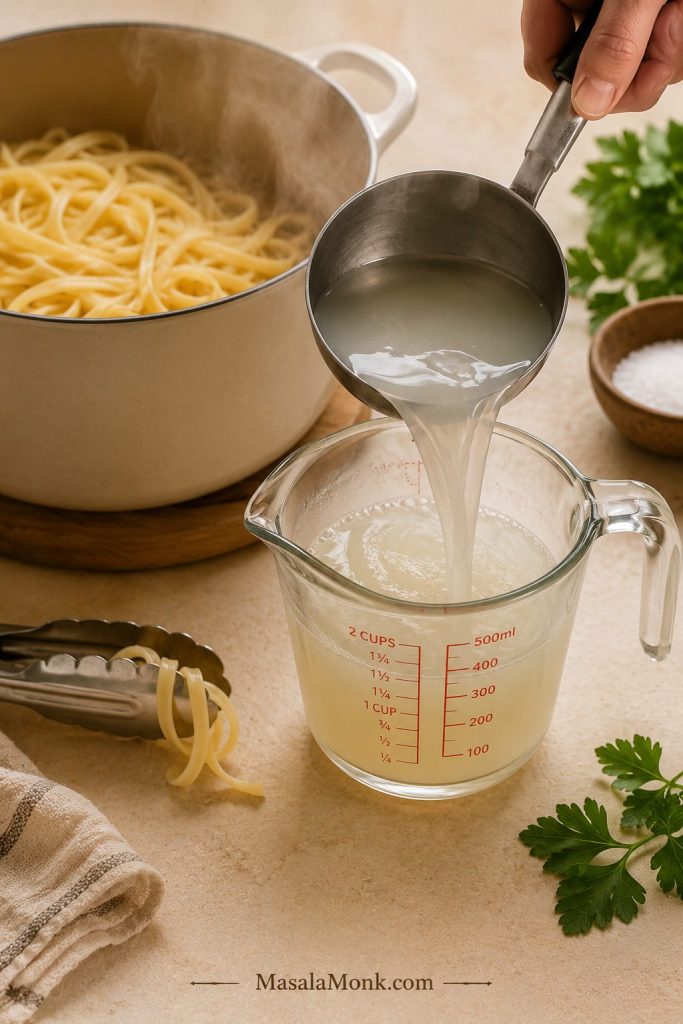
Reserved Cooking Water
This is the tiny step that saves the whole bowl. Before draining the pasta, scoop out at least 1 cup / 240 ml of the cooking water. You will usually use only ¼ to ½ cup / 60–120 ml, but saving extra gives you control if the pesto is thick or the pasta starts to tighten as it sits.
Parmesan, Lemon and Black Pepper
Parmesan gives salty depth and helps the sauce cling. Finely grated cheese disappears into the warm sauce more easily than large shavings, so grate it fine if you want a smoother coating. If you are choosing between Parmesan, Parmigiano Reggiano, Grana Padano, or Pecorino, MasalaMonk’s Parmesan vs Parmigiano Reggiano guide explains the differences clearly.
Lemon juice is optional, but very useful when pesto tastes heavy, oily, flat, or too garlicky. Used lightly, it does not make the pasta taste lemony; it simply wakes up the basil, cheese, and garlic. Black pepper adds a final lift without changing the character of the dish.
Optional Add-Ins
Cherry tomatoes, chicken, shrimp, salmon, broccoli, peas, spinach, zucchini, mozzarella, paneer, chickpeas, and toasted nuts can all work. Add them after the base pasta is lightly sauced. If the bowl is already dry, extra ingredients will only make that problem more obvious.
Equipment You Need
You do not need special equipment, but you do need somewhere gentle to toss the pasta after it is drained.
- Large pot: for boiling the pasta with enough room to move.
- Mug or heatproof measuring cup: for scooping out the water before draining.
- Large mixing bowl or room-temperature skillet: best for tossing pesto with hot pasta off the heat.
- Tongs, spoon, or silicone spatula: tongs for long pasta; a spoon or spatula for short shapes.
- Microplane or fine grater: for Parmesan that melts smoothly into the sauce.
Why not toss in the hot pasta pot? The empty cooking pot can stay very hot. A large bowl or room-temperature skillet warms the pesto with the heat of the pasta without cooking the basil too aggressively.
Best Pasta for Pesto
Pesto works especially well with shapes that can hold a loose, herby sauce. Spirals, ridges, tubes, and slightly rough surfaces are especially good because pesto can cling instead of sliding off.
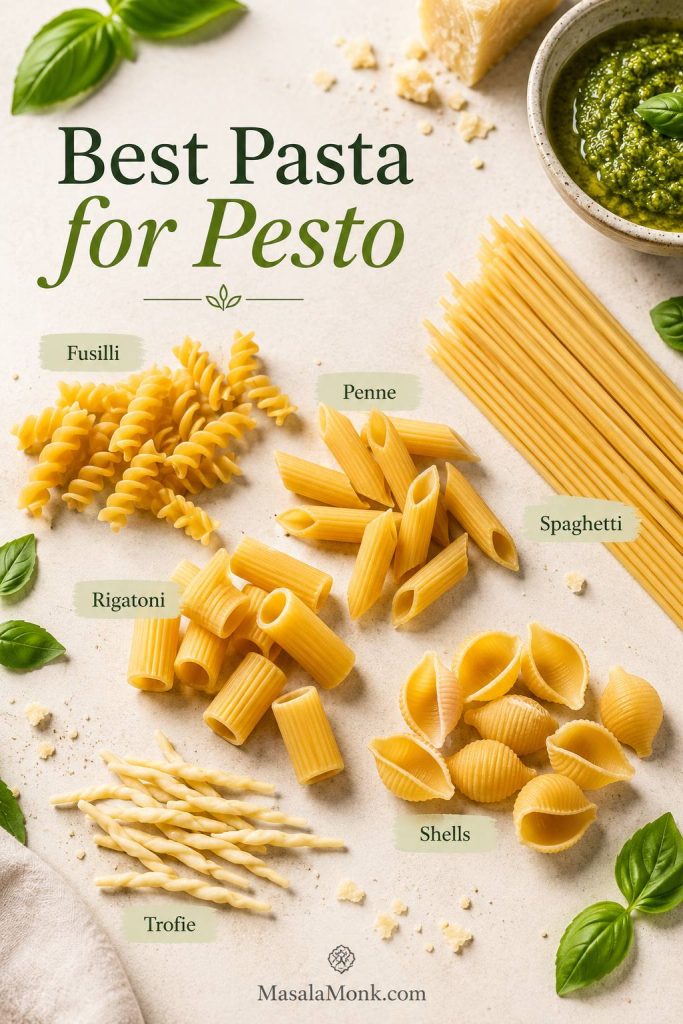
| Pasta Shape | Best Use |
|---|---|
| Fusilli / Rotini | Best all-rounder. The spirals catch pesto beautifully. |
| Penne / Ziti | Easy weeknight choice. Tosses evenly and works with add-ins. |
| Spaghetti / Linguine | Classic and elegant, but needs energetic tossing and enough cooking water. |
| Trofie | Traditional Ligurian-style shape if you can find it. |
| Rigatoni | Good with tomatoes, chicken, vegetables, or mozzarella, but toss well so pesto does not sit inside the tubes. |
| Shells | Family-friendly and good at holding little pockets of pesto; toss gently so the shells do not clump. |
| Tortellini / Gnocchi | Richer and heavier, best when you want a more filling meal; keep the pesto loose so it does not feel heavy. |
Best first choice: fusilli, rotini, or penne. They are forgiving, easy to toss, and much less likely to leave pesto sitting at the bottom of the bowl. Save spaghetti or linguine for when you are ready to toss with a little more patience.
Once you choose the pasta shape, use the ratio guide to decide how much pesto and cooking water to start with.
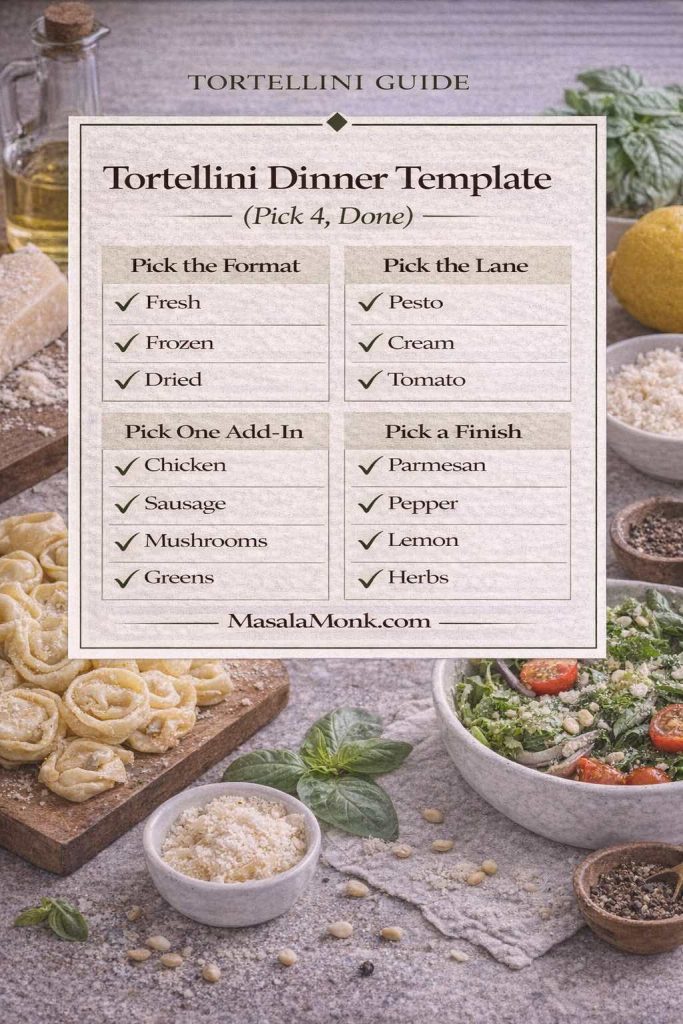
Long pasta like spaghetti can be excellent, but it needs enough starchy water and proper tossing. Short pasta is more forgiving, especially if you are using a thick jarred pesto. If you want a filled-pasta version, MasalaMonk’s how to cook tortellini guide includes pesto tortellini ideas you can adapt with the same gentle tossing method.
Pesto Pasta Ratio
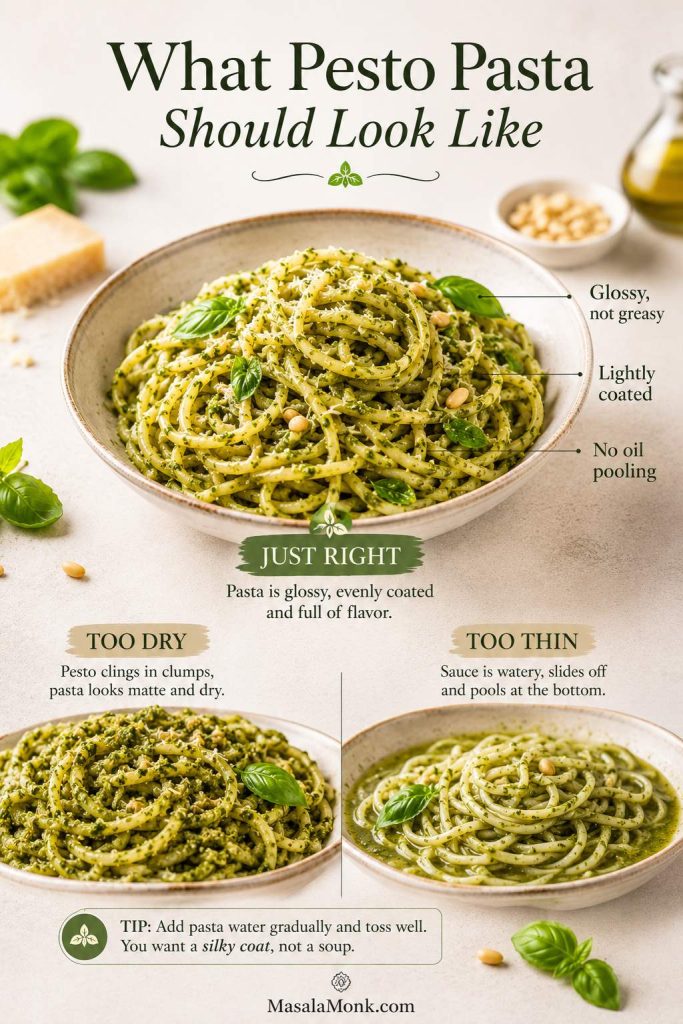
When this dish tastes flat, oily, or dry, the ingredient list usually is not the problem. The ratio just needs a small adjustment. A bland bowl usually needs more pesto, Parmesan, or salt. An oily or salty bowl usually means the pesto is too concentrated. Dry pasta needs more starchy water, while a thin sauce needs more tossing, a little Parmesan, or a short rest.
Use this table as a starting point, then let the bowl tell you what it needs. Tight pasta needs a splash of cooking water. Flat flavor can be fixed with pesto, Parmesan, lemon, or black pepper. Saltiness is better balanced with extra pasta, tomatoes, mozzarella, spinach, or another unsalted add-in rather than more pesto.
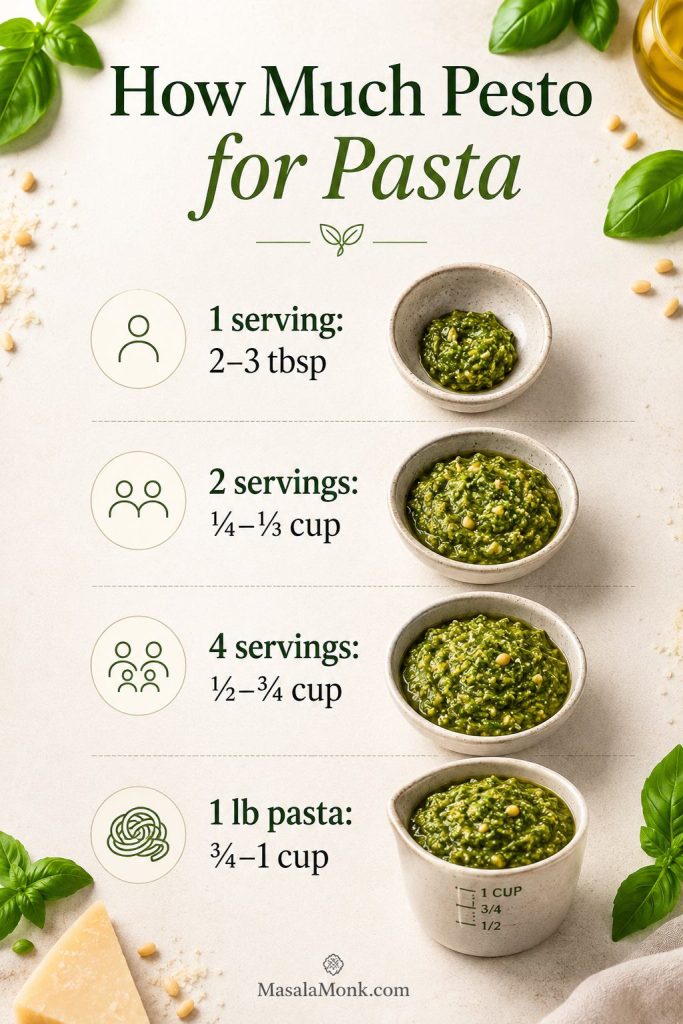
| Servings | Dry Pasta | Pesto | Cooking Water to Start | Add Up To |
|---|---|---|---|---|
| 1 | 3 oz / 85 g | 2–3 tbsp | 1 tbsp | 3 tbsp |
| 2 | 6 oz / 170 g | ¼–⅓ cup | 2 tbsp | ¼ cup |
| 4 | 12 oz / 340 g | ½–¾ cup | ¼ cup | ½ cup |
| 5–6 | 1 lb / 450 g | ¾–1 cup | ⅓ cup | ¾ cup |
Homemade vs store-bought adjustment: homemade pesto is often fresher, looser, and less salty, so you may use the higher end of the range. Store-bought pesto can be saltier, oilier, and more concentrated, so start lower and add more only after tasting.
The numbers are a starting point, not a rule you have to obey perfectly. Some pestos are loose and mild; others are salty little flavor bombs. Taste once, loosen once, then decide.
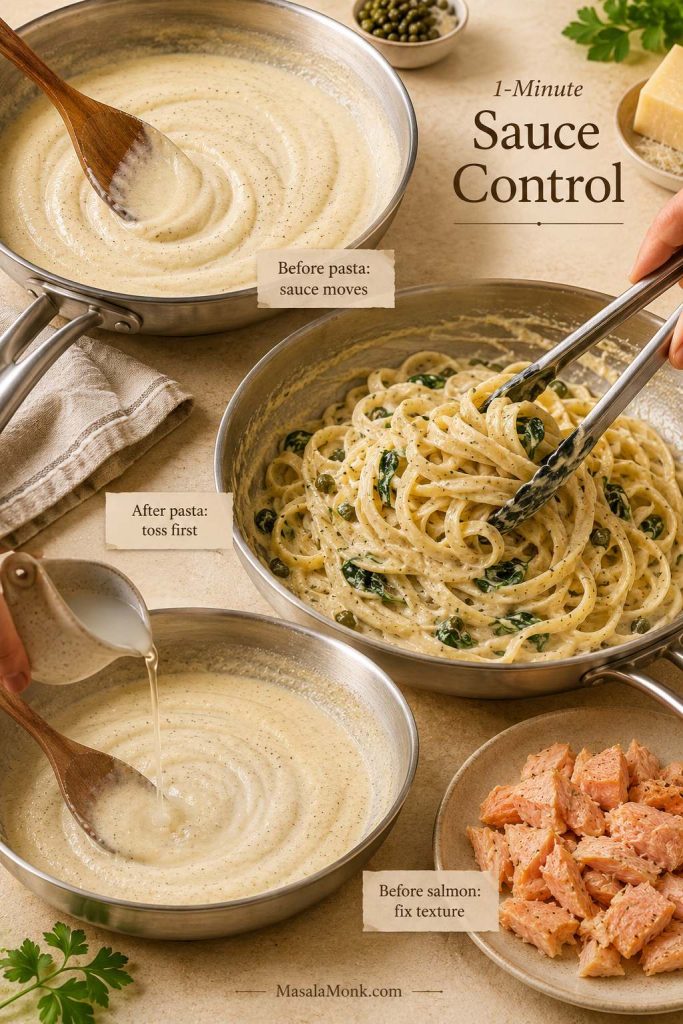
The Pasta Water Trick That Keeps Pesto Pasta Saucy
If your bowl has ever turned dry, oily, stiff, or clumpy, this is the part that fixes it. The water you saved is not just water. It carries starch from the pasta, and that starch helps pesto loosen into a sauce that coats instead of separating.
More oil usually makes the bowl heavier. More pesto can make it too salty or intense. A starchy splash from the pot does something different: it loosens the sauce while helping it hold onto the noodles.
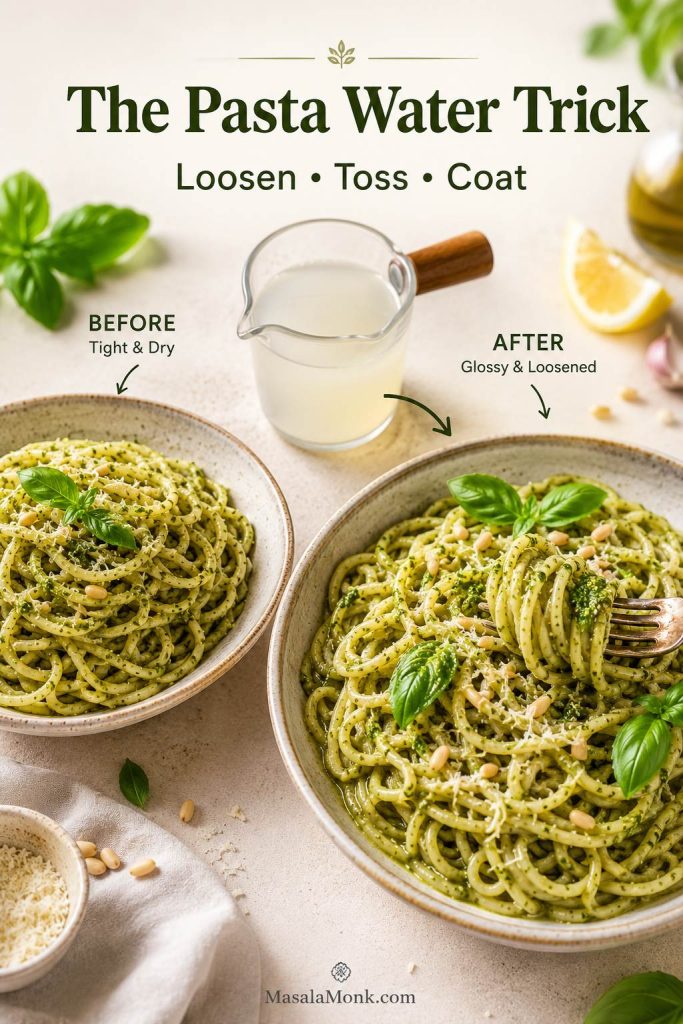
What the Sauce Should Look Like
The pasta should look lightly coated and shiny, not greasy. You should not see thick green clumps or an oily puddle at the bottom. When you lift the pasta with tongs or a spoon, the sauce should move with it instead of sliding away.
For specific dry, oily, bitter or too-salty problems, use the fixes section before changing the recipe.
Start with ¼ cup / 60 ml cooking water for 4 servings, toss well, then add more 1–2 tablespoons at a time. Do not panic if it looks a little loose for the first few seconds. Keep tossing. The starch, oil, cheese, and pesto need a moment to come together.
Also, do not add oil to the pasta water. You want the pasta’s surface starch to help the pesto cling. Oil can make the noodles more slippery and does not solve the real sauce problem. Serious Eats explains the same pasta-water principle in more detail.
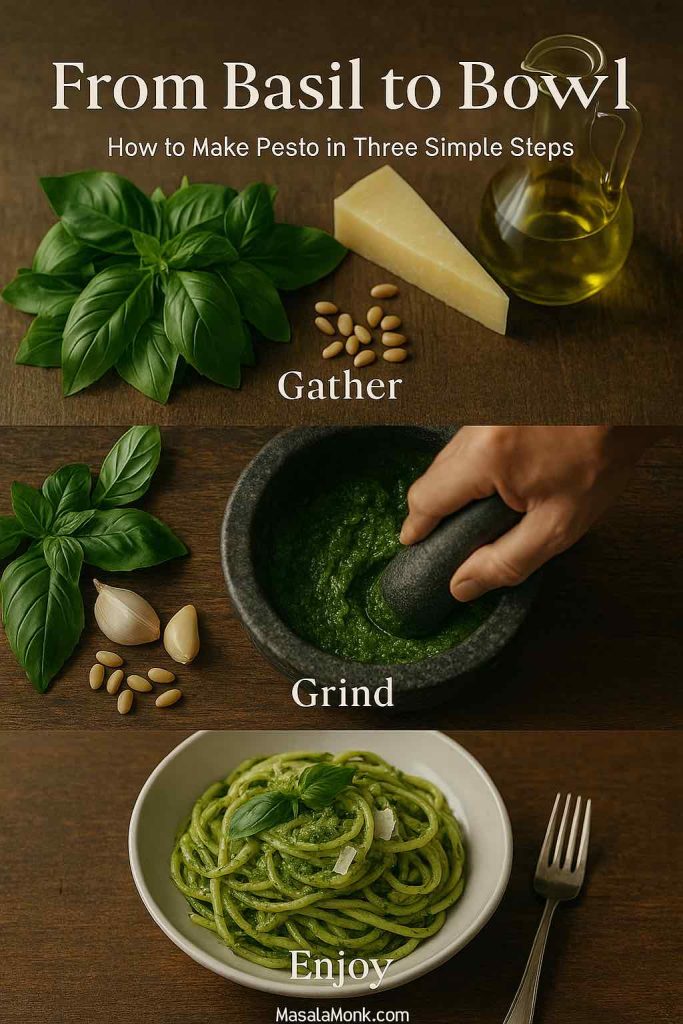
How to Make Pesto Pasta
Use this same method for basil pesto pasta, pesto noodles, spaghetti with pesto, penne pesto pasta, and most simple pasta-and-pesto combinations.
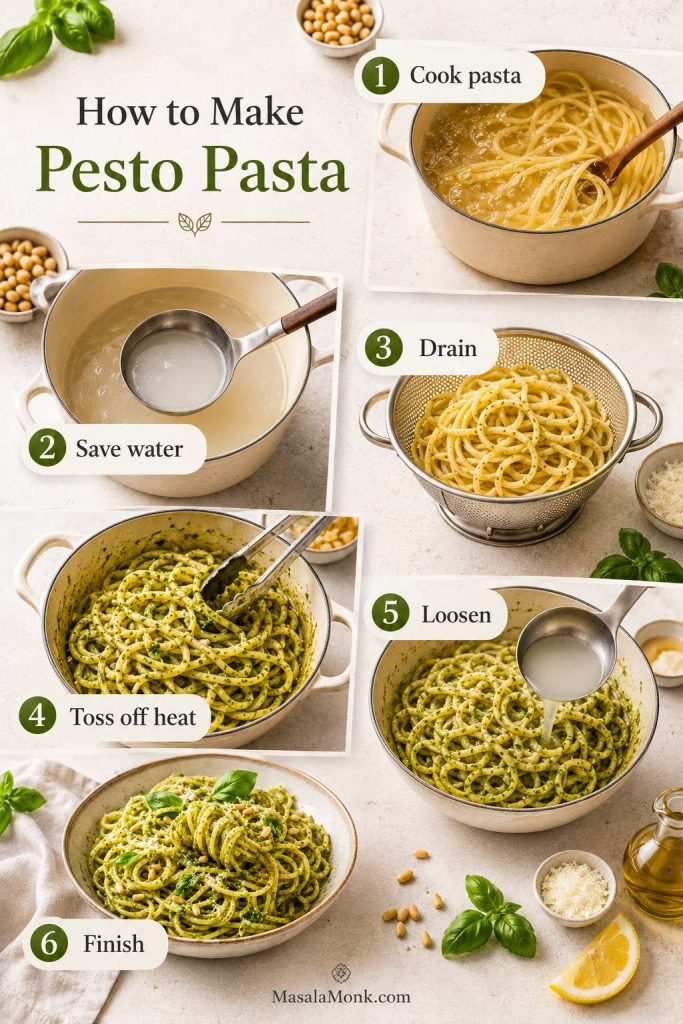
1. Cook the Pasta in Salted Water
Bring 3–4 quarts / 3–4 liters of water to a boil and salt it well. As a simple guide, use about 1 tablespoon kosher salt, or 2 teaspoons fine sea salt. Use a little less if your pesto or Parmesan is very salty. Add the pasta and cook until al dente according to the package timing. The pasta should still have a little bite because it will soften slightly as you toss it.
2. Save Cooking Water Before Draining
Have the pesto, bowl, Parmesan and measuring cup ready before you drain. This dish is easiest when the hot pasta goes straight from the colander into the mixing bowl.
Just before draining, scoop out at least 1 cup / 240 ml of the starchy cooking water. This is your sauce insurance. It helps loosen thick pesto, fix dry pasta, and bring oily sauce back together.
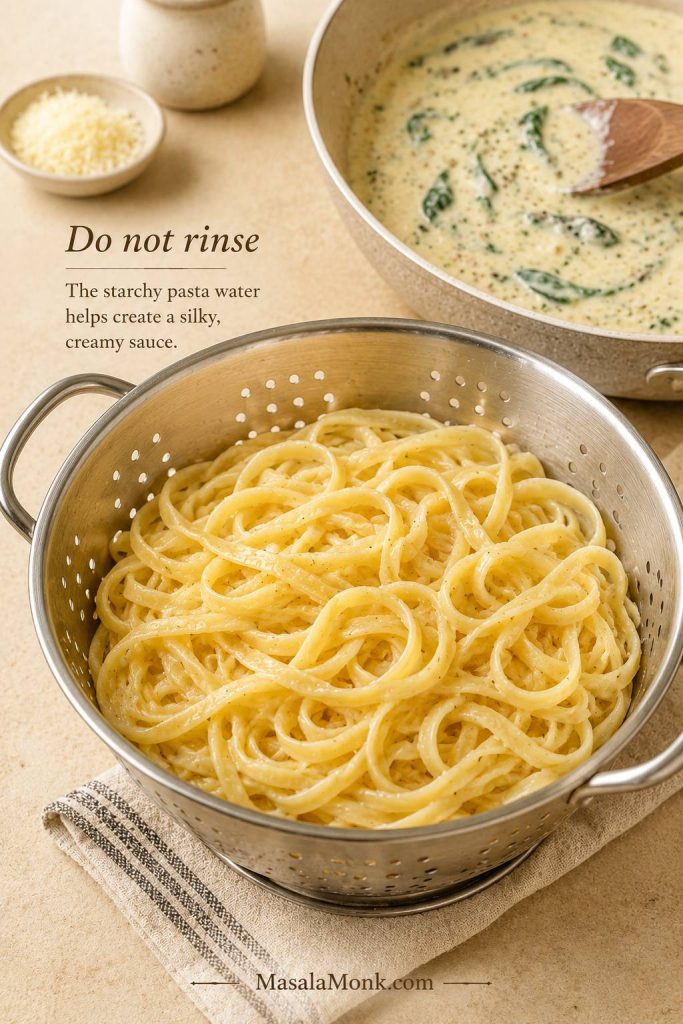
3. Drain, But Do Not Rinse
Drain the pasta, but do not rinse it. The starch on the surface helps the pesto cling. Rinsing washes away that helpful starch and cools the pasta too much.
4. Toss Pesto with Hot Pasta Off the Heat
Transfer the pasta to a large mixing bowl or a wide skillet that is not on the stove. Add the pesto and start tossing. The pasta will warm the sauce on its own, without pushing the basil into that dull, overcooked flavor.
5. Add the Water You Saved Until the Sauce Coats Well
Add ¼ cup / 60 ml of the water you saved and toss well. At first, the sauce may look a little loose. Keep tossing. The pesto, starch, oil, and cheese will start to come together. Add more 1–2 tablespoons at a time until the pasta is evenly coated.
6. Finish and Serve
Add Parmesan, black pepper, and a small squeeze of lemon if needed. Taste before adding more salt because pesto and Parmesan can already be salty. Serve immediately, while the sauce is warm and loose; pesto pasta tightens as it waits.
The first time you make it, keep the add-ins simple and learn the texture: pasta that moves easily when tossed, with no thick green clumps, no oil slick, and no dry patches underneath. Once you know that feel, the creamy, chicken, tomato, vegan, and cold pasta salad versions become much easier.
Once the method makes sense, use the recipe card for the shorter cooking version.
Recipe Card: Easy Pesto Pasta
Easy Pesto Pasta Recipe
This easy pesto pasta recipe uses basil pesto, hot pasta, Parmesan and starchy cooking water for a quick dinner that tastes fresh and stays saucy instead of dry. It works with homemade or store-bought pesto and is ready in about 20 minutes.
Ingredients
- 12 oz / 340 g dried pasta, such as fusilli, penne, spaghetti, linguine, trofie, or shells
- Salt, for the pasta water
- ½ to ¾ cup / 120–180 ml basil pesto, homemade or store-bought
- 1 cup / 240 ml starchy cooking water, using ¼ to ½ cup / 60–120 ml as needed
- ¼ cup / about 25 g finely grated Parmesan, plus more for serving
- 1–2 tsp / 5–10 ml fresh lemon juice, optional
- Freshly ground black pepper, to taste
- Fresh basil, toasted pine nuts, walnuts, or extra Parmesan, for serving
Method
- Bring a large pot of water to a boil. Salt it well, then add the pasta.
- Cook until al dente according to the package timing.
- Before draining, save at least 1 cup / 240 ml of the starchy cooking water.
- Drain the pasta, but do not rinse it.
- Transfer the hot pasta to a large mixing bowl or a wide skillet off the heat.
- Add ½ cup / 120 ml pesto if using store-bought pesto, or ¾ cup / 180 ml pesto if using a mild homemade pesto.
- Add ¼ cup / 60 ml of the cooking water and toss well.
- Add more 1–2 tablespoons at a time until the sauce clings evenly to the pasta.
- Add Parmesan, black pepper, and lemon juice if the pasta needs brightness.
- Taste and adjust. Add more pesto only if the pasta needs more flavor, not just more moisture.
- Serve immediately with extra Parmesan, basil, toasted nuts, or a little more black pepper.
Notes
- Have the pesto, bowl, Parmesan and measuring cup ready before draining.
- Do not boil pesto on the stove; let the hot pasta warm it gently.
- If the sauce looks tight or oily, add a small splash of the cooking water and toss before adding more pesto.
- If using very salty store-bought pesto, start with ⅓ to ½ cup and add more only after tasting.

Homemade vs Store-Bought Pesto: How Much to Use and How to Fix Each One
Both homemade and store-bought pesto work, but they do not behave the same way. Homemade pesto is usually fresher, greener, and looser. Store-bought pesto is often more concentrated, so taste it first and start lower in the range.
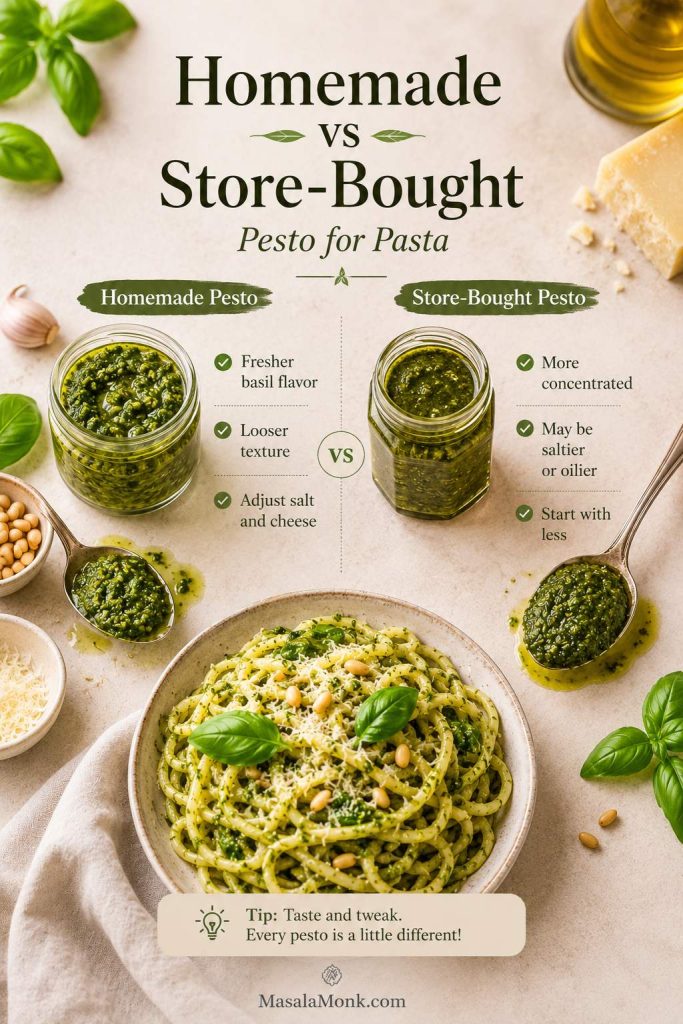
How to Choose Store-Bought Pesto for Pasta
Refrigerated pesto is usually the best first choice for fresh basil flavor. Shelf-stable pesto can still work, but it often needs help from lemon, Parmesan, fresh basil, or careful loosening because the flavor can be darker, saltier, or more intense.
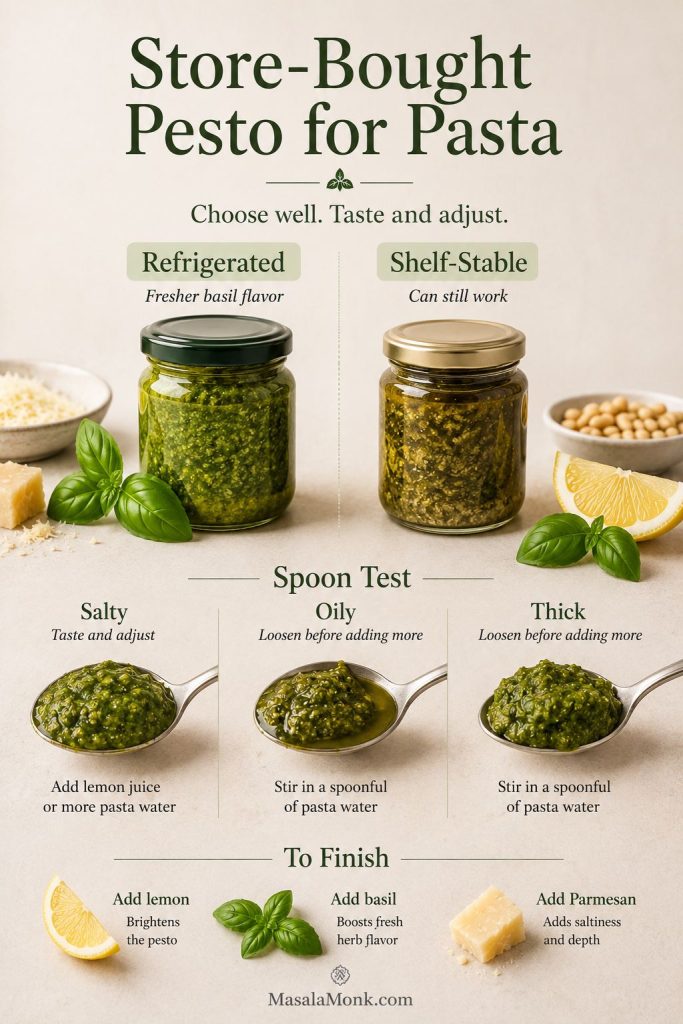
- Salty pesto: start with less pesto and balance the bowl with tomatoes, mozzarella, spinach, or extra pasta.
- Oily pesto: skip extra oil; use a small splash of the cooking water and finely grated Parmesan to help the sauce come together.
- Flat pesto: wake it up with lemon, black pepper, fresh basil, or a little extra cheese.
- Very thick pesto: let it sit at room temperature while the pasta cooks, then loosen it gradually.
- Allergen concerns: check labels for nuts, cheese, and shared-production warnings.
| Pesto Type | How Much to Start With for 12 oz / 340 g Pasta | Best Adjustment |
|---|---|---|
| Fresh homemade pesto | ¾ cup / 180 ml | Loosen with a small splash of the cooking water until the sauce coats well; finish with lemon if needed. |
| Thick store-bought pesto | ½ cup / 120 ml | Loosen it before adding more pesto. |
| Very salty pesto | ⅓–½ cup / 80–120 ml | Use less Parmesan and balance with unsalted vegetables or extra pasta. |
| Loose oily pesto | ½ cup / 120 ml | Add Parmesan and toss well with a small splash of the cooking water. |
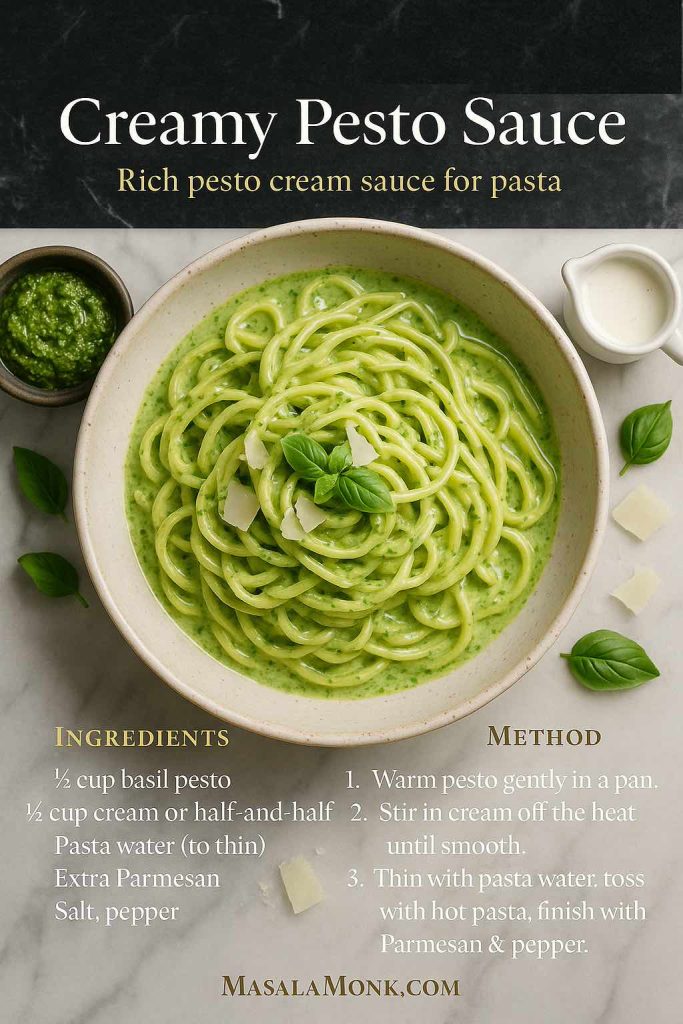
How to Make Creamy Pesto Pasta
For creamy pesto pasta, use the same base method, then add a small amount of cream, cream cheese, Greek yogurt, ricotta, or cashew cream. Go gently here. A little dairy makes the sauce softer and richer, but too much turns it into a cream sauce with pesto hiding in the background.
Creamy pesto pasta should still taste like pesto first. The cream is there to round the edges, not steal the whole bowl.
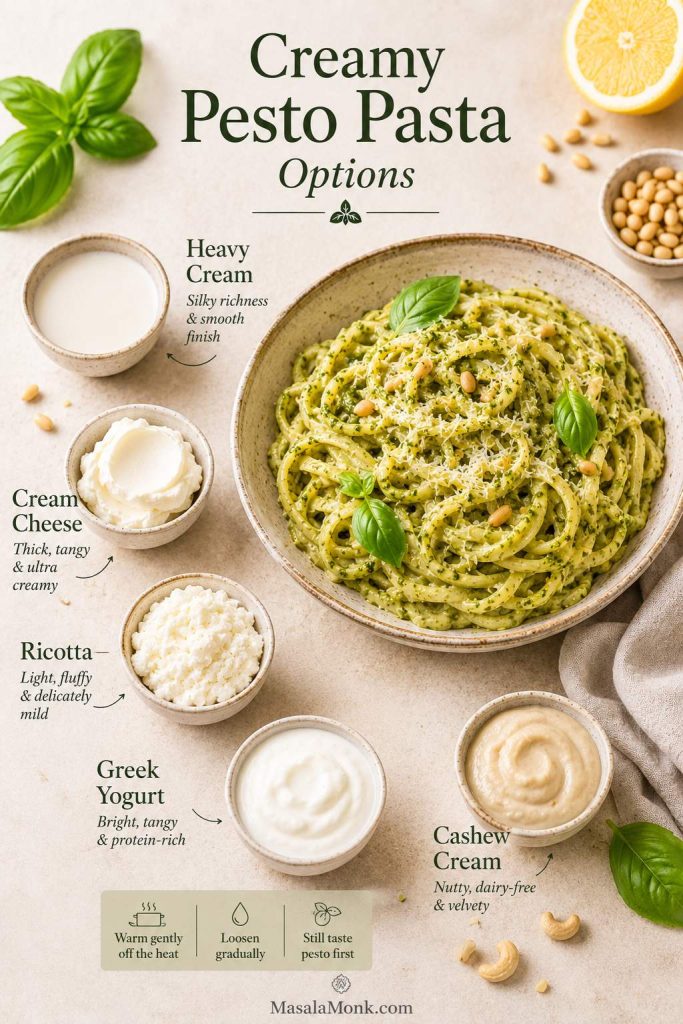
| Creamy Option | How to Use It | Best For |
|---|---|---|
| Heavy cream | Warm ¼ cup / 60 ml gently, then toss with pesto and a small splash of the cooking water off the heat. | Classic creamy pesto pasta. |
| Cream cheese | Use 2–3 tbsp and loosen gradually with the cooking water until smooth. | Thicker, family-style sauce. |
| Greek yogurt | Stir in off the heat to avoid splitting. | Tangier, lighter version. |
| Ricotta | Whisk with a little cooking water first, then toss with pesto. | Soft and creamy without becoming too heavy. |
| Cashew cream | Use with vegan pesto and loosen gradually. | Dairy-free creamy pesto pasta. |
For this base recipe, keep the creamy variation controlled. Add just enough to soften the pesto, then use the water you saved to keep the sauce light enough to coat the pasta. If you are craving a richer chicken-and-cream pasta rather than a pesto-forward bowl, MasalaMonk’s chicken alfredo pasta guide is a better match for that direction.
If you want to turn the creamy version into a full dinner, choose one protein or vegetable from the add-ins guide.
Best Add-Ins for Pesto Pasta: Chicken, Tomatoes, Shrimp, Vegetables and More
Add-ins are easiest when the base pasta already tastes good. Think of them as guests, not rescuers. Chicken, tomatoes, shrimp, peas, or paneer can make the bowl more complete, but they cannot fix a sauce that was too tight from the start.
How to Choose Add-Ins Without Making the Pasta Heavy
For a no-stress first version, make the plain pesto pasta once before adding too much. After that, the variations are easy because you know what the sauce should feel like.
As a rule, keep add-ins to one protein and one vegetable unless you are making pasta salad. Too many extras cool the pasta quickly and make the pesto harder to coat evenly.
Quick Add-In Guide
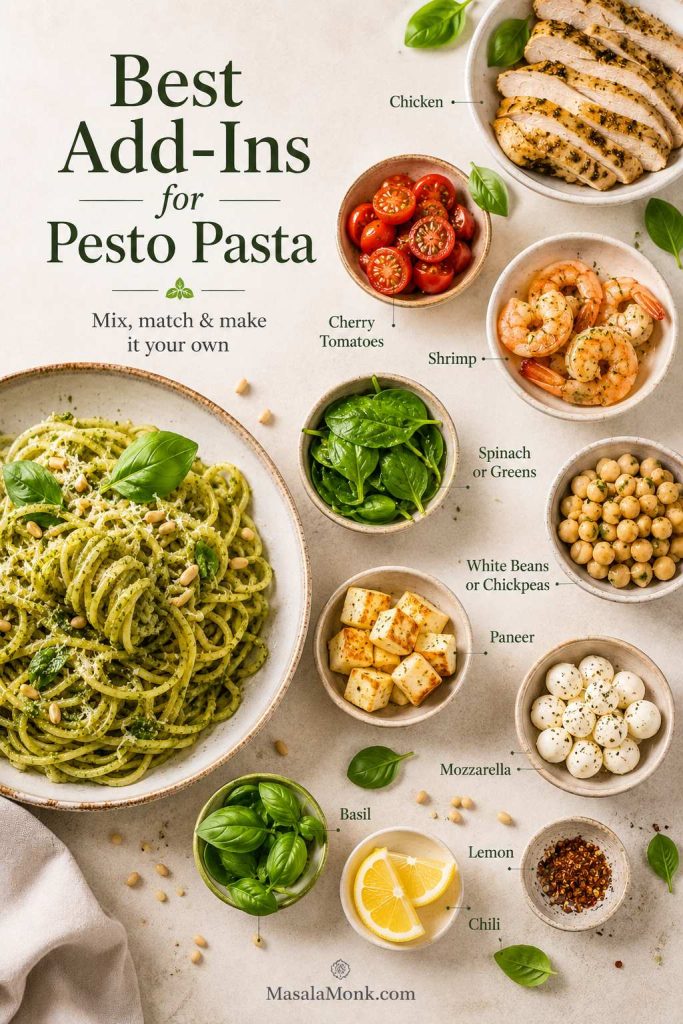
| Add-In | How to Use It | Best For |
|---|---|---|
| Cherry tomatoes | Add fresh, blister in a pan, or roast first. | Brightness and color. |
| Chicken | Add cooked sliced chicken after tossing the pasta. | Protein-rich dinner. |
| Shrimp | Sauté separately, then fold in at the end. | Fast seafood pesto pasta. |
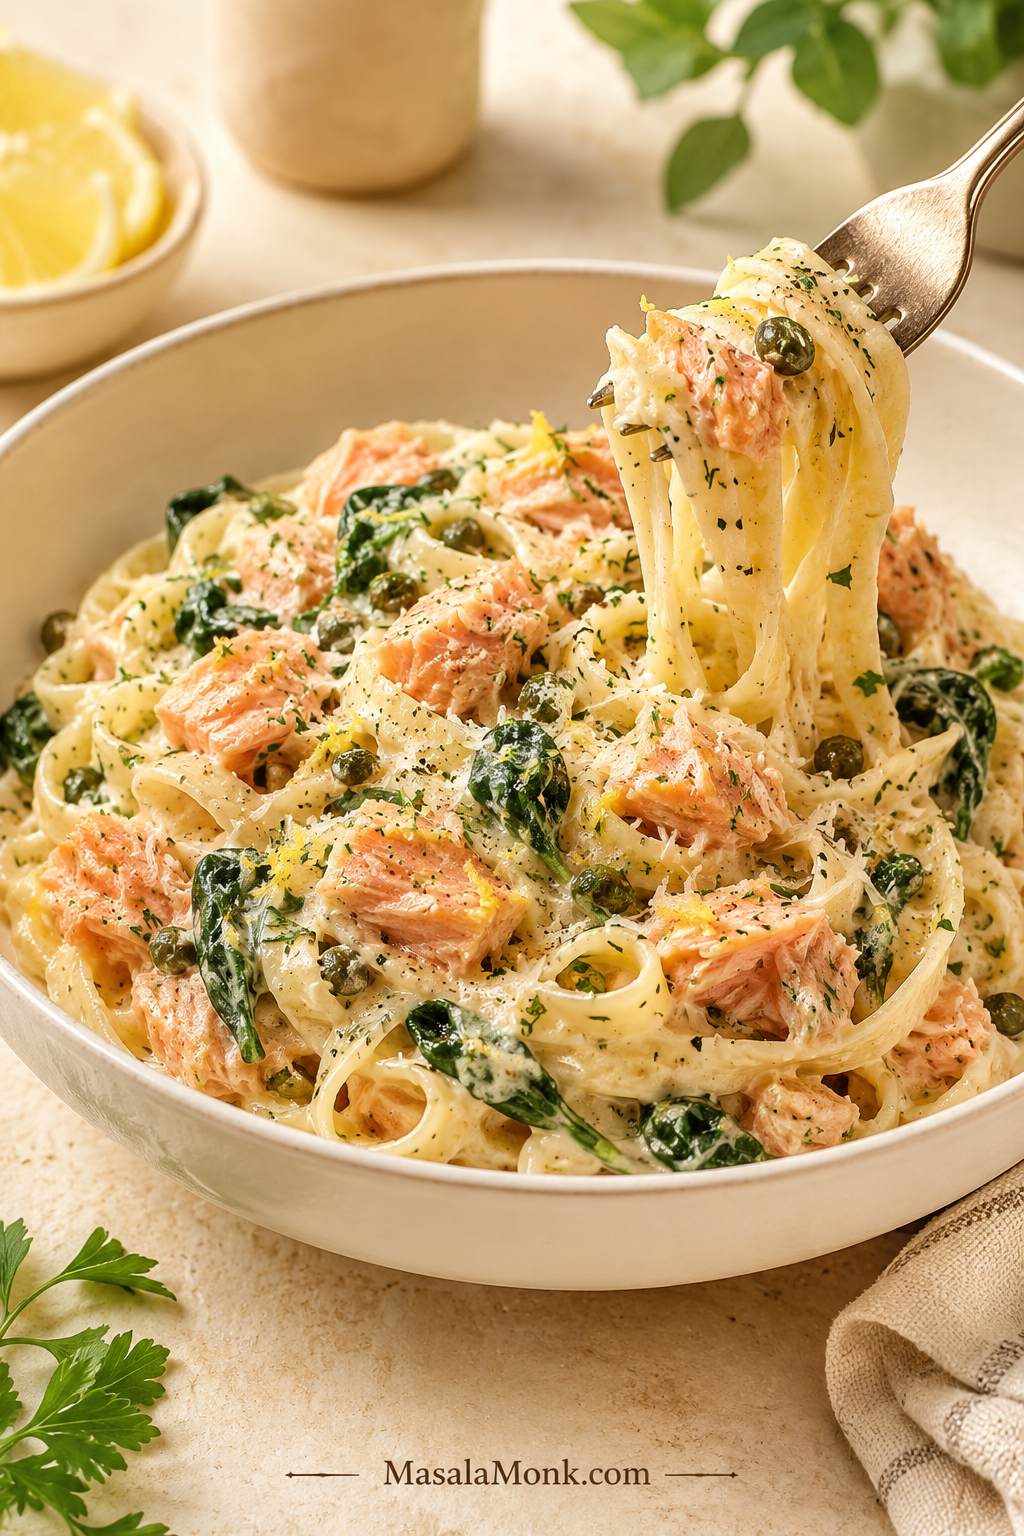
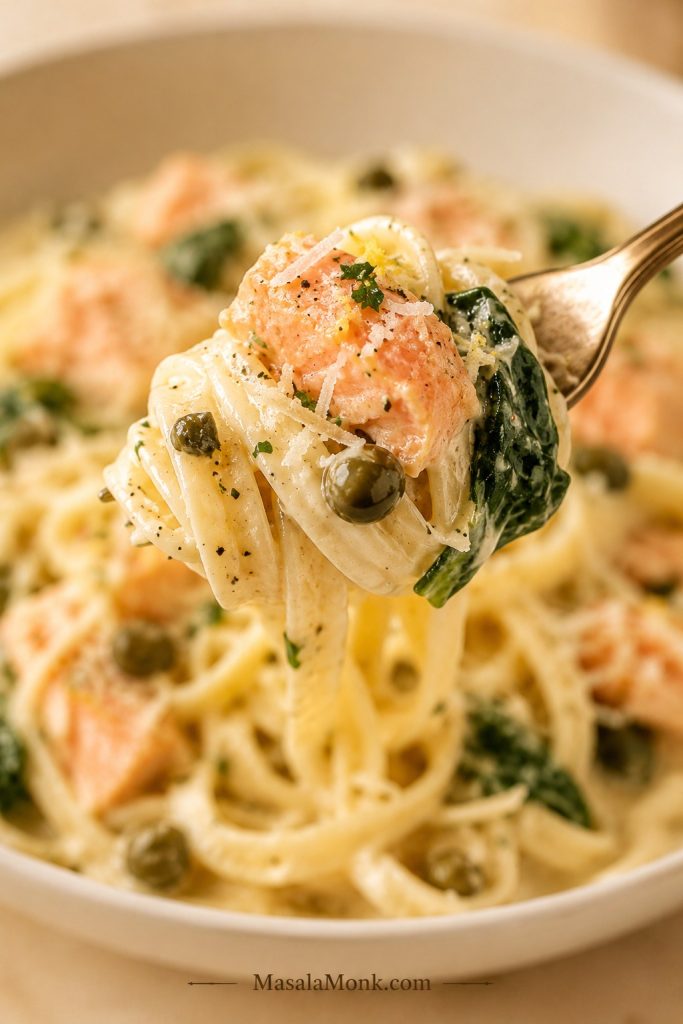
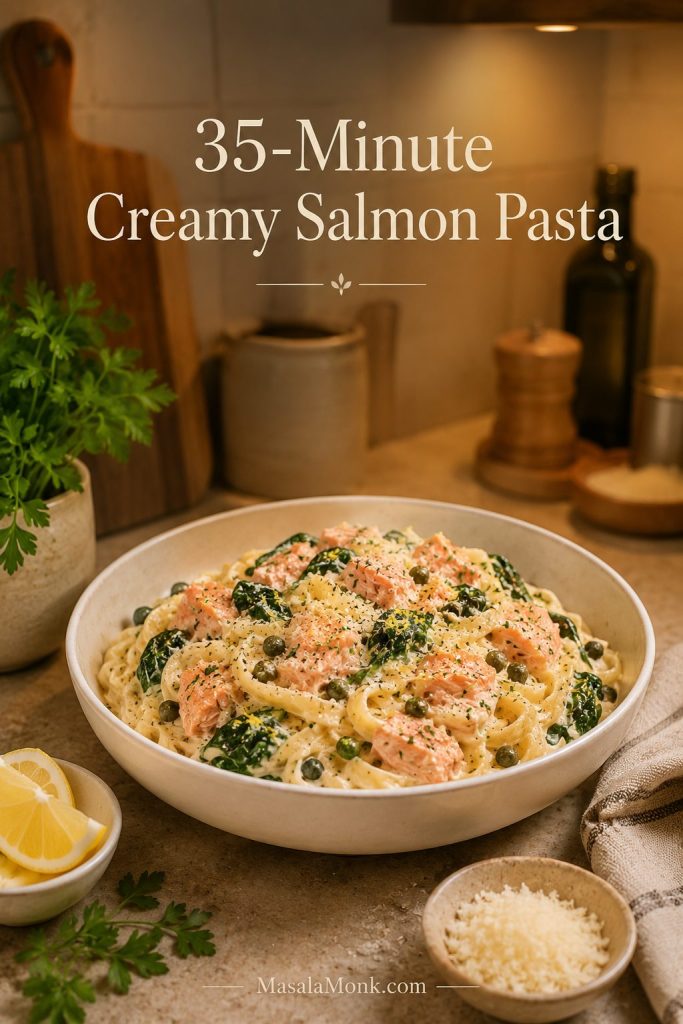
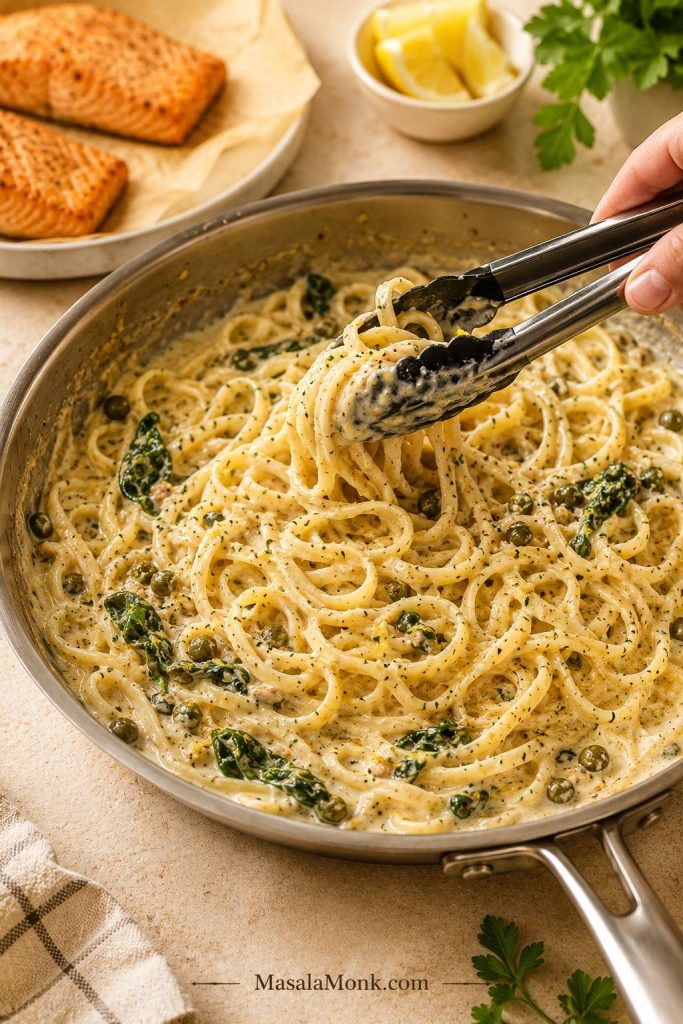
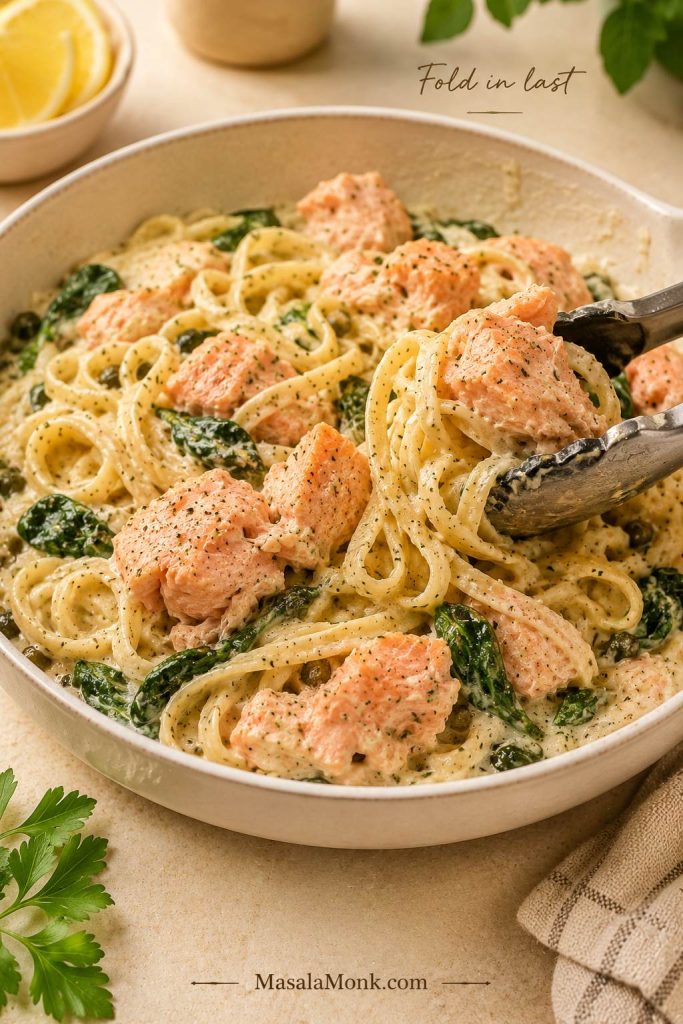
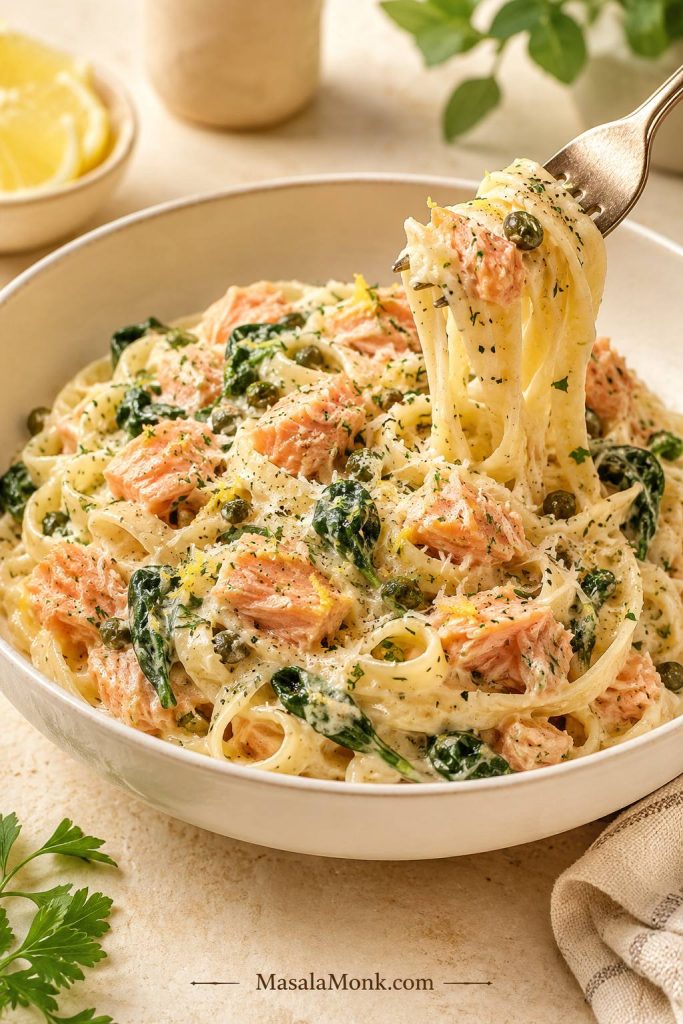
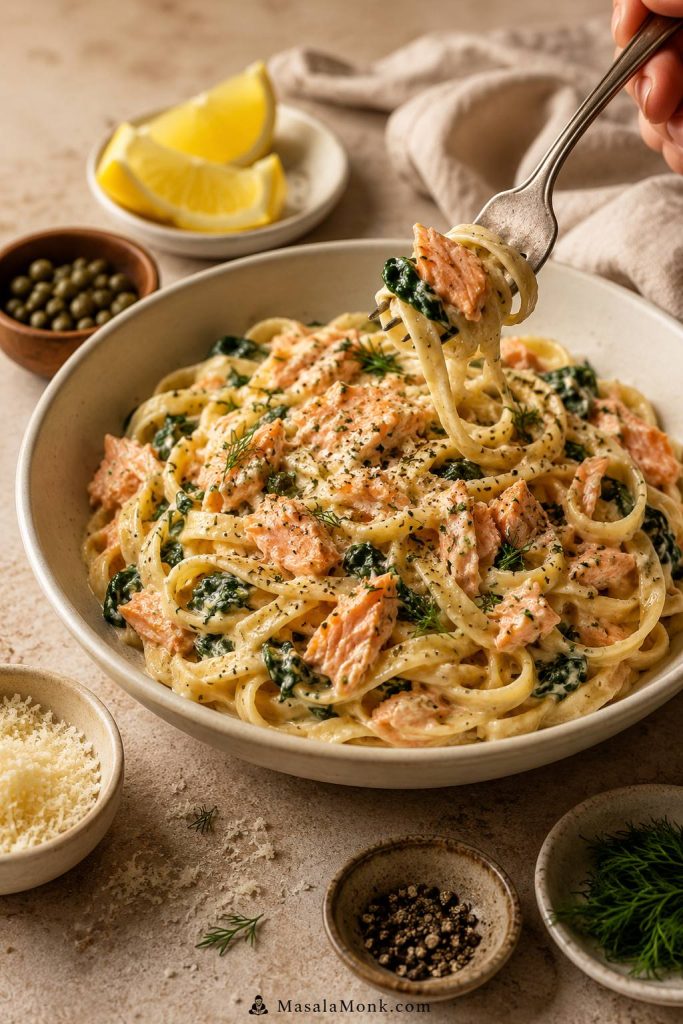
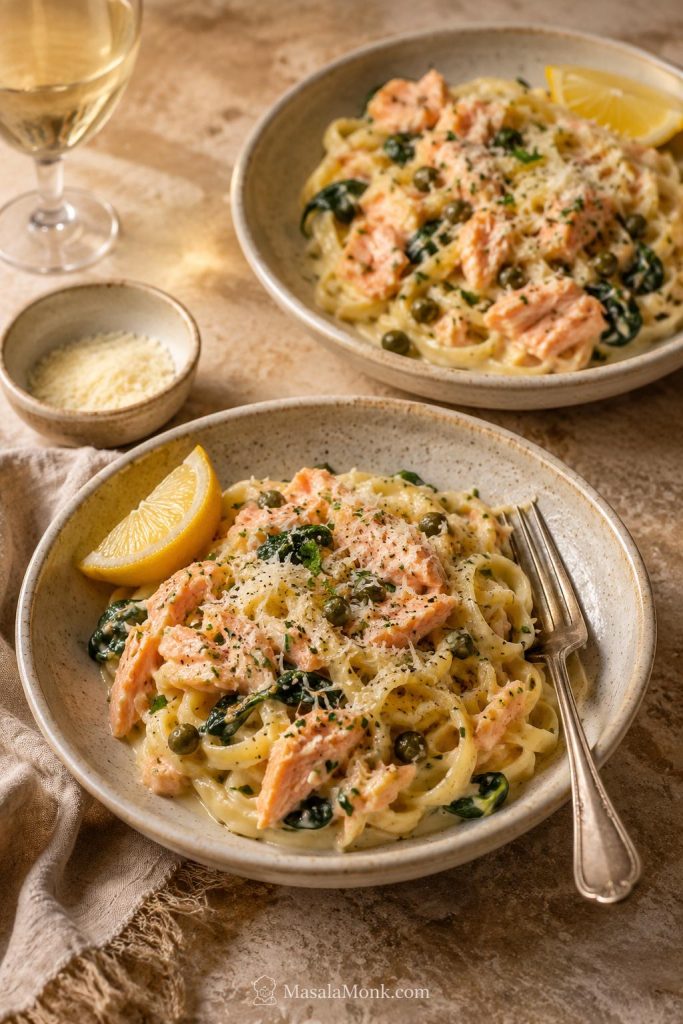
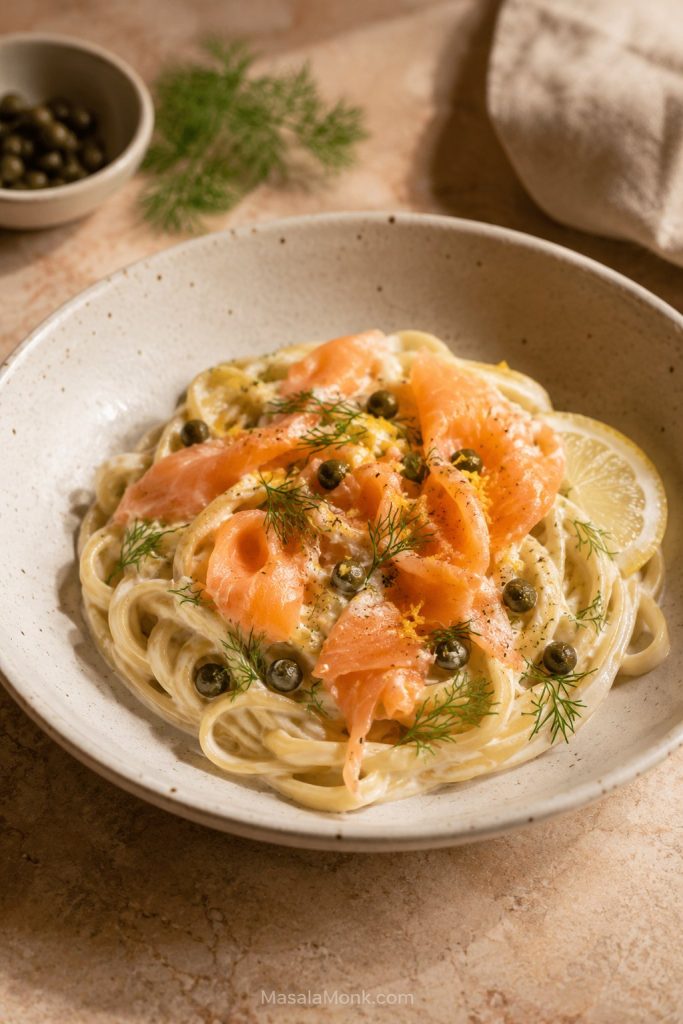
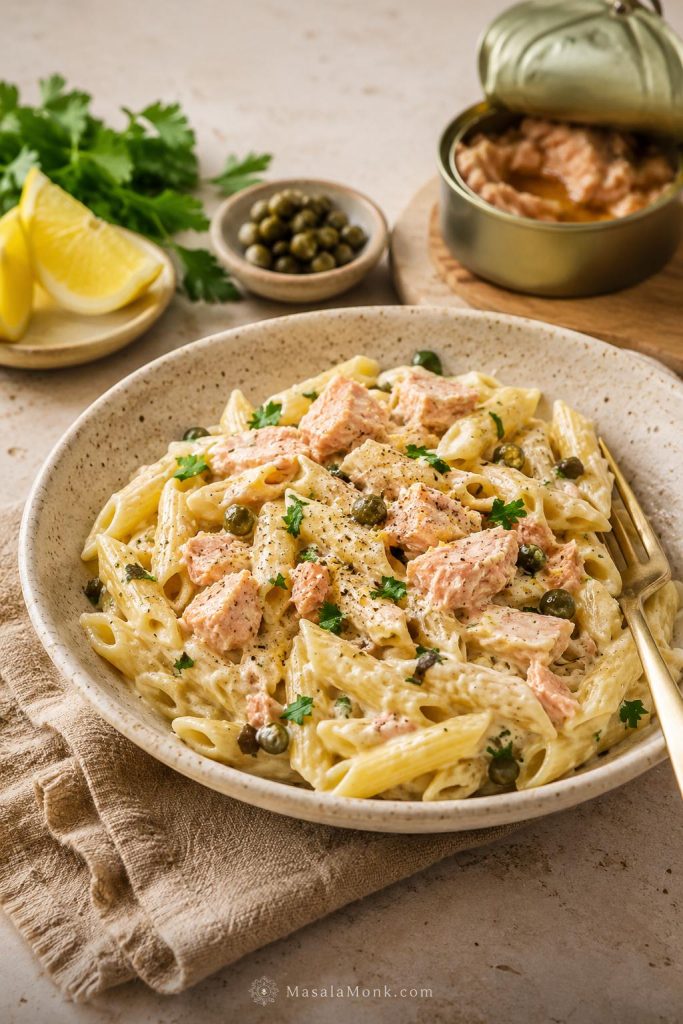
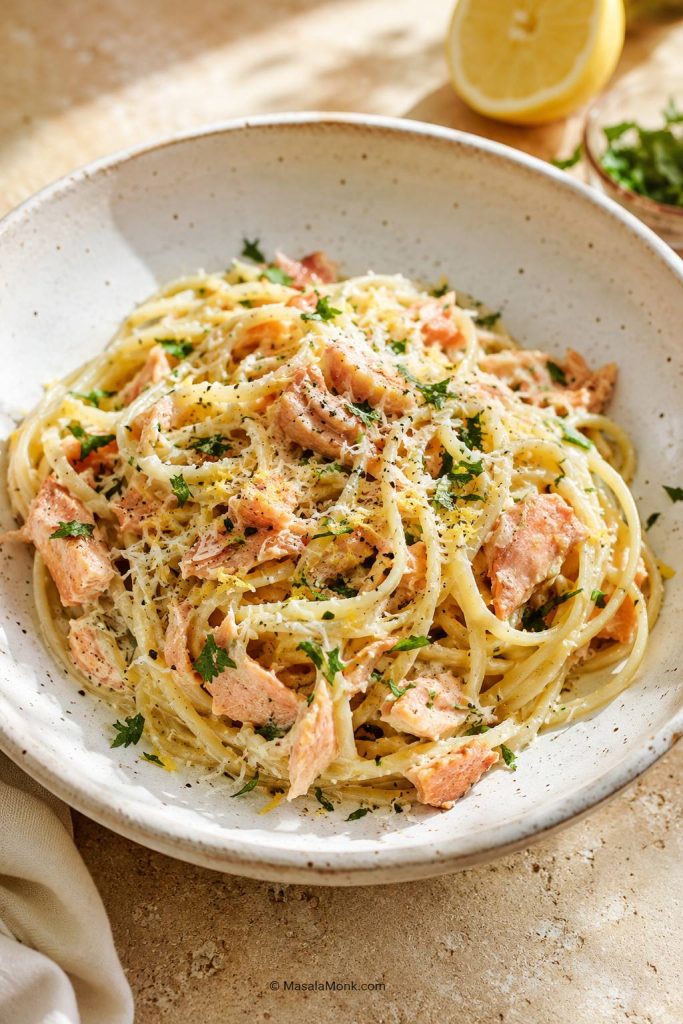
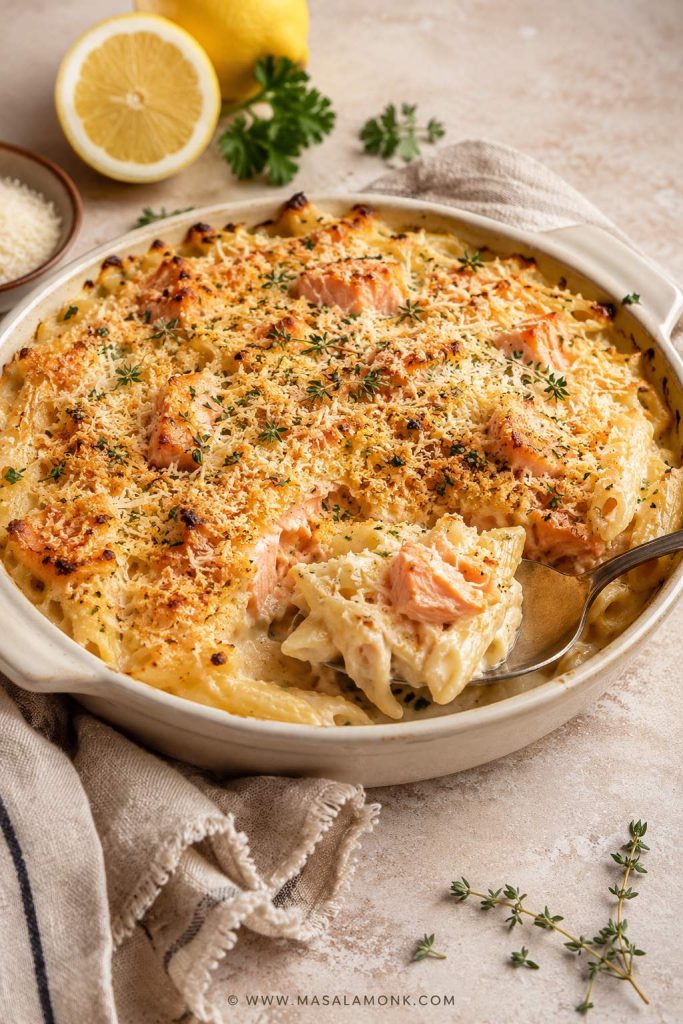
| Salmon | Flake cooked salmon into the finished pasta. | Richer dinner bowl. |
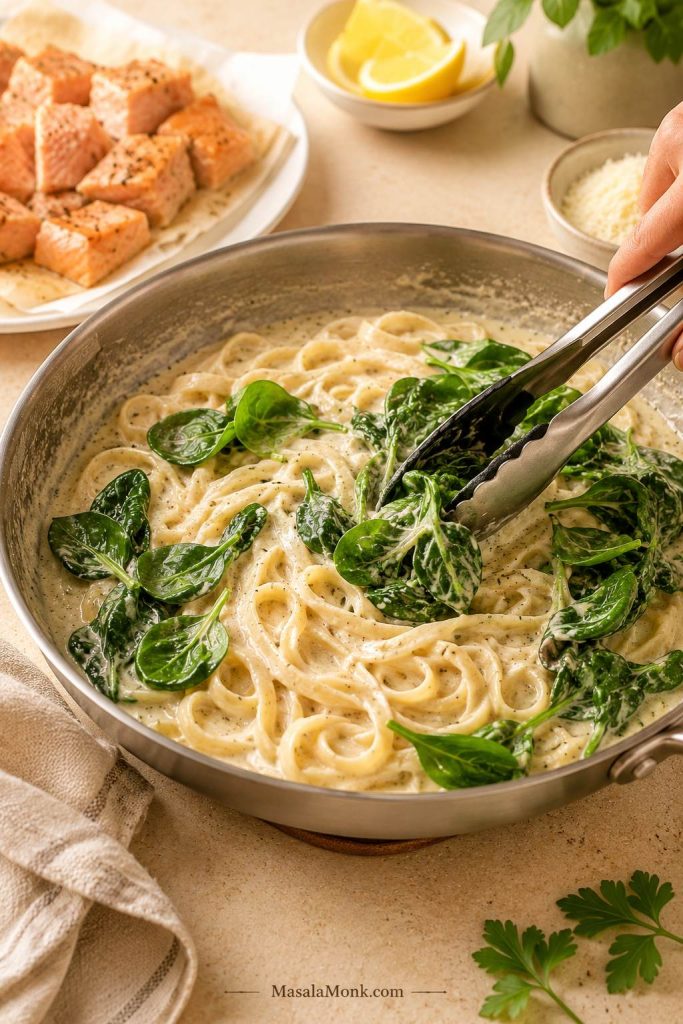
| Spinach | Wilt with the hot pasta before adding pesto. | Easy greens. |
| Broccoli | Boil with the pasta during the last 2–3 minutes. | Family-friendly vegetable version. |
| Peas | Add during the last minute of pasta cooking. | Sweetness and color. |
| Zucchini | Sauté first so it does not water down the pesto. | Summer pesto pasta. |
| Mozzarella | Fold in after tossing so it softens but does not disappear. | Tomato-basil style pasta. |
| Green beans and potatoes | Boil small potato pieces with the pasta, then add green beans near the end. | Classic Ligurian-style pesto pasta. |
| Paneer | Pan-sear cubes separately, then fold in at the end. | Vegetarian protein variation. |
| Chickpeas or white beans | Warm separately or toss in at the end. | Easy vegetarian meal. |
Best First Add-Ins to Try
For the easiest dinner upgrade, start with cherry tomatoes, peas, or spinach. For a more filling bowl, add chicken, shrimp, salmon, paneer, chickpeas, or white beans. Whatever you choose, get the sauce right first; add-ins should make the pasta better, not cover up a dry base.
If you are cooking extra on purpose, check the storage and reheating tips so the leftovers do not turn dry.
The base bowl should still taste like pesto pasta after the add-ins go in. When chicken, shrimp, or vegetables become the main event, add a little lemon or basil at the end to bring the pesto back forward.
If you want to take the same idea in a more Indian direction, MasalaMonk’s guide to pesto pasta with Indian twists plays with coriander, mint, curry leaf, spinach and tomato-sesame pesto variations.
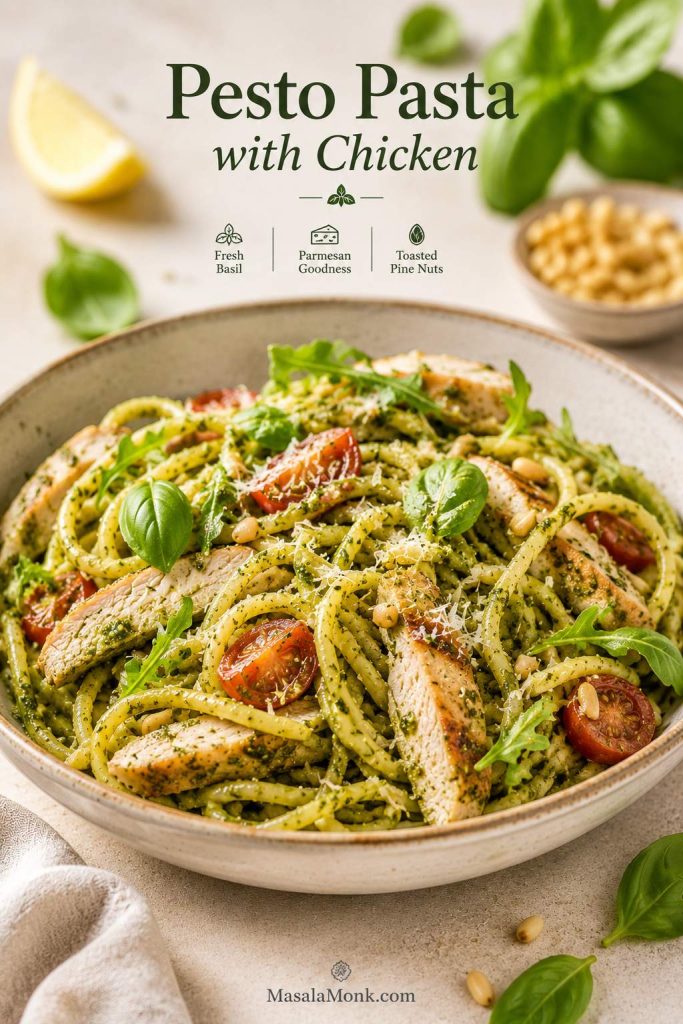
Pesto Pasta with Chicken
Cook the chicken separately, then slice or cube it and fold it into the finished pasta. MasalaMonk’s chicken pesto pasta recipe covers the full chicken version, including creamy, one-pot, baked, mushroom, tomato and lighter variations.
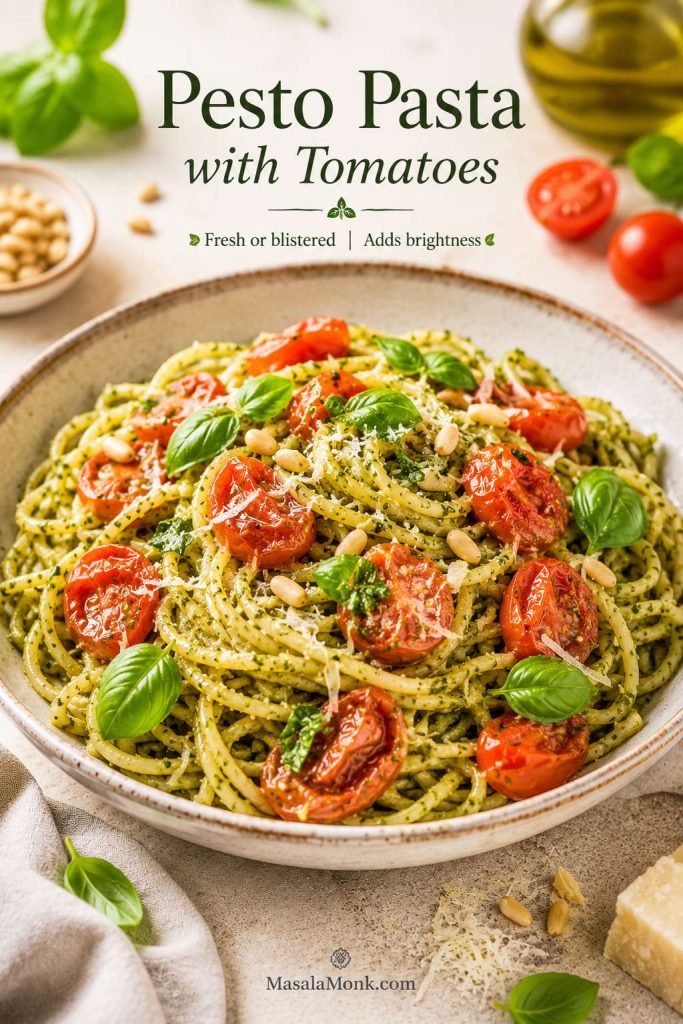
Pesto Pasta with Tomatoes
Cherry tomatoes are one of the easiest upgrades because their acidity balances the richness of pesto. Use them fresh for a quick version, blister them in olive oil for a saucier bowl, or roast them if you want a sweeter, deeper flavor.
If you want the tomatoes to become the main sauce instead of an add-in, MasalaMonk’s tomato sauce from fresh tomatoes guide is the better direction for a bright tomato-forward pasta night.
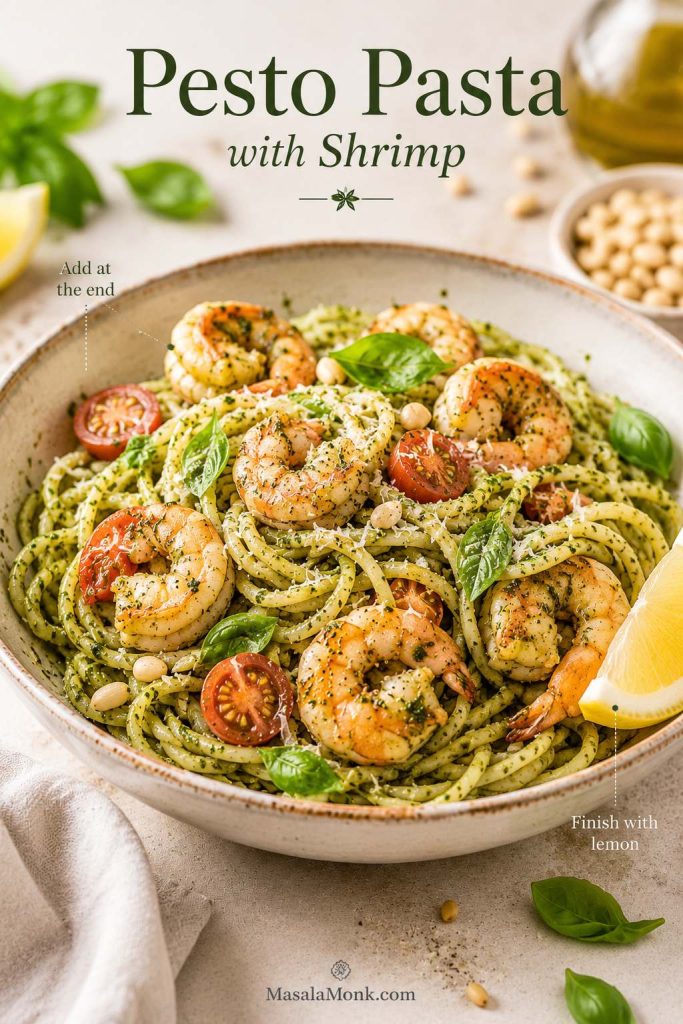
Pesto Pasta with Shrimp or Salmon
Shrimp and salmon both work well with pesto, but do not cook them in the pesto itself. Sauté shrimp separately or flake cooked salmon into the finished pasta. Add lemon at the end to keep the dish bright.
Vegetarian, Vegan and Nut-Free Options
Pesto pasta is easy to adapt because the base method stays the same. Change the pesto, but keep the same gentle tossing and starchy-water finish.
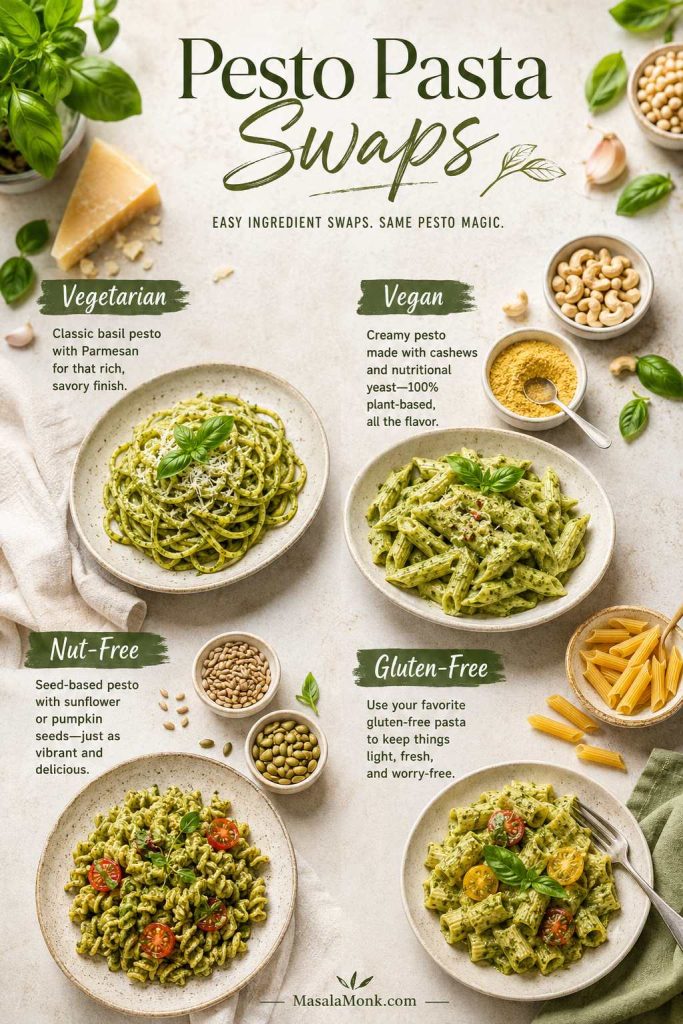
Vegetarian Pesto Pasta
For a vegetarian pesto pasta, check the cheese in the pesto. Traditional Parmesan-style cheeses may use animal rennet, so choose a vegetarian hard cheese or make pesto at home with a vegetarian-friendly cheese.
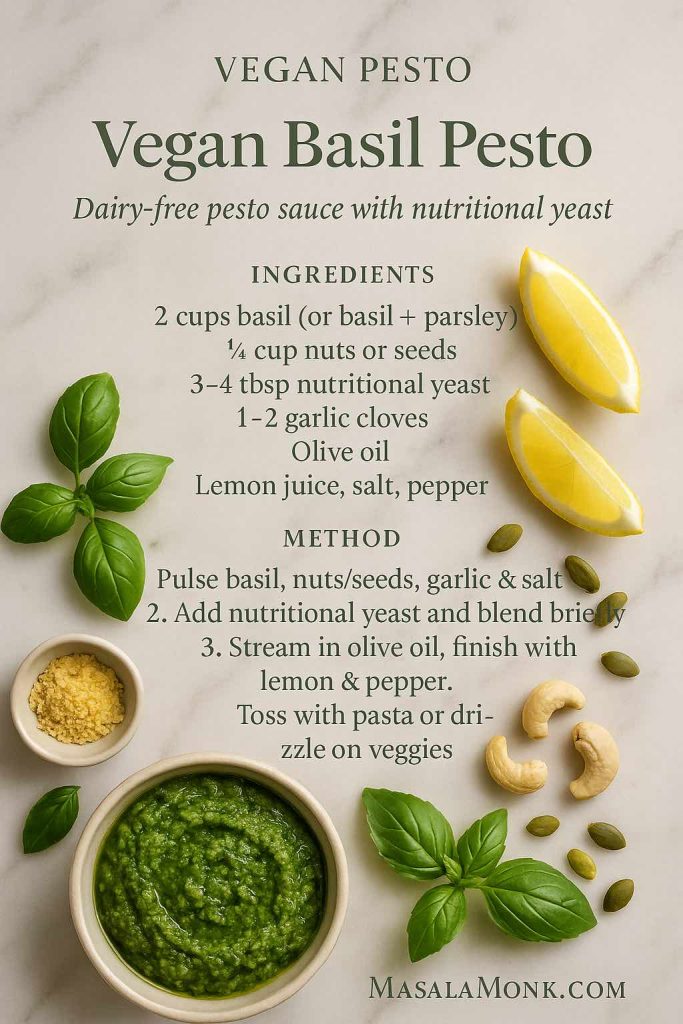
Vegan Pesto Pasta
Use vegan pesto and skip the Parmesan finish. Vegan pesto pasta often needs extra savory depth because it loses Parmesan’s salty edge. Nutritional yeast, toasted seeds, lemon, black pepper, or a spoon of cashew cream can help the sauce taste fuller. MasalaMonk also has a fresh basil vegan pesto recipe that can work as a starting point.
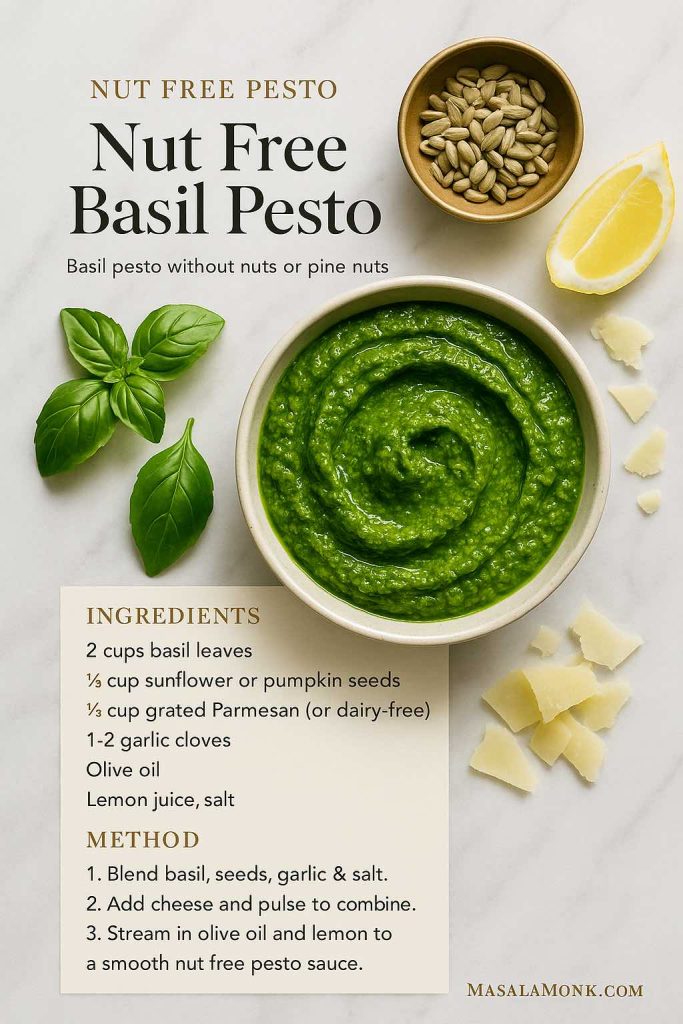
Nut-Free Pesto Pasta
Use pesto made with sunflower seeds, pumpkin seeds, hemp seeds, or a seed-free herb sauce. For the safest nut-free version, use a clearly labeled nut-free pesto rather than simply swapping nuts at home if you are cooking for someone with an allergy. Check labels carefully and avoid shared jars, grinders, or utensils unless you know they are safe.
Gluten-Free Pesto Pasta
Use your favorite gluten-free pasta, but watch the cooking time closely. Gluten-free pasta can break or soften quickly, so drain it while it still has bite and toss gently. Add the cooking water slowly because some gluten-free pasta water can thicken the sauce faster than regular pasta water.
How to Fix Dry, Oily, Bitter or Too-Salty Pesto Pasta
Start with the Sauce Texture
If your pesto pasta has ever turned dry, oily, bitter, too salty, or dull, it is usually not a recipe failure. It is a ratio, heat, or tossing problem. Most of these issues can be fixed before the pasta reaches the table.
Before adding more pesto or oil, try one small splash of warm cooking water and 10 seconds of firm tossing. Most pesto pasta problems improve there first.
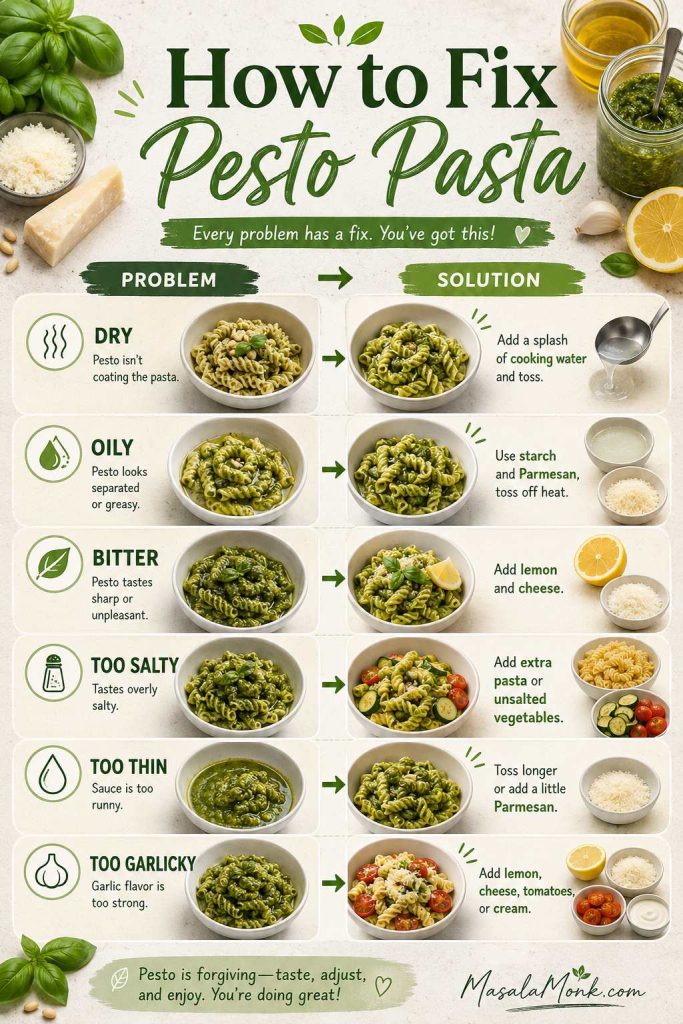
Quick Fixes for Common Pesto Pasta Problems
| Problem | Why It Happened | How to Fix It |
|---|---|---|
| Dry pesto pasta | Not enough starchy water, or the pasta absorbed the sauce. | Add warm cooking water 1 tbsp at a time and toss well. |
| Oily pesto pasta | The pesto oil did not come together with the starch. | Add a splash of cooking water and a little Parmesan, then toss off the heat. |
| Bitter pesto pasta | The pesto was overheated, over-garlicky, or made with tired basil. | Add lemon, Parmesan, tomatoes, or a small knob of butter. |
| Pesto turned dark | Too much heat hit the basil. | Add fresh basil or lemon now; next time keep the pesto away from harsh heat. |
| Bland pasta | The pasta water was not salted enough. | Finish with salt, Parmesan, black pepper and lemon. |
| Sauce too thin | Too much cooking water was added at once. | Toss longer, add Parmesan, and let it sit for 1 minute. |
| Too salty | The pesto or Parmesan was very salty. | Add more pasta, tomatoes, mozzarella, spinach or unsalted vegetables. |
| Too garlicky | The pesto has a strong raw garlic bite. | Add lemon, cheese, tomatoes, cream or extra pasta. |
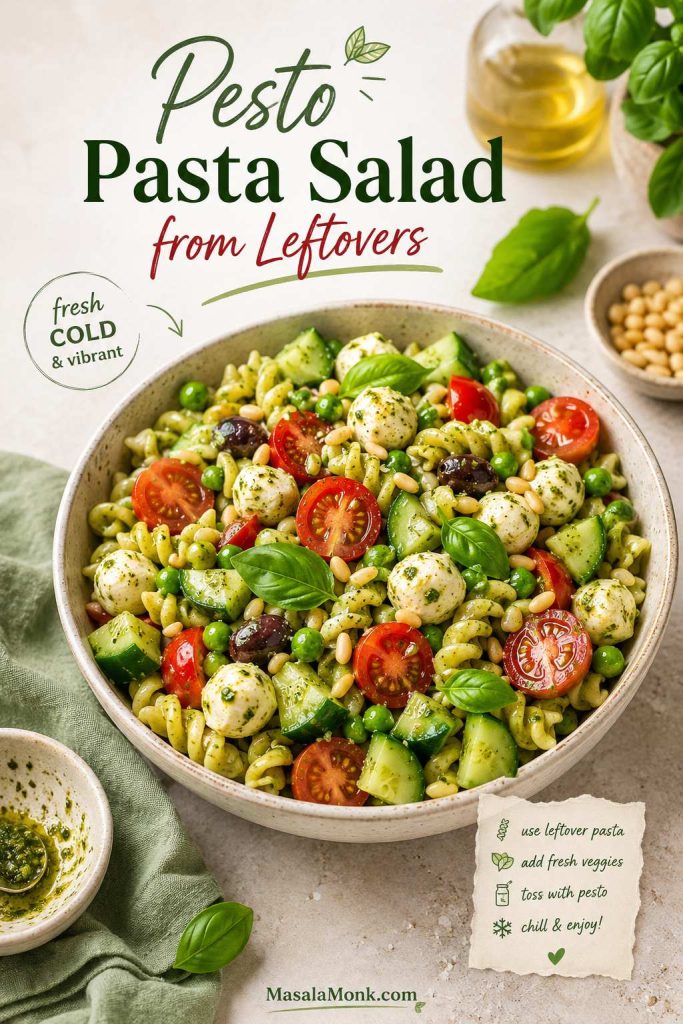
| Leftovers are dry | The pasta absorbed the sauce in the fridge. | Eat cold as pasta salad or loosen gently with a splash of water. |
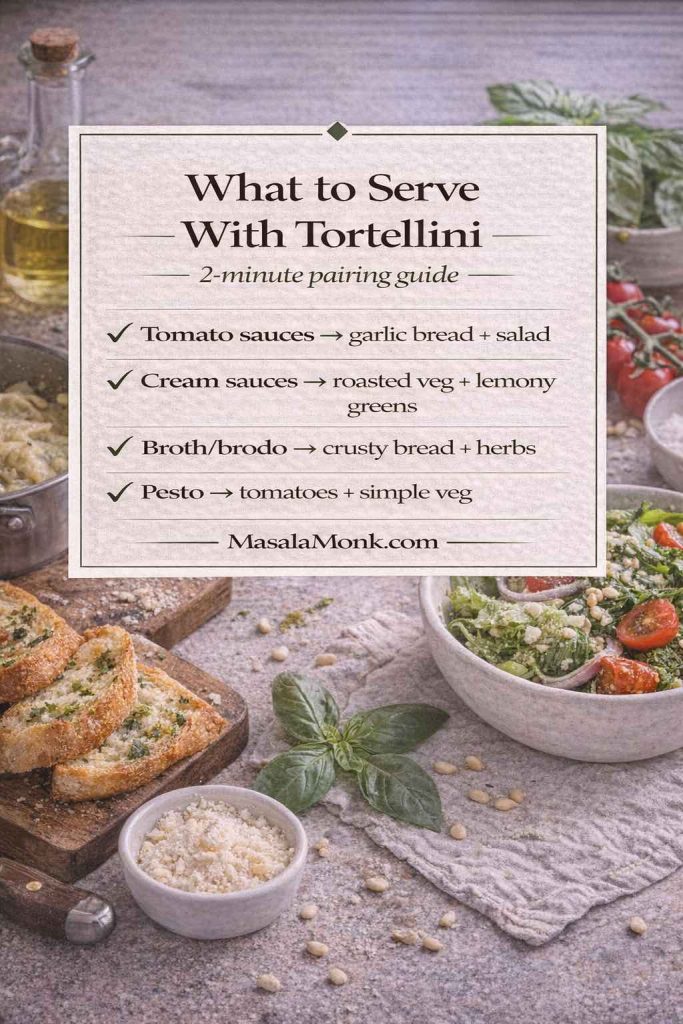
What to Serve with Pesto Pasta
Pesto pasta can be a light meal on its own, but it also plays well with simple sides. Since the sauce is rich and herby, the best pairings are fresh, crisp, acidic, or simply roasted.
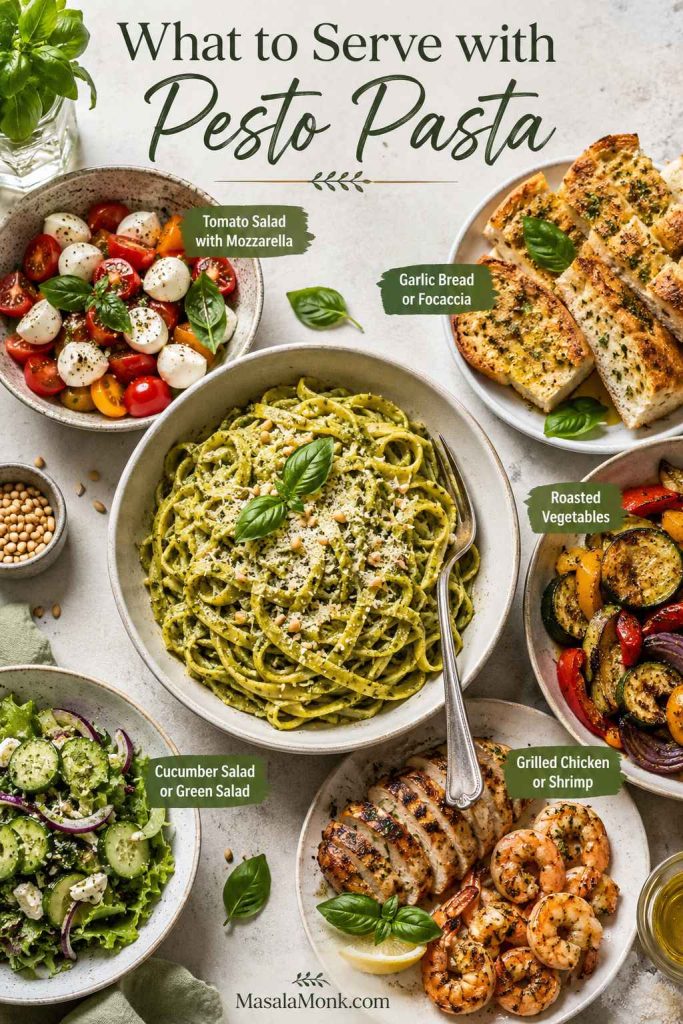
- Tomato salad with basil and mozzarella
- Garlic bread or focaccia
- Roasted broccoli, zucchini, asparagus, or bell peppers
- Grilled chicken, shrimp, salmon, tofu or paneer
- Green salad with lemon vinaigrette
- Cucumber salad for a cold, crisp, acidic side
- Soup for a bigger dinner
- Burrata or fresh mozzarella with tomatoes
If you are serving pesto pasta for guests, keep the base pasta simple and put add-ins on the side. That lets people choose chicken, shrimp, tomatoes, vegetables, extra cheese, paneer, or a vegan topping without changing the whole dish.
Storage and Reheating
This dish is happiest right after tossing, while the sauce is still loose and the basil tastes fresh. Leftovers still work, but the pasta will absorb some of the sauce as it sits.
If you know you are cooking ahead, keep a spoonful of pesto aside and stir it into the leftovers after reheating or just before serving cold. That fresh spoonful brings back some of the basil flavor the fridge can dull.
For the easiest leftover plan, skip reheating and use the pesto pasta salad idea instead.
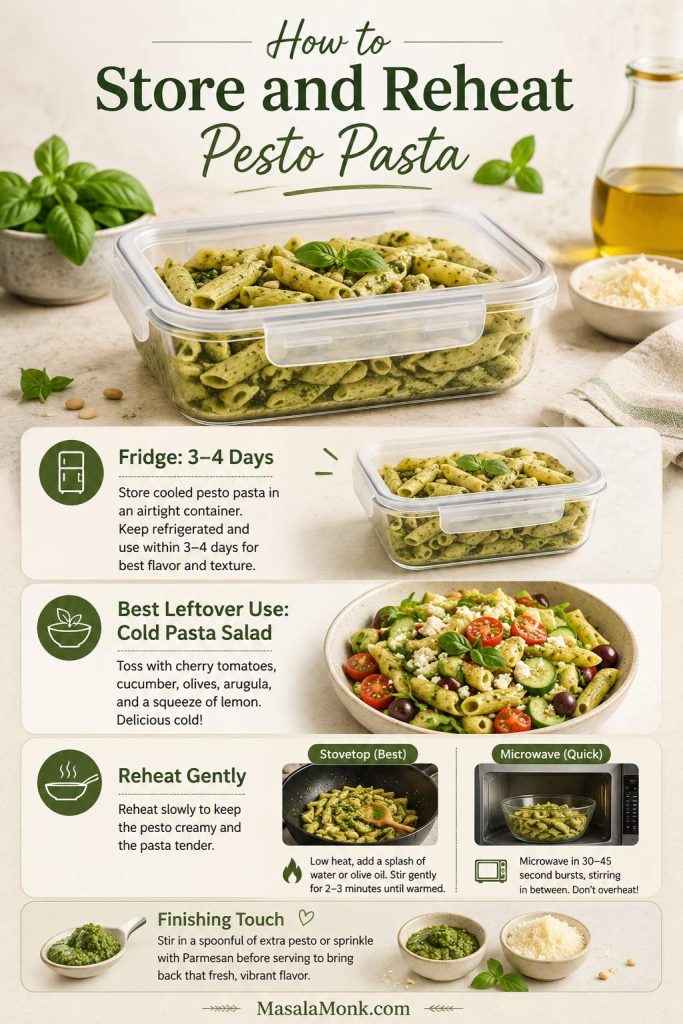
- Fridge: store in an airtight container for 3–4 days.
- Best leftover use: eat cold or room temperature as pesto pasta salad.
- Gentle reheat: warm briefly over low heat or in short microwave bursts with a splash of water. Stop as soon as it is warm; high heat can darken the basil and make the sauce oily.
- Freezing: freezing cooked pesto pasta is not ideal because the texture changes. Freeze pesto separately when possible.
Turn Leftovers into Pesto Pasta Salad
To turn leftovers into pesto pasta salad, let the pasta cool, then add a spoonful of pesto, a little lemon juice, and a few fresh add-ins such as cherry tomatoes, cucumber, mozzarella, olives, peas, or spinach.
For general leftover safety, the USDA FSIS recommends storing leftovers in airtight packaging or covered containers and using refrigerated leftovers within 3–4 days. You can read their leftovers and food safety guidance for more detail.
FAQs About Pesto Pasta
How much pesto should I use for pasta?
For 4 servings, start with ½ to ¾ cup / 120–180 ml pesto for 12 oz / 340 g dried pasta. Use less if the pesto is store-bought, salty, or oily. Use more if the pesto is homemade, fresh, mild, or loose.
How much pesto do I need for 1 lb of pasta?
For 1 lb / 450 g dried pasta, start with ¾ cup / 180 ml pesto and add up to 1 cup / 240 ml if the pesto is mild. Keep ¾ cup / 180 ml cooking water nearby and add it gradually until the sauce coats the pasta.
Should pesto be heated before adding to pasta?
Pesto should be warmed gently by the hot pasta, not cooked like a tomato sauce. Toss the pesto with hot pasta off the heat, then loosen it with the cooking water you saved.
How do you keep pesto pasta bright green?
Do not simmer or boil the pesto. Toss it with hot pasta away from direct heat, serve soon after mixing, and finish with fresh basil or a small squeeze of lemon if the flavor needs brightness.
Why is my pesto pasta dry?
A dry bowl usually means the sauce is too tight, not that it needs more oil. Add a small splash of warm cooking water, toss hard for a few seconds, and repeat only if the pasta still looks patchy.
Why is my pesto pasta oily?
Oily pesto pasta usually means the sauce did not come together properly. Add a small splash of the cooking water and Parmesan, then toss off the heat until the oil and starch combine.
What pasta shape is best with pesto?
Fusilli, rotini, penne, ziti, trofie, shells, spaghetti and linguine all work. Short ridged or spiral shapes are the easiest because they catch pesto well.
Does store-bought pesto work for pasta?
Store-bought pesto works well, but start with less because it can be saltier and oilier than homemade pesto. Loosen it first, then decide if you need more pesto.
How do you make pesto pasta creamy?
Add a small amount of heavy cream, cream cheese, ricotta, Greek yogurt, or cashew cream. Keep the heat gentle, and use the cooking water you saved to keep the sauce smooth.
What protein goes well with pesto pasta?
Chicken, shrimp, salmon, chickpeas, white beans, tofu and paneer all work. Cook them separately, then fold them into the finished pasta.
What vegetables go well with pesto pasta?
Cherry tomatoes, broccoli, peas, spinach, zucchini, asparagus, roasted peppers and green beans all pair well with pesto pasta.
Can pesto pasta be vegan?
Yes. Use vegan pesto and skip Parmesan, or replace it with nutritional yeast, toasted nuts, seeds, lemon, or a little cashew cream.
Can I make pesto pasta ahead of time?
You can, but it tastes freshest right after tossing. For the best make-ahead version, cook the pasta, cool it, and serve it as pesto pasta salad with extra pesto, lemon juice, and fresh add-ins before serving.
Is pesto pasta better hot or cold?
Fresh pesto pasta is best warm, right after tossing. Leftovers are often better cold or at room temperature as pesto pasta salad because reheating can dull the basil flavor. Add a little fresh pesto, lemon juice, or olive oil before serving cold if the pasta tastes dry.
Final Tip
The best pesto pasta should be glossy, not greasy. Save the starchy water, keep the pesto away from harsh heat, and toss until the sauce clings lightly to every piece. Once you understand that texture, every version becomes easier.