Posted on — Leave a comment

Ground Pork Meatballs Recipe: Juicy Baked, Pan-Fried or Air-Fried Meatballs

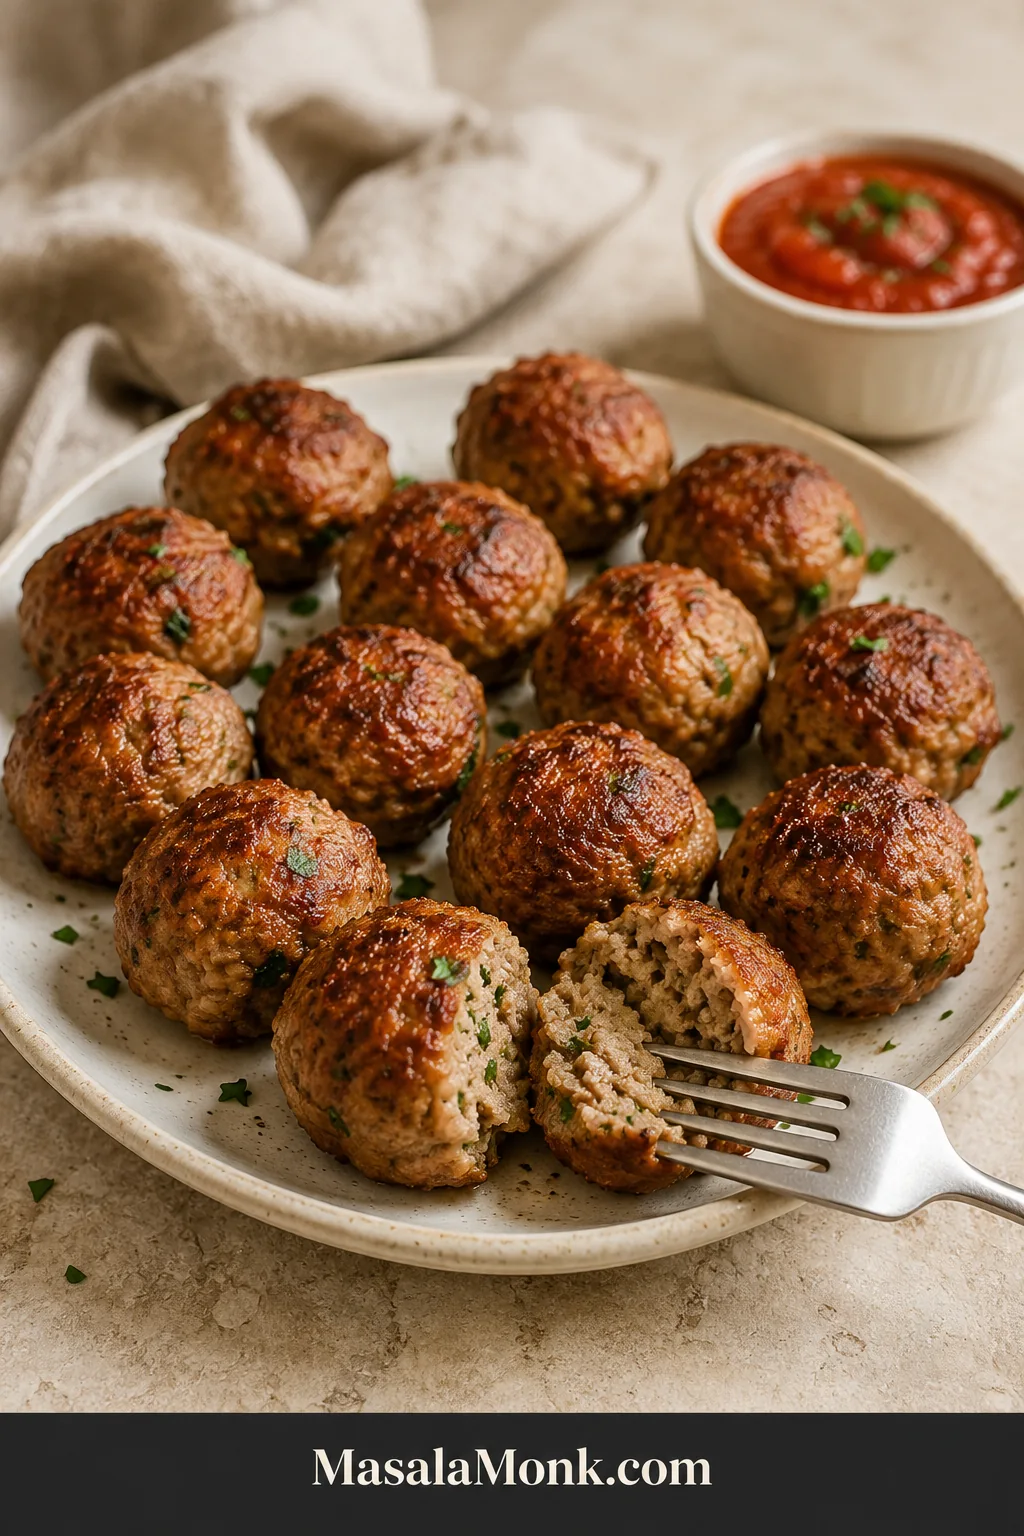
Baked ground pork meatballs on a cream platter, with one meatball split open to show the cooked center and a small bowl of marinara behind it.

The first meatball is usually eaten beside the tray: browned at the edges, tender enough to split with a fork and still moist in the middle.

Ground pork is naturally suited to that balance. These meatballs have rich pork flavor, gentle garlic and onion, fresh parsley and a golden-brown exterior around a tender center.

They are especially useful on nights when the ground pork is ready but dinner is not. Make one simple mixture, then turn it into a marinara dinner, a gravy plate, a rice bowl or an appetizer with dipping sauce.

One pork mixture, three ways to cook it—and a tender center whichever you choose. Soften the breadcrumbs first, handle the pork gently, keep the portions even and stop cooking as soon as the centers are ready.

Start With the Baked Version

Baking is the easiest place to begin. It cooks all 16 meatballs at once, asks for the least attention and is the most forgiving method.

The process is only four moves: soften the panko, mix gently, shape 16 even meatballs and bake. From there, the oven does the hands-off cooking, and the baked version takes about 40 minutes from bowl to table.
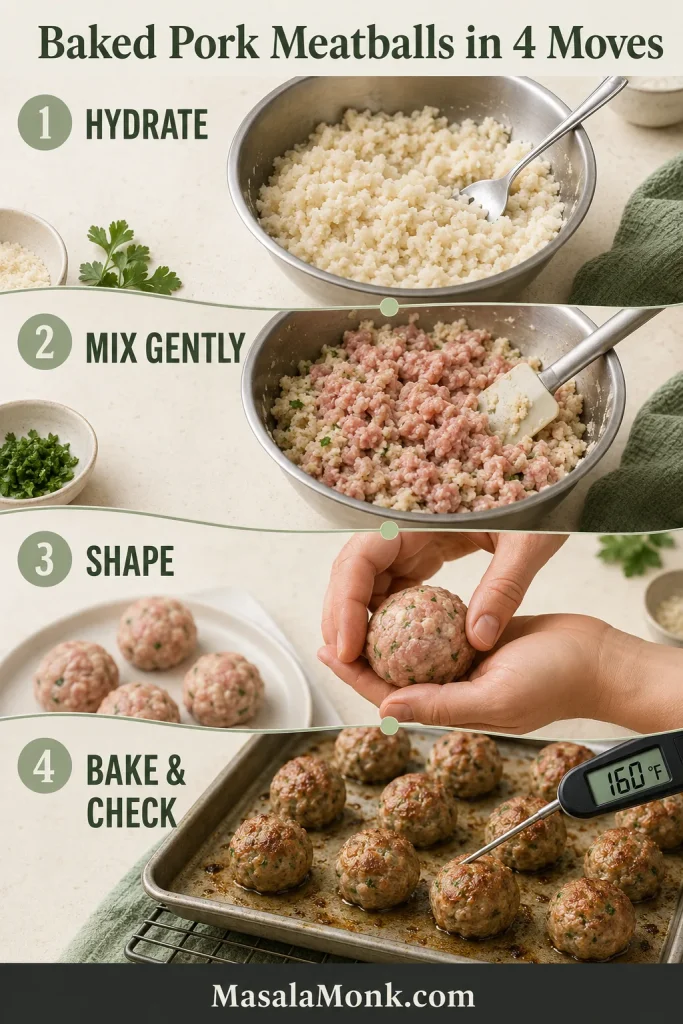
Four-step visual guide showing panko being hydrated, ground pork being mixed gently, meatballs being shaped, and baked meatballs checked with a thermometer.
Hydrate the crumbs, mix gently, shape evenly and check the center—the four controls behind tender baked pork meatballs.

For the simplest dinner, bake them, warm four per person in marinara and serve with spaghetti or toasted bread. Choose the skillet when you want the deepest crust, or air-fry six to ten meatballs when speed matters. Whichever method you choose, a moist mixture needs gentle handling—not extra kneading.

The recipe

Ground Pork Meatballs: Baked, Pan-Fried or Air-Fried

A little milk-softened panko keeps these all-pork meatballs tender without making them too soft to shape or brown.

Recipe at a glance

  • Yield: About 16 medium meatballs; serves 4
  • Portion: 35–36 g / 1¼ oz each, about 1½ inches / 4 cm
  • Preparation: About 20 minutes
  • Total time, baked: About 40 minutes, including a 3-minute rest
  • Oven: 15–18 minutes
  • Skillet: 10–12 minutes per batch; up to 14 with the covered finish
  • Air fryer: 10–13 minutes per batch
  • Ground pork doneness: 160°F / 71°C

Ingredients

  • 1 lb (454 g) plain ground pork or pork mince, preferably regular rather than extra-lean
  • 25 g panko breadcrumbs (begin with about ⅓ cup when measuring without a scale)
  • 2 tablespoons (30 ml) milk
  • 1 large egg (about 50 g) without the shell
  • 2 tablespoons (about 8 g) finely chopped fresh parsley
  • 1 teaspoon (about 3 g) onion powder
  • 1 teaspoon (about 3 g) garlic powder
  • 5 g fine sea salt (about ¾ teaspoon)
  • ½ teaspoon (about 1 g) freshly ground black pepper
  • 1 tablespoon (15 ml) neutral oil, for pan-frying
  • Oil for greasing the tray, rack or air-fryer basket, as needed

Equipment: a large mixing bowl, fork or flexible spatula, instant-read thermometer and the pan or air fryer needed for your chosen method. A scale or 2-tablespoon scoop helps keep the portions even.

Mix and shape

  1. Make the panade. Stir the panko and milk together in the mixing bowl. Leave for 5 minutes, until the crumbs are evenly damp and no loose milk remains.
  2. Season the binder. Add the egg, parsley, onion powder, garlic powder, salt and black pepper. Mix until even.
  3. Add cold pork. Keep the pork refrigerated until the panade is ready, then fold it in with a fork, flexible spatula or your fingertips just until no large unmixed patches remain. Do not knead the mixture smooth.
  4. Check the seasoning, if needed. Cook a 20 g tester patty completely, cool briefly and taste. Scatter any adjustment evenly over the bowl and fold once or twice. Never taste raw pork.
  5. Portion first. Divide into 16 portions weighing about 35–36 g / 1¼ oz each. A rounded 2-tablespoon scoop is a useful starting point. After removing a 20 g tester, divide the remaining mixture into 16 portions of about 35 g each.
  6. Shape gently. Roll each portion only until it holds a ball about 1½ inches / 4 cm across. The surface should feel slightly sticky but still hold a rounded shape; it should not slump flat or feel liquid.
  7. Chill only if needed. If the mixture is warm or the balls begin to flatten, refrigerate them for 15–20 minutes before cooking.

After shaping, follow one cooking method below.

Choose one: Bake

  1. Heat the oven. Set the oven to 400°F / 200°C conventional / 180°C fan. Line a rimmed sheet pan with parchment or place a lightly greased wire rack over the pan.
  2. Space the meatballs. Arrange in one layer with about 1 inch / 2.5 cm between them.
  3. Bake and begin checking early. Start checking at 14 minutes. Most 35–36 g meatballs will need about 15–18 minutes.
  4. Check the center. Take them out when two of the largest meatballs reach 160°F / 71°C. Use color as a clue, but let the thermometer decide.
  5. Rest briefly. Leave for 3 minutes before serving or transferring to sauce so the juices settle and the surface firms slightly.

Choose one: Pan-Fry

  1. Heat the skillet. Warm 1 tablespoon (15 ml) neutral oil in a 12-inch / 30 cm heavy skillet over medium heat.
  2. Work in two batches. Add 8 meatballs, leaving room to turn them. Let the first side cook for about 2 minutes before moving.
  3. Brown several surfaces. Turn gradually. Once browned, reduce the heat to medium-low.
  4. Finish the centers. Continue cooking and turning until the meatballs reach 160°F / 71°C, about 10–12 minutes in total, or up to 14 minutes when the covered finish is needed.
  5. Rescue early darkening. Move the pan off the heat, add 2 tablespoons / 30 ml water down the side, cover and return to low heat for 1–2 minutes. Uncover for the final 30–60 seconds.
  6. Reset for the remaining eight. Wipe out burnt bits, leave a thin film of rendered fat and add 1 teaspoon oil only if the skillet looks dry. The second panful may finish slightly sooner because the skillet is already hot.

Choose one: Air-Fry

  1. Preheat when recommended. Set a basket-style air fryer to 375°F / 190°C and follow the manufacturer’s preheating guidance.
  2. Leave room for airflow. Lightly oil the basket and arrange the meatballs in one layer without touching. Cook in batches, and never preheat with loose parchment inside.
  3. Begin checking at 9 minutes. Turn after about 6 minutes if the appliance browns more strongly on one side.
  4. Cook to temperature. Most 35–36 g meatballs will need about 10–13 minutes. Remove at 160°F / 71°C.
  5. Pause between batches. Rest the cooked meatballs for 3 minutes while the next round cooks.

Recipe notes

  • Panko volume varies by brand. Without a scale, begin with about ⅓ cup, hydrate it fully and add more only if the chilled mixture still slumps. For fine dry breadcrumbs, begin with 20 g, wait 5 minutes and add up to 5 g more only if needed.
  • Use the 5 g salt weight for consistent seasoning; fine and coarse crystals fill a spoon differently.
  • Unsweetened, unflavored non-dairy milk or water may replace the 2 tablespoons / 30 ml milk.
  • Ground chicken or turkey substitutions must reach 165°F / 74°C.
  • To double: double every ingredient by weight, mix in two bowls if needed and use spaced trays or separate cooking batches.

The recipe above is all you need to start cooking. Keep reading for why the mixture works, how the methods differ and what to do if something goes wrong.

Why Ground Pork Works So Well for Meatballs

Plain ground pork—or pork mince in the UK, Australia and several other markets—has enough fat and natural richness to make tender meatballs without beef, veal or sausage.

A light panko-and-milk panade protects the center without making it bready, while keeping the portions even makes every cooking time more useful. The raw mixture will feel softer than a lean beef mixture; if a scoop stays rounded on the tray, trust it before reaching for more crumbs.

Seasoning stays simple but not bland: garlic and onion sit quietly behind the pork, parsley adds freshness and enough salt makes the meatballs satisfying before any sauce is added. Simmer a few in marinara tonight, glaze a few for tomorrow’s rice bowl and freeze the rest for another dinner.

Think of this as an everyday savory base. Swedish gravy meatballs, sweet-and-sour versions and Vietnamese xíu mại each need their own balance of binder, seasoning and sauce. For other ways to use the package, browse MasalaMonk’s ground pork recipes.

Ingredients for Ground Pork Meatballs
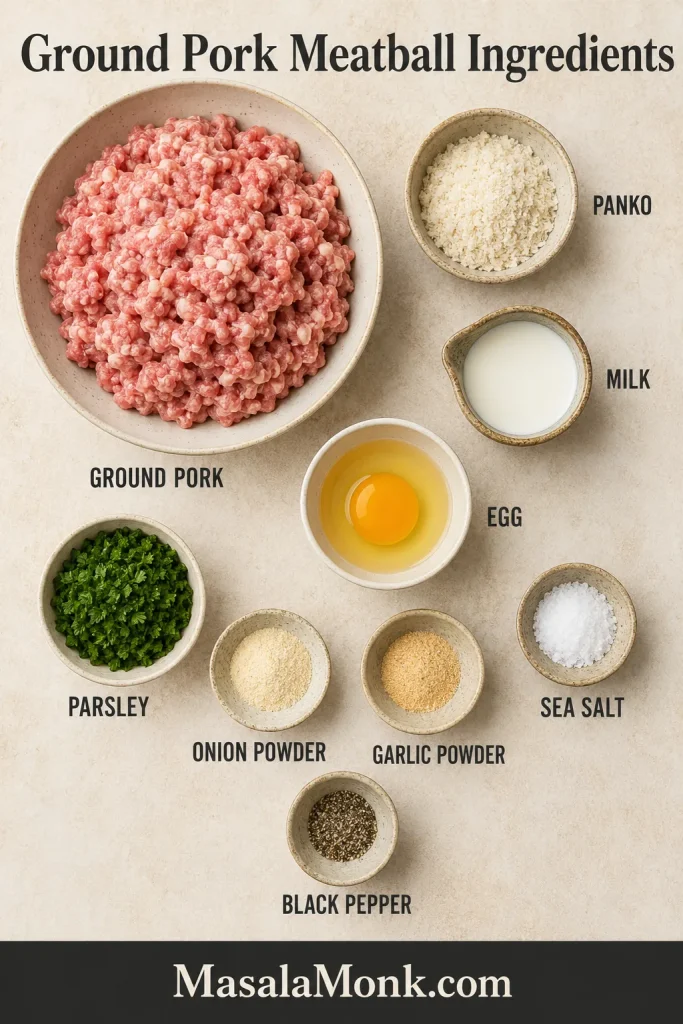
Overhead ingredient board with ground pork, panko, milk, egg, parsley, onion powder, garlic powder, sea salt, and black pepper.
The base seasoning stays neutral, so one batch can move toward marinara, gravy, rice bowls or appetizers.

Ground Pork or Pork Mince

Use plain ground pork, not breakfast or Italian sausage, which already contains salt, spices and often extra fat. Regular pork is more forgiving than the leanest package; when the label gives a percentage, roughly 15–20% fat suits an everyday meatball.
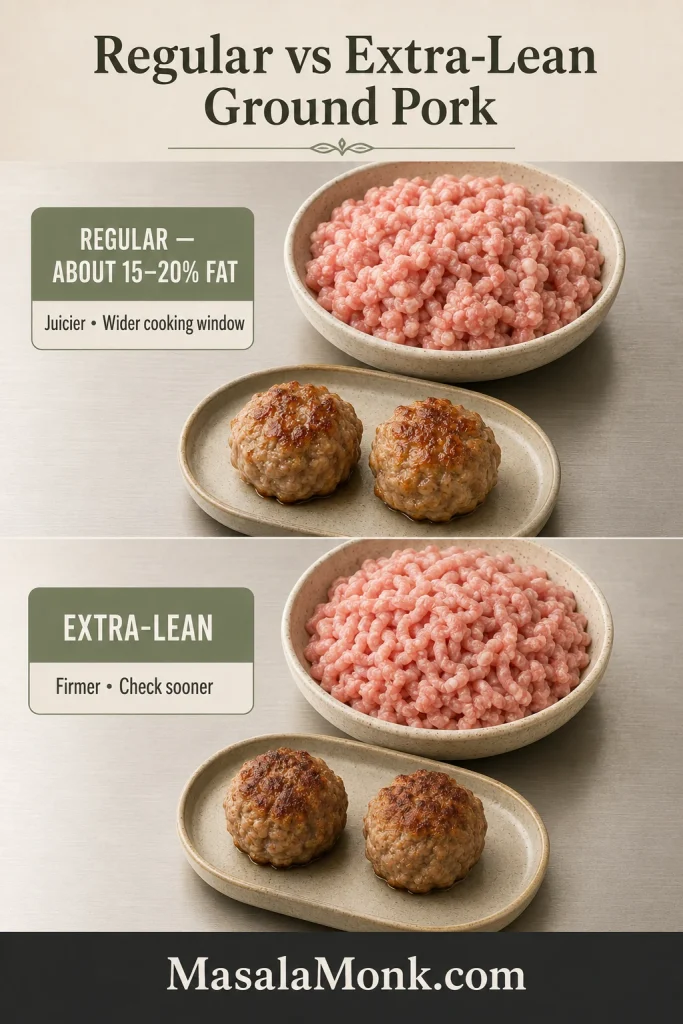
Comparison of regular ground pork and extra-lean ground pork with cooked meatballs showing how fat level changes texture.
A regular-fat package gives a wider margin before dryness; extra-lean pork needs earlier checking.

The Panade: Panko, Milk and Egg

Soaking the panko in milk creates a light panade that holds moisture more effectively than dry crumbs mixed straight into the pork. Just 2 tablespoons / 30 ml milk tenderizes the center without making the mixture slump or flatten.

Fine dry breadcrumbs absorb faster than panko, so add them gradually. Unsweetened non-dairy milk or water can replace the milk in the same 2-tablespoon / 30 ml quantity.
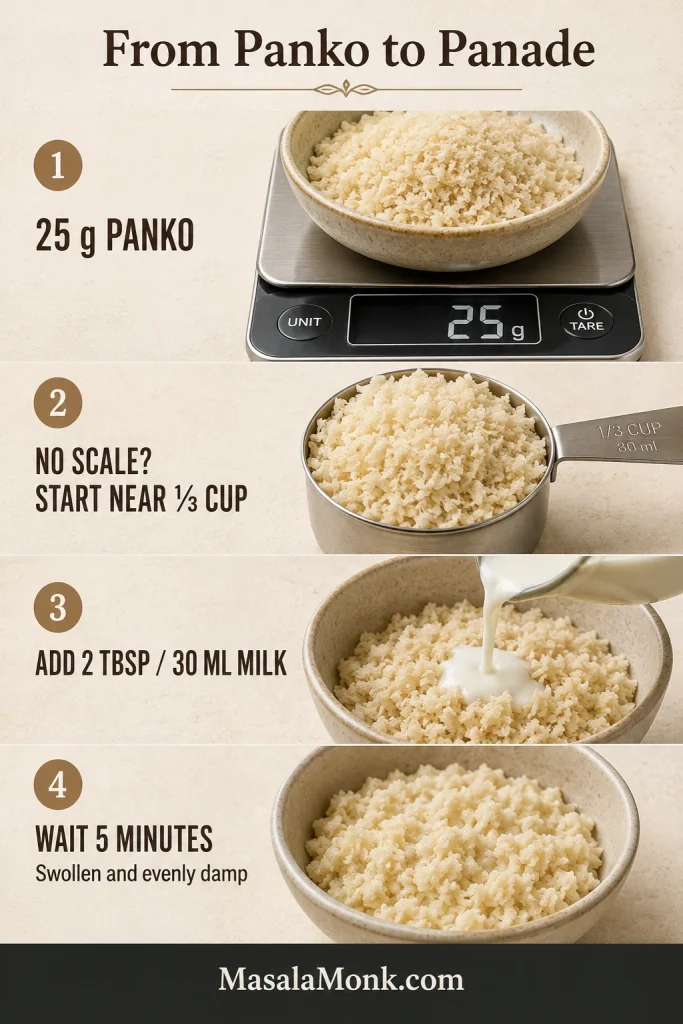
Panko panade guide showing 25 grams of panko, an approximate one-third cup measure, milk being added, and hydrated crumbs after resting.
Hydrate the panko first so it softens and distributes moisture evenly through the pork.

The egg helps the pork and breadcrumbs hold together. It is not the ingredient that makes the meatball juicy, and adding more does not automatically make the center softer. Too much egg relative to the crumbs and meat can create a loose raw mixture and a springy cooked texture.

Aromatics and Seasoning

Powdered aromatics distribute evenly without adding the variable moisture of raw onion, which helps one mixture work across all three methods. Prefer fresh onion? A measured version appears below; large pieces can stay firm and create weak points.

Parsley adds freshness without tying the meatballs to one sauce or cuisine, while black pepper gives the pork gentle background warmth. Salt must reach the center, and crystal sizes vary, so use the 5 g weight when possible.

If you add salty Parmesan, soy sauce or another assertive ingredient, cook a small tester before shaping. It is the safest way to correct the bowl without gambling on the whole tray.

The main recipe uses a light panade. Because the alternatives below change the finished texture, treat them as separate versions rather than direct swaps. Pork meatballs can be made with or without breadcrumbs, but the results will not be identical.
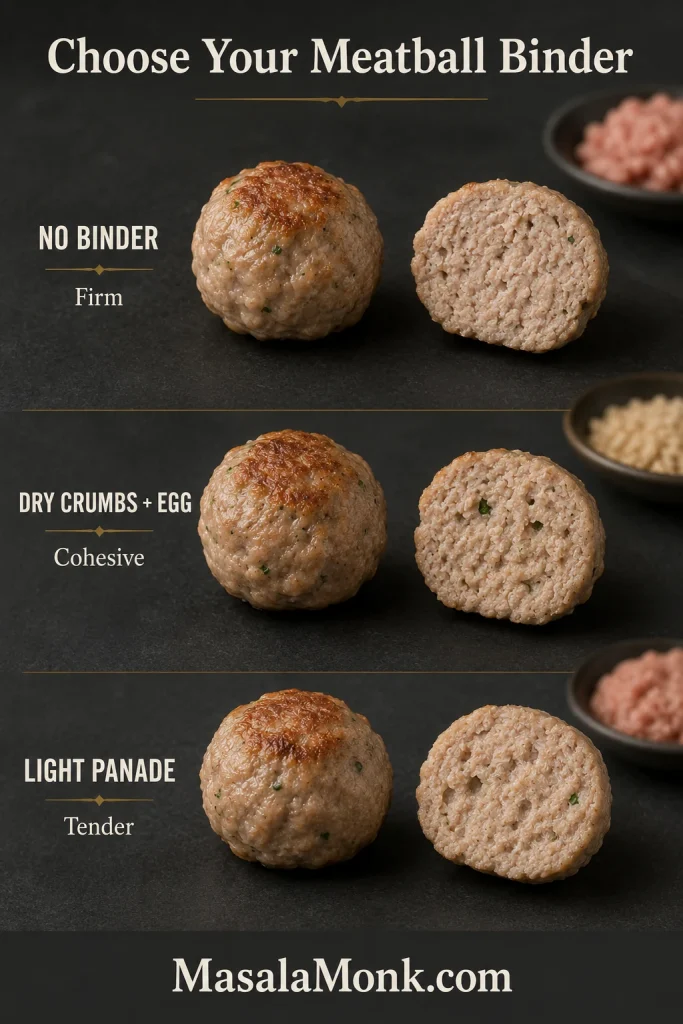
Three cooked pork meatballs compared by binder: no binder, dry crumbs and egg, and light panade, with different interior textures.
Binder choice changes the bite: no binder is firmest, dry crumbs are tighter, and a light panade gives the most tender center.

No binder

Texture: Firm and pork-forward

Forgiveness: Lowest

Best for: Regular-fat pork and cooks who prefer a firmer bite

Dry breadcrumbs and egg

Texture: Cohesive and slightly firmer

Forgiveness: Moderate

Best for: Quick everyday meatballs

Light panade

Texture: Tender without becoming very soft

Forgiveness: Highest

Best for: Baking, pan-frying, air frying, spaghetti and freezing

The light panade keeps the center tender across the oven, skillet and air fryer without making the meatballs difficult to shape, brown or reheat.

Binder-Free Pork Meatballs: No Breadcrumbs or Egg

For a firmer binder-free meatball, use regular ground pork—preferably near 20% fat when labeled—and omit the panko, milk and egg together. Mix only until the pork feels slightly tacky and cohesive, then portion the same 35–36 g size, shape without compressing and chill for about 20 minutes.

Baking gives this variation the widest cooking window. Use the same 160°F / 71°C endpoint; if pan-frying, let the first surface set fully before turning. Expect a firmer, more pork-forward center and a narrower margin between ready and dry.

Gluten-Free Pork Meatballs

Use gluten-free panko in the same gram weight. That preserves a texture much closer to the original than replacing the breadcrumbs with a large amount of almond flour.

Before adding more crumbs: give the panko its full hydration time. If the quantities are correct and the mixture is merely warm, chill it for 15–20 minutes first. When the chilled mixture still slumps rather than merely feeling sticky, fold in 1 teaspoon panko, wait 3 minutes and reassess. Repeat only as needed, up to 1 tablespoon.

How to Mix and Shape Pork Meatballs

1. Make and Season the Panade

Stir the panko and milk together and wait about 5 minutes. The crumbs should swell and look evenly damp, not float in a pool of milk.

Mix in the egg, parsley, onion powder, garlic powder, salt and pepper before the pork enters the bowl. The seasoning spreads more evenly, so the meat needs less handling later.

2. Fold in the Cold Pork

Keep the pork refrigerated while the panade hydrates, then fold it in only until no large plain patches remain. Stop while the mixture still looks loose and softly textured—not glossy, smeared or paste-like.
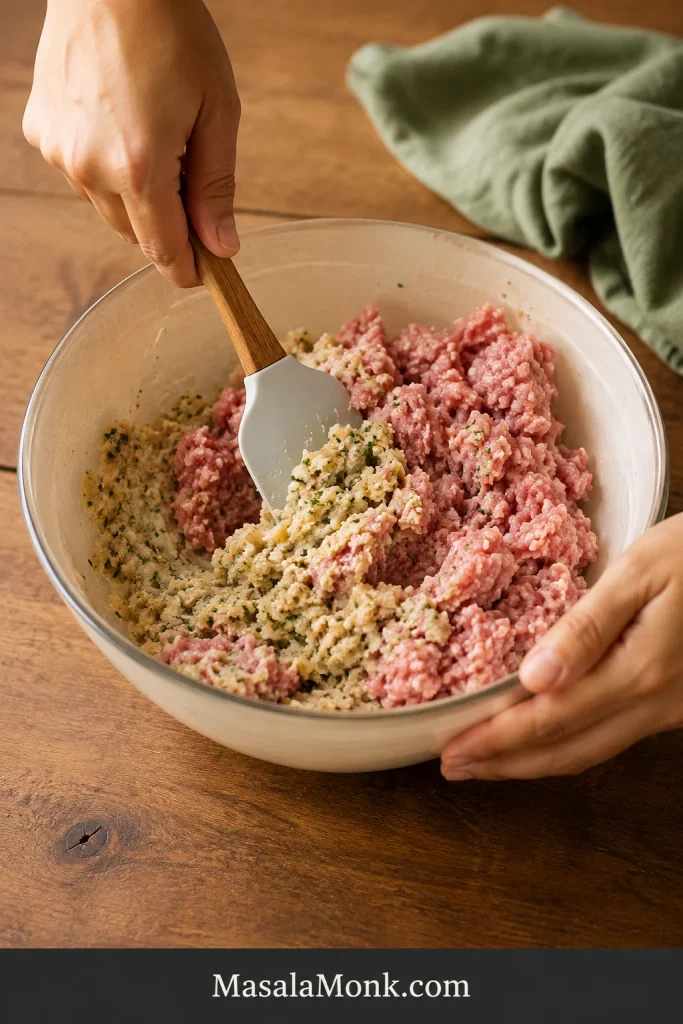
Hands folding cold ground pork into a hydrated panko panade in a mixing bowl on a wooden work surface.
Fold only until the pork is evenly combined; a pasty mixture cooks firmer and springier.

The mixture may feel softer than you expected. That is normal. Scoop one portion onto the tray: if it stays rounded rather than spreading, keep going instead of reaching for more crumbs.
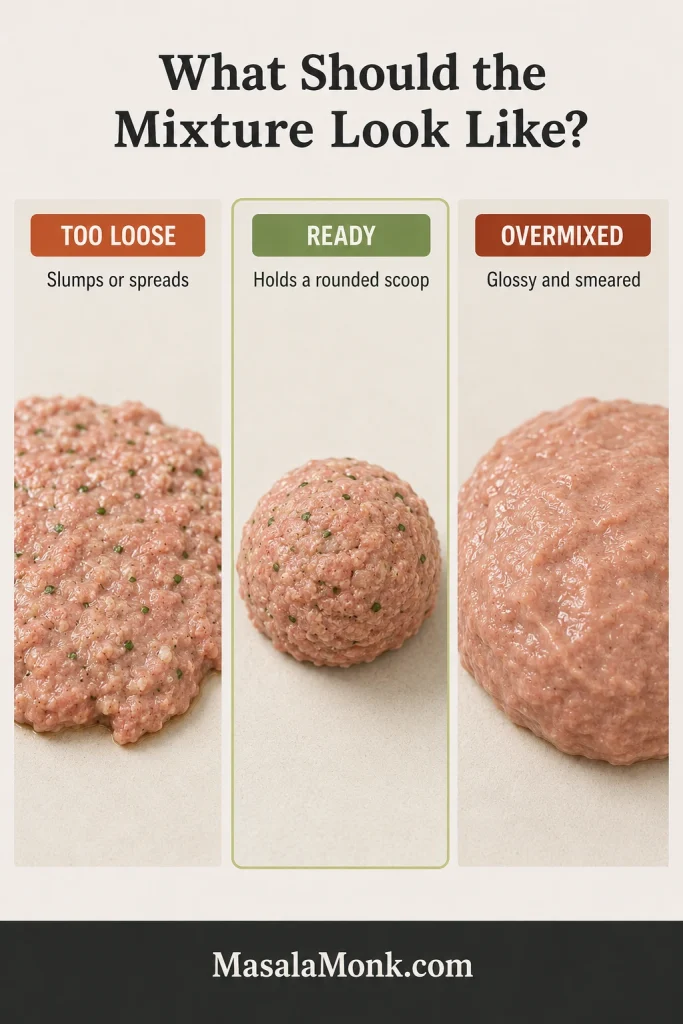
Three raw pork meatball mixtures showing a loose mixture that spreads, a ready mixture that holds a rounded scoop, and an overmixed glossy mixture.
A sticky mixture is workable when it still holds a rounded scoop after resting.

3. Cook a Seasoning Tester

A small cooked tester is the safest way to correct the seasoning before shaping all 16 meatballs. If it needs adjustment, scatter the extra seasoning evenly over the bowl and fold only once or twice; never taste raw pork mixture.
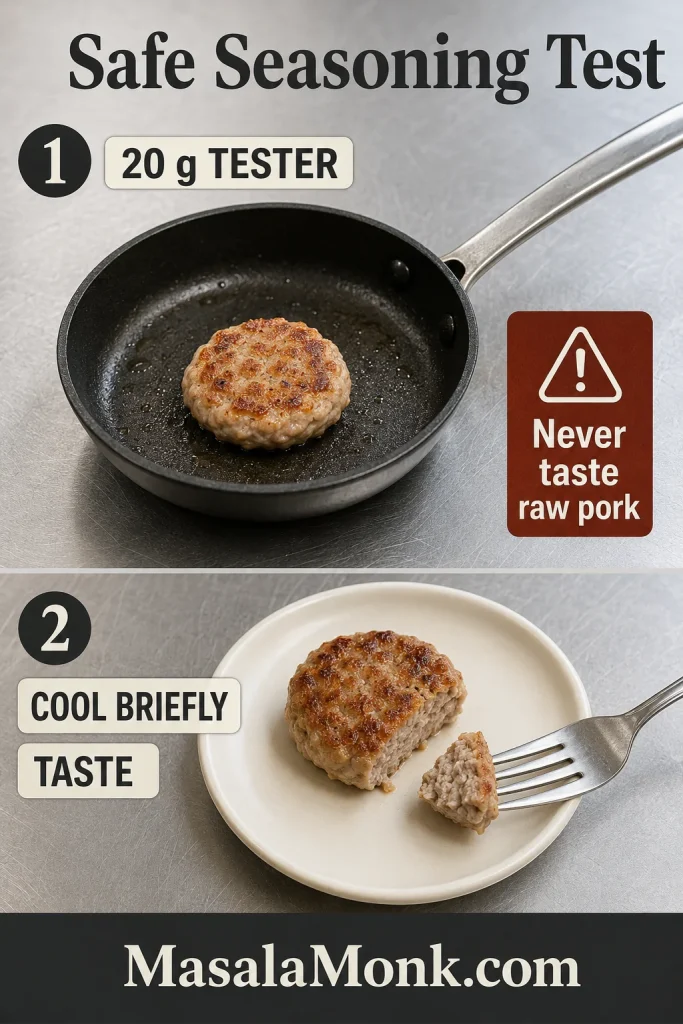
Small pork seasoning tester cooked in a skillet, cooled on a plate, and prepared for tasting with a fork.
Cook one small tester before shaping so seasoning corrections happen safely.

4. Portion, Shape and Chill Only if Needed

Scoop or weigh all 16 portions before rolling. Without a tester, use 35–36 g / about 1¼ oz per meatball; after a 20 g tester, portion the remainder at about 35 g each. A rounded 2-tablespoon scoop and a diameter near 1½ inches / 4 cm are useful visual checks.
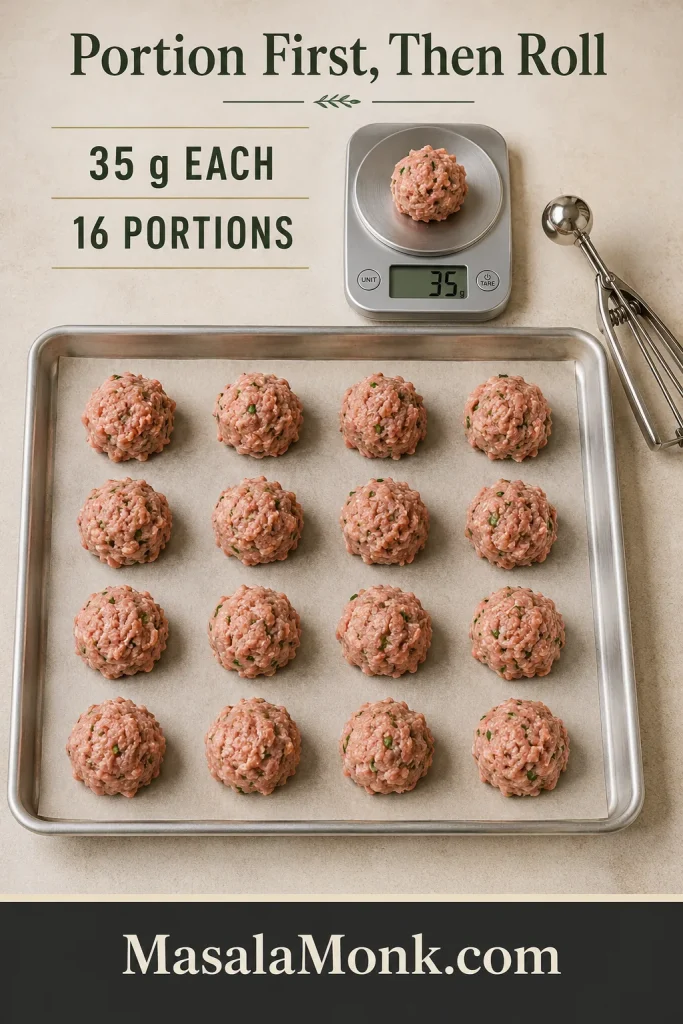
Sixteen raw ground pork meatball portions on a parchment-lined sheet pan, with one portion on a scale reading 35 grams.
Even 35 g portions help the full tray finish at the same time.

Roll each portion only until the surface closes and the ball holds together. Dampen your palms if the mixture clings. If the portions flatten on the tray or the kitchen is warm, chill them for 15–20 minutes; when they already hold their shape, cook them without adding an automatic delay.
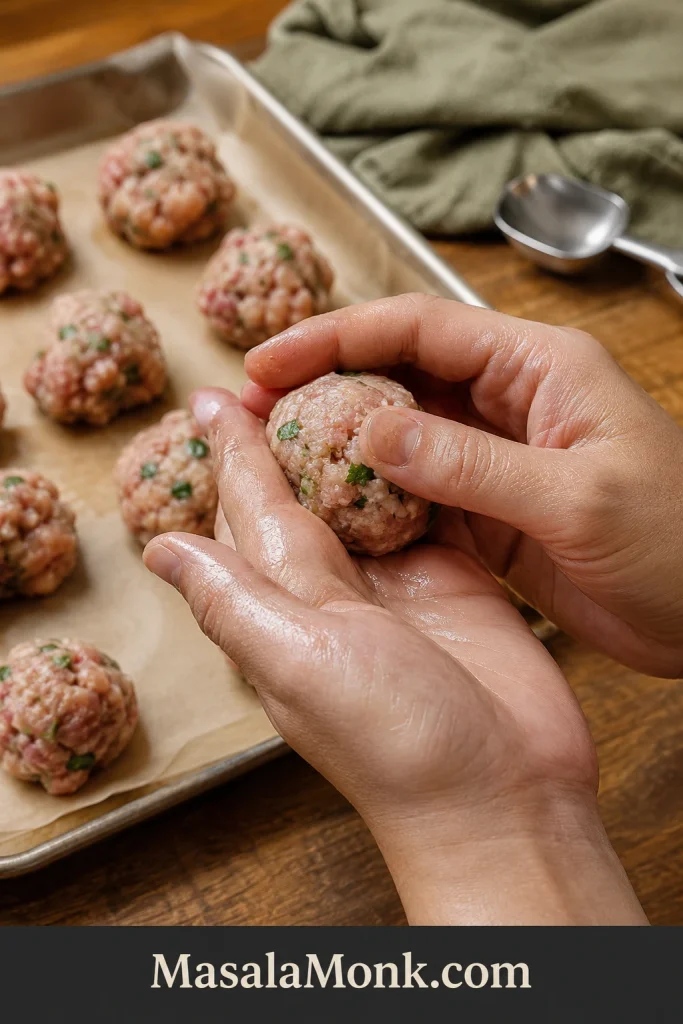
Damp hands gently shaping a raw ground pork meatball while other portions rest on a parchment-lined tray.
Close the surface with light pressure without compressing the center into a dense ball.

Choose Your Cooking Method

Choose the oven for calm, the skillet for crust or the air fryer for speed. The mixture stays the same; only the capacity, browning and attention change.

  • Bake for ease. The full recipe cooks at once with moderate browning and very little hands-on work.
  • Pan-fry for the deepest crust. Work in two batches when you want strong browning and flavorful skillet fond for gravy or sauce.
  • Air-fry six to ten for speed. This works best when the basket has enough open space for hot air to move around every meatball.
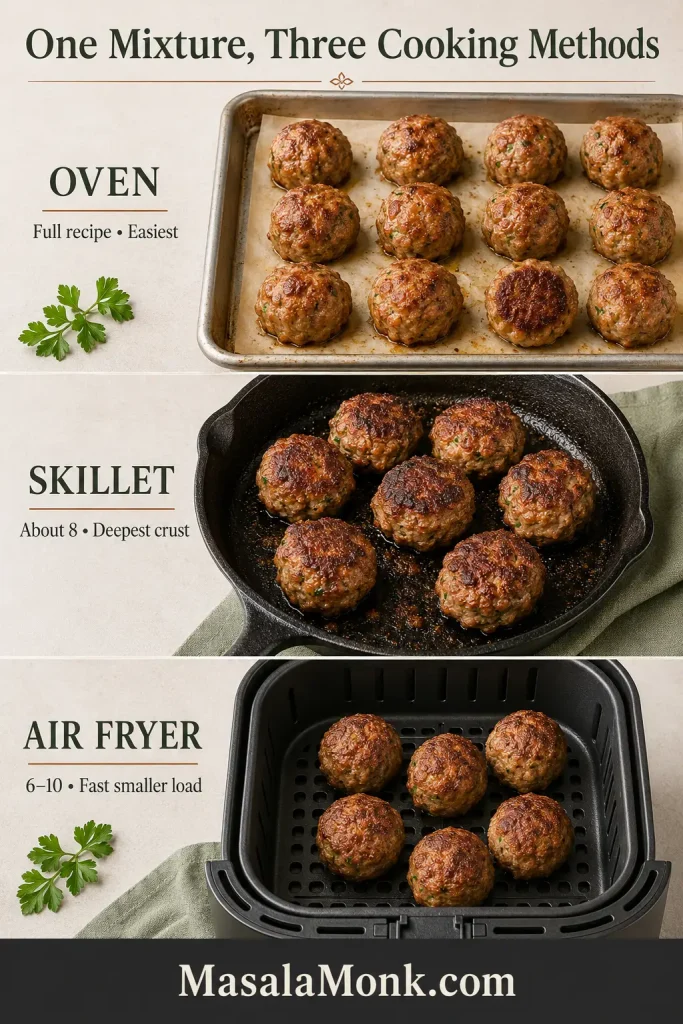
Comparison board showing oven-baked, skillet-cooked, and air-fried ground pork meatballs with different browning levels.
Baking is hands-off, skillet cooking builds crust, and air frying favors small, well-spaced batches.

Baked Ground Pork Meatballs

Baking is the calmest way to cook the whole tray. Bake 35–36 g meatballs at 400°F / 200°C conventional / 180°C fan. Begin checking at 14 minutes; most take 15–18 minutes. Take them out at 160°F / 71°C. Use parchment for easy cleanup and deeper browning underneath, or a greased rack when you want air to circulate around more of each meatball.
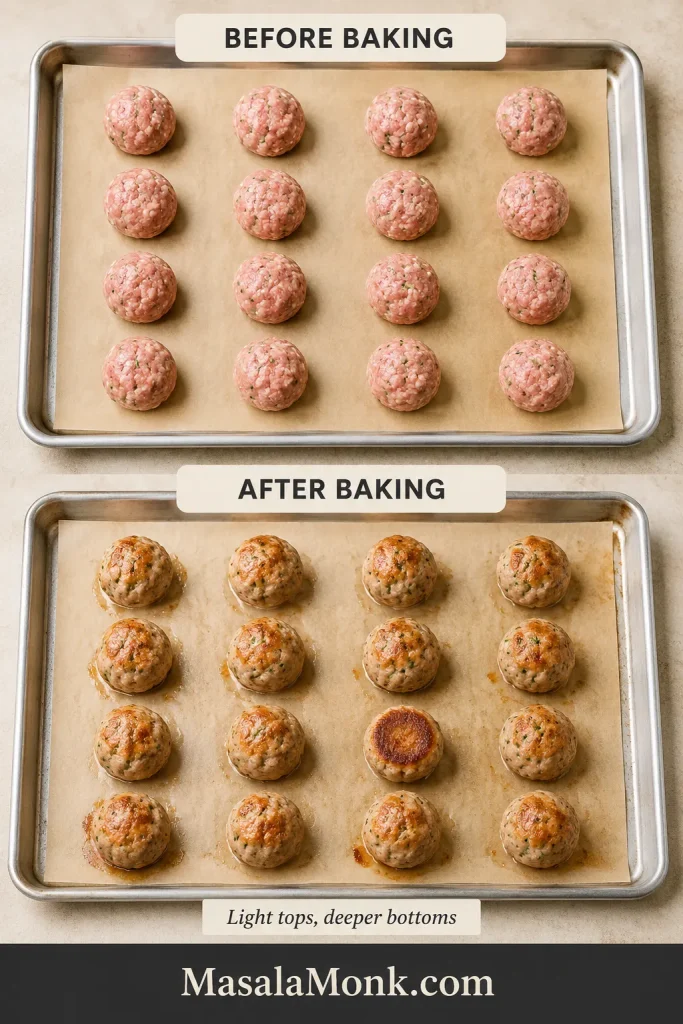
Before-and-after sheet pans showing sixteen raw pork meatballs before baking and sixteen baked meatballs with browned bottoms and lightly colored tops.
Baked pork meatballs often brown more underneath than on top, so let temperature make the final call.

Parchment vs Wire Rack

  • Parchment: easiest cleanup and minimal sticking, though the bottoms may sit in a little rendered fat.
  • Wire rack: more even browning, but longer cleanup and a very soft mixture may settle into the wires.
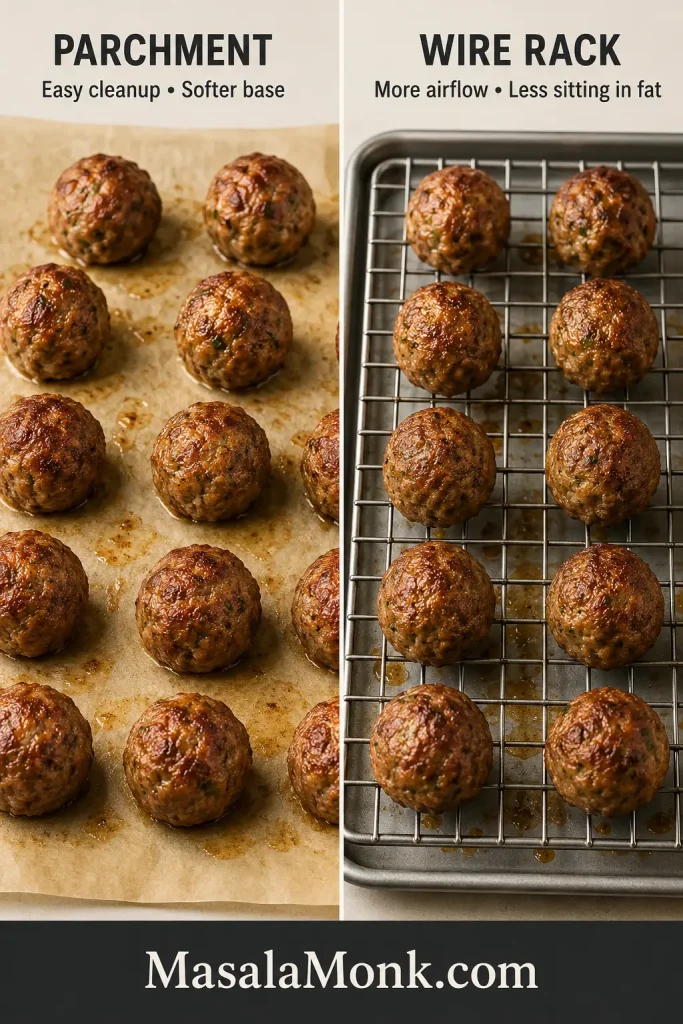
Side-by-side comparison of baked pork meatballs on parchment and on a wire rack set over a sheet pan.
Use parchment for cleanup or a rack for airflow; both can work well with the same mixture.

Flipping is optional when the meatballs have room around them. Turn them once near the end only if the undersides color much faster than the tops. When they are close, the tops should look dry and lightly golden, with deeper browning underneath; rest the meatballs for 3 minutes before serving or adding them to sauce.

Pan-Fried Ground Pork Meatballs

Pan-frying gives the meatballs their deepest crust and leaves browned flavor in the skillet for gravy or sauce. For 35–36 g meatballs, begin checking at 9 minutes; most need 10–12 minutes per batch, or up to 14 minutes with the covered finish. Take them out at 160°F / 71°C. This method needs more attention than baking because the surface can color before the middle is ready.

Brown Them in Two Batches

A 12-inch / 30 cm heavy skillet holds about eight standard meatballs with room to turn. Heat a thin film of neutral oil over medium, add the first eight and leave the first side alone for about 2 minutes. If a meatball resists the turn, give it another 20–30 seconds; a firm golden-brown patch usually releases more cleanly than a pale surface.

Tongs testing a browned pork meatball in a cast-iron skillet, with other meatballs cooking around it.
A stuck skillet meatball usually needs more time, not more force.

Turn gradually so several sides develop color, then lower the heat to medium-low. Before the second eight, remove any burnt bits, leave a thin film of rendered fat and add only about 1 teaspoon oil if the skillet looks dry. They may finish slightly sooner because the pan is already hot.

When the Outside Browns Too Fast

A dark crust with an underdone middle does not mean the meatballs are lost. Reduce the heat, move the skillet briefly away from the burner and add about 2 tablespoons (30 ml) water carefully down the side. Cover immediately and return to low heat for 1–2 minutes.

Uncover for the final 30–60 seconds so the crust does not stay wet. The sizzling should settle as the water evaporates and the browned surface firms again.
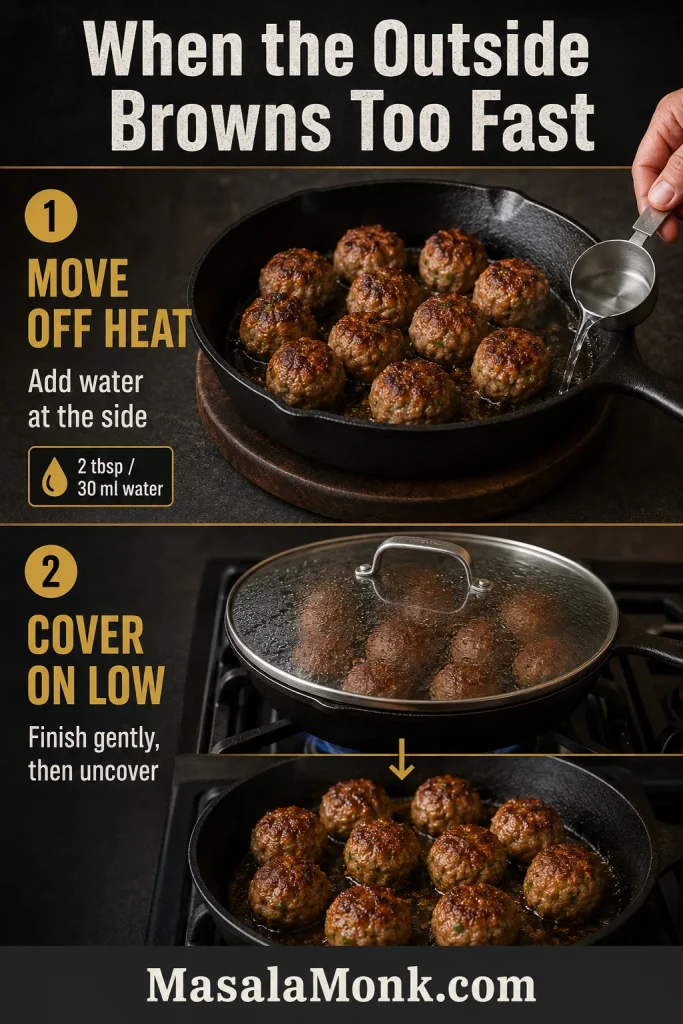
Two-step skillet guide showing browned pork meatballs moved off direct heat, water added at the side, and the pan covered on low heat.
Covered low heat finishes the center when the crust browns too quickly.

Browned is not the same as done. A meatball can have a deep crust and still be undercooked in the middle. Browning tells you about flavor; the thermometer tells you when the ground pork is safely cooked.

Air Fryer Ground Pork Meatballs

A basket-style air fryer is useful for six to ten meatballs or a quick dinner for two. Cook 35–36 g meatballs at 375°F / 190°C. Begin checking at 9 minutes; most need 10–13 minutes per load. Take them out at 160°F / 71°C. Its concentrated heat creates good color quickly, but it also makes the center easier to overshoot.

Give the hot air room to move. Follow the manufacturer’s preheating guidance, never preheat with loose parchment inside and arrange six to ten oiled meatballs in one layer with visible space between them.
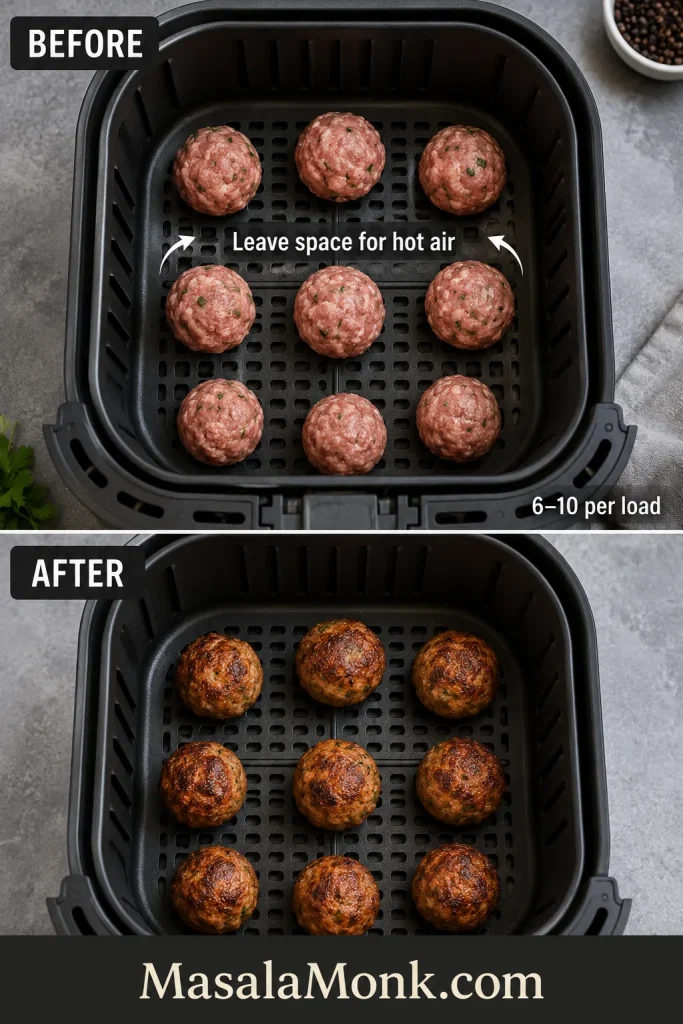
Air fryer basket showing raw pork meatballs spaced apart before cooking and browned meatballs after cooking.
Visible air gaps help air-fryer pork meatballs brown instead of steam.

Turn after about 6 minutes only when the appliance browns more strongly from one direction. Look for a dry, browned exterior and rounded sides rather than waiting for every surface to become deeply dark; oven-style air fryers may need several additional minutes.

Ground Pork Meatball Cooking Times and Doneness

The following ranges apply to raw meatballs weighing about 35–36 g / 1¼ oz and measuring roughly 1½ inches / 4 cm across. Use 400°F / 200°C conventional / 180°C fan for the oven and 375°F / 190°C for the air fryer; every method finishes at 160°F / 71°C.

Here are all three methods side by side.

MethodSetting / loadCheck fromTime
Oven400°F; full recipe14 min15–18 min
SkilletMedium, then medium-low; about 89 min10–12 min per batch, plus a brief pan reset
Air fryer375°F; 6–109 min10–13 min per load

These are times to start checking, not promises that every appliance will finish at the same minute. Chilled meatballs, crowded pans and larger portions need longer; powerful air fryers and smaller portions may finish sooner.

Mini Pork Meatballs

Mini meatballs weighing around 18–20 g cook much faster. Begin checking baked meatballs around 9 minutes, skillet meatballs around 6 minutes and air-fried meatballs around 6–7 minutes.

They work well in soup, on appetizer platters and in meals where every spoonful should contain a meatball. Use the thermometer for the final decision.

For larger 50–60 g meatballs, keep the same cooking temperature and begin checking several minutes after the standard size. Their timing varies more by method, so use 160°F / 71°C as the endpoint.
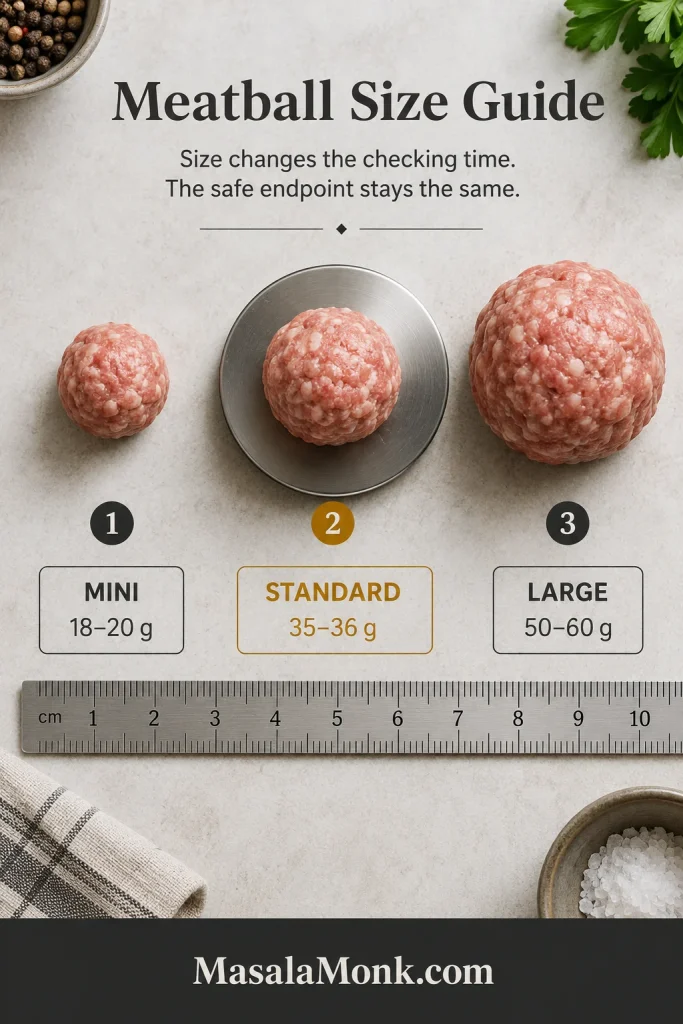
Size guide showing mini, standard, and large raw pork meatball portions with gram ranges and a ruler.
Size changes timing; the safe center temperature does not.

How to Check Pork Meatball Doneness

Ground pork meatballs are ready when their centers reach 160°F / 71°C. The familiar 145°F / 63°C guidance applies to intact pork chops, steaks and roasts—not ground pork. See the USDA safe minimum temperature chart.

  1. Choose two of the largest meatballs, preferably from different parts of the tray, skillet or basket.
  2. Insert an instant-read thermometer through the side rather than straight down from the top.
  3. Aim for the center without pushing the probe through into the hot cooking surface.
  4. Take them out when both meatballs have reached the safe temperature in the middle.

Instant-read thermometer inserted through the side of a cooked pork meatball, reading 160°F and 71°C, with a split meatball nearby.
Probe from the side to reach the center; ground pork meatballs are done at 160°F / 71°C.

Color alone is not a reliable safety test. A faint pink tone does not mean you need to cook away all the moisture: pork can remain slightly pink after reaching a safe temperature, while a dry meatball can still look moist when sliced. Use a thermometer for a more useful answer than cutting several meatballs apart. The center should split easily with a fork and look moist rather than wet or springy.

Finishing Pork Meatballs in Marinara

These meatballs are mild enough for tomato sauce but savory enough to serve without it. Keep them near the standard size so they heat evenly and sit comfortably beside each forkful of pasta. Use MasalaMonk’s homemade marinara sauce or a well-seasoned jarred sauce.

For fully cooked meatballs: simmer gently in marinara for 5–10 minutes, stirring around them rather than repeatedly pushing them against the pan. Extra cooked meatballs can also become meatball baked ziti.

When meatballs are browned but undercooked: transfer them directly from the skillet into gently simmering marinara and continue cooking without interruption. Do not cool or refrigerate partially cooked ground pork to finish later.

Can raw meatballs cook directly in sauce? They can, but this soft panade mixture is easier to handle and develops better browned flavor when baked or seared first. The timings here are therefore written for fully cooked meatballs or for meatballs browned and moved straight into sauce while cooking continues.
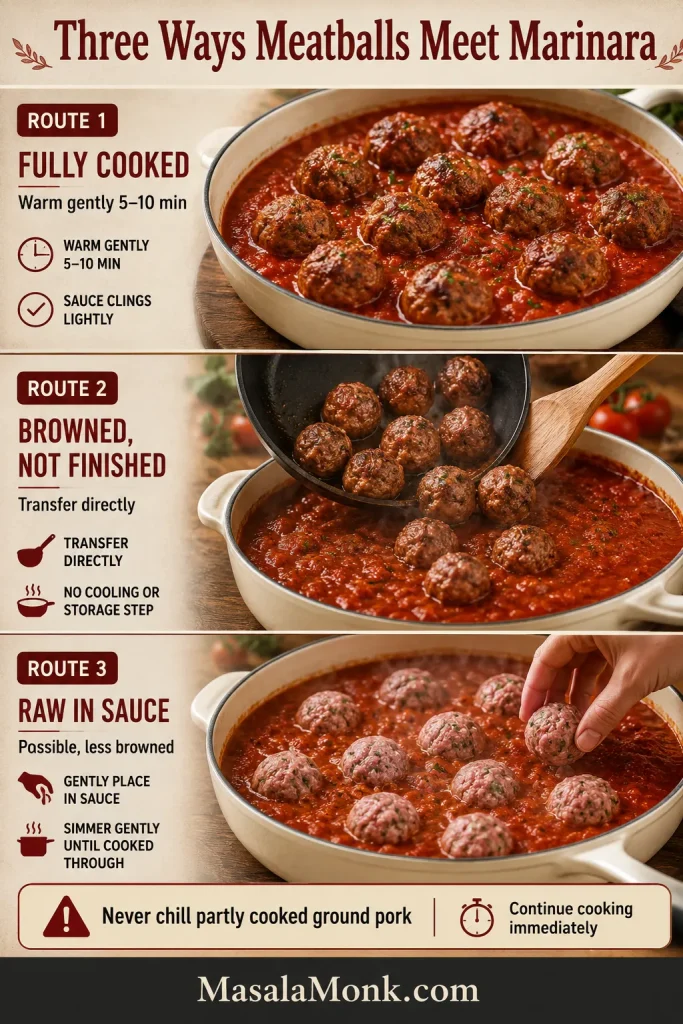
Three-route marinara guide showing fully cooked meatballs warmed in sauce, browned unfinished meatballs transferred to sauce, and raw meatballs placed in sauce.
Warm cooked meatballs gently; keep browned or raw meatballs cooking until their centers reach 160°F / 71°C.

Check one of the largest meatballs from the side and keep simmering until the center reaches 160°F / 71°C. Meatball size and sauce temperature vary, so the thermometer matters more than a fixed number of minutes.

Ground Pork Meatball Troubleshooting

If something went wrong, start with what you saw. Dry, loose, pale and dark-on-the-outside meatballs have different causes; several can still be rescued tonight, and the rest are straightforward to prevent next time.

Texture and Structure
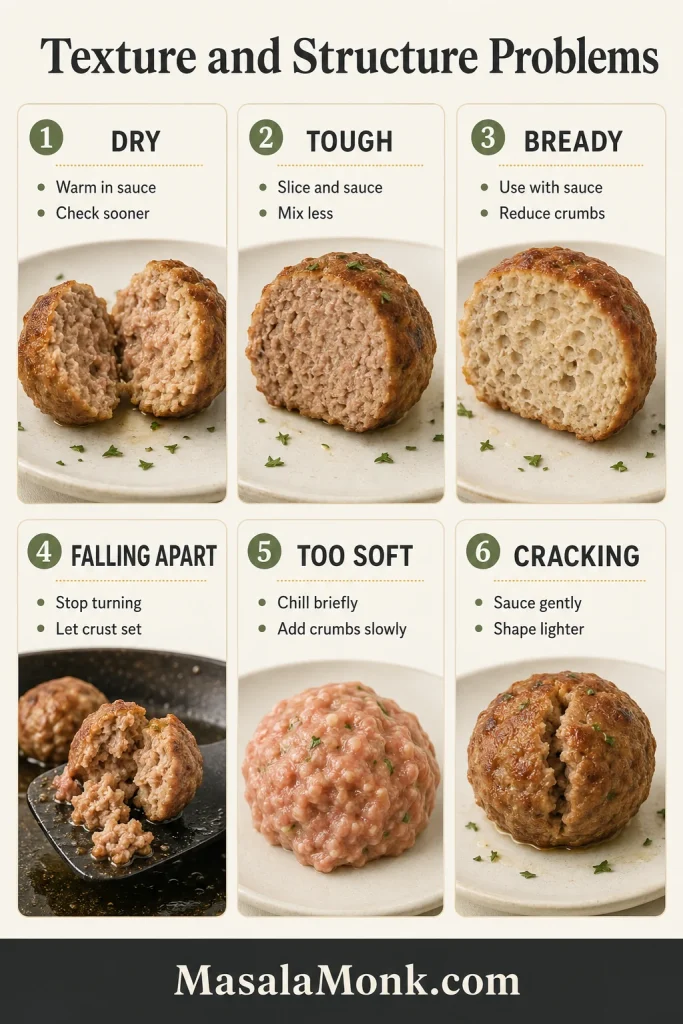
Troubleshooting board showing dry, tough, bready, falling-apart, too-soft, and cracked pork meatball examples with short rescue cues.
Match the symptom first; texture fixes depend on moisture, binder, mixing and turning.

Match the Texture Symptom

Dry

Likely cause: Very lean pork or cooking past the safe center temperature

Rescue now: Warm briefly in marinara, gravy or a little broth.

Next time: Use regular ground pork and start checking earlier.

Tough or rubbery

Likely cause: Overmixing, tight shaping or cooking too long

Rescue now: Slice or crumble into sauce, soup or a baked pasta.

Next time: Fold only until combined, shape without compressing and stop cooking at temperature.

Bready or spongy

Likely cause: Too many breadcrumbs, too much egg or an overextended binder

Rescue now: Serve with a strongly seasoned sauce or break into a tomato-based dish.

Next time: Weigh the panko and keep the egg-and-milk quantities unchanged.

Falling apart

Likely cause: Excess liquid, unevenly mixed binder or a first surface that has not set

Rescue now: Stop turning and finish gently under a lid or directly in simmering sauce.

Next time: Measure the liquid, distribute the binder evenly and wait before the first turn.

Too soft or slumping

Likely cause: A warm mixture, excess liquid or panko that has not fully hydrated

Rescue now: Chill for 15–20 minutes. If it still slumps, add panko 1 teaspoon at a time as described above.

Next time: Keep the pork cold, hydrate the panko fully and measure every liquid.

When Meatballs Crack

Small surface lines usually mean the portions were shaped a little dry or loose. Dampen your hands and close the surface gently. Deep cracks with crumbling point to a mixture that is too dry or not evenly combined.

Browning and Pan Problems
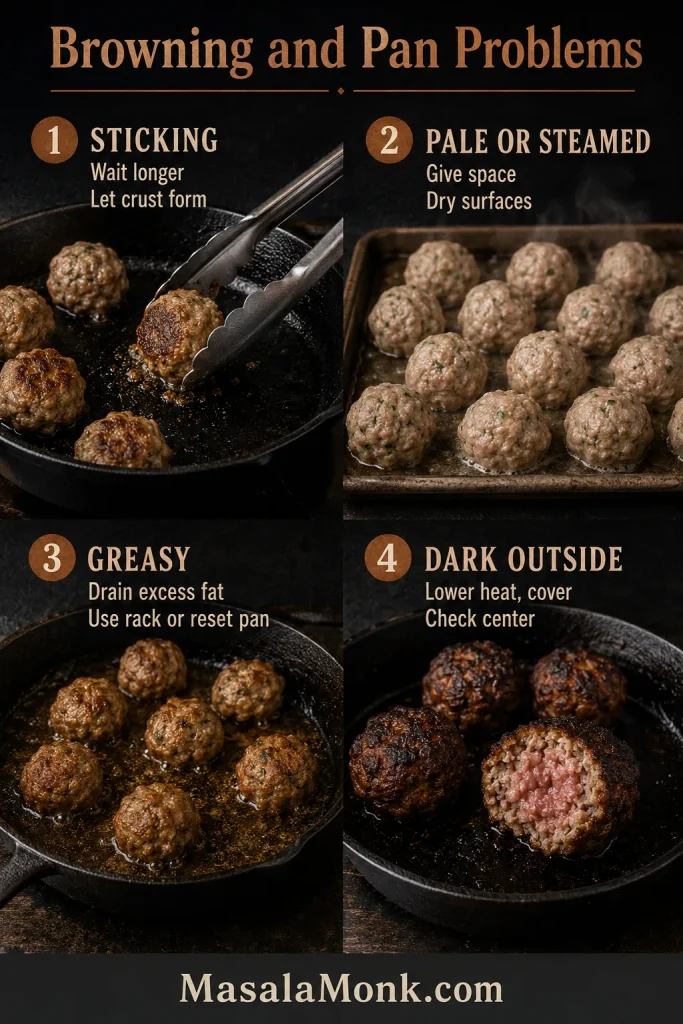
Troubleshooting board showing sticking, pale or steamed meatballs, greasy meatballs, and dark outside meatballs with an undercooked center.
Heat, space, surface moisture and fat usually explain browning problems before the recipe needs changing.

Fix the Browning Problem

Sticking to the pan

Likely cause: Too little oil, an unsuitable surface or turning before the crust releases

Rescue now: Leave the meatball another 20–30 seconds, then loosen it gently with a thin spatula.

Next time: Use a thin film of oil and let the first side brown before moving it.

Pale or steamed

Likely cause: Crowding, wet surfaces or insufficient heat and airflow

Rescue now: Create more space and, while the centers are still below temperature, give the meatballs brief higher heat.

Next time: Dry the cooking surface and leave visible room around every meatball.

Greasy

Likely cause: Particularly fatty pork or meatballs sitting in rendered fat

Rescue now: Drain or blot the excess fat, then move the meatballs to a clean pan or rack if they still need cooking.

Next time: Drain the skillet between batches or bake on a rack when the pork releases a lot of fat.

Dark outside, undercooked inside

Likely cause: Heat too high or meatballs larger than the recipe size

Rescue now: Lower the heat and finish under a lid or directly in simmering sauce.

Next time: Keep the portions even and reduce the heat once the crust forms.

Flavor and Fat Checks

If they taste bland: finish them with a well-seasoned sauce, glaze or a small pinch of finishing salt. Next time, weigh the salt and cook the optional tester before shaping.

A little rendered fat is normal. If a large amount collects, use a rack in the oven or drain the skillet between batches so the meatballs brown instead of sitting in it.

Ground Pork Meatball Variations

The gentle garlic, onion and parsley base leaves room for several different meals. Keep it as written when you want options later, or choose one flavor direction instead of combining every appealing seasoning in the same bowl.
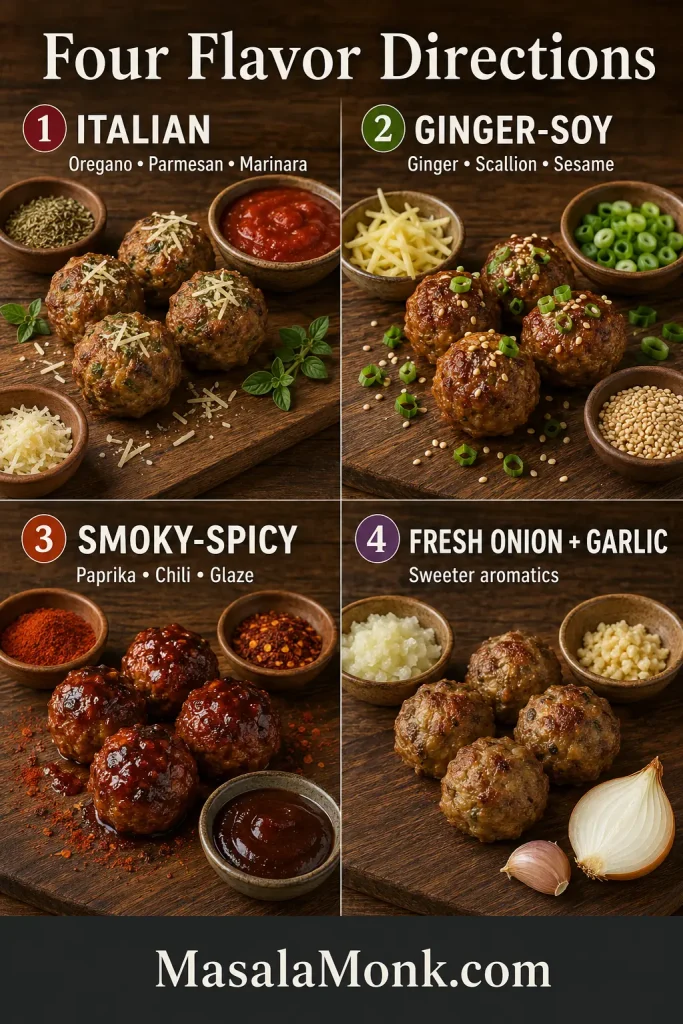
Four flavor directions for pork meatballs: Italian, ginger-soy, smoky-spicy, and fresh onion with garlic.
Flavor directions let the same pork base become marinara-friendly, bowl-ready, glazed or aromatic.

Italian-Style Pork Meatballs

  • Stir in 1 teaspoon dried oregano or Italian seasoning.
  • Fold in ¼ cup (about 22 g) finely grated Parmesan.
  • Keep the parsley and add an extra ¼ teaspoon black pepper.
  • Reduce the fine salt to ½ teaspoon (about 3 g), then confirm with a cooked tester.

Oregano, Parmesan and extra pepper make these fuller and saltier, especially good with marinara or toasted subs.

Ginger-Soy Pork Meatballs

  • Mix in 2 teaspoons (about 4 g) finely grated fresh ginger.
  • Replace the parsley with 2 tablespoons (about 10 g) sliced scallions.
  • Use 1 tablespoon (15 ml) soy sauce.
  • Finish with ½ teaspoon toasted sesame oil.
  • Reduce the fine salt to ¼ teaspoon (about 1.5 g), then confirm with a cooked tester.

Ginger and scallions make the pork brighter and more aromatic, especially with rice, peanut noodles or crisp vegetables. Sweet-and-sour and Vietnamese-style meatballs need their own binder, aromatics and sauce rather than one extra seasoning stirred into this base.

Smoky and Spicy Pork Meatballs

  • Stir in 1 teaspoon smoked paprika.
  • Use ¼–½ teaspoon chili flakes, depending on how much heat you want.
  • For rice, flatbreads or yogurt sauce, include ⅛ teaspoon ground cumin.

Smoked paprika warms the browned edges before the chili arrives. For a sweet-hot finish, spoon or brush on mango habanero sauce after cooking so the glaze does not scorch.

Fresh Onion and Garlic

Replace the onion powder with 2 tablespoons (about 20 g) very finely grated onion and the garlic powder with 1 small finely grated garlic clove (about 3 g). Reduce the milk to 1 tablespoon (15 ml) to account for the onion’s moisture, then chill the mixture if it still feels soft.

Fresh onion gives the meatballs a softer, slightly sweeter aromatic flavor, although the extra moisture makes the mixture a little looser.

For a brighter herb-led plate, serve this version with fresh chimichurri. Its parsley, garlic and vinegar echo the meatball seasoning while cutting through the pork’s richness.

All-Pork Meatballs vs Beef-and-Pork Meatballs
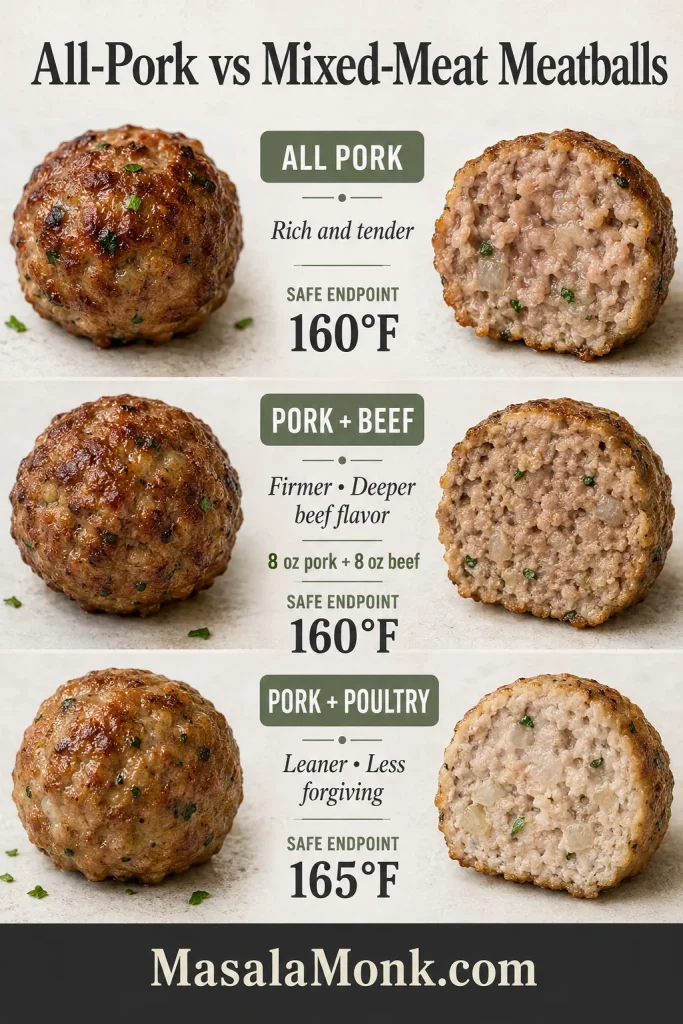
Comparison of all-pork, pork-and-beef, and pork-and-poultry meatballs with cooked interiors and safe temperature labels.
All-pork and pork-beef finish at 160°F; pork mixed with poultry needs 165°F.

Pork only

Texture and flavor: Rich, tender and juicy

Best for: The main recipe, rice bowls, gravy and flexible meal prep

Pork and beef

Texture and flavor: Firmer with deeper beef flavor

Best for: Tomato sauces and meatball sandwiches

Pork and turkey or chicken

Texture and flavor: Lighter but less forgiving

Best for: Leaner meal prep; cook to 165°F / 74°C

For a straightforward beef-and-pork version, use 8 oz / 227 g ground pork plus 8 oz / 227 g ground beef and keep the base binder unchanged; expect a firmer bite and deeper beef flavor. Lean poultry may need more moisture, while seasoned sausage usually needs much less added salt. Pork and veal can produce a delicate mixed-meat result, but it belongs to recipes designed for that softer texture. Any mixture containing ground poultry requires the higher 165°F / 74°C endpoint.

The softer all-pork version is particularly good under a spoonful of creamy mushroom sauce, while the firmer beef-and-pork version stands up well to a thicker tomato sauce.

What to Serve With Ground Pork Meatballs

One recipe can become more than one dinner. Simmer four meatballs in marinara tonight, glaze four for tomorrow’s rice bowl and freeze the rest for another evening.
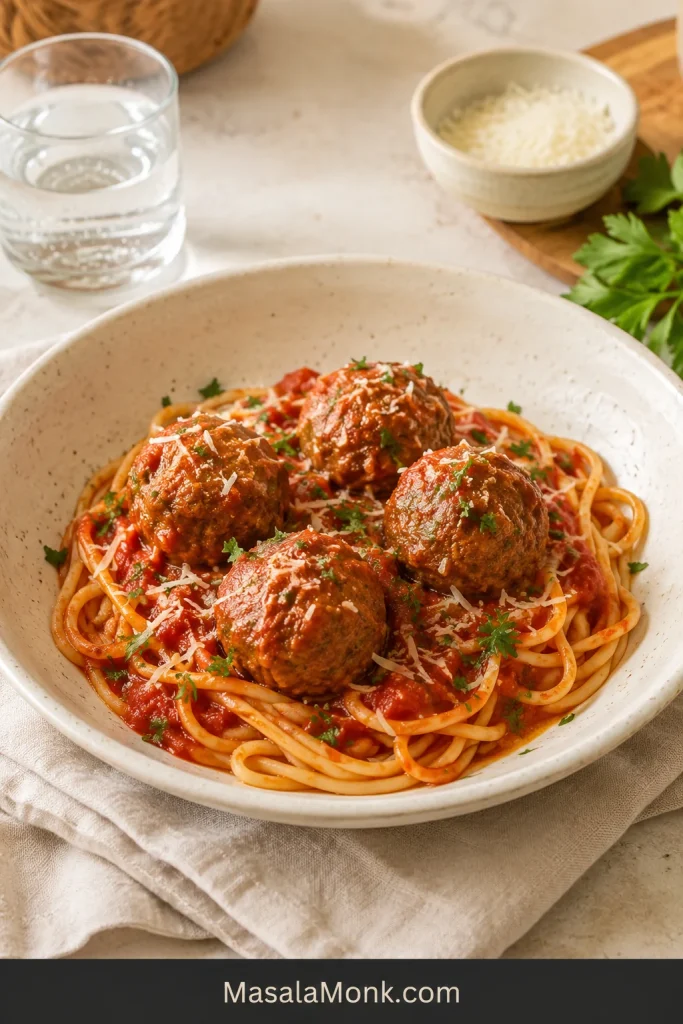
Four pork meatballs served over spaghetti with marinara, parsley, and a small amount of Parmesan in a cream bowl.
Four medium meatballs make a generous serving with spaghetti, marinara and a crisp salad.

Pasta and Sandwiches

  • Serve with marinara, spaghetti, Parmesan and a crisp salad.
  • Tuck them into a toasted roll with marinara and melted mozzarella.
  • Turn leftovers into a comforting meatball baked ziti.

Comfort-Food Plates

  • Spoon the skillet meatballs and gravy over garlic mashed potatoes with green beans.
  • Pair baked meatballs with ranch roasted potatoes and a simple green salad.
  • Serve with creamy mashed potatoes and onion or mushroom gravy.
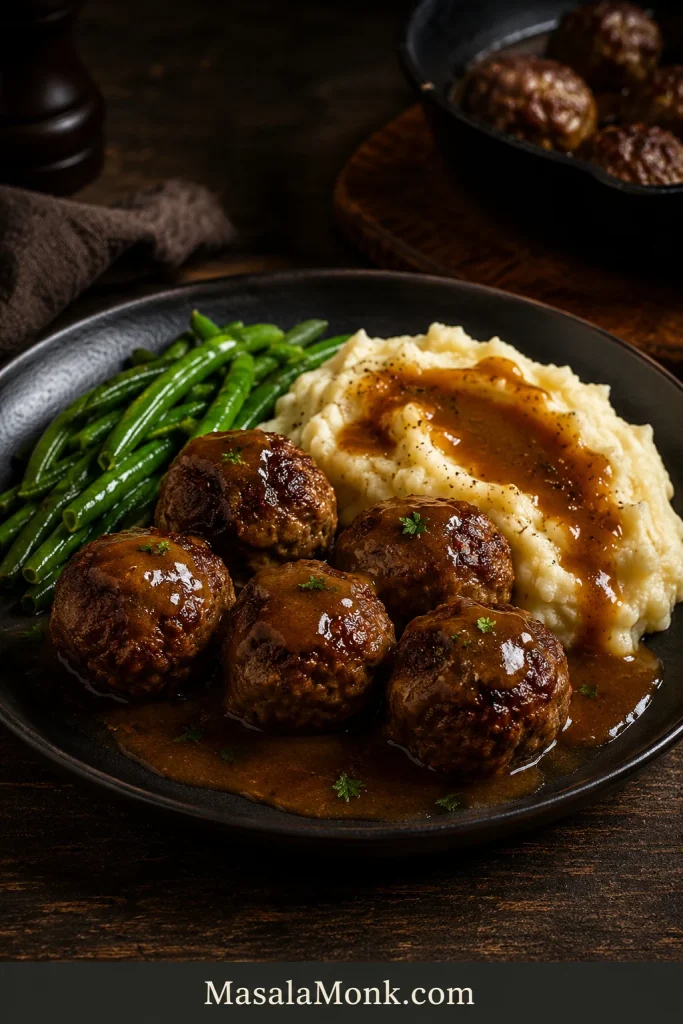
Pork meatballs with brown gravy, mashed potatoes, and green beans on a dark plate.
Gravy rewards a deeper skillet crust because the browned flavor carries into the sauce.

Rice Bowls and Lighter Meals

  • Add ginger-soy meatballs to rice with roasted or steamed vegetables.
  • Build a lower-carb plate with roasted vegetables, cauliflower mash or a cool tzatziki sauce.
  • Balance the richness with cucumber salad or crisp homemade coleslaw.

Appetizers and Meal Prep

  • Serve mini meatballs with mustard, tomato or yogurt sauce; for a sweet-savory party version, make grape jelly meatballs.
  • Pack medium meatballs with a grain, roasted vegetables and the sauce in a separate container.

Two serving ideas showing pork meatballs in a rice bowl with vegetables and mini meatballs on an appetizer platter with dipping sauce.
The same mixture can become a rice bowl dinner or mini appetizer meatballs for dipping.

As a main dish, plan on about 4 medium meatballs per person; with spaghetti or a substantial grain bowl, 3 may be enough. For appetizers, allow 3–4 mini meatballs per person among several snacks, or 5–6 when the meatballs are the main party bite.

Make Ahead, Store, Freeze and Reheat

Make Ahead and Refrigerate

Shape the meatballs up to 24 hours ahead. Keep the total refrigerated time for the raw ground pork within 1–2 days of purchase or refrigerator thawing, and do not exceed the package date.

Cover and refrigerate at 40°F / 4°C or colder in one layer, or separate stacked layers with parchment. Begin checking the cold meatballs at the normal time.

Refrigerate cooked meatballs within 2 hours in a shallow, covered container and use them within 3–4 days. A small amount of sauce helps protect the surfaces from drying.

Freeze Raw or Cooked Meatballs

To freeze raw meatballs:

  1. Arrange the shaped raw meatballs on a parchment-lined tray without letting them touch.
  2. Leave them until firm.
  3. Transfer to a freezer-safe container or bag.
  4. Label clearly as raw and add the date.
  5. For the best texture, use within 3–4 months. Thaw overnight in the refrigerator before cooking because the oven, skillet and air fryer timings in this recipe are written for thawed meatballs.

If the pork thawed safely in the refrigerator, it may be refrozen raw, although the texture can lose quality. Pork thawed in cold water or the microwave should be cooked before refreezing. See the USDA freezing guidance.

To freeze cooked meatballs:

Cool promptly, tray-freeze in one layer and transfer to a sealed freezer container once firm. Use within about 3 months for the best texture. Stash a few now and one future bowl of pasta, rice or soup is already halfway solved.
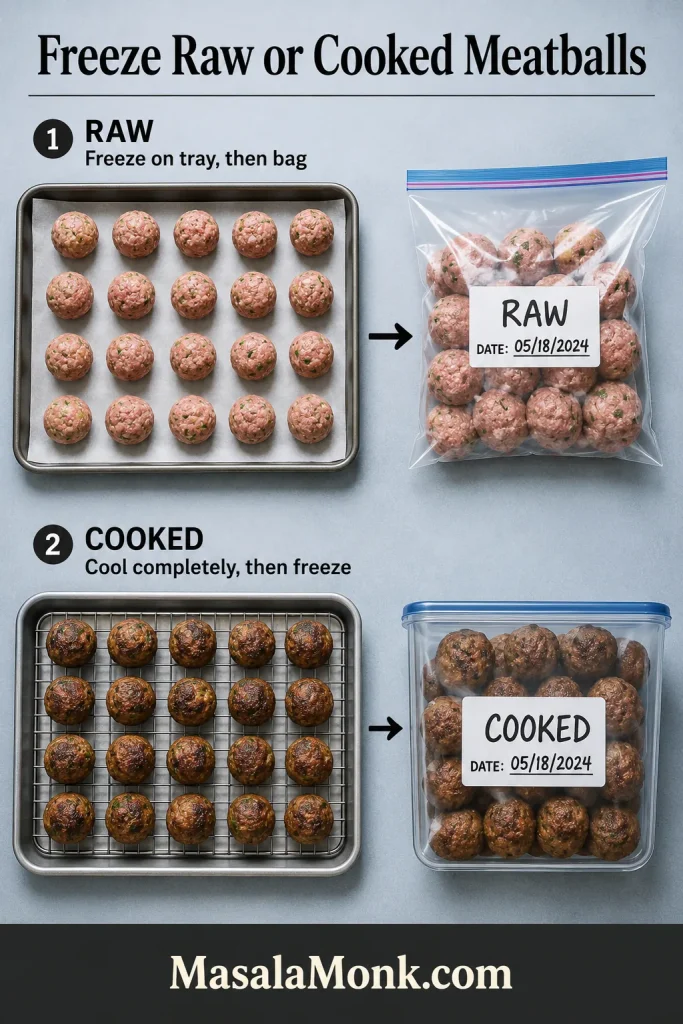
Freezer guide showing raw pork meatballs frozen on a tray and bagged, and cooked meatballs cooled on a rack and stored in a labeled container.
Freeze raw meatballs separately before bagging, and cool cooked meatballs completely before storage.

Reheat Without Drying Them Out

  • Sauce: warm gently in a covered pan.
  • Oven: cover and reheat at 325°F / 160°C with a spoonful of water or sauce.
  • Air fryer: reheat near 350°F / 175°C and start checking after 3 minutes.
  • Microwave: cover loosely and use short intervals, turning between intervals.
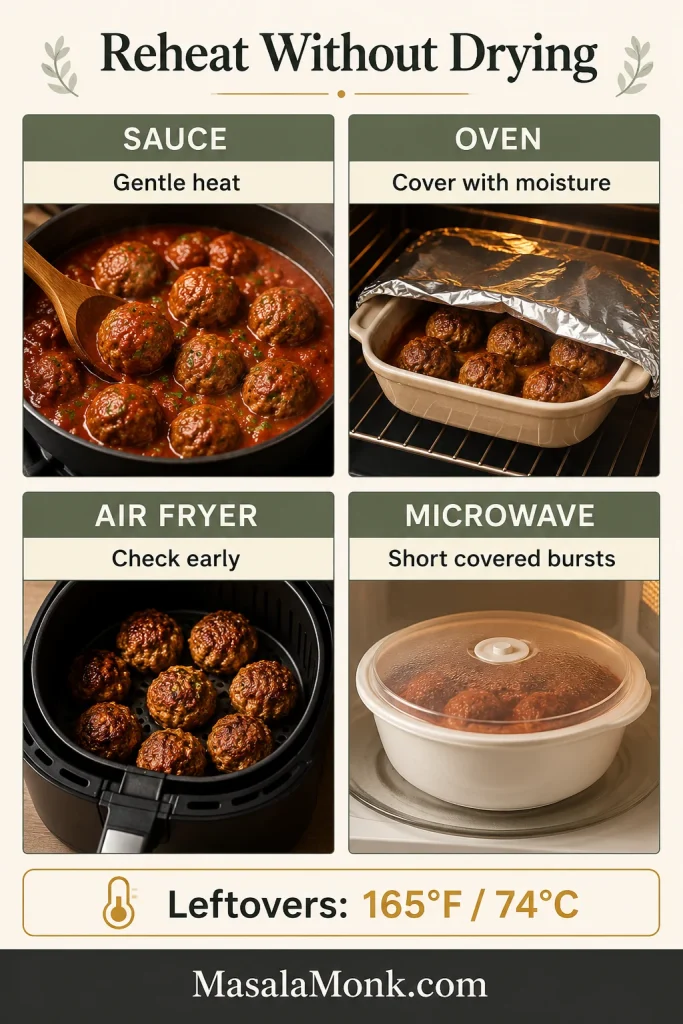
Reheating guide showing pork meatballs warmed in sauce, covered in the oven, reheated in an air fryer, and reheated in a covered microwave-safe dish, with a leftovers temperature of 165°F.
Reheat gently with moisture when possible, and bring leftovers to 165°F / 74°C.

Reheated leftovers should reach 165°F / 74°C. Warm only what you need instead of repeatedly reheating all of them.

The Rule to Remember

Ground pork does not need another meat to make a good meatball. Let the panko absorb the milk, spread the seasoning through the binder and stop mixing as soon as the pork is evenly combined.

From there, keep the portions consistent and pull them from the heat as soon as the centers are safely cooked. The best method is the one that gets a tender meatball onto your plate without making dinner harder than it needs to be.

Which method did you choose—and did the meatballs go into spaghetti, gravy, a rice bowl or straight from the tray?
Posted on — Leave a comment

Air Fryer Pork Tenderloin Recipe: Juicy, Easy, No-Dry Timing Guide

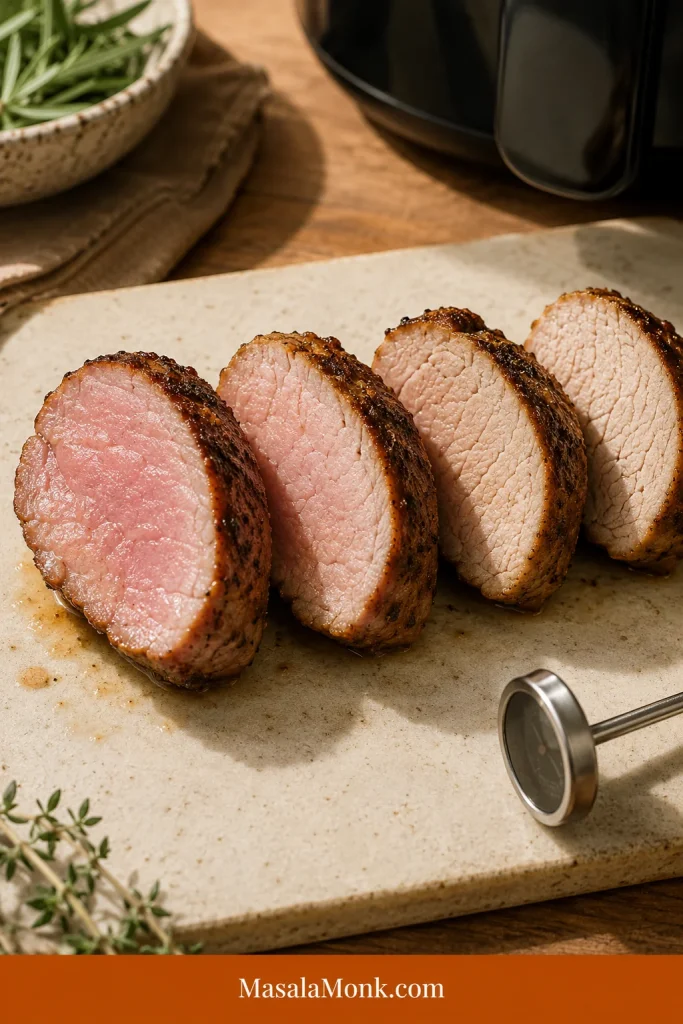
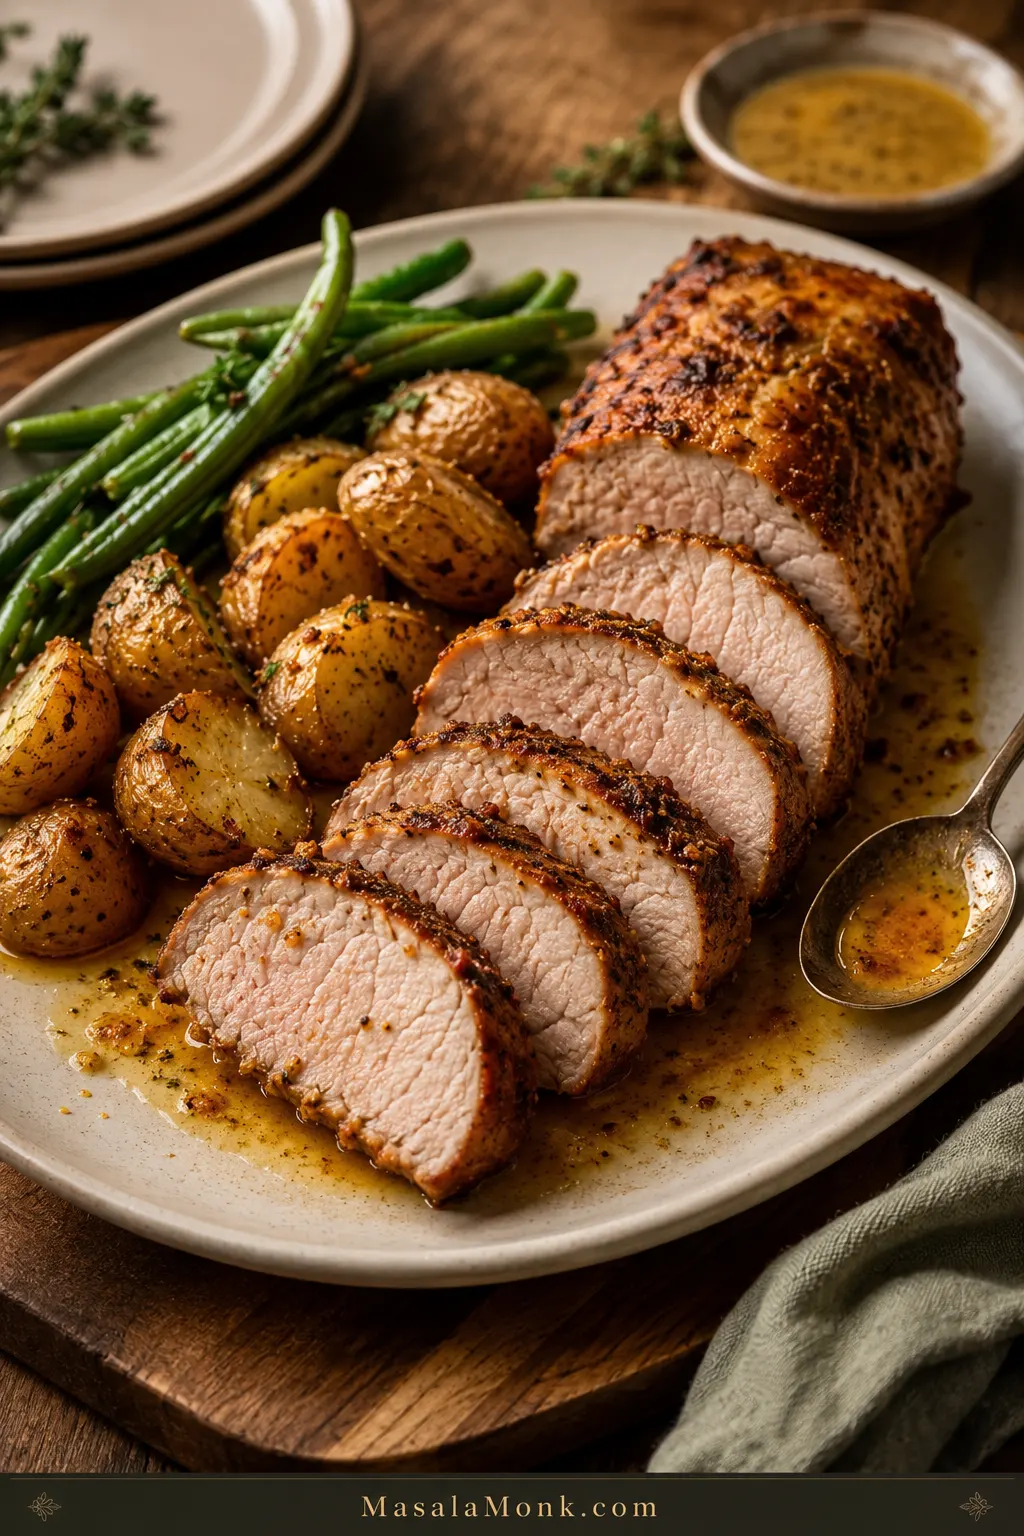
Sliced air fryer pork tenderloin with browned edges, tender center, roasted potatoes, green beans, and juices on a serving board.

Air fryer pork tenderloin is the kind of dinner that feels almost too easy when it goes right. The outside turns browned and savory, the inside stays juicy, and you can slice it onto plates in about half an hour without heating the oven.

You are not trying to make fancy pork here. The goal is smoky browned edges, tender slices, and just enough pan-style flavor to make dinner feel like more than a shortcut. Everything comes down to three things: cook it hot, check it early, and rest before slicing.

Because pork tenderloin is lean, a few extra minutes can turn glossy slices into dry pork, especially if your piece is small, your air fryer runs hot, or the package in front of you is actually pork loin instead of tenderloin.

This guide is built for the real-life versions too: small tenderloins, hot air fryers, pre-marinated packs, pork fillet labels, frozen pork, and the moment you realize your potatoes need longer than the pork.

Quick Answer

Cook pork tenderloin in the air fryer at 400°F / 200°C, or 205°C if your air fryer uses exact 5-degree settings, until the middle of the pork reads 145°F / 63°C. Most 1–1½ lb / 450–680g tenderloins take about 18–24 minutes, but small or slim pieces can finish sooner. Start checking early, rest for 5 minutes, then slice across the grain.

The clock gets you close. A temperature check saves the pork.

What success looks like

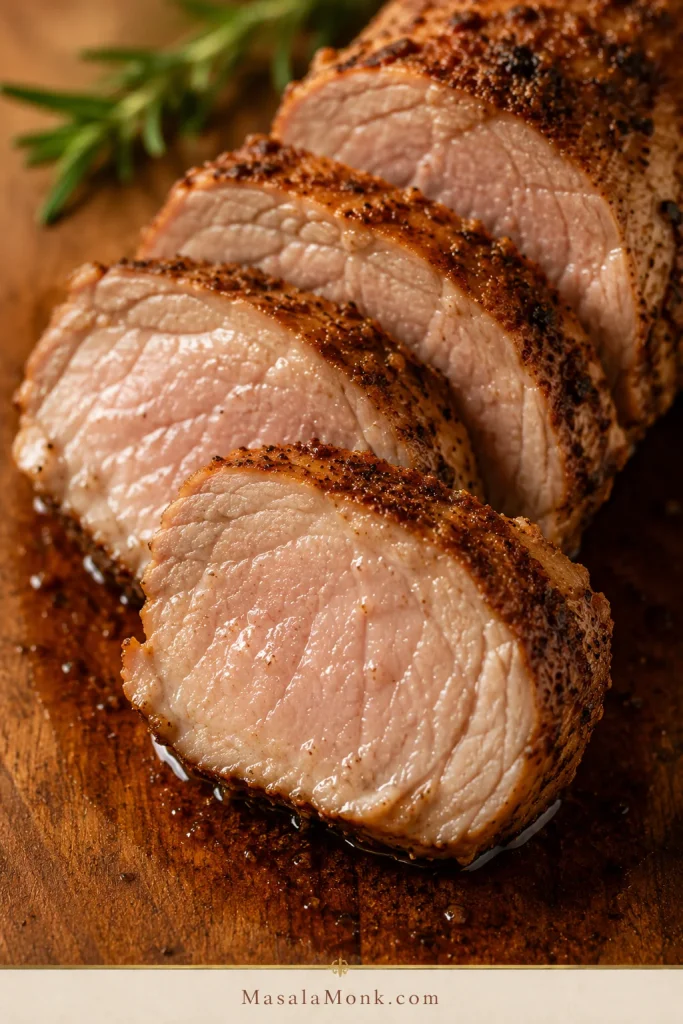
The pork should have browned, smoky-garlic edges, a moist center, and slices that look glossy instead of chalky. Spoon any board juices back over the sliced pork before serving. That little step makes the whole plate feel more finished.

Texture check: Before serving, look for a moist center and glossy slices rather than a chalky cut surface.

Close-up of sliced air fryer pork tenderloin with browned crust, moist center, and juices on a wooden cutting board.
Look for slices that stay glossy in the center after resting; that shine is the visual clue that the pork was not cooked too long.

Ready to cook? Jump to the recipe cardNeed timing? See the chart

Make this when

  • You want pork that slices juicy, not dry and gray.
  • You need dinner fast, but still want it to feel complete.
  • You bought pork tenderloin or pork fillet and need clear air fryer timing.
  • You are using a Ninja Foodi, basket air fryer, oven-style air fryer, or pre-marinated pack.
  • You want potatoes, carrots, green beans, rice, salad, or a simple sauce on the side.

Air Fryer Pork Tenderloin Recipe Card

This is the fast version: season the pork with a smoky garlic-Dijon rub, air fry it hot, check once before it overcooks, and rest it so the slices stay juicy.

Recipe at a Glance

RecipeAir Fryer Pork Tenderloin
Best cutPork tenderloin or pork fillet, 1–1½ lb / 450–680g
Prep time5–10 minutes
Cook time18–24 minutes for most tenderloins
Start checking13–14 minutes for small/slim pieces; 16–18 minutes for standard pieces
Rest time5 minutes
Total timeAbout 28–35 minutes
Servings4
Air fryer temperature400°F / 200°C, or 205°C if available
Internal temperature145°F / 63°C in the center, then rest

Ingredients

  • 1 pork tenderloin, 1–1½ lb / 450–680g
  • 1 tablespoon / 15 ml olive oil or avocado oil
  • 1 teaspoon / 5 ml Dijon mustard
  • 1–2 teaspoons brown sugar or honey
  • 1 teaspoon smoked paprika
  • 1 teaspoon garlic powder
  • ½ teaspoon onion powder
  • ¾–1 teaspoon kosher salt, depending on size and seasoning
  • ½ teaspoon black pepper
  • Pinch of cayenne, chili powder, or red pepper flakes, optional

Method

  1. Preheat the air fryer to 400°F / 200°C, or 205°C if your air fryer allows that setting. Give it 3–5 minutes if your model recommends preheating.
  2. Pat the pork dry. Remove any tough silver skin if present.
  3. Mix the oil, Dijon mustard, brown sugar or honey, smoked paprika, garlic powder, onion powder, salt, pepper, and optional chili in a small bowl.
  4. Rub the seasoning mixture all over the tenderloin.
  5. Place it in the air fryer basket with space around it. Cut it in half crosswise if needed so it fits without curling tightly.
  6. Air fry for 10–12 minutes, then flip.
  7. Continue cooking until the middle reaches 145°F / 63°C, checking early for small or slim tenderloins.
  8. Rest loosely tented for 5 minutes, then slice across the grain into thick, juicy pieces.

Do not cook by time alone. A slim 1 lb tenderloin and a thick 1½ lb tenderloin should not be treated like the same piece of meat.

A simple plate of potatoes and green vegetables turns the tenderloin into a full weeknight dinner after the main method is done.

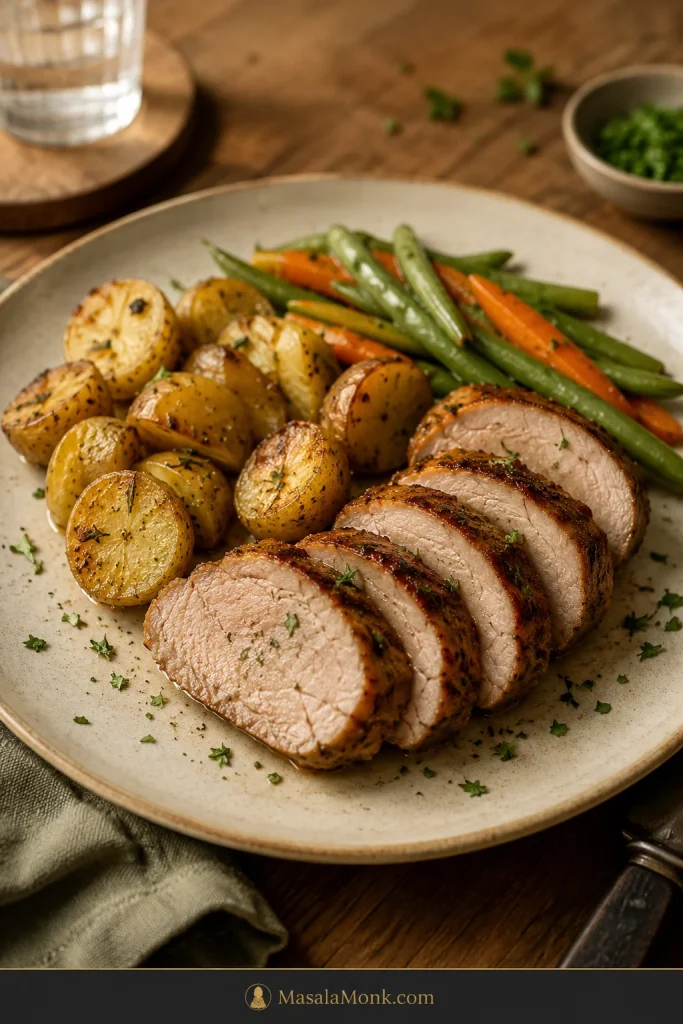
Plate of sliced pork tenderloin served with roasted potatoes, green beans, carrots, and herbs.
For a fast weeknight plate, pair pork tenderloin slices with potatoes and green vegetables so the air fryer recipe feels like a full meal, not just the main protein.

From here, the things that change the result are the cut, the thickness, the air fryer style, and when you stop cooking. That is what the rest of the guide helps you control.

Table of Contents

Choose your path

With a plain tenderloin, start with the recipe card and cooking chart. For a package labeled pork loin filet, check the cut section before you season anything. Adding potatoes or carrots? Read the sides section first so the pork does not wait around while the vegetables finish.

Why This Works

The air fryer works beautifully for pork tenderloin because the cut is small enough to cook through before the outside has time to dry out. You get browned edges without babysitting a skillet, as long as you stop at temperature.

The flavor is simple but satisfying: smoky, garlicky, lightly tangy, and just sweet enough to help the edges brown. Oil helps the rub toast instead of sitting dry on the surface. Dijon adds a quiet tang without making the pork taste mustardy. Brown sugar or honey helps the outside color. The short rest keeps the slices glossy when you cut in.

When it comes out right, the edges are smoky and browned, the slices look moist, and the mustard-garlic rub tastes like it took more effort than it did.

That is also why this tenderloin cooks hotter than some air fryer pork chops. Pork chops are flatter and can tighten quickly, so if the package in front of you is actually chops, switch to this air fryer boneless pork chops guide instead.

The no-dry rules

  • Use pork tenderloin, not pork loin. The cuts are different and need different timing.
  • Cook hot, but check early. 400°F / 200°C browns well, but small pieces finish quickly.
  • Test the middle, not the tapered end. The thin tail is not the doneness judge.
  • Rest before slicing. Five quiet minutes gives you glossier, juicier slices.
  • Do not chase “no pink.” A slight blush can be normal when the pork is cooked to temperature.

Before any of those rules can help, though, the cut has to be right.

Pork Tenderloin vs Pork Loin vs Pork Fillet

This is worth checking before you cook, because the wrong cut is the easiest way to follow the recipe perfectly and still end up disappointed. Pork tenderloin, pork loin, pork loin filet, pork fillet, and pork roast sound similar, but they do not cook the same way.

How to Identify the Right Cut

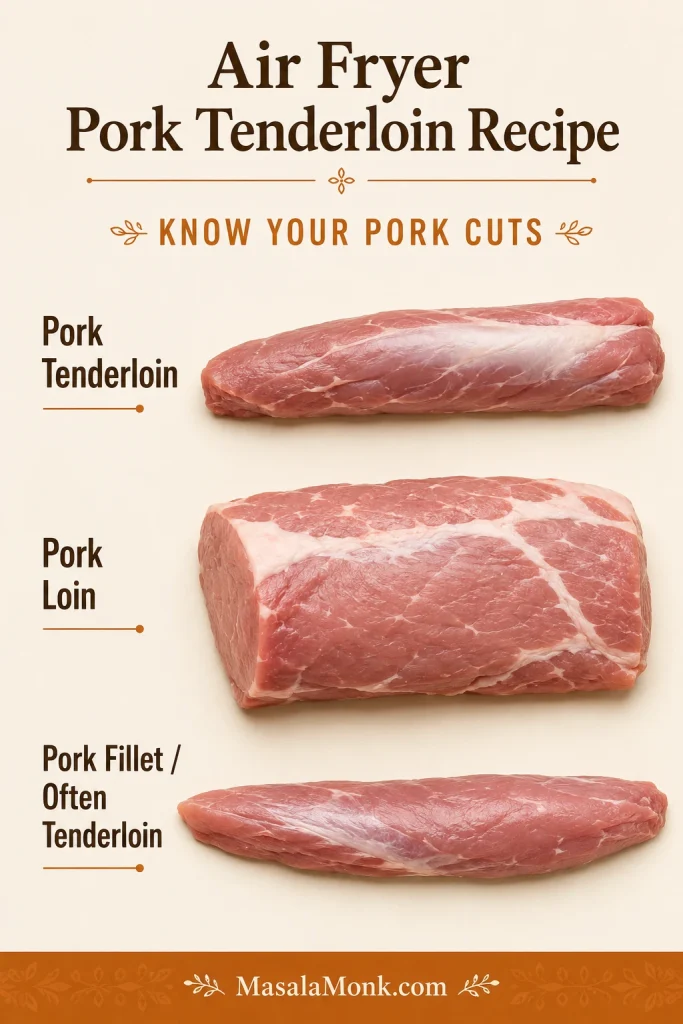
Cut check: Shape matters here; this visual helps you confirm tenderloin or pork fillet before using the air fryer timing.

Comparison image showing pork tenderloin, pork loin, and pork fillet with different shapes and sizes.
A quick shape check here can save the whole recipe: tenderloin and pork fillet are usually long and narrow, while pork loin is wider and cooks on a different timeline.
Package saysWhat it likely isUse this recipe?
Pork tenderloinLong, narrow, lean cut, usually 1–1½ lbYes
Pork filletOften the same cut as pork tenderloin in UK, Australia, and some grocery labelingYes, if long, narrow, and about 450–680g / 1–1½ lb
Pork loinWider, larger roast-style cutNo, it needs different timing
Pork loin filetCan be a branded or pre-marinated loin-style cut; check shape and weight carefullyMaybe, only if it looks like tenderloin
Pork roastUsually larger and wider than tenderloinNo

When to Switch Recipes

If it is wide like a roast, stop. This method is for a long, narrow pork tenderloin or pork fillet. A pork loin roast needs a different timing plan.

If your package turns out to be a bigger pork loin, you are not stuck — just switch methods. MasalaMonk already has a dedicated slow cooker pork loin recipe and a smoked pork loin recipe for that larger cut.

If you have pork tenderloin but want another cooking method, see the pork tenderloin in oven guide or this softer, hands-off slow cooker pork tenderloin recipe.

Cut confirmed? Back to the recipe cardGo to the cooking time chart

Ingredients for Juicy Pork Tenderloin

The ingredient list is short on purpose. Pork tenderloin does not need to be buried under sauce. It needs enough fat for browning, enough salt for flavor, and a rub that gives the air fryer something to toast.

The result is a smoky garlic crust with a little mustardy brightness and just enough sweetness to make the edges taste dinner-worthy, not sugary.

What Each Ingredient Does

Gather the rub ingredients before preheating so the pork can go from seasoning to basket without losing momentum.

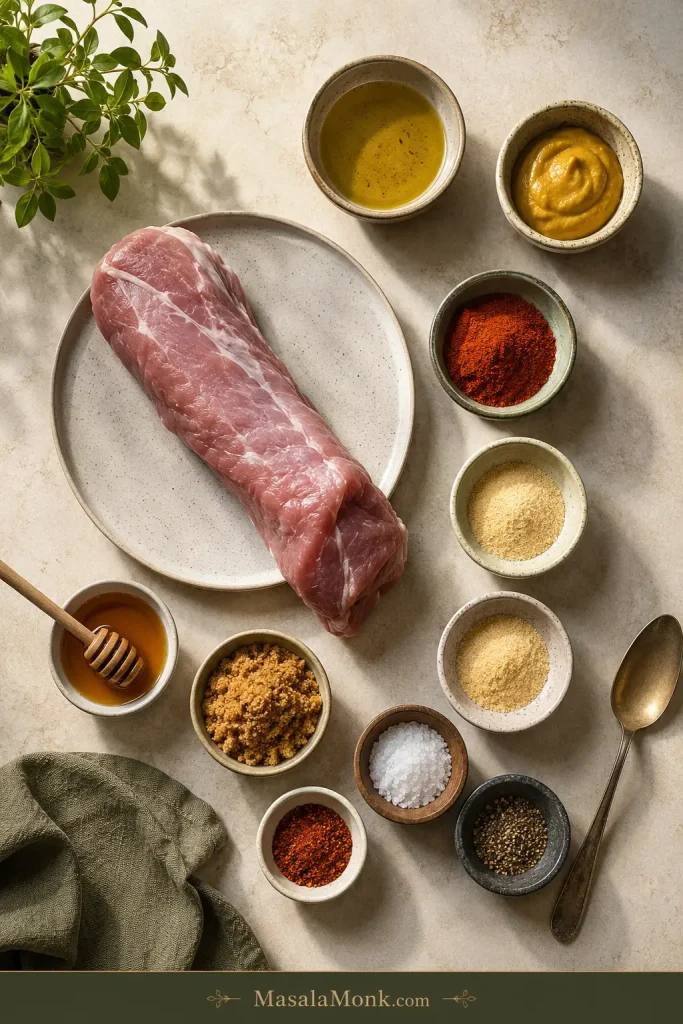
Overhead view of pork tenderloin ingredients including raw pork, oil, Dijon mustard, smoked paprika, garlic powder, onion powder, salt, pepper, honey, and brown sugar.
This short ingredient list works because each part has a job: oil helps the rub cling, Dijon adds brightness, and paprika plus garlic build the crust.
IngredientUS amountMetric amountWhy it helps
Pork tenderloin1–1½ lb450–680gThe ideal size for this method
Olive oil or avocado oil1 tbsp15 mlHelps browning and seasoning coverage
Dijon mustard1 tsp5 mlAdds tang and helps the rub cling
Brown sugar or honey1–2 tsp5–10 mlBalances lean pork and helps browning
Smoked paprika1 tsp2–3gAdds color and smoky depth
Garlic powder1 tsp3gMain savory note
Onion powder½ tsp1–2gRounds out the rub
Kosher salt¾–1 tsp4–6gPrevents bland pork
Black pepper½ tsp1gAdds gentle heat
Cayenne or chili powderPinchPinchOptional heat

Salt and Seasoning Notes

For smaller or pre-marinated tenderloins, stay near the lower salt amount. Use the higher amount for a plain, larger one. When the pork is already seasoned, injected, or packed in a salty marinade, reduce the salt in the rub.

With fine salt or table salt instead of kosher salt, start with about ½ teaspoon for a 1 lb / 450g tenderloin and adjust next time. Fine salt packs more tightly, so the same spoonful tastes saltier.

Easy Substitutions

  • No Dijon? Use yellow mustard, whole-grain mustard, or skip it and add a small splash of lemon juice or vinegar for brightness.
  • No smoked paprika? Use regular paprika with a pinch of chili powder, cayenne, or cumin.
  • No brown sugar? Use honey or maple syrup. Skip the sweetener if your marinade is already sweet.
  • No avocado oil? Olive oil works well. Use a light coating so the rub clings and browns.
  • Using a salty seasoning blend? Reduce or skip the added salt until you know how salty the blend is.

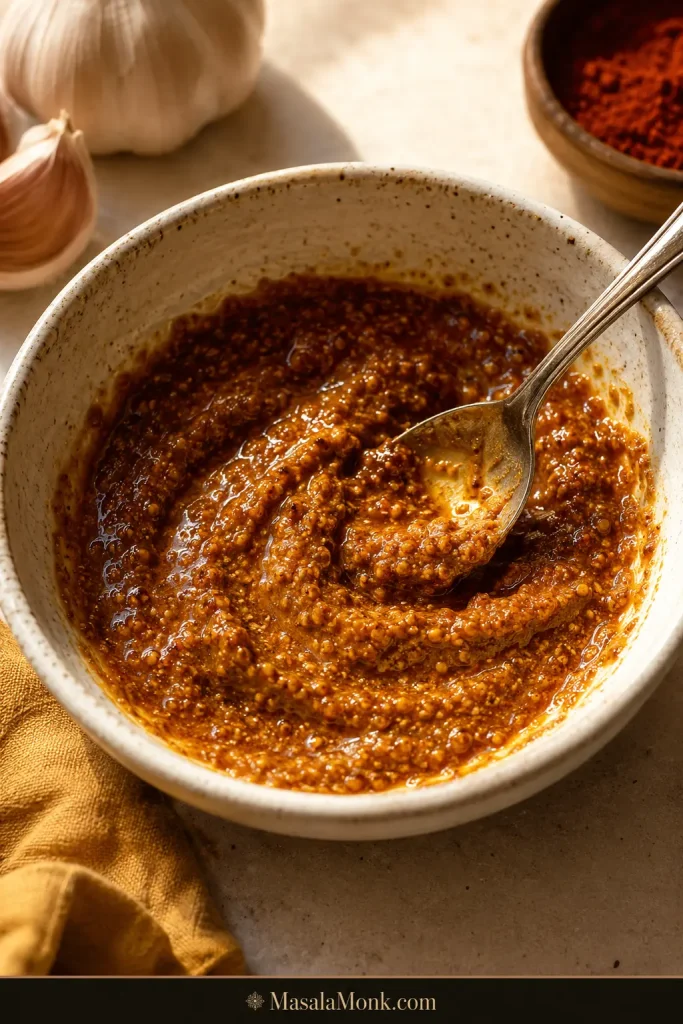
Rub texture: Aim for a loose paste that coats the pork evenly instead of dropping into the basket.

Bowl of smoky garlic Dijon rub with a spoon, made with mustard, paprika, oil, garlic, and seasonings.
The rub should look like a loose paste so it clings to the pork instead of dropping off as dry seasoning in the basket.

Can I use a marinade instead?

Yes. For a simple marinade-style version, mix 1 tablespoon oil, 2 teaspoons soy sauce, 1 teaspoon Dijon mustard, 1 tablespoon honey or brown sugar, 1 teaspoon garlic powder, and 1–2 teaspoons lemon juice or vinegar. Marinate for 20–30 minutes if you have time, then air fry the same way and check the internal temperature.

Equipment You Need

You can make this with basic kitchen tools, but the thermometer is the one that matters. Pork tenderloin is too lean and too quick-cooking for blind timing.

  • Air fryer
  • Instant-read thermometer
  • Tongs
  • Small bowl for the seasoning paste
  • Measuring spoons
  • Paper towels
  • Cutting board
  • Sharp knife for trimming silver skin and slicing

Basket Air Fryer, Oven-Style Air Fryer, and Ninja Foodi Notes

Air fryer style changes how quickly the outside browns, so use this as a first-check guide before trusting one fixed time.

Air fryer typeWhat to expectFirst check
Basket air fryerBrowns fastest with strong direct airflow13–16 minutes
Oven-style air fryerMay need a few extra minutes16–18 minutes
Ninja Foodi or Foodi GrillCan brown aggressively from the top13–15 minutes
Small air fryerCut the tenderloin in half; do not coil it tightlyBased on thickness
Air fryer with linerBrowning can slow if airflow is blockedCheck color and temperature early

How to Prepare the Pork

A good result starts before the basket: dry the surface, season all sides, and remove any tough silver skin so the finished slices are tender from edge to edge.

Prep Steps Before Air Frying

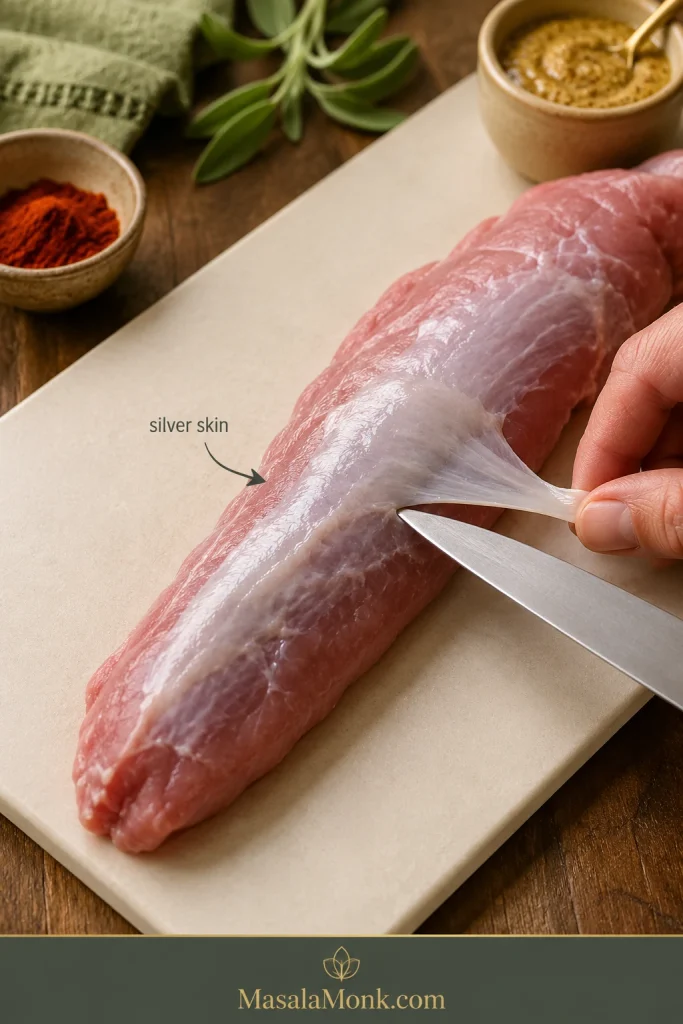
Look for the shiny strip before seasoning; trimming it now prevents chewy bites later.

Raw pork tenderloin on a cutting board with silver skin being lifted and trimmed with a knife.
Trim the silver skin before cooking, otherwise that shiny strip stays tough even when the pork itself is perfectly done.
  1. Pat it dry. Surface moisture slows browning.
  2. Remove silver skin. This is the shiny, tough membrane that does not soften well during cooking. Slide a thin knife under it and trim it away.
  3. Trim lightly. Pork tenderloin is already lean. Remove loose fat or ragged edges, but do not over-trim.
  4. Protect the thin tail. If the tapered end is very thin, tuck it slightly under so it does not overcook too far ahead of the center.
  5. Season all over. Coat the top, bottom, sides, and tapered end.
  6. Let it sit briefly. Even 5–10 minutes while the air fryer preheats helps the seasoning settle.

Seasoning Check Before Air Frying

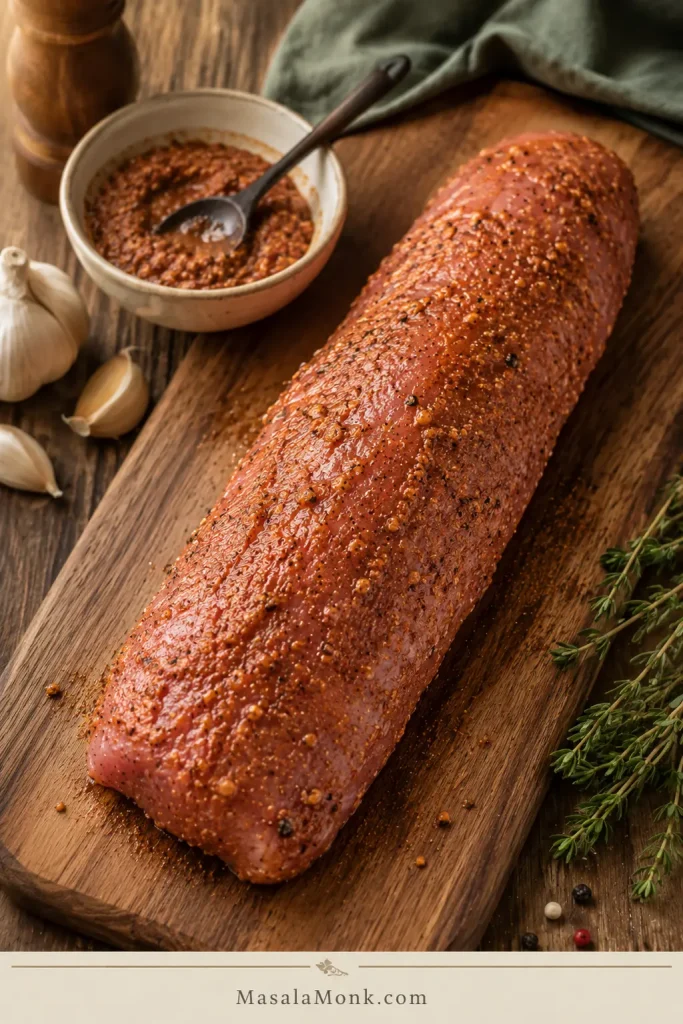
The tenderloin should look evenly coated before cooking, with no bare patches on the sides or tapered end.

Raw pork tenderloin coated evenly with reddish garlic Dijon seasoning paste on a wooden board.
Once the tenderloin is evenly coated, the paprika-Dijon rub can toast into a savory crust while the center stays protected from drying out.

How to Cook It in the Air Fryer

This is where the pork starts becoming dinner, not just a timing problem. Once it is seasoned, the cooking is simple. The only trick is not walking away for too long the first time you make it in your air fryer.

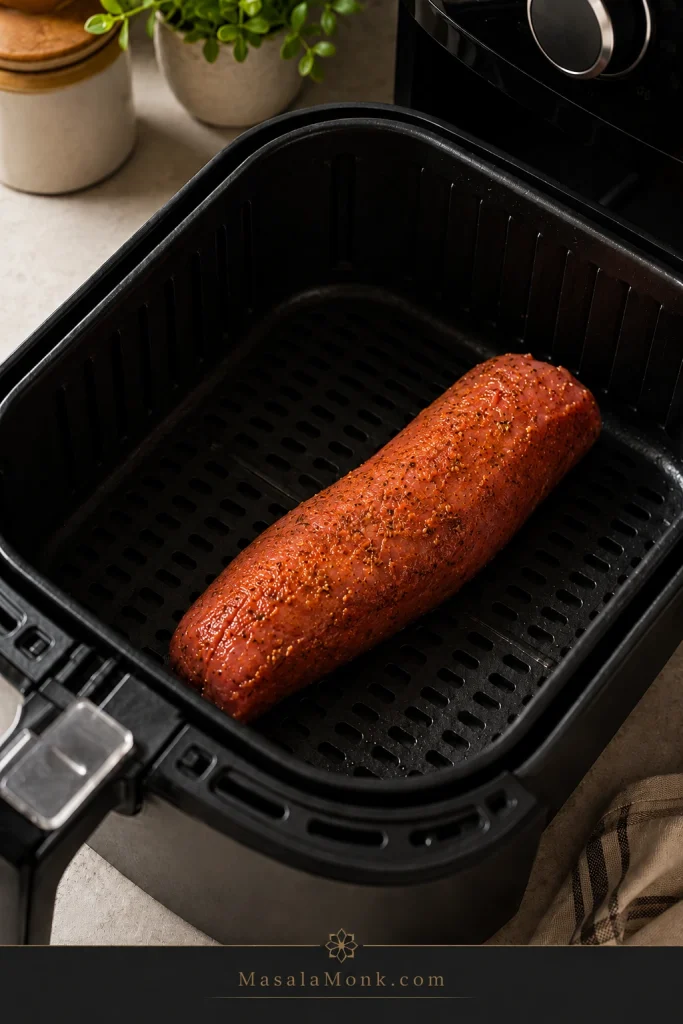
Basket spacing: Leave visible room around the pork so hot air can reach the sides and brown the surface.

Seasoned raw pork tenderloin placed inside an air fryer basket with clear space around it.
Leave open space around the pork tenderloin in the air fryer basket; that airflow helps the surface brown instead of steaming.

Step-by-Step Air Fryer Method

  1. Preheat the air fryer. Set it to 400°F / 200°C, or 205°C if available. Preheat for 3–5 minutes if your air fryer recommends it.
  2. Season the pork. Rub the oil, mustard, and spice mixture over the whole tenderloin.
  3. Place it in the basket. Leave space around the meat so hot air can circulate. Cut it in half crosswise if it is too long.
  4. Cook the first side. Air fry for 10–12 minutes. The outside should be starting to color, but it does not need to look deeply browned yet.
  5. Flip. Turn the tenderloin with tongs. Some juices in the basket are normal.
  6. Watch the surface. By the time it is close, the rub should smell toasted and savory, and the outside should look browned in patches rather than wet.
  7. Finish cooking. Continue air frying until the middle reaches 145°F / 63°C.
  8. Rest. Transfer to a board and rest loosely tented for 5 minutes.
  9. Slice. Cut across the grain into thick slices. The center should look moist, not chalky.

After the Flip

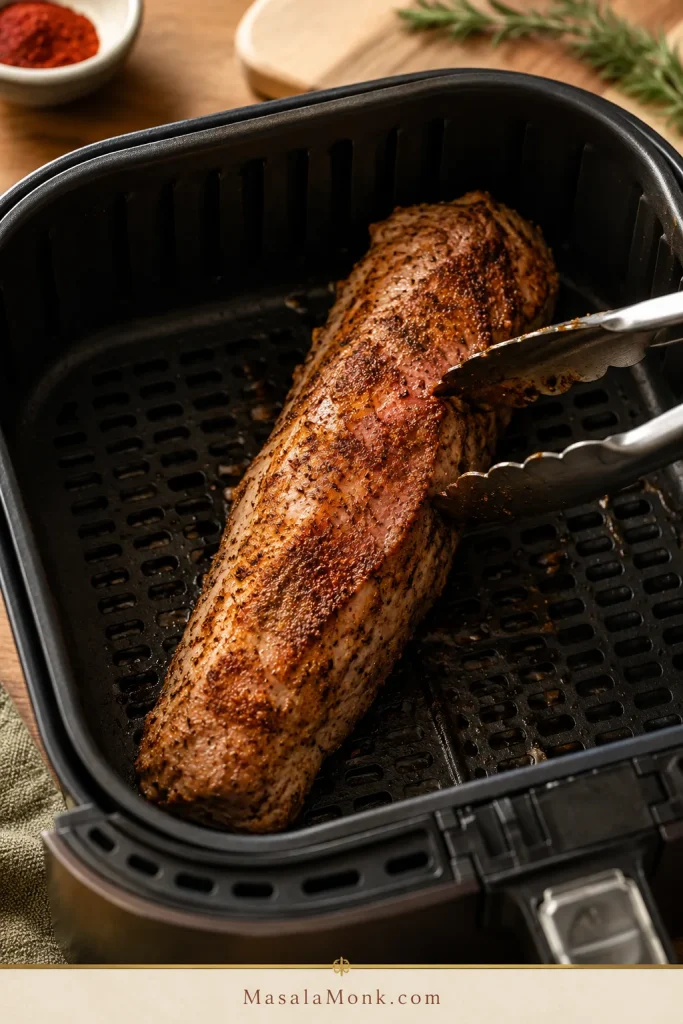
After the flip, browned patches are enough; from this point, temperature matters more than chasing a darker crust.

Pork tenderloin halfway cooked in an air fryer basket with browned seasoning patches after being flipped.
After flipping, the surface should start browning in patches; from here, rely on the thermometer rather than waiting for the outside to get darker.

When the Outside Browns Fast

Dark edges before a done center usually mean the heat is too aggressive. Lower the air fryer to 375–390°F / 190–200°C for the remaining minutes. If the pork is cooked through but pale, brush it with a little oil, honey mustard, or pan juices and air fry for 1–2 more minutes only if it is not already above temperature.

Rest and Slice Before Serving

Resting is not just waiting. It helps the juices settle before you slice. Spoon those juices back over the meat, and the pork tastes more finished.

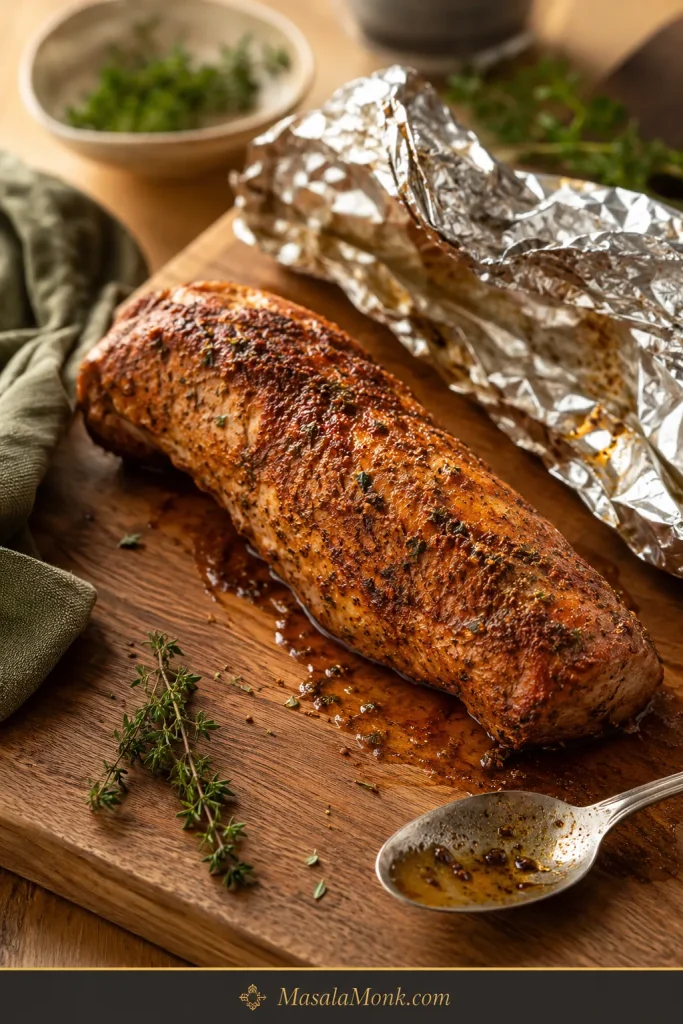
Rest the pork here before slicing so the juices settle and the board juices can be spooned back over the meat.

Whole cooked pork tenderloin resting on a wooden board with foil nearby, herbs, a spoon, and visible board juices.
Give the pork a few quiet minutes here; that short rest keeps more juices in the slices and leaves enough on the board to spoon back over the top.

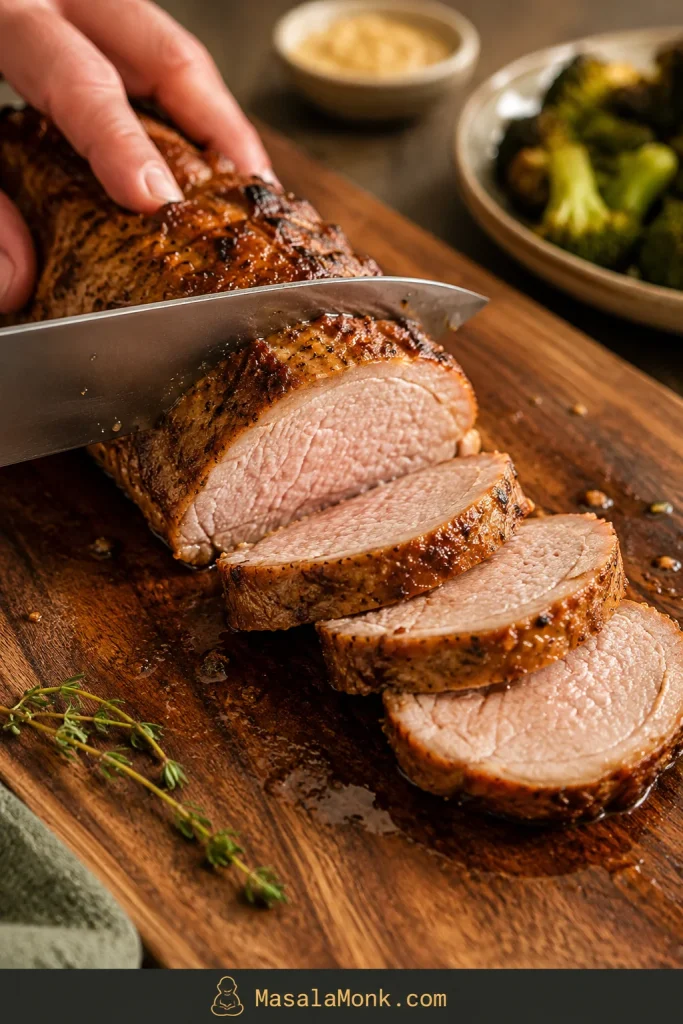
When the tenderloin has rested, use a steady cross-grain cut to make thick slices that stay moist on the plate.

Cooked pork tenderloin being sliced with a knife into thick pieces on a wooden cutting board.
Then slice across the grain into thick pieces; thinner slices dry out faster, while thicker slices hold moisture better on the plate.

Need exact timing? See the chartCheck the temperature guide

Cooking Time Chart by Weight

The chart is here to keep you from guessing, not to make the recipe complicated. Use the earliest check time when cooking a new brand, a new air fryer, or a pre-marinated pack.

First time with this air fryer? Watch closely once. After that, your own air fryer timing becomes the shortcut.

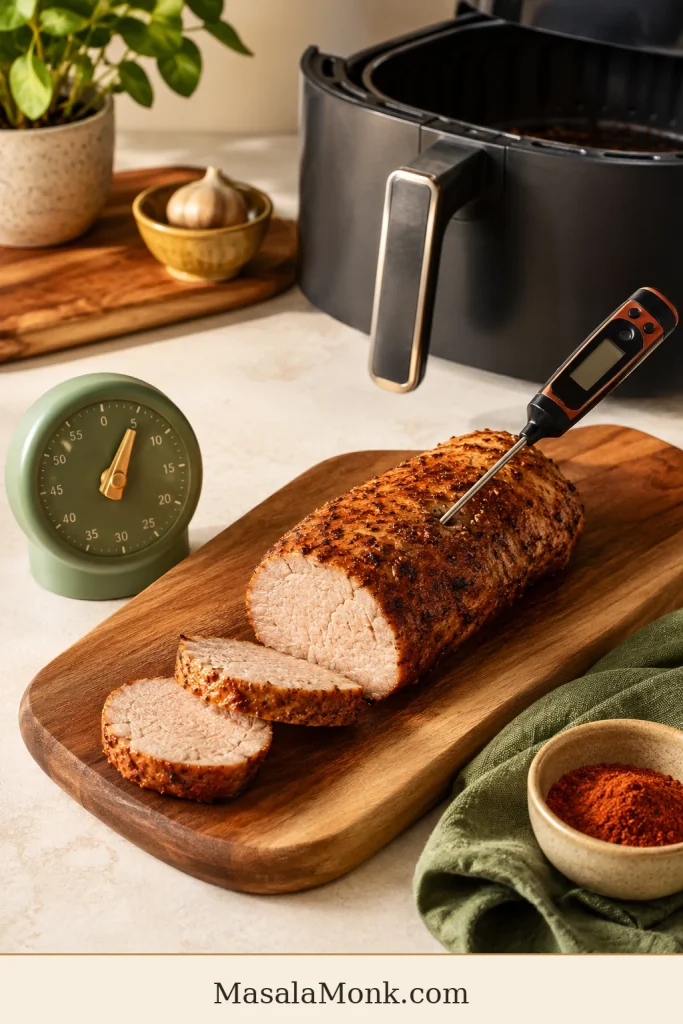
Use the timer to know when to start checking, then let the thermometer decide when the pork is done.

Cooked pork tenderloin on a cutting board with an instant-read thermometer, kitchen timer, air fryer, spice bowl, and green towel.
Your timer helps you know when to start checking, while the thermometer tells you when to stop; together, they make air fryer pork tenderloin repeatable.
Pork tenderloin sizeMetricAir fryer tempStart checkingLikely total time
Small or slim tenderloin450g / 1 lb400°F / 200°C13–14 min14–18 min
Standard tenderloin565g / 1¼ lb400°F / 200°C16 min18–22 min
Larger tenderloin680g / 1½ lb400°F / 200°C18–20 min20–26 min
Very thick tenderloin700g+ / 1½ lb+390–400°F / 200–205°C20 min24–28 min
Cut in half to fitSame total weight400°F / 200°C13–16 minDepends on thickness, not length

How to Use the Chart

Cutting a tenderloin in half does not automatically cook it in half the time. Thickness matters more than length. Pieces that stay thick in the center still need time, while slim pieces finish faster.

Save your first successful timing. Once you know how your air fryer handles a 1 lb or 1½ lb tenderloin, this recipe becomes much easier the next time.

If your “very thick tenderloin” is actually wide like a roast, pause and check the package. It may be pork loin, not tenderloin, and it needs a different cooking plan.

Internal Temperature and Pink Pork

Pork tenderloin is done when the middle of the thickest part reaches 145°F / 63°C, followed by a short rest. Check the largest section, not the thin tail end.

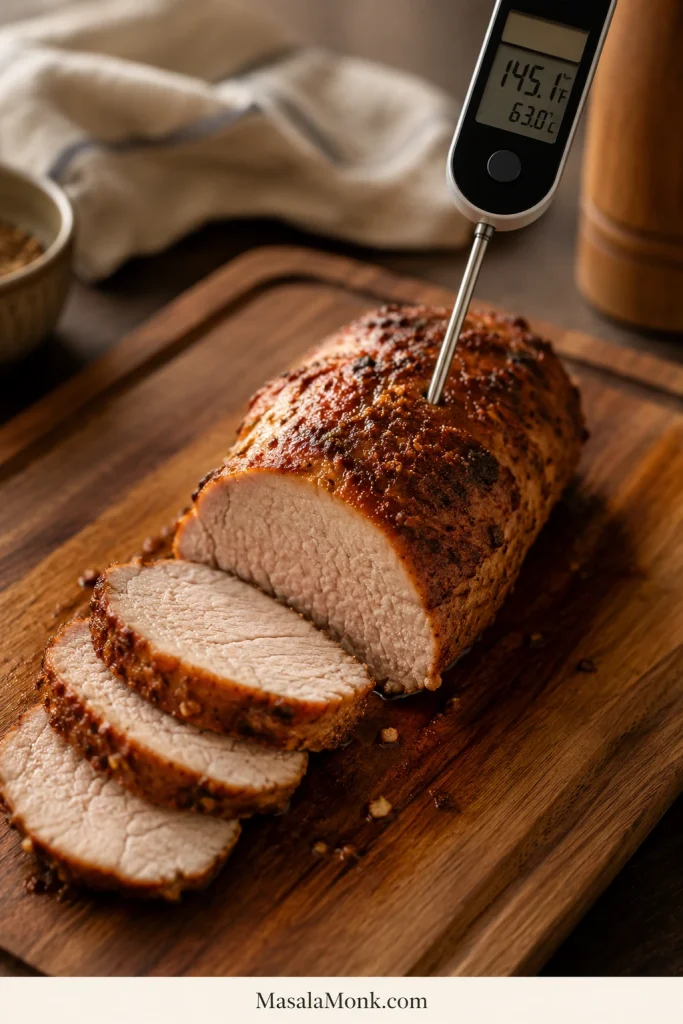
Temperature check: Measure the thickest center, not the thin end, when checking for 145°F / 63°C.

Instant-read thermometer inserted into the thickest center of cooked pork tenderloin on a wooden cutting board.
The thermometer should go into the thickest center, not the thin end; pull the pork at 145°F / 63°C so the slices stay tender after resting.

For food safety, FoodSafety.gov lists pork steaks, roasts, and chops at 145°F / 63°C with a 3-minute rest.

The National Pork Board pork cooking temperature guide gives the same practical guidance: 145°F, a short rest, and a digital thermometer.

What Pink Pork Means

That is why a slight blush of pink can be normal. Pink does not automatically mean raw; temperature tells you more than color.

For beginners, keep the target simple: cook to 145°F / 63°C, then rest for 5 minutes. Experienced cooks may start watching closely around 140–143°F because carryover can raise the final temperature during rest, but the clearest serving target for this recipe is still 145°F / 63°C.

Once you trust the thermometer, pork tenderloin stops being stressful. Instead of guessing by color or cutting into it five times, cook to the number, let it rest, and slice when the juices have settled.

Doneness guide

  • 140–143°F / 60–62°C: Watch closely here only if you understand carryover cooking and will rest the pork immediately.
  • 145°F / 63°C: Clearest finished target for most home cooks.
  • 150°F / 66°C: Still usable, but getting firmer.
  • 160°F / 71°C and above: Much drier, especially in lean tenderloin.

This visual pairs with the doneness guide: as pork cooks longer, the slices turn paler, firmer, and less glossy.

Four pork tenderloin slices arranged from pink and moist to pale and firmer, with a meat thermometer nearby.
As pork cooks longer, the slices turn paler and firmer; a slight blush with the right internal temperature can still mean tender, safe pork.

Nervous about dryness? Troubleshoot itBack to the recipe card

Why It Turns Dry — and How to Prevent It

This is the section to read if you are nervous, using a new air fryer, or already worried you left the pork in a minute too long. Dryness usually comes down to timing, cut, or resting. The good news is that all three are fixable.

ProblemWhat happensFix
Cooking by time onlyThe pork can overcook before you noticeUse the time chart, then do the doneness check
Using pork loin instead of tenderloinThe cut is larger and needs different timingCheck the package and shape before cooking
Very small tenderloinIt cooks faster than the recipe rangeStart checking at 13–14 minutes
No restJuices run out when slicedRest 5 minutes before cutting
Sugary marinade burns earlyThe outside darkens before the middle is doneCheck early or reduce the temperature slightly
Aggressive reheatingLeftovers become dry and firmReheat gently with sauce, broth, or butter

Match Your Result

Still not sure what happened? Match the result:

  • Outside dark, inside not ready: The heat was too aggressive, the rub was sugary, or the pork sat too close to the heating element. Lower the temperature for the remaining minutes.
  • Pale outside, dry inside: The pork likely cooked too long without enough surface oil or browning. Next time, dry it well, coat lightly with oil, and start checking earlier.
  • Only the thin end was dry: The tenderloin was tapered. Tuck the thin tail slightly under or expect the end pieces to cook faster than the center slices.

Dry pork is not ideal, but it is rarely beyond saving. Slice it thicker and serve it with something moist: pan juices, honey mustard, mushroom sauce, gravy, melted butter, broth, apple chutney, or a spoon of barbecue sauce.

If the slices need extra help, a spoon of creamy mushroom sauce turns slightly over-rested or lean pork into a much softer dinner plate.

Adding Potatoes, Carrots, or Green Beans

After the pork is under control, the real trick is keeping the sides from making it wait. You can cook it with potatoes, carrots, green beans, or sweet potatoes in the air fryer, but dense vegetables often take longer than the pork.

The pork is the part you protect. Vegetables are the part you can let keep cooking.

Best No-Dry Method

  1. Cook the tenderloin first.
  2. Rest it for 5–10 minutes.
  3. While it rests, cook or finish the potatoes, carrots, or green beans in the air fryer.
  4. Slice the pork right before serving.

This keeps the pork from waiting around while the potatoes catch up.

If you would rather keep the air fryer focused on the meat, make the potatoes separately. These ranch roasted potatoes give you crisp, salty-herby edges without forcing the tenderloin to wait in the basket.

One-Basket Dinner Example

For a simple one-basket version, use 1 lb / 450g pork tenderloin, 8 oz / 225g baby potatoes, and 1 large carrot. Halve the baby potatoes, slice the carrot thinly, toss the vegetables with oil and seasoning, and air fry them for 8–10 minutes at 390–400°F / 200–205°C. Add the seasoned pork, then cook until it reaches 145°F / 63°C. If the meat finishes before the vegetables are tender, remove and rest it while the vegetables cook a few minutes longer.

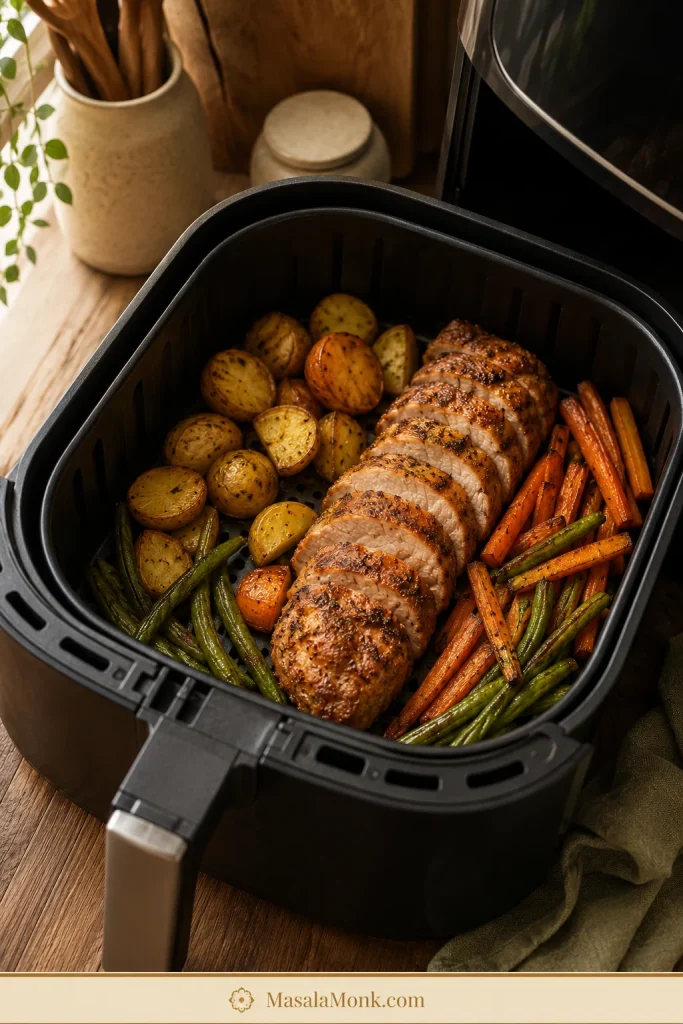
One-basket note: Keep the pork visible and let dense vegetables finish separately if they need more time.

Air fryer basket with sliced pork tenderloin, roasted baby potatoes, carrots, and green beans.
When making a one-basket dinner, keep the pork visible and give potatoes or carrots extra time so the vegetables finish without overcooking the meat.

Vegetable Timing Tips

SideBest way to handle it
Baby potatoesHalve them and give them a head start.
Regular potatoesCut into ½-inch cubes so they cook faster.
CarrotsSlice thinly or cut small; thick carrots need extra time.
Green beansAdd later or cook while pork rests.
Sweet potatoesCut small and expect them to need more time than green vegetables.

For a sweeter vegetable side, roasted carrots with honey, maple, or garlic work especially well with the smoky paprika and mustard in this pork rub.

Can You Cook It From Frozen?

Thawed is the recipe. Frozen is the emergency version.

A thawed tenderloin seasons better, browns better, cooks more evenly, and usually has a better texture. If you are staring at a frozen one and need a fallback, drop the heat and give it more time.

  • Use a lower temperature: about 330°F / 165°C.
  • Start checking around 30 minutes and expect roughly 33–38 minutes for many pieces, depending on thickness.
  • Start from frozen, then season once the surface softens enough for the rub to stick.
  • Flip halfway.
  • Check the middle, not just the browned outside.
  • Rest before slicing.

Do not cook a frozen double pack as one solid block. Separate the tenderloins first if they are frozen together. Do not use this fallback method for stuffed, rolled, or bacon-wrapped frozen tenderloin. Frozen breaded pork tenderloin is also a different product from raw whole tenderloin, so follow the package guidance and confirm doneness.

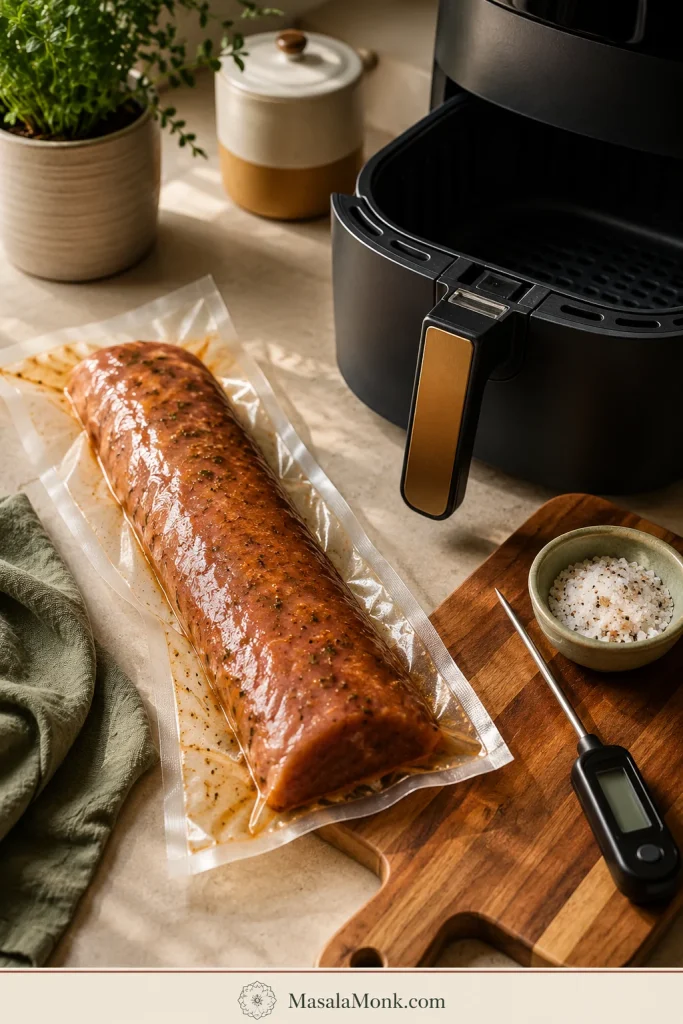
Smithfield, Hormel, and Pre-Marinated Packs

Pre-marinated packs are where label confusion shows up again. They are convenient, but some are pork tenderloin, some are pork loin filet, and some are wider, sweeter, or saltier than this recipe assumes.

These packs can still make an easy dinner; they just need a quick label check before they go into the basket.

Before cooking a pre-marinated pack, check the shape, salt level, sweetness, and final temperature instead of trusting the label alone.

Unbranded pre-marinated pork tenderloin package beside an air fryer basket, thermometer, salt bowl, wooden board, and green towel.
Pre-marinated pork tenderloin can be convenient, but check the shape, salt level, sweetness, and final temperature instead of trusting package timing alone.

Pre-Marinated Package Checklist

  • Check the package name, weight, and shape before cooking.
  • Long, narrow packs around 1–1½ lb / 450–680g usually work with this method.
  • A pork loin filet label deserves a closer look. It may look long in the package but still be wider and denser than pork tenderloin.
  • Wider pork loin filet or roast-style packs need different timing.
  • Pat off excess wet marinade if it is very drippy.
  • Start checking around 15 minutes because sugar-heavy marinades can brown faster.
  • Dark edges early are a sign to check temperature before assuming the pork is done.
  • Use less added salt because many pre-marinated packs are already seasoned.

Package timing is a starting point, not a promise. Use the package for flavor guidance and your thermometer for doneness.

Air Fryer Pork Tenderloin Medallions

If you sliced the pork already, switch timing systems. Medallions cook much faster than a whole tenderloin, which makes them useful for rice bowls, salads, wraps, or a faster dinner plate.

  1. Slice the tenderloin into even medallions, about 1–1½ inches thick.
  2. Season both sides.
  3. Air fry at 350°F / 175°C for about 9–12 minutes, flipping once.
  4. Start checking around 7–8 minutes if the pieces are closer to 1 inch thick.
  5. Check the largest medallion for 145°F / 63°C, then rest briefly before serving.

Even thickness matters. Tiny end pieces cook faster than center-cut medallions, so pull them early if needed.

Flavor Variations

After you know when to stop cooking, the flavor can go almost anywhere. The timing usually stays close unless the tenderloin is thicker, smaller, wrapped, frozen, or heavily coated.

  • Honey mustard: Add extra Dijon and honey, then finish sliced pork with a small spoon of sauce.
  • BBQ rub: Use smoked paprika, brown sugar, garlic powder, onion powder, salt, pepper, and chili powder.
  • Garlic herb: Use garlic powder, thyme, rosemary, parsley, black pepper, and olive oil.
  • Cajun: Use Cajun seasoning, smoked paprika, garlic, and oil. Watch the salt if your blend is salty.
  • Soy-Dijon marinade: Use soy sauce, Dijon mustard, honey, garlic powder, and a little vinegar or lemon juice.
  • Spicy chili-garlic: Add chili flakes, cayenne, or chili paste to the oil and mustard mixture.
  • Bacon-wrapped: Cook more carefully because bacon needs time to render. Start checking early so the pork does not overcook while the bacon browns.

Choose honey mustard for a softer family-style dinner, Cajun for heat, garlic herb for mashed potatoes, and BBQ rub if you want leftovers for sandwiches.

After slicing, this honey mustard dressing can double as a bright pork drizzle, especially with the honey mustard or garlic herb versions.

With BBQ-style pork tenderloin, creamy coleslaw is a natural fresh side because it brings crunch, tang, and a little sweetness.

What to Serve with It

This pork tenderloin is flexible enough for a quick weeknight dinner, a meal-prep bowl, or a slightly nicer weekend plate. A few slices over mashed potatoes feels cozy; the same pork over rice with sauce becomes lunch tomorrow.

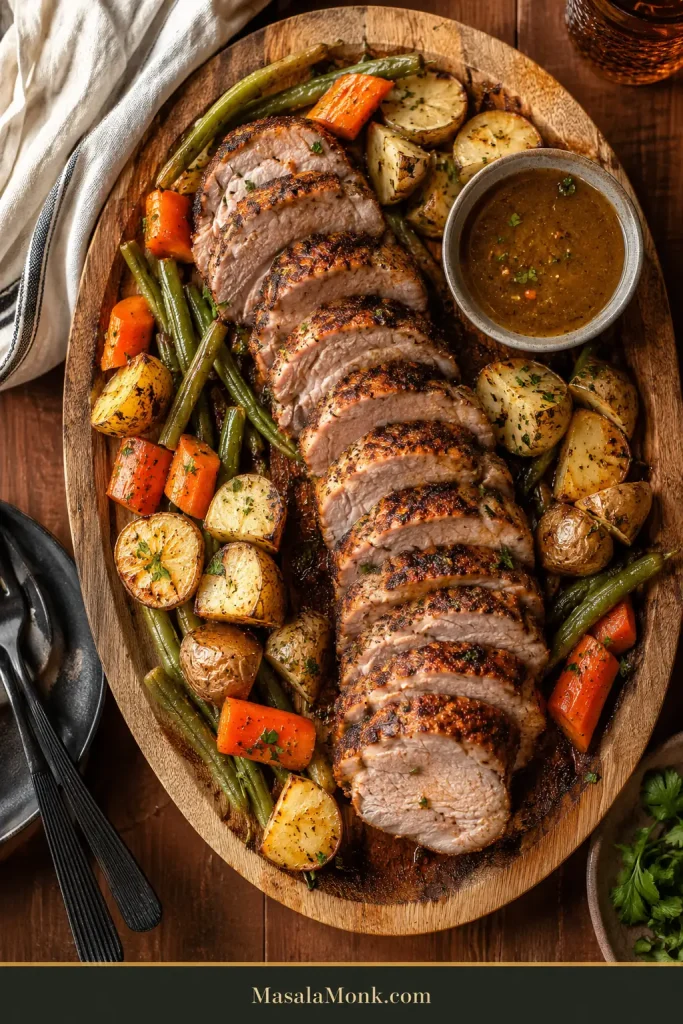
Once the pork is sliced, a platter with vegetables, potatoes, sauce, and board juices makes serving easier.

Family-style wooden platter with sliced pork tenderloin, roasted potatoes, carrots, green beans, herbs, and a bowl of sauce.
For serving, arrange sliced pork tenderloin with vegetables, potatoes, and sauce so each portion gets crust, tender center, and a little pan-style flavor.

Comfort sides

A classic comfort plate starts with sliced pork over creamy mashed potatoes, so the juices, mustard sauce, or mushroom gravy have somewhere to land.

Garlic mashed potatoes are the richer version, especially if you are skipping a sauce. For a cozy family-style dinner, creamy macaroni and cheese also works well with something green or crisp on the side.

Fresh sides

Something crisp beside the warm pork helps balance the plate. A wedge salad gives you cold crunch, creamy dressing, and steakhouse-style balance. Green beans, simple salad, apple sauce, apple chutney, and roasted carrots also fit the plate.

Bowls, wraps, and easy leftovers

Sliced pork works well over rice, in wraps, on salads, or tucked into quick bowls with vegetables and sauce. If you are turning leftovers into rice bowls, this how to cook rice guide helps with stovetop, rice cooker, and Instant Pot timing.

Make-Ahead Tips

You can season the pork up to 12 hours ahead and refrigerate it covered. Let it sit at room temperature for 15–20 minutes while the air fryer preheats, then cook as directed.

If the rub contains a lot of salt or soy sauce, avoid over-marinating a very small tenderloin. The smaller the piece, the faster salty marinades can make the texture feel firm.

Storage and Reheating

Leftover pork is best when you treat it gently. The meat is lean, so reheating should warm it through without blasting away the moisture you protected during cooking.

NeedBest method
Fridge storageStore in an airtight container for 3–4 days.
Freezer storageFreeze sliced or portioned pork, wrapped well, for easier reheating.
Air fryer reheatingReheat slices at 350°F / 175°C for 3–4 minutes.
Microwave reheatingAdd a splash of broth, water, butter, or sauce and heat gently.
What to avoidDo not blast a whole cooked tenderloin in the air fryer again. It can dry out before the center warms.

Leftover slices are best used gently: tucked into rice bowls with sauce, folded into wraps, chopped into breakfast hash, or added cold to salads instead of aggressively reheated.

Extra slices can become an easy lunch with rice, crisp vegetables, greens, and a sauce that brings moisture back.

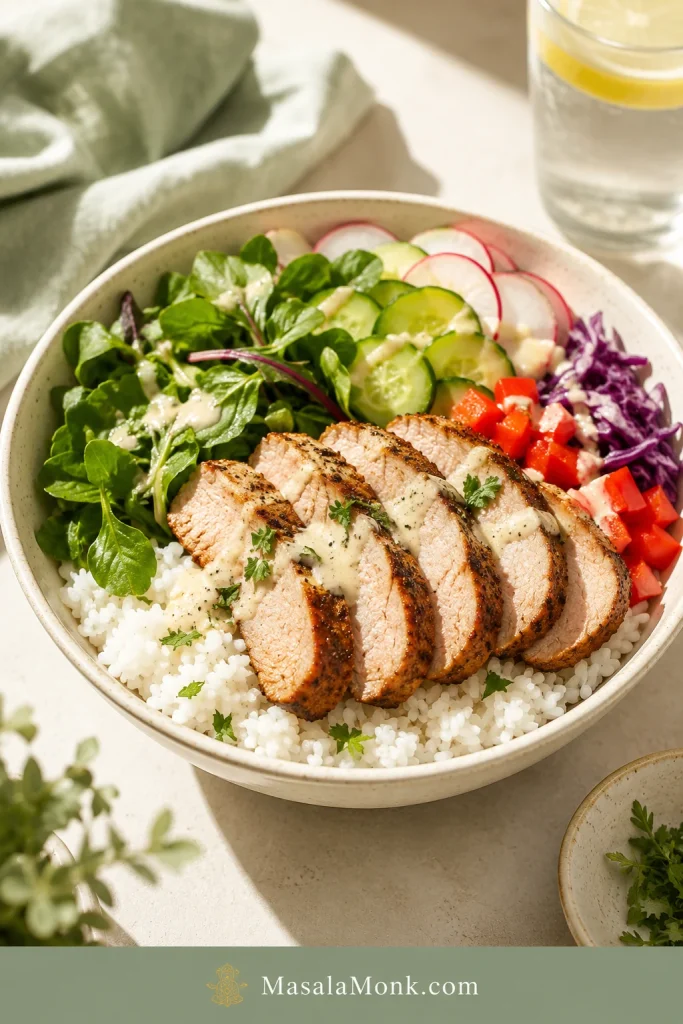
Rice bowl with sliced pork tenderloin, white rice, leafy greens, cucumber, radish, red pepper, purple cabbage, herbs, and sauce.
Finally, leftover air fryer pork tenderloin works beautifully in rice bowls because the sauce, greens, and crisp vegetables bring moisture back to the slices.

Go to FAQBack to the recipe cardBack to top

FAQ

How long do you cook pork tenderloin in the air fryer?

Most 1–1½ lb / 450–680g pork tenderloins take 18–24 minutes at 400°F / 200°C. Slim 1 lb pieces may finish closer to 14–18 minutes, while thick pieces may need 24–28 minutes. Use the chart, then confirm 145°F / 63°C in the center.

What temperature should I air fry pork tenderloin?

Set the air fryer to 400°F / 200°C, or 205°C if your model allows that setting. This gives good browning without a long cook time. If your air fryer runs very hot, reduce slightly to 375–390°F / 190–200°C and cook to temperature.

How do I keep it from drying out?

Use the right cut, check early, and rest before slicing. The mistake is usually not the seasoning — it is leaving lean pork in the air fryer a few minutes too long.

What if I do not have a meat thermometer?

A thermometer is strongly recommended because pork tenderloin is lean and cooks quickly. Without one, use the timing chart, slice into the thickest part, and check that the pork is hot all the way through with no raw-looking center. This is less reliable than a temperature check, so a small instant-read thermometer is worth it.

Is pork tenderloin the same as pork loin?

No. Pork tenderloin is long, narrow, and usually 1–1½ lb. Loin is wider, larger, and more roast-like. They need different cooking times, so checking the package before cooking matters.

Is pork fillet the same as pork tenderloin?

Often, yes. In many places, pork tenderloin is sold as pork fillet. If your pork fillet is long, narrow, and around 450–680g / 1–1½ lb, this air fryer method applies.

Can pork tenderloin be pink inside?

Yes. A slight blush can be normal when the pork is cooked to temperature. Do not keep cooking just to erase every hint of pink, or the tenderloin can turn dry.

Do I need to flip it?

Yes. Flipping helps the pork brown more evenly, especially in basket-style air fryers where the top often gets more direct heat than the bottom. Turn it after the first 10–12 minutes, then finish cooking.

Can I cook frozen pork tenderloin in the air fryer?

You can, but thawed is better for browning and texture. For frozen pork tenderloin, use about 330°F / 165°C, begin testing around 30 minutes, season once the surface softens, flip halfway, and confirm doneness before serving.

Can I cook pork tenderloin and potatoes together?

Yes, but potatoes need a head start because they usually take longer. Cook the pork first and finish the vegetables while it rests, or start small-cut potatoes 8–10 minutes before adding the pork.

How do I cook pre-marinated pork tenderloin?

Check that the package is actually pork tenderloin and not pork loin filet. Pat off excess wet marinade if needed, begin testing around 15 minutes, and cook until the pork reaches 145°F / 63°C. If the outside darkens early, check the temperature before assuming the middle is done.

Can I season pork tenderloin ahead of time?

Yes. You can season it up to 12 hours ahead and refrigerate it covered. Let it sit out for 15–20 minutes while the air fryer preheats so it is not going into the basket ice-cold.

How do I reheat leftovers?

Reheat slices at 350°F / 175°C for 3–4 minutes in the air fryer, or microwave gently with a splash of broth, water, butter, or sauce. Sliced pork reheats better than a whole tenderloin because it warms faster and needs less time.

Can I make pork tenderloin medallions in the air fryer?

Yes. Slice the tenderloin into even 1–1½ inch medallions, season both sides, and air fry at 350°F / 175°C for about 9–12 minutes, flipping once. Start checking early if the pieces are closer to 1 inch thick.

Final Tip

Once you know the cut, the temperature, and when to stop cooking, air fryer pork tenderloin becomes a very easy win: browned outside, juicy inside, and flexible enough for potatoes, salads, bowls, or leftovers the next day. The first cook teaches you your air fryer; after that, this becomes one of those dinners you can repeat without hovering over the basket.

If your air fryer runs especially hot or slow, drop your timing in the comments — model, weight, and total cook time are especially helpful. Someone else with the same style of air fryer may be comparing notes before dinner.

Back to recipe cardBack to cooking chartBack to top

Posted on — Leave a comment

Pork Leg Roast Recipe with Crackling and Cooking Time per kg

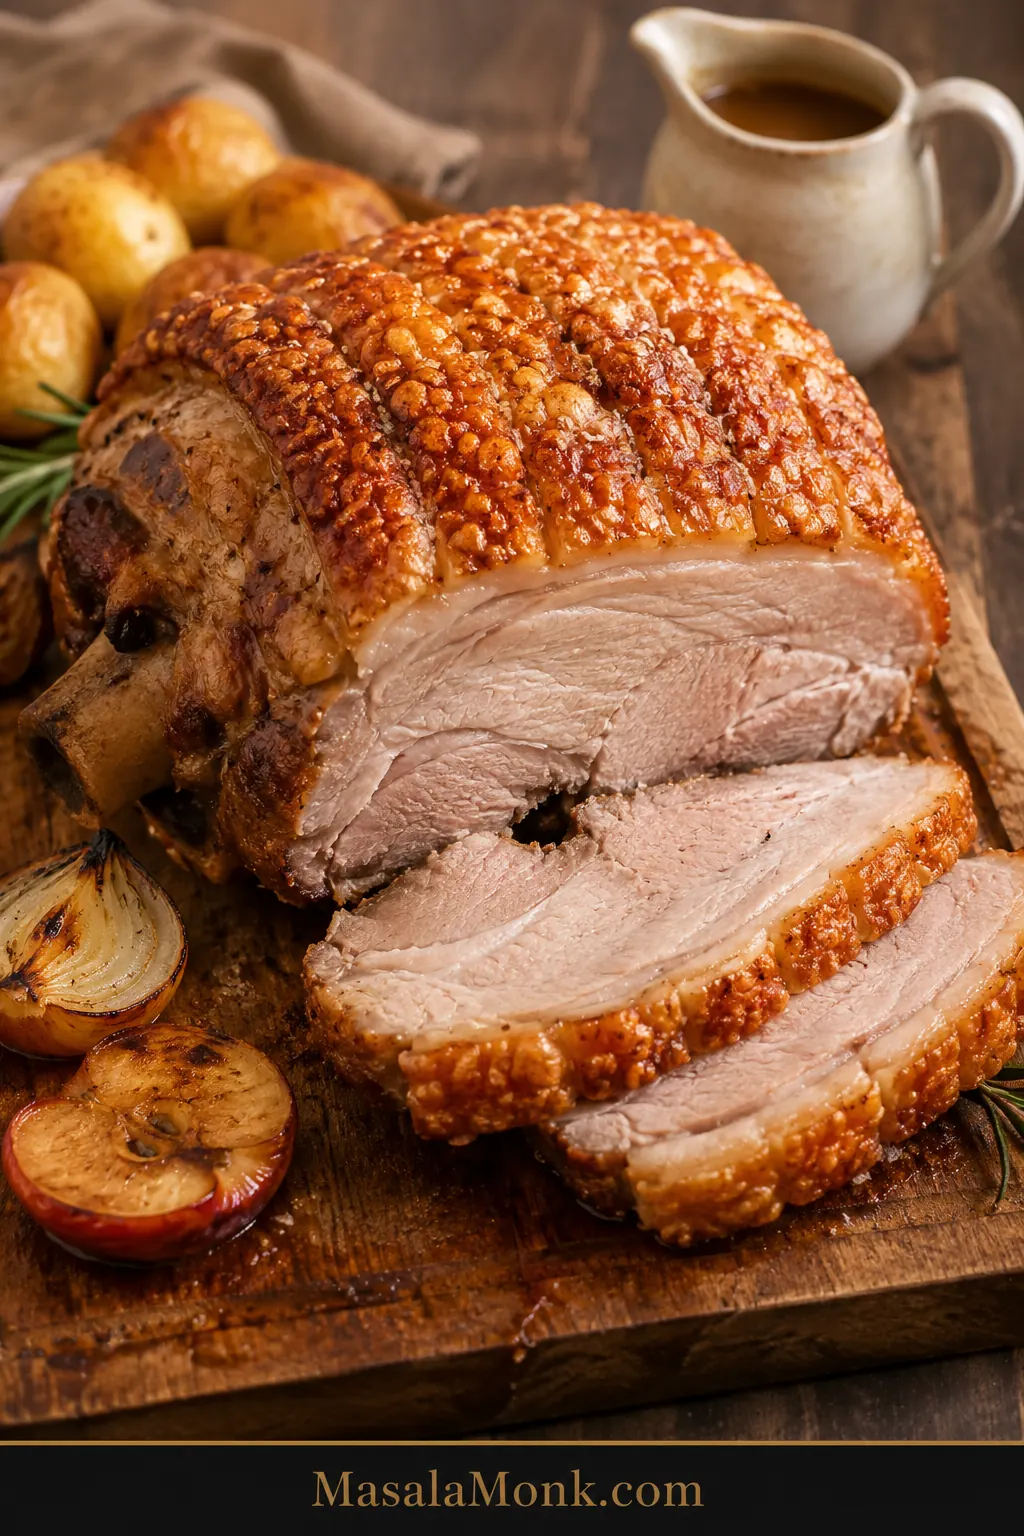
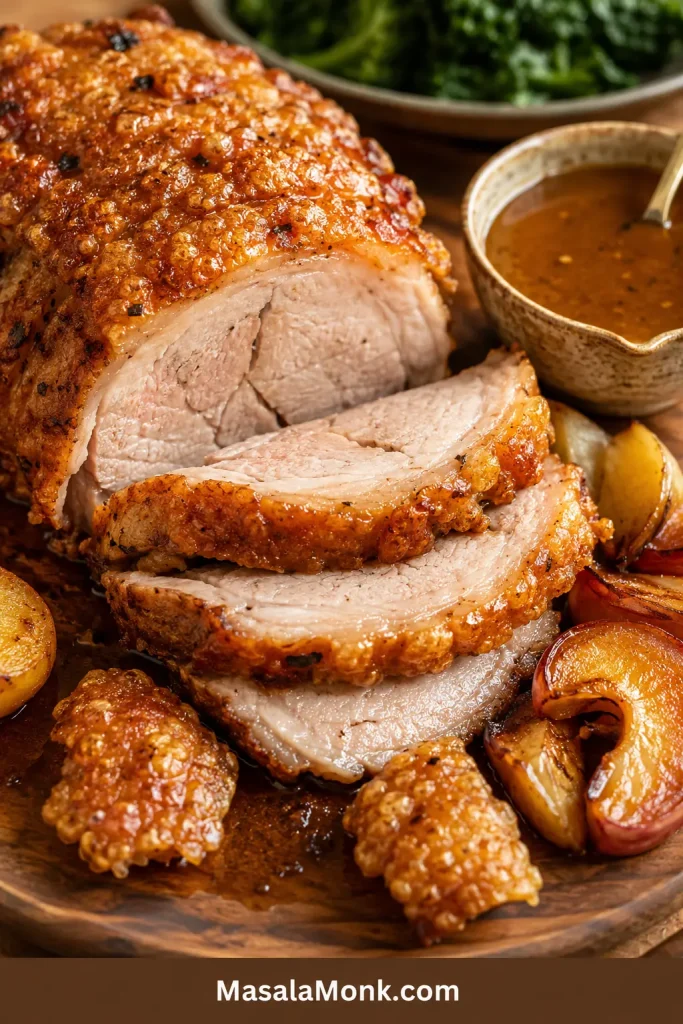
Roast pork leg with blistered golden crackling, carved slices, gravy, roasted apples, potatoes, and vegetables on a wooden board.

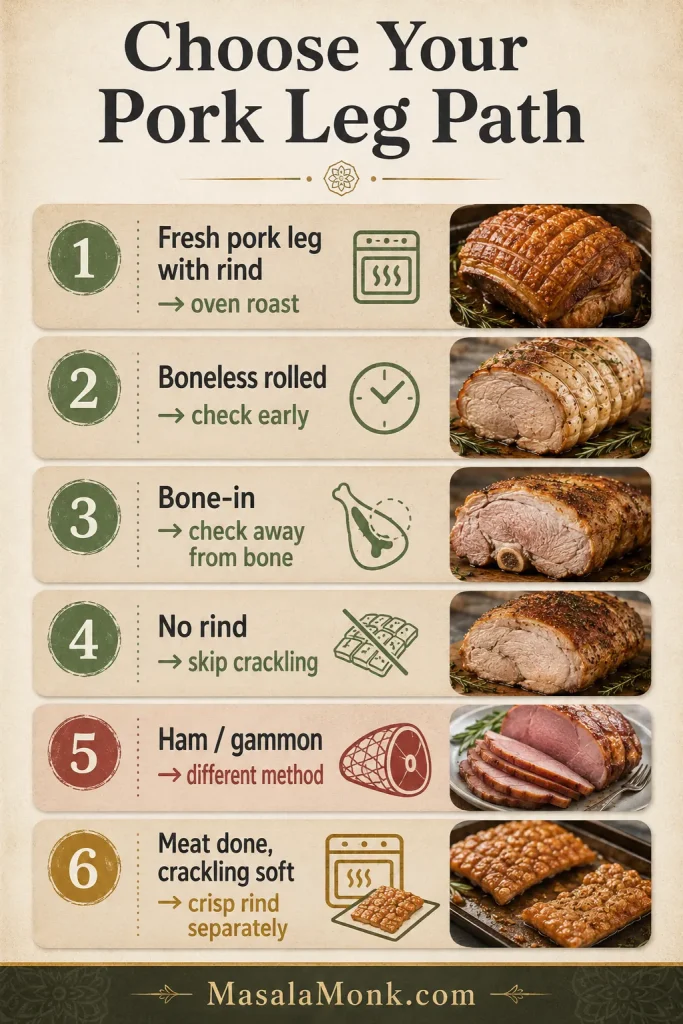
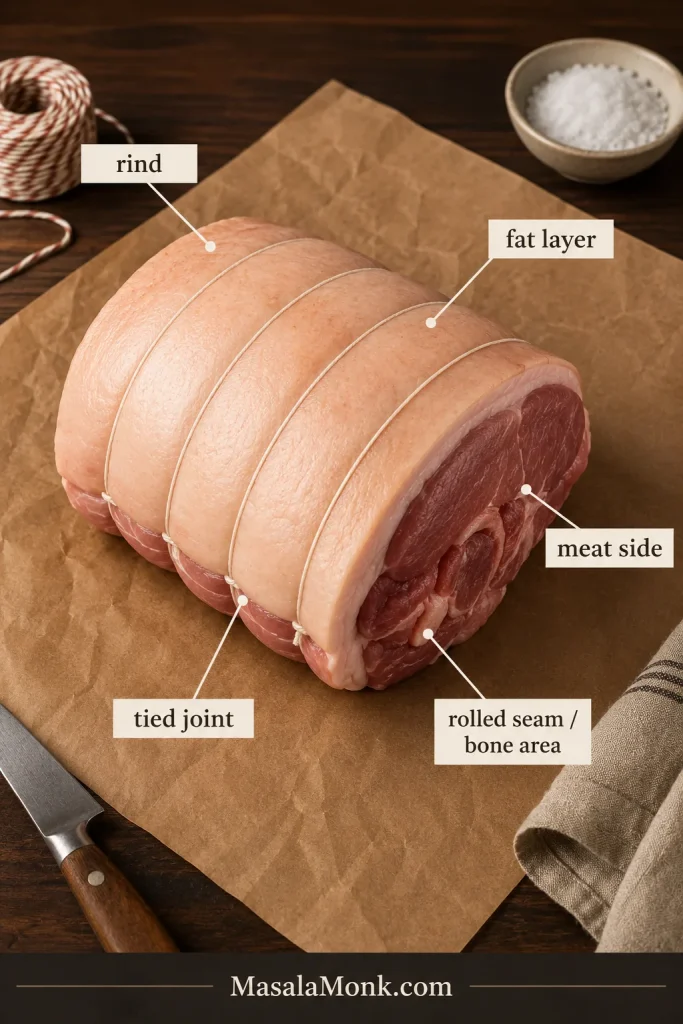
Pork leg roast is easy to love once it is cooked, but confusing before it goes into the oven. The label may say pork leg, leg of pork, pork joint, rolled pork leg, boneless roast, or bone-in joint. Then every timing chart seems to disagree.

It is one of those cuts that feels simple at the butcher and suddenly complicated at home. The joint is big, the rind has to crackle, the meat can dry out, and dinner still needs to happen on time.

That confusion is normal. Once you know the cut, the timing, and how to keep the skin dry, the roast becomes much easier.

This is a big roast, but it does not need to feel like a gamble. The secret is the two-job rule: crisp the rind first, then protect the meat. This guide gives you the full method for juicy sliceable pork, crisp crackling, cooking time per kg, internal temperature, and notes for boneless, bone-in, rolled, slow cooker, and air fryer pork leg.

The goal is simple: juicy sliceable pork, crisp crackling, and no guessing at the oven door.

Already cooking? Use the quick answer first, then check the cooking time chart and internal temperature guide before you roast.

Quick Answer: Pork Leg Roast Time and Temperature

For pork leg roast with rind, start hot at 240°C / 465°F or 220°C fan for 30–40 minutes to begin the crackling. Then reduce to 180°C / 350°F or 160°C fan and cook for about 30–40 minutes per kg, depending on the size and shape of the roast.

Use the time chart to plan, but use a thermometer to finish. For juicy sliceable pork, aim for 63–65°C / 145–149°F in the thickest part, then rest before carving. Prefer a firmer traditional roast? Cook closer to 70–71°C / 158–160°F.

Think of the roast as two separate jobs: dry heat for the skin, gentler heat for the center. If one finishes before the other, separate the jobs instead of overcooking the whole joint.

Jump to: Recipe · Choose Your Path · Cooking Time per kg · Internal Temperature · Timing Plan · Hot Start vs Final Blast · Crackling · Oven Method · Troubleshooting · Serving · Leftovers · FAQs

Choose Your Path Before You Follow the Chart

Before you choose a timing, check three things: whether your pork is fresh pork leg, whether it has rind, and whether it is boneless, rolled, or bone-in. Those details decide the cooking plan.

  • Fresh pork leg with rind: use the main oven method.
  • Boneless rolled pork leg: use the same method, but start checking early.
  • Bone-in pork leg: allow extra time and check the thickest meat away from the bone.
  • No rind: skip the crackling steps and focus on internal temperature.
  • Ham, gammon, cured leg, or smoked leg: pause and use ham-specific instructions.
  • Meat done but crackling soft: rest the pork and crisp the rind separately.

If the roast suddenly feels too big for the pan and too important to mess up, pause here. Dry skin, a hot oven, and a thermometer will do more for you than any complicated marinade.

Decision guide showing different pork leg roast paths for rind-on pork, boneless rolled pork, bone-in pork, skinless pork, ham, gammon, and soft crackling.
Before you use a pork leg cooking time per kg chart, identify the cut because rind, bone, shape, and curing change the safest cooking path.

Next: Once you know the cut, go to the recipe card, cooking time per kg chart, or pork leg label guide.


Pork Leg Roast with Crackling

This recipe uses a 2.5 kg pork leg roast with rind. It works for boneless rolled pork leg, deboned pork leg roast, or a bone-in pork leg roast of a similar size. Adjust the timing using the chart below.

You do not need a complicated marinade here. The magic is in a dry rind, enough salt, a fully preheated oven, a hot start for crackling, and a lower oven temperature for the meat.

Recipe Details

Prep Time20 minutes active, plus optional drying time
Cook TimeAbout 2 hours for a 2.5 kg roast
Rest Time15–20 minutes
Total TimeAbout 2 hours 30 minutes, plus optional overnight drying
Servings6–8
Main Cut2.5 kg pork leg roast, rind on, boneless rolled or bone-in
Doneness63–65°C / 145–149°F in the thickest part for juicy slices
Crackling SignDry, salted rind that bubbles, blisters, and turns crisp during the hot start

No overnight drying? You can still make this today. Pat the rind dry several times, leave it uncovered while the oven preheats, salt it well, and use the hot-start oven stage. Overnight drying helps, but it is not mandatory.

Cooking a smaller roast? If your joint is closer to 1 kg, start checking much earlier than the default 2.5 kg timing. Small pork leg joints dry faster, especially when they are narrow, boneless, or rolled tightly.

Before you start, gather the few things that make this roast easier. The thermometer and a rack or trivet are the two most useful helpers.

Equipment You’ll Need

ToolWhy it helps
Roasting trayHolds the pork, aromatics, and pan juices
Wire rack or onion-and-apple trivetKeeps the pork lifted so the rind stays exposed
Paper towelsDry skin is the first step to good crackling
Sharp knife or utility bladeScores the rind cleanly without tearing it
Meat thermometerPrevents dry pork and removes guesswork
FoilUseful for shielding dark crackling patches or resting meat loosely
Serrated knifeCuts through crackling more cleanly
Carving boardGives the roast space to rest and slice neatly

If you only add one tool, make it the thermometer. It turns this from a timing gamble into a controlled roast.

Ingredients

  • 2.5 kg pork leg roast, rind on, boneless rolled or bone-in
  • 1½–2 tablespoons sea salt flakes
  • 1½–2 tablespoons olive oil or neutral oil
  • 1 teaspoon black pepper
  • 1–2 teaspoons fennel seeds, lightly crushed, optional
  • 4–6 garlic cloves, lightly crushed
  • 2 large onions, thickly sliced
  • 2–4 apples, halved or quartered, optional
  • 2–3 sprigs rosemary or sage
  • 250–500 ml stock, cider, or water for the tray and gravy
  • 1–2 tablespoons flour or cornflour, optional, for gravy
  • 1 teaspoon mustard or a splash of apple cider vinegar, optional

Salt note: Most of the salt is for the rind and crackling, not for heavily salting the meat. Rub it in after the rind is dry, not while it is still wet from packaging. If you are using fine table salt instead of flaky sea salt, use less.

Before the Pork Goes in the Oven

This quick check helps prevent the two biggest problems: soft crackling and dry pork.

  • Rind looks dry and matte, not wet or glossy.
  • Scoring cuts through the skin, but not deep into the meat.
  • Salt is rubbed into the scored cuts.
  • Oven is fully preheated before the pork goes in.
  • The joint sits rind-side up.
  • Skin is as level as you can make it.
  • Liquid stays in the bottom of the tray, below the pork.
  • The roast is not sitting deep in liquid.

Method

  1. Dry and score the rind. Pat the skin very dry. Score through the skin and some fat if needed, but do not cut deep into the meat.
  2. Bring the pork out briefly. Let the joint sit out for 45–60 minutes while the oven heats, but do not leave raw pork at room temperature for hours.
  3. Season the meat side only. Rub the meat side with pepper, fennel if using, garlic, herbs, and a little oil. Keep wet seasonings away from the rind.
  4. Oil and salt the rind. Rub the skin lightly with oil, then massage sea salt into the scored cuts.
  5. Set up the tray. Place onions, garlic, apples, and herbs in a roasting tray. Set the pork rind-side up on a rack or onion-and-apple trivet.
  6. Roast hot for crackling. Cook at 240°C / 465°F or 220°C fan for 30–40 minutes, until the rind starts to bubble, blister, and turn golden.
  7. Lower the heat. Reduce to 180°C / 350°F or 160°C fan. Add stock, cider, or water to the tray if making gravy, keeping it below the pork and away from the rind.
  8. Cook to temperature. Roast until the thickest part reaches 63–65°C / 145–149°F for juicy slices, or 70–71°C / 158–160°F for a firmer roast.
  9. Rest without steaming the crackling. Give the pork 15–20 minutes. Leave crisp crackling exposed so steam cannot soften it.
  10. Rescue, gravy, and carve. If the meat is done but the crackling is soft, remove the rind and crisp it separately. Make gravy from the pan juices, then carve the pork across the grain.

The full oven method below explains each step in more detail. First, make sure the cut you have matches the path you are following.

Quick Cut Check

Still not sure what kind of pork leg you bought? Use this table before you worry about exact timing.

Raw skin-on pork leg roast on butcher paper with labels for rind, fat layer, meat side, rolled seam or bone area, and tied joint.
Once the rind, fat layer, meat side, and rolled shape make sense, pork leg roast labels stop feeling like butcher-counter guesswork.
What you haveBest approach
Boneless pork leg roastUse the main recipe and start checking early
Rolled pork leg jointKeep the rind level, roast as directed, and check the center of the roll
Bone-in pork legUse the time chart, allow extra time, and check away from the bone
Whole pork legUse the chart only as a guide; check more than one spot
Skin-on pork legBest choice for crackling
Fresh ham, uncookedTreat it like fresh pork leg, but use the thermometer and allow extra time for large pieces
Skinless pork legUse the roast method, but skip the crackling steps
Slow cooker pork legCook gently first, then crisp the rind separately
Pork leg for pulled porkPossible, but pork shoulder is usually better
Ham or gammonUse a ham-specific recipe, not this method

Once you know which version you have, the rest becomes much easier. Skin-on pork leg is for crackling. Boneless rolled pork leg is for neat slices. Bone-in pork leg is for a bigger centerpiece. Ham is a different recipe altogether.

Now plan the roast: use the pork leg cooking time per kg chart, then check the internal temperature guide before you finish.

Why This Pork Leg Roast Works

This method works because it stops forcing the skin and the meat to behave the same way. Bold heat helps the top blister. Gentle cooking keeps the center juicy. Once you separate those jobs, pork leg stops feeling like a gamble.

  • A hot start wakes up the crackling. Dry skin needs a blast of high heat to puff, blister, and crisp.
  • Lower heat protects the meat. After the skin has had its heat, the center can cook through without drying out.
  • The chart gets you close; the thermometer tells you when to stop. That keeps timing useful without making it the final judge.
  • Dry heat stays on top. Apples, onions, herbs, garlic, and stock sit under or around the roast, not over the crackling layer.
  • The method adapts to the cut. Boneless, bone-in, rolled, and pork leg joint versions all work when you adjust timing and check the center properly.
  • Leftovers stay useful. This cut slices cleanly for roast dinners, sandwiches, wraps, and next-day meals.

Pork Leg Labels Explained

The quick cut check above helps you choose a path. This section explains the labels you may see at the butcher or supermarket.

Fresh Pork Leg, Fresh Ham, Ham, and Gammon

Pork leg is sold under several names. The same basic roasting method works for most fresh pork leg roasts, but the timing changes with size, shape, bone, and whether the rind is attached.

A rind-on joint with an even fat layer is usually easier to crackle than a patchy, thin-skinned piece. You can still cook an uneven roast well, but you may need to level the skin or rescue a softer patch separately at the end.

Comparison chart showing fresh pork leg, uncooked fresh ham, cured ham or leg, and gammon or smoked leg labels.
Fresh pork leg and uncooked fresh ham can follow this roast method; however, cured ham, smoked leg, and gammon need separate instructions.

Pork Leg Label Table

Cut or labelWhat it meansWhat changes
Boneless pork leg roastThe bone has been removed, and the meat may be rolledEasier to carve and cooks evenly, but can dry faster
Rolled pork legBoneless leg rolled and tied into a jointGreat for neat slices; check the center early
Deboned pork leg roastAnother name for boneless pork legUse boneless timing guidance
Bone-in pork leg roastPork leg with the bone still attachedMay take longer; check away from the bone
Whole pork legA large full-leg roastBest for gatherings; check more than one spot
Pork leg jointCommon UK-style name for a roasting pieceUse the weight-based chart below
Skin-on or rind-on pork legThe rind is still attachedBest choice for crackling
Skinless pork legThe rind has been removedCan be roasted, but it will not make crackling
Fresh pork legUncured raw pork legCorrect for this recipe
Fresh ham, uncookedUS-style label for uncured pork legCan be roasted like fresh pork leg, but large pieces need extra time and thermometer checks
Ham, gammon, or cured pork legPork leg that has been curedNeeds a different cooking or glazing method

Labels such as fresh pork, pork leg, leg joint, roasting joint, rolled leg, rind-on pork leg, or fresh ham uncooked usually mean you are in the right place. Gammon, ham, cured leg, smoked leg, or leg ham need ham-specific instructions instead.

When Pork Leg Is Not the Right Cut

Pork loin and pork tenderloin need cut-specific methods because they are smaller, leaner, and shaped differently. Compare with this pork tenderloin in oven guide or this slow cooker pork loin recipe if that is the cut you bought.

This cut is also different from shoulder. Choose shoulder when you want soft, fall-apart meat. Pick leg when you want neat roast slices and crisp crackling.

Pork Leg Cooking Time per kg

This is the chart to use when you are trying to work backward from dinner time. It will help you plan the meal, but it does not need to be perfect down to the minute.

If you came here with a label in one hand and a dinner time in mind, this is the section that matters most. These times are deliberately given as a range because shape matters as much as weight.

Pork leg roast cooking time per kilogram chart with hot-start timing, lower roasting ranges, resting time, and internal temperature reminder.
Use the pork leg cooking time per kg chart for planning, then confirm doneness with internal temperature instead of trusting the clock alone.

Pork Leg Time Chart by Weight

Pork leg sizeHot crackling stageLower roasting stageApprox total oven time
1 kg30–40 minutes30–40 minutes1 hour–1 hour 20 minutes
1.5 kg30–40 minutes45–60 minutes1 hour 15 minutes–1 hour 40 minutes
2 kg30–40 minutes60–80 minutes1 hour 30 minutes–2 hours
2.5 kg40 minutes75–90 minutes1 hour 55 minutes–2 hours 10 minutes
3 kg40 minutes90–120 minutes2 hours 10 minutes–2 hours 40 minutes
4 kg40 minutes2 hours–2 hours 40 minutes2 hours 40 minutes–3 hours 20 minutes
5 kg40 minutes2 hours 30 minutes–3 hours 20 minutes3 hours 10 minutes–4 hours

The simplest planning formula is 30–40 minutes hot for crackling, then about 30–40 minutes per kg at the lower temperature.

For a 1 kg pork leg joint: check the center temperature as soon as the hot crackling stage ends. Small boneless roasts can move from juicy to dry quickly, especially if they are narrow or rolled tightly.

A boneless rolled joint can cook a little faster because it is more even. Larger bone-in roasts and whole legs can take longer. Start checking before the earliest time in the chart so you do not accidentally push the meat too far.

Before you stop roasting: check the internal temperature. The chart organizes dinner, but the thermometer decides doneness.

Pork Leg Cooking Time per Pound

The kg chart is the main one. Use this next table only if your label is in pounds.

These totals include the hot crackling stage. After that first blast of heat, estimate about 15–20 minutes per pound at the lower roasting temperature.

Pork leg sizeApprox total oven timeNotes
3 lb1 hour 20 minutes–1 hour 45 minutesCheck early; small roasts dry quickly
4 lb1 hour 40 minutes–2 hoursCommon small family roast
5 lb1 hour 55 minutes–2 hours 20 minutesClose to the default recipe size
6 lb2 hours 10 minutes–2 hours 45 minutesBone-in may need longer
8 lb2 hours 45 minutes–3 hours 30 minutesCheck more than one spot

Timing gets dinner organized. The thermometer decides when the pork is actually ready.

Example Timing Plan for a 2.5 kg Pork Leg Roast

The charts tell you how long the pork may take. This timing plan shows how to work backward from serving time for the 2.5 kg roast used in this recipe.

Time before servingWhat to do
Night before or morningLeave the rind uncovered in the fridge if you can
About 3 hours before servingTake pork out, dry the rind, and check the scoring
About 2½ hours before servingPreheat the oven fully and prepare the tray
About 2¼ hours before servingStart the hot crackling stage
About 1½ hours before servingLower the oven and continue roasting
About 30 minutes before servingStart checking the center temperature
About 20 minutes before servingRest the pork and finish crackling separately if needed
Just before servingCarve, make gravy, and serve

Do not chase the exact minute. The point is to give yourself enough room for resting, gravy, and a crackling rescue if the rind needs it.

A roast that reaches temperature early is a good problem. Rest it. If the crackling needs help after the meat is done, crisp the rind separately.

Why Pork Leg Cooking Times Differ So Much

If you have checked a few pork leg roast recipes already, you have probably seen different timing formulas. One chart may say 30–35 minutes per kg. Another may suggest 40 minutes per kg. Pound-based recipes often use 20–30 minutes per pound, while supermarket labels sometimes build in extra time.

That does not mean everyone is wrong. It means the joint is affected by more than just weight. Two good recipes can give different times and still both make sense.

  • Shape matters. A short, thick roast cooks differently from a long, narrow one.
  • Boneless and bone-in are not identical. Rolled pork leg often cooks more evenly, while bone-in pork may need extra time.
  • Small joints dry faster. A 1 kg roast can overcook quickly if you follow a timing formula blindly.
  • Large whole legs are uneven. A 4–5 kg pork leg needs temperature checks in more than one place.
  • The rind adds a separate job. Crackling needs high heat, but the meat underneath still needs controlled cooking.
  • Ovens vary. Fan ovens, older ovens, and crowded roasting trays can all change the timing.

This is the moment where many roasts go wrong: the crackling looks behind schedule, so the cook keeps roasting everything. Don’t. Check the meat first. If the center is ready, save the skin separately instead of drying out the whole joint.

This is why the thermometer is not a fancy extra here. It is the simplest way to protect the roast you paid for.

Best Oven Temperature for Pork Leg Roast

A good roast usually needs two stages because the top and the center are asking for different things.

If your oven uses convection or fan-forced heat, use the fan temperature. Roast in the center or upper-middle of the oven so the rind gets strong heat without sitting too close to the element. Aggressive ovens need a little watching, so shield dark patches with foil if they brown before the rest of the skin catches up.

StageConventional ovenFan ovenPurpose
Crackling start240°C / 465°F220°C fanBlisters and crisps the rind
Main roast180°C / 350°F160°C fanCooks pork through gently
Crackling rescue220–240°C / 430–465°F200–220°C fanFinishes soft rind patches

Very high heat for the whole cook can make the crackling look good but leave the meat dry. Low heat from the start can cook the meat gently but leave the rind chewy. The two-stage method gives you the best balance.

Hot Start or Final Blast for Pork Leg Crackling?

Both methods can work, which is why roast pork advice can look contradictory. Some recipes begin with high heat. Others roast lower first and finish with a final blast to crisp the skin.

This recipe uses a hot start because pork leg is leaner than shoulder and the rind benefits from early dry heat. The first blast gets the crackling moving; the lower stage then protects the center of the roast.

Side-by-side guide comparing hot start and final blast methods for pork crackling, with heat cues for skin and meat.
Hot start and final blast can both work for pork crackling; therefore, choose the method that protects the meat while drying and blistering the rind.

A final blast can also work, especially with fattier cuts, but it is not a reason to overcook the meat. For pork leg, the safest rule is this: give the rind enough high heat, cook the center gently, and separate the rind at the end if the crackling and meat do not finish together.

Do not judge the crackling too early. You are looking for signs of progress: dry-looking skin, bubbling, blistering, and golden patches. That blistered surface is what will later break into crisp shards instead of bending like chewy skin.

Need visual cues? See what good crackling progress looks like before deciding whether the rind needs more heat.

What Internal Temperature Should Pork Leg Roast Be?

The easiest way to stop guessing is to check the center with a thermometer. Insert it into the thickest part of the pork, away from the bone and away from the rolled seam if the roast is tied.

The center temperature can rise a little as the roast rests, especially in larger joints, so start checking early rather than waiting until the very last minute. Pork leg is lean enough that a few extra minutes can matter; the thermometer is not just about safety, it is how you protect juiciness.

Pork leg roast with thermometer inserted into the thickest part, beside doneness ranges for juicy slices, firmer pork, and resting.
After the timing chart gets you close, the thermometer tells you whether the center is juicy, firmer, or ready to rest.

Choose Your Pork Leg Result

What you wantAim forWhat it means
Juicy sliceable pork63–65°C / 145–149°FTender slices for roast dinner, sandwiches, and leftovers
Firmer traditional roast70–71°C / 158–160°FLess pink, firmer texture, but it can be drier
Shredded pork legLonger moist cookingPossible for saucy sandwiches, though pork shoulder is better
Best cracklingDry rind + hot startNeeds a skin-on roast with dry, salted rind

Food safety guidance commonly lists whole cuts of fresh pork at 145°F / 63°C with a rest. The National Pork Board pork temperature guide gives the same 145°F guidance for fresh pork roasts, chops, loin, and tenderloin.

The useful rule is simple: let the timing chart guide the day, then let the thermometer decide when the pork is ready.

How to Get Crisp Pork Leg Crackling

Crackling looks dramatic, but the rules are simple: dry the rind, salt it well, and give it enough heat. Seasoning on the meat is flexible. The skin is the part that needs discipline.

Crackling is also the part you can rescue if the meat finishes first, so do not panic if everything is not perfect at the same moment. The meat and rind do not have to finish together.

What good crackling progress looks like

Good crackling does not need to look perfect halfway through. Look for dry-looking skin, small bubbles, blistered patches, golden edges, and a surface that looks tighter than when it went in. It just needs to be moving in the right direction.

Four-stage pork crackling guide showing dry salted rind, early bubbles, blistered patches, and crisp golden crackling.
As the roast cooks, look for progress rather than perfection: dry rind, early bubbles, blistered patches, then crisp pork crackling.

If the meat and crackling are not finishing together, jump to the separate-rind rescue.

Dry the rind properly

Pat the rind dry with paper towels. If you have time, leave the pork uncovered in the fridge for several hours or overnight. The surface should look dry and matte before roasting, not wet or glossy.

Side-by-side comparison of wet glossy pork rind and dry matte pork rind before roasting.
The rind should look matte before roasting because glossy surface moisture becomes steam, and steam is the enemy of crisp pork crackling.

No hours to spare? Dry it as well as you can, leave it uncovered while the oven preheats, then salt it generously. You can still get good crackling without overnight drying, but you have to remove as much surface moisture as possible.

Score the rind without cutting into the meat

If your pork leg is not already scored, use a very sharp knife to cut lines through the rind and fat. You are cutting through the skin and some fat, not making deep cuts into the pork itself. Deep cuts into the meat can release juices onto the rind and make crackling harder.

Close-up of pork leg rind being scored through the skin and fat, with labels showing rind, fat, and meat below.
Score the pork rind to open the fat layer for salt and heat, but stop before the meat so juices do not soften the crackling.

Already scored by the butcher? Do not keep cutting deeper. You only need channels for salt and heat to reach the fat.

Optional: use the boiling-water trick

Some cooks pour boiling water over scored pork rind to tighten the skin before roasting. If you do this, dry the rind completely afterward before adding oil and salt.

Do this before the final drying stage, not right before the pork goes into the oven. The trick only helps if the skin becomes dry again. Wet rind will steam, not crackle.

Keep wet seasonings away from the top

Garlic, herbs, mustard, cider, stock, and vegetables are all good with pork leg, but keep them under or around the roast. Avoid spreading wet marinades over the rind if you want crisp crackling.

Use oil lightly

A thin rub of oil helps salt stick and encourages even heat. You do not need to drown the rind.

Salt generously

Massage sea salt into the cuts after the rind is dry. Salt helps draw out moisture and season the crackling. If there are huge clumps sitting on top, brush off the excess before roasting.

Flaky salt rubbed into the scored cuts of dry pork rind before roasting.
After the rind is dry, work salt into the cuts so the surface seasons evenly and sheds moisture before the hot oven stage.

Start hot and avoid steam

The first 30–40 minutes are important. Keep the pork uncovered and avoid opening the oven repeatedly. During this stage, the skin should start to bubble, blister, and turn golden in patches.

If you are worried about steam, add tray liquid after the hot crackling stage, not before. Keep that liquid in the bottom of the tray and away from the rind.

Keep the rind as level as possible

If one side of the rind sits much lower, juices can pool there. Use onions, apples, or a small piece of foil under the roast to level the surface if needed.

Know the crackling rescue rule

When the pork is done but the crackling is not crisp, stop cooking the meat and finish the rind separately while the pork rests.

Cooked pork resting on a board while removed pork rind sits separately on a tray or air fryer basket to crisp.
If the meat finishes before the crackling, protect the roast first and crisp the rind separately as a controlled rescue.

To rescue crackling separately, lift off the rind, place it on a tray, salt lightly again if needed, and blast it in a hot oven, under the grill/broiler, or in an air fryer until hard and crisp. Check often because it can go from perfect to burnt quickly.

This one move can save both the meat and the crackling. You are not failing the roast; you are just separating the two jobs.

By this point, you do not need to know every possible pork label. You only need the weight, whether the joint has rind, and where to put the thermometer. The oven method below brings those pieces together.

How to Cook Pork Leg Roast in the Oven

The steps look long on paper, but most of the work is simple: dry the skin, salt it well, start hot, then let the thermometer guide the finish.

At this point, you only need four things: a dry scored top, a hot first stage, a lower second stage, and a thermometer in the thickest part. Everything else is there to help those four things work.

Step 1: Dry the pork

Remove any packaging and pat the pork dry, especially the rind. Overnight fridge drying helps when you have time. Even 30–60 minutes uncovered while the oven heats is better than roasting a wet rind.

Standing at the counter with the roast already unwrapped? Start with the skin. Dry it first, then move on to seasoning and tray setup.

Step 2: Bring it closer to room temperature

Take the pork out of the fridge about 45–60 minutes before roasting, usually while the oven heats and you prepare the tray. Do not leave raw pork sitting out for hours.

Step 3: Score the rind

Score the rind in narrow lines if it has not already been done. Cut through the skin and fat, but avoid cutting into the meat.

Step 4: Season the meat side

Rub the meat side with pepper, crushed fennel seeds if using, and a little oil. Tuck garlic, rosemary, sage, onions, and apples under the roast for aroma.

Step 5: Salt the rind

Rub a thin layer of oil over the rind, then massage salt into the scores. This gives crackling its flavor and crunch.

Step 6: Set up the roasting tray

Place sliced onions, garlic, apples, and herbs in the tray. Set the pork on top, rind facing up. A rack is ideal, but a thick bed of onions and apples also works as a trivet. The pork should sit above the liquid, not in it.

Pork leg roast sitting rind-side up on a rack above onions, apples, garlic, herbs, and liquid in a roasting tray.
Meanwhile, the tray setup matters: aromatics flavor the juices below while the pork rind stays lifted in dry oven heat.

Step 7: Roast hot for crackling

Make sure the oven is fully preheated. Roast in the center or upper-middle of the oven at 240°C / 465°F or 220°C fan for 30–40 minutes. The rind should begin to bubble, blister, puff, and turn golden.

The crackling does not need to look perfect halfway through. Look for progress: bubbling, blistering, dry-looking skin, and golden patches. That blistered surface is what will later break into crisp shards instead of bending like chewy skin.

When the rind still looks pale, flat, and soft after the hot stage, it needs more heat. A roast that is nowhere near done can continue cooking. If the center is already close, save that final heat for the skin separately later.

Step 8: Lower the oven

Reduce the oven to 180°C / 350°F or 160°C fan. If you want gravy, add stock, cider, or water to the bottom of the tray. Keep the liquid below the pork so the roast does not steam.

Step 9: Cook to temperature

Continue roasting until the thickest part reaches your preferred internal temperature. For juicy sliceable pork, aim for 63–65°C / 145–149°F. Prefer a firmer, more traditional roast? Aim for 70–71°C / 158–160°F.

If the meat reaches temperature before the crackling is perfect, you have not failed. That is exactly what the separate-rind rescue is for.

Step 10: Rest before carving

Rest the pork for 15–20 minutes. Resting is not just waiting; it helps keep the juices from running out as soon as you carve.

Rest the meat, not the steam. Leave crisp crackling exposed so steam cannot soften it. If you need to keep the meat warm, tent foil loosely around the sides but leave the top uncovered.

When the pork has rested properly, the slices should look moist rather than wet, with enough structure to hold together on the plate.

Step 11: Make gravy from the tray

Spoon off excess fat from the roasting tray. Stir flour or cornflour into the pan juices, then add stock, cider, or water and simmer until the gravy thickens. A little mustard or apple cider vinegar sharpens the flavor and balances the richness.

The gravy should taste savory, slightly sweet from the onions or apples, and sharp enough to cut through the richness of the pork.

Step 12: Slice and serve

Use a serrated knife to cut through the crackling, then carve the pork into slices. Slice across the grain when you can. If the grain changes direction as you carve around the roast, turn the meat and keep slicing across the lines of the muscle.

The best slices hold together but still look juicy at the center, with crisp pieces of crackling on the side for anyone who reaches for them first.

Sliced pork leg roast with moist meat, crisp golden crackling pieces, gravy, roasted apples, potatoes, and vegetables.
Proper resting shows in the slices: the pork holds together, stays moist in the center, and still gives crisp crackling for contrast.

Once you understand the oven method, the variations are easier. Boneless, bone-in, slow cooker, and air fryer versions all follow the same basic rule: protect the rind, then cook the center gently.

Need a specific version? Jump to boneless pork leg, bone-in pork leg, slow cooker pork leg, or air fryer pork leg.

Boneless Pork Leg Roast

Boneless pork leg roast is one of the easiest forms to cook because it is usually rolled into a neat shape and tied. It slices cleanly and fits well in a normal roasting tray.

The main thing to watch is dryness. Because the bone has been removed, a boneless or rolled pork leg can go from juicy to dry if it is roasted too long. It is convenient, but because it is lean and evenly shaped, it can give you less margin for error than a fattier cut.

  • Use the same hot-start crackling method.
  • Keep the rind facing up and as level as possible.
  • Check the center early.
  • Do not rely only on the label timing if the roast is small.
  • Rest before slicing so the juices settle.

A 1–1.5 kg joint needs earlier checking than the chart may suggest. Smaller rolled roasts cook faster than many people expect.

Bone-In Pork Leg Roast

A bone-in pork leg roast is larger, more dramatic, and excellent for a centerpiece meal. It can also take longer than a boneless roast of the same weight because the shape is less even.

  • Use the same high-heat start for crackling.
  • Check the temperature in the thickest meaty part, not touching the bone.
  • Allow extra time for large roasts.
  • Rest at least 20 minutes for bigger pieces.
  • Carve around the bone with a sharp knife.

If you are cooking a whole pork leg or a very large bone-in leg, use the chart only as a guide. Large roasts vary too much in shape for timing alone to be reliable.

Can You Cook Pork Leg in the Slow Cooker?

Yes, you can cook pork leg in the slow cooker, but there is one important catch: the slow cooker will not make crisp crackling by itself.

Use the slow cooker when tenderness matters more than oven-roast texture. It is helpful for gentle cooking, but not helpful if you expect the skin to crackle inside the cooker.

Slow cooker pork leg will taste more like tender sliced or chunked pork than classic oven roast pork. The meat can be good, but the rind needs a separate crisping step.

Slow cookers create steam and moist heat. That is good for tender meat, but bad for dry, blistered rind. If you want slow cooker pork leg with crackling, cook the meat gently first, then crisp the rind separately in a hot oven, under the grill/broiler, or in an air fryer.

Basic slow cooker pork leg method

  • Use a 1.5–2.5 kg pork leg joint, preferably skin-on if you want crackling.
  • Season the meat side with salt, pepper, garlic, herbs, onions, and apples.
  • Add a small amount of stock, cider, apple juice, or water to the slow cooker.
  • Keep the liquid below the rind if the skin is still attached.
  • Cook on low for about 7–8 hours, or on high for about 4–5 hours, until tender.
  • Remove the pork and pat the rind very dry.
  • Rub the rind with salt and crisp it in a hot oven at 220–240°C / 430–465°F until crackled.

When the meat is already perfectly cooked but the skin is rubbery, remove the rind in one piece and crisp it separately. That protects the pork from drying out while the crackling finishes.

If your real goal is classic shredded pork, pork shoulder is still the better cut. Pork leg can work, but it needs more moisture and is less forgiving. For a dedicated shredded method, use this slow cooker pulled pork recipe.

Can You Use Pork Leg for Pulled Pork? Only If You Have To

You can use pork leg for pulled pork, but it is not usually the best cut.

Pork leg can shred if cooked low and slow with enough moisture, but it will not be as rich, juicy, or forgiving as shoulder. If you already have this cut and want to pull it, cook it until very tender, add moisture such as stock, cider, apple juice, or sauce, then shred while warm.

Mix the shredded meat with cooking juices or sauce so it does not taste dry. If you are turning leftover roast pork into sandwiches, this BBQ sauce for pulled pork can help bring back moisture and flavor.

Can You Cook Pork Leg Roast in an Air Fryer?

Yes, but air fryer pork leg works best with smaller boneless joints. A 1–1.5 kg roast is usually more realistic than a large bone-in leg, unless you have a very large air fryer.

  • Dry and salt the rind the same way as the oven method.
  • Start hot to help the skin crisp.
  • Reduce the temperature to cook the meat through.
  • Use a thermometer, because air fryer models vary a lot.
  • Do not crowd the basket; air needs to circulate around the rind.

With many small joints, a hot start around 200–210°C / 400–410°F for about 20 minutes can help the rind. Then lower the heat to around 160–180°C / 320–350°F and cook until the center reaches your target temperature.

A roast that sits too close to the air fryer element is better cooked in the oven. If fat begins smoking in your air fryer, pause, drain excess fat from the drawer if your model allows, and continue at a slightly lower temperature.

If your pork has been sliced into chops rather than kept as a roast, use a chop-specific guide instead. This air fryer pork chops recipe is a better fit for individual pieces.

For larger pork leg roasts, the oven is usually easier and more reliable.

Is Pork Leg the Same as Ham?

Fresh pork leg and ham come from the same general part of the pig, but they are not the same thing in the kitchen.

Fresh pork leg is uncured raw pork. That is what this recipe uses. It can be roasted with rind to make crackling. In some US labels, you may also see fresh ham, uncooked, which means uncured pork leg rather than ready-to-eat ham.

Ham is cured pork leg. It may be smoked, salted, brined, or partially cooked depending on the product. Ham usually needs a different method, often with soaking, glazing, gentle reheating, or baking.

Labels such as fresh pork leg, fresh ham uncooked, pork leg roast, leg of pork, pork joint, boneless pork leg, rolled pork leg, or bone-in pork leg mean this guide is for you. Ham, gammon, cured pork leg, or leg ham need ham-specific cooking instructions instead.

Troubleshooting Pork Leg Roast

Most pork leg problems are fixable. The key is not to keep cooking the meat just because the rind needs more time.

Do not panic if the meat and crackling are not ready at the same moment. That happens often, and it is fixable.

Emergency Crackling Check

Use this check before you keep roasting. It helps you decide whether the meat needs more time, the crackling needs protection, or the rind should be finished separately.

Troubleshooting chart showing what to do when pork meat is done or not done and crackling is pale, dark, soft, or crisp.
Use this emergency crackling check beside the oven when the pork and rind are moving at different speeds.
SituationBest move
Meat not done, crackling paleKeep roasting and check again soon
Meat not done, crackling darkLower the oven and shield dark patches with foil
Meat done, crackling softRemove the rind and crisp it separately
Meat done, crackling crispRest uncovered and leave the crackling exposed
Meat nearly done, rind still palePlan a separate crackling finish while the pork rests

If guests are waiting, this is where the separate-rind rescue saves dinner. Rest the pork, crisp the skin, and bring both back together on the board.

Common Pork Leg Roast Problems and Fixes

ProblemWhy it happenedWhat to do
Crackling is softThe rind was wet, the oven was not hot enough, or steam built upIncrease the heat, or remove the rind and crisp it separately
Meat is done but crackling is not crispThe pork cooked faster than the rind crackledRest the meat and crisp the rind separately in a hot oven, grill/broiler, or air fryer
Crackling is burning in spotsThe oven heat is uneven or one patch is too exposedCover dark spots loosely with foil and keep cooking the pale areas
Rind is pale, flat, and softIt has not had enough dry heat yetGive the rind more heat; if the meat is done, crisp the rind separately
Rind is chewyNot enough drying, salt, or high heatDry longer next time; for now, give it a hot final blast
Pork is dryIt cooked too long or too hot after the crackling stageSlice thinly and serve with gravy; next time check the center earlier
Boneless roast cooked unevenlyThe rolled joint was uneven or loosely tiedCheck more than one spot and rotate the tray if needed
Slow cooker rind is rubberySteam softened the skinPat it dry, salt it again, and crisp it separately
Skin is crisp but meat is not doneThe hot stage worked before the center finished cookingReduce the oven and continue roasting; shield crackling if needed

The Rescue Rule to Remember

The best rescue trick is this: if the pork meat is done but the crackling is not, stop cooking the meat. Remove the rind and crisp it separately. That gives you better crackling without turning the roast dry.

That is the real secret of pork leg roast: do not punish the meat while trying to save the crackling.

Back on track? Return to serving ideas or go back to the quick answer.

What to Serve with Pork Leg Roast

Once the crackling is crisp and the pork has rested, keep the sides simple and let the roast be the center of the plate.

The best plate has contrast: crisp crackling, tender slices, hot gravy, and sides that either catch the sauce, soften the plate, or cut through the richness with something sharp and fresh.

  • Roast potatoes
  • Apple sauce
  • Mustard gravy
  • Roasted apples and onions
  • Carrots and parsnips
  • Peas or green beans
  • Red cabbage or braised cabbage
  • Yorkshire puddings or dinner rolls
  • Simple green salad with a sharp vinaigrette

For a classic roast dinner plate, serve the pork with a soft potato side like this mashed potatoes recipe. If you want something crisp and cold beside the rich pork, a wedge salad works well, especially with sharp honey mustard dressing.

For a bigger holiday-style roast, add eggless Yorkshire pudding or a cozy green side like green bean casserole. Keep the sides simple if the pork has strong crackling and gravy.

Leftover Pork Leg Ideas

Pork leg is one of the better roasts for leftovers because it slices neatly instead of falling apart. This is one of the quiet benefits of pork leg: even after the roast dinner, you still have useful slices for tomorrow.

Tomorrow’s pork should not feel like leftovers you have to use up. Cold slices should feel useful, not sad: ready for mustardy sandwiches, quick pork-and-gravy rolls, hash, or bowls that are already halfway made.

Store the pork and crackling separately if you can. The meat likes moisture; the crackling does not.

Split image showing sliced leftover pork stored separately from crackling and a roast pork sandwich with sauce and crisp crackling pieces.
Finally, store pork and crackling separately: the meat needs moisture, while crisp pieces need dryness for sandwiches, rolls, hash, or bowls.
  • Roast pork sandwiches with mustard or apple sauce
  • Pork and gravy rolls
  • Tacos or wraps
  • Pork hash with potatoes and onions
  • Soup with vegetables and stock
  • Salad bowls with apples, cabbage, and mustard dressing
  • Quick BBQ pork sandwiches with sauce

For leftover roast pork sandwiches, a little garlic aioli or BBQ sauce keeps the meat from tasting dry. If you want a cold side for next-day lunches, these potato salad recipes are a natural match.

Small chopped pieces of pork leg can also go into hash, pies, or croquettes. If you have leftover mashed potatoes too, this croquettes recipe is a useful next-day idea.

Cool leftovers and refrigerate them promptly. Store sliced pork in shallow airtight containers in the fridge for 3–4 days. For longer storage, freeze sliced pork with a little gravy or pan juice so it reheats more gently. Keep crackling separate and re-crisp it in a hot oven or air fryer.

For best texture, reheat sliced pork gently with a splash of gravy, stock, or water so it does not dry out. Reheat crackling separately until crisp again.


FAQs

How long does pork leg take to roast?

A pork leg roast usually takes 30–40 minutes at high heat for crackling, then about 30–40 minutes per kg at a lower roasting temperature. For a 2.5 kg roast, expect around 2 hours, plus resting time.

How long do you cook pork leg per kg?

After the hot crackling stage, cook pork leg for about 30–40 minutes per kg at 180°C / 350°F or 160°C fan. Start checking near the early end of the range.

What temperature should pork leg roast be cooked to?

For juicy sliceable pork, aim for 63–65°C / 145–149°F in the thickest part, then rest before carving. Prefer a firmer well-done roast? Cook closer to 70–71°C / 158–160°F.

Should pork leg be pink inside?

Pork leg can be slightly pink inside if it has reached the correct internal temperature. For juicy slices, cook the thickest part to 63–65°C / 145–149°F and rest before carving. If you prefer a firmer, less pink roast, cook closer to 70–71°C / 158–160°F, but it may be drier.

Is pork leg good for roasting?

It is, especially when it has the rind attached for crackling. Treat it as a slicing roast with a hot start for the skin and controlled heat for the meat.

Is boneless pork leg roast different from bone-in?

Yes. Boneless pork leg roast is easier to carve and often cooks more evenly. Bone-in pork leg may take longer and should be checked away from the bone.

How do I get crackling on pork leg?

Dry the rind well, score it if needed, rub with oil and salt, and start the roast in a hot oven. Keep liquid and wet seasonings away from the skin.

Do I put water in the roasting tray?
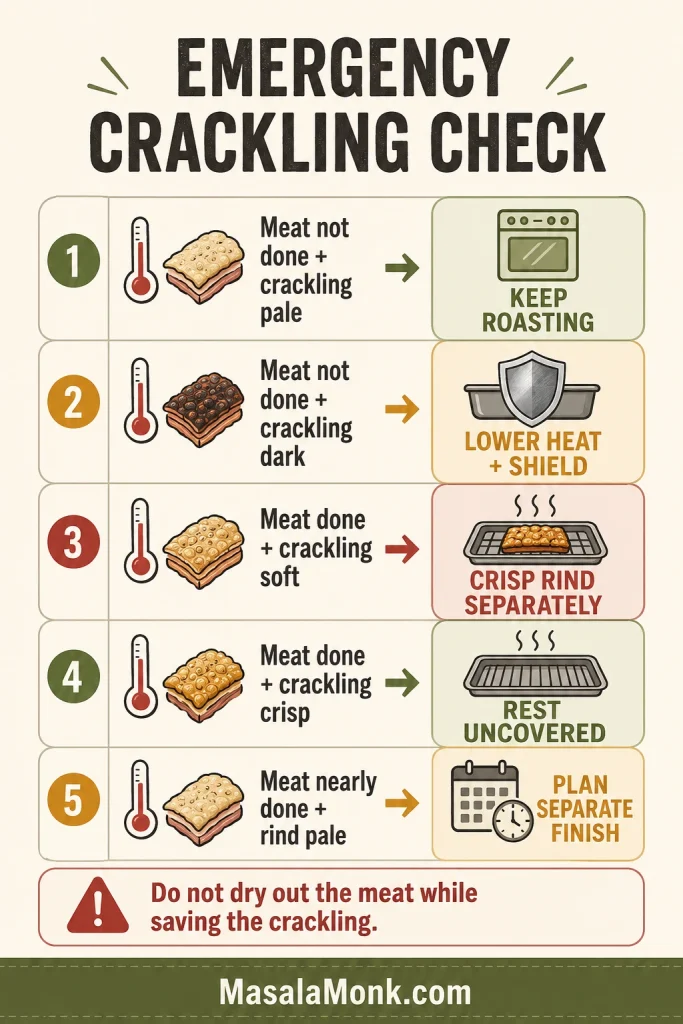
You can add a small amount of stock, cider, or water after the hot crackling stage if you want gravy. Keep it below the pork and away from the rind. Too much liquid creates steam, and steam softens crackling.

Can I roast pork leg without rind?

Yes. Roast skinless pork leg using the same internal-temperature guidance, but skip the crackling steps. Because there is no rind to protect the top, check early and avoid overcooking.

Should I pour boiling water over pork rind?

You can, but only before the final drying stage. Boiling water can tighten scored rind, but the skin must be dried completely afterward or it will steam instead of crackle.

Can I cook pork leg in the slow cooker?

Yes, but the rind will not crackle in the slow cooker. For crackling, finish the rind separately in a hot oven, grill/broiler, or air fryer.

Can I make pulled pork with pork leg?

You can, but pork leg is not the easiest cut for classic pulled pork. It needs slow cooking and enough moisture, while pork shoulder is usually richer and more forgiving.

Is pork leg the same as ham?

No. Fresh pork leg is uncured raw pork and can be roasted with crackling. Ham is cured pork leg and needs a different cooking or glazing method. In some US labels, uncured pork leg may also be called fresh ham.

Why is my pork leg roast dry?

Usually because it cooked too long after the crackling stage. Slice it thinly and serve it with gravy or pan juices; it is still usable. Next time, start checking the center earlier.

What should I do if the crackling is not crisp?

You have not ruined the roast. If the meat still needs time, increase the oven heat near the end. Once the meat is already done, remove the rind and crisp it separately.

Can I cook pork leg roast in an air fryer?

Small boneless joints can work in an air fryer. Start hot for the rind, then lower the temperature and cook until the center reaches the correct internal temperature.

Should I cover pork leg while roasting?

Not during the crackling stage. Steam is the enemy of crisp rind. Later, you can loosely shield parts of the roast if they are browning too fast.

How long should pork leg rest before carving?

Let pork leg rest for at least 15–20 minutes before carving. Larger bone-in roasts can rest a little longer.

What size pork leg roast do I need?

As a rough guide, allow 250–350 g raw pork leg per person if bone-in, or about 200–250 g per person if boneless. Add extra if you want leftovers.


The Simple Rule for Pork Leg Roast

The whole recipe comes back to the two-job rule: crisp the rind first, then protect the meat. Make the skin dry, salty, and hot enough for crackling. Then lower the oven and cook the meat gently until the center reaches the right temperature.

Use the chart to plan the meal, but let the thermometer decide when the pork is ready. When the knife gets through the crisp top and the pork underneath still slices cleanly, the method has done its job.

Once you have made it this way once, pork leg stops feeling like a risky centerpiece. You know what the skin needs, what the meat needs, and when to stop cooking. That is how you get crisp crackling, juicy slices, and a roast that feels calm from oven to carving board.

Keep a quick note of the weight, whether the roast was boneless or bone-in, and when it reached temperature. That one note makes the next pork leg roast much easier.

Posted on — Leave a comment

BBQ Sauce for Pulled Pork

Pulled pork sandwich on parchment with glossy BBQ sauce, coleslaw, pickle slices, a toasted bun, and extra sauce in a small bowl.

A lot of BBQ sauce is made for brushing, glazing, or dipping. Pulled pork needs something different. Once the meat is shredded, the sauce has to slip between the strands, brighten the richness, and still leave the pork tasting like pork.

This BBQ sauce for pulled pork is tomato-rich, tangy with apple cider vinegar, gently smoky, and loose enough to coat the shreds without turning them sticky or soggy. It lands between a classic sweet tomato BBQ sauce and a sharper Carolina-style finish, so it works for sandwiches, sliders, slow cooker pork, smoked pork, and leftovers.

The best move is simple: start light, sauce after shredding, and taste before adding more. If you are still cooking the pork, start with this slow cooker pulled pork recipe, then come back here for the sauce, timing, and amount.

Quick Answer

The best BBQ sauce for pulled pork is tangy, lightly sweet, gently smoky, and pourable enough to move through shredded meat. Use 1/4 to 1/3 cup sauce per pound of cooked pulled pork for a light coating, or about 1/2 cup per pound for saucy sandwiches.

Add most of the sauce after shredding, not before long cooking. Warm sauce spreads more evenly, and starting with less keeps the pork juicy instead of drowned.

Three pulled pork sauce rules: start lighter than you think, thin after simmering, and fix dry pork with moisture before adding sweetness.

Make It Now

Need sauce fast? Whisk the ketchup, vinegar, sweeteners, mustard, Worcestershire, spices, and optional smoke in a saucepan. Simmer for 10 to 15 minutes, then thin it after cooking. For pulled pork, the finished sauce should fall from a spoon in a slow ribbon.

Check the Sauce Texture Before Tossing

The sauce should cling first, then fall slowly from the spoon. That texture helps it coat the shreds without clumping or soaking the meat.

Thick red-brown BBQ sauce falling slowly from a spoon into a saucepan in a glossy ribbon.
Before the sauce touches the pork, check the ribbon. It should fall slowly from the spoon so it can coat shredded pork evenly instead of clumping in heavy patches.

If the pork tastes dry, resist the urge to bury it under sweeter sauce. Dry pulled pork usually needs moisture first, then flavor.

Jump to recipe card · Check sauce texture · See sauce amounts

BBQ Sauce for Pulled Pork Recipe

Sweet, Tangy BBQ Sauce for Pulled Pork

A quick homemade BBQ sauce that makes pulled pork taste balanced and saucy without hiding the meat. You get ketchup body first, vinegar lift next, a little molasses depth, and gentle smoke at the end.

On a sandwich, you should get soft pork, warm sauce, a little slaw or pickle sharpness, and a bun that still holds together — not one heavy mouthful of sugar.

Prep time5 minutes
Cook time10 to 15 minutes
Total time15 to 20 minutes
YieldAbout 2 to 2 1/2 cups / 480 to 600 ml, depending on how much you reduce and thin it
Serving size1/4 cup / 60 ml
Enough forAbout 4 to 5 lb / 1.8 to 2.25 kg cooked pulled pork, depending on how saucy you like it
Best forPulled pork, sandwiches, sliders, slow cooker pork, smoked pork, leftovers

Equipment

  • Medium saucepan
  • Whisk
  • Measuring cups and spoons
  • Wooden spoon or silicone spatula
  • Jar, bottle, or airtight container

Pulled Pork BBQ Sauce Ingredients

Each ingredient has a job: body, sweetness, vinegar lift, smoke, savory depth, or final texture control.

Homemade BBQ sauce ingredients arranged around a saucepan, including ketchup, apple cider vinegar, brown sugar, honey, molasses, mustard, Worcestershire sauce, smoked paprika, garlic, onion powder, black pepper, and liquid smoke.
This pulled pork BBQ sauce starts with ketchup for body, then uses apple cider vinegar, brown sugar, honey, molasses, mustard, Worcestershire, and smoked spices to build balance.
  • 1 1/2 cups / 360 ml ketchup
  • 1/2 cup / 120 ml apple cider vinegar
  • 1/3 cup / about 65 g packed brown sugar
  • 1 tbsp / 15 ml molasses
  • 1 tbsp / 15 ml honey
  • 1 1/2 tbsp / 22 ml Worcestershire sauce
  • 1 tbsp / 15 g Dijon or yellow mustard
  • 1 tsp / about 2 g smoked paprika
  • 1 tsp / about 3 g garlic powder
  • 1 tsp / about 2 to 3 g onion powder
  • 1/2 tsp chili powder or cayenne, more to taste
  • 1/2 tsp black pepper
  • 1/2 tsp salt, then more to taste; start with 1/4 tsp if the pork was cooked with a salty rub
  • 2 to 4 tbsp / 30 to 60 ml pork juices, apple juice, broth, or water, plus more only if needed
  • 4 to 8 drops liquid smoke, optional

Instructions

Simmer the BBQ Sauce Gently

Keep the heat controlled once the sauce reaches a bubble. A steady simmer builds flavor; a hard boil can scorch the sugar and make the sauce taste harsh.

Red-brown BBQ sauce gently simmering in a metal saucepan with a wooden spoon and small bubbles on the surface.
Once the BBQ sauce bubbles gently, keep the heat steady. A low simmer softens the vinegar, dissolves the sugar, and rounds out the flavor without scorching.
  1. Add all sauce ingredients except the thinning liquid to a medium saucepan: ketchup, vinegar, sweeteners, Worcestershire sauce, mustard, spices, salt, pepper, and optional liquid smoke.
  2. Whisk until mostly smooth. The sugar will dissolve as the sauce warms.
  3. Set the pan over medium heat and bring the sauce to a gentle simmer.
  4. Reduce the heat to medium-low and simmer for 10 to 15 minutes, stirring often enough that the sugar does not stick to the bottom.
  5. Whisk in 2 tbsp pork juices, apple juice, broth, or water. Add more, a tablespoon at a time, until the sauce looks glossy and pourable.
  6. Taste and adjust. Add vinegar for more lift, honey or brown sugar for sweetness, Worcestershire for depth, cayenne for heat, or cooking juices if the sauce feels too thick.
  7. Use warm with shredded pulled pork, or cool completely before storing.

Thin BBQ Sauce After Simmering

Simmer first, then loosen the sauce at the end. That way you control the final texture instead of guessing before the sauce has reduced.

Broth or pork juices being poured from a glass measuring cup into a saucepan of thick BBQ sauce with a whisk inside.
The final splash of liquid is about control, not watering the sauce down. Pork juices, broth, apple juice, or water help the sauce move through the shreds.

Texture cue: the sauce should cling to a spoon, then run slowly when tilted. Heavy clumps mean it needs a splash of liquid. A watery run means it needs a few more minutes of uncovered simmering.

Scaling note: for a party tray, double the sauce and keep extra warm on the side. Do not double the liquid smoke at first; add it slowly to taste.

How much sauce to use · When to add sauce · Fix sauce problems

Most Helpful Sections

Once the sauce is made, the next question is not whether it is good — it is what your pork needs from it.

What Kind of Finish Does Your Pork Need?

A slow cooker batch, a smoky pork shoulder, dry leftovers, and a tray of sandwiches do not need the exact same finish. Start with the main sauce, then adjust based on what the meat needs.

You do not have to sauce the whole batch the same way. Keep the pork lightly sauced, then let people add more BBQ sauce or vinegar sauce at the table.

If your pulled pork is…Do this
Slow cooker pork and mildUse the main BBQ sauce with smoked paprika and some cooking juices.
Smoked and richKeep the BBQ sauce sharper, or add a light vinegar finishing sauce.
Going into sandwichesUse a slightly thicker BBQ sauce with enough vinegar to balance the bun and slaw.
Dry leftoversWarm with BBQ sauce plus reserved juices, broth, or apple juice.
Already sweetAdd vinegar, mustard, black pepper, or Worcestershire sauce.
Store-bought sauceWarm it, thin it, and sharpen it before tossing with pork.
Rich, fatty, or smokyUse less sauce at first, then brighten with vinegar or a light finishing sauce.

How Much BBQ Sauce for Pulled Pork

Use 1/4 to 1/3 cup BBQ sauce per pound of cooked pulled pork for a light coating, or about 1/2 cup per pound for saucy sandwiches. These amounts are for cooked pulled pork, not raw pork shoulder, because raw pork loses weight during cooking.

Sauce amount is where pulled pork usually goes wrong. Too little is easy to fix; too much can turn a good tray of pork into sweet, wet shreds.

Cooked pulled porkLightly saucedSaucy sandwiches
1 lb / 450 g1/4 to 1/3 cup / 60 to 80 ml1/2 cup / 120 ml
3 lb / 1.35 kg3/4 to 1 cup / 180 to 240 ml1 1/2 cups / 360 ml
5 lb / 2.25 kg1 1/4 to 1 2/3 cups / 300 to 400 ml2 to 2 1/2 cups / 480 to 600 ml
8 lb / 3.6 kg2 to 2 2/3 cups / 480 to 640 ml3 1/2 to 4 cups / 840 to 960 ml

BBQ Sauce Amount Chart

Use the chart as a starting point, then taste the pork after the first toss. Cooked pulled pork absorbs sauce differently depending on moisture, bark, and how finely it is shredded.

Infographic showing BBQ sauce amounts for cooked pulled pork: 1 pound uses 1/4 to 1/3 cup for light coating or 1/2 cup for saucy pork; 3 pounds uses 3/4 to 1 cup or 1 1/2 cups; 5 pounds uses 1 1/4 to 1 2/3 cups or 2 to 2 1/2 cups; 8 pounds uses 2 to 2 2/3 cups or 3 1/2 to 4 cups.
For cooked pulled pork, begin with 1/4 to 1/3 cup BBQ sauce per pound. Then move closer to 1/2 cup per pound only when the goal is saucy sandwiches.

Start light, then build. A small first toss gives you control. Once the pork has rested for a minute, you can always add another spoonful of warm sauce.

Lightly Sauced vs Over-Sauced Pulled Pork

Before adding more, look at the pork. Visible strands and a light gloss usually mean the sauce is doing its job.

Comparison showing lightly sauced pulled pork with visible strands beside over-sauced pulled pork with darker meat and sauce pooling.
The goal is coating, not drowning. Lightly sauced pulled pork keeps its strands and texture, while too much sauce can hide the meat and make the tray feel heavy.

Choose the lower amount for smoked pork, BBQ plates, or meat served with several sides. Move toward the higher amount for sandwiches, sliders, party trays, or leftovers that will be reheated later.

For a tray that will sit warm, keep the pork lightly sauced and hold extra sauce separately. Pork gets wetter as it sits, and guests can always add more.

A double batch of this sauce is usually enough for 8 to 10 lb cooked pulled pork if you are not drowning the meat.

Back to recipe · When to add sauce · Avoid over-saucing

When to Add BBQ Sauce to Pulled Pork

Add BBQ Sauce After Shredding

Add most BBQ sauce after shredding pulled pork, not before long cooking, so the sauce stays fresh and the meat stays easy to control.

Three-step guide showing shredded pulled pork first, warm BBQ sauce added second, and pulled pork tossed lightly with sauce third.
Sauce the pork after shredding when possible. That keeps the BBQ sauce fresher, protects the texture, and lets you decide how saucy the batch should be.

The same sauce can taste bright and fresh after shredding, or dull and heavy if it cooks too long with the meat. Waiting until the pork is pulled also lets you decide how saucy each batch should be.

SituationBest move
Slow cooker pulled porkAdd most of the sauce after shredding. Use cooking juices to loosen it.
Smoked pulled porkSmoke the pork mostly unsauced, then add sauce after pulling or serve it on the side.
Pulled pork sandwichesToss lightly with warm sauce, then serve extra sauce separately.
Leftover pulled porkReheat with sauce plus reserved juices, broth, apple juice, or water.
Party trayKeep the pork lightly sauced, then hold extra warm sauce nearby.

Toss BBQ Sauce with Pulled Pork Gently

Warm sauce spreads faster and needs less stirring. Use tongs or two forks, then stop once the pork looks evenly coated.

Hands using metal tongs to gently toss warm BBQ sauce through shredded pulled pork in a parchment-lined tray.
After adding warm sauce, toss gently rather than stirring hard. That way, the pulled pork stays in soft strands instead of turning wet and mushy.

For deeper sauce flavor, add shredded pork to warm sauce and simmer gently for 10 to 20 minutes. Keep the heat low and stir gently so the pork stays in soft strands instead of turning mushy.

Sauce amount chart · Check sauce texture · How to toss the pork

The Texture That Coats Pulled Pork Without Soaking It

Pulled pork sauce should be thinner than a sticky rib glaze but thicker than a vinegar finishing sauce. It needs enough body to cling, but enough movement to reach all the shredded pieces.

Too Thick, Too Thin, or Just Right?

Dip a spoon into the sauce and tilt it. Aim for a slow ribbon, not heavy clumps and not a watery splash. A thick sauce needs a small splash of liquid; a thin sauce needs a few more minutes uncovered.

Infographic comparing pulled pork BBQ sauce textures labeled too thick, just right, and too thin, with spoons showing clumpy, ribboning, and runny sauce.
Texture decides how BBQ sauce behaves on shredded pork. Too thick will clump, too thin will run off, and the right sauce coats in a smooth ribbon.

Sandwich cue: if you have ever watched the bottom bun collapse before the first bite, the problem was probably not the pork. It was the sauce balance. The sauce should hold the meat together without soaking the bread.

How to thin sauce · Fix too thick or too thin sauce · Sandwich balance tips

Pulled Pork Sauce Mistakes to Avoid

You do not have to decide the whole batch at once. Keep the pork lightly sauced, taste one forkful, then decide whether it needs more sweetness, more vinegar, or just a spoon of warm cooking juices.

  • Pouring in the whole batch at once. Under-sauced pork is easy to fix; over-sauced pork makes you wish you had stopped two spoonfuls earlier.
  • Using cold sauce on warm pork. Cold sauce tightens everything up. Warm it first and the pork will toss more gently and evenly.
  • Making the sauce too thick. Pulled pork sauce should move through the shreds, not sit in clumps.
  • Adding more sugar when the pork tastes dry. Add moisture first, then adjust sweetness if needed.
  • Boiling sauced pulled pork hard. Once the meat is shredded, use low heat. Boiling can break the strands and make the texture mushy.
  • Cooking a sweet sauce for hours with the pork. Unless the recipe is built for it, long cooking can dull the sauce and make the pork taste overly sweet.

Why This Sauce Works with Shredded Pork

This is not a sticky rib glaze and not a thin vinegar-only finishing sauce. It sits in the middle: tomato-based, bright, gently smoky, and easy to pour.

Pork shoulder is rich, shredded meat has lots of surface area, and sandwiches need structure. A good pulled pork sauce has to handle all three: acidity to lift the meat, sweetness to round the edges, body to cling, and enough movement to reach the strands.

That is why a sauce that tastes slightly bold in the pan often tastes just right once it is folded into warm pork. Shredded pork has more surface area than sliced meat, so every spoonful affects more bites.

Ingredients and Substitutions

The recipe is simple, but each ingredient has a job. That is what keeps the sauce from tasting like warmed ketchup and sugar.

Ketchup

Ketchup gives the sauce its tomato base, color, body, and familiar BBQ flavor. It also keeps the recipe quick because the tomato is already cooked and lightly seasoned.

Apple Cider Vinegar

Apple cider vinegar keeps pulled pork from tasting heavy after the third bite. White vinegar works in a pinch, but use a little less because it tastes sharper. Rice vinegar gives a softer tang.

Brown Sugar, Honey, and Molasses

Brown sugar gives sweetness and body. Molasses adds darker BBQ depth. Honey rounds out the vinegar. No molasses? Use a little extra brown sugar or a spoon of maple syrup. The sauce will taste lighter but still work.

Worcestershire Sauce and Mustard

Worcestershire sauce brings savory depth, while mustard gives the sauce a sharper edge. Together, they keep the flavor from turning flat or candy-sweet.

Smoked Paprika and Liquid Smoke

Smoked paprika gives gentle BBQ flavor. Liquid smoke is optional and should be used carefully. A few drops can help slow cooker pork taste more BBQ-like, but too much can make the sauce harsh.

Pork Juices, Apple Juice, Broth, or Water

This is the final texture control. Pork juices make the sauce taste most connected to the meat, apple juice softens the tang, broth keeps it savory, and water loosens the sauce without adding a new flavor.

How to Make BBQ Sauce for Pulled Pork

The recipe card gives the exact steps, so think of this section as the cooking cues. Whisk everything before the pan gets too hot, then simmer gently until the sharp raw vinegar smell softens and the sauce tastes rounder.

Thin the sauce after simmering, not before. Simmering concentrates the flavor; thinning at the end lets you choose the right texture for shredded pork.

Taste the sauce before it touches the meat. It should feel a little louder in the pan, because shredded pork will soften the vinegar, sweetness, salt, and smoke.

Adjust one thing at a time. If the pork was cooked with a salty rub, fix sharpness and moisture before adding more salt.

BBQ Sauce vs Finishing Sauce

BBQ sauce is thicker and sweeter; finishing sauce is thinner, sharper, and used lightly after shredding to brighten rich pork.

TypeTextureFlavorBest use
BBQ sauceThicker and pourableTomato-rich, balanced, gently smokySandwiches, sliders, saucy pulled pork
Finishing sauceThinVinegar-forward, pepperySmoked pork, rich pork shoulder, Carolina-style pulled pork

BBQ Sauce vs Finishing Sauce for Pulled Pork

Use this comparison when you are deciding whether the pork needs body, brightness, or both.

Pulled pork with thick BBQ sauce in a bowl labeled body and gloss and thin vinegar finishing sauce in a jar labeled vinegar lift.
BBQ sauce gives pulled pork body, gloss, and richness. A finishing sauce works differently: it adds vinegar lift when smoky or fatty pork needs brightness.

Use finishing sauce when the pork is already smoky, rich, and good — it just needs a spark. BBQ sauce is what you use when you want a fuller sandwich sauce with body, sweetness, and gloss.

A mop sauce is different again. It is brushed or mopped onto meat while it cooks, especially during smoking; this Food & Wine mop sauce explainer describes it as a thin barbecue sauce used during cooking. The BBQ sauce in this recipe is thicker and sweeter than a mop sauce, so use it after the pork is cooked rather than as a long-cooking baste.

Quick Vinegar Finishing Sauce

For a quick vinegar finishing sauce, warm 1/2 cup / 120 ml apple cider vinegar with 1 1/2 tbsp brown sugar, 1/2 tsp salt, 1/4 tsp black pepper, 1/2 tsp red pepper flakes, and 1 tsp ketchup if you want a slightly rounder finish. Warm just until the sugar dissolves, then cool.

Start with 1 to 2 teaspoons finishing sauce per cup of shredded pork, toss, then taste before adding more. Vinegar finishing sauce is strong by design.

Fix bottled BBQ sauce · Use sauce for sandwiches · Back to main BBQ sauce

How to Steer the Sauce Without Starting Over

Once the sauce tastes balanced, these small changes let you steer it toward tangier, sweeter, smokier, spicier, thinner, less sweet, or richer without starting over.

Want it…Add this
More tangyApple cider vinegar
SweeterBrown sugar, honey, or molasses
SmokierSmoked paprika or a tiny amount of liquid smoke
SpicierCayenne, hot sauce, chili flakes, or chili powder
ThinnerPork juices, apple juice, broth, water, or vinegar
Less sweetVinegar, mustard, black pepper, or Worcestershire sauce
RicherA small knob of butter, added on low heat

To add fruitier heat, borrow the sweet-spicy direction from this mango habanero sauce recipe and stir a small spoonful into the BBQ sauce instead of plain hot sauce. Cleaner heat comes from cayenne or a few drops of sharp pepper sauce.

If you add butter, use low heat and whisk gently. High heat can make buttery sauce separate.

How to Make Bottled BBQ Sauce Work for Pulled Pork

Bottled sauce is not cheating. It is a base. The trick is to taste it like a cook, then adjust it for your pork.

Starting with a bottle is often the fastest route to good pulled pork; the difference is whether you use it straight or tune it first.

Bottled sauce may taste fine on a spoon but too sweet once it hits rich pork, so warm it before you sharpen, thin, or deepen it.

ProblemFix
Too sweetAdd apple cider vinegar and black pepper
Too thickAdd pork juices, broth, apple juice, water, or vinegar
Too flatAdd Worcestershire sauce, mustard, or smoked paprika
Too smokyAdd vinegar and a little honey or brown sugar
Too spicyAdd ketchup, honey, or a small piece of butter
Too thinSimmer uncovered for 5 to 10 minutes

How to Fix Bottled BBQ Sauce for Pulled Pork

Warm the bottled sauce first, then fix the specific problem you taste. A small adjustment usually works better than adding everything at once.

Infographic showing bottled BBQ sauce fixes: add vinegar and pepper if too sweet, juices or broth if too thick, Worcestershire and mustard if too flat, vinegar and honey if too smoky, ketchup or butter if too spicy, and simmer uncovered if too thin.
Bottled BBQ sauce can still work beautifully with pulled pork. Warm it first, then adjust sweetness, thickness, smoke, spice, or flat flavor one fix at a time.

Cold bottled sauce can tighten the texture of warm pulled pork, so warm it first if you can. Warm sauce spreads better and keeps the pork texture softer.

Make homemade sauce instead · Troubleshoot sauce problems · Use the right amount

For Sandwiches, Balance Matters More Than More Sauce

A pulled pork sandwich needs sauce with enough body to hold the meat together, but not so much thickness that it sits in sweet patches. The goal is a sandwich that feels juicy all the way through, but still lets you taste the pork, the slaw, the pickle, and the bun in one clean bite.

Build a Better Pulled Pork Sandwich

Think in layers: warm sauced pork, something crisp, something sharp, and a bun sturdy enough to hold it all together.

Open pulled pork sandwich with BBQ sauce, coleslaw, pickle slices, a toasted bun, and the top bun leaning back to show the layers.
For pulled pork sandwiches, balance matters more than extra sauce. Slaw, pickles, and a sturdy bun make the BBQ sauce taste brighter and the sandwich easier to eat.
  • Warm the sauce before tossing it with the pork.
  • Use enough sauce to coat, not flood.
  • Add extra sauce on the side instead of drowning the sandwich.
  • Use a tangier sauce if you are adding creamy coleslaw.
  • Add pickles or onions if the pork and sauce taste too sweet.
  • Use a sturdier bun if the pork is very juicy.

For the classic sandwich build, pair the pork with a crisp coleslaw recipe, pickles, and extra warm sauce on the side.

Sauce amount chart · Fix bottled sauce · Back to recipe

What to Use If You Do Not Want BBQ Sauce

Pulled pork does not have to be sweet or tomato-based. The important thing is moisture plus contrast: something to keep the meat juicy, and something to stop all that richness from tasting flat.

  • Vinegar finishing sauce: best for smoked or fatty pork.
  • Pork juices with vinegar and pepper: simple, savory, and not sweet.
  • Mustard sauce: tangy and good with sandwiches.
  • Salsa verde: good for tacos, rice bowls, and nachos; this salsa verde recipe works when you want a brighter, less sweet direction.
  • Chipotle sauce: smoky, spicy, and good for wraps.

For a group, the easiest move is to keep the pork lightly seasoned and offer two sauces: one classic BBQ sauce and one sharper vinegar-style sauce.

Storage and Freezing

Cool the sauce completely before storing it. Transfer it to a clean jar, bottle, or airtight container.

  • Fridge: store the sauce for 1 to 2 weeks.
  • Freezer: freeze the sauce for up to 3 months.
  • Thawing: thaw overnight in the fridge.
  • Reheating: warm gently in a saucepan over low heat.
  • If it thickens: thin with water, apple juice, broth, pork juices, or vinegar.

This is a good make-ahead sauce. The flavor gets smoother after a few hours in the fridge, especially if you used smoked paprika, mustard, or liquid smoke.

If the sauce has already been mixed with pulled pork, store it like cooked meat. USDA leftover guidance recommends refrigerating leftovers for 3 to 4 days or freezing them for longer storage. Refrigerate within 2 hours, and reheat gently with a splash of liquid so the pork stays moist.

What to Serve with Pulled Pork BBQ Sauce

Pulled pork is the main reason to make this sauce, but it earns its place on the rest of the BBQ plate too. Serve it with crisp slaw, pickles, soft buns, baked beans, or creamy macaroni and cheese.

It also works for BBQ pork bowls, baked potatoes, nachos, sliders, and party trays where you want one sauce that can sit on the side without taking over the whole meal.

Troubleshooting

Most BBQ sauce problems are fixable, especially if you change one thing at a time instead of trying to rescue the whole pan in one move.

Pulled Pork Sauce Fixes

Start with the problem you can taste or see, then make one adjustment. That keeps the sauce balanced instead of swinging from too sweet to too sharp.

Troubleshooting infographic for pulled pork sauce showing fixes for common problems: too sweet with vinegar, too sharp with honey, too thick with juices, too thin with simmering, dry pork with moisture, and flat sauce with contrast.
When pulled pork sauce tastes off, change one thing at a time. Use vinegar for too sweet, honey for too sharp, juices for too thick, simmering for too thin, moisture for dry pork, and contrast for flat flavor.

The sauce is too sweet.

Start with apple cider vinegar, mustard, black pepper, or Worcestershire sauce. Add a little, then taste again.

The sauce is too sharp.

Round it with a little more brown sugar, honey, molasses, or ketchup. Simmer for a few minutes to soften the vinegar.

The sauce is too thick for shredded pork.

Whisk in a small splash of reserved juices, broth, apple juice, or water until it pours easily. Pulled pork sauce should not behave like a sticky glaze.

The sauce is too thin.

Simmer uncovered for 5 to 10 minutes, stirring often so the sugar does not stick to the pan.

The pork tastes dry even after adding sauce.

Restore moisture with sauce plus a splash of reserved juices, broth, apple juice, or water. Sauce adds flavor, but liquid brings the pork back.

The sauce tastes flat.

Bring it back with Worcestershire sauce, mustard, smoked paprika, a pinch of salt, or a splash of vinegar. Flat sauce usually needs contrast, not just more sugar.

Back to recipe · Back to Most Helpful Sections

FAQ

What is the best BBQ sauce for pulled pork?

The best BBQ sauce for pulled pork is tangy, lightly sweet, gently smoky, and pourable enough to coat shredded meat without hiding the pork.

How much BBQ sauce do I need per pound of pulled pork?

Use about 1/4 to 1/3 cup BBQ sauce per pound of cooked pulled pork for a light coating. For saucy sandwiches, use about 1/2 cup per pound.

Do you add BBQ sauce before or after shredding pulled pork?

Add most of the sauce after shredding. This keeps the meat easier to control and prevents the sauce from tasting dull after long cooking.

Should pulled pork be mixed with sauce or served on the side?

Both work. For sandwiches, mix in enough warm sauce to season the pork, then serve extra on the side. Smoked pork and party trays stay more flexible when the meat is only lightly sauced.

What is the difference between BBQ sauce and finishing sauce?

BBQ sauce is thicker, sweeter, and more tomato-based. Finishing sauce is thinner, sharper, and added after shredding to brighten rich or smoky pork.

Can I use vinegar sauce instead of BBQ sauce for pulled pork?

Yes. Vinegar sauce works especially well when the pork is already smoky, fatty, or rich. Apply it lightly; it is meant to brighten the meat, not soak it.

What sauce is best for pulled pork sandwiches?

Choose a sauce that is tangy enough to balance the pork and thick enough to hold the sandwich together. If the sandwich tastes heavy, add pickles, onions, slaw, mustard, or a little vinegar for contrast.

How do I make store-bought BBQ sauce better for pulled pork?

Warm it gently and adjust it. Add vinegar if it is too sweet, cooking juices or apple juice if it is too thick, Worcestershire and mustard if it tastes flat, or smoked paprika if it needs more BBQ flavor.

How do I thin BBQ sauce for shredded pork?

Thin BBQ sauce with pork juices, apple juice, broth, water, or apple cider vinegar. Add a little at a time until the sauce spreads through the pork without clumping.

Can I freeze homemade BBQ sauce?

Yes. Cool the sauce completely, transfer it to a freezer-safe container, and freeze for up to 3 months. Thaw in the fridge and reheat gently before using.

Final Tip

The best pulled pork sauce is not the one that shouts the loudest. It is the one that makes the pork taste fuller, juicier, and more complete without covering it up. Start with a little sauce, toss gently, taste, and adjust from there.

Once the pork tastes moist, balanced, and still like pork, stop. That is the point where BBQ sauce is doing its job.

Back to top · Back to recipe

Posted on — Leave a comment

Egg Foo Young Recipe with Takeout-Style Gravy

Golden Egg Foo Young patties served with brown gravy, sliced scallions, steamed rice, chopsticks, and a spoon on a ceramic plate.

The best Egg Foo Young recipe tastes like old-school Chinese-American takeout rebuilt for a home skillet: soft egg in the center, browned edges outside, little snaps of vegetable crunch, and brown gravy that turns plain rice into dinner. It should not taste like a flat breakfast omelet wearing sauce. It should feel sturdier, saucier, and more generous than that.

Homemade Egg Foo Young usually goes wrong in predictable ways: the filling is too wet, the patties tear when flipped, the eggs turn rubbery, or the gravy thickens into paste. This version keeps the mixture balanced, uses a clear 6-egg to 2–2½ cup filling ratio, and treats the first patty as a test round so you can adjust the heat, oil, or scoop size before the whole batch is cooked. If your first patty misbehaves, jump to troubleshooting before cooking the next one.

The method starts in a skillet and ends with hot gravy over rice. You can pan-fry for an easy weeknight dinner, shallow-fry for better browned edges, or use the restaurant-style method when you want puffier patties. Either way, the goal is the same: tender egg patties that hold together, a sauce that moves instead of sitting like paste, and a plate that finally feels like Egg Foo Young rather than an omelet with toppings.

Why the gravy should move: the sauce should coat the patty while still flowing into the rice. If it sits like paste, the dish starts feeling heavy before the eggs have a chance to shine.

Glossy brown gravy being poured from a small pitcher over a golden Egg Foo Young patty with rice blurred in the background.
The sauce should move as it pours. If it sits heavily on the patty, thin the gravy before serving so the eggs stay tender instead of buried.

Quick Answer: What Is Egg Foo Young?

Egg Foo Young is a Chinese-style egg patty made with beaten eggs, vegetables, and often shrimp, chicken, pork, beef, tofu, or extra vegetables. In Chinese-American takeout, it is usually served as separate patties with brown gravy and rice.

You may also see it written as Egg Foo Yung, Egg Fu Yung, or Egg Foo Yong. The spelling changes, but the idea stays the same: vegetables and protein are mixed directly into beaten eggs, cooked into patties, and finished with a savory brown sauce.

This recipe is built for the gravy-over-rice version people usually mean when they crave Egg Foo Young: browned edges, a tender center, crisp little vegetables, and enough sauce to make rice feel like part of the dish. It is not a folded breakfast omelet, a baked egg casserole, or a dry scramble. The patty should be sturdy enough for sauce, soft enough to cut cleanly, and generous enough that every bite tastes like more than plain egg. If the sauce is the part you came for, go straight to the brown gravy method.

Cut-open Chinese-American Egg Foo Young patty served with rice, brown gravy, scallions, a spoon, and a takeout box in the background.
This is the old-school Chinese-American version many people mean when they crave Egg Foo Young: separate patties, rice, scallions, and a savory brown sauce.

What this recipe prevents: wet filling that tears the patties, flat omelet-like rounds with no browned edges, bland eggs that depend completely on sauce, and gravy that turns gluey before it reaches the plate.

Recipe snapshot

Egg Foo Young at a Glance

Yield4 servings / 6 medium patties
Prep Time15 minutes
Cook Time20 minutes
Total Time35 minutes

Main method: pan-fried or shallow-fried patties in a skillet.

Restaurant-style option: deeper oil for puffier, crisp-edged patties.

Sauce: brown cornstarch gravy with stock, soy sauce, oyster sauce, sesame oil, and white pepper.

Best served with: steamed rice, fried rice, noodles, stir-fried vegetables, or a crisp cucumber salad.

Fastest weeknight version: use cooked shrimp, leftover chicken, roast pork, pressed tofu, or quick-cooking vegetables. Make the gravy first, cook smaller ⅓- to ½-cup patties, and adjust after the first one instead of forcing the whole batch through the same heat.

Cooked shrimp, chopped chicken, pressed tofu, scallions, eggs, and a skillet arranged for a quick Egg Foo Young dinner.
For a faster weeknight Egg Foo Young, start with cooked protein or pressed tofu; then keep the patties smaller so they set quickly and flip cleanly.

Why This Egg Foo Young Recipe Works

The egg has to stay in charge. That is the whole recipe. You want enough vegetables and protein to make the patties taste generous, but enough beaten egg to set around everything and hold the shape when you lift it from the pan.

  • The ratio keeps the patties stable. Six large eggs comfortably hold about 2 to 2½ cups total filling.
  • Small, controlled add-ins cook cleanly. Drained sprouts, thin cabbage, diced onion, and chopped protein stay tucked inside the egg instead of leaking water into the pan.
  • A tiny cornstarch slurry helps structure. One teaspoon in the egg mixture helps the patty hold without making it bouncy.
  • The sauce stays adjustable. Making the gravy separately means you can thin, thicken, or season it without overcooking the eggs.
  • The oil level controls texture. Pan-fry for weeknight ease, shallow-fry for better edges, or use deeper oil for restaurant-style puff.

The main rule: think of the mixture as eggs carrying filling, not vegetables barely glued together with egg. If the bowl looks like a dry pile or a loose soup, fix that before the first patty hits the pan.

Spoon lifting scoopable Egg Foo Young batter with beaten egg coating bean sprouts, scallions, onion, and chopped protein.
Before the mixture reaches the skillet, it should look scoopable and egg-forward. In other words, the eggs should carry the filling, not barely glue it together.

Ingredients for Fluffy Egg Foo Young

This is the kind of recipe that turns a few eggs, a handful of vegetables, and a little gravy into a proper meal. The ingredient list is simple; the important part is cutting the filling small enough to cook quickly and keeping it steady enough to stay inside the patty.

Small pieces are your friend here. They cook quickly, stay tucked into the egg, and give every bite crunch, sweetness, and little pockets of savoriness.

Egg Foo Young ingredients including eggs, bean sprouts, scallions, cabbage, chopped protein, soy sauce, stock, oyster sauce, and cornstarch on a prep counter.
Good Egg Foo Young starts before the pan: dry sprouts, small vegetables, measured filling, and a ready gravy base make the cooking much easier to control.

To make the Egg Patties

Eggs, Vegetables, and Protein

  • Eggs: Six large eggs make 6 medium patties, enough for 4 servings with rice and gravy.
  • Bean sprouts: One cup / about 70–85 g gives the patties classic crunch without crowding the eggs. Drain them well so the mixture stays scoopable. No sprouts? See the bean sprout substitutes.
  • Protein or tofu: Keep this to 115–140 g / 4–5 oz for the 6-egg version. Cooked shrimp, chicken, roast pork, or firm tofu all work as long as they are chopped small.
  • Vegetable-only version: Choose thin vegetables and keep the total filling within the ratio below. A quick sauté helps mushrooms, zucchini, or bell pepper settle into the eggs instead of loosening the mixture.
  • Onion: A small ¼ cup / about 35 g is enough once it is finely diced.
  • Cabbage or mushrooms: Use ⅓ to ½ cup / about 35–50 g finely shredded cabbage or thinly sliced mushrooms. Mushrooms should be pre-cooked if they seem watery.
  • Scallions / spring onions: Two scallions / about 15–20 g add freshness without making the mixture heavy.

Drain Bean Sprouts Before Mixing

Bean sprouts add the classic crunch, but they also carry water. Drain them before mixing so the egg can set cleanly around the filling.

Fresh bean sprouts draining in a fine mesh strainer over a bowl on a kitchen counter.
Wet sprouts can loosen the egg mixture quickly, so draining them well gives the first patty a much better chance of holding together.

Seasoning, Structure, and Frying Oil

  • Cornstarch: Mix 1 teaspoon / about 3 g cornstarch with 1 tablespoon / 15 ml cold water before whisking it into the eggs.
  • Sesame oil: A small ½ teaspoon / 2.5 ml adds aroma. More can overpower the patties.
  • White pepper: A little white pepper gives the eggs and gravy that warm Chinese-restaurant note without making the dish spicy.
  • Neutral oil: Use just enough to coat the pan for tender patties, or about ¼ inch / 6 mm for puffier shallow-fried edges.

Egg-to-filling ratio: for 6 large eggs, keep the total filling around 2 to 2½ cups. That includes bean sprouts, onion, cabbage or mushrooms, scallions, and protein. Use the numbers as a guide, but trust the bowl too: the egg should still visibly surround the filling.

Egg Foo Young ratio guide showing bowls for 4 eggs, 6 eggs, and 8 eggs with measured amounts of vegetables and protein.
The egg-to-filling ratio is the reason the patties hold together. Too much filling makes them tear, while enough beaten egg helps everything set into a stable round.
EggsTotal FillingBest Yield
4 large eggsAbout 1½ cups4 small patties
6 large eggs2 to 2½ cups6 medium patties
8 large eggs3 to 3½ cups8 medium patties or 6 large patties

Ingredient Prep Matters

If you remember only one prep rule, make it this: the add-ins should help the egg set, not fight it. When vegetables are drained and cut small, the patties cook calmly instead of sputtering, tearing, or leaking in the pan.

Hand slicing cabbage, scallions, onion, and mushrooms into small pieces on a cutting board for Egg Foo Young.
Small, thin vegetables cook more evenly inside the patties, so the egg can set around them instead of tearing around bulky pieces.

Cook Watery Vegetables First

Mushrooms, zucchini, bell pepper, and similar vegetables can release liquid as they cook. If you use more than ⅓ to ½ cup, sauté them briefly first, then let them cool before adding them to the eggs. Cooked shrimp, chicken, pork, or tofu should also be chopped small enough to stay tucked into the patty when you flip it.

Mushrooms and zucchini being sautéed in a skillet before being added to Egg Foo Young batter.
A quick sauté lets mushrooms, zucchini, and other watery add-ins release steam before they weaken the Egg Foo Young batter.

What Goes Into Egg Foo Young Gravy

Some people call it Egg Foo Young sauce, but the takeout version eats more like a light brown gravy. It should taste rounded, not just salty: savory from stock and soy sauce, slightly rich from oyster sauce, and smooth enough to coat the eggs without weighing them down.

Saucepan with Egg Foo Young gravy ingredients including stock, soy sauce, oyster sauce, cornstarch, white pepper, sesame oil, and dark soy sauce.
Egg Foo Young gravy gets its flavor before it thickens, so build the base with stock, soy sauce, oyster sauce, white pepper, and sesame oil first.
  • Stock: Chicken stock gives the most familiar flavor; 2 cups / 480 ml is enough sauce for the patties and rice. Vegetable stock works for a meatless version.
  • Light soy sauce: 1½ tablespoons / about 22 ml seasons the gravy and adds umami.
  • Oyster sauce: 1 tablespoon / 15 ml gives the sauce body and a deeper restaurant-style flavor.
  • Dark soy sauce: ½ teaspoon / 2.5 ml is optional, but it gives the gravy a deeper brown color.
  • Sugar: 1–2 teaspoons / 4–8 g rounds out the salty sauces without making the gravy sweet.
  • White pepper: ¼ teaspoon adds gentle warmth.
  • Cornstarch slurry: 2 tablespoons / about 16 g cornstarch mixed with 3 tablespoons / 45 ml cold water thickens the gravy.
  • Sesame oil: ½ teaspoon / 2.5 ml goes in at the end so the aroma stays fresh.

Easy swaps: use vegetable stock for a meatless gravy, vegetarian oyster sauce or mushroom sauce instead of oyster sauce, and tamari only if every other ingredient is also gluten-free. Dark soy sauce is optional; the gravy will be lighter without it but still good.

Pan-Fried vs Restaurant-Style Egg Foo Young

There are two common versions of Egg Foo Young in people’s minds. One is an easy skillet patty with gravy. The other is the puffier, crisp-edged Chinese restaurant version cooked in more oil. Both can be delicious, but the oil level changes the texture.

Pan-fried Egg Foo Young patty compared with a puffier restaurant-style patty near a wok and wire rack.
Pan-fried Egg Foo Young is easier at home; however, more oil creates puffier restaurant-style edges and a richer takeout texture.
MethodBest ForTextureNotes
Pan-friedEasy home cookingTender, lightly goldenUses the least oil and is easiest for beginners.
Shallow-friedBest home balanceGolden edges, slightly fuller centerUse about ¼ inch / 6 mm oil in a skillet or wok.
Deep-friedRestaurant-style puffPuffy, crisp-edged, richerUses more oil and needs temperature control.

Best setup for most home cooks: use a 10-inch nonstick skillet, a ½-cup measure, and a thin flexible spatula. Shallow-frying with about ¼ inch / 6 mm oil gives better browning than a barely oiled pan without the mess of deep-frying. Want the puffier version? Skip to the restaurant-style method.

How to Make Egg Foo Young

Once the filling is chopped, the gravy ingredients are measured, and your pan is ready, the recipe moves quickly. Keep the bowl close to the stove, cook in small batches, and adjust the heat after the first patty if you need to.

1. Prep the Filling

Drain the bean sprouts very well. Finely dice the onion, slice the scallions, and shred the cabbage or slice the mushrooms thinly. Chop your shrimp, chicken, pork, tofu, or vegetables into small pieces.

Cook chicken or pork first so the eggs can stay tender instead of waiting in the pan for meat to finish. Cooked shrimp, cooked chicken, roast pork, or tofu can go straight into the filling.

2. Make the Gravy Before Frying

Once the eggs hit the pan, things move quickly. Having the gravy ready means the patties can go straight from skillet to plate while they are still soft in the center and browned at the edges. If the sauce thickens while the patties cook, a splash of stock or water will bring it back.

3. Mix the Eggs

In a large bowl, whisk the eggs until the whites and yolks are fully combined. In a small bowl, mix 1 teaspoon cornstarch with 1 tablespoon cold water, then whisk that slurry into the eggs with sesame oil and white pepper.

Fold in the bean sprouts, onion, cabbage or mushrooms, scallions, and protein. The mixture should scoop easily: glossy egg around the filling, not soup and not a dry vegetable pile. Mix right before cooking so the vegetables keep their snap and the batter stays light.

4. Cook the Patties

Heat the Pan and Scoop the Batter

Heat a nonstick skillet, wok, or well-seasoned pan over medium to medium-high heat. Add enough neutral oil to coat the bottom for pan-frying, or about ¼ inch / 6 mm oil for a more shallow-fried texture.

Egg Foo Young patty frying in shallow oil with bubbles around the golden edge and a spatula near the pan.
A shallow layer of oil helps the edge set before the center dries out, which makes the patty sturdier when it is time to flip.

Use a ½-cup measure for standard patties. Scoop the egg mixture into the pan, nudging the filling into a round shape. Cook until the edges are set and the bottom is golden, about 2 to 3 minutes. Flip carefully and cook the second side until the middle has no liquid egg, about 1½ to 2 minutes more.

Let It Set Before Flipping

Egg Foo Young patty being lifted and flipped on a thin spatula in a skillet with shallow oil.
Wait until the first side feels stable on the spatula. Then flip once, gently, instead of moving the patty while the center is still loose.

Use the First Patty as Your Test

The first patty is often the test patty. If it browns too fast, lower the heat before the next batch; if it sticks or looks dry around the edges, add a little more oil. Look for a center that springs lightly and no loose egg running from the middle. After that first patty, the recipe usually relaxes: you know whether the pan wants less heat, more oil, or a smaller scoop. If the first one tears, browns too fast, or stays runny, do not guess; check the troubleshooting table before cooking the next batch.

Slightly uneven first Egg Foo Young patty on a spatula beside a skillet and a bowl of batter.
One imperfect first patty can save the whole batch, because it shows whether the pan needs less heat, more oil, or a smaller scoop.

Scoop size guide: use ⅓-cup scoops for small beginner-friendly patties, ½-cup scoops for standard home patties, and ¾-cup scoops only if you are using more oil and feel confident flipping larger rounds.

How to Know the Patties Are Right

Cut-open Egg Foo Young patty with golden edges, a set center, bean sprouts, scallions, and visible filling.
The best doneness cue is texture: the center should be set, the edge should be browned, and the inside should still look tender rather than dry.

You nailed the patties when:

  • The edges are golden but not hard.
  • The center springs lightly when pressed.
  • No loose egg runs from the middle.
  • The patty lifts without tearing.
  • The sprouts still have a little snap.

Doneness cue: the egg should be set in the center, not wet or liquid. Shrimp should look opaque. Chicken and pork are safest and easiest when cooked before they go into the egg mixture. For exact food-safe temperatures for egg dishes and poultry, the USDA safe temperature chart is a useful reference.

5. Rest Briefly, Then Serve

Transfer the cooked patties to a wire rack or a plate lined with paper towel. Let them rest in a single layer so the edges stay better. Spoon hot gravy over the top right before serving so the eggs stay tender and the sauce softens the edges without making the plate soupy.

How to Make the Brown Gravy

Bad Egg Foo Young gravy usually goes watery or gluey. The sweet spot is smooth, savory, and spoon-coating, with enough body to cling to the patties but enough movement to sink into the rice. That is the difference between plain egg patties and the takeout-style plate people remember.

Once the slurry is smooth, the sauce is simple. Cornstarch must be mixed with cold water before it touches hot liquid; otherwise, it can clump almost instantly.

Cornstarch slurry being stirred with cold water in a small glass bowl for Egg Foo Young gravy.
A smooth slurry is the shortcut to smooth Egg Foo Young gravy; mix it cold first, then whisk it into the hot sauce gradually.
  1. Combine the base. In a small saucepan, combine stock, light soy sauce, oyster sauce, optional dark soy sauce, sugar, and white pepper.
  2. Bring to a simmer. Heat gently until the mixture is steaming and lightly bubbling.
  3. Make the slurry. In a small bowl, stir cornstarch with cold water until smooth.
  4. Thicken slowly. Whisk the slurry into the simmering gravy a little at a time.
  5. Simmer until shiny. Cook for 30 to 60 seconds, until the gravy coats the back of a spoon.
  6. Finish with sesame oil. Add sesame oil at the end so the aroma stays fresh.

Gravy texture cue: the gravy should look shiny, coat the back of a spoon, and still pour easily. If it sits heavily on the patty, thin it before serving. If it disappears through the rice like broth, give it a little more time or a little more slurry.

Glossy brown Egg Foo Young gravy coating the back of a spoon with a visible drip over a saucepan.
Once the gravy coats the spoon and drips slowly, it is ready: thick enough for the patties, but still loose enough to flow into the rice.

Cornstarch Gravy vs Roux Gravy

The main recipe uses cornstarch because it is fast, glossy, and easy to control. If you want a richer old-school body, start with a light roux and finish with a smaller amount of slurry.

Two bowls of brown gravy showing a glossy cornstarch gravy and a thicker roux-style gravy with spoon trails.
Cornstarch gives Egg Foo Young gravy a glossy, lighter finish, while a roux adds a rounder restaurant-style body. Choose based on the texture you want.
StyleBest ForTexture
Cornstarch-only gravyFast weeknight Egg Foo YoungGlossy, light, pourable
Roux + cornstarch gravyMore old-school restaurant bodyRounder, richer, more gravy-like
Arrowroot gravyCorn-free adjustmentClearer and slightly slicker; avoid long boiling

For a roux version, cook 1 tablespoon neutral oil with 1 tablespoon flour for 1 to 2 minutes, then whisk in the stock and seasonings before finishing with a smaller amount of cornstarch slurry. Making the gravy gluten-free means checking every ingredient, not just swapping the soy sauce. Use tamari only if the stock, oyster sauce or vegetarian oyster sauce, and thickener are also gluten-free.

Restaurant-Style Egg Foo Young: How to Get Puffier Patties

Restaurant-style Egg Foo Young is not just “more oil.” Hotter oil sets the outside quickly, which helps the patty puff and brown before the center overcooks. That is why shallow-frying gives you a better home version than a barely oiled pan, and deeper oil gives you the most dramatic restaurant-style texture.

Oil Temperature for Restaurant-Style Puff

For puffier patties, use a wok or deep pot with 2–3 inches of neutral oil. Heat the oil to about 350°F / 175°C. When the egg mixture goes in, the oil temperature will drop. Letting the patties cook closer to 325°F / 160°C helps them puff and set without scorching.

Restaurant-style Egg Foo Young patty puffing in hot oil with a thermometer clipped to a wok and a wire rack nearby.
For restaurant-style Egg Foo Young, hot oil sets the outside quickly. Meanwhile, the center stays tender because the patty puffs before it overcooks.
  • Use a ladle instead of pouring from the bowl.
  • Lower the egg mixture gently into the oil so it forms a round patty.
  • Let the first side set before moving it.
  • Flip once the edges look golden and the patty feels stable.
  • Drain on a wire rack, not a flat plate, so the edges stay crisp.
  • Give each patty room so the oil stays hot and the edges set quickly.

Egg Foo Young Variations

Choose the variation by what you want from the plate. Shrimp gives the most classic takeout feel, chicken is the easiest leftover dinner, pork or char siu brings deeper flavor, and tofu or vegetables make the lightest version. The rule stays the same for all of them: keep the pieces small, control watery add-ins, and let the egg remain the binder.

How to Prep Add-Ins

Before you choose shrimp, chicken, pork, tofu, or vegetables, check how much moisture and cooking time that add-in brings to the eggs.

Prep bowls of shrimp, cooked chicken, pork or char siu, tofu, mushrooms, and cabbage for Egg Foo Young variations.
Different add-ins need different prep. Cooked meats are easiest, while mushrooms, tofu, and cabbage need the right size and moisture control.
Add-InCooked or Raw?Prep CueWatch-Out
ShrimpCooked easiest; raw okay if smallChop large shrimpRaw shrimp must turn opaque
ChickenCooked bestDice or shred smallRaw chicken can overcook the eggs
Pork / char siuCooked bestDice smallCan make the filling salty
Firm tofuUse pressed tofuPat dry and dice smallSoft tofu breaks down
MushroomsPre-cook if using more than a littleSlice thinReleases water
CabbageRaw okay if thinShred fineToo much makes patties loose

Shrimp Egg Foo Young

Shrimp is the most takeout-feeling version: sweet, quick-cooking, and easy to pair with brown gravy. Cooked small shrimp are easiest. If using raw shrimp, chop them small enough to turn opaque by the time the egg sets.

Shrimp Egg Foo Young patty cut open to show shrimp inside, served with brown gravy, scallions, and rice.
Shrimp Egg Foo Young gives the most classic takeout feel; for best results, chop large shrimp so the pieces stay tucked inside the patty.

Chicken Egg Foo Young

Chicken is the best leftover version. Use cooked chicken, chopped or shredded small, so the eggs can stay tender instead of waiting in the pan for raw meat to finish.

Cooked chopped chicken being folded into Egg Foo Young batter with bean sprouts, scallions, and vegetables in a glass bowl.
Chicken Egg Foo Young works best with cooked, chopped chicken because the eggs can set quickly instead of waiting for raw meat to cook through.

Pork Egg Foo Young

Pork, roast pork, or char siu gives the deepest old-school flavor. Dice it small and season the egg mixture lightly because cooked pork can bring plenty of salt on its own.

Pork Egg Foo Young patty cut open with diced char siu inside, scallions on top, and brown gravy in a bowl nearby.
Pork or char siu adds deeper flavor, but the pieces still need to be small enough for the egg to bind into a clean patty.

Vegetable Egg Foo Young

Vegetable Egg Foo Young works best when the vegetables are chosen for texture, not just volume. Thin cabbage, sprouts, scallions, and shredded carrot can usually go in raw; mushrooms, zucchini, bell pepper, and watery greens should be cooked briefly first.

Firm tofu works well if you want a meatless version with more body. Press it, pat it dry, and dice it small before adding it to the bowl. For vegetarian gravy, use vegetable stock and vegetarian oyster sauce or mushroom sauce.

Vegetable and tofu Egg Foo Young patty cut open with tofu cubes, bean sprouts, cabbage, carrot, scallions, and brown gravy.
Vegetable Egg Foo Young works best when the filling is chosen for texture, not volume. Firm tofu, cabbage, sprouts, and scallions keep it light but satisfying.

No Bean Sprouts? Use These Instead

Bean sprouts give Egg Foo Young its classic crunch, but you can still make good patties without them. Choose the substitute by what the mixture needs.

Bean sprout substitutes for Egg Foo Young including Napa cabbage, water chestnuts, snow peas, shredded cabbage, carrot, scallions, mushrooms, zucchini, and greens.
No bean sprouts? Use crisp substitutes like Napa cabbage, water chestnuts, or snow peas. Cook watery vegetables first so they do not loosen the batter.
  • For crunch: thin Napa cabbage, diced water chestnuts, or julienned snow peas.
  • For easy volume: finely shredded cabbage, shredded carrot, or extra scallions.
  • Use carefully: mushrooms, zucchini, and watery greens. Cook them briefly first, then cool before adding them to the eggs.

The substitute should support the egg, not take over the bowl. If the mixture starts looking like vegetables barely coated in egg, add another beaten egg or hold some filling back for the next batch.

Troubleshooting Egg Foo Young

Start with the First Patty

If your first patty is messy, do not panic. Egg Foo Young is easy to adjust batch by batch because you can change the scoop size, heat, oil, or mixture before the next patty goes in.

Most Egg Foo Young problems are batch-by-batch problems, not recipe-ending problems. Even restaurant-style Egg Foo Young is not about perfect circles; it is about tender eggs, enough filling, and a sauce that brings the plate together.

Egg Foo Young troubleshooting guide showing patties that fall apart, stay too runny, have burnt edges, and turn out just right.
One messy patty does not ruin Egg Foo Young; instead, use it to fix the mixture, heat, oil, or scoop size before the next round.

Common Problems and Quick Fixes

ProblemFix NowFix Next Time
Patties fall apartMake smaller patties and add 1 beaten egg to the remaining mixture if needed.Keep total filling to 2–2½ cups per 6 eggs.
Mixture looks waterySpoon off excess liquid before frying.Drain sprouts well and pre-cook vegetables that release liquid.
Center stays runnyLower heat slightly and cover the pan briefly.Use ½-cup scoops instead of oversized patties.
Edges burn before center setsReduce heat and add a little more oil if the pan is dry.Cook over medium to medium-high heat, not high heat.
Patties taste blandServe with hot gravy and garnish with scallions or white pepper.Use flavorful stock, white pepper, sesame oil, and a well-seasoned gravy.
Patties turn rubberyReheat gently and avoid cooking them further.Pull patties once the egg is set; do not cook until dry.
Gravy is too thinAdd a little more cornstarch slurry and simmer briefly.Bring the sauce to a simmer before adding slurry.
Gravy is too thickWhisk in stock or water, a splash at a time.Add slurry gradually instead of all at once.
Gravy is lumpyStrain it if needed, then whisk smooth.Mix cornstarch with cold water first and stream it in while whisking.
Leftovers become soggyReheat patties separately from the gravy.Store patties and gravy in separate containers.

What to Serve with Egg Foo Young

Plain steamed rice is the classic base because it catches the salty-silky finish and keeps the plate from feeling too rich. The rice is not just filler here; it is part of why the dish feels like dinner.

If you are making Egg Foo Young for brunch, keep the sides lighter with something crisp like this cucumber salad recipe. If you are building a Chinese restaurant-style dinner, pair it with fried rice, noodles, or stir-fried greens.

  • Steamed jasmine rice: the easiest and most classic base.
  • Spam fried rice: ideal when you want a full restaurant-style plate. You can also use the same cold-rice method with simpler add-ins.
  • Garlic noodles: richer, cozier, and good with extra gravy.
  • Stir-fried greens: bok choy, cabbage, green beans, broccoli, or snow peas all work well.
  • Cucumber salad: a cool, crisp contrast to the hot gravy.
  • Chili oil: add at the table if you want heat.
  • Extra scallions: a fresh finish that keeps the dish from feeling heavy.

Storage, Make-Ahead Tips, and Reheating

Egg Foo Young is at its best when the patties are hot and the gravy is freshly spooned over the top, but leftovers can still be very good if the sauce and eggs are stored separately. This keeps the patties from absorbing too much gravy and turning soft. For general leftover timing and storage safety, the USDA’s leftovers and food safety guidance is a useful reference.

  • Make the gravy ahead: prepare it up to 2 days ahead and refrigerate it separately. Reheat gently and thin with stock or water if needed.
  • Prep the vegetables ahead: chop them earlier in the day and keep them dry in the fridge. Mix them with the eggs only right before cooking.
  • Refrigerate: store cooked patties and gravy in separate airtight containers for up to 3–4 days.
  • Reheat patties: warm gently in a skillet over low to medium heat, or use an air fryer briefly if you want firmer edges.
  • Reheat gravy: warm in a saucepan, whisking in a splash of stock or water if it has thickened.
  • Microwave carefully: use short bursts because eggs can turn rubbery when overheated.
  • Freeze only if needed: freeze patties without gravy. The texture is better refrigerated than frozen.

FAQs

Is Egg Foo Young the same as an omelet?

It is omelet-like, but not exactly the same as a Western folded omelet. Egg Foo Young has the vegetables and protein mixed directly into the eggs, is usually cooked as separate patties, and is served with brown gravy.

What is Egg Foo Young gravy made of?

Most Egg Foo Young gravy is made with stock, soy sauce, oyster sauce, white pepper, sesame oil, and a cornstarch slurry. A roux can be added for a rounder, more old-school restaurant-style body.

Why does my Egg Foo Young fall apart?

Usually, the filling is too wet, too heavy, or the patties are too large. Keep the filling around 2 to 2½ cups for 6 eggs, drain vegetables well, and use ½-cup scoops.

Why is my Egg Foo Young not fluffy?

Flat Egg Foo Young usually comes from a dry pan, oversized patties, or watery filling. A barely oiled skillet makes the mixture behave like a flat omelet. A little more oil, smaller scoops, and controlled add-ins help the edges puff before the center dries out.

What meat is best for Egg Foo Young?

Shrimp gives the most classic takeout feel, chicken is easiest for leftovers, and roast pork or char siu gives deeper flavor. Whatever protein you choose, keep it small so the egg can hold it.

Can Egg Foo Young be made without bean sprouts?

Yes. Use thin Napa cabbage, shredded cabbage, water chestnuts, snow peas, shredded carrot, or extra scallions. Choose small, controlled substitutes so the egg patties still hold together.

Is Egg Foo Young Chinese or Chinese-American?

Egg Foo Young has roots in Chinese egg dishes, but the gravy-covered version many people order from takeout menus is strongly Chinese-American. This recipe is built around that restaurant-style plate: separate egg patties, vegetables, optional protein, rice, and brown gravy.

Can the gravy be vegetarian?

Yes. Use vegetable stock and vegetarian oyster sauce or mushroom sauce. Check the soy sauce and other condiments too if you need the whole dish to meet a specific dietary requirement.

How do I make Egg Foo Young taste like takeout?

The takeout flavor comes from three things working together: enough oil to brown the edges, small amounts of white pepper and sesame oil, and a brown gravy that tastes savory before it thickens. If the patties are dry and the gravy is flat, it will taste like an omelet with sauce, not Egg Foo Young.

Should the gravy go on before or after serving?

Spoon the gravy over the patties just before serving. If the patties sit in gravy too long, they soften and lose their best texture.

Can you bake or air-fry Egg Foo Young?

You can bake or air-fry the egg mixture in a small greased pan, but it will eat more like a baked omelet or mini frittata than classic Egg Foo Young. For browned edges and takeout-style texture, a skillet with enough oil is still the better method. For a baked egg texture, these egg muffin cups are a better fit.

Once the ratio clicks, Egg Foo Young stops feeling fussy. The first patty teaches you the heat, the sauce goes on at the end, and the rest becomes a flexible dinner you can make with shrimp, chicken, pork, tofu, or the vegetables already in the fridge.

Egg Foo Young Step by Step

Use this quick visual recap before the recipe card if you want the whole cooking flow in one place: prep the filling, mix the eggs, cook the patties, thicken the gravy, and serve hot.

Step-by-step Egg Foo Young process showing filling prep, egg mixing, patty cooking, gravy thickening, and serving with rice.
This visual roadmap shows the whole flow: prep the filling, mix the eggs, cook the patties, thicken the gravy, then serve hot.

Recipe card

Egg Foo Young Recipe with Takeout-Style Gravy

Fluffy Chinese-American egg patties with crisp vegetables, your choice of shrimp, chicken, pork, tofu, or extra vegetables, and smooth brown gravy to spoon over rice.

Prep Time15 minutes
Cook Time20 minutes
Total Time35 minutes
Servings4

Yield: 6 medium patties

Method: Pan-fried / shallow-fried

Cuisine: Chinese-American

Course: Dinner, main dish, brunch

Ingredients

For the Egg Patties

  • 6 large eggs
  • 1 teaspoon / about 3 g cornstarch mixed with 1 tablespoon / 15 ml cold water
  • ½ teaspoon / 2.5 ml toasted sesame oil
  • ¼ teaspoon white pepper
  • 1 cup / about 70–85 g bean sprouts, rinsed and very well drained
  • 115–140 g / 4–5 oz chopped cooked shrimp, cooked chicken, roast pork, or firm tofu
  • ¼ cup / about 35 g finely diced onion
  • ⅓ to ½ cup / about 35–50 g finely shredded cabbage or thinly sliced mushrooms
  • 2 scallions / spring onions, thinly sliced
  • 2–4 tablespoons / 30–60 ml neutral oil for pan-frying, or more as needed for shallow-frying

For the Gravy

  • 2 cups / 480 ml chicken stock or vegetable stock
  • 1½ tablespoons / about 22 ml light soy sauce
  • 1 tablespoon / 15 ml oyster sauce or vegetarian oyster sauce
  • ½ teaspoon / 2.5 ml dark soy sauce, optional
  • 1–2 teaspoons / 4–8 g sugar, to taste
  • ¼ teaspoon white pepper
  • 2 tablespoons / about 16 g cornstarch
  • 3 tablespoons / 45 ml cold water
  • ½ teaspoon / 2.5 ml toasted sesame oil

For Serving

  • Steamed rice or fried rice
  • Extra sliced scallions
  • Chili oil, optional

Instructions

Make the Gravy

  1. Prep the filling. Drain the bean sprouts well. Dice the onion, slice the scallions, shred the cabbage or mushrooms, and chop the protein small. Pre-cook raw chicken, raw pork, mushrooms, or vegetables that release a lot of moisture.
  2. Start the gravy. In a small saucepan, combine the stock, soy sauce, oyster sauce, optional dark soy sauce, sugar, and white pepper. Bring to a gentle simmer.
  3. Thicken the gravy. Stir 2 tablespoons cornstarch with 3 tablespoons cold water until smooth. Whisk the slurry into the simmering gravy a little at a time. Simmer for 30 to 60 seconds, until smooth and spoon-coating. Stir in sesame oil and keep warm.

Mix and Cook the Patties

  1. Mix the eggs. In a large bowl, whisk the eggs. Stir 1 teaspoon cornstarch with 1 tablespoon cold water, then whisk it into the eggs with sesame oil and white pepper.
  2. Add the filling. Fold in the bean sprouts, protein, onion, cabbage or mushrooms, and scallions. The mixture should scoop easily: glossy egg around the filling, not soup and not a dry vegetable pile.
  3. Heat the pan. Heat a nonstick skillet or wok over medium to medium-high heat. Add enough oil to coat the bottom, or about ¼ inch / 6 mm oil for a shallow-fried texture.
  4. Cook the patties. Scoop about ½ cup egg mixture into the pan for each patty. Cook for 2 to 3 minutes, until the edges set and the bottom is golden. Flip carefully and cook for 1½ to 2 minutes more, until the middle has no liquid egg.
  5. Adjust after the first patty. If it browns too quickly, lower the heat. If it sticks or looks dry around the edges, add a little more oil before the next batch.

Rest and Serve

  1. Repeat and serve. Cook the remaining patties in batches. Transfer to a wire rack or paper towel-lined plate, let them rest in a single layer, and spoon hot gravy over the patties just before serving.

Notes

  • Keep total filling around 2 to 2½ cups for 6 eggs.
  • The mixture should look egg-forward: glossy egg around the filling, not vegetables barely coated in egg.
  • The first patty is your test patty. Adjust heat, oil, or scoop size before continuing.
  • Use ⅓-cup scoops for easier flipping or ½-cup scoops for standard patties.
  • Cook chicken or pork before adding it. Cooked shrimp is easiest; raw shrimp should be chopped small and cooked until opaque.
  • For puffier edges, shallow-fry with about ¼ inch / 6 mm oil.
  • For roux-style gravy, cook 1 tablespoon oil with 1 tablespoon flour for 1 to 2 minutes, whisk in the stock and seasonings, then finish with less slurry.
  • Spoon gravy over the patties just before serving, not far ahead.
  • Store patties and gravy separately.

Back to top