Pork leg roast is easy to love once it is cooked, but confusing before it goes into the oven. The label may say pork leg, leg of pork, pork joint, rolled pork leg, boneless roast, or bone-in joint. Then every timing chart seems to disagree.
It is one of those cuts that feels simple at the butcher and suddenly complicated at home. The joint is big, the rind has to crackle, the meat can dry out, and dinner still needs to happen on time.
That confusion is normal. Once you know the cut, the timing, and how to keep the skin dry, the roast becomes much easier.
This is a big roast, but it does not need to feel like a gamble. The secret is the two-job rule: crisp the rind first, then protect the meat. This guide gives you the full method for juicy sliceable pork, crisp crackling, cooking time per kg, internal temperature, and notes for boneless, bone-in, rolled, slow cooker, and air fryer pork leg.
The goal is simple: juicy sliceable pork, crisp crackling, and no guessing at the oven door.
Already cooking? Use the quick answer first, then check the cooking time chart and internal temperature guide before you roast.
Quick Answer: Pork Leg Roast Time and Temperature
For pork leg roast with rind, start hot at 240°C / 465°F or 220°C fan for 30–40 minutes to begin the crackling. Then reduce to 180°C / 350°F or 160°C fan and cook for about 30–40 minutes per kg, depending on the size and shape of the roast.
Use the time chart to plan, but use a thermometer to finish. For juicy sliceable pork, aim for 63–65°C / 145–149°F in the thickest part, then rest before carving. Prefer a firmer traditional roast? Cook closer to 70–71°C / 158–160°F.
Think of the roast as two separate jobs: dry heat for the skin, gentler heat for the center. If one finishes before the other, separate the jobs instead of overcooking the whole joint.
Jump to: Recipe · Choose Your Path · Cooking Time per kg · Internal Temperature · Timing Plan · Hot Start vs Final Blast · Crackling · Oven Method · Troubleshooting · Serving · Leftovers · FAQs
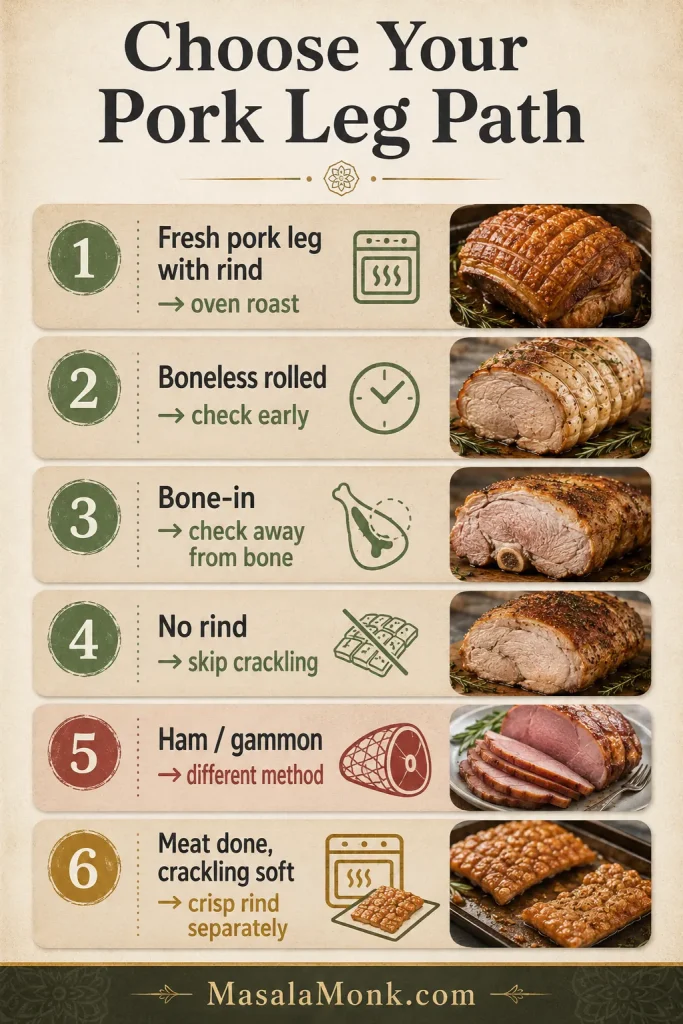
Choose Your Path Before You Follow the Chart
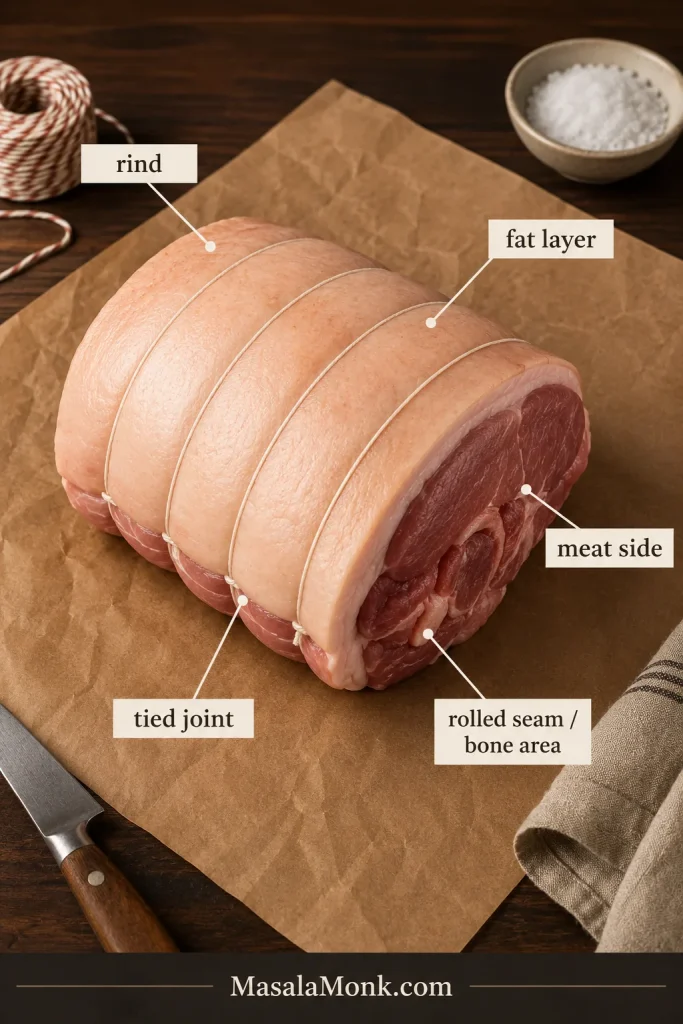
Before you choose a timing, check three things: whether your pork is fresh pork leg, whether it has rind, and whether it is boneless, rolled, or bone-in. Those details decide the cooking plan.
- Fresh pork leg with rind: use the main oven method.
- Boneless rolled pork leg: use the same method, but start checking early.
- Bone-in pork leg: allow extra time and check the thickest meat away from the bone.
- No rind: skip the crackling steps and focus on internal temperature.
- Ham, gammon, cured leg, or smoked leg: pause and use ham-specific instructions.
- Meat done but crackling soft: rest the pork and crisp the rind separately.
If the roast suddenly feels too big for the pan and too important to mess up, pause here. Dry skin, a hot oven, and a thermometer will do more for you than any complicated marinade.
Next: Once you know the cut, go to the recipe card, cooking time per kg chart, or pork leg label guide.
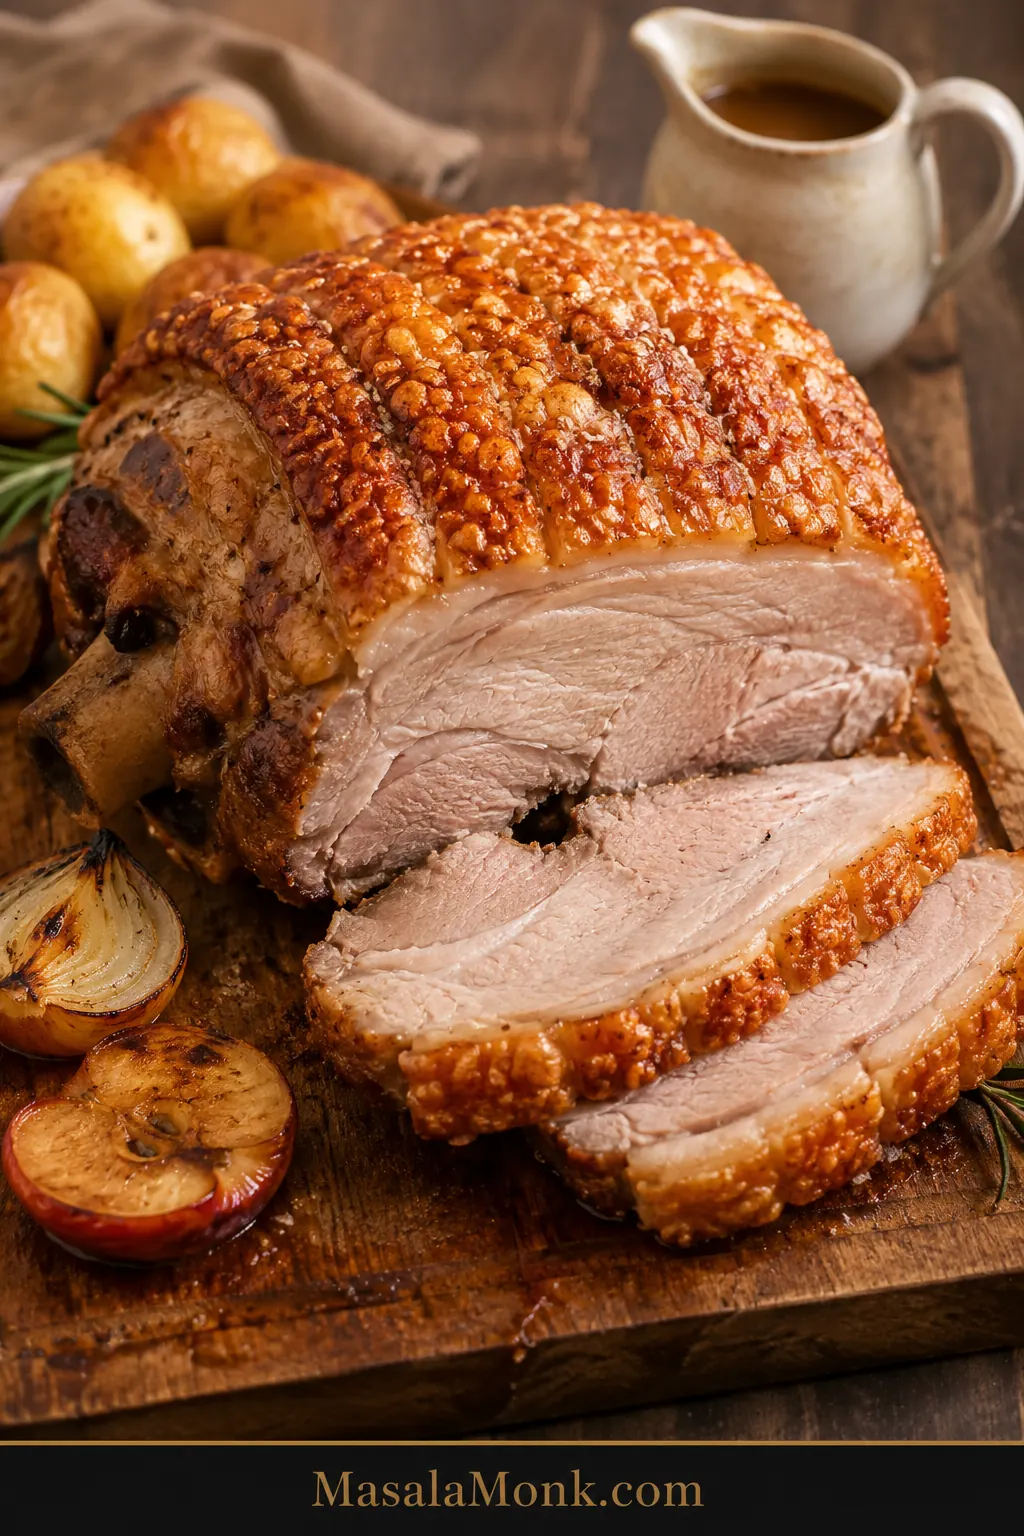
Pork Leg Roast with Crackling
This recipe uses a 2.5 kg pork leg roast with rind. It works for boneless rolled pork leg, deboned pork leg roast, or a bone-in pork leg roast of a similar size. Adjust the timing using the chart below.
You do not need a complicated marinade here. The magic is in a dry rind, enough salt, a fully preheated oven, a hot start for crackling, and a lower oven temperature for the meat.
Recipe Details
| Prep Time | 20 minutes active, plus optional drying time |
| Cook Time | About 2 hours for a 2.5 kg roast |
| Rest Time | 15–20 minutes |
| Total Time | About 2 hours 30 minutes, plus optional overnight drying |
| Servings | 6–8 |
| Main Cut | 2.5 kg pork leg roast, rind on, boneless rolled or bone-in |
| Doneness | 63–65°C / 145–149°F in the thickest part for juicy slices |
| Crackling Sign | Dry, salted rind that bubbles, blisters, and turns crisp during the hot start |
No overnight drying? You can still make this today. Pat the rind dry several times, leave it uncovered while the oven preheats, salt it well, and use the hot-start oven stage. Overnight drying helps, but it is not mandatory.
Cooking a smaller roast? If your joint is closer to 1 kg, start checking much earlier than the default 2.5 kg timing. Small pork leg joints dry faster, especially when they are narrow, boneless, or rolled tightly.
Before you start, gather the few things that make this roast easier. The thermometer and a rack or trivet are the two most useful helpers.
Equipment You’ll Need
| Tool | Why it helps |
|---|---|
| Roasting tray | Holds the pork, aromatics, and pan juices |
| Wire rack or onion-and-apple trivet | Keeps the pork lifted so the rind stays exposed |
| Paper towels | Dry skin is the first step to good crackling |
| Sharp knife or utility blade | Scores the rind cleanly without tearing it |
| Meat thermometer | Prevents dry pork and removes guesswork |
| Foil | Useful for shielding dark crackling patches or resting meat loosely |
| Serrated knife | Cuts through crackling more cleanly |
| Carving board | Gives the roast space to rest and slice neatly |
If you only add one tool, make it the thermometer. It turns this from a timing gamble into a controlled roast.
Ingredients
- 2.5 kg pork leg roast, rind on, boneless rolled or bone-in
- 1½–2 tablespoons sea salt flakes
- 1½–2 tablespoons olive oil or neutral oil
- 1 teaspoon black pepper
- 1–2 teaspoons fennel seeds, lightly crushed, optional
- 4–6 garlic cloves, lightly crushed
- 2 large onions, thickly sliced
- 2–4 apples, halved or quartered, optional
- 2–3 sprigs rosemary or sage
- 250–500 ml stock, cider, or water for the tray and gravy
- 1–2 tablespoons flour or cornflour, optional, for gravy
- 1 teaspoon mustard or a splash of apple cider vinegar, optional
Salt note: Most of the salt is for the rind and crackling, not for heavily salting the meat. Rub it in after the rind is dry, not while it is still wet from packaging. If you are using fine table salt instead of flaky sea salt, use less.
Before the Pork Goes in the Oven
This quick check helps prevent the two biggest problems: soft crackling and dry pork.
- Rind looks dry and matte, not wet or glossy.
- Scoring cuts through the skin, but not deep into the meat.
- Salt is rubbed into the scored cuts.
- Oven is fully preheated before the pork goes in.
- The joint sits rind-side up.
- Skin is as level as you can make it.
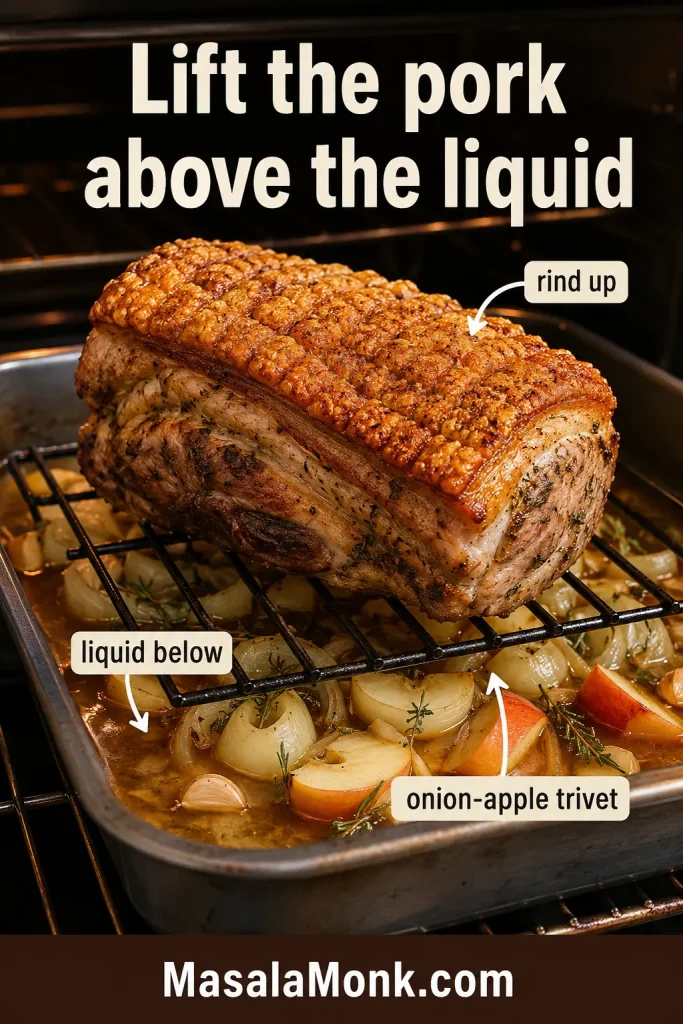
- Liquid stays in the bottom of the tray, below the pork.
- The roast is not sitting deep in liquid.
Method
- Dry and score the rind. Pat the skin very dry. Score through the skin and some fat if needed, but do not cut deep into the meat.
- Bring the pork out briefly. Let the joint sit out for 45–60 minutes while the oven heats, but do not leave raw pork at room temperature for hours.
- Season the meat side only. Rub the meat side with pepper, fennel if using, garlic, herbs, and a little oil. Keep wet seasonings away from the rind.
- Oil and salt the rind. Rub the skin lightly with oil, then massage sea salt into the scored cuts.
- Set up the tray. Place onions, garlic, apples, and herbs in a roasting tray. Set the pork rind-side up on a rack or onion-and-apple trivet.
- Roast hot for crackling. Cook at 240°C / 465°F or 220°C fan for 30–40 minutes, until the rind starts to bubble, blister, and turn golden.
- Lower the heat. Reduce to 180°C / 350°F or 160°C fan. Add stock, cider, or water to the tray if making gravy, keeping it below the pork and away from the rind.
- Cook to temperature. Roast until the thickest part reaches 63–65°C / 145–149°F for juicy slices, or 70–71°C / 158–160°F for a firmer roast.
- Rest without steaming the crackling. Give the pork 15–20 minutes. Leave crisp crackling exposed so steam cannot soften it.
- Rescue, gravy, and carve. If the meat is done but the crackling is soft, remove the rind and crisp it separately. Make gravy from the pan juices, then carve the pork across the grain.
The full oven method below explains each step in more detail. First, make sure the cut you have matches the path you are following.
Quick Cut Check
Still not sure what kind of pork leg you bought? Use this table before you worry about exact timing.
| What you have | Best approach |
|---|---|
| Boneless pork leg roast | Use the main recipe and start checking early |
| Rolled pork leg joint | Keep the rind level, roast as directed, and check the center of the roll |
| Bone-in pork leg | Use the time chart, allow extra time, and check away from the bone |
| Whole pork leg | Use the chart only as a guide; check more than one spot |
| Skin-on pork leg | Best choice for crackling |
| Fresh ham, uncooked | Treat it like fresh pork leg, but use the thermometer and allow extra time for large pieces |
| Skinless pork leg | Use the roast method, but skip the crackling steps |
| Slow cooker pork leg | Cook gently first, then crisp the rind separately |
| Pork leg for pulled pork | Possible, but pork shoulder is usually better |
| Ham or gammon | Use a ham-specific recipe, not this method |
Once you know which version you have, the rest becomes much easier. Skin-on pork leg is for crackling. Boneless rolled pork leg is for neat slices. Bone-in pork leg is for a bigger centerpiece. Ham is a different recipe altogether.
Now plan the roast: use the pork leg cooking time per kg chart, then check the internal temperature guide before you finish.
Why This Pork Leg Roast Works
This method works because it stops forcing the skin and the meat to behave the same way. Bold heat helps the top blister. Gentle cooking keeps the center juicy. Once you separate those jobs, pork leg stops feeling like a gamble.
- A hot start wakes up the crackling. Dry skin needs a blast of high heat to puff, blister, and crisp.
- Lower heat protects the meat. After the skin has had its heat, the center can cook through without drying out.
- The chart gets you close; the thermometer tells you when to stop. That keeps timing useful without making it the final judge.
- Dry heat stays on top. Apples, onions, herbs, garlic, and stock sit under or around the roast, not over the crackling layer.
- The method adapts to the cut. Boneless, bone-in, rolled, and pork leg joint versions all work when you adjust timing and check the center properly.
- Leftovers stay useful. This cut slices cleanly for roast dinners, sandwiches, wraps, and next-day meals.
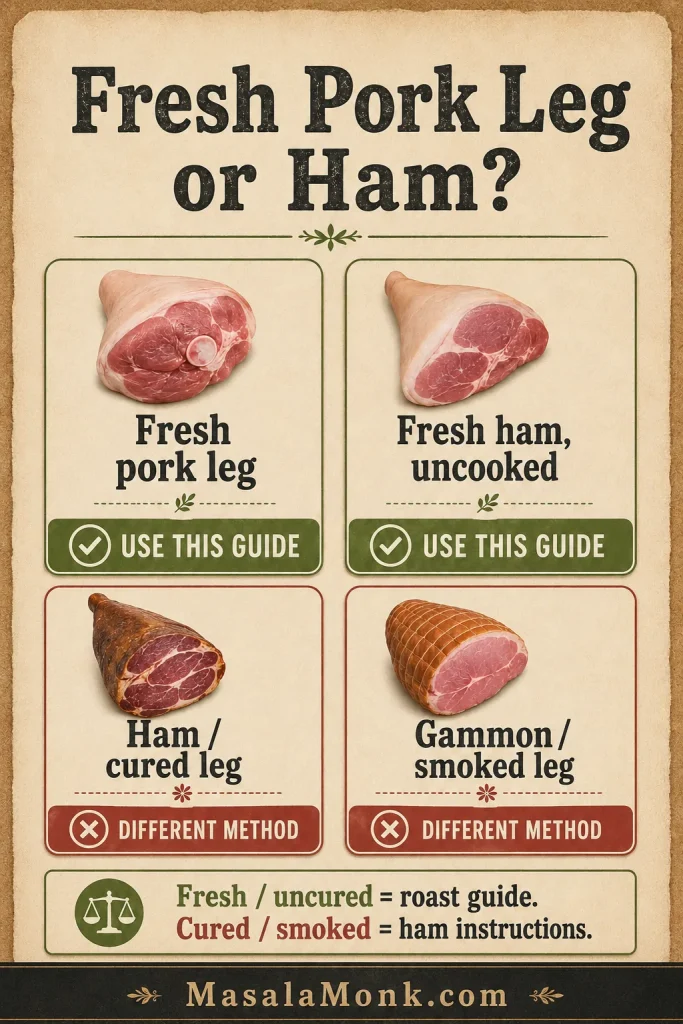
Pork Leg Labels Explained
The quick cut check above helps you choose a path. This section explains the labels you may see at the butcher or supermarket.
Fresh Pork Leg, Fresh Ham, Ham, and Gammon
Pork leg is sold under several names. The same basic roasting method works for most fresh pork leg roasts, but the timing changes with size, shape, bone, and whether the rind is attached.
A rind-on joint with an even fat layer is usually easier to crackle than a patchy, thin-skinned piece. You can still cook an uneven roast well, but you may need to level the skin or rescue a softer patch separately at the end.
Pork Leg Label Table
| Cut or label | What it means | What changes |
|---|---|---|
| Boneless pork leg roast | The bone has been removed, and the meat may be rolled | Easier to carve and cooks evenly, but can dry faster |
| Rolled pork leg | Boneless leg rolled and tied into a joint | Great for neat slices; check the center early |
| Deboned pork leg roast | Another name for boneless pork leg | Use boneless timing guidance |
| Bone-in pork leg roast | Pork leg with the bone still attached | May take longer; check away from the bone |
| Whole pork leg | A large full-leg roast | Best for gatherings; check more than one spot |
| Pork leg joint | Common UK-style name for a roasting piece | Use the weight-based chart below |
| Skin-on or rind-on pork leg | The rind is still attached | Best choice for crackling |
| Skinless pork leg | The rind has been removed | Can be roasted, but it will not make crackling |
| Fresh pork leg | Uncured raw pork leg | Correct for this recipe |
| Fresh ham, uncooked | US-style label for uncured pork leg | Can be roasted like fresh pork leg, but large pieces need extra time and thermometer checks |
| Ham, gammon, or cured pork leg | Pork leg that has been cured | Needs a different cooking or glazing method |
Labels such as fresh pork, pork leg, leg joint, roasting joint, rolled leg, rind-on pork leg, or fresh ham uncooked usually mean you are in the right place. Gammon, ham, cured leg, smoked leg, or leg ham need ham-specific instructions instead.
When Pork Leg Is Not the Right Cut
Pork loin and pork tenderloin need cut-specific methods because they are smaller, leaner, and shaped differently. Compare with this pork tenderloin in oven guide or this slow cooker pork loin recipe if that is the cut you bought.
This cut is also different from shoulder. Choose shoulder when you want soft, fall-apart meat. Pick leg when you want neat roast slices and crisp crackling.
Pork Leg Cooking Time per kg
This is the chart to use when you are trying to work backward from dinner time. It will help you plan the meal, but it does not need to be perfect down to the minute.
If you came here with a label in one hand and a dinner time in mind, this is the section that matters most. These times are deliberately given as a range because shape matters as much as weight.
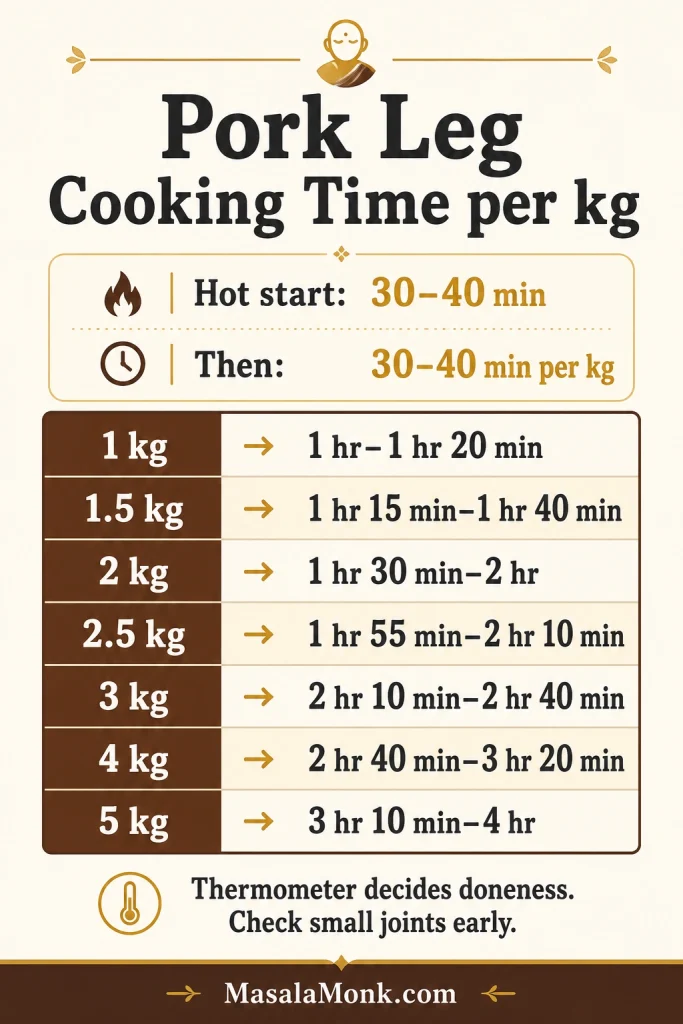
Pork Leg Time Chart by Weight
| Pork leg size | Hot crackling stage | Lower roasting stage | Approx total oven time |
|---|---|---|---|
| 1 kg | 30–40 minutes | 30–40 minutes | 1 hour–1 hour 20 minutes |
| 1.5 kg | 30–40 minutes | 45–60 minutes | 1 hour 15 minutes–1 hour 40 minutes |
| 2 kg | 30–40 minutes | 60–80 minutes | 1 hour 30 minutes–2 hours |
| 2.5 kg | 40 minutes | 75–90 minutes | 1 hour 55 minutes–2 hours 10 minutes |
| 3 kg | 40 minutes | 90–120 minutes | 2 hours 10 minutes–2 hours 40 minutes |
| 4 kg | 40 minutes | 2 hours–2 hours 40 minutes | 2 hours 40 minutes–3 hours 20 minutes |
| 5 kg | 40 minutes | 2 hours 30 minutes–3 hours 20 minutes | 3 hours 10 minutes–4 hours |
The simplest planning formula is 30–40 minutes hot for crackling, then about 30–40 minutes per kg at the lower temperature.
For a 1 kg pork leg joint: check the center temperature as soon as the hot crackling stage ends. Small boneless roasts can move from juicy to dry quickly, especially if they are narrow or rolled tightly.
A boneless rolled joint can cook a little faster because it is more even. Larger bone-in roasts and whole legs can take longer. Start checking before the earliest time in the chart so you do not accidentally push the meat too far.
Before you stop roasting: check the internal temperature. The chart organizes dinner, but the thermometer decides doneness.
Pork Leg Cooking Time per Pound
The kg chart is the main one. Use this next table only if your label is in pounds.
These totals include the hot crackling stage. After that first blast of heat, estimate about 15–20 minutes per pound at the lower roasting temperature.
| Pork leg size | Approx total oven time | Notes |
|---|---|---|
| 3 lb | 1 hour 20 minutes–1 hour 45 minutes | Check early; small roasts dry quickly |
| 4 lb | 1 hour 40 minutes–2 hours | Common small family roast |
| 5 lb | 1 hour 55 minutes–2 hours 20 minutes | Close to the default recipe size |
| 6 lb | 2 hours 10 minutes–2 hours 45 minutes | Bone-in may need longer |
| 8 lb | 2 hours 45 minutes–3 hours 30 minutes | Check more than one spot |
Timing gets dinner organized. The thermometer decides when the pork is actually ready.
Example Timing Plan for a 2.5 kg Pork Leg Roast
The charts tell you how long the pork may take. This timing plan shows how to work backward from serving time for the 2.5 kg roast used in this recipe.
| Time before serving | What to do |
|---|---|
| Night before or morning | Leave the rind uncovered in the fridge if you can |
| About 3 hours before serving | Take pork out, dry the rind, and check the scoring |
| About 2½ hours before serving | Preheat the oven fully and prepare the tray |
| About 2¼ hours before serving | Start the hot crackling stage |
| About 1½ hours before serving | Lower the oven and continue roasting |
| About 30 minutes before serving | Start checking the center temperature |
| About 20 minutes before serving | Rest the pork and finish crackling separately if needed |
| Just before serving | Carve, make gravy, and serve |
Do not chase the exact minute. The point is to give yourself enough room for resting, gravy, and a crackling rescue if the rind needs it.
A roast that reaches temperature early is a good problem. Rest it. If the crackling needs help after the meat is done, crisp the rind separately.
Why Pork Leg Cooking Times Differ So Much
If you have checked a few pork leg roast recipes already, you have probably seen different timing formulas. One chart may say 30–35 minutes per kg. Another may suggest 40 minutes per kg. Pound-based recipes often use 20–30 minutes per pound, while supermarket labels sometimes build in extra time.
That does not mean everyone is wrong. It means the joint is affected by more than just weight. Two good recipes can give different times and still both make sense.
- Shape matters. A short, thick roast cooks differently from a long, narrow one.
- Boneless and bone-in are not identical. Rolled pork leg often cooks more evenly, while bone-in pork may need extra time.
- Small joints dry faster. A 1 kg roast can overcook quickly if you follow a timing formula blindly.
- Large whole legs are uneven. A 4–5 kg pork leg needs temperature checks in more than one place.
- The rind adds a separate job. Crackling needs high heat, but the meat underneath still needs controlled cooking.
- Ovens vary. Fan ovens, older ovens, and crowded roasting trays can all change the timing.
This is the moment where many roasts go wrong: the crackling looks behind schedule, so the cook keeps roasting everything. Don’t. Check the meat first. If the center is ready, save the skin separately instead of drying out the whole joint.
This is why the thermometer is not a fancy extra here. It is the simplest way to protect the roast you paid for.
Best Oven Temperature for Pork Leg Roast
A good roast usually needs two stages because the top and the center are asking for different things.
If your oven uses convection or fan-forced heat, use the fan temperature. Roast in the center or upper-middle of the oven so the rind gets strong heat without sitting too close to the element. Aggressive ovens need a little watching, so shield dark patches with foil if they brown before the rest of the skin catches up.
| Stage | Conventional oven | Fan oven | Purpose |
|---|---|---|---|
| Crackling start | 240°C / 465°F | 220°C fan | Blisters and crisps the rind |
| Main roast | 180°C / 350°F | 160°C fan | Cooks pork through gently |
| Crackling rescue | 220–240°C / 430–465°F | 200–220°C fan | Finishes soft rind patches |
Very high heat for the whole cook can make the crackling look good but leave the meat dry. Low heat from the start can cook the meat gently but leave the rind chewy. The two-stage method gives you the best balance.
Hot Start or Final Blast for Pork Leg Crackling?
Both methods can work, which is why roast pork advice can look contradictory. Some recipes begin with high heat. Others roast lower first and finish with a final blast to crisp the skin.
This recipe uses a hot start because pork leg is leaner than shoulder and the rind benefits from early dry heat. The first blast gets the crackling moving; the lower stage then protects the center of the roast.
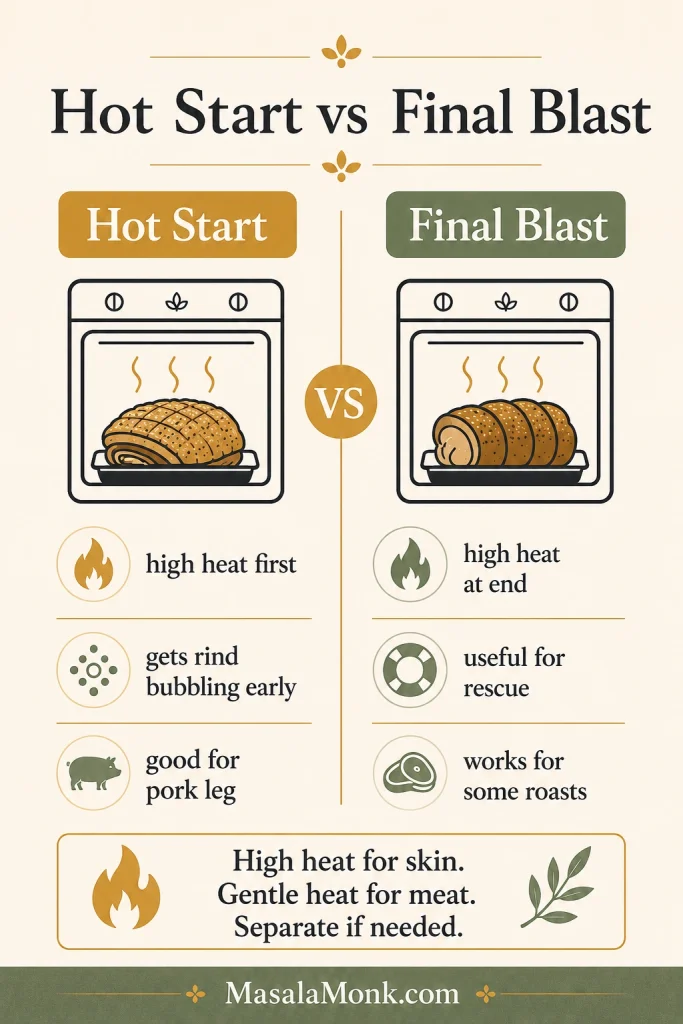
A final blast can also work, especially with fattier cuts, but it is not a reason to overcook the meat. For pork leg, the safest rule is this: give the rind enough high heat, cook the center gently, and separate the rind at the end if the crackling and meat do not finish together.
Do not judge the crackling too early. You are looking for signs of progress: dry-looking skin, bubbling, blistering, and golden patches. That blistered surface is what will later break into crisp shards instead of bending like chewy skin.
Need visual cues? See what good crackling progress looks like before deciding whether the rind needs more heat.
What Internal Temperature Should Pork Leg Roast Be?
The easiest way to stop guessing is to check the center with a thermometer. Insert it into the thickest part of the pork, away from the bone and away from the rolled seam if the roast is tied.
The center temperature can rise a little as the roast rests, especially in larger joints, so start checking early rather than waiting until the very last minute. Pork leg is lean enough that a few extra minutes can matter; the thermometer is not just about safety, it is how you protect juiciness.
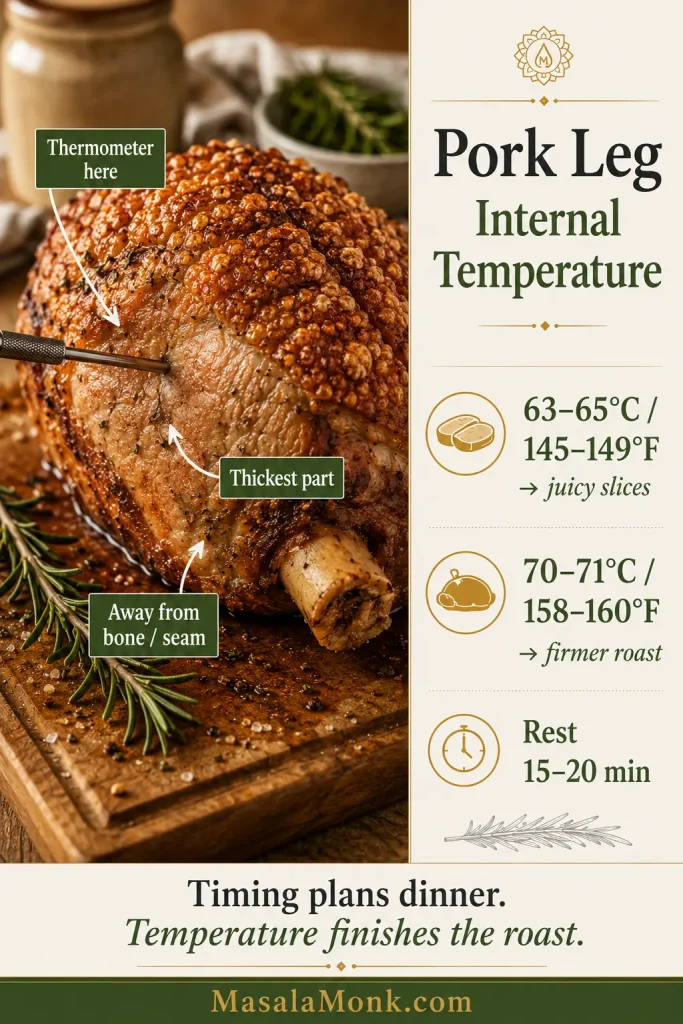
Choose Your Pork Leg Result
| What you want | Aim for | What it means |
|---|---|---|
| Juicy sliceable pork | 63–65°C / 145–149°F | Tender slices for roast dinner, sandwiches, and leftovers |
| Firmer traditional roast | 70–71°C / 158–160°F | Less pink, firmer texture, but it can be drier |
| Shredded pork leg | Longer moist cooking | Possible for saucy sandwiches, though pork shoulder is better |
| Best crackling | Dry rind + hot start | Needs a skin-on roast with dry, salted rind |
Food safety guidance commonly lists whole cuts of fresh pork at 145°F / 63°C with a rest. The National Pork Board pork temperature guide gives the same 145°F guidance for fresh pork roasts, chops, loin, and tenderloin.
The useful rule is simple: let the timing chart guide the day, then let the thermometer decide when the pork is ready.
How to Get Crisp Pork Leg Crackling
Crackling looks dramatic, but the rules are simple: dry the rind, salt it well, and give it enough heat. Seasoning on the meat is flexible. The skin is the part that needs discipline.
Crackling is also the part you can rescue if the meat finishes first, so do not panic if everything is not perfect at the same moment. The meat and rind do not have to finish together.
What good crackling progress looks like
Good crackling does not need to look perfect halfway through. Look for dry-looking skin, small bubbles, blistered patches, golden edges, and a surface that looks tighter than when it went in. It just needs to be moving in the right direction.
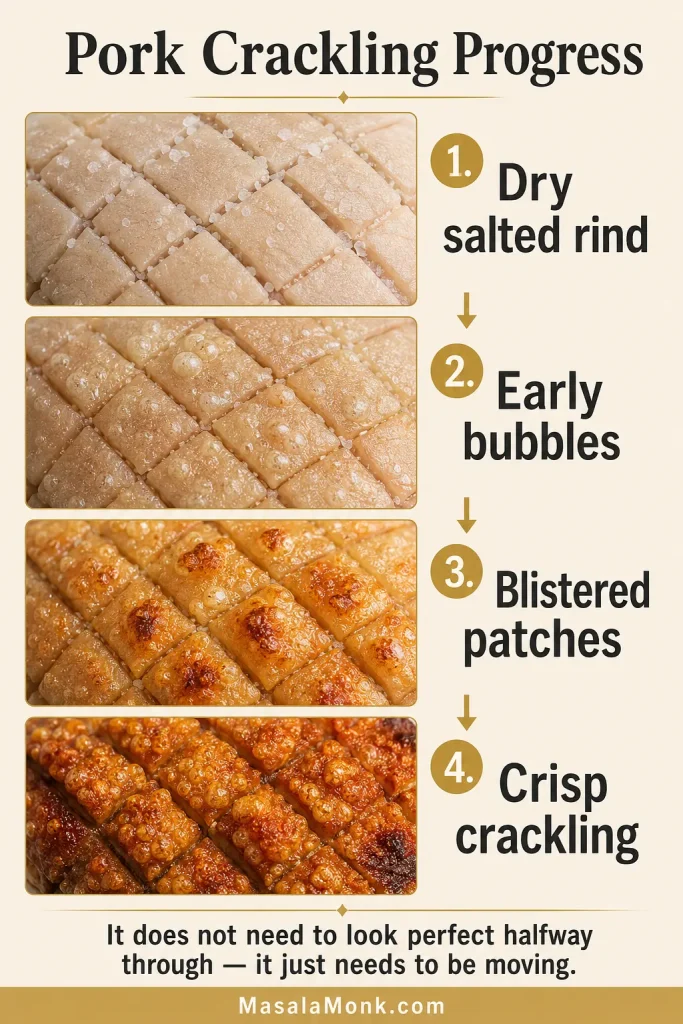
If the meat and crackling are not finishing together, jump to the separate-rind rescue.
Dry the rind properly
Pat the rind dry with paper towels. If you have time, leave the pork uncovered in the fridge for several hours or overnight. The surface should look dry and matte before roasting, not wet or glossy.
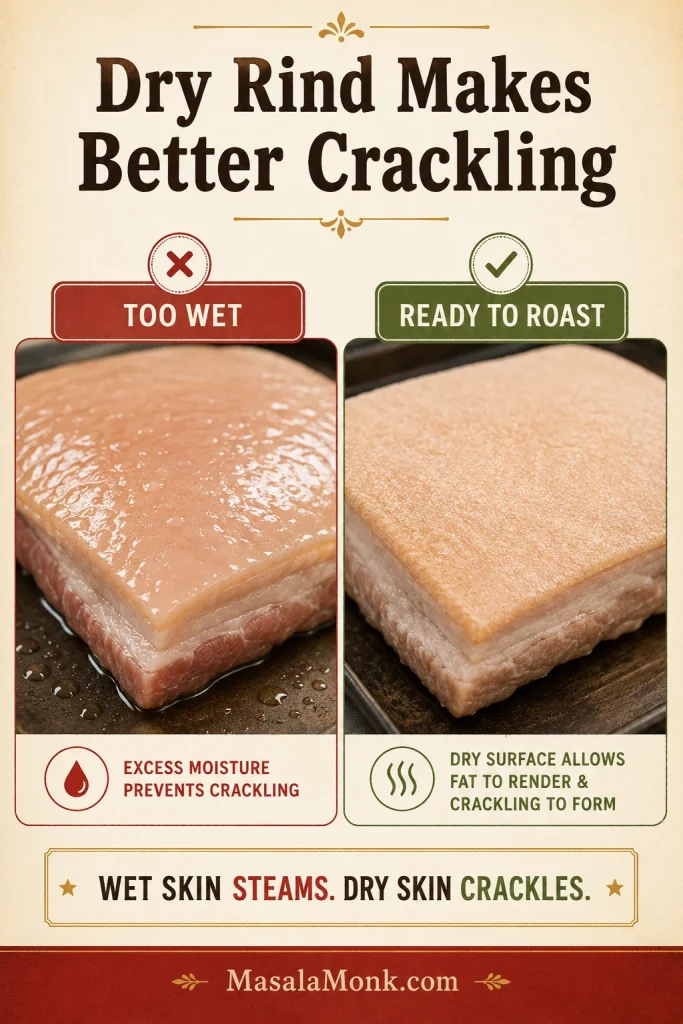
No hours to spare? Dry it as well as you can, leave it uncovered while the oven preheats, then salt it generously. You can still get good crackling without overnight drying, but you have to remove as much surface moisture as possible.
Score the rind without cutting into the meat
If your pork leg is not already scored, use a very sharp knife to cut lines through the rind and fat. You are cutting through the skin and some fat, not making deep cuts into the pork itself. Deep cuts into the meat can release juices onto the rind and make crackling harder.
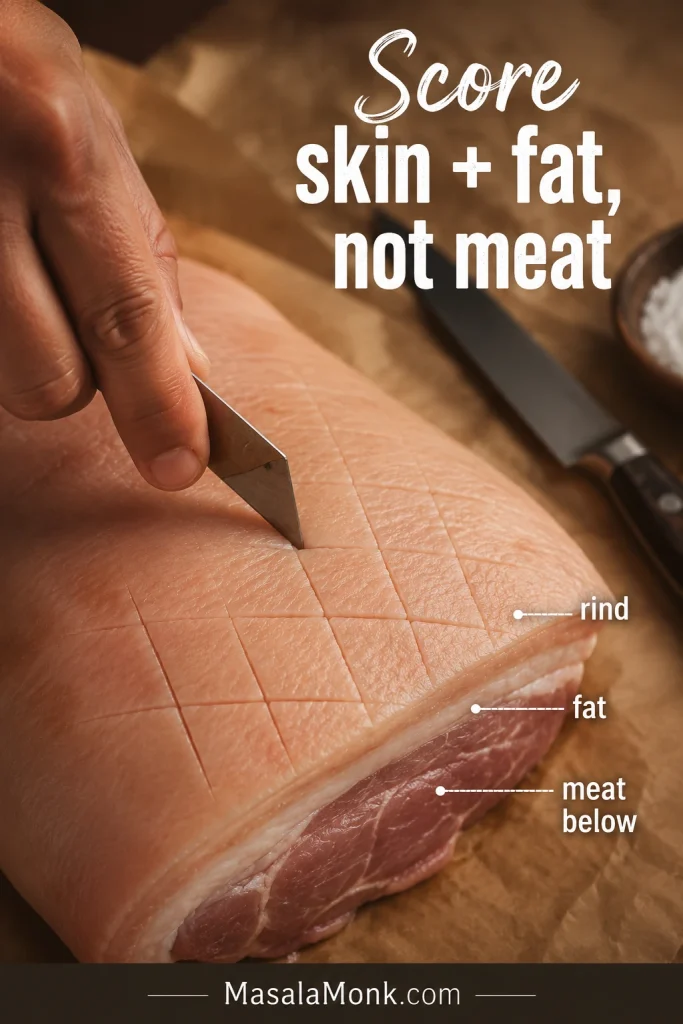
Already scored by the butcher? Do not keep cutting deeper. You only need channels for salt and heat to reach the fat.
Optional: use the boiling-water trick
Some cooks pour boiling water over scored pork rind to tighten the skin before roasting. If you do this, dry the rind completely afterward before adding oil and salt.
Do this before the final drying stage, not right before the pork goes into the oven. The trick only helps if the skin becomes dry again. Wet rind will steam, not crackle.
Keep wet seasonings away from the top
Garlic, herbs, mustard, cider, stock, and vegetables are all good with pork leg, but keep them under or around the roast. Avoid spreading wet marinades over the rind if you want crisp crackling.
Use oil lightly
A thin rub of oil helps salt stick and encourages even heat. You do not need to drown the rind.
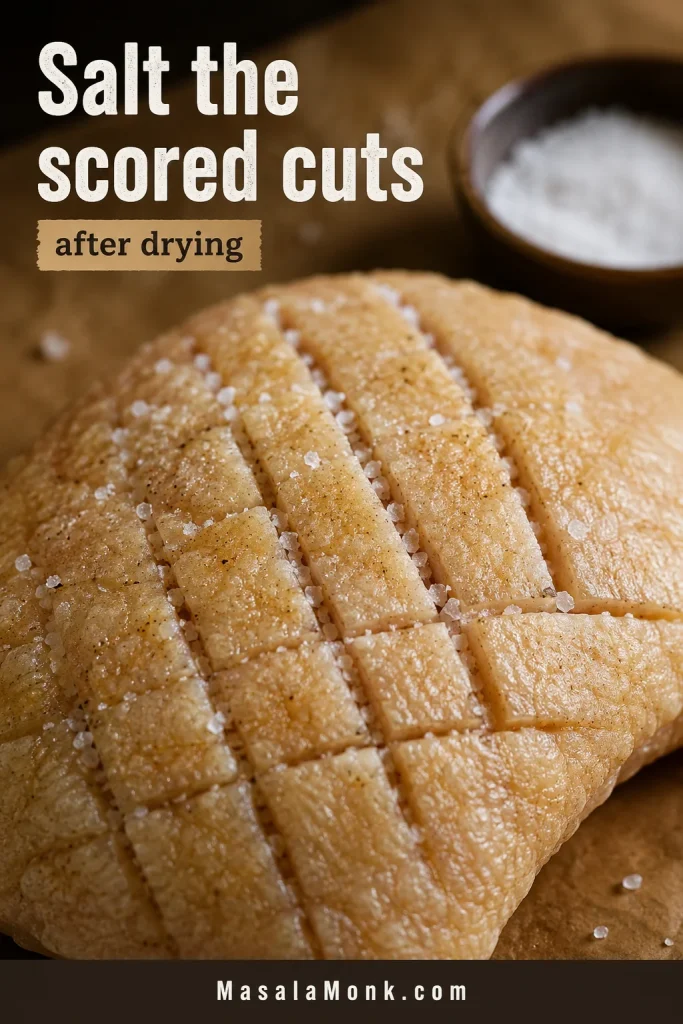
Salt generously
Massage sea salt into the cuts after the rind is dry. Salt helps draw out moisture and season the crackling. If there are huge clumps sitting on top, brush off the excess before roasting.
Start hot and avoid steam
The first 30–40 minutes are important. Keep the pork uncovered and avoid opening the oven repeatedly. During this stage, the skin should start to bubble, blister, and turn golden in patches.
If you are worried about steam, add tray liquid after the hot crackling stage, not before. Keep that liquid in the bottom of the tray and away from the rind.
Keep the rind as level as possible
If one side of the rind sits much lower, juices can pool there. Use onions, apples, or a small piece of foil under the roast to level the surface if needed.
Know the crackling rescue rule
When the pork is done but the crackling is not crisp, stop cooking the meat and finish the rind separately while the pork rests.
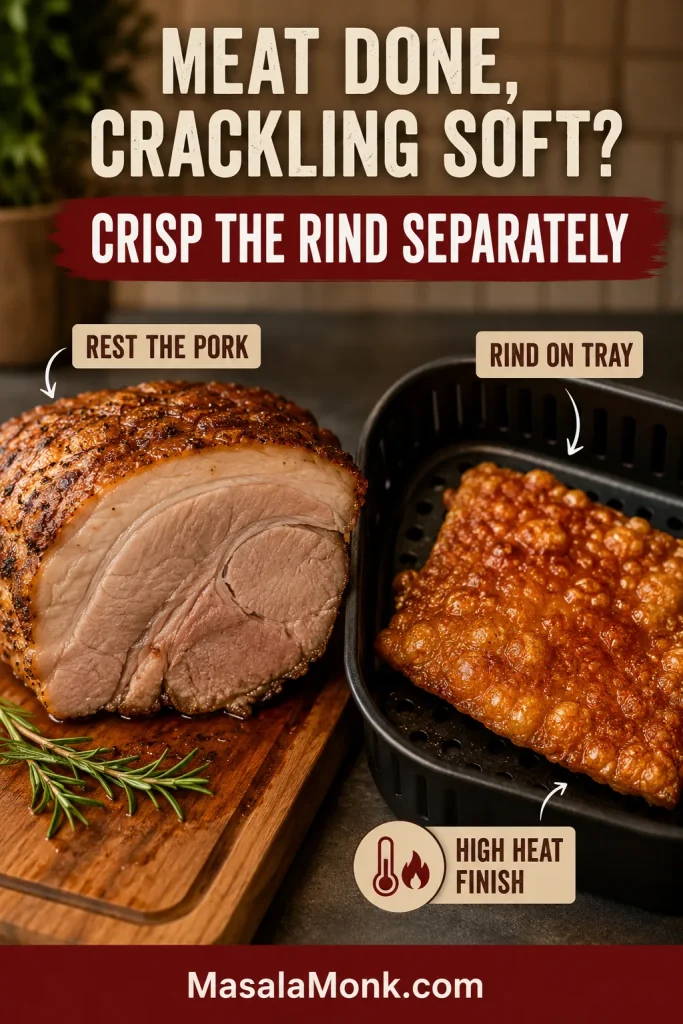
To rescue crackling separately, lift off the rind, place it on a tray, salt lightly again if needed, and blast it in a hot oven, under the grill/broiler, or in an air fryer until hard and crisp. Check often because it can go from perfect to burnt quickly.
This one move can save both the meat and the crackling. You are not failing the roast; you are just separating the two jobs.
By this point, you do not need to know every possible pork label. You only need the weight, whether the joint has rind, and where to put the thermometer. The oven method below brings those pieces together.
How to Cook Pork Leg Roast in the Oven
The steps look long on paper, but most of the work is simple: dry the skin, salt it well, start hot, then let the thermometer guide the finish.
At this point, you only need four things: a dry scored top, a hot first stage, a lower second stage, and a thermometer in the thickest part. Everything else is there to help those four things work.
Step 1: Dry the pork
Remove any packaging and pat the pork dry, especially the rind. Overnight fridge drying helps when you have time. Even 30–60 minutes uncovered while the oven heats is better than roasting a wet rind.
Standing at the counter with the roast already unwrapped? Start with the skin. Dry it first, then move on to seasoning and tray setup.
Step 2: Bring it closer to room temperature
Take the pork out of the fridge about 45–60 minutes before roasting, usually while the oven heats and you prepare the tray. Do not leave raw pork sitting out for hours.
Step 3: Score the rind
Score the rind in narrow lines if it has not already been done. Cut through the skin and fat, but avoid cutting into the meat.
Step 4: Season the meat side
Rub the meat side with pepper, crushed fennel seeds if using, and a little oil. Tuck garlic, rosemary, sage, onions, and apples under the roast for aroma.
Step 5: Salt the rind
Rub a thin layer of oil over the rind, then massage salt into the scores. This gives crackling its flavor and crunch.
Step 6: Set up the roasting tray
Place sliced onions, garlic, apples, and herbs in the tray. Set the pork on top, rind facing up. A rack is ideal, but a thick bed of onions and apples also works as a trivet. The pork should sit above the liquid, not in it.
Step 7: Roast hot for crackling
Make sure the oven is fully preheated. Roast in the center or upper-middle of the oven at 240°C / 465°F or 220°C fan for 30–40 minutes. The rind should begin to bubble, blister, puff, and turn golden.
The crackling does not need to look perfect halfway through. Look for progress: bubbling, blistering, dry-looking skin, and golden patches. That blistered surface is what will later break into crisp shards instead of bending like chewy skin.
When the rind still looks pale, flat, and soft after the hot stage, it needs more heat. A roast that is nowhere near done can continue cooking. If the center is already close, save that final heat for the skin separately later.
Step 8: Lower the oven
Reduce the oven to 180°C / 350°F or 160°C fan. If you want gravy, add stock, cider, or water to the bottom of the tray. Keep the liquid below the pork so the roast does not steam.
Step 9: Cook to temperature
Continue roasting until the thickest part reaches your preferred internal temperature. For juicy sliceable pork, aim for 63–65°C / 145–149°F. Prefer a firmer, more traditional roast? Aim for 70–71°C / 158–160°F.
If the meat reaches temperature before the crackling is perfect, you have not failed. That is exactly what the separate-rind rescue is for.
Step 10: Rest before carving
Rest the pork for 15–20 minutes. Resting is not just waiting; it helps keep the juices from running out as soon as you carve.
Rest the meat, not the steam. Leave crisp crackling exposed so steam cannot soften it. If you need to keep the meat warm, tent foil loosely around the sides but leave the top uncovered.
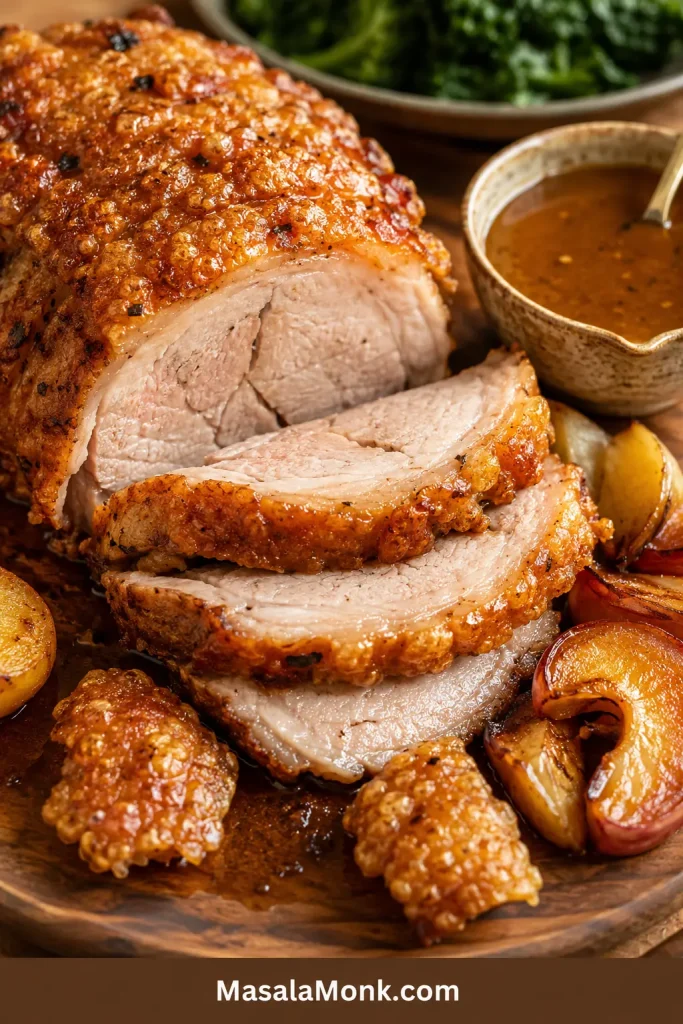
When the pork has rested properly, the slices should look moist rather than wet, with enough structure to hold together on the plate.
Step 11: Make gravy from the tray
Spoon off excess fat from the roasting tray. Stir flour or cornflour into the pan juices, then add stock, cider, or water and simmer until the gravy thickens. A little mustard or apple cider vinegar sharpens the flavor and balances the richness.
The gravy should taste savory, slightly sweet from the onions or apples, and sharp enough to cut through the richness of the pork.
Step 12: Slice and serve
Use a serrated knife to cut through the crackling, then carve the pork into slices. Slice across the grain when you can. If the grain changes direction as you carve around the roast, turn the meat and keep slicing across the lines of the muscle.
The best slices hold together but still look juicy at the center, with crisp pieces of crackling on the side for anyone who reaches for them first.
Once you understand the oven method, the variations are easier. Boneless, bone-in, slow cooker, and air fryer versions all follow the same basic rule: protect the rind, then cook the center gently.
Need a specific version? Jump to boneless pork leg, bone-in pork leg, slow cooker pork leg, or air fryer pork leg.
Boneless Pork Leg Roast
Boneless pork leg roast is one of the easiest forms to cook because it is usually rolled into a neat shape and tied. It slices cleanly and fits well in a normal roasting tray.
The main thing to watch is dryness. Because the bone has been removed, a boneless or rolled pork leg can go from juicy to dry if it is roasted too long. It is convenient, but because it is lean and evenly shaped, it can give you less margin for error than a fattier cut.
- Use the same hot-start crackling method.
- Keep the rind facing up and as level as possible.
- Check the center early.
- Do not rely only on the label timing if the roast is small.
- Rest before slicing so the juices settle.
A 1–1.5 kg joint needs earlier checking than the chart may suggest. Smaller rolled roasts cook faster than many people expect.
Bone-In Pork Leg Roast
A bone-in pork leg roast is larger, more dramatic, and excellent for a centerpiece meal. It can also take longer than a boneless roast of the same weight because the shape is less even.
- Use the same high-heat start for crackling.
- Check the temperature in the thickest meaty part, not touching the bone.
- Allow extra time for large roasts.
- Rest at least 20 minutes for bigger pieces.
- Carve around the bone with a sharp knife.
If you are cooking a whole pork leg or a very large bone-in leg, use the chart only as a guide. Large roasts vary too much in shape for timing alone to be reliable.
Can You Cook Pork Leg in the Slow Cooker?
Yes, you can cook pork leg in the slow cooker, but there is one important catch: the slow cooker will not make crisp crackling by itself.
Use the slow cooker when tenderness matters more than oven-roast texture. It is helpful for gentle cooking, but not helpful if you expect the skin to crackle inside the cooker.
Slow cooker pork leg will taste more like tender sliced or chunked pork than classic oven roast pork. The meat can be good, but the rind needs a separate crisping step.
Slow cookers create steam and moist heat. That is good for tender meat, but bad for dry, blistered rind. If you want slow cooker pork leg with crackling, cook the meat gently first, then crisp the rind separately in a hot oven, under the grill/broiler, or in an air fryer.
Basic slow cooker pork leg method
- Use a 1.5–2.5 kg pork leg joint, preferably skin-on if you want crackling.
- Season the meat side with salt, pepper, garlic, herbs, onions, and apples.
- Add a small amount of stock, cider, apple juice, or water to the slow cooker.
- Keep the liquid below the rind if the skin is still attached.
- Cook on low for about 7–8 hours, or on high for about 4–5 hours, until tender.
- Remove the pork and pat the rind very dry.
- Rub the rind with salt and crisp it in a hot oven at 220–240°C / 430–465°F until crackled.
When the meat is already perfectly cooked but the skin is rubbery, remove the rind in one piece and crisp it separately. That protects the pork from drying out while the crackling finishes.
If your real goal is classic shredded pork, pork shoulder is still the better cut. Pork leg can work, but it needs more moisture and is less forgiving. For a dedicated shredded method, use this slow cooker pulled pork recipe.
Can You Use Pork Leg for Pulled Pork? Only If You Have To
You can use pork leg for pulled pork, but it is not usually the best cut.
Pork leg can shred if cooked low and slow with enough moisture, but it will not be as rich, juicy, or forgiving as shoulder. If you already have this cut and want to pull it, cook it until very tender, add moisture such as stock, cider, apple juice, or sauce, then shred while warm.
Mix the shredded meat with cooking juices or sauce so it does not taste dry. If you are turning leftover roast pork into sandwiches, this BBQ sauce for pulled pork can help bring back moisture and flavor.
Can You Cook Pork Leg Roast in an Air Fryer?
Yes, but air fryer pork leg works best with smaller boneless joints. A 1–1.5 kg roast is usually more realistic than a large bone-in leg, unless you have a very large air fryer.
- Dry and salt the rind the same way as the oven method.
- Start hot to help the skin crisp.
- Reduce the temperature to cook the meat through.
- Use a thermometer, because air fryer models vary a lot.
- Do not crowd the basket; air needs to circulate around the rind.
With many small joints, a hot start around 200–210°C / 400–410°F for about 20 minutes can help the rind. Then lower the heat to around 160–180°C / 320–350°F and cook until the center reaches your target temperature.
A roast that sits too close to the air fryer element is better cooked in the oven. If fat begins smoking in your air fryer, pause, drain excess fat from the drawer if your model allows, and continue at a slightly lower temperature.
If your pork has been sliced into chops rather than kept as a roast, use a chop-specific guide instead. This air fryer pork chops recipe is a better fit for individual pieces.
For larger pork leg roasts, the oven is usually easier and more reliable.
Is Pork Leg the Same as Ham?
Fresh pork leg and ham come from the same general part of the pig, but they are not the same thing in the kitchen.
Fresh pork leg is uncured raw pork. That is what this recipe uses. It can be roasted with rind to make crackling. In some US labels, you may also see fresh ham, uncooked, which means uncured pork leg rather than ready-to-eat ham.
Ham is cured pork leg. It may be smoked, salted, brined, or partially cooked depending on the product. Ham usually needs a different method, often with soaking, glazing, gentle reheating, or baking.
Labels such as fresh pork leg, fresh ham uncooked, pork leg roast, leg of pork, pork joint, boneless pork leg, rolled pork leg, or bone-in pork leg mean this guide is for you. Ham, gammon, cured pork leg, or leg ham need ham-specific cooking instructions instead.
Troubleshooting Pork Leg Roast
Most pork leg problems are fixable. The key is not to keep cooking the meat just because the rind needs more time.
Do not panic if the meat and crackling are not ready at the same moment. That happens often, and it is fixable.
Emergency Crackling Check
Use this check before you keep roasting. It helps you decide whether the meat needs more time, the crackling needs protection, or the rind should be finished separately.
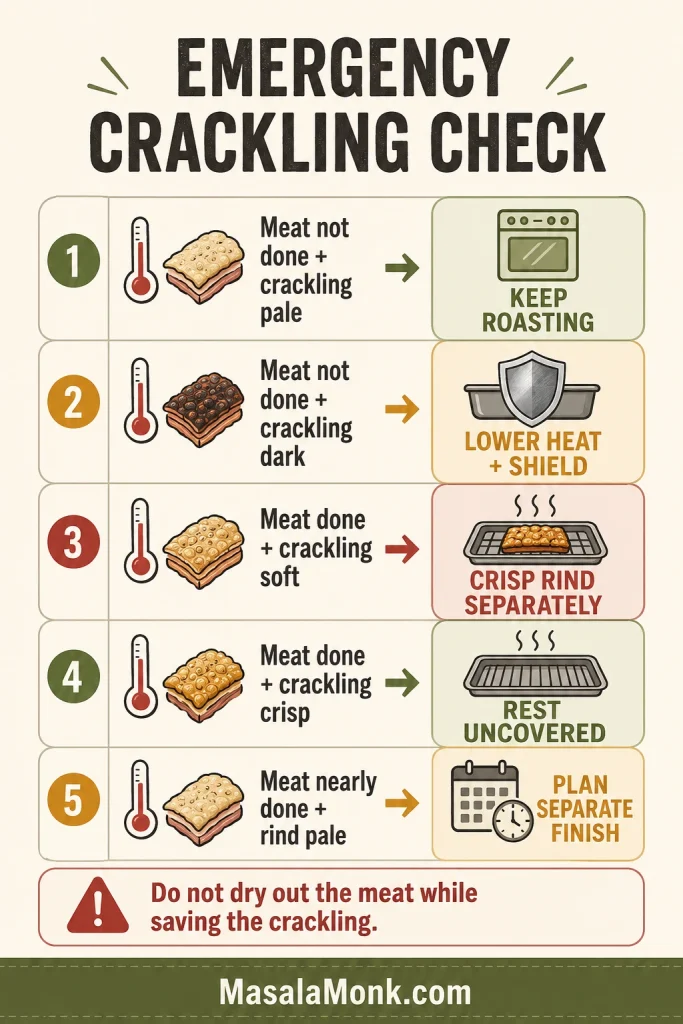
| Situation | Best move |
|---|---|
| Meat not done, crackling pale | Keep roasting and check again soon |
| Meat not done, crackling dark | Lower the oven and shield dark patches with foil |
| Meat done, crackling soft | Remove the rind and crisp it separately |
| Meat done, crackling crisp | Rest uncovered and leave the crackling exposed |
| Meat nearly done, rind still pale | Plan a separate crackling finish while the pork rests |
If guests are waiting, this is where the separate-rind rescue saves dinner. Rest the pork, crisp the skin, and bring both back together on the board.
Common Pork Leg Roast Problems and Fixes
| Problem | Why it happened | What to do |
|---|---|---|
| Crackling is soft | The rind was wet, the oven was not hot enough, or steam built up | Increase the heat, or remove the rind and crisp it separately |
| Meat is done but crackling is not crisp | The pork cooked faster than the rind crackled | Rest the meat and crisp the rind separately in a hot oven, grill/broiler, or air fryer |
| Crackling is burning in spots | The oven heat is uneven or one patch is too exposed | Cover dark spots loosely with foil and keep cooking the pale areas |
| Rind is pale, flat, and soft | It has not had enough dry heat yet | Give the rind more heat; if the meat is done, crisp the rind separately |
| Rind is chewy | Not enough drying, salt, or high heat | Dry longer next time; for now, give it a hot final blast |
| Pork is dry | It cooked too long or too hot after the crackling stage | Slice thinly and serve with gravy; next time check the center earlier |
| Boneless roast cooked unevenly | The rolled joint was uneven or loosely tied | Check more than one spot and rotate the tray if needed |
| Slow cooker rind is rubbery | Steam softened the skin | Pat it dry, salt it again, and crisp it separately |
| Skin is crisp but meat is not done | The hot stage worked before the center finished cooking | Reduce the oven and continue roasting; shield crackling if needed |
The Rescue Rule to Remember
The best rescue trick is this: if the pork meat is done but the crackling is not, stop cooking the meat. Remove the rind and crisp it separately. That gives you better crackling without turning the roast dry.
That is the real secret of pork leg roast: do not punish the meat while trying to save the crackling.
Back on track? Return to serving ideas or go back to the quick answer.
What to Serve with Pork Leg Roast
Once the crackling is crisp and the pork has rested, keep the sides simple and let the roast be the center of the plate.
The best plate has contrast: crisp crackling, tender slices, hot gravy, and sides that either catch the sauce, soften the plate, or cut through the richness with something sharp and fresh.
- Roast potatoes
- Apple sauce
- Mustard gravy
- Roasted apples and onions
- Carrots and parsnips
- Peas or green beans
- Red cabbage or braised cabbage
- Yorkshire puddings or dinner rolls
- Simple green salad with a sharp vinaigrette
For a classic roast dinner plate, serve the pork with a soft potato side like this mashed potatoes recipe. If you want something crisp and cold beside the rich pork, a wedge salad works well, especially with sharp honey mustard dressing.
For a bigger holiday-style roast, add eggless Yorkshire pudding or a cozy green side like green bean casserole. Keep the sides simple if the pork has strong crackling and gravy.
Leftover Pork Leg Ideas
Pork leg is one of the better roasts for leftovers because it slices neatly instead of falling apart. This is one of the quiet benefits of pork leg: even after the roast dinner, you still have useful slices for tomorrow.
Tomorrow’s pork should not feel like leftovers you have to use up. Cold slices should feel useful, not sad: ready for mustardy sandwiches, quick pork-and-gravy rolls, hash, or bowls that are already halfway made.
Store the pork and crackling separately if you can. The meat likes moisture; the crackling does not.
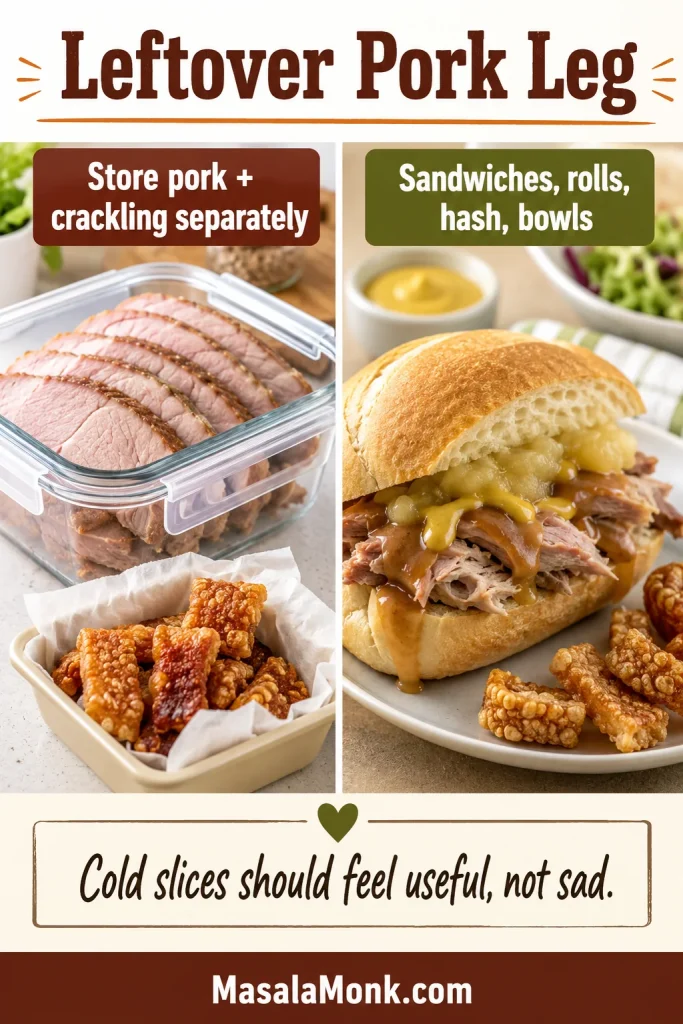
- Roast pork sandwiches with mustard or apple sauce
- Pork and gravy rolls
- Tacos or wraps
- Pork hash with potatoes and onions
- Soup with vegetables and stock
- Salad bowls with apples, cabbage, and mustard dressing
- Quick BBQ pork sandwiches with sauce
For leftover roast pork sandwiches, a little garlic aioli or BBQ sauce keeps the meat from tasting dry. If you want a cold side for next-day lunches, these potato salad recipes are a natural match.
Small chopped pieces of pork leg can also go into hash, pies, or croquettes. If you have leftover mashed potatoes too, this croquettes recipe is a useful next-day idea.
Cool leftovers and refrigerate them promptly. Store sliced pork in shallow airtight containers in the fridge for 3–4 days. For longer storage, freeze sliced pork with a little gravy or pan juice so it reheats more gently. Keep crackling separate and re-crisp it in a hot oven or air fryer.
For best texture, reheat sliced pork gently with a splash of gravy, stock, or water so it does not dry out. Reheat crackling separately until crisp again.
FAQs
How long does pork leg take to roast?
A pork leg roast usually takes 30–40 minutes at high heat for crackling, then about 30–40 minutes per kg at a lower roasting temperature. For a 2.5 kg roast, expect around 2 hours, plus resting time.
How long do you cook pork leg per kg?
After the hot crackling stage, cook pork leg for about 30–40 minutes per kg at 180°C / 350°F or 160°C fan. Start checking near the early end of the range.
What temperature should pork leg roast be cooked to?
For juicy sliceable pork, aim for 63–65°C / 145–149°F in the thickest part, then rest before carving. Prefer a firmer well-done roast? Cook closer to 70–71°C / 158–160°F.
Should pork leg be pink inside?
Pork leg can be slightly pink inside if it has reached the correct internal temperature. For juicy slices, cook the thickest part to 63–65°C / 145–149°F and rest before carving. If you prefer a firmer, less pink roast, cook closer to 70–71°C / 158–160°F, but it may be drier.
Is pork leg good for roasting?
It is, especially when it has the rind attached for crackling. Treat it as a slicing roast with a hot start for the skin and controlled heat for the meat.
Is boneless pork leg roast different from bone-in?
Yes. Boneless pork leg roast is easier to carve and often cooks more evenly. Bone-in pork leg may take longer and should be checked away from the bone.
How do I get crackling on pork leg?
Dry the rind well, score it if needed, rub with oil and salt, and start the roast in a hot oven. Keep liquid and wet seasonings away from the skin.
Do I put water in the roasting tray?
You can add a small amount of stock, cider, or water after the hot crackling stage if you want gravy. Keep it below the pork and away from the rind. Too much liquid creates steam, and steam softens crackling.
Can I roast pork leg without rind?
Yes. Roast skinless pork leg using the same internal-temperature guidance, but skip the crackling steps. Because there is no rind to protect the top, check early and avoid overcooking.
Should I pour boiling water over pork rind?
You can, but only before the final drying stage. Boiling water can tighten scored rind, but the skin must be dried completely afterward or it will steam instead of crackle.
Can I cook pork leg in the slow cooker?
Yes, but the rind will not crackle in the slow cooker. For crackling, finish the rind separately in a hot oven, grill/broiler, or air fryer.
Can I make pulled pork with pork leg?
You can, but pork leg is not the easiest cut for classic pulled pork. It needs slow cooking and enough moisture, while pork shoulder is usually richer and more forgiving.
Is pork leg the same as ham?
No. Fresh pork leg is uncured raw pork and can be roasted with crackling. Ham is cured pork leg and needs a different cooking or glazing method. In some US labels, uncured pork leg may also be called fresh ham.
Why is my pork leg roast dry?
Usually because it cooked too long after the crackling stage. Slice it thinly and serve it with gravy or pan juices; it is still usable. Next time, start checking the center earlier.
What should I do if the crackling is not crisp?
You have not ruined the roast. If the meat still needs time, increase the oven heat near the end. Once the meat is already done, remove the rind and crisp it separately.
Can I cook pork leg roast in an air fryer?
Small boneless joints can work in an air fryer. Start hot for the rind, then lower the temperature and cook until the center reaches the correct internal temperature.
Should I cover pork leg while roasting?
Not during the crackling stage. Steam is the enemy of crisp rind. Later, you can loosely shield parts of the roast if they are browning too fast.
How long should pork leg rest before carving?
Let pork leg rest for at least 15–20 minutes before carving. Larger bone-in roasts can rest a little longer.
What size pork leg roast do I need?
As a rough guide, allow 250–350 g raw pork leg per person if bone-in, or about 200–250 g per person if boneless. Add extra if you want leftovers.
The Simple Rule for Pork Leg Roast
The whole recipe comes back to the two-job rule: crisp the rind first, then protect the meat. Make the skin dry, salty, and hot enough for crackling. Then lower the oven and cook the meat gently until the center reaches the right temperature.
Use the chart to plan the meal, but let the thermometer decide when the pork is ready. When the knife gets through the crisp top and the pork underneath still slices cleanly, the method has done its job.
Once you have made it this way once, pork leg stops feeling like a risky centerpiece. You know what the skin needs, what the meat needs, and when to stop cooking. That is how you get crisp crackling, juicy slices, and a roast that feels calm from oven to carving board.
Keep a quick note of the weight, whether the roast was boneless or bone-in, and when it reached temperature. That one note makes the next pork leg roast much easier.


