Posted on — Leave a comment

Pozole Rojo Recipe: Authentic Mexican Pork Pozole With Hominy

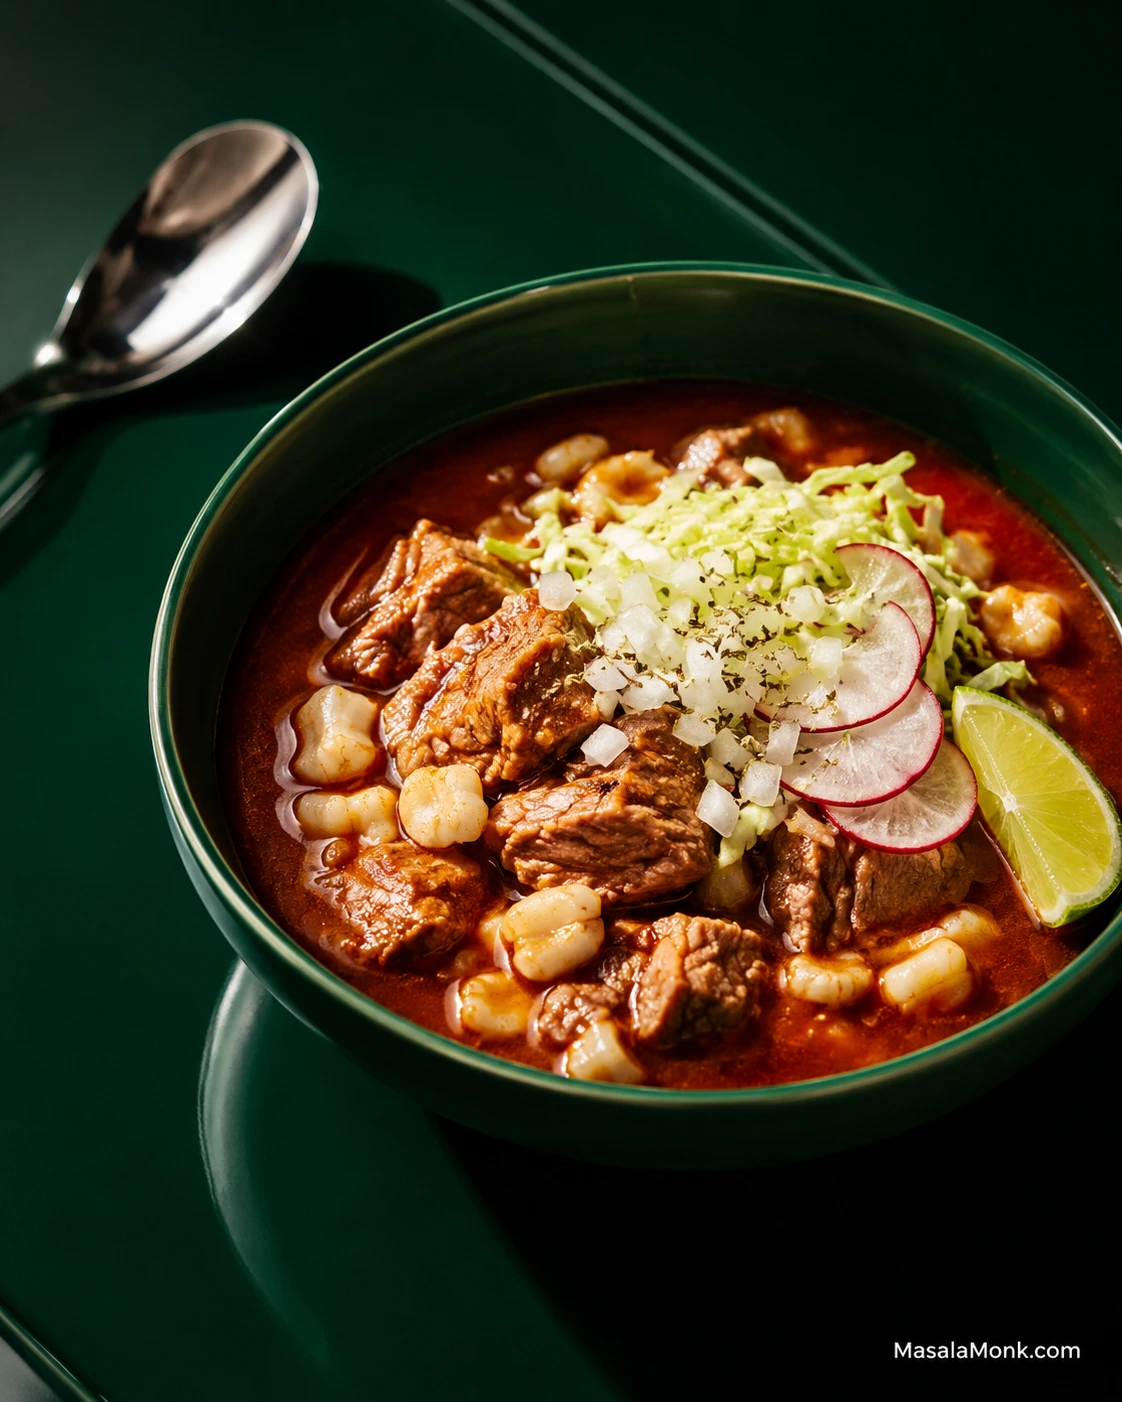
Portrait view of a green bowl filled with red pozole broth, large hominy kernels and pork chunks, topped with shredded cabbage, chopped white onion, radish slices, oregano, and a lime wedge.

A bowl of pozole rojo lands on the table hot and deeply savory: tender pork, plump hominy and a brick-red chile broth. Then you start changing it. Cold cabbage, sliced radish, onion, crushed oregano and lime make the next spoonful sharper, fresher and crunchier than the first. Part of the pleasure is that the pot is shared, but each bowl is yours to finish.

Pozole rojo is a Mexican hominy-and-meat soup or stew flavored and colored with dried red chiles. The details vary by region and household. Here, pork shoulder builds the broth while guajillo and ancho make the rojo, with chile de árbol available when you want more heat.

None of the individual steps is especially difficult. What matters is knowing when to stop toasting a chile, when the shoulder is ready for the next stage and what kind of hominy you actually bought. Those small decisions matter far more than throwing extra spices into the pot at the end.

Use the times below as checkpoints, not finish lines. We’re aiming for a loose, brick-red broth with tender pork that still holds as pieces. The hominy should taste seasoned by the pot around it, and the garnishes should brighten an already good bowl rather than rescue it.

Quick Answer: How to Make Pozole Rojo

  • Simmer the pork. Cook pork shoulder gently with onion, garlic and bay until nearly tender.
  • Make the rojo. Briefly toast guajillo and ancho chiles, soften them, blend with aromatics, strain, then cook the puree in a little fat until glossy and no longer raw-smelling.
  • Bring the pot together. Add the rojo and rinsed hominy while the shoulder still has a little resistance. Simmer another 30–45 minutes.
  • Finish the bowls. Add cabbage or lettuce, radishes, white onion, Mexican oregano and lime. Serve tostadas and extra chile alongside.
On This Page

Before You Start: Make These 3 Choices

ChooseUse ThisWhy
Pork3 lb / 1.36 kg boneless shoulderForgiving, flavorful and rich enough to build the broth
ChilesGuajillo + ancho; árbol optionalGuajillo carries the red-chile flavor, ancho adds depth and árbol brings heat
Hominy4 × 15-oz / 425-g cansOur default: hominy in nearly every spoonful without taking over the bowl

Using bone-in shoulder? Buy roughly 3½–4 lb / 1.6–1.8 kg and, if possible, have the butcher cut it into several large pieces. A whole bone-in roast will cook differently from 2-inch chunks.

Using dried hominy? Read the dried-hominy instructions first. You need corn that has already been nixtamalized but still requires soaking and cooking; untreated dried corn is a different project.

Once those choices are settled, the cooking is mostly a matter of timing the pork and rojo so they reach the finished pot at the right moment.


Pozole Rojo Recipe

This pork pozole rojo uses whole dried guajillo and ancho chiles rather than canned enchilada or red sauce. The main pot stays mild to moderate, leaving plenty of room for extra chile at the table.

  • Serves: 8 as a main course; about 10–12 smaller portions
  • Prep: about 30 minutes
  • Hands-on cooking after prep: about 15–30 minutes
  • Cook/simmer: about 2½–3 hours
  • Total with canned hominy: about 3–3½ hours
  • Heat: mild to moderate, adjustable
  • Recommended pot: about 8 qt / 7.5 L

Starting with dried hominy adds considerably more time: commonly an overnight soak plus several hours of separate cooking, depending on the product.

Equipment

  • 8-quart / approximately 7.5-L stockpot or Dutch oven
  • Blender suitable for hot foods
  • Fine-mesh sieve
  • Medium saucepan or high-sided skillet
  • Heatproof bowl
  • Tongs or slotted spoon
  • Knife and cutting board

For the Pork Broth

  • 3 lb / 1.36 kg boneless pork shoulder, cut into roughly 2-inch / 5-cm pieces
  • Optional for a richer broth: 1 lb / 450 g pork neck bones, meaty ribs, shank or pig’s feet
  • 10 cups / 2.4 L water to start, or enough to mostly cover the pork
  • 1–2 cups / 240–475 ml additional hot water, available if needed
  • ½ large white onion
  • 4 garlic cloves, peeled
  • 2 bay leaves
  • 18 g fine sea salt, divided, plus more to taste

If the shoulder has a very thick, hard exterior fat cap, trim away the excess. Leave the softer fat and marbling that help keep the meat juicy.

Salt varies enormously by brand and crystal size, so weight is the most reliable measure. Start with about 12 g in the broth and reserve roughly 6 g for final seasoning.

No scale? With fine sea salt, about 2 teaspoons is a conservative starting point for the broth; season the finished pot gradually. Kosher salts vary substantially by crystal size and shouldn’t be substituted spoon-for-spoon.

Water is the default because the pork is building its own broth. With boneless shoulder and no extra bones, some low-sodium stock can replace part of the water for a slightly fuller starting point. Reduce the added salt accordingly.

For the Red Chile Sauce

  • 6 medium dried guajillo chiles, 30–35 g
  • 3 medium dried ancho chiles, 30–40 g
  • 0–2 dried chiles de árbol, optional for heat
  • ½ large white onion
  • 4 garlic cloves
  • 2 teaspoons Mexican oregano
  • ½ teaspoon freshly ground black pepper
  • 2 tablespoons / 30 ml lard or neutral cooking oil
  • 1–2 cups / 240–475 ml pork broth from the pot, as needed for blending

Chile sizes vary enormously, so let the gram weight win when your particular chiles look unusually large or small.

Mediterranean oregano will work if Mexican oregano isn’t available, though the aroma is different.

For the Hominy

  • 4 cans hominy, 15 oz / 425 g each, about 60 oz / 1.7 kg packaged weight total, drained and thoroughly rinsed

White or golden/yellow canned hominy both work.

For Serving

  • 3–4 cups finely shredded cabbage or lettuce
  • 6–8 radishes, thinly sliced
  • ½–1 medium white onion, finely chopped
  • 4–6 limes, cut into wedges
  • About 2 tablespoons Mexican oregano
  • 8–12 tostadas
  • Optional avocado, cilantro and hot chile salsa

1. Start the Pork Broth

Put the pork shoulder, optional bone-rich pork, ½ onion, 4 garlic cloves, bay leaves, about 12 g salt and 10 cups / 2.4 L water in the pot. Most of the pork should sit beneath the liquid; add a little more water if your pot or bone-in pieces require it.

Bring the pot just to a boil over medium-high heat. Skim away the heavier gray foam that gathers on the surface.

Lower the heat as soon as the broth boils. Partially cover and maintain a gentle simmer with lazy bubbles appearing here and there.

This is the quiet part of the recipe. Keep an eye on the liquid level, add hot water if the pork becomes too exposed, and let the shoulder simmer for about 1½ hours while you turn to the chiles.

2. Prepare and Toast the Chiles Briefly

Stem the guajillo and ancho chiles and shake or scrape out most of the seeds. Stem the árbol chiles too, if using.

Heat a dry skillet over medium to medium-low heat. Press a guajillo or ancho against the hot surface for about 5–10 seconds, flip and warm the other side briefly.

The chile should smell fragrant and become slightly more pliable. Still cold and stiff? Give it another brief contact with the pan.

Árbol chiles are thin and scorch quickly. Warm them for only a few seconds or put them straight into the soaking bowl. Blackened patches, smoke or an acrid smell mean a chile has burned; replace a badly scorched one.
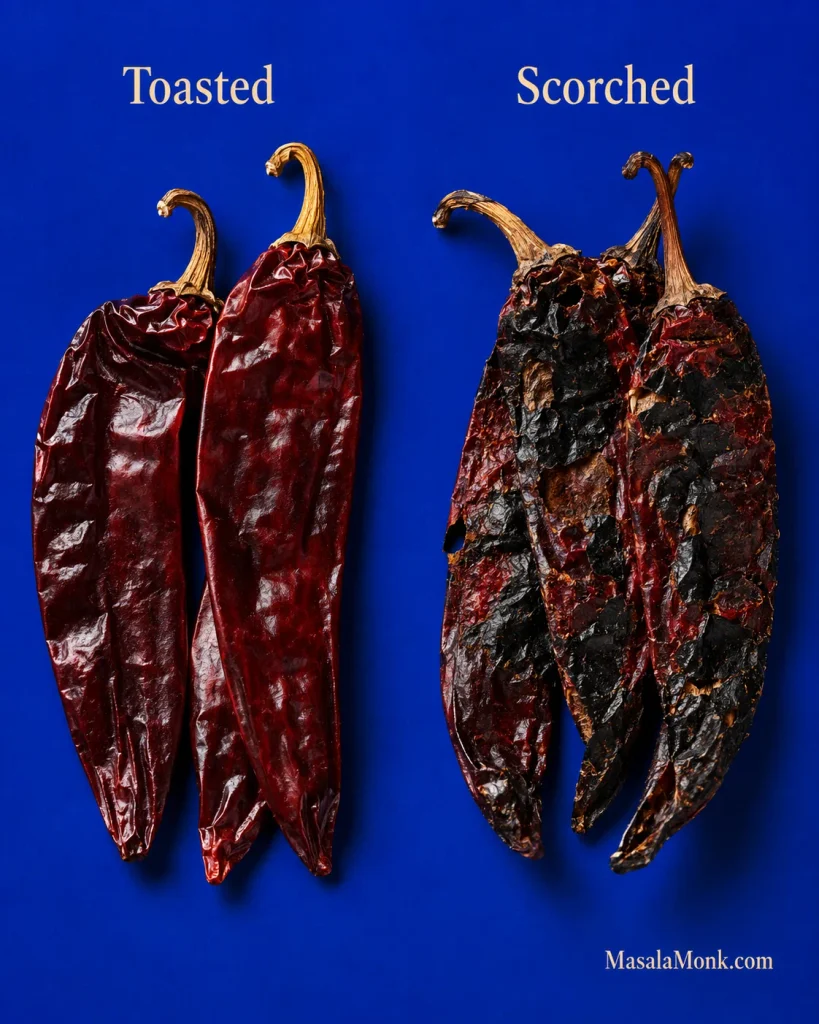
Side-by-side dried chiles labeled Toasted and Scorched on a blue background; the toasted chiles remain glossy dark red while the scorched chiles have extensive blackened patches.
With guajillo and ancho chiles, it is safer to stop a little early than a little late. A chile that is merely under-toasted can still flavor the rojo; a badly scorched one can bring bitterness that soaking will not undo.

3. Soften the Chiles

Put the chiles in a heatproof bowl and cover with very hot water. Soak for about 15–20 minutes, until they bend and fold easily without cracking.

Taste a little of the soaking water. If it tastes pleasantly chile-like, use some for blending. If it tastes bitter, burnt or unpleasantly harsh, discard it and use pork broth instead.

4. Blend and Strain the Rojo

Put the softened chiles in a blender with the remaining ½ onion, 4 garlic cloves, Mexican oregano, black pepper and about 1 cup / 240 ml pork broth.

Let steaming-hot broth stand for a few minutes before blending. Don’t overfill the jar, and follow your blender manufacturer’s instructions for venting hot liquids safely.

Blend until smooth, adding only enough extra broth to keep everything moving. The puree should pour easily. Push it through a fine-mesh sieve to catch tougher pieces of chile skin that could make the finished broth gritty.

5. Cook the Red Chile Sauce

Heat the lard or oil in a high-sided skillet or saucepan over medium heat. Carefully pour in the strained puree; it can splatter when it meets the hot fat.

Cook for about 8–12 minutes, stirring regularly. The puree will darken slightly and turn glossy as the sharp soaked-chile smell cooks away. Once it smells cooked rather than raw, move on.
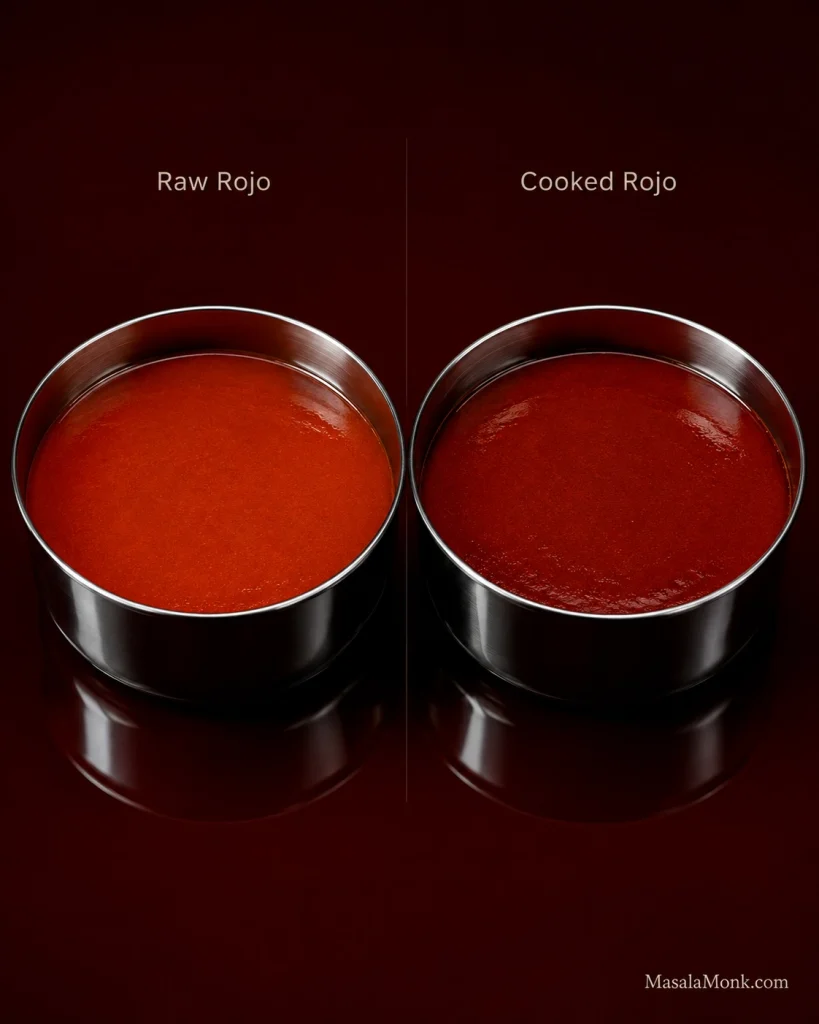
Two metal bowls labeled Raw Rojo and Cooked Rojo show a brighter red raw chile sauce beside a slightly darker, glossier cooked sauce.
The visual change in a properly cooked red chile sauce for pozole is intentionally subtle. If the rojo becomes so thick that it has to be scraped from the pan instead of poured, it has reduced farther than this recipe needs.

Cooking the rojo separately isn’t mandatory, but it is deliberate here: the short fry concentrates the puree before it joins the pork broth.

6. Check the Pork

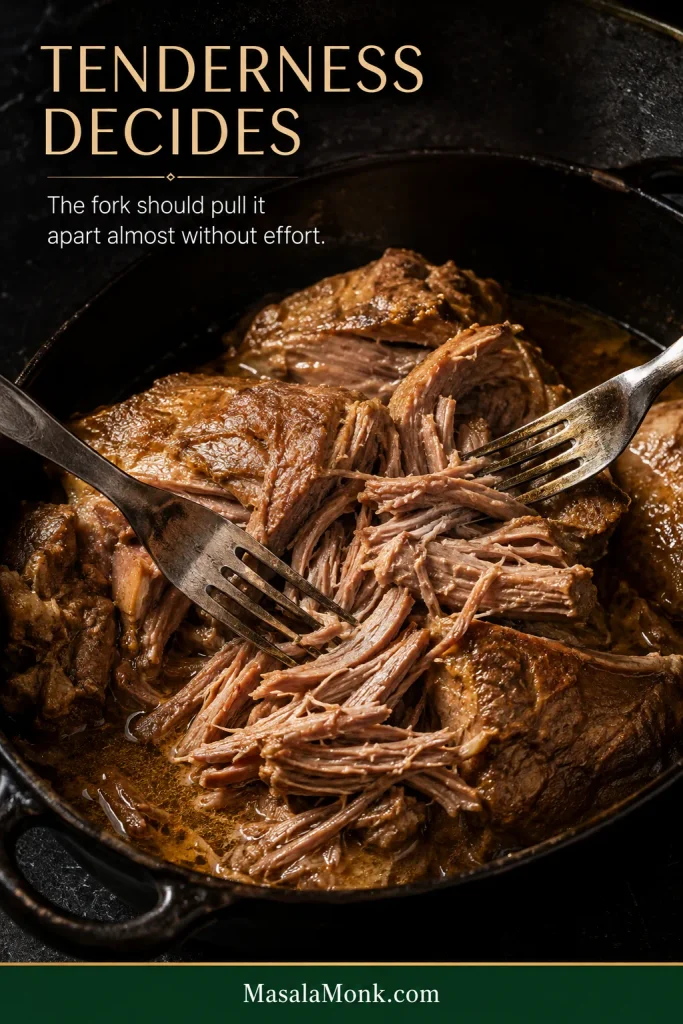
At around 1¾–2 hours total simmering time, test a piece of shoulder. A fork should enter much more easily than it did at the beginning. A little resistance is fine because the meat still has another 30–45 minutes in the finished pot.

Meat that remains tight and rubbery needs another 20–30 minutes at the same gentle simmer.

Remove the bay leaves and any large pieces of broth onion. If you used neck bones, ribs or shank, remove the bones, pull off any tender meat and return it to the pot. With pig’s feet, keep whatever tender edible pieces you enjoy and discard the hard bones.

Pork becomes safe to eat before shoulder becomes tender enough for pozole. Keep cooking for the texture, not the thermometer alone.

7. Add the Rojo and Hominy

Stir the cooked rojo into the pork broth. The pale broth turns brick-red almost immediately, and the smell of the pot shifts from mostly pork and garlic to something unmistakably chile-rich.
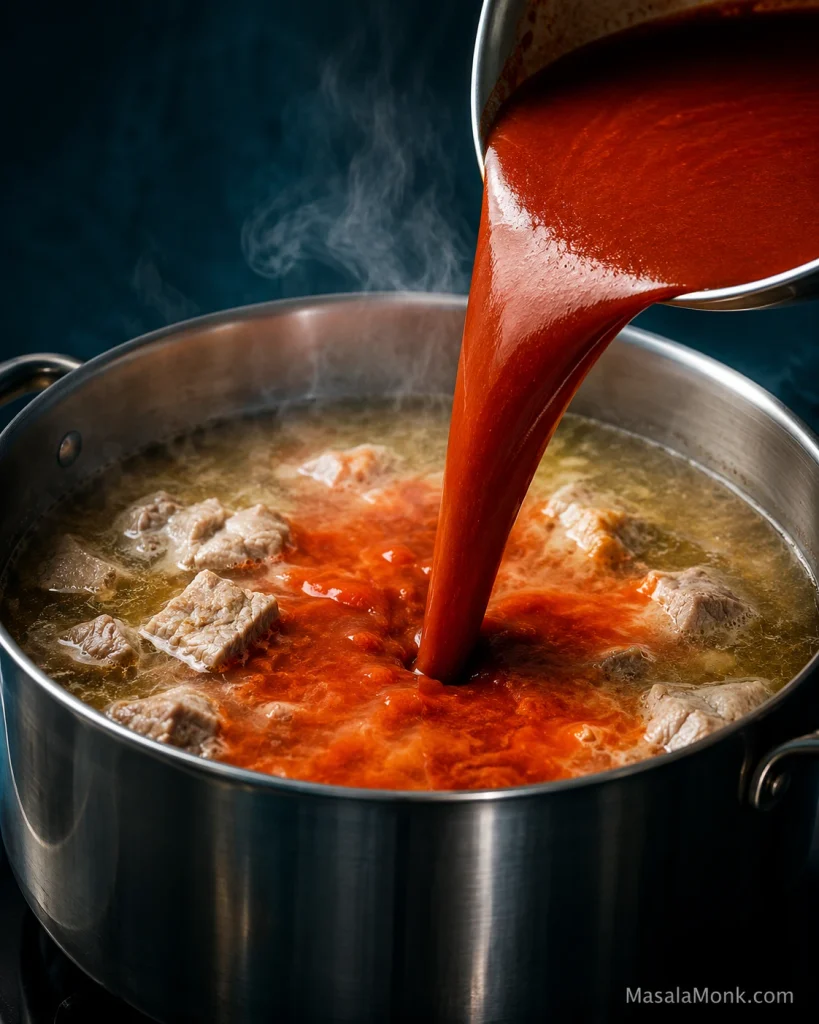
Smooth red chile sauce being poured into a stainless-steel pot of pale pork broth with visible pork chunks, creating red swirls through the simmering liquid.
A properly strained rojo should disappear into the pork broth, not float through it as chile-skin flecks or coarse pulp. That smooth dispersion is one reason straining matters even though the sauce will simmer again in the finished pot.

Add the drained and thoroughly rinsed hominy. Return the pot to a gentle simmer and cook for another 30–45 minutes, uncovered or partially covered.

For this version, stop before the shoulder falls completely into shreds. It should yield easily while still leaving you substantial pieces of pork.

The hominy should no longer taste like plain kernels dropped into soup; it should taste of the pork-and-chile broth around it.

8. Season and Serve

Now taste. Add the remaining reserved salt gradually, stirring and tasting between additions.

A watery broth needs reduction before much more salt. An over-concentrated one needs hot water or unsalted stock first. Skim off large pools of fat while leaving a light sheen on the surface.

Ladle pork, hominy and plenty of rojo into bowls and bring the garnishes to the table.


What Should Good Pozole Rojo Taste and Feel Like?

Taste the broth first. Pork and dried chile should feel like they belong to the same liquid; it shouldn’t taste like plain stock with red sauce stirred in at the end. Drag a spoon through it. The broth should move easily, with enough body from pork, corn and chile to linger lightly on the spoon without turning into chile gravy.

The color may look fiercer than the heat. A deeply red bowl can still be quite mild, especially when the rojo relies mostly on guajillo and ancho.

Break a piece of shoulder with the edge of your spoon. It should separate with gentle pressure while still giving you an actual piece of pork to lift and eat.

Bite a hominy kernel in half. Tender with a little chew is good; a hard or chalky center needs more cooking.
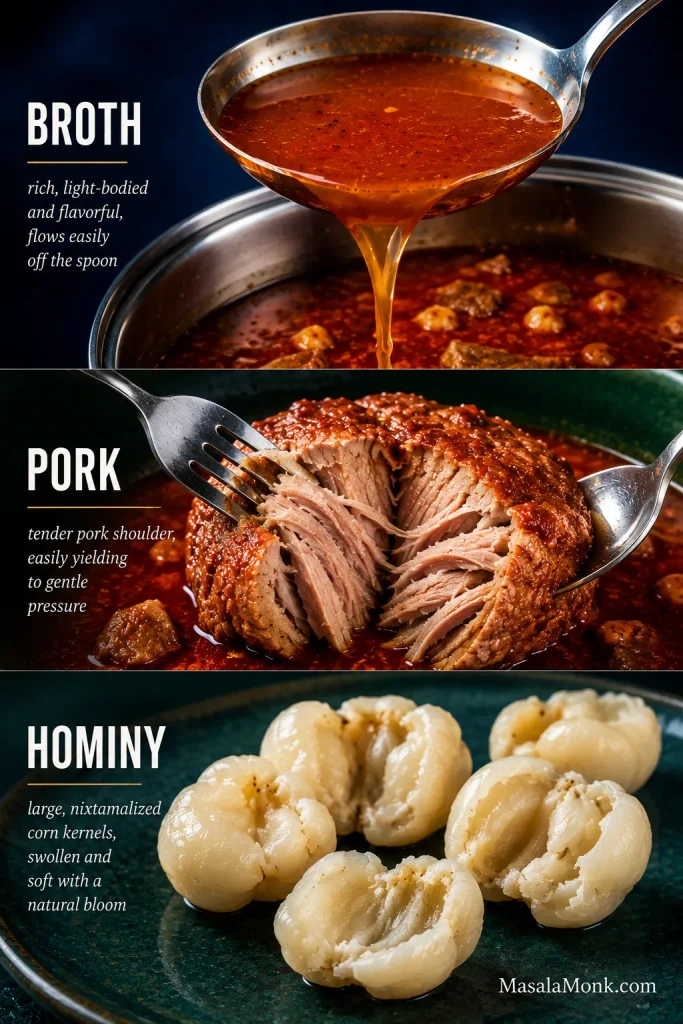
Three stacked close-up photographs labeled Broth, Pork, and Hominy show flowing red broth in a ladle, tender pork shoulder separating under utensils, and large opened cooked hominy kernels.
These three checkpoints do not always finish at the same minute. If one component still lags, cook for that cue rather than the clock, then recheck the broth, pork and hominy before serving.

Now add lime to one spoonful or one side of the bowl and taste again. Lime shouldn’t rescue a bland broth. It should make an already savory one feel brighter, fresher and less heavy.

Something still off? Jump to Pozole Rojo Troubleshooting →

How to Serve Pozole Rojo

The garnishes finish the bowl. Cabbage or lettuce cools the hot broth, radish adds a peppery snap, onion brings fresh sharpness, Mexican oregano adds aroma and lime cuts through the richness of the pork. Tostadas bring the crunch.

Put the garnishes down the middle of the table and leave the bowls unfinished. Someone will pile on cabbage, somebody else will mostly want lime and oregano, and the person chasing heat can reach for the salsa. By the time everyone starts eating, no two bowls need to look quite the same.

Avocado, cilantro and extra chile salsa are also common additions in different households. Crema and cheese also appear in some versions, but they aren’t part of the core garnish set used here.

To build a bowl, ladle in pork, hominy and plenty of broth. Add cabbage, radish and chopped onion. Rub a little oregano between your fingers over the steam, squeeze in lime and then decide how much extra chile you want.

Pozole is built for a table full of people. One pot can stay hot while everyone finishes a bowl differently. Someone goes back for seconds, someone adds another squeeze of lime, and the cook can stay at the table instead of assembling every serving.
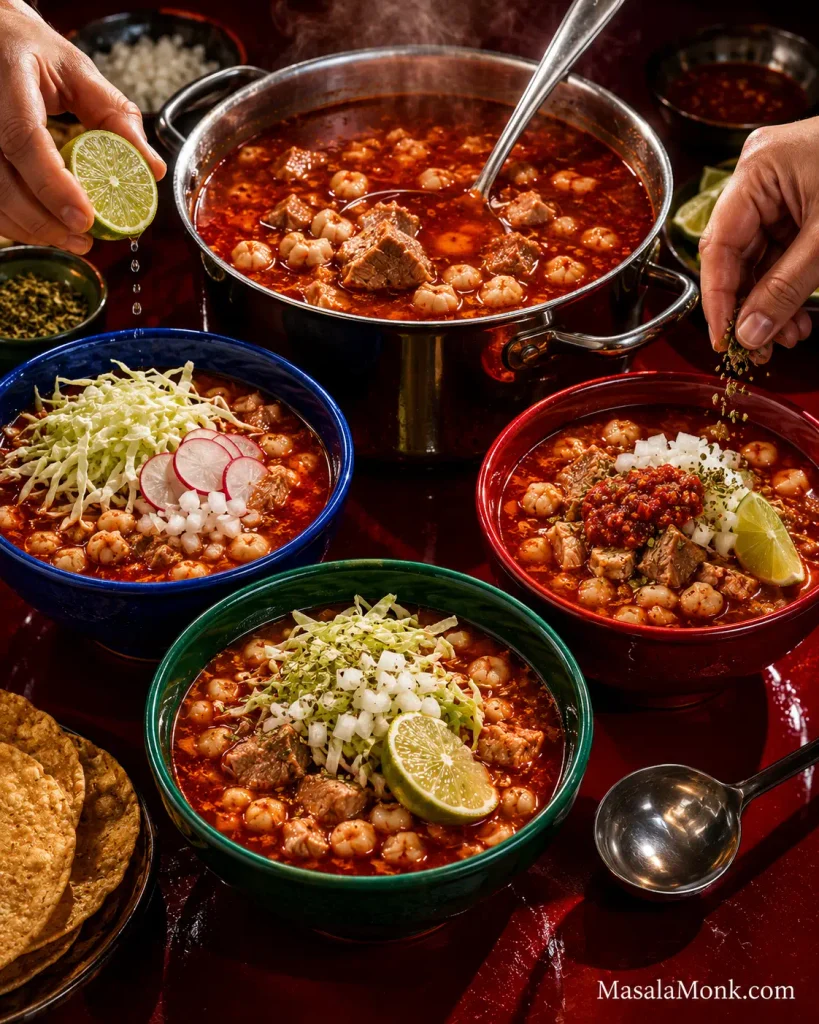
Steaming pot of pozole rojo surrounded by three bowls with different toppings; one emphasizes cabbage and radish, one lime and oregano, and one red chile salsa, while two hands add lime and herbs.
Keep the shared pot balanced; lime, Mexican oregano and extra chile can move each bowl brighter, sharper or hotter at the table.

That flexibility at the table reflects a broader truth about pozole: there isn’t one national pot that everyone makes exactly the same way.

About This Style of Pozole Rojo

Mexican pozole rojo varies by region and household in its chile blend, pork cuts, aromatics and garnishes. Mexico’s Secretaría de Agricultura describes red pozole as particularly associated with Jalisco, with ancho and guajillo among the chiles used and pork among the common meats.

This pot follows that familiar line: nixtamalized corn, pork, guajillo and ancho. Other versions may change the chile blend, include tomato or use aromatics such as cumin, clove, mint or cilantro. Those differences are part of the dish’s regional and household life.

Pozole, Posole and the Three Main Styles

Pozole is the standard spelling in Mexican Spanish. Posole is an established spelling in the United States, particularly in New Mexican and Southwestern cooking, where the word may refer to the prepared corn as well as the finished dish. New Mexican red posole often centers on New Mexico red chile rather than the guajillo-and-ancho blend used here.

  • Rojo: Pozole rojo gets its defining character from dried red chiles.
  • Verde: Pozole verde takes its green character from ingredients such as green chiles, tomatillos and herbs, depending on the region and recipe.
  • Blanco: Pozole blanco leaves out a defining red or green chile sauce so the pale meat-and-hominy broth takes center stage.

Within that range, changing the chile blend is one of the easiest ways to change the character of the pot.

What Each Chile Does in Pozole Rojo

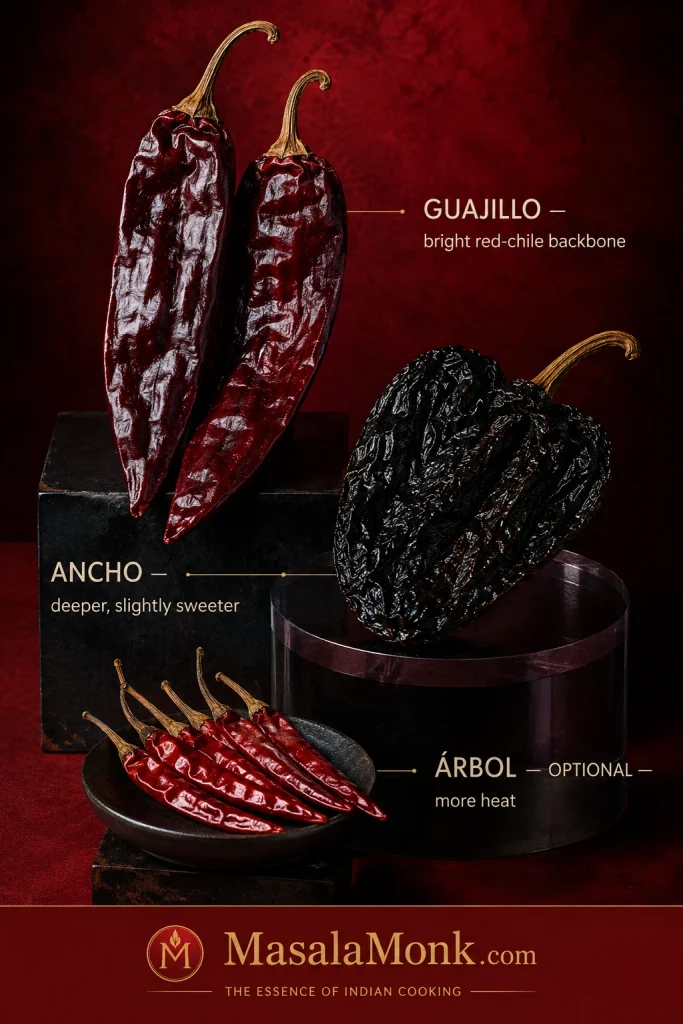
Guajillo, ancho and árbol may all look like dried red peppers in the bag, but they do very different jobs once they reach the pot.
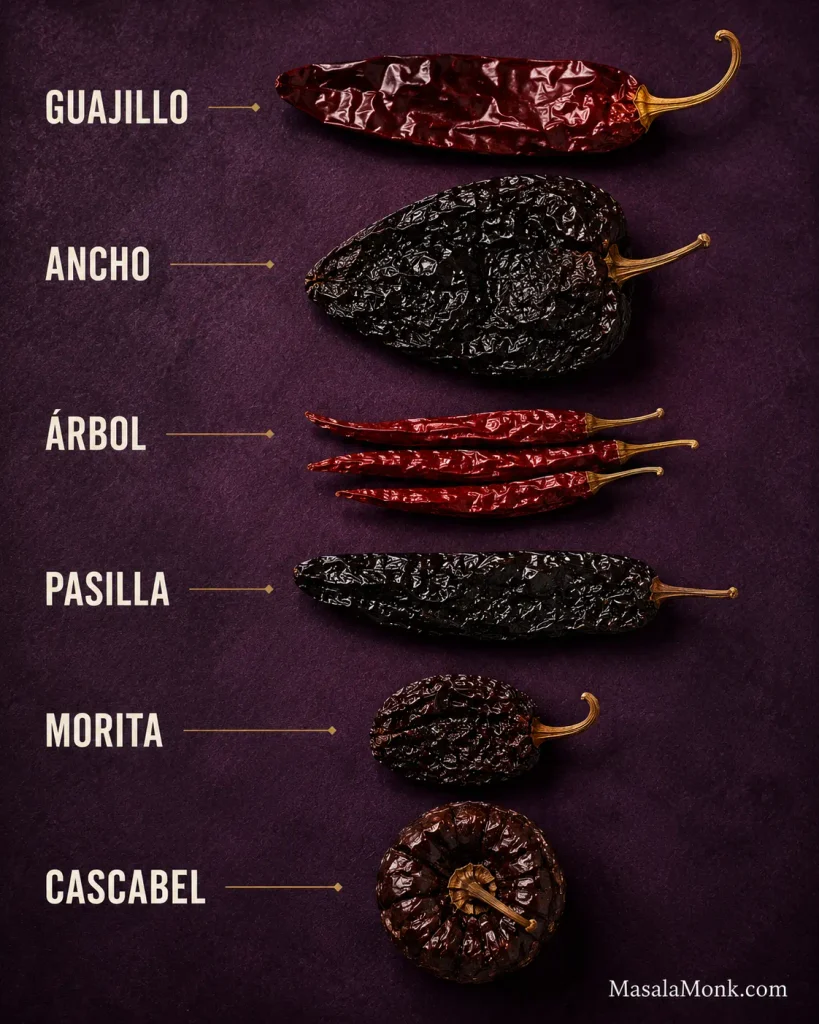
Six dried Mexican chiles arranged vertically on a plum background and labeled Guajillo, Ancho, Árbol, Pasilla, Morita, and Cascabel, showing their different sizes, shapes, and colors.
For dried Mexican chiles, silhouette is often easier to compare than exact color: ancho is broad, guajillo elongated, árbol thin, pasilla long and narrow, morita small and compact, and cascabel distinctly round.
ChileFlavor / RoleHeatBest When You Want…
GuajilloFruity red-chile backboneMildA vivid red broth without much extra heat
AnchoDark fruit, sweetness and depthMildA rounder, deeper rojo
ÁrbolClean, direct heatHotMore heat without adding much bulk
PasillaEarthy complexityMildA darker, earthier blend
MoritaSmoky chile characterMediumA noticeable smoky edge
CascabelRounded, nutty chile flavorMildA softer, nuttier direction

The first three make the formula above. Think of pasilla, morita and cascabel as directions you can take the blend rather than automatic one-for-one replacements.

Look for guajillos and anchos that still bend somewhat instead of shattering immediately. Their skins should retain some color and sheen, and the bag should smell fruity or earthy. A good bag announces itself before you ever turn on the stove; faded, dusty and brittle chiles tend to taste flatter.

Why Guajillo Leads the Blend

Tear open a good guajillo and its role makes sense: fruity, warm and distinctly red-chile without much aggressive heat. It carries most of the rojo’s chile character here. Ancho sits behind it with darker fruitiness and depth.

Controlling the Heat

More guajillo or ancho usually gives you more chile flavor without dramatically increasing the heat. Chile de árbol is the heat lever.

  • Mild: omit árbol
  • Moderate: start with 1 árbol
  • Hotter: try 2 árbol and offer extra salsa at the table

Árbol chiles vary in strength, so those amounts are only a rough guide. Build depth in the pot; let serious heat happen at the table.

Guajillo-heavy blends also tend to look brighter. More ancho, pasilla or morita pulls the broth toward brick-red or brown-red. Both can be completely normal; darker color becomes a warning sign only when the broth also tastes burnt or acrid.

For a deeper look at how dried peppers soften, blend and change once cooked, see our guide to cooking with dried pepper sauces.

Cooking now? Return to Step 2: Toast the Chiles → or go back to the full Pozole Rojo Recipe.

Hominy for Pozole: Canned, Frozen or Dried

Hominy begins as corn, but nixtamalization gives it the plump kernels and distinctive flavor expected in pozole. It tastes corn-forward, mildly earthy and nutty rather than sweet like canned sweetcorn, with a tender but substantial chew.
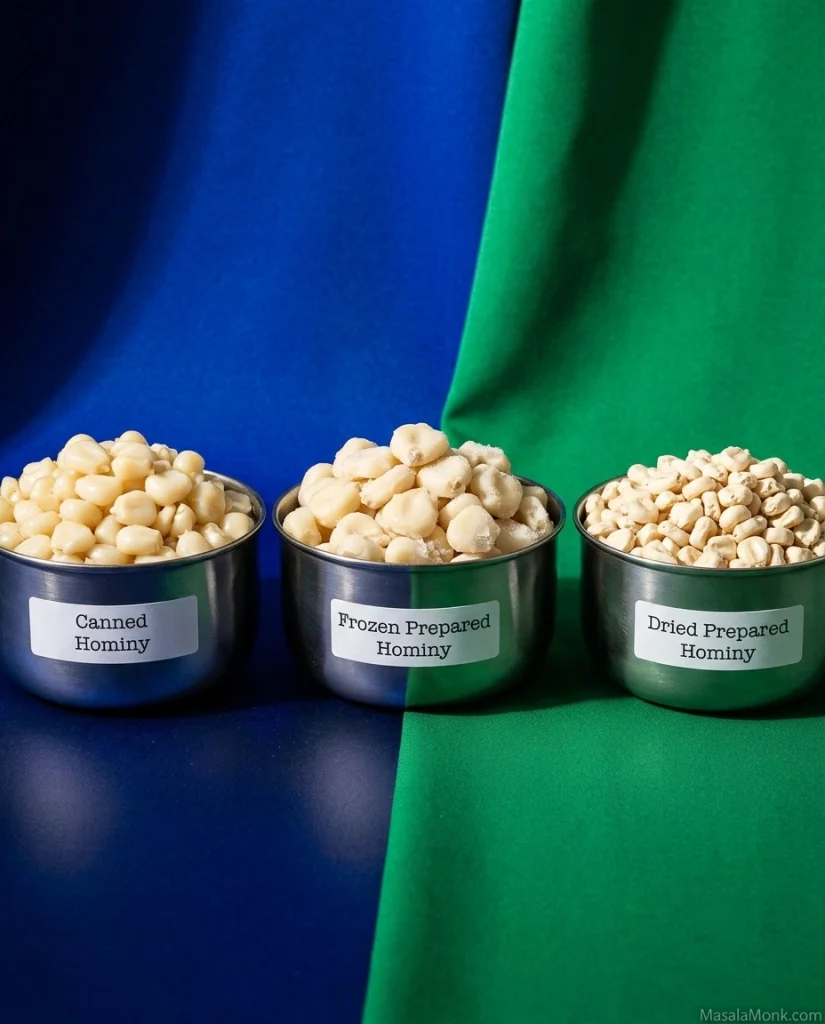
Three metal bowls compare canned hominy, frozen prepared hominy, and dried prepared hominy; the canned and frozen kernels are large and hydrated while the dried kernels are noticeably smaller.
Think about prepared size rather than dry size when comparing hominy. Canned and frozen prepared kernels have already swollen substantially; dried prepared hominy starts smaller because much of that expansion still has to happen in the pot.

Our homemade corn tortilla guide explains the same transformation from the masa side: masa harina is also made from nixtamalized corn, which is why it behaves so differently from ordinary cornmeal. Regular canned sweetcorn won’t give you the same flavor or texture.

How Much Canned Hominy?

Our default is four 15-ounce cans. That puts hominy in nearly every spoonful while leaving plenty of room for pork and broth.

For About 3 lb / 1.36 kg PorkHow the Pot Changes
3 × 15-oz cansBrothier and more pork-forward
4 × 15-oz cansOur default
5 × 15-oz cansVery hearty and hominy-forward

Canned hominy is already tender. The 30–45 minutes it spends in this pot are about integration: the kernels absorb the red broth while the broth picks up more corn character. Add them a little later if you prefer a firmer, more distinct kernel.

Rinse First; Blanch or Roast Only if You Want To

Rinsing is the default. Drain canned hominy and rinse it thoroughly under cool running water.

A noticeable canned flavor is a reason to blanch: put the rinsed kernels into fresh boiling water, let the water return to a boil, then drain and rinse again.

Roasting is optional. For firmer texture and a slightly more concentrated corn flavor, dry the rinsed hominy and roast at 450°F / 230°C for 15–20 minutes, tossing once, until fragrant and beginning to brown.

Prepared frozen hominy is a useful middle ground when you can find it. Cook it according to the package directions until tender, then add it with the rojo in Step 7.

Using canned hominy, as in the main recipe? Return to Step 7: Add the Rojo and Hominy → The next section is only for cooks starting with dried hominy.

Using Dried Hominy Instead

Dried hominy can give pozole an especially full corn flavor. The first job is making sure you bought the right corn.

You want dried corn that has already been nixtamalized but still needs soaking and cooking. Packaging may call it prepared dried hominy, dried posole or prepared pozole corn.

Be careful with names alone. Maíz pozolero or cacahuazintle does not necessarily mean the corn in a particular bag has already been nixtamalized. Look for prepared/nixtamalized wording or follow the producer’s preparation instructions. Untreated dried corn requires another process entirely.

Prepared hominy varies by producer, so let the package directions win here. Rancho Gordo is a useful reference if you’re unsure whether the dried corn you bought is already prepared or still needs nixtamalization.

Once you know which corn you bought, the rest is mostly patience.

How to Cook Dried Hominy for Pozole

For this batch, start with 14–16 oz / 400–450 g dried prepared hominy. A pound / 454 g typically yields about 6–7 cups cooked, though variety and final tenderness affect the yield.

  1. Sort and rinse the kernels.
  2. Soak according to the package directions; an 8-hour or overnight soak is common for prepared dried hominy.
  3. Drain and cover with fresh water by about 2 inches / 5 cm.
  4. Bring the corn to a boil as directed by the producer.
  5. Reduce to a steady simmer and cook until tender, commonly 2–4 hours or longer.

Taste a kernel. Still hard or chalky in the middle? Keep cooking. Fully cooked hominy should be tender and pleasantly chewy, and many kernels will split or bloom at one end.

Reserve some cooking liquid, then drain. Use roughly 6–7 cups cooked hominy in place of the canned hominy and add it with the rojo in Step 7. Save the cooking liquid for loosening the finished broth if needed.

Ready to use the hominy? Return to Step 7: Add the Rojo and Hominy →

Choosing Pork for Pozole

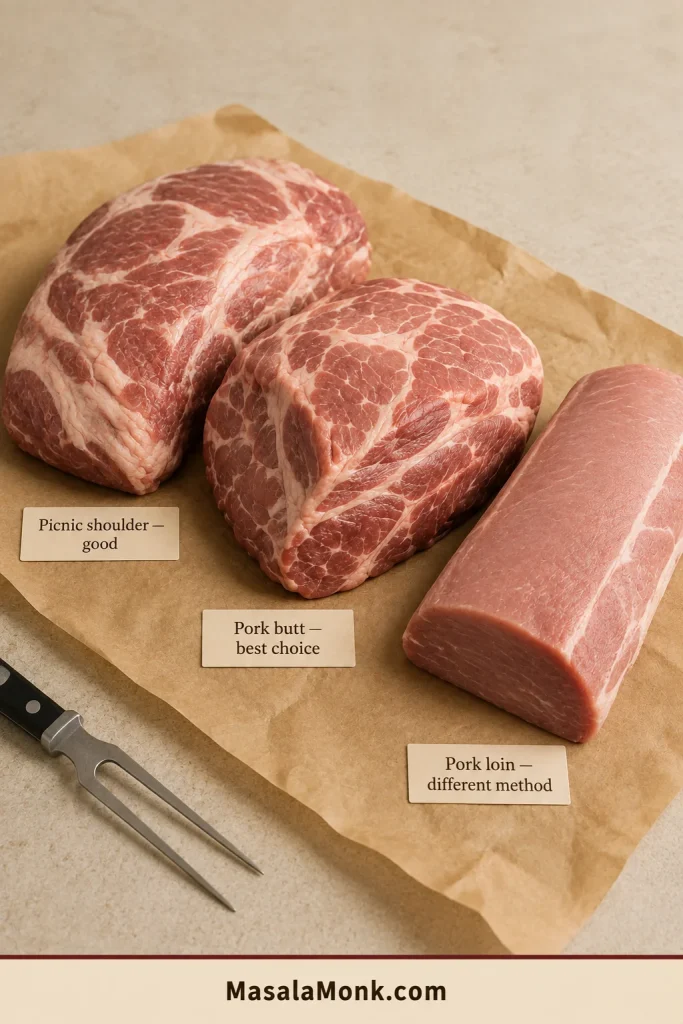
For this pot, buy pork shoulder unless you have a reason not to. Its marbling and connective tissue keep the meat juicy through a long simmer and contribute body to the broth.

Neck bones, meaty ribs or shank can simmer alongside it when you want more pork flavor and gelatin. Pig’s feet bring still more collagen and body, but none of these additions is required. Pork leg makes a leaner pot and needs closer attention; pork loin is a poor fit for this long simmer.

Shoulder can seem stubborn for a while and then soften quickly once its connective tissue starts giving way. That is why the fork matters more than a rigid minute mark.

Do You Need to Brown the Pork?

No. Starting the shoulder in water keeps this broth cleaner; the cooked rojo provides the darker depth later.

Pozole Rojo Troubleshooting

If something feels wrong, identify the symptom before changing the pot. Bitterness, blandness, tough pork and thin broth all need different fixes.

Flavor Problems

Bitter or burnt? Check the chiles first. A chile may have blackened during toasting, the puree may have caught while frying, or bitter soaking water may have gone into the blender.

Caught a badly scorched rojo before it reaches the soup? Remake it. Once a strong burnt flavor has been stirred through the whole pot, it is difficult to remove completely. Mild bitterness may sometimes be softened with unsalted broth and careful seasoning, but severe scorching does not have a magic fix.

Bland? Work out what is actually missing before adding more of everything.

  • Watery overall: simmer uncovered and reduce.
  • The flavors are there but muted: add salt gradually.
  • The chile tastes raw or separate: give the combined pot more gentle simmering time.
  • Rich but dull: finish one bowl with lime before changing the whole pot.
  • Porky but genuinely weak on chile: Make half a batch of the rojo, cook it as in Step 5, then stir it in gradually and taste as you go. Salt and reduction can intensify the chile already present, but they can’t replace what’s missing.

Texture and Consistency Problems

Pork still tough? Keep the gentle simmer and give it another 20–30 minutes. Don’t turn up the heat. Tough shoulder usually needs more time for its connective tissue to soften.

Dried hominy still hard? First make sure the corn really is prepared/nixtamalized hominy. Once that is established, hardness usually means more cooking time. Keep it submerged and continue simmering; some products take substantially longer than others.

Broth too thin? Simmer uncovered to reduce it. When the flavor is already concentrated enough and you only want a little more body, blend ½–1 cup cooked hominy with some broth and stir it back in.

Quick Fixes for Other Problems

ProblemLikely CauseFix
Harsh or mouth-dryingOld chiles, tough skins, over-concentration or too little simmering after the rojo was addedGive it more gentle simmering time; check concentration and salt
Not spicy enoughGuajillo and ancho added flavor rather than much heatAdd a hot árbol or puya salsa, preferably at the table
Too spicyToo much hot chile for the batchAdd unsalted broth and, if practical, more pork or hominy; recheck salt afterward
Brown-red instead of bright redA darker chile blendDo nothing unless the broth also tastes burnt or acrid
Broth too thickToo much reduction or absorptionAdd hot water, unsalted broth or reserved hominy cooking liquid gradually
Greasy surfaceMore rendered pork fat than you wantSkim obvious pools; chilling makes excess fat easy to remove later
Pork dry or stringyLean cut, small pieces, aggressive boiling or overcookingUse shoulder in larger pieces and keep the simmer gentle next time
Canned hominy tastes separateNot enough integration timeSimmer another 15–20 minutes
Canned hominy tastes “canned”Brand or rinsing issueRinse more thoroughly; blanch or roast before adding next time
Dried hominy went mushyCooked beyond your preferred endpointStart tasting sooner next time; kernels can bloom without falling apart

← Back to the Pozole Rojo Recipe

Make Pozole Ahead: Recalentado, Storage and Reheating

There are two useful ways to get ahead. You can make the entire pot in advance and reheat it, or prepare the rojo 1–2 days ahead, refrigerate it separately and cook the pork and hominy on serving day.

Pozole is particularly good at becoming tomorrow’s lunch. Big pots are often made with leftovers in mind, and the reheated meal after a gathering is commonly called the recalentado.

Overnight, the hominy keeps absorbing broth while the pork and chile flavors settle together. The next bowl can taste even more integrated than the first. It will usually need a splash of water or broth because the corn has been drinking while you weren’t looking.
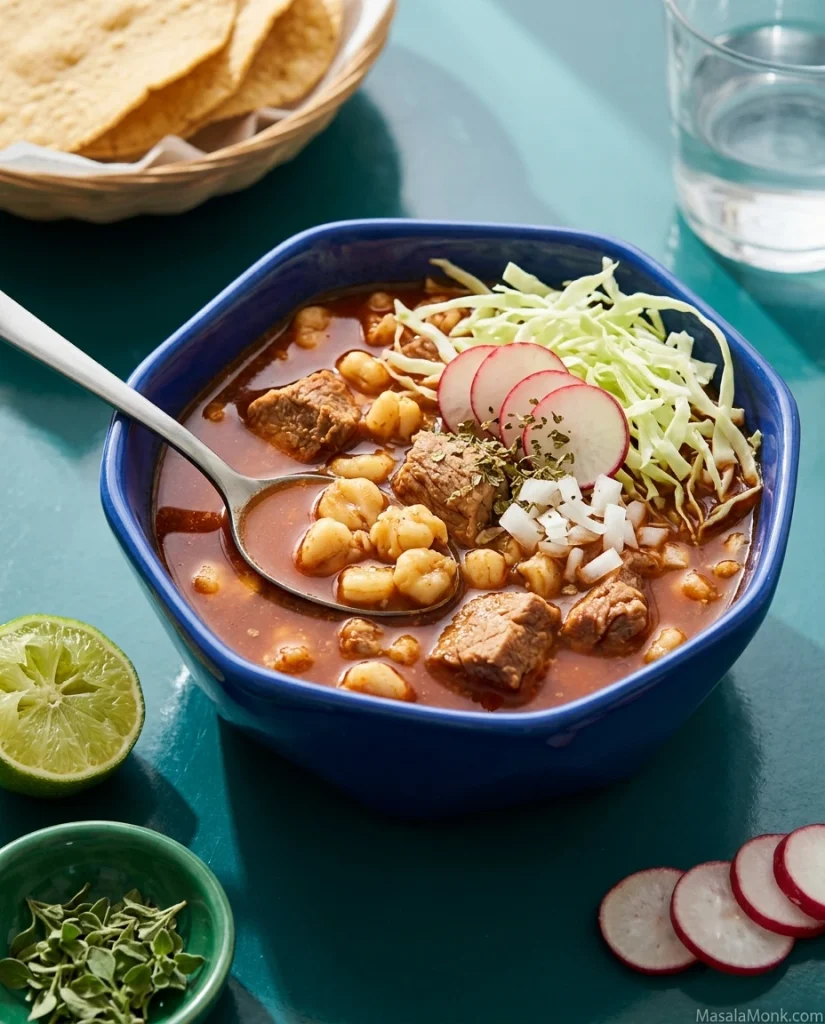
Blue bowl of reheated pozole rojo with pork and hominy, freshly topped with shredded cabbage, sliced radish, chopped white onion, oregano, and lime on a teal table.
Reheat the pozole first, then restore the contrast with fresh cabbage, radish, white onion, Mexican oregano and lime.

For Christmas, parties or a large family meal, handle the garnishes closer to serving. Shred the cabbage, slice the radishes, chop the onion and cut the limes while the pozole reheats.

Cool a Large Pot Safely

Don’t leave a full stockpot sitting at room temperature for hours while the center cools. USDA leftovers guidance recommends dividing large amounts of food into shallow containers so they cool quickly and refrigerating leftovers within 2 hours.

  • Refrigerator: Store cooled pozole in covered containers for up to 3–4 days. Keep fresh garnishes separately.
  • Freezer: Freeze for 3–4 months for best quality, leaving a little room for expansion.
  • Reheating: Heat gently, stirring occasionally, until leftovers reach 165°F / 74°C.

Add water or broth until the reheated pozole has the consistency you want, then taste for salt again.

Set out the fresh garnishes again and the reheated bowl feels like another meal, not simply yesterday’s leftovers.


Corn, chiles, pork and pots don’t all behave exactly alike, which is why the cues matter as much as the clock. If you make the pozole, tell us which chiles and hominy you found, whether you added any bone-rich pork and how your pot behaved.

If the hominy took longer, the shoulder softened sooner or your chile blend came out darker than expected, those details are useful too. They may help the next person cooking from the same kind of corn or bundle of dried chiles.
← Back to the Pozole Rojo Recipe · Back to top ↑

Posted on — Leave a comment

Dan Dan Noodles Recipe: Spicy Sichuan Noodles With Pork & Chili Oil

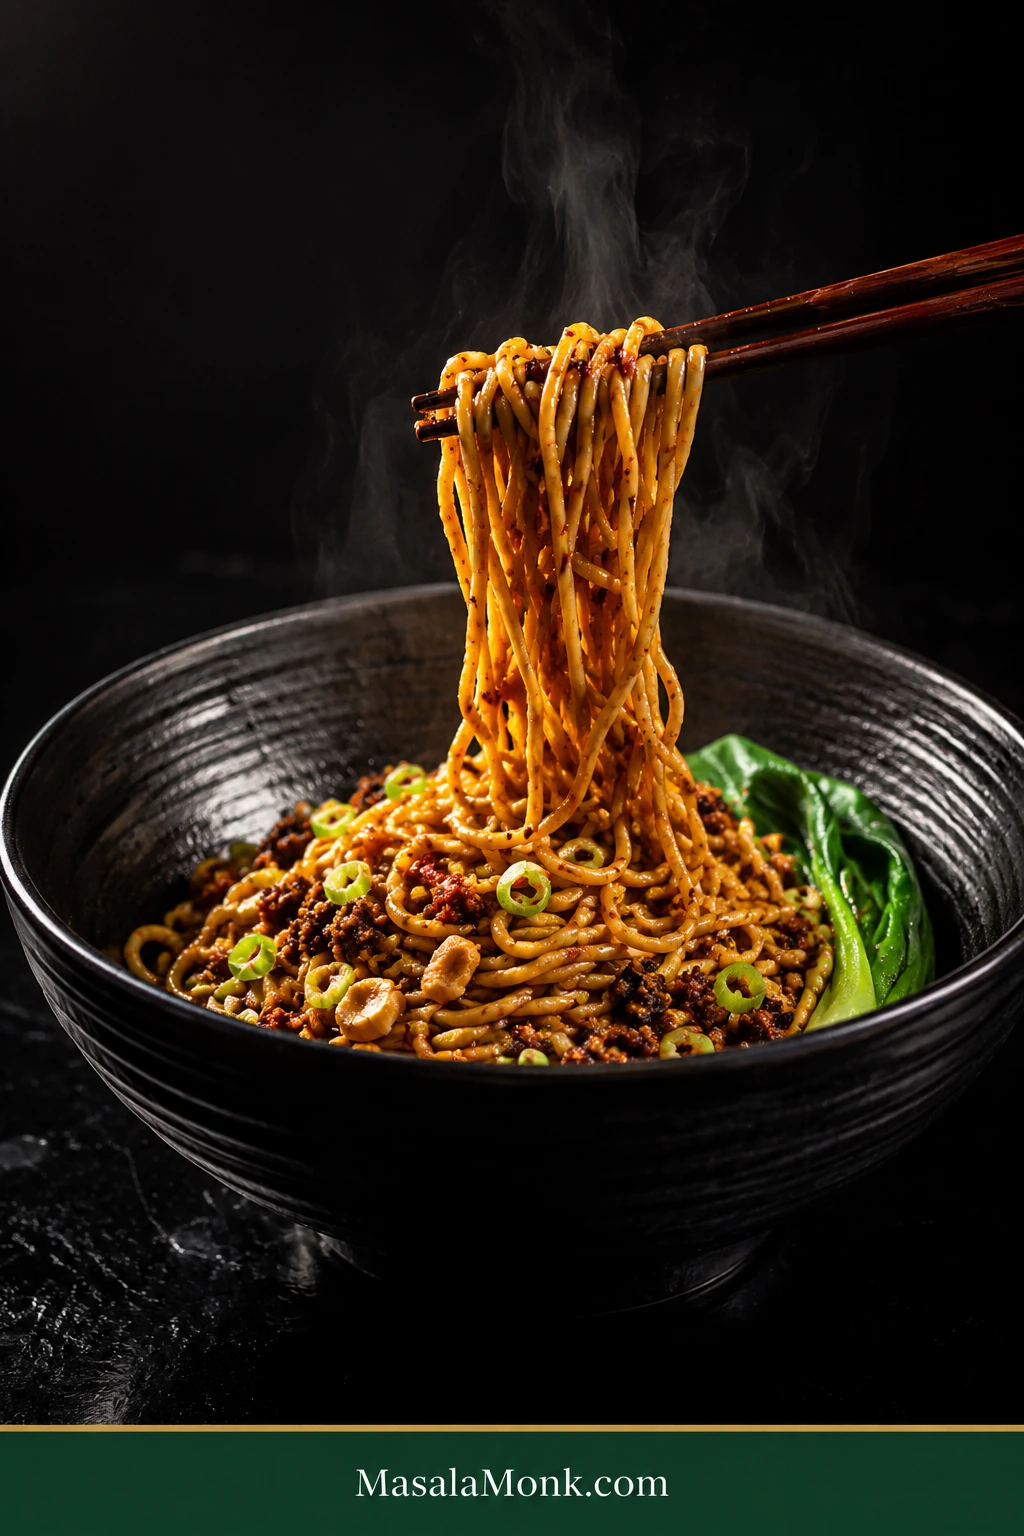
Bowl of Dan Dan noodles with thin sauce-coated wheat noodles, browned ground pork, ya cai, scallions and greens, with a small bundle lifted by chopsticks.

Good Dan Dan noodles should make you want the next bite before the first one has quite finished: springy wheat noodles slicked with a rusty-red sesame-chili sauce, crisp pieces of pork, salty-fermented mustard greens, scallions, and enough Sichuan pepper to leave a citrusy tingle on your lips.

Dan Dan noodles—dàndàn miàn (担担面)—are rooted in Sichuan street food: wheat noodles, chili oil, Sichuan pepper, preserved vegetables, and usually a modest savory pork topping, all packed into an intensely flavored serving.

A good bite changes as you eat it. Chili and dark vinegar arrive first; pork and ya cai bring the deep savory middle; roasted sesame softens the sharper edges; then Sichuan pepper leaves that unmistakable buzz behind after you’ve swallowed.

The ingredient list may contain a few unfamiliar jars, but once they’re in the pantry, this becomes a 30–35 minute dinner. This version keeps the bowl concentrated and sauce-clinging, uses prepared chili oil to keep the work manageable, and uses just enough sesame paste to round the sauce without hiding the black vinegar, ya cai, chili, or Sichuan pepper.

Coat the noodles, don’t drown them. The measurements get you close; the final toss tells you when to stop.

Bowl of Dan Dan noodles with thin sauce-coated wheat noodles, browned ground pork, ya cai, scallions and greens, with a small bundle lifted by chopsticks.
Before serving, give the bowl one last deep toss. Dan Dan noodles eat better when pork and ya cai are threaded through the strands instead of sitting as a decorative cap.

Quick Answer: How to Make Dan Dan Noodles

For 4 bowls in about 30–35 minutes, brown 225 g / 8 oz ground pork until its released moisture disappears and the crumbles begin frying. Season with Shaoxing wine, a little soy sauce, and 25–30 g / about 1 oz sui mi ya cai while you whisk the sesame-chili sauce.

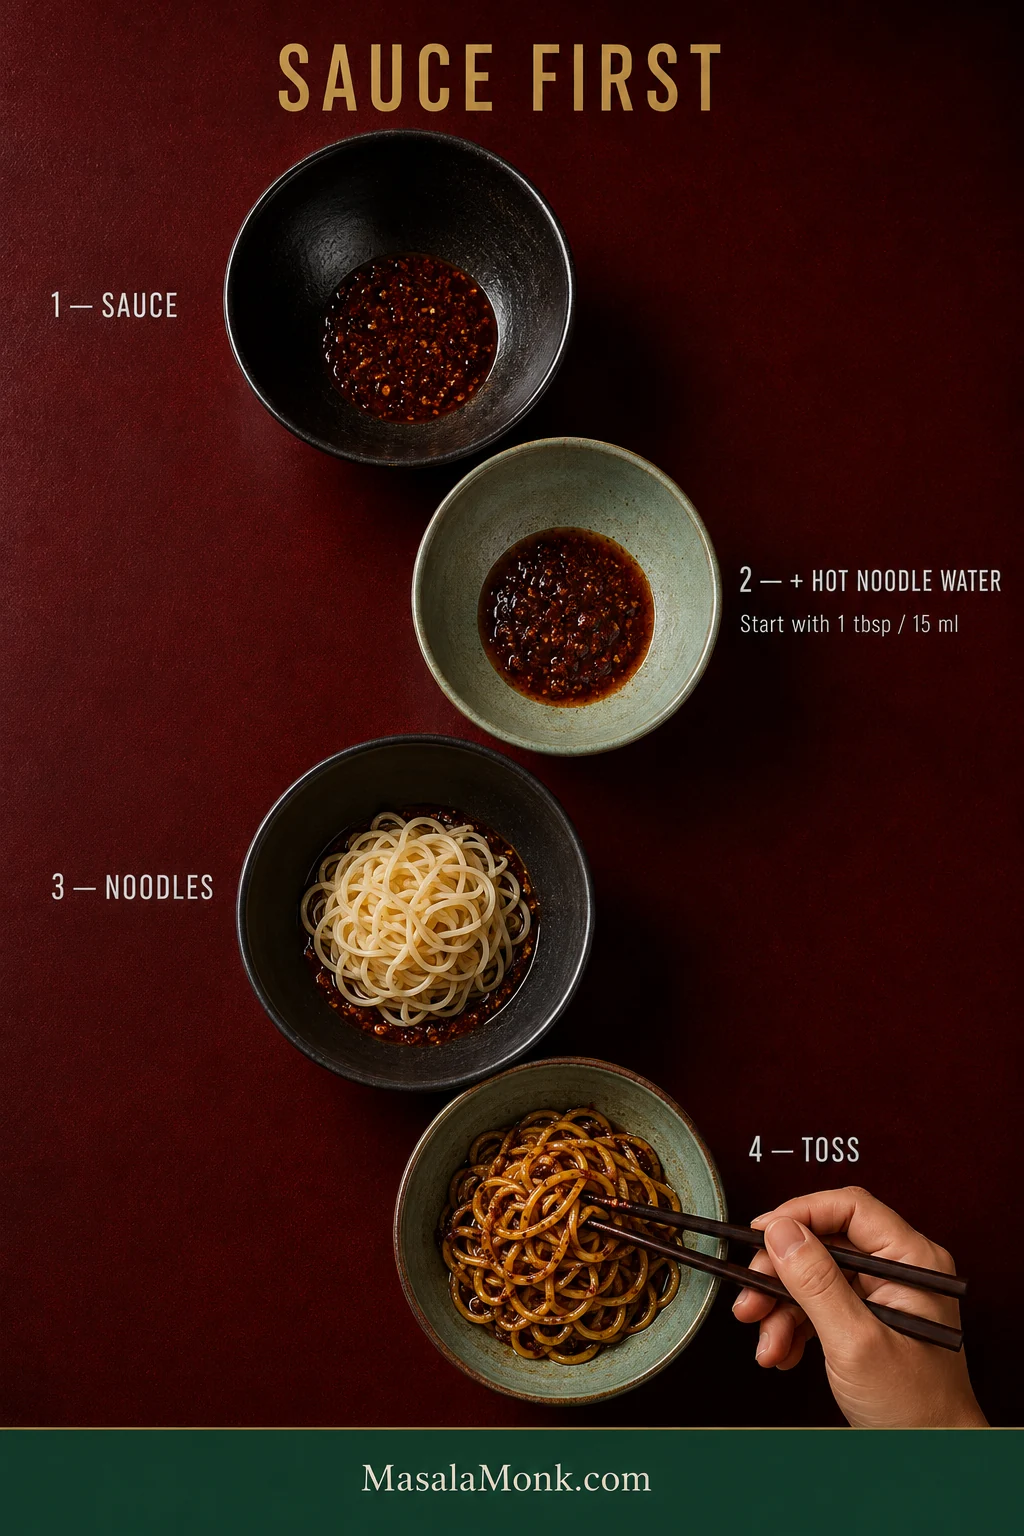
Cook 500 g / about 18 oz fresh Chinese wheat noodles or 300–325 g / about 10½–11½ oz dried noodles until springy. Put sauce into four bowls, start each with 1 tbsp / 15 ml hot noodle water, add the noodles, and toss. Add more water only a teaspoon at a time if needed, then finish with pork, greens, scallions, chili oil, and Sichuan pepper.

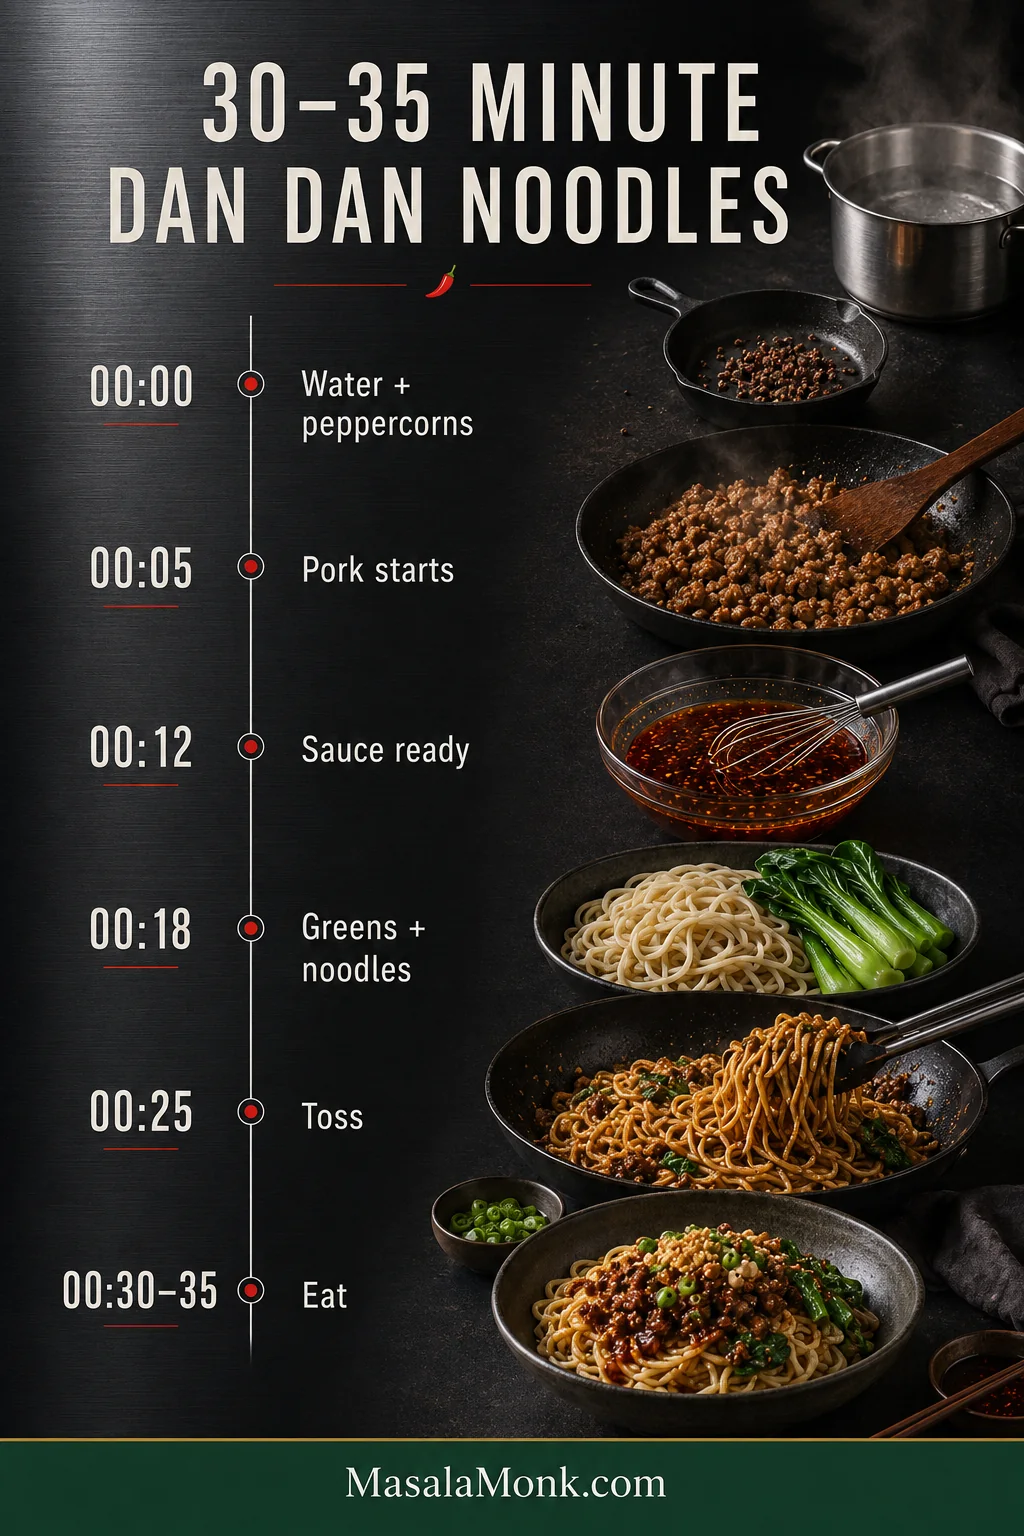
Timeline for 30–35 minute Dan Dan noodles showing water heating and peppercorn toasting, pork cooking, sauce mixing, noodles and greens, tossing and serving.
Use the water-heating window instead of waiting on it: toast the Sichuan pepper, brown the pork and mix the sauce before the noodles ever need your full attention.

Dan Dan Noodles Recipe

Spicy Sichuan wheat noodles with tangy sesame-chili sauce, browned pork, preserved mustard greens, and heat you can adjust at the table.

There are really only three main jobs here: brown the pork, mix the sauce, and cook the noodles.

Prep15 minutes
Cook15–20 minutes
Total30–35 minutes
Serves4

Serving note: With several other dishes on the table, this batch can make about 6 smaller portions. For six bowls, start with about 2 tsp / 10 ml noodle water per bowl, then adjust only as needed.

Heat: moderate as a starting point, with extra chili oil and Sichuan pepper available for individual bowls.

Equipment

  • Large pot for the noodles
  • 12-inch / 30 cm skillet or wok
  • Medium mixing bowl
  • Four serving bowls
  • Strainer, spider, or tongs
  • Mortar and pestle or spice grinder

Ingredients

Noodles & Finishing

  • 500 g / about 18 oz fresh thin-to-medium Chinese wheat noodles, preferably alkaline if available
    OR 300–325 g / about 10½–11½ oz dried Chinese wheat noodles
  • 150 g / about 5 oz baby bok choy, choy sum, or another tender Asian green, optional
  • 2 scallions, thinly sliced
  • 2 tbsp roasted peanuts, roughly chopped, optional
  • Extra chili oil, for serving
  • Extra freshly ground Sichuan pepper, for serving
  • 1 cup / 240 ml hot noodle water, reserved before draining; you probably won’t use all of it

Pork & Ya Cai

  • 225 g / 8 oz ground pork
  • 1 tsp neutral oil, only if the pork is particularly lean or the pan needs it
  • 1 tbsp / 15 ml Shaoxing wine — Shaoxing cooking wine is fine; dry sherry also works
  • 1 tsp / 5 ml Chinese light soy sauce
  • 25–30 g / about 1 oz sui mi ya cai (Sichuan preserved mustard greens), finely chopped
  • 1 tsp finely grated fresh ginger, optional but recommended

Dan Dan Sauce

  • 2 tbsp / about 32 g Chinese sesame paste, stirred smooth before measuring
  • 3 tbsp / 45 ml Chinese light soy sauce
  • 2 tbsp / 30 ml Chinkiang black vinegar
  • 3 tbsp / 45 ml Chinese chili oil, stirred before measuring, plus more to taste
  • 1½ tsp sugar
  • 2 garlic cloves, finely grated or minced
  • 1½ tsp whole Sichuan peppercorns

Before you cook, check three things.

  • Ya cai: pleasantly salty is fine; aggressively salty needs a brief rinse and a very good squeeze.
  • Chili oil: one jar may be mostly aromatic while another is genuinely fierce.
  • Sesame paste: stir the separated oil completely back into the paste before measuring.

There’s usually no need to salt the noodle water. The soy sauce, preserved vegetables, and many bottles of Shaoxing cooking wine already bring plenty of seasoning.

Instructions

Prep the Pepper and Brown the Pork

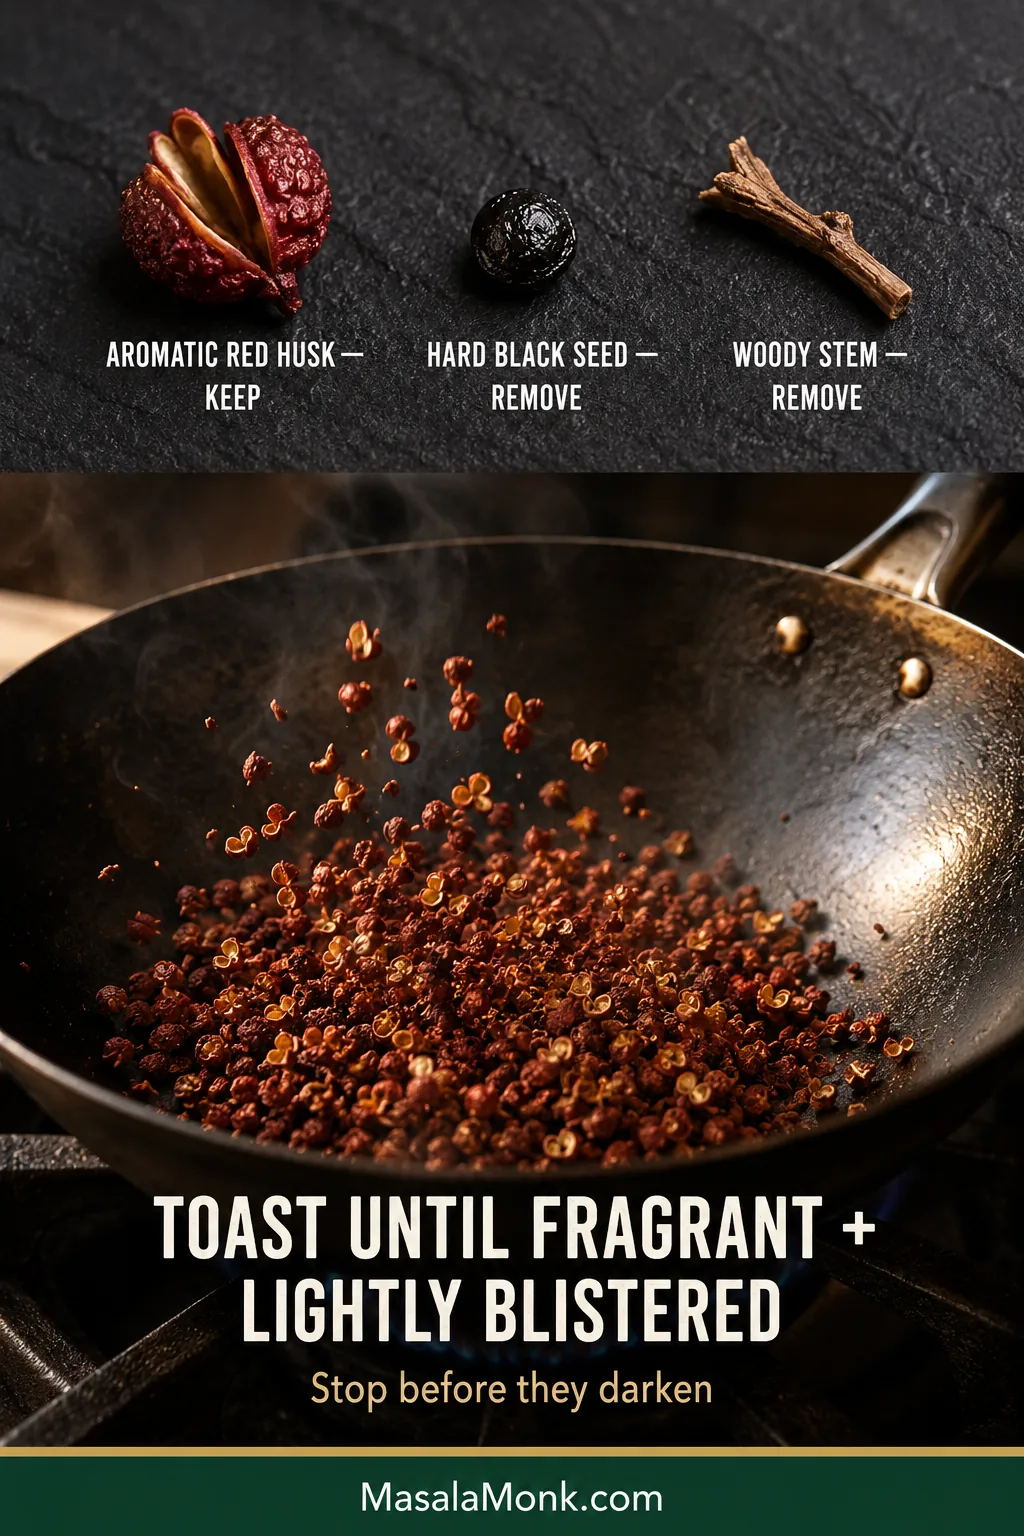
Sichuan pepper guide showing red aromatic husks to keep, hard black seeds and woody stems to remove, followed by husks gently toasting in a skillet.
If the citrus aroma becomes vivid before the peppercorns look dramatically darker, trust your nose. Sichuan pepper can cross from fragrant to scorched faster than its color suggests.
  1. Start the noodle water and toast the Sichuan peppercorns. Fill the noodle pot and set it over high heat. While the water comes toward a boil, pick out any obvious hard black seeds or woody stems from the peppercorns, then put the aromatic husks in the dry skillet you’ll later use for the pork. Toast over medium-low to medium heat for about 1–2 minutes, shaking frequently, until intensely citrusy and lightly blistered. Tip them out before they darken, grind reasonably fine, and reserve about half for the table.
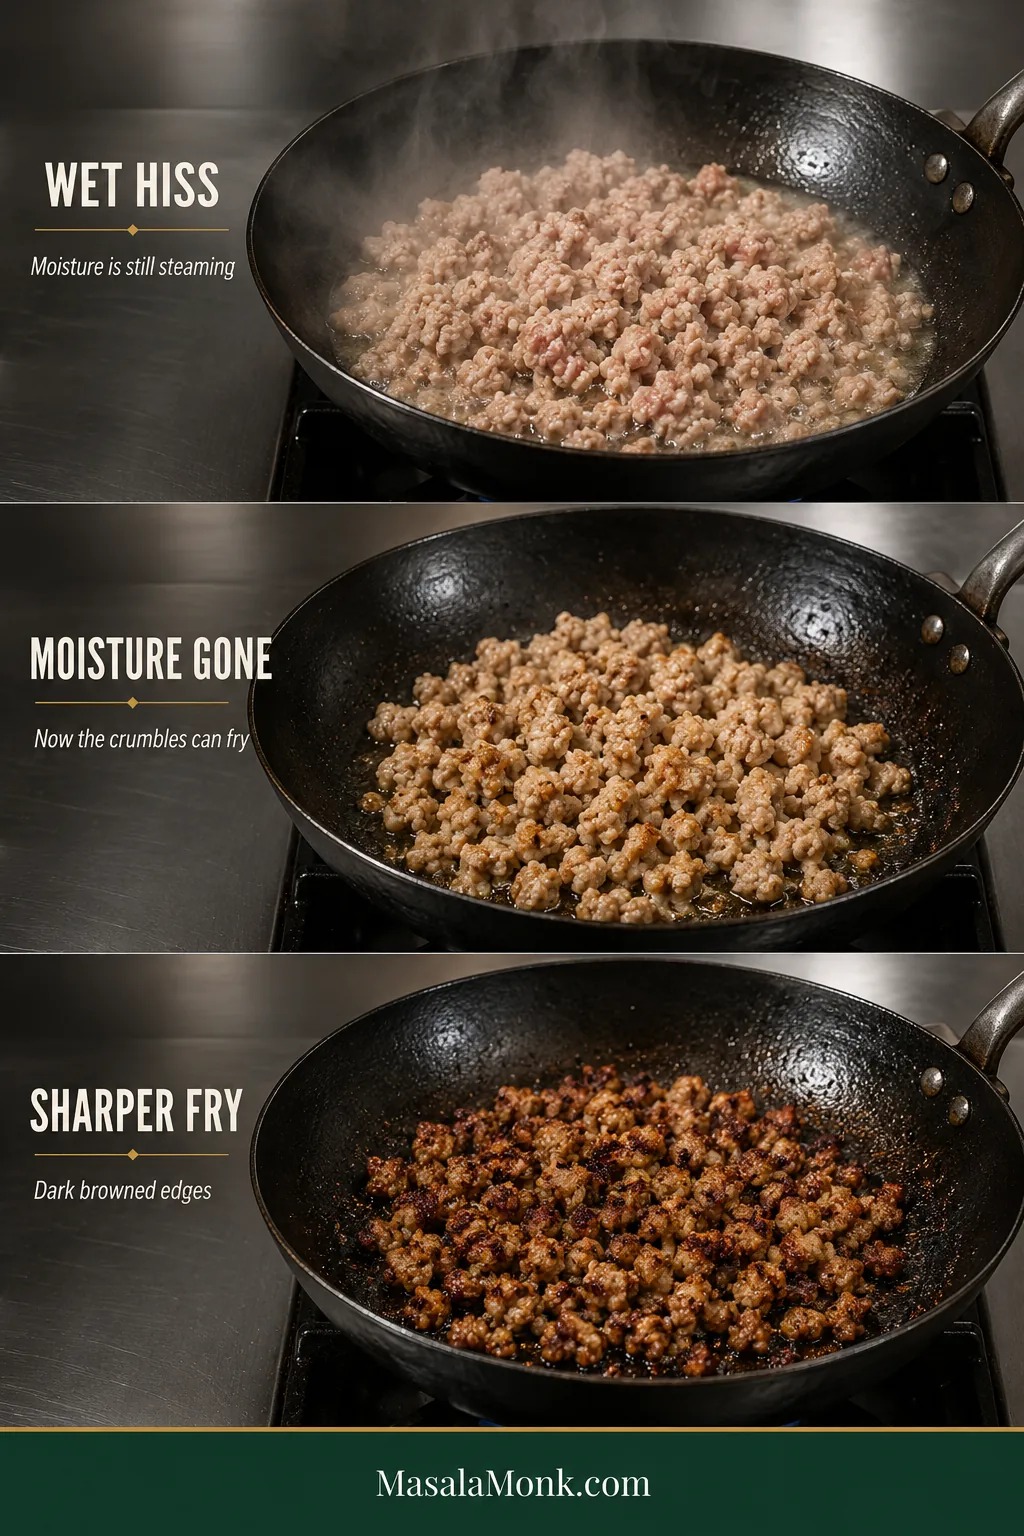
  2. Brown and season the pork. Return the skillet to medium-high heat. Add oil only if needed, then spread in the pork and break it into small irregular crumbles. At first you’ll hear a wet hiss. Keep cooking until the visible moisture disappears and the sound changes to a sharper fry. Continue until you see dark browned spots and crisp edges, usually 6–8 minutes total. Add the ginger for about 20 seconds, pour the Shaoxing wine around the hot edge of the pan, and add the teaspoon of soy sauce. Once that liquid has nearly disappeared, stir in the ya cai and fry for another 1–2 minutes. Ground pork should reach at least 160°F / 71°C; the finished topping should also look browned and relatively dry.
Three stages of ground pork cooking: pale and wet with steam, drier after moisture evaporates, then browned with crisp edges.
Pour in the Shaoxing wine only after the pan sounds like frying rather than steaming. That timing helps preserve the crisp browned pork edges you just worked to create.

Mix the Sauce and Cook the Noodles

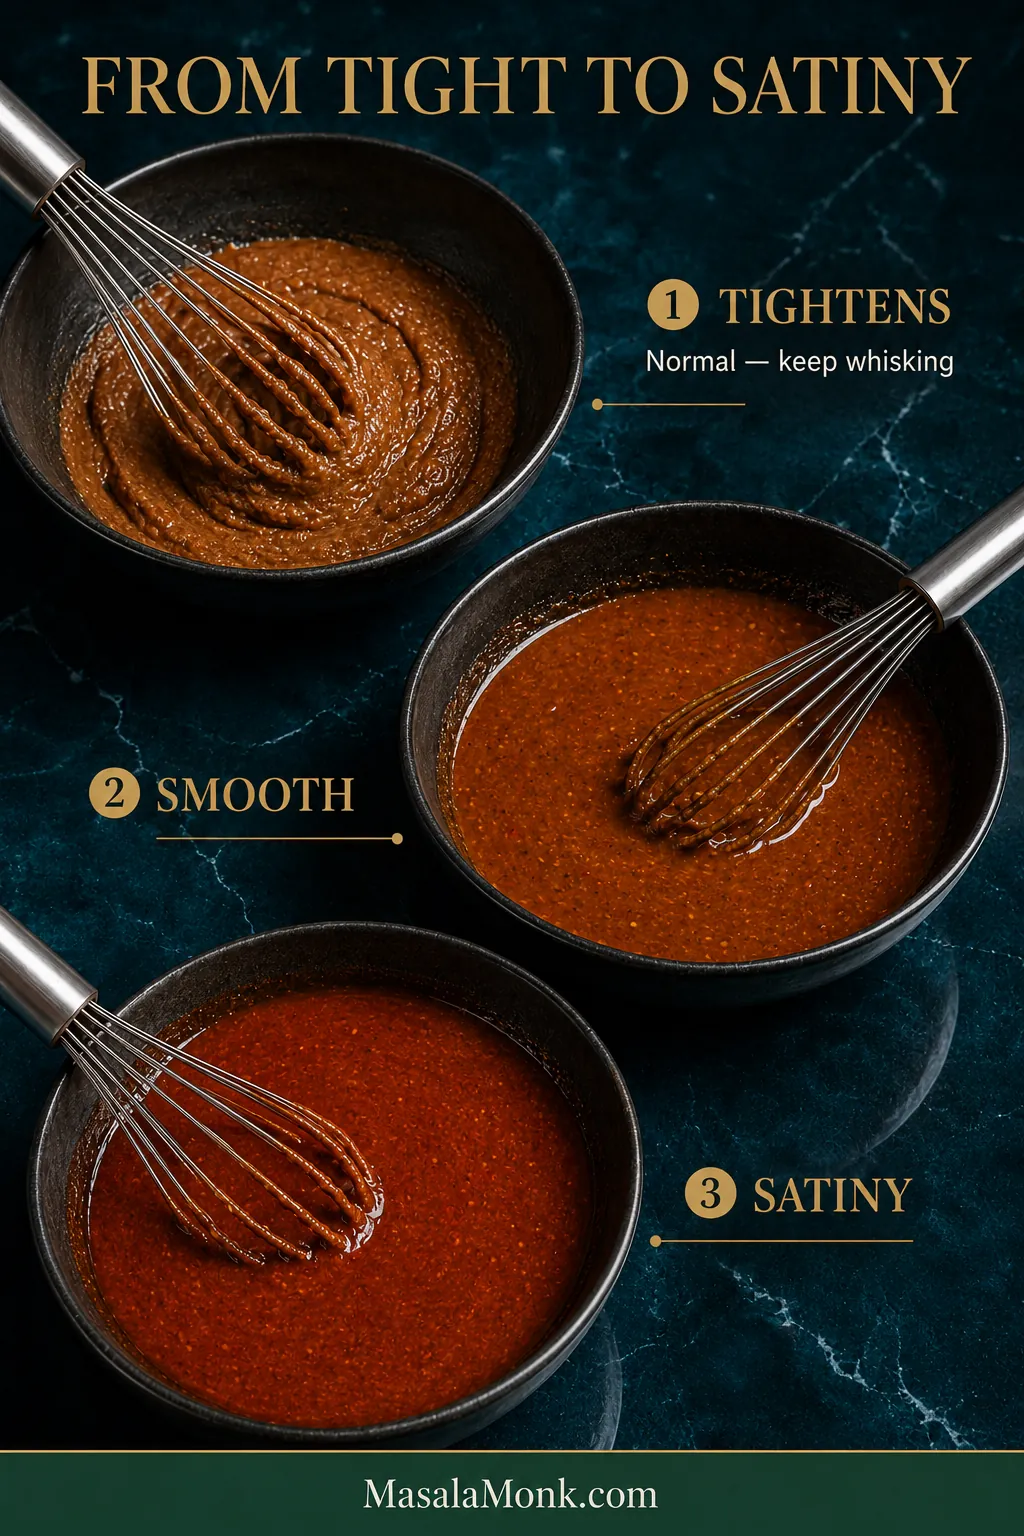
Three Dan Dan sauce stages showing a thick tightened sesame mixture, a smoother blended sauce and a final glossy reddish-brown satiny sauce.
Let the concentrated Dan Dan sauce finish coming together before you loosen it. Noodle water is a final-fit adjustment, not a remedy for sesame paste tightening temporarily.
  1. Mix and taste the sauce. Put the sesame paste in a medium bowl and gradually whisk in the 3 tablespoons soy sauce. The paste may tighten briefly; keep whisking until it becomes smooth. Add the Chinkiang vinegar, sugar, garlic, and about half of the ground Sichuan pepper, then whisk in the chili oil until the sauce looks satiny and even. Taste a tiny dab. It should seem deliberately intense but balanced because the plain noodles will soften every flavor.
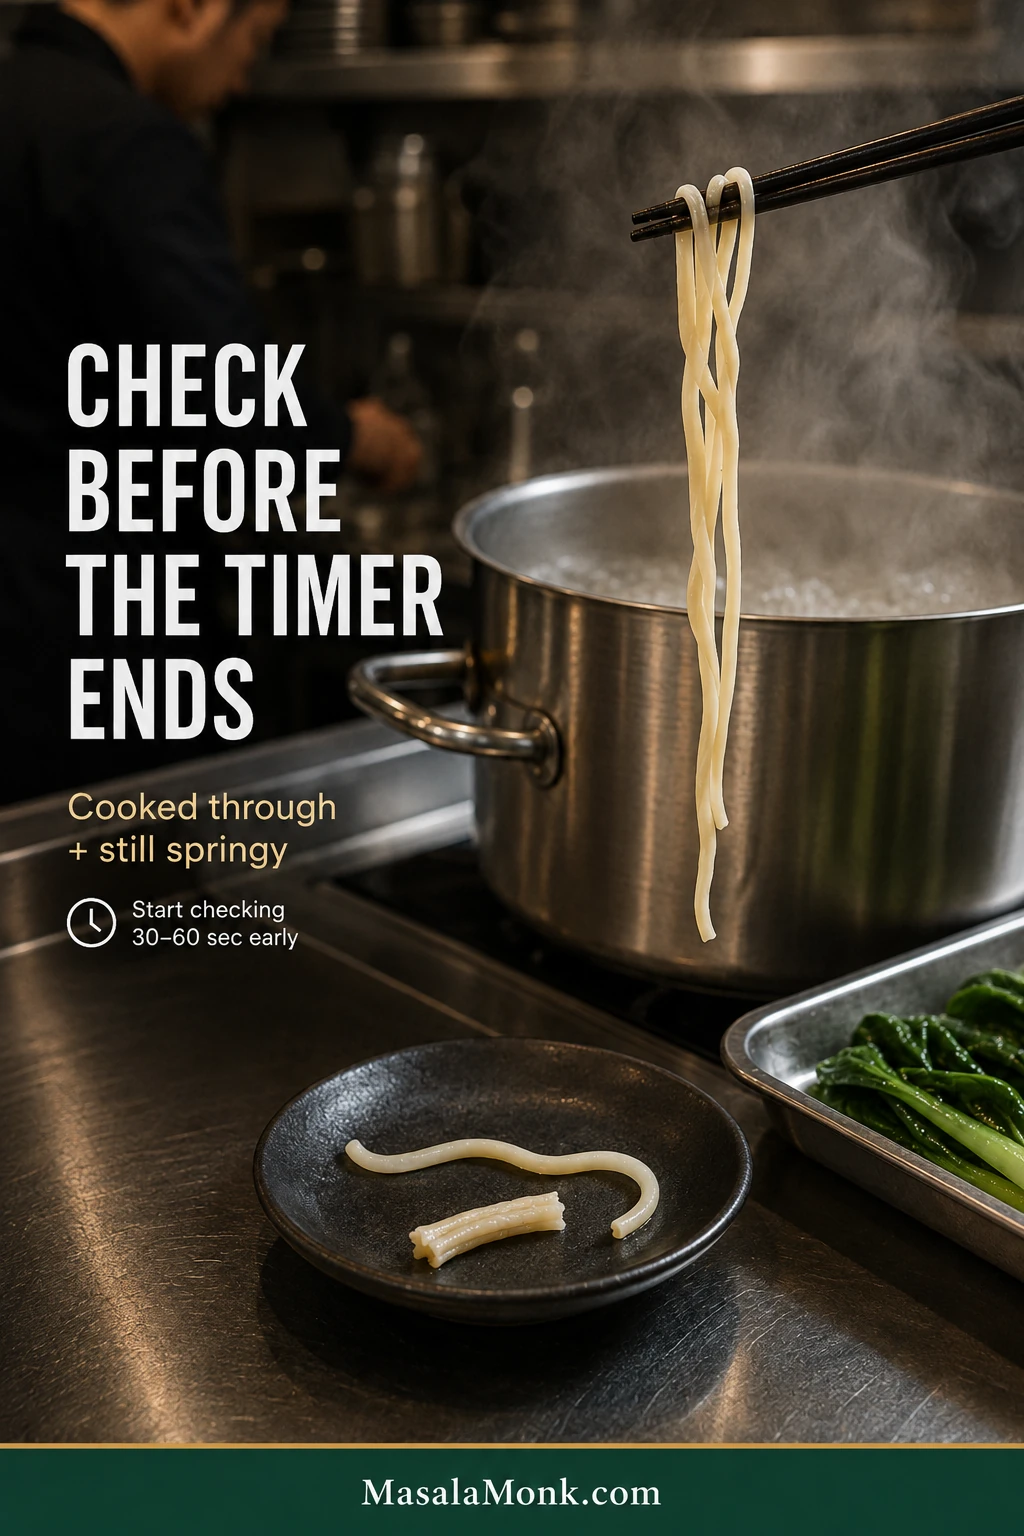
  2. Cook the greens and noodles. Blanch tender leafy greens for about 30–45 seconds; halved baby bok choy may need closer to 60–90 seconds. Lift them out when the leaves are bright and the stems crisp-tender. Add the noodles and begin checking 30–60 seconds before the package time ends. Bite one: it should be cooked through but still push back slightly between your teeth. Reserve 1 cup / 240 ml noodle water before draining.
Chinese wheat noodles lifted from boiling water for a doneness check, with cooked samples showing the springy texture to look for.
Pull one noodle early and bite it. Residual heat plus tossing will finish the job, while softness gained from overcooking in the pot cannot really be taken back.

Assemble and Finish

Four-step Dan Dan noodle assembly showing concentrated sauce, a small amount of hot noodle water, drained noodles added and noodles tossed until coated.
Different noodles absorb sauce differently. Starting small with hot noodle water lets each bowl find its own ideal consistency instead of forcing every batch to the same hydration.
  1. Sauce the noodles bowl by bowl. Divide the concentrated sauce among four bowls and whisk about 1 tbsp / 15 ml hot noodle water into each. Drain the noodles well, divide them among the bowls, and toss thoroughly from the bottom. If the strands remain heavy or clumped, add more hot water only 1 tsp / 5 ml at a time. They’re ready when the noodles lift cleanly and the sauce comes with them.
  2. Top, toss, and adjust. Add the pork and ya cai, greens, scallions, and peanuts if using. Toss enough topping through the noodles that pork and preserved greens show up throughout the serving. Taste. More chili oil increases the burn; freshly ground Sichuan pepper increases the citrusy buzz; a few drops of Chinkiang vinegar can wake up a bowl that feels heavy. Eat while the noodles are hot and lively.

Recipe Notes

  • Use the listed fresh or dried noodle weight. Fresh noodles carry substantially more water, so equal package weights produce different amounts of noodle.
  • For this hot version, drain and sauce the noodles immediately. An unusually starchy fresh noodle that begins sticking can have a very quick rinse; shake it extremely dry and move straight to the sauce.
  • Prepared chili oil keeps this weeknight-friendly. Homemade oil is excellent when you already have it.
  • Start modestly with Sichuan pepper. Anyone who wants a stronger buzz can add more to their own serving.

The Finished Noodles: What You’re Looking For

  • Noodles: springy and easy to lift in separate strands.
  • Sauce: clinging to the strands with no thin pool underneath.
  • Pork: dark in spots, relatively dry, and crisp around some of the smaller edges.
  • Flavor: layered and lively, without one ingredient flattening everything else.
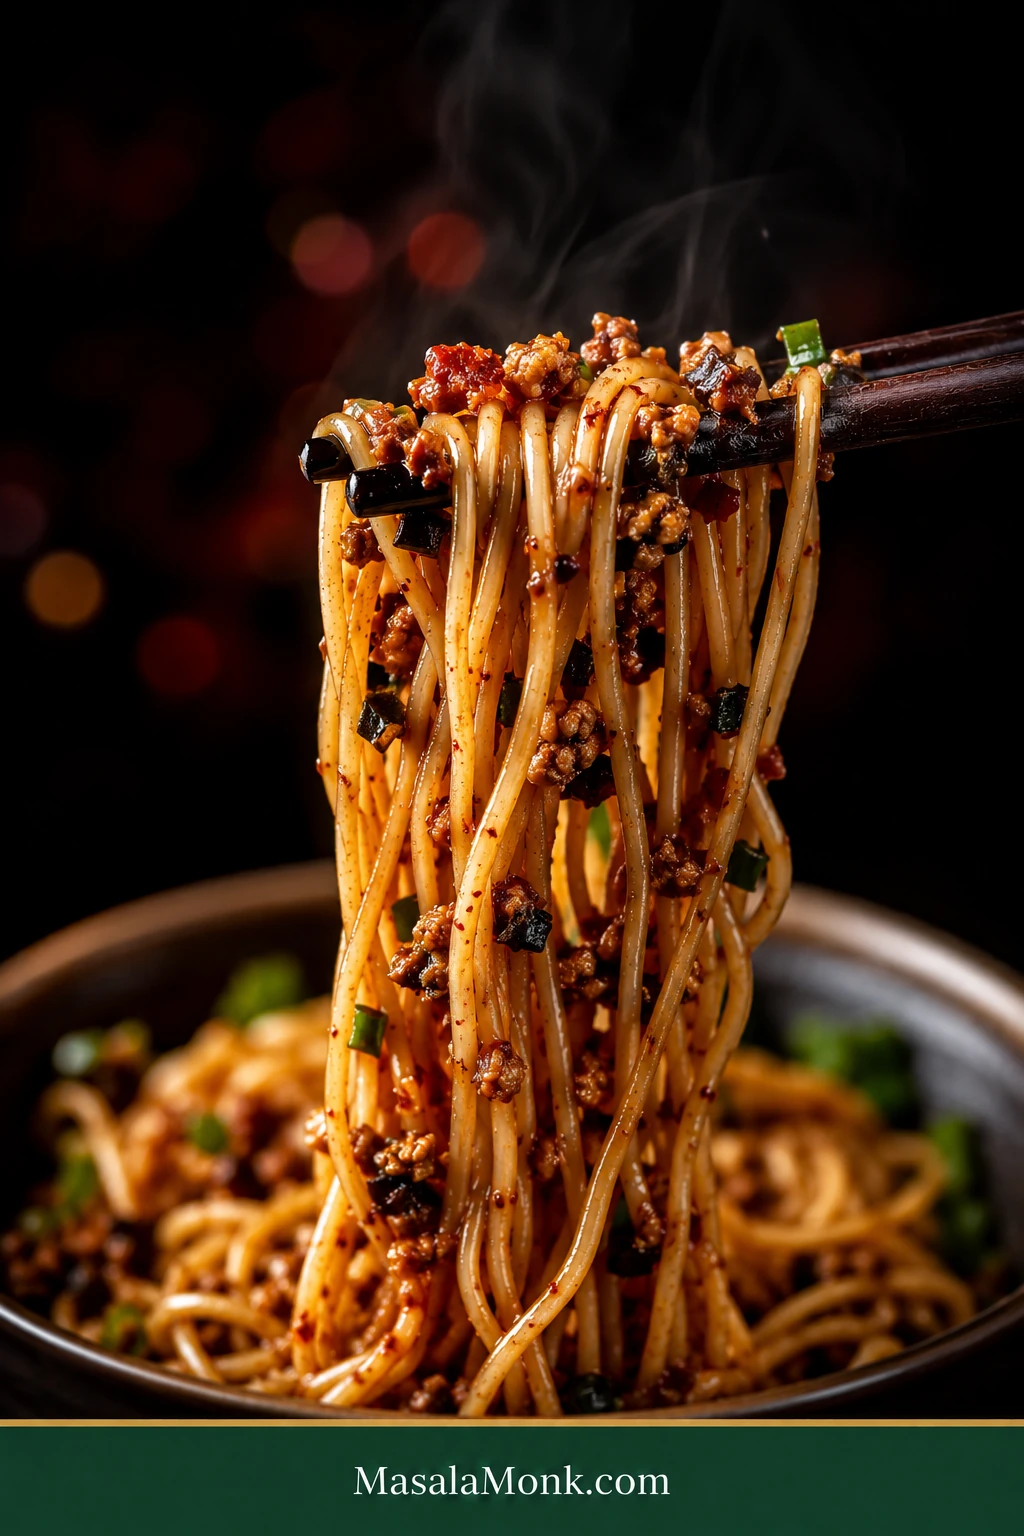
Close-up of thin Dan Dan noodles lifted with chopsticks, showing separated strands evenly coated with sauce and small pieces of browned pork and ya cai.
Use the lift as a distribution test: if sauce, little pork crumbles and ya cai rise with the noodles, the savory topping has made its way through the bowl.

Now take a bite. The noodles should be hot and slippery, black vinegar should give the first mouthful a quick acidic snap, browned pork and ya cai should keep appearing between strands, and the peppercorn tingle should build gradually, leaving the vinegar, pork, sesame, and preserved mustard easy to notice.

Something cold and crisp is especially good beside all that richness. A simple cucumber salad gives the meal an easy vinegary counterpoint.

Cooking right now? You can stop here. Everything below is for choosing ingredients, understanding why versions differ, or fixing something that didn’t behave as expected.

Explore the Dan Dan Noodles Guide

What Are Dan Dan Noodles? Name, Street-Food Roots & Variations

Dan Dan noodles are a Sichuan wheat-noodle dish traditionally associated with street vendors and a concentrated mix of chili, Sichuan pepper, preserved vegetables, and savory toppings. The name dàndàn miàn comes from the dàn, or carrying pole, associated with vendors who sold the noodles.

You may also see Szechuan Dan Dan noodles. Szechuan is an older English romanization that remains common on menus and in recipe searches.

How Traditional Is This Version?

Dan Dan noodles vary considerably from cook to cook and shop to shop, so there isn’t one modern formula that defines every Sichuan bowl. Some servings are drier, others carry more seasoned liquid; sesame paste appears in some versions and not others, and pork quantities range from a light topping to much more substantial portions.

This version keeps wheat noodles, chili oil, Sichuan pepper, preserved mustard greens, Chinkiang vinegar, and dry-fried pork at the center while making the portions substantial enough for a main meal.

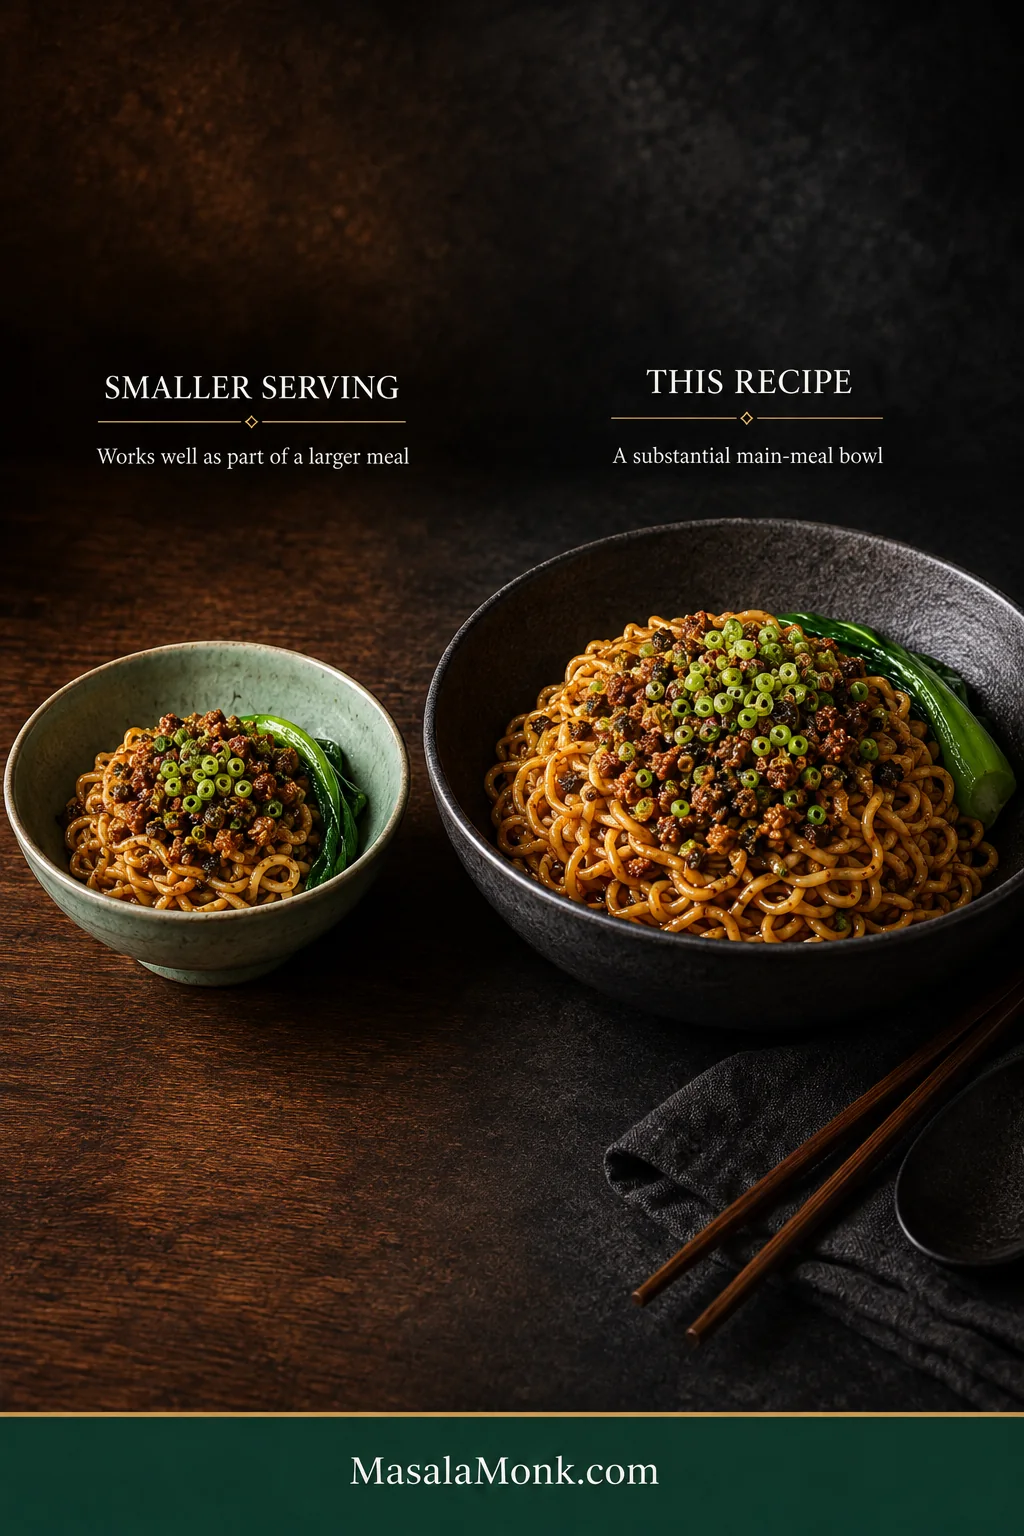
Two servings of Dan Dan noodles side by side, comparing a smaller bowl for a shared meal with a more substantial main-meal portion.
Portion size changes the role of the noodles more than the identity of the dish: a smaller bowl joins a larger spread, while this recipe turns the same concentrated flavors into dinner.

For broader context on Sichuan cooking and the many forms dishes like Dan Dan noodles can take, Fuchsia Dunlop’s The Food of Sichuan is an excellent English-language reference.

Why Good Dan Dan Recipes Look So Different

Compare a few good recipes and you’ll quickly run into doubanjiang, fermented black beans, sweet bean sauce or hoisin, dark soy, five-spice, sesame paste, peanuts, stock—or none of the above.

The variations are not random. Different cooks build fermented depth, sweetness, savoriness, heat, and richness in different ways.

Here, the pork stays fairly simple so chili oil, Sichuan pepper, ya cai, black vinegar, and roasted sesame remain easy to pick out. Doubanjiang adds another powerful fermented-bean note and more salt. It belongs comfortably in other versions; this one gets its fermented depth elsewhere.

Are Dan Dan Noodles Dry or Soupy?

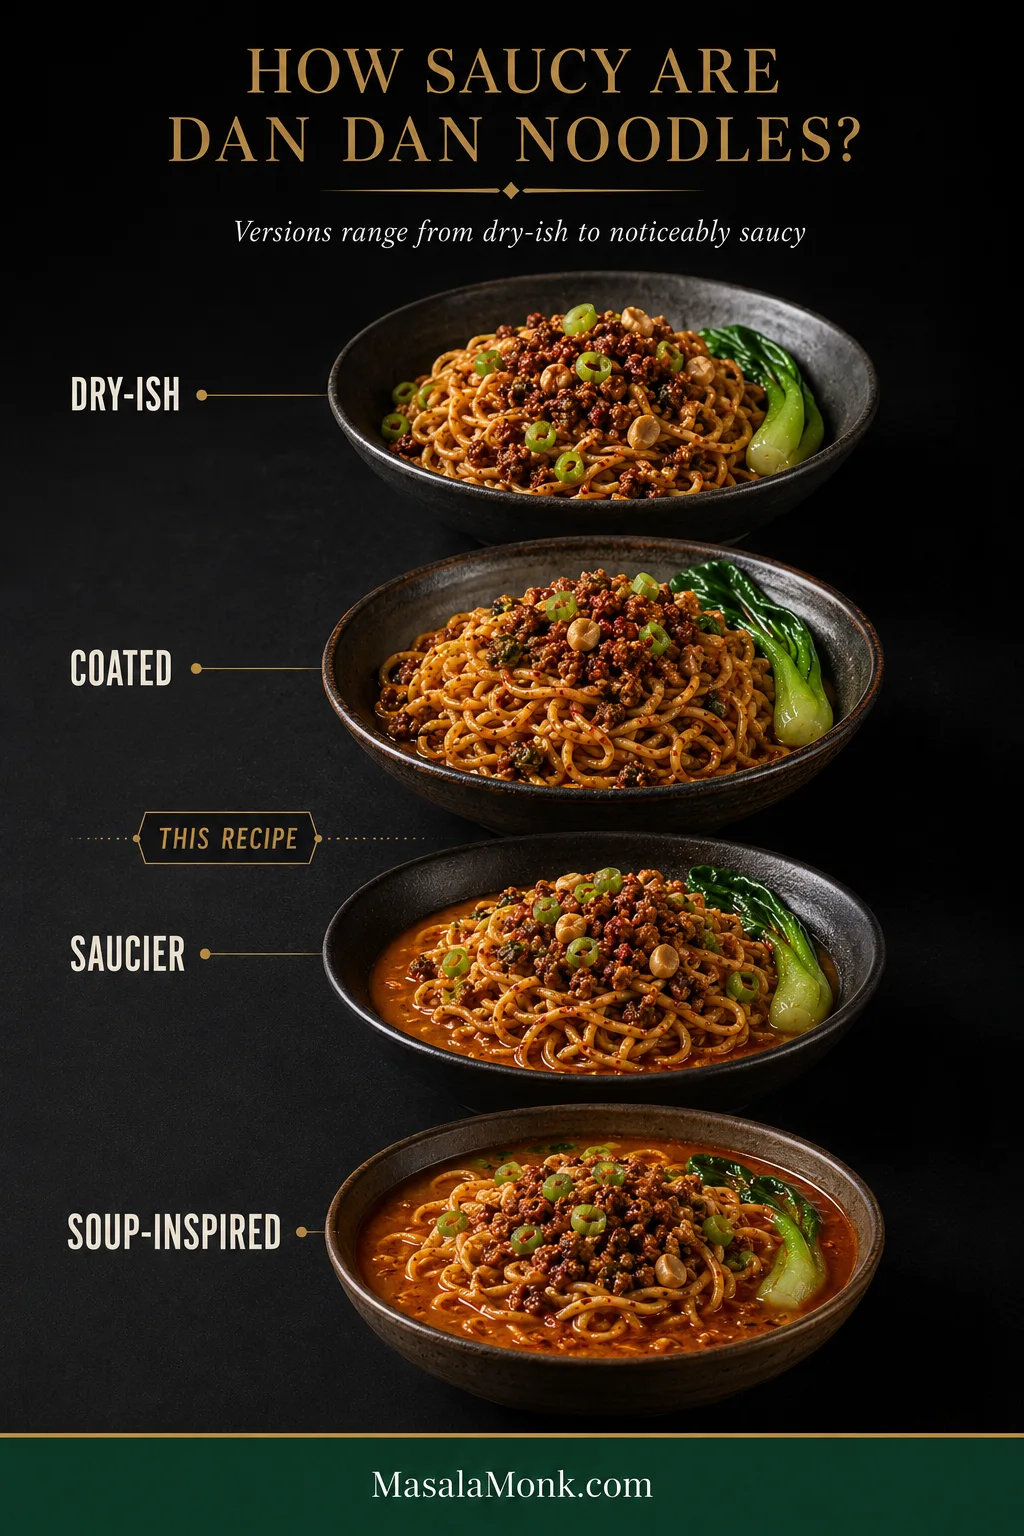
Dan Dan noodles range from quite dry to noticeably more saucy. Many Sichuan and Chengdu-style bowls use only a modest amount of intensely seasoned liquid, while other traditional versions are looser.

Four bowls showing Dan Dan noodles progressing from dry-ish to coated, saucier and brothy, with this recipe marked near the coated end.
The useful distinction is coating versus broth. A Dan Dan bowl can look glossy and still be fairly dry when the seasoned liquid stays on the noodles instead of surrounding them.

Even a dry-ish bowl still carries plenty of chili oil and concentrated seasoning. Japanese tantanmen and Dan Dan-inspired noodle soups take this flavor family much farther toward a full broth, which produces a distinctly different eating experience.

What Noodles Are Best for Dan Dan Noodles?

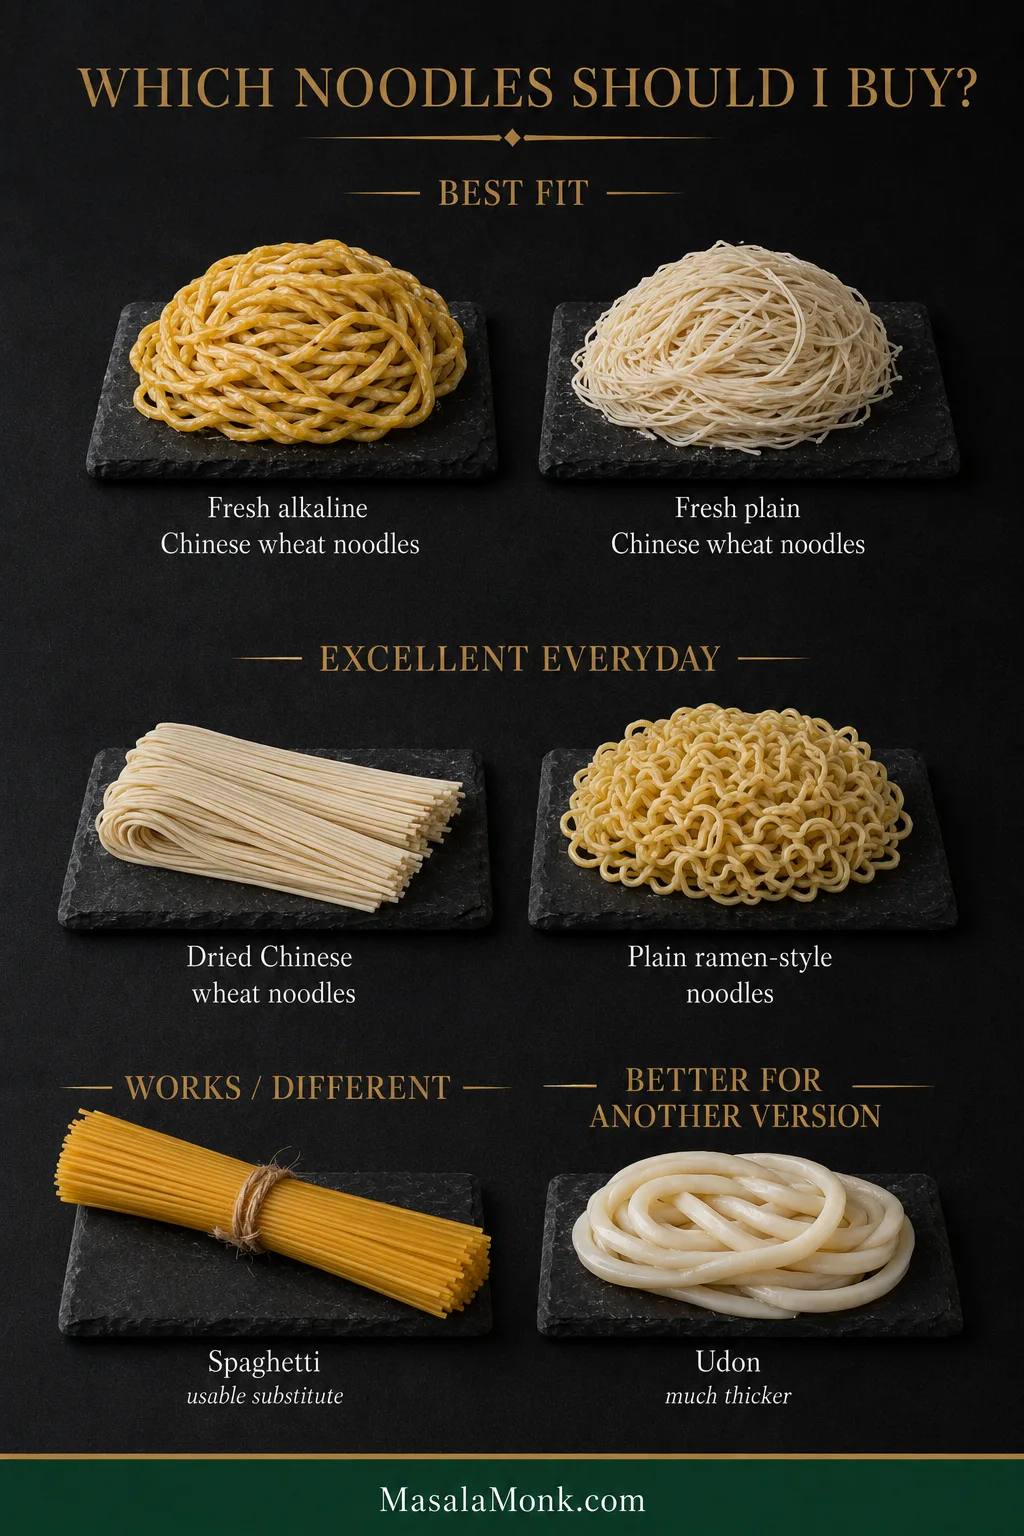
Thin-to-medium Chinese wheat noodles are the best fit. Fresh alkaline noodles are especially springy, while dried Chinese wheat noodles make an excellent pantry option.

In a Chinese or well-stocked Asian grocery, look for fresh noodles in the refrigerated case. The strands should be thin enough to tangle easily around chopsticks, with much less heft than udon.

Comparison of fresh alkaline wheat noodles, fresh plain Chinese wheat noodles, dried Chinese wheat noodles, ramen-style noodles, spaghetti and thick udon.
When package names are vague, compare the strands themselves. Thin-to-medium wheat noodles with some resilience are a better shopping clue than chasing one supposedly perfect label.
Noodle How it behaves Verdict
Fresh alkaline wheat noodles Springy, slippery, resilient Excellent when available
Fresh plain Chinese wheat noodles Slightly softer chew Excellent
Dried Chinese wheat noodles Reliable and easy to keep in the pantry Excellent everyday option
Plain ramen-style noodles Good chew and enough structure for the sauce Good substitute
Spaghetti Less springy, but carries the sauce surprisingly well Use it if that’s what you have
Rice noodles Different absorption and texture A bigger departure
Udon Much thicker and asks for a different sauce balance Better saved for another version

If all you can find is spaghetti, make dinner. The noodles didn’t come from the Chinese aisle, but the sauce still has plenty to hold onto.

Why Fresh and Dried Noodles Need Different Weights

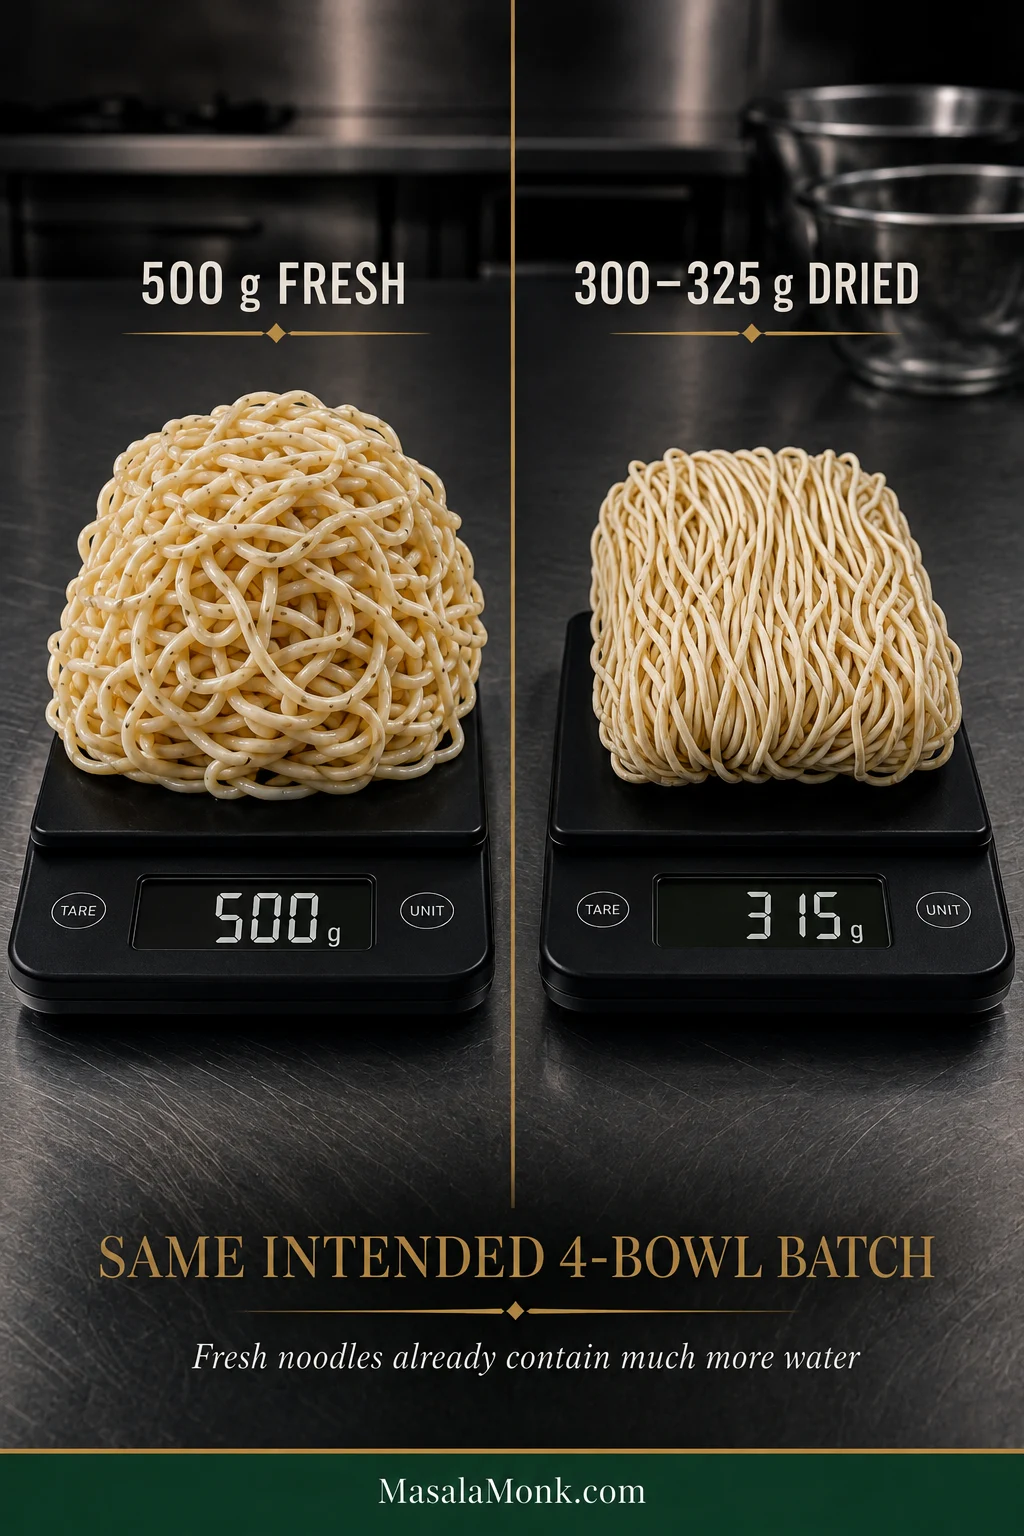
About 500 g / 18 oz fresh or 300–325 g / 10½–11½ oz dried gives you the intended four-bowl batch. Fresh noodles already carry substantial water weight, so equal package weights produce very different amounts of actual noodle.

Fresh Chinese wheat noodles measured at 500 grams beside about 300–325 grams of dried wheat noodles, both intended to make four servings.
Fresh and dried Chinese wheat noodles are not interchangeable package weights. Keep the recipe’s separate gram amounts, then let texture—not the number on the bag—decide when cooking is finished.

Whatever you buy, begin checking before the printed cooking time ends. Let the clock tell you when to check; let the noodle decide when it’s done.

Get the Dan Dan Sauce Right

Dan Dan sauce is built from chili oil, soy sauce, Sichuan pepper, black vinegar and, in this version, Chinese sesame paste, garlic, and a little sugar.

It starts concentrated because the noodles soften both flavor and texture. Sesame paste also varies considerably from jar to jar, which makes noodle water more useful as a final adjustment than as a fixed quantity.

Start each serving with about a tablespoon of hot noodle water. Toss completely, then add another teaspoon only when the strands still feel heavy.

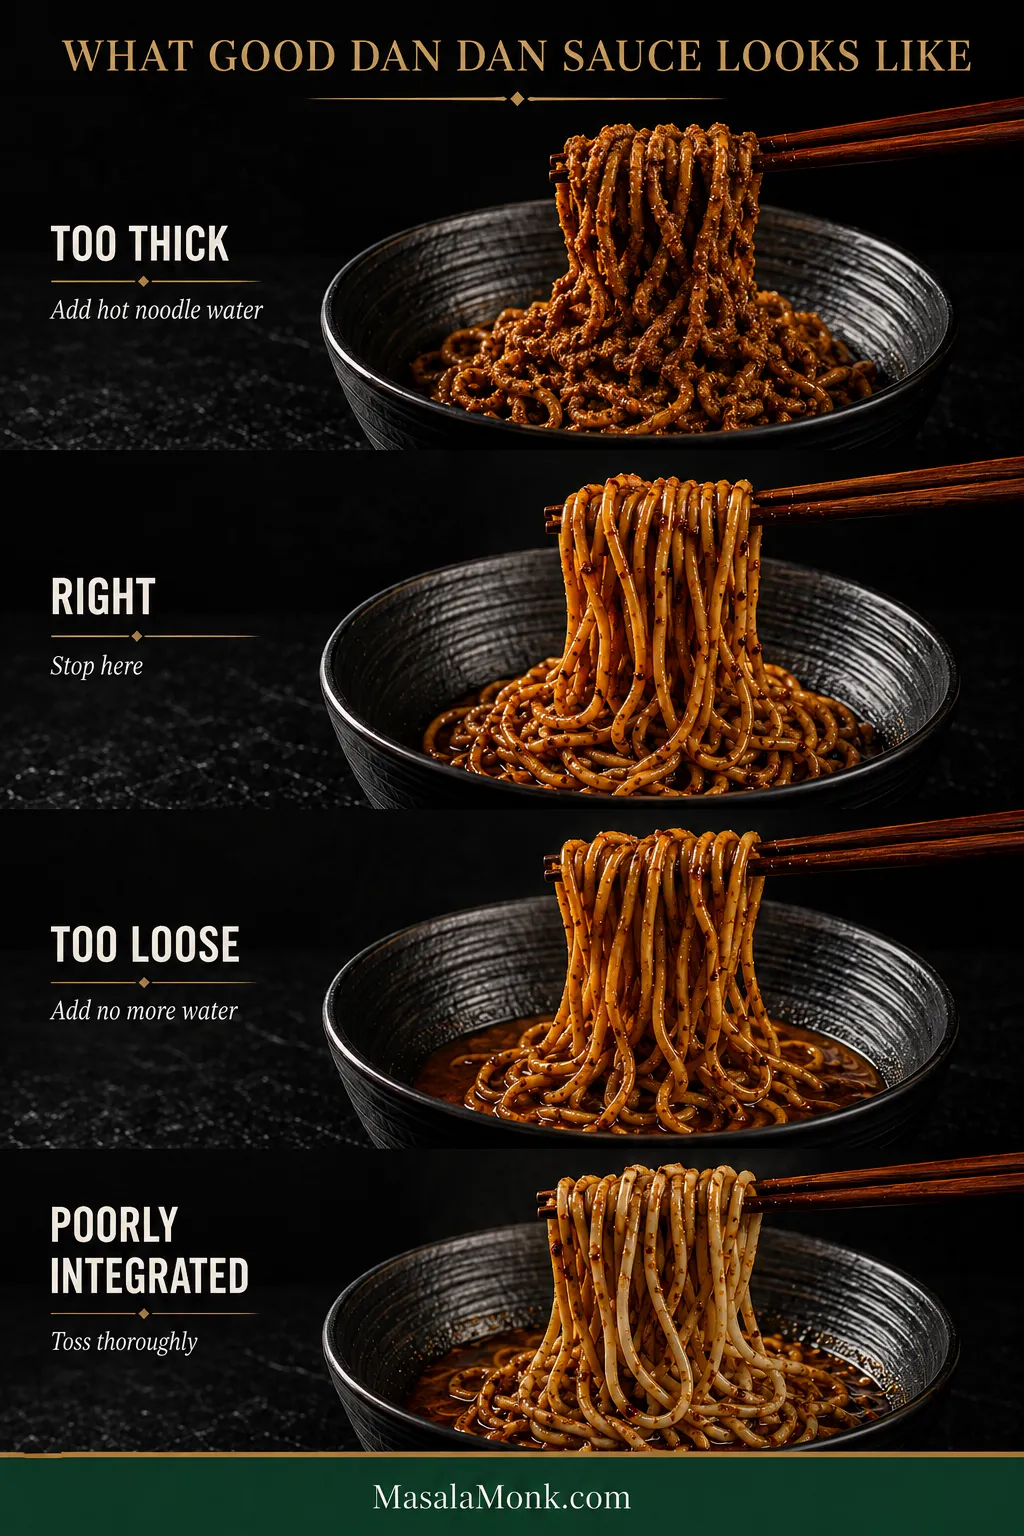
What you see What’s happening What to do
Strands stick in a heavy clump and sauce sits in thick patches Too thick Add hot noodle water a teaspoon at a time
The sauce coats the strands and lifts cleanly with them Right Put the measuring spoon down
Thin liquid slips off the strands and gathers underneath Too loose Add no more water; toss thoroughly
An oil slick surrounds noodles that still seem poorly coated Poorly integrated Toss vigorously and let the sauce come together
Four sauce states on noodles: too thick and clumped, correctly glossy and separated, too loose with liquid pooling below, and poorly integrated with uneven oil.
Dan Dan sauce consistency belongs to the toss. A sauce that seems thick by itself may become exactly right once hot noodles and a little noodle water enter the equation.

What the Concentrated Sauce Should Taste Like

Before the noodles go in, the sauce should taste deliberately bold: roasted sesame underneath, clear black-vinegar acidity, aromatic chili warmth, assertive saltiness, and a noticeable Sichuan-pepper hum. None of those flavors should erase the others.

An obvious imbalance is easiest to correct now. A heavy sauce often needs brightness; a nearly heatless one may simply be meeting a mild chili oil. Sesame should round the sharper flavors, not become the whole story.

That roasted richness comes from a deliberately modest amount of Chinese sesame paste.

Chinese Sesame Paste vs Tahini vs Peanut Butter

Sesame paste is common in many Dan Dan noodle versions, but it isn’t universal across Sichuan. This recipe uses enough to add roasted depth while leaving room for chili, black vinegar, ya cai, and Sichuan pepper.

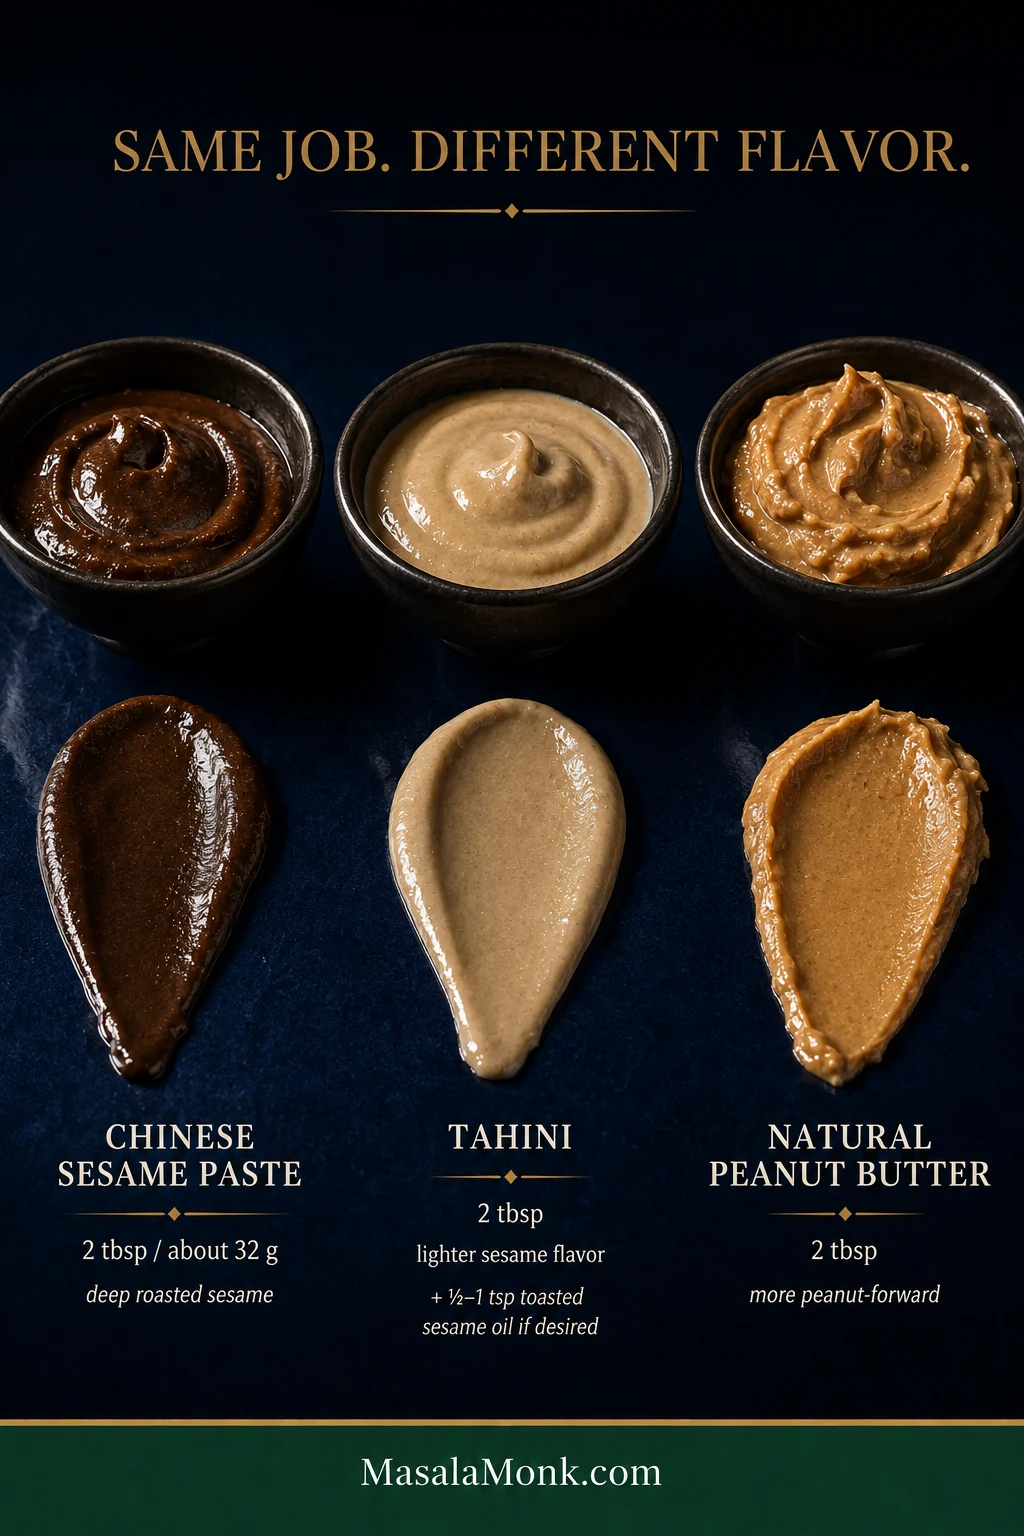
Chinese sesame paste has a darker, toastier character than most tahini because its sesame seeds are roasted more deeply. A substitute still makes excellent noodles without requiring a large dose of extra sesame oil.

Chinese sesame paste, tahini and natural peanut butter compared side by side, showing different colors, textures and starting amounts.
A substitution changes the personality of the bowl: tahini keeps the flavor sesame-led, while peanut butter makes the peanut note more obvious. Neither needs to be disguised.
What you have Starting point Expect
Chinese sesame paste 2 tbsp / about 32 g Deep roasted sesame flavor
Tahini 2 tbsp tahini; optionally add about ½–1 tsp toasted sesame oil A lighter sesame flavor
Natural unsweetened peanut butter 2 tbsp A clearer peanut note; extra sesame oil isn’t required
Sweetened peanut butter Start with no added sugar; add some only after tasting the finished sauce Sweeter, more peanut-forward noodles

No Chinese sesame paste today? Dinner is still very much on. These are starting points, and the finished sauce gets the final say.

Make Sure the Jar Is Actually Sesame Paste

Imported labels can be confusing. A jar translated as “sesame sauce” may contain plain sesame paste, or it may already include soy, sugar, vinegar, and other seasonings.

Check the ingredient list. A pre-seasoned sesame sauce changes the salt, sweetness, and acidity of the recipe before you add anything else.

Prefer a creamier noodle where peanut butter is meant to lead? Our peanut noodles recipe starts from that balance.

Pork & Ya Cai: Get the Topping Right

How to Get Crisp Pork Instead of Gray Pork

If the pork still sounds wet, it isn’t really browning yet.

Ground pork normally goes through a steamy stage first. Then the visible moisture disappears, the sound becomes sharper, and the crumbles begin frying in their own rendered fat. That’s when the color deepens and crisp edges start to appear.

Add Shaoxing wine and soy after browning begins. The hot pan reduces them quickly around the meat and preserves those fried edges.

For food safety, ground pork should reach at least 160°F / 71°C. The temperature tells you the meat is safe; the browned dry edges tell you it has reached the texture worth putting on the noodles.

Once those crumbles are browned and dry around the edges, ya cai gives them the salty-fermented bite that makes the topping much more than plain ground pork.

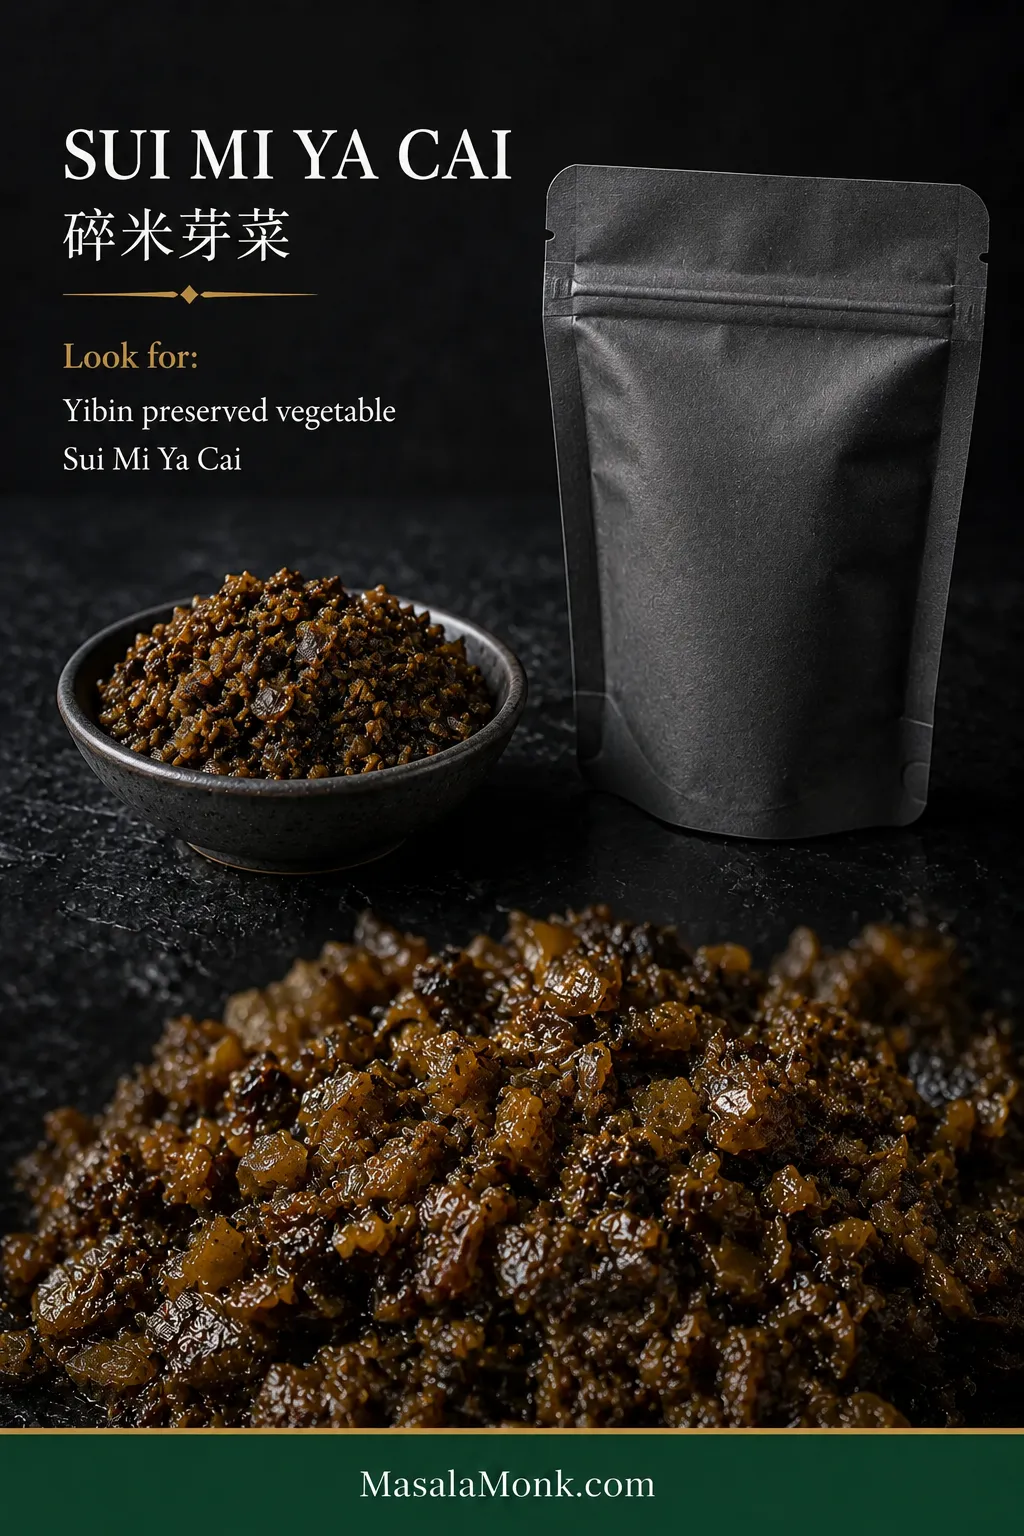
What Is Sui Mi Ya Cai?

Sui mi ya cai is a Sichuan preserved mustard vegetable with salty, fermented, slightly sweet depth. Its chewy-crisp pieces are especially good tucked among the browned pork.

Sui mi ya cai shown in a generic packet, a small dish and close-up, revealing its finely chopped dark brown preserved mustard-vegetable texture.
Shopping shortcut: sui mi ya cai should already look finely chopped and preserved. Long stems or large leafy pickles usually mean you’ve found a different mustard vegetable.

At a Chinese grocery, look for Sui Mi Ya Cai, Yibin preserved vegetable, or 碎米芽菜, often in small vacuum-sealed packets. No Chinese grocery nearby? Search those exact names online; generic “pickled mustard greens” can lead to several different preserved vegetables.

Should You Rinse Ya Cai?

Do not make rinsing automatic. Make tasting automatic. Packets differ in saltiness and seasoning. Use pleasantly salty ya cai as it is. Aggressively salty ya cai gets a brief rinse and a thorough squeeze before chopping.

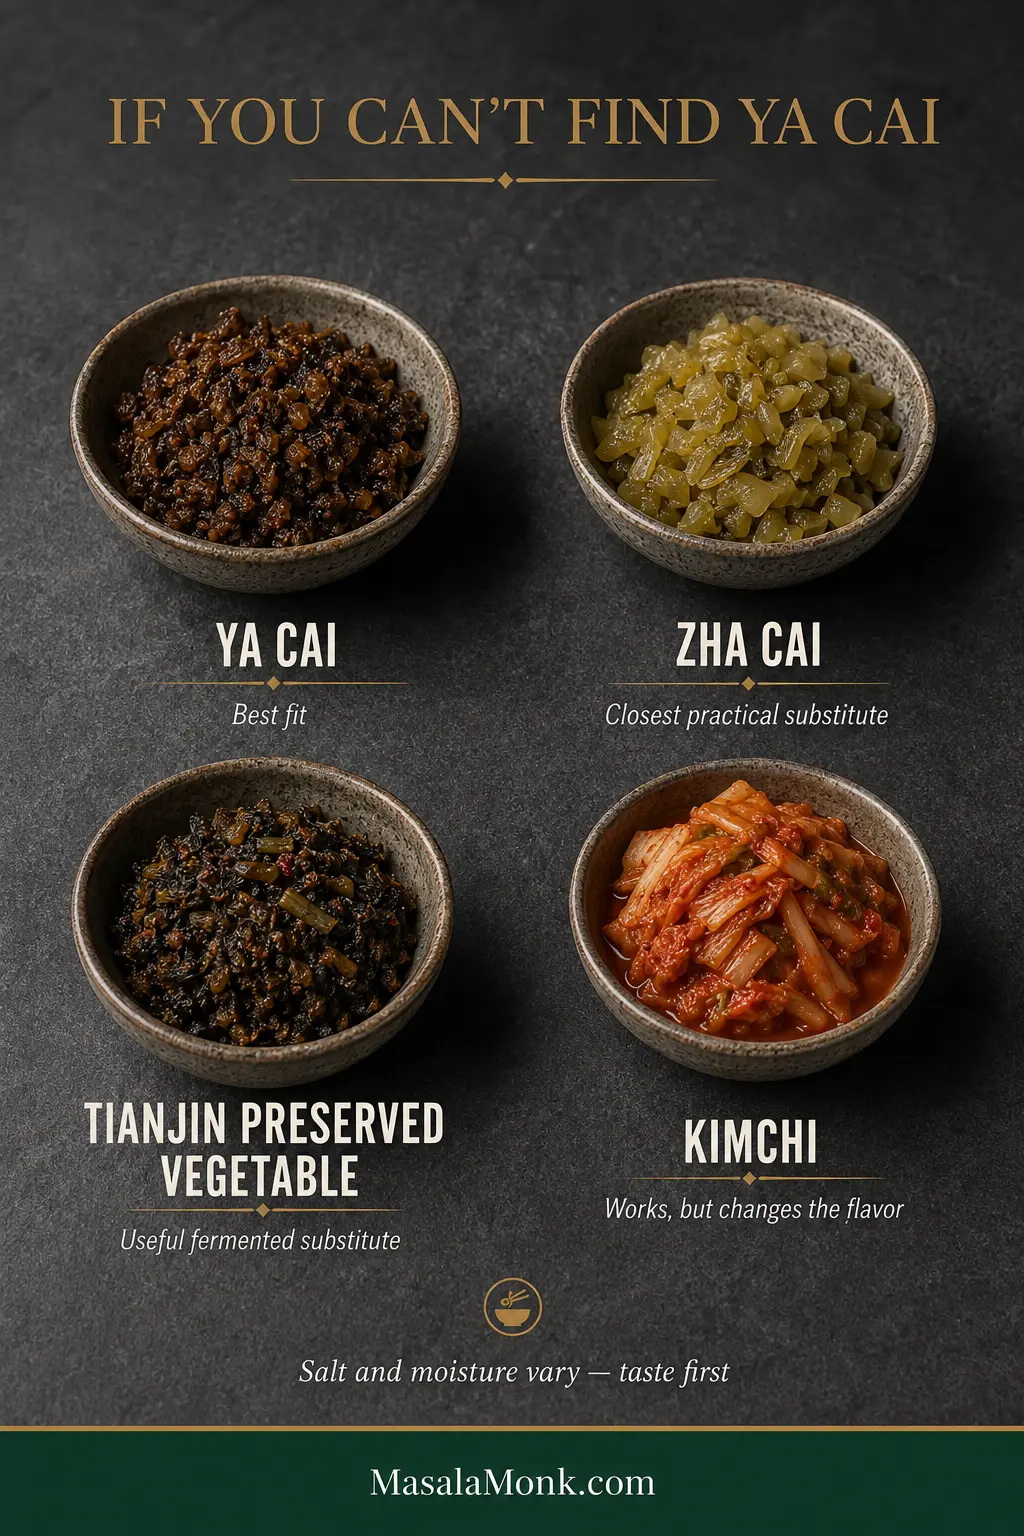
Best Substitutes for Sui Mi Ya Cai

Four preserved vegetables compared: finely chopped ya cai, firmer zha cai, Tianjin preserved vegetable and wetter red kimchi as increasingly different substitutes.
Choose the substitute by moisture as well as flavor. Zha cai mainly needs fine chopping; kimchi, however, benefits from draining and extra pan time before it joins the pork.
  • Zha cai: the closest practical substitute here. Chop it finely and account for its saltiness.
  • Tianjin preserved vegetable or another Chinese preserved mustard: different in character, but still useful for salty fermented depth.
  • Kimchi: changes the flavor noticeably but works in an emergency. Drain or squeeze it very well, chop finely, and cook off the remaining moisture after adding it to the pork.
  • Nothing: the noodles still work, but you’ll lose one of the salty-fermented notes that makes Dan Dan noodles immediately recognizable.

How Spicy Are Dan Dan Noodles? Má vs Là

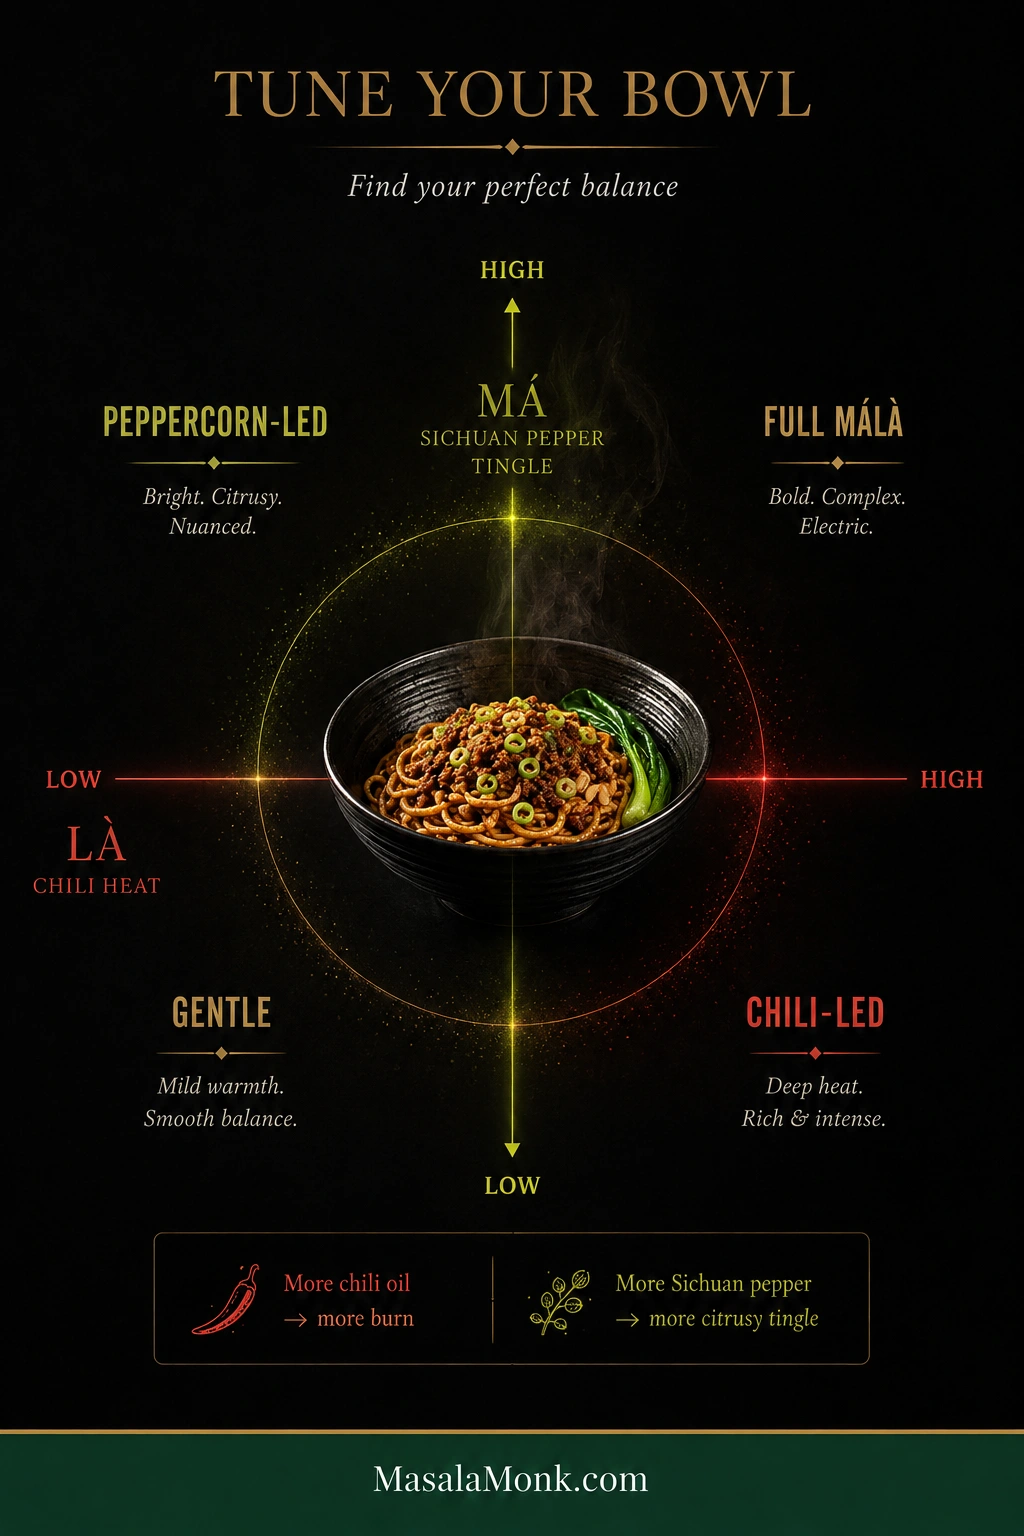
Dan Dan noodles range from moderately spicy to fiercely hot depending on the chili oil and Sichuan pepper. More importantly, they contain two distinct sensations: là is chili heat, while má is the citrusy, lightly numbing effect of Sichuan peppercorns.

Má and là flavor map showing chili heat increasing horizontally and Sichuan pepper tingle vertically, with gentle, chili-led, pepper-led and full málà zones.
Change one dial at a time. More chili oil answers “not hot enough”; more Sichuan pepper answers “not tingly enough.” That makes málà much easier to control.
  • Less heat overall: reduce both chili oil and Sichuan pepper.
  • More burn with roughly the same tingle: add chili oil.
  • More citrusy tingle with roughly the same chili heat: add freshly ground Sichuan pepper at the table.
  • Full-on málà: increase both gradually.

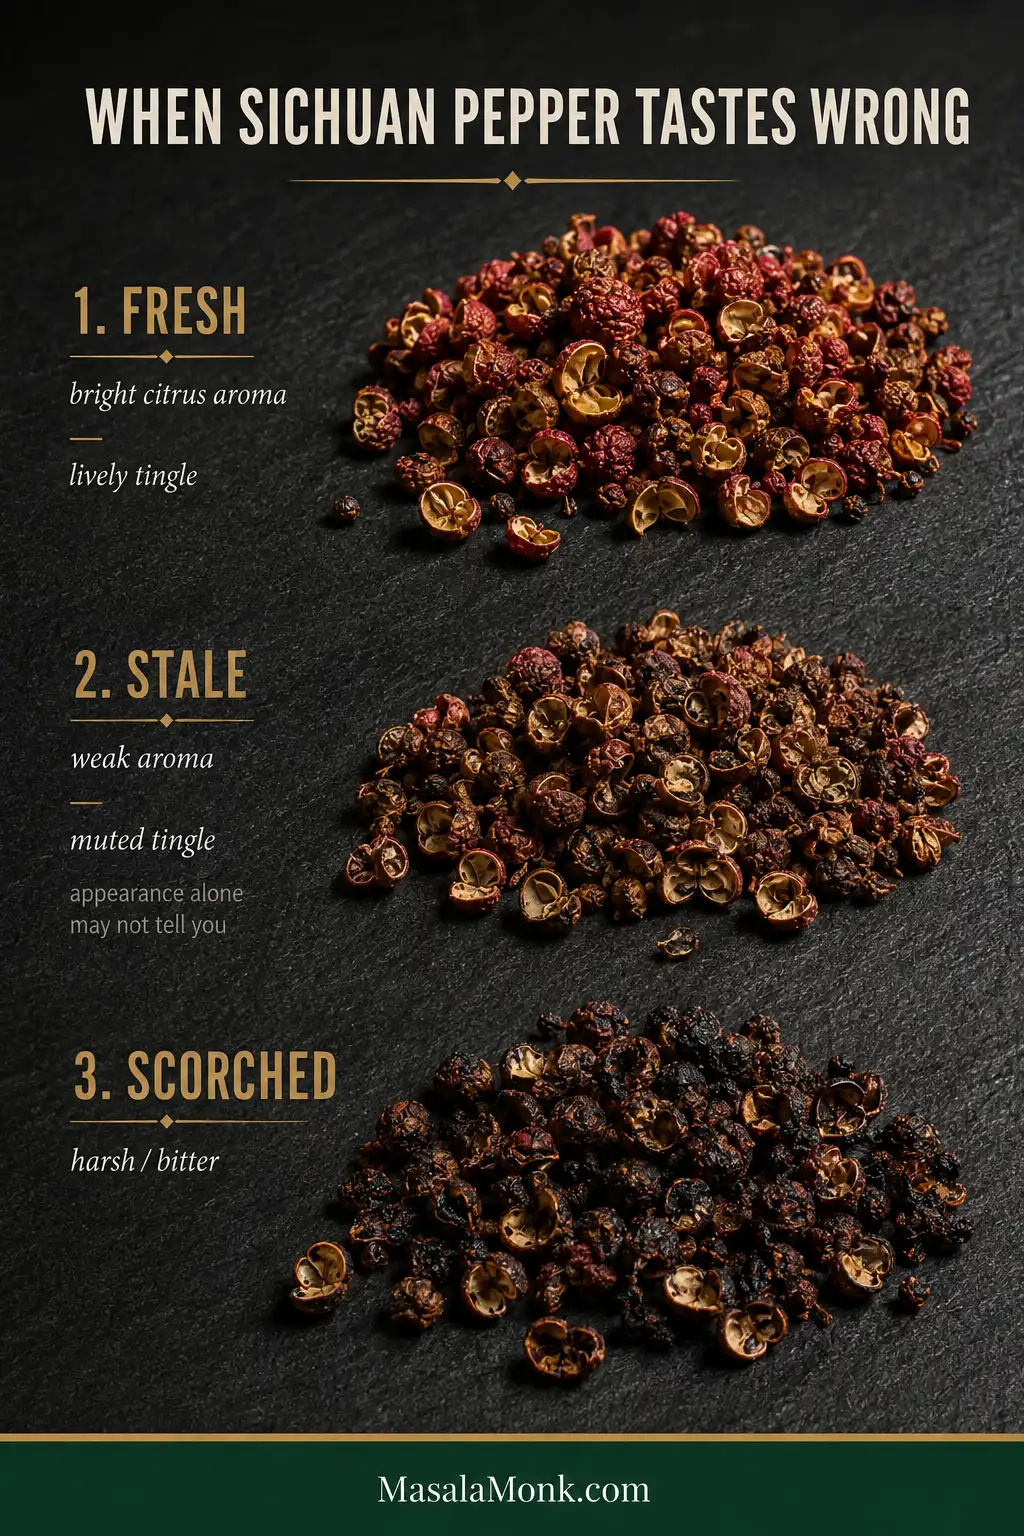
The first proper hit of Sichuan pepper can be surprising. That electric, citrusy sensation is part of the pleasure. A dull, woody pepper may simply be stale; harsh bitterness more often points to scorching, an excessive amount, or too much hard dark seed material in the grind.

Sichuan peppercorns compared as fresh reddish husks, duller stale pepper and dark scorched pepper, with aroma and flavor cues for each condition.
Crush a Sichuan pepper husk between your fingers before cooking. A vivid citrus aroma is a stronger freshness clue than color alone.

Part of what makes the bowl so satisfying is the contrast: slippery noodles, dry-crisp pork, chewy preserved mustard, and a red chili-oil sheen carrying all that heat and aroma through the strands.

Shaoxing Wine, Vinegar, Soy Sauce & Chili Oil

These aren’t one-recipe purchases. Chinkiang vinegar, Shaoxing wine, chili oil, and Sichuan pepper all earn their place quickly if Chinese food appears regularly in your kitchen.

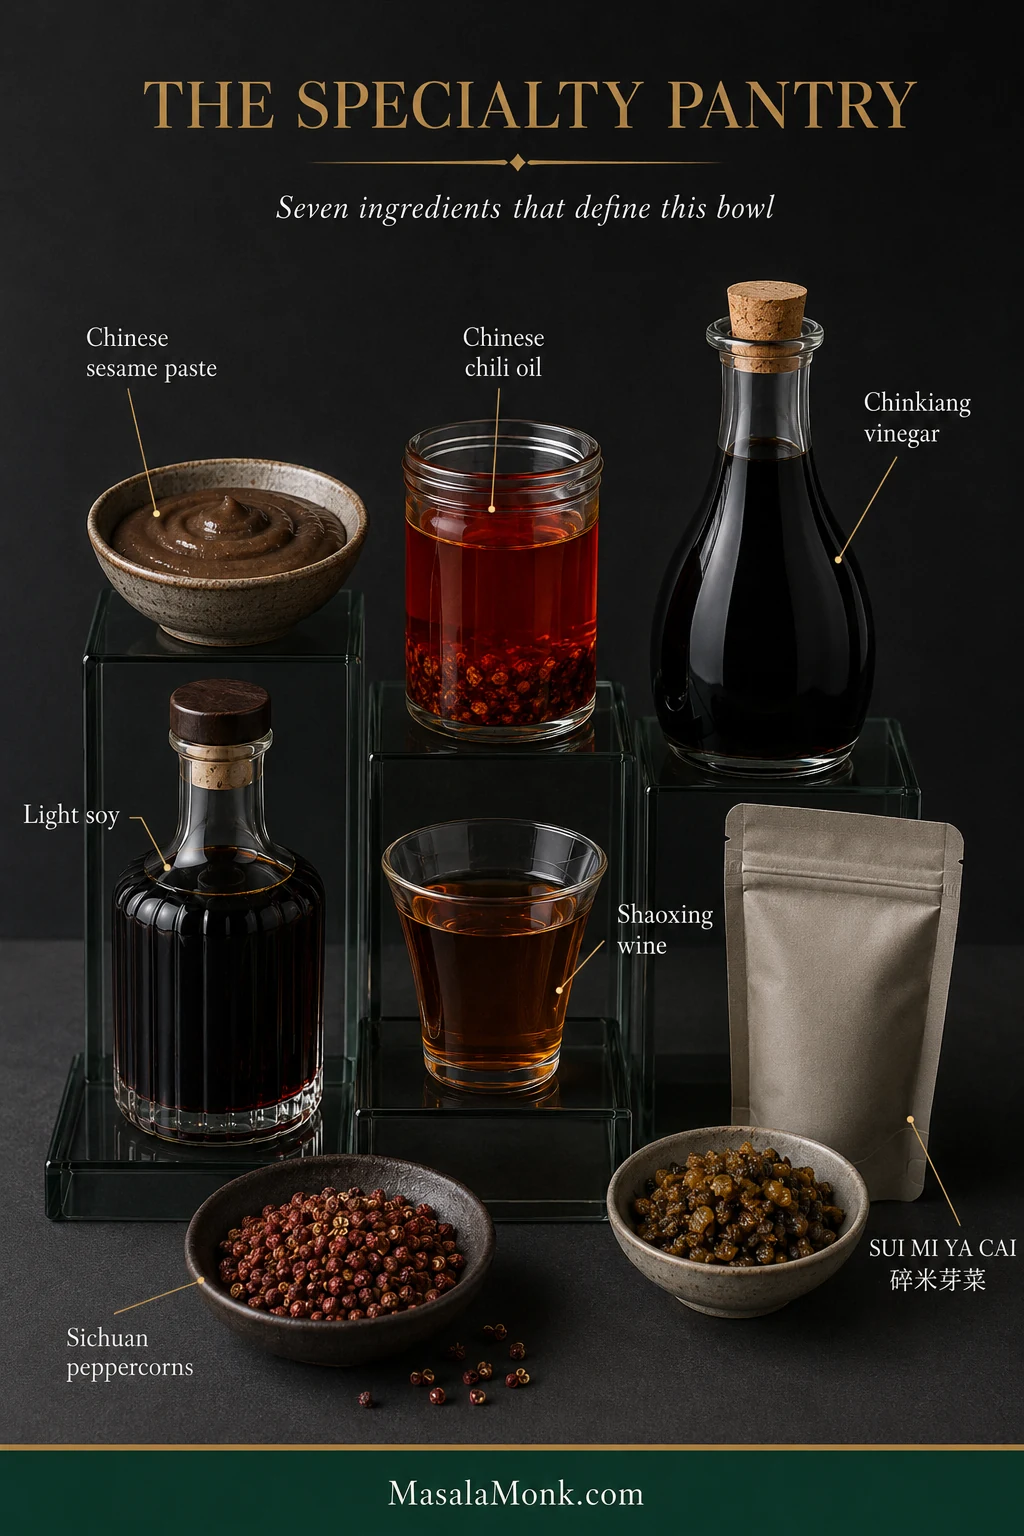
Seven specialty ingredients for Dan Dan noodles: Chinese sesame paste, chili oil, Chinkiang vinegar, light soy, Shaoxing wine, sui mi ya cai and Sichuan peppercorns.
Once these seven Sichuan pantry ingredients are stocked, most future Dan Dan noodle nights begin with measuring rather than shopping. The unfamiliar part gets familiar surprisingly quickly.

Shaoxing Cooking Wine

A bottle labeled “Shaoxing cooking wine” is completely normal. Many inexpensive cooking versions contain added salt, which is one reason this recipe doesn’t automatically add salt to the pork or noodle water.

No Shaoxing wine? Use dry sherry in the same 1 tbsp / 15 ml amount.

Chinkiang Black Vinegar

Use another dark Chinese rice vinegar in the same starting amount. Chinkiang has a particularly deep, malty character, so the flavor will change slightly, but the sauce will still have the acidity it needs.

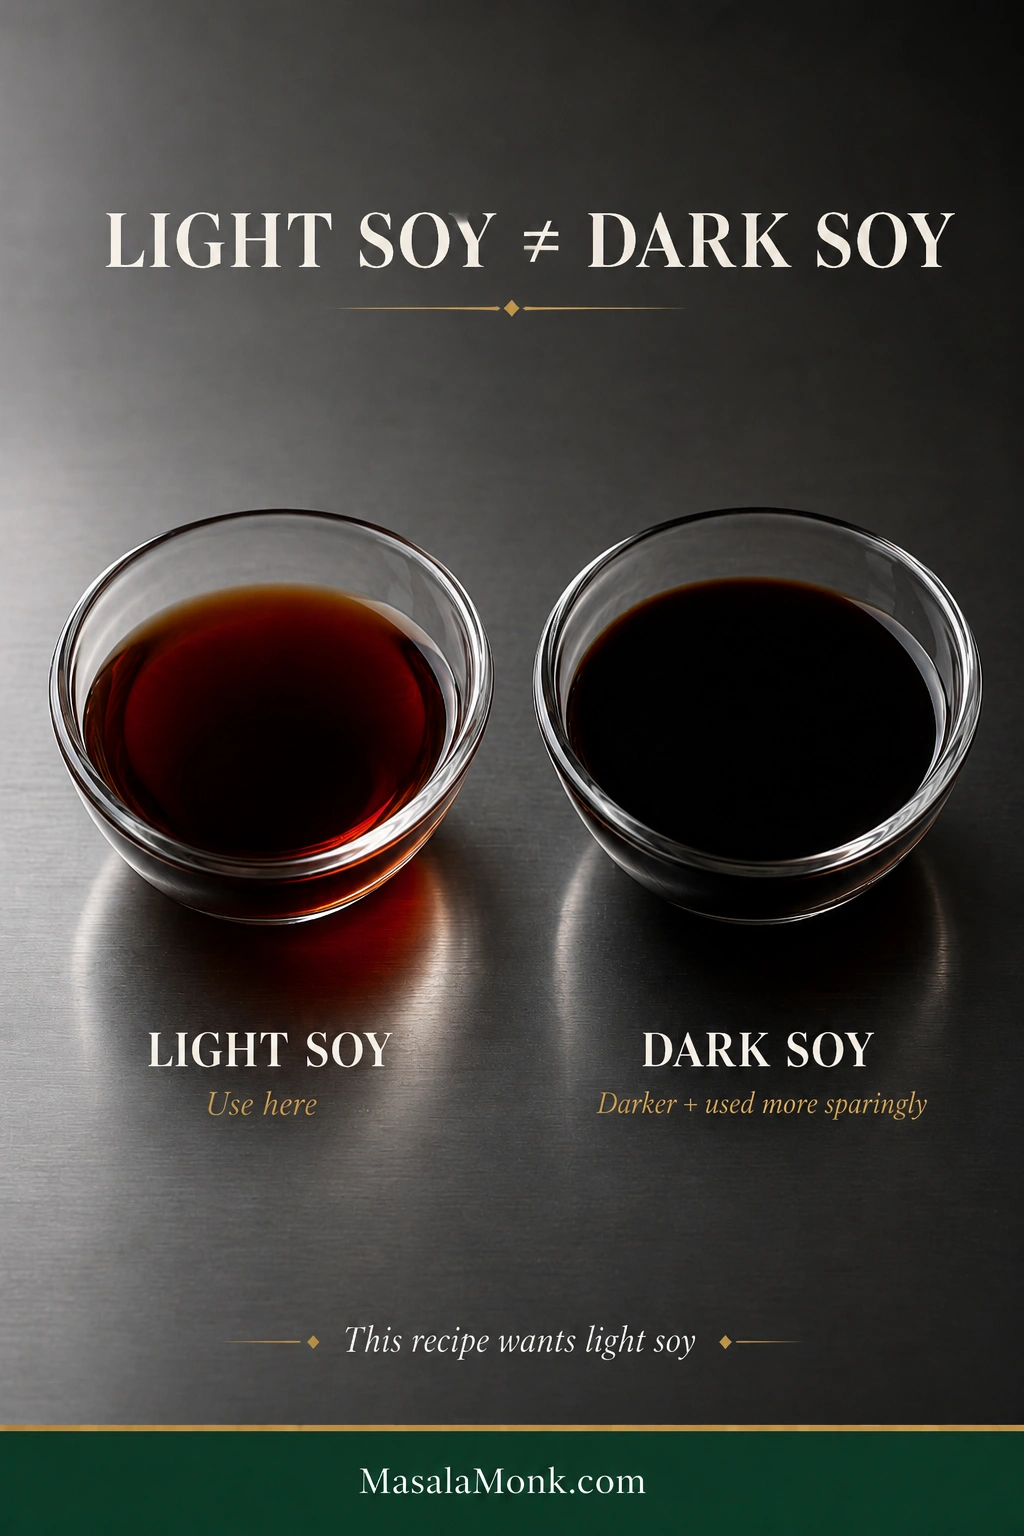
Light Soy vs Dark Soy

Chinese light soy sauce is ideal. Start with the same quantity of ordinary all-purpose soy sauce when that’s what you have, keeping in mind that some bottles are noticeably saltier than others.

Light soy sauce and dark soy sauce compared in matching dishes, showing translucent reddish-brown light soy beside much darker, more opaque dark soy.
If Chinese light soy is unavailable, ordinary all-purpose soy is usually a closer direction than dark soy. Because brands vary in saltiness, taste before making any further correction.

Dark soy is much deeper in color and normally used more sparingly. It changes both the appearance and balance of the sauce, so use light or all-purpose soy here when possible.

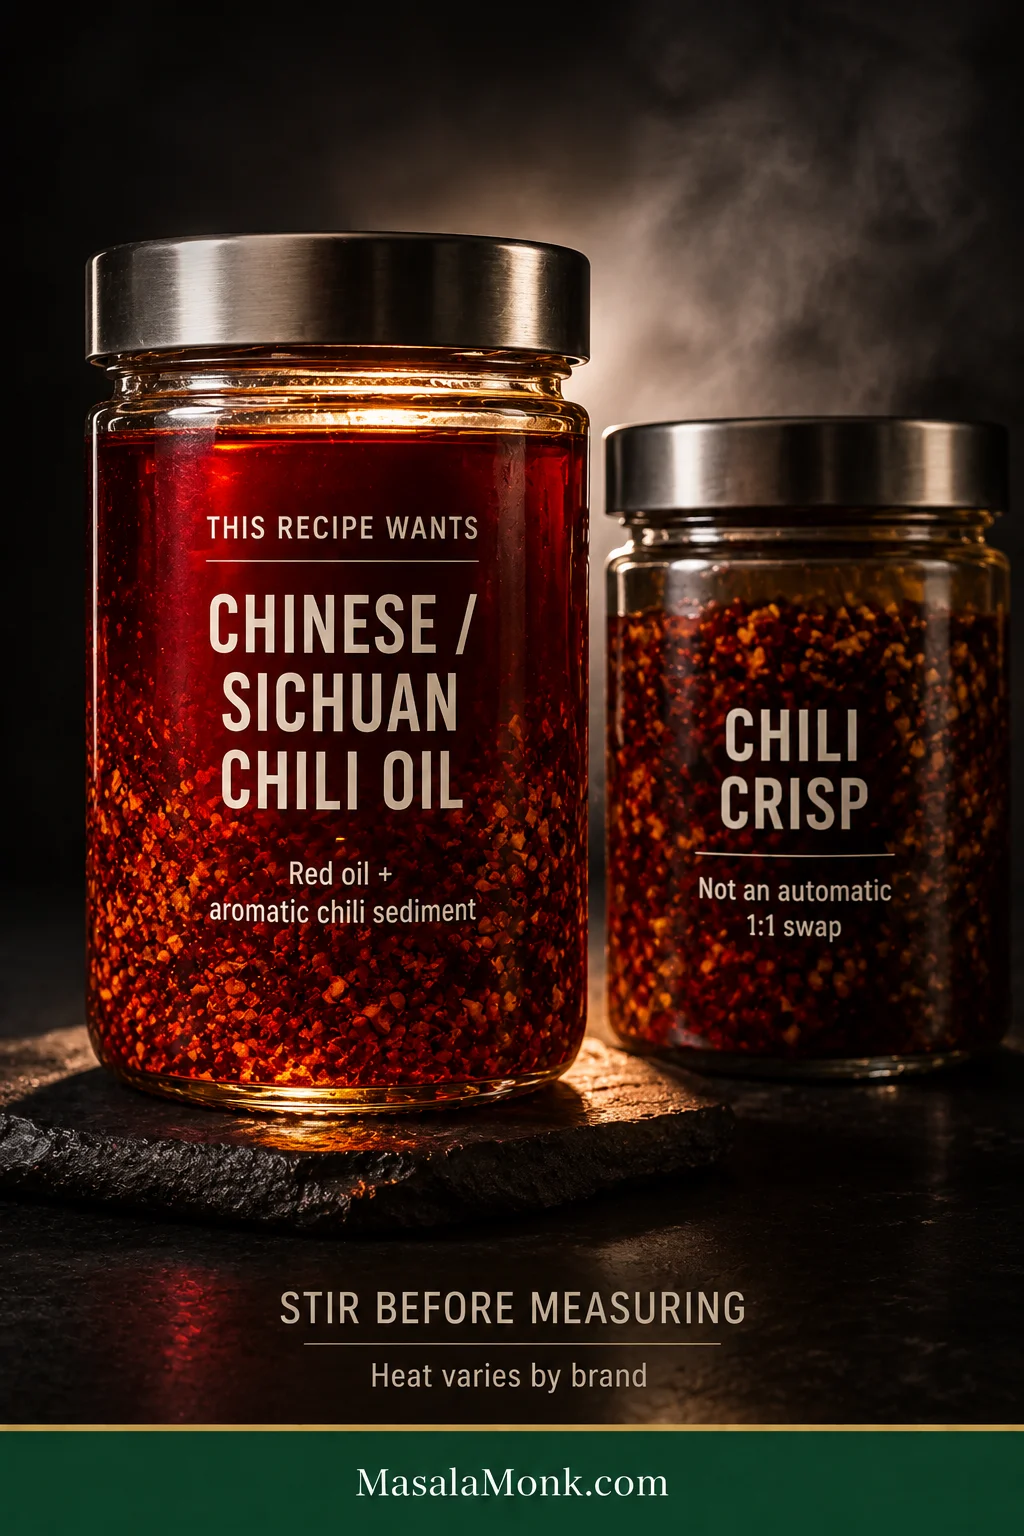
Choosing the Chili Oil

Look for a fragrant Chinese or Sichuan-style red chili oil with visible chili sediment. Stir the jar before measuring so some of those aromatic solids reach the sauce too.

Chinese Sichuan chili oil with mostly red oil and chili sediment beside a solids-heavy jar of chili crisp, showing why they are not automatic substitutes.
Use the spoon test, not just the jar: mostly red oil with some sediment suits this Dan Dan sauce well; a spoon packed with crunchy solids behaves more like chili crisp.

Heat varies enormously by brand. Three tablespoons of one can be pleasantly warm; three tablespoons of another can be an entirely different evening.

Homemade Sichuan chili oil is another option. The Sichuan chili oil section in our pepper sauce guide gives you the from-scratch route when you want it.

Chili crisp needs a more conservative starting amount. Its garlic, sweetness, salt, oil-to-solids ratio, and heat vary too much between brands for a dependable spoon-for-spoon swap. Add some, toss the noodles, then decide whether the bowl wants more.

Dan Dan Noodles Troubleshooting

Already tossed everything together and something tastes wrong? Don’t start throwing ingredients at it. Find the problem first. Most of these are fixable.

Flavor Problems

Problem Save it now Next time
Too salty Add unseasoned noodles or greens; a little hot water can soften the intensity Check the ya cai, soy sauce, and cooking wine before adding extra salt
Too sour Add more noodles or a little sesame component; use a tiny pinch of sugar only if needed Use slightly less vinegar if your bottle is particularly sharp
Too sweet Add a little vinegar and chili oil Reduce the sugar, especially with sweetened peanut butter
Too spicy Add noodles, greens, and a little sesame component Use less of a particularly hot chili oil in the base
Too numbing, bitter, or medicinal Dilute with more noodles or sauce without extra Sichuan pepper Use less pepper and toast gently; avoid scorching it
Too sesame- or peanut-heavy Add noodles, vinegar, and chili to restore balance Measure the paste instead of using a heaped spoonful
Flat or bland Don’t assume it needs more soy; use the diagnostic below Build the bowl from fresh peppercorns, flavorful chili oil, and properly seasoned pork

Texture Problems

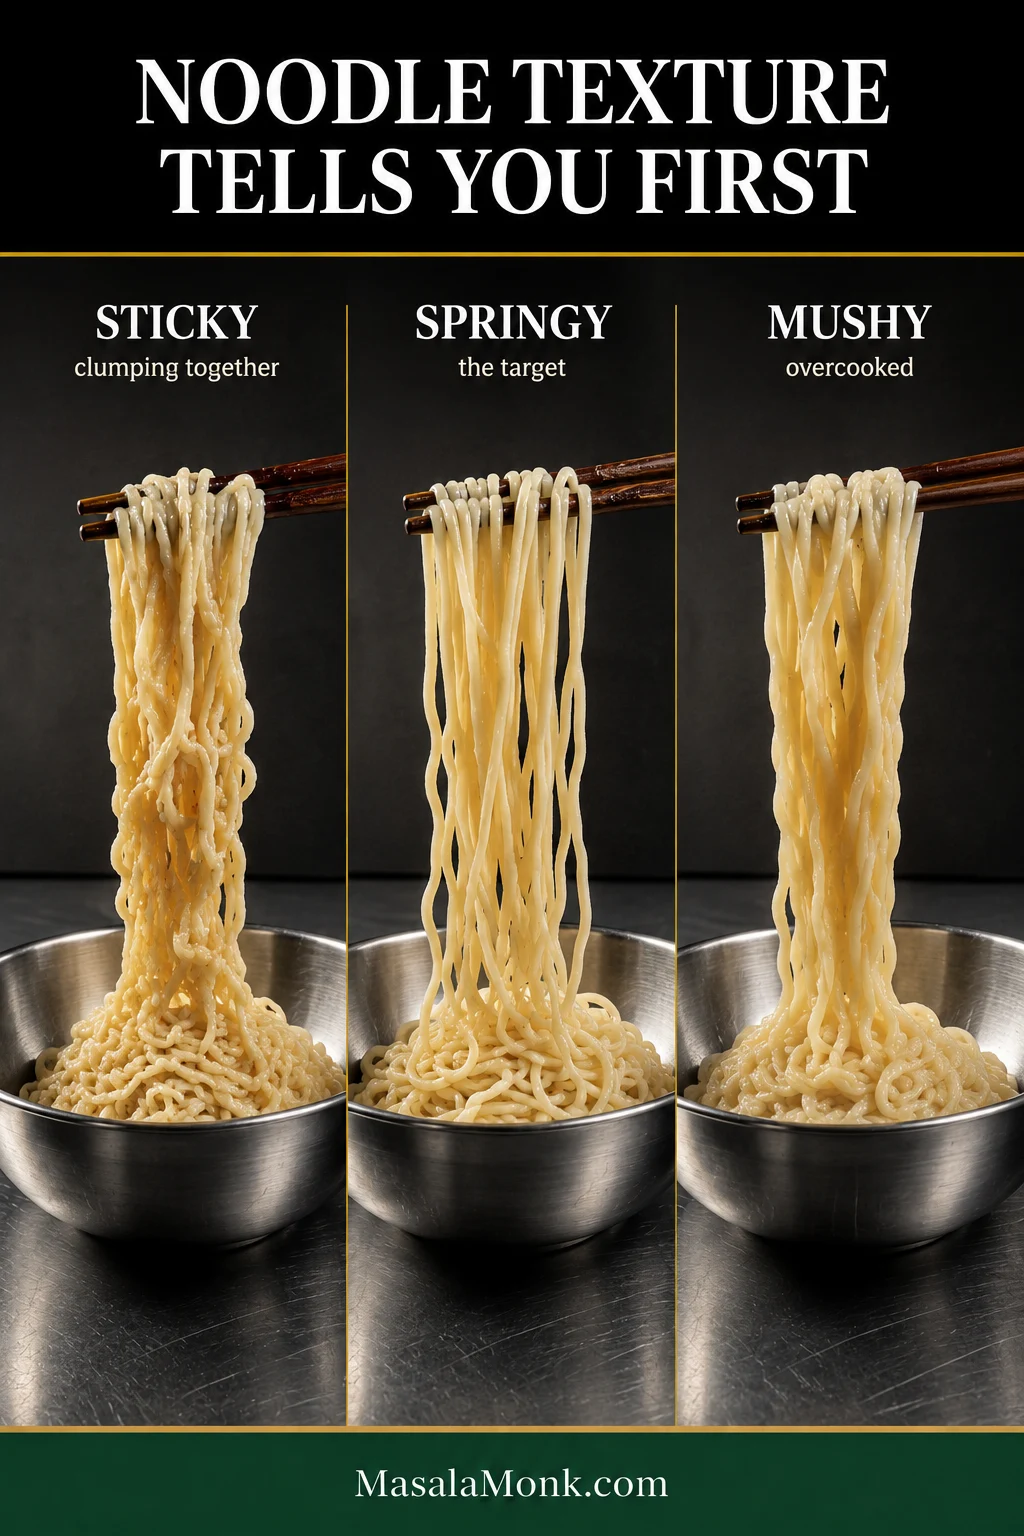
Three controlled noodle lifts comparing sticky clumped noodles, springy separated noodles as the target and limp swollen noodles that are overcooked.
Sticky can still be rescued; mushy cannot. If the noodles retain structure, loosen and toss them. If the strands have collapsed, serve promptly and adjust the cooking time next round.
Problem Save it now Next time
Sticky noodles Loosen gently and toss immediately; add only as much water as necessary Start checking the noodles earlier and sauce them promptly
Mushy noodles Serve immediately; the texture cannot really be reversed Pull them 30–60 seconds earlier
Gray, soft pork Keep frying until released moisture disappears and browning develops Use a wider hot pan and add liquid seasonings later

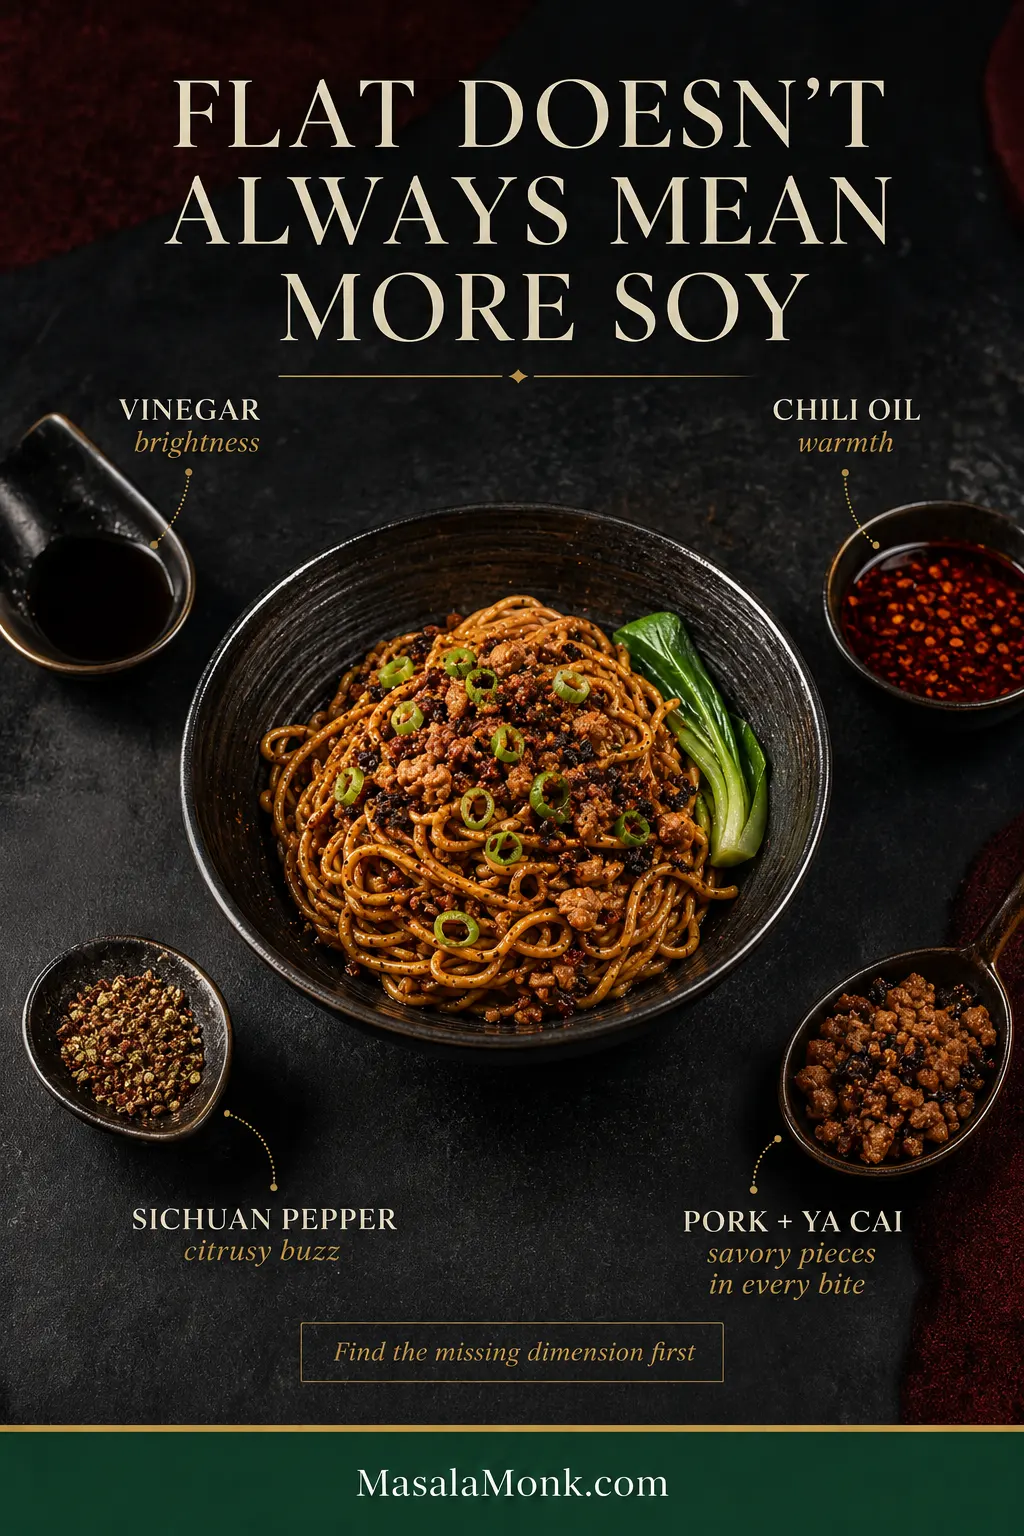
Before You Reach for More Soy Sauce

A bowl can taste flat without needing more salt. A few drops of Chinkiang vinegar may supply the missing brightness. Fresh Sichuan pepper brings back the citrusy buzz; chili oil restores warmth; tossing the pork and ya cai properly through the noodles can bring the savory pieces into every bite.

Dan Dan noodle bowl surrounded by Chinkiang vinegar, chili oil, Sichuan pepper and pork with ya cai, each labeled for the flavor dimension it adds.
Name the missing sensation before adding anything: brightness, warmth, citrusy tingle or savory depth. That one-word diagnosis is more useful than automatically reaching for more soy sauce.

Make Ahead, Store & Reheat

Planning to cook right now instead? Jump back to the recipe card; the storage section is here when you want the make-ahead route.

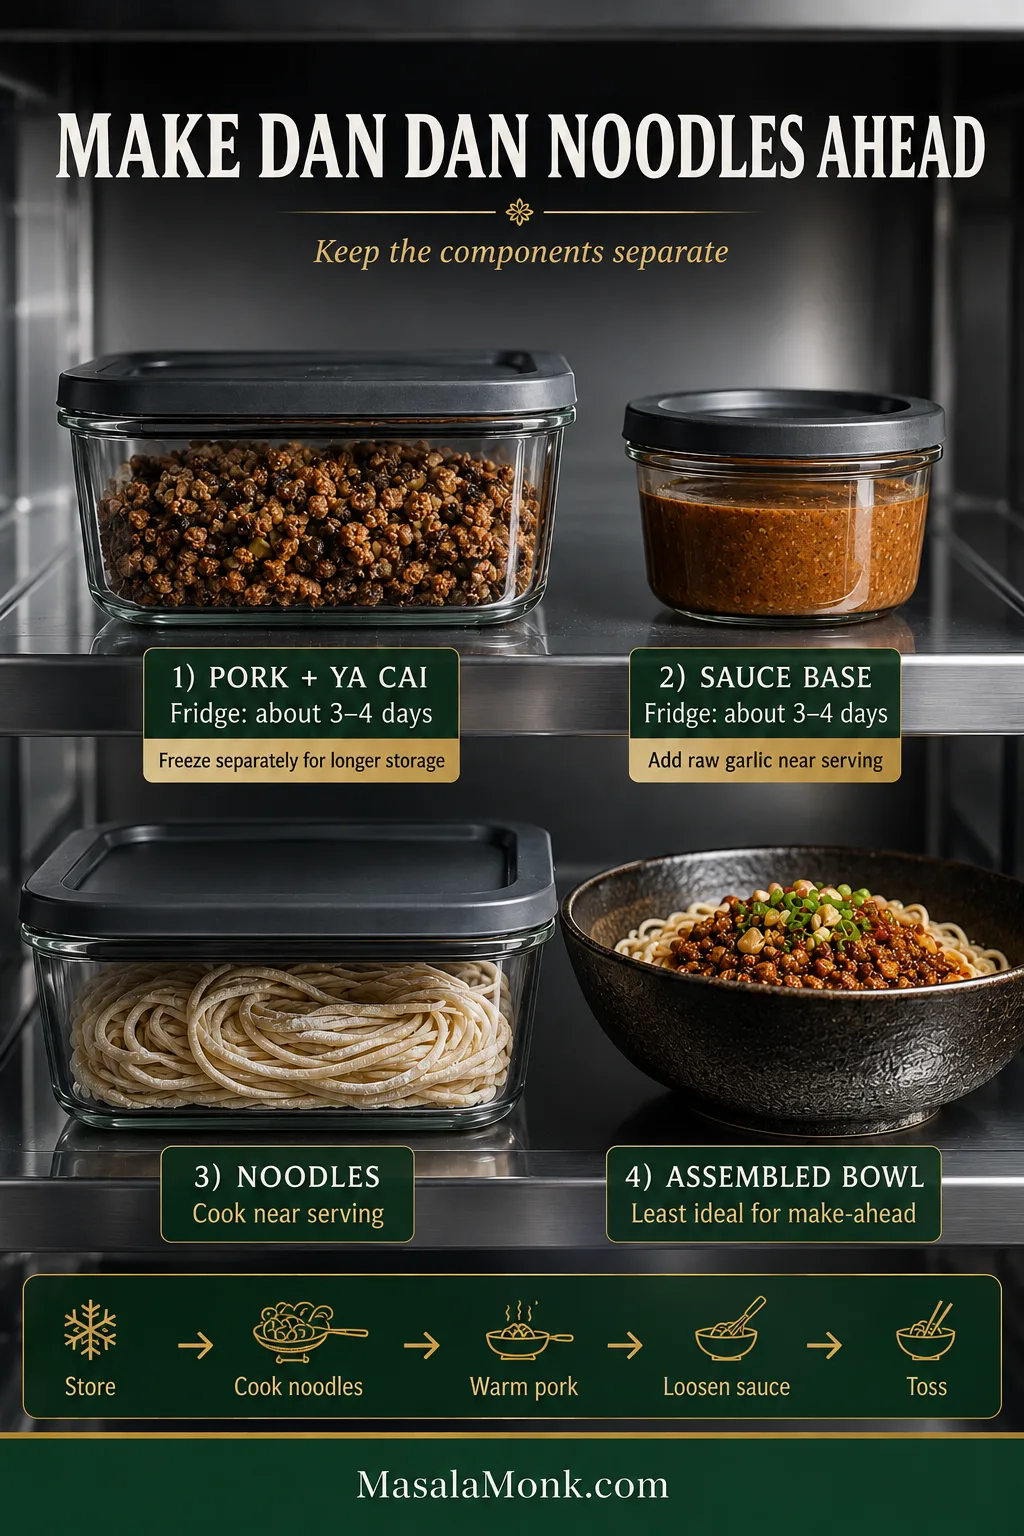
For fast Dan Dan noodles later in the week, make the pork topping and a garlic-free sauce base ahead. Another serving then comes down to fresh noodles, a quick blanch of greens, warmed pork, a spoonful of sauce, and the final chili-oil/Sichuan-pepper adjustment.

Keep the components separate when possible. Pork and sauce wait much more gracefully than cooked noodles do.

Make-ahead Dan Dan noodle components stored separately: pork with ya cai, reddish-brown sauce base, fresh uncooked noodles and an assembled bowl marked least ideal for storage.
Think in order of texture loss: pork and sauce wait well, uncooked noodles wait better than cooked ones, and a fully assembled Dan Dan bowl should be last in line.
  • Chili oil: store according to the jar label or the instructions for the homemade chili-oil recipe you used.
  • Sauce base: refrigerate for up to about 3–4 days. Leave the raw garlic out and stir it in shortly before serving.
  • Pork and ya cai: refrigerate promptly in a covered container and use within about 3–4 days.
  • For longer storage: freeze the cooked pork topping separately, thaw it in the refrigerator, then reheat it in a skillet. Cook fresh noodles for serving.
  • Noodles: cook near serving whenever possible. Refrigerated noodles lose their spring and separation sooner than the other components.
  • Fully assembled noodles: least ideal for make-ahead because the strands continue absorbing sauce as they sit.

How to Reheat Dan Dan Noodles

Already assembled: Cover one leftover bowl loosely with a damp paper towel and microwave in short bursts, tossing once or twice. Add a teaspoon of water only if the noodles seem dry.

Components stored separately: Warm the pork in a skillet, loosen the cold sauce with a small splash of warm water, and combine everything with freshly cooked noodles when possible. This gives you the best texture.

Whichever route you use, wake the serving back up with fresh scallions, chili oil, vinegar, or Sichuan pepper as needed. Reheat leftovers to 165°F / 74°C.

Easy Ways to Change the Recipe

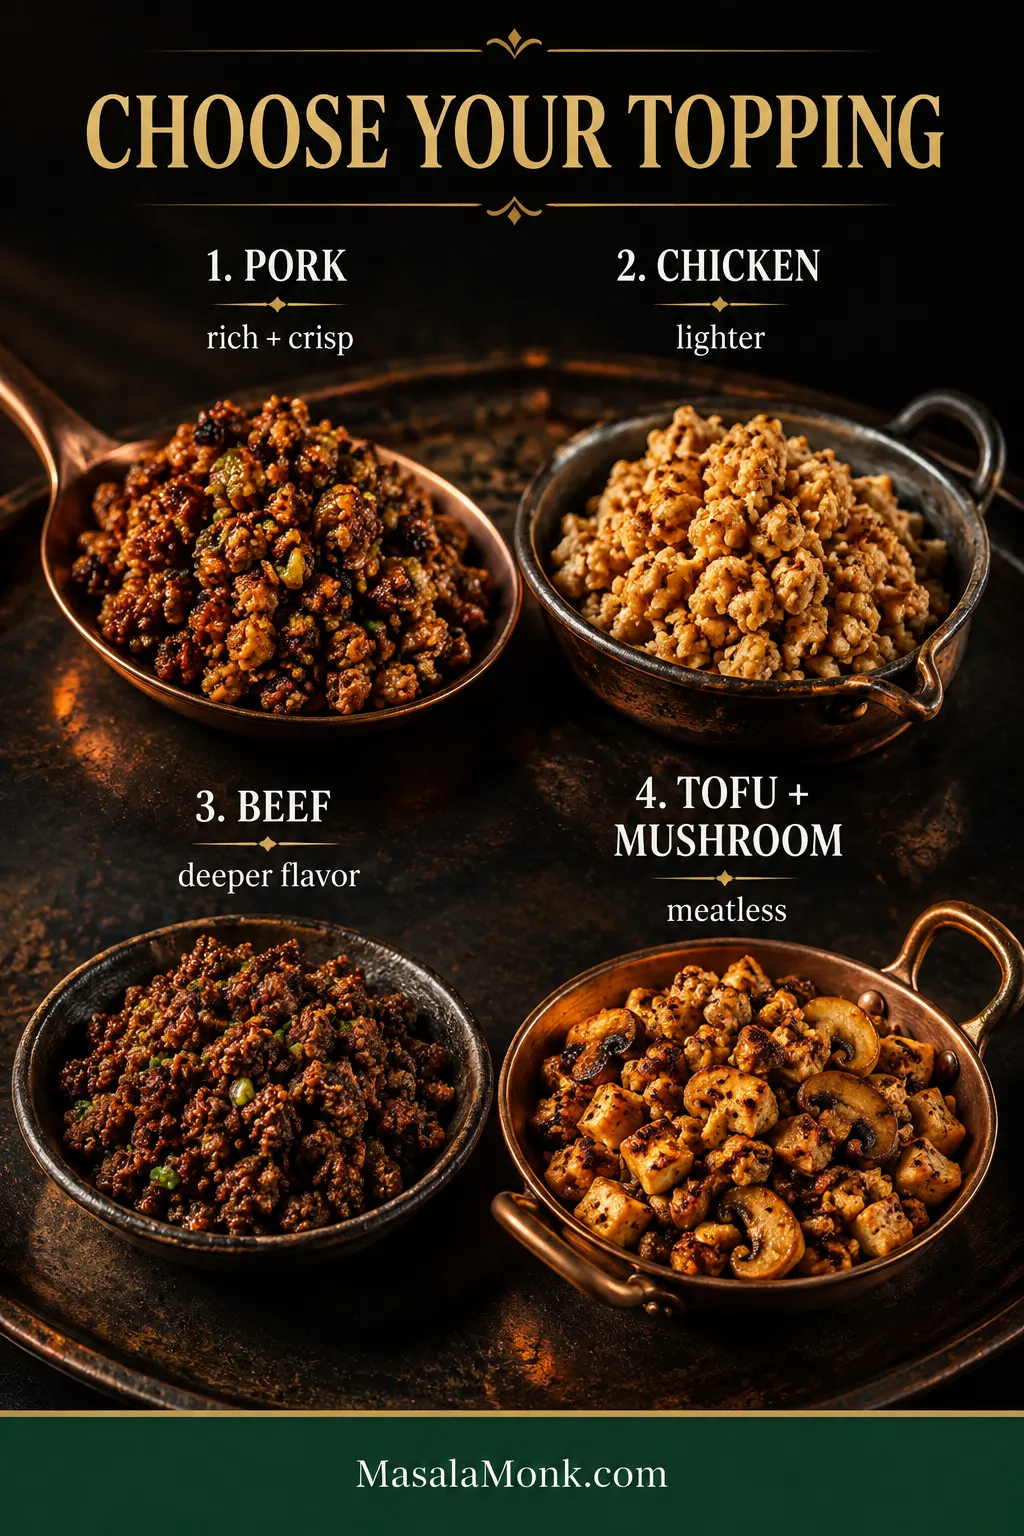
Ground Chicken

Ground chicken gives you a lighter topping. Its lower fat content often benefits from a little neutral oil. Cook away the released moisture before adding the Shaoxing wine and soy, and bring ground chicken to at least 165°F / 74°C.

Four Dan Dan noodle topping options shown separately: crisp ground pork, lighter browned chicken, deeper-brown beef, and browned tofu with mushrooms.
Changing the topping also changes the pan strategy: chicken may need extra fat, beef needs rendered-fat control, while tofu and mushrooms need stronger browning to build savory depth.

Ground Beef

Ground beef brings deeper meat flavor and more richness. Choose a fairly lean grind so rendered beef fat doesn’t overwhelm the chili oil. Brown it until relatively dry before adding the liquid seasonings, and cook ground beef to at least 160°F / 71°C.

Tofu & Mushrooms

Finely chopped firm tofu and mushrooms make a good meatless topping. Cook the mushrooms until their moisture is gone, then give the tofu time to pick up some color before seasoning. Browning and mushroom savoriness supply some of the depth that pork normally contributes.

A full 1 lb / 454 g package of pork will leave roughly half for another meal. That’s an excellent excuse to make Pad Kra Pao another night: browned pork, garlic, chili, basil, and rice.

Make It Milder

Use less chili oil and Sichuan pepper in the base sauce, then put both on the table. One person can keep their serving gentle while somebody else adds another spoonful of chili oil and a fresh pinch of pepper.

A Cold Dan Dan Noodle Adaptation

This particular recipe is at its best hot, when the sauce is fluid and the pork is at its crispest, but it also adapts well to a cool or room-temperature bowl.

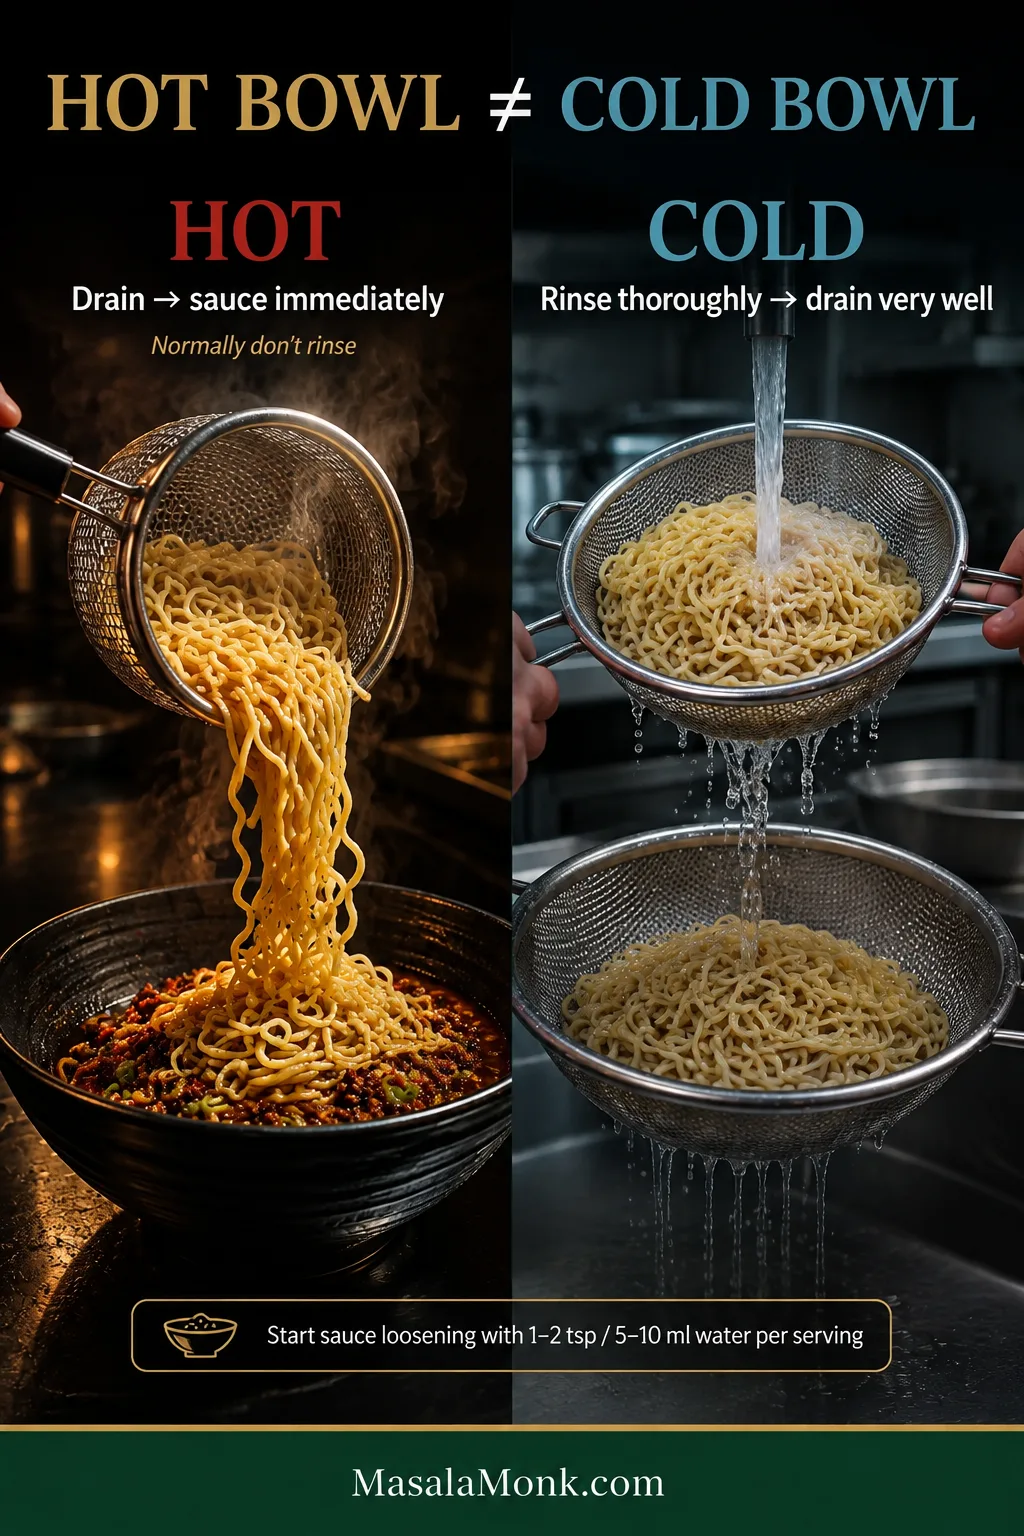
Hot bowl: normally leave the noodles unrinsed. Cold bowl: rinse deliberately. For the cold version, cook until just springy, rinse thoroughly under cool water to stop the cooking and remove excess surface starch, then drain extremely well.

Split guide showing hot noodles drained directly into sauce and cold noodles rinsed under cool water before being thoroughly drained.
Rinsing is not an automatic anti-stick trick. Instead, it is a deliberate cooling step for cold Dan Dan noodles; the hot version keeps its surface starch and goes straight toward sauce.

Loosen the sauce with cooled reserved noodle water or room-temperature water. Start with roughly 1–2 tsp / 5–10 ml per serving, toss, and add a little more only when the sauce still feels heavy.

For a larger spread, vegetable spring rolls add another crisp texture alongside the noodles.

Made these? Tell us which noodles and chili oil you used—and whether you kept the bowl gentle or pushed the málà.

The first batch may have you reading labels on sesame paste, ya cai, and black vinegar. By the second, those jars are already familiar and your attention has moved where it belongs—to the pork in the pan and the noodles in the bowl.

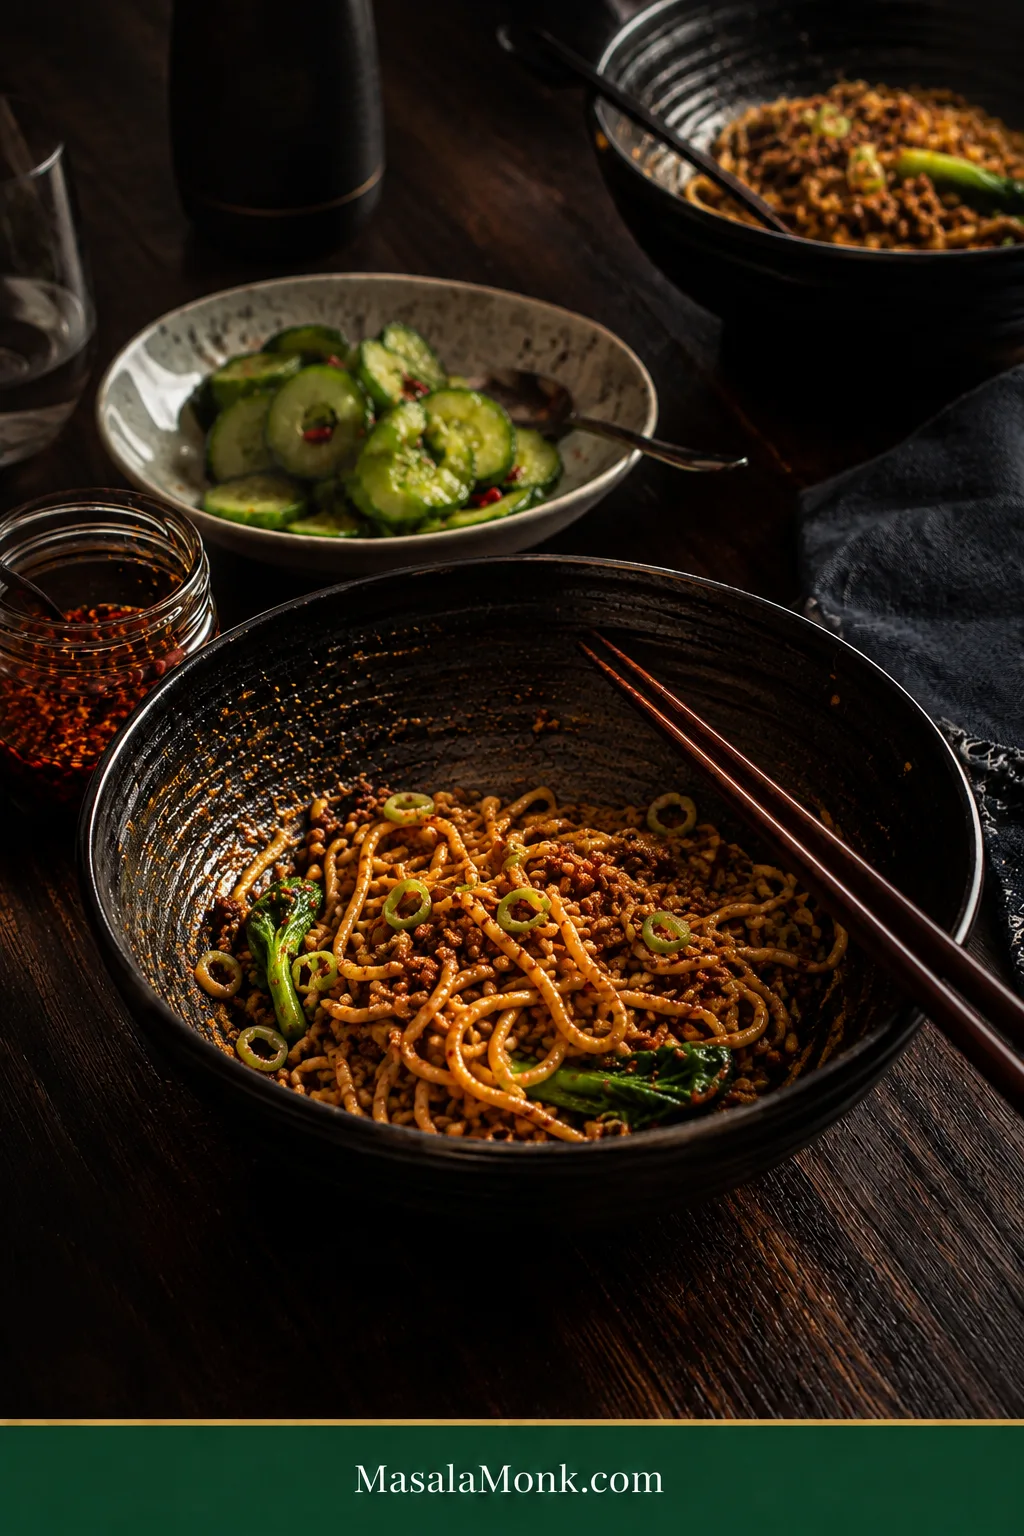
Partly eaten bowl of Dan Dan noodles on a dark dinner table with chopsticks, chili oil, cucumber salad and a second bowl in the background.
By this point, the specialty jars have done their job. What remains is dinner: a bowl worth eating while it is lively rather than another problem to solve.

↑ Back to Recipe Back to Top

If the noodles still have spring and those crisp pork-and-ya-cai bits keep turning up between bites, stop tinkering and eat.

Posted on — Leave a comment

Mexican Tamales Recipe: Pork Tamales With Red Chile

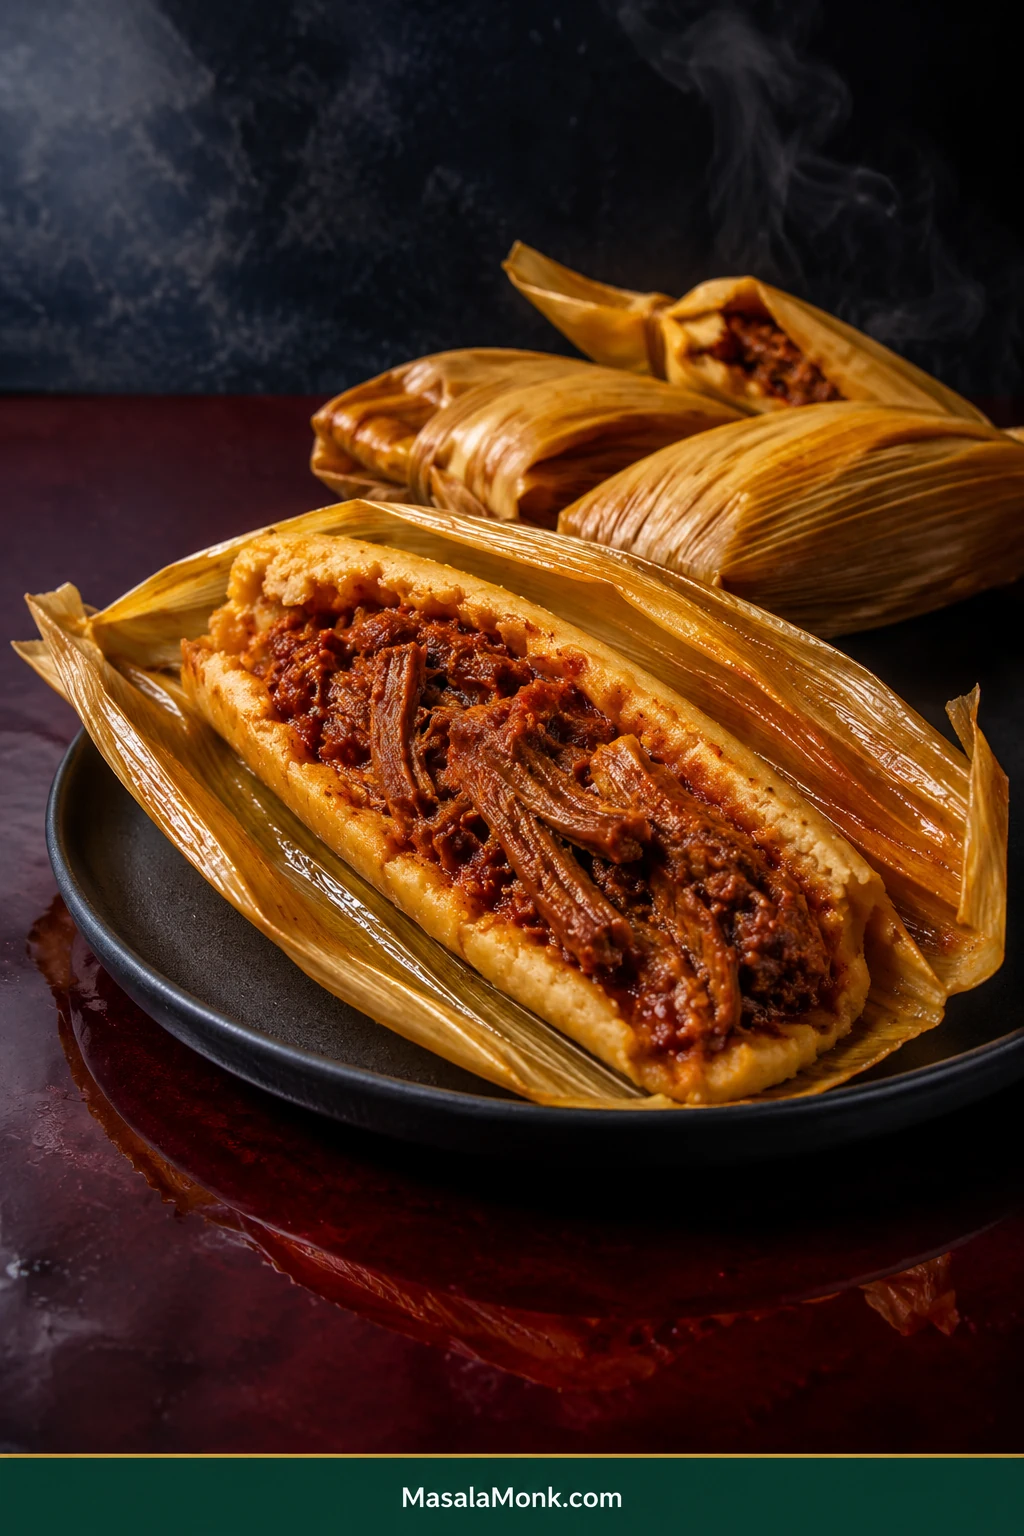
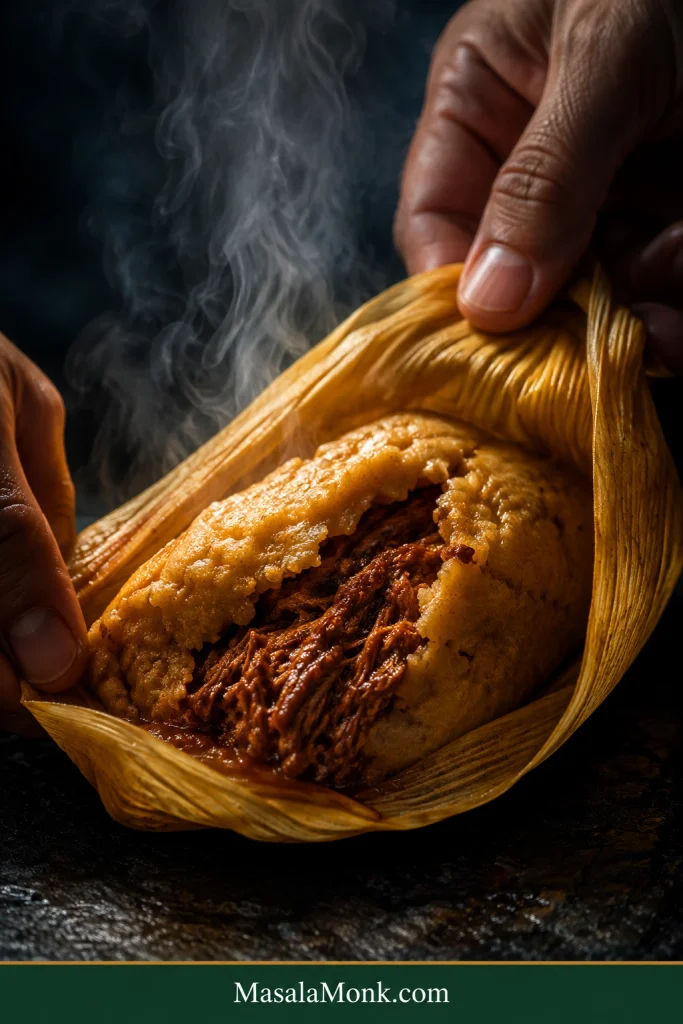
Opened Mexican pork tamale showing tender corn masa around shredded red chile pork, with several corn-husk-wrapped tamales behind it.

Peel back a good pork tamale and the husk releases from tender, savory masa with a line of juicy red-chile pork running through the center. The masa is soft but set, the filling is generous, and both taste seasoned enough to matter.

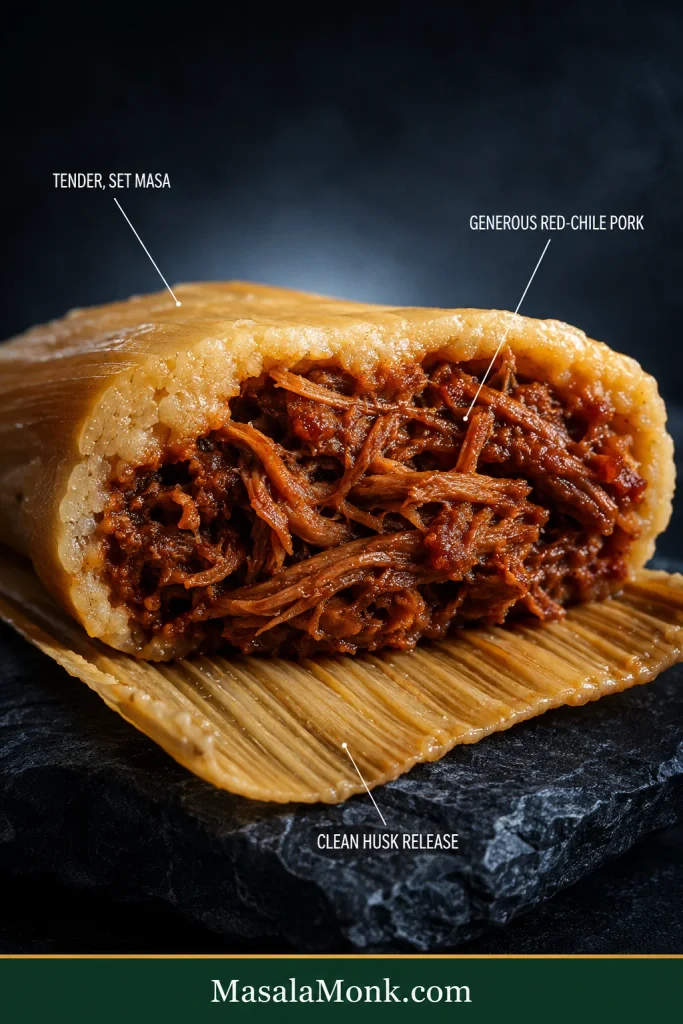
Close-up cross-section of a pork tamale labeled to show tender set masa, generous red chile pork filling, and clean separation from the corn husk.
A consistent masa ring around a continuous pork center is a better portion check than perfectly straight edges.

Tamales are not intimidating because any one step is unusually difficult. The challenge is that the pork, chile sauce, masa, husks, and steam all have their own version of right — and on a first batch, those cues may not be obvious yet.

If tamales are new to you, that is what the checkpoints below are for. A crooked spread, an awkward husk, or a loose fold does not mean starting over; most small assembly problems are easy to fix as you go.

Quick Answer: How Do You Make Mexican Pork Tamales?

Cook pork shoulder until it pulls apart easily and save the broth. Make a guajillo-ancho red chile sauce, reserve ¼ cup / 60 ml for the masa, then start with 1 cup / 240 ml of the remaining sauce in the shredded pork. Reduce until the filling is glossy and thick enough to mound without watery sauce pooling around it.

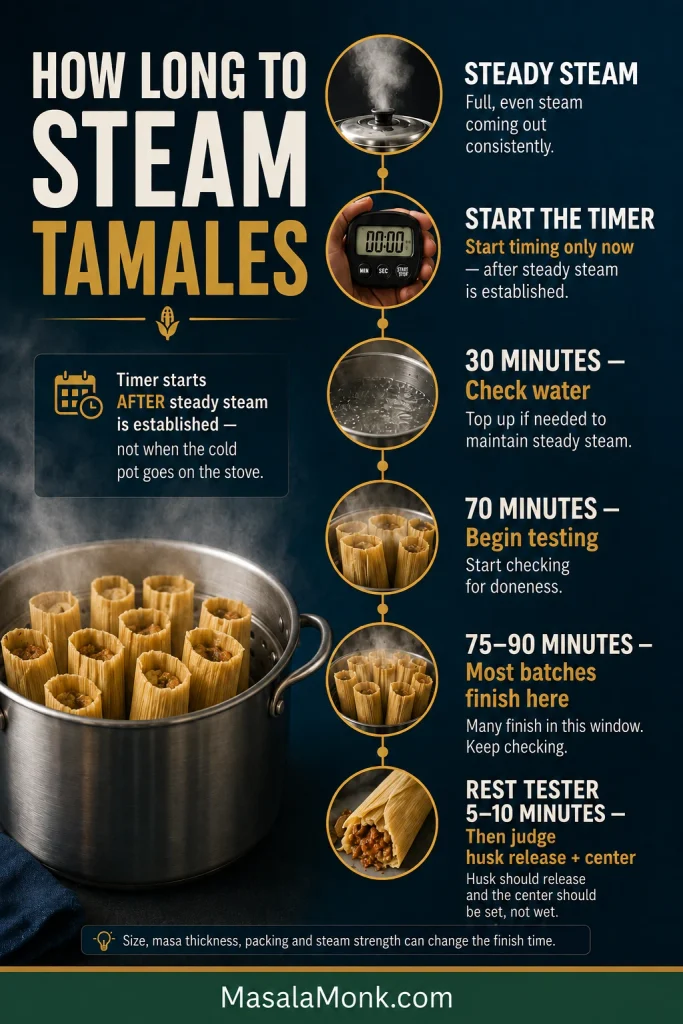
Whip lard and mix it with masa harina, baking powder, salt, warm pork broth, and the reserved chile sauce. Use 40 g prepared masa + 30 g pork filling per medium tamale, fold inside softened corn husks, and steam upright. Start timing once steady steam is established, begin checking at 70 minutes, and rest a tester before deciding whether it needs more time.

Mexican Pork Tamales With Red Chile — Recipe Card

Red chile pork tamales with tender, broth-seasoned masa and a generous pork center. The guajillo-ancho filling is rich, savory, and gently warming, with optional chile de árbol when you want more heat.

Yield24 medium tamales; a little extra filling is possible
Serves8–12 with sides
HeatGenerally mild to medium; add 1–2 chiles de árbol for more heat
Active workRoughly 2–3 hours, depending largely on wrapping speed
Elapsed timeAbout 5½–6½ hours, much of it hands-off
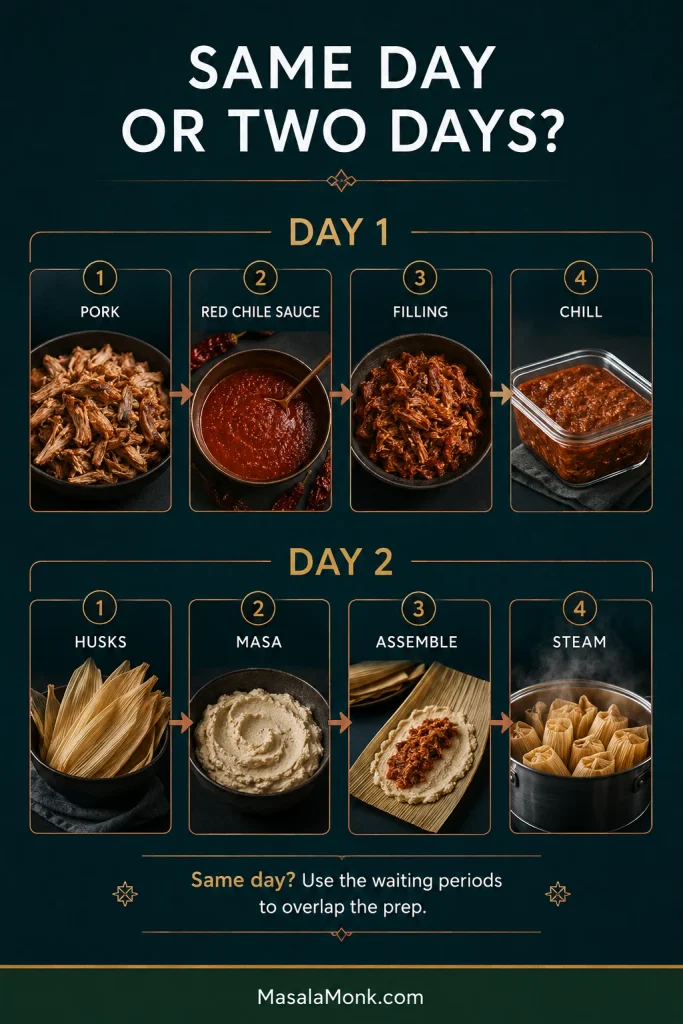
Lowest-stress workflowMake the filling on Day 1; assemble and steam on Day 2
Per tamale40 g prepared masa + 30 g pork filling
Final rest10–15 minutes

Ingredients

For the Pork

  • 2 lb / 900 g boneless pork shoulder or pork butt, cut into 2–3 inch / 5–7 cm chunks
  • ½ medium white onion
  • 4 garlic cloves, lightly crushed
  • 1 bay leaf
  • 1½ teaspoons fine sea salt, about 8–9 g
  • About 6 cups / 1.4 L water to start, plus more hot water as needed

For the Red Chile Sauce

  • 45 g dried guajillo chiles, about 8
  • 35 g dried ancho chiles, about 3
  • 1–2 dried chiles de árbol, optional
  • 2 garlic cloves
  • 1 teaspoon ground cumin
  • 1 teaspoon Mexican oregano
  • 2 cups / 475 ml reserved pork broth
  • 1 tablespoon / 15 g lard or 1 tablespoon / 15 ml neutral oil
  • Fine sea salt to taste

For the Masa

  • 3 cups / 360 g masa harina for tamales
  • 6 oz / 170 g lard, softened but not melted
  • 1½ teaspoons / about 6 g baking powder — not baking soda
  • 1 teaspoon fine sea salt, about 5–6 g; reduce if your broth is already salty
  • 1¾ cups / 415 ml comfortably warm pork broth
  • ¼ cup / 60 ml red chile sauce
  • Up to ¼ cup / 60 ml additional warm broth, only as needed

For Assembly

  • 30–32 dried corn husks, enough for 24 good wrappers plus extras

Instructions

Pork, Chiles & Filling

  1. Cook the pork. Combine the pork chunks, onion, 4 garlic cloves, bay leaf, salt, and about 6 cups / 1.4 L water. Simmer gently for 2–2½ hours, adding hot water as needed to keep the pork mostly submerged, until it shreds easily. Strain and reserve at least 4 cups / 950 ml broth, preferably a little more.
  2. Prepare the chiles. Stem and seed the guajillo and ancho chiles; stem the optional árbol chile. Toast the guajillo and ancho briefly until fragrant, adding the árbol only for the final few seconds. Soak all the chiles in very hot water for 20–30 minutes, then drain.
  3. Make the sauce. Blend the softened chiles with 2 garlic cloves, cumin, oregano, and 2 cups / 475 ml pork broth. Strain. Heat 1 tablespoon lard or oil and carefully add the sauce. Simmer for 10–15 minutes until the raw chile aroma softens and the sauce remains smooth, fluid, and easy to spoon. Season with salt and reserve ¼ cup / 60 ml for the masa.
  4. Finish the filling. Shred the pork, discarding any large pieces of fat. Stir in 1 cup / 240 ml of the remaining chile sauce. Simmer until glossy and thick, adding more sauce a few spoonfuls at a time if needed. Stop when a spoonful forms a soft mound without loose red liquid pooling around it. Set aside to cool.

Husks, Masa & Taste Test

  1. Prepare the husks. Rinse and sort 30–32 husks. Soak in very hot water for 30–60 minutes until pliable, then drain until flexible and damp, not dripping.
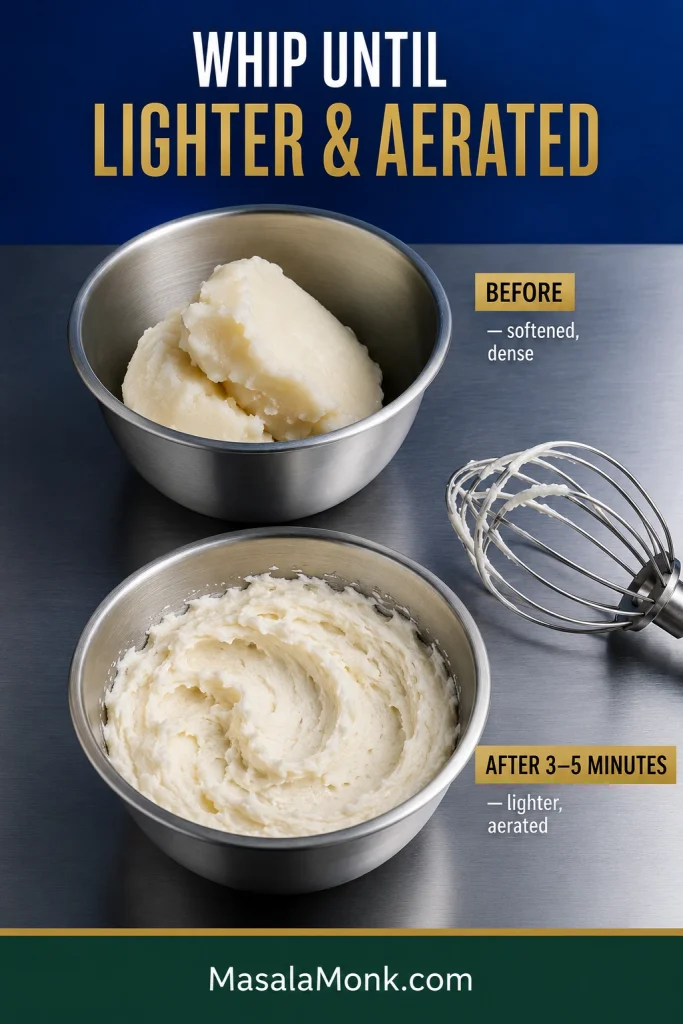
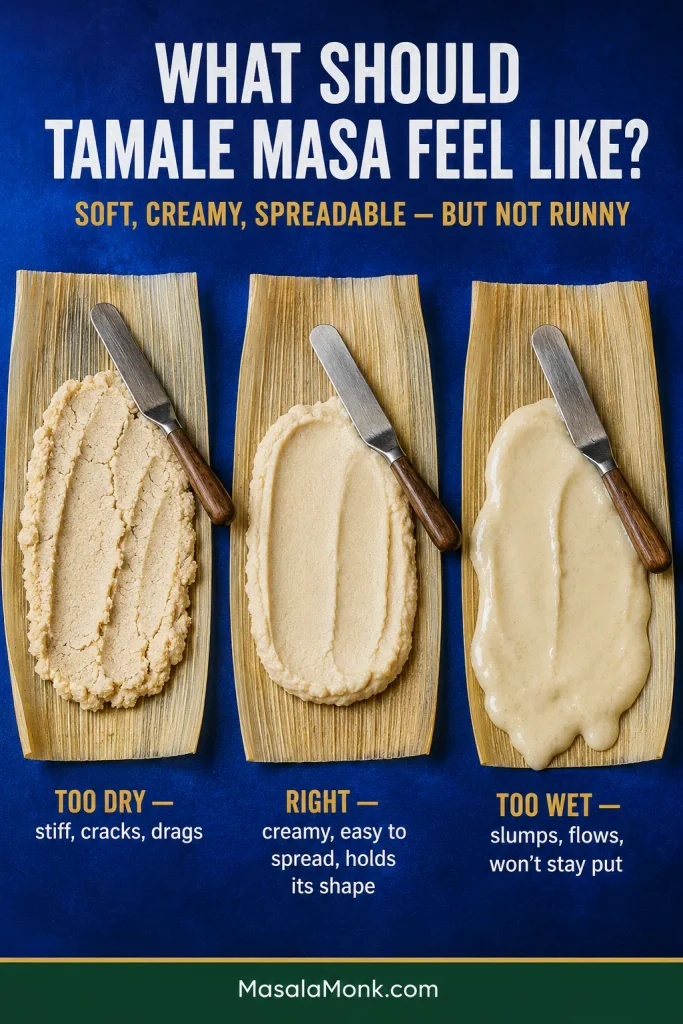
  2. Make the masa. Beat the lard for 3–5 minutes until lighter and aerated. Whisk masa harina, baking powder, and salt separately, then add to the lard while gradually mixing in 1¾ cups / 415 ml warm broth and ¼ cup / 60 ml reserved chile sauce. Beat until creamy and easy to spread. Add extra broth 1 tablespoon / 15 ml at a time only if needed. Keep covered during assembly.
  3. Taste the masa. Flatten a small spoonful into a thin patty and microwave in short intervals until completely set. Taste and adjust the salt before assembling the full batch.

Portion, Fill & Fold

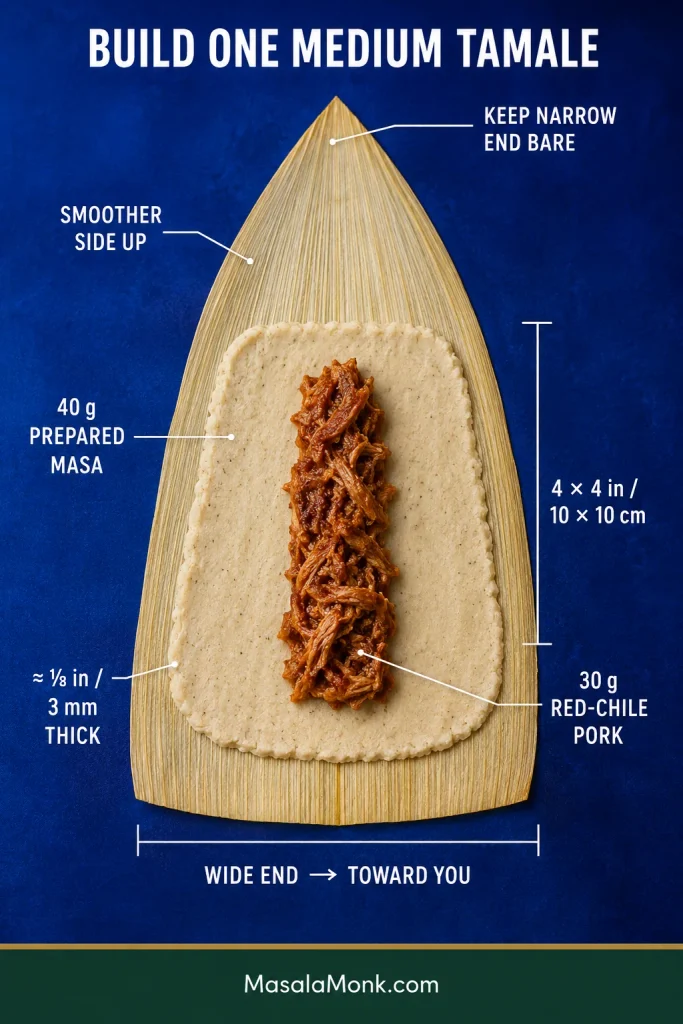
  1. Portion and fill. Lay a husk smooth-side up with the wide end toward you. Spread 40 g masa into a roughly 4-inch / 10 cm square over the broad half, leaving the narrow end bare. Add 30 g pork filling in a line through the center.
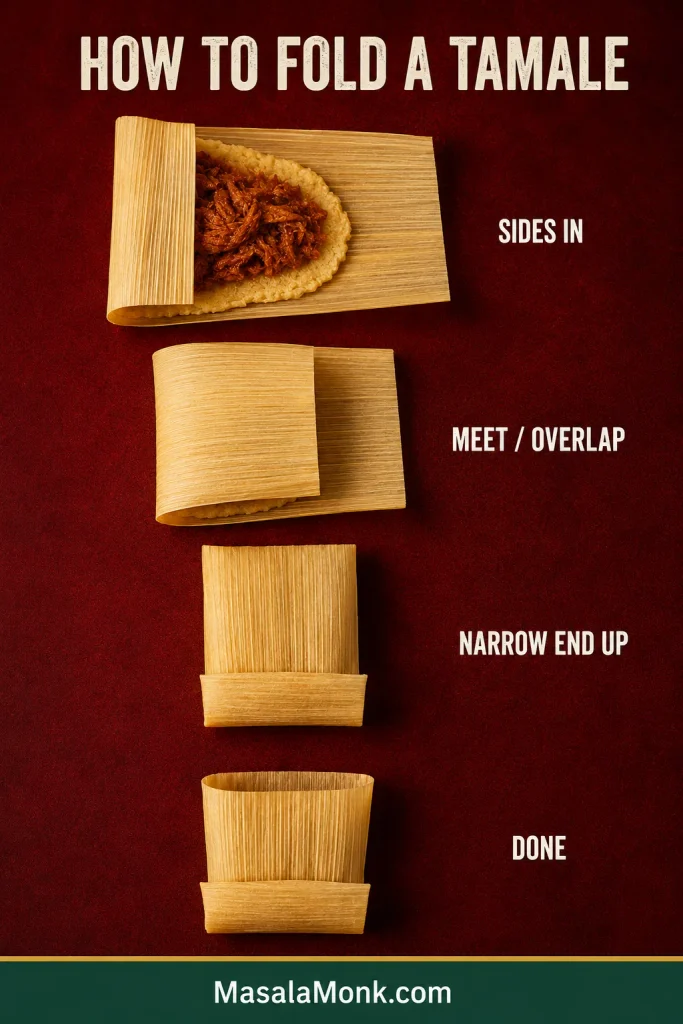
  2. Fold. Fold the long sides around the filling, then fold the bare narrow end upward. Leave the wide end open.

Steam & Finish

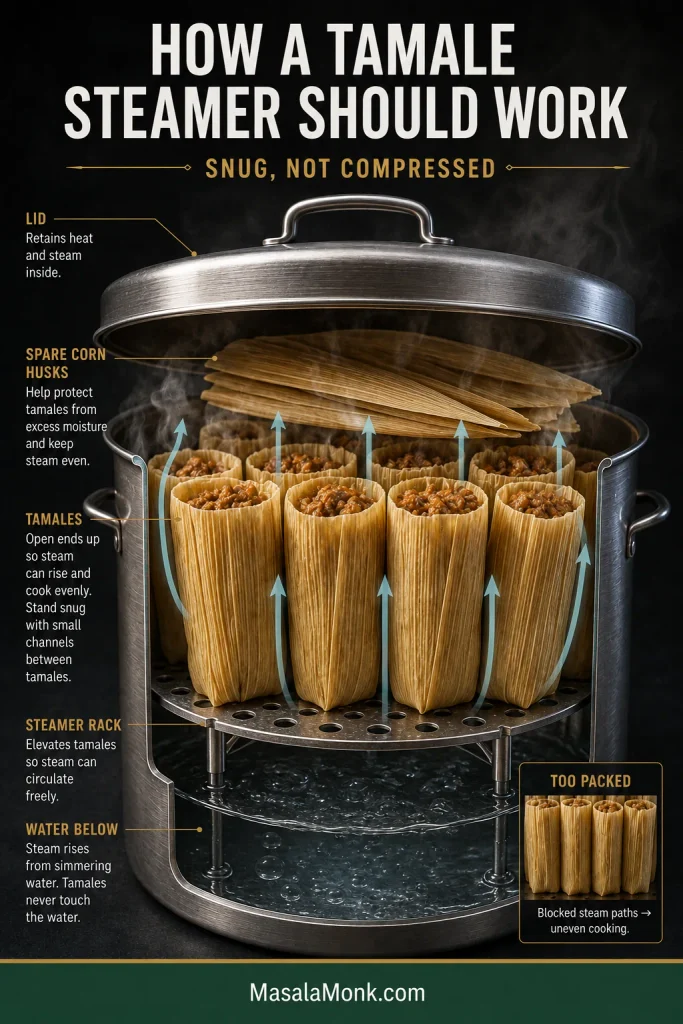
  1. Load the steamer. Keep the water surface below the rack. Stand the tamales upright with open ends up, snug enough to support one another while leaving paths for steam. Cover the top with spare husks and close the lid.
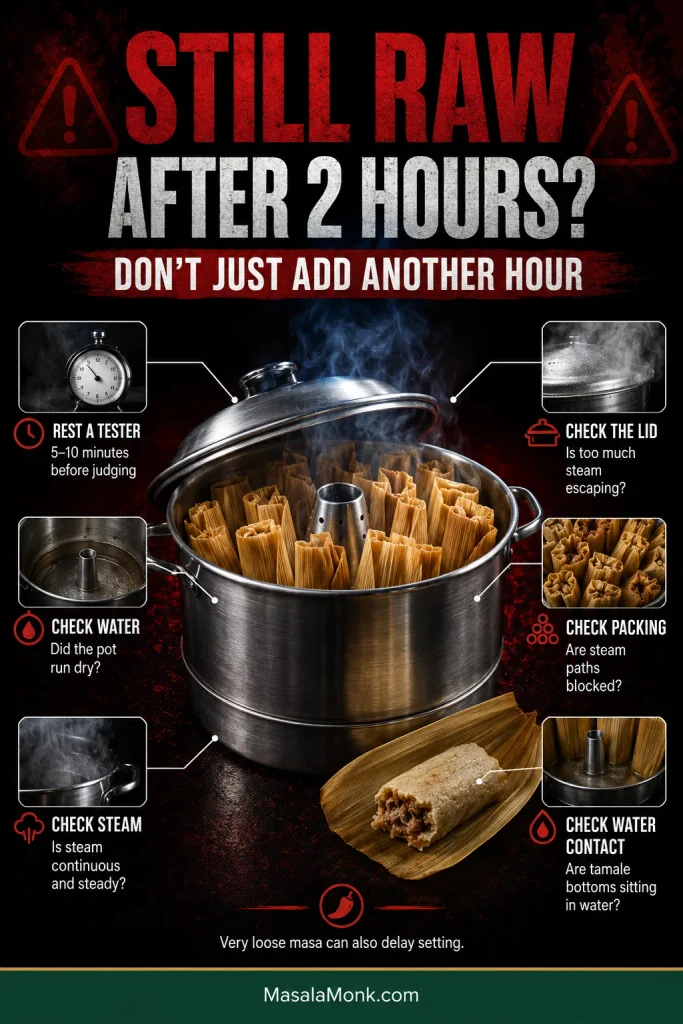
  2. Steam. Bring the pot to steady steam, then start the timer. Check the water after 30 minutes. Begin testing at 70 minutes; most batches finish in 75–90 minutes.
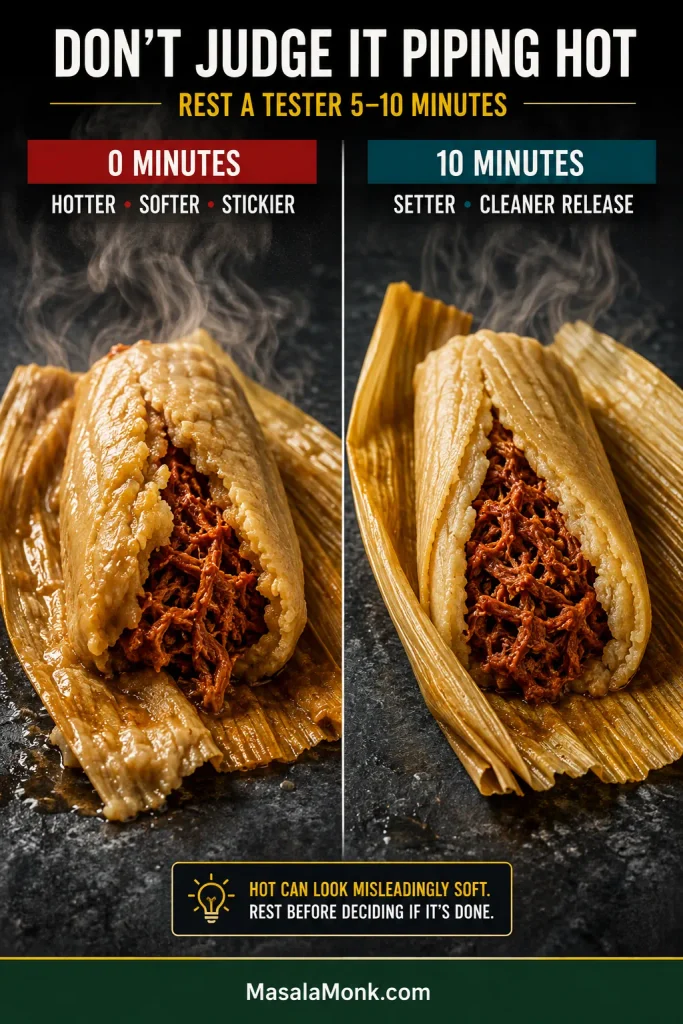
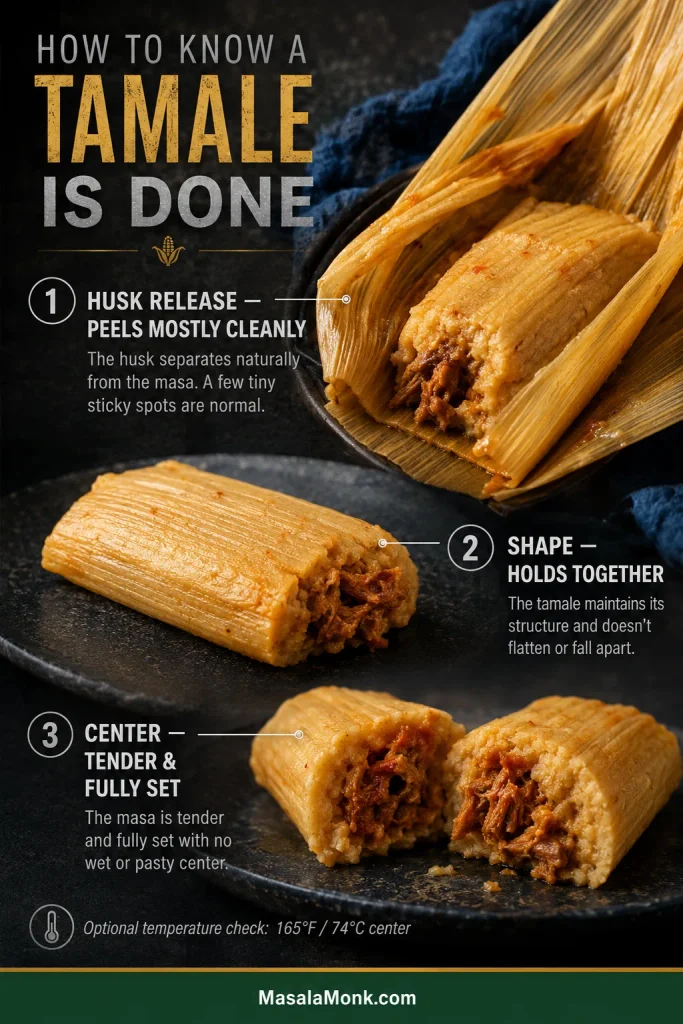
  3. Test. Remove one tamale and rest it for 5–10 minutes. It is ready when the husk peels away mostly cleanly and the masa holds its shape with a tender, fully set center. Wet or pasty masa needs another 10–15 minutes of steam before retesting.
  4. Rest and serve. Let the finished batch sit for 10–15 minutes before serving. Discard the corn husks before eating.

Making these for the first time? The recipe card tells you what to do. The detailed guide below shows you how to tell when each stage is right — from pork that is ready to shred to masa that spreads easily and a tamale that is actually finished steaming.

Detailed Tamale Guide

Before You Start

Tamales vary enormously across Mexico, and regions and families have their own preferred fillings, wrappers, masa textures, and folding styles. Here, we are making corn-husk red chile pork tamales — tamales rojos de puerco — with a relatively thin layer of tender masa and a generous pork center.

The flavor is chile-rich without being fiercely hot. Guajillo supplies the brighter dried-chile backbone while ancho brings darker, slightly sweeter depth. Some of that red chile sauce goes into the masa too, so the wrapper carries the same savory chile character as the filling.

Think of the work in two halves. First, cook the pork and turn it into a thick red-chile filling. Then soften the husks, make the masa, and settle into the repetitive part: spread, fill, fold, steam.

The pork broth connects both halves. It seasons the chile sauce and the masa, so save it when the pork is done.

The Lowest-Stress Plan

Make the pork and red chile filling on Day 1. Transfer it to a shallow container and refrigerate promptly. On Day 2, soak the husks, mix the masa, assemble, steam, and serve.

Two-day tamale workflow showing pork, red chile sauce, filling and chilling on day one, followed by husks, masa, assembly and steaming on day two.
Splitting the work across two days reduces the amount of hands-on assembly you have to juggle at once.

A same-day batch is completely possible. As the pork cooks, clean the chiles and sort the husks. During that cooling window, finish the sauce. Once the filling is cooling, make the masa. When the filling is finished, the longest cooking job is already behind you.

Ingredient Notes & Equipment

Pork Shoulder

Pork shoulder, pork butt, and Boston butt all refer to well-marbled shoulder meat. It has enough connective tissue and fat to stay juicy through the long simmer and become easy to shred once fully tender.

Boneless pork keeps the recipe weight predictable. Bone-in shoulder works too, but buy extra to account for the bone.

Guajillo and Ancho Chiles

Guajillo gives the sauce its brighter red-chile backbone; ancho contributes darker, slightly sweeter depth. Neither is especially fierce. The optional chile de árbol is what moves the filling noticeably hotter.

Chile sizes vary considerably, which is why the recipe gives gram weights as well as approximate counts.

Three dried chiles used for pork tamales: long red guajillo, broad dark ancho, and small thin chile de árbol, with labels describing their roles.
The distinct shapes also help at the market: guajillo is long, ancho is broad and wrinkled, and chile de árbol is small and slender.

If dried chiles are unfamiliar territory, the guajillo section in our pepper sauce guide goes deeper into how dried peppers soften, blend, and simmer.

Masa Harina for Tamales

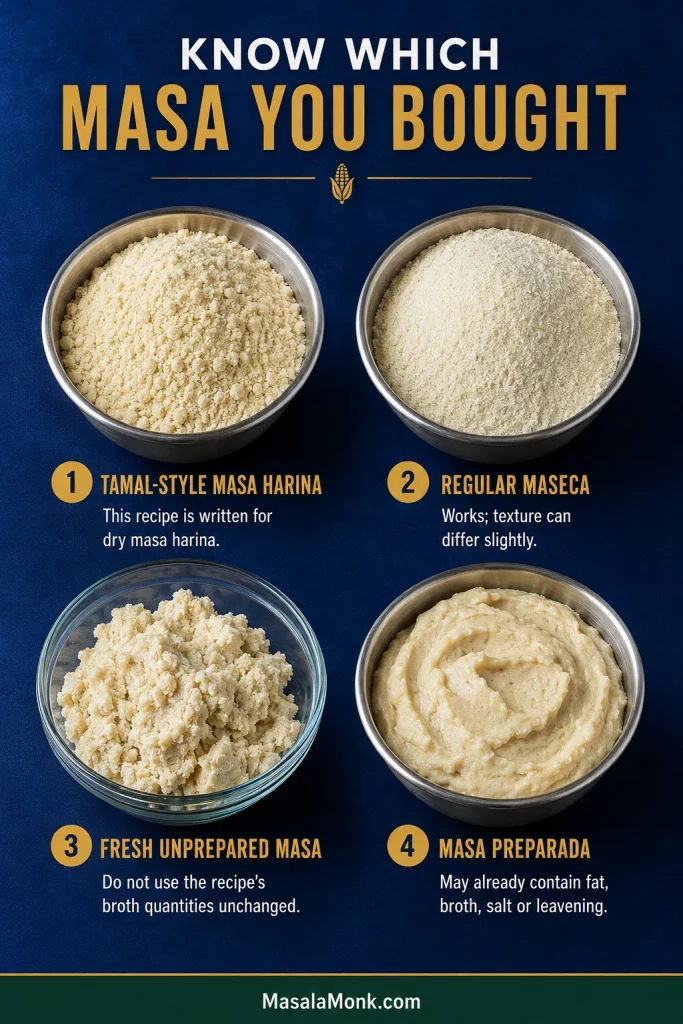
Use masa harina made from nixtamalized corn — the treated corn used to make traditional masa. Maseca Tamal is one common option, but other masa harina intended for tamales can work too. Ordinary cornmeal and polenta are different products and will not behave the same way here.

Can You Use Regular Maseca for Tamales?

Yes. If regular Maseca is what you have, you can still make tamales with it. The finished texture may be slightly different from a coarser tamal-specific masa harina, but it can still produce a good batch.

Buying fresh masa? This recipe’s quantities are written for dry masa harina. Fresh unprepared masa already contains water, so do not apply the broth quantities here unchanged. Masa preparada para tamales may already contain fat, salt, broth, or leavening, so check what you bought before adding anything else.

Comparison of tamal-style masa harina, regular Maseca dry masa harina, fresh unprepared masa, and prepared tamale masa, showing their different physical forms.
Before measuring broth, read the label: prepared masa may already contain fat, broth, salt or leavening.

Lard gives this version richness and tenderness. Other fats behave differently, so use a masa formula written for your chosen oil or shortening if you want to replace it.

Corn Husks

Bags of dried corn husks are naturally uneven: wide, narrow, torn, thick, thin, and occasionally awkward. That is why the recipe soaks more husks than the final yield requires. The extras give you good wrappers for the tamales and smaller clean pieces for patching, lining the steamer, or tying a stubborn fold.

Large corn husk labeled to show the smoother side for spreading masa, the wide end, and the narrow end that folds upward.
For wrapping, flexibility and a broad usable spreading area matter more than a perfectly shaped husk.

Equipment

  • Large Dutch oven or heavy pot
  • Blender
  • Fine-mesh strainer
  • Large mixing bowl
  • Hand mixer or stand mixer
  • Large bowl or pot for soaking husks
  • Tamale steamer (tamalera), or stockpot with a steamer insert
  • Small offset spatula, butter knife, or spoon for spreading
  • Kitchen scale, especially useful while learning the portions
  • Instant-read thermometer, optional

You do not need a dedicated tamalera. What matters is keeping the tamales above the water inside a covered pot while leaving enough open space for steam to circulate.

No mixer? A sturdy spoon or whisk and some vigorous beating can work; a mixer simply makes aerating the lard easier.

How to Make Pork Tamales With Red Chile

Step 1: Cook the Pork Until It Shreds Easily

Put the pork, onion, crushed garlic, bay leaf, and salt in a large heavy pot. Add about 6 cups / 1.4 L water, or enough to comfortably cover the meat.

Bring to a boil, skim away any heavy foam, then lower the heat to a gentle simmer. Partially cover and cook for 2 to 2½ hours.

Check the pot occasionally and add hot water as needed to keep the pork mostly submerged. Finish with at least 4 cups / 950 ml strained broth, preferably a little more, so there is enough for the sauce, masa, and final texture adjustment.

By the end, the pork should pull apart almost without effort. Shoulder often reaches roughly 190–200°F / 88–93°C by the time its connective tissue has softened enough for easy shredding, but there is no prize for hitting an exact number.

Tenderness decides. Meat that still fights the fork needs more time.

Cooked pork shoulder being pulled apart easily with forks, showing moist tender strands and a light sheen of broth.
Shorter pork strands distribute more evenly through the filling and are easier to portion into consistent 30 g servings.

Save the broth. Strain the cooking liquid and set aside 2 cups / 475 ml for the chile sauce, 1¾ cups / 415 ml for the masa, and at least another ¼ cup / 60 ml for adjustments. If you come up short, make up the difference with unsalted chicken broth or hot water.

Pork broth divided into measuring vessels: 2 cups for red chile sauce, 1¾ cups for masa, and up to ¼ cup reserved for adjusting the masa.
Taste the reserved broth before seasoning the sauce or masa, because a concentrated broth can already carry substantial salt.

Let the pork cool until it is comfortable to handle. While it cools, turn to the chiles.
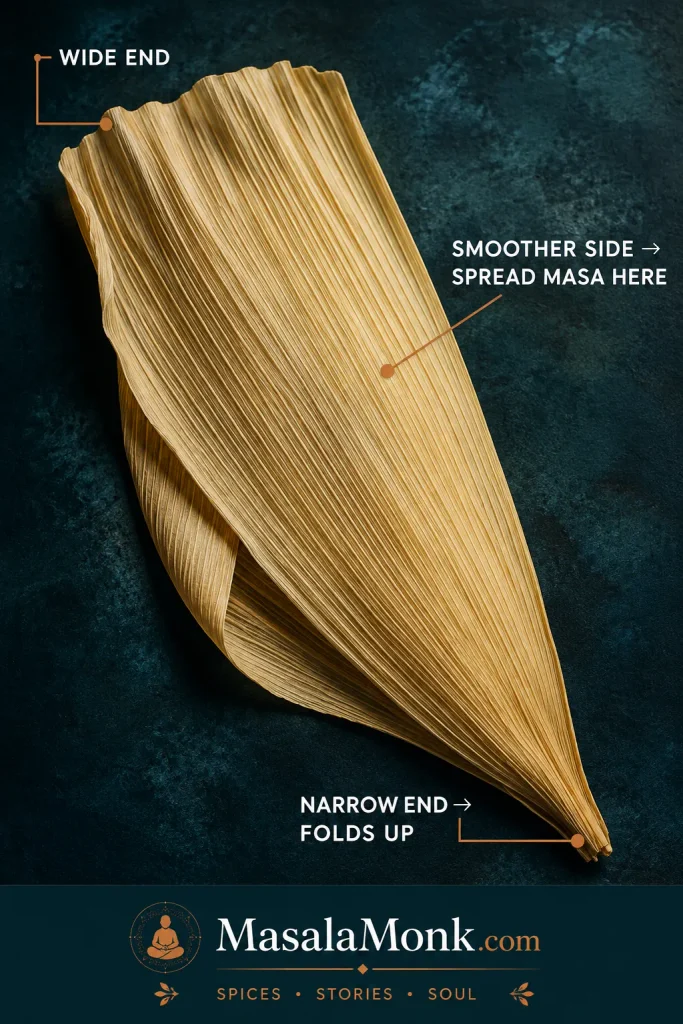
Step 2: Make the Red Chile Sauce

Wipe the dried chiles clean. Remove the stems from the guajillo and ancho, split them open, and shake out most of the seeds. Stem the optional árbol chile too.

Heat a dry skillet over medium to medium-low. Toast the guajillo and ancho very briefly, turning them, until they smell warm and distinctly chile-like and become slightly more flexible. Add the árbol chile only for the final few seconds because its thin skin scorches quickly.

Fragrant is enough. That aroma is your cue to stop. A chile that turns black and smells burned is better replaced than carried into the sauce.

Transfer all the toasted chiles to a bowl, cover with very hot water, and weight them down with a small plate if needed. They are ready when they bend easily without cracking, usually after 20–30 minutes. Drain.

Dried chile shown in three stages: dry, briefly toasted without burning, and softened after soaking until flexible.
Brief dry heat develops aroma; soaking restores flexibility, while thin chile de árbol needs much less skillet time than guajillo or ancho.

Blend the softened chiles with the 2 garlic cloves, cumin, oregano, and 2 cups / 475 ml reserved pork broth until as smooth as possible.

Push the purée through a fine-mesh strainer. A powerful blender may leave it nearly silky already, but straining removes stubborn pieces of dried chile skin that can make the finished sauce feel gritty.

Heat 1 tablespoon lard or oil in a saucepan over medium heat. Carefully pour in the strained sauce; it can splatter when it meets the hot fat. Simmer, stirring regularly, for 10–15 minutes. The sharp, almost dusty smell of the soaked chiles gives way to something deeper and rounder as the sauce darkens slightly.

The finished sauce should remain fluid and easy to spoon, not reduced into a paste. Season with salt, then reserve ¼ cup / 60 ml for the masa.

Correct red chile sauce flowing easily from a spoon beside a smaller example of over-reduced sauce that is thick and pasty.
Stopping while the sauce still flows gives you room to tighten the pork filling without making it dry or paste-like.

Step 3: Finish the Red Chile Pork Filling

Shred the pork into small strands, discarding any large pieces of fat.

Stir 1 cup / 240 ml of the remaining chile sauce into the pork to start. Simmer gently until the sauce settles around the meat. Add more a few spoonfuls at a time when the pork needs it.

Chile size, straining loss, sauce reduction, and cooked pork yield all vary slightly. Stop at the right texture; you may not need every drop of sauce.

The Filling Test

  • Too dry: the meat looks fibrous and there is barely enough sauce to coat the strands.
  • Right: every shred looks glossy and saucy, and a spoonful forms a soft mound.
  • Too wet: red liquid runs away from the pork and pools around a spoonful.

The Filling Test

Three pork tamale filling consistencies showing dry under-coated pork, correctly glossy pork with sauce clinging to the meat and no puddle, and overly wet pork sitting in loose red liquid.
If red liquid runs away from the pork when you tilt the spoon, the filling needs more reduction before assembly.

For 24 tamales, you will use 720 g / 1.6 lb filling. You do not need to weigh the whole pan; portioning 30 g into the first few wrappers will show you whether you are on track.

Taste a forkful before setting the filling aside. It should already be satisfying on its own: savory pork first, followed by warm dried-chile flavor. Adjust the salt now.

Extra pork or sauce is fine. Save it for tacos, eggs, rice bowls, quesadillas, or another meal. There is no benefit in squeezing it into already well-filled tamales.
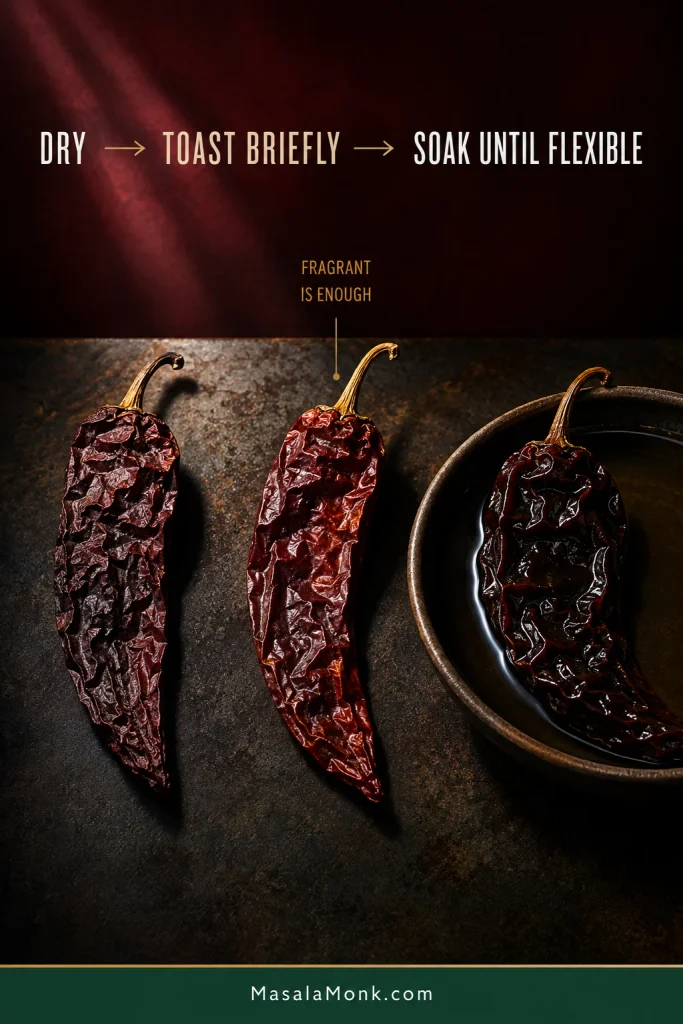
Set the filling aside to cool. The longest cooking job is now done. While it cools, get the husks ready.

Step 4: Rinse, Sort, Soak and Drain the Corn Husks

Give the husks a quick rinse to remove loose dust or corn silk, then sort them before soaking. Put the widest, least damaged pieces in your wrapping pile and save smaller clean pieces for overlapping, patching, ties, and lining the steamer.

Soak 30–32 husks in very hot water, using a plate or smaller bowl to keep them submerged. Begin checking after 30 minutes; some bags need closer to an hour. A ready husk bends and folds easily without cracking.

Shake off the water and let the husks drain upright or pat away obvious droplets. Damp husks stay flexible; dripping-wet ones can make the masa slide as you spread it.

Two soaked corn husks comparing a damp pliable husk with a dripping-wet husk covered in visible water droplets.
If good masa suddenly skates across the wrapper, check the husk for surface water before changing the dough.

Overlap two small husks when necessary, patch a torn wrapper with another piece, save narrow clean pieces for ties or the steamer, and discard anything musty or moldy. One unusually difficult wrapper may simply be a thick or stubborn husk.

Step 5: Make the Masa

Beat the softened lard with a hand mixer or stand mixer for 3–5 minutes, until it looks lighter and visibly aerated.

Stainless-steel bowls showing dense softened lard before whipping and lighter, aerated lard after 3 to 5 minutes of beating.
Look for a lighter, expanded texture with soft ridges rather than chasing one particular shade of white.

In another bowl, whisk together the masa harina, baking powder, and salt.

With the mixer running on low, add the dry mixture to the whipped lard in several additions. Gradually mix in the 1¾ cups / 415 ml pork broth, followed by the reserved ¼ cup / 60 ml red chile sauce. Use comfortably warm broth; steaming-hot liquid can soften the whipped lard too much.

Beat until evenly mixed. Hold back the final ¼ cup / 60 ml broth until you have checked the texture; different masa harina absorbs liquid at different rates.
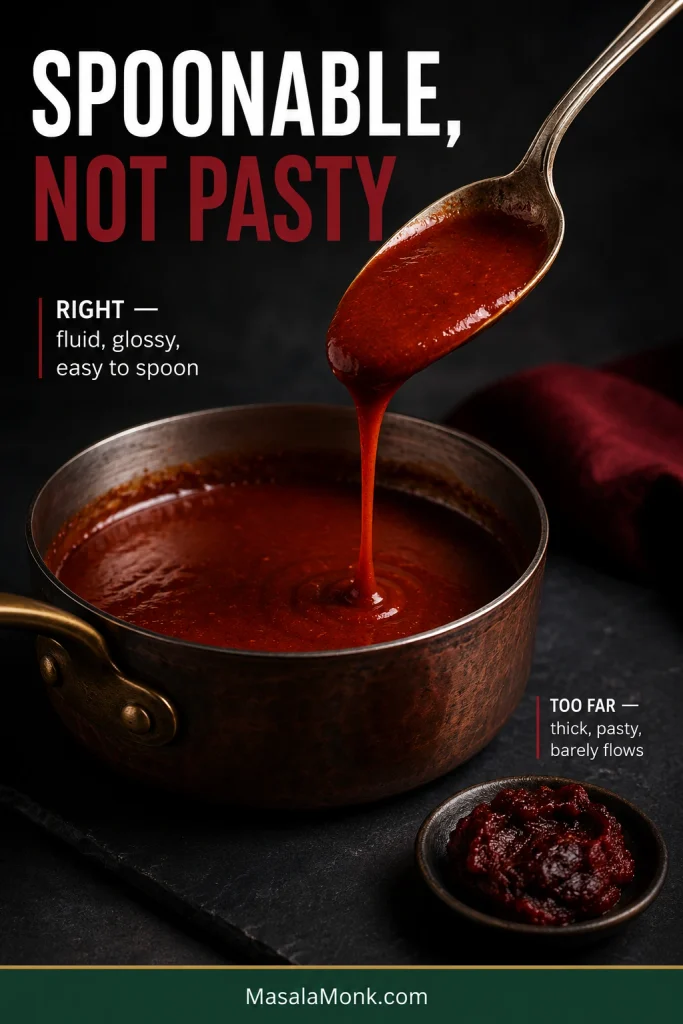
The Masa Test

Tamale masa should be soft and creamy enough to spread easily — roughly like thick hummus or soft frosting — while still staying where you put it.

  • Too dry: stiff, cracked around the edges, difficult to smear, and closer to firm clay than a spreadable dough.
  • Right: creamy, cohesive, easy to spread into a thin layer, and able to hold its shape.
  • Too wet: slumps, flows, or slides away from the spot where you spread it.

The Masa Test

Three tamale masa textures spread on corn husks: dry cracked masa, creamy spreadable masa that holds its shape, and overly wet masa that slumps and flows.
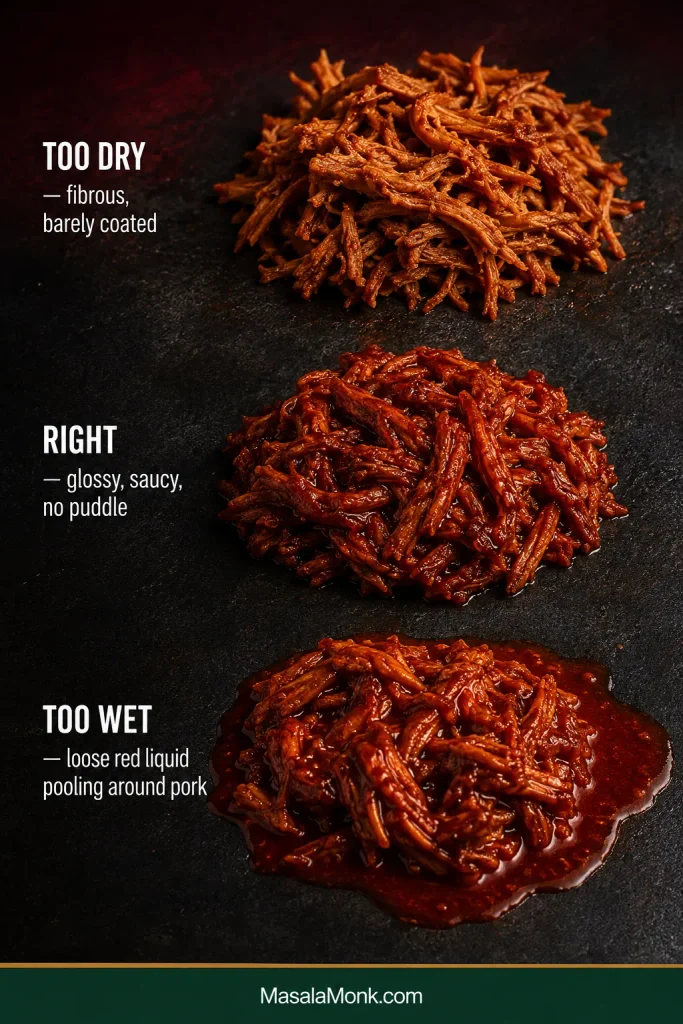
Correct masa glides under the spreading tool and stays where it is placed; dry masa fights the stroke and loose masa keeps moving.
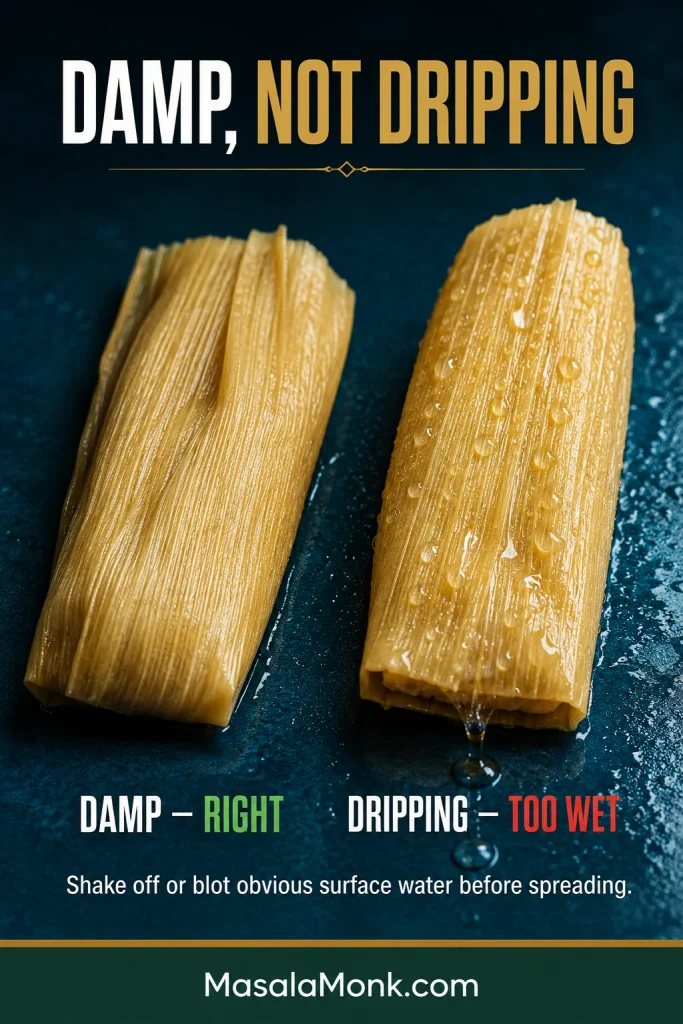
Masa that feels stiff or cracks while spreading needs more warm broth. Mix it in 1 tablespoon / 15 ml at a time, mixing completely before adding another spoonful.

Does Tamale Masa Have to Float?

Not necessarily. Some recipes use a floating ball of masa as a clue that enough air has been incorporated, but hydration, fat, density, and the size of the test piece can affect the result. Floating is one clue, not the final verdict. For this recipe, the more useful signs are lightness, easy spreading, good seasoning, and the texture of the cooked masa.

Piece of tamale masa floating in water beside correctly spreadable masa on a corn husk, illustrating that the float test is only one clue to masa readiness.
Do not change good masa just to make a test piece float; the cooked texture matters more than the glass.

Cook a test bite before wrapping 24 tamales. Flatten a teaspoon or two of masa into a small thin patty on a microwave-safe plate and microwave in short intervals until completely set. Taste for salt first, then for savory pork-broth depth and gentle red-chile warmth. The masa should taste good even before the pork arrives.
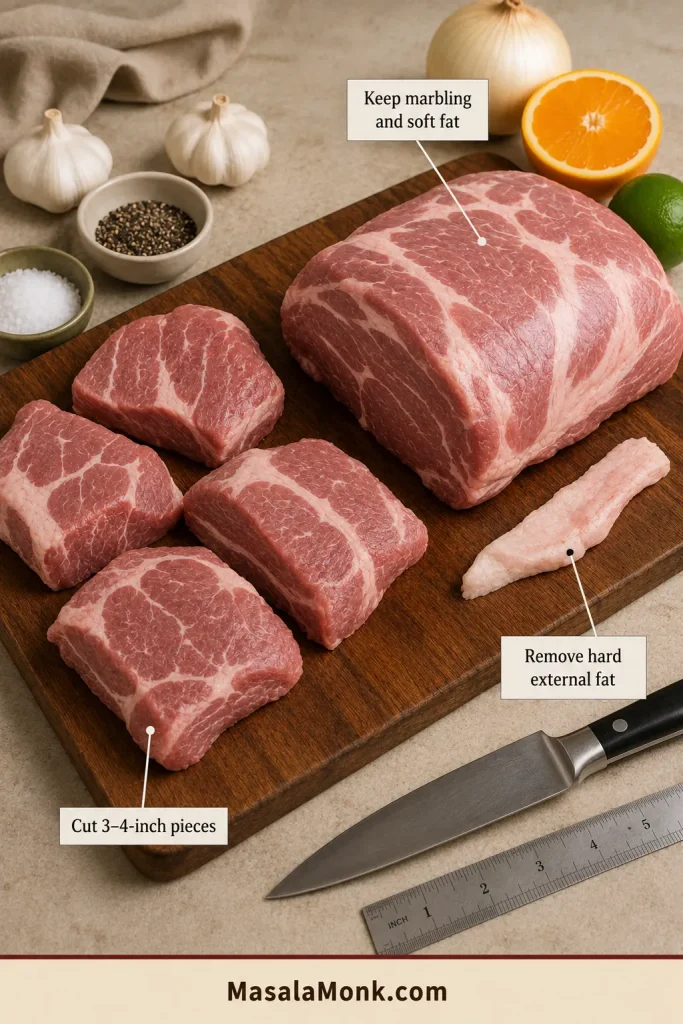
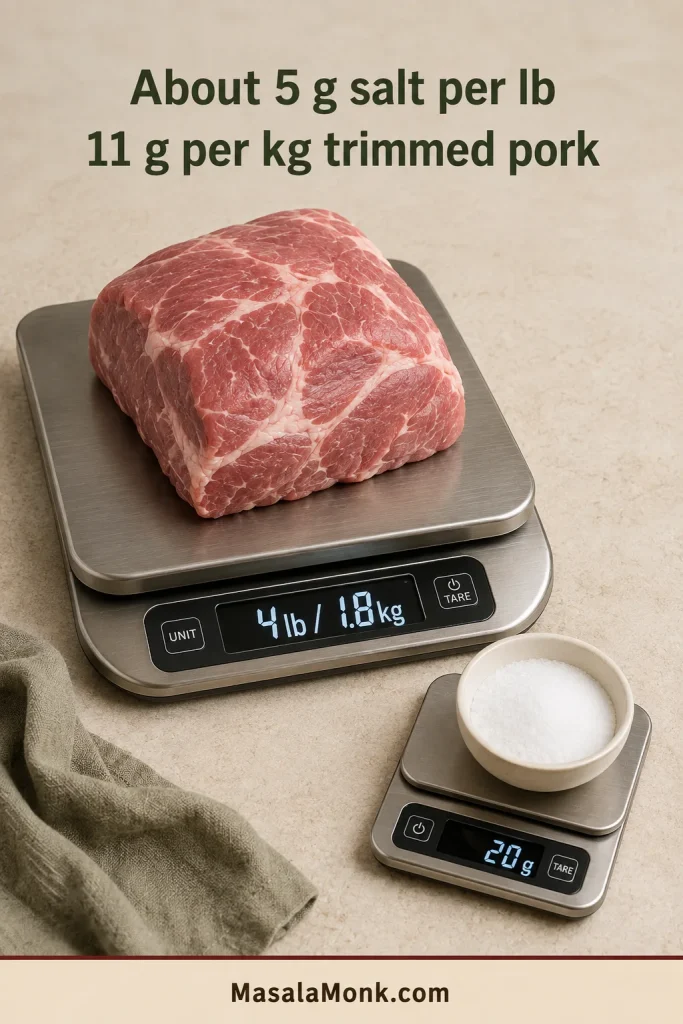
If the masa noticeably stiffens as you work, mix in warm broth a tablespoon at a time until it spreads easily again.

Now every component is ready. Put the husks, masa, filling, spreading tool, scale, and a tray within easy reach. From here, the job changes from cooking separate pieces to building the tamales themselves.
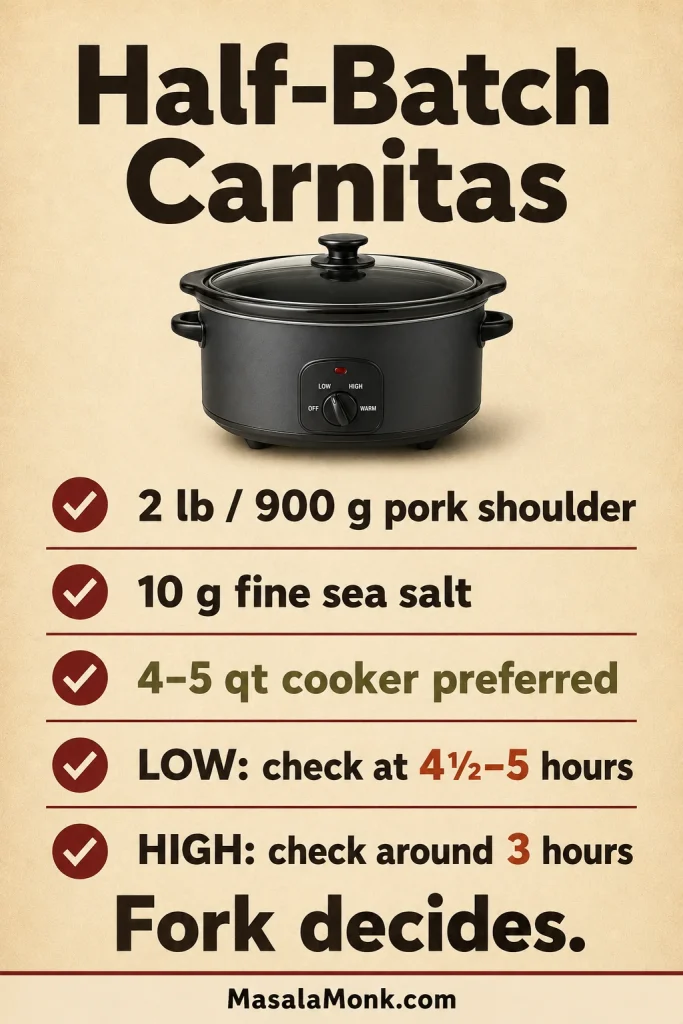
Step 6: Portion, Fill and Fold

The first tamale is usually the slowest. Once you have wrapped several, the motions begin to repeat themselves.
If you have another pair of hands, this is an easy job to divide: one person can spread while another fills and folds.

How Much Masa and Filling Per Tamale?

Use 40 g prepared masa + 30 g red chile pork filling for each medium tamale. Weigh the first three or four; once you recognize those portions, work by eye.

Overhead corn husk showing 40 grams of masa spread about 4 by 4 inches and 3 millimeters thick, with 30 grams of red chile pork centered on top and the narrow end left bare.
Similar masa thickness from wrapper to wrapper helps the batch steam more evenly while the measured filling keeps pork present without overloading the fold.

Which Side of the Corn Husk Does the Masa Go On?

Spread the masa on the smoother side of the husk. Lay the wide end toward you and keep the narrow end bare so it can fold upward later.

Spread. Smear the masa over a roughly 4-inch / 10 cm square on the broad half of the husk. Aim for a thin, even layer, about ⅛ inch / 3 mm thick.

A small offset spatula is easiest to control, though a butter knife or the back of a spoon works too. Masa that continually tears the husk may need a little more broth. A spread that is simply too thick or crooked can be scraped back into the bowl and tried again. Nothing has been ruined.

Fill. Run the pork through most of the masa zone instead of piling everything in the center. That puts filling into more bites while preserving enough border to close the wrapper.

Fold. Bring one long side over the filling, then the opposite side, so the masa edges meet or slightly overlap. Fold the bare narrow end upward and leave the wider end open. Most husks do not need tying; a loose wrapper can simply be opened and folded again.

Four-stage corn-husk tamale folding sequence showing the long sides folding around the filling, the narrow end folding upward, and the finished wrapper with its wide end open.
If the wrapper will not close comfortably, remove a little filling or excess masa instead of squeezing the husk tighter.

Aim for consistent portions, not identical husks. Corn wrappers vary naturally. Similar amounts of masa and filling matter more than perfectly matching every finished shape.

Once several tamales are lined up on the tray, the project starts looking different from where it began. Separate bowls of pork, masa, chiles, and husks have finally started turning into dinner.

Two people making pork tamales at a worktable, with one spreading masa and another filling and folding, surrounded by masa, thick red chile pork filling, corn husks and finished tamales.

Set each folded tamale on the tray with its open end up. Once the batch is wrapped, move everything to the steamer.

Step 7: Load the Steamer

Add enough water for a long steam, then check the level before loading the tamales: the water surface must sit clearly below the steamer rack. The bottoms of the tamales should not sit in water. In many pots, 1½–2 inches / 4–5 cm is a useful starting depth.

Line the rack with spare clean corn husks if you have them. Stand the tamales upright with their open ends facing upward.

Snug is good. Compressed is not. The tamales should support one another while leaving pathways for steam to move through the pot.

Cutaway tamale steamer showing water below the perforated rack, upright corn-husk tamales with open ends up, spare husks on top, and steam moving through gaps around the batch.

A partly filled steamer can be supported with an upside-down heatproof bowl or another safe heatproof spacer so the tamales remain upright without being squeezed together. Cover the top with a few spare husks, then close the pot with a reasonably tight-fitting lid.

Step 8: How Long to Steam Tamales

Begin checking these medium tamales at 70 minutes; most batches finish in 75–90 minutes. Size, masa thickness, packing, and steam strength can move the finish point.

Bring the pot to strong, continuous steam, then adjust the heat so the steam remains steady. Start the timer once that steady steam is established.

Tamale steaming timeline showing steady steam before starting the timer, a water check at 30 minutes, first test at 70 minutes, typical 75 to 90 minute finish window, and a 5 to 10 minute tester rest.

Once the steamer settles into its rhythm, there is not much to do besides keep an ear on the pot and make sure the water does not disappear. Before long, you should begin to smell warm corn and chile beneath the lid.

Check the water level 30 minutes after the timer starts and periodically after that. Add hot or boiling water down the side when needed, taking care not to splash the tamales.

Avoid lifting the lid every few minutes just to look. Every peek releases steam and makes the pot build that heat again.

Do not judge a piping-hot tamale. Remove one tester and leave it for 5–10 minutes before peeling back the husk. Masa is softer and stickier immediately out of the steamer than it is after that short rest.

Side-by-side pork tamales immediately after steaming and after a 10-minute rest, with the hot tamale softer and stickier and the rested tamale firmer with cleaner husk release.

A tester with a set center and a wrapper that releases mostly cleanly is done. Wet or paste-like masa after the rest needs another 10–15 minutes of steam before you check a different tamale.

How to Tell When Tamales Are Done

Your timer tells you when to start checking. The tamale tells you when it is finished.

After the tester has rested, look for three things:

  • Husk: peels away mostly cleanly instead of carrying off a wet layer of masa.
  • Shape: the tamale stays together when unwrapped.
  • Center: tender and fully set, with no wet or pasty core.

After the tester has rested, look for three things:

  • Husk: peels away mostly cleanly instead of carrying off a wet layer of masa.
  • Shape: the tamale stays together when unwrapped.
  • Center: tender and fully set, with no wet or pasty core.
Tamale doneness guide showing mostly clean husk release, a tamale holding its shape, and a cut center with tender fully set masa, plus a small optional 165°F or 74°C temperature check.
When husk release, shape and center texture agree, you have stronger evidence than any one cue can provide alone.

Temperature can confirm that the center is thoroughly hot, but texture and husk release are the more useful culinary doneness checks for this recipe. If you use a thermometer as an additional check, look for 165°F / 74°C in the center.

What to Serve With Pork Tamales

Let the finished batch rest for 10–15 minutes before serving. The masa settles slightly as the tamales cool. Two to three medium tamales per person is a useful starting point when they are the main course; peel away and discard the husks at the table.

Taste the first tamale before covering it with salsa. The masa has been seasoned with pork broth and red chile specifically so it deserves to be tasted along with the filling.

After that, keep the plate as simple or generous as you like. A spoonful of roasted salsa verde brings brightness, lime cuts through the rich pork, and creamy refried beans make an easy side. Rice works well for a fuller meal, while a crisp salad or slaw brings freshness.

Open red chile pork tamale served on a cobalt-blue table with wrapped tamales, salsa verde, lime wedges, refried beans and Mexican rice.
Lime, salsa and simple sides add contrast to the rich pork and chile without needing to cover the tamale itself.

Tamales Still Raw After 2 Hours? Diagnose Before Steaming Longer

After two hours, another blind hour of steaming is the last thing you want to hear. So stop treating time as the only variable.

Before adding another long stretch of cooking, rest one tester for 10 minutes. A tamale that firms and begins releasing from its husk as it cools may already have been cooked; very hot masa can look softer and stickier than the same masa several minutes later.

A genuinely wet center after that rest means it is time to inspect the steamer:

  • Is there still water in the pot?
  • Is the pot producing continuous steam?
  • Does the lid fit reasonably tightly?
  • Are the tamales squeezed into one solid mass?
  • Do raw patches appear where tamales touch one another?
  • Are the bottoms sitting in water?
  • Is heavy condensation repeatedly reaching the open tops?
  • Was the masa extremely loose before wrapping?

When some tamales are completely done while others have isolated raw patches, steam circulation, inconsistent thickness, and packing are more likely suspects than the entire pot simply needing another hour.

Diagnostic guide for tamales still raw after two hours, showing checks for tester rest, water level, steady steam, lid leakage, crowded packing and tamale bottoms touching water.
Whole-batch wetness suggests a broader steam or masa problem, while isolated raw patches point more strongly toward circulation, packing or uneven thickness.

Tamale Troubleshooting

ProblemDiagnosis & Fix
Masa cracks while spreadingIt is probably too dry. Mix in warm broth 1 tbsp / 15 ml at a time.
Masa slumps or flowsIt is too loose. Stop adding liquid, let it sit briefly, then reassess.
Masa fights the huskCheck for stiff masa and dripping-wet husks before blaming your spreading technique.
Filling leaksThe filling may be too wet, the tamale overfilled, or the masa layer too thin in places.
Tamale is still wet after restingIt is undercooked. Steam another 10–15 minutes and test a different tamale.
Some tamales are done and others rawLook for crowding, blocked steam paths, or noticeably different masa thicknesses.
Whole batch remains raw after excessive steamingCheck water, steam strength, lid fit, packing, and water contact before simply adding another hour.
Tamales are soggy or waterloggedWater or heavy condensation may be reaching the masa. Keep the water below the rack and use spare husks over the batch.
Finished masa is denseLook at masa hydration, how well the lard was aerated, and whether the masa was spread too thickly.
Tamales taste blandThe masa itself may have been underseasoned. The cooked masa taste-test catches this before assembly.
Red chile sauce is bitterThe dried chiles may have scorched. Strong burned-chile flavor is usually better remade than disguised.
Red chile sauce is grittyPush the blended sauce through a fine-mesh strainer.
Bottom of the steamer burnsThe water boiled away. Start with enough water and check the level during steaming.
Six tamale problem examples labeled sticky, dense, soggy, leaking, bitter and uneven, with causes involving resting, hydration, water contact, wet filling, scorched chiles and steam circulation.
Use the symptom to choose the variable to change, then leave the others alone so you can tell what actually fixed the batch.

Make Ahead, Store, Freeze & Reheat

Make the Filling Ahead

The pork filling can comfortably be made 1–2 days ahead. Transfer it to a shallow container and refrigerate promptly.

Assemble the Night Before

You can assemble the tamales, cover them well, refrigerate overnight, and steam them the following day. Because they enter the steamer colder, expect them to take somewhat longer than freshly assembled tamales.

Refrigerating Cooked Tamales

Refrigerate cooked tamales within 2 hours after serving. Leave the husks on, store in a covered container, and use within 4 days.

Freezing Tamales

For the simplest first batch, cool the cooked tamales completely and freeze them with their husks still on in a well-sealed freezer container or bag. For best quality, plan to use them within about 6 months.

Can you freeze tamales before steaming? Yes. Assemble them, freeze in a single layer until firm, then transfer to a sealed freezer container or bag. They can be steamed from frozen, though they will need more time than fresh tamales. Freezing after cooking remains the easiest default when predictable reheating matters most.

How to Reheat Tamales

Storage and reheating guide showing cooked tamales refrigerated within two hours, frozen once chilled, and reheated in a steamer or microwave, with refrigerator, freezer and reheating times.
Freeze cooked tamales in the quantities you usually reheat so one meal does not require repeatedly opening a larger frozen batch.
MethodStarting Point
Steamer, refrigeratedBegin checking after 10–15 minutes
Steamer, a few frozen tamalesBegin checking after 20–30 minutes; a larger frozen batch can take longer
Microwave, 1 refrigerated tamale in its husk30–60 seconds under a damp paper towel, then continue in short intervals as needed

Frozen cooked tamales can be thawed overnight or reheated directly from frozen. Keep the husks on while steaming. Reheated leftovers should reach 165°F / 74°C in the center.

Making 12, 24 or 48 Tamales

These tables scale the measured ingredients. Pork-cooking water and steamer water depend on the size and shape of your pots, so those are handled separately below.

Three trays containing exactly 12 tamales in a 3-by-4 grid, 24 tamales in a 4-by-6 grid, and 48 tamales in a 6-by-8 grid to illustrate batch scaling.
The larger the batch, the more physical space the tamales occupy, so vessel capacity becomes part of the scaling decision.

Pork

Ingredient12 Tamales24 Tamales48 Tamales
Raw pork1 lb / 450 g2 lb / 900 g4 lb / 1.8 kg
White onion¼ medium½ medium1 medium
Garlic2 cloves4 cloves8 cloves
Bay leaf1 small12
Fine sea salt, starting amount¾ tsp / about 4 g1½ tsp / 8–9 g1 tbsp / 16–18 g

Red Chile Sauce

Ingredient12 Tamales24 Tamales48 Tamales
Guajillo chiles23 g45 g90 g
Ancho chiles18 g35 g70 g
Garlic1 clove2 cloves4 cloves
Ground cumin½ tsp1 tsp2 tsp
Mexican oregano½ tsp1 tsp2 tsp
Pork broth1 cup / 240 ml2 cups / 475 ml4 cups / 950 ml
Lard or neutral oil1½ tsp / about 7–8 g or ml1 tbsp / 15 g or ml2 tbsp / 30 g or ml
Fine sea saltTo tasteTo tasteTo taste
Starting sauce added to pork½ cup / 120 ml1 cup / 240 ml2 cups / 480 ml
Optional chile de árbolTo tasteTo tasteTo taste

Scale chile de árbol to taste; heat doesn’t need to double just because the batch does.

Masa & Assembly

Ingredient12 Tamales24 Tamales48 Tamales
Masa harina1½ cups / 180 g3 cups / 360 g6 cups / 720 g
Lard3 oz / 85 g6 oz / 170 g12 oz / 340 g
Baking powder¾ tsp / 3 g1½ tsp / 6 g1 tbsp / 12 g
Fine sea salt, starting amount½ tsp / 2.5–3 g1 tsp / 5–6 g2 tsp / 10–12 g
Warm pork broth210 ml / ¾ cup + 2 tbsp1¾ cups / 415 ml3½ cups / 830 ml
Red chile sauce in masa2 tbsp / 30 ml¼ cup / 60 ml½ cup / 120 ml
Extra broth for adjustmentUp to 2 tbsp / 30 mlUp to ¼ cup / 60 mlUp to ½ cup / 120 ml
Corn husks to soak15–1630–3260–64

Scaling Notes

Use the listed salt quantities as starting points and taste as you go. Broth concentration and reduction can change how salty the finished sauce and masa taste.

Pork-cooking water does not need to be multiplied mechanically. Use enough to keep the meat mostly submerged and replenish with hot water when needed. Steamer water is also pot-dependent: use enough to sustain the steam while keeping its surface safely below the rack.

Steaming time does not double with batch size. A 48-tamale batch changes the geometry of the steamer, so two pots or two rounds are usually better than packing one pot tightly enough to block circulation.

Making a long group batch? A tamale-making session is often called a tamalada. When assembly stretches beyond about two hours, keep most of the cooked filling and the lard-and-broth masa refrigerated and bring out smaller working portions as needed. The USDA’s tamalada guidance covers food-safety considerations for longer sessions.

Whether you made 12 tamales or 48, the moment that tells you the work paid off is the same.

Hands peeling back the corn husk of a steaming pork tamale to reveal tender corn masa surrounding glossy shredded red chile pork filling.

A few hours earlier, this was a pot of pork, a bowl of masa, dried chiles, and a stack of awkward corn husks. Now peel one open while it is still warm: the wrapper gives way, a little steam escapes, and the tender masa holds that red-chile pork through the center.

That small reveal is the payoff for all the spreading, folding, waiting, and checking.

If you make these, tell me how your batch went — especially what surprised you or behaved differently from what you expected.

Back to top

Posted on — Leave a comment

Pork Tenderloin Marinade Recipe: Easy, Juicy & Perfect for Grill, Oven or Air Fryer

Sliced marinated pork tenderloin with a deep golden-mahogany crust, moist pale center, mustard-style sauce in a ramekin, and carving knife on a walnut board.

A good pork tenderloin marinade should give you savory, garlicky edges, enough sweetness to help the outside caramelize, and slices that still glisten when they reach the plate. It should not require an entire day of planning—and it definitely should not leave you with beautifully browned pork that somehow turned dry in the middle.

Pork tenderloin is naturally tender. The bigger risks are simpler: too much salt, a marinade that gets harsher with time, or leaving this very lean cut over the heat after the center is ready.

The marinade itself is a quick whisk-and-pour job, which makes this one of those dinners that can look like you worked much harder than you did. Even 30 minutes gives the outside noticeable seasoning, while 8–12 hours works when overnight prep is easier.

One thick tenderloin or two skinny ones, oven, grill or air fryer—you can adjust for what is actually in front of you without guessing.

Marinate for flavor. Cook for juiciness.

Quick Answer: How Long Should You Marinate Pork Tenderloin?

For this soy-Dijon marinade, 30 minutes gives the outside noticeable flavor, 2–4 hours is an easy same-day target, and 8–12 hours works for overnight prep.

Different marinades need different timing. A much more acidic mixture—or one made with fresh pineapple—should not automatically get the same overnight treatment.

Once cooking begins, the timer tells you when to start checking; the thermometer tells you when to stop. Cook the thickest part to 145°F / 63°C. Rest the tenderloin for 5 minutes; the USDA safety minimum after reaching 145°F is at least 3 minutes.

Pork Tenderloin Marinade Recipe

This recipe is written for 1 lb / 454 g of plain pork tenderloin. If yours is close to that weight and you have an instant-read thermometer, make it as written and you’re set. The deeper notes are there for the nights when your pork, timing or appliance behaves differently.

Recipe at a Glance

Base pork weight1 lb / 454 g
Marinade prepQuick whisk-and-pour
Marinating window30 minutes to 12 hours
Oven400°F / 205°C
Grill400–450°F / 205–230°C, with a cooler zone
Air fryer400°F; use 200°C on models that use Celsius
Final internal temperature145°F / 63°C in the thickest part
Rest5 minutes
Serves3–4

Equipment: a large zip-top food bag or snug nonreactive container, small mixing bowl or measuring jug, whisk or fork, tongs and an instant-read meat thermometer.

Ingredients

  • 1 lb / 454 g plain pork tenderloin
  • 2 tbsp / 30 ml low-sodium soy sauce
  • 2 tbsp / 30 ml olive oil or avocado oil
  • 1 tbsp / 15 g Dijon mustard
  • 1 tbsp / about 12 g packed light brown sugar
  • 1 tbsp / 15 ml apple cider vinegar
  • 2 medium garlic cloves / about 6 g, finely grated or minced
  • ½ tsp / about 1 g black pepper
  • ½ tsp dried thyme or oregano

No extra salt is needed. Low-sodium soy sauce already handles most of the seasoning. Full-sodium soy, a salty rub or pork packed with a seasoning solution can push the finished tenderloin much saltier than expected.

Pork tenderloin marinade ingredients around a raw tapered tenderloin: soy sauce, oil, Dijon, brown sugar, vinegar, garlic, pepper and herbs.
A snug coating is enough. Pork tenderloin does not need to sit submerged in marinade for the surface to be evenly seasoned.

Method

  1. Check the cut and label. Make sure you have pork tenderloin, not pork loin. If the package is pre-seasoned or enhanced, or says it contains a seasoning solution, check the sodium before adding this marinade.
  2. Trim the silver skin. Slip a sharp knife just underneath the shiny membrane, angle the blade slightly upward and slice it away without digging deeply into the meat.
Hands trimming shiny silver skin from a raw tapered pork tenderloin with a knife angled beneath the membrane.
Silver skin feels firm and papery, unlike softer fat. Trim the shiny membrane without carving away good meat underneath.
  1. Whisk the marinade. Combine the soy sauce, oil, Dijon, brown sugar, vinegar, garlic, pepper and herbs until smooth and the sugar is mostly dissolved. It should smell savory and garlicky first, with a light tang behind it.
Thin amber-brown pork tenderloin marinade with garlic and herb flecks streaming from a whisk into a glass bowl.
The marinade should stream off the whisk, not cling like a glaze. If it turns sticky, it can scorch faster over high heat.
  1. Coat the pork. Put the tenderloin in a snug bag or container, add the marinade and turn until every side has a thin, even coating. The meat does not need to be submerged.
Raw pork tenderloin in a zip bag evenly coated with pork tenderloin marinade, with only a small amount pooling below.
A snug bag keeps a modest amount of marinade against the meat. Even coverage matters more than a deep pool of liquid.
  1. Refrigerate. Marinate for 30 minutes to 12 hours.
  2. Drain before cooking. Let the loose marinade run off. Pat the pork especially dry if you’re searing it before roasting.
  3. Choose your cooking method. Use the oven, grill or air-fryer directions below and cook until the thickest part reaches 145°F / 63°C.
  4. Rest 5 minutes before slicing.

Choose Your Cooking Method

  • Oven: Roast at 400°F / 205°C. For a slim 1-pound tenderloin, begin checking around 18 minutes. Thicker pieces often need longer. Remove at 145°F / 63°C and rest 5 minutes.
  • Grill: Heat the grill to 400–450°F / 205–230°C with a hot side and a cooler side. Brown over direct heat, turning every 2–3 minutes, then move the pork to gentler heat once the crust looks good. Take a temperature reading once that crust is established and remove at 145°F / 63°C.
  • Air fryer: Set it to 400°F, or 200°C on models that use Celsius. Follow your appliance’s own preheating guidance. Turn around 10 minutes, then take the first temperature reading around 14 minutes for a roughly 1-pound tenderloin. Larger or thicker pieces need longer. Remove at 145°F / 63°C and rest 5 minutes.

That’s enough to get dinner on the table. Got a thicker tenderloin, a very hot grill or an air fryer that cooks faster than expected? The notes below cover those cases.

Optional serving sauce

Want extra sauce for the sliced pork? Make this separately so it never touches raw meat:

  • 1 tbsp / 15 ml low-sodium soy sauce
  • 1 tbsp / 15 ml olive or avocado oil
  • 1½ tsp Dijon mustard
  • 1½ tsp brown sugar
  • 1½ tsp apple cider vinegar
  • 1 medium garlic clove, finely grated or minced
  • ¼ tsp black pepper
  • ¼ tsp dried thyme or oregano

Whisk everything together in a small saucepan and warm gently over low heat while the pork rests, just until the sugar dissolves and the sauce looks smooth. Keep it spoonable rather than reducing it into a heavy glaze.

Success Cues: From Marinade to Slice

  • Marinade: savory and garlicky with a clean, gentle tang.
  • After marinating: the pork is coated from end to end without sitting in a deep pool.
  • Before searing: the exterior feels tacky, with no loose marinade running off.
  • On the grill: the crust develops deep roasted, caramelized patches before anything turns bitter-black.
  • After resting: the cut surface looks moist, with a little juice beading on the meat and board.

Need to Adapt the Recipe? Use This Guide

The straightforward version is above. Jump to whatever matches the pork or problem in front of you.


Pork Tenderloin vs Pork Loin, Medallions and Two-Packs

Long, narrow and very lean, pork tenderloin usually has one end tapering noticeably thinner than the other. In many markets, pork fillet is another common name for essentially the same cut.

Pork loin is different. It is broader, heavier and behaves more like a roast. If that’s what you bought, don’t use the tenderloin cooking times below. Our slow cooker pork loin recipe is one option when you want a low-and-slow route.

Medallions need less marinating and far less cooking time. They are usually tenderloin sliced crosswise into rounds, which exposes more surface to the marinade and gives heat a much shorter path through the meat.

Raw pork tenderloin, tenderloin medallions and a much wider pork loin displayed side by side for comparison.
Tenderloin, medallions and pork loin do not cook on the same timetable. Identify the cut before you borrow any timing advice.

Two tenderloins from the same package rarely finish at exactly the same moment. Check the slimmer one first, pull it when it reaches temperature, and let the thicker piece keep going. Dinner is still on track.

One thick tapered pork tenderloin beside two slimmer tenderloins of roughly similar combined weight.
Two pieces can share one package weight and still finish at different times. Thickness—not the combined weight—drives each center.

Packages marked pre-seasoned, pre-marinated or enhanced—or labeled as containing a seasoning solution—may carry plenty of salt before you add anything. Check the label first. If the pork is already marinated, skip the homemade mixture and go straight to the cooking method you want.

How Much Marinade Do You Need?

If your tenderloin is close to a pound, make one batch and move on. For a noticeably larger or smaller piece, use the table as your starting point, then look at the coating.

Pork weightStarting amount
About 12 oz / 340 g¾ batch
1 lb / 454 g1 batch
About 1¼ lb / 567 g1¼ batches
About 1½ lb / 680 g1½ batches
About 2 lb / 907 gUp to 2 batches; use enough to coat well

A snug bag may coat one larger tenderloin perfectly with less liquid than a broad container. Two smaller tenderloins expose more surface, so they can need a little more marinade to coat comfortably.

Zip the bag, turn the pork and look. Once every side has a light sheen from end to end, you’re there. You are coating pork, not poaching it.

Three bags compare too little, enough and too much pork tenderloin marinade around raw tenderloin.
Before mixing more marinade, turn the bag and redistribute what you have. Dry patches can be a contact problem, not a quantity problem.

A wide casserole dish can make the same quantity look strangely small because the liquid spreads away from the meat. Turn the pork once or twice before deciding you need another batch.

The same pork tenderloin marinade in a snug zip bag and a broad shallow dish, showing different visible liquid depth.
The same marinade looks shallower in a wide dish. A snug bag keeps it close to the pork and saves refrigerator space.

What This Marinade Does

Pork tenderloin does not need a marinade to become tender. This mixture is mainly about seasoning, aroma, balance and giving the outside more flavor when it meets the heat.

Expect savory soy and Dijon first, warm garlic behind them, a little sweetness at the browned edges, and enough vinegar to keep everything lively. The pork should still taste like pork; the marinade is there to make those outer bites better, not bury them.

  • Low-sodium soy sauce supplies salt and savory depth.
  • Dijon adds body and rounded tang.
  • Brown sugar balances the salty-tangy ingredients and encourages deeper browning.
  • Apple cider vinegar keeps the flavor bright.
  • Oil helps everything coat evenly, while garlic and herbs bring most of their aroma to the outer bites.
Cooked medallions surrounded by pork tenderloin marinade ingredients, with callouts for soy, Dijon, sugar, vinegar, oil, garlic and herbs.
Most of the marinade’s biggest payoff happens at the surface, where salt, sugar, garlic and heat build the browned, savory edge.

Once that coated surface hits real heat, this is where the marinade earns its keep: the garlic smells toastier, the sugar helps the edges deepen, and the salty-sweet crust becomes much more noticeable than it was in the bag.

Garlic, herbs and mustard still do most of their obvious work near the exterior. A milder center is normal. Slice the pork and bring the serving sauce to the table instead of trying to solve it with days in marinade.

Pork medallions showing a browned outer crust and moist center, with callouts for where pork tenderloin marinade flavor is strongest.
Thinner slices give each bite more seasoned edge; thicker slices emphasize the milder center. Slice thickness changes how strong the marinade seems.

How Long to Marinate Pork Tenderloin

Marinating time belongs to the marinade. A mild soy-Dijon mixture, a citrus-heavy version and fresh pineapple all behave differently.

TimeBest useWhat to expect
30 minutesDinner is closeNoticeable seasoning around the outside
2–4 hoursSame-day prepA fuller, more settled savory flavor
8–12 hoursOvernight prepA convenient make-ahead window for this marinade
LongerUsually unnecessaryMore time without a guaranteed improvement

Anything in between is fine. Ninety minutes works. Six hours works. You haven’t missed a secret window because dinner moved by an hour.

Pork tenderloin marinade timeline showing 30 minutes, 2–4 hours, 8–12 hours and longer.
Use this timeline for this soy-Dijon formula. Stronger acid or fresh pineapple needs a different clock.

Only have 30 minutes? Use them. Dinner is not ruined because you forgot to start at lunchtime. The center will stay milder than the outer bites, but the soy, garlic and mustard still have time to make themselves known.

Can you leave pork tenderloin in this marinade too long? Yes. Beyond about 12 hours, there is little reason to keep pushing. Extra salt, acid and time can eventually make the outer layer too salty, oddly firm or unpleasantly soft.

Safe and delicious are two different clocks. Pork can stay safely refrigerated longer than it needs to marinate here. USDA guidance permits pork in marinade in the refrigerator for up to 5 days, but that is a safety allowance—not a flavor or texture recommendation.

Fresh pineapple is different because bromelain can soften meat quickly. Use a separately timed pineapple marinade rather than adding it to this overnight formula.

Once the marinating time is up, the priority changes. Get the surface ready for heat, then let browning and temperature take over.

From Marinade to Heat

Keep the pork refrigerated while it marinates, turning it once if needed so every side stays coated. Any sauce meant for the table should be made separately before the raw pork is involved.

The USDA recommends marinating meat in the refrigerator. If marinade that touched raw pork is reused, bring it to a boil first; otherwise, discard it. See the USDA pork marinating guidance.

How wet should the pork be when it hits the heat?

  • Straight roasting: let the loose marinade drain well.
  • Sear, then roast: pat the exterior fairly dry so it can brown quickly.
  • Grill: let the excess drip away but keep a thin coating on the meat.
  • Air fryer: drain well so liquid does not collect underneath.

There is no need to rinse the pork. A lightly coated surface is exactly what you want.

Raw marinated pork tenderloin prepared at four surface-moisture levels for roasting, searing, grilling and air frying.
Loose marinade slows browning. Drain well for roasting and air frying; pat especially dry before a hard sear.

The oven is the easiest controlled route, the grill gives this marinade its most dramatic crust, and the air fryer is hard to beat when speed matters. All three finish at the same place: 145°F / 63°C in the thickest part.

Marinated Pork Tenderloin in the Oven

Roast at 400°F / 205°C. For a slim 1-pound tenderloin, start checking around 18 minutes. Thicker pieces often need longer.

  1. Preheat the oven to 400°F / 205°C.
  2. Let the loose marinade drain away.
  3. Tuck a dramatically thin tail underneath so it does not finish long before the thicker middle.
  4. Place the pork on a lightly oiled rimmed pan or in a small roasting dish.
  5. Give a thicker piece more time and let the thermometer decide the finish.
  6. Remove at 145°F / 63°C and rest 5 minutes.

You’ll smell the garlic and mustard turning toastier before the pork is finished. The edges should deepen to a roasted brown, and by the time the thermometer says stop, the outside should look far more appetizing than the pale marinated pork that went into the oven.

Oven-roasted pork tenderloin with a golden-mahogany crust, moist sliced center and browned cooking juices in the pan.
Those browned pan juices are useful. Spoon a little back over the sliced pork instead of leaving all that flavor behind.

For a Darker Crust: Sear, Then Roast

Heat a heavy oven-safe skillet over medium-high heat with a thin film of neutral oil. Pat the tenderloin fairly dry, then let its broad sides turn deep golden, about 1–2 minutes per side.

Move the skillet to the oven once the crust looks good and begin checking sooner than you would with a straight roast. The hot pan has already given the center a head start.

Tongs turning tapered pork tenderloin in a cast-iron skillet, with one side deeply browned and the rest still lighter.
Searing builds crust; it does not seal in juices. Once the exterior is browned, let gentler oven heat finish the center.

Our pork tenderloin in the oven guide goes deeper into oven-specific timing and temperature choices.

Pork Tenderloin Marinade for Grilling

The grill is where this marinade gets its boldest crust. Heat it to 400–450°F / 205–230°C and give yourself both a hot area for browning and a gentler area for finishing.

With gas, lower or switch off one burner. With charcoal, bank most of the coals to one side.

  1. Let the loose marinade drip away before the pork goes on.
  2. Start over direct heat and rotate every 2–3 minutes so several sides develop deep roasted color.
  3. Once the crust looks right, move the tenderloin to the cooler side if the middle still needs time.
  4. Close the lid and let gentler heat finish the center.
  5. Take the first temperature reading once the crust is established. Thickness and grill heat can move the finish time noticeably.
  6. Remove at 145°F / 63°C and rest 5 minutes.
Marinated pork tenderloin on grill grates with irregular golden-mahogany browning, garlic flecks and a visibly tapered shape.
Look for irregular mahogany browning, not perfect black grill marks. Sugar, soy and garlic can turn bitter quickly over aggressive heat.

Beautiful crust, center not ready? Move it to the cooler side. You haven’t ruined anything. The direct heat has already done the browning; now the gentler side can finish the pork without scorching those salty-sweet edges.

Two-zone charcoal grill with browned pork tenderloin moving from the hot coal side to a cooler finishing zone.
Two-zone grilling separates browning from doneness. Once the crust is set, move cooler and let gentler heat finish the center.

Marinated Pork Tenderloin in the Air Fryer

Set the air fryer to 400°F, or 200°C on models that use Celsius. Follow your appliance’s instructions on whether it should preheat first; air fryers vary enough in size and power that cook times should be treated as starting points, not promises.

Raw marinated pork tenderloin cut into two straight pieces with open space around them in an air-fryer basket.
Air needs room to move around the pork. If a long tenderloin curls or crowds the basket, cutting it crosswise can improve evenness.
  1. Drain the tenderloin well and leave visible space around it.
  2. Cut an overly long tenderloin in half crosswise instead of curling it tightly around the basket.
  3. Cook for about 10 minutes, then turn the pork.
  4. For a tenderloin around 1 pound, take the first temperature reading around 14 minutes. A larger or thicker piece will usually need longer.
  5. Recheck the center as needed instead of automatically adding another fixed block of time.
  6. Remove at 145°F / 63°C and rest 5 minutes.

Air-fryer cooking time varies with appliance size and power, while the safe internal temperature does not. That’s why the thermometer matters more here than a minute-perfect chart.

Partly browned pork tenderloin in an air-fryer basket being checked in the thickest section with an instant-read thermometer.
The first thermometer reading teaches you about your own air fryer. Remember whether this basket ran fast or slow for similar thickness next time.

For unusually thick pieces or more appliance-specific guidance, our air fryer pork tenderloin guide goes deeper.

Weight Sets the Marinade; Thickness Drives the Cook

Weight determines how much marinade to start with. Thickness determines when to start checking. Temperature determines when to stop.

Infographic linking pork tenderloin weight, thickness and internal temperature with a scale, differently sized tenderloins and thermometer.
Two equally heavy tenderloins can finish at different times. Thickness—not package weight alone—is the better clue for when to start checking.

Two tenderloins can weigh almost the same and still finish several minutes apart because heat has farther to travel through the thicker one. Your pork does not need to look like the tenderloin in a recipe photo. Watch the piece in front of you.

The tapered tail often finishes first. Tuck a very thin end underneath for oven or air-fryer cooking, or point it toward gentler heat on the grill.

Raw tapered pork tenderloin labeled at the thick center and thin tail, with tuck-under and gentler-heat guidance.
A thin tail can dry before the center is ready. Tuck it under or keep that end over gentler heat.

How to Check Pork Tenderloin Temperature

Check the thickest part with an instant-read thermometer. On a narrow cut like tenderloin, inserting from the side can make it easier to get the thermometer tip into the center.

Thermometer inserted horizontally into the thickest part of cooked pork tenderloin, with the probe tip centered away from the tail.
Aim the probe tip at the center of the thickest section, not the tapered tail or the surface.

The USDA safe minimum for whole cuts of pork is 145°F / 62.8°C followed by at least a 3-minute rest. See the USDA safe minimum internal temperature chart.

A slight blush can be completely normal. Once the thickest part has reached 145°F / 63°C, you do not need to keep cooking until every slice turns white. A cool, translucent-looking center below temperature is different. The appearance tells you to check; the thermometer makes the final call.

Cooked pork tenderloin with a subtle pink center at 145°F beside a lower-temperature comparison slice.
A faint blush can remain at 145°F / 63°C. Use the thermometer—not color alone—to decide.

Ingredient Swaps and Flavor Variations

Missing something from the base marinade? Start with the swaps below. Want a deliberately different flavor instead? The variations come next.

Missing ingredientWhat to use instead
Low-sodium soy sauceRegular soy can work, but sodium varies widely by brand. Compare sodium per tablespoon and use less when needed.
Soy sauceTamari is often the closest savory substitute, though it may be just as salty. Coconut aminos is usually sweeter and less salty.
Brown sugarHoney or maple syrup can replace it; begin with a little less because liquid sweeteners make the coating stickier and can brown faster.
Fresh garlicUse about ½ tsp garlic powder in place of the two medium cloves.
Four sauce portions compare low-sodium soy sauce, regular soy sauce, tamari and coconut aminos for saltiness and sweetness.
A one-for-one swap can still change salt and sweetness. Adjust cautiously, especially with regular soy sauce or coconut aminos.

Pork Tenderloin Marinade Without Soy Sauce

For a soy-free version, replace the soy sauce with 2 tbsp / 30 ml coconut aminos and leave out the brown sugar at first.

Taste the unused mixture before the pork goes in. Pleasantly sweet but a little flat usually means it needs salt, not more sugar. Add fine salt a small pinch at a time until the savory side catches up. If gluten rather than soy is the concern, certified gluten-free tamari is generally the closer flavor swap.

Four Easy Flavor Directions

These are easy ways to nudge the base marinade in a new direction without turning the page into four more full recipes. Keep the salty-sweet-tangy balance in mind and taste any unused marinade before adding the pork.

Honey Mustard — rounder, sweeter and more lacquered. Replace the brown sugar with a slightly smaller amount of honey and increase the Dijon to about 1½ tbsp. Honey browns quickly, so watch aggressive heat.

Balsamic — darker, tangier and richer. Replace the cider vinegar with balsamic and begin with about half the brown sugar. Add more only if the unused marinade needs it.

Citrus-Garlic — bright and fresh. Use lemon or lime juice in place of the cider vinegar and add finely grated zest. Push the citrus much higher than the base amount and the pork should spend less time marinating.

Spicy — savory first, warmth at the finish. Add red-pepper flakes, minced fresh chilli or chilli sauce. A chilli sauce that is already sweet or salty may mean backing off the sugar or soy elsewhere.

Sliced pork tenderloin with four pork tenderloin marinade variations: honey-Dijon, balsamic, citrus-garlic and spicy red chilli.
Change one flavor direction at a time. Honey-Dijon, balsamic, citrus-garlic and spicy versions stay clearer when the base structure remains familiar.

No time to marinate at all? A dry rub makes more sense when you want to season and cook immediately or when a dry, browned crust is the priority. For the opposite approach—sear first, then add a sweet-savory glaze—our honey garlic pork chops show how that works.

Pork Tenderloin Marinade Troubleshooting

If dinner has gone slightly sideways, start here. Some problems can still be improved tonight; others tell you what to change next time.

Troubleshooting graphic comparing dry slices, pale wet pork, a dark exterior with underdone center, and a dry thin tail.
Start by locating the problem: surface, center or thin end. That usually points to moisture, heat or cooking time as the next adjustment.

Cooking and Doneness Problems

ProblemWhat probably happenedWhat to do
Dry throughoutThe pork cooked too far.Slice thinly and add warm serving sauce now; start checking earlier next time.
Dry thin tailThe tapered end finished first.Give those slices extra sauce; tuck the tail or keep it toward gentler heat next time.
Dark outside, underdone middleThe crust finished before the center.Move to gentler or indirect heat and let the middle catch up.
Burned outsideWet sugary marinade met aggressive heat.Trim genuinely bitter patches if needed; drain better and save very sweet glazes for later next time.
Pale, wet-looking outsideThe pork carried too much loose moisture into the heat.Dry it more thoroughly before searing and give the skillet time to get properly hot.
One tenderloin finishes firstThe pieces are different thicknesses.Take the finished one out and let the thicker piece continue cooking.
The middle is slightly pinkProperly cooked pork can retain a blush.Check the thickest part with a thermometer and use temperature as the final decision.

Deep mahogany can be exactly what you want; brittle black sugar and garlic are different. If the exterior is the part making you hesitate, use the comparison below.

Macro comparison of mahogany caramelization on pork tenderloin beside a blackened, brittle surface with charred garlic.
Mahogany is caramelized; brittle black is burned. If the crust darkens too fast, lower the heat or move the pork cooler.

Salt, Texture and Flavor Problems

ProblemWhat probably happenedWhat to do
Too saltySoy, added salt, salty rub or enhanced pork stacked together.Serve with unsalted sides now; check the label and reduce the total sodium next time.
Ham-like or unusually firmToo much salt met too much time.Slice thinly now; reduce sodium and shorten the soak next time.
Soft, mealy or mushy outsideStrong acid or a fast-acting tenderizing ingredient sat too long.There is no true texture rescue; shorten the contact time next time.
Center tastes mildGarlic, mustard and herbs did most of their work near the exterior.Slice the pork and add serving sauce. More days in marinade are not the answer.

The flavor was great, but the pork was dry? That tells you the marinade did its job; cooking time is what needs changing. Extra hours in the bag cannot protect a lean tenderloin that stays over the heat too long.

Make Ahead, Freeze and Store

Yes—fresh pork tenderloin can be frozen in this marinade. Bag it and freeze promptly, then thaw it in the refrigerator before cooking.

A tenderloin that’s already frozen solid is different: thaw it in the refrigerator first, then add the marinade. The thawed surface coats more evenly, and you’ll have a much easier time judging the cook afterward.

Pork tenderloin marinade freezer guide showing fresh pork bagged with marinade, frozen flat and thawed in the refrigerator.
Freeze the bag flat to save space and keep the marinade distributed around the pork. Thaw the sealed package in the refrigerator.
What you haveWhat to do
Unused marinadeMix ahead, cover and refrigerate until you’re ready to add pork.
Raw pork in marinadeFor best flavor and texture with this recipe, cook within the 30-minute to 12-hour window.
Fresh pork frozen in marinadeFreeze promptly; for best quality, aim to use within about 4–6 months. Thaw in the refrigerator before cooking.
Cooked porkRefrigerate promptly and use within 3–4 days.
Leftovers you’re reheatingReheat to 165°F / 74°C.

Cold Pork Tenderloin Is Underrated

If tomorrow’s lunch is part of the plan, cold slices are genuinely excellent in sandwiches, salads and grain bowls. With such a lean cut, they can be more enjoyable than reheating every slice until the juiciness disappears.

An easy next-day plate is cold tenderloin with potato salad, pickles and something crisp and green. When you do want the pork warm, use gentle covered heat with a spoonful of serving sauce, broth or pan juices.

Sourdough sandwich with thin cold pork tenderloin slices, crisp greens, pickles and mustard-style dressing.
Cold tenderloin is easier to eat when sliced thin. Mustard, pickles and other bright, acidic ingredients also reach more of each bite.

What to Serve With Marinated Pork Tenderloin

The pork already brings plenty of savory-sweet flavor, so give it sides that either catch the juices or freshen up the plate.

Three pork tenderloin pairings: roasted pork with mashed potatoes, grilled pork with slaw and corn, and citrus-garlic pork with rice.
Match the sides to the cooking style: creamy with roasted pork, crisp with grilled pork, fresh and bright with citrus-garlic.

Slice the rested tenderloin into medallions and spoon the board juices back over the warm cut surfaces. Bring the serving sauce to the table instead of burying the whole platter in it. The best bites have the contrast we’re after from the beginning: browned, garlicky edges and a center that still feels tender and juicy.

Frequently Asked Questions

Do I need to brine pork tenderloin before marinating?

No. The soy-based marinade already brings salt, so a separate brine adds another sodium layer and can push the pork toward overly salty or cured-tasting.

Do I need to poke holes in pork tenderloin?

No. An even coating is enough. Poking holes is unnecessary.

Do I need to bring pork tenderloin to room temperature before cooking?

No. Take it from the refrigerator, prepare the outside for your cooking method and let the thermometer tell you when the center is finished.


Marinate for Flavor. Cook for Juiciness.

Your tenderloin does not have to match the one in a recipe photo. Use its weight to decide how much marinade to start with, make sure every side is coated, then let thickness and temperature guide the cooking.

Get those pieces right and the first slice tells you you’ve nailed it: caramelized and garlicky around the edges, moist through the middle, with warm juice gathering on the board and enough sauce nearby to catch with the next bite.

If you make it, tell us the weight of your tenderloin, how long you marinated it, which cooking method you used and how long yours actually took. Those details give the next cook something genuinely helpful to compare with their own pork.

← Back to recipe · ↑ Back to top

Posted on — Leave a comment

Pork Carnitas Recipe — Juicy with Crispy Edges

Tray of crisp-edged pork carnitas with corn tortillas, chopped white onion, cilantro, lime wedges, salsa verde and several loosely filled tacos.

Slow cooker pork carnitas can turn out beautifully tender and still miss the reason you wanted carnitas in the first place: dark, crisp edges around pieces that remain juicy in the middle.

Lift the lid and you may find plenty of soft pork, but no crust anywhere. Add too much liquid and it tastes like wet taco filling. Pull it into fine threads, and the broiler can dry those strands before the meat develops a proper browned edge.

The easiest solution is to stop asking the slow cooker to do two opposite jobs. Let it soften the shoulder slowly with orange, lime, garlic, oregano, cumin and ancho chile. Once the thickest section yields easily to a fork, move the pork into dry, intense heat for the finish.

Quick Answer: How to Make Crispy Slow Cooker Carnitas

Cook large pieces of pork shoulder with a small amount of citrus until a fork turns easily through the thickest section. No initial searing or added broth is required. Lift out the pork, strain the cooking juices and reduce them only when they taste thin.

Pull the meat into broad pieces, then broil or skillet-crisp it in a loose layer. Spoon a little reserved juice over the pork only after it has browned. Leave any pork you are saving uncrisped, then brown each portion fresh when you reheat it.

Essential slow cooker pork carnitas decisions
Decision Best starting point
Pork and cooker 4 lb / 1.8 kg trimmed pork shoulder in a 6 qt / 5.7 L slow cooker
Cooking time Begin checking at 6 hours on LOW or 3½–4 hours on HIGH
Doneness A fork turns through the thickest section with little resistance
Best finish Broiler for a full batch; skillet for the deepest crust
Infographic shows pork moving from a slow cooker to dry heat, followed by a small measured addition of reserved cooking juice.
Slow cooking builds tenderness; dry heat creates the final crust.
Open the Full Carnitas Guide

Slow Cooker Pork Carnitas Recipe

Pork shoulder cooks with a small amount of citrus, garlic, onion and warm spices until it separates easily but still holds broad pieces. The finished tray should contain deeply browned tips, crisp flat edges and thicker pieces that remain soft enough to pull apart.

Use the broiler for a full batch or a skillet for the deepest crust. Allow about 25 minutes to trim, weigh, cut and season the pork. Once the lid is closed, the long cook is hands-off.

Prep 25 minutes
LOW Cook 6½–8½ hours
HIGH Cook 4–5½ hours
Broiler Crisping 5–9 minutes per pan; 15–20 minutes for the batch
Skillet Crisping 3–4 minutes per batch; 20–35 minutes for the recipe
Estimated Yield 2½–3 lb / 1.15–1.35 kg cooked pork

Planning window: Allow about 7½–10 hours on LOW or 5–6¾ hours on HIGH, including preparation, resting and broiling. Allow additional time if the cooking juices need reducing.

Expect approximately 8–11 hearty servings, 10–14 taco-bar servings or 20–30 small tacos.

For serving: warm tortillas, chopped white onion, cilantro, lime wedges and roasted salsa verde or another bright salsa.

Essential Equipment

  • 6 qt / 5.7 L slow cooker or Crock-Pot
  • Kitchen scale
  • Cutting board and chef’s knife
  • Tongs or a large slotted spoon
  • Fine-mesh strainer and wide saucepan
  • One or two uncoated, broiler-safe rimmed metal sheet pans

An instant-read thermometer, fat separator and heavy skillet are helpful but optional.

Cooker fit: Arrange the pork in a snug layer with modest overlap. It may touch the sides, but it should not press against the lid. The cooker may look almost dry at first. That is expected—the shoulder will release plenty of moisture and fat.

Seasoned pork shoulder pieces sit snugly over onion, garlic and bay leaves in an oval slow cooker with modest overlap and space beneath the lid.
Modest overlap is fine; a raised lid or compressed pork is not.

Ingredients

Raw boneless pork shoulder surrounded by orange, lime, onion, garlic, oregano, cumin, ancho chile, black pepper, salt and bay leaves.
Pork shoulder provides the body; citrus, aromatics and spices shape the flavor.
  • 4 lb / 1.8 kg boneless pork shoulder, pork butt or Boston butt, weighed after removing skin and unusually thick external fat
  • 20 g fine sea salt
  • 2 teaspoons dried Mexican oregano, crushed between your fingers
  • 1½ teaspoons ground cumin
  • 1 teaspoon freshly ground black pepper
  • 1 teaspoon ancho chile powder
  • 1 large yellow or white onion, about 8–9 oz / 225–250 g, cut into thick wedges
  • 8 garlic cloves, peeled and lightly crushed
  • ½ cup / 120 ml fresh orange juice
  • 2 tablespoons / 30 ml fresh lime juice
  • 2 bay leaves

Buying note: Choose a slightly larger roast when it has skin or a very thick fat cap, so approximately 4 lb / 1.8 kg remains after trimming.

Scaling salt: Use approximately 5 g per pound or 11 g per kilogram of trimmed pork. Salt volume varies significantly by brand and crystal size.

For Crisping

  • Reserved cooking juices
  • Reserved pork fat, lard or neutral oil for skillet crisping, if needed

Go to the instructions ↓

Instructions

  1. Prepare the pork. Thaw completely in the refrigerator and pat dry. Remove skin and unusually thick, hard external fat, keeping the softer fat and marbling.
  2. Cut and season. Divide the shoulder into roughly 3–4-inch / 7.5–10 cm pieces of similar thickness. Combine the salt, oregano, cumin, pepper and ancho chile, then coat every cut side and fold.
  3. Load the cooker. Scatter the onion and garlic across the bottom. Arrange the pork over them, tuck in the bay leaves and pour the citrus around the meat.
  4. Cook until tender. Cover and cook on LOW, beginning to check at 6 hours, or on HIGH, beginning to check at 3½–4 hours.
  5. Use the fork test. Test a thick central piece and one near the side. The pork is ready when the fork turns easily and separates a broad section without force.

After the Slow Cook: Rest, Strain and Pull

  1. Rest and strain. Transfer the pork to a rimmed tray and let it rest for about 10 minutes while you strain the cooking liquid into a saucepan. Discard the bay leaves; discard the softened onion and garlic or save them for beans, rice or soup.
  2. Adjust the juices. Spoon off excess fat, reserving a little for skillet crisping. Taste the strained cooking juices once they are cool enough. If they taste thin and citrusy, simmer until the orange settles into the background and the juices taste fuller and lightly coat a spoon. Set them aside as the reserved juices.
  3. Pull the pork. Leave a mixture of meaty chunks, shorter strands and soft interior pieces.
  4. Crisp and finish. Use the broiler for the full batch or a skillet for deeper browning. Add a measured amount of reserved juice after the crust develops. Keep the rest for serving, storage and reheating.

Use the resting window: keep the pork in broad sections while the juices are strained and a small amount of clean fat is reserved.

Cooked pork rests in broad sections on a tray while its cooking liquid is strained into a saucepan and a small portion of fat is reserved.
Rest the pork while the juices are strained, skimmed and tasted.

Broiler Finish for the Full Batch

  1. Position an oven rack so the pork will sit approximately 4–6 inches / 10–15 cm beneath the broiler. Preheat the broiler fully.
  2. Use a bare broiler-safe metal sheet pan, or line the pan with heavy-duty foil. Avoid nonstick pans unless the manufacturer explicitly rates them for broiler use.
  3. Divide the pork between two pans in loose single layers. Broil one pan at a time for the most even browning. With only one pan, work in two rounds.
  4. If the pork already glistens, begin without adding liquid. If it looks unusually dry, drizzle with no more than 1 tablespoon / 15 ml reserved juice per pan.
  5. Broil for 3–5 minutes. Turn roughly half the pieces, leaving some browned surfaces facing upward, then broil for another 2–4 minutes.
  6. Finish each pan with 1–2 tablespoons / 15–30 ml hot reserved juices. Toss briefly and serve promptly.

Broiler Browning Cues

Three-stage sequence shows moist pork before broiling, the first dark tips after several minutes and crisp edges after part of the tray is turned.
First dark tips mean redistribute the pork; they do not always mean stop.

The pork should already taste well seasoned before it reaches the broiler. This final step is mainly about browning.

Judge the finished tray by its range of textures rather than by one uniform shade of brown.

A tray of deeply browned carnitas is pulled from the oven while tongs lift one crisp-edged but still flexible piece.
Stop with deeply crisp tips and thicker pieces that remain soft and juicy.
Skillet Finish for Smaller Batches
  1. Heat a heavy skillet over medium-high heat. Add a teaspoon of reserved pork fat, lard or neutral oil if the pan is dry.
  2. Add about 8 oz / 225 g pork to a 10-inch / 25 cm skillet, or 10 oz / 285 g to a 12-inch / 30 cm skillet.
  3. Press gently and leave undisturbed for 2–3 minutes.
  4. Turn part of the pork and cook for another 30–60 seconds.
  5. Remove from the heat, add about 1 tablespoon / 15 ml reserved juice and repeat with the remaining pork.

Success cue: Stop when the exposed edges are dark and crisp but the larger pieces still bend and pull apart softly. Carnitas should have contrast, not uniform crunch.

How this recipe was developed: This slow-cooker adaptation is based on established pork-shoulder cooking principles, measured salt, restrained added liquid and sensory doneness cues. Slow cookers and shoulder cuts vary, so the stated times are checking windows rather than guarantees.

Tender first. Crisp second.

Burgundy-tipped tongs lift a broad carnitas piece with a dark underside, crisp irregular edges and a moist pork center.
Dark crust outside, moist pork inside—the texture carnitas should keep.

Three Signs Your Carnitas Are on Track

Watch for these three changes as the pork moves from the slow cooker to the crisping tray.

Three-part infographic shows fork-tender pork, moist broad pork pieces without pooled liquid and finished carnitas with browned undersides and crisp tips.
Check tenderness, surface moisture and final crust at three separate stages.
Carnitas appearance and texture checkpoints
Stage What to look for
Ready to leave the slow cooker A fork turns easily, but the pork still lifts in large sections
Ready to crisp The pieces have a moist sheen, with no puddle collecting underneath
Finished Browned undersides and crisp tips surround soft, juicy centers

Choosing the Best Pork for Carnitas

A marbled shoulder gives the slow cooker what it needs: fat for juiciness and connective tissue that softens during the long cook.

Boneless pork butt, picnic shoulder and lean pork loin displayed together with labels comparing their suitability for carnitas.
Visible marbling protects the pork through slow cooking and final crisping.

On a phone, swipe sideways to see the full table.

Pork cuts suitable for slow cooker carnitas
Pork cut Verdict What changes
Pork butt, Boston butt or shoulder blade roast Best choice Well marbled, forgiving and easy to divide into large pieces
Picnic shoulder Good May need more trimming and can include skin or bone
Bone-in shoulder Good but slower Use more raw weight and expect a wider timing window
Pork loin Separate method Leaner and better with a shorter, gentler cook
Tenderloin or pork chops Not suitable for this timing Too lean and too quick-cooking for the shoulder method

Working with pork loin instead? Its leaner structure needs the shorter method in our slow cooker pork loin recipe. For tenderloin, use the timing and handling in this slow cooker pork tenderloin guide.

Buying and Preparing the Shoulder

Pork butt and Boston butt come from the upper shoulder. Picnic shoulder comes from lower on the front leg. Both work, but pork butt is usually more compact, well marbled and easier to prepare.

Boneless shoulder is easier to weigh, season and divide. For a roughly 5 lb / 2.25 kg bone-in shoulder, 20 g salt is a sensible starting point because part of the packaged weight is bone. Expect a later first check, and taste the reserved juices before making any final seasoning adjustment.

Remove skin and unusually thick, hard fat, but keep the softer fat and marbling.

Partly trimmed pork shoulder with hard exterior fat removed and several large irregular pieces beside a 3–4-inch size guide.
Match the thickest sections; the pieces do not need perfect shapes.

Carnitas Ingredients and Substitutions

Salt and Seasoning

The recipe uses 20 g salt for 4 lb / 1.8 kg trimmed pork—about 1.1% by weight. Salt crystals vary too much for one universal teaspoon conversion, so a scale is the clearest option.

Four pounds of trimmed pork shoulder on one digital scale and 20 grams of fine sea salt in a bowl on another scale.
Salt by weight to avoid the density differences between fine, coarse and flaky crystals.

Mexican oregano brings an earthy, citrusy note. Mediterranean oregano is a practical substitute, although its flavor is more minty and herbal. Cumin stays in the background, while ancho chile adds mild warmth rather than sharp heat.

Using a carnitas seasoning packet? Check the sodium first. With a salted packet, leave out the recipe salt initially and adjust only after tasting the reserved juices.

Citrus and Added Liquid

Orange rounds out the garlic and spices without making the pork taste sweet. Lime brings a sharper edge, so most of it is better saved for the table. Fresh juice is best, and there is no need to add peel—the long cook can draw bitterness from it.

No orange juice? Replace it with the same amount of unsalted chicken broth or water. Use only 1 tablespoon / 15 ml lime juice in the cooker, then brighten the finished pork with fresh lime.

A shallow layer of liquid is enough. Starting with cups of broth gives the pork a weaker flavor and leaves much more moisture to manage before browning.

Do You Need to Sear the Pork?

No. Searing can add another layer of browned flavor, but that crust softens during hours of moist cooking. Skip it for a simpler start; the final crisping stage matters more.

Want to change the flavor?

More Pork-Forward Carnitas

Reduce the cumin to ¾ teaspoon, leave out the ancho chile powder and use only 1 tablespoon / 15 ml lime juice. Offer more lime at the table and use reserved pork fat for skillet crisping.

Smoky Chipotle Carnitas

Add 1 finely chopped chipotle pepper in adobo with 1–2 teaspoons of the sauce. Leave out the ancho chile powder at first because the chipotle will taste stronger after the juices reduce.

A spoonful of fresh mango salsa gives the smoky pork a cool, bright contrast.

Beer or Mexican Coke

  • Beer: Replace ¼ cup / 60 ml orange juice with the same amount of mild lager.
  • Mexican Coke: Replace ¼ cup / 60 ml orange juice with cane-sugar cola for a sweeter finish.

Keep the total liquid unchanged so the pork does not take longer to brown.

Half-Batch Slow Cooker Carnitas

Cooking for fewer people? Make the 2 lb / 900 g half batch

A 4–5 qt / 3.8–4.7 L slow cooker gives a half batch the best fit. A 6-quart model also works, but the shallower fill may alter evaporation and timing.

  • 2 lb / 900 g pork shoulder, weighed after major trimming
  • 10 g fine sea salt
  • 1 teaspoon Mexican oregano
  • ¾ teaspoon ground cumin
  • ½ teaspoon black pepper
  • ½ teaspoon ancho chile powder
  • ½ large onion, about 4–4½ oz / 110–125 g
  • 4 garlic cloves
  • ¼ cup / 60 ml orange juice
  • 1 tablespoon / 15 ml lime juice
  • 1 bay leaf

Begin checking at 4½–5 hours on LOW or around 3 hours on HIGH. A common window is 5½–7 hours on LOW or 3½–4½ hours on HIGH, but the fork still decides.

Half-batch planning: quantities scale directly, but cooker fit and the first tenderness check still need their own adjustment.

Half-batch infographic lists 2 pounds of pork shoulder, 10 grams of salt, a 4–5-quart cooker and earlier LOW and HIGH checking times.
Use a smaller cooker and begin checking earlier; cooking time does not halve.

Carnitas vs Slow Cooker Pulled Pork

Carnitas are often described as Mexican pulled pork, but the comparison only goes so far. Both can begin with pork shoulder; the seasoning, texture and finish move in different directions.

Broad crisp-edged carnitas pieces sit beside finer strands of barbecue pulled pork coated in reddish-brown sauce.
Carnitas need exposed browned surfaces, not merely separated pork fibers.
  • This slow-cooker version uses citrus, oregano and restrained spices; barbecue pulled pork leans more heavily on rub, smoke, vinegar and sauce.
  • Broader, irregular pieces are typical of carnitas; pulled pork is usually separated into finer strands.
  • Dry heat gives carnitas their browned finish; pulled pork generally stays soft and coated with sauce.
  • Tacos, tostadas and bowls suit carnitas naturally; barbecue pork fits buns, sliders and barbecue plates.

For soft, sauced pork made for sandwiches and sliders, follow our slow cooker pulled pork recipe.

Is This Traditional Carnitas?

Traditional carnitas take a different route. In Michoacán, pork is commonly cooked slowly in rendered fat, often in large copper vessels, as described in Mexico’s Ministry of Culture overview of Michoacán cooking.

This slow-cooker version uses moist heat for tenderness, then adds a separate browning stage for the crisp-soft finish.

Why Each Step Matters for Juicy, Crisp Carnitas

Cut and Season Large Pieces

Large pieces reach tenderness more predictably than one compact roast while keeping enough mass to stay succulent. Similar thickness matters more than perfect shape. Mix the salt and spices before applying them, then press the seasoning into the freshly cut surfaces and folds.

Hands rub a dry spice mixture over the sides, cut faces and folds of several large raw pork shoulder pieces.
Season every cut face so flavor reaches beyond the original exterior.

Load the Cooker and Leave It Closed

Put the onion and garlic beneath the shoulder, where the released juices will collect. Pour the citrus around the edges. The cooker may look almost dry, but the pork will release moisture and fat as it cooks. Early stirring and repeated lid lifting only slow the process.

Seasoned pork shoulder sits mostly above a shallow layer of citrus juice, onion and garlic at the bottom of a slow cooker.
The liquid starts low, then rises as the shoulder releases fat and juices.

Check the Center and the Edge

Slow cookers often run hotter near the walls, so test the thickest central piece and one near the side. If the fork still meets resistance at the expected time, close the lid and give the pork another 30 minutes. Nothing has gone wrong; the connective tissue simply needs longer.

A fork tests the thickest pork piece in the center of a slow cooker while a second marked area identifies a piece near the outer edge.
If the edge yields but the thick center resists, keep cooking.

When the fork finally turns easily, the uncertain part is over. The bright citrus aroma should have softened, and the cooker should smell much more deeply of pork, garlic and oregano. The shoulder is ready for the high-heat finish that gives carnitas their contrast.

Taste the Juices Before Reducing Them

When you lift the lid, there may be far more cooking liquid than expected. Most of it came from the shoulder itself. Strain it, spoon off only the excess fat and taste once it has cooled enough.

Amber pork cooking liquid, rendered fat, softened onion, garlic and bay leaves remain inside an emptied slow cooker.
Much of the final liquid rendered directly from the pork shoulder.

If the strained juices taste thin and citrusy, simmer until the orange settles into the background and the flavor becomes fuller and more savory. The finished juices should taste primarily of pork and garlic, with the citrus supporting the flavor rather than leading it.

Thin amber pork juices run quickly from one spoon while darker reduced juices leave a light coating on a second spoon.
Reduce for fuller flavor, stopping before the juices turn sticky or overly salty.

Stop when the liquid lightly coats a spoon. Juices that already taste balanced do not need reducing.

Decision infographic directs balanced pork juices to be reserved, thin citrusy juices to be simmered and already salty juices not to be reduced.
Reduce only thin juices; balanced or salty juices should stay as they are.

Preserve Some Thicker Pieces

Keep some meaty pieces among the shorter strands, then pull only as much as needed for the first tray or skillet batch. Their edges can brown while their centers remain soft, and larger pieces can always be separated further at the table.

Cooked pork on a metal tray includes broad chunks, shorter strands and a small example of pork shredded too finely.
Thin strands crisp first; thicker pieces protect the juicy interior.

Back to recipe card ↑ · Cooking time and doneness ↓ · Back to top ↑

Carnitas Cooking Time and Doneness

The clock tells you when to start checking. The fork tells you when to stop.

Timing infographic lists LOW and HIGH checking windows, internal-temperature checkpoints and a reminder to judge tenderness with a fork.
Temperature guides the check; fork resistance decides when the shoulder is tender.

On a phone, swipe sideways to see the full table.

Slow cooker pork carnitas cooking times
Pork size and shape Setting Begin checking Common working window
2 lb / 900 g large pieces LOW 4½–5 hours 5½–7 hours
2 lb / 900 g large pieces HIGH About 3 hours 3½–4½ hours
4 lb / 1.8 kg large pieces LOW About 6 hours 6½–8½ hours
4 lb / 1.8 kg large pieces HIGH 3½–4 hours 4–5½ hours
4 lb / 1.8 kg whole boneless roast LOW recommended About 8 hours 8–10 hours
Bone-in shoulder LOW recommended Later than equivalent boneless pieces Depends on bone, thickness and roast shape

LOW is the better choice for whole and bone-in shoulders because their thickness makes HIGH timing less predictable. All of these times are checking guides rather than guarantees; cooker shape, starting temperature and batch depth also affect the finish.

Safe Temperature Is Not the Same as Tenderness

Whole-muscle pork is considered safe at 145°F / 63°C followed by a three-minute rest, but shoulder is normally still firm at that point. Begin checking more closely around 190°F / 88°C. Pull-apart tenderness commonly arrives around 195–205°F / 91–96°C, but the fork makes the final decision.

Thaw pork before slow cooking and keep the lid closed until the first planned check. USDA slow-cooker safety guidance also recommends reheating cold leftovers outside the slow cooker before transferring them to a cooker for hot holding.

Use the Fork Test

  • Not ready: The fork needs pressure, twisting feels tight, or the meat springs back.
  • Ready: The fork enters easily, turns with little resistance and separates a broad section.
  • Very soft: The pork collapses into fine strands with almost no pressure. Remove it promptly and handle it gently; it can still taste excellent, but it will not hold larger pieces as well.

How to Make Carnitas Crispy Without Drying the Pork

Once the pork is tender, its surface needs strong heat and enough space for moisture to escape.

Choose the Best Crisping Method

  • Broiler: Best for a full family or party batch. It handles the most pork at once and produces varied crisp edges.
  • Skillet: Best for smaller portions and the deepest contact browning. Work in batches so the meat fries instead of steaming.
  • Air fryer: Best for freshly cooked pork or a small portion of refrigerated leftovers. It can reheat and crisp the pork in the same step.
Broiler-crisped carnitas with irregular dark tips sit beside skillet-crisped carnitas with broad, deeply browned contact surfaces.
Broilers crisp exposed peaks; skillets build broad contact crusts.

Set the broiler rack before the pork reaches the tray. Position the meat 4–6 inches / 10–15 cm below the element so the edges brown quickly without scorching.

Oven cutaway shows a metal sheet pan of carnitas positioned 4–6 inches, or 10–15 centimeters, beneath the upper broiler element.
Four to six inches balances fast browning with enough control to avoid scorching.

How Wet Should the Pork Be?

The pieces should glisten, with no puddle collecting underneath. If the tray begins looking soupy, divide the pork before giving it more heat. As the surface dries, the soft hiss of steam becomes a sharper sizzle. That is when the crust begins to form.

Broad pulled pork pieces glisten lightly on a metal sheet pan with visible gaps and no liquid puddle beneath them.
A light sheen is useful; a puddle traps steam and prevents browning.

A loose layer browns; a deep pile steams.

Infographic compares a loose layer of browned carnitas with a deep crowded tray of pale pork surrounded by trapped moisture.
Open gaps release steam and let the pork surface grow hotter.

Reserved juices belong in the finishing stage, after dry heat has already done the work of building a crust.

A measured tablespoon of reserved pork cooking juice is drizzled over carnitas after the meat has developed dark browned edges.
Add measured juice after browning so the finished crust stays intact.

What skillet browning should look like: the deepest color develops on the flat surfaces that remain in contact with the hot pan.

Broad pork pieces develop dark contact crusts in a cast-iron skillet while burgundy-tipped tongs turn one browned section.
Stillness against the skillet creates the deepest contact crust.

Air-Fryer Carnitas

For refrigerated leftovers, use the air fryer to reheat and crisp the pork at the same time. Continue cooking until the center reaches 165°F / 74°C and the edges are browned. Cold pork may need longer than freshly cooked pork.

  1. Preheat the air fryer to 400°F / 200°C.
  2. Add about 8 oz / 225 g pork in a loose layer. If it looks dry, toss it with 1–2 teaspoons of reserved juice.
  3. Air-fry for 3 minutes, then toss or turn part of the pork.
  4. Continue until the center reaches 165°F / 74°C and the edges are crisp. Freshly cooked pork commonly needs another 1–3 minutes; refrigerated pork may need longer.
A loose portion of leftover carnitas crisps inside an air-fryer basket while an instant-read thermometer displays 165°F and 74°C.
Air circulation crisps small portions quickly, so watch the thinnest strands.

Slow Cooker Carnitas Troubleshooting

Troubleshooting infographic pairs tough, steaming, dry, bland, mushy and overly salty carnitas with different corrective actions.
Most problems trace back to tenderness, tray moisture or high-heat timing.

On a phone, swipe sideways to see the full table.

Common slow cooker carnitas problems and fixes
Problem Likely cause What to do
Pork is still tough The connective tissue has not softened Cover and continue cooking; check again in 30–45 minutes
Pork is mushy Small pieces, overcooking or a long hold in hot liquid Drain promptly and crisp broad portions carefully
Too much liquid The shoulder released moisture and fat Strain, skim and reduce only what you need
Pork will not crisp Wet surface, crowding or weak heat Divide it into loose batches and fully preheat the broiler or skillet
Pork dries beneath the broiler Pieces are too fine or the second pass is too long Keep larger pieces and finish with a measured spoonful of juice
Carnitas taste bland Watery juices or no final seasoning check Reduce the strained juices if needed, then adjust salt and lime
Carnitas are too salty The juices are too salty, or the pork itself is over-seasoned When the juices are too salty, use less of them. Balance over-seasoned pork with plain tortillas, unsalted beans, avocado or rice

The Pork Is Still Tough

A shoulder that is hot but still stubborn simply needs more time. Fully cooked pork can remain tight before its connective tissue has softened enough to pull apart.

If the cooker also looks unusually dry, add a small amount of hot water or unsalted broth around the meat. This is most likely with a small batch in a large cooker.

The Pork Turned Mushy

Mushiness usually comes from small pieces, a long hold after tenderness, repeated stirring or leaving fine strands submerged in all the cooking liquid. Remove finished shoulder promptly and rest it in larger sections. Browning can improve a soft exterior, but it cannot rebuild the meat’s structure.

The Pork Is Steaming Instead of Browning

Move half the pork to another tray or skillet. Let pooled moisture evaporate, then leave the pieces alone long enough for a crust to form.

The Pork Finished Early

If dinner is close, hold the pork in large sections with a modest amount of juice on WARM only when a thermometer confirms that it remains at 140°F / 60°C or hotter. Crisp it shortly before serving.

If the meal is still several hours away, cool and refrigerate the pork promptly. Reheat and crisp it closer to dinner instead of leaving it on a long hot hold.

Decision infographic shows pork held with juice above 140°F in a slow cooker or cooled promptly in a covered container for later reheating.
Hold briefly above 140°F / 60°C; chill promptly for a longer delay.

Continue to serving ideas ↓ · Store or reheat later ↓ · Back to recipe card ↑ · Back to top ↑

How to Serve Carnitas

Bring the first tray straight to the table rather than covering it. Warm tortillas, chopped onion, cilantro, lime and one bright salsa are enough; the pork should still be the part everyone notices first.

Let everyone take the crispest pieces while the next batch browns. The last person to build a taco still gets pork fresh from the heat.

Hands carry a hot tray of crisp pork carnitas toward a table with tortillas, chopped onion, cilantro, lime and salsa verde.
Serve in waves so each tray reaches the table with crisp edges.

The Simplest Carnitas Taco

  • Warm corn tortilla
  • Crisp-edged carnitas
  • Finely chopped white onion
  • Fresh cilantro
  • A squeeze of lime
  • Roasted salsa verde or a bright red salsa
Corn tortilla filled with crisp pork carnitas, diced white onion and cilantro beside lime wedges and a bowl of salsa verde.
Fresh, restrained toppings keep the browned pork in focus.

For a creamier taco, add one rich element rather than several. A small spoonful of fresh guacamole softens the crisp edges without burying the pork.

Build a Carnitas Taco Bar

  • Warm corn and flour tortillas
  • Pickled red onions and radish slices
  • Guacamole or diced avocado
  • Pico de gallo
  • Cotija or another crumbly cheese
  • Black beans or refried beans
  • Lime wedges
Large tray of pork carnitas surrounded by tortillas, salsa verde, chopped onion, cilantro, lime wedges and pickled red onions.
Separate components protect the crust and let guests build to taste.

Add black beans and a bowl of fluffy rice for guests who would rather build a carnitas bowl.

How Much Carnitas Per Person?

On a phone, swipe sideways to see the full table.

Estimated carnitas serving portions
Serving style Pork quantity Approximate yield
Small taco 1½–2 oz / 40–55 g per taco 20–30 tacos
Taco meal with sides 3–4 oz / 85–115 g per person 10–14 people
Hearty tacos or bowl 4–5 oz / 115–140 g per person 8–11 people
Large plated main 5–6 oz / 140–170 g per person 7–9 people

Other Ways to Use Carnitas

Use leftovers in quesadillas, burrito bowls, tostadas, breakfast hash or loaded potatoes, crisping the pork before adding it whenever the dish allows. For breakfast meal prep, the cooling and reheating approach in these breakfast burritos helps keep the tortillas from becoming wet or chewy.

Storing, Freezing and Reheating Carnitas

Carnitas are unusually good make-ahead food—as long as you save the crisping for later.

Keep any pork you are not serving soft and juicy. Tomorrow, warm one portion with a little juice, let the surface dry and crisp it fresh so the browned edges return.

Three-step infographic shows soft pork refrigerated with juice, reheated to 165°F in an air fryer and then crisped until browned.
Store the pork soft and juicy, then crisp each portion before serving.

Refrigerating Carnitas

  1. Divide the pork into shallow containers and refrigerate within two hours.
  2. Add enough reserved juice to keep it moist without submerging it.
  3. Keep the remaining juices in a separate container.
  4. Use refrigerated carnitas within 3–4 days.
  5. Crisp only the portion you are about to serve.

Freezing Carnitas

Freeze the pork before crisping in practical meal portions. About 1 lb / 454 g suits a family meal, while 8 oz / 225 g works well for one or two people.

  1. Place each portion in a freezer-safe bag or container.
  2. Add 2–4 tablespoons / 30–60 ml reserved juice per pound / 454 g pork.
  3. Press freezer bags flat to remove excess air.
  4. Label each portion with its date and weight.
  5. Freeze the remaining juices in small portions.

For best quality, use frozen carnitas within about three months.

Reheat Without Drying the Pork

  1. Thaw frozen carnitas in the refrigerator when time allows.
  2. Reheat with a little reserved juice on the stove, in the microwave, in a conventional oven or in the air fryer until the pork reaches 165°F / 74°C.
  3. Allow excess surface moisture to evaporate.
  4. Crisp the pork in a skillet, beneath the broiler or in the air fryer.
  5. Add a small spoonful of hot juice after browning.

Reheat cold leftovers outside the slow cooker. Once fully hot, the pork can be transferred to a preheated cooker and held at 140°F / 60°C or above.

Slow Cooker Pork Carnitas FAQ

Can You Put Frozen Pork in a Slow Cooker?

Thaw pork completely in the refrigerator before slow cooking. Frozen or partly frozen meat may take too long to heat through safely in a slow cooker, and it also makes the cooking window difficult to predict.

Should the Pork Be Covered With Liquid?

No. A shallow layer is enough. The shoulder releases substantial moisture and fat as it cooks.

Can You Cook the Shoulder Whole?

Yes, as long as it fits without pressing against the lid. Place a whole boneless roast with the fattier side facing upward, season it all over and pour the citrus around it. Use LOW and expect a later first check and a wider timing window.

Is LOW or HIGH Better?

LOW gives the broadest and most forgiving window. HIGH works for large boneless pieces when time is limited, but begin checking earlier and watch closely once the meat starts separating.

Can You Halve the Recipe?

Yes. Use the 2 lb / 900 g half-batch quantities above. A 4–5-quart slow cooker gives the smaller batch the best fit, although a 6-quart cooker can also work with a wider timing window.

Tender First, Crisp Second

Serve the pork straight from the tray while the dark edges are crisp and the larger pieces still pull apart softly inside.

Made these carnitas? Tell us whether you cooked them on LOW or HIGH and which crisping method you preferred. If you noted the pork weight, cooker size or fork-tender time, include those too—they may help the next person making dinner.

And tell us what went into the first taco.

Back to recipe card ↑ · Back to top ↑