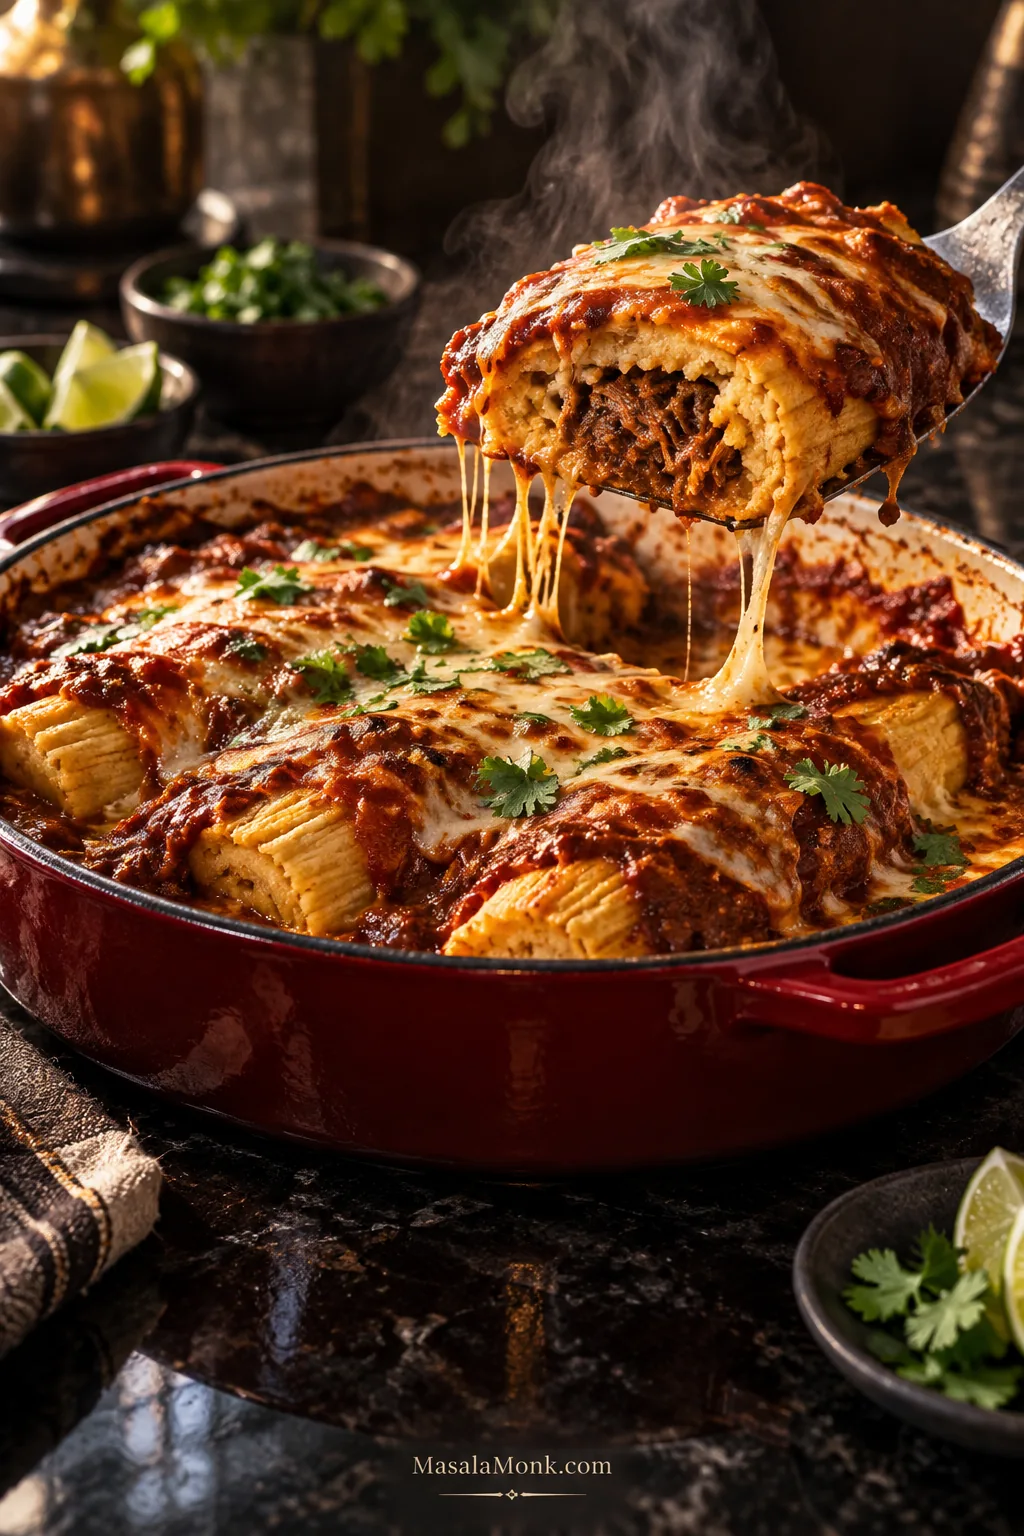
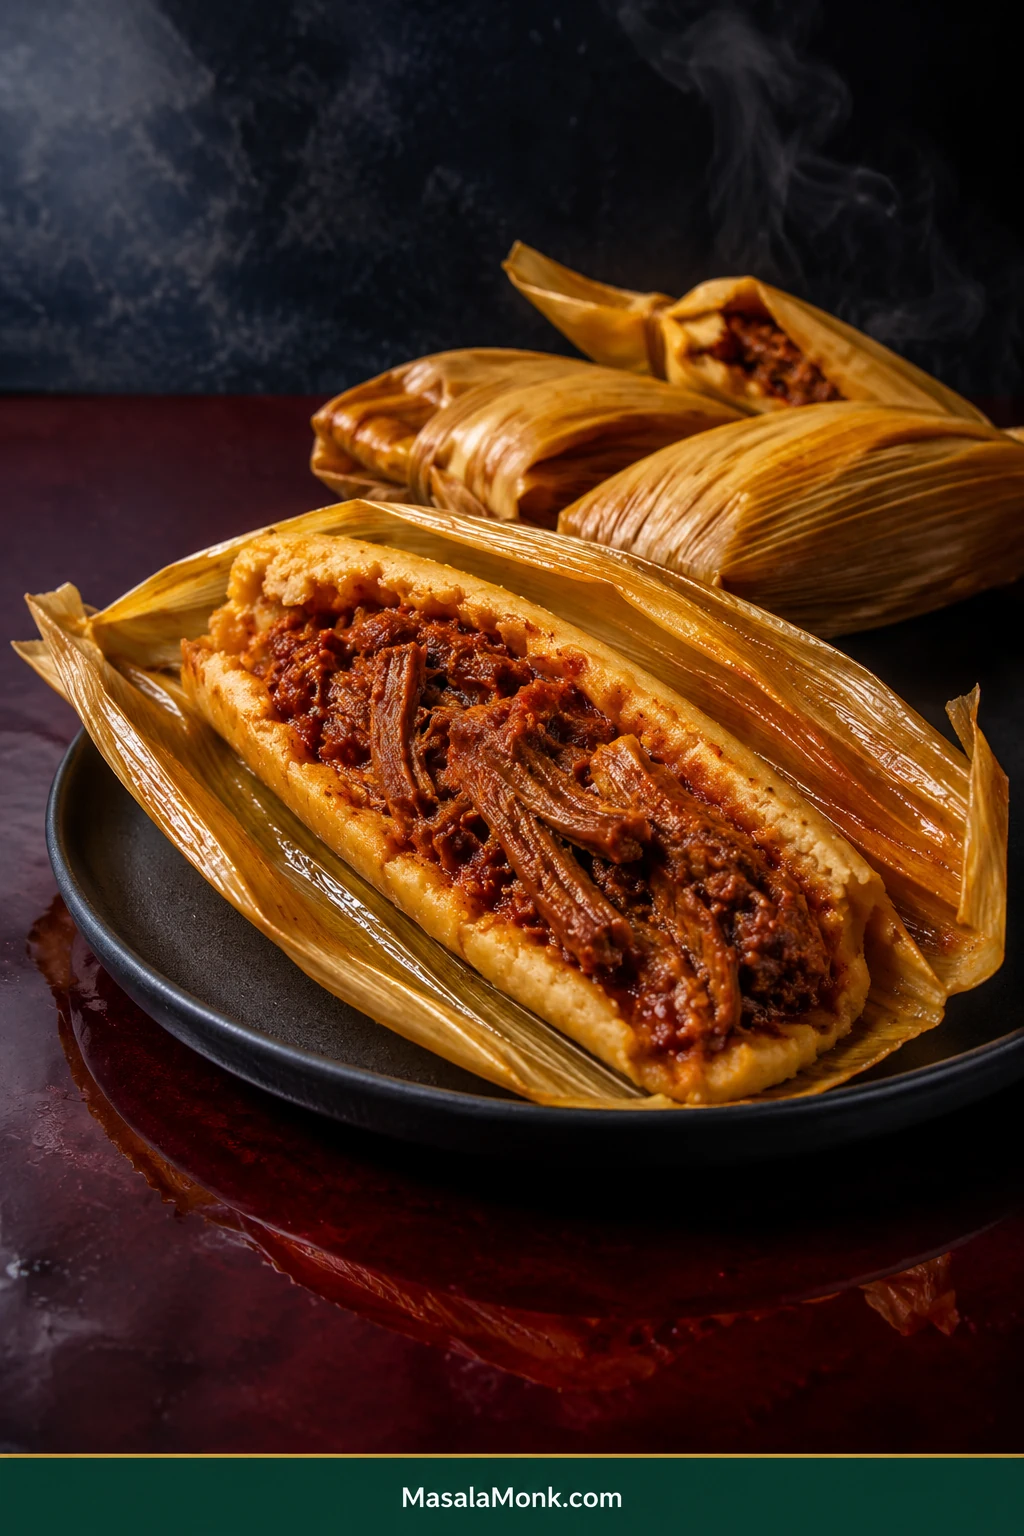
Tamales have a way of arriving by the dozen, which is wonderful until you’ve reheated them the same way for the third time. This tamale casserole with tamales turns actual cooked tamales into a different dinner: hot filling wrapped in tender masa, sauce tucked around the edges, bubbling cheese across the top, and a few exposed spots getting lightly toasted in the oven.
The basic idea is simple: arrange fully cooked tamales in a shallow dish with a modest amount of sauce and cheese, then bake until the center is hot and the top is golden and bubbling. There is no cornbread mix, cornmeal crust, or raw masa topping here; this is simply a baked way to use tamales that are already cooked.
The leftovers do not need to be perfect. One tamale split in half? Tuck the pieces into a gap. Different fillings in the same batch? That’s fine too.
Beef, pork, chicken, cheese, green chile, beans, or a mixed box can all go into the casserole. What matters more at the beginning is whether the tamales are chilled and easy to lift, freshly cooked, frozen, or delicate from a can.
Handle tamales according to firmness: chilled ones tolerate arranging; freshly steamed and canned ones need less movement; frozen ones only need enough thawing to unwrap.
Leftover, Refrigerated or Store-Bought Cooked Tamales
The easiest kind to use. Unwrap them while they’re cold enough to hold their shape, then arrange them straight in the dish.
Frozen
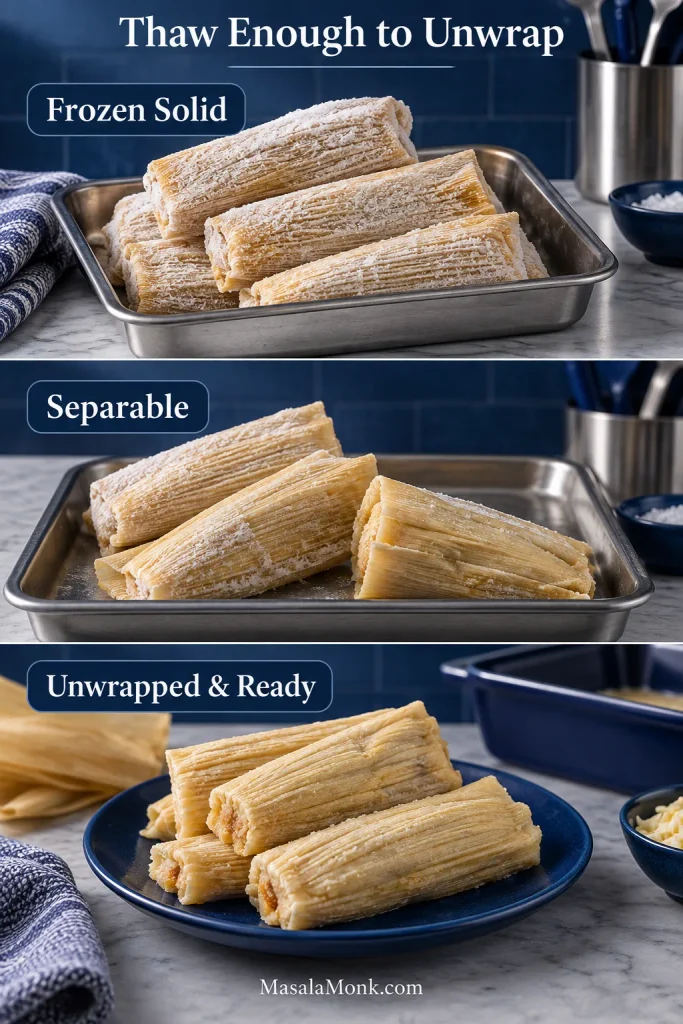
They do not need to thaw completely. Get them soft enough to separate and unwrap; a colder casserole will simply need more covered heating time.
Freshly Cooked or Steamed
Let them cool until the masa is set enough to unwrap and lift cleanly. Fresh-from-the-steamer tamales can be fragile while they’re very hot.
Canned
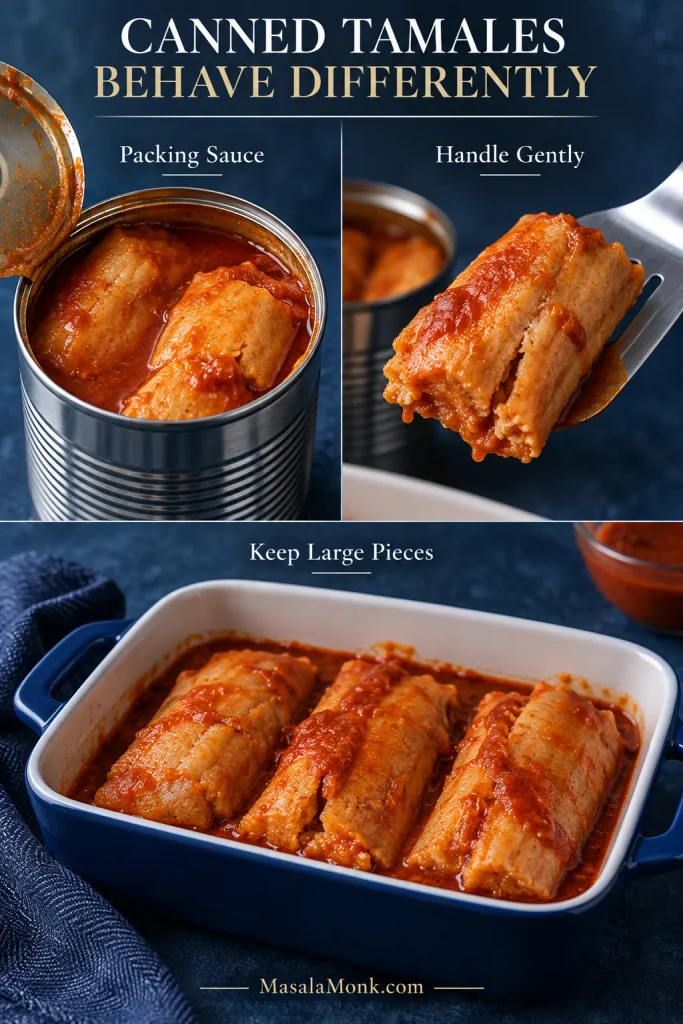
These behave differently. They’re usually more delicate, and their packing sauce may already provide much of the moisture the casserole needs.
If you’re starting with a fresh homemade batch rather than leftovers, these pork tamales with red chile cover the tamale-making process first.
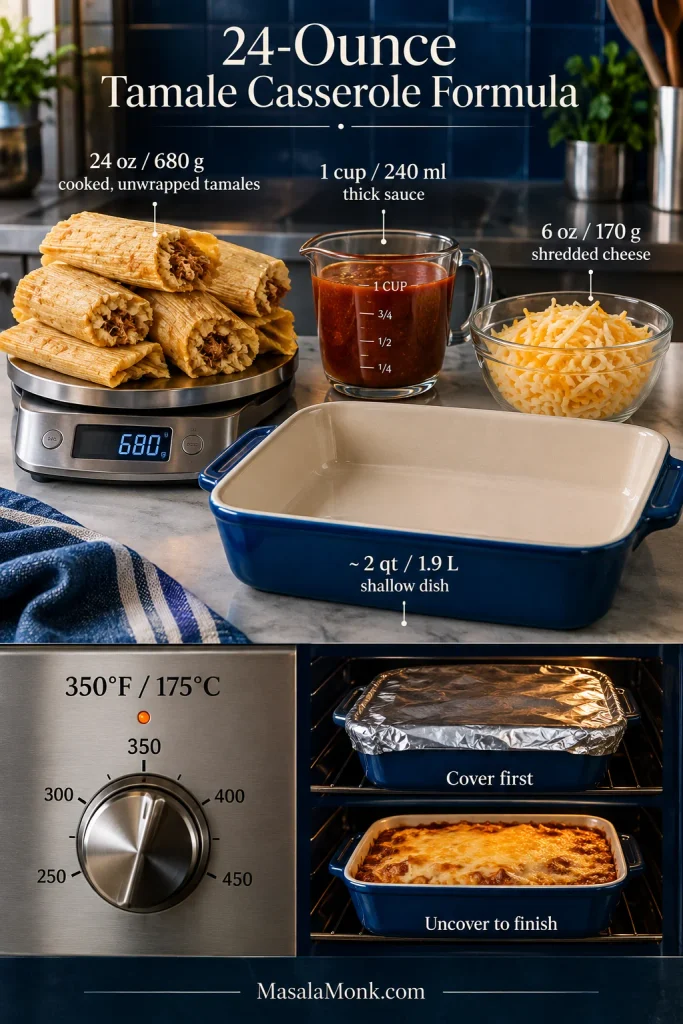
Use the formula below for fully cooked, cool or refrigerated tamales, weighed without their wrappers. Frozen tamales mostly just need more covered heating time. Canned tamales are different enough that it’s better to judge their sauce separately.
The 24-Ounce Tamale Casserole Formula
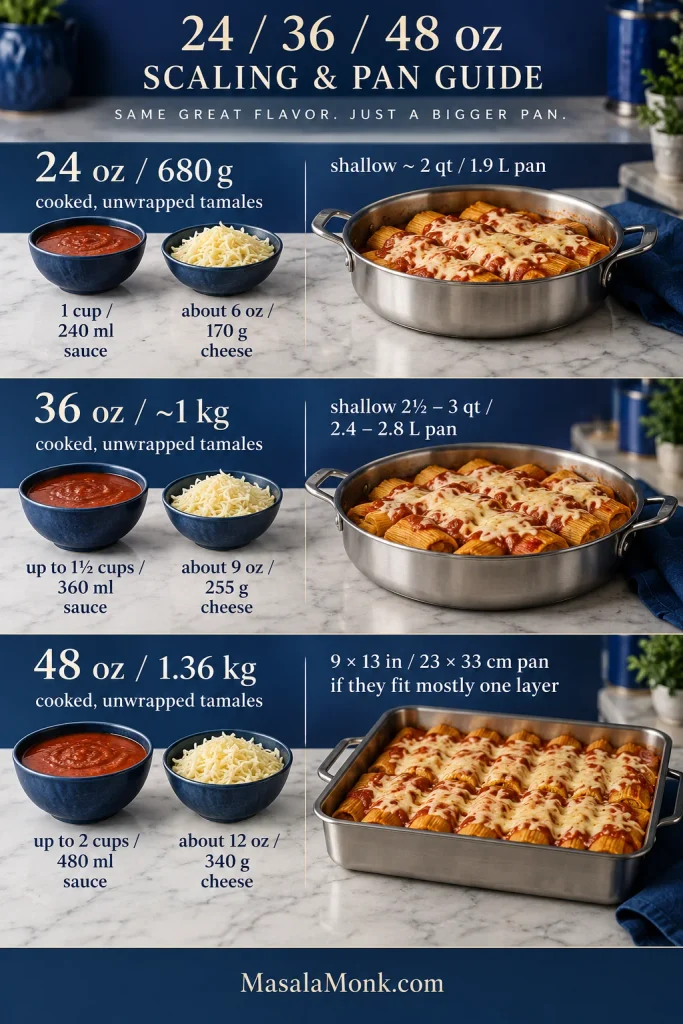
24 oz / 680 g cooked, unwrapped tamales + 1 cup / 240 ml thick sauce + 6 oz / 170 g shredded cheese → shallow ~2 qt / 1.9 L dish → 350°F / 175°C → cover first, uncover to finish
Weight matters more than count. Twenty-four ounces of unwrapped tamales may mean six large handmade tamales or eight to twelve smaller ones.
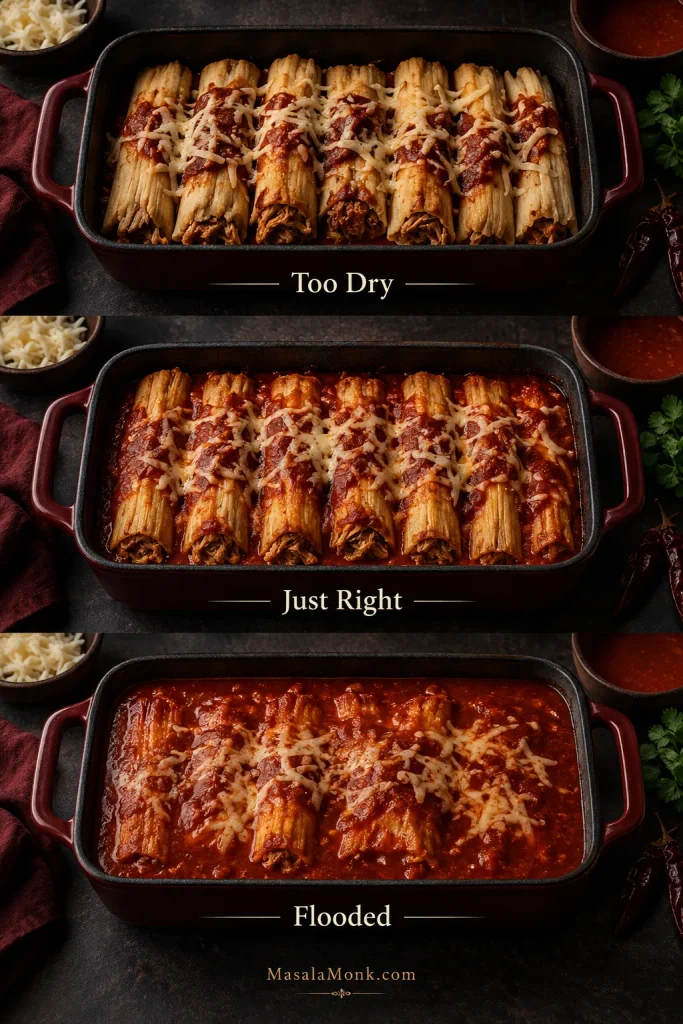
Add the first cup of sauce and look at the dish. You want a light coating over the tamales and a little sauce settling between them. Sauced, not flooded.
Use 24 oz / 680 g as the baseline, then let the tamales decide whether you need the full sauce allowance.
Easy Tamale Casserole Recipe
This base recipe assumes cool or refrigerated fully cooked tamales. Tamales that are still very cold or partly frozen will need longer under cover before the final uncovered bake.
Prep 10–15 minutes
Bake about 30–35 minutes for cool or refrigerated tamales
Rest 10 minutes
Total about 50–60 minutes
Serves 4 as a main dish, or about 6 lighter portions with sides
Ingredients
24 oz / 680 g cooked, unwrapped tamales, roughly 6 large or 8–12 smaller tamales
1 cup / 240 ml thick red or green enchilada sauce, salsa roja, or salsa verde, plus up to ¼ cup / 60 ml more if the tamales are unusually dry
6 oz / 170 g shredded cheese, roughly 1½ cups depending on the grate; Monterey Jack, cheddar, Oaxaca, or a mixture
To stretch the casserole, optional: up to 1 cup total well-drained corn and/or rinsed, drained black or pinto beans
For serving, optional: guacamole or avocado, sour cream, lime, and cilantro
Green chiles, a little onion, jalapeño, or sliced olives can join the casserole if they suit the filling. Keep those as flavor additions rather than another full cup of bulk.
Monterey Jack and Oaxaca melt especially smoothly. Cheddar brings a sharper flavor and more noticeable browning, so a Jack-cheddar blend is an easy middle ground.
Hold the extra salt for now. Tamales, enchilada sauce, cheese, beans, and chiles may already bring plenty. Taste what you’re using before seasoning the whole pan.
Equipment: a shallow ~2 qt / 1.9 L baking dish, foil or an oven-safe lid, and ideally an instant-read thermometer. With the full cup of corn or beans, a roomier ~2½ qt / 2.4 L dish may be easier to work with.
How to Make It
1. Heat the Oven
Heat a conventional oven to 350°F / 175°C. Lightly grease the baking dish if yours tends to stick.
2. Unwrap the Tamales
Remove every corn husk, paper wrapper, or other wrapping. If you’re weighing the tamales yourself, the 24 oz / 680 g refers to the cooked tamales after those wrappers are removed.
Newly steamed tamales should cool until the masa is set enough to lift without slumping apart.
3. Fit Them Into the Dish
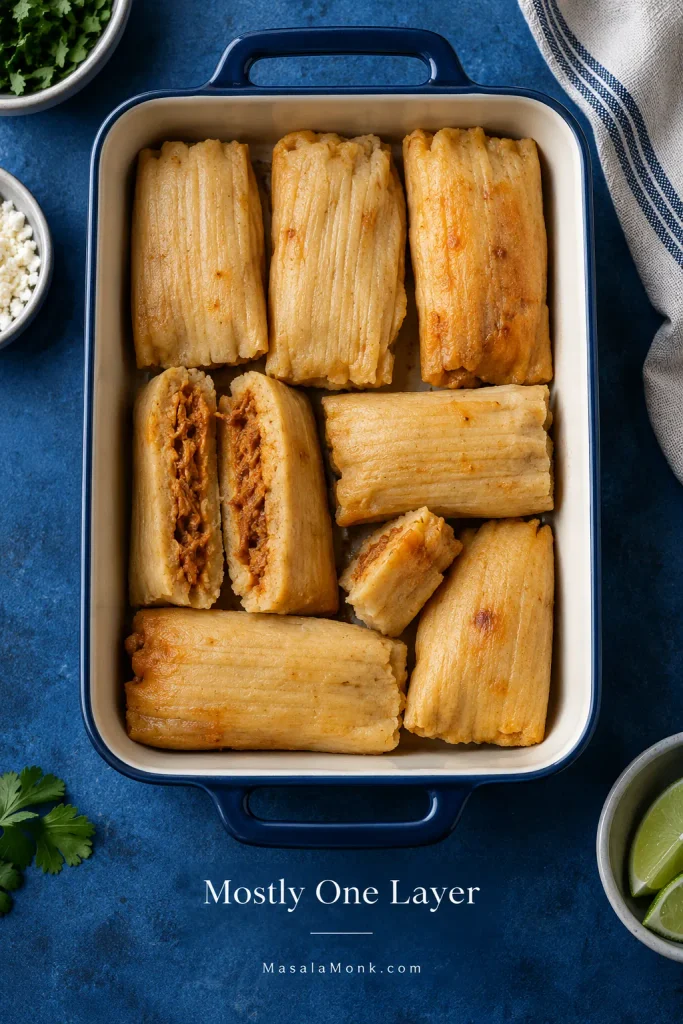
Arrange the tamales snugly, mostly in a single layer. Keep them whole when they fit. Large tamales can be halved lengthwise, and broken pieces can fill the gaps.
Don’t chase a perfectly neat arrangement. A split tamale or one lying sideways in the corner will bake just fine.
Broken pieces are fine in the gaps; a mostly single layer matters more than neat rows because stacked tamales heat less evenly.
4. Add the Sauce
Spoon 1 cup / 240 ml sauce over and around the tamales. Add any well-drained corn or beans now.
The sauce should coat the tamales without collecting in a deep pool underneath. Very dry tamales may need some or all of the extra ¼ cup / 60 ml; moist tamales may need none of it.
You should still see masa before baking. Visible ridges leave room for sauce to settle without drowning the tamales.
5. Add the Cheese
Scatter the 6 oz / 170 g cheese evenly over the pan, leaving a few tamale edges exposed so they can toast a little at the end.
Quick pan check: you should still be able to see the tamales, and moving the dish should not send a wave of sauce across the bottom.
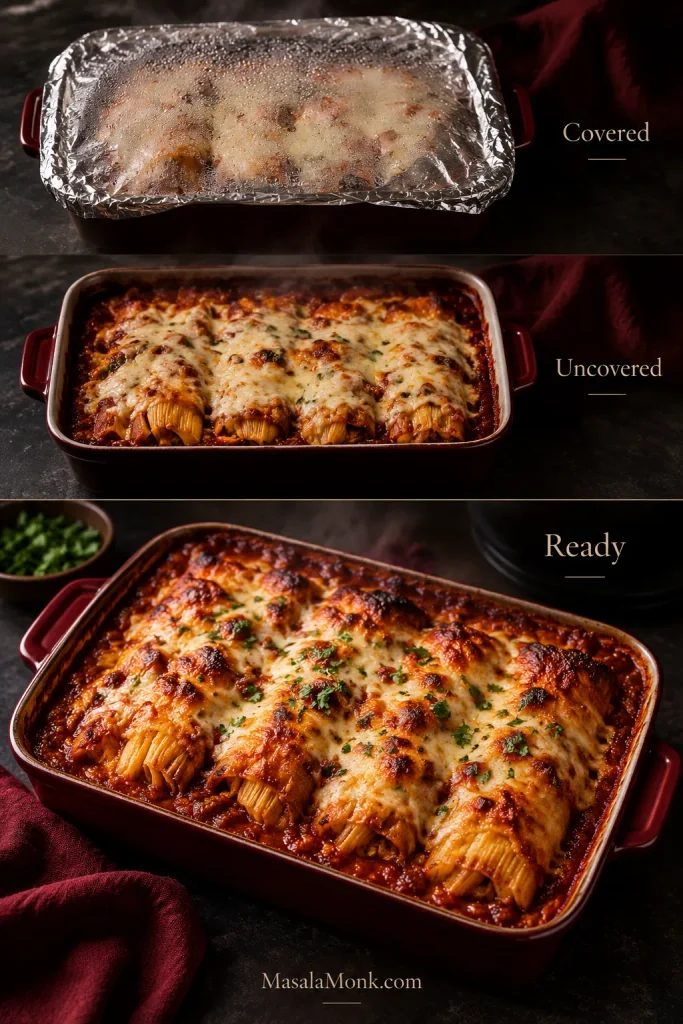
6. Cover and Bake
Cover and bake for about 20 minutes. Tent foil slightly so it does not sit heavily on the cheese; lightly grease the underside if the pan is very full.
7. Uncover and Finish
Remove the foil or lid and bake for another 10–15 minutes. The cheese should melt completely and pick up a few golden spots while exposed masa edges toast lightly.
Cover first to warm the tamales gently; uncover at the end so moisture can escape and the cheese and exposed masa can brown.
Check the temperature in the center of a tamale near the middle of the dish—not just in the hot sauce bubbling around it. It should reach 165°F / 74°C.
Check a center tamale, not the bubbling sauce. Reheated leftovers should reach 165°F / 74°C in the middle.
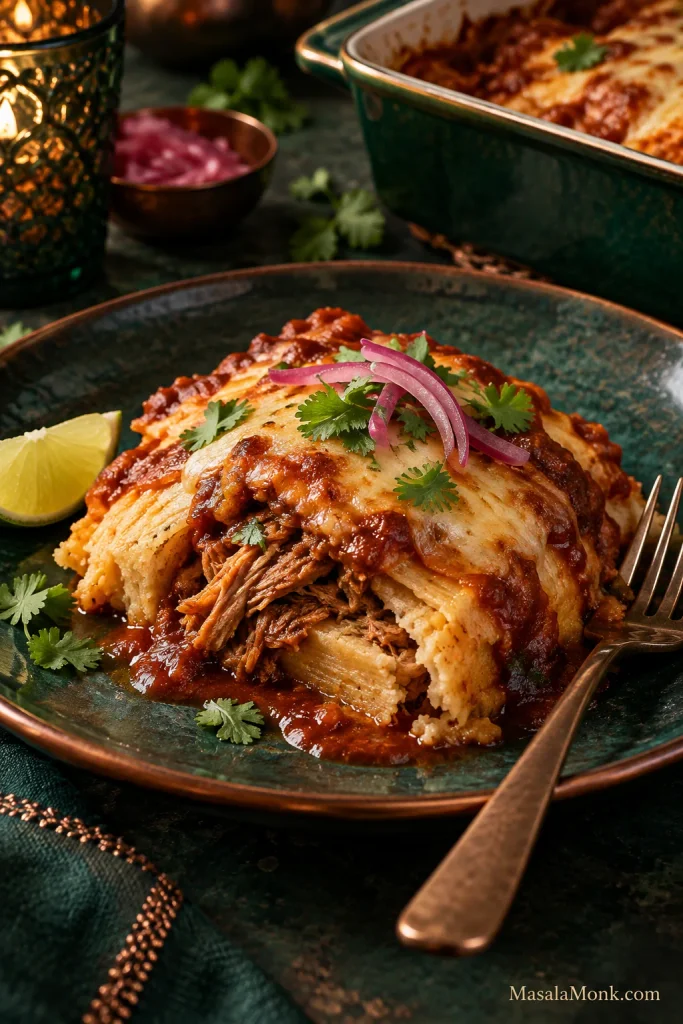
The tamales should still be easy to recognize beneath the cheese: tender masa, hot filling, and sauce gathered around them rather than swallowing them.
8. Rest for 10 Minutes
Let the casserole stand for 10 minutes. The bubbling settles and the tamales become easier to lift without pulling apart.
On the plate, you should still be able to recognize the tamale: tender masa around a hot filling, melted cheese above it, and enough sauce nearby to swipe up with each forkful.
Starting with canned tamales? Check the canned-tamale notes before using the full base amount of sauce.
Most batches only need small adjustments: a roomier pan, a little less sauce, or more covered heating time.
Weight and Pan Fit
“Six tamales” can mean very different things. Six small supermarket tamales may barely fill a pan that six generous handmade tamales completely cover. That’s why the recipe scales by cooked, unwrapped weight first and count second.
Cooked, unwrapped tamales
Sauce guide
Cheese guide
Pan
24 oz / 680 g
1 cup / 240 ml
About 6 oz / 170 g
Shallow ~2 qt / 1.9 L
36 oz / ~1 kg
Up to 1½ cups / 360 ml
About 9 oz / 255 g
Shallow 2½–3 qt / 2.4–2.8 L
48 oz / 1.36 kg
Up to 2 cups / 480 ml
About 12 oz / 340 g
9×13 in / 23×33 cm if the tamales fit mostly in one layer
The larger amounts scale directly from the base recipe, but that does not mean every drop of sauce belongs in the dish. Moist tamales, saucy fillings, canned ingredients, and wet add-ins can all justify holding some back.
Choose the next-size-up dish before you start stacking tamales. When very large tamales make the pan awkward, halving a few lengthwise is better than building a second layer.
When the batch grows, go wider before going deeper; keeping a similar depth helps larger pans heat like the base recipe.
Sauce and Moisture
Keep enough sauce nearby for the batch, but stop when the dish looks right. Before baking, tilt it slightly. A little sauce moving between the tamales is fine; a noticeable wave rushing to one side means the pan already has plenty.
Corn, beans, and chiles bring moisture of their own. Drain canned ingredients well and leave behind any puddle from thawed frozen corn.
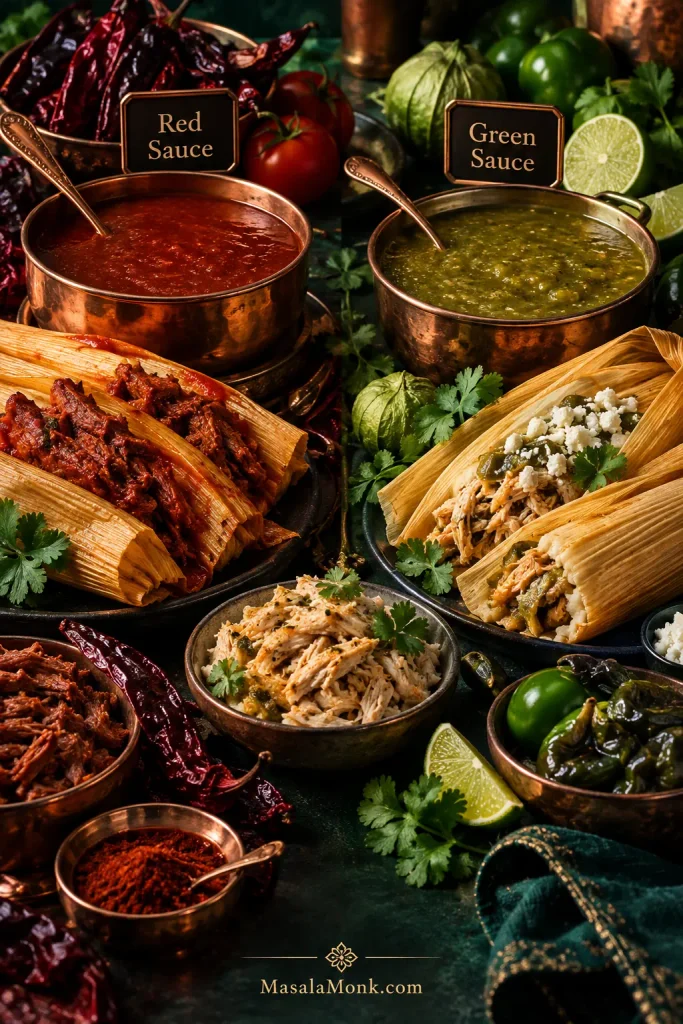
Red enchilada sauce or salsa roja gives beef and red-chile pork a deeper chile note. Salsa verde works especially well with cheese and green-chile pork, while chicken is good with either.
A thicker roasted salsa verde is particularly useful here because it clings to the tamales instead of running to the bottom of the pan.
Choose red or green by filling, then watch consistency: a thicker sauce clings to masa instead of pooling underneath.
Keep the casserole moderate when different people want different levels of heat. The pepper sauce guide can help with something hotter for the table.
If the pan is already looking too wet, dry, or uneven, skip ahead to tamale casserole troubleshooting before adding more heat or sauce.
Frozen Tamales
Yes, fully cooked frozen tamales work here. They only need to thaw enough to separate, unwrap, and arrange in the dish.
Refrigerator thawing gives the neatest handling. For a quicker route, microwave-defrost only until the tamales separate, then assemble and bake the casserole immediately.
Packages labeled uncooked—or those that tell you to steam or cook the tamales before serving—need that cooking step first.
Freezer-dried edges can take a little of the reserved sauce. A cold center simply needs more covered time before the browning stage.
Frozen tamales are ready for assembly once they separate and unwrap cleanly; the covered bake can handle the remaining chill.
Canned Tamales
Yes, canned tamales can work, but they need gentler handling and usually less added sauce. They’re delicate before they ever reach the baking dish, and the sauce packed around them changes how much more moisture the casserole needs.
Two 15–16 oz cans would give roughly 30–32 oz / about 850–910 g total canned product, including the packing sauce. The weight printed on the can includes that sauce, so do not plug it directly into the 24-ounce formula for cooked, unwrapped tamales.
Remove paper or other wrappers carefully and keep the tamales whole or in large pieces.
Add extra sauce only after the canned tamales and their packing sauce are in the dish.
Set the tamales into the dish gently. Stirring them through the other ingredients is more likely to break them apart.
Packing sauce already changes the moisture balance, so handle canned tamales gently and decide on extra sauce only after they are in the dish.
Expect a softer finished casserole than you would get from chilled husk-wrapped tamales. A side of quick refried beans from a can can make the meal more substantial without making the casserole itself heavier or wetter.
Want to Stretch the Casserole?
For the 24-ounce base casserole, ½ cup well-drained corn + ½ cup rinsed, drained black or pinto beans is about the most extra bulk worth adding if you still want the tamales to remain the point of the dish.
A 9×13-inch / 23×33 cm dish works for many batches around 48 oz / 1.36 kg, provided the tamales still fit mostly in one layer. Once they start piling up, use a second shallow dish instead.
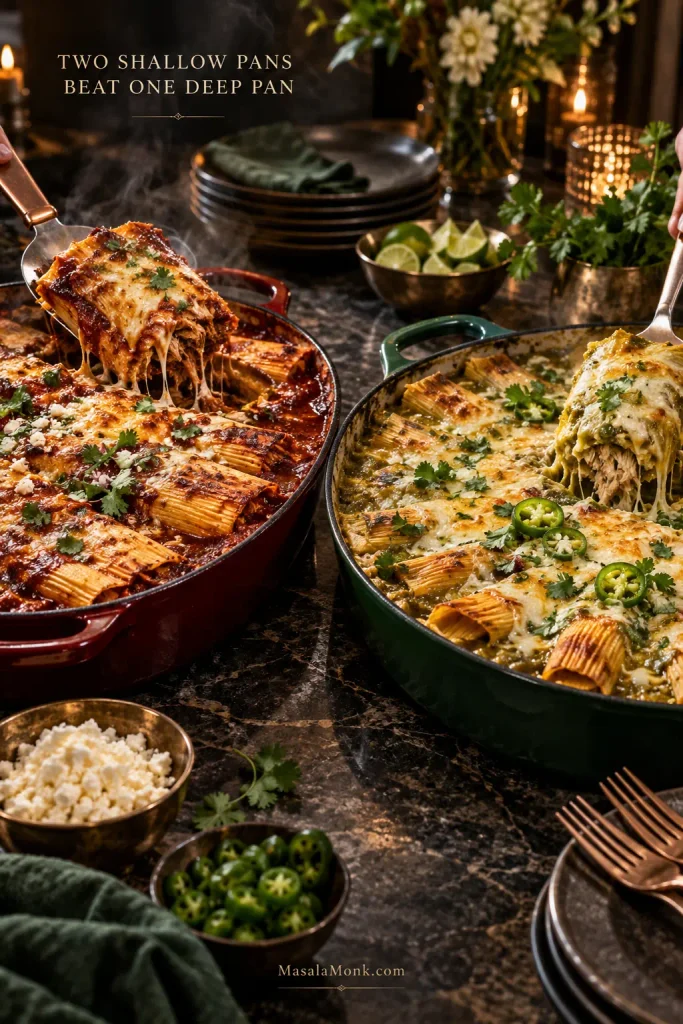
Two pans also make it easy to serve different tastes: one red and one green, or a meat-filled batch alongside a cheese version.
Two shallow pans heat more predictably than one deep pan and make it easy to keep red, green, meat and cheese versions separate.
What to Serve With Tamale Casserole
The casserole already brings warm masa, melted cheese, chile sauce, and plenty of soft texture. Something fresh or crisp alongside keeps the plate from feeling heavy.
For freshness, try lime wedges, pico de gallo, pickled red onions, cilantro, jalapeños, shredded cabbage with lime, or a simple green salad. A spoonful of fresh guacamole is especially good with red chile and browned cheese.
For a more substantial meal, serve refried beans, black beans, or plain rice alongside rather than loading more into the baking dish.
Use fresh, acidic sides to cut richness; choose rice or beans when the meal needs more substance instead.
Tamale Casserole Troubleshooting: What Happened to My Tamales?
If something went sideways, start with the pan: how wet it is, how deeply the tamales are stacked, and how delicate they were before baking.
Texture and Heating Problems
What happened
Likely reason
What helps
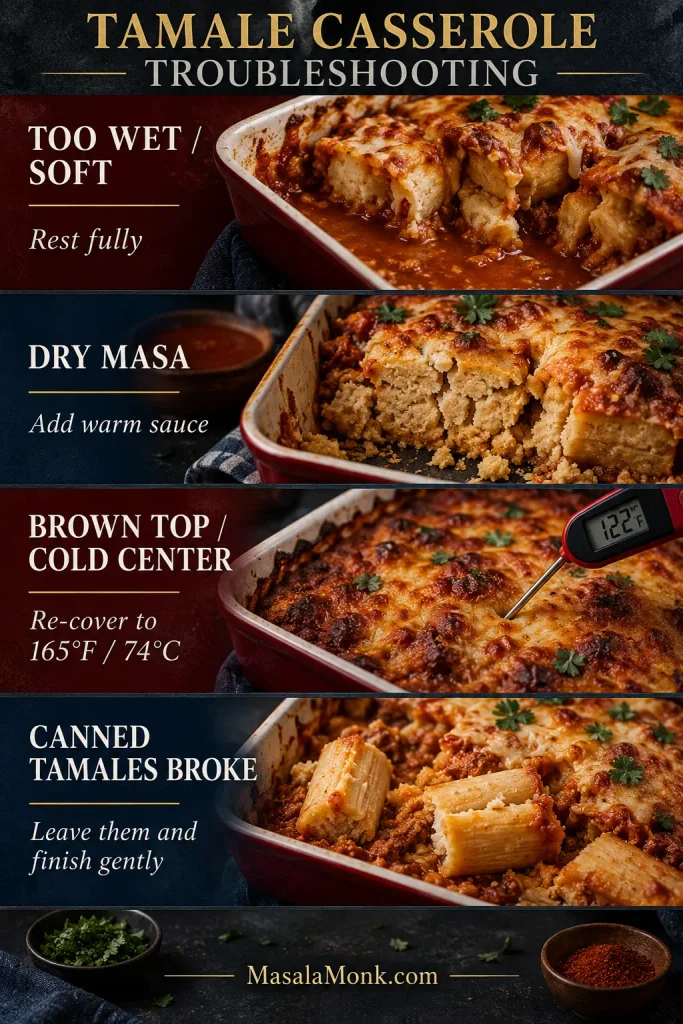
Tamales turned very soft
Too much free liquid or a long wet bake
Now: Let the casserole rest fully before serving. Next time: Use less sauce and drain add-ins more thoroughly.
Sauce is pooling underneath
Extra sauce or water from beans, vegetables, or frozen ingredients
Now: Give the casserole a few more uncovered minutes, then rest it. Next time: Hold some sauce back or drain the add-ins better.
Masa is dry and crumbly
Freezer drying or too much uncovered heat
Now: Spoon a little warm sauce or salsa over the serving. Next time: Keep the first phase covered longer or use a little more sauce.
Cheese is browned but the middle is cold
Very cold tamales or a deep, crowded pan
Now: Re-cover the casserole and keep heating until a center tamale reaches 165°F / 74°C. Next time: Use a shallower dish or allow more covered time.
Diagnose the texture before adding more heat: the fix for a cold center can make dry masa or a wet bottom worse.
Handling and Flavor Problems
What happened
Likely reason
What helps
Tamales broke while assembling
Fresh masa had not set enough to handle cleanly
Now: Tuck the pieces into the gaps and keep going. Next time: Let a freshly cooked batch cool longer.
Canned tamales fell apart
Delicate tamales plus excess handling or liquid
Now: Leave the pieces where they are and finish the casserole. Next time: Move them less and check the packing sauce before adding more liquid.
Casserole tastes flat
Mild filling paired with mild sauce
Now: Finish with lime, salsa, hot sauce, cilantro, or pickled jalapeños. Next time: Season the sauce with garlic, cumin, or extra chile before baking.
Everything tastes too salty
Salt accumulated from tamales, sauce, cheese, and canned ingredients
Now: Serve smaller portions with unsalted beans, avocado, cabbage, sour cream, or plain rice. Next time: Taste the components before adding extra salt, cheese, or salty sauce.
A hot casserole that is simply a little loose may only need a few more uncovered minutes followed by the full 10-minute rest. Baking indefinitely will eventually dry the exposed masa while the bottom stays soft.
You can assemble the casserole the night before. If firmer masa matters, wait to add the sauce until closer to baking. If convenience matters most, refrigerate the whole assembled dish and expect slightly softer tamales the next day.
Refrigerating and Freezing
Cooked leftovers are generally kept refrigerated for 3–4 days. This casserole, however, may begin with tamales that have already spent time in the refrigerator.
Keep their original cooking and storage date in mind instead of treating the casserole as a brand-new 3–4-day window. Freeze portions if you will not finish them promptly.
USDA FSIS recommends reheating leftovers to 165°F / 74°C and using frozen leftovers within about 3–4 months for best quality. Its leftovers and food-safety guidance also covers safe cooling, thawing, and reheating.
Wrap frozen portions well so exposed masa does not dry out in the freezer.
Reheating
Cover larger portions and reheat at 350°F / 175°C until the center reaches 165°F / 74°C. Keeping the dish covered for most of the reheat helps the masa stay soft; uncover briefly at the end if you want the top to pick up some color again.
For one serving, microwave it covered in shorter intervals, rotating the plate if your microwave heats unevenly, until the center reaches 165°F / 74°C.
What About Tamale Pie?
This casserole starts with cooked tamales. Tamale pie usually starts with seasoned meat, beans, or chile and adds a cornbread, cornmeal, polenta, or masa layer. The names overlap, but they solve different dinner problems.
If what you want next is another saucy baked dinner without individual rolling, a chicken enchilada casserole is a natural next stop.
By the time the cheese has browned and the exposed masa edges have toasted, the tamales you were tired of reheating have become a very different dinner.
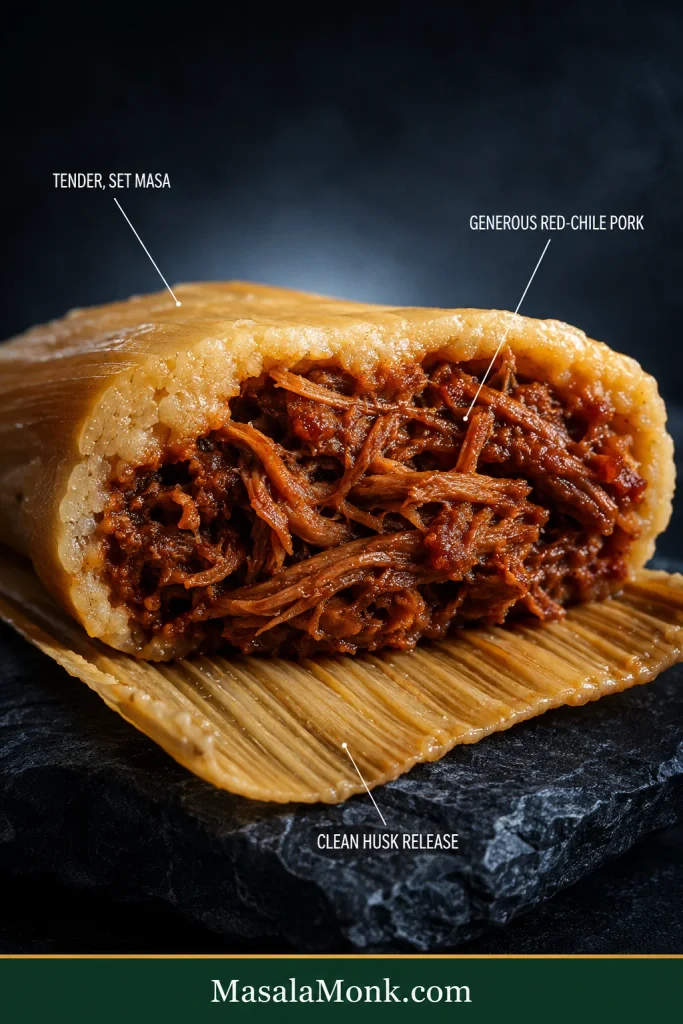
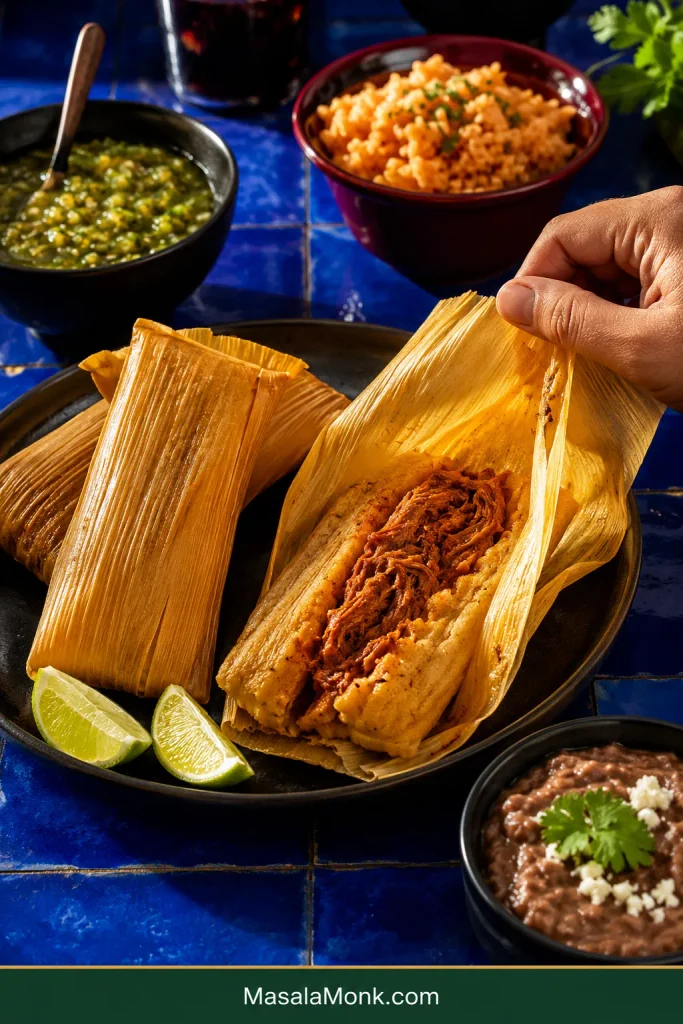
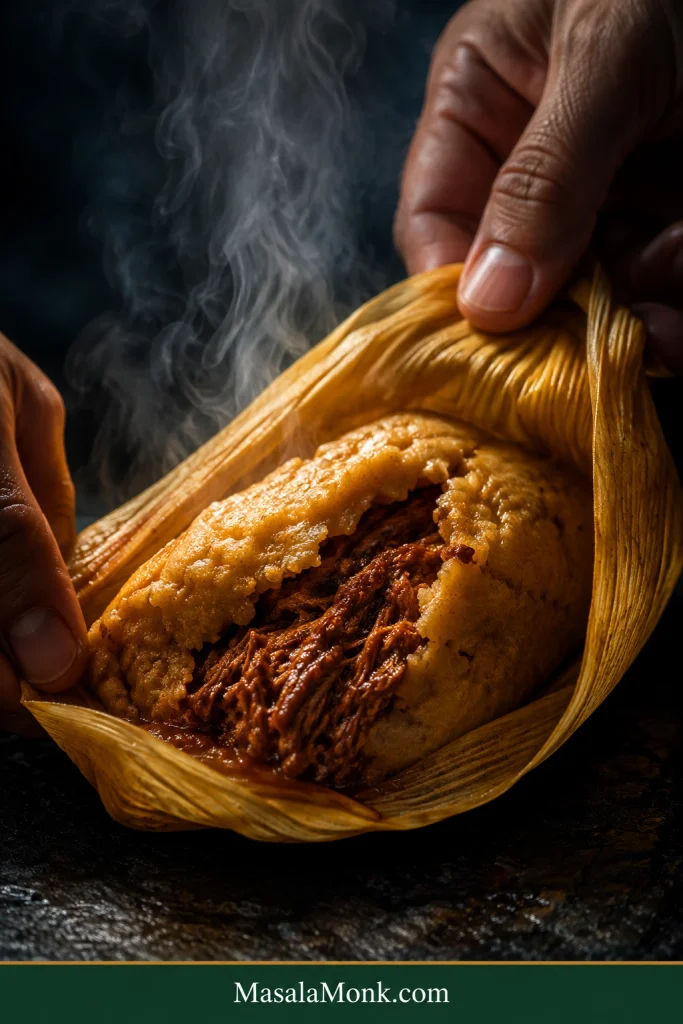
Peel back a good pork tamale and the husk releases from tender, savory masa with a line of juicy red-chile pork running through the center. The masa is soft but set, the filling is generous, and both taste seasoned enough to matter.
A consistent masa ring around a continuous pork center is a better portion check than perfectly straight edges.
Tamales are not intimidating because any one step is unusually difficult. The challenge is that the pork, chile sauce, masa, husks, and steam all have their own version of right — and on a first batch, those cues may not be obvious yet.
If tamales are new to you, that is what the checkpoints below are for. A crooked spread, an awkward husk, or a loose fold does not mean starting over; most small assembly problems are easy to fix as you go.
Quick Answer: How Do You Make Mexican Pork Tamales?
Cook pork shoulder until it pulls apart easily and save the broth. Make a guajillo-ancho red chile sauce, reserve ¼ cup / 60 ml for the masa, then start with 1 cup / 240 ml of the remaining sauce in the shredded pork. Reduce until the filling is glossy and thick enough to mound without watery sauce pooling around it.
Whip lard and mix it with masa harina, baking powder, salt, warm pork broth, and the reserved chile sauce. Use 40 g prepared masa + 30 g pork filling per medium tamale, fold inside softened corn husks, and steam upright. Start timing once steady steam is established, begin checking at 70 minutes, and rest a tester before deciding whether it needs more time.
Mexican Pork Tamales With Red Chile — Recipe Card
Red chile pork tamales with tender, broth-seasoned masa and a generous pork center. The guajillo-ancho filling is rich, savory, and gently warming, with optional chile de árbol when you want more heat.
Yield
24 medium tamales; a little extra filling is possible
Serves
8–12 with sides
Heat
Generally mild to medium; add 1–2 chiles de árbol for more heat
Active work
Roughly 2–3 hours, depending largely on wrapping speed
Elapsed time
About 5½–6½ hours, much of it hands-off
Lowest-stress workflow
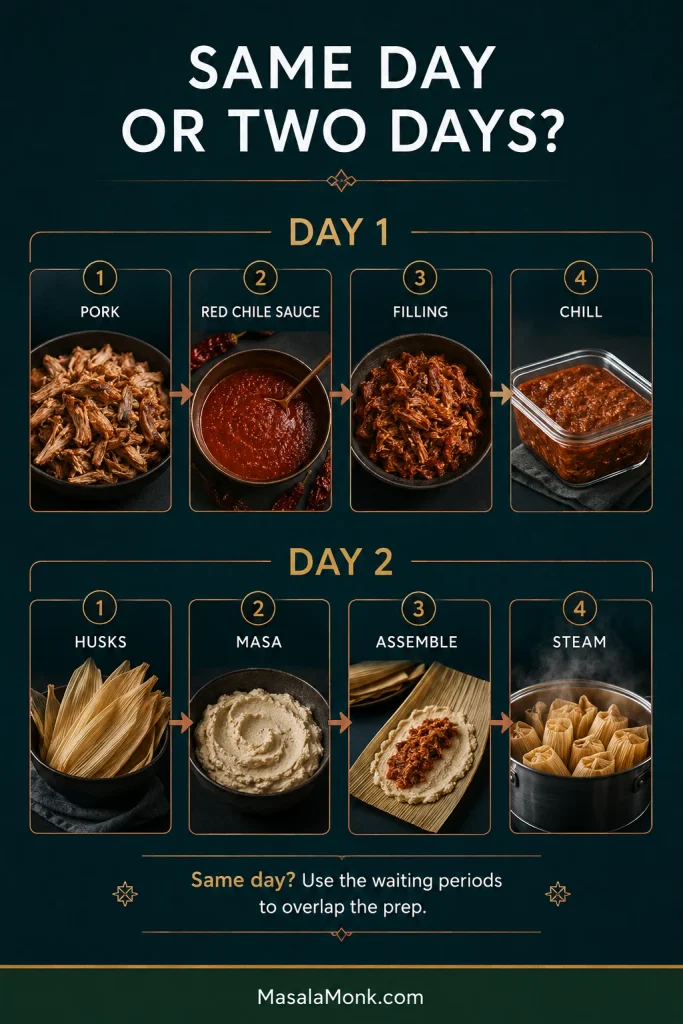
Make the filling on Day 1; assemble and steam on Day 2
Per tamale
40 g prepared masa + 30 g pork filling
Final rest
10–15 minutes
Ingredients
For the Pork
2 lb / 900 g boneless pork shoulder or pork butt, cut into 2–3 inch / 5–7 cm chunks
½ medium white onion
4 garlic cloves, lightly crushed
1 bay leaf
1½ teaspoons fine sea salt, about 8–9 g
About 6 cups / 1.4 L water to start, plus more hot water as needed
For the Red Chile Sauce
45 g dried guajillo chiles, about 8
35 g dried ancho chiles, about 3
1–2 dried chiles de árbol, optional
2 garlic cloves
1 teaspoon ground cumin
1 teaspoon Mexican oregano
2 cups / 475 ml reserved pork broth
1 tablespoon / 15 g lard or 1 tablespoon / 15 ml neutral oil
Fine sea salt to taste
For the Masa
3 cups / 360 g masa harina for tamales
6 oz / 170 g lard, softened but not melted
1½ teaspoons / about 6 g baking powder — not baking soda
1 teaspoon fine sea salt, about 5–6 g; reduce if your broth is already salty
1¾ cups / 415 ml comfortably warm pork broth
¼ cup / 60 ml red chile sauce
Up to ¼ cup / 60 ml additional warm broth, only as needed
For Assembly
30–32 dried corn husks, enough for 24 good wrappers plus extras
Instructions
Pork, Chiles & Filling
Cook the pork. Combine the pork chunks, onion, 4 garlic cloves, bay leaf, salt, and about 6 cups / 1.4 L water. Simmer gently for 2–2½ hours, adding hot water as needed to keep the pork mostly submerged, until it shreds easily. Strain and reserve at least 4 cups / 950 ml broth, preferably a little more.
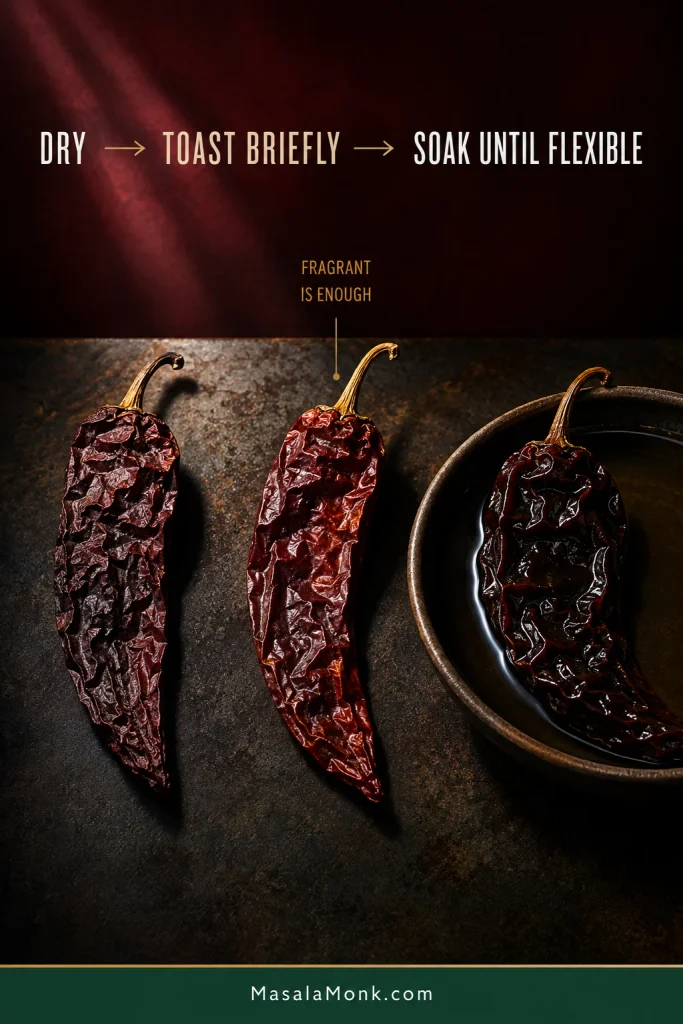
Prepare the chiles. Stem and seed the guajillo and ancho chiles; stem the optional árbol chile. Toast the guajillo and ancho briefly until fragrant, adding the árbol only for the final few seconds. Soak all the chiles in very hot water for 20–30 minutes, then drain.
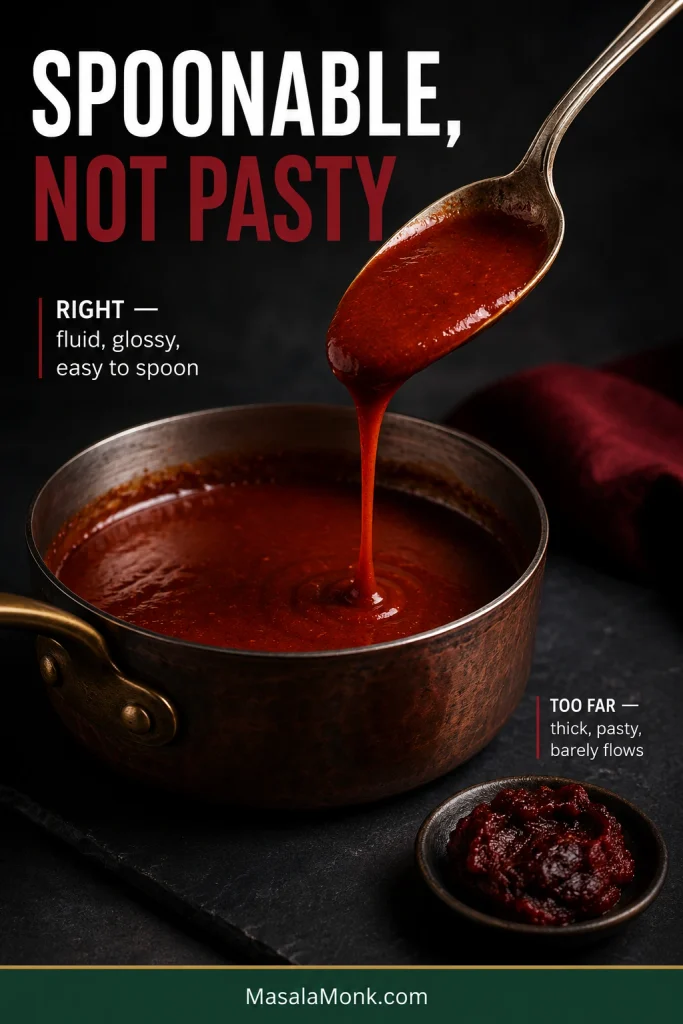
Make the sauce. Blend the softened chiles with 2 garlic cloves, cumin, oregano, and 2 cups / 475 ml pork broth. Strain. Heat 1 tablespoon lard or oil and carefully add the sauce. Simmer for 10–15 minutes until the raw chile aroma softens and the sauce remains smooth, fluid, and easy to spoon. Season with salt and reserve ¼ cup / 60 ml for the masa.
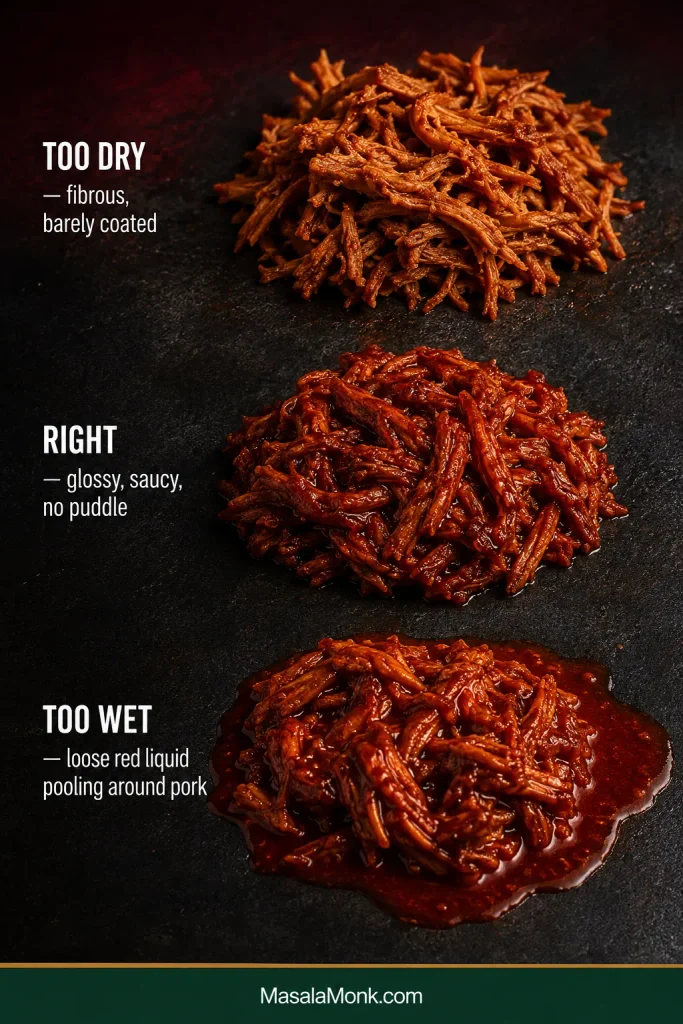
Finish the filling. Shred the pork, discarding any large pieces of fat. Stir in 1 cup / 240 ml of the remaining chile sauce. Simmer until glossy and thick, adding more sauce a few spoonfuls at a time if needed. Stop when a spoonful forms a soft mound without loose red liquid pooling around it. Set aside to cool.
Husks, Masa & Taste Test
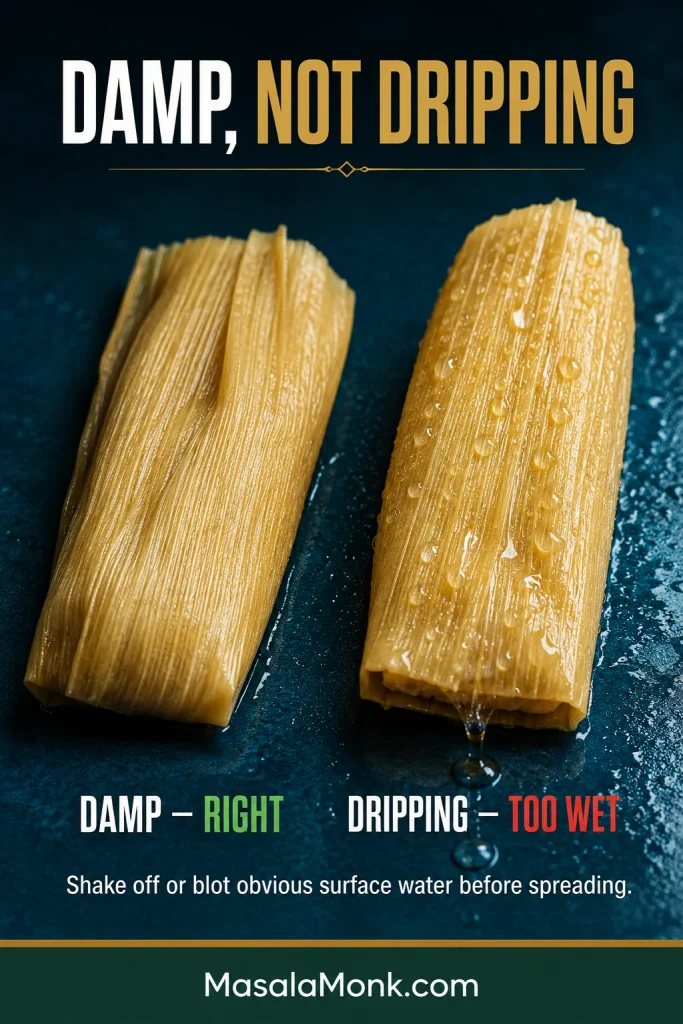
Prepare the husks. Rinse and sort 30–32 husks. Soak in very hot water for 30–60 minutes until pliable, then drain until flexible and damp, not dripping.
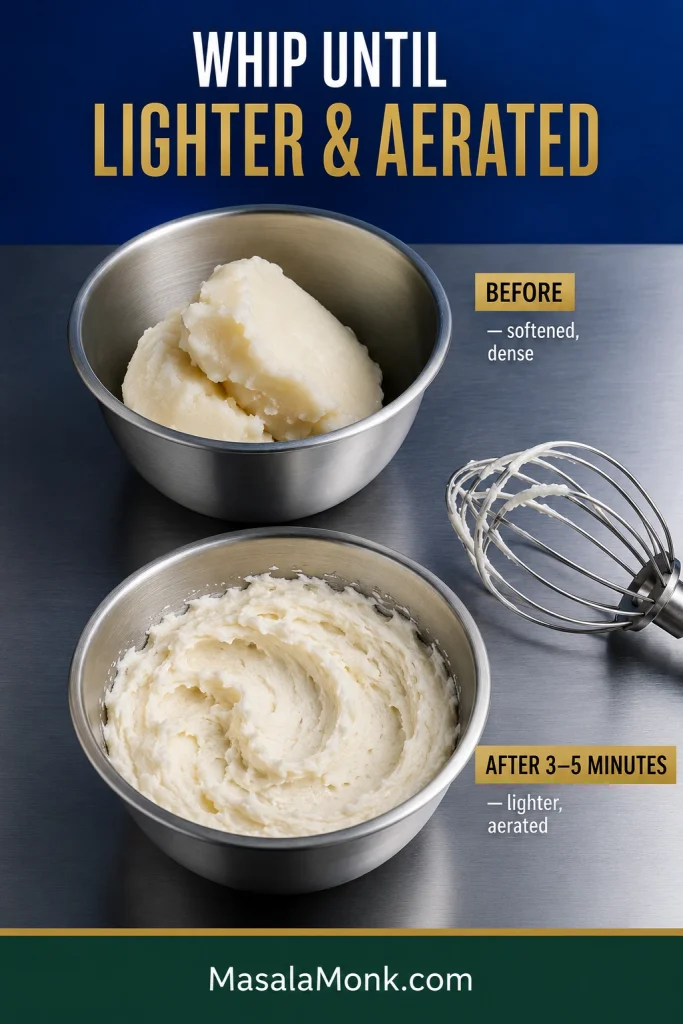
Make the masa. Beat the lard for 3–5 minutes until lighter and aerated. Whisk masa harina, baking powder, and salt separately, then add to the lard while gradually mixing in 1¾ cups / 415 ml warm broth and ¼ cup / 60 ml reserved chile sauce. Beat until creamy and easy to spread. Add extra broth 1 tablespoon / 15 ml at a time only if needed. Keep covered during assembly.
Taste the masa. Flatten a small spoonful into a thin patty and microwave in short intervals until completely set. Taste and adjust the salt before assembling the full batch.
Portion, Fill & Fold
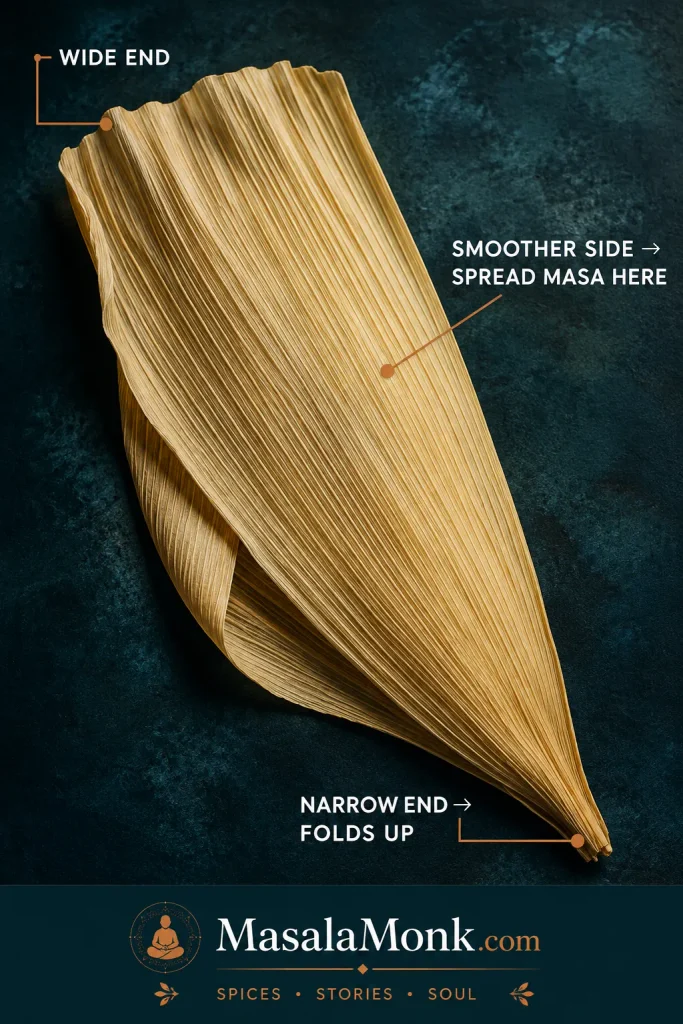
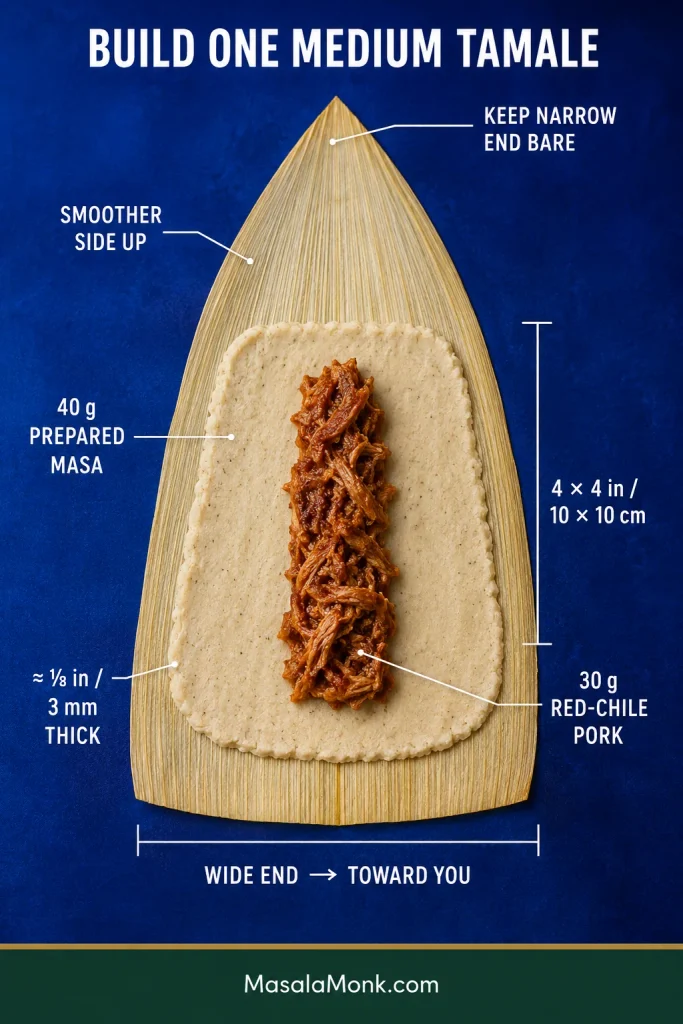
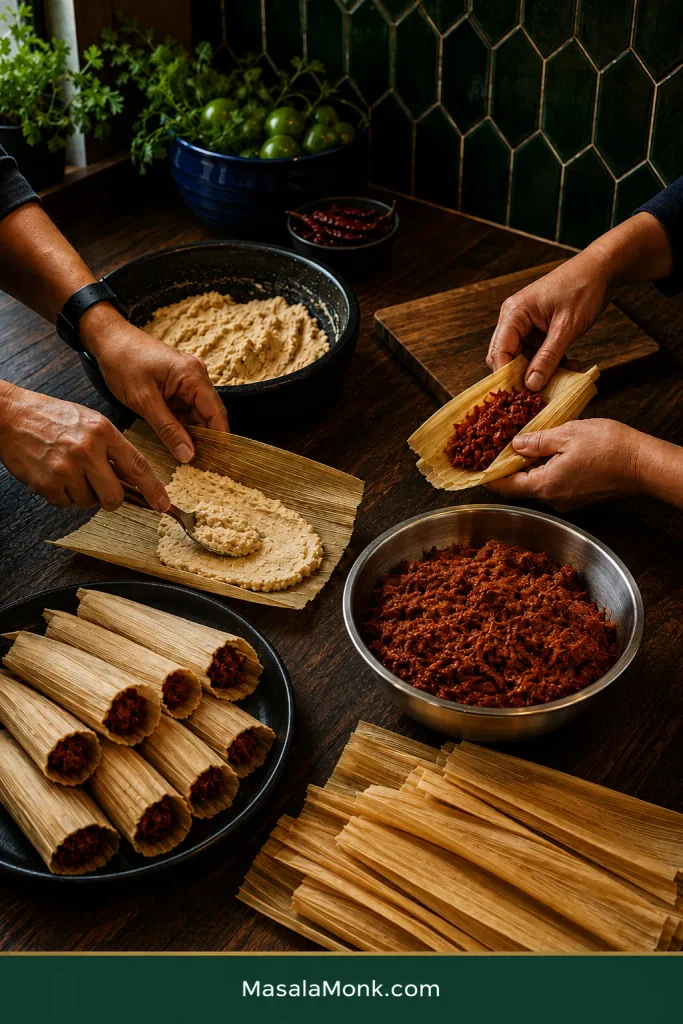
Portion and fill. Lay a husk smooth-side up with the wide end toward you. Spread 40 g masa into a roughly 4-inch / 10 cm square over the broad half, leaving the narrow end bare. Add 30 g pork filling in a line through the center.
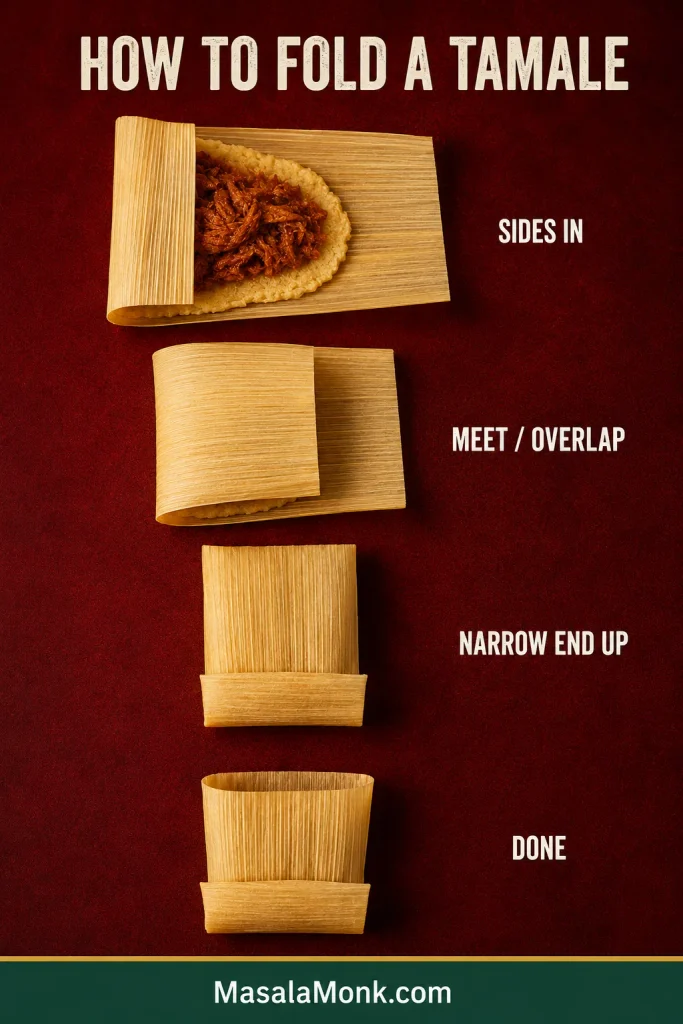
Fold. Fold the long sides around the filling, then fold the bare narrow end upward. Leave the wide end open.
Steam & Finish
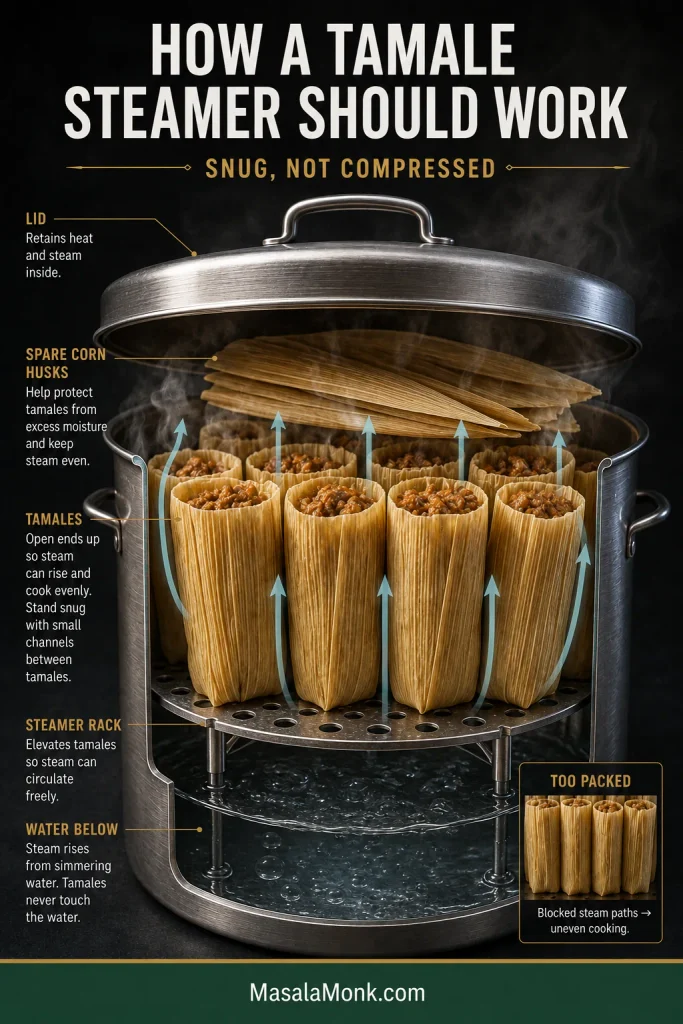
Load the steamer. Keep the water surface below the rack. Stand the tamales upright with open ends up, snug enough to support one another while leaving paths for steam. Cover the top with spare husks and close the lid.
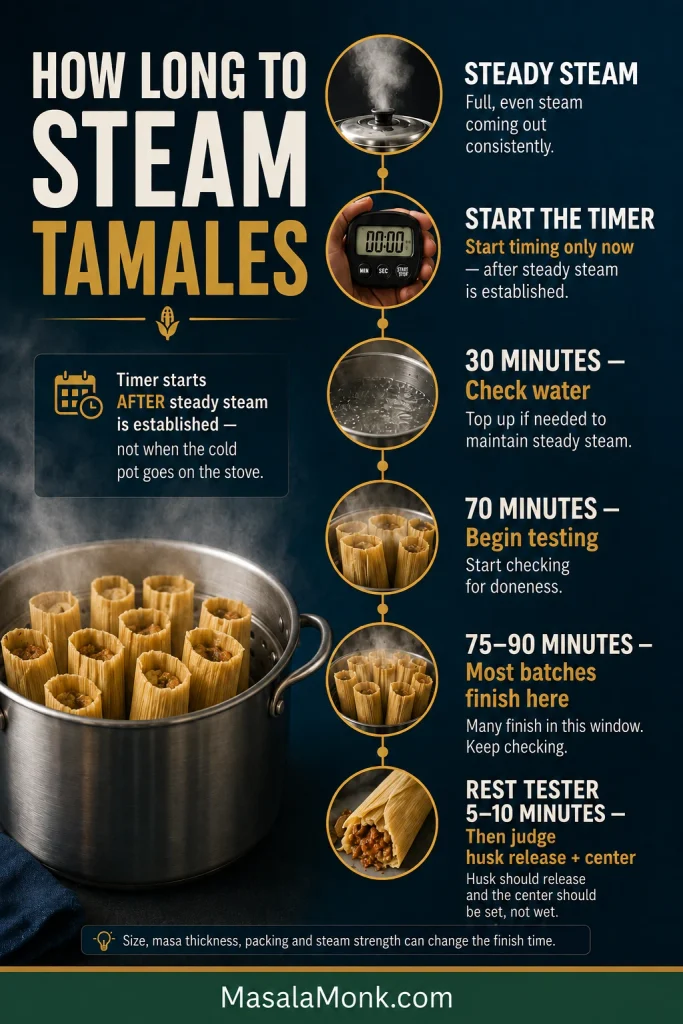
Steam. Bring the pot to steady steam, then start the timer. Check the water after 30 minutes. Begin testing at 70 minutes; most batches finish in 75–90 minutes.
Test. Remove one tamale and rest it for 5–10 minutes. It is ready when the husk peels away mostly cleanly and the masa holds its shape with a tender, fully set center. Wet or pasty masa needs another 10–15 minutes of steam before retesting.
Rest and serve. Let the finished batch sit for 10–15 minutes before serving. Discard the corn husks before eating.
Making these for the first time? The recipe card tells you what to do. The detailed guide below shows you how to tell when each stage is right — from pork that is ready to shred to masa that spreads easily and a tamale that is actually finished steaming.
Tamales vary enormously across Mexico, and regions and families have their own preferred fillings, wrappers, masa textures, and folding styles. Here, we are making corn-husk red chile pork tamales — tamales rojos de puerco — with a relatively thin layer of tender masa and a generous pork center.
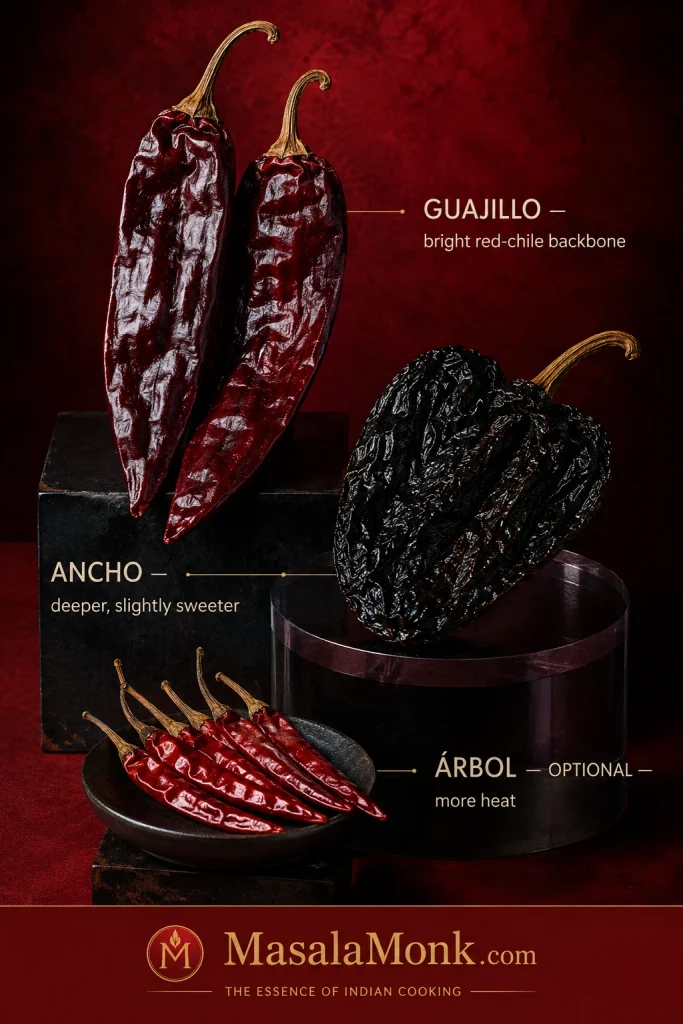
The flavor is chile-rich without being fiercely hot. Guajillo supplies the brighter dried-chile backbone while ancho brings darker, slightly sweeter depth. Some of that red chile sauce goes into the masa too, so the wrapper carries the same savory chile character as the filling.
Think of the work in two halves. First, cook the pork and turn it into a thick red-chile filling. Then soften the husks, make the masa, and settle into the repetitive part: spread, fill, fold, steam.
The pork broth connects both halves. It seasons the chile sauce and the masa, so save it when the pork is done.
The Lowest-Stress Plan
Make the pork and red chile filling on Day 1. Transfer it to a shallow container and refrigerate promptly. On Day 2, soak the husks, mix the masa, assemble, steam, and serve.
Splitting the work across two days reduces the amount of hands-on assembly you have to juggle at once.
A same-day batch is completely possible. As the pork cooks, clean the chiles and sort the husks. During that cooling window, finish the sauce. Once the filling is cooling, make the masa. When the filling is finished, the longest cooking job is already behind you.
Ingredient Notes & Equipment
Pork Shoulder
Pork shoulder, pork butt, and Boston butt all refer to well-marbled shoulder meat. It has enough connective tissue and fat to stay juicy through the long simmer and become easy to shred once fully tender.
Boneless pork keeps the recipe weight predictable. Bone-in shoulder works too, but buy extra to account for the bone.
Guajillo and Ancho Chiles
Guajillo gives the sauce its brighter red-chile backbone; ancho contributes darker, slightly sweeter depth. Neither is especially fierce. The optional chile de árbol is what moves the filling noticeably hotter.
Chile sizes vary considerably, which is why the recipe gives gram weights as well as approximate counts.
The distinct shapes also help at the market: guajillo is long, ancho is broad and wrinkled, and chile de árbol is small and slender.
If dried chiles are unfamiliar territory, the guajillo section in our pepper sauce guide goes deeper into how dried peppers soften, blend, and simmer.
Masa Harina for Tamales
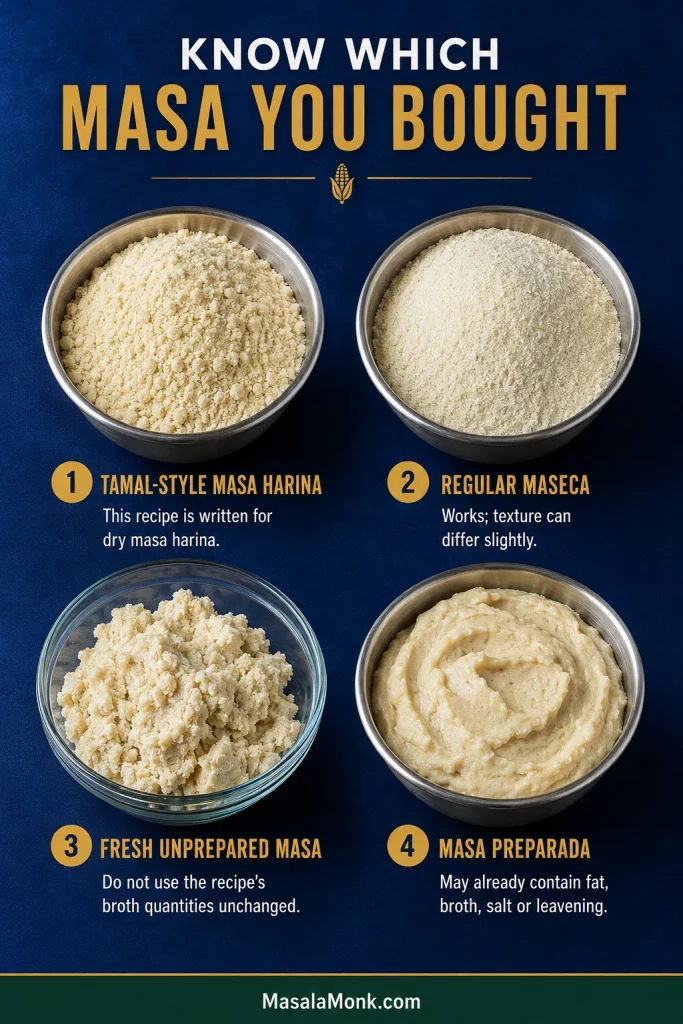
Use masa harina made from nixtamalized corn — the treated corn used to make traditional masa. Maseca Tamal is one common option, but other masa harina intended for tamales can work too. Ordinary cornmeal and polenta are different products and will not behave the same way here.
Can You Use Regular Maseca for Tamales?
Yes. If regular Maseca is what you have, you can still make tamales with it. The finished texture may be slightly different from a coarser tamal-specific masa harina, but it can still produce a good batch.
Buying fresh masa? This recipe’s quantities are written for dry masa harina. Fresh unprepared masa already contains water, so do not apply the broth quantities here unchanged. Masa preparada para tamales may already contain fat, salt, broth, or leavening, so check what you bought before adding anything else.
Before measuring broth, read the label: prepared masa may already contain fat, broth, salt or leavening.
Lard gives this version richness and tenderness. Other fats behave differently, so use a masa formula written for your chosen oil or shortening if you want to replace it.
Corn Husks
Bags of dried corn husks are naturally uneven: wide, narrow, torn, thick, thin, and occasionally awkward. That is why the recipe soaks more husks than the final yield requires. The extras give you good wrappers for the tamales and smaller clean pieces for patching, lining the steamer, or tying a stubborn fold.
For wrapping, flexibility and a broad usable spreading area matter more than a perfectly shaped husk.
Equipment
Large Dutch oven or heavy pot
Blender
Fine-mesh strainer
Large mixing bowl
Hand mixer or stand mixer
Large bowl or pot for soaking husks
Tamale steamer (tamalera), or stockpot with a steamer insert
Small offset spatula, butter knife, or spoon for spreading
Kitchen scale, especially useful while learning the portions
Instant-read thermometer, optional
You do not need a dedicated tamalera. What matters is keeping the tamales above the water inside a covered pot while leaving enough open space for steam to circulate.
No mixer? A sturdy spoon or whisk and some vigorous beating can work; a mixer simply makes aerating the lard easier.
How to Make Pork Tamales With Red Chile
Step 1: Cook the Pork Until It Shreds Easily
Put the pork, onion, crushed garlic, bay leaf, and salt in a large heavy pot. Add about 6 cups / 1.4 L water, or enough to comfortably cover the meat.
Bring to a boil, skim away any heavy foam, then lower the heat to a gentle simmer. Partially cover and cook for 2 to 2½ hours.
Check the pot occasionally and add hot water as needed to keep the pork mostly submerged. Finish with at least 4 cups / 950 ml strained broth, preferably a little more, so there is enough for the sauce, masa, and final texture adjustment.
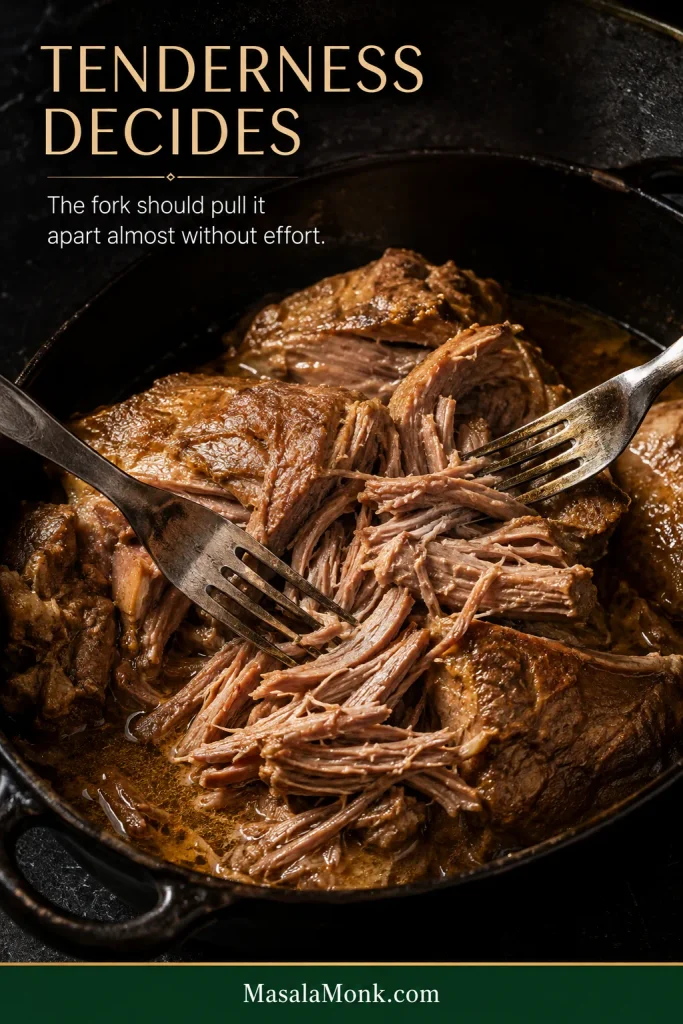
By the end, the pork should pull apart almost without effort. Shoulder often reaches roughly 190–200°F / 88–93°C by the time its connective tissue has softened enough for easy shredding, but there is no prize for hitting an exact number.
Tenderness decides. Meat that still fights the fork needs more time.
Shorter pork strands distribute more evenly through the filling and are easier to portion into consistent 30 g servings.
Save the broth. Strain the cooking liquid and set aside 2 cups / 475 ml for the chile sauce, 1¾ cups / 415 ml for the masa, and at least another ¼ cup / 60 ml for adjustments. If you come up short, make up the difference with unsalted chicken broth or hot water.
Taste the reserved broth before seasoning the sauce or masa, because a concentrated broth can already carry substantial salt.
Let the pork cool until it is comfortable to handle. While it cools, turn to the chiles.
Step 2: Make the Red Chile Sauce
Wipe the dried chiles clean. Remove the stems from the guajillo and ancho, split them open, and shake out most of the seeds. Stem the optional árbol chile too.
Heat a dry skillet over medium to medium-low. Toast the guajillo and ancho very briefly, turning them, until they smell warm and distinctly chile-like and become slightly more flexible. Add the árbol chile only for the final few seconds because its thin skin scorches quickly.
Fragrant is enough. That aroma is your cue to stop. A chile that turns black and smells burned is better replaced than carried into the sauce.
Transfer all the toasted chiles to a bowl, cover with very hot water, and weight them down with a small plate if needed. They are ready when they bend easily without cracking, usually after 20–30 minutes. Drain.
Brief dry heat develops aroma; soaking restores flexibility, while thin chile de árbol needs much less skillet time than guajillo or ancho.
Blend the softened chiles with the 2 garlic cloves, cumin, oregano, and 2 cups / 475 ml reserved pork broth until as smooth as possible.
Push the purée through a fine-mesh strainer. A powerful blender may leave it nearly silky already, but straining removes stubborn pieces of dried chile skin that can make the finished sauce feel gritty.
Heat 1 tablespoon lard or oil in a saucepan over medium heat. Carefully pour in the strained sauce; it can splatter when it meets the hot fat. Simmer, stirring regularly, for 10–15 minutes. The sharp, almost dusty smell of the soaked chiles gives way to something deeper and rounder as the sauce darkens slightly.
The finished sauce should remain fluid and easy to spoon, not reduced into a paste. Season with salt, then reserve ¼ cup / 60 ml for the masa.
Stopping while the sauce still flows gives you room to tighten the pork filling without making it dry or paste-like.
Step 3: Finish the Red Chile Pork Filling
Shred the pork into small strands, discarding any large pieces of fat.
Stir 1 cup / 240 ml of the remaining chile sauce into the pork to start. Simmer gently until the sauce settles around the meat. Add more a few spoonfuls at a time when the pork needs it.
Chile size, straining loss, sauce reduction, and cooked pork yield all vary slightly. Stop at the right texture; you may not need every drop of sauce.
The Filling Test
Too dry: the meat looks fibrous and there is barely enough sauce to coat the strands.
Right: every shred looks glossy and saucy, and a spoonful forms a soft mound.
Too wet: red liquid runs away from the pork and pools around a spoonful.
The Filling Test
If red liquid runs away from the pork when you tilt the spoon, the filling needs more reduction before assembly.
For 24 tamales, you will use 720 g / 1.6 lb filling. You do not need to weigh the whole pan; portioning 30 g into the first few wrappers will show you whether you are on track.
Taste a forkful before setting the filling aside. It should already be satisfying on its own: savory pork first, followed by warm dried-chile flavor. Adjust the salt now.
Extra pork or sauce is fine. Save it for tacos, eggs, rice bowls, quesadillas, or another meal. There is no benefit in squeezing it into already well-filled tamales.
Set the filling aside to cool. The longest cooking job is now done. While it cools, get the husks ready.
Step 4: Rinse, Sort, Soak and Drain the Corn Husks
Give the husks a quick rinse to remove loose dust or corn silk, then sort them before soaking. Put the widest, least damaged pieces in your wrapping pile and save smaller clean pieces for overlapping, patching, ties, and lining the steamer.
Soak 30–32 husks in very hot water, using a plate or smaller bowl to keep them submerged. Begin checking after 30 minutes; some bags need closer to an hour. A ready husk bends and folds easily without cracking.
Shake off the water and let the husks drain upright or pat away obvious droplets. Damp husks stay flexible; dripping-wet ones can make the masa slide as you spread it.
If good masa suddenly skates across the wrapper, check the husk for surface water before changing the dough.
Overlap two small husks when necessary, patch a torn wrapper with another piece, save narrow clean pieces for ties or the steamer, and discard anything musty or moldy. One unusually difficult wrapper may simply be a thick or stubborn husk.
Step 5: Make the Masa
Beat the softened lard with a hand mixer or stand mixer for 3–5 minutes, until it looks lighter and visibly aerated.
Look for a lighter, expanded texture with soft ridges rather than chasing one particular shade of white.
In another bowl, whisk together the masa harina, baking powder, and salt.
With the mixer running on low, add the dry mixture to the whipped lard in several additions. Gradually mix in the 1¾ cups / 415 ml pork broth, followed by the reserved ¼ cup / 60 ml red chile sauce. Use comfortably warm broth; steaming-hot liquid can soften the whipped lard too much.
Beat until evenly mixed. Hold back the final ¼ cup / 60 ml broth until you have checked the texture; different masa harina absorbs liquid at different rates.
The Masa Test
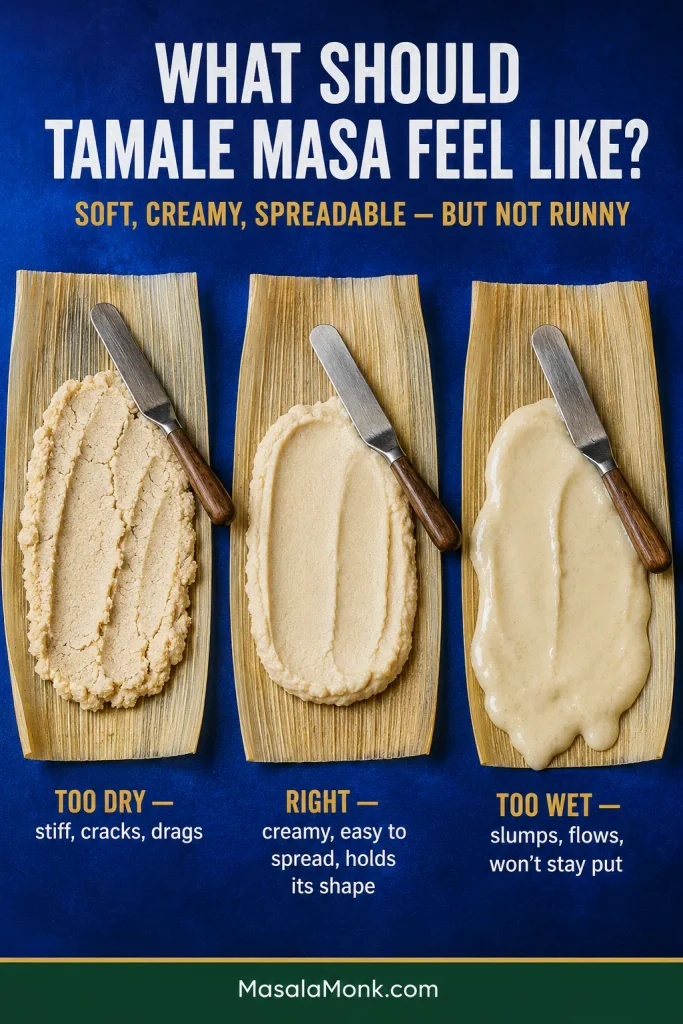
Tamale masa should be soft and creamy enough to spread easily — roughly like thick hummus or soft frosting — while still staying where you put it.
Too dry: stiff, cracked around the edges, difficult to smear, and closer to firm clay than a spreadable dough.
Right: creamy, cohesive, easy to spread into a thin layer, and able to hold its shape.
Too wet: slumps, flows, or slides away from the spot where you spread it.
The Masa Test
Correct masa glides under the spreading tool and stays where it is placed; dry masa fights the stroke and loose masa keeps moving.
Masa that feels stiff or cracks while spreading needs more warm broth. Mix it in 1 tablespoon / 15 ml at a time, mixing completely before adding another spoonful.
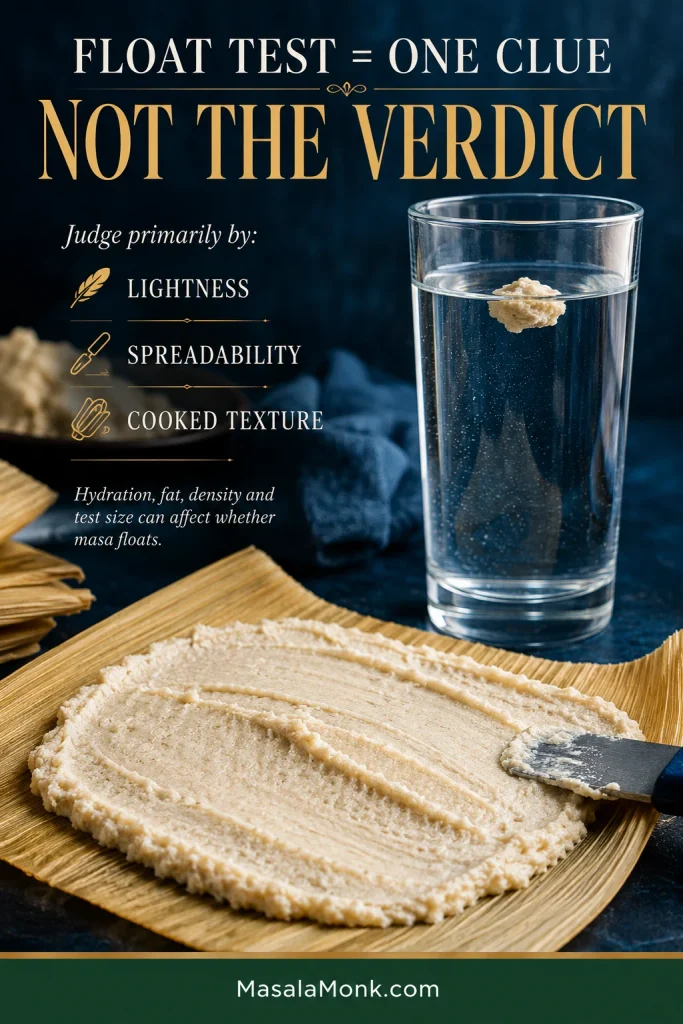
Does Tamale Masa Have to Float?
Not necessarily. Some recipes use a floating ball of masa as a clue that enough air has been incorporated, but hydration, fat, density, and the size of the test piece can affect the result. Floating is one clue, not the final verdict. For this recipe, the more useful signs are lightness, easy spreading, good seasoning, and the texture of the cooked masa.
Do not change good masa just to make a test piece float; the cooked texture matters more than the glass.
Cook a test bite before wrapping 24 tamales. Flatten a teaspoon or two of masa into a small thin patty on a microwave-safe plate and microwave in short intervals until completely set. Taste for salt first, then for savory pork-broth depth and gentle red-chile warmth. The masa should taste good even before the pork arrives.
If the masa noticeably stiffens as you work, mix in warm broth a tablespoon at a time until it spreads easily again.
Now every component is ready. Put the husks, masa, filling, spreading tool, scale, and a tray within easy reach. From here, the job changes from cooking separate pieces to building the tamales themselves.
Step 6: Portion, Fill and Fold
The first tamale is usually the slowest. Once you have wrapped several, the motions begin to repeat themselves.
If you have another pair of hands, this is an easy job to divide: one person can spread while another fills and folds.
How Much Masa and Filling Per Tamale?
Use 40 g prepared masa + 30 g red chile pork filling for each medium tamale. Weigh the first three or four; once you recognize those portions, work by eye.
Similar masa thickness from wrapper to wrapper helps the batch steam more evenly while the measured filling keeps pork present without overloading the fold.
Which Side of the Corn Husk Does the Masa Go On?
Spread the masa on the smoother side of the husk. Lay the wide end toward you and keep the narrow end bare so it can fold upward later.
Spread. Smear the masa over a roughly 4-inch / 10 cm square on the broad half of the husk. Aim for a thin, even layer, about ⅛ inch / 3 mm thick.
A small offset spatula is easiest to control, though a butter knife or the back of a spoon works too. Masa that continually tears the husk may need a little more broth. A spread that is simply too thick or crooked can be scraped back into the bowl and tried again. Nothing has been ruined.
Fill. Run the pork through most of the masa zone instead of piling everything in the center. That puts filling into more bites while preserving enough border to close the wrapper.
Fold. Bring one long side over the filling, then the opposite side, so the masa edges meet or slightly overlap. Fold the bare narrow end upward and leave the wider end open. Most husks do not need tying; a loose wrapper can simply be opened and folded again.
If the wrapper will not close comfortably, remove a little filling or excess masa instead of squeezing the husk tighter.
Aim for consistent portions, not identical husks. Corn wrappers vary naturally. Similar amounts of masa and filling matter more than perfectly matching every finished shape.
Once several tamales are lined up on the tray, the project starts looking different from where it began. Separate bowls of pork, masa, chiles, and husks have finally started turning into dinner.
Set each folded tamale on the tray with its open end up. Once the batch is wrapped, move everything to the steamer.
Step 7: Load the Steamer
Add enough water for a long steam, then check the level before loading the tamales: the water surface must sit clearly below the steamer rack. The bottoms of the tamales should not sit in water. In many pots, 1½–2 inches / 4–5 cm is a useful starting depth.
Line the rack with spare clean corn husks if you have them. Stand the tamales upright with their open ends facing upward.
Snug is good. Compressed is not. The tamales should support one another while leaving pathways for steam to move through the pot.
A partly filled steamer can be supported with an upside-down heatproof bowl or another safe heatproof spacer so the tamales remain upright without being squeezed together. Cover the top with a few spare husks, then close the pot with a reasonably tight-fitting lid.
Step 8: How Long to Steam Tamales
Begin checking these medium tamales at 70 minutes; most batches finish in 75–90 minutes. Size, masa thickness, packing, and steam strength can move the finish point.
Bring the pot to strong, continuous steam, then adjust the heat so the steam remains steady. Start the timer once that steady steam is established.
Once the steamer settles into its rhythm, there is not much to do besides keep an ear on the pot and make sure the water does not disappear. Before long, you should begin to smell warm corn and chile beneath the lid.
Check the water level 30 minutes after the timer starts and periodically after that. Add hot or boiling water down the side when needed, taking care not to splash the tamales.
Avoid lifting the lid every few minutes just to look. Every peek releases steam and makes the pot build that heat again.
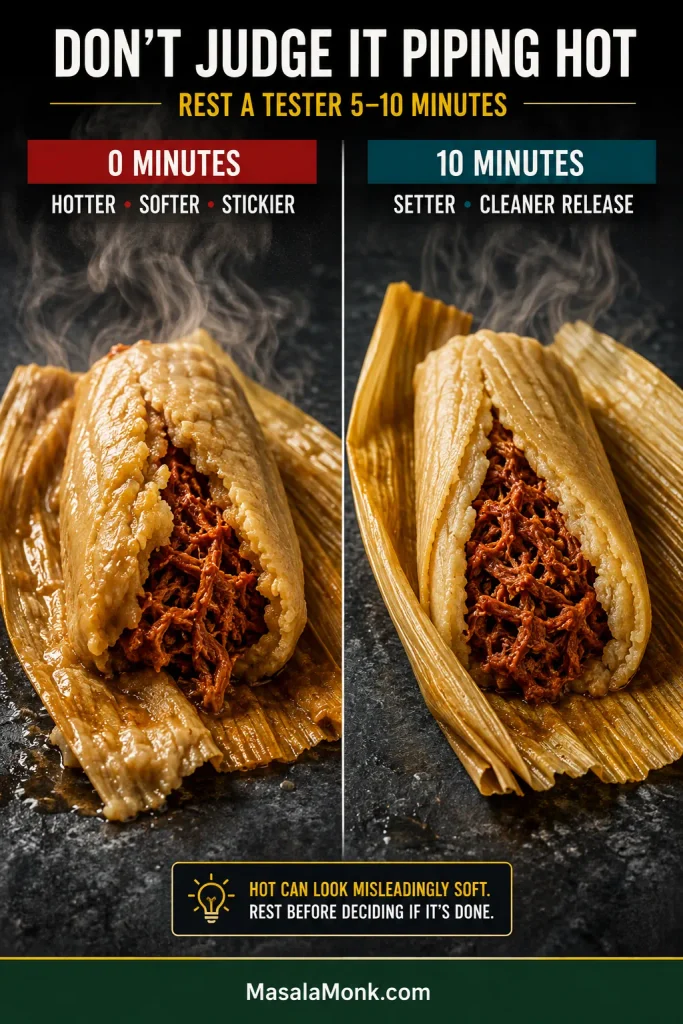
Do not judge a piping-hot tamale. Remove one tester and leave it for 5–10 minutes before peeling back the husk. Masa is softer and stickier immediately out of the steamer than it is after that short rest.
A tester with a set center and a wrapper that releases mostly cleanly is done. Wet or paste-like masa after the rest needs another 10–15 minutes of steam before you check a different tamale.
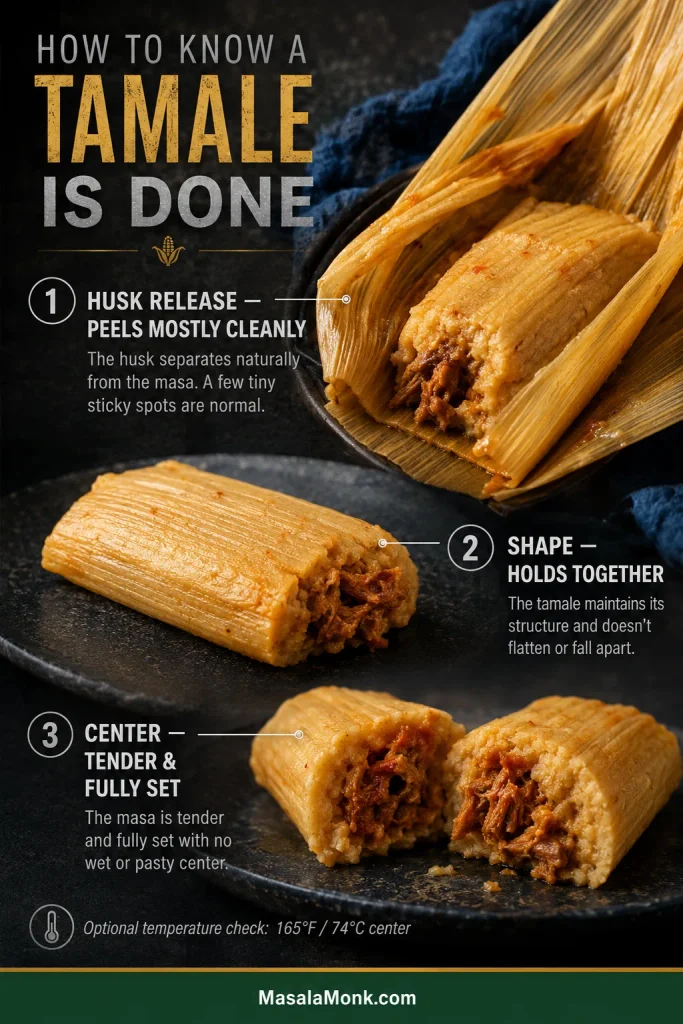
How to Tell When Tamales Are Done
Your timer tells you when to start checking. The tamale tells you when it is finished.
After the tester has rested, look for three things:
Husk: peels away mostly cleanly instead of carrying off a wet layer of masa.
Shape: the tamale stays together when unwrapped.
Center: tender and fully set, with no wet or pasty core.
After the tester has rested, look for three things:
Husk: peels away mostly cleanly instead of carrying off a wet layer of masa.
Shape: the tamale stays together when unwrapped.
Center: tender and fully set, with no wet or pasty core.
When husk release, shape and center texture agree, you have stronger evidence than any one cue can provide alone.
Temperature can confirm that the center is thoroughly hot, but texture and husk release are the more useful culinary doneness checks for this recipe. If you use a thermometer as an additional check, look for 165°F / 74°C in the center.
What to Serve With Pork Tamales
Let the finished batch rest for 10–15 minutes before serving. The masa settles slightly as the tamales cool. Two to three medium tamales per person is a useful starting point when they are the main course; peel away and discard the husks at the table.
Taste the first tamale before covering it with salsa. The masa has been seasoned with pork broth and red chile specifically so it deserves to be tasted along with the filling.
After that, keep the plate as simple or generous as you like. A spoonful of roasted salsa verde brings brightness, lime cuts through the rich pork, and creamy refried beans make an easy side. Rice works well for a fuller meal, while a crisp salad or slaw brings freshness.
Lime, salsa and simple sides add contrast to the rich pork and chile without needing to cover the tamale itself.
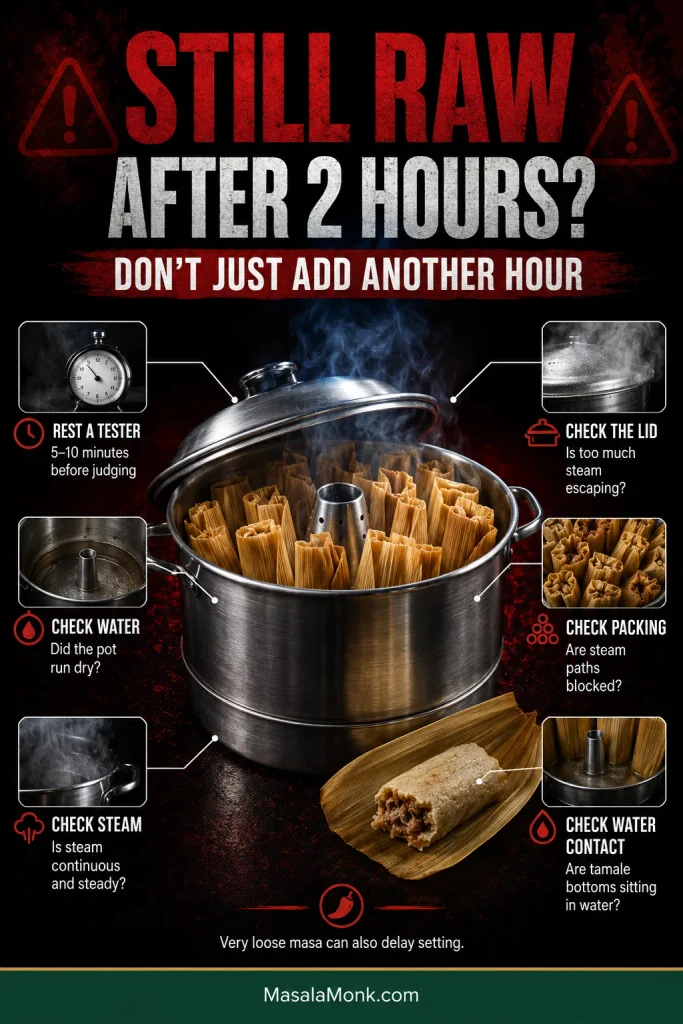
Tamales Still Raw After 2 Hours? Diagnose Before Steaming Longer
After two hours, another blind hour of steaming is the last thing you want to hear. So stop treating time as the only variable.
Before adding another long stretch of cooking, rest one tester for 10 minutes. A tamale that firms and begins releasing from its husk as it cools may already have been cooked; very hot masa can look softer and stickier than the same masa several minutes later.
A genuinely wet center after that rest means it is time to inspect the steamer:
Is there still water in the pot?
Is the pot producing continuous steam?
Does the lid fit reasonably tightly?
Are the tamales squeezed into one solid mass?
Do raw patches appear where tamales touch one another?
Are the bottoms sitting in water?
Is heavy condensation repeatedly reaching the open tops?
Was the masa extremely loose before wrapping?
When some tamales are completely done while others have isolated raw patches, steam circulation, inconsistent thickness, and packing are more likely suspects than the entire pot simply needing another hour.
Whole-batch wetness suggests a broader steam or masa problem, while isolated raw patches point more strongly toward circulation, packing or uneven thickness.
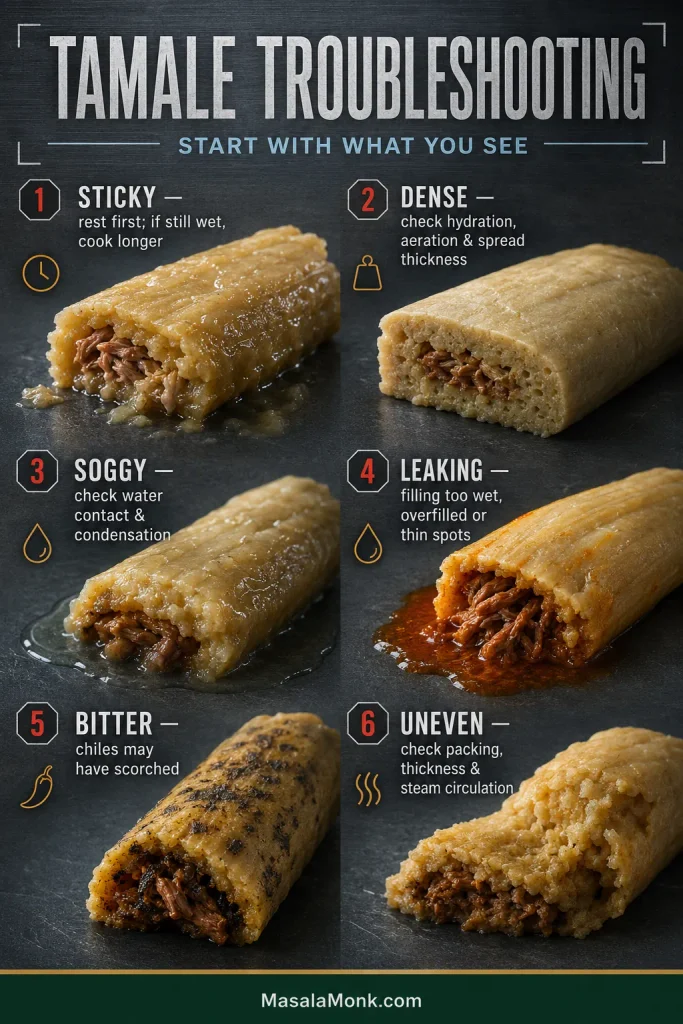
Tamale Troubleshooting
Problem
Diagnosis & Fix
Masa cracks while spreading
It is probably too dry. Mix in warm broth 1 tbsp / 15 ml at a time.
Masa slumps or flows
It is too loose. Stop adding liquid, let it sit briefly, then reassess.
Masa fights the husk
Check for stiff masa and dripping-wet husks before blaming your spreading technique.
Filling leaks
The filling may be too wet, the tamale overfilled, or the masa layer too thin in places.
Tamale is still wet after resting
It is undercooked. Steam another 10–15 minutes and test a different tamale.
Some tamales are done and others raw
Look for crowding, blocked steam paths, or noticeably different masa thicknesses.
Whole batch remains raw after excessive steaming
Check water, steam strength, lid fit, packing, and water contact before simply adding another hour.
Tamales are soggy or waterlogged
Water or heavy condensation may be reaching the masa. Keep the water below the rack and use spare husks over the batch.
Finished masa is dense
Look at masa hydration, how well the lard was aerated, and whether the masa was spread too thickly.
Tamales taste bland
The masa itself may have been underseasoned. The cooked masa taste-test catches this before assembly.
Red chile sauce is bitter
The dried chiles may have scorched. Strong burned-chile flavor is usually better remade than disguised.
Red chile sauce is gritty
Push the blended sauce through a fine-mesh strainer.
Bottom of the steamer burns
The water boiled away. Start with enough water and check the level during steaming.
Use the symptom to choose the variable to change, then leave the others alone so you can tell what actually fixed the batch.
Make Ahead, Store, Freeze & Reheat
Make the Filling Ahead
The pork filling can comfortably be made 1–2 days ahead. Transfer it to a shallow container and refrigerate promptly.
Assemble the Night Before
You can assemble the tamales, cover them well, refrigerate overnight, and steam them the following day. Because they enter the steamer colder, expect them to take somewhat longer than freshly assembled tamales.
Refrigerating Cooked Tamales
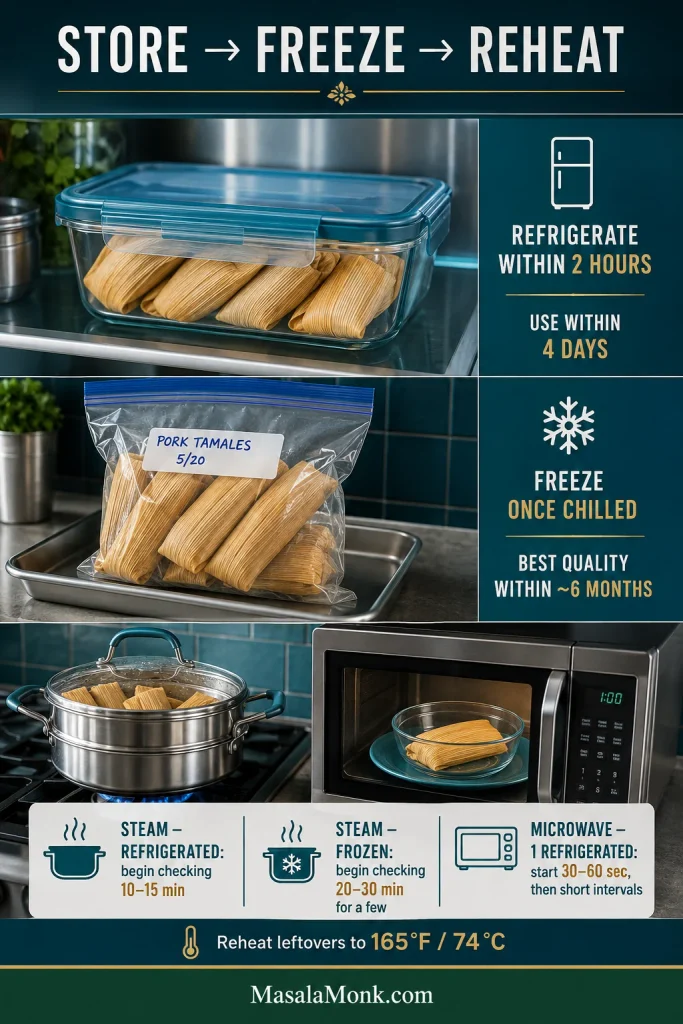
Refrigerate cooked tamales within 2 hours after serving. Leave the husks on, store in a covered container, and use within 4 days.
Freezing Tamales
For the simplest first batch, cool the cooked tamales completely and freeze them with their husks still on in a well-sealed freezer container or bag. For best quality, plan to use them within about 6 months.
Can you freeze tamales before steaming? Yes. Assemble them, freeze in a single layer until firm, then transfer to a sealed freezer container or bag. They can be steamed from frozen, though they will need more time than fresh tamales. Freezing after cooking remains the easiest default when predictable reheating matters most.
How to Reheat Tamales
Freeze cooked tamales in the quantities you usually reheat so one meal does not require repeatedly opening a larger frozen batch.
Method
Starting Point
Steamer, refrigerated
Begin checking after 10–15 minutes
Steamer, a few frozen tamales
Begin checking after 20–30 minutes; a larger frozen batch can take longer
Microwave, 1 refrigerated tamale in its husk
30–60 seconds under a damp paper towel, then continue in short intervals as needed
Frozen cooked tamales can be thawed overnight or reheated directly from frozen. Keep the husks on while steaming. Reheated leftovers should reach 165°F / 74°C in the center.
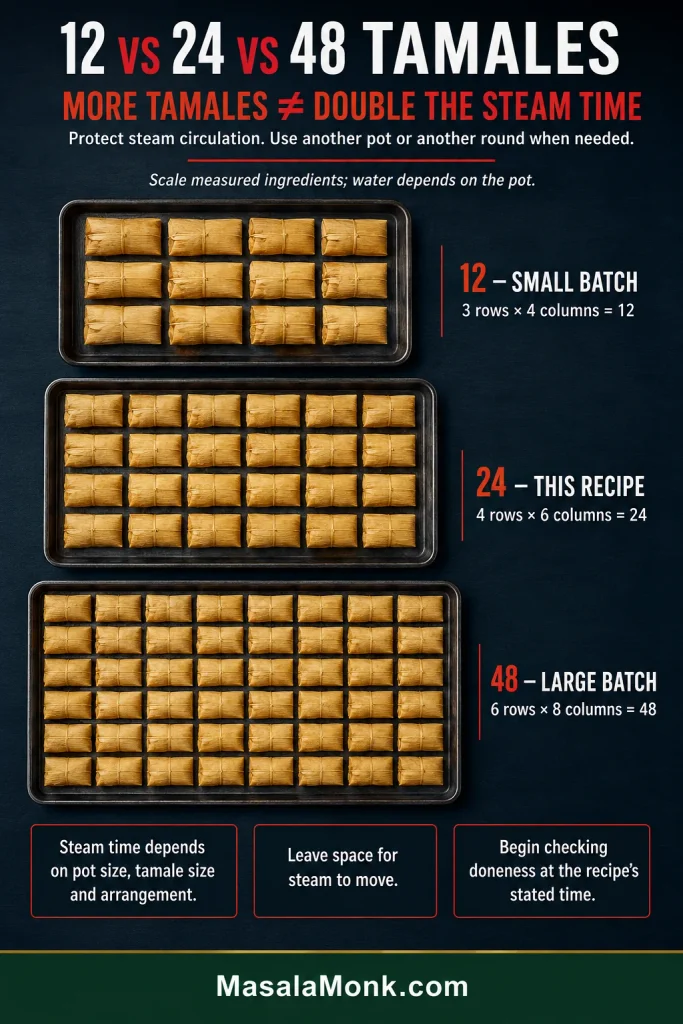
Making 12, 24 or 48 Tamales
These tables scale the measured ingredients. Pork-cooking water and steamer water depend on the size and shape of your pots, so those are handled separately below.
The larger the batch, the more physical space the tamales occupy, so vessel capacity becomes part of the scaling decision.
Pork
Ingredient
12 Tamales
24 Tamales
48 Tamales
Raw pork
1 lb / 450 g
2 lb / 900 g
4 lb / 1.8 kg
White onion
¼ medium
½ medium
1 medium
Garlic
2 cloves
4 cloves
8 cloves
Bay leaf
1 small
1
2
Fine sea salt, starting amount
¾ tsp / about 4 g
1½ tsp / 8–9 g
1 tbsp / 16–18 g
Red Chile Sauce
Ingredient
12 Tamales
24 Tamales
48 Tamales
Guajillo chiles
23 g
45 g
90 g
Ancho chiles
18 g
35 g
70 g
Garlic
1 clove
2 cloves
4 cloves
Ground cumin
½ tsp
1 tsp
2 tsp
Mexican oregano
½ tsp
1 tsp
2 tsp
Pork broth
1 cup / 240 ml
2 cups / 475 ml
4 cups / 950 ml
Lard or neutral oil
1½ tsp / about 7–8 g or ml
1 tbsp / 15 g or ml
2 tbsp / 30 g or ml
Fine sea salt
To taste
To taste
To taste
Starting sauce added to pork
½ cup / 120 ml
1 cup / 240 ml
2 cups / 480 ml
Optional chile de árbol
To taste
To taste
To taste
Scale chile de árbol to taste; heat doesn’t need to double just because the batch does.
Masa & Assembly
Ingredient
12 Tamales
24 Tamales
48 Tamales
Masa harina
1½ cups / 180 g
3 cups / 360 g
6 cups / 720 g
Lard
3 oz / 85 g
6 oz / 170 g
12 oz / 340 g
Baking powder
¾ tsp / 3 g
1½ tsp / 6 g
1 tbsp / 12 g
Fine sea salt, starting amount
½ tsp / 2.5–3 g
1 tsp / 5–6 g
2 tsp / 10–12 g
Warm pork broth
210 ml / ¾ cup + 2 tbsp
1¾ cups / 415 ml
3½ cups / 830 ml
Red chile sauce in masa
2 tbsp / 30 ml
¼ cup / 60 ml
½ cup / 120 ml
Extra broth for adjustment
Up to 2 tbsp / 30 ml
Up to ¼ cup / 60 ml
Up to ½ cup / 120 ml
Corn husks to soak
15–16
30–32
60–64
Scaling Notes
Use the listed salt quantities as starting points and taste as you go. Broth concentration and reduction can change how salty the finished sauce and masa taste.
Pork-cooking water does not need to be multiplied mechanically. Use enough to keep the meat mostly submerged and replenish with hot water when needed. Steamer water is also pot-dependent: use enough to sustain the steam while keeping its surface safely below the rack.
Steaming time does not double with batch size. A 48-tamale batch changes the geometry of the steamer, so two pots or two rounds are usually better than packing one pot tightly enough to block circulation.
Making a long group batch? A tamale-making session is often called a tamalada. When assembly stretches beyond about two hours, keep most of the cooked filling and the lard-and-broth masa refrigerated and bring out smaller working portions as needed. The USDA’s tamalada guidance covers food-safety considerations for longer sessions.
Whether you made 12 tamales or 48, the moment that tells you the work paid off is the same.
A few hours earlier, this was a pot of pork, a bowl of masa, dried chiles, and a stack of awkward corn husks. Now peel one open while it is still warm: the wrapper gives way, a little steam escapes, and the tender masa holds that red-chile pork through the center.
That small reveal is the payoff for all the spreading, folding, waiting, and checking.
If you make these, tell me how your batch went — especially what surprised you or behaved differently from what you expected.