Posted on — Leave a comment

Chicken Tortilla Soup Recipe: Easy, Smoky & Loaded with Crispy Tortilla Strips

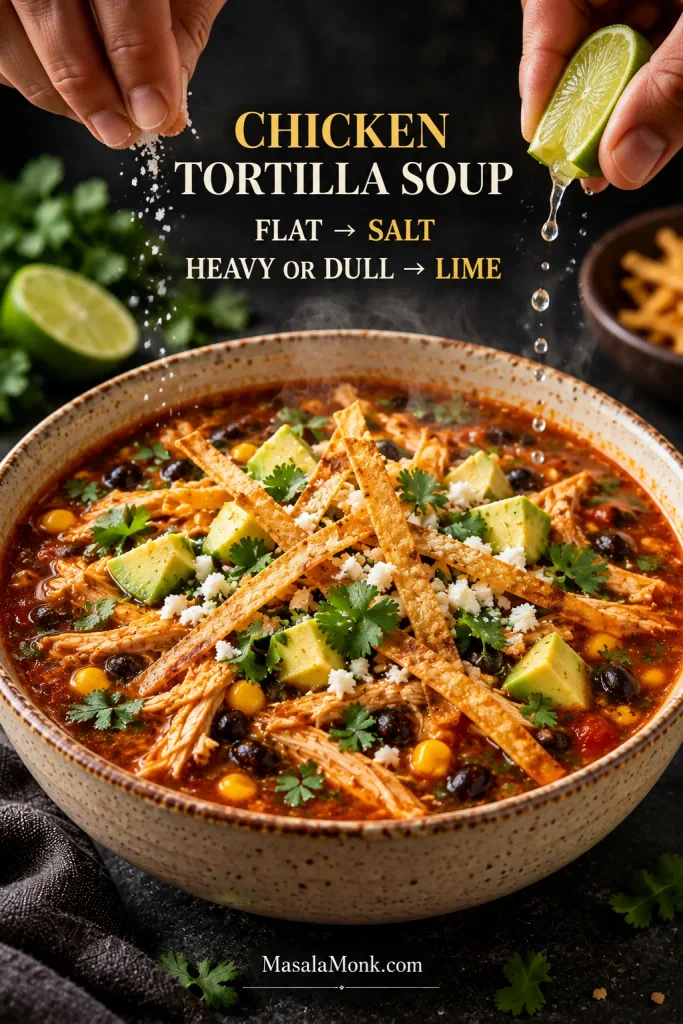
Bowl of red chicken tortilla soup with shredded chicken, black beans, corn, avocado, cotija, cilantro, lime and crisp tortilla strips.

Chicken tortilla soup can go wrong in a surprisingly ordinary way: plenty of chicken, beans and chips, yet a broth that tastes mostly of canned tomato. A good bowl should be different. The first spoonful should taste of chile, chicken broth and fresh lime, with tortilla strips that still crack when they hit the soup.

This chicken tortilla soup recipe starts with the broth. Dried chile, tomato, onion and garlic are blended and cooked down before the rest of the liquid goes in. Two corn tortillas disappear into that base for a little body and toasted-corn flavor; the rest become the crisp topping. Add tender chicken, black beans and sweet corn and you have a generous dinner that still eats like soup rather than bean chili. The broth itself is simpler than the ingredient list suggests: most of it moves between the blender and one soup pot.

What to Expect from This Chicken Tortilla Soup

Chicken tortilla soup is a tomato-and-chile chicken soup finished with corn tortillas and fresh toppings; this version also blends a small amount of tortilla into the broth for gentle body. It stays broth-forward, without cream or flour thickening. Allow 45–50 minutes with raw chicken thighs, 35–40 minutes with cooked chicken and whole dried chiles, or roughly 25–30 minutes when you also use the ancho-powder and ready-made tortilla chip shortcuts.

Spoon lifting shredded chicken, black beans and corn as red tortilla soup broth drips back into the bowl.
Use the spoon as a quick texture check: the broth can cling lightly to the chicken, but it should break naturally into drops as it falls. A heavy, stretchy stream is a sign the soup has moved beyond a broth-forward consistency.

Chicken Tortilla Soup Recipe

Smoky tomato-and-dried-chile broth, tender shredded chicken, black beans and corn, with corn tortilla blended into the soup for gentle body and another batch kept crisp for serving.

Dried chiles, corn tortillas and broth brands all vary a little. The measurements give you a reliable starting point; use the color, texture and doneness cues alongside them.

Prep
15 minutes

Cook
30–35 minutes

Total
45–50 minutes

Yield
6 generous bowls

Pot
5–6 qt / 4.7–5.7 L

Heat
Usually mild-medium; chile heat varies

Equipment

  • 5–6 qt / 4.7–5.7 L Dutch oven or heavy soup pot
  • Blender
  • Fine-mesh strainer, optional
  • Instant-read thermometer
  • Small 8-inch / 20 cm skillet for frying, or a rimmed baking sheet for baked tortilla strips

Chicken Tortilla Soup Ingredients

The dried chiles are the specialty ingredient most worth finding. Mexican oregano is easier to substitute, and the toppings are flexible.

For the blended tomato-chile base

  • 1 medium dried pasilla (negro) chile, stemmed and seeded / 8–10 g after trimming
  • 1 medium dried guajillo chile, stemmed and seeded / 5–7 g after trimming
  • 2 tablespoons neutral oil / 30 ml, divided
  • 1 medium white onion, chopped / 160 g
  • 4 garlic cloves, roughly chopped / 16 g
  • 1 can fire-roasted diced tomatoes with their juices / 28 oz / 794 g
  • 1½ teaspoons finely chopped chipotle in adobo / 8 g
  • 1 teaspoon adobo sauce / 5 ml
  • 2 small corn tortillas, about 6 inches / 15 cm each / 50 g total, torn
  • 1 cup low-sodium chicken broth / 240 ml
  • 1 teaspoon ground cumin / 2 g
  • ½ teaspoon Mexican oregano / 0.5 g, crushed between your fingers

Buying pasilla: look for a long, narrow, very dark dried chile, sometimes labeled pasilla negro. A fresh green poblano is not the same thing, even though some stores use “pasilla” loosely.

No whole dried chiles? Start with 1 tablespoon pure ancho chile powder, not an American-style chili powder seasoning blend. Skip the soaking step and add the ancho powder with the cumin and oregano near the end of the tomato-base reduction.

Mexican oregano is more citrusy and earthy than standard Mediterranean-style oregano. Regular dried oregano can stand in when that is what you have.

To finish the soup

  • 4 cups low-sodium chicken broth / 950 ml
  • Up to 1 additional cup low-sodium chicken broth / 240 ml, only if needed for consistency
  • 5 g fine sea salt / about 1 teaspoon, plus more to taste
  • 1½ lb boneless skinless chicken thighs / 680 g
  • 1 can black beans / 15 oz / 425 g, rinsed and drained / 255 g drained
  • 1 cup corn kernels / 165 g, frozen or well-drained canned corn
  • 2 tablespoons fresh lime juice / 30 ml, plus more to taste

For the crispy tortilla strips

  • 6 small corn tortillas, about 6 inches / 15 cm each / 150 g total
  • For frying: ¾ cup neutral high-heat oil / 180 ml, or enough for about ¼ inch / 6 mm depth in an 8-inch / 20 cm skillet
  • For baking or air frying: 1 tablespoon neutral oil / 15 ml
  • Fine salt, for seasoning

Canola, sunflower, avocado or another neutral high-heat oil will work.

For serving

  • 1 large avocado, diced
  • ½ cup crumbled cotija or queso fresco / 60 g
  • ⅓ cup Mexican crema or sour cream / 80 ml, optional
  • Fresh cilantro leaves or roughly chopped cilantro
  • 1–2 limes, cut into wedges
  • Sliced jalapeño or hot sauce, optional

How to Make Chicken Tortilla Soup

Think of the method in four phases: build the broth base, cook the chicken, crisp the tortillas, then finish the soup.

Build the broth base

  1. Toast and soften the chiles. Set the dry soup pot over medium heat. Press the pasilla and guajillo against the surface for 10–15 seconds per side, just until fragrant and slightly pliable. Do not let them blacken. Transfer them to a heatproof bowl, cover with very hot water and leave for 10–15 minutes. While they soak, move straight on to the onion and garlic. Skip this step when using ancho powder.
  2. Cook the onion and garlic. Add 1 tablespoon / 15 ml oil to the pot. Cook the onion over medium heat for 5–7 minutes, stirring occasionally, until soft with a few golden edges. Add the garlic and cook for 30 seconds.
  3. Blend the base. Drain the softened chiles. Blend them with the cooked onion and garlic, tomatoes and juices, chipotle, adobo sauce, torn tortillas and 1 cup / 240 ml broth. Let the mixture sit for 2 minutes so the tortillas soften, then blend until smooth. If your blender is not rated for hot liquids, let the mixture cool first and follow the manufacturer’s venting instructions. Strain only if coarse chile-skin flecks remain.
  4. Cook the puree down. Add the remaining tablespoon / 15 ml oil to the pot, then carefully pour in the puree. Cook over medium heat for 6–8 minutes, stirring frequently. The color deepens, the raw tomato smell fades and a spatula dragged across the bottom leaves a brief track before the puree flows back. This is where the pot stops smelling like canned tomatoes and starts smelling like dinner. Stir in the cumin and oregano for the final 30 seconds; add ancho powder here when using that shortcut.

Cook the chicken and crisp the tortillas

  1. Add the broth and chicken. Stir in 4 cups / 950 ml broth and the starting salt, then keep the soup at a gentle simmer. Unfold the thighs before adding them. Begin checking at 12–14 minutes. 165°F / 74°C is the safety threshold; thighs often shred more easily nearer 175°F / 79°C. If the meat still fights the forks, give it another couple of minutes.
  2. Make the tortilla strips while the chicken cooks. Cut the tortillas into strips roughly ¼ inch / 6 mm wide and 2–3 inches / 5–7.5 cm long. Very fresh strips can be dried at 250°F / 120°C for 10–12 minutes first. For frying, heat the oil to 350–365°F / 175–185°C and cook in small batches for 45–75 seconds. As moisture leaves, the bubbling calms. Pull the strips when golden and crisp, then drain and salt lightly.
  3. Rest and shred the chicken. Transfer the thighs to a plate for a few minutes, then pull them into substantial bite-size pieces. Keep the juices that collect on the plate.

Finish and serve

  1. Finish the soup. Add the beans and corn to the simmering broth and cook for 3 minutes. Return the shredded chicken and its juices, then warm everything together for another minute.
  2. Check the consistency. Tilt the ladle: the broth should still run easily around the chicken and beans. Give the tortilla starch another minute to thicken the broth before adjusting it. For a thinner soup, add the optional broth ¼ cup / 60 ml at a time.
  3. Add the lime and taste. Turn off the heat and stir in 2 tablespoons / 30 ml lime juice. Broth, beans, cheese and any salty tortilla topping can all shift the final seasoning, so taste before adding more salt. A flat soup may simply need salt; a well-seasoned bowl that still feels heavy often needs another squeeze of lime. Save extra heat for the table.
  4. Serve. Ladle the soup into bowls. Put the tortilla strips, avocado, cheese, cilantro, lime, crema, jalapeño and hot sauce on the table and let everyone finish their own.

Shortcuts and alternate routes

Prefer not to fry? Toss the strips with 1 tablespoon / 15 ml oil and a pinch of salt. Bake at 400°F / 205°C for 8–12 minutes, tossing halfway. For the air fryer, use the same lightly oiled strips and cook at 350°F / 175°C for 4–6 minutes per batch, keeping them in a loose layer.

Cooked chicken: Use 3 loosely packed cups / 14–16 oz / 400–450 g rotisserie or leftover chicken and add it during the final few minutes. Keeping the whole dried chiles puts this route at roughly 35–40 minutes.

Fastest route: Cooked chicken + pure ancho chile powder + ready-made tortilla chips can bring the recipe closer to 25–30 minutes.

Chicken breast: Use the same 1½ lb / 680 g and remove it promptly once the thickest part reaches 165°F / 74°C.

Cooking now? Return to the recipe card. Stay with the deeper guide if you want to understand the broth more closely, or jump to troubleshooting if something in the pot is not quite behaving.

The Broth Is the Recipe

Blend the tomato, chiles, aromatics and tortilla first, then cook that puree down before adding the rest of the broth.

Chicken, beans and corn make the bowl filling. The broth decides whether it tastes like tortilla soup. Putting canned tomatoes straight into several cups of stock can leave the liquid tasting thin even when the bowl is crowded with ingredients. Cooking the blended tomato-chile mixture first drives off water, deepens the color and pushes that raw canned-tomato smell into the background.

Rick Bayless uses the same basic order in his sopa Azteca: the tomato, onion, garlic and pasilla mixture is concentrated before the broth goes in. Here, black beans, corn and plenty of chicken simply make the finished bowl more filling.

Blender filled with softened dried chiles, tomatoes, cooked onion and garlic, chipotle, torn corn tortillas and chicken broth.
The first cup of broth gives the softened chiles and torn corn tortillas enough liquid to circulate smoothly in the blender. As a result, the tortilla starch disperses through the base instead of leaving obvious pieces in the finished chicken tortilla soup.

Pasilla, guajillo and chipotle

Pasilla = earthy and dark. Guajillo = brighter and fruitier. Chipotle = smoky and hotter. Pasilla gives the broth its darker base note, guajillo lifts it, and chipotle supplies the obvious smoke. If you want to work more deeply with dried chiles, the pozole rojo recipe uses guajillo and ancho much more prominently.

Dried pasilla and guajillo chiles beside chipotle in adobo, showing their different colors, shapes and textures.
Treat chipotle as a smoke control, not the answer to every chile problem. If the broth already has enough smoke but needs more heat, jalapeño or hot sauce can raise the heat without pushing the chicken tortilla soup further toward chipotle.

Tortillas Have Two Jobs

Two go in; the rest stay out. If you are here for the crunchy half, jump to the crispy tortilla strips.

The tortillas blended with the tomato and chiles give the broth gentle body and carry corn flavor into the soup itself. Weight matters more than count here because corn tortillas vary considerably in thickness and hydration—especially homemade ones. The homemade corn tortilla recipe goes deeper into masa harina and hydration.

Soft torn corn tortillas beside the soup base and golden tortilla strips being added to a finished bowl of chicken tortilla soup.
Moisture treatment needs to be opposite here: the tortillas blended into the broth should soften completely, while the serving strips need to lose moisture and stay dry. That contrast is what lets corn tortillas create both body and crunch.

Chicken Tortilla Soup with Thighs, Breast or Rotisserie Chicken

Boneless skinless thighs are the default because they stay juicy in broth and tolerate the extra cooking needed to become tender enough to shred.

The safe minimum for poultry is 165°F / 74°C. For thighs, that is the safety threshold; a little more gentle cooking can make them much easier to shred. Around 175°F / 79°C is a useful texture target when the meat still resists.

Boneless chicken thigh with a thermometer reading 165°F and tender meat pulling apart beside simmering broth.
Check the temperature while the thigh is still whole, since the thickest section gives a more reliable reading than shredded pieces. Once 165°F / 74°C is reached, use fork resistance—not temperature alone—to decide whether it needs a little more gentle simmering.

Breast needs less time. Remove it promptly at 165°F / 74°C instead of giving it the extra simmer that helps thighs. The baked chicken breast guide has a fuller breakdown of thickness and temperature.

Rotisserie chicken only needs warming. Add roughly 3 loosely packed cups during the final few minutes; simmering already-cooked chicken through the whole recipe only gives it more opportunity to dry out.

Taste and Adjust the Broth Before Serving

This is often the point where you’ve tasted the pot twice and something still seems slightly off. Reaching for another spoonful of cumin is tempting. It is rarely the first answer.

Broth brands, tomato acidity and tortilla thickness all vary, so identify what the soup is missing before adding more of anything.

What you noticeWhat to do
Thin like plain stockSimmer uncovered first. If it still needs body, blend ½ small corn tortilla with ½ cup / 120 ml hot soup and return it to the pot.
Too thick or chili-likeAdd warm low-sodium broth ¼ cup / 60 ml at a time.
Flat everywhereAdd a little salt, stir well and taste again.
Seasoned but heavy or dullAdd fresh lime juice 1 teaspoon / 5 ml at a time.
Mostly tastes of tomatoCheck the salt first. If that is balanced, stir ½ teaspoon pure ancho or guajillo chile powder into a few spoonfuls of hot broth, return it to the pot and simmer for 2–3 minutes.
Needs more smokeAdd a small amount of adobo sauce.
Smoke is right but you want more heatAdd jalapeño or hot sauce instead of more chipotle.
Chicken tortilla soup being seasoned with a pinch of salt and squeezed fresh lime over the bowl.
Change one variable at a time, stir thoroughly, then taste again. Lime can brighten a seasoned broth but cannot replace missing salt; likewise, adding more salt will not supply the acidity a heavy chicken tortilla soup may need.

How thick should chicken tortilla soup be, and how do you thicken it?

Chicken tortilla soup does not need to be thick. This version stays broth-forward, with enough tortilla starch to give the liquid light body without making it pasty. If your soup is thinner than that, simmer first; only then add a little blended tortilla if it still needs help.

Tilt a spoonful and the broth still moves freely around the chicken and beans. Newly added tortilla continues hydrating for a few minutes, so give it time before deciding the pot needs more.

Ladle pouring red chicken tortilla soup broth back into the bowl in a fluid stream with chicken, beans and corn below.
Another useful consistency cue is how quickly the broth closes behind a ladle. It should flow back readily; if a trench lingers or the liquid piles around the solids, the chicken tortilla soup is moving closer to chili than broth.

Crispy Tortilla Strips

The recipe card gives the exact frying, baking and air-fryer routes. What matters most is moisture. Very fresh tortillas sputter longer because they have more water to lose; slightly drier tortillas crisp sooner. Small batches also help the frying oil recover quickly instead of turning the process into a long, greasy soak.

Watch the bubbles as well as the clock. They are lively at first and calm as the strips lose moisture. Golden color plus noticeably quieter bubbling is the cue to get them out.

Thin corn tortilla strips shallow-frying in oil, turning golden as bubbles subside and one crisp strip is lifted from the skillet.
Once the tortilla strips leave the oil, drain them in a loose layer and season while they are still hot. Piling freshly fried strips too deeply traps steam, which can undo some of the crispness you just worked to create.

The fastest shortcut: tortilla chips

Good tortilla chips are fine on a busy night. Put them on the table instead of stirring them into the pot. An open bag also gives you an easy excuse for some fresh guacamole.

Substitutions

  • Beans: use pinto instead of black beans, or leave them out for a lighter bowl. Prefer beans on the side? These quick refried beans are an easy option.
  • Corn: leave it out when you do not want the sweetness or extra bulk. Nothing needs to replace it.
  • Pasilla: ancho gives a sweeter, rounder result; another guajillo makes the chile profile brighter and fruitier.
  • Chile de árbol: use it only when you deliberately want extra heat. It is much hotter than pasilla, guajillo or ancho and is not an equal-weight replacement.
  • Regular canned tomatoes: use them. Fire-roasted tomatoes simply bring another roasted note.
  • Flour tortillas: skip the blended tortilla if corn tortillas are unavailable. Once hydrated, flour tortillas taste different and behave differently.
  • Gluten-free: this recipe contains no added flour. For strict gluten avoidance, check that the broth, chipotle in adobo, corn tortillas or packaged chips, and toppings are labelled or otherwise confirmed gluten-free.
  • Cream or cream cheese: a substantial amount turns this into a different kind of soup. For a creamy chicken-and-bean dinner, the slow cooker white chicken chili is a better fit.

Found the substitution you needed? Return to the recipe card.

Troubleshooting Chicken Tortilla Soup

The broth adjustment table above handles seasoning and thickness. These problems usually come from the cooking itself.

The soup is much hotter than expected

Dilute the pot with unsalted broth, then rebalance the salt and lime. Avocado and crema can make each spoonful taste milder, but they can’t take heat back out of the pot.

The chicken is chewy

Breast usually gets chewy because it cooked too long. Thighs can stay firm because their connective tissue has not softened enough yet. Thigh meat that still resists shredding needs a little longer at a gentle simmer.

The broth feels gritty

Dried chile skin is the likely culprit. Blend longer, then strain the puree if coarse flecks remain.

The soup tastes bitter

The chile may have burned during toasting, or the puree may have caught on the bottom while reducing. Brief toasting brings aroma; blackened chile can turn the entire pot bitter.

Dried pasilla and guajillo chiles toasting in a dry skillet with a blackened chile showing the burned stage to avoid.
Do not send a scorched dried chile into the blender hoping the broth will hide it. Because blending distributes that burnt flavor through the entire tomato-chile base, discarding one blackened chile is much easier than rescuing a bitter pot later.

Storage, Make-Ahead and Reheating

The soup can be made a day ahead. Refrigerate the broth, chicken, beans and corn together, then keep the tortilla strips and fresh toppings separate until serving.

Tortilla strips can also be prepared a day ahead. Let them cool completely before sealing them in a dry airtight container.

For food safety, USDA guidance recommends shallow containers for rapid cooling and using cooked leftovers within 3–4 days. If you need longer storage, freeze the soup without the tortilla strips or fresh toppings and use it within roughly 2–3 months for best quality.

Tomorrow’s soup will almost certainly be thicker. Tortilla starch continues taking up liquid as the soup rests, so loosen it with a little broth while reheating and bring leftovers back to 165°F / 74°C. Taste the salt and lime again before the bowls go out.

Thick chicken tortilla soup being loosened with poured broth while crisp tortilla strips remain in a separate bowl nearby.
Judge the consistency after the soup is hot, not straight from the refrigerator. Chilled tortilla starch can make leftovers look unusually thick; therefore, reheat first and add broth gradually only after you can see how freely the soup moves.

Toppings and Serving

Put the toppings on the table and let the bowls diverge. Someone will want extra lime, somebody else more heat, and another person may skip the crema entirely. If you trim the topping list, keep the tortilla strips and lime; the rest can flex around whoever is eating.

Chicken tortilla soup surrounded by avocado, cotija, crema, cilantro, lime, jalapeño and tortilla strips as a hand squeezes lime over the bowl.
Serving the toppings separately does more than offer choice. Cool avocado or crema can soften and cool an individual bowl, while lime, jalapeño and crisp tortilla strips adjust brightness, heat and texture without changing the entire pot.

For a brighter green counterpoint, add a spoonful of roasted salsa verde at the table. It brings tomatillo, green chile and lime without changing the whole pot.


The bowl should land in layers: smoky broth, fresh lime, tender chicken and sweet corn, with cool avocado, salty cheese and crisp tortilla around the edges. Add those strips at the last second.

Then eat while they still crack.
Back to recipe ↑  ·  Back to top ↑

Posted on — Leave a comment

Pozole Rojo Recipe: Authentic Mexican Pork Pozole With Hominy

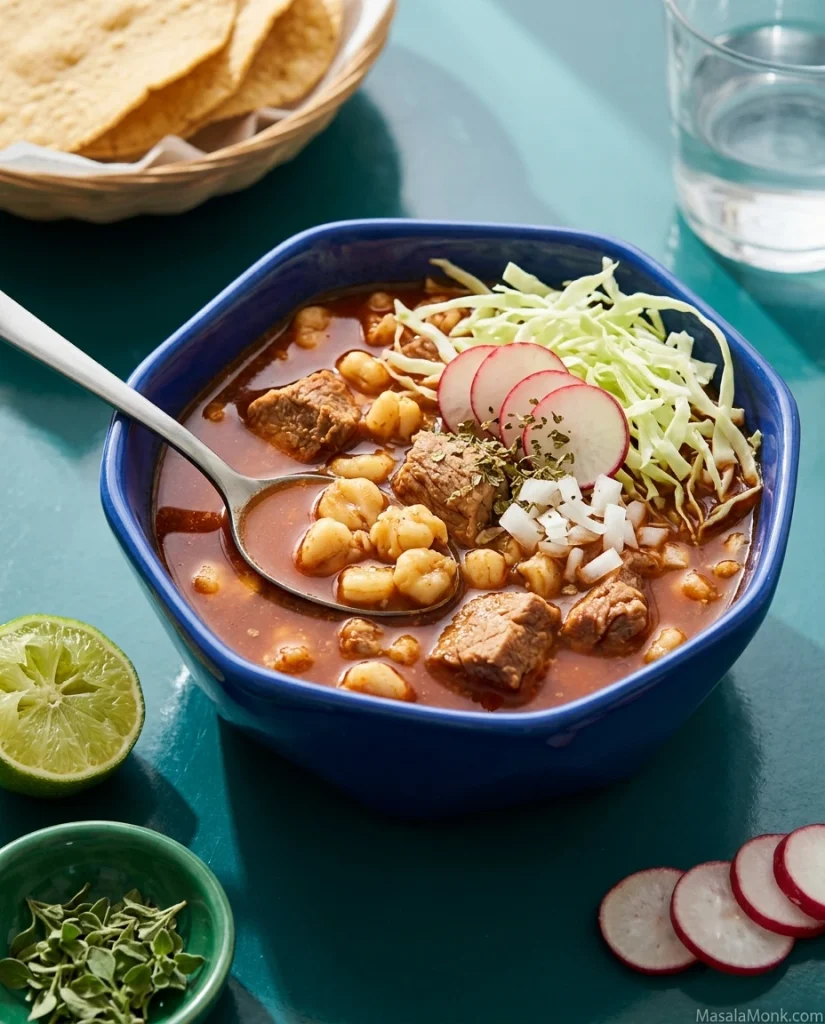
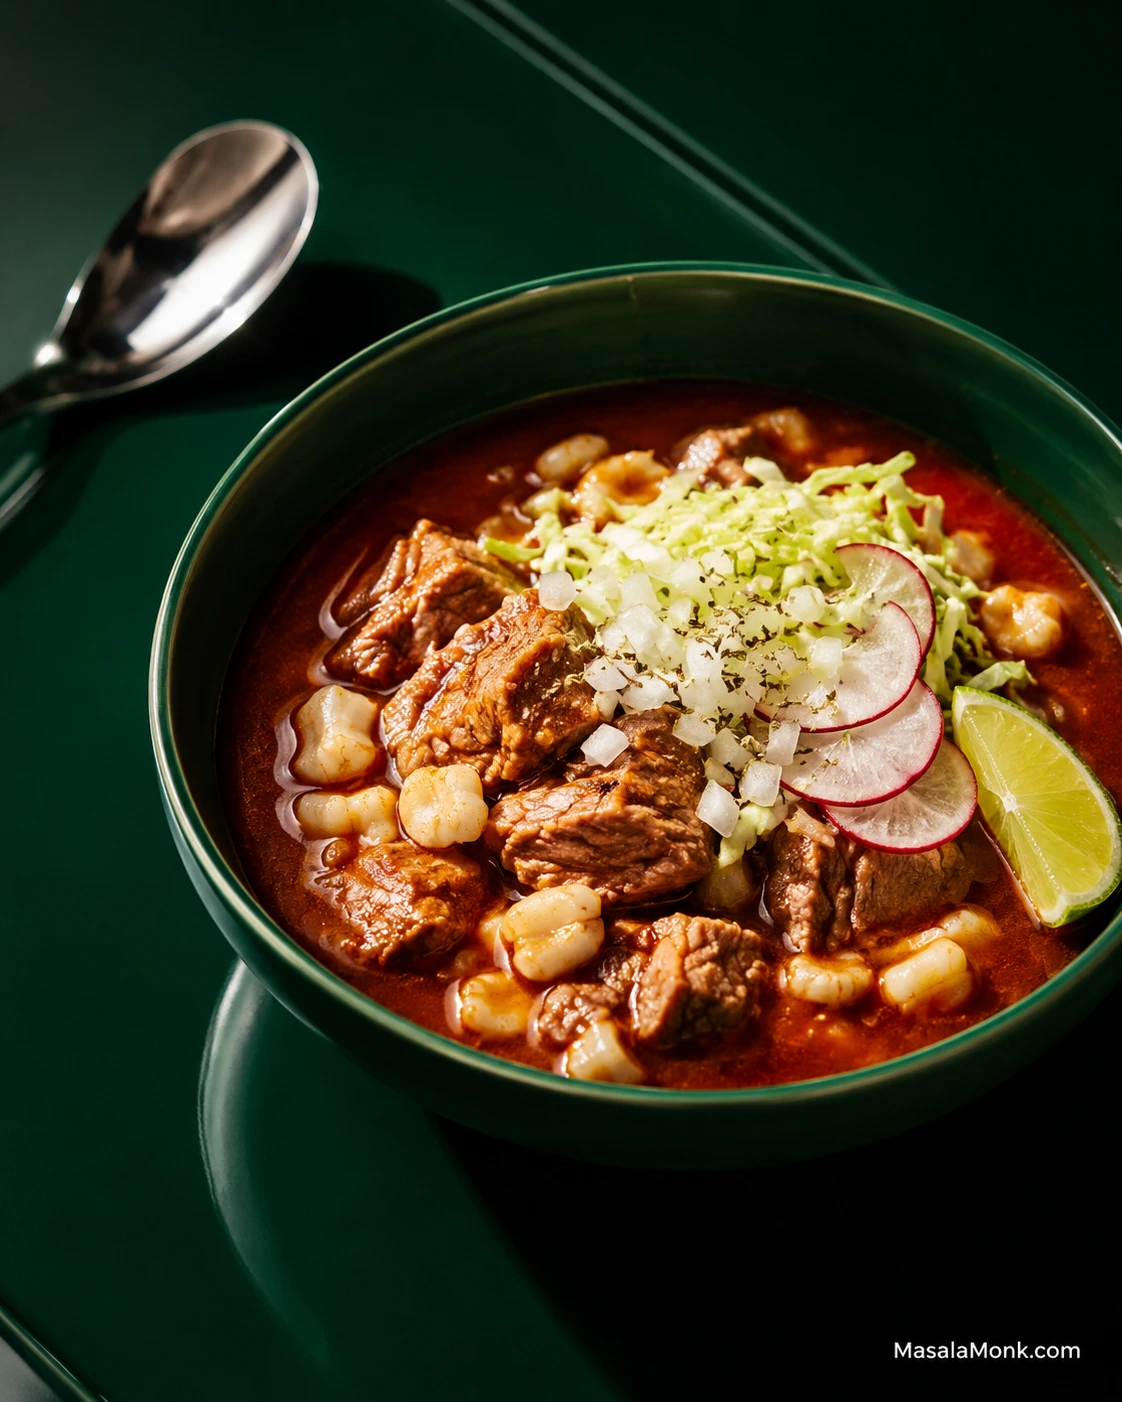
Portrait view of a green bowl filled with red pozole broth, large hominy kernels and pork chunks, topped with shredded cabbage, chopped white onion, radish slices, oregano, and a lime wedge.

A bowl of pozole rojo lands on the table hot and deeply savory: tender pork, plump hominy and a brick-red chile broth. Then you start changing it. Cold cabbage, sliced radish, onion, crushed oregano and lime make the next spoonful sharper, fresher and crunchier than the first. Part of the pleasure is that the pot is shared, but each bowl is yours to finish.

Pozole rojo is a Mexican hominy-and-meat soup or stew flavored and colored with dried red chiles. The details vary by region and household. Here, pork shoulder builds the broth while guajillo and ancho make the rojo, with chile de árbol available when you want more heat.

None of the individual steps is especially difficult. What matters is knowing when to stop toasting a chile, when the shoulder is ready for the next stage and what kind of hominy you actually bought. Those small decisions matter far more than throwing extra spices into the pot at the end.

Use the times below as checkpoints, not finish lines. We’re aiming for a loose, brick-red broth with tender pork that still holds as pieces. The hominy should taste seasoned by the pot around it, and the garnishes should brighten an already good bowl rather than rescue it.

Quick Answer: How to Make Pozole Rojo

  • Simmer the pork. Cook pork shoulder gently with onion, garlic and bay until nearly tender.
  • Make the rojo. Briefly toast guajillo and ancho chiles, soften them, blend with aromatics, strain, then cook the puree in a little fat until glossy and no longer raw-smelling.
  • Bring the pot together. Add the rojo and rinsed hominy while the shoulder still has a little resistance. Simmer another 30–45 minutes.
  • Finish the bowls. Add cabbage or lettuce, radishes, white onion, Mexican oregano and lime. Serve tostadas and extra chile alongside.
On This Page

Before You Start: Make These 3 Choices

ChooseUse ThisWhy
Pork3 lb / 1.36 kg boneless shoulderForgiving, flavorful and rich enough to build the broth
ChilesGuajillo + ancho; árbol optionalGuajillo carries the red-chile flavor, ancho adds depth and árbol brings heat
Hominy4 × 15-oz / 425-g cansOur default: hominy in nearly every spoonful without taking over the bowl

Using bone-in shoulder? Buy roughly 3½–4 lb / 1.6–1.8 kg and, if possible, have the butcher cut it into several large pieces. A whole bone-in roast will cook differently from 2-inch chunks.

Using dried hominy? Read the dried-hominy instructions first. You need corn that has already been nixtamalized but still requires soaking and cooking; untreated dried corn is a different project.

Once those choices are settled, the cooking is mostly a matter of timing the pork and rojo so they reach the finished pot at the right moment.


Pozole Rojo Recipe

This pork pozole rojo uses whole dried guajillo and ancho chiles rather than canned enchilada or red sauce. The main pot stays mild to moderate, leaving plenty of room for extra chile at the table.

  • Serves: 8 as a main course; about 10–12 smaller portions
  • Prep: about 30 minutes
  • Hands-on cooking after prep: about 15–30 minutes
  • Cook/simmer: about 2½–3 hours
  • Total with canned hominy: about 3–3½ hours
  • Heat: mild to moderate, adjustable
  • Recommended pot: about 8 qt / 7.5 L

Starting with dried hominy adds considerably more time: commonly an overnight soak plus several hours of separate cooking, depending on the product.

Equipment

  • 8-quart / approximately 7.5-L stockpot or Dutch oven
  • Blender suitable for hot foods
  • Fine-mesh sieve
  • Medium saucepan or high-sided skillet
  • Heatproof bowl
  • Tongs or slotted spoon
  • Knife and cutting board

For the Pork Broth

  • 3 lb / 1.36 kg boneless pork shoulder, cut into roughly 2-inch / 5-cm pieces
  • Optional for a richer broth: 1 lb / 450 g pork neck bones, meaty ribs, shank or pig’s feet
  • 10 cups / 2.4 L water to start, or enough to mostly cover the pork
  • 1–2 cups / 240–475 ml additional hot water, available if needed
  • ½ large white onion
  • 4 garlic cloves, peeled
  • 2 bay leaves
  • 18 g fine sea salt, divided, plus more to taste

If the shoulder has a very thick, hard exterior fat cap, trim away the excess. Leave the softer fat and marbling that help keep the meat juicy.

Salt varies enormously by brand and crystal size, so weight is the most reliable measure. Start with about 12 g in the broth and reserve roughly 6 g for final seasoning.

No scale? With fine sea salt, about 2 teaspoons is a conservative starting point for the broth; season the finished pot gradually. Kosher salts vary substantially by crystal size and shouldn’t be substituted spoon-for-spoon.

Water is the default because the pork is building its own broth. With boneless shoulder and no extra bones, some low-sodium stock can replace part of the water for a slightly fuller starting point. Reduce the added salt accordingly.

For the Red Chile Sauce

  • 6 medium dried guajillo chiles, 30–35 g
  • 3 medium dried ancho chiles, 30–40 g
  • 0–2 dried chiles de árbol, optional for heat
  • ½ large white onion
  • 4 garlic cloves
  • 2 teaspoons Mexican oregano
  • ½ teaspoon freshly ground black pepper
  • 2 tablespoons / 30 ml lard or neutral cooking oil
  • 1–2 cups / 240–475 ml pork broth from the pot, as needed for blending

Chile sizes vary enormously, so let the gram weight win when your particular chiles look unusually large or small.

Mediterranean oregano will work if Mexican oregano isn’t available, though the aroma is different.

For the Hominy

  • 4 cans hominy, 15 oz / 425 g each, about 60 oz / 1.7 kg packaged weight total, drained and thoroughly rinsed

White or golden/yellow canned hominy both work.

For Serving

  • 3–4 cups finely shredded cabbage or lettuce
  • 6–8 radishes, thinly sliced
  • ½–1 medium white onion, finely chopped
  • 4–6 limes, cut into wedges
  • About 2 tablespoons Mexican oregano
  • 8–12 tostadas
  • Optional avocado, cilantro and hot chile salsa

1. Start the Pork Broth

Put the pork shoulder, optional bone-rich pork, ½ onion, 4 garlic cloves, bay leaves, about 12 g salt and 10 cups / 2.4 L water in the pot. Most of the pork should sit beneath the liquid; add a little more water if your pot or bone-in pieces require it.

Bring the pot just to a boil over medium-high heat. Skim away the heavier gray foam that gathers on the surface.

Lower the heat as soon as the broth boils. Partially cover and maintain a gentle simmer with lazy bubbles appearing here and there.

This is the quiet part of the recipe. Keep an eye on the liquid level, add hot water if the pork becomes too exposed, and let the shoulder simmer for about 1½ hours while you turn to the chiles.

2. Prepare and Toast the Chiles Briefly

Stem the guajillo and ancho chiles and shake or scrape out most of the seeds. Stem the árbol chiles too, if using.

Heat a dry skillet over medium to medium-low heat. Press a guajillo or ancho against the hot surface for about 5–10 seconds, flip and warm the other side briefly.

The chile should smell fragrant and become slightly more pliable. Still cold and stiff? Give it another brief contact with the pan.

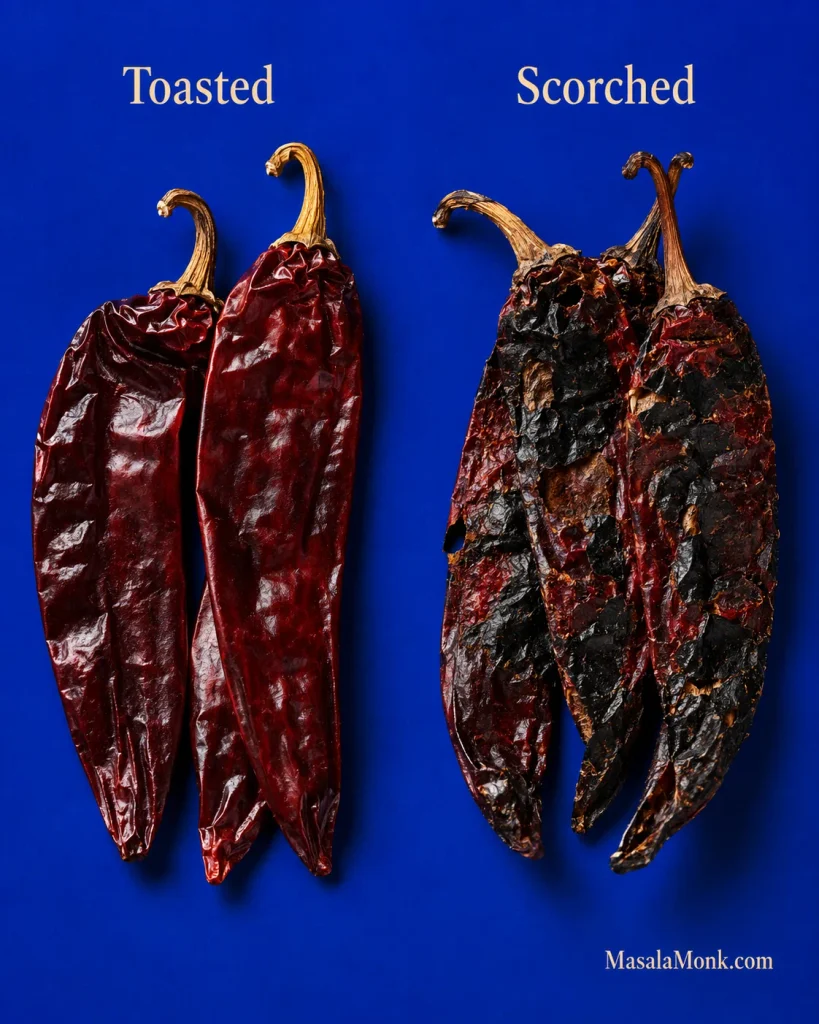
Árbol chiles are thin and scorch quickly. Warm them for only a few seconds or put them straight into the soaking bowl. Blackened patches, smoke or an acrid smell mean a chile has burned; replace a badly scorched one.

Side-by-side dried chiles labeled Toasted and Scorched on a blue background; the toasted chiles remain glossy dark red while the scorched chiles have extensive blackened patches.
With guajillo and ancho chiles, it is safer to stop a little early than a little late. A chile that is merely under-toasted can still flavor the rojo; a badly scorched one can bring bitterness that soaking will not undo.

3. Soften the Chiles

Put the chiles in a heatproof bowl and cover with very hot water. Soak for about 15–20 minutes, until they bend and fold easily without cracking.

Taste a little of the soaking water. If it tastes pleasantly chile-like, use some for blending. If it tastes bitter, burnt or unpleasantly harsh, discard it and use pork broth instead.

4. Blend and Strain the Rojo

Put the softened chiles in a blender with the remaining ½ onion, 4 garlic cloves, Mexican oregano, black pepper and about 1 cup / 240 ml pork broth.

Let steaming-hot broth stand for a few minutes before blending. Don’t overfill the jar, and follow your blender manufacturer’s instructions for venting hot liquids safely.

Blend until smooth, adding only enough extra broth to keep everything moving. The puree should pour easily. Push it through a fine-mesh sieve to catch tougher pieces of chile skin that could make the finished broth gritty.

5. Cook the Red Chile Sauce

Heat the lard or oil in a high-sided skillet or saucepan over medium heat. Carefully pour in the strained puree; it can splatter when it meets the hot fat.

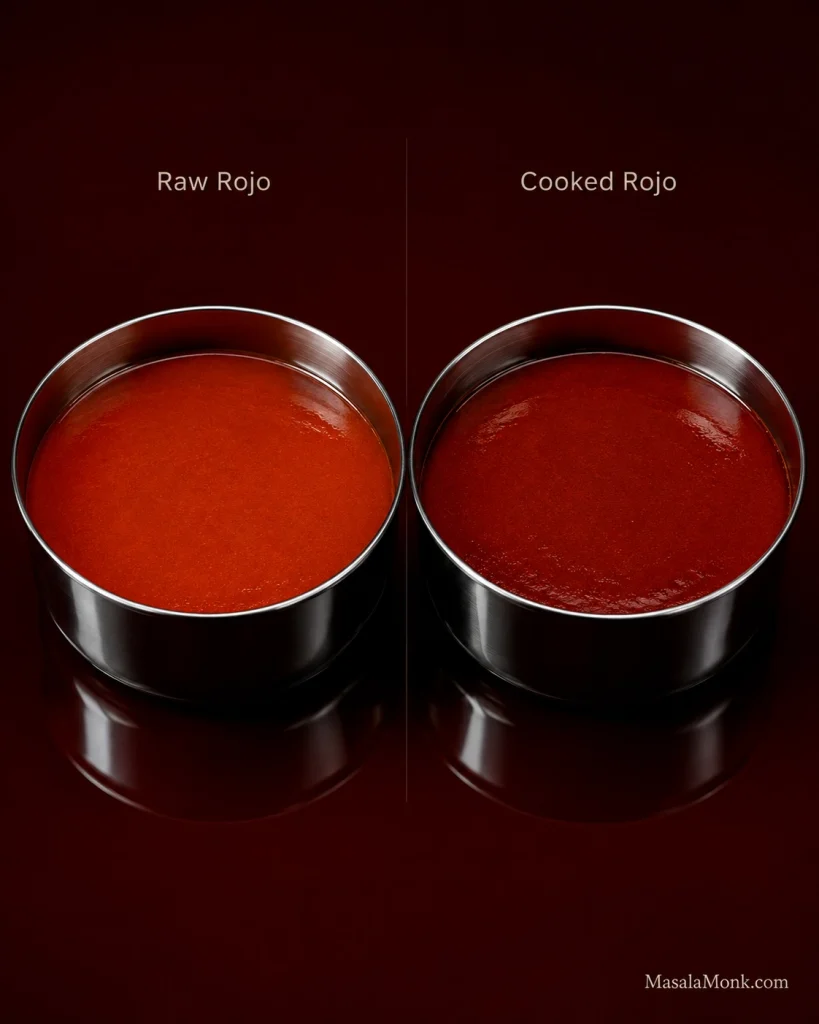
Cook for about 8–12 minutes, stirring regularly. The puree will darken slightly and turn glossy as the sharp soaked-chile smell cooks away. Once it smells cooked rather than raw, move on.

Two metal bowls labeled Raw Rojo and Cooked Rojo show a brighter red raw chile sauce beside a slightly darker, glossier cooked sauce.
The visual change in a properly cooked red chile sauce for pozole is intentionally subtle. If the rojo becomes so thick that it has to be scraped from the pan instead of poured, it has reduced farther than this recipe needs.

Cooking the rojo separately isn’t mandatory, but it is deliberate here: the short fry concentrates the puree before it joins the pork broth.

6. Check the Pork

At around 1¾–2 hours total simmering time, test a piece of shoulder. A fork should enter much more easily than it did at the beginning. A little resistance is fine because the meat still has another 30–45 minutes in the finished pot.

Meat that remains tight and rubbery needs another 20–30 minutes at the same gentle simmer.

Remove the bay leaves and any large pieces of broth onion. If you used neck bones, ribs or shank, remove the bones, pull off any tender meat and return it to the pot. With pig’s feet, keep whatever tender edible pieces you enjoy and discard the hard bones.

Pork becomes safe to eat before shoulder becomes tender enough for pozole. Keep cooking for the texture, not the thermometer alone.

7. Add the Rojo and Hominy

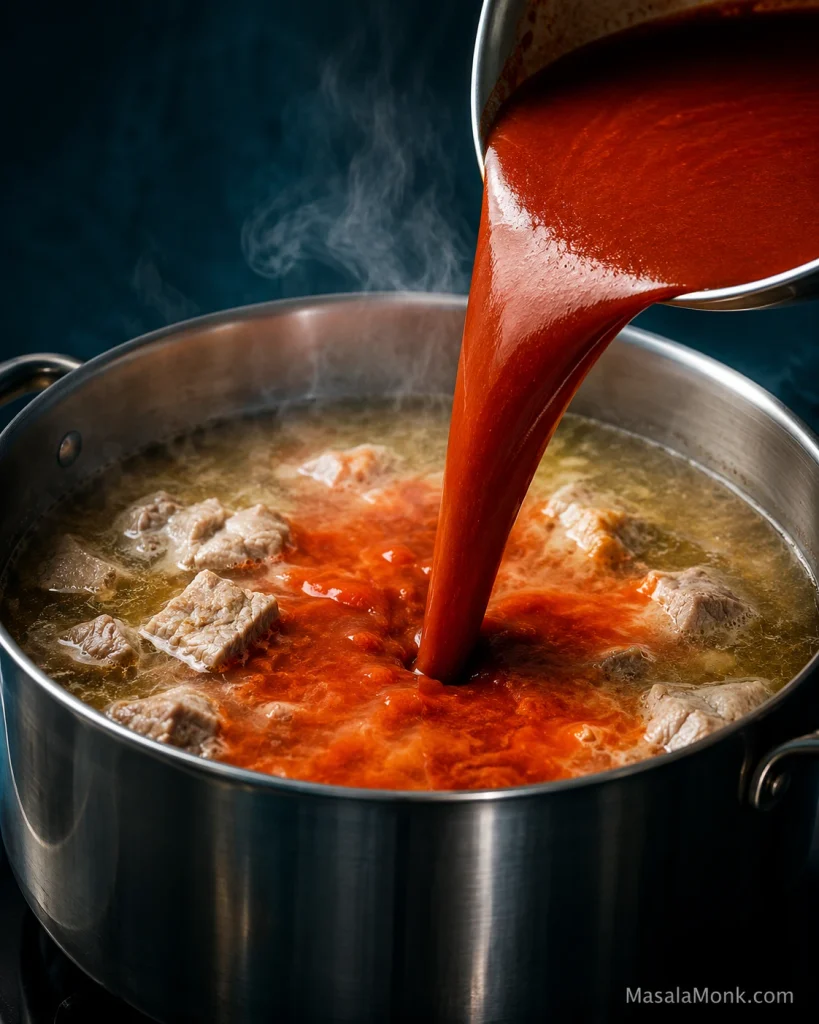
Stir the cooked rojo into the pork broth. The pale broth turns brick-red almost immediately, and the smell of the pot shifts from mostly pork and garlic to something unmistakably chile-rich.

Smooth red chile sauce being poured into a stainless-steel pot of pale pork broth with visible pork chunks, creating red swirls through the simmering liquid.
A properly strained rojo should disappear into the pork broth, not float through it as chile-skin flecks or coarse pulp. That smooth dispersion is one reason straining matters even though the sauce will simmer again in the finished pot.

Add the drained and thoroughly rinsed hominy. Return the pot to a gentle simmer and cook for another 30–45 minutes, uncovered or partially covered.

For this version, stop before the shoulder falls completely into shreds. It should yield easily while still leaving you substantial pieces of pork.

The hominy should no longer taste like plain kernels dropped into soup; it should taste of the pork-and-chile broth around it.

8. Season and Serve

Now taste. Add the remaining reserved salt gradually, stirring and tasting between additions.

A watery broth needs reduction before much more salt. An over-concentrated one needs hot water or unsalted stock first. Skim off large pools of fat while leaving a light sheen on the surface.

Ladle pork, hominy and plenty of rojo into bowls and bring the garnishes to the table.


What Should Good Pozole Rojo Taste and Feel Like?

Taste the broth first. Pork and dried chile should feel like they belong to the same liquid; it shouldn’t taste like plain stock with red sauce stirred in at the end. Drag a spoon through it. The broth should move easily, with enough body from pork, corn and chile to linger lightly on the spoon without turning into chile gravy.

The color may look fiercer than the heat. A deeply red bowl can still be quite mild, especially when the rojo relies mostly on guajillo and ancho.

Break a piece of shoulder with the edge of your spoon. It should separate with gentle pressure while still giving you an actual piece of pork to lift and eat.

Bite a hominy kernel in half. Tender with a little chew is good; a hard or chalky center needs more cooking.

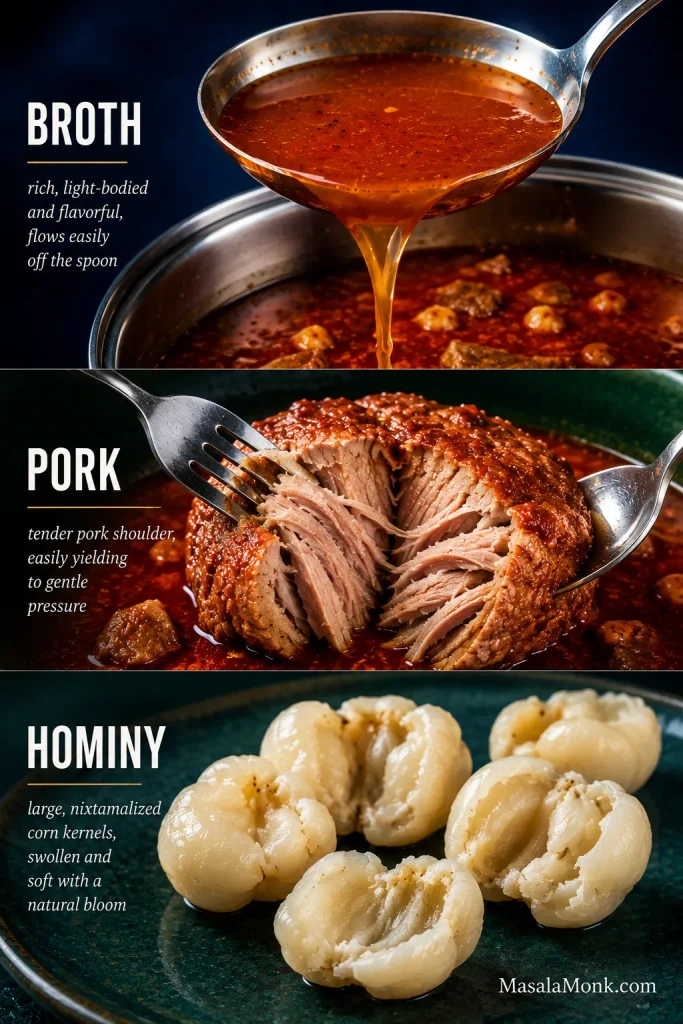
Three stacked close-up photographs labeled Broth, Pork, and Hominy show flowing red broth in a ladle, tender pork shoulder separating under utensils, and large opened cooked hominy kernels.
These three checkpoints do not always finish at the same minute. If one component still lags, cook for that cue rather than the clock, then recheck the broth, pork and hominy before serving.

Now add lime to one spoonful or one side of the bowl and taste again. Lime shouldn’t rescue a bland broth. It should make an already savory one feel brighter, fresher and less heavy.

Something still off? Jump to Pozole Rojo Troubleshooting →

How to Serve Pozole Rojo

The garnishes finish the bowl. Cabbage or lettuce cools the hot broth, radish adds a peppery snap, onion brings fresh sharpness, Mexican oregano adds aroma and lime cuts through the richness of the pork. Tostadas bring the crunch.

Put the garnishes down the middle of the table and leave the bowls unfinished. Someone will pile on cabbage, somebody else will mostly want lime and oregano, and the person chasing heat can reach for the salsa. By the time everyone starts eating, no two bowls need to look quite the same.

Avocado, cilantro and extra chile salsa are also common additions in different households. Crema and cheese also appear in some versions, but they aren’t part of the core garnish set used here.

To build a bowl, ladle in pork, hominy and plenty of broth. Add cabbage, radish and chopped onion. Rub a little oregano between your fingers over the steam, squeeze in lime and then decide how much extra chile you want.

Pozole is built for a table full of people. One pot can stay hot while everyone finishes a bowl differently. Someone goes back for seconds, someone adds another squeeze of lime, and the cook can stay at the table instead of assembling every serving.

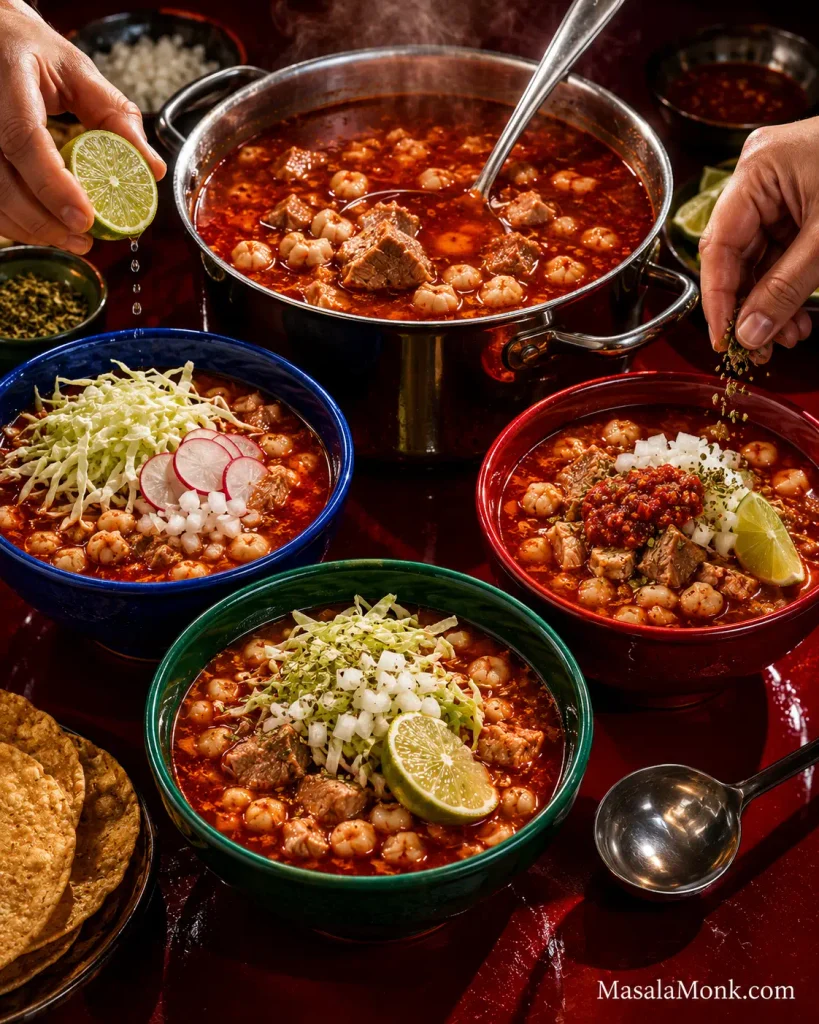
Steaming pot of pozole rojo surrounded by three bowls with different toppings; one emphasizes cabbage and radish, one lime and oregano, and one red chile salsa, while two hands add lime and herbs.
Keep the shared pot balanced; lime, Mexican oregano and extra chile can move each bowl brighter, sharper or hotter at the table.

That flexibility at the table reflects a broader truth about pozole: there isn’t one national pot that everyone makes exactly the same way.

About This Style of Pozole Rojo

Mexican pozole rojo varies by region and household in its chile blend, pork cuts, aromatics and garnishes. Mexico’s Secretaría de Agricultura describes red pozole as particularly associated with Jalisco, with ancho and guajillo among the chiles used and pork among the common meats.

This pot follows that familiar line: nixtamalized corn, pork, guajillo and ancho. Other versions may change the chile blend, include tomato or use aromatics such as cumin, clove, mint or cilantro. Those differences are part of the dish’s regional and household life.

Pozole, Posole and the Three Main Styles

Pozole is the standard spelling in Mexican Spanish. Posole is an established spelling in the United States, particularly in New Mexican and Southwestern cooking, where the word may refer to the prepared corn as well as the finished dish. New Mexican red posole often centers on New Mexico red chile rather than the guajillo-and-ancho blend used here.

  • Rojo: Pozole rojo gets its defining character from dried red chiles.
  • Verde: Pozole verde takes its green character from ingredients such as green chiles, tomatillos and herbs, depending on the region and recipe.
  • Blanco: Pozole blanco leaves out a defining red or green chile sauce so the pale meat-and-hominy broth takes center stage.

Within that range, changing the chile blend is one of the easiest ways to change the character of the pot.

What Each Chile Does in Pozole Rojo

Guajillo, ancho and árbol may all look like dried red peppers in the bag, but they do very different jobs once they reach the pot.

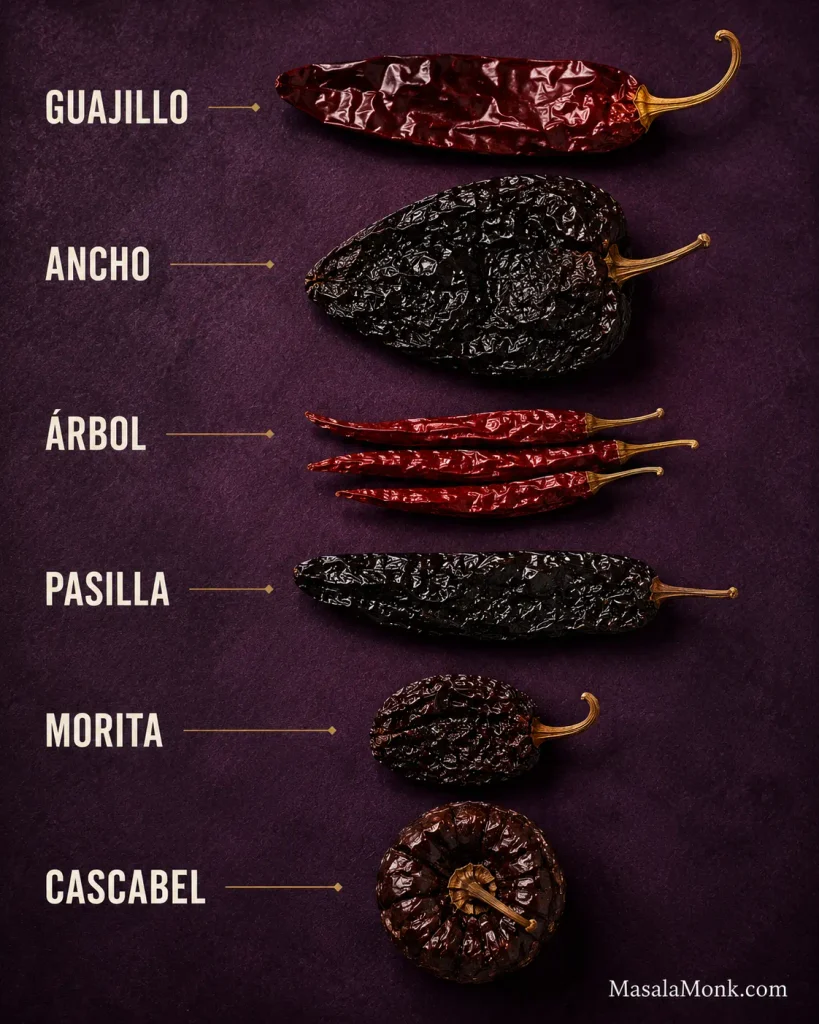
Six dried Mexican chiles arranged vertically on a plum background and labeled Guajillo, Ancho, Árbol, Pasilla, Morita, and Cascabel, showing their different sizes, shapes, and colors.
For dried Mexican chiles, silhouette is often easier to compare than exact color: ancho is broad, guajillo elongated, árbol thin, pasilla long and narrow, morita small and compact, and cascabel distinctly round.
ChileFlavor / RoleHeatBest When You Want…
GuajilloFruity red-chile backboneMildA vivid red broth without much extra heat
AnchoDark fruit, sweetness and depthMildA rounder, deeper rojo
ÁrbolClean, direct heatHotMore heat without adding much bulk
PasillaEarthy complexityMildA darker, earthier blend
MoritaSmoky chile characterMediumA noticeable smoky edge
CascabelRounded, nutty chile flavorMildA softer, nuttier direction

The first three make the formula above. Think of pasilla, morita and cascabel as directions you can take the blend rather than automatic one-for-one replacements.

Look for guajillos and anchos that still bend somewhat instead of shattering immediately. Their skins should retain some color and sheen, and the bag should smell fruity or earthy. A good bag announces itself before you ever turn on the stove; faded, dusty and brittle chiles tend to taste flatter.

Why Guajillo Leads the Blend

Tear open a good guajillo and its role makes sense: fruity, warm and distinctly red-chile without much aggressive heat. It carries most of the rojo’s chile character here. Ancho sits behind it with darker fruitiness and depth.

Controlling the Heat

More guajillo or ancho usually gives you more chile flavor without dramatically increasing the heat. Chile de árbol is the heat lever.

  • Mild: omit árbol
  • Moderate: start with 1 árbol
  • Hotter: try 2 árbol and offer extra salsa at the table

Árbol chiles vary in strength, so those amounts are only a rough guide. Build depth in the pot; let serious heat happen at the table.

Guajillo-heavy blends also tend to look brighter. More ancho, pasilla or morita pulls the broth toward brick-red or brown-red. Both can be completely normal; darker color becomes a warning sign only when the broth also tastes burnt or acrid.

For a deeper look at how dried peppers soften, blend and change once cooked, see our guide to cooking with dried pepper sauces.

Cooking now? Return to Step 2: Toast the Chiles → or go back to the full Pozole Rojo Recipe.

Hominy for Pozole: Canned, Frozen or Dried

Hominy begins as corn, but nixtamalization gives it the plump kernels and distinctive flavor expected in pozole. It tastes corn-forward, mildly earthy and nutty rather than sweet like canned sweetcorn, with a tender but substantial chew.

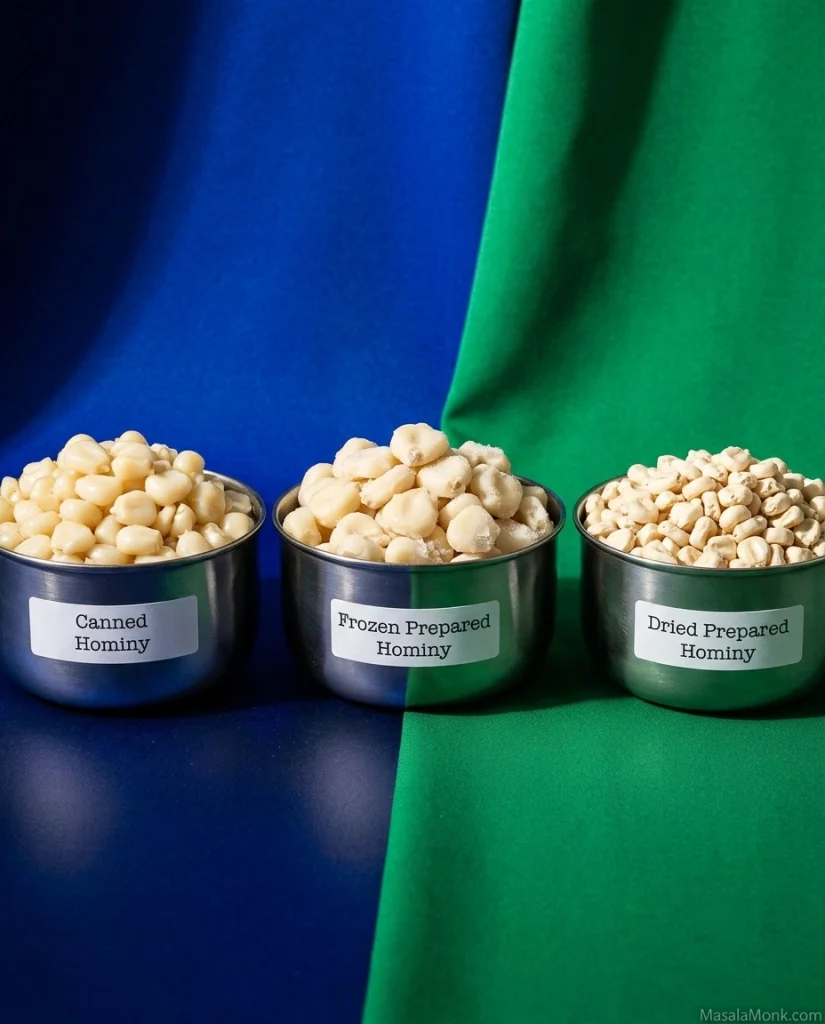
Three metal bowls compare canned hominy, frozen prepared hominy, and dried prepared hominy; the canned and frozen kernels are large and hydrated while the dried kernels are noticeably smaller.
Think about prepared size rather than dry size when comparing hominy. Canned and frozen prepared kernels have already swollen substantially; dried prepared hominy starts smaller because much of that expansion still has to happen in the pot.

Our homemade corn tortilla guide explains the same transformation from the masa side: masa harina is also made from nixtamalized corn, which is why it behaves so differently from ordinary cornmeal. Regular canned sweetcorn won’t give you the same flavor or texture.

How Much Canned Hominy?

Our default is four 15-ounce cans. That puts hominy in nearly every spoonful while leaving plenty of room for pork and broth.

For About 3 lb / 1.36 kg PorkHow the Pot Changes
3 × 15-oz cansBrothier and more pork-forward
4 × 15-oz cansOur default
5 × 15-oz cansVery hearty and hominy-forward

Canned hominy is already tender. The 30–45 minutes it spends in this pot are about integration: the kernels absorb the red broth while the broth picks up more corn character. Add them a little later if you prefer a firmer, more distinct kernel.

Rinse First; Blanch or Roast Only if You Want To

Rinsing is the default. Drain canned hominy and rinse it thoroughly under cool running water.

A noticeable canned flavor is a reason to blanch: put the rinsed kernels into fresh boiling water, let the water return to a boil, then drain and rinse again.

Roasting is optional. For firmer texture and a slightly more concentrated corn flavor, dry the rinsed hominy and roast at 450°F / 230°C for 15–20 minutes, tossing once, until fragrant and beginning to brown.

Prepared frozen hominy is a useful middle ground when you can find it. Cook it according to the package directions until tender, then add it with the rojo in Step 7.

Using canned hominy, as in the main recipe? Return to Step 7: Add the Rojo and Hominy → The next section is only for cooks starting with dried hominy.

Using Dried Hominy Instead

Dried hominy can give pozole an especially full corn flavor. The first job is making sure you bought the right corn.

You want dried corn that has already been nixtamalized but still needs soaking and cooking. Packaging may call it prepared dried hominy, dried posole or prepared pozole corn.

Be careful with names alone. Maíz pozolero or cacahuazintle does not necessarily mean the corn in a particular bag has already been nixtamalized. Look for prepared/nixtamalized wording or follow the producer’s preparation instructions. Untreated dried corn requires another process entirely.

Prepared hominy varies by producer, so let the package directions win here. Rancho Gordo is a useful reference if you’re unsure whether the dried corn you bought is already prepared or still needs nixtamalization.

Once you know which corn you bought, the rest is mostly patience.

How to Cook Dried Hominy for Pozole

For this batch, start with 14–16 oz / 400–450 g dried prepared hominy. A pound / 454 g typically yields about 6–7 cups cooked, though variety and final tenderness affect the yield.

  1. Sort and rinse the kernels.
  2. Soak according to the package directions; an 8-hour or overnight soak is common for prepared dried hominy.
  3. Drain and cover with fresh water by about 2 inches / 5 cm.
  4. Bring the corn to a boil as directed by the producer.
  5. Reduce to a steady simmer and cook until tender, commonly 2–4 hours or longer.

Taste a kernel. Still hard or chalky in the middle? Keep cooking. Fully cooked hominy should be tender and pleasantly chewy, and many kernels will split or bloom at one end.

Reserve some cooking liquid, then drain. Use roughly 6–7 cups cooked hominy in place of the canned hominy and add it with the rojo in Step 7. Save the cooking liquid for loosening the finished broth if needed.

Ready to use the hominy? Return to Step 7: Add the Rojo and Hominy →

Choosing Pork for Pozole

For this pot, buy pork shoulder unless you have a reason not to. Its marbling and connective tissue keep the meat juicy through a long simmer and contribute body to the broth.

Neck bones, meaty ribs or shank can simmer alongside it when you want more pork flavor and gelatin. Pig’s feet bring still more collagen and body, but none of these additions is required. Pork leg makes a leaner pot and needs closer attention; pork loin is a poor fit for this long simmer.

Shoulder can seem stubborn for a while and then soften quickly once its connective tissue starts giving way. That is why the fork matters more than a rigid minute mark.

Do You Need to Brown the Pork?

No. Starting the shoulder in water keeps this broth cleaner; the cooked rojo provides the darker depth later.

Pozole Rojo Troubleshooting

If something feels wrong, identify the symptom before changing the pot. Bitterness, blandness, tough pork and thin broth all need different fixes.

Flavor Problems

Bitter or burnt? Check the chiles first. A chile may have blackened during toasting, the puree may have caught while frying, or bitter soaking water may have gone into the blender.

Caught a badly scorched rojo before it reaches the soup? Remake it. Once a strong burnt flavor has been stirred through the whole pot, it is difficult to remove completely. Mild bitterness may sometimes be softened with unsalted broth and careful seasoning, but severe scorching does not have a magic fix.

Bland? Work out what is actually missing before adding more of everything.

  • Watery overall: simmer uncovered and reduce.
  • The flavors are there but muted: add salt gradually.
  • The chile tastes raw or separate: give the combined pot more gentle simmering time.
  • Rich but dull: finish one bowl with lime before changing the whole pot.
  • Porky but genuinely weak on chile: Make half a batch of the rojo, cook it as in Step 5, then stir it in gradually and taste as you go. Salt and reduction can intensify the chile already present, but they can’t replace what’s missing.

Texture and Consistency Problems

Pork still tough? Keep the gentle simmer and give it another 20–30 minutes. Don’t turn up the heat. Tough shoulder usually needs more time for its connective tissue to soften.

Dried hominy still hard? First make sure the corn really is prepared/nixtamalized hominy. Once that is established, hardness usually means more cooking time. Keep it submerged and continue simmering; some products take substantially longer than others.

Broth too thin? Simmer uncovered to reduce it. When the flavor is already concentrated enough and you only want a little more body, blend ½–1 cup cooked hominy with some broth and stir it back in.

Quick Fixes for Other Problems

ProblemLikely CauseFix
Harsh or mouth-dryingOld chiles, tough skins, over-concentration or too little simmering after the rojo was addedGive it more gentle simmering time; check concentration and salt
Not spicy enoughGuajillo and ancho added flavor rather than much heatAdd a hot árbol or puya salsa, preferably at the table
Too spicyToo much hot chile for the batchAdd unsalted broth and, if practical, more pork or hominy; recheck salt afterward
Brown-red instead of bright redA darker chile blendDo nothing unless the broth also tastes burnt or acrid
Broth too thickToo much reduction or absorptionAdd hot water, unsalted broth or reserved hominy cooking liquid gradually
Greasy surfaceMore rendered pork fat than you wantSkim obvious pools; chilling makes excess fat easy to remove later
Pork dry or stringyLean cut, small pieces, aggressive boiling or overcookingUse shoulder in larger pieces and keep the simmer gentle next time
Canned hominy tastes separateNot enough integration timeSimmer another 15–20 minutes
Canned hominy tastes “canned”Brand or rinsing issueRinse more thoroughly; blanch or roast before adding next time
Dried hominy went mushyCooked beyond your preferred endpointStart tasting sooner next time; kernels can bloom without falling apart

← Back to the Pozole Rojo Recipe

Make Pozole Ahead: Recalentado, Storage and Reheating

There are two useful ways to get ahead. You can make the entire pot in advance and reheat it, or prepare the rojo 1–2 days ahead, refrigerate it separately and cook the pork and hominy on serving day.

Pozole is particularly good at becoming tomorrow’s lunch. Big pots are often made with leftovers in mind, and the reheated meal after a gathering is commonly called the recalentado.

Overnight, the hominy keeps absorbing broth while the pork and chile flavors settle together. The next bowl can taste even more integrated than the first. It will usually need a splash of water or broth because the corn has been drinking while you weren’t looking.

Blue bowl of reheated pozole rojo with pork and hominy, freshly topped with shredded cabbage, sliced radish, chopped white onion, oregano, and lime on a teal table.
Reheat the pozole first, then restore the contrast with fresh cabbage, radish, white onion, Mexican oregano and lime.

For Christmas, parties or a large family meal, handle the garnishes closer to serving. Shred the cabbage, slice the radishes, chop the onion and cut the limes while the pozole reheats.

Cool a Large Pot Safely

Don’t leave a full stockpot sitting at room temperature for hours while the center cools. USDA leftovers guidance recommends dividing large amounts of food into shallow containers so they cool quickly and refrigerating leftovers within 2 hours.

  • Refrigerator: Store cooled pozole in covered containers for up to 3–4 days. Keep fresh garnishes separately.
  • Freezer: Freeze for 3–4 months for best quality, leaving a little room for expansion.
  • Reheating: Heat gently, stirring occasionally, until leftovers reach 165°F / 74°C.

Add water or broth until the reheated pozole has the consistency you want, then taste for salt again.

Set out the fresh garnishes again and the reheated bowl feels like another meal, not simply yesterday’s leftovers.


Corn, chiles, pork and pots don’t all behave exactly alike, which is why the cues matter as much as the clock. If you make the pozole, tell us which chiles and hominy you found, whether you added any bone-rich pork and how your pot behaved.

If the hominy took longer, the shoulder softened sooner or your chile blend came out darker than expected, those details are useful too. They may help the next person cooking from the same kind of corn or bundle of dried chiles.

← Back to the Pozole Rojo Recipe · Back to top ↑