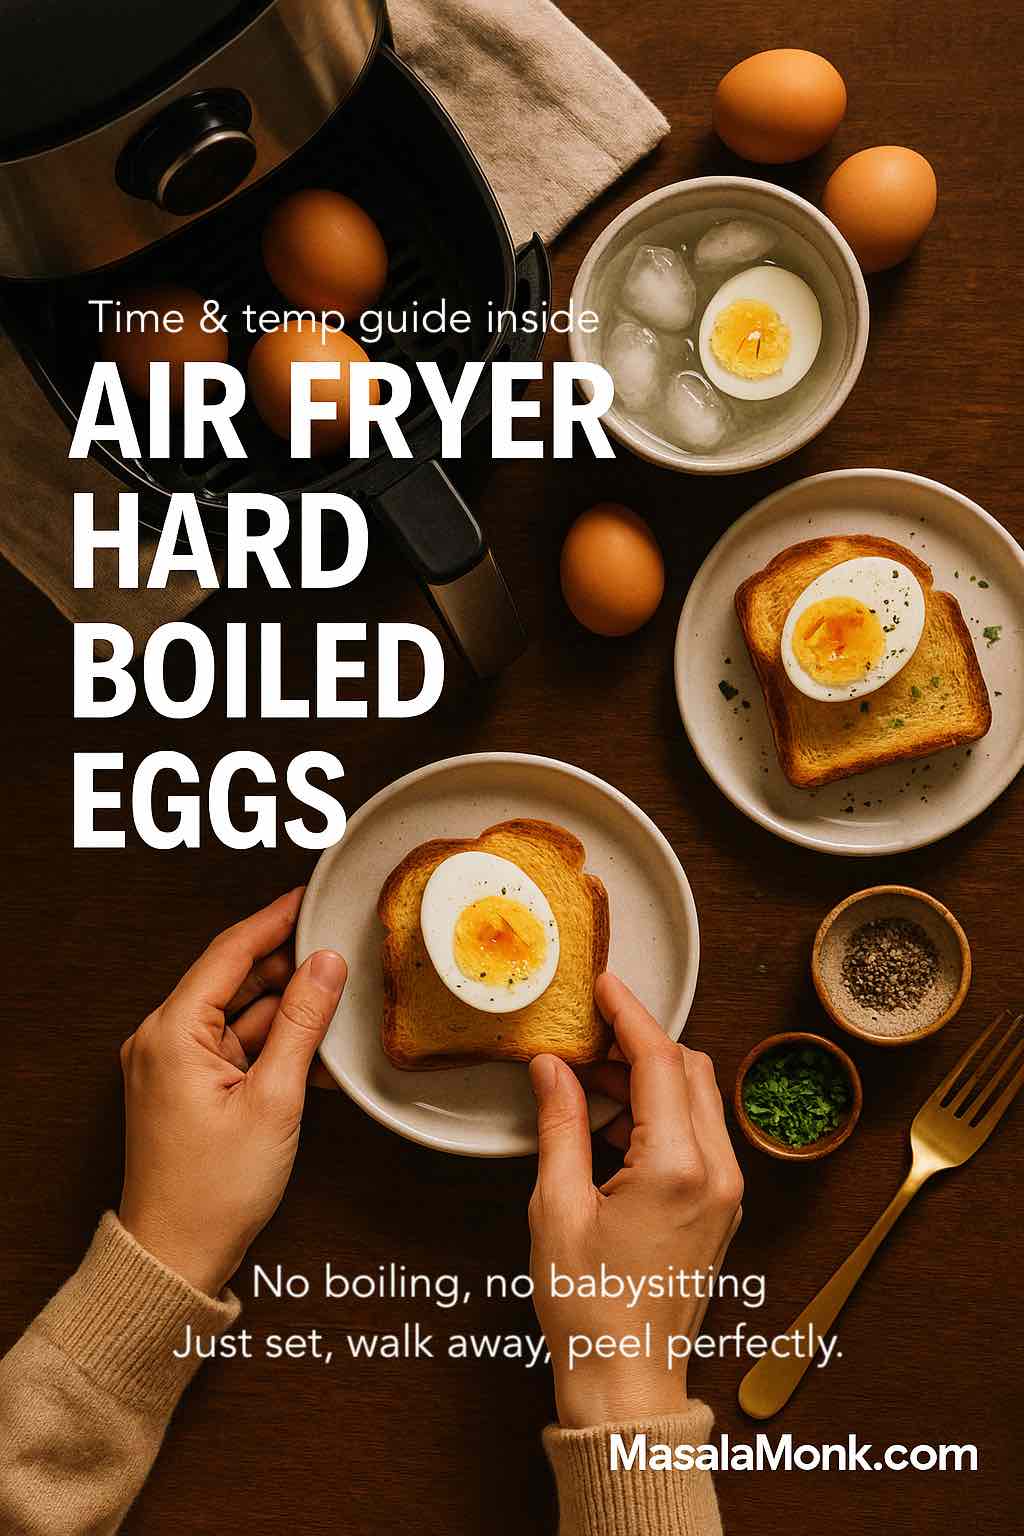
If there’s one tiny kitchen trick that quietly changes your weekly routine, it might be this: making air fryer hard boiled eggs instead of dragging out a pot of water every time you want a few eggs. You lay them gently in the basket, set the time, walk away, and come back to perfectly cooked eggs that slide out of their shells with almost no effort.
No hovering over the stove. No pan to scrub. Just reliable, easy-peel eggs you can eat on toast, turn into deviled eggs, throw into salads, or stash in the fridge for busy days.
What Are Air Fryer Hard Boiled Eggs, Really?
The phrase “hard boiled eggs” is a bit of a lie here, because there’s no actual boiling. Instead of simmering in water, the eggs sit in the dry, circulating heat of the air fryer. The shells protect the whites and yolks, and the hot air cooks them kind of like a tiny oven.
The result is surprisingly close to classic boiled eggs:
- Whites set and firm
- Yolks as soft, jammy, or firm as you like, depending on time
- Shells that usually peel very cleanly after a cold plunge
Curious about how other recipe developers handle it too? It’s interesting later to compare this method with recipes like Feel Good Foodie’s air fryer hard boiled eggs, but first it’s helpful to get your own timing dialed in.
Why Bother With Air Fryer Hard Boiled Eggs?
You might already have a foolproof stovetop method. So why move to the air fryer?
Less watching, more living
On the stove, you need to:
- Bring water to a boil
- Lower in the eggs gently
- Track the timing
- Adjust the heat to maintain a gentle simmer
With an air fryer, you:
- Preheat
- Put the eggs in
- Set the time
- Walk away
That makes it incredibly convenient if you’re also juggling toast, coffee, kids, or work messages in the morning.
Easily scale up or down
Some days you just need one egg for a snack. Other days you want a whole batch for meal prep. Either way, air fryer hard boiled eggs handle it effortlessly:
- One egg cooks just as easily as eight
- The method stays the same; you may only tweak the time by a minute if you pack the basket
It’s especially handy if you’re prepping a full week’s worth of eggs for breakfast boxes or high-protein snacks. If you’re tracking macros or protein intake, it’s useful to know exactly how much protein two boiled eggs give you, so a weekly batch practically becomes a pre-portioned protein stash in the fridge.
Great for meal prep and snacking
Because hard cooked eggs store well, they’re perfect for:
- Lunchboxes
- Salad toppers
- Quick snacks with just a pinch of salt and spice
- Deviled eggs for parties
The USDA notes that once eggs are hard-cooked and refrigerated, they can be safely stored for up to one week. That guideline, explained in their note on how long you can keep hard cooked eggs, makes a weekly egg-prep session genuinely worthwhile.
Ingredients and Equipment
You might already have everything you need.
Ingredients
- Eggs – any number that fits in a single layer in your air fryer basket
- Ice and cold water – for an ice bath to stop cooking and help with peeling
That’s all. No oil, no vinegar, no baking soda tricks required.
Equipment
- Air fryer – basket or drawer style
- Tongs or a spoon – to lift hot eggs safely
- Large bowl – to hold the ice water bath
If you’re new to air fryers in general, it’s worth giving a quick read to 12 common air fryer mistakes and how to fix them. Simple things like overcrowding, skipping preheating, or using the wrong temperature can make a big difference with eggs too.
Step-by-Step Recipe: Air Fryer Hard Boiled Eggs
Let’s walk through the whole process from cold eggs to easy-peel perfection.
Step 1: Preheat the air fryer for Hard Boiled Eggs
Begin by preheating your air fryer to 270°F (about 130–135°C) for 3–5 minutes.
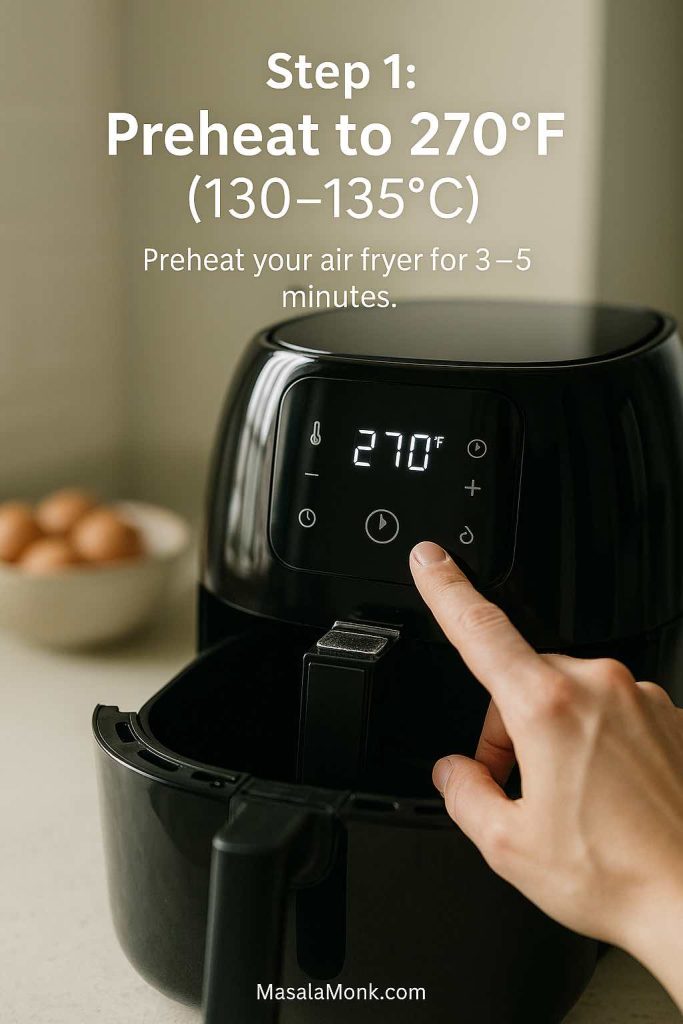
This short preheat helps ensure the eggs start cooking in a stable, even environment. If you’ve ever had eggs with slightly undercooked whites or overcooked yolks, a proper preheat alone can fix a lot of that inconsistency.
Step 2: Arrange the eggs in the basket
Once the air fryer is hot, carefully place the eggs in the basket:
- Lay them in a single layer
- Leave a little space between each egg so hot air can circulate
- Avoid stacking or using multiple racks for this method
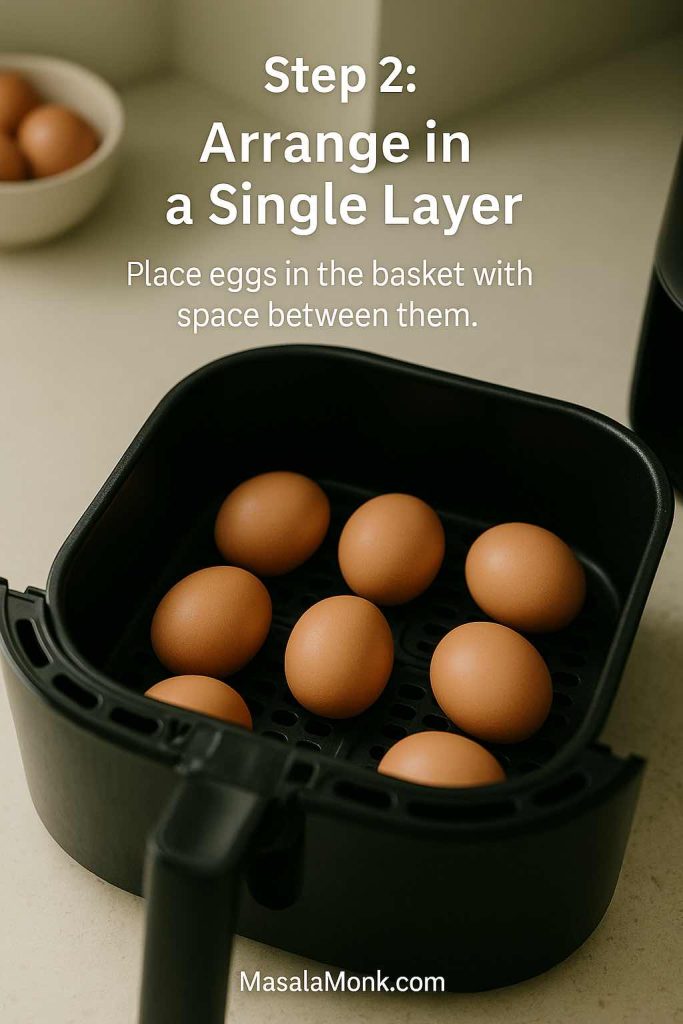
Packing too many eggs too tightly can cause uneven cooking, especially at the edges of the basket. A little breathing room gives you more consistent results.
Step 3: Set the time and temperature
Now comes the key part: the timing.
At 270°F (about 132°C), these ranges work well:
- Soft “boiled” eggs with runny yolks:
About 11–12 minutes - Jammy eggs with custardy yolks:
Around 13–14 minutes - Fully hard boiled eggs with firm yolks:
Roughly 15–17 minutes
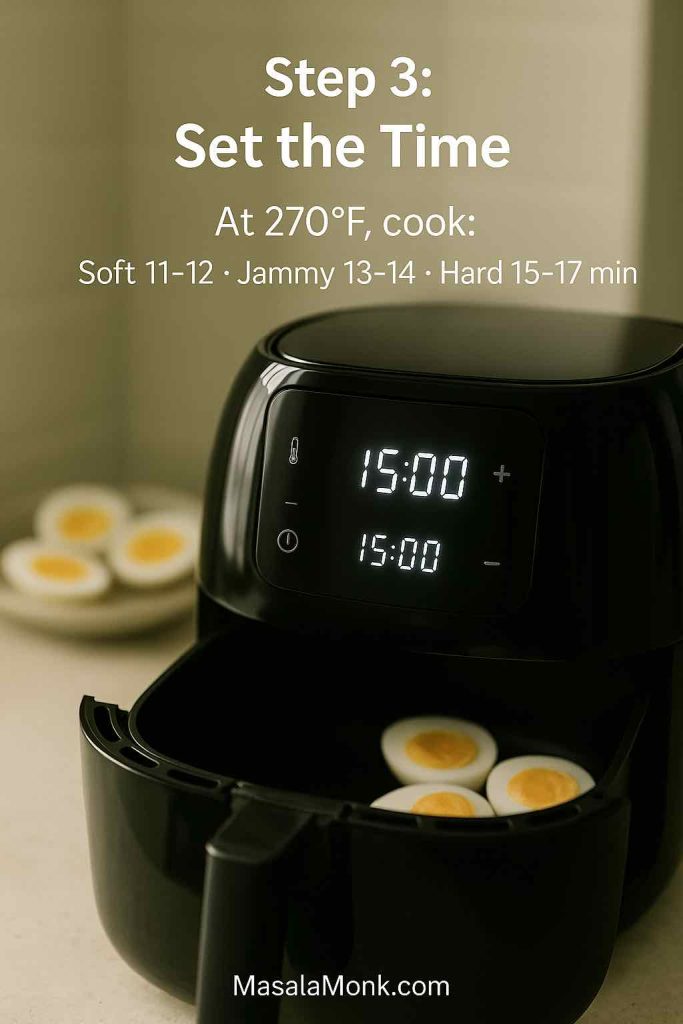
As a starting point, many people enjoy hard boiled eggs at about 15 minutes, then adjust slightly up or down on the next batch. Air fryers vary a bit in intensity, so once you test your machine, you’ll know your own perfect “house timing”.
If you’re curious how other cooks adapt the same idea, recipes like Skinnytaste’s air fryer hard boiled eggs or Cook At Home Mom’s air fryer eggs use similar combinations of temperature and timing, which can reassure you that you’re in a safe, sensible range.
Step 4: Shock the eggs in an ice bath
As soon as the timer beeps, move quickly:
- Carefully lift the eggs from the basket with tongs or a spoon.
- Transfer them straight into a bowl filled with ice and cold water.
- Let them rest there for at least 5–10 minutes.

This “shock” does two important things:
- It stops the cooking instantly, so your yolks don’t overcook and turn chalky.
- It helps the membrane pull away from the shell, making the eggs significantly easier to peel.
The FDA’s egg safety guidance on what you need to know about egg safety also emphasizes proper chilling and refrigeration to minimize foodborne risk, which is another good reason not to skip the ice bath.
Step 5: Peel or store Air Fryer Hard Boiled Eggs
After the eggs have cooled down:
- Crack each egg gently on the counter, then roll it to create a network of cracks.
- Start peeling from the wider end; there’s often a little air pocket there that makes it easier to get under the shell.
- If the shell clings in spots, peel under a gentle stream of running water to loosen it.

You can now:
- Eat the eggs right away
- Store them whole and unpeeled in the fridge
- Peel them all at once and keep them in an airtight container for quick snacks
For food safety, the USDA’s note on how long to keep hard cooked eggs clearly states they can be refrigerated for up to one week. That applies whether the eggs are peeled or still in their shells, as long as they’ve been chilled promptly.
Also Read: Negroni Recipe: Classic Cocktail & Its Variation Drinks
Air Fryer Hard Boiled Eggs: Soft, Jammy, and Hard
The beauty of this method is how easy it is to fine-tune the yolks.
How to make Soft air fryer eggs
If you love a runny yolk for dipping toast, try:
- 11–12 minutes at 270°F, followed by the same ice bath

The white should be set while the center stays liquid or very soft. These are gorgeous served:
- Over toast with butter and black pepper
- On top of hot ramen or noodle soup
- Alongside roasted veggies and bread
Also Read: How to Cook Perfect Rice Every Time (Recipe)
How to make Jammy air fryer eggs
Jammy eggs fall right in the middle: the yolk is thick and creamy rather than runny or crumbly.
- Aim for 13–14 minutes at 270°F, then chill in ice water
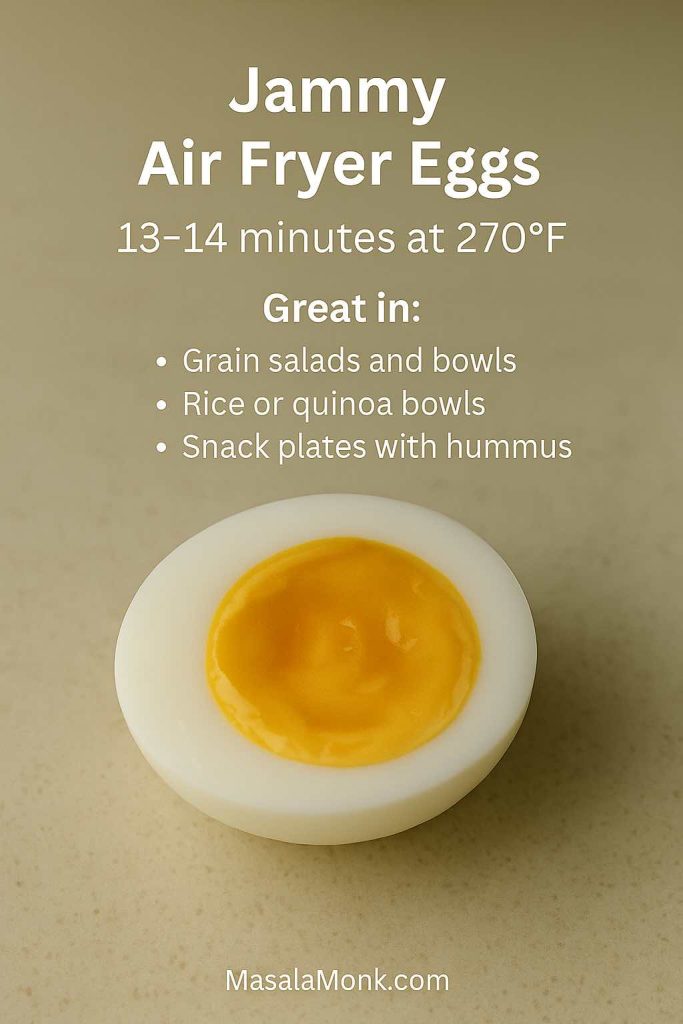
This texture shines in:
- Salads (especially grain-based ones)
- Rice and quinoa bowls
- Snack plates with vegetables, hummus, and a few olives
How to make Classic Air Fryer Hard Boiled Eggs
For air fryer hard boiled eggs that slice cleanly and mash well:
- Go with 15–17 minutes at 270°F, depending on how firm you prefer the yolk

These are ideal for:
- Egg salad
- Deviled eggs
- Sliced eggs on sandwiches or toast
- Protein-packed lunch boxes
Once you’ve tested your air fryer, you can even jot down separate timings for “soft,” “jammy,” and “hard” on a sticky note and keep it near the machine.
Also Read: Whiskey Sour Recipe: Classic Cocktail, Best Whiskey & Easy Twists
Ways to Use Air Fryer Hard Boiled Eggs
Having a container of air fryer hard boiled eggs in the fridge is like having a little protein toolkit ready whenever hunger hits.
Deviled eggs and party platters
Perhaps the most classic way to dress up hard boiled eggs is to turn them into deviled eggs. After you cook and chill your eggs in the air fryer, you can follow the fillings and flavor variations from this deviled eggs recipe with eight delicious twists.
Because air fryer hard boiled eggs usually have:
- Evenly cooked yolks
- Shells that peel cleanly
they’re perfect for deviled eggs that look neat enough to take to potlucks, brunches, or holiday tables.
Everyday breakfasts (and special brunches)
It’s very easy to build breakfast around a couple of eggs:
- Slice them over buttered toast with a sprinkle of chilli flakes.
- Pair them with a small fruit bowl and coffee.
- Serve them alongside sautéed greens or leftover veggies.
On weekends or special mornings, you can go further and pair your air fryer hard boiled eggs with something sweet from the same appliance, such as french toast sticks that work in both the oven and the air fryer.
If you’re cooking for someone who avoids eggs but still loves brunch, you could switch them to vegan french toast with air fryer options or eggless french toast that’s crispy and fluffy while you enjoy your eggs on the side.
High-protein snacks
Hard boiled eggs are basically ready-made high-protein snacks. Two eggs alone make a surprisingly satisfying mini-meal. For more detailed macro info, you can peek at this breakdown of protein in three scrambled eggs, then adapt the numbers for your boiled eggs.
For a snack plate, try combining:
- A couple of egg halves
- Some cut vegetables
- A handful of nuts or seeds
- A little hummus or yogurt dip
When you’d rather keep things plant-based, it’s nice to still lean on the air fryer. For example, high-protein vegan meal prep ideas using an air fryer offer plenty of tofu and legume-based options to enjoy alongside, or instead of, eggs.
Salads, bowls, and sandwiches
Because they slice and chop so neatly, hard boiled eggs slot beautifully into:
- Green salads
- Pasta salads
- Grain bowls with roasted vegetables
- Sandwiches and wraps
For a slightly more global twist, you might draw inspiration from a list of popular Mediterranean breakfasts, adding olives, cucumbers, tomatoes, olive oil, and fresh herbs around your eggs.
Simple Seasoning Ideas (and a Deep Dive if You Want One)
Plain boiled eggs with just a pinch of salt are comforting. Still, once you start sprinkling on spices and toppings, they get much more exciting.
If you want a full playground of ideas, there’s a dedicated guide to seasoning options that make eggs come alive, but here are a few easy combinations you can try immediately:
- Classic: Sea salt, black pepper, a drizzle of olive oil
- Desi-inspired: Chaat masala, red chilli powder, a squeeze of lime
- Smoky: Smoked paprika, garlic powder, a tiny bit of butter
- Crunchy: Toasted sesame seeds, soy sauce, chopped spring onions
- Herby: Fresh coriander or parsley, lemon zest, cracked pepper
You can also slice eggs onto toasted buns or pav and spoon over a light hollandaise or yoghurt-based sauce if you’d like to riff on some of the ideas from a desi twist on Eggs Benedict.
Nutrition and Health: Are Air Fryer Hard Boiled Eggs Good for You?
Eggs are one of those foods that look simple but come with a lot of nutrition and a lot of opinions.
What’s inside an egg?
Each egg contains:
- High-quality protein
- Fat (mostly in the yolk)
- A mix of vitamins and minerals, including B vitamins, choline, and some fat-soluble vitamins
For a closer look at what each part gives you, you can check:
- A focused breakdown of egg yolk nutrition and protein
- A separate overview of egg whites for weight loss and healthy eating
Together, those explain why egg whites are popular in weight loss diets, while yolks carry their own valuable nutrients.
How many eggs are okay per day?
That question comes up constantly. The answer depends on your health profile, cholesterol levels, and the rest of your diet. However, modern research tends to be kinder to eggs than older headlines suggested.
If you’d like a nuanced, readable explanation, this article on eggs and daily consumption walks through what studies actually say instead of relying on myths. It’s a great companion if you’re eating eggs regularly and want to understand where they fit in.
For people following low-carb or keto-style eating, eggs are almost a foundation food. There’s even a separate deep dive on why eggs are such a keto staple, which is useful if you’re combining this air fryer method with keto meal prep.
Are air fryers themselves healthy?
The air fryer is often marketed as a “healthy” appliance because it lets you cook crispy foods with much less oil than deep frying. That’s mostly true, but there are a couple of details worth knowing:
- For starchy foods like fries, research has shown air frying can sometimes lead to higher acrylamide levels than boiling or steaming. Acrylamide is a compound formed in browned, carbohydrate-rich foods. A research summary on air frying and acrylamide in foods goes into detail on this.
- However, eggs are not starchy, and they don’t contain the sugars and amino acids in the same way that potatoes or bread do, so acrylamide isn’t really a concern when you’re making air fryer hard boiled eggs.
For a balanced look at the broader question, you can read a practical overview in “Do Air Fryers Cause Cancer?” on Poison.org, which essentially concludes that moderation, variety, and proper cooking habits matter far more than any single appliance.
Also Read: 10 High Calorie Protein Shakes & Smoothie Recipes for Healthy Weight Gain
Storage, Safety, and Freshness
It’s easy to get excited about convenience and forget the boring-but-important part: food safety.
How long do hard boiled eggs last?
As mentioned earlier, the USDA has a clear answer: hard cooked eggs, once cooled and refrigerated, are safe to eat for up to one week. Their short note on how long you can keep hard cooked eggs is worth reading if you’re prepping a big batch.
In addition:
- Don’t leave cooked eggs at room temperature for more than two hours. The FDA’s egg safety page on what you need to know about egg safety emphasizes that time window to reduce the risk of bacteria growing.
- Store eggs in the refrigerator, not on the counter, once they’re cooked.
Storing raw eggs before cooking
It also helps to start with fresh eggs. For raw eggs, USDA guidance on how long eggs can be stored in the fridge explains that whole eggs in their shells typically keep for several weeks when refrigerated promptly.
If you’re curious about egg quality, cost, and labels, it can be useful to read whether expensive eggs are truly worth your money. That guide walks through cage-free, organic, and other terms so you can decide whether the premium is worthwhile for you.
Troubleshooting: Common Air Fryer Hard Boiled Eggs Issues
Even though the method is simple, questions do pop up. Fortunately, most problems have easy fixes.
My shells have brown spots
Sometimes, you’ll see little brown or tan spots on the shells after cooking in the air fryer. This usually happens where the hot air or heating element browned the shell. The inside is almost always fine.
If it bothers you aesthetically, you can:
- Lower the temperature slightly and cook a bit longer, or
- Experiment with moving the basket further from the top element if your machine allows
Once peeled, the egg usually looks completely normal.
I’m getting a greenish ring around the yolk
That green or grey ring around the yolk is a classic sign of overcooking. It’s safe to eat, but the texture can be a bit chalky.
To prevent it:
- Shorten the cooking time by 1–2 minutes next time
- Make sure you’re using a prompt, cold ice bath to stop the cooking
If it happens occasionally, don’t worry; you’re still very close to the right timing, and a tiny adjustment usually fixes it.
Some eggs cracked in the air fryer
Small hairline cracks can happen when:
- Eggs are packed too tightly
- There are tiny existing cracks you didn’t notice
- The temperature in your air fryer is very intense in one spot
To reduce cracking:
- Space the eggs out
- Avoid dropping them into the basket
- Try starting with room-temperature eggs if you consistently see cracks coming from fridge-cold eggs
Minor cracks are mostly cosmetic; as long as you chill and store the eggs properly, they’re usually fine to eat.
Also Read: High Protein Overnight Oats | 5 Recipes (Low Calorie, Vegan, Bulking & More)
Variations and Related Air Fryer Recipes
Once you’re comfortable knocking out air fryer hard boiled eggs, it’s only natural to cast around for more things to cook in there—especially for breakfasts, snacks, and meal prep.
Chicken wings and party snacks
For game nights or casual gatherings, a tray of eggs alone feels a bit bare. Adding something crispy and shareable works beautifully. That’s where super crispy air fryer chicken wings with no baking powder come in. They’re crunchy, flavorful, and much easier than dragging out a deep fryer.
On the side, you can offer more nibbles like:
Those snacky ideas turn a simple batch of eggs into part of a full spread.
Plant-based air fryer inspiration
Just as eggs are a powerhouse for omnivores, the air fryer is also a great ally for plant-based meal prep. On days when you want to rely less on animal protein, you can reach for:
- 5 high-protein vegan meal prep ideas using an air fryer
- Tempeh meal prep with sweet chili air-fried bites and other ideas
- Tofu-based breakfast ideas instead of eggs
Those resources make it easy to keep your air fryer busy even when you’re giving eggs a rest.
Beyond breakfast: falafel, potatoes, and more
As your confidence with the air fryer grows, it’s fun to explore more adventurous recipes, such as:
- Falafel with five Indian-inspired twists, including an air fryer advantage
- Ten creative potato appetizers, many of which adapt nicely to the air fryer
Add a few air fryer hard boiled eggs on the side, and you suddenly have mezze-style spreads, brunch boards, and snack platters that feel far more impressive than the effort required.
Bringing It All Together
In the end, air fryer hard boiled eggs are one of those quiet, unflashy techniques that earn their spot in your regular routine simply because they work so well:
- The method is straightforward and hands-off.
- The results are consistent once you know your air fryer’s timing.
- The eggs themselves are endlessly versatile—breakfasts, snacks, salads, deviled trays, and everything in between.
As you start making them week after week, you’ll probably find your own little twists: a preferred level of doneness, a favorite seasoning, or a go-to way to serve them. And once the air fryer is already hot and humming, you might find yourself adding a few wings, potatoes, or plant-based bites to the basket as well.
All from the simple idea of “boiling” eggs without ever boiling water.
Also Read: Tres Leches – Mexican 3 Milk Cake Recipe
FAQs for Air Fryer Hard Boiled Eggs
1. What are air fryer hard boiled eggs, exactly?
Air fryer hard boiled eggs are whole eggs cooked in their shells using the hot, circulating air of an air fryer instead of boiling water on the stove. The heat gently cooks the whites and yolks until they reach your preferred level of doneness—soft, jammy, or fully hard—so you get the same result as traditional boiled eggs, just with a much simpler, hands-off method. In short, it’s a no-water way to make “boiled” eggs in an air fryer.
2. How long does it take to make air fryer hard boiled eggs?
To begin with, timing depends on how you like your yolks. For most air fryer hard boiled eggs, a good range is 15–17 minutes at a moderate temperature like 270°F (about 130–135°C). If you prefer softer centers, you can drop that to around 11–12 minutes for soft “boiled” eggs or 13–14 minutes for jammy yolks. After cooking, an ice bath finishes the job and helps them peel easily.
3. What is the best temperature for hard boiled eggs in the air fryer?
For reliable results, a medium temperature usually works best. Rather than cranking the heat all the way up, aim for about 270°F (around 132°C) when making air fryer hard boiled eggs. This gentler heat cooks the eggs evenly from shell to center and reduces the risk of rubbery whites or overcooked yolks. You can adjust a little up or down based on how powerful your specific air fryer feels.
4. Do I need water to make boiled eggs in the air fryer?
Interestingly, no water is needed at all for air fryer boiled eggs. The eggs sit directly in the basket in their shells, and the hot air does the cooking. Water baths, simmering, and boiling are replaced by a simple timer plus an ice bath afterward. The only water you really want is in the bowl for cooling the eggs quickly once they’re done.
5. Can I cook soft, jammy, and hard eggs in the air fryer using the same method?
Yes, you can use the same basic method and simply change the time. Soft air fryer eggs with runny yolks usually need around 11–12 minutes. Jammy eggs with a creamy, custardy center often do well at about 13–14 minutes. Finally, truly hard boiled air fryer eggs typically sit in the basket for 15–17 minutes. Everything else about the process—preheating, arranging the eggs, and chilling them—stays the same.
6. How many eggs can I cook in an air fryer at once?
Generally, you can cook as many eggs as fit in a single layer in your air fryer basket. They should sit comfortably without stacking or crowding so that the hot air can move around them. If your basket is big, you might easily handle a dozen eggs; if it’s smaller, you might cook six or eight. When the basket is very full, you might add a minute or so to your usual time for fully hard boiled eggs in the air fryer.
7. Why do my eggs crack or “explode” in the air fryer?
Every so often, eggs in an air fryer can crack, and occasionally a little egg white leaks out. Frequently, this happens when the eggs are packed too tightly, dropped into the basket, or have tiny hairline cracks already. In addition, a very high temperature can make pressure build up quickly inside the shell. To reduce cracking, space the eggs out, handle them gently, and stick to a moderate temperature instead of blasting them on maximum.
8. How do I make air fryer hard boiled eggs easier to peel?
Peeling is all about two key steps. First, don’t overcook the eggs; overdone eggs tend to cling to their shells. Second, transfer the eggs straight into an ice bath as soon as they come out of the air fryer. The sudden chill helps the egg pull away from the membrane inside the shell, which makes air fryer hard boiled eggs peel with far less frustration. Rolling the egg on the counter to crack the shell all over before peeling also helps.
9. Can I cook eggs in an air fryer without the shell?
Absolutely, you can cook eggs in an air fryer without the shell by using ramekins or silicone cups. For example, you can crack an egg into a greased ramekin for a baked or “boiled” style result, whisk eggs with milk and cheese for scrambled eggs in the air fryer, or pour a seasoned mixture into silicone molds for egg cups or egg bites. In each case, the air fryer becomes a tiny oven for your eggs, rather than just a replacement for boiling.
10. Is it safe to cook eggs in an air fryer?
Yes, cooking eggs in an air fryer is safe as long as you treat it like any other cooking method and follow basic food safety. Eggs should be cooked until the whites are fully set and yolks reach your chosen level of doneness, and any mixed egg dishes like egg bites or air fryer omelettes should be cooked until firm and steaming hot. Once they’re done, they need to be cooled and refrigerated promptly if you’re not eating them right away.
11. How long do air fryer boiled eggs last in the fridge?
Once you’ve cooled them down, air fryer boiled eggs keep well in the refrigerator. Typically, they can be stored for up to one week in a covered container. You can keep them in their shells or peel them in advance; either way, the key is to chill them promptly after cooking and then keep them cold. If they’ve been sitting at room temperature for more than a couple of hours, it’s safer to discard them.
12. Can I make scrambled eggs in the air fryer?
Yes, scrambled eggs in the air fryer are very doable. Instead of putting eggs straight in the basket, you whisk them in a bowl with a splash of milk, seasonings, and perhaps cheese, then pour the mixture into a greased, oven-safe dish or ramekin. After that, you cook the eggs at a moderate temperature, stirring once or twice if you like smaller curds, until they’re just set. The result is a gentle, baked-style scramble that pairs nicely with toast or vegetables.
13. Can I cook poached-style eggs in an air fryer?
You can’t poach eggs in the traditional sense inside an air fryer basket, but you can get a very similar result in cups. To create an air fryer poached egg effect, you grease a small ramekin or silicone cup, add a spoonful of water, and gently crack in an egg. Then, you cook it at a moderate heat until the whites are set and the yolk is still soft. The texture won’t be identical to a water-poached egg, yet it comes pleasantly close and works well for toast or brunch dishes.
14. How do I make air fryer egg bites or egg cups?
For air fryer egg bites, you whisk eggs with a little milk or cream, then stir in extras like cheese, chopped vegetables, herbs, or cooked meats. Next, you pour this mixture into greased silicone molds, muffin cups, or small ramekins, filling them about three-quarters full. After that, you cook them in the air fryer at a gentle temperature until they’re puffed and set in the center. These egg cups are easy to refrigerate and reheat, which makes them perfect for quick breakfasts.
15. Can I make an omelette or frittata in an air fryer?
Yes, an air fryer omelette or frittata is a great way to use the same appliance for a heartier dish. You simply whisk eggs with milk or cream, season well, and fold in fillings like vegetables, cheese, or leftover meats. Then, you pour everything into a greased, oven-safe pan that fits in the basket. Once it’s in, you cook the mixture until the center is set and the top is lightly golden. Thinner mixtures resemble an omelette, while thicker ones turn into a frittata-style bake.
16. Are air fryer hard boiled eggs healthier than regular boiled eggs?
Nutritionally, air fryer hard boiled eggs and classic stovetop boiled eggs are very similar. In both cases, you’re cooking the egg in its shell without added fat, and the protein, vitamins, and minerals remain largely the same. The main advantage of the air fryer method is convenience and ease rather than a big shift in nutrition. As always, how healthy your meal is overall depends more on what else is on the plate alongside those eggs.
17. Why do my air fryer boiled eggs sometimes have a green ring around the yolk?
When you see a green or grey ring around the yolk, it’s usually a sign that the eggs have been slightly overcooked. In an air fryer, this often means the temperature was a bit high or the time a little long. To fix it next time, you can reduce the cooking time by a minute or two and make sure the eggs go straight into an ice bath at the end. Even with the ring, the eggs are still safe to eat; the change is mainly cosmetic and affects texture more than anything else.
18. Can I use air fryer hard boiled eggs for deviled eggs?
Definitely, air fryer hard boiled eggs are excellent for deviled eggs. In fact, once you dial in the timing, the whites tend to be evenly cooked and the yolks nicely centered, which makes them ideal for neat deviled halves. After cooking and cooling, you simply peel the eggs, slice them, and mash the yolks with your chosen ingredients to make the filling. From there, you can keep things classic or experiment with spices, herbs, and toppings to create a tray of deviled eggs that really stands out.