There are some dishes that belong to more than a kitchen. They belong to a season, a place, and a way of living. This Punjabi mutton bhuna is one of them. It brings to mind cold November days in the village, wheat sowing in the fields, smoke rising from open flame, and a meal coming together through many hands rather than one. Onions roast over the fire, tomatoes char and soften, garlic gets crushed fresh, and the mutton is watched patiently as it cooks. By the time everything is ready, the food tastes far richer than its short ingredient list suggests.
This recipe is shared with due credit to Dr. Aman Singh Kahlon, Amritsar, who remembers this style of mutton from childhood village visits during the winter sowing season. That memory explains the dish well. This is not a restaurant-style curry built on cream, curd, or a crowded masala base. It is a rustic bhuna shaped by mustard oil, charred onions, charred tomatoes, ginger, garlic, mutton fat, and patient reduction.
The result is thick, smoky, savory, and deeply comforting. The masala clings to the meat instead of floating around it. The spices support the flavor rather than overpower it. If you enjoy old-school Punjabi cooking that feels grounded and full of character, this is the kind of recipe that earns its place quickly.
Punjabi mutton bhuna recipe snapshot
Prep time: 25 to 30 minutes Cook time: 1 hour 15 minutes to 1 hour 45 minutes Serves: 4 to 6 Course: Main course Cuisine: Punjabi / North Indian Texture: Thick, reduced, masala-coated Spice level: Mild to medium Best for: Winter lunches, family dinners, slow weekend cooking
This is the kind of mutton dish that should finish thick, smoky, and close-clinging rather than loose and gravy-heavy. Before you start, keep that texture target in mind, because the whole recipe is built around reduction, not excess sauce.
Many mutton recipes begin with sliced onions fried in oil and tomatoes cooked down in the same pan. This one takes a more distinctive route. The onions are roasted directly over flame until soft and smoky, then pounded into a rough pulp. The tomatoes are charred until blistered and softened, then peeled and mashed the same way.
That one decision changes the flavor of the whole dish. The onions become sweeter and deeper. The tomatoes lose some of their raw sharpness and gain a fuller, fire-kissed savoriness. Once bhunoed together, they create a masala that tastes smokier, richer, and more elemental than a standard curry base.
This fire-roasted onion-tomato base is what separates this bhuna from a more standard curry. The onions should soften under the char, the tomatoes should blister and sweeten, and both should stay slightly rustic so the final masala keeps its village-style character.
Bhuna mutton in Punjabi style is defined by technique
The word bhuna refers less to a fixed list of ingredients and more to a method built around frying, scraping, reducing, and concentrating flavor with very little free liquid. In South Asian cooking, bhuna-style dishes develop depth through repeated caramelization and minimal-moisture cooking rather than through a loose gravy. (Epicurious)
That is exactly why this recipe is finished as a thick, clingy preparation rather than a runny curry. The masala is meant to grip the meat.
Why mustard oil and mutton fat matter
Mustard oil gives this dish much of its backbone. Once heated properly, its raw edge mellows and leaves behind a bold, earthy depth that suits this style of Punjabi cooking beautifully.
The small amount of kidney fat matters too. It is not there to make the dish greasy. It is there to enrich the stock, deepen the masala, and give the finished bhuna a rounder, more savory body.
Why this Punjabi mutton bhuna recipe tastes different
This recipe does not depend on yogurt, cream, cashew paste, or a long list of spices. It trusts smoke, meat, mustard oil, and reduction to do most of the work. That simplicity is not a limitation. It is the reason the dish tastes so assured.
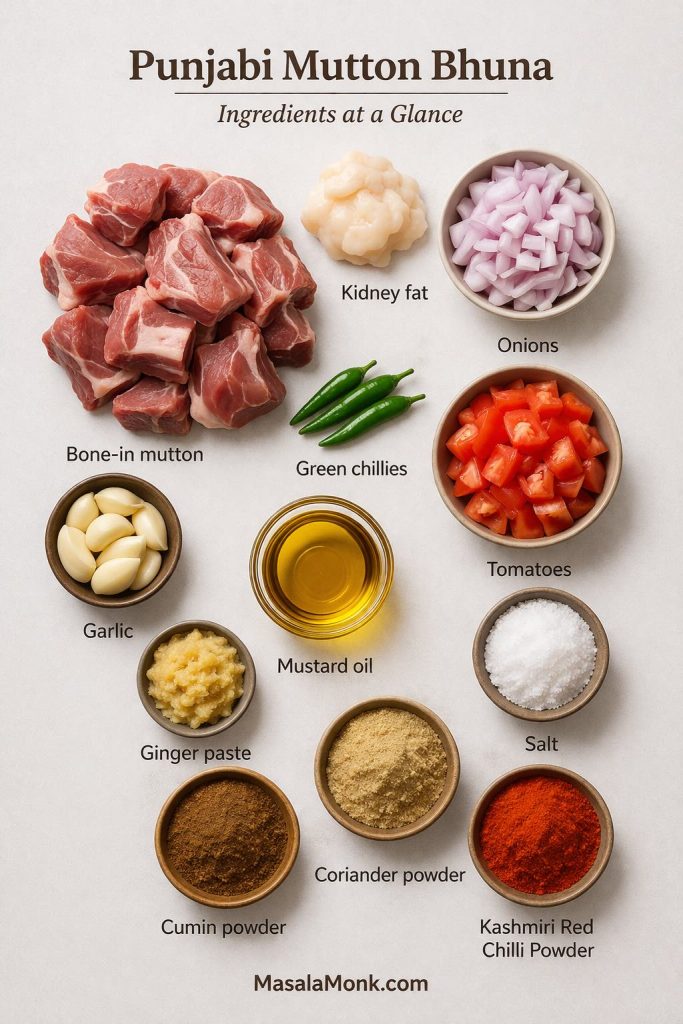
The beauty of this Punjabi mutton bhuna lies in how focused the ingredient list is. Bone-in mutton gives the curry depth, kidney fat brings richness, mustard oil adds character, and the onion-tomato base carries the smoky rustic heart of the dish. Garlic, ginger, green chillies, cumin, coriander, and Kashmiri red chilli powder do not overcrowd the recipe; instead, they support the bhuna and help it cook down into a thick, glossy masala that clings to the meat instead of sitting loose around it.
Ingredient notes for the best Punjabi mutton bhuna
Best cut of mutton for this bhuna mutton recipe
Bone-in mutton works best here because it gives a fuller stock and holds up well through the two-stage cooking process. Medium pieces are better than very small ones, since tiny pieces can overcook by the time the bhuna is fully reduced.
Why kidney fat helps
The quantity is small, but it makes a real difference. As it cooks, the fat enriches both the early stock and the final masala. The result is more savory depth and better mouthfeel without making the dish heavy.
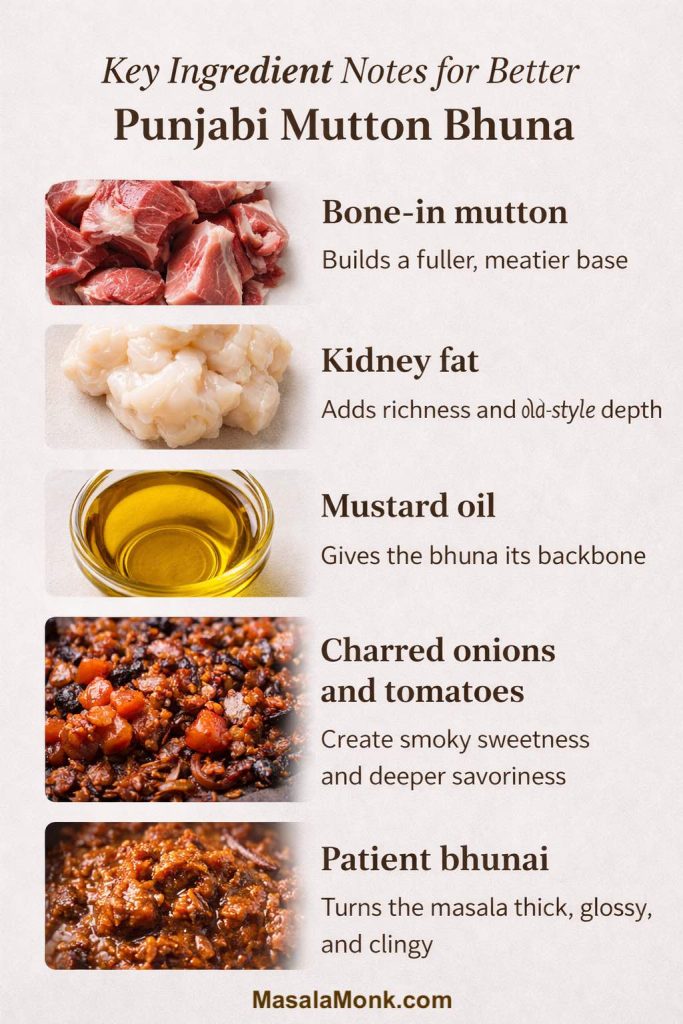
What makes this Punjabi mutton bhuna memorable is not a long ingredient list but the way a few powerful choices shape the final dish. Bone-in mutton gives the curry a fuller, meatier base, kidney fat adds the kind of richness that makes the bhuna feel deep and old-school, and mustard oil brings the sharp backbone that keeps the masala from tasting flat. From there, the charred onions and tomatoes build the smoky sweetness that sets this recipe apart, while patient bhunai cooks everything down into the thick, glossy, clingy finish that should coat the meat rather than pool around it.
Mustard oil, chillies, and texture notes
Mustard oil is strongly recommended because it suits the flavor profile of this dish so well. Heat it properly before adding aromatics so the raw smell softens.
Kashmiri chilli powder brings color and gentle warmth rather than aggressive heat. The sharper heat comes from the green chillies, so adjust them to taste.
Keep the charred onion and tomato mixture slightly coarse. A completely smooth puree will push the dish toward generic restaurant-style gravy, while a rougher pulp keeps it true to its rustic identity.
How to make Punjabi mutton bhuna (step by step recipe)
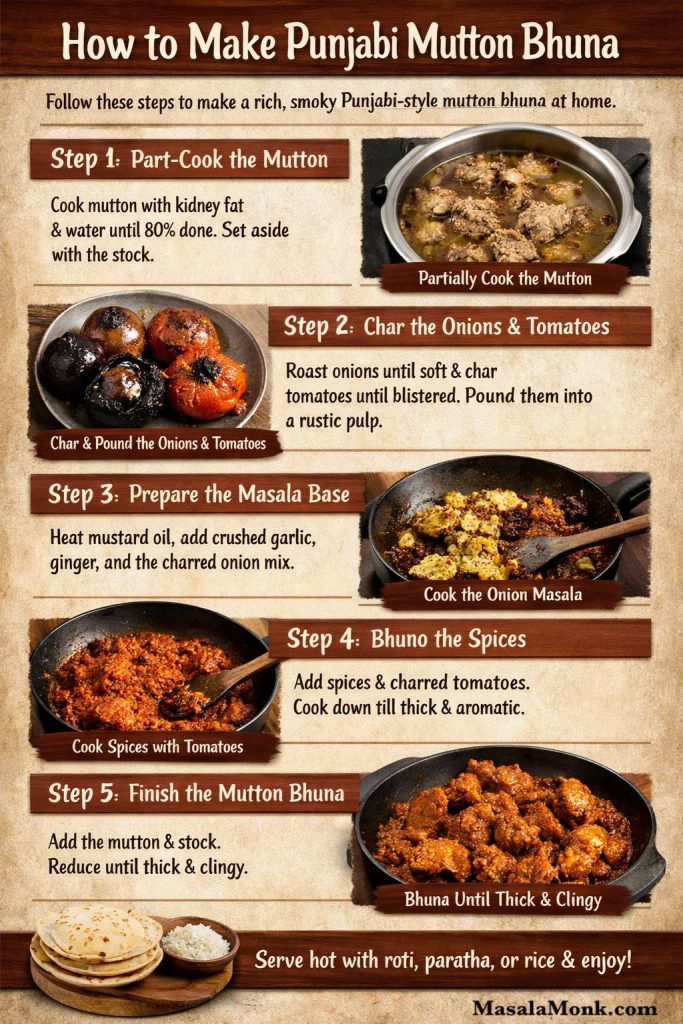
This recipe becomes straightforward once you understand the sequence. First, the mutton is partially cooked. Then the onions and tomatoes are charred and pounded. After that, the masala is built in mustard oil, the spices are cooked into the base patiently, and the meat is finished in the reduced masala until everything turns thick, glossy, and deeply flavorful.
Quick method summary for Punjabi mutton bhuna
If you want the full flow at a glance before you begin, this is the sequence that matters most.
Part-cook the bone-in mutton with kidney fat, salt, and a little water until it is about 80 percent done. Keep the stock.
Char the onions until softened inside, then peel and pound them with green chillies into a rough pulp.
Char the tomatoes until blistered and soft, peel them, and pound them into a coarse rustic pulp.
Heat mustard oil and fry the garlic and ginger briefly to remove their raw edge.
Add the onion mixture and bhuno it patiently until it tightens, deepens, and smells sweeter.
Add cumin, coriander, and Kashmiri chilli powder, then stir in the tomato pulp.
Cook the masala until it thickens, darkens slightly, and begins showing traces of oil around the edges.
Return the mutton and stock to the pan, then reduce everything until the masala turns thick, glossy, and clingy around the meat.
Rest briefly before serving so the bhuna settles and coats the mutton even better.
That is the full structure of the dish. The detailed step by step method below will help you judge each stage more confidently.
Step 1: Part-cook the mutton for Punjabi-style bhuna mutton
Place the mutton and chopped kidney fat in a pressure cooker or heavy-bottomed pan. Add 1 cup water and about 1 teaspoon of salt.
If using a pressure cooker, cook until the meat is about 80 percent done. In many home cookers, this may be around 4 to 6 whistles on medium heat, though the exact timing depends on the cut and age of the meat. Go by texture rather than whistle count alone. The meat should feel mostly cooked but still offer slight resistance.
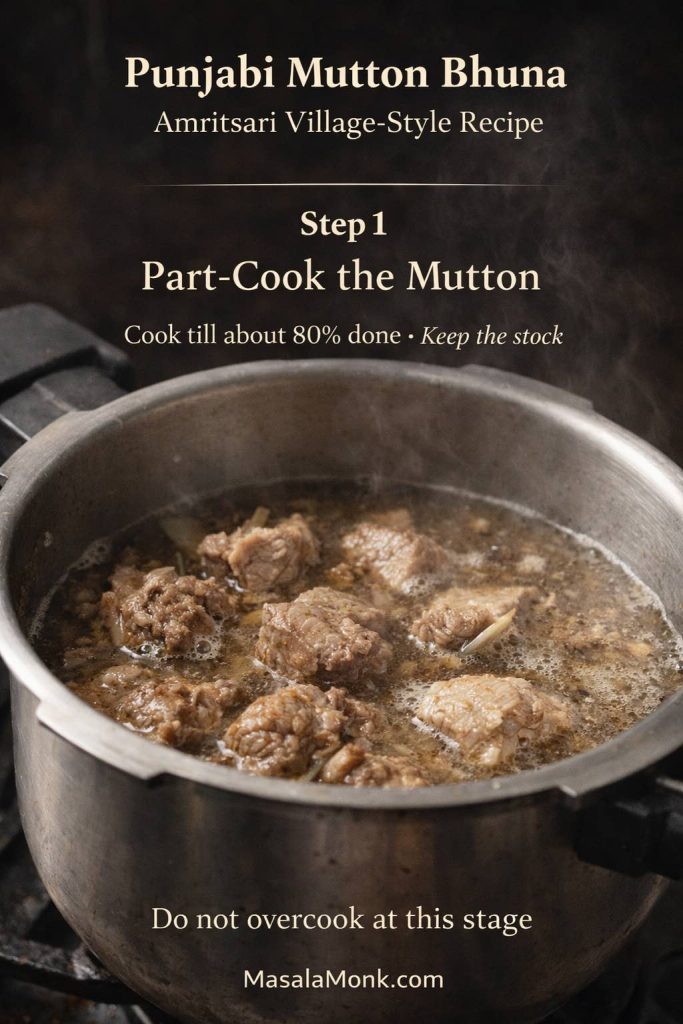
Step 1 in this Punjabi mutton bhuna recipe is to part-cook the bone-in mutton until it is about 80% done, then keep the stock for the final bhuna. This early stage builds the base of the dish without overcooking the meat, so the mutton can finish properly later in the thick onion-tomato masala.
If using a pan, cover and cook over medium to medium-low heat for about 35 to 50 minutes, checking occasionally. Add a small splash of water only if the pan begins to dry too much.
Once nearly done, set the meat and stock aside. Keep all the stock. It becomes part of the final bhuna.
Step 2: Char the onions and tomatoes
Roast the onions directly over open flame or hot coals until the outside blackens in patches and the insides soften well. You want smoke and sweetness, not a harsh burnt bitterness.
When cool enough to handle, peel away the burnt outer layer and keep the softened onion flesh. Pound it with the green chillies into a rough pulp. A mortar and pestle is ideal, but a blender on pulse mode works too.
Step 2 is where this Punjabi mutton bhuna starts building its signature flavor. The onions are charred till soft and smoky, the tomatoes are blistered and peeled, and both are kept rustic rather than pureed smooth. That fire-roasted base is what gives the final bhuna its deeper, smokier character.
Now char the tomatoes until their skins blister and loosen and the flesh softens visibly. Peel away the skins and pound the tomatoes into a coarse pulp.
Both mixtures should look rustic rather than polished. A little uneven texture is a good thing here.
Step 3: Build the bhuna mutton masala base
Heat the mustard oil in a heavy kadhai until it comes up to temperature and the raw smell mellows. Reduce the heat slightly and add the crushed garlic and ginger paste.
Fry for 1 to 2 minutes, stirring so the garlic does not catch. You want the rawness to leave without pushing the aromatics into bitterness.
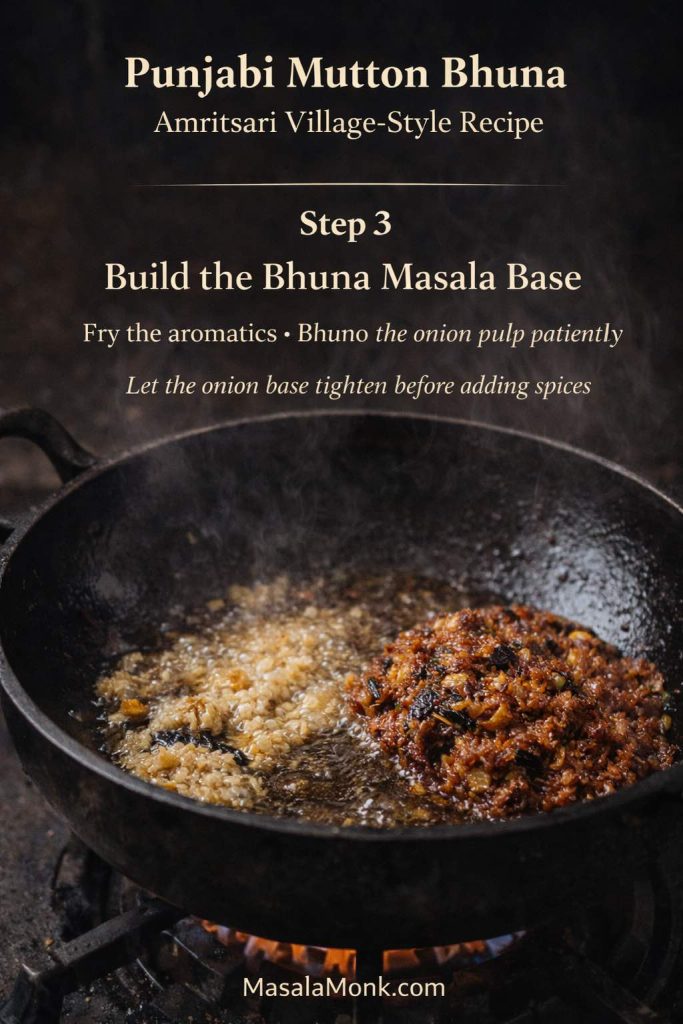
Step 3 is where Punjabi mutton bhuna starts taking on its real character. The mustard oil heats the pan, the ginger and garlic lose their raw edge, and the charred onion mixture begins to bhuno into a deeper, richer base. This stage should start loose and glossy, then slowly tighten as the flavors deepen before any powdered spices are added.
Add the charred onion and green chilli pulp. Also add any soft fatty bits or rendered fat from the partially cooked mutton. Start bhunoing this mixture over medium heat.
At first the onion mixture will look loose and wet. Keep stirring and scraping the pan. Over the next 8 to 12 minutes, it should darken slightly, tighten, and smell sweeter and deeper. Lower the heat a little if it begins sticking too fast. The onion base needs time to fry properly before the powdered spices go in.
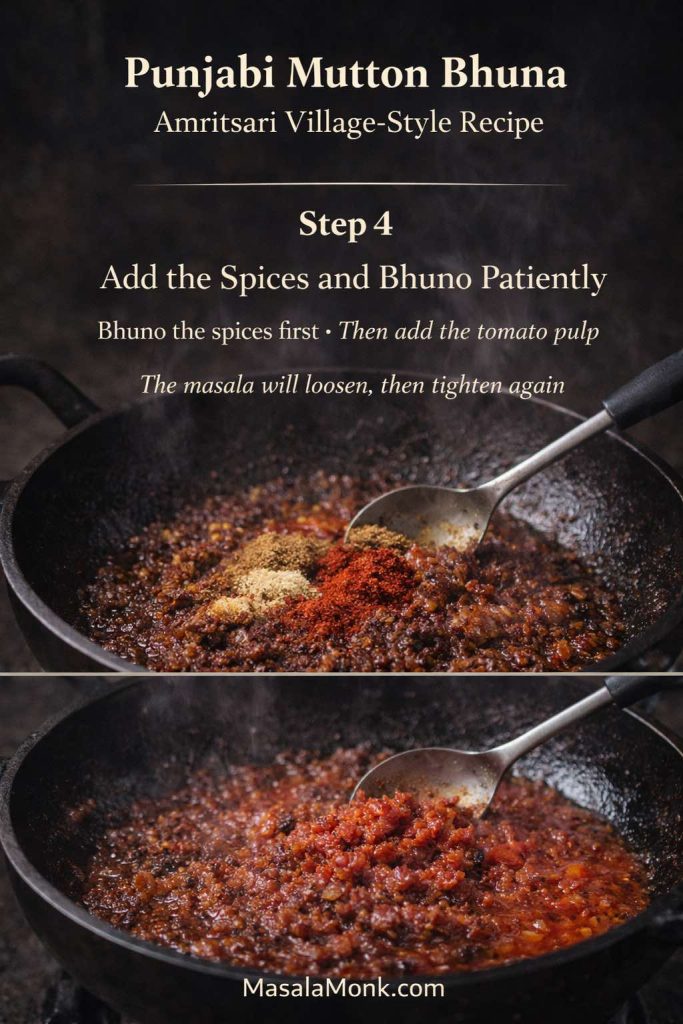
Step 4: Add the spices and bhuno patiently
Add the cumin powder, coriander powder, and Kashmiri red chilli powder to the onion base. Stir right away so the spices bloom evenly in the fat.
Cook for about a minute, then add the charred tomato pulp. The mixture will loosen again. Keep cooking over medium heat, stirring often, and do not let the masala catch at the bottom.
Step 4 is where the bhuna masala deepens and changes character. First the cumin, coriander, and Kashmiri chilli powders are bhunoed briefly in the fried onion base, then the charred tomato pulp is added. The mixture loosens at first, but as it cooks down, the masala tightens, darkens, and begins moving toward the rich, clingy finish that defines Punjabi mutton bhuna.
As the moisture cooks away, the masala will begin to tighten. The color will deepen, the aroma will round out, and traces of oil will start appearing around the edges. That is the sign that the bhunai is moving in the right direction.
This stage usually takes another 8 to 10 minutes. When you drag a spoon through the pan, the masala should briefly part and gather back more thickly rather than flow like a thin sauce.
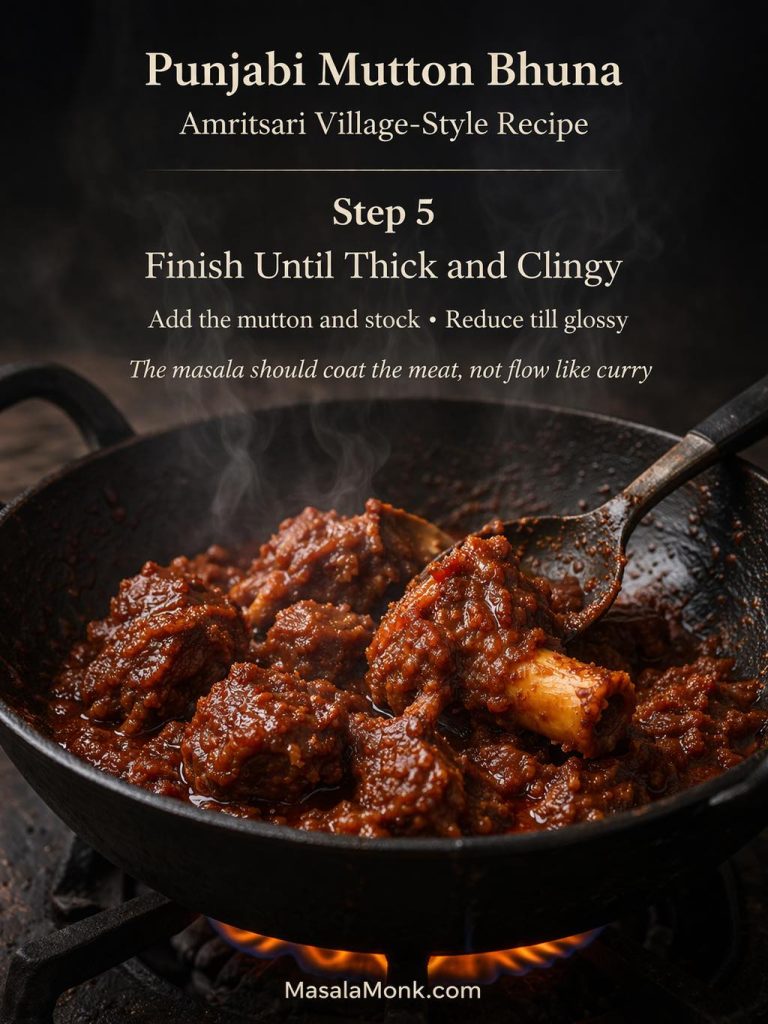
Step 5: Finish the Punjabi mutton bhuna until thick and clingy
Add the partially cooked mutton and all the remaining stock. Mix thoroughly so the meat gets coated in the bhuna base.
Cook over medium heat, stirring often, until the stock reduces and the masala begins to cling closely to the meat. This stage is not only about reheating the meat. It is where the dish turns from cooked ingredients into a finished bhuna.
Step 5 is where Punjabi mutton bhuna becomes what it is meant to be: thick, glossy, and deeply reduced. The partially cooked mutton goes back into the masala with the stock, then cooks down until the sauce no longer runs like curry and instead clings closely to every piece. This is the stage that gives bhuna mutton its rich, concentrated finish.
Depending on how much stock remains, this may take 10 to 20 minutes. Taste for salt during the last few minutes, since reduction will intensify seasoning.
The finished dish should look glossy and deeply colored. The masala should coat the meat rather than drip off it. There should be enough moisture to keep every bite juicy, but not enough for the dish to feel like a loose curry.
The sweet spot is a masala that holds to the meat without turning dry. Too much liquid and the dish feels diluted; too little and the richness turns heavy instead of balanced.
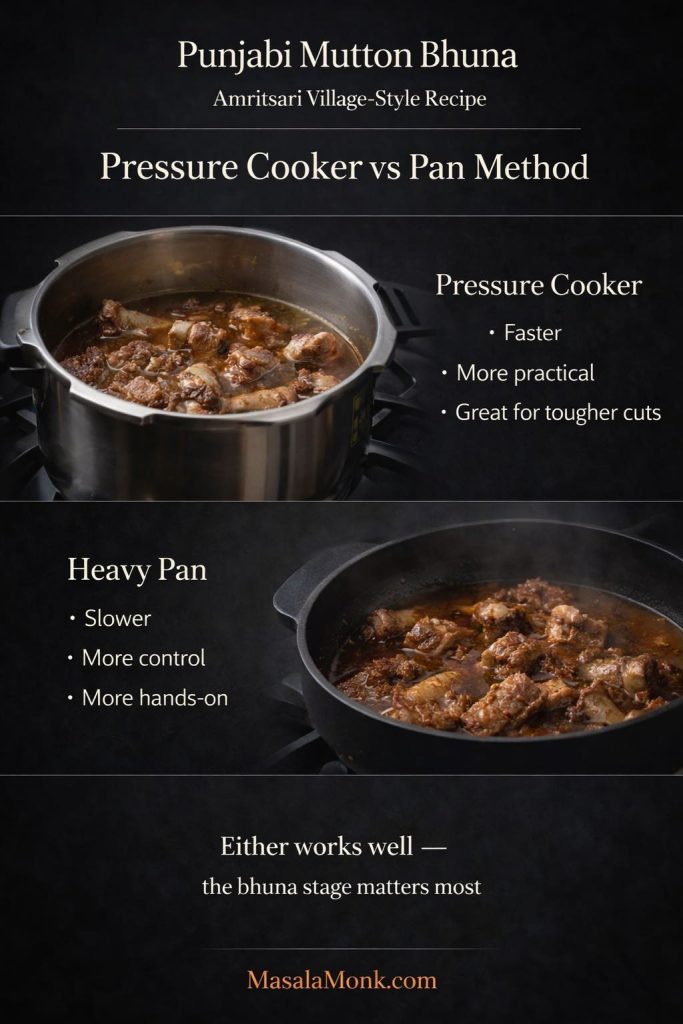
Pressure cooker vs pan method for Punjabi mutton bhuna
Pressure cooker method for bhuna mutton in Punjabi style
A pressure cooker is the more practical route for most home kitchens. It tenderizes the mutton efficiently and shortens the first stage significantly. That fits this recipe well because pressure cookers are especially suited to foods that are naturally tough or require longer cooking times. (ISU Extension and Outreach Blogs)
The key is to stop before the meat is fully done. Once the mutton returns to the pan for the bhuna, it still needs time to absorb the masala and finish properly.
Choosing between a pressure cooker and a heavy pan changes the pace of the recipe more than the final flavor. The cooker gets the mutton close to tender faster, while the pan gives you a slower, steadier route with a little more control before the bhuna stage does its real work.
Pan method
A heavy pan gives you more gradual control and feels closer to the slower rhythm of the dish’s original setting. It suits cooks who do not mind spending a bit more time and paying closer attention to liquid levels.
This method can give excellent results, but it asks for more patience. You need to watch the meat, stir occasionally, and make sure the pan never dries out too far.
Which one should you choose for Punjabi-style bhuna mutton
Choose a pressure cooker when time matters. Choose a pan when you want slower control. In either case, the final flavor depends more on the quality of the bhuna than on the first cooking vessel. Save the stock, do not overcook the meat early, and let the reduction stage do its work.
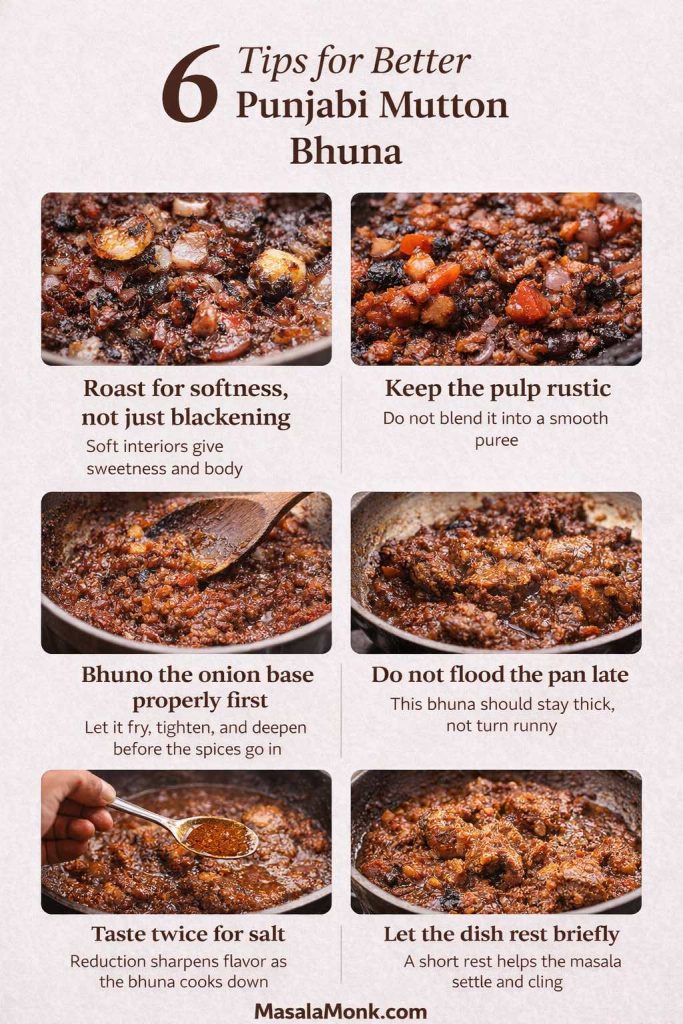
The onions and tomatoes should not merely look charred. They must soften properly too. That softened interior is what gives the dish sweetness and body.
The best Punjabi mutton bhuna comes from restraint as much as flavor. Roast the onions and tomatoes until they soften, not just blacken, keep the pulp rough instead of blending it smooth, and give the onion base enough time to bhuno before the spices go in. Just as importantly, do not loosen the pan late with extra water, taste again for salt after reduction sharpens everything, and let the finished bhuna rest briefly so the masala settles and clings more beautifully to the meat.
Keep the pulp rustic
A completely smooth puree makes the dish feel more generic. A rougher pulp gives the bhuna more character and a more grounded texture.
Bhuno the onion base properly first
Do not rush into the spice stage. The onion mixture needs time to fry, tighten, and deepen before the cumin, coriander, and chilli go in.
Do not flood the pan late
This is a bhuna, not a flowing curry. Too much extra water at the end will flatten the texture and dilute the concentration you worked to build.
Taste twice for salt
Salt lightly in the first stage, then check again near the end. Reduction sharpens everything.
Let the dish rest briefly
Even 10 minutes off the heat helps the masala settle and cling more beautifully before serving.
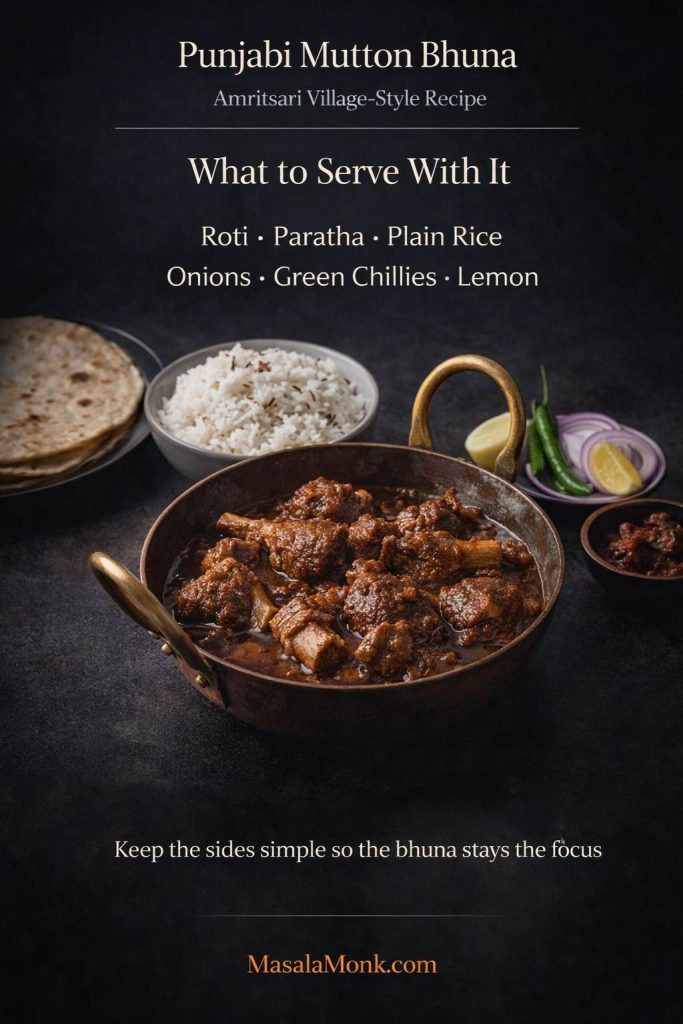
This dish likes simple company. Hot rotis are an excellent match, especially if they are sturdy enough to scoop up the thick masala. Plain parathas work very well too.
If you prefer rice, keep it uncomplicated. Plain steamed rice or jeera rice lets the bhuna stay the focus of the plate.
Punjabi mutton bhuna pairs best with simple sides that let the rich masala stay at the center of the meal. Roti, paratha, or plain rice work beautifully, while sliced onions, green chillies, and a squeeze of lemon add the sharp contrast that this deep, smoky dish loves.
Sides and finishing touches
Sliced onions, green chillies, and a wedge of lemon fit the spirit of the dish especially well. They cut through the richness without distracting from it. A sharp pickle can also work, though use it lightly because the bhuna already carries plenty of depth.
Related Punjabi comfort dishes
If you enjoy this kind of hearty North Indian cooking, you may also want to explore Punjabi-style rajma curry on days when you want something comforting but meat-free. For another bold gravy-style main, Balti Paneer Gravy is a good next stop. And for a classic favorite in a richer, creamier lane, butter chicken offers a very different but equally satisfying dinner mood.
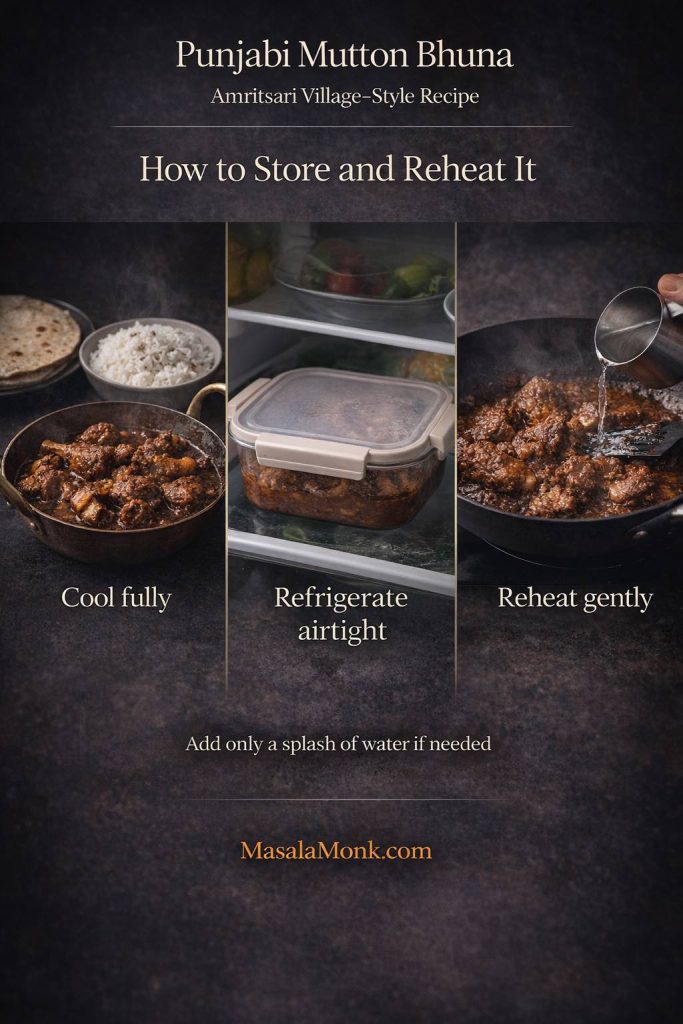
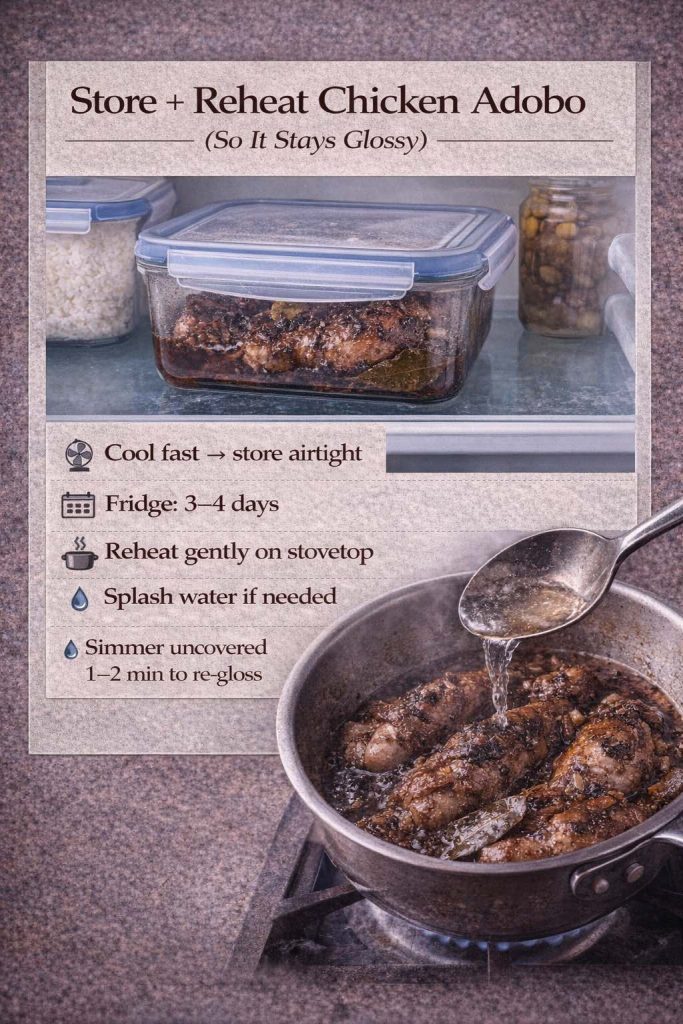
This bhuna stores well, and like many reduced meat dishes, it often tastes even better after a little rest. The smoke, stock, fat, and spice settle into each other more fully, and the masala seems to grip the meat even better the next day.
Let the dish cool fully, then refrigerate it in an airtight container for up to 2 days.
Punjabi mutton bhuna keeps well when the rich masala is handled gently after cooking. Let it cool fully before refrigerating, store it airtight, and reheat slowly so the thick bhuna texture loosens just enough without turning back into a thin curry.
To reheat, transfer it to a pan and warm gently over low heat. Add only a small splash of water if needed. The goal is to loosen the masala just enough, not turn it back into a thin curry.
If you know you want leftovers, you can stop the final reduction a touch earlier, since reheating will tighten the dish slightly more.
Some dishes impress through abundance. This one impresses through confidence. It uses very little that feels unnecessary. There is no attempt to hide the mutton under excess spice or smooth everything into a polished restaurant gravy. Instead, it leans into smoke, mustard oil, fat, and reduction.
That is what gives the recipe its grounded appeal. The charred onions bring sweetness, the tomatoes bring depth, the mutton fat gives savoriness, and the bhuna ties everything together into one thick, flavorful coating.
With due credit to Dr. Aman Singh Kahlon, Amritsar, this recipe preserves a beautiful style of winter village cooking in a form that still makes perfect sense in a home kitchen today. Serve it hot, serve it slowly, and let the masala do what it is meant to do.
Use this as a quick visual map of the recipe, but let the written method guide the details. The real success of this dish comes from texture cues: partly cooked meat, softened charred vegetables, a properly fried base, and a final reduction that turns clingy and glossy.
1. Can I make punjabi mutton bhuna without a pressure cooker?
Yes. A heavy pan works well too. It simply takes longer and needs more attention.
2. Can I use lamb instead of goat meat in punjabi mutton bhuna?
Yes. The flavor will be slightly milder and fattier, but the method still works.
3. Can I make it without kidney fat?
Yes, though the finished punjabi mutton bhuna may taste a little less rich and rounded.
4. Why are the onions and tomatoes charred first?
Because that is one of the defining flavor moves in this recipe of punjabi bhuna mutton. Charring adds smoke, sweetness, and depth before the bhunai even begins.
5. Can I skip charring if I do not have open flame?
You can roast the onions and tomatoes on a very hot tawa, under a broiler, or in a hot oven until blistered and softened. That still gives you some roasted depth.
6. Can I make punjabi mutton bhuna without mustard oil?
Yes, but the character changes. A neutral oil will work, though the dish loses some of its Punjabi rustic edge.
7. How do I know when the bhuna stage is done?
The masala should look thick, glossy, and cohesive. It should cling to the meat, with small traces of oil visible around the edges.
8. Why does my bhuna taste watery?
Usually because the final reduction was not taken far enough or too much water was added late.
9. Is punjabi mutton bhuna very spicy?
Not necessarily. The Kashmiri chilli powder mainly adds color and mild warmth. The sharper heat comes from the green chillies.
10. Can I make it ahead?
Yes. Punjabi mutton bhuna often tastes even better after a few hours or the next day.
11. Is there a safe temperature reference for mutton or goat?
For whole cuts of goat or similar red meats, USDA guidance uses 145°F / 62.8°C with a rest period, while ground meat should reach 160°F / 71.1°C. In a dish like this, though, tenderness usually comes from cooking well past bare-minimum doneness until the meat softens properly in the bhuna. (Food Safety and Inspection Service)
There is something deeply reassuring about a warm fruit dessert, and this peach cobbler with canned peaches belongs squarely in that comforting category. It asks very little from you, yet it still manages to feel generous, homemade, and worthy of setting down in the middle of the table while everyone leans in for a closer look. Peach cobbler has always had that kind of charm. It fits just as naturally at a casual family dinner as it does at a holiday meal, and it carries that wonderful mix of ease and nostalgia that makes people reach for another spoonful almost before the first one is finished.
Even so, cobbler can become oddly complicated once real life enters the picture. Fresh peaches are wonderful when they are ripe, fragrant, and abundant, but they are not always in season, and they are certainly not always ready when you are ready. Frozen peaches can help, although they bring their own texture questions. Canned peaches, by contrast, are already peeled, already sliced, already soft, and already sitting in the pantry waiting for you. That is exactly why a good peach cobbler with canned peaches deserves a permanent place in your dessert rotation.
This peach cobbler with canned peaches is a buttery batter-style cobbler baked in a 9×13-inch dish at 350°F until the top turns deeply golden and the fruit bubbles around the edges. Better still, this is not a “good enough for now” version of cobbler. When the fruit is drained properly, the sweetness is balanced, and the topping is given the right structure, a canned peach cobbler can taste every bit as cozy and satisfying as the kind people remember from church suppers, family reunions, summer weekends, and old-fashioned Sunday dinners.
Peach cobbler with canned peaches recipe at a glance
Before we get into the richer details, here is the shape of the recipe in simple terms.
Serves 8 to 10
Prep time: about 15 minutes
Bake time: 40 to 50 minutes
Resting time: 20 minutes
Oven temperature: 350°F
Baking dish: 9×13-inch
Style: buttery batter-style peach cobbler
Best fruit: canned peaches in juice or light syrup
Those details matter because they set expectations early. The dessert is not fussy, though it does ask for a little care. Once you know the pan size, the temperature, and the texture you are aiming for, the rest becomes much easier.
This peach cobbler with canned peaches recipe card gives you the full bake at a glance: ingredient measurements, prep and bake time, pan size, and the simple method that keeps the cobbler buttery, golden, and easy to follow. It is especially helpful if you want a quick visual reference while baking or a saveable guide for later. Just as importantly, it highlights one of the biggest texture tips in the whole post: drain the canned peaches first for the best cobbler.
Why this peach cobbler with canned peaches feels worth making
It solves the real-life version of dessert
For many home cooks, the easiest route to a truly reliable cobbler is not through perfect fresh fruit at all. It is through a well-made peach cobbler with canned peaches recipe that understands how to turn pantry ingredients into something warm, golden, and worth sharing. That is what this recipe sets out to do.
Rather than giving you a vague shortcut and hoping everything works out, it walks you into the process in a way that helps the dessert come out buttery on top, tender underneath, and pleasantly peachy without tipping into a watery mess. Along the way, it answers the practical questions that actually matter when canned fruit is involved. Should you drain the peaches? Can you use peaches in syrup? How sweet should the batter be? What makes the difference between a simple peach cobbler with canned peaches and one that tastes flat or overly sweet? Most importantly, how do you make something that feels homemade even when the peaches came from a can?
Small decisions make the biggest difference
The answer lies in a handful of choices done well. A little draining. A measured hand with liquid. Enough butter to give the cobbler a rich base. A batter that stays tender rather than heavy. A baking time that allows the topping to turn properly golden. A rest at the end so the filling can settle instead of running across the plate.
None of those choices is difficult. Taken together, however, they change everything. They are the reason one cobbler tastes like a rushed pantry dessert while another tastes warm, balanced, and fully intentional. Because of that, this recipe does not ask for perfection. It simply asks for care in the places where care matters most.
A recipe that meets several cravings at once
So whether you were hoping for an easy peach cobbler with canned peaches, a homemade peach cobbler using canned peaches, an old fashioned peach cobbler recipe with canned peaches, or simply a dependable dessert you can make without waiting for peach season, you are in exactly the right place.
This version is warm, practical, and generous. It tastes like the kind of dessert someone made because they wanted everybody at the table to feel looked after. That quality is part of what makes cobbler so enduring. It is not only about sweetness. It is also about comfort, familiarity, and the quiet pleasure of setting down something that feels both humble and deeply welcome.
Why this peach cobbler with canned peaches belongs in your kitchen
It removes the friction that keeps dessert from happening
A good cobbler earns its place not because it is flashy, but because it is useful in the loveliest possible way. It solves dessert without ever feeling like a compromise, turning ingredients you already have into something that fills the house with the smell of butter, vanilla, and fruit. Before long, there is every reason to pull out the ice cream, set the kettle on for coffee, or call people into the kitchen because something wonderful is coming out of the oven.
This particular peach cobbler recipe with canned peaches is especially useful because it removes several of the friction points that make fruit desserts feel like too much work on an ordinary day. No peeling is required, no blanching is needed, and there is no need to guess whether the peaches are ripe enough, sweet enough, or still stubbornly firm in the middle. Instead, the fruit is ready to go, which lets you focus on the part that matters most: turning those peaches into a cobbler that tastes rich, balanced, and deeply comforting.
It keeps the homemade feeling intact
Just as importantly, this recipe does not lean on artificial shortcuts that strip away the homemade feel. It is not a dump cake, although that style certainly has its place, nor is it a biscuit mix cobbler, even if that option can be helpful on a rushed day. Rather than becoming a three ingredient peach cobbler with canned peaches where convenience pushes the dessert too far from its roots, this version keeps the process easy while still delivering the warmth and character of a true cobbler.
A few ordinary pantry ingredients are all it takes to build a batter-style topping that rises around the fruit and turns into that soft, buttery, golden layer people associate with a classic cobbler. Accordingly, the result still feels easy, but it also feels cooked, considered, and made on purpose.
It gives you ease without sacrificing character
That balance is the real appeal here. You get the ease people want from a quick peach cobbler with canned peaches without losing the warmth and tenderness that make cobbler feel special in the first place. Nothing about it is fussy, yet the dessert still tastes intentional. The method is simple, though never bare, and the final result is easy enough for a weeknight, welcome at a potluck, and entirely worthy of the words homemade and old-fashioned.
It changes the way you think about pantry fruit
There is another reason this kind of recipe matters: it lets you make peace with the pantry in a much more satisfying way. Too often, canned fruit gets pushed into the category of emergency ingredient, something you use only because fresh is not available. In truth, canned peaches can be a gift. They are consistent, soft, and ready.
When used carefully, they give you a filling that already has the tenderness cobbler wants. What they need is a recipe that understands their strengths and corrects their weaknesses. That is what this one does. It does not apologize for the pantry. It makes the pantry feel smart.
Can you really make excellent peach cobbler with canned peaches?
Yes, and a peach cobbler with canned peaches can taste fully homemade
You absolutely can, and not in a reluctant, second-best sort of way. A peach cobbler with canned peaches can come out golden at the edges, soft in the middle, fragrant with vanilla and cinnamon, and beautifully spoonable. With the right handling, it tastes homemade, feels old-fashioned, and becomes exactly the kind of dessert people ask about after dinner.
That matters, because many cooks begin with quiet doubts. They assume canned peaches will only ever produce a serviceable dessert, never a memorable one. Yet cobbler does not demand perfect fruit. It demands warm fruit, balanced sweetness, and a topping that bakes into something tender and rich. Canned peaches can absolutely deliver on that promise when they are treated properly.
Why people hesitate
The hesitation usually comes from a reasonable place. Canned fruit is packed with liquid, sometimes syrupy liquid, and cobbler is notoriously unforgiving when too much moisture gets into the pan. Because of that, it is easy to imagine the whole thing turning soupy, over-sweet, or strangely flat.
That is not really a canned peach problem so much as a handling problem. Once you understand how to treat the fruit, the rest becomes straightforward. In other words, the problem is rarely the peach itself. The problem is almost always what the extra liquid does to the batter and the bake.
The short answer
Yes, canned peaches work beautifully in cobbler as long as they are drained well, sweetened thoughtfully, and baked long enough for the topping to fully set. Peaches packed in juice or light syrup are usually the easiest to manage, while heavy syrup peaches often need a bit more draining and a lighter hand with sugar.
The small act of control that changes the outcome
Peaches packed in juice or light syrup are often the easiest option because they give you more control. Heavy syrup peaches can still work, though they ask for a little restraint elsewhere. Either way, the crucial step is not simply dumping the can into the dish.
The peaches need to be drained and given a moment to shed excess liquid. From there, you can decide whether the fruit needs a little of its own juices added back in. Sometimes it does. Quite often, it does not. That small act of control is one of the main reasons this canned peach cobbler recipe turns out juicy rather than watery.
From fallback ingredient to smart ingredient
So the better question is not whether you can use canned peaches. The better question is how to use them so the cobbler tastes like you meant it to, not like you settled for it. Once that shift happens, canned peaches stop feeling like a fallback and start feeling like one of the smartest ways to make cobbler well.
If you enjoy baking that balances comfort with a little practical know-how, you might also like the way MasalaMonk’s tres leches cake recipe approaches a crowd-pleasing dessert: generous, clear, and deeply reader-friendly.
What Kind of Peach Cobbler with Canned Peaches Is This?
Cobbler is one word for several traditions
One of the quiet confusions around cobbler is that the word sounds singular while the desserts themselves are not. Ask five people what peach cobbler should be, and you may get five different answers. Some want a biscuit topping with distinct mounds of dough. Others expect a more cake-like layer that rises around the fruit. Some think of cobbler as nearly pie-like, while others fold it into the broader family of fruit bakes that includes crisp, crumble, buckle, and slump.
That variety is part of the charm, but it can also make recipes feel unclear. A person expecting a biscuit cobbler may be surprised by a batter-style one. Someone hoping for a crisp may wonder where the oat topping went. Clarity helps.
This is a batter-style peach cobbler with canned peaches
This recipe is a batter-style peach cobbler with canned peaches, and that tells you what to expect before you even pick up the flour. Rather than heading into biscuit territory, cake mix territory, or the world of oat-topped crisps and streusel-like crumbles, you are making the kind of cobbler that pours into the pan, welcomes the peaches over the top, and bakes into a soft, buttery layer around the fruit.
What this cobbler is not
It is not a biscuit cobbler with separate rounds on top, and it is not a cake mix peach cobbler with canned peaches that behaves more like a dump cake. Nor is it a peach crisp with oats or a crumble with a streusel topping. Instead, it lands in that cozy middle where the batter rises around the fruit and creates a spoonable dessert with golden edges and a tender center.
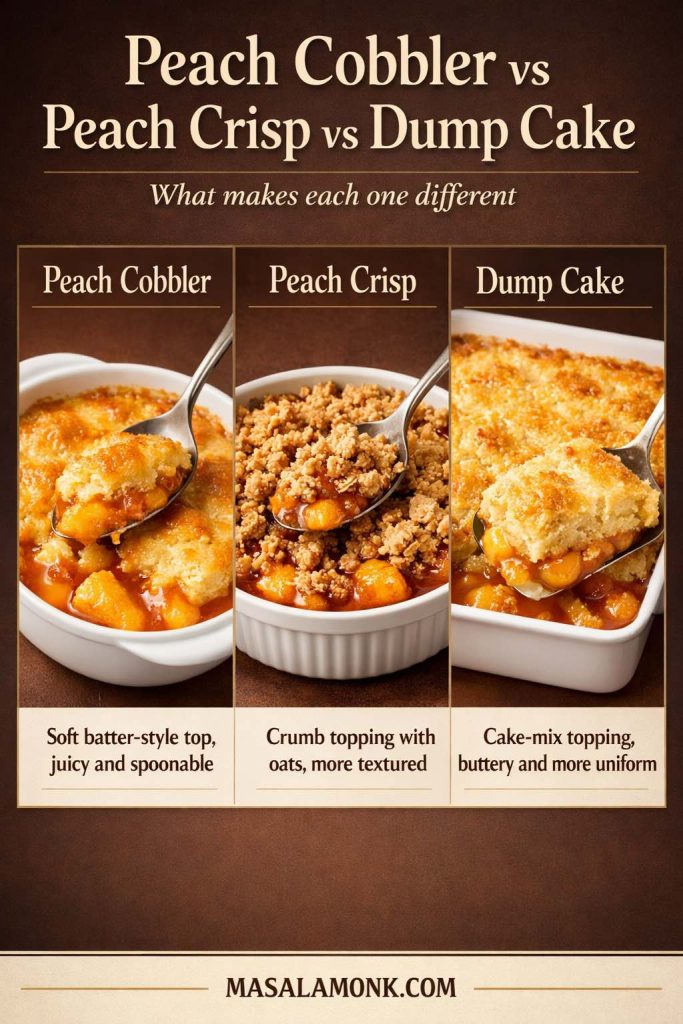
Not every baked peach dessert is the same, and this comparison makes the differences easier to see at a glance. Peach cobbler has a softer batter-style topping that feels juicy and spoonable, peach crisp has a more textured crumb topping often made with oats, and dump cake has a more uniform cake-mix style top. If you have ever wondered why a peach cobbler with canned peaches looks and bakes differently from a crisp or a dump cake, this guide helps clarify it quickly before you bake.
Why canned peaches work especially well in this style
That style works especially well when the peaches come from a can. Because the fruit is already soft, it nestles into the batter without needing much encouragement. The batter, in turn, rises gently as it bakes, creating those lovely areas where the top is crisp at the edge and soft closer to the fruit.
The whole dessert ends up feeling rustic, warm, and familiar. It does not need decorative flourishes to feel complete. Instead, it leans on contrast: juicy fruit, soft topping, rich edges, warm spice, and just enough sweetness to make the peaches feel fuller without drowning them.
Why one recipe can satisfy several cravings
That distinction also helps explain why this version satisfies so many closely related cravings at once. It works beautifully as an easy peach cobbler recipe with canned peaches, while still delivering the comfort and fullness of a homemade peach cobbler with canned peaches. For anyone who grew up with batter-style Southern cobblers, it may even strike the same familiar note as a southern peach cobbler with canned peaches, especially when served warm with vanilla ice cream melting into the corners.
For a broader look at how cobbler styles differ, King Arthur Baking’s piece on different peach cobbler styles is genuinely helpful. It explains why one person’s “real cobbler” may look very different from another’s. That said, the method here stays reassuringly simple: buttery batter, drained peaches, no stirring, patient bake.
Ingredients for Homemade Peach Cobbler with Canned Peaches
The recipe ingredients
Here is the full ingredient list with amounts that make the method easier to follow.
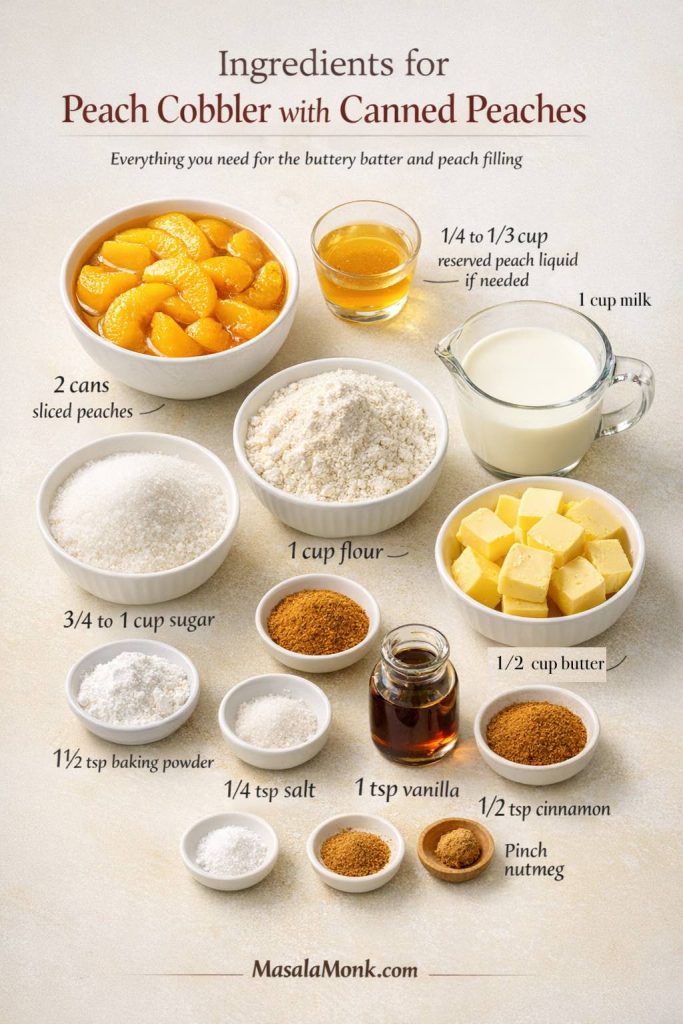
This ingredients card for peach cobbler with canned peaches shows the full ingredient lineup at a glance, from sliced canned peaches and reserved peach liquid to flour, sugar, milk, butter, vanilla, and warm baking spices. It is especially useful before you start mixing, because it helps you quickly check the measured ingredients for the buttery batter and peach filling without scanning the whole recipe line by line. For readers who like a visual prep reference, this makes the recipe easier to organize, save, and follow.
2 cans sliced peaches, about 15 ounces each, drained
1/4 to 1/3 cup reserved peach liquid, only if needed
1 cup all-purpose flour, about 120 grams
3/4 to 1 cup granulated sugar, 150 to 200 grams, depending on the peaches
1 1/2 teaspoons baking powder
1/4 teaspoon salt
1 cup milk, 240 ml
1/2 cup unsalted butter, 113 grams
1 teaspoon vanilla extract
1/2 teaspoon ground cinnamon
Pinch of nutmeg, optional
Nothing about this ingredient list is extravagant. That is part of the charm. The dessert relies on ordinary baking staples arranged with a little care, which is exactly why it feels so approachable.
The peaches and the topping base
The peaches provide the fruit body of the dessert. Because they are already soft, they do not need much from the oven besides warmth and enough time for their juices to settle into the batter around them.
Flour gives the topping structure. It should not be heavy or dense, which is why all-purpose flour works beautifully here. Baking powder lifts the batter, turning it from a flat liquid into the tender golden top that defines this cobbler style. Milk loosens everything into a pourable consistency and helps the topping bake into something soft and tender rather than stiff.
The ingredients that bring balance
Sugar sweetens both the topping and, indirectly, the whole dessert. However, the exact amount can and should respond to your peaches. Fruit packed in heavy syrup needs less additional sugar than fruit packed in juice. That is one of the easiest ways to keep a peach cobbler made from canned peaches from becoming cloying.
Salt matters more than it may first appear. A small amount keeps the sweetness lively rather than one-note. Vanilla and cinnamon round everything out. They do not need to shout. Their job is simply to make the whole dessert smell and taste more complete.
The ingredient that gives peach cobbler with canned peaches its richest edges
Butter does several jobs at once. It enriches the flavor, supports browning, and creates the sort of edge texture people love most in a cobbler—the places where the topping goes almost crisp before giving way to softer spoonfuls underneath.
That buttery edge is one of the quiet pleasures that makes cobbler feel homemade in a deeper way. It is not only about sweetness or fruit. It is also about those golden corners, those slightly richer bites, and that unmistakable smell when butter and batter meet heat at the bottom of the dish.
A peach cobbler with canned peaches can only be as balanced as the fruit allows, so it is worth taking a moment to understand what you are opening.
Choosing the right canned peaches can make a big difference in how your peach cobbler tastes and bakes. This guide compares peaches packed in juice, light syrup, and heavy syrup, and also covers when jarred peaches can work. If you want the cleanest peach flavor and the easiest sweetness control, peaches in juice are usually the best choice. Light syrup is still a very good option, while heavy syrup needs more draining and a lighter hand with added sugar. Save this before shopping so your peach cobbler with canned peaches starts with the right fruit.
How Many Cans for Peach Cobbler with Canned Peaches?
For a standard 9×13-inch peach cobbler with canned peaches, two 15-ounce cans of sliced peaches usually give the best fruit-to-topping balance. If your cans are unusually full or the slices are packed loosely, adjust by eye so the batter is comfortably covered without being overloaded.
Peaches packed in juice
Canned peaches in juice are often the easiest and cleanest choice. They taste fruity rather than syrupy, which means the cobbler has a better chance of tasting like peaches instead of sugar. They also let you add sweetness where you want it rather than accepting whatever intensity came in the can.
Peaches packed in light syrup
Peaches packed in light syrup are also a very good option. They have a little more built-in sweetness, though not usually so much that the dessert becomes overwhelming. In many kitchens, these are the happy middle ground.
Peaches packed in heavy syrup
Heavy syrup peaches can still be used successfully. However, they benefit from extra draining and a lighter hand with sugar in the batter. If that adjustment is ignored, the final result can feel both too sweet and too loose, which is one of the most frustrating combinations in a cobbler.
Jarred peaches
You may also see jarred peaches from time to time. If you have been wondering about peach cobbler with jarred peaches, they can work in much the same way as canned peaches, provided the fruit is soft and the liquid is handled carefully. The same principle applies: drain first, assess later.
Slice size and texture
If the peaches are sliced evenly and not too thin, so much the better. Very soft or broken slices are not a disaster, though they will create a more jammy filling. That can be lovely in its own way, especially if what you want is comfort rather than presentation.
Yes. Not always to the point of dryness, but yes, you should drain them.
This is one of the most important decisions in the recipe, and it is the main reason so many cobblers either succeed beautifully or miss the mark. Too much liquid in the pan makes it difficult for the batter to rise and set properly. The topping may remain pale or gummy. The peaches may bubble furiously and still never seem to settle. The dessert may smell wonderful and yet spoon out like sweet soup.
How Long to Drain Canned Peaches for Peach Cobbler
Drain the peaches for 5 to 10 minutes before using them. If they are packed in heavy syrup, lean toward the longer end. You are not trying to dry them out completely. Instead, you are removing enough excess liquid to keep the cobbler from becoming watery.
Wondering why peach cobbler with canned peaches sometimes turns runny? This guide shows the steps that make the biggest difference: drain the peaches well, add syrup back only if the fruit needs it, bake until the top is deeply golden, and let the cobbler rest before serving. It is one of the easiest ways to keep a canned peach cobbler rich, buttery, and beautifully spoonable instead of watery. Save this as a quick visual reference before baking.
When to add some liquid back
Draining gives you control. Once the peaches sit in a colander for several minutes, you can see what you are actually working with. If they still look glossy and juicy, that is often all you need. If they look strangely dry, reserve a few tablespoons of their liquid and add it back with intention rather than by accident.
Why this matters so much
This is the point at which a homemade peach cobbler using canned peaches starts to feel more like actual cooking and less like a shortcut. You are not obeying the can. You are reading the fruit and adjusting accordingly.
For the same reason, you do not want to treat every can the same way. Juice-packed peaches behave differently from peaches in heavy syrup. A fruit cup’s worth of extra liquid may seem harmless, yet it changes the cobbler dramatically. A measured hand is kinder to the final dessert than generosity in this particular case.
This is where everything comes together. The process is easy, though not careless. Each step builds on the one before it, and none of them is difficult.
This step-by-step peach cobbler with canned peaches guide turns the full method into a quick visual roadmap, from draining the peaches and melting butter to baking until deeply golden and letting the cobbler rest before serving. It is especially useful if you want to see the flow of the recipe at a glance before starting, and it reinforces the small technique details that make the biggest difference in texture, color, and overall success.
Step 1: Drain the peaches for 5 to 10 minutes
Open the peaches and pour them into a colander set over the sink or a bowl. Leave them there while you prepare the batter and preheat the oven. If the peaches are in heavy syrup, letting them sit a little longer is helpful. At this stage, you are not trying to dry them out completely; you are simply removing the excess that would otherwise flood the cobbler.
If you like, save a small amount of the drained liquid. It may come in handy later, although quite often you will discover the fruit does not need it.
This Step 1 peach cobbler with canned peaches technique card shows one of the most important moves in the whole recipe: drain the peaches for 5 to 10 minutes before they go into the dish. That small step helps control excess syrup, keeps the batter from getting flooded, and gives you a cobbler that bakes up juicy, golden, and spoonable instead of watery. If the peaches are packed in heavy syrup, draining well matters even more.
Step 2: Heat the oven to 350°F and melt the butter in a 9×13-inch baking dish
Place the butter in the baking dish and let it melt in the warming oven. This is one of those tiny old-fashioned moves that makes the finished dessert feel richer and more complete. The butter coats the bottom of the pan, helps the batter spread, and creates beautifully browned edges.
Meanwhile, because the dish is warming and the butter is melting, you can make the batter without feeling rushed.
This Step 2 peach cobbler with canned peaches technique card shows why melting the butter directly in the baking dish matters before the batter goes in. That hot buttery base helps the batter spread properly, encourages rich golden edges, and gives the cobbler more of the classic buttery texture people expect from an old-fashioned batter-style peach cobbler. It is a small step, but it sets up the structure of the whole dessert.
Step 3: Mix the dry ingredients
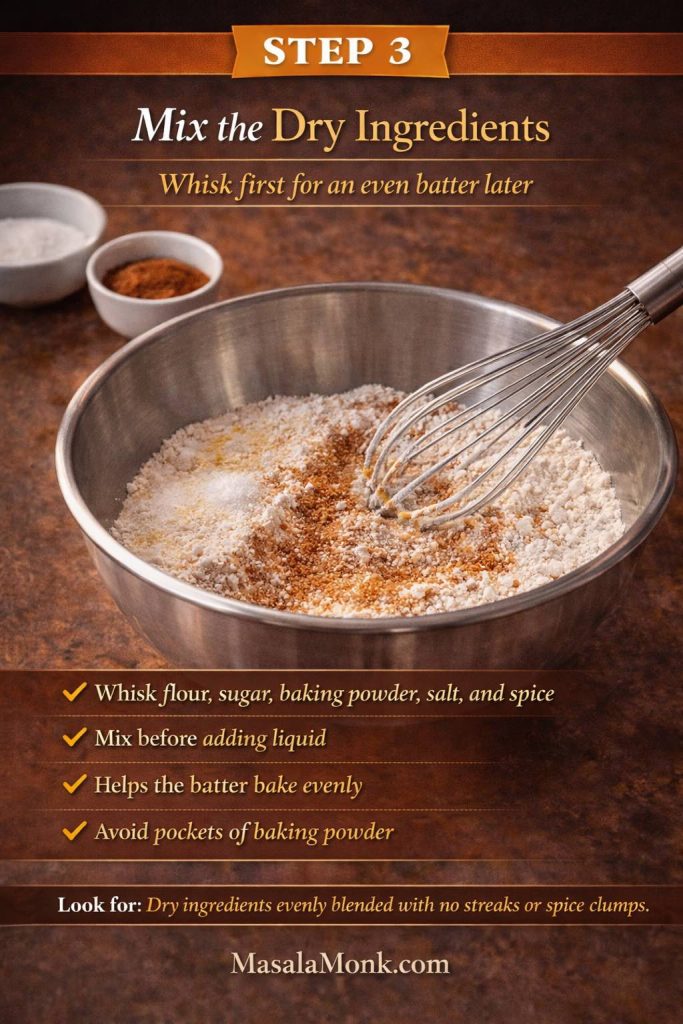
In a bowl, whisk together the flour, baking powder, salt, cinnamon, and nutmeg if you are using it. Mixing the dry ingredients first keeps everything evenly distributed, which matters more than people often realize. A pocket of baking powder in one corner and none in another is not the kind of rustic touch anybody actually wants.
This Step 3 peach cobbler with canned peaches technique card shows why whisking the dry ingredients first is worth doing before the milk and vanilla go in. It helps distribute the baking powder, salt, sugar, and spice more evenly through the batter, which gives the cobbler a more consistent rise, better texture, and fewer clumps or uneven pockets in the finished topping. It may look like a small step, but it helps set up a smoother, more reliable batter-style peach cobbler from the very beginning.
Step 4: Combine the wet ingredients and make the batter
In a separate bowl or large measuring cup, stir together the milk, vanilla, and sugar. Once the sugar is largely dissolved, add the dry mixture and stir just until the batter comes together.
What the batter should feel like
The batter should be smooth and pourable, closer to thick pancake batter than to cream. If it looks too stiff, add 1 tablespoon of milk at a time until it loosens slightly. If it seems unusually thin, let it stand for 1 to 2 minutes so the flour can hydrate before deciding whether it needs adjustment.
This Step 4 peach cobbler with canned peaches batter guide shows the texture you want before the batter goes into the baking dish: smooth, thick, and pourable, closer to pancake batter than to thin cream. It is a useful visual checkpoint if you have ever wondered whether your cobbler batter is too thick or too loose, because getting this consistency right helps the topping bake up tender, buttery, and evenly set instead of dense or heavy.
Step 5: Pour the batter over the melted butter and do not stir
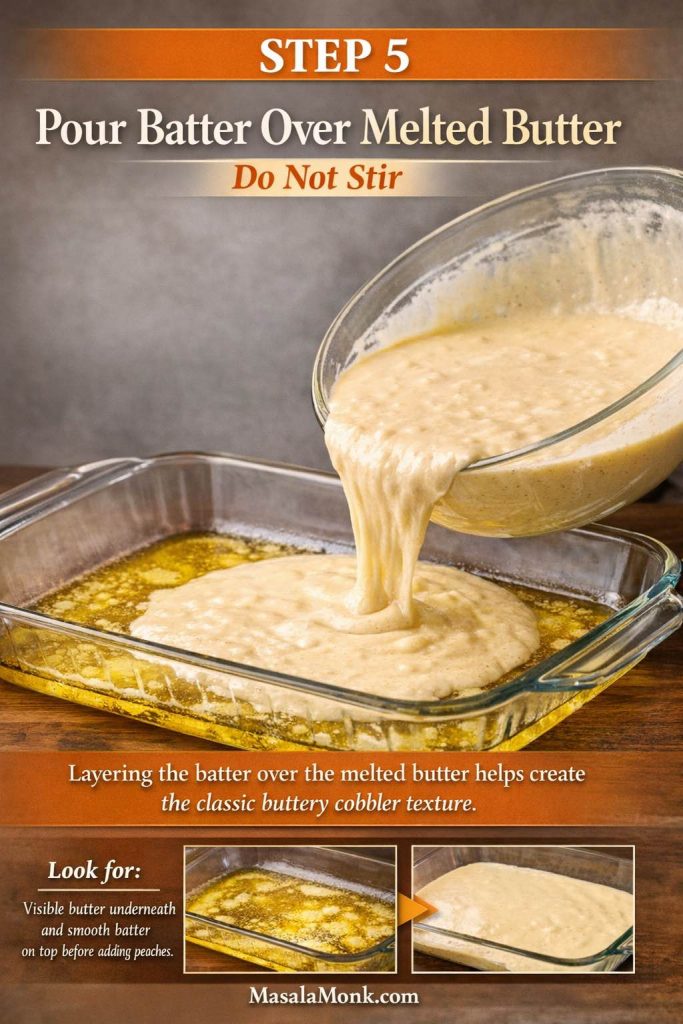
Remove the dish from the oven carefully. The butter should be fully melted and fragrant. Pour the batter evenly over the butter. Do not stir. That instruction matters because the layered arrangement is part of what helps the topping form as it should.
This Step 5 peach cobbler with canned peaches technique card shows one of the most important parts of the recipe: pour the batter over the melted butter and do not stir. That layering is what helps create the classic buttery batter-style cobbler texture, with tender topping, rich golden edges, and juicy peaches settling in as the dessert bakes. If you have ever wondered why some cobblers turn out heavy or lose that old-fashioned texture, this is one of the key moments that makes the difference.
Step 6: Spoon the peaches over the batter
Scatter the drained peaches across the surface of the batter. Try to distribute them fairly evenly so every part of the cobbler gets some fruit. If the peaches look as though they need a little moisture, drizzle over just 1 to 3 tablespoons of reserved liquid. The important point is restraint. The peaches should look glossy and comfortable, not submerged.
This Step 6 peach cobbler with canned peaches technique card shows how the fruit should be added before baking: spoon the drained peaches evenly over the batter, keep the surface well covered without crowding, and add back only a little reserved liquid if the peaches seem dry. It is a helpful visual for getting the fruit-to-batter balance right, which is one of the biggest keys to a cobbler that bakes up juicy, golden, and spoonable instead of watery.
Step 7: Bake for 40 to 50 minutes, until deeply golden and bubbling
Slide the dish into the oven and bake for about 40 to 50 minutes. Start checking at around 40 minutes, but let color and bubbling guide you more than the clock. The cobbler is ready when the top is deeply golden, the edges are bubbling, and the center looks set rather than pale or shiny.
If it browns quickly on top but still seems underdone in the middle, lay a piece of foil loosely over the dish and keep going. It is far better to protect the top than to remove the cobbler too early.
This Step 7 peach cobbler with canned peaches doneness guide shows the visual cues that matter most before you pull the dish from the oven: a deeply golden top, bubbling edges, and a center that looks set rather than pale or shiny. It is especially helpful if you want to judge doneness by sight instead of relying only on the timer, because this is one of the biggest differences between a cobbler that turns out rich, buttery, and beautifully spoonable and one that comes out underbaked or too loose.
Step 8: Rest for at least 20 minutes before serving
This may be the most underrated step in the whole recipe. Let the cobbler sit for at least 20 minutes once it comes out of the oven. During that time, the juices settle, the topping firms gently, and the whole dessert becomes more coherent. The difference between immediately scooped cobbler and properly rested cobbler is surprisingly large.
Once it has rested, serve it warm.
This Step 8 peach cobbler with canned peaches technique card shows why resting the cobbler before serving matters so much. Giving it at least 20 minutes lets the filling settle, helps the center firm up, and makes the dessert easier to scoop without turning watery or loose. It is one of the simplest ways to get a peach cobbler that feels richer, more cohesive, and beautifully spoonable when it finally reaches the table.
What the Batter for Peach Cobbler with Canned Peaches Should Look Like
Recipes often tell you what to do without telling you what to look for. That can make even easy recipes feel uncertain. With this peach cobbler with canned peaches recipe, a few visual cues are especially helpful.
This peach cobbler batter guide shows the visual cues that matter most while baking: a pourable batter before the cobbler goes into the oven, golden edges with a softer center midway through baking, and a deeply golden top with a set center when the cobbler is done. It is a helpful reference if you are making peach cobbler with canned peaches and want to judge doneness by sight instead of guessing from the clock alone. Save it for the next time you want a cobbler that looks right, bakes evenly, and finishes beautifully.
Before baking
The batter should be pourable but not thin. It should spread with minimal encouragement when poured into the buttered dish, yet it should not race to the edges like cream. Think of something soft enough to settle but substantial enough to hold itself.
The peaches should look juicy, not dripping. After draining, they should glisten a bit. They should not sit in a puddle.
Halfway through baking
Halfway through baking, the cobbler will look uneven in a good way. The edges usually rise and color first. The center may still seem softer and paler. Resist the urge to panic at that stage. Cobbler often looks unfinished until it suddenly does not.
When the cobbler is done
Your peach cobbler with canned peaches is ready when the top is deep golden rather than pale, the edges bubble clearly, and the center looks set instead of shiny or wet. A spoon dipped into the middle should lift soft topping, not raw batter.
After resting
Once rested, each spoonful should hold a little shape before giving way. It is still cobbler, so it is not meant to slice like a cake, yet it should not pour either. That balance is exactly what makes it so satisfying.
Why this easy peach cobbler with canned peaches tastes homemade
Homemade flavor is not magic. More often than not, it comes from restraint and care. This recipe tastes homemade because nothing about it is trying too hard. The peaches remain the star. The cinnamon is present but not overwhelming. The vanilla softens the edges of the sweetness rather than turning the whole thing into dessert perfume. The butter is generous enough to matter without drowning the fruit.
Just as importantly, the sweetness, butter, and fruit stay in balance. In many rushed versions, the fruit is too sweet, the topping too bland, or the liquid so uncontrolled that the whole dessert seems muddled. Here, the batter has enough salt to stay lively. The topping bakes long enough to develop color. The peaches stay juicy but not chaotic. Those choices give the dessert definition.
There is also something undeniably homemade about a cobbler that knows what it is. It does not try to be a pie. It does not lean on packets or mixes for identity. Instead, it becomes what cobbler has always promised to be: warm fruit under a golden topping, ready to be spooned into bowls while everyone hovers nearby.
How to keep peach cobbler with canned peaches from getting watery
A watery cobbler is disappointing not only because of texture, but also because it steals confidence from the cook. The dessert may smell wonderful. The top may look promising. Then the spoon goes in, and all at once the fruit floods the bowl. Fortunately, this is usually preventable.
Watery peach cobbler with canned peaches is usually caused by too much liquid, underbaking, or cutting into it too soon. This troubleshooting guide shows the four steps that make the biggest difference: drain the peaches well, add syrup back only if the fruit needs it, bake until the cobbler is deeply golden and set, and let it rest before serving. Keep this visual nearby when baking if you want a peach cobbler that stays juicy, rich, and spoonable without turning soupy.
To avoid a watery cobbler
Drain the peaches well, add reserved liquid only a tablespoon or two at a time, bake until the top is deeply golden and the center looks set, and let the cobbler rest before serving. Those four steps solve most texture problems before they begin.
The first safeguard: draining
It is impossible to say too often because it matters that much. If you pour peaches and all their liquid directly into the pan, you are gambling. Sometimes the dessert will still set. Sometimes it will not. Draining takes the odds firmly in your favor.
The second safeguard: restraint with liquid
If the peaches need some moisture back, add it by the tablespoon rather than by instinctive splashing. A little can make the filling lush. Too much makes it loose.
The third safeguard: full baking time
Do not underbake the cobbler. A pale top and an under-set center are invitations to watery spoonfuls. Let the dessert become deeply golden and visibly bubbling before you call it done.
The fourth safeguard: proper rest
Fruit desserts are not at their most stable the instant they leave the oven. They need a little time to collect themselves. Give them that time.
The fifth safeguard: balanced sweetness
Peaches in heavy syrup often create the illusion that more sugar equals more flavor. In reality, too much sugar can make the filling taste exaggerated and somewhat slick. A more balanced sweetness lets the fruit and topping hold their shape better in flavor as well as texture.
If you want another thoughtful take on peach cobbler structure and fruit handling, King Arthur Baking’s Southern-style peach cobbler recipe is a useful reference.
Making this old fashioned peach cobbler recipe with canned peaches feel even more classic
This recipe already lands in a very comforting, old-fashioned place. Even so, there are a few ways to nudge it further in that direction if that is the mood you want.
A few small choices make a canned peach cobbler feel far more old-fashioned: drain the peaches well, keep the vanilla and cinnamon gentle, bake until the top turns deeply golden, and let the cobbler rest before serving. Those details help the fruit taste brighter, the topping feel more buttery, and the whole dessert come across as warm, balanced, and truly homemade rather than rushed.
Deepen the warmth
A touch of brown sugar in place of some of the white sugar can deepen the flavor and make the dessert feel slightly more rustic. Extra cinnamon can do the same, though too much will flatten the peach flavor rather than enhance it, so keep it gentle. A tiny bit of nutmeg is especially lovely when you want warmth without obvious spice.
Serve it simply
Warm cobbler in simple bowls has a charm all its own. A scoop of vanilla ice cream is classic for good reason. If you are in the mood to make the pairing extra special, MasalaMonk’s guide on how to make ice cream with a KitchenAid mixer is a natural companion.
Let the edges go a little darker
You can also lean old-fashioned by baking the cobbler until the edges get a bit deeper in color than you might first think necessary. Those darker buttery spots are often the most delicious parts of the pan.
How this recipe compares with quick, simple, and shortcut versions
There is a reason phrases like quick peach cobbler with canned peaches and simple peach cobbler with canned peaches sound so appealing. They promise a dessert that fits into real life. This recipe honors that spirit, although it does not strip the process down to the point where the dessert loses character.
Biscuit mix and Bisquick versions
Yes, you can make a peach cobbler with biscuit mix, and a Bisquick canned peach cobbler is certainly possible too. Those versions can be useful when speed matters most. Still, they tend to produce a different topping character and a more shortcut-style flavor than a batter-style cobbler like this one.
This Bisquick vs from-scratch peach cobbler with canned peaches comparison helps you see the trade-off before you bake. A from-scratch batter cobbler gives you the more classic homemade feel, buttery golden edges, and better control over sweetness, while a Bisquick version can save time and cut down on pantry steps. If you have been deciding between a quicker shortcut and a more old-fashioned batter-style cobbler, this guide makes the difference much easier to understand at a glance.
Cake mix and dump cake versions
Cake mix versions, dump cake versions, and recipes built around astonishing brevity all have their place. A cake mix peach cobbler with canned peaches can be comforting in its own right. So can a peach dump cake with canned peaches. Yet those desserts move farther away from the tender, integrated topping that makes a classic batter-style cobbler feel so homemade.
This cake mix peach cobbler vs dump cake vs classic cobbler comparison makes the shortcut differences much easier to understand before you bake. A classic cobbler gives you the most old-fashioned batter-style texture, a cake mix cobbler leans more cakey and convenience-driven, and dump cake is the easiest pantry dessert of the three. If you have been deciding between a true peach cobbler with canned peaches and the quicker cake-mix or dump-cake routes, this guide helps you see exactly how the texture, method, and overall feel change from one version to the next.
Why this middle ground works so well
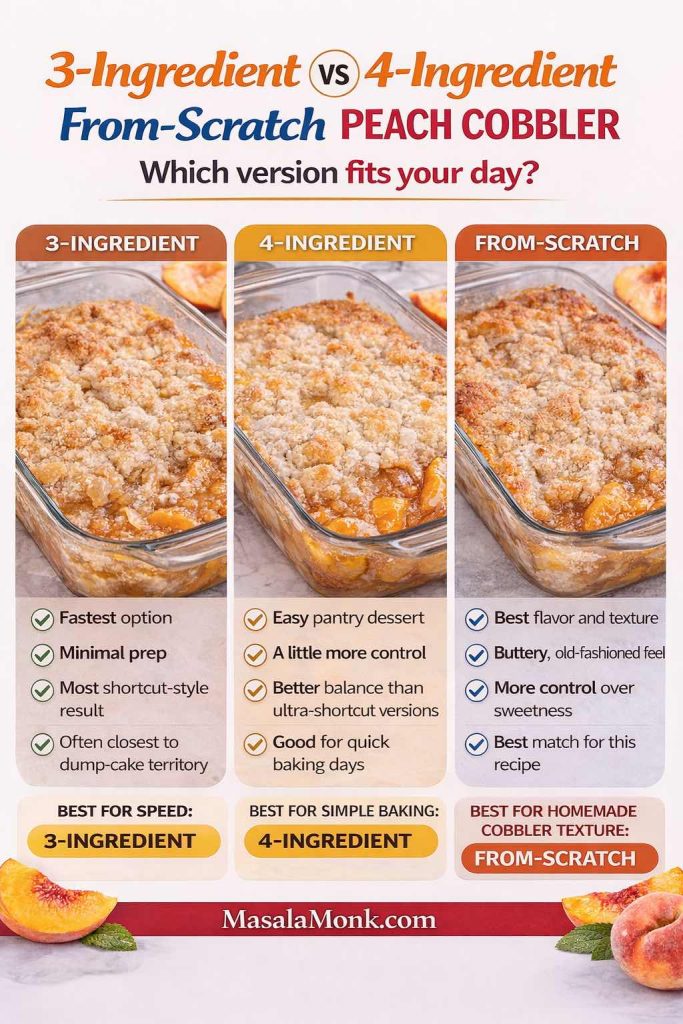
All this recipe really asks for is a bowl, a whisk, a baking dish, and a handful of pantry ingredients. Special equipment is unnecessary, advanced technique is not required, and the process does not turn the kitchen upside down. Even so, that small bit of extra effort gives you something far more satisfying than many three-ingredient or four-ingredient versions manage: a better topping, deeper flavor, and much better control over the fruit.
This 3-ingredient vs 4-ingredient vs from-scratch peach cobbler comparison helps you see how the shortcut spectrum changes the final dessert. A 3-ingredient peach cobbler is the fastest route and often the most shortcut-style, a 4-ingredient version gives you a little more control while still staying easy, and a from-scratch peach cobbler with canned peaches delivers the best flavor, texture, and old-fashioned buttery feel. If you have been deciding between quick convenience and a more homemade result, this guide makes the trade-offs much easier to understand at a glance.
What about frozen peaches?
Frozen peaches work well in cobbler, though they usually need thawing and draining first. Because they release moisture differently from canned peaches, they belong more naturally in their own recipe framework. The same is true for peach cobbler using frozen peaches or peach cobbler recipe using frozen peaches. The spirit is similar, but the details deserve their own treatment.
This canned vs frozen peaches for peach cobbler comparison helps you choose the right fruit before you bake. Canned peaches are the easiest fit for this recipe because they are already peeled, sliced, and pantry-friendly, while frozen peaches can work well too but usually need thawing, draining, and a little more moisture control. If you have ever wondered which option gives you the smoothest path to a juicy, not watery, peach cobbler, this guide makes the trade-offs much easier to see at a glance.
Easy Variations on Peach Cobbler with Canned Peaches Recipe
One of the nicest things about a good cobbler base is that it can flex without losing itself.
Lemon zest
A little lemon zest can brighten peaches that taste dull or flat. This is especially helpful if the fruit feels sweet but not particularly peachy.
This peach cobbler with canned peaches variations guide shows four easy ways to change the flavor without losing the buttery, old-fashioned cobbler feel. From classic cinnamon vanilla and deeper brown sugar notes to a brighter lemon version and a peach berry twist, it helps readers see how flexible the base recipe can be before they start baking. It works especially well here because the section is about easy variations, and this card turns those ideas into a quick visual reference readers can save, compare, and come back to later.
Brown sugar
A spoonful or two of brown sugar can make the topping feel richer and more caramel-like.
Almond extract
A bit of almond extract, used sparingly, can lend a lovely bakery note. Use much less than you would vanilla because it is powerful.
Mixed berries
A few raspberries or blueberries scattered among the peaches can make the filling feel summery and a little more vivid, though the cobbler will then become a peach-forward mixed fruit dessert rather than a pure peach version.
A slightly thicker filling
If you prefer a slightly thicker fruit layer, toss the drained peaches with 1 to 2 teaspoons of cornstarch before adding them to the batter. Many cobblers do not need this if the fruit has been drained properly and the bake is given enough time, but it can be helpful with particularly soft fruit.
What to serve with peach cobbler with canned peaches
Warm peach cobbler knows how to carry a dessert course on its own, but the right accompaniments make it feel even more complete.
Wondering what to serve with peach cobbler with canned peaches? This old fashioned serving guide shows the classic pairings that make a warm cobbler feel even more special: a scoop of vanilla ice cream, a little whipped cream, and a hot cup of coffee on the side. Use it as a quick visual reminder when you want your peach cobbler to feel cozy, generous, and beautifully served for family dinner, holidays, or an easy dessert night at home.
Vanilla ice cream with peach cobbler with canned peaches
Vanilla ice cream is the classic choice for obvious reason. The cream softens the sweetness, the cold contrasts beautifully with the warm topping, and the melting edges mingle with the fruit in a way that feels almost unfairly good. If you like homemade pairings, MasalaMonk’s guide to making ice cream at home is a lovely place to wander next.
Whipped cream
Whipped cream is another easy option, especially if you want something lighter than ice cream. Softly whipped cream with very little sugar lets the cobbler remain the center of attention.
Coffee with this peach cobbler with canned peaches
Coffee is wonderful beside peach cobbler, particularly in cooler weather or after dinner. A warm mug turns the whole dessert into more of an occasion. If that sounds appealing, MasalaMonk’s cappuccino recipe makes an especially nice pairing.
Iced coffee or brighter drinks
On a warmer day, or if you are serving cobbler after lunch, something chilled can feel more refreshing. In that case, these iced coffee recipes are an easy next stop.
If you are serving the cobbler at a summer gathering and want a brighter drink on the table, a fresh cocktail can make the whole dessert spread feel more playful. MasalaMonk’s Paloma recipe or mojito recipe would suit that mood beautifully.
Storing and reheating leftovers of peach cobbler with canned peaches
Leftover cobbler is one of life’s small luxuries. The texture changes a little, of course. The topping softens as it sits. Even so, the flavor remains lovely, and a gently reheated bowl the next day can be unexpectedly perfect.
This storage and reheating guide for peach cobbler with canned peaches shows the simple steps that help leftovers stay as enjoyable as possible: let the cobbler cool completely, cover and refrigerate it once fully cooled, enjoy it within 2 to 3 days, and reheat gently before serving. It is especially useful if you want a quick visual reminder after baking, because peach cobbler tastes wonderful the next day too, but the topping softens over time and reheating method makes a difference. Microwave works for speed, while the oven helps recover some of the cobbler’s texture.
How long peach cobbler with canned peaches keeps
Once the cobbler has cooled, cover it and refrigerate it. It is best within 2 to 3 days. If you plan to eat it within a day or two, the pan can stay as it is. For longer storage within that short window, individual portions make reheating simpler.
How to reheat peach cobbler with canned peaches
The microwave works well enough for convenience, especially if you are warming a single serving. If you want the top to recover a little of its edge, the oven is better. Warm the cobbler gently until heated through rather than blasting it at a high temperature.
A brief food-safety note
For broader kitchen guidance, the FDA’s pages on safe food handling and safe food storage are useful references. Not every recipe needs those reminders, yet dessert made with fruit and dairy-based batter is still food that deserves proper care.
More desserts to make when this cobbler puts you in a baking mood
Once a warm fruit dessert comes out well, there is often a pleasant temptation to keep going. If that mood strikes, there are several rich, substantive MasalaMonk recipes that fit beautifully into the same comforting, reader-friendly spirit.
For something milky, generous, and celebration-ready, the tres leches cake recipe is a natural next bake. If you want a dessert with crisp edges and a different kind of warmth, homemade churros are deeply satisfying. If chocolate sounds more tempting than fruit, these vegan chocolate cake recipes offer another inviting direction.
The point is not to rush away from cobbler. Quite the opposite. It is to enjoy the way one good homemade dessert often opens the door to another.
Final thoughts on making a peach cobbler with canned peaches
Peach cobbler with canned peaches works because it meets you where you are while still giving you something that feels warm, generous, and deeply real. There is no need to wait for a perfect season, insist on ideal fruit, or treat dessert like a performance. Instead, a few pantry ingredients, a little care with the liquid, and enough patience to let butter, flour, peaches, and heat do what they have always done so beautifully together are enough to produce something genuinely comforting.
The result is the kind of dessert that earns its keep. It is easy enough for an ordinary evening, lovely enough for company, and comforting enough to make the kitchen feel briefly softer and kinder. That is no small thing.
So the next time you see canned peaches in the pantry and wonder whether they can become something more than a backup ingredient, let the answer be yes. With the right recipe, they can turn into a peach cobbler with canned peaches that tastes homemade, an easy peach cobbler with canned peaches recipe you return to without hesitation, or the kind of old fashioned canned peach cobbler that disappears from the table faster than expected. More than that, they can become the sort of dessert that reminds you how often the simplest things, handled well, are the ones that stay with people longest.
1. Can you make peach cobbler with canned peaches?
Absolutely. A well-made peach cobbler with canned peaches can turn out buttery, golden, soft around the fruit, and every bit as comforting as a version made with fresh peaches. In fact, canned peaches make the recipe easier and more consistent because the fruit is already peeled, sliced, and tender.
2. Do you drain canned peaches for peach cobbler?
Yes, draining the peaches is usually the better choice. Otherwise, too much liquid can leave the cobbler watery and overly sweet. After draining, you can always add back a small amount of the peach liquid if the fruit looks too dry, but starting with control gives you a much better result.
3. What canned peaches are best for peach cobbler?
Canned peaches packed in juice or light syrup are usually the best option. They give you enough sweetness and moisture without making the dessert heavy or syrupy. Peaches in heavy syrup can still work, though you will usually want to drain them very well and reduce the sugar in the recipe slightly.
4. Can I use peaches in heavy syrup for peach cobbler?
Yes, you can. Even so, they need a little more care. Drain them thoroughly, taste the fruit, and use less added sugar in the batter if needed. That way, the peach cobbler with canned peaches still tastes balanced rather than overly sweet.
5. Why is my peach cobbler with canned peaches watery?
Most often, a watery cobbler comes down to too much liquid, not enough baking time, or skipping the resting period. If the peaches are not drained well, the batter struggles to set properly. Likewise, if the cobbler is pulled from the oven too early, the center may stay loose. Letting it rest after baking also helps the filling settle.
6. How do I keep peach cobbler with canned peaches from getting soggy?
Start by draining the peaches well. After that, avoid pouring all the syrup or juice back into the dish. Bake the cobbler until the top is deeply golden and the edges are bubbling, then let it rest before serving. Those small steps keep the topping tender without turning it soggy.
7. Can I make an easy peach cobbler with canned peaches ahead of time?
Yes, although cobbler is usually at its best on the day it is baked. If needed, you can make it earlier in the day and reheat it gently before serving. The flavor stays lovely, while the topping may soften a little as it sits.
8. Can I make a homemade peach cobbler using canned peaches that still tastes old-fashioned?
Definitely. The key is not the source of the peaches alone, but how the cobbler is built around them. A buttery batter, balanced sweetness, warm spice, and proper baking time go a long way toward making the dessert taste homemade and old-fashioned rather than rushed.
9. What is the difference between peach cobbler with canned peaches and peach crisp?
The difference is mostly in the topping. Peach cobbler with canned peaches has a soft batter-style or biscuit-style topping, depending on the recipe. Peach crisp, by comparison, usually has a crumbly topping made with butter, flour, sugar, and often oats. Cobbler feels softer and more spoonable, whereas crisp leans more crumbly and textured.
10. Can I make peach cobbler with canned peaches without fresh peaches at all?
Yes, completely. That is one of the best things about this dessert. You do not need fresh peaches for the recipe to work beautifully. As long as the canned peaches are drained well and the liquid is handled carefully, the cobbler can taste warm, juicy, and fully finished.
11. Can I turn this into an old fashioned peach cobbler recipe with canned peaches?
Yes, very easily. To give the cobbler more of an old-fashioned feel, keep the flavors simple, use a little cinnamon and vanilla, and bake it until the edges are richly golden. Serving it warm with vanilla ice cream also helps create that classic cobbler experience.
12. Can I use self-rising flour in peach cobbler with canned peaches?
You can, although you will need to adjust the recipe. Since self-rising flour already contains leavening and salt, it should replace both the all-purpose flour and part of the baking powder-and-salt structure. If you use it without adjusting anything else, the topping may not bake the way you expect.
13. Can I make peach cobbler with canned peaches and biscuit mix instead?
Yes, you can, and many people do. A peach cobbler made with biscuit mix or a Bisquick canned peach cobbler usually has a slightly different flavor and texture from a batter-style cobbler. It can still be good, but it will not have quite the same homemade character as a from-scratch version.
14. Is cake mix peach cobbler with canned peaches the same as regular cobbler?
Not exactly. A cake mix peach cobbler with canned peaches is usually closer to a dump cake in style. It is quicker and more shortcut-driven, whereas a traditional batter-style cobbler has a softer, more integrated topping. Both can be delicious, though they are different desserts.
15. How long does peach cobbler with canned peaches last in the fridge?
Usually, it keeps well for 2 to 3 days when covered and refrigerated. The topping will soften over time, but the flavor remains very good. Reheating individual portions before serving often brings back some of the warmth and comfort that make cobbler so appealing.
16. Can I freeze peach cobbler with canned peaches?
Yes, although the texture is best when freshly baked or gently reheated after refrigeration. Freezing is possible, but the topping may soften more after thawing. Even then, the dessert can still be very enjoyable, especially if warmed before serving.
17. What should I serve with peach cobbler with canned peaches?
Vanilla ice cream is the classic answer, and for good reason. Whipped cream is another lovely option. On cooler evenings, coffee pairs beautifully with peach cobbler, while warmer days may call for something chilled alongside it.
18. Why does my peach cobbler topping stay pale?
Usually, that happens when the cobbler needs more time in the oven or when the liquid level is too high. A proper bake gives the topping enough time to rise, brown, and set. If the top is coloring too slowly, keep baking until the edges are clearly golden and the center looks finished.
19. Can I make a simple peach cobbler with canned peaches less sweet?
Certainly. The easiest way is to reduce the sugar slightly, especially if the peaches are packed in syrup. Choosing peaches in juice or light syrup also helps keep the dessert more balanced from the start.
20. Is peach cobbler with canned peaches good for holidays and potlucks?
Very much so. Since the recipe is easy to scale, easy to transport, and familiar to most people, it works especially well for gatherings. Better yet, it holds onto that homemade, comforting feel that makes cobbler such a welcome dessert on any table.
This chicken adobo recipe gives you the version most people are hoping for when they search for adobong manok: tender chicken, plenty of garlic, a savory-tangy soy-and-vinegar sauce, and a final reduction that turns the braising liquid glossy enough to cling to the meat and rice.
The ingredients are simple, but the order matters. Brown the chicken without trying to cook it through, keep the garlic fragrant rather than dark, simmer gently until the meat is tender, and only then decide how far to reduce the sauce. Stop while there is still enough to spoon over rice for classic adobo, or keep going for a drier, lacquered adobong manok na tuyo.
Filipino adobo changes from household to household, so there is no useful reason to pretend one ratio is the only legitimate one. This version keeps a clear starting point—½ cup / 120 ml soy sauce, ⅓ cup / 80 ml vinegar, and ¾ to 1 cup / 180–240 ml water for 1.2–1.5 kg chicken—then shows you how to adjust the finished pot without losing the character of the dish.
Chicken adobo at a glance: Serves 4–5 · best with bone-in thighs or drumsticks · simmer 25–35 minutes for those cuts · cook chicken to at least 165°F / 74°C · reduce 8–12 minutes for a saucy finish or longer for tuyo.
Chicken Adobo Recipe
Classic Filipino chicken adobo with bone-in chicken braised in soy sauce, vinegar, garlic, bay leaves and peppercorns, then reduced until the sauce is glossy and deeply savory.
Prep15 minutes
Cook55 minutes
Total1 hour 10 minutes
Yield4–5 servings
CuisineFilipino
MethodStovetop braise
Ingredients
1.2–1.5 kg bone-in chicken thighs and drumsticks, skin-on optional
1 tablespoon neutral oil
10–12 garlic cloves, smashed
3 bay leaves
1–1½ teaspoons whole black peppercorns, or ¾ teaspoon coarsely cracked pepper
½ cup / 120 ml soy sauce
⅓ cup / 80 ml cane vinegar, coconut vinegar, or distilled white vinegar
¾–1 cup / 180–240 ml water
Optional short marinade: Take 2 tablespoons soy sauce, 1 tablespoon vinegar and 3–4 garlic cloves from the measured ingredients above. Toss with the chicken for 15–30 minutes. This is optional and is not included in the total time.
Instructions
Prep the chicken. Pat the pieces thoroughly dry. If using large leg quarters, separate them into thighs and drumsticks so they cook more evenly. Do not add extra salt at this stage.
Brown in batches. Heat the oil in a wide heavy pan over medium-high heat. Brown the chicken in a single layer for about 2–4 minutes per side, aiming for golden patches rather than a dark crust. Transfer to a plate.
Cook the aromatics. Lower the heat to medium. Add the smashed garlic and cook for 30–60 seconds, just until fragrant. Add the bay leaves and peppercorns.
Build the braise. Add the water first and scrape up the browned bits. Pour in the soy sauce and vinegar. Let the mixture come to a lively simmer; giving the vinegar a minute or two before vigorous stirring can help its raw aroma settle.
Simmer until tender. Return the chicken and any juices to the pan. Cover and simmer gently: 25–35 minutes for bone-in thighs or drumsticks, 18–25 minutes for wings, or 12–18 minutes for breast pieces. Chicken should reach at least 165°F / 74°C.
Reduce the sauce. Remove the lid and simmer over medium heat until the sauce is glossy. For a classic saucy finish, this usually takes 8–12 minutes. Turn the chicken once or twice as the sauce thickens. If the meat is already tender and the sauce needs more reduction, lift the chicken out and reduce the liquid separately.
Rest and serve. Turn off the heat and let the chicken sit in the sauce for about 5 minutes. Serve hot with rice, spooning the sauce over the top.
Optional Tuyo Finish
For adobong manok na tuyo: Reduce longer, usually 12–18 minutes in total. For an extra-sticky glaze, remove the tender chicken, reduce the sauce hard for 3–5 minutes, then return the chicken and toss to coat.
In This Chicken Adobo Guide
Chicken Adobo Ingredients
Chicken, vinegar, soy sauce, garlic, bay leaves and peppercorns do most of the work. The ingredient list is short enough that changing the vinegar or soy sauce can noticeably shift the finished pot, so it helps to know what each choice is doing before you start adjusting quantities.
The base formula for 4–5 servings: 1.2–1.5 kg chicken with 120 ml soy sauce, 80 ml vinegar and 180–240 ml water, plus garlic, bay and peppercorns.
Best Chicken Cuts for Adobo
Bone-in thighs and drumsticks are the easiest default for this chicken adobo recipe. They have enough fat and connective tissue to stay juicy through the covered simmer and the uncovered reduction. Wings cook faster and take especially well to a sticky tuyo finish.
Chicken breast works, but it has less room for error. Simmer it only until done, pull it from the pan, reduce the sauce separately, then return the breast for a 1–2 minute glaze. If breast is the cut you cook most often, the MasalaMonk guide to keeping chicken breast juicy goes deeper into thickness, temperature and carryover cooking.
Thighs and drumsticks are the most forgiving; wings cook faster, while breast should be pulled early and returned only for the final glaze.
Which Soy Sauce and Vinegar Work Best?
Use the soy sauce you know, but remember that brands and styles can differ sharply in saltiness and color. If the bottle in your kitchen is unfamiliar, the MasalaMonk soy sauce guide explains the practical differences between common types.
Cane vinegar is a natural fit for Filipino adobo. Coconut vinegar is usually rounder, while distilled white vinegar gives a cleaner, sharper edge. With a stronger vinegar, do not reduce the water just because the vinegar tastes sharp; water is the part that dilutes both acidity and salt. Start within the 180–240 ml range, then judge the sauce near the end rather than trying to correct it while it is still thin and raw-tasting.
Optional 15–30 Minute Marinade
A long marinade is not required. If you have 15–30 minutes, take 2 tablespoons soy sauce, 1 tablespoon vinegar and 3–4 smashed garlic cloves from the measured recipe ingredients and toss them with the chicken while you prepare the pan and aromatics. If dinner needs to move immediately, skip it.
The short marinade is optional: use measured soy sauce, vinegar and garlic from the main recipe, then continue with the same browning and braising method.
Garlic, Peppercorns, Bay Leaves and Optional Onion
Garlic is not a background ingredient here: 10–12 smashed cloves give this chicken adobo recipe much of its savory aroma. Smashing rather than finely mincing the cloves also makes them less likely to scorch during the brief sauté. Three bay leaves add a dry, herbal note, while whole peppercorns give little bursts of warmth as the sauce reduces.
One small sliced onion is optional. Add it after the chicken comes out of the pan and give it a minute or two to soften before the garlic goes in. It makes the sauce a little rounder and sweeter without turning the dish into a different style. Fresh chili is better treated according to the table: add one or two to the braise if everyone wants heat, or serve sliced chili on the side when different diners want different levels.
These aromatics are easy to increase casually, but restraint helps. More garlic is usually forgiving; too many bay leaves can become medicinal, and heavily crushed pepper can make the final reduction harsher than expected. For this adobo recipe, chicken and sauce should still lead, with the aromatics supporting rather than dominating them.
How to Make Chicken Adobo, Step by Step
The recipe card above gives you the short route. This section is for the points where texture and timing matter: getting real browning instead of steam, keeping garlic from scorching, knowing when the chicken is tender, and reducing the sauce without overcooking the meat.
1. Dry the Chicken Before It Hits the Pan
Pat the pieces thoroughly dry with paper towels. Surface moisture has to boil away before browning can begin, so wet chicken spends its first minutes steaming. A wide pan also matters; if the pieces are packed tightly, brown them in batches.
Dry chicken, a wide pan and enough space between pieces are the three biggest safeguards against steaming instead of browning.
2. Brown for Golden Patches, Not a Dark Crust
Heat 1 tablespoon oil over medium-high heat. Once the chicken goes in, leave it alone long enough to release naturally. The visual target is golden patches, not a uniformly dark crust: about 2–4 minutes per side is a useful starting range, depending on the pan, cut and batch size.
Aim for scattered golden-brown patches. You are building fond for the sauce, not trying to finish the chicken during searing.
3. Keep the Garlic Fragrant
After the chicken comes out, lower the heat before adding the smashed garlic. Thirty to sixty seconds is usually enough. Add the bay leaves and peppercorns once the garlic smells sweet and aromatic. If the garlic races toward brown, add a splash of the measured water and move on to the braising liquid.
The garlic should smell aromatic and look pale to lightly golden. Dark, scorched garlic can make the finished sauce bitter.
4. Deglaze, Then Add Soy Sauce and Vinegar
Add the water first and scrape the bottom of the pan. Those browned bits are part of the sauce. Add the soy sauce and vinegar, bring the liquid to a lively simmer, and let the vinegar cook for a minute or two before stirring vigorously. The point is not to “cook out” the acid; it is simply to let the harshest raw vinegar aroma settle.
Water loosens the browned fond from the pan; soy sauce and vinegar then turn those concentrated bits into the base of the braise.
5. Simmer Gently Until the Chicken Is Tender
Return the chicken and any juices to the pan, cover and keep the heat low enough for a gentle simmer rather than a hard boil. Bone-in thighs and drumsticks usually need 25–35 minutes; wings about 18–25 minutes. Breast pieces need only 12–18 minutes and should be removed as soon as they are done.
Use cut-specific timing, then confirm doneness by tenderness and a safe internal temperature of at least 165°F / 74°C.
For food safety, poultry should reach at least 165°F / 74°C at the thickest part. The USDA chicken safety guidance also covers storage and reheating, which we use again later in this guide.
Chicken Breast Adobo: Pull It Early, Glaze It Later
With breast, pull it as soon as it is done, reduce the sauce separately, then return the meat for a 1–2 minute glaze.
6. Reduce Only After the Chicken Is Tender
Take off the lid and raise the heat to medium. The sauce will move from thin and broth-like to darker, shinier and more concentrated. For a classic finish, stop when it coats the back of a spoon and there is still enough to spoon over rice—usually after about 8–12 minutes of uncovered reduction.
Stop at the glossy spoon-coating stage for classic saucy adobo; keep reducing for a drier, lacquered tuyo finish.
7. Rest for 5 Minutes Before Serving
Turn off the heat and leave the chicken in the sauce for about five minutes. The reduction settles slightly and the meat gets a final coating before it reaches the plate.
A short rest lets the sauce settle and cling before you spoon the chicken and adobo sauce over hot rice.
Getting the Adobo Sauce Right
The starting ratio is only half the story. Soy sauce and vinegar vary, chicken releases juices, and a wide pan can reduce faster than a narrow pot. The finished sauce should therefore be judged by both taste and concentration, not by the clock alone.
Soy sauce brings savory depth, vinegar brings acidity, water controls concentration, and reduction determines the final body of the sauce.
How soy sauce, vinegar, water and reduction affect chicken adobo sauce
Component
What it does
What to watch
Soy sauce
Salt, color and savory depth
Some brands are much saltier than others
Vinegar
Acidity and characteristic adobo tang
Distilled white vinegar can taste sharper than cane or coconut vinegar
Water
Dilutes salt and acidity while the chicken braises
Use more when the starting mixture is too concentrated, not less
Reduction
Concentrates flavor and thickens the sauce
It also concentrates salt and acid, so taste as the sauce tightens
What if the Vinegar Smells Harsh?
Early in the simmer, vinegar can smell much sharper than the finished dish tastes. Give it a few minutes before correcting anything. If the sauce is still thin, continued cooking may mellow that raw aroma while the liquid reduces. Once the sauce is already thick and concentrated, however, further reduction is not the right fix for excessive sourness because it concentrates the acid as well.
Saucy Adobo vs Adobong Manok na Tuyo
For classic saucy adobo, stop after roughly 8–12 minutes of reduction, when the sauce coats a spoon but still pools lightly in the pan. For tuyo, reduce longer—often 12–18 minutes total—until the liquid clings tightly to the chicken.
For an extra-glossy tuyo finish, remove the tender chicken, reduce the sauce hard for 3–5 minutes, then return the chicken and toss until lacquered.
Doubling Chicken Adobo Without a Watery Pot
This chicken adobo recipe scales well, but a double batch does not behave exactly like two single batches in the same pot. More chicken releases more liquid, and crowding reduces the exposed surface area that lets moisture escape. The usual result is not under-seasoning; it is a sauce that takes much longer to concentrate.
Use the widest heavy pot or sauté pan that comfortably holds the chicken. Brown in batches rather than stacking pieces, then combine them for the covered simmer. Double the chicken, soy sauce, vinegar, garlic, bay and peppercorns, but treat the water as an adjustable braising liquid rather than a number that must be doubled blindly. Start with enough for a comfortable simmer, remembering that the chicken itself will contribute juices.
Once the meat is tender, judge the pot before reducing. If there is a large volume of liquid, lift the chicken out and reduce the sauce on its own so the meat does not overcook while you wait for evaporation. A wider pan may finish quickly; a deep narrow pot can need considerably longer. The endpoint remains the same: glossy enough to coat a spoon, with enough sauce left for the style you want.
Chicken Adobo Troubleshooting
Start by looking at the sauce itself. A thin sharp sauce needs a different fix from a thick sharp sauce; “too sour” is not enough information on its own.
Start with the sauce’s thickness before fixing the flavor: a thin, sharp sauce may need more simmering, while an already-thick sour sauce needs dilution rather than further reduction.
Chicken adobo troubleshooting by problem, likely cause and fix
Problem
Likely reason
What to do now
Too sour, sauce still thin
Vinegar still tastes raw and the sauce has not settled
Simmer a little longer, then taste again before adding anything
Too sour, sauce already thick
Acid is too concentrated for your vinegar
Add a small splash of water, simmer briefly, then use a tiny pinch of sugar only if needed
Too salty
Soy sauce or reduction has concentrated too far
Add water a little at a time, simmer gently and re-taste
Sauce too thin
Not enough evaporation
Remove tender chicken and reduce uncovered until glossy
Sauce too thick
Reduced too far
Loosen with a splash of hot water
Garlic tastes bitter
Garlic browned too hard before liquid was added
Dilute slightly if needed; next time lower the heat before adding garlic
Chicken feels tough
Lean cut, hard boil, or not enough gentle cooking
Lower to a gentle simmer and continue until tender; do not compensate with higher heat
What to Serve With Chicken Adobo
Hot steamed rice is the obvious partner because it catches both the sauce and the garlic. If you want a dependable method for separate, fluffy grains, use the MasalaMonk guide to cooking rice alongside the adobo.
The richest plate usually needs contrast: hot rice for the sauce, something crisp and tangy, and chili served separately.
If you prefer a mellow counterpoint, a small scoop of creamy potato salad can work too, especially beside a sharper vinegar-forward adobo. Keep the portion modest so the rice and chicken remain the center of the plate.
Add Something Cold and Crisp
A vinegar-dressed cucumber salad works particularly well because it gives the plate crunch without competing with the adobo sauce. Quick-pickled cucumber or radish does the same job.
Build a Bigger Filipino-Style Table
If adobo is one part of a larger meal, Pinakbet Tagalog brings squash, eggplant, okra and long beans to the table, giving the rich chicken a vegetable-heavy counterpoint.
Keep the Heat on the Side
Instead of making the whole pot spicy, serve sliced chilies or a bright vinegar-forward pepper sauce at the table. Everyone can change the heat without changing the sauce balance for everyone else.
Chicken Adobo Variations
Once the classic method is clear, most variations are small changes in one ingredient or in how far the sauce is reduced. Keep the main braise recognizable and change one variable at a time.
The same braise can move toward tuyo, potato, subtle sweetness, pineapple, oyster sauce or ginger without changing the entire cooking method.
Chicken Adobo With Potato
Add 2 medium potatoes, peeled and cut into chunks, when the chicken returns to the braising liquid. Simmer until both the chicken and potatoes are tender, then reduce uncovered. The potatoes absorb sauce and make the pot feel more substantial without changing its basic flavor.
Sweet Chicken Adobo
Reduce the sauce first, then add 1–2 teaspoons brown sugar near the end. The aim is to round the acidity, not make the sauce obviously sugary.
Add only 1–2 teaspoons brown sugar after the sauce has reduced, then simmer briefly and taste before adding more.
Chicken Adobo With Pineapple
Add ½–1 cup pineapple chunks during the last 10 minutes of simmering. If using canned fruit, add only a small splash of juice if the sauce needs it; too much can make the finish syrupy.
Add pineapple during the last 10 minutes so the pieces stay juicy, then reduce only long enough to glaze the chicken.
Chicken Adobo With Oyster Sauce
Stir in 1 tablespoon oyster sauce with the braising liquids. Because it adds salt as well as savory depth, use a little less soy sauce at the start and adjust only after reduction.
Oyster sauce adds savory depth but also salt; start with slightly less soy and make the final adjustment only after reduction.
Adobo With Luya (Ginger)
Add a 1-inch piece of sliced ginger with the garlic. It gives the sauce a warm, clean aroma without taking over. If that ginger-led Filipino chicken profile is what you enjoy most, Chicken Tinola takes it in a lighter, brothier direction.
Add a 1-inch piece of sliced ginger with the garlic, then simmer and reduce the adobo as usual.
Adobong Puti (White Adobo)
Adobong puti omits soy sauce and relies on vinegar, garlic, bay leaves, peppercorns and salt. Keep the water toward the higher end at first, season gradually, then reduce once the chicken is tender. Without soy sauce, the result is paler, brighter and more vinegar-forward.
White adobo skips soy sauce; season with salt gradually, keep enough water for the braise, then reduce near the end for body.
Chicken Adobo sa Gata
Cook the chicken until tender using the classic method. As the sauce begins its final reduction, stir in ¾ cup coconut milk and simmer gently for 5–8 minutes. Avoid a hard boil; the goal is a smooth, creamy sauce rather than separated coconut fat.
Add ¾ cup coconut milk only after the chicken is tender, then simmer gently for 5–8 minutes instead of boiling hard.
If you want to start from fresh coconut, the MasalaMonk guide to making coconut milk at home covers the extraction step separately.
Storage, Reheating and Make-Ahead
This chicken adobo recipe is unusually friendly to leftovers because the meat stays protected by sauce and the garlic, vinegar and soy taste more integrated after a night in the refrigerator. The trick is reheating gently enough that the meat stays tender while the sauce regains its gloss.
Cool promptly, refrigerate in a covered container for 3–4 days, then reheat gently with a splash of water if the sauce has tightened.
Refrigerating and Freezing
Cool leftovers promptly and refrigerate in a shallow covered container. USDA guidance recommends using cooked chicken within 3–4 days. For longer storage, freeze portions with enough sauce to protect the meat from drying out.
Reheat Without Losing the Sauce
Warm the chicken over medium-low heat. If the sauce is very thick from the refrigerator, add a small splash of water. Once everything is hot, simmer uncovered for 1–2 minutes to bring the sauce back to a glossy consistency. Reheated leftovers should reach 165°F / 74°C.
Making Chicken Adobo a Day Ahead
You can cook the adobo completely a day before serving, including the final reduction. Cool it promptly, refrigerate it with the chicken sitting in the sauce, then reheat gently the next day. If the chilled sauce has tightened into a gel, add only a small splash of water at first; it will loosen as it warms. Once the chicken is hot, uncover for the final minute or two and let the sauce return to the consistency you want. Making the dish ahead is especially convenient for a larger batch because all the browning and long simmering are already finished before guests arrive.
Crispy-Skin Leftover Adobo
For crisp edges, lift cooked chicken from the sauce, pat lightly dry, crisp for 1–2 minutes in a hot pan or under the broiler, then spoon the hot sauce over it.
If you used skin-on chicken, separate texture from reheating: warm the sauce first, crisp the chicken briefly in a hot pan or under the broiler, then spoon the sauce over the top. That gives you crisp edges without having to cook the chicken hard in the sauce.
Leftover Chicken Adobo Rice Bowl
Warm chopped or shredded adobo chicken with a spoon of sauce, then build a rice bowl with something fresh and crisp on the side.
Chopped adobo chicken makes an easy rice bowl. If you also have cold rice to use up, the MasalaMonk chicken fried rice method is another route—use the adobo meat as cooked chicken and add it near the end rather than searing it again.
Shredded Chicken Adobo for Wraps and Sandwiches
Shredded adobo chicken works as a filling for wraps, sandwiches or lettuce cups; add crisp vegetables to keep the leftover meal from feeling heavy.
And if the chicken disappears before the rice does, leftover rice can go in a completely different direction with these crispy arancini-style rice balls.
A Short Note on Filipino Adobo
Adobo is not a single fixed formula. The name is Spanish in origin, but the Filipino practice of preserving and cooking food with vinegar predates the colonial label; over time, household and regional versions developed with different balances of vinegar, salt or soy, garlic and other aromatics. The Philippine Information Agency gives useful cultural context for how Filipino food traditions—including adobo—reflect that layered history.
Frequently Asked Questions
1. Do I need to marinate chicken adobo?
No. The covered braise seasons the chicken well on its own. A 15–30 minute marinade with measured soy sauce, vinegar and garlic is optional if you have the time.
2. Which vinegar is best for chicken adobo?
Cane vinegar is a strong first choice. Coconut vinegar is usually a little rounder, while distilled white vinegar gives a sharper, cleaner acidity. Start with the recipe amount and use water to control concentration rather than cutting the water because a vinegar tastes strong.
3. What soy sauce-to-vinegar ratio should I use?
This recipe uses ½ cup / 120 ml soy sauce to ⅓ cup / 80 ml vinegar, plus ¾–1 cup / 180–240 ml water. Treat that as a starting formula; your soy sauce saltiness, vinegar acidity and final reduction all affect the finished balance.
4. Why is my chicken adobo too sour?
If the sauce is still thin and smells raw, simmer a little longer before judging it. If it is already thick and still too sour, add a small splash of water and re-simmer briefly. A tiny pinch of sugar can round the acidity after that, but do not keep reducing an already concentrated sauce just to chase away sourness.
5. Should chicken adobo be saucy or dry?
Both styles are common. Stop the reduction while there is still sauce to spoon over rice for a classic saucy finish, or reduce longer for adobong manok na tuyo, where the sauce clings tightly to the chicken.
6. Can I use chicken breast instead of thighs?
Yes. Simmer breast pieces for about 12–18 minutes, remove them as soon as they are done, reduce the sauce separately, then return the chicken for a 1–2 minute glaze.
7. Can chicken adobo be made ahead?
Yes. This chicken adobo recipe can be cooked fully the day before, cooled promptly and refrigerated in its sauce. Reheat gently with a splash of water if needed, then simmer uncovered for a minute or two to restore the gloss.
8. What does adobo mean in Filipino cooking?
In Filipino cooking, adobo refers broadly to a family of dishes cooked with vinegar and salt or soy sauce, commonly with garlic and pepper. Chicken adobo and pork adobo are among the best-known versions, but household formulas vary widely.
Once you have made the classic version, the useful thing to remember is not a slogan but the sequence: tenderize the chicken first, concentrate the sauce second, and make final taste adjustments only when you can see how concentrated the pot has become.
Constipation is exhausting, but lunch can actually help. These high-fiber sandwiches are built the way your gut prefers: sturdy whole-grain bread for gentle bulk, creamy legume spreads for steady fiber, seed “gel boosters” for softness, and juicy produce for moisture. Moreover, they’re practical—quick to assemble, easy to repeat, and sized to deliver meaningful fiber without feeling heavy.
Now, how much fiber do most adults need? A realistic daily target sits around 25–38 g. However, jumping there overnight can backfire. Instead, increase gradually—about 5 g extra per day each week—and pair each meal with fluids so fiber can actually hold water and move comfortably (see this concise intake overview and NIDDK hydration guidance). Meanwhile, short habits matter: drink a glass of water with your sandwich, then take a 10–15-minute walk. Little by little, those simple moves add up to relief.
Because details determine outcomes, every recipe below was designed with fiber grams, moisture, and texture in mind. In other words, the builds aren’t random—they’re engineered for comfort, regularity, and flavor you’ll actually crave tomorrow.
How much fiber these sandwiches deliver & of what kinds?
First, how much: each sandwich aims to contribute roughly 12–20 g of fiber toward your day. Which means, two thoughtfully built high-fiber sandwiches can cover most of what you need, leaving breakfast and snacks to top you up gently.
Second, which kinds: not all fibers behave the same, so the layers do different jobs.
Viscous, soluble fibers make a soft gel that holds water in the stool, which often makes passing easier. You’ll get these from oats and barley (thanks to β-glucans), plus chia and ground flax (rich in mucilage). we have used oat/barley-leaning breads, avocado-chia mixes, and flax-boosted hummus throughout. If you’re curious about the mechanics, here’s a clear look at β-glucans and stool-softening and a friendly explainer on chia’s mucilage-rich fiber.
Insoluble fibers—from bran, leafy greens, and vegetable skins—add gentle bulk and help speed transit. As a result, grated carrots, greens, and crunchy slaws live inside the sandwich, not just on the side, so every bite pulls its weight.
Moisture is the multiplier. Because fiber needs water to work, spreads are creamy, fillings are juicy, and sauces are built in rather than left out. Additionally, we suggest sipping water with the meal, since fluids help fiber function.
Finally, how the recipes are structured: each sandwich states its intent (relief or maintenance), lists realistic portions, and includes make-ahead notes, smart swaps, and small finishing touches. Therefore, you can choose what fits today—and repeat it tomorrow—without turning lunch into a project.
Why High-Fiber Sandwiches help (and how to build them)
Put simply, sandwiches make fiber doable. They bundle the right textures (soft + crisp), the right moisture (creamy + juicy), and the right amounts (measured slices and scoops) into a meal you can repeat tomorrow. Moreover, the format nudges consistency—arguably the most important factor for regularity.
They’re effortless to measure—and easy to stick with
Whole-grain slices are pre-portioned, spreads are spoonable, and veg layers are visible. Making it easy for you to assemble, eat, and actually hit useful daily fiber targets with minimal guesswork. If you like to prep once and assemble fast, this MasalaMonk idea for lentil meal-prep (as a sandwich filling) shows how a single batch can anchor multiple sandwiches during the week.
Moisture is built in by design
Dry, dense meals can backfire. We have ensured, each of these high-fiber sandwiches are built in a way that anchors moisture inside the bread: creamy hummus or yogurt-tahini underlayers, avocado folded with seeds, and juicy produce (carrot, greens, citrus segments) on top. That layering keeps bites slick rather than pasty, which, in turn, supports comfortable stool texture. If you like dairy or dairy-free yogurt as a base, a quick example is this hung curd spinach sandwich—the same idea powers our “Green Goddess” stack.
Layer order actually helps transit
Then start with a creamy spread to “seal” the crumb; next, add your fiber engine (chickpeas, lentils, or black beans) so it clings; in the end, finish with watery produce for slip. Additionally, a squeeze of lemon or a spoon of salsa adds acidity and fluid without heaviness. Small choices like these often determine whether a sandwich just sits—or genuinely supports movement.
Seeds add gentle gel—without bulky portions
A teaspoon of chia or finely ground flax disappears into spreads yet changes texture meaningfully after a glass of water. In brief, chia’s soluble, mucilage-rich fiber is well-documented (concise overview, open-access review; see also a broader nutrient profile in this MDPI review of chia’s composition: open access). For flax specifics you can use in everyday cooking, here’s a MasalaMonk primer: flax seeds for strong digestion.
The hand-held format supports satiety and travel
Because each of these high-fiber sandwiches pairs intact grains with legumes and produce, you get slower digestion and steadier fullness; which means, you’re less likely to graze later. For a clear big-picture explainer on fiber’s roles (beyond “roughage”), Harvard’s Nutrition Source summarizes the two fiber types and their effects.
Gentle routines amplify the effect
Right after eating, your body’s gastrocolic reflex naturally increases colon motility—so a brief 10–15-minute walk can nudge momentum in the right direction. For a plain-language primer, see Cleveland Clinic’s overview of the gastrocolic reflex. Moreover, even light movement supports regularity; their constipation guide underscores that exercise can stimulate the intestines. If symptoms persist despite these habits, the NIDDK’s constipation page outlines when to speak with a clinician.
Build template (at a glance)
Bread (2 slices): 100% whole-grain or sprouted; look for ≥3–4 g fiber per slice.
Spread (2–4 tbsp): hummus, white-bean mash, or yogurt-tahini; optionally stir in 1 tsp chia or ground flax.
Engine (⅓–½ cup): chickpeas, lentils, or black beans; lightly mash so it anchors.
Produce (heaped): grated carrot + leafy greens + a juicy element (cucumber, tomato, or citrus).
Finish: lemon or vinegar splash; herbs; pepper. Additionally, sip water and, if possible, take a short walk afterward.
For background reading that ties food choices to gut comfort more broadly (in case you want to deepen the “why”), this MasalaMonk primer on gut inflammation and digestive health connects everyday plant foods with a calmer baseline—useful context for readers who like understanding the bigger picture.
When constipation drags on, lunch is often the easiest place to add high fiber foods for constipation relief—without cooking an entire pot of anything. In practice, plant based foods high in fiber (beans, chickpeas, lentils, leafy greens) plus high fiber fruits and vegetables for constipation (kiwi, pear, apple, carrots) work together; as a result, you get both moisture and bulk. Along the way, foods rich in soluble fiber—like oats, barley, chia, and ground flax—form a gentle gel that supports softer stools and calmer bellies. Because you asked for a high fiber plant based diet approach, every sandwich below is fully plant-forward, practical for weekdays, and aligned with high fiber foods for gut health, colon health, and everyday digestive health. For hydration cues that make this even easier, see NIDDK’s diet & constipation guidance; for grain choices that add viscous fiber, here’s a friendly β-glucan overview.
Format you’ll see below: brief “why,” a clear ingredient list, step-by-step method, fiber-forward upgrades, and make-ahead tips—so these fiber rich foods for bowel movement become an easy habit, not homework.
1) Hummus–Kiwi–Greens “Softener” — flagship of High-Fiber Sandwiches (Relief)
Estimated fiber: ~17 g • Taste & texture: cool, fresh, silky When to choose it: stools feel dry; you want gentle moisture without heaviness
Why it works (quickly yet gently) This is a purpose-built combo of foods that are rich in soluble fiber and high fiber fruits for constipation. Specifically, creamy hummus (legumes = plant based foods high in fiber) and a teaspoon of ground flax (mucilage) create a moist base; then, thin-sliced kiwi and a mound of grated carrot supply juicy volume. Resulting in every bite that stays soft, which supports easier bowel movements and overall gut health. If you’d like a plain-English primer on adding flax safely, skim flax seeds for strong digestion; if you prefer the science on chia/flax-style gels, here’s a concise chia fiber review for later.
Moist hummus + ground flax soften; kiwi and grated carrot add fluid; whole-grain bread supplies gentle bulk. Aim for ~17 g fiber here and drink water with the meal for best effect.
Ingredients (serves 1)
2 slices 100% whole-grain bread (≥3–4 g fiber/slice; oats or barley in the mix add foods rich in soluble fiber)
Hummus, 4 tbsp (legume base = high fiber foods for digestive health)
Ground flaxseed, 1 tsp (stirred into the spread)
Kiwi, 1 medium, thin-sliced (one of the most convenient high fiber fruits for constipation)
Baby spinach, big handful (leafy greens = fiber rich foods for gut health)
Carrot, finely grated, ½ cup (insoluble lift for bowel movement comfort)
Lemon juice, black pepper, tiny pinch of salt
Method
In a small bowl, whisk lemon into the hummus; then stir in ground flax until creamy.
Spread the mixture edge-to-edge on both slices; afterwards, pile on spinach, layer kiwi, and shower with grated carrot.
Season with pepper and a pinch of salt; and then, close gently and press once with your palm.
Fiber-forward upgrades (choose 1–2, not all)
Add 2–3 tbsp chickpeas into the hummus; which will make you push the legume count higher for a plant based high fiber diet day.
Scatter 1 tsp chia over the carrot before closing; helping you nudge the soluble fiber profile without adding bulk.
Swap bread for a dense oat-bran or barley loaf to increase β-glucans (i.e., foods rich in soluble fiber)—see β-glucan basics.
Make-ahead & serving
Grate carrot the night before; store sealed so it stays juicy.
Assemble within 10 minutes of eating (kiwi looks and tastes brightest right away).
Serve with a full glass of water; thus, the high fiber foods to ease constipation you just ate can actually hold fluid as intended.
On very sensitive days, replace raw spinach with tender arugula for similar benefits and gentler texture.
Why it fits the brief This sandwich champions high fiber foods for constipation relief without heaviness—because moisture, viscosity, and volume are layered on purpose. In turn, you’ll notice comfort during the afternoon rather than bloat
Estimated fiber: ~19–20 g • Taste & texture: warm, savory, cohesive When to choose it: you need relief and long-lasting satiety
Why it works (comfort + momentum) Here you combine two plant based foods high in fiber—a white-bean mash and saucy lentils—with a crunchy layer of broccoli slaw. Which helps you get soluble-leaning moisture from tomato-braised lentils and insoluble lift from brassica shreds. Because the filling is warm and glossy, this tastes indulgent; nevertheless, it is textbook high fiber foods for bowel movements, colon health, and all-day digestive health. Prefer batch cooking? This lentil meal-prep filling anchors several sandwiches across the week—convenient for a high fiber plant based diet.
Warm, saucy lentils + creamy white-bean mash keep the filling moist, while broccoli slaw adds insoluble lift. Press 2–3 min/side for a cohesive, ~19–20 g fiber sandwich—drink water with the meal to help the soluble fibers gel.
Ingredients (serves 1)
2 slices sprouted-grain bread (≥3–4 g fiber/slice; excellent high fiber foods for gut health)
Warm a small pan; sauté onion and garlic until tender; then add tomato paste and smoked paprika.
Stir in lentils with 2–3 tbsp water and a splash of vinegar; simmer 3–4 minutes until thick, glossy, and spoonable.
Spread white-bean mash on both bread slices; afterwards, pile on the lentils; then crown with broccoli slaw.
Press in a grill pan or sandwich press 2–3 minutes per side until toasty outside and steamy inside.
Fiber-forward upgrades (pick what fits your day)
Fold 1 tsp ground flax into the bean mash; in practice, you add foods that are rich in soluble fiber without changing flavor.
Replace one slice with an oat-bran slice for extra β-glucans (again, high fiber foods for colon health).
Add 2 tbsp grated carrot to the slaw for more insoluble volume (i.e., fiber rich fruits and vegetables for constipation in practice).
Make-ahead & serving
Simmer a bigger batch of lentils on Sunday; cool quickly and refrigerate up to 4 days (or freeze flat in bags).
Keep slaw dry until assembly so it stays crisp; alternatively, dress slaw lightly with lemon just before toasting.
Serve with a sliced apple or pear (skin on): those are easy fiber rich fruits for constipation that travel well.
Hydrate alongside; that helps the sandwich’s foods rich in soluble fiber can do their gel-forming job.
Why it fits the brief Because it layers legumes two ways, this toastie moves from “filling” to truly high fiber foods to ease constipation. Moreover, it stays moist, which many readers find is the missing piece in at-home “healthy” & high-fiber sandwiches.
Estimated fiber: ~17 g • Taste & texture: cool, herby, packable When to choose it: you want balance, not “power relief,” especially on workdays
On days you want reliability rather than “power relief,” this build blends foods rich in soluble fiber (barley’s β-glucans) with legume bulk from chickpeas. Consequently, you get a gentle gel plus comfortable volume—exactly what high fiber foods for digestive health should deliver. If you’re curious about the science behind β-glucans and softness, here’s a clear overview.
Balanced, packable fiber: barley’s β-glucans for gentle softness, chickpeas for comfortable bulk, and an avocado–chia base to keep moisture. Spread thickly on rye/whole-grain (3–4 g fiber/slice) and sip water to help soluble fibers work.
Ingredients (serves 1)
2 slices rye or 100% whole-grain bread (≥3–4 g fiber/slice; supports high fiber foods for gut health)
Avocado, ¼ fruit, mashed (creamy base for moisture)
Chia seeds, 1 tsp (disappears into the mash; classic foods rich in soluble fiber) — background: chia’s mucilage review
Cooked chickpeas, ⅓ cup (plant based foods high in fiber)
Cooked barley, ¼ cup (β-glucans for stool comfort)
Celery (finely diced), dill, lemon, pepper, small pinch salt
Method
Mash avocado with lemon; then stir in chia and chopped dill until glossy.
Fold in chickpeas, barley, and celery; afterwards, season to taste.
Spread thickly; after that, close and press lightly for a tidy, travel-worthy sandwich.
Fiber-forward upgrades
Add 2 tbsp grated carrot for extra insoluble lift—useful among high fiber fruits and vegetables for constipation.
Swap one slice for an oat-bran slice to nudge β-glucans (again, foods rich in soluble fiber).
For herb lovers, a handful of parsley adds polyphenols without changing fiber math.
Make-ahead & serving
Mix the filling up to 48 hours ahead; which means, weekday assembly takes 2 minutes.
Serve with apple slices (skin on) for simple fiber rich fruits for constipation and satisfying crunch.
Sip water alongside; therefore, the sandwich’s soluble fibers can actually do their job.
Why it fits the brief This is a dependable high fiber plant based diet lunch: creamy, not dry; hearty, not heavy; and quietly supportive for bowel movements, colon health, and long-term gut health.
Estimated fiber: ~12–13 g • Taste & texture: juicy, herb-bright, light When to choose it: you want support without heaviness
Why it works (light yet helpful) Some days you want a lift without intensity. Here, juicy pear (skin on) brings pectin, leafy greens add volume, and a yogurt-tahini herb sauce keeps everything moist. Ultimately you get high fiber foods for constipation relief that feel bright rather than dense—ideal for easy digestive health.
Light yet effective: pear pectin provides soft, juicy fiber; greens add comfortable volume; yogurt-tahini keeps moisture so bites stay bright—not heavy. Aim for ~12–13 g fiber here and sip water to help soluble fibers do their job.
Ingredients (serves 1)
2 slices oat-bran or whole-grain bread (≥3–4 g fiber/slice)
The sauce keeps 3–4 days; making weekday builds stay fast.
Serve with a small bowl of berries for additional fiber rich fruits for constipation that don’t weigh you down.
Drink water; subsequently, the pectin and seed gels work more comfortably.
Why it fits the brief Although gentle, the stack still qualifies as high fiber foods for bowel movements, and, importantly, it supports colon health without the heaviness that sometimes derails weekday lunches.
Estimated fiber: ~18.5–19 g • Taste & texture: warm, saucy, satisfying When to choose it: you need soothing relief and an easy win at dinner
Why it works (warm, saucy, effective) This is comfort food with a purpose. Black beans (core to any plant based high fiber diet) supply both soluble and insoluble fiber; avocado keeps things lush; and fresh salsa provides juicy acidity so the sandwich never feels dry. Meaning, you get high fiber foods to ease constipation that also satisfy.
Warm, saucy relief: black beans deliver soluble + insoluble fiber, avocado keeps bites lush, and salsa adds juicy acidity so the sandwich never eats dry. Toast until just melty; aim for ~18.5–19 g fiber and sip water to help fiber work comfortably.
Ingredients (serves 1)
2 slices sprouted-grain bread (≥3–4 g fiber/slice; great for high fiber foods for gut health)
Avocado, ¼ fruit, mashed
Black beans, ½ cup (lightly mashed so they cling)
Fresh tomato-onion salsa, ¼ cup (or tomato-lime if onion-sensitive)
Optional: thin slice cheddar or plant cheese
Lime, cumin, pinch salt
Method
Mash avocado with lime and a pinch of cumin; spread from edge to edge.
Spoon on black beans; then add salsa; top with cheese if using.
Toast or grill until warmed through and a little melty.
Fiber-forward upgrades
Stir 1 tsp ground flax into the avocado to lean toward foods rich in soluble fiber.
Add 2 tbsp grated carrot for extra insoluble support (a staple among high fiber fruits and vegetables for constipation).
Swap one slice for oat-bran bread to increase β-glucans.
Make-ahead & serving
Beans keep 3–4 days; meanwhile, mash just before assembly for best texture.
Serve with orange segments or cucumber spears; which makes you add fluid and crunch that amplify results.
Hydrate; in turn, these fiber rich foods for bowel movement do their job more comfortably.
Why it fits the brief It’s a weeknight win: cozy, fast, and firmly in the lane of high fiber foods for colon health and everyday digestive health.
Estimated fiber: ~14 g • Taste & texture: savory-tangy, deli-style When to choose it: things are moving, and you want to keep the gut ecosystem happy
Why it works (tangy and sustaining) Once things are moving, pairing plant based foods high in fiber with fermented vegetables is a smart way to maintain momentum. Tempeh offers satisfying protein and fiber; kimchi or sauerkraut adds acidity, moisture, and live cultures; as a result, you get high fiber foods for gut health in a deli-style package. For more combinations, browse Probiotic-Rich Sandwiches.
Steady maintenance, deli-style: fiber-rich tempeh plus fermented kimchi/kraut bring moisture, acidity, and live cultures; rye adds whole-grain fiber. Grill lightly to meld. Tip—stir 1 tsp chia into the sauce or add tomato slices for extra softness and juiciness; sip water alongside.
Ingredients (serves 1)
2 slices whole-grain rye (≥3–4 g fiber/slice)
Tempeh, ~100 g, sliced and sautéed
Kimchi or sauerkraut, ¼ cup
Spinach, big handful
Yogurt-mustard (or a dairy-free version)
Method
Sear tempeh in a thin film of oil until browned; then set aside.
Add thin tomato slices for juicy slip (handy within high fiber fruits and vegetables for constipation).
Stir 1 tsp chia into the yogurt-mustard for a small soluble nudge (again, foods that are rich in soluble fiber).
Prefer milder ferments? Use kraut and a dab of pickle brine for acidity without heat.
Make-ahead & serving
Cook tempeh 2–3 days ahead; consequently, weekday assembly is trivial.
Serve with carrot sticks and apple wedges (skin on) for easy fiber rich fruits for constipation and crunch.
Water alongside, then a brief walk; helping the meal support predictable bowel movements.
Why it fits the brief This one keeps the momentum you’ve built—supporting colon health and digestive health while staying firmly in the high fiber plant based diet lane.
Sidekicks that make High-Fiber Sandwiches even more effective
Kiwifruit (1–2/day)—slice one into Sandwich #1 and enjoy the second on the side. Trials show kiwi improves bowel movements and overall comfort (kiwi RCT overview; gold-kiwi RCT).
Chia or ground flax add-ins—a teaspoon whisked into spreads boosts softness without heaviness. Chia’s mucilage is well documented (chia fiber review), and flax blends easily into hummus or avocado (see flax seeds for strong digestion).
Hydration reminder—fluids help fiber function; thus, pair every High-Fiber Sandwich with water or herbal tea (NIDDK guidance).
Gentle ramp-up (comfort matters with High-Fiber Sandwiches)
If you’re coming from a low-fiber baseline, jumping to 30+ grams immediately can feel rough. Therefore, increase gradually—about 5 g per day each week—and keep fluids steady. On a day that feels gassy, reduce raw brassicas, emphasize oats, barley, chia/flax, and use ripe pears or kiwi for a softer profile; subsequently, bring the extra crunch back as comfort improves. For a neutral reference on intake ranges, most adults do well around 25–38 g/day (scale up gradually: concise intake overview).
Ultimately, relief comes from meals that are moist, fibrous, and easy to repeat. These six High-Fiber Sandwiches were engineered for exactly that: whole-grain bread for steady bulk, legume spreads for satisfying depth, chia or ground flax for gentle gel, and fruit-veg add-ins—kiwi, pear, apple, carrots, greens—for softness and volume. Add water, take a short walk, and give it a few consistent days. Consequently, your gut will notice; meanwhile, your schedule won’t suffer; and, importantly, your lunches will finally pull their weight.
1) What makes these High-Fiber Sandwiches good for constipation relief?
Because they combine foods rich in soluble fiber (oats, barley, chia, ground flax) with insoluble sources (bran, leafy greens, vegetable skins), they add moisture and gentle bulk together. Consequently, stools hold water, bowel movements become easier, and overall digestive health feels steadier. Meanwhile, the format is practical—so you actually repeat it.
2) How many grams of fiber should I aim for with a high fiber plant based diet?
Most adults do well around 25–38 g per day. That said, increase gradually. For example, add about 5 g per day each week and space it across meals. In practice, two High-Fiber Sandwiches can provide a big share, while breakfast and snacks top up the rest.
3) Which ingredients are the best high fiber foods for constipation relief inside a sandwich?
Start with plant based foods high in fiber: chickpeas, lentils, and black beans. Then, add foods that are rich in soluble fiber—chia, ground flax, oats, and barley—for gel-forming softness. Finally, tuck in high fiber fruits and vegetables for constipation like kiwi, pear, apple (skin on), carrots, and leafy greens for comfortable volume.
4) Are there specific fiber rich fruits for constipation that work especially well between bread?
Yes—pears and apples (with the skin), berries, and kiwi slot neatly into layers. Moreover, citrus segments and grated carrot add juiciness without heaviness. In turn, those choices support bowel movements while keeping sandwiches fresh and bright.
5) What bread should I pick for high fiber foods for gut health?
Choose 100% whole-grain or sprouted loaves that list whole grain first and give at least 3–4 g fiber per slice. Better yet, rotate rye, oat-bran, and barley-forward breads to keep textures interesting and to boost foods rich in soluble fiber via β-glucans.
6) I feel gassy when I jump into a plant based high fiber diet. What should I tweak?
First, slow the ramp—add fiber gradually. Next, emphasize moist builds with foods that are rich in soluble fiber (chia, ground flax, oats, barley) and slightly reduce raw brassicas for a few days. Subsequently, bring crunch back as comfort improves. Hydration and a brief walk after meals often help.
7) How can I hydrate wisely so high fiber foods to ease constipation actually work?
Pair each sandwich with a full glass of water. Additionally, use juicy layers—tomato, cucumber, citrus segments—to keep bites moist. Consequently, soluble fibers can form the soft gel that supports smoother bowel movements.
8) What are smart add-ins for high fiber foods for colon health?
Sprinkle 1 teaspoon of chia or finely ground flax into spreads; fold beans into hummus; or add a spoon of barley or oat-bran to legume salads. Therefore, you raise soluble fiber without making the sandwich bulky or dry.
9) Can I keep these High-Fiber Sandwiches fully vegan?
Absolutely. In fact, a high fiber plant based diet is the default here. Use hummus, white-bean mash, avocado-chia spreads, and yogurt-style dairy-free sauces. Meanwhile, tempeh, kimchi, and sauerkraut bring plant-forward protein and tang that support gut health.
10) What are easy meal-prep moves so my high fiber foods for digestive health stick all week?
Batch-cook lentils and chickpeas; chill barley; pre-grate carrots; wash greens; and keep ground flax and chia within arm’s reach. Consequently, assembly takes five minutes, and you’ll actually repeat the habit.
11) How do I balance high fiber foods for bowel movements with a sensitive stomach?
Begin with softer, moist builds: creamy spreads, thin-sliced fruit, and tender greens. Moreover, keep portions moderate, chew thoroughly, and add a short post-meal walk. On balance, that trio supports comfort while still moving fiber intake upward.
12) Are raw veggies mandatory, or can I still get high fiber foods for constipation relief with gentler textures?
You can. Lightly sautéed onions/peppers, roasted carrots, or softened greens still count. In practice, you’ll retain fiber while improving tolerance. Therefore, choose textures your gut likes and keep moisture high.
13) Which spreads quietly raise foods rich in soluble fiber without changing flavor?
Hummus mixed with 1 tsp ground flax, avocado blended with 1 tsp chia, or yogurt-tahini whisked with oat-bran. Subsequently, you’ll notice creamier bites and better stool softness—without extra weight.
14) Do I need fruit at every meal to hit high fiber foods for gut health targets?
Not necessarily, but it helps. For instance, one high fiber fruits for constipation choice (pear, apple, berries, or kiwi) inside or beside a sandwich boosts totals and adds moisture. Meanwhile, legumes and whole-grain bread carry the rest.
15) What’s the simplest “starter” High-Fiber Sandwich if I’m brand-new to this?
Begin with whole-grain bread, hummus + 1 tsp ground flax, thin-sliced pear or apple, and a handful of spinach. Therefore, you’ll get foods rich in soluble fiber plus gentle bulk in a mild, friendly package.
16) How do I keep high fiber foods for colon health from feeling dry or dense?
Layer moisture at every step: creamy spread, juicy produce, and a quick acidity hit (lemon, vinegar, salsa). Consequently, the sandwich eats soft, not stodgy—and your bowel movements tend to follow suit.
17) Are there kid-friendly options that still count as plant based foods high in fiber?
Yes: mashed black beans with mild salsa and avocado on soft whole-grain bread; chickpea “salad” with finely diced cucumber; or thin pear slices with yogurt-tahini. Moreover, cutting sandwiches into small squares improves traction with picky eaters.
18) How can I vary flavors yet stay within high fiber foods for digestive health?
Rotate breads (rye, oat-bran, sprouted), spreads (hummus, white-bean, avocado-chia), and high fiber fruits and vegetables for constipation (pear, apple, kiwi, carrot, greens). In turn, you’ll keep taste buds happy while the fiber keeps working.
19) Do these ideas help if I’m focused on high fiber foods for gut health beyond constipation?
Generally, yes. While everyone’s different, a steady mix of soluble and insoluble fiber plus plant diversity often supports gut health and overall comfort. Nevertheless, adjust portions and textures to your tolerance.
20) What’s a quick checklist before I make any High-Fiber Sandwiches?
Whole-grain bread (3–4 g fiber/slice) ✅ Legume base (⅓–½ cup) ✅ Seed booster (1 tsp chia or ground flax) ✅ Juicy produce (heaped) ✅ Water alongside + brief walk ✅ Therefore, you’ve covered high fiber foods for constipation relief and set up a predictable, comfortable day.
There’s a moment—right after the first shake—when mango and citrus perfume the air and the tin goes icy in your hands. That’s when a mango martini stops being just another summer drink recipe and becomes a small celebration. Because mango carries sunshine in its fibers and vodka carries clarity in its bones, they meet in the glass with effortless grace. However, the difference between a sweet, muddled fruit drink and a crisp, bar-quality cocktail is in the balance: just enough acid to lift, just enough orange liqueur to sparkle, and just enough dilution to glide.
Today, we’ll start with a classic Mango Martini recipe you can learn by heart. Then, we’ll move through five high-intent riffs people love making at home: Spicy, Passion Fruit (“Pornstar”-style), Frozen, Mango-Vodka, and Mango–Pineapple. Along the way, we’ll drop in helpful technique links, because sometimes you want a second opinion or a deeper dive. Moreover, you’ll find small upgrade notes inside each recipe so you can dial flavor exactly to your liking. And although these builds are quick, they’re not shortcuts; instead, they’re flexible frameworks that welcome your taste and your pantry.
If you’re picking fruit right now, choose mangoes you’d happily eat out of hand. For quick guidance on texture and sweetness, skim Best Mango for Aamras; it’s a handy companion when you’re puréeing for drinks. Similarly, if you prefer a published point of reference for the classic shape of this cocktail, both SAQ’s Mango Martini and this straightforward mango martini cocktail echo the same structure you’ll see below.
A good mango martini is a study in contrast. On one hand, mango brings velvety body; on the other, lime juice cuts a clean path through the sweetness. Furthermore, a measured pour of orange liqueur adds a bright, candied orange aroma that reads as “cocktail” rather than “smoothie.” Finally, a hard shake and a fine strain give you that hotel-bar polish at home.
Ingredients (1 cocktail)
60 ml vodka
45 ml mango purée or 60 ml mango nectar
15 ml triple sec or Cointreau
10–15 ml fresh lime juice, to taste
0–10 ml simple syrup, only if the mango is shy on sweetness
Poolside serve: pre-chill the coupe in an ice bucket, shake to a tight frost, and strain fast so the towel setup stays crisp. For two drinks of Mango Martini, double the mix but keep shaking time the same to preserve texture.
Method
Chill the glass. Place a coupe or martini glass in the freezer while you prep.
Load the shaker. Add vodka, mango, orange liqueur, lime, and—if needed—simple syrup to a shaker with plenty of ice.
Shake hard. Go for 12–15 seconds until the tin frosts. Consequently, you’ll build proper dilution and a satiny texture.
Fine-strain. Double-strain into the chilled glass to catch fibers and ice chips.
Garnish. Express an orange peel over the surface or perch a mango slice on the rim.
Notes & Tiny Upgrades
Purée vs nectar: Purée gives plush texture; nectar is lighter. Therefore, if you swap nectar in, reduce or skip simple syrup.
Citrus balance: Limes vary wildly. Start at 10 ml; then taste and adjust. Likewise, if your mango is overripe, lean into the lime for lift.
Technique reassurance: For another published baseline that mirrors this balance, check SAQ’s recipe and this home-kitchen mango martini cocktail.
Spicy Mango Martini Recipe (Jalapeño or Tajín Rim)
Spice wakes mango up. Nevertheless, you don’t need to set your mouth on fire; you just need enough heat to add rhythm. Because jalapeño brings grassy warmth and Tajín brings chile-lime electricity, you can customize the style two ways: in the glass with a gentle muddle, or on the rim with a neat, photogenic halo. Importantly, the rim-only route delivers aroma and a balanced first sip without the risk of over-infusing the drink itself.
Ingredients (1 cocktail)
60 ml vodka
40–45 ml mango purée
15 ml triple sec
15 ml fresh lime juice
2–3 thin jalapeño slices (optional, for in-glass heat)
Tajín + lime wedge (for the rim)
For clean heat, rim the glass first and keep jalapeño slices in the shaker for only one or two presses—then discard before straining. Fine-strain to catch seeds, and mix a small jar of chile-salt in advance (2:1 Tajín to fine salt) for faster service on busy nights.
Add controlled heat. If you want spice in the drink, lightly muddle jalapeño in the shaker—just one or two presses.
Shake & strain. Add remaining ingredients and ice; shake hard; fine-strain into the rimmed glass.
Garnish. Use a jalapeño coin or a lime wheel.
Try This Too
Prefer fragrance without extra fire? Skip the muddle and rely solely on the rim. Conversely, if you love intensity, add a razor-thin sliver of habanero—then taste before you commit.
For more chile-rim technique (with photos), browse our watermelon margarita variations; the same steps apply, even though the base spirit changes.
Passion Fruit + Mango Martini (“Pornstar”-Style Recipe)
This riff channels a modern classic: vanilla-tinted vodka, tangy passion fruit, and a side of bubbles for contrast. Because mango loves passion fruit, the pairing feels inevitable—lush meets zesty, tropical meets sparkling. For background and deeper technique notes, see Difford’s Porn Star Martini, Bon Appétit’s recent update, and BBC Good Food’s home version. Collectively, they confirm the essentials: passion fruit’s tartness, a hint of vanilla, and that playful prosecco companion.
Ingredients (1 cocktail)
45 ml vodka (vanilla vodka if available)
30 ml passion fruit liqueur or 30–45 ml passion fruit purée
20–30 ml mango purée
10–15 ml fresh lime juice
5–10 ml vanilla syrup (optional, to taste)
Optional: 30–60 ml chilled prosecco on the side
Chill a tiny prosecco glass alongside the coupe so every sip-and-chase stays sparkling. For a truer “Pornstar” profile, keep mango and passion fruit equal, then finish with a whisper of vanilla sugar on the rim instead of extra syrup.
Method
Build the core. Shake vodka, passion fruit, mango, lime, and (if using) vanilla syrup with ice.
Strain and serve. Fine-strain into a chilled coupe.
Add the flourish. Serve prosecco on the side for sip-and-chase, or float a restrained splash on top.
Try This Too
Split the fruit evenly—mango = passion fruit—for a perfectly balanced tang. Alternatively, if you want a drier finish, drop the syrup and let the liqueur (or purée) speak.
Vanilla doesn’t need to shout. Consequently, if you don’t have vanilla syrup, a scant pinch of vanilla sugar stirred in before shaking does the job beautifully.
Frozen Mango Martini (Blender, Summer-Ready Recipe)
Sometimes the air itself begs for a blender. Even so, a great frozen cocktail is more technique than guesswork. Because ice can drown flavor if you’re not careful, measure your frozen fruit and liquid, blend in stages, and taste as you go. Notably, the frozen daiquiri method popularized in serious cocktail writing explains why measured dilution matters; for a quick primer on that logic, read The Best Frozen Daiquiri and adapt the principles to mango.
Ingredients (1 large cocktail)
60 ml vodka
1 heaping cup frozen mango chunks (about 150–170 g)
20 ml triple sec
15–20 ml fresh lime juice
10–15 ml simple syrup (to taste)
60–90 ml very cold water (start low; add as needed)
Tip for silkier texture: freeze mango in small chunks and chill the blender jug for 10 minutes. Start with the lower end of water, blend briefly, then adjust with teaspoon splashes until the pour just ribbons—this prevents watery flavor and keeps the slush tight.
Method
Stage the blend. Add everything to the blender with ~60 ml water.
Pulse, then blend. Pulse a few times; then blend only until smooth. Therefore, you won’t over-aerate or over-dilute.
Taste and tune. Add a splash more water for flow or a touch of syrup for ripeness; give it one short blend.
Serve cold. Pour into a chilled coupe. Garnish with a lime wheel or a tiny mango slice.
Try This Too
A pinch of salt brightens fruit, just as it does in good cooking. Likewise, swapping water for coconut water adds a gentle tropical hum without heaviness. For additional tropical ideas, wander through Coconut Water Cocktails.
Mango-Vodka Martini (Using Mango-Flavoured Vodka)
Flavoured vodkas can be divisive; nevertheless, mango versions have a devoted following, especially Absolut Mango and Cîroc Mango. Because those spirits already contribute fruit and aroma, the key is restraint elsewhere. Instead of piling on purée and liqueur, keep the structure lean so the drink stays elegant. For a spirit-forward template—and a sense of how dry vermouth can shape the edges—take a look at Difford’s Mango Vodka Martini.
Ingredients (1 cocktail)
45 ml mango-flavoured vodka
15 ml plain vodka (to dry the profile slightly)
20–25 ml mango purée (easy does it)
10–15 ml dry vermouthor 10–15 ml triple sec (choose one)
5–10 ml fresh lime juice
Keep the bottle of dry vermouth refrigerated and dose sparingly—10 ml dries the drink without muting mango. If using Cîroc Mango (softer), add the plain vodka to sharpen the finish; with Absolut Mango (brighter), you can dial the purée to 20 ml and rely on a firm orange-peel express for aroma.
Method
Shake with intention. Add everything to a shaker with ice; shake briskly until well chilled.
Fine-strain. Pour into a chilled coupe; express an orange peel over the top.
Try This Too
To steer closer to a classic “martini” posture, choose dry vermouth and keep purée at the low end. Conversely, if you’d like a fruitier party vibe, pick triple sec and nudge mango up by 5 ml.
Mango–Pineapple Martini Recipe (Zippy & Crowd-Pleasing)
Pineapple is mango’s lively friend. Because it carries natural acidity and foam-friendly proteins, it both brightens the palate and gives a gentle froth when shaken hard. Moreover, the combo tastes like a beach afternoon while still behaving like a martini. Consequently, it’s the riff people keep making “just one more” of.
Ingredients (1 cocktail)
45 ml vodka
30 ml mango purée
30 ml fresh pineapple juice
15 ml triple sec
10 ml fresh lime juice
Shake with fresh pineapple juice for a light, natural foam; if using carton juice, add 5 ml aquafaba or pineapple gomme for the same silky head. Batch the vodka + mango purée + triple sec in advance, keep it cold, then add lime and juice when you shake to order.
Method
Build and shake. Add everything to a shaker with ice; shake hard for 12–15 seconds.
Fine-strain and garnish. Strain into a chilled martini glass; garnish with a tiny pineapple wedge or a lime coin.
Try This Too
Add a dash of coconut water for length and softness. Alternatively, micro-grate fresh nutmeg over the top for a quiet tiki nod.
If you want to compare builds for fruit-forward “martini” structure, revisit SAQ’s mango martini and adjust ratios to suit your pineapple.
Although recipes matter, technique carries the day. Therefore, here’s a compact list you can actually use while you shake.
Chill everything. Cold glass, cold shaker, cold ingredients—everything tastes tighter and cleaner. Consequently, you’ll need less ice time to reach balance.
Shake like you mean it. Ten gentle shakes won’t cut it. Instead, shake hard for 12–15 seconds to knit acids, alcohol, and fruit.
Fine-strain always. Mango fibers and ice shards dull texture. Thus, double-straining gives that “why does this feel so smooth?” moment.
Taste, then nudge. After the first sip, decide: one dash more lime for brightness, or one teaspoon of simple for roundness. Likewise, a pinch of salt often wakes up fruit without obvious “saltiness.”
Rims: lime, not water. For chile-salt or Tajín rims, swipe with lime; then dip. Water turns rims drippy; citrus makes a tacky surface that stays put. For a quick visual, use this Tajín salt rim guide and this pro rimming guide.
Frozen logic. Measured liquid + measured frozen fruit = repeatable texture. Consequently, you avoid bland, watery slush. For the “why” behind it, see Serious Eats’ frozen daiquiri method and borrow the ratios.
Pantry & Substitutions (Because Real Life Happens)
Even with the best intentions, sometimes you don’t have the exact bottle or the perfect fruit. Fortunately, mango is forgiving, and so are these builds.
Vodka: Any clean, mid-shelf vodka works. However, if you enjoy a little aromatic lift, a grain-based vodka often reads slightly sweeter, while a grape-based vodka reads softer.
Mango purée vs nectar: Purée equals body and ripe impact; nectar equals convenience and consistency. Accordingly, drop or dial back simple syrup when using nectar.
Orange liqueur: Triple sec is bright and linear; Cointreau is richer and a touch more bitter-orange. Either fits; therefore, pick the one that matches your mood.
Citrus swap: No lime? Use lemon, but reduce slightly; then taste and adjust. Meanwhile, a micro-splash of orange juice can round sharp edges if your citrus is too aggressive.
Heat source: Jalapeño is classic for approachable spice. Alternatively, serrano gives tighter heat, while habanero brings a floral blast—use a sliver, not a slice.
Sweeteners: Standard simple syrup (1:1) keeps things quick; rich syrup (2:1) sweetens with less water, which can be helpful in the shaken versions. If you’re blending, either works—just taste before you pour.
Service & Garnish (Small Things, Big Payoff)
Great drinks often come down to finishing touches. Therefore, give yourself an extra minute for presentation.
Glassware: A coupe feels classic and forgiving; a V-stem martini glass feels dramatic and photogenic. Nevertheless, use what you have; the liquid is the star.
Garnish choices: Mango slice, lime coin, or orange twist all make sense. Similarly, edible flowers skimmed across the surface look graceful on the Passion Fruit riff.
Ice management: Fast, vigorous shaking builds a tight texture quickly; conversely, lazy shaking melts more ice and blurs the flavors.
Batching for friends: Multiply the non-citrus ingredients in a bottle and chill. Then, when guests arrive, measure into the shaker, add fresh citrus, and shake to order. Consequently, every glass tastes first-round fresh.
When to Choose Which Mango Martini Riff/Recipe
Admittedly, choosing is half the fun. Even so, here’s a quick guide for mood-pairing.
Classic: Date night, starters, or when you want a clean read on the fruit you bought today.
Spicy: Grilled shrimp, chaat, or anything salty and crunchy; the chile-lime halo makes flavors ping.
Passion Fruit: Brunch, birthdays, or any moment that welcomes a side of sparkle; vanilla tucks the acidity into a plush pillow.
Frozen: Poolside, balcony evenings, or after a hot afternoon; measured dilution keeps it vibrant, not watery.
Mango-Vodka: Cocktail hour for the flavoured-vodka loyalists; dry vermouth makes it adult, not candy.
Mango–Pineapple: Happy chaos: game nights, family cookouts, and lazy weekends; it’s friendly without being simple.
Helpful Links to Learn More (If You Like Rabbit Holes)
While you can make everything above with confidence right now, you may occasionally want to dive deeper. In that case, use these as touchstones:
Cocktails often feel like tiny theater: a few props, a few gestures, and suddenly the room sparkles. Yet the real magic in a mango martini is simple attention—cold glass, fresh citrus, ripe fruit, and a confident shake. Because you now have a classic you can throw together from memory, you also have a launchpad for evenings that want a twist. Therefore, pick the riff that fits your mood, rim a glass if you’re feeling festive, and trust your palate as you taste and tune.
And if mangoes are already perfuming the kitchen, you’re halfway there. Consequently, tonight’s the night: ice in the tin, lime at the ready, music on. Cheers.
FAQs
1) What’s the simplest Mango Martini Recipe I can memorize?
Start with a 2–1.5–0.5–0.25 pattern: 2 oz vodka, 1.5 oz mango purée, 0.5 oz orange liqueur, and 0.25–0.5 oz fresh lime juice. Shake hard, fine-strain, and garnish. Moreover, if your mango is super ripe, you can skip any extra sugar.
2) Mango purée, nectar, or juice—which one works best?
Purée gives body and that luxurious mouthfeel; nectar is lighter and convenient; juice is the most delicate. Consequently, when using nectar or juice, taste first and—if needed—add a touch of simple syrup to keep the Mango Martini Recipe balanced.
3) Can I make a Mango Martini Recipe without a shaker?
Yes. Although a shaker gives better texture, you can add ingredients to a jar with ice, seal tightly, and shake for 20–25 seconds. Then, strain through a fine sieve. Ultimately, colder and more dilution-controlled equals better flavor.
4) How do I get that bar-quality silky finish?
Two steps: shake vigorously and fine-strain through a small mesh strainer. Additionally, chill the glass first; colder service keeps flavors sharp and, therefore, more elegant.
5) What kind of vodka should I choose?
Any clean, mid-shelf vodka works. However, for a fruit-forward style, neutral grain or grape-based vodkas keep the mango in the spotlight. If you’re using mango-flavored vodka, reduce the purée slightly so the Mango Martini Recipe stays crisp, not candy-sweet.
6) How do I make a spicy Mango Martini Recipe without overpowering heat?
Do a Tajín rim for aromatic spice, and then skip muddling chiles in the shaker. Alternatively, if you want a gentle kick, lightly press 2–3 jalapeño slices—no more—before shaking. Meanwhile, taste and adjust; you can always add heat, but you can’t remove it.
7) Can I swap the spirit—say, gin or rum—instead of vodka?
Absolutely. Gin adds botanical snap, while white rum leans tropical and round. Therefore, when swapping, keep mango at 1–1.5 oz and nudge the citrus up by a barspoon if it tastes too sweet.
8) My drink tastes flat—what should I tweak first?
First, add a small squeeze of lime; brightness snaps flavors into focus. Next, if it’s still dull, stir in a pinch of salt (yes, really). Finally, if the fruit was underripe, add ¼ oz simple syrup and shake again. Consequently, you’ll find the sweet-acid balance that defines a great Mango Martini Recipe.
9) How do I batch a Mango Martini Recipe for a party?
Combine vodka, mango purée, and orange liqueur in a bottle and chill well. Just before serving, measure a portion into a shaker, add fresh lime, and shake with ice. In addition, always fine-strain so the last glass tastes as polished as the first.
10) Can I make a Frozen Mango Martini without it turning watery?
Yes—use frozen mango as the “ice,” add measured cold water (start small), and blend in short bursts. Besides, taste and adjust with tiny additions of water or syrup; that way, the texture stays lush and the flavor remains concentrated.
11) What garnishes pair best with a Mango Martini?
A thin mango slice, a lime coin, or an expressed orange peel all work beautifully. Moreover, for the passion-fruit riff, a vanilla sugar rim or a half passion fruit looks stunning without complicating the Mango Martini Recipe itself.
12) Do I need simple syrup—and if so, how much?
Often you don’t. However, if the mango isn’t very sweet (or you used juice), add ¼ oz simple syrup, shake, and retaste. Therefore, you’ll sweeten just enough to smooth edges while keeping the drink bright.
13) What’s the best way to rim the glass without mess?
Use citrus, not water. Rub the rim with a lime wedge, dip into your salt/sugar/Tajín mix, and tap off excess. Consequently, the rim sticks cleanly and doesn’t slide down the glass.
14) Any quick food pairings for a Mango Martini Recipe?
Think salty, crunchy, and fresh: sev puri, grilled prawns, chili-lime nuts, or even a mango-and-paneer skewer. Meanwhile, for the spicy version, add cooling sides—cucumber slices or yogurt-mint dip—to balance the heat.
15) How do I keep flavors consistent if my mangoes vary?
Standardize the process: after shaking, taste a small sip before straining. If it reads too tart, add a teaspoon of syrup; if it’s too sweet, add a teaspoon of lime and shake again. Ultimately, that tiny checkpoint is how every Mango Martini Recipe becomes reliably great at home.