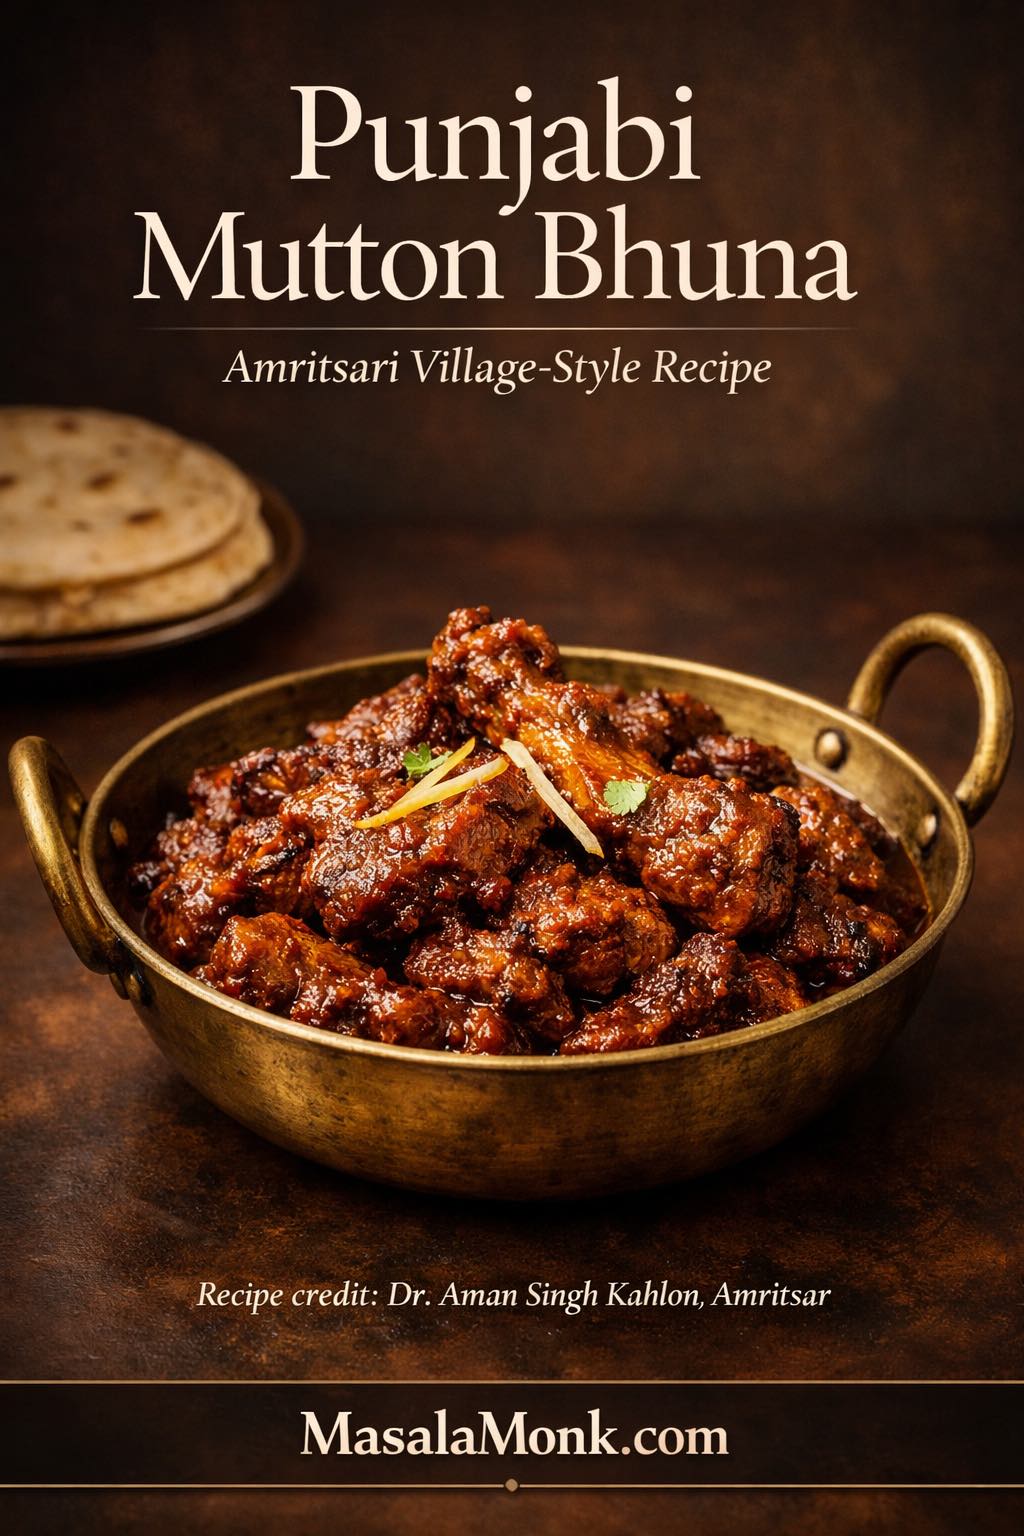
There are some dishes that belong to more than a kitchen. They belong to a season, a place, and a way of living. This Punjabi mutton bhuna is one of them. It brings to mind cold November days in the village, wheat sowing in the fields, smoke rising from open flame, and a meal coming together through many hands rather than one. Onions roast over the fire, tomatoes char and soften, garlic gets crushed fresh, and the mutton is watched patiently as it cooks. By the time everything is ready, the food tastes far richer than its short ingredient list suggests.
This recipe is shared with due credit to Dr. Aman Singh Kahlon, Amritsar, who remembers this style of mutton from childhood village visits during the winter sowing season. That memory explains the dish well. This is not a restaurant-style curry built on cream, curd, or a crowded masala base. It is a rustic bhuna shaped by mustard oil, charred onions, charred tomatoes, ginger, garlic, mutton fat, and patient reduction.
The result is thick, smoky, savory, and deeply comforting. The masala clings to the meat instead of floating around it. The spices support the flavor rather than overpower it. If you enjoy old-school Punjabi cooking that feels grounded and full of character, this is the kind of recipe that earns its place quickly.
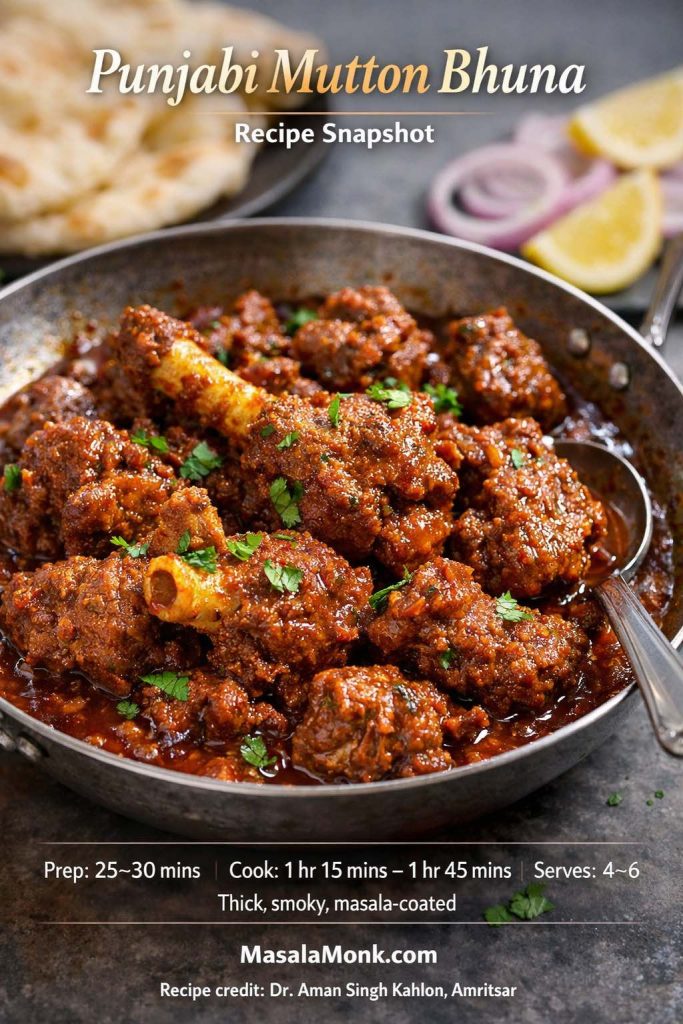
Punjabi mutton bhuna recipe snapshot
Prep time: 25 to 30 minutes
Cook time: 1 hour 15 minutes to 1 hour 45 minutes
Serves: 4 to 6
Course: Main course
Cuisine: Punjabi / North Indian
Texture: Thick, reduced, masala-coated
Spice level: Mild to medium
Best for: Winter lunches, family dinners, slow weekend cooking
Also Read: Peach Cobbler with Canned Peaches (Dessert Recipe)
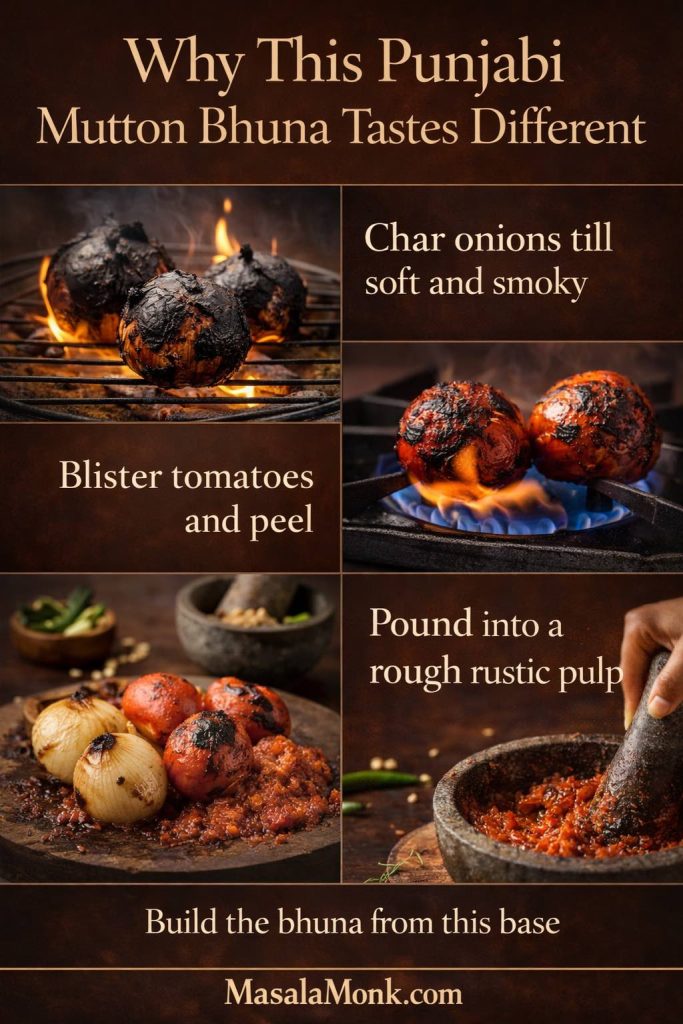
What makes this Punjabi mutton bhuna special
Charred onions and tomatoes change the base
Many mutton recipes begin with sliced onions fried in oil and tomatoes cooked down in the same pan. This one takes a more distinctive route. The onions are roasted directly over flame until soft and smoky, then pounded into a rough pulp. The tomatoes are charred until blistered and softened, then peeled and mashed the same way.
That one decision changes the flavor of the whole dish. The onions become sweeter and deeper. The tomatoes lose some of their raw sharpness and gain a fuller, fire-kissed savoriness. Once bhunoed together, they create a masala that tastes smokier, richer, and more elemental than a standard curry base.
Bhuna mutton in Punjabi style is defined by technique
The word bhuna refers less to a fixed list of ingredients and more to a method built around frying, scraping, reducing, and concentrating flavor with very little free liquid. In South Asian cooking, bhuna-style dishes develop depth through repeated caramelization and minimal-moisture cooking rather than through a loose gravy. (Epicurious)
That is exactly why this recipe is finished as a thick, clingy preparation rather than a runny curry. The masala is meant to grip the meat.
Why mustard oil and mutton fat matter
Mustard oil gives this dish much of its backbone. Once heated properly, its raw edge mellows and leaves behind a bold, earthy depth that suits this style of Punjabi cooking beautifully.
The small amount of kidney fat matters too. It is not there to make the dish greasy. It is there to enrich the stock, deepen the masala, and give the finished bhuna a rounder, more savory body.
Why this Punjabi mutton bhuna recipe tastes different
This recipe does not depend on yogurt, cream, cashew paste, or a long list of spices. It trusts smoke, meat, mustard oil, and reduction to do most of the work. That simplicity is not a limitation. It is the reason the dish tastes so assured.
Also Read: Avocado Chocolate Mousse Recipe
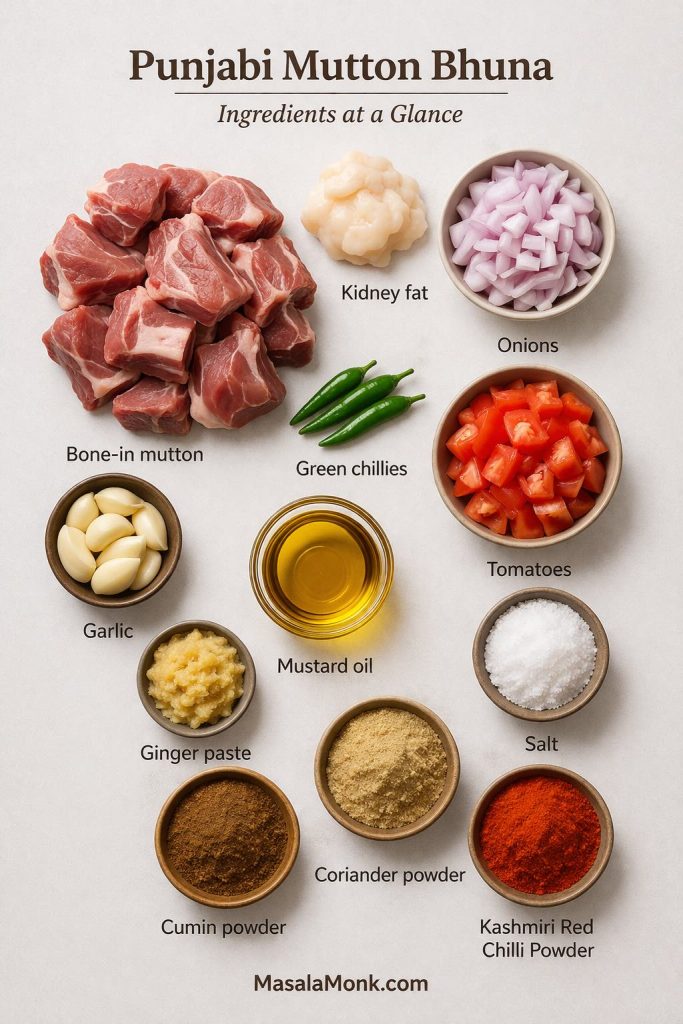
Best ingredients for Punjabi mutton bhuna
- 1 kg mutton, bone-in preferred
- 50 grams mutton kidney fat, chopped
- 3 large onions
- 3 medium to large tomatoes
- 2 to 4 green chillies
- 10 to 12 garlic cloves, crushed
- 1 tablespoon ginger paste
- 3 tablespoons mustard oil
- 1 teaspoon cumin powder
- 1 tablespoon coriander powder
- 1 to 1½ teaspoons Kashmiri red chilli powder
- 1 to 1½ teaspoons salt, or to taste
- 1 cup water, plus a little more only if needed
Also Read: Falafel Recipe: Crispy Homemade, Air Fryer and Baked Falafel
Ingredient notes for the best Punjabi mutton bhuna
Best cut of mutton for this bhuna mutton recipe
Bone-in mutton works best here because it gives a fuller stock and holds up well through the two-stage cooking process. Medium pieces are better than very small ones, since tiny pieces can overcook by the time the bhuna is fully reduced.
Why kidney fat helps
The quantity is small, but it makes a real difference. As it cooks, the fat enriches both the early stock and the final masala. The result is more savory depth and better mouthfeel without making the dish heavy.
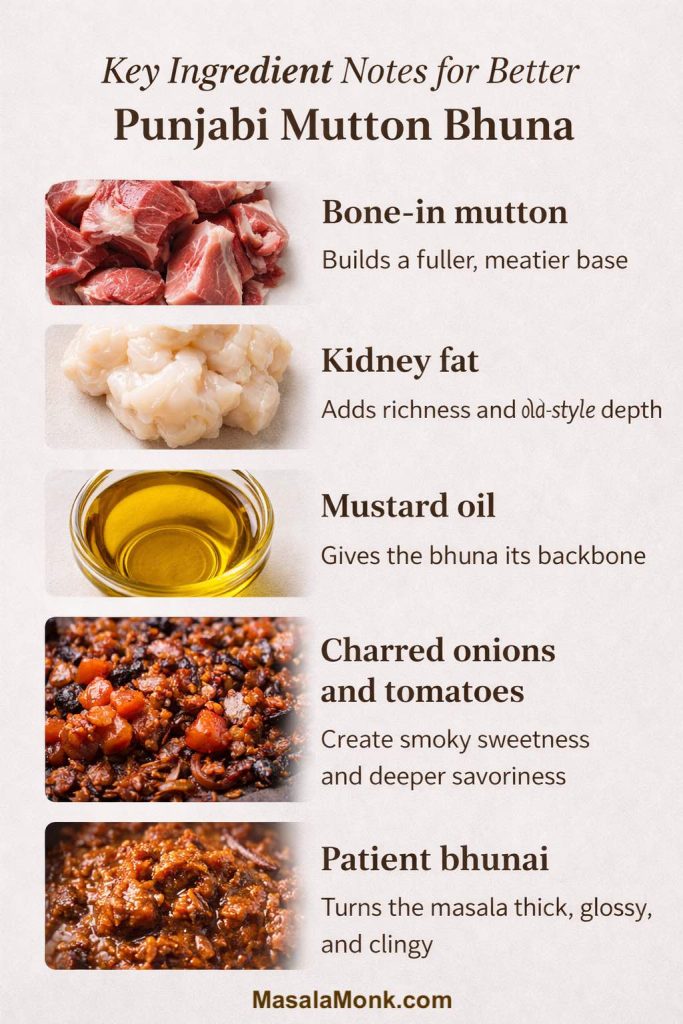
Mustard oil, chillies, and texture notes
Mustard oil is strongly recommended because it suits the flavor profile of this dish so well. Heat it properly before adding aromatics so the raw smell softens.
Kashmiri chilli powder brings color and gentle warmth rather than aggressive heat. The sharper heat comes from the green chillies, so adjust them to taste.
Keep the charred onion and tomato mixture slightly coarse. A completely smooth puree will push the dish toward generic restaurant-style gravy, while a rougher pulp keeps it true to its rustic identity.
Also Read: Mango Margarita Recipe (Frozen or On the Rocks)
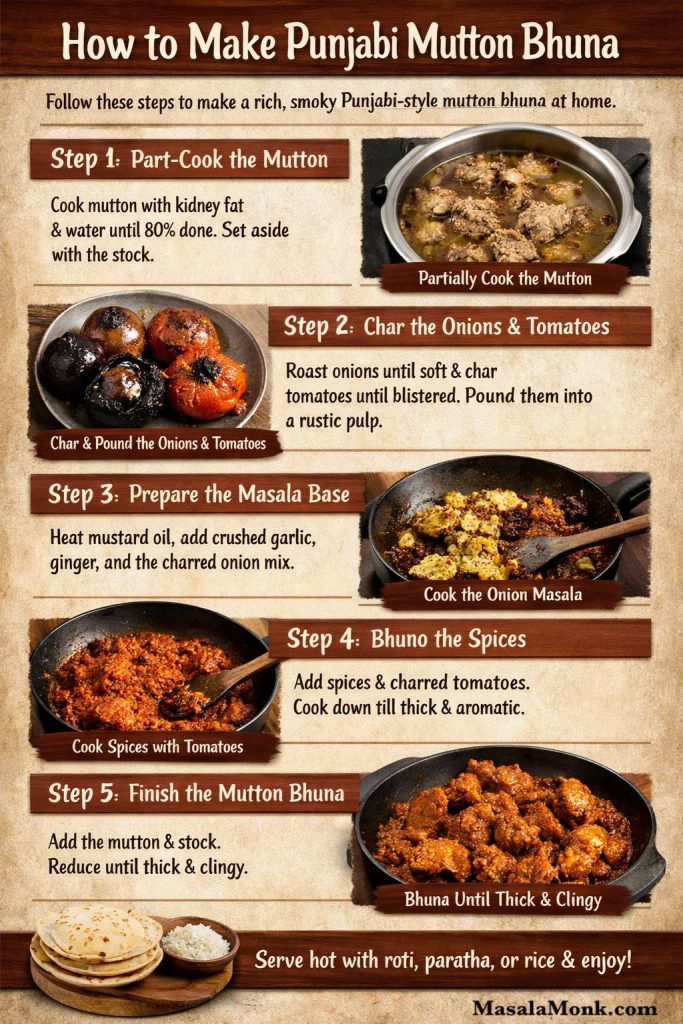
How to make Punjabi mutton bhuna (step by step recipe)
This recipe becomes straightforward once you understand the sequence. First, the mutton is partially cooked. Then the onions and tomatoes are charred and pounded. After that, the masala is built in mustard oil, the spices are cooked into the base patiently, and the meat is finished in the reduced masala until everything turns thick, glossy, and deeply flavorful.
Quick method summary for Punjabi mutton bhuna
If you want the full flow at a glance before you begin, this is the sequence that matters most.
- Part-cook the bone-in mutton with kidney fat, salt, and a little water until it is about 80 percent done. Keep the stock.
- Char the onions until softened inside, then peel and pound them with green chillies into a rough pulp.
- Char the tomatoes until blistered and soft, peel them, and pound them into a coarse rustic pulp.
- Heat mustard oil and fry the garlic and ginger briefly to remove their raw edge.
- Add the onion mixture and bhuno it patiently until it tightens, deepens, and smells sweeter.
- Add cumin, coriander, and Kashmiri chilli powder, then stir in the tomato pulp.
- Cook the masala until it thickens, darkens slightly, and begins showing traces of oil around the edges.
- Return the mutton and stock to the pan, then reduce everything until the masala turns thick, glossy, and clingy around the meat.
- Rest briefly before serving so the bhuna settles and coats the mutton even better.
That is the full structure of the dish. The detailed step by step method below will help you judge each stage more confidently.
Step 1: Part-cook the mutton for Punjabi-style bhuna mutton
Place the mutton and chopped kidney fat in a pressure cooker or heavy-bottomed pan. Add 1 cup water and about 1 teaspoon of salt.
If using a pressure cooker, cook until the meat is about 80 percent done. In many home cookers, this may be around 4 to 6 whistles on medium heat, though the exact timing depends on the cut and age of the meat. Go by texture rather than whistle count alone. The meat should feel mostly cooked but still offer slight resistance.
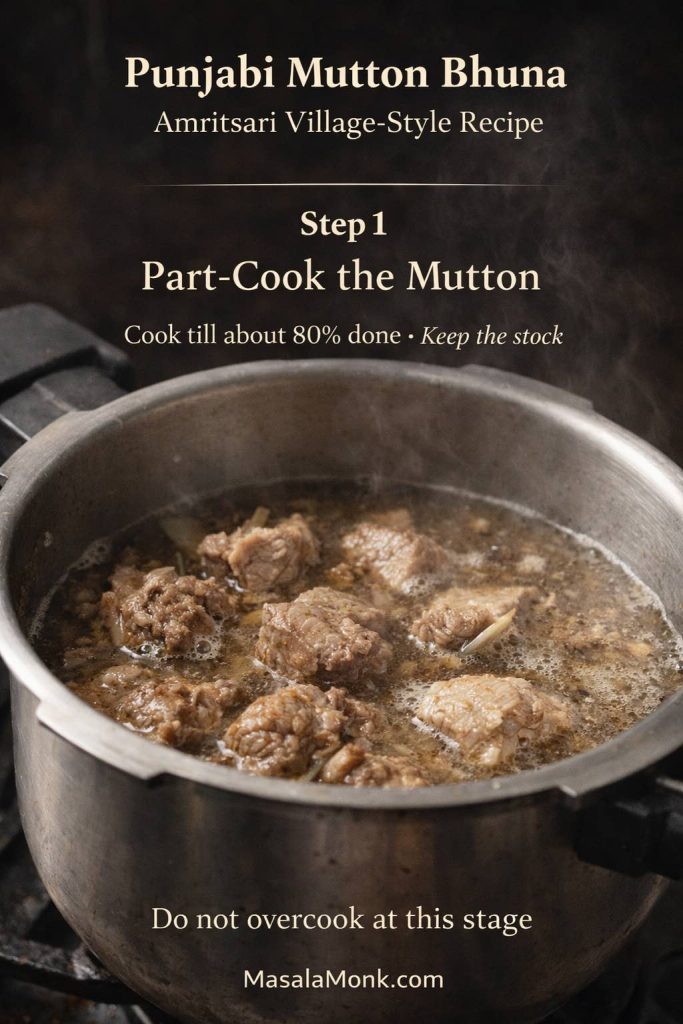
If using a pan, cover and cook over medium to medium-low heat for about 35 to 50 minutes, checking occasionally. Add a small splash of water only if the pan begins to dry too much.
Once nearly done, set the meat and stock aside. Keep all the stock. It becomes part of the final bhuna.
Step 2: Char the onions and tomatoes
Roast the onions directly over open flame or hot coals until the outside blackens in patches and the insides soften well. You want smoke and sweetness, not a harsh burnt bitterness.
When cool enough to handle, peel away the burnt outer layer and keep the softened onion flesh. Pound it with the green chillies into a rough pulp. A mortar and pestle is ideal, but a blender on pulse mode works too.
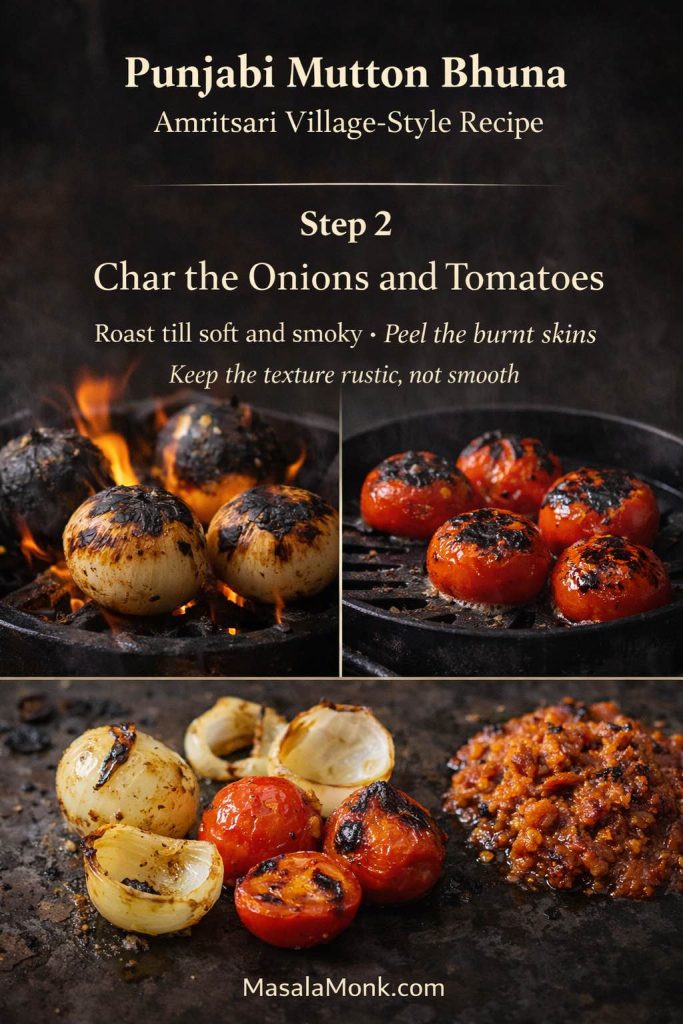
Now char the tomatoes until their skins blister and loosen and the flesh softens visibly. Peel away the skins and pound the tomatoes into a coarse pulp.
Both mixtures should look rustic rather than polished. A little uneven texture is a good thing here.
Step 3: Build the bhuna mutton masala base
Heat the mustard oil in a heavy kadhai until it comes up to temperature and the raw smell mellows. Reduce the heat slightly and add the crushed garlic and ginger paste.
Fry for 1 to 2 minutes, stirring so the garlic does not catch. You want the rawness to leave without pushing the aromatics into bitterness.
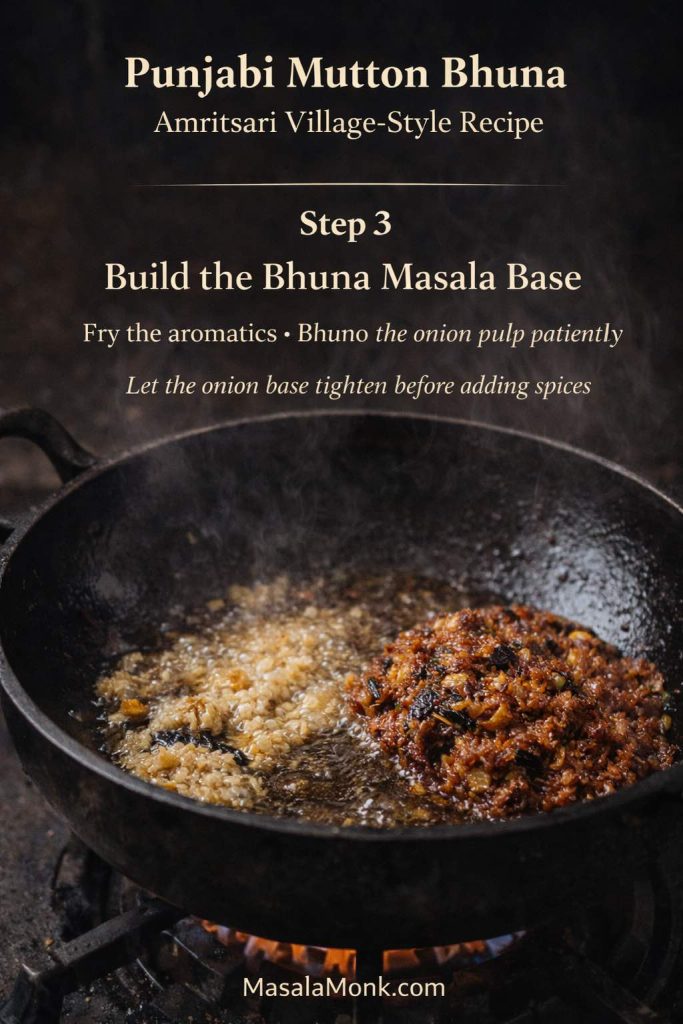
Add the charred onion and green chilli pulp. Also add any soft fatty bits or rendered fat from the partially cooked mutton. Start bhunoing this mixture over medium heat.
At first the onion mixture will look loose and wet. Keep stirring and scraping the pan. Over the next 8 to 12 minutes, it should darken slightly, tighten, and smell sweeter and deeper. Lower the heat a little if it begins sticking too fast. The onion base needs time to fry properly before the powdered spices go in.
Step 4: Add the spices and bhuno patiently
Add the cumin powder, coriander powder, and Kashmiri red chilli powder to the onion base. Stir right away so the spices bloom evenly in the fat.
Cook for about a minute, then add the charred tomato pulp. The mixture will loosen again. Keep cooking over medium heat, stirring often, and do not let the masala catch at the bottom.
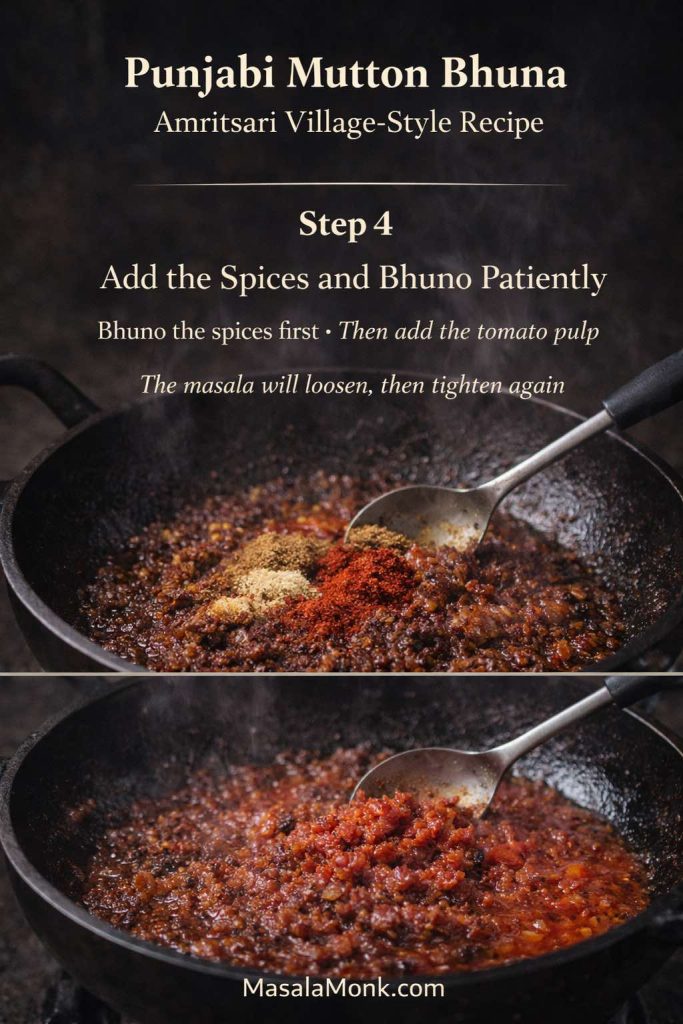
As the moisture cooks away, the masala will begin to tighten. The color will deepen, the aroma will round out, and traces of oil will start appearing around the edges. That is the sign that the bhunai is moving in the right direction.
This stage usually takes another 8 to 10 minutes. When you drag a spoon through the pan, the masala should briefly part and gather back more thickly rather than flow like a thin sauce.
Step 5: Finish the Punjabi mutton bhuna until thick and clingy
Add the partially cooked mutton and all the remaining stock. Mix thoroughly so the meat gets coated in the bhuna base.
Cook over medium heat, stirring often, until the stock reduces and the masala begins to cling closely to the meat. This stage is not only about reheating the meat. It is where the dish turns from cooked ingredients into a finished bhuna.
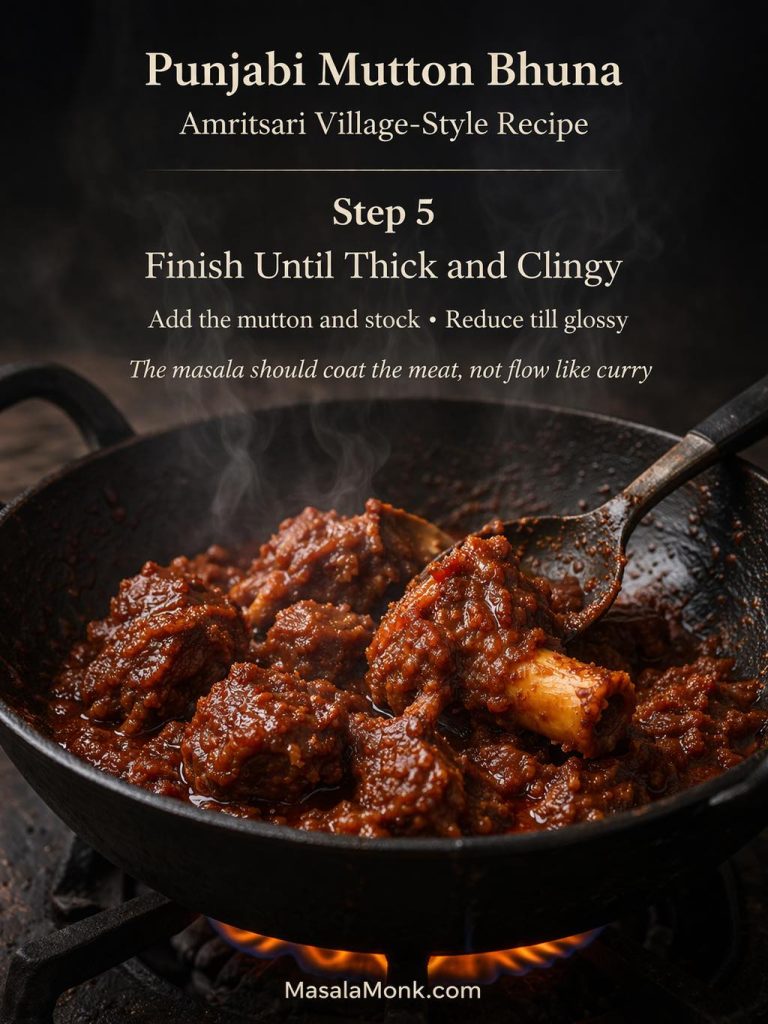
Depending on how much stock remains, this may take 10 to 20 minutes. Taste for salt during the last few minutes, since reduction will intensify seasoning.
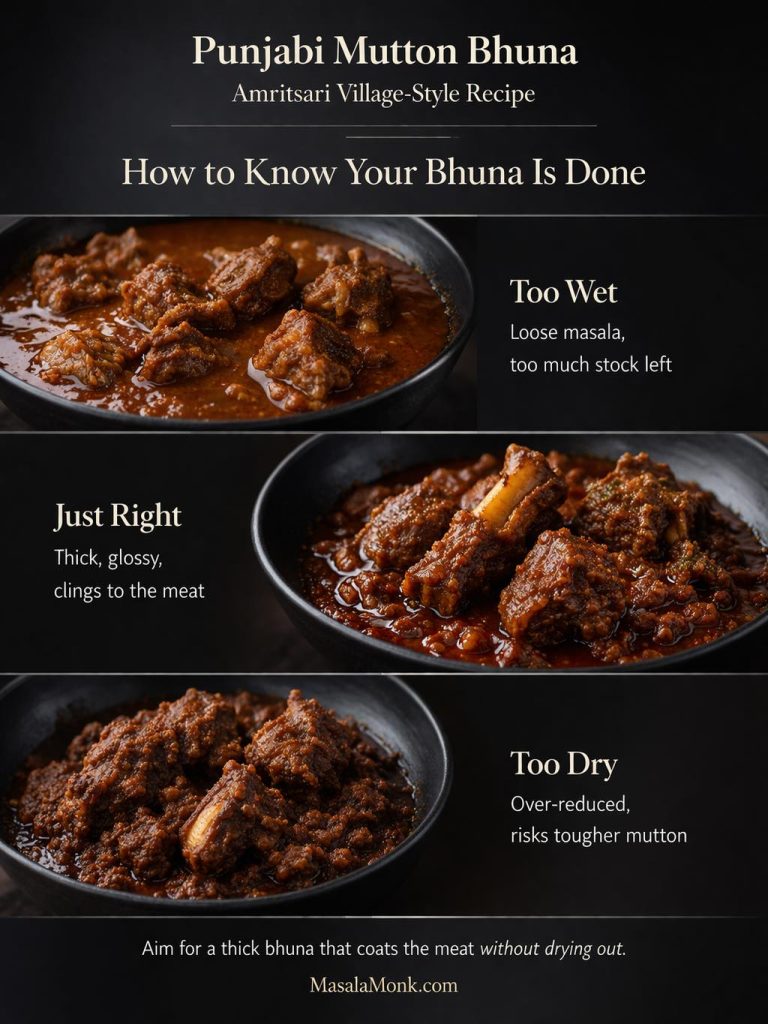
The finished dish should look glossy and deeply colored. The masala should coat the meat rather than drip off it. There should be enough moisture to keep every bite juicy, but not enough for the dish to feel like a loose curry.
Also Read: Sourdough Pizza Dough Recipe (Crispy Crust & Easy Pizza Base)
Pressure cooker vs pan method for Punjabi mutton bhuna
Pressure cooker method for bhuna mutton in Punjabi style
A pressure cooker is the more practical route for most home kitchens. It tenderizes the mutton efficiently and shortens the first stage significantly. That fits this recipe well because pressure cookers are especially suited to foods that are naturally tough or require longer cooking times. (ISU Extension and Outreach Blogs)
The key is to stop before the meat is fully done. Once the mutton returns to the pan for the bhuna, it still needs time to absorb the masala and finish properly.
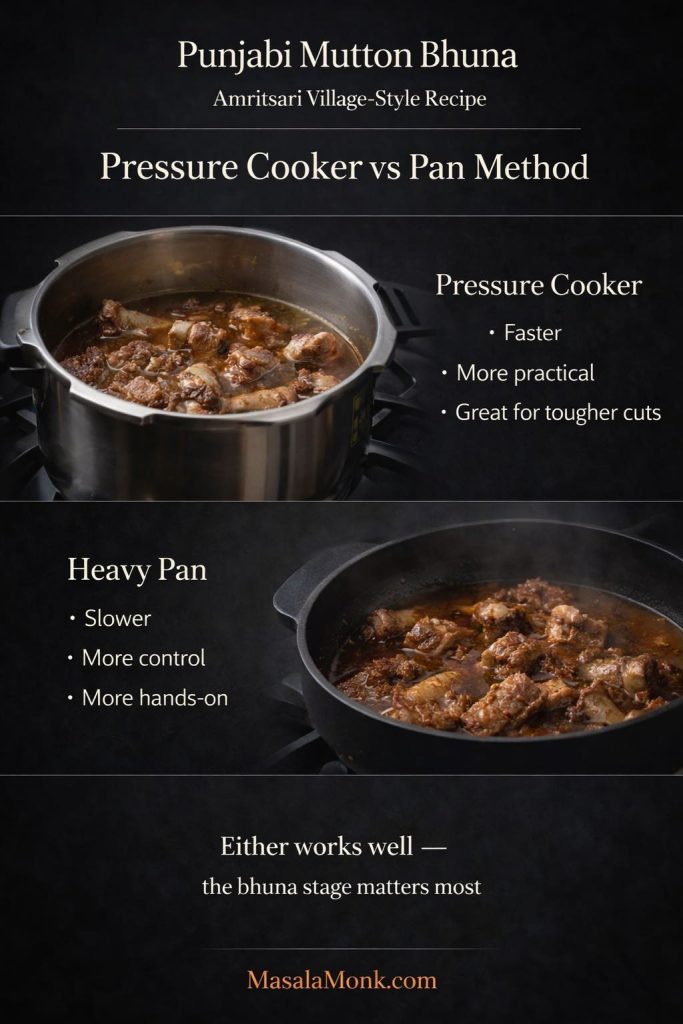
Pan method
A heavy pan gives you more gradual control and feels closer to the slower rhythm of the dish’s original setting. It suits cooks who do not mind spending a bit more time and paying closer attention to liquid levels.
This method can give excellent results, but it asks for more patience. You need to watch the meat, stir occasionally, and make sure the pan never dries out too far.
Which one should you choose for Punjabi-style bhuna mutton
Choose a pressure cooker when time matters. Choose a pan when you want slower control. In either case, the final flavor depends more on the quality of the bhuna than on the first cooking vessel. Save the stock, do not overcook the meat early, and let the reduction stage do its work.
Also Read: Balti Paneer Gravy (Restaurant-Style, Creamy + Bold Recipe)
Tips for the best Punjabi mutton bhuna
Roast for softness, not just blackening
The onions and tomatoes should not merely look charred. They must soften properly too. That softened interior is what gives the dish sweetness and body.
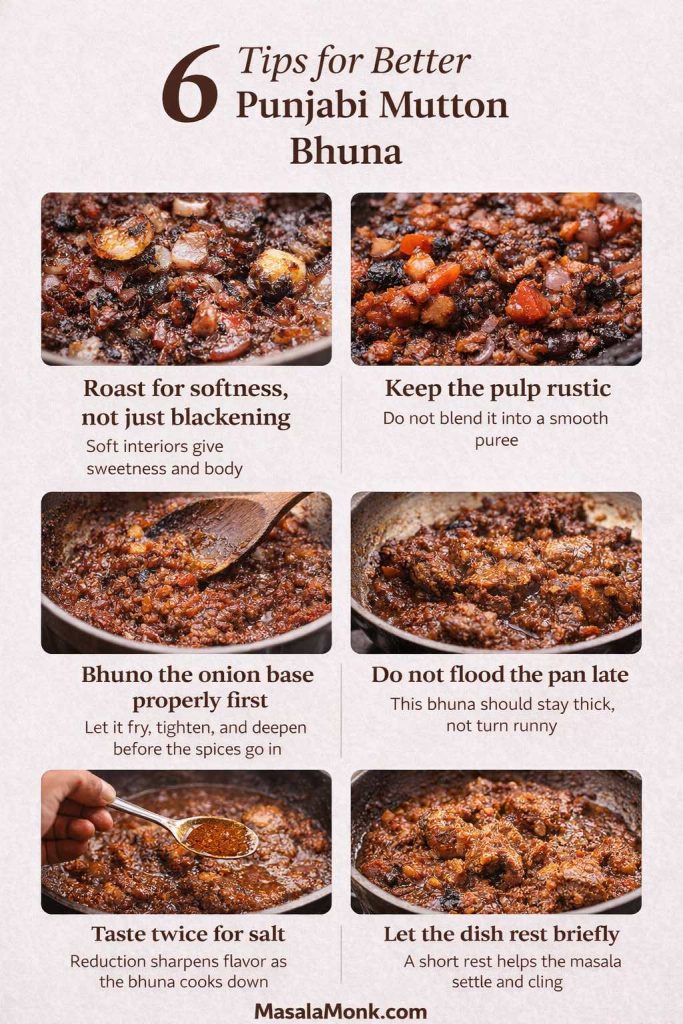
Keep the pulp rustic
A completely smooth puree makes the dish feel more generic. A rougher pulp gives the bhuna more character and a more grounded texture.
Bhuno the onion base properly first
Do not rush into the spice stage. The onion mixture needs time to fry, tighten, and deepen before the cumin, coriander, and chilli go in.
Do not flood the pan late
This is a bhuna, not a flowing curry. Too much extra water at the end will flatten the texture and dilute the concentration you worked to build.
Taste twice for salt
Salt lightly in the first stage, then check again near the end. Reduction sharpens everything.
Let the dish rest briefly
Even 10 minutes off the heat helps the masala settle and cling more beautifully before serving.
Also Read: Mojito Recipe (Classic) + Ratios, Pitcher, Mocktail & Easy Variations
What to serve with bhuna mutton in Punjabi style
Best breads and rice
This dish likes simple company. Hot rotis are an excellent match, especially if they are sturdy enough to scoop up the thick masala. Plain parathas work very well too.
If you prefer rice, keep it uncomplicated. Plain steamed rice or jeera rice lets the bhuna stay the focus of the plate.
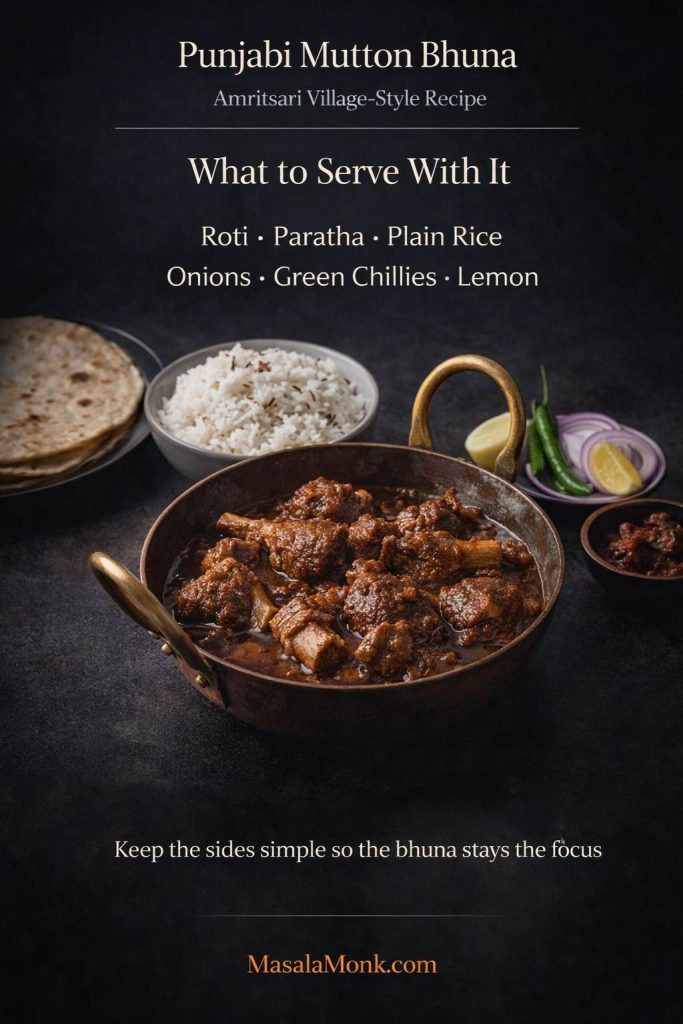
Sides and finishing touches
Sliced onions, green chillies, and a wedge of lemon fit the spirit of the dish especially well. They cut through the richness without distracting from it. A sharp pickle can also work, though use it lightly because the bhuna already carries plenty of depth.
Related Punjabi comfort dishes
If you enjoy this kind of hearty North Indian cooking, you may also want to explore Punjabi-style rajma curry on days when you want something comforting but meat-free. For another bold gravy-style main, Balti Paneer Gravy is a good next stop. And for a classic favorite in a richer, creamier lane, butter chicken offers a very different but equally satisfying dinner mood.
Also Read: Paloma Recipe: 12 Paloma Cocktail Drinks
How to store and reheat Punjabi mutton bhuna
This bhuna stores well, and like many reduced meat dishes, it often tastes even better after a little rest. The smoke, stock, fat, and spice settle into each other more fully, and the masala seems to grip the meat even better the next day.
Let the dish cool fully, then refrigerate it in an airtight container for up to 2 days.
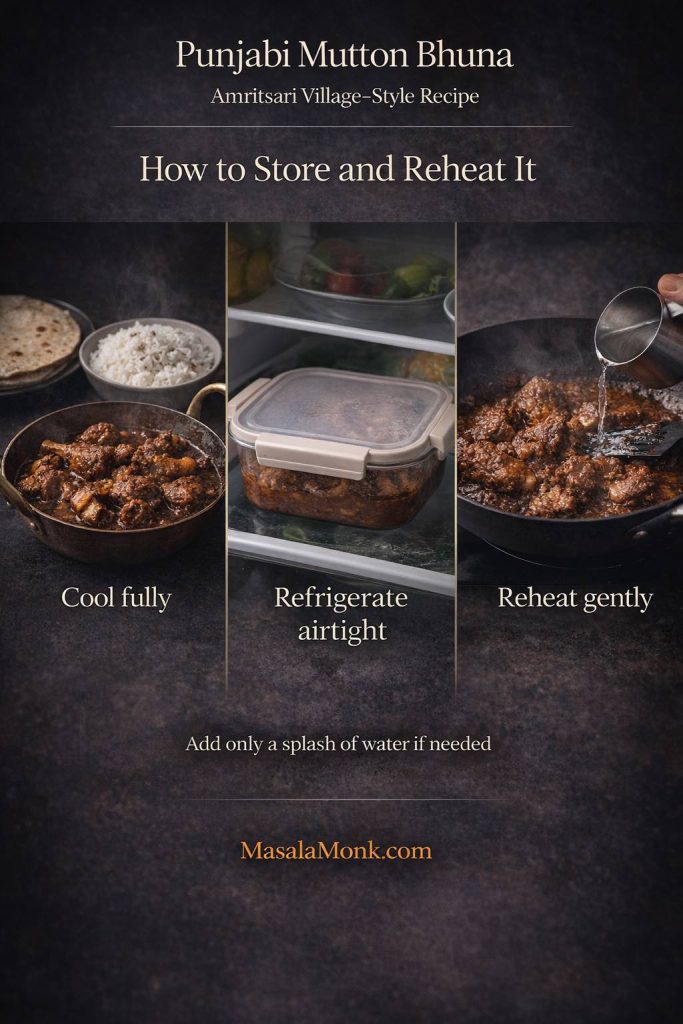
To reheat, transfer it to a pan and warm gently over low heat. Add only a small splash of water if needed. The goal is to loosen the masala just enough, not turn it back into a thin curry.
If you know you want leftovers, you can stop the final reduction a touch earlier, since reheating will tighten the dish slightly more.
Also Read: Air Fryer Donuts Recipe (2 Ways): Glazed Homemade Donuts + Biscuit Donuts
Final thoughts on Punjabi mutton bhuna
Some dishes impress through abundance. This one impresses through confidence. It uses very little that feels unnecessary. There is no attempt to hide the mutton under excess spice or smooth everything into a polished restaurant gravy. Instead, it leans into smoke, mustard oil, fat, and reduction.
That is what gives the recipe its grounded appeal. The charred onions bring sweetness, the tomatoes bring depth, the mutton fat gives savoriness, and the bhuna ties everything together into one thick, flavorful coating.
With due credit to Dr. Aman Singh Kahlon, Amritsar, this recipe preserves a beautiful style of winter village cooking in a form that still makes perfect sense in a home kitchen today. Serve it hot, serve it slowly, and let the masala do what it is meant to do.
Also Read: Chicken Pesto Pasta (Easy Base Recipe + Creamy, One-Pot, Baked & More)
Punjabi mutton bhuna FAQs
1. Can I make punjabi mutton bhuna without a pressure cooker?
Yes. A heavy pan works well too. It simply takes longer and needs more attention.
2. Can I use lamb instead of goat meat in punjabi mutton bhuna?
Yes. The flavor will be slightly milder and fattier, but the method still works.
3. Can I make it without kidney fat?
Yes, though the finished punjabi mutton bhuna may taste a little less rich and rounded.
4. Why are the onions and tomatoes charred first?
Because that is one of the defining flavor moves in this recipe of punjabi bhuna mutton. Charring adds smoke, sweetness, and depth before the bhunai even begins.
5. Can I skip charring if I do not have open flame?
You can roast the onions and tomatoes on a very hot tawa, under a broiler, or in a hot oven until blistered and softened. That still gives you some roasted depth.
6. Can I make punjabi mutton bhuna without mustard oil?
Yes, but the character changes. A neutral oil will work, though the dish loses some of its Punjabi rustic edge.
7. How do I know when the bhuna stage is done?
The masala should look thick, glossy, and cohesive. It should cling to the meat, with small traces of oil visible around the edges.
8. Why does my bhuna taste watery?
Usually because the final reduction was not taken far enough or too much water was added late.
9. Is punjabi mutton bhuna very spicy?
Not necessarily. The Kashmiri chilli powder mainly adds color and mild warmth. The sharper heat comes from the green chillies.
10. Can I make it ahead?
Yes. Punjabi mutton bhuna often tastes even better after a few hours or the next day.
11. Is there a safe temperature reference for mutton or goat?
For whole cuts of goat or similar red meats, USDA guidance uses 145°F / 62.8°C with a rest period, while ground meat should reach 160°F / 71.1°C. In a dish like this, though, tenderness usually comes from cooking well past bare-minimum doneness until the meat softens properly in the bhuna. (Food Safety and Inspection Service)
Also Read: Tapas Recipe With a Twist: 5 Indian-Inspired Small Plates