Posted on Leave a comment

Beef Stroganoff Recipe: Tender Beef, Creamy Mushroom Sauce & Easy 30-Minute Dinner

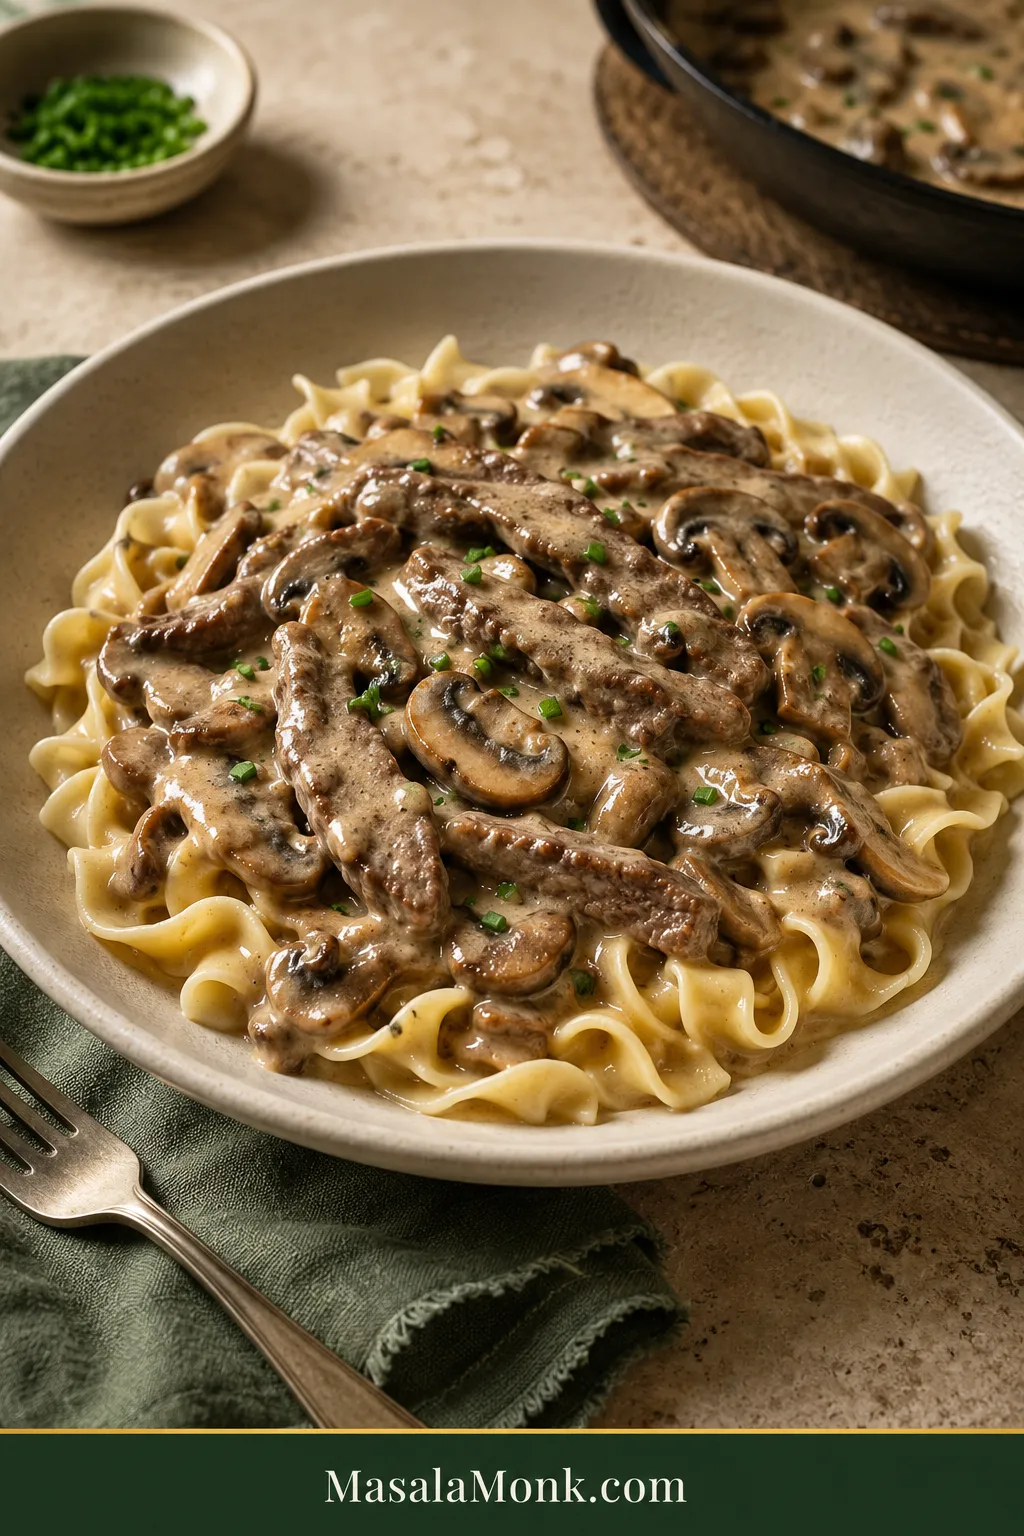
Beef Stroganoff over wide egg noodles with thin browned beef strips, sliced cremini mushrooms, glossy tan sauce and a small scattering of chopped chives.

A good skillet of Beef Stroganoff is all tender browned beef, mushrooms with real color, and a glossy sour-cream sauce that finds its way into the noodles.

It can also look right and still disappoint.

A creamy sauce can hide chewy beef. Mushrooms can soften without developing much flavor. And a sauce that looked generous in the skillet can all but disappear once it meets the noodles.

The fork tells you the truth.

Tender beef yields easily instead of making you chew through long fibers. Properly browned mushrooms taste developed, not merely cooked. The sauce clings in a smooth, savory coat—creamy enough to comfort, loose enough to flow.

This Beef Stroganoff comes together in about 30 minutes with top sirloin, fresh cremini mushrooms, beef broth, Dijon mustard, Worcestershire sauce and full-fat sour cream. There is no cream of mushroom soup, no heavy cream and no wine required.

The Beef Stroganoff Method in One Minute

Sear fast. Brown the mushrooms fully. Build the sauce. Keep the final heat low; return the beef last.

  • Sear fast: use tender steak, slice it thinly across the grain and brown it in uncrowded batches.
  • Brown the mushrooms fully: cook away the moisture they release before building the sauce.
  • Build the sauce: get the flavor and consistency where you want them while the beef rests.
  • Keep the final heat low: stir in the sour cream, then return the steak only long enough to finish cooking and heat through.

The timing works because several jobs overlap. Start the noodle water first; slice and sear the steak while it heats, drop the noodles when the mushrooms go into the skillet, and build the sauce while the beef rests. That overlap is what makes about 30 minutes of elapsed time realistic, although especially juicy mushrooms or slower knife work can add a few minutes.
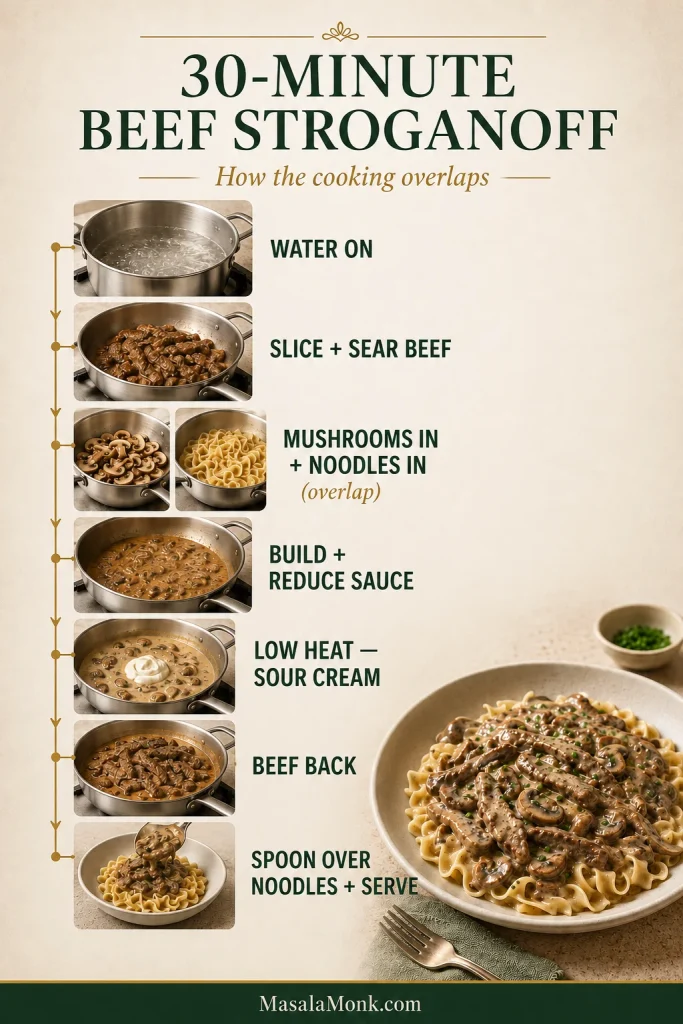
Timeline showing overlapping Beef Stroganoff tasks: heating noodle water, preparing and searing beef, cooking mushrooms and noodles, building the sauce, adding sour cream and serving.
If timing slips, let the noodles wait; thin sirloin is less forgiving of extra heat than buttered pasta.

It is the sort of dinner that feels richer than the time it took to make.

Beef Stroganoff Recipe

Serves: 4 generously
Prep: about 10 minutes
Cooking: about 20 minutes
Total elapsed time: about 30 minutes, with some prep overlapping the cooking
Main equipment: 12-inch (30 cm) heavy skillet and a pot for the noodles

Ingredients

For the Stroganoff

  • 1¼ lb (570 g) top sirloin steak
  • ¾ tsp fine sea salt (about 4–5 g), divided, plus more to taste
  • ¾ tsp freshly ground black pepper, divided
  • 1½ tbsp (22 ml) neutral high-heat oil, divided
  • 12 oz (340 g) cremini or baby bella mushrooms, sliced
  • 1 medium-large yellow onion (about 160 g), thinly sliced
  • 2 tbsp (28 g) unsalted butter
  • 2 garlic cloves (about 6 g), finely minced
  • ½ tsp sweet paprika, optional — use sweet, not smoked
  • 2 tbsp (about 16 g) all-purpose flour
  • 1½ cups (360 ml) low-sodium beef broth, plus extra for loosening if needed
  • 2 tsp Dijon mustard
  • 2 tsp (10 ml) Worcestershire sauce
  • ⅔ cup full-fat sour cream (about 150 g), taken out of the refrigerator before cooking
  • 2 tbsp chopped fresh chives, for serving

For Serving

  • 10 oz (285 g) wide egg noodles
  • 1 tbsp (14 g) unsalted butter
  • Salt for the noodle water

Optional Wine Variation

Add ¼ cup (60 ml) dry white wine after the garlic. Scrape up the browned bits and reduce until only a thin layer of wine remains in the skillet, then continue with the regular 1½ cups (360 ml) beef broth. The wine adds brightness and complexity; it does not replace part of the broth in this version.
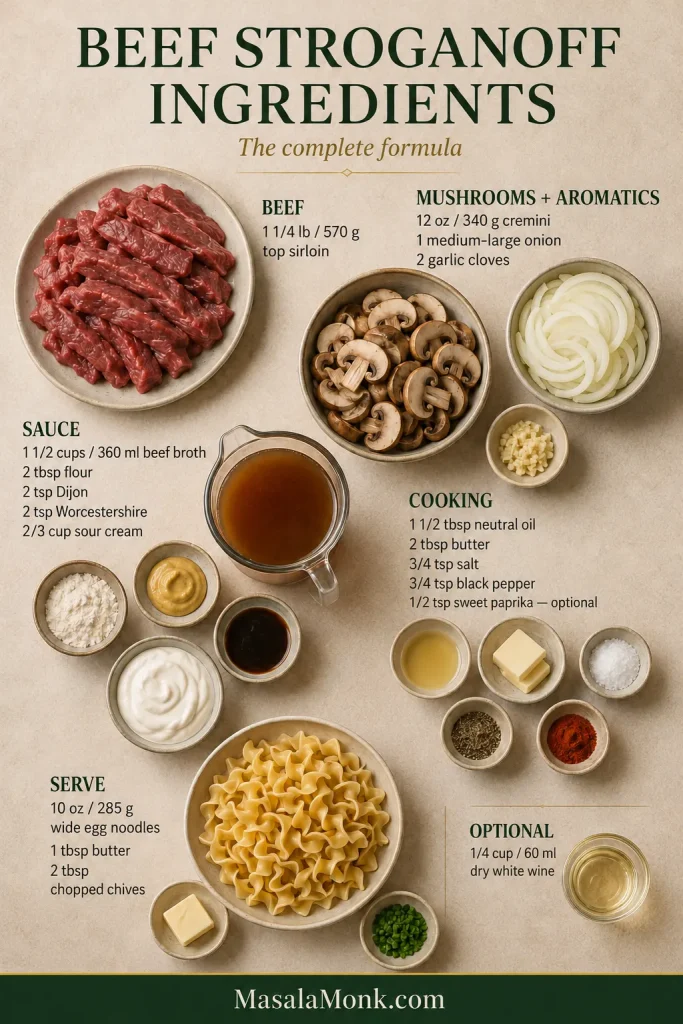
Overhead ingredient board with top sirloin, cremini mushrooms, onion, garlic, broth, flour, Dijon mustard, Worcestershire sauce, sour cream, egg noodles, butter, oil, chives and optional wine.
Measure the sauce ingredients first so the beef can leave the heat the moment it is ready.

Instructions

Start the Noodles and Sear the Beef

  1. Start the noodle water. Put a large pot of well-salted water over high heat, then move straight to the beef. Once the water boils, keep it ready while you sear the steak. When the mushrooms go into the skillet in Step 4, add the noodles to the boiling water. Cook according to the package directions, drain when just tender, toss with 1 tablespoon butter and keep warm. Keep the noodles separate from the Stroganoff unless every serving is going straight to the table.
  2. Slice and season the beef. Trim thick exterior fat and obvious tough sinew. Cut the steak across the grain into strips about ¼ inch (6 mm) thick and roughly 2 inches (5 cm) long. Pat very dry, then season with ½ teaspoon salt and ½ teaspoon black pepper.
  3. Sear the beef in two batches. Heat a 12-inch (30 cm) heavy skillet over high heat until a strip of beef sizzles immediately on contact. Add about half the oil and half the beef in one uncrowded layer. Sear for roughly 30–45 seconds per side, just until browned patches develop. Transfer to a plate, let the skillet return to strong heat, then repeat with the remaining oil and beef. The centers may look underdone when the strips leave the pan. That’s intentional; they cook again at the end.

Brown the Mushrooms and Build the Sauce

  1. Brown the mushrooms and onion. Lower the heat to medium. Once the aggressive searing heat has settled, add 1 tablespoon butter and the mushrooms. Drop the noodles into their boiling water now. Cook the mushrooms for about 3 minutes, then add the onion and remaining tablespoon butter. Continue for roughly 5–8 minutes, until most of the released mushroom water has evaporated and browned edges begin to appear. Listen to the pan: the wet hiss eventually gives way to a sharper sizzle. Season with the remaining ¼ teaspoon salt and ¼ teaspoon pepper.
  2. Build the sauce. Stir in the garlic for about 30 seconds. For the wine variation, add the wine now, scrape up the browned bits and reduce until only a thin layer remains. Stir in the optional paprika, sprinkle the flour over the mushrooms and onion, and cook for about 1 minute. Add a small splash of broth and stir until smooth, scraping the browned bits from the bottom of the skillet. Gradually stir in the remaining broth, followed by the Dijon and Worcestershire.
  3. Reduce to the right consistency. Simmer for roughly 3–5 minutes. Drag a spatula through the skillet; the trail should remain visible briefly before flowing closed. A loose sauce needs more reduction. A sauce that has become too thick can be loosened with broth or hot noodle water, one tablespoon at a time.

Finish Gently and Serve

  1. Add the sour cream over low heat. Put the sour cream in a small bowl and whisk in 2–3 tablespoons of hot sauce, one spoonful at a time. Lower the heat—or briefly take the skillet off the burner—then stir the warmed sour cream into the sauce until smooth and glossy.
  2. Taste and adjust. Check the salt first. A muted sauce may need another ¼ teaspoon Dijon. Taste before adding anything else. Another ¼–½ teaspoon Worcestershire can deepen the savory flavor without taking over.
  3. Return the beef. Fold in the steak and every drop of juice collected on the plate. Cook only long enough for the thin strips to finish cooking and heat through. Taste the sauce once more and adjust the salt if needed.
  4. Serve. Spoon the Stroganoff over the warm buttered noodles and scatter the chopped chives over the top.
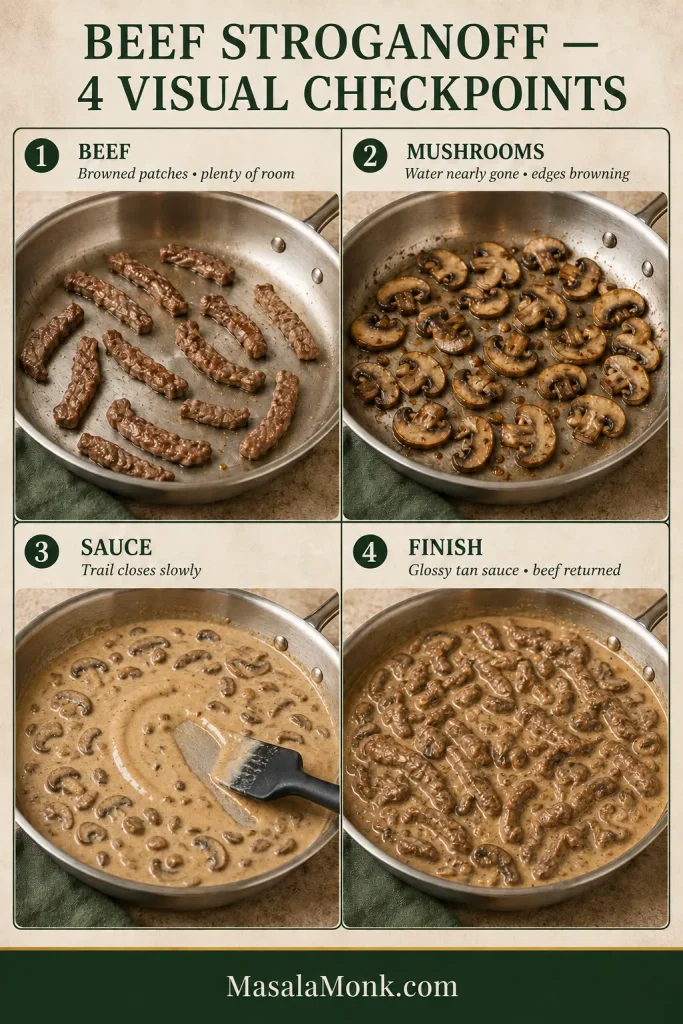
Four cooking checkpoints showing spaced browned beef, mushrooms after most moisture has evaporated, sauce leaving a slow-closing spatula trail, and finished creamy Stroganoff with beef returned.
Use the skillet, not the stopwatch: browning, evaporated mushroom moisture and a slow-closing sauce trail are the key checkpoints.

Food-safety note: USDA guidance for whole beef steaks, chops and roasts is 145°F (63°C) followed by a 3-minute rest. See the USDA safe minimum temperature chart for current guidance.

Doubling the recipe: pan surface area becomes the limiting factor. Keep the beef batches the same size, which usually means four batches instead of two, or work with two large skillets. Twice as many mushrooms also need more room and more time for their moisture to evaporate, so a double batch will take longer than 30 minutes.
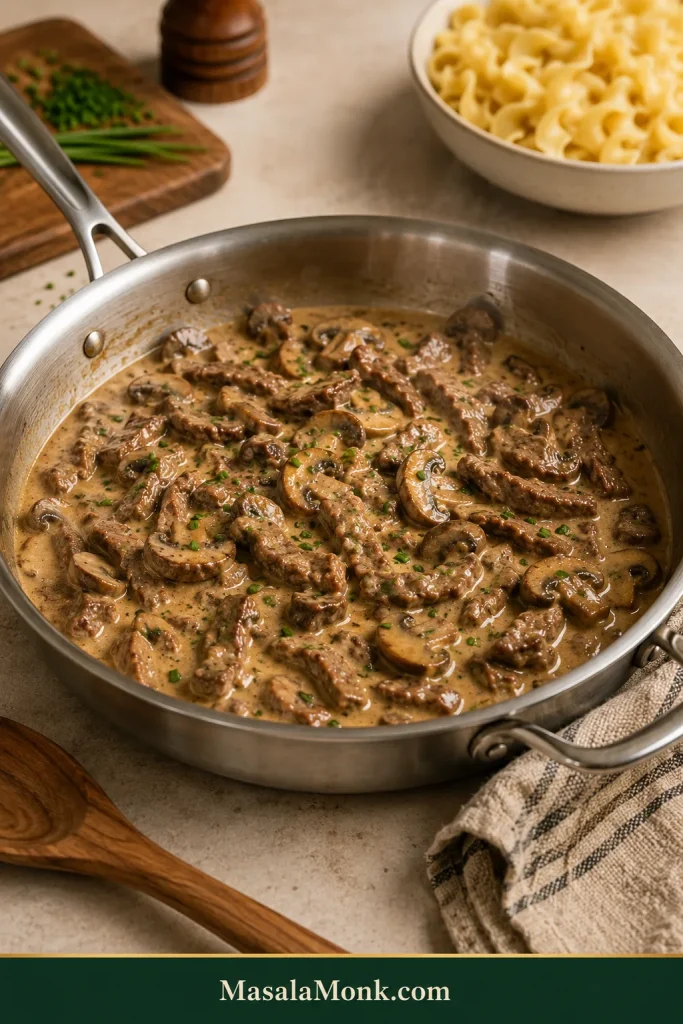
Finished Beef Stroganoff in a stainless steel skillet with thin beef strips and browned mushrooms in glossy tan sauce; wide egg noodles are kept separately nearby.
The finished sauce should still move when the skillet tilts; if it sits stiffly, loosen it before serving.

Need a closer look at one technique? Keep the beef tender · Brown the mushrooms · Understand the sauce · Troubleshoot a problem

What Is the Best Beef for Beef Stroganoff?

Top sirloin is the best all-around beef for this fast Beef Stroganoff. It is naturally tender enough for a short sear, has plenty of beef flavor, is easy to find and usually costs less than tenderloin or ribeye.

Price isn’t really the dividing line here. Cooking style is. Tender steaks suit this quick skillet method. Tougher cuts need a slower route; a few extra minutes in this skillet won’t suddenly make stew meat tender.
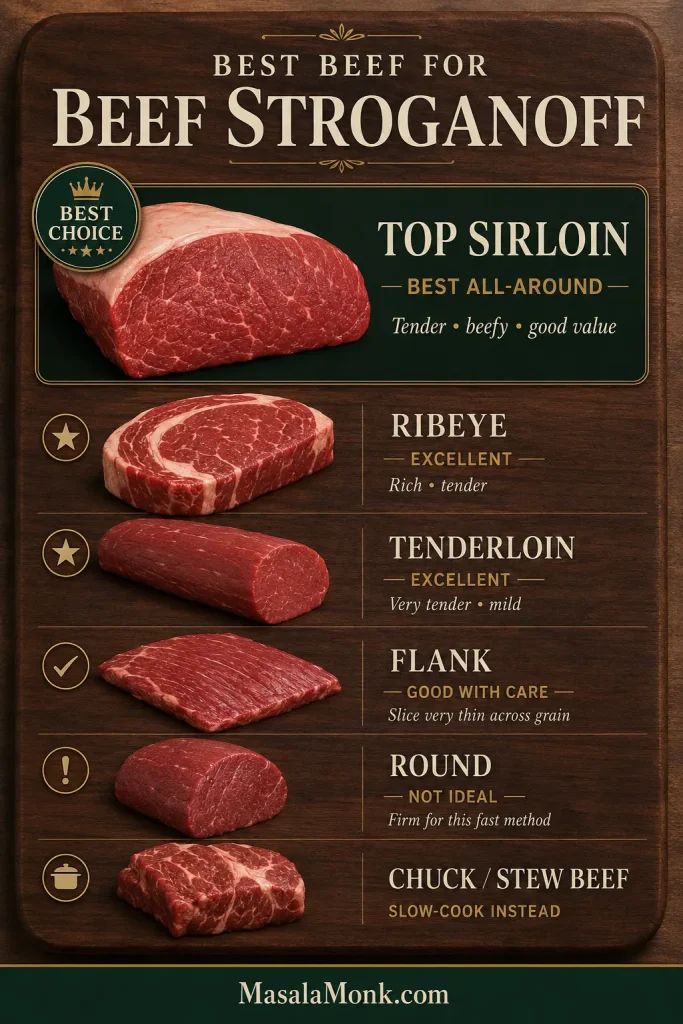
Comparison guide for Beef Stroganoff cuts, with top sirloin presented as the best all-around choice alongside ribeye, tenderloin, flank, round and chuck.
For quick Beef Stroganoff, fine marbling helps; thick fat seams and connective tissue do not have time to soften.

Chuck is much more at home in our slow cooker pot roast, where several hours of low, steady cooking give connective tissue time to soften.

Beef cutFor this fast method?What to expect
Top sirloinExcellent — best overallTender, beefy and good value
RibeyeExcellentRich, tender and more expensive
Tenderloin / filetExcellentVery tender, mild and expensive
Pre-cut steak stripsSometimesDepends on the original cut
Flank steakGood with careSlice very thinly across the grain
RoundNot idealOften lean and firm in a short cook
Chuck / stew meatNoBetter with long, slow cooking

If sirloin doesn’t fit the budget tonight, Stroganoff is not off the table—the beef and cooking method just need to suit each other.

What About Beef Labeled “Stroganoff Strips”?

Check whether the original cut is listed on the package. Some pre-sliced Stroganoff strips are sirloin and work beautifully; others are inexpensive beef cut into narrow pieces. The label tells you how the store expects the meat to be used, not whether it is naturally tender. Thickness matters too: even when the cut itself is suitable, slice unusually thick strips down toward the ¼-inch (6 mm) target before cooking.

How to Keep the Beef Tender

For tender Beef Stroganoff, slice a naturally tender cut thinly across the grain, dry it well, sear it quickly in batches and keep its final cooking time brief.

Slice Across the Grain

Look at the steak before cutting it and find the direction of the long muscle fibers. Cut across those fibers, not alongside them. Shorter fibers are easier to chew.

Aim for strips around ¼ inch (6 mm) thick and 2 inches (5 cm) long. They should be easy to eat in the same forkful as a mushroom and a few noodles, not long enough to turn dinner into a tug-of-war.
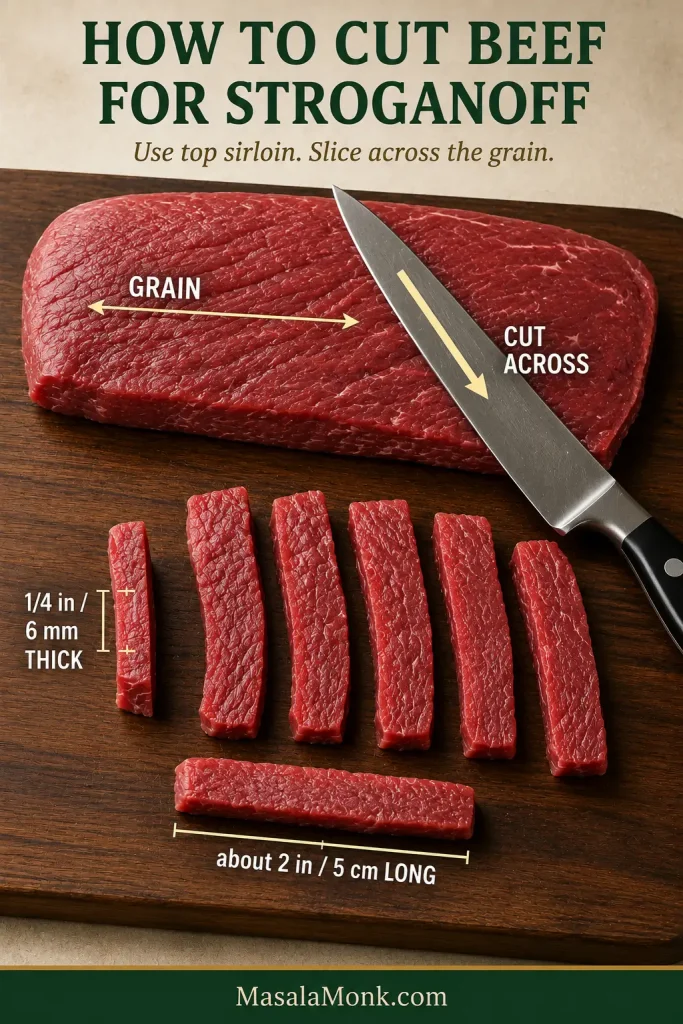
Top sirloin with muscle grain marked, a knife cutting across the grain, and Stroganoff strips shown about 6 millimeters thick and 5 centimeters long.
If the grain changes direction, rotate the sirloin as you cut so every strip stays across the fibers.

Trim what a fast sear cannot soften. Fine marbling is welcome. Thick bands of exterior fat and tough sinew are not. This recipe cooks too quickly for a large chewy seam to render or soften.

Dry beef browns better. Blot the strips thoroughly before they enter the skillet. Surface moisture has to evaporate before serious browning begins, and a pan crowded with damp beef cools quickly. With dry beef and strong heat, you get brown patches outside while those thin centers have cooking left for the return to the skillet. That’s the sweet spot.
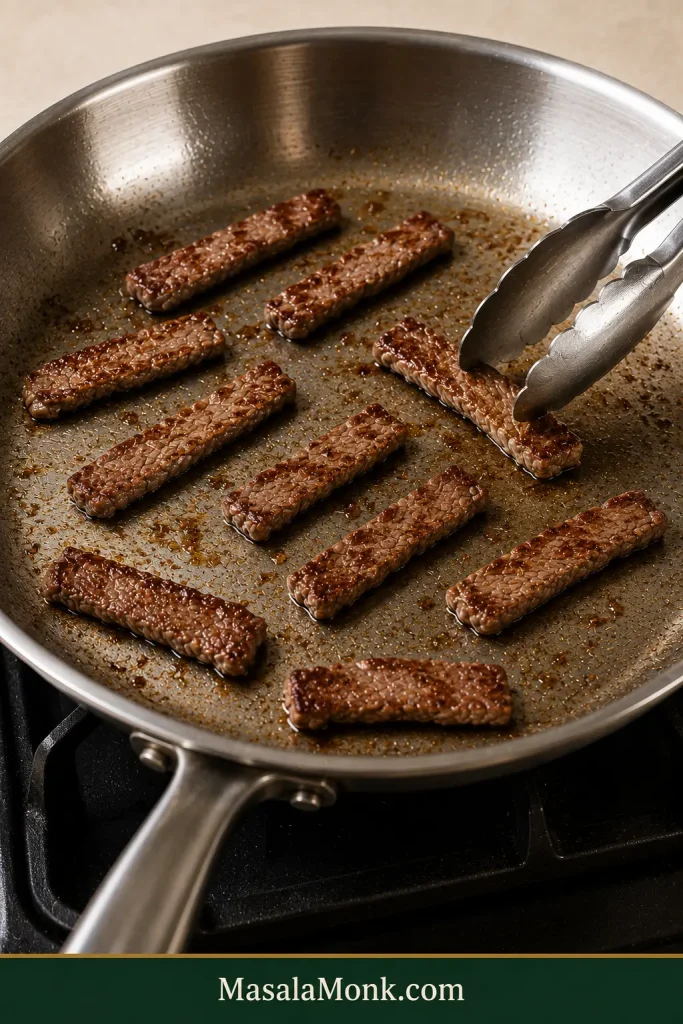
Thin beef strips browning with clear space between them in a stainless steel skillet while metal tongs turn one browned strip.
If batch two stops sizzling on contact, let the skillet regain heat before adding more beef.

Keep the First Sear Short

Thin sirloin strips need only a brief head start. Once they have color, move them to a plate and let the mushrooms and sauce catch up. Extra simmering does not make sirloin more tender. It just keeps cooking it.
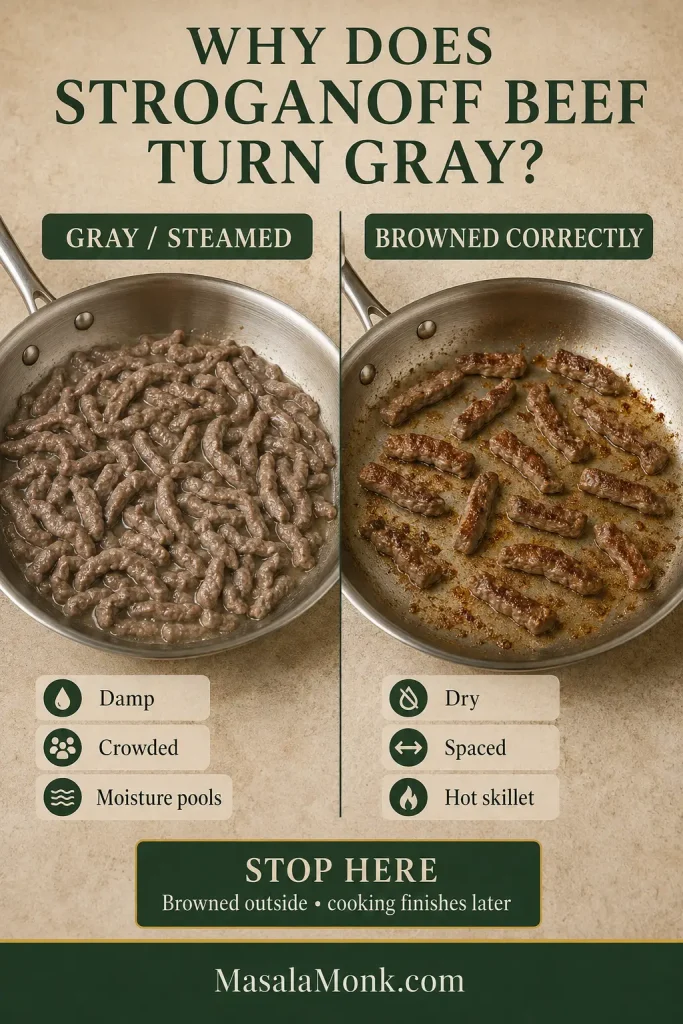
Side-by-side comparison of crowded gray beef surrounded by moisture and properly spaced browned beef in a hot stainless steel skillet.
Once gray beef is cooked, stop chasing color; extra heat cannot undo steaming, but it can toughen the meat.

With the beef out of the way, the mushrooms can have the skillet to themselves.

How to Get Deeply Browned Mushrooms

Cook the mushrooms until the water they release has evaporated and browned edges begin to appear. Soft mushrooms are not necessarily browned mushrooms.

Fresh mushrooms usually move through three recognizable stages:

  1. They soften and absorb some of the fat.
  2. They release water. The skillet can suddenly look much wetter than expected.
  3. The water cooks away and browning begins.
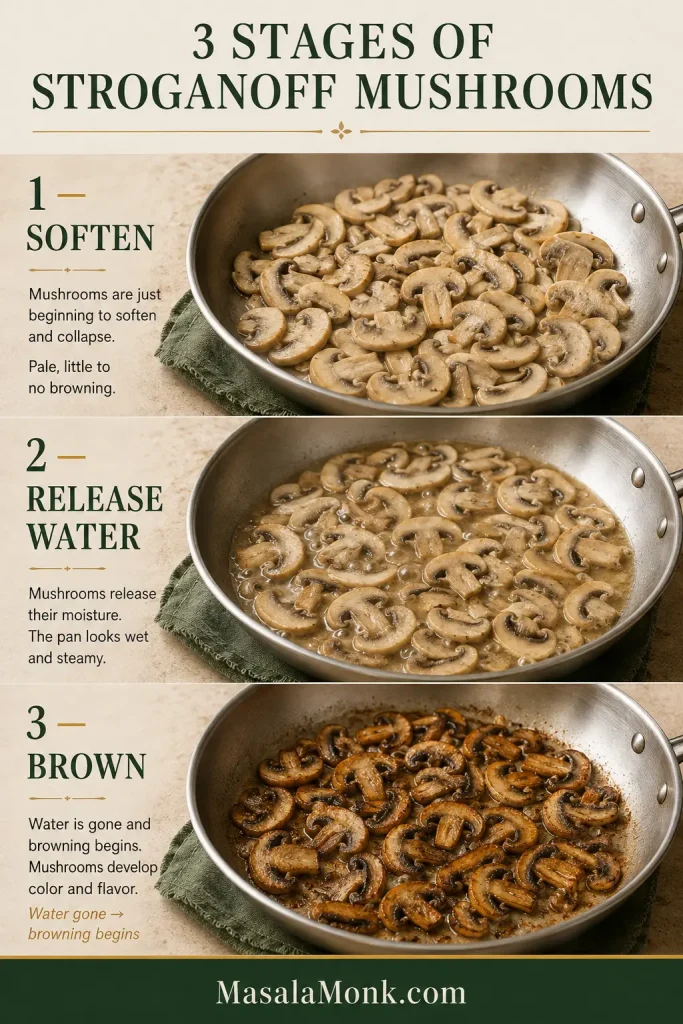
Three stages of sliced cremini mushrooms in one skillet: initially softening, sitting in released liquid, and finally browned after the moisture has evaporated.
Let released mushroom liquid evaporate in the pan; meaningful browning begins only after the wet stage passes.

The wet middle stage is where cooks often think something has gone wrong. It hasn’t.

Keep cooking while liquid covers the bottom of the skillet. As it disappears, the pan moves from a wet hiss to a sharper sizzle, and brown patches show around the mushroom edges. The aroma deepens too. Suddenly the skillet smells much more like dinner.

That change in sound, aroma and color tells you more than the clock does.

Cremini, White Button or Shiitake?

Cremini, also sold as baby bella mushrooms, are the everyday choice here. They bring more mushroom depth than white buttons while remaining easy to find.

White button mushrooms work well too. Good browning matters more than buying an expensive variety. For a deeper mushroom note, replace 2–3 oz (55–85 g) of the cremini with sliced shiitake caps.
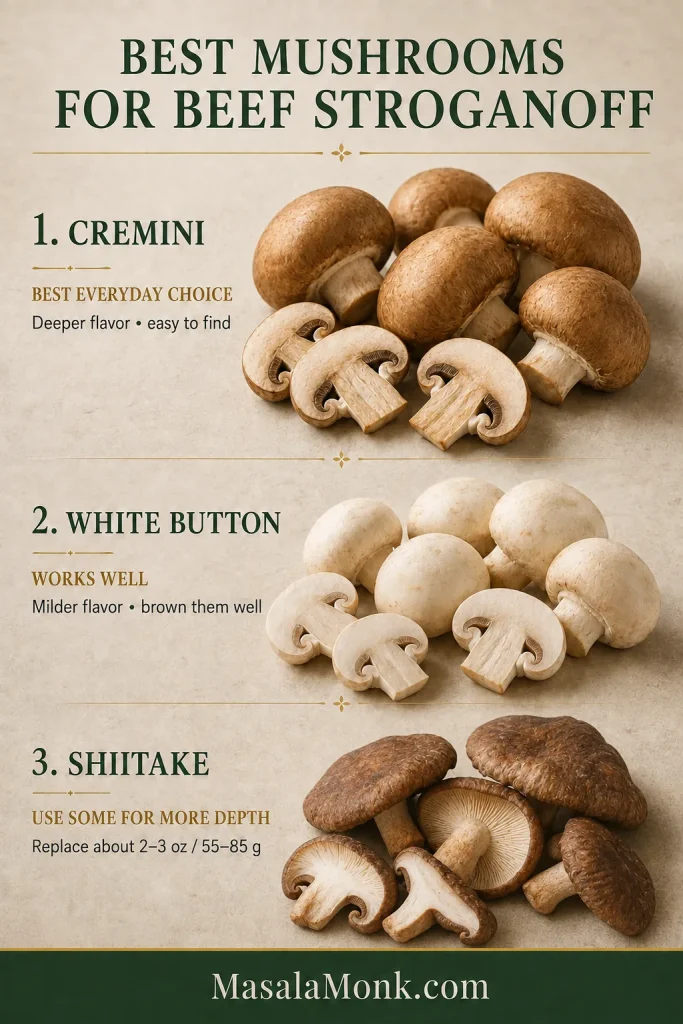
Mushroom comparison showing brown cremini, white button and dark-capped shiitake mushrooms, with cremini identified as the everyday Stroganoff choice.
Similar slice thickness helps cremini, white buttons or shiitake lose moisture and brown more evenly.

Love that browned-mushroom flavor? Our creamy mushroom sauce takes the same idea in a direction designed for steak, chicken or pasta. Once the mushroom water is gone and the edges have color, the skillet is ready to become the sauce.

How Beef Stroganoff Sauce Works

The sauce should taste first of browned beef and mushrooms, with sour cream smoothing the edges—not like a bowl of sour cream with a little beef in it.

What Is Stroganoff Sauce Made Of?

Stroganoff sauce is a savory sour-cream sauce built from beef broth and browned mushrooms, with Dijon and Worcestershire for depth and flour to give it body.

The broth pulls the browned bits from the skillet into the sauce, while Dijon adds brightness and Worcestershire deepens the beefy side. Flour gives the broth enough body to cling to the noodles; sour cream comes last with richness and tang.
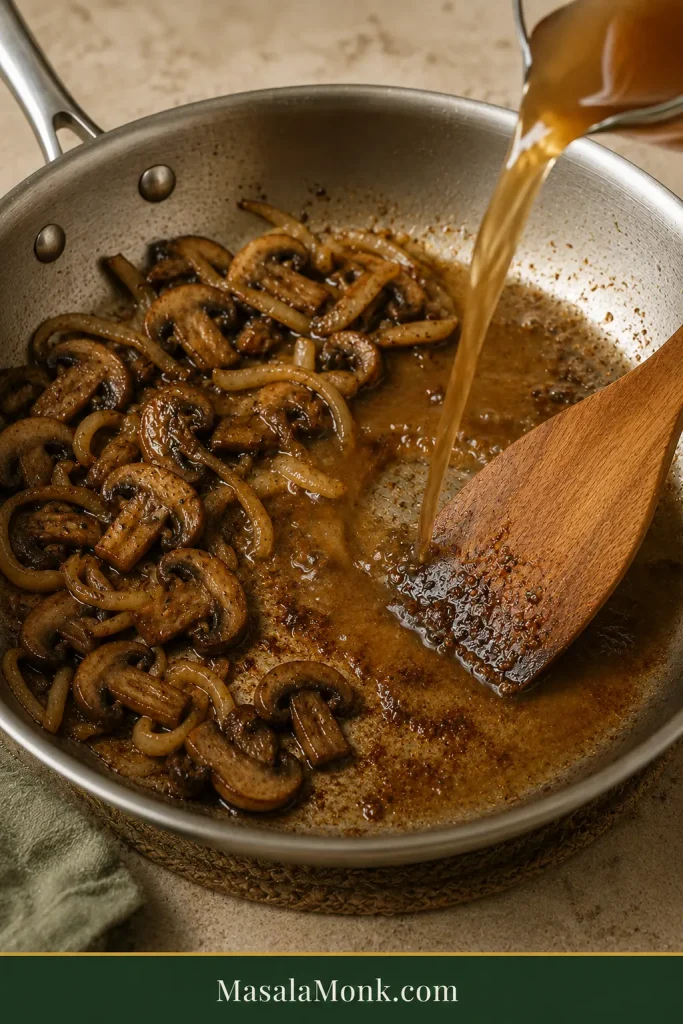
Beef broth being poured into a stainless skillet with browned mushrooms and onions while a wooden spatula loosens browned fond from the pan.
Keep the deep-brown fond for flavor; remove any truly black, scorched residue before deglazing.

Finished Stroganoff sauce is glossy and pale brown to tan rather than stark white, with browned mushrooms visible through it.

How Thick Should Stroganoff Sauce Be?

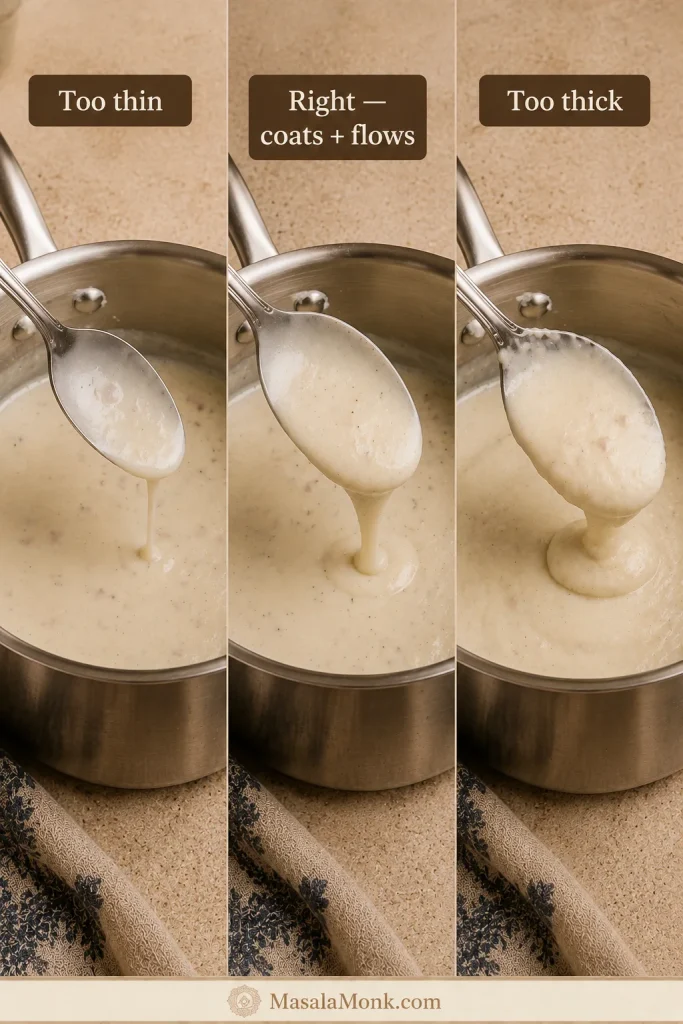
Think loose gravy rather than soup or paste: enough body to coat a noodle, but fluid enough to move around the plate.
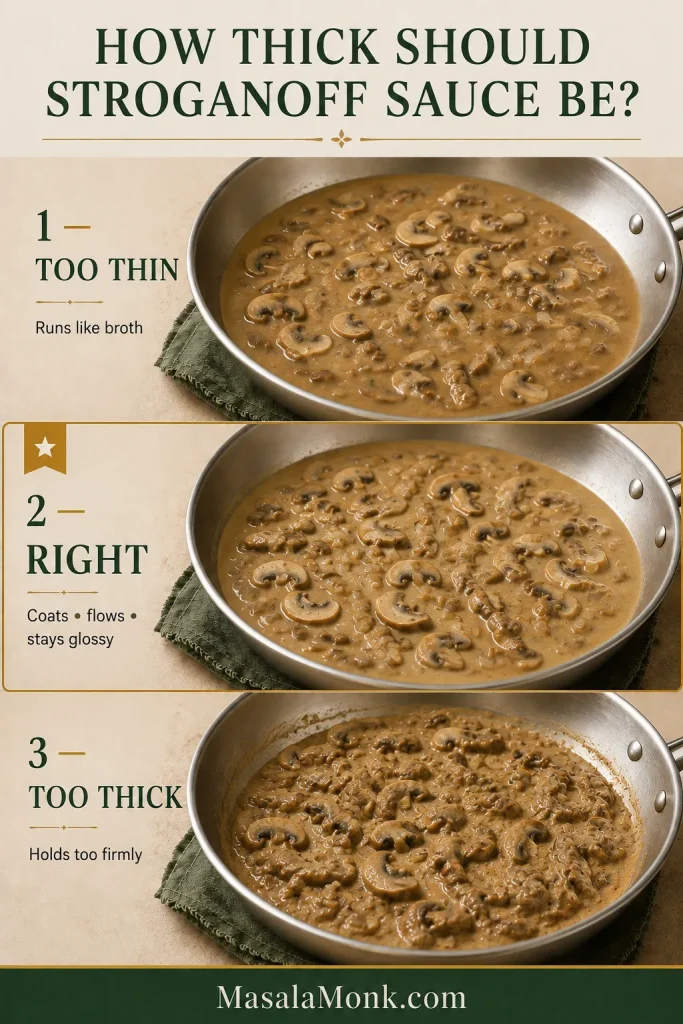
Three skillets comparing thin, correct and overly thick mushroom sauce, with the correct sauce glossy and fluid around the mushroom slices.
Stop reducing slightly before perfect thickness; sour cream and a short rest will add more body.

On a spoon, the sauce leaves an opaque coating instead of running straight off. Drag a spatula through the skillet and the trail hangs around briefly before flowing closed. More reduction fixes most thin sauces at this stage; broth or hot noodle water loosens one that has gone too far.
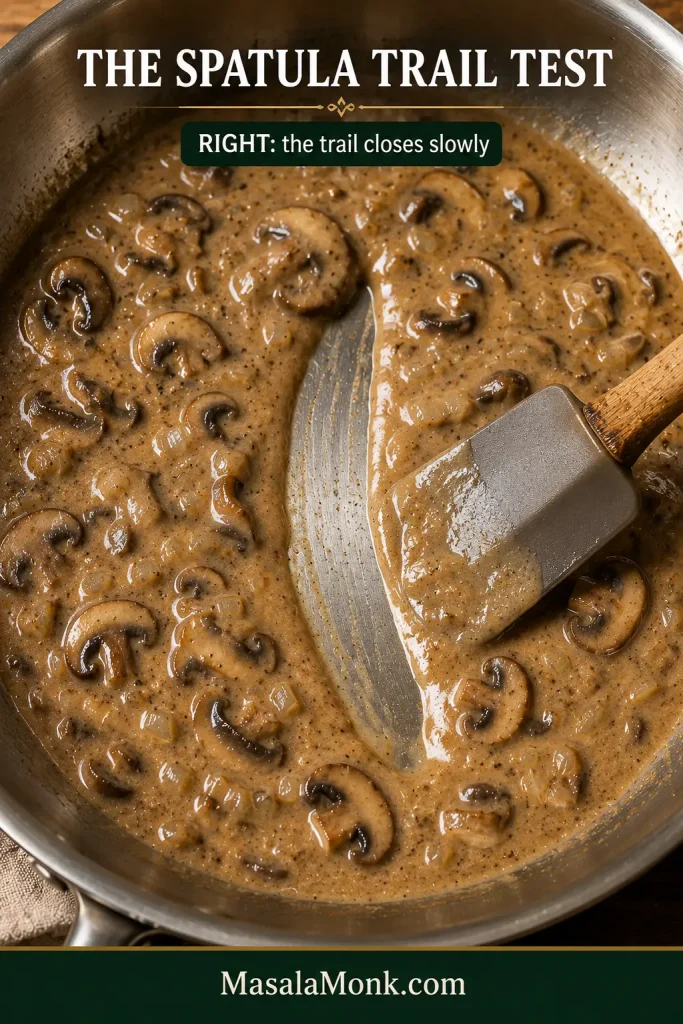
Wooden spatula drawn through glossy mushroom sauce in a stainless skillet, creating a clear path that is beginning to flow closed.
Test an open patch of sauce—the liquid, not a pile of mushrooms, should make the spatula trail linger.

Sour Cream Is the Finish, Not the Fix

Before the sour cream goes in, the sauce should already be close to the thickness and flavor you want.

Up to this point, the skillet can simmer and reduce freely. Once the sour cream is in, keep the heat low. Tempering it with a few spoonfuls of hot sauce first makes that last stage more forgiving.
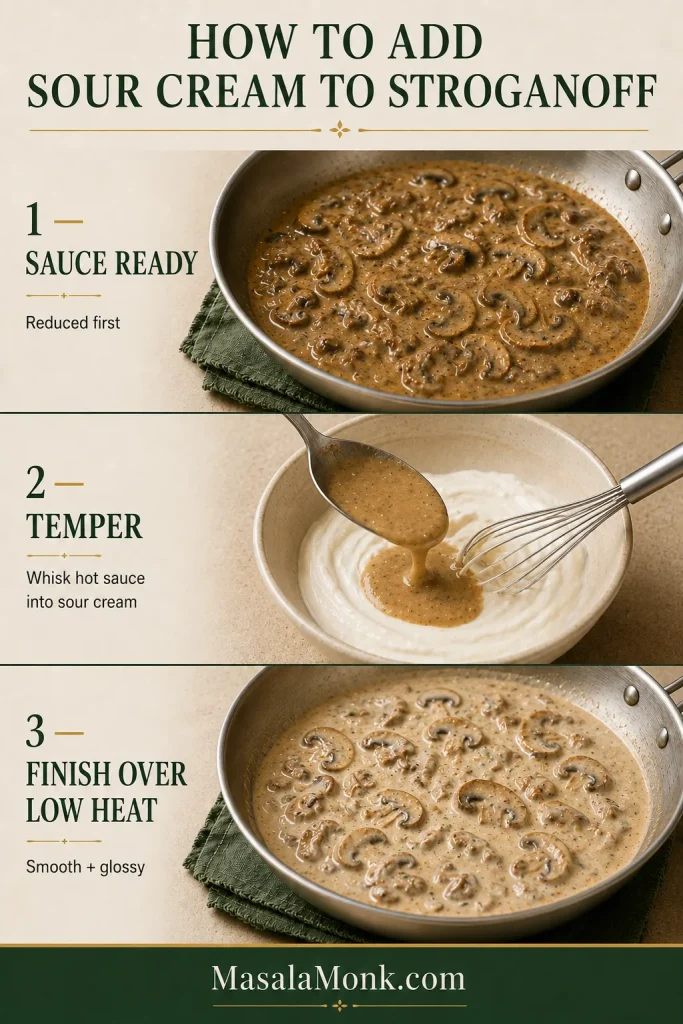
Three-stage guide showing reduced mushroom sauce, hot sauce mixed gradually into sour cream, and the resulting pale tan creamy sauce finished gently over low heat.
Cold sour cream benefits from tempering: a little hot sauce warms it gradually before the low-heat finish.

By then, the mushrooms have color, the sauce coats the spoon and the seasoning is nearly there. Stir in the sour cream and dinner is close.

Does Beef Stroganoff Need Heavy Cream?

No. Beef broth and flour provide the body in this version, while sour cream supplies the richness and tang. Heavy cream appears in many modern Stroganoff recipes and makes a richer, softer-tasting sauce, but it isn’t necessary here.

When the Sauce Looks Good but Tastes Flat

A beautiful skillet can still taste muted. More sour cream usually isn’t the answer.

Salt wakes up an underseasoned sauce. Dijon gives it lift, while Worcestershire adds deeper savoriness. Make small adjustments and taste between them; it is much easier to add another drop than to pull one back out.

Something still off in the skillet? Jump to troubleshooting · Back to the recipe

What to Serve With Beef Stroganoff

Wide egg noodles are the first choice here. Their broad surfaces catch the sauce without competing with the beef.

Mashed potatoes make the plate softer and richer; rice keeps things simple. Pappardelle or tagliatelle work when wide egg noodles are hard to find, while cauliflower mash gives you a lower-carb base that holds a creamy sauce well.
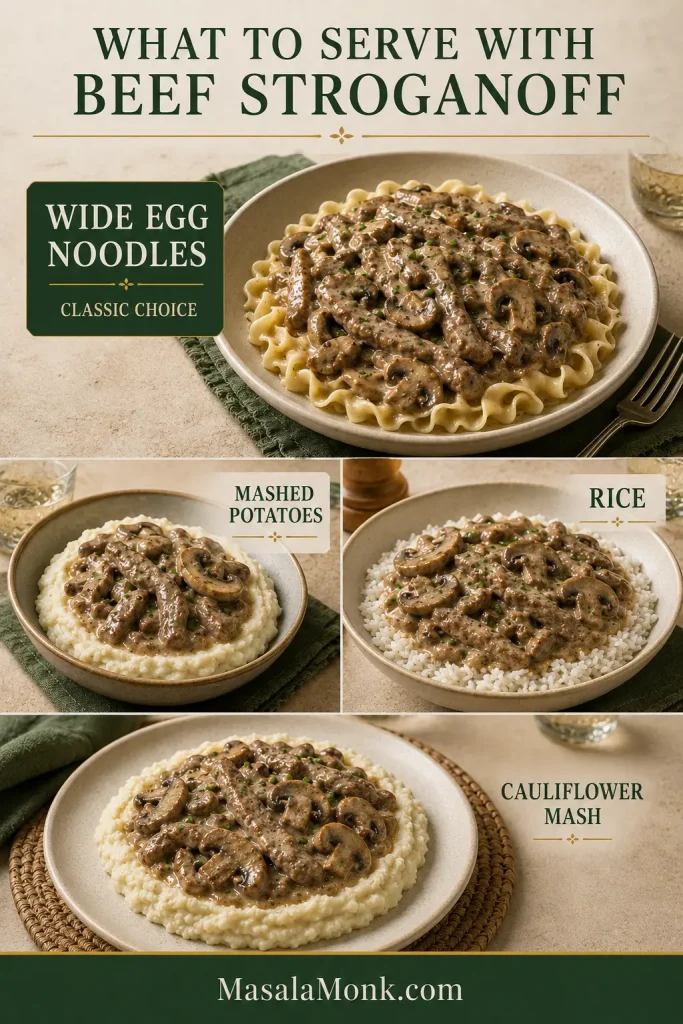
Serving comparison showing Beef Stroganoff paired with wide egg noodles, mashed potatoes, white rice and cauliflower mash.
Noodles catch sauce in folds, potatoes absorb it eagerly, and rice keeps more separation between bites.

If potatoes sound especially good tonight, these creamy mashed potatoes are soft and spoonable enough for the Stroganoff to settle right into them.

The rest of the plate does not need much. Stroganoff is already warm, soft and rich, so a crisp green salad or simply cooked green vegetable gives it contrast without turning an easy skillet dinner into a project.

Swaps and Variations That Work

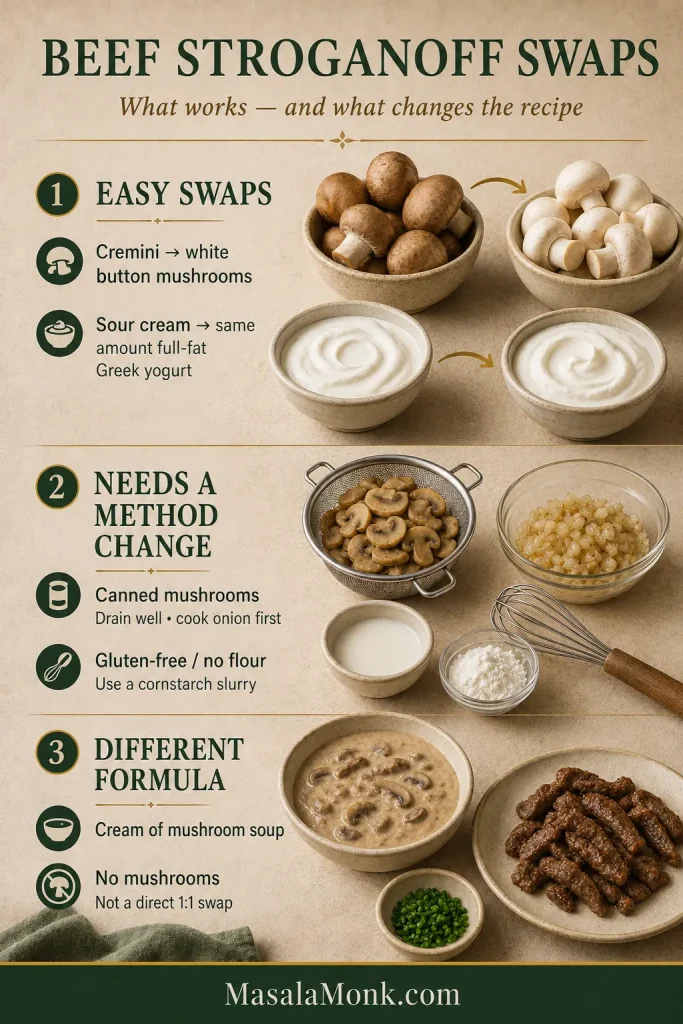
Missing an ingredient doesn’t always mean changing the whole recipe. These swaps fit the method without quietly turning it into a different Stroganoff.

SwapHow to make it work
White button mushroomsUse them 1:1 in place of cremini and cook them through the same moisture-release and browning stages.
Canned mushroomsDrain very well. Instead of the normal mushroom step, melt the full 2 tablespoons butter and cook the onion first until softened. Add the drained mushrooms for the final 2–3 minutes and cook off any remaining moisture. Season with the remaining ¼ teaspoon salt and ¼ teaspoon pepper, then continue with the garlic. They will not develop the same browned flavor as fresh mushrooms.
Full-fat Greek yogurtUse the same amount as the sour cream. Temper it the same way and keep the final heat low. Expect a slightly sharper finished sauce.
No WorcestershireLeave it out rather than forcing a substitute. Check the salt at the end. Extra Dijon can add brightness, but the finished sauce will have less savory depth.
Gluten-freeUse gluten-free noodles and check the broth, Worcestershire and mustard labels. Omit the flour. After the broth reduces, mix 1 teaspoon cornstarch with 1 tablespoon cold water and stir the slurry in gradually. Repeat only when more thickening is needed.
No flourOmit the flour and let the broth reduce first. Mix 1 teaspoon cornstarch with 1 tablespoon cold water, add part of the slurry, and cook briefly before deciding whether the sauce needs the rest.
Beef Stroganoff substitution guide grouping white mushrooms and Greek yogurt as easier swaps, canned mushrooms and cornstarch as method changes, and condensed soup or removing mushrooms as larger formula changes.
Ask what the ingredient does: flavor-only swaps are simpler than changes to moisture, thickening or dairy behavior.

Can I Use Cream of Mushroom Soup?

Yes—but not as a direct 1:1 replacement for the broth and sour cream here. Condensed soup brings its own salt, starch, dairy and mushroom flavor, so swapping it in changes too much of this sauce to treat it like one ordinary ingredient substitution.

A soup-based Stroganoff works best when the recipe is built around the soup from the beginning. Adding a can halfway through this version and trying to correct everything afterward creates more problems than it solves.

Using Leftover Cooked Steak

Skip the searing completely. Slice the cooked steak thinly and fold it in at the very end, only long enough to heat through. Already-cooked steak does not need another full round of cooking.

What If I Don’t Want Mushrooms?

Leaving out all 12 ounces (340 g) of mushrooms isn’t a clean swap in this formula. They account for a large amount of the food in the skillet and contribute moisture and savory flavor as they cook. With all of that removed, too much else changes for “just leave them out” to be good advice. A mushroom-free Stroganoff needs its sauce built differently from the start.

A Note on “Authentic” Beef Stroganoff

There isn’t one frozen-in-time version everyone has to reproduce. Beef Stroganoff has changed as it has traveled through countries and home kitchens, with different approaches to mushrooms, seasoning and dairy, as well as different choices of noodles, rice or potatoes underneath.

The goal here is narrower: tender quickly seared steak, deeply browned mushrooms and a tangy sour-cream sauce that works on an ordinary weeknight.

Beef Stroganoff Troubleshooting

If dinner is already in the skillet and something looks wrong, start with the symptom you can see or taste. Most problems come back to the beef, the mushrooms, the sauce consistency or too much heat after the sour cream goes in.
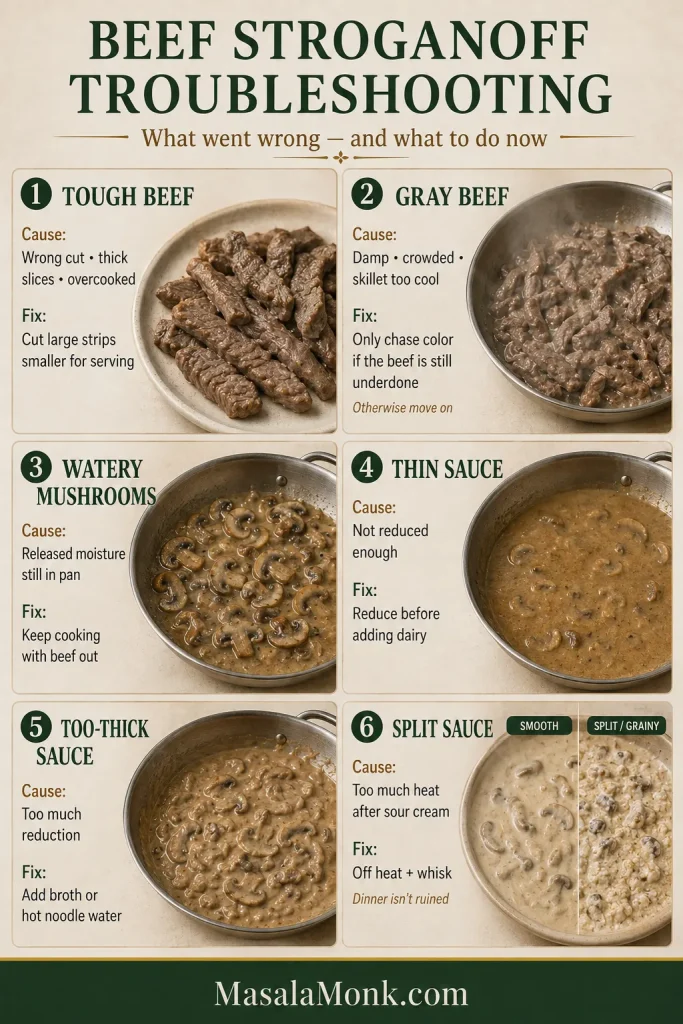
Six-part Beef Stroganoff troubleshooting guide covering tough beef, gray beef, watery mushrooms, thin sauce, overly thick sauce and split sauce with causes and corrective actions.
Protect tenderness and sauce texture first; fixing color or thickness is not worth creating a worse problem.

Beef and Mushroom Problems

ProblemLikely causeWhat to do nowNext time
Beef is toughWrong cut, thick slices or too much cookingCut large strips smaller to make them easier to eatUse sirloin or another tender steak, slice across the grain and keep the cooking brief
Beef is grayDamp meat, cool skillet or overcrowdingIf still underdone, remove excess liquid and briefly restore strong heat. If already cooked, move on—don’t sacrifice tenderness chasing colorDry the beef, work in batches and let the skillet recover between them
Mushrooms are wateryReleased moisture has not evaporated yetKeep the beef out and continue cooking until the liquid is gone and browning beginsFollow the pan rather than relying only on the timer

Sauce, Noodle and Leftover Problems

ProblemLikely causeWhat to do nowNext time
Sauce is thinToo much moisture or insufficient reductionReduce before adding dairy or beef; use a small slurry when reduction is not enoughLet mushroom moisture evaporate before building the sauce
Sauce is too thickToo much reduction or thickenerAdd broth or hot noodle water one tablespoon at a timeStop reducing while the sauce is slightly looser than the texture you want on the plate
Flour is lumpyThe broth went in too quicklyWhisk or stir vigorously before adding sour creamStart with a small splash of broth and smooth it out before adding more
Sauce is grainy or splitThe sour cream met excessive heatTake the skillet off the heat and whisk. It may not regain perfect gloss, but dinner isn’t ruinedTemper the sour cream and keep the final heat low
Sauce tastes flatUnderseasoning or weak browningCheck salt first, then adjust Dijon or Worcestershire in small amountsDevelop color on the beef and mushrooms and scrape the browned bits into the sauce
Sauce disappeared into noodlesThe noodles sat in the sauce and absorbed itLoosen the remaining sauce with some brothKeep the main skillet and noodles separate until serving
Leftovers are dryNoodles absorbed sauce during storageReheat with a splash of brothStore the noodles separately

My Sauce Is Thin, but the Sour Cream Is Already In

Once the sour cream is in, boiling the sauce down hard creates a second problem while you’re trying to fix the first.

Mix 1 teaspoon cornstarch with 1 tablespoon cold water. Stir about half into the Stroganoff over low heat and give it a moment to thicken. Add more only when the sauce needs it. Next time, do most of the reducing before adding the sour cream.
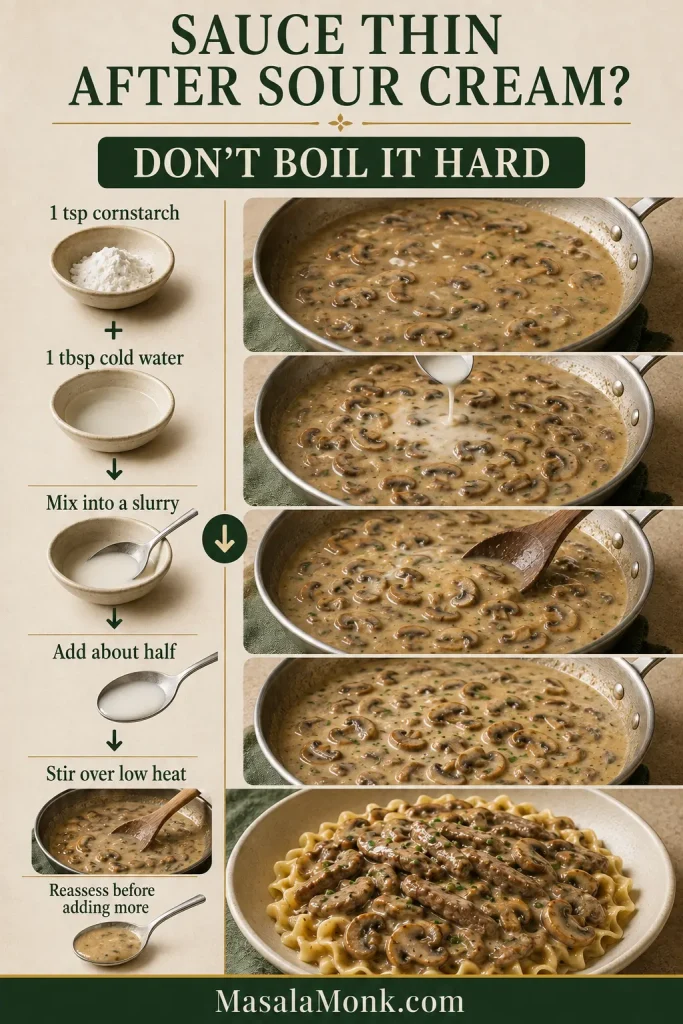
Step-by-step sauce rescue showing cornstarch mixed with cold water into a slurry and added gradually to thin Stroganoff sauce over low heat.
Add slurry gradually and pause before adding more—cornstarch needs heat and a moment to show its full effect.

Dinner back on track? Back to the recipe · Back to top

Make It Ahead, Store It and Reheat It

For the best leftovers, keep the noodles separate, reheat the sauce gently and treat freezing as a texture decision rather than an all-or-nothing rule. The details below cover each route.
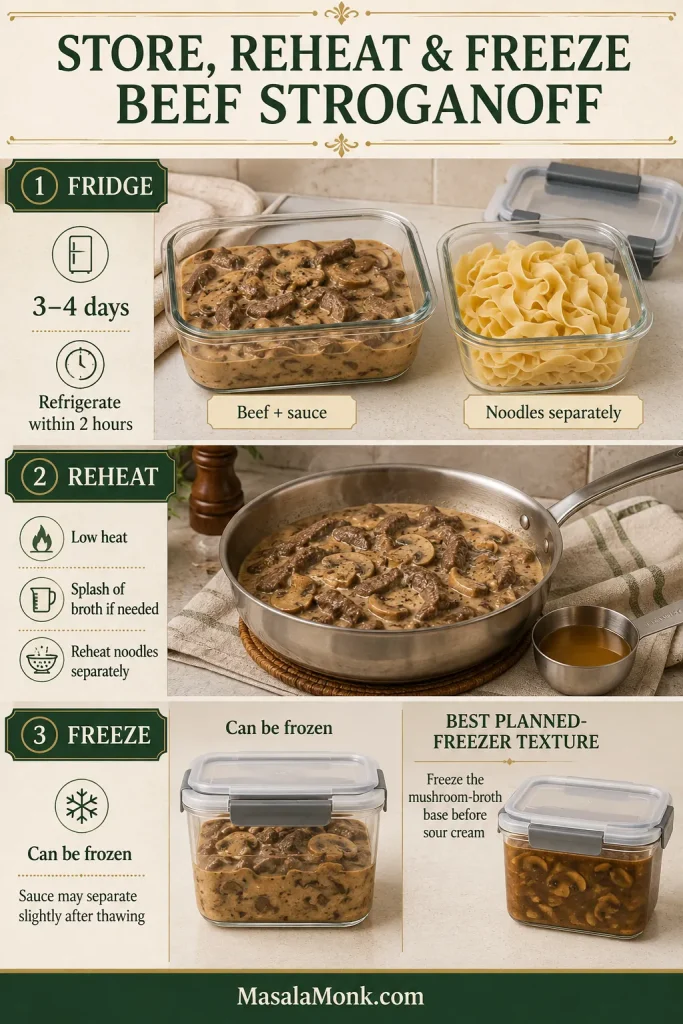
Storage guide showing Beef Stroganoff beef and sauce refrigerated separately from egg noodles, gentle skillet reheating with broth, and mushroom-broth sauce base frozen before sour cream.
Separate noodles give you control: loosen the sauce with broth without overcooking the pasta during reheating.

How Long Does Beef Stroganoff Keep?

Refrigerated Beef Stroganoff keeps for 3–4 days. Refrigerate leftovers within 2 hours of cooking. For reheating guidance, FoodSafety.gov recommends heating leftovers to 165°F (74°C).

Store the beef and sauce together and the noodles separately. That prevents tomorrow’s noodles from soaking up much of the sauce while everything sits in the refrigerator.

How to Reheat It Without Breaking the Sauce

Warm Stroganoff slowly, adding a splash of broth when the chilled sauce needs loosening. Stir often so the edges do not get much hotter than the center. Reheat the noodles separately.

Where to Stop If You’re Making It Ahead

Make the mushroom-broth sauce base ahead, but sear the steak fresh when you’re ready to eat. Stop once the sauce base reaches the consistency you want, before the sour cream goes in. Cool it promptly and refrigerate it. Keep the raw steak refrigerated separately.

At dinnertime, heat the skillet and sear the beef first. Transfer it to a plate, lower the heat and let the skillet settle for a moment, then add the prepared mushroom-broth base to the same pan. Warm it through, scraping in the fresh browned bits left by the steak. Temper and stir in the sour cream, then return the beef only long enough to finish cooking and heat through. Do not partially sear the beef, refrigerate it and plan to complete its cooking later.
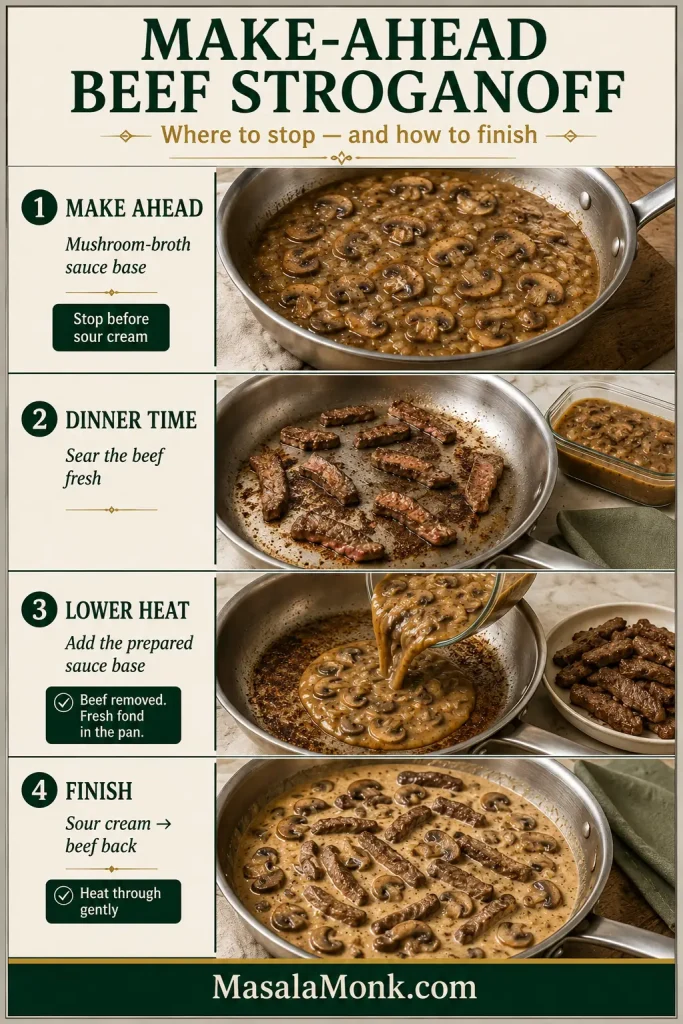
Four-step make-ahead guide showing mushroom-broth sauce prepared without dairy, fresh beef seared separately, sauce base reheated in the skillet, then sour cream added and beef returned.
The chilled sauce base will thicken; loosen it gently with broth before adding sour cream and freshly seared beef.

Can You Freeze Beef Stroganoff?

Yes. Fully cooked Beef Stroganoff can be frozen, although the sour-cream sauce may look slightly separated after thawing. Thaw and reheat it slowly, adding broth as needed to loosen the sauce.

If you’re cooking specifically for the freezer, the smoother option is to freeze the mushroom-broth sauce base before adding the sour cream. Reheat the base and add fresh sour cream when you make the meal.

The Fork Should Tell You It Worked

A 30-minute dinner does not have to taste hurried.

The beef gets its short blast of high heat. The mushrooms stay in the skillet long enough to develop real color. Those browned bits make their way into the sauce, and the sour cream softens everything without burying the beef and mushrooms underneath it.

Spoon it over the warm noodles while the sauce is glossy and flowing. Add the fresh chives last.

Then take the first forkful: a tender strip of beef, a browned mushroom, a few noodles and enough tangy sauce to bring all three together.
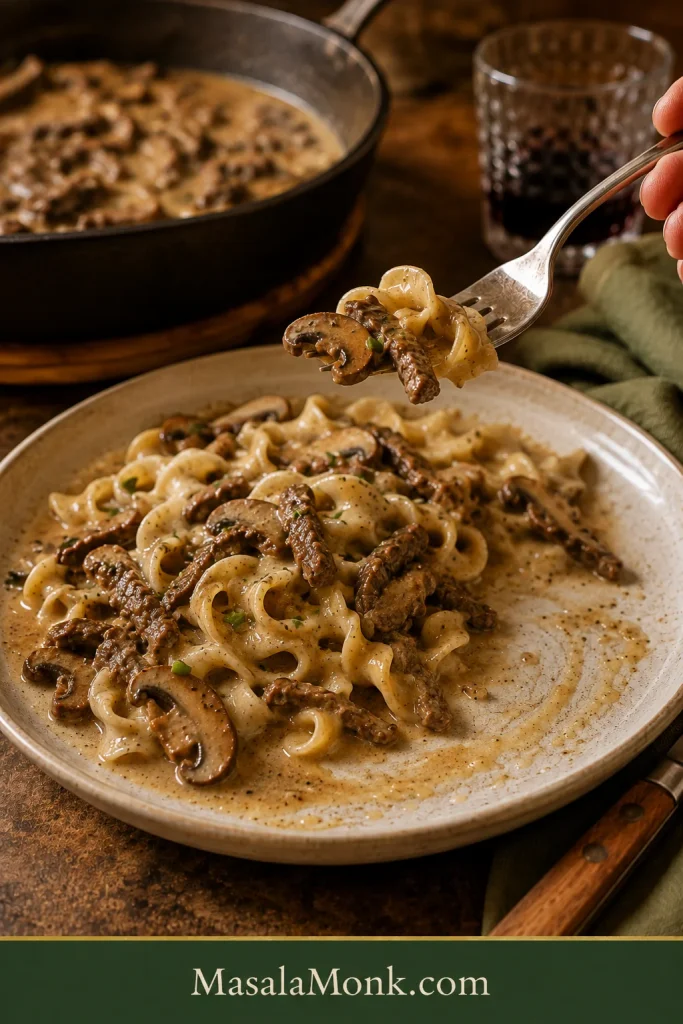
Partially eaten plate of Beef Stroganoff as a fork lifts a bite with one thin beef strip, a browned mushroom slice, a fold of wide egg noodle and glossy tan sauce.
Posted on Leave a comment

Chicago Italian Beef Recipe: Juicy, Thinly Sliced & Dipped

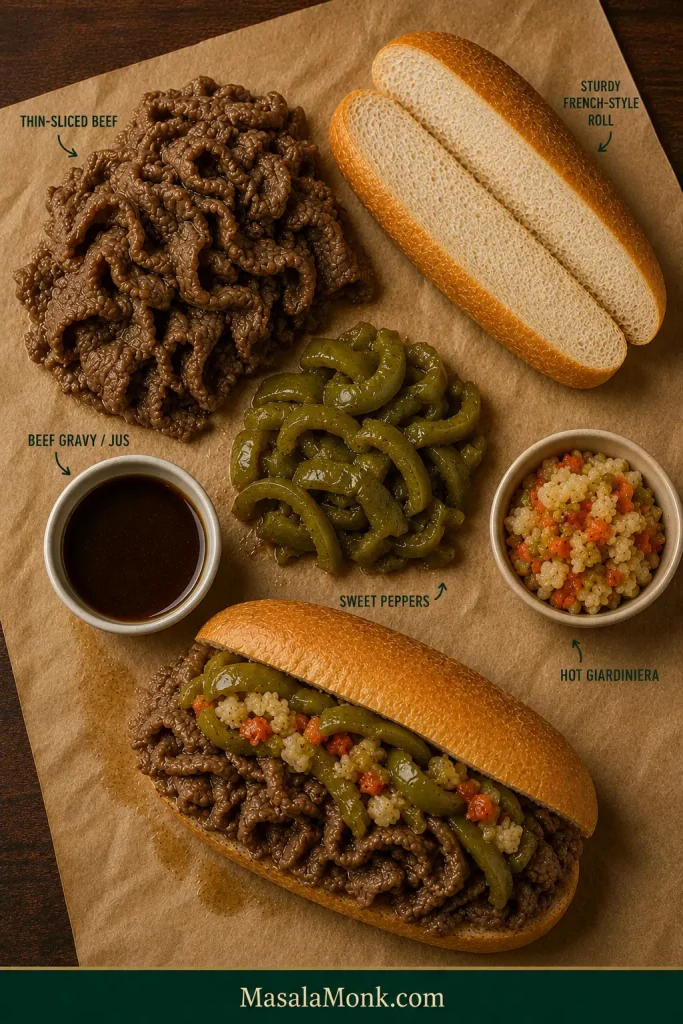
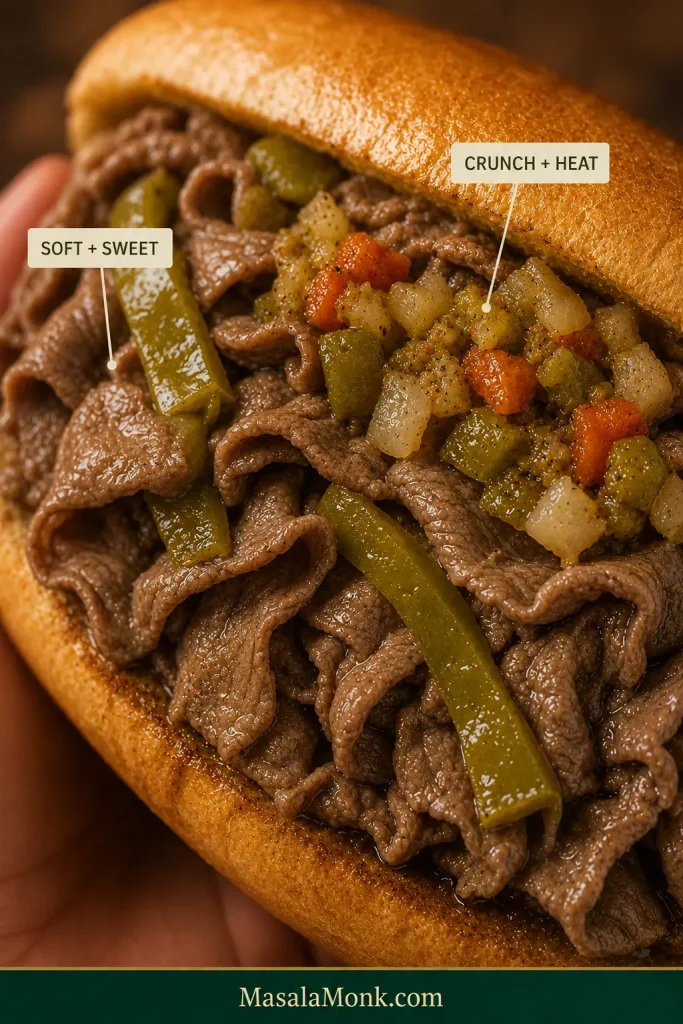
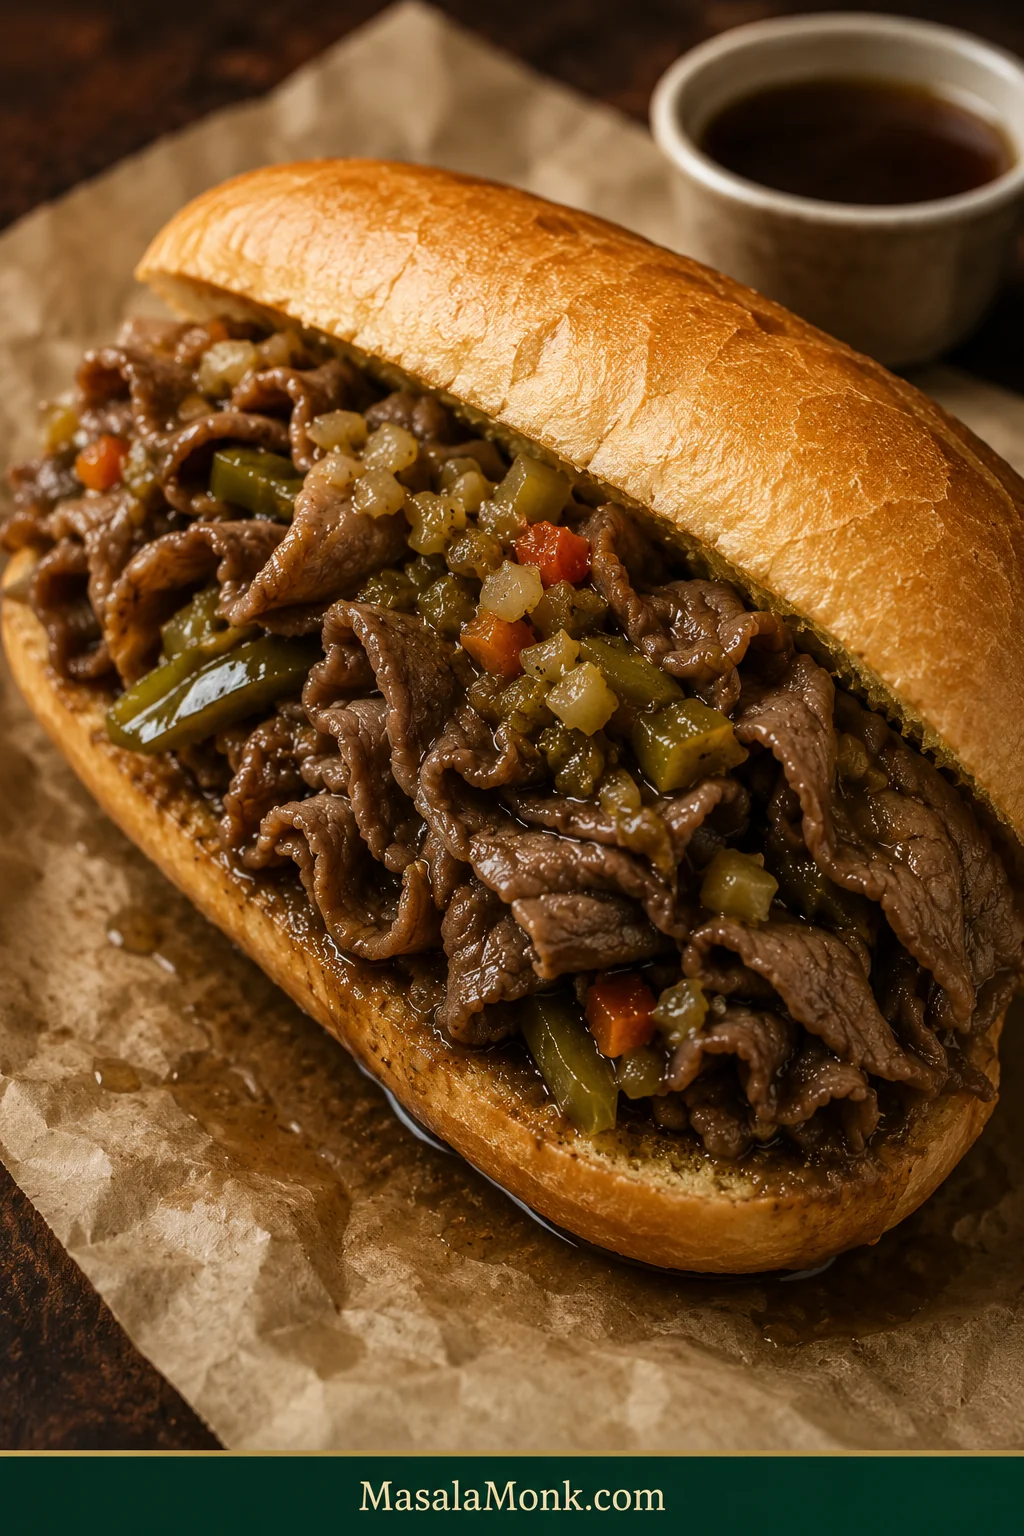
Chicago Italian beef sandwich filled with thin folded brown beef, soft green sweet peppers and chopped giardiniera in a gravy-darkened French roll.

A good Chicago Italian beef sandwich looks a little out of control before you ever take a bite. The beef sits in loose, thin folds rather than neat carved slabs. Hot, seasoned gravy has worked into the meat and the edges of the roll. Sweet peppers slump into the filling, giardiniera cuts through with crunch and heat, and if you chose yours dipped, the bread is carrying far more liquid than bread normally should.

What separates the memorable versions from ordinary roast beef on a roll is not one secret spice. Thick slices can feel chewy even when the roast itself was cooked well. Weak jus leaves everything flat. Too much reduction turns it salty. Shredded chuck can be delicious but eats like a different sandwich. And a roll that cannot handle gravy may collapse before you reach the second half.

Here, a relatively lean round roast stays sliceable, chills until firm, gets shaved very thin, then returns briefly to a deeply seasoned beef jus. Add soft sweet peppers, hot Chicago-style giardiniera, or both, and decide for yourself how far the gravy goes.

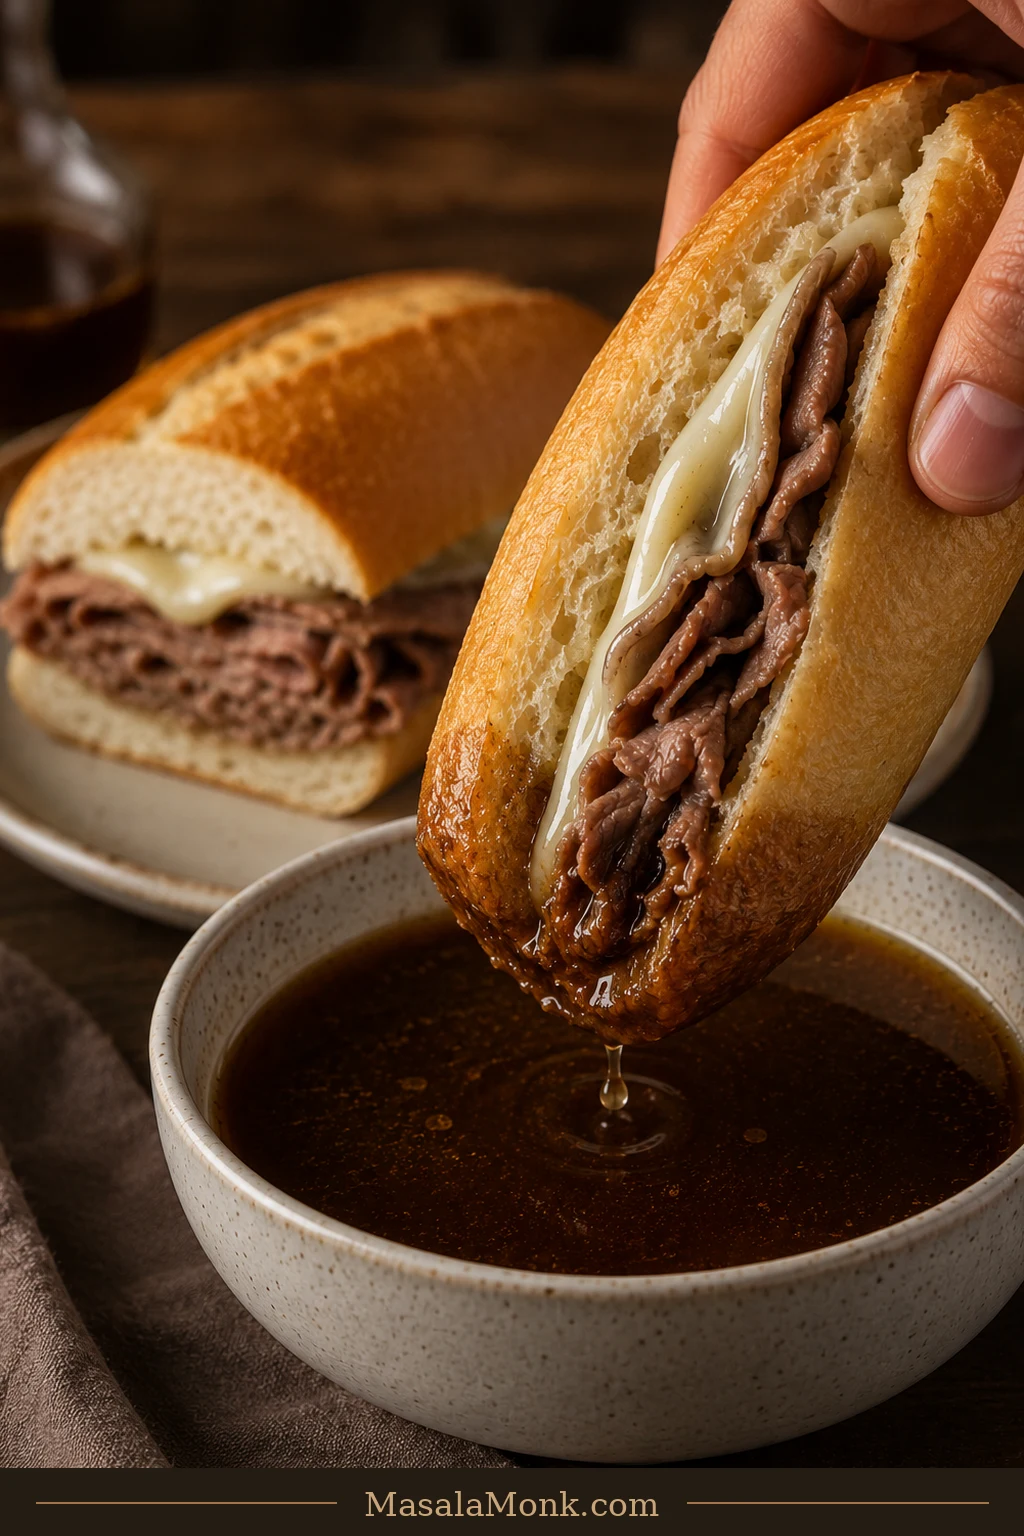
Chicago Italian beef is a Chicago-born sandwich of thinly sliced seasoned beef piled onto a French-style roll with beef gravy or jus, then often finished with sweet peppers, hot giardiniera, or both. The bread can stay relatively dry, take extra gravy, or be dipped right into the jus.

Why Chicago Italian Beef Is Built This Way

The exact origin of Italian beef is debated, but the sandwich grew out of Chicago’s Italian-American communities in the early 20th century. A commonly told history links its very thin beef and abundant gravy to feeding large wedding crowds economically: stretch the roast, put its juices back to work, and serve it on bread sturdy enough to catch them. However it began, that practical, crowd-friendly logic helped make Italian beef one of the city’s defining sandwiches.

Overhead anatomy of an Italian beef sandwich showing the roll, folded beef, sweet peppers, giardiniera and beef jus as separate parts of the build.
The sandwich works as liquid management: sturdy roll, thin beef, seasoned jus and peppers all control how the bite holds together.
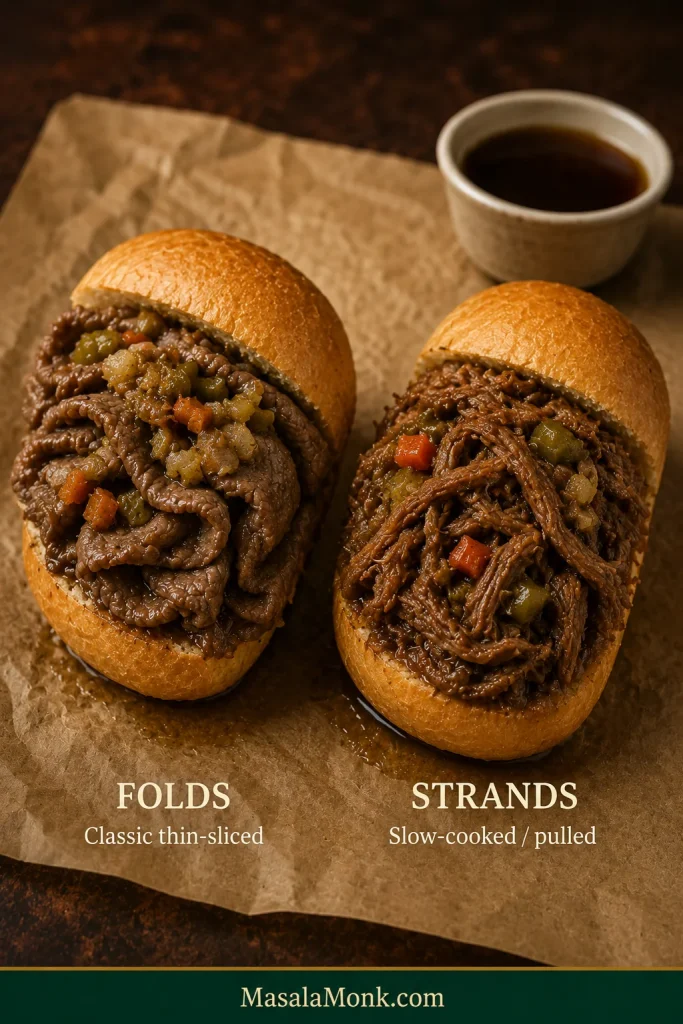
Which Italian Beef Are You Making?

Decide first whether you want folds or strands. Slow-cooker Italian beef gives you soft pulled meat; if the sandwich in your head has thin folds, use the roast → chill → shave route below.

Side-by-side comparison of an Italian beef sandwich made with thin folded beef and one made with pulled beef strands.
Thin folds give cleaner bites and more jus control; pulled strands belong to the softer, slow-cooked route.

On a phone? Swipe sideways to see the full table.

What you wantBest routeResult
Classic thin Chicago-style beefRoast → chill → shave → warm in jusLoose, flexible slices with the most control over texture
Italian beef tonightThin cooked roast beef + quick homemade jusA practical same-day sandwich without waiting overnight
Hands-off fall-apart beefSlow cookerTender pulled or shredded beef instead of shaved slices

The full recipe below is the first route. A four-sandwich same-day shortcut appears later for the night when waiting for a roast to chill is simply not happening.


Chicago Italian Beef Recipe

Two days sounds excessive for a sandwich until you realize most of that time is the refrigerator doing something useful. Day 1 cooks the beef and builds the jus. The overnight chill makes genuinely thin home slicing much easier. Day 2 is mostly slicing, warming and assembling.

Yield
8 generous sandwiches. The 4 lb / 1.8 kg starting roast allows for cooking loss, trimming and portion flexibility; smaller sandwiches may stretch the batch further.

Active time
About 1 hour, plus extra time if slicing entirely by hand

Plan ahead
Best over 2 days; optional 4–12-hour seasoning rest before roasting

Oven
325°F / 165°C

Roast endpoint
145°F / 63°C

Slice
About 1–2 mm to start

Timing note
Begin checking around the one-hour mark; thickness and internal temperature decide when the roast is done.

Equipment

  • Roasting pan around 9 × 13 inches / 23 × 33 cm
  • Rack that fits over or inside the roasting pan
  • Instant-read or leave-in meat thermometer
  • Fine-mesh strainer
  • Large saucepan or Dutch oven for the jus
  • Long sharp slicing or carving knife
  • Meat slicer, optional but very helpful
  • Tongs and ladle

Ingredients

Beef

  • 4 lb / 1.8 kg top round or bottom round, preferably 2 similarly sized roasts
  • 14 g kosher salt, preferably weighed
  • 2 teaspoons dried oregano
  • 2 teaspoons garlic powder
  • 1 teaspoon onion powder
  • 1 teaspoon freshly ground black pepper
  • 1 teaspoon dried basil
  • 1 teaspoon fennel seeds, lightly crushed
  • ½ teaspoon red pepper flakes, optional
  • 2 tablespoons / 30 ml olive oil

Jus

  • 6 cups / 1.4 L low-sodium beef stock
  • 1 medium yellow onion, about 7 oz / 200 g, quartered
  • 6 garlic cloves, about 18 g, smashed
  • 1 teaspoon dried oregano
  • 1 teaspoon freshly ground black pepper
  • ½ teaspoon dried basil
  • ½ teaspoon fennel seeds, lightly crushed
  • ¼ teaspoon red pepper flakes, optional
  • 2 bay leaves
  • 2 teaspoons / 10 ml Worcestershire sauce, optional, added after tasting the finished jus
  • Up to 2 cups / 475 ml unsalted or low-sodium beef stock, reserved for adjusting the jus

Sweet Peppers

  • 3 large green bell peppers, about 1 lb / 450 g
  • 1 tablespoon / 15 ml olive oil
  • ¼ teaspoon / about 1 g kosher salt

Assembly

  • 8 soft, sturdy French or Italian-style rolls, about 6 inches / 15 cm each
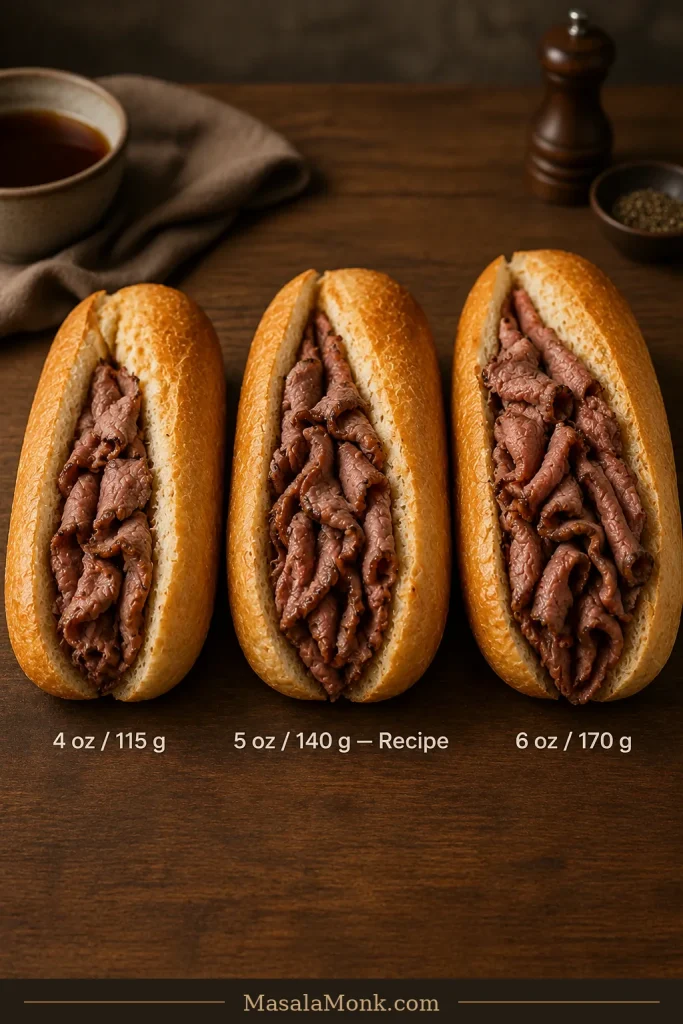
  • 4–5 oz / 115–140 g cooked beef from the roast per sandwich
  • 1–1½ oz / 30–40 g cooked sweet peppers per sandwich, if using
  • 4–6 oz / 120–160 g Chicago-style giardiniera solids total, about ½–¾ oz / 15–20 g per sandwich
  • Hot beef jus, for warming, spooning and dipping

About the salt: weighing the 14 g is more reliable than a single spoon conversion because kosher salts differ substantially in density. The beef itself does not need to taste aggressively salty; those thin slices will later pick up seasoning from the jus.

Instructions

Day 1 — 1. Season the Beef

Pat the beef dry. Mix the salt with the oregano, garlic powder, onion powder, black pepper, basil, fennel and red pepper flakes. Rub the meat with olive oil, then coat it evenly with the seasoning.

Have extra time? Refrigerate the seasoned beef uncovered for 4–12 hours. Starting later is fine; the chill after roasting matters much more to the final slice.

2. Build the Jus in the Roasting Pan

Heat the oven to 325°F / 165°C.

Pour the 6 cups / 1.4 L stock into a roughly 9 × 13-inch / 23 × 33-cm roasting pan. Add the onion, garlic, oregano, black pepper, basil, fennel, red pepper flakes and bay leaves.

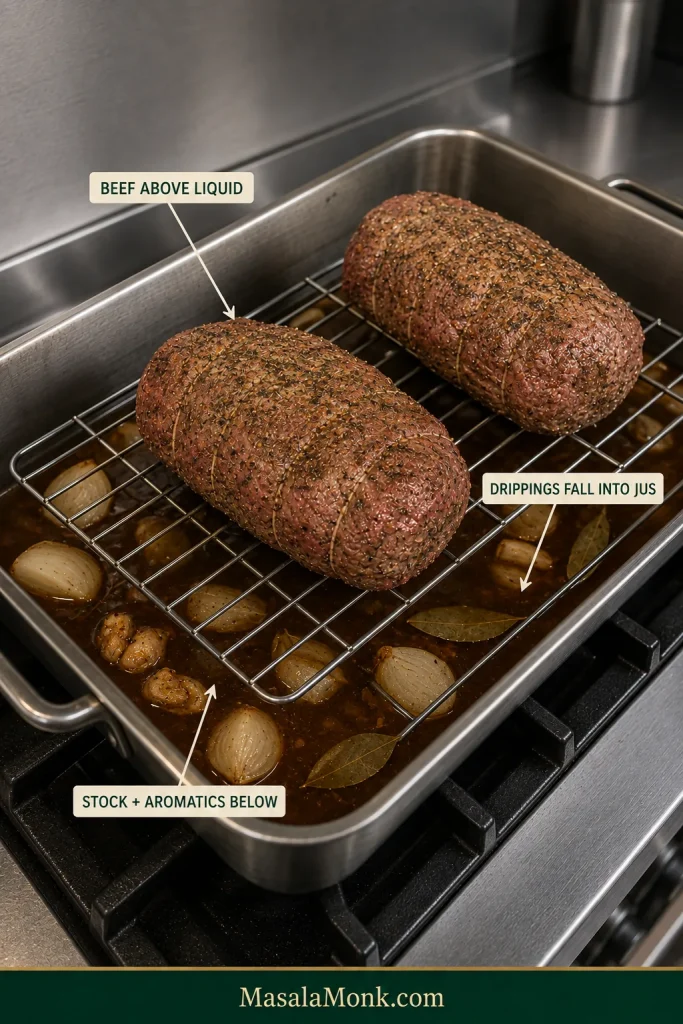
Set the rack over the liquid and arrange the beef on top. Keep the meat above the stock so its drippings fall into the seasoned liquid while the outside still roasts.

Two beef roasts resting on a rack above seasoned stock, onions, garlic and aromatics in a roasting pan.
The rack does more than hold the beef up. It keeps the roast exposed to oven heat while the liquid underneath catches drippings—so you build Italian beef jus without turning the roast into a braise.

3. Roast to 145°F / 63°C

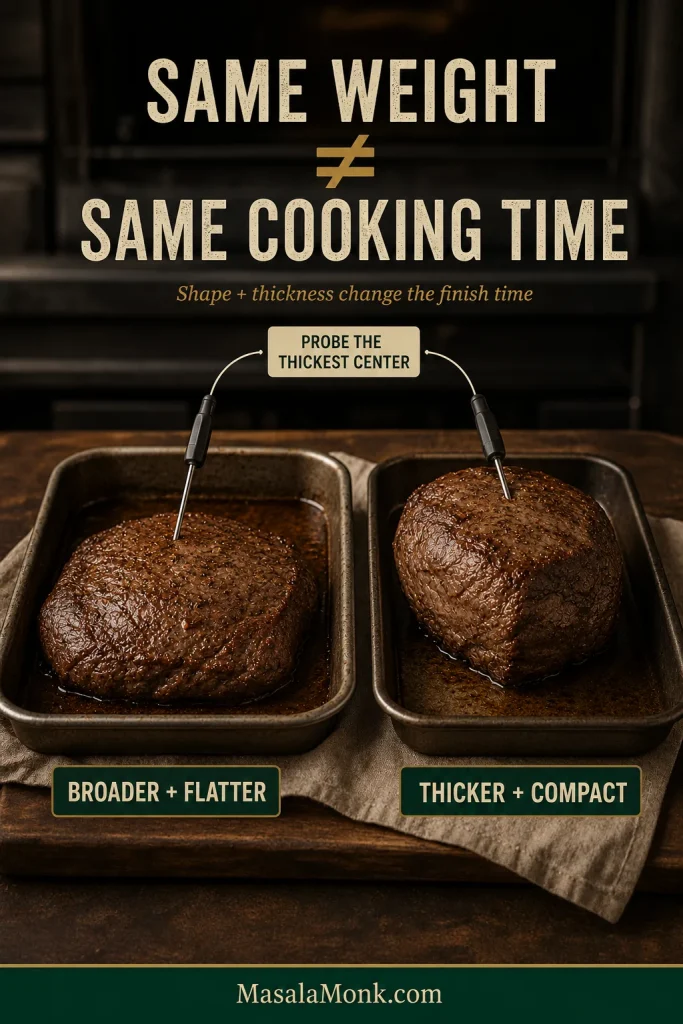
Roast until the thickest center of each piece reaches 145°F / 63°C. With two roughly 2 lb / 900 g roasts, begin checking around the one-hour mark. Remove each piece as it reaches temperature; one may finish well before the other.

A broad, flatter roast can finish sooner than a compact thick one of the same weight. The clock tells you when to check; the thermometer tells you when to stop.

4. Rest, Portion and Chill

Rest the beef for at least 15 minutes. That comfortably exceeds the USDA minimum three-minute rest for a whole beef roast cooked to 145°F / 63°C.

Look at the grain, then divide the roast into a few slicer-friendly pieces if needed. Keep each piece oriented so tomorrow’s cuts can still run across the grain.

Arrange the pieces on a shallow tray and refrigerate promptly; don’t leave the roast sitting out to cool. Get it into the refrigerator no later than 2 hours after cooking. Cover tightly once chilled through.

The roast may look less exciting cold than it did coming out of the oven. That’s fine. Tomorrow, that firmness becomes folds.

5. Strain and Chill the Jus

Strain the roasting liquid into a shallow heat-safe container, pressing gently on the onion and garlic before discarding the solids. Refrigerate promptly.

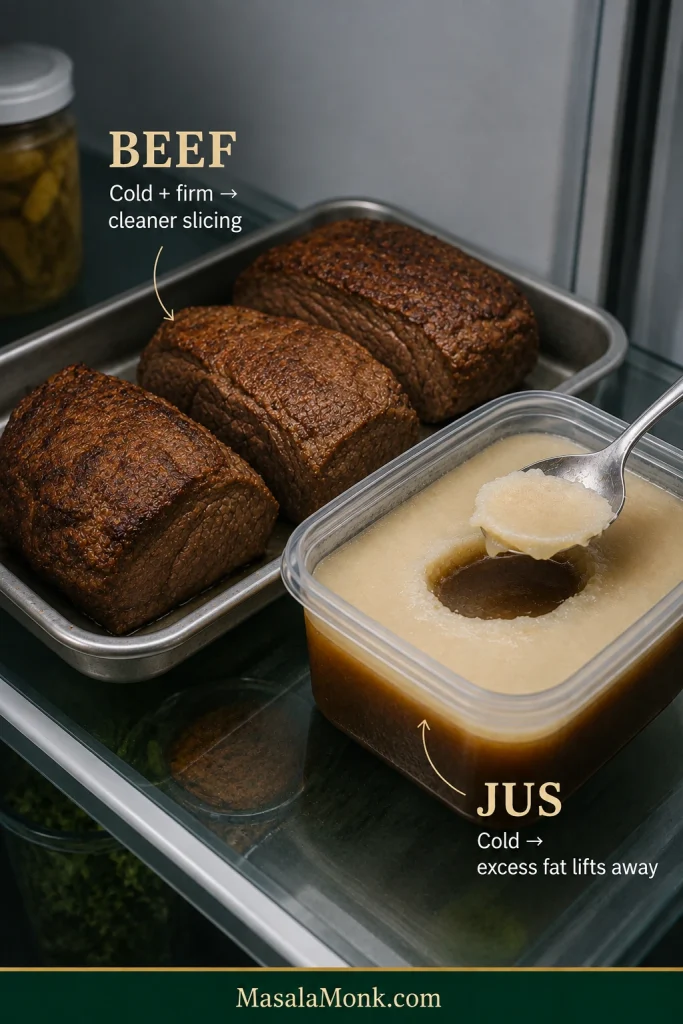
Once cold, excess fat firms on the surface and becomes easy to remove. Leave a little behind for flavor and body.

Chilled cooked beef beside cold beef jus with a firm fat layer on top, showing the two results of overnight refrigeration.
The refrigerator is doing two different jobs here: firming the roast for cleaner slicing and making excess fat easy to lift from the jus. Treat both as prep for better control tomorrow.

Day 2 — 6. Roast the Sweet Peppers

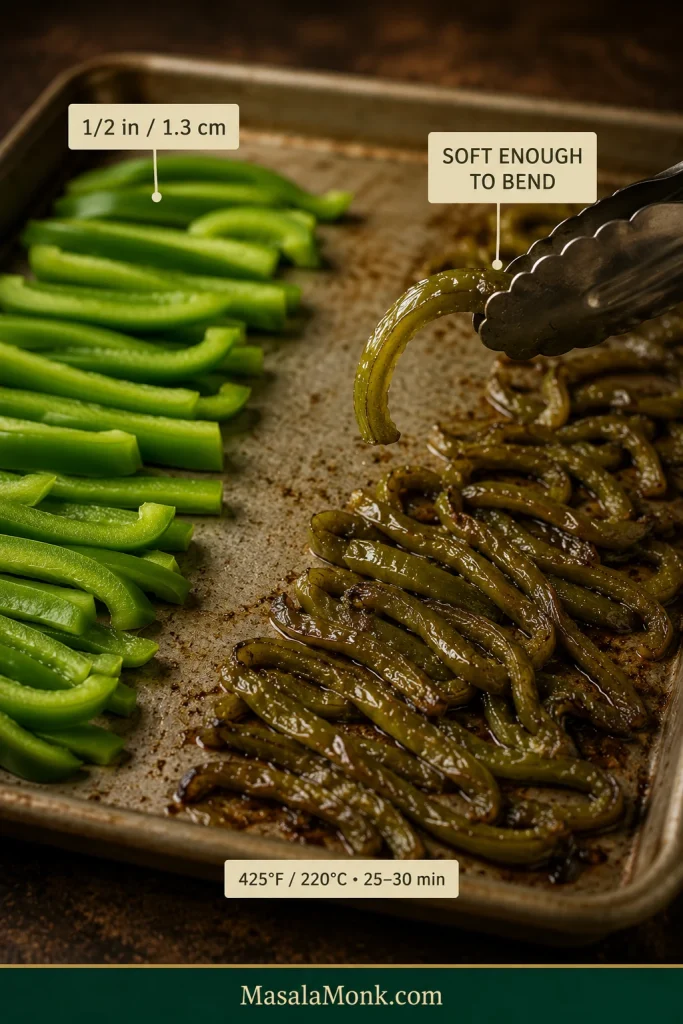
Heat the oven to 425°F / 220°C. Cut the peppers into strips about ½ inch / 1.3 cm wide, toss with the oil and salt, then roast for 25–30 minutes, stirring once.

Lift a strip. It should bend easily, with a soft collapsed texture that settles into the beef instead of crunching through the bite.

Green bell pepper strips shown raw and after roasting, with the cooked peppers soft, collapsed and flexible.
Broad bell-pepper pieces are easier to identify after roasting and less likely to disappear into stringy strips. Cook them until they fold with the beef instead of announcing themselves with a crunch.

7. Reheat and Finish the Jus

Lift away excessive hardened fat, leaving a little behind. Pour the jus into a wide saucepan or Dutch oven and bring it to a full rolling boil.

For eight sandwiches, about 5 cups / 1.2 L is usually enough for a mostly dry-or-wet table. Aim closer to 6 cups / 1.4 L when several sandwiches are likely to be dipped.

Reduce thin-tasting jus before the beef goes anywhere near it. A concentrated or salty batch needs some of the reserved unsalted or low-sodium stock instead. Taste again before adding Worcestershire or more salt.

Taste the jus on the actual bread: tear off a corner of the roll and dip it into the jus. The crumb should darken quickly and taste beefy, garlicky and peppery without tasting aggressively salty once the bread has absorbed it.

Hand dipping a torn piece of French roll into a bowl of dark brown Italian beef jus as the crumb absorbs the liquid.
Use the roll to decide what happens next: bland once soaked means the jus can concentrate further; salty once soaked means dilute before the beef goes in.

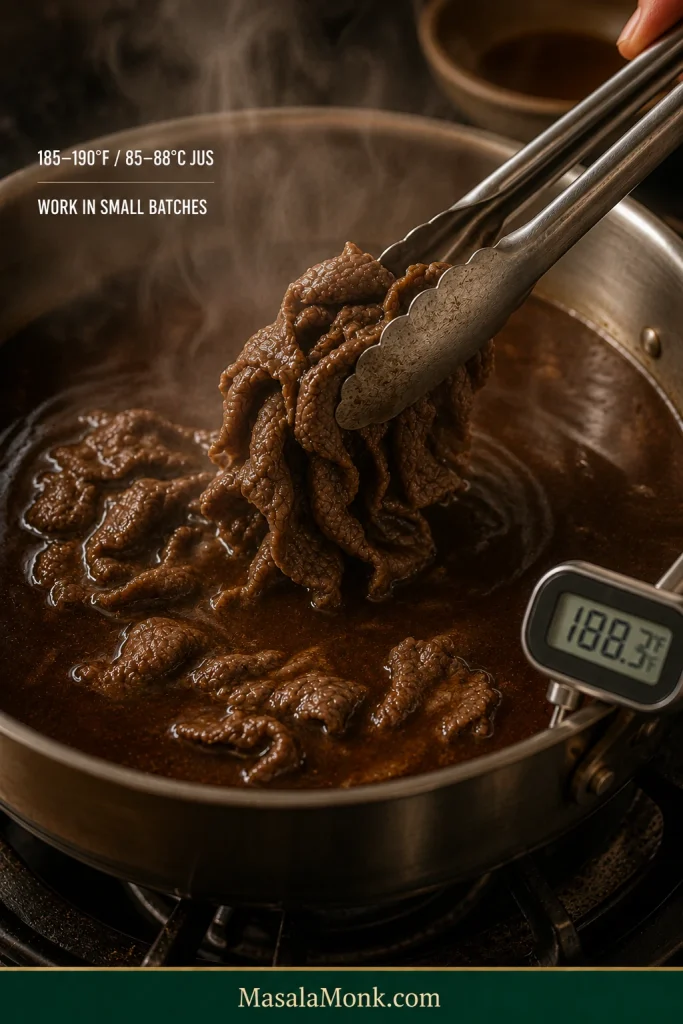
When that soaked piece of bread already tastes like the sandwich you want, lower the jus to roughly 185–190°F / 85–88°C.

8. Find the Right Slice

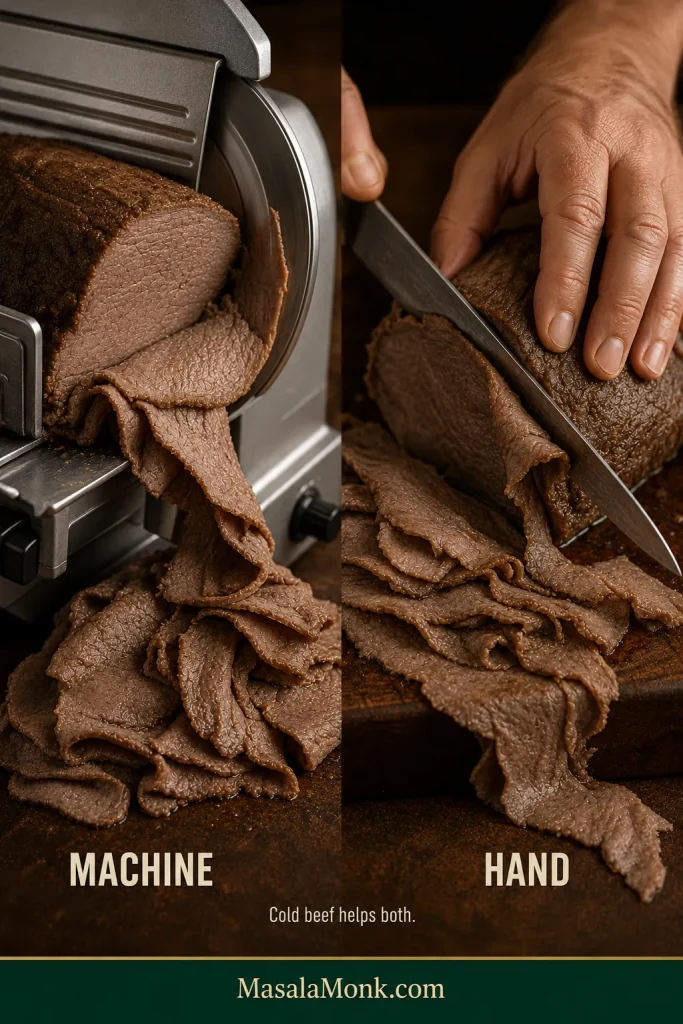
Working with one thoroughly cold piece, slice across the grain. With a meat slicer, begin around 1–2 mm. With a knife, aim for the thinnest clean, intact slices you can comfortably manage.

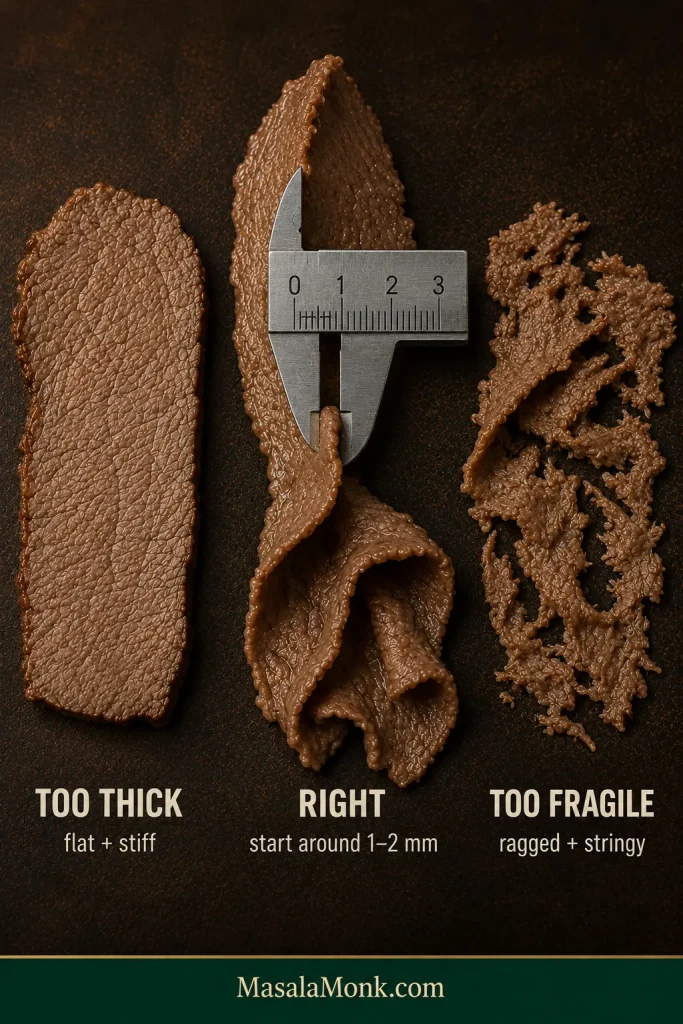
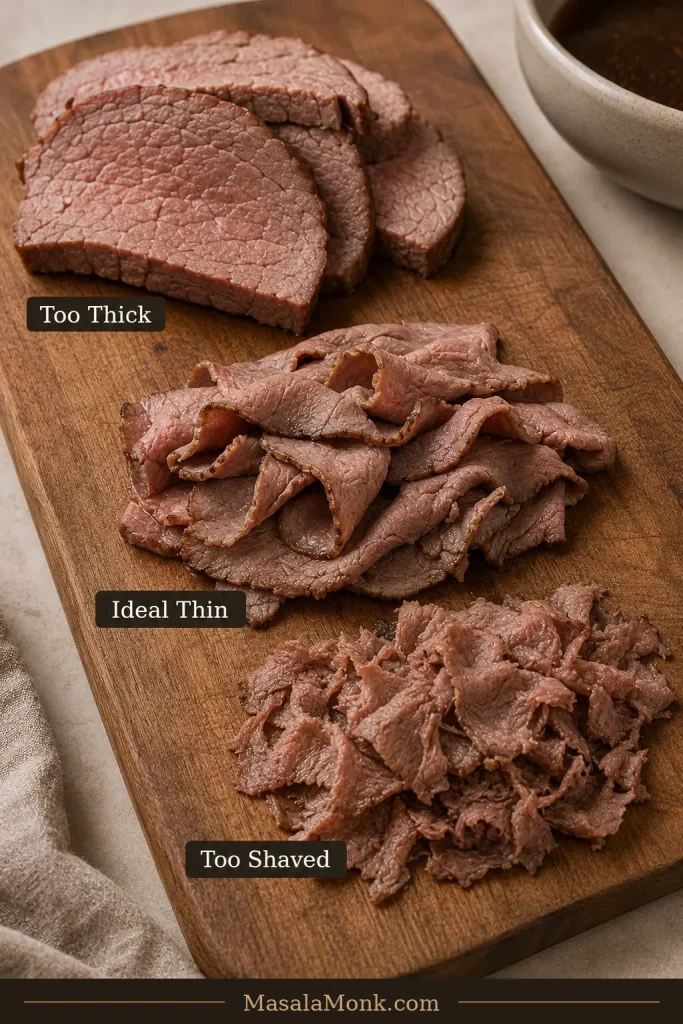
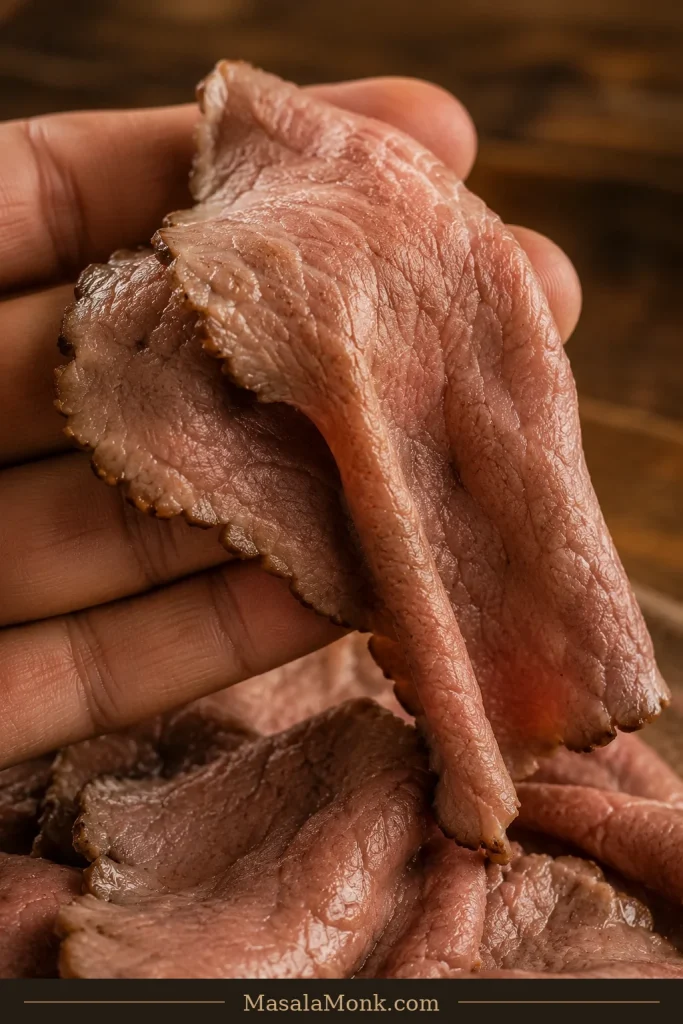
Cut three or four slices before committing the whole roast. Lift one. A good slice droops over your fingers, wrinkles and folds. A rigid, flat slice wants a thinner setting; ragged scraps mean you’ve gone a little too far.

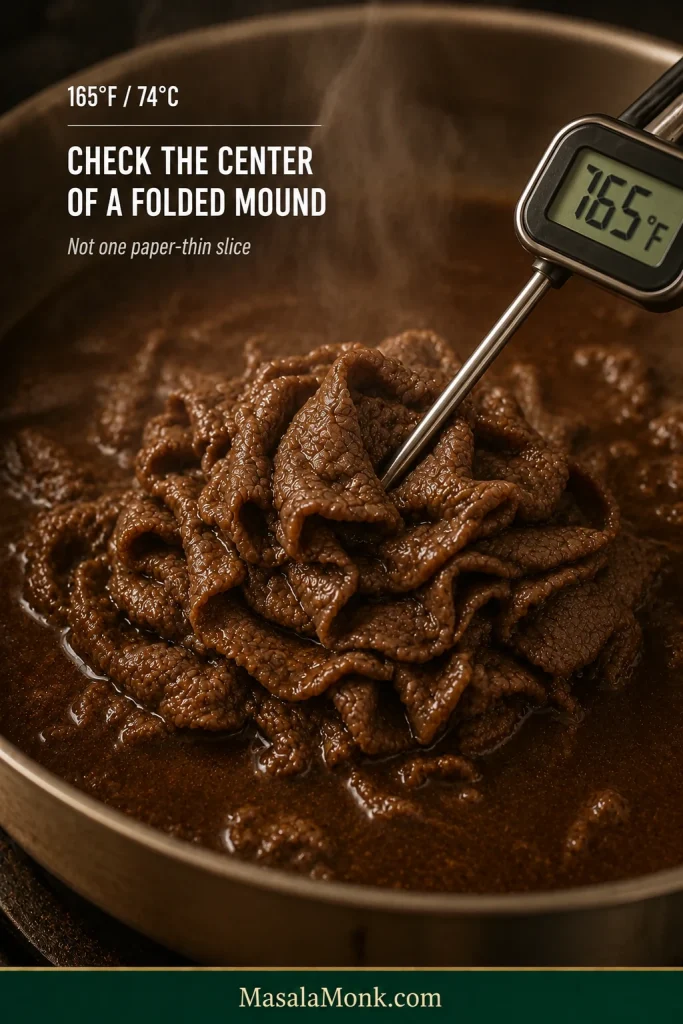
Warm a small folded handful in the jus until steaming hot throughout. To verify reheating temperature, gather the slices into a small mound and check the center for 165°F / 74°C rather than trying to probe a single paper-thin slice.

Three cooked beef slices labeled too thick, right and too fragile, with the correct thin slice hanging in soft folds.
Judge the final thickness after warming a sample, not only while the beef is refrigerator-cold. The right slice should stay intact yet bite through without dragging half the filling from the roll.

Take a bite. A long strip that pulls away from the sandwich needs thinner slicing. Beef that falls apart before the tongs can lift it cleanly can go slightly thicker. Once the bite feels right, slice the rest.

A meat slicer makes the job easier; it is not the price of admission. Hand-cut slices that fold and bite cleanly are doing their job.

9. Warm the Beef in Small Batches

Add enough cold sliced beef for one or two sandwiches to the jus at roughly 185–190°F / 85–88°C. Loosen the slices gently with tongs and reheat each batch until steaming throughout and 165°F / 74°C at the center.

Thin cooked beef slices being loosened with tongs in a steaming pot of dark Italian beef jus.
Watch the pot when cold beef enters. If the jus loses most of its steam and takes a long time to recover, the batch is too large; smaller portions keep the folds tender and service moving.

Very thin beef may be ready in roughly 1–2 minutes, but use that only as orientation. Batch size, slice thickness, beef temperature and the amount of jus all change the timing.

The cold slices should relax, darken with gravy and hang softly from the tongs. Lift them out once they’re hot and supple.

10. Build the First Sandwich, Then Adjust

Open one roll without cutting through the hinge. Add 4–5 oz / 115–140 g hot beef in loose folds, plus 1–1½ oz / 30–40 g sweet peppers and ½–¾ oz / 15–20 g giardiniera solids if using.

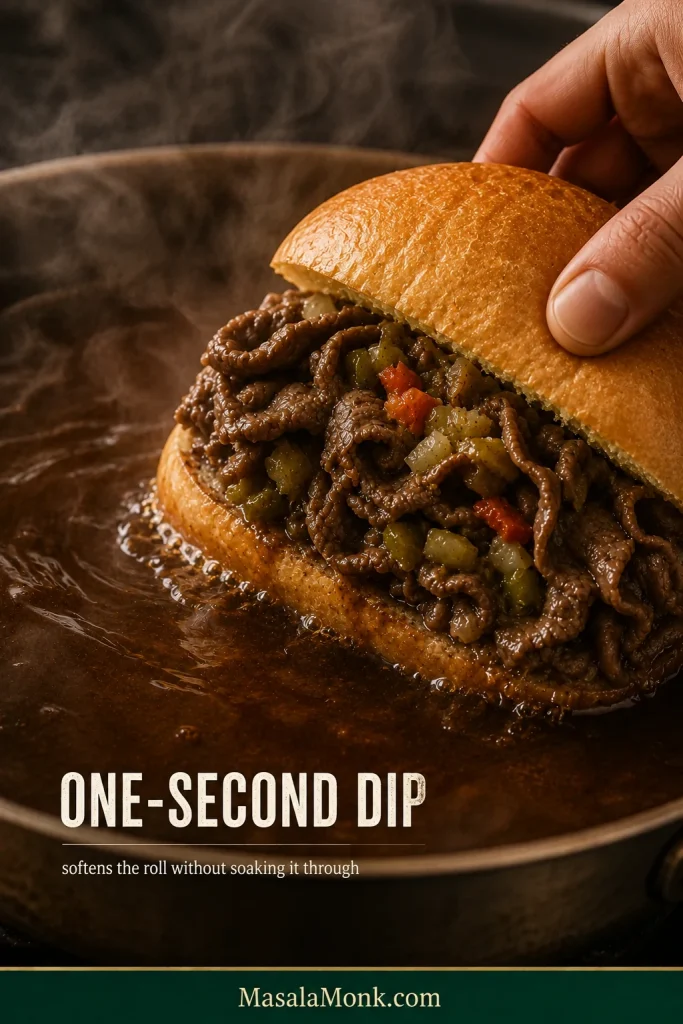
Start the first sandwich wet or give it an easy one-second dip, then take a bite.

Fully assembled Italian beef sandwich being briefly lowered into a pan of dark beef jus.
Think of the one-second dip as the middle ground: enough exterior contact to soften and season the roll, but brief enough that the hinge still has work left to do.

A dark, tender crumb with a secure hinge tells you the roll can probably take more gravy. Bread already close to collapse has shown you its limit. Build the rest to order.

Eat a fully dipped sandwich now. Good bread can survive gravy. It cannot turn today’s dunk into tomorrow’s packed lunch.

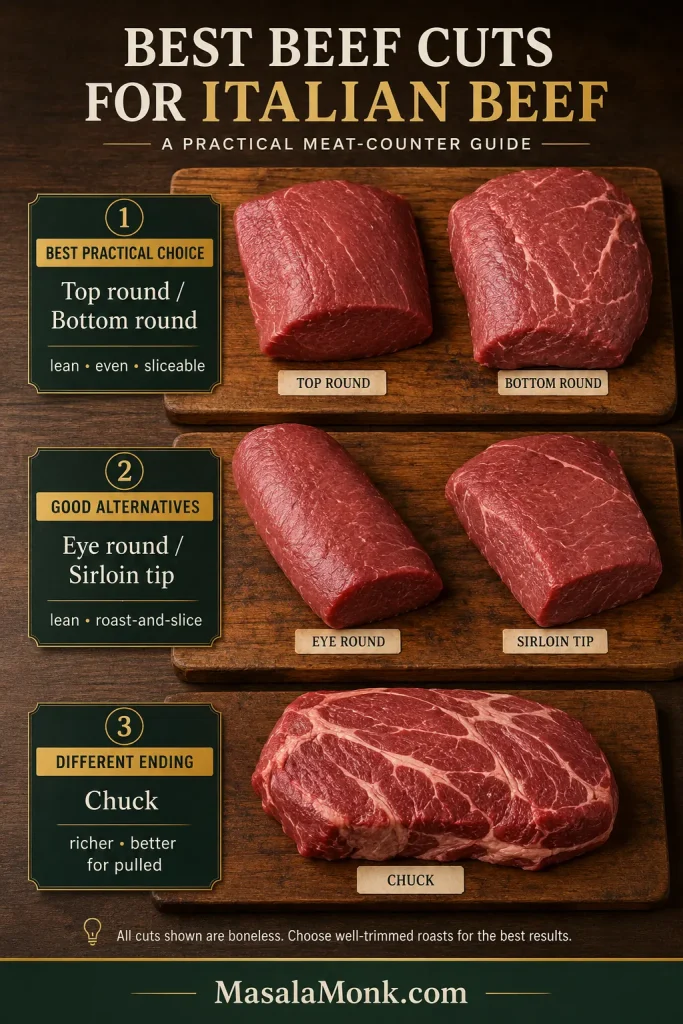
Choosing the Best Beef Cut for Italian Beef

Top round and bottom round are the easiest practical choices for thinly sliced Chicago Italian beef at home. Sirloin also works well. Chuck makes more sense when the plan is long cooking and pulled beef.

On a phone? Swipe sideways to see the full table.

CutThin slicedSlow-cooked / pulledMain tradeoff
Top roundExcellentFairLean, even-grained and easy to shave once cold
Bottom roundExcellentGoodBeefy and usually economical; thin slicing matters
Eye of roundVery goodPoorVery lean and less forgiving of thick slices
Sirloin / sirloin tipExcellentFairOften naturally tender, usually more expensive
ChuckPoorer fitExcellentRich and collagen-heavy; naturally suits fall-apart cooking

Top round and bottom round can both work beautifully. At the store, look almost as closely at shape as the label: a fairly even roast with a clear grain direction cooks and slices more predictably than one with a thick center and sharply tapered tail.

Butcher-style comparison of several beef cuts for Italian beef, including round roasts, sirloin and chuck.
Choose an evenly shaped roast with a clear grain direction; shape and grain matter almost as much as the cut name.

You have not bought bad beef if chuck is already in your refrigerator; you have bought beef that wants a different ending. Its extra collagen and fat reward long cooking and naturally pull it toward shredding. If that sounds good, our slow cooker pot roast recipe is built around the same strengths.

How Long to Roast Italian Beef: Temperature, Shape and Timing

Roast weight gives you a place to start planning; thickness decides how quickly heat reaches the center. Two roasts with the same weight can finish surprisingly far apart when one is broad and flat and the other compact.

With two roughly 2 lb / 900 g roasts, begin checking around the one-hour mark. A single thick 4 lb / 1.8 kg roast will generally need longer, but the thermometer—not a predicted finish time—decides when each piece comes out.

One roast finishing well before the other does not mean anything has gone wrong. Take it out and let the thicker one catch up.

Two equal-weight beef roasts with different shapes and thermometer probes placed in their thickest centers.
A tapered roast may effectively have two cooking zones: the thin end heats faster while the thick center is still catching up. Probe where the meat is deepest, and let each roast finish on its own schedule.

Why Italian Beef Recipes Use Such Different Temperatures

Italian beef recipes can look wildly contradictory because they are not all chasing the same texture. Some keep the roast closer to conventional roast-beef doneness before chilling and shaving it. Others cook round much further toward tenderness before cooling and slicing, while slow-cooker versions deliberately head toward meat that pulls apart.

We’re roasting this beef so it can be sliced later, not cooking it until it wants to fall apart. In this recipe, the roast reaches 145°F / 63°C, chills thoroughly, gets shaved very thin and then comes back to temperature briefly in the jus. A higher-temperature, long-cooked version follows another route and produces a different texture.

How Thin to Slice Italian Beef — and What “Thin” Looks Like

Chill the Roast First

Warm roast beef compresses; cold roast beef slices. Press the center gently before you start. It should feel thoroughly cold and firm rather than soft and springy.

A short freezer chill can firm a stubbornly soft roast further. Stop while the center is still easy to slice—you want firmer beef, not a frozen block.

Start around 1–2 mm. Lift a slice and look at what it does.

Too thick: it lies flat and stiff like carved roast beef and can pull from the sandwich in one long strip.

Right: it droops, wrinkles and folds over your fingers. Several slices can pile together without becoming one heavy slab.

Too fragile: it breaks into stringy scraps before a clean slice reaches the tray. Move slightly thicker.

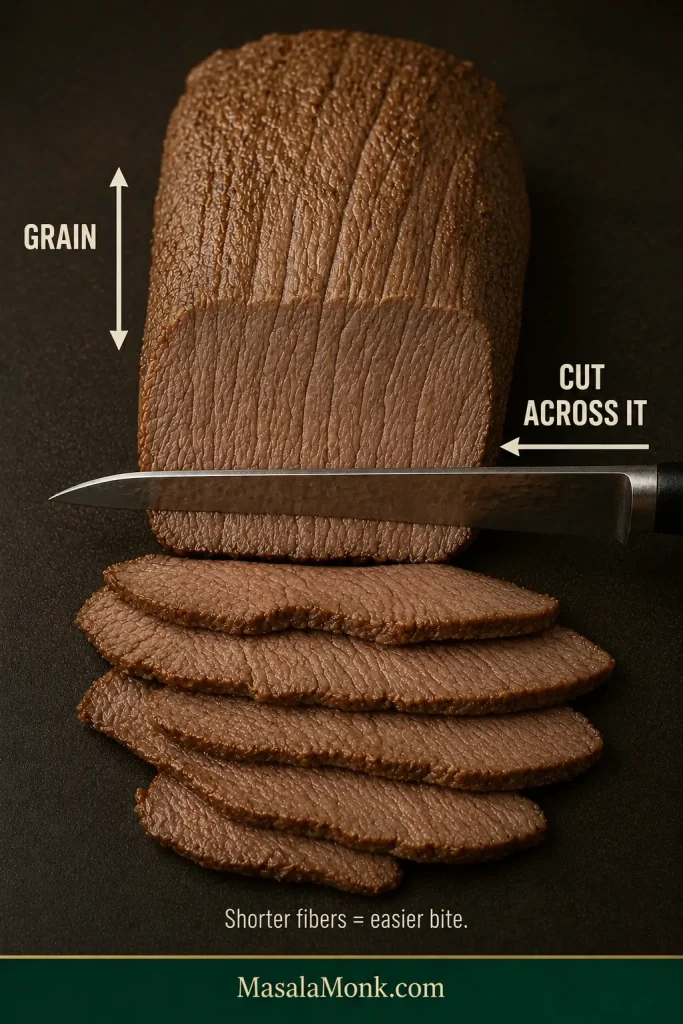
Cut Across the Grain

Look at the visible muscle fibers before you settle into a slicing rhythm. Cut across them rather than along them so the finished slices bite through more easily.

Cooked beef with visible muscle grain and a knife positioned to cut across the fibers.
If the grain changes direction, turn or divide the roast before slicing so every cut still runs across the fibers.

No Meat Slicer?

Yes, you can make Italian beef without a meat slicer. Chill the roast completely, use a long sharp knife and cut as thinly as you comfortably can. Slightly thicker intact slices are better than shredded scraps.

Split view of chilled Italian beef being sliced with a meat slicer and by hand with a long sharp knife.
A slicer buys repeatability; by hand, intact slightly thicker folds beat shredded scraps.

Smooth slicing strokes work better than pushing straight down. A butcher or deli may also be willing to slice chilled cooked meat, although store policies vary.

Hand-cut beef that folds and bites cleanly is thin enough, even if nobody would mistake it for commercial deli slicing.

How to Reheat Italian Beef Without Making It Tough

Cold beef drops the temperature of the jus as soon as it goes in, so give each portion enough room to loosen instead of packing the pot with a cold solid mass.

Keep the jus around 185–190°F / 85–88°C while reheating. The beef should become steaming hot throughout and reach 165°F / 74°C when checked in the center of a folded mound. Let the liquid recover before adding another cold portion.

Food thermometer inserted into the center of a small mound made from several folded slices of hot Italian beef.
The folded mound creates something a thermometer can actually measure: a real center. A single paper-thin slice is too shallow to give the probe tip a useful reading.

Hard bubbling around delicate slices or rapidly curling edges mean the heat is too aggressive. Once the beef is hot and hanging softly from the tongs, more time is not helping it.

The Jus Is Half the Sandwich

Good Italian beef jus should taste a little stronger than broth you’d happily sip from a mug. Beef and bread soften its impact, but the soaked crumb should never taste aggressively salty.

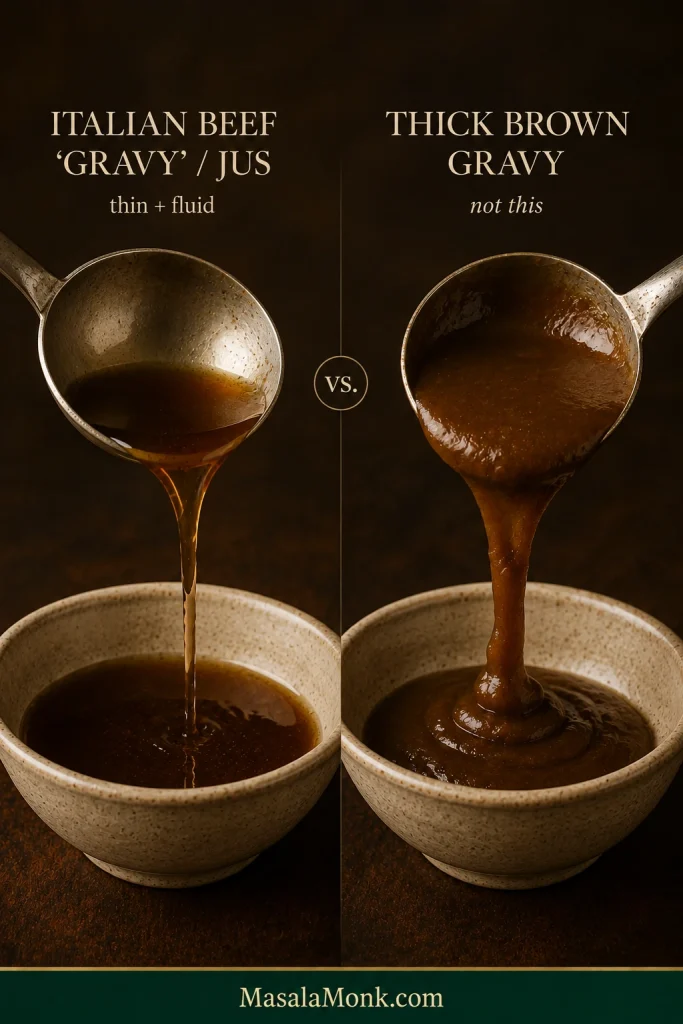
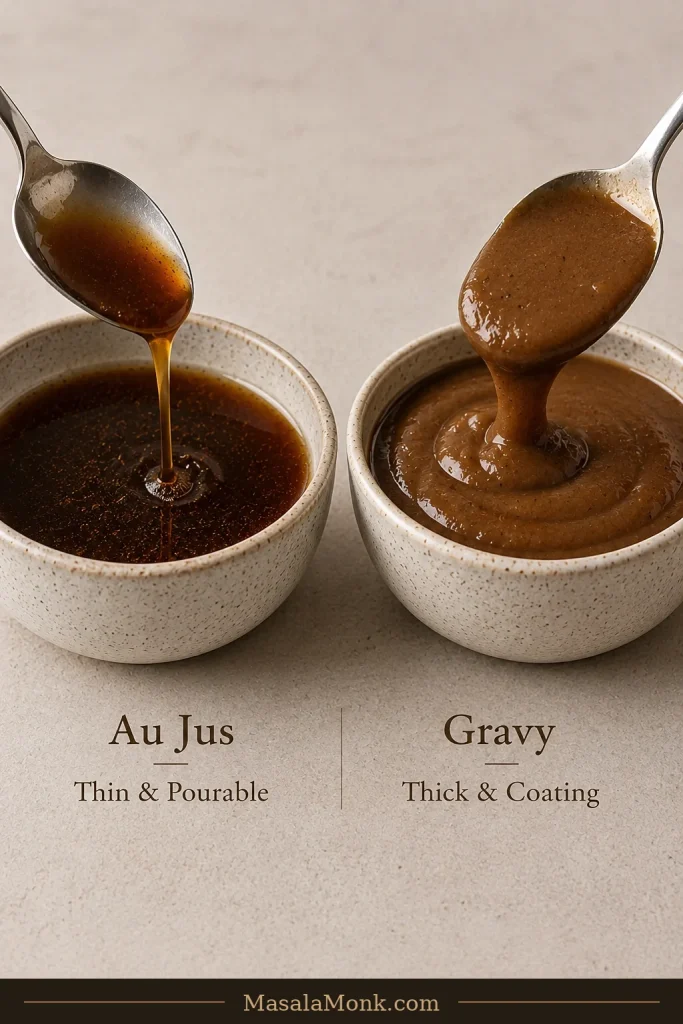
Chicago shops often call the seasoned roasting liquid gravy; cooks also say juice or jus. Here, those words mean the thin beef liquid used to warm and wet the sandwich, not a flour-thickened brown gravy.

Side-by-side comparison of fluid dark Italian beef jus and thick brown gravy clinging heavily to a spoon.
Italian beef jus should penetrate the folds and crumb, not sit on top like a thick sauce.

The jus should taste primarily of beef, garlic and pepper. Oregano, fennel and basil belong in the background. When dried herbs are the first thing you notice, they’ve become too loud.

Volume matters too. A wide pan evaporates faster, ovens vent differently and roasts release different amounts of juice. About 5 cups / 1.2 L suits a mostly dry-or-wet table; move closer to 6 cups / 1.4 L when several sandwiches will be dipped.

Weak jus needs reduction without the beef in the pan. Over-concentrated jus needs unsalted stock or water. In both cases, bread is a better judge than another spoonful straight from the pot.

Best Bread for Italian Beef: What Can Take the Jus?

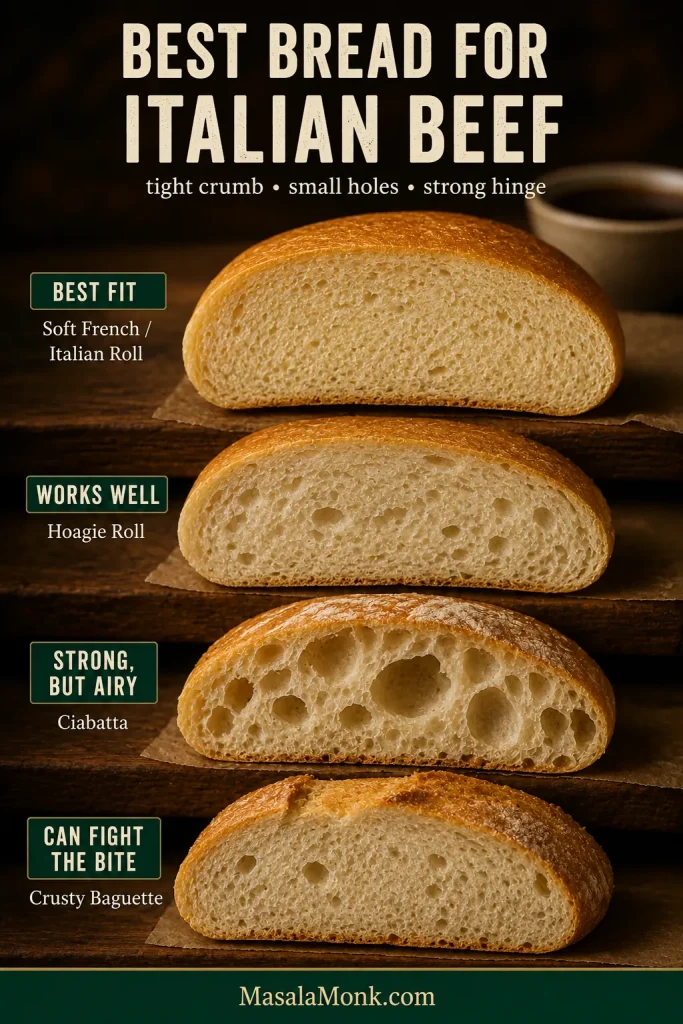
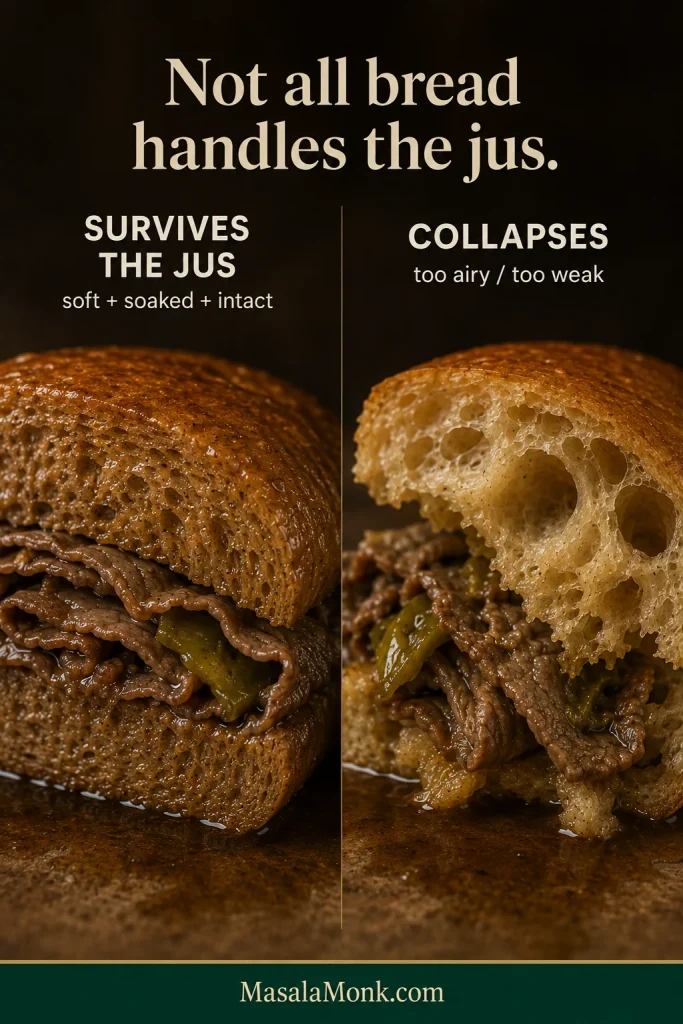
Use a soft French or Italian roll with a fairly tight crumb, light chew and strong hinge. It should absorb jus without collapsing or becoming harder to bite than the beef.

Cross-sections of several rolls compared for Italian beef, showing tight crumb, open crumb and different crust thicknesses.
The best roll has a soft, tight crumb and enough structure to absorb gravy without collapsing.

Look for a fine, relatively tight crumb with small holes. Large open pockets soak unevenly and give the gravy easier places to weaken the roll. For a concrete Chicago reference, Portillo’s serves its Italian beef on Turano French bread.

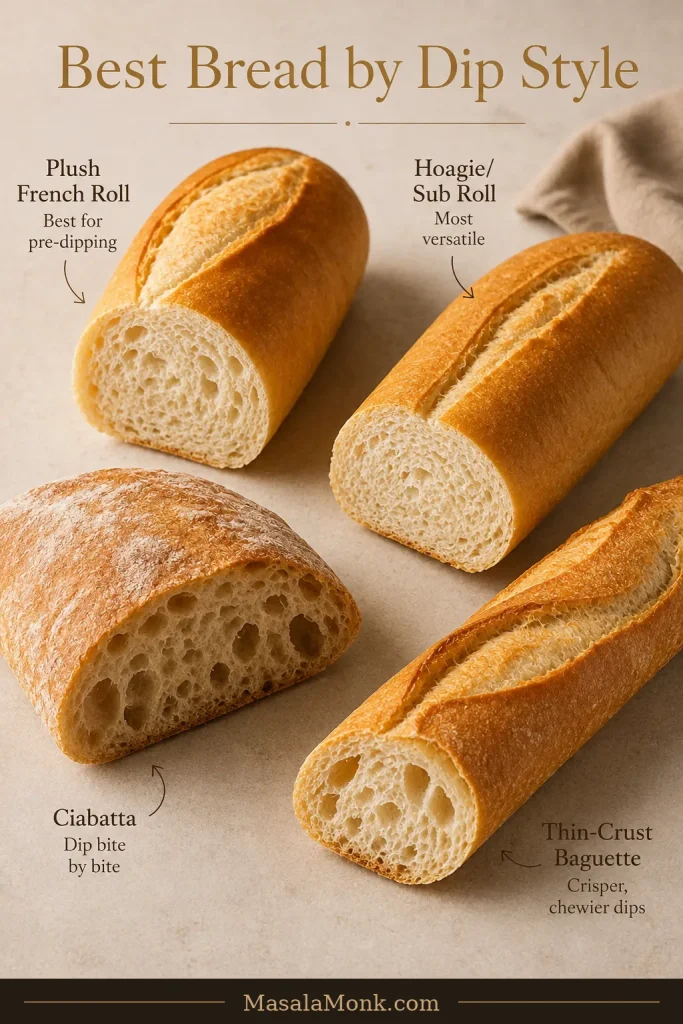
A soft French or Italian sub roll is usually the easiest substitute. Sturdy hoagie rolls can work well too. Ciabatta has enough strength but its larger holes change the way gravy travels through the bread.

A very crusty baguette can fight the filling; an ultra-airy soft bun may absorb more than it can hold.

Comparison of a jus-soaked roll staying intact and another bread roll collapsing after absorbing too much liquid.
If a roll tastes great dry but falls apart after dipping, change the gravy exposure before changing the filling. A shorter dip can rescue a softer roll without rebuilding the whole sandwich.

Don’t toast the roll until crisp. A particularly soft substitute can benefit from brief warming or light surface-drying, but the center should still yield easily when pressed.

If you would rather make the bread yourself, our homemade hoagie and sub rolls are one route to a sturdy sandwich roll. Keep the crust on the softer side if you plan to dip it.

Dry, Wet (Juicy), Easy-Dipped or Dipped?

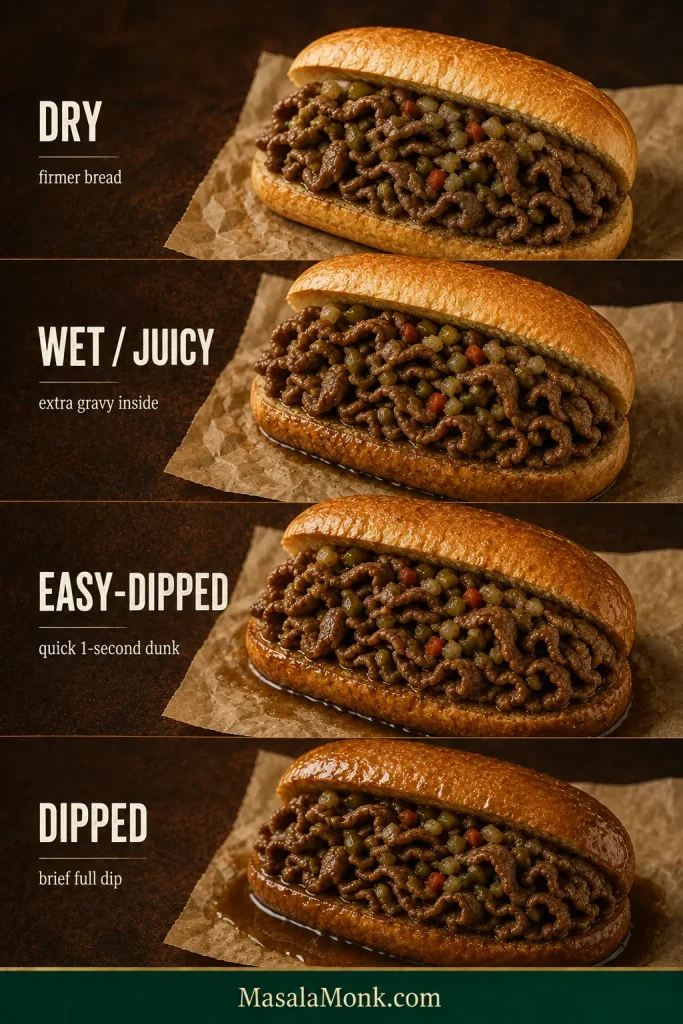
Dry keeps the roll relatively firm. Wet carries extra gravy into the bread. Easy-dipped gives the whole sandwich a quick one-second dunk. Dipped briefly submerges it for a few seconds.

How to Read a Chicago Italian Beef Order

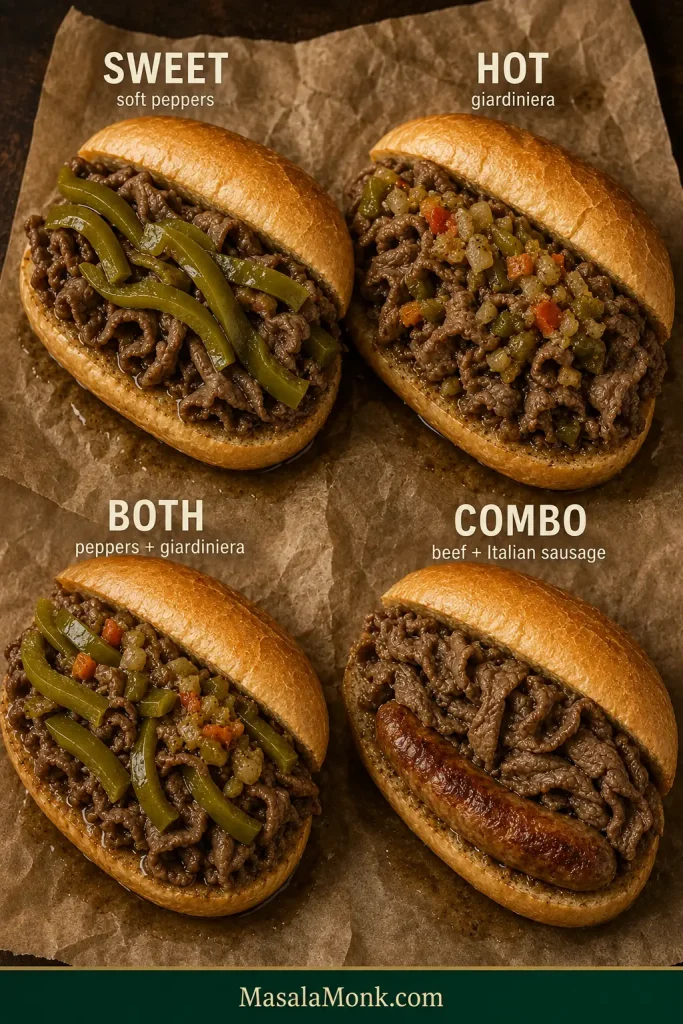
The exact wording varies from one beef stand to another, but the choice is essentially how much gravy reaches the bread. “Sweet” means cooked peppers, while “hot” points to giardiniera. If you see a combo on a Chicago beef menu, that means an Italian sausage has been added to the beef sandwich.

Four Italian beef variations showing sweet peppers, hot giardiniera, both toppings and a combo with Italian sausage and beef.
Order on three axes: peppers—sweet, hot or both; meat—beef or combo; gravy—dry, wet or dipped.

That shorthand is part of the pleasure of ordering Italian beef. This is a sandwich meant to be adjusted at the counter—sweet, hot, both, comparatively dry or soaked enough that you need to lean over the wrapper before taking the first bite. If The Bear sent you looking for it, this is the world of choices the show helped introduce to a much wider audience.

The amount of gravy is a preference, not an authenticity exam. Portillo’s ordering guide likewise distinguishes several gravy levels, including dry, easy-dipped, fully dipped and gravy on the side.

Choose Your Gravy Level

On a phone? Swipe sideways to see the full table.

StyleWhat happensBest when
DryBeef drains well before filling the rollTransporting the sandwich or keeping bread firmer
Wet / juicyPlenty of jus travels with the beef and more may be spooned insideYou want lots of gravy flavor without soaking the whole exterior
Easy-dippedThe assembled sandwich gets about a one-second dunkYou want softened bread with some structure left
DippedThe whole sandwich is briefly submerged for a few secondsYou want maximum saturation and will eat immediately
Jus on the sideThe sandwich stays comparatively dry and each bite is dippedTakeout, slow eating or maximum control
Four Italian beef sandwiches labeled dry, wet, easy-dipped and dipped, showing progressively more gravy in the bread.
Drier sandwiches travel better; easy-dipped and dipped versions are best eaten immediately.

A fully dipped sandwich is deliberately messy. Keep the wrapper or plate underneath and lean in.

When an easy dip is exactly as wet as you enjoy it, you’ve found your level. The best gravy choice is the one that makes you want the next bite.

For a full sandwich-shop plate, hot crispy homemade French fries are an easy partner—especially when there happens to be enough jus nearby for the occasional fry dip.

Sweet Peppers and Hot Giardiniera

“Sweet” means soft cooked bell peppers, not a sugary sauce. They should bend easily and disappear into a bite of beef instead of crunching like fajita peppers.

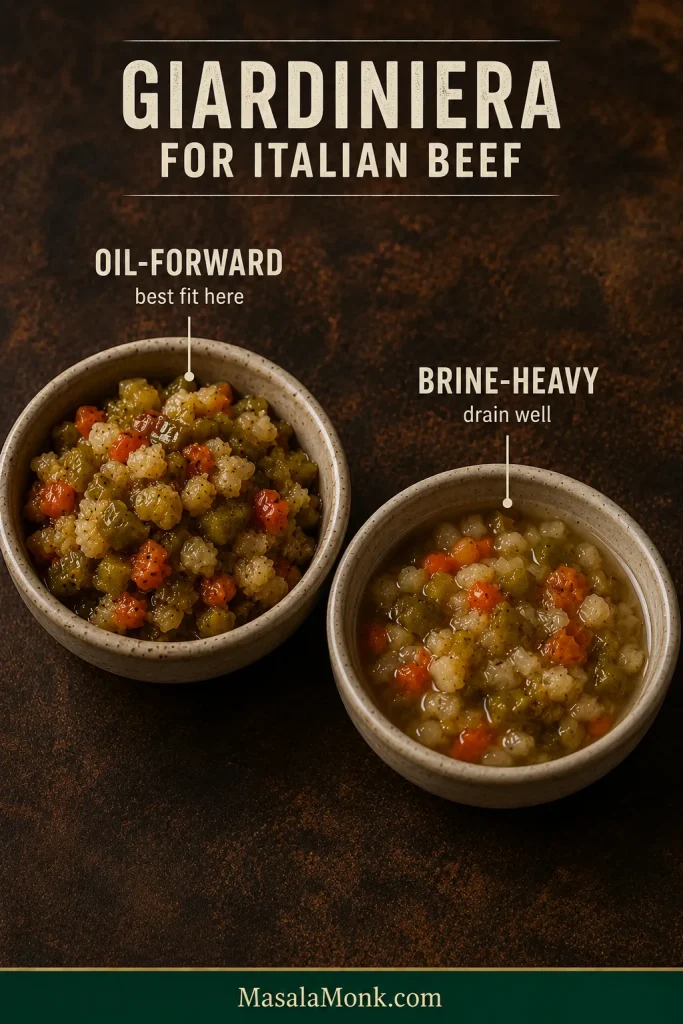
Chicago-style giardiniera is an oil-forward mix of chopped pickled vegetables and chiles that adds heat, acidity and crunch. Large cauliflower florets or chunky carrots are easier to eat when chopped finer.

Look at the liquid in the jar too. If the vegetables are swimming in sharp vinegar brine instead of seasoned oil, drain them particularly well before they reach the sandwich. Leave properly oil-packed giardiniera glossy rather than squeezing it dry.

Two bowls comparing glossy oil-packed chopped Chicago giardiniera with a wetter giardiniera sitting in vinegar-heavy brine.
Drain brine-heavy giardiniera; with oil-packed Chicago-style giardiniera, leave some seasoned oil clinging to the vegetables.

Start with about ½–¾ oz / 15–20 g per sandwich and put more at the table. It should sharpen the beef without covering up everything underneath.

Hot and sweet work especially well together: soft peppers deepen the juicy side of the sandwich while giardiniera brings crunch and brightness.

Close-up Italian beef sandwich topped with soft green sweet peppers and chopped hot giardiniera over thin folded beef.
Use the toppings as a diagnostic. If every bite feels crunchy, the sweet peppers probably need more cooking; if chile heat hides the beef, pull back the giardiniera. Contrast should sharpen the sandwich, not compete with it.

Cheese is optional. Mozzarella or provolone can both work, but beef, gravy, bread and peppers define the sandwich without either one.

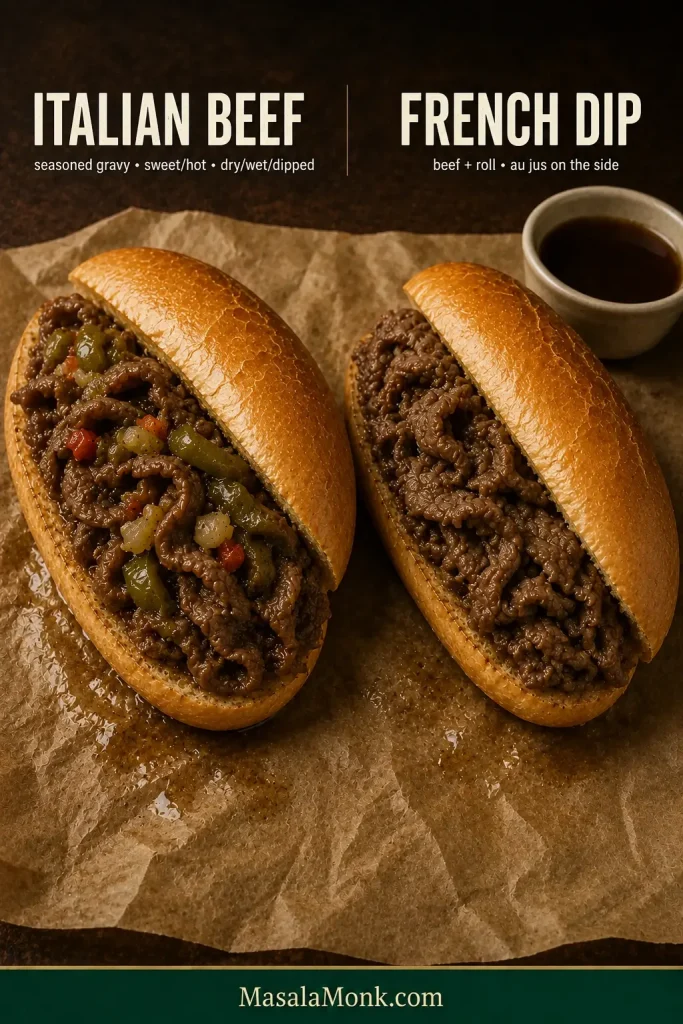
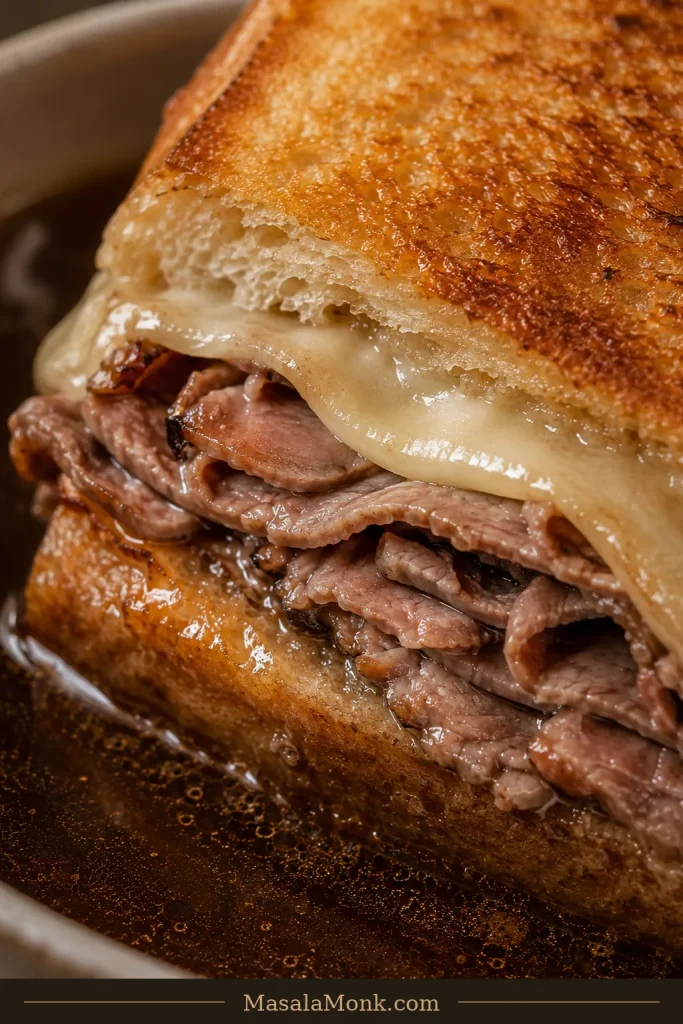
Italian Beef vs French Dip: What’s the Difference?

Both sandwiches can involve thin roast beef, a sturdy roll and beef jus, but they eat differently. Chicago Italian beef usually has a more assertively seasoned gravy, often includes sweet peppers or giardiniera, and builds the amount of gravy directly into the sandwich—dry, wet or dipped.

A French Dip is usually simpler: beef and bread with au jus served alongside for dipping. If that cleaner beef-and-jus combination is what you’re after, see our French Dip sandwich recipe.

Italian beef and French Dip sandwiches side by side, with peppers and giardiniera on the Italian beef and a separate cup of jus beside the French Dip.
Italian beef integrates seasoned gravy and peppers; French Dip keeps a simpler beef-and-bread build with jus on the side.

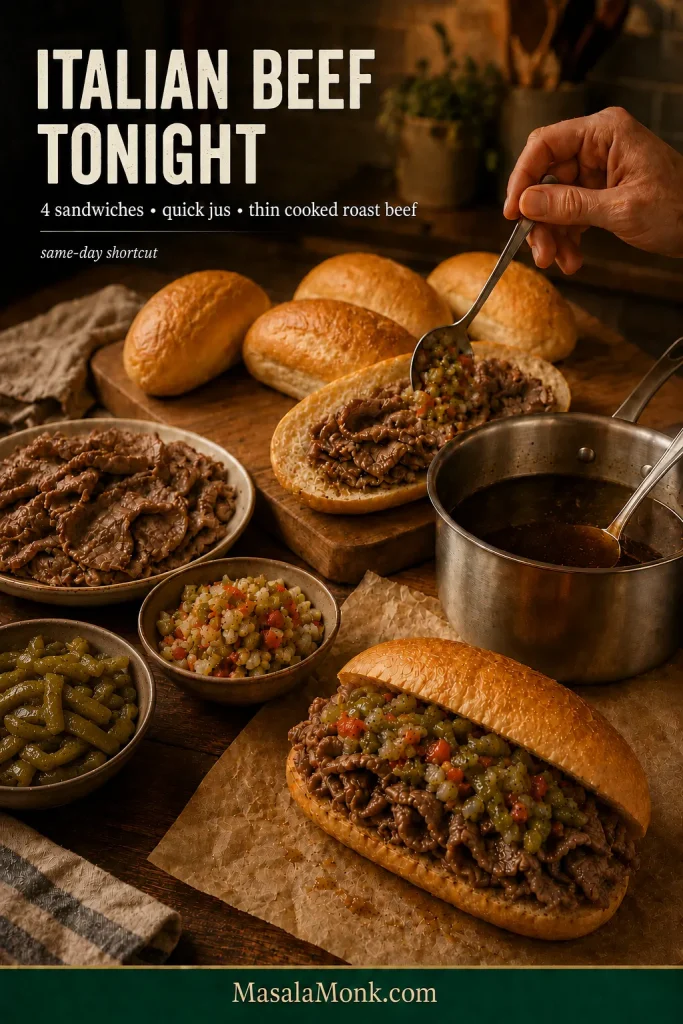
Italian Beef Tonight: A Fast 4-Sandwich Shortcut

If you found this page late in the afternoon, look for very thin plain or lightly seasoned cooked roast beef. Avoid heavily smoked, barbecue-flavored or heavily pepper-crusted versions; those flavors can pull the jus somewhere else entirely.

Same-day Italian beef setup with thin cooked roast beef, rolls, quick jus, peppers, giardiniera and a finished sandwich.
For quick Italian beef, choose plain or lightly seasoned thin roast beef so the homemade jus remains in charge.

This shortcut makes 4 sandwiches.

  • 1–1¼ lb / 450–570 g thin cooked roast beef
  • 3 cups / 700 ml low-sodium beef stock
  • ½ medium yellow onion, roughly chopped
  • 3 garlic cloves, smashed
  • ½ teaspoon dried oregano
  • ½ teaspoon black pepper
  • ¼ teaspoon dried basil
  • ¼ teaspoon fennel seeds, lightly crushed
  • Pinch red pepper flakes, optional
  • 1 bay leaf
  • 1 teaspoon Worcestershire sauce, optional, after tasting
  • Kosher salt, only if needed after tasting
  • 4 sturdy soft rolls
  • Sweet peppers and giardiniera, as desired

Build the Quick Jus

Simmer the stock, onion, garlic, herbs, spices and bay leaf for about 20–25 minutes, then strain. Dip in a piece of bread. Reduce a little longer if the jus still tastes thin.

Once the concentration tastes right, decide whether it needs Worcestershire or salt. The roast beef may already contribute plenty of seasoning, so make those adjustments at the end.

Bring the jus to a rolling boil, then lower it to about 185–190°F / 85–88°C. Reheat the beef in modest portions until steaming hot throughout and 165°F / 74°C in the center of a folded mound.

Build with the same peppers, giardiniera and gravy choices as the full version. You lose some roast-and-drippings depth, but dinner still lands in the right neighborhood. If you want the roast-and-chill method next time, return to the full Chicago Italian beef recipe.

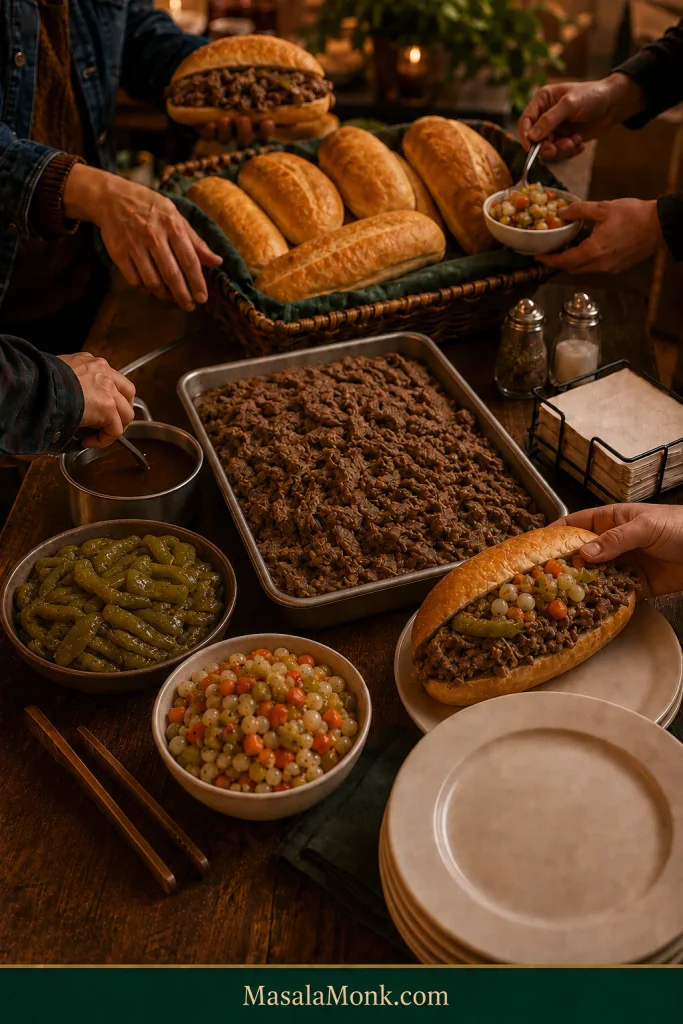
Making Italian Beef for a Crowd

Italian beef is excellent party food because nearly all the fiddly work can happen before anyone arrives. Keep plenty of gravy ready without making the entire shaved roast spend the evening sitting in it.

Italian beef party station with sliced beef, separate jus, rolls, sweet peppers and giardiniera while guests assemble sandwiches.
Build to order: beef and jus can wait hot, but gravy starts changing bread texture immediately.

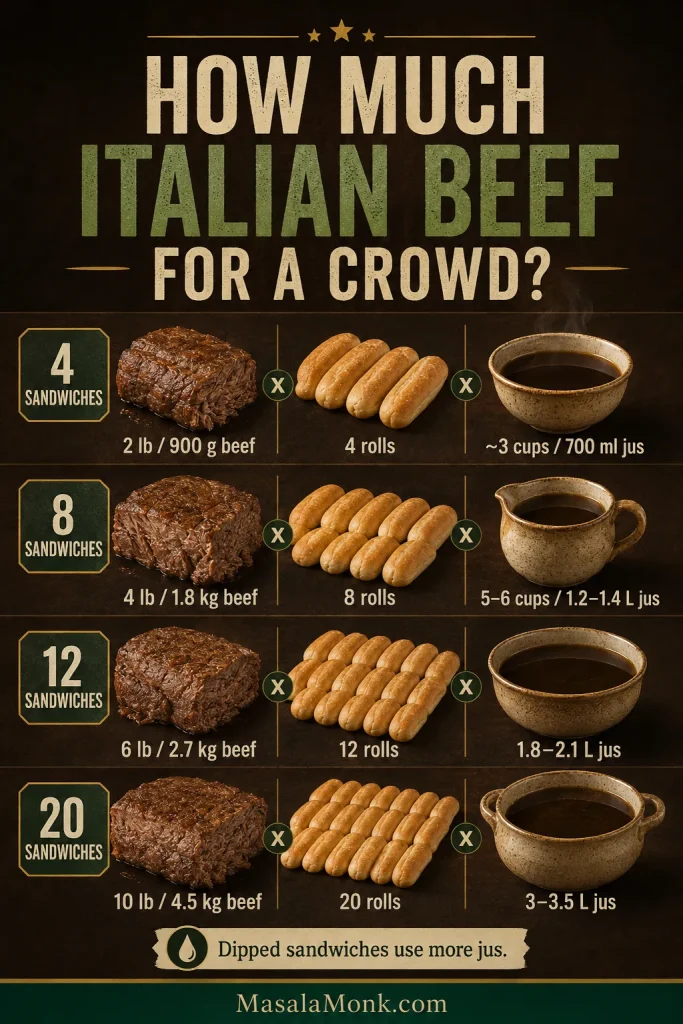
How Much Italian Beef for a Crowd?

For planning, work from the number of sandwiches you expect to serve. One sandwich per guest may be enough as part of a larger buffet. If Italian beef is the main event, extra rolls and beef give you breathing room for bigger appetites.

On a phone? Swipe sideways to see the full table.

SandwichesRaw beefRollsFinished jusRaw peppersGiardiniera
42 lb / 900 g4About 3 cups / 700 ml8 oz / 225 g2–3 oz / 60–80 g
84 lb / 1.8 kg8About 5–6 cups / 1.2–1.4 L1 lb / 450 g4–6 oz / 120–160 g
126 lb / 2.7 kg12About 1.8–2.1 L1½ lb / 675 g6–8 oz / 180–240 g
2010 lb / 4.5 kg20About 3–3.5 L2½ lb / 1.1 kg10–14 oz / 300–400 g
Quantity guide showing beef, roll and jus amounts for 4, 8, 12 and 20 Italian beef sandwiches.
For a crowd, plan extra jus—dipped sandwiches use it fast. Keep unsalted stock nearby for extending the pot.

A mostly fully-dipped crowd will use more jus. Keep extra unsalted or low-sodium stock nearby so the pot can be extended without driving the salt upward.

Cook time does not simply double with the quantity of beef. Two 4-pound roasts do not automatically need twice as long as one 4-pound roast; thickness, spacing and airflow matter far more.

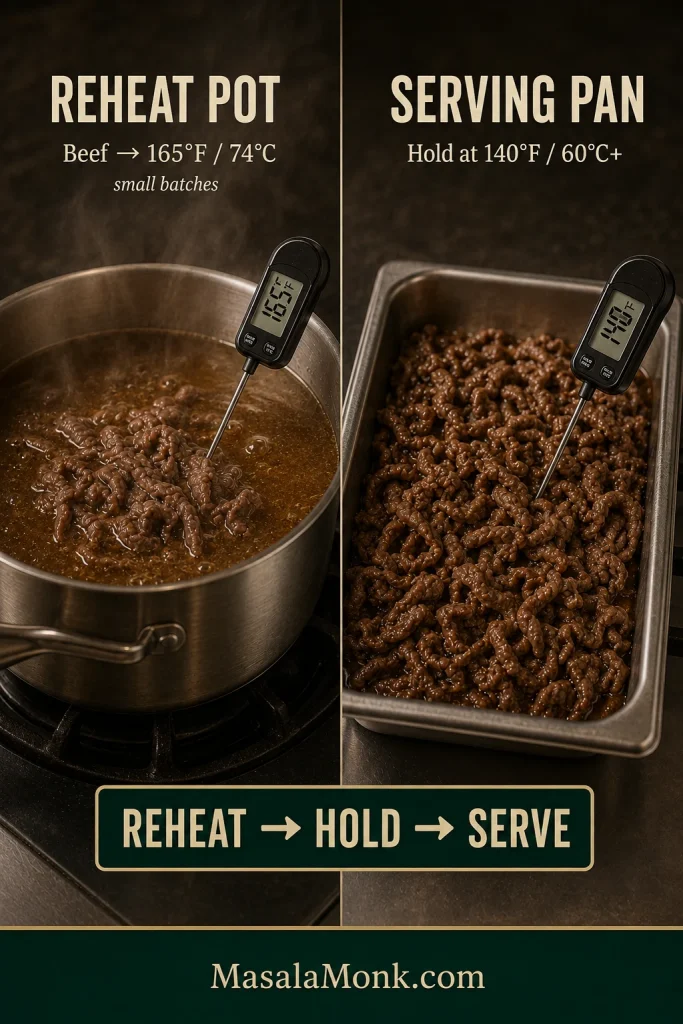
Use a Reheat Pot and a Serving Pan

For longer service, reheat the beef in one pot and hold it in a separate pan.

  • Reheat pot: keep a working pot of jus around 185–190°F / 85–88°C. Add chilled sliced beef in modest portions and reheat to 165°F / 74°C in the center of a folded mound.
  • Serving pan: move the reheated beef with enough jus to stay moist into a preheated pan and hold it at 140°F / 60°C or warmer.
  • Remaining beef: keep it refrigerated until its turn.
  • Rolls: dry and separate.
  • Sweet peppers: warm and separate.
  • Giardiniera: separate so everyone controls their own heat.
Two-part guide showing cold Italian beef reheated in a jus pot and already-hot beef held separately in a serving pan.
Reheat cold beef fully in the jus pot; use the serving pan only to hold already-hot beef.

After a cold batch enters the reheat pot, let the jus recover toward its working temperature before adding more. That keeps service moving without turning all the thin beef into an all-evening simmer.

The person who wants a relatively dry sandwich and the person who wants to baptize theirs in gravy can still eat from the same setup without negotiating.

For a bigger spread, a make-ahead potato salad can be finished before hot service begins, leaving your last-minute attention for the beef and jus.

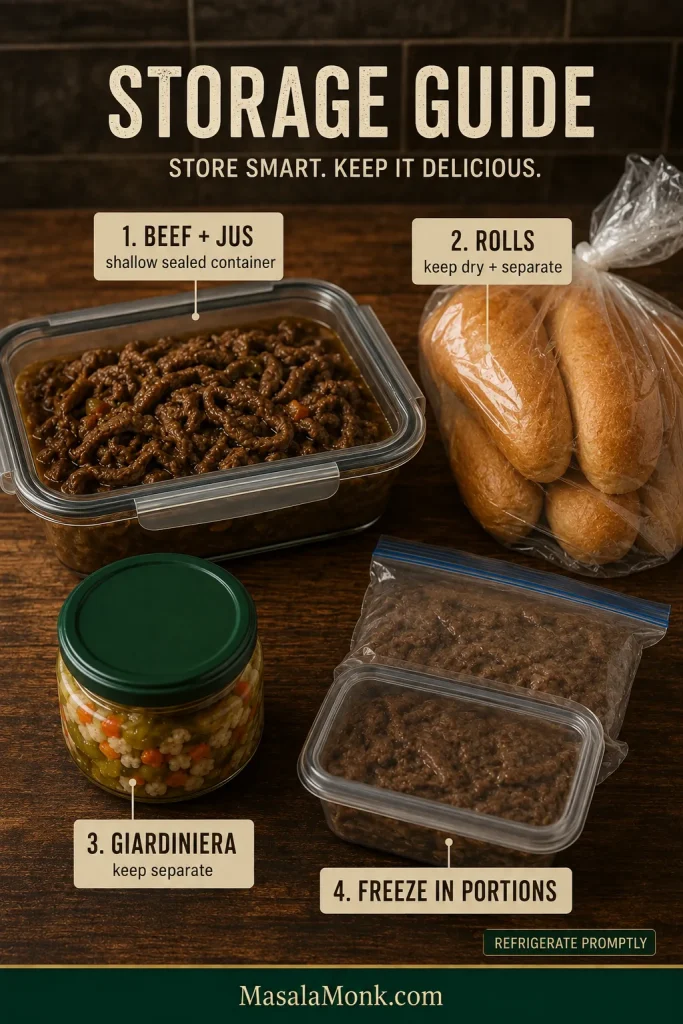
Make Ahead, Store, Freeze and Reheat

Day 1: roast the beef, divide it into manageable pieces if needed, strain the jus and refrigerate both promptly. Day 2: slice the beef, roast or reheat the peppers, finish the jus and warm the meat as needed.

Refrigerator: keep cooked beef and jus covered and refrigerated and use within 3–4 days. Keep the rolls and giardiniera separate.

Freezer: freeze sliced beef with enough jus to protect it from drying, divided into useful portions. For best quality, use frozen cooked beef within about 2–3 months. Freeze the bread separately.

Stored Italian beef and jus divided into containers, with bread, sweet peppers and giardiniera kept separately.
Store in meal-size portions so you can reheat only what you need and leave the rest untouched.

To reheat: bring the jus back to a rolling boil first and make any concentration adjustments. Lower it to the gentler working temperature, then reheat the beef until steaming throughout and 165°F / 74°C.

Troubleshooting Chicago Italian Beef

Start with the part that feels wrong: the beef, the jus or the assembled sandwich. Separating those three usually points to the useful fix much faster than throwing more seasoning at everything.

Beef Problems

On a phone? Swipe sideways to see the full table.

ProblemLikely causeRescue nowNext time
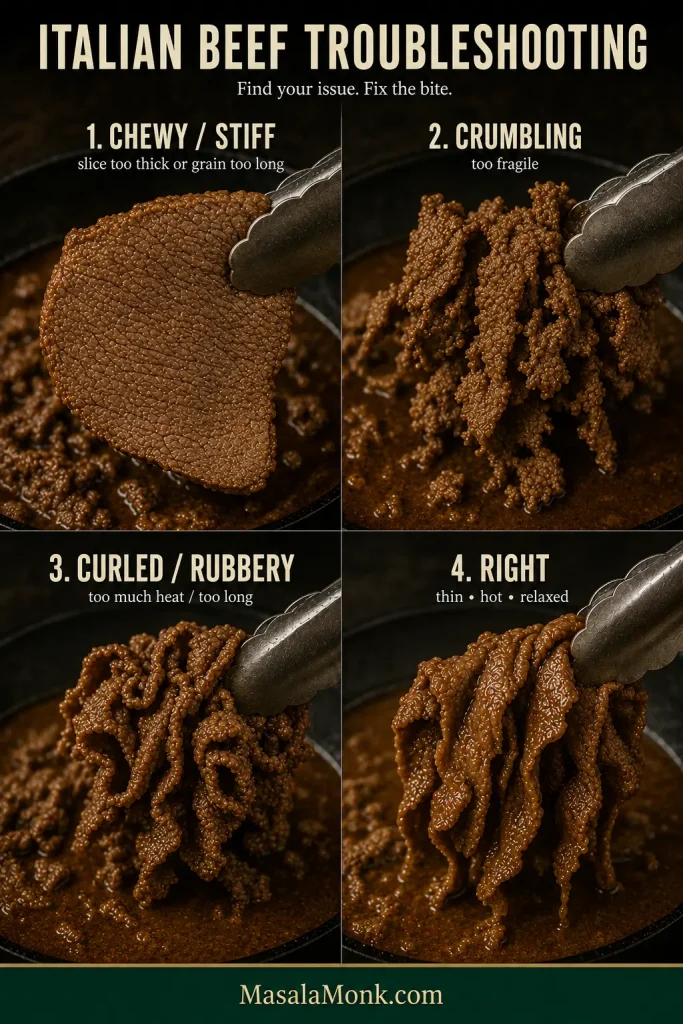
Thick and chewySlices too thick or cut with the grainCut large slices into smaller biteable pieces across the grainChill harder and slice thinner
Crumbles while slicingBeef too soft, setting too thin or roast cooked too farIncrease slice thickness slightlyChill fully and preserve a sliceable roast
Curled or rubbery in jusToo much heat or too much time after reheatingLift the beef out as soon as it is hotWork in smaller portions at gentler heat
Mushy or shreddingCut or cooking endpoint suited to pulled beefServe it as tender pulled Italian-style beefUse round or sirloin when intact slices are the goal
Four-state Italian beef troubleshooting guide showing stiff slices, crumbling beef, tightly curled beef and correct soft folds.
Watch what happens when the tongs lift the beef. Good Italian beef hangs in relaxed folds; board-stiff slices, crumbling pieces or tight curls tell you where to look before changing the seasoning.

Jus Problems

On a phone? Swipe sideways to see the full table.

ProblemLikely causeRescue nowNext time
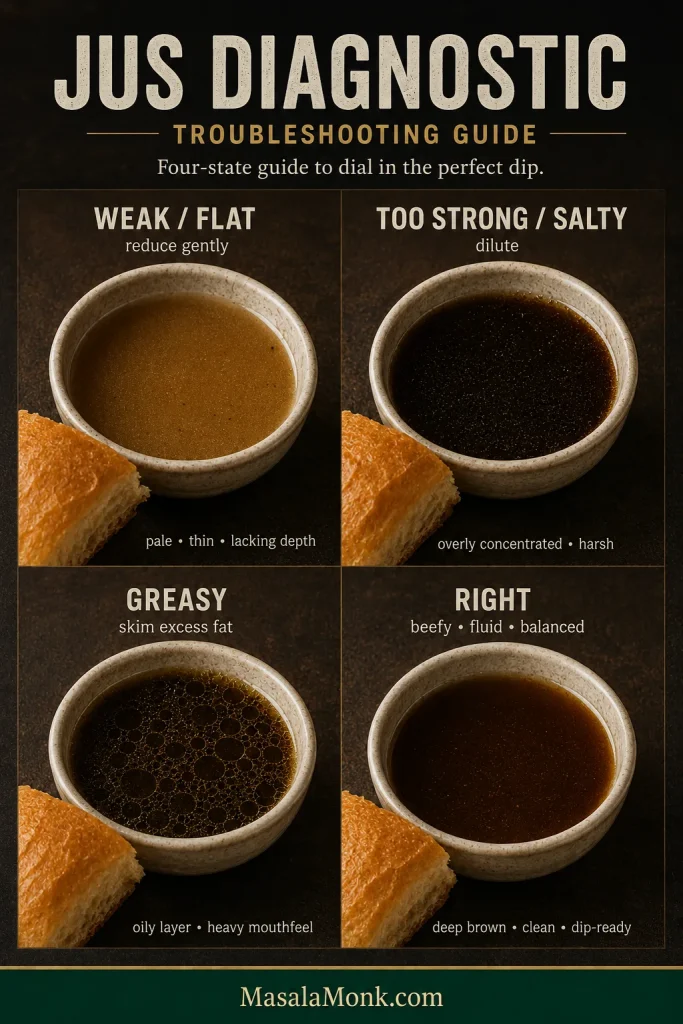
Weak or wateryToo much finished liquid or mild stockReduce the jus without the beefJudge by finished volume and the bread test
Too saltyHigh-sodium stock or too much reductionDilute gradually with unsalted stock or waterStart low-sodium and season at the end
Too greasyMore rendered fat than the liquid needsSkim the surfaceChill overnight and lift away hardened excess
Not enough for dippingWide pan or aggressive evaporationExtend with unsalted or low-sodium stockWatch pan width and target finished volume
Italian beef jus troubleshooting graphic showing weak, salty, greasy and insufficient jus with different corrective actions.
Fix one variable at a time: reduce weak jus, dilute salty jus, skim grease, or extend a short pot.

If the Beef and Jus Both Taste Right

Bread and gravy: a roll that disintegrates needs a tighter crumb or shorter dip. A sandwich that still feels dry needs more jus traveling with the beef or spooned inside. When the bread is simply wetter than you enjoy, move one step down the gravy scale next time.

Toppings: excessive chile heat calls for less giardiniera or a milder jar. A sharp black-pepper bite points back to the jus, which can be diluted now and seasoned more gently next time. Crunchy sweet peppers simply need more cooking.

It still tastes like ordinary roast beef: look first at slice thickness, jus strength and how much gravy actually reaches the bread. Those three changes will move the sandwich further than another handful of dried herbs.

Three-stage guide progressing from thick dry roast beef to thin juicy folds and finally a gravy-soaked Italian beef sandwich with peppers and giardiniera.
The deeper goal is integration: the beef should stop feeling like a separate layer sitting on bread. When slice, jus and crumb begin working together, the whole bite tastes seasoned rather than assembled.

When the Sandwich Is Right

You notice it before the second bite. The beef no longer looks like neat carved roast; it has relaxed into loose folds. The roll is darker where the gravy reached it but still intact in your hands. Sweet peppers disappear into some bites, while giardiniera catches you in others with enough crunch and heat to keep all that beef and soaked bread lively.

Once those pieces are working, the final few seconds are personal. Keep it fairly dry. Spoon on more gravy. Give it the one-second dip. Or lower the entire sandwich into the jus and accept that dinner now requires two hands and a serious stack of napkins.

Hand holding a partially eaten Chicago Italian beef sandwich with thin folded beef, sweet peppers, giardiniera and visibly gravy-soaked bread.
At this point, stop adjusting and eat. A dipped Chicago Italian beef sandwich has a short sweet spot when the bread is thoroughly juicy but still strong enough to stay in your hands.

If you make it, tell us which beef cut you used, whether you sliced by hand or with a machine, and where you landed on the gravy scale—dry, wet, easy-dipped or fully dipped. Those details can help the next cook decide where to start.

Posted on Leave a comment

Ratatouille Recipe: Easy, Classic French Vegetable Stew

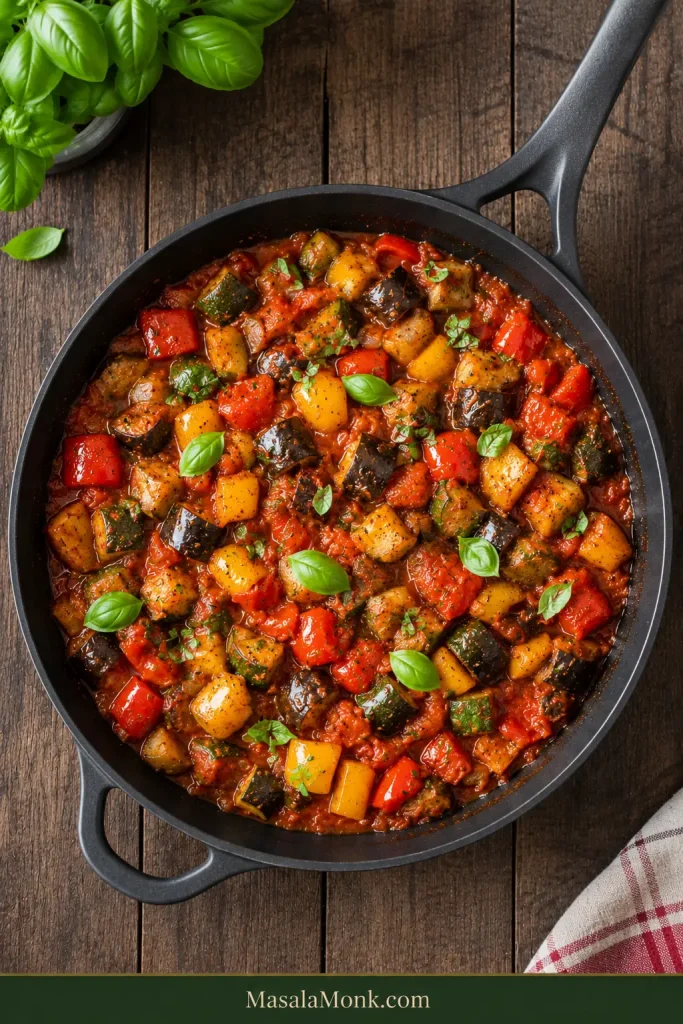
Finished classic ratatouille in a wide dark pan, with a serving spoon lifting chunks of eggplant, zucchini and bell pepper coated in thick tomato sauce.

A good ratatouille gives you a little bit of everything in the same spoon: eggplant soft enough to almost melt, zucchini that is tender but still unmistakably zucchini, sweet pepper, and glossy tomato caught around the vegetables instead of pooling underneath them.

That sounds simple until five very different vegetables share the same pan. Eggplant needs enough heat and time to lose its spongy center. Zucchini can go from pleasantly tender to collapsed remarkably quickly. Tomatoes release plenty of water before they start behaving like sauce.

Ratatouille makes particular sense when the garden, market—or just your vegetable drawer—suddenly seems full of zucchini, tomatoes, peppers and eggplant. And after all that chopping, watching those vegetables disappear into a pale, watery pot feels particularly unfair.

This easy ratatouille recipe uses one wide pan and a staged method so the vegetables can finish tender without collapsing into one texture.

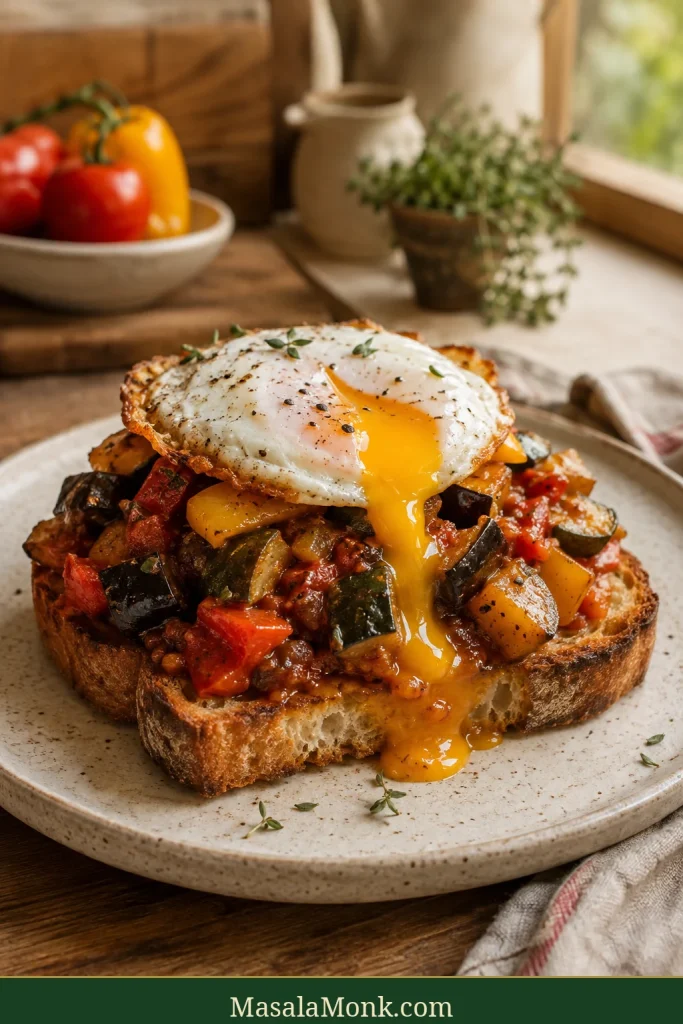
We stop when the stew is soft and generous but still varied from bite to bite. Serve it with bread, eggs or a simple grilled main, eat it warm or at room temperature, and save the leftovers for another meal—the flavors settle together beautifully overnight.

Quick Answer: How to Make Classic Ratatouille

Classic ratatouille is a Provençal vegetable stew made with eggplant, zucchini or courgette, bell peppers, tomatoes, onion, garlic, olive oil and herbs.

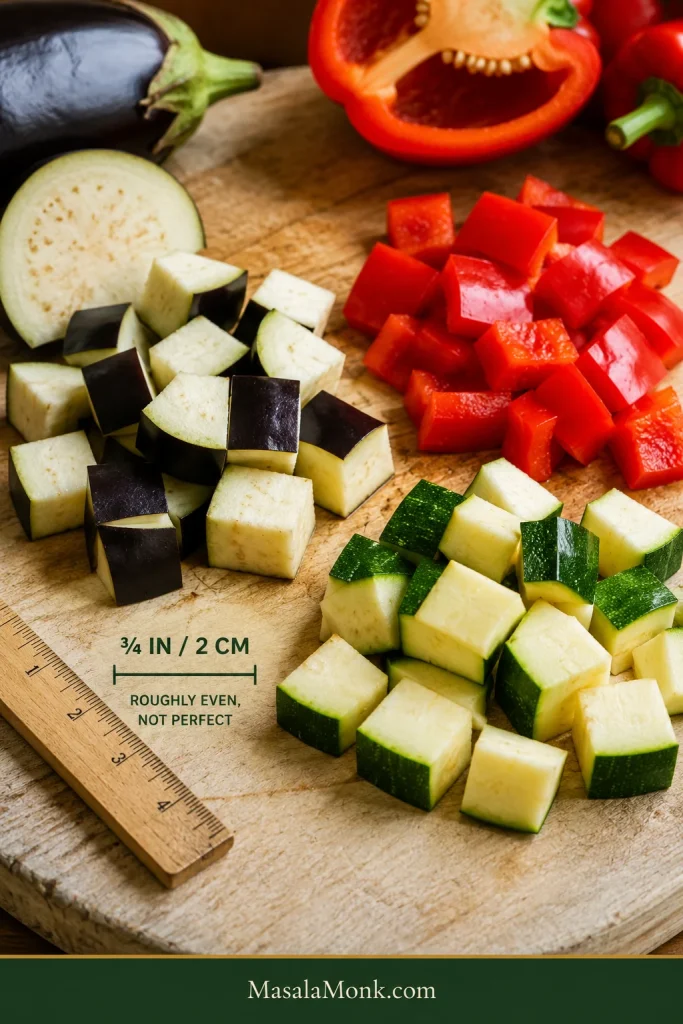
For about 6 side servings or 4 generous main-dish portions, use roughly 500 g / 18 oz eggplant, 400 g / 14 oz zucchini, 300 g / 10½ oz peppers and 750 g / 26 oz tomatoes. Cut the main vegetables into about ¾-inch / 2 cm pieces.

The easiest way to keep ratatouille from turning watery or mushy is to brown the eggplant and zucchini in separate turns, reduce the tomatoes before recombining, then return the zucchini only near the end. The eggplant gets enough time to become creamy while the zucchini keeps its shape.

What does ratatouille taste like? Sweet tomato and peppers, savory olive oil and garlic, creamy eggplant, tender zucchini, thyme and basil. It is rich enough to feel substantial while still tasting unmistakably of vegetables.

Close-up of finished ratatouille with callouts identifying creamy eggplant, intact zucchini and thick tomato coating.
Judge the spoonful, not just the pan: the best ratatouille gives you creamy eggplant, a little resilience from zucchini and concentrated tomato in the same bite.

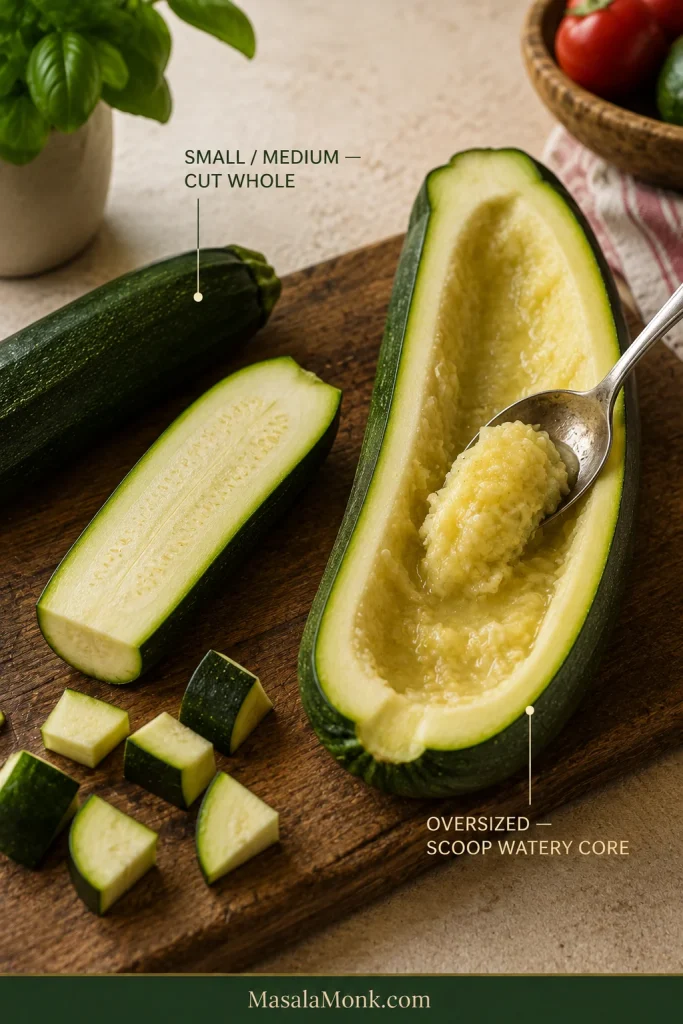
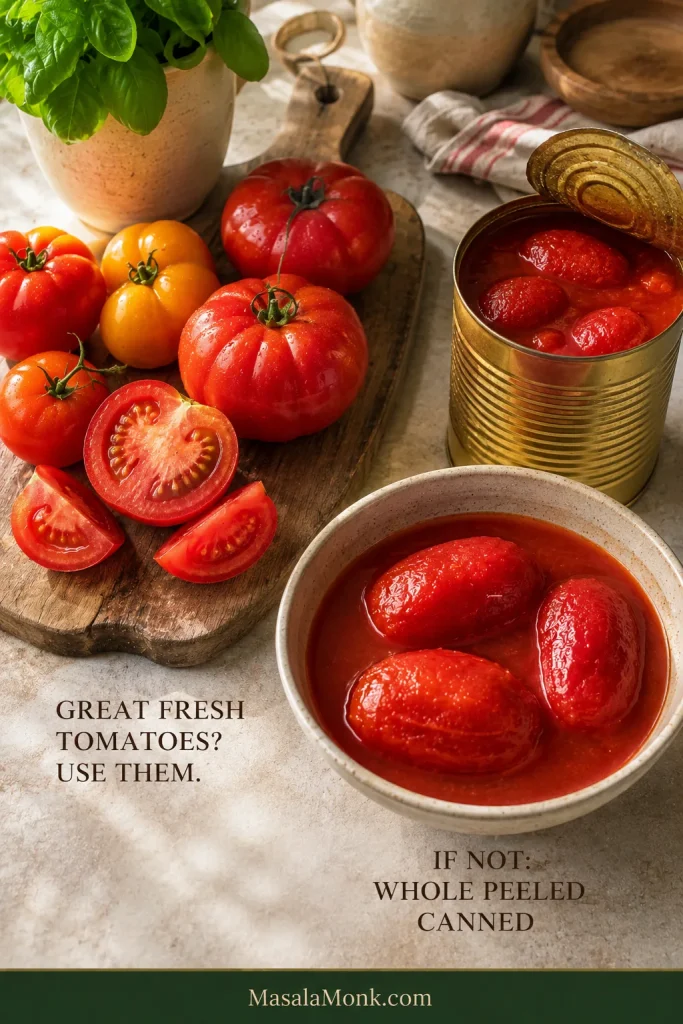
Before you start: use fresh tomatoes when they are flavorful; otherwise use good canned whole peeled tomatoes. Fresh, firm eggplant can go straight into the pan—save pre-salting for unusually mature, heavily seeded or wet eggplant.

Classic Ratatouille Recipe

A staged one-pan French ratatouille with creamy eggplant, tender zucchini and sweet peppers in a concentrated tomato base.

Recipe at a Glance

  • Difficulty: easy
  • Prep: about 25–30 minutes
  • Cook: about 45–60 minutes
  • Rest: 15 minutes recommended
  • Total: about 1 hour 25 minutes to 1 hour 45 minutes
  • Serves: about 6 as a side or 4 as a generous main
  • Best pan: 12-inch / 30 cm wide high-sided sauté pan or wide shallow 5–6 qt / 5–6 L Dutch oven
  • Vegetable cut: about ¾ inch / 2 cm
  • Texture target: tender vegetables with a little thick tomato sauce around them and very little free liquid
  • Diet: naturally vegan, vegetarian, dairy-free and gluten-free

The technique is easy; the chopping takes time. The staged cooking adds minutes, not difficulty, and gives each vegetable enough room to keep its own texture.

Equipment

  • 12-inch / 30 cm wide high-sided sauté pan or wide shallow Dutch oven
  • Chef’s knife and cutting board
  • Wooden spoon or flexible spatula
  • Two bowls or plates for holding the eggplant and zucchini separately
  • Slotted spoon, useful but not essential

Pan shape matters. A broad cooking surface lets vegetable moisture escape. With a smaller pan, brown the eggplant and zucchini in batches instead of piling them high.

Side-by-side comparison of vegetables spread across a wide sauté pan and crowded into a deeper pot with more visible steam.
With a wider pan, steam has somewhere to go. Crowding a deep pot not only limits browning; it can also slow tomato reduction later and leave the whole dish wetter.

Ingredients

Weights are before trimming.

  • 500 g / 18 oz eggplant, about 1 medium-large or 2 small, cut into ¾-inch / 2 cm pieces
  • 400 g / 14 oz zucchini or courgette, about 2 medium, cut into ¾-inch / 2 cm pieces
  • 300 g / 10½ oz red, yellow or orange bell peppers, about 2 medium, cored and cut into ¾-inch / 2 cm pieces; green works too but gives a more vegetal, less sweet result
  • 200 g / 7 oz yellow onion, about 1 medium-large, chopped
  • 750 g / 26 oz ripe fresh tomatoes, about 5–6 medium, chopped with their juices or 1 x 28 oz / 794 g can whole peeled tomatoes, hand-crushed with the juices
  • 18 g garlic, about 4–5 large cloves, finely chopped
  • 75 ml / 5 tablespoons extra-virgin olive oil, divided, plus up to 15 ml / 1 tablespoon more if needed
  • 10 g fine sea salt, about 1¾ teaspoons depending on the salt, divided, plus more after tasting if needed
  • ½ teaspoon freshly ground black pepper
  • 2 teaspoons fresh thyme leaves, or 4–5 thyme sprigs
  • 15 g / ½ oz fresh basil leaves, roughly torn
  • 1–2 teaspoons red wine vinegar, optional, for finishing
Eggplant, zucchini, bell peppers, tomatoes, onion, garlic, basil, thyme and olive oil arranged on a neutral work surface.
Because ratatouille has such a short ingredient list, condition matters: tired eggplant, watery zucchini or bland tomatoes affect the final pan more than an extra pinch of herbs.

Method

  1. Cut the vegetables. Cut the eggplant, zucchini and peppers into roughly ¾-inch / 2 cm pieces. Don’t worry about perfect cubes; aim for pieces that are reasonably even.
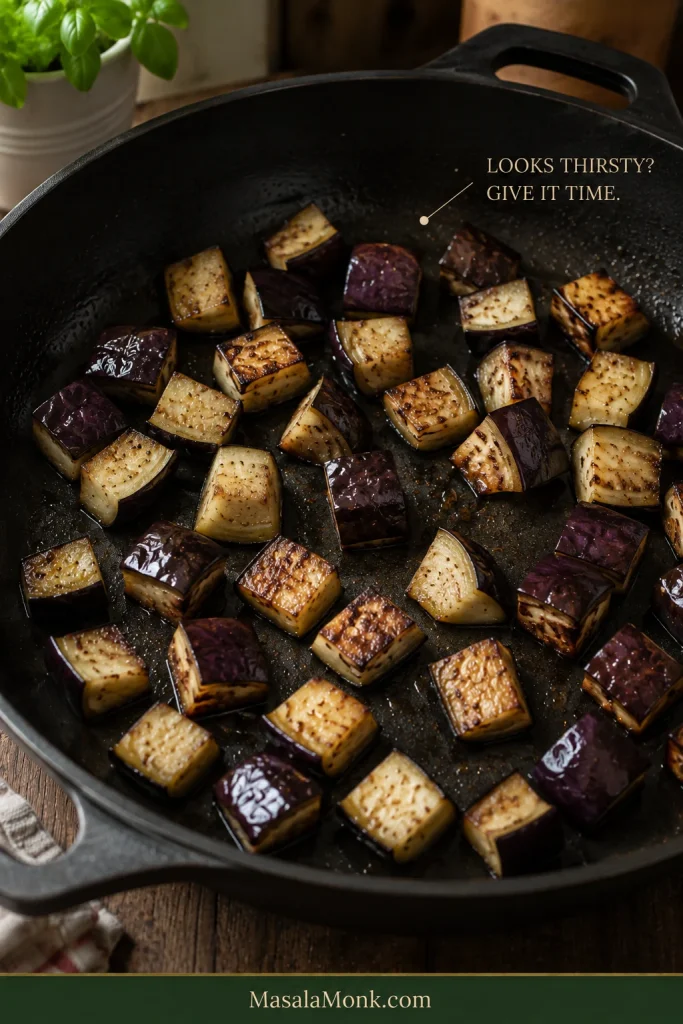
  2. Brown the eggplant. Heat 3 tablespoons / 45 ml olive oil over medium-high heat. Add the eggplant and ½ teaspoon of the measured salt. Spread the pieces as loosely as the pan allows and cook for 8–10 minutes, turning occasionally. Look for scattered brown patches and centers beginning to lose their raw, cottony resistance. Transfer the eggplant to a bowl.
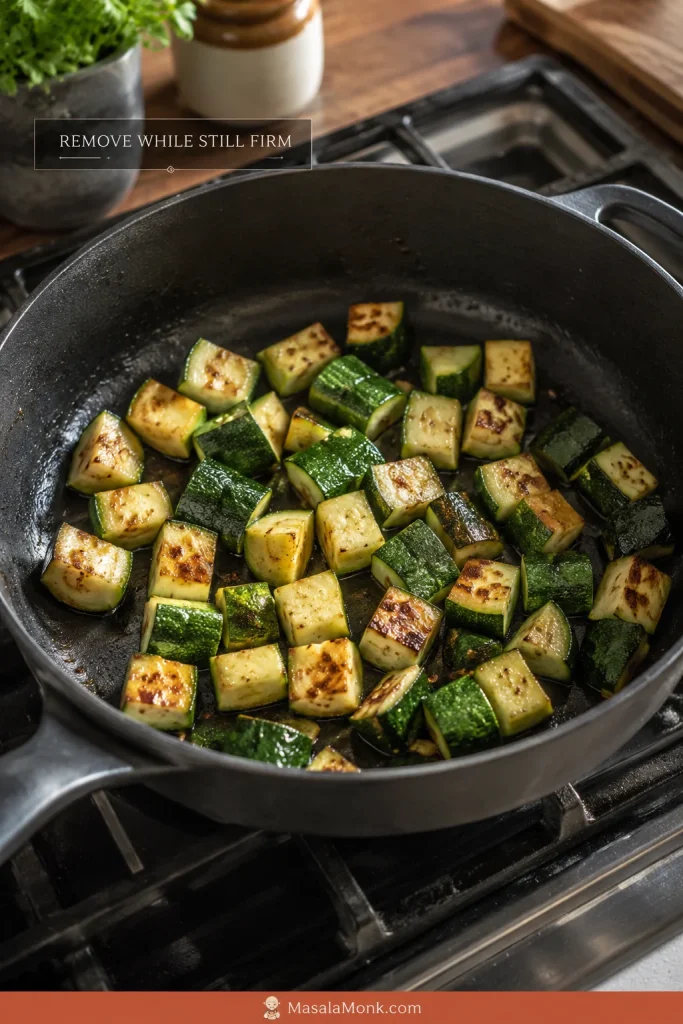
  3. Give the zucchini a shorter turn. Add 1 tablespoon / 15 ml olive oil, the zucchini and ¼ teaspoon salt. Cook for 4–5 minutes. Let it pick up some color, then remove it while the centers still feel firm. Transfer the zucchini to a separate plate or bowl; it returns to the pan later than the eggplant.
  4. Soften the onion and peppers. Reduce the heat to medium. Add the remaining 1 tablespoon / 15 ml olive oil, followed by the onion, peppers and ¼ teaspoon salt. Cook for 8–10 minutes. The onion should be soft, the peppers should bend easily under the spoon, and their raw grassy smell should have become noticeably sweeter.
  5. Add the garlic and thyme. Stir for 30–60 seconds. As soon as the garlic aroma rises clearly from the pan, add the tomatoes.

Reduce the Tomatoes, Then Recombine

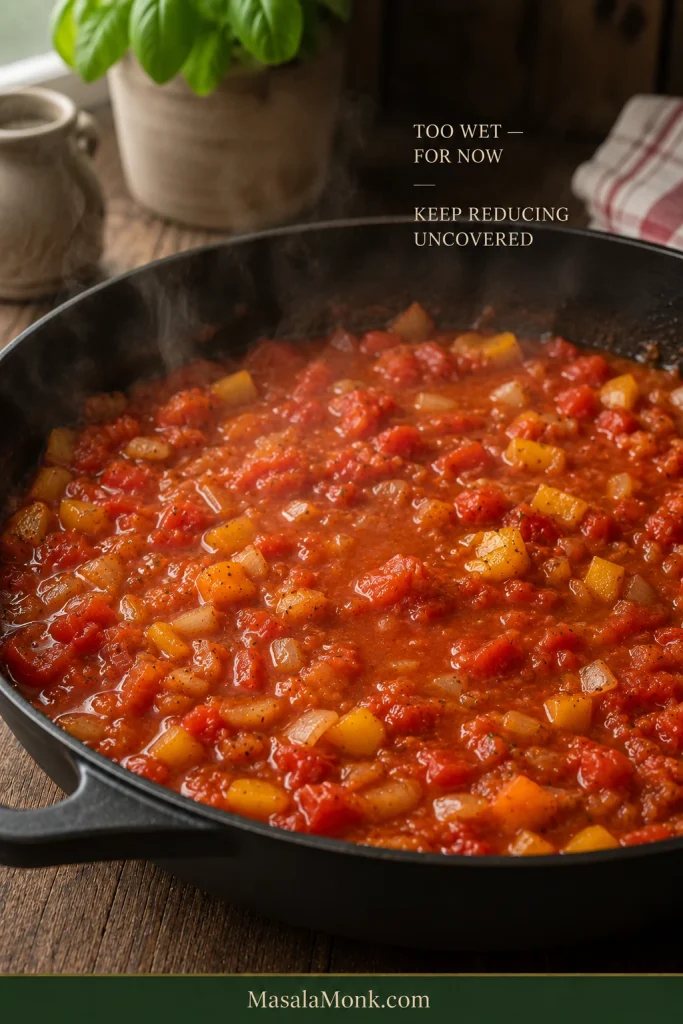
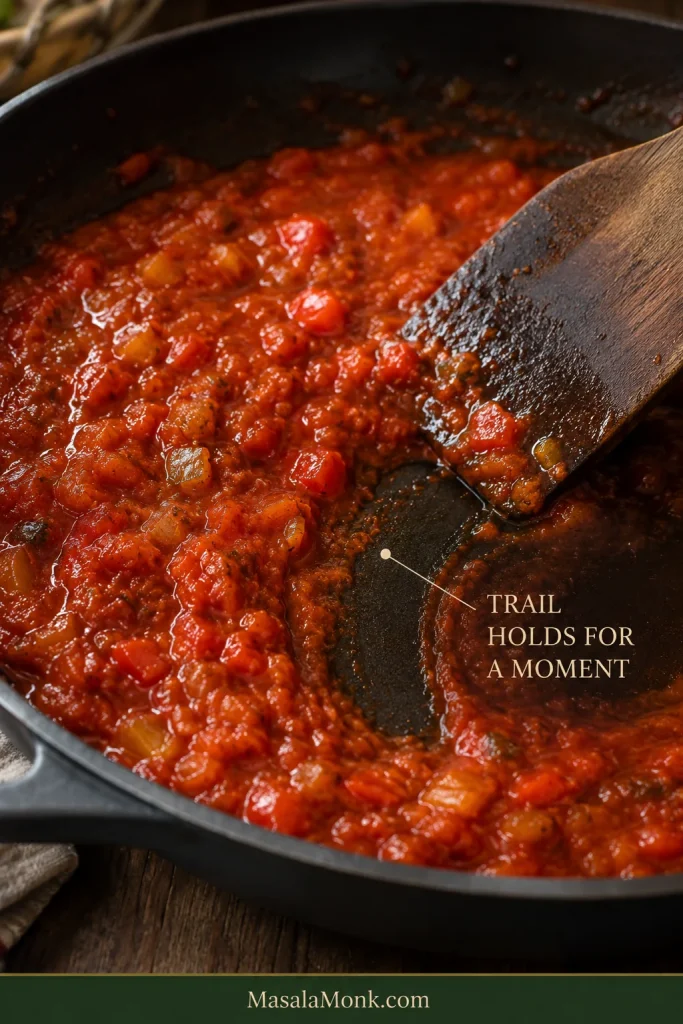
  1. Reduce the tomatoes. Add the tomatoes, black pepper and another ½ teaspoon salt, leaving the remaining salt for the final tasting. Bring to a lively simmer and cook uncovered for about 10–15 minutes, stirring occasionally. Very juicy tomatoes may need longer. Continue until the tomatoes have relaxed into a loose sauce and a spatula dragged across the bottom leaves a trail for a moment before the liquid closes behind it.
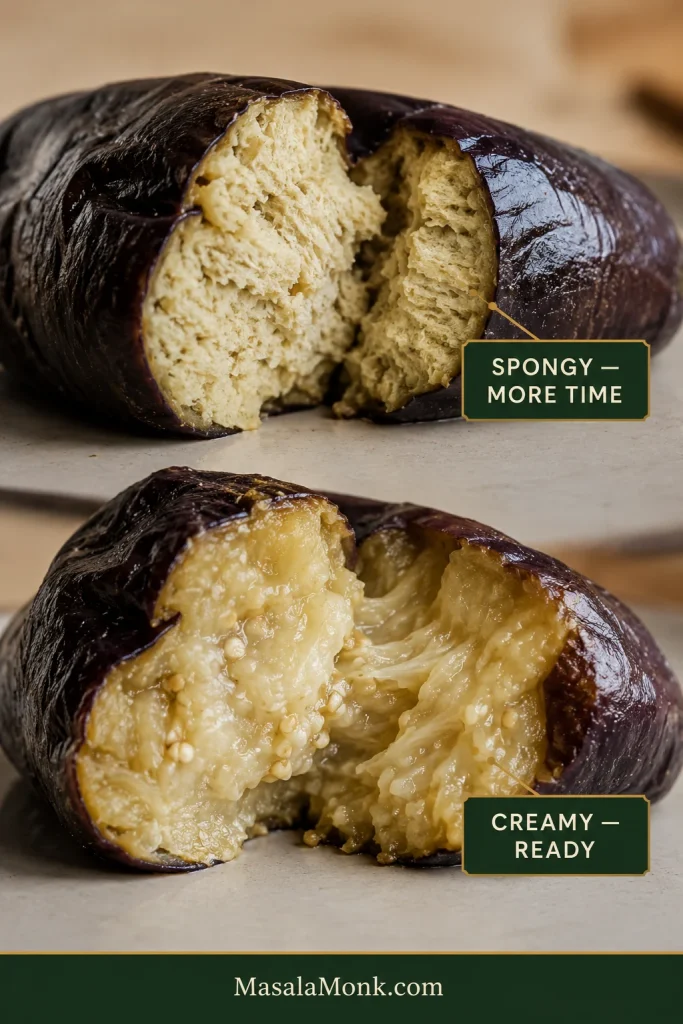
  2. Return the eggplant. Fold it into the tomato base. Lower the heat to a gentle simmer and cook uncovered for 8–10 minutes. Bite or press a piece when you are unsure: the center should be creamy, with no dry or cottony resistance.
  3. Return the zucchini. Fold it in gently and cook for another 3–5 minutes, just until tender. Stir only as much as necessary from here on so the softened vegetables hold together.
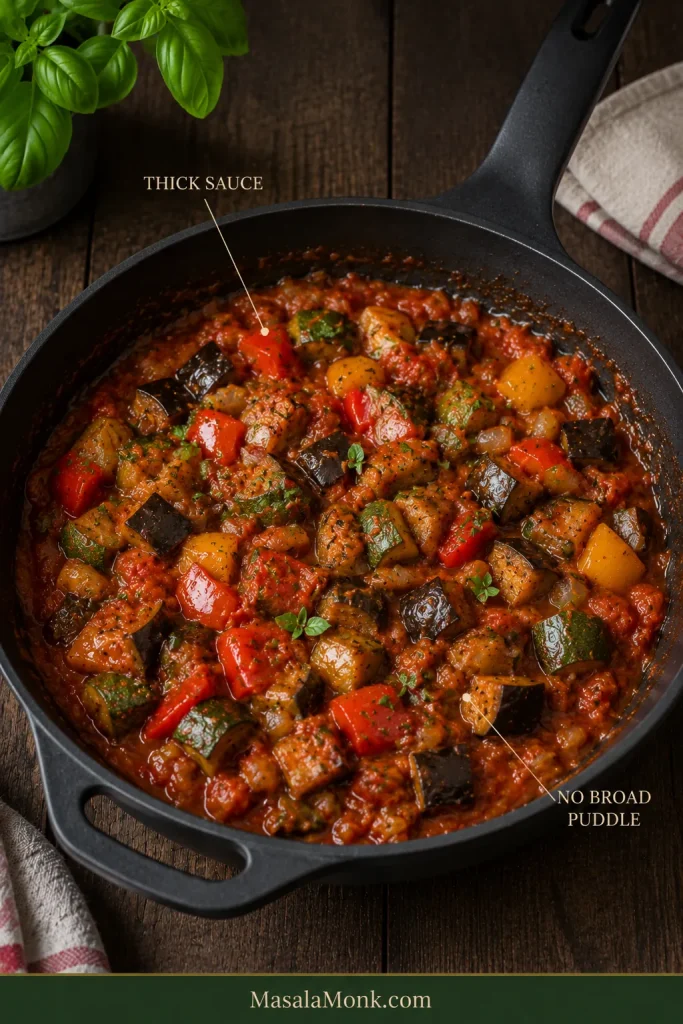
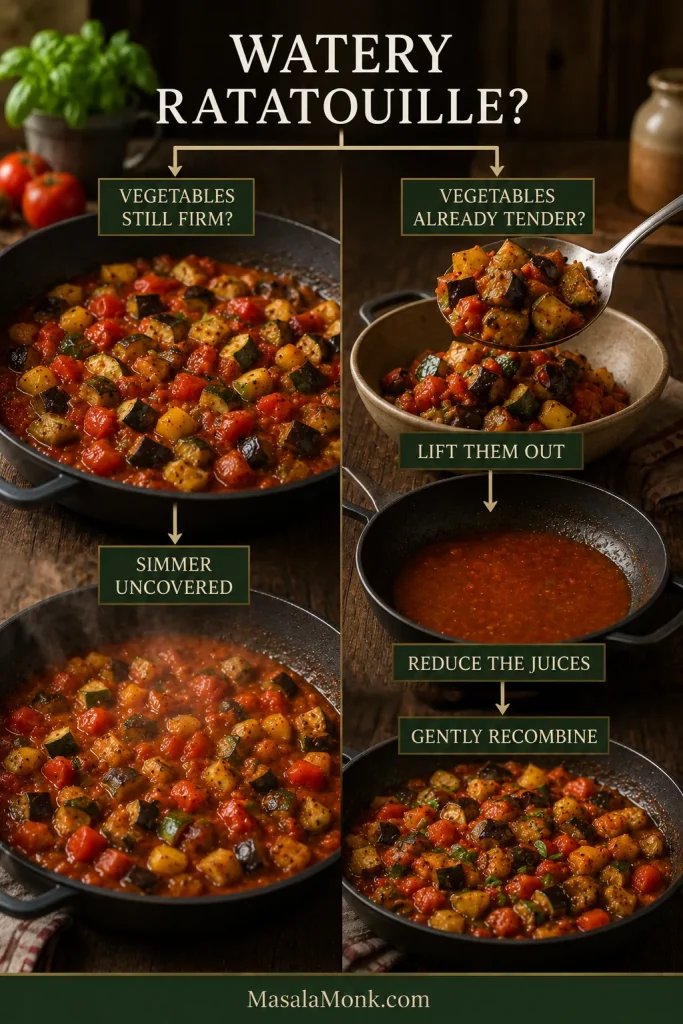
  4. Check the consistency. Tilt the pan. A small amount of thick sauce should move around the vegetables; you should not see a broad puddle of thin red juice. If the vegetables still need cooking, continue simmering uncovered. If they are already tender but the sauce is thin, lift them out with a slotted spoon, reduce the liquid on its own until glossy, then gently fold the vegetables back in.
  5. Finish and rest. Remove any thyme stems and taste for salt. If the ratatouille tastes rich but slightly dull, add 1 teaspoon red wine vinegar. Taste again and add the second teaspoon only if it still needs brightness. Fold in most of the basil, remove the pan from the heat and rest for 15 minutes. Finish with the remaining basil.

Recipe Notes

  • Fresh or canned tomatoes: ordinary ripe tomatoes need no routine peeling or seeding. Use canned whole peeled tomatoes with their juices when fresh ones are disappointing. Judge either version by the consistency of the sauce.
  • Optional eggplant salting: unusually mature, heavily seeded or wet eggplant can be salted with about ½ teaspoon of the measured salt for 20–30 minutes, then blotted very thoroughly. Skip the ½ teaspoon normally added with the eggplant in Step 2 and adjust the final seasoning by taste.
  • Water: the vegetables and tomatoes normally provide enough. If the tomato base begins catching before it has reduced, add only 1–2 tablespoons / 15–30 ml at a time.
  • Extra oil: the reserved tablespoon is there for an unusually absorbent batch of eggplant. Add it only if the pieces begin catching or scorching.

Check Doneness · Troubleshooting · Back to Top

Need Help With Your Ratatouille?

Classic Ratatouille Is the Rustic Stovetop Dish

Traditional ratatouille does not follow one fixed cooking sequence. Some versions cook the vegetables separately; others add them successively. Both approaches recognize the same thing: eggplant, zucchini, peppers and tomatoes do not soften or release water at the same rate. This recipe keeps one pan but gives the vegetables separate turns.

Classic ratatouille is a rustic Provençal vegetable stew; the neat spiral of thin vegetables popularized by the movie is a different refined preparation commonly associated with confit byaldi. If the immaculate vegetable spiral from the film is what you pictured, this pan will look much more relaxed and rustic. That’s the point: everyday stovetop ratatouille is about tender vegetables coming together in the pan, not maintaining a carefully arranged pattern.

Comparison of chunky classic stovetop ratatouille in a pan and a movie-style preparation made from thin overlapping vegetable slices.
The different cuts also change the eating experience. Chunky stovetop ratatouille gives varied textures in each spoonful, while thin layered vegetables create a more even, refined bite.

Ratatouille comes from Provence in southern France and is particularly associated with Nice. Classic versions usually bring together eggplant, zucchini or courgette, peppers, tomatoes, onion, garlic, olive oil and Mediterranean herbs. Some cooks keep the vegetables fairly distinct; others continue toward a soft, almost confited consistency. There is room for both.

Lidia Bastianich’s classic ratatouille on PBS, for example, sautés the vegetables separately before bringing them together for a much longer final cook. Here we keep that useful principle while doing the work in one pan.

Ingredients That Change the Result

The formula itself is simple. What matters most is the quality of the vegetables and how each one behaves in the pan.

Eggplant: Choose Firm, Then Cook Until Creamy

Eggplant or aubergine gives ratatouille much of its soft body. Choose one that feels firm and heavy for its size, with smooth skin. Leave the skin on; it helps the pieces hold together.
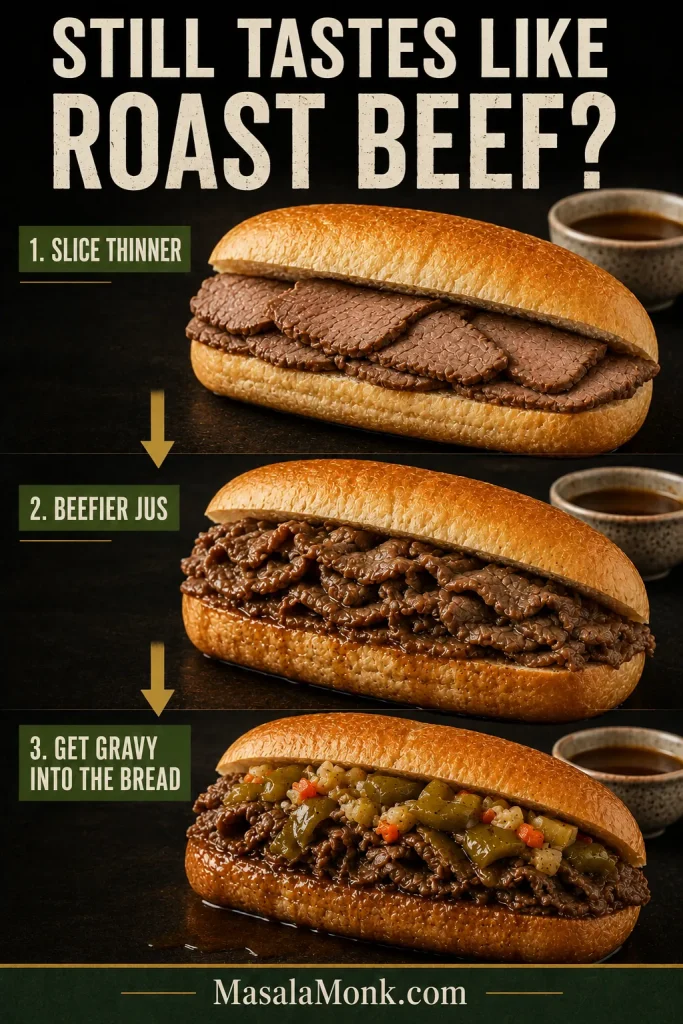
Fresh firm dark-purple eggplant with compact pale flesh beside a more mature eggplant with numerous developed seeds and a wetter interior.
Seediness is a better warning sign than size alone. A large eggplant with compact pale flesh can cook beautifully; a loose, heavily seeded center is more likely to need extra attention.

The important change happens inside. Raw eggplant has a dry, spongy bite. Properly cooked eggplant gives easily under the spoon and feels creamy through the center—the same tenderness cue that matters in baked Eggplant Parmesan.

Comparison of eggplant showing a pale dry fibrous center labeled “Spongy — more time” and a soft glossy center labeled “Creamy — ready.”
Surface color cannot tell you whether eggplant is done. A beautifully browned piece can still be spongy inside, so judge the softness of the center instead.

Zucchini: Choose Small or Medium When You Can

Small and medium zucchini have firmer flesh and smaller seed cavities, so you can simply cut them whole. An enormous garden zucchini with a pale, heavily seeded core benefits from having that loose watery center scooped out first.

Small zucchini with compact flesh beside an oversized zucchini split lengthwise while a spoon removes its loose watery seed core.
Use the center as your guide, not just the ruler. Scoop an oversized zucchini only when its seed core has become loose and watery enough to dilute the ratatouille.

Tomatoes: Use the Ones That Taste Good

Fresh tomatoes earn their place when they are fragrant and flavorful before cooking. Ordinary ripe tomatoes can be chopped whole; blanching, peeling and routine seeding only add work.

Outside peak tomato season, good canned whole peeled tomatoes often give you a deeper, more reliable base—crush them by hand and pour in the juices too. If you have more ripe tomatoes to use, they can go into this fresh tomato sauce.

Ripe fresh tomatoes beside whole peeled canned tomatoes sitting in their juices.
Fresh versus canned tomatoes changes the journey more than the destination. Whichever you use, keep reducing until the sauce coats rather than judging doneness by a fixed cooking time.

Olive Oil, Peppers, Onion, Garlic and Herbs

Measure the olive oil before you start. Eggplant can make a pan look surprisingly dry for a few minutes, and having a measured amount makes it easier to resist pouring endlessly.

Red, yellow and orange peppers bring sweetness. Onion builds the base underneath them. Add the garlic once both have softened so it can perfume the pan without scorching. Thyme handles the simmer happily; basil tastes fresher near the end.

Ratatouille Substitutions That Still Make Sense

One missing vegetable does not have to derail dinner. The useful question is what the swap changes.

Change What to do What changes
No eggplant Increase zucchini and peppers for a lighter stew. Dense squash can add body but needs a longer head start. There is no exact substitute for eggplant’s rich, creamy texture. Winter squash also adds sweetness and takes the dish farther from classic ratatouille.
No zucchini Increase eggplant and peppers modestly. The finished dish will be richer and heavier.
No peppers Simply leave them out. You lose some sweetness and fruity pepper flavor.
Yellow summer squash Use it in place of zucchini. Very little changes; give it the same short cooking window.
No good fresh tomatoes Use canned whole peeled tomatoes with their juices. The reduction time may change, but the flavor can be better than with poor fresh tomatoes.
No fresh thyme Use about 1 teaspoon dried thyme or 1–1½ teaspoons herbes de Provence. Dried herbs are more concentrated, so use them with restraint.

Take away the tomatoes along with several of the defining vegetables and you’re moving toward another kind of vegetable stew. It may still be excellent; it does not need ratatouille’s name to be worth eating.

How to Make Ratatouille for Two

Halve the ingredients and keep the same sequence. Start with about 2½ tablespoons olive oil and keep another teaspoon or two nearby in case the eggplant starts catching.

Don’t shrink the cooking surface too aggressively. A tiny deep saucepan traps moisture more readily than a broad skillet even with half the vegetables.

The smaller batch may reduce faster once the tomatoes go in. Follow the appearance of the sauce instead of cutting every cooking time exactly in half.

Three Things Decide the Texture Before Cooking Starts

Cut the main vegetables around ¾ inch / 2 cm. Tiny dice soften quickly and disappear more readily into the sauce. Very large pieces keep more structure but need considerably longer. Two centimeters gives you a forgiving middle and keeps the chopping reasonable.

Eggplant, zucchini and bell pepper cut into roughly 2-centimeter chunks beside a ruler and 3/4-inch measurement guide.
Consistency matters more than perfect 2 cm cubes. A few uneven pieces are harmless; mixing tiny dice with large chunks creates vegetables that reach tenderness at completely different times.

Use a broad cooking surface. A broad surface gives steam somewhere to escape instead of trapping it around the vegetables.

Listen as well as look. Eggplant or zucchini hitting a properly heated pan should sizzle. A deep mound that quickly turns quiet and steamy needs more space.

Cooking Stages · Check Doneness

How Ratatouille Changes in the Pan

Times are useful checkpoints. The vegetables give better signals.

Watch the eggplant first. For a few minutes it can look alarmingly thirsty while the center is still spongy, which is exactly when another pour of oil feels tempting. Give it time. As the pieces brown and begin to soften, that urge to add more oil fades.

Eggplant chunks browning in a mostly dry-looking sauté pan with the words “Looks thirsty? Give it time.”
A dry-looking pan does not automatically mean the eggplant needs more oil. Give the flesh time to soften before deciding whether that reserved spoonful is actually necessary.

Zucchini needs almost the opposite treatment. Take it out while it still seems slightly underdone. That firmness gives it enough room to finish later without disappearing into the stew.

Chunky zucchini pieces lightly browned in a sauté pan with an instruction to remove them while still firm.
The brief sauté is for surface flavor, not full doneness. The center should still resist slightly when the zucchini leaves the pan.

Then the tomatoes usually make the pan look worse before they make it look better. Juice spreads across the bottom, steam lifts from the surface, and for a while everything looks far too wet. Keep cooking. The tomato flesh slumps, the color darkens and turns glossier, and the sharp raw-tomato smell softens.

Tomatoes, softened onions and bell peppers simmering in abundant loose tomato liquid with steam rising from a wide pan.
Watch the direction of travel, not one wet-looking moment. If the tomato liquid is steadily reducing and becoming glossier, the ratatouille is moving toward the right consistency.

When the Tomatoes Start Behaving Like Sauce

Drag a spatula across the bottom. Early on, liquid rushes straight back into the trail. Later, the path stays visible for a moment before the sauce closes behind it. That same trail test works whenever you reduce a tomato sauce, including marinara: thin sauce usually needs evaporation before it needs another ingredient.

Reduced tomato base in a dark pan with a spatula dragged through the center, leaving a visible trail.
The spatula trail works across tomato types. Fresh and canned tomatoes can release very different amounts of water, but both are ready when the reduced sauce briefly holds a path.

When the eggplant returns, the pan may still look like several cooked vegetables sharing a sauce. A few minutes later the tomato begins settling around the pieces, the peppers soften into the background, and the zucchini finishes gently. Suddenly it looks like ratatouille.

From here, fold rather than churn. Soft vegetables can be broken with a spoon even when the cooking itself is exactly right.

Check Doneness · Back to Recipe

The Pan, Not the Timer, Tells You When Ratatouille Is Done

Start checking around the suggested times, then stop when the food reaches these cues. No single vegetable decides doneness; the useful window is when the slowest pieces are tender but the quickest-cooking ones have not started falling apart.

Final Consistency: Read the Whole Pan

Look at Ready when…
Eggplant The center is creamy and yielding with no dry, cottony resistance
Zucchini Tender enough to cut easily with a spoon while still holding its shape
Peppers Soft and sweet with no raw crunch
Tomato Thick enough to coat the vegetables without running freely around them
Pan bottom A small amount of sauce remains; there is no broad puddle of thin red liquid
Whole dish The flavors have come together, but the spoon still gives you different textures
Finished ratatouille in a tilted pan with thick sauce surrounding distinct vegetables and very little free liquid.
Stop just before the dish looks completely settled. Ratatouille tightens slightly during its rest, so a pan that is perfect over the heat can become too dry on the table.

Zucchini: Stop Before It Collapses

Like your ratatouille softer? Continue the gentle simmer. Some traditional versions go much farther toward a deep, almost jammy consistency. Our stopping point is a preference, not a universal rule.

Three stages of cooked zucchini labeled “Remove here,” “Finished here” and “Too far,” progressing from firm pieces to tender pieces and then collapsing pieces.
Zucchini texture changes before its color changes dramatically. That is why firmness is a much better doneness cue than waiting for the pieces to look visibly different.

Troubleshooting · Back to Recipe

Ratatouille Troubleshooting

Before adding ingredients or automatically cooking longer, look at what is actually wrong. Most ratatouille problems have a specific fix.

Decision guide showing watery ratatouille simmered uncovered when vegetables are firm, or tender vegetables removed while excess juices reduce before recombining.
A watery ratatouille is really two possible problems: excess liquid needs more heat, while vegetables that are already tender need protection from that extra cooking.

Texture and Moisture Problems

Problem Fix it now Why it happened / next time
Thin red liquid pooling Vegetables still firm? Simmer uncovered. Already tender? Lift them out, reduce the liquid alone until glossy, then fold them back in. Too much moisture was trapped. Give the vegetables more room and reduce the tomato base farther before recombining.
Eggplant is spongy Give it more time in the tomato sauce until the center becomes creamy. The eggplant is undercooked. Let it begin softening properly during the first browning.
Eggplant seems to absorb all the oil Turn the pieces and give them time. Use the reserved oil only if they begin to scorch. Some absorption is normal; weak heat can exaggerate it. Measure the oil and use active sautéing heat.
Finished ratatouille is greasy Spoon off obvious excess oil if necessary. Too much oil was added, often in repeated pours while the eggplant looked dry. Start with the measured amount.
Zucchini is collapsing Stop cooking. The flavor can still be excellent even if the zucchini has lost its shape. It cooked too long or returned too early. Brown briefly and add it back near the end.

Flavor and Seasoning Problems

Problem Fix it now Why it happened / next time
Vegetables are pale and bland Reduce loose liquid first, then correct the salt before adding more herbs. The vegetables steamed or excess water diluted the flavor. Use stronger heat, more pan surface or smaller batches.
Ratatouille tastes rich but flat Correct the salt first, then add 1 teaspoon red wine vinegar and taste again. The finished pan needs seasoning or a touch of acidity.
Tomato tastes harsh If the vegetables still need time, continue uncovered. If they are tender, remove them and reduce some sauce separately. Check salt before trying a tiny pinch of sugar. The tomato may be under-reduced or unusually acidic. Better tomatoes and sufficient reduction help next time.
Garlic tastes bitter Burned garlic is difficult to rescue; dilution may soften the bitterness. The garlic scorched. Add it only after the onion and peppers have softened.

Once the sauce is right, all of that diagnosis disappears from the plate. What remains is the good part: sweet pepper, soft eggplant, zucchini, basil and tomato in the same warm spoonful.

Overhead view of rested ratatouille in a dark pan with visible eggplant, zucchini, peppers, tomato sauce and fresh basil.
After resting, the dish should look unified without becoming uniform: tomato fills the gaps, while the shapes and colors of the vegetables still reveal what went into the pan.

Back to Recipe · Back to Top

What to Serve With Ratatouille

Serve ratatouille with crusty bread, polenta, rice or eggs for a vegetarian meal, or use it as a side for chicken, fish, lamb or sausages.

Once the pan is where you want it, ratatouille becomes wonderfully undemanding. Spoon it beside dinner, pile it onto bread, or let the vegetables become the meal.

Make it the main: add crusty bread or sourdough focaccia, creamy polenta, rice, couscous, white beans or chickpeas. A fried or poached egg makes it more substantial without taking attention away from the vegetables.

Chunky ratatouille spooned over pale creamy polenta in a shallow ceramic bowl and finished with basil.
Polenta works especially well with a strongly reduced batch of ratatouille. Its mild creaminess softens concentrated tomato and olive-oil flavors without competing with the vegetables.

Serve it as a side: simply cooked chicken, fish, lamb, sausages or roasted meat all leave plenty of room for the ratatouille.

Or make lunch out of it: spoon warm ratatouille over crisp toast and add a fried egg. The tomato and olive oil soften the top of the bread while the edges stay crisp, and the yolk runs straight into the vegetables. Goat cheese or another tangy cheese is good here too, and a smaller amount of ratatouille can go into an easy frittata.

Thick crisp toast topped with chunky ratatouille and a fried egg, with runny golden yolk flowing over the vegetables.
Crisp toast is especially useful with next-day ratatouille: as the vegetables become softer and more integrated overnight, the bread puts a fresh layer of texture back into the meal.

Ratatouille does not need to be piping hot; it is good warm, at room temperature or chilled. During the 15-minute rest, the bubbling settles and the sauce thickens slightly around the vegetables, while the olive oil, herbs and tomato become easier to taste. If serving leftovers cold, let them lose the deepest refrigerator chill first.

Make Ahead, Store, Freeze and Reheat

Yes—ratatouille is excellent made a day ahead. The vegetables become softer, but the tomato, garlic, herbs and olive oil taste more integrated after a night in the refrigerator.

If you’re cooking specifically for the next day, hold back most of the basil and add it just before serving so its fresh flavor does not disappear into the overnight rest.

Day one gives you clearer textures. Day two gives you deeper integration. Neither is a consolation prize.

Fridge, Freezer and Reheating at a Glance

For the practical timeline, keep the three jobs separate: chill leftovers promptly, freeze airtight portions you will not use soon, and reheat only what you plan to eat.

Three-part guide showing ratatouille refrigerated in a covered container, frozen in an airtight container and gently reheated in a pan, with storage times and 165°F or 74°C reheating guidance.
Shallow containers help leftovers cool more quickly and make it easier to reheat only the amount you actually plan to serve.

Refrigerate and Reheat Gently

Refrigerate leftovers within 2 hours of cooking—or within 1 hour when the surrounding temperature is above 90°F / 32°C—in covered, preferably shallow containers. USDA leftover guidance recommends using refrigerated cooked leftovers within 3–4 days and reheating them to 165°F / 74°C.

Reheat only the portion you plan to eat. The microwave works well for a single serving because the heating is brief. On the stovetop, use low to medium-low heat and stir only as much as necessary. Once it is hot, stop. Yesterday’s zucchini does not need another fifteen-minute simmer.

An oilier appearance after reheating does not necessarily mean the original batch contained too much oil. Extra evaporation removes water while the olive oil remains, making it more visible.

Can You Freeze Ratatouille?

Yes. Freeze it in an airtight container and use it within about 2–3 months for best quality. Expect softer vegetables after thawing, especially the zucchini.

That softer texture works well in pasta, eggs, soup or on toast. A thawed batch that has become too soft to enjoy on its own can also become the start of a vegetable soup; minestrone takes the tomato-and-vegetable idea in a heartier beans-and-pasta direction.

Leftover Ideas · Back to Recipe

Five Good Ways to Use Leftover Ratatouille

Leftover ratatouille can become pasta sauce, a toast topping, frittata filling, a spoonful over polenta, or the beginning of a vegetable soup.

Rigatoni tossed with leftover ratatouille, with visible eggplant, zucchini and red and yellow peppers coated in tomato sauce and finished with basil.
Short pasta has a practical advantage here: chunky eggplant, zucchini and peppers settle between the tubes and ridges instead of slipping away from long strands to the bottom of the bowl.
  1. Toss it with pasta. Warm the ratatouille, loosen it with some pasta water and fold it through. Basil, Parmesan or goat cheese can finish it. For something cheesier and more substantial, the same vegetables also work beautifully in vegetable baked ziti.
  2. Pile it onto toast. Add an egg or tangy cheese and lunch is essentially done.
  3. Put it into eggs. Warm it under fried or poached eggs, or use a modest amount as a cooked vegetable filling for an omelet or frittata.
  4. Spoon it over polenta. Soft vegetables and concentrated tomato are particularly good against creamy polenta.
  5. Turn a very soft batch into sauce or soup. Crush it into a chunky pasta sauce or blend some of it into a smoother vegetable base. The texture changed; dinner did not fail.

When the Vegetables Come Together

When the pan is right, you don’t really need the clock anymore. The tomato has thickened around the vegetables, the eggplant gives under the spoon, the peppers are sweet, and the zucchini has made it to the end intact.

Give it fifteen minutes to settle. By then the sauce has gathered around the vegetables, the steaming heat has eased, and the ratatouille is ready to eat.

If you make it, tell me where you like your ratatouille to land: vegetables still clearly distinct, or soft and deeply confited?

Back to Recipe · Back to Top

Posted on Leave a comment

French Dip Sandwich Recipe: Easy Roast Beef With Au Jus

French dip sandwich half held above a bowl of brown au jus, with the lower cut edge visibly soaked and thin roast beef and melted provolone inside.

The first bite of a good French dip gives you several things at once: bread with a little chew, folds of hot roast beef, melted provolone and warm, oniony jus soaking into the cut edge.

The disappointing version loses that balance fast. Thin roast beef tightens from too much heat, the jus tastes saltier than savory, or the bread softens long before you wanted it to.

A French dip is one of the few sandwiches you keep finishing as you eat it. How much jus reaches the bread—and when—changes the whole experience. Keep some chew and dunk each bite as you go, or deliberately soften the roll for a wetter, old-school version. Both can be excellent. The important part is that you control the soak.

This easy version starts with sliced cooked roast beef, builds a quick jus while the rolls toast, and puts four substantial sandwiches on the table in about 30 minutes. No whole roast or long braise—just hot beef, good bread, melted cheese and a bowl of jus that changes the sandwich bite by bite.

Quick Answer: The Easy French Dip Formula

Use thinly sliced cooked roast beef, a 6-inch / 15-cm roll that can absorb jus without falling apart, and mild provolone. Plan on 4–6 oz (115–170 g) beef per person; 5 oz / 140 g makes a generous sandwich. For four sandwiches, make about 2½ cups / 600 ml jus—enough for individual dipping bowls plus some for warming the beef.


Make It Now: Easy French Dip Sandwiches With Au Jus

Recipe at a Glance

  • Yield: 4 substantial sandwiches
  • Prep time: 10 minutes
  • Cook time: about 20 minutes
  • Total time: about 30 minutes

Equipment

  • Medium saucepan
  • Rimmed baking sheet
  • Tongs
  • Sharp knife, if slicing leftover roast beef
  • 4 small bowls or ramekins for the jus
  • Fine-mesh strainer, optional

Ingredients

For the Au Jus

  • 1 tablespoon (14 g) unsalted butter
  • 1 large yellow onion, about 7 oz (200 g), halved and thinly sliced
  • 2 garlic cloves, about 6 g, finely chopped
  • 3 cups (710 ml) low-sodium beef stock
  • 2 teaspoons (10 ml) Worcestershire sauce
  • ½ teaspoon dried thyme, or 1 teaspoon fresh thyme leaves
  • ½ teaspoon freshly ground black pepper
  • 1 tablespoon (15 ml) dry sherry, optional
  • Kosher salt, only if needed after tasting

For the Sandwiches

  • 1¼ lb (567 g) thinly sliced cooked roast beef
  • 4 French, hoagie or Italian-style rolls, about 6 inches / 15 cm each
  • 2 tablespoons (28 g) softened unsalted butter
  • 8 thin slices mild provolone, about 4–6 oz / 115–170 g total depending on thickness
Overhead arrangement of sliced roast beef, sandwich rolls, provolone, onion, garlic, butter, beef stock, Worcestershire sauce, thyme, black pepper and sherry.
Low-sodium stock gives the jus room to reduce without turning salty; Worcestershire, roast beef and cheese bring additional seasoning once the sandwich comes together.
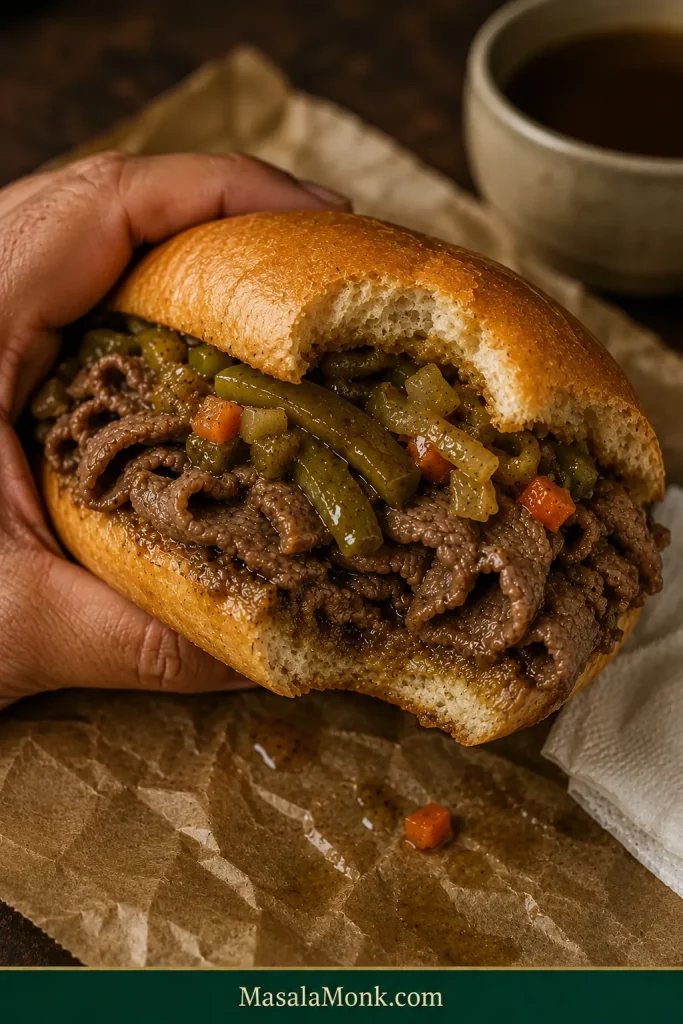
Instructions

1. Start the Au Jus

Melt 1 tablespoon butter in a medium saucepan over medium heat. Add the onion and cook for 8–12 minutes, stirring occasionally, until soft and lightly golden around some of the edges.

Sliced onions in a pan changing from pale and firm to soft, translucent and lightly golden around the edges.
For this quick jus, lightly golden edges are enough. Once the onions bend easily and smell sweet, deeper caramelization adds more time than the sandwich needs.

Add the garlic and cook for 30 seconds. If using sherry, pour it in and let it bubble briefly while you scrape up the browned bits from the bottom of the pan.

Add the beef stock, Worcestershire sauce, thyme and black pepper. Bring to a gentle boil, lower the heat and simmer uncovered for 8–10 minutes, until the broth tastes fuller and more concentrated.

Thin brown onion au jus gently simmering in a saucepan with small bubbles and visible steam.
Quiet bubbling gives you more control. A hard boil reduces the jus faster, so salt and other concentrated flavors can overshoot before you notice.

While the jus simmers, toast the rolls in Step 2. Working on both at once keeps the meal comfortably around the 30-minute mark.

2. Toast the Rolls and Melt the Cheese

Heat the broiler (high, if adjustable) and position an oven rack about 5–7 inches / 13–18 cm from the element, if your oven allows. Split the rolls and butter the cut surfaces.

Arrange them cut-side up on a rimmed baking sheet and broil for 1–3 minutes, until golden and lightly crisp while the centers still give when pressed.

Three split sandwich rolls showing pale under-toasted bread, a golden toasted surface and an overly dark toasted surface.
Aim for a golden cut face: enough toast to resist the first dip, but not so much that the roll becomes hard to bite.

Place 1 slice provolone on each cut half and return the rolls to the broiler for 30–60 seconds, just until the cheese turns glossy and melts against the bread. Stay close; a broiler can go from pale to scorched while you’re reaching for the tongs.

Pale provolone melted smoothly over the golden cut surface of a toasted sandwich roll.
Melt the provolone before adding the beef so the delicate slices never need a second trip under the broiler.

No broiler? Toast the rolls in a preheated 425°F / 220°C oven for 5–7 minutes, adding the cheese for the final 1–2 minutes.

3. Finish the Jus and Warm the Beef

Return to the saucepan. You will usually have around 2½ cups / 600 ml jus, though pan width and simmer strength will affect the exact yield. Taste before adding salt.

Strain out the onions for a clearer dipping bowl and save them for the sandwiches. Leave them in and the jus becomes more rustic and onion-forward.

Turn the heat to low. Add the ready-to-eat deli roast beef in manageable batches and separate the slices gently with tongs. Warm until the meat loses its refrigerator chill and relaxes into soft folds, usually 1–2 minutes. Avoid a hard boil.

Lift the beef out and let excess jus drip back into the saucepan. For higher-risk diners, heat deli meat to 165°F / 74°C or steaming hot; see the food-safety note below.

Tongs lifting thin folded roast beef from hot brown au jus, with liquid dripping back into the saucepan.
Look for relaxed, glossy folds rather than curled edges. Once the beef is hot and supple, get it out of the jus.

4. Build the Sandwiches

Divide the beef among the four rolls, using about 5 oz / 140 g per sandwich. Pile the slices in loose folds. The layers stay tender and catch pockets of jus between them.

Tongs placing thin folded roast beef along a toasted roll already lined with melted pale provolone.
Stagger the slices instead of stacking them flat. The beef spreads from end to end, and fewer long slices pull out with the first bite.

Add some of the reserved onions if using, close the rolls and serve while everything is still warm.

Finished French dip sandwich cut into halves on a plate beside a small ramekin of brown au jus.
Keeping the jus beside the sandwich preserves the bread’s starting texture until you decide how wet each bite should be.

5. Serve With Hot Jus

Divide the remaining hot jus among four small bowls, aiming for about ½ cup / 120 ml per person. Serve immediately and dip each bite as deeply as you like—the first one is especially good while the bread still has some toast left in it.

Close-up of a French dip sandwich edge with darker au-jus-soaked crumb below and golden toasted bread above, with roast beef and melted provolone visible.
The exposed crumb softens first because the crust absorbs more slowly. A shallow dunk adds tenderness without sacrificing the roll’s structure.

French Dip Guide

Best beef · Bread & cheese · Au jus · Dip styles · Troubleshooting · Variations · Sides · For a crowd · Storage & reheating · FAQs

Best Meat for French Dip

Standing at the deli counter? Ask for roast beef sliced thinly, but not shaved into wispy pieces. Thick slices eat more like little steaks; meat shaved too finely can break apart as it warms.

Three portions of cooked roast beef showing thick slices, ideal thin flexible slices and very finely shaved pieces.
Thin, intact slices give the jus plenty of surface area while still behaving like slices when warmed, folded and bitten.

A good slice should fold without immediately tearing. It should droop over your fingers rather than stand stiff. Those flexible folds stay tender and hold jus between the layers when you bite.

One thin cooked roast beef slice draped naturally over a person’s fingers without tearing.
The fold test predicts warming too: flexible slices separate easily in hot jus, while stiff pieces stay slab-like.

Plain or lightly seasoned roast beef gives the oniony jus and cheese room to show up. Heavy smoke and thick pepper crusts can take over quickly.

How Much Roast Beef per Sandwich?

Plan on 4–6 oz (115–170 g) cooked beef per person. Four ounces gives you more bread and jus in each bite. Five ounces is a generous everyday portion. At six ounces, the beef becomes unmistakably the main event.

For four people, buy 1–1½ lb / 454–680 g. The 1¼ lb / 567 g in the recipe lands neatly in the middle.

Three identical open rolls containing increasing amounts of thin roast beef labeled 4 ounces, 5 ounces and 6 ounces.
About 5 oz / 140 g fills a 6-inch roll generously without forcing it open; go lighter or heavier depending on whether bread or beef should lead.

Ready to cook? Go straight to the French Dip recipe and start the jus.

Leftover Roast Beef and Prime Rib

Leftover roast beef works beautifully. Chill it before slicing if necessary; cold meat firms up and is easier to cut thinly across the grain.

Prime rib makes a richer sandwich, especially with some of its defatted drippings in the jus. Horseradish or spicy mustard keeps those richer bites lively.

Starting With Raw Beef?

Match the cut to the cooking method. Top round or rump suits a sliced-roast approach. Chuck and shoulder need a longer, moist cook. Ribeye gives you a tender steak-style French dip at a much higher price.

Got a shoulder roast instead? Our beef shoulder roast Crock Pot guide covers the slower route for chuck shoulder, arm roast and shoulder clod.

Best Bread and Rolls for French Dip

Once the beef is tender and thin, the roll decides what the jus feels like. It needs to absorb plenty without becoming unpleasant to hold or bite. At the store, give it a gentle squeeze. The crumb should spring back and the crust should yield easily when you bite through it.

A hand gently pressing a soft French or hoagie roll, leaving a shallow indentation while the bread keeps its shape.
Deeply dented rolls may soften too fast; barely yielding rolls can stay tough. The sweet spot is soft, springy and still structured.
  • Plush French roll: soaks up plenty of jus and stays tender; ideal for a softer or pre-dipped sandwich.
  • Hoagie or sub roll: soft enough to soak, sturdy enough to hold together; a good middle ground between softness and structure.
  • Ciabatta: airier inside with more crust and chew; good for dipping bite by bite.
  • Thin-crusted baguette: crisp and slightly chewier, with more resistance at the bite.
Four breads with cut crumb visible: plush French roll, hoagie roll, ciabatta and thin-crust baguette, labeled for different dipping styles.
The strongest roll is not automatically the best. Choose first for absorbency, then for how much crust and chew you want after dipping.

Very hard artisan baguettes are a different matter. They may survive the jus beautifully while making the sandwich far more work than your jaw would like.

Aim for rolls around 6 inches / 15 cm long. If you want to make the bread too, these sourdough hoagie and sub rolls have the chew and structure for a generously filled sandwich.

Provolone, Swiss or Gruyère?

I would reach for provolone first: mild, smooth and easy to melt. Swiss tastes nuttier, while Gruyère brings more richness and is especially good with prime rib. Two thin slices per sandwich are plenty. Skipping cheese entirely lets the roast beef and jus stand on their own.

How to Make Better Au Jus for French Dip

The roll controls how quickly the jus gets in. The jus decides whether that soak is worth chasing.

Deli roast beef does not give you a roasting pan full of fresh meat juices, so this quick version starts with beef stock, onion, garlic, Worcestershire and herbs.

Lightly golden onions provide enough sweetness for a 30-minute sandwich. Cook them until soft and fragrant, add the stock, then simmer until the separate ingredients begin tasting like one savory broth. For fully caramelized onions, our French onion soup recipe takes the slower route.

Keep the jus thin enough to soak into the bread. Flour, cornstarch and gravy mix produce a heavier coating. Low-sodium beef stock gives you the most control; broth works too. Consommé starts more concentrated, so taste before adding more salt.

Two bowls comparing thin translucent brown au jus running freely from a spoon with thicker opaque gravy clinging to another spoon.
Au jus should move into the bread; gravy tends to remain on it. That difference in flow is why thickening the dipping sauce changes more than its appearance—it changes how the sandwich eats.

Taste a spoonful. If you would happily take another sip, the jus is probably ready for the sandwich. If all you notice is salt, it still needs balancing.

Using Roast Beef or Prime Rib Drippings

Have roast or prime-rib drippings? Separate excess rendered fat but keep the meat juices and browned bits. Add a splash of beef stock to the hot roasting pan, scrape up the fond, pour that liquid into a saucepan and add stock until you have the quantity of jus you need.

Roasting pan with browned fond and meat juices as stock is added and the browned bits are loosened from the pan.
Fond and fat are not the same thing. Keep the browned bits in the pan, remove excess rendered fat, then deglaze so the jus tastes beefy rather than greasy.

Strain it for a clear bowl, or keep the softened aromatics for a more rustic dip.

How Wet Should a French Dip Be?

Once the jus tastes right, the last decision is how much of it should reach the bread.

A French dip is supposed to get wet. The real question is how wet, and when.

Crisp-Edge, Dip-at-the-Table Style

This is the default method in the recipe above. Toast the cut surfaces, melt the cheese against the bread, fill the roll with hot beef and bring the jus to the table. The first dunk softens the cut edge while the rest of the roll still has some chew.

For a first French dip, I would start here. Everyone gets to decide how far to take it.

Soft, Pre-Dipped Style

Soft is its own style of French dip. Historic Los Angeles versions deliberately moisten the bread before serving, from a light dip to sandwiches that are thoroughly wet.

For this version, change the assembly slightly: do not melt the cheese onto the bread before dipping. Lightly toast the plain buttered roll—or leave a plush roll untoasted if it already has enough structure—then briefly dip one cut half in hot jus for a lighter sandwich or both halves for a softer one.

Add the hot beef and provolone immediately. Thin cheese will soften against the warm meat; for a fully melted finish, place the cheese over the beef and put the open sandwich under a hot broiler for 30–60 seconds before closing it.

Two French dip sandwiches side by side, one with golden structured bread and one with darker, softer bread soaked farther through with au jus.
A pre-dipped sandwich keeps absorbing jus while it waits, whereas a crisp-edge version is more forgiving if dinner is delayed. Match the dipping style to when you can actually serve it.

The dipped crumb becomes tender and deeply savory, almost custardy where the jus has soaked all the way through.

When Is a Pre-Dipped French Dip Too Soggy?

The bread has gone too far when it turns gummy, falls apart too early, or can no longer hold the filling. Let excess liquid drain from the beef, assemble close to serving, and adjust the dip to the roll in your hand.

Two soaked French dip sandwiches compared side by side: one with porous saturated bread holding its shape and one with compressed gummy bread collapsing around the filling.
If a pre-dipped roll sags before filling, shorten the dip or drain the beef more thoroughly. Once the crumb turns compressed and pasty, extra toasting will not restore it.

This is a good sandwich to finish at the table. Bring over the hot sandwiches and individual bowls of jus, then let everyone choose: careful edge dips, half the sandwich submerged, or progressively wetter bites as dinner goes on.

Five French dip sandwich sections showing progressively more au jus absorbed into the bread, from dry toasted crumb to thoroughly wet but intact bread.
Dipping depth changes more than wetness. As the jus travels farther through the crumb, you steadily trade toasted resistance for tenderness, until bread and beef begin to feel almost like one continuous bite.

French Dip Troubleshooting

Salty jus, tight beef and failing bread account for most French dip trouble.

ProblemWhat HappenedFix
Au jus tastes too saltyThe stock and other salty ingredients became too concentratedDilute gradually with unsalted or very low-sodium stock; use small additions of water if needed. For the balance cues, return to the au jus guide.
Au jus tastes weak or flatThe stock is mild or has not concentrated enoughSimmer a little longer; if it is still flat, add a small splash of Worcestershire or some defatted roast drippings rather than simply adding salt.
Deli roast beef turned tightIt spent too long at a hard boilLower the heat and stop once the slices are hot and supple; revisit the gentle warming step.
Bread falls apart immediatelyThe roll is too fragile or took on more liquid than it could handleUse a stronger roll, drain the beef briefly or shorten the pre-dip.
Bread stays too tough after dippingThe roll is overly hard or crustyChoose a more tender French or hoagie-style roll next time.

Easy French Dip Variations and Shortcuts

Leftover brisket: Sliceable brisket can stand in for roast beef if it still holds together rather than collapsing into shreds. Starting from raw? See our slow cooker brisket recipe.

Creamy horseradish: Stir 2 tablespoons mayonnaise with 1–2 teaspoons prepared horseradish, a squeeze of lemon and black pepper. Spread it thinly; the cool horseradish bite is especially good with richer beef.

Shortcut jus: Prepared au-jus mix works when dinner needs to move even faster. Dilute it according to the package directions and taste before adding anything else salty.

What to Serve With French Dip Sandwiches

Crispy homemade French fries with dill pickles or pepperoncini are the obvious classic. A few fries will probably find their way into the jus too, and there are worse things that can happen to a potato.

After several rich, dipped bites, cold creamy coleslaw or a sharp green salad tastes especially good. Roasted green beans or broccoli keep the plate lighter, while potato salad works well when you need a side that can be finished before the sandwiches.

French dip sandwich served with a bowl of au jus, French fries, creamy coleslaw, dill pickle and pepperoncini.
Think in contrasts: pickles and pepperoncini add acidity, cold slaw refreshes, and crisp fries bring crunch back after a softer jus-soaked bite.

French Dip for a Crowd

For every four people, plan on 1–1½ lb / 454–680 g cooked roast beef, 4 rolls and about 2½ cups / 600 ml prepared jus. Keep the components separate and build the sandwiches in batches so the bread stays ready for the jus at the table.

Put the hot jus into individual bowls. It turns serving into part of the meal and saves you from guessing whether everyone wants a cautious dip or a sandwich approaching full submersion.

Table set for four with four French dip sandwich portions, four individual bowls of au jus and several hands holding or dipping sandwiches.
Set out the jus only when the sandwiches are ready; keeping it hot until the last moment gives every diner a better first dip.

Make Ahead, Store and Reheat French Dip

French dip is easy to prep ahead as long as you stop before assembly. Make the jus, portion or slice the beef, and have the cheese ready in the refrigerator. Leave the rolls whole and dry. At serving time, reheat the jus, toast the bread, melt the cheese and warm the meat last.

Make-ahead French dip components kept separately: au jus to reheat, thin roast beef to warm last, provolone ready to melt and dry sandwich rolls kept away from moisture.
For the fastest finish, portion the beef and cheese before chilling so serving-time work is limited to reheating, toasting and assembly.

For leftovers, keep the beef, jus and cheese refrigerated separately and store the bread away from moisture. Cool the jus promptly in a covered container; if chilled roast drippings leave a firm cap of fat on top, remove the excess before reheating.

Refrigerate perishable food within 2 hours of serving—or within 1 hour when the surrounding temperature is above 90°F / 32°C. Most cooked leftovers should be used within 3–4 days. See the current USDA leftovers and food-safety guidance for the full recommendations.

Serving someone at higher risk from Listeria? People who are pregnant, aged 65 or older, or have weakened immune systems have a higher risk of serious illness. Current USDA guidance recommends heating deli meat to 165°F / 74°C or until steaming hot.

How to Reheat French Dip

Reheat the jus first. Previously cooked refrigerated beef should reach 165°F / 74°C; once safely hot, thin slices do not need to linger over high heat.

Toast the roll separately, melt the cheese, then rebuild the sandwich. Done in that order, yesterday’s French dip feels like a sandwich again instead of a container of reheated leftovers.

Continuous kitchen scene showing stored roast beef and jus, thin beef warming gently with hot jus, rolls toasting separately and a rebuilt French dip sandwich in the foreground.
Bread and beef need different kinds of heat. Dry heat restores the roll’s toast, while brief moist heat is gentler on thin roast beef. That is why rebuilding works better than reheating the assembled sandwich.

French Dip Sandwich FAQs

What is a French dip sandwich?

A French dip is a hot sliced-meat sandwich—most commonly roast beef—served with savory meat juices or jus for dipping. Depending on the style, the bread may be dipped before serving, dunked bite by bite at the table, or both.

Is a French dip sandwich actually French?

No. Despite the name, French dip is an American sandwich strongly associated with Los Angeles. Its exact origin is disputed, with more than one historic Los Angeles restaurant connected to the story.

What does “au jus” mean?

“Au jus” means “with juice” and refers to serving meat with its juices. When a French dip starts with a freshly cooked roast, those juices and pan drippings can form the heart of the dip. With deli roast beef, a seasoned beef-stock dipping liquid fills the same practical role.


The moment to aim for is that first dunk: the bread darkens where it touches the jus, then gives way into hot beef and melted cheese. Maybe the rest of the roll still has some chew; maybe the next bite deserves a longer soak. That is part of what makes French dip so satisfying—the bowl beside it lets you keep changing the sandwich until you find exactly the version you like.

If you make it, tell us where you landed: deli roast beef or leftovers, provolone or Swiss, clear jus or onions left in—and whether you stayed with careful edge dips or eventually sent half the sandwich straight into the bowl.

Posted on Leave a comment

Scalloped Potatoes Recipe: Creamy, Tender and Never Watery

Shallow casserole of scalloped potatoes with a serving lifted to reveal thin, tender potato layers coated in creamy sauce and browned around the edges.

The best scalloped potatoes slump softly under the serving spoon. The slices are tender all the way through but still visible as layers, mellow onion and garlic run through the creamy sauce, and the browned edges give you the richest bites in the pan.

Scalloped potatoes aren’t difficult, but they can be frustrating when they go wrong because most problems reveal themselves late. After more than an hour in the oven, nobody wants to discover a firm layer hiding beneath a beautifully browned top—or thin sauce pooling underneath the first serving.

This version is made from scratch with Russet potatoes and a buttery whole-milk white sauce seasoned with softened onion, garlic, black pepper and an optional whisper of nutmeg. You don’t need canned soup, heavy cream or cheese to make it rich and satisfying.

Quick answer

How to Make Creamy Scalloped Potatoes Without a Watery Sauce

Slice 3 lb (1.36 kg) Russet potatoes about ⅛ inch (3 mm) thick. Layer them with a lightly thickened whole-milk white sauce in a shallow 9 × 13-inch (23 × 33-cm) baking dish.

Bake at 375°F (190°C) for 45 minutes covered, then uncover and bake another 25 minutes. Start checking at the 70-minute mark. A thin knife should pass all the way through without catching on a firm layer. Most pans finish in the 75–90 minute range.

Rest the potatoes for 20 minutes before serving. And don’t worry if some slices remain visible above the sauce before baking. Scalloped potatoes do not need to swim.

Make it now

Scalloped Potatoes Recipe

These easy scalloped potatoes pair thin Russet slices with a savory onion-and-garlic white sauce that stays creamy without relying on heavy cream or cheese.

Recipe at a Glance

  • Yield: 8 side-dish servings
  • Prep: 25 minutes
  • First check: 70-minute mark
  • Typical bake: 75–90 minutes
  • Rest: 20 minutes
  • Total: 2 hours to 2 hours 15 minutes
  • Oven: 375°F (190°C)
  • Dish: shallow 9 × 13 inches (23 × 33 cm), about 2 inches (5 cm) deep

Equipment

  • Shallow 9 × 13-inch (23 × 33-cm) baking dish
  • Medium saucepan
  • Whisk
  • Mandoline with hand guard or sharp chef’s knife
  • Aluminum foil

A similarly sized shallow dish works too. A deeper dish stacks the potatoes into a thicker layer, so heat takes longer to reach and soften the slices in the middle.

Comparison of scalloped potatoes arranged in a shallow casserole and stacked much more deeply in another dish where the center cooks more slowly.
Pan dimensions can vary a little; what matters is the height of the potato stack. A noticeably deeper layer takes longer for heat to soften through the center.

Planning to finish the top under the broiler? Use a baking dish rated for broiler heat.

Ingredients

Russet potatoes, whole milk, butter, flour, onion, garlic, salt, pepper, nutmeg and fresh herbs arranged for making scalloped potatoes.
Most of the salt seasons the sauce; the rest reaches the potato layers directly.
  • 3 lb (1.36 kg) Russet potatoes, weighed before peeling
  • 3½ tablespoons (50 g) unsalted butter, plus more for the dish
  • 1 medium yellow onion, about 5 oz (140 g), finely diced
  • 2 medium garlic cloves, about 6 g, finely minced
  • ¼ cup (30 g) all-purpose flour
  • 2½ cups (590 ml) whole milk
  • 2 teaspoons fine sea salt (about 11 g), divided
  • ¾ teaspoon freshly ground black pepper
  • ⅛ teaspoon ground nutmeg, optional
  • Chopped chives, parsley or a few thyme leaves, optional for serving

Instructions

Prep the Sauce and Potatoes

  1. Heat the oven and prepare the dish. Set a rack in the center, heat the oven to 375°F (190°C), and lightly butter the baking dish.
  2. Soften the onion and garlic. Melt the butter in a medium saucepan over medium heat. Cook the onion for 5–7 minutes, stirring occasionally, until soft and translucent. Add the garlic and cook for another 30 seconds, just until fragrant.
  3. Make the white sauce. Stir in the flour and cook for 1 minute, until no dry flour remains. Gradually whisk in the milk in several additions, followed by 1½ teaspoons (about 8 g) salt, the pepper and optional nutmeg. Cook over medium to medium-low heat, whisking regularly, until the sauce lightly coats the back of a spoon but still pours easily. Once all the milk is incorporated, this usually takes 4–6 minutes. Remove from the heat.
  4. Scrub, peel and slice the potatoes. Cut the Russets into even rounds about ⅛ inch (3 mm) thick. Keep the starch on the cut surfaces; don’t rinse or soak the slices. Separate any rounds that cling together.
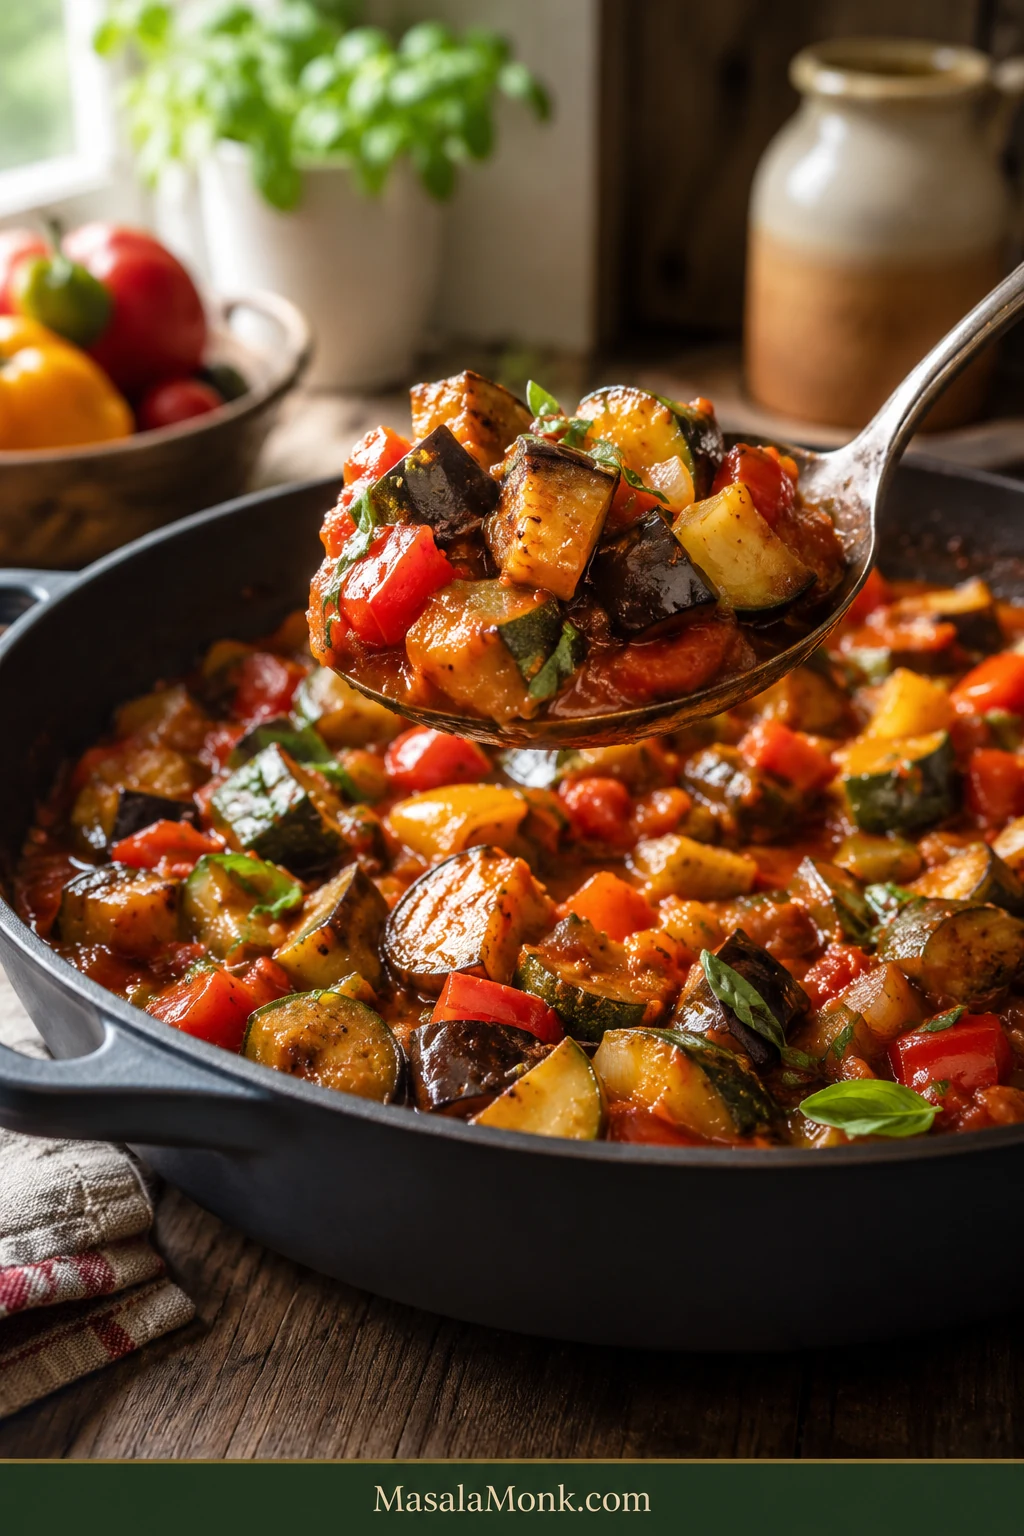
Three potato slices compared by thickness, with about 3 millimeters shown as correct between a thinner and a much thicker slice.
Aim for about ⅛ inch (3 mm) throughout so the slices reach tenderness together.
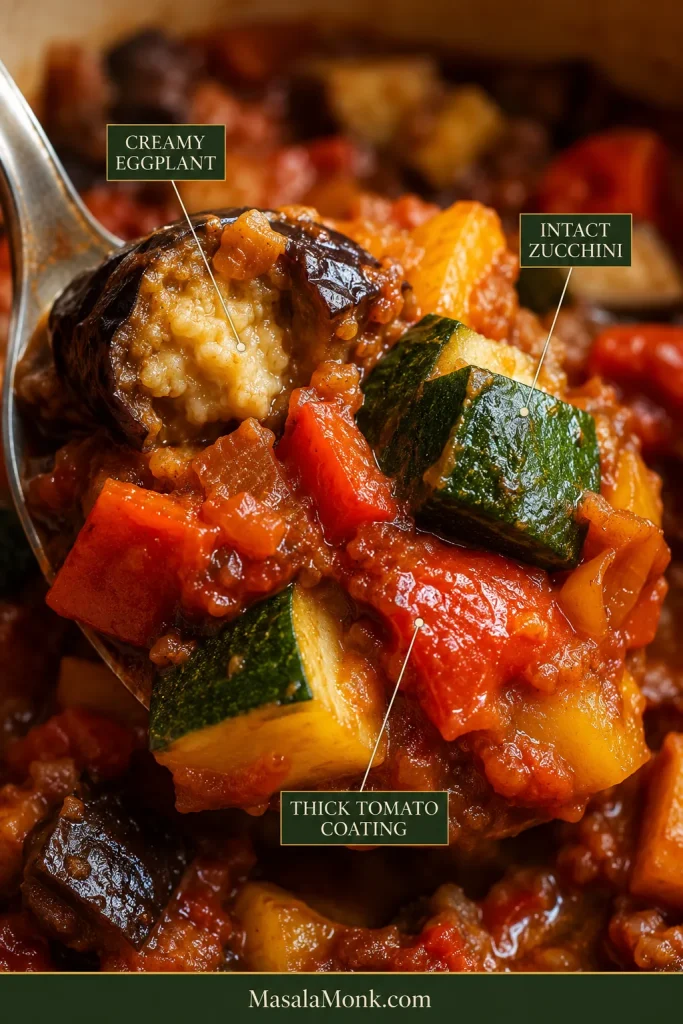
  1. Check the sauce. It may thicken while you’re slicing the potatoes. Warm it gently and whisk until it pours easily again, adding a small splash of milk only when needed.
White sauce shown at three consistencies: too thin and runny, correctly coating a spoon while still flowing, and too thick and heavy.
The target is a light coating that still pours easily—looser than gravy, but with enough body to stay with the potato layers.

Layer and Bake

  1. Layer the potatoes. Spread one-third across the dish, overlapping loosely and avoiding dense stacks. Sprinkle with one-third of the remaining ½ teaspoon (about 3 g) salt, then spoon over one-third of the sauce. Repeat twice, finishing with sauce across the top.
  2. Cover and bake for 45 minutes. Seal the dish tightly with foil. The trapped steam gives the stacked slices time to soften before the exposed top gets too dark.
  3. Uncover and bake another 25 minutes. Rotate the dish now if your oven browns unevenly. You should see steady bubbling around the edges and smell mellow onion, garlic and butter. The top can still be fairly pale, and some potato may still feel firm. This is usually the point when the pan starts looking like dinner.
  4. Start checking at the 70-minute mark. Push a thin knife all the way through the potatoes. Clear resistance means they need more time, so continue uncovered in 5–10 minute stretches. Most pans finish between 75 and 90 minutes. Another 10 minutes is not a problem; give the final firm layer time to cook.
Thin knife stopping at a firm center layer of scalloped potatoes compared with the knife sliding easily through fully tender layers.
If the knife catches in the middle, keep baking; when it glides through the stacked slices, the potatoes are ready.

Finish and Serve

  1. Take the pan out when the potatoes are tender all the way through. The knife should move through the stacked slices with very little resistance.
  2. Brown the top only if it needs it. Once the potatoes are cooked through, a long extra bake can dry them out. A brief broil gives the top deeper browned flavor. Use a broiler-safe pan and watch closely.
  3. Rest for 20 minutes. The hard bubbling will calm and the sauce will settle around the potato layers. Finish with chives, parsley or thyme if you want a little freshness against the creamy sauce.
Side view of scalloped potatoes showing many thin, tender potato layers separated by creamy white sauce.
Narrow seams of sauce between the slices are enough; the potatoes do not need to sit in a pool.

If you’re cooking right now, you can stop here. Once the potatoes are tender and the pan has had its 20-minute rest, dinner is ready. Everything below is optional help for choosing ingredients, fixing problems, planning ahead and serving the dish.


Best Potatoes: Russet or Yukon Gold?

Both work. Russets give you especially tender, creamy layers; Yukon Golds stay a little firmer and more defined.

PotatoFinished textureWhat happens to the sauceBest when you want
RussetVery tender and yieldingReleases more starchMaximum creaminess
Yukon GoldFirmer, tidier slicesReleases less starchButtery flavor with more distinct layers
Russet and Yukon Gold potatoes compared with cooked samples showing softer Russet layers and firmer Yukon Gold layers.
Russets relax more; Yukon Golds keep cleaner layers. Use the same weight and slice thickness for either.
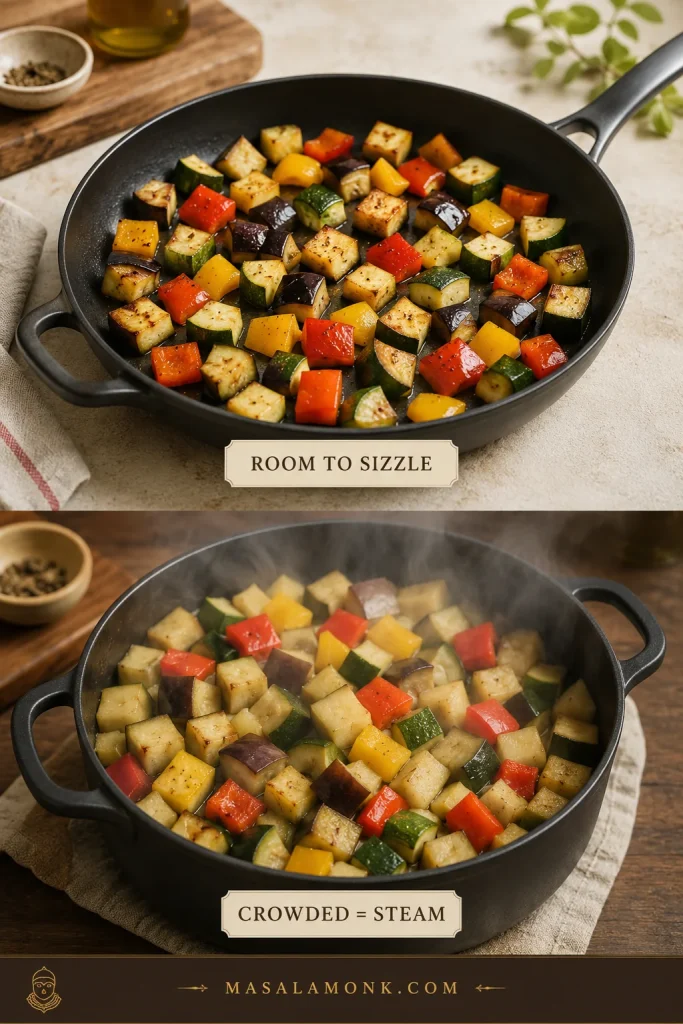
How to Prep Russets or Yukon Golds

Russets suit this version because some of their starch moves into the sauce as they cook, helping it cling between the slices. Their thicker skins can stand out in such thin layers, so peeling is worth the few extra minutes.

Yukon Golds are a good swap when you prefer the potatoes to keep their shape more clearly. Use the same weight and slice thickness. Their thinner skins are less noticeable, so leaving them on becomes mostly a matter of preference.

The same texture difference shows up in mashed potatoes: Russets lean lighter and fluffier, while Yukon Golds make a naturally buttery, creamier mash.

Whichever potato you choose, keep the starch clinging to the freshly cut slices. Make the sauce first, cut the potatoes afterward, and assemble the dish right away.

Freshly cut potato slices with a faint cloudy starch film compared with rinsed slices that look cleaner and wetter.
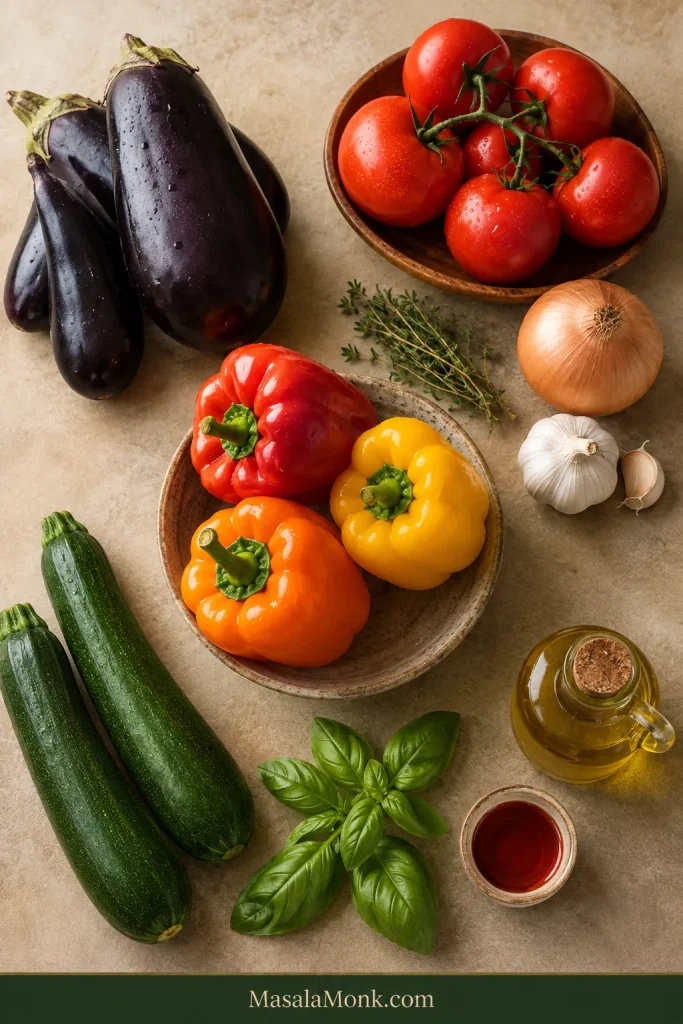
Keep the natural surface starch; it helps the lightly thickened milk sauce cling as the potatoes bake.

Milk, Cream and the White Sauce

Cook the onion until it is soft and translucent, not browned. At that point its flavor is sweet and mellow; garlic and black pepper round out the sauce, while optional nutmeg should stay quietly in the background.

Finely diced yellow onion softened in butter until glossy and translucent but not browned.
Soft and translucent is enough; browning would push the sauce toward a deeper onion flavor.
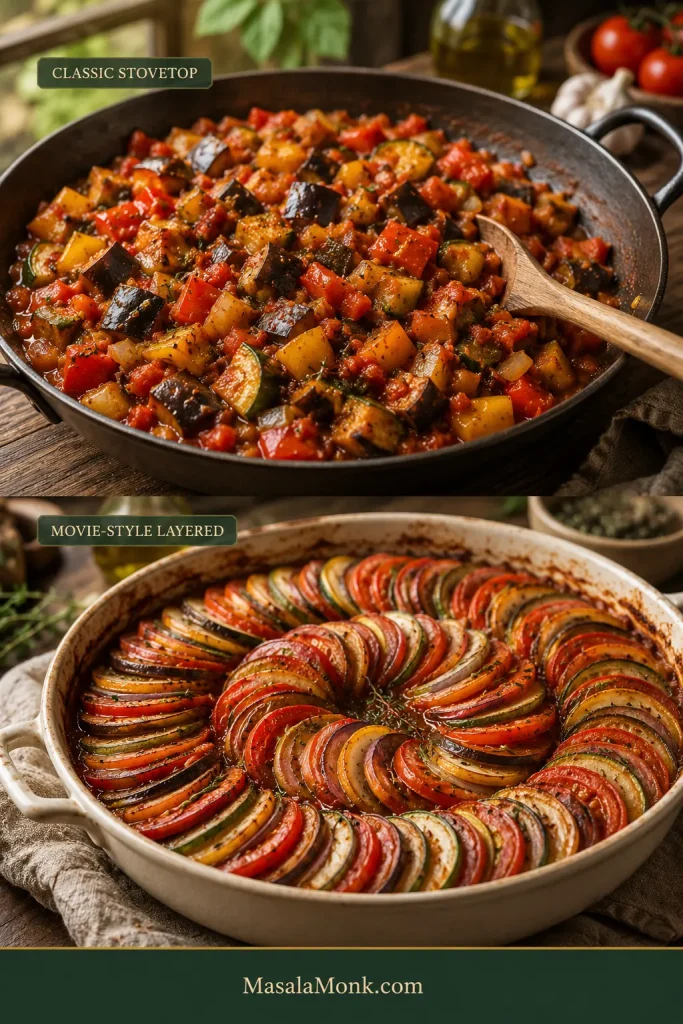
The sauce is essentially a simple béchamel-style white sauce: butter and flour give the milk some body before it goes into the oven, then potato starch thickens it further as the layers bake.
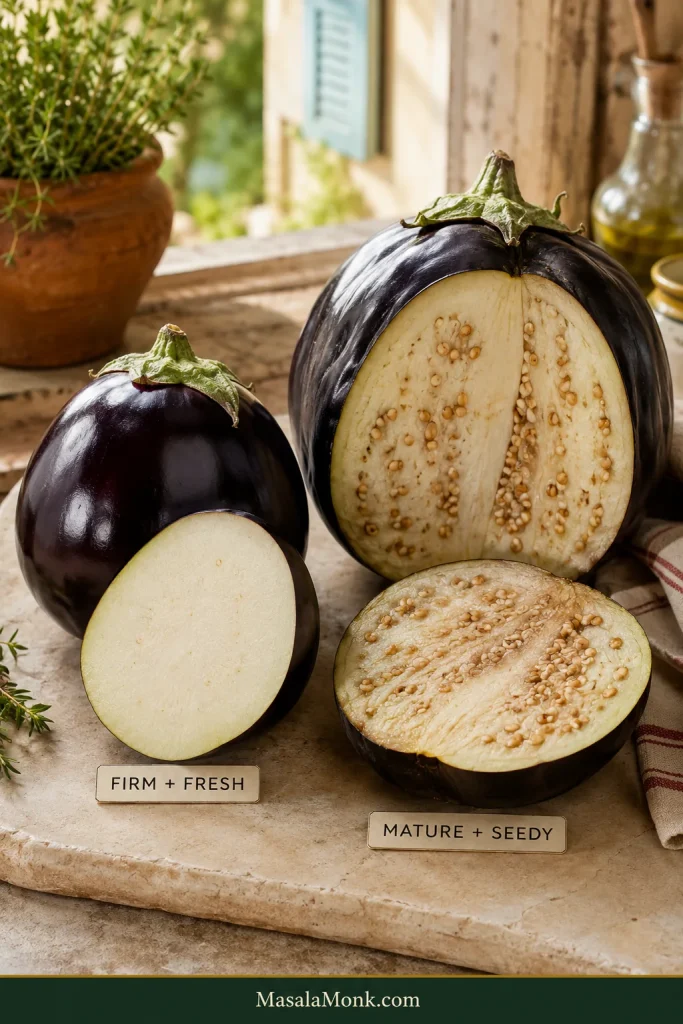
Soft diced onion coated with a pale butter-and-flour mixture in a stainless steel pan before milk is added.
Cook until no dry flour remains, but stop before the roux takes on brown color.

Dairy Choices for Scalloped Potatoes

Whole milk gives the best balance here—rich enough to feel creamy without overwhelming the potatoes.

Half-and-half makes a richer version. Heavy cream can replace roughly one-third to one-half of the milk when you want something more luxurious. 2% milk gives you a lighter sauce. Skim milk produces a leaner result and isn’t the best choice when creaminess is the goal.

Dairy guide comparing whole milk, 2 percent milk, half-and-half and a mixture containing heavy cream for the potato casserole.
Whole milk is the baseline; richer dairy changes richness, not the sauce endpoint.

What the Sauce Should Look Like

The sauce should tell you when it is ready. Almost milk-thin? Give it another minute. Thick enough to sit heavily on the spoon? Loosen it before layering. The sweet spot is a light coating on the spoon that still flows easily.

Scalloped Potatoes vs Au Gratin

The names overlap in modern recipes, but traditionally scalloped potatoes are built around sliced potatoes and a creamy sauce. In potatoes au gratin, cheese usually plays a defining role.

Creamy scalloped potatoes without a cheese crust compared with potatoes au gratin topped with a visibly browned cheese layer.
Scalloped potatoes let the creamy sauce lead; au gratin usually makes cheese a defining feature.

Cheese is optional here. Add up to 4 oz (115 g) finely grated sharp cheddar or Gruyère if you want it, either over the top when the foil comes off or stirred into the warm sauce away from direct heat.

If the scalloped potatoes you grew up with started with a can of cream-of-mushroom soup, that’s another very familiar branch of the dish. Condensed soup replaces the homemade white sauce; it isn’t something to pour on top of the recipe as written because it already brings its own starch, salt and flavor.

The same homemade-sauce-versus-canned-soup choice comes up in our green bean casserole.

Troubleshooting a thin sauce? See why they turn watery →

What the Potatoes Should Look Like at Three Stages

Use the clock as a checkpoint, then let the pan confirm what happens next. The visual changes matter most as the casserole moves from covered to uncovered to rested.

Baking timeline showing 45 minutes covered, 25 minutes uncovered, a first check at 70 minutes, more time if firm, and a 20-minute rest.
Use the clock as a checkpoint; center tenderness still decides when the casserole is done.

Before baking

The sauce should flow easily between the slices, and the potato depth should stay reasonably even. Perfect rows are optional; loose overlap matters much more.

Three-step scalloped potato assembly showing loosely overlapping slices, seasoning and white sauce, then repeated layers in a shallow casserole.
Loose overlap leaves pathways for sauce and heat; tight stacks make uneven cooking more likely.

Some upper slices can stay visible before baking. The sauce should reach through the layers without leaving the potatoes sitting in a pool of liquid.

Correctly sauced scalloped potatoes with some slices visible compared with an overfilled casserole where excess liquid surrounds the potatoes.
Some potato can stay visible before baking. Extra milk for reassurance can leave too much liquid after the casserole cooks.

When the foil comes off

Look for steady bubbling around the perimeter and a surface that may still be fairly pale. The upper slices will have begun to yield, while the potatoes lower in the pan can still need more time. The butter, onion and garlic should be noticeably fragrant by now.

Scalloped potatoes shown before baking, pale and bubbling after the foil is removed, and finished with irregular golden browning.
After uncovering, evaporation concentrates the sauce while exposed potato surfaces finally get a chance to brown.

When they’re done

At the finish, the potatoes are tender all the way through and the edges have picked up some color. The sauce bubbles with more body than it had earlier in the bake. After resting, it clings around the slices instead of running across the plate.

Overhead view of a shallow casserole of scalloped potatoes with irregular golden patches and darker browning around the perimeter.
Color is secondary: a tender casserole may still have pale patches between deeper browned edges.

Why They Turn Watery

Watery scalloped potatoes rarely come down to one mistake. Potato quantity, surface starch, sauce consistency, pan depth, the covered and uncovered stages, and the final rest all affect what reaches the plate.

Troubleshooting guide showing six causes of watery scalloped potatoes: too much liquid for the potatoes, rinsed starch, thin sauce, deep layering, insufficient evaporation and judging before resting.
Most watery pans trace back to one of these six decisions.

How to Prevent Watery Scalloped Potatoes

  • Use the full potato quantity. The 2½ cups (590 ml) milk are balanced around 3 lb (1.36 kg) potatoes.
  • Keep the surface starch. Rinsing the slices removes starch that otherwise helps the sauce gain body.
  • Give the milk a head start. Lightly thickening it before assembly means the potatoes aren’t beginning their bake in plain liquid.
  • Keep the potato layer reasonably shallow. A thicker vertical stack needs more time for heat to work through it evenly.
  • Let the covered stage work first. The potatoes need moisture while they soften. Once the foil comes off, evaporation can concentrate the sauce and the exposed edges can begin to brown.
  • Rest before deciding the sauce is too thin. It is naturally at its loosest while everything is still bubbling hard.

Loose isn’t automatically watery. A pan straight from the oven can look looser than it will 20 minutes later. Give it the rest first. Only then decide whether there is genuinely too much thin liquid.

Scalloped potatoes shown hot and loose, creamy and settled after a 20-minute rest, and genuinely watery with thin liquid still pooling around the slices.
Judge the sauce after the full 20-minute rest. Thin liquid that still separates then is different from the normal looseness of a bubbling-hot pan.

Troubleshooting

Start with what you can see and feel. Most problems have a straightforward next move, and some apparent problems need nothing more than patience.

What you seeWhat to do
Loose sauce straight from the ovenRest for 20 minutes before judging it
Thin liquid still pooling after the restWhen the potatoes are fully tender, return the pan uncovered for 5–10 minutes, then let it settle again
Whole middle still firmCover again if the top is already dark and continue baking in 5–10 minute stretches
Only random slices stay firmKeep this batch cooking; next time watch for thicker rounds or slices stuck together
White sauce has flour lumps before layeringWhisk firmly while warm and press obvious lumps against the side of the saucepan; add milk more gradually next time
Sauce is too thick before layeringWarm gently and whisk until pourable, adding a small splash of milk only as needed
Potatoes are tender but the top is paleUse a brief broiler finish in a broiler-safe dish
Finished potatoes seem dryStop the regular bake as soon as the potatoes are cooked through; use brief high heat for extra browning

The sauce still looks watery after resting

Visible thin liquid after the 20-minute rest is different from the normal looseness of a piping-hot pan. When the potatoes are already tender, return the dish to the oven uncovered for another 5–10 minutes. Watch closely: once the excess liquid is gone, creamy can turn dry surprisingly quickly.

The potatoes are cooking unevenly

A firm layer through the whole middle simply needs more time. Cover the dish again when the top is already sufficiently browned and keep baking until the potatoes are cooked through.

Cutaway comparison of scalloped potatoes with a broadly firm center and another casserole with isolated thick or stuck firm slices.
One broad firm zone usually needs more cooking time; scattered firm pieces point back to uneven thickness or slices stuck together.
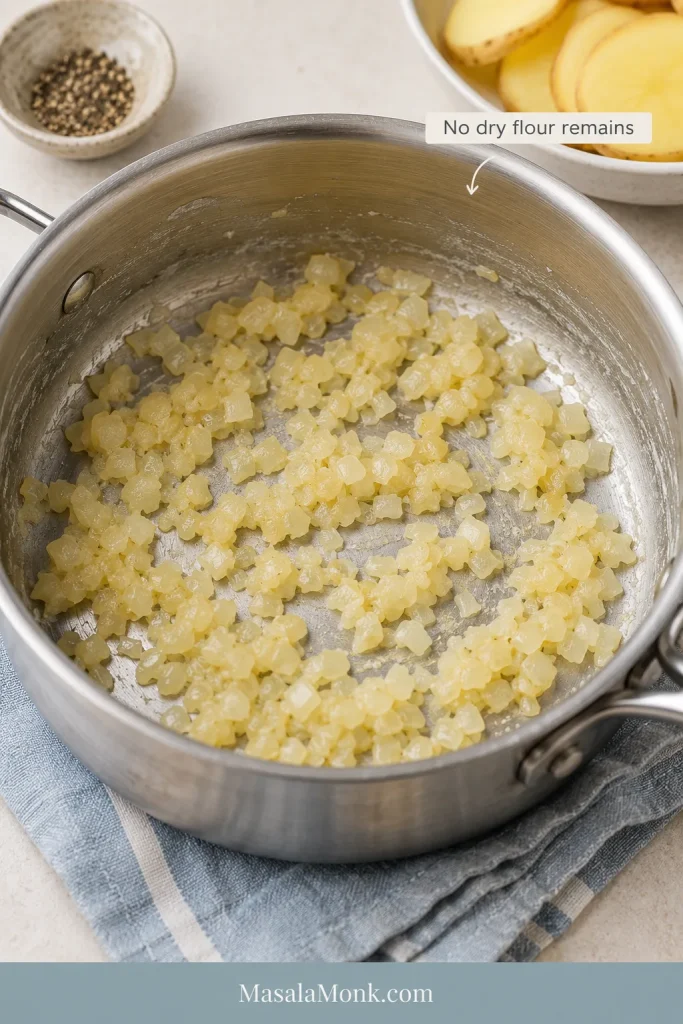
Random firm slices point to something different: thickness or stacking. A few thicker rounds, or several slices pressed tightly together, can lag behind everything around them.

Hands gently separating thin raw potato slices that have stuck together before layering them in the casserole.
Two slices stuck together cook like one thick slice, so separate little stacks before layering.

The white sauce looks too thick or lumpy

Deal with this before layering. Sauce that has simply thickened while waiting usually needs gentle heat and whisking, perhaps with a small splash of milk. Flour lumps are easier to correct while the sauce is still in the saucepan: whisk firmly and press stubborn lumps against the side until they break down.

Once the potatoes are cooked through and the rested sauce clings around the slices, stop fixing things. They’re ready to eat.

Serving spoon lifting soft scalloped potatoes with thin layered slices bending naturally and creamy sauce clinging between them.
A slight bend on the spoon signals tender layers that still hold together.

Return to recipe · Back to top ↑

What If Your Oven Is at 350°F, 400°F or 425°F?

350°F (175°C): the potatoes will cook more slowly. Begin checking around the 80-minute mark and continue until no firm layer remains.

375°F (190°C): use the main method. This temperature gives a comfortable balance between steady cooking and controlled browning.

400°F (205°C): the exposed top will color faster, so don’t let browning convince you the potatoes underneath are finished. Keep the covered-first method.

During the uncovered stage, check the potatoes themselves. Once the top has enough color, loosely cover it again if the layers underneath still need more time.

Pale but fully tender scalloped potatoes compared with the same casserole after a brief browning finish.
Once the center is tender, use a brief broil for color instead of prolonging the bake.

425°F (220°C): save this temperature for the finish. Once the potatoes are nearly or completely cooked, a short burst of higher heat can deepen the color. A full bake at 425°F risks dark edges long before the stacked slices are ready.

Oven temperature guide showing 350 degrees Fahrenheit as slower, 375 as the main method, 400 as faster browning and 425 as finishing heat only.
Higher heat browns sooner. Whatever temperature you use, let tenderness through the center—not surface color—decide when the potatoes are done.
Make-Ahead Options

The white sauce can be made up to 2 days ahead, cooled, covered and refrigerated. Rewarm it gently until pourable before assembling the potatoes. That removes a useful chunk of work without leaving raw slices sitting around overnight.

You can also assemble the whole dish several hours in advance, cover it tightly and refrigerate. A cold pan will take longer to bake, and the delay varies with the baking dish and how thoroughly chilled everything is.

Don’t simply tack a fixed 10 minutes onto the recipe. Keep the dish covered while the potatoes warm and begin to soften, then use their texture to decide when they’re ready for the final uncovered stage.

For this method, skip the overnight water soak. Soaking prevents sliced potatoes from browning, but it also washes away some of the surface starch we’re deliberately keeping to help the sauce.

Make-ahead decision tree showing white sauce prepared up to two days ahead, an assembled potato casserole several hours ahead, or the complete dish baked the day before.
For a busy holiday, the fully baked day-ahead route is the most predictable; shorter lead times leave more of the cooking for serving day.

For a holiday, bake it the day before

On a holiday, predictability is worth more than doing everything at the last minute. If the ham is warming, vegetables are waiting and somebody needs the oven for rolls, scalloped potatoes are a terrible thing to discover still have a hard center.
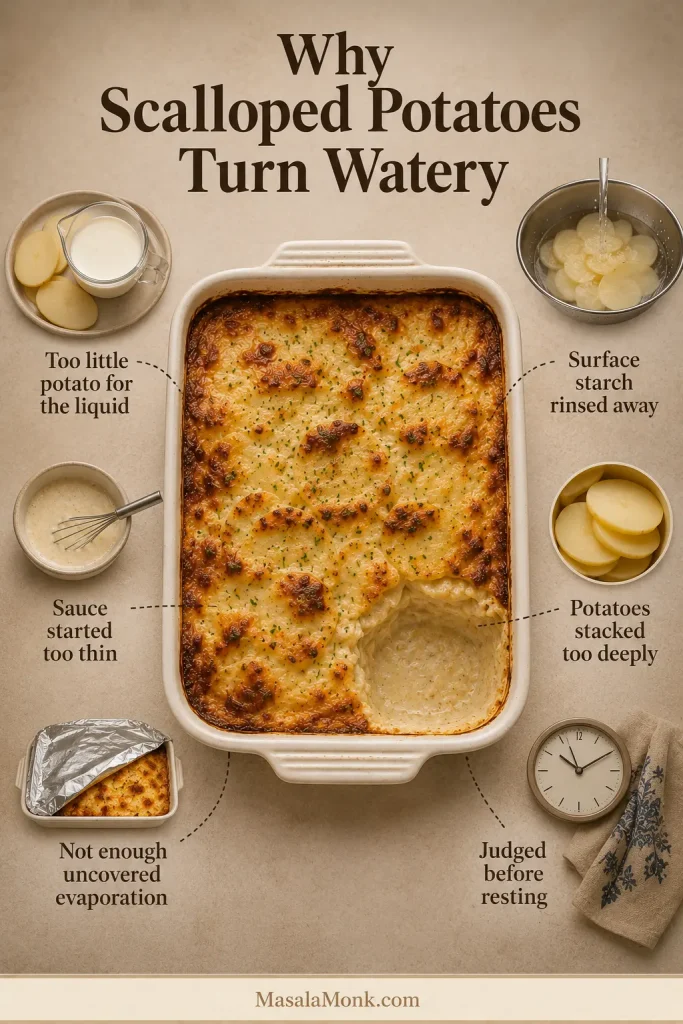
Fully baking them a day ahead removes that gamble. It is especially useful beside a honey glazed ham, which has its own warming and glazing schedule.
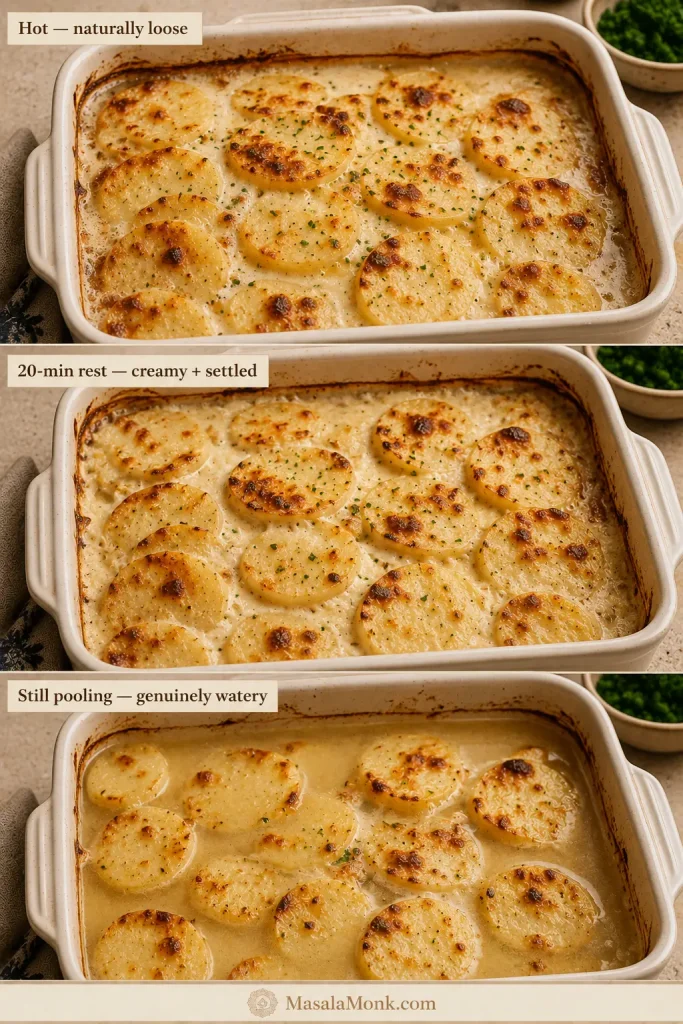
  1. Bake the potatoes normally and let them rest.
  2. Cool briefly, then cover and refrigerate the pan within 2 hours.
  3. Reheat covered at 350°F (175°C) until the center reaches 165°F (74°C).
  4. Uncover near the end when the surface needs refreshing.
Day-before holiday timeline showing the casserole baked until tender, rested, cooled briefly and refrigerated, then reheated covered at 350 degrees Fahrenheit to 165 degrees before a short uncovered finish.
Bake until fully tender the day before. Serving day becomes reheating and refreshing the surface, not another round of checking for doneness.

Another way to ease holiday oven traffic is to move the main elsewhere: a slow cooker whole chicken leaves the oven almost entirely to the potatoes.

Return to recipe · Back to top ↑

For Two, Eight or a Crowd

Changing the quantity is straightforward. Keeping roughly the same depth in the baking dish matters more than keeping exactly the same footprint.

Scale sideways, not deeper. Two shallow pans cook more predictably than one giant dish piled twice as high.

Same amount of scalloped potatoes divided between two shallow pans compared with one deep casserole where the center takes longer to cook.
Double the pan area, not the stack height. Two shallow pans also give you more browned edges.

Pan Sizes and Serving Amounts

BatchSide servingsPotatoesDishTiming
Half41½ lb (680 g)8 × 8-inch (20 × 20-cm) shallow dishStart checking a little before the standard batch; similar depth means the total cooking time may remain fairly close
Standard83 lb (1.36 kg)9 × 13-inch (23 × 33-cm) dishFirst check at 70 minutes
Double166 lb (2.72 kg)Two 9 × 13-inch dishesAllow extra time when both pans share the oven
Large crowdMultiply standard batchesAs neededSeveral shallow pansJudge each pan separately

The standard recipe uses roughly 6 oz (170 g) raw potato per side serving. That’s comfortable when several other dishes are on the table; make more when the potatoes are likely to be one of the stars.

Pan and serving guide showing a half batch in an 8-inch square dish, the standard batch in a 9-by-13-inch dish, a double batch in two 9-by-13-inch pans, and several shallow pans for a crowd.
Preserve casserole depth when scaling; a double batch belongs in two shallow 9 × 13-inch pans.

For two people, halve the recipe and use an 8 × 8-inch (20 × 20-cm) shallow dish. You’ll get about four side portions, so there should be enough for dinner and leftovers.

For a family roast-style meal, the standard pan fits naturally beside a slow cooker brisket with onion gravy. The slow cooker handles the beef while the potatoes get the oven.

For a Holiday Crowd

For Thanksgiving, Christmas or Easter, use two ordinary 9 × 13-inch pans instead of crowding 6 lb (2.72 kg) potatoes into one deep dish. Rotate them when your oven has obvious hot spots. You may need a little extra time—and you get twice as many browned corner pieces, which is hardly a downside.

Close-up of a browned corner portion of scalloped potatoes with golden edges and a creamy layered interior.
Edges lose moisture fastest, concentrating the sauce and creating especially browned, flavorful bites.

What to Serve With Scalloped Potatoes

Scalloped potatoes already bring richness, tenderness and plenty of creaminess. The rest of the plate benefits from browned meat or fish, something green, and enough freshness or acidity to keep everything lively.

Scalloped potatoes served at a dinner table with browned meat and green vegetables.
Pair the rich potatoes with a browned main and something green for contrast.

With pork: the browned edges and sticky sweet-savory glaze on honey garlic pork chops are especially good against a spoonful of creamy potatoes. Add broccoli, green beans or a sharp salad and dinner is done.

On a holiday table: ham, turkey and roast beef all work beautifully. For something brighter alongside them, roasted carrots bring caramelized edges, color and just enough sweetness to wake up a rich plate.

With fish: honey garlic salmon has enough browned, garlicky glaze to stand beside the potatoes without needing another heavy side.

Storage, Reheating and Freezing

Cover and refrigerate leftovers within 2 hours. The USDA leftovers guidance recommends using refrigerated leftovers within 3–4 days and reheating them to 165°F (74°C). Use that temperature as the target whichever reheating method you choose.

Storage guide showing the casserole refrigerated for 3 to 4 days, reheated to 165 degrees Fahrenheit, or frozen for about two months for best quality.
Refrigeration preserves texture better. Freeze for longer storage when needed, knowing the potatoes and dairy sauce may return a little less smoothly after thawing.

One serving: cover loosely and microwave in short intervals until the middle reaches 165°F (74°C). A teaspoon or two of milk around the serving can loosen sauce that has tightened in the refrigerator.

Several servings: cover and reheat at 350°F (175°C). Start checking after about 20 minutes and continue until the potatoes reach 165°F (74°C) in the middle.

A whole pan from the refrigerator: cover and reheat at 350°F (175°C). Begin checking after about 30 minutes and continue until the center reaches 165°F (74°C). Uncover for the final 5–10 minutes when the top needs refreshing.

Cold firm serving of scalloped potatoes compared with a warm reheated serving with softer layers and creamier sauce.
Gentle reheating relaxes chilled layers; a little milk can loosen sauce that has tightened in the refrigerator.

Can you freeze scalloped potatoes?

You can, although refrigeration preserves the texture better. Potatoes can become slightly mealier after freezing and thawing, and the dairy sauce may not return quite as smoothly.

If you do freeze them, once the potatoes are chilled, portion them into airtight containers and freeze for up to 2 months for best quality. Thaw overnight in the refrigerator and reheat gently. A small splash of milk can help when the sauce has tightened.

Return to recipe · Back to top ↑


A good pan of scalloped potatoes doesn’t need to stand rigidly on the plate. Spoon into it and you should find tender layers, browned edges, mellow onion and garlic, and enough creamy sauce clinging between the slices to make the corner pieces especially hard to resist.

Plated serving of creamy scalloped potatoes with visible tender layers and browned edges.
After resting, the sauce should travel with the potato layers instead of running across the plate.

Give the potatoes that last bit of resting time, then bring the pan to the table while the edges are still warm and browned. That’s when scalloped potatoes are at their best.