Posted on Leave a comment

Master Your KitchenAid Mixer: 5 Essential Tips and Tricks

yellow kitchenaid stand mixer

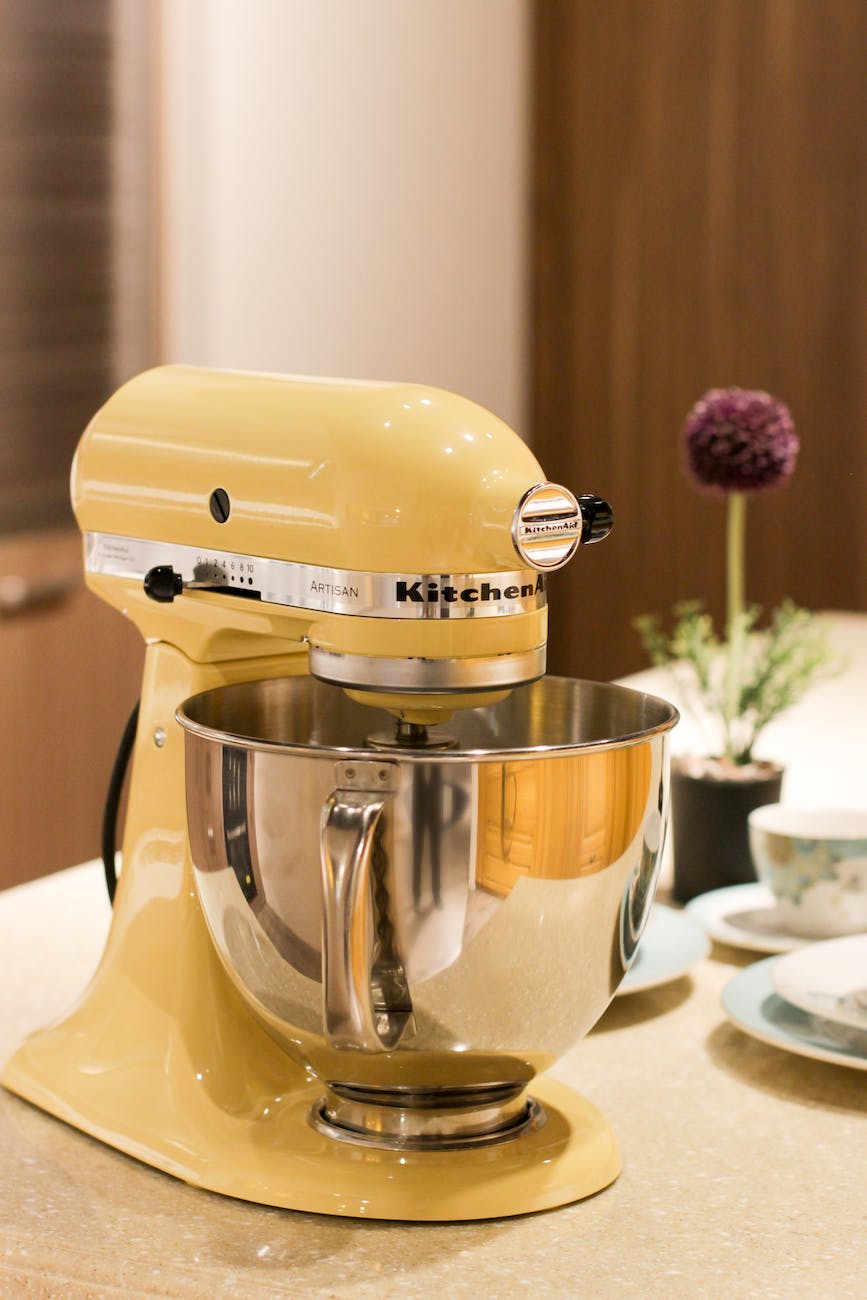
Hello, culinary enthusiasts! 🙌 Today, we’re diving deep into the world of KitchenAid mixers, a versatile kitchen gadget that has become a staple in homes around the world. Known for its power, precision, and stylish design, the KitchenAid mixer is not just a tool—it’s a culinary partner that helps you create delicious meals and treats with ease.🍴🎉

Our guide for today comes from Stephanie, the creative mind behind the YouTube channel Martinmade. Stephanie and her husband James have a passion for DIY, cooking, and sharing their knowledge with others. Their video “5 Tips and Tricks For Your KitchenAid” has garnered over 310,000 views, making it a favorite among KitchenAid users. We highly recommend checking it out for a comprehensive visual guide. 🎥

1. Cord Management 🧹

The first hurdle you might encounter with your KitchenAid mixer is the pesky cord. But don’t worry, Stephanie has a neat trick! Use a command strip attached directly to the mixer itself. This way, the cord moves along with the mixer, making it much more convenient and less of a nuisance. It’s a small change, but it makes a world of difference! 🌟

2. Beater Storage 🗄️

The KitchenAid mixer comes with three beaters, each with its own purpose. Stephanie suggests hanging them on command hooks attached to the inside of a cabinet door. This keeps them easily accessible and neatly out of the way. No more rummaging through drawers to find the right beater! 🙌

3. Homemade Butter 🧈

Your KitchenAid mixer can turn you into an artisan butter maker! Just add whipping cream and a pinch of salt to the mixer, then let it do its magic. Blend until it starts splashing buttermilk, then drain it off. Blend a bit more, drain again, and voila! You have homemade butter. It’s a fun and satisfying process, and the result is absolutely delicious! 🍞

4. Effortless Meat Shredding 🍗

Your KitchenAid mixer can also be your secret weapon when it comes to shredding meat, such as chicken or turkey. Simply switch out the beater to the metal one, add your cooked meat, and shred away! It’s fast, efficient, and saves you from the tedious task of hand shredding. 🌮

5. Cheese Shredding Made Easy 🧀

Last but not least, your KitchenAid mixer can be a lifesaver when it comes to shredding cheese. If you often buy large blocks of cheese, consider getting a shredder attachment for your mixer. It’s a game-changer that saves you from the time-consuming task of hand shredding. Plus, who doesn’t love freshly shredded cheese? 🍕

We hope you found these tips helpful and that they inspire you to explore new ways to use your KitchenAid mixer. If you have any other KitchenAid tips or tricks, we’d love to hear them. Join our vibrant community on Facebook and share your insights. We’re always looking for new ways to make the most of our kitchen tools. 🎉

Happy cooking, everyone! 🍽️

Posted on Leave a comment

Making Roti Dough with a KitchenAid Mixer: A Quick and Easy Guide

yellow kitchenaid stand mixer

Hello, home cooks! 🍽️💕 Today, we’re exploring a quick and easy method to prepare roti dough using a KitchenAid Mixer. This fantastic guide comes from the YouTube channel Cook with Kash and Manish, a wonderful resource for anyone looking for simple yet efficient cooking techniques. This video has garnered over a million views, proving its popularity among home cooks worldwide.

🍞 The Magic of KitchenAid Mixer 🥖

A KitchenAid Mixer is a versatile kitchen appliance that can be used for a variety of tasks, from mixing cake batter to kneading dough. In this guide, we’ll be using it to prepare roti dough, a staple in many cuisines around the world. The best part is that it takes only 3 minutes to make a beautiful soft dough, and anyone can do it, even kids (under adult supervision, of course)!

🍽️ The Guide: How to Make Roti Dough Using a KitchenAid Mixer 🍞

Unfortunately, the video doesn’t provide a detailed step-by-step process in the transcript. However, based on the video description and common practices, here’s a general guide on how to make roti dough using a KitchenAid Mixer:

  1. Attach the dough hook to your KitchenAid Mixer.
  2. Add your flour to the mixing bowl. The quantity would depend on how many rotis you plan to make.
  3. Start the mixer on a low speed to avoid flour dust.
  4. Gradually add water to the bowl while the mixer is running. The amount of water will depend on the type of flour and the desired consistency of the dough.
  5. Increase the speed of the mixer as the dough starts to form.
  6. Continue mixing until the dough is soft and pliable. This should take about 3 minutes.

And there you have it, a quick and easy way to make roti dough using a KitchenAid Mixer!

🍴 Enjoying Your Homemade Roti 🍽️

Once you have your roti dough ready, you can roll it out and cook it on a hot griddle or tawa. Serve your homemade roti with your favorite curry or use it to make wraps and sandwiches. The possibilities are endless!

🎉 Join the Foodie Community! 🍽️

If you try this method or have other cooking techniques to share, join the vibrant and engaging food lovers community on Facebook. It’s a place where you can share your culinary experiments, discover new recipes, and connect with fellow food enthusiasts.

🙏 Credits 🙏

A big thank you to Cook with Kash and Manish for sharing this fantastic guide on making roti dough using a KitchenAid Mixer. Their channel is a treasure trove of culinary delights, with recipes and techniques that are not only delicious but also easy to follow. So, if you’re looking for more culinary inspiration, do check out their channel.

And remember, as they say, “Cooking life is more easier with a KitchenAid Mixer!” 🍽️💕

Posted on Leave a comment

Surprise Everyone with This Peach Condensed Milk Cake

Peach Fantasy by Masala Monk

Hello, food lovers! 🍽️💕 Today, we’re diving into a delightful dessert recipe that’s sure to impress everyone at your next gathering. We’re talking about a Peach Condensed Milk Cake, a dessert that’s not only incredibly flavorful but also easy to make! This fantastic recipe comes from the YouTube channel Amo Receitas, a wonderful resource for anyone looking for simple yet tasty meal ideas.

🎉 Join the Foodie Community! 🍽️

If you try these recipes or have other delicious recipes to share, join the vibrant and engaging food lovers community on Facebook. It’s a place where you can share your culinary experiments, discover new recipes, and connect with fellow food enthusiasts.

🍑 The Magic of Peach Condensed Milk Cake 🍰

Peach Condensed Milk Cake is a dessert that combines the sweet and tangy flavor of peaches with the creamy richness of condensed milk. The result is a cake that’s moist, flavorful, and absolutely delicious. Plus, it’s a versatile dessert that can be served at any occasion, from a casual family dinner to a special celebration.

🍽️ The Recipe: How to Make Peach Condensed Milk Cake 🍑

The recipe starts with the cake batter, which is made from 3 1/2 cups of flour, 1 cup of sugar, 3 eggs, 3/4 cup of oil, 1 1/4 cup of milk, 1 tablespoon of baking powder, and 1 teaspoon of vanilla sugar. The ingredients are mixed together until smooth.

Next, the batter is poured into a greased baking dish. Slices of peach are arranged on top of the batter, and then 1 1/2 cups of condensed milk is poured over the peaches. The cake is then baked until golden and set.

🍴 Enjoying Peach Condensed Milk Cake: Tips and Suggestions 🍽️

When enjoying Peach Condensed Milk Cake, here are a few tips and suggestions:

  • Feel free to adjust the amount of condensed milk to suit your taste. If you prefer a less sweet cake, you can reduce the amount of condensed milk.
  • This cake is best served chilled, so consider making it a day ahead and storing it in the refrigerator overnight.
  • Peach Condensed Milk Cake makes a great dessert for any meal. Serve it with a cup of coffee or tea for a delightful afternoon treat.

🎉 Join the Foodie Community! 🍽️

If you try this recipe or have other delicious recipes to share, join the vibrant and engaging food lovers community on Facebook. It’s a place where you can share your culinary experiments, discover new recipes, and connect with fellow food enthusiasts.

🙏 Credits 🙏

A big thank you to Amo Receitas for sharing this fantastic Peach Condensed Milk Cake recipe. Their channel is a treasure trove of delicious recipes that are easy to follow and absolutely delightful to taste. If you’re a fan of simple and tasty recipes, be sure to check out their YouTube channel for more culinary inspiration

So, are you ready to bring a taste of this delicious Peach Condensed Milk Cake into your kitchen? With this recipe, you can enjoy a delicious and unique dessert right at home. Happy cooking! 🍽️🎉

Remember to check out more amazing recipes on Amo Receitas‘s YouTube channel. Enjoy the delicious day! 🌞🍡🌭

Posted on Leave a comment

4 Simple and Delicious Toast Recipes!

bread on plate beside glas

Hello, food lovers! 🍽️💕 Today, we’re diving into the world of quick and easy breakfast recipes with a focus on a staple food item: toast. But this isn’t just any toast. We’re talking about four unique and delicious toast recipes that will revolutionize your breakfast routine. These recipes come from the YouTube channel Cooking Everyday, a fantastic resource for anyone looking for simple yet tasty meal ideas.

🍞 The Magic of Toast 🍳

Toast is a breakfast staple in many households. It’s quick, easy, and can be customized in countless ways. But if you’re tired of the same old butter and jam, these four toast recipes are sure to shake things up. From egg-filled bread to honey toast, these recipes take toast to a whole new level.

🍽️ The Recipes: How to Make Delicious Toast 🍞

Recipe 1: Egg in a Hole Toast 🍳

This recipe starts with a slice of bread and a glass. The glass is used to cut a hole in the middle of the bread. The bread is then fried in butter on medium heat. An egg is cracked into the hole, seasoned with salt and black pepper, and topped with green onions and cheddar cheese. The inside of the bread is placed on top, and the whole thing is flipped over and fried until golden brown.

Recipe 2: Scrambled Egg Toast 🍳

This recipe begins with three eggs, which are seasoned with salt, black pepper, and paprika, and mixed well. Parsley, green onions, and mozzarella cheese are added to the egg mixture. The bread is dipped in the egg mix and fried in butter for 2-3 minutes on each side.

Recipe 3: Stuffed Egg Toast 🍳

This recipe involves one egg, chopped green onion, chopped bell pepper, salt, and black pepper. The mixture is poured inside a hole cut in a slice of bread, topped with cheddar cheese, and fried for 3-5 minutes on each side.

Recipe 4: Tomato and Cheese Toast 🍞

This recipe uses stale bread, eggs, salt, black pepper, tomato sauce, mozzarella cheese, grape tomatoes, parsley, and olive oil. The bread is cut into pieces, dipped in the egg mixture, and fried. Tomato sauce and cheese are added on top, along with grape tomatoes and parsley. The toast is fried for an additional 3-5 minutes.

🍴 Enjoying Your Delicious Toast: Tips and Suggestions 🍽️

When enjoying these toast recipes, here are a few tips and suggestions:

  • Feel free to adjust the ingredients to suit your taste. If you prefer a different type of cheese or want to add more vegetables, go for it!
  • These toast recipes are best enjoyed hot from the pan. They make a great breakfast or snack, and are sure to impress your family and friends.
  • Don’t be afraid to get creative with your toast. These recipes are just a starting point. The possibilities are endless!

🎉 Join the Foodie Community! 🍽️

If you try these recipes or have other delicious recipes to share, join the vibrant and engaging food lovers community on Facebook. It’s a place where you can share your culinary experiments, discover new recipes, and connect with fellow food enthusiasts

So, are you ready to bring a taste of these delicious toast recipes into your kitchen? With these recipes, you can enjoy a delicious and unique breakfast right at home. Happy cooking! 🍽️🎉

Remember to check out more amazing recipes on Cooking Everyday‘s YouTube channel. Enjoy the delicious day! 🌞🍡🌭

Posted on Leave a comment

Honey Garlic Chicken: A Scrumptious Dinner Ready in 15 Minutes!

a dish of glazed chicken wings with a dip

Hello, food enthusiasts! 🍽️💕 Today, we’re exploring a quick and easy recipe that’s perfect for those busy weeknights when you want a delicious meal without spending hours in the kitchen. We’re talking about Honey Garlic Chicken, a dish that’s not only incredibly flavorful but also ready in just 15 minutes! This fantastic recipe comes from the YouTube channel Delicious and easy recipes, a go-to place for anyone looking for simple yet tasty meal ideas.

🍯 The Magic of Honey Garlic Chicken 🍗

Honey Garlic Chicken is a popular dish known for its sweet and savory flavor profile. The combination of honey and garlic gives the chicken a rich and aromatic taste that’s hard to resist. Plus, it’s a versatile dish that can be served with a variety of sides, from steamed vegetables to fluffy rice.

🍽️ The Recipe: How to Make Honey Garlic Chicken 🍯

The recipe starts with two chicken breasts, which are seasoned with salt and black pepper. The chicken is then coated in all-purpose flour, which helps to give it a nice, golden crust when cooked.

Next, the chicken is fried in 40 grams of butter for 4 to 5 minutes on each side until it’s beautifully golden and crispy. Three cloves of garlic are then added to the pan, infusing the chicken with their aromatic flavor.

The dish is then finished with a delicious sauce made from 20 grams of butter, 1 tablespoon of light soy sauce, 1 tablespoon of vinegar, and 5 tablespoons of honey. The sauce is poured over the chicken, coating it in a sweet and tangy glaze that’s simply irresistible.

🌱 Garnishing the Dish 🌱

To add a pop of color and freshness to the dish, it’s garnished with spring onions. The spring onions not only add a vibrant touch to the dish but also provide a nice contrast to the sweet and savory flavors of the honey garlic sauce.

🍴 Enjoying Honey Garlic Chicken: Tips and Suggestions 🍽️

When enjoying Honey Garlic Chicken, here are a few tips and suggestions:

  • Feel free to adjust the amount of honey and garlic to suit your taste. If you prefer a sweeter sauce, add more honey. If you’re a fan of garlic, feel free to add an extra clove or two.
  • This dish is best served hot, straight from the pan. The honey garlic sauce is delicious when it’s warm and glossy, coating the chicken in a layer of sweet and savory goodness.
  • Honey Garlic Chicken makes a great main dish for any meal. Serve it with a side of steamed vegetables or fluffy rice for a complete and satisfying meal.

🎉 Join the Foodie Community! 🍽️

If you try this recipe or have other delicious recipes to share, join the vibrant and engaging food lovers community on Facebook. It’s a place where you can share your culinary experiments, discover new recipes, and connect with fellow food enthusiasts.

🙏 Credits 🙏

A big thank you to Delicious and easy recipes for sharing this fantastic Honey Garlic Chicken recipe. Their channel is a treasure trove of delicious recipes that are easy to follow and absolutely delightful to taste. If you’re a fan of quick and easy recipes, be sure to check out their YouTube channel for more culinary inspiration

So, are you ready to bring a taste of Asian cuisine into your kitchen? With this Honey Garlic Chicken recipe, you can enjoy a delicious and unique meal right at home. Happy cooking! 🍽️🎉

Remember to check out more amazing recipes on Delicious and easy recipes‘s YouTube channel. Enjoy the delicious day! 🌞🍡🌭